Printable Version of Topic
Click here to view this topic in its original format
914World.com _ FS/WTB: 914 Parts _ Through-the-Hood Filler Kit
Posted by: Marek Oct 27 2018, 01:38 PM
FS: Through-the-Hood Filler Kit for 914
Finally
The kit contains all you need, to make your "through the hood filler look" complete
with out any welding or painting !!!!
the kit includeds
* Original 100mm vented Blau fuel cap, in stainless steel with a 5 hole fin
* A bolt on fuel neck you screw direct on to your tank , gaskets to adjust the height
you can combine the gasket depending on the height you need
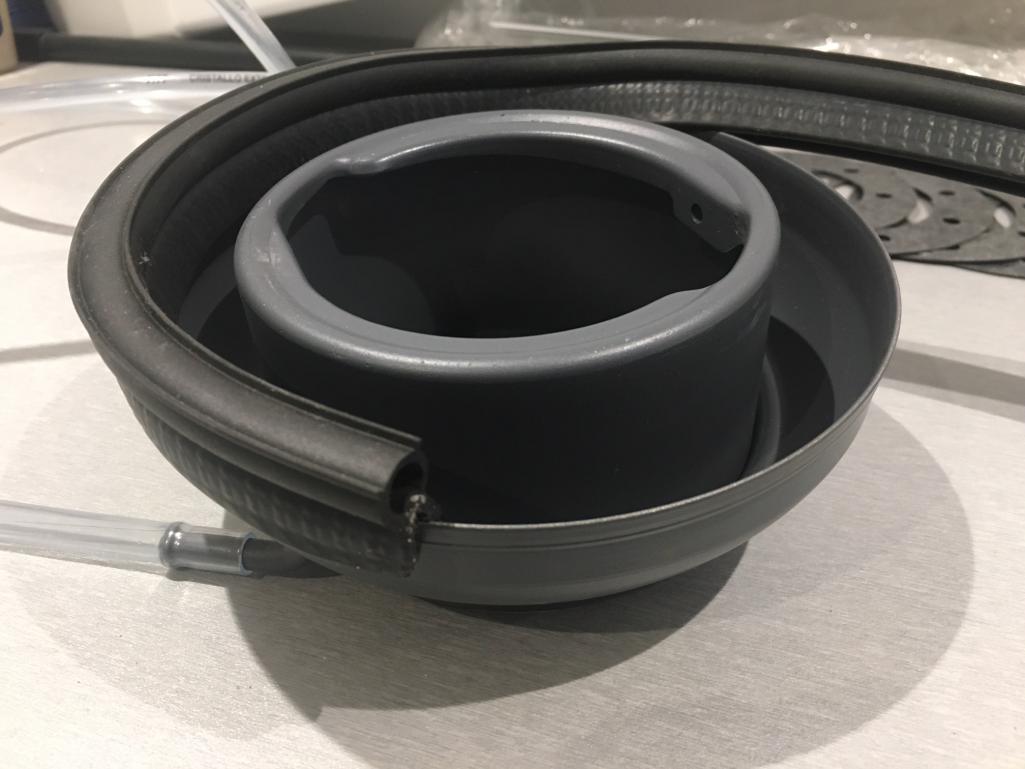
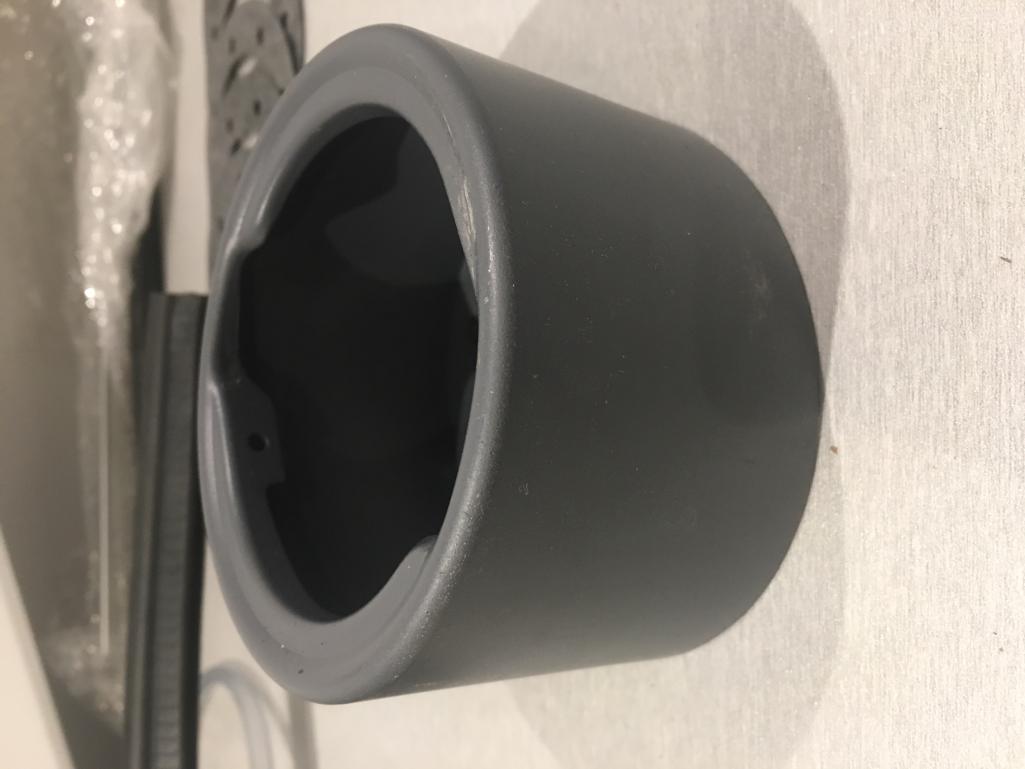
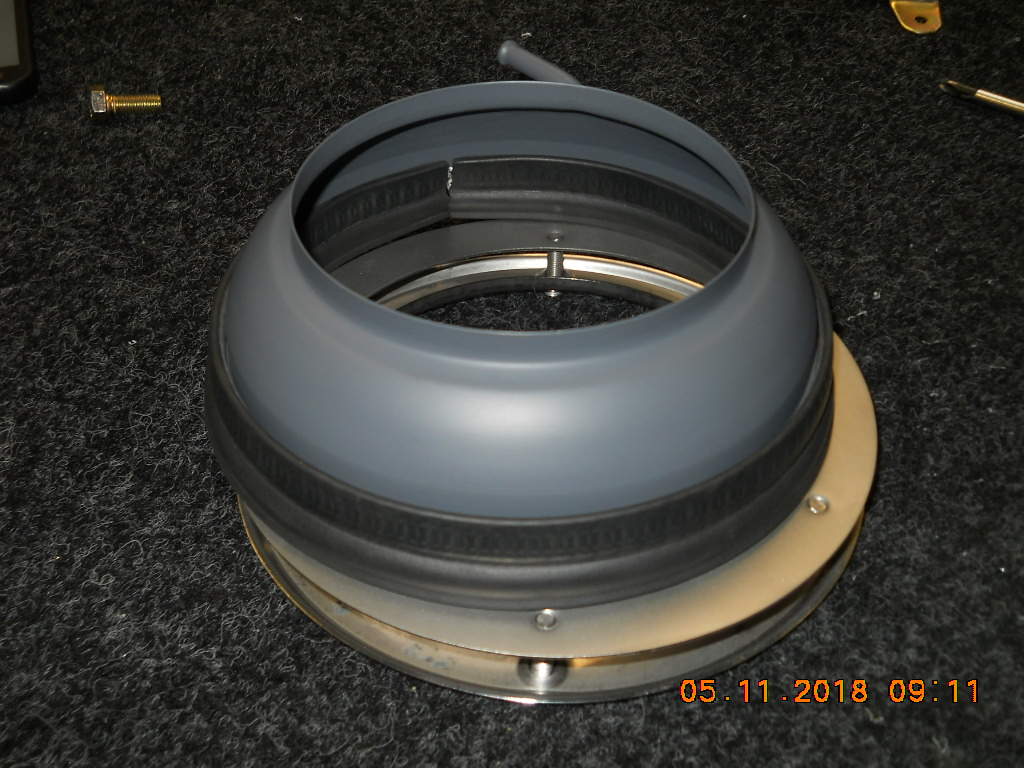
* A "Dog bowl" to overfill fuel or rain it has a 1 m long drain tube,
on top it has a rubber seal, so its tight closing against the hood, without damage
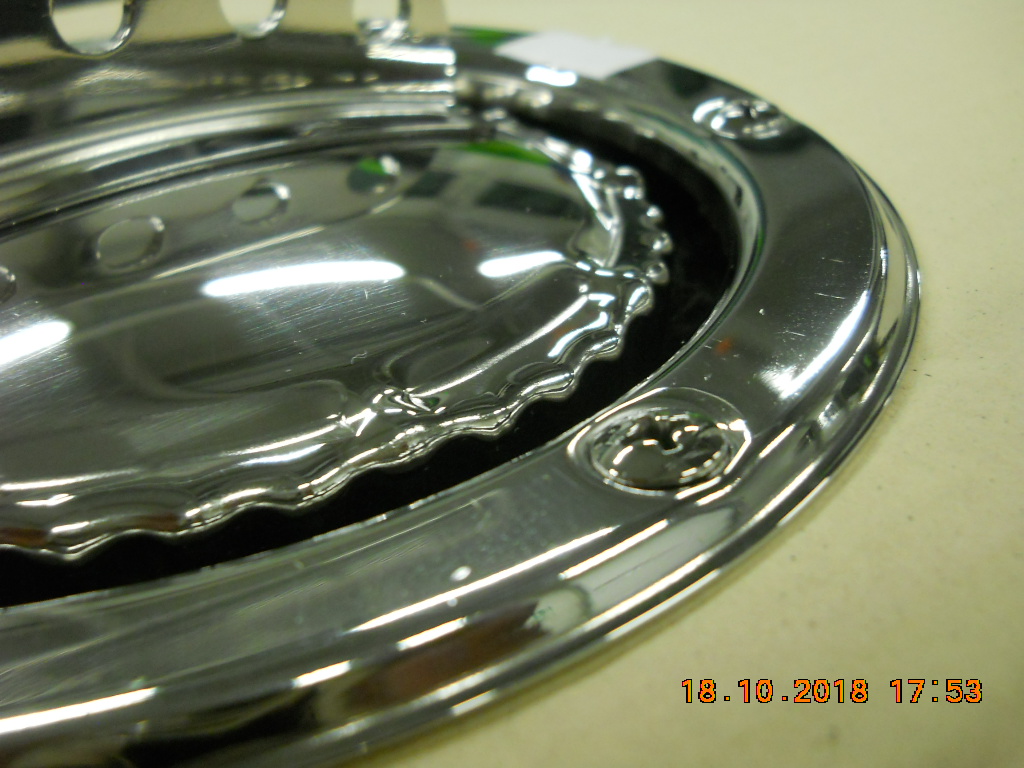
* A Stainless bezel to mount on the hood, by screwing it on, with the incl 6 screws
btw every bolt , screw etc you need are included incl a shortl instruction
the only work you have to do your self is
*messure up and drill a hole 127 mm in your bonnet , use some epoxy primer on the edge
*remove the expansion tank on top of the tank by unscrewing the 8 bolts
*screw on the Fuel kneck , it got the correct angle put gaskets under it to get the height
( BE AWARE YOU CAN ADJUST THE TANK IT SELF A BIT ,SO MAKE SURE ITS STRAP´ ON THIGHT BEFORE YOU DO ANYTHING )
*put on the dog bowl ,mount the gasket and drain tube ,use silicone to set the height of the dogbowl
*screw on the top stainless or silver bezel with the included 6 stainless screws to the "under the hood" bezel , you might need to shorten the screws os they dont scrath the rubber seal , and use a drop of loctite to be sure the screws a lock thight
A silver mat painted cap / bezel option is available , see pics later in the post
For those of you that are not a fan of the screw on bezel on the hood , there is a option!
For the 911 kit we offered a square adapter you see on the last picture
its easy and simple and you get the perfect "hole in you hood" but its requiers welding / paint job
This version is also on stock now with a Silver or polished
Price 350 EURO + shipping ( to USA 37€ ) - 445 USD incl postage to US
Importen Do note !!!
I am shipping by DHL from Germany which is the cheapest option, I have been using them the last 10 years , so full tracking number never had a problem
BUT expect up to 4 weeks delivery , DHL said its long security checks in at US customs
Paypal ok, BUT save 25 EURO by a direct bank wire
By interest drop me a mail early911parts@gmail.com
I have posted some pictures below and much more to come ASAP
Regards
Marek ( Denmark )
Attached thumbnail(s)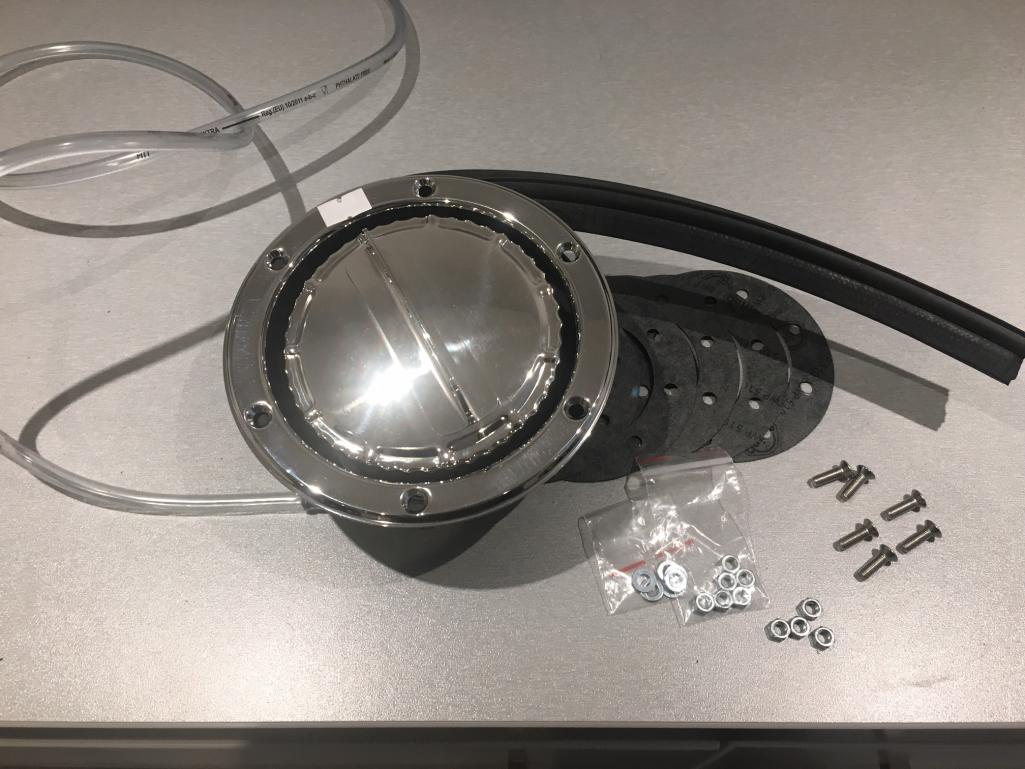
Attached image(s)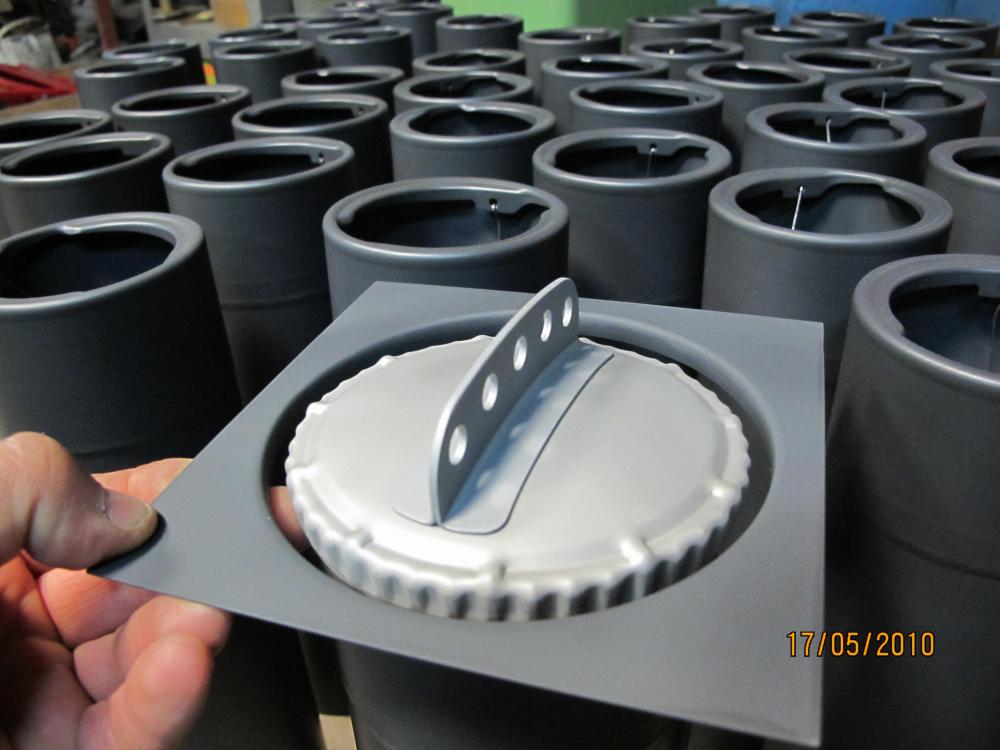
Posted by: Marek Oct 27 2018, 01:44 PM
The finish look mounted
More installation pictures will follow ASAP
Marek
Attached image(s)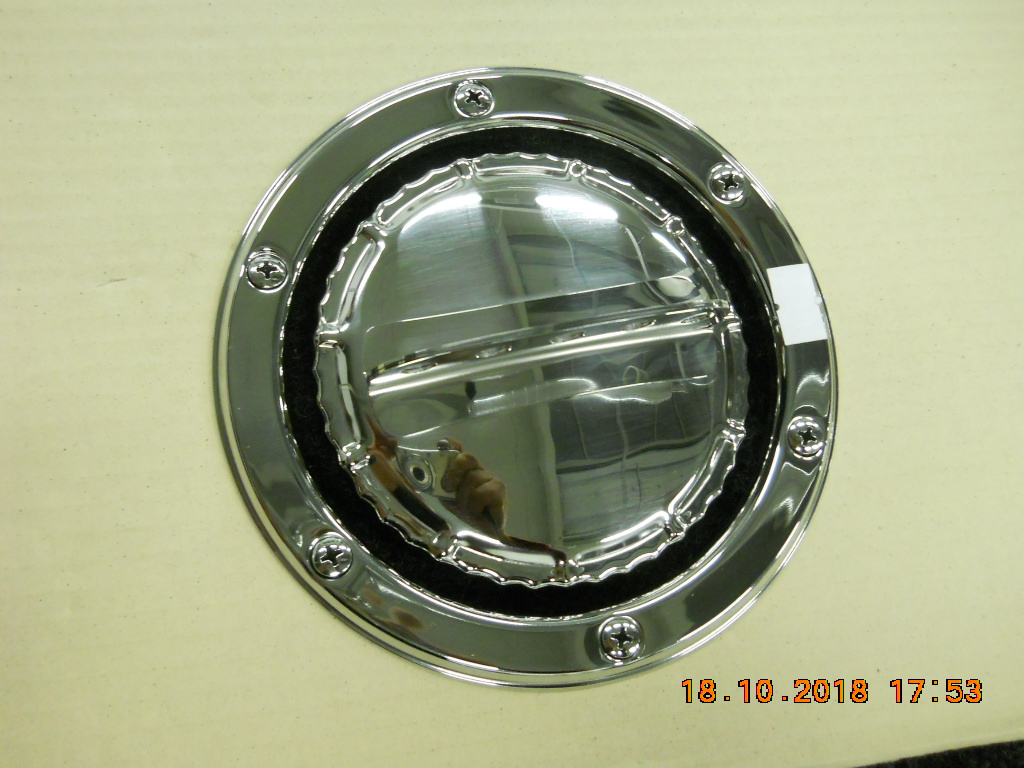
Posted by: sfrenck Oct 27 2018, 03:38 PM
![popcorn[1].gif](style_emoticons/default/popcorn[1].gif)
Take some pics of the finished product a little further away? Hood up and hood down?
Posted by: pdlightning Oct 27 2018, 09:13 PM
Sure looks pretty!
Posted by: jmitro Oct 28 2018, 06:46 AM
looks great; i'll be interested pending your other installation photos.
what is the price in US dollars?
Posted by: Chi-town Oct 28 2018, 09:24 AM
Can I get it in non-polished?
Posted by: burton73 Oct 28 2018, 09:41 PM

Can I get it in non-polished?
If you send it out for anodizing it would look hot.
Bob B
Posted by: BuddyV Oct 28 2018, 10:53 PM
Can I get it in non-polished?
If you send it out for anodizing it would look hot.
Bob B
I second that idea..... DO IT!!!!!
Posted by: Chi-town Oct 28 2018, 11:31 PM
Can I get it in non-polished?
If you send it out for anodizing it would look hot.
Bob B
I was thinking more a raw brushed stainless

Posted by: Marek Oct 29 2018, 01:52 AM
Hi Guys
I will post more pics asap from the instalation this week
BUT It will only come in 2 finishes a polished version and a silver painted one, as on the 4th pic in the first post
the cap it self is stainless , not sure you can anodize stainless
but its possible to polish the cap your self ,if you want a more brusched look
I did this kit also for the 911 now allmost 9 years ago and sold over 1000 pcs thanks to the magnus walker fever :-) and have seen different versions what people did to it , but I will only offer the 2 versions polished and silver painted, the silver have a satin finish to it
M
Posted by: Chi-town Oct 29 2018, 10:18 AM
Silver painted works 
Posted by: ValcoOscar Oct 29 2018, 10:38 AM
FOR ME...I like the last image of Post #1...weld in trim piece.
Is this piece included in complete 914 kit?
IMHO I don't care for fastened trim ring.
Oscar
Posted by: Marek Nov 5 2018, 01:01 PM
Sorry guys , forgot that the boys in the shop had 3 days off last week
Thanks for all the response I got
Here are a few more info and answeres to some of the questions I got
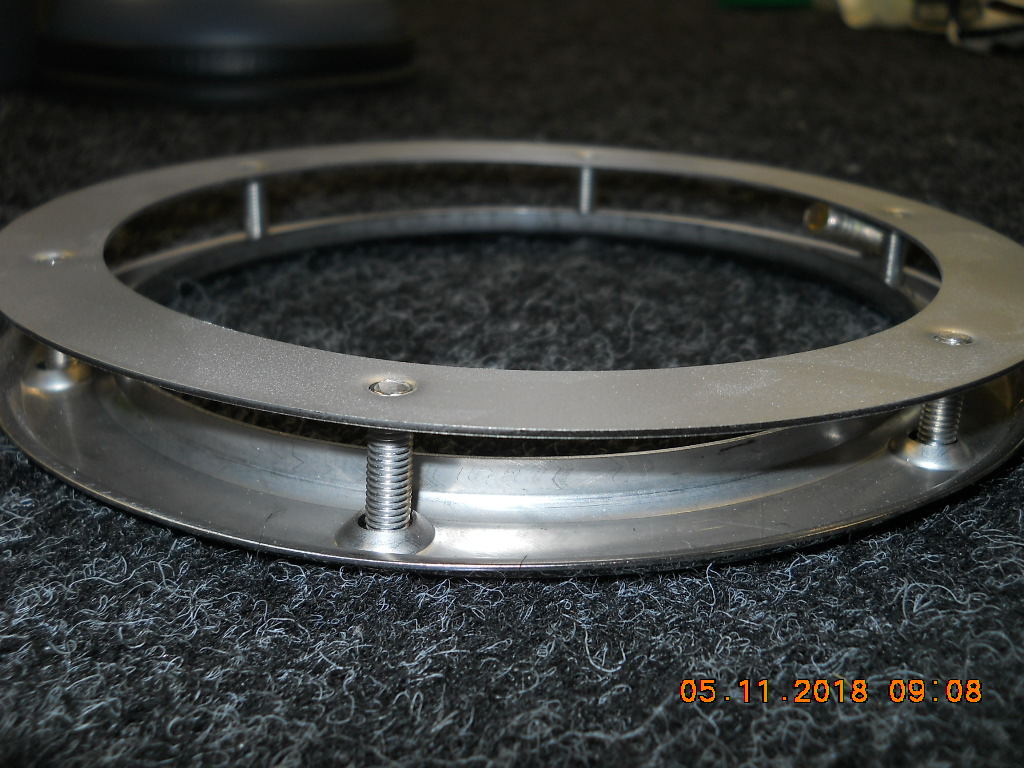
how its the bezel screwed on
By the "down under the hood" :-) bezel as you see on the pictures
the included screws are 5*12 mm in some case depending what bonnet you got steel or fiber , you have might to shorten the screws a bit, so they dont scratch or puncture the rubber seal and a good idea is to use a drop of loctite on each screw , when you are all messured up
( hope the "upside down" pics makes sense :-)
you also see the the hole we made in the bonnet by messuring up the bezel the hole must be 127 mm
as you can see the cap is a bit below level
there are servel "spacers" in the kit , ( 5 mm , 8 mm , 1 mm etc ) going all up to 1,5 Cm which should cover it , we have tried this on 3 cars and all where different
by any questions please send me a mail to early911parts@gmail.com
first paid kits are now in the mail , I hope I got back to everybody , or pls send me a mail
Regards
Marek
Attached image(s)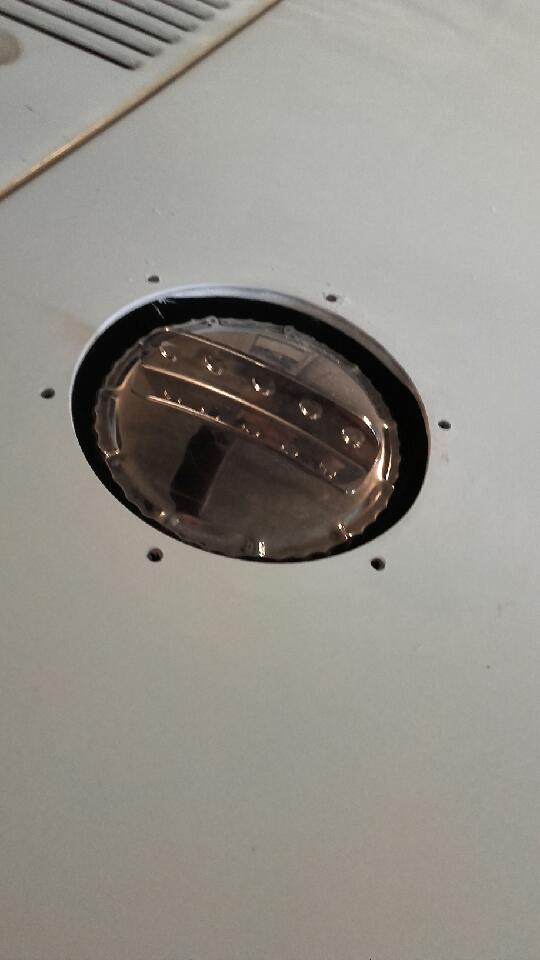
Posted by: Marek Nov 19 2018, 02:54 PM
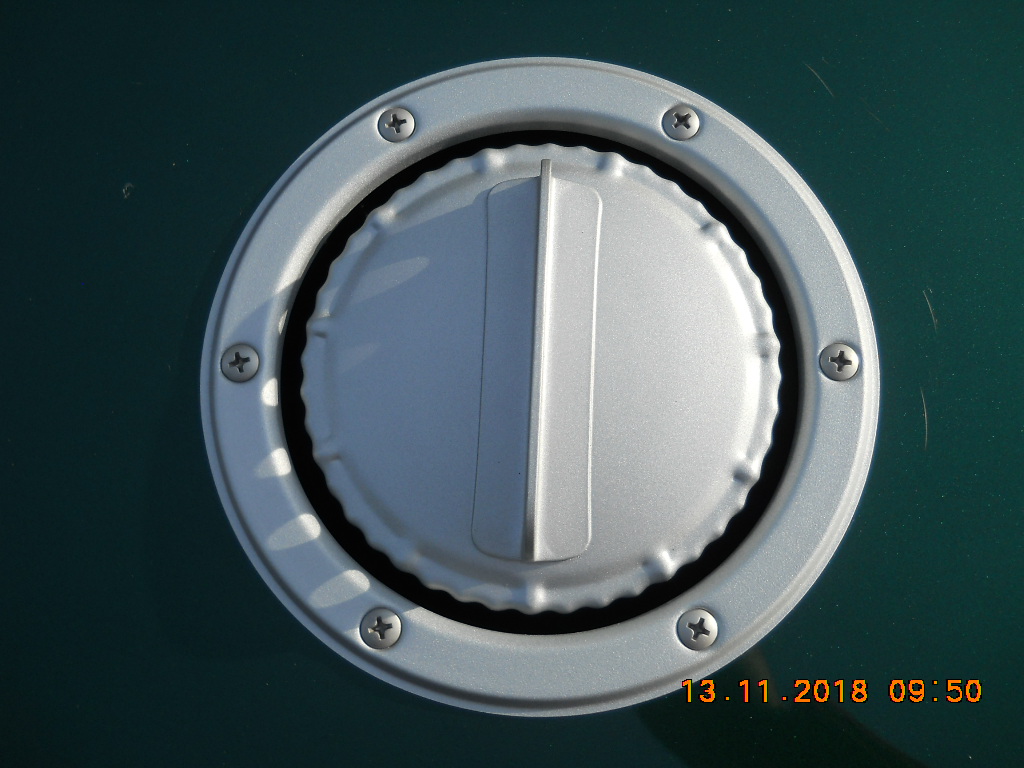
Silver painted version , tested and on stock
The screws are glass blasted stainless steel screws
Attached image(s)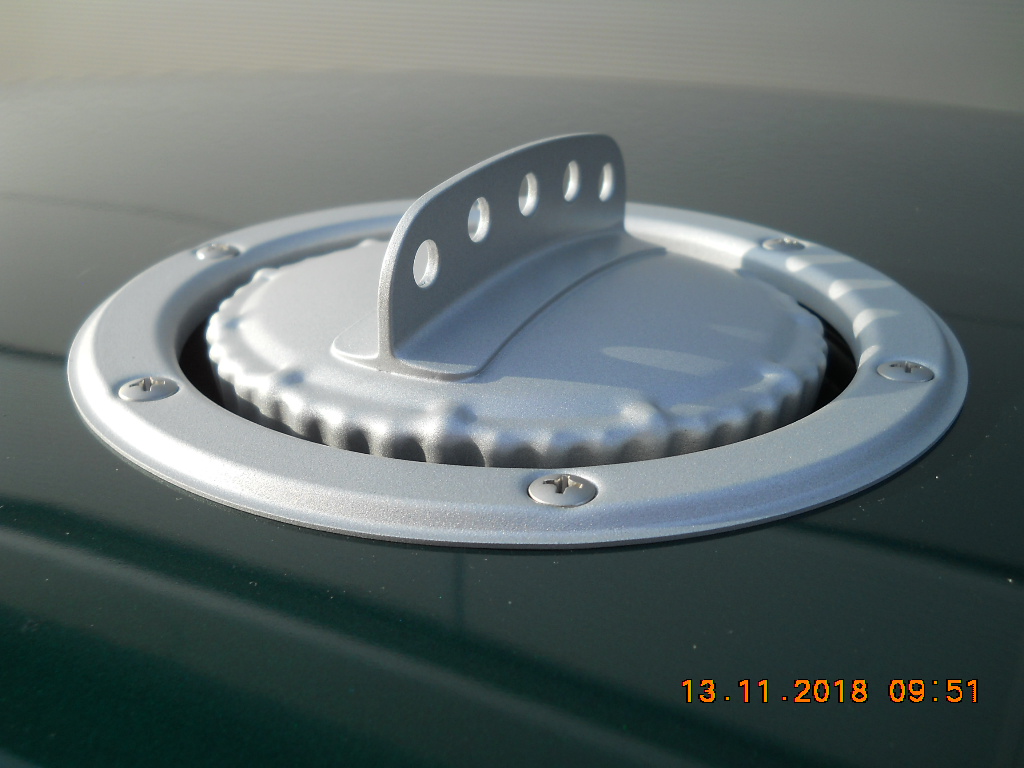
Posted by: johnvan8 Nov 20 2018, 04:08 PM
Very interested. What is the best way to figure out exact location to cut hood? Is there a template or is it better to cut specifically to where your tank/hood are located in relation to each other?
Posted by: mb911 Nov 20 2018, 04:38 PM
FOR ME...I like the last image of Post #1...weld in trim piece.
Is this piece included in complete 914 kit?
IMHO I don't care for fastened trim ring.
Oscar

Posted by: Marek Nov 20 2018, 04:57 PM
Very interested. What is the best way to figure out exact location to cut hood? Is there a template or is it better to cut specifically to where your tank/hood are located in relation to each other?
Well john , no template but I can post some ruff messurements to point you in a direction ,
but we can not make a template due to the bonnet and tank can be a few mm off in messurement on every car
so it requiers some messuring , I can tell how we did
we removed the expansion tank on top of the tank by unscrewing the 8 bolts
we tape the fuel opening with papper tape
we marked a cross on the center of the fuel openning
then we drilled a small hole 20 mm or so ,as closed to the center mark as we could predict
and when we saw we are close to center we did the hole larger and larger step by step
hope it gives an idea
Marek
Posted by: Marek Nov 20 2018, 05:00 PM
Hi Oscar the weld in trim is included,
Marek
FOR ME...I like the last image of Post #1...weld in trim piece.
Is this piece included in complete 914 kit?
IMHO I don't care for fastened trim ring.
Oscar
Posted by: ValcoOscar Nov 20 2018, 05:20 PM
Hi Oscar the weld in trim is included,
Marek
FOR ME...I like the last image of Post #1...weld in trim piece.
Is this piece included in complete 914 kit?
IMHO I don't care for fastened trim ring.
Oscar
Now we're talking
 ...I need to bridge a few weeks but I'll be placing an order for two kits as a Christmas gift to myself.
In addition, can I also purchase a separate weld in trim ring ONLY?
Oscar
Posted by: Marek Nov 20 2018, 05:23 PM
Sure no problem just drop me a mail when you are ready
Marek
Hi Oscar the weld in trim is included,
Marek
FOR ME...I like the last image of Post #1...weld in trim piece.
Is this piece included in complete 914 kit?
IMHO I don't care for fastened trim ring.
Oscar
Now we're talking
...I need to bridge a few weeks but I'll be placing an order for two kits as a Christmas gift to myself. In addition, can I also purchase a separate weld in trim ring ONLY?
Oscar
Posted by: johnvan8 Nov 20 2018, 05:33 PM
Very interested. What is the best way to figure out exact location to cut hood? Is there a template or is it better to cut specifically to where your tank/hood are located in relation to each other?
Well john , no template but I can post some ruff messurements to point you in a direction ,
but we can not make a template due to the bonnet and tank can be a few mm off in messurement on every car
so it requiers some messuring , I can tell how we did
we removed the expansion tank on top of the tank by unscrewing the 8 bolts
we tape the fuel opening with papper tape
we marked a cross on the center of the fuel openning
then we drilled a small hole 20 mm or so ,as closed to the center mark as we could predict
and when we saw we are close to center we did the hole larger and larger step by step
hope it gives an idea
Marek
That makes sense. Start with a small hole and go larger to center the opening, not the other way around! How long to ship to California?
Posted by: ValcoOscar Nov 20 2018, 05:40 PM
Very interested. What is the best way to figure out exact location to cut hood? Is there a template or is it better to cut specifically to where your tank/hood are located in relation to each other?
Well john , no template but I can post some ruff messurements to point you in a direction ,
but we can not make a template due to the bonnet and tank can be a few mm off in messurement on every car
so it requiers some messuring , I can tell how we did
we removed the expansion tank on top of the tank by unscrewing the 8 bolts
we tape the fuel opening with papper tape
we marked a cross on the center of the fuel openning
then we drilled a small hole 20 mm or so ,as closed to the center mark as we could predict
and when we saw we are close to center we did the hole larger and larger step by step
hope it gives an idea
Marek
That makes sense. Start with a small hole and go larger to center the opening, not the other way around! How long to ship to California?
Hey John-
If you buy a kit also maybe we can have a mini tech install session at my house.

Oscar
Posted by: Marek Nov 20 2018, 05:43 PM
Sorry to California you should expect UP to 4 weeks
Sorry its the cheapest shipping I found from Denmark
Fedex, UPS are 200 usd 
Very interested. What is the best way to figure out exact location to cut hood? Is there a template or is it better to cut specifically to where your tank/hood are located in relation to each other?
Well john , no template but I can post some ruff messurements to point you in a direction ,
but we can not make a template due to the bonnet and tank can be a few mm off in messurement on every car
so it requiers some messuring , I can tell how we did
we removed the expansion tank on top of the tank by unscrewing the 8 bolts
we tape the fuel opening with papper tape
we marked a cross on the center of the fuel openning
then we drilled a small hole 20 mm or so ,as closed to the center mark as we could predict
and when we saw we are close to center we did the hole larger and larger step by step
hope it gives an idea
Marek
That makes sense. Start with a small hole and go larger to center the opening, not the other way around! How long to ship to California?
Posted by: johnvan8 Nov 20 2018, 07:31 PM
Very interested. What is the best way to figure out exact location to cut hood? Is there a template or is it better to cut specifically to where your tank/hood are located in relation to each other?
Well john , no template but I can post some ruff messurements to point you in a direction ,
but we can not make a template due to the bonnet and tank can be a few mm off in messurement on every car
so it requiers some messuring , I can tell how we did
we removed the expansion tank on top of the tank by unscrewing the 8 bolts
we tape the fuel opening with papper tape
we marked a cross on the center of the fuel openning
then we drilled a small hole 20 mm or so ,as closed to the center mark as we could predict
and when we saw we are close to center we did the hole larger and larger step by step
hope it gives an idea
Marek
That makes sense. Start with a small hole and go larger to center the opening, not the other way around! How long to ship to California?
Hey John-
If you buy a kit also maybe we can have a mini tech install session at my house.
Oscar
Oscar, are you getting a kit? If so, I'm definitely interested in a tech install session!
John
Posted by: ValcoOscar Nov 20 2018, 08:00 PM
Very interested. What is the best way to figure out exact location to cut hood? Is there a template or is it better to cut specifically to where your tank/hood are located in relation to each other?
Well john , no template but I can post some ruff messurements to point you in a direction ,
but we can not make a template due to the bonnet and tank can be a few mm off in messurement on every car
so it requiers some messuring , I can tell how we did
we removed the expansion tank on top of the tank by unscrewing the 8 bolts
we tape the fuel opening with papper tape
we marked a cross on the center of the fuel openning
then we drilled a small hole 20 mm or so ,as closed to the center mark as we could predict
and when we saw we are close to center we did the hole larger and larger step by step
hope it gives an idea
Marek
That makes sense. Start with a small hole and go larger to center the opening, not the other way around! How long to ship to California?
Hey John-
If you buy a kit also maybe we can have a mini tech install session at my house.
Oscar
Oscar, are you getting a kit? If so, I'm definitely interested in a tech install session!
John
Yes..I'm getting two complete (RAW/Silver) kits plus a weld in ring for an existing car.
Oscar
Posted by: rgalla9146 Nov 20 2018, 09:36 PM
FOR ME...I like the last image of Post #1...weld in trim piece.
Is this piece included in complete 914 kit?
IMHO I don't care for fastened trim ring.
Oscar
I'm with Oscar. I like it simple
But still ......a big 'Thank you' to Marek for such a beautiful, well conceived,
excellent product.
Posted by: larryM Nov 22 2018, 11:26 PM
long time back, Martin Baker was making & selling these & i think he can provide template - might be worth a shout to him - his Sunoco tribute has it & it would be easy to copy the pattern off the hood
Posted by: johnvan8 Nov 23 2018, 09:47 AM
@http://www.914world.com/bbs2/index.php?showuser=18672 : are there any unwanted consequences to removing the expansion tank? Others please feel free to chime in if you know the answers.
Posted by: 914forme Nov 24 2018, 09:07 AM
I'll be in for one with the weld on ring trim. Going to be painting anyway.
Posted by: Marek Jan 9 2019, 11:03 AM
BUMP
But I am mostly interested in any feedback :-)
7 kits sold to 914world members
just want to check if my work paid off
M.-)
Posted by: totle Jan 9 2019, 04:57 PM
Nice looking kit
Posted by: Marek Mar 11 2019, 03:47 AM
3 more kits in the mail to US :-) Thanks
Posted by: Niclas_Swe Mar 22 2019, 07:35 AM
Would be great to have a pic where you see more of the car when it is mounted.
Is it available in a lockable version?
Is that a standard EPDM-gasket?
Posted by: pdlightning Mar 22 2019, 10:18 AM
@http://www.914world.com/bbs2/index.php?showuser=18672 : are there any unwanted consequences to removing the expansion tank? Others please feel free to chime in if you know the answers.
I am also wondering about what to do about the expansion tank and locating a template for the hood.
Posted by: Marek Sep 12 2019, 01:36 PM
Bumped
Come on guys show some pics :-) of your builds and feed backs
at least 15 sets where send to US
kits are on stock
Powered by Invision Power Board (http://www.invisionboard.com)
© Invision Power Services (http://www.invisionpower.com)