Printable Version of Topic
Click here to view this topic in its original format
914World.com _ 914World Garage _ interior removal/replace
Posted by: tat2dphreak Mar 15 2004, 10:09 AM
ok, the dash on my old car is 10X better than the new one... I'm about to sell the old car, but am going to remove a couple of these interior items first...
first the dash... the soft part (pass. side, near windshied) is what I really need to replace... but I can't figure out how to get this part(or the hard part) off... I removed the lower dash(knee pad) thinking that it would give access.. but it did not help... also, I saw there are 2 holes: one at either end, concealed by the door when closed... are there supposed to be screws in these? if so, what kind? they appear to be completely empty...
the other piece I am having trouble with is the passenger seat... the driver's seat came out just like Haynes said it would... the Passenger seat will slide all the way forward, but not pop out... 
last part, removing the back pad... I have removed all of the screws and the engine release knob... but the plastic piece behind the knob seems to have become a permanant part of both the backpad and the cable... it won't budge.... what's the secret to getting this off?
a pic showing the dash part I need to get to:
Attached image(s)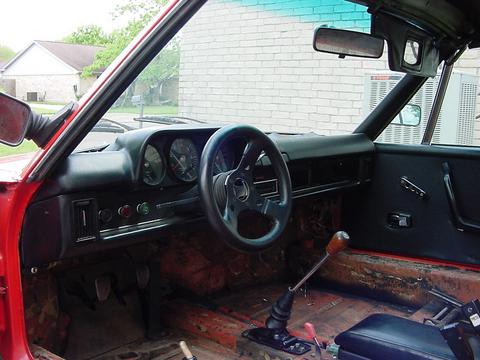
Posted by: Bleyseng Mar 15 2004, 10:28 AM
"last part, removing the back pad... I have removed all of the screws and the engine release knob... but the plastic piece behind the knob seems to have become a permanant part of both the backpad and the cable... it won't budge.... what's the secret to getting this off?
It is part of the backpad.
To take of the backpad remove the bottom screws and then pull the bottom out alittle, then lift it carefully straight up.
Geoff
Posted by: James Adams Mar 15 2004, 10:33 AM
You should have come to Zim's! I had a dash pad to sell there and you could have looked at how it goes in.
It is held in by 13mm nylon nuts. Take the gauge panel out to see 2. One above each air outlet. Others above radio and ashtray. They are a big fat pain to get out!
Posted by: tat2dphreak Mar 15 2004, 10:39 AM
James,
I wanted to... but we had company at the last minute, so my Kitchen pass got revoked... :|
ok, that makes sense, I just didn't know what to look for... will that also give access to the soft part behind the dash pad on the pass. side?... this is the part I really need.
Geoff, the top part is loos already, but that plastic piece is holding the cable and backpad like there is no tommorrow... does that piece screw off of the cable? or does it just take some "persuation" ? 
Posted by: Joe.D Mar 15 2004, 10:39 AM
I'll answer what I know, and leave the rest for others.
Backpad: That flat disc is also threaded, and needs to be unscrewed. It has two little pin holes, and there is a tool that fits into them - but you can usually use something else, such as the tips of a pair of needle nose pliers. Counter clock wise turn to remove.
Right seat works the same as the left - for those years with a movable right seat. There is a a spring interlock in the outside track that you have to pust upwards in order to slide the seat forward beyond the normal stop. If you have a fixed right seat, someone else will have to reveal how to remove it.
The plugs in the side of the dash board need to be removed, and there are #2 phillips head screws in each hole. The pad tends to backfill into the holes over time, but they're in there.
The "hard part" of the upper dash is held on with screw that are reached from underneath, but they're not easy to see. I recall a thread here about replacing the dashtop but don't have the link handy.
The "Soft part" of the dash top is glued to padding underneath it which is glued to the metal dashboard. It is also held in place by being pinched by the hard part, and by an end-to-end seal/clip that follows the curve of the windshield. It will be hard to remove the clip without breaking it, and hard to remove the top material without tearing the padding beneath it.
Good luck.
Joe
Posted by: tat2dphreak Mar 15 2004, 10:46 AM
The "Soft part" of the dash top is glued to padding underneath it which is glued to the metal dashboard. It is also held in place by being pinched by the hard part, and by an end-to-end seal/clip that follows the curve of the windshield. It will be hard to remove the clip without breaking it, and hard to remove the top material without tearing the padding beneath it.
Good luck.
Joe
well, SHIT! <_<
this piece on the red car is all wavy and bubbley... looks like dammit! is there a replacement piece for this? all I see at tweeks and pelican is the hard part... or a way to fix it?
I missed the spring interlock... the one on the driver's side must have been toast!
Posted by: Joe.D Mar 15 2004, 11:29 AM
Its just a flat piece of "leather" (probably vinyl). Just cut a new one from new stuff obtained locally. Maybe try a big fabric store or an upholstery shop?
Posted by: Jeffs9146 Mar 15 2004, 11:30 AM
I have removed and replaced the dash before and it is a PITA but with patience you can find all of the plastic nuts and work them loose. Yes there are #2 screws on either end of the dash.
The toughest nuts are behind the gauges and between the 1/2 gap in the metal frame. If you use a large screwdriver to pry apart the gap you can get a wrench in to loosen the nuts. Once they are loose you will be able to spin them off with the tip of your finger. I had to take out the radio so I could reach up from under the dash and get all the way over to the nut above the heater controls. Be very careful removing the dash pad or it will crack!
Good luck!
Jeff
Posted by: tod914 Mar 15 2004, 12:44 PM
Back bolster ...
before u take it out, you will need to remove the black metal plate over the hand brake cable. Also, pull out from the bottom, then pull down. If u pull straight out you will bend or break the clips.
Posted by: tat2dphreak Mar 15 2004, 01:43 PM
I'll have to look into that... thanks... I also may see if the piece is in good enough shape to reuse... it looks like it just came unglued... any suggestiongs on the proper adhesive? 3m spray?
Posted by: James Adams Mar 15 2004, 01:58 PM
It has thin foam under it - it probably crumbled.
Posted by: tracks914 Mar 15 2004, 07:15 PM
There are Nine (9) nylon nuts to remove the dash. Patience is a must but will be worth it in the long run. I have a dash pad in my workshop that I can take a picture of if you want. It will show the location of all the nuts/studs, but they aren't really too hard to find. The only tough ones are the 2 behind the guages and the two on the ends if you don't know they are there.
Posted by: boxstr Mar 15 2004, 11:00 PM
The glove box is the first thing to get out of your way, You may want to remove the radio and you will need to get the gauges out of the way also , they do not have to come all of the way out. The heather controls are not in the way.
I hope that you do not have fat hands or fingers, they don't help. The nuts holding the dashpad are plastic and I have seen aluminum.
Just take one nut out at a time and take your time.
By monster garage.
CCLINDASHPADHELL
Posted by: Gint Mar 16 2004, 12:11 AM
Dash studs #1
Attached image(s)
Posted by: Gint Mar 16 2004, 12:13 AM
#2
Attached image(s)
Posted by: Gint Mar 16 2004, 12:13 AM
#3
Attached image(s)
Posted by: Gint Mar 16 2004, 12:14 AM
#4
Attached image(s)
Posted by: tat2dphreak Mar 16 2004, 08:25 AM
thanks for all the help guys! I appreciate it!
Powered by Invision Power Board (http://www.invisionboard.com)
© Invision Power Services (http://www.invisionpower.com)