Printable Version of Topic
Click here to view this topic in its original format
914World.com _ 914World Garage _ The restoration begins!
Posted by: 993inNC Feb 2 2010, 07:07 PM
So I hadn't been terribly active here lately since deciding to jump into the resto fire. I had hoped to have a driver i could restore, what I ended up with (from what I can tell) is a good candidate for saving. So I have been stripping it since September of last year. Took the holidays off and just this week really jumped in heavy.
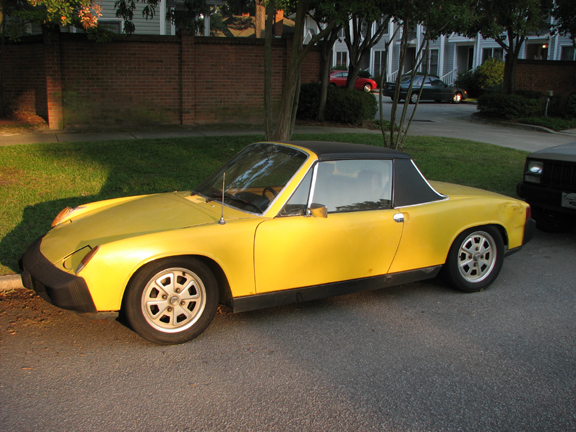
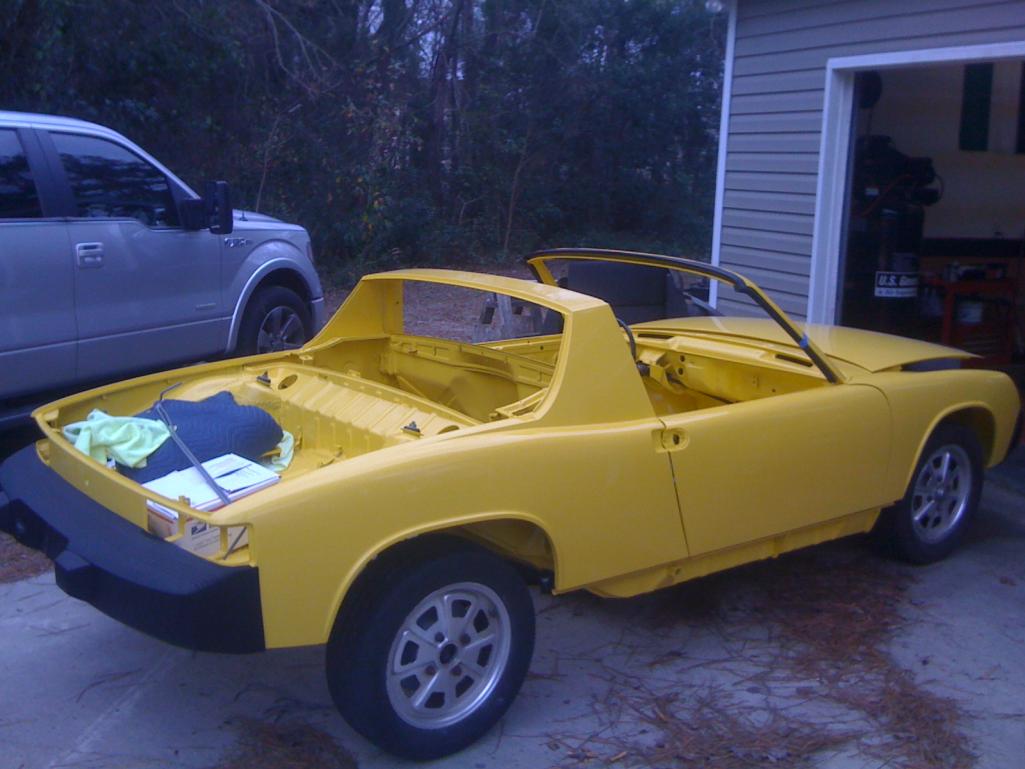
Quick update, its a 75 L13 (Summer yellow) 1.8L and has had a few paint jobs (terrible ones) over its life.
I found a media blaster here locally (finally) and I have to admit, I LOVE soda blasting. Makes 35 year old metal look like brand new (other than damaged areas). Was considering sand before finding this guy, but he has convinced me. So far he's done the doors, deck lid and hood (threw my 993 track rims in there since they were looking ratty too  ).
).
Next week, his rotisserie is supposed to be available, so we'll load it up, he'll blast it down to metal (may sand blast the floors to get the nasty rust off and see whats left) and he's going to let me have the rotis for 1 month to give me time to replace the pans etc....
Now the questions
Who really has the best price and product when it comes to the replacement metal? I know Auto Atl and Resto Design have them and there seems to be a decent price difference. I know a good many of you have experience with both and since I have none with either, I'd like to rely on what you guys have to say. I'm going to need pans, inner lower firewall, engine tray (holds the engine rubber) under the battery tray, and maybe a couple other small metal bits.
I'll need this stuff pretty quick if I don't want to pay for the rotis after a month, so who can I rely on?
I'll be posting pics soon for a complete diary of the restoration. Hope I can live up to some of the amazing work I've seen here. I plan to do the pans etc myself, but there is rust in tight spots (underside of doors and small area on the rear decklid) that I don't have the talent for. The blaster was a Mercedes body man for many years and I'll defer that intricate work to him.
This is going to get expensive, I can already tell
Oh as a bench mark, he said its going to run between 12-1400 to do the entire car. Sounded high but what are my alternatives .....? It is pretty work though, and I think is the right thing to do
TIA
Posted by: McMark Feb 2 2010, 07:13 PM
If $1200-1400 sounds high, get ready.... 
Oh, and 
Looking forward to following along.
Posted by: 993inNC Feb 2 2010, 07:43 PM
great what does that ^^^^^^^^^^^^^^^ mean? Ready for......?
Promise I'll get pics up. i was a nasty rainy day here and I don't need any more rust on newly blasted parts. Tomorrow is supposed to be nice
Posted by: scotty b Feb 2 2010, 07:55 PM
FWIW we had a tr3 soda blasted at one of the shops I worked at and IIRC it was 1100.00 for JUST the exterior body. No interior, no floors, just a rolling chassis on the ground. 1200.00 isn't bad. Just remeber to run a d.a. with 80-150 grit over it before priming. Soda leaves a film that the paint won't adhere to.
Posted by: 993inNC Feb 2 2010, 08:11 PM
I was told there is a chemical stripper that can be sprayed on and then the car needs to be pressure washed to get the soda residue off. Apparently soda leaves the factory metal intact as apposed to breaking through the "skin" of it. Sand on the other hand penetrates the metal and thats bad. I'm sure the blast man will point me in the right direction.
The price sounded high because I got a price to sand blast at 3-500. Another soda @ $800 and this guy was top dollar. He does pick up and deliver the parts to my hose and is lending the rotisserie so i figure that has value to it
But thanks for the heads up though.
Now I just need new metal (and apparently lots of $$) and I'll be on my way
Posted by: Pat Garvey Feb 2 2010, 08:43 PM

FWIW we had a tr3 soda blasted at one of the shops I worked at and IIRC it was 1100.00 for JUST the exterior body. No interior, no floors, just a rolling chassis on the ground. 1200.00 isn't bad. Just remeber to run a d.a. with 80-150 grit over it before priming. Soda leaves a film that the paint won't adhere to.
Scotty,
I'm not in need, but curious....
What's a "d.a."?
Pat
Posted by: jaxdream Feb 2 2010, 11:41 PM
D. A. = dual action sander. Small hand held sander air powerd preferably.
Jack / Jaxdream
Posted by: Gint Feb 3 2010, 07:47 AM
Promise I'll get pics up. i was a nasty rainy day here and I don't need any more rust on newly blasted parts. Tomorrow is supposed to be nice
I think he means that you're going to spend a lot more than $1200 before you finish this project. But what do I know about that.

Good luck! And post more pics!
Posted by: McMark Feb 3 2010, 12:43 PM
Yup. 
Nothing will be as cheap as you're thinking. At least in my experience. 
Posted by: gopack Feb 3 2010, 02:20 PM
This is going to get expensive, I can already tell
Oh as a bench mark, he said its going to run between 12-1400 to do the entire car. Sounded high but what are my alternatives .....? It is pretty work though, and I think is the right thing to do
TIA
Funny, my guy quoted me $12-14K as well. After a while (3 months) I got it back in primer, and a total of $16500 spent there, NOT including the 1K for the flares, the $700 for the fiberglass parts, and the $500 for replacement body panels! I added lots of "wants", so it is my own fault. As it sits now, it need between $5 and 8K for a good paint job!
Just my $0.02!
Good luck! and show it off!
Posted by: gopack Feb 3 2010, 02:22 PM
Never mind! the soda and sand blaster chargd me 1000 only!
Posted by: 993inNC Feb 3 2010, 03:32 PM
This is going to get expensive, I can already tell
Oh as a bench mark, he said its going to run between 12-1400 to do the entire car. Sounded high but what are my alternatives .....? It is pretty work though, and I think is the right thing to do
TIA
Funny, my guy quoted me $12-14K as well. After a while (3 months) I got it back in primer, and a total of $16500 spent there, NOT including the 1K for the flares, the $700 for the fiberglass parts, and the $500 for replacement body panels! I added lots of "wants", so it is my own fault. As it sits now, it need between $5 and 8K for a good paint job!
Just my $0.02!
Good luck! and show it off!
I'm sure hoping you mean 12-14 HUNDRED and not THOUSAND and $1650, not 16,500!
As for the expense part I figure, 1200 for the blasting, 1000 in new metal, 1000 in body work and prep that I can't do, 2000 +/- for the paint. So 5k in the body/paint with me doing a lot of the metal replacing. I've received prices on interior, which comes to $1000 seats (leather), 600 dash recover (alcantara) 5-750 (misc interior coverings) and a couple hundred for carpet and minor trim bits.
Not doing anything crazy with the motor or suspension, just want a nice stock driver. hope to have 10k or under in it when done.......we'll see how that goes!

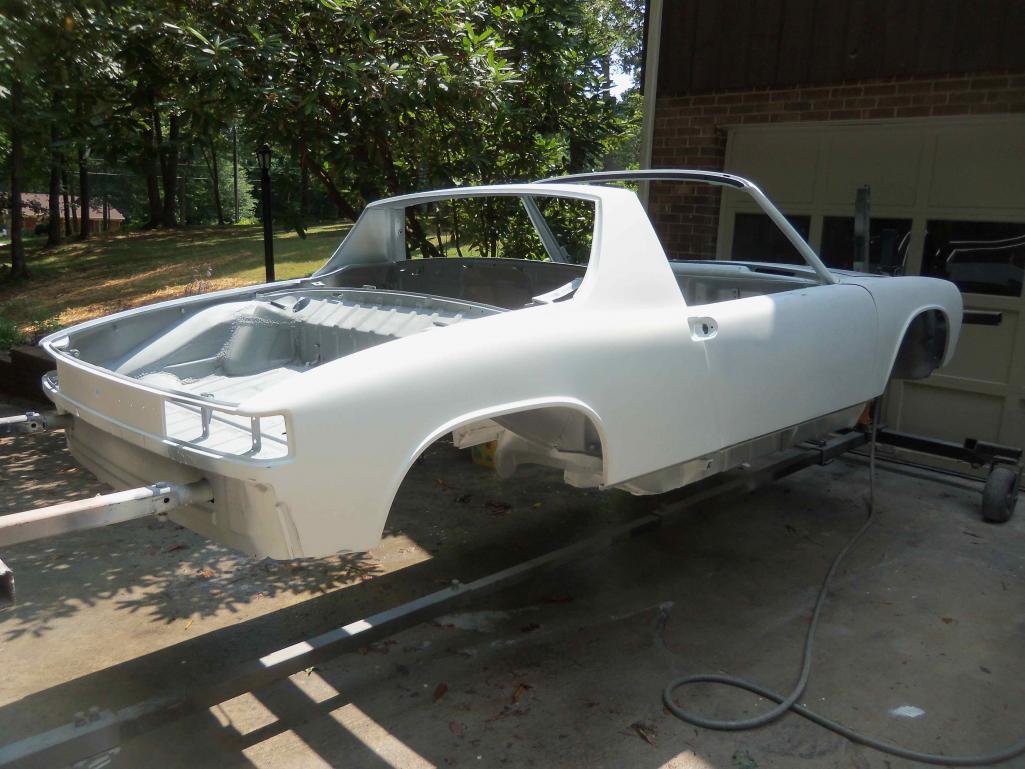
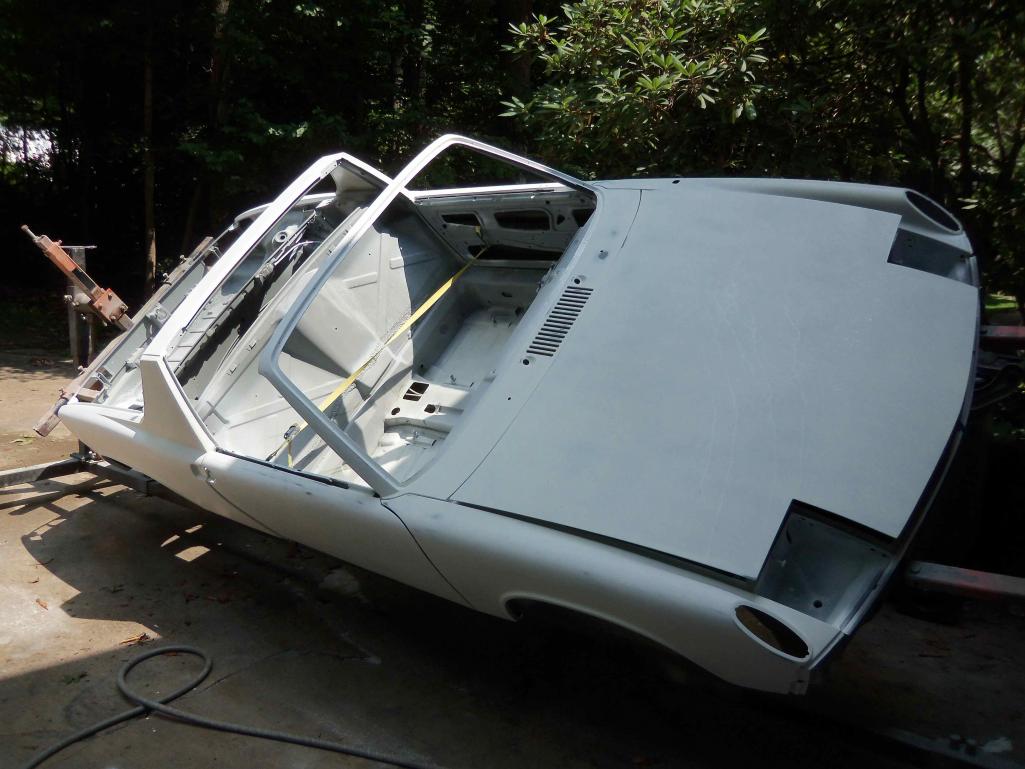
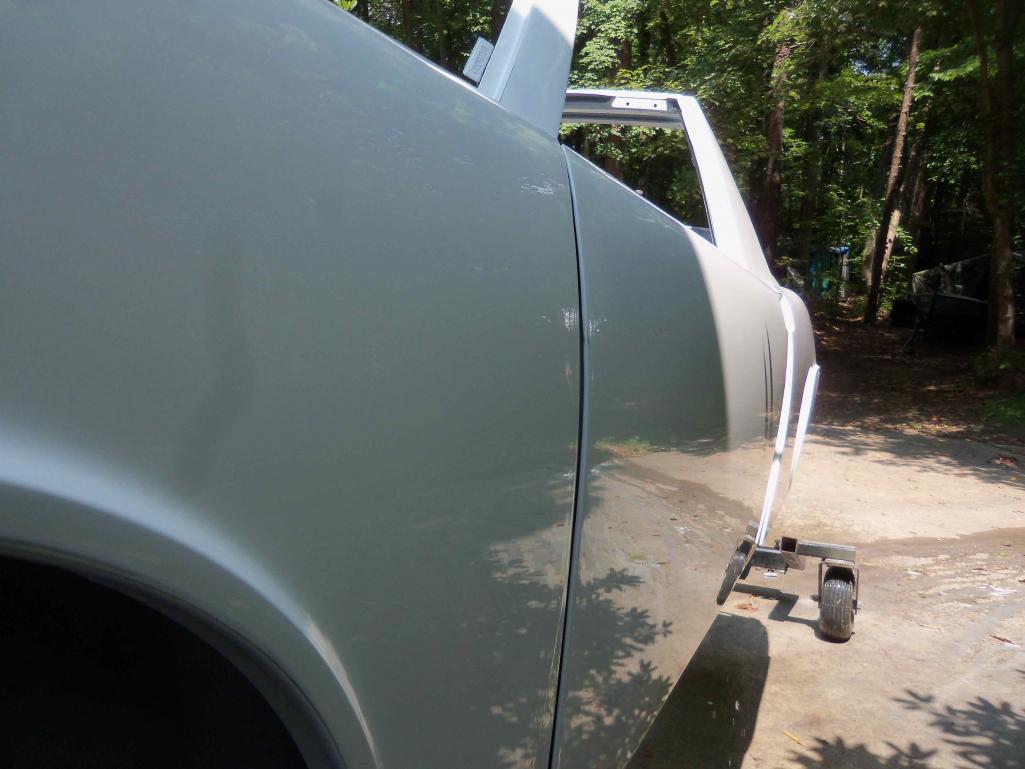
Posted by: 993inNC Feb 4 2010, 07:20 PM
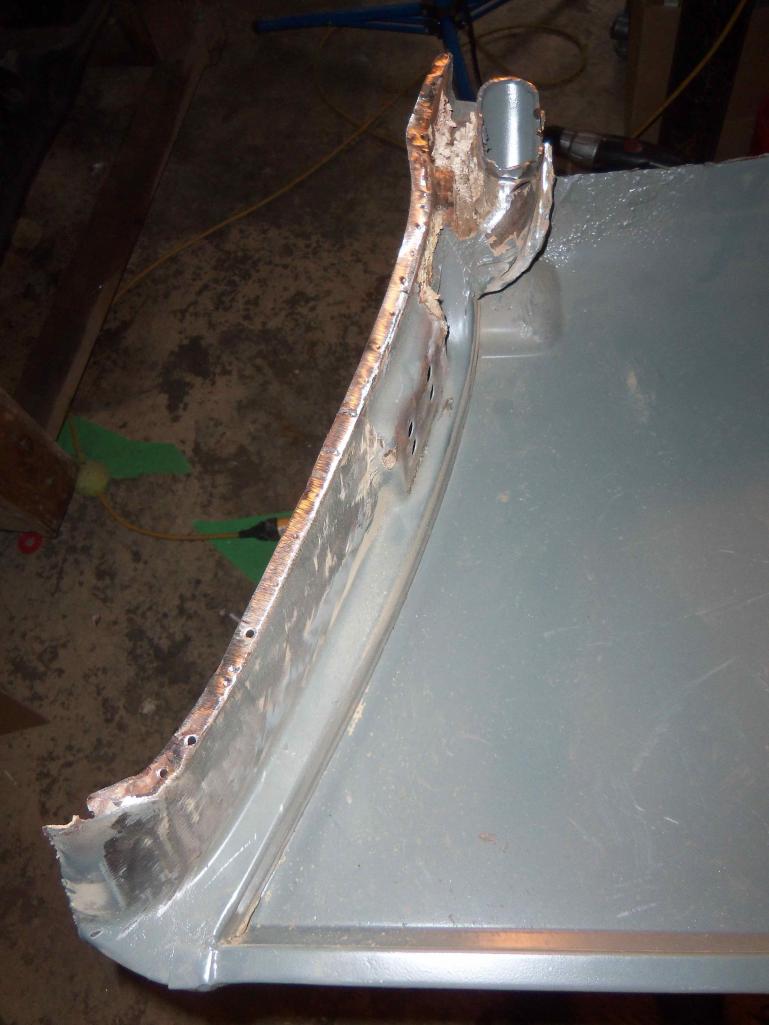
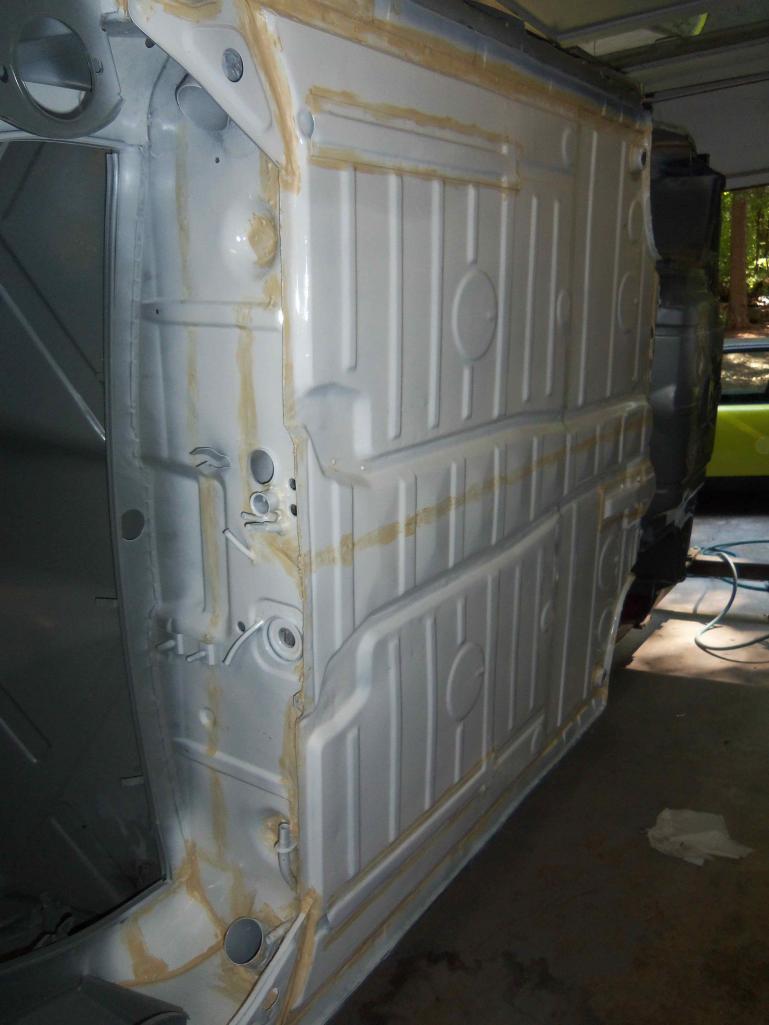
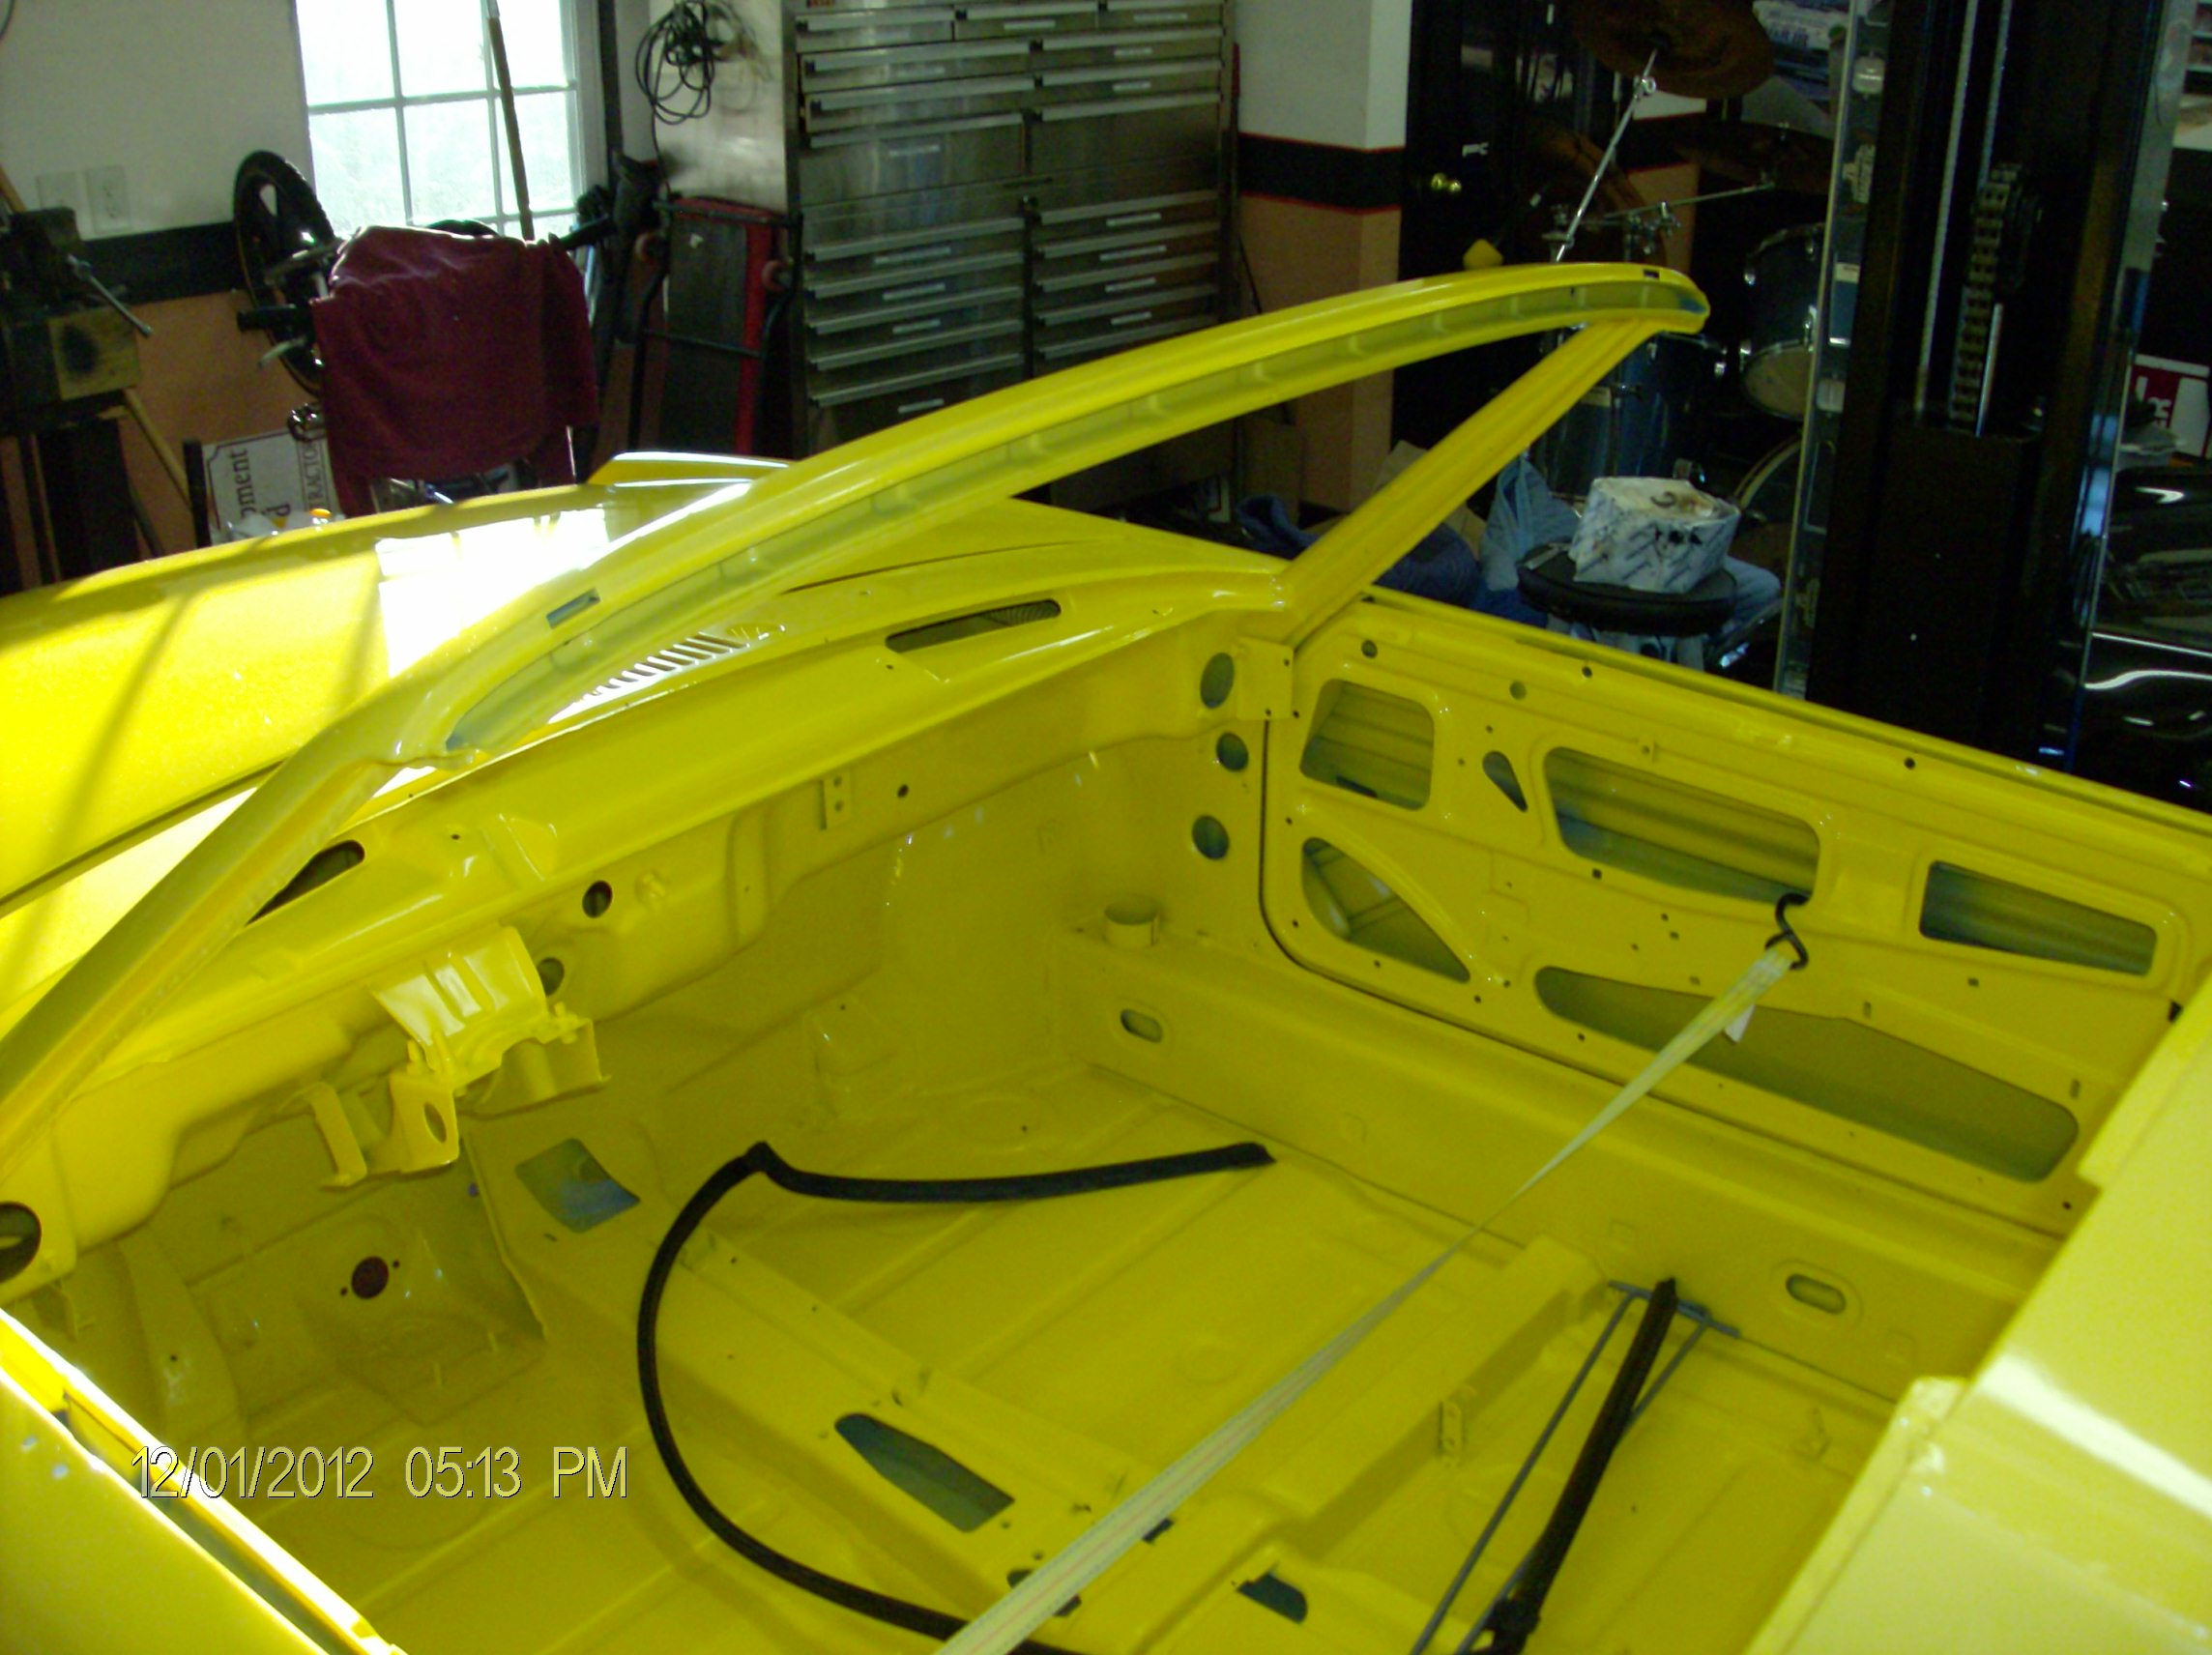
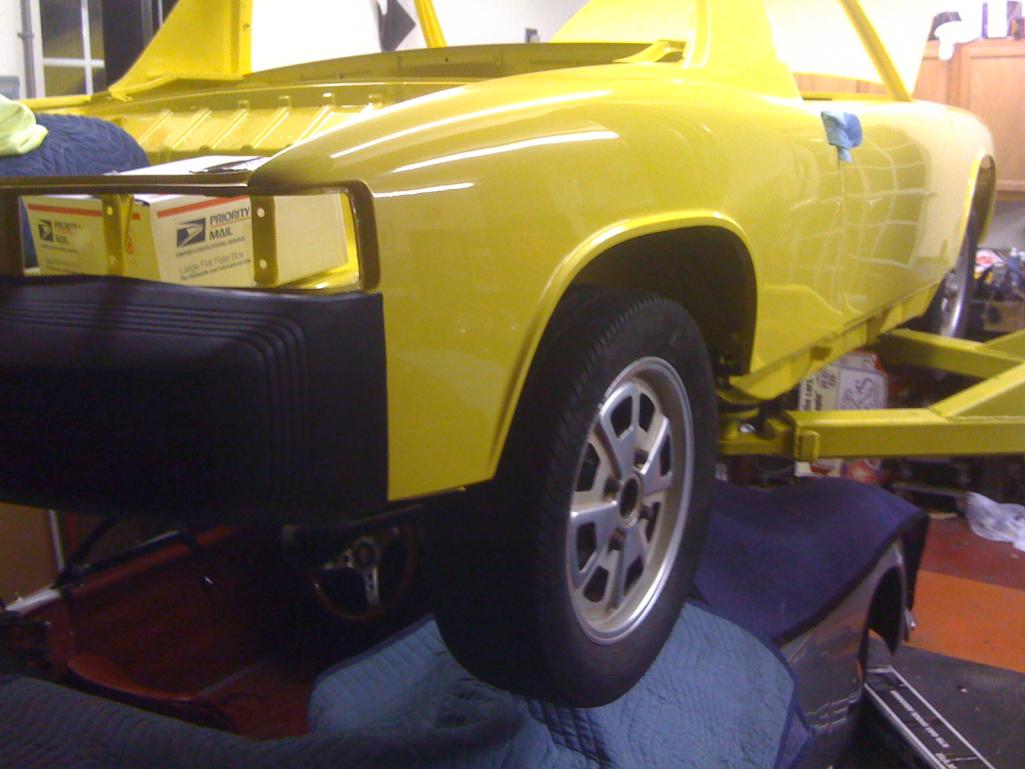
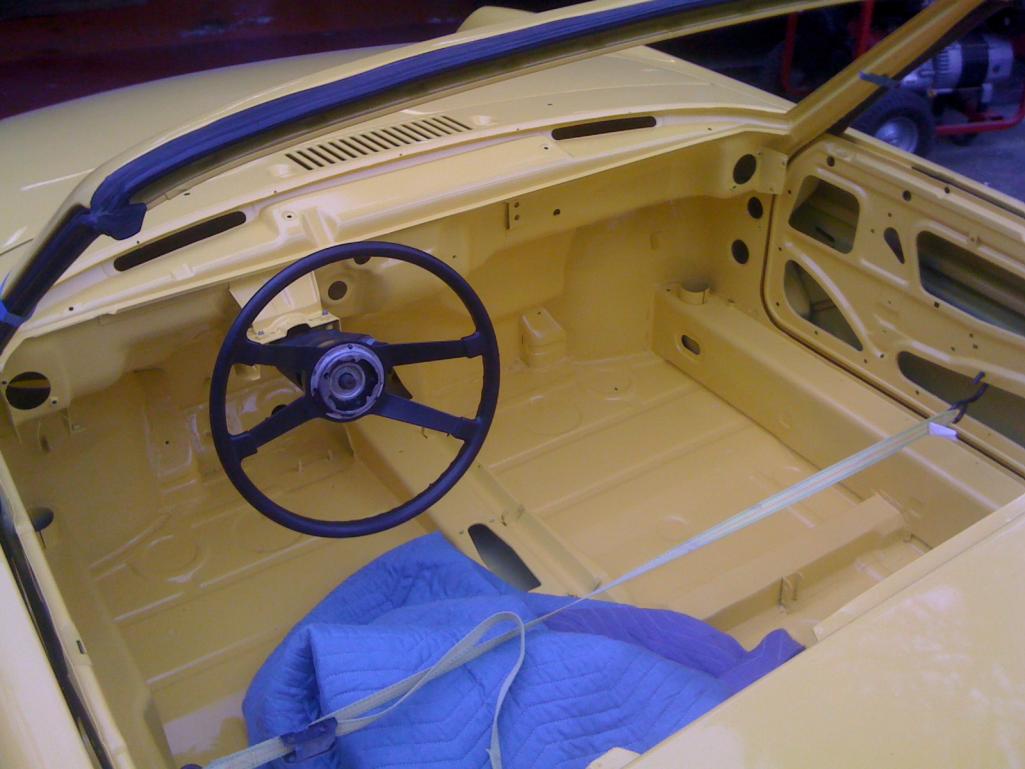
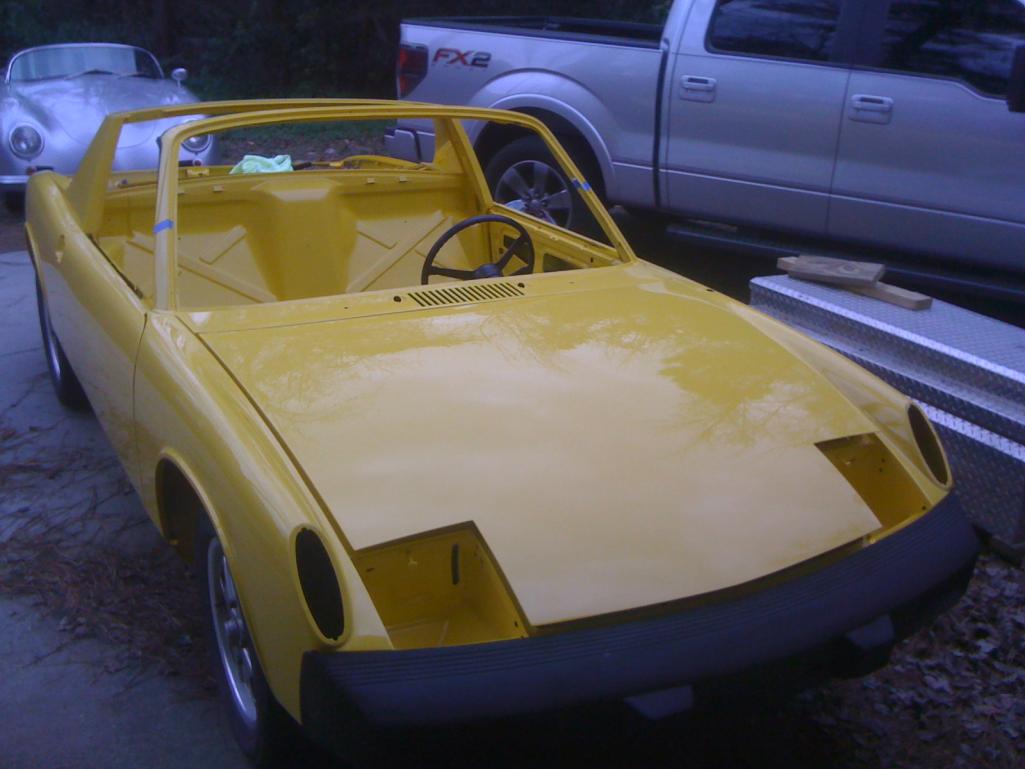
So I promised pics and here some are (sorry for the quality, cell pics since my digital "walked off" during my home addition).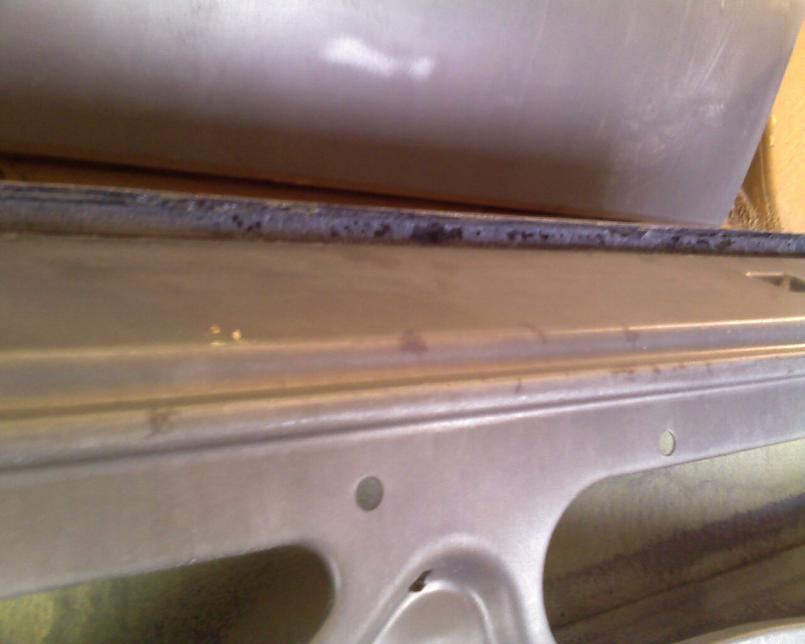
Posted by: 993inNC Feb 4 2010, 07:28 PM
Posted by: 993inNC Feb 4 2010, 07:31 PM
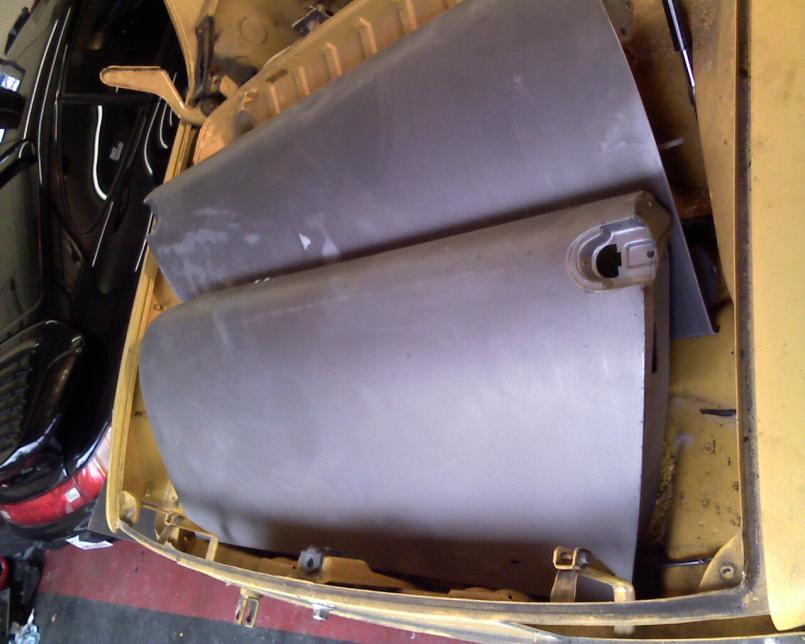

Posted by: 993inNC Feb 4 2010, 07:34 PM
Posted by: 993inNC Feb 4 2010, 07:36 PM
Sorry, I have a ton of pics but this site only lets me load one or two at a time and I know no one wants to go through 30 pages 1 at a time
Should have the rotisserie first of the week and off to the blaster it goes. Will report back once stripped
Posted by: McMark Feb 4 2010, 07:47 PM
If the site only lets you load one or two you should resize them to 800px max. See the FAQ forum for how cause I'd love to see more.
Posted by: 993inNC Feb 4 2010, 07:54 PM
Posted by: Ian Stott Feb 4 2010, 07:56 PM
Mark I have a brand new set of floor pans still in the box, got them from Restoration Design and I am looking to sell them, got some other stuff too.
Ian Stott
Moncton
Posted by: 993inNC Feb 4 2010, 07:56 PM
couple more for giggles. I'm sick......and tired.....no really. I can't imagine going through and reducing them. Head is killing me
Attached thumbnail(s)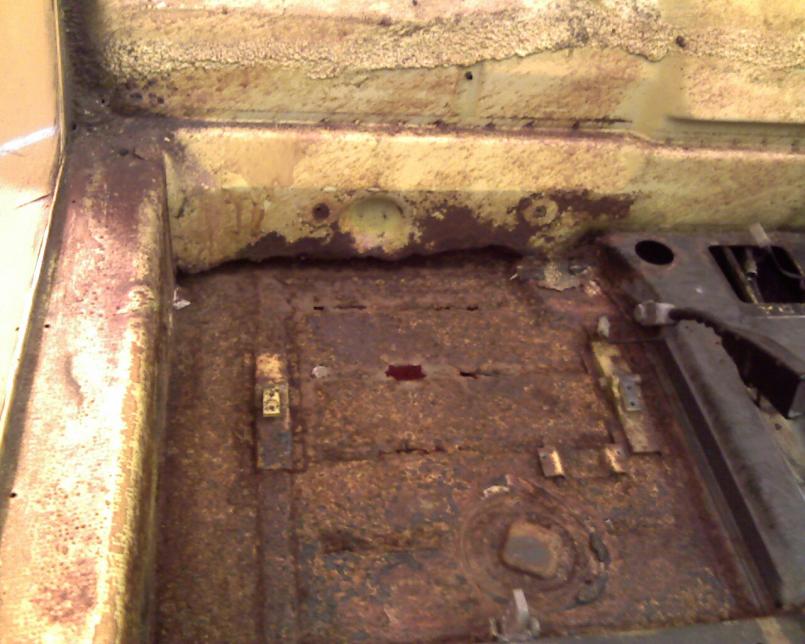
Posted by: Ian Stott Feb 4 2010, 07:58 PM
Mark I have a brand new set of floor pans still in the box, got them from Restoration Design and I am looking to sell them, got some other stuff too.
Ian Stott
Moncton
Ignore this post I am trying to watch the curling match and be online at the same time, not doing either well!!
Ian Stott
Posted by: 993inNC Feb 4 2010, 08:14 PM
Trying to watch Top Gear and do this too, but of you were talking to me (the pans etc) lets take that discussion off line. I'll need parts very soon so let me know what you have.
Posted by: 993inNC Feb 26 2010, 01:00 PM
No going back now!
Was hoping to have the car blasted by now, but apparently my media guy is backed up. 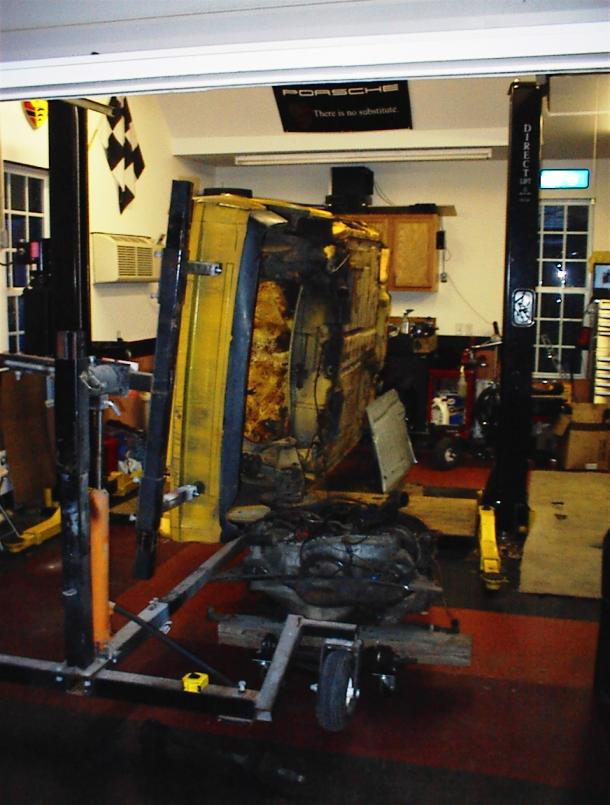
Posted by: 993inNC Feb 26 2010, 01:02 PM
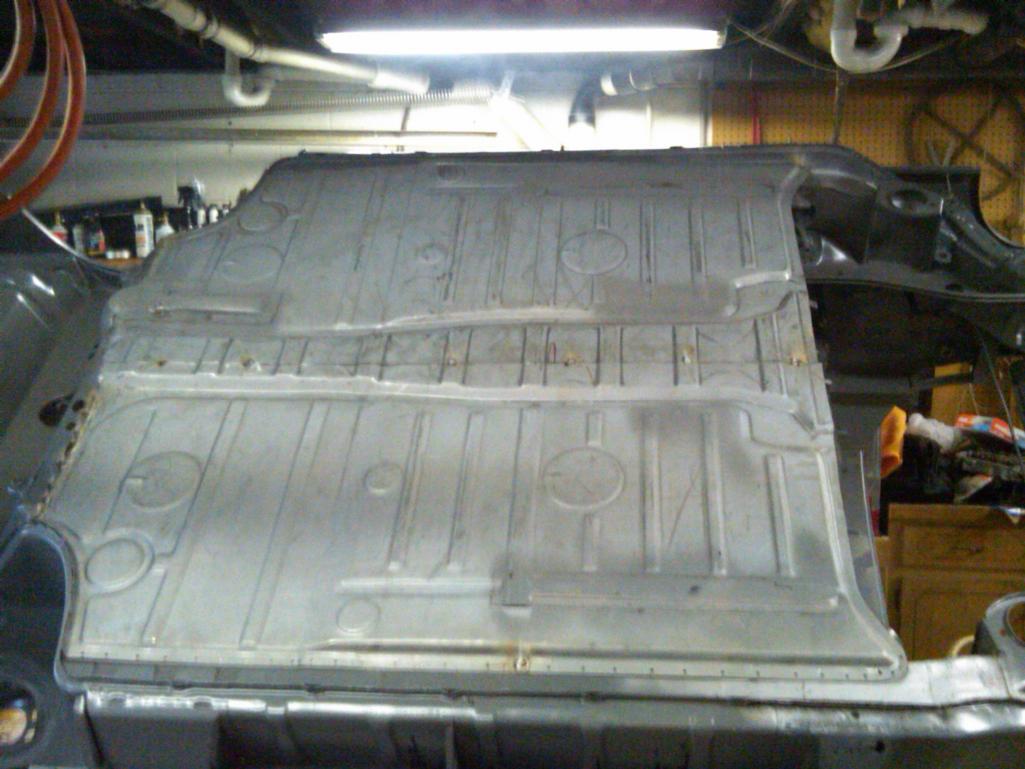
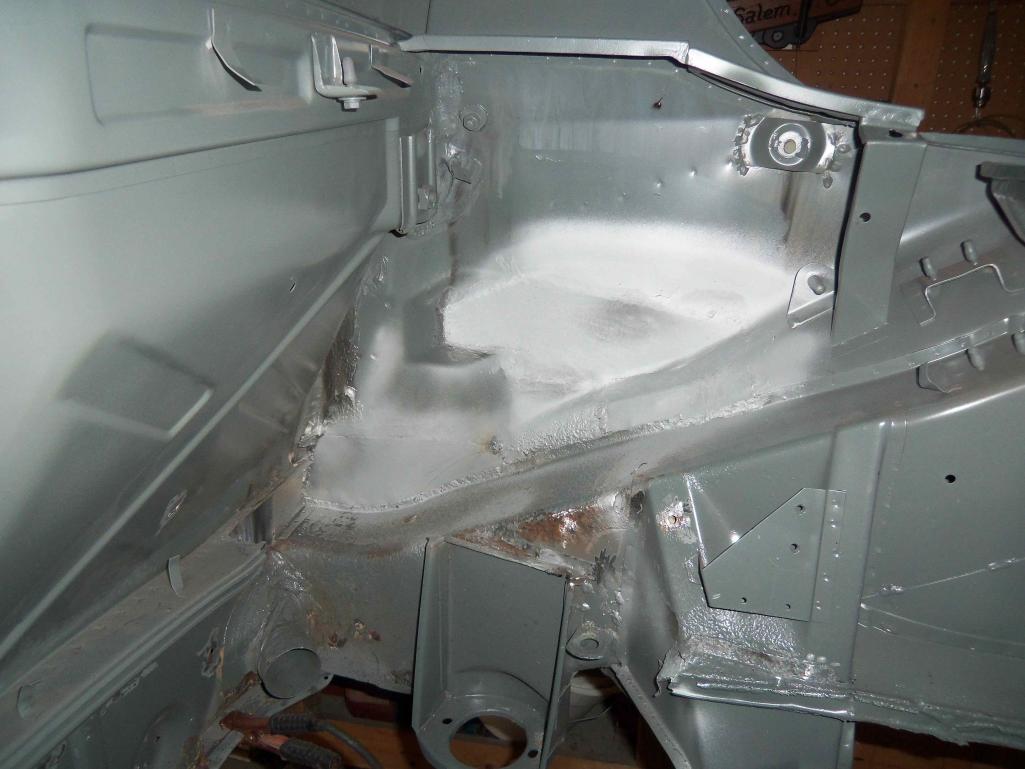
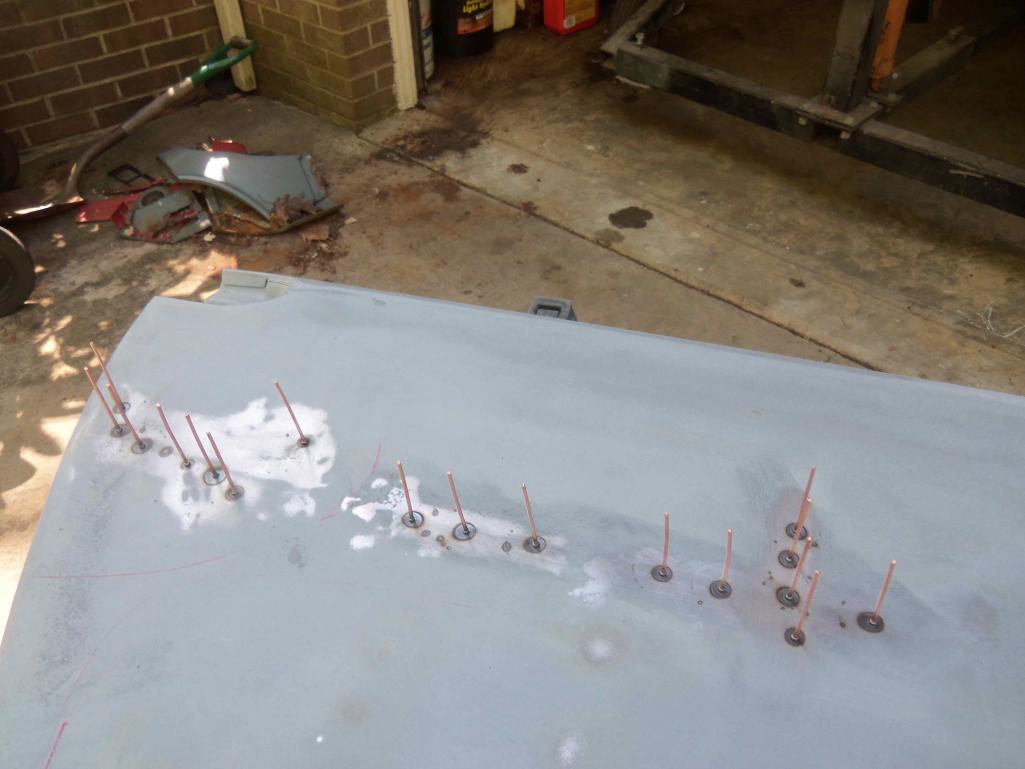
pans are gone. New metal is here and waiting for me to weld it in.
Posted by: 993inNC Feb 26 2010, 01:07 PM
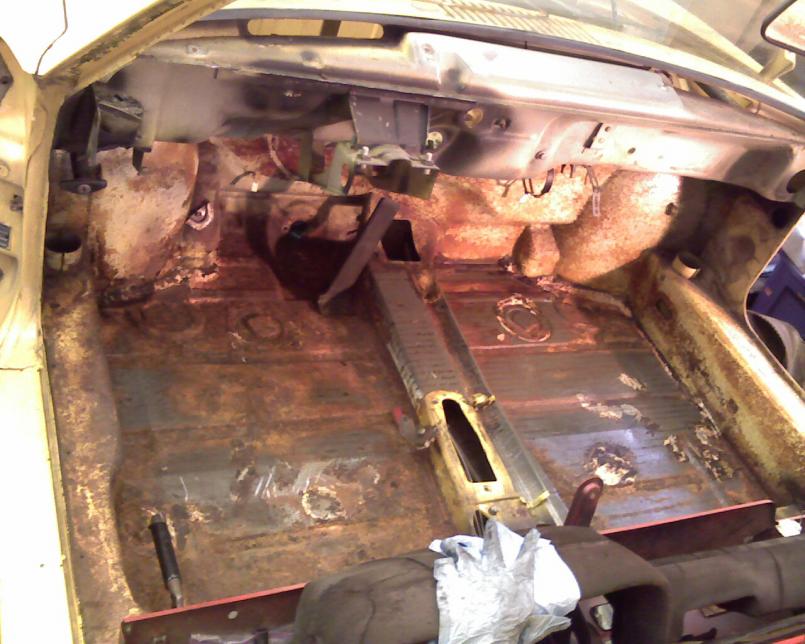
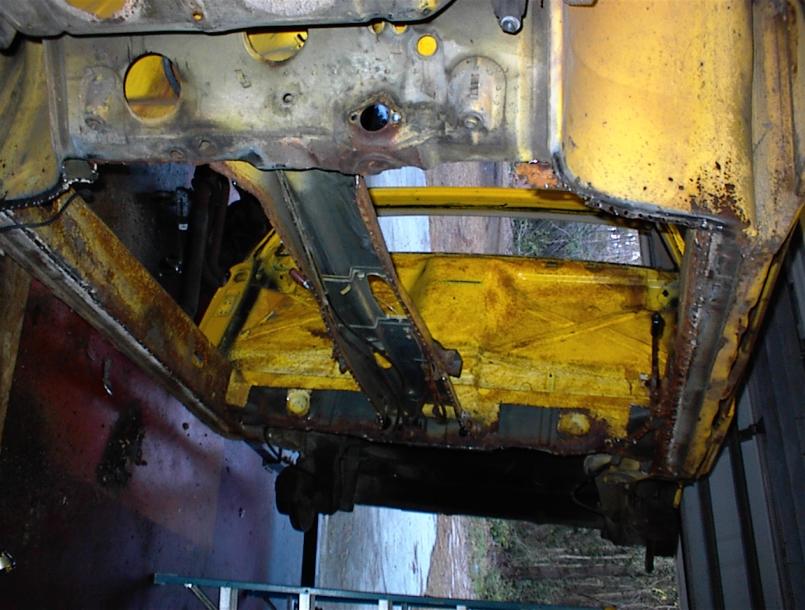
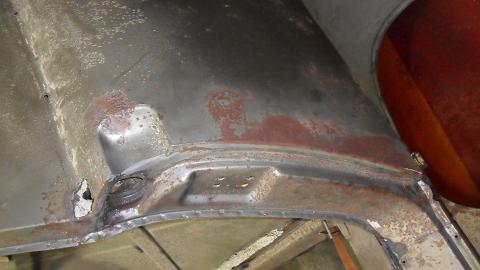
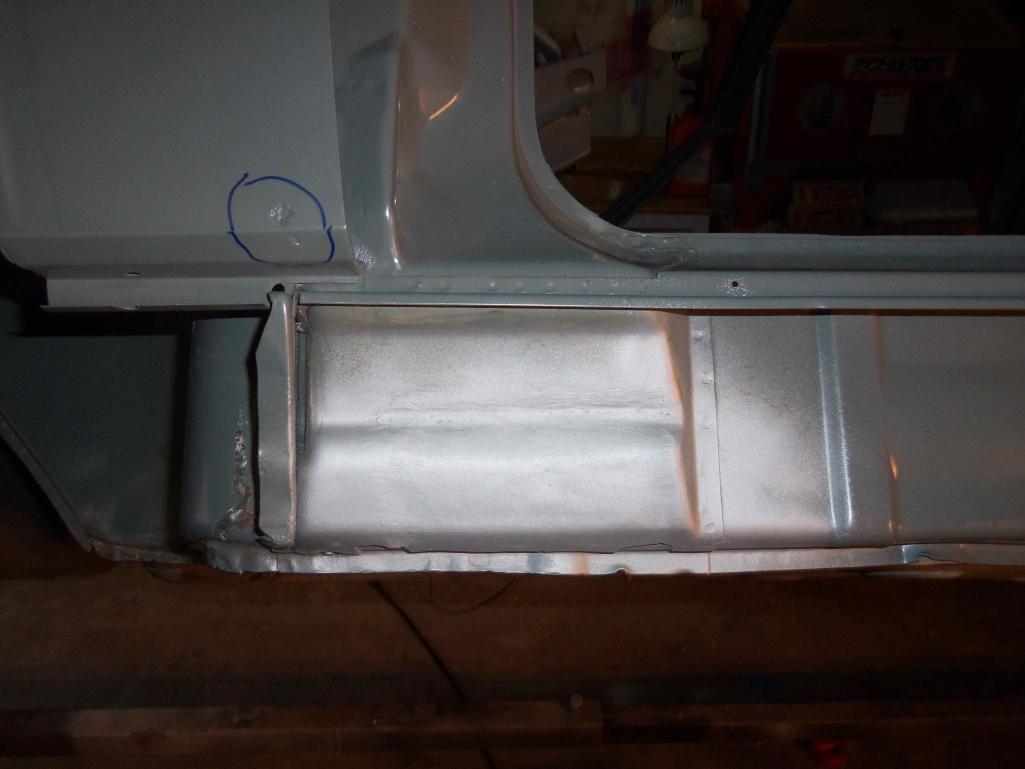
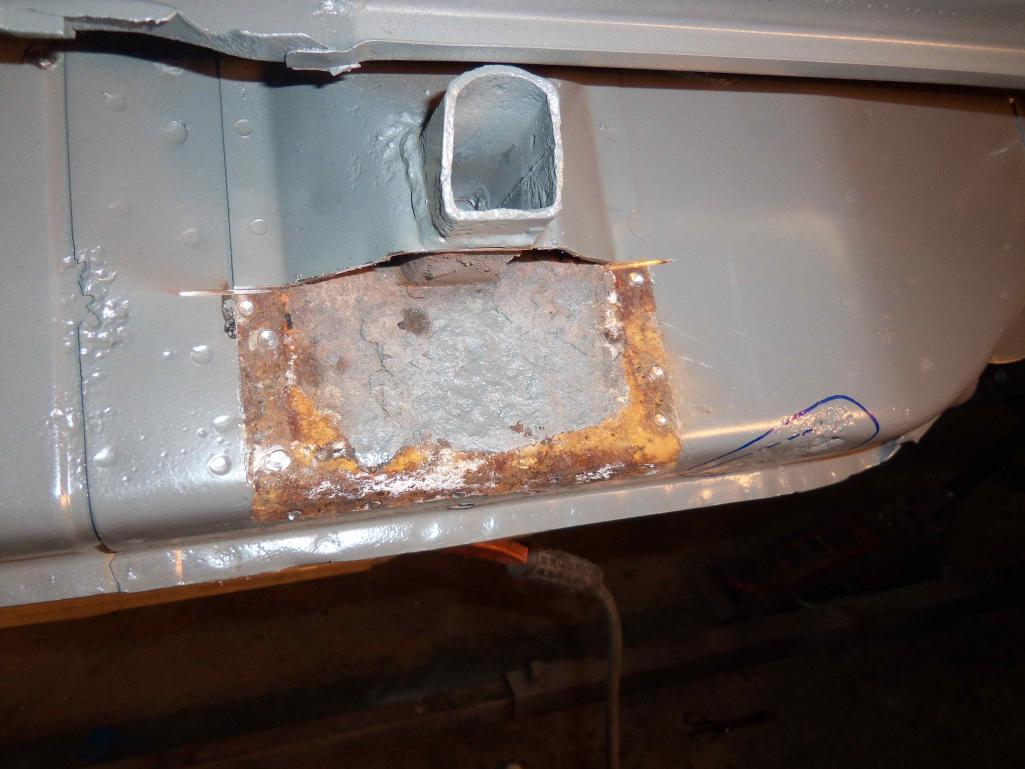
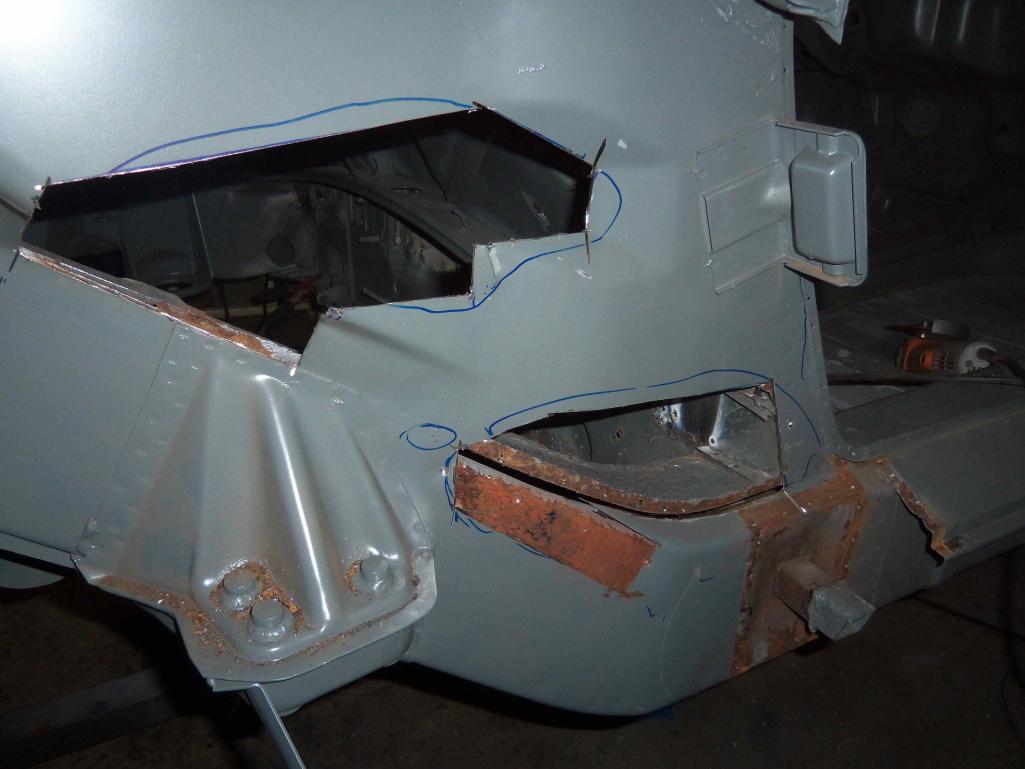
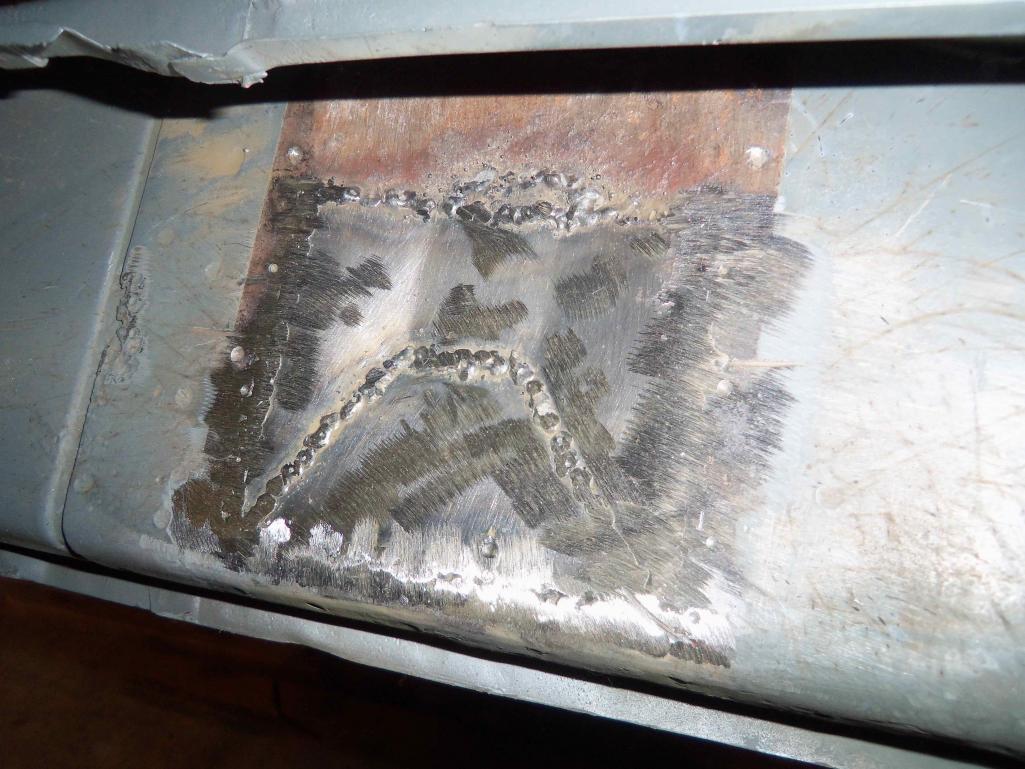
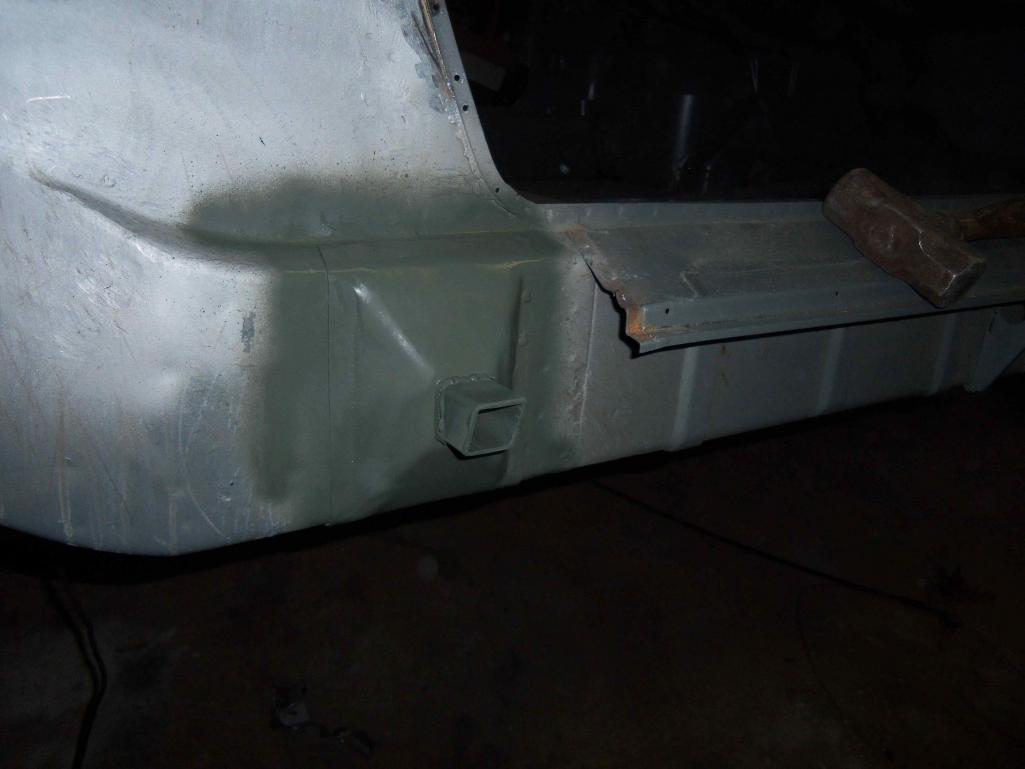
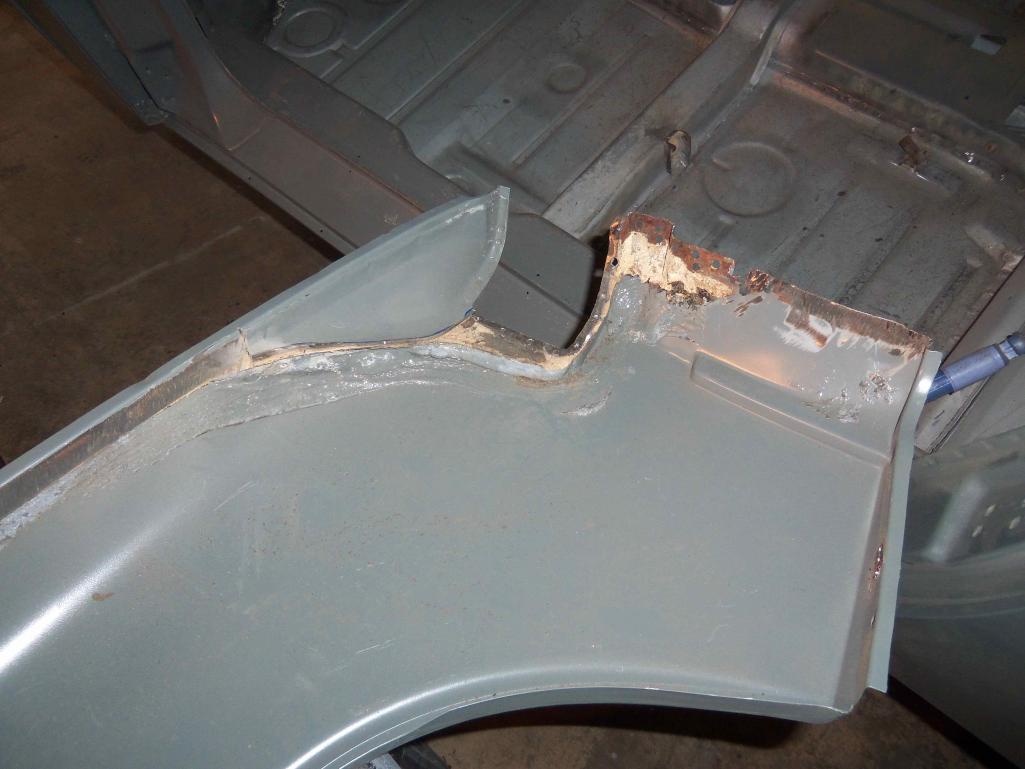
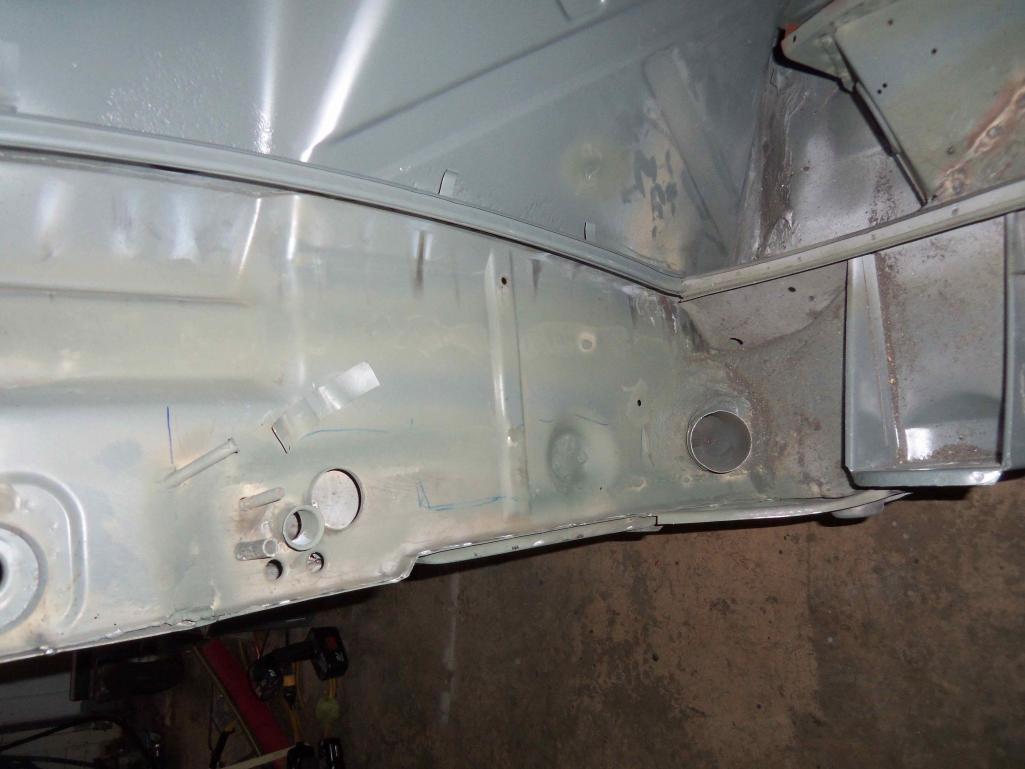
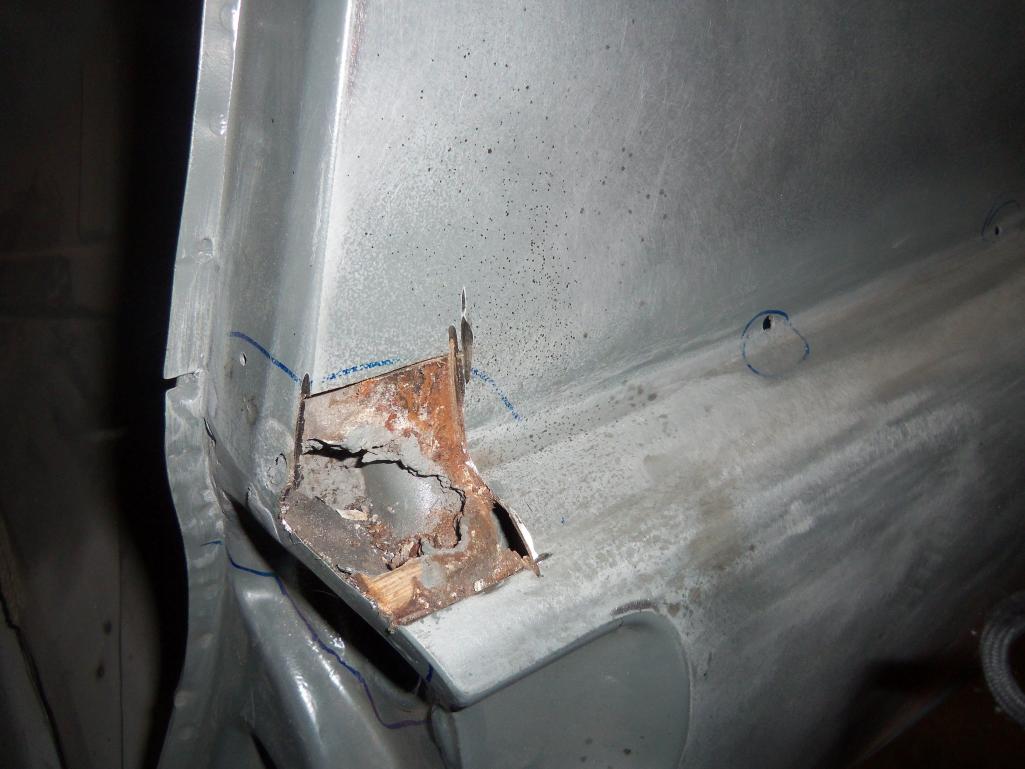
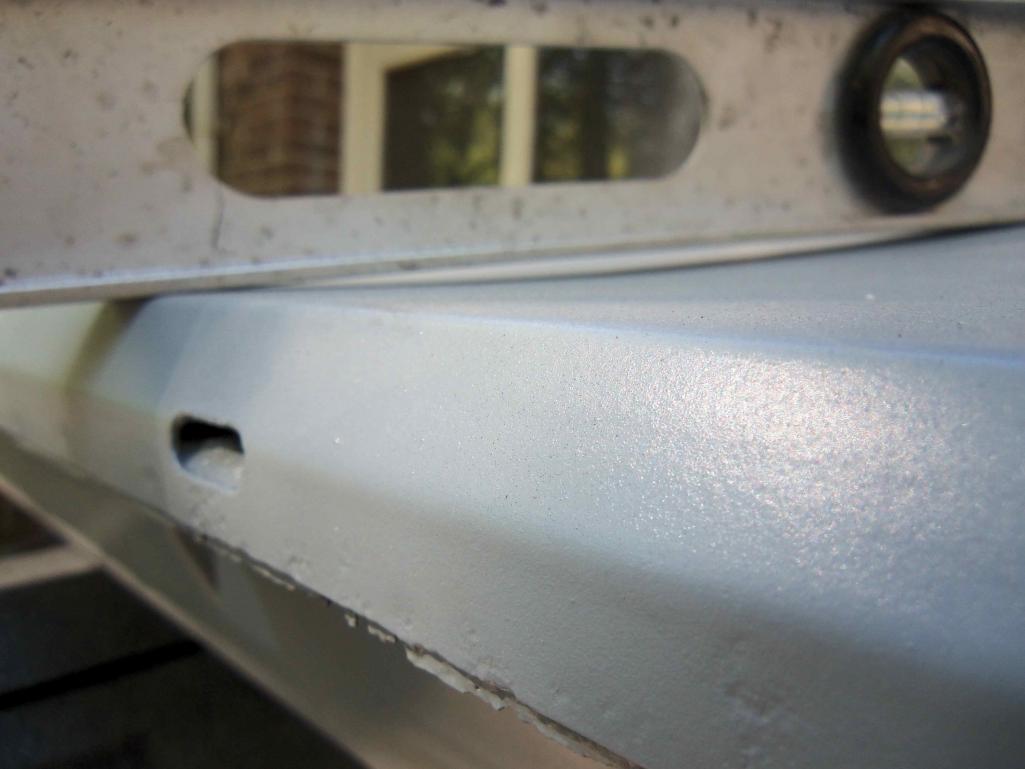
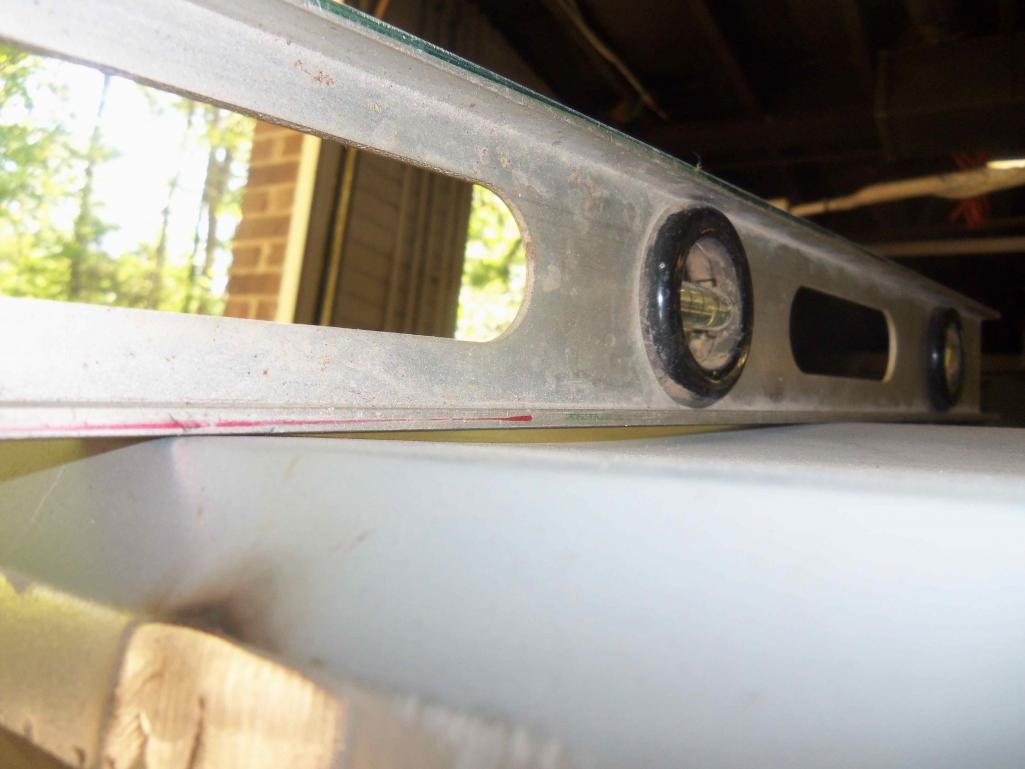
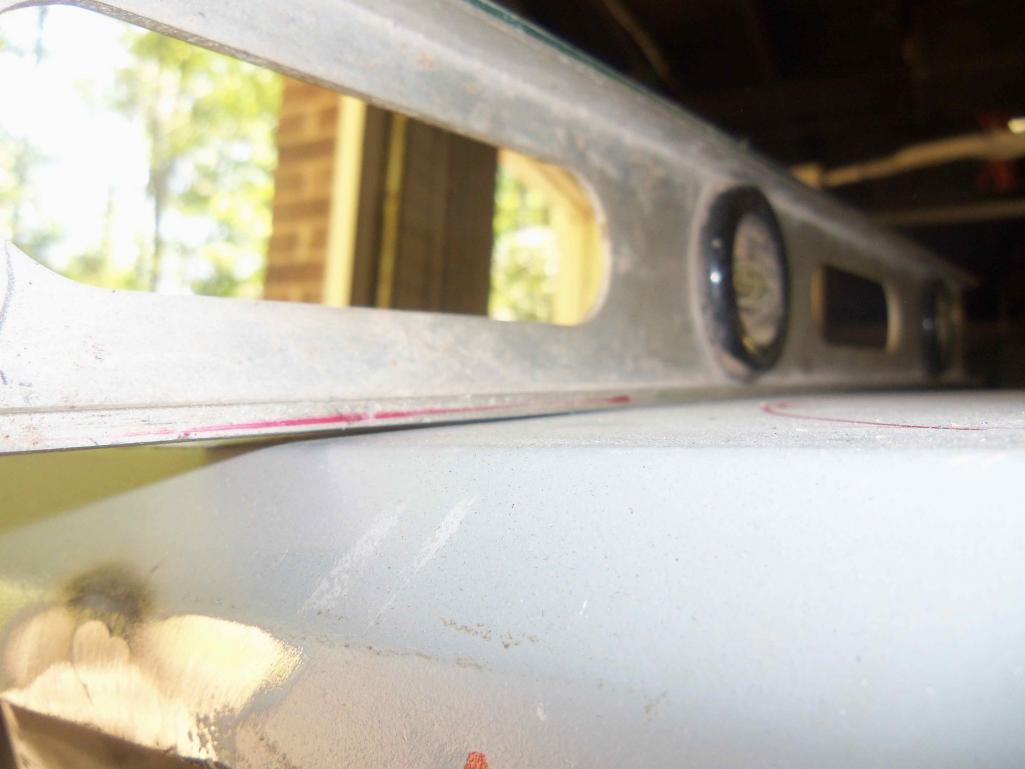
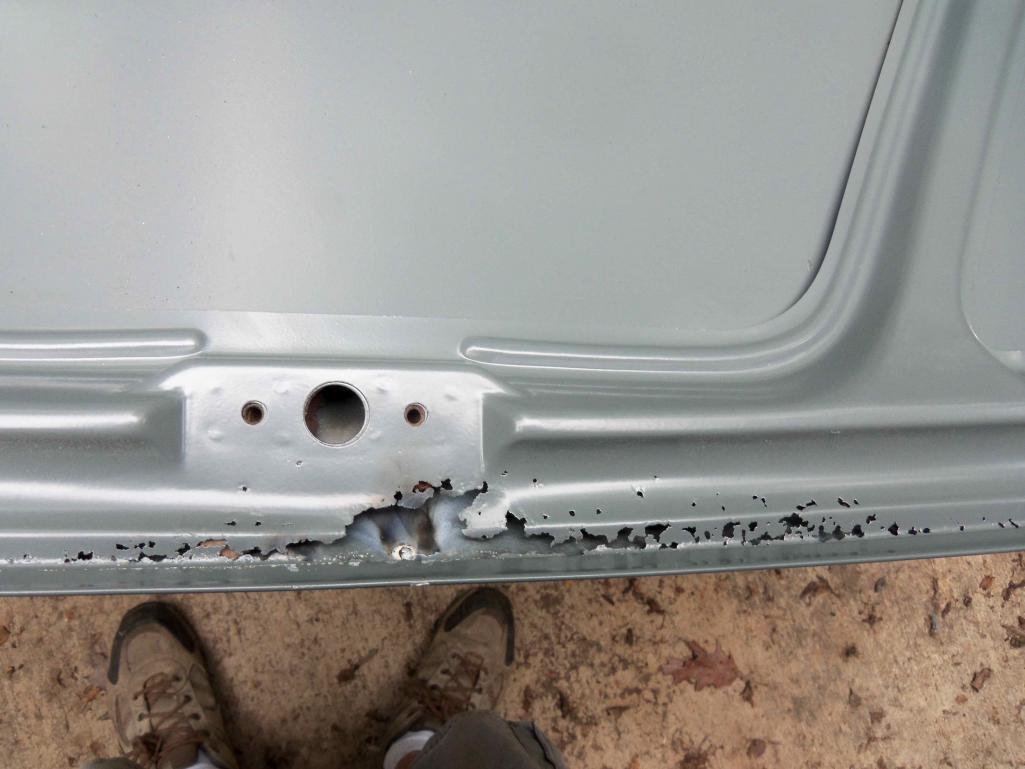
So far this is all I can find for real damage in the longs (was rotten where I cut the hole out). Shined light down each way and looks clean! There's bit more to be cut out, but I want to see it after blasting before I cut any more out. Should be able to get away with a small thick steel patch repair.....no?
Posted by: 993inNC Mar 10 2010, 08:17 PM
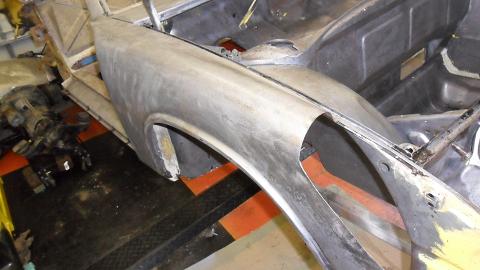
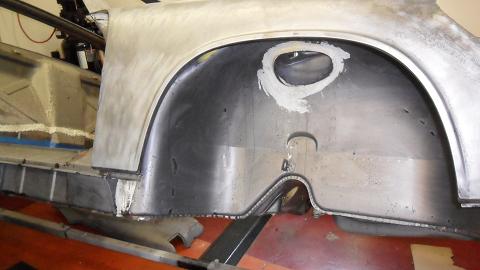
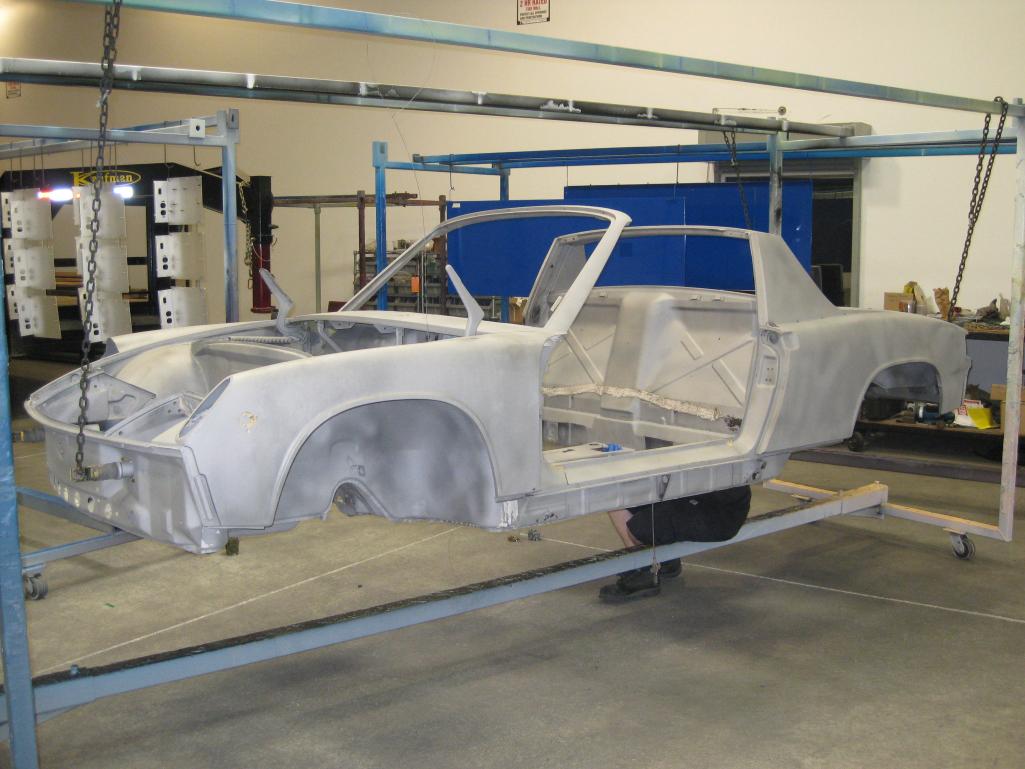
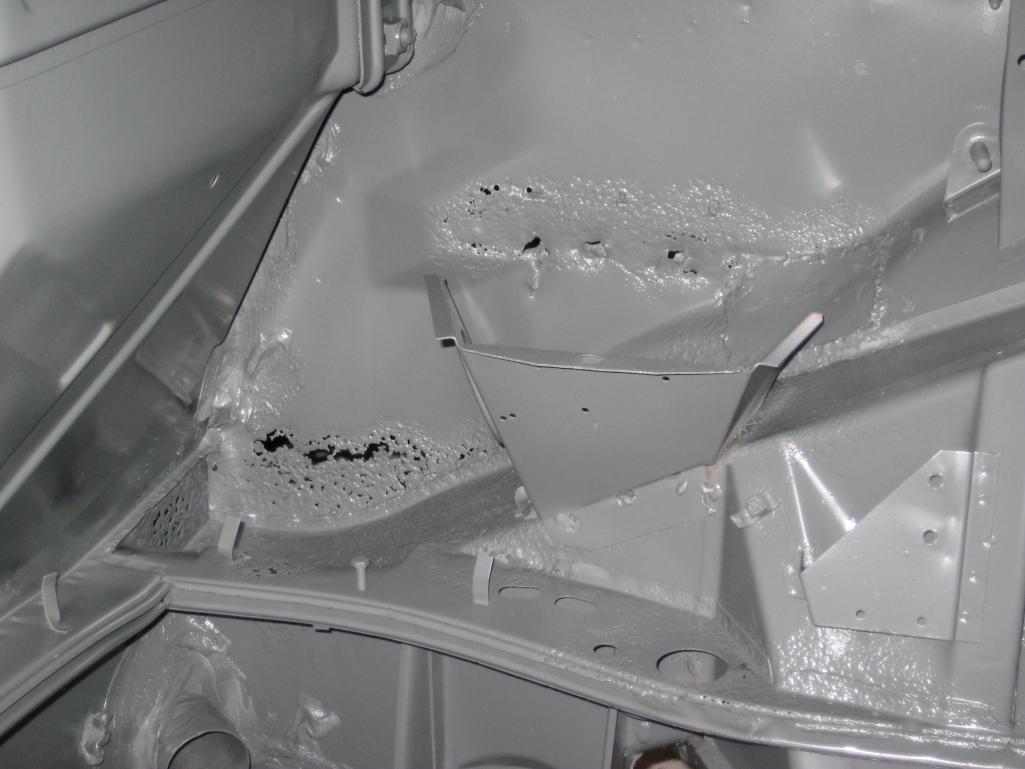
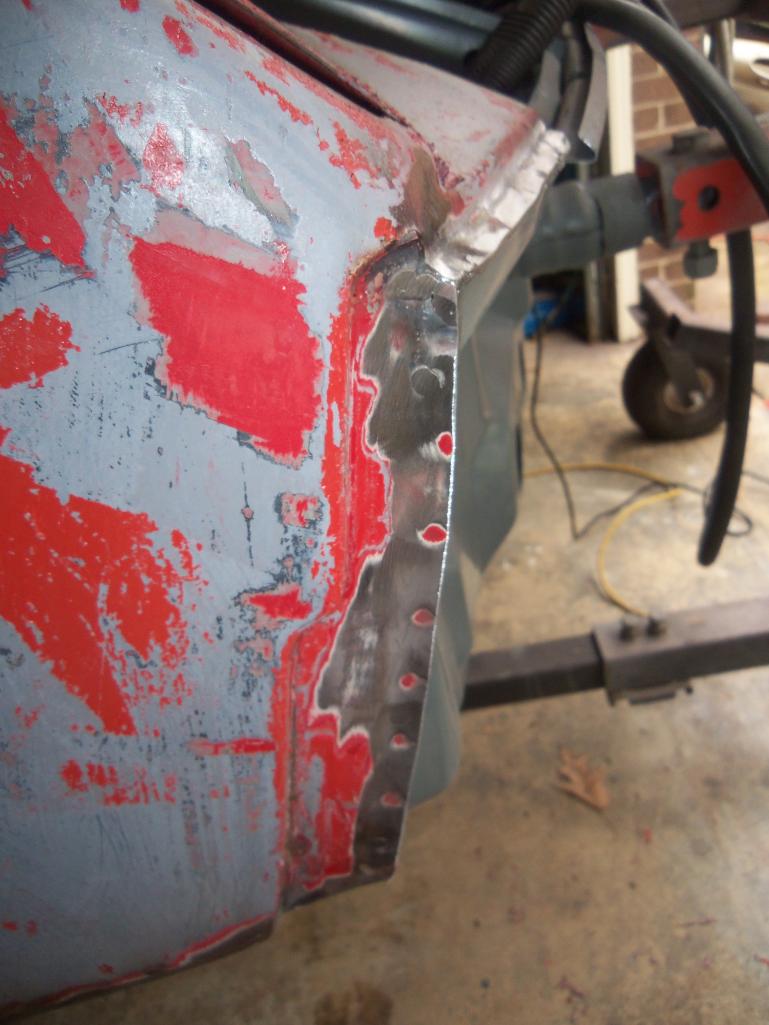
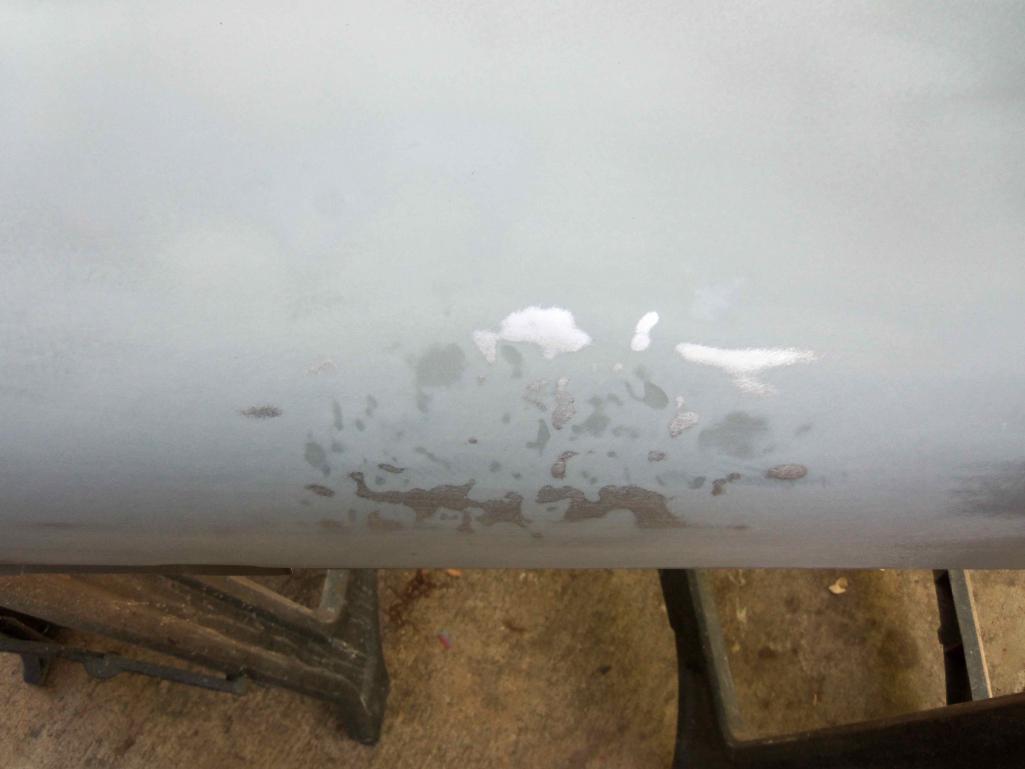
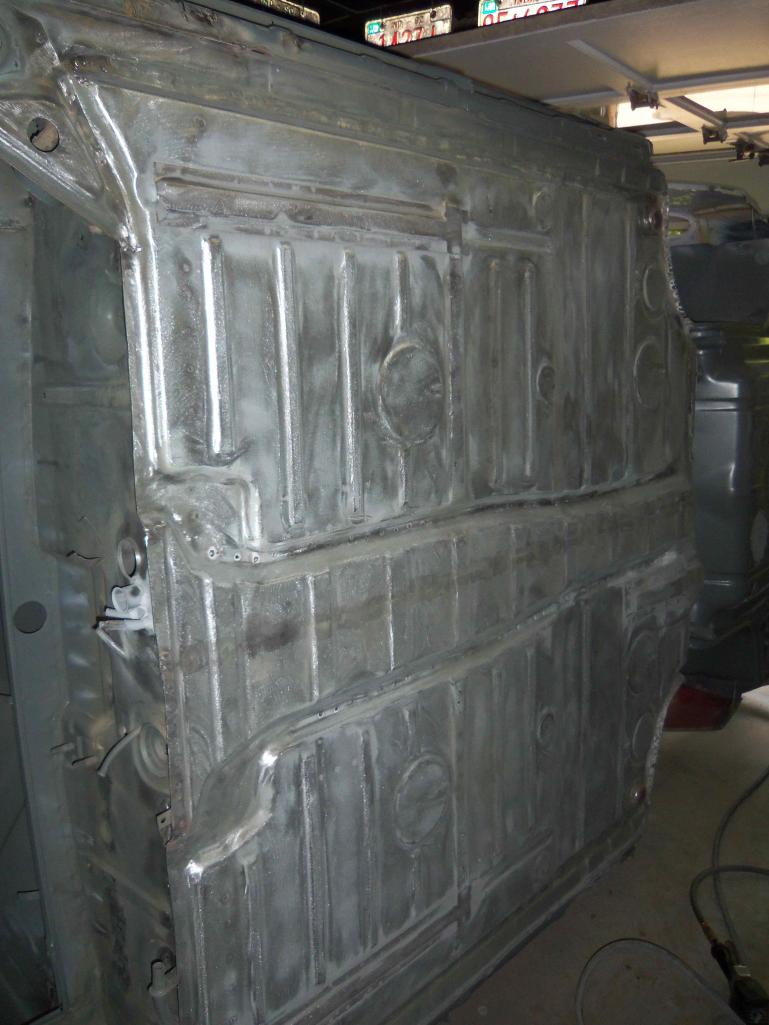
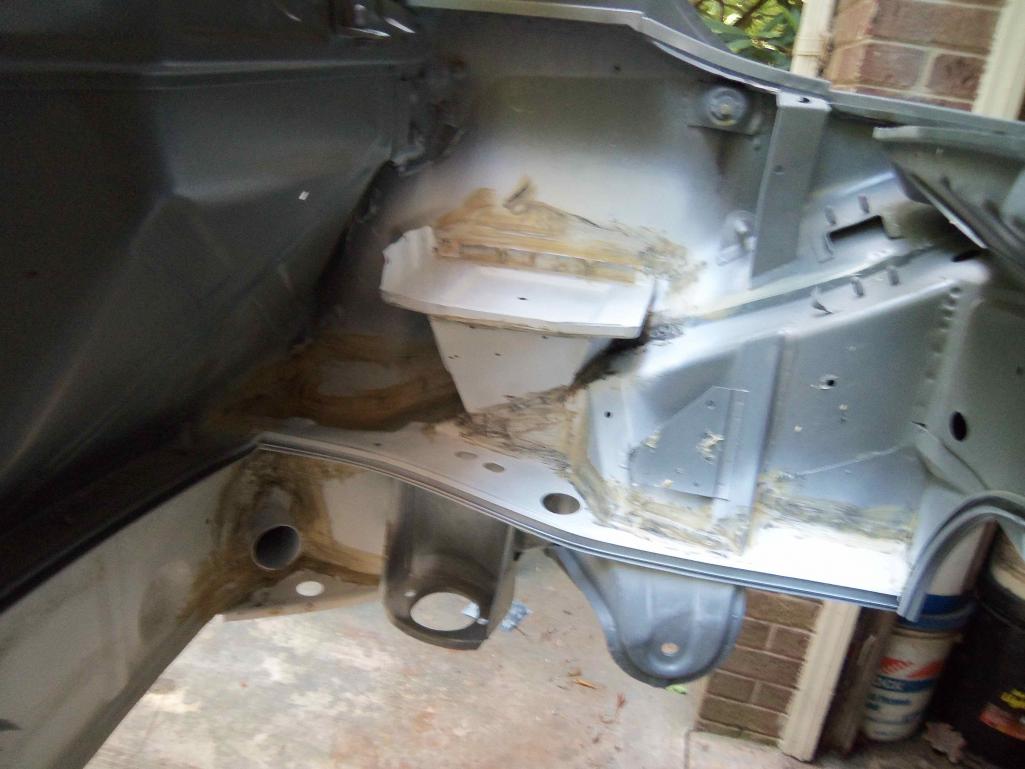
And yesterday the fun began. This was a couple hours worth of work. The blaster got the passenger side of the car done in about an hour. The car seems to be in what he calls "cherry" shape considering its age. It has however seen a few mishaps in iys past. Some idiot thought it better to bondo the entire rear quarter panel in lieu of hammer and dolly'g the dents out. That crap was like concrete coming off.....slowly!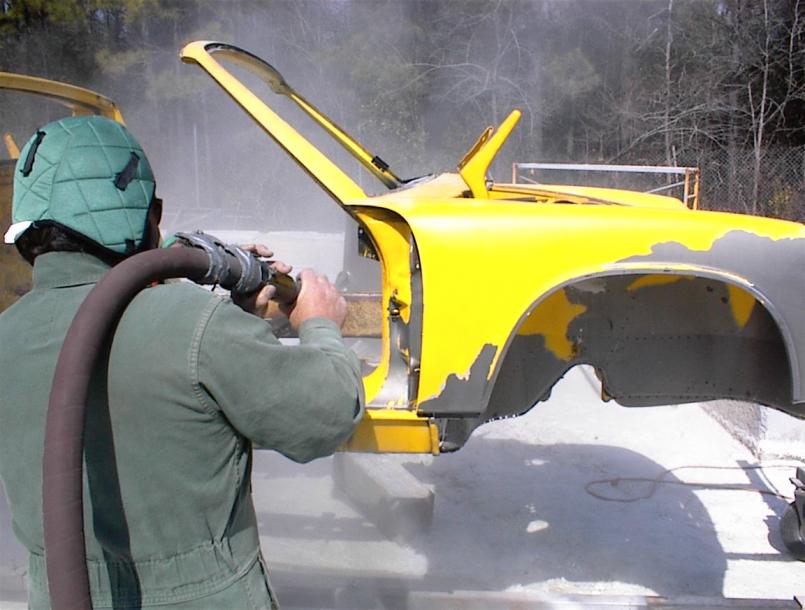
Posted by: 993inNC Mar 10 2010, 08:20 PM
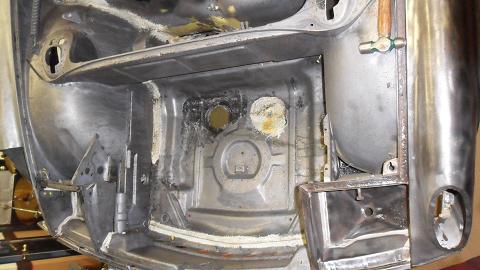
Was told the brass and lead we found throughout the car is factory original (the brass is directly under the word original and is at the front of the sill as well at the top_.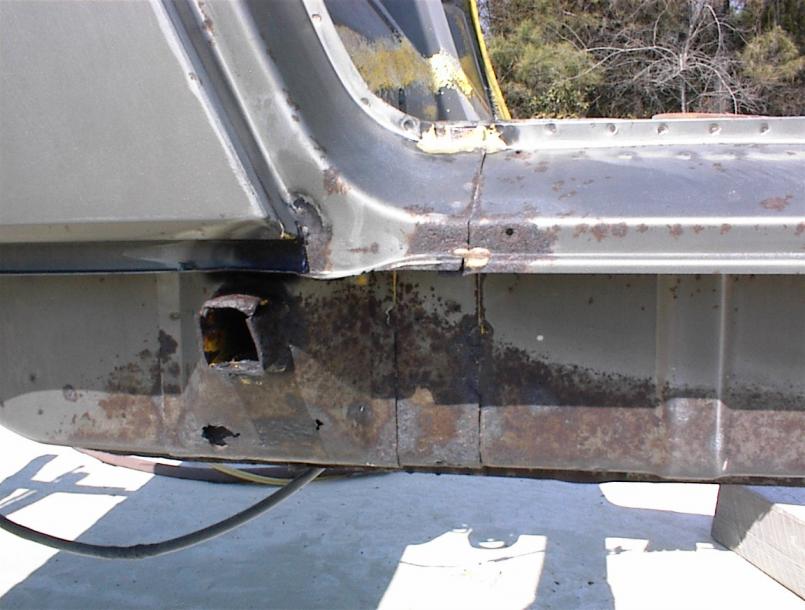
The window frame is in great shape too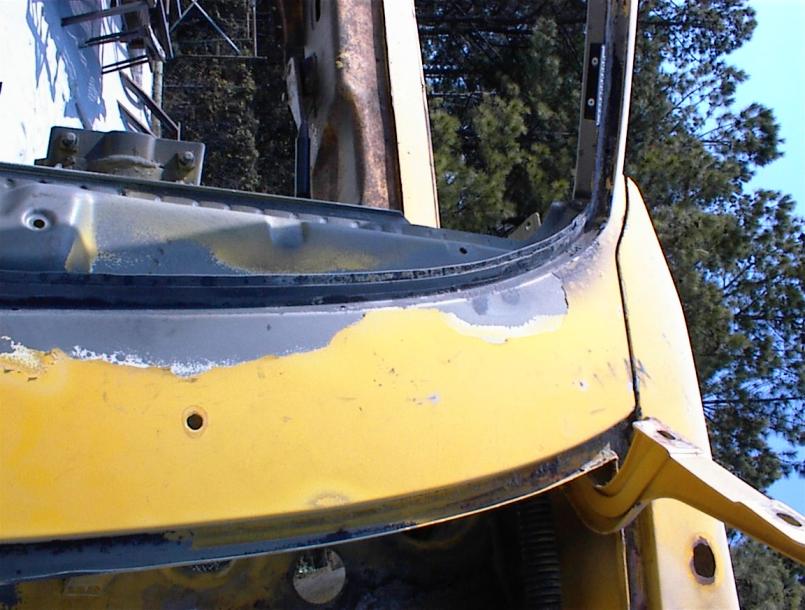
Posted by: 993inNC Mar 10 2010, 08:24 PM
He got quite a bit done in just a couple hours, can't wait to see it complete and do a final assessment of it's condition. Sand blasting of the surface rust will commence after the soda is complete.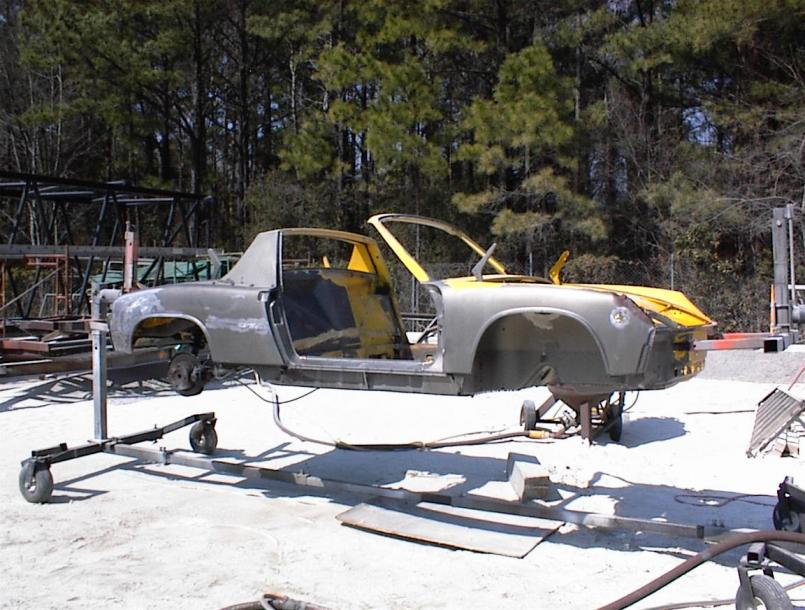
Posted by: Jon Fernandes Mar 10 2010, 08:36 PM
Careful with the sand as it can warp body panels.
Posted by: 993inNC Mar 10 2010, 08:49 PM
Yeah, I know. We're just doing very small spot areas to get rid of surface rust, not doing entire panels. I'm confident this guy knows what he's doing.
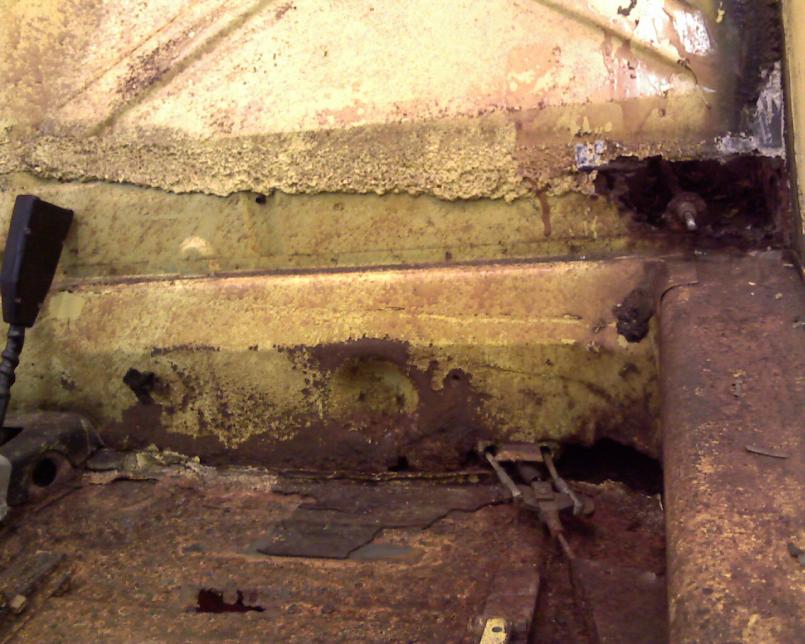
Posted by: 993inNC Jul 20 2011, 06:41 PM
Well its been over a year and I am disappointed to report that my soda blast guy didn't turn out to quite as I had hoped.
After well over a year, I finally had to force my hand to get my car back......and of course it wasn't done. I had been sweet talked into bringing all my parts and pieces over to him for help with welding the new parts in and prime the entire car once new parts were installed, well that didn't go as planned! Most never even made it out of their boxes!
Two bright spots came out of everything though. I only paid the guy (way back in the beginning) $300 for the car to get blasted, and the car is still on his rotisserie with no time frame to give it back! He did cut out the entire back quarter panel for replacement as well as the front corner light metal, there is just the other rear corner that needs pulling and body repair.
My plan of attack (already started): With various wire wheels on my pneumatic drill, I am grinding off the surface rust that has grown on the car since the car was never sealed after the initial blasting. I'll wash it in Ospho rust inhibitor as I go and a total bath once completely ground down. Then a "super clean" and water bath with scotchbrite scrub pad, drying and then primer. I want to get to this point before hitting the welding/body work to make sure there is no future rust issues.
Luckily the metal is still in great shape, a couple rust issues but all the main areas are in great shape (longs, suspension points, etc).
A couple pics for your enjoyment First two are before grinding, last 3 are after grinding/Ospho
Attached image(s)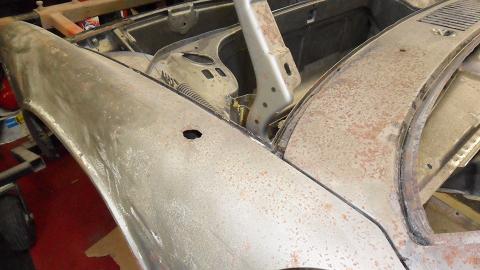
Posted by: Cairo94507 Jul 21 2011, 07:20 AM
Despite the delays it is very exciting to see these cars in their naked form. I love seeing the bare metal all clean and waiting for newer technology finishes to be applied to protect them for the next 40 plus years. Good luck.
Posted by: scotty b Jul 21 2011, 08:29 PM
In his defense it's a hard business these days. We deal in discretionary income, and when times are tight guys like us take the first hit. If he is primarily a blaster, he will stick with the blasting as he is known to be one of few. I am known for metal and paint, and not blasting, yet it is still hard to make ends meet. We are a specialty line of business, the first to lose work when times are tight. If he is good, give him a break. the end results will be worth it in the long run
I am having to take n work that I would turned away 3 years ago. Unfortunately my regular customers have suffered. I try my best to keep in touch with them and let them know what is going on. So ar all have been very understanding and supportive. Give him a reasonable break if he has a good rep.
Posted by: 993inNC Jul 22 2011, 03:55 PM
In his defense it's a hard business these days. We deal in discretionary income, and when times are tight guys like us take the first hit. If he is primarily a blaster, he will stick with the blasting as he is known to be one of few. I am known for metal and paint, and not blasting, yet it is still hard to make ends meet. We are a specialty line of business, the first to lose work when times are tight. If he is good, give him a break. the end results will be worth it in the long run
I am having to take n work that I would turned away 3 years ago. Unfortunately my regular customers have suffered. I try my best to keep in touch with them and let them know what is going on. So ar all have been very understanding and supportive. Give him a reasonable break if he has a good rep.
I can appreciate hard times and having to prioritize, but blasting the car is a good days work.....ok maybe two, the car sat for a year + with no protection after the initial blasting. I would have been fine with finishing and giving it back but he strung me along and added insult to injury by telling me to bring all my parts over and that he'd make things right for me and promising me a finish day that came and went long ago. That to me, as a person of a few businesses, is uncalled for. Communication is key and I got none. He's an okay guy personally, that's not what this is about, he just sucks as a businessman. My lesson learned.
I'm just happy I got it back and its not to bad off. It also seems like the grinding of surface rust is a lot easier to remove than all those layers of paint, so again another bright side. I've got about half the car ground down, work on the rest next week and get it washed down soon.
Posted by: trojanhorsepower Jul 22 2011, 04:08 PM
Hi Chris,
How did I miss all this progress?? I hate that you had to deal with all the delay, but it looks like you are all over it now.
I moved to the mountains so I won't get to help, but good luck and keep at it.
-Peter
Posted by: scotty b Jul 22 2011, 04:32 PM
In his defense it's a hard business these days. We deal in discretionary income, and when times are tight guys like us take the first hit. If he is primarily a blaster, he will stick with the blasting as he is known to be one of few. I am known for metal and paint, and not blasting, yet it is still hard to make ends meet. We are a specialty line of business, the first to lose work when times are tight. If he is good, give him a break. the end results will be worth it in the long run
I am having to take n work that I would turned away 3 years ago. Unfortunately my regular customers have suffered. I try my best to keep in touch with them and let them know what is going on. So ar all have been very understanding and supportive. Give him a reasonable break if he has a good rep.
I can appreciate hard times and having to prioritize, but blasting the car is a good days work.....ok maybe two, the car sat for a year + with no protection after the initial blasting. I would have been fine with finishing and giving it back but he strung me along and added insult to injury by telling me to bring all my parts over and that he'd make things right for me and promising me a finish day that came and went long ago. That to me, as a person of a few businesses, is uncalled for. Communication is key and I got none. He's an okay guy personally, that's not what this is about, he just sucks as a businessman. My lesson learned.
I'm just happy I got it back and its not to bad off. It also seems like the grinding of surface rust is a lot easier to remove than all those layers of paint, so again another bright side. I've got about half the car ground down, work on the rest next week and get it washed down soon.
Oops I wan't paying full attention.
 I missed that it took a year just to get blasted. That IS uncalled for. The car also should have been etched and sealed immediately after the blasting was done so all that flash rusting would have been prevented. Carry on
Posted by: 993inNC Jul 22 2011, 08:26 PM
In his defense it's a hard business these days. We deal in discretionary income, and when times are tight guys like us take the first hit. If he is primarily a blaster, he will stick with the blasting as he is known to be one of few. I am known for metal and paint, and not blasting, yet it is still hard to make ends meet. We are a specialty line of business, the first to lose work when times are tight. If he is good, give him a break. the end results will be worth it in the long run
I am having to take n work that I would turned away 3 years ago. Unfortunately my regular customers have suffered. I try my best to keep in touch with them and let them know what is going on. So ar all have been very understanding and supportive. Give him a reasonable break if he has a good rep.
I can appreciate hard times and having to prioritize, but blasting the car is a good days work.....ok maybe two, the car sat for a year + with no protection after the initial blasting. I would have been fine with finishing and giving it back but he strung me along and added insult to injury by telling me to bring all my parts over and that he'd make things right for me and promising me a finish day that came and went long ago. That to me, as a person of a few businesses, is uncalled for. Communication is key and I got none. He's an okay guy personally, that's not what this is about, he just sucks as a businessman. My lesson learned.
I'm just happy I got it back and its not to bad off. It also seems like the grinding of surface rust is a lot easier to remove than all those layers of paint, so again another bright side. I've got about half the car ground down, work on the rest next week and get it washed down soon.
Oops I wan't paying full attention.
I missed that it took a year just to get blasted. That IS uncalled for. The car also should have been etched and sealed immediately after the blasting was done so all that flash rusting would have been prevented. Carry on No worries
It's not that it took a year to get blasted. He jumped on it pretty quick at first and got it about 75% done.......then time stopped. It still isn't quite done but I think I can strip it with grinders and chemical strippers. The Ospho is a wonderful etching chemical and cleanser and I don't think he'll have done much damage other to have wasted my time (and his since he word for basically free). Can't wait to get it done and painted, so looking forward to it...........been saving for an entire year+ for it Peter, to bad. Keep in touch on the thread, hope the move has treated you well.
Posted by: 993inNC Jul 25 2011, 05:16 PM
Well my son decided he wanted to work on "his Porsche" tonight (he's 4 years old btw) after dinner. So to appease I took him out to try out the aircraft stripper I just bought this afternoon.
OMG that stuff is amazing!  I did just the inner driver's wheel well to practice and in moments the paint was bubbling up. A buddy warned me about getting it on my skin etc......he was right, it hurts! Burns like a weld slag, even through leather welding gloves......crazy stuff. Love it though, should have the car ready for body work in no time at this rate.
Posted by: SUNAB914 Jul 26 2011, 07:39 AM
Your wife will kill you if your boy gets hurt with aircraft stripper. just the fumes alone are enough hazard. Wish I was in the area still to help you, but as you can see I moved along also. Good luck with project.
Posted by: 993inNC Jul 26 2011, 02:37 PM
Man everyone is bailing out on me!
Yeah she would kill me! He wasn't out there long, but I didn't want to squelch his enthusiasm for "his Porsche". As my second child and only boy, I need to foster any tendencies towards P-cars and guy stuff in general. Of course my 12 year old got
pissed thinking he was getting a Porsche and she wasn't  Suppose maybe I should foster her enthusiasm too?
I'm excited about the prospects of being able to start welding and getting the body ready for paint soon. I need to keep telling myself I can do this so I don't loose interest. Its not helping that everyone is moving away on me !
Posted by: SirAndy Jul 26 2011, 03:13 PM
Where are your door braces???
Before you start welding anything back together, you need to add (adjustable) braces and make sure everything is within factory specs.
http://www.914world.com/specs/bodydims.php
http://www.914world.com/specs/underdims.php

Posted by: 993inNC Jul 26 2011, 05:16 PM
There aren't any Andy. I know what you are going to say, and I will before I start welding big stuff like pans etc back in. I just verified the "f" measurement (rollbar to windshield) and its dead nuts on. The longs are truly in such good shape that car hasn't flexed a bit in the year + its been on that rotisserie. I'll go through and verify everything when I get into it heavy, promise
Thanks for those dimension pages BTW, just what I was wondering about where to find.
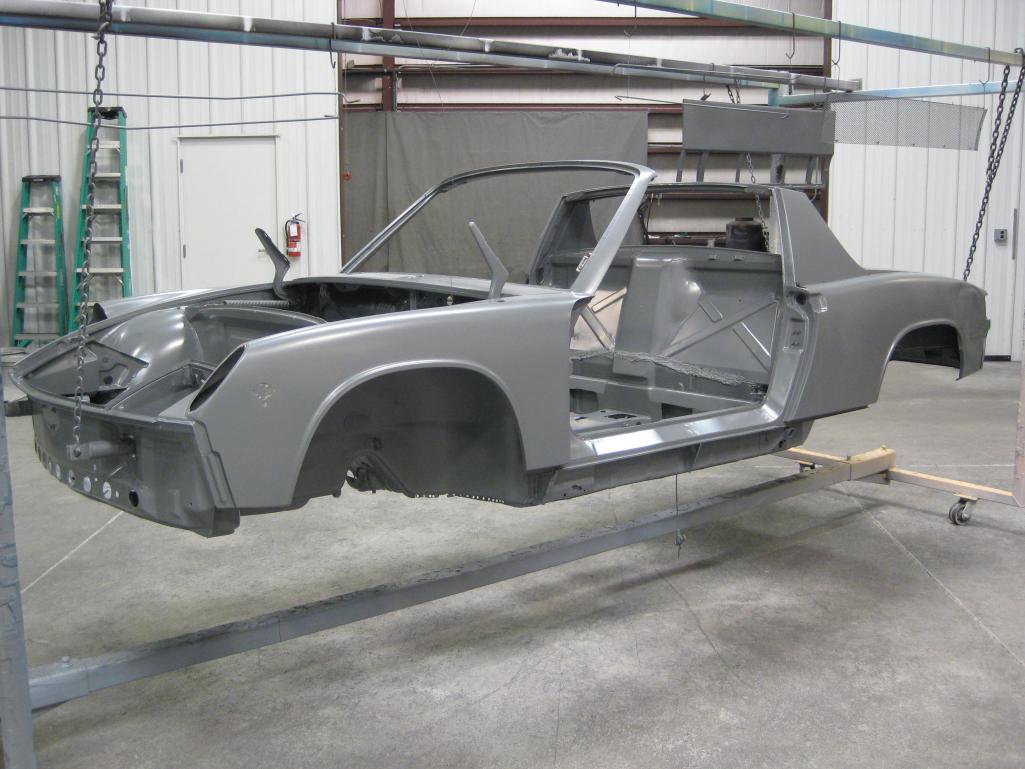
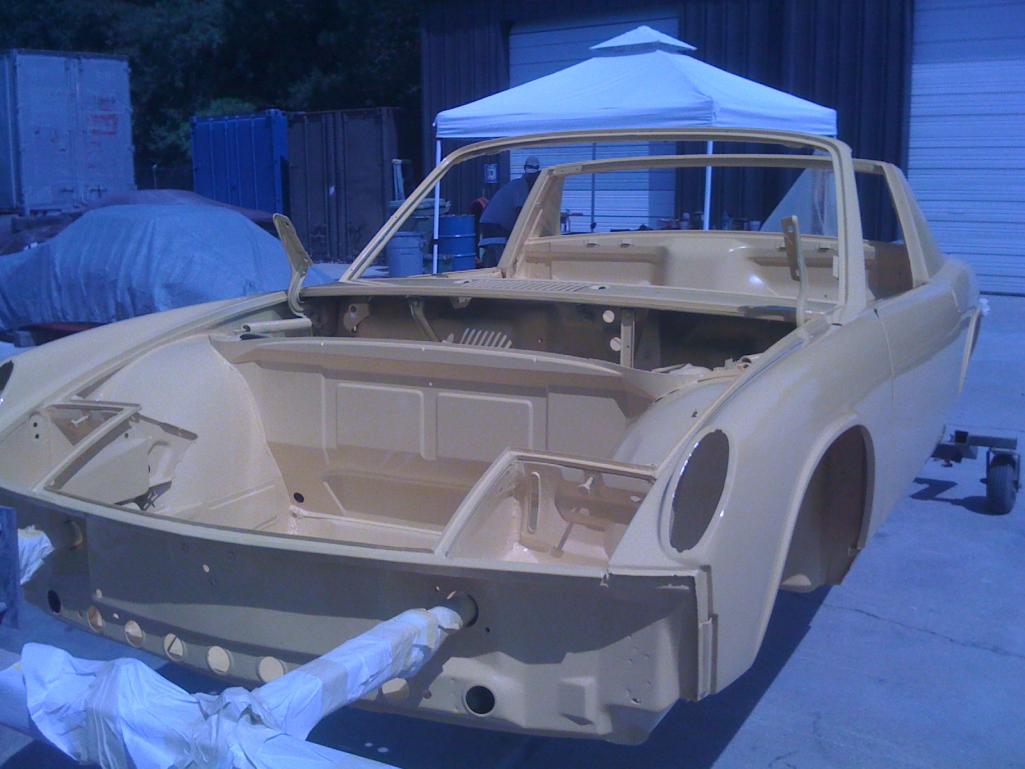
Posted by: 993inNC Oct 3 2011, 08:26 PM
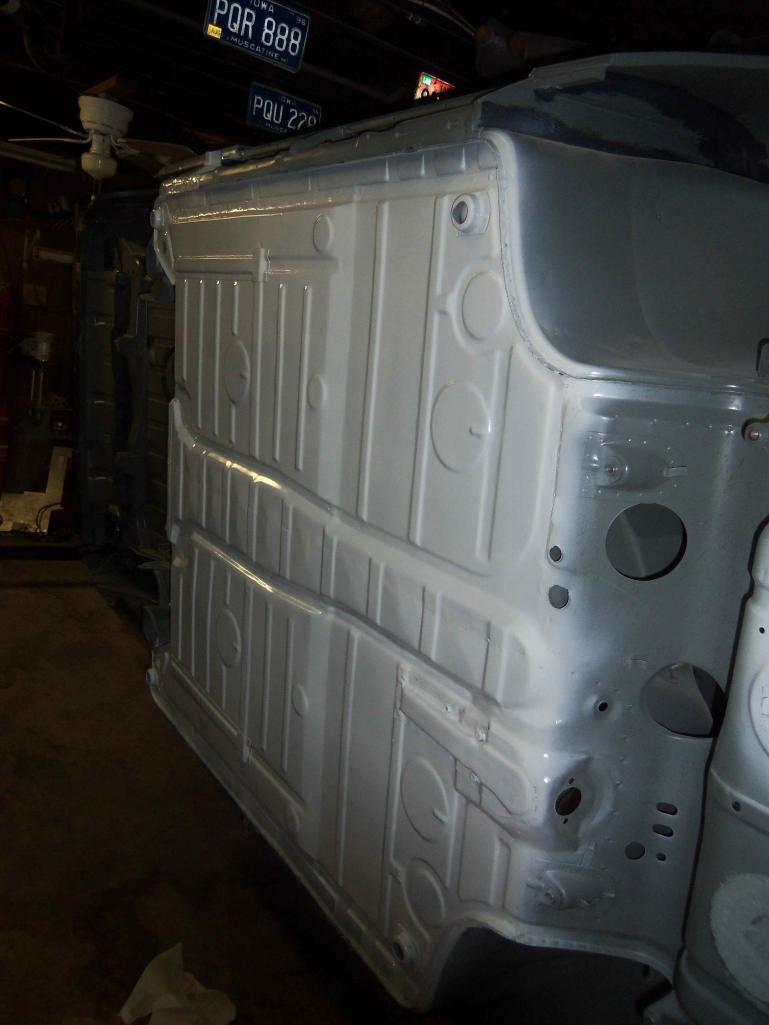
So with as busy I've been lately with work, I got tired of looking at my unfinished car (blasting was never finished by the first guy). I started to chemical strip the remainer of the car but was getting frustrated with the time it was taking and the fact that the rest of the car was flash rusting as time went on. My Ospho wash worked well but there was a fair amount of prep time in being able to do that.
I met a guy a while back who runs a powder coating shop but had not had a blasting capability.............until recently!
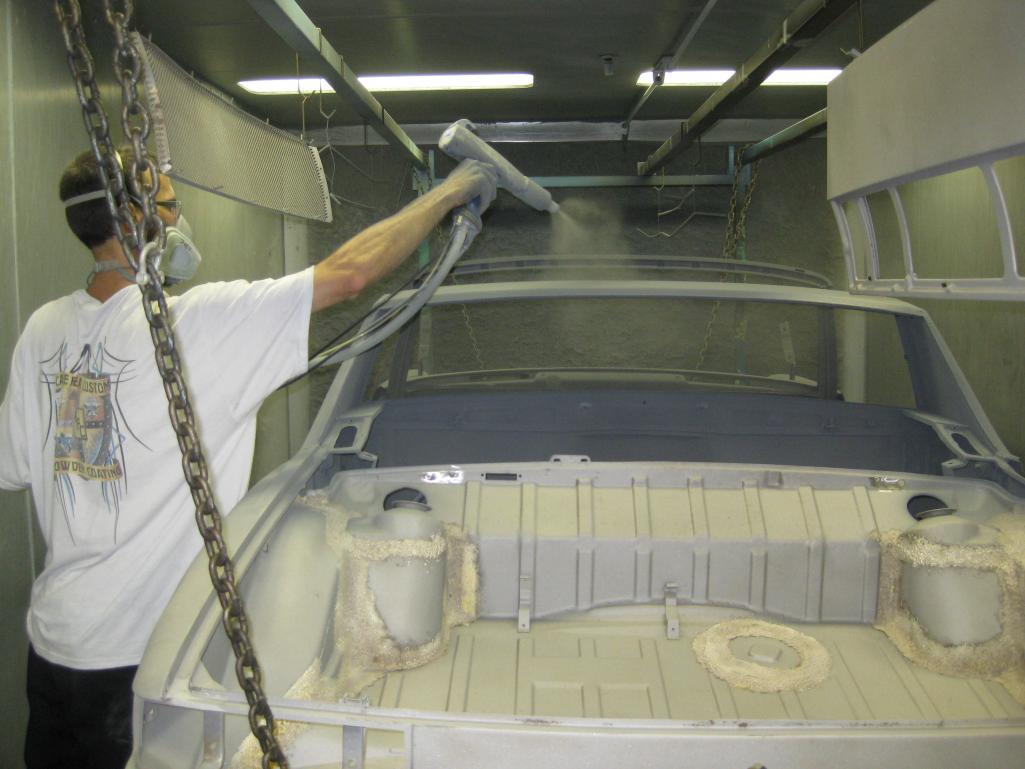
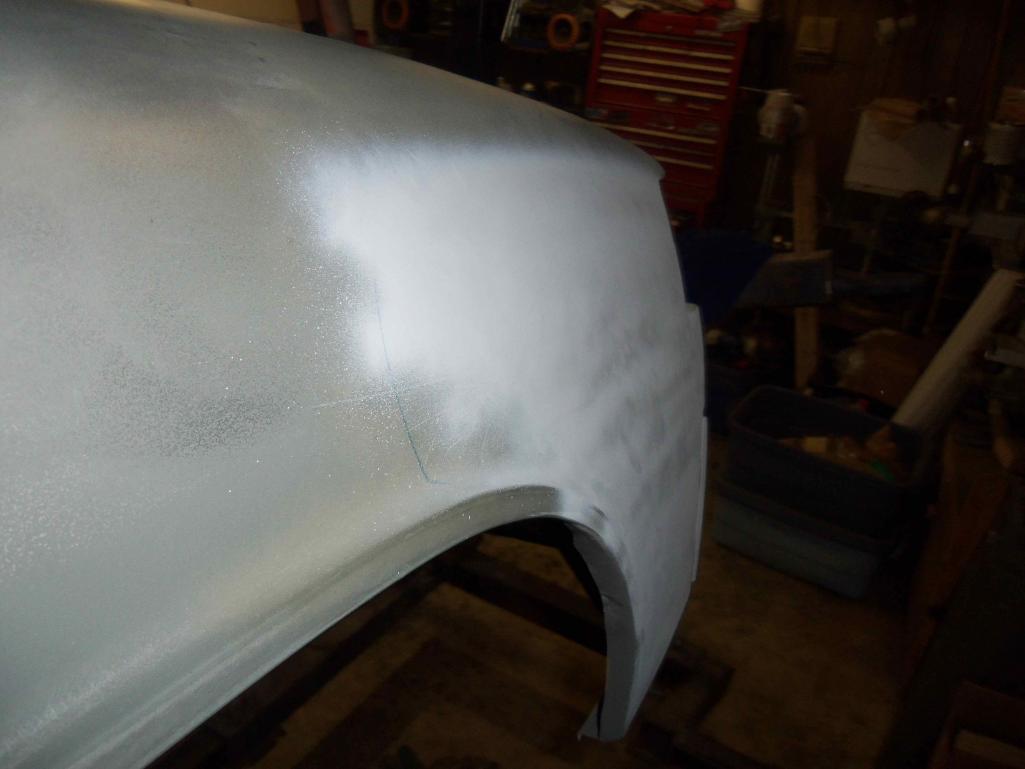
I brought the car (still on the first blasters rotisserie!) to the second guy. Last week he blasted the entire car again for me with aluminum oxide and then powder coated the car. Enclosed are the pics. Can not express how my somewhat OCD self is excited. Now I can work on little bits at a time without having to worry about rusting somewhere else and paint remnants here and there (that was driving me crazy, I couldn't see the forest through the trees!). I can grind the coating back down to do welding etc and just have to prime back small parts instead of an entire car!
Attached thumbnail(s)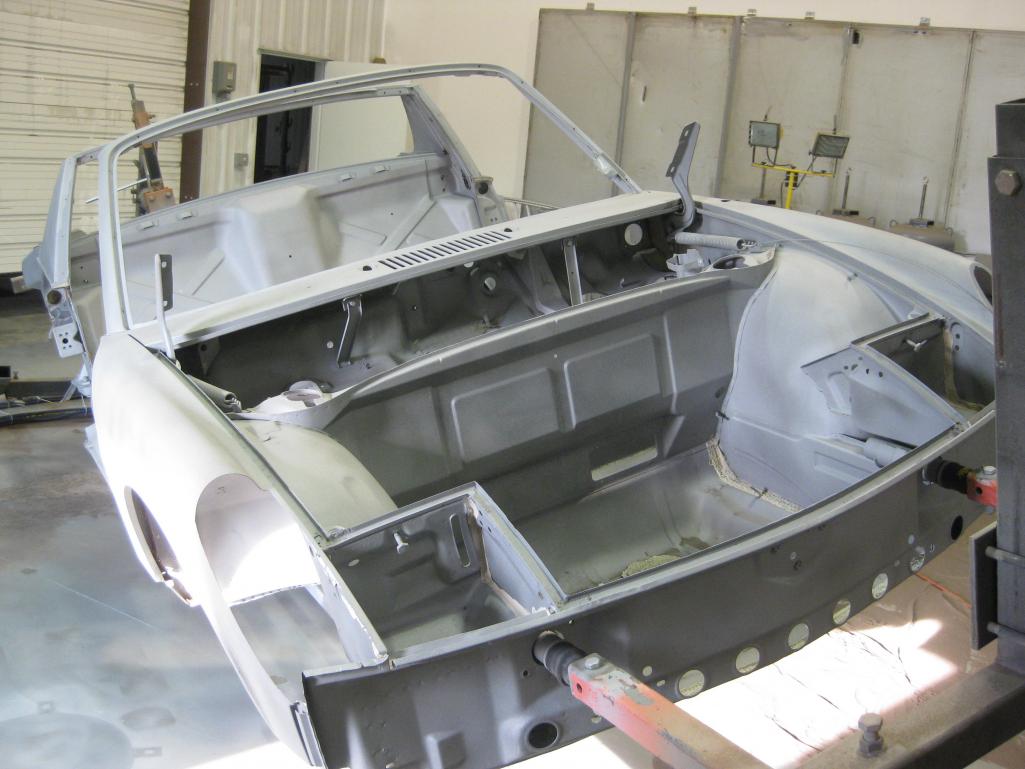
Posted by: CrashDown Oct 3 2011, 08:56 PM
good luck man, that powdercoat is gonna be a bitch to sand all the way off....
Posted by: jaxdream Oct 4 2011, 09:40 AM
First completely powdercoated 914 ????  Exterme rustproofing!!!
I like it !!!
Jack
Posted by: Ductech Oct 4 2011, 01:28 PM
Have any of you guys ever scraped powdercoat out of threads of bolt holes!!! That was the one thing I hated when a customer would bring in a powder coated swing arm with bolt holes chock full of powdercoat. And not to be a shit but I worry more about the areas that you can't easily powdercoat. like the intersections of multiple panels coming together to be spot welded that you see all of the place. and the longs internally. Did you cut a bit of the longs somewhere and seal the inside?
Posted by: 993inNC Oct 4 2011, 06:29 PM
Have any of you guys ever scraped powdercoat out of threads of bolt holes!!! That was the one thing I hated when a customer would bring in a powder coated swing arm with bolt holes chock full of powdercoat. And not to be a shit but I worry more about the areas that you can't easily powdercoat. like the intersections of multiple panels coming together to be spot welded that you see all of the place. and the longs internally. Did you cut a bit of the longs somewhere and seal the inside?
So far, I think I can say with a reasonable degree of certainty, that these guys did an outstanding job. I have only found one easily seen spot where they missed with both the media blast and coating (a suspension point), but it was a clean rust free area still covered with a hint of paint so I'm not concerned. They took the time to cover bolts and holes, the vin tag and the vin stamped into the fender, etc...
The longs I can't comment on other than to say that there is a little coating that can be seen inside and plan to run an Ospho wash down them before all is done which will carbonize any rust in there.
Someone commented about how difficult it will be to sand off. First, I have no intentions of sanding off the coating other than for welding and body work. I did sand some off today with a pneumatic drill sanding disk (forget the grit) and it came off like a champ, not easily mind you (it was on there good), but I got to bare metal with no issues.
The coating made it into those multi point locations you mentioned.....its everywhere!
Secondly, show me a primer job that covers as good as a good powder coating, and as uniformly thick....
I'm pleased and for $1000 to blast and coat, can't go wrong IMO

I'd powder coat the car's final color if I knew there would be no body filler, but I doubt that will be the case.
Posted by: trojanhorsepower Oct 4 2011, 07:06 PM
Woo Hooo
Progress!
I can't believe $1000! That seems pretty good to me. I wish I could bring them mine. I am trying to get my shop built so I can't spare the $$.
Can you paint over the powder coating?
Posted by: 993inNC Oct 4 2011, 07:13 PM
Woo Hooo
Progress!
I can't believe $1000! That seems pretty good to me. I wish I could bring them mine. I am trying to get my shop built so I can't spare the $$.
Can you paint over the powder coating?
Yeah I thought it was a great deal, since the first idiot wanted $1200 just to blast! I ended up having $300 in the first guy and I'll have $1050 in this guy once the two decklids and healight buckets come back, so $1350 in all. Now if I could just find someone to do the body work that cheap and well done, I'd be in business!!
The second guy is a 914 fan, has one in the back of the shop tucked away awaiting resto and two more parts cars, so I think I got a combo good deal.....he's a fan of the cars and hadn't done one before so it was an experience for both of us.
And yes, paint over powder coating. It gets prep'd like any other primer coat from what he tells me.
Posted by: Philip W. Oct 6 2011, 06:23 AM
Woo Hooo
Progress!
I can't believe $1000! That seems pretty good to me. I wish I could bring them mine. I am trying to get my shop built so I can't spare the $$.
Can you paint over the powder coating?
Yeah I thought it was a great deal, since the first idiot wanted $1200 just to blast! I ended up having $300 in the first guy and I'll have $1050 in this guy once the two decklids and healight buckets come back, so $1350 in all. Now if I could just find someone to do the body work that cheap and well done, I'd be in business!!
The second guy is a 914 fan, has one in the back of the shop tucked away awaiting resto and two more parts cars, so I think I got a combo good deal.....he's a fan of the cars and hadn't done one before so it was an experience for both of us.
And yes, paint over powder coating. It gets prep'd like any other primer coat from what he tells me.
that's pretty cool- i could see if you wanted black, to do that in a gloss black.
Where is the shop in N.C. ? i'm down in S.C. , and eventually need to do the same with mine. (except i have some extensive rear long and jack point work to do.)
I have not found an experienced 914 body person here is southern SC., might be willing to transport, SC to NC not too far to do that.
enjoying the thread, please keep updating as work is done.
Phil
Posted by: 993inNC Oct 7 2011, 05:26 PM
Woo Hooo
Progress!
I can't believe $1000! That seems pretty good to me. I wish I could bring them mine. I am trying to get my shop built so I can't spare the $$.
Can you paint over the powder coating?
Yeah I thought it was a great deal, since the first idiot wanted $1200 just to blast! I ended up having $300 in the first guy and I'll have $1050 in this guy once the two decklids and healight buckets come back, so $1350 in all. Now if I could just find someone to do the body work that cheap and well done, I'd be in business!!
The second guy is a 914 fan, has one in the back of the shop tucked away awaiting resto and two more parts cars, so I think I got a combo good deal.....he's a fan of the cars and hadn't done one before so it was an experience for both of us.
And yes, paint over powder coating. It gets prep'd like any other primer coat from what he tells me.
that's pretty cool- i could see if you wanted black, to do that in a gloss black.
Where is the shop in N.C. ? i'm down in S.C. , and eventually need to do the same with mine. (except i have some extensive rear long and jack point work to do.)
I have not found an experienced 914 body person here is southern SC., might be willing to transport, SC to NC not too far to do that.
enjoying the thread, please keep updating as work is done.
Phil
The guy's shop is in Leland NC. On the web at capefearpowdercoating.com (no affiliation, just seems like a good guy).
There's a Porsche resto guy up this way, but his reputation is spotty. Knows his stuff but has been a rob Peter to pay Paul kinda guy in the past and I'm just not sure of him. I have so much going on right now and the car is in such good shape, I'd love to find someone to hand it off to to restore properly for me (at least body and paint). We'll see. So far I've owned the car two years and am now just getting to a workable state and now I have no time for it like I did when I bought it!
I'll keep the thread alive, don't worry. I'm inspired and educated by those here and some of the amazing work I've seen, will do my part to carry the torch
Posted by: mepstein Oct 7 2011, 07:17 PM
I'm curious about the powder coating. Your guy powder coated over the seam sealer, covered up the paper and foil tags and then placed it in the oven? Then he's doing bodywork and paint over the powder coat? Never heard it done like that.
Posted by: sixnotfour Oct 7 2011, 09:15 PM
Once you smell powder burning while welding, you will rethink.
My local powder coater does everything , but the exterior panels . They simply blow it off before baking. Tags and such are masked and then unmasked before baking.
Posted by: 993inNC Oct 8 2011, 01:16 PM
I'm curious about the powder coating. Your guy powder coated over the seam sealer, covered up the paper and foil tags and then placed it in the oven? Then he's doing bodywork and paint over the powder coat? Never heard it done like that.
He told me the coating would not stick to the sealer and it seems that it hasn't (so far as I can tell). All tags have been removed and will be replaced as well as the ds jamb tag (with color code - new rivets await it's reattachment). The rear production date sticker has been removed (a new one has already been purchased and date stamp mimicked- can't tell original from new). The only tag left was the windshield vin (masked for blasting) and the ps fender vin stamp (masked before coating).
The oven temp was low enough not to melt the heat tubes in the longs but hot enough to properly bake the coating.
Its a really nice job! Will need a sand and prep for paint but not to much. As for bodywork, coating is removed before the work. The coating was for the sake of saving the remainder 75% of the car while the rest is worked on. Flash rust from the first guy's blasting was covering the car and I wanted that to stop while I worked on the problem spots. Should be no issues with painting over it. If I can keep filler out of the body, I'll coat the car the factory paint color too!
Posted by: dlee6204 Nov 26 2011, 09:31 PM
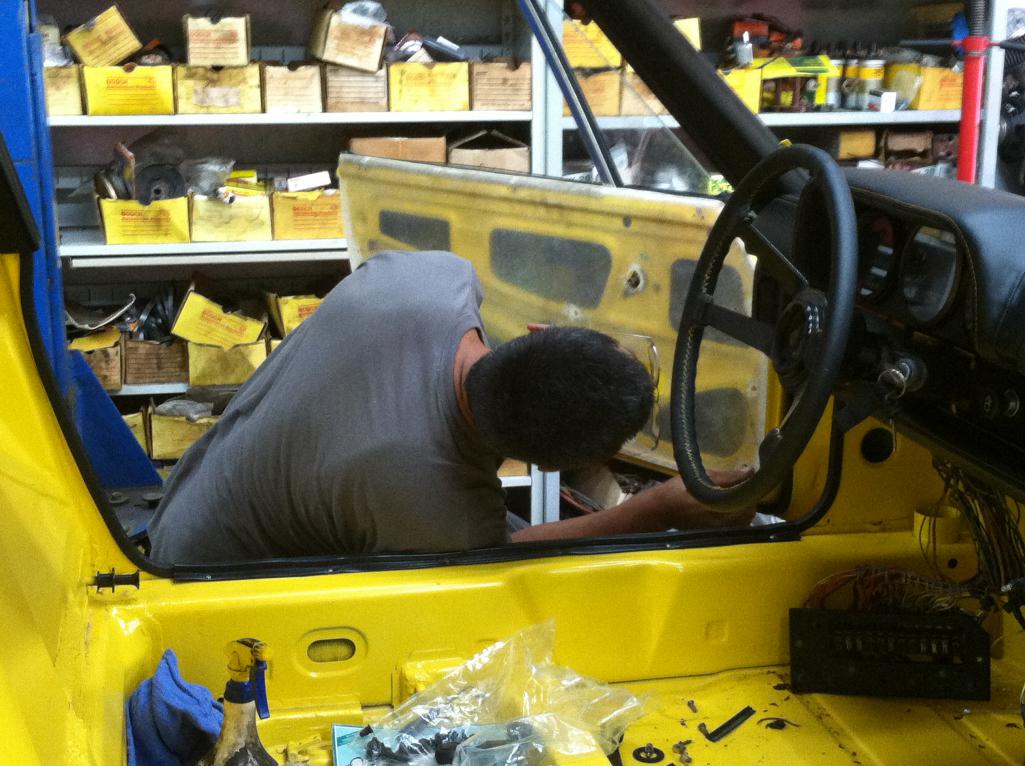
So I'm going to revive this thread for everybody...
Chris, 993inNC, brought me the car to do all the repairs and get it ready for paint! He dropped it off yesterday and I started to tear into it a little bit today.
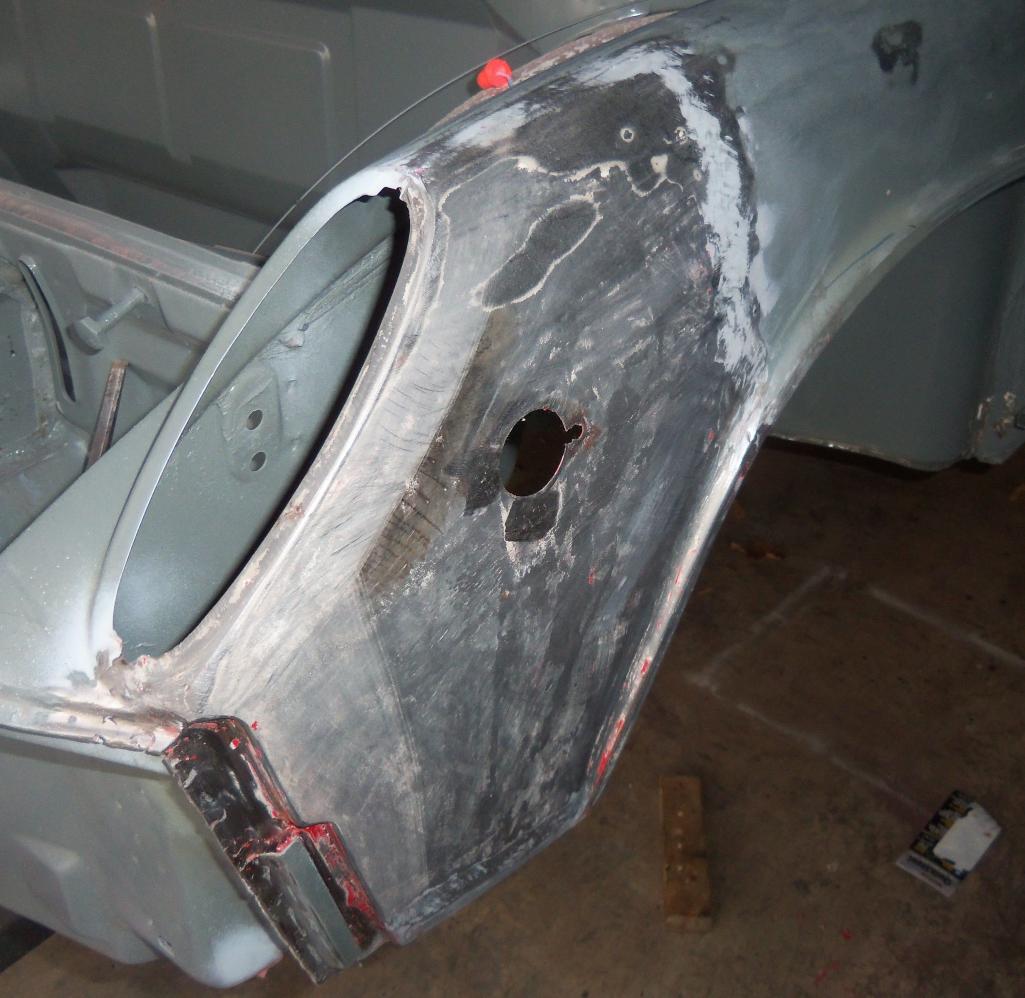
The powder coating on the car is pretty awesome. It even makes swiss cheese look good and swiss cheese it has! Overall it is a pretty solid car with a lot of little rust in lots of places.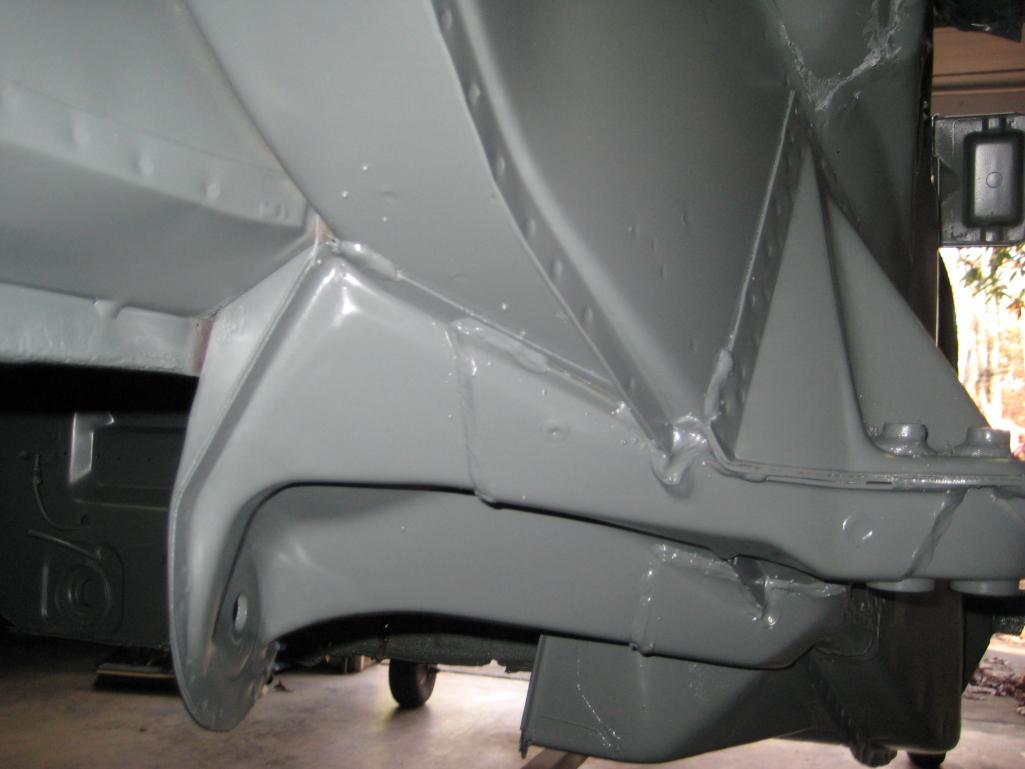
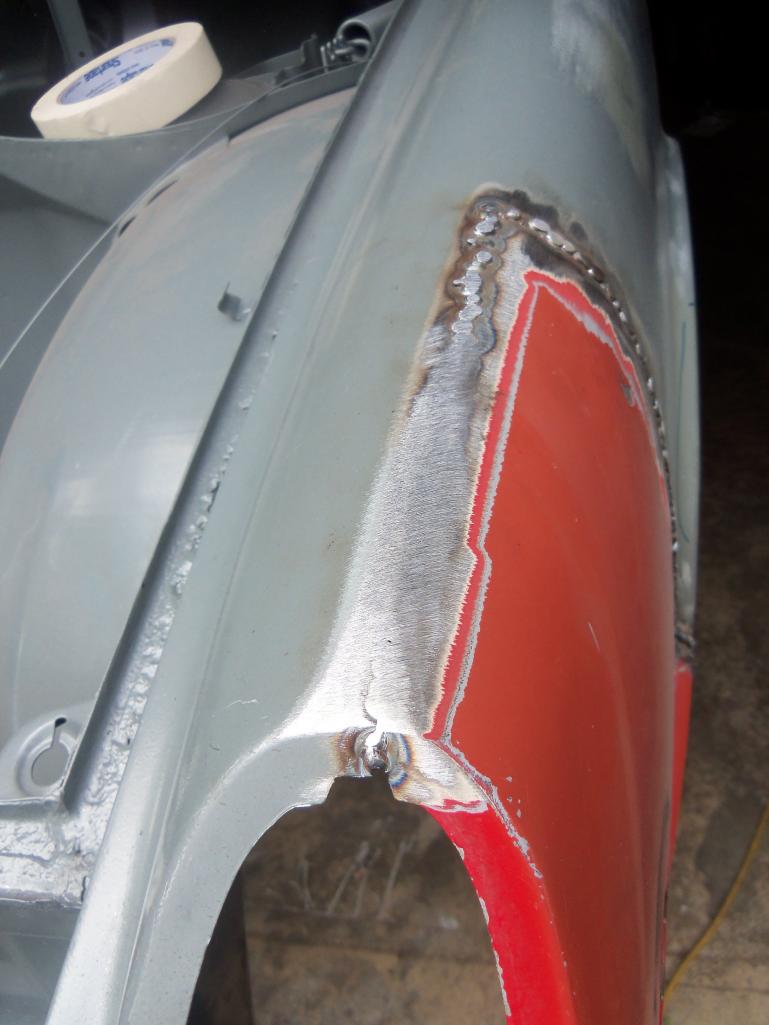
Posted by: dlee6204 Nov 26 2011, 09:43 PM
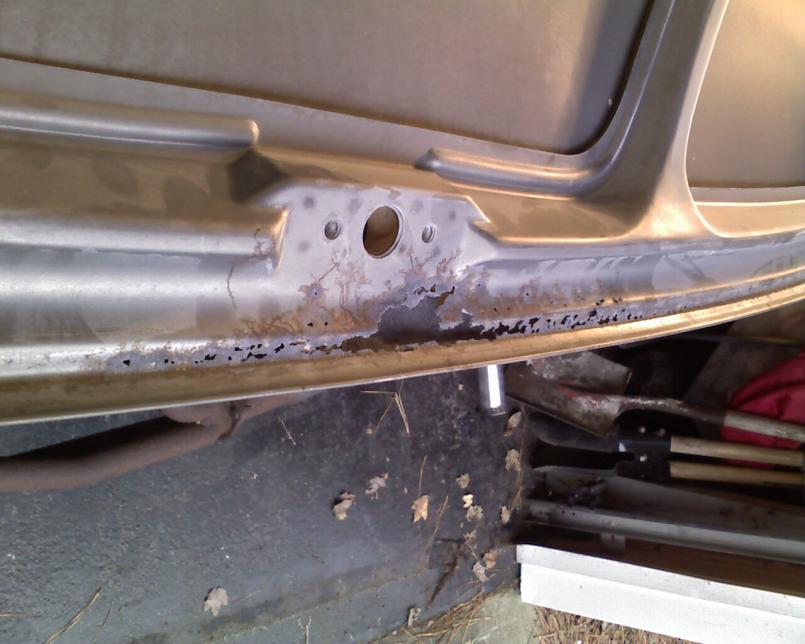
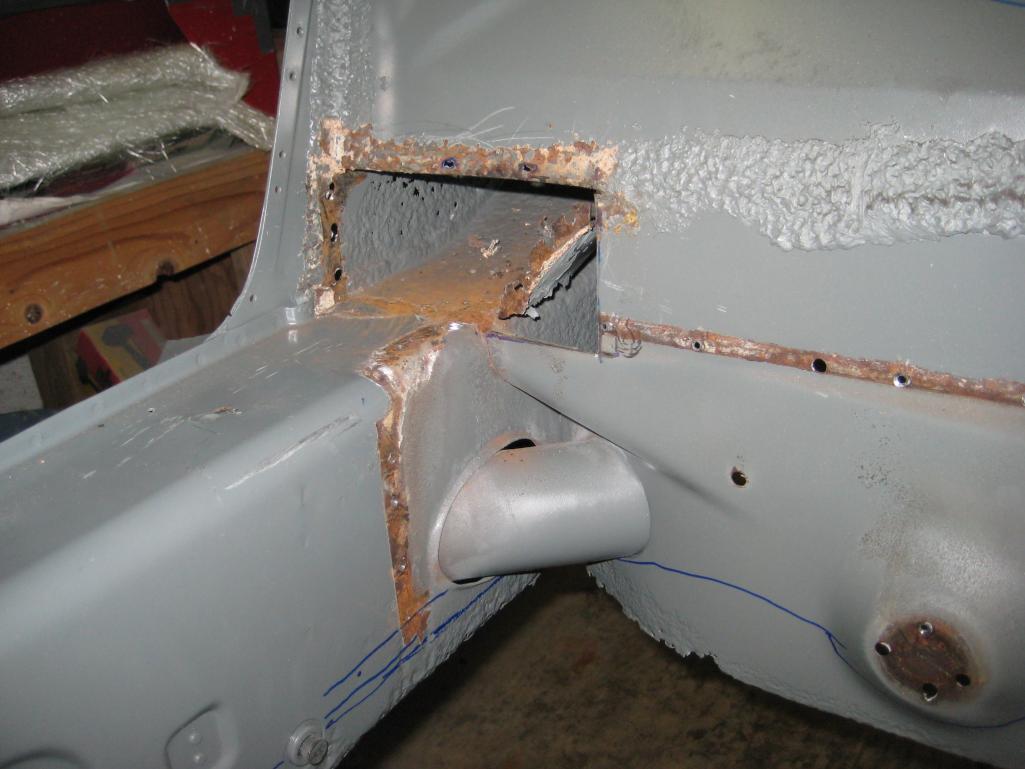
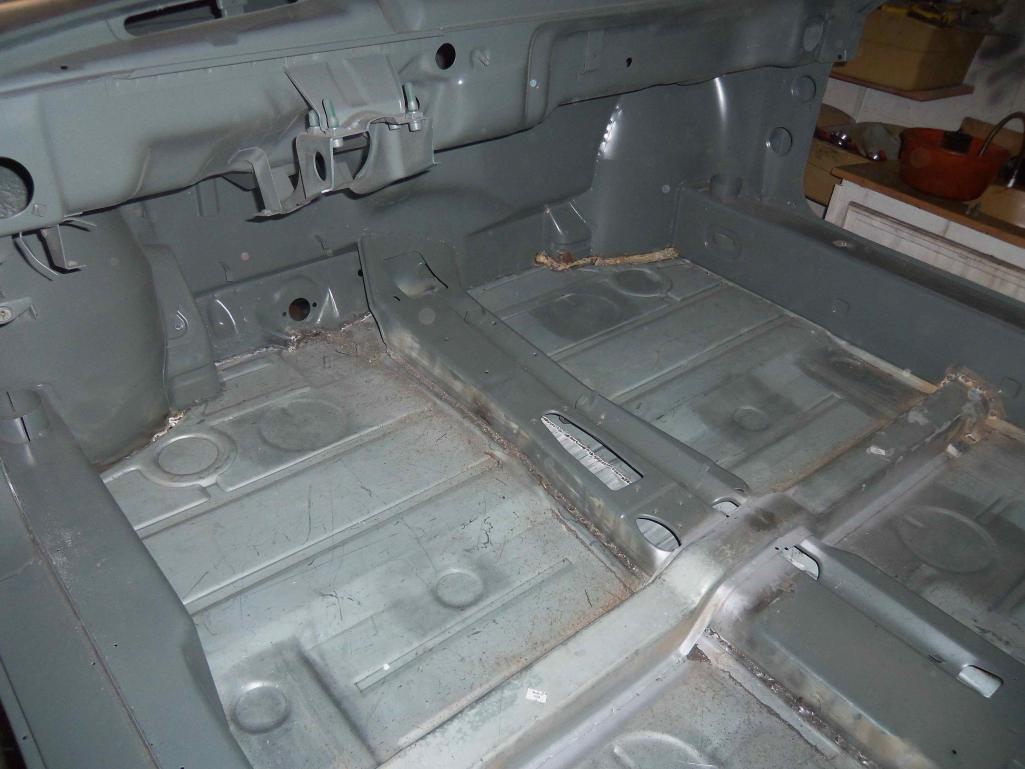
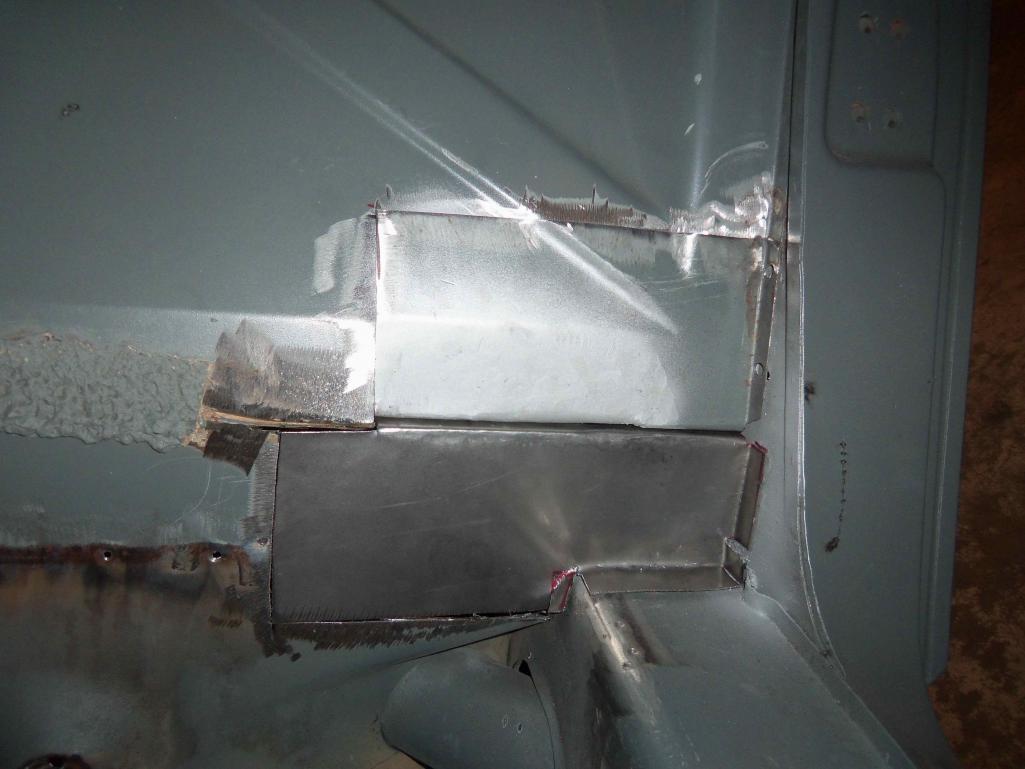
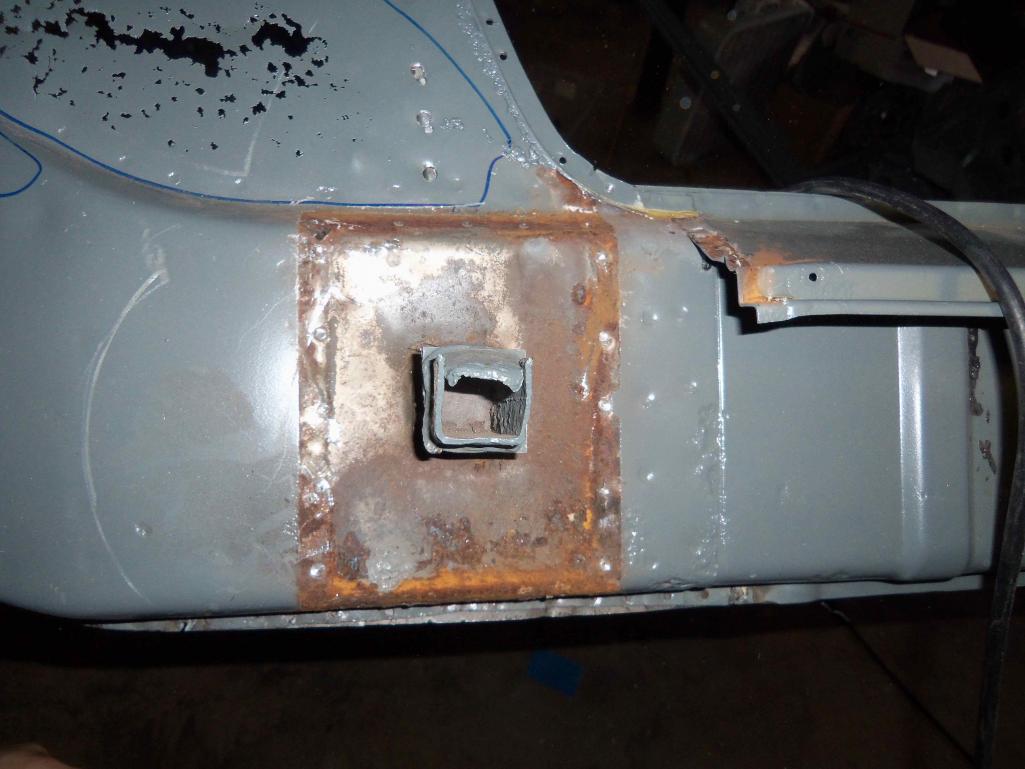
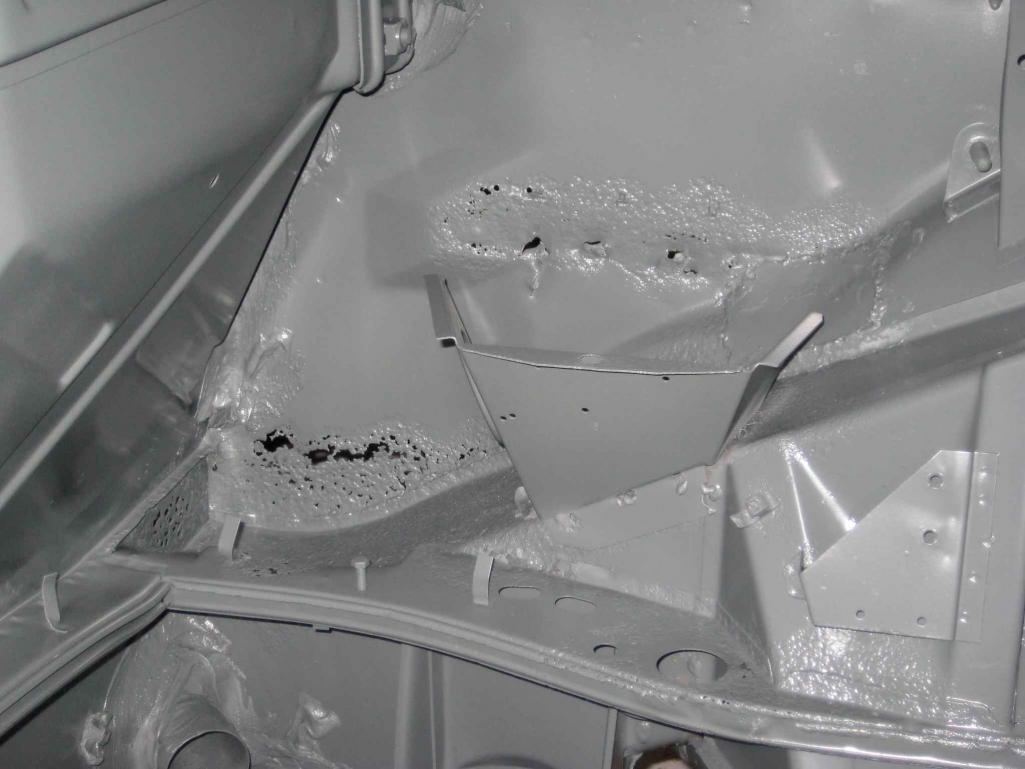
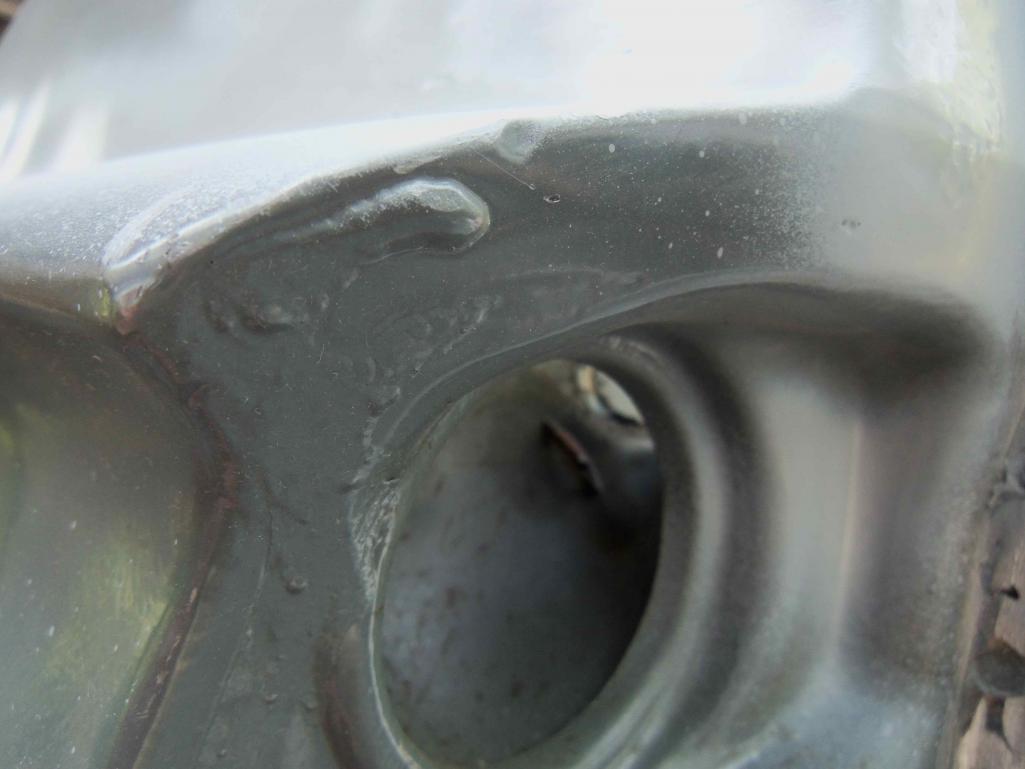
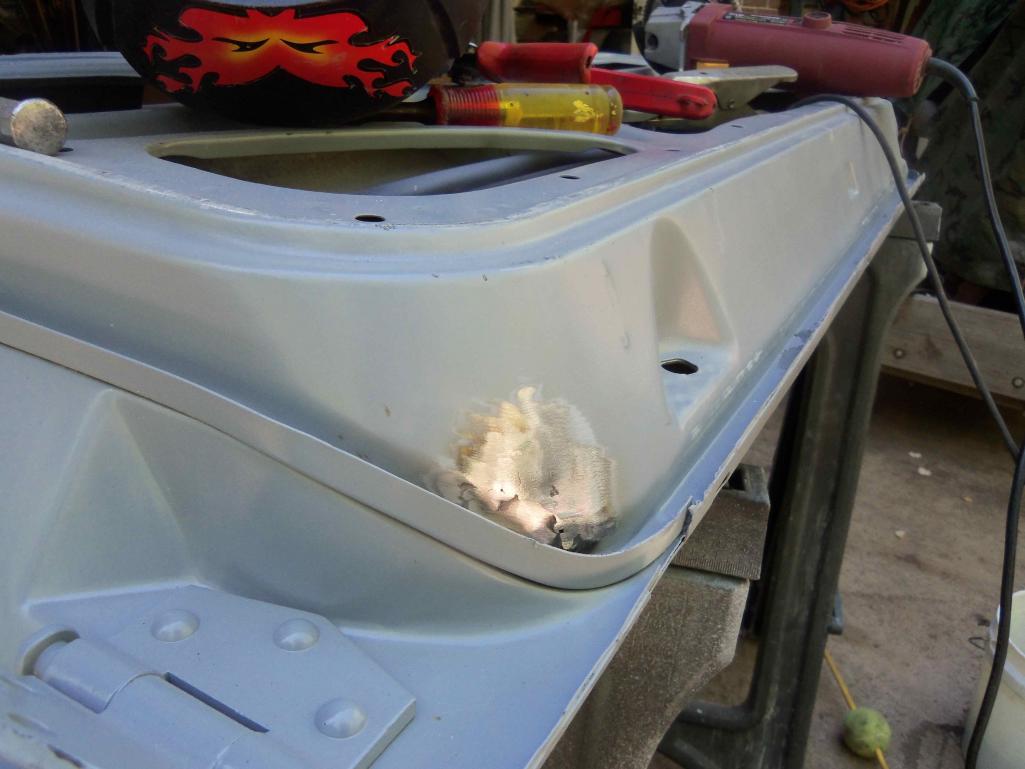
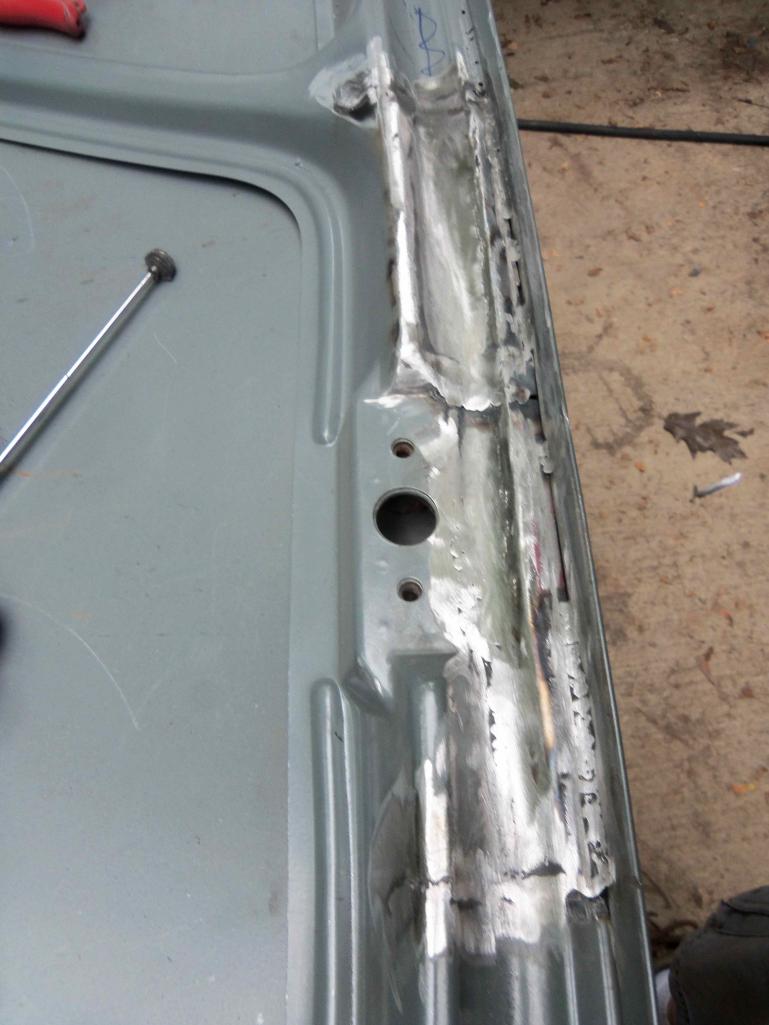
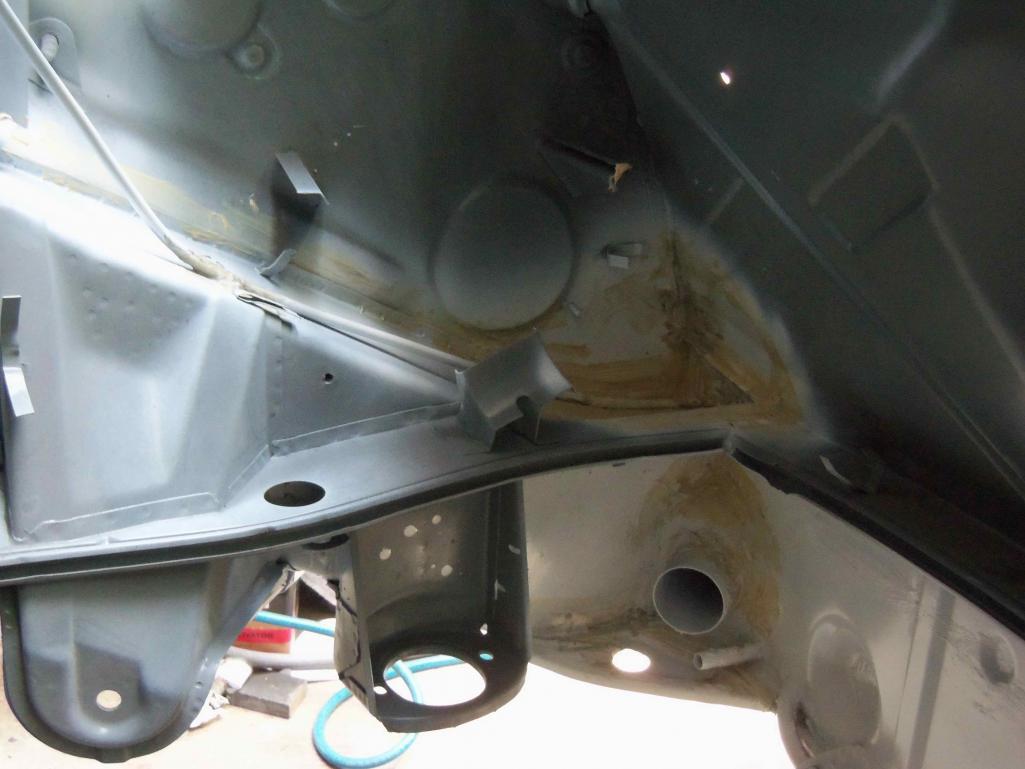
The longs have a little bit of rust which is going to be my first concern. I started off by removing what was left of the inner lower firewall.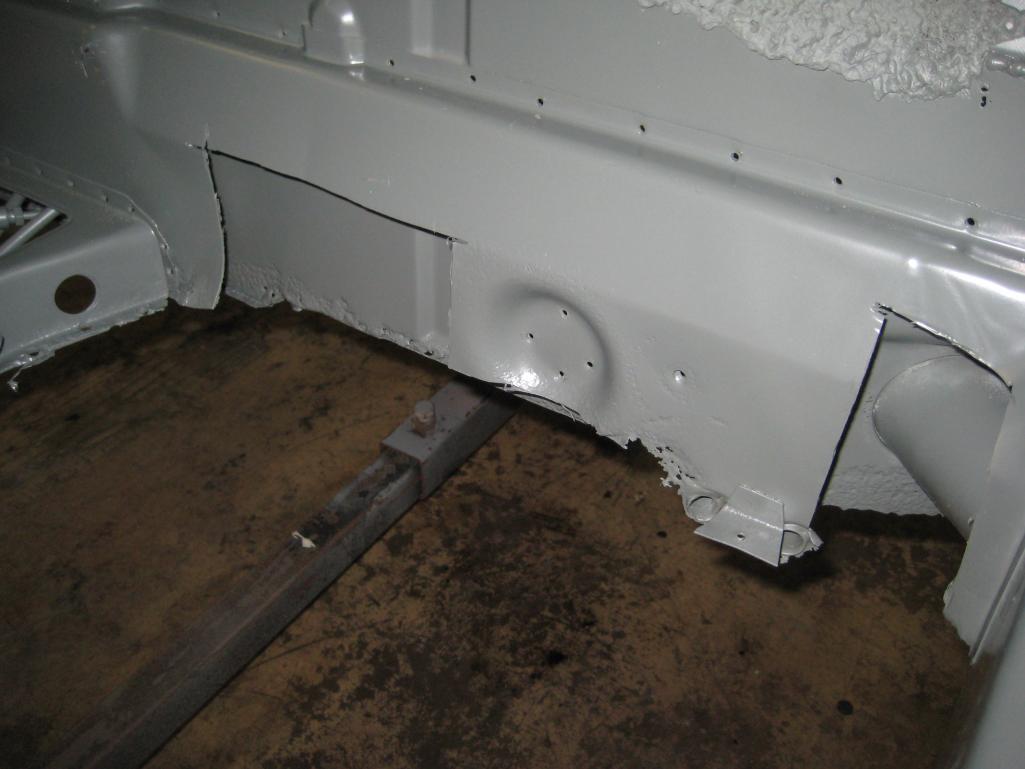
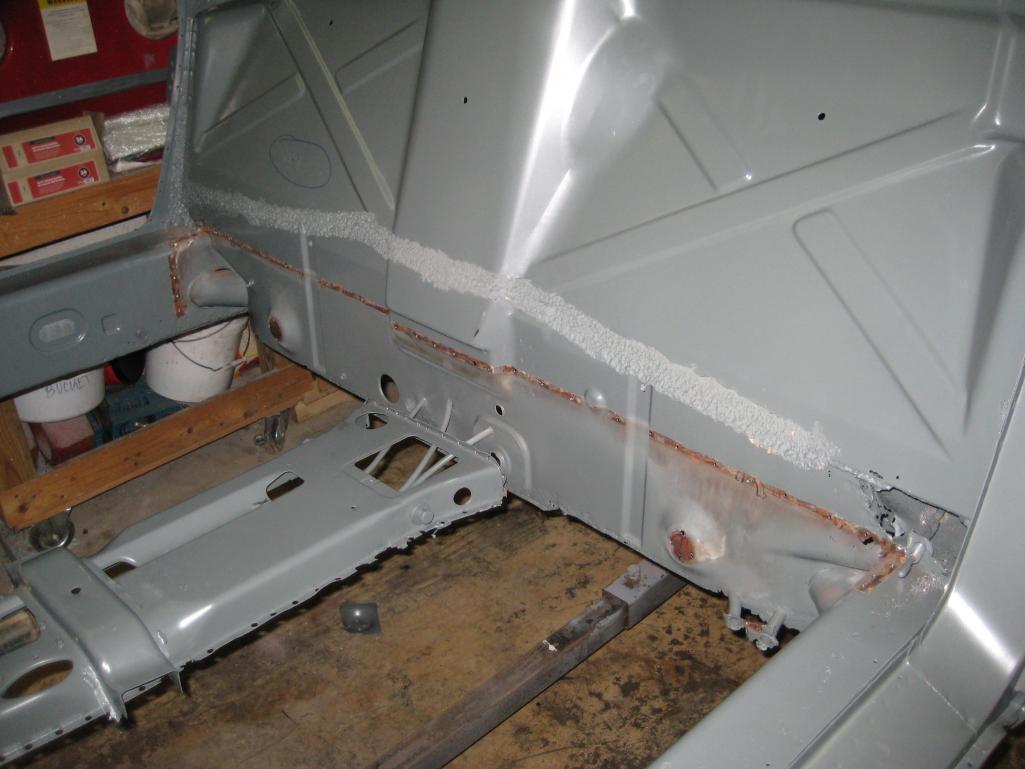
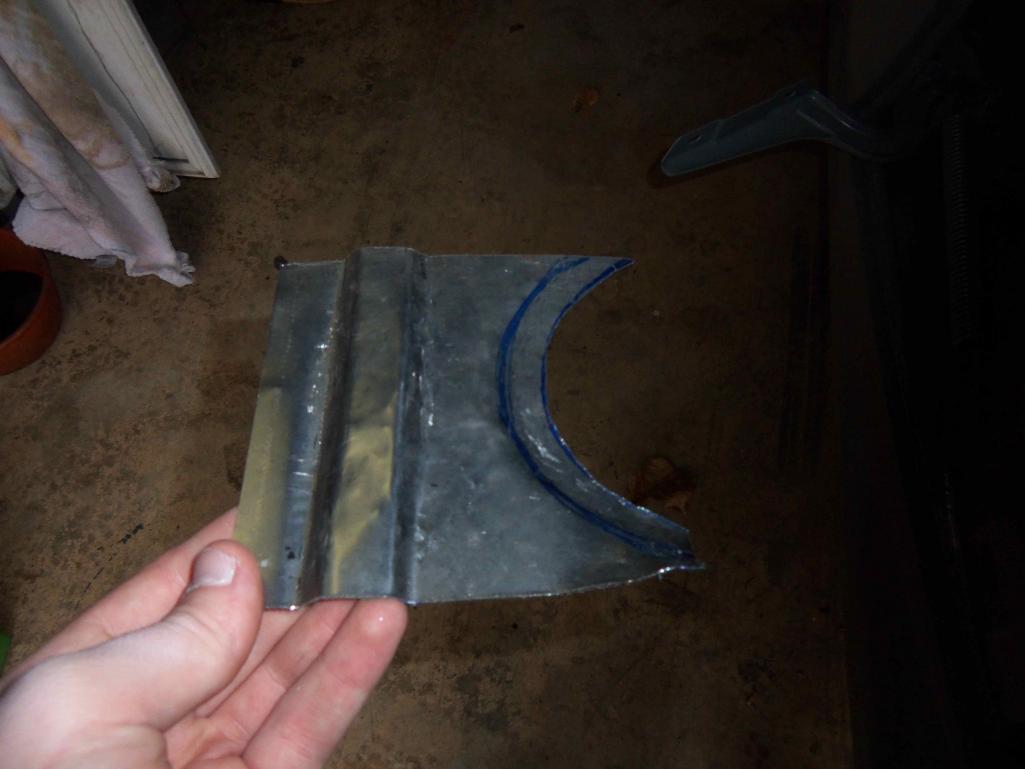
Posted by: dlee6204 Nov 26 2011, 09:52 PM
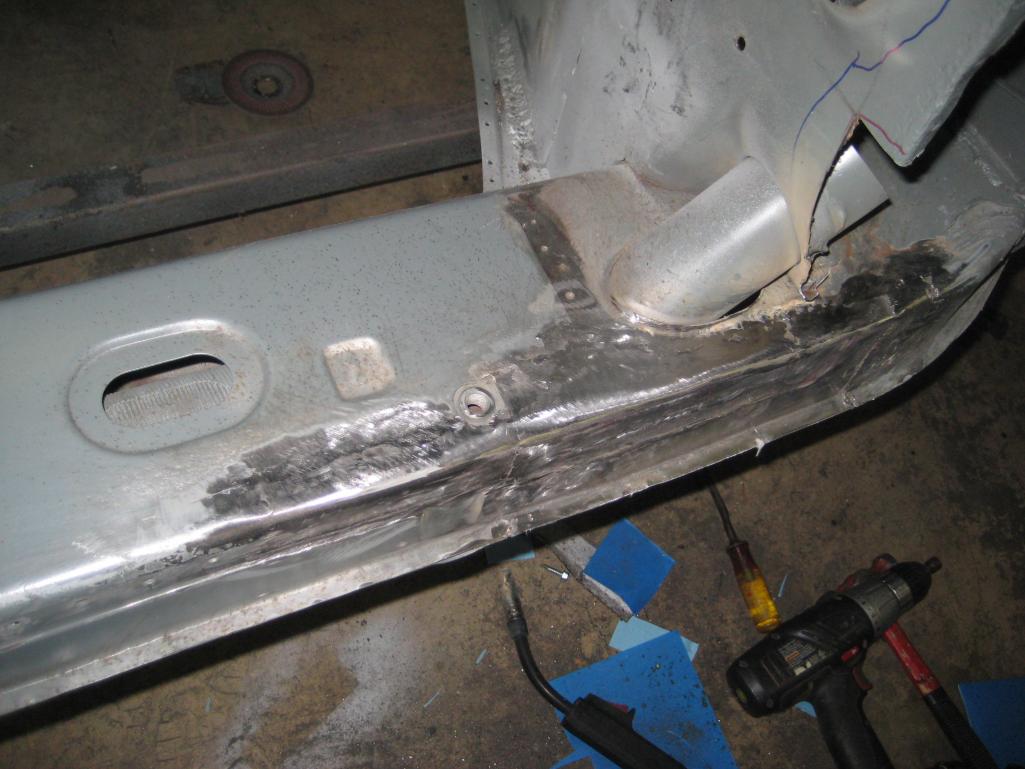
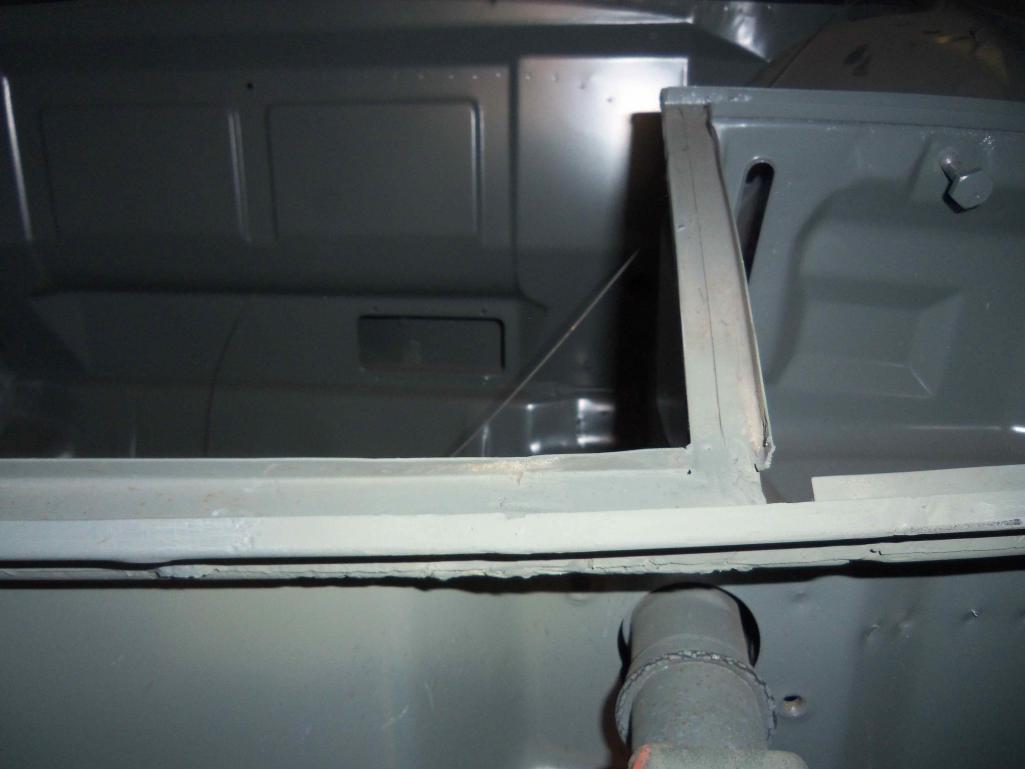
I need to pick up some sheet metal for the long work so I started to work on the firewall in the meantime. 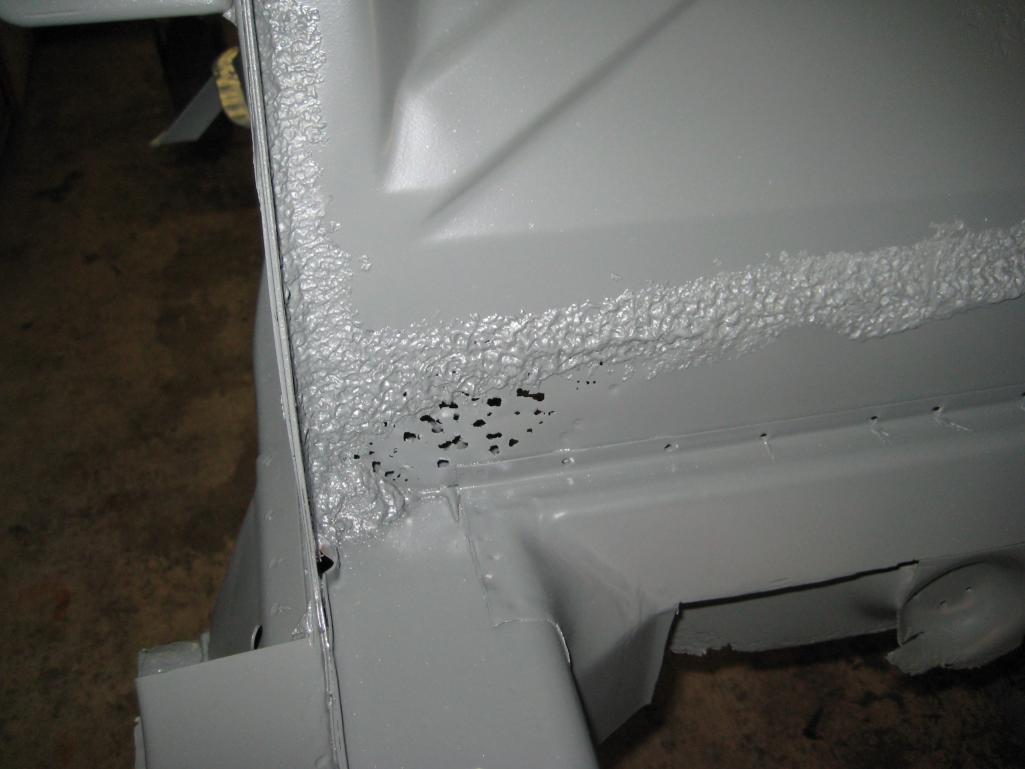
Posted by: dlee6204 Nov 26 2011, 10:06 PM
And I made up a panel to replace the area. That's all I got done today. Tomorrow I'll do some clean up, weld this piece in, and get some door braces in before I start the longs. 
Posted by: rick 918-S Nov 26 2011, 10:21 PM
And I made up a panel to replace the area. That's all I got done today. Tomorrow I'll do some clean up, weld this piece in, and get some door braces in before I start the longs.
Please get some mild steel 18/20 gauge sheet metal for your patches. that thin galvinized metel (likely 28 ga.) will not weld very good and will posion you.
Posted by: Cairo94507 Nov 26 2011, 10:28 PM
I know nothing about metal but when I looked at that patch I thought "that looks like galvanized metal and it looks really thin". Then I read the next post and went "whew". Someone that has to know more than me saw it too. I am looking forward to seeing this restoration done. I know it will be done right.
Posted by: dlee6204 Nov 27 2011, 06:58 AM
The metal I am using is 20 ga. Not the thin stuff. I do need to pick up some regular steel though.
Posted by: saigon71 Nov 27 2011, 08:02 AM
And I made up a panel to replace the area. That's all I got done today. Tomorrow I'll do some clean up, weld this piece in, and get some door braces in before I start the longs.
Please get some mild steel 22/24 gauge sheet metal for your patches. that thin galvinized metel (likely 28 ga.) will not weld very good and will posion you.
somewhatI was told a while back on this forum to use 18GA for structural repairs and 20GA for non-structural repairs on these cars.
Keep it going and save that teener!
Posted by: dlee6204 Dec 12 2011, 03:29 PM
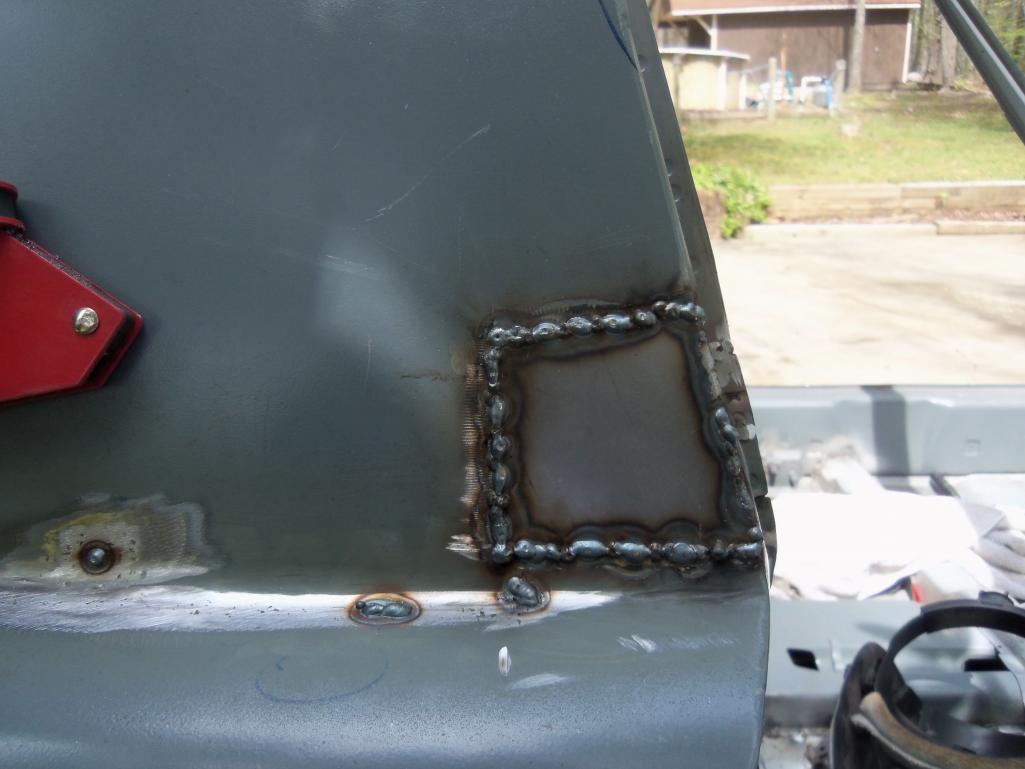
Update: Here is the corner of the firewall welded in. I lightly coated it with a primer to keep it from rusting. 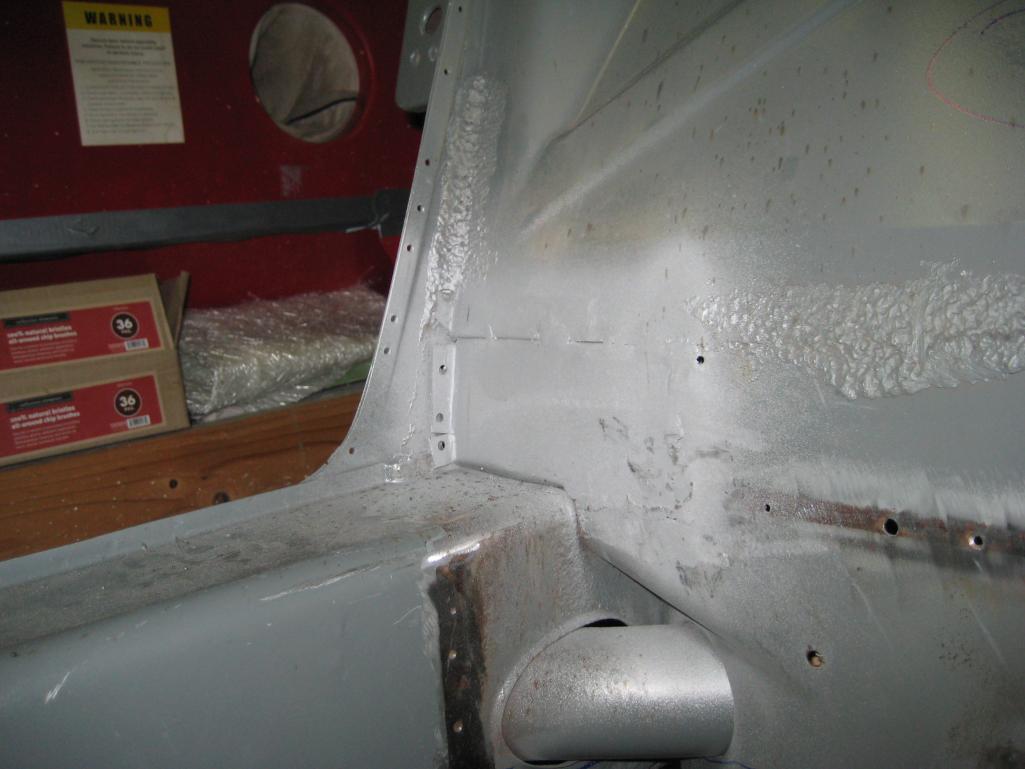
Posted by: dlee6204 Dec 12 2011, 03:37 PM
I next moved onto the pass. long. 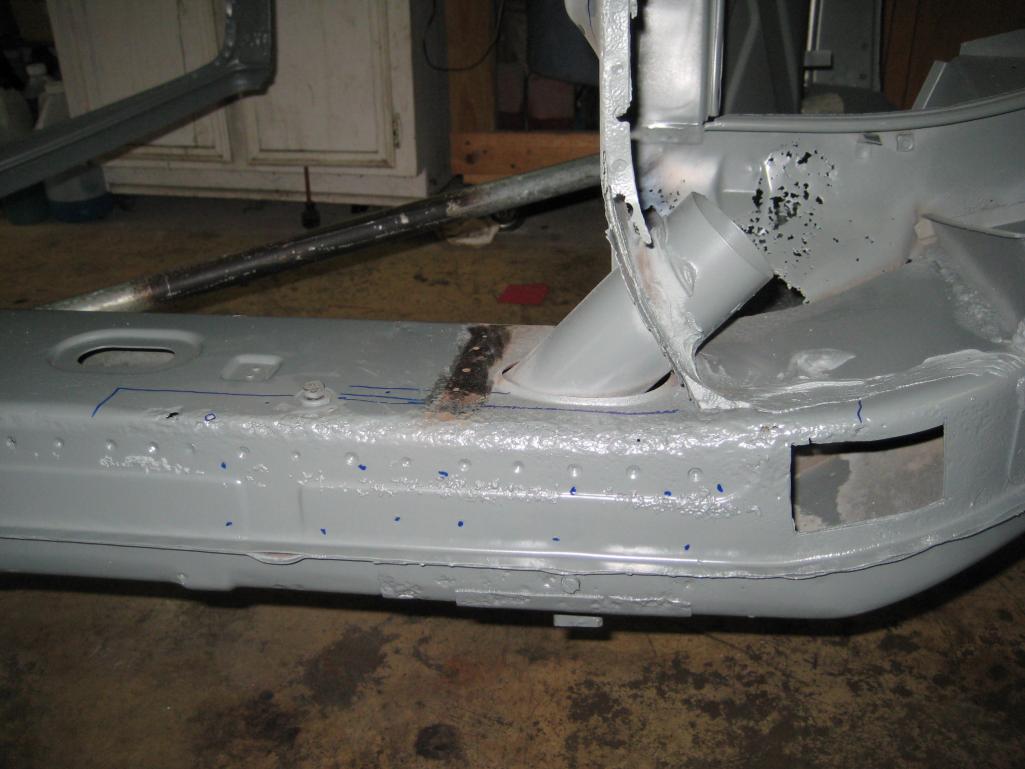
Top layer of bad stuff cut out...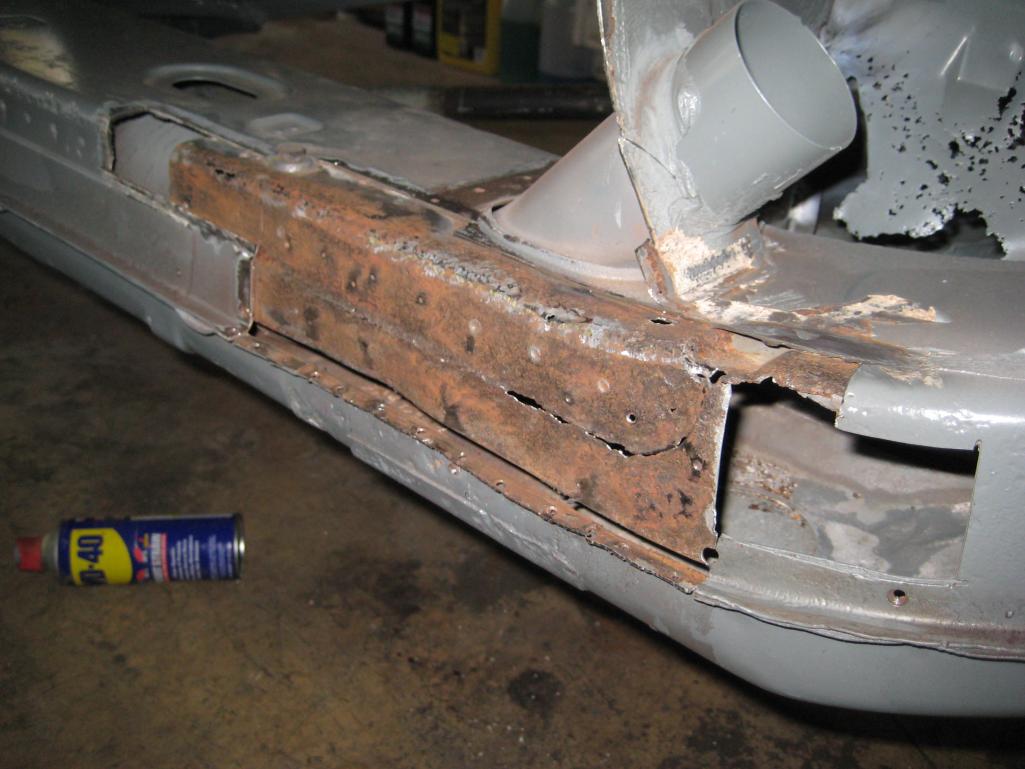
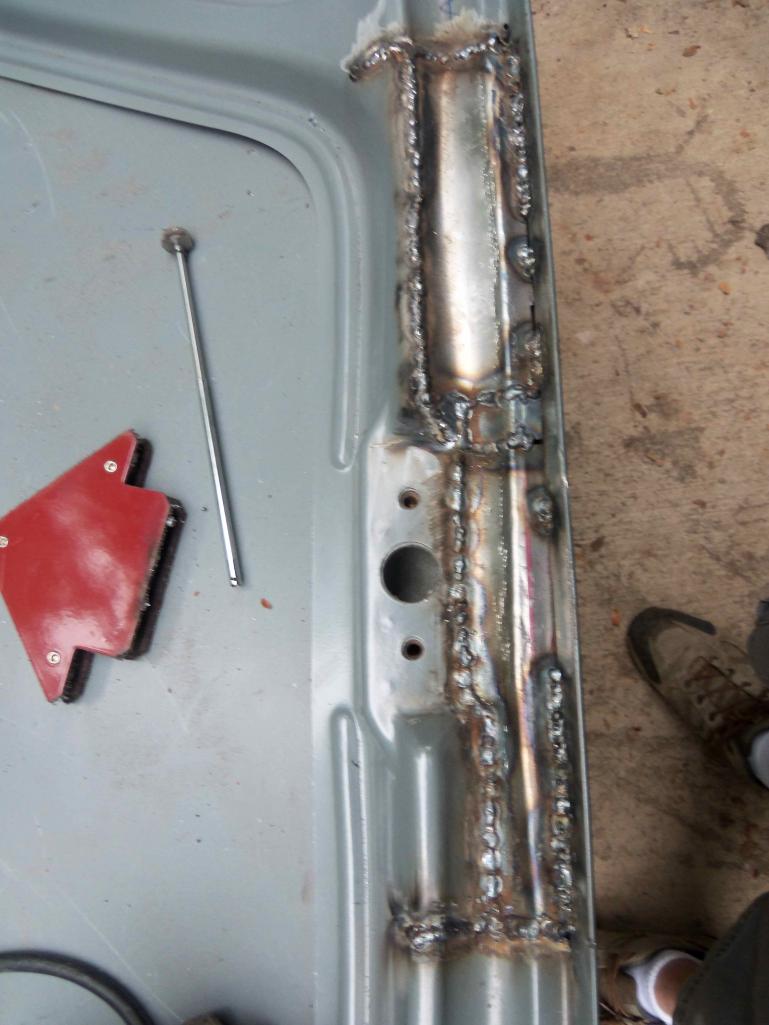
I didn't get a picture but I also cut out some of the substructure and welded in a new piece before welding in a new formed piece so everything is doubled-up for strength 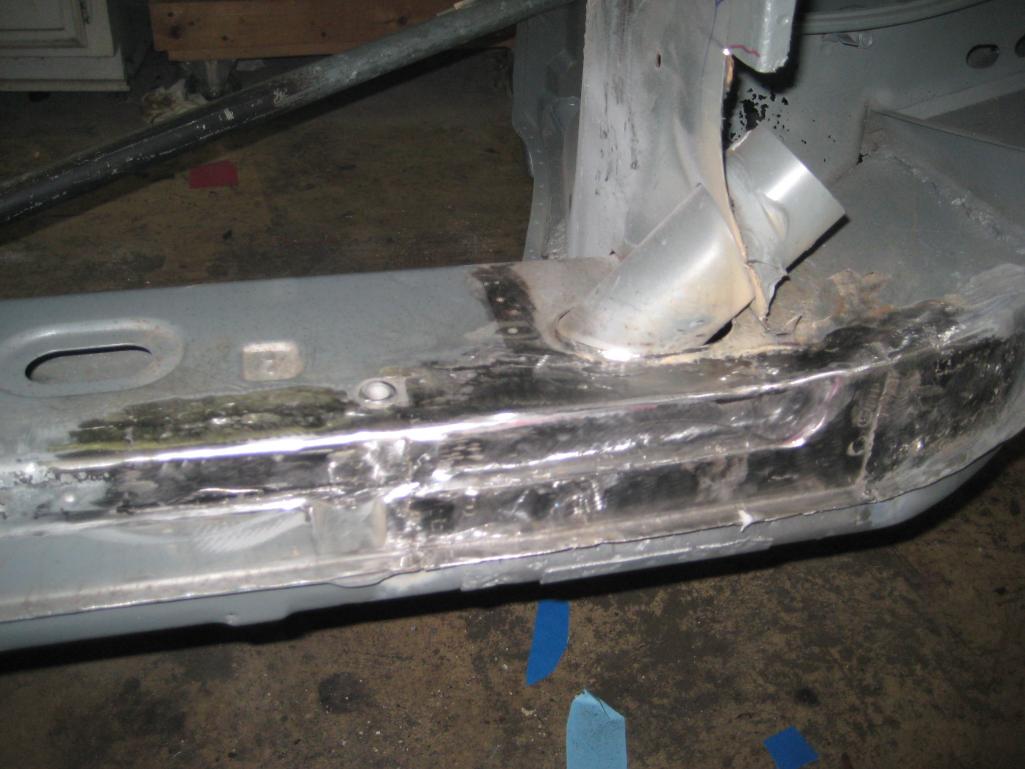
Posted by: dlee6204 Dec 12 2011, 03:43 PM
Next came the driver's side long which was not as bad...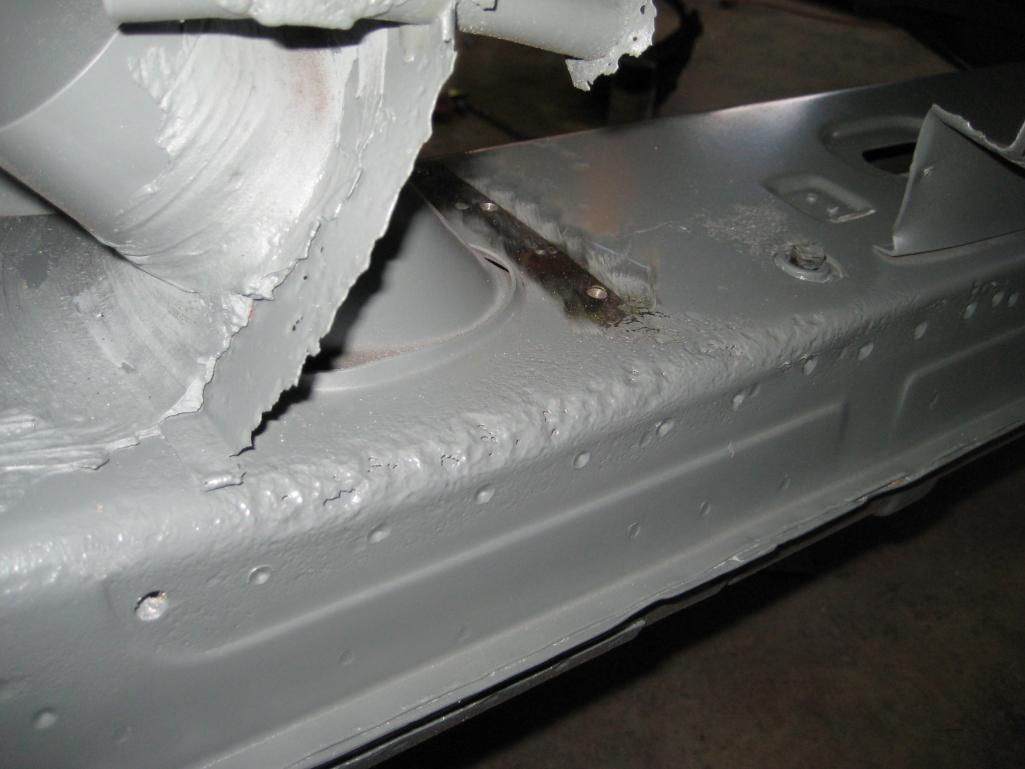
Bad stuff out...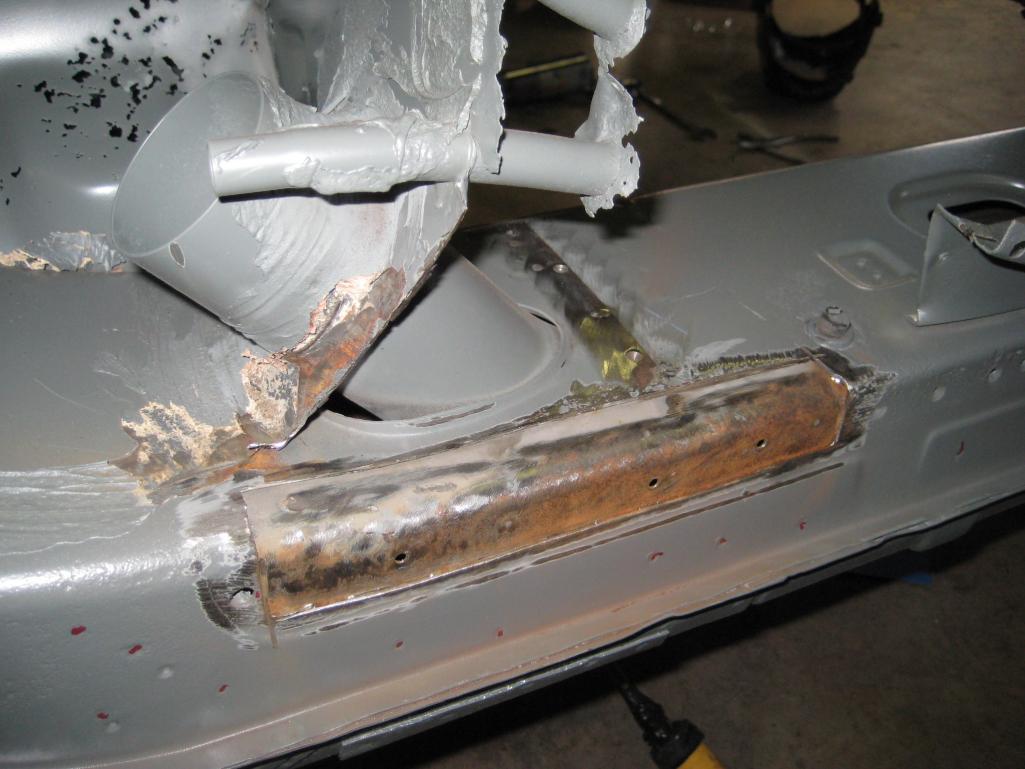
New stuff going in...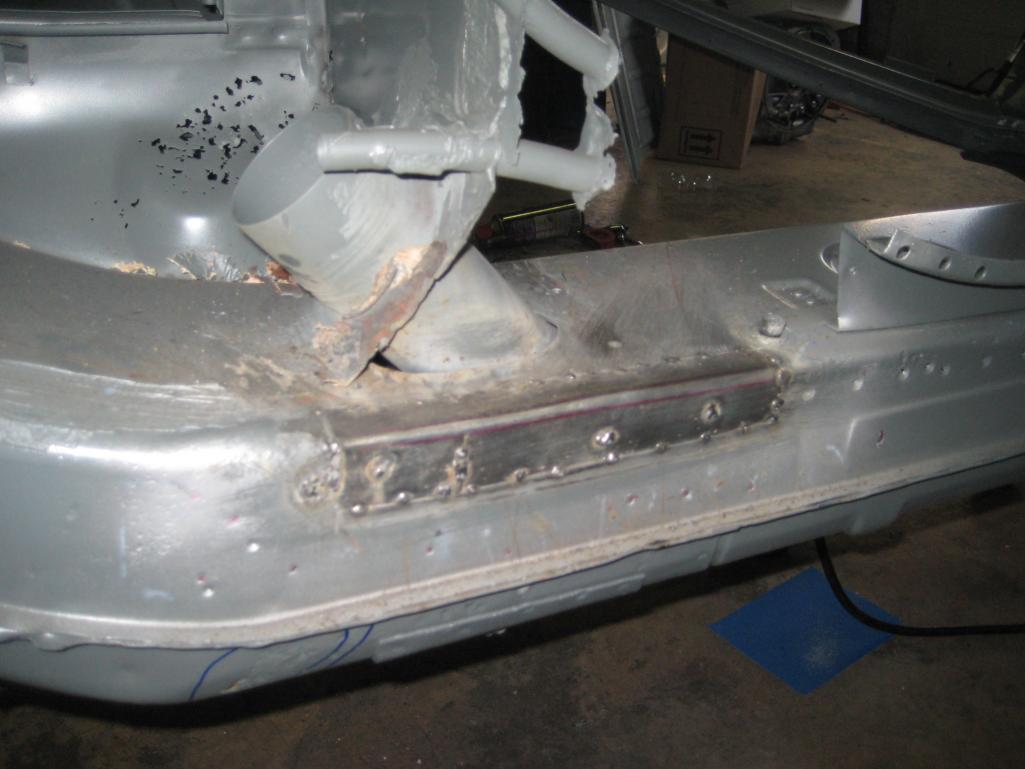
Finished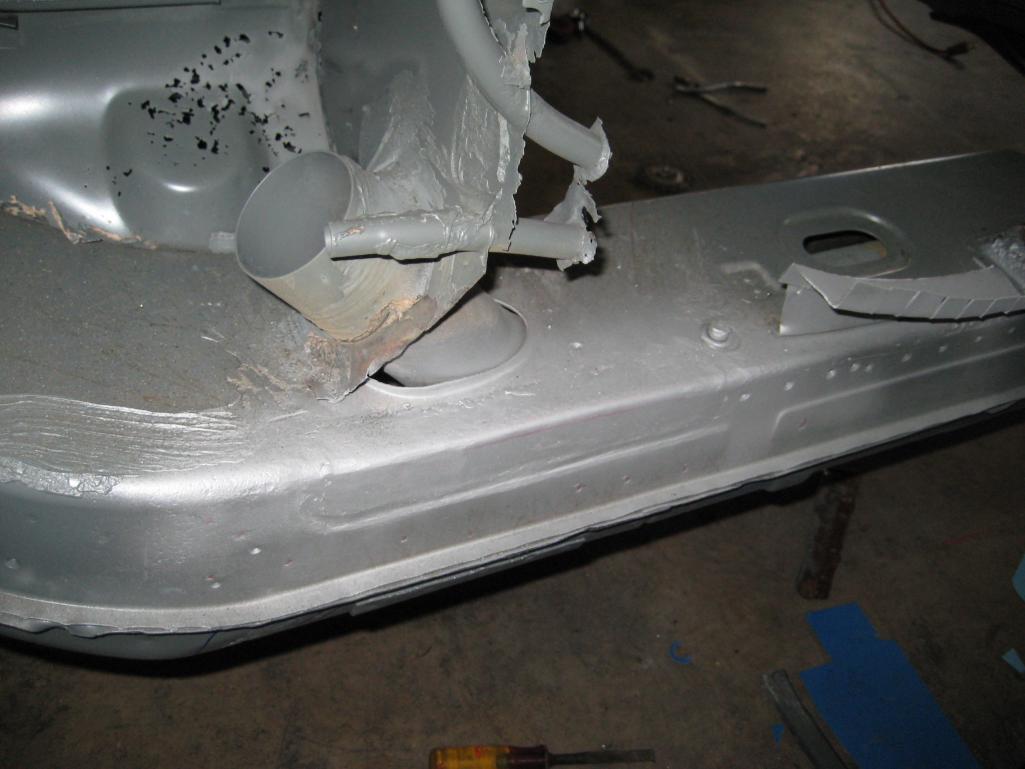
Posted by: dlee6204 Dec 12 2011, 03:51 PM
And for the record, I used 18 gauge steel. I'll be using 20 gauge for non-structural repairs such as the firewall.
Posted by: 993inNC Dec 12 2011, 04:59 PM
Wow Doug, looks really good! Can't wait to see more!
Posted by: dlee6204 Dec 16 2011, 10:05 PM
Got a little more work done today. I finished replacing the entire clutch tube and got the new floorpans fitted and tacked into place.  Couldn't find the camera so I snapped two quick shots with the cell phone...
Posted by: SUNAB914 Dec 17 2011, 08:09 AM
You rock Doug.
Posted by: mepstein Dec 17 2011, 08:16 AM
You replaced a lot of metal. Do the doors still fit correctly?
Posted by: dlee6204 Jan 3 2012, 11:08 AM
Yup. The gaps and body measurements checked out beforehand and I braced the door openings before I started the long work. Everything still measures correctly.
Posted by: dlee6204 Jan 3 2012, 11:16 AM
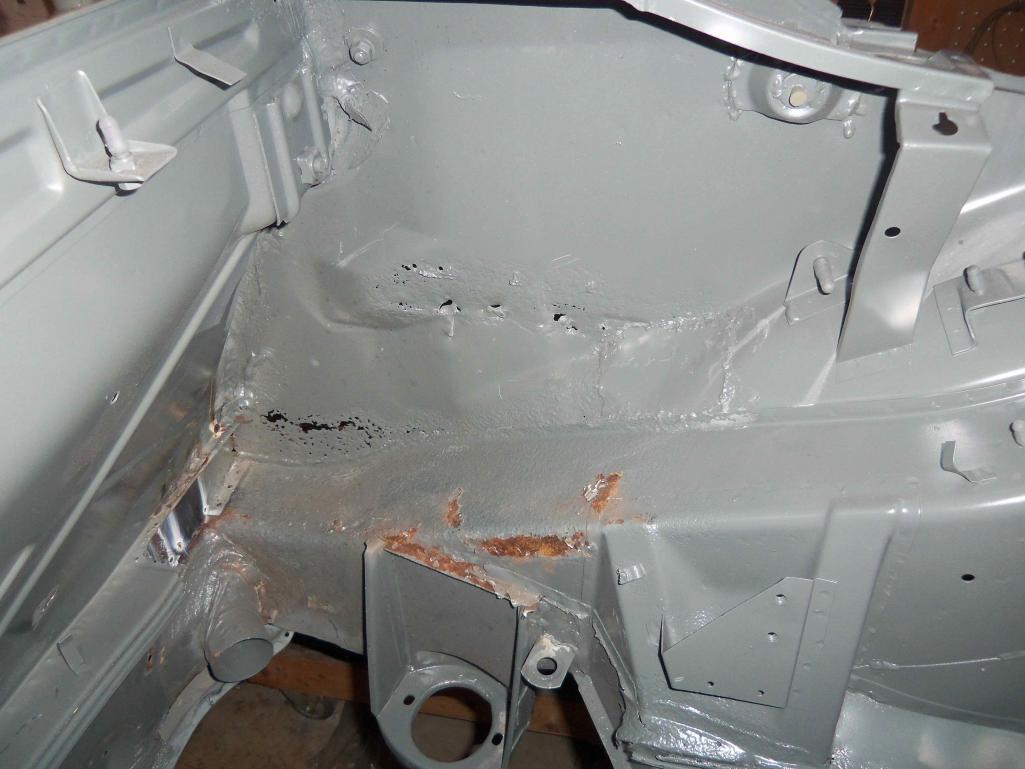
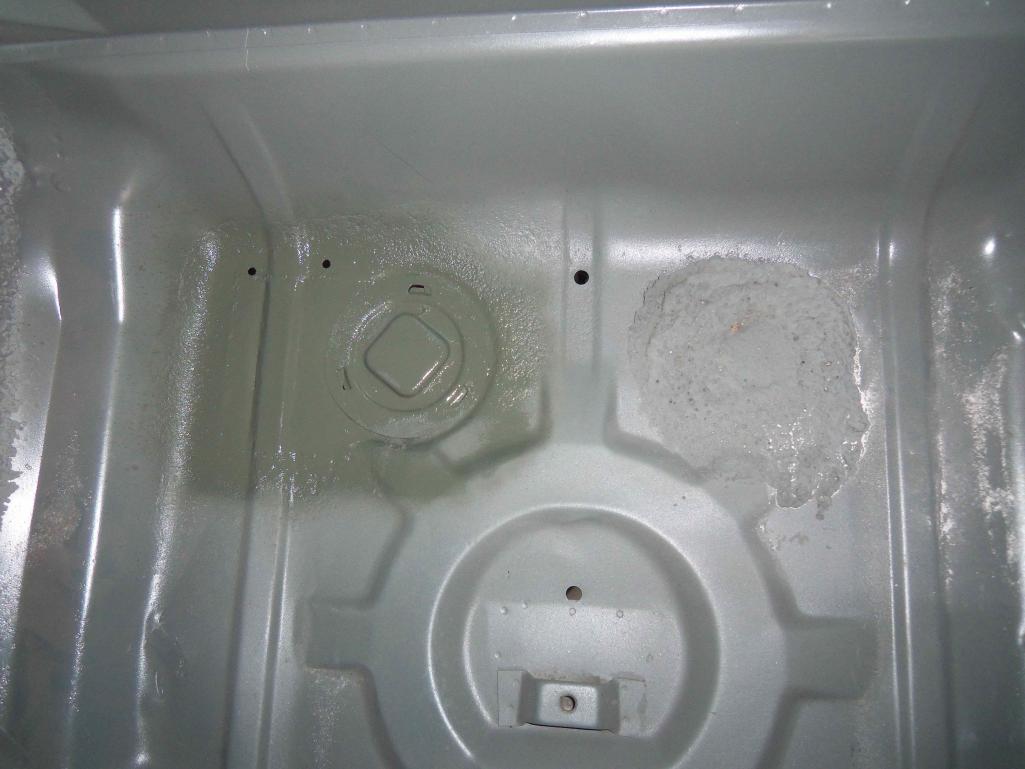
The floor is done, the center tunnel welded in, cross-members in, inner lower firewall in, driver's side engine shelf and firewall are repaired, and a new engine lid latch tube is in. 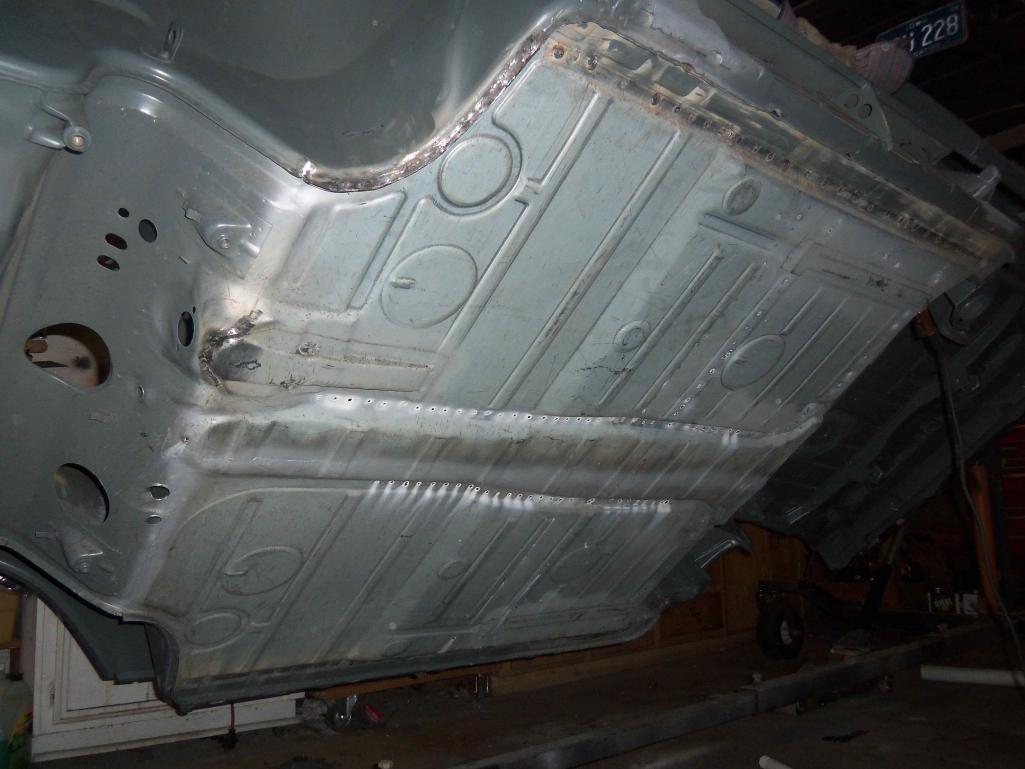
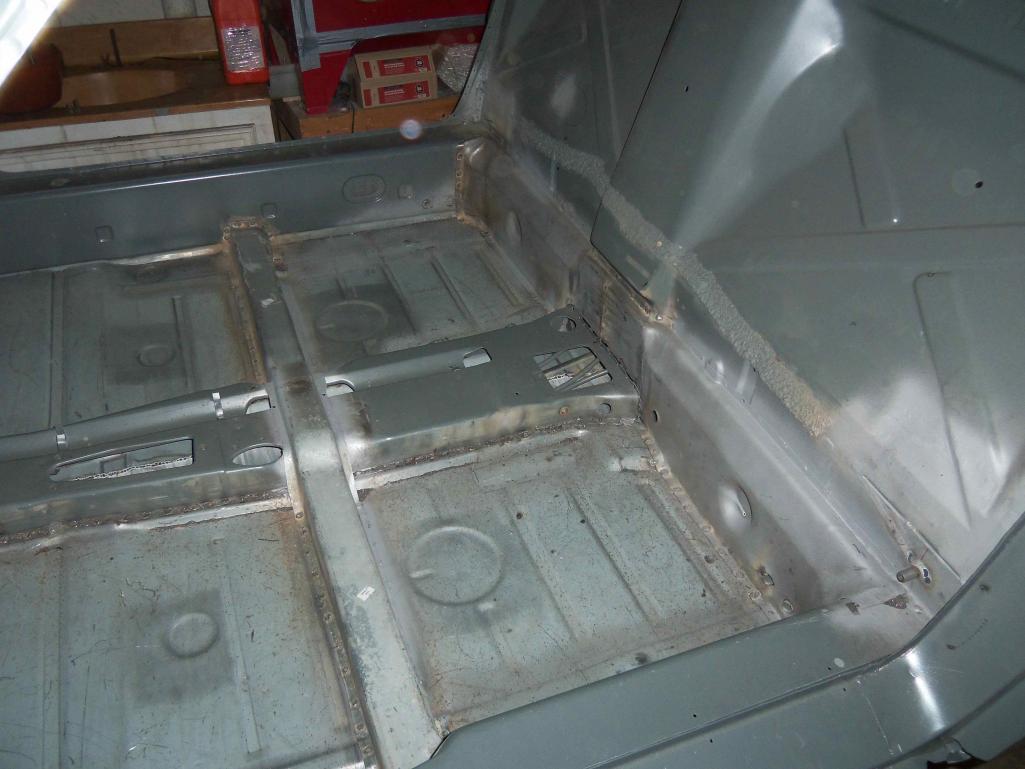
Posted by: dlee6204 Jan 3 2012, 11:27 AM
Before...

After... I need to remember to replace the ground stud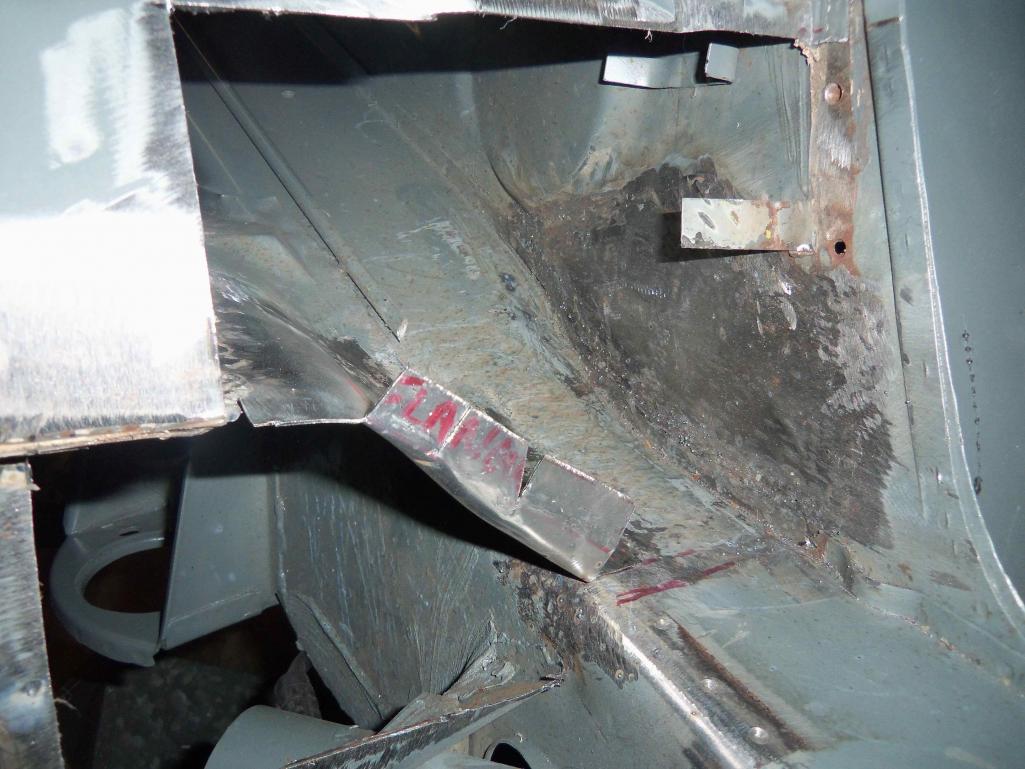

New tube installed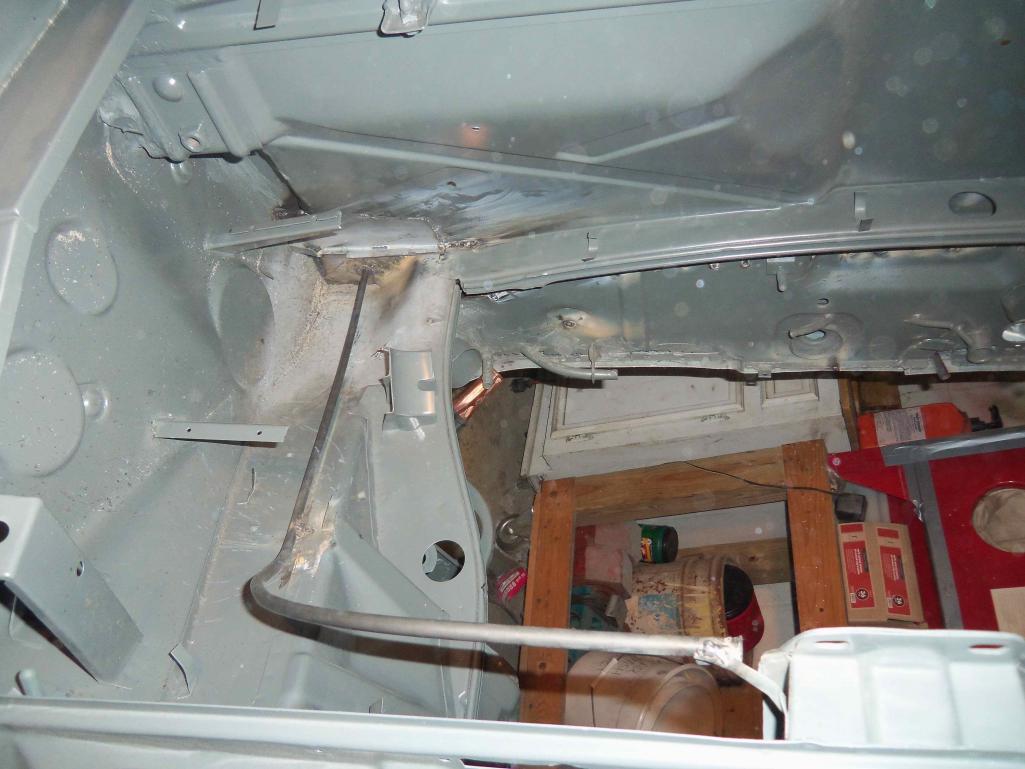
Posted by: dlee6204 Jan 3 2012, 11:36 AM
Patched a small area on the front of the long...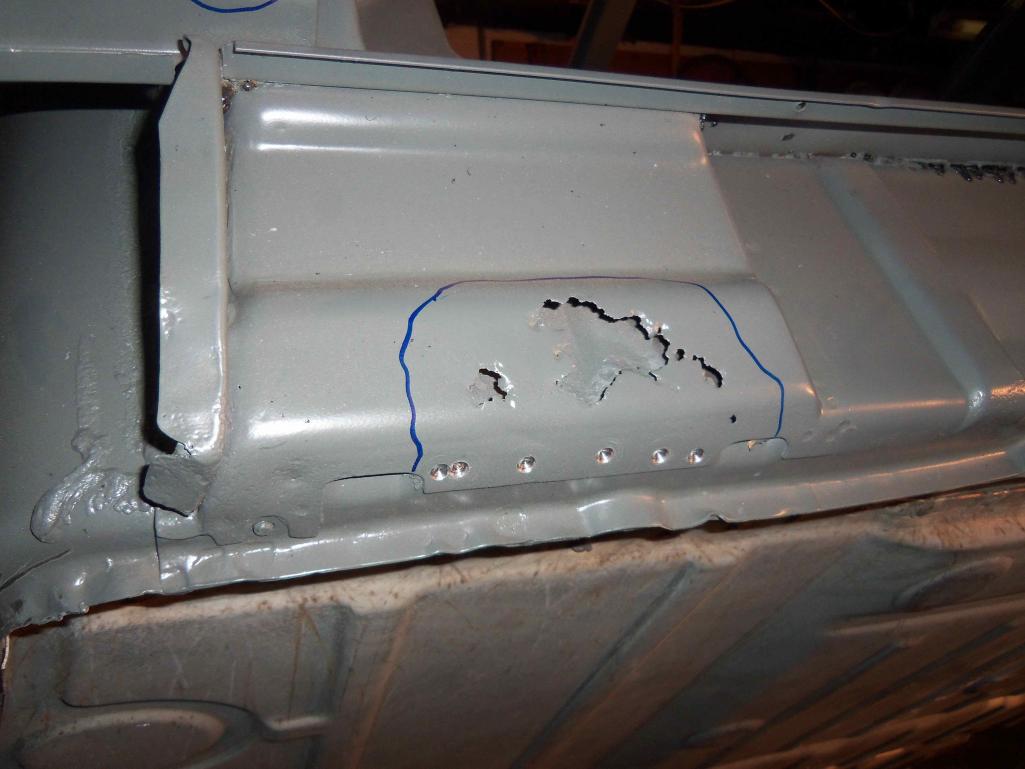
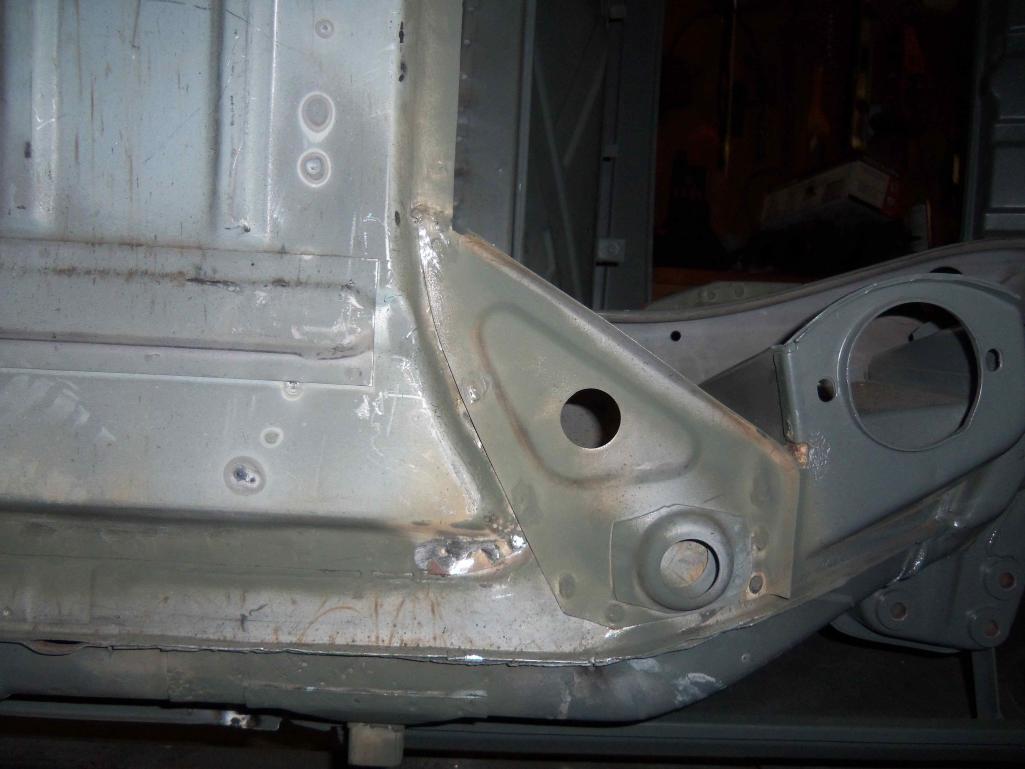
Posted by: dlee6204 Jan 3 2012, 11:41 AM
I also went ahead and removed the jack points. They will need a little work before new pieces go in.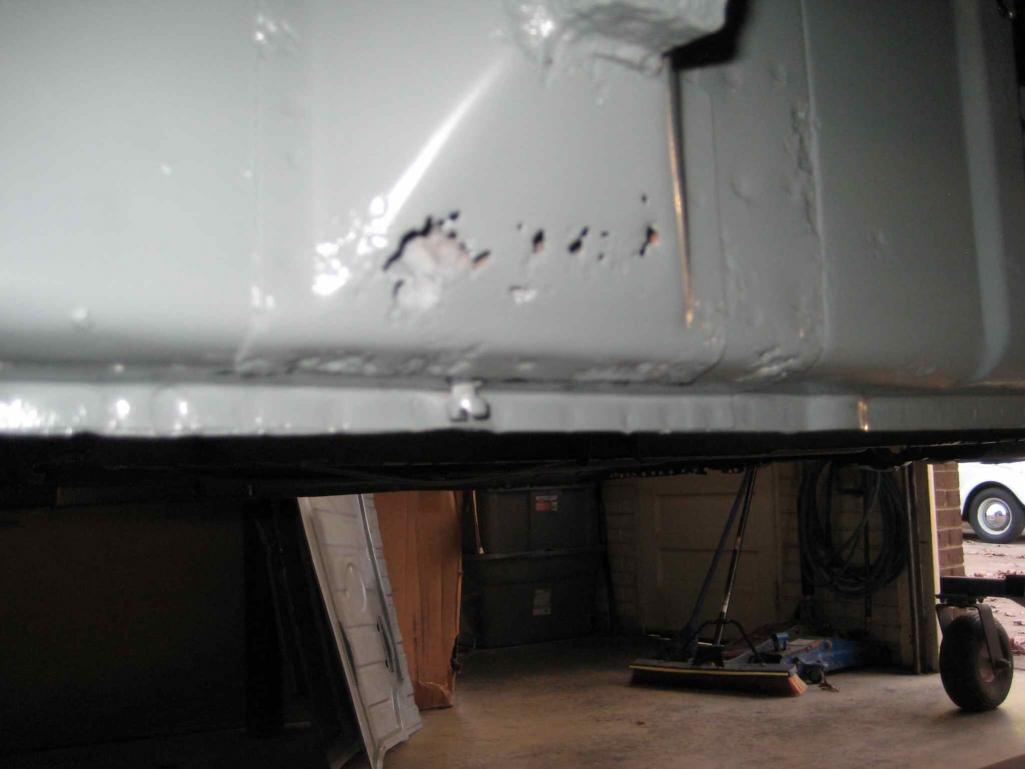
Posted by: dlee6204 Jan 3 2012, 11:44 AM
And I started prepping to work on the hell hole... 
Posted by: SUNAB914 Jan 3 2012, 11:48 AM
keep going Doug, you are doing great.
Posted by: dlee6204 Jan 3 2012, 05:57 PM
keep going Doug, you are doing great.
Thanks Chris
Got all the bad places cut out for today...
Posted by: 993inNC Jan 3 2012, 06:36 PM
HOLY CRAP 
You've been busy (disregard the first half of my email!) Looks great, I may have to start working on cleaning up the suspension parts. You won't be much longer at that rate and I haven't even started getting ready for a rolling chassis.
Posted by: dlee6204 Jan 3 2012, 07:30 PM
HOLY CRAP
You've been busy (disregard the first half of my email!) Looks great, I may have to start working on cleaning up the suspension parts. You won't be much longer at that rate and I haven't even started getting ready for a rolling chassis.
Yeah, get to work

Posted by: 993inNC Jan 4 2012, 06:39 AM
Yes Sir
Posted by: dlee6204 Jan 6 2012, 03:19 PM
Update: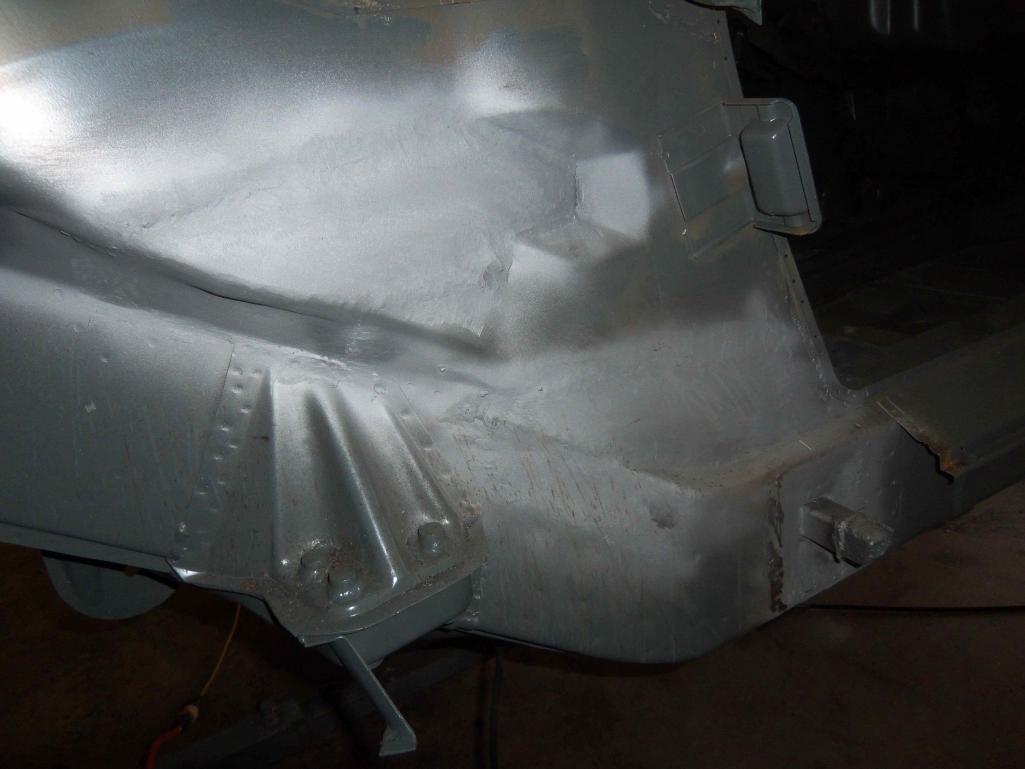
Posted by: dlee6204 Jan 21 2012, 08:56 PM
My welder broke last weekend so I haven't made as much progress as I would have liked. I got a new welder am back in business. I received a package this week from Restoration Design so I was able to get some work done today. 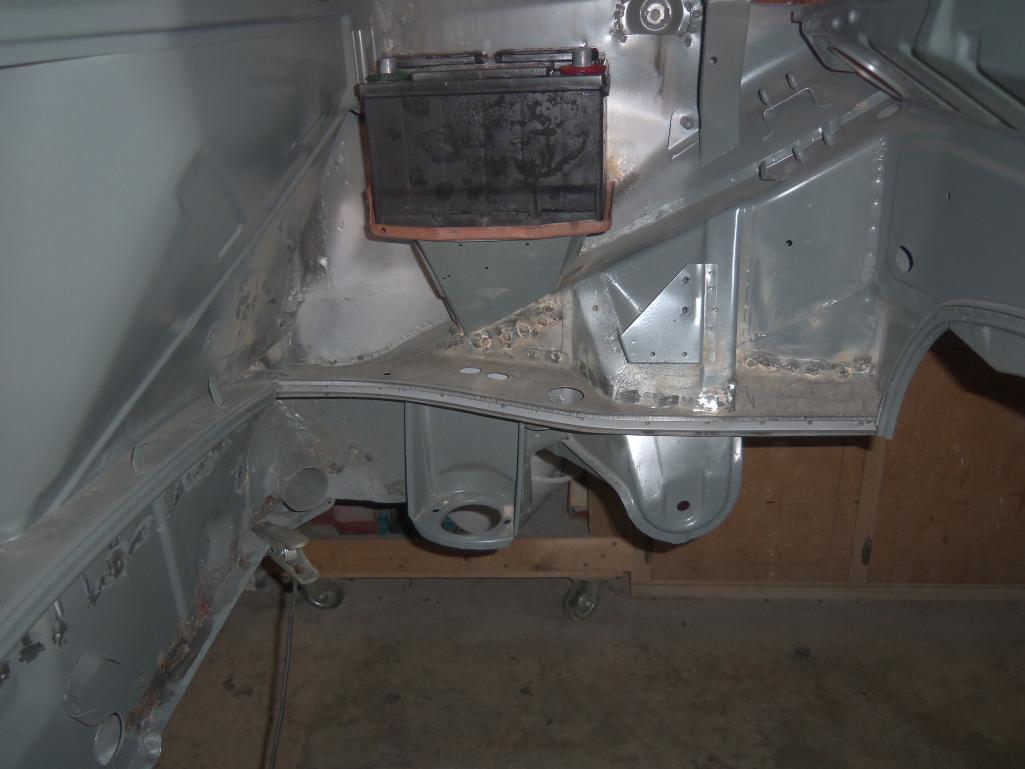
More to come...
Posted by: saigon71 Jan 21 2012, 10:05 PM
Awesome work!
Posted by: dlee6204 Jan 21 2012, 10:32 PM
Awesome work!
I used your thread to find the correct placement of the new tray!
Posted by: dlee6204 Feb 4 2012, 03:49 PM
Got some more work done today. I got the jack points installed on both sides. The sub-metal needed to be replaced before I could weld in the new pieces so it took some time.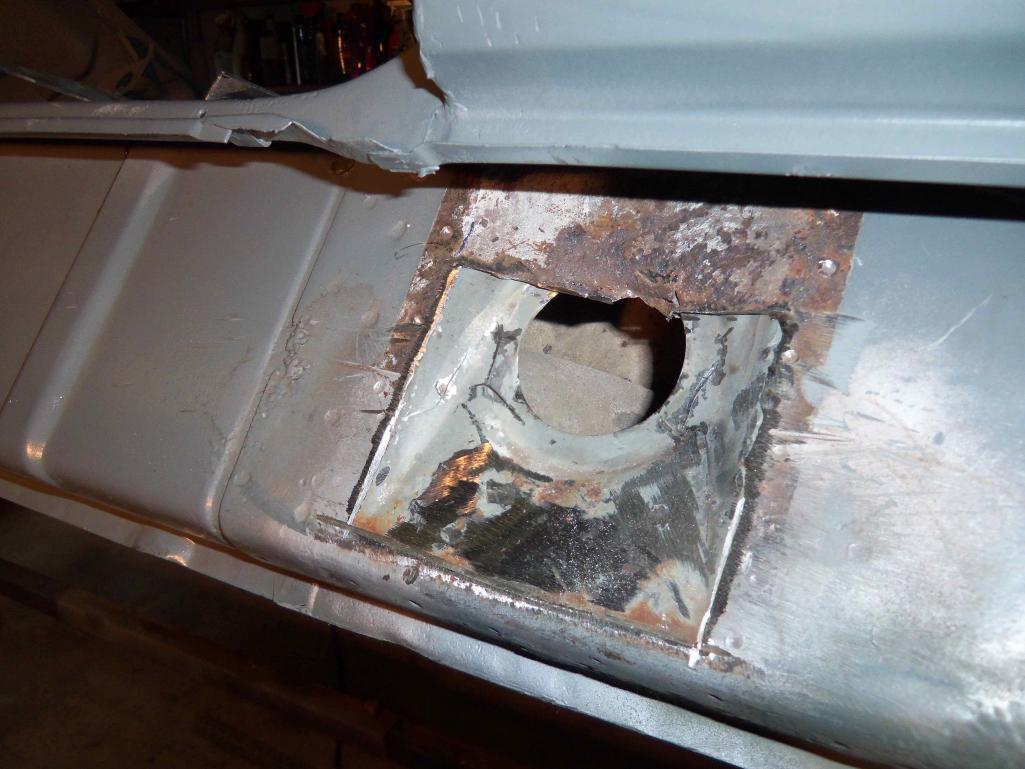
I cut out a small piece from the door jamb to gain better access to the top.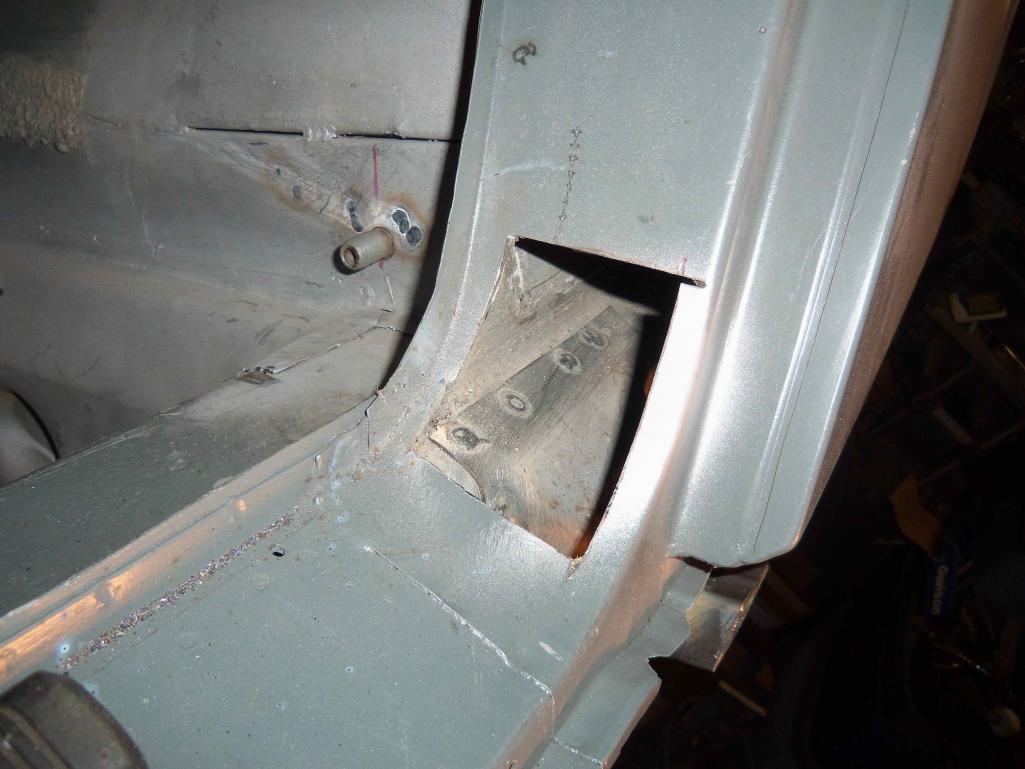
Posted by: dlee6204 Feb 4 2012, 03:51 PM
The story was the same for the other side...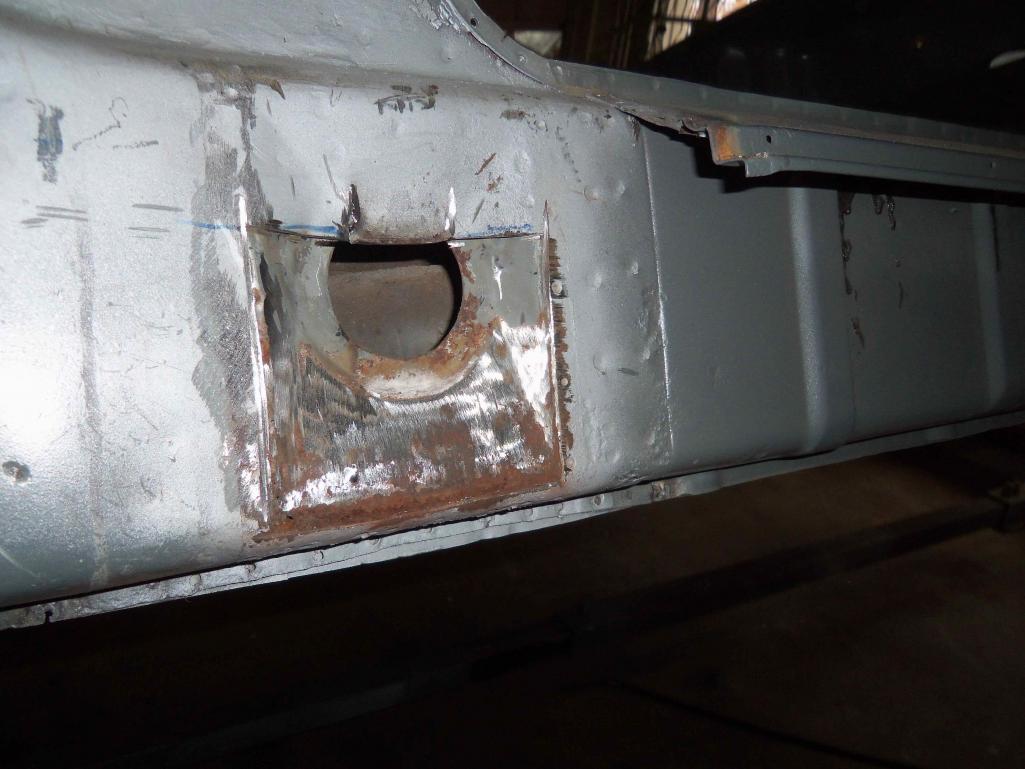
Posted by: Germancar-Junkie Feb 4 2012, 06:57 PM
Ohhhhh, so that's what a long is supposed to look like! I didn't recognize it without the brown holey stuff??? 
Posted by: dlee6204 Feb 5 2012, 09:31 PM
I got the seat hinges in today 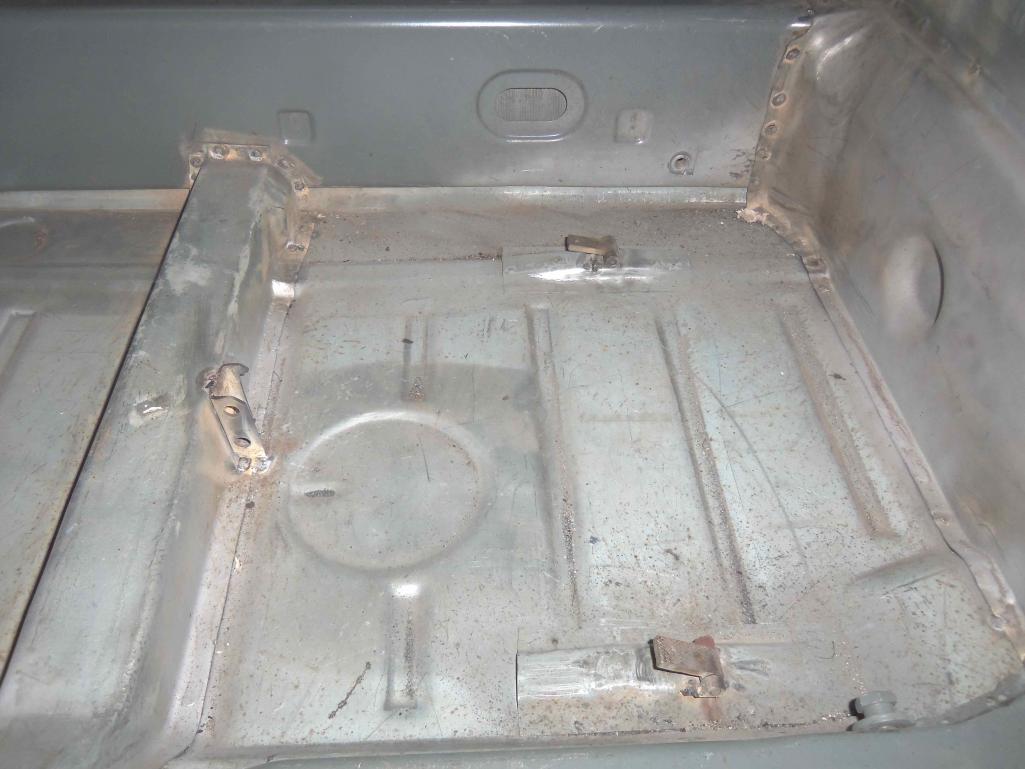
Posted by: dlee6204 Feb 5 2012, 09:37 PM
I also spent quite a bit of time prepping the replacement rear fender. There was plenty of extra meat around the edges from where it was cut off the donor car that I had to remove. Just a little more trimming and it will be ready to go back on. 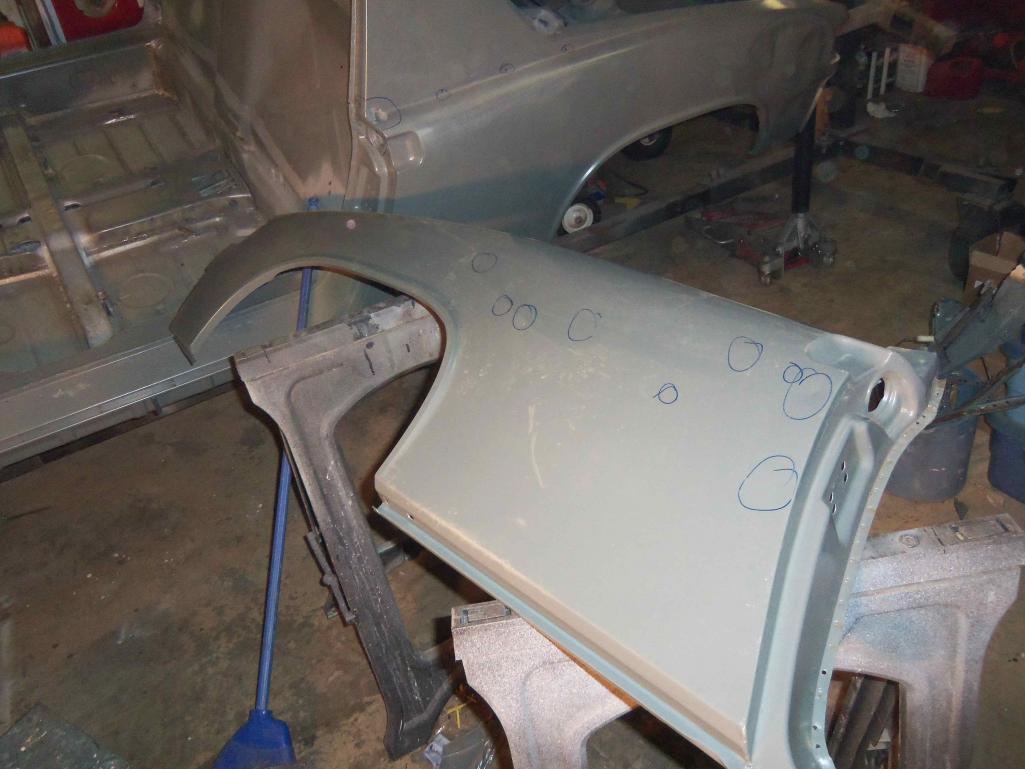
Posted by: saigon71 Feb 5 2012, 10:34 PM
Lookin good man!
Like the idea of cutting a flat access panel in the jamb to get at the top of the jackpost.
Posted by: dlee6204 Feb 23 2012, 08:52 PM
Update:
I've been working on a lot of little things lately. The front weatherstrip channel needed a little work so I took care of that. 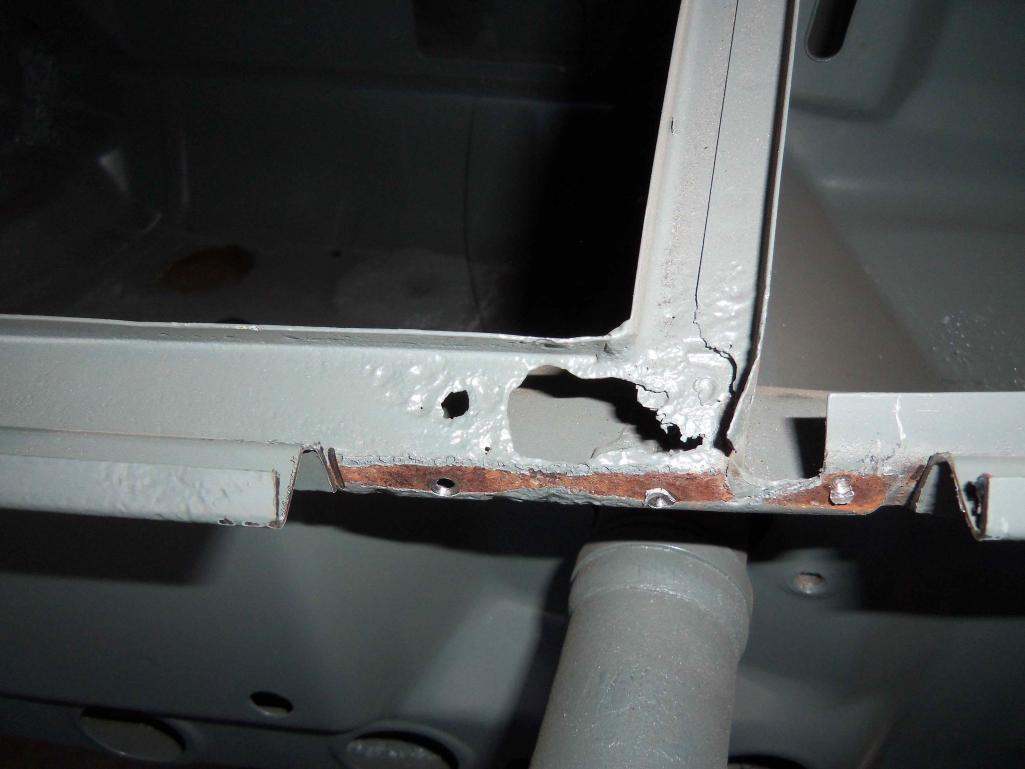
Posted by: dlee6204 Feb 23 2012, 08:58 PM
The front trunk floor also has some thin metal with small pinholes. Welding them up wasn't an option so I fabricated and replaced a small section. 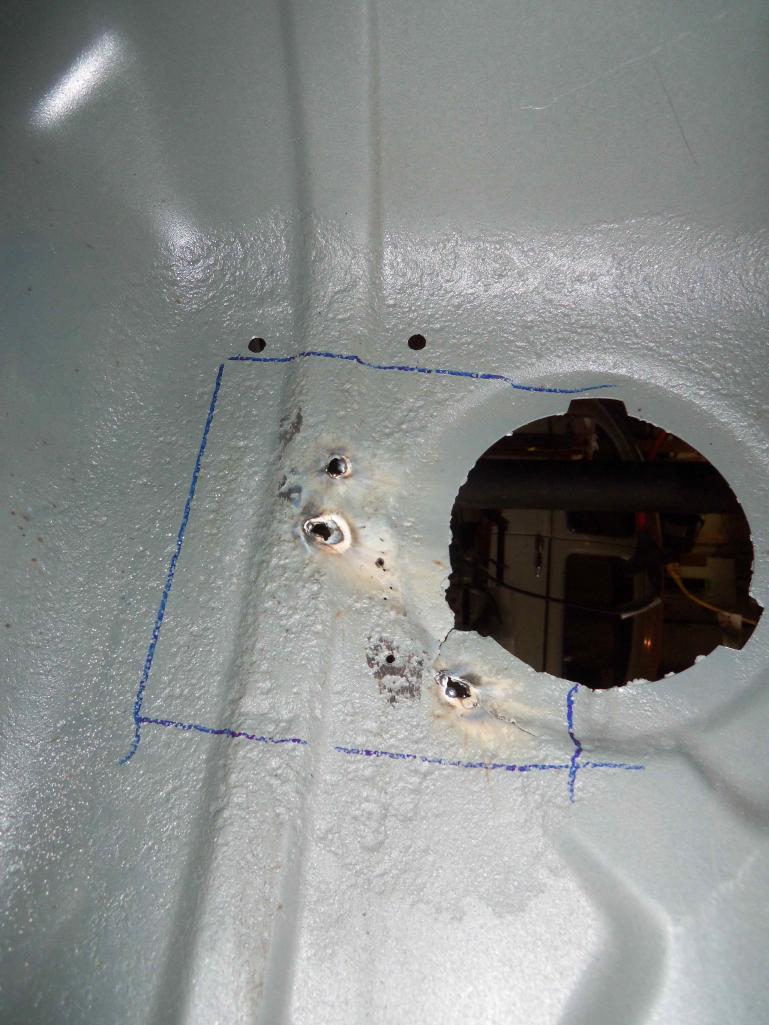
Posted by: dlee6204 Feb 23 2012, 09:12 PM
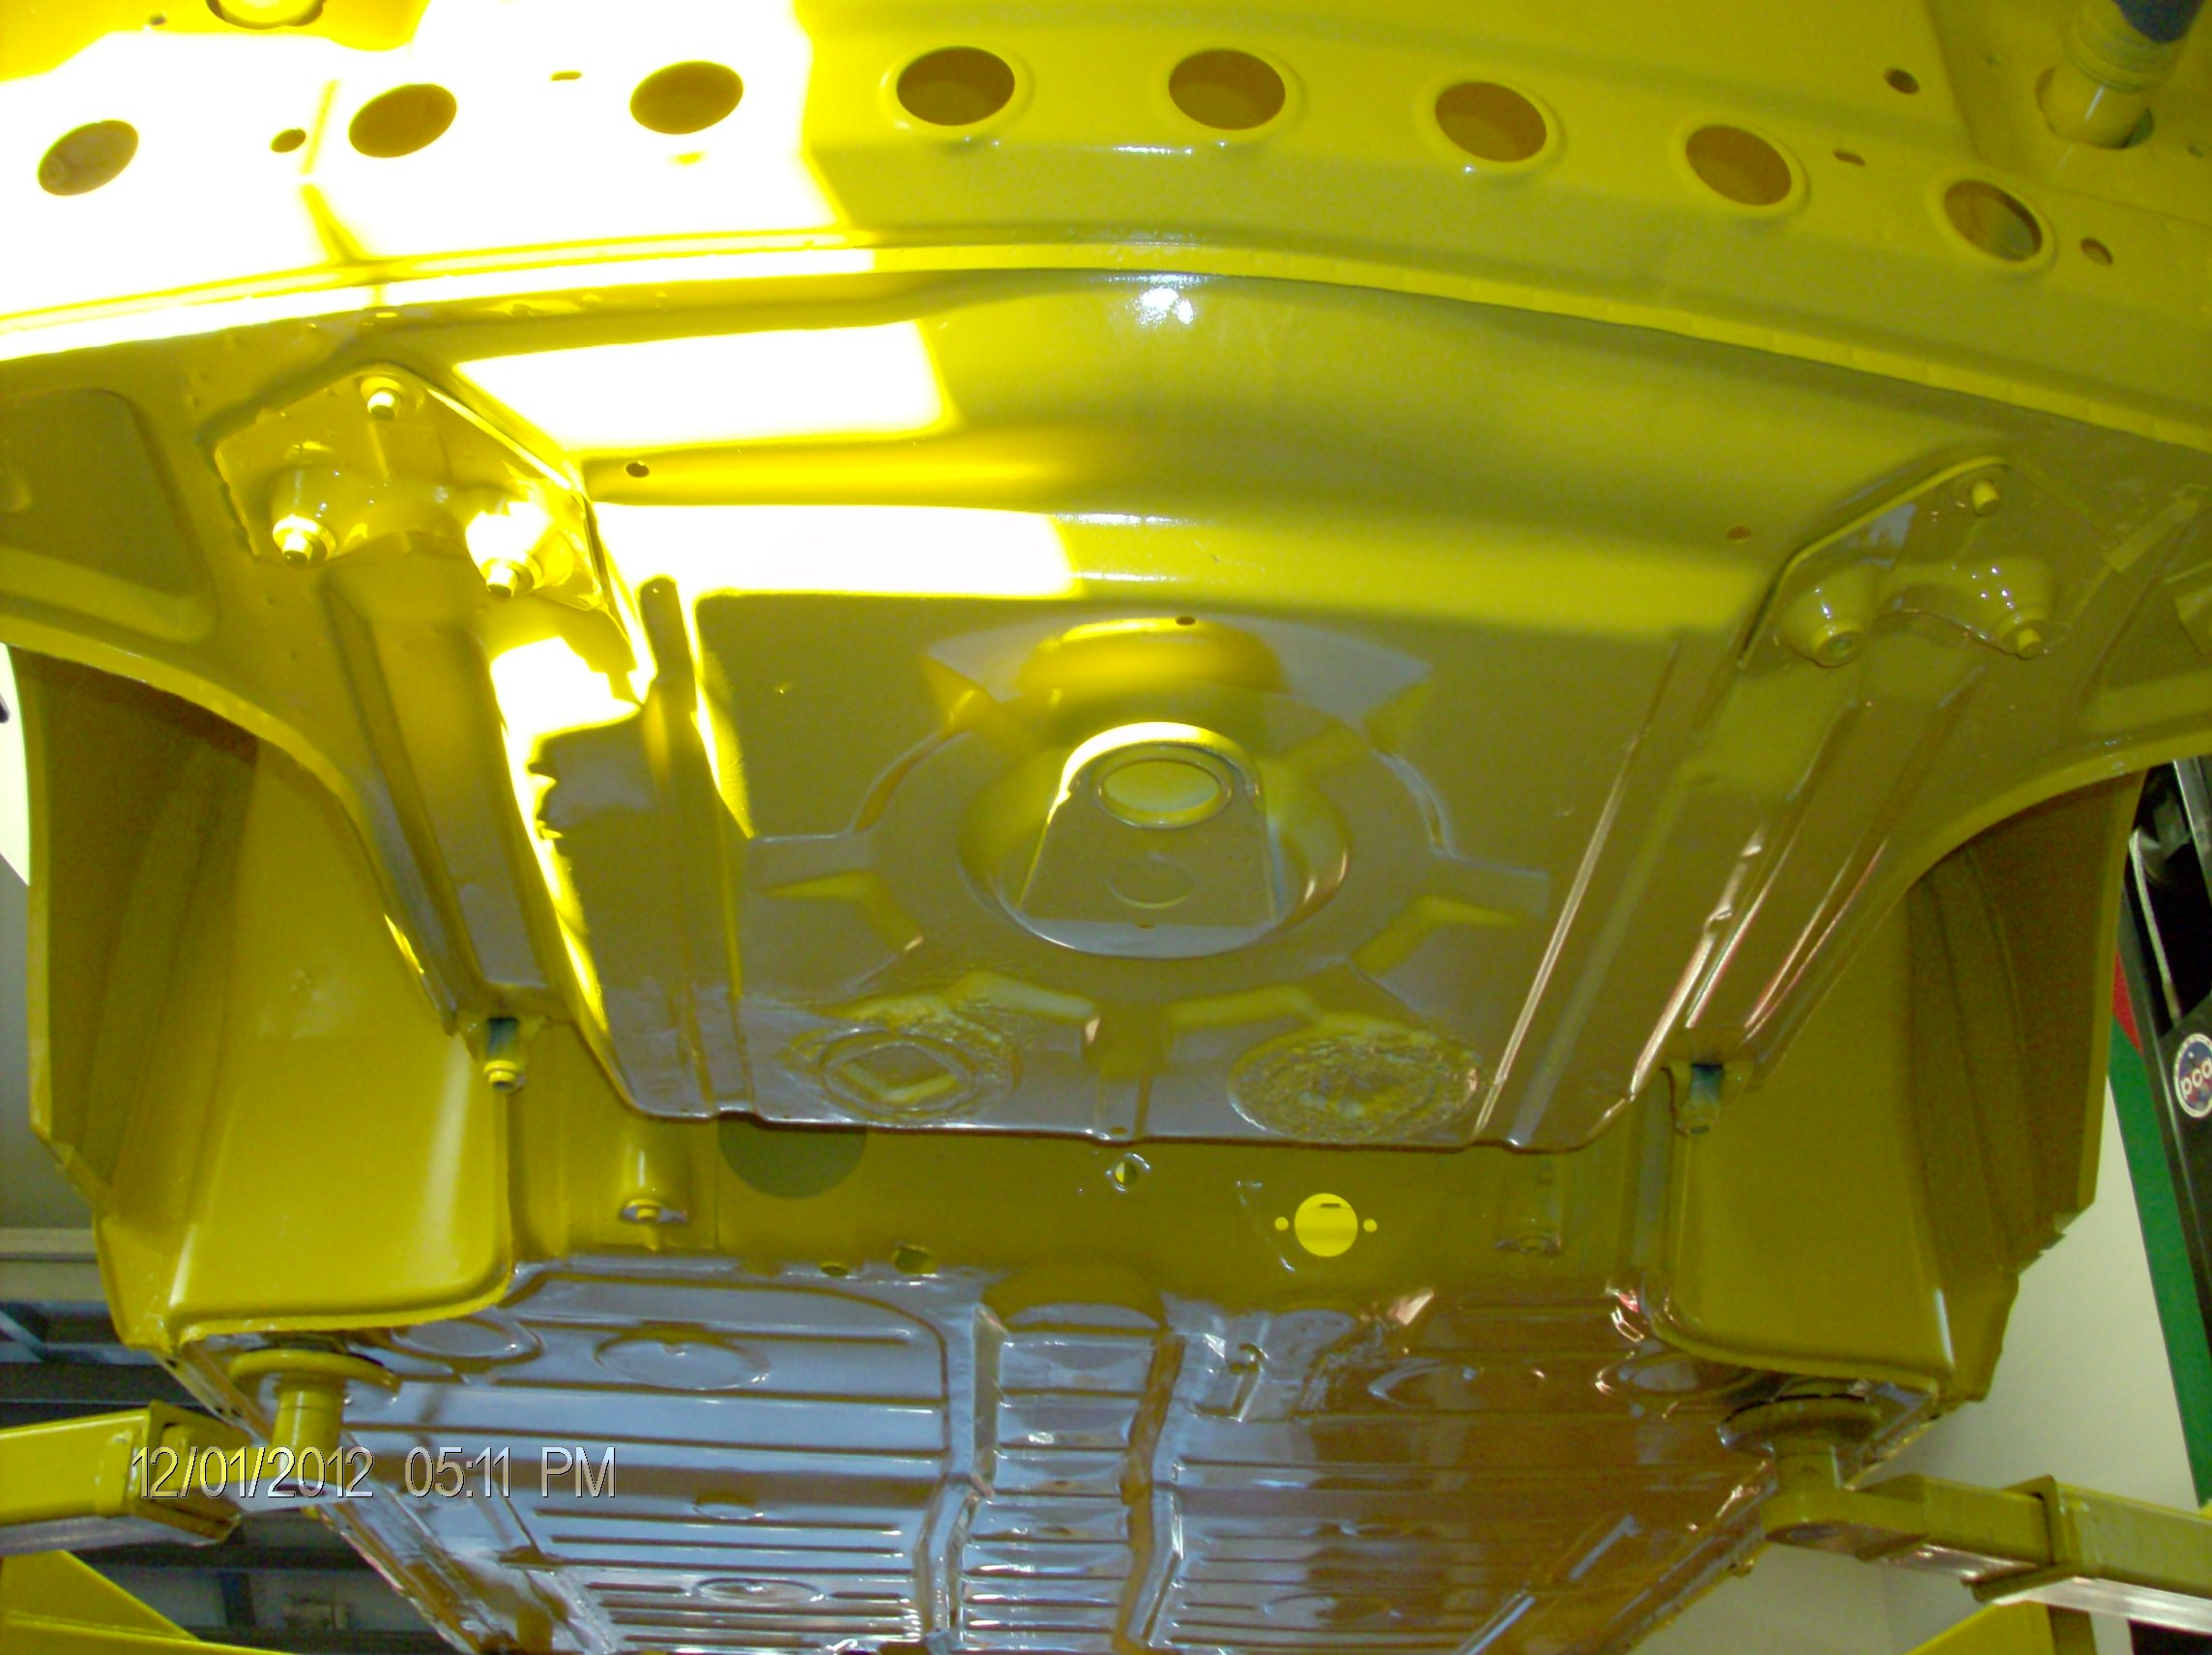
I did some work on the lower firewall too. 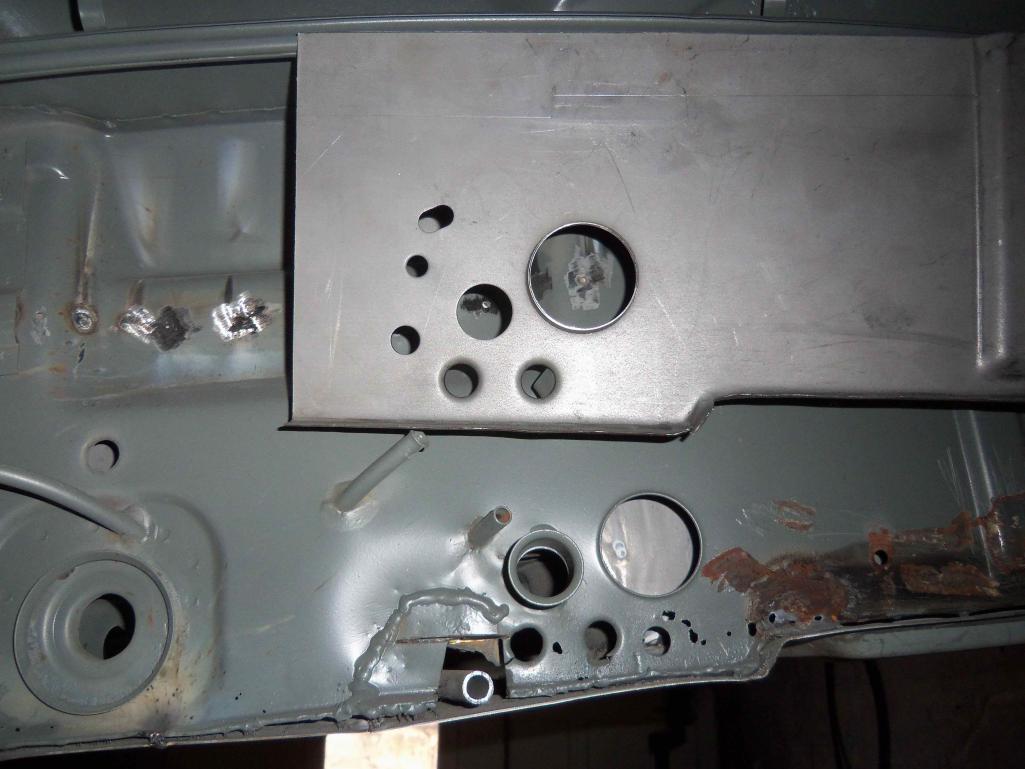

Also installed the front donuts.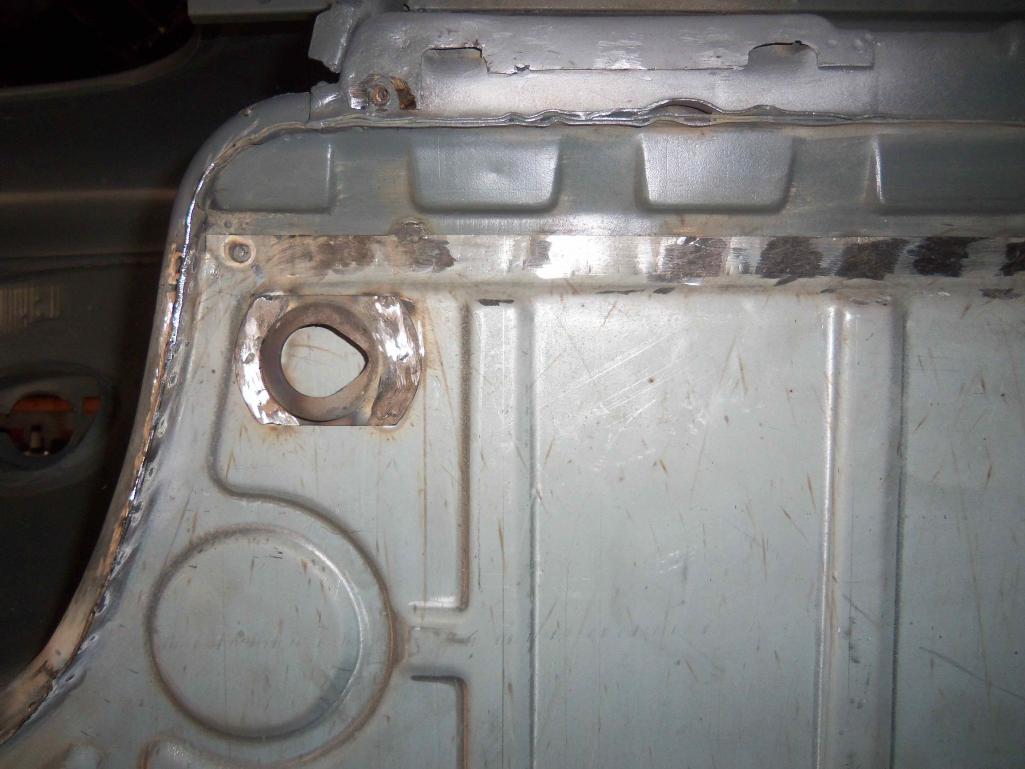
I still have one small piece of the lower firewall to replace on the driver's side and then the jacking triangle and then I will be done working underneath the car. I will rotate the car and begin working on the exterior bodywork. I already spent some time on bodywork but am waiting to finish some of it before I post.
Posted by: dlee6204 Feb 23 2012, 09:14 PM
Oh and who says there aren't enough spot welds on a 914... 
Posted by: 993inNC Feb 24 2012, 04:54 PM
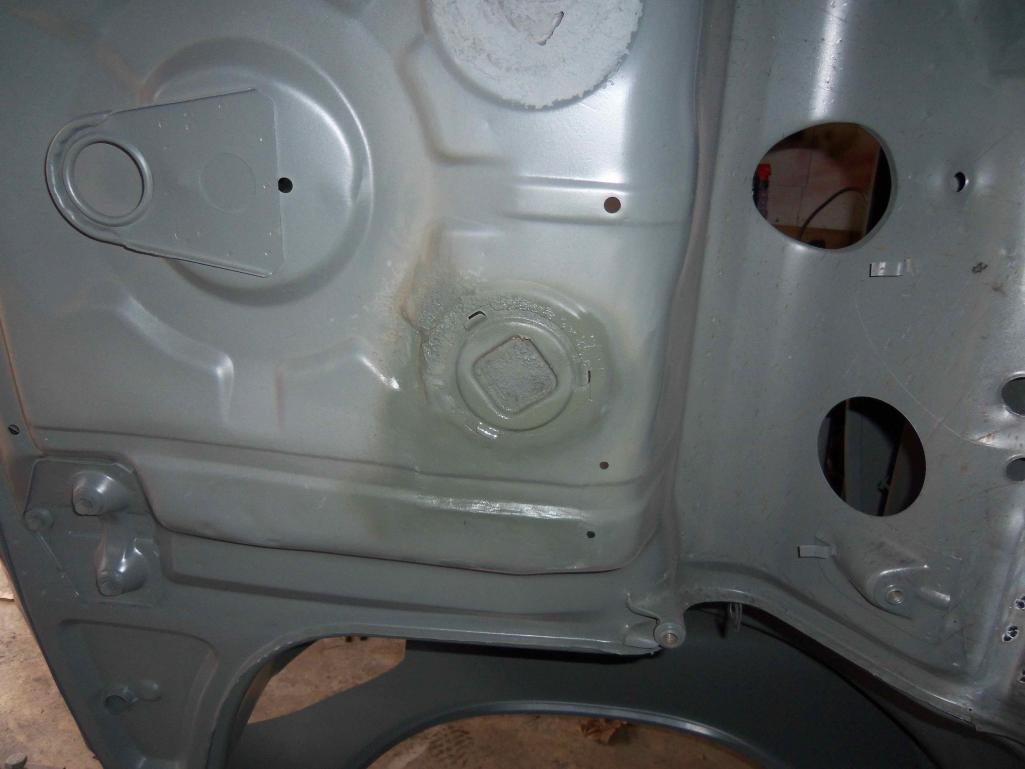
looks great Doug! Is the rust on the pass lower fw flash rust from grinding away the powder coating? It's not embedded rust under the coating is it?
Posted by: dlee6204 Feb 24 2012, 09:08 PM
looks great Doug! Is the rust on the pass lower fw flash rust from grinding away the powder coating? It's not embedded rust under the coating is it?
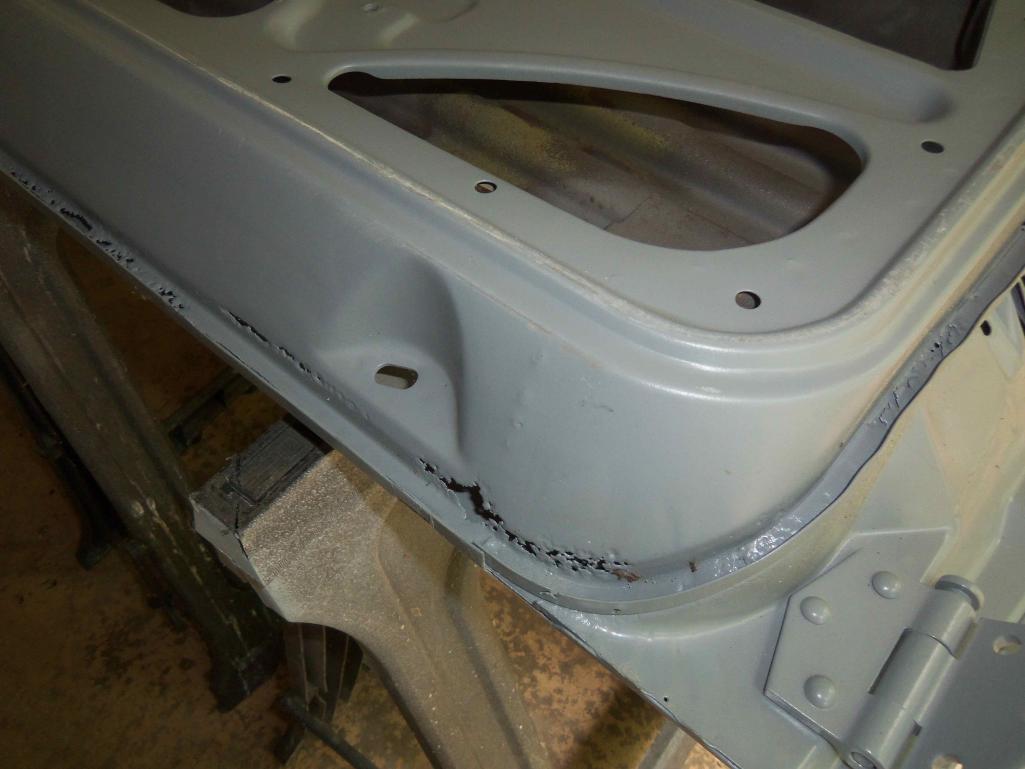
Post 95, picture 2? That's rust that was under some of the seam sealer. That whole lower edge though was replaced.
Posted by: 993inNC Feb 24 2012, 10:03 PM
Cool, what's the other side look like? Hey BTW did you ever get that ground bolt back in on the driver's side wall just above the engine tray release tube?
Posted by: dlee6204 Feb 24 2012, 10:08 PM
No I keep remembering I need to do that and then I forgot to put it on the list.
 Consider it done!
Posted by: dlee6204 Apr 4 2012, 09:36 PM
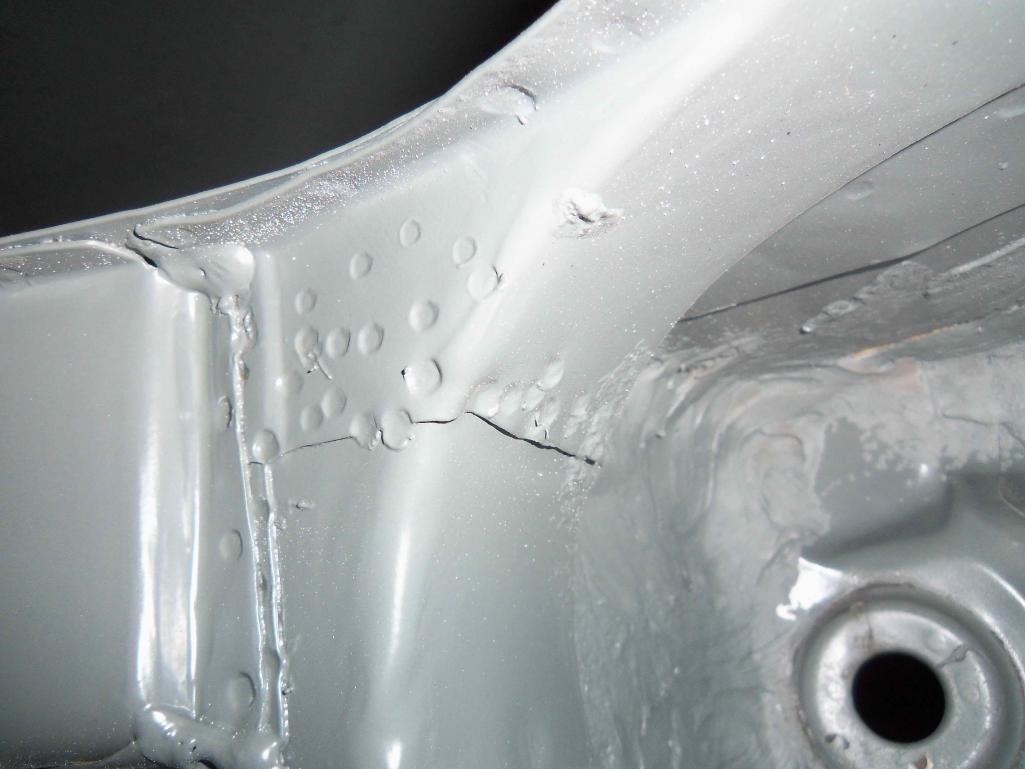
So its been a while since my last update. Lots of work has been going on... I'll add some tonight then more to come soon...
Here is the seam for the rear fender before welding it up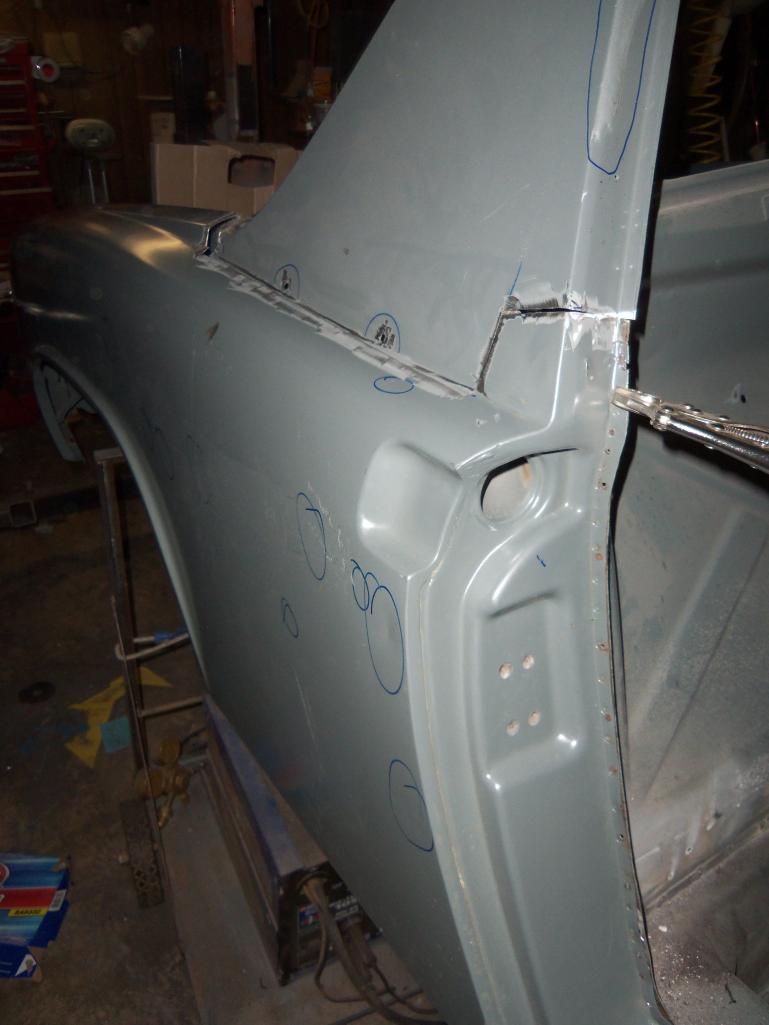
I had to replace a small section too. Sail panel holes were also welded up. 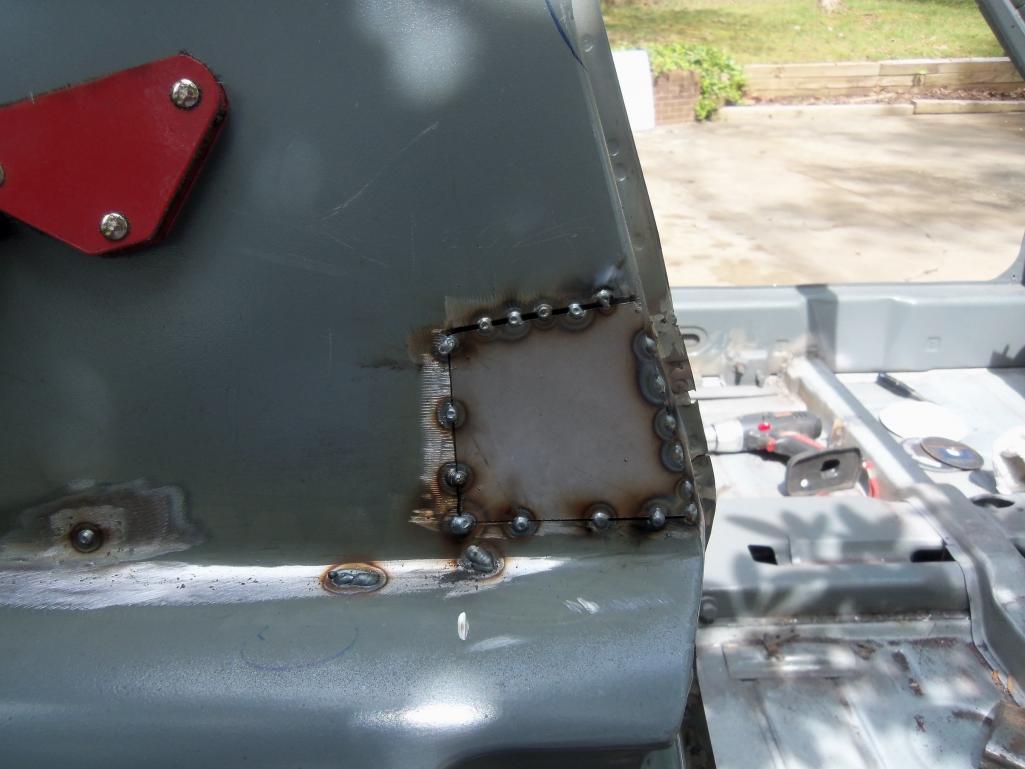
Posted by: dlee6204 Apr 4 2012, 09:37 PM
Posted by: dlee6204 Apr 4 2012, 09:39 PM
The driver's side also had some rust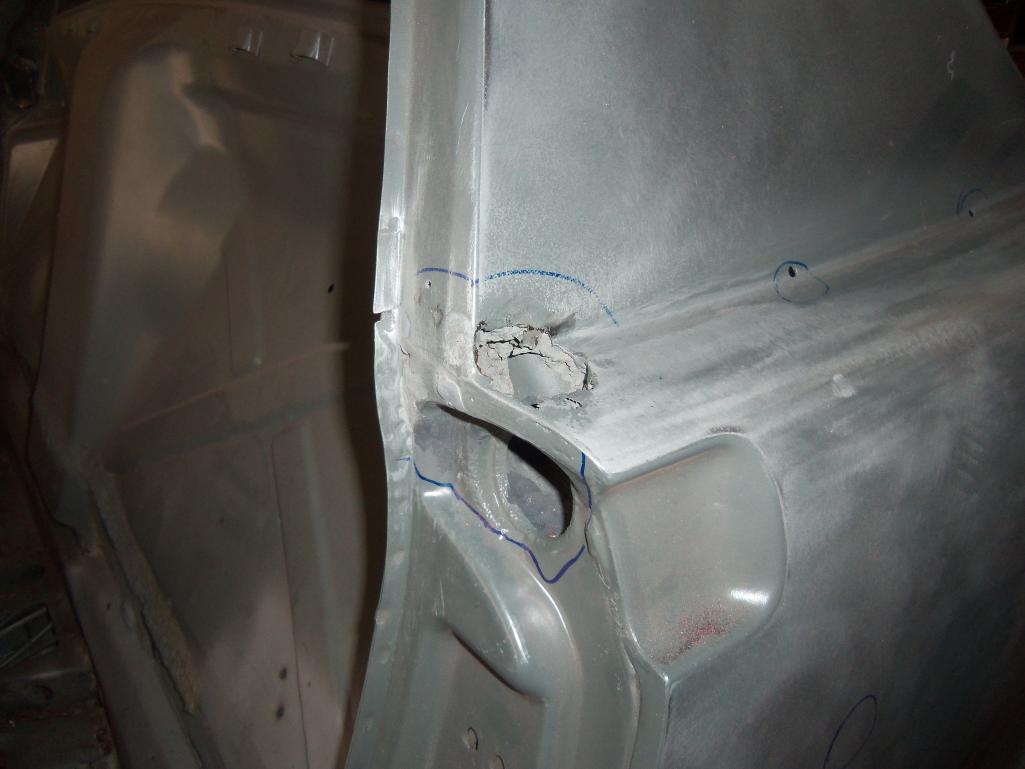
Posted by: dlee6204 Apr 4 2012, 09:42 PM
Everything welded up 
Posted by: dlee6204 Apr 4 2012, 09:52 PM
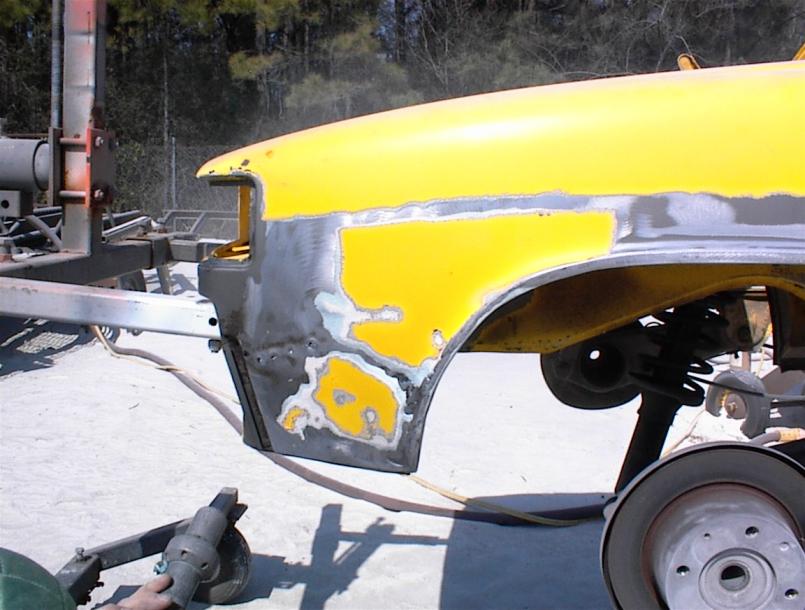
Front fenders also needed to be partially replaced. Passenger side had some damage that was cut out before it came to me. 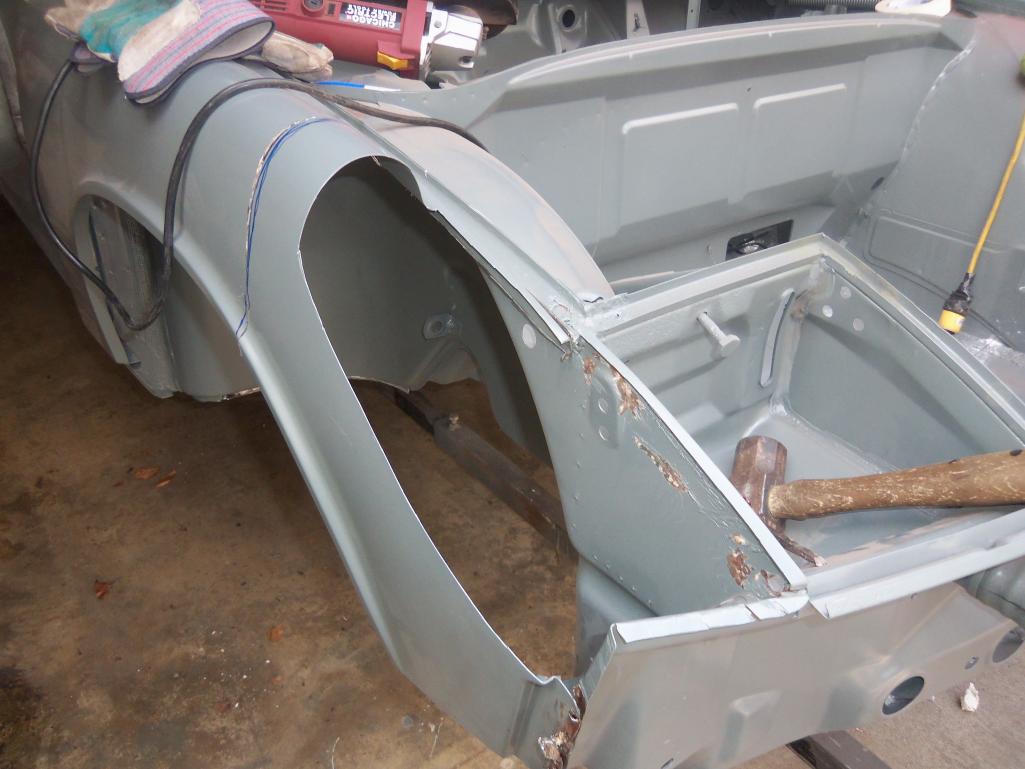
Replacement piece tacked on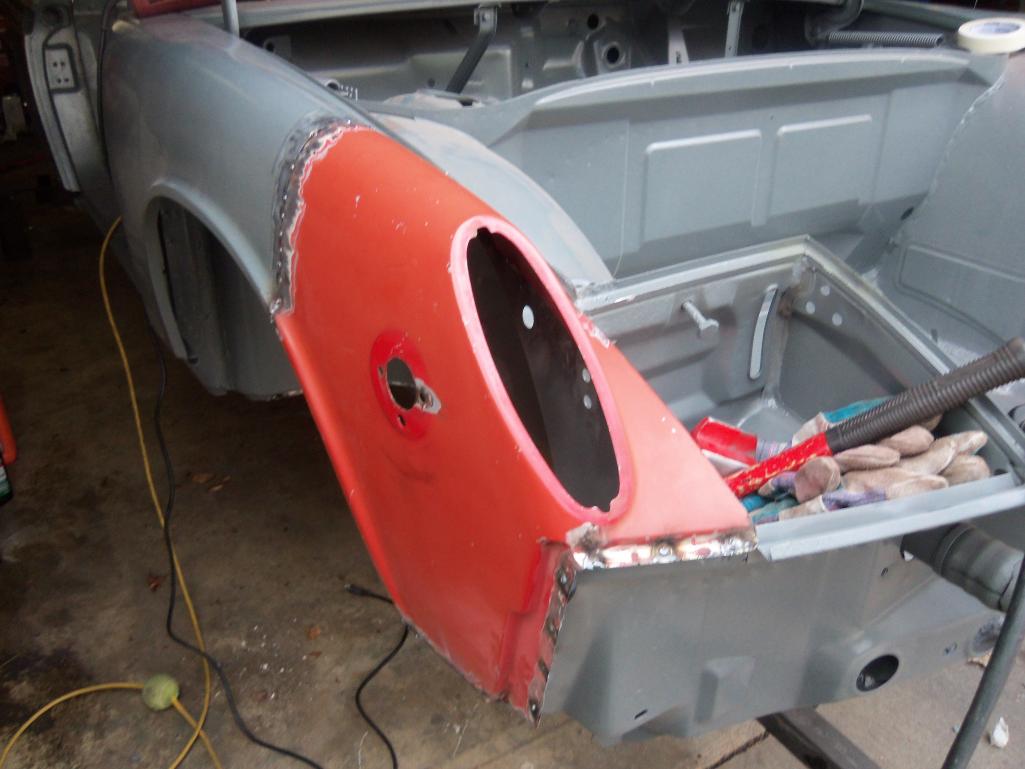
Posted by: dlee6204 Apr 4 2012, 09:56 PM
My spot welds came out stealthy 
Seams finished off, bumper clip welded on, paint stripped. The side marker hole has since been filled too. 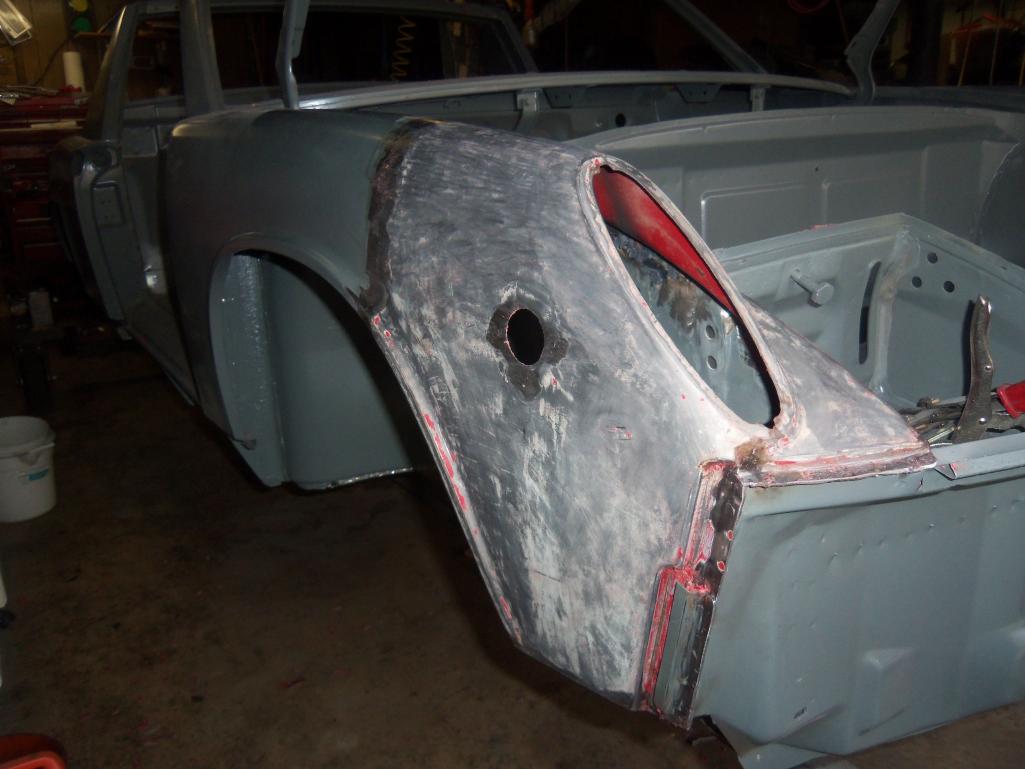
Posted by: dlee6204 Apr 4 2012, 10:04 PM
Driver's side got a similar treatment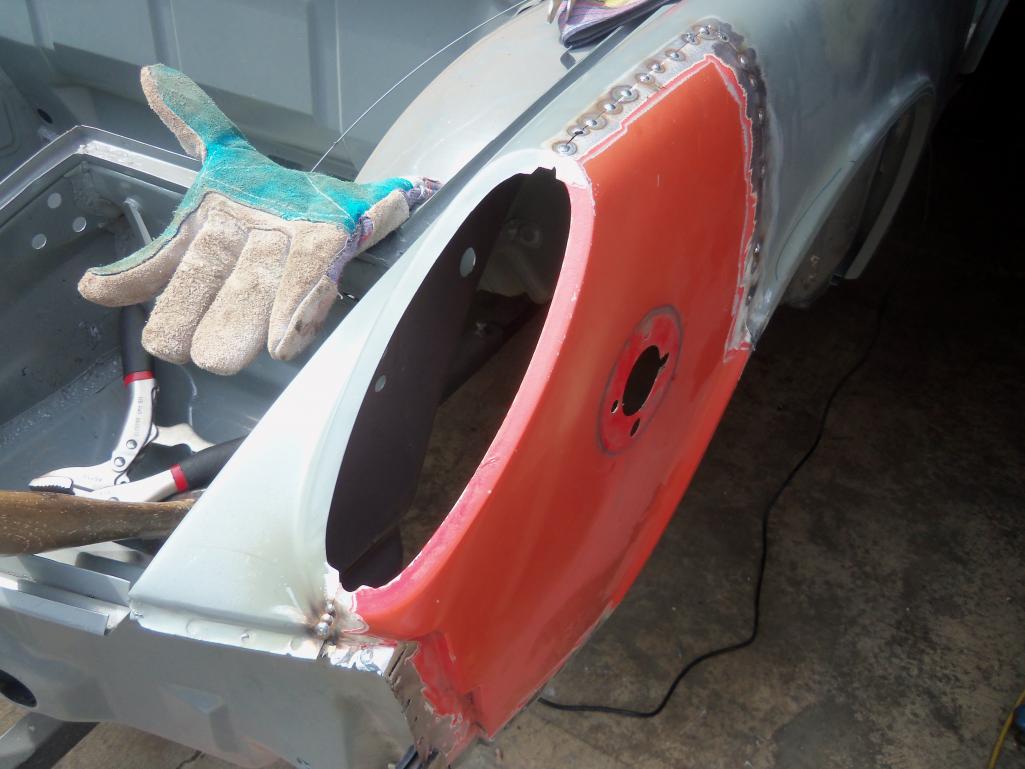
Posted by: Socalandy Apr 4 2012, 10:33 PM
Awsome ![popcorn[1].gif](style_emoticons/default/popcorn[1].gif)
Posted by: rick 918-S Apr 5 2012, 08:34 AM
Nice work sectioning those fenders.
Posted by: broomhandle Apr 5 2012, 10:22 AM
Holy crap, nice work. I thought i had horrible rust. but, your work has shown me a lot. keep it up!
Posted by: saigon71 Apr 5 2012, 04:02 PM
Wow...awesome work! Keep it up.
Posted by: trojanhorsepower Apr 5 2012, 05:55 PM
Man Chris,
Looks like you got the right guy on this...
Doug, any chance random people could stop by and watch you work.
I am stoked to see another NC Teener
Pete
Posted by: dakotaewing Apr 5 2012, 06:48 PM
What are you using to grind those welds?
Good Job!!
Posted by: dlee6204 Apr 5 2012, 08:02 PM
I use a 36 grit flapper disk to cut back most of it, then follow up with an 80 grit to finish it off.
Posted by: dlee6204 Apr 5 2012, 08:07 PM
I am stoked to see another NC Teener
Pete
Anybody can literally stop by anytime and shoot the breeze. I'm always up for meeting new people and talking cars.

Posted by: dlee6204 Apr 5 2012, 08:20 PM
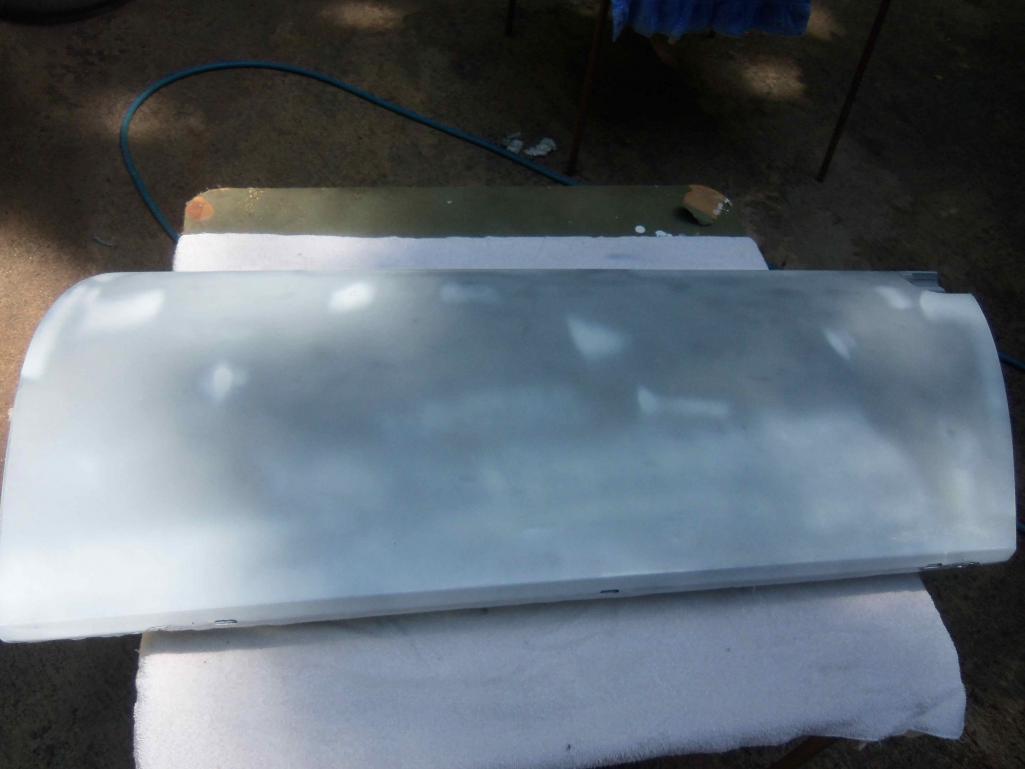
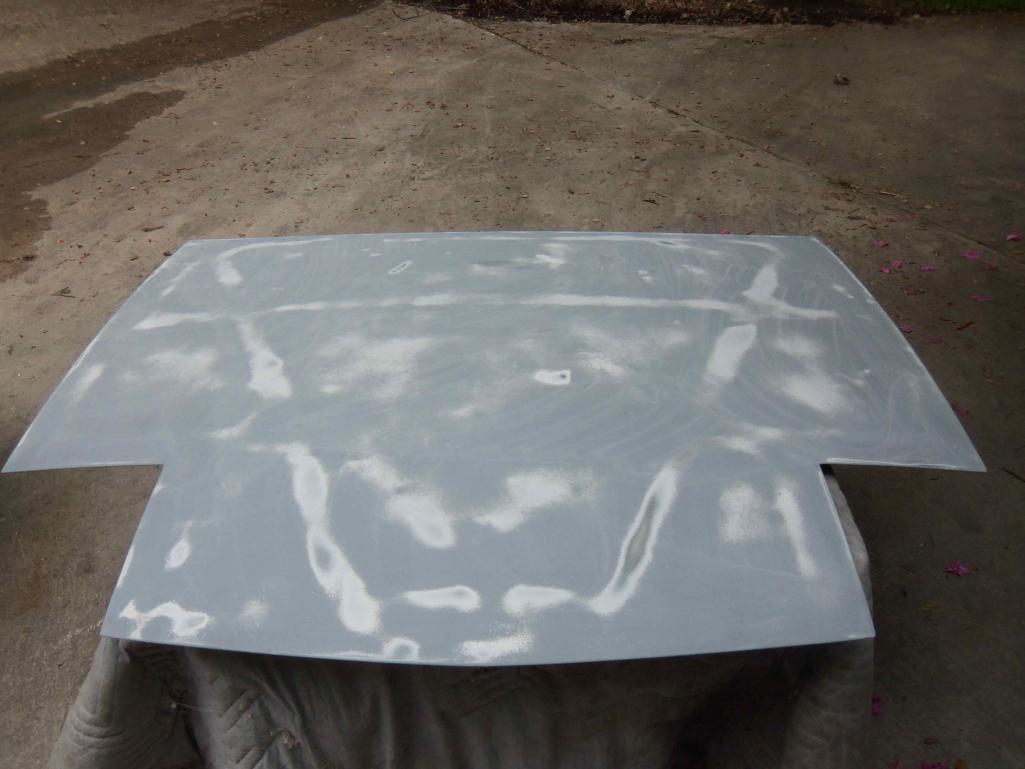
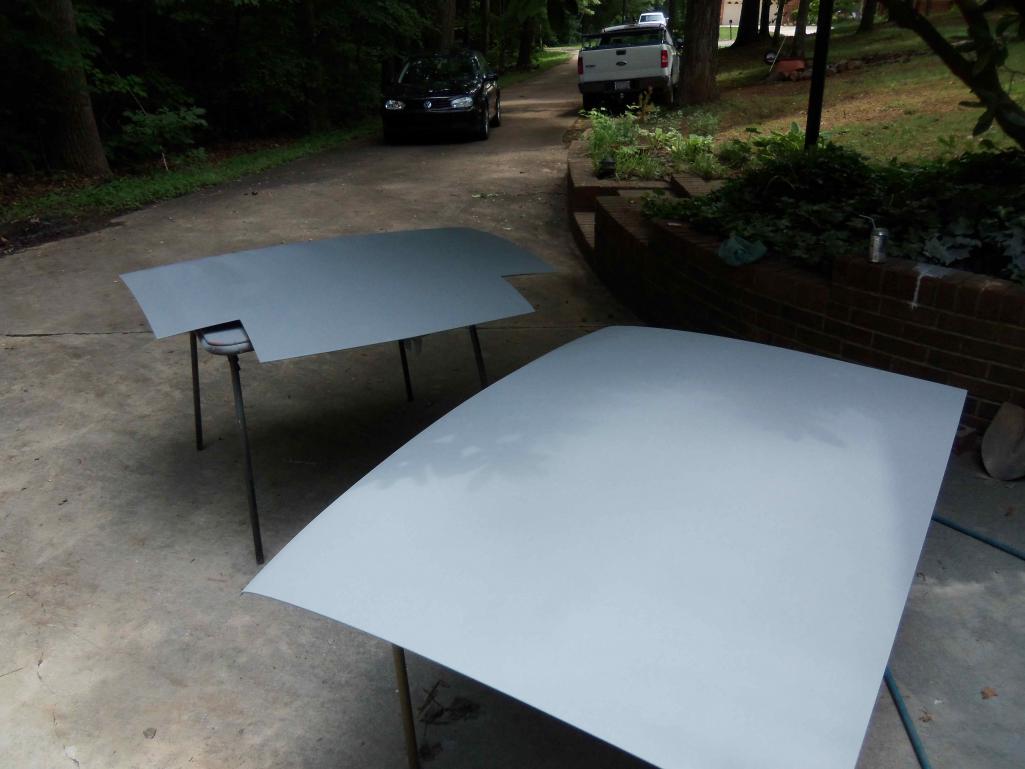
Here a few pictures of the front hood. Overall it had about 6 dimples and one bigger goofy dent. A little hammer and dolly work took care of most of it. No filler for this hood. 
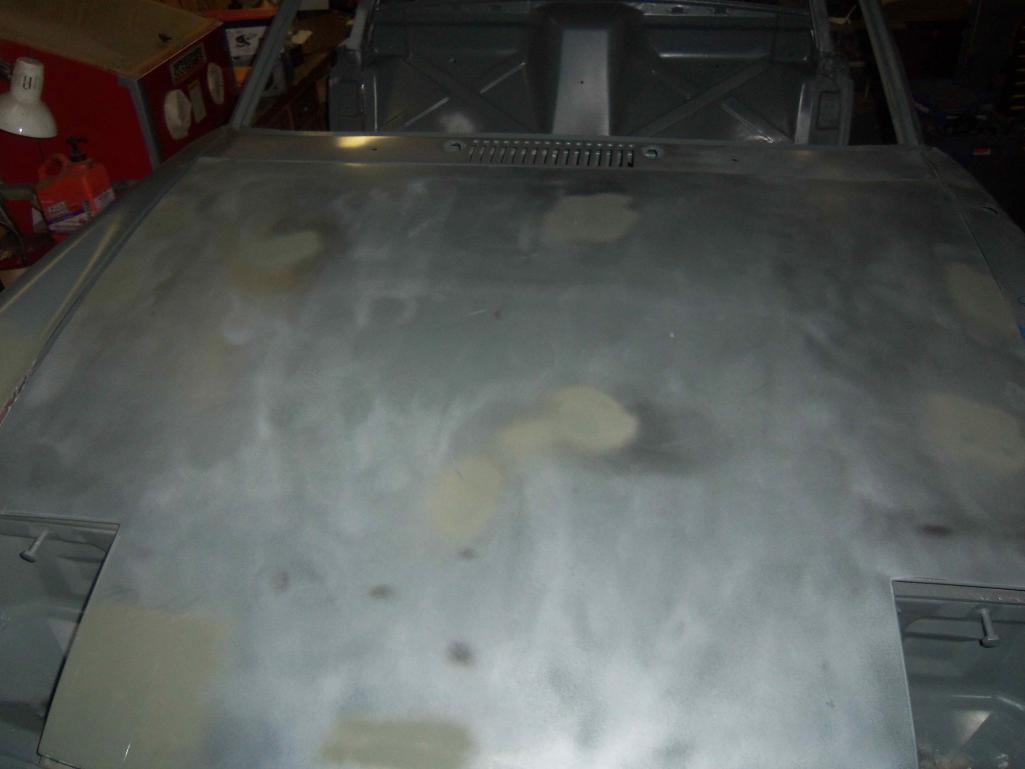
I should add that after I've gotten done with a repair, I hit it with some rattle can primer so it doesn't rust. All of which will be removed before I hit the areas with epoxy primer.
Posted by: dlee6204 Apr 5 2012, 08:31 PM
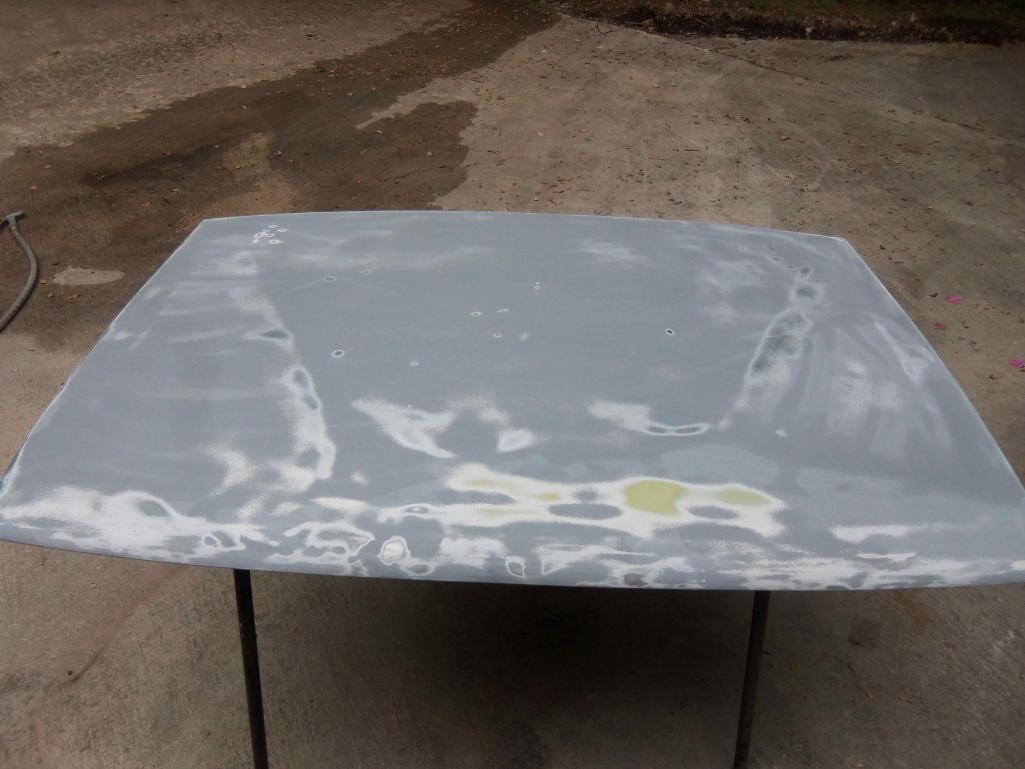
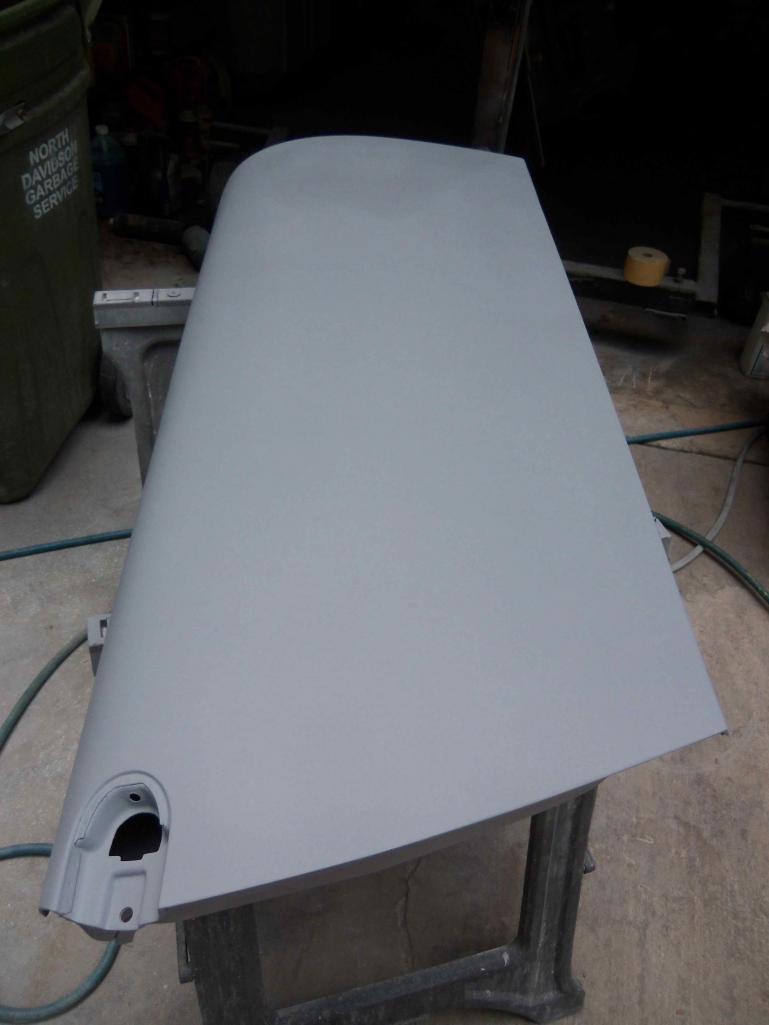
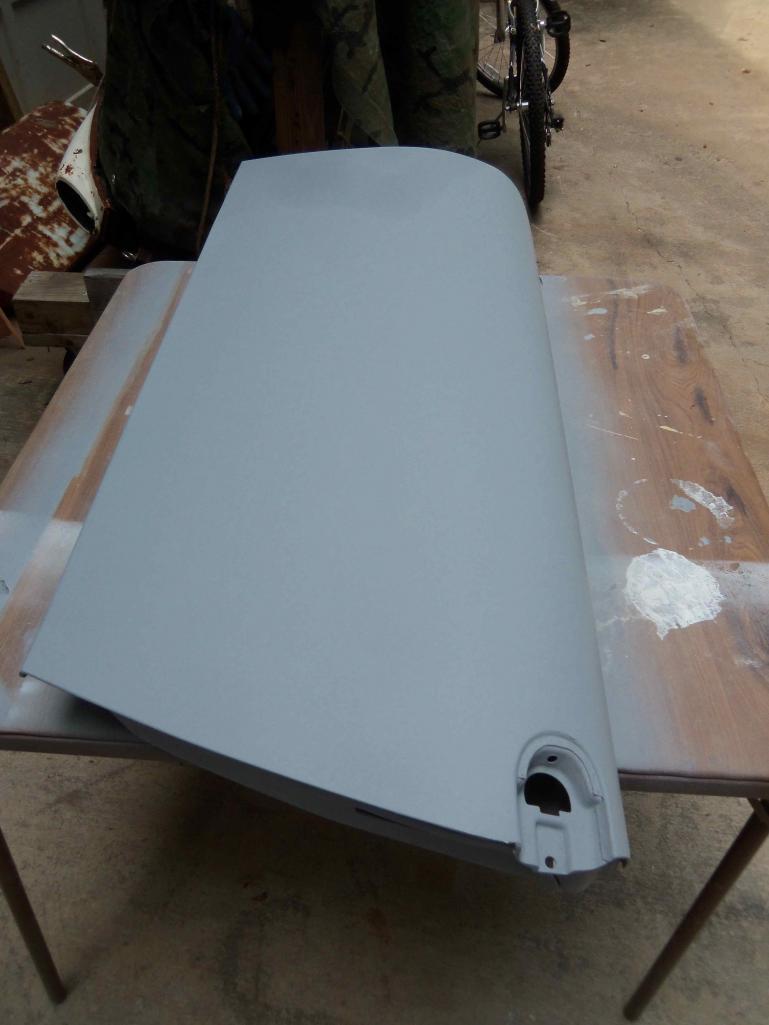
The Pass. rear fender has numerous dents and low spots. Only a couple of them will need hammering out, the rest will smooth over with some sanding and primer.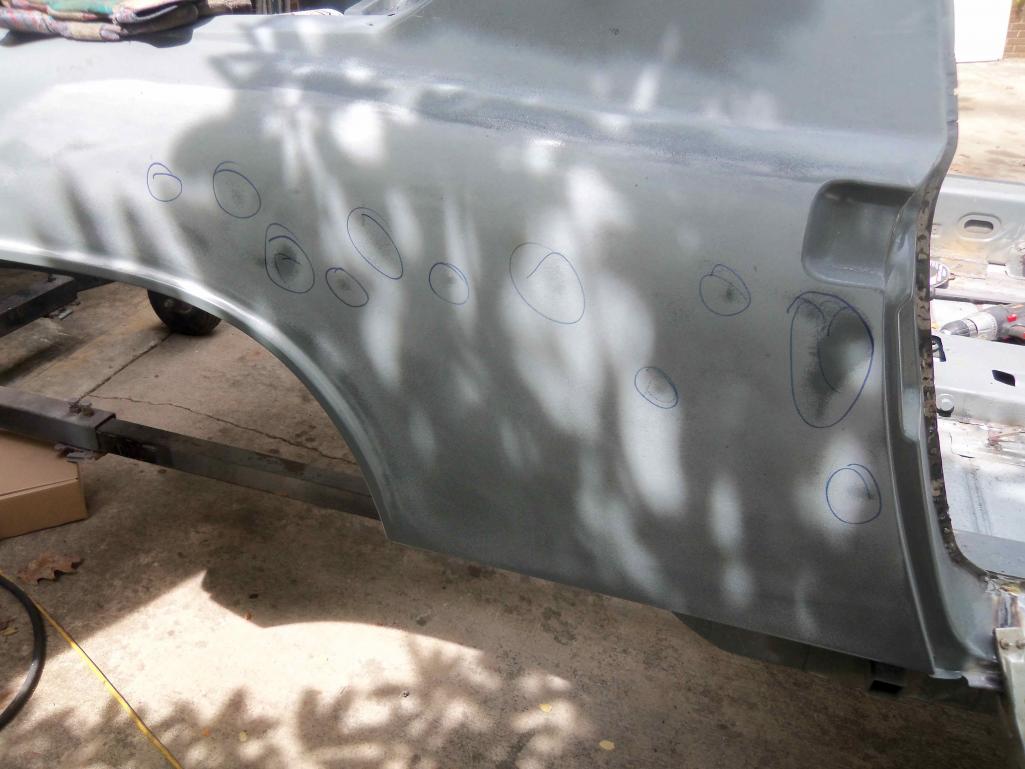
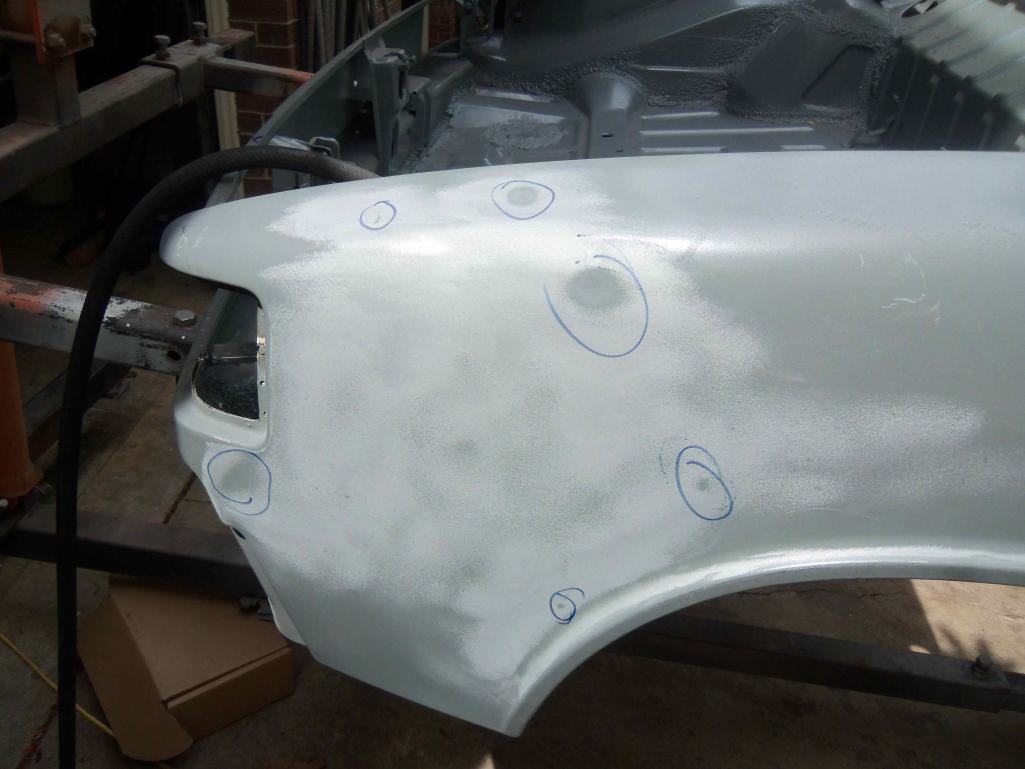
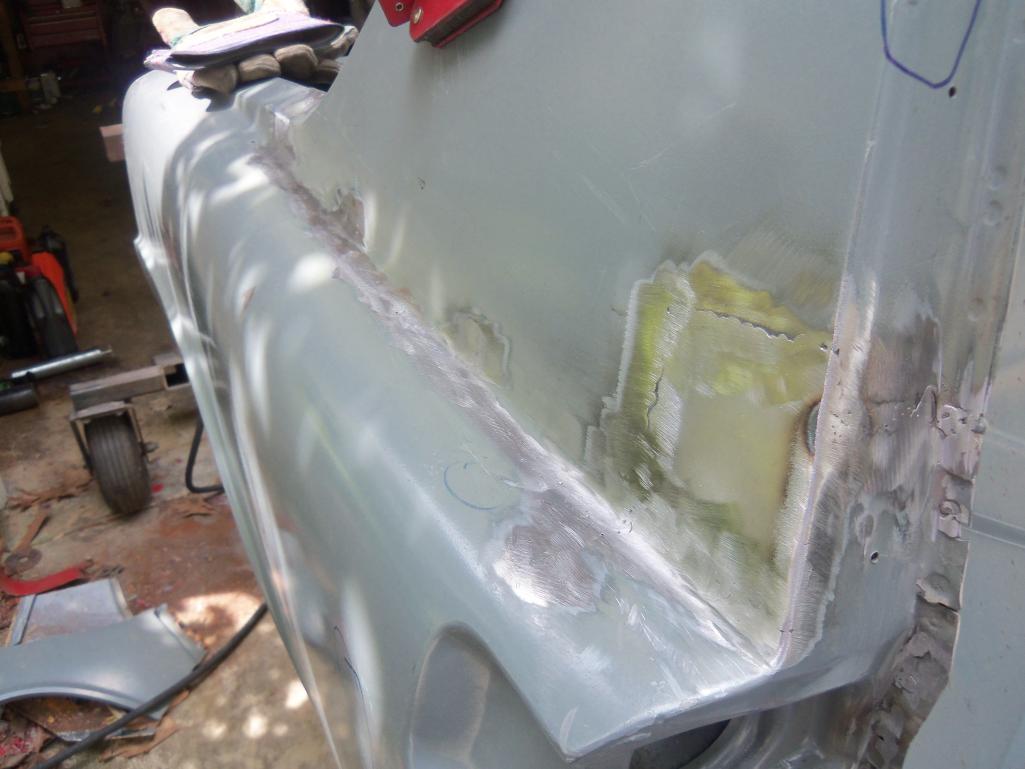
In case anyone was wondering what happens when you powdercoat the body, the lead filler liquifies. 
And this one has me stumped... There was a spot of lead filler underneath the targa bar.
Attached thumbnail(s)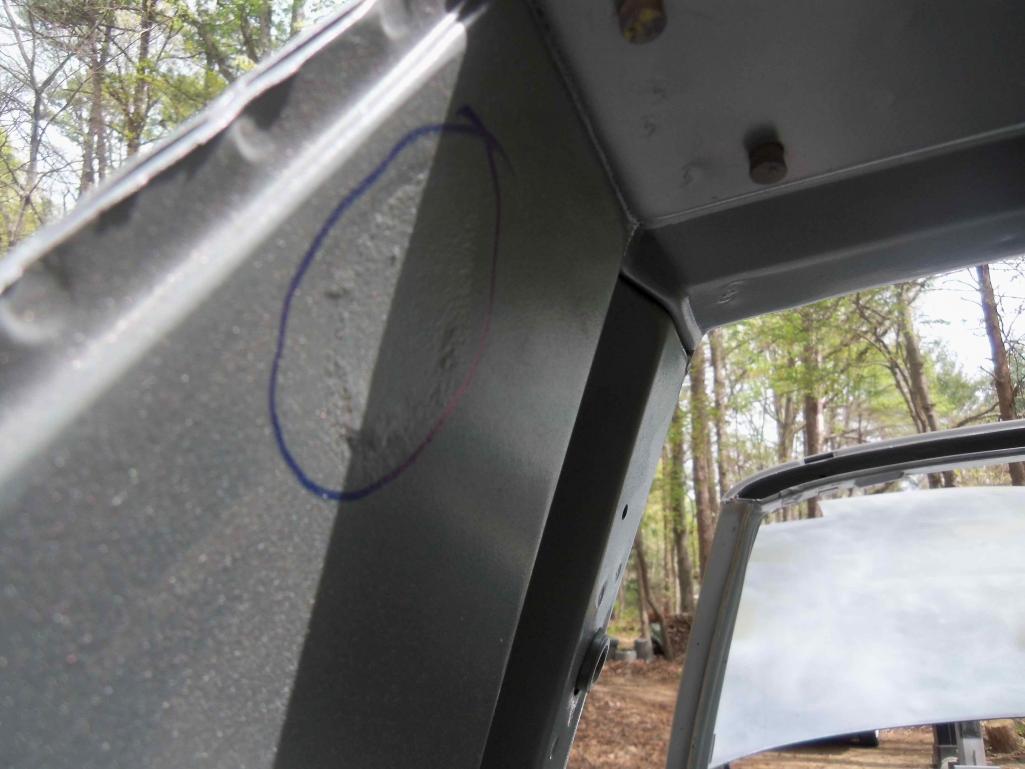

Posted by: dlee6204 Apr 5 2012, 08:52 PM
And here is my biggest accomplishment so far.
The driver's side rear fender had a really nasty dent in the back. It was my goal to get the dent pulled out and repair it so that it will need no filler. It was a lot of work but mission accomplished. Tools used: hammer, dollies, stud gun and puller, metal files and a big ole shrinking disk. 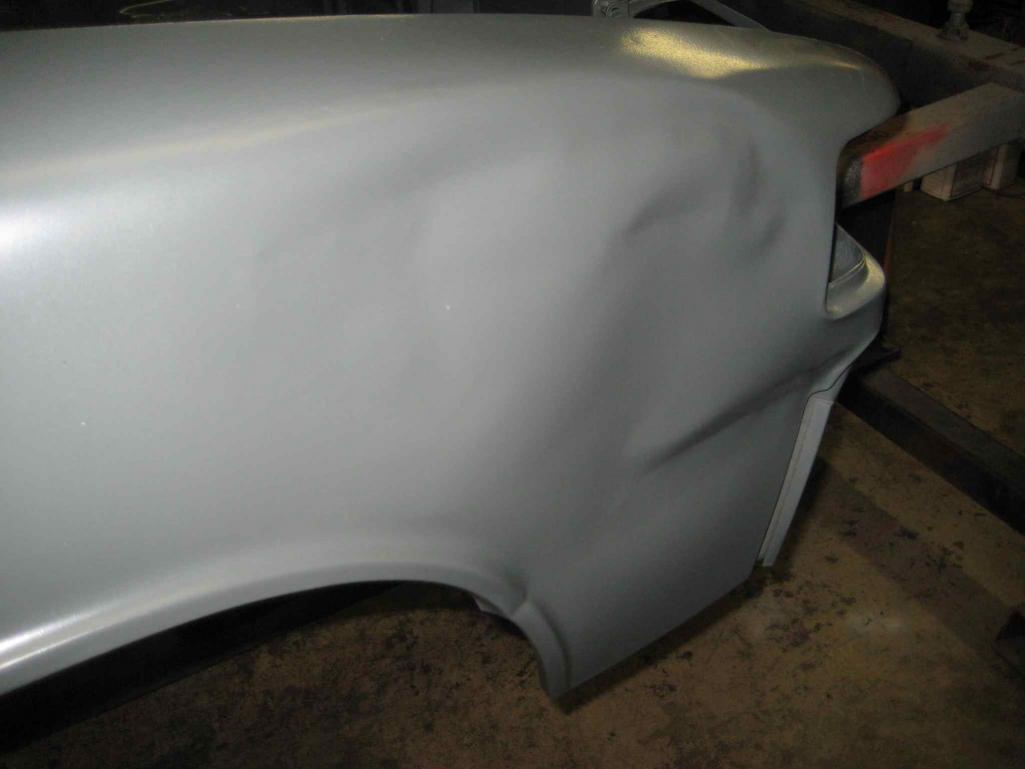
After I got the panel into shape, I started filing the top of the area to get it smooth.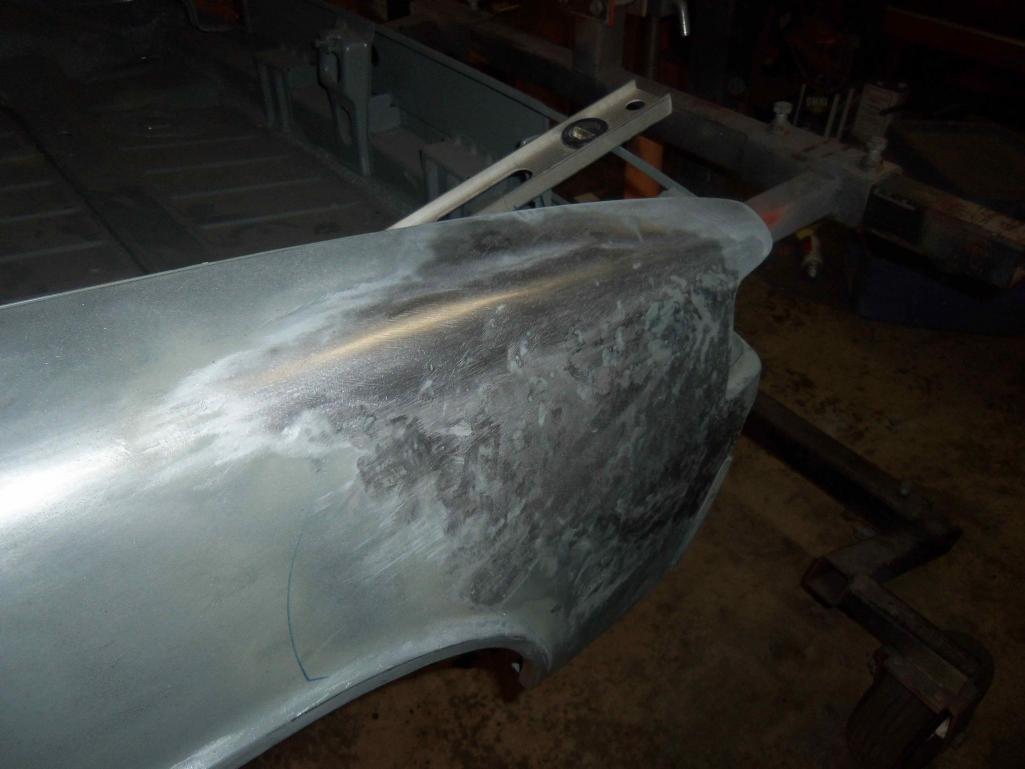
This shows some low spots after I started filing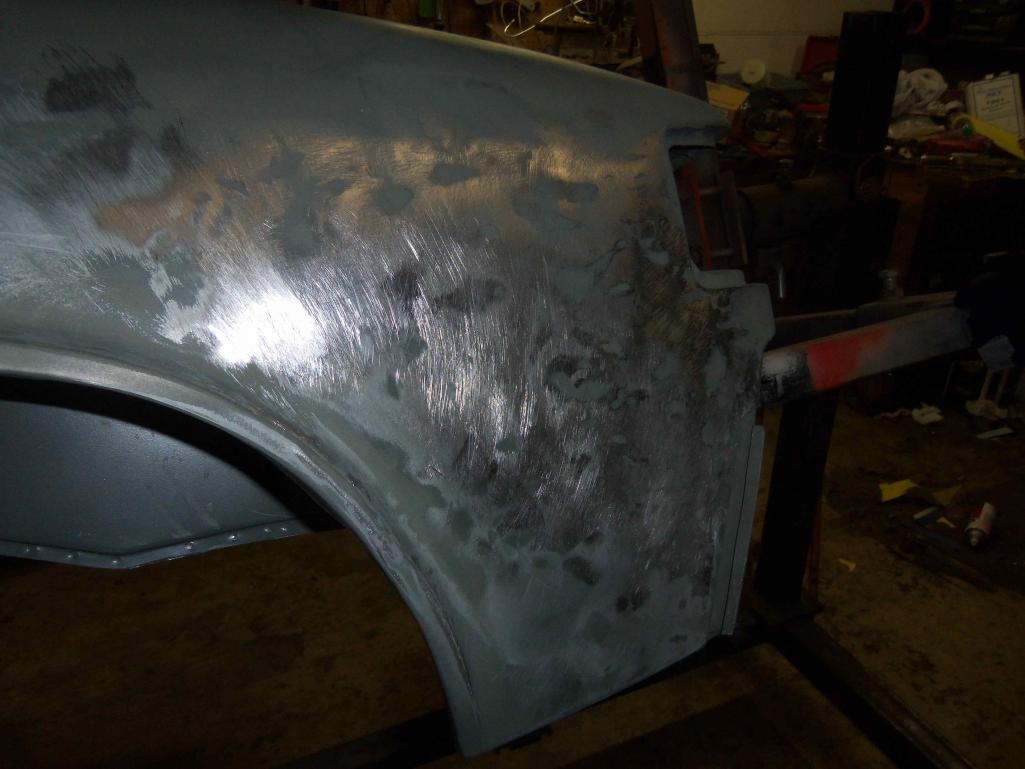
More or less finished. I wish I would have taken better pictures throughout the process. 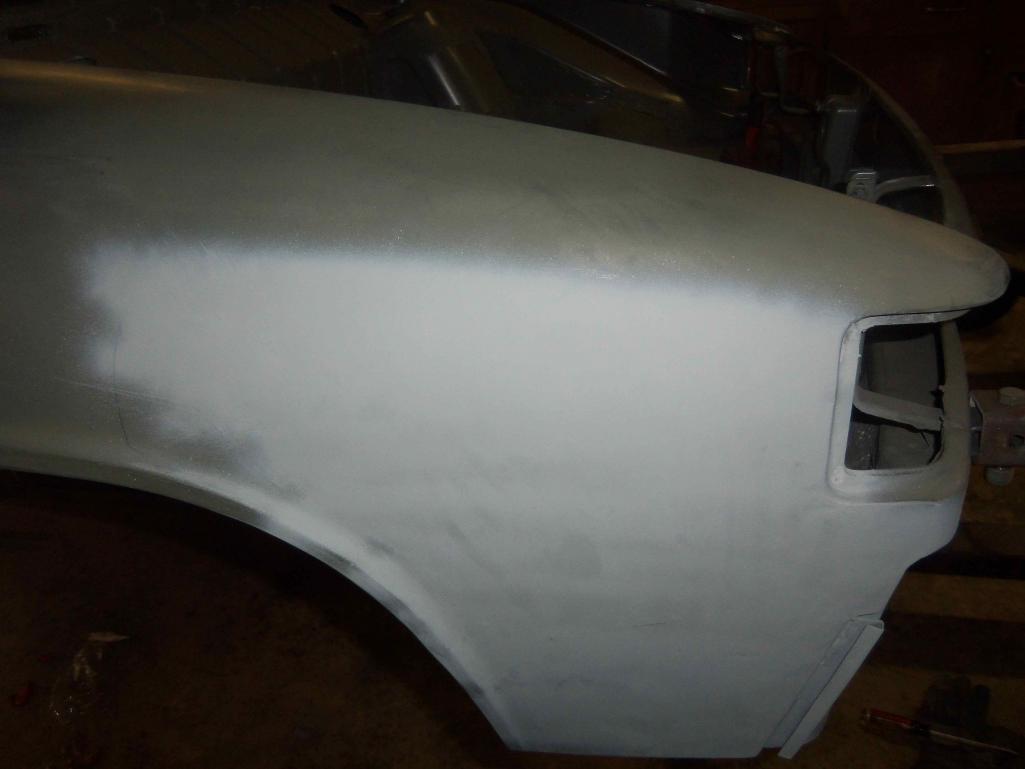
Posted by: 993inNC Apr 7 2012, 07:39 PM
Looks pretty damn amazing from my house Doug! We gonna take first at pebble beach with it
Posted by: SUNAB914 Apr 8 2012, 05:03 PM
I Doug I have a basement you can have! Your a keeper. 
Posted by: dlee6204 Apr 15 2012, 09:12 PM
Got some work done on the doors. The passenger door had some dents and one small bit of rust. The driver's side had more rust though. Both doors though had large oil-canning on the bottom half. Possibly from the heat of powder coating. I got both doors roughed back into shape but they will need a skim coat of filler. 
After some heat and hammer and dolly work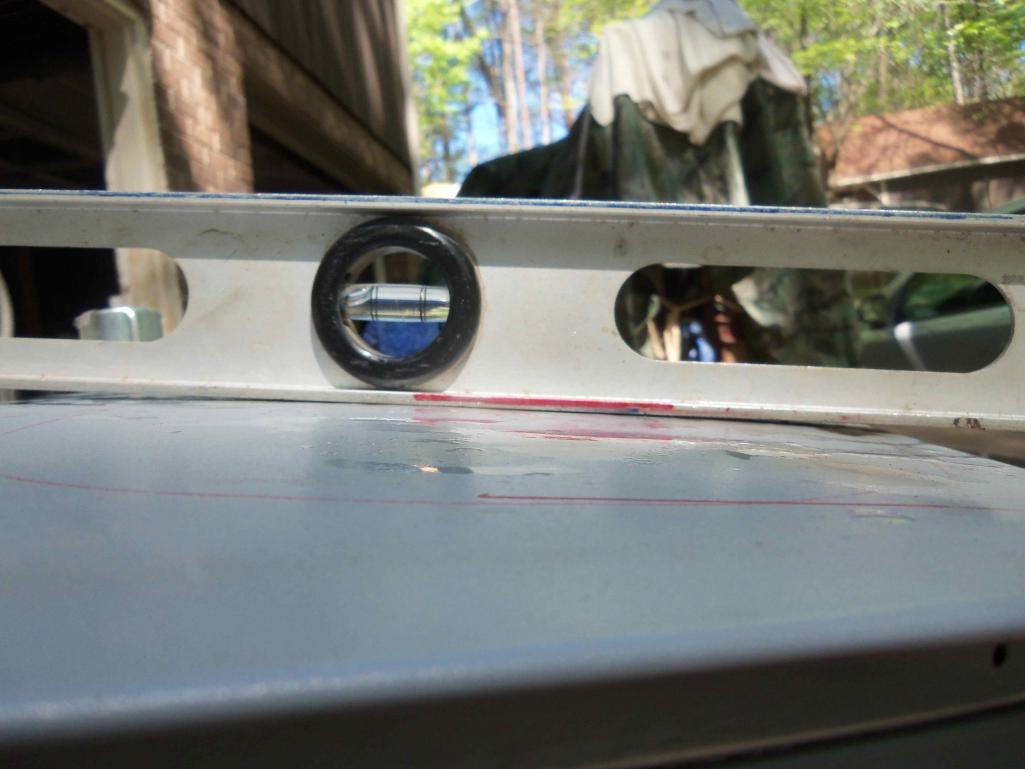
Posted by: dlee6204 Apr 15 2012, 09:14 PM
One small bit of rust... 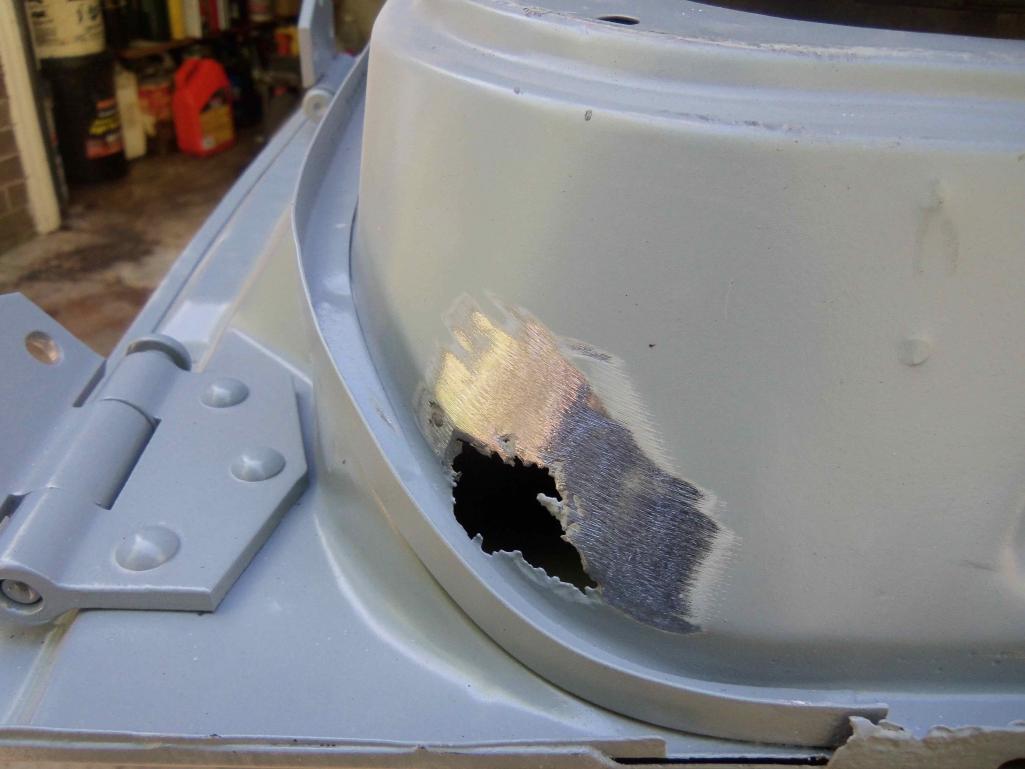
Posted by: dlee6204 Apr 15 2012, 09:23 PM
And the driver's door... the 'fun' door 
I started by cutting out the bottom channel completely.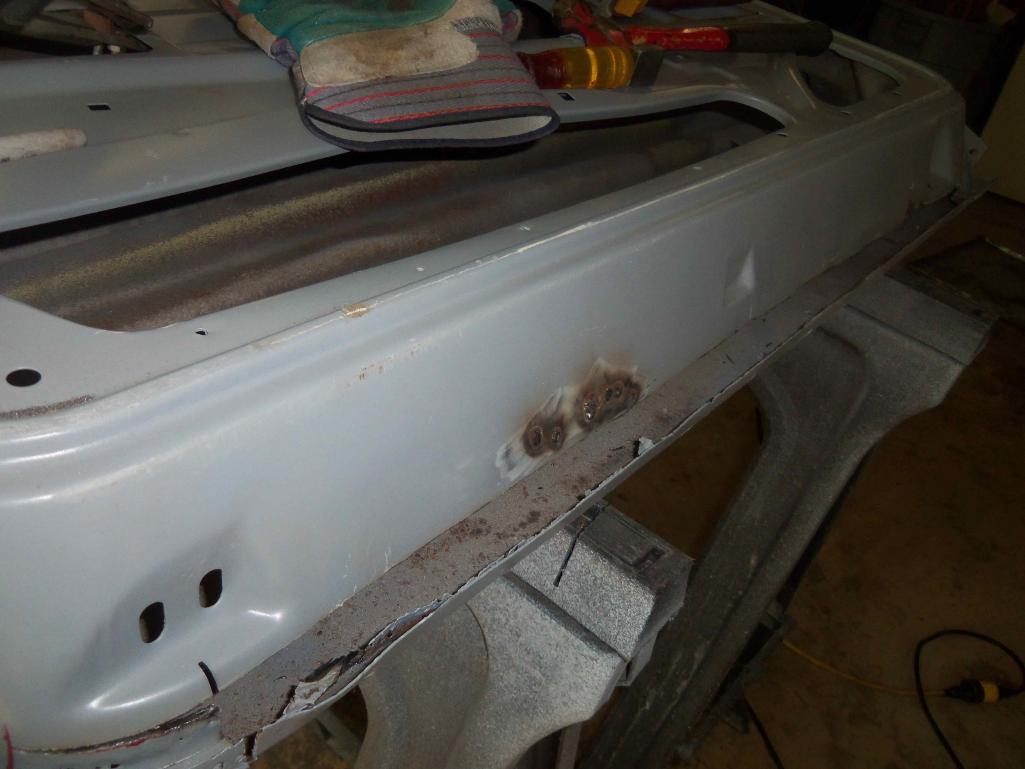
I then cut out a strip of some 20 gage steel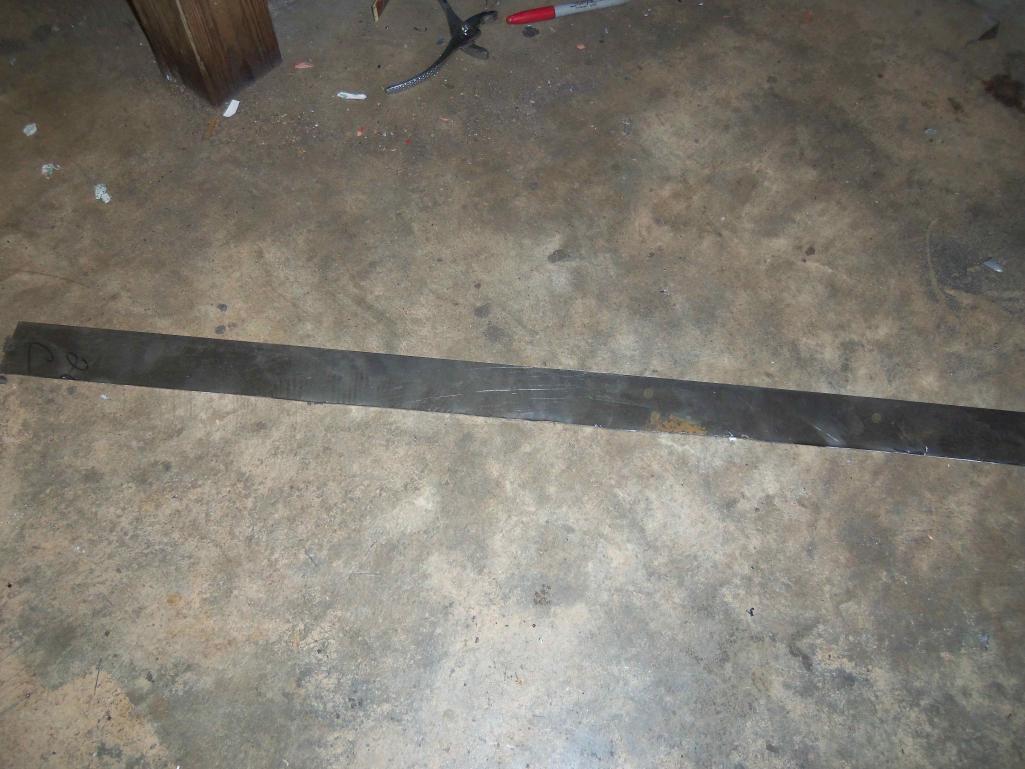
Made a 90 degree bend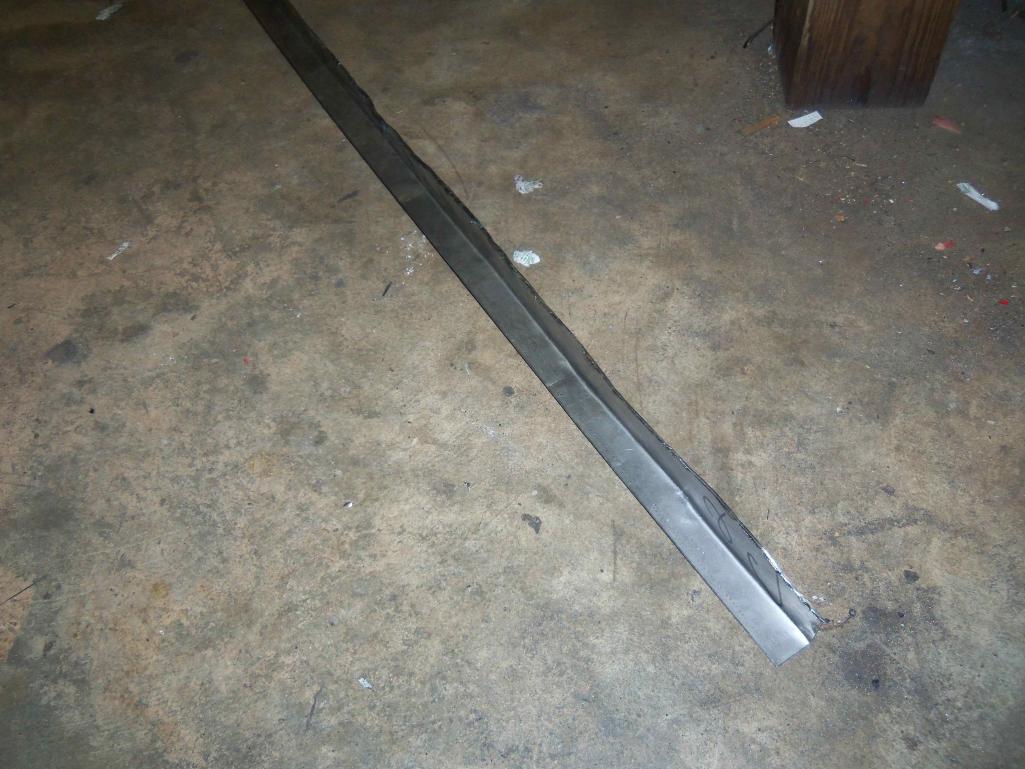
And used a steel block to form the U-shape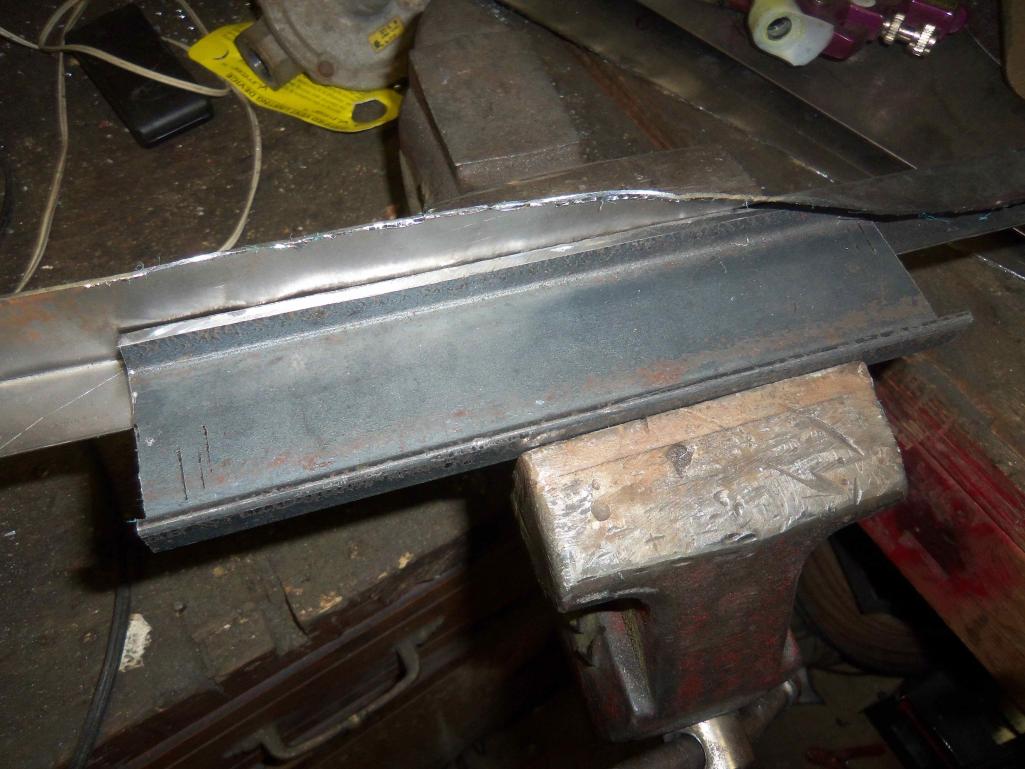
Posted by: dlee6204 Apr 15 2012, 09:28 PM
Voila!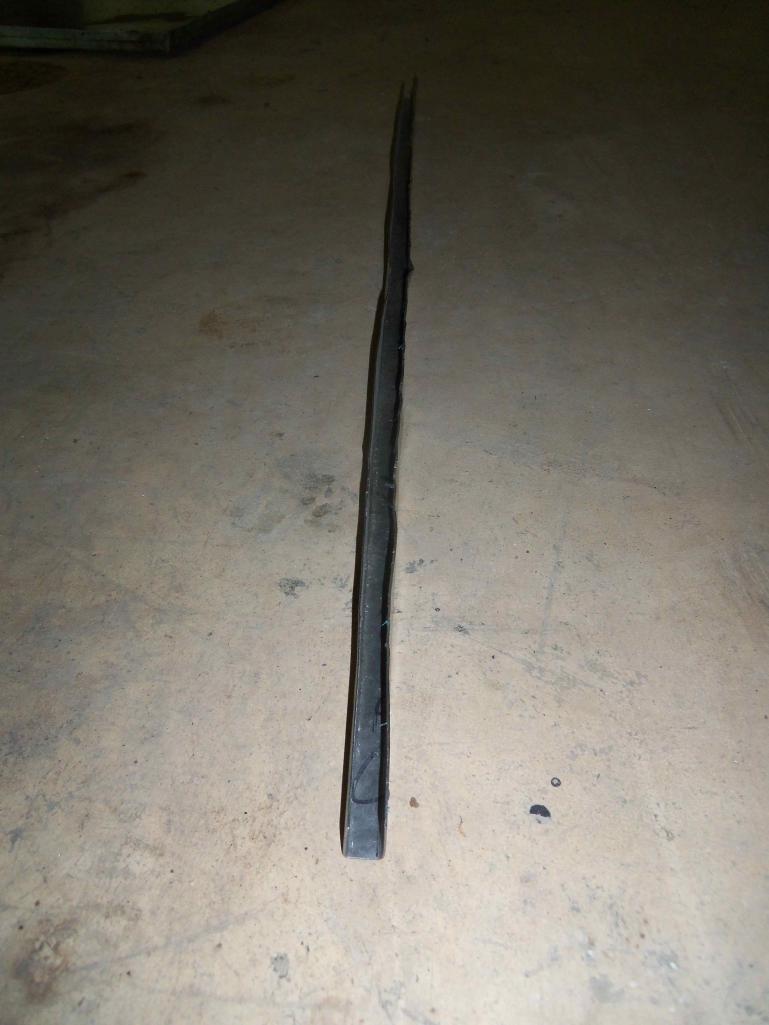
I welded it in! I smoothed over the welds and its now good to go. 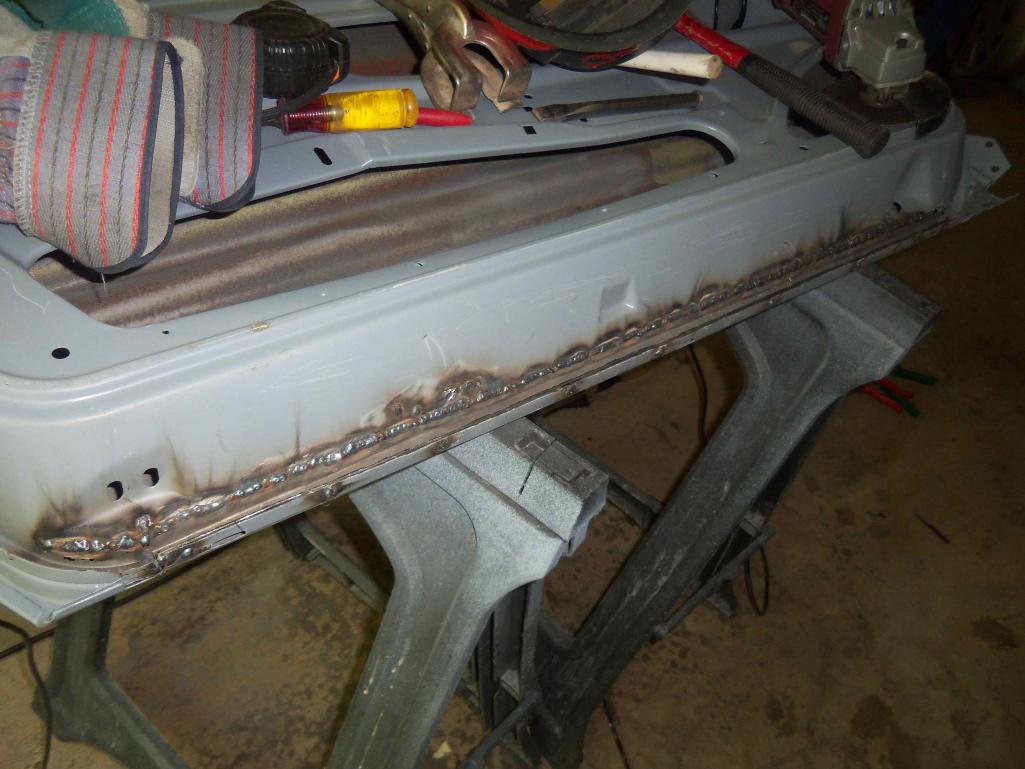
Posted by: dlee6204 Apr 15 2012, 09:33 PM
More oil canning...
Posted by: 993inNC Apr 16 2012, 07:36 AM
Dude, really, that is very cool! And the bottom edge of the door didn't warp with all that welding? I never even thought about cutting all of that out, just thought we'd fill it in.
Great work......
Posted by: FourBlades Apr 16 2012, 10:32 AM
Nice repair work!
John
Posted by: dlee6204 May 21 2012, 07:34 AM
Posted by: dlee6204 May 21 2012, 07:42 AM
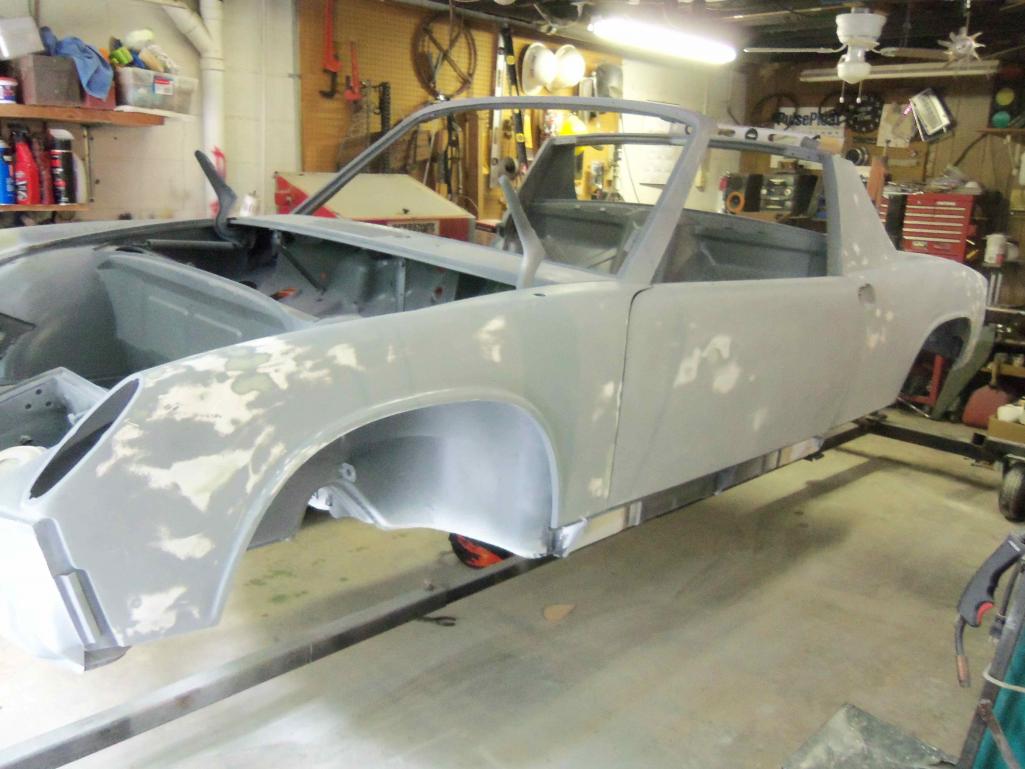
Lots of tedious work has been happening... I have been focussing on finishing the bodywork for the doors and lids. I started off by sanding everything, applying an epoxy primer over any bare metal areas, and then adding filler over that. This is followed by several stages of high build primer and block sanding. They have their final stage of primer and after I finish the rest of the car, I will wet sand everything down in prep for paint. I'm not going to paint it, Chris will find someone else to do that. 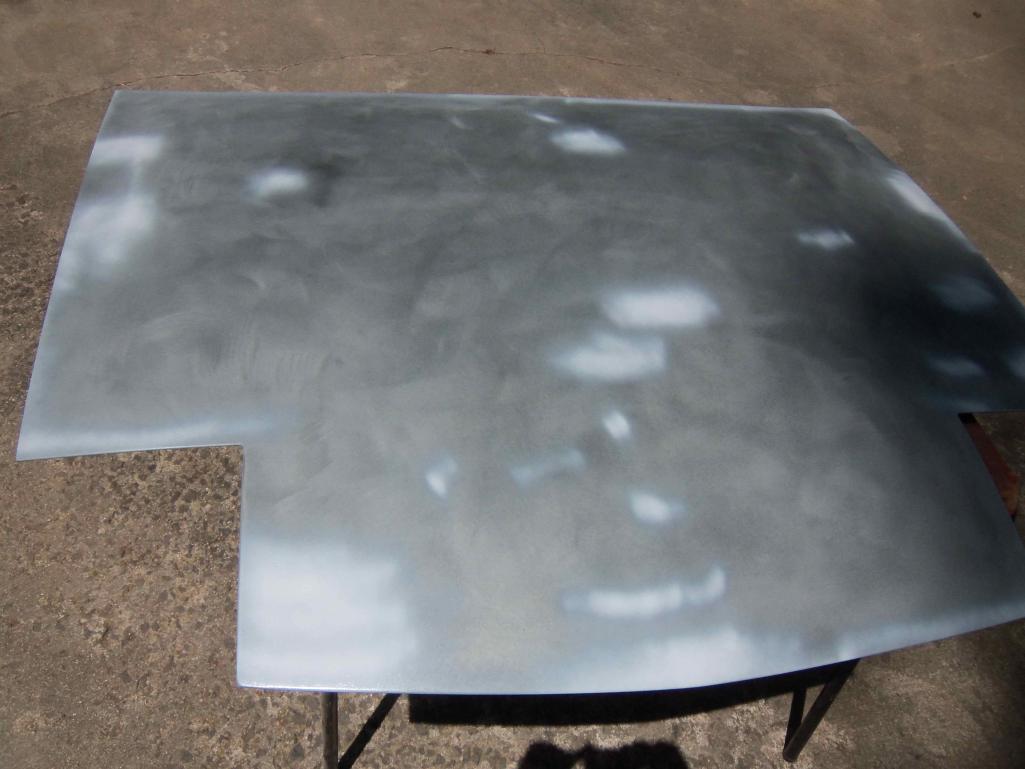
Posted by: dlee6204 May 21 2012, 07:46 AM
I also started working on prepping the rest of the car. I sanded the underside of the floorpan and applied some epoxy. I will add seam sealer and then apply a second coat.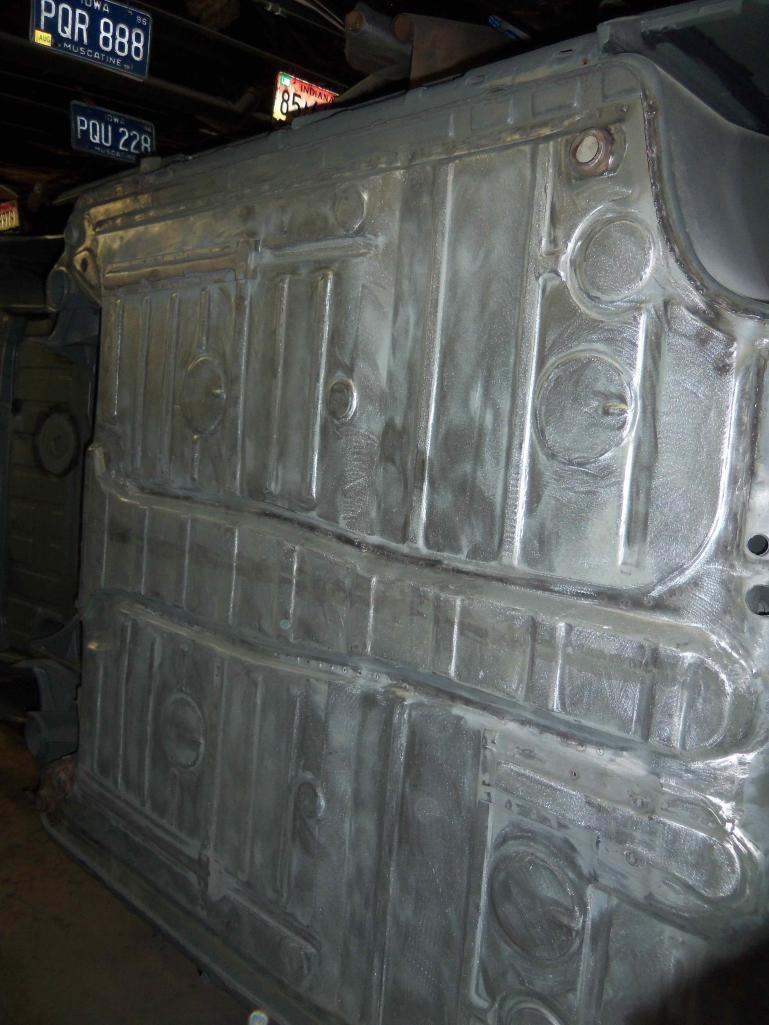
Posted by: dlee6204 May 21 2012, 09:05 AM
All sealed up 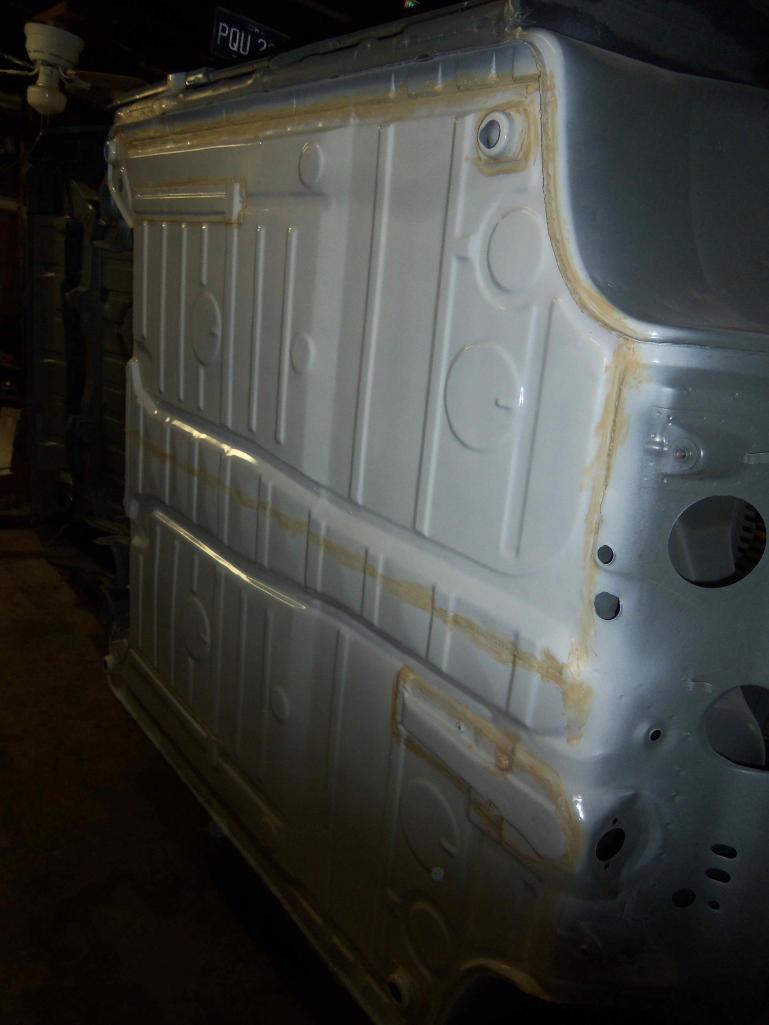
Posted by: Cairo94507 May 21 2012, 03:08 PM
Wow That is some serious work and nicely done. Love watching the progress of the build.
Posted by: speed metal army May 21 2012, 11:30 PM
Wow
That is some serious work and nicely done. Love watching the progress of the build.No sh!t!!!!seriously, crazy nice work and dedication. Hats off.
Posted by: saigon71 May 22 2012, 06:11 AM
Impressive work...especially that door channel piece.
Keep it up!
Posted by: dlee6204 May 22 2012, 08:55 AM
Thanks guys.
The underside of the floorpan is pretty much done. 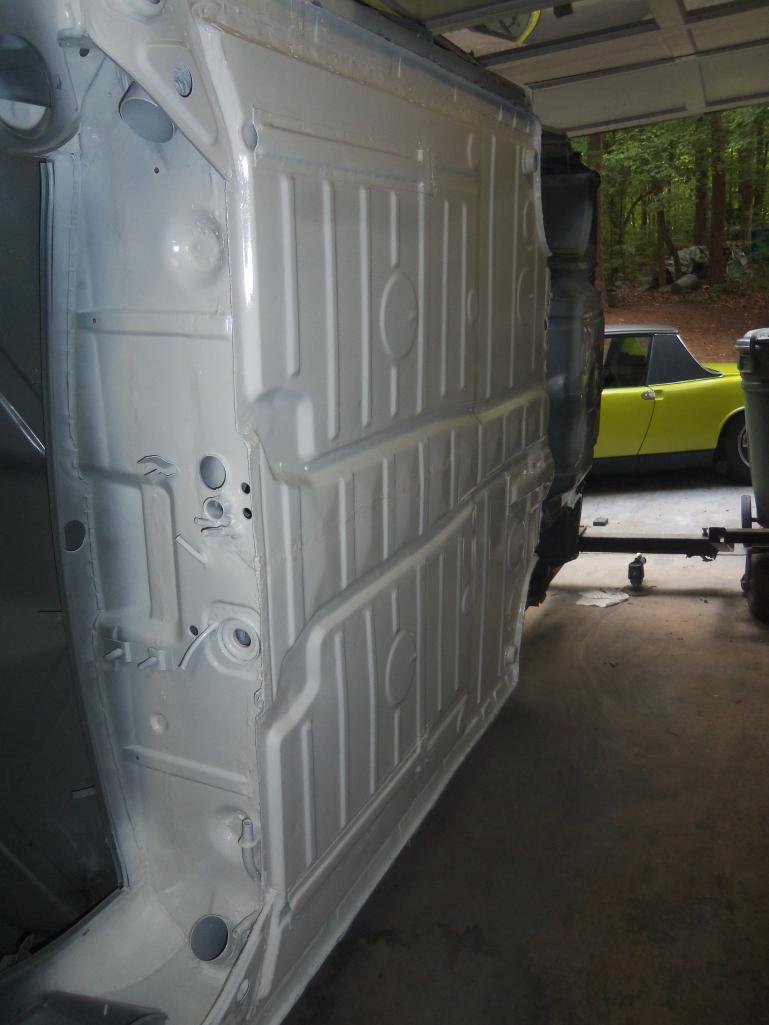
Posted by: arkitect May 22 2012, 09:06 AM
Very talented repairs...it will be like new after you are done.
Dave
Posted by: 993inNC May 22 2012, 09:08 AM
Are we spraying the entire car that white epoxy Doug? That white will go a long way to helping the factory yellow really pop!
Work looks great from here BTW
Posted by: dlee6204 May 22 2012, 10:38 AM
Chris, ill try to give you a call tonight. There's a few small things we need to discuss.
Posted by: 993inNC May 22 2012, 04:25 PM
Ooo that doesn't sound good!
Posted by: dlee6204 May 22 2012, 04:32 PM
I said SMALL stuff
Posted by: dlee6204 May 27 2012, 10:01 AM
I got the floors and engine bay epoxied and sealed. I'm being very thorough with the seam sealer but I'm making sure not to use too much and not to glob it on there. I will shoot a second coat of epoxy in the morning and then these areas will be done. 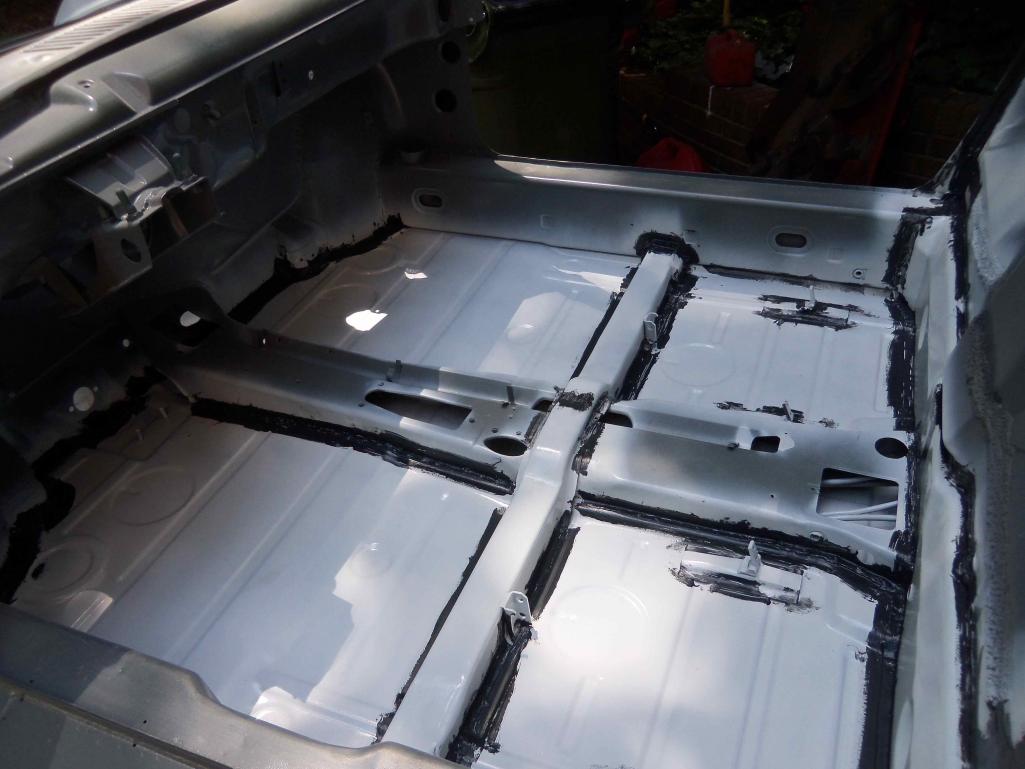
Posted by: OllieG May 27 2012, 11:13 AM
Great stuff going on here, nice one!
Are you sanding down each coat of epoxy so the next layer can key to it?..or is it working without?
Ollie.
Posted by: dlee6204 May 27 2012, 11:29 AM
For the epoxy primer, I sand the surface with 80 grit and then apply the epoxy. You can re-coat the epoxy up to a week without having to sand per the tech sheet. So when the car goes in for final paint, everything will have to be scuffed up again.
Posted by: dlee6204 May 27 2012, 11:31 AM
I should also add that the primers I am using are from Southern Polyurethanes.
http://www.southernpolyurethanes.com/
Posted by: dlee6204 Jun 7 2012, 05:05 PM
UPDATE: I've been getting a lot of work done. I started by prepping the driver's side, hitting it with some epoxy primer, seam sealer, body filler, high build primer and block sanding. That side is pretty much done, just needs final sanding. The cowl area also got done. 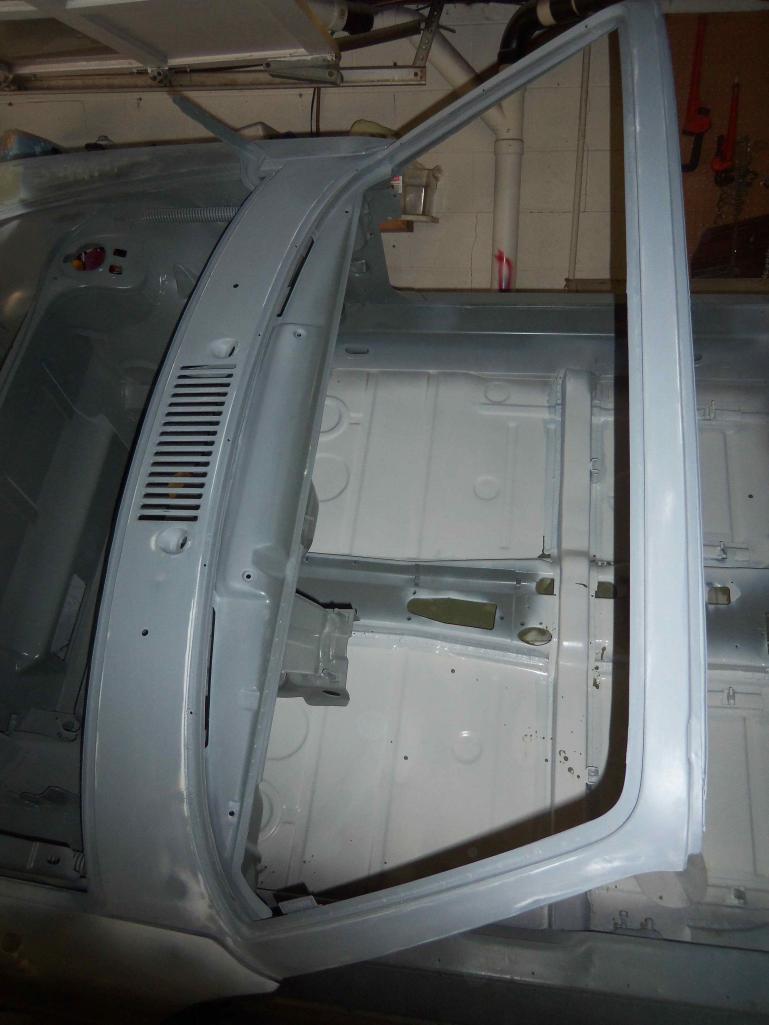
I also used Eastwood's Internal Frame Coating in all the cavities possible. 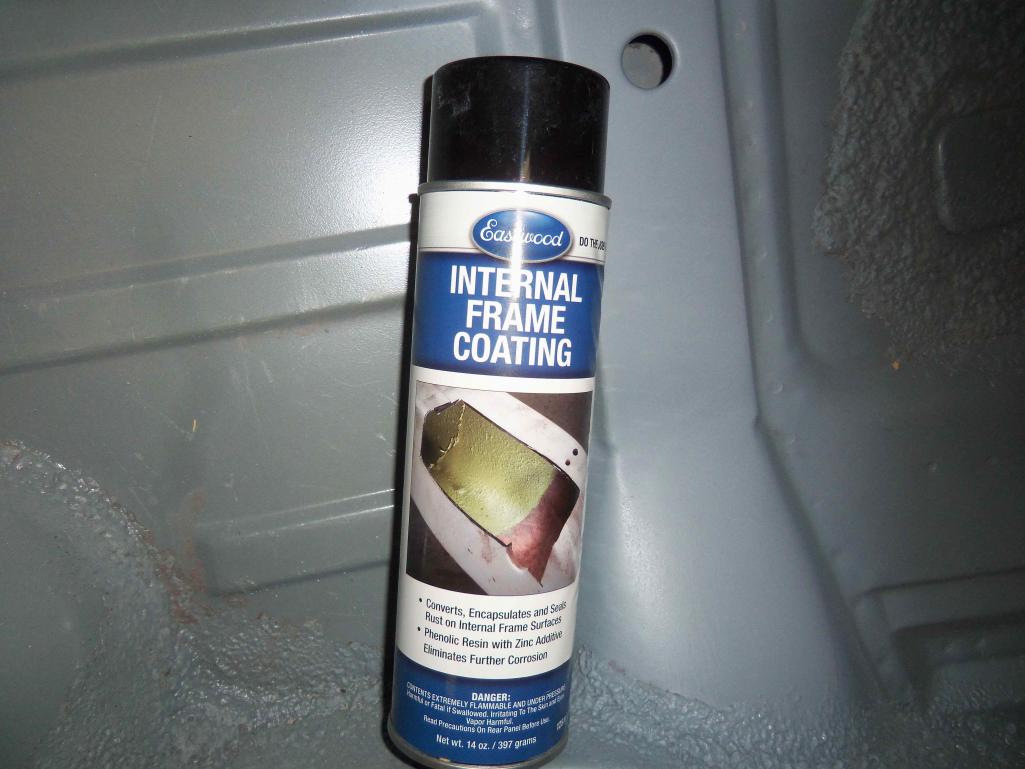
What's left to do: Passenger side fenders and final sanding.
Posted by: Jacob Jun 7 2012, 05:44 PM
Great work! Thank-you for posting your progress. Very educational! Much appreciated!
Posted by: dlee6204 Jun 24 2012, 07:01 PM
Well the body is pretty much done as far as I'm concerned. I gave it two coats of epoxy primer/sealer and gave it a wet sand. Bodywork came out great. 
I used water when taking these shots. The epoxy is NOT that glossy.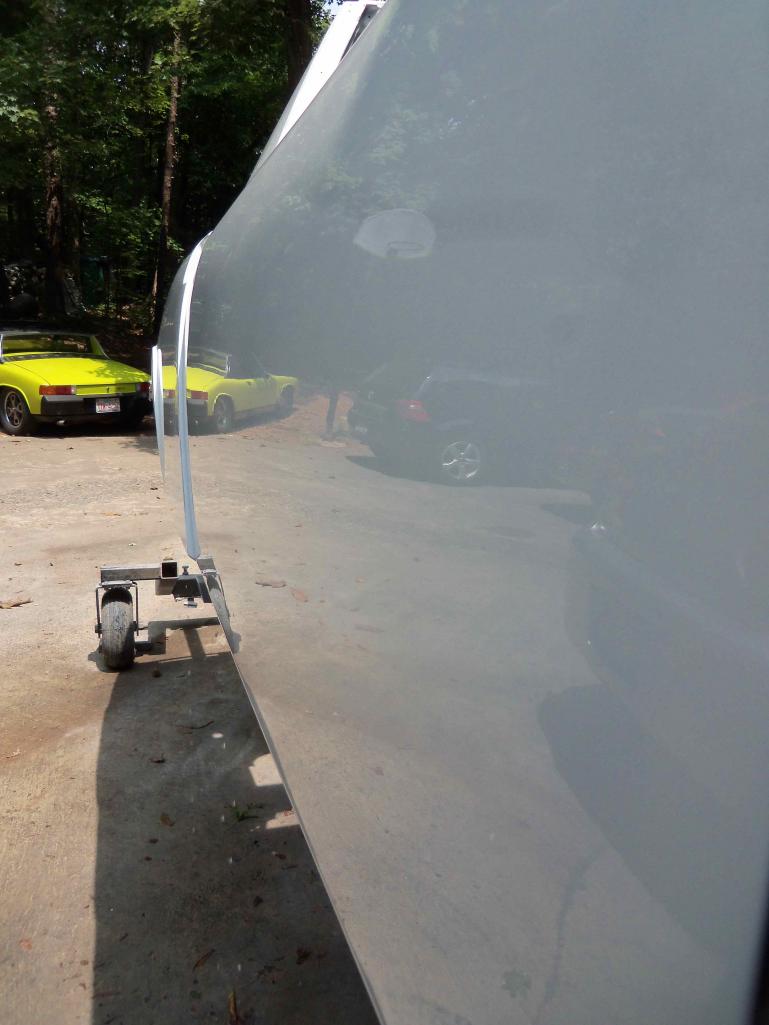
Posted by: dlee6204 Jun 24 2012, 07:03 PM
Posted by: Cairo94507 Jun 25 2012, 06:48 AM
Wow - very nice I can't wait to see it with color.
Posted by: trojanhorsepower Jun 25 2012, 05:31 PM
Doug,
That looks great! What are you going to do next?
Peter
Posted by: dlee6204 Jun 25 2012, 07:55 PM
That looks great! What are you going to do next?
Peter
Thanks! I'm pretty much done with my part on the car. Just some small touchup/cleanup here and there. Chris is going to pick the car up in a few weeks and will take it to a body shop and have it prepped and painted.
Hopefully I will now have spare time to work on my own car... it needs a little lovin.

Posted by: dlee6204 Jul 25 2012, 07:55 PM
Well Chris came and picked the car up today. He liked it, he paid for it, he loaded it up, and he took it home. Before he left I let him take my car through its paces as a little motivation. 
Now I need to know what to do with all the empty space. 

Posted by: trojanhorsepower Jul 26 2012, 07:11 PM
Put my car in it?
Posted by: trojanhorsepower Jul 26 2012, 07:12 PM
Chris sweet rig! I like the fact that the rotissory fits with the car on it.
Posted by: dlee6204 Jul 26 2012, 08:02 PM
Put my car in it?
I wouldn't say no
Posted by: 993inNC Jul 27 2012, 05:45 AM
Chris sweet rig! I like the fact that the rotissory fits with the car on it.
Me too
Its the only trailer I have that the car fit in with the rotiss.The car looks great. Doug did an amazing job! I certainly couldn't have done even close to the same job (to busy, would have been in too big of a rush to finish).
Hoping to have it wearing color soon, then we really get to see how it turned out
Posted by: 993inNC Sep 21 2012, 04:28 PM
AND WE HAVE COLOR!!!!!! Woohooooooo
Three years just about to the day to get to this moment. I am so excited, should have it back mid next week. Already have the suspension bits at the powder coater. New shocks, bearings and misc suspension bits on order.......should be a rolling chassis soon. Can't wait to dive in. First thing to go on are the big ass black bumpers! I know, not the prettiest but they are original and in really nice shape and taking up a lot of room in my storage shed. Already scrubbed them down, a little back to black for effect and on they'll go!
Attached thumbnail(s)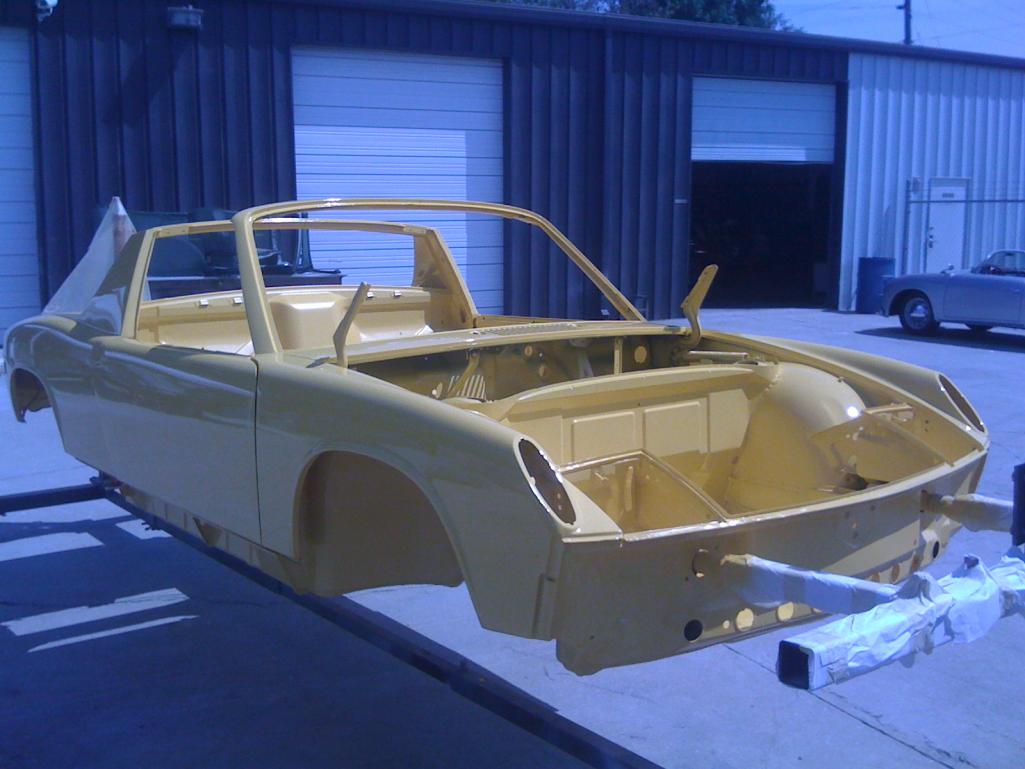
Posted by: dlee6204 Sep 21 2012, 04:41 PM
I'm super excited and it's not even my car! 

Posted by: trojanhorsepower Sep 21 2012, 06:01 PM
Looks great Chris!
Posted by: 993inNC Sep 21 2012, 07:05 PM
Thanks, it really does. Doug did a fine job. The fenders and door look amazing as does the pan and underside of the car. His cutting and welding in work was top notch. The body shop found a small area of work that needed attention on the hood and decklid, nothing major. Its a lot of acreage of relatively flat surface and was barely noticeable by touch let alone by eye, but this guy knew what to feel for. Can't really complain. Doug was great to work with, chronicled everything here (which I've saved to flash disk for future proof of work done) and did a waaaay better job than I could have ever thought to do. And was reasonably priced to boot, happy all around.
Posted by: Krieger Sep 21 2012, 10:26 PM
Very nice work! It's hard to tell what color it is. Tan? Yellow?
Posted by: Krieger Sep 21 2012, 10:27 PM
Oh, I like the bis ass black bumpers!
Posted by: wrightee Sep 22 2012, 06:10 AM
Before...
After... I need to remember to replace the ground stud
New tube installed
Wow, excellent work and an inspiration to get working harder on my project. I have rust almost identical to photo #2 above (driver side engine shelf). Question: did you form sheet metal to patch the shelf piece and leave out the small drain indendation (that looks like it doesn't work anyway)? Also, for the inner firewall fix; did you have to open up the fender for access, or were you able to repair this from the inside?
Posted by: wrightee Sep 22 2012, 06:13 AM
Before...
After... I need to remember to replace the ground stud
New tube installed
Wow, excellent work and an inspiration to get working harder on my project. I have rust almost identical to photo #2 above (driver side engine shelf). Question: did you form sheet metal to patch the shelf piece and leave out the small drain indendation (that looks like it doesn't work anyway)? Also, for the inner firewall fix; did you have to open up the fender for access, or were you able to repair this from the inside?
The photo was on post #74
Posted by: dlee6204 Sep 22 2012, 07:47 AM
Very nice work! It's hard to tell what color it is. Tan? Yellow?
I believe its the original color L13 (Summer yellow). Hopefully we can get some better pictures once he gets the car back.
Posted by: dlee6204 Sep 22 2012, 07:56 AM
Wow, excellent work and an inspiration to get working harder on my project. I have rust almost identical to photo #2 above (driver side engine shelf). Question: did you form sheet metal to patch the shelf piece and leave out the small drain indendation (that looks like it doesn't work anyway)? Also, for the inner firewall fix; did you have to open up the fender for access, or were you able to repair this from the inside?
Yeah I believe I left the drain indent out of it. I can't remember if I drilled a drain hole or not. For the sidewall, I did not have to remove any part of the fender. I was able to do it all from the engine bay or passenger compartment. When doing the outer jackpost though I removed part of the door jamb to get a little more access. I didn't want to do anymore welding on exterior panels than I already had to.
Posted by: nsr-jamie Sep 22 2012, 08:33 AM
Glad to see you got the bodywork done and some paint on it. Looking forward to seeing some better pictures. I sure learned a lot from this posting, thanks
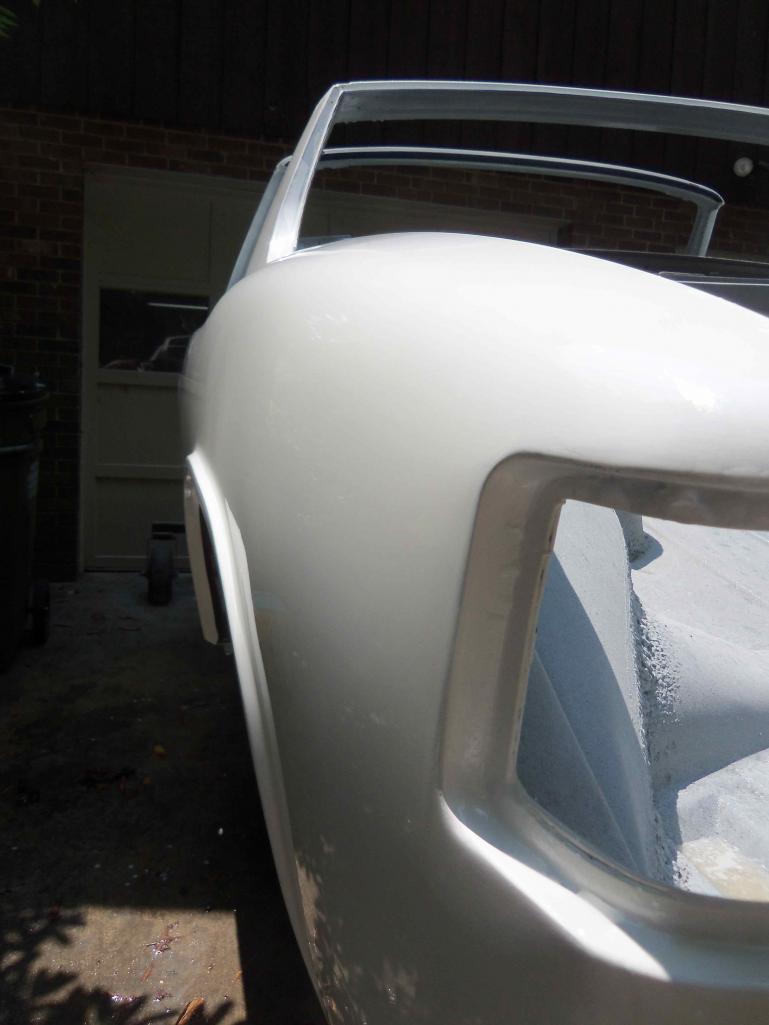
Posted by: 993inNC Dec 1 2012, 09:31 PM
SHE's BACK!!
So after three years and three months of owning what was supposed to be my little driver, Summer is back and ready for reassembly!
I need to get it back to the body shop for some flaws I found and want fixed. Should have it to roller stage very soon. I have all new suspension, bearing and brake parts (accept calipers), and am ready to go..........if I could only find the rear trailing arm bolts
I'll get better pics tomorrow. I've already got the bumpers on, as well as the front A-arms. If I can find the rear swing arm bolts, it'll be rolling in no time
Attached thumbnail(s)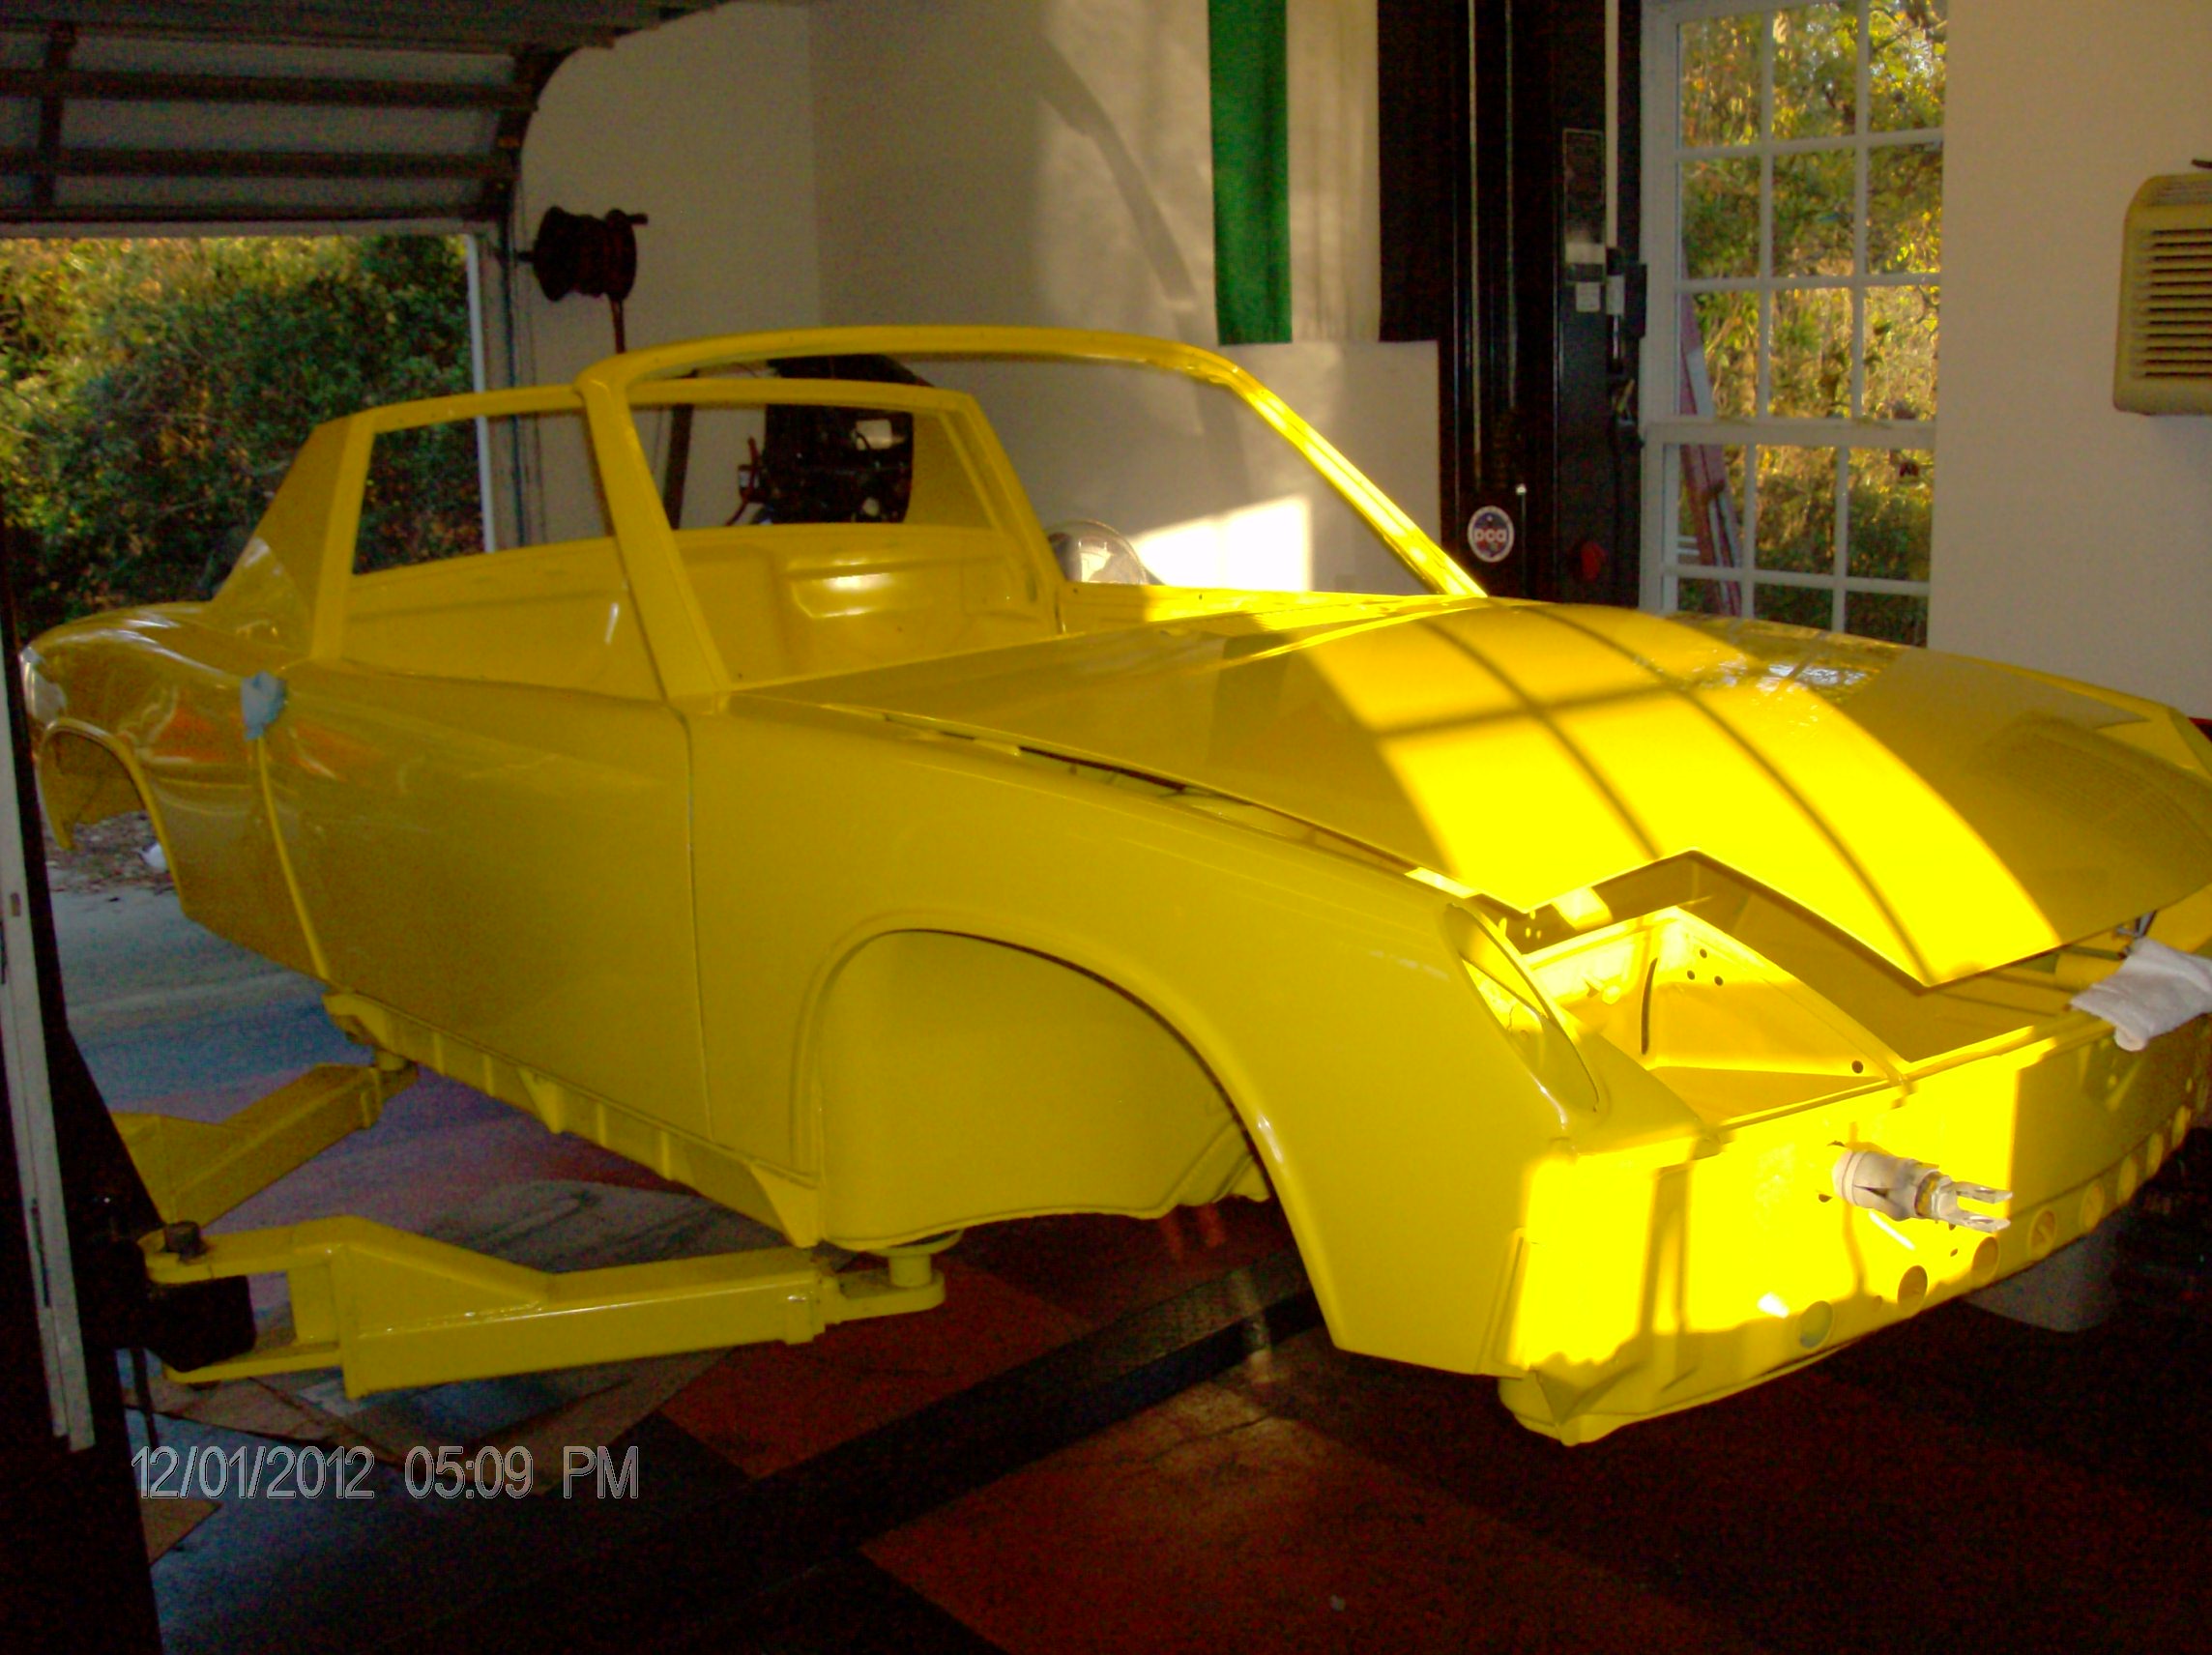

Posted by: FourBlades Dec 1 2012, 09:50 PM
Wow, that is beautiful.
Too nice to put any greasy parts on it.
Just leave it like that...
John
Posted by: Cairo94507 Dec 2 2012, 08:34 AM
That looks so nice! I can't wait to see some parts start to appear.
Posted by: saigon71 Dec 2 2012, 08:46 AM
Dude...your car looks awesome! Great work!
I also picked up some of Eastwoods Internal Frame Coating that I plan to use in the center tunnel. What do you think of this product? Any application tips?
Congrats again, I look forward to seeing this thing get put back together.
Posted by: jersey914 Dec 2 2012, 09:56 AM
Beautiful restoration! Another one saved! Now throw some muscle into it!

Posted by: bulitt Dec 2 2012, 10:56 AM
What trailing arm bolts do you need? These?
Posted by: 993inNC Dec 2 2012, 11:28 AM
Those would probably be them Bob. I found allen headed bolts that did the trick but I don't like not using the right bolts. figured I'd at least get started and could always go back and change them out.
Also have seemed to misplace a rear strut spring cap and a trailing arm shaft nut.......got lazy at the end of disassembly! Everything else is bagged and tagged.
John I'd love to leave it as is, but with two other cars, I need my lift And it is too nice to put old parts back on.......but its what I have so.....
Saigon, you'll have to ask Doug about what he thought of the coating, I had nothing to do with it.
Jersey, hadn't decided what I'm doing for a motor yet. I have two and considered building one up and saving the other. I'm not going crazy though, I have the 993 if I want to go fast. This just has to look good
Posted by: trojanhorsepower Dec 2 2012, 04:46 PM
That looks awesome Chris! This car is really going to be nice. I will have to check it out next time I am down your way.
Posted by: dlee6204 Dec 3 2012, 11:18 AM
My only tip is that it can be very messy! It dries pretty quick too. I can't really comment on how well it performs other than it gets everywhere and is a pain to clean up!
Posted by: 993inNC Dec 3 2012, 06:25 PM
That looks awesome Chris! This car is really going to be nice. I will have to check it out next time I am down your way.
Thanks brother, come down any time.
Posted by: Eric_Shea Dec 3 2012, 06:45 PM
Looks great Chris. Stay at it!
Posted by: Socalandy Dec 3 2012, 09:46 PM
Looks Amazing!!!
Posted by: 993inNC Dec 4 2012, 02:59 PM
Looks Amazing!!!
Sure does! Got to thank Doug up there dlee6204, he did the body work on it. I couldn't have done what he did, that's for sure. I'm just proud to have a nicely restored ride. So many have been hacked or half ass fixed over the years, I think this car will really be something some day (hopefully soon).
I'll have some more teaser pics very soon!
Posted by: 993inNC Dec 4 2012, 09:06 PM
A little tease 
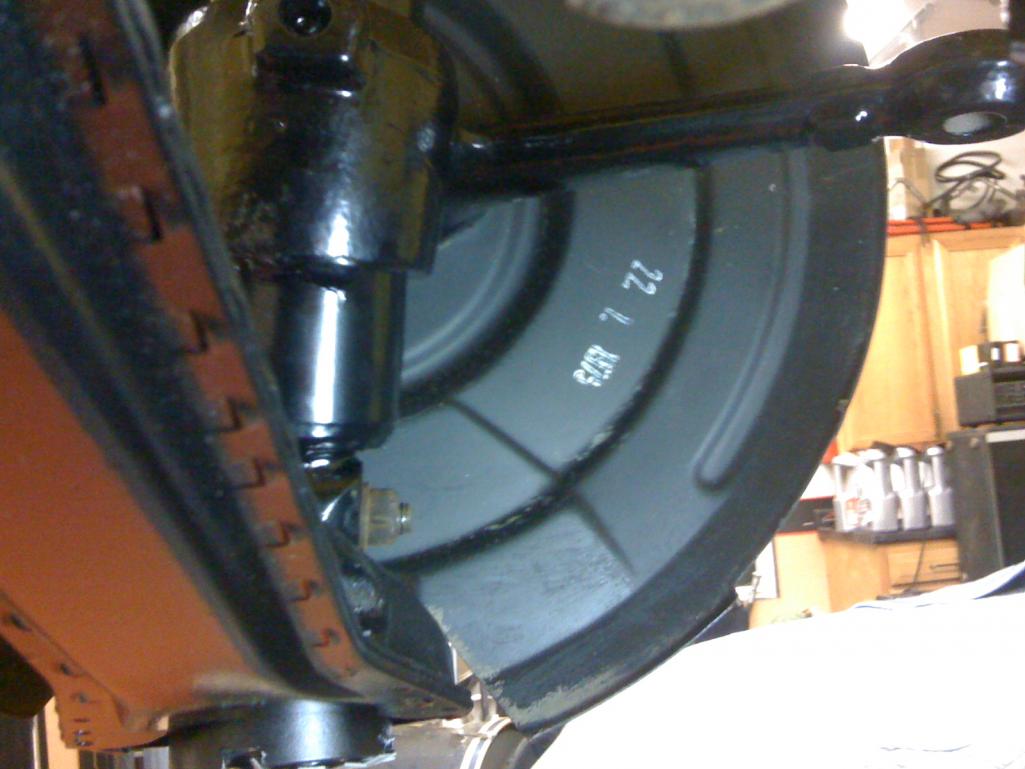
The production dates were apparently stamped in white paint on the inside of the brake dust shields. It reads 22/2/1975 so I didn't paint or alter them at all. The rear trailing arms used to have something similar, but I didn't tell the media balster in time and they got blasted off 
Posted by: JmuRiz Dec 4 2012, 09:08 PM
VERY nice!
Posted by: jersey914 Dec 4 2012, 09:30 PM
Nice tease!

Posted by: 993inNC Dec 5 2012, 08:48 PM
Okay this one was just for me A little minor sense of accomplishment. Sorry for the crappy Iphone pics.
Attached thumbnail(s)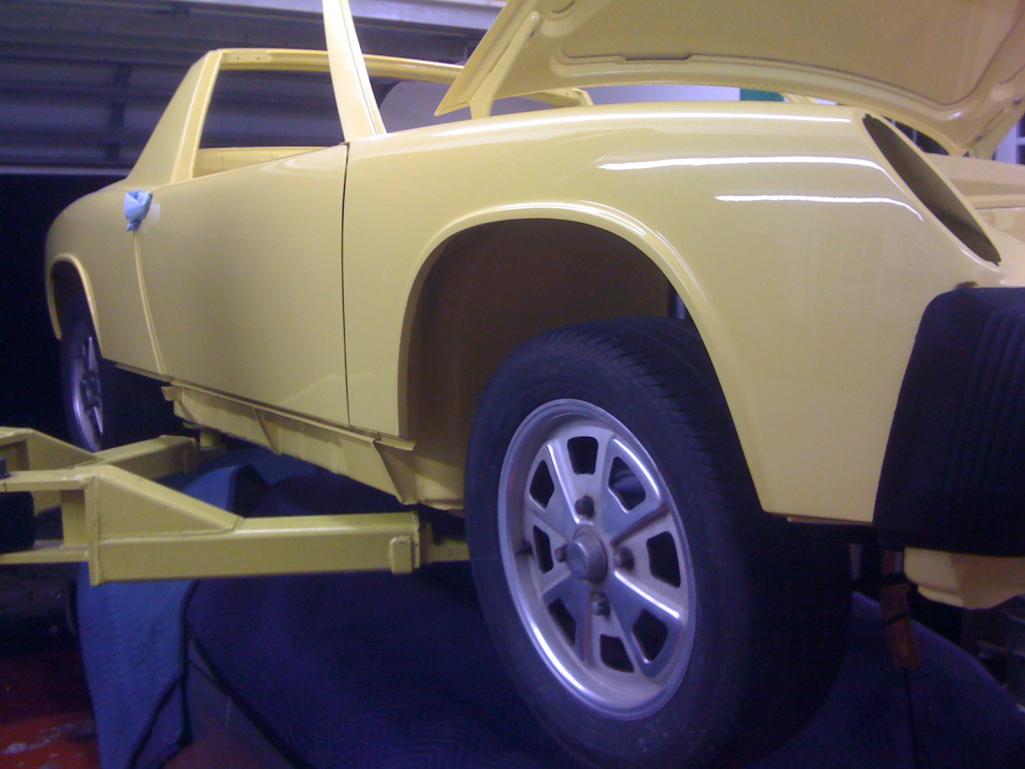
Posted by: bigkensteele Dec 5 2012, 09:45 PM
The production dates were apparently stamped in white paint on the inside of the brake dust shields. It reads 22/2/1975 so I didn't paint or alter them at all. The rear trailing arms used to have something similar, but I didn't tell the media balster in time and they got blasted off
My '75 still has the markings on the trailing arms. I can take some pics if you desire. Jeff Bowlsby has had rubber stamps made to replicate some of the engine tin markings. I am sure that your could do the same for the trailing arms.
Posted by: 993inNC Dec 6 2012, 06:50 AM
The production dates were apparently stamped in white paint on the inside of the brake dust shields. It reads 22/2/1975 so I didn't paint or alter them at all. The rear trailing arms used to have something similar, but I didn't tell the media balster in time and they got blasted off
My '75 still has the markings on the trailing arms. I can take some pics if you desire. Jeff Bowlsby has had rubber stamps made to replicate some of the engine tin markings. I am sure that your could do the same for the trailing arms.
Ooh, that would be cool! I don't remember what mine said though, guess I could just match the front, but not sure that would be accurate............hmm
Go ahead and post that pic if its not to much trouble. Thanks
Posted by: bigkensteele Dec 6 2012, 08:52 AM
The production dates were apparently stamped in white paint on the inside of the brake dust shields. It reads 22/2/1975 so I didn't paint or alter them at all. The rear trailing arms used to have something similar, but I didn't tell the media balster in time and they got blasted off
My '75 still has the markings on the trailing arms. I can take some pics if you desire. Jeff Bowlsby has had rubber stamps made to replicate some of the engine tin markings. I am sure that your could do the same for the trailing arms.
Ooh, that would be cool! I don't remember what mine said though, guess I could just match the front, but not sure that would be accurate............hmm
Go ahead and post that pic if its not to much trouble. Thanks
Off the top of my head, it is a circle with a letter in the middle. There aren't any production dates on them. I have only seen that on the brake shields. I will post pics as soon as I get a chance.
Posted by: Gint Dec 6 2012, 07:39 PM
That's looking great!
Posted by: bigkensteele Dec 7 2012, 06:03 PM
I apologize for the crappy phone pics, but they should be clear enough to replicate whatever this is. This is from the drivers side. The passenger side is just a white smudge in the same location.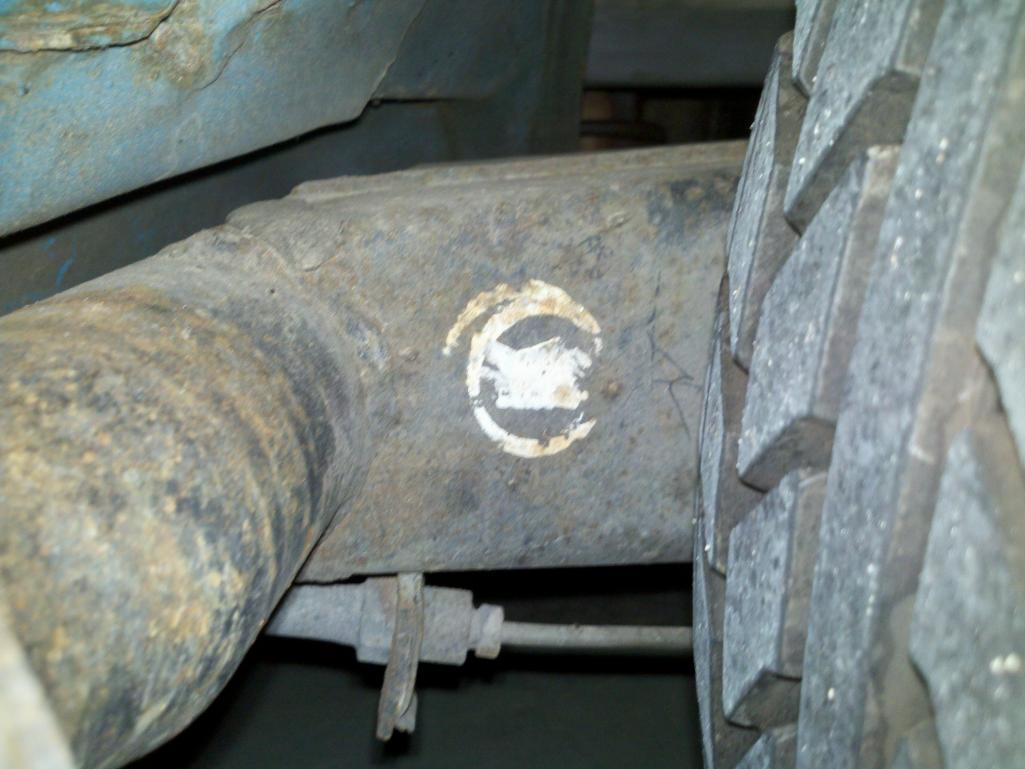
Posted by: bigkensteele Dec 7 2012, 06:04 PM
Blurry, but should give an idea of the size. You could probably recreate this with a paint pen.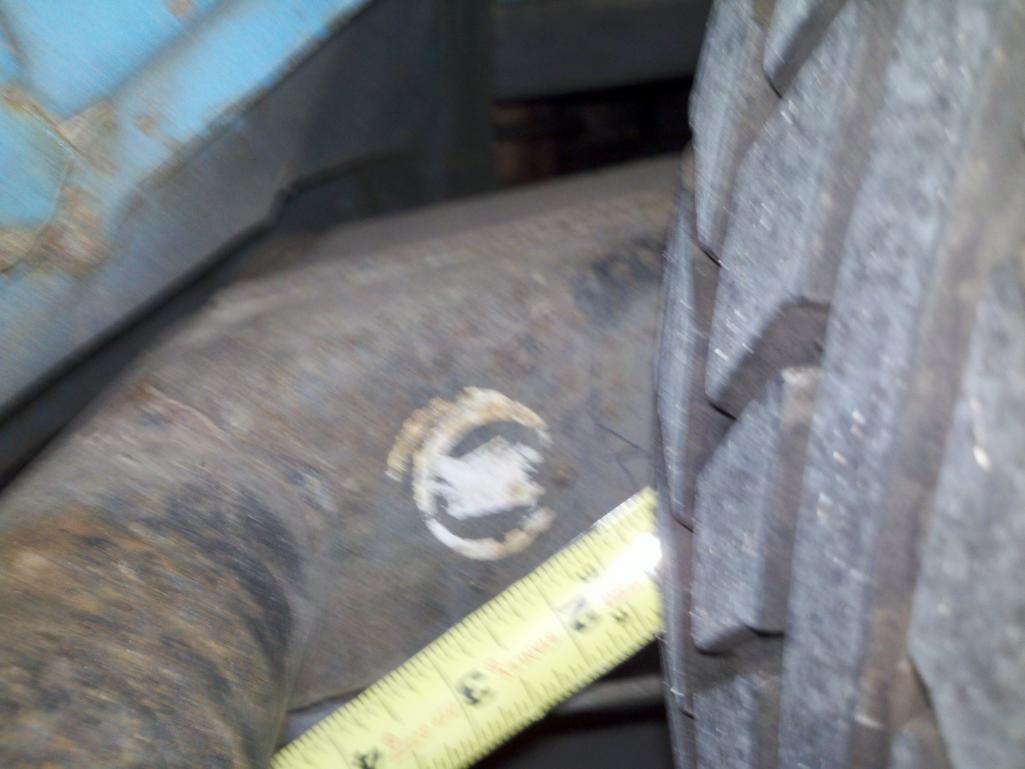
Posted by: 993inNC Jan 15 2013, 05:36 PM
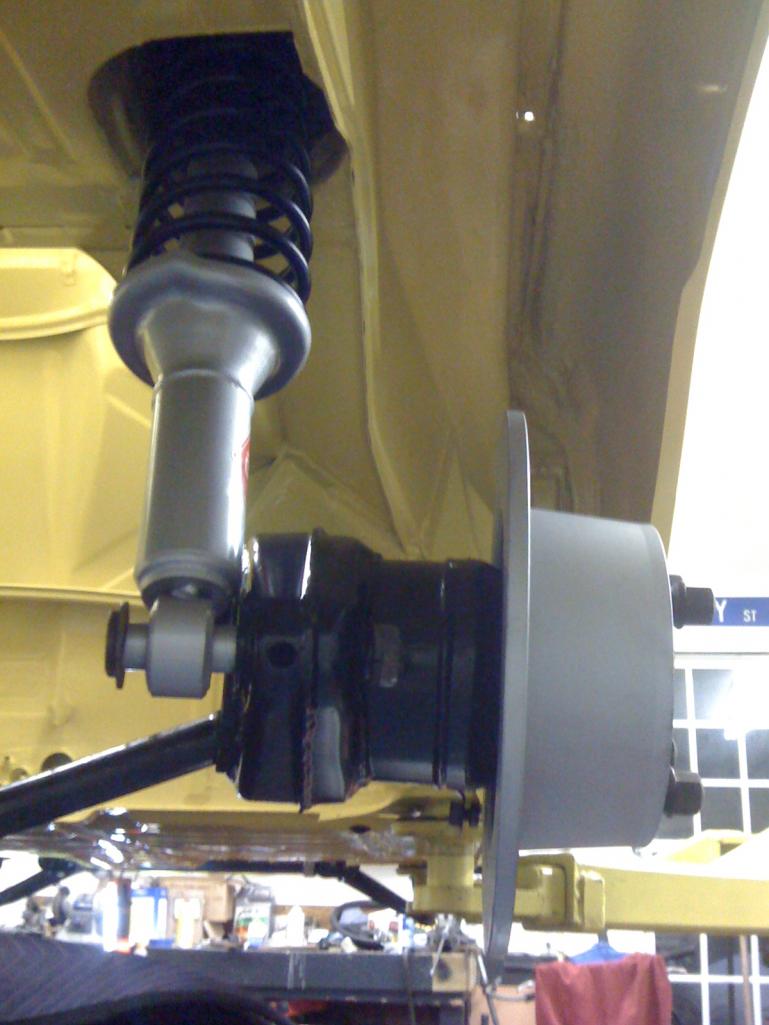
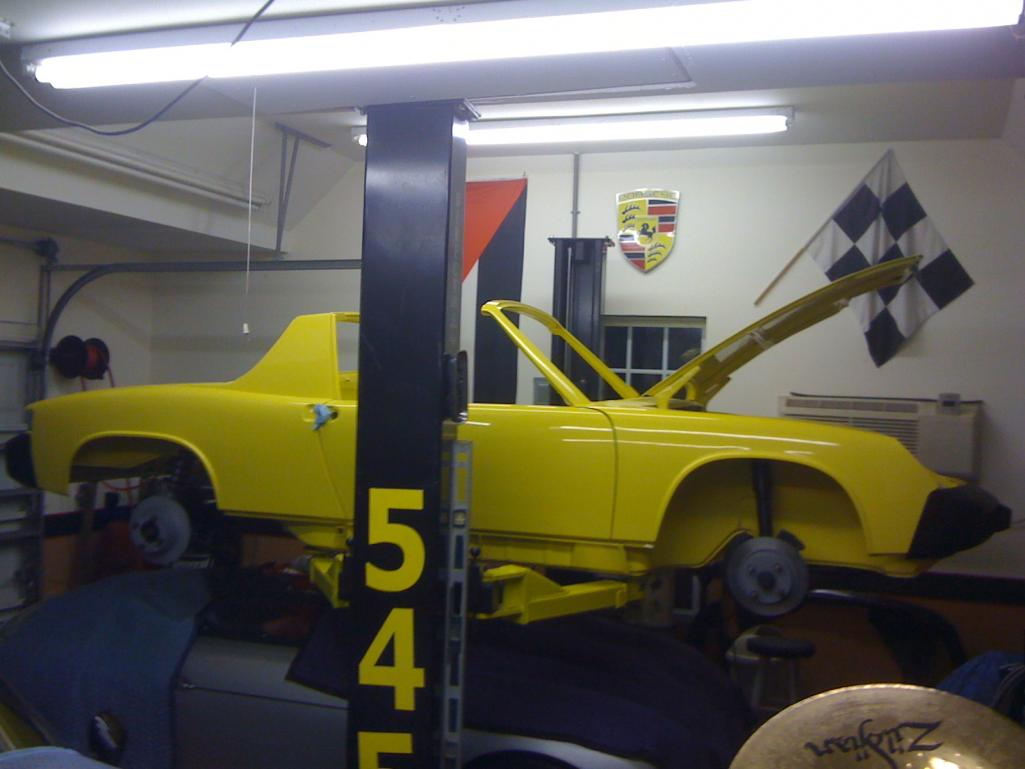
Today was for me, a triumphant day, one I've waited over three years for! An over cast day turned sunny for me when Summer rolled out of the garage on her own shoes for the first time since late 2009. All new suspension parts, bearings, rotors (no calipers yet).
Got to go back to the body shop tomorrow to address a couple of little issues I don't like and then I think i'll start with the wire harness. I also want to polish the rims clean soon so the car looks good standing still
Attached thumbnail(s)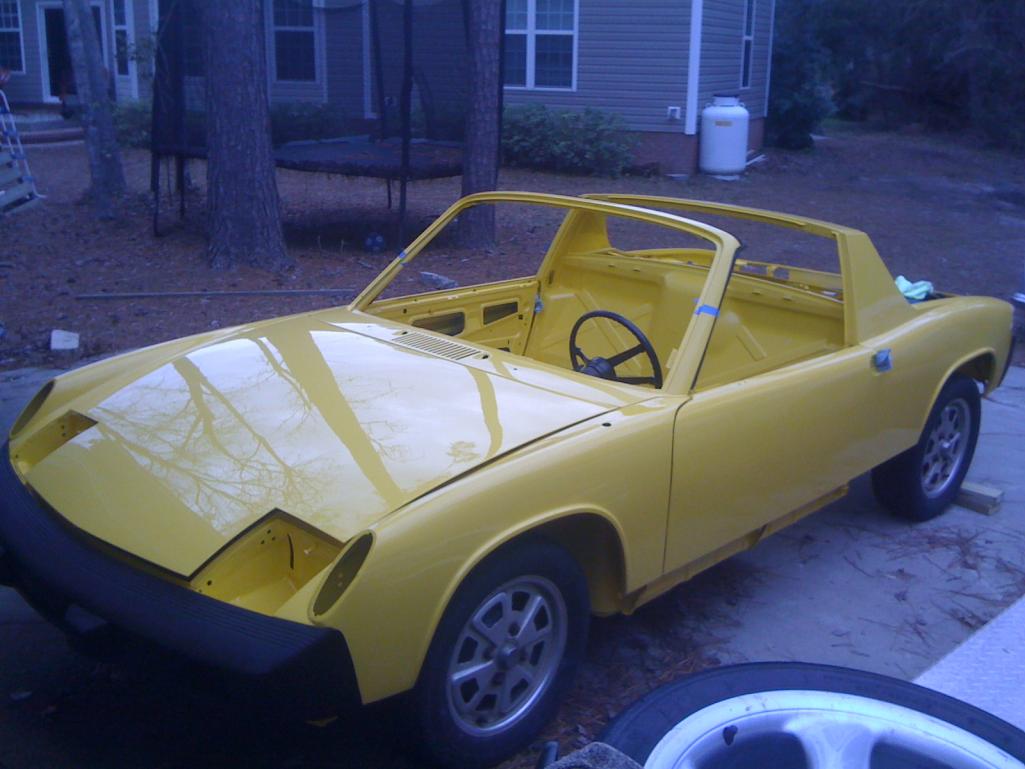
Posted by: jdlmodelt Jan 15 2013, 09:06 PM
Today was for me, a triumphant day, one I've waited over three years for! An over cast day turned sunny for me when Summer rolled out of the garage on her own shoes for the first time since late 2009. All new suspension parts, bearings, rotors (no calipers yet).
Got to go back to the body shop tomorrow to address a couple of little issues I don't like and then I think i'll start with the wire harness. I also want to polish the rims clean soon so the car looks good standing still
B-E-A-U-tiful work, man!
Posted by: trojanhorsepower Jan 16 2013, 07:49 PM
Look'n good!
Posted by: naro914 Jan 23 2013, 08:41 AM
Hey Chris! Long time no talk!! been to the track lately?
VERY NICE!!! You need to get this done by the Fall....we have something planned you need to bring that to..
Posted by: SUNAB914 Jan 23 2013, 08:46 AM
Very nice job. Protect that paint as you put things back together. still a bunch ahead of you.
Posted by: 993inNC Jan 24 2013, 03:05 PM
Hey Chris! Long time no talk!! been to the track lately?
VERY NICE!!! You need to get this done by the Fall....we have something planned you need to bring that to..
hey Bob, yeah it has been a while. No hadn't been to the track in a while but hoping that changes very soon (looking at a track '44 right now). I'm hoping to hit the '14 hard this summer if time allows. What's planned?
Very nice job. Protect that paint as you put things back together. still a bunch ahead of you.
The paint guy keeps telling me the same but knows what the out come will really be
Posted by: 993inNC Apr 10 2013, 07:10 PM
So I made a small step towards reassembly yesterday. After doing a quick tidy up of the garage, I finally pulled the car back out of the trailer and got it on the lift so I could park my Speedster under it when the 914 isn't being worked on.
I put the dash carcass back in and started running the wire harness. I've got most of it figured out as to what wires go to what accessory. I think before I continue though, it's time to stop and really take a hard look at the harness. I didn't use the one that came out because it is covered in yellow paint from previous paint jobs. I bought a used complete harness off Ebay years ago that came from a 75 or 76 car, it got stripped 6 years into its life. I should probably really look at each carefully to make sure they are the same or at least close enough for what I'm doing.
I've seen and subscribed to some of the harness threads I've found, but does anyone have any further wisdom to share before I proceed?
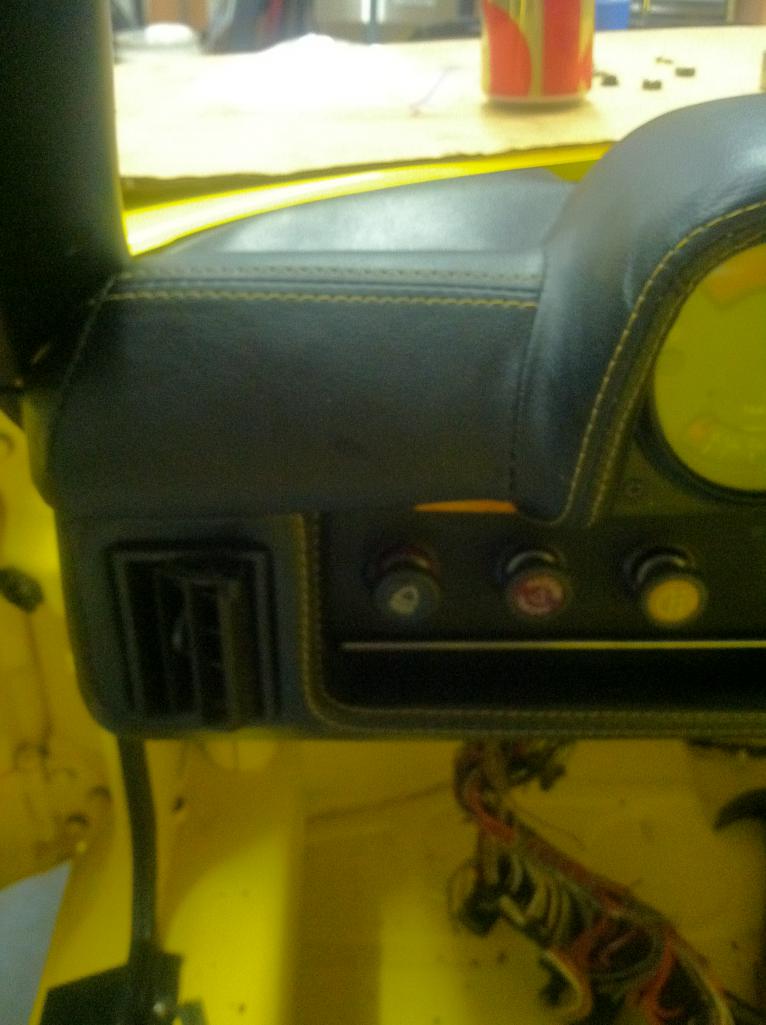
...Oh and I also brought the trim pieces for around the roll bar and door weather stripping to the powder coating guy to have them become satin black. I'm not a chrome guy, and since black trim and no sail vinyl was an option, I elected to go that route.
Posted by: 993inNC May 15 2013, 08:11 PM
Another little step closer today
Got the trim pieces back and just had to see them on. Bought new stainless screws for the parts and put everything on. I need the little holders for the bottom trailing edge of the sail panel trims. Don't think I've seen them for sale, may have to make them unless someone has some.
And I just love the black on yellow. Going to do away with all bright work and go to black.
Attached thumbnail(s)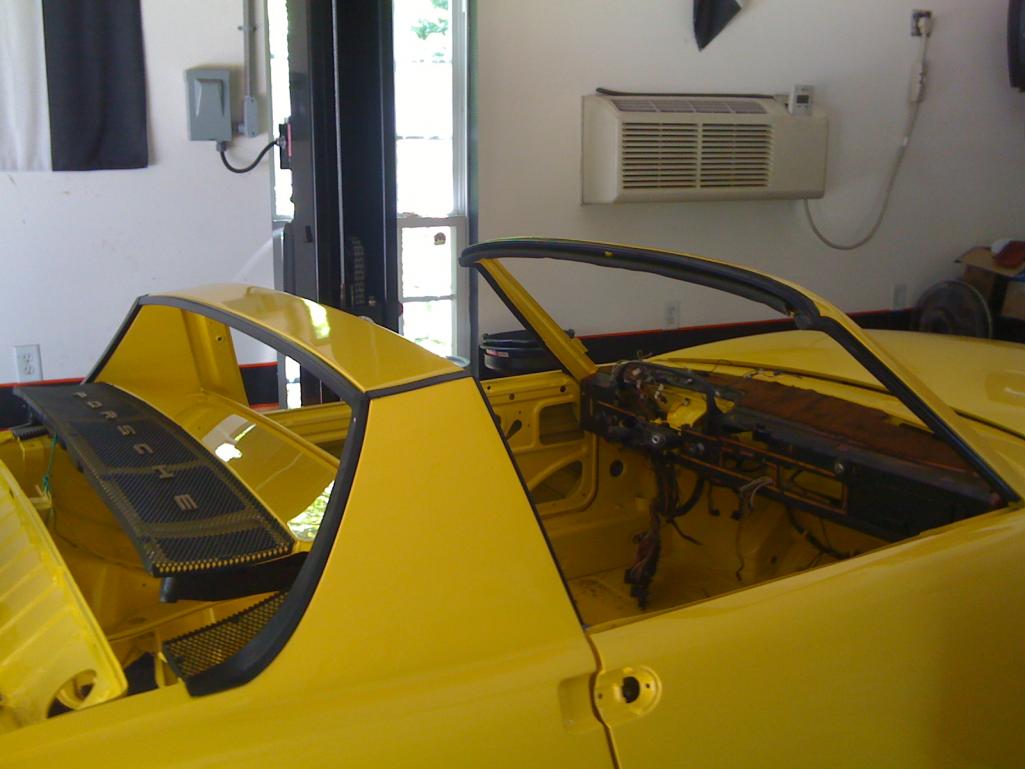
Posted by: SUNAB914 May 16 2013, 04:20 AM
Chris, would you please finish!
S/F
Chris
Posted by: 993inNC May 16 2013, 04:53 AM
"givin' er all I've got Captain"
I'm hoping to hit it hard this summer, but i tend to stay busy in one way shape or form and with family stuff mixed in, its hard to focus on it. Think I'm going to work on polishing the rims and finish running the wire harness next.
Posted by: 993inNC Aug 5 2013, 06:49 PM
Sorry, cross post from "what did you do today"
Here's what I did over the last couple of days. Gauges had old faded and scratched lenses so I new glass cut for them. The brake warning light plastic face had warped and shrunk over the years too so I made a new face with plexiglass and got a small piece of red vinyl sign material to place behind it. Also used a small piece at the fuel empty window. It was also faded badly and had warped. Found the tach bezel to be either brass or bronze. Either way couldn't get paint to stick well so I took it all off and I think I like the oddball bezel being in the middle.
Didn't take long to do any of it, just slow and tedious like anything else. I think it cam out pretty well.
I've dropped the upper and lower dash pads to get repaired at a local upholstery shop. The upper is getting repaired and re wrapped in black vinyl with fine yellow stitching similar to what would have been done on leather wrapped 911 dash. The lower just has one crack and the guy thinks he can fix and dye to match new upper.......time will tell! Hope to have it back the end of this week.
Attached thumbnail(s)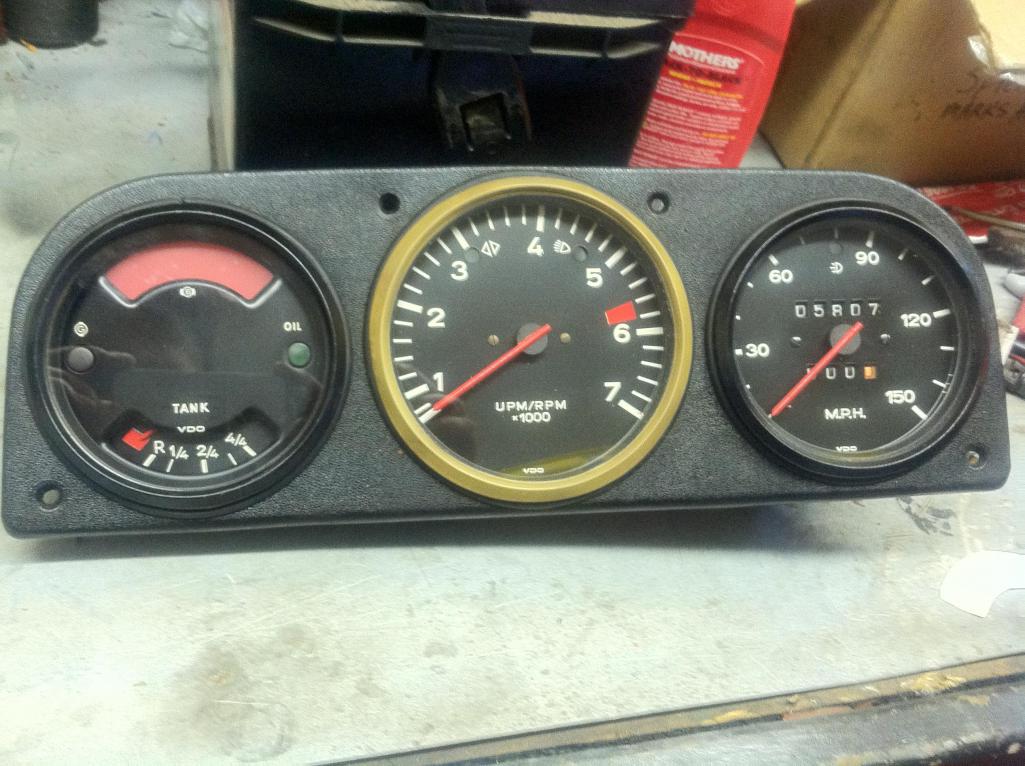
Posted by: Ian Stott Aug 6 2013, 02:59 PM
You are an inspiration to a lot of us, nice work.
Ian Stott
Moncton
Canada
Posted by: 993inNC Aug 9 2013, 08:35 AM
Well I too am always blown away and inspired by the people on these boards. There are always those WAAAAY more talented than me. I just do what I can and pay others when I can't
Posted by: 993inNC Oct 13 2013, 08:42 PM
Been a bit busy with other things lately. But got my dash top back from the upholstery place and decided tonight I would put the dash back together. The shop gave me a good size piece of the matching vinyl, closed cell foam and glue for the fixed portion of the dash. I made a paper template of the dash top, cut out the foam, used it to template the vinyl (went + 1/2" more all the way around) and glued the foam down. Waited a few minutes and glued the vinyl down. I decided to start at the gauge side since it gets so thin and curvy on that side. Did the vinyl in 3rds because I was alone and didn't want to have too much to work with at one time. I think it came out pretty good.
Had the shop stitch the dash top and bottom joints in yellow to match the exterior color. know the purists will cringe but I really like it. Modernizes it up a bit and its somewhat suttle.
Attached thumbnail(s)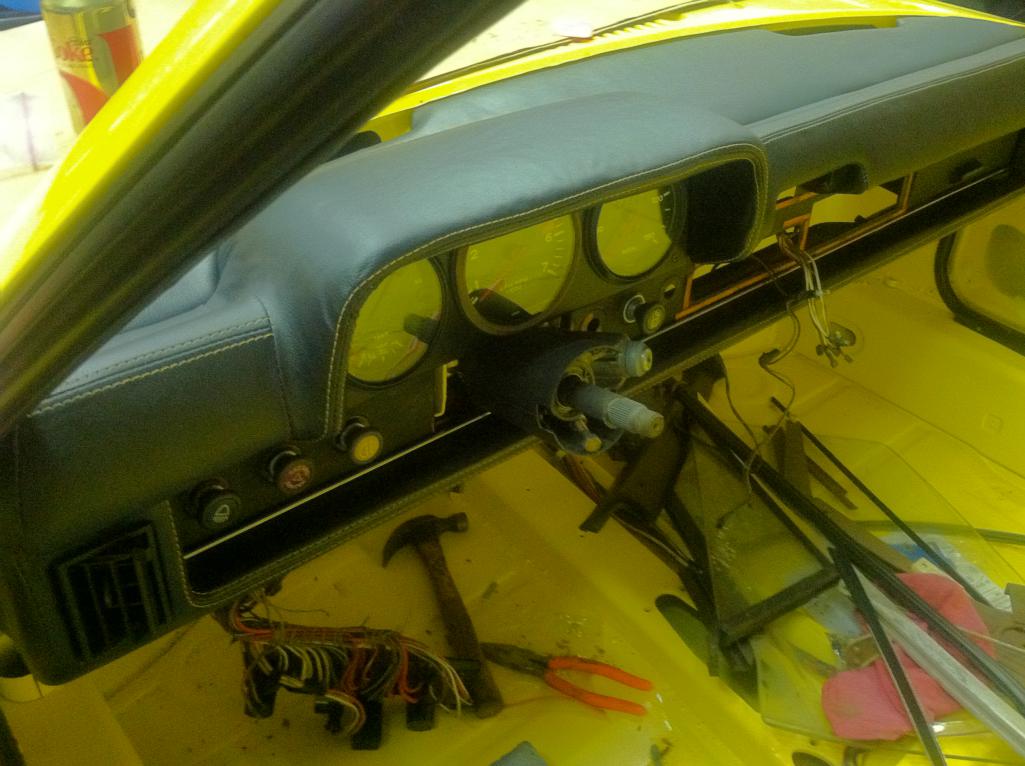
Posted by: 993inNC Oct 13 2013, 08:45 PM
One more. Sorry for the so so pics. Iphone camera
Posted by: 993inNC Oct 13 2013, 08:47 PM
One more. Sorry for the so so pics. Iphone camera
Attached thumbnail(s)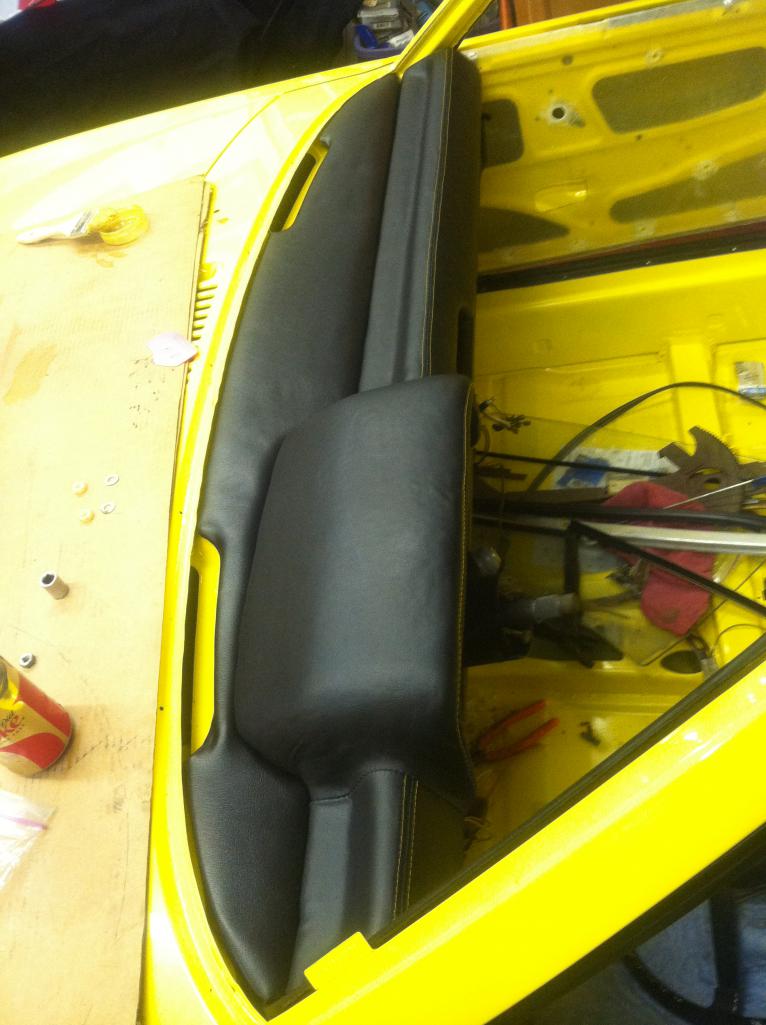
Posted by: 993inNC Jul 22 2014, 07:40 PM
Well it's been since Oct of 2013 since I've updated. So that you all don't think I quit......not the case. Been super busy and preoccupied with other projects, including putting a track Boxster together and replacing the motor twice!!! Grrr.....
Back to it.
Found a great father son team locally who are VW guru's and also drive a 914. They are now working on getting the car back together for me. Dropped it off this past Sunday and since, they have gotten into fitting fiberglass door cards, splitting brake calipers for rebuild, cleaning up headlight parts to reinstall. Just generally diving in headlong! I'm so excited to think I will finaly have it back in the coming months and will be driving it. Owned it since 2009 and it's been an up and down project. I just don't have the time or ability to keep attention to complete it and am glad these guys are local and I can help support a fellow car nut. Couple pics for your enjoyment. And a little tease on the direction of the wheels
Attached thumbnail(s)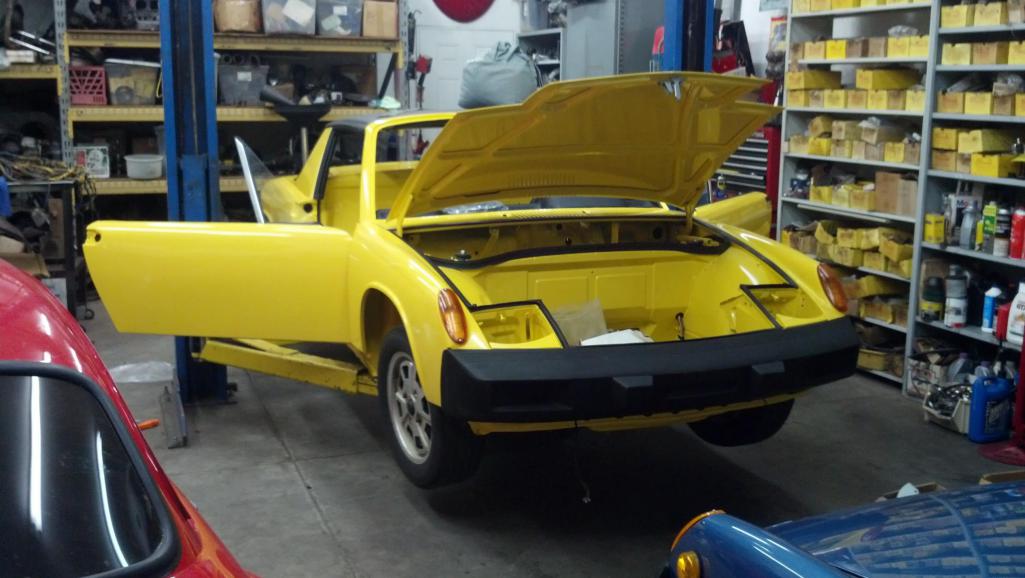
Posted by: dlee6204 Jul 23 2014, 08:01 AM
Chris, glad to see progress being made
Posted by: JmuRiz Jul 24 2014, 08:15 AM
LOVE the dash, I'd like to have the same on my car, with Ravenna Green stitching!!!
Posted by: Big Len Jul 24 2014, 08:49 AM
Looks great.
Posted by: CrashDown Jul 25 2014, 12:43 AM
totally inspirational build here....
Posted by: 993inNC Jul 25 2014, 05:26 PM
Thanks guys, been a looooong road!
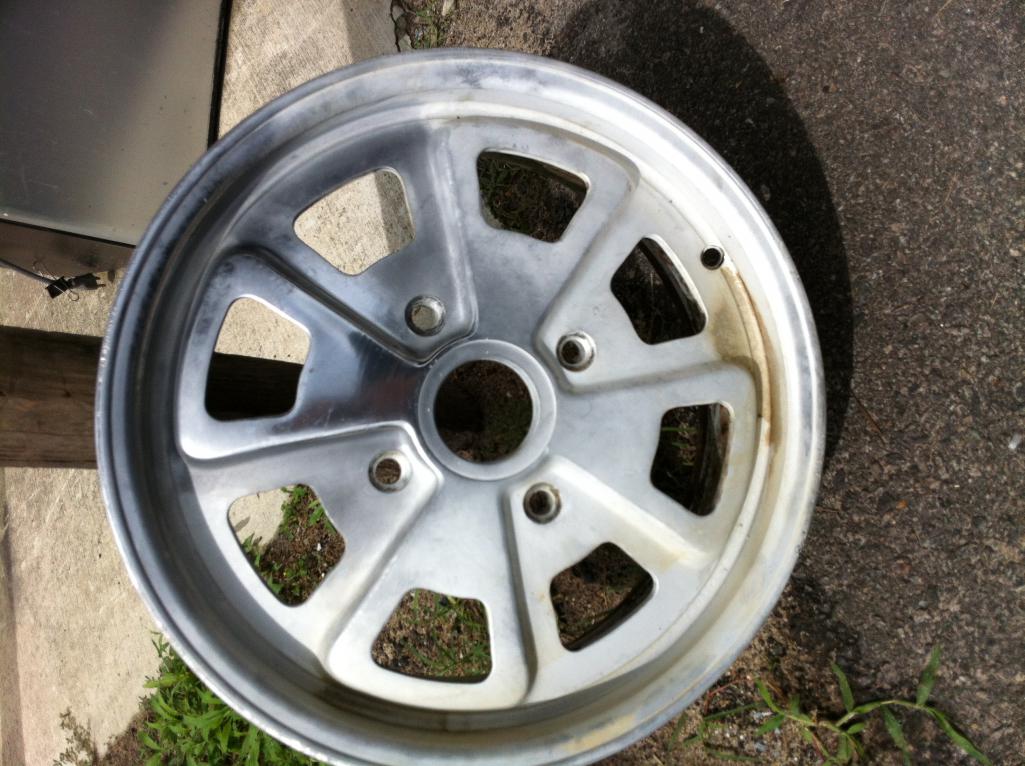
Got my wheels back from stripper and found I have a nasty crack in one. Doug sent you text, need a few odds/ends.....
Need to find another wheel. Going to polish these. not sure if we're going to do just faces or entire wheel.
The car may be done soon, thought it may be a few months but could be as soon as end of August if all goes well!! Can't wait either way!
Attached thumbnail(s)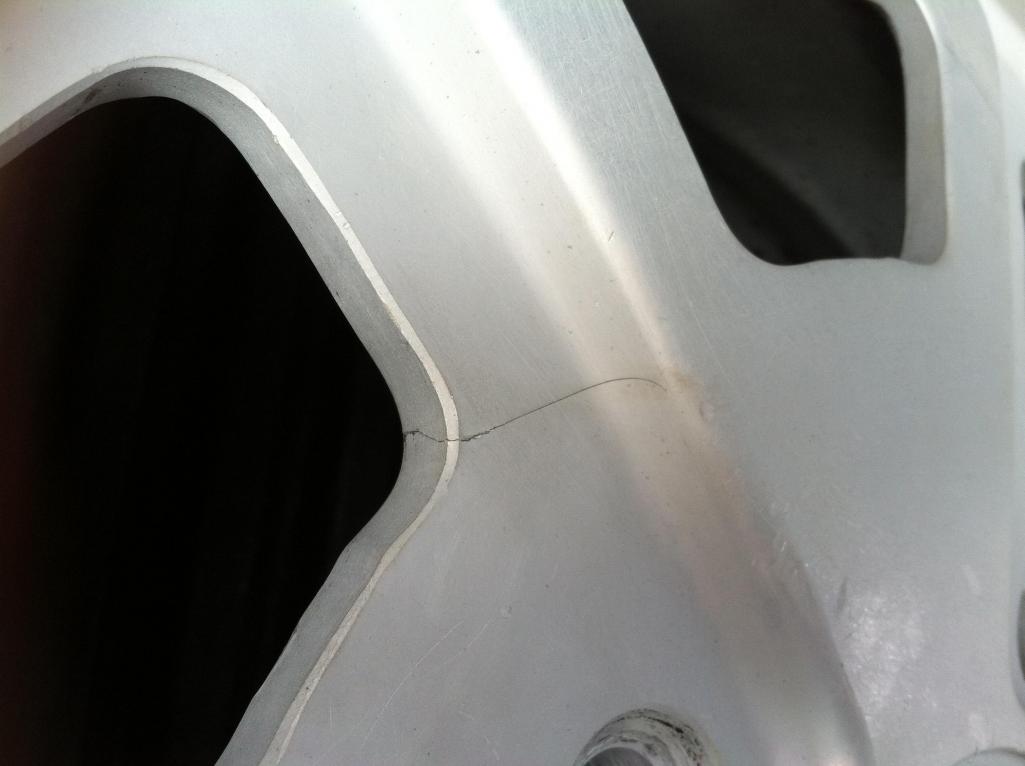
Attached image(s)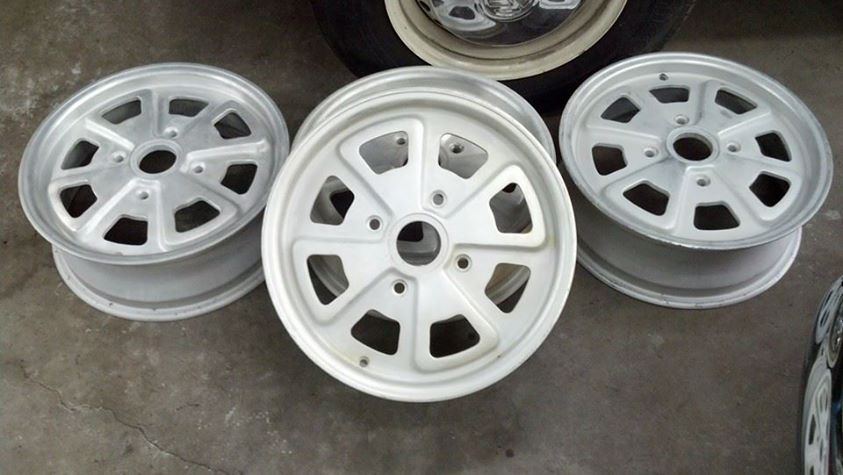
Posted by: 993inNC Oct 26 2014, 08:00 PM
Been a while since posting here. The resto thread has been sort of picked up over on facebook. The car should hopefully be done soon.
We went with just freshening the stock 1.8L, and put 40's for carbs on it (hopefully is a good combo). Decided to update the car's look by getting rid of all "brightwork". All trim has been powder coated black and I went with the rubber windshield trim. Makes the car look very 911. I think only those who know these cars will know what I've done, otherwise it just takes a few years off the age of the car. The only "silver" are the door lock tumblers............that's it! Polished the high points of the wheels, and went with yellow stitching on any exposed stitch both on the seats and backpad to match having done it on the dash. Also just bought a vintage 1979 Momo wheel to give it a period "custom" look.
Here's the link to a picture album, enjoy
https://www.facebook.com/media/set/?set=a.10201393839328069.1073741830.1836958734&type=3
Posted by: trojanhorsepower Oct 27 2014, 06:19 PM
Chris,
The link does not work for me. Do you have to be a facebooker?
Posted by: Hine62 Oct 27 2014, 06:33 PM
Nice work! It looks like you know what you are doing and are good at it too.
Would you mind telling me what you are using to weld with and what settings? My car was never going to be a total resto, but I have some frame work to do. Just looking for some advice...
hine62
Posted by: 993inNC Oct 27 2014, 06:58 PM
Chris,
The link does not work for me. Do you have to be a facebooker?
You may have to be. And it's the only place the pics are at the moment. The guy finishing it (his son) is posting as they progress. Hope it to be done reeeeal soon. Been a few months now and I'm ready for it to be mine again
Posted by: 993inNC Oct 27 2014, 07:00 PM
Nice work! It looks like you know what you are doing and are good at it too.
Would you mind telling me what you are using to weld with and what settings? My car was never going to be a total resto, but I have some frame work to do. Just looking for some advice...
hine62
I don't know my stuff, I know what I like
Doug Leehr (member here) did the metal and prep work, paint was by a local shop. Car is being reassembled by another local guy cuz I just don't have the time or patience and I'm hoping to turn this into a business with his (and other's) help.
Posted by: r_towle Oct 27 2014, 08:44 PM
Sierra Madre collection
You need new lug bolts.
Nice project so far.
Posted by: 993inNC Nov 6 2014, 09:02 PM
Today was the first time since buying the car in Sept of 2009 that I got to sit in a complete car and hear it run. So excited to almost have it back. Can not wait to drive it. Been a long road to resto (no pun intended), but it's finally almost complete. It turned out that I decided to make some little tweaks to make the car mine. All parts other than the steering wheel are factory, just decided to "update" the look of the car. All bright work is now black powder coated. Front side markers are gone. Went with dual carbs (still have FI) just for the sound and finally I had the interior bits stitched in yellow to highlight the features. Love the way the car looks. Would love to do another but a 6 convert or a LARGE 4 cyl motor.
Attached thumbnail(s)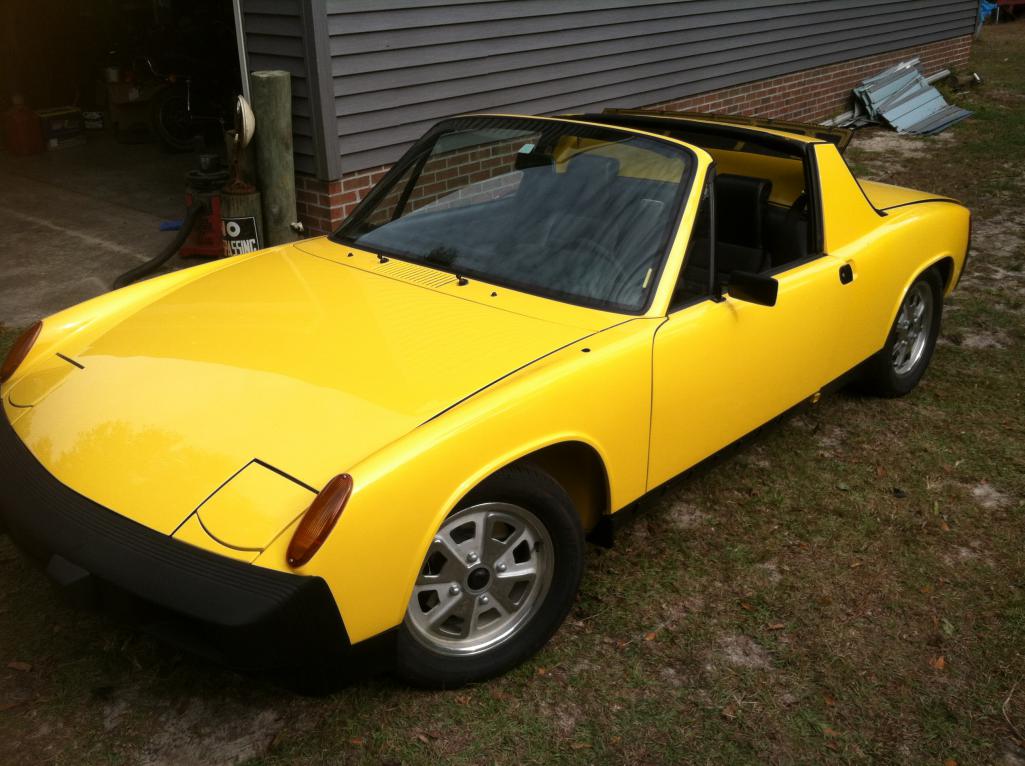
Posted by: saigon71 Nov 7 2014, 06:20 AM
Today was the first time since buying the car in Sept of 2009 that I got to sit in a complete car and hear it run. So excited to almost have it back. Can not wait to drive it. Been a long road to resto (no pun intended), but it's finally almost complete. It turned out that I decided to make some little tweaks to make the car mine. All parts other than the steering wheel are factory, just decided to "update" the look of the car. All bright work is now black powder coated. Front side markers are gone. Went with dual carbs (still have FI) just for the sound and finally I had the interior bits stitched in yellow to highlight the features. Love the way the car looks. Would love to do another but a 6 convert or a LARGE 4 cyl motor.
Looks great!
Congrats on being so close to the finish line!
Now:

Posted by: 993inNC Dec 6 2014, 04:19 PM
Well folks...............
It's been 5 years and 3 months roughly, and I can finally say "Summer" is done (mostly )
Drove it home yesterday and to cars and coffee today (was a big hit). Needs a few tweaks and a few extra parts to make it 100%, but it's home and road worthy. Spent waaaaay to much, but hopefully the market on these cars comes to me and I'll sell it on maybe next year after enjoying for a while.
Attached image(s)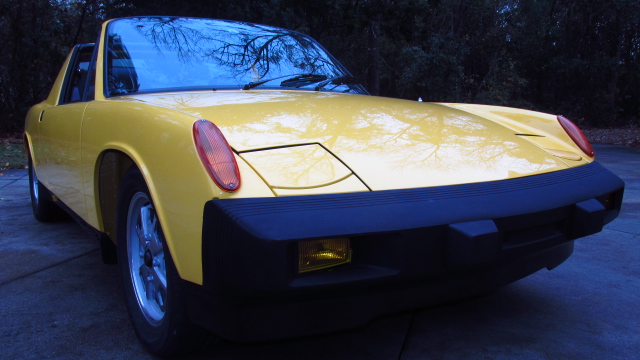
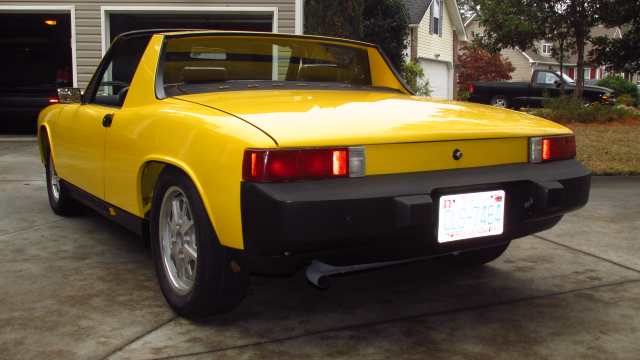
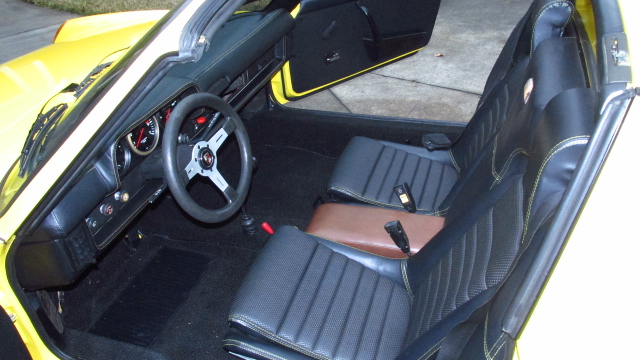
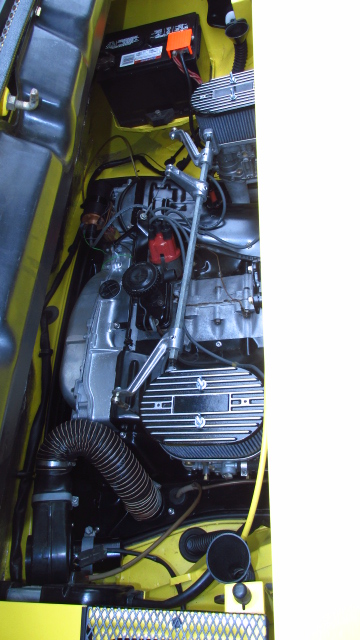
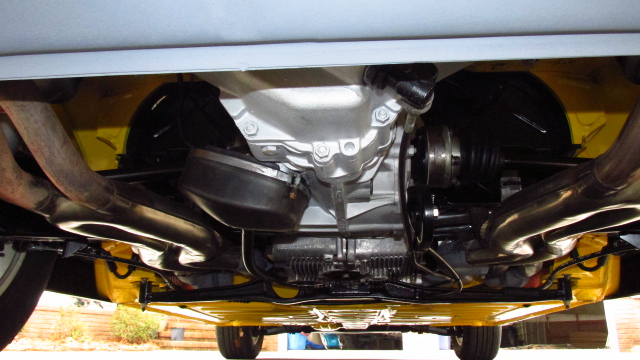

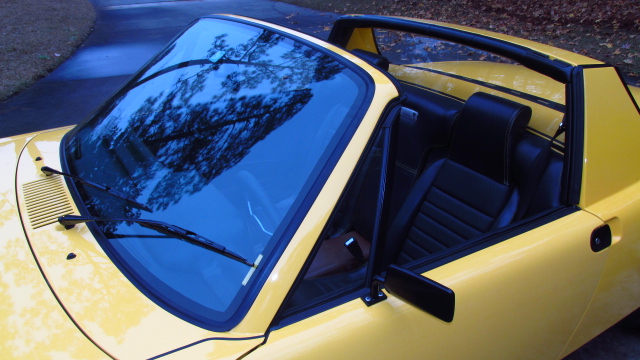
Posted by: Cairo94507 Dec 6 2014, 05:06 PM
Very Nice But you need to post better pictures than that. Pleaseeeeeeee.
Posted by: cary Dec 7 2014, 08:44 AM
Another little step closer today
Got the trim pieces back and just had to see them on. Bought new stainless screws for the parts and put everything on. I need the little holders for the bottom trailing edge of the sail panel trims. Don't think I've seen them for sale, may have to make them unless someone has some.
And I just love the black on yellow. Going to do away with all bright work and go to black.
What is the black finish? Powdercoated?
Posted by: 993inNC Dec 15 2014, 07:18 AM
Cary, yes. All powder coated parts, no paint. Completely dis-assembled everything bright and had them coated. Just about everything on the car that is black is coated. Very little paint used.
Cairo, I can't take a good pic to save my life. These were with my daughter's camera and still not my best work. But you get the idea, the car looks great!
Posted by: cary Dec 15 2014, 07:55 AM
How about the door mirror? How hard is it to get the glass and trim out/off?
Is it just glued in? I've never taken one apart.
Posted by: 76-914 Dec 15 2014, 04:53 PM
Duplicolor makes a black paint for vinyl and carpet. $8 and works great.
Posted by: FourBlades Dec 15 2014, 05:44 PM
Congratulations!
I think I have been following your build since the beginning.
Your car looks stunning.
Now drive it and stop thinking about selling.
John
Posted by: 993inNC Dec 17 2014, 05:10 PM
How about the door mirror? How hard is it to get the glass and trim out/off?
Is it just glued in? I've never taken one apart.
The plastic trim is a form fit, not hard at all to remove. I would say just be careful. if it feels brittle, it could break. I took a couple of glass out and all went well.
Posted by: 993inNC Dec 17 2014, 05:11 PM
Duplicolor makes a black paint for vinyl and carpet. $8 and works great.
Yeah I need to get on that and paint the center pad.
Posted by: 993inNC Dec 17 2014, 05:17 PM
Congratulations!
I think I have been following your build since the beginning.
Your car looks stunning.
Now drive it and stop thinking about selling.
John
Thanks John. I think I was pretty awe struck by your talents and build too. I would love to get into the resto business and have made a really good contact for getting many item restored at reasonable prices, i just need to find a good paint/body guy local that I can count on and won't rape me. I have recently bought a 71 1.7L and a 2.0L 74, so I'm not without 914's. Both are drivers and I was hoping to make the 71 (in the worst shape) as my "before" with this car being the "after".
I'm watching the market on these cars. As next year approaches and Amelia Island goes by (914 featured car), the market should come to me and I'll probably look to find it a new home. If so, the 74 will get cleaned up and I have an '81 Scirocco S I'd love to see back in its original glory! Time will tell
Thanks for the kudos Posted by: cary Dec 17 2014, 08:09 PM
How about the door mirror? How hard is it to get the glass and trim out/off?
Is it just glued in? I've never taken one apart.
The plastic trim is a form fit, not hard at all to remove. I would say just be careful. if it feels brittle, it could break. I took a couple of glass out and all went well.
Chris, thanks for the info. What did you glue the glass back in with?
Posted by: FourBlades Dec 17 2014, 09:20 PM
Looking forward to seeing your new builds...
John
Posted by: 993inNC Dec 28 2014, 08:41 PM
How about the door mirror? How hard is it to get the glass and trim out/off?
Is it just glued in? I've never taken one apart.
The plastic trim is a form fit, not hard at all to remove. I would say just be careful. if it feels brittle, it could break. I took a couple of glass out and all went well.
Chris, thanks for the info. What did you glue the glass back in with?
No glue, they're sort of a compression fit. Once you fit the plastic ring back in the the housing, it and the glass are pretty tight. There's really nothing to glue to because of the rod and nut that create the up/down pivot that comes in the side of the housing. I suppose you could adhere the outer most edges to the housing.......
Looking forward to seeing your new builds...
John
That may be a while John. I have sooo much money in this car, I want to see what the market does after the Amelia Island Concourse this coming year. The 914 is the featured car, if they continue to rise in value, I may attempt to sell this one and move onto another. I have an '81 Scirocco S I'd really like to do next (sorry not a 914
). With my other two teeners as drivers, I could still enjoy the car even if I sell this one. Plus I have some taxable events happening over this year, next and maybe 2016 so funds may be tight........ Time will tell. With his siblings today out for a photo op and garage rearrange .........
Attached thumbnail(s)
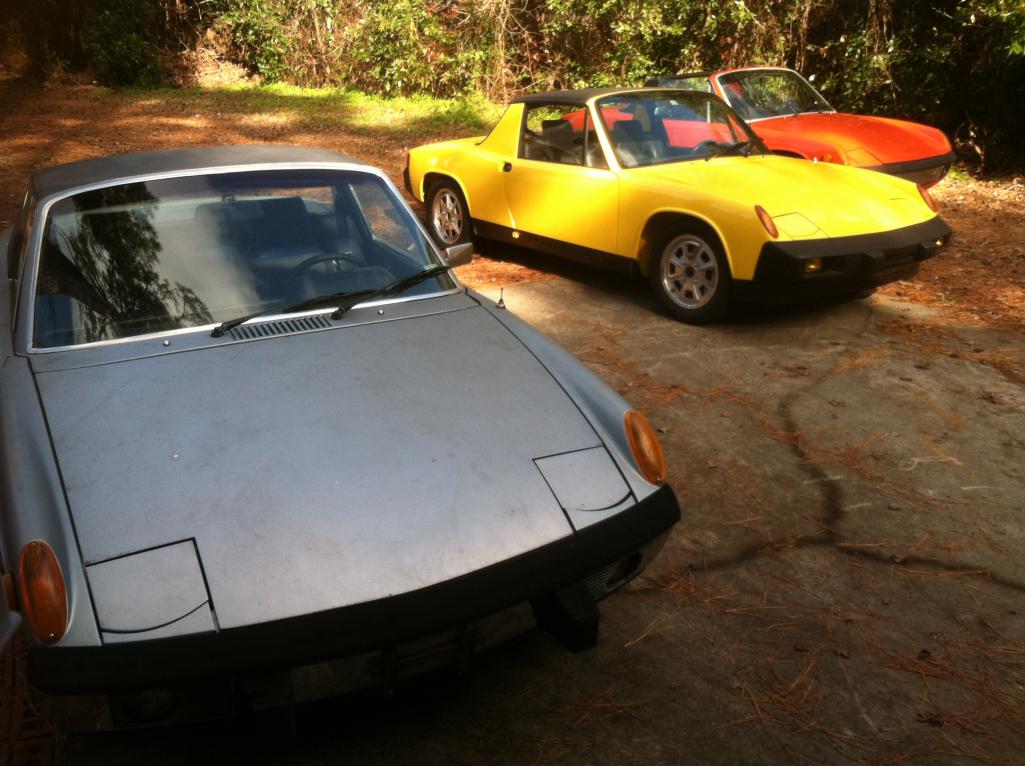
Posted by: bigkensteele Dec 29 2014, 04:57 PM
Please do a build thread on the Scirocco! I (and I'm sure others) would love to see it. I still miss my '85, and it has been gone for 20 years now.
Posted by: 993inNC Jan 1 2015, 06:43 PM
A little teaser to start the new year
Attached thumbnail(s)
Posted by: iwanta914-6 Oct 16 2015, 07:35 AM
I see "Summer" is now for sale on the Samba. While the price tag is way out of my range, it's a steal with all the work that went into it. A 75 (with undocumented low mileage) recently sold on eBay for about the same and it wasn't nearly this nice. Beautiful 914 even if it is a big bumper...
Posted by: 993inNC Nov 12 2015, 06:03 AM
You are correct. I've put him up for sale and intend on trying to stick to that price. It's sooo expensive to properly restore a car, and there's no reason these cars shouldn't be worth the money..........
In the mean time, I've put 1800 miles on the clock and continue to do little things to him as time goes on. I'm enjoying the driving experience, so I'm in no hurry. I only hope others will follow me and help get the values up for nice cars.
Thanks for the compliment.
Posted by: 993inNC Nov 26 2015, 07:05 AM
And now he's on eBay for sale, do tell a friend
http://www.ebay.com/itm/221951332363?ssPageName=STRK:MESELX:IT&_trksid=p3984.m1555.l2649
Posted by: Jason74914 Jan 11 2016, 11:59 PM
993inNC,
Seeing a pic of your new project, reminded me of a 78 Scirocco I had in the mid-late nineties as a SCCA racer. Every mod you could imagine! Had the European Hella quad-halogen headlights as well (not really legal here!). I dug around for a picture (literally dug through pics) and couldn't find one. But I did come across a pic of this VW that I owned and weekend raced....one car that may be more rare to see today than a 914!
FYI, I paid my way through school buying, fixing, and selling water-cooled VW's. Probably owned/flipped about 30-40 over the years.
Posted by: 993inNC Jan 12 2016, 07:27 PM
I'd love to have a mint Corrado too. The only cool VW I never had back in the day. Test drove them new, but never pulled the trigger.
Posted by: falcor75 Jan 13 2016, 12:16 AM
Have fun with the Scirocco, I had a '81 GTI that was my first Project car.
Started as a $300 Project with the Engine and gearbox laying in the trunk and
looked like this after 8 years of gradually updating it. 
When I sold it it had a 1.8T Engine and G60 gearbox and G60 brakes on it. Second and third gear with traction and you'd need a seriously quick car to keep up.
Posted by: 993inNC Jan 21 2016, 09:36 PM
Beautiful Roc. I've always had a water cooled VW. My first was a 79 4 door rabbit, graduated to GTi, raced then as well, had numerous Roc's and couldn't pass up a free resto candidate. Hoping Summer sells soon.....can't wait to get on the Roc and 2.0L 74 teener resto
Powered by Invision Power Board (http://www.invisionboard.com)
© Invision Power Services (http://www.invisionpower.com)