Printable Version of Topic
Click here to view this topic in its original format
914World.com _ 914World Garage _ Dad's Early 1970 Project #1140
Posted by: Sleepin Feb 16 2010, 10:50 PM
I saw a listing on Craigslist the other day (Friday), "1969 Porsche 914 - Good Condition $price" I figured I would call and go look at it. I called the guy, asked him the VIN 4702901140...ohh early 70.
"When could I see the car?"
"Not until Monday, I have things going over Valentine's"
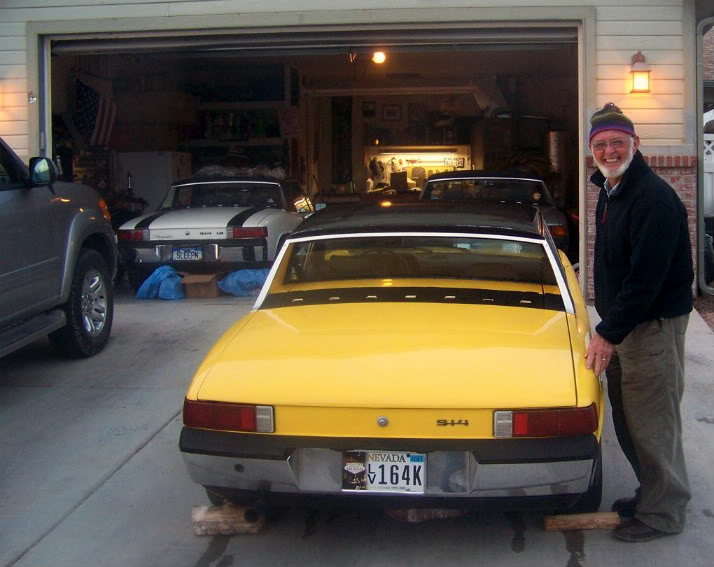
Ok....I gotta wait two days, no biggie. Monday rolls around...go over to the guy's house after work. He opens the garage and I am immediately impressed that through the dust is a nice looking car! Build date 01/70..... Vegas car...zero rust...needs some definite attention. I do the exam before trying to start it. Not too shabby. I go to fire it up... "Oh, this hasn't started since Oct 2008...it hasn't been driven at all since 2006." Ok, time to mechanic a little and get her fired up...45 minutes later she is "kind of" running.
Let the owner know that I would think about it. I then sent my dad some pics of it once I got home. He sends me an email shortly after saying "lets go get it". He fell instantly in love with it.
Today was my birthday, so Dad and I got together to go pick it up. Once I got her running again, I had to 4x4 it out of his dirt (not gravel) driveway and over a snowbank....this required pushing...quite entertaining from the driver's seat!  Once backed up a bit, I made a comment that this was going to take a while to get out of this driveway... "just go forward across my lawn" ok....hehe drove across the wet lawn auto xing around his sprinkler heads.
So here she is, my dad standing proudly by his new toy! 
Posted by: tod914 Feb 16 2010, 10:59 PM
Happy B-day! What a nice find. Congrads.
Posted by: 6freak Feb 16 2010, 11:00 PM
way to go ....nice score  looks pretty decent ...P.S HAPPY BIRTHDAY
Posted by: underthetire Feb 16 2010, 11:01 PM
wow, that thing looks like new!
Posted by: montoya 73 2.0 Feb 16 2010, 11:03 PM
 Sweet score.
Posted by: Sleepin Feb 16 2010, 11:08 PM
She looks a little better in pictures! When coming off of the trailer in 2006 (after coming from Vegas), the owner took it for a little spin and the rear DS wheel fell off and dented up the quarter...yup, lug nuts need to be tightened... 
The car was originally a L96D color, the current paint appears to be an 80's laquer job with some cracking going on. She will need paint. I am pretty excited for Dad, he has wanted a sports car for years...perfect one to start with!
Posted by: Dr Evil Feb 16 2010, 11:36 PM
Hows the gear box 

Posted by: Sleepin Feb 17 2010, 06:28 AM
The gearbox is horrible! Second gear synchro appears to be totally gone. I have (I think) everything I need to convert it to a sideshift. I may have to dig through a few piles to find all the linkage. This trans may be a candidate for a rebuild!
Posted by: zymurgist Feb 17 2010, 06:57 AM
Nice find!
Posted by: rick 918-S Feb 17 2010, 08:15 AM
WooooHoo! 

Posted by: Jon Fernandes Feb 17 2010, 08:16 AM
Nice find!
Posted by: PanelBilly Feb 17 2010, 08:28 AM
Looks good in the pictures. Hows the rust issues? Is it really rust free?
Posted by: Gint Feb 17 2010, 09:11 AM
Looks good from here! Happy birthday. Tell Dad: 
Posted by: Cairo94507 Feb 17 2010, 09:11 AM
Very nice; looks like you scored a nice car. Good luck and enjoy.
Posted by: Sleepin Feb 17 2010, 10:43 AM

Looks good in the pictures. Hows the rust issues? Is it really rust free?
Thanks everyone! Dad is pretty excited!
I crawled underneath looking for rust spots and have yet to have found any at all. I did find that the sheet metal below the battery and above the long has been patched, but after looking underneath it is evident that they did indeed cut out all offending iron oxide.
She does need some body work and paint....yellow cars always look better in pictures...I think that is why they have to drive so fast, so no one can get a close look to see that they really are 20 footers!
 This car is a 20 footer by all means.
 I will be working to return it to driver status this weekend (including a new sideshift) and hopefully talking dad into visiting a body shop. I did drive it the 5 miles to my house, but it will need some TLC before being a true driver again. He is adamant about the yellow, so it will not be returning to silver anytime soon.

After having just two injected cars, I really forgot how good the dual carbs really sound, especially without a sound pad in the engine bay.
Posted by: Sleepin Feb 17 2010, 10:53 AM
This will need some attention....the lower part of this quarter is folded back from the lost tire incident the last owner had.
Posted by: rick 918-S Feb 17 2010, 12:03 PM
Bring is over to Zipper.  I bet he can work the metal out for you.
Posted by: Sleepin Feb 17 2010, 12:17 PM
I am heading over there in short order. Remember that purple 914 over there? That is going to be the shifter and linkage donor.
I need to hook up with Zipper anyways, it has been since RRC that I have seen him.
Posted by: rick 918-S Feb 17 2010, 12:43 PM
I am heading over there in short order. Remember that purple 914 over there? That is going to be the shifter and linkage donor.
I need to hook up with Zipper anyways, it has been since RRC that I have seen him.
Tell him Hi from us!
Posted by: Sleepin Feb 17 2010, 01:45 PM
I am heading over there in short order. Remember that purple 914 over there? That is going to be the shifter and linkage donor.
I need to hook up with Zipper anyways, it has been since RRC that I have seen him.
Tell him Hi from us!
We will do! You and Sandy sure made an impression on him!
I was looking at the VIN database. The next older car than Dad's is 4702901121 owned by GreatPumpkin. That car has a build date of 12/69, and is only 19 cars away from this car. That leads me to believe that this was one of the first cars built in 1970 (it is the earliest one in the member registry)!
Thanks Greg, now that picture sure reminds me of a Travelocity commercial!
Posted by: Sleepin Feb 17 2010, 09:03 PM
Well, we found the second hurdle after the tail shifter....
seems when the tire came off on the PO, it tweaked the DS rear suspension. I noticed today that there is positive camber in that wheel. Looking closely at the hub/trailing arm assembly it looks as if the hub is bent.
Question #1.... If the wheel comes off in a turn, which tweaks first, the hub or the body?
Question #2.... If I replace the while trailing arm and hub, what are the chances that it will actually fix the problem (after alignment of course)? Because I have a set of freshly rebuilt trailing arms sitting here with all new bushings and bearings.
I thought I heard a rubbing noise in a hard corner...sure enough! The top side of the tire!  165's are not supposed to rub!
Posted by: rick 918-S Feb 17 2010, 09:19 PM
Sounds like the tire may have been slid into a curb rolling the tire and trailing arm under slightly. I would check the trailing arm ear carefully. If it looks good, (no kinks or stress related paint fractures) Then Find a couple places that are consistant like the pucks and take a couple cross measurement from the attaching bolts at the suspension ear. If there is too much interference use a weighted string line off the bolt to get the measurement you need to be confident the mounting point is good. Most likely the trailing arm is twisted.
Posted by: Dr Evil Feb 17 2010, 09:25 PM
If you can manually change the camber with that side lifted, I would start small and look at the bushings in the trailing arm to body area. These tend to go and can cause what you described. I doubt the hub is warped, but that is an easy fix (luckily).
Posted by: sixnotfour Feb 17 2010, 10:07 PM
Nice find ,
How much room does your Dad have around his place ? , How many jackstands does he own ?,
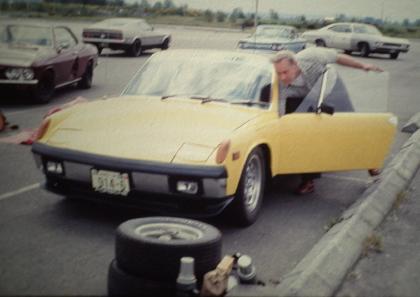
my dad and his yellow 914, 32yrs ago. Maybe my mom will drive hers out to RRC
Attached image(s)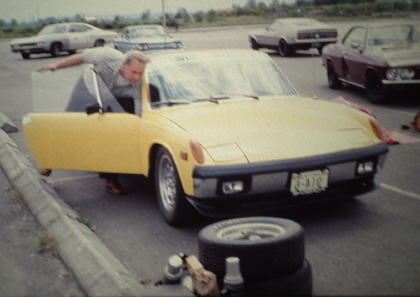
Posted by: Sleepin Feb 17 2010, 10:13 PM
Thanks for the tips! I hope it is simple. I feel like an idiot for not noticing it earlier. Next time.
I will probably get it up on jackstands tomorrow to drop the engine, and will really be able to inspect everything better.
Posted by: Sleepin Feb 17 2010, 10:24 PM
Awesome Jeff! That plate looks familiar!
Posted by: RobW Feb 17 2010, 10:55 PM
Congrats on the new ride... it goes to show you.... you're never too old to enjoy a 914...
Posted by: Sleepin Feb 17 2010, 11:26 PM
Thanks Rob! I got a text from Val today... "I opened your garage door and there is your dad working on his car already!"
Posted by: Jeffs9146 Feb 18 2010, 11:31 AM
seems when the tire came off on the PO, it tweaked the DS rear suspension. I noticed today that there is positive camber in that wheel. Looking closely at the hub/trailing arm assembly it looks as if the hub is bent.
Question #1.... If the wheel comes off in a turn, which tweaks first, the hub or the body?
Question #2.... If I replace the while trailing arm and hub, what are the chances that it will actually fix the problem (after alignment of course)? Because I have a set of freshly rebuilt trailing arms sitting here with all new bushings and bearings.
I thought I heard a rubbing noise in a hard corner...sure enough! The top side of the tire! 165's are not supposed to rub!
I had the exact problem on my 6 when I bought it! I replaced the trailing arm. You will need to check the ear that the trailing arm bolts to! Mine had ovaled the hole so I had to fill the hole in by welding and redrilling!
Similar to these photos!
Attached image(s)


Posted by: Sleepin Feb 18 2010, 12:00 PM
Nice work Jeff! I had thought about that too. I looked from the outside last night and didn't see any obvious cracks. Keeping the fingers crossed!
Posted by: Sleepin Feb 18 2010, 11:09 PM
I got Dad's car in the garage and in the pre-engine drop position...
Does this seem a tad off to you?
Engine bay is pretty clean, it is going to look good after a cleaning:
There has been some hellhole work...and an aluminum battery tray  :
:
I will call this the "before" picture:


Posted by: rick 918-S Feb 19 2010, 12:19 AM
Called it. Curbed tire. bent trailing arm mounting ear may be ok.
Posted by: Sleepin Feb 19 2010, 07:19 AM
I hope so Rick!
Posted by: davep Feb 19 2010, 08:54 AM
Most likely the arm is bent; happened to me when I hit a curb after slipping on some gravel. The trick is to get the 3 bolts out without breaking them. There is supposed to be a plastic cap over the threaded hole, so putting penetrating fluid in there a few days in advance can help. Best penetrating fluid is supposed to be 50% acetone & 50% ATF.
It is strange that you report the DOT date as 01/70 as I have 12/69 up into the 2000 range. It would be great to get the chassis number from the Karmann badge.
Posted by: Sleepin Feb 19 2010, 09:26 AM
Nice find ,
How much room does your Dad have around his place ? , How many jackstands does he own ?,
my dad and his yellow 914, 32yrs ago. Maybe my mom will drive hers out to RRC
Heya Jeff, I fixed that pic for you:
Attached image(s)
Posted by: Sleepin Feb 19 2010, 10:05 PM
Tonight's progress: Engine out, trans split off, a whole lot of cleaning done...and to do! Tomorrow we are going to go load up the new trans and try to scavenge the shift linkage and shifter. If we get that done in time, we will tackle the trailing arm.
Seems the Buttercup crew is so busy, I will post pics to entertain you for now! 


Posted by: Sleepin Feb 19 2010, 11:02 PM
Most likely the arm is bent; happened to me when I hit a curb after slipping on some gravel. The trick is to get the 3 bolts out without breaking them. There is supposed to be a plastic cap over the threaded hole, so putting penetrating fluid in there a few days in advance can help. Best penetrating fluid is supposed to be 50% acetone & 50% ATF.
It is strange that you report the DOT date as 01/70 as I have 12/69 up into the 2000 range. It would be great to get the chassis number from the Karmann badge.
It does look like the arm is bent. After inspecting the ear tonight, I found no cracks or abnormalities.
Here are those #'s:


Posted by: sixnotfour Feb 19 2010, 11:22 PM
Son why is there only four cylinders ?, hahaha
Replace the arm and align at home . I used this method at the Lemans Classic on a greenwood corvette the frenchy's all laughed and we kicked there ass.
Later he said I thought you were crazy with string.
http://www.google.com/url?sa=t&source=web&ct=res&cd=3&ved=0CA4QFjAC&url=http%3A%2F%2Fraystrax.com%2Fha%2FPDFs%2FHOME%2520ALIGNMENT%2520OF%2520PORSCHE%2520914.pdf&rct=j&q=string+alignmentr+method+ray+scruggs&ei=UnJ_S--IHYTkswOoy4GSBA&usg=AFQjCNHMAeJk53Xlqhl0n0l0bx4b-MztDQ
Attached image(s)
Posted by: rick 918-S Feb 20 2010, 07:46 AM
Man you guys tore right into this one! You will be ready in no time! Hey thanks for posting the pics. Those guys working on Buttercup have their hands full. No time for click click!
I stole the alignment link and posted it in the build off thread. I'm sure Ed has done it a million times but I thought it my prove usefull.
Posted by: davep Feb 20 2010, 09:49 AM
It is strange that you report the DOT date as 01/70 as I have 12/69 up into the 2000 range.
Here are those #'s:
Thanks very much for the documentation. I'll have to study this to see what I can learn from it. Most interesting!
Posted by: Sleepin Feb 20 2010, 04:52 PM
Plenty of progress today. We went over to scavenge off of my parts car at my brothers house. We nabbed up a 2.0 and sideshift trans. We also found all of the linkage and a shifter! I was worried that I would'nt have all of it.
We got the new trans cleaned and drained and installed the pilot bearing. Also got the old tailshifter engine bar and brackets off. Pretty much all we have left is to get the sideshifter engine bar mounts off of the 2.0 and swap the shifter out.
Where is the best place to buy Weber gaskets (I just need the top / air filter side gaskets)?
Also, does anyone have a spare 1.7L cooling fan in good shape? Dad's was missing four fins. Nothing like a good 12% loss in cooling!
Posted by: Sleepin Feb 20 2010, 07:52 PM
Can anyone verify that the 1.7 and 2.0 fans are the same and are marked the same?
Looked on The Bird, seems they are both timed the same...I have a 2.0 sitting here with a real nice fan on it. 
Posted by: dw914er Feb 21 2010, 02:07 AM
Nice find Eric!
I'm sure dad will be thrilled when she gets all cleaned up. Very very early 914 
Posted by: Dave_Darling Feb 21 2010, 12:52 PM
The fans are all the same, just marked differently. But since the 1.7 and 2.0 use the same timing, they are totally interchangeable.
Make sure you get the motor mount bar and associated stuff from the later car as well as the side-shift linkage. All of the linkage, even the gear shift lever.
--DD
Posted by: Sleepin Feb 21 2010, 07:59 PM
The fans are all the same, just marked differently. But since the 1.7 and 2.0 use the same timing, they are totally interchangeable.
Make sure you get the motor mount bar and associated stuff from the later car as well as the side-shift linkage. All of the linkage, even the gear shift lever.
--DD
Thanks Dave! That is pretty much what I figured about the fans. I will be posting a very informative post up here shortly about fans. I found out quite a bit.
We have everything needed, just waiting on the bushings and motor mount bolts to ship.
Today I brought back the bellows thermostat and flaps that had been removed from this engine. I also installed two underbody flaps, seems this car was too early to have them. We drained and refilled the "new" trans and got it on the engine. We also pulled the fan and the motor mount brackets off of the donor engine.
I am sure a bunch of other stuff that I am forgetting.
They didn't want me at the Buttercup build because I make a mess!

Posted by: rick 918-S Feb 21 2010, 08:28 PM
Nice work Eric!
Posted by: Sleepin Feb 21 2010, 09:13 PM
Thanks Rick! This has been a blast for both dad and I!
Posted by: Geezer914 Feb 22 2010, 03:51 PM
Nice find, enjoy the build. These are the only cars I know that go up on jack stands as soon as we buy them. I gues it is part of the fun owing a 914. New springs & shocks, front struts, new bushings, new seals, rebuild brakes. weather stripping, interior, and the list goes on......
Posted by: Sleepin Feb 24 2010, 07:35 AM
Thanks Geezer!
We got the motor mount rubbers in last night, so I mounted the engine bar and the fan housing. It looks like the next step will be a valve adjustment and to get the tins and carbs on! She should (*should) be up this weekend!
Posted by: Sleepin Feb 25 2010, 12:36 AM
Valve adjustment done, tin back on, wiring coming together!
Posted by: Sleepin Feb 26 2010, 12:13 PM
After a helluva week at work and some long hours, I will finally be able to get this car back together this weekend!
Posted by: rick 918-S Feb 26 2010, 01:20 PM
Did you ever confirm the trailing arm thing? ![popcorn[1].gif](style_emoticons/default/popcorn[1].gif)
Posted by: Sleepin Feb 26 2010, 01:31 PM
I am going to confirm that tonight Rick. By the looks of things the trailing arm is the only thing that is bent. I am pulling it and installing another one this evening. 

Posted by: JRust Feb 26 2010, 02:42 PM
Git your ass in gear Eric! You need to get it finished so you can get yours ready for Route66 .
Seriously though you are making great progress. Hope to see it in person in 2 weeks
Posted by: Sleepin Feb 26 2010, 08:11 PM


Posted by: Sleepin Feb 27 2010, 02:00 AM
Yup....this is the dumbest thing I have seen for a while. I found why the *&%*(&^ wheel fell off. Looks like someone had threaded these into the hubs. When the DAPO hit the curb, or went around a slight sweeping right, the studs promptly pulled out. So...what does he do, puts a new set of the same style of studs back in the rears. 
I was wondering what he was talking about when he told me he had "only replaced the rear lug nuts and hadn't put the new ones on the front yet...." So I look into his baggie of "lug nuts" to find four lug nuts and four screw in studs. So, just to prove myself right, I went and pulled a lug bolt off of the front...three turns and I had the stud, and nut in my hand. 
If you are gonna be stupid, you had better be tough:
I like this picture.....if you look hard enough, you can actually see the stupid floating away:
Posted by: Gint Feb 27 2010, 09:24 AM
That thing has Rivs right? Are the lug bolts holes conical or ball seat? If they're ball, put stock lug bolts back on it and get rid of the cheap studs. If they're conical seat, you're gonna have fun finding conical seat bolts in GJ. But if you find some, let me know where.
Posted by: rick 918-S Feb 27 2010, 09:40 AM
And replace the shock, I can see the spring seat has the paint fractured where it's welded to the housing.
Posted by: zymurgist Feb 27 2010, 09:56 AM
If you are gonna be stupid, you had better be tough

"Life's tough, it's even tougher if you're stupid." - John Wayne
Posted by: Sleepin Feb 27 2010, 12:31 PM
I am going to put all new (if I can find them) lug bolts all the way around. Looks like I may have to replace all four hubs if these were drilled out and re-threaded, or simply force (see: cross) threaded on there.
I have yet to have tried to see if I can still tighten up a lug bolt on there. If I can get one to thread easily and tighten up, I may be able to use these hubs still.
These are conical Riv's, so I will need to find a set of lugs. The bolts are 14mmx1.50? How long of a shank?
Posted by: Cap'n Krusty Feb 27 2010, 01:25 PM
I read through this thread pretty quickly, so I may have missed some stuff. You remember the adapter bushing for the firewall where the shift rod goes through?
The Cap'n
Posted by: Gint Feb 27 2010, 02:23 PM
 Actually 24mm is probably overkill. 15mm would be more than sufficient and I think stock steelies and lugs are closer to 15-20 engagement. So measure from the bottom of the cone seat to the back of the wheel and add 15-25mm. Lug bolts are typically measured at the threads only. I've used this place in the past (for my Superlite's): http://www.eurosportacc.com/hr_wheel_bolts_studs.htm
Posted by: Gint Feb 27 2010, 02:47 PM
This is a deal:
http://www.amazon.com/German-Bolts-14mmx1-5-32mm-Shank/dp/B001F215M4/ref=sr_1_22?s=automotive&ie=UTF8&qid=1267303278&sr=1-22
And 32mm is probably long enough for Riv's. As always though, YMMV. Measure twice...
Posted by: Sleepin Feb 27 2010, 05:22 PM
I read through this thread pretty quickly, so I may have missed some stuff. You remember the adapter bushing for the firewall where the shift rod goes through?
The Cap'n
http://www.pelicanparts.com/cgi-bin/smart/more_info.cgi?pn=SLP-FSSC-001&catalog_description=Firewall%20Shift%20Bushing%2C%20Used%20When%20Converting%20Early%20%39%31%34%27s%20To%20The%20Later%20%31%39%37%33%2D%37%36%20Side%20Shift%20transmission%2C%20%39%31%34%20%31%2E%37%20%28%31%39%37%30%2D%37%32%29%2C%20Each Yup, I have that one.
Posted by: Sleepin Feb 27 2010, 05:25 PM
This is a deal:
http://www.amazon.com/German-Bolts-14mmx1-5-32mm-Shank/dp/B001F215M4/ref=sr_1_22?s=automotive&ie=UTF8&qid=1267303278&sr=1-22
And 32mm is probably long enough for Riv's. As always though, YMMV. Measure twice...
Thanks Gint, I will measure that out and see!

Posted by: Sleepin Feb 27 2010, 08:34 PM
Yeah, dad is getting a set of Konis off of the spare car..get rid of those Kill Yer Backs.
We measured and found out that DAPO used metric studs (whew) but standard lug nuts . So I may have overreacted! All we will need is to pull all of the studs and run in them with bolts.  I ran in a factory bolt in a couple holes and got good solid engagement, so I am happy!
So with this:
I would think that this would work?
Attached image(s)
Posted by: john grier Feb 27 2010, 08:46 PM
From what I have seen you got a great deal as you stated up front.
No need to dis the po just because you are more informed.
Be happy with what you have! 
Posted by: Sleepin Feb 27 2010, 08:50 PM
Don't get me wrong, I am not knocking the PO in the dirt, he was just pretty ignorant on all things mechanical. He even told me so. So I figured I would find a few things like this. Still a good deal, no doubt! I still think we pretty much stole this car! 
Posted by: john grier Feb 27 2010, 09:19 PM
Don't get me wrong, I am not knocking the PO in the dirt, he was just pretty ignorant on all things mechanical. He even told me so. So I figured I would find a few things like this. Still a good deal, no doubt! I still think we pretty much stole this car!
I think that is what most of us want to think, that we are better than the other guy.
Some of my 914's were bought at bargian prices because we knew how to fix them and they did not. Then on the other hand they may know but are playing dumb.
All and all

Be happy with what you have.
Posted by: Gint Feb 28 2010, 08:12 AM
We measured and found out that DAPO used metric studs (whew) but standard lug nuts
. So I may have overreacted! All we will need is to pull all of the studs and run in them with bolts. I ran in a factory bolt in a couple holes and got good solid engagement, so I am happy!So with this:
I would think that this would work?
Posted by: rick 918-S Feb 28 2010, 08:45 AM
We measured and found out that DAPO used metric studs (whew) but standard lug nuts
. So I may have overreacted! All we will need is to pull all of the studs and run in them with bolts. I ran in a factory bolt in a couple holes and got good solid engagement, so I am happy!So with this:
I would think that this would work?
 Check the seat again those may be ball seat.
Posted by: Sleepin Feb 28 2010, 01:57 PM
As far as I can tell, those wheels are cone seat. No need in half-assing things. It really gives me a good feeling when we can correct a previous mis-doing!
Posted by: Sleepin Feb 28 2010, 09:51 PM
Turns out that those Konis I thought I had were Hencho en Mexico EAPs once they were cleaned So, Mr. Shea has a nice set of Bilsteins en route! 
Made a little progress today:
We were able to replace the trailing arm and get a little adjustment back towards normal. Even though I snapped one of the bolts around the shims...need to get that out. :
Posted by: rick 918-S Feb 28 2010, 10:20 PM
That rear wheel is looking better. She's cleaning up nice!
Posted by: Ferg Mar 1 2010, 01:09 PM
Put some polish on that bumper already, sheesh 
Posted by: Sleepin Mar 1 2010, 01:37 PM
I know huh? That flash made the bumper look horrible!
Posted by: sixnotfour Mar 1 2010, 02:14 PM
Looks like my windows
Posted by: Socalandy Mar 1 2010, 03:32 PM
I need to remember that one!!
THE FLASH DID IT
Posted by: 70_914 Mar 1 2010, 03:41 PM
[/quote]
I just pulled my engine, and you don't need it this high if you take the CV axles out.
$.02, take it or leave it....
Kevin
Posted by: Sleepin Mar 1 2010, 04:44 PM
I hate you guys!
The bumper don't look that bad from a distance:
Posted by: Sleepin Mar 1 2010, 04:46 PM
I just pulled my engine, and you don't need it this high if you take the CV axles out.
$.02, take it or leave it....
Kevin
But it needs to be that high for me to get my fat ass under it!

Posted by: Sleepin Mar 1 2010, 10:53 PM
A new rear window to decklid seal and new window squeeges ordered today. Sent Racer Chris off an email for some nice SS lines!
Posted by: sixnotfour Mar 2 2010, 12:30 AM
$.02, take it or leave it....
I think John Denver sang it best, Rocky Mountian Hiigghh - Colorado
Posted by: Sleepin Mar 2 2010, 07:51 AM
$.02, take it or leave it....
I think John Denver sang it best, Rocky Mountian Hiigghh - Colorado
One of these days I will just put a hoist in the ceiling so I can lift the ass end all the way up!
Posted by: RobW Mar 2 2010, 07:59 AM
$.02, take it or leave it....
I think John Denver sang it best, Rocky Mountian Hiigghh - Colorado
One of these days I will just put a hoist in the ceiling so I can lift the ass end all the way up!
Or dig a hole for the engine to fall into
Posted by: Sleepin Mar 2 2010, 10:15 AM
$.02, take it or leave it....
I think John Denver sang it best, Rocky Mountian Hiigghh - Colorado
One of these days I will just put a hoist in the ceiling so I can lift the ass end all the way up!
Or dig a hole for the engine to fall into
There is an idea! I will do that if/when I remove my 1.8 for transplant. Give her a proper burial!
Tonight I will attempt removal of the bolt I broke off...I hate extracting broken bolts! At least this one broke while going in, and not coming out.
I think I mentioned earlier that I snapped off one of the three bolts that so on the shim side of the trailing arm.
Right now we are just waiting for:
Lug Bolts (Prestige Wheel)
Rear Bilsteins (PMB)
Rear window seals and side window squeegees (914 Rubber)
SS fuel line (Tangerine)
an alignment
tires
Pretty cool to be able to use so many Member-Vendors!
They are really dedicated to our community!
Posted by: Sleepin Mar 3 2010, 11:32 PM

She is back up and running. Traced out a faulty fuel pump and a crappy set of points. Shift linkage is finally back on and adjusted. It is coming together nicely. I think she may be ready to go this weekend!
https://www.youtube.com/watch?v=Uf97QI0jCu8
http://www.youtube.com/watch?v=Uf97QI0jCu8
Posted by: rick 918-S Mar 3 2010, 11:37 PM
Give her a good shake down before next weekend!
Posted by: Sleepin Mar 4 2010, 09:38 AM
Give her a good shake down before next weekend!
We hope to be able to! Val and I are heading for Arizona Monday...hope to have most everything together by then!

Posted by: Jon Fernandes Mar 4 2010, 10:11 AM
She is back up and running. Traced out a faulty fuel pump and a crappy set of points. Shift linkage is finally back on and adjusted. It is coming together nicely. I think she may be ready to go this weekend!
Sounds good, time to
Posted by: lynn478co Mar 4 2010, 10:38 AM
We hope to be able to! Val and I are heading for Arizona Monday...hope to have most everything together by then!
Uh, try Sunday my dear, we will be in Arizona on Monday
Posted by: Sleepin Mar 4 2010, 10:29 PM
First the good news!
Thank you Mr. Shea!
Car is running great and shifting great. The only problem I am banging my head against is a broken bolt here...on the driver side:
The worse news is that I snapped my spiral easy out in the hole as well...and pretty much flush with the bolt remnants.
I am pretty much out of ideas as far as what to do at this point. I was thinking that it could be feasible to drill through the plastic cap at the to of the treaded sleeve and either tap it out to the next size, or use a bolt and a nut. Any ideas?
Posted by: rick 918-S Mar 4 2010, 10:59 PM
Eric,
Do you have a mig welder in the garage? You could place a washer over the broken easy out and weld the washer to the broken piece. The mig a nut to the washer. You may at least be able to remove piece this way.
Posted by: Jeffs9146 Mar 4 2010, 11:11 PM
You could try from the top! Clean out the tops and fill up with PB for a few days then drill out the center of the bolt and use another ez out from the top to thread it through! Make sure the threads where it broke are clean enough not to eat it up as it passes through.
Posted by: Sleepin Mar 4 2010, 11:15 PM
No mig...and....broken piece is about 1 1/2" up da hole....
Posted by: Sleepin Mar 4 2010, 11:24 PM
You could try from the top! Clean out the tops and fill up with PB for a few days then drill out the center of the bolt and use another ez out from the top to thread it through! Make sure the threads where it broke are clean enough not to eat it up as it passes through.
That is what I was wondering....do those threads go all the way through the top? If I pop off those plastic caps (after de-undercoating) will I actually see the top of my bolt?
Not sure the PB will help...I broke it while going back in with it...turns out that someone had previously installed 2 non-hardened bolts (slightly long for more alignment shims), I did not notice until one snapped... yup, that was stupid of me.
Posted by: Jeffs9146 Mar 5 2010, 12:33 AM
Yes, I broke one once and was able to get it out the top......but it was clean and not obstructed. You might try to clean it from the top with some sharp tools to make sure the threads are clean before you attempt it!
What does that mean, were they broken, you broke the non-hardened bolts or did they mess up something?
Posted by: Sleepin Mar 5 2010, 07:33 AM
Jeff, I meant that out of the 3 bolts I pulled out of the car on that side, 2 were hardware store low grade bolts. Someone must have bought longer bolts to accomodate for the huge amount of alignment spacers in that side.
Nothing was messed up because of this, I just wish I would have noticed that they were cheapo's and that they were a little too long. The force I broke the bolt with was not very much.
I just didn't notice until I was looking at the remnants of the bolt I broke off.
Posted by: RobW Mar 5 2010, 08:48 AM
Jeff, I meant that out of the 3 bolts I pulled out of the car on that side, 2 were hardware store low grade bolts. Someone must have bought longer bolts to accomodate for the huge amount of alignment spacers in that side.
Nothing was messed up because of this, I just wish I would have noticed that they were cheapo's and that they were a little too long. The force I broke the bolt with was not very much.
I just didn't notice until I was looking at the remnants of the bolt I broke off.
That sucks... there's nothing worse that having to clean up a short term "wrong" fix
Posted by: Jeffs9146 Mar 5 2010, 11:10 AM
That should help protect the threads as you attempt to spin it out throught the top!
PB is your friend and make sure those threads are very clean! I would take a wire brush attachment on a dremmel and clean them well then soak them in PB.
Posted by: Sleepin Mar 6 2010, 11:47 PM
She is all back together! Dad has some electrical troubleshooting to do on the lights and things.
My hats off to two more of our vendors!
First off Racer Chris and Tangerine Racing! Wow, the pictures really do not do his stainless fuel lines justice! They are truly a work of art, and Chris is a pleasure to deal with!
Secondly Mark of 914rubber.com! Once again I am truly impressed at the quality and craftsmanship of the seals he produces!
And as always, Eric Shea and PMB Performance...very acommodating and helpful! Gotta love it!
All of the vendors have been really awesome throughout this project! I am sure we will be needing more from y'all!
Posted by: rick 918-S Mar 7 2010, 08:59 AM
Details... road test? broken bolt? Trailing arm?
Posted by: foofighter Mar 13 2010, 02:23 PM
Hey I actually looked at that before you! The guy said he got it in a trade from someone who owed him money. The rear tire incident occured when the tire wasn't bolted on and he decided to drive it.... I got a bad vibe about it so I left.
I hope it works out well for you!
I would love to come by sometime to meet you and see your cars.
-Sean
Posted by: Sleepin Mar 18 2010, 08:39 AM
Hey I actually looked at that before you! The guy said he got it in a trade from someone who owed him money. The rear tire incident occured when the tire wasn't bolted on and he decided to drive it.... I got a bad vibe about it so I left.
I hope it works out well for you!
I would love to come by sometime to meet you and see your cars.
-Sean
Sean, I think we have talked over the Colorado 914 board. We do need to meet up!
As far as the broken bolt went, until I can cut that sleeve out of the ear and weld a new one in, I went ahead and tapped the sleeve for a larger bolt. Seems to be working fine. (we will see if they can get an alignment on it or not.)
Adjusted the shifter, and Dad took official possesion of the car last night. Now I am only a weekend mechanic for his car, not a full time mechanic!
Can anyone reccommend a good book to learn about Weber IDF's? I grew up with simple injected cars!
Posted by: Sleepin Mar 18 2010, 10:01 PM
Posted by: rick 918-S Mar 18 2010, 10:46 PM
Nice!
Posted by: Sleepin Mar 21 2010, 05:19 PM
We were able to take all three cars down to Gateway today! A lot of fun! It was like having a mini event!


Posted by: Sleepin Mar 21 2010, 05:32 PM

Powered by Invision Power Board (http://www.invisionboard.com)
© Invision Power Services (http://www.invisionpower.com)