Printable Version of Topic
Click here to view this topic in its original format
914World.com _ 914World Garage _ Starting a new thread for my 10,000 post! New photos!
Posted by: rick 918-S Feb 23 2010, 01:19 AM
This is my 10,000 post on the world forum  and the start of a new build thread.
As some may know I purchased a project car for Sandy. She has been wanting a 914 of her own for awhile now. In order to qualify the car had to be an unusual color and not rusted in half. Oh, and it had to be low priced. I have two kids in college and Sandy's working on her Masters.
I purchased a car that was used as a parts donor for Bryanf' car. The color is Revenna. This met the first qualification. The photos show the car is pretty nice as far as 914 rust goes and Bryan allowed me to buy the car right.
I'm traveling to Half Moon Bay to recover the car. My oldest son Aric will be with me. We are leaving March 9th and plan to drive straight through. As part of the trip we want to put our feet on the ocean, maybe check out Chris Julian's Ultima and maybe turn a wrench or two on Rob Ways Dad's car.
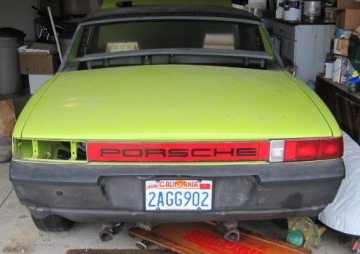
Here's a couple of photos of the car. I think there are a few more parts missing than are displayed. I will be hunting for used stuff after I have a chance to see what I have. 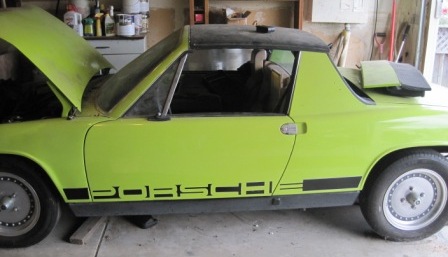
The hell hole has light surface rust!!! No hole!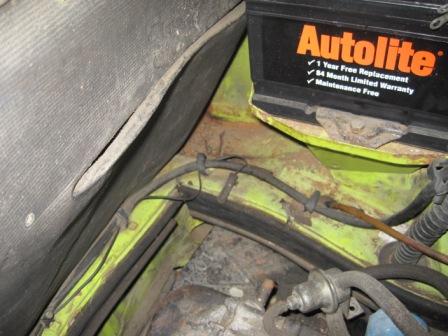
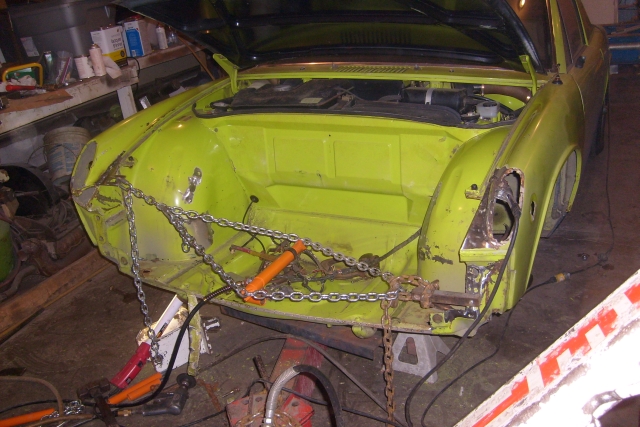
Here's the bad... Hit in the front which is the reason it became a parts car.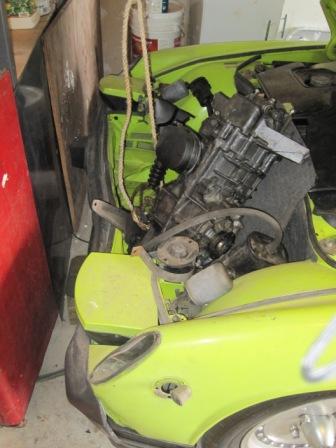
Hereis a photo of the new parts that started to arrive today! Sandy was excited enough to go on ebay and make an offer on a set of 2.0 euro P&C's. She offer $ 169.00 and the seller accepted! 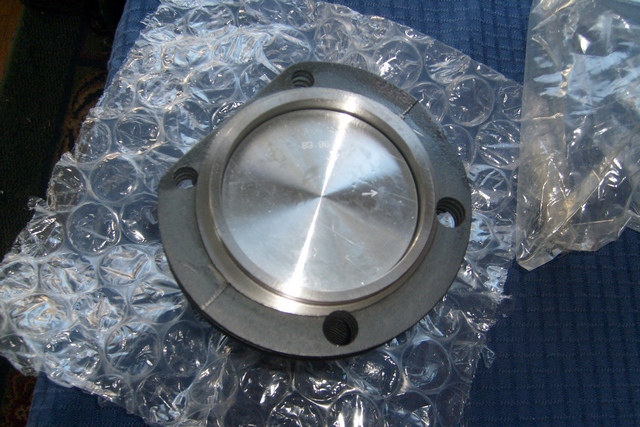
We have been discussing names for her new car. Lots of funny and cool names have been suggested. Sandy was thinkin maybe "Abby" It's kind of a play on words and came from a discussion we were having. It won't happen until the time is right.
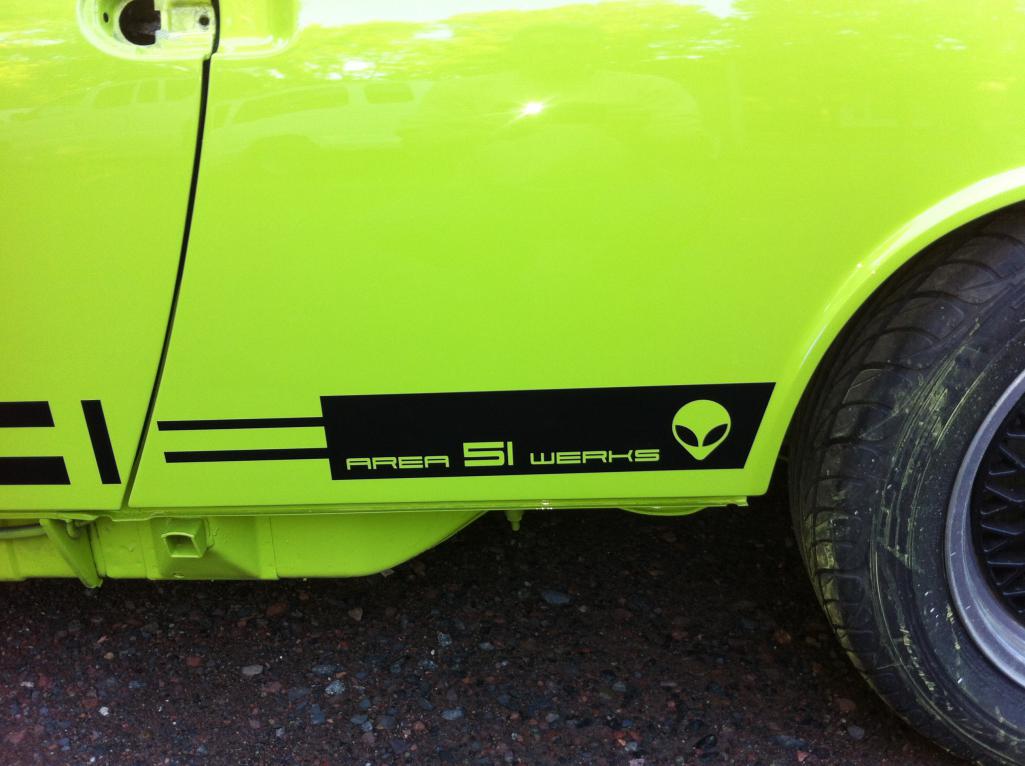
It started out as "Alien Baby". 

So, Here's the start of a new chapter. Follow along if you want.
Posted by: jcambo7 Feb 23 2010, 04:08 AM


![popcorn[1].gif](style_emoticons/default/popcorn[1].gif)
Posted by: carr914 Feb 23 2010, 06:01 AM
Looks like a good starting point, but don't you think she is 4 P/Cs short? 
T.C.
Posted by: RobW Feb 23 2010, 08:21 AM
Cool projet. Sandy has excellent taste in cars!
Posted by: Andyrew Feb 23 2010, 11:02 AM
Awesome!! Say HI to Chris for me!!
Posted by: dr914@autoatlanta.com Feb 23 2010, 11:14 AM
looks like a GREAT starting point! great color rust free minor front end damage. Thank you for taking it upon yourself to save it.
Posted by: kwales Feb 23 2010, 11:28 AM
Hey, I got one just like that.
Mine says Matchbox on the bottom....
Posted by: Todd Enlund Feb 23 2010, 12:58 PM
Awesome. A stock-ish Ravenna car with steelies is what I was going to build for my wife ex when she decided that she wanted a teener.
Posted by: MDG Feb 23 2010, 05:20 PM
I wasn't here when you did the Alien - though I've read through that thread . . . a few times. Looking forward to this one! Love those '70s colours colors.
Posted by: Eric_Shea Feb 23 2010, 05:26 PM
One of my favorite colors.
I would go through it carefully though... looks like it was hit so hard that the transmission ended up in the front trunk! 
Posted by: scotty b Feb 23 2010, 06:49 PM
So how many cars are you building right now Rick ? Benz, Healy, 914. Do you EVER sleep ?? You and Jake would make one hell of a build team. 
BTW what ever happens to Britts car ? Pinky
Posted by: rick 918-S Feb 24 2010, 12:32 AM
BTW what ever happens to Britts car ? Pinky
Still have them all. My job has been kicking my ass for the last 3 years. I'm just wrapping up a reconsiliation of a pile of invioces totaling $ 780,000.00. This is only part of the project. The loss will be 4mil. Makes my head spin. I predict a slowing trend for the kind of work I do. (at least I hope so)
The Benz, Driver side of the chassis is welded, all new Benz body panels test fit, Right side is stripped, frame rail is removed.
The Shealey is all wired except the F.I. harness. I mean dash to tail lights. The injection harness section is stripped of all dead end wiring within the injection harness and ready to install. Lots of little things to do. Disc brakes conversion, drive shaft, body work on the front clip and paint, etc. It's a long term full on resto/mod with everything being either repaired, replaced or modified. No hurry on completion. It was supposed to be the quick and dirty driver. But not anymore.
My 914 is and will always be a work in progress.
and the Raspberry car is so bad I can't decide whether to buid it or scrap it.
Entire the Revenna car. Sure it's tapped in the front but I plan on pulling the damage, painting what I have to and freshening the engine. I mean the heads go to the chevy machine shop for the low buck valve job, AA P&C's, crack the case for new bearings and seals, and get it running. No frills.
Ya, and I'll sleep when I'm dead.
![yellowsleep[1].gif](style_emoticons/default/yellowsleep[1].gif)
Posted by: Eric_Shea Feb 24 2010, 09:30 AM
Ooooh... I have my own car now.
Posted by: rick 918-S Feb 24 2010, 10:35 AM

Ooooh... I have my own car now.
 Here it is Eric!
Posted by: rick 918-S Feb 24 2010, 12:54 PM
Up date already. As part of the journey to recover Sandy's car my son Aric and I may take a detour on the way back to Area51Werks. The Route 66 Classic is the same weekend as we are traveling home. We may steer the "Mothership" south east and pass by the event. Part of our journey will be through Witchita. Mike Moorman invited us to stop over and pick up a much needed front clip. As with anything, were in flux.
Posted by: gopack Feb 24 2010, 01:05 PM
I was wondering how long Rick could stay at 10,000 posts! I think he showed great restraint to stay long enough to make me wonder if there was some admin trickery involved!
Posted by: rick 918-S Feb 24 2010, 01:11 PM
I was wondering how long Rick could stay at 10,000 posts! I think he showed great restraint to stay long enough to make me wonder if there was some admin trickery involved!
 I think it was something like 23.5 hrs. I couldn't restrain myself any longer.
Posted by: markb Feb 24 2010, 01:57 PM
Cool!
A couple of comments:
You needed another project? 
Have you thought about naming it Matchbox?
Shall we start expecting you to drive 2 cars tho the next WCR?
10,000 posts? Blabbermouth. 
Posted by: rick 918-S May 30 2010, 05:01 PM
Time to update this. I hope to be able to spend a little more time on this car over the next 2 months. If my work flow cooperates... We shall see.
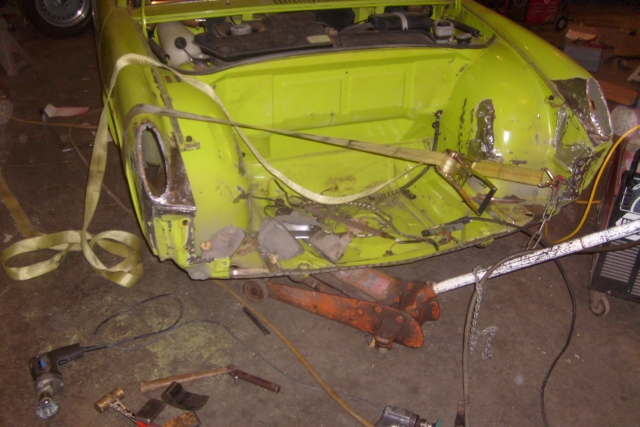
Here's where I started. I forgot to take a shot of the car before I started the work. So here's the best photo of the damage.
Here's a shot of the right side 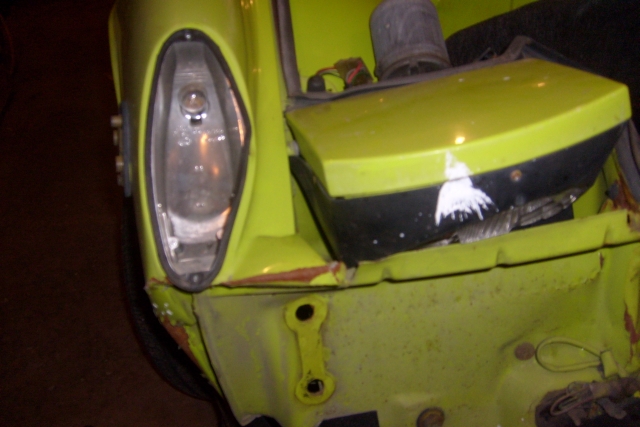
Posted by: rick 918-S May 30 2010, 05:03 PM
Right side.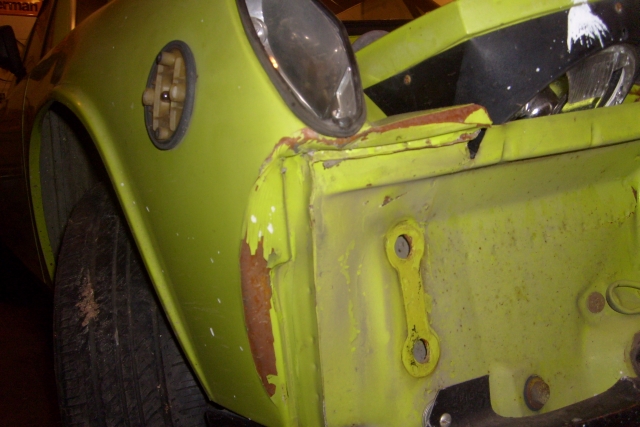
Left side.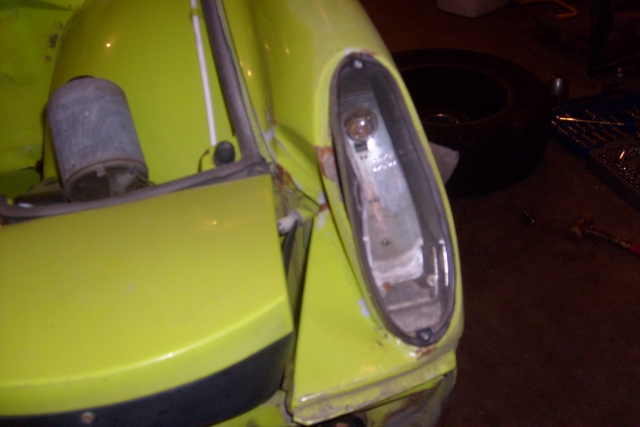
Posted by: rick 918-S May 30 2010, 05:05 PM
Check the kink in the inner panel
Check the hood to fender gap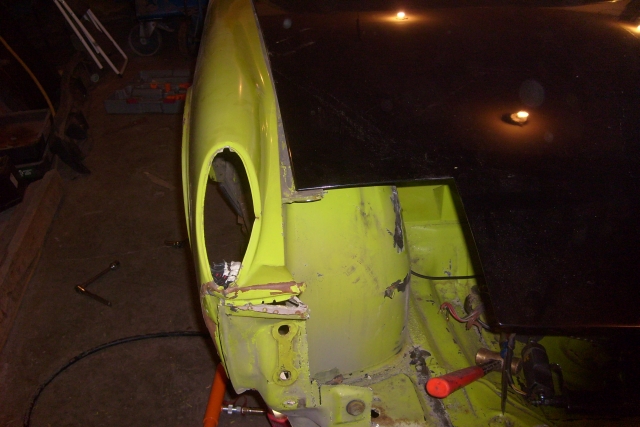
Posted by: rick 918-S May 30 2010, 05:09 PM
[attachmentid=220768]
Here's the donor front clip after partial trimming. This was a gift from Mike Moorman. Thanks Mike! 
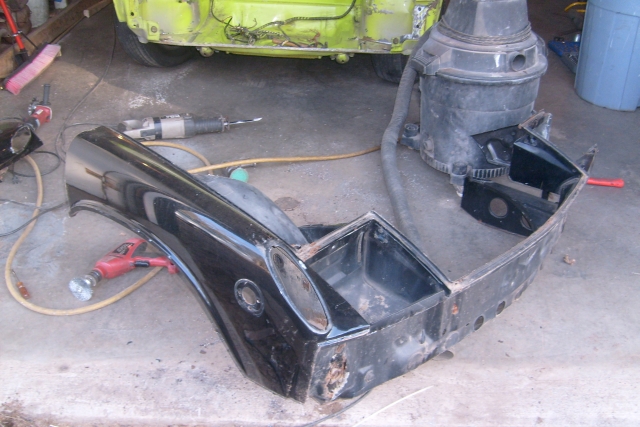
Attached image(s)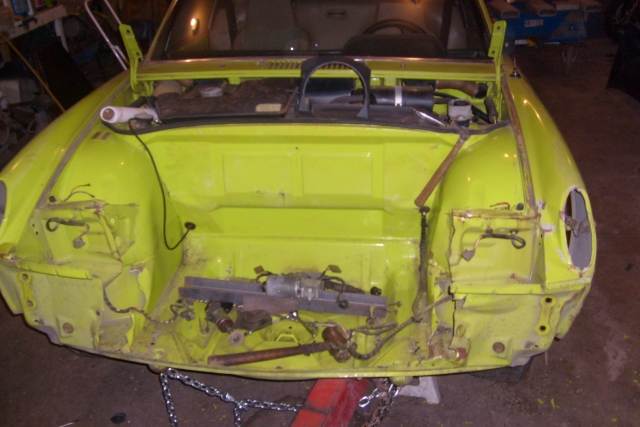
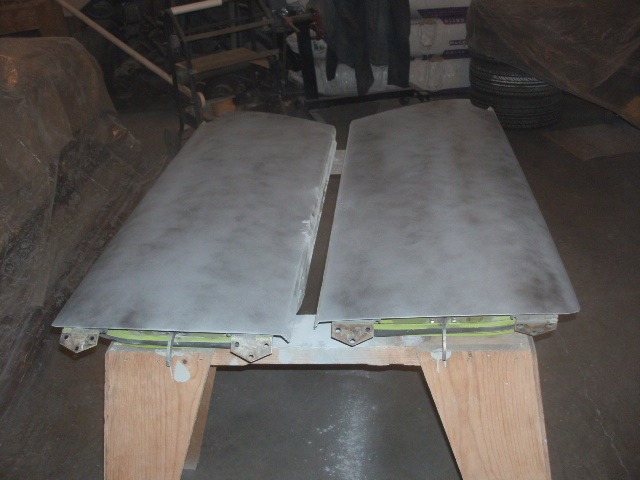
Posted by: rick 918-S May 30 2010, 05:11 PM
Posted by: rick 918-S May 30 2010, 05:15 PM
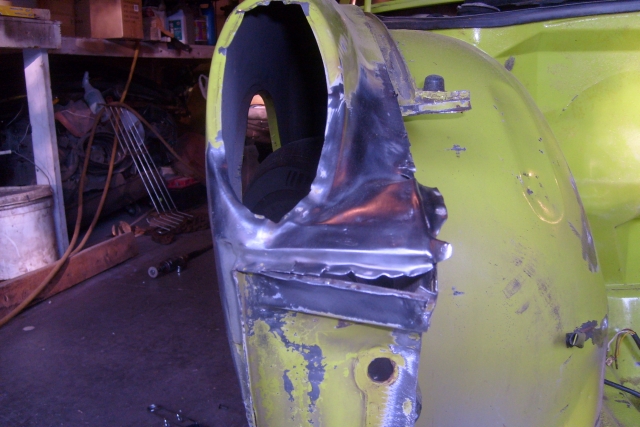
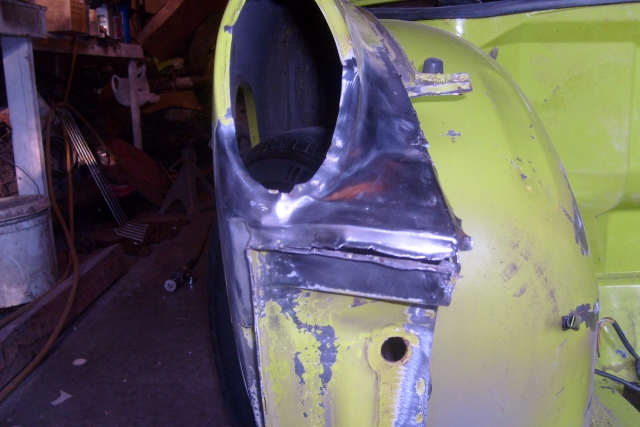
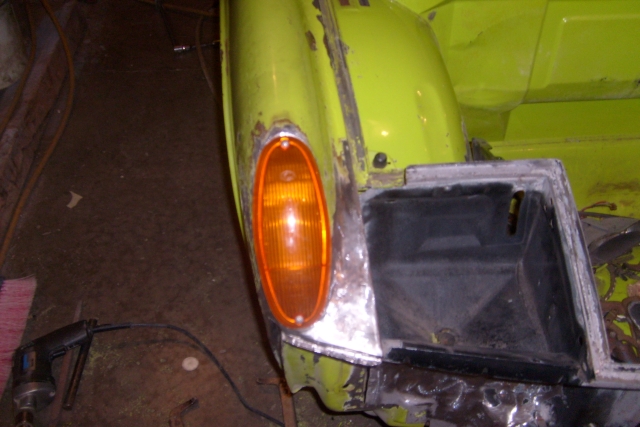
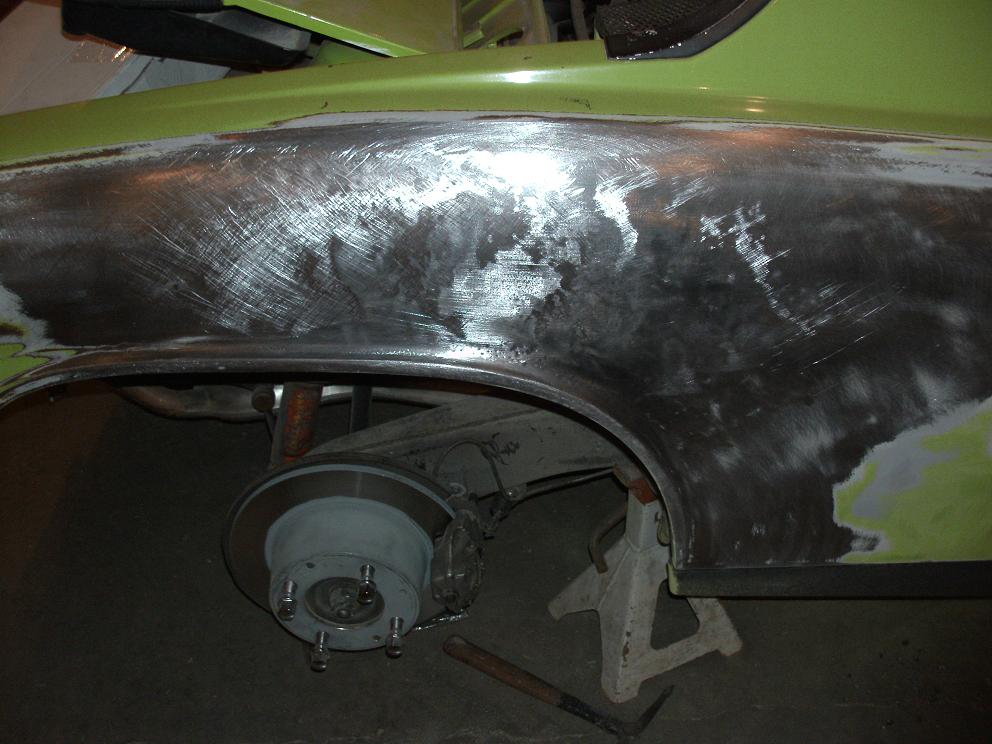
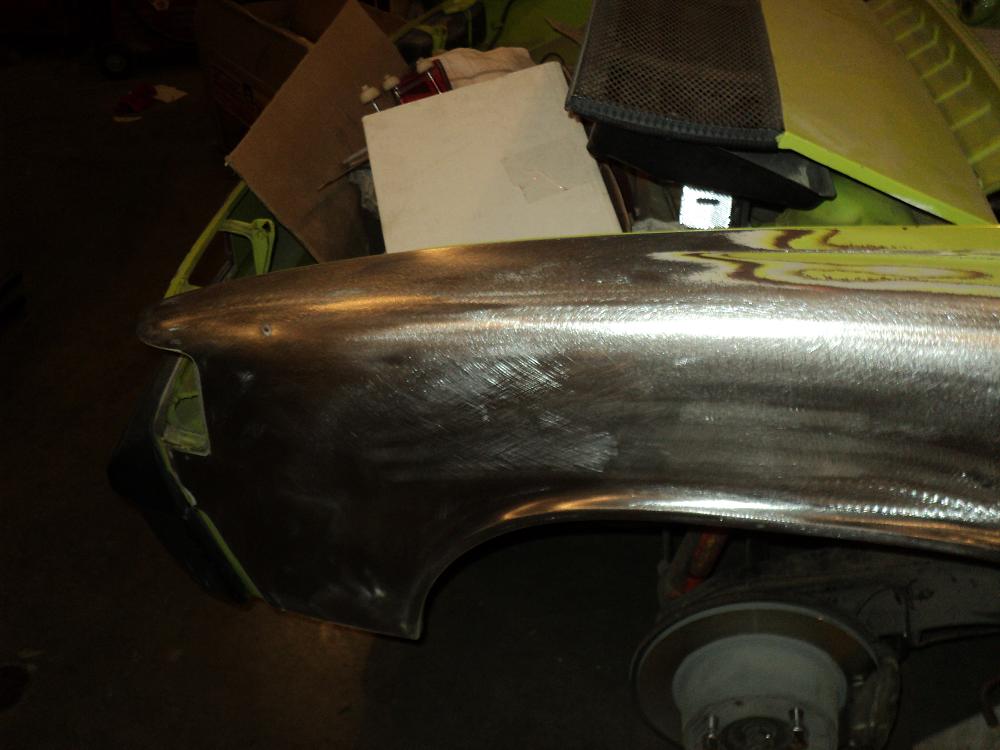
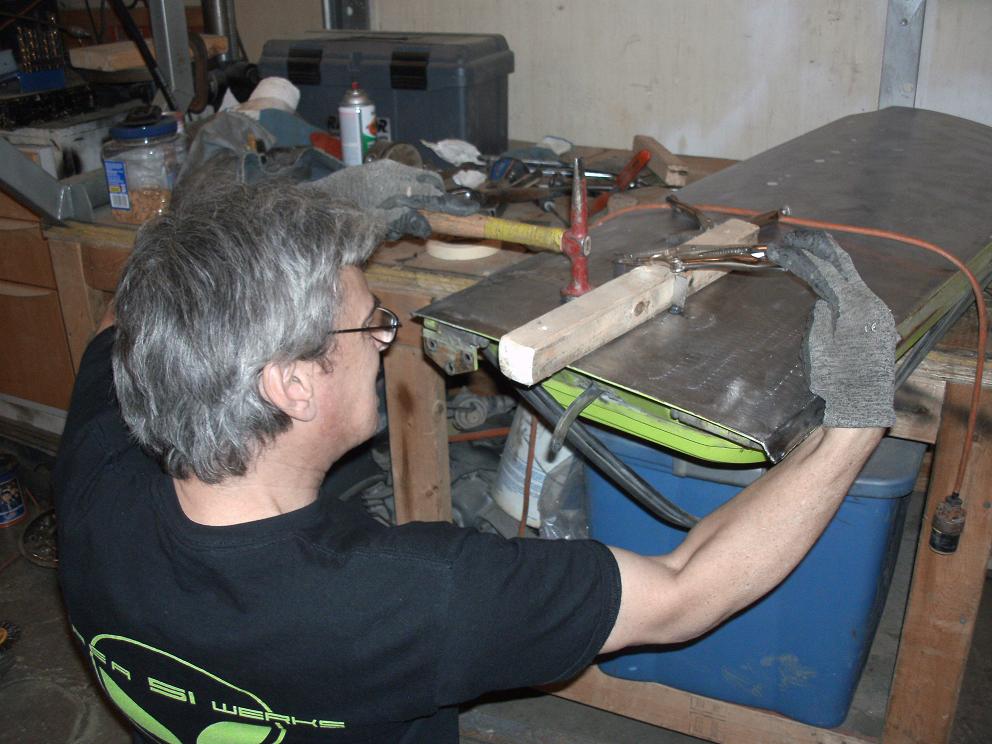
Ok, Here's the fender I repaired this weekend. Seriously deformed light opening. It took about 12 hours to bring this back inline.
Attached image(s)
Posted by: rick 918-S May 30 2010, 06:32 PM
Posted by: rick 918-S May 30 2010, 06:35 PM
Here's what I'm talking about. The whole fender was twisted outward as shown on the earlier photos of the hood to fender gap.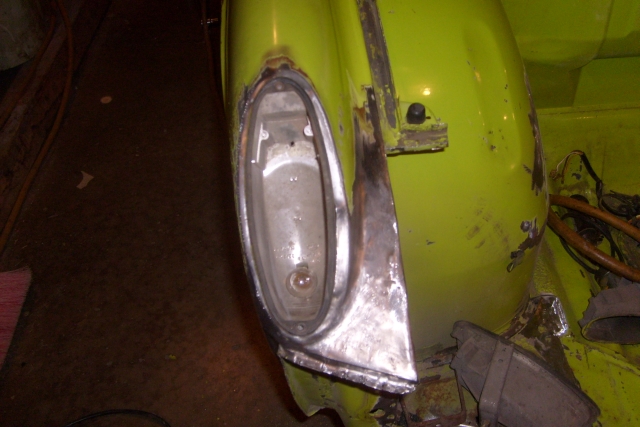
Posted by: rick 918-S May 30 2010, 06:40 PM
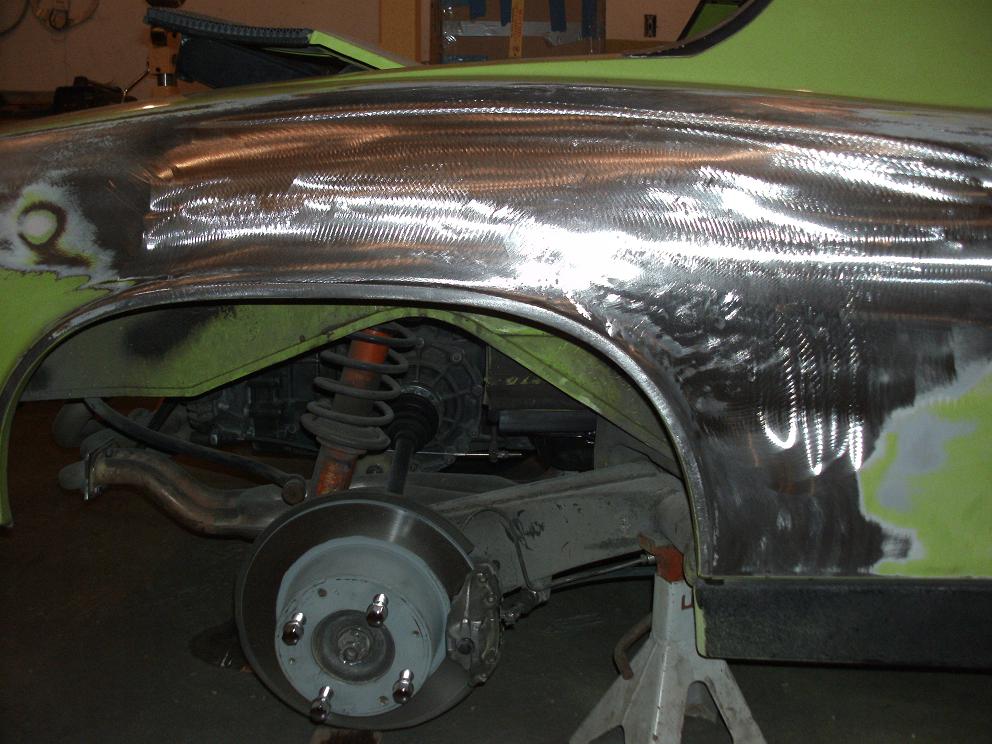
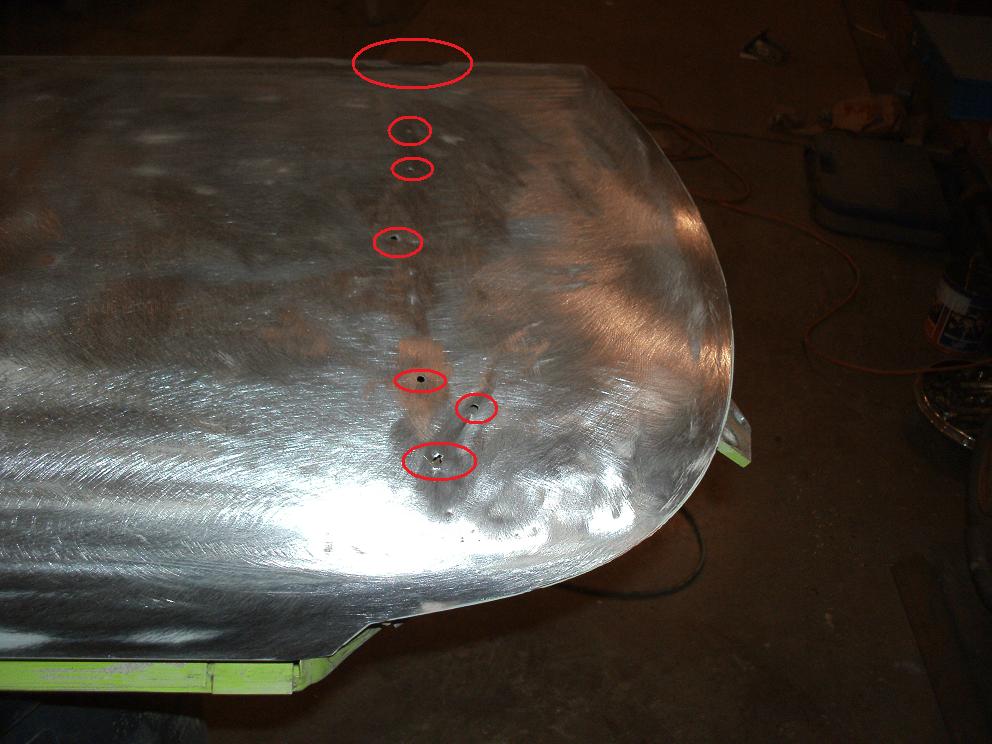
After some serious twisting and hammering this is the end result.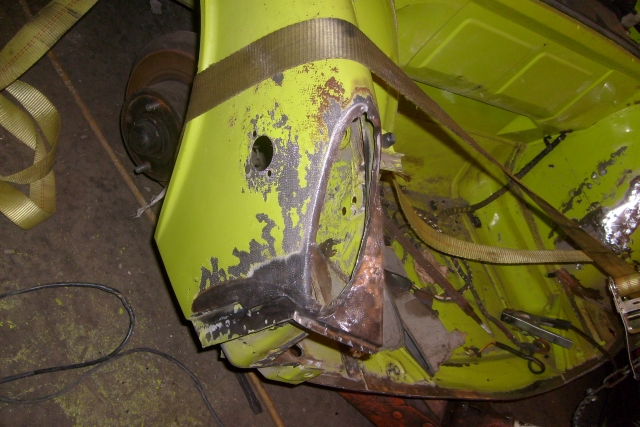
Posted by: scotty b May 30 2010, 07:07 PM
 Damn your making me want a spot welder again
Posted by: rick 918-S May 30 2010, 07:18 PM
Damn your making me want a spot welder again I'm not ready to reattach the front panel yet but this is the spot welder I'm really stoked to fire up!
Posted by: scotty b May 30 2010, 07:32 PM
Is that Lenco one of the older " green box" units? I know of one in the back of a local shop I might try to get if I can get the attatchments like you have for it 
Posted by: rick 918-S May 30 2010, 07:55 PM
Is that Lenco one of the older " green box" units? I know of one in the back of a local shop I might try to get if I can get the attatchments like you have for it
Yep, A green 3000A. I snagged it off Ebay cheap. The attachment I have is a L-950. It requires an adaptor kit to work with the older welder but it's totally worth it. I think L-950 was around 650.00 including the kit.
Posted by: rick 918-S Jul 4 2010, 07:55 AM
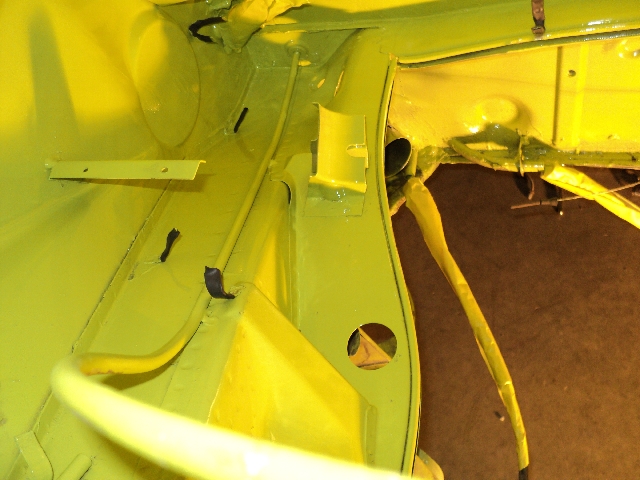
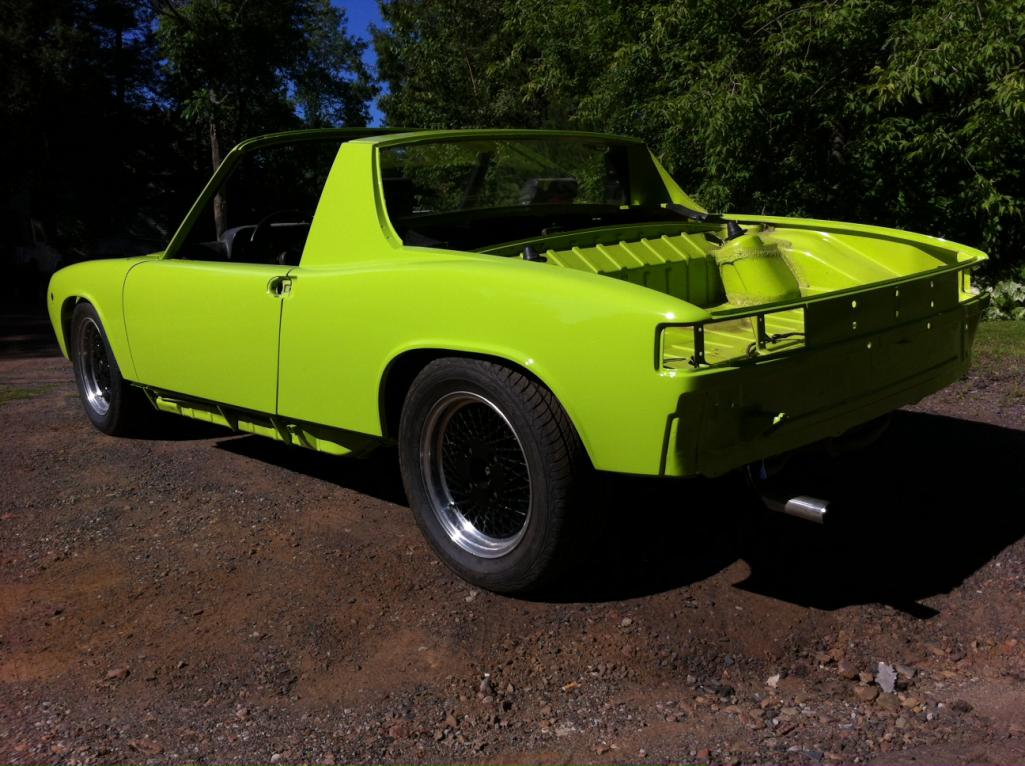
I started sand blsting the surface rust in the engine bay yesterday but it was so hot and humid my moisture filter was soaked through in about 20 minutes. But here is the reason I wanted this car. 
The only holes are in the battery tray and the base of the rear bulkhead where the sound deadening pad was glued to it. 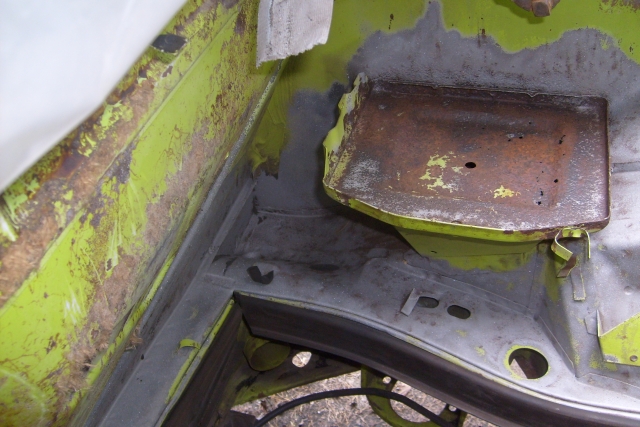
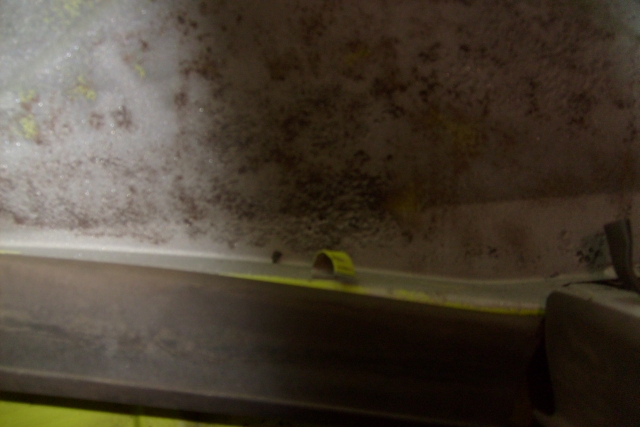
Posted by: rick 918-S Jul 4 2010, 08:03 AM
We have all seen this bulkhead rust before but not usually so little. There is a hole in each lower side of the bulk head in the usuall place that is the size of the end of an ink pen.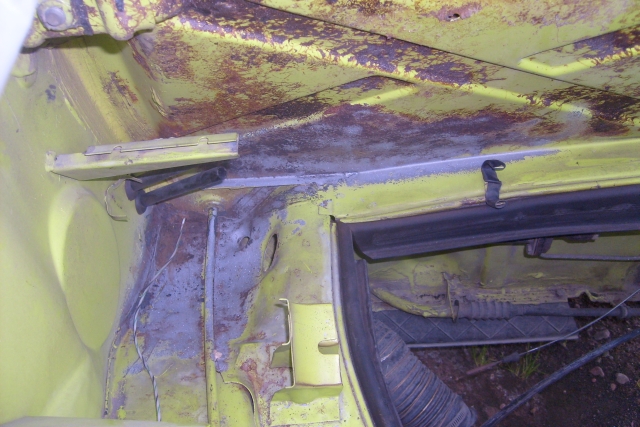
Posted by: Eric_Shea Jul 4 2010, 08:28 AM
Spot welders and clean hell holes rule! 
(even "I" can use a spot welder!) 
Posted by: rick 918-S Jul 20 2010, 10:28 PM
Finshed blasting. I removed the battery tray. I wasn't satified with the results I was getting with tray in place. I still need to condition/convert the metal before priming.
I went to the paint store today. I use DuPont and have used it all the years I have been working on cars. L65K is only available in Imron which is an old finish mostly used for fleet trucks. I brought the bent hood in with me to have it scanned. I'm having the paint mixed in Chroma One which is a very durable, workable, buffable and repairable finish. I asked for a pint to see how well the color will match once sprayed. The scanned formula didn't look right. I will need to correct it for a proper match.
Are you sitting down? $ 140.00 a pint
Attached image(s)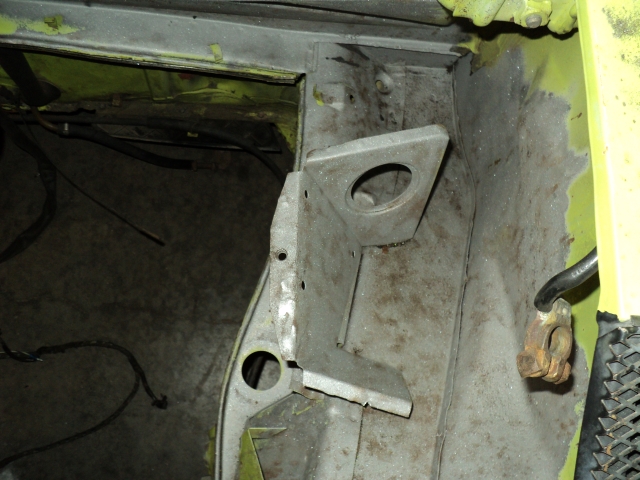
Posted by: scotty b Jul 21 2010, 02:14 PM
Not surprising. The L80E for Jims car was 115.00 a pint for base. The only formulas the paint shop had for it was either Spies or Glasurit. I'm going to get it scanned so next time I can get it in Chromabase. That should save about 100.00
Posted by: RobW Jul 21 2010, 02:20 PM
Decent tub there Rick! Git er dunn ! 
Posted by: BigDBass Jul 21 2010, 02:32 PM
Are you sitting down? $ 140.00 a pint
I was sitting down. It didn't help.

Posted by: scotty b Jul 21 2010, 02:55 PM
Are you sitting down? $ 140.00 a pint
I was sitting down. It didn't help.
Now figure that at 4-5 QUARTS of paint for an entire car. Taint cheap

Posted by: rick 918-S Aug 14 2010, 07:44 PM
Started getting things in order for next weekend. With any luck I will have this enigne back together and ready to install when the North Star Crew come to the Bolts and BBQ event here at Area51Werks.
Did a leak down but I couldn't get better than 40 on #4. Funny cause when I pulled the heads and cleaned them up I tested the seats with solvent and no valves were leaking. 
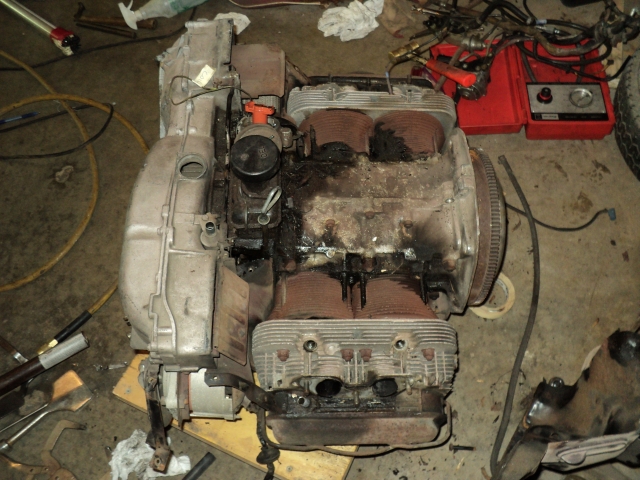
Posted by: rick 918-S Aug 14 2010, 07:46 PM
Here's the block all cleaned up ready to do cylinder heights.
Attached image(s)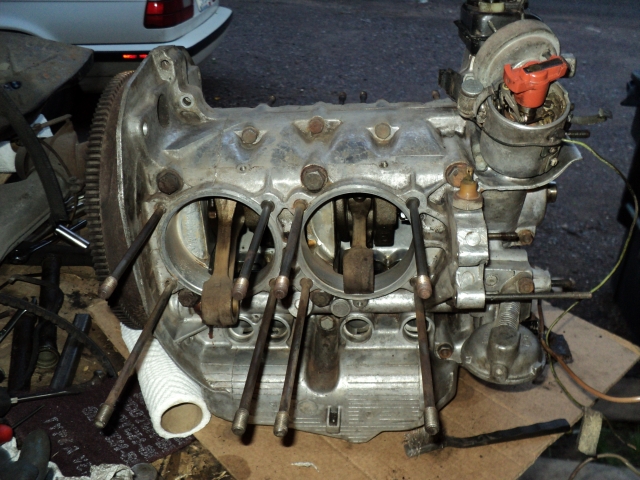
Posted by: rick 918-S Aug 14 2010, 07:50 PM
Here's the heads. Looks like no cracks and I solvent tested them and the valves and seats weren't leaking.
These heads are off to the chevy guys machines shop. I have been wanting to test these guys on price. The work will be fine I'm sure. They do all kinds of aluminum head repairs these days.
Attached image(s)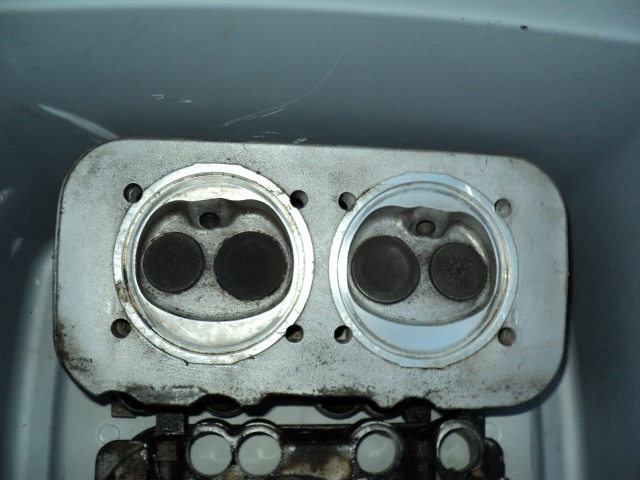
Posted by: rick 918-S Aug 14 2010, 07:51 PM
I hope to drive this car out to the RRC! 
Second head.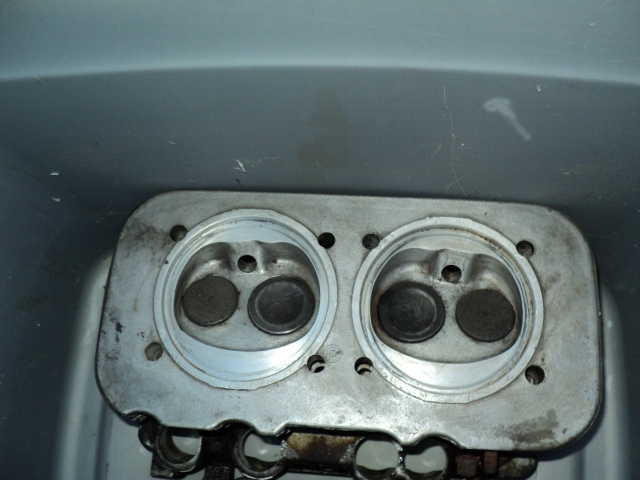
Posted by: Sleepin Aug 14 2010, 08:41 PM
Man, seeing that engine like that really makes me want to come up here and help!
Posted by: jmill Aug 14 2010, 09:02 PM
Is that my old engine? If so it looks pretty good. I thought for sure the heads would look worse than that.
Posted by: rick 918-S Aug 14 2010, 10:04 PM
Yep, The other engine I have must have a dropped seat because I cant turn it over a full rotation.
The engine was likely usable as is but For some reason I couldn't get a good leak down. Probably me using the tool wrong more than the engine. But anyway I have a new set of P&C's I'm sticking on so she should be good to go!
Posted by: rick 918-S Mar 19 2011, 09:14 AM
Progress photos, My son Aric and I have been trying to clean the garage to make some room to work. Part of that involves emptying boxes by assembling things. Here's what we have been up to.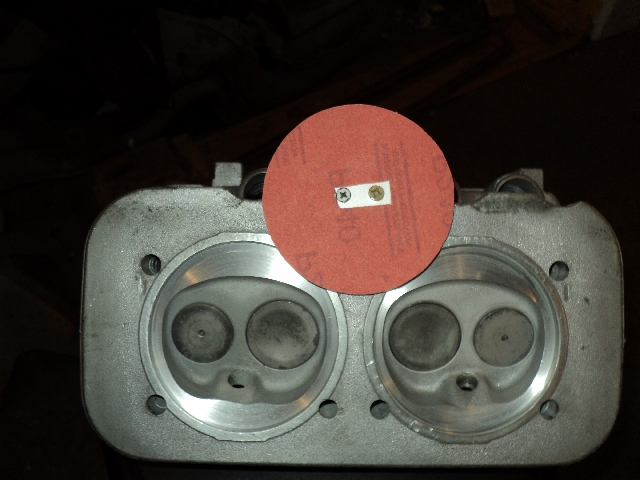
Made a tool to refinish cylinders without having the fly cut at the machine shop. These heads were really nice. I had new guides installed and they were ready to go.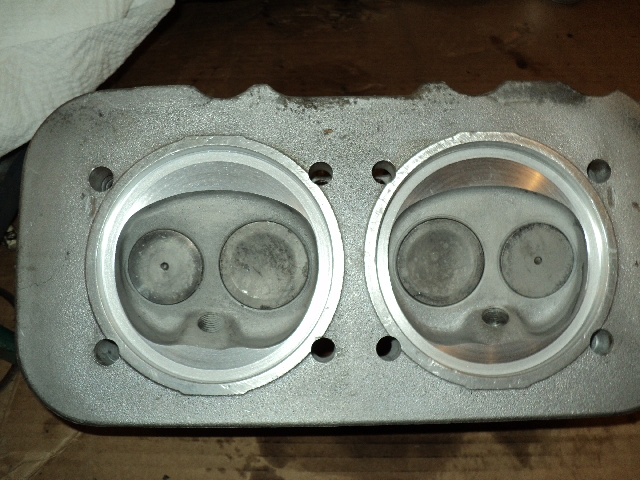
Lapped the cylinders to the heads as instructed by Jake.  No head gaskets like the type I engines now.
Posted by: rick 918-S Mar 19 2011, 09:29 AM
We were able to reduce the volume of boxes a little by bolting these parts on. Notice the lightened flywheel.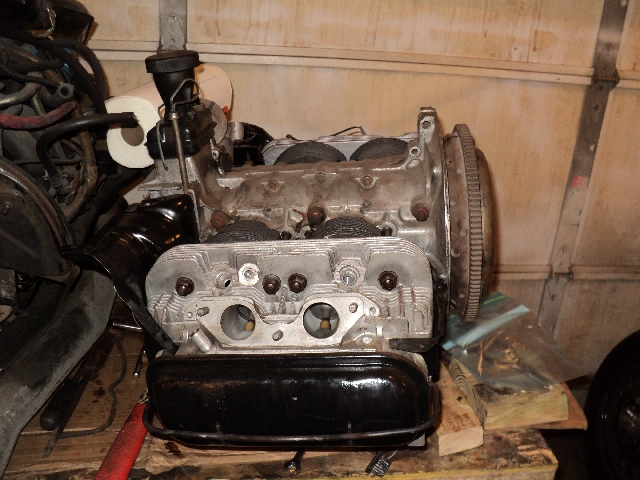
Posted by: rick 918-S Mar 19 2011, 09:30 AM
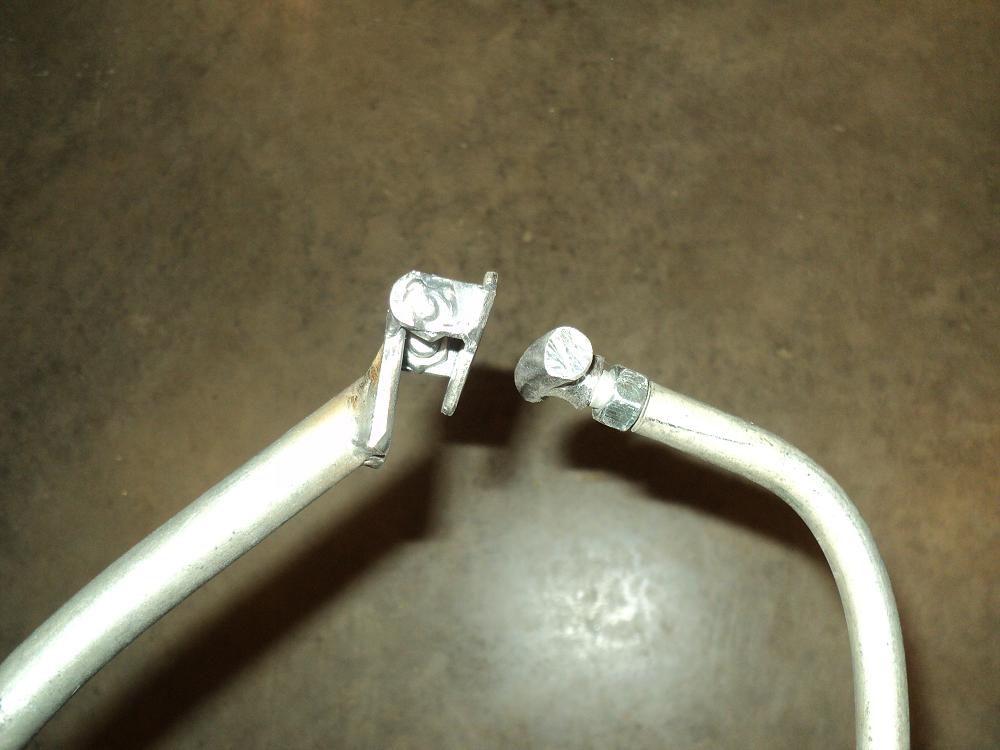
We started pulling stuff the firewall to get it ready to paint before the engine goes in and discovered this clutch tube repair. Very poor quality repair hidden under wades of red silicon . So we get to do some Notice how clean the metal is.  Zero Rust!
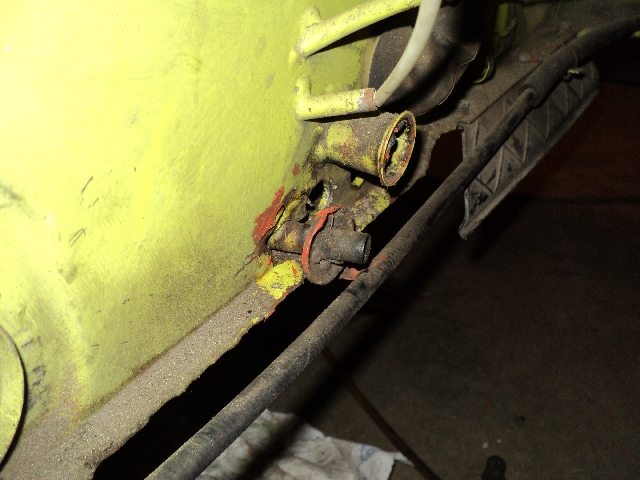
Posted by: rick 918-S Mar 19 2011, 10:10 PM
lottsa work to reduce the number of boxes in the garage.
Attached thumbnail(s)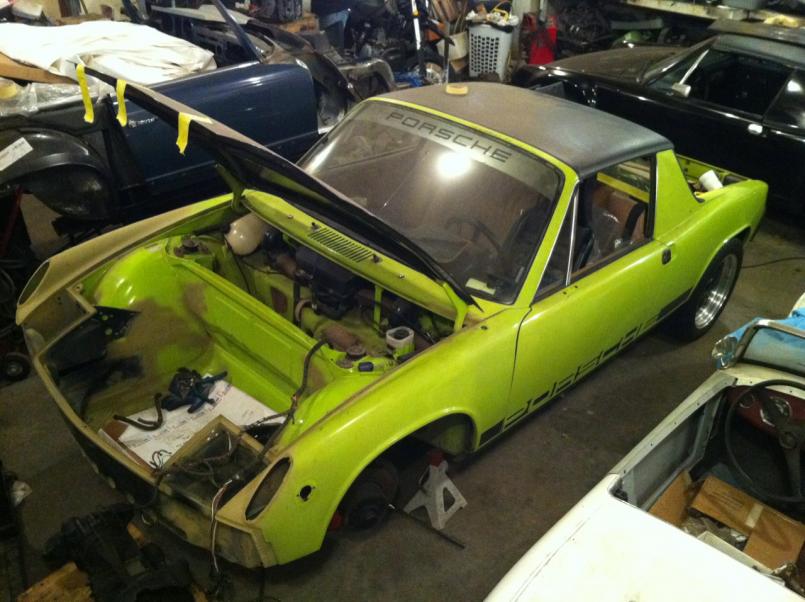
Posted by: rick 918-S Mar 26 2011, 11:08 PM
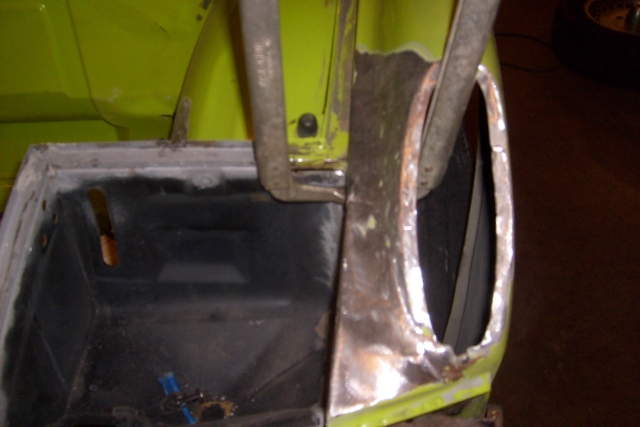
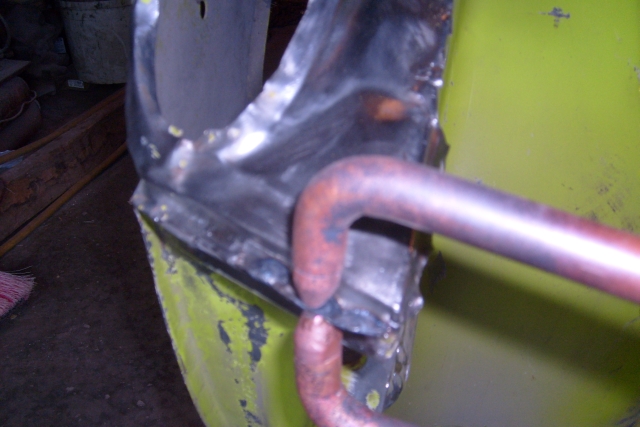
OK, fixed the clutch tube. You can see in the photos above someone welded a huge washer to the lower bulkhead flange and then to the tube. There is a major crack in the bulkhead clear into the fuel line hole.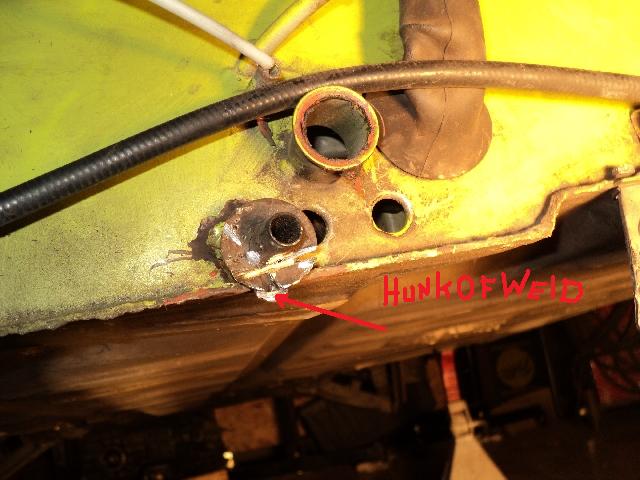
I cut the big stinkin washer off.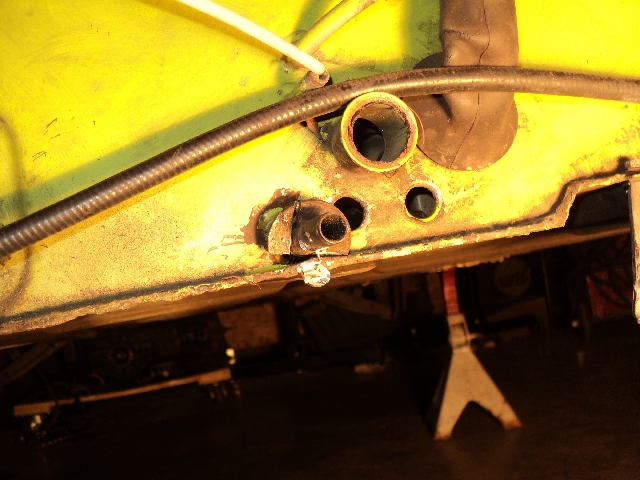
Posted by: rick 918-S Mar 26 2011, 11:13 PM
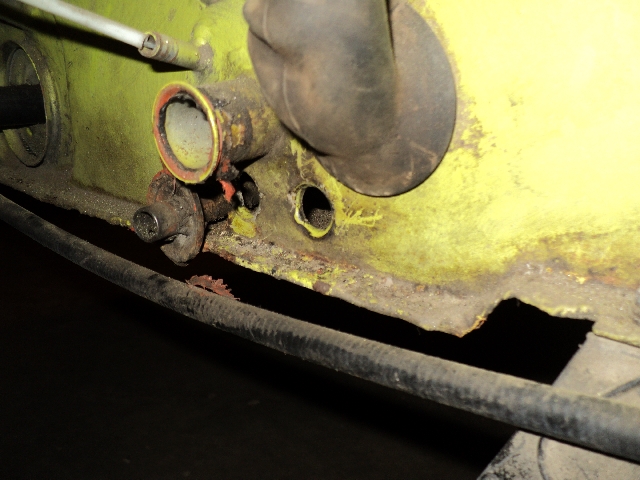
Here's the tube and fire wall after I cut off the washer. There was a big weld I cleaned off the bulk head flange and tube.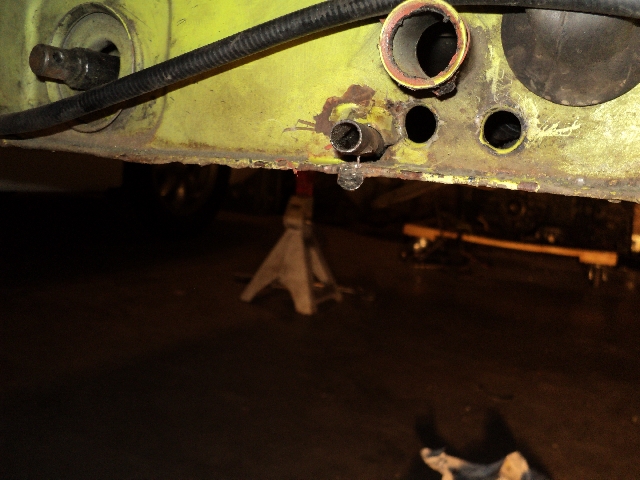
Here is the new washer fit to the tube. You can see the crack into the fuel line tube hole.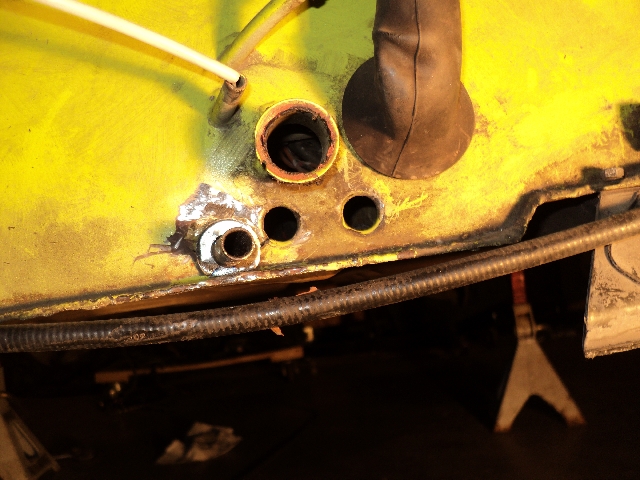
Posted by: rick 918-S Mar 26 2011, 11:19 PM
I brazed the washer to the firewall and the tube. Incase anyone is wondering why I brazed the washer and tube, It is very easy to blow through the tube with a mig and end up with a knob of weld inside the tube. Who ever repaired this tube the last time did leave a bump of weld inside the tube. I have to get in there and drill it or file it flatter so it doesn't wear the cable sheath. Besides, the cable tubes were originally silicon bronze welded in place from the factory. Ready to prep and paint.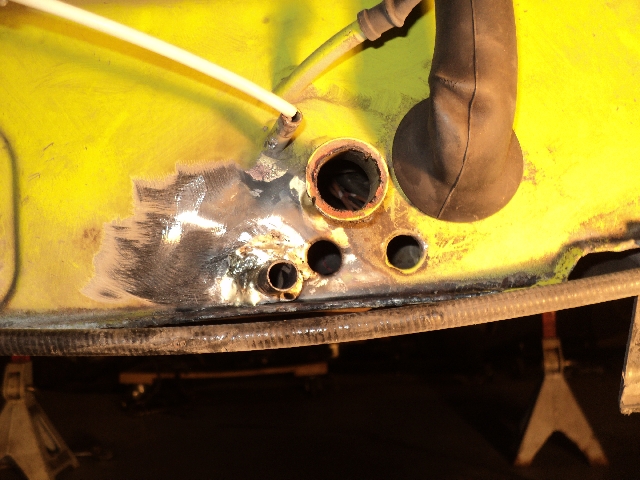
and incase you forgot how rust free this car is. 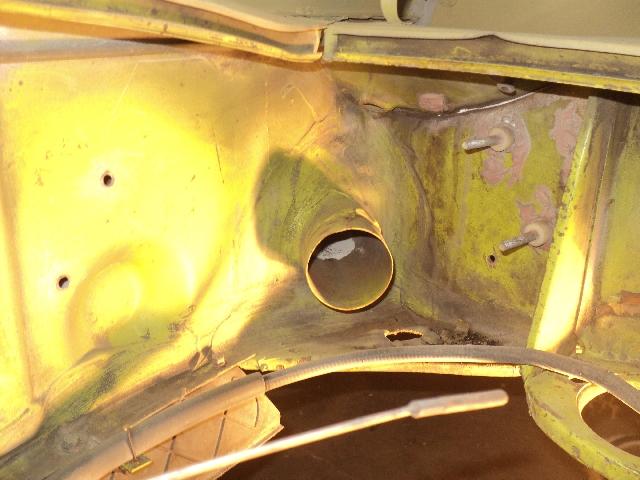
Posted by: rick 918-S Mar 26 2011, 11:34 PM
Also finished installing the engine tin.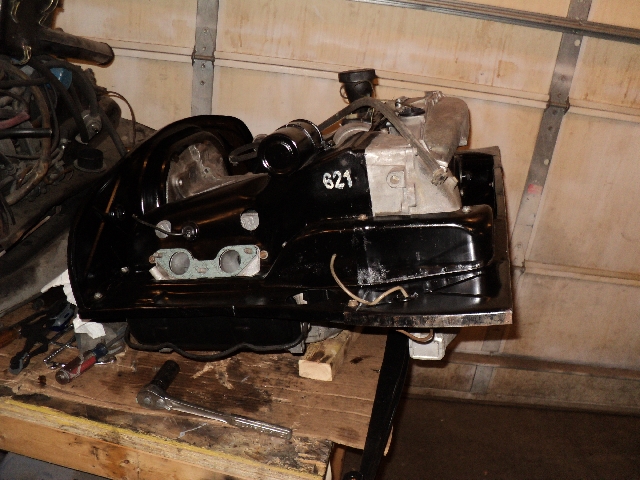
I cleaned and painted one of the intake tubes. The heat and oil staining darkened the finish.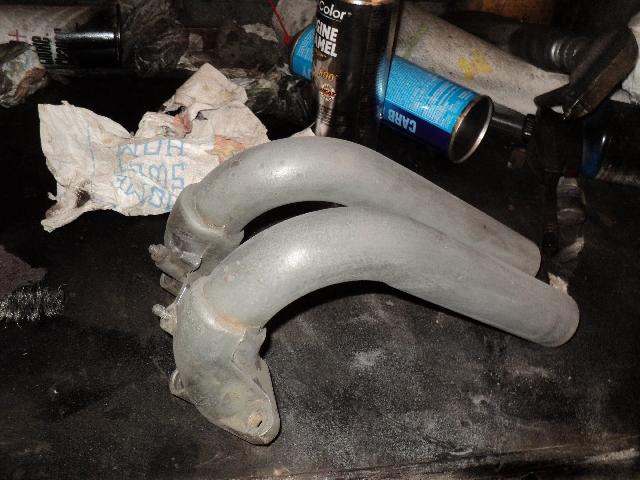
Here's the new paint. 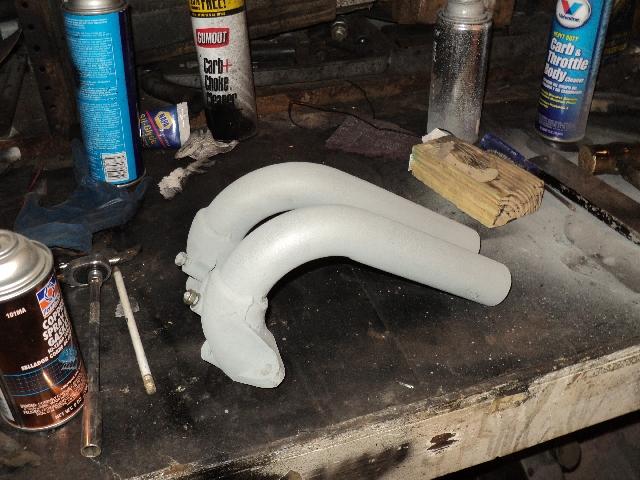
I used this Galvanized weld through primer I purchased at the welding supply store. It's a flat finish but with a light wax rub it looks very stock. 
Posted by: Cairo94507 Mar 27 2011, 07:53 AM
I could spend all day looking at build threads; nice work and a very clean car to start with.
Posted by: dlee6204 Mar 27 2011, 10:02 AM
Lookin good!
Posted by: jmill Mar 27 2011, 10:47 AM
Beautiful. 
What kind of primer did you use, and did you tint it? Looks great.
I'm chomping at the bit to get back into my garage. It wont be until the end of April, though. I promised my daughter I'd build her a new bedroom set for her birthday.
Posted by: rick 918-S Mar 27 2011, 12:14 PM
Beautiful.
What kind of primer did you use, and did you tint it? Looks great.
I'm chomping at the bit to get back into my garage. It wont be until the end of April, though. I promised my daughter I'd build her a new bedroom set for her birthday.
You mean on the car? That is DuPont Veri-prime. It's an acid based self etching primer used as an first coat over bare metal.
Posted by: jmill Mar 27 2011, 06:41 PM
Yes on the car, sorry for the confusion. Looked like zinc chromate primer like I used working on airplanes. Haven't seen a greenish tinted primer since then.
Posted by: rick 918-S Mar 27 2011, 06:52 PM
Yes on the car, sorry for the confusion. Looked like zinc chromate primer like I used working on airplanes. Haven't seen a greenish tinted primer since then.
Yes, I know what your refering to. Same type of a self etching finish. This is a zinc chomate also but some I think are more appropriate for Aluminum. Scotty may have a better recollection of the difference.
Posted by: rick 918-S Apr 24 2011, 06:54 PM
Couple progress photos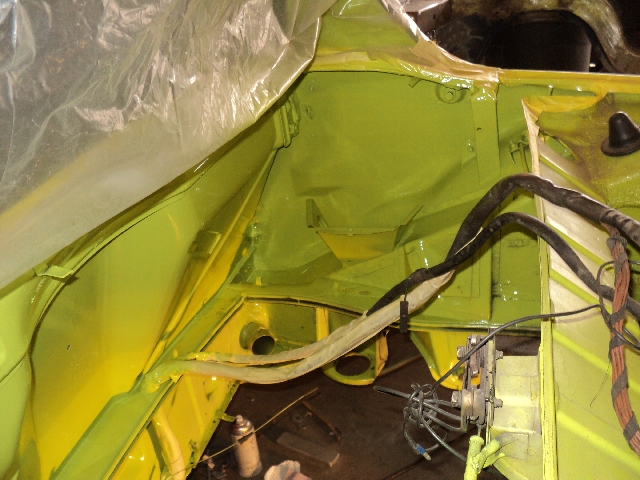
Posted by: rick 918-S Apr 24 2011, 06:55 PM
Posted by: rick 918-S Apr 24 2011, 06:57 PM
I painted everything, then added the battery tray with cold welds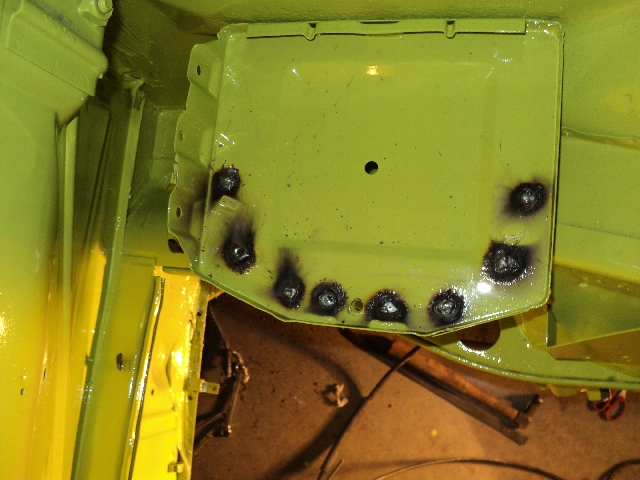
Posted by: scotty b Apr 24 2011, 07:12 PM
stellar
Posted by: rick 918-S Apr 24 2011, 08:03 PM
Here's the stand before I cleaned up the welding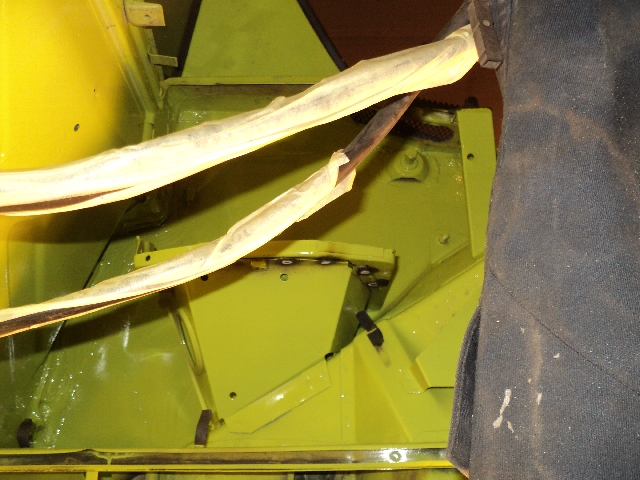
Posted by: rick 918-S Apr 24 2011, 08:06 PM
Here's after clean up and painting.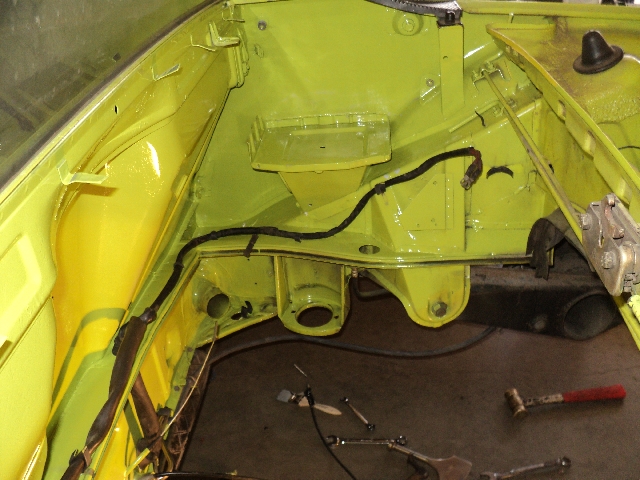
Posted by: rick 918-S Apr 24 2011, 08:07 PM
Starting to rerun the wiring and stuff.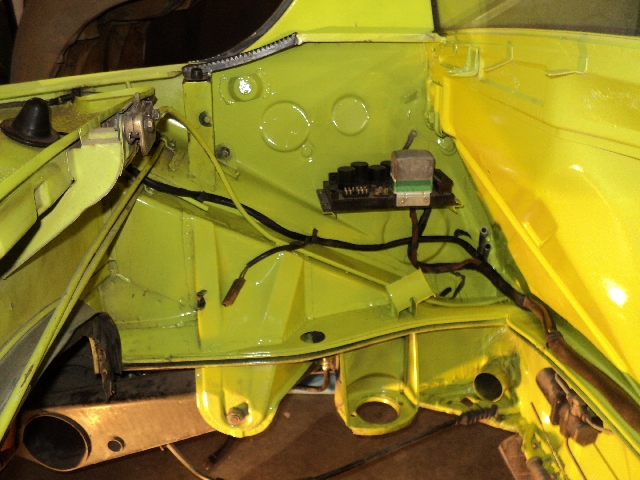
Posted by: jmill Apr 24 2011, 09:45 PM
Very nice!
Posted by: watsonrx13 Apr 25 2011, 05:14 AM
Rick can you explain the term 'cold welds'?
BTW, the car is looking great...
-- Rob
I painted everything, then added the battery tray with cold welds
Posted by: rick 918-S Apr 25 2011, 07:00 AM
Rick can you explain the term 'cold welds'?
BTW, the car is looking great...
-- Rob
I painted everything, then added the battery tray with cold welds
I turned the settings down to the lowest on my mig. My goal is to just attach the tray and keep the paint burn to a minimum. The tray is not structural in the way a jack post or a seat mount is. The bolt that holds the battery is also actually in the stand so inertia from the battery is transfered there. I also don't weld the tray to the vertical inner panel. I use urothane seam sealer and bond it. The poor inner panel is usually thin from battery acid. I don't see the need to weld the tray back to the inner panel.
Edit: I since changed my mind about this when the inertia pulled the battery tray away from the inner panel and split my seam sealer. I ended up tack welding it to the inner after all.
Hey, live and learn.
Posted by: watsonrx13 Apr 25 2011, 10:15 AM
Thanks for the explaination.
Would the battery tray be a good canidate for bonding using adhesives?
-- Rob
Posted by: rick 918-S Apr 25 2011, 10:34 AM
Thanks for the explaination.
Would the battery tray be a good canidate for bonding using adhesives?
-- Rob
I think that could be done. Bodyshops bond all kinds of parts on now. Adhesives are extremely advanced now. They are expensive though. Like anything you'd have to weigh the cost over the benifit.
Posted by: Root_Werks Apr 25 2011, 11:31 AM
Posted by: Ferg Apr 25 2011, 11:33 AM
Posted by: Kansas 914 Apr 25 2011, 11:59 AM
Starting to rerun the wiring and stuff.
Awesome - at this pace - you will finish Sandy's car way before I finish my Willow car...
Posted by: rick 918-S Apr 27 2011, 10:10 PM
Didn't Mark Whitsell say he was making the rubber grommet for the drain tubes? I didn't see it on his web site.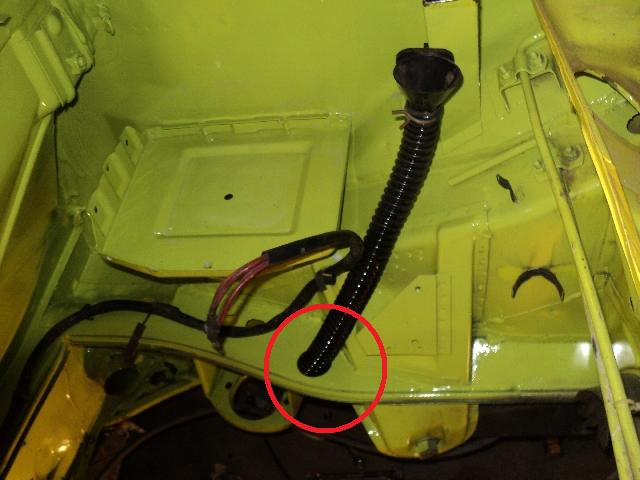
Posted by: r_towle Apr 27 2011, 10:48 PM
you have me worried now.
Rich
Posted by: rick 918-S May 11 2011, 10:04 PM
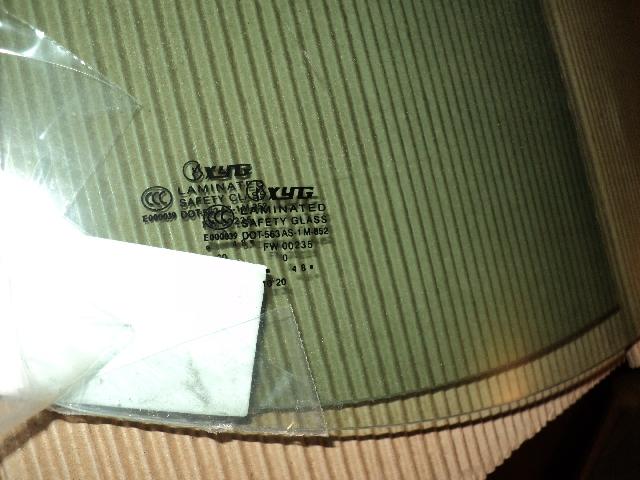
I ordered three windshields. One for the Alien. (cracked last year on the way to RRC ) One for the Ravenna car (cracked) and one for the Raspberry car. They arrived today from the East Coast intacked.
Attached image(s)
Posted by: rick 918-S May 22 2011, 07:41 AM
I sent the 2.0 engine harness out to Jeff Bowlsby for a tune up. It came back while I was out of town working. The thing is bitchin! All cleaned up, repaired some brittle wires, installed all new stock rubber boots! I just installed it on the engine this morning! 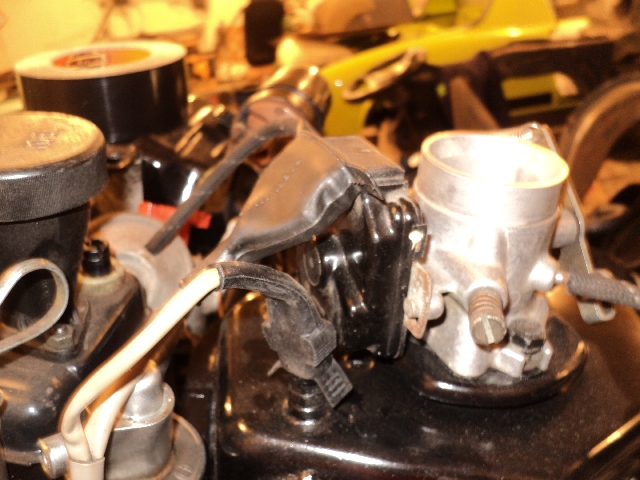
Just need to complete the vacuum hoses and it's ready to install.
Posted by: majkos May 23 2011, 04:01 PM
Go Rick Go!
Nice soft wirings are indeed, sweet!
Posted by: Ferg May 23 2011, 04:49 PM
Nice progress, maybe we will have some Ravenna at RRC
Posted by: rick 918-S May 23 2011, 07:09 PM
We were shooting for the WCR but I just got buried with work 24/7 No way I can get back to it.
Posted by: championgt1 May 23 2011, 09:24 PM
Awesome! Love Ravenna green. 
Posted by: rick 918-S May 30 2011, 07:13 AM
OK, took a mental break from work and went out and buffed the wheel lips. I have one left. Then I can duct tape the shiney lips, soda blast the centers and get them painted.
Oh ya, after buffing the lips I wash the wheels with a soft brush and Dawn dish soap and run them through a cycle in the dishwasher to be sure there is no compound left behind or down in the space between the cast center and the wheel barrel.
Attached image(s)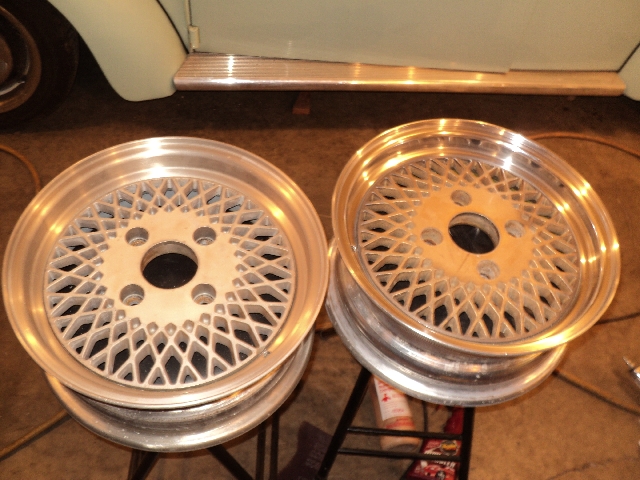
Posted by: majkos May 30 2011, 07:55 AM
dishwasher?
I assume you have one in the shop?
Posted by: rick 918-S May 30 2011, 09:44 AM
dishwasher?
I assume you have one in the shop?
Nope, In the kitchen.
 anyone looking?
Posted by: majkos May 30 2011, 10:15 AM
dishwasher?
I assume you have one in the shop?
Nope, In the kitchen.
anyone looking? well then I thought since it's her's 914
you had permission
Posted by: jmill May 30 2011, 01:08 PM
Oh ya, after buffing the lips I wash the wheels with a soft brush and Dawn dish soap and run them through a cycle in the dishwasher to be sure there is no compound left behind or down in the space between the cast center and the wheel barrel.
Reminds me of the time I ruined a pot and stunk up the house installing a cam gear.

Posted by: rick 918-S May 30 2011, 01:56 PM
dishwasher?
I assume you have one in the shop?
Nope, In the kitchen.
anyone looking? well then I thought since it's her's 914
you had permission
It's easier to ask for forgiveness that permission
Posted by: majkos May 30 2011, 05:34 PM
dishwasher?
I assume you have one in the shop?
Nope, In the kitchen.
anyone looking? well then I thought since it's her's 914
you had permission
It's easier to ask for forgiveness that permission
yup

Posted by: rick 918-S Jun 18 2011, 10:59 PM
Just got these back from the powder coater! I had the back of the wheels done also so brake dust will rinse off easily.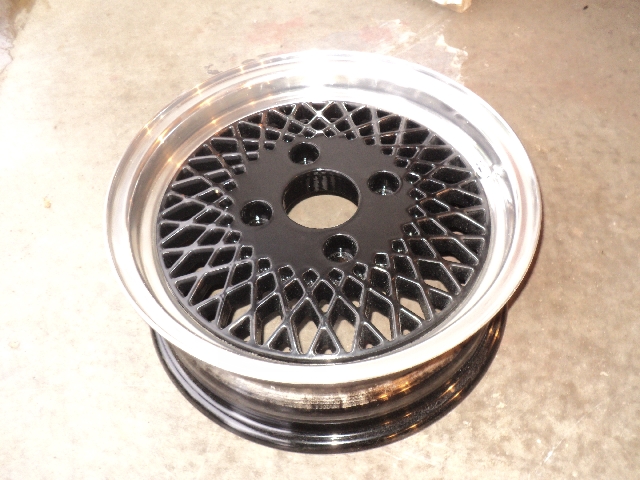
Posted by: RobW Jun 19 2011, 07:58 AM
Nice wheels Rick! Put em on something and drive! Happy Fathers Day!
Posted by: rick 918-S Jun 19 2011, 09:28 AM
Nice wheels Rick! Put em on something and drive! Happy Fathers Day!
I'm heading to the tire store. I spent several hours removing over spray off the polished lips.
First and last time I will use this powder guy. I'm buying my own equipment.  They'll do but it's not what I expected.
Thanks Rob! Happy Fathers day to you also. I am heading over to my oldest sons engagement party this afternoon and then building a counter in my youngest sons music store later on today.
Posted by: rick 918-S Jul 4 2011, 09:12 PM
Squeezed in some work this morning before anyone else got up. For those who have followed this build you will likely remember this car was a frontal crash victom. It appears the car stopped but the energy in the rubber mounted engine didn't the engine seal shelf infront of the engine was bent and the ears on the transaxle snapped off. 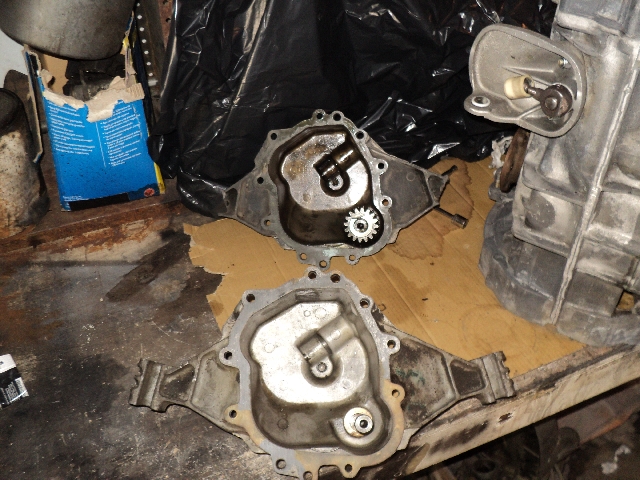
Posted by: rick 918-S Jul 4 2011, 09:13 PM
Thanks to video from Dr. Evil and the replacement part he supplied I have the skill and the part to get this transaxle back in service. I was out at 7:30 am degreasing the housing and getting it ready for the repair. 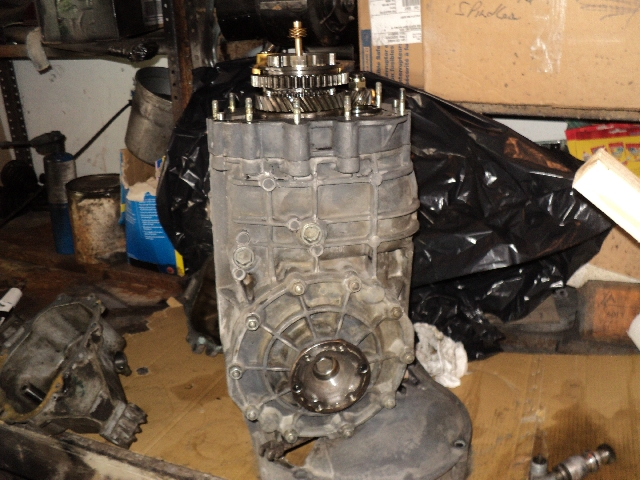
Posted by: rick 918-S Jul 4 2011, 09:14 PM
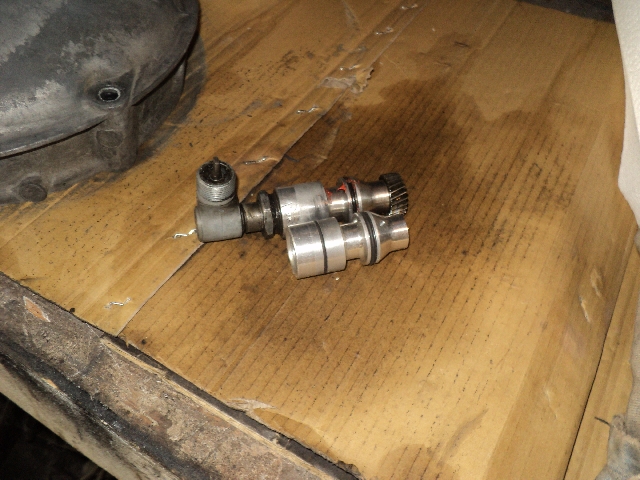
I figured while I had it all cleaned up I would install this cool speedo drive made by McMark! 
Posted by: rick 918-S Jul 18 2011, 08:50 PM
Just received the last few parts needed to install the engine and transaxle.
Great Vaccum line set from George at AA!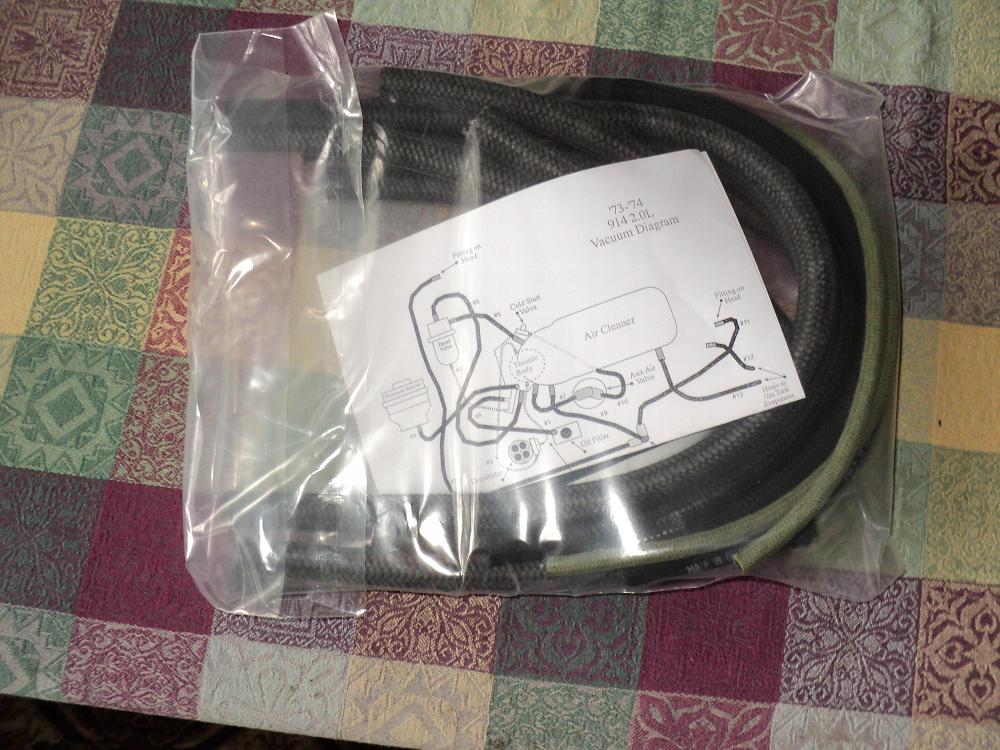
I had the muffler blasted and I painted it with Zinc weld through primer.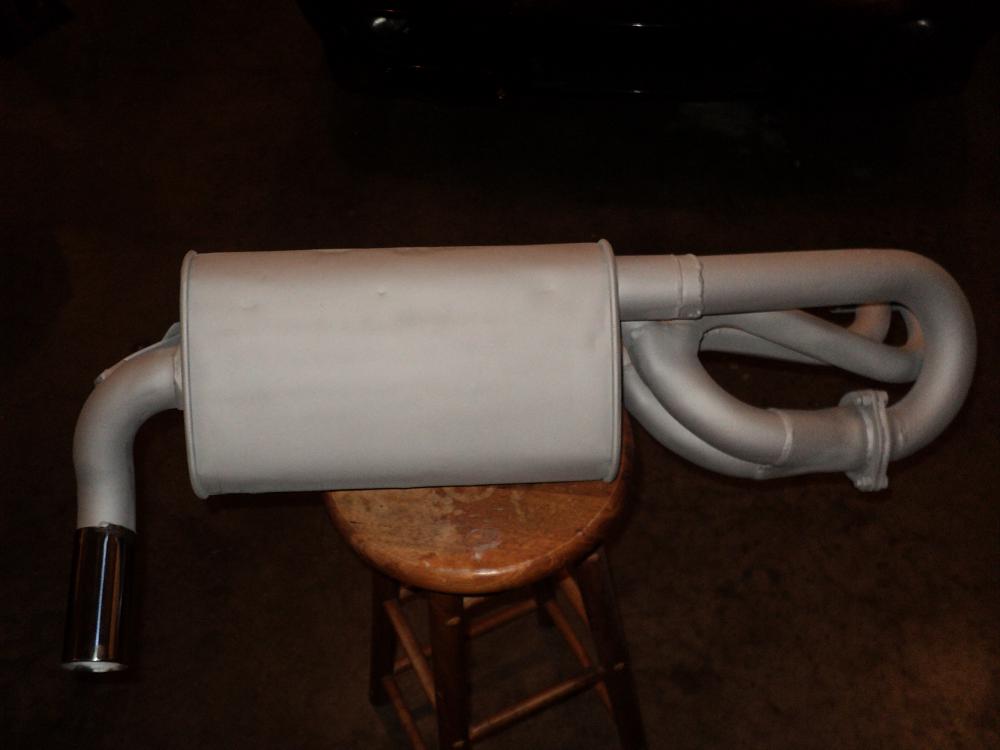
Posted by: rick 918-S Jul 18 2011, 09:33 PM
Oh and the brakes are completely refub'd with parts from Eric Shea. New 19mm master cylinder. and the tires are mounted on the car. It's off the jack stands and ready for the engine install.
Here's the wheels and tires!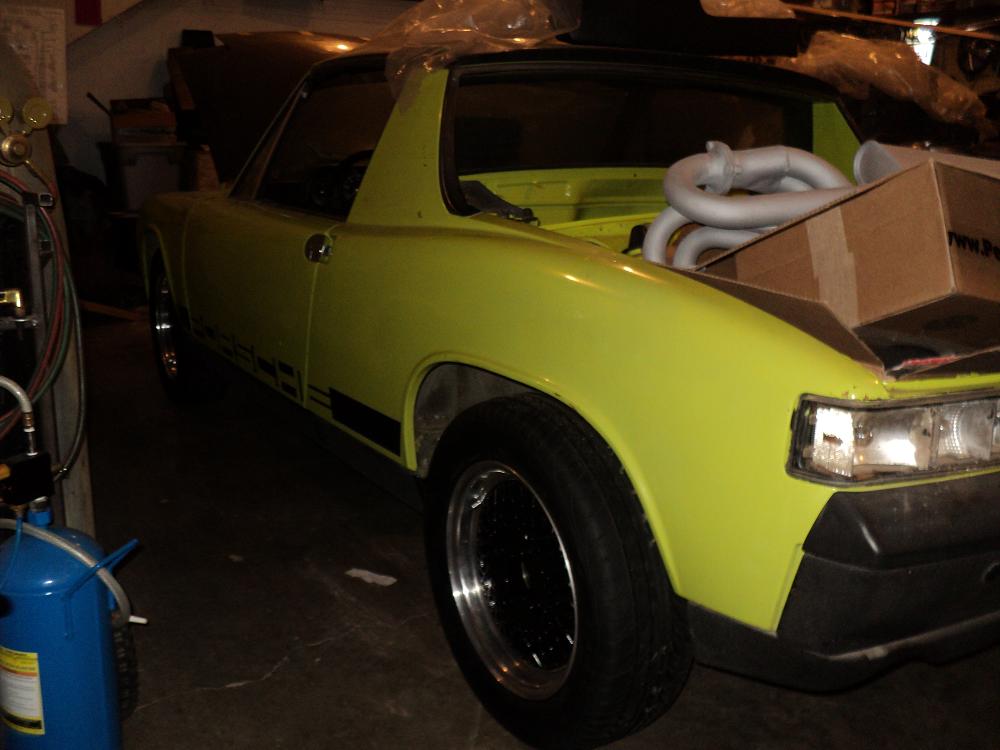
Posted by: rick 918-S Jul 26 2011, 10:13 PM
Engine and transaxle are mated. I hope to have the engine installed by the weekend.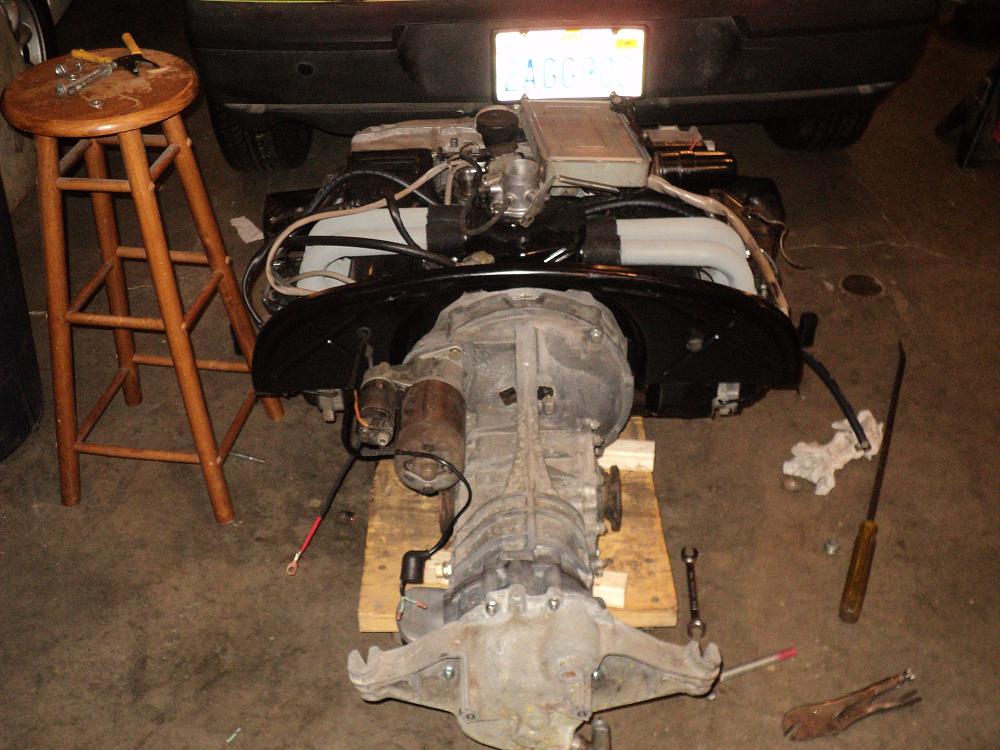
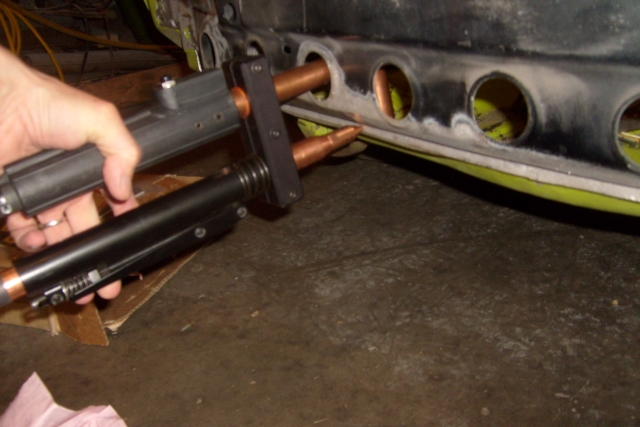
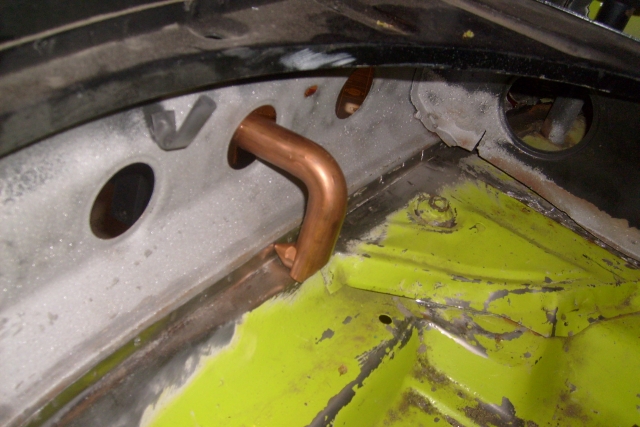
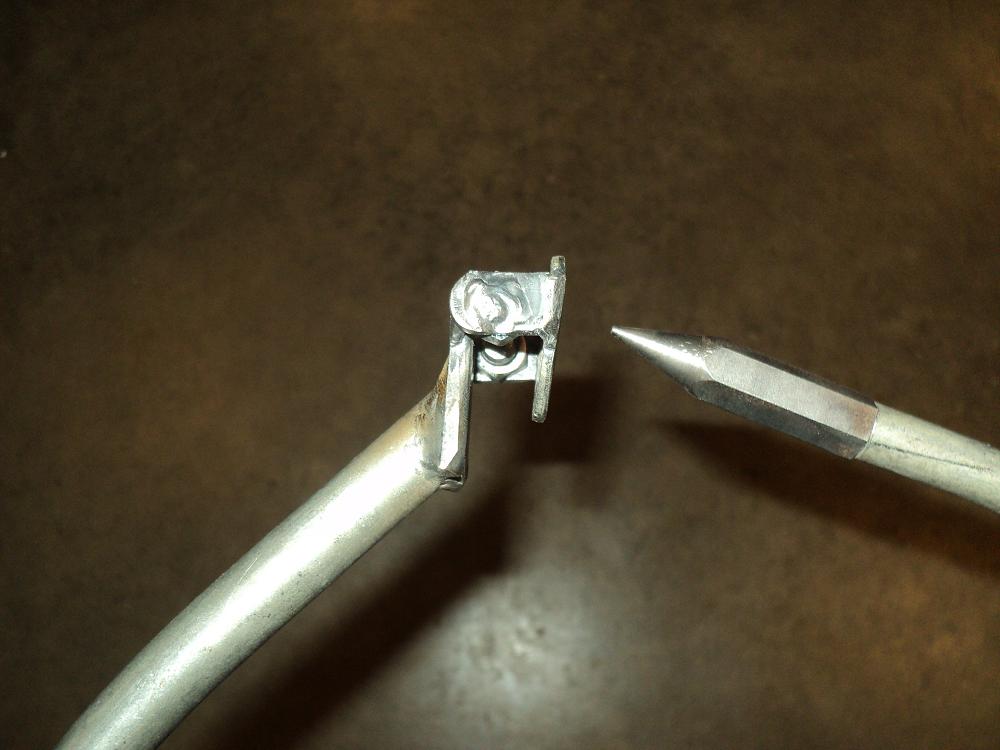
I repaired the wiring for the backup lights. The ends are copper tubing. I penned the end of the tubing into a cone and used a flaring tool on the other end then soldered them to the wiring.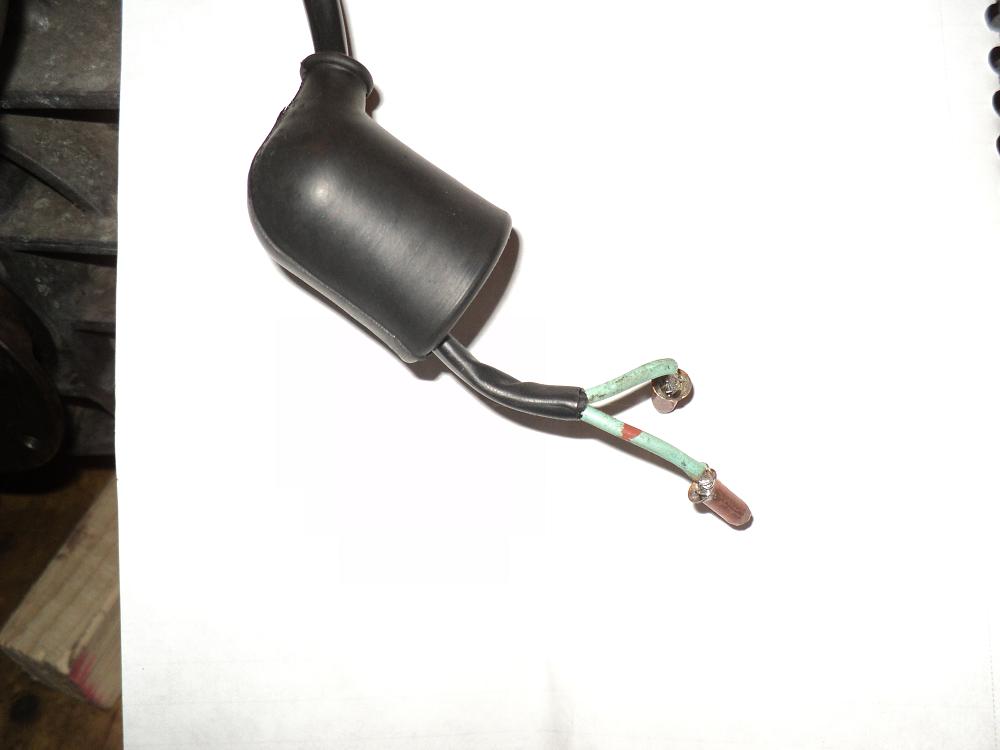
Some of the parts getting installed.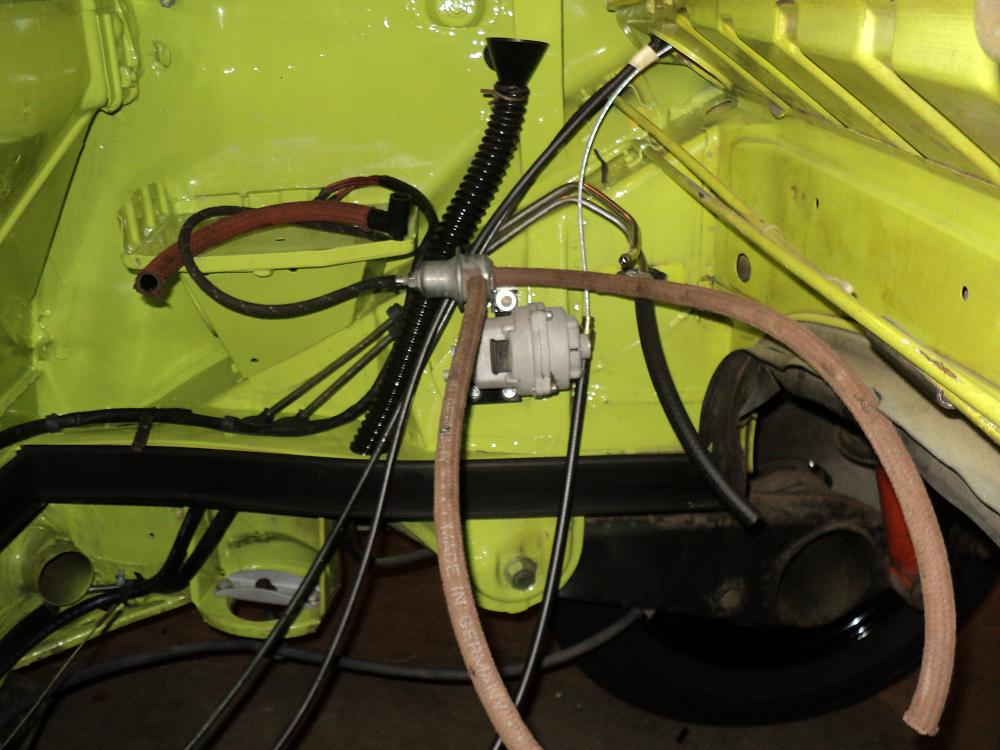
Posted by: rick 918-S Jul 27 2011, 11:18 PM
Engine is in 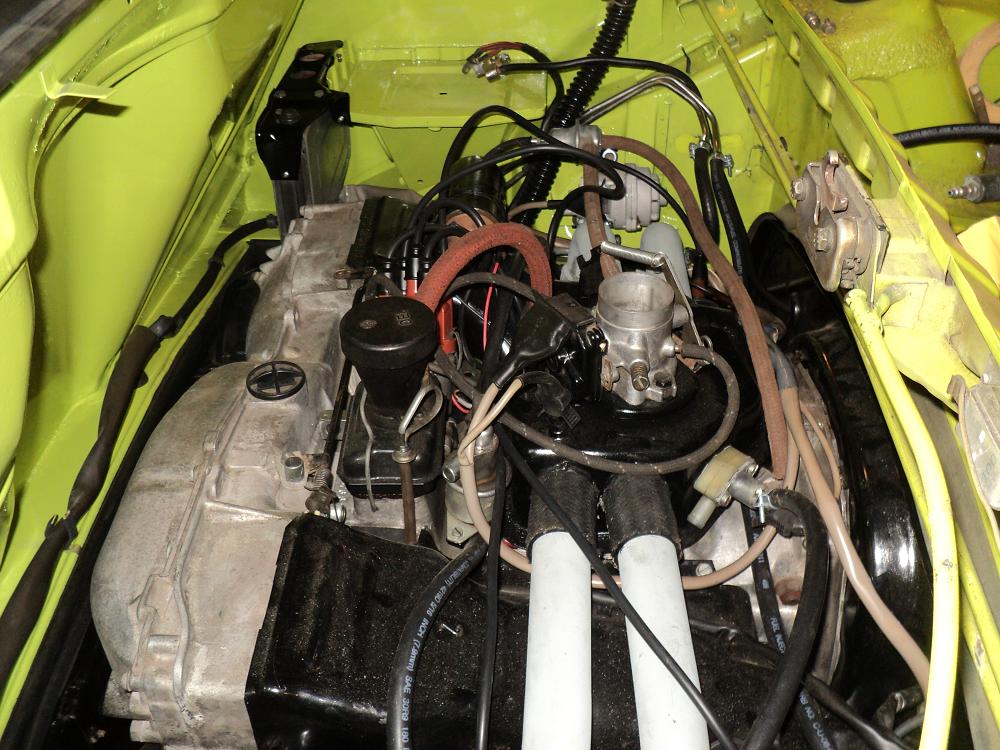
Posted by: iamchappy Jul 28 2011, 07:47 AM
Looking good!
Posted by: John Jentz Jul 28 2011, 09:07 AM
Rick, how come you didn't paint the whole engine bay?
Posted by: rick 918-S Jul 28 2011, 09:29 PM
Rick, how come you didn't paint the whole engine bay?
I had to stop someplace. I just rubbed off some of the discoloration left from life in the engine bay of a 914. It cleans up nice. I'm not doing a CW job on this. It's a very nice solid car we want to drive this year. Maybe even to the RRC 2011...
We shall see...
Posted by: majkos Aug 17 2011, 07:18 AM
![]() Looking real good there, Rick!
Looking real good there, Rick!
I love the reverse switch trick! Genius!
Posted by: rick 918-S Nov 23 2011, 10:03 PM
She's starting to come back to life! My oldest son Aric and I rebuilt the 2.0 I got from John Miller in Racine WI. After many months of sneeking in a couple minutes here and there. Sandy and I started the engine tonight. The smoke is coming from the exhaust system. I had it sand blasted and I painted it with heavy zinc weld through primer. It's going to take awhile to burn off.
https://www.youtube.com/watch?v=tzTNI-sreSQ
Posted by: championgt1 Nov 23 2011, 10:10 PM
It's alive!!
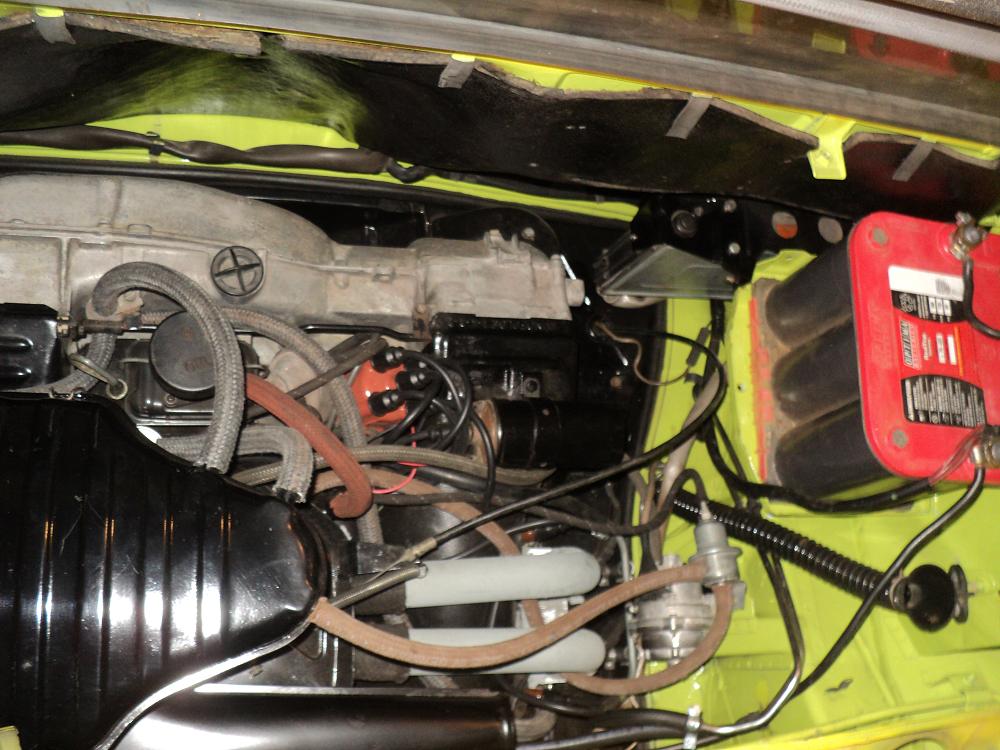
Posted by: rick 918-S Nov 25 2011, 11:46 PM
A couple gatuitus engine shots.
Attached image(s)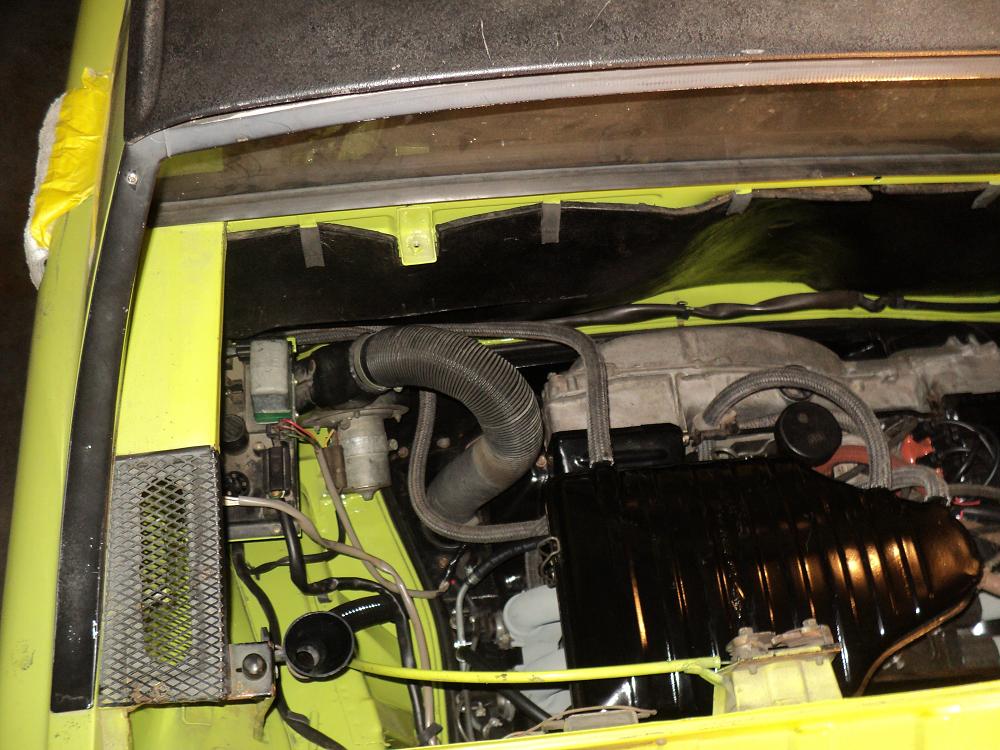
Posted by: rick 918-S Dec 10 2011, 03:31 PM
https://www.youtube.com/watch?v=4z-lrIuW934&feature=youtu.be
https://www.youtube.com/watch?v=d3rNSwOTtas&feature=youtu.be
Posted by: dlee6204 Dec 10 2011, 05:22 PM
Woohoo! 
You're missing a few parts though... 
Posted by: rick 918-S Dec 10 2011, 06:01 PM
Woohoo!
You're missing a few parts though...
Ya, you should have seen the looks we got!

 My son Aric and I took turns driving it around the neighborhood. We needed to warn up the engine so we could set the timing. The second video were still not timed. I was loosing the dizzy and discovered the shrink tubing on the connector for the supplementary air valve was dried up and crumbing. I accidentally shorted it with the wrench and blew the fuse on the relay board. If you notice the engine rpm's pick up as the injectors go lean then the engine died. Then I said. Oh oh...
Posted by: iamchappy Dec 10 2011, 09:40 PM
I'm totally assimilated......
Posted by: rick 918-S Dec 12 2011, 12:17 AM

Posted by: bryanf Dec 12 2011, 10:58 AM
Awesome! So glad to see it move under its own power!
Posted by: ottox914 Dec 13 2011, 10:42 AM
Awesomeness. Another one back from the dead.
Posted by: rick 918-S Jan 16 2012, 11:32 PM
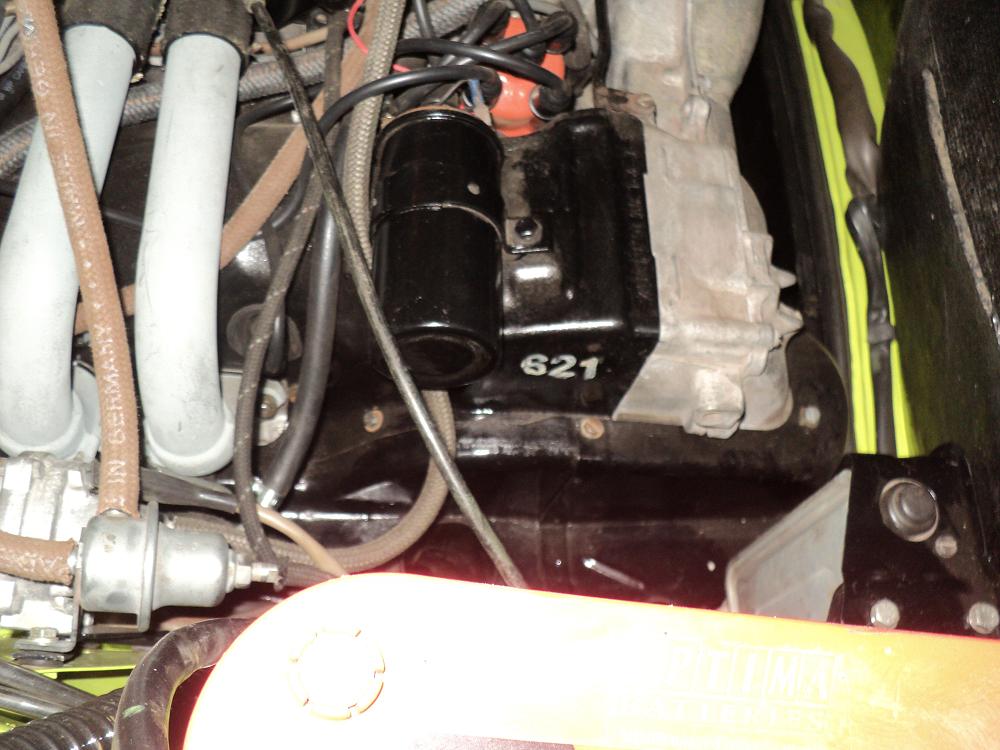
Not too much to update here yet since Aric and I drove the car around without and lights or body panels to be sure that mechanically the was sound. But here's a detail I missed. I decided to locate the fuel pump up front. I like the factory pocket for the fuel pump from the late cars so I added one.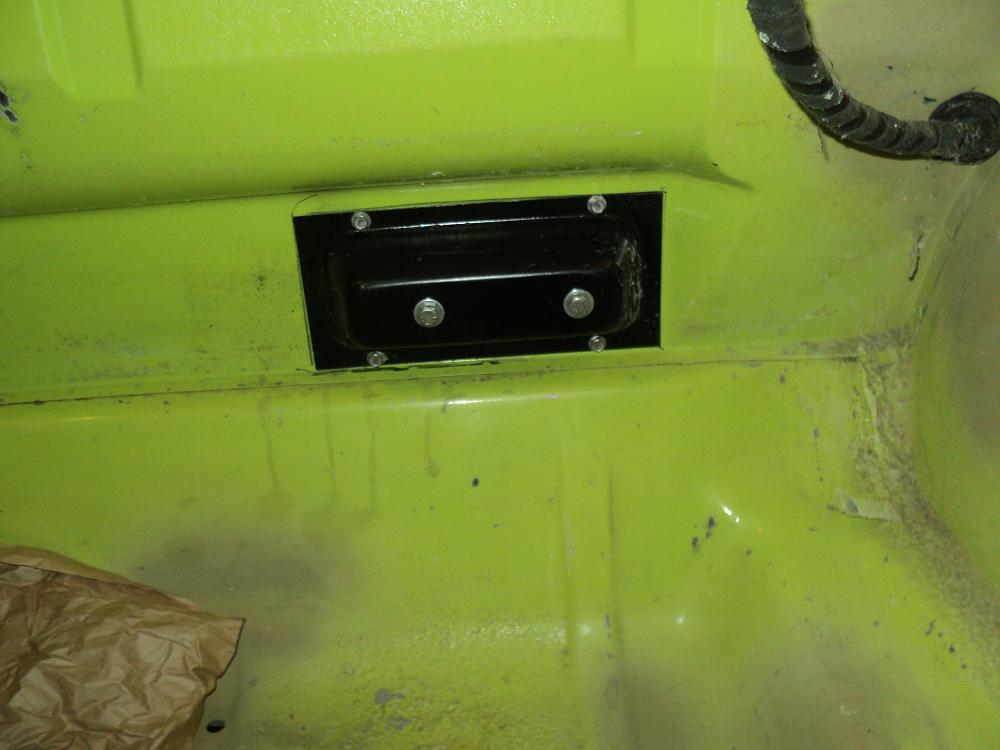
Also used the battery charger method to clean the gas tank before it was installed.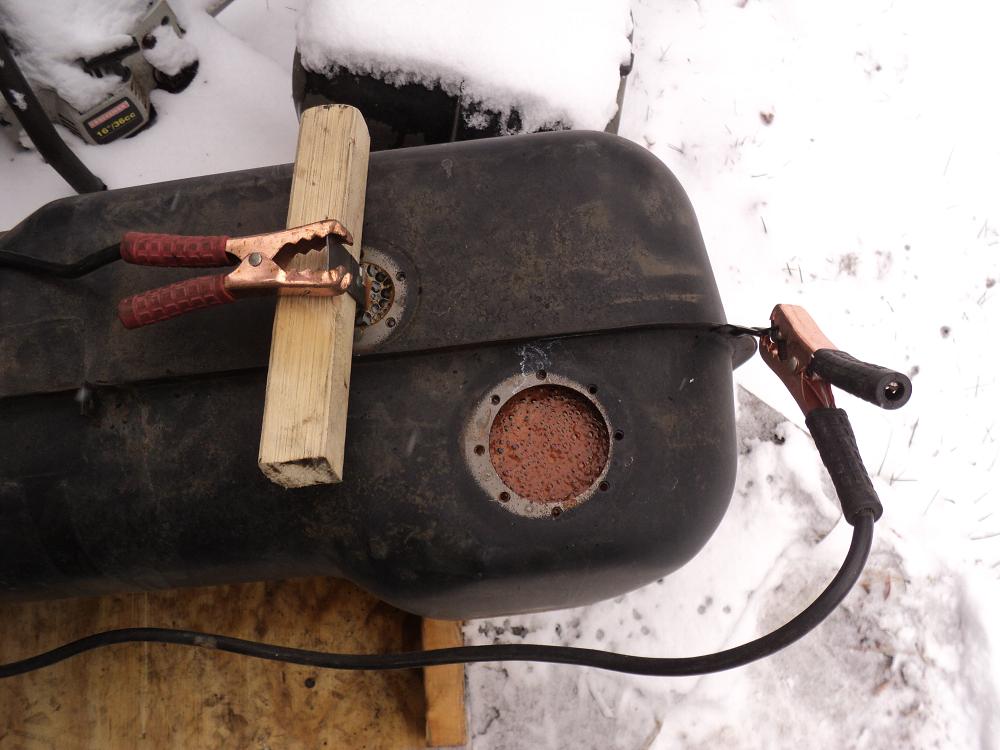
I have the heating ducts finished with the exception of the barrel nuts for the cables. Those should arrive tomorrow and the car will be off the jack stands and ready for the paint work to begin.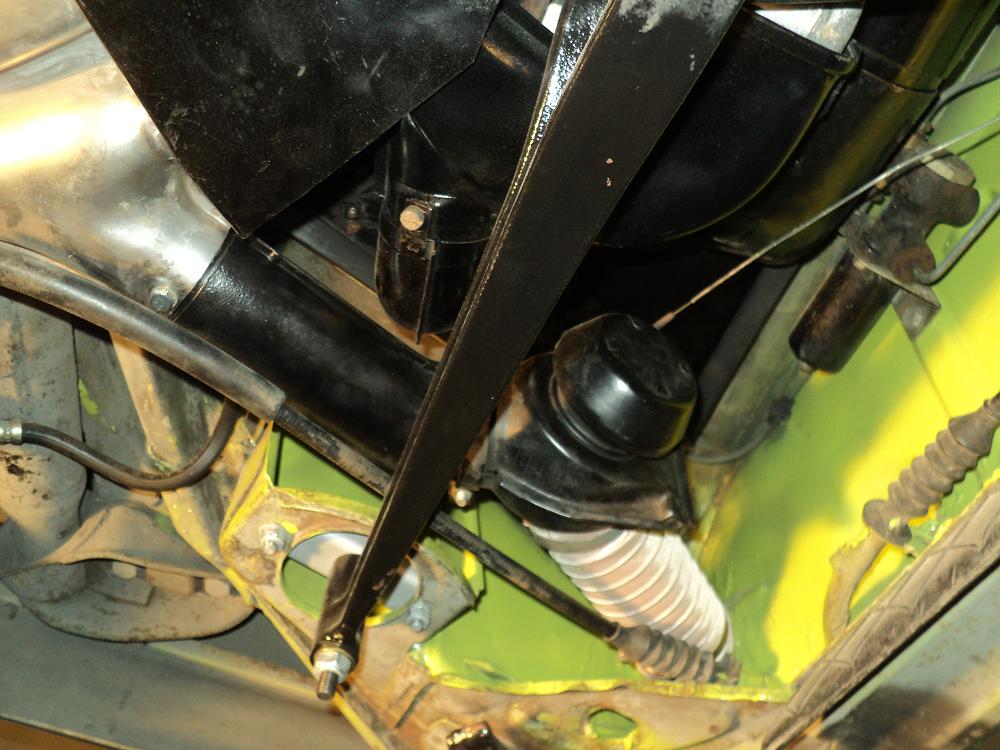
Posted by: rick 918-S Feb 13 2012, 01:48 AM
So cars are like a box of Cracker Jacks. There's a surprise in every box. Some good, some not so good. As I started sanding on the car I discovered it had two repaints. I don't paint over a repaint. Todays paint systems are not compatable with laquer based primers and glazing putties. This car had the old laquer base Nitrostan or what the old school bodymen know as Red Cap. So off comes all the paint right down to the steel.
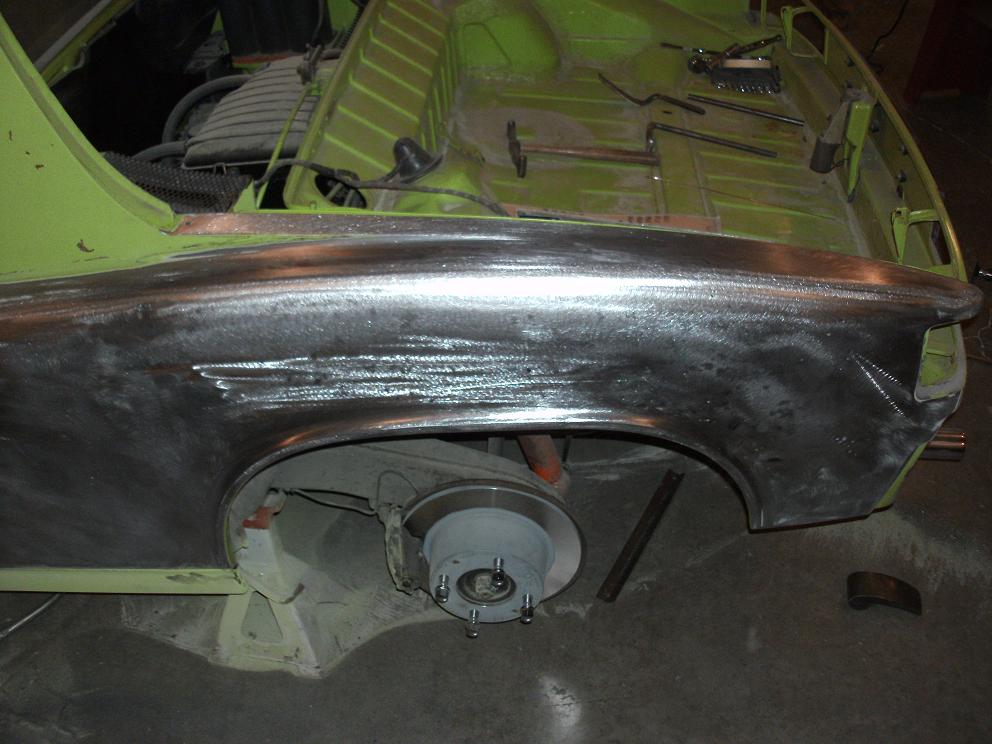
The second not so nice surprise was the dent in the quarter panel that had been stuffed full of filler as deep as 3/4". To make matters worse they attacked the inside radius with a pick hammer!
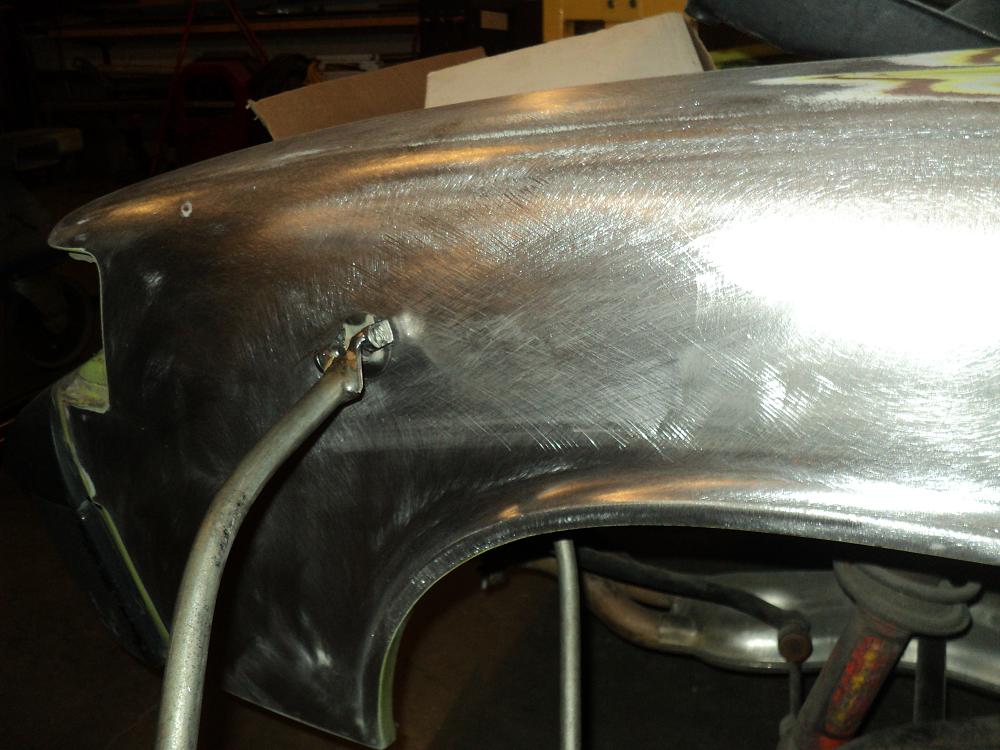
I spent most of the day bumping and filing. Here's the results.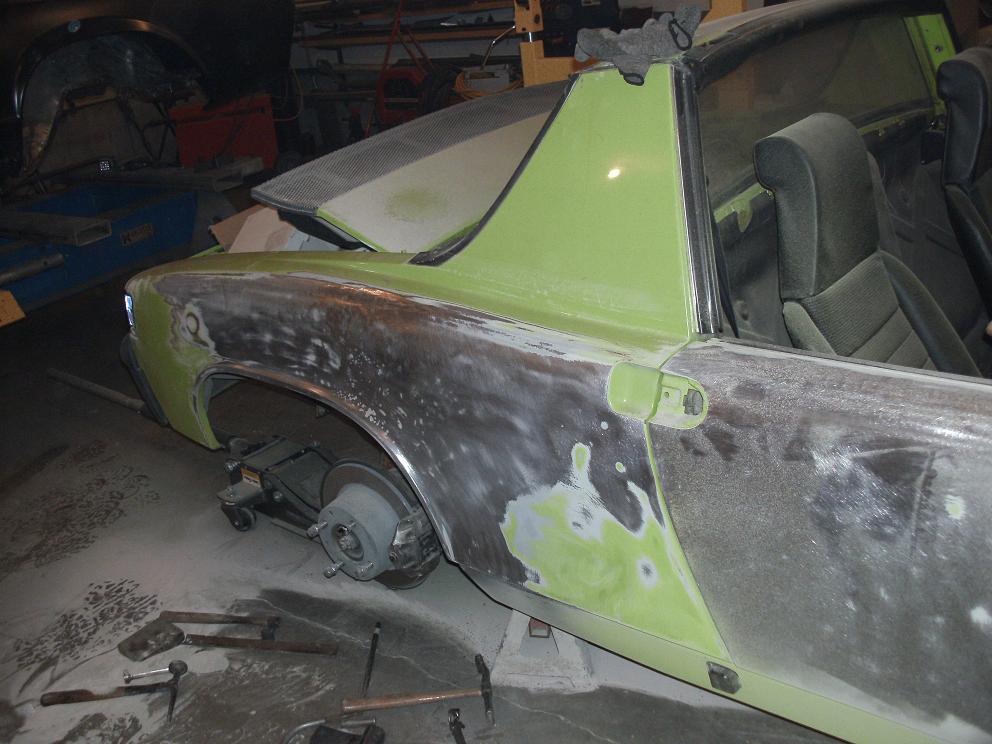
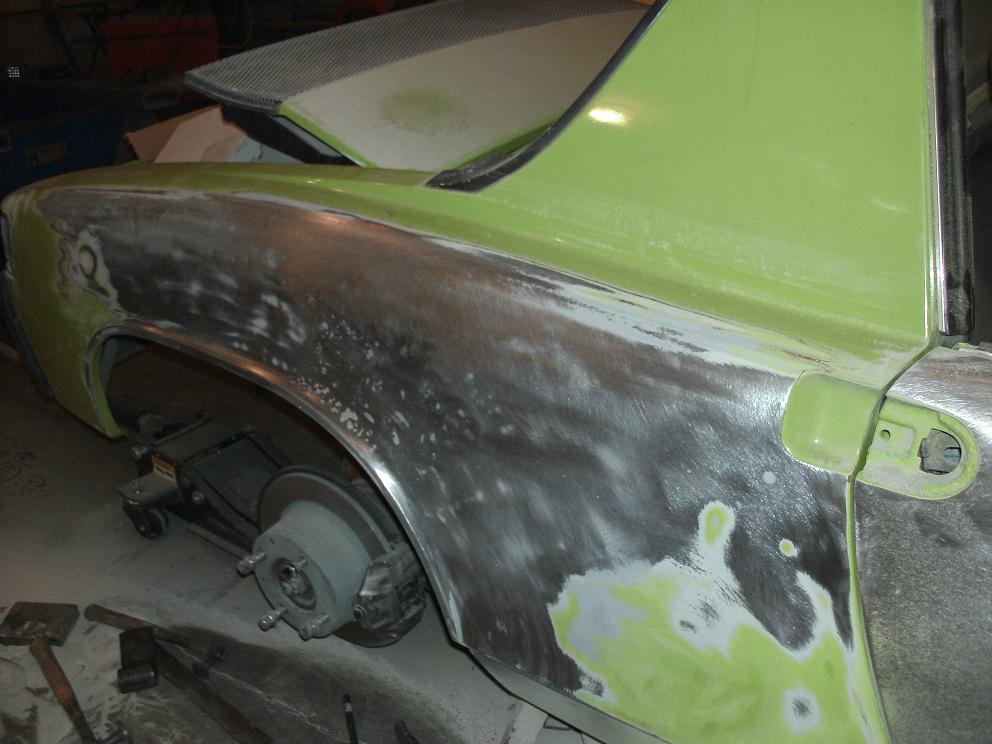
Here is a dent that is easier to see. I used a bullseye pick and file to repair most of the damage on this panel.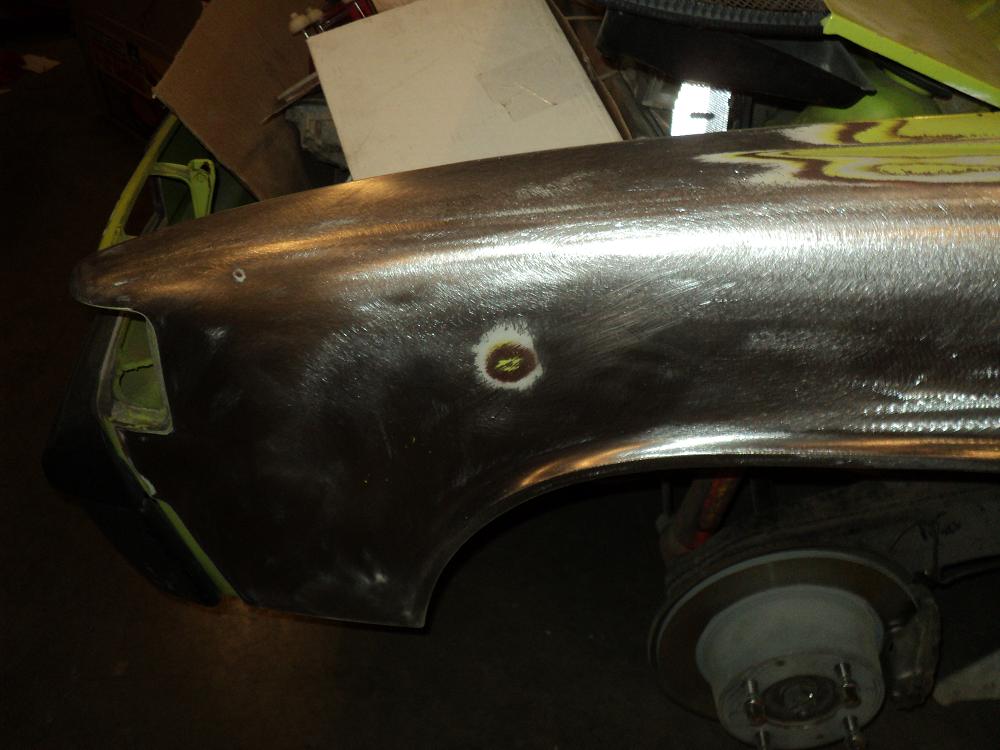
Posted by: rick 918-S Feb 13 2012, 01:58 AM
Some of the accessories For my Bullseye pick.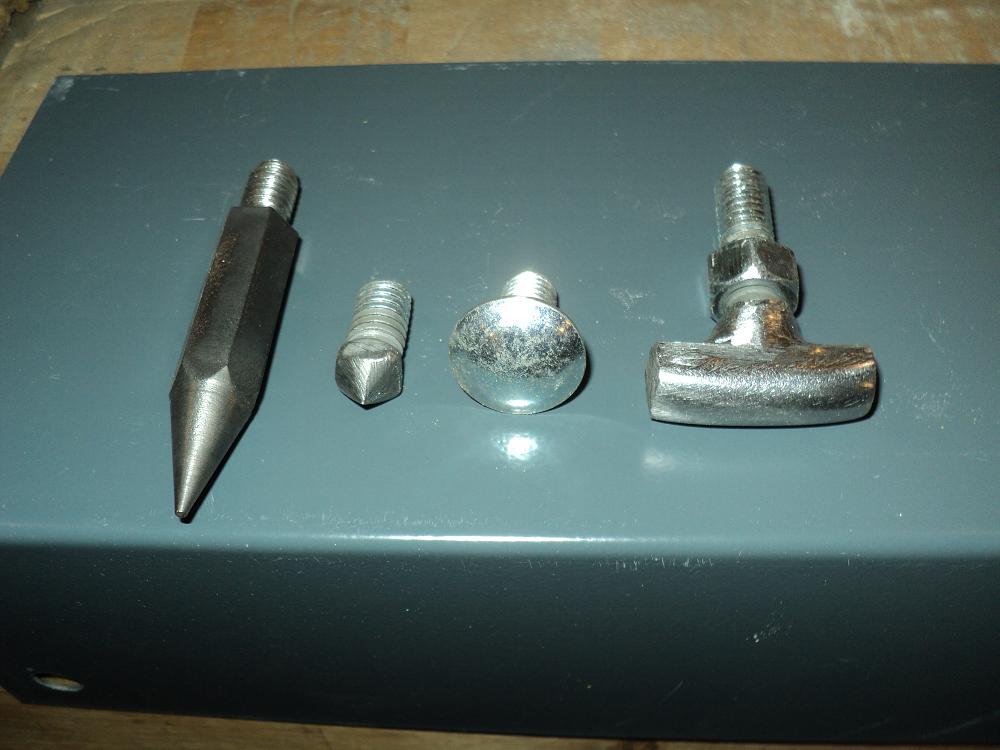
I added this swivel foot to my pick. When you tip the tool the fixed foot tends to dig in and actually cause indents as your bumping the panel.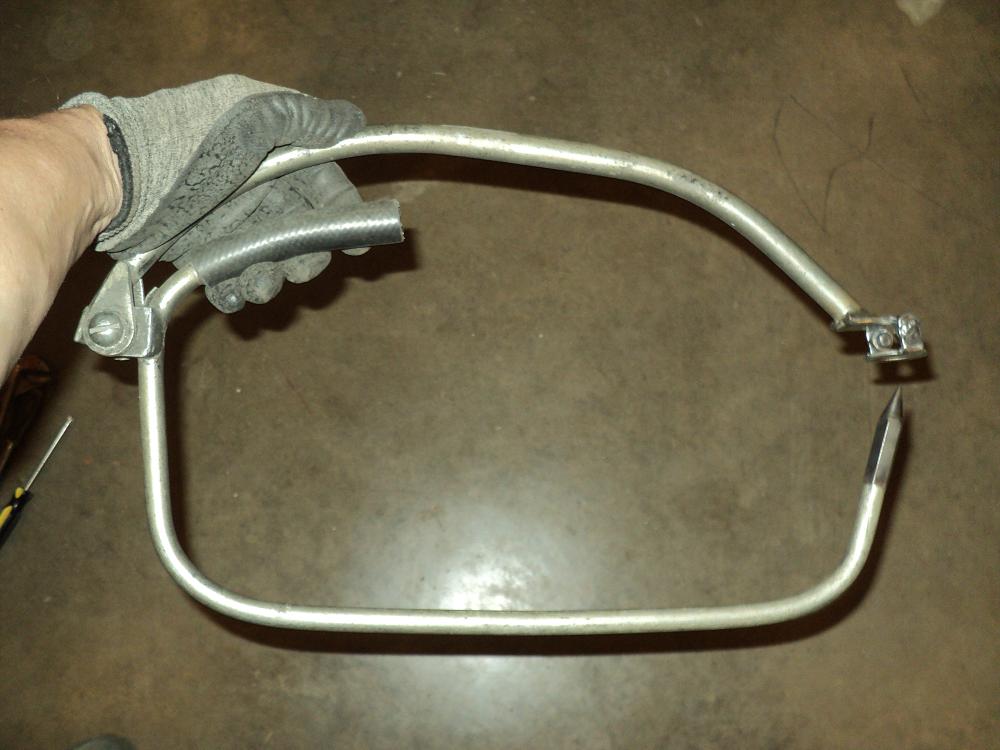
Posted by: SirAndy Feb 13 2012, 02:01 AM
If you turn the bolts on the engine mount bar upside down (head on the bottom) you're less likely to scrape it on a curb and bend the bar.
Posted by: rick 918-S Feb 13 2012, 02:05 AM
If you turn the bolts on the engine mount bar upside down (head on the bottom) you're less likely to scrape it on a curb and bend the bar.
Ya, but it's alot easier to install them that way by yourself.
Posted by: bcheney Feb 13 2012, 06:25 AM
Great job on this car Rick. Love the color and know it will put a smile on the faces of many in the months and years ahead.
Posted by: rick 918-S Feb 18 2012, 10:31 AM
Great job on this car Rick. Love the color and know it will put a smile on the faces of many in the months and years ahead.
Wait until you see the new stripes I had cut on the new paint!
Posted by: rick 918-S Mar 8 2012, 09:58 AM
Ok, Missed a couple weeks of repairs. Soon to be in primer.
Left quarter repair. The last guy left a huge dent in the panel and beat the high spots in with a pick hammer. When I ground the paint off the panel I discovered I had about a 3 lb. coffee can of body filler dust. Completely unnessecary.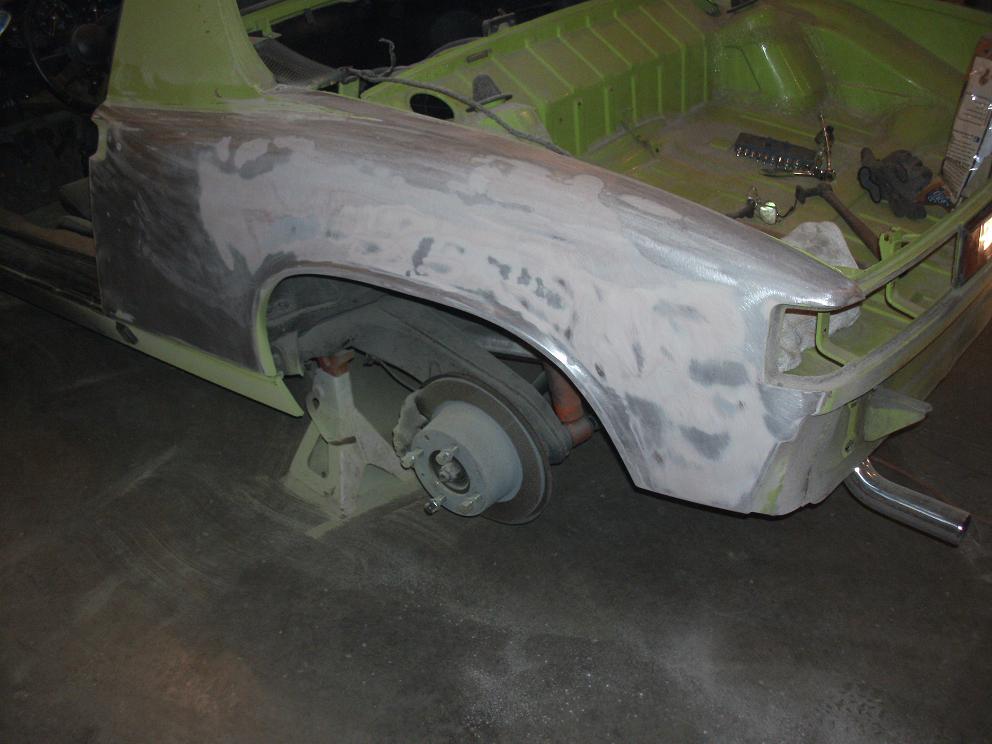
After:
Here's some California rivets I found when I stripped the left door.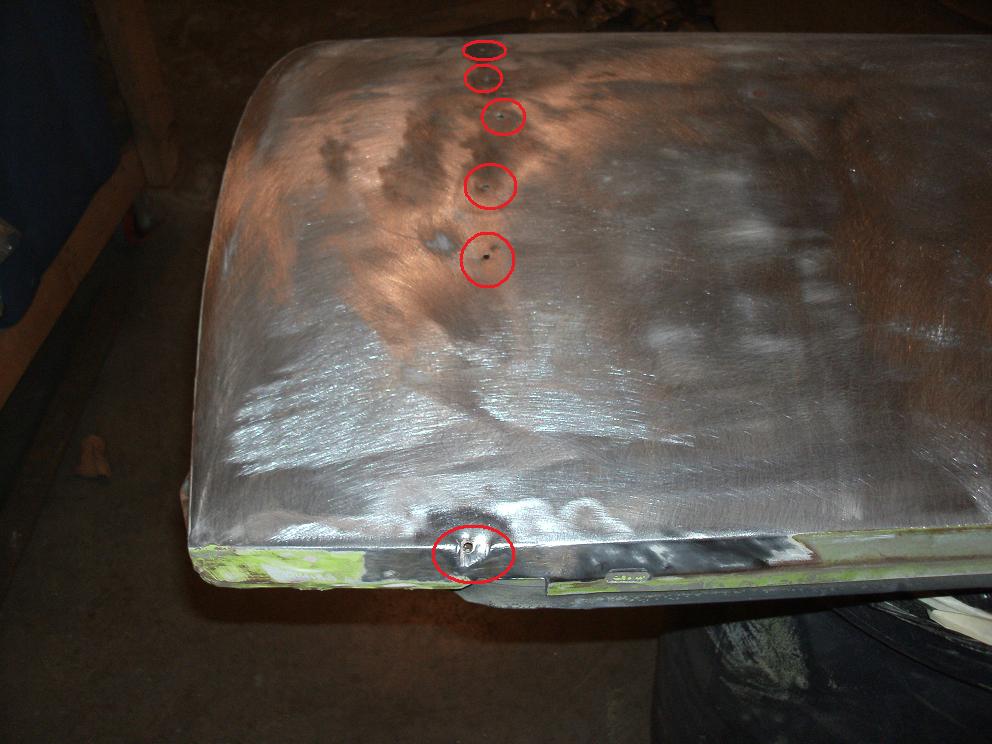
Repaired: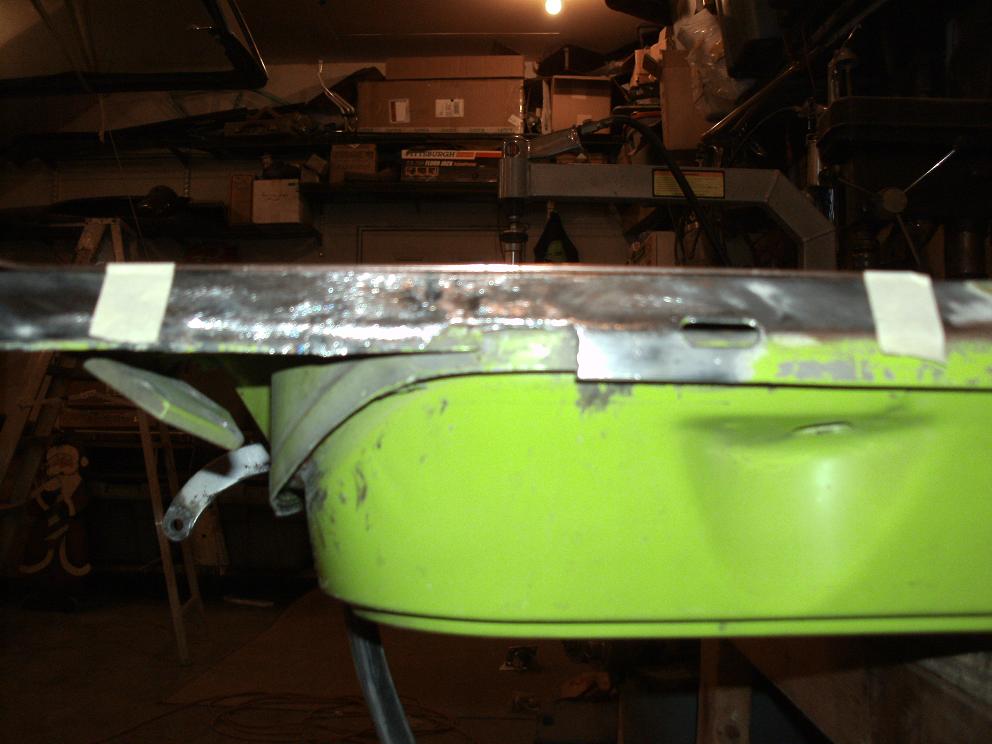
Welded up the big aftermarket mirror holes.
Posted by: Ferg Mar 8 2012, 10:37 AM
Posted by: McMark Mar 8 2012, 10:43 AM
When do you move out here again?
Posted by: rick 918-S Mar 8 2012, 11:32 AM
When do you move out here again?
Funny you should ask.... Sandy was looking at Jobs in other parts of the country and asked where I wanted to live... If she could get a new gig in Nor Cal..
Who knows.She has a masters in IT leadership and computer science. She works with sequil and other stuff I have no idea about. Hey Andy!
Posted by: majkos Mar 8 2012, 02:30 PM
How about Mile High!? Colorado!
That's right, I forget you couldn't breath here.
Posted by: rick 918-S Mar 8 2012, 05:40 PM
Yep, altitude sickness, Remember that?  I think you can adjust to that over time though.
Posted by: rick 918-S Mar 24 2012, 05:59 PM
Pulled the rocker covers. 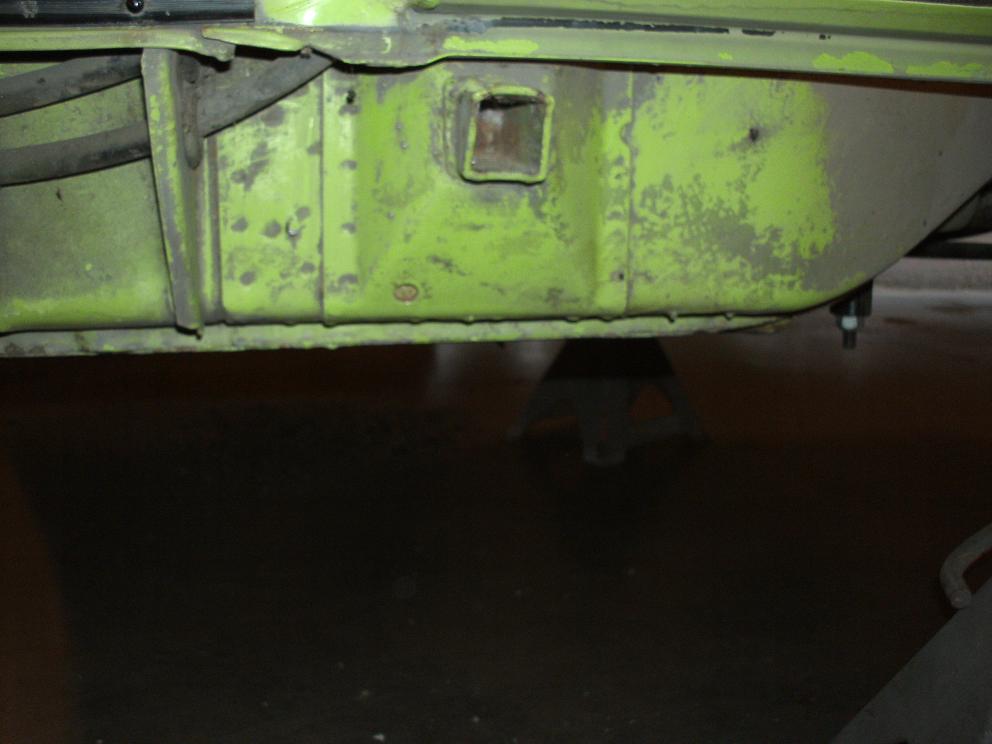
Posted by: billh1963 Mar 25 2012, 06:45 AM
Nice jack points...you suck!
Posted by: rick 918-S Mar 25 2012, 06:56 AM
Nice jack points...you suck!
Posted by: RobW Mar 25 2012, 07:32 AM
Plenty of good weather and insurance claims in CA. Nice work on Sandys car! 
Posted by: rick 918-S May 15 2012, 09:00 PM
The car went into high build primer on March 31, 2012. We blocked it out a week later. I always like to let the car sit after blocking for at least a couple weeks to be sure the solvents evaporate. Some guys like to let it sit in high build then block the car I like to block it, let it sit then re-prime and re-block before paint. I've done it both ways and both work.
Here's a photo just after priming.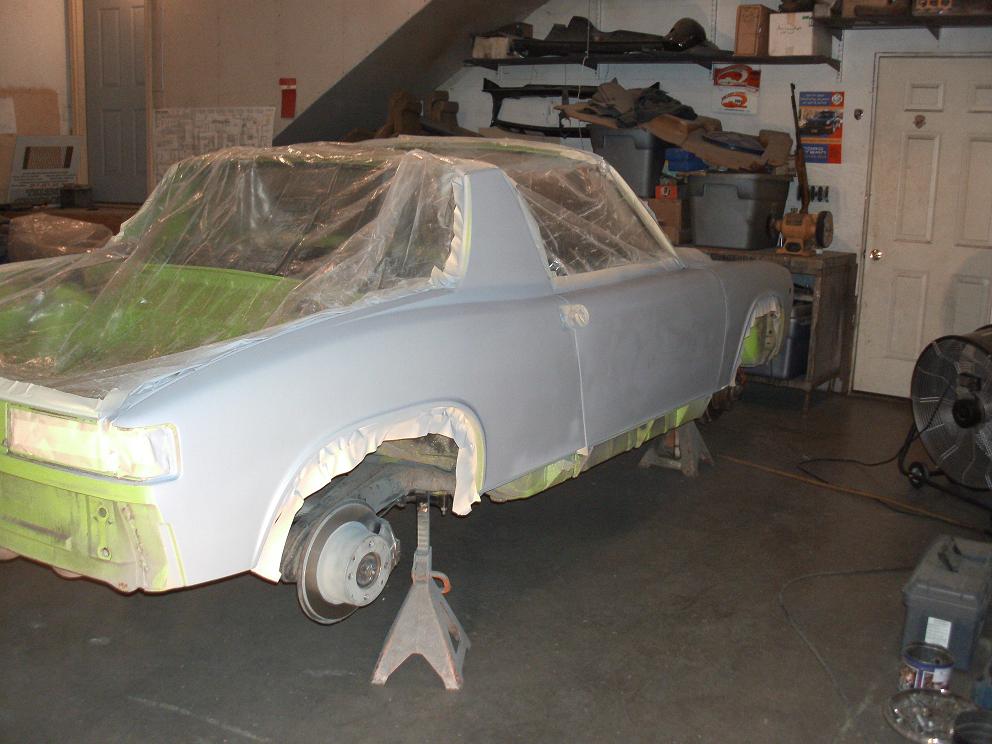
Posted by: rick 918-S Apr 4 2013, 07:59 PM
I can't believe it's been almost a year since my son and I blocked this car. I put it back into high build and blocked it again. We were trying to make the Route 66 this year. I totally blew past the deadline. On the bright side the shell and doors are ready to paint. I have the paint and I'm working on renting a booth to shoot it. Lets see if I can get this done before next year this time.
Attached image(s)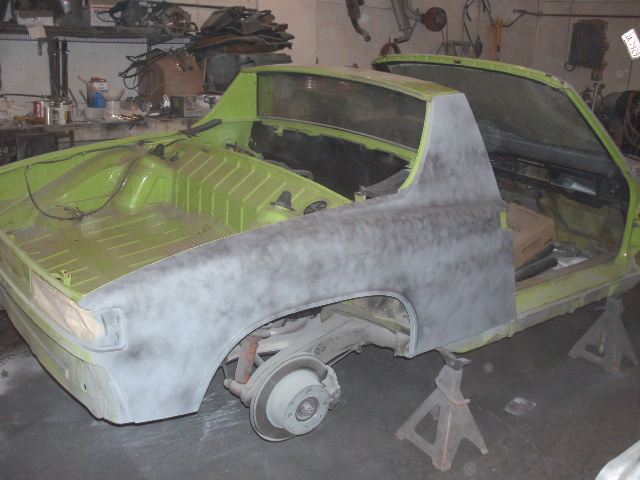

Posted by: r_towle Apr 4 2013, 08:07 PM
First off, now I feel much better....
Second, what booth did you have at WOW?
Rich
Posted by: rick 918-S Apr 4 2013, 08:08 PM
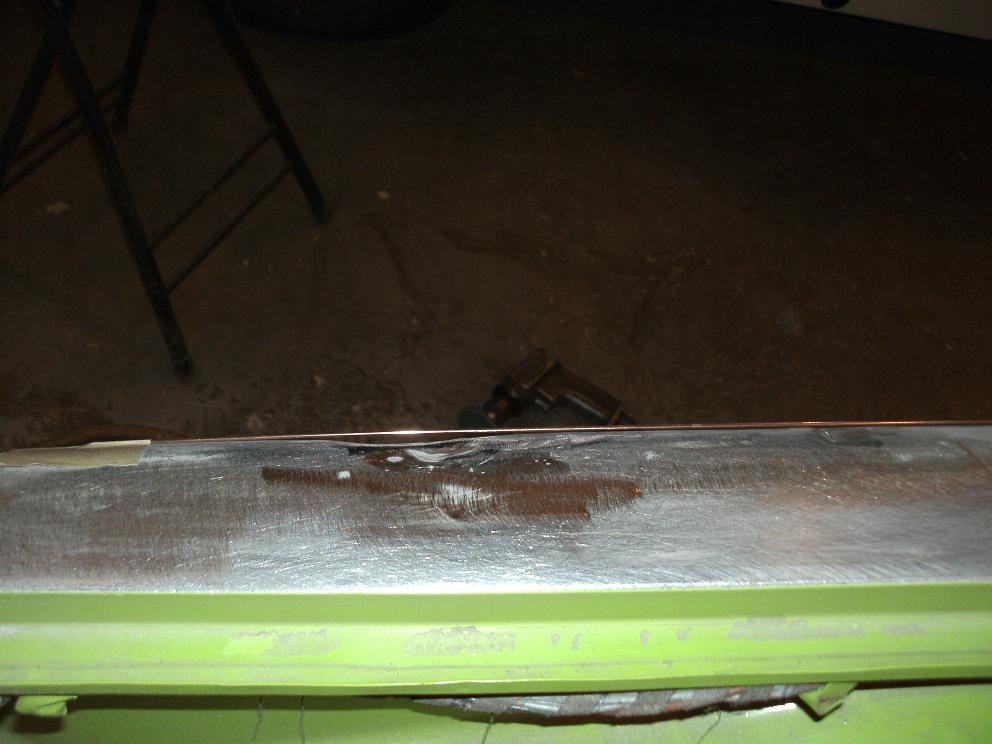
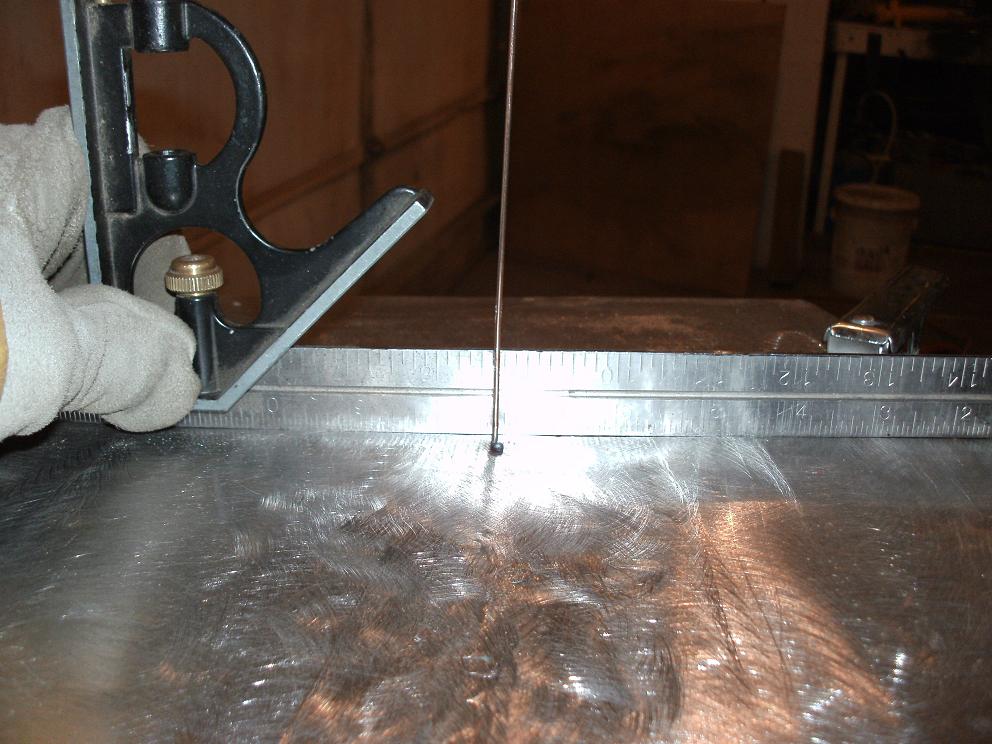
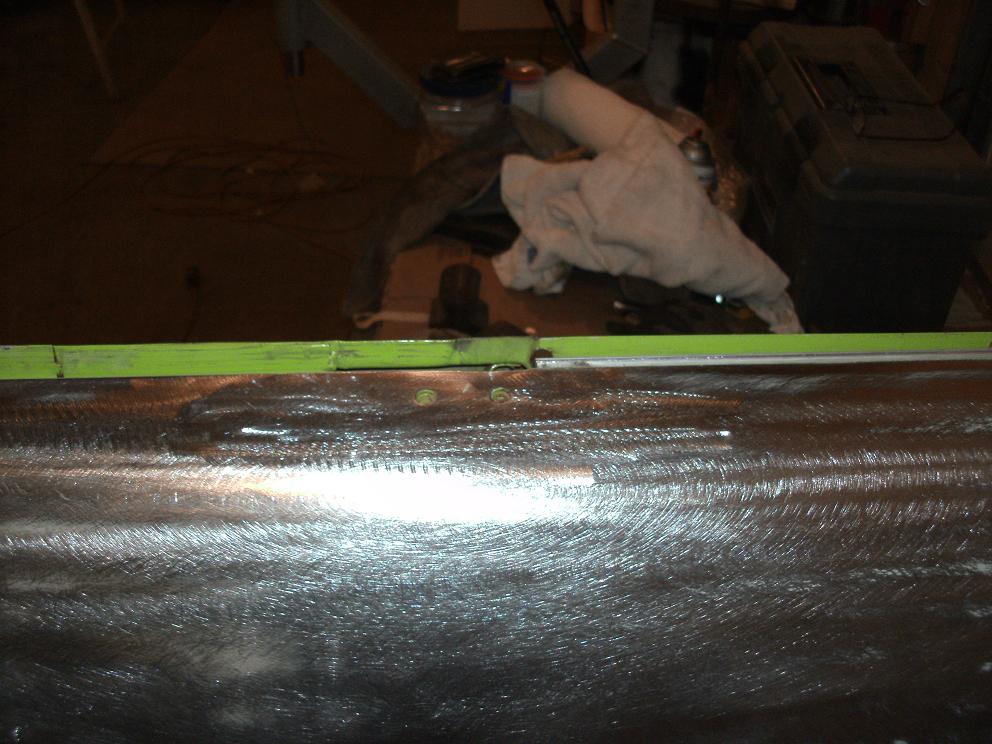
Don't forget to seam seal and paint the inside of any panels you repair or the tin worn will wreck your day.
Also I want you guys to think about checking all the seams on the inside of the panels. Over time the seam sealer will split and allow moisture into the tight places where panels meet. Again the tin worn will be there sooner than later.
This is the back side of the butt welded fender I sectioned. You can barely see the seam. The outer face was metal finished.
Attached image(s)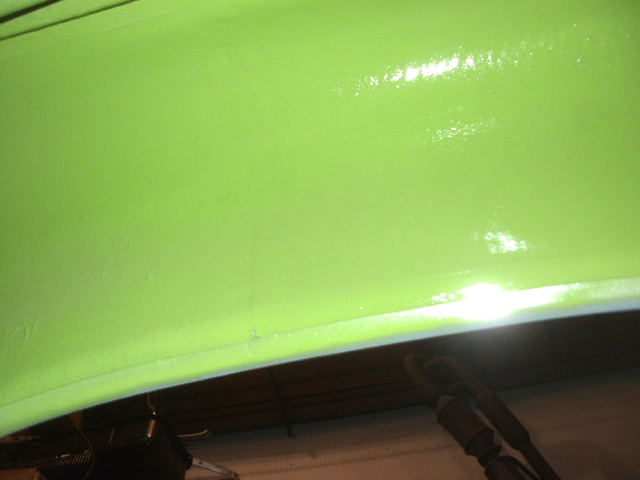
Posted by: rick 918-S Apr 4 2013, 08:10 PM
First off, now I feel much better....
Second, what booth did you have at WOW?
Rich
Hey rich, remember when we talked about open flame heaters? I have a unit heater. I heat up the garage and turn down the t stat.
Posted by: rick 918-S Apr 14 2013, 04:34 PM
I have been attempting to match the factory color. I always use single stage paint for solid colors. I like the factory look of the single stage paint. It's vintage looking. I spent the last week tinting the paint. The color formula is no longer available in anything other than a truck fleet paint. I had my local Du Pont store shoot a scan with their color match camera. #1 and #2 are the colors the camera produced.
Number 1 is the first attempt with Chroma One. The match was way off. It looked pea green. Actually very close to the VW van color. Some of you may have seen those pea green 70's vans back in the day.
Well for $ 1,000.00 for Chroma One I wasn't going to even start tinting it. It was that far off.
Number 2 is the camera mix for Nason single stage urethane. I worked the color from pea green to a hue that was in the range of the factory color but too dark and the shift or chroma was off. 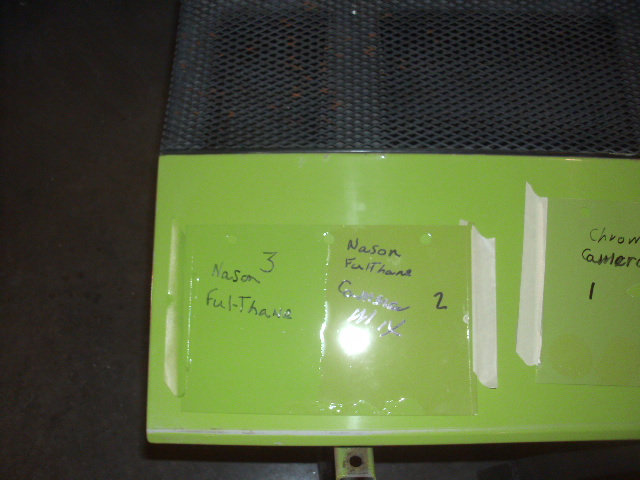
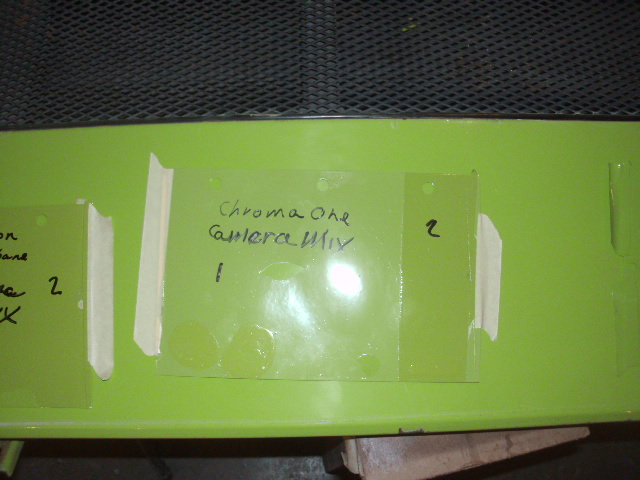
After 6 more gradual shifts in color I'm happy with the results. The engine lid is still in the factory color as are the door jambs. Here are the results.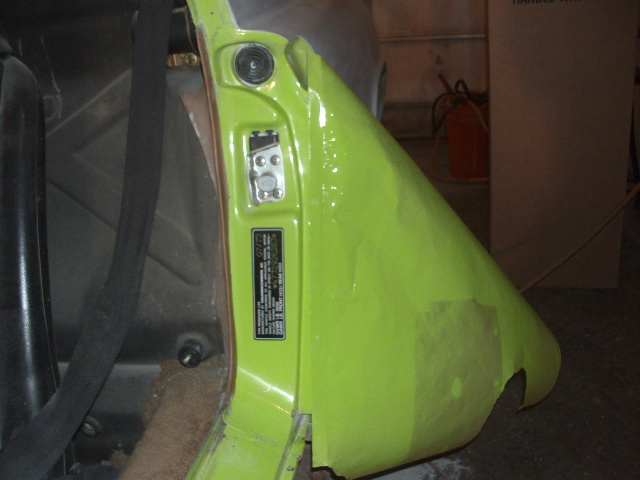
Attached image(s)
Posted by: Ferg Apr 15 2013, 08:47 AM
Posted by: rick 918-S May 2 2013, 07:22 PM
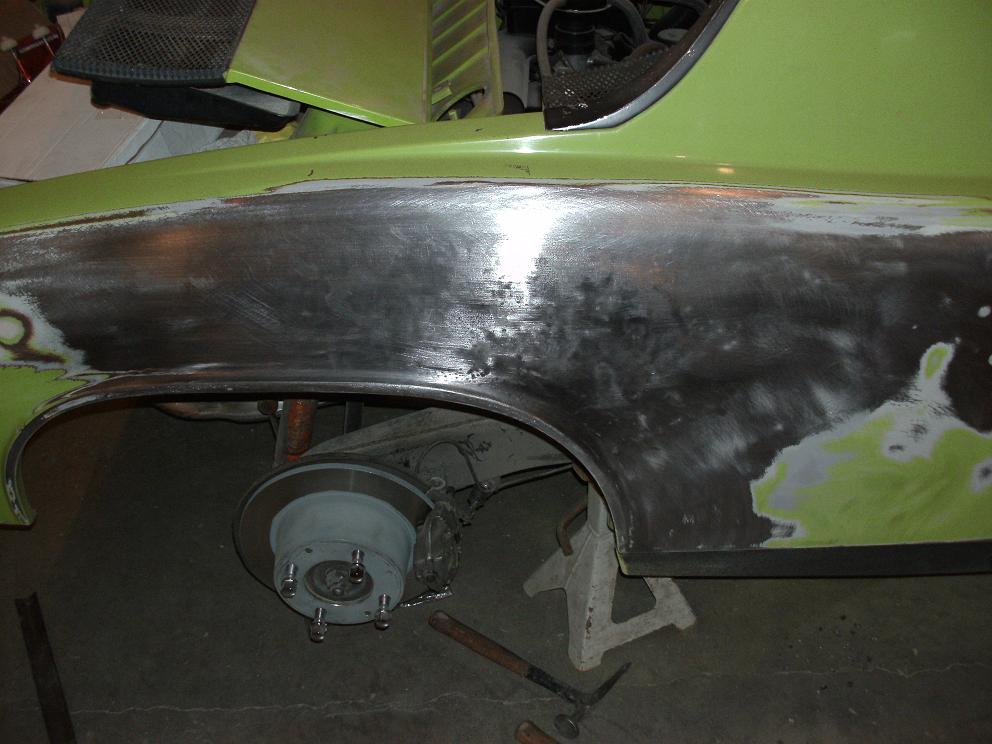
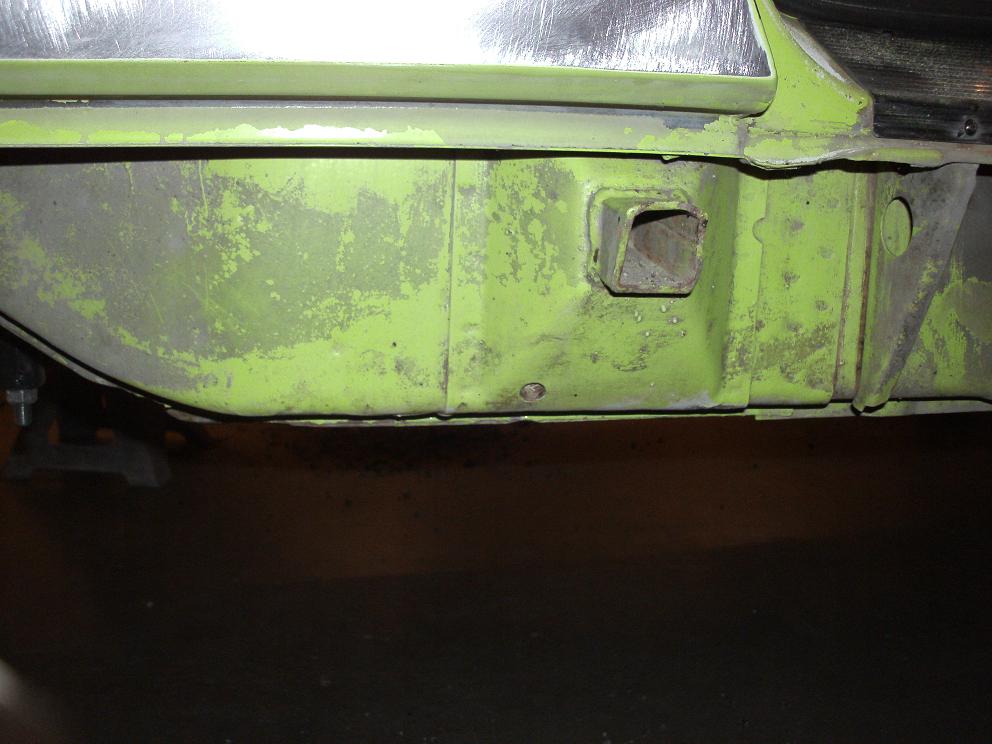
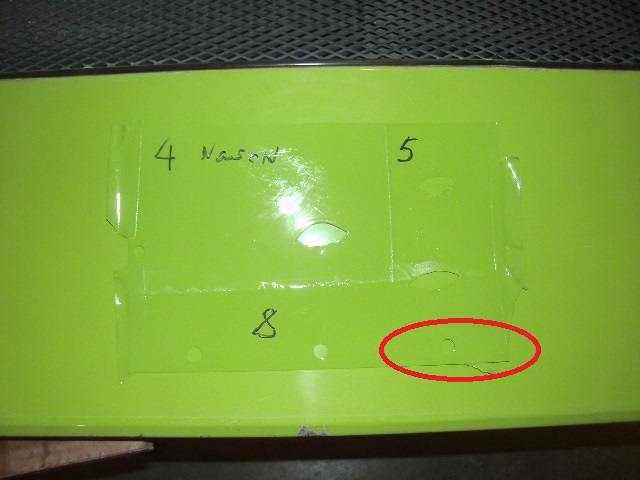
I worked really hard at matching this color. Here is a photo from when I started on the car. Then the same shot after the repair. There is no body filler on this wheelhouse.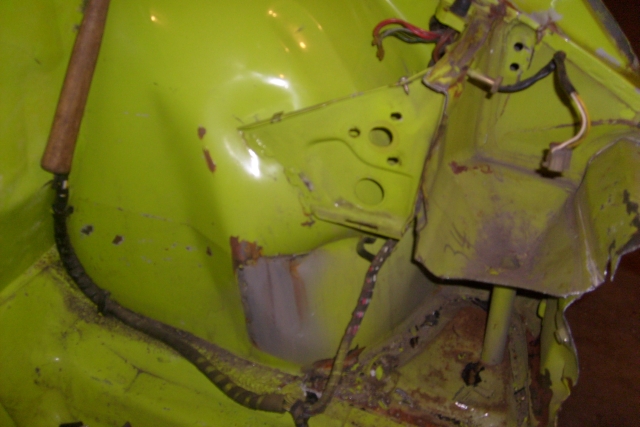
Here is the repaired wheelhouse in color.
These areas in red are not painted. I did not paint past the bulkhead seal and I only blended the color onto the bulkhead. This shows the color match.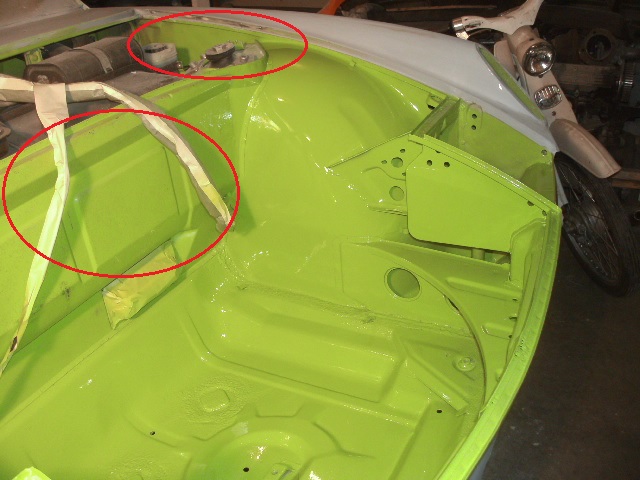
Posted by: iamchappy May 2 2013, 08:20 PM
Nice!
Posted by: Cairo94507 May 3 2013, 06:52 AM
Wow! THat is one hell of a color match. Nice work. Get some paint on that body now
Posted by: JmuRiz May 3 2013, 07:06 AM
What a great color
Posted by: rick 918-S May 3 2013, 07:20 AM
Wow! THat is one hell of a color match. Nice work. Get some paint on that body now
Shooting for Saturday
Posted by: r_towle May 3 2013, 07:42 AM
Good luck.
I found a local hotrod shop that was looking for work.
He painted all the parts, I put it all back together.
I slight tap with a 5 lb hammer in several spots got me back on track with the tub....just a little area that got pushed in from the bumper.
For the 914, as I crawl along at a snails pace...
I am wondering if any rattle can primer could be used as the base to cover up my work for some time.
With the plan to go over everything with real primer from a spray gun later (much later) and then high build, sealer etc etc.
Any experience with a specific brand of rattle can that works?
PPG sells one at the paint store, but I thought all rattle can primer is made up of the wrong materials...
rich
Posted by: rick 918-S May 3 2013, 08:07 AM
Good luck.
I found a local hotrod shop that was looking for work.
He painted all the parts, I put it all back together.
I slight tap with a 5 lb hammer in several spots got me back on track with the tub....just a little area that got pushed in from the bumper.
For the 914, as I crawl along at a snails pace...
I am wondering if any rattle can primer could be used as the base to cover up my work for some time.
With the plan to go over everything with real primer from a spray gun later (much later) and then high build, sealer etc etc.
Any experience with a specific brand of rattle can that works?
PPG sells one at the paint store, but I thought all rattle can primer is made up of the wrong materials...
rich
A little off topic but I have used self etching in a can when I had a spot or two that I did not want to mix up and spot in to save gun cleanup. That could work . You could always sand it off when your ready to move onto a 2K or something.
Rick
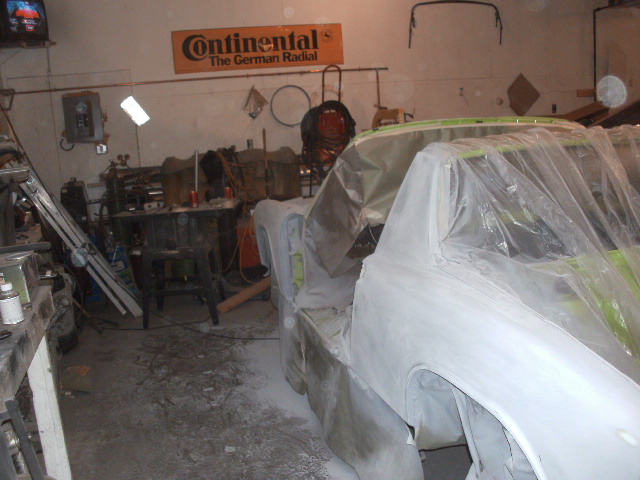
Posted by: rick 918-S Aug 11 2013, 09:42 AM
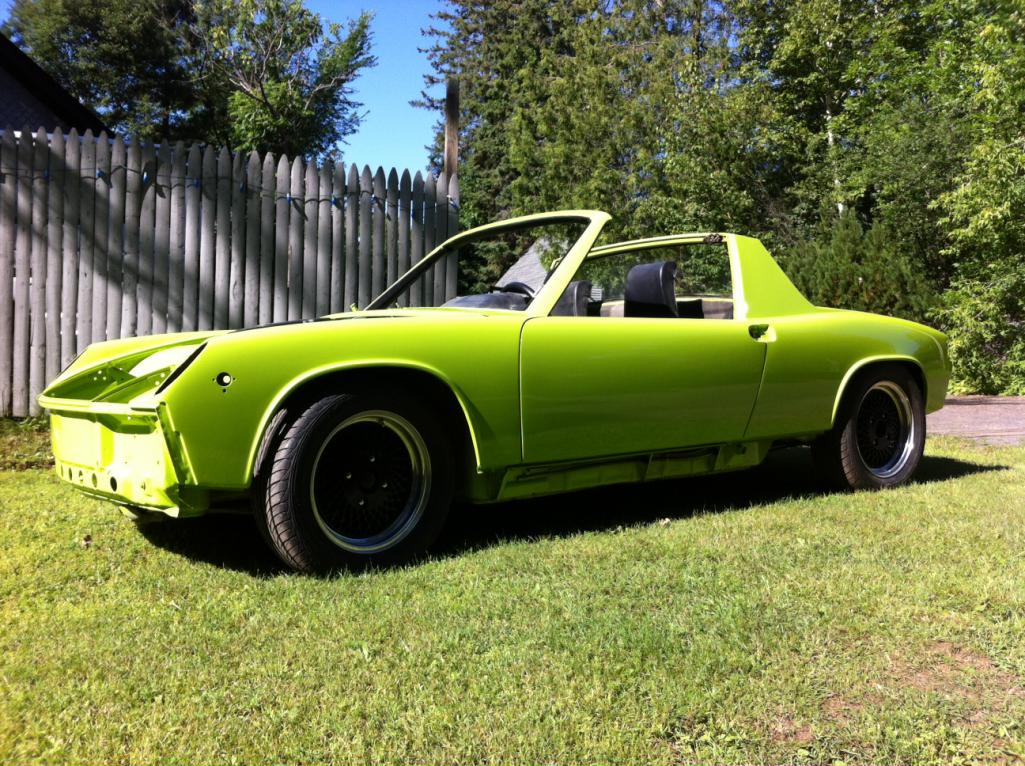
Finally took some time and rented a booth to shoot the shell and doors for Sandy's car. Loooooong way to go yet but at least I don't have to sit and look at this car in primer any longer. This is right out of the booth.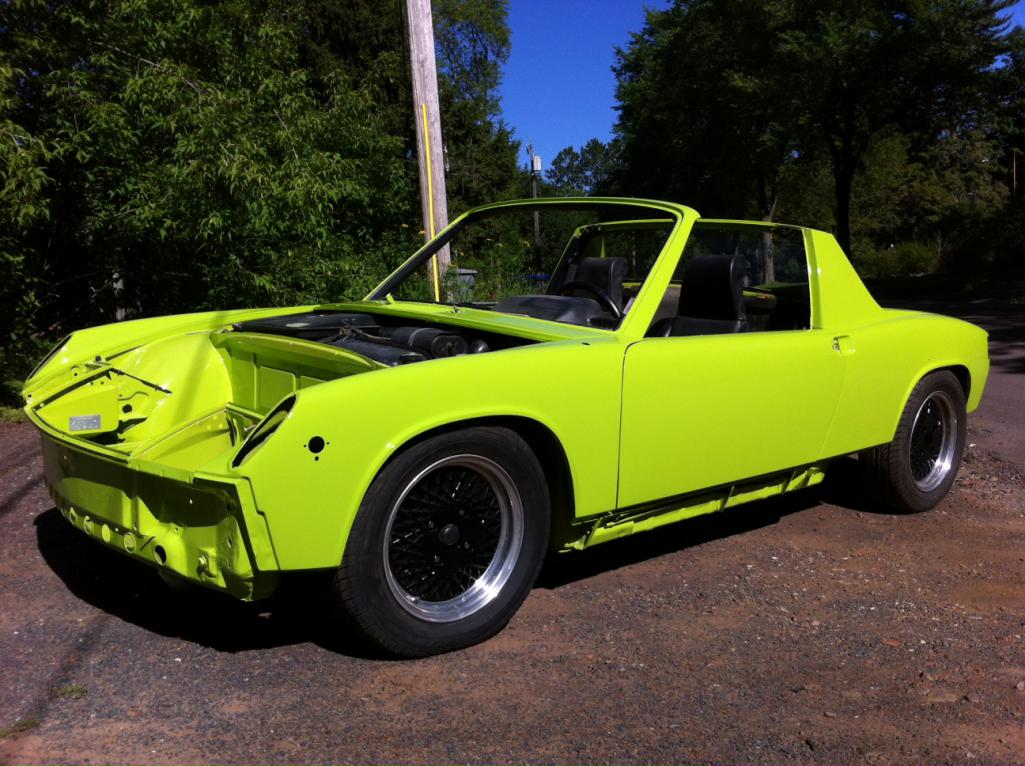
Posted by: rick 918-S Aug 11 2013, 09:48 AM
Crappy smart phone camera. My son Aric and I tag teamed it Friday night and painted it in memory of my Best friend and brother in-law that we lost to cancer on Thursday. Dave and his son Dave Jr. would have been right there with us. Davey stopped by to check on us but couldn't stay for obvious reasons.
So here's to David! We stood shoulder to shoulder working on cars and family. We'll miss you.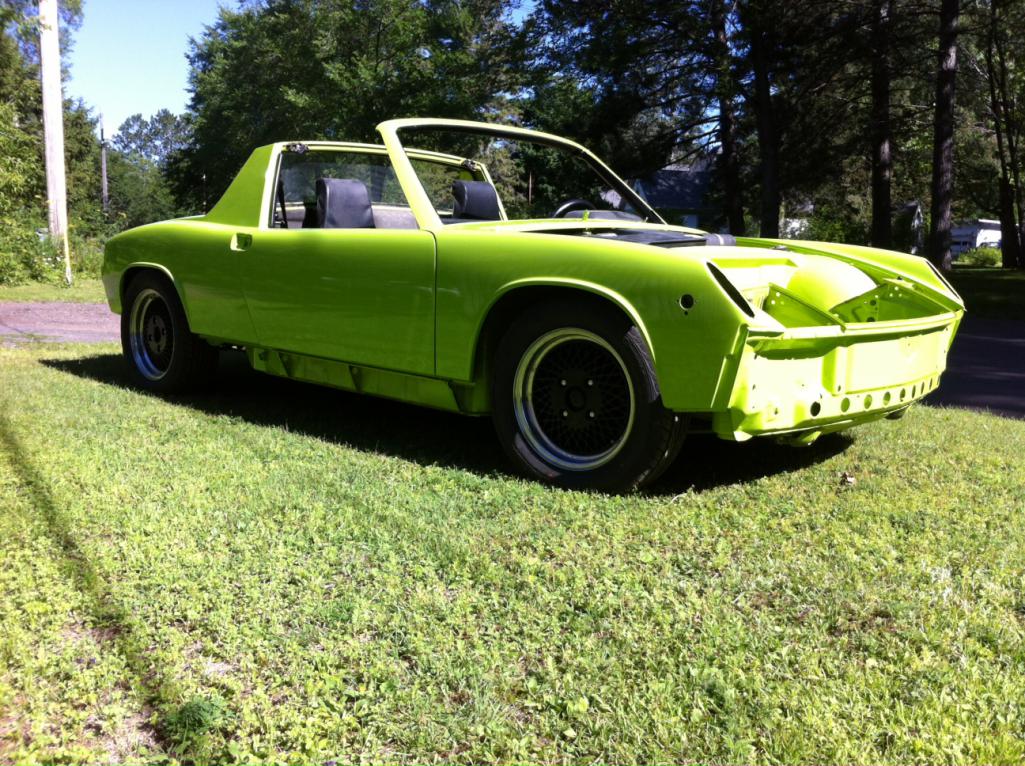
Posted by: scotty b Aug 11 2013, 10:13 AM

Posted by: siverson Aug 11 2013, 10:17 AM
Nice!
Posted by: KELTY360 Aug 11 2013, 10:26 AM
Sorry for you loss Rick.
Car looks great...but you really should have chosen a bright color...
Posted by: Ferg Aug 12 2013, 09:24 AM
Best color ever.
Posted by: KELTY360 Aug 12 2013, 10:47 AM
This picture highlights the reason I prefer painted sails. There is a graceful sculpting where the kicked up fender meets the end of the sail that is lost when the vinyl and shiny trim is added.
Great color!
Posted by: JmuRiz Aug 12 2013, 10:52 AM
Best color ever.
To be honest, I didn't even notice that cool curve when there is no sail vinyl.
Posted by: balljoint Aug 12 2013, 05:17 PM
This picture highlights the reason I prefer painted sails. There is a graceful sculpting where the kicked up fender meets the end of the sail that is lost when the vinyl and shiny trim is added.
Great color!
Wholeheartedly!
Posted by: rick 918-S Aug 12 2013, 07:29 PM
I was going to post a question about whether I should add the vinyl or leave it as is. I guess I got my answer. Glad you all like it! Wait until you see the stripe...
Posted by: bigkensteele Aug 12 2013, 07:45 PM
Sorry to hear of your loss, Rick. I am certain that your nephew still has a great role model, even though he no longer has his dad.
I think sail vinyl depends a lot on the color of the car. I like it present more often than not, especially when the roof is on. But this color has me undecided. I think it will look great either way.
Posted by: rick 918-S Aug 15 2013, 05:29 AM
Tail lights are in and working, headlight motors and lifts are in, windshield is in.
My son Aric is going to continue working on the car while I'm in Toronto.
Attached thumbnail(s)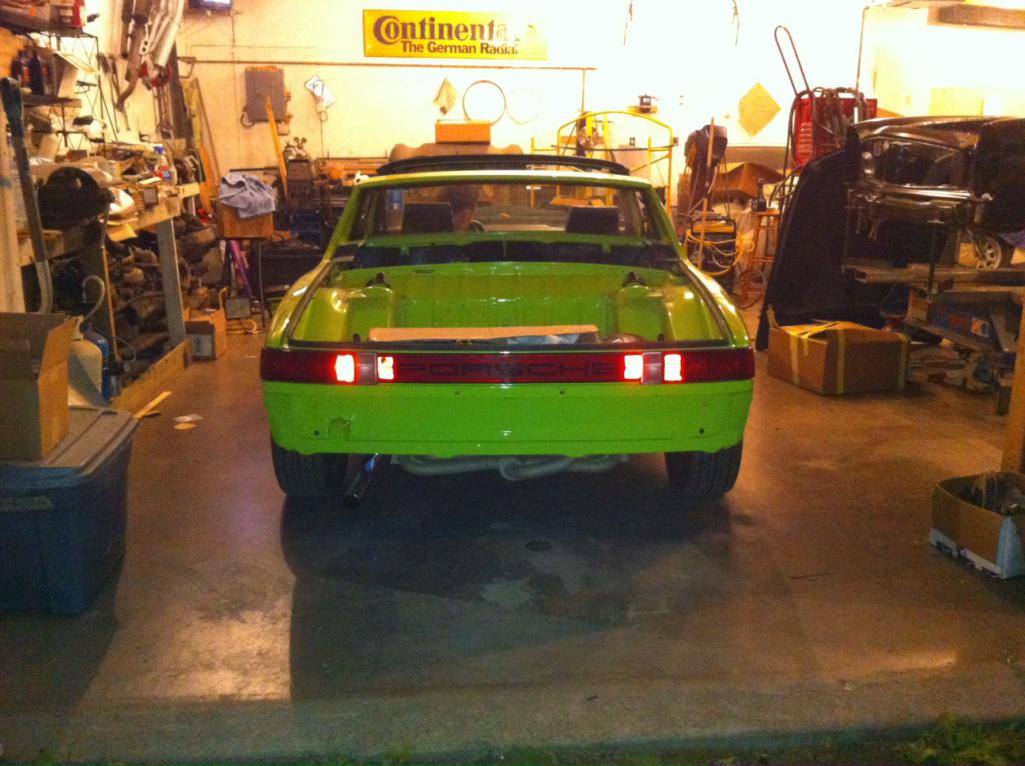
Posted by: 76-914 Aug 15 2013, 08:52 AM
Very nice; as usual. My heartfelt condolences to you and your family.
Posted by: rick 918-S Sep 15 2013, 06:10 PM
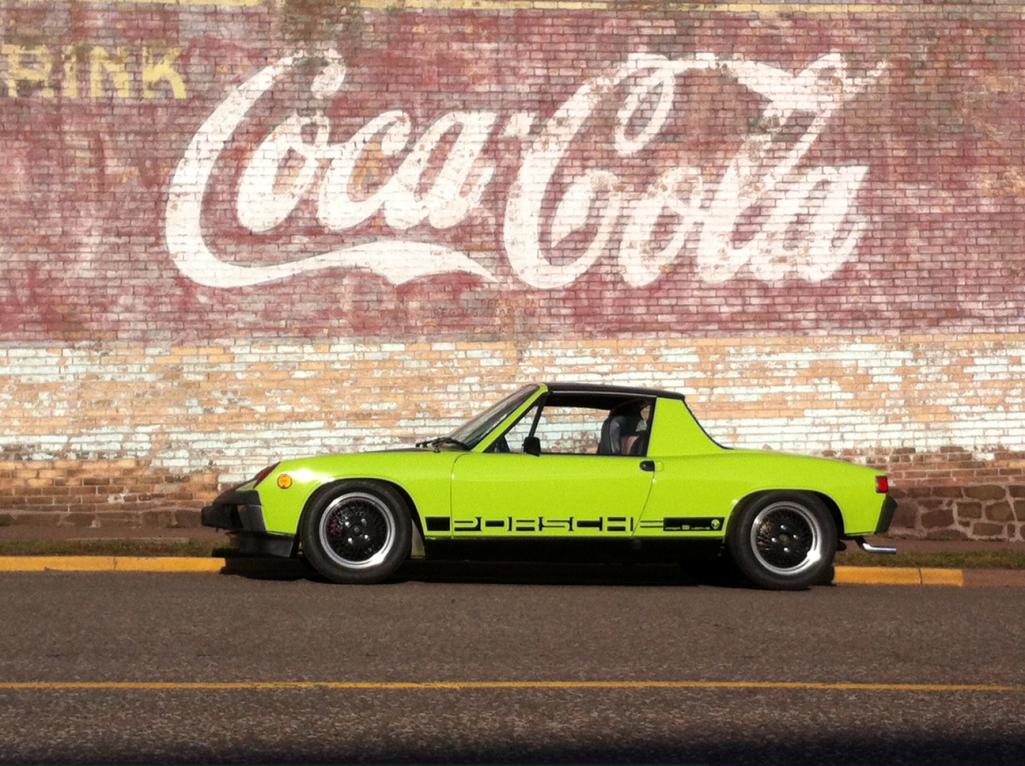
Photos from 914 day.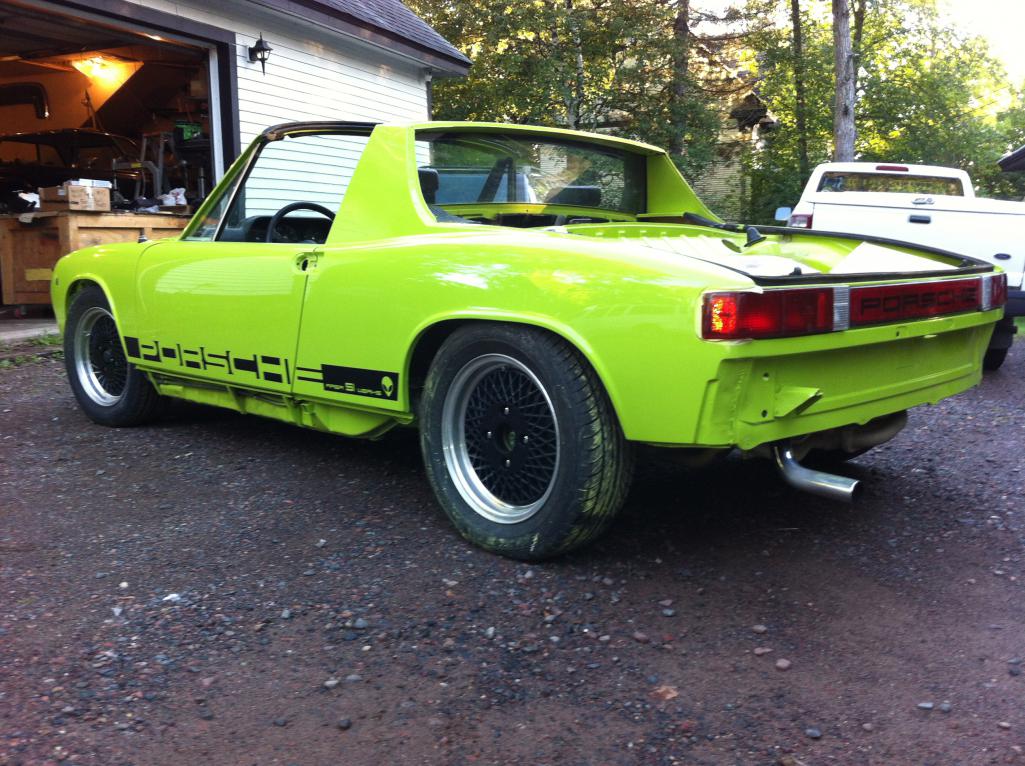
Posted by: Chris H. Sep 15 2013, 06:18 PM
Awesome stripe.
Posted by: r_towle Sep 15 2013, 06:19 PM
5,333 posts later
Posted by: rick 918-S Sep 15 2013, 06:21 PM
At least it's mostly in paint.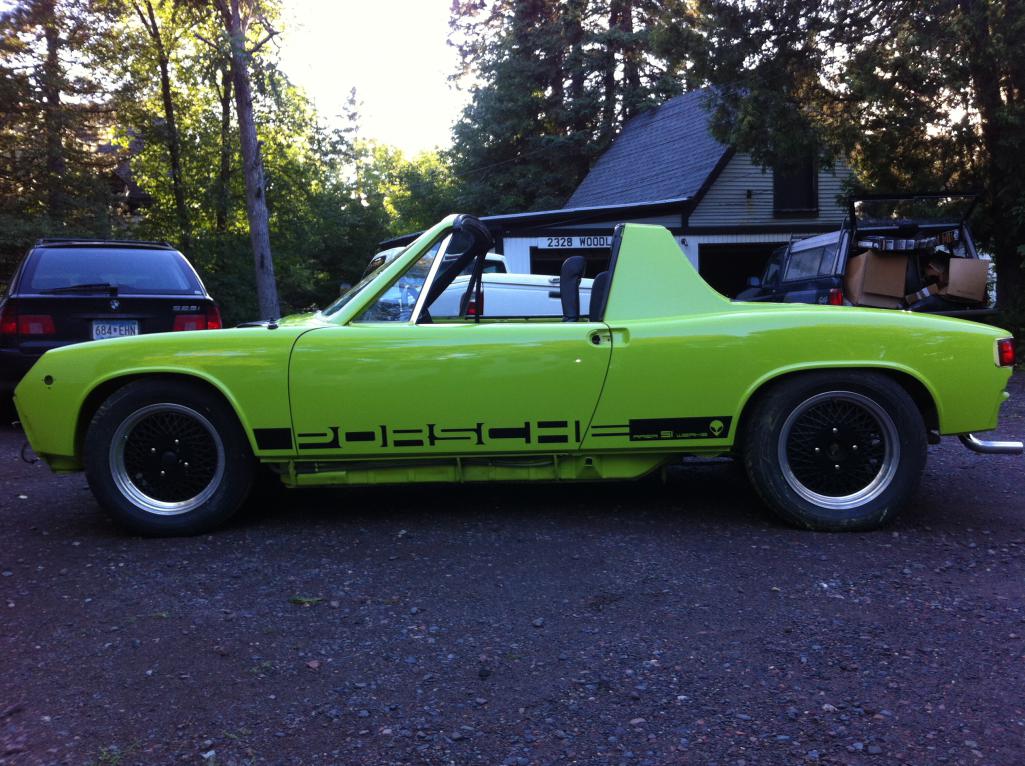
Posted by: scotty b Sep 15 2013, 06:28 PM
Posted by: r_towle Sep 15 2013, 06:32 PM
At least it's mostly in paint.Is that a diss???
It will happen, I looked at it today....
Lots of metalwork left to go....dang.
It will be online by spring...need to start running autox again...
Rich
Posted by: rick 918-S Sep 19 2013, 10:51 AM
This is a bump for my friend Gary from Superior WI. He was over today checking the progress on Sandy's car. He has owned his 914 since almost new. ![]()
Posted by: rick 918-S Sep 30 2013, 10:39 PM
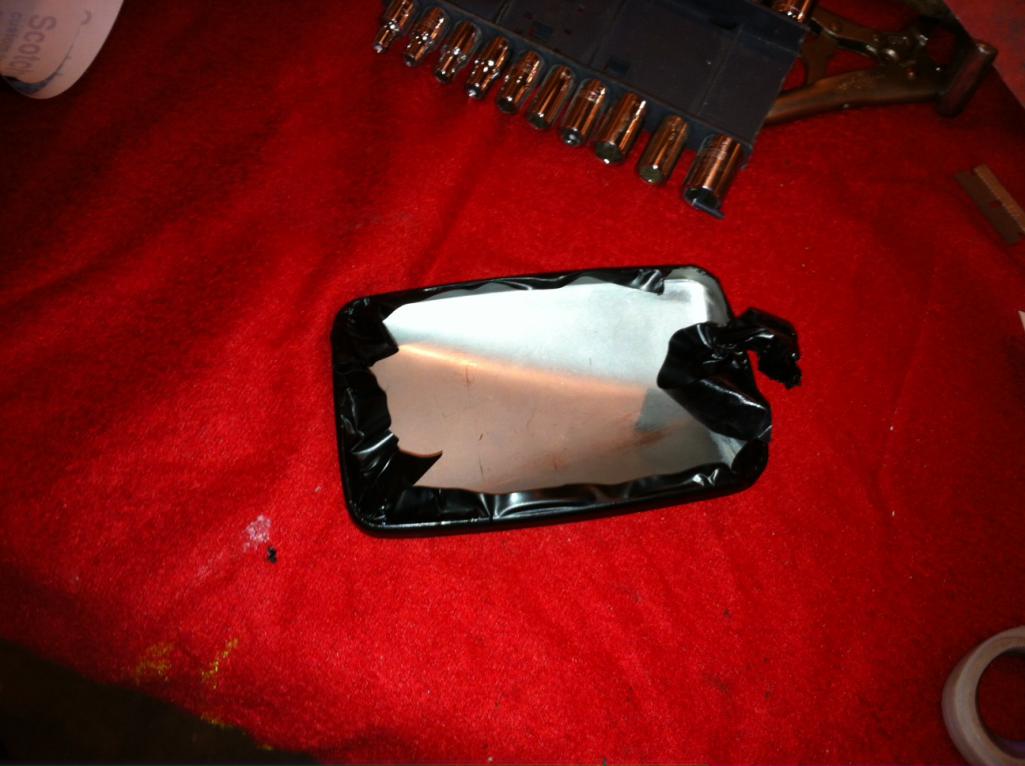
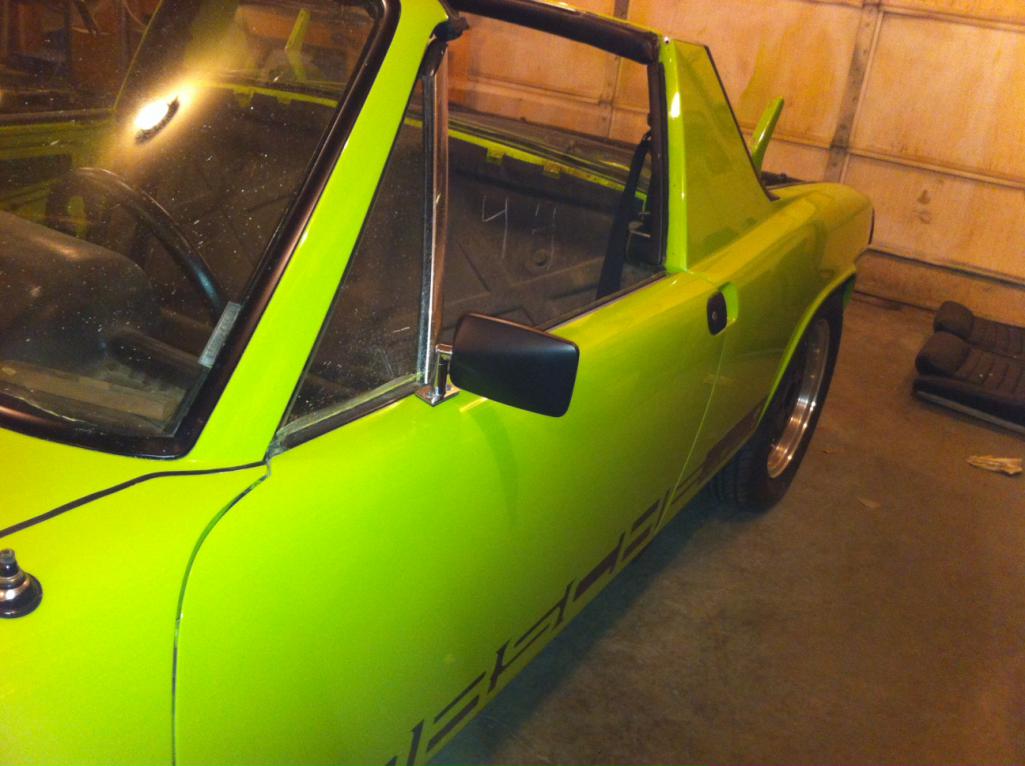
Wrapped the mirrors in Vinyl. The bubble you see with come out in the sun. 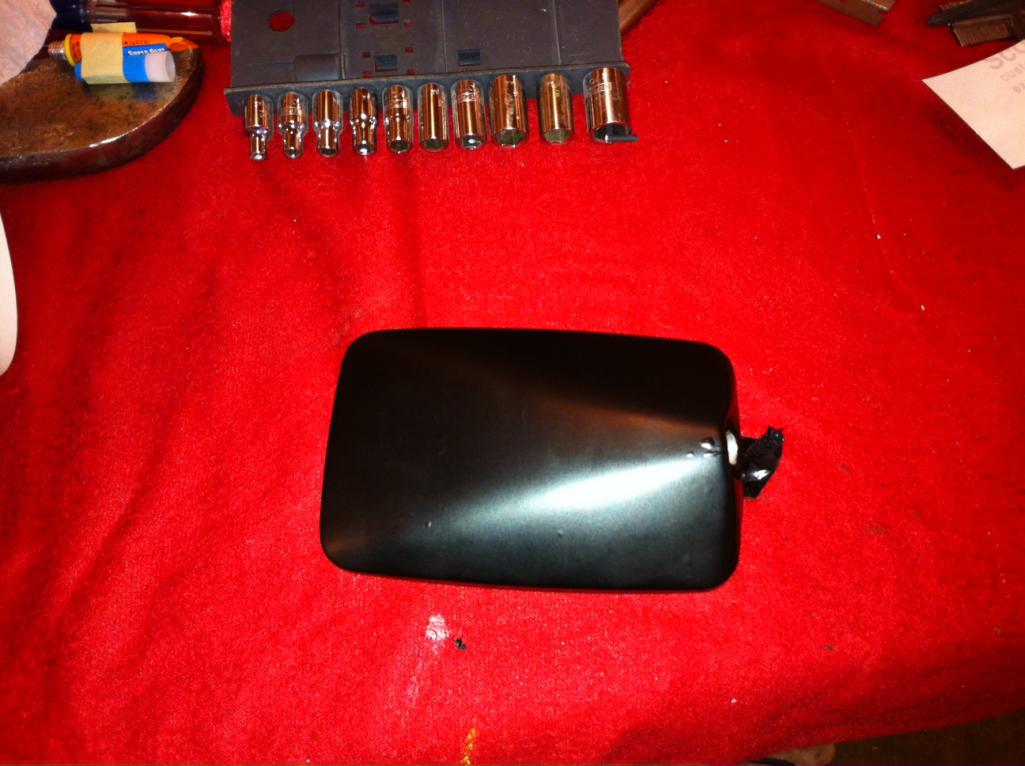
Posted by: rick 918-S Sep 30 2013, 10:39 PM
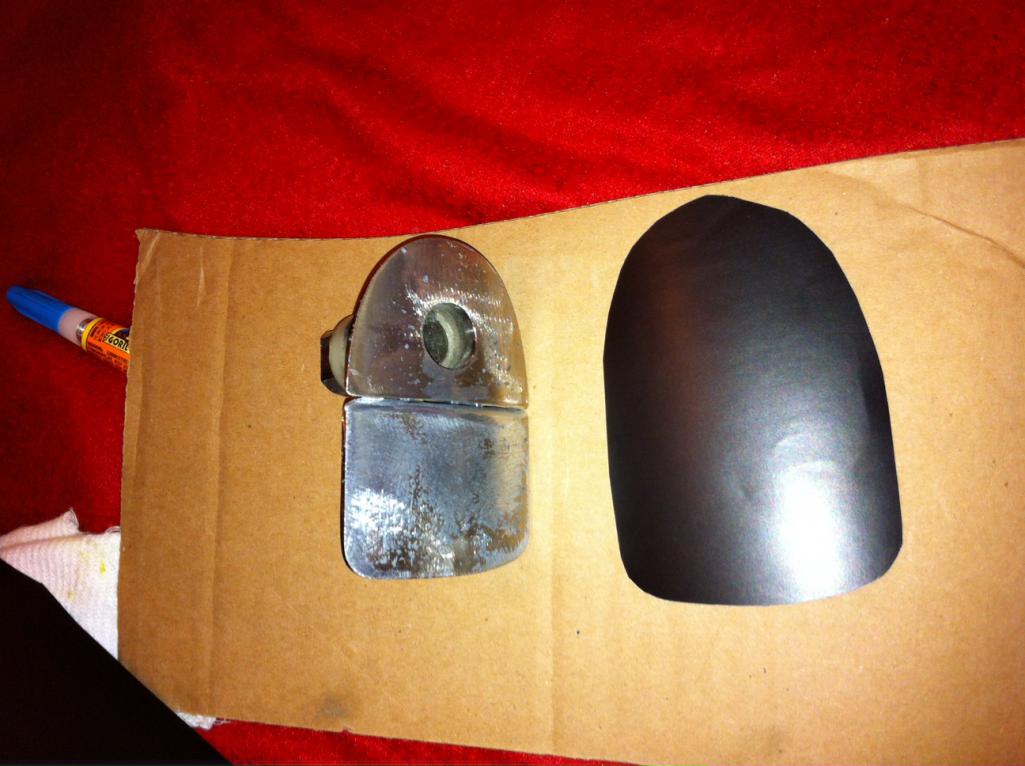
I took some working door handles that we pitted with the chrome pealing off and overlaid them with Vinyl. These handles would have otherwise been discarded.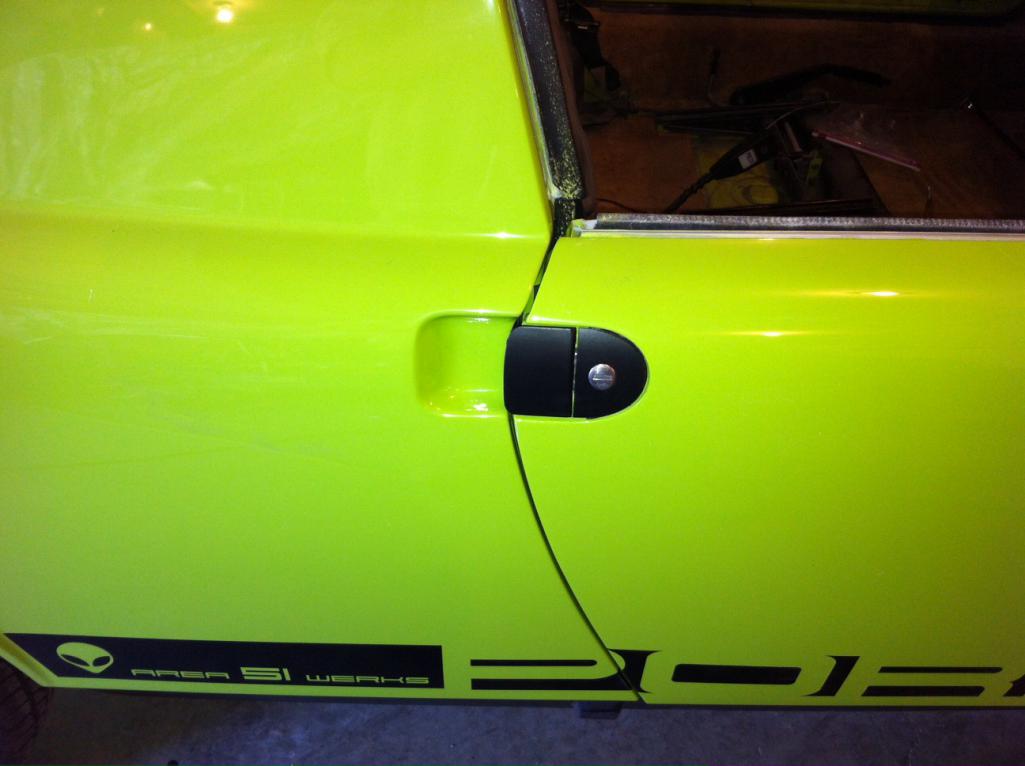
Posted by: Sleepin Sep 30 2013, 11:23 PM
Plasti dip would also do the trick there Rick.
Posted by: rick 918-S Oct 11 2013, 08:31 PM
This has been a lot longer journey than I expected but life has a way of doing that to all of us. For the most part Sandy's car is done. I have another front lid that I am painting body color and I have a pretty nice front bumper that I am painting also.
Sandy came out to the garage, looked the car over and named her: 7 of 9
So her she was: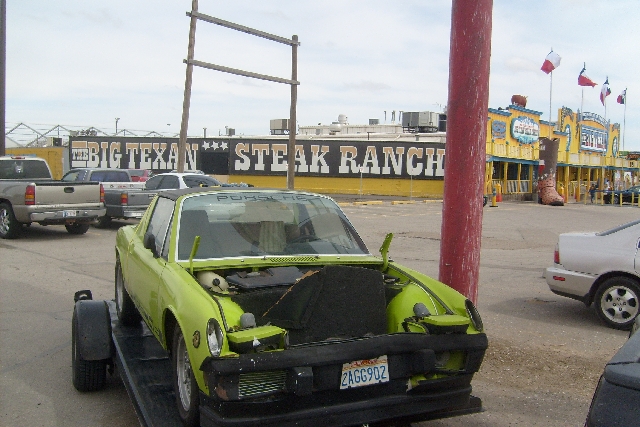
As she is now: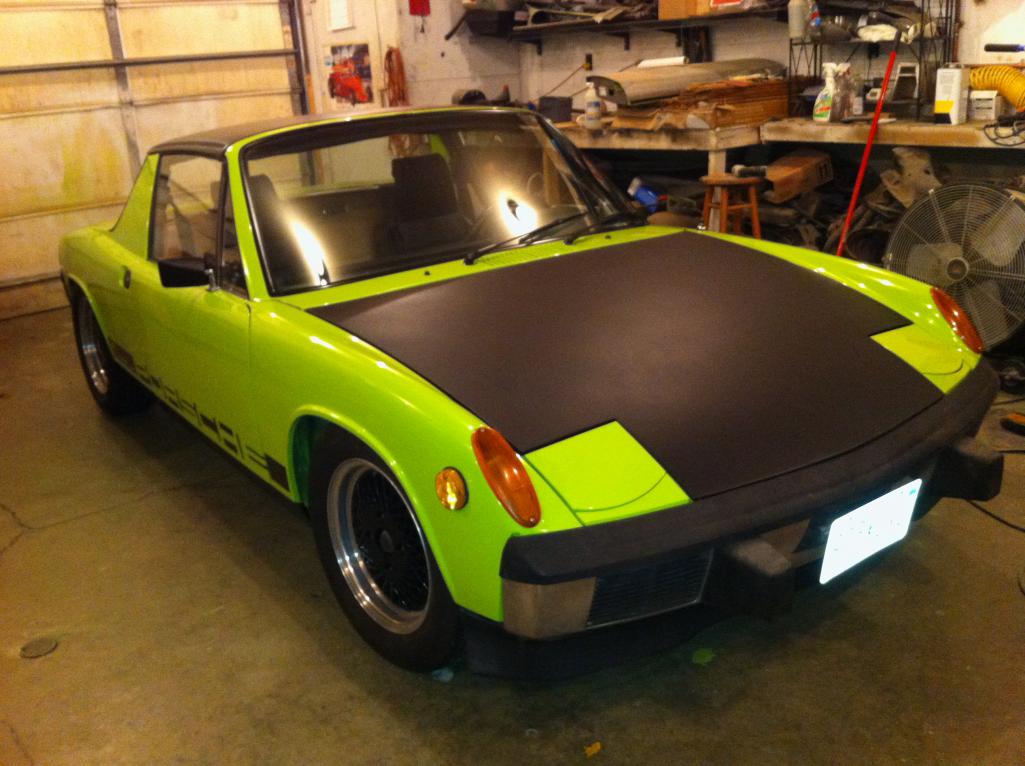
Posted by: JRust Oct 11 2013, 08:41 PM
Looks great but I think I like the body color lids better. The green looks fantastic! Especially with all the black as accents. Excellent work
Posted by: Jeroen Oct 11 2013, 08:44 PM
awesome job! post some more pics PLEASE...
Posted by: r_towle Oct 11 2013, 10:23 PM
Dude, where is the tape measure?
Attached image(s)
Posted by: 914coop Oct 12 2013, 06:35 PM
Looks fantastic , wish I could have been home today to see it in person.
Posted by: rick 918-S Oct 12 2013, 07:18 PM
Looks fantastic
, wish I could have been home today to see it in person.I knocked on the door pretty loud thinking Dan was home but he didn't come to the door.
He is either a sound sleeper or he wasn't home. I'll be back down soon!
For the other interested parties, Sandy and I drove her 7 of 9 about 400 miles today.
 We brought Irv some engine tin and looked at a 914-6 that needs a little work on the longs. It was a good day in the 914 world!
Posted by: rick 918-S Oct 12 2013, 07:19 PM
Dude, where is the tape measure?
No Rich....
Posted by: rick 918-S Oct 12 2013, 07:19 PM
Dude, where is the tape measure?
Double post but still... No Rich....
Posted by: r_towle Oct 12 2013, 08:04 PM
Haha
Posted by: McMark Oct 12 2013, 11:45 PM
So awesome! 
Posted by: rick 918-S Oct 15 2013, 06:17 PM
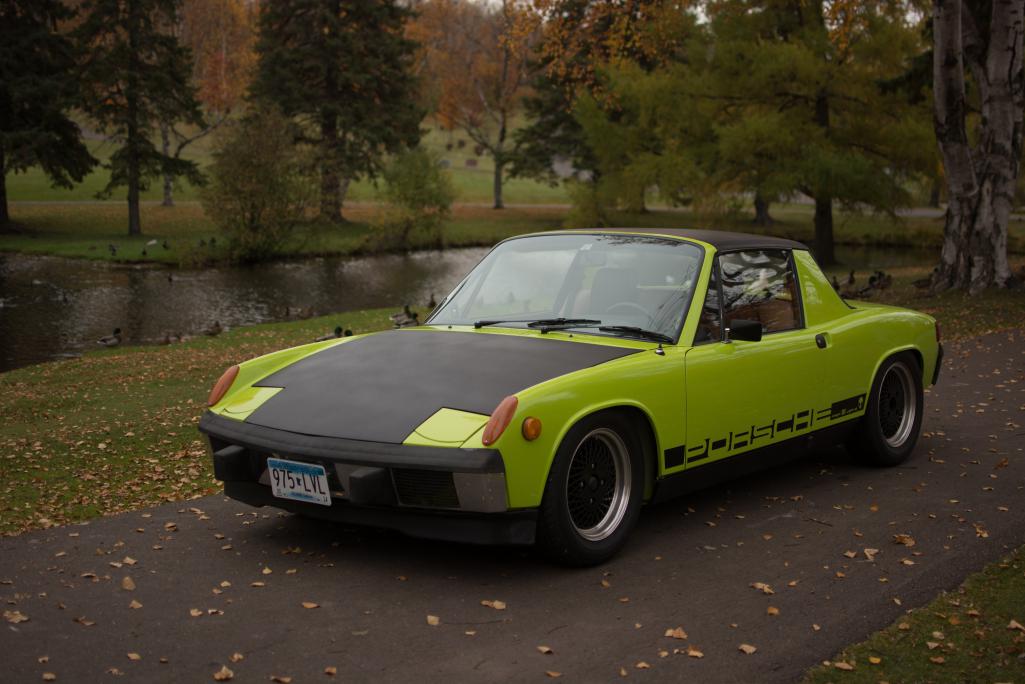
awesome job! post some more pics PLEASE...
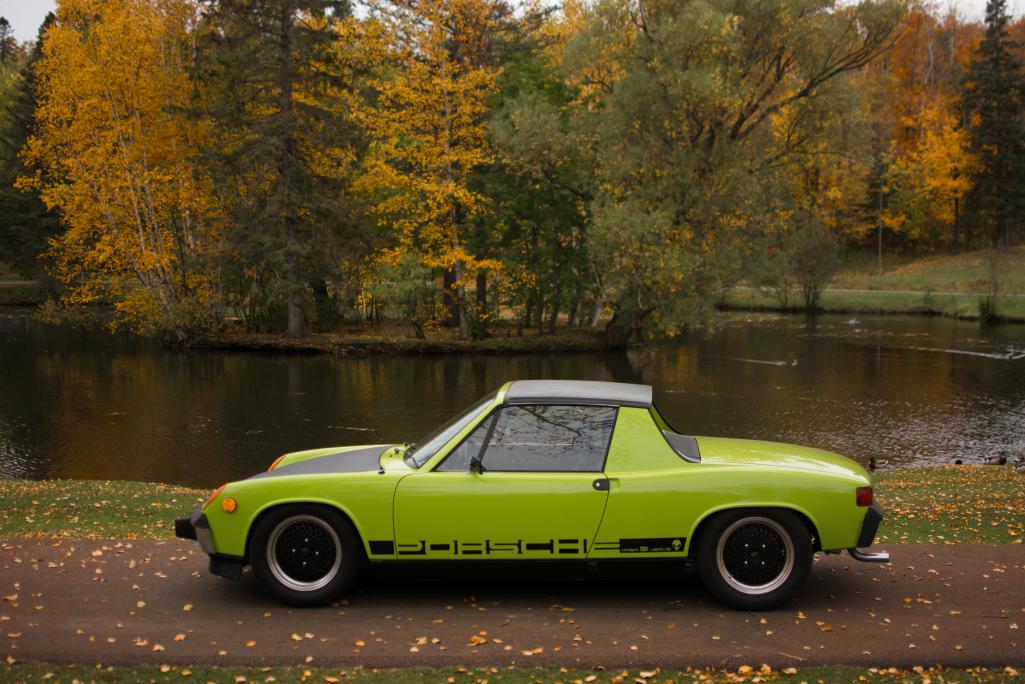
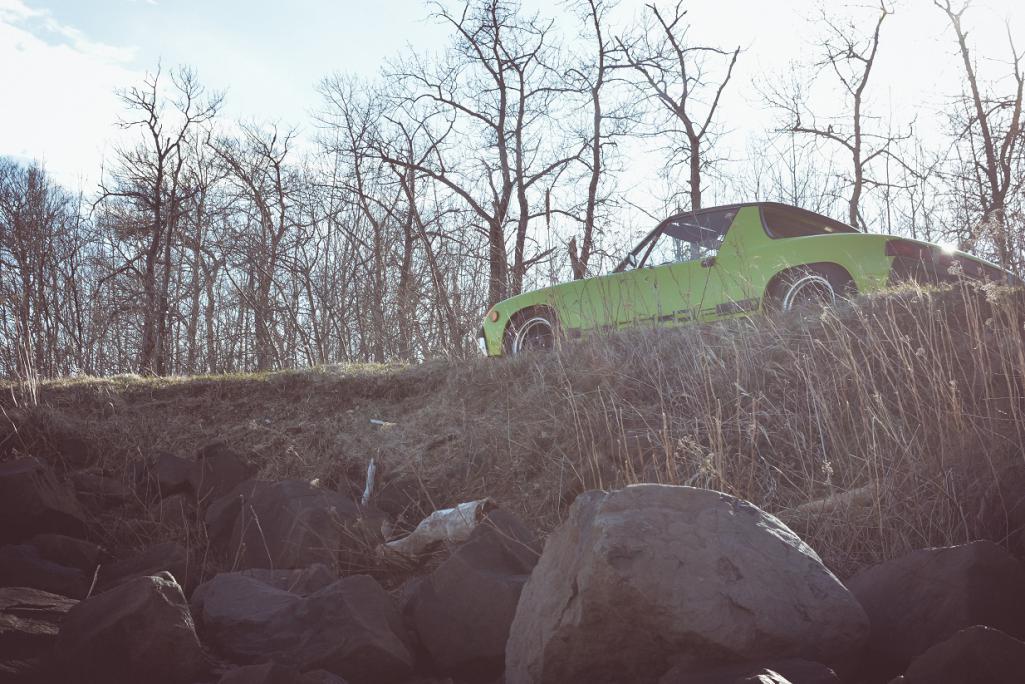
My son Aric took her out yesterday and got these shots.
Posted by: McMark Oct 15 2013, 08:29 PM
Perfection!
Posted by: scotty b Oct 15 2013, 09:30 PM
Perfection!
Now on to the 6 !!!
Posted by: rick 918-S Oct 29 2013, 10:24 PM
7 of 9 Tucked away for the winter.
Posted by: rick 918-S Nov 28 2013, 12:16 AM
Well it snowed here today so that's it for the year. I found this photo my son Aric took this fall. 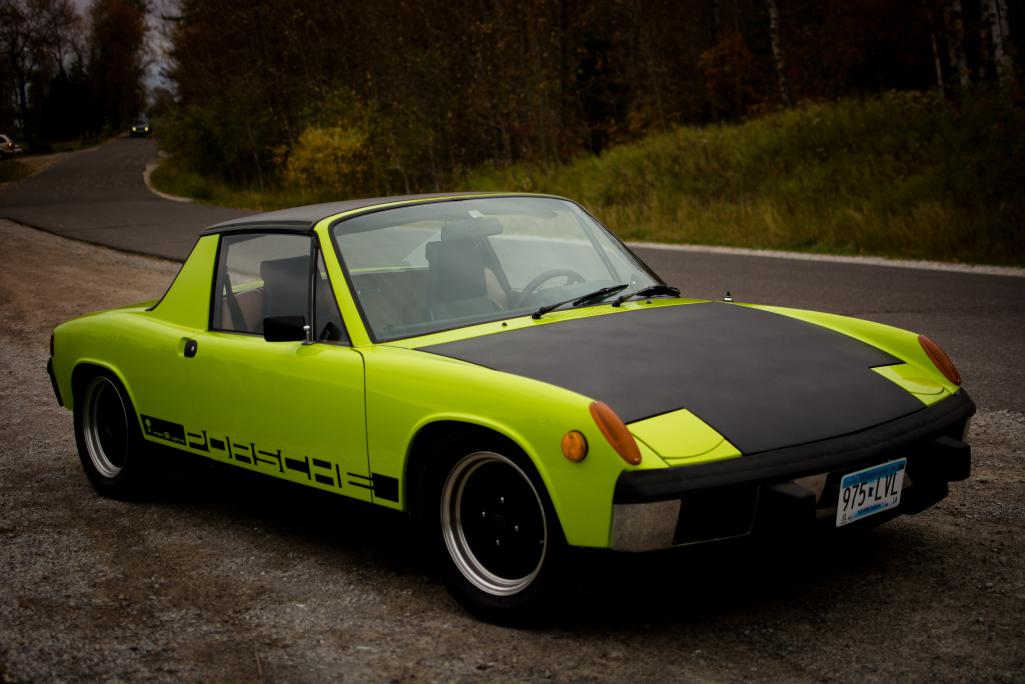
Posted by: carr914 Nov 28 2013, 06:16 AM

Posted by: lonewolfe Nov 28 2013, 10:15 AM
Is that a bug eye'd Sprite? We have some new neighbors that bought a house up the street and they have two of these covered up in the driveway. I always loved those cars!
Ooooh... I have my own car now.
Here it is Eric! Posted by: Krieger Nov 28 2013, 10:27 AM
I just reread the entire thread Rick. You do such nice work! I think I missed how the hood is black? Wrap? For us California people, how does that shelter work at keeping the weather out?
Posted by: rick 918-S Nov 28 2013, 10:49 AM
I just reread the entire thread Rick. You do such nice work! I think I missed how the hood is black? Wrap? For us California people, how does that shelter work at keeping the weather out?
Thank you!
 The Hood was painted black as a last minute attempt to get the car rolling. I have a second hood to paint body color but I didn't have it prepped. The black hood is wrinkle finish. I hid a couple small hail dents that I left in it. Can't see any imperfections in the finish. I actually like it enough I may just leave it on.
The shed works but sweats inside. I am going to add some vents you use when you shrink wrap boats to get some weather proof venting. We shall see how it holds up for the winter with the snow around it.
Posted by: rhodyguy Nov 28 2013, 01:35 PM
rich, you might consider a couple of notched 2x material propped under the ridge to help with the snow load during a big event.
Posted by: rick 918-S Nov 28 2013, 02:02 PM
rich, you might consider a couple of notched 2x material propped under the ridge to help with the snow load during a big event.
Ya I'm a little concerned about that but there's no place to do that with the car in there. I think I'm going to add some ratchet straps across the inside to make a triangle out of the top inside.
Posted by: rick 918-S Feb 11 2014, 07:24 AM
Thinking about the Route 66 event..... Only 12' of hard packed white stuff in the way.. Anyone got some dynamite?... 
Attached thumbnail(s)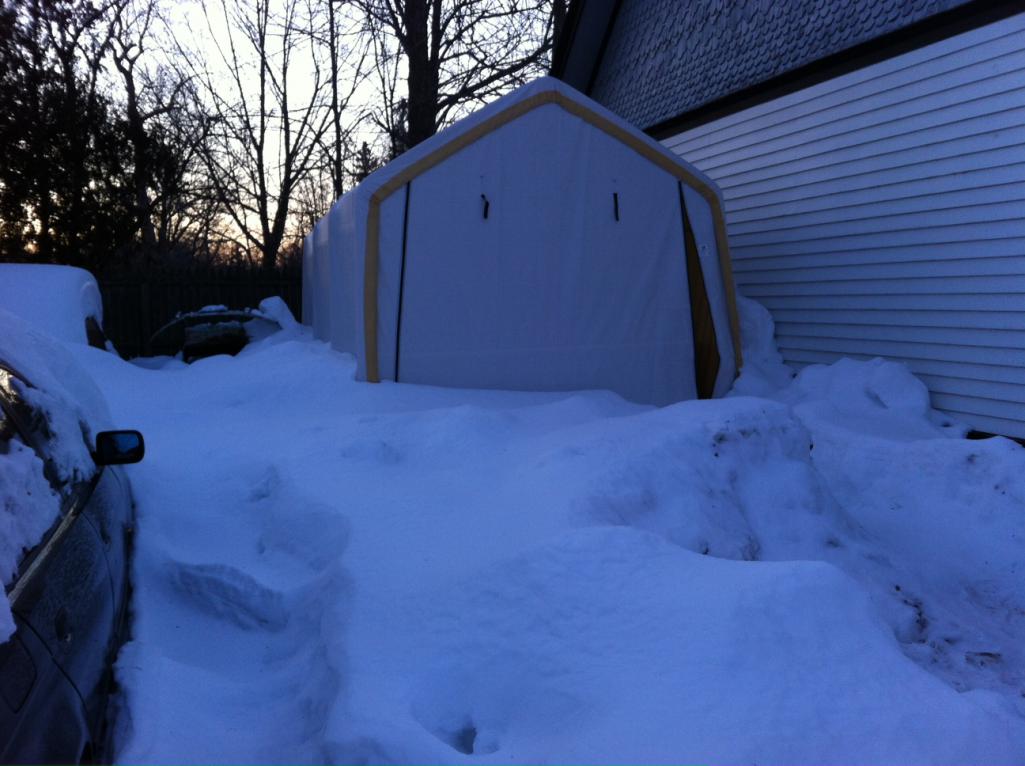
Posted by: Kansas 914 Feb 11 2014, 09:09 AM
Thinking about the Route 66 event.....
Only 12' of hard packed white stuff in the way.. Anyone got some dynamite?... Start the car - let it warm up and the get a running start?
Hope to see you guys at Route 66!
Posted by: 76-914 Feb 11 2014, 09:53 AM
Thinking about the Route 66 event.....
Only 12' of hard packed white stuff in the way.. Anyone got some dynamite?... Oh yeah, now I remember why I moved from MN.
Posted by: CptTripps Feb 11 2014, 10:53 AM
Get one if these...you'll be just fine.
https://www.youtube.com/watch?v=DCwky4RHstA
Posted by: JRust Feb 11 2014, 12:18 PM
Yeah hoping to see you at Route Rick! Kinda suck to be driving your 914 in that weather. We just had a weird snow storm here. I had a good foot & a half at my house. Just pisses me off as we just got most the sand/rocks off the road from December. Now I have to deal with that shit for another 2 months. At least I just replaced my last cracked windshield just in time
Posted by: worn Feb 11 2014, 01:49 PM
Thinking about the Route 66 event.....
Only 12' of hard packed white stuff in the way.. Anyone got some dynamite?... Just rent a bobcat.
My wife just weaseled out of rt66 (not that I didn't know all along). Cold as hell all over and it don wanna stop! Still I have new shocks to break in and a CHT to fret over for 3,000 miles so I thiink I better book my room.
Do you want me to come with a garden shovel?
Posted by: bryanf Feb 19 2014, 07:56 PM
Absolutely beautiful work. I'm so glad I didn't have that car hauled off to the junk yard.
Posted by: rick 918-S Feb 19 2014, 10:27 PM
Absolutely beautiful work. I'm so glad I didn't have that car hauled off to the junk yard.
For those that don't remember Bryan offered this car up as a parts cars due to the serious hit in the nose. I took one good look at the photos and knew it was too solid to cut up. Bryan gave me the opportunity to get the car and save it.
There were a couple ways the repairs could have gone. Quick and dirty or the long way around the horn. Because Bryan purchased the car after the wreck with the intension of using it for parts I ended up sourcing stuff from a Minnesota rust bucket and the classifieds here. My goal was to build it to a high standard. I think I was able to get close. Sandy and I are looking forward to our first long distance award!
Thanks again Bryan.
I still owe you a turn behind the wheel next time we get it out west.
Posted by: r_towle Feb 19 2014, 10:31 PM
. Sandy and I are looking forward to our first long distance award!
Is that a challenge?
Posted by: rick 918-S Feb 19 2014, 10:34 PM
. Sandy and I are looking forward to our first long distance award!
Is that a challenge?
Bring it on!
But you do understand you need to get your car finished right? 
Posted by: rjames Feb 19 2014, 11:17 PM
Just read the entire thread for the first time. Beautiful work. Wish I had time to learn the bodywork skills or had the $ to pay someone to do it for me.
Love the color. Keep the black hood.
Posted by: rick 918-S Mar 7 2014, 01:10 PM
That big lump is my BMW Touring. The canvas tarp shed is about to be crushed on all sides from the weight of ice and snow. Guess where Sandy's car is... 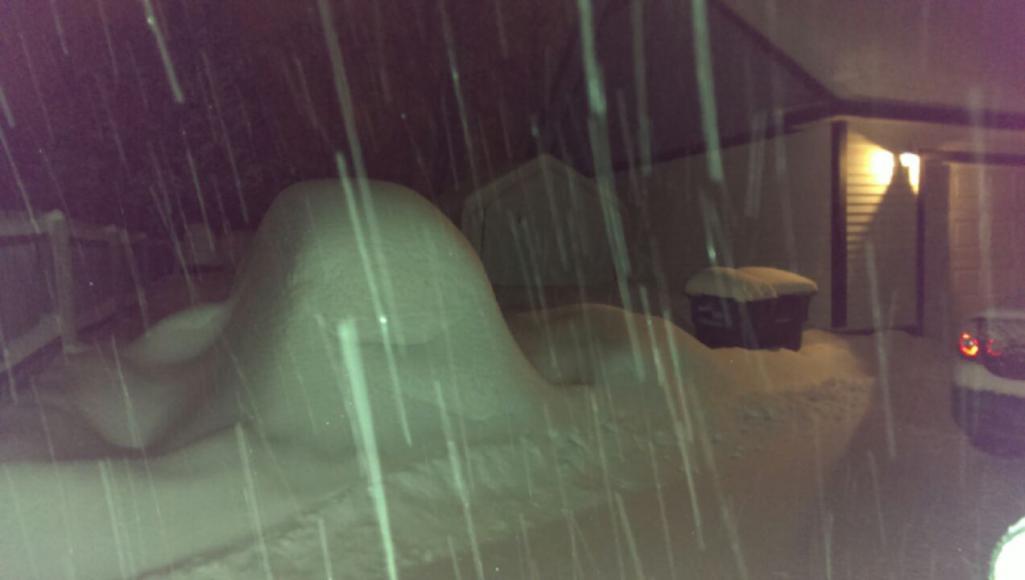
Posted by: 914_teener Mar 7 2014, 01:58 PM
I thought you are going to move to warmer clime Rick?
Come out here to Kalifornia!
Posted by: rsrguy3 Mar 7 2014, 02:56 PM
I think you should seriously consider Northern Ut. snow is much lighter, lol and plenty of big tech firms that need serious IT talent! Plus, we got the Shae!-G
Posted by: worn Mar 7 2014, 03:06 PM
That big lump is my BMW Touring. The canvas tarp shed is about to be crushed on all sides from the weight of ice and snow. Guess where Sandy's car is... Does this mean you aren't coming to the 66?
Also, I forgot that Duluth was above the arctic circle. Still have the porch lights on at 3 in the afternoon. Rough. Here it may thaw by sending us freezing rain. Can't complain it might be above freezing.
Posted by: worn Mar 7 2014, 03:11 PM
Guess where Sandy's car is...
Yeah, it is up by the house in the tarp-shed. Looks like you need to move what I think are garbage cans and then it is essentially smooth sailing.
Posted by: rhodyguy Mar 8 2014, 12:38 PM
vegas beckons. what a mess. icy packed stuff should be melted off by JUNE? another one is headed your way next week yes?
Posted by: rick 918-S May 4 2014, 07:10 PM
7 of 9 finally made it out of her winter hive. Aric took her out so she could stretch her legs.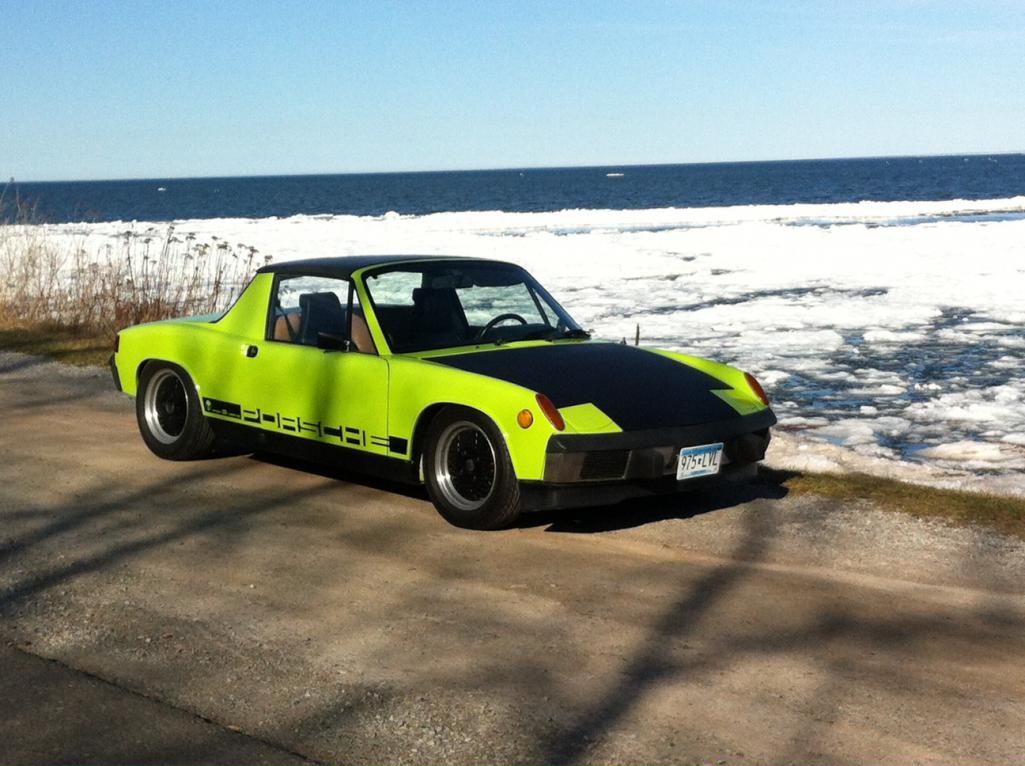
Oh ya, check out the sneak peek of the 911 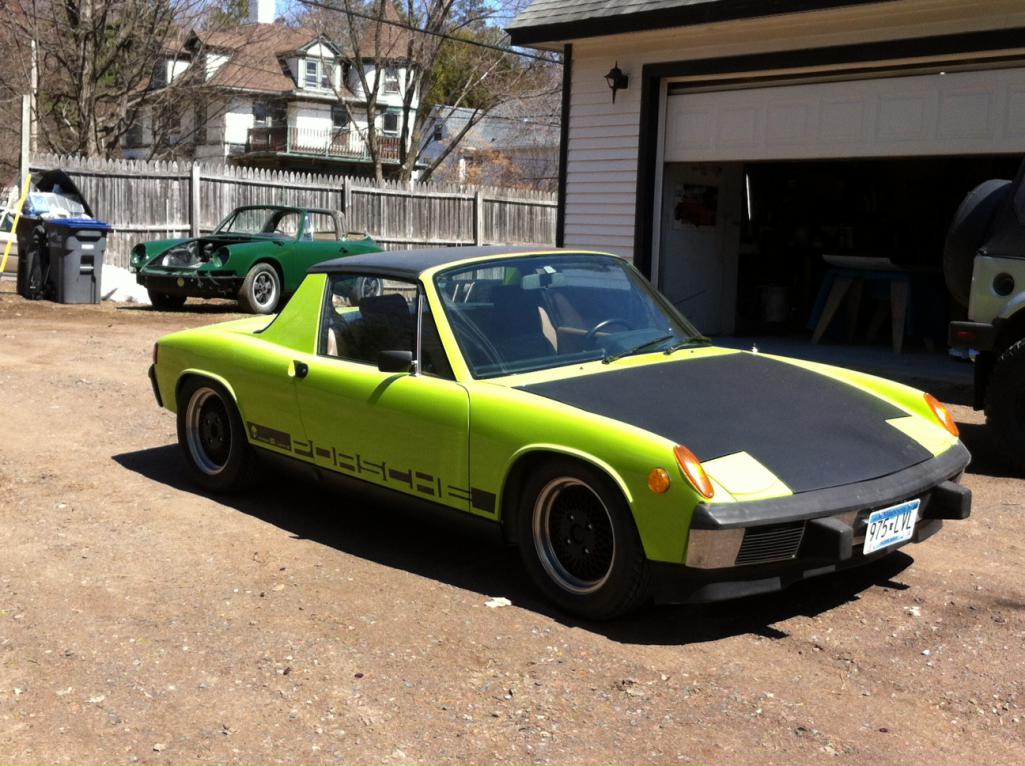
Posted by: rick 918-S Jun 16 2014, 11:33 AM
My Son Aric took his new son for his first 914 ride!
Attached thumbnail(s)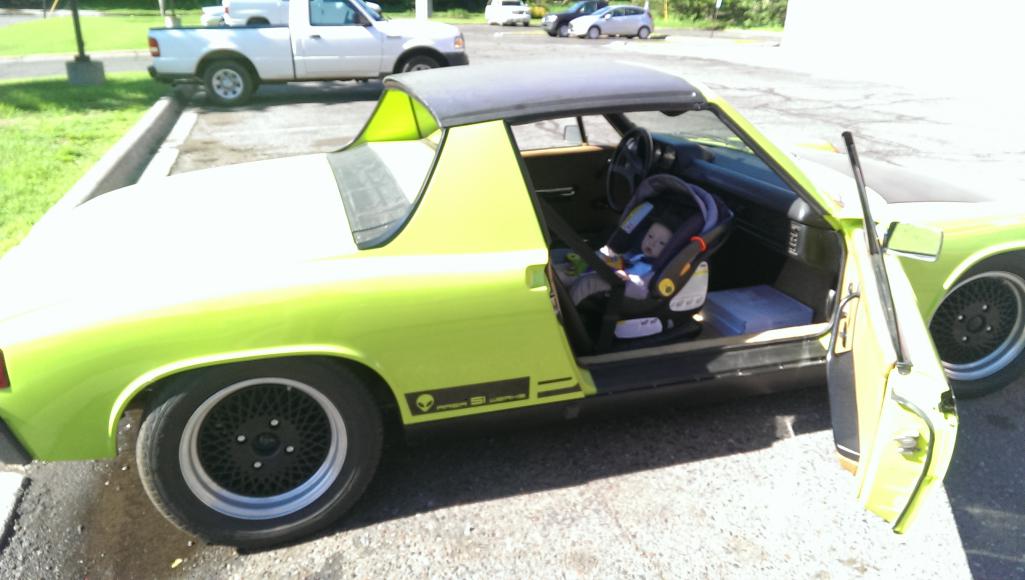
Posted by: KELTY360 Jun 16 2014, 02:04 PM
My Son Aric took his new son for his first 914 ride!
Posted by: jmill Jun 16 2014, 05:14 PM
Love it! The black hood completes the look.
Posted by: rick 918-S Jun 20 2014, 09:55 PM
Thanks man! it's come a long way from a parts car that was going to be cut up.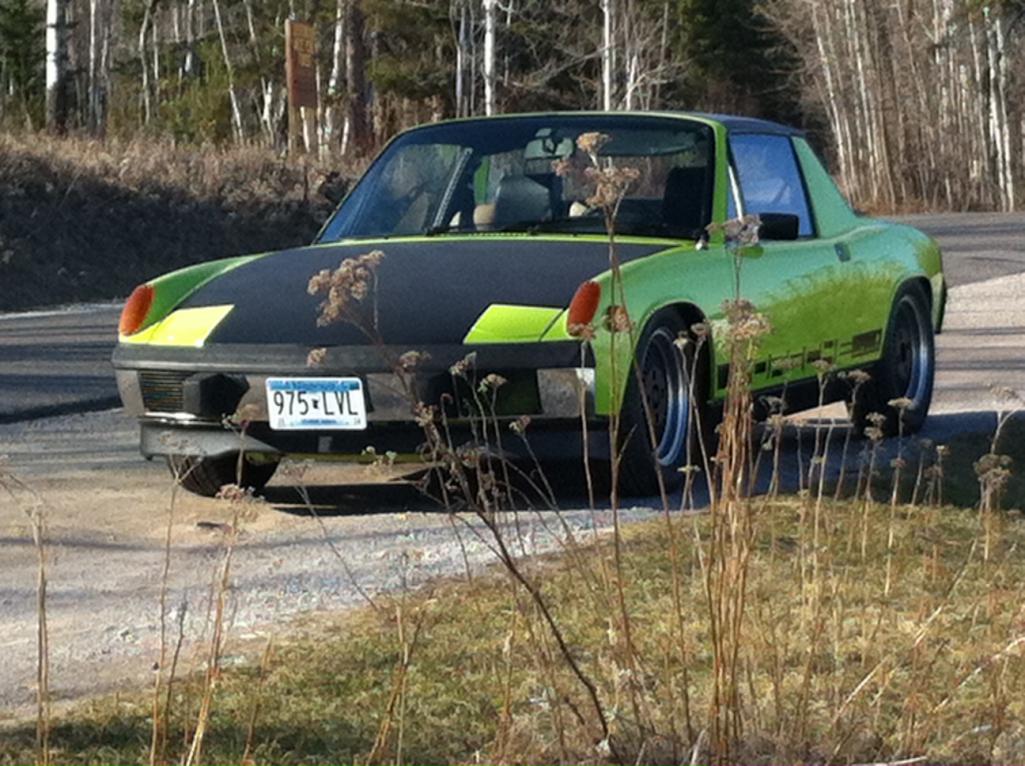
Posted by: bulitt Jun 21 2014, 04:42 AM
My Son Aric took his new son for his first 914 ride!
Was this the Son going to Flute-U to make instruments? How did he do? Didn't even know there was such a school!
Posted by: rick 918-S Jun 21 2014, 06:18 PM
My Son Aric took his new son for his first 914 ride!
Was this the Son going to Flute-U to make instruments? How did he do? Didn't even know there was such a school!
Nope, My oldest is a nurse with a wife and our first grand son Soren. My youngest is a college grad with a BA in Music. He also attended a luthier school. There were only 3 student per semester allowed.
Posted by: rick 918-S Jun 22 2014, 12:14 AM
Sandy and I are working in Nebraska. Wish we had her car here with us.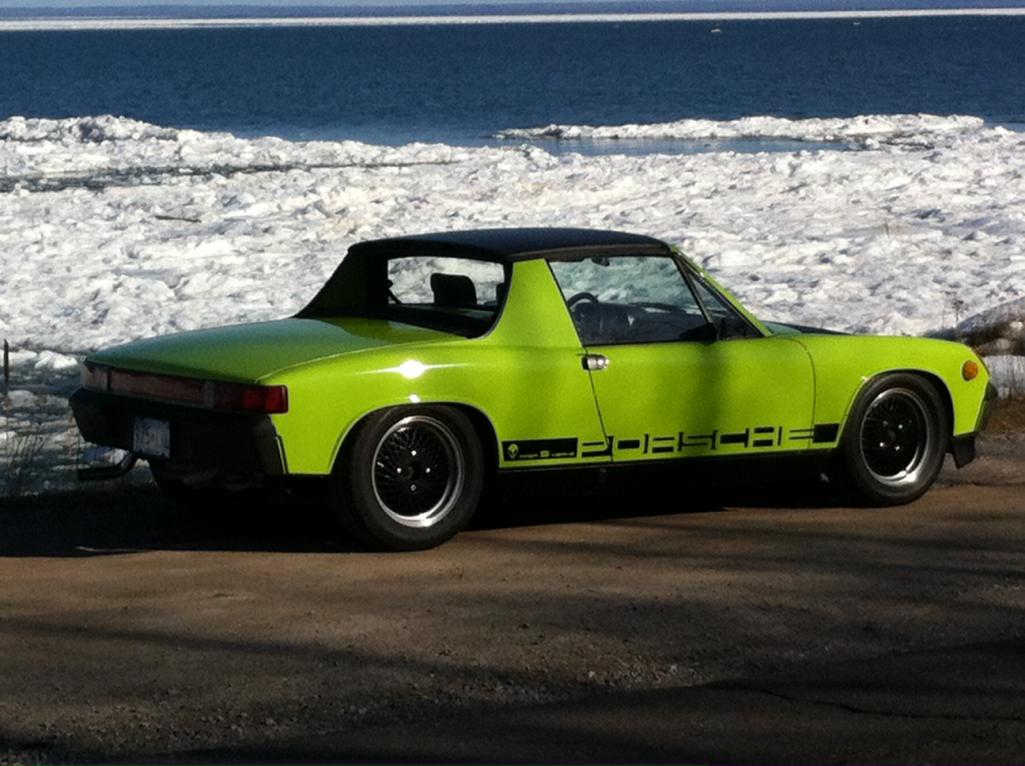
Posted by: balljoint Jun 22 2014, 06:59 AM
My Son Aric took his new son for his first 914 ride!
This makes me smile. I did this same thing with both of my kids in various iterations of child car seats. They are now 8 and 5 and love the 914 more than ever.
Posted by: rick 918-S Jun 22 2014, 06:46 PM
My Son Aric took his new son for his first 914 ride!
This makes me smile. I did this same thing with both of my kids in various iterations of child car seats. They are now 8 and 5 and love the 914 more than ever.
He's trying to figure out how he can fit a car seat in the middle and still shift...
You know incase we want to take the Alien and 7 of 9 to an event.
Posted by: rick 918-S May 6 2015, 11:02 PM
Taken 2010 on the way home from Half Moon Bay. 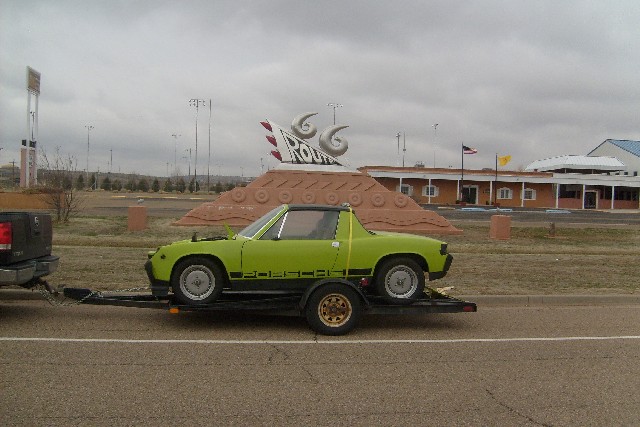
Taken 5-4-15 Sandy and I had to park around the back side of the monument. It had rained really hard and there was standing water on the street that was up to the rockers.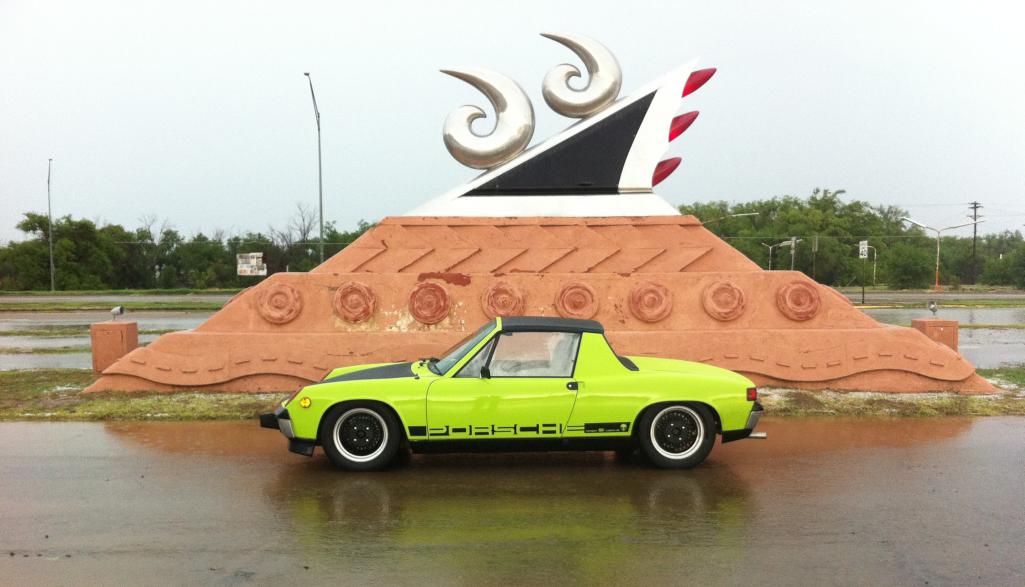
We put on over 5000 miles since March. With a little routine maintenance I would have no issue with firing up the car and doing it again. She ran sweet all the way with the only real issue being the starting thing and the speedometer quit. Pretty simple fixes. Stuff you find on a good shake down run.
Just need to change the oil and filter, check the valves and adjust the clutch cable and she's ready for another road trip! What a great car!
Posted by: altitude411 May 7 2015, 07:38 AM
Fantastic thread Rick. Thank you for supplying some great reading material on this snowy birthday in Montana. (me) I can't wait to see the six thread. Any sneak previews of the car? I hope mine is done for next years WCR. I look forward to meeting you in person. Great job. Now get to work on the six. It's still snowing.
Posted by: rick 918-S May 10 2015, 08:43 PM
Fantastic thread Rick. Thank you for supplying some great reading material on this snowy birthday in Montana.
(me) I can't wait to see the six thread. Any sneak previews of the car? I hope mine is done for next years WCR. I look forward to meeting you in person. Great job. Now get to work on the six. It's still snowing. Sorry to read about the snow. Glad you enjoyed it.
On a sadder note (for me really) the car is going to a new home. It really disturbs me. I don't sell stuff.
But on a lighter note the new owner is excited to get the car. He takes delivery in three weeks. I'm sure the new owner will post photos of the transfer.
Posted by: mgp4591 May 10 2015, 10:23 PM
Make sure to stay in touch with them and if they're not already, introduce them to the motley crew! My son (who was with me at WCR but doesn't have the same interest as I do) said that the "green machine" was his favorite! I pointed out details in all the other cars but he stuck to his guns, and when I told him you're selling it he was saying "NOOOO! I really like that one!" So, your pain is felt...
Posted by: McMark May 11 2015, 08:59 AM
Fantastic thread Rick. Thank you for supplying some great reading material on this snowy birthday in Montana.
(me) I can't wait to see the six thread. Any sneak previews of the car? I hope mine is done for next years WCR. I look forward to meeting you in person. Great job. Now get to work on the six. It's still snowing. Sorry to read about the snow. Glad you enjoyed it.
On a sadder note (for me really) the car is going to a new home. It really disturbs me. I don't sell stuff.
But on a lighter note the new owner is excited to get the car. He takes delivery in three weeks. I'm sure the new owner will post photos of the transfer.
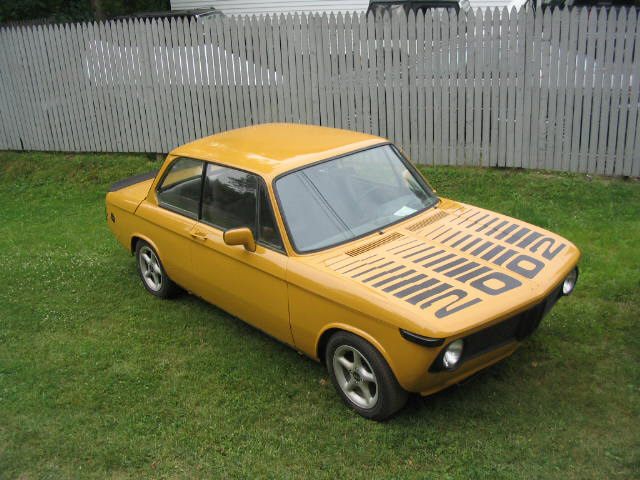
I know exactly how you feel. I just sold my BMW 2002. Couldn't really wrap my head around what I was doing, but it needed to be done.
Posted by: rick 918-S May 11 2015, 02:51 PM
Fantastic thread Rick. Thank you for supplying some great reading material on this snowy birthday in Montana.
(me) I can't wait to see the six thread. Any sneak previews of the car? I hope mine is done for next years WCR. I look forward to meeting you in person. Great job. Now get to work on the six. It's still snowing. Sorry to read about the snow. Glad you enjoyed it.
On a sadder note (for me really) the car is going to a new home. It really disturbs me. I don't sell stuff.
But on a lighter note the new owner is excited to get the car. He takes delivery in three weeks. I'm sure the new owner will post photos of the transfer.
I know exactly how you feel. I just sold my BMW 2002. Couldn't really wrap my head around what I was doing, but it needed to be done.
You and me walk the same path...
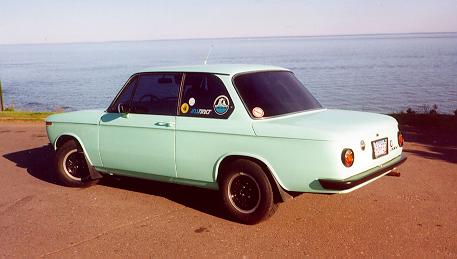
I still think about my time with the square and round tail cars...
Powered by Invision Power Board (http://www.invisionboard.com)
© Invision Power Services (http://www.invisionpower.com)