Printable Version of Topic
Click here to view this topic in its original format
914World.com _ 914World Garage _ DIY Subaru AWD to 2WD conversion
Posted by: jpnovak Mar 7 2010, 09:51 PM
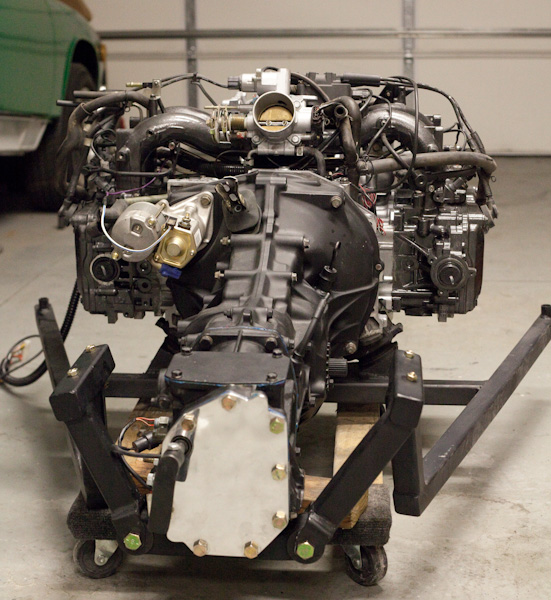
I noticed there has been a lot of talk using the Bremar Kits for the Subaru transmission. For those who do not know, Bremar makes a very nice locking lug for converting AWD to 2WD within the Subaru transmissions. This is required for those doing the full Suby conversion where the 914 drive train location is mid-ship.
I would absolutely love to purchase the Bremar parts. However, I am building a GRM $2010 Challenge car and the budget is extremely tight. I want to show how to make your own conversion parts while spending a few hours in the garage and no cash outlay. Not all Suby transmissions are created equal. Most should follow a similar procedure.
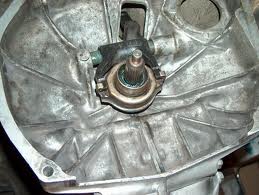
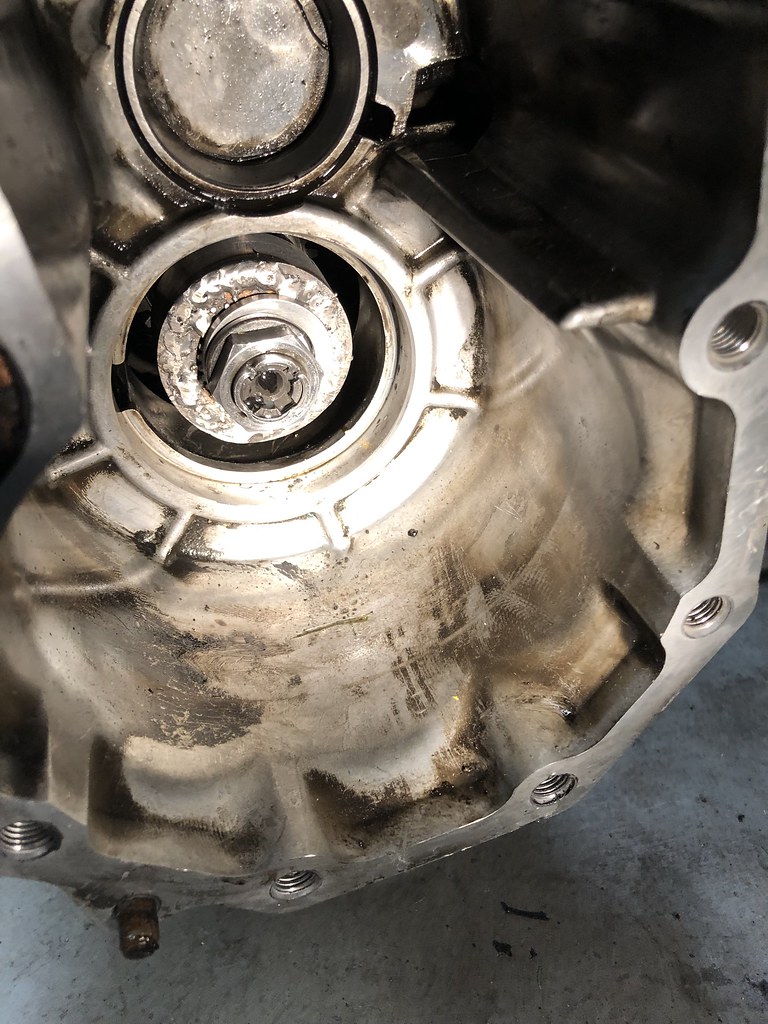
So... Lets get started. first thing to do is remove the rear end cover. Remove the perimeter 14mm bolts. Then use a dead blow hammer and soft drift to coax the end cover off its locating pins. When you remove the end cover you will be staring at the center differential. Pull this out of the rear of the transmission and set it aside. This is what we will be doing surgery on. After removal of the differential you will have a hole and layshaft that drives the rear driveshaft. It will look something like this...
picture of removed end cover. 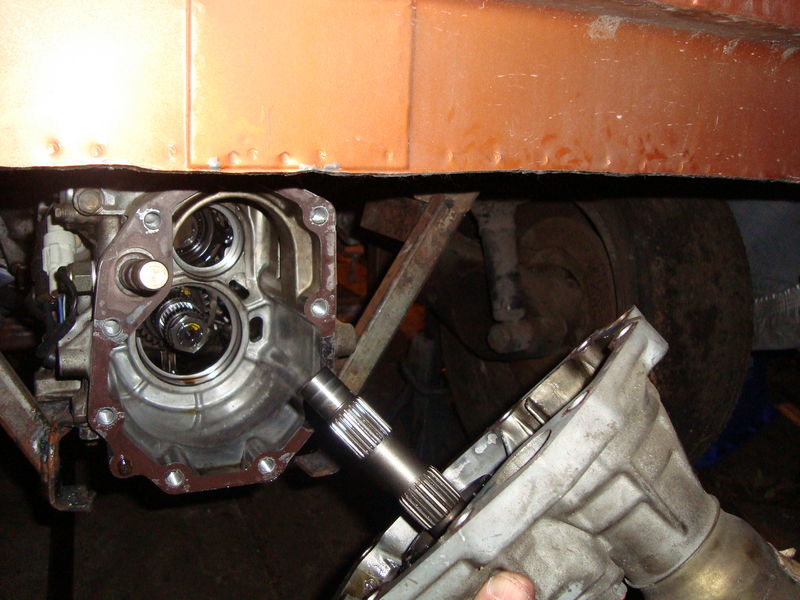
There are more details on removal and installation of the Bremar Kit here.
http://specificdesign.com/transmission.htm
I used this site for reference. You need to remove the end nut from the shaft. I used a pair of vice grips on the output shafts to lock the transmission against the motor mounts. The same technique works in when you are reinstalling the parts. 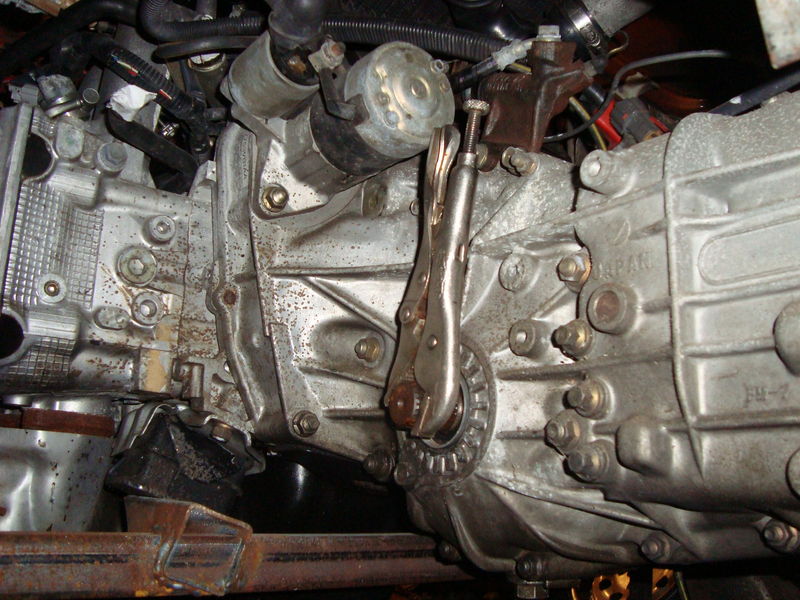
Once you have the parts laying on the bench you must disassemble the differential. Set it on the bench with the spider gears down and the female splined shaft pointing up.
There is a carrier bearing that will press fit down the female shaft section. This bearing must be removed first. It also may be left in the case. Either way, take it out. Mine was left pressed on the differential. I used two long pry bars under the bearing to pull it. My bearing puller jaws would not fit between the diff and the bearing. use what you must.
Next, locate the 8 mating spline section around the perimeter of the differential. There is a inside circlip that will be inserted in the mating splines. Use a small screwdriver or pick to pull out and then remove the circlip.
Now the top part of the differential will separate. There are three main sections of the differential. The lower spider gear carrier, a middle section that supports the layshaft and the top female section that we just pulled the bearing off. I roller bearing lets the middle section rotate within the locked lower carrier and top spline section. Separate the parts and lay them on the bench.
Start with the middle section. You must cut off the internal splines. This is an integral part of the final part. Clamp this in a vise and cut off the protruding section.
These gear sections are extremely hard. I used a cut-off wheel up against the base. Go slow and get this cut as clean and square as you can. If you are crooked you will pay later. 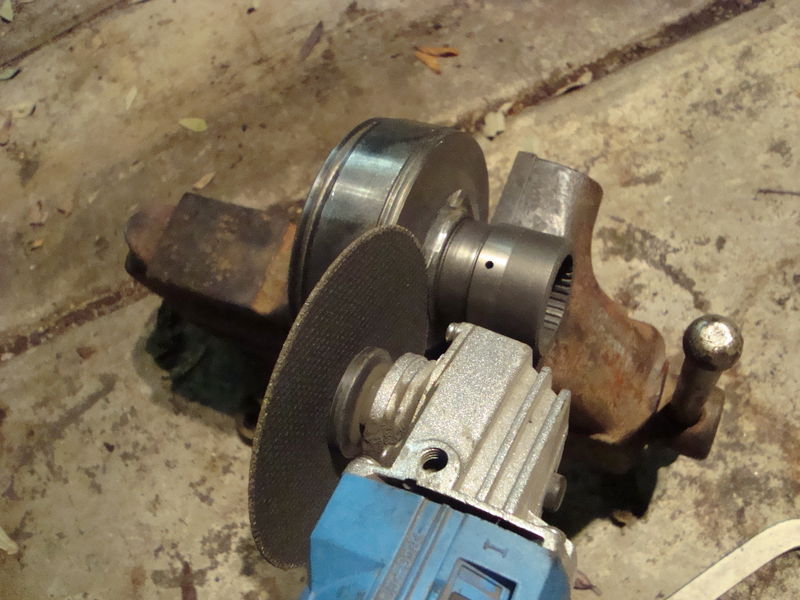
After the cut you must partially reassemble everything on the bench. Place the roller bearings in the groove and insert the cutoff section into the outer female spline. 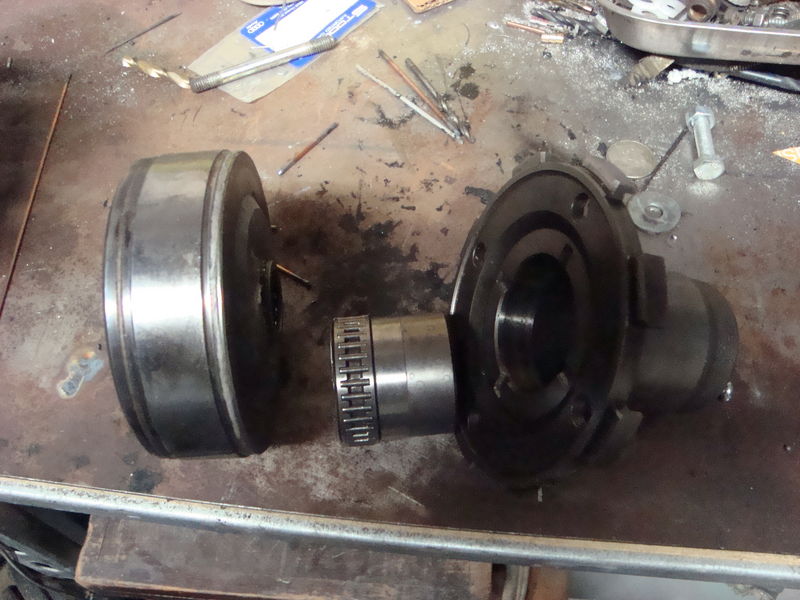
The bearings locate and center the two spline sections. Here is what it all looks like aligned from the backside. 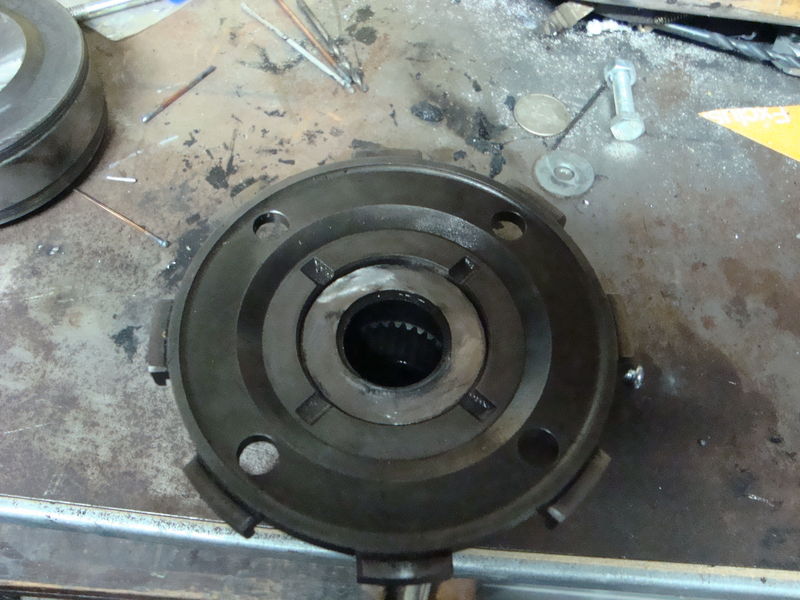
With the parts laying upright on the bench you can see the alignment. At this point you should drop in the spline section that was removed from the mainshaft behind the staked nut. All together it looks like this.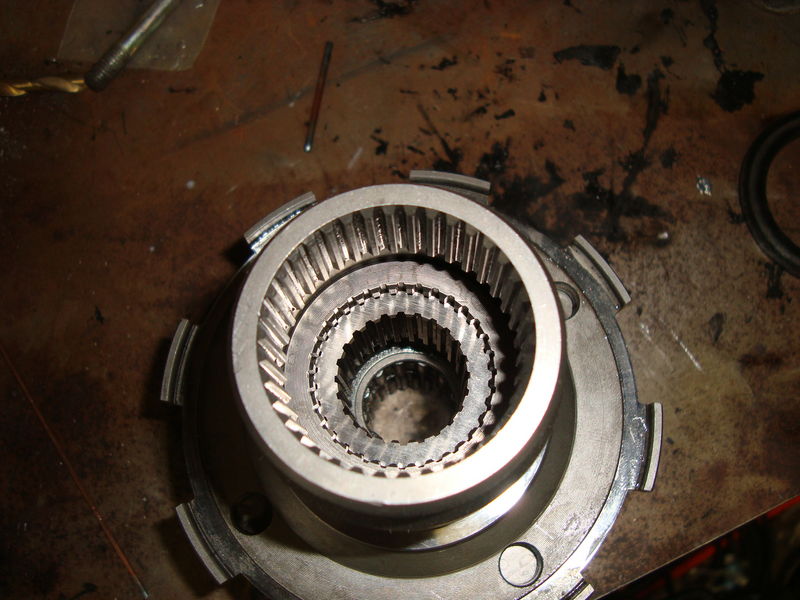
I assembled everything on top of the base of the middle section. there is a small roller bearing the will support everything and hold it in place. Next, run a weld bead around the perimeter making the splines one. The center most section of splines will not be attached at this point. They are press-fit. They can not come out when the whole assembly is installed back in the transmission. 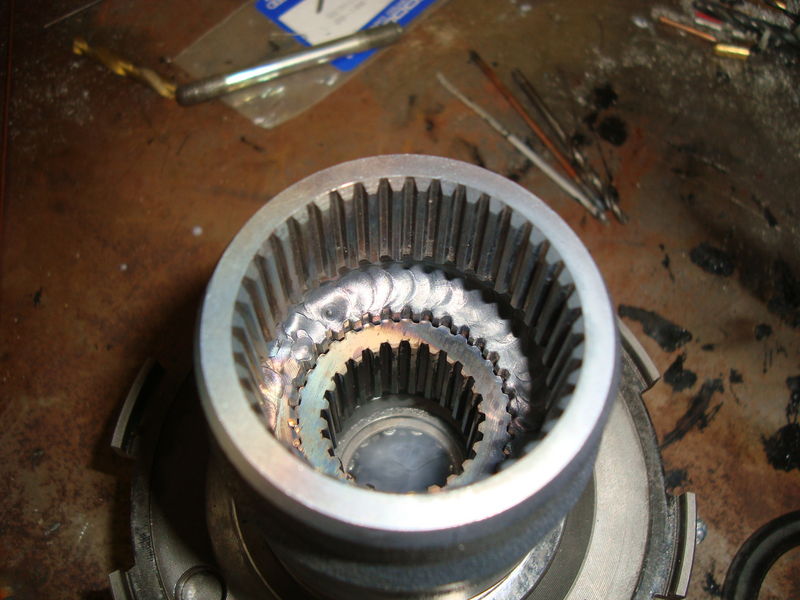
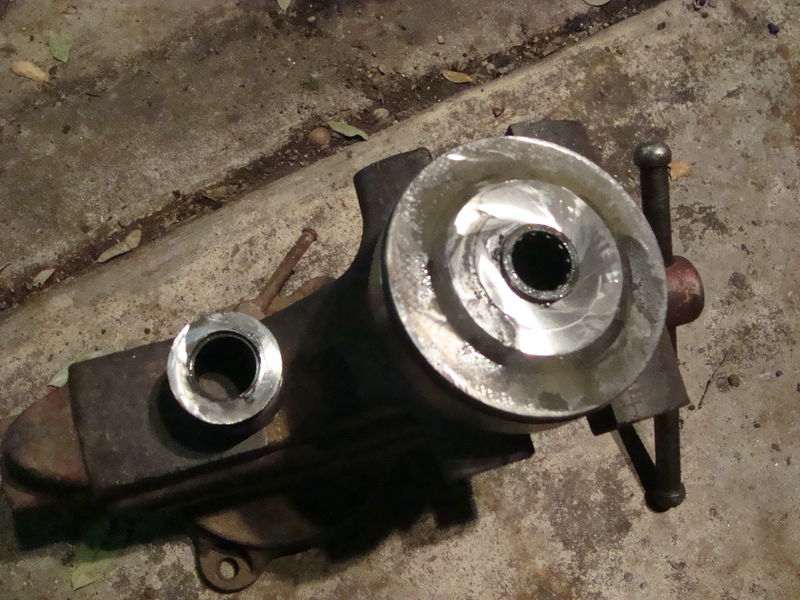
Now it is time for more cutting. We must now cut off the large flange from the welded part. Same procedure as before. I made the cut about 2mm up from the start of the precision mating surface where the large support bearing was pressed. The tools. 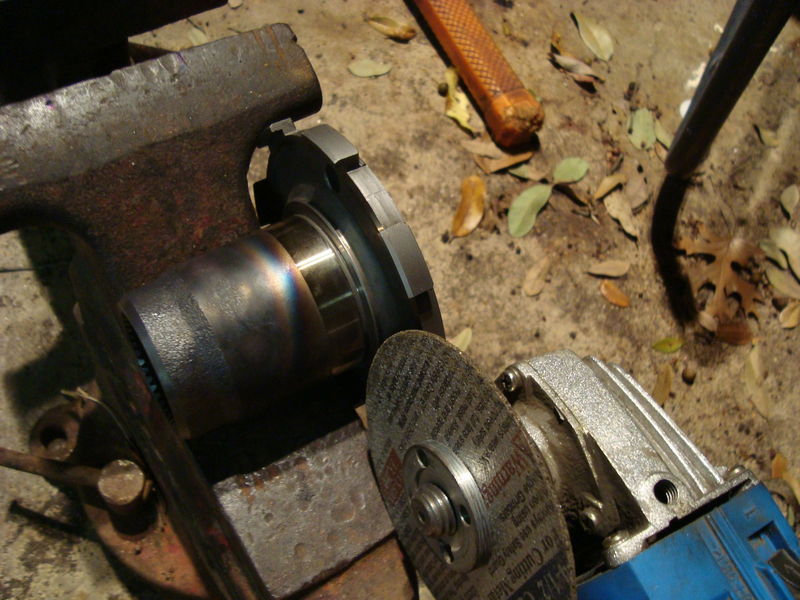
The Carnage: Notice that the roller bearing will be cut and fall out. Since we welded the other side these are no longer needed. 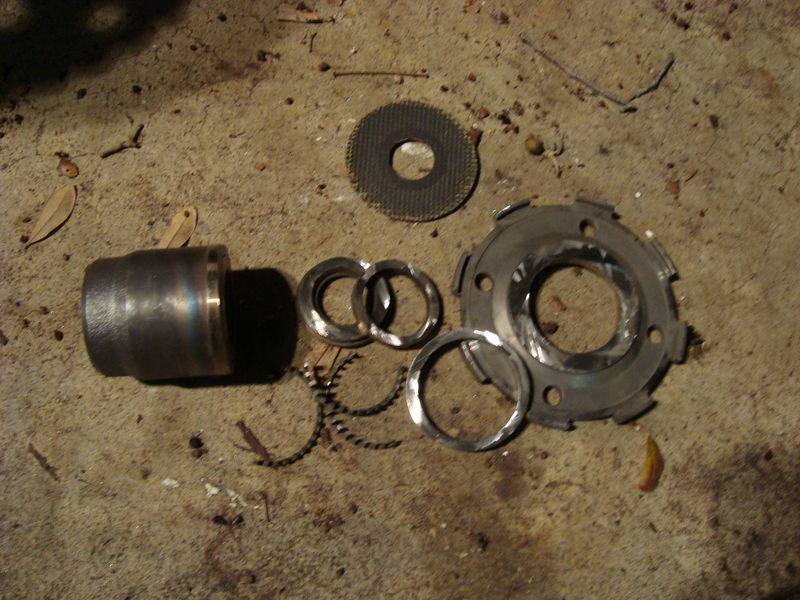
The result: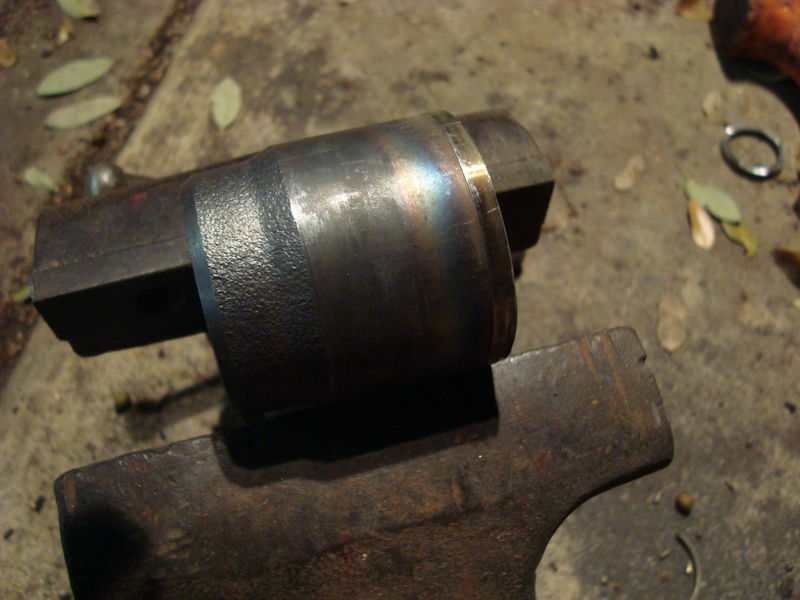
From the end: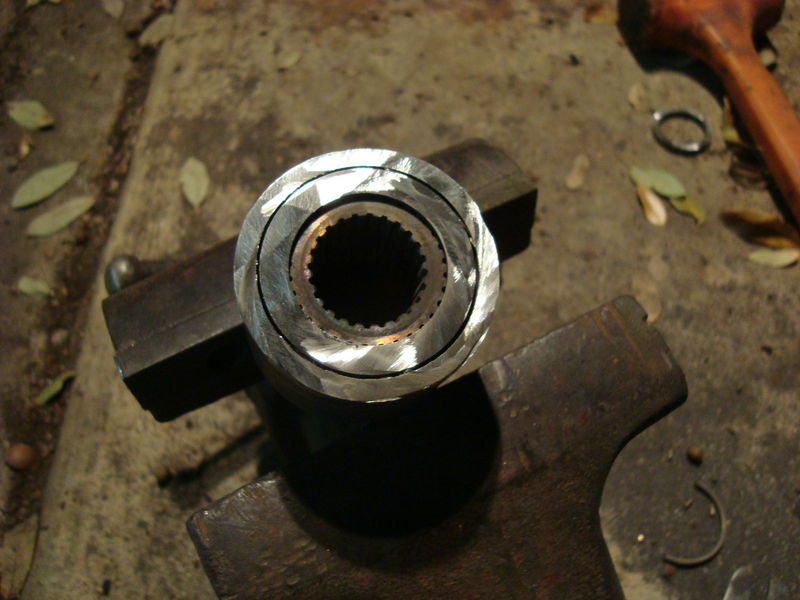
Now its time for more welding. Fire up the torch and fuse these sections. I did not use any filler and setup the arc with a pointed tip for maximum penetration. Lots of heat and patience.
First the outer part line.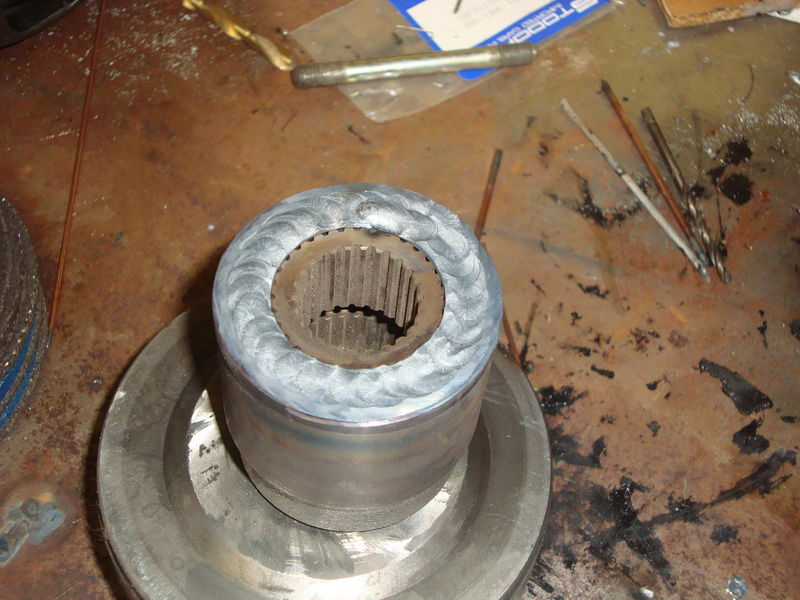
Then the inner. Make sure you do not damage the inner splines. These must be clean so that they slide back on the tranmission pinion shaft. 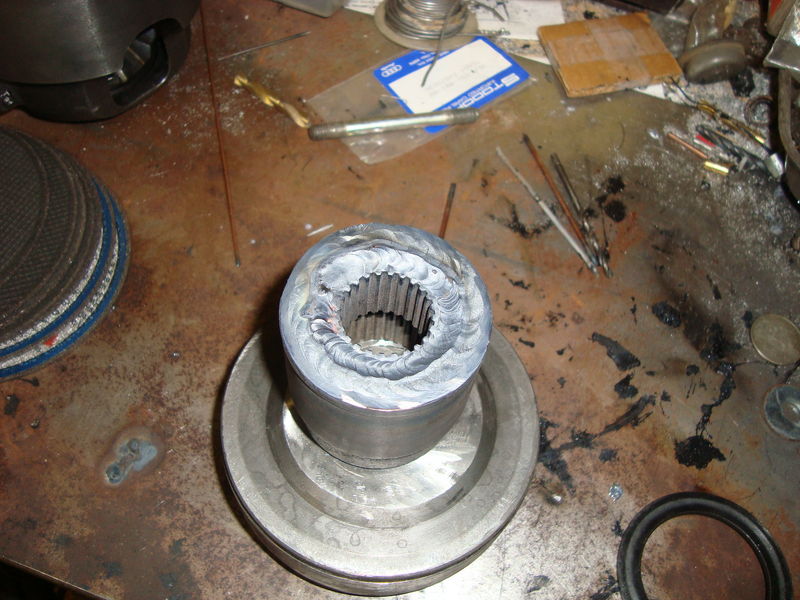
Now you can put it back in the transmission. I used a hammer and drift to make sure that it seats on the shaft. Mine fit very tight. I suspect there was a little warping from the welding heat. I used a drop of red loctite on the threads of the nut since it was not so pretty after removing the original stakes. I also removed one spacer from behind the nut as the welds took a bit of room.
Overall the cost was 3 cut-off wheels and some Ar out of the welding tank. Total time was about 2 hours.
Next step, make a flat cover plate.
Posted by: G Man Mar 7 2010, 10:10 PM
Very good info. As of now I don't have a 914 but am seriously considering making the plunge if I can make it work. By that I mean I need an auto trans car. I have nerve damage to my spine and can't use a clutch. Would this process work on an auto transmission?
Posted by: BIGKAT_83 Mar 7 2010, 10:16 PM
Good job and a great write up. Thanks for sharing
Bob
Posted by: kg6dxn Mar 7 2010, 10:21 PM

Very good info. As of now I don't have a 914 but am seriously considering making the plunge if I can make it work. By that I mean I need an auto trans car. I have nerve damage to my spine and can't use a clutch. Would this process work on an auto transmission?
This will not work for an automatic. But... You can buy a front wheel drive auto Subaru or Audi and use that transaxle.
Posted by: G Man Mar 7 2010, 10:47 PM
Very good info. As of now I don't have a 914 but am seriously considering making the plunge if I can make it work. By that I mean I need an auto trans car. I have nerve damage to my spine and can't use a clutch. Would this process work on an auto transmission?
This will not work for an automatic. But... You can buy a front wheel drive auto Subaru or Audi and use that transaxle.
Thanks for that info. Is there any info available about this process. I have seen the thread with the Audi trans adapted to the 914 engine and I have considered going that route. Any info would be great.

Posted by: Andyrew Mar 7 2010, 10:52 PM
Very good info. As of now I don't have a 914 but am seriously considering making the plunge if I can make it work. By that I mean I need an auto trans car. I have nerve damage to my spine and can't use a clutch. Would this process work on an auto transmission?
This will not work for an automatic. But... You can buy a front wheel drive auto Subaru or Audi and use that transaxle.
Ya a full FWD audi automatic (w/ tiptronic and paddle shifters) engine and trani swap is something im going to be doing in the next year.
Posted by: enikolayev Mar 8 2010, 12:00 AM
wow, great writeup! i have been wondering how to DIY this for some time now... Thanks!
Posted by: BIGKAT_83 Mar 8 2010, 05:36 PM
I also started out building a 2010 challange car, but after working on the car found it to be far better than I thought.
I was going to do a weld on the center diff. like you did but found a locking sleeve and plate from a unfinished project for $100
What are your plans for the axles? The 914 stock axles which are the same diameter as the 911 and buss axles are long enough and a large enough diameter to be resplined on the transaxle end for the subaru joint. I've had a couple of these done and really like the way they came out. I had the first ones done at a shop on the west coast for $125 for both.
After looking around I was able to find someone local here in Atlanta that would do them for less.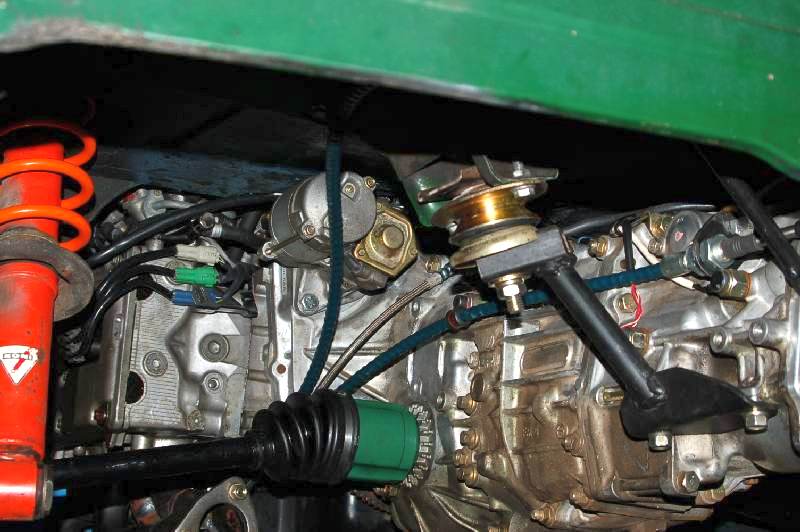
Bob
Posted by: rick 918-S Mar 8 2010, 07:51 PM
I also started out building a 2010 challange car, but after working on the car found it to be far better than I thought.
I was going to do a weld on the center diff. like you did but found a locking sleeve and plate from a unfinished project for $100
What are your plans for the axles? The 914 stock axles which are the same diameter as the 911 and buss axles are long enough and a large enough diameter to be resplined on the transaxle end for the subaru joint. I've had a couple of these done and really like the way they came out. I had the first ones done at a shop on the west coast for $125 for both.
After looking around I was able to find someone local here in Atlanta that would do them for less.
Bob
Bob,
Give us some details on the axle work. How much were they shortened when they were resplined? Start a thread like this one!

More photos please.

Posted by: Andyrew Mar 8 2010, 07:59 PM
I agree with Rick,
I'll have to get some custom axles done when I do the Audi trani, using the 914 shaft would be easy and cheap!
Where did you have it done at over here?? Start a thread!!
Posted by: eric914 Mar 8 2010, 09:23 PM
Very nice. Any more on the axles?
Posted by: quikshft Mar 9 2010, 12:35 AM
Overall the cost was 3 cut-off wheels and some Ar out of the welding tank. Total time was about 2 hours.
Next step, make a flat cover plate.
Excellent post and write up! I wondered why this couldn't be done but didn't have the removed parts to inspect to see if it was possible. Should save a few bucks if I should get around to building a Suby powered car.
Posted by: jpnovak Mar 9 2010, 07:07 AM
Thanks to everyone for the compliments.
I have all but no money left in the budget and I still have to get tires and a cooling system. Radiators are cheap. Long hoses to the front are not.
For axles I plan to cut the 914 outer and Subaru inner. Then weld and sleeve the two axle sections. I can make it strong enough to last the event and then I will look at alternatives.
Posted by: camaroz1985 Mar 9 2010, 08:52 AM
That's the same thing I'm doing for my axles.
Nice work you did on the center diff. I started with a FWD parts car so I didn't need to worry about a conversion.
Posted by: sawtooth Dec 20 2010, 12:01 PM
Hey Jamie very nice work. It looks like this may require tig? I'm wondering if this can be done with a mig? It looks to me like the weld on the inner portion would be really tough to get a mig tip in there to do the job.
Posted by: rick 918-S Dec 20 2010, 12:32 PM
Thanks to everyone for the compliments.
I have all but no money left in the budget and I still have to get tires and a cooling system. Radiators are cheap. Long hoses to the front are not.
For axles I plan to cut the 914 outer and Subaru inner. Then weld and sleeve the two axle sections. I can make it strong enough to last the event and then I will look at alternatives.
I used electrical conduit under the car and standard radiator hoses to connect the engine to the tubes and radiator. Way cheaper than Gates hose.
Posted by: Britain Smith Dec 20 2010, 09:55 PM
Call up Renegade...I got the Gates Strip hose from them for around $120. It was plenty of hose with some extra.
-Britain
Posted by: jpnovak Dec 21 2010, 02:13 PM
Dean,
You could probably use a MIG for the welding. Depending on the torch and gas collar you may have a tough time seeing the bead. It will certainly be a tight fit.
I did use a TIG. I setup the part to rotate such that I could get a fixed angle with the torch head. Then I rotated the part with my left hand. I walked the part rather than the cup.
Make sure you have a stout welder. A 110V will not cut it on this thick steel.
Posted by: sawtooth Jan 13 2011, 10:33 AM
Dean,
You could probably use a MIG for the welding. Depending on the torch and gas collar you may have a tough time seeing the bead. It will certainly be a tight fit.
I did use a TIG. I setup the part to rotate such that I could get a fixed angle with the torch head. Then I rotated the part with my left hand. I walked the part rather than the cup.
Make sure you have a stout welder. A 110V will not cut it on this thick steel.
Thanks Jamie, great advice.
For anyone who might run into the same issues I did, here's how I ended up welding mine...
I only have a 110 mig which works great for everything I've ever needed, but Jamie's right it won't even begin to penetrate this thick hardened steel. I tried even just to tack things in place and the welds popped off like solder.
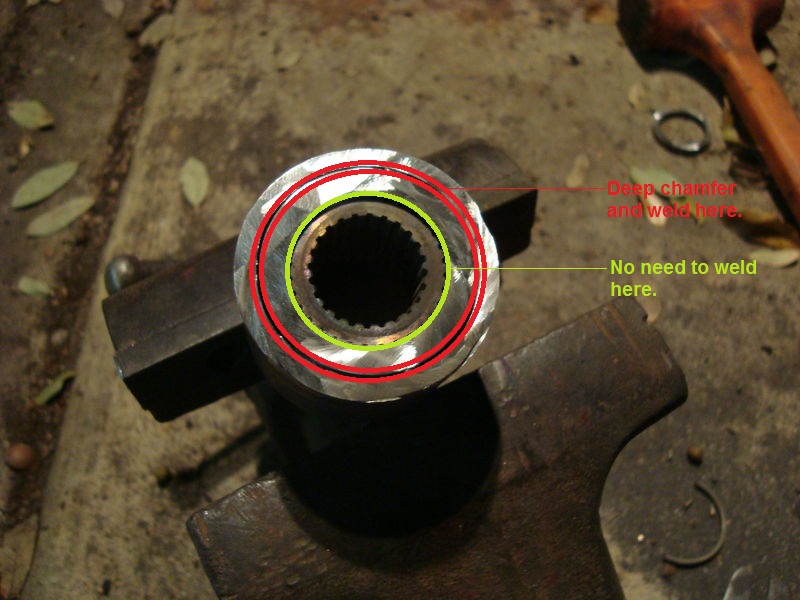
So I took it to my machinist and described what I wanted, and how I'd seen it done with a TIG. He said there's no way he could get his tig in the front side to get the bead like Jamie did. So he came up with a plan which I think will hold up really well. He cut an aggressive chamfer on the back side between the two main cylinders. Then he welded that chamfer using filler, with lots of penetration. The center spline did not need to be welded because it is geared to the middle cylinder and can't go anywhere. It also gets seized in place because of the heat shrinkage from the weld. And it removes any chance of messing up the spline teeth.
Thanks again Jamie for your excellent write up. For anyone who can't do the great filler-less tig work like you did, this might be the next best option. We'll see how it holds up.
Posted by: charliew Jan 13 2011, 10:41 AM
Great idea. It looks like from the picture the inner sleeve can be ground to a chamfer with a bench grinder or belt sander and that alone would be enough for a good recess to fill with filler.
The only thing about the wire feed is the filler is mild steel that is being mixed to the alloy of the sleeve. Non filler welding changes the metallurgy but not as much. This is a twisting force though not a bending force so it is not nearly as critical.
Posted by: FourBlades Jan 13 2011, 11:14 AM
I don't know if pre-heating the pieces before MIG welding them would help in this
situation. When I have welded 1/4 plate or other thick steel, I pre-heated the area
with a MAPP torch or oxy and it makes your welds penetrate much better.
That might warp the part too much, I don't know.
John
Posted by: barada Jan 13 2011, 01:25 PM
Interested in how you do the plate. I would entertain the money they want for the adaptor but 200 plus for the plate seems high.
Posted by: sawtooth Jan 13 2011, 01:38 PM
Interested in how you do the plate. I would entertain the money they want for the adaptor but 200 plus for the plate seems high.
The plate is pretty simple. I just used 1/4 aluminum I picked up at my local scrap yard. I used the differential housing that I removed from the tail of the trans as a template by setting it on the plate, tracing the outline and marking center of holes. You can eliminate the top right and bottom left alignment pins. I just cut my alignment pins off but kept the shape in the plate. The shift rod takes a little bit of time to get right, it is an oval because of the angle. I just used a die grinder to get the right shape. I polished the plate just because, not sure I'll keep it that way but I'm starting to like it. DBCooper's wrx thread has a very nice plate complete with a cnc logo.
Posted by: charliew Jan 14 2011, 05:48 AM
A thought occured to me. I wonder if a 2wd suby mainshaft would work? It probably would be one piece since it doesn't have a center diferential. I know it's shorter. I don't have one to compare. I do know the 05 legacy uses different gear widths than the 02 wrx, I think 3rd uses different spacing than the 05 legacy 3rd. I have all this stuff but haven't torn into it yet and won't till I can devote the time to study up on what fits in the 02 wrx case. I've got a 05 legacy tranny but the case is broken and mainshaft is bent. I've got a new mainshaft, the bremar stuff and a obx lsd. I sorta want to build a girdle for the case. The weak points are said to be the shafts flexing and from the case spreading inbetween the shafts. Course thats on awd with about 32 inches of tire contact in a 3400 lb car pushing over 400 ft lbs of torque.
Posted by: nsyr Jan 14 2011, 10:57 AM
Speaking from experience, the FWD transmissions do work. But i don't recommend them.
I am using an early 90's legacy fwd tranny with the wrx engine. it is appealing since they are so cheap. however the stock clutch will not hold the torque. i found this out the hard way.
I then got a stage 3 spec clutch ($450). which does hold the torque, but it has it's drawbacks like clutch chatter and harsh engagement.
not to mention it has worn pretty quickly too. it is about at the end of it's life after about 10k miles, and so is the tranny. i drained the fluid and opened the back end recently and it was filled with metallic sludge from wear.
Posted by: sawtooth Jan 14 2011, 11:10 AM
Speaking from experience, the FWD transmissions do work. But i don't recommend them.
I am using an early 90's legacy fwd tranny with the wrx engine. it is appealing since they are so cheap. however the stock clutch will not hold the torque. i found this out the hard way.
I then got a stage 3 spec clutch ($450). which does hold the torque, but it has it's drawbacks like clutch chatter and harsh engagement.
not to mention it has worn pretty quickly too. it is about at the end of it's life after about 10k miles, and so is the tranny. i drained the fluid and opened the back end recently and it was filled with metallic sludge from wear.
The Exedy stage 1 organic clutch is supposed to be great for holding power while being much more streetable than the puc disc clutches. Not sure if its available for the fwd trans but it should be. The suby guys on nasioc really like it.
Posted by: nsyr Jan 14 2011, 01:57 PM
the problem with the fwd tranny for n/a cars is that it is push type pressure plate. where the turbo cars have pull type that provide a much greater clamping force.
Posted by: charliew Jan 16 2011, 11:06 PM
The na using a weaker pressure plate never occured to me but that seems logical. I know I ordered a lightened flywheel and better clutch and pressure plate for the wrx motor and tranny and it was around 600.00. I didn't know about the push and pull till someone on here started talking about moving the pivot ball and I just thought it was a newer or older tranny till he said it was a 05 tranny.
Posted by: nsyr Jan 17 2011, 08:55 AM
first pic is push type
second pic is pull type (more clamping force)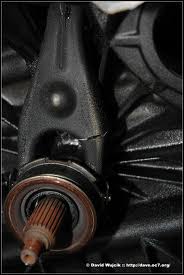
Posted by: jimkelly May 23 2016, 12:41 PM
oops. can this be welded (AS IS, short length) and used with some washers?
Attached thumbnail(s)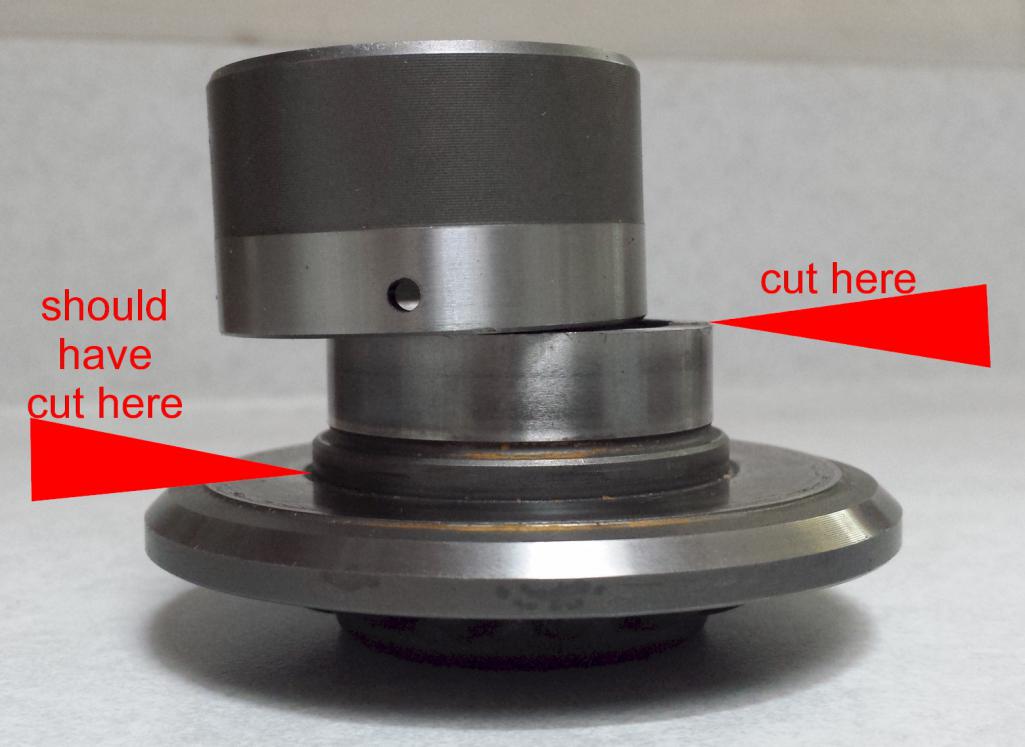
Posted by: rightpedal May 23 2016, 01:38 PM
Now your just making fun of me.
Posted by: jimkelly May 23 2016, 02:43 PM
more pics of the 2 pieces I will have welded after we make a jig to keep them centered to each other and spaced correctly. in pic I have the inner section resting on a tall socket to keep it up high inside the larger outer piece, for the pic, and to should closer to what finished part would look like.
the factory machined end goes deeper in trans and the cut end goes towards the nut. so i am thinking some spacers on the tail end/nut end will suffice?
Attached image(s)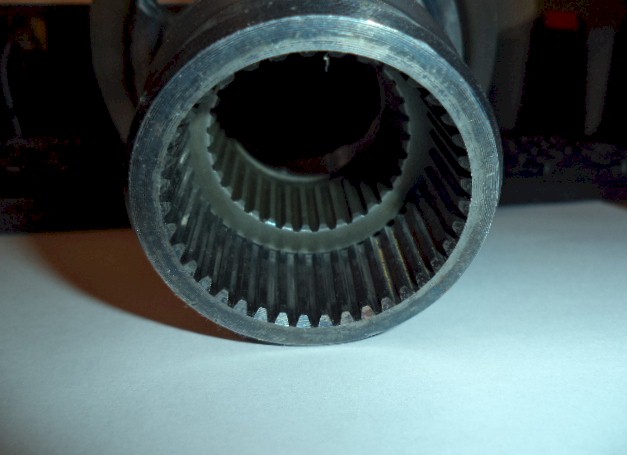

Posted by: jimkelly May 2 2017, 07:25 AM
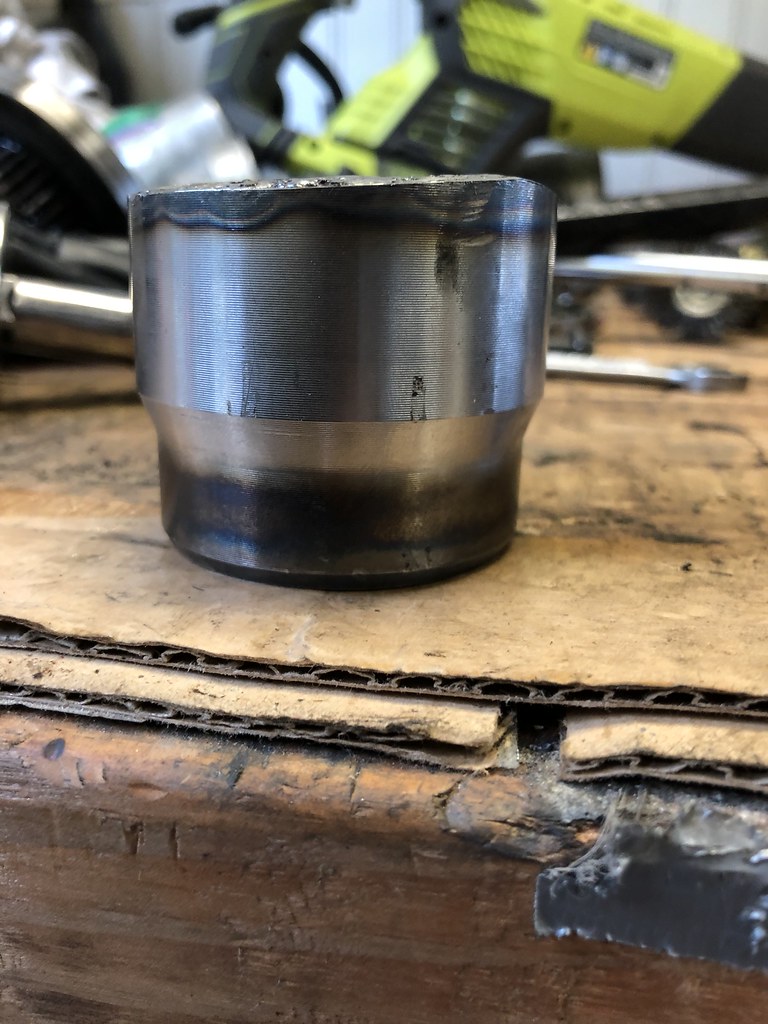
my coupler. hope it holds together. one weld at top.
Attached thumbnail(s)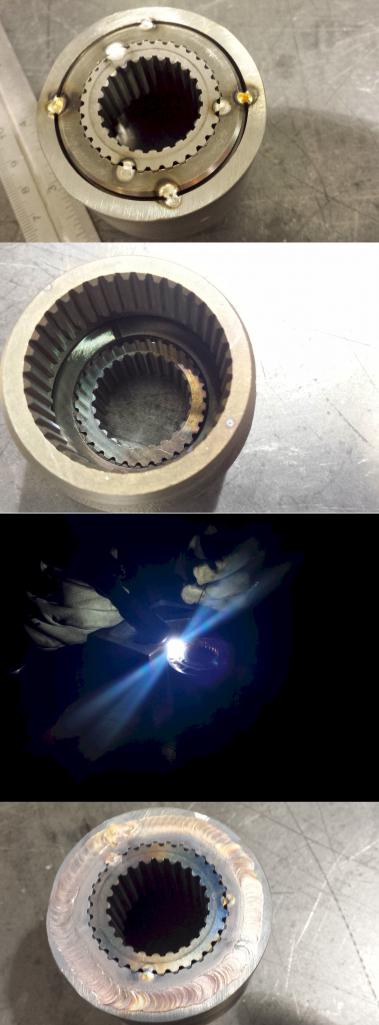
Posted by: Curbandgutter May 7 2017, 12:04 AM
Very good info. As of now I don't have a 914 but am seriously considering making the plunge if I can make it work. By that I mean I need an auto trans car. I have nerve damage to my spine and can't use a clutch. Would this process work on an auto transmission?
This will not work for an automatic. But... You can buy a front wheel drive auto Subaru or Audi and use that transaxle.
Ya a full FWD audi automatic (w/ tiptronic and paddle shifters) engine and trani swap is something im going to be doing in the next year.
Andrew I have that tranny of my s4 it's a triptronic. I'll sell it to you.
Posted by: Andyrew May 7 2017, 08:10 AM
7 year old post buddy 
Before I decided on what I decided on.
Posted by: pploco May 29 2019, 11:44 AM
I know this is an old post, but does anyone know of any alternative options for the plate than the $200 Bremar? They don’t even throw in a little lube with that...
Posted by: mepstein May 29 2019, 11:48 AM
I know this is an old post, but does anyone know of any alternative options for the plate than the $200 Bremar? They don’t even throw in a little lube with that...
Ross was selling some for about $70 or cut out your own.
Posted by: 76-914 May 29 2019, 11:49 AM
I know this is an old post, but does anyone know of any alternative options for the plate than the $200 Bremar? They don’t even throw in a little lube with that...
Buy a scrape piece of 1/2" aluminum; cut, drill and polish if you desire.
EDIT: you'll have that rear section that is thrown away as your template and/or drill guide that makes this a snap.
Posted by: JRust May 29 2019, 12:22 PM
I know this is an old post, but does anyone know of any alternative options for the plate than the $200 Bremar? They don’t even throw in a little lube with that...
Ross was selling some for about $70 or cut out your own.
 & again you can make one easy
Posted by: pploco May 29 2019, 01:10 PM
I guess I'll give it a shot. For 200 bucks I could ruin a lot of 1/2 inch aluminum plate
Posted by: Chi-town May 29 2019, 01:14 PM
The only plus to the Bremar is that he eliminates an extra splined piece on the pinion shaft and includes the rear plate
Posted by: eeyore May 29 2019, 01:44 PM
I guess I'll give it a shot. For 200 bucks I could ruin a lot of 1/2 inch aluminum plate
I could help you knock one out fairly quickly.
Posted by: pploco May 29 2019, 01:58 PM
The only plus to the Bremar is that he eliminates an extra splined piece on the pinion shaft and includes the rear plate
Yes, but for about $400 bucks plus shipping. Too steep for this CSOB.
Posted by: pploco May 29 2019, 01:59 PM
I guess I'll give it a shot. For 200 bucks I could ruin a lot of 1/2 inch aluminum plate
I could help you knock one out fairly quickly.
That would be great. I'll see if I can find a scrap of aluminum.
Posted by: eeyore May 29 2019, 02:18 PM
That would be great. I'll see if I can find a scrap of aluminum.
Check your PMs
Posted by: 76-914 May 29 2019, 04:40 PM
They make a "tool" that is about $60 which can be used to lock them together. Much cheaper the one Bremmer sells. I forget where I bought mine but Bob B told me about this place He goes by @BIGKAT 83
Posted by: pploco May 29 2019, 05:00 PM
I just IM'd him. If he responds, I'll post a link here.
Thank you!
Posted by: Chi-town May 29 2019, 06:28 PM
The tool is a cast piece and is not meant for actual applied engine force.
Posted by: mepstein May 29 2019, 07:32 PM
Send Ben/MB911 a link to the instructions to modify the stock trans part. Might be a lot cheaper than aftermarket.
@http://www.914world.com/bbs2/index.php?showuser=9892
Posted by: 76-914 May 29 2019, 09:21 PM
The tool is a cast piece and is not meant for actual applied engine force.
Well it sure handles the abuse well, so far. 15K on mine with some very hard shifts from 1st to 2nd. Then again I'm running a NA 6 cylinder and a little over 200 HP. Not a turbo'd 4.
Posted by: Mike Bellis May 29 2019, 11:55 PM
Zombie thread... 
Posted by: pploco May 30 2019, 09:04 AM
I took the plunge and made one out of the broken center diff I had. It wasn't too bad actually, but admittedly my welds aren't the prettiest - so hopefully it stays together.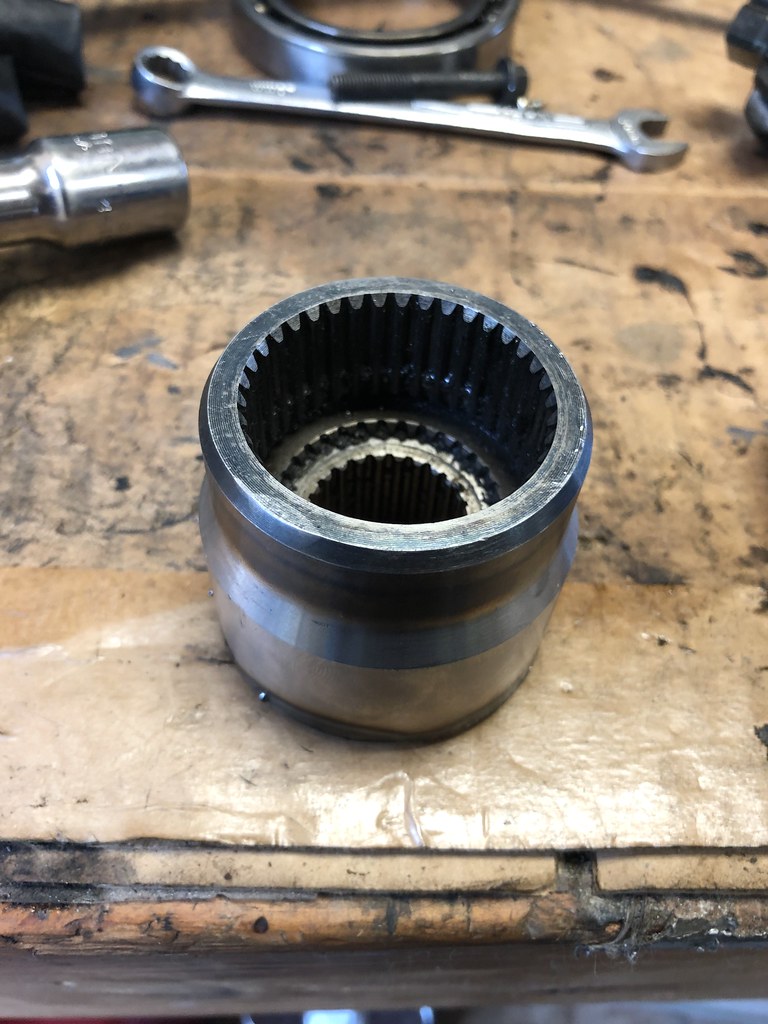
The welds penetrated pretty deep, so we'll see. I used a lock washer and a little locktite, so it shouldn't back off the splines. But here's to hoping this can handle the abuse I'm going to put it through.
Posted by: Chi-town May 30 2019, 04:49 PM
You'll want to flatten that rear edge, you really don't want a vibration in the output shaft
The Bremar is $275 in USD
Powered by Invision Power Board (http://www.invisionboard.com)
© Invision Power Services (http://www.invisionpower.com)