Printable Version of Topic
Click here to view this topic in its original format
914World.com _ 914World Garage _ Top end rebuild (sort of)
Posted by: KaptKaos Apr 10 2010, 06:27 PM
Some of you may know that I buggered up my heads on my /4 a few months ago. I put in a step-down stud on the exhaust and put it in crooked. I pulled the heads, sent them to the machine shop to have them fixed up.
In the process of pulling the heads, one of the cylinders stuck onto the head. In pulling it off, I broke one of the rings on the piston. Lovely!
So I then pulled all of the cylinders, and honed them to break the glaze. I just bought a new set of rings, and will re-ring all of the cylinders. I will be putting new rings on the pistons this weekend and possibly installing the cylinders. I bought a ring compressor too.
The pistons, rods and crank all stayed in the case, except for one piston I took off for measurements, etc... I will be putting that back on too.
This is the first time I am doing this. What oil should I use for assembly? Since the pistons are already on the rods, I will be slipping the cylinders down onto the pistons. Any hints there on how best to handle that?
All of the push rods, rockers, etc.. were marked for their cylinder, and will be going back where they were.
Is there anything else I should be looking for, doing, etc..???
Oh, what's the torque setting on the nuts that hold the heads on? Is there a preferred pattern for tightening those?
TIA
Posted by: ahdoman Apr 10 2010, 06:47 PM
Hey Joe - Just a couple of things I've run into...
- Ring compressor; make sure you have one that you can take off from the bottom. The ones available from most auto parts stores won't work.
- Use assembly lube on the wrist pin bearings. Use regular motor oil in the jugs. After you have the pistons and jugs on, rotate the engine (you'll need to use spacers and nuts to hold the jugs on) and wipe the oil clean from the jugs. Turn the motor over a couple of times to make sure you get most of the oil. The rings will set a lot quicker that way. Also, if you rotate the engine over a couple of times you'll ensure everything is correct.
- If the machine shop did work on your heads you'll have to set the deck height. Don't skip that step. Bent valves will ruin your day.
Posted by: KaptKaos Apr 10 2010, 07:29 PM
Steve - thanks for the tips.
The machine shop didn't do any major work. They fixed my studs, replaced all of the exhaust seats and cleaned up the heads a little (flycut is the term I am told).
Do I still need to set the deck height? If so, how do I do that? Can you point me to some instructions?
Posted by: KaptKaos Apr 10 2010, 11:28 PM
Also, the pistons have a lot of carbon build-up on them. I cleaned the one I took off of the rod, and am working on the others. Any hints/tips on how best to get that crap off. It's pretty thick.
TIA
Posted by: Ericv1 Apr 11 2010, 05:58 AM

Also, the pistons have a lot of carbon build-up on them. I cleaned the one I took off of the rod, and am working on the others. Any hints/tips on how best to get that crap off. It's pretty thick.
TIA
It's going to be difficult to clean the pistons if you keep them on the rod. I would take them off the rod and sub merse them in a one gallon can of carb cleaner. Most auto parts stores will have this on hand. If you leave the piston sub merged for a couple of hours, you'll be able to wipe the carbon off. The carb cleaner will dissolve it well. I wouldn't try to clean the pistons on the rod because you could get some carbon debris that makes its way back into the case. Your already 90% there on disassembling the top end. You may as well spend anonther 1/2 hour to pull the snap rings and wrist pins to do it right. If they fly cut the heads, I believe that means they leveled them and took .25mm to create an even surface. You'll need to compensate by putting on a thicker base gasket. At least you would on a six cylinder engine. That's what I'm working with. I may be wrong. I'm sure a pro will chime in if I am. Good luck.
Posted by: ahdoman Apr 11 2010, 09:13 AM
Hey Joe - What EricV1 said is correct. It's not a big deal to remove the piston from the rod to clean it. Like him my last rebuild was a six. To set the deck height I measured the thickness of small pieces of rosin core solder and then super glued those small pieces of rosin core solder to the pistons around the edges and assembled the the short block. I then turned the engine over by hand so that the solder was squashed by the piston between the head. I then removed the solder measured it and that told me the thickness of the base shims I needed. If you want to just take a gamble on it ask the machine dhop how much they removed and add that difference to the thickness of the shims that were on there when you took the engine apart. I dug through my shop manual and here's the torque page. I was unable to locate the deck height info.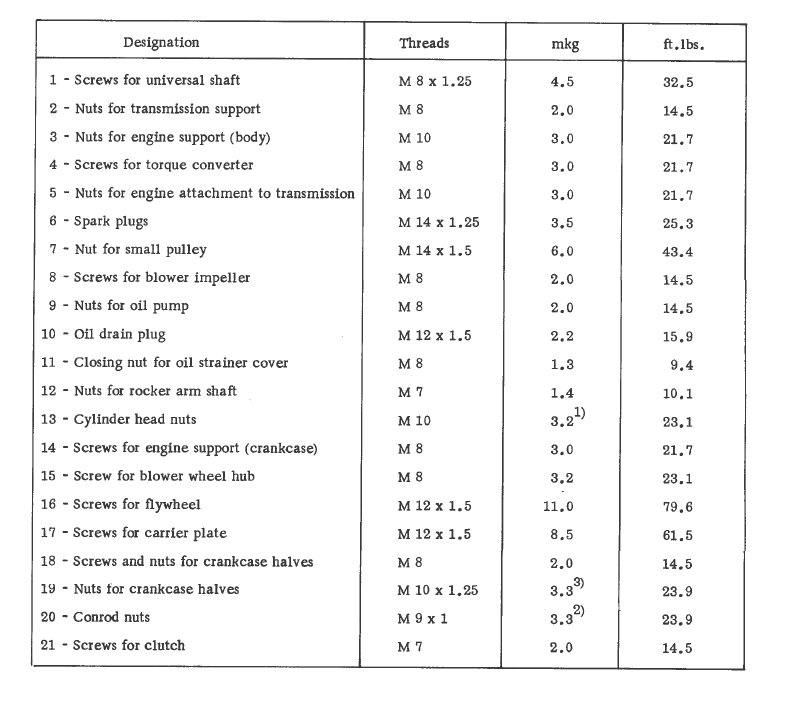
Posted by: KaptKaos Apr 11 2010, 10:51 AM
Steve,
Not sure I follow your method on measuring the correct height. I understand what the measurement is for, I just don't know how to determine the correct thickness of those shims.
The cylinders have shims already. Can I add another shim to make up for the removed material or do I just get a single thicker shim?
I spent about an hour last night cleaning the pistons. I will see how they look this morning and go from there.
My goal has been to do as little disassembly as possible. The plan being that I would have less to do when I put it all back together. It's not working out that way. LOL.
Powered by Invision Power Board (http://www.invisionboard.com)
© Invision Power Services (http://www.invisionpower.com)