Printable Version of Topic
Click here to view this topic in its original format
914World.com _ 914World Garage _ F^&*^&*^ing exhaust head studs- Distributor ?
Posted by: JRust May 1 2010, 04:18 PM
Okay I officially pulled an dipshit move today. I was putting my drivetrain all together to be ready to install in my LE. All was going great as I had Mr Kona down helping me today. We got the transmission mounted. Put on the passenger side SS (bolted in place by Brian) & all was great. We change spots & I do the drivers side. I've got all the nuts on & am bolting into place. I have my torque wrench on there & am tightening away. It is was to big for the job but I figure all is well. Well I am a dipshit as I overtightened one & snaped the bolt  . I do have some nice stud pullers sowhile pissed for being an idiot. I figure I can get it out without to much trouble.
Hell no I can't. Even after some heat my stud snaps again at the head. . I then try to get under there & drill a hole to use an extractor. My extractor breaks in the hole I drilled. SO now I have to drill that out too. I am so frustrated & it's my own damn fault. I'm going to head to harbor freight & pick up a new tap & dye set.
Any ideas on how to not screw this up any worse 
Posted by: r_towle May 1 2010, 04:30 PM
get left handed cobalt drill bits or carbide drill bits...get a left handed set...
As you drill, you end up loosening the stud.
Why do you think Len hates used heads...
Rich
Posted by: McMark May 1 2010, 06:54 PM
Bad news. The extractor is VERY hard will eat your drill bits and laugh at you, or worse, will FORCE your drill bits off center and make you drill into the head meat. 
It REALLY REALLY sucks, but I'd stop. Take a couple days off, then pull the motor and get the head off and let someone else deal with it. You're problem CAN get a lot worse.
I wish I could tell you there's a quick fix, but there's not and you'll be much better off by taking the longer route on this.
Posted by: JRust May 1 2010, 07:05 PM
I didn't know they made drill bits left handed  . I will try to find some. Would home depot carry that?
On the extractor I will see. I am taking a break now & was feeling better. Until Macmark told me I am going to have to pull my head . I am going to give drilling it out a try tommorow. The extractor I had I think was kind of a cheap old thing. So hopefully that is why it broke & I will be able to get it out. Whatever I do will be slow & methidical. These are rebuilt heads & I'll be damned if I am going to screw them up
I'm over bein pissed as there's not much I can do about it now. Other than not make it any worse.
Posted by: r_towle May 1 2010, 07:20 PM
home depot wont carry left handed bits.
McMaster will.
First, find a way with picks to try and loosen the extractor and get it out of the way.
Rich
Posted by: Vacca Rabite May 1 2010, 07:21 PM
Pull the head. Let someone one that can put it in a jig and hit it will his mill drill out the bolt and extractor.
If you go off center, you are going to be into it for $$$, as you will have to get the head welded and rebuilt.
Zach
Posted by: JRust May 1 2010, 08:38 PM
McMark was right. The extractor is some hard stuff. Drill bit wouldn't touch it. Picks aren't going to get it out either. I think if I had the extractor out I could get it. Big shocker that using the extractor wasn't my smartest move. Especially considering how the stud wouldn't budge with my stud puller. I shouldn't have even tried the damn extractor . So yes off comes the head. It does suck to be sure. I guess it's a learning experience though right
Okay well I need to read up on pulling the head. I should have learned this by now. If I have any prayer of getting it back soon I need to get it pulled & to a machine shop monday. I'll read up in my haynes but if you want to give me the rundown on taking it off thats great.
Posted by: underthetire May 1 2010, 08:48 PM
Only 3 ways to get that extractor out now.
A dremel with a small grinding bit and a lot of time.
a carbide drill on a mill, don't try to use carbide with a hand drill, you'll be sorry.
A EDM (electrical discharge machine) Some special shops do tap extraction ( same material) call around for precision machine shops.
They used to sell TAP OUT witch you basically made a dam with some putty around the broken tap/extractor and filled the inside with a special acid. The acid didn't touch aluminum, just steel. This takes several days.
Good luck man, I drilled two broken ones out about a month ago.
Posted by: underthetire May 1 2010, 08:57 PM
here is some info, guess its just nitric acid
http://yarchive.net/metal/tap_remove.html
It actually does work. Used this method for years before we had EDM's
Posted by: MrKona May 1 2010, 09:00 PM
Hey Jamie,
On my way home today, I was thinking, "He's gonna have to pull the head..."
You're going to have to remove the tin pieces that screw into that head, and of course, all the pieces that screw onto the pieces that screw onto the head..
After that, you need to remove the rockers, pushrods (keep them together for reassembly) pushrod tubes, and under-the-head tin (that tin also screws onto the heads). Then the stud nuts that hold the heads on. Then the head should pull right off.
- Bryan
Posted by: JRust May 1 2010, 09:05 PM

Hey Jamie,
On my way home today, I was thinking, "He's gonna have to pull the head..."
You're going to have to remove the tin pieces that screw into that head, and of course, all the pieces that screw onto the pieces that screw onto the head..
After that, you need to remove the rockers, pushrods (keep them together for reassembly) pushrod tubes, and under-the-head tin (that tin also screws onto the heads). Then the stud nuts that hold the heads on. Then the head should pull right off.
- Bryan
I don't have to do anything with the valves right
Posted by: MrKona May 1 2010, 09:06 PM
Hey Jamie,
On my way home today, I was thinking, "He's gonna have to pull the head..."
You're going to have to remove the tin pieces that screw into that head, and of course, all the pieces that screw onto the pieces that screw onto the head..
After that, you need to remove the rockers, pushrods (keep them together for reassembly) pushrod tubes, and under-the-head tin (that tin also screws onto the heads). Then the stud nuts that hold the heads on. Then the head should pull right off.
- Bryan
I don't have to do anything with the valves right
Nope.
Posted by: JRust May 1 2010, 09:10 PM
Piece of cake then. I'll pull it tommorow. Then find a place machine shop on monday when I go to work. Hopefully they wont ding me to badly for the work
Ah crap I need to order some more parts now. Since it hasn't been run since it's been rebuilt. Will I need to replace the copper seal/seat between the heads & piston jugs? Then I need a new valve cover gasket (I know as it ripped coming off), Push rod tube seals. Anything else?
Posted by: aircooledtechguy May 1 2010, 09:23 PM
I feel your pain. . .
Taps are tough, but ONLY because of their heat treatment. You can anneal the tap by hitting it with a torch so it glows and allowing it to cool on its own. Then you can drill right through them like any other steel.
I've done this several times over the years with other bolts on cars. Once you hit it with a torch so it glows, you can drill right through them. 'Course this will be a LOT easier with the head off and on a bench. . .
Good Luck!!
Posted by: McMark May 1 2010, 10:55 PM
1. Pull the motor.
2. Remove the intake runner on that side.
3. Remove the engine tin on that side (top piece, and the front and rear pieces, you'll need to remove the fan housing)
4. Take off the valve cover.
5. Remove the four nuts that hold on the rockers.
6. Remove the pushrods.
7. Remove the pushrod tubes.
8. Remove the under cylinder tin.
9. Take off the head nuts.
10. Slide the head off.
For reassembly, choose if you want to attempt to apply sealant to the surface between the cylinders and the block. This area could leak later, but it's not too common of a leak point, so it's not a huge risk. If you're going to do it, pull the cylinders and clean up any old sealant and do it right.
You'll need new sealing gaskets if you're using those (I have some I can send you). Install those and slide the head into place. Apply some sealant to the lower head washers and head nuts. Torque the head nuts to 13 ft/lbs, then to 24 ft/lbs (check Haynes for the pattern).
Install the under cylinder tin.
Install the pushrod tubes.
Install the pushrods.
Install the rockers and the pushrod retaining wire.
Adjust the valves.
Install the valve cover.
Install the engine tin.
Install the fuel injection.
Install the motor.
Install the exhaust. (Using a 1/4" socket wrench, never 3/8") 
Best of luck. You'll be okay, and so will your motor. Work slow, don't worry about WCR or any other deadline. If you make it, it was meant to be. If you don't, you can still come and I'll buy you a BIG beer. :beer:
Posted by: WFG May 2 2010, 12:06 AM
Same thing happened to me in the 80s i used masonary drill bits with the flat carbide end drill slow will take time but will work
Posted by: JRust May 2 2010, 01:48 AM
1. Pull the motor.
2. Remove the intake runner on that side.
3. Remove the engine tin on that side (top piece, and the front and rear pieces, you'll need to remove the fan housing)
4. Take off the valve cover.
5. Remove the four nuts that hold on the rockers.
6. Remove the pushrods.
7. Remove the pushrod tubes.
8. Remove the under cylinder tin.
9. Take off the head nuts.
10. Slide the head off.
For reassembly, choose if you want to attempt to apply sealant to the surface between the cylinders and the block. This area could leak later, but it's not too common of a leak point, so it's not a huge risk. If you're going to do it, pull the cylinders and clean up any old sealant and do it right.
You'll need new sealing gaskets if you're using those (I have some I can send you). Install those and slide the head into place. Apply some sealant to the lower head washers and head nuts. Torque the head nuts to 13 ft/lbs, then to 24 ft/lbs (check Haynes for the pattern).
Install the under cylinder tin.
Install the pushrod tubes.
Install the pushrods.
Install the rockers and the pushrod retaining wire.
Adjust the valves.
Install the valve cover.
Install the engine tin.
Install the fuel injection.
Install the motor.
Install the exhaust. (Using a 1/4" socket wrench, never 3/8")
Best of luck. You'll be okay, and so will your motor. Work slow, don't worry about WCR or any other deadline. If you make it, it was meant to be. If you don't, you can still come and I'll buy you a BIG beer. :beer:
If It doesn't make WCR oh well. I'd like to be in it & obviously take it on the drives. Not critical to me having a good time. Although it would help

Thanks for the nicely written breakdown. I did try heating the stud & was able to drill into it fine before I tried the extractor. Just wasn't meant to be

I'll get it to a machine shop & see how it goes. I still have enough time to get everything together if I get it back quickly. If I can't find a place that can do it right away is what worries me
 . If I can't get a place to do it by midweek I'll be hosed. Even then I may just put another motor in to come
Posted by: sww914 May 2 2010, 02:12 AM
There is another way.
I've done it 100 times on various broken studs.
With the head off you can put an 8mm nut on top of the broken stud and mig weld the nut to the broken stud, through the hole and fill the nut up all the way to the top.
Hit it with an impact gun to unscrew the broken stud. Most likely it will just extract the broken easy-out so weld another nut on. It will probably break off so do it again. It will probably break off again so do it again. It might take 10 tries. Or 20. Each time the heat expands the stud and crushes the corrosion more than the last time, getting you closer to your goal.
Even 30 8mm nuts are cheaper than a trip to the machine shop and cheaper than ruining your head with a drill bit drifting off to the side.
Good thing steel mig welds won't stick to your aluminum head, isn't it?
This process is so quick and easy if the part isn't upside down that I don't usually charge my customers to extract the broken fastener unless it's really bad.
Posted by: vsg914 May 2 2010, 07:58 AM
Pushrods must be reinstalled exactly like they come out.
Posted by: McMark May 2 2010, 10:19 AM
Steve's got a good technique there.
Posted by: Tom May 2 2010, 10:37 AM
Jamie,
Sorry to hear this. Take a breath, or break. I know you are somewhat in a hurry so you can drive this , but the extra time spent now will seem like ice cream if your hurry causes another problem. 
This almost happened to me before I even knew about the dreaded exhaust stud breaking issue. I was extremely lucky and stopped and researched before doing anything else. Whew! Just be careful.
Good luck,
Tom
Posted by: Marty Yeoman May 2 2010, 10:43 AM
Bad news. The extractor is VERY hard will eat your drill bits and laugh at you, or worse, will FORCE your drill bits off center and make you drill into the head meat.
It REALLY REALLY sucks, but I'd stop. Take a couple days off, then pull the motor and get the head off and let someone else deal with it. You're problem CAN get a lot worse.
I wish I could tell you there's a quick fix, but there's not and you'll be much better off by taking the longer route on this.

Posted by: JRust May 2 2010, 11:55 AM
Okay I just pulled the head. Was pretty easy I must admit. Here are pics of the carnage. I didn't have the motor in the car yet. I was putting everything on before install. Which as it turned out wasn't a bad idea . At least I didn't have to drop the motor to pull the head.
Being this hasn't been run since the rebuild. Are the large cylinder crush washers  toast? So I should replace those? How about the push rod tube seals?
Attached image(s)


Posted by: Vacca Rabite May 2 2010, 12:08 PM
Do yourself a favor. Write ON each pushrod what bore it came out of with a sharpie. Even if they are in order now, they could get kicked, knocked or otherwise jumbled. they need to go back into the same bore they came out of.
You are on the right path. I bet the acid would work if you can find it and have a few days to spare. otherwise, off to the shop you go.
Zach
Posted by: McMark May 2 2010, 10:45 PM
Why do people think the pushrods have to go back in the same bore? They're all the same length and they aren't a wear item. Lifters need to go back in the same place when they get pulled because they 'wear in' with the cam. The pushrods aren't like that.
Posted by: messix May 2 2010, 10:50 PM
Why do people think the pushrods have to go back in the same bore? They're all the same length and they aren't a wear item. Lifters need to go back in the same place when they get pulled because they 'wear in' with the cam. The pushrods aren't like that.
oh but they do "wear" in the cup of the rocker.
better safe than sorry!
Posted by: computers4kids May 3 2010, 07:37 AM
Jamie,
You might consider replacing the other head studs unless you think the mechanic just use too much force  Dang, I'm always scared of snapping a stud...I've read too many threads with this story.
Believe it or not, I actually use a 1/4 drive rachet when dealing wtih the exchangers...I like to really feel how much pressure I'm applying.
I wish you the best my friend; I know how much you want to bring your LE to the WCR.
Mark
Posted by: JRust May 3 2010, 08:02 AM
Mcmark mentioned using a 1/4 inch ratchet on it too. I think that is a very smart idea. This was totaly my fault to be sure. I was using my torque wrench at 14lbs & I didn't hear or feel it click like it is supposed to. It also is a huge 1/2" drive as that was the only torqe wrench I owned. So it was a combination of all. If I had used a smaller one I would have had no problem. Using such a big ratchet took all the feel out of it. I still should have been more careful. I was a little excited bolting it up & having it come together after so long . I'm still pretty pissed at myself about it. Besides pulling the head so I could take it in today. I didn't do anything else to the LE. Just not in a good frame of mind to be down there by it.
I'll feel better once I get the head back & put it back together 
Posted by: RoadGlue May 3 2010, 08:54 AM
Why do people think the pushrods have to go back in the same bore? They're all the same length and they aren't a wear item. Lifters need to go back in the same place when they get pulled because they 'wear in' with the cam. The pushrods aren't like that.
I'm with Mark here. I've never given second thought about push rod order when doing repairs like this. I can't say it has ever come back to bite me in the butt either.
Jrust - I had the same problem as you (though my stud broke during a collision) and had to pull the motor to have the stud (and more) fixed. I just got it back together last week. I didn't replace the cylinder shims. I was a little worried about there being an oil leak, but so far it doesn't look like it's leaking.
Posted by: charliew May 3 2010, 09:36 AM
I once used every 1/2 and 5/8 nut I had on a sbc head in a blazer trying to get the rear most exhaust stud out. I used a ac crackerbox stick welder, it was the easiest to use in the spot I was in. I had the inner fender wheelwell off, it is close to the ac/heater box on the firewall. Ended up it had two easy outs in it and one 1/4 tap? from a po. It did come out but the po made such a mess I had to use a helicoil.
Posted by: charliew May 3 2010, 09:43 AM
For all you know the stud was weakened when it was taken apart. Exhaust studs get soft from heat. I wonder who did your heads. The keepers and retainers and springs look like the varnish was never cleaned off or the combustion chambers were not checked for cracks? If all the push rods are known to be the same length it shouldn't matter as the lash will have to be set anyway. I have always tried to find copper or brass nuts to use on exhaust studs to prevent the siezing on the studs and they are pretty soft. I'm not sure they are as soft as the aluminum though. Chev exhaust pipe studs in the cast iron heat risers and manifolds are where I got most of my initiation on weak exhaust studs, at least I wasn't also dealing with a aluminum mounting piece.
Posted by: Root_Werks May 3 2010, 09:47 AM
So close!
Keep at it.
Posted by: JRust May 3 2010, 01:11 PM
Went by a machine shop & they sent me to another place. This place has an EDM something they zap the stud with electricity while drilling or something. I don't know how they do it & don't care. When I dropped it off they said no problem. Should be less than a $100 & we'll have it this afternoon  . I'm feeling much better. I'll feel even better when I get it back & they really did get it without a problem
Posted by: ClayPerrine May 3 2010, 01:40 PM
EDM is the way to go. They will be able to remove the broken stud and not touch the threads.
Be careful with the new stud. 
Posted by: MrKona May 3 2010, 02:15 PM
Jamie,
That's great news. FYI - I have a new 8mm stud that I won't use (my heads take 10mm/8mm step studs). I just dropped it in the mail to you so you don't have to fiddle with a used stud.
Hopefully you'll have it tomorrow.
- Bryan
Posted by: McMark May 3 2010, 02:34 PM
This is GREAT NEWS!. EDM is awesome and really is the best way to go here. I had this EXACT series of events way back when on my 928.
Posted by: Cap'n Krusty May 3 2010, 03:03 PM
Check the hole for fit when you get it back. We use a VERY GOOD EDM guy, and he warns us to do so. Last go-round we had to helicoil 5 of the 8 holes he did.
The Cap'n
Posted by: Root_Werks May 3 2010, 03:13 PM
And of course you meant TimeCert right Krust.
Posted by: JRust May 3 2010, 05:43 PM
Jamie,
That's great news. FYI - I have a new 8mm stud that I won't use (my heads take 10mm/8mm step studs). I just dropped it in the mail to you so you don't have to fiddle with a used stud.
Hopefully you'll have it tomorrow.
- Bryan
Thanks Bryan that is perfect.
Well it didn't go perfectly at the shop. The threads were not in good shape. They went ahead & put a helicoil in it. I am fine with it though. Also it only ran $65 so I can't complain. I had to leave work & head north on some service stuff. So I can't pick it up till tommorow.
On a semi related note I may go pick up a 74 2.0 parts car tonight
. Motor is torn apart & it's missing one head & the Fuel injection . The FI would have come in handy .I'm hoping I'll get lucky & find it somewhere in his shop.
Posted by: JRust May 4 2010, 09:29 PM
Picked up the head today & it looks great . I got home a little to late to do anything tonight. I'll be putting it back on tommorow night. Got a few seals to pick up at the local vw place to be safe.
Posted by: Root_Werks May 5 2010, 01:54 PM
Cool! Be nice to see your LE. I think Rich is pretty close to having his on the road as well.
LE's rock!
Posted by: biosurfer1 May 5 2010, 01:59 PM
Isn't it fun to pay a bunch of money have something back to way it already was? ...I've been there. Glad your's is getting there!
Posted by: JRust May 5 2010, 11:01 PM
Okay so I installed my head & pushrod tubes. I had my haynes out & I see intall the pushrods retaining clip . I know there was not one in there when I pulled my head to begin with . How critical is it? I guess I'm going to have to pul my other valve cover just to see if that side has it
Attached image(s)
Posted by: RoadGlue May 5 2010, 11:18 PM
Ignore that photo for the most part. Once the rocker assemblies are in place the clips will have something to attach to. You can put the rockers in before you put the clip in. The clip will bend enough to where it can be installed last. Just make sure the flat bits on the bottom of the clip are flush up against the push rod tubes. It's easy for them to slip during installation and to end up in the tube vs. against the lip of the tube.
You're almost there!
Posted by: McMark May 5 2010, 11:46 PM
Worst case scenario, if you leave it out, you MIGHT have a small oil leak. So it's not really a big deal. If you don't have them, add them to your shopping list, but don't stress it.
Posted by: JRust May 6 2010, 08:20 PM
Does it matter how the rocker ends bolt on? I just noticed I have 3 one way & the 4th the other
& yes I still need to adjust my valves
Attached image(s)
Posted by: ClayPerrine May 6 2010, 08:54 PM
Yes, it does matter. the blocks should have the slots on the bottom. The spring fits into the slots when it is installed.
Posted by: r_towle May 6 2010, 09:37 PM
What is the different color goo?
IC white and blue goo???
Rich
Posted by: McMark May 6 2010, 09:44 PM
All of those are wrong.
Attached image(s)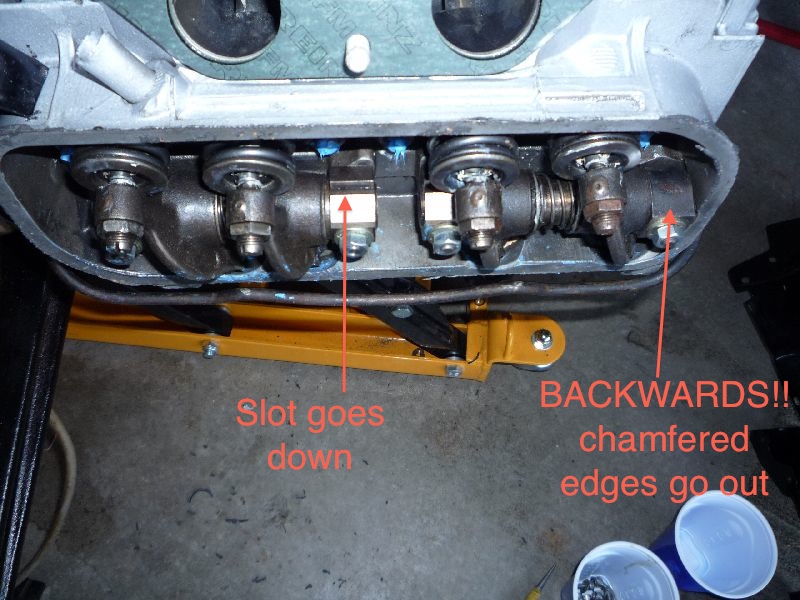
Posted by: messix May 6 2010, 09:58 PM
What is the different color goo?
IC white and blue goo???
Rich
rtv
Posted by: JRust May 6 2010, 10:00 PM
Thank you! It looked wrong. I will fix it tommorow. Man I would be toast without you guys
Posted by: kwales May 7 2010, 09:54 AM
Hope that's not blue RTV...
If it is, that's a plugged oil passage waiting to happen.....
Posted by: Root_Werks May 7 2010, 02:39 PM
Hope that's not blue RTV...
If it is, that's a plugged oil passage waiting to happen.....
I think Jamie sneezed was all.
Posted by: JRust May 7 2010, 08:46 PM
Okay I am going to go adjust my valves for the first time. Pitiful I know. Doesn't look to hard but I don't see which valve is the intake & which is the exhaust Use my picture to know how it's sitting above. It doesn't specify that in my haynes. Or on the pelican tech article. I have previously just paid to have someone else do it
Posted by: sww914 May 7 2010, 09:15 PM
The intakes are the 2 center valves. The exhaust are the 2 outer valves. You can see the intake valves through the intake ports in your photo.
Posted by: bandjoey May 7 2010, 09:28 PM
This hasn't been talked about here but..someone in the know needs to chime in.
It's something that JRust might need to know before he get's too much further.
I've been told to get the right torque on the lifter bolts, each valve needs to be at (tdc, etc) a special place. Otherwise, you're torquing against an open valve and the lifters will be loose after that valve moves.
Is this right or wrong?
Posted by: Dr Evil May 7 2010, 09:30 PM
Look at which one leads to the exhaust and which leads to the intake and you will have it figured out. Dont stress so much. You are doing awesome and asking good questions.
Posted by: Dr Evil May 7 2010, 09:39 PM
This hasn't been talked about here but..someone in the know needs to chime in.
It's something that JRust might need to know before he get's too much further.
I've been told to get the right torque on the lifter bolts, each valve needs to be at (tdc, etc) a special place. Otherwise, you're torquing against an open valve and the lifters will be loose after that valve moves.
Is this right or wrong?
As long as he follows the haynes manual, he will be fine.
Posted by: JRust May 7 2010, 09:54 PM
Got it thanks. I do have my haynes manual not to mention Pelican great tech article on doing the valve job. Kind of strange the haynes manual just says to adjust the valves & how to do it. Yet doesn't tell you what teh valve clearance should be. Pelicans tech article spells it out nicely. Valve clearances are .15mm intake & .20mm exhaust. That sound right?
I have no problem asking questions. Sometimes they may seem a little dumb. I don't care as I just want to get it right. I'm getting excited to get it all back together.
Posted by: ConeDodger May 7 2010, 10:09 PM
Man I would be toast without you guys
Thank God we are here then 'cause Toast is much better looking than you

Posted by: computers4kids May 8 2010, 07:37 AM
Jamie,
If you run short on time getting it all together , just get all the basics connected and bring up all your FI parts & your carb setup when you trailer your car and I'm sure there are plenty of people that would be more than glad to turn a wrench in Tahoe 
 . I am really looking forward to seeing your car.
On a side note...have you talked to people in the know what needs to be done to startup and break-in an aircooled motor. Not sure on our motors, but there are often additives needed for proper cam breakin, etc, etc.
Mark 
Posted by: DNHunt May 8 2010, 07:51 AM
Jamie
I've never seen where the piston has to be at TDC but, it can't hurt and the reasoning seems sound. Just be careful when you torque the nuts. The torque value is silly small. I can't remember it off hand but, it is easy to spin the studs.
Dave
Posted by: JRust May 8 2010, 02:08 PM
Okay I got my valve's set fine. I put everything back together & have my tin back on. It's ready for the SS HE to be bolted back on (VERY CAREFULLY  ). I started putting my FI on. I had to pull the cylinder head temp sensor off my 73 as this one didn't have it. No problem although I had to pull the tin AGAIN. LOL
I did notice between going from one motor to the other. My LE motor has the distributor sitting 1/4 turn differently than my 73. I am sure it is wrong on my 74. My friend who rebuilt it for me apparantlt got it in wrong. I need to fix it but am not entirely sure how to do it without completely screwing things up . Here are pics
Attached image(s)


Posted by: 70_914 May 8 2010, 02:13 PM
Okay I got my valve's set fine. I put everything back together & have my tin back on. It's ready for the SS HE to be bolted back on (VERY CAREFULLY
). I started putting my FI on. I had to pull the cylinder head temp sensor off my 73 as this one didn't have it. No problem although I had to pull the tin AGAIN. LOLI did notice between going from one motor to the other. My LE motor has the distributor sitting 1/4 turn differently than my 73. I am sure it is wrong on my 74. My friend who rebuilt it for me apparantlt got it in wrong. I need to fix it but am not entirely sure how to do it without completely screwing things up
. Here are picsAre your block and fan shroud painted or just that clean? Looks nice either way...
Posted by: JRust May 8 2010, 02:16 PM
Yeah just painted with the rebuild. Only wish I had done the same when I did the tranny. It looks like $hit compared to the motor
Powered by Invision Power Board (http://www.invisionboard.com)
© Invision Power Services (http://www.invisionpower.com)