Printable Version of Topic
Click here to view this topic in its original format
914World.com _ 914World Garage _ Screw it I'm going in
Posted by: obscurity May 29 2010, 08:36 AM
Well we pick up our story already in progress but I hope that by forcing myself to post some pictures I will be motivated to keep going.
I bought the car may years ago and have yet to truely enjoy it. I have started to restore it several times and always get distracted but this weekend the baby (and his mother) is out of town and we have a three day weekend so lets see how far I can get.
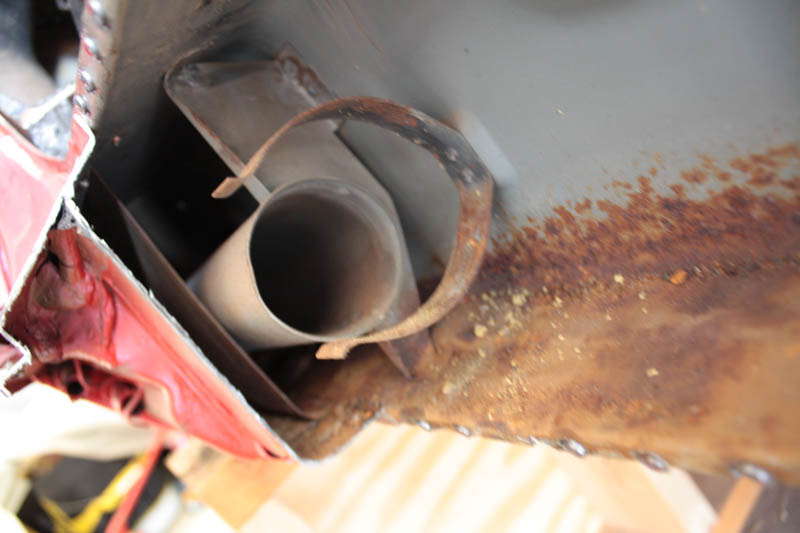
Here is where we are starting this morning.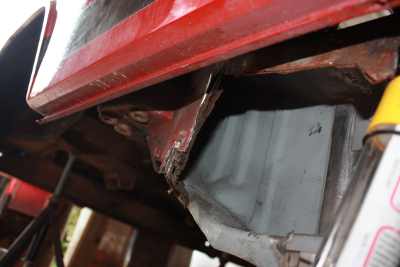
Posted by: Lennies914 May 29 2010, 08:39 AM

 Is that the only bad area?
Posted by: obscurity May 29 2010, 08:42 AM
Unfortunately no. The floors will have to be fixed as well as some other more minor rust repair
Posted by: arkitect May 29 2010, 09:39 AM
Post as many picts as you can....I like to see the action.
Dave
Posted by: obscurity May 29 2010, 10:07 AM
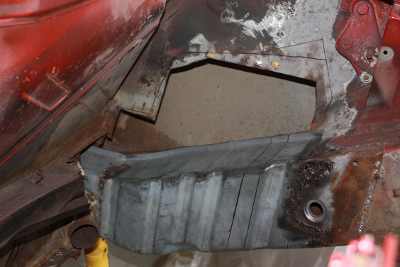
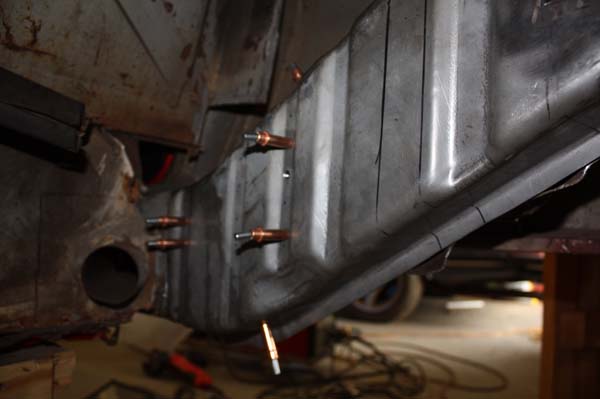
OK I took a step backward. I removed the dogleg panel that I already put in so I could better access the outside wheel well.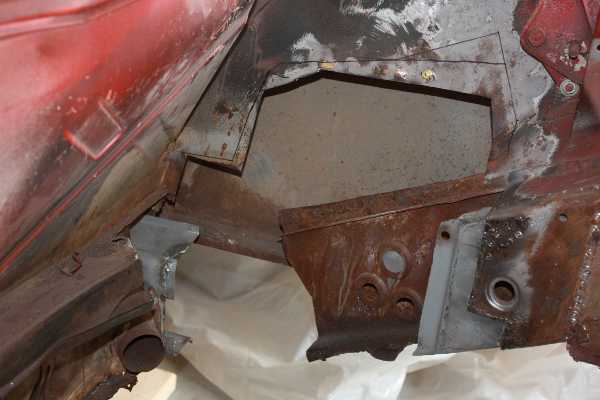
I am going to sandblast the inside of the areas I can get to but what should I spray/paint onto the bare metal before I weld it back up? I have some weld thru primer but something tlls me this is not the answer. Should I run out and try to find some ospho or something else?
Posted by: obscurity May 29 2010, 10:36 AM
Gonna try POR15. Off to AA and Home Depot for some other supplies.
Posted by: rohar May 29 2010, 11:05 AM

Gonna try POR15. Off to AA and Home Depot for some other supplies.
I'm not sure I'd try and weld through POR 15, but I am a big fan. For the places you can't get to after welding I'd use a weld through primer, weld up the steel, clean the outside VERY well and hit it with POR 15
Posted by: veltror May 29 2010, 11:11 AM
If you need any inspiration take a look at my thread. In the US you guys have a larger choice of starter cars etc, anyway I am sentimentally attached to my car and cannot wait to get started putting it back together. Today the floors got welded we are back on target. I wish you all the best with your resto just keep going it will be worth it in the end.
Roman
Posted by: obscurity May 29 2010, 01:28 PM
If you need any inspiration take a look at my thread. In the US you guys have a larger choice of starter cars etc, anyway I am sentimentally attached to my car and cannot wait to get started putting it back together. Today the floors got welded we are back on target. I wish you all the best with your resto just keep going it will be worth it in the end.
Roman
Very inspiring!! I'll have to read it much more throughly this evening.
Well, My supplies run is over. George gave me some POR15 so between that and the weld-thru (and some more cut-off wheels) I should be able to make some more progress.
Back to work,
Posted by: corsepervita May 29 2010, 04:36 PM
We are all amateurs till at some point we decided to jump in and take on the task and learn from it  Will be a great experience - best of luck to you! This forum has a lot of helpful people on here!
Posted by: obscurity May 29 2010, 06:57 PM
So here is a pic of the car a few years ago before I got the bright idea to fix the rust. The pic is from the Georgia Tech Auto Show.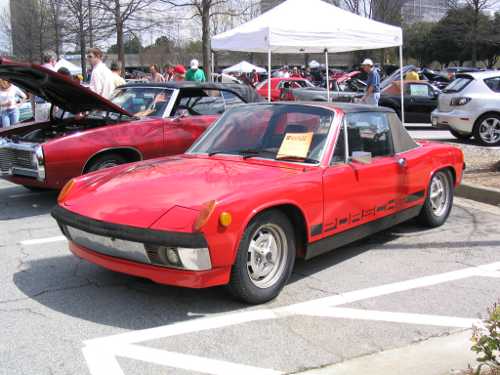
Posted by: obscurity May 29 2010, 07:04 PM
And this is how far I got today.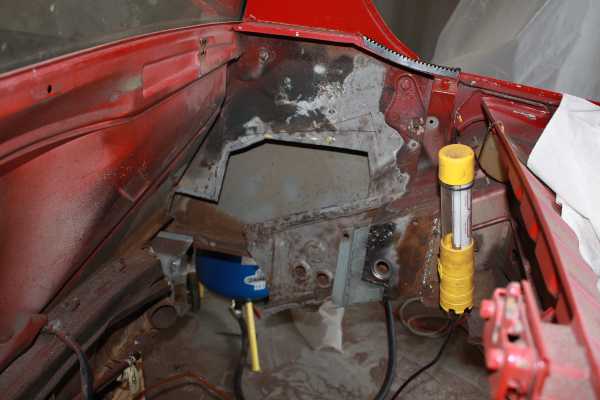

The plan is to sandblast a little more tomorrow, then clean up all the media and paint as much as I can with POR15 and while that drys I'll try to size the replacement panel.
Posted by: SirAndy May 29 2010, 09:34 PM
paint as much as I can with POR15
Don't!
I'm afraid, POR15 does not work as advertised ...

I have had better luck with Metal Ready or Ospho and then a good primer over that once it's dry.
 Andy
Andy
Posted by: obscurity May 30 2010, 06:17 AM
Don't!
I'm afraid, POR15 does not work as advertised ...
Just out of curiousity what went wrong? My search indicates that POR has problems for future paint application and in abusive environments (wheel wells, etc.) But tht it might be Ok inside the longs
Posted by: kwales May 30 2010, 10:18 AM
Inside the longs, I use zinc paint to act as a sacrificial anode to prevent rust, and then top the paint with cavity wax (aka Cosmoline). Cavity wax never really hardens other than on the exterior surface, is waterproof, and contains rust inhibitors.
Posted by: obscurity May 30 2010, 10:56 AM
Inside the longs, I use zinc paint to act as a sacrificial anode to prevent rust, and then top the paint with cavity wax (aka Cosmoline). Cavity wax never really hardens other than on the exterior surface, is waterproof, and contains rust inhibitors.
Whre can you find that stuff? Do you go to an auto paint store or pepboys or online?
Thanks,
Posted by: obscurity May 30 2010, 10:59 AM
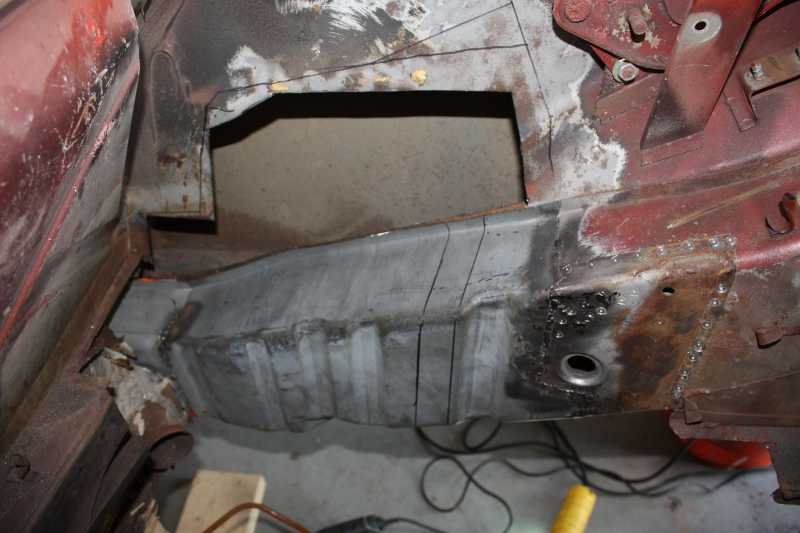
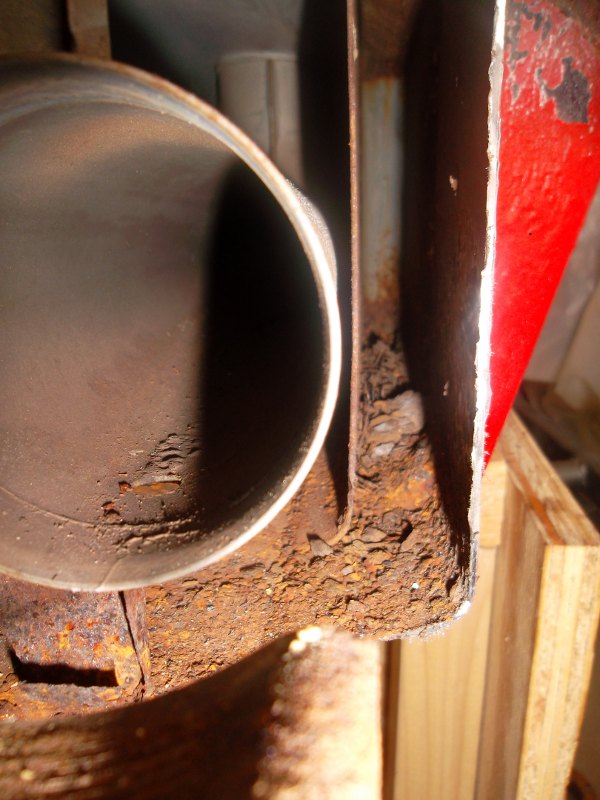
How much pitting is too much pitting. Obviously more needs to go on the left but if I take more off the top I am into the outer suspention attachment bracket
Thanks,
Posted by: obscurity May 30 2010, 03:21 PM
If you come across spot welds (in appearance) that are gold in color when you grind them is that a braze? or was the last owner using some othe welding metal?
Can you weld to it or should I cut it out?
Posted by: obscurity May 30 2010, 05:29 PM
I didn't get as far as I wanted today but when the mosquitos attack you have to go in,
I start the day with this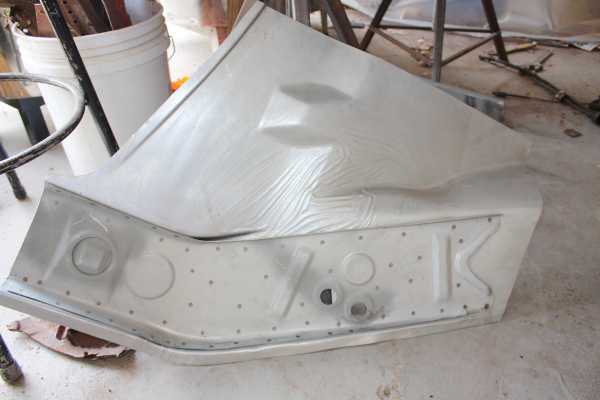
and finished it up with this. It isn't all the way cut out and I have not started welding yet but I'm pretty proud of it so far.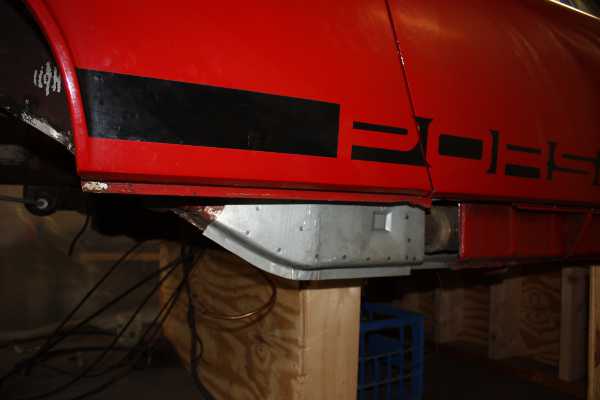
Posted by: scotty b May 30 2010, 07:11 PM
If you come across spot welds (in appearance) that are gold in color when you grind them is that a braze? or was the last owner using some othe welding metal?
Can you weld to it or should I cut it out?
If it is truely a spot weld and is gold ( brazed ) it is not factory. Post a pic so we can see exactly what you are talking about. As steel gets hot it will turn goldish before it gets blue. Perhaps you just got the spot hot when grinding or drilling

Posted by: rick 918-S May 30 2010, 07:27 PM
If you come across spot welds (in appearance) that are gold in color when you grind them is that a braze? or was the last owner using some othe welding metal?
Can you weld to it or should I cut it out?
If it is truely a spot weld and is gold ( brazed ) it is not factory. Post a pic so we can see exactly what you are talking about. As steel gets hot it will turn goldish before it gets blue. Perhaps you just got the spot hot when grinding or drilling
If it's brass you can't weld to it. Remove it. Photos are always good.
![popcorn[1].gif](style_emoticons/default/popcorn[1].gif)
Posted by: obscurity May 30 2010, 07:36 PM
If you come across spot welds (in appearance) that are gold in color when you grind them is that a braze? or was the last owner using some othe welding metal?
Can you weld to it or should I cut it out?
If it is truely a spot weld and is gold ( brazed ) it is not factory. Post a pic so we can see exactly what you are talking about. As steel gets hot it will turn goldish before it gets blue. Perhaps you just got the spot hot when grinding or drilling
You can see the gold in this picture just above the hole
Posted by: scotty b May 30 2010, 07:49 PM
Someone brazed in a battery tray at some point. Cut out above it to get clean metal.
Posted by: obscurity May 30 2010, 08:42 PM
Someone brazed in a battery tray at some point. Cut out above it to get clean metal.
Scotty B, Thanks for the help! Those spots have been bugging me since I uncovered them almost a year ago. I'll cut them out in the morning.
Posted by: obscurity Jun 6 2010, 07:43 PM
I only got a small amount of time to work on the car this weekend but I just about have the inner wheel well cut out. It just needs a little more trimming.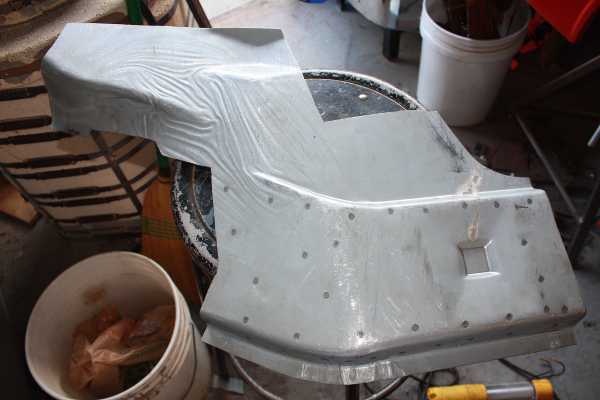
Posted by: obscurity Jul 4 2010, 01:52 PM
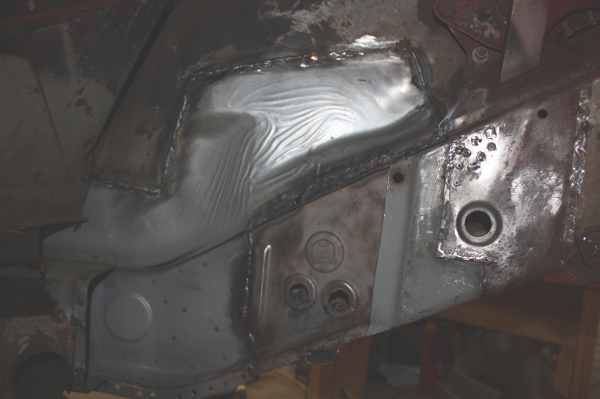
I am back at it this weekend. I received the jack point replacement piece from Restoration Design. Does anyone know what is on the inside of the panel. It looks like a paint of aome sort but it is silver and rough. It is not on the exposed side. My guess is weld through primer or etching primer. Here is the part mocked up. I plan to weld it tomorrow hopefully.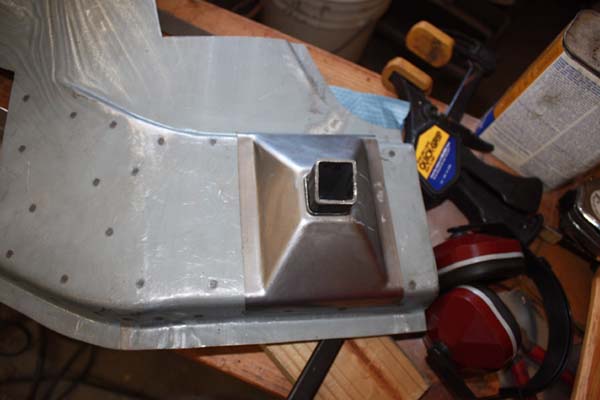
Beyond that I made a sleeve for the joint betweent the mid long and the rear long. I really don't like how every replacemet panel come together in a 6" area at the most strained point on the car so hopfully this will help with that. First a few pictures of the pattern and pattern transfer.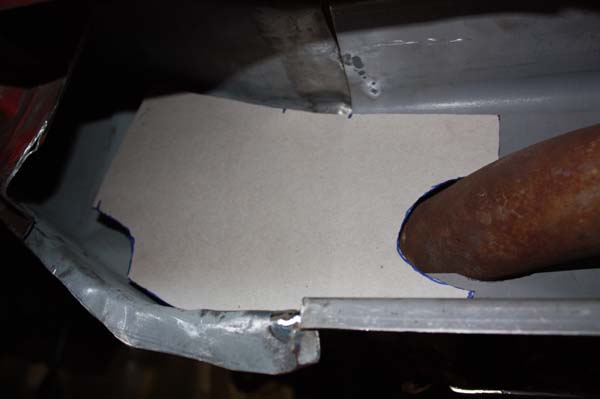

And finally the final part. It needs a little more shaping and the weld look like crap but overall I am happy with it. I will need to prime it as best I can and spot it in.
Posted by: scotty b Jul 4 2010, 02:00 PM
please tell me you have braced that car WELL ??!!!! You've removed alot of structural metal AND have added a fair amoutn of heat. That's more than enough to make it twist. 
Posted by: obscurity Jul 4 2010, 02:08 PM
please tell me you have braced that car WELL ??!!!! You've removed alot of structural metal AND have added a fair amoutn of heat. That's more than enough to make it twist.
I have the front half supported one a frame and the trunk up on some screw jackstands that I made. I have been taking measurements and it now a little straighter than it started...I Hope
Posted by: scotty b Jul 4 2010, 02:34 PM
You really should stop and make a solid brace within the door frame. Won't take long, just make it go from the hinge mount(s) to the latch or the seat belt mount. You can just tack weld a piece of pipe in place if you don't want to spend a lot of time on it. You're playing with fire IMHO
Posted by: scotty b Jul 4 2010, 02:36 PM
[quote name='obscurity' date='Jul 4 2010, 12:08 PM' post='1339195'] --><div class='quotetop'>QUOTE(scotty b @ Jul 4 2010, 04:00 PM) </div><div class='quotemain'><!--quotec-->
please tell me you have braced that car WELL ??!!!! You've removed alot of structural metal AND have added a fair amoutn of heat. That's more than enough to make it twist.
[/quote]
I Hope
[/quote]
My dad used to tell me
" you can hope in one hand and sh*t in the other, tell me which one gets filled first"
know whut I mean Vern ?
Posted by: obscurity Jul 4 2010, 06:30 PM
You really should stop and make a solid brace within the door frame. Won't take long, just make it go from the hinge mount(s) to the latch or the seat belt mount. You can just tack weld a piece of pipe in place if you don't want to spend a lot of time on it. You're playing with fire IMHO
I have actually gotten mixed recommendations on this one from quite a few people. I share your concern, and I actually already built a brace from the hinge to the latch and had it in for a while but took it out because I couldn't tell if the body was flexing only if the distance between the hinge and the latch was constant. With the door in I can tell how the gap is working while I am welding.
I have thought about making a solid brace that connects to two points on each side and has some x bracing to keep it all straight.
Posted by: obscurity Jul 5 2010, 04:11 PM
Just a couple of quick thoughts as I sat out in my garage thinking about what needed to happen next...
When I began working on the project I was terrified to cut into the car despite the rust clearly cutting its own way out. Now after months of slowly moving forward I find myself almost gleefully willing to cut more metal off but terrified to start welding it back up. I think it is partially a fear of warping the car in the effort but also that if I weld it up now it makes it much harder to go back and fix anything I may have forgotten (or worse yet done wrong) Its times like these I would love to have some old time expert who swings by the house every once and a while for coffee and conversation who can tell me where I'm going to run into problems. I guess the task for the week is to steel myself against the idea of welding a substantial part of the long next weekend.
Posted by: charliew Jul 5 2010, 05:15 PM
My thoughts are you have blown off the best info provided so far. If you don't brace the tub you will not be happy with the outcome. If someone told you it doesn't need bracing the've never done it with this much removed at one time. THERE IS NO WAY that tub can stay straight while it is being heated and cooled. Every time a bead is put in it will shrink some as it cools, the idea is to limit it as much as possible. If you think it is cut up now wait till you try to straighten it out. But it will be a great story so try your best and lets see how you end up. The door gap and the twist, think about it. A support under the middle of the long and the center tunnel will also help. How long has it been suspended between the outer supports? Try putting a 8ft 2x4 on two supports at the ends and let it stay there for a month and see what happens. Metal is only stronger but it still does the same thing only less.
I forgot, the time to build the brace was before you cut all the pieces out. Somehow you are going to need to do some real close measuring on the top gap and the door gap top and bottom, and the side to side diagonal before you start to make sure it doesn't change as you proceed. You can put a straight edge on the outside of the doors to see if either side is out from the fender or quarter on the outside.
Good luck and I hope it works out but you are in a pretty interesting spot at this point. You do seem to have some metal working skills though so maybe this will prove to everyone that has done it, it really doesn't need bracing if you are good enough.
Posted by: obscurity Jul 5 2010, 05:41 PM
My thoughts are you have blown off the best info provided so far. If you don't brace the tub you will not be happy with the outcome. If someone told you it doesn't need bracing the've never done it with this much removed at one time. THERE IS NO WAY that tub can stay straight while it is being heated and cooled. Every time a bead is put in it will shrink some as it cools, the idea is to limit it as much as possible. If you think it is cut up now wait till you try to straighten it out. But it will be a great story so try your best and lets see how you end up. The door gap and the twist, think about it. A support under the middle will also help.
I forgot, the time to build the brace was before you cut all the pieces out. Somehow you are going to need to do some real close measuring on the top gap and the door gap top and bottom, and the side to side diagonal before you start to make sure it doesn't change as you proceed.
Good luck and I hope it works out but you are in a pretty interesting spot at this point. You do seem to have some metal working skills though so maybe this will prove to everyone that has done it, it really doesn't need bracing if you are good enough.
I didn't mean to sound like I was not paying attention to scotty b's advice. I very much value the advice he has given me. He clearly knows what he is doing. Its obvious to me there is alot of force at work in this fix after reading Jeff Hail's account of breaking his turnbuckle in the process so the car could very easily move on me. I want to either make a brace that can not possibly move or I want to be sure I know when it moves so I can back up and take another route. It would be ideal if I could figure out a way to do both.
So far all my measurements have indicated that nothing has moved in a bad way. I was able to take a little twist out of the that seemed to already be there.
Posted by: mepstein Jul 5 2010, 06:23 PM
Just a couple of quick thoughts as I sat out in my garage thinking about what needed to happen next...
When I began working on the project I was terrified to cut into the car despite the rust clearly cutting its own way out. Now after months of slowly moving forward I find myself almost gleefully willing to cut more metal off but terrified to start welding it back up. I think it is partially a fear of warping the car in the effort but also that if I weld it up now it makes it much harder to go back and fix anything I may have forgotten (or worse yet done wrong) Its times like these I would love to have some old time expert who swings by the house every once and a while for coffee and conversation who can tell me where I'm going to run into problems.
You just got the internet equivalent and you blew him off
I guess the task for the week is to steel myself against the idea of welding a substantial part of the long next weekend.
Posted by: obscurity Jul 5 2010, 06:32 PM
You just got the internet equivalent and you blew him off
Like I said that was not my intent. In fact I just spent an hour in the garage trying to figure out how to both put in a brace and tell what is going on with the door gap.
Obviously I don't express myself terribly well with the internet.
Posted by: saigon71 Jul 5 2010, 08:08 PM
This thread shows braces running from the upper seat belt attach point to the inner cowl. This method will allow you to keep the doors on and constantly check the gaps. I am copying this approach on my restoration. The only modification I may do is to weld 1X1 steel tubing to the inner cowl (instead of flat plate) to get a little more clearance when the door closes.
http://www.914world.com/bbs2/index.php?showtopic=76791&st=20
Best of luck to you...I have very similar rust issues.
Posted by: charliew Jul 6 2010, 10:43 PM
Put the braces in and make sure the door closes easily and that it doesn't pull the jamb around as it latches. I would brace the door gap at the top and the bottom with the top gap equal on both sides. Make sure the door is perfect at it's front edge first. Loose hinges won't be very helpful either. Stop after short welds and either cool it or let it cool enough to put your hand on it.
Posted by: obscurity Jul 11 2010, 05:05 PM
After several "recomendations" I took a step back and rebuilt the brace I had earlier so it could be installed like Jeff Hail's brace with the door on the car. Thank You for everyones urging and Saigon71's directing me back to Jeff Hail's very inspiring build thread. Here are a couple of pictures of the main diagonal. As soon as I finish a little welding at the botton I can install a second brace to the bottom of the latch jamb. I have set it up so it will just bypass the passenger side door handle.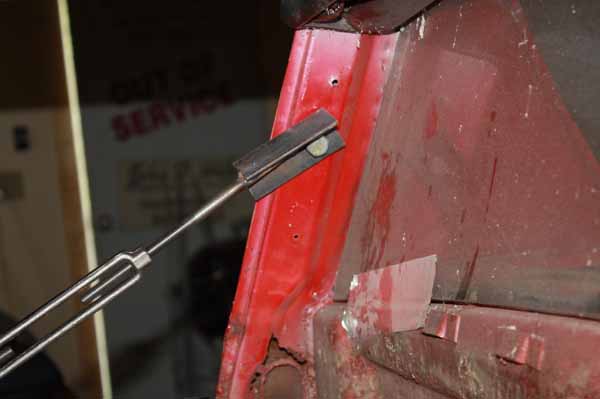
Posted by: strawman Jul 11 2010, 07:16 PM
I, too, have dug into the hell hole and related rustoration. My advice is use a beefier brace... when you start really welding on the structural stuff, you'll put a lot of stress on the brace.
Posted by: obscurity Jul 12 2010, 04:59 AM
I, too, have dug into the hell hole and related rustoration. My advice is use a beefier brace... when you start really welding on the structural stuff, you'll put a lot of stress on the brace.
How big do you recommend? It is a little unclear from the picture but the steel is a small channel so is much wider than it is tall. I thought about welding an angle or somthing to the bottom of it to reduce its slenderness ratio but I was thinking the second brace would help a lot. The second brace will have to take a much higher axial load than the first since it will be parallel to the long and just above it so it has no lever advantage. I was a little concerned that if I make the brace too stiff and the car shrinks that I will break though the fire wall before the brace bends. My thought was it might be better if the brace breaks just before the car does.
Posted by: strawman Jul 12 2010, 10:38 AM
Here is my build blog:
http://www.914world.com/bbs2/index.php?act=ST&f=2&t=83031
Look at post #17, which describes the braces that I built. They're sturdy and cheap, and still permit you to open/close the doors.
Posted by: obscurity Jul 12 2010, 11:19 AM
Here is my build blog:
http://www.914world.com/bbs2/index.php?act=ST&f=2&t=83031
Look at post #17, which describes the braces that I built. They're sturdy and cheap, and still permit you to open/close the doors.
Strawman,
Your thread is impressive and I will look at ways to beef up my brace. In looking at your thread I noticed you are using a rotisserie before the hell hole is completed. Did you have any problems due to flexing when the car is off the ground and spanning that far when you started cutting out steel inthe hell hole?
Posted by: strawman Jul 12 2010, 01:01 PM
Strawman,
Your thread is impressive and I will look at ways to beef up my brace. In looking at your thread I noticed you are using a rotisserie before the hell hole is completed. Did you have any problems due to flexing when the car is off the ground and spanning that far when you started cutting out steel inthe hell hole?
Nope, everything seems lined up fine, based on the jigs I built before cutting in. Also, I didn't cut out too much metal at one time. If you'll look at my blog, I did the inner portion of the long (in the engine bay) first, and then the outer section. But I honestly won't know for sure until I get the car off the rotisserie and back on the ground in the coming weeks... and who's to say my car wasn't twisted before I started? Nonetheless, I tried to limit my exposure to chassis changes by bracing the car well.
Geoff
Posted by: obscurity Jul 18 2010, 12:56 PM
Not as much progress as I would like this weekend but I have start to prep the inner wheel well for final install and I have fitted the sleeve inside the long a little tighter so I can spot weld it in later after the ineer wheel well is in. I have also begun welding the jack sleeve to the inner wheel well. I don't think I can do it while it is in the car without cutting the outer wheel well partially off.
I would like to take a momment to pat the guy who invented clecos on the back. I picked up a pack from Eastwood and used them to hold the sleeve in place. They are truely a wonder tool.
Posted by: obscurity Aug 28 2010, 08:15 PM
Finally got a chance to weld some more and so far the car has not warped at all but I have a ways to go (i.e. the inner long) Here are a few pictures. Of the inner wheel well.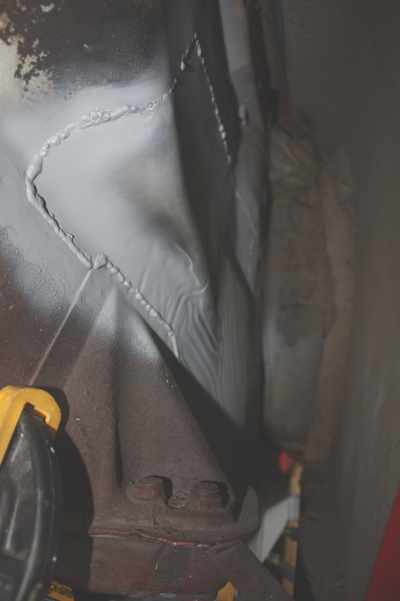
Posted by: obscurity Aug 28 2010, 08:20 PM
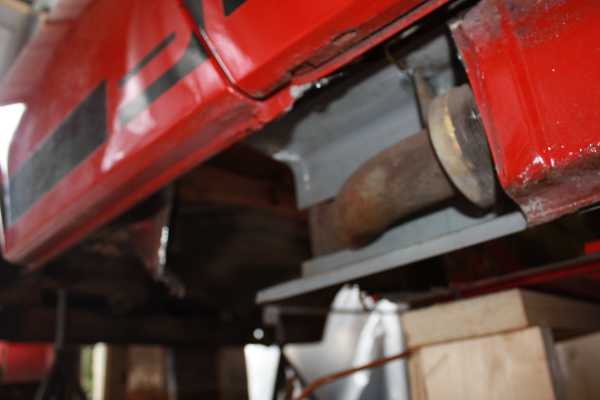
And a few more of upcoming challenges. This one is the drivers's side long. This one should be challenging since no makes the part.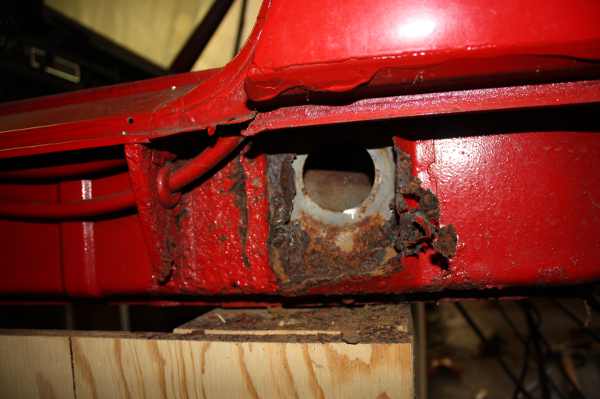
And this one is the center tunnel. Its not as bad as the picture looks but it is rusted through in places.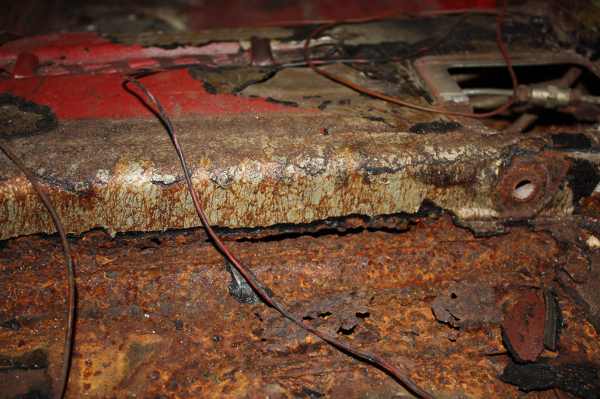
Posted by: avidfanjpl Aug 28 2010, 08:45 PM
Hey John,
If you think no one makes the jackplate and tube, go to Restoration Design in Canada. They are easy to google. I just bought 2. But, one has to have someone fabricate the round piece to hold the jacktube before you put the plate on over it and have it seam welded closed.
RD has the only correctly thick plate. I looked. And I think the Long you show may not be shot at all, but I can only see the jack tube area in the top pic.
I cut both my jack plates/tubes out in 2 evenings. My car is ready for welding. I abated the rust with Marine Clean and then Metal Ready and sprayed weld through Wurth's primer before the body shop gets it with the parts.
I have seen worse. I have owned worse. Guys here have brought back worse.
I would be more concerned about the tunnel. Your work is excellent, so you are way ahead of my skill level.
Good luck!
John
Posted by: obscurity Oct 2 2010, 12:30 PM
Spent a little more time last weekend and got the inner long (dogleg) welded into place. Needs a little more work and the welds need cleaning up but it is getting closer. I also have start opening up the drivers long. Does anyone have a method to look at the length of the long to check for interior rust without taking off the outer long. I hate to drill out all those perfectly good factory spot welds just to check for rust.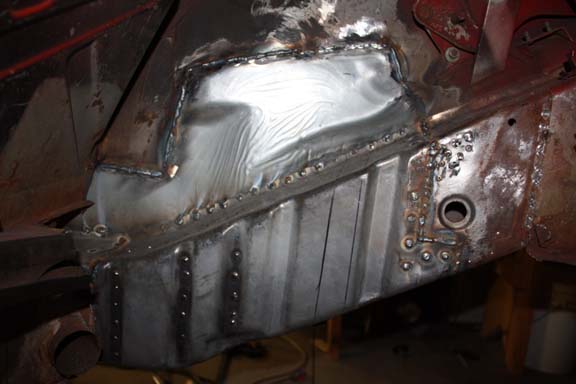
Posted by: SUNAB914 Oct 3 2010, 09:24 AM
Hey , by any chance did you buy this car from AA years ago? I think I have the sales pictures that AA sent me when I was looking for a new one. I think I still have them in a drawer also. Had to have been over 15 years ago I got the pics.
Keep up the good work.
Posted by: obscurity Oct 3 2010, 12:28 PM
Hey , by any chance did you buy this car from AA years ago? I think I have the sales pictures that AA sent me when I was looking for a new one. I think I still have them in a drawer also. Had to have been over 15 years ago I got the pics.
Keep up the good work.
I did buy it from AA about 15 years ago! If you find that sales picture I'd love to see a scan of it. When I bought it it looked much better than the rust I have discovered would lead you to believe especially when you consider that I have driven it very little in the interveneing years and it has been garaged and dry most of that time
Posted by: SUNAB914 Oct 6 2010, 08:32 AM
PM me your address and I will dig them out and send them to you if I can find them. That's about right 15 years ago. I almost bought it. I think it was $3500 or so? keep up the good work.
Posted by: obscurity Mar 7 2011, 07:53 PM
Finally got some time to work on the car again over the last few weekends. I fabricated the part below to patch a rust hole on the drivers side right behind the jackpost. When I started the jack post and "pyramid" cover looked pretty solid but a few minutes with a screwdriver and I had what you saw above. I bought a few new parts from AA and fabricated the piece below. They are not the prettiest but they are the best lookin' part I have made to date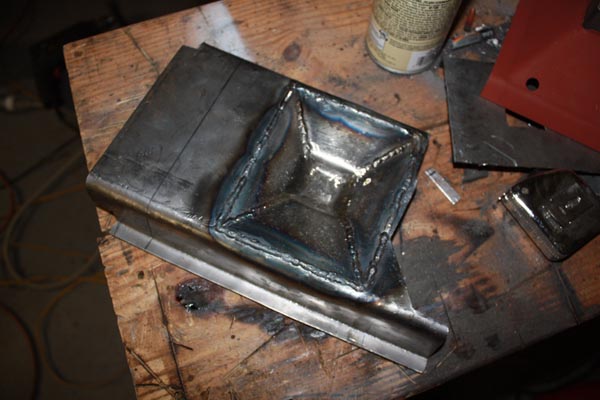
It may be alittle while before I can weld it on since I think I would be well served to remove the outer clamshell and see what is going on aroud those heater tubes and I have little more work to do to the inner piece of steel behind this piece.
Posted by: jaxdream Mar 8 2011, 07:46 AM
Looking great dude , I've got the drvr's and pssgr's side jack post areas both to do myself. I like the fact that you are fabing some of the peices that you need , gives me hope that I can do the same ( very low budget ).
Please keep the pics coming , you are doing a heck of a good job . 
Jack / Jaxdream
Posted by: obscurity Mar 8 2011, 08:32 AM
Thanks! The only tools I used for this was a hammer, a welder and a dremel. It was not quick but so far it has been rewarding
John
Looking great dude , I've got the drvr's and pssgr's side jack post areas both to do myself. I like the fact that you are fabing some of the peices that you need , gives me hope that I can do the same ( very low budget ).
Please keep the pics coming , you are doing a heck of a good job .
Jack / Jaxdream
Posted by: Cevan Mar 8 2011, 12:54 PM
Keep up the great work. I love watching these resto threads.
Posted by: obscurity Jun 18 2011, 11:57 AM
The year so far has conspired against my car habit. This is the first weekend I have had to work on the car since March. I have opened up the rockers and found some rust (no surprise) but it doesn't seem as bad as I expected. It seems like there is some scale a little further forward but I'm hoping it isn;t as bas as it looks since I is hard to open that area up.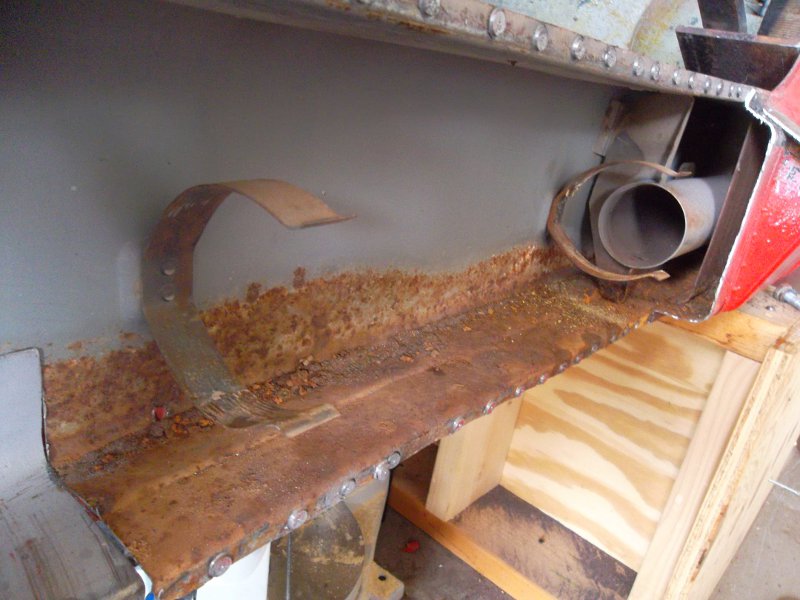
Posted by: saigon71 Jun 19 2011, 07:59 AM
Good to see you back at it! Great job fabricating that drivers side jack piece...I suspect I will be doing that soon myself. I really hope someone starts making that repair panel! 
Posted by: Strudelwagon Jun 19 2011, 09:51 AM
I'm always amazed when I see guys step out of their comfort zone and take on a complicated repair that they have no experience with.
These cars see alot of owners that would sit on the issue that you're up against and sell 5 years later feeling beaten.
I think the ineternet and sites like 914World allow people to find their sows ear and turn it into that silk purse (I'm not saying your into purses).
Guys like ScottyB, Sir Andy, Dr Evil are just a few of the mentors passing down the knowledge.
whether you know it or not, you're inspiring others to step out of their comfort zone and wade into the rusty underworld .
You're doing a great job, keep it going!
SW
Posted by: saigon71 Jun 20 2011, 05:58 AM
I'm always amazed when I see guys step out of their comfort zone and take on a complicated repair that they have no experience with.
These cars see alot of owners that would sit on the issue that you're up against and sell 5 years later feeling beaten.
I think the ineternet and sites like 914World allow people to find their sows ear and turn it into that silk purse (I'm not saying your into purses).
Guys like ScottyB, Sir Andy, Dr Evil are just a few of the mentors passing down the knowledge.
whether you know it or not, you're inspiring others to step out of their comfort zone and wade into the rusty underworld .
You're doing a great job, keep it going!
SW

I read every build thread and learn something from each one. There is a wealth of knowledge on this site from people who have been through it before. Thanks to all who have passed down their knowledge!
Posted by: obscurity Jun 29 2011, 11:01 AM
I broke out the sand blaster last weekend and cleaned up the inside of the long as best I could, then sprayed it with some Ospho. It came out pretty good but there are some more areas that I have not yet managed to get to. I am constantly amazed at how hard my sandblaster is to operate. It is one of the cheap harbour freight models. Between its tendancy to give me either nothing but air or mostly sand it is amazing that anything gets done. Between that and my undersized (for the job) air compressor and every sandblasting session ends with me swearing a lot and covered with sand. There has got to be a better way.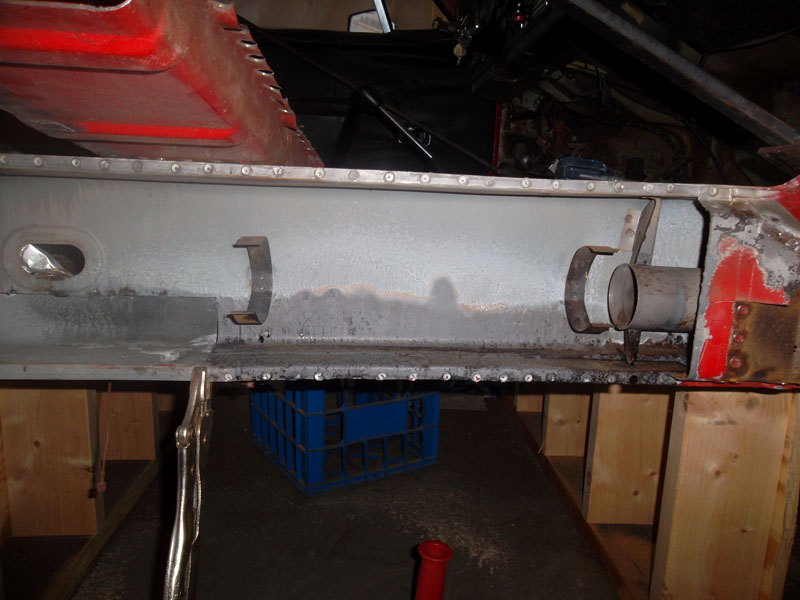
John
Posted by: obscurity Jun 29 2011, 11:06 AM
After finishing center portion of the long I realized that there was a tiny hole a little further forward into the long where it gets much more complicated under the door hinge. What I found is in the picture below. Obviously I will need to cut it out. Unfortunately it means that I will most likely need to but the entire inner rocker instead of just fabricating the relatively simple area in the back as I had originally intended. I better open up the diriver side as well before I order the parts. No point in going out twice.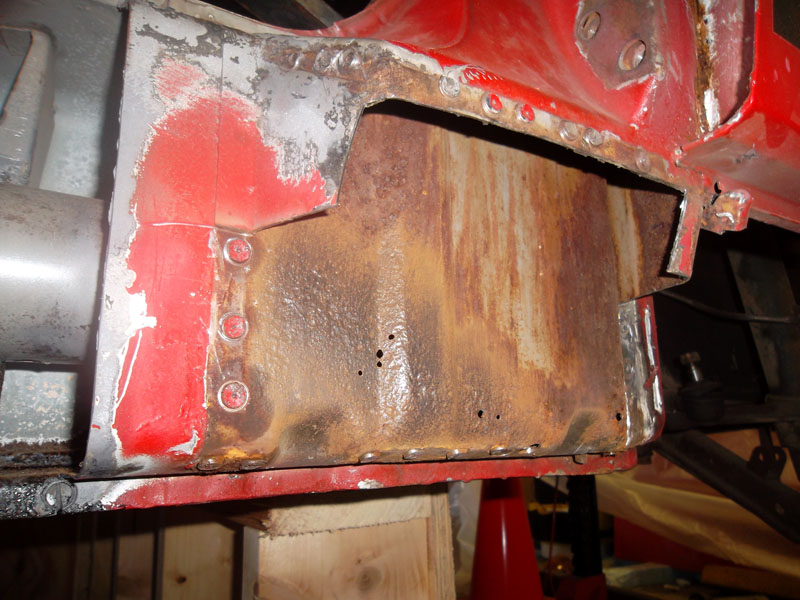
John
Posted by: FourBlades Jun 29 2011, 06:51 PM
Sand blasting is great when the flow is happening but maddening when it is not.
Some tricks I've used are:
1. You need a water separator in your air line or moisture causes clumps that clog things up, I use a good one 10' from the compressor and a replaceable one right before the blaster, check your water separator and empty it every hour or so
2. Sift all your sand to avoid clogs
3. when stopping even for a few seconds, turn off the sand before turning off the air or shutting the nozzle or you will get a clog right away, turn on the air first and open the nozzle then open the sand last when starting up
4. Trying to blast when your air pressure is below 60 psi is usually frustrating, take a break and let your compressor catch up and you will get more done in the long run
5. Put a portable fan blowing on your compressor so it does not overheat from continuous running, even compressors with fans can use help from a second fan when blasting
6. hold the gun farther from the piece you are blasting than you think should and it usually works better
These things worked for me, you need to experiment with your set up to find what
works...
John
Posted by: dion9146 Jun 29 2011, 07:13 PM
In a sick twisted way I'm jealous of guys like yourself that take on a project like this. Sure, I love driving mine and not worrying about restoring anything on the car, but I've almost suffered a few weak moments in the last few months where I almost sold the car to take on a near-death project.....then my Wife steps in and reminds me of how much of a stupid idea that is. 
Nice job, and keep it up.
Posted by: obscurity Jun 29 2011, 09:05 PM
In a sick twisted way I'm jealous of guys like yourself that take on a project like this. Sure, I love driving mine and not worrying about restoring anything on the car, but I've almost suffered a few weak moments in the last few months where I almost sold the car to take on a near-death project.....then my Wife steps in and reminds me of how much of a stupid idea that is.
Nice job, and keep it up.
Thanks!
I suppose the grass is always greener. I spend a bunch of time hoping I can finish this so I can just drive the thing. On the plus side I have learned a lot. I'm not entirely sure that I am not slowly turning the car into much smaller pieces of steel.
John
Posted by: obscurity Jun 29 2011, 09:09 PM
Sand blasting is great when the flow is happening but maddening when it is not.
Some tricks I've used are:
1. You need a water separator in your air line or moisture causes clumps that clog things up, I use a good one 10' from the compressor and a replaceable one right before the blaster, check your water separator and empty it every hour or so
2. Sift all your sand to avoid clogs
3. when stopping even for a few seconds, turn off the sand before turning off the air or shutting the nozzle or you will get a clog right away, turn on the air first and open the nozzle then open the sand last when starting up
4. Trying to blast when your air pressure is below 60 psi is usually frustrating, take a break and let your compressor catch up and you will get more done in the long run
5. Put a portable fan blowing on your compressor so it does not overheat from continuous running, even compressors with fans can use help from a second fan when blasting
6. hold the gun farther from the piece you are blasting than you think should and it usually works better
These things worked for me, you need to experiment with your set up to find what
works...
John
Thanks! I will definitely have to give all these all a try. Anything to reduce the frustration!
John
Posted by: SUNAB914 Jun 30 2011, 06:40 AM
I found the pics, would like to send them to you. Good luck with resto.
PM address again.
Posted by: charliew Jun 30 2011, 03:54 PM
When you take a lot of structure out without REAL good bracing it will be a miracle if it goes back together as straight as it should be.
Posted by: trojanhorsepower Jun 30 2011, 05:49 PM
The only way to make sandblasting better is to pay someone else to do it.
Posted by: obscurity Aug 14 2011, 03:55 PM
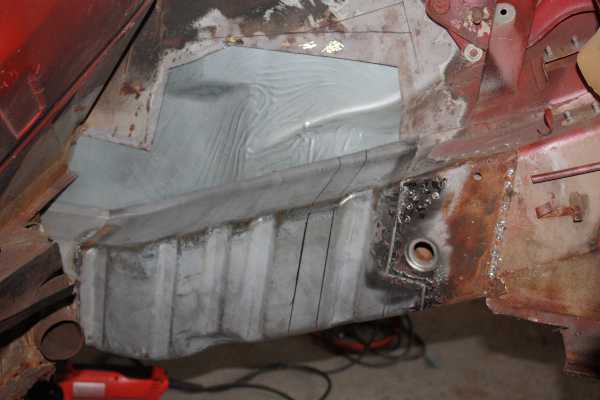
It has been a while since my last post and I have been working but have not made any substantive progress until today. Today was all about sleeving the inside of the passenger side long. If you look at several of my previous posts you will see that I removed a significant portion of the bottom of the inner long because of rust. Following Jeff Hails advice in the Bring out the Dead thread I decided to sleeve the long to strengthen my welds. This is the piece I fabed today from 16g. There are two notches at the top that will be filled with the pieces that came out of them once the piece is welded in. All that is left to close up this side is to buy some 18g and fix the baffle at the front of the long (not quite visible at the right of the pic but it is in several other shots).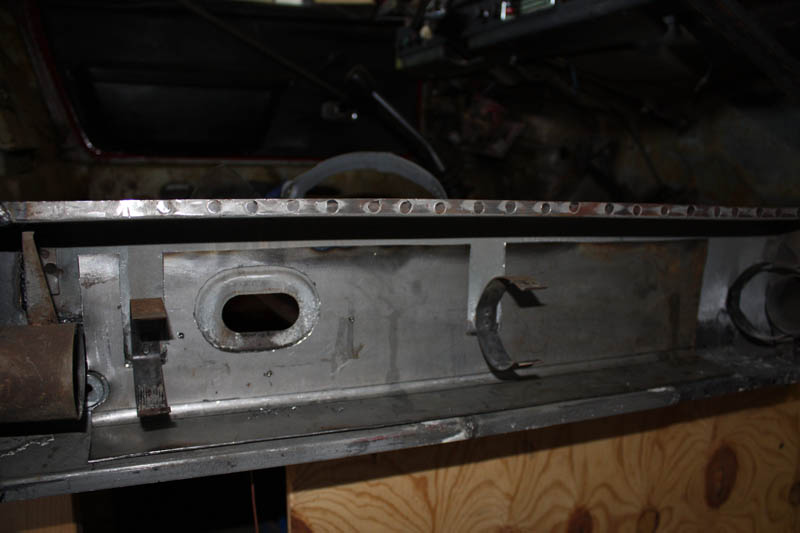
Posted by: obscurity Aug 21 2011, 05:49 PM
This is what I got done this weekend. Not quite what I was shooting for but I got most of it done despite my garage being very hot today (I need to invest in AC) and having a spliting headache most of the time.
Weld thru primer applied.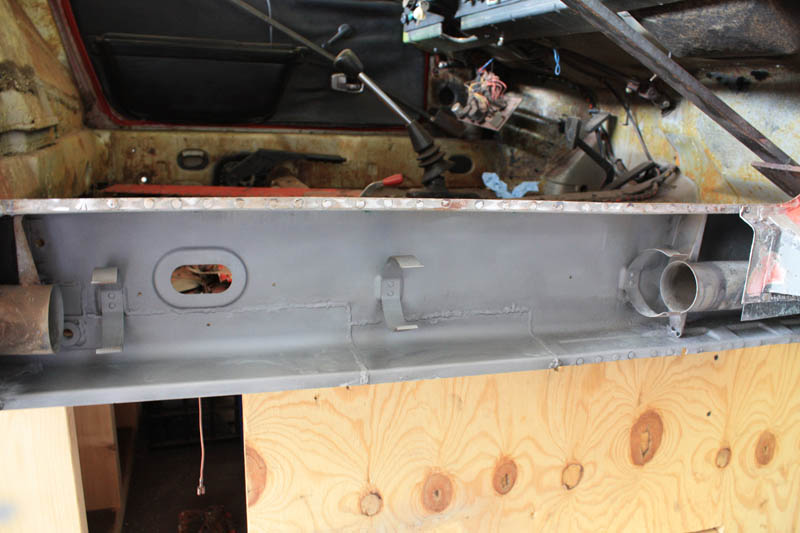
Stiffener sleeve prepped and ready to go in.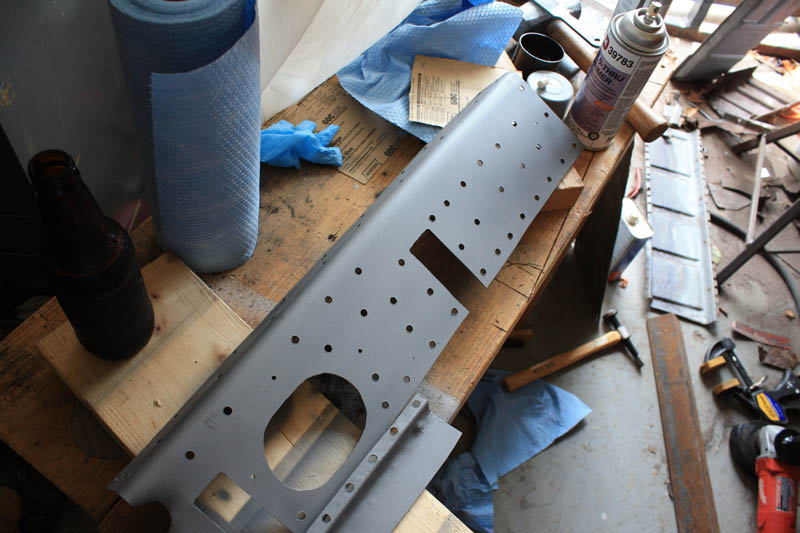
Front baffle seam welded in but not yet cleaned up.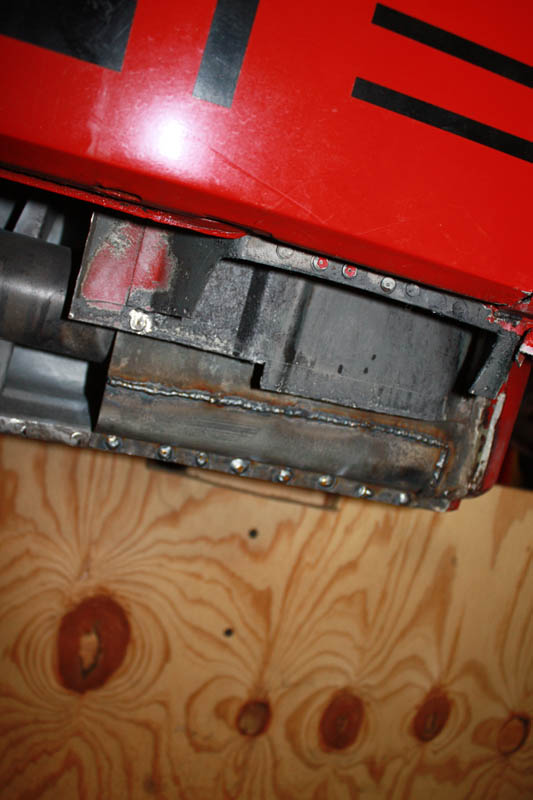
Stiffener in welded and primed.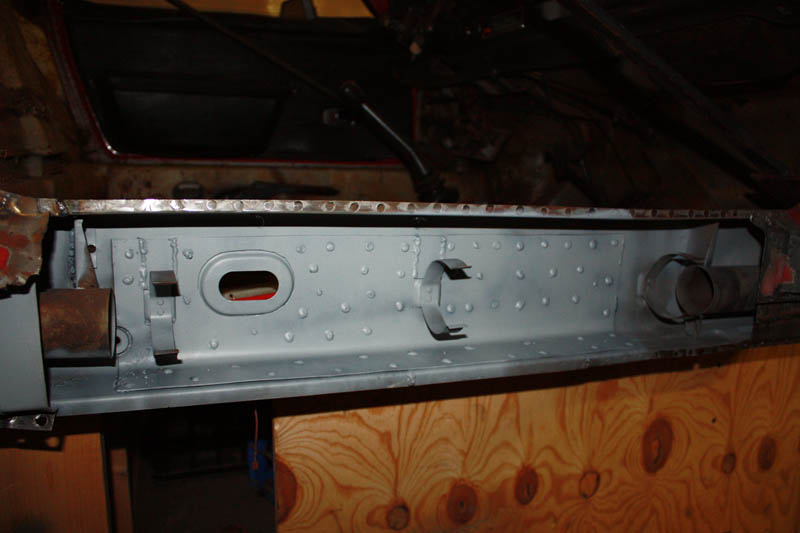
Next step is getting cleaning everything up putting the heater tube in and welding on the outer longitudinal panel
John
Posted by: obscurity Aug 28 2011, 07:45 PM
Didn't get that much done even though I worked at it all day but I do have the passenger side closed up!!. It still needs some grinding and the sill and lower door jamb.
Now my debate is do I open up the other side. It is not as bad off at the back as the passenger side but I really don't want to discover it needs done after I paint the car. On the other hand I hate to drill out all those perfectly good factory spot welds and replace them with my less optimal versions if there is nothing wrong with it. I wonder if anyone in the Atlanta area has a fiber optic camera that I could use?
Now for a couple of pics...
Heater tube back in
Everything welded up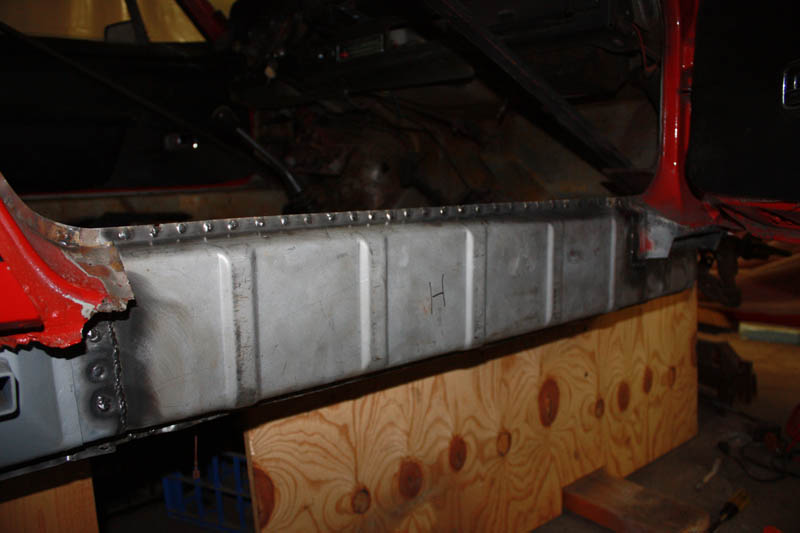
Posted by: SUNAB914 Aug 29 2011, 07:14 AM
Did you get the pics?
Posted by: obscurity Aug 29 2011, 07:21 AM
Did you get the pics?
I Did!! Sorry, I forgot to PM you to thank you!! With those pictures I would probably buy it again even through I now know what its issues are!
Posted by: FourBlades Aug 29 2011, 08:19 AM
Those are really nice looking patchs and welds.
Very neat and professional looking work.
Your car will be good for 40 more years.
You may want to test fit your door to see where you are.
Some temporary bracing across the door is always good.
John
Posted by: Root_Werks Aug 29 2011, 10:12 AM
Welding the stiffener on the inside is very cool! Nice work, keep the progress pics coming.
Posted by: obscurity Aug 29 2011, 10:37 AM
Those are really nice looking patchs and welds.
Very neat and professional looking work.
Your car will be good for 40 more years.
You may want to test fit your door to see where you are.
Some temporary bracing across the door is always good.
John
Thanks! There actually is a brace going from the upper seatbelt point to the floor boards. Some have questioned whether it is strong enough but so far it does not have too much tension on it. The door is actually also in place and I keep checking it and a few other measurements as I go. So far there has not bee much movement (if any). I have been very careful to keep my weld heat down by only welding a fwe things at a time and I have been trying to control weld shrinkage by welding seams first while the panel is otherwise loose before doing the spots
By the way I love the rotisserie in your profile pic! I have borrowed a metal rotisserie but I wonder if your version might be better to do the floors since it grabs the car much closer to the middle and might induce less flex.
John
Posted by: obscurity Aug 29 2011, 10:42 AM
Welding the stiffener on the inside is very cool! Nice work, keep the progress pics coming.
Thanks! I hope I have enough in there to do at least some stiffening but I am thinking that I will have to still do the upper half of the to really make it stiff. I am also considering doing a 16 ga stiffener that extends through the firewall on the cabin side of the long to reinforce the dogleg since I have replaceed most of the metal in that area and am not entirely sure it is strong enough.
Thanks,
John
Posted by: obscurity Sep 17 2011, 01:30 PM
Now that the passenger side is welded up, I have moved on the drivers side and I am pleasantly surprised. There is definitely some rust but as far as I can tell it is all surface rust. It was almost not worth taking it apart but while I am here I will go ahead and replace most of the rocker/outer long with a new piece (I already have it). The front under the door jamb doesn't look that bad so I will try to sand blast what I can and Ospho the whole thing but not open it up like the passenger side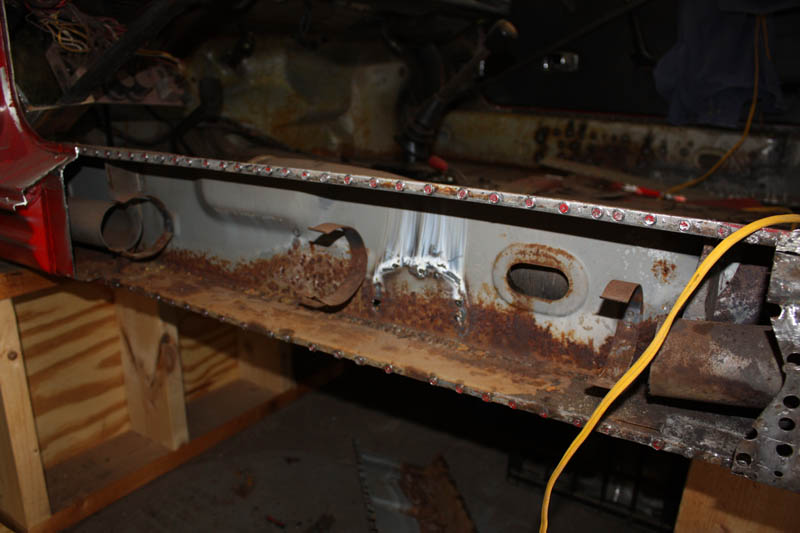
Posted by: obscurity Sep 17 2011, 01:37 PM
An interesting discovery while I had it open. I have always wondered why the brake light stayed on quite a bit while I was driving but I figured the switch must be bad or it was a wiring problem. I knew the hand brake had been replaced but the job looked pretty good so I figured it was not that. Turns out I was wrong. From the inside you can see that the new part does not cover the front holes that were drilled to remove the old part. Whoever did the work managed to weld the brake handle back on about 1/4" - 3/8" behind the priginal position so it fails to press the button in the down position. unless it sits just right. I guess I have to cut that off and redo that too.
Inside the cabin looks good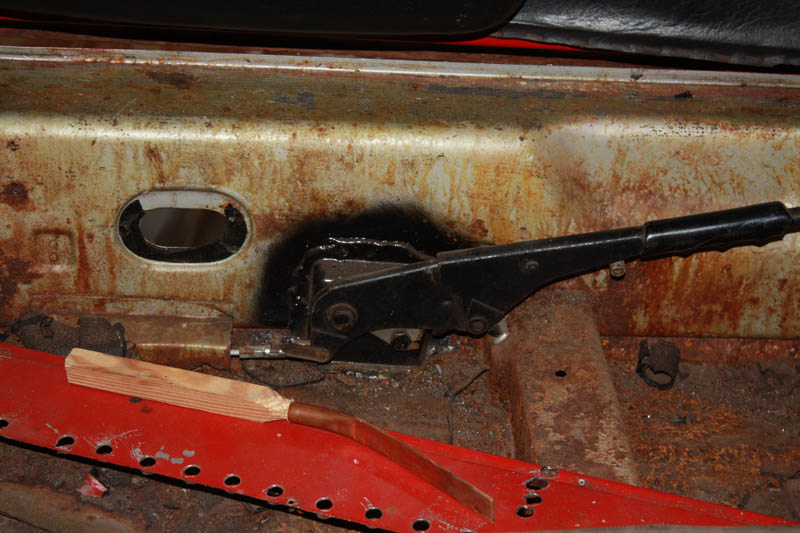
inside the long not so much
Posted by: mark21742 Sep 17 2011, 06:21 PM
Looking great man! As you have found out, the best way to learn is to dive in! Lol keep up the good work and you'll have your baby back on the road in no time.....unless your wife is like mine and makes you work on her car every weekend instead of your car lol
Posted by: lrm914 Sep 17 2011, 07:00 PM
An interesting discovery while I had it open. I have always wondered why the brake light stayed on quite a bit while I was driving but I figured the switch must be bad or it was a wiring problem. I knew the hand brake had been replaced but the job looked pretty good so I figured it was not that. Turns out I was wrong. From the inside you can see that the new part does not cover the front holes that were drilled to remove the old part. Whoever did the work managed to weld the brake handle back on about 1/4" - 3/8" behind the priginal position so it fails to press the button in the down position. unless it sits just right. I guess I have to cut that off and redo that too.
Inside the cabin looks good
inside the long not so much
I have been following your thread, keep up the good work!
Instead of cutting out the PB to adjust 1/4 inch, would it be easier to add some kind of shim to the PB switch button to get it to contact better?
Posted by: obscurity Sep 17 2011, 07:24 PM
I have been following your thread, keep up the good work!
Instead of cutting out the PB to adjust 1/4 inch, would it be easier to add some kind of shim to the PB switch button to get it to contact better?
Yeah it would probably be easier and I was thinking along these lines until I took another look at how they buchered the long getting the old brake out. In the end, I think I am going to replace the metal and remount the brake.
John
PS Where in GA are you?
Posted by: lrm914 Sep 17 2011, 10:06 PM
I have been following your thread, keep up the good work!
Instead of cutting out the PB to adjust 1/4 inch, would it be easier to add some kind of shim to the PB switch button to get it to contact better?
Yeah it would probably be easier and I was thinking along these lines until I took another look at how they buchered the long getting the old brake out. In the end, I think I am going to replace the metal and remount the brake.
John
PS Where in GA are you?
Hey John,
I'm in Cave Spring Ga, about 10miles from Rome, GA...
Ever heard of it?
I got a project going here too.
Larry
Posted by: obscurity Sep 18 2011, 10:47 AM
I have been following your thread, keep up the good work!
Instead of cutting out the PB to adjust 1/4 inch, would it be easier to add some kind of shim to the PB switch button to get it to contact better?
Yeah it would probably be easier and I was thinking along these lines until I took another look at how they buchered the long getting the old brake out. In the end, I think I am going to replace the metal and remount the brake.
John
PS Where in GA are you?
Hey John,
I'm in Cave Spring Ga, about 10miles from Rome, GA...
Ever heard of it?
I got a project going here too.
Larry
Not Cave Springs but definitely Rome. Hows your car comeing?
John
Posted by: lrm914 Sep 18 2011, 01:49 PM
I have been following your thread, keep up the good work!
Instead of cutting out the PB to adjust 1/4 inch, would it be easier to add some kind of shim to the PB switch button to get it to contact better?
Yeah it would probably be easier and I was thinking along these lines until I took another look at how they buchered the long getting the old brake out. In the end, I think I am going to replace the metal and remount the brake.
John
PS Where in GA are you?
Hey John,
I'm in Cave Spring Ga, about 10miles from Rome, GA...
Ever heard of it?
I got a project going here too.
Larry
Not Cave Springs but definitely Rome. Hows your car comeing?
John
I am currentlt tempering High heat paint on some Heat exchanger parts on my BBQ grill, my wife thinks I'm nuts.
Overall, much like you I have had this car for many years, my garage princess.
And every so often when the honey do list begins to be completed, I catch the feaver to complete the car. For the past few months I have been polishing, cleaning, getting parts together from various source to complete the car. To date I have almost everything I will need in terms of parts, to get the car together to begin the process of getting it fired up. I still have alot of electrical wiring to sort out, but I've made more progress in the past 3 months than I have in the 13 years i have had the car.
Where you at in GA?
Larry
Posted by: obscurity Sep 18 2011, 05:37 PM
Where you at in GA?
Larry
I'm in SW Atlanta. Just north of East Point
Posted by: obscurity Oct 9 2011, 05:33 PM
Didn't get much done on the car this weekend (It was my Anniversary) but I did make it the the Peach State PCA Autocross at Atlanta Motor Speedway. All I did was spectate but it was a lot of fun. Below are some pics of what I got done last weekend.
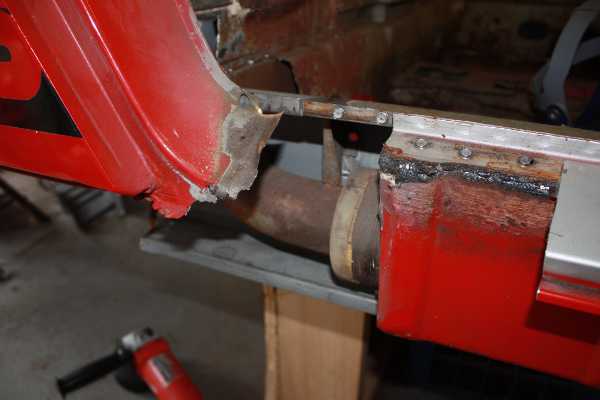
The deeper I dig into the Driver's long the less I like what I see. The front is still ok but as you can see the rear is very pitted on the inside.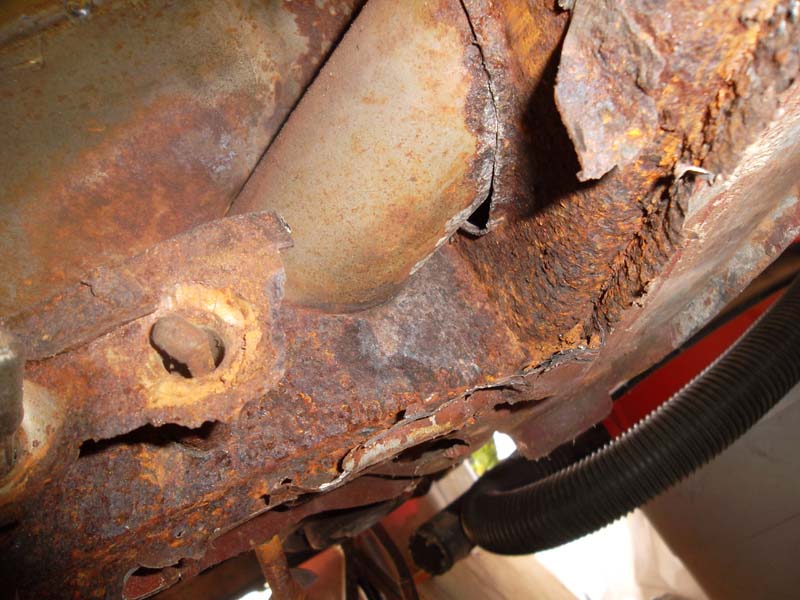
I have not yet decided how much farther back I will cut out. The area I have alreay cut out is easily replaced with some left over inner long from the passenger side but if I go much farther back I will need to fab some more custom parts as the long starts to turn up and he inner reinforcing layer starts to have corrugations. Before I make any more decisions I will need to determine whether this car has a drivers hell hole.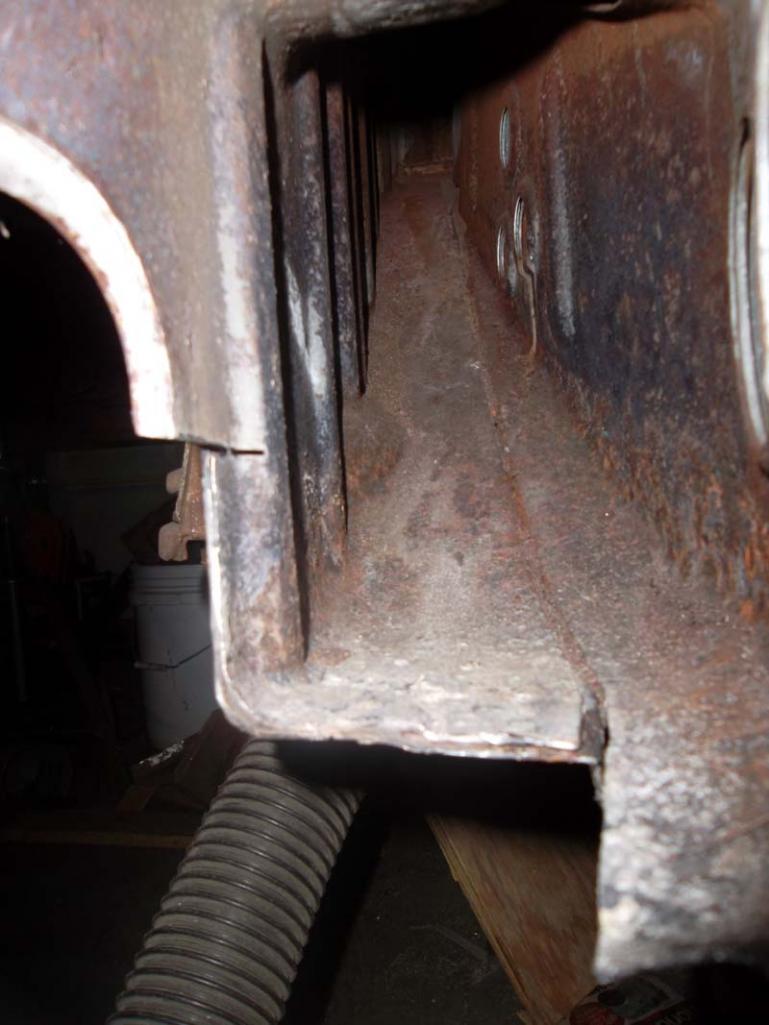
On the plus side I fabed the inner sleeve for the drivers side. I'll have to decide whether it is worth refabing it once I determine how much more comes out.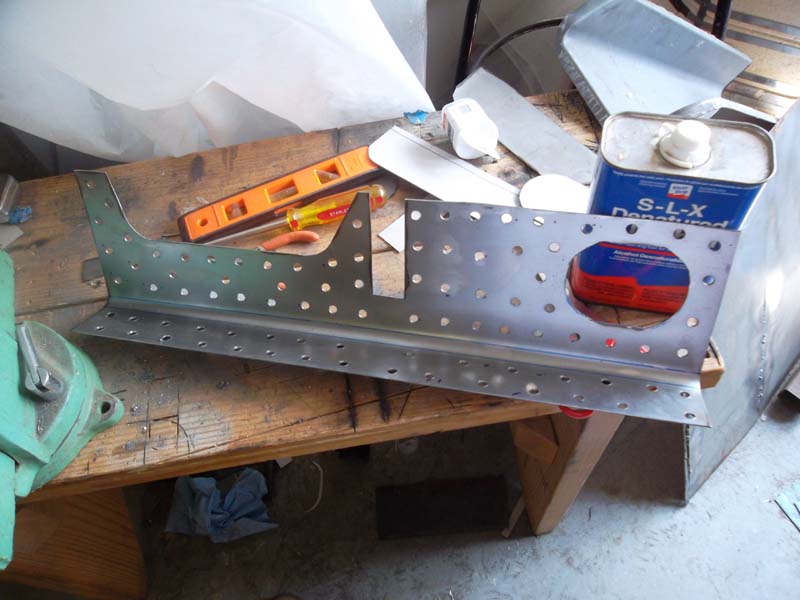
John
Posted by: barada Oct 9 2011, 06:23 PM
Didn't get much done on the car this weekend (It was my Anniversary) but I did make it the the Peach State PCA Autocross at Atlanta Motor Speedway. All I did was spectate but it was a lot of fun. Below are some pics of what I got done last weekend.
The deeper I dig into the Driver's long the less I like what I see. The front is still ok but as you can see the rear is very pitted on the inside.
I have not yet decided how much farther back I will cut out. The area I have alreay cut out is easily replaced with some left over inner long from the passenger side but if I go much farther back I will need to fab some more custom parts as the long starts to turn up and he inner reinforcing layer starts to have corrugations. Before I make any more decisions I will need to determine whether this car has a drivers hell hole.
On the plus side I fabed the inner sleeve for the drivers side. I'll have to decide whether it is worth refabing it once I determine how much more comes out.
John
John,
Still making great strides with your work. I went to the Autocross today as a spectator. Was in my Green 911.
Phillip
Posted by: obscurity Oct 9 2011, 06:36 PM
John,
Still making great strides with your work. I went to the Autocross today as a spectator. Was in my Green 911.
Phillip
I was wondering whose car that was. I really like the green color.
John
Posted by: obscurity Jun 23 2012, 12:32 PM
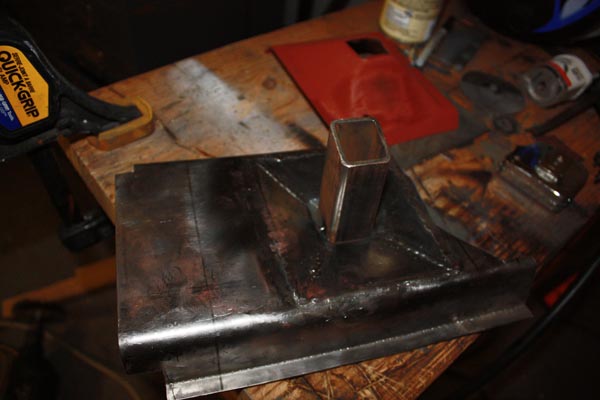
Made a little progress on the car in the last few weeks. Just a couple of photos of the pattern and part that I made to cover up the longitudinal ribs from the replacement panel in the engine compartment. I extended it through the fire wall since I have to replace the bottom of the fire wall anyway. It shoulld also help to stiffen the frame a little.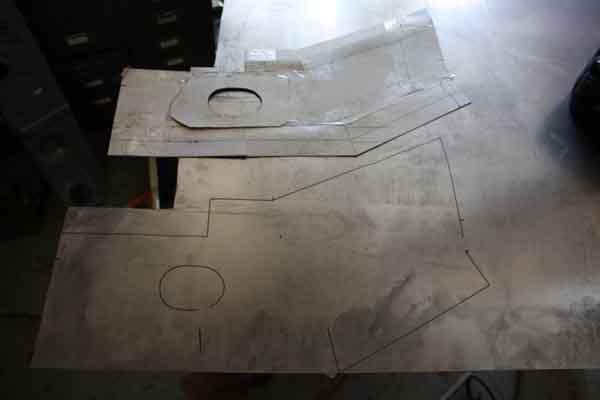
Hopefully next weekend I can finish up the fabrication and start welding things onto the car.
Posted by: SUNAB914 Jun 23 2012, 01:08 PM
Last few weeks?? You mean months, better get going buddy. We're waiting!
Posted by: obscurity Jun 24 2012, 01:58 PM
I've got the suspension console tentatively fitted.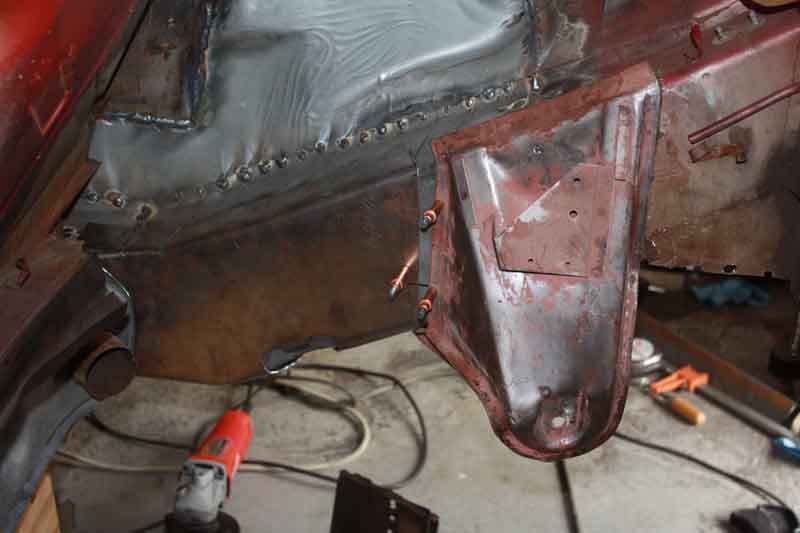
And I need to start looking at the engine mount.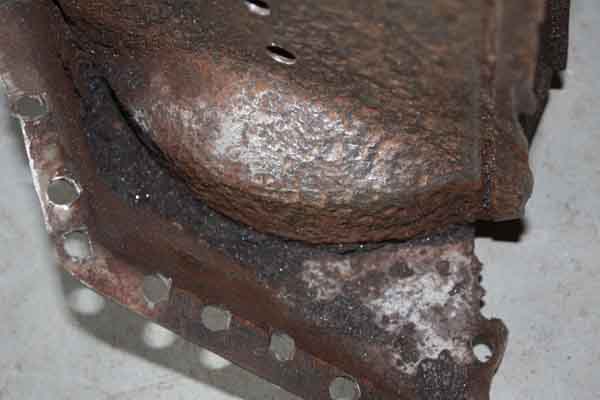
Posted by: obscurity Jan 2 2022, 05:16 PM
I can't believe how long I have been working on this car.. Anyway it is on the rotisserie. I'm going to have to will this thing to someone for completion.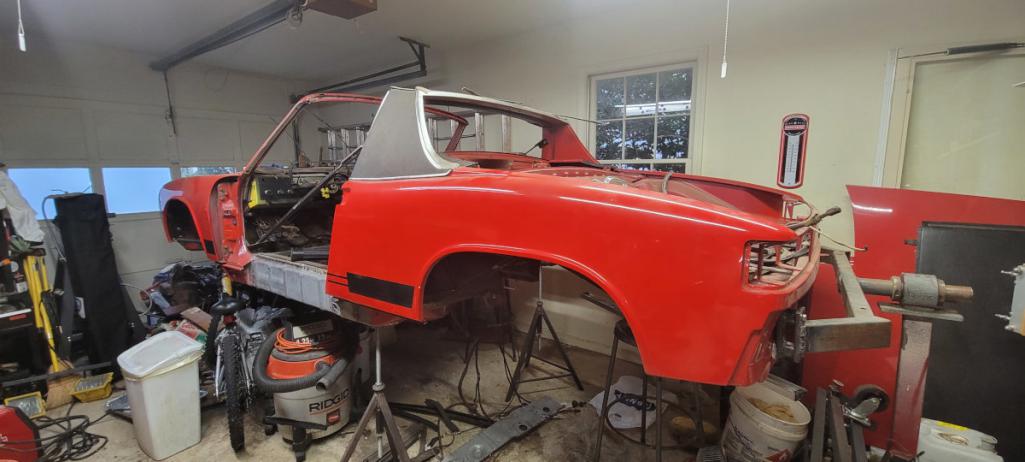
Posted by: krazykonrad Jan 2 2022, 05:52 PM
Welcome back! It looks like you've done some impressive work.
Posted by: obscurity Jan 23 2022, 12:04 PM
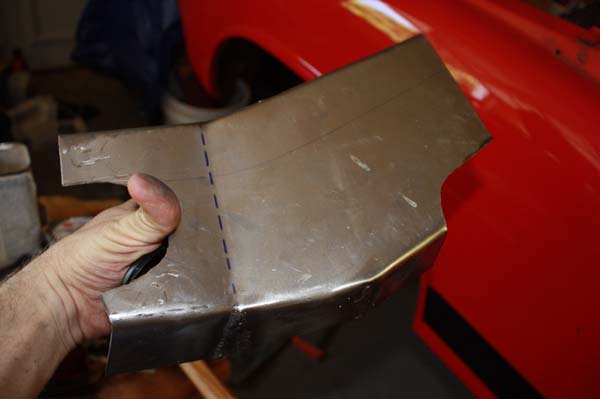
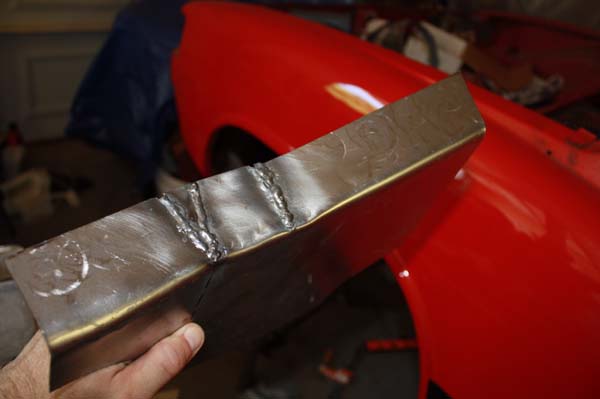
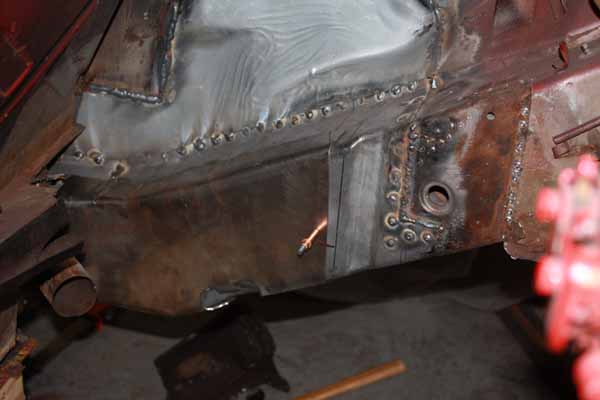
Thought I would see if anyone has an opinion of some of my welding plans. I have already welding in the replacement dogleg in the longitudinal.
Since the corrugations look a little odd I thought I would add another layer of steel to smooth things out. I am a little concerned that the extra layer will add too much thickness but it will add more strength to the bend the bottom of the long.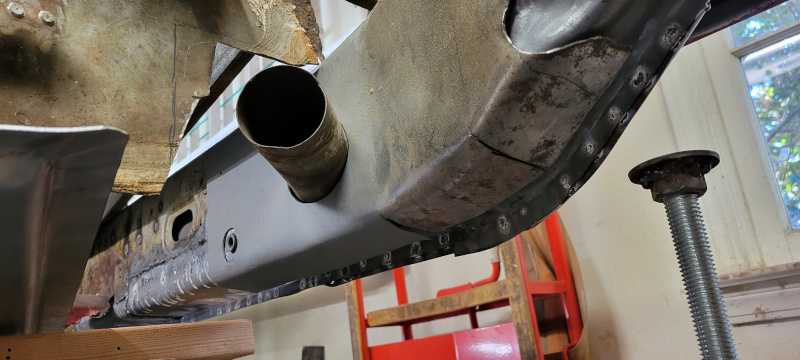
One the fire wall is in it looks ok.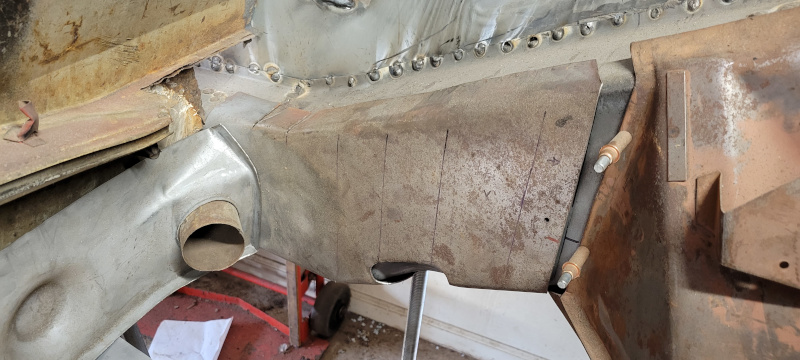
Let me know what you think. On a side note the surface rust will be cleaned up. I fabbed this several years ago.
John W
Posted by: obscurity Oct 29 2022, 05:30 PM
Just an update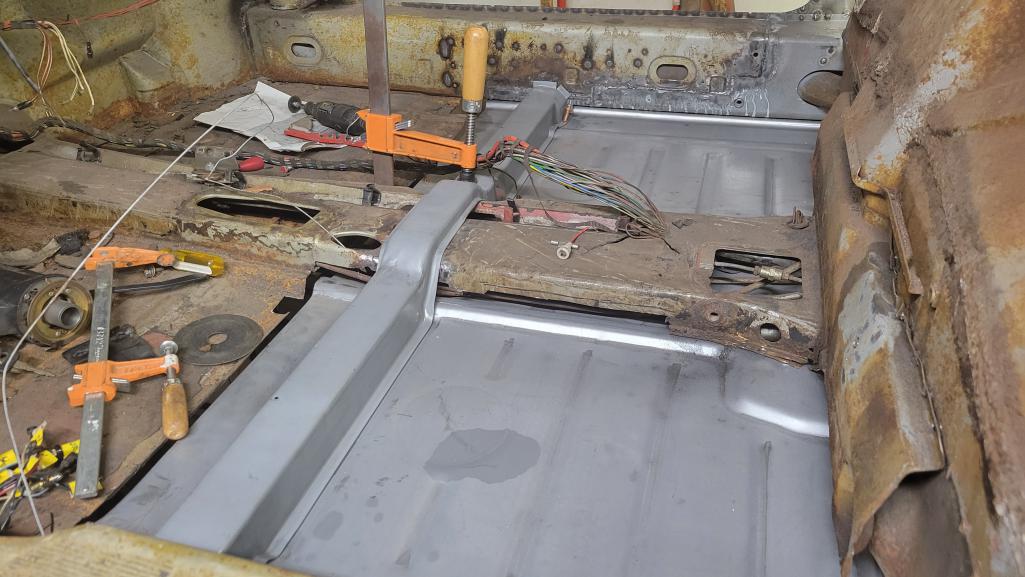
Powered by Invision Power Board (http://www.invisionboard.com)
© Invision Power Services (http://www.invisionpower.com)