Printable Version of Topic
Click here to view this topic in its original format
914World.com _ 914World Garage _ r/c Fuchs wheel project progress thread
Posted by: RJMII Jul 8 2010, 09:03 PM
Edit:
http://www.smalltowngeek.net/?page_id=912
please let PM me if there are problems with the store...
-Jim
PS: Final version picture: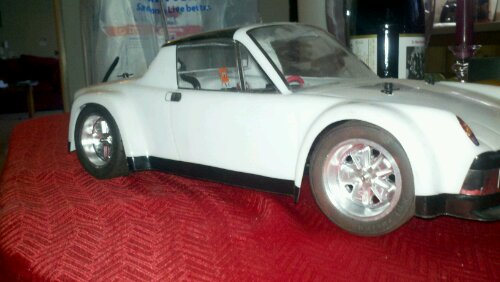
I now have two cars here, and I've got the measurements! I am ready to start cutting out the wheels. It will be easiest to do them if I do a larger run.
The process for cutting out the wheels requires me to set up my CNC mill in multiple configurations.
26 or 31mm widths. The tires these are designed for are the HPI vintage tires. If you'd like to run a different set, PM me or post here.
Here are a couple of teaser pics. The chunk missing was a glitch in the code, but has been resolved in the PC simulations.
Attached image(s)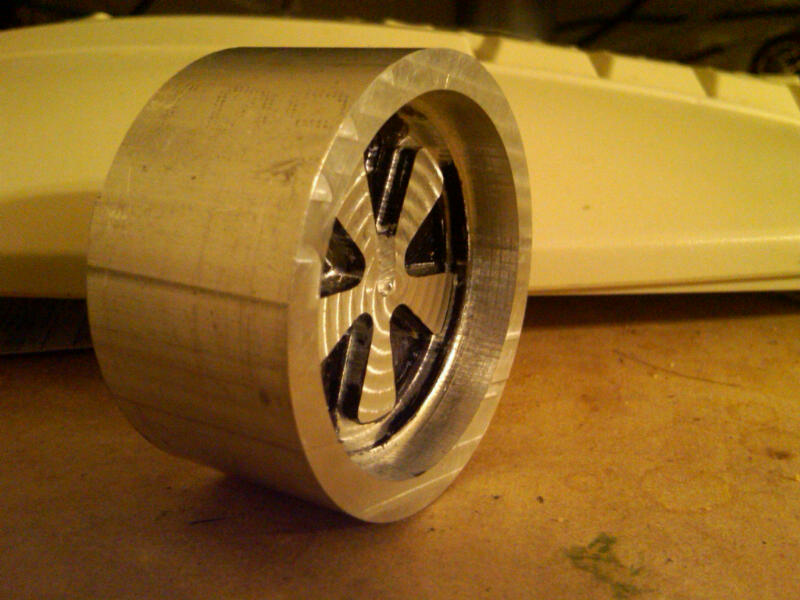
Posted by: GeorgeRud Jul 8 2010, 09:12 PM
Those should look great! Will these fit the Tamiya chassis? I have one that I hope to use for my 914 RC body!
Posted by: RJMII Jul 8 2010, 09:18 PM
George, YES! I am building them to fit the Tamiya chassis. 
Posted by: rick 918-S Jul 8 2010, 11:53 PM
I'll pull a front and rear off my car and send them to you. These are the closest I could find in a 5 spoke pattern. These are two different sizes.
I have your address.
Attached image(s)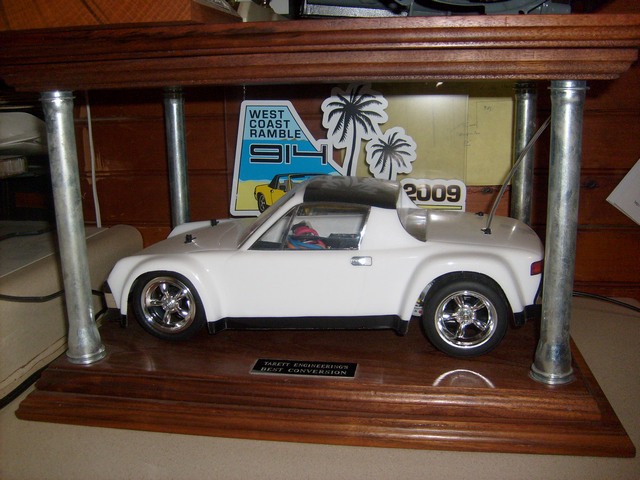
Posted by: RJMII Jul 8 2010, 11:54 PM
Rick, which chassis are you running? Do you want two of each size?
Posted by: rick 918-S Jul 9 2010, 12:02 AM

Rick, which chassis are you running? Do you want two of each size?
I have the Tamiya. It was a VW Beetle bodied car. Yes, I think I have a thread here someplace about when I bought these. I have the sizes and source in the thread.
Posted by: rick 918-S Jul 9 2010, 12:08 AM
Here's the link. http://www.914world.com/bbs2/index.php?showtopic=97857&hl=
Posted by: RJMII Jul 9 2010, 12:11 AM
That would be the same car I've got on the way, then, the VW bug from Tamiya. It's the M04L chassis if it is rear wheel drive.
The design of these wheels takes an average of the two back spacings and makes them the width of the front tire. I would be more than happy to make the staggered set for you. Let me know when the package is on the way so that I can keep an eye out and let you know when it safely arrives... etc etc
Posted by: BKLA Jul 9 2010, 12:25 AM
Jim -
The wheels that Rick is asking about are the same ones I sent you for scanning. His are chrome where the ones I sent are the brushed look.
Are you making different offsets for front and rear using a "standard" 26mm tire? or are you making the rears wider and planning to use the HPI "vintage" 31mm tires?
Posted by: RJMII Jul 9 2010, 12:36 AM
Brett,
I will do them however Rick would like them for his set.
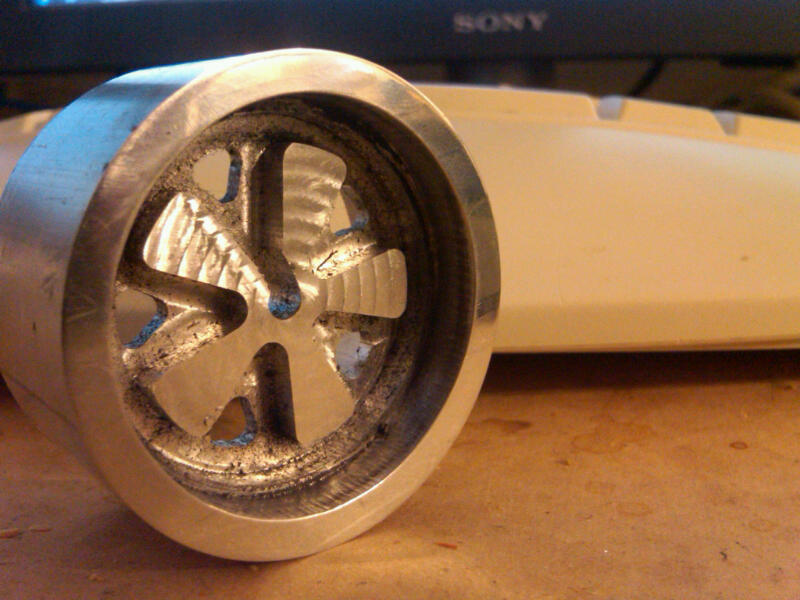
The backspacing can be easily changed to match; I'm waiting until I see how it looks on your car before deciding which measurements to use for offset. The wheel I'm sending to you has a backspacing measurement that is average (minus .035"ish) of the two you sent to me. The narrow wheel had .437" backspacing, and the wide wheel had .675" backspacing; this one that is pictured has .495" backspacing. If it is sticking out too far, I can shave it down a little bit more.
Where's a good place to get some tires for myself? My bug is on the way... (and I'm still waiting for a reply to my PM from the kind individual that offered to sell me a 914 body)
Posted by: Zimms Jul 9 2010, 04:58 AM
Jim -
The wheels that Rick is asking about are the same ones I sent you for scanning. His are chrome where the ones I sent are the brushed look.
Are you making different offsets for front and rear using a "standard" 26mm tire? or are you making the rears wider and planning to use the HPI "vintage" 31mm tires?
Be careful with the HPI tires. They have a special bead used to make them compatible with a locking mechinism on their wheeels. From their website when you click on #4797 vintage tire:
"New from HPI Racing are Vintage Racing Tires. Available in 26mm and 31mm widths, these tires are specially designed for use with our Vintage wheels and bodies. The tread pattern is a symmetrical design that recreates the popular racing tires from the 60’s, and the outer sidewall has a high profile for maximum realism. Molded with our popular D compound rubber and supplied with single-piece donut inner foams, these tires deliver excellent handling on parking lot surfaces.
Because of the special sidewall construction, these tires must be used on HPI Vintage Wheels. "
Unless Rich is copying the HPI wheel bead, you could have a problem.
http://www.hpiracing.com/products/en/4797/
Posted by: rick 918-S Jul 9 2010, 07:08 AM
I like that vintage tire that I have on the car. I will just send you the whole car Jim. Then you can test fit the tires and wheels on the car.
Posted by: djm914-6 Jul 9 2010, 07:29 AM
FYI: When I cut the wheel openings on Ricks car, I stayed close to the molded trim lines. My later cars have a more scale like wheel opening (lower). Make sure the wheels and tires stay well inside the body. When I run the Turbo twists from the Tamiya Boxster, it rubs like crazy in the front and sticks out in the rear. I'm sure other modelers would cut their new shells lower too if they could.
Posted by: steveherman Jul 9 2010, 07:42 AM
I want a rc 914!!!
Where can i get one???
RICK... IF (big if) you WERE to sell yours how much would it be?
I am a firm believer in EVERYTHING has a price!!!
PM me if you prefer!!!
Posted by: rick 918-S Jul 9 2010, 08:11 AM
I want a rc 914!!!
Where can i get one???
RICK... IF (big if) you WERE to sell yours how much would it be?
I am a firm believer in EVERYTHING has a price!!!
PM me if you prefer!!!
This car was an award I received from the WRC.
 A Trophy. I'm very proud of it. Some things hold more meaning than money.
Posted by: MoveQik Jul 9 2010, 08:14 AM
Jim,
Can I get just one wheel? I'll put it on a gold rope and wear it as a funky, fresh medallion. 
Posted by: steveherman Jul 9 2010, 09:10 AM
I want a rc 914!!!
Where can i get one???
RICK... IF (big if) you WERE to sell yours how much would it be?
I am a firm believer in EVERYTHING has a price!!!
PM me if you prefer!!!
This car was an award I received from the WRC.
A Trophy. I'm very proud of it. Some things hold more meaning than money. so if i offered my real yellow 74 2.0 with fresh paint and newly reupholstered yellow plaid seats and fuchs ...
u would say no?
 LOL!!!!!!
See... everything has a price!!!!
Posted by: RJMII Jul 9 2010, 09:27 AM
Thank you! I can copy the locking pattern.
I have it drawn up already to make sure the 31mm tires will be compatible.Okay, that would be great. Do you want them to fit the same as the ones on it, or would you like them moved in-board a little if possible?
Thank you, David!
Where can i get one???
I can build one for you. PM me and we can talk options.
Can I get just one wheel? I'll put it on a gold rope and wear it as a funky, fresh medallion.
I can make one that is the same thickness as the emblems you bought. But you HAVE to wear it to RRC.
Posted by: McMark Jul 9 2010, 10:27 AM
Yer gonna be selling singles, right? 
Posted by: BKLA Jul 9 2010, 12:03 PM
I want a rc 914!!!
Where can i get one???
See... everything has a price!!!!
Air Boston has done some sweet paint jobs on the 914 shells. I have three.
- 2006 WCC Car painted like a beer and sponsored by GT Performance. (Silent auction winner - thanks to my son!)
- A yellow one painted similar to the "zonk"
- An orange one painted to match the Brumos car #58
Dave can paint it anyway you want.
Have jim build you one and have dave paint it!
http://www.airbostongraphics.com/914.htm
BTW -
It appears that the "M" chassis bodies (like the 914) will fit the HPI Cup Racer chassis - if I am reading the info posted on the HPI website correctly.
Might have to try and see!
Posted by: BKLA Jul 9 2010, 12:16 PM
Where's a good place to get some tires for myself? My bug is on the way... (and I'm still waiting for a reply to my PM from the kind individual that offered to sell me a 914 body)
Jim -
You can order wheels and tires right from HPI directly. Most of the local hobby shops don't stock the really cool stuff, just what sells the most!
Wheels:
http://www.hpiracing.com/hpiwheels/touring/
tires:
http://www.hpiracing.com/hpitires/touring/
Talk to Dave at Air Boston regarding bodies. He did a group buy a few months ago. I had him paint up my two... He does everything by hand and is meticulous!
Posted by: RJMII Jul 9 2010, 03:34 PM
I want a rc 914!!!
Where can i get one???
See... everything has a price!!!!
Air Boston has done some sweet paint jobs on the 914 shells. I have three.
- 2006 WCC Car painted like a beer and sponsored by GT Performance. (Silent auction winner - thanks to my son!)
- A yellow one painted similar to the "zonk"
- An orange one painted to match the Brumos car #58
Dave can paint it anyway you want.
Have jim build you one and have dave paint it!
http://www.airbostongraphics.com/914.htm
BTW -
It appears that the "M" chassis bodies (like the 914) will fit the HPI Cup Racer chassis - if I am reading the info posted on the HPI website correctly.
Might have to try and see!
 Dave does an awesome job at painting! He has got some serious talent and an eye for detail.
 http://www.airbostongraphics.com/914.htm
Posted by: Zimms Jul 9 2010, 04:53 PM
BTW -
It appears that the "M" chassis bodies (like the 914) will fit the HPI Cup Racer chassis - if I am reading the info posted on the HPI website correctly.
Might have to try and see!
I was looking at that, and their wheelbase only goes to 225 mm. The Tamiya Long chassis goes to 240 ish, required for the 914 shell.
Posted by: RJMII Jul 9 2010, 06:55 PM
Yer gonna be selling singles, right?
Of course! If you want one that doesn't need to be fitted to a car, I can get to it sooner.
Another teaser pic of prototype number3:
Attached image(s)
Posted by: ConeDodger Jul 10 2010, 10:04 AM
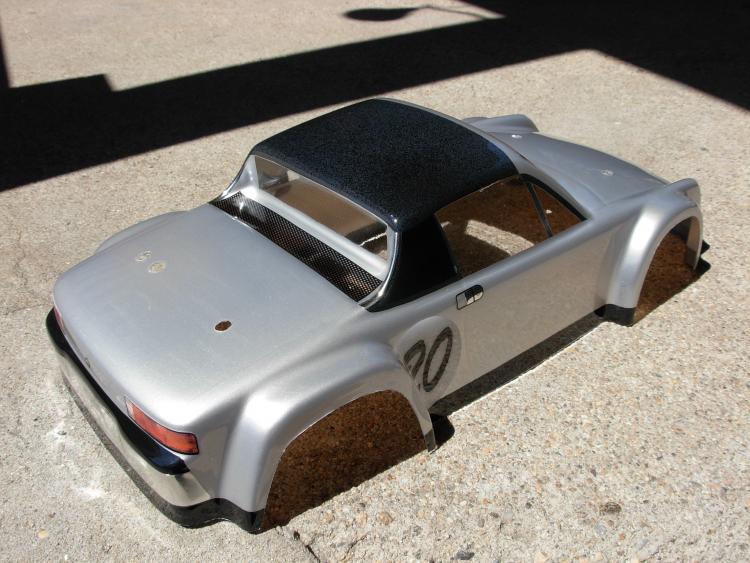
Here is my Air Boston Group Buy 914 Chassis. Made to match my car on autocross days. I would love a set of Fuchs for it. I might even buy two sets. If David ever does another group buy I might buy another and have him paint it... hmmm either Max Moritz or Brumos style...
Attached image(s)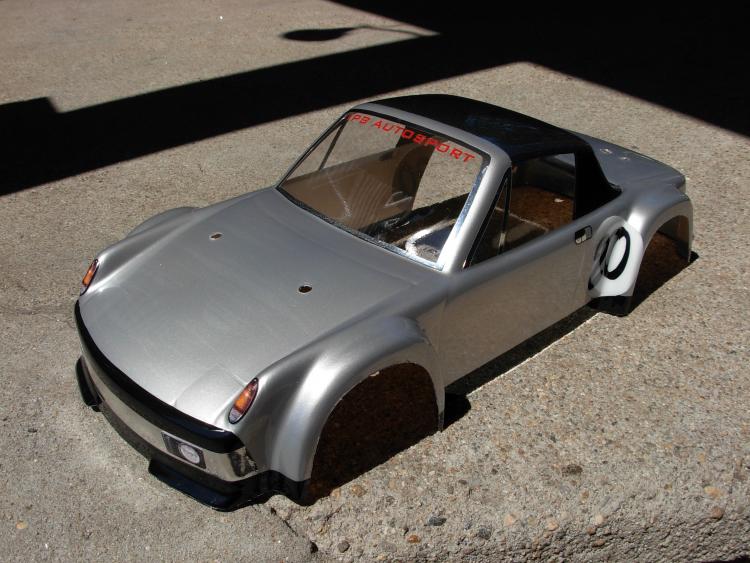
Posted by: RJMII Jul 10 2010, 10:27 AM
Rob, which chassis are you using? (that's a body... a very nice looking on at that.  )
)
What tires? the standard set with all 4 the same(26mm), or the staggered 26/31 setup?
Posted by: ConeDodger Jul 10 2010, 01:52 PM
Rob, which chassis are you using? (that's a body... a very nice looking on at that.
)What tires? the standard set with all 4 the same(26mm), or the staggered 26/31 setup?
M04L... I have no tires on it right now. The chassis is on its way from Japan.
I would like the wheels to be RSR finish
Oh, and only one set for now... I just noticed your price and that is a little rich for something that will sit on the shelf for a while...
Posted by: RJMII Jul 11 2010, 02:29 PM
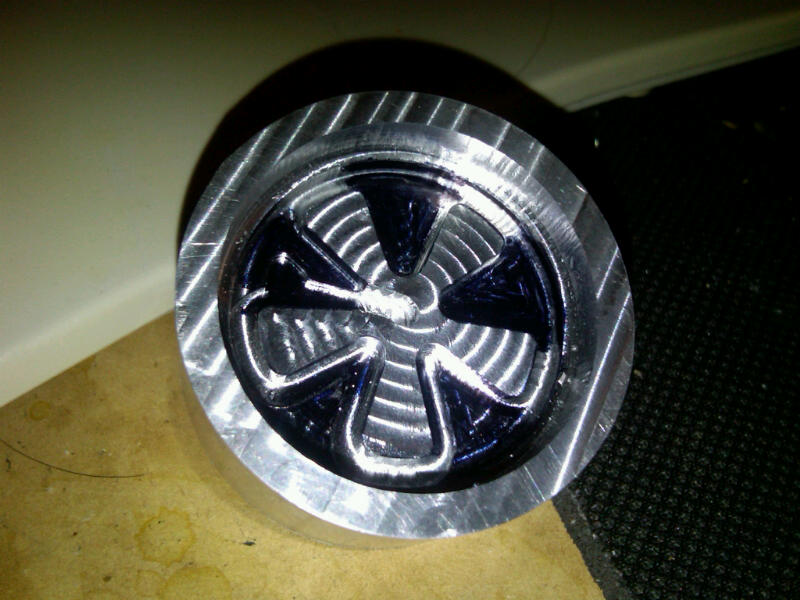
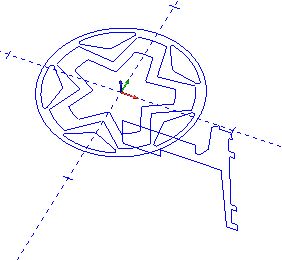
Screen shot from the drawing for prototype #4.
I've been comparing this to the wheel on my car... it's getting closer to the real thing. See the rounded edges and the sloped lip?
Attached image(s)
Posted by: RJMII Jul 11 2010, 02:32 PM
After all night in the vibratory polisher being bashed and pounded on by walnut shells.
Attached image(s)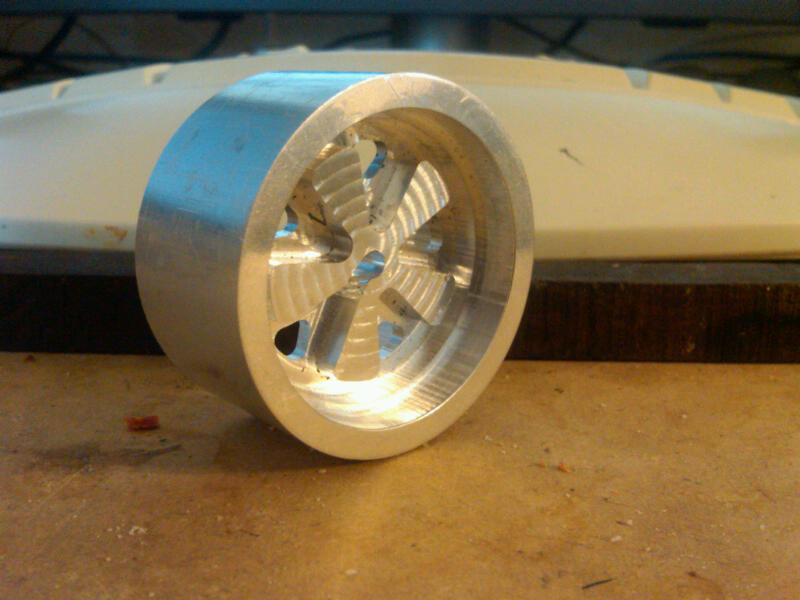
Posted by: rick 918-S Jul 11 2010, 03:47 PM
I forgot to PM you. I'm crazy busy driving from the metro to the canadian border and home all last week...  My car was shipped. Should be there by Wednesday. I took out the Extra insurance. Considering I didn't purchase this and it was an award I have no idea what it's worth. I only insured it for $ 200.00 What do these cars cost, chassis, custom painted, custom wheels...etc...
Posted by: RJMII Jul 11 2010, 05:39 PM
I'm looking forward to putting a set of wheels on your car! Which method did you ship?
Here is a breakdown of these cars:
[url=http://www3.towerhobbies.com/cgi-bin/wti0001p?&I=LXRXV3&P=0]Donor Car
[/url]$239 + Shipping
http://cgi.ebay.de/VW-PORSCHE-914-M-CHASSIS-KAROSSERIE-1-10-DECALS-/400129659017?cmd=ViewItem&pt=RC_Modellbau&hash=item5d2996108919,95 Euros + shipping to US. ($25.237 + shipping at current exchange rate)
http://www.hpiracing.com/products/en/4797/$14.00
http://www.hpiracing.com/products/en/4793/$13.00
http://www.airbostongraphics.com/914.htm$55.00 (as starting point)
And you're adding the custom CNC billet aluminum wheels: $120 set of four.
Posted by: rick 918-S Jul 12 2010, 06:56 AM
I'm looking forward to putting a set of wheels on your car!
Which method did you ship?Here is a breakdown of these cars:
[url=http://www3.towerhobbies.com/cgi-bin/wti0001p?&I=LXRXV3&P=0]Donor Car
[/url]$239 + Shipping
http://cgi.ebay.de/VW-PORSCHE-914-M-CHASSIS-KAROSSERIE-1-10-DECALS-/400129659017?cmd=ViewItem&pt=RC_Modellbau&hash=item5d2996108919,95 Euros + shipping to US. ($25.237 + shipping at current exchange rate)
http://www.hpiracing.com/products/en/4797/$14.00
http://www.hpiracing.com/products/en/4793/$13.00
http://www.airbostongraphics.com/914.htm$55.00 (as starting point)
And you're adding the custom CNC billet aluminum wheels: $120 set of four.
I'll have to increase the shipping for the return trip...
 I sent it UPS. I'll PM the tracking number. I forgot to toss some aluminum scrap in the box. I'll try to get another box out later in the week but it's starting to get nuts here.
Posted by: RJMII Jul 14 2010, 03:22 PM
prototype3 on the car...
Now I can get some measurements and SEE how they fit! I am so stoked!
Rick, THANK YOU!!!
Here's the pic.
Attached image(s)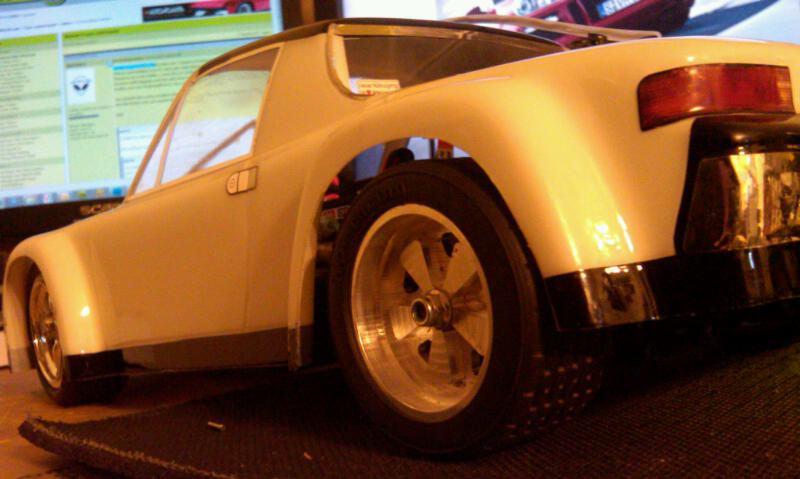
Posted by: Sleepin Jul 14 2010, 03:57 PM
Those look great Jim! With a little finishing and painting, those will be nuts on!
Posted by: Joe Sharp Jul 14 2010, 04:49 PM
The cars that I put together for the WCR were about $450 with radio. That is with 2 batteries and a charger but without the trophy.
Posted by: rick 918-S Jul 14 2010, 04:56 PM
prototype3 on the car...
Now I can get some measurements and SEE how they fit! I am so stoked!
Rick, THANK YOU!!!
Here's the pic.
Those are going to look outragous on our cars! All the 911 guys are going to have wheel envy.

Posted by: ConeDodger Jul 14 2010, 07:12 PM
I spent part of the day assembling the chassis for mine pictured above. Pretty elaborate. My kid is stoked. The cheesy VW wheels that come with the Bug M04-L kit will never do...
Posted by: roadster fan Jul 19 2010, 04:51 PM
Jim the wheels are looking REAL good, keep up the hard work! 
Jim
Posted by: BKLA Jul 19 2010, 06:16 PM

Looking good!
Posted by: nsr-jamie Jul 20 2010, 08:40 AM
Looks cool to see them on a car...is your CNC set up able to do 3D stuff ?
Posted by: RJMII Jul 21 2010, 07:44 PM
Yes, my CNC is setup to do 3d.
I'm still working on the fourth axis; I'd like to program it so I can get perfect circles and the correct contours.
More progress pictures:
My VW donor car showed up the other day. Xac and I put it together, and I showed him how much fun it is to assemble stuff. 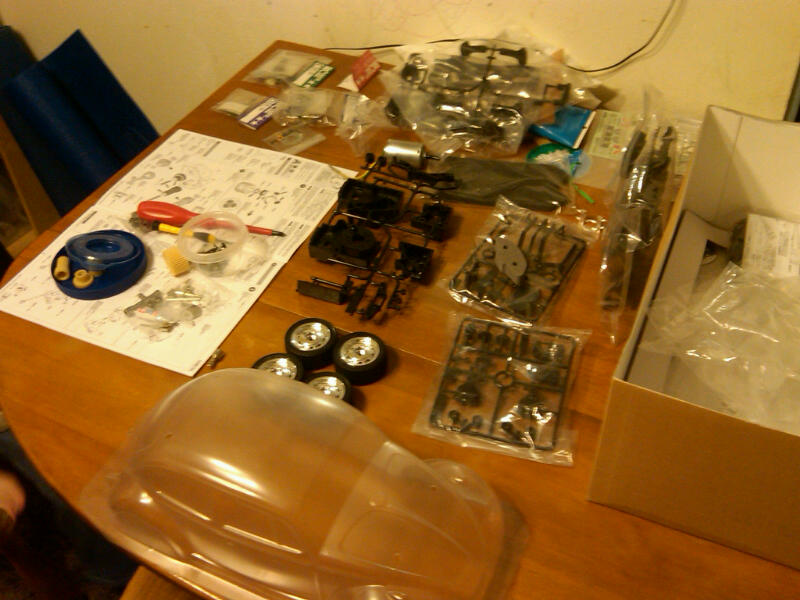
I've also been working on the polishing. See the sides of the Fuchs in the picture? that's from hanging out in the walnut shells for 24 hours. 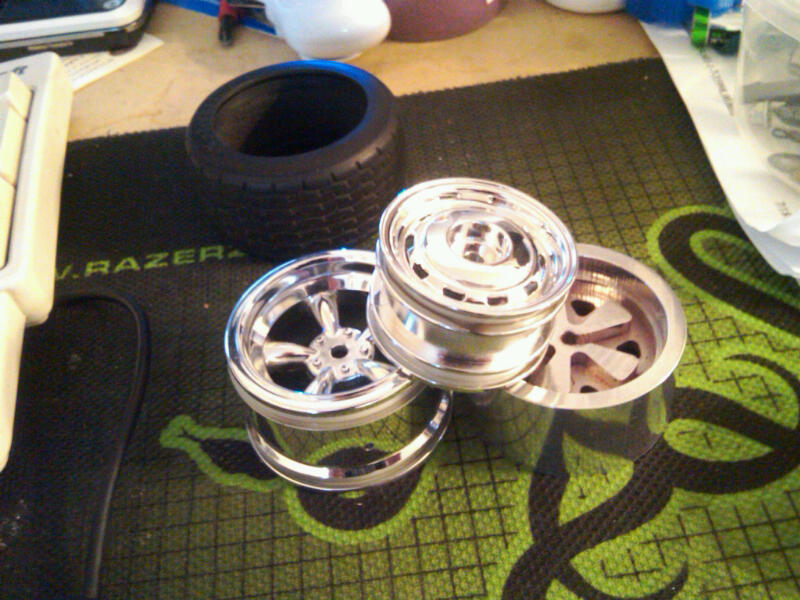
Posted by: RJMII Jul 22 2010, 04:16 PM
I now have two cars here, and I've got the measurements! I am ready to start cutting out the wheels. It will be easiest to do them if I do a larger run.
The process for cutting out the wheels requires me to set up my CNC mill in multiple configurations.
The process, for those that are curious:
Step one, chop up the stick of 2inch aluminum into inch and a half long chunks. - 2 hours.
(Dial in vice on rotary table to be centered with spindle) - half an hour, 45 minutes. Requires dial indicator.
Step two: Face the chunks/machine one face square and mark it. - 10 minutes per wheel.
Step three: Face other side of chunks/machine down to size. (1.125 for narrow wheels, 1.25 for wide wheels. - 10 to 15 minutes per wheel
Step four: Rough out the fronts of each wheel. (I'll put a spacer between the bottom of the vice and the wheel so that the same code can be used for narrow and wide wheels and run all of them through at once) - 35 to 45 minutes per wheel
Step five: Rough out the backs of the wide wheels - 35 to 45 minutes per wheel
Step six: Rough out the backs of the narrow wheels - 30 to 35 minutes per wheel
step seven: Run the finishing script for the backs of the Wide wheels - 15 minutes per wheel
step eight: run the finishing script for the backs of the narrow wheels. (finishes the 'hex' for the drive nut) 15 minutes per wheel
Step nine: Run the script for the 3d portion of the fronts of the wheels. (the part that makes them have 'the look') - hour and a half per wheel (working on making this take less time)
(now I set the machine up with the rotary table being vertical, with out the vice. I'll have a fixture to bolt the wheels to, and it will be dialed in centered on the rotary table)
Step ten: Run the script for each wheel for the area that the tire mounts. 10 to 15 minutes per wheel.
Step eleven: Put a couple of sets of wheels in the polisher for over night. The polisher has walnut shells and rouge. - one to two nights.
Posted by: RJMII Jul 22 2010, 04:53 PM
Here is a top view of the car.
Back left tire is the wide one.
Back right tire is a narrow one.
Front right tire is a narrow one.
Front left tire is a stock bug tire and wheel. (much smaller diameter, takes different tires)
Attached image(s)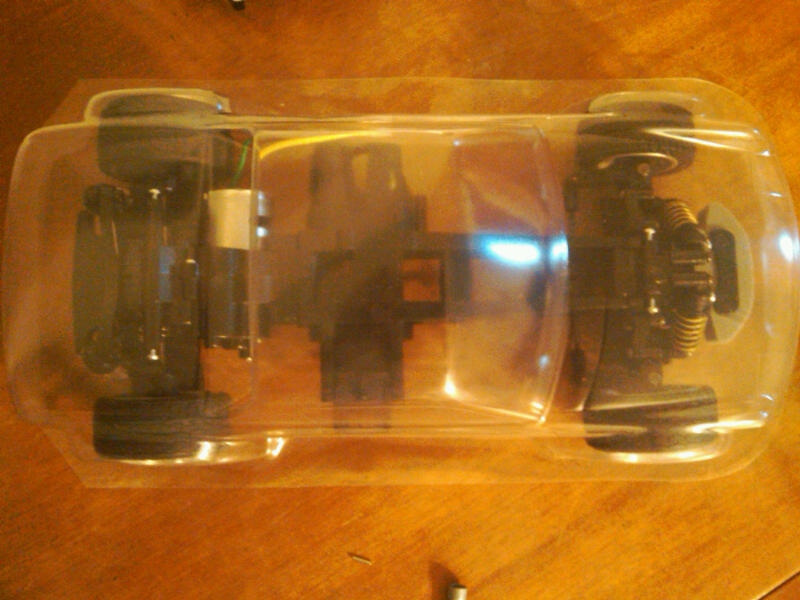
Posted by: rick 918-S Jul 22 2010, 05:59 PM
Somehow I missed the pre-order info on the first post. I just sent the better half an email and asked her to send money via PP.
Get your orders in boys!
Posted by: RJMII Jul 22 2010, 06:08 PM
Rick, I just added it. I wanted to get the measurements and code sorted out first. Quality is high priority here and I wanted to make sure I can do it and do it right. I am confident enough in the project now to go forward.
Posted by: rick 918-S Jul 22 2010, 06:23 PM
Great! I'm looking forward to seeing the finished produce. Specially on MY car.
Posted by: RJMII Jul 23 2010, 03:35 PM
anyone else?
Posted by: rick 918-S Jul 23 2010, 04:18 PM
Sent the pay pal I think. ![]()
Posted by: RJMII Jul 27 2010, 12:28 PM
I ordered the metal today. Should be in my posession early next week; and I'm still taking pre-orders.
the pre-orders will close when I post pics of Rick's car with a full set of them cut in 3d. Yes, the contours of the leaf will be rounded.
Posted by: RJMII Aug 3 2010, 10:45 AM
I've been working on the 3d tool paths to get the very fine details in the wheels.
another teaser pic. the green lines show the tool path.
Attached thumbnail(s)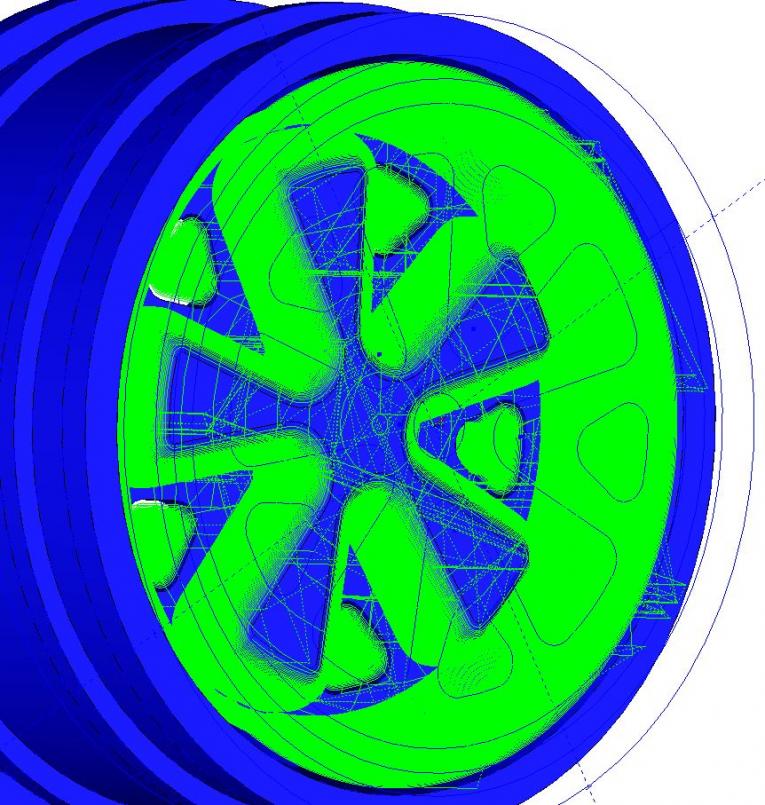
Posted by: RJMII Aug 3 2010, 10:46 AM
zoomed in
Attached thumbnail(s)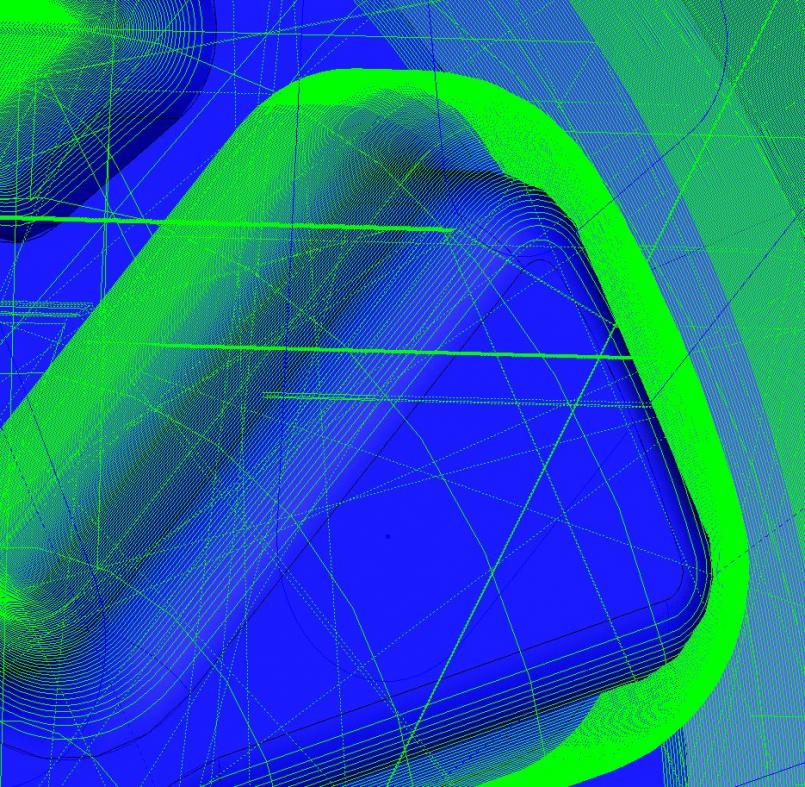
Posted by: rick 918-S Aug 3 2010, 05:50 PM
That's cool! Build em and they will sell! 
Posted by: Vacca Rabite Aug 3 2010, 06:21 PM
I am looking forward to seeing the initial maps for the cookie cutters!
zach
Posted by: RJMII Aug 9 2010, 12:57 PM
beginnings of COOKIES!
Attached image(s)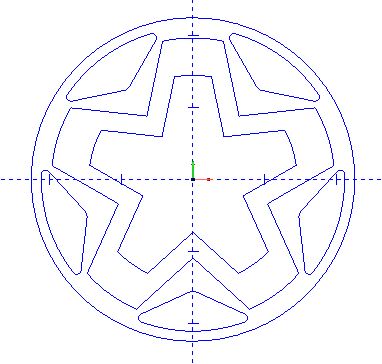
Posted by: underthetire Aug 9 2010, 01:56 PM
Man, I just read some of your times for cutting. We need to find you a CNC lathe bad !
Posted by: rick 918-S Aug 10 2010, 07:41 AM
The cookies look diffecult... 
Posted by: RJMII Aug 10 2010, 08:18 AM
I keep looking for used mini lathes that I can convert. PM or email if you find something?
They are proving to be a challenge.
Now to get back to finishing my last run of emblems. I've about got my machine modified with the new controller, drivers, and more voltage. Hopefully this helps drop my machining times.
Posted by: RJMII Sep 21 2010, 07:41 PM
as promised;
picture of prototype FOUR! starting to go 3d. It looks cooler in person, IMHO.
Attached image(s)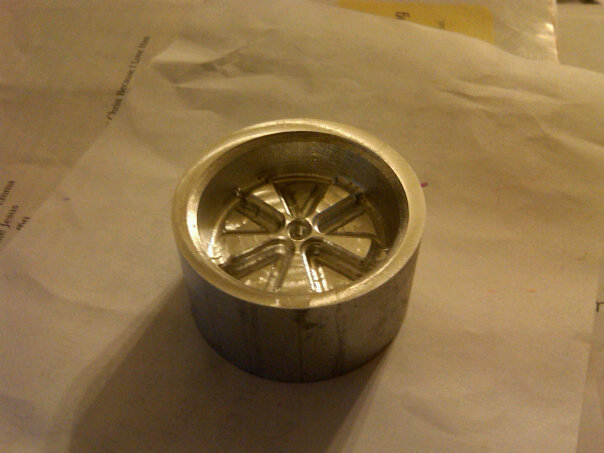
Posted by: RJMII Sep 21 2010, 07:46 PM
Man, I just read some of your times for cutting. We need to find you a CNC lathe bad !
The new 42ipm rapids are helping a ton, along with adjusting my cutting styles. I learned a lot playing with the new setup, trying different things. I'm able to hit 23ipm for a feed rate if I use just the right amount of bit; before I was going full bit width. :S I could hit faster rapids if I were to go full stepping instead of half, but I like it where it is at and probably won't gain much with the smaller movements that primarily rely on the acceleration capabilities of the steppers.
Posted by: rick 918-S Sep 21 2010, 11:05 PM
as promised;
picture of prototype FOUR! starting to go 3d.
It looks cooler in person, IMHO.That's really starting to look good!
Posted by: RJMII Nov 15 2010, 05:30 PM
My health has picked back up, I am stoked! I get to start working on wheels and emblems again this week.
I think I've pretty much got the code issues resolved and need to run another prototype to finalize the notion that they are ready.
The bit wasn't fitting between the lip of the wheel and the petals, and was causing high spots.
Posted by: nsr-jamie Nov 16 2010, 04:41 AM
Hi Jim, glad you are better and back to work on those cool parts.....looking forward to seeing them in person and those cool GT logos too.
Do you have any access to stereolithiography equipment or rapid prototyping 3D printers? If so, it might be a lot easier to manufacture small amounts of the wheels and be a lot cheaper too.
Posted by: RJMII Nov 16 2010, 08:10 AM
Jamie, thank you!
No, I don't. If I went that route, they wouldn't be billet aluminum.
Posted by: RJMII Dec 6 2010, 08:33 PM
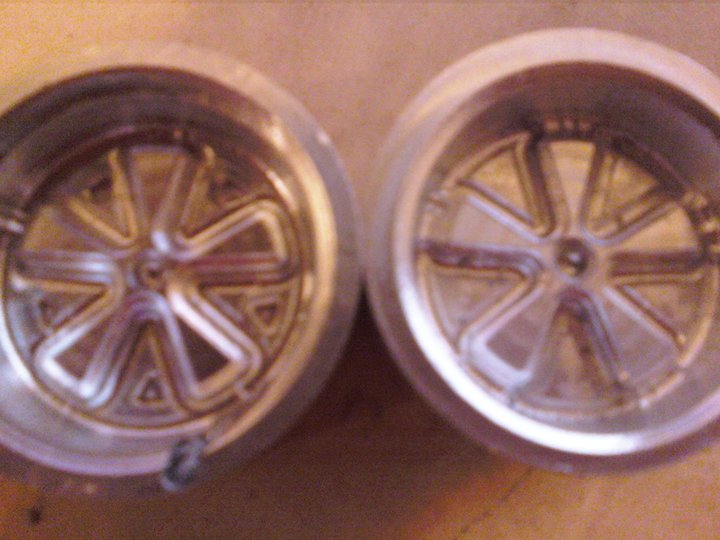
Look, a pile of squared circles!
and a lurry picture of prototype number five next to number four. The differences are the holes in the webbing, the petals are separated from the lip and have more definition, and the petals have a larger corner radius along the outer edge that makes them more rounded and smooth.
Attached image(s)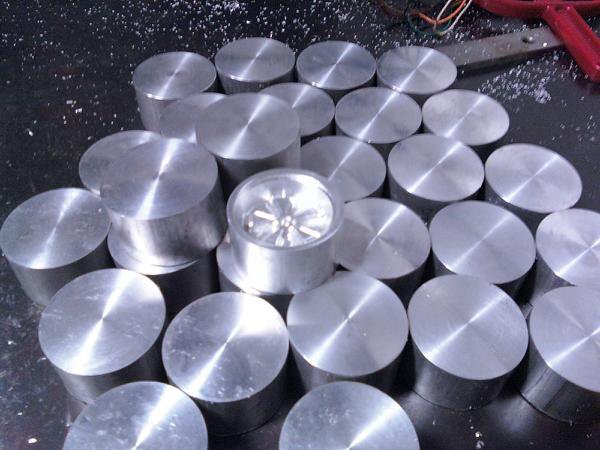
Posted by: RJMII Dec 6 2010, 08:34 PM
I ran several different sets of code on number five to varying depths, fixing screw ups along the way.
Posted by: rick 918-S Dec 6 2010, 09:22 PM
That looks bitchin Jim. Keep at it!
Posted by: jetboy Dec 6 2010, 10:30 PM
wow. thats some nice progress.
Posted by: BKLA Dec 7 2010, 07:38 PM
All that hard work is paying off!!
Great job!!!!!
Posted by: RJMII Dec 17 2010, 11:33 AM
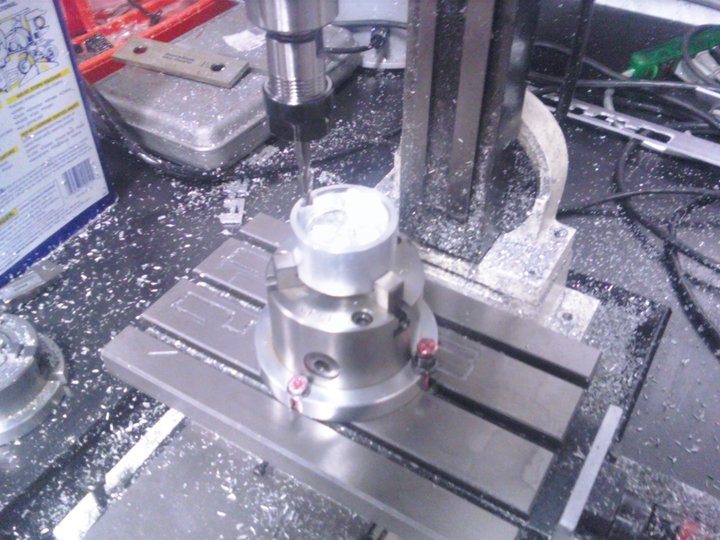
New addition to my wheel making!
The 3 Jaw chuck bolts directly to my mill bed, or the rotary table. It holds the wheels in place MUCH more securely than the little vise I was using.
The rotary table also has a new addition; a stepper motor! Now it needs wired and the backlash taken out.
Attached image(s)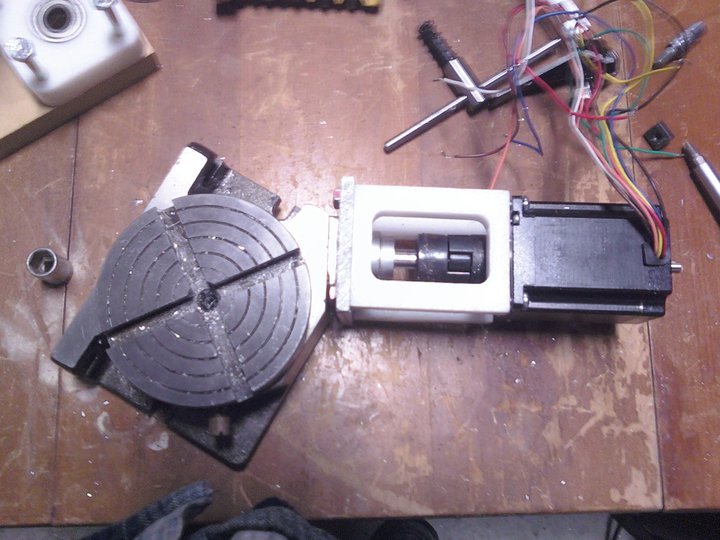
Posted by: rick 918-S Dec 17 2010, 12:58 PM
New tools are the best!
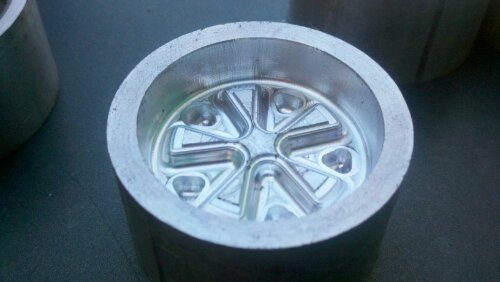
Posted by: RJMII Dec 19 2010, 09:13 PM
here is prototype number 7. I'm getting the back sides of the wheels figured out, and have the fronts pretty much wrapped up. The only thing missing is the hole for the bolt to hold it onto the car.
Attached image(s)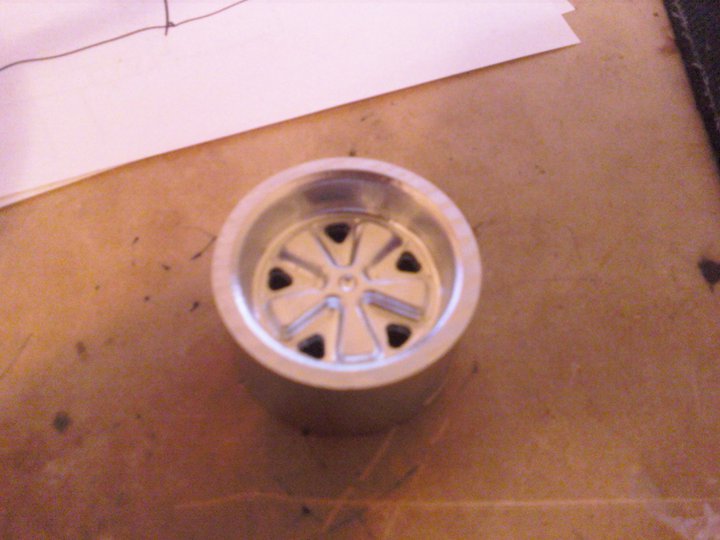
Posted by: BKLA Dec 20 2010, 08:48 AM
Wow! Looking great!!!
Posted by: rick 918-S Dec 20 2010, 11:32 AM
That's set to kill!
Posted by: RJMII Dec 23 2010, 07:52 PM
4th axis and tailstock bolted to the mill. I should be able to work on the code for the area the tire mounts in on the outside of the wheel now.
Attached image(s)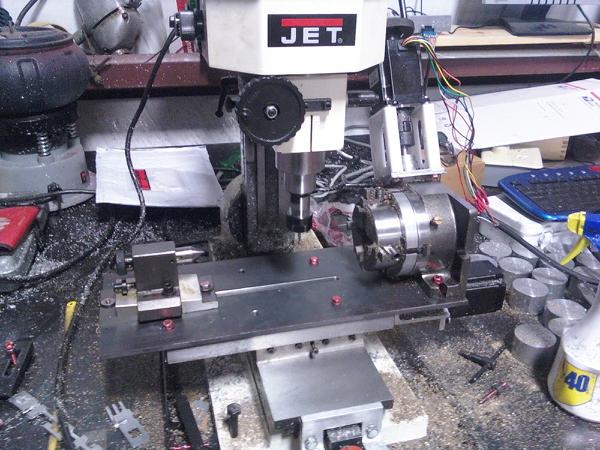
Posted by: RJMII Apr 21 2011, 04:54 PM
We moved last month, and my brother was kind enough to spend the day on one of his weekends off to help me relocate all of my machining equpment from my dad's shop to the garage that is basically on the other side of the wall from my living room. My CNC mill is less that 30 foot from my couch that I lounge on while healing and resting. Things are getting easier and looking up for me.
Attached thumbnail(s)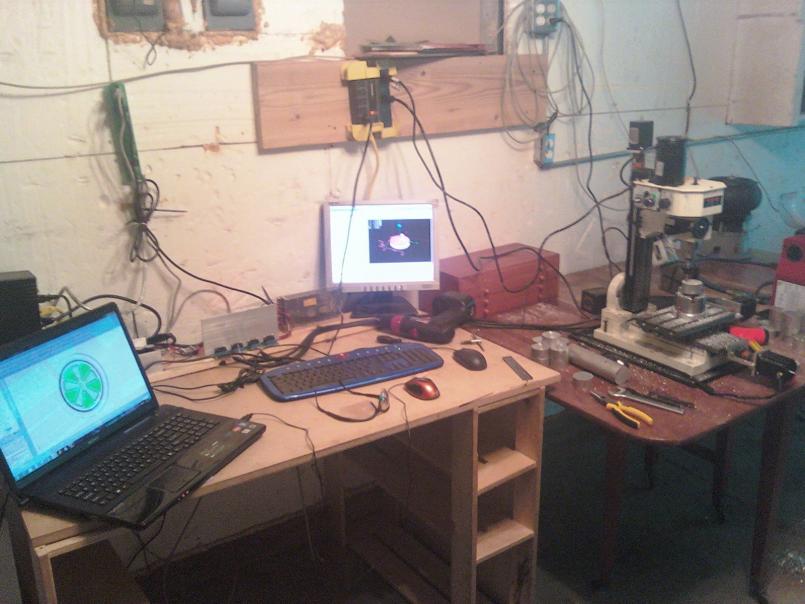
Posted by: RJMII Apr 21 2011, 04:56 PM
a close up of the tool path on my EMC/linux box.
the red lines are the ones that are done for this particular wheel.
Attached thumbnail(s)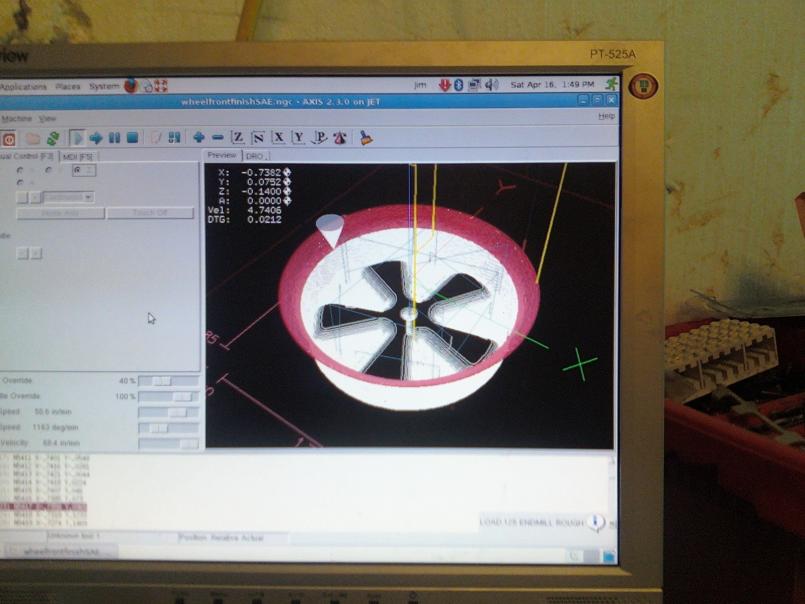
Posted by: RJMII Apr 21 2011, 04:57 PM
This is the beginning of the pile of blanks that are ready for the above pictured tool path.
Attached thumbnail(s)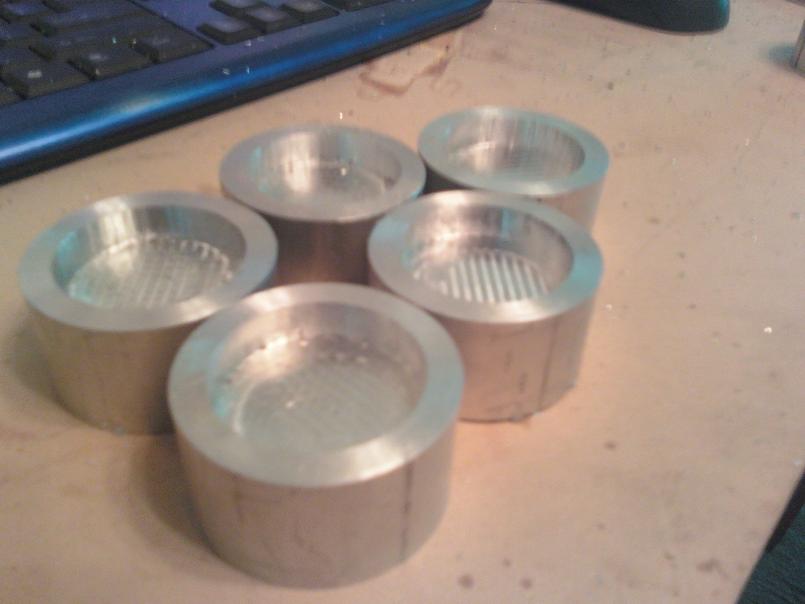
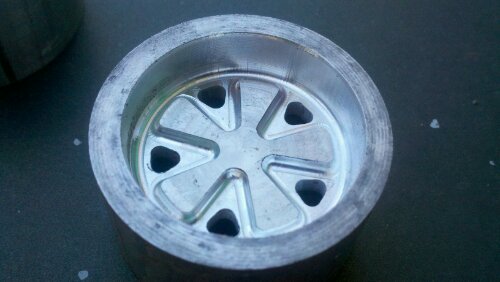
Posted by: RJMII Apr 21 2011, 04:58 PM
This is the wheel that was cut out from the above pictured tool path.
Attached thumbnail(s)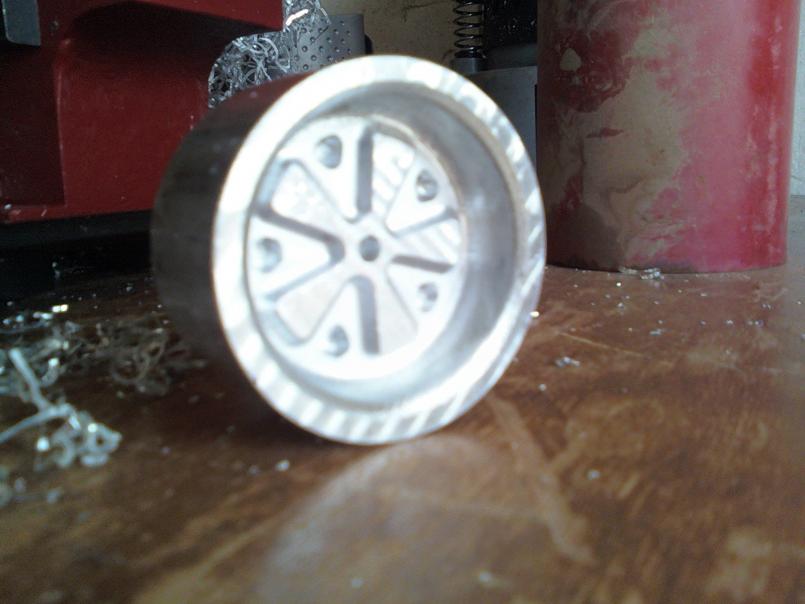
Posted by: Cairo94507 Apr 21 2011, 04:58 PM
Wow! That is crazy cool. How cool would it be to have one big enough for a paper weight on your desk?
Posted by: RJMII Apr 21 2011, 04:59 PM
and here is another one that had a couple of glitches on the back side, and the 3 jaw chuck was .030" off center for the face. It's now a paperweight somewhere else w/out the tire on it.
Attached thumbnail(s)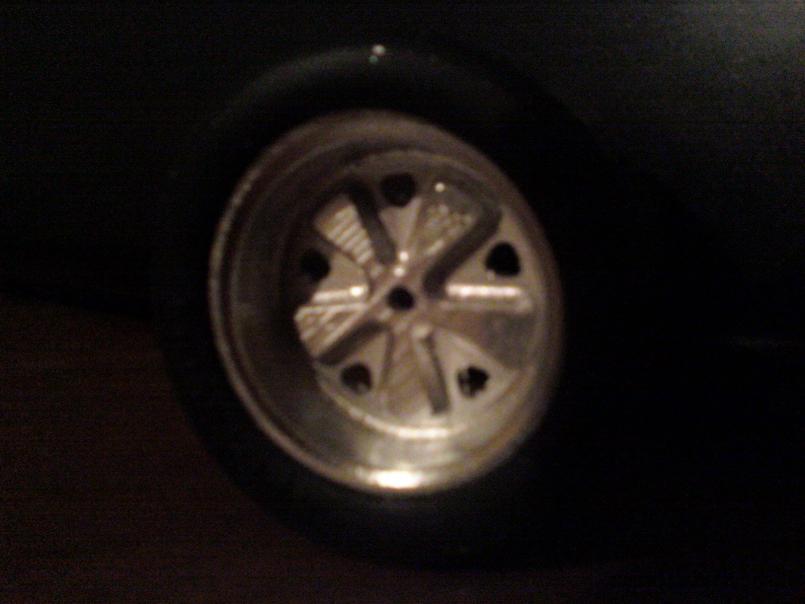
Posted by: RJMII Apr 21 2011, 05:03 PM
Wow! That is crazy cool. How cool would it be to have one big enough for a paper weight on your desk?
Thanks, man! How cool is it that you posted that right as I was posting that the last one I made IS a paperweight somewhere!
Posted by: KELTY360 Apr 21 2011, 06:19 PM
That's cool Jim. So you've got a house with attached garage now? Movin' on up!
Posted by: RJMII May 17 2011, 01:33 PM
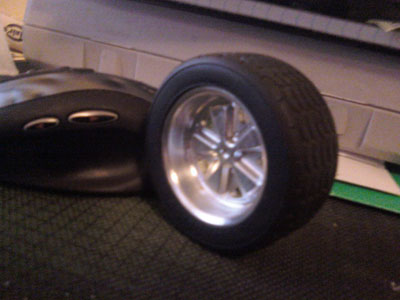
got some more done.
The back of the wheel is getting some minor adjustments and should be good here soon.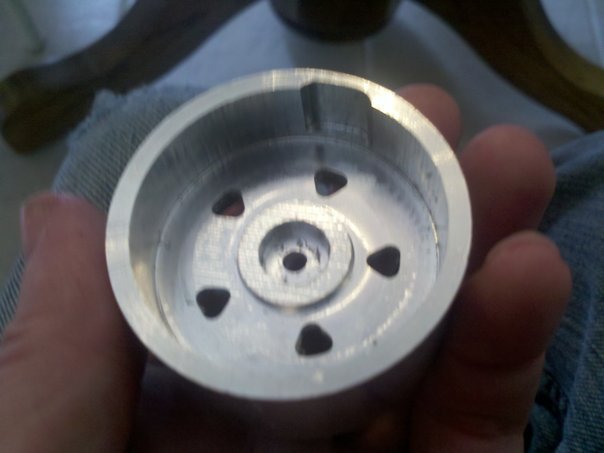
The front is ready to go.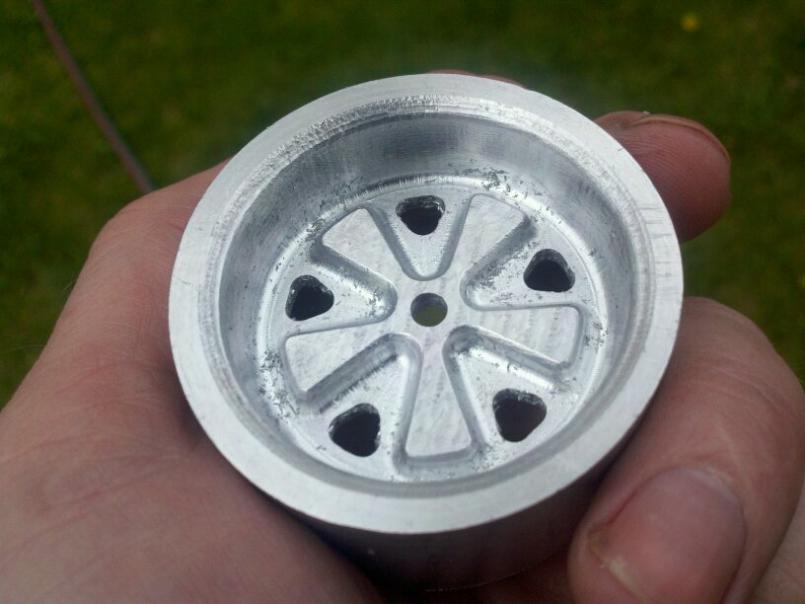
and here is what it looks like on the car.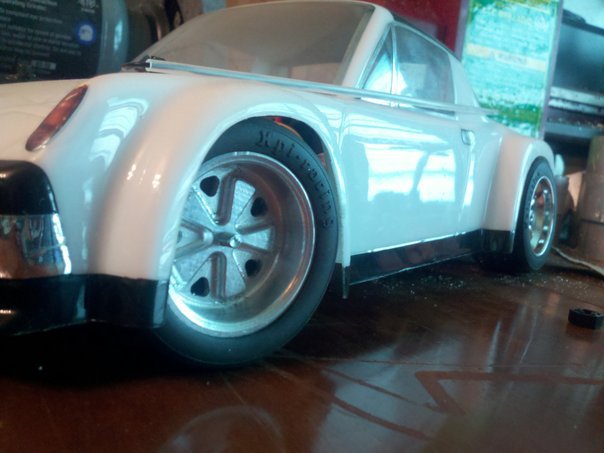
Posted by: RJMII May 17 2011, 04:31 PM
Working on the different finishes using some of the screw ups for test pieces.
Attached image(s)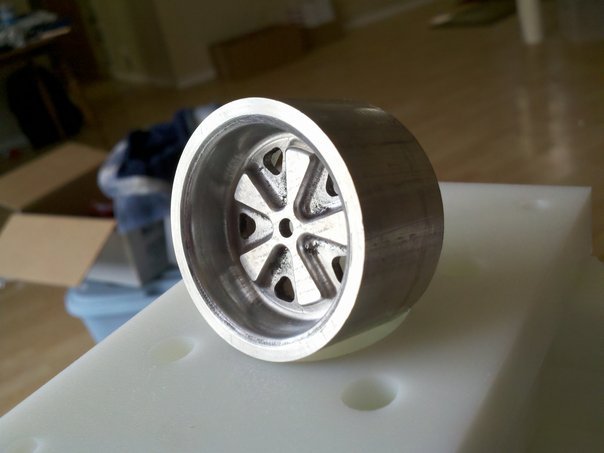
Posted by: AZ914 May 17 2011, 04:47 PM
That is what I call DEEP DISH.
Posted by: rick 918-S Aug 23 2011, 07:48 AM
How are my wheels coming? The last photos look bitchin! 
Posted by: RJMII Aug 23 2011, 07:52 AM
My mill fried again (in a different spot) and I had to rebuild it. 
the stack of wheels blanks are sitting waiting to be done. The mill is back up and running with the 4th axis.
Posted by: rick 918-S Aug 23 2011, 07:57 AM
My mill fried again (in a different spot) and I had to rebuild it.
the stack of wheels blanks are sitting waiting to be done. The mill is back up and running with the 4th axis.
They sure look cool!
Posted by: RJMII Aug 23 2011, 08:16 AM
thanks!
This is my project for the next couple of days while I get drawings done for other projects I am catching up on.
Posted by: rohar Aug 23 2011, 08:21 AM
Hey RMJII, it might be time to build a small foundry. I'm thinking a LOT of the work could be cast into these pieces faster than milled. Then throw them on the mill for finishing.
I'd add pics of mine, but it's in storage while we try and sell the house. Here's one similar: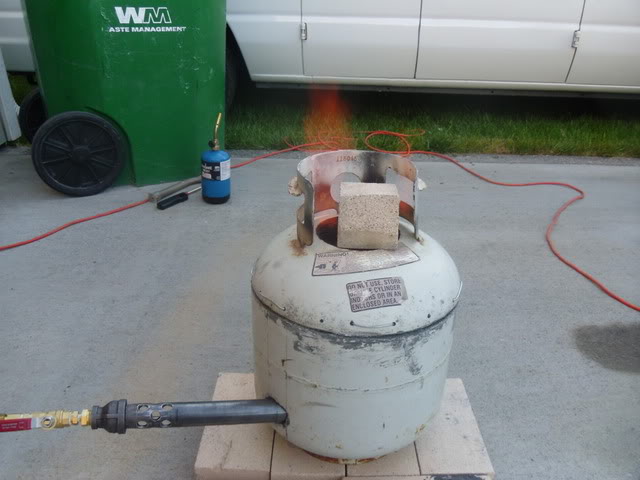
About $50 in supplies to build the thing and you'll never toss out another beer can again.
http://www.backyardmetalcasting.com
Posted by: RJMII Aug 23 2011, 08:31 AM
And I"ll probably stop losing so much money on tossed wheel blanks.
I swear I've been going into debt trying to make these.
Posted by: nsr-jamie Aug 23 2011, 09:33 AM
Dont throw out those ones that didn't make the quality control inspection...they could always be used for something else for example a key chain or fob, paper weight holder or something cool if you can come up with an interesting idea. I scrapped many pieces and parts many years ago when I was learning about CNC machining and programing. Thats how you learn from it, you learn from your mistakes and try not to do them again. Keep up the good work
Jamie
Posted by: rohar Aug 23 2011, 12:02 PM
And I"ll probably stop losing so much money on tossed wheel blanks.
I swear I've been going into debt trying to make these.
I'm thinking with a couple of flower pots, a mapp torch, some pearlite and a muffin tin, you could come pretty close to recasting that aluminum into a new blank.
Posted by: rick 918-S Aug 23 2011, 05:47 PM
I had to bump this thread one more time before the server goes off line just because this is one of the coolest projects currently being worked on by any of the jack standers here. ![]()
Jim, If you need a couple more bucks for my wheels let me know. This has got to be seriously hard to do. I can't remember what the group buy price was but I don't think it was enough considering the mill problems and learning curve. I can see you have the concept. Keep at it.
EDIT: Oh, just don't tell Sandy. Like I said I don't remember what the price of the wheels were but I do remember her reaction when she found out what she just paid for..  for a toy? wheels for a toy?
  It was really funny.
Posted by: RJMII Aug 23 2011, 05:49 PM
Rick, I'd be happy to accept donations at this point. I'm not going to put any $number on it because I honestly don't think it would be fair. (Very appreciated, though; that it would be. and I wish the Star Wars movies were on Blu Ray already!)
Posted by: rick 918-S Aug 23 2011, 05:55 PM
PM me your address before Sir Andy shuts us down and I will send a money order. I can't ask the boss for pay pal service for this one.
Posted by: Vacca Rabite Aug 23 2011, 07:46 PM
Same with Rick. let me know what you need. Also, don't bother with making me cookies. Fuchs will be totally fine.
Zach
Posted by: RJMII Aug 27 2011, 10:36 AM
Wow, thank you guys! Your words of encouragement were just what I needed this week.
I took the rest of the aluminum stock/stick I am using and went to the machine shop that a friend owns and cut it down for another 6 or 7 sets.
The mill is set up perfect right now for getting the blanks all cut to a uniform size, and I modified my dial indicator and a c-clamp so I can center the end mill to the a-axis. pictures forthcoming.
Posted by: underthetire Aug 27 2011, 11:04 AM
Dont throw out those ones that didn't make the quality control inspection...they could always be used for something else for example a key chain or fob, paper weight holder or something cool if you can come up with an interesting idea. I scrapped many pieces and parts many years ago when I was learning about CNC machining and programing. Thats how you learn from it, you learn from your mistakes and try not to do them again. Keep up the good work
Jamie
That's not an exactly easy learning piece to make either. I remember a very seasoned machinist recently scrapping a 30 thousand dollar piece of material. We've all been there. I've scrapped my share back in the day as well, and that was a proven machine! Mueller just scrapped some parts off his recently retrofitted Bridgeport as well. Think of it as buying books for one class that you will never need again.
Posted by: RJMII Aug 27 2011, 02:33 PM
This should help find center.
Attached image(s)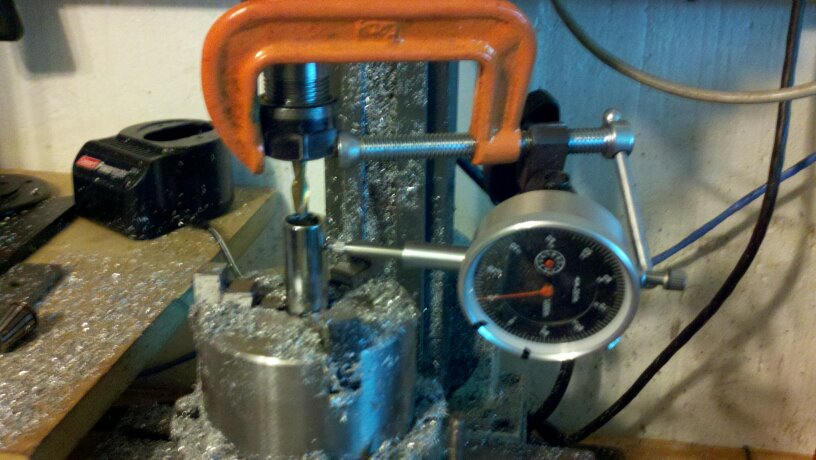
Posted by: rohar Aug 27 2011, 02:59 PM
Hey man, I was thinking about you this morning. Looks like I'm gonna be moving on the 20th of next month so I get all my gear back from storage. If you need castings of stuff, let me know. I should be ready to start melting aluminum again by the 25th
It's a smaller foundry, so about a quart of aluminum is the biggest pour i can do for now.
Posted by: underthetire Aug 27 2011, 06:01 PM
Hey Jim, there is a much simpler way to find center. Leave the chuck mount bolts loose, bring the spindle down, then use the three jaw chuck and clamp on the spindle. Tighten chuck to table. No indicating required. Usually will get you less than .001 doing it that way.
Posted by: Cairo94507 Aug 27 2011, 07:45 PM
Incredible skills! I would love one of the Fuchs wheels for a paper weight on my desk. Maybe with a tire on it if possible. Let me know what it would run once you are in production.
Thanks,
Michael
Posted by: RJMII Aug 27 2011, 08:10 PM
Hey Jim, there is a much simpler way to find center. Leave the chuck mount bolts loose, bring the spindle down, then use the three jaw chuck and clamp on the spindle. Tighten chuck to table. No indicating required. Usually will get you less than .001 doing it that way.
Thanks, Jeff!
It's centered pretty good now.
the needle hardly moves away from the white line it is pointing at. The chrome socket worked wonders...and... I didn't want to lose my 'z' setting. it's perfect right now.
Thanks,
Michael
Michael, thank you! will do.
Posted by: montoya 73 2.0 Aug 27 2011, 08:20 PM
Those wheels look great. Is there a waiting list for a full set?
Posted by: RJMII Aug 28 2011, 08:14 AM
Drew, yes. Some have even paid to help cover R&D on the project. (and; Jamie from Japan, and Jeff From CA, have sent tooling and offered up suggestions/advice to help with the learning curve)
The pictures below:
the larger stack are all sliced and squared and ready to be cutdown to size.
to make them look like the other stack. They are all squared up from where the band saw cut crooked. (put them on the lathe for this) after the lathe, they went to the mill because it is set up to run from the computer and it cuts them to size more quickly than I could do by hand on the lathe.
Attached image(s)
Posted by: nsr-jamie Aug 28 2011, 08:23 AM
If you have any access to a surface grinder would be a good time to very gently surface grind them to a perfect flat finish on both sides. It makes a better product and setting up in the CNC is a bit easier and they come out much nicer.
Or like another member mentioned....it might be better to make some kind of mold and just pour the molten alloy into it...can you say "INVESTMENT CASTING" ...this is actually an old technique they use to make jewellery with a "lost wax" or wax melting process...not too expensive and easy to machine but you would need a foundry friend who seems to be offering his services.
Posted by: RJMII Aug 28 2011, 12:46 PM
Jamie, thank you for the tip.
I'll probably be getting ahold of rohar on the phone sometime within the next month. He seems to be busy with a move at the moment, and I still need to make a perfect finished product.
It's getting closer each day, and I'm pretty excited about it.
Posted by: RJMII Aug 29 2011, 12:52 PM
Posted by: RJMII Aug 29 2011, 01:42 PM
a friend wrote a perl script for me to run a spiral to cut the wheel blanks out. These things are getting easier to cut out and much more efficient.
Now if that solder joint in the spindle speed controller would stop vibrating out...
https://www.youtube.com/watch?v=7HJrrBthN0c
Posted by: rohar Aug 29 2011, 02:05 PM
So pretty. I love watching a mill go. It just makes me happy. A big old bridgeport just came available over here. So tempting...
Posted by: RJMII Sep 13 2011, 12:53 PM
The 4th axis is back into action!
It was off-center and needed rebuilt.
The collar has two arrays of set screws. the bottom array is for holding the 3 jaw chuck onto the rotary table; the top array is for centering the 3 jaw chuck by finite adjustments to the screws, similar to how a 4 jaw chuck works.
https://www.youtube.com/watch?v=vungG6hc0JE
Posted by: RJMII Sep 13 2011, 12:56 PM
The wheels are getting closer...
The main code is worked out and tested on the 4th axis; the wheel blanks are sitting on deck; and the jigs are built.
https://www.youtube.com/watch?v=-hGLwPHZTOw
Posted by: rick 918-S Sep 13 2011, 09:29 PM
![popcorn[1].gif](style_emoticons/default/popcorn[1].gif) That's cool
That's cool
Posted by: RJMII Sep 16 2011, 01:30 PM
update pic:
I am really making some good progress now.
I did some more. I have a stack of about 50 wheels in the making.
Attached image(s)
Posted by: rick 918-S Sep 16 2011, 08:47 PM
Keep going I can hardly wait! I'm going to paint mine to match my the ones on the Alien.
Posted by: RJMII Sep 16 2011, 09:40 PM
Yes sir.
I kept going!
This is the last of the narrow ones being made into blanks.
Attached image(s)
Posted by: speed metal army Sep 17 2011, 12:27 AM
OK...I dont have go fast rc's,but...I have 2.2 rockcrawlers.Pleeeaase make me some 2.2 bead lock fuchs!!I know itd be a pain in the ass,but...Lets face it,you could sell a boatload of em for shitsure. 
Posted by: RJMII Sep 17 2011, 06:55 AM
OK...I dont have go fast rc's,but...I have 2.2 rockcrawlers.Pleeeaase make me some 2.2 bead lock fuchs!!I know itd be a pain in the ass,but...Lets face it,you could sell a boatload of em for shitsure.
is 2.2 the diameter? PM me... I'd need a sample to work with.
Posted by: Vacca Rabite Sep 17 2011, 01:31 PM
This is great to see.
Are you ready to start production, or are you still setting the tune for the mill?
Zach
Posted by: RJMII Sep 17 2011, 02:26 PM
This IS production now.
I'll be shipping them out before October is over. They are high priority so I can move on to the next project.
There are 12 sets and at the moment half of them are spoken for.
Posted by: Vacca Rabite Sep 17 2011, 03:45 PM


Posted by: RJMII Oct 1 2011, 08:58 AM
Where can I get a resistor like this?
This is how far I got before the resistor had too many heat cycles and failed. The vibrations and heat cycles...
And I was making such good progress! The ones on the far left have both front and rear rough cuts done.
THe middle ones have the back cuts done, and the far right are the right size of blanks.
Attached image(s)
Posted by: kg6dxn Oct 1 2011, 09:16 AM
If the color from right to left is: brown, green, red, gold the value is 1.5K ohms +/- 5%. Hard to tell in your picture. http://www.mouser.com/?cm_mmc=google-_-ppc-_-americas-_-Local%20Campaign%20(California)&gclid=COeU38bjx6sCFQd6gwod_URr4g
Posted by: rick 918-S Oct 24 2011, 07:50 PM
Posted by: Vacca Rabite Oct 24 2011, 08:08 PM
indeed!
Posted by: RJMII Oct 24 2011, 08:09 PM
seems like everytime I start making progress on these I find a new 'weak link' in my mill.
new spindle controller and spindle motor were required from that resistor repair gone bad. pics coming up...
Posted by: RJMII Oct 24 2011, 08:13 PM
This is what I got accomplished today. The Super PID came from New Zealand and will allow me to control the spindle speed from the same computer that controls the mill.


Posted by: Cairo94507 Oct 24 2011, 08:52 PM
This is very exciting; I can't wait to order one for my desk. Will you have the option of buying them with appropriate cool tires?
Thanks and good luck.
Posted by: rick 918-S Oct 24 2011, 09:49 PM
That's cool Jim. It's always interesting to see what your up against. Your not only milling custom wheels your building your mill and controller. Way over my head.
Posted by: rick 918-S Nov 30 2011, 10:11 PM
How they coming?
Posted by: nsr-jamie Dec 1 2011, 05:50 AM
How they coming?
Me too checking in and hope all health issues are going well.
Posted by: Vacca Rabite Dec 1 2011, 01:07 PM
I know something y'all don't know.
I'll let Jim do the update though.
Zach
Posted by: rick 918-S Dec 1 2011, 01:25 PM
I know something y'all don't know.
I'll let Jim do the update though.
Zach
Not fair!

Posted by: RJMII Dec 1 2011, 02:35 PM
I know something y'all don't know.
I'll let Jim do the update though.
Zach
I took a break to work on 'me'. :-)
Zach, can you post a link to my photo album that documents what I just overcame?
I am posting from my phone while working on the wheels...
Posted by: rick 918-S Dec 1 2011, 03:38 PM
I know something y'all don't know.
I'll let Jim do the update though.
Zach
I took a break to work on 'me'. :-)
Zach, can you post a link to my photo album that documents what I just overcame?
Posted by: RJMII Dec 1 2011, 04:29 PM
https://www.facebook.com/media/set/?set=a.10150951110735251.759094.721900250&type=3
I can get back to work now, I hope.
Zach's been watching the pics...
and knows I am working on the wheels this week.
Posted by: rick 918-S Dec 1 2011, 06:32 PM
They say what doesn't kill us make us stronger but....  Good to read your back doing something. I believe doing something rewarding and brings the feeling of accomplishment is one of our healing powers. Do a little everyday. It will make you smile.
Posted by: Vacca Rabite Dec 1 2011, 07:14 PM
In short, Jim has gone from this:
to this:
And a whole bunch of personal as well as health turn arounds as well.
I don't know the whole story, but I know its been a heck of a rough ride.
Zach
Posted by: rick 918-S Dec 1 2011, 11:11 PM
Man these things are bitchin!
Posted by: zymurgist Dec 2 2011, 05:36 AM
Posting this pic for Jim since he doesn't have intertubes at home...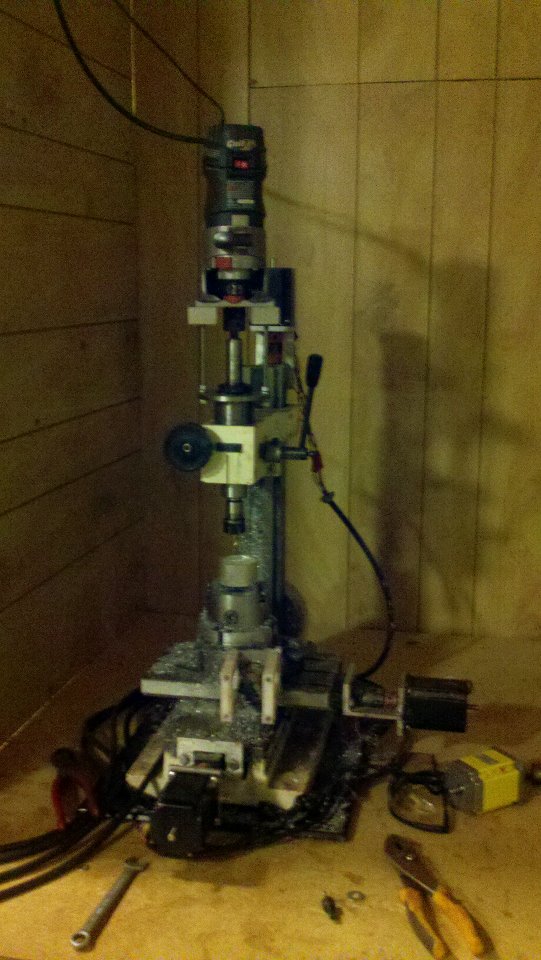
Spindle is a go. :-) 5000rpm on the tach and it spins up smoooooth!
Posted by: Gint Dec 2 2011, 06:59 AM
Awesome Jim! Hey if there is still a wheel set available, sign me up would ya?
Posted by: rick 918-S Dec 2 2011, 07:57 AM
That thing is crazy! I'm going to have to keep those wheels for the concours shows. There too nice for track wheels!
Posted by: rick 918-S Dec 21 2011, 09:51 PM
Any news?
Posted by: Vacca Rabite Dec 23 2011, 05:16 PM
Bump for an update?
Posted by: RJMII Dec 24 2011, 11:44 AM
waiting on new optical sensors from NZ or Australia... my spindle ate mine.
Ordered them a little under two weeks ago, should be here soon.
Posted by: rick 918-S Dec 24 2011, 01:40 PM
I bet it drives you nuts when your equipment stops. Keep us posted!
Posted by: RJMII Dec 24 2011, 05:29 PM
I check the mailbox daily with anticipation!
my blog has pictures of what I've been doing while I wait. The router table has been getting some use of the linux box and router/spindle motor. I've been running it WOT at 35k RPM and cutting at 200-240 ipm through .25 inch plywood to cut some 3d puzzles. not goin to post pics here, just to stay this thread on focus of the wheels.
yeah... I've been going nuts waiting for the optical sensors.
Posted by: RJMII Feb 10 2012, 06:17 PM
Posted by: GeorgeRud Feb 10 2012, 06:30 PM
If any sets are still available, I'd love to get a set of the wheels.
Posted by: rick 918-S Feb 10 2012, 07:58 PM
That thing was crankin! 
Posted by: RJMII Mar 23 2012, 02:36 PM
I switched from one cad cam software to another, and from my mini mill to a HAAS VF2.
a friend on the other side of the mountain let me come play for a day, so provided I had a learning curve from completely switching setups, I'd say i had a pretty productive trip.
I'll be back over there in a week or so. I managed to get the code down to 12 minutes for the front side of the wheel.
I think the last step I need to do is adjust the X/Y tolerences for the final finishing pass with the .125" ball nose, and the fronts will be perfected for the machining center.
pictures: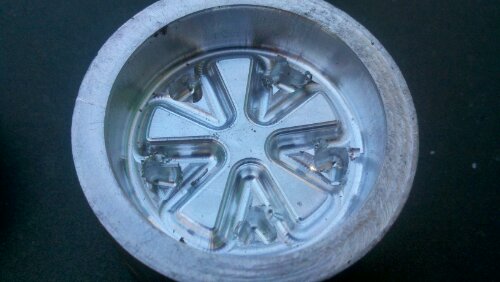
Posted by: Cairo94507 Mar 23 2012, 04:05 PM
Very cool.
Posted by: rick 918-S Mar 23 2012, 10:51 PM
Very COOL Jim! Any chance I'll get to run my car this summer? Those wheels are bitchin!
Posted by: RJMII Mar 24 2012, 08:45 AM
I'd say the chances are very likely.
Posted by: treborzerimar Mar 24 2012, 10:06 AM
I don't even HAVE an RC car.... why do I want to buy a set of wheels???
LOL!
..... I'll support excellent innovation. Sign me up for a set
Nice work.
Posted by: RJMII Mar 29 2012, 06:31 PM
major progress. 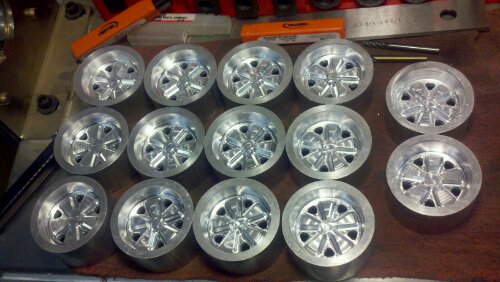
Posted by: rick 918-S Mar 29 2012, 06:37 PM
major progress.


Posted by: RJMII Mar 29 2012, 06:37 PM

Posted by: underthetire Mar 29 2012, 06:38 PM
Glad you got them and your machine all worked out! Good luck on your new venture!
Posted by: RJMII Mar 29 2012, 06:42 PM
thanks, Jeff!
I did this batch on the HAAS... I love my new job!!
Posted by: underthetire Mar 29 2012, 07:13 PM
Wonder how fast our little mori would make those parts? 40,000 rpm and capable of 1000ipm in full 3d mode, holding 1micron tolerance. Fast little die mold machine.
Posted by: rick 918-S Mar 29 2012, 07:57 PM
thanks, Jeff!
I did this batch on the HAAS... I love my new job!!
So you got the new job?
Posted by: RJMII Mar 30 2012, 08:15 AM
Wonder how fast our little mori would make those parts? 40,000 rpm and capable of 1000ipm in full 3d mode, holding 1micron tolerance. Fast little die mold machine.
Want to find out?
Does the Mori have an auto tool changer? That one sounds like it could be fun to play with... The HAAS only goes 7500rpm spindle speed... but you already knew that.
We hit one of the wheels at 1100ipm with the 3/8 endmill for roughing and made a nice aluminum 'sculpture'. That was chalked up as a 'learning experience' for editing code on the mill monitor. Somehow the line that said 'F35.5234' got deleted while taking out a 4 minute session of the bit spiraling above the part and not cutting anything.
@Rick;
Yeah! Thank you.
I am stoked! The owner is a buddy that worked with my dad when I was in high school. He is Very easy to work with and lets me make my own 914 parts. (for the real car, not just the little ones)
Posted by: underthetire Mar 30 2012, 09:16 AM
Sure does, 20 tool. HSK tooling, 10GB program storage, ESPRIT 3D cad/Cam software built in, high speed contour control, conversational programming, twin motors and ballscrews for each axis, twin SONY .01Um scales on each axis. Only 5.9" travel in x and y axis. Tiny smoking fast machine. If you want, send me the HAAS code and i'll throw it in the simulator of the control and see how fast it'll go.
BTW, this tiny machine was more than a nice house in most parts of the country!
Posted by: RJMII Mar 31 2012, 03:15 PM
Yer gonna be selling singles, right?
http://www.smalltowngeek.net/?page_id=912
for a full set, add 4 to the cart.
they are shipping this week.
Posted by: RJMII Mar 31 2012, 03:26 PM
what I get to work with now.
the doors slide open and my mini mill will fit in the cutting area that I get to work with now.
Attached thumbnail(s)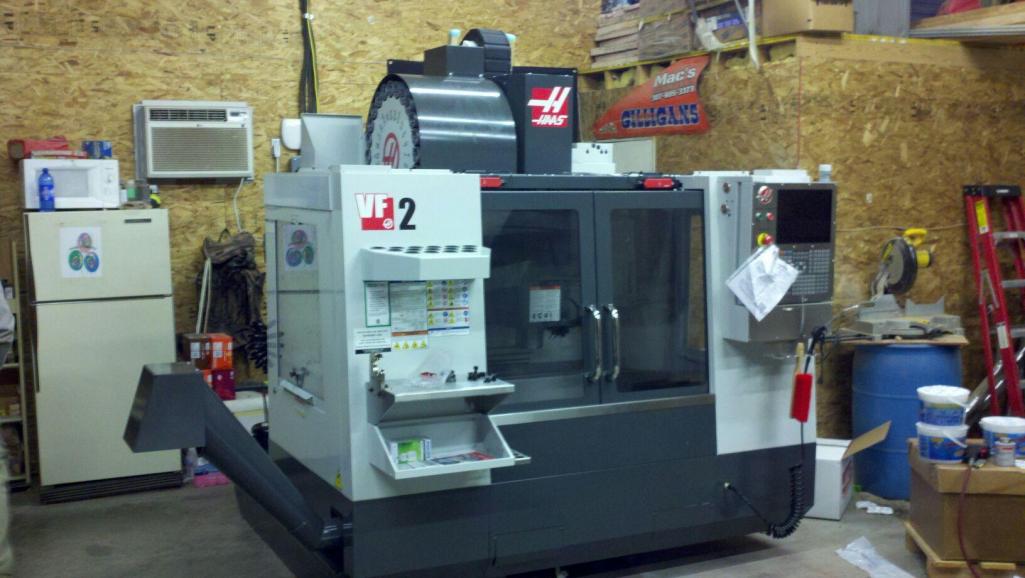
Posted by: underthetire Mar 31 2012, 05:17 PM
Fairly new machine! I like that control, it's pretty easy. We ordered a haas, no tool changer. Ripped the spindle out of it, spindle motor, enclosure, modified it a wee bit and am now waiting for the 400 watt laser to get here.
Posted by: RJMII Mar 31 2012, 06:08 PM
can you email pics of the spindle motor and spindle? to my jimmc914 (at) gmail account... major eye candy. lol
what kind of laser are you installing in place of it?
somewhere down the road I'd like to play with that sort of thing on my router table. I've got some links for later that have DIY style stuff to convert it.
Posted by: underthetire Mar 31 2012, 08:35 PM
It's a rofin 400 watt. Fiber for cutting and welding applications. Cost about 185k ! I can't take pics at work, sorry.
Posted by: rick 918-S Mar 31 2012, 09:06 PM
Damn Jim! those photos on your web page are bitchin!
Posted by: nsr-jamie Apr 1 2012, 09:05 AM
Wow!! Cool !! Sounds like things are going much better now...we haven't talked in a while..I will send you a PM.
Posted by: RJMII Apr 8 2012, 06:14 PM
Little white alien:
box almost ready to distribute: (the lathe work hasn't been done)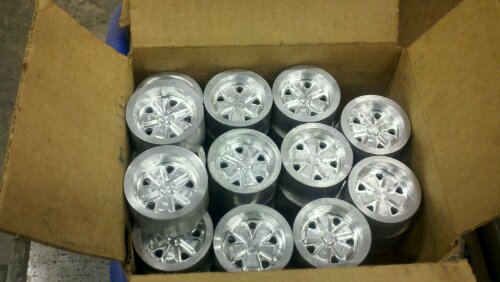
Getting artisitic:
http://www.smalltowngeek.net/wp-content/uploads/wpstorecart/2012-03-31_14-39-00_259.jpg
Posted by: rick 918-S Apr 8 2012, 07:13 PM
Little white alien:
box almost ready to distribute: (the lathe work hasn't been done)
Getting artisitic:
http://www.smalltowngeek.net/wp-content/uploads/wpstorecart/2012-03-31_14-39-00_259.jpg
Those things look sooo deep!
Posted by: nsr-jamie Aug 23 2012, 09:41 PM
Is Jim still around? So the wheels are complete and ready to be shipped? Jim can you get back to me please. I have tried to contact you with no luck, thanks.
Powered by Invision Power Board (http://www.invisionboard.com)
© Invision Power Services (http://www.invisionpower.com)