Printable Version of Topic
Click here to view this topic in its original format
914World.com _ 914World Garage _ Tomeric Build Thread
Posted by: tomeric914 Aug 1 2010, 04:28 PM
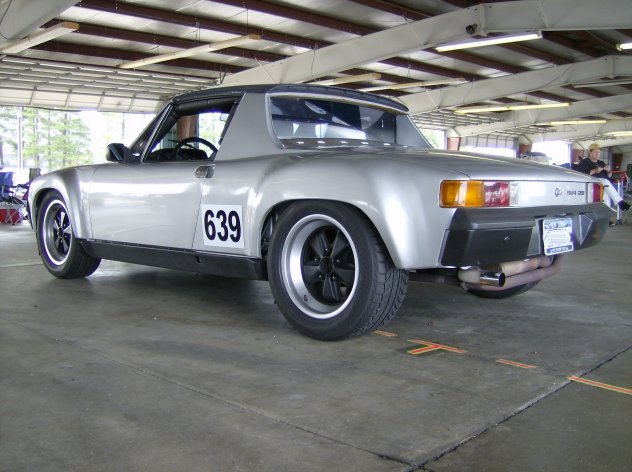
Back in February of '08, Cupomeat and Tomeric914 picked up this lovely 916 replica and a boatload of spare parts: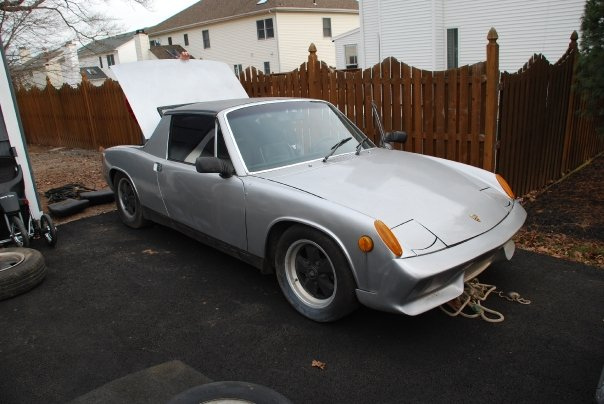
Clean, one owner, Florida car, runs great, blah, blah, blah... When we picked it up, one carb was seized and the PO was "working on it". "Does the engine turn over?", I ask. "Last I knew it did", he says.
Yea, maybe not: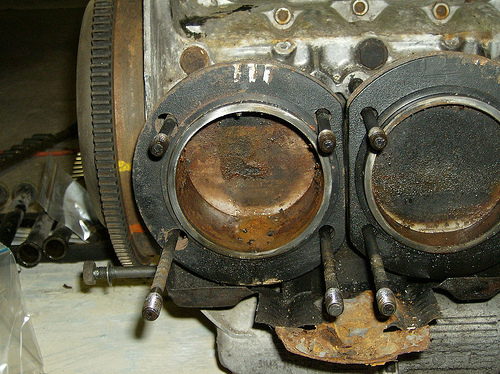
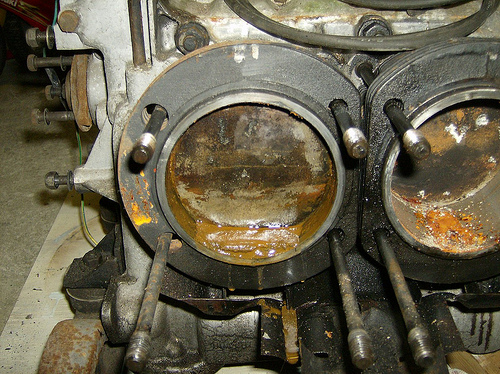
Our first clue was when we pulled the oil drain plug and nothing came out. It was about 20 degrees in the garage so the water on the bottom of the engine was frozen. After using a torch to melt the water, the oil came out.
http://www.youtube.com/watch?v=VuK9Z7fpgic
The video above shows a nice ice cube stuck to the float of the one Weber that was still in the car. The PO said the car ran hot so they remove the rain tray to get more air in the engine compartment. The filters didn't have rain hats on and there were 1/4" to 1/2" gaps around the bottoms of the filters. The PO had made up some cheesedick plate for the bottom of the filter on but didn't understand the concept of flatness.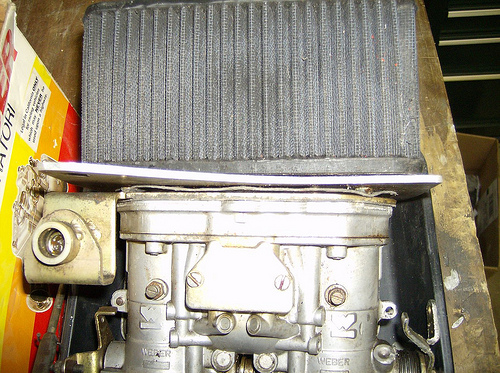
That was only the beginning of the fun. I've already forgotten about all the other half-assed fixes the PO did. My goal was to get the car on the road by April and on the track by the end of the summer.
The PO had relocated the battery to the trunk which I wasn't crazy about. They also did some hellhole repair that looked to be ok. I finished their repair and but the battery tray back where it should be. At the same time, I rebuilt the 2.0 engine using A LOT of the spare parts we had (heads were one of those spare parts). What amazed me was the amount of parts that were in their original shipping boxes dated from the mid 1980's with 2nd day air! They sat for 20+ years!
Here is the engine in the car around the middle of April all set to go.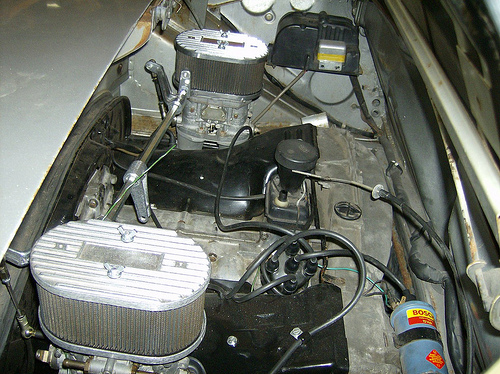
So now it has 96mm KB pistons and AA cylinders (which, BTW suck. AA used to have decent cylinders). It is now a 2056 with 40IDFs and what appears to be an old S&S exhaust setup. I put the lowest profile tires I could find on the crappy set of cookie cutters we had.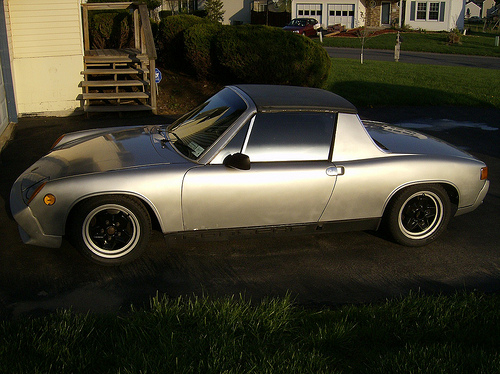
For the next few months I drive it and sort out the various issues, rebuild all the brake calipers, remove the brake line tee that the DAPO put in and get a nice reconditioned brake pressure regulator from PMB. Sign up for my first track event at Watkins Glen and before going there, install an oil cooler.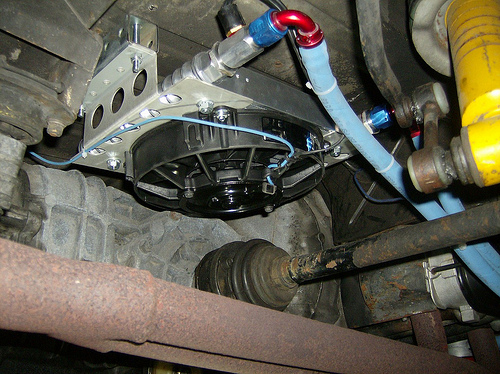
Then I found some rust in the long that needed attention. Luckily, not too bad... yet. Cut it out and repair it.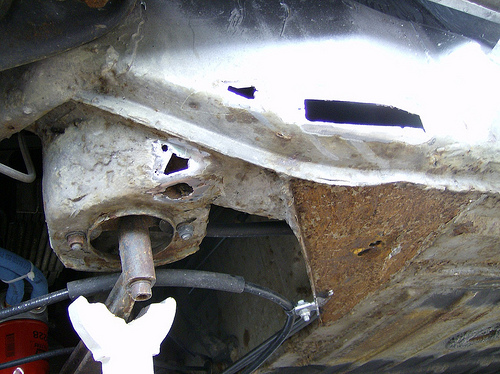
Then off to the Glen!
Posted by: tomeric914 Aug 1 2010, 07:00 PM
At the Glen, the car feels a little loose in the rear but I keep driving figuring its because I'm pushing the car harder. Get home, jack it up and find one of the rear bushings decided to go. I picked up a set of Weltmeister bushings (first mistake) to replace the stock ones.
While I'm in there, I decided to change to 911 rear brakes and toss the 914 setup. I score a new pair of vented 911 rear rotors and a 911 parking brake setup and engineer the whole setup.
While I'm in there I discover more loveliness in the form of rust on both sides of the car. Here's the before on one side: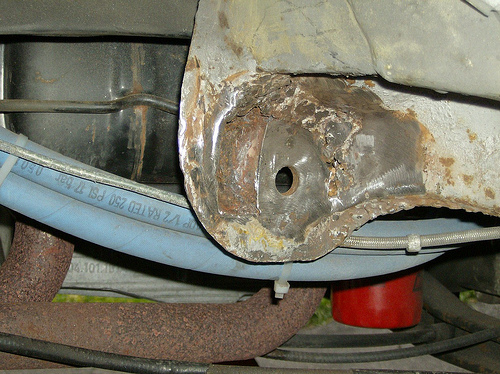
...and the after on the other. It was all smoothed out and painted before everything went back together.
...and installed: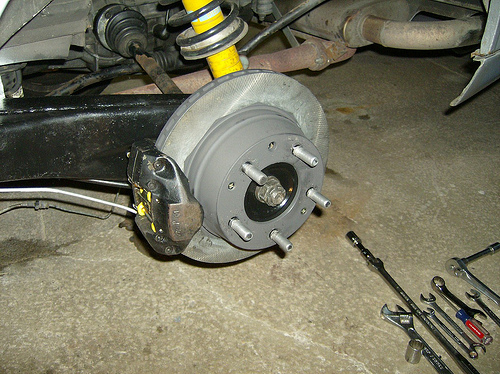
When we bought the car, it had already been converted to 5-bolt so the rear was a no-brainer. The front had early an early 5-bolt arrangement with solid discs on it. The struts were shot. Luckily, the parts stash had a pair of vented discs and hubs with newer Bilstein monotube struts. Those went in so we had vented discs all the way around.
Moving forward to June of 2009, I made a trip down to Tangerine Racing in my '58 VW Single Cab to pick up on of their weld in roll cages. After getting it home and mocking it up, it put the passenger seat just too far forward. Since I knew I was going to have instructors with me, I returned the main hoop for a double bump hoop. There is no doubt, Chris's stuff is first rate!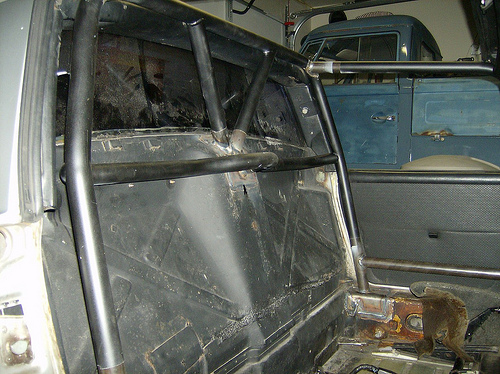
That was followed up with Second Skin's Damplifier Pro: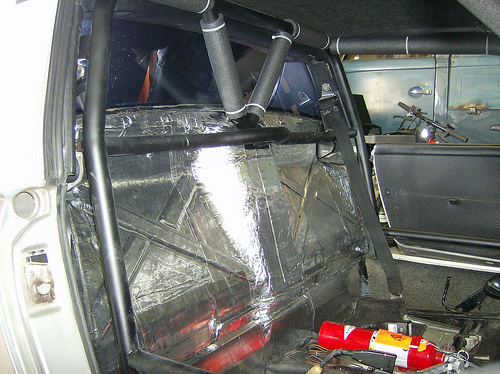
...and Luxury Liner: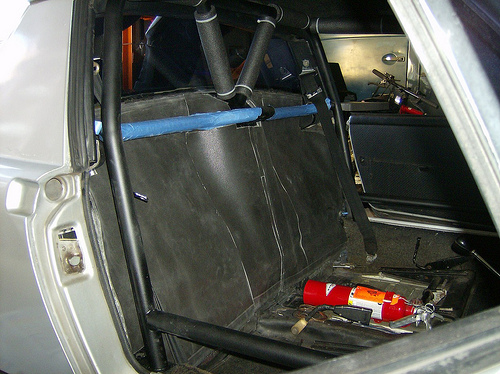
Then back to Watkin's Glen again!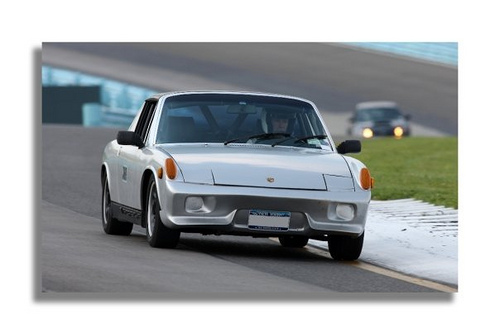
Posted by: Ericv1 Aug 1 2010, 07:31 PM
Nice, I'm liking the 916 front and rear. If properly done it looks awesome.
Posted by: tomeric914 Aug 1 2010, 08:01 PM
Oops, I can't forget the garage floor rebuild that happened in the middle of this. I had long suspected that the floor was hollow underneath. I decided to undertake this "small" task with the aid of a masonry contractor. SO I rented a jackhammer, punched a hole in the floor and stuck a light and my digital camera underneath.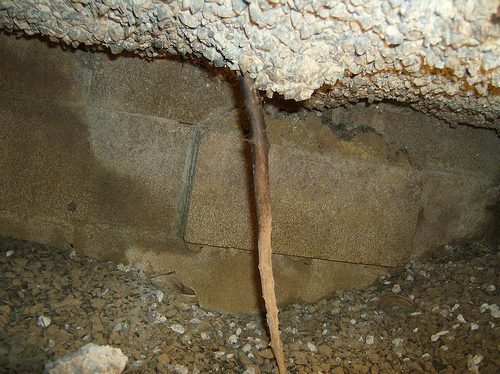
Yes, you are looking at the underside of the garage floor above and the settled gravel fill about 16" below. Gotta love these low budget home builders.
Here we are after pulling out 14 ton of concrete, replacing with flowable fill and pouring in the new concrete. Funny how none of my neighbors stopped by while I was removing the old floor, but they all showed up when the concrete truck was there!
Next on the list was seating and 5-point harnesses. Since I'm over 6 foot tall and my head hits the roof with a helmet on unless I removed the stock seat bottom cushion, I purchased a pair of Kirkey Intermediates and welded up some frames that would sit as close to the floor as possible. I fabricated the driver's side: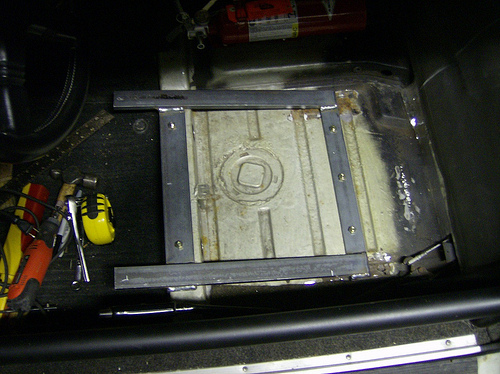
Then moved on to the passenger side to find that the cross support was rotted along with the floor underneath it.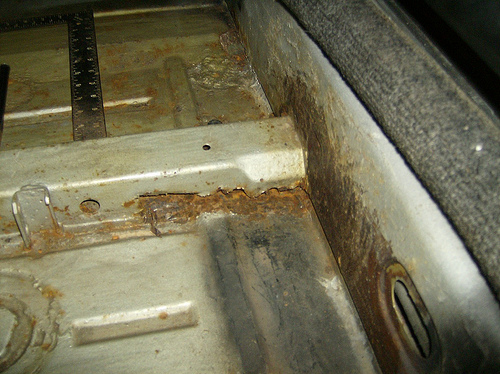
So I repaired the floor and rebuilt the cross rail.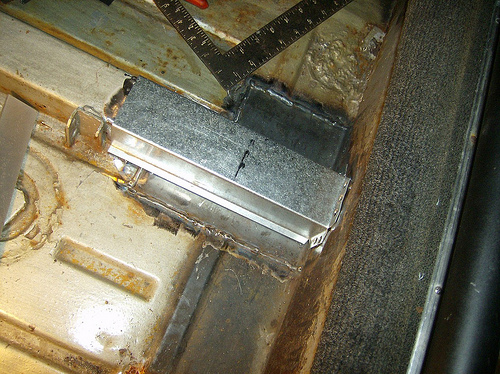
and completed the installation: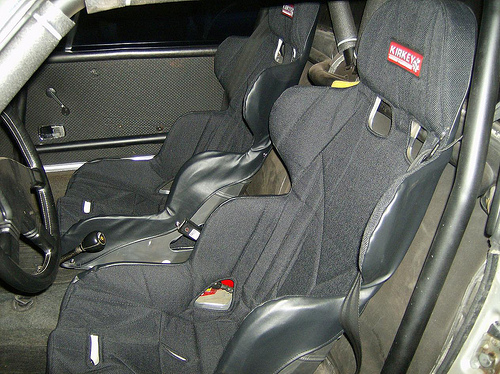
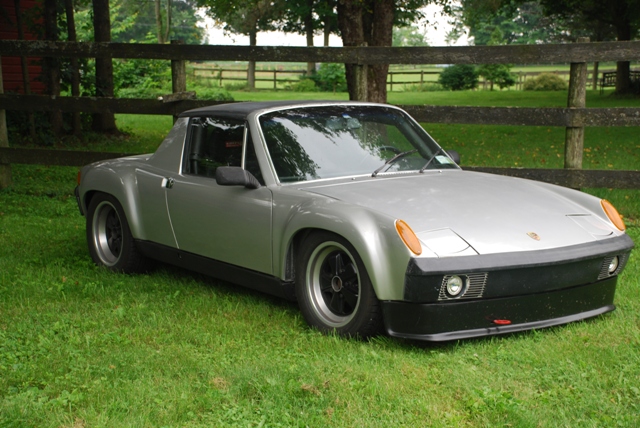
Next was time for a facelift. The car came with hideous looking 916 bumpers (IMHO) that needed to go. Cupomeat brought up stock 914 front and rear bumpers and I got at it. First was removing the front bumper only to discover what little had been holding it on.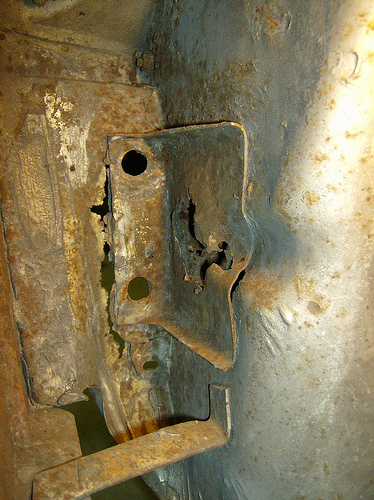
The inner front fender in this location gives very little room to manipulate any tool much less an angle die grinder or MIG gun but somehow I managed it.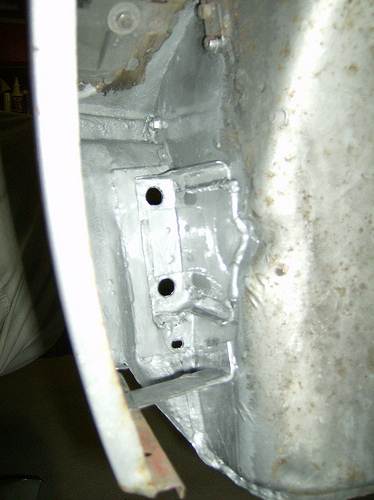
Thanks to the 914World classifieds, I scored a stock fiberglass front bumper to go along with the LE front spoiler we had in the stash.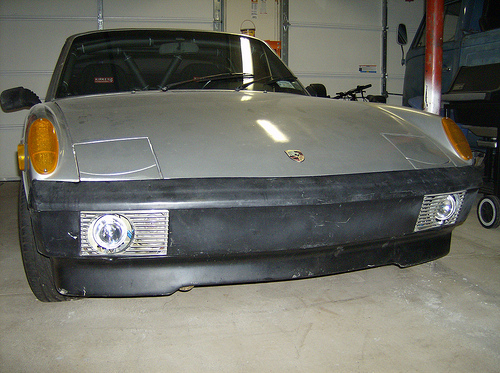
We had a stock 914 rear bumper in pretty darn good shape that I painted up gloss black and stuck on the rear. What a difference that made over the 916 look!
So here we are in March of 2010 with a DE around the corner at Limerock. My money was in for the Mepstein GT flare and rocker group buy as well. There was one spot of rust on the passenger fender that bothered me. This was where the dealer had installed an antenna and created a nice pocket for water to sit and rust in. Sometime in the past, the PO removed the antenna and slathered Bondo in its place creating an even bigger problem. I started at it with my pick only to watch it basically disintegrate.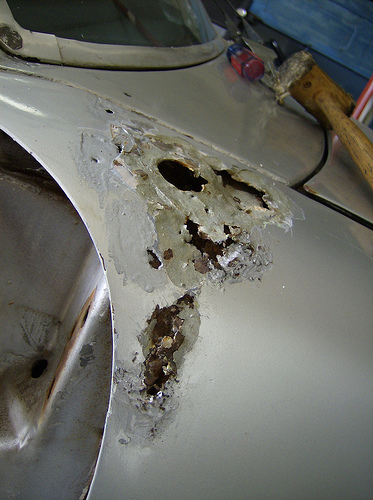
Yuck...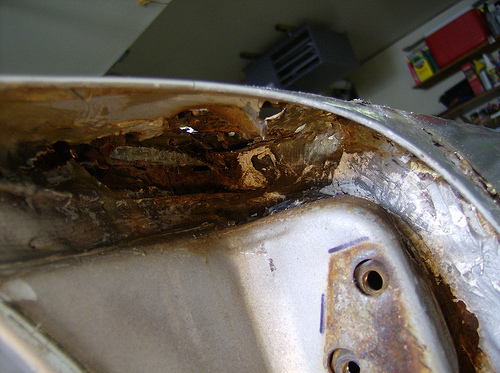
Cut out the old...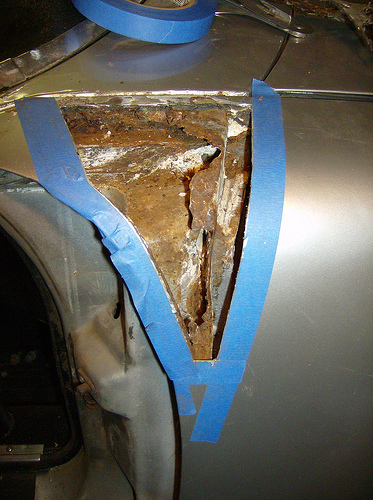
Hand form a repair piece out of 14 gauge...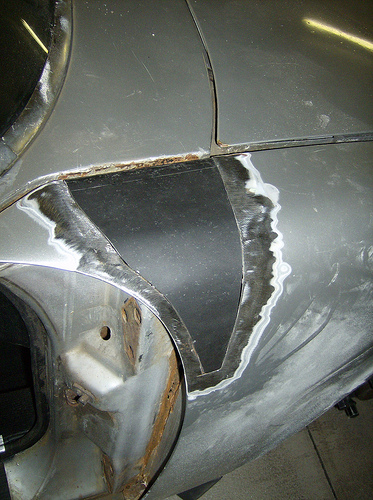
Weld it in...
...and finish it off. Not shown is all the steps to remove the underlying surface rust, prep it and painting underneath.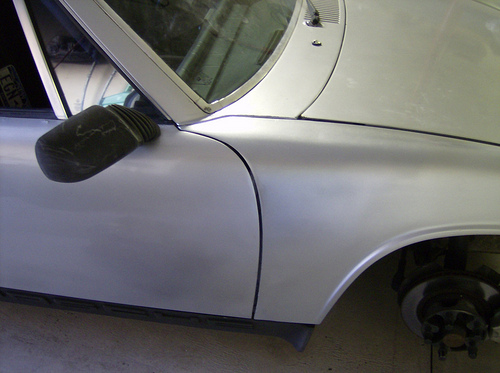
Off to the track!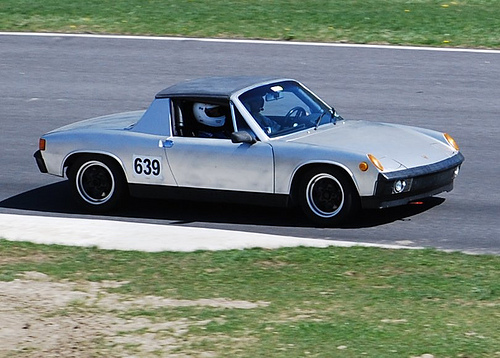
...more later! (This was through end of April 2010)
Posted by: Cupomeat Aug 2 2010, 09:13 AM
Having seen pix throughout this process, it is amazing work Tom!
Thanks for stopping by on Saturday to show off the car, it looks GREAT!
Ready for WG again!
Posted by: Nürburg Nomad May 13 2011, 01:39 AM
Have any updates and particularly current side profile photos to share? I'm considering buying the same 245/60/16 rear tire size you mentioned in another thread but it would be nice to see it first! 
Posted by: Cairo94507 May 13 2011, 06:58 AM
Wow! Very nice work and I too like the stock (early) bumpers over the 916 bumpers. Happy motoring.
Posted by: rick 918-S May 13 2011, 07:06 AM
Drive it like ya stole it! 
Posted by: PanelBilly May 13 2011, 08:36 AM
I need to component you on the nice balance of restoration vs. function. At least that's the wY it looks like from the thread.
Posted by: tomeric914 May 13 2011, 09:32 AM
Thanks PB. That means a lot to me considering the level of perfection that I've seen from your threads!
I think I've got a few good shots of the 245's on the rear with flares.
I will try in earnest to update this thread over the weekend. I flared and painted it last year then dropped a six in it over the winter.
Posted by: PeeGreen 914 May 13 2011, 09:40 AM
I like the progression  . Looking good
Posted by: Cupomeat May 13 2011, 09:41 AM
No doubt that you have made HUGE changes on this car since the last posting!
Let me know if you want me to post pix for you!
Posted by: abnrdo May 14 2011, 04:00 AM
Nice work!! Inspiration for me when I get home!
Posted by: tomeric914 May 15 2011, 10:02 AM
Getting back to it, I'll start back at May 2010...
Remember I said I replaced the rear swing arm bushings with Weltmeister bushings? What a waste! They quickly wore enough to have noticeable play in the rear suspension that I had to replace them again. I should have bought the Elephant polybronze setup from the start. Oh well, lesson learned. The Elephant setup went in very easily and works great!
Next was the fender flare install (with thanks to mepstein for setting up the group buy!) I won't bore you with the how-to of flare installs. There are other threads for that, but basically...
Carefully cut out the old measuring 12 times and cutting once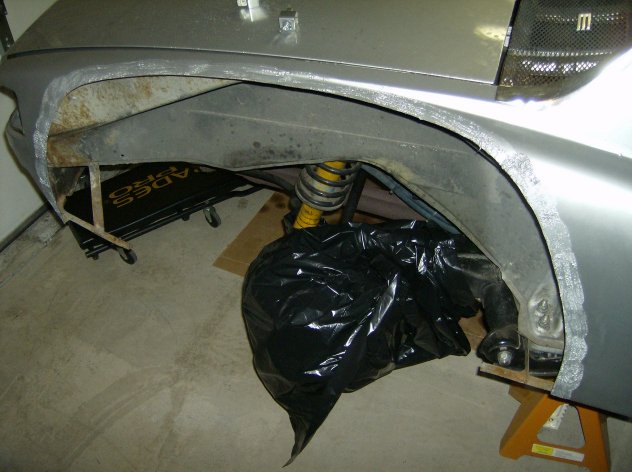
...and butt weld in the new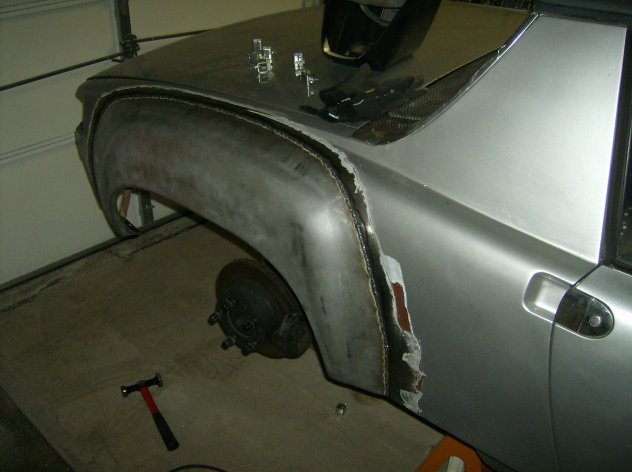
So while I'm at it, I decided to replace the non-existent jack point that the DAPO had removed and replaced with a flat plate. Little did I know that there was a whole 'nuther cluster waiting for me underneath.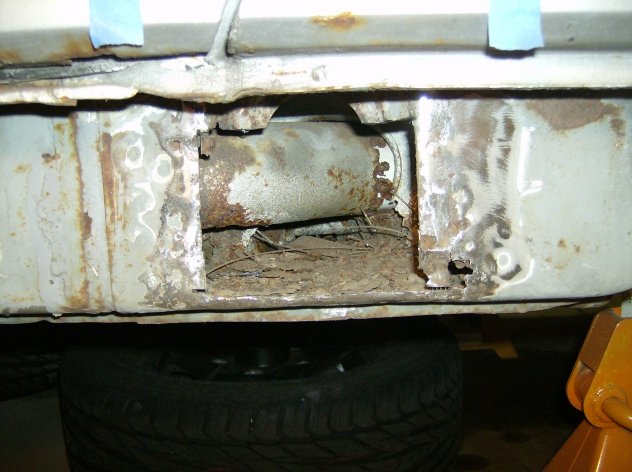
This also extended to the inside where I found the driver's side seat belt mounting point dangerously loose. So I cut and cut and cut some more to get rid of the rust and rebuilt this portion of the long and floor pan.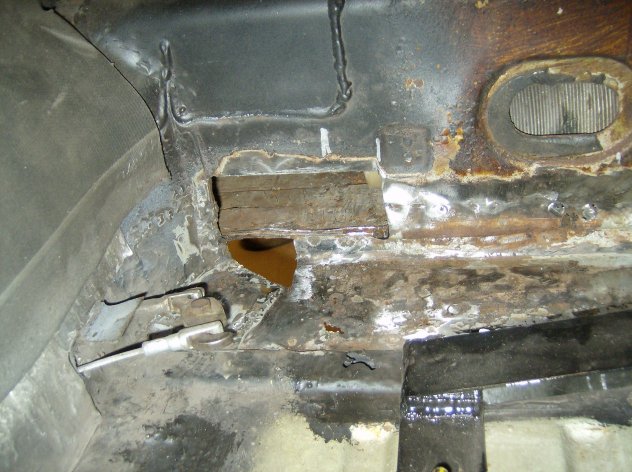
That work easily added a month to the whole flare install but resulted in a much stronger long and a functional jack point.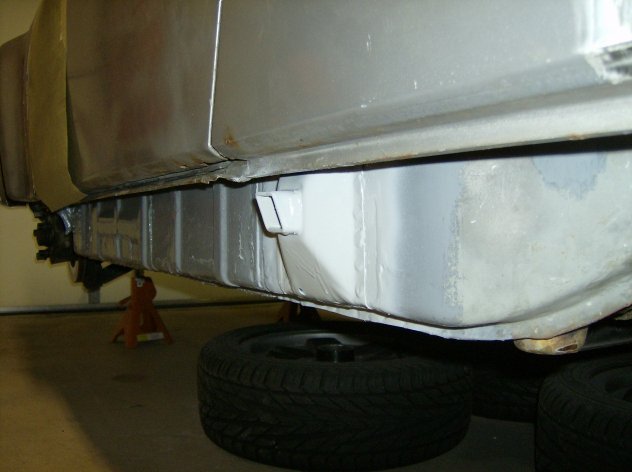
Then came fitting the 245/50-16 tire inside the flare, which in the pic below, it isn't.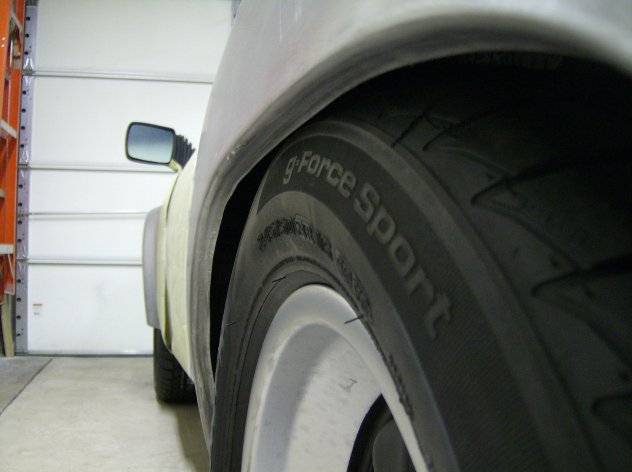
Lots of opinions on this one, cut versus roll, etc. My factory rear fenders had the lips trimmed so I did the same. I attempted to roll the lip but all that did was to start and deform them fender. Just not worth it. Here is a pic of the fender well painted showing the lip trimmed.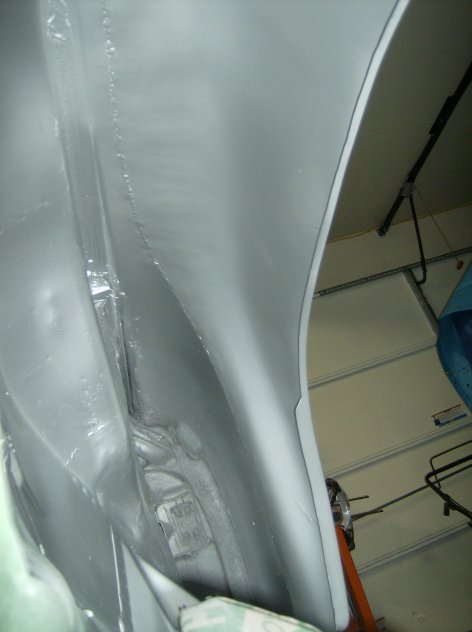
After that, I stripped the doors and the rest of the paint from the fenders and put them in epoxy.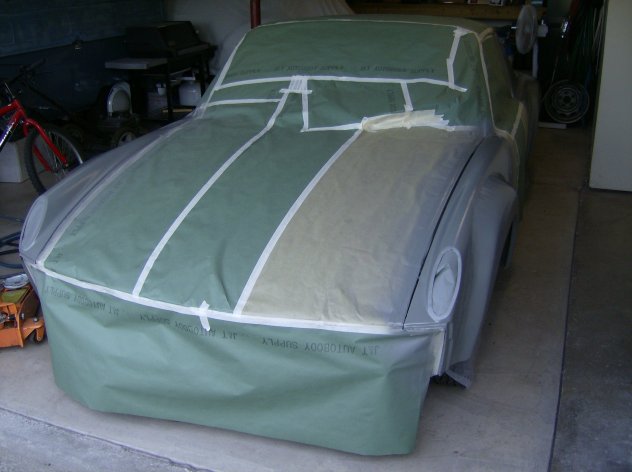
Then hammered and shaped and added filler only where necessary followed by more epoxy, urethane primer, wet sanding, basecoat and finally clearcoat. 
...still more to come (this is through August 2010)
Posted by: FourBlades May 15 2011, 10:39 AM
Great work man, keep the pictures coming.
I also like how you have kept it on the road most of the restoration.
John
Posted by: tomeric914 May 15 2011, 10:51 AM

I also like how you have kept it on the road most of the restoration.
Well, I don't drive it when there is snow on the ground so that gives me 6 months to work on it!
I'll get more pics up later so this thread is up to date.
Posted by: markb May 15 2011, 10:58 AM

Posted by: tomeric914 May 15 2011, 06:11 PM
From the start of this build, the priorities were:
1. Get it running
2. Upgrade the brakes to vented all the way around
3. Get a full cage in for stiffness and safety
4. Better seats
5. 5 point harnesses
6. Flares and wider tires
7. More horsepower
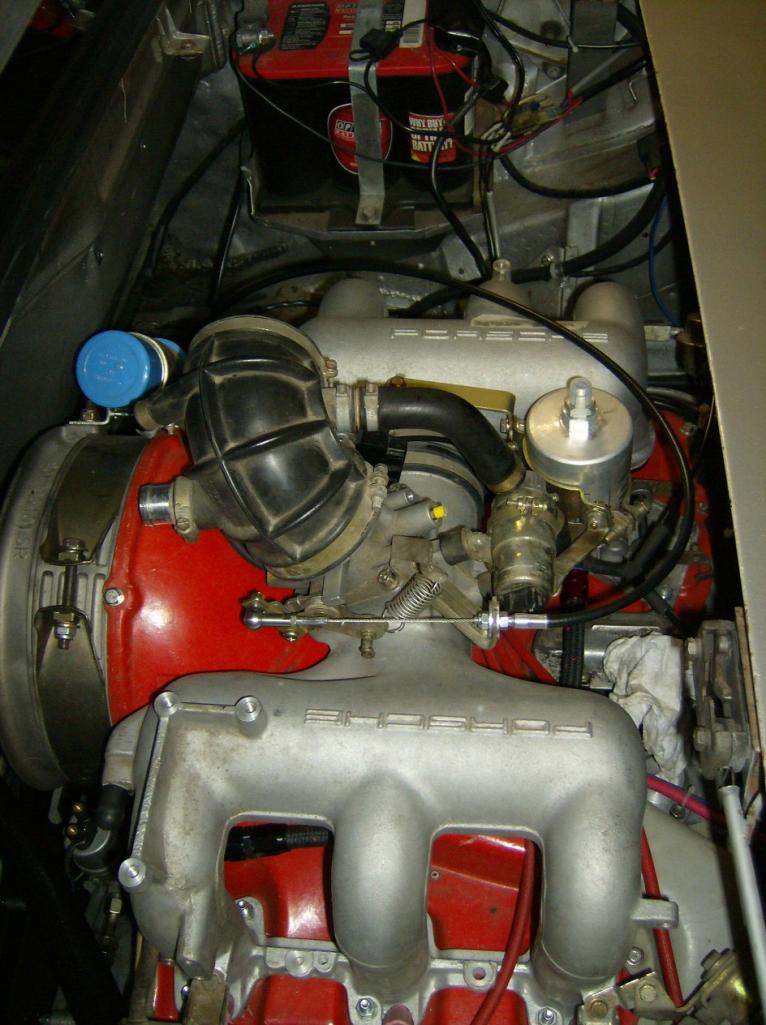
Step 7 started about a year ago when I picked up a Rich Johnson engine mount and started hunting for a 911 engine. We wanted a 3.0 because it seemed to be the best built and most reliable of all, not to mention that it was less likely to get me in as much trouble as a 3.6 would.
So I found a 3.0 on the bird board with CIS and a bunch of parts. Basically an engine in unknown condition with a bunch of parts, but not enough parts to get it running.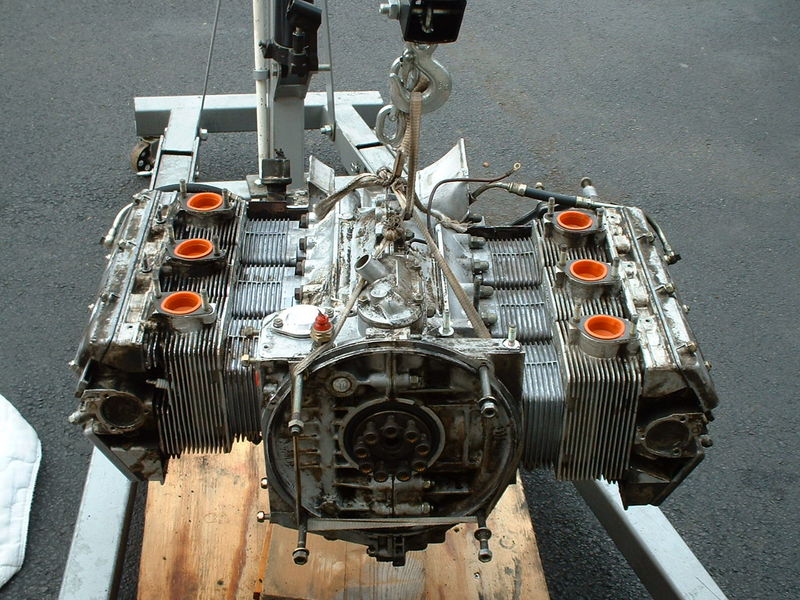
I thought about getting the CIS going on it, but after adding up all the parts to even think about getting it running and the great possibility that even then it wouldn't work I went the Weber route. Looked around a bit for the right set of carbs when I just happened to stumble across a set that Eric Shea had for sale.
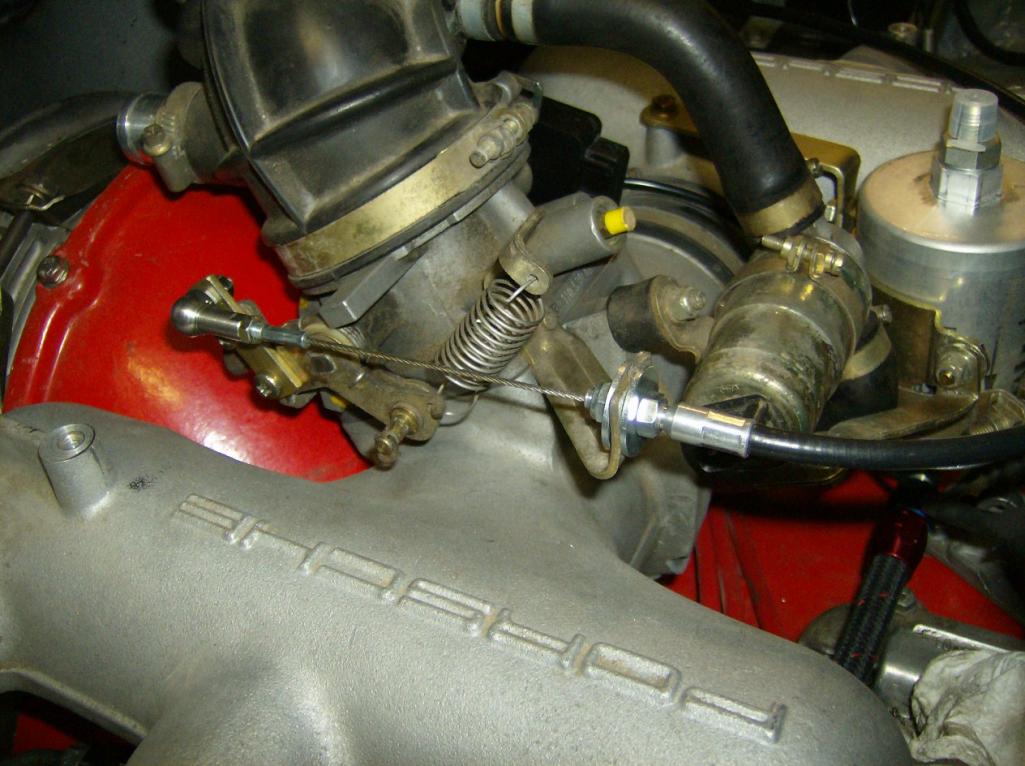
Unfortunately, the intake manifolds weren't ideal for a CIS setup and the beautifully restored air cleaner would have been too restrictive for my needs so I opted for PMO manifolds and rain hats. (This shot is for you Mr. Shea )
On the underside, I modified the 914-4 linkage with a straight section of 3/4" tubing, rebuilt the CVs in hopes that they at least last the summer, ran new cables.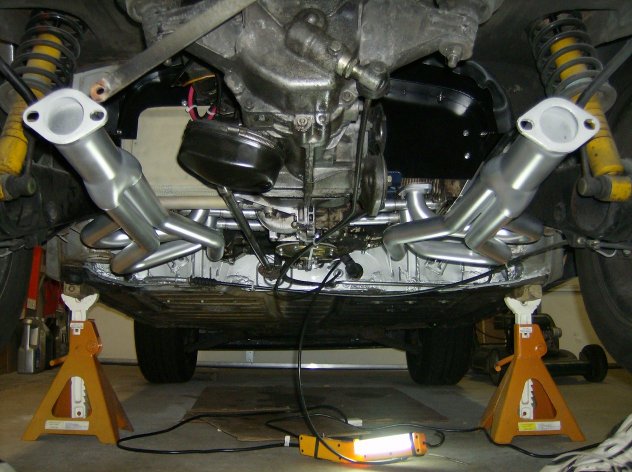
Throttle is always a challenge on 6 conversions. I wasn't a fan of the bell crank linkage so I had a custom throttle cable built and designed my own bracket. If there's interest, I may build more (just drop me a PM).
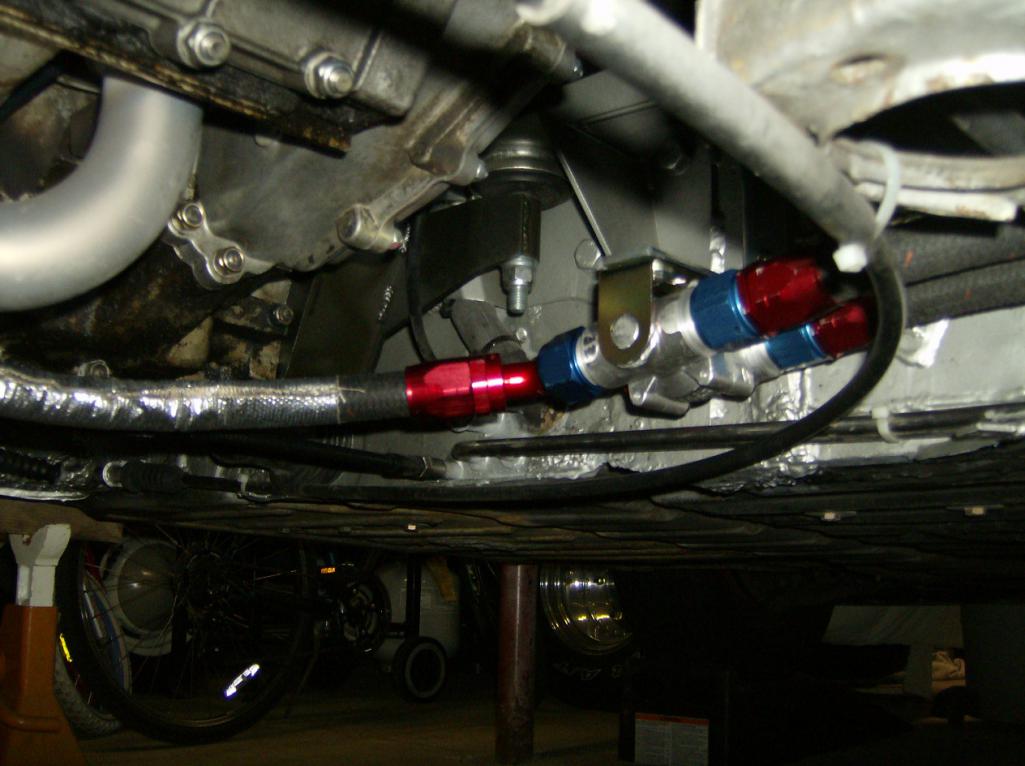
While running the lines, I departed from the typical 6 path and ran the scavenge line towards the back and into a small Earl's oil cooler. Initial trial shows at least a 25 degree drop between the cooler fan on and off so it should be perfect for track days.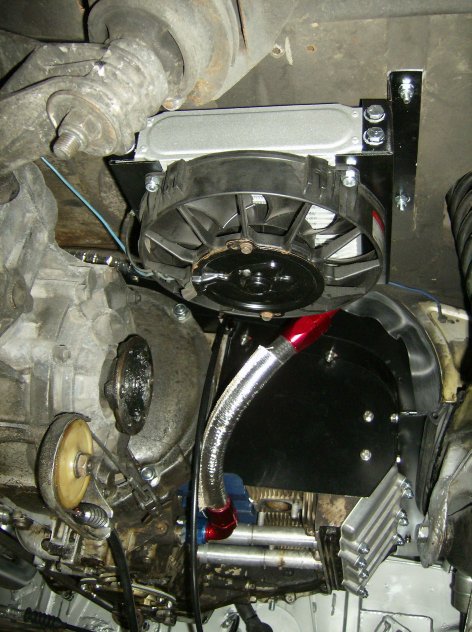
I've yet to do the final tune on the carbs and permanently hook up the breather but the initial drive shows that this little car just got a lot more fun to drive! I'm also working on a custom dual exhaust setup so stay tuned!
Many of the parts not needed were sold which subsidized the parts for purchase which kept my wife happy and this conversion's cost reasonable. Thanks to a few of our member vendors here on 914World; Jonathan @ GPR for the 914-6 tin and oil tank group buy and Maltese Falcon at MSDS for getting me in on the 914-6 header group buy, Rich Johnson for the engine mount and 914-6 oil cooler mod, Chris Foley at CFR for the roll cage and rear suspension heim braces.
Posted by: Cupomeat May 15 2011, 09:33 PM
As always Tom, First Class work!
Looks great! 
Posted by: jaxdream May 16 2011, 08:52 AM
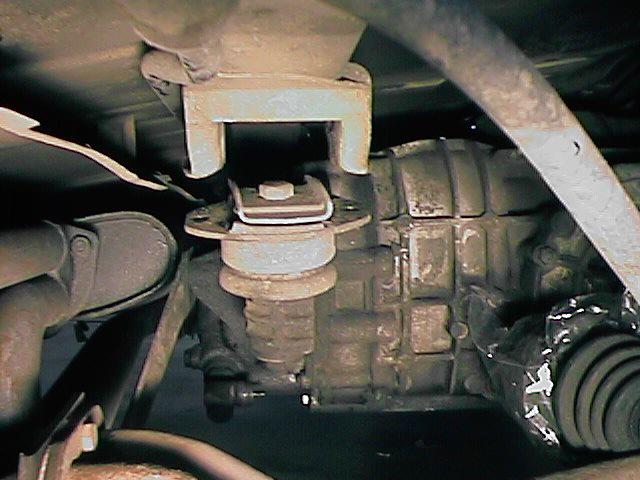
I could be wrong , but looks like you are missing that big "cup " washer on top of the trans ear mounts . You have done a lot of work to this car , keep it going , looks great !!! 
Jack / Jaxdream
Posted by: ewdysar May 16 2011, 11:50 AM
Nice work, Tom!
I'm getting ready to get some GT flares installed, so I appreciate the pics of your rear wheel/tire clearance.
Which Fuchs rims are you running? Are you running any spacers? The rear tires are 245/50, what size are the fronts?
I've got 7s and 9s and I want to run 225/50/16s in front and 265/45/16s in back. I think that the rear fenders will need a little extra room for the 265s.
Thanks.
Posted by: tomeric914 May 16 2011, 12:08 PM
I could be wrong , but looks like you are missing that big "cup " washer on top of the trans ear mounts . You have done a lot of work to this car , keep it going , looks great !!!
Thanks Jack! Hmm, there is a big cup shaped washer on the bottom of the trans ears but I believe these are 911 mounts on the rear which have a wide steel bushing that takes the place of the top washer. Good eye!
EDIT: Ah, I see now! That's a big washer I'm missing. Hmm, why does it need to be so big? (Image below from Pelican Parts website, not my vehicle)
Nice work, Tom!
I'm getting ready to get some GT flares installed, so I appreciate the pics of your rear wheel/tire clearance.
Which Fuchs rims are you running? Are you running any spacers? The rear tires are 245/50, what size are the fronts?
I've got 7s and 9s and I want to run 225/50/16s in front and 265/45/16s in back. I think that the rear fenders will need a little extra room for the 265s.
Thanks Eric! I'm running 16x7 225/55 front and 16x8 245/50 rear using 911 offset and no spacers on the rear. You'll need to widen the fenders some more to fit the 265s. I had to trim the lip to get the 245s to safely fit. There's about 1cm between the fender lip and the rear tire.
Posted by: tomeric914 May 22 2011, 06:49 PM
Update: Finished up the exhaust. This is a Maganflow Tru-X crossflow muffler. Fits perfectly between the headers. Equal length exhaust now for both sides. A little droney at 2000 rpm but not bad at 3000 rpm (highway speed). About $200 in materials and easily 10 hours of labor getting everything just right.
I used Rustoleum 2000 deg primer and paint on the muffler. Looks good so far. I'll try to update next year after I get some miles on it.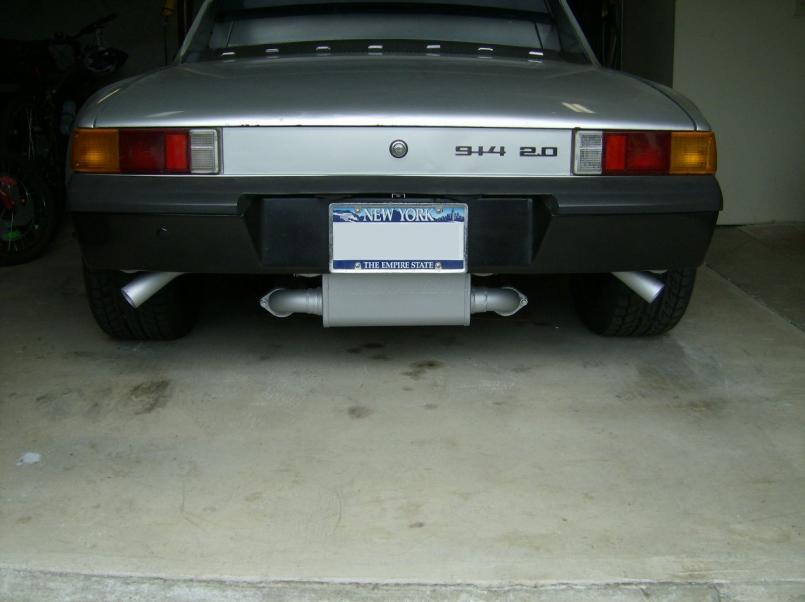
Posted by: tomeric914 May 28 2011, 11:06 AM
Update: Finally done with the breather. There's really no good place to mount it. In the trunk was out because I carry stuff back there. I cut a 16 gauge plate, bolted the breather to it and then screwed the plate to the firewall.
Fitting on the breather is -16AN so I picked up some aluminum tube, swedged it to a straight fitting and threaded it on to the breather.
Hose is from my FLAPS where they let me wander the radiator hose rack until I found what I needed. This one is a Dayco part # B71540 from a Nissan/Datsun/Suzuki that I cut and spliced to get the right angle I needed.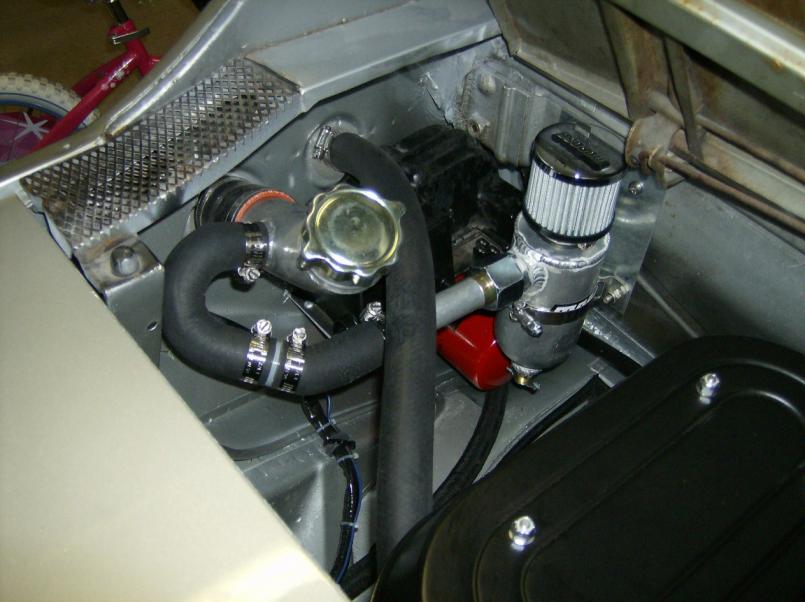
Posted by: Cupomeat Jun 1 2011, 03:05 PM
Looks GREAT!
I guess it is more of a NARP with the Nissan/Datsun/Suzuki part in it... 
Posted by: tomeric914 Jun 1 2011, 06:20 PM
Yea, but the breather says Moroso so it must be fast!
Posted by: kconway Jun 1 2011, 08:01 PM
Are those breather/catch cans required for street cars or ax cars only? Not sure what I should be doing with that spigot coming out of my tank.
Posted by: nsr-jamie Jun 1 2011, 09:37 PM
You do great work!! Car looks excellent now!! Must be quite a difference for sure.
Posted by: Cupomeat Jun 1 2011, 09:50 PM
You do great work!! Car looks excellent now!! Must be quite a difference for sure.
He DOES do great work, however I did notice one serious problem that NEEDS to be fixed.
He covered over HALF of the "Moroso" sticker...

Seriously, Tom's work is first class and this car is amazing. I remember when I first saw it, I figured we'd make a beater track car out of it. Now it is a phenomenal machine.
Posted by: tomeric914 Jun 2 2011, 10:17 AM
Are those breather/catch cans required for street cars or ax cars only? Not sure what I should be doing with that spigot coming out of my tank.
Well, technically a breather/catch can shouldn't pass emissions, but it's old enough that most people don't have an issue with it. A better way would be to route to the catch can and then to the intake instead of the gauze element on it now.
I coated part of the engine compartment in oil without any breather and that was just from street driving. The can is a must in my view and handy to catch the oil and be able to drain off!
Posted by: jaxdream Jun 2 2011, 04:32 PM
I could be wrong , but looks like you are missing that big "cup " washer on top of the trans ear mounts . You have done a lot of work to this car , keep it going , looks great !!!
Thanks Jack! Hmm, there is a big cup shaped washer on the bottom of the trans ears but I believe these are 911 mounts on the rear which have a wide steel bushing that takes the place of the top washer. Good eye!
EDIT: Ah, I see now! That's a big washer I'm missing. Hmm, why does it need to be so big? (Image below from Pelican Parts website, not my vehicle)
That cup washer keeps the trans from sliding off the bolt from the open side as it " cups " over the top of the trans ear . Just a heads up note.
Still a great looking car.
Jack
Nice work, Tom!
I'm getting ready to get some GT flares installed, so I appreciate the pics of your rear wheel/tire clearance.
Which Fuchs rims are you running? Are you running any spacers? The rear tires are 245/50, what size are the fronts?
I've got 7s and 9s and I want to run 225/50/16s in front and 265/45/16s in back. I think that the rear fenders will need a little extra room for the 265s.
Thanks Eric! I'm running 16x7 225/55 front and 16x8 245/50 rear using 911 offset and no spacers on the rear. You'll need to widen the fenders some more to fit the 265s. I had to trim the lip to get the 245s to safely fit. There's about 1cm between the fender lip and the rear tire.
Posted by: tomeric914 Jun 15 2011, 09:27 PM
My solution to turn the oil cooler fan on:
Honda Civic/Accord/etc. radiator fan switch from Autozone, $20. Wells part number TU197 with 18 x 1.5 metric thread. Turns on at roughly 93 deg C. Off somewhere around 89 deg C.
Pigtail for same radiator switch from the local pic and pull, $1.50
The switch threads into where the idiot light was situated. I used the adapter that was in this spot for the combo oil pressure/idiot light switch now mounted next to the fan.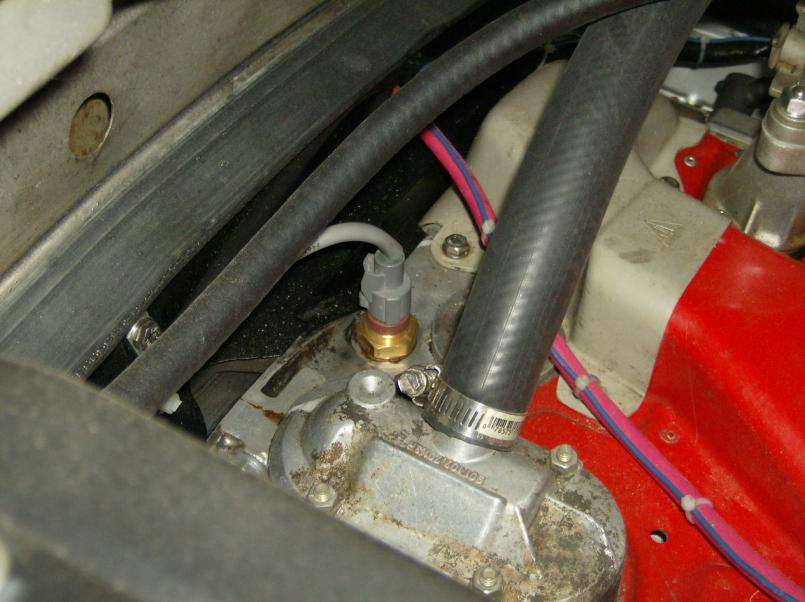
Posted by: Cupomeat Jun 15 2011, 09:39 PM
My solution to turn the oil cooler fan on:
Honda Civic/Accord/etc. radiator fan switch from Autozone, $20. Wells part number TU197 with 18 x 1.5 metric thread. Turns on at roughly 93 deg C. Off somewhere around 89 deg C.
Pigtail for same radiator switch from the local pic and pull, $1.50
The switch threads into where the idiot light was situated. I used the adapter that was in this spot for the combo oil pressure/idiot light switch now mounted next to the fan.
Nice continued use of NARP parts!!!
Seriously, good idea.
Posted by: pete-stevers Jun 15 2011, 11:49 PM
I spotted a single cab in one of those pics.....
Posted by: tomeric914 Jun 16 2011, 06:31 AM
I spotted a single cab in one of those pics.....
It's in more than one of those pics. There's another vehicle in one of those pics too but it's undercover

Posted by: tomeric914 Jun 26 2011, 09:16 PM
So I tackled the oil leaks from my chain boxes with the engine in the car this weekend working through about 6" worth of access on the driver's side while on my back and the rear of the car on jack stands. Made lots of marks so that everything went in EXACTLY as I had removed it.
I pulled all of the plugs so the engine could be rotated easily. Once I completed the driver's side, I rotated the engine SLOWLY to make sure there was no interference. With everything in order, I started on the passenger side using the same process. When I put the passenger side back together with all of the marks lined up, the cam was off and I had interference! What happened? Well, while getting the chain box off, I pushed some of the chain inside the case which probably caused one of the links to skip a tooth on the intermediate shaft gear and put the cam timing off. I adjusted one tooth on the cam gear and everything was back to normal.
Everything is now back together and working correctly with no leaks from the chain boxes. Total time to complete... 20+ hours, but it was well worth it!
My view from below on the driver's side: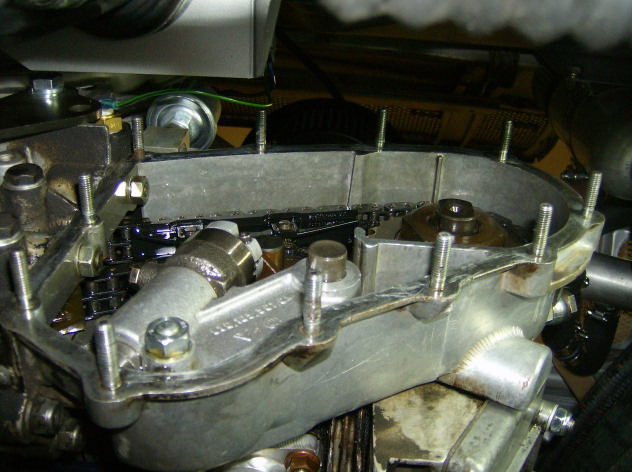
Lot's of marks: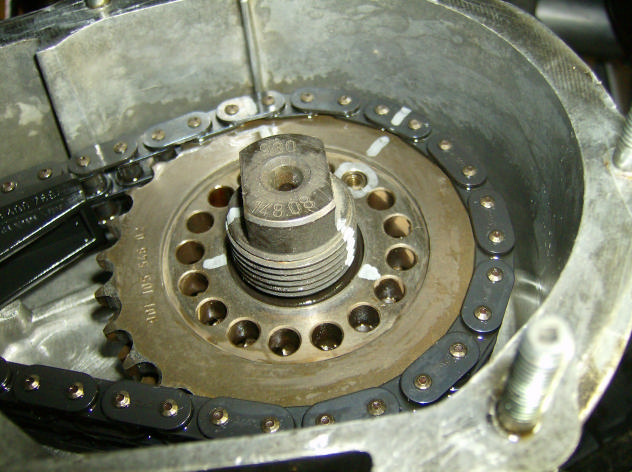
Not for the faint of heart!
Posted by: Eric_Shea Jun 28 2011, 09:29 PM
Looking great Tom!
I like the fact that you "fix and drive, fix and drive, fix and drive... "
I know what's next! 
Posted by: Cupomeat Jul 1 2011, 08:54 AM
Looking great Tom!
I like the fact that you "fix and drive, fix and drive, fix and drive... "
I know what's next!
Eric, according to your logical pattern recognition, somthing would need to "break" before he could then "fix" it...
So unless the calipers break, he can't fix em
Seriously, Tom is amazing in his ability to complete a project and keep that car as his daily driver all summer.
Posted by: tomeric914 Jul 1 2011, 03:52 PM
Eric, according to your logical pattern recognition, somthing would need to "break" before he could then "fix" it...
So unless the calipers break, he can't fix em
Seriously, Tom is amazing in his ability to complete a project and keep that car as his daily driver all summer.
With the extra hp I have now, I'm fixing it before it gets broken in a bad way at WG.
I believe I drove it every day this week!

Posted by: Cupomeat Jul 2 2011, 09:14 PM
Good point, fixing brakes BEFORE something breaks is the way to go.
Very much looking forward to seeing that beast tomorrow!
Posted by: Cupomeat Jul 3 2011, 08:36 PM
Good point, fixing brakes BEFORE something breaks is the way to go.
Very much looking forward to seeing that beast tomorrow!
AND here it is with a mini Marcy Porsche reunion!
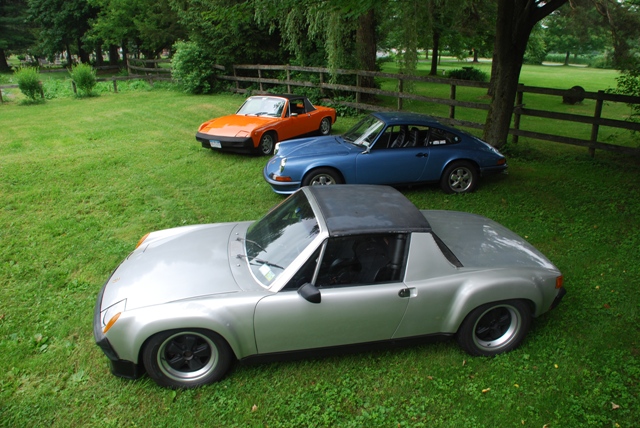
And here it is in glory, and OH what a great sound from that motor.
Posted by: Cupomeat Jul 3 2011, 08:56 PM
Having had a ride now, all I can say is that I want a 6 cyl conversion as well!
Damn, that thing pulls HARD and the sound is excellent, and yes, loud with the headers, exhaust and carbs (2 ft from your ears).
Great car, and sorry about your air dam(n) Tom.
Posted by: tomeric914 Jul 4 2011, 06:27 PM
Great car, and sorry about your air dam(n) Tom.
Hey, it's the price ya pay for having the dam thing 3" from the ground! I actually think I cracked it backing out of the front driveway and not in the back yard for the photo shoot.
Posted by: tomeric914 Aug 14 2011, 09:45 AM
ok, so I've been busy with a few things and haven't been updating my thread as I should.
First was installing as large of a cooler as I possibly could under the rear deck seeing as that the first one was way too small. I scored a Setrab 11" x 12" on eBay, picked up a fan and designed a shroud to hold it all. Little known place in Syracuse is http://www.aquacutinc.com/applications.html who will cut pretty much anything out of any material. You just need to provide the DXF file.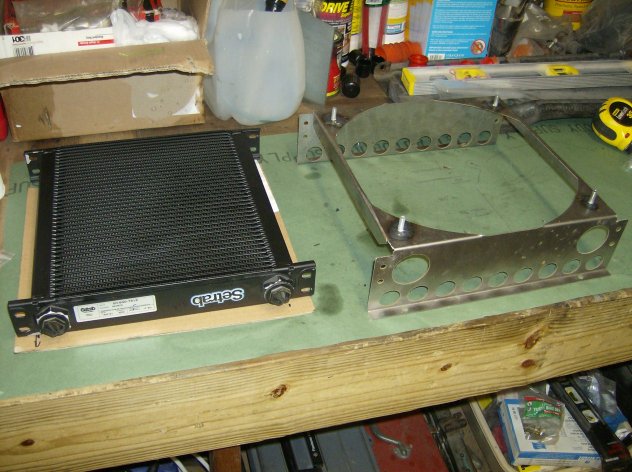
The cooler is tucked up next to the transmission. The sway bar swings next to the cooler with only 1/2" to spare. It's been put through its paces with no interference.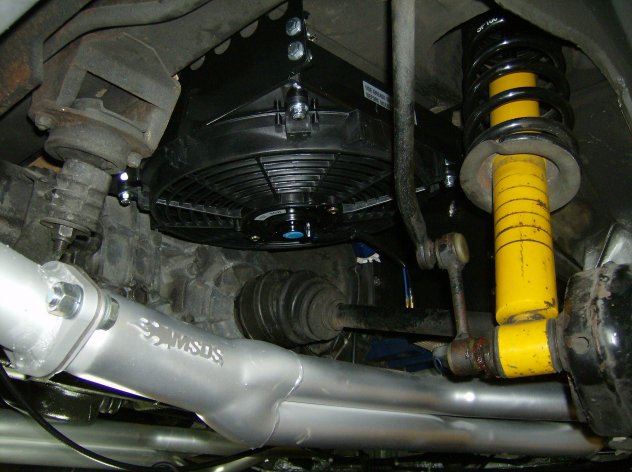
My goal was to keep the cooler in back and not run lines to the front of the vehicle. While this works in conjunction with the stock oil cooler for the street at keeping temps reasonable, it didn't work to keep the oil temps down so well on the track. The next mod will be to relocate it to the front trunk.
The other recent addition was a pair of restored Alfa Romeo GTV6 Brembo calipers and Porterfield R4-S pads from Eric Shea at http://www.pmbperformance.com/catalog/item/4741552/6862358.htm to replace the M calipers. These calipers look REAL nice, are lighter by nearly 10 lbs and worked fantastic at last weekend's DE at Watkin's Glen.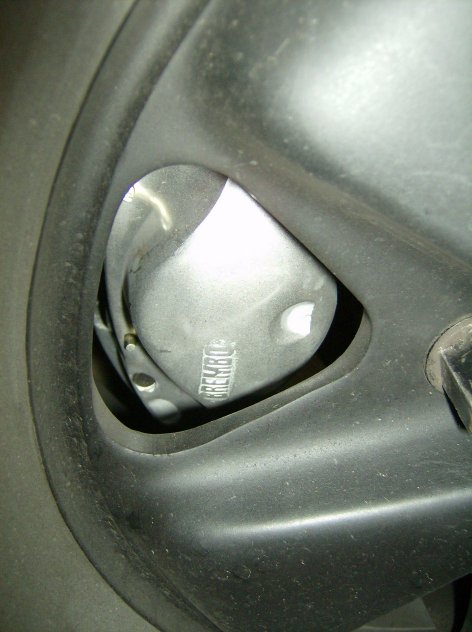
The car has changed significantly over the past 8 months with the addition of the 6, heavier springs, Koni adjustables in front and now the Brembos. Watkins Glen was the first event I've made it to since these changes and all I can say is WOW.
Here's some video from Cupomeat's 993 C4 eventually catching and passing me. Some in the rain, some in the dry. Enjoy!
I couldn't get it to embed, so here's the link http://www.vimeo.com/27610851
Posted by: AZ914 Aug 14 2011, 04:14 PM
The cooler looks great! I'm about to add a dual fan cooler in the same spot and was wondering what you used for mounting hardware.?. i.e. vibration isolators, etc.
Thanks for any info.
Jason
Posted by: Scarlet75 Aug 14 2011, 04:19 PM
I really need to get down there and check this 914 out.
Posted by: tomeric914 Aug 14 2011, 09:23 PM
The cooler looks great! I'm about to add a dual fan cooler in the same spot and was wondering what you used for mounting hardware.?. i.e. vibration isolators, etc.
Thanks for any info.
Jason
Thanks Jason! The cooler is solidly mounted in a water jet cut sheet metal frame of my own design. The key is to keep it from vibrating. There are couple of folks on here who have mounted a dual fan arrangement down there. Do a search for the words +oil +cooler and user names "Vacca Rabite" and "Series9"
I really need to get down there and check this 914 out.
Just let me know when you're down this way next!
Posted by: tomeric914 Mar 25 2012, 09:54 AM
I've been busy this winter working on a couple of projects. My wife thinks I'm nuts because the car was running perfectly well when I put it away.
Project 1 - 3.2 EFI manifold with MS2
The first challenge was to get the manifold to fit. I ended up reversing the manifold which worked better for my purposes.
1. Repurposed the heater fan motor bracket to hold the fuel filter vertically behind the manifold. There is now a metric to AN tee off the bottom of that filter that feeds both fuel manifolds.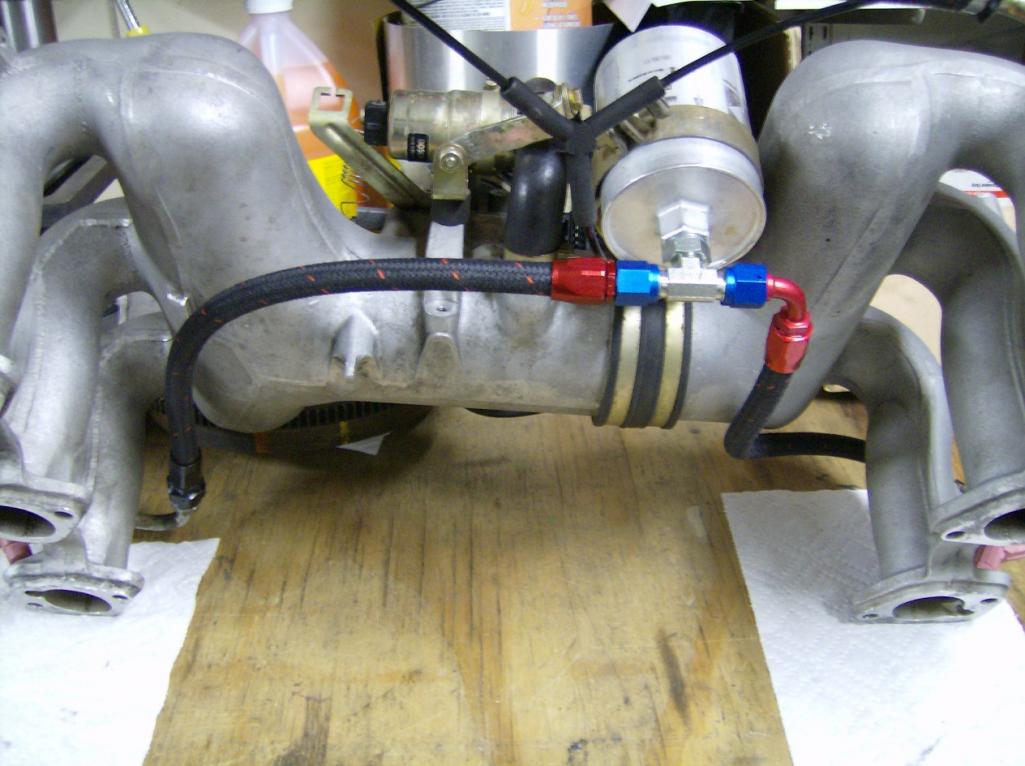
2. I had to drill my nice powder coated tin to run the cable up through, but it was worth it. This is a 6" longer than stock cable from Terry Cable. The cable is mounted to the old cruise control throttle bracket with a small square to round adapter. I just needed to make a new throttle bracket to connect the cable up.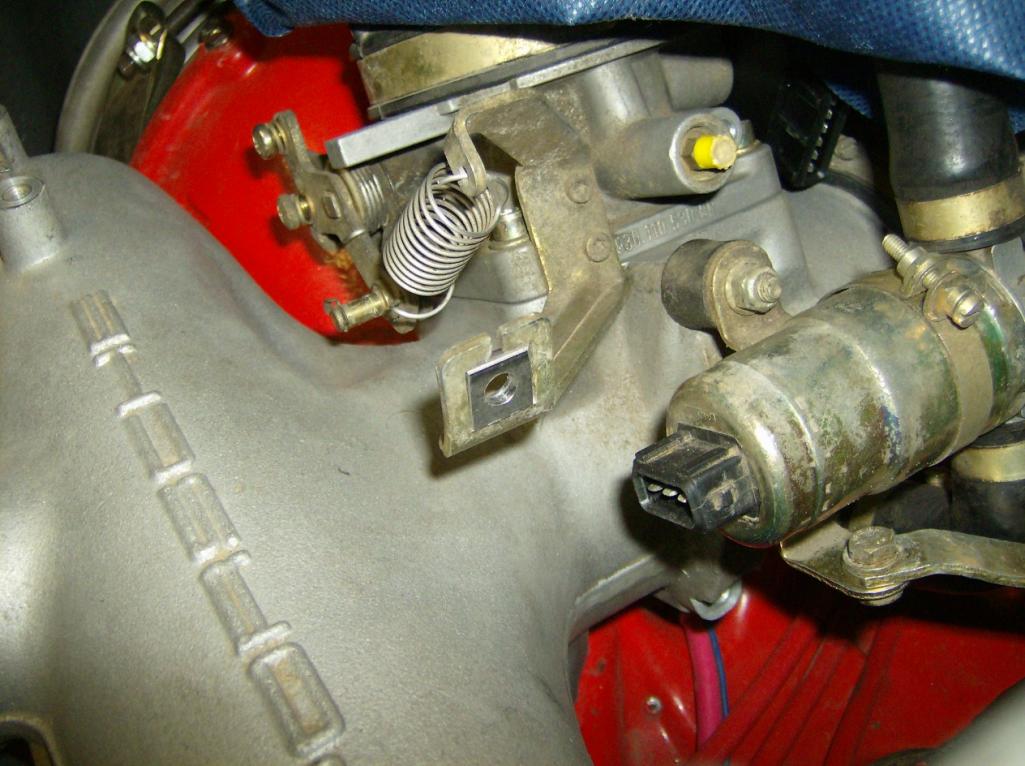
Just need to finalize a bracket or two and shorten the intake tube a couple of inches.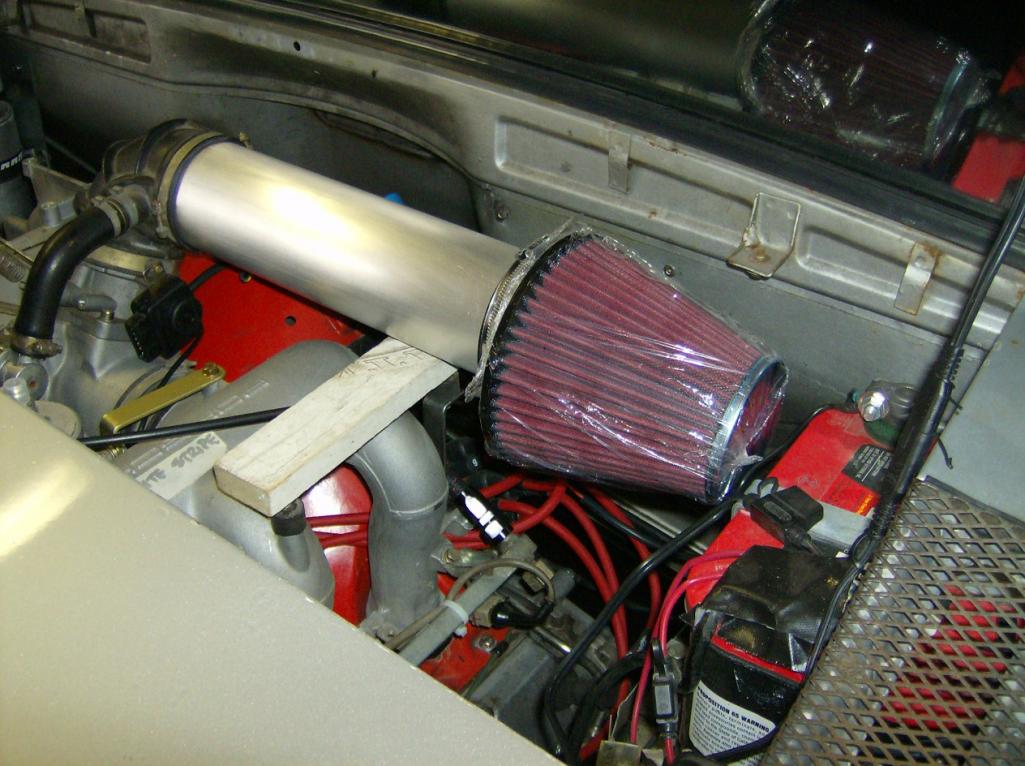
Project 2 - Relocate Oil Cooler to Front Trunk
I had originally mounted a Setrab 12 x 12 cooler with a 12" fan back next to the transmission because it worked well with a smaller cooler with the 4 cylinder on track days. Also didn't want to add more air under the car.
Anyways, track day oil temps were, ahem, too high at 270 deg F. I used Google Sketchup to design the shroud in 3D.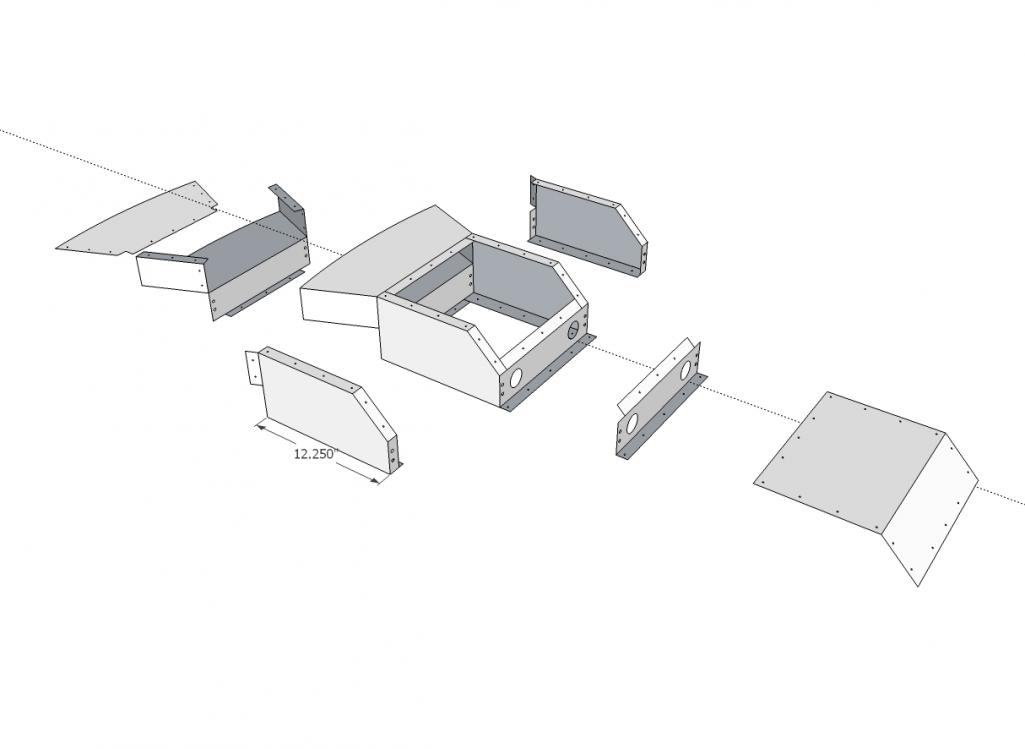
Then I "flattened" the parts using AutoCad and sent the files to my favorite local waterjet company where they cut all the parts. Next was to bring them into our model shop and bend the parts into the desired shape, then bring them home and bolt it all together.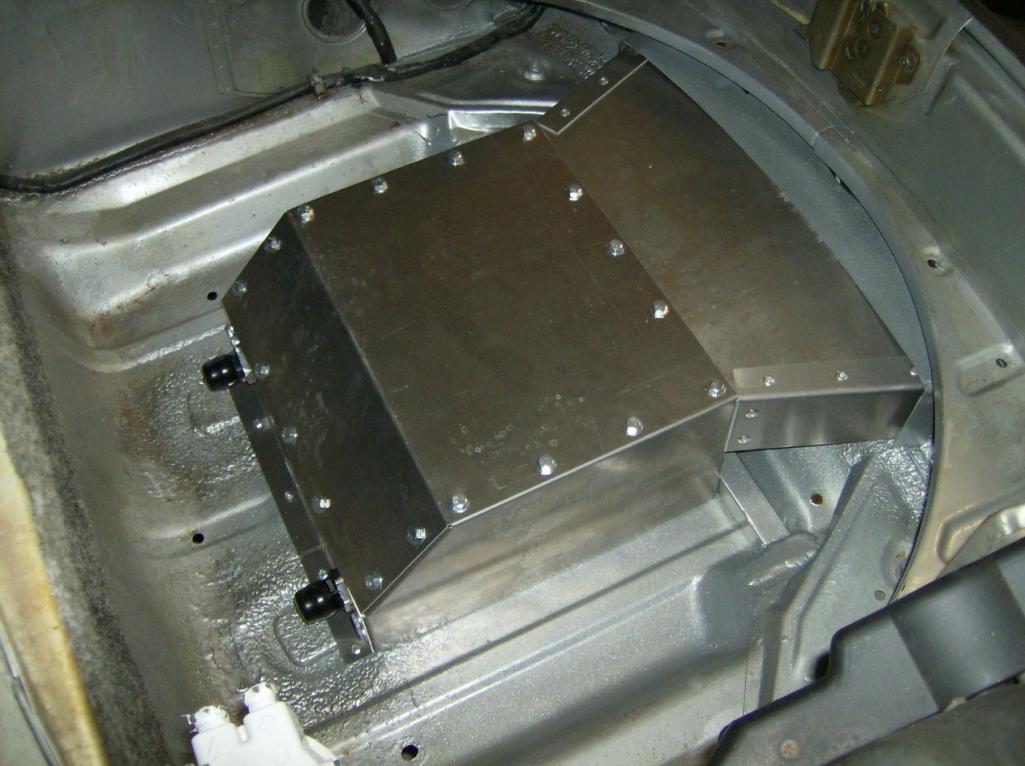
Not seen here is the cutting and shrinking that I did to the trunk floor to get it all flat so that the cooler would bolt up to the floor nice and flat.
Still to come, oil line routing, EFI tuning, etc.
Posted by: Cupomeat Apr 20 2012, 01:41 PM
Damn, looking forward to seeing this car in July.
Posted by: tomeric914 Apr 20 2012, 03:53 PM
Damn, looking forward to seeing this car in July.
With any luck I'll make decent progress this weekend. I have issues with cutting into perfectly good sheet metal!
Posted by: rick 918-S Apr 21 2012, 06:11 AM
Very nice!
Posted by: jmill Apr 21 2012, 10:47 AM
Still one of my favorite cars.
Posted by: tomeric914 Apr 21 2012, 02:29 PM
Still one of my favorite cars.
Thanks John!
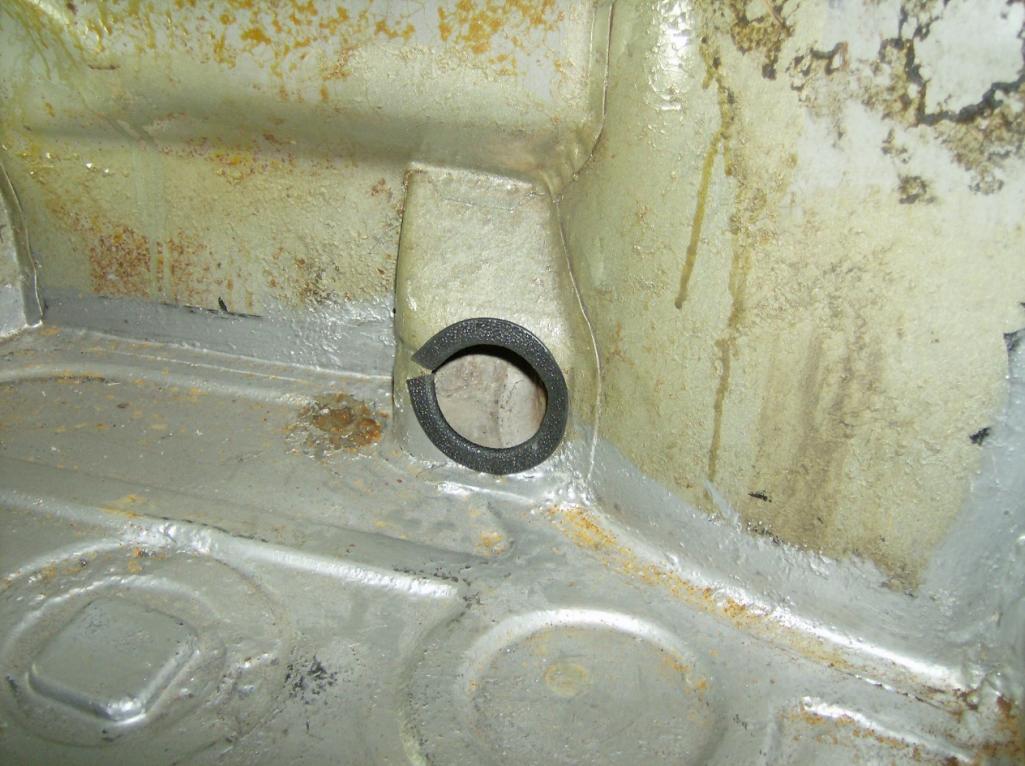
I finally got the oil lines run front to back running through the heater ducts in the long and took a few pictures that may help others in the future.
This is up front on the passenger side in front of the gas tank taken without a flash to show that the path is fairly clear to the inside.

Next is at the passenger footwell. I used a 2-1/4" hole saw and used some TrimLock to cover the sharp edges.
Cutting the long is the PITA of the hole process. I drilled once with the same 2-1/4" hole saw cutting through the long sheet metal and then into the elbow duct inside the long. Then I used the hole saw again to cut another half hole further forward so the hose radius was smooth. TrimLock was used on the long and the duct inside the long to protect the hose.
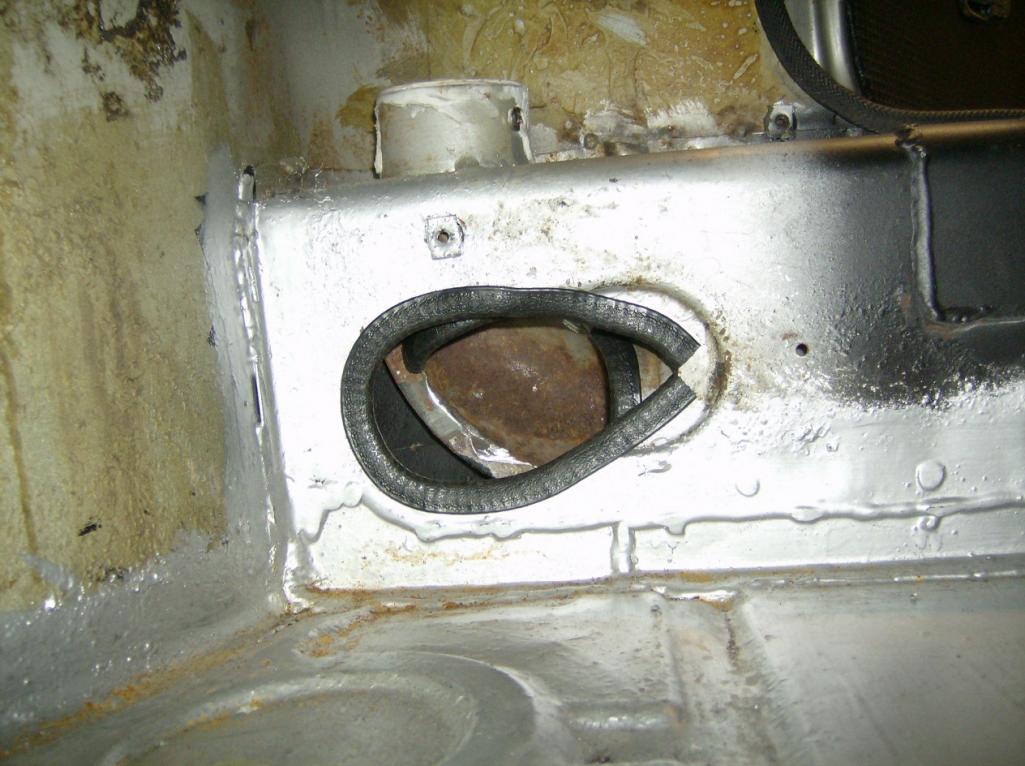
Final after the hose was run
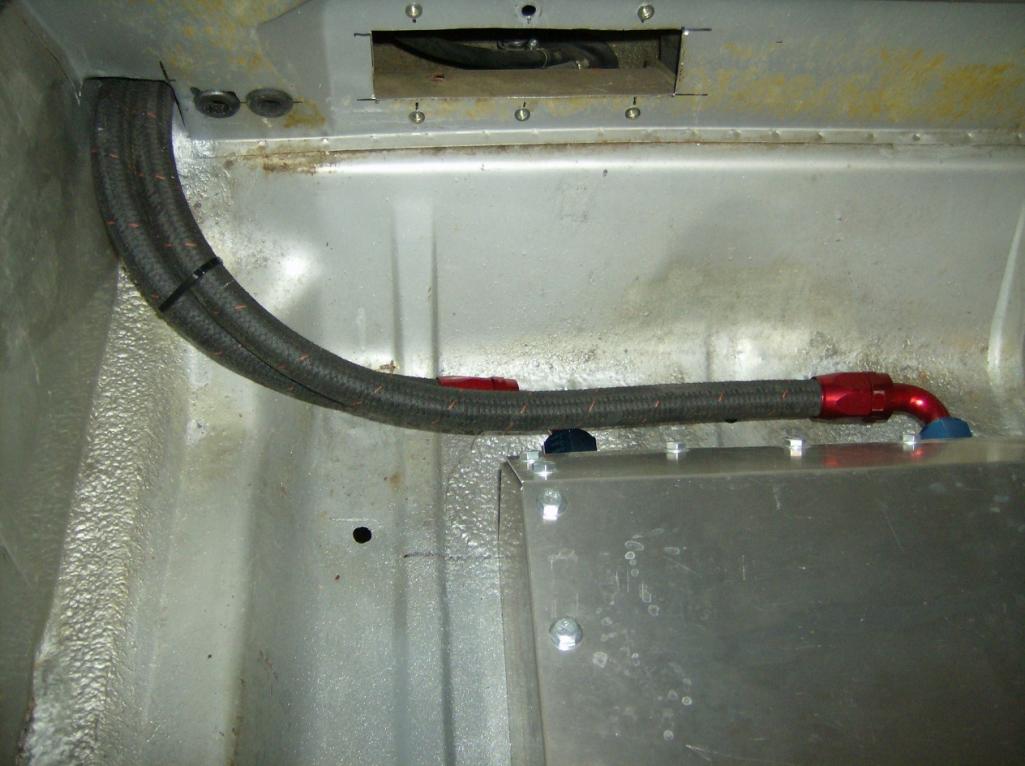

Next, locate the oil thermostat and do the plumbing out back...
Posted by: tomeric914 May 19 2012, 07:42 PM
I need to get more pictures up, but in the meantime, here's a video of the very first start with Megasquirt and a rare picture of my ugly mug. Honest to God, this is the first time I turned the key and it started up better than with the old carbs! Lot's of tuning to do, but I'll take it!
Gah! Still can't embed Vimeo content
https://vimeo.com/42467463
Posted by: Cupomeat May 19 2012, 10:09 PM
Fantastic!!!
You almost have your daily driver back!!!
Sounds great too!
Posted by: tomeric914 Jul 5 2012, 06:36 AM
More progress:
Added another layer of Damplifier (http://www.secondskinaudio.com) to the firewall. Mainly because it is now offered in in black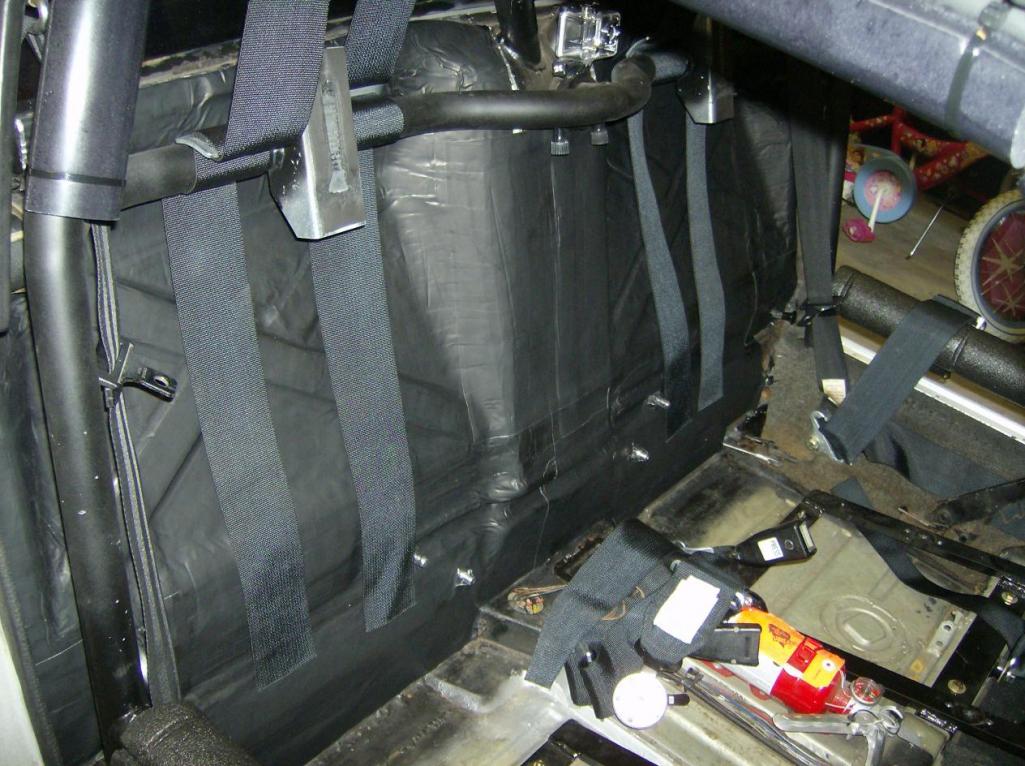
Changed out the roll bar padding to the "correct" SFI padding. I like the BSCI stuff (http://www.rollbarpadding.com) because it's just a little softer than the hard padding offered by others.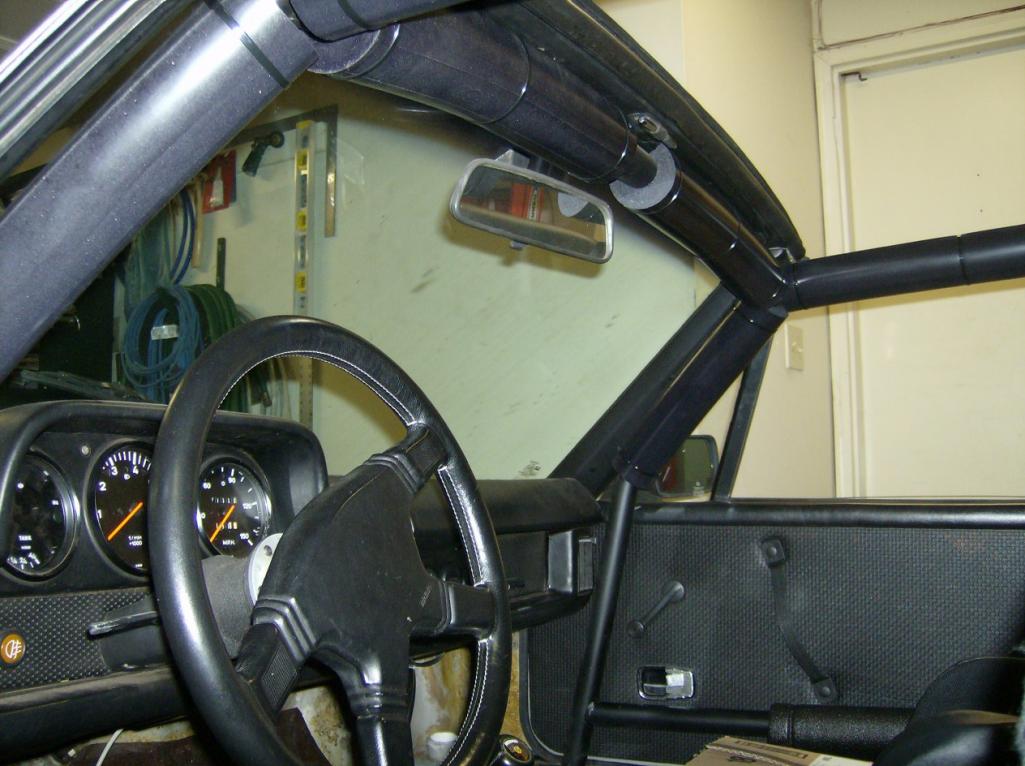
The previous owner had removed the trunk torsion springs for some bizzaro reason. I'd been keeping the trunk open with a wooden grade stake. Finally bought the CAMP914 trunk shock kit (http://www.camp914.com).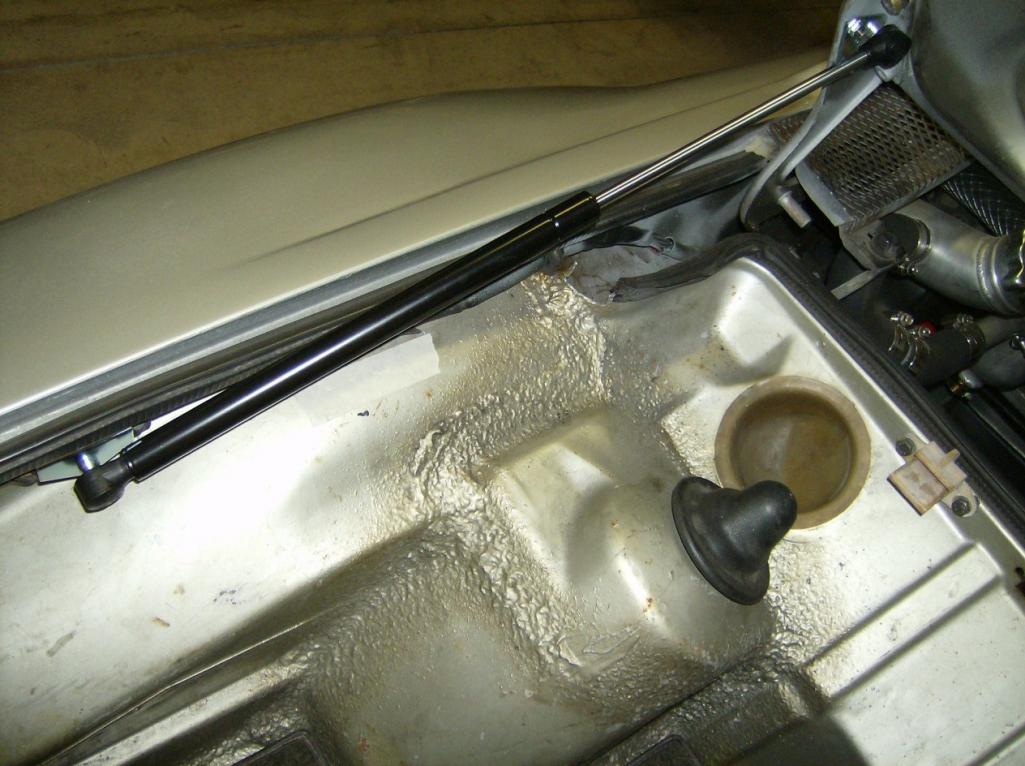
Posted by: JmuRiz Aug 2 2012, 01:37 PM
Looking good, good to know the rear cooler was only good enough for road-car duty...I'll have to file that in my mental cabinet for future use.
Posted by: FourBlades Aug 3 2012, 08:52 AM
More nice work!
How do you like the kirkey seats?
John
Posted by: tomeric914 Aug 3 2012, 08:04 PM
Looking good, good to know the rear cooler was only good enough for road-car duty.
The front cooler works great. We're at Watkins Glen, it was 98F today and the oil temp never got higher than 200F. That's a helluva lot better than the 270F+ I saw the last time we were down here.
How do you like the kirkey seats?
The Kirkey's are great on the track. No need to hold yourself in place like with the stock seats.
Posted by: Cupomeat Sep 6 2012, 04:44 PM
A good shot of Tom at WG.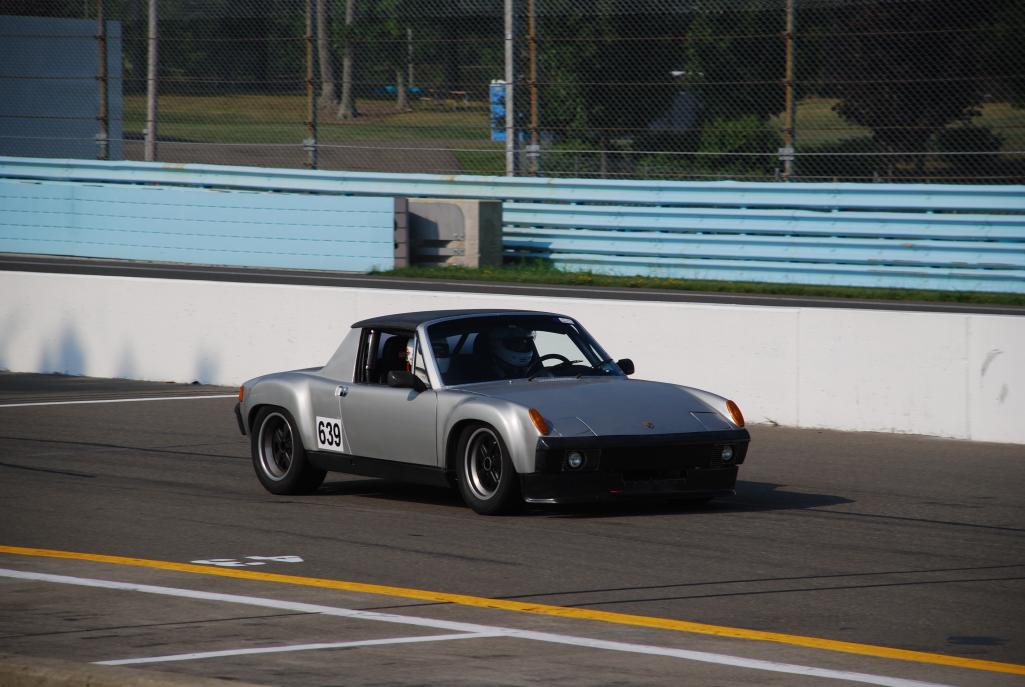
That car is amazingly fast now, no small part owed to Tom's driving.

Posted by: tomeric914 Sep 6 2012, 07:15 PM
Going faster means I need to scrub off more speed too. As I mentioned in another thread, this resulted in warped rotors. The low front air dam does its job well keeping air from under the car, but unfortunately blocks airflow to the front brakes. It was amazing how hot the front fenders got!
So first, get the old rotors off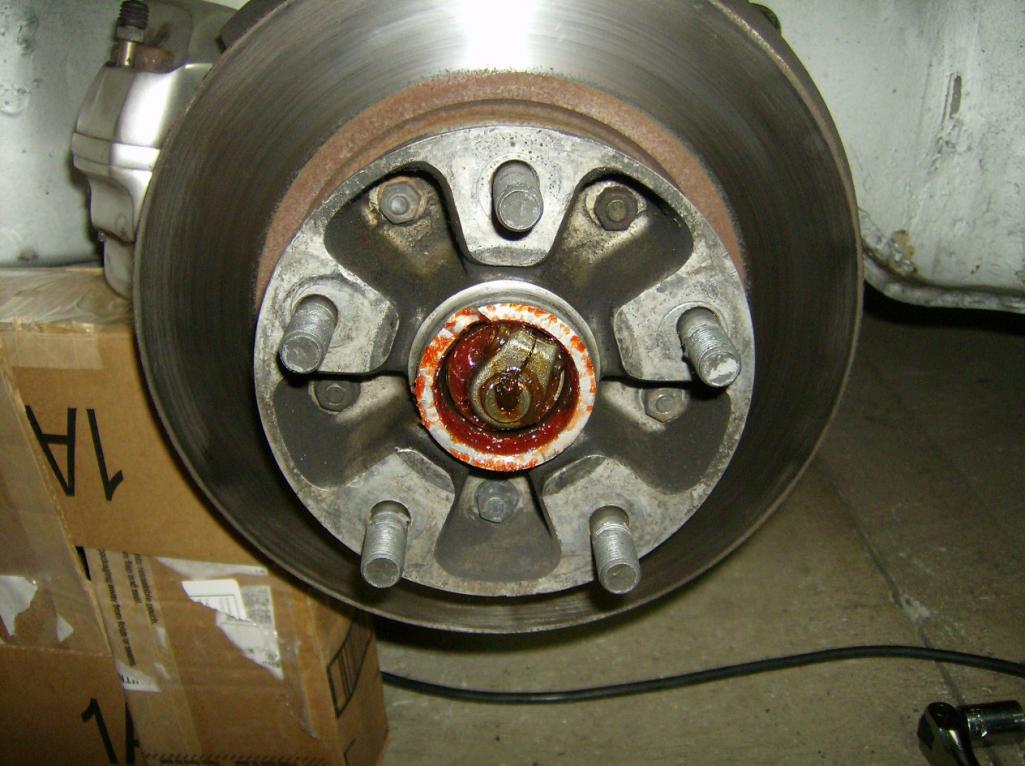
Clean up the spindle and remove the original backing plates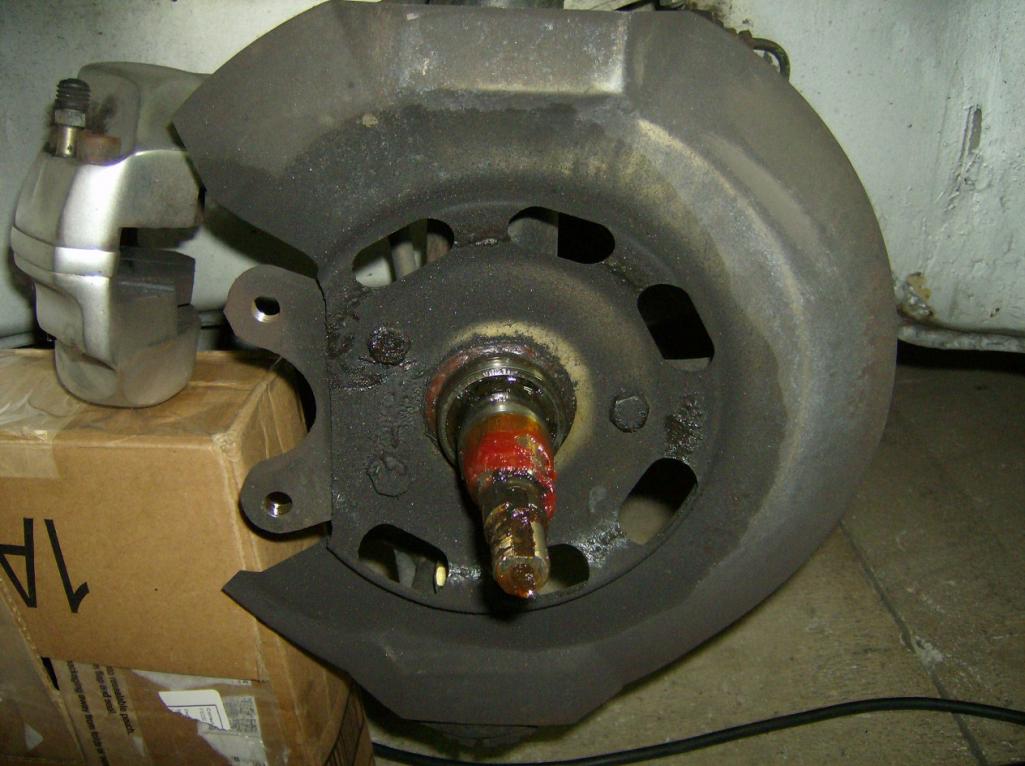
Put the new AJ ducted backing plates on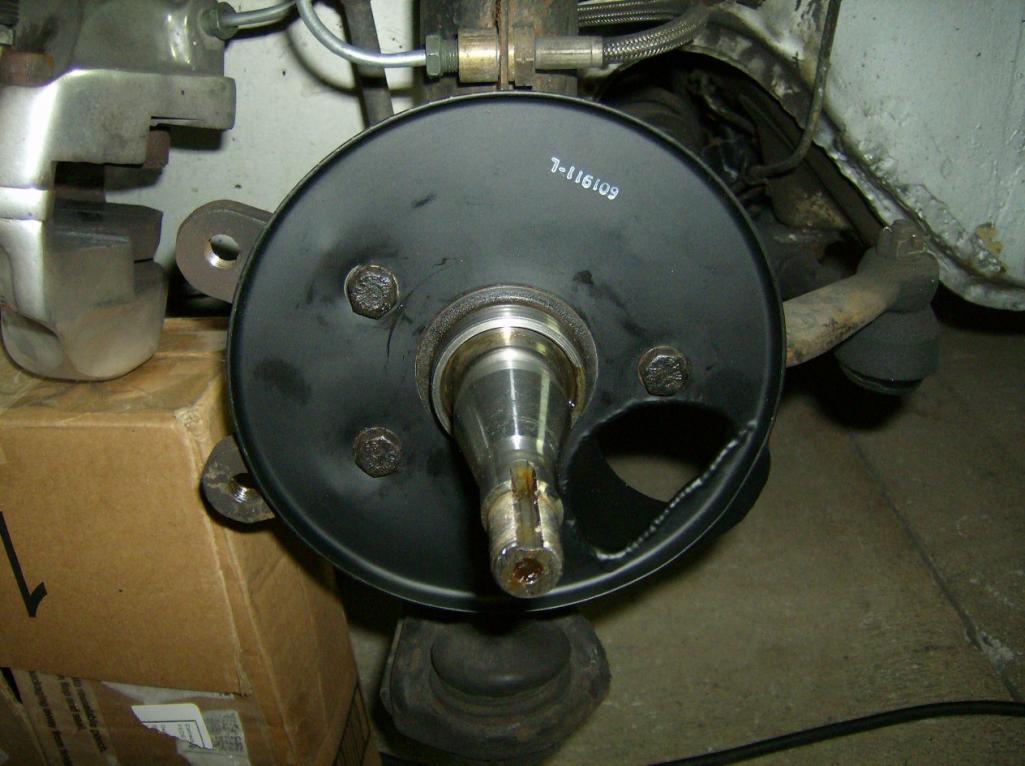
Disassemble the rotor from the hub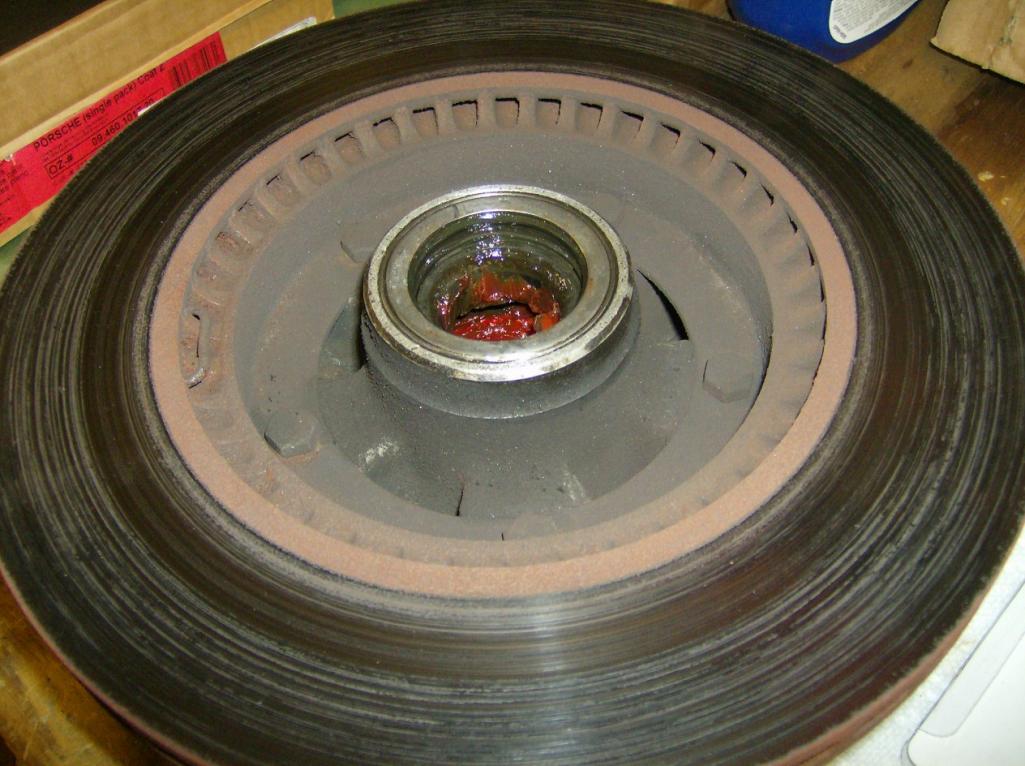
Smart racing is no longer and I couldn't find the air blockoff plates so I drew my own on AutoCAD from dimensions found online and had them waterjet locally out of stainless.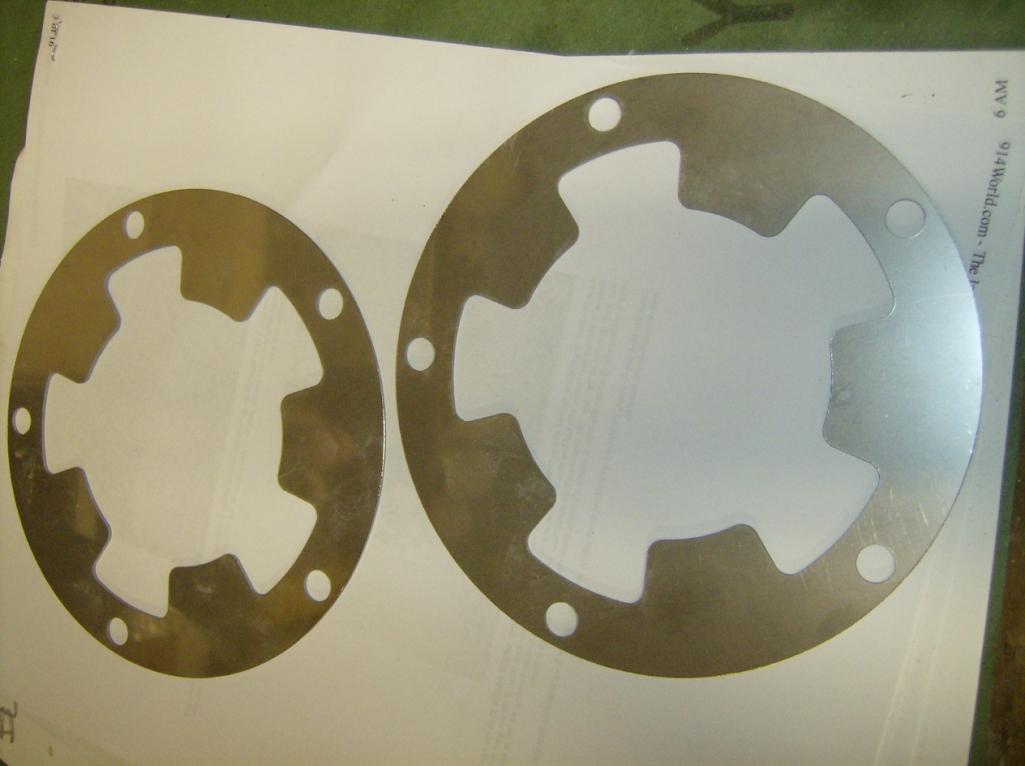
Install the blockoffs and massage them a little to fit just right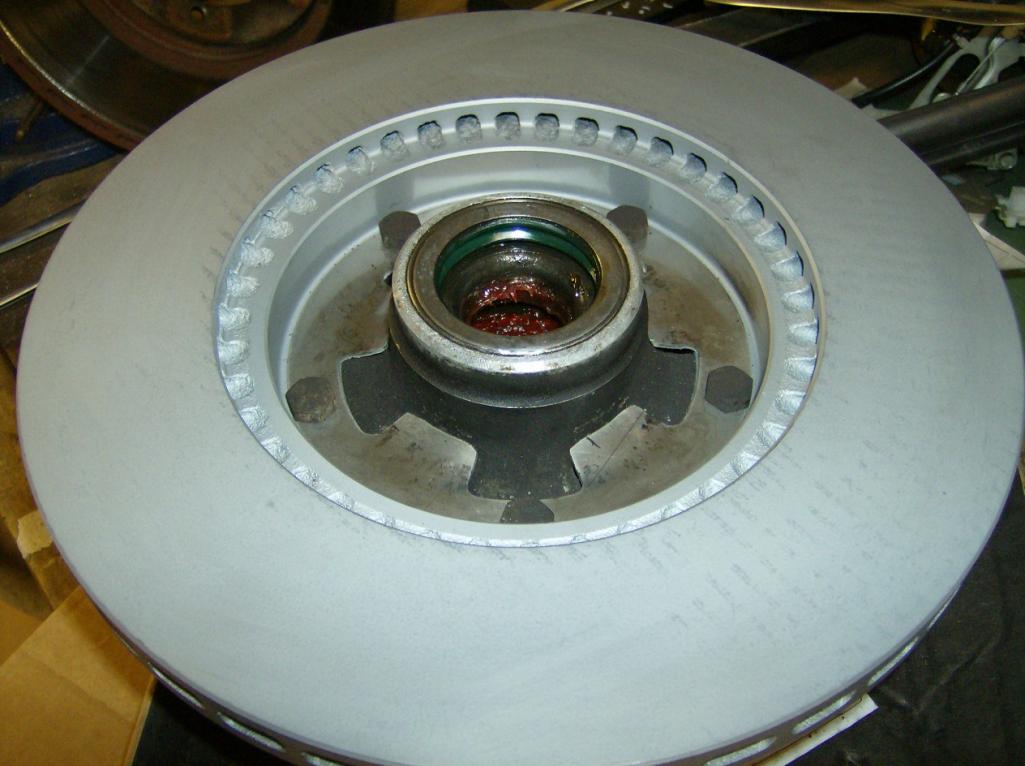
Put the rotor back on and massage the ducted backing plates to fit just right. BTW, the DAPO put the front wheel bearing seals in backwards. I didn't have new ones to put in so those pictured here are installed incorrectly!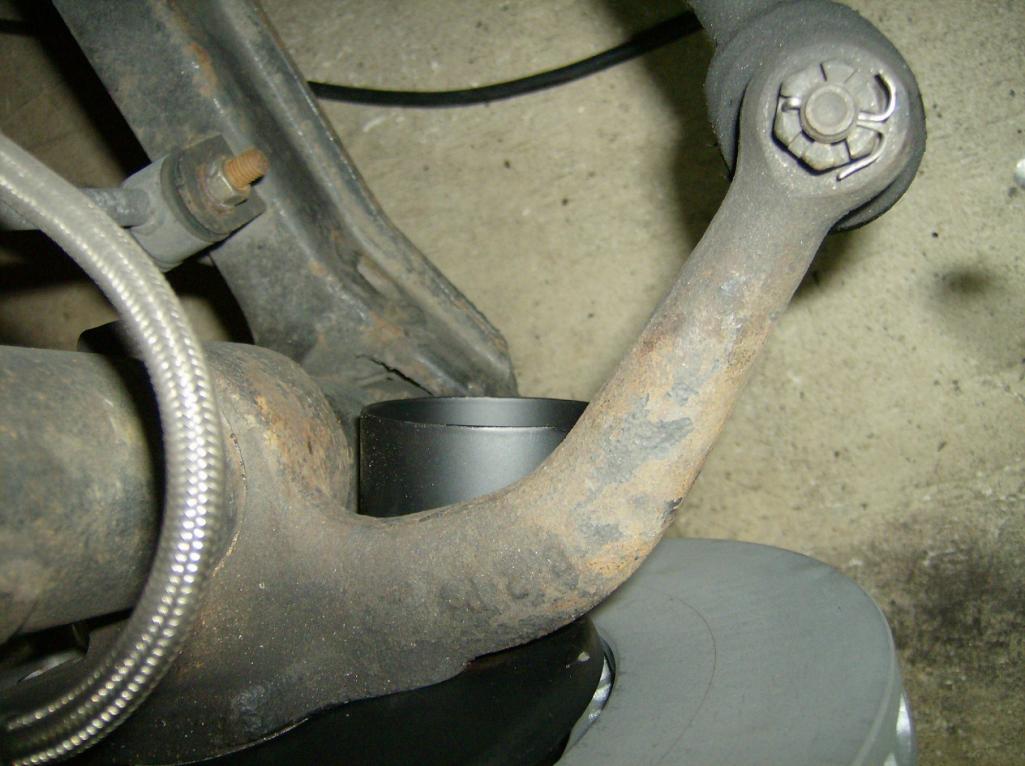
Put it all back together and drive it
I found Zimmerman rotors on http://www.partsgeek.com for a decent price and free shipping.
Next is to fabricate some duct manifolds for the A-arms and purchase some not so cheap silicone or neoprene duct.
Posted by: somd914 Sep 8 2012, 06:34 AM
Tom,
Awesome build.
I'm loving your old 2056 in my car, but give me a call when your ready for another engine swap, I'll gladly take this one
Posted by: tomeric914 Apr 5 2014, 08:42 PM
Been busy this winter but haven't posted much to the build thread. I put a "How-to" together for a cost effective rear coil over setup here:
http://www.914world.com/bbs2/index.php?showtopic=229288
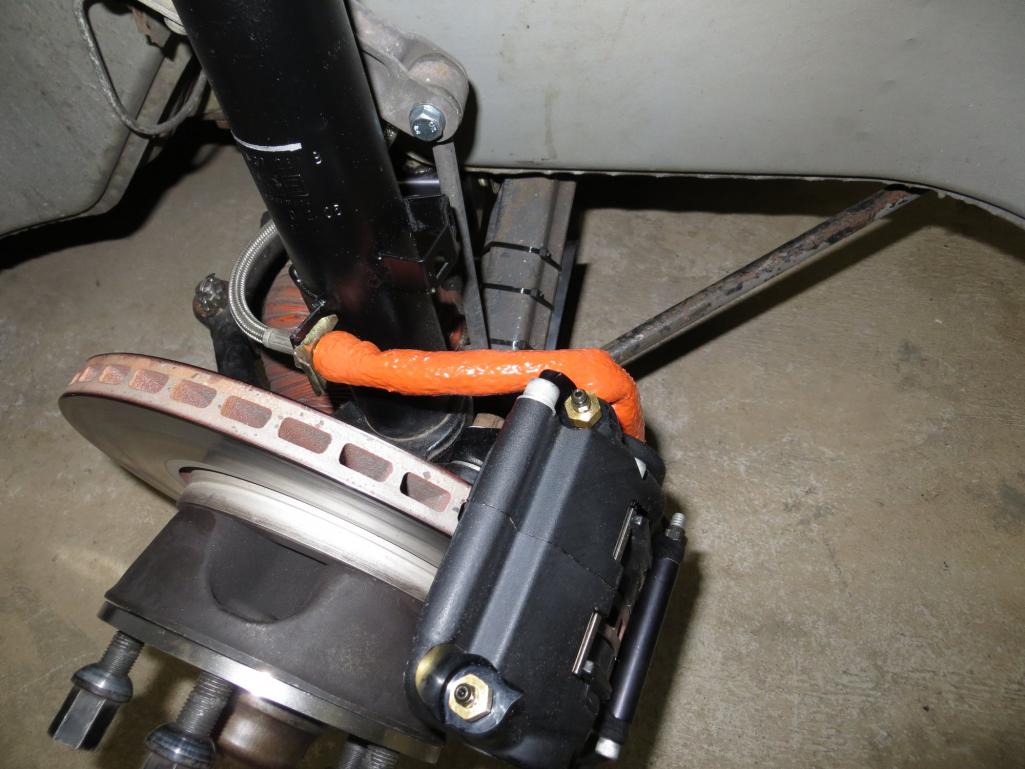
As well as swapped out my awesome Brembo AM calipers from Eric at PMB for a set of 4 piston Wilwoods with a lot more pad area and thickness. The Wilwoods were literally a bolt on with a 2mm spacer. Why more pad area? Mainly for better longevity and a slightly better heat sink. Of course this required a strut housing swap to go from 3" spacing to 3.5" spacing. Consider that thread your winter time entertainment 
I also insulated the hard line which runs about an inch away from the rotor face with fire sleeve.
...and "while I was in there" I swapped out the stock bushings for Rebel Racing Teflon RSR setup.
Anyways, a couple of pics for your enjoyment!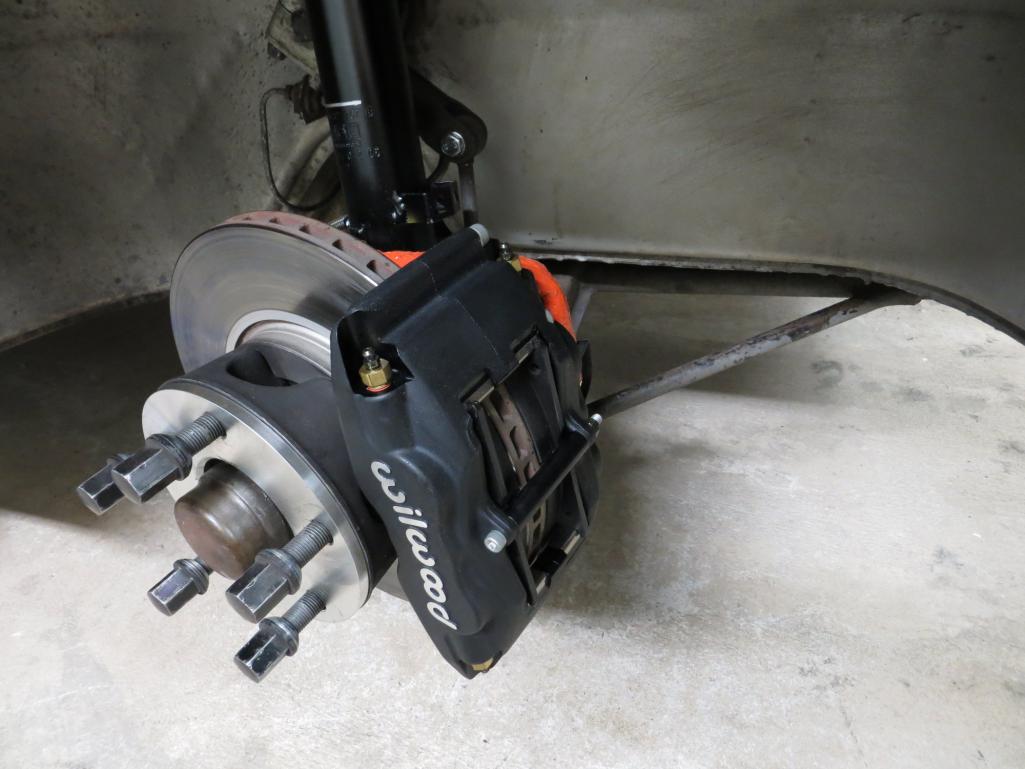
Posted by: jaxdream Apr 6 2014, 09:14 AM
Forgive my ignorance Tom , what was the "blockoff" plates installed on the back of the rotors for blocking off ???
GR8 thread man !!!!
Jack
Posted by: tomeric914 Apr 6 2014, 09:41 AM
Forgive my ignorance Tom , what was the "blockoff" plates installed on the back of the rotors for blocking off ???
Jack, no problem! The blockoff plates force all of the air through the radial vent holes inside the disc. Without the blockoff, the air would blow past the vent holes and out the 5 big holes in the hub. Those 5 big holes correspond with the stud locations. The blockoffs are only needed when air is ducted to the rotors like I have done.
Posted by: tomeric914 Apr 7 2014, 09:12 PM
Finally added my Sheridan rear spoiler. One of the nicest aftermarket fiberglass components I have purchased.
Link to the "How-To" portion of installing the rear spoiler: http://www.914world.com/bbs2/index.php?s=&showtopic=229928&view=findpost&p=2022462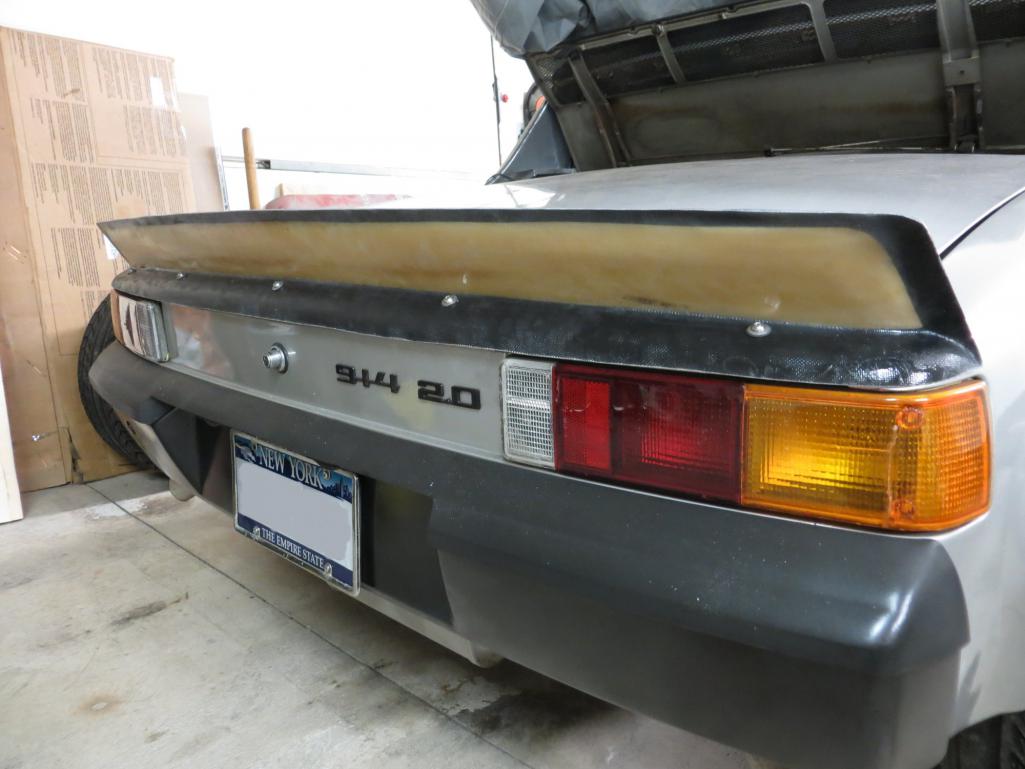
Posted by: arkitect May 2 2015, 10:18 AM
Cool thread, have not seen this type of rear spoiler. Is the plan to paint it or leave it raw looking?
Dave
Posted by: tomeric914 May 2 2015, 12:58 PM
Cool thread, have not seen this type of rear spoiler. Is the plan to paint it or leave it raw looking?
Dave
Thanks Dave. I'm leaving the spoiler raw for now.
Posted by: Maltese Falcon May 2 2015, 03:58 PM
Excellent craftsmanship here Tom...I dig the silver paint with gt flares 
Marty
Posted by: Luke M May 3 2015, 06:48 PM
Hey Tom,
Nice car you got there. Would you be willing to share more info on the 3.0 to 3.2 EFI intake conv. ?
Posted by: tomeric914 Jun 30 2017, 06:49 PM
Just updating my thread with post I recently made http://www.914world.com/bbs2/index.php?showtopic=312451
I was looking for a 20.64mm master cylinder option and stumbled across a thread on Pelican where someone had put a 1990's Corrado master cylinder in a 911 or 914. There was only but one picture and not much of a write-up so I figured I'd try and document what I did.
This master cylinder uses the same pushrod that you already have, though some adjustment will be necessary. You will also need to bend new brake lines if you want to do it right.
As with any brake work. If you don't know what the hell you're doing, don't do this.
Parts:
357 611 019 - this is for the 20.64mm master cylinder
357 611 019 B - this is for the 22.22mm master cylinder
911 355 322 00 - straight reservoir feed fitting
911 355 323 00 - angled reservoir feed fitting
7mm blue braided brake reservoir hose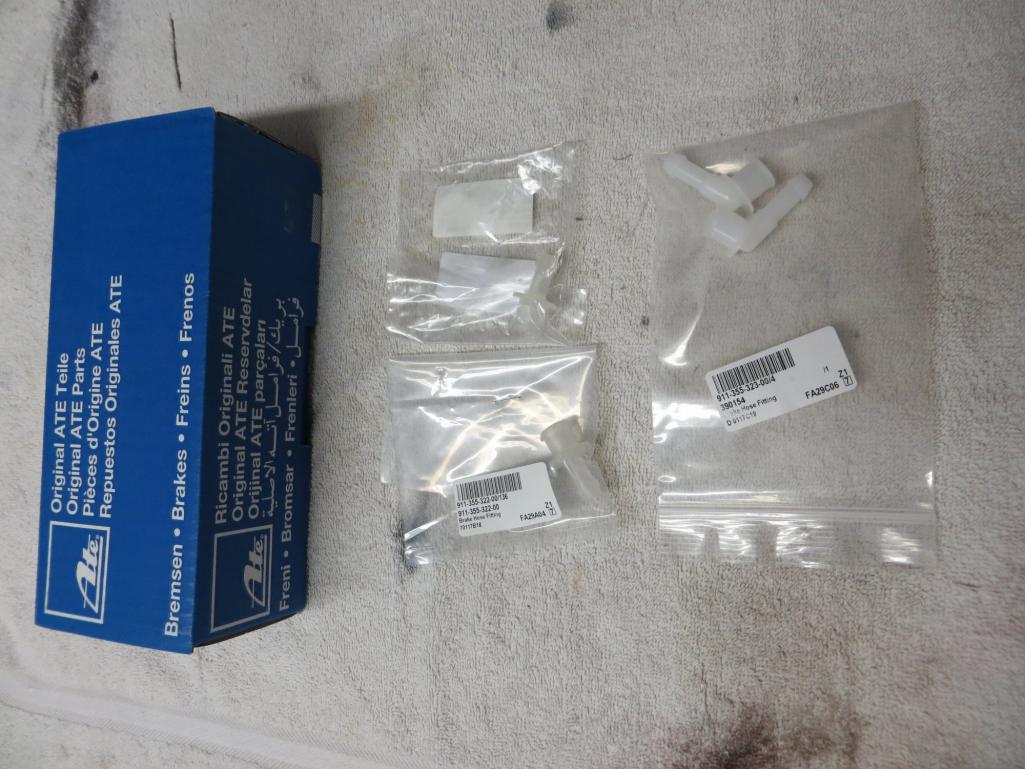
You'll need to decide which master cylinder is right for your application. For example, my braking system is pretty much all mid-1980's Carrera sized calipers and referencing Bill Verberg's brake page, I found that the mid-1980's Carrera used a 20.64mm master cylinder. I also knew that my pedal travel was more than I liked while on track.
https://members.rennlist.com/1976c38/brakes.htm
I purchased all of the parts through Pelican, the 357 611 019 (20.64mm) is an ATE unit made of aluminum and was only about $100. The 357 611 019 B (22.22mm) is made by a few companies, is a cast iron unit and about $50.
Here's where you are today:
[img]http://www.914world.com/bbs2/uploads/post-9101-1498609158_thumb.jpg
[/img]
1. Drain your reservoir using a turkey baster so you don't wear the entire contents of the reservoir.
2. Disconnect all brake lines, the reservoir feed lines and unbolt the master cylinder.
3. Loosen the locknut and unthread the master cylinder pushrod from the pedal cluster, then run a tap through the threaded portion still on the pedal cluster to clean it up. Make sure the threads on the pushrod are clean and that the locknut threads all the way down on the pushrod. (I had to find a thinner locknut for my application. You may or may not need to do the same).
4. Unbox your new master cylinder and pop in the fittings as shown in the picture below. Use a dab of brake fluid to help lubricate the fitting where it inserts into the master cylinder. ALSO, you'll need to plug one of the extra ports on the master cylinder that you aren't using as seen below. I placed a piece of tape over all of the openings while fitting the master cylinder to keep dirt out.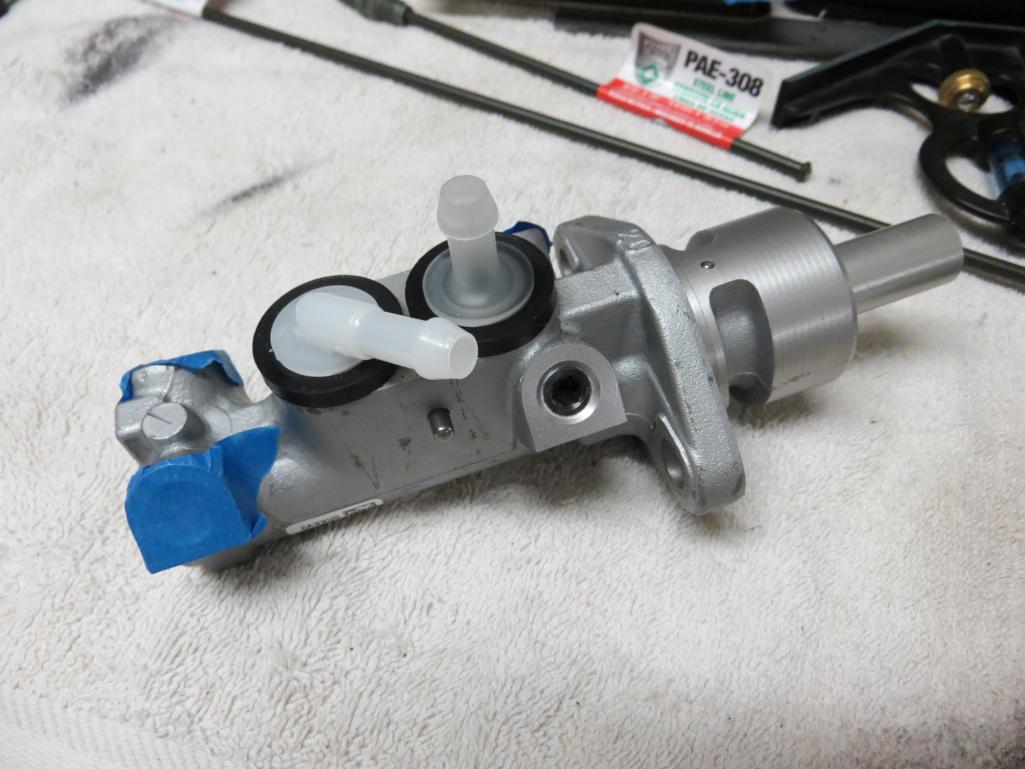
5. Grease the tip of the pushrod before installing the master cylinder. Torque the two 8mm nuts to 18 ft-lbs. I left the washers off. VERY IMPORTANT - now adjust the pedal free play to approximately 1mm by turning the pushrod inside the car at the pedal cluster. Once adjusted, tighten down the locknut. Make sure that the brake light switch lever is in the correct position to actuate when the brake pedal is depressed.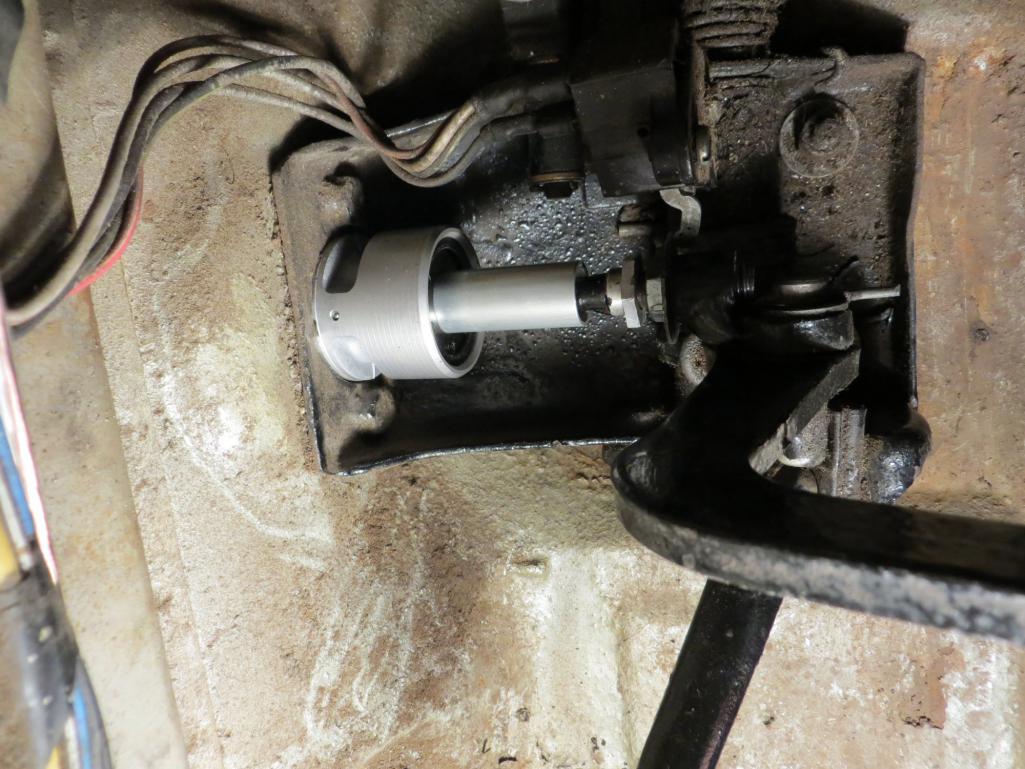
6. Back under the vehicle, decide how you will connect the reservoir to the master cylinder. The metal ends of my plastic lines were rusty so I decided to cut them off and use a short length of 7mm blue braided reservoir hose to each line. You could also run the blue braided hose all the way from the reservoir to master cylinder. Use a dab of brake fluid to make it easier to install the hose on the fittings.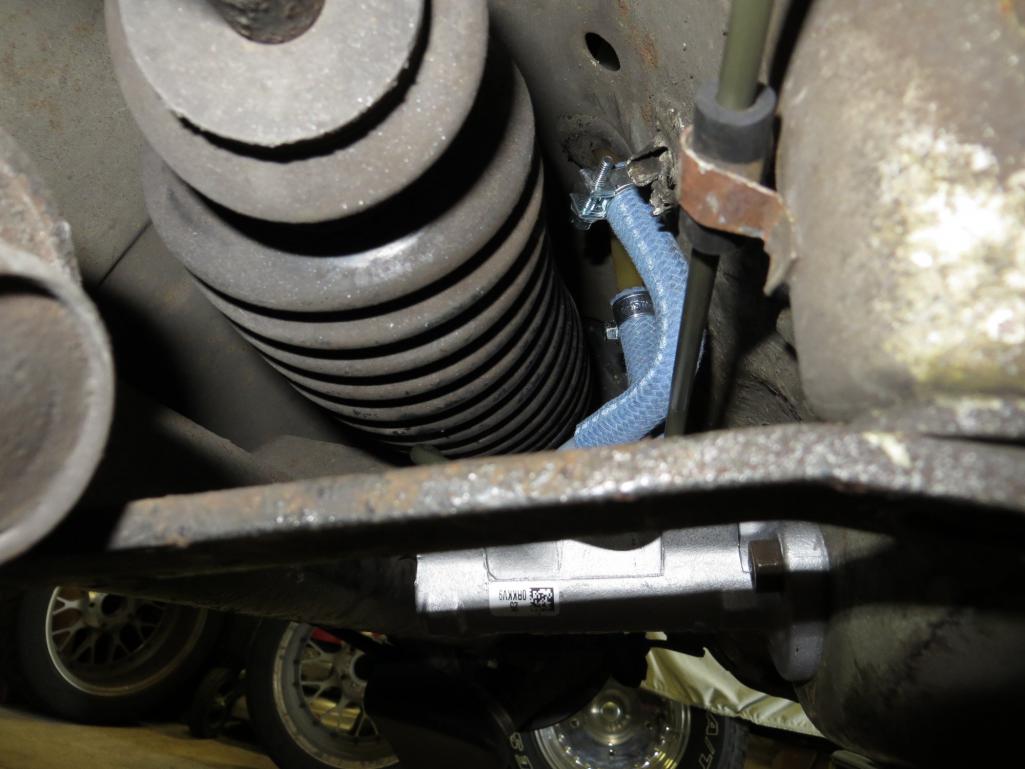
7. Next, bend new brake lines for the front brakes and a short piece for the rears.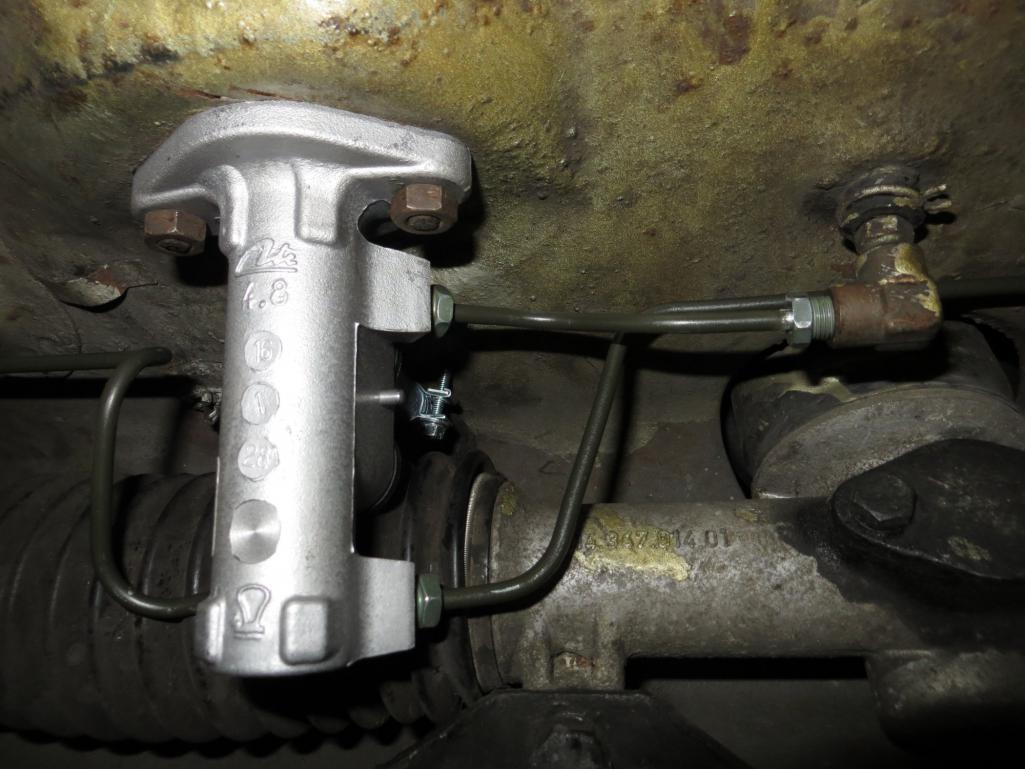
8. Last, but not least, bleed the brakes reinstall the bottom pan and enjoy your new firmer, but not too firm, pedal feel!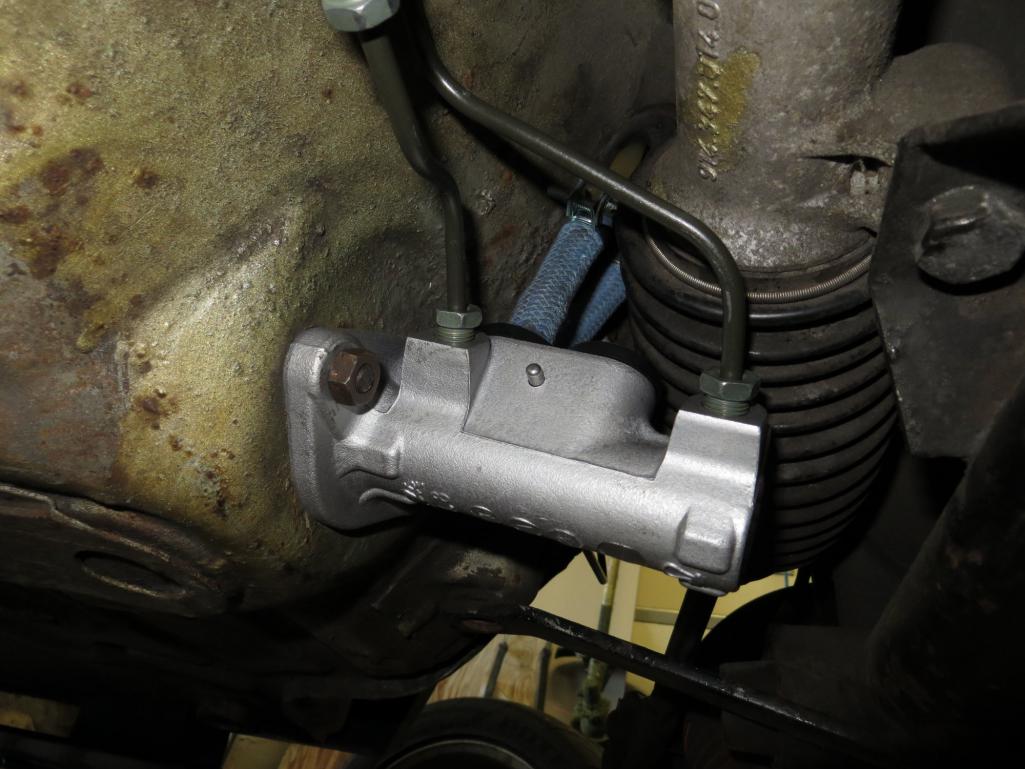
Posted by: tomeric914 Jan 14 2018, 11:02 AM
With the Christmas break, I finally took the time to relocate my brake ducts from the A-arm scoops underneath to an integrated location within the oil cooler housing. The trick was finding a location where they did not interfere with the suspension or steering.
I found a couple of 2.5" aluminum elbows off eBay and fit them just above the A-arm behind the sway bar links.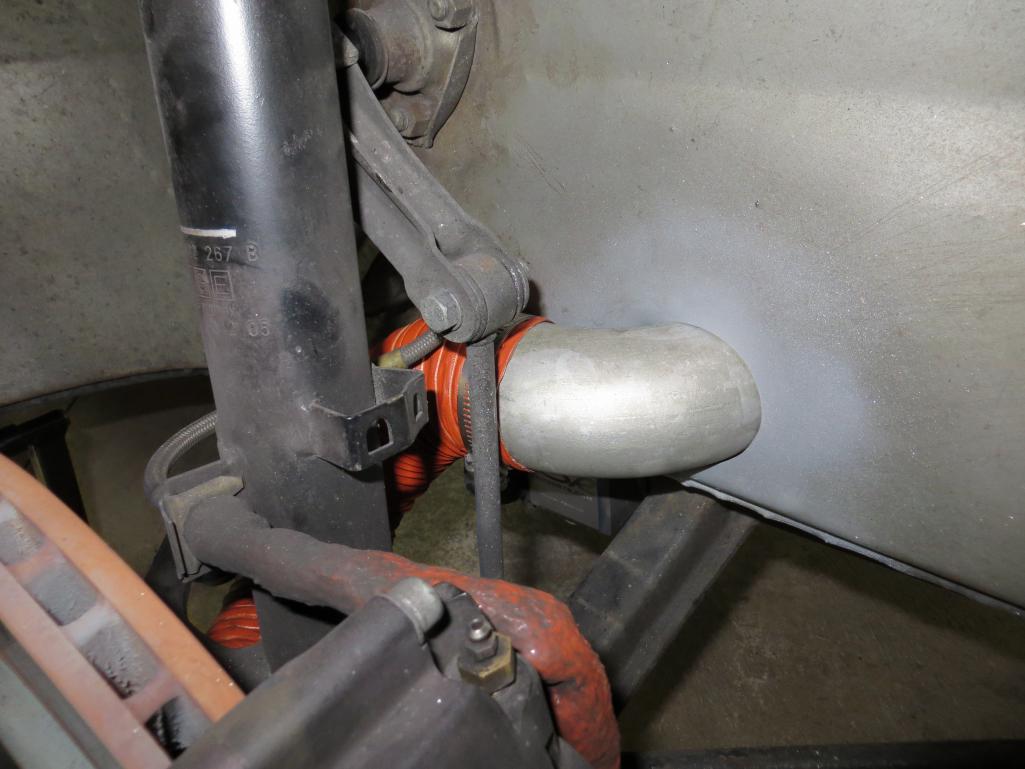
I also discovered that my sway bar had shifted itself to the right and was in contact with the strut housing. Weird that it hadn't happened in the past 10 years.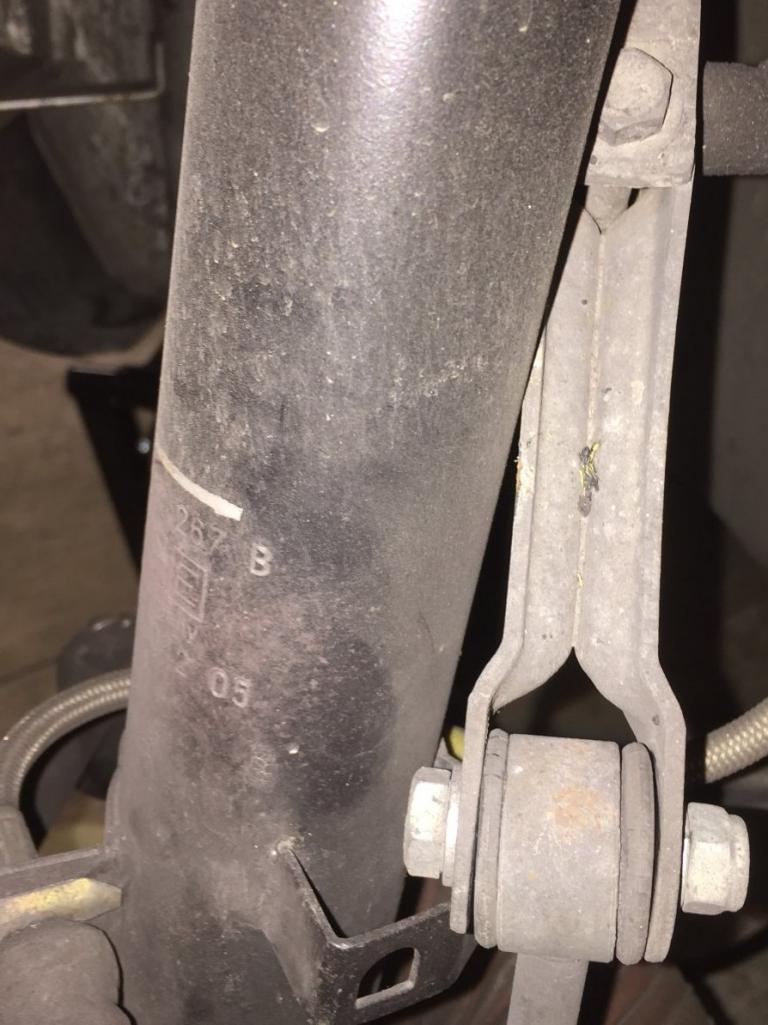
This is the stock 15mm sway bar so I picked up a couple of split clamps from McMaster along with a couple of nylon washers to prevent future squeaking.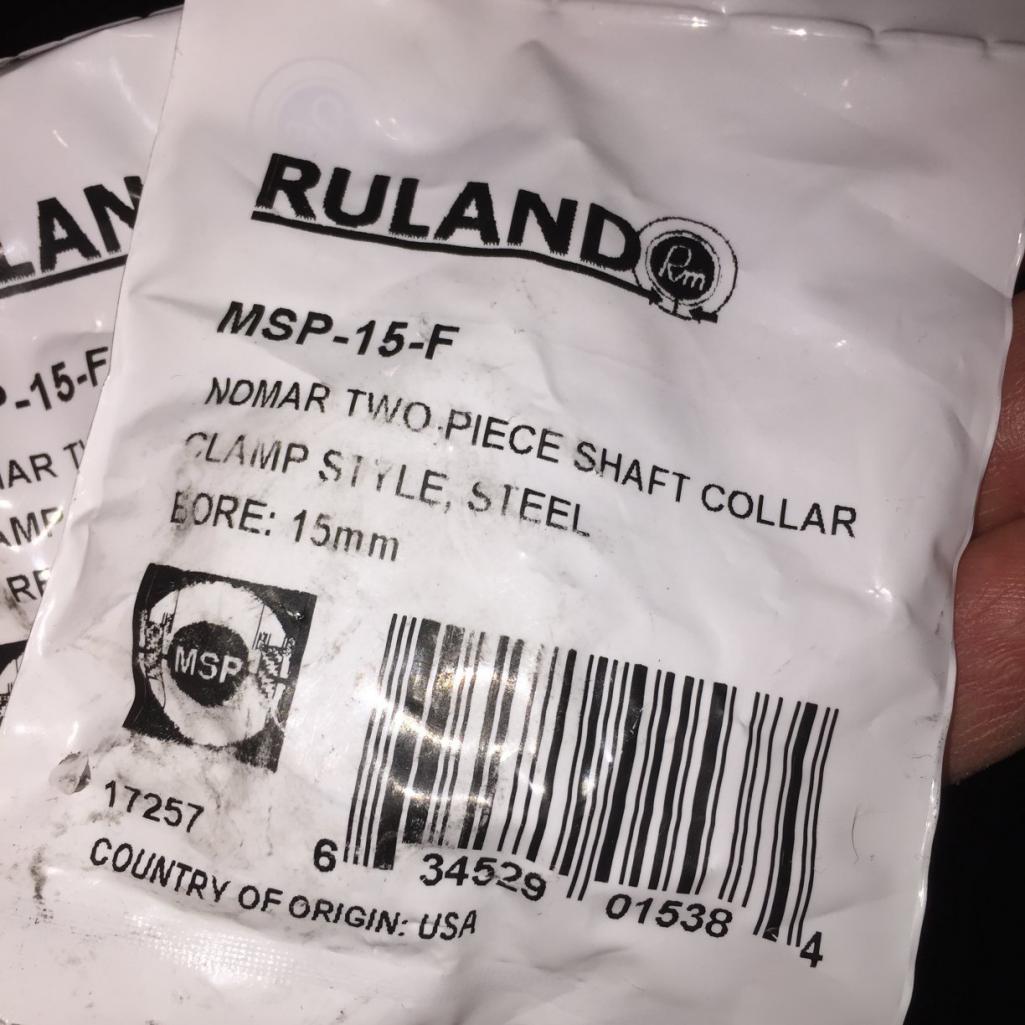
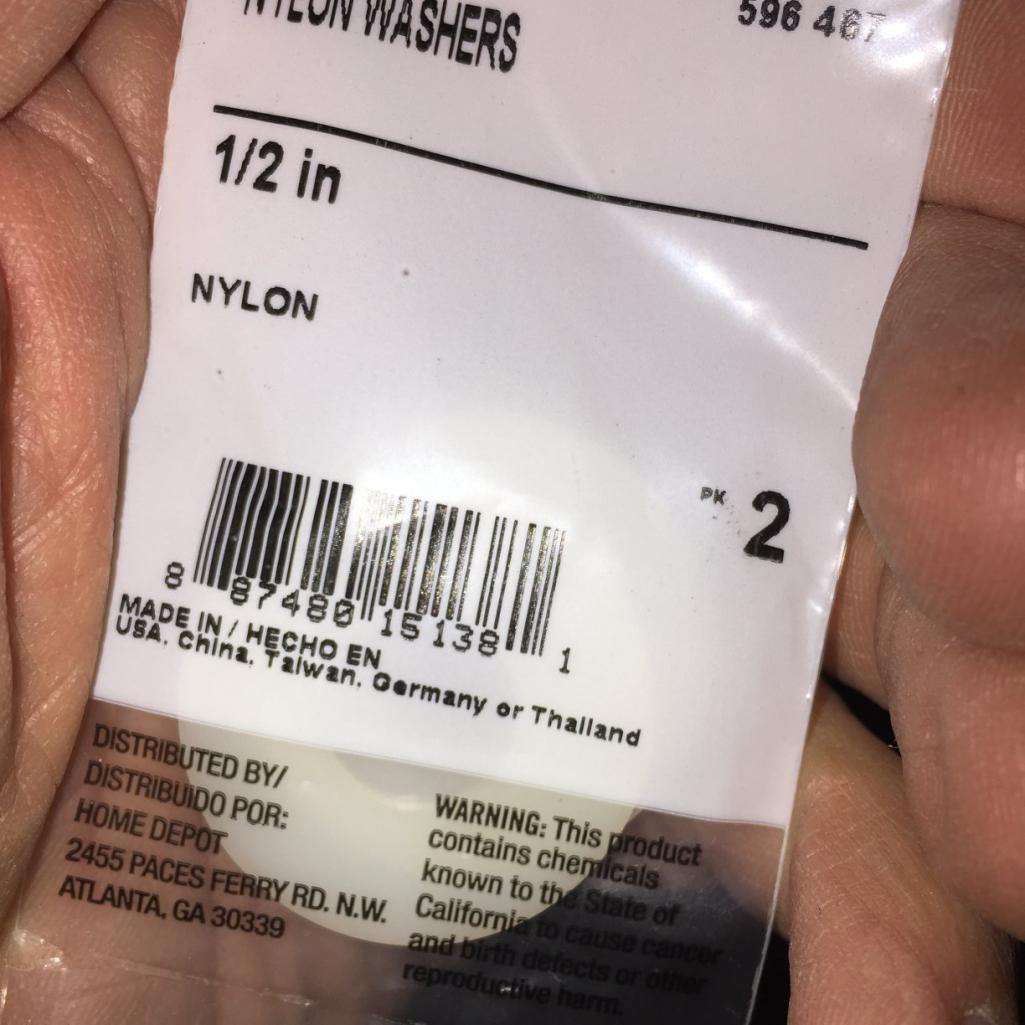
First, I re-centered the sway bar. I drilled the 1/2" washers to 5/8", since the local hardware store only had 1/2", and then slit the washers so that they could be installed without removing the bar. They cannot be slipped over the ends of a stock bar because the bar is tapered to a square which engages the sway bar arms. Then, I installed the split collars next to the washers on each side.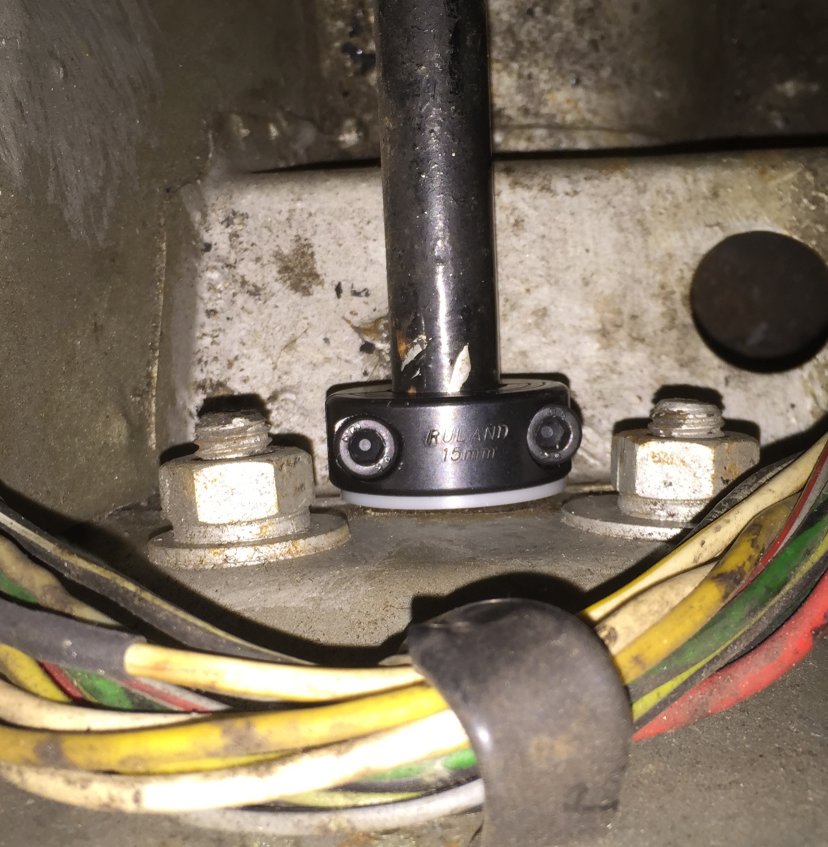
Posted by: Cupomeat Jan 15 2018, 01:00 PM
Looks great! Let's see if the rotor cracking is reduced.
Posted by: totle Sep 7 2018, 02:18 AM
Tomeric, can you please share a picture of how you routed the oil lines into the tunnel from the engine side?
Great build thread by the way.
I was planning to route the lines the same way you have done
Posted by: tomeric914 Sep 7 2018, 04:07 PM
...can you please share a picture of how you routed the oil lines into the tunnel from the engine side?
Post #53 has all of the important views as far as where I cut and what I used to line the sharp edges with.
http://www.914world.com/bbs2/index.php?s=&showtopic=109664&view=findpost&p=1670785
From the engine firewall side, I fed the lines in through the heater duct. I don't have any pics of that, but it should be self explanatory.
I did connect the two lines going to the heater duct to a 200 deg F Mocal thermostat.
Posted by: totle Sep 8 2018, 02:49 PM
Thanks. Ok, thought you routed it outside the heater duct.
Great, thanks
Posted by: tomeric914 Jan 19 2020, 12:24 PM
Late update...
A few years ago, when @http://www.914world.com/bbs2/index.php?showuser=8376 and I ran one lap together, I installed a 600 watt Bluetooth amp so we could have some tunes on the road wirelessly routed from our phones. While the theory was good, it's still loud as $%#@ in the car at speed and there really was no bass.
With a little research, we came up with the Sound Ordnance B-8PTD which is an 8", 125 watt, self powered amp. This neatly and conveniently connected into the Bluetooth amp's RCA outputs.
The next trick was mounting since the car is set up for track duty with a roll cage and containment seats bolted pretty close to the floor. It couldn't go on the passenger footwell because there are oil lines there and it's already cramped for the passenger. It couldn't go behind either seat because they are all the way back (I'm 6'-3"). It could fit between the seats like the Ford GT because I have no firewall pad.
I disassembled the amp and put bolts through the baseplate which were nutted on the outside, basically making each of them a stud so that I could bolt it through the firewall with nylock nuts.
On a side note, I learned that that the Sound Ordnance box is sealed when I didn't seal up two holes that I had placed in the wrong location on the backplate. The result was a hissing noise at every bass hit!
While this isn't a huge sub, it is more than enough to fill in the missing bass in the small 914 cabin.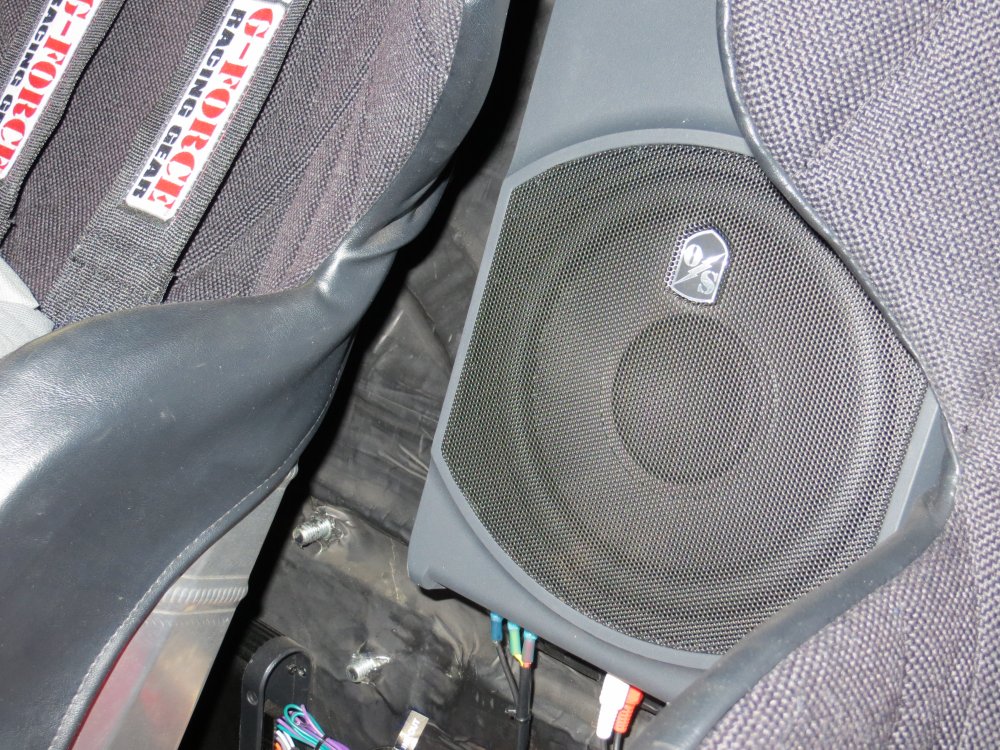
Posted by: tomeric914 Feb 10 2023, 09:50 PM
Well apparently I have not updated this thread in a while. The brakes got upgraded again to thicker and slightly larger diameter rotors just for giggles and to try and eliminate rotor cracking every 10 or so track days.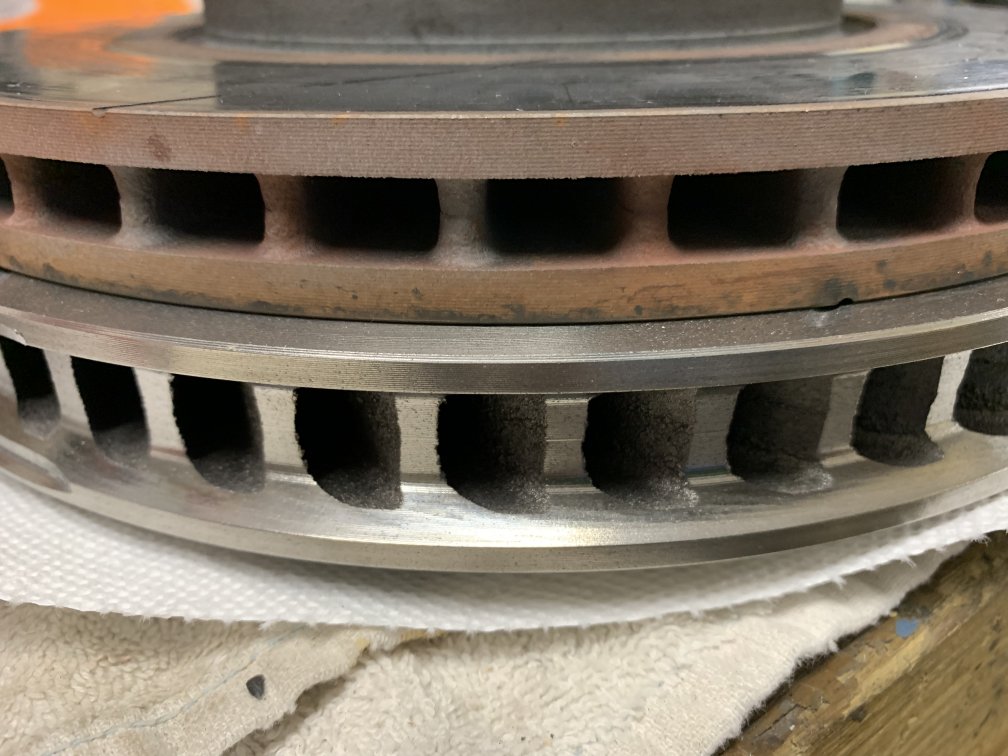
So yeah, those are a bit thicker at 1.21" vs the stock 911 SC discs at 0.81". The rotrs got mounted to hats I think I found in the Classifieds a while back that came from RSR here: https://www.rsrproducts.com/product-page/rebel-930-8-hole-rotor-hats-pair
Then I designed the caliper brackets and gave Xometry.com a try. Only took a couple of weeks and was relatively inexpensive. To be honest, I rapid prototyped (3D printed) the brackets out of plastic first to verify the fit.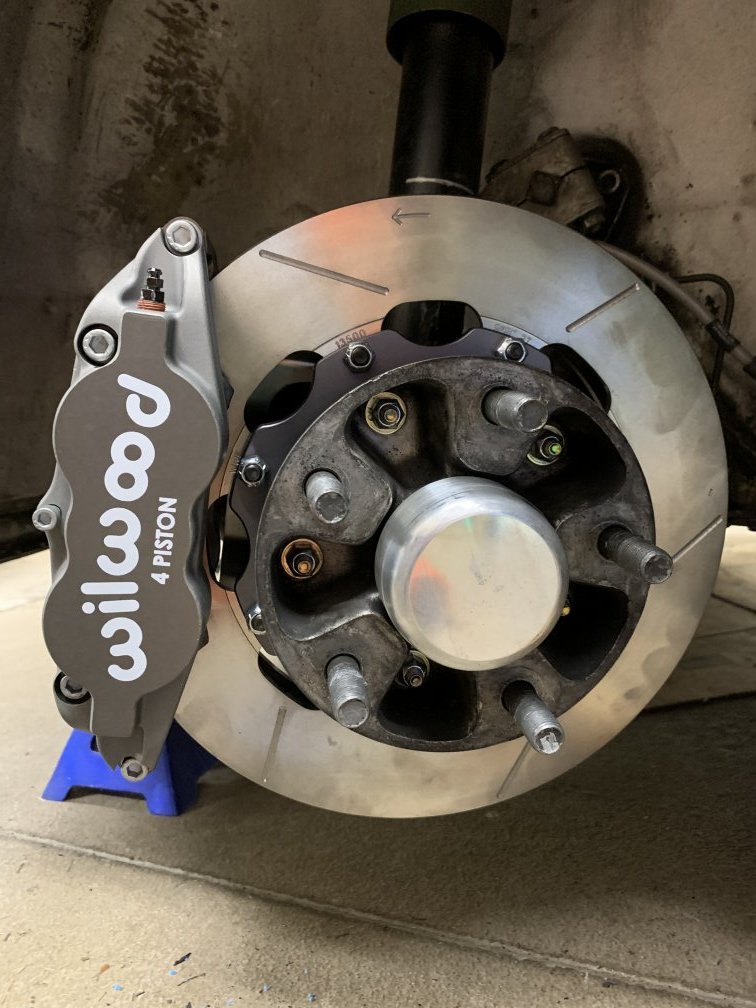
Brakes work great with no issues so far! ...but, more to come.
Posted by: tomeric914 Feb 18 2023, 06:35 PM
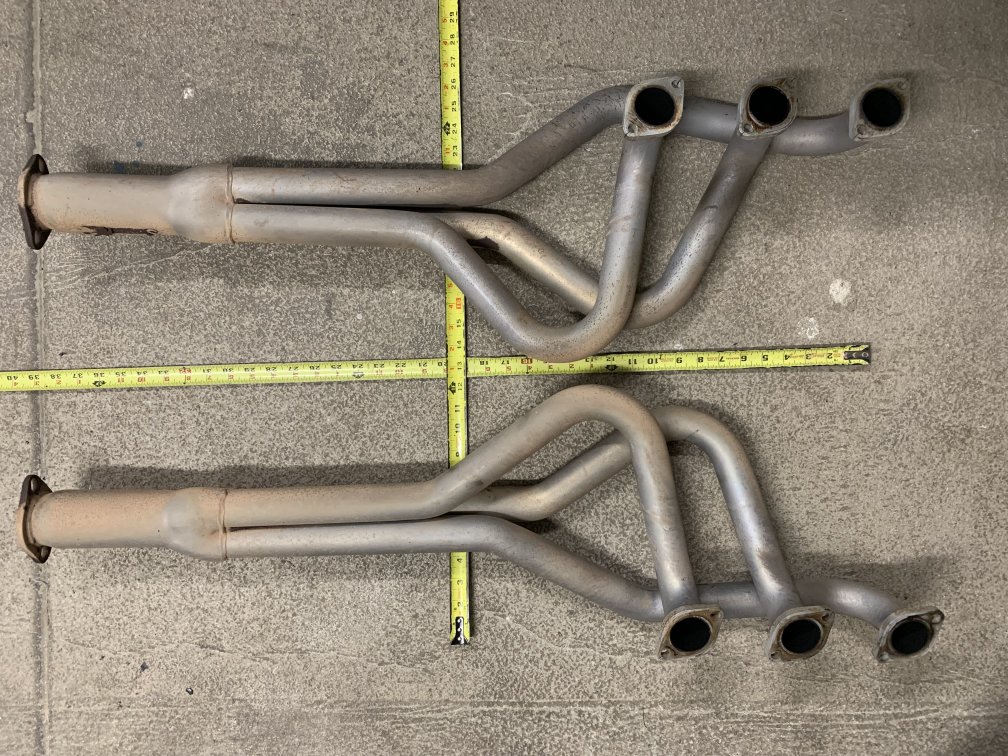
More updates incoming. After 12 years of abuse and probably about 50k track miles, the drivetrain is coming out to do some chassis repairs. WHILE I'M IN THERE it's time to recoat the MSDS headers. A huge shout out to @http://www.914world.com/bbs2/index.php?showuser=2755 for building a great set of headers that have been awesome!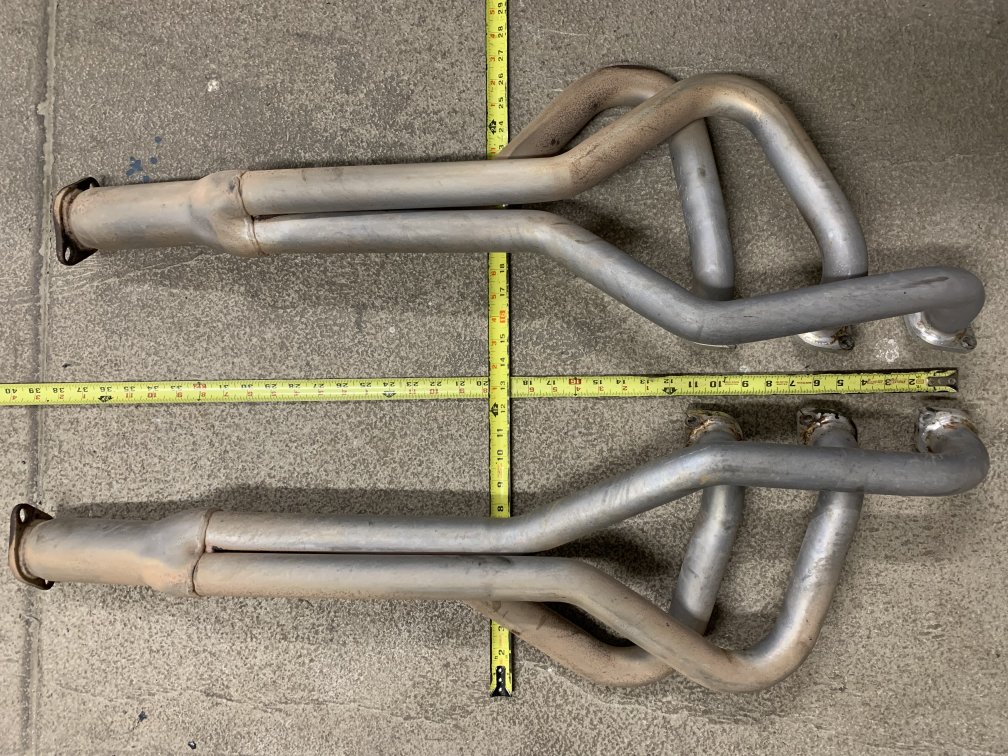
Powered by Invision Power Board (http://www.invisionboard.com)
© Invision Power Services (http://www.invisionpower.com)