Printable Version of Topic
Click here to view this topic in its original format
914World.com _ 914World Garage _ Front end changeover in progress...
Posted by: jk76.914 Sep 9 2010, 07:45 PM
I'm finally getting rid of the 4-to-5 lug adapters and doing a real Porsche 5 lug front suspension. Contrary to normal practice, which is normal for me, I guess, I'm installing real 914/6 struts with new Bilstein inserts. I bought the parts about 5 years ago on eBay, and the kit was all-inclusive, with freshly painted struts and new ball joints, bearings, rotors, pads, and brake hardware, and rebuilt M calipers. My excuse is I didn't know any better at the time, or I'd have looked for a later 911 set with the later bearing type, but alas, I own it now and everything is in real nice shape.
I think I'm good to go on parts and tools, but I'm trying to find out the torque requirement for the lock bolt for the ball joint. It's an M10 x 30mm x 1.5mm pitch, going into steel threads in the strut; presumably the lower part of the strut, below the tube, is forged.
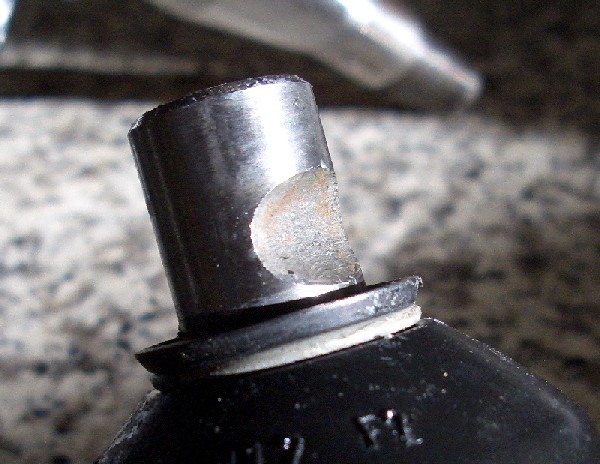
Looks like an M10 grade 12.9 bolt is good for 50 ft-lbs, but I don't want to chance stripping out the threads. Nor do I want the BJ to pop because it's too loose. Does anyone know the torque spec? Thanks! Picture below-
PS- any tips for installing this type of strut? Thanks!
Posted by: ripper911 Sep 10 2010, 05:18 PM
![]()
IDK
Posted by: ArtechnikA Sep 11 2010, 05:32 AM

I think I'm good to go on parts and tools, but I'm trying to find out the torque requirement for the lock bolt for the ball joint. It's an M10 x 30mm x 1.5mm pitch, going into steel threads in the strut; presumably the lower part of the strut, below the tube, is forged.
Looks like an M10 grade 12.9 bolt is good for 50 ft-lbs, but I don't want to chance stripping out the threads. Nor do I want the BJ to pop because it's too loose.
The early 911 Spec Book calls for 6,5 mkp on the M10x30 ball joint bolt.
Since the bolt positively retains the ball joint as long as it is there, you don't really have to worry about it coming adrift. (You have the 'Old Style' ball joints with the round 'notch' - yes?)
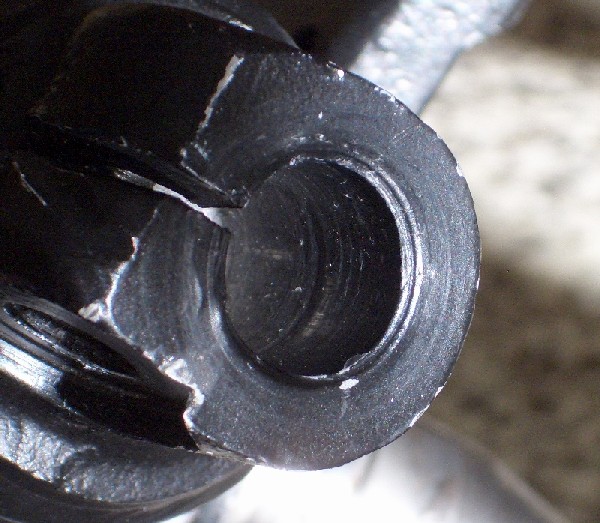
The big problem with the pinchbolt ball joints is that the hole at the bottom of the strut wears and the fit gets sloppy; there is no fix for this other than new struts. So MAKE SURE you have a good tight fit.
(I have always thought it should be possible to ream the hole and install a sleeve, but this never materialized in the marketplace, so I have to conclude it was always cheaper to replace the struts than machine the sleeves.)
Posted by: jk76.914 Sep 11 2010, 06:26 AM
I think I'm good to go on parts and tools, but I'm trying to find out the torque requirement for the lock bolt for the ball joint. It's an M10 x 30mm x 1.5mm pitch, going into steel threads in the strut; presumably the lower part of the strut, below the tube, is forged.
Looks like an M10 grade 12.9 bolt is good for 50 ft-lbs, but I don't want to chance stripping out the threads. Nor do I want the BJ to pop because it's too loose.
The early 911 Spec Book calls for 6,5 mkp on the M10x30 ball joint bolt.
Since the bolt positively retains the ball joint as long as it is there, you don't really have to worry about it coming adrift. (You have the 'Old Style' ball joints with the round 'notch' - yes?)
The big problem with the pinchbolt ball joints is that the hole at the bottom of the strut wears and the fit gets sloppy; there is no fix for this other than new struts. So MAKE SURE you have a good tight fit.
(I have always thought it should be possible to ream the hole and install a sleeve, but this never materialized in the marketplace, so I have to conclude it was always cheaper to replace the struts than machine the sleeves.)
THANKS!! 6.5 mkp works out to 47 ft-lbs, which is pretty close to the 51-56 ft-lbs recommended for a 10.9 grad fastener. This means that the bolt is at least a 10.9 grade, which generically rates at 51-56 ft-lbs in steel. An 8.8 is only rated for 34-38 ft-lbs. (I said 12.9 originally, but I think I fat-fingered it.)
I have the right ball joints, and they're a smooth snug fit into the bore, which itself looks to be very clean and smooth, so I think I'm OK.
Thanks again!! Jim
Posted by: ArtechnikA Sep 11 2010, 06:31 AM
...This means that the bolt is at least a 10.9 grade...
The bolt is specified as a 10,9 - check the headstamp.
Posted by: jk76.914 Sep 11 2010, 07:15 AM
...This means that the bolt is at least a 10.9 grade...
The bolt is specified as a 10,9 - check the headstamp.
That's more good information! I actually don't have the bolts. I bought the setup from someone who was going to do a 5-lug conversion (or maybe he was restoring a 914/6?) and must've changed his mind. But anyway these bolts were the only parts missing.
Thanks again! Jim
Posted by: jk76.914 Sep 29 2010, 06:34 PM
Picked up an official Bilstein gland nut wrench for my "new" front struts. Got it from Bilstein for only $4.60 plus shipping. And they threw in a set of logo stickers to wrap around the struts after I paint them John Deere green. I told them I needed the stickers so I can still advertise the Bilsteins after the part number sticker is inside the strut housing....
New hardware is on its way from McMaster-Carr and Pelican Parts....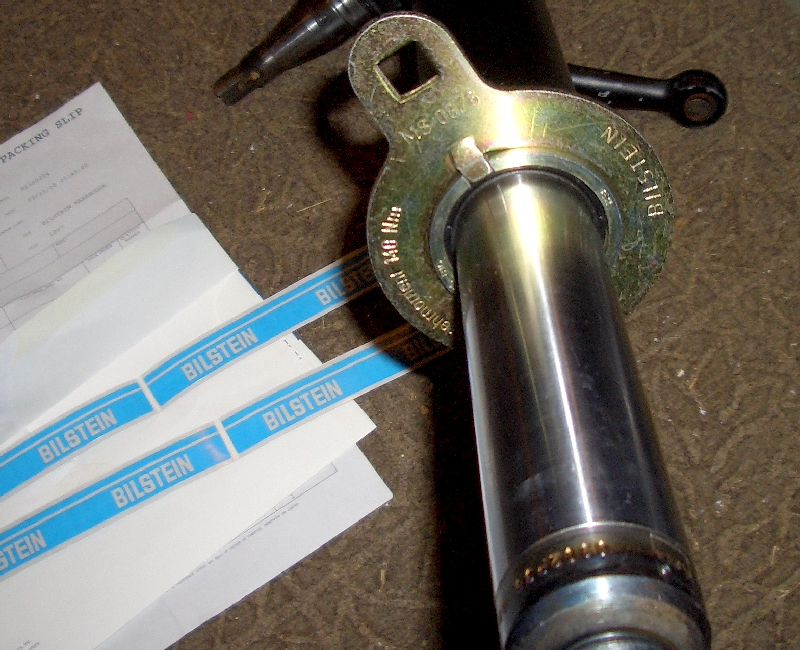
Posted by: Eric_Shea Sep 29 2010, 07:00 PM
Factory Manual = 47ftlbs.
Not following... you mean later ball joint? Those struts are fine. As long as your holes in the bottom are round you're good. 99.9% of them are fine. One article in Pano and the world thinks early pinch struts are all bad.

Those are my favorite struts for a 914. Good choice.

Posted by: jk76.914 Sep 29 2010, 08:23 PM
I lucked out. Thanks for the vote of confidence. Looking forward to having a tight steady front end again.
Jim
Posted by: ArtechnikA Sep 30 2010, 04:43 AM
99.9% of them are fine. One article in Pano and the world thinks early pinch struts are all bad.
Maybe it was just the luck of the draw but I had two bad ones on one car at a time I really didn't need the expense of replacing two struts. (This was a long time ago, they are long gone now.)
There was a pair of those on my 911 and as soon as I can get the $%$## stuck ball joints, upper bearings, and tie rod ends out, I'll be glad to be rid of them. Especially now that they have been deemed 'highly prized' ;-)
Posted by: Eric_Shea Sep 30 2010, 09:14 AM
OK... 98%
Just saying... T-Struts, pinch or pin are the perfect strut for a 914. Read the Excellence article on the 3 1970 911's and see what the writer says about the suspensions.
Need more brake? Brembo bolt-ons (and they're the lightest caliper I've ever found).
Need a different insert? Everyone makes a replacement.
Same vented rotor used on the 911 for almost 2 decades.
The days of the lowly "T" strut are gone. New "hero" in my book. I'll go with "highly prized" 
Posted by: Cap'n Krusty Sep 30 2010, 10:18 AM
Picked up an official Bilstein gland nut wrench for my "new" front struts. Got it from Bilstein for only $4.60 plus shipping. And they threw in a set of logo stickers to wrap around the struts after I paint them John Deere green. I told them I needed the stickers so I can still advertise the Bilsteins after the part number sticker is inside the strut housing....
New hardware is on its way from McMaster-Carr and Pelican Parts....
$4.60 for a tool that comes in the box with the insert? After I had a box full, I tossed most of 'em ......................... At least you got some decals .............
The Cap'n
Posted by: jk76.914 Sep 30 2010, 06:27 PM
$4.60 for a tool that comes in the box with the insert? After I had a box full, I tossed most of 'em ......................... At least you got some decals .............
The Cap'n
Well, I bought those inserts back in '02 when the car was coming apart, and there was no wrench in my boxes. I didn't have access to elite team of experts back then. So anyway, I was glad to find it for only $4.60, but I guess I got taken for a ride. I've read a lot of threads talking about using big pliers or pipe wrenches, and I was thinking maybe I was letting folks in on something that could help them out.
Posted by: Eric_Shea Sep 30 2010, 06:33 PM
Don't worry Jim... that's just our Cap'n. He's telling you he loves you in his own little way!
Posted by: jk76.914 Sep 30 2010, 06:44 PM
Don't worry Jim... that's just our Cap'n. He's telling you he loves you in his own little way!
I'm not worried. I love my new wrench. I'm gonna sleep with it tonight.
Posted by: Eric_Shea Sep 30 2010, 06:49 PM
 Let me know how that turns out. $4.60 might be a bargin!
Posted by: ArtechnikA Sep 30 2010, 06:51 PM
Just saying... T-Struts, pinch or pin are the perfect strut for a 914.
For completeness, let's elaborate that when you say 'T' strut, you're actually saying 'M-caliper' (3" mount) strut. And probably with Boge insert threads.
The Boge thread is not controversial, because you can get Koni and/or Bilstein inserts for a Boge thread strut, but if you've got a Koni or Bilstein-threaded strut, you're a little more locked in.
I mention this because there _are_ 3.5" (S-caliper) Boge-thread 'T' struts. I looked all through the parts books 'back in the day' to find them. Specifically, Sportomatic Targas had them, possibly only in 1972.
I've got a pair, which I bought new from the dealer because I wanted to run S calipers and already had a set of Boge-thread externally adjustable Koni inserts. I can get you part numbers in the morning. Wedge-pin ball joints.
Now that I've got the raised-spindle RSR Bilstein struts, I won't be needing that pair of struts either...
Posted by: Eric_Shea Sep 30 2010, 08:03 PM
The struts that were on 99.9% of the T's yes...
Posted by: jk76.914 Jun 23 2011, 06:51 PM
Getting this together finally. Painted the struts Bilstein green, got the old ones off the car, found some new upper mounts... I'll post some new pics shortly....
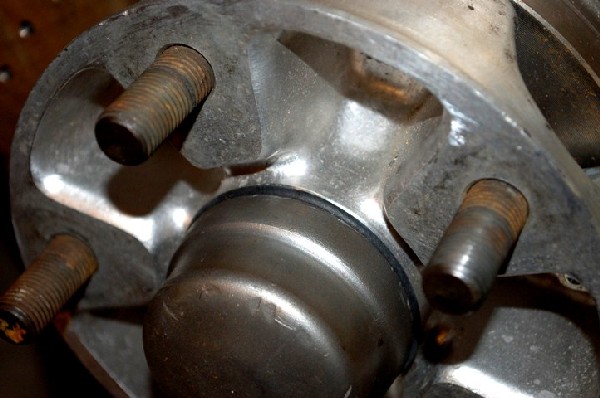
Meanwhile, as I said I'm using former 914/6 parts for my 5 lug conversion. They use the pinch-bolt ball joint mount. I don't have the washer that goes between the ball joint and the strut, and they're discontinued, at least at Pelican and at Porsche. It's item number 22 in the drawing below, part number 901 341 659 00.
Is there anything unique about this washer? I measure the ball joint at .630", non-tapered, so a 5/8 washer would do it. I can get hardened steel or stainless steel, in various thicknesses and OD. Does anyone have one laying around that they can measure for me?
Thanks, Jim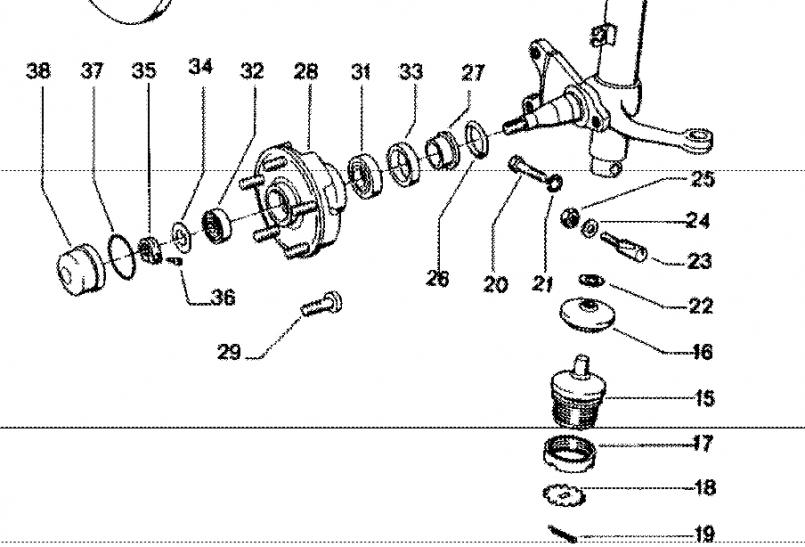
Posted by: jk76.914 Jun 23 2011, 07:00 PM
Painted John Deere green. I coated it with Ben Moore matt clear (rattle can) when the green was almost dry (felt a drag when I ran my finger across it lightly), and it really brought it to a perfect Bilstein green, in my opinion.
You can also see the stickers Bilstein sent me when I ordered the wrench last fall.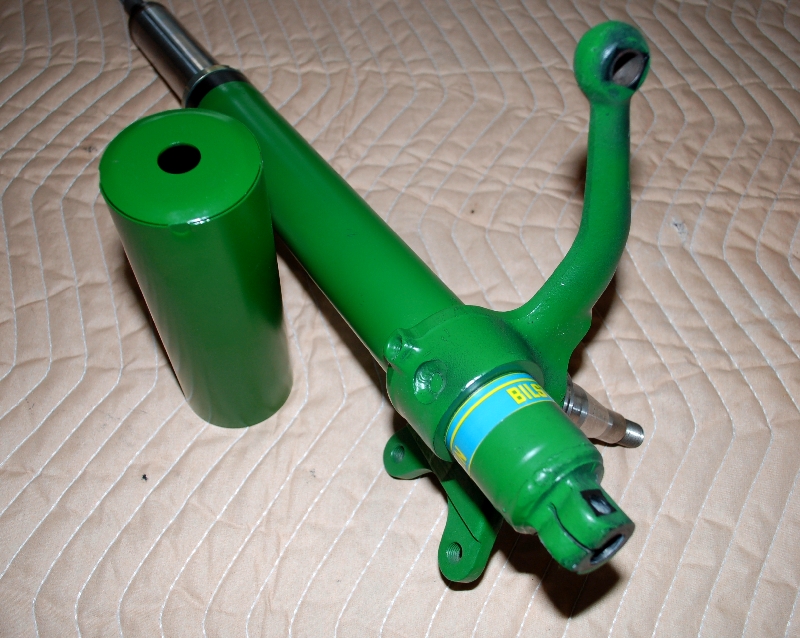
Posted by: jk76.914 Jun 23 2011, 07:06 PM
Starting point. Those 5 lug adapters have been on there since I did my refurb back in 2003. They also served as 1" spacers to fill out my wheel wells. I'll be offering them up for sale in a bit.
Underneath the spacers are 5-lug drilled 914/4 rotors. They were new when drilled, and only have about 10,000 miles on them. I have the new lug studs that came with them. I'll also be offering them for sale after I get both sides off. Please don't contact me about buying any of this stuff until I post it in the FS forum. Thanks.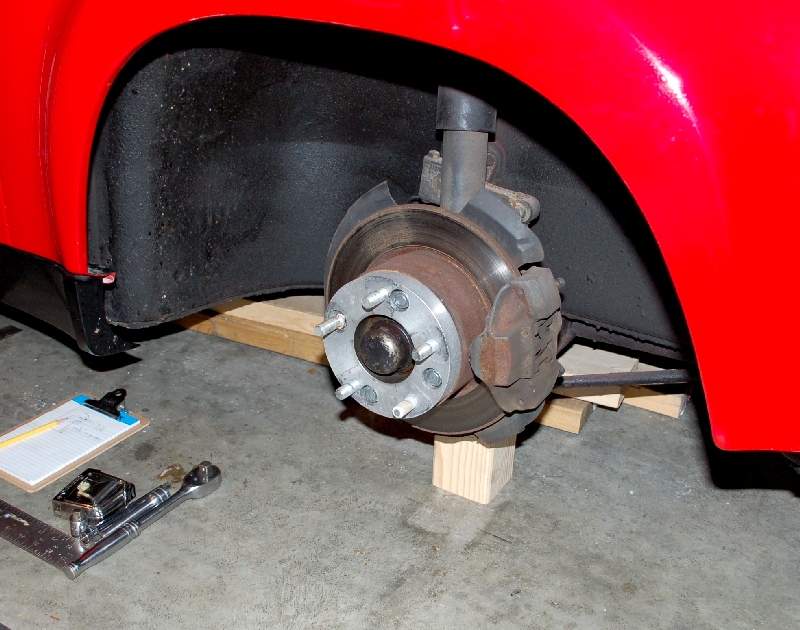
Posted by: Eric_Shea Jun 23 2011, 10:07 PM
Nice job on the struts... nine months oughts be enough time to have them dry!
Edit: Noticing that sway bar in there as well. That's going to be a sweet handling 914.
Posted by: MoveQik Jun 23 2011, 10:20 PM
You can also see the stickers Bilstein sent me when I ordered the wrench last fall.
Well played.

Posted by: ArtechnikA Jun 24 2011, 06:41 AM
Is there anything unique about this washer?
I wouldn't call it unique, but IIRC, it's _really_ thin.
Like 1mm, maybe less.
I may have one somewhere but I doubt I have a pair.
But my guess is all the usual suspects for used parts (HPH, EASY, PartsHeaven, ...) have buckets of them...
Posted by: FourBlades Jun 24 2011, 06:50 AM
I never knew about the wrench and never got one in the bilsteins I have bought.
I am jealous!
I also had my gland nut work itself loose after a year or so.
John
Posted by: jk76.914 Jun 25 2011, 07:52 AM
I never knew about the wrench and never got one in the bilsteins I have bought.
I am jealous!
I also had my gland nut work itself loose after a year or so.
John
Stamped into the wrench is: "140 Newton-meters", which is about 103 ft-lbs. I'm not sure how you'd do that without the wrench.
Based on your experience, I think I'll put several drops of green loctite (penetrating kind) around the circumference just be be sure. Just in time before they go on!
Jim
Posted by: jk76.914 Jun 25 2011, 08:05 AM
Is there anything unique about this washer?
I wouldn't call it unique, but IIRC, it's _really_ thin.
Like 1mm, maybe less.
I may have one somewhere but I doubt I have a pair.
But my guess is all the usual suspects for used parts (HPH, EASY, PartsHeaven, ...) have buckets of them...
Thanks for the response. I finally measured the parts. The ID of the washer (OD of the ball joint shaft) is .630". The OD of the washer needs to be at least 1", to overhang the ridge on the rubber boot. And when I bench-assembled the joint into the strut, I used a feeler gauge and decided that .030" thick would do it. This thickness will slightly compress the rubber. .030" is just shy of 1mm (.0394"), exactly as you estimated.
I ordered a bag of 10 stainless steel shims from McMaster-Carr (www.mcmaster.com), catalog number 97022A499, for $9.04. The shims are .630" (+/- .005") ID x 1.00" OD x .031" thick. As shims, they'll have very smooth surfaces. I'll probably have them Tuesday. If anyone needs these for a front end rebuild, let me know. I have extras and I'll even cover the postage. Remember, they're only used on the pinch-bolt strut, which went away sometime in 1972 (I think).
While I'm waiting, I'll clean some parts, do a fit check, and start disassembling the other side.
Jim
Posted by: jk76.914 Jun 26 2011, 06:46 PM
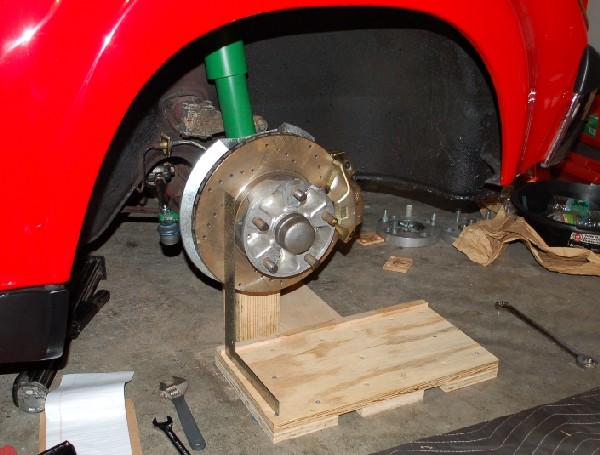
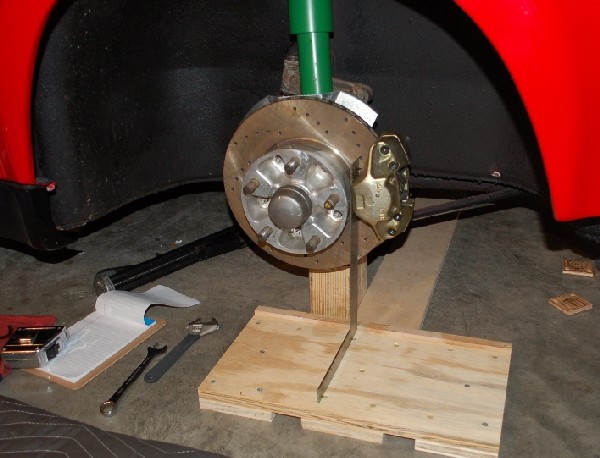
Just finished a fit check of most parts. Everything goes together as it should, with two exceptions- The hole in the tab (on the strut) where the hard and soft brake lines meet is too small for my '76 style brake hose. These were originally 914/6 struts, and didn't the early ones mate hose-to-hose, and then connect at the caliper with a banjo bolt? The tab is the same width as my '76, so I'll just ream the hole out to fit. The tab and hole are also in the right place to connect my '76 hard line from the M caliper. Easy.
The second fit problem is the dust shields. They rub on the rotor. First I though I goofed when I specified the part number when I posted my WTB here at the site, but looking through PET, this same part number covers both solid and vented rotors. It looks like I can easily reform (bend) the shields back out of the way, but I'd appreciate any comments. The alignment of the rotor in the caliper looks perfect. See photos.
Once these are cleared up, I just need to await my ball joint washers, and it goes back together.
Jim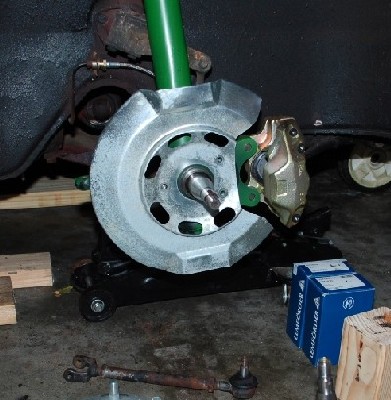
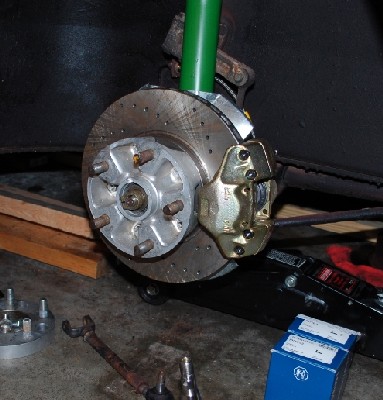
Those plated dust shields and restored calipers are the work of Eric Shea. Beautiful job, Eric!!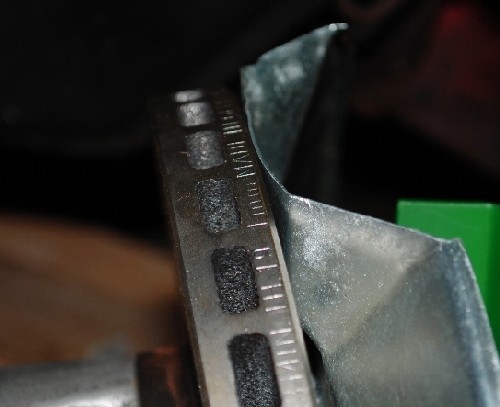
Posted by: jk76.914 Jun 26 2011, 06:47 PM
bump. ![]()
Posted by: jk76.914 Jun 26 2011, 06:48 PM
(shrinking pics to make my posts more readable) ![]()
Posted by: jk76.914 Jun 26 2011, 06:51 PM
Thinking about it, maybe the struts are different on cars with solid rotors? Could the 914/6 struts position the dust shield closer to the centerline of the rotor?
Posted by: jk76.914 Jun 26 2011, 06:57 PM
Oops. Forgot to mention. Those plated dust shields and restored calipers are the work of Eric Shea. Beautiful job, Eric!!
Posted by: ArtechnikA Jun 26 2011, 07:56 PM
Couldn't say for sure, since I've never done a 4->5 conversion.
I can say, tho, that i remove the dust covers from every car I have the hubs off. They buy you nothing unless you drive in snow.
I do replace the 6mm fasteners tho, since I believe they may contribute to the strength. If you have a concours car, nevermind.
Posted by: Eric_Shea Jun 26 2011, 10:39 PM
Thanks Jim... Happy to help.
Just bend the shields back a bit.
Posted by: jk76.914 Jul 2 2011, 01:36 PM
Got the driver's side strut out. The castle nut on the bottom of the ball joint broke free with a few whacks and the big drift .
I dropped some green Loctite on the threads of the big insert retainer nut on both new struts- you could see it getting sucked into the threads and disappearing. Also got the hole in the tab reamed out for the later style brake hose, and repainted. The new strut is in on the passenger side, and torqued. I was able to get 150 ft-lbs with the cheapo eBay ball joint socket. I'll have them tightened up to 180 (per manual) when I get it aligned as soon as it's on the road.
The only glitch is the sway bar alignment. It rubs the strut when I allow the control arm to hang free. I noticed it's about 2.25" from the mounting plate to the square end on the driver's side (plenty of clearance) but over 3" on the passenger side. I found a thread ( http://www.914world.com/bbs2/index.php?showtopic=85891 ) where a member was advised to tap it over to center it, that it just relies on friction in the bushings to keep it in place, I guess. I'll try that tonight.
You can see how close the lever (flush with the tip of the sway bar itself) comes to the strut. And this is with the control arm jacked up quite a bit. They interfere when it hangs free.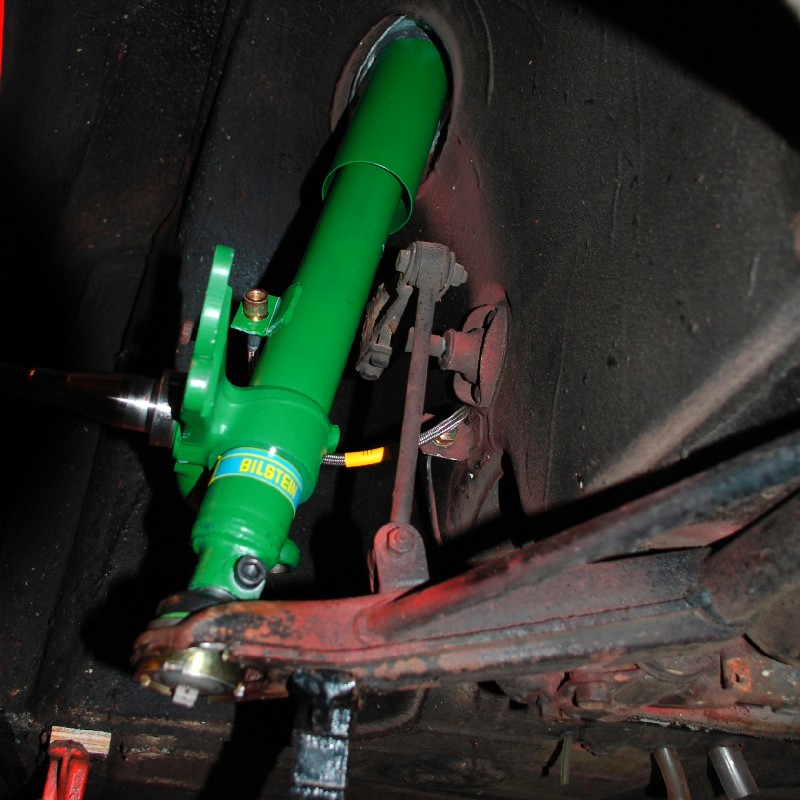
Posted by: ArtechnikA Jul 2 2011, 01:45 PM
I got tired of the sliding and just put some 'appropriately sized' spacers between the lever arms and the pillar blocks. IIRC, I used 3/4" PVC pipe...
With the stock antiroll bar, you may find a different size tube fits better, but there's n magic to it.
Posted by: jk76.914 Jul 21 2011, 04:33 AM
Well I'm finally getting closer. I replaced the tie rod ends last weekend, and went around and torqued everything to spec. All that's left is bleeding the brakes and a crude setting of toe-in so I can get to the alignment shop. Hopefully, that'll be some morning next week.
Regarding brakes- The brakes seem to be bled, no more bubbles coming out, but they feel WAAAAY different. LOTS of pedal travel, getting almost to the floor. Is this what I should expect with the M calipers? The old brakes worked fine, and the 19mm MS only has about 12,000 miles since new. I didn't expect this much difference.... am I missing something?
Procedure: I poured new DOT 3 fluid through the system to flush the lines first. Let it run out both brake lines (not connected yet) at both calipers simultaneously through tygon into bottles. Then did the same with my ATE DOT 4 Super Blue.... Then I connected the lines to the calipers to fill the restored caliper cylinders with the DOT 4 and bleed. I used a pressure bleeder first- limited it to 5 psi- and kept the reservoir half full at least from that point on. Finally, I had my wife press the pedal while I finished the job manually. My wife's comment about the pedal feel- "you have no brakes there." Not encouraging.
I appreciate your thoughts. Thanks!
Jim
Posted by: ArtechnikA Jul 21 2011, 04:39 AM
Regarding brakes- The brakes seem to be bled, no more bubbles coming out, but they feel WAAAAY different. LOTS of pedal travel, getting almost to the floor. Is this what I should expect with the M calipers?
The pedal should definitely stiffen up at the end of its travel.
But if the calipers have been freshly rebuilt, it takes a while (maybe 100 mi) for all the pistons to reach their 'resting' position in the O-ring seals. Until then, they're getting pulled back too far into the caliper and you have to make up that distance all over again.
But there is a big difference between lots of pedal before resistance and no resistance...
Posted by: jk76.914 Jul 21 2011, 05:05 AM
ArtechnikA- Thanks for the comments, that may be it or part of it...
I thought of another clue. When my wife pushed on the pedal, there wasn't much flow. On some pushes, there may have been none, or at least so little as to be undetectable. There're weren't bubbles on these pushes either. The most effective combination was 5-7 psi at the MS while she pressed the pedal....
Could the front pistion in the MS be stuck forward?
Posted by: ArtechnikA Jul 21 2011, 05:17 AM
The most effective combination was 5-7 psi at the MS while she pressed the pedal....
Could the front pistion in the MS be stuck forward?
I can't say it's impossible, but there is a nice spring in the MC to return the pistons.
What's the history on this MC ?
You should also note that the first thing that happens when the MC pistons move forward is that they shut off any connection to the reservoir - otherwise, pedal action would just pump fluid back up into the reservoir rather than the brake circuits. So nothing you're doing by pressurising the reservoir should have any effect.
If it's an excess-travel thing you should be able to pump the pedal (couple of quick shots) and get pressure. If that doesn't help, you probably still have air in the lines. Let them sit, preferably overnight, while tapping on them with a small brass or plastic hammer, to help dislodge and coalesce bubbles.
It's also possible that you managed to get air in the rear brake circuit - you bled the back too, yes ?
I presume you've checked plunger rod free play. There must be -some- -- I think the book number is about 1mm. If there is none, or preload, you're interfering with that connection to the reservoir.
If none of that helps, it may be time to pull the calipers back off the car and bench-bleed them... PITA but some calipers need it more than others. I never had to do it to 'M's but it has the advantage of removing unknowns.
Posted by: Eric_Shea Jul 21 2011, 09:12 AM
Leave it like it is and bed your pads using the procedure on my site. Your pedal will eventually come back up.
This happens all the time with new seals. Your seals will eventually bed in and the pad bedding process helps.
Posted by: jk76.914 Jul 22 2011, 04:06 AM
Leave it like it is and bed your pads using the procedure on my site. Your pedal will eventually come back up.
This happens all the time with new seals. Your seals will eventually bed in and the pad bedding process helps.
Will do. Should be driving again on Sunday. (famous last words!)
Thanks for the advice.
Jim
Posted by: jk76.914 Jul 22 2011, 08:27 PM
OK, I got it. As Eric indicated, the new rubber dust boots weren't slipping along the fresh (slightly granular) surface of the piston. It isn't supposed to, except to adjust for wear. It's intended to act as a spring to pull the piston back in slightly to get it away from the rotor when you release the brakes. As the pads wear, the piston travel will increase, until there is finally some slip along the piston to reset everything. On mine, because there was no slip (no adjustment), the seals pulled the pistons too far back into the cylinder. There was enough volume of displacement between the larger diameter of the M caliper and the too long travel of the pistons that the entire volume of the master cylinder was required to just push the pistons out near the rotor. So the pedal went all the way to the floor before the pads were tight between rotor and piston.
So first, I made myself a homemade set of pads. Real organics-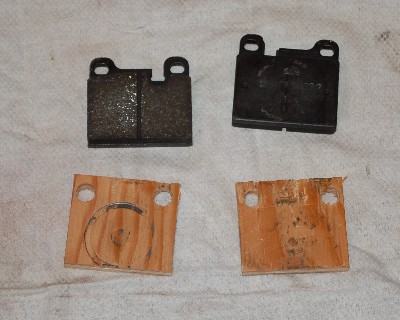
I wanted them to be thinner than the new pads, but thicker than the backing plate. My goal was to get the pistons out enough to get that first slip of the rubber dust seal along the piston-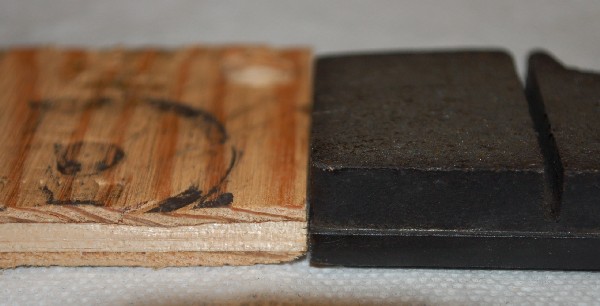
I installed them into one caliper...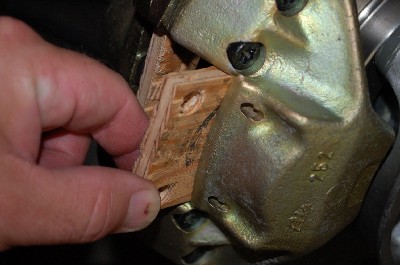
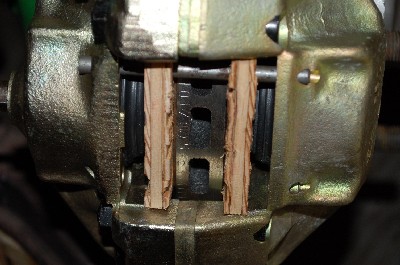
And pumped the brake. The brake went from "nothing" to "not bad" in about five pumps! I removed the plywood brake pads, pried the pistons back in, reassembled the real pads and hardware, topped off the reservoir, and then repeated on the other side!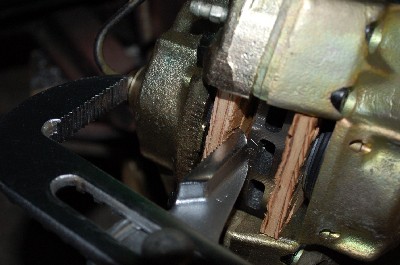
As I pumped the brakes with the "organics" in, one nice thing is that I could hear the pistons coming out of the cylinders- actually the plywood was creaking as it was being crushed! Also, when I was all done, real pads installed, I could hear the equalizer in back of me thump every time I pumped. A good sign.
Feeling good about the brakes now. Still need to bleed the rears, but I'll do that after my first drive. Now on to the toe-in.
Thanks, everyone, for the suggestions!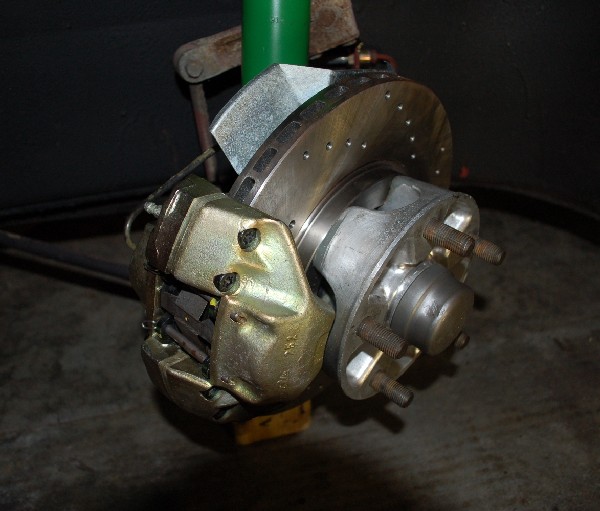
Posted by: jk76.914 Aug 7 2011, 06:42 PM
Getting there. Devil's in the details I s'pose.
New tie rod ends and boots all around.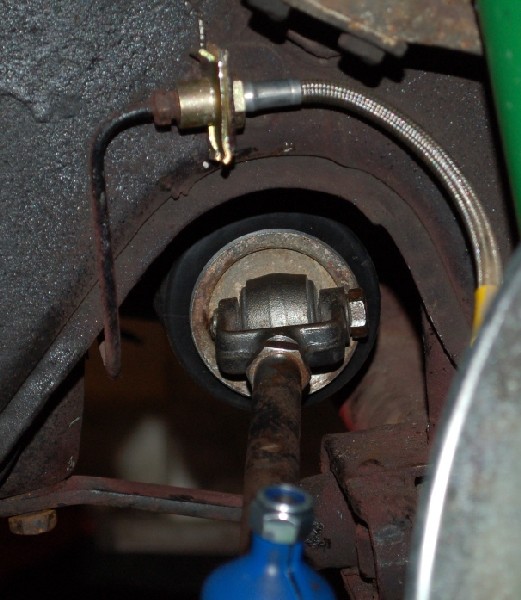
Seals for the bearing caps. Never saw these before, but they were in PET so I ordered a pair from Pelican. They're little tubes- not solid.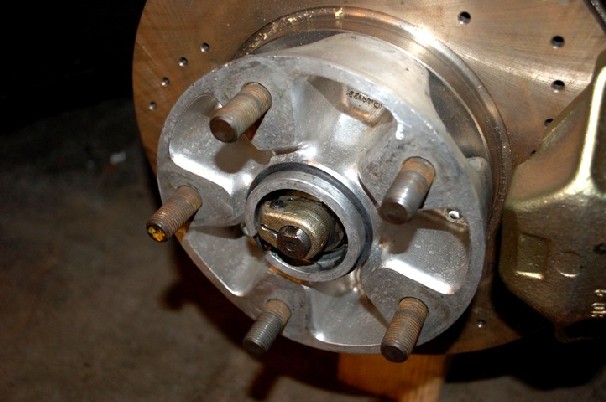
Posted by: jk76.914 Aug 7 2011, 07:40 PM
Built a big T-square to set toe. Before I started the project, I measured the height off the floor to the outer end of the control arms at 5.25". Two 4x4's were cut to this length, and the car lowered onto them. This approximated ride height, but with no tires so access was easy and I didn't have to worry about settling the rubber every change. I made sure the control arm front edge was flush with the front surface of the 4x4, so I could set the T-square bridging across them. A small carpenter square from the cleat on the T-square to the brake disk, adjust the tie rod so fore and aft are square, flip the T-square to the other side, repeat, and done. It would have worked better if I had done it before the caliper was mounted, to give me a longer base, but it was OK.
I had it aligned on Thursday, and it came up -.79 degrees on the right, and -.52 degrees on the left. Not very good, but it got me to the alignment shop. Alignment shop was interesting- next post.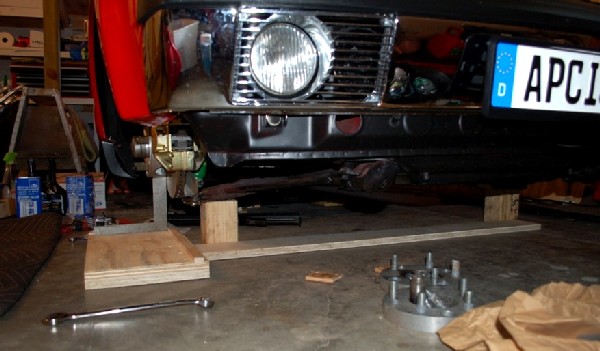
Posted by: jk76.914 Aug 8 2011, 04:17 AM
Took it for alignment on Thursday morning. They couldn't get the front end camber set. Best they could do is:
Right: -1.4 degrees
Left: -0.8 degrees
Caster OK at 5.5 degrees both sides, the bottom end of the range.
On the front camber, the adjustment topped out at the edge of the adjustment range on the right, and when he tried to match it on the left it bottomed out at the -0.8 degrees.
When I got home, I think I figured out part of the problem- the car is sitting too low. After installing the new Bilsteins, I had to lower it. Makes sense. The old KYBs were shot, and I think the new Bils were lifting the front end maybe 100 pounds? So I lowered it some one night, but didn't settle and recheck it before I went to alignment. Duh. Not only did it settle too low, but the left was about an inch lower then the right. Lowering increases camber by itself, but the tilt will increase it on the right and decrease it on the left on top of it. Is this making sense?
I raised the front end some and leveled it. It's still raked about an inch back to front, but now I'm going to drive it several times, checking and tweaking height in between, before going back to alignment.
Rear is pretty good at -1.5 degrees camber both sides and .12 degrees toe both sides. A bit more camber than I wanted (wanted closer to stock).
It would have been nice if the shop, who specializes in German cars and does a lot of Porsche, would have noticed the height issues....
Car is getting there. The new front end is the biggest improvement to driving of all the work I've done in the past 10 years. Can't wait to get this all dialed in.
Am I right in my assumption that with more negative camber you should have a bit more toe out?
Powered by Invision Power Board (http://www.invisionboard.com)
© Invision Power Services (http://www.invisionpower.com)