Printable Version of Topic
Click here to view this topic in its original format
914World.com _ 914World Garage _ My 72 3.0 progress thread: Project F-914
Posted by: Krieger Sep 24 2010, 08:48 PM
So I have been working like a dog at work, on the house, with my kids, wife and not in this order. The last 20 months have been when the majority of the work has been done. I do enjoy the post here and try to contibute, but I just haven't had the time to make a progress thread. What may or may not be seen in the pics: chasis stiffening kit, engman kit and suspension console reinforcement of my own design. This console reinforcing was detailed on the club site and is in the classics. This car is being built for mostly track use, but I intend for now to keep it street legal...or at least appear like it is. The car started life as a 1972 1.7 I bought for $300 complete with 86k total miles. I got it to run with the replacement of one seal and a used head sensor. I bought it for my ding dong brother who later said he didn't want it. It made sense for me to convert this car for track use rather than butcher up my very nice 75. As luck would have it, about 6 months later I purchased a very wrecked original 70 six with a 3.0L in it........
Attached image(s)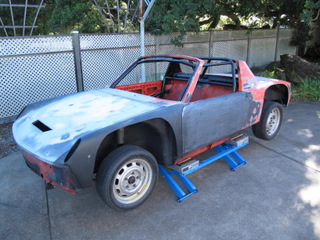
Posted by: Krieger Sep 24 2010, 08:52 PM
The body on this car is very straight, just uglier than crap. Hood was rusty and dinged up, but it mostly worked out. I made steel panels and welded them in place of the headlights. I intend to put some HID bulbs in the turn buckets
Attached image(s)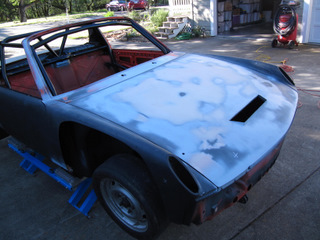
Posted by: Krieger Sep 24 2010, 08:53 PM
I have an RX-7 cooler with a shroud that I built to vent up through the hood. I will get to these pics prolly another day.
Attached image(s)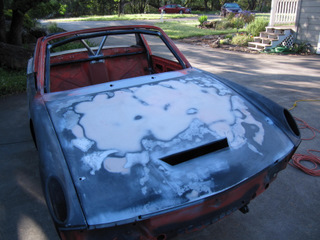
Posted by: Krieger Sep 24 2010, 08:57 PM
The cage is from Tangerine racing with some other bits I added tying into the front and the rear suspension.
Attached image(s)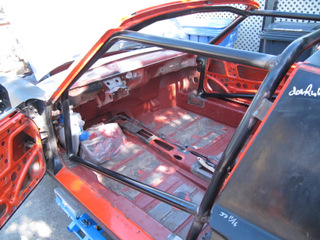
Posted by: Krieger Sep 24 2010, 08:59 PM
The engine compartment, with bracing and angle iron added to shock tower/long area. And my home depot battery tray for a smaller odessey battery. Link for my console reinforcing: http://www.914club.com/bbs2/index.php?showtopic=66112&st=0
Attached image(s)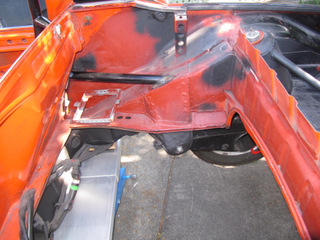
Posted by: Krieger Sep 24 2010, 09:07 PM
I did some bracing in the rear trunk as well. I copied a lot of ideas from Jim Patrick's web site. I studied those cages a lot, Oh and I LOVED the way someone on our site did their rear lid. It folds back out of the way for some mad access to the engine compartment. It involves the front trunk mechanism from an 89 Buick Le Sabre. It was pretty easy to get bolted to the body and the welded to the trunk. The square tubing on the top of the lid keeps the front of the lid from lifting up.
Attached image(s)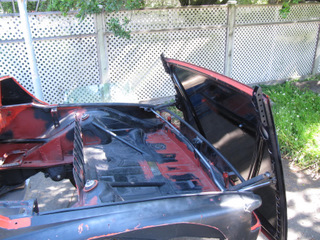
Posted by: Krieger Sep 24 2010, 09:08 PM
closer
Attached image(s)
Posted by: Krieger Sep 24 2010, 09:12 PM
I also did away with the front trunk springs and made a simple prop rod out of one of the rear trunk torsion bars, cut down and bent. A part from a 96 pontiac fits the od of this rod and hold it securely in place!
Attached image(s)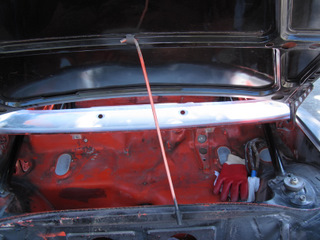
Posted by: Krieger Sep 24 2010, 09:13 PM
$2.00 Pontiac part and reinforcing for front trunk.
Attached image(s)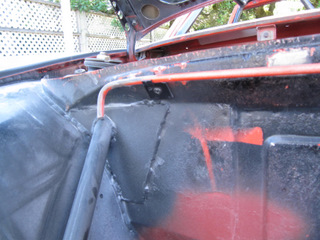
Posted by: Krieger Sep 24 2010, 09:21 PM
Other bits not seen but on:
Rennmetal flat-tow bracket, reinforcing for body near sway bar.
Tangerine Racing raised spindles.
Elephant poly-bronze bushings.
Factory 6 engine mount.
Seen, but not described:
And YES riveted on fiberglass fenders!
Lots of holes drilled in parts like doors, lids and brackets. Not because its really that much lighter but because I had hole saws and it looks way cool!  and goes with the aviation theme/scheme i've got going on.
Posted by: FourBlades Sep 25 2010, 09:30 PM
This is a cool looking build! 

Lets see some more and larger pictures. ![popcorn[1].gif](style_emoticons/default/popcorn[1].gif)
John
Posted by: Krieger Sep 26 2010, 10:49 AM
I have some more time to post pictures correctly. The car was painted last month a matte metalic silver. This paint is a polyurethane and looks awsome in the sun. In the garage it looks a little dull. Basically it looks like glass beaded aluminum! The paint is from TCP Global in San Diego. Hot Rod Flats is the color line.
Attached thumbnail(s)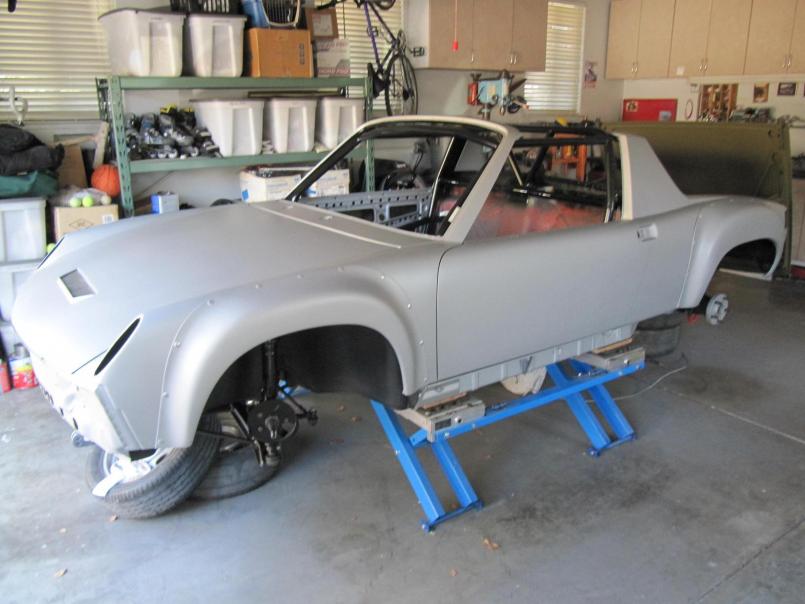
Posted by: Krieger Sep 26 2010, 10:52 AM
I thought the big rivets, silver paint, and the holes I drilled in the car lent itself nicely to an aviation theme so I'm running with it.
Attached thumbnail(s)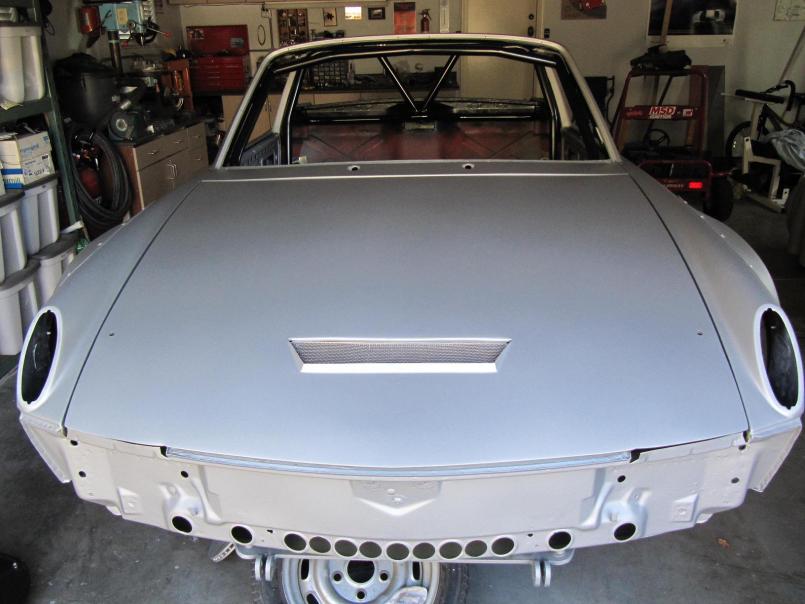
Posted by: Krieger Sep 26 2010, 10:54 AM
A dozen spray cans of olive drab was easy to do in the front/rear trunks, inside the doors.
Attached thumbnail(s)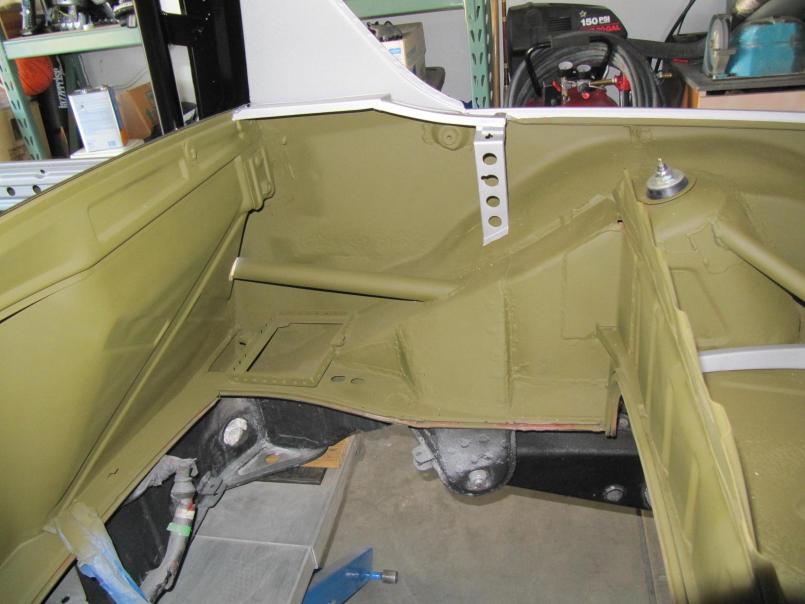
Posted by: Krieger Sep 26 2010, 10:56 AM
It looks so freakin cool 
Attached thumbnail(s)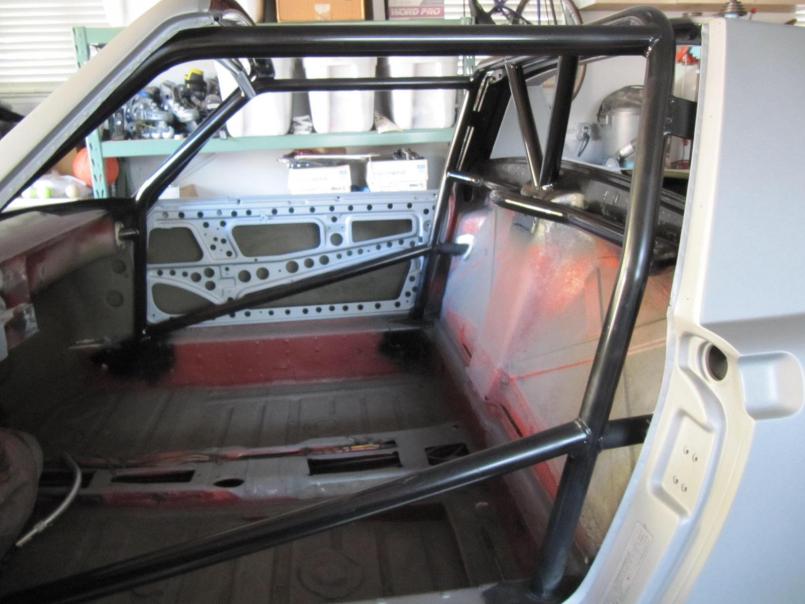
Posted by: Krieger Sep 26 2010, 10:58 AM
Here is the front trunk with my "deluxe" home made shroud. This was fun to do.
Attached thumbnail(s)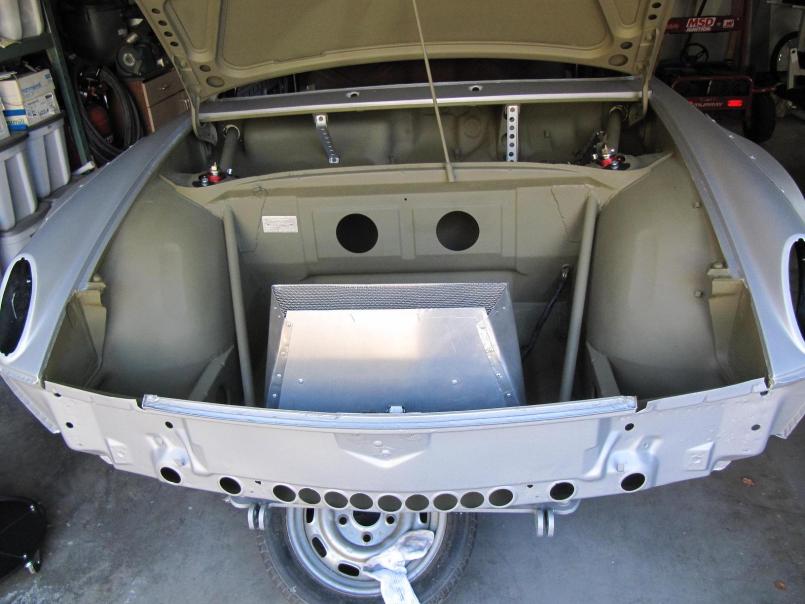
Posted by: DanT Sep 26 2010, 11:06 AM
looking nice Andy, and some excellent "outside the box" touches..
I also see your Rennenmetal super beetle tow bar bracket!
Posted by: Krieger Sep 26 2010, 11:06 AM
I owe some credit to Sir Andy for the how I cut the front lid for the exit. He posted a drawing how he was going to cut and bend the front of the hole up and the rear down for venting out his hood. The exit area is more than twice the intake area. I placed the exit towards the front of the lid after studying the aerodynamics project that was going on at San Diego State? that shows a lower pressure area on the front portion of our trunks ahead of the turn buckets. Will it work.......well see.
Attached thumbnail(s)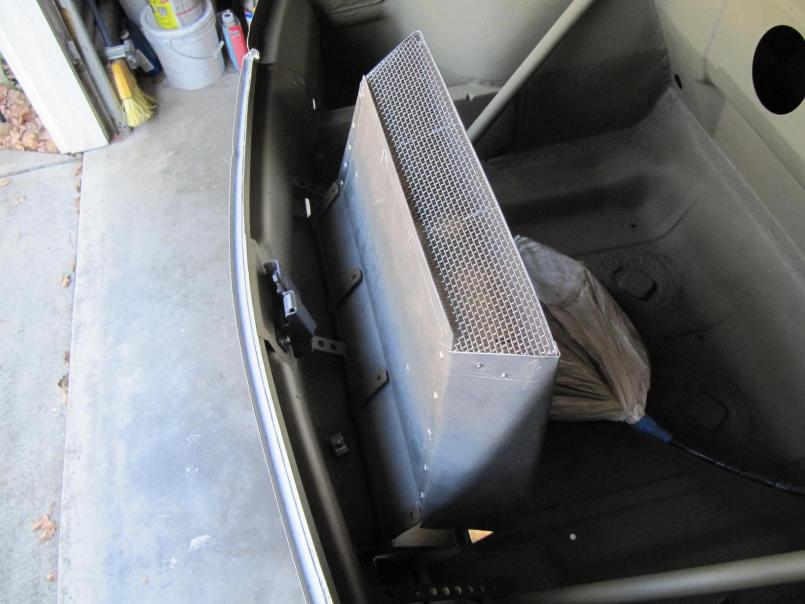
Posted by: Krieger Sep 26 2010, 11:09 AM

looking nice Andy, and some excellent "outside the box" touches..
I also see your Rennenmetal super beetle tow bar bracket!
Ha Ha thats funny Dan!
Posted by: Krieger Sep 26 2010, 11:11 AM
Another rear trunk done!
Attached thumbnail(s)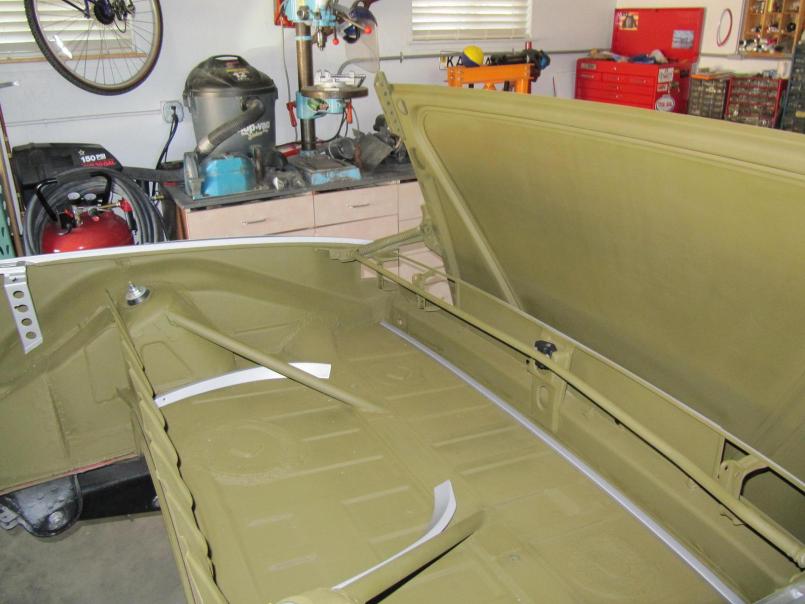
Posted by: Krieger Sep 26 2010, 11:16 AM
This car will handle like it was on rails so I'm deleting the tires and setting th car up with a flux capacitor! I paint stripped the wheels. I was stoked at how cool they look naked I had to put them on! I am not painting them.
Attached thumbnail(s)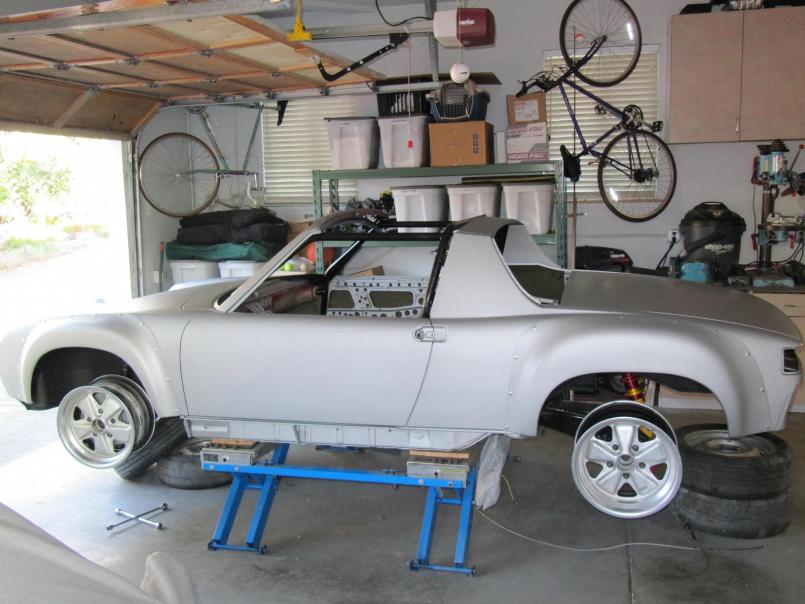
Posted by: rick 918-S Sep 26 2010, 11:22 AM
Nice placement of the angle iron rear tower brace. That's where these cars have shown stress cracks. Also the front bulkhead triangle. This is a common stress buckle of a front end collision.
Posted by: Krieger Sep 26 2010, 11:27 AM
Front suspension detail: Carrera front struts/brakes- Konis, turbo tie rods, elephant polybronze bushings, low friction rear mounts only. 22mm bars, vented backing plates/ hub block offs. Chassis reinforcing for sway bar.
oh, I do have a Tarret front sway bar, but I'm leaving that for a rainy day.
Edit: 21mm torsion bars
Attached thumbnail(s)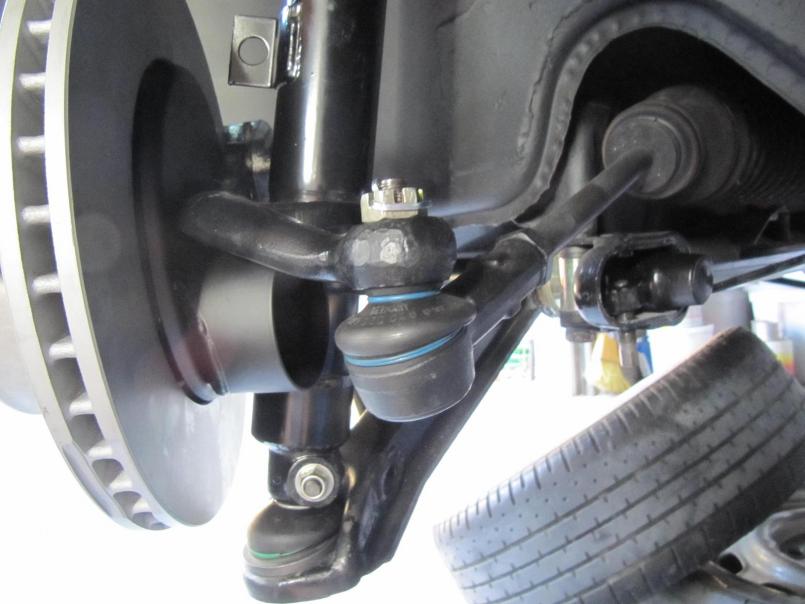
Posted by: Krieger Sep 26 2010, 11:32 AM
Rear suspension detail: Elephant polybronze, Koni adjustable, Ground Control adjustable sleeves. 250# springs
Not shown: SC rear brakes
Edit: 200# springs
Attached thumbnail(s)
Posted by: Hontec Sep 26 2010, 12:01 PM
WOW!! love it !!! 
Posted by: 3d914 Sep 26 2010, 05:26 PM
Very nice job, Andy!
Posted by: JRust Sep 26 2010, 07:52 PM
Looking great man! 
Posted by: NS914 Oct 12 2010, 07:12 AM
Rear suspension detail: Elephant polybronze, Koni adjustable, Ground Control adjustable sleeves. 250# springs
Not shown: SC rear brakes
Hi Andy,
All of these body color engine bays and your color too, I have decided to take my engine / tranny out again and really clean up and paint, silver in my case. I am also going to follow up with Tangerine on the Cage. I like the addional reinforcement you have done.
What is the brand / model of lift you have? That looks really cool and would work really well in my single car garage. i have been doing a complete rebuild sadly for more years than it should take but, am getting there.
Yours is a very cool car!
Grant
Posted by: RobW Oct 12 2010, 07:40 AM
Nice work Andy! Living the dream!
Posted by: Krieger Oct 12 2010, 08:23 PM
Thanks Rob, I am living the dream! I am living the dream! I just gotta keep reminding myself sometimes.
Thanks Grant. Here is the link for my EZ lift: http://ezcarlift.com/
Edit: This is my 914th Post! I think I finally figured out how to do a link correctly!
Posted by: ChrisNPDrider Oct 13 2010, 02:10 PM
Andy! Nice work buddy. It's great to see all that reading, practice, and experience culminate in a successful progress thread with a working link.

Great work on the 6! I hope it gets giant fighter plane sharks teeth in the front and a sexy gal painted on the sail panel.
Posted by: Krieger Oct 17 2010, 09:36 AM
Of course I wanted something different for my dash that matched the rest of my theme teen. Here is the template I made out of cardboard and the aluminum sheet of .80 that has been cut out.
Attached thumbnail(s)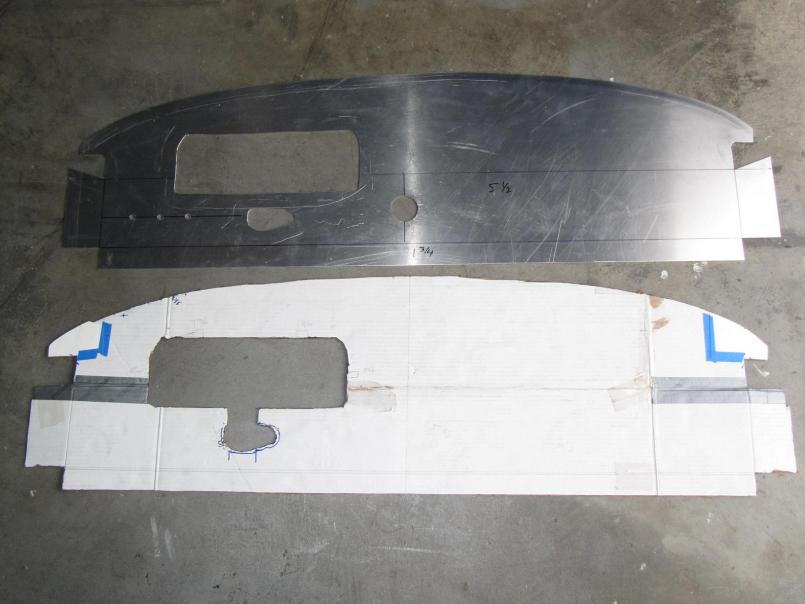
Posted by: Krieger Oct 17 2010, 09:46 AM
As you can see the dimensions are similar to the stock steel dash frame. I cut off the steel frame that holds the gauge plate and will be bolting that on once the aluminum is bent up. I will be using the stock gauge face plate as well. Gauges will be 911 oil temp/pressure combo, 911 tach, 914 150 mph speedo. Down on dash face the single cut out is for fuel. Thats all I'm doing so far. I want to drive this freakin thing. I am going to spray the dash with black wrinkle paint. Aluminum is so much easier to work with!
Attached thumbnail(s)
Posted by: gothspeed Oct 17 2010, 11:02 AM
Great job!!! 
Posted by: Krieger Oct 24 2010, 06:54 PM
Here is the dash bent up. I paid the shop where I buy materials to do this $35. I had to trim the corner tabs on top of the dash. When I drew this thing up I wasn't sure if I could install the dash with these corners with the roll cage installed in car. I cut them off. The aluminum sheet is .80 thick. The top bend is 110* just like stock.
Attached thumbnail(s)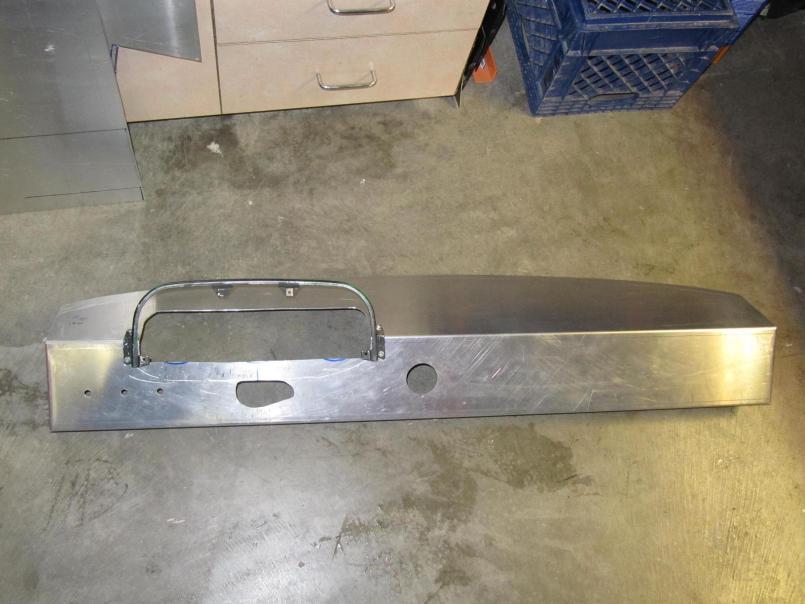
Posted by: Krieger Oct 24 2010, 06:59 PM
Here is the gauge hoop bolted up. A little more filing for the gauges and where the steering column turn signal/washer assembly go. Then the folds will get tig welded. I need to finish the hood cover for the gauges.
Attached thumbnail(s)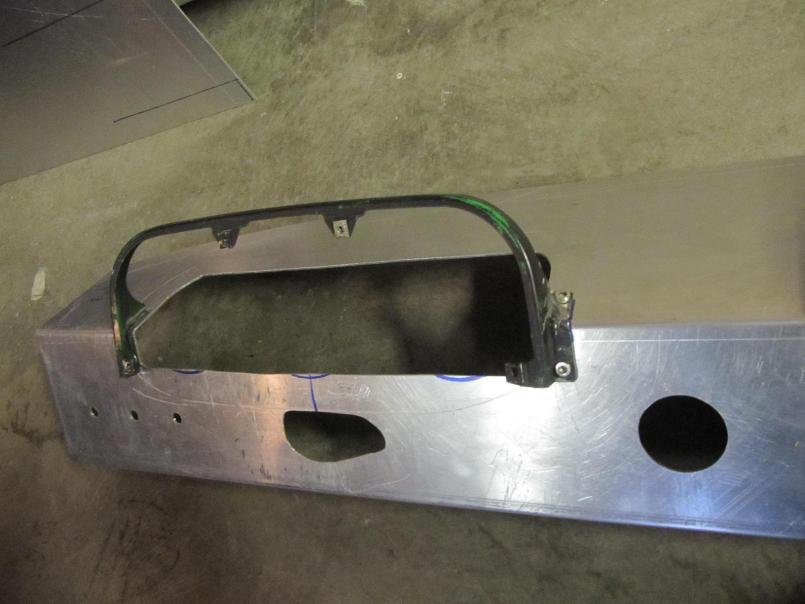
Posted by: Eric_Shea Oct 24 2010, 07:11 PM
Sweet project Andy.
Posted by: pete000 Oct 24 2010, 07:56 PM
What kind of floor lift is that? looks pretty slick.
Posted by: Krieger Oct 24 2010, 08:31 PM
A very cool tool. Check post #30 for link.
Posted by: arkitect Oct 24 2010, 08:40 PM
Andy,
Cool project, I like the aircraft theme you've got going from exposed fasteners to paint and cool mods, great job.
Dave
Posted by: Krieger Nov 4 2010, 09:23 PM
Got the cover made and riveted in place. I used seam sealer on the inside between the cover and the dash to fill any gaps an hold it in place from vibrating.
Attached thumbnail(s)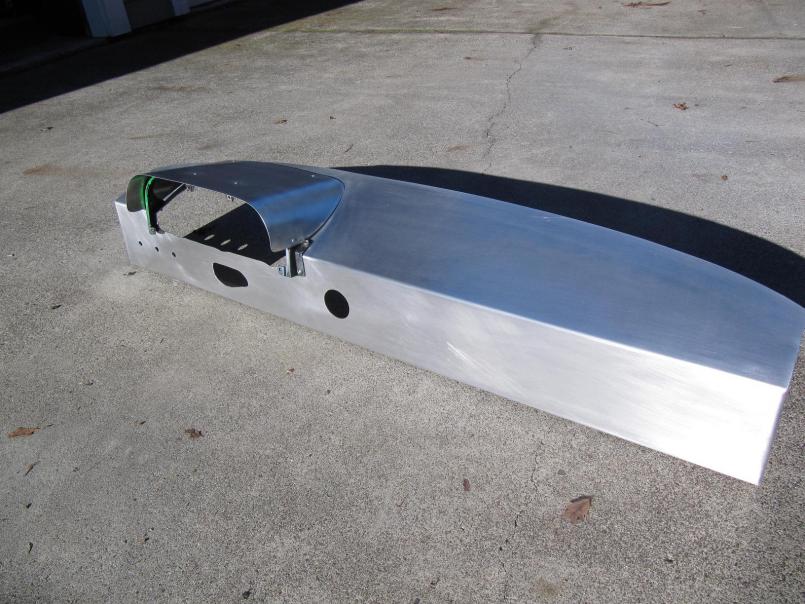
Posted by: Krieger Nov 4 2010, 09:25 PM
Bird's eye. I have a can of krylon wrinkle paint for the gauge plate and dash!
Attached thumbnail(s)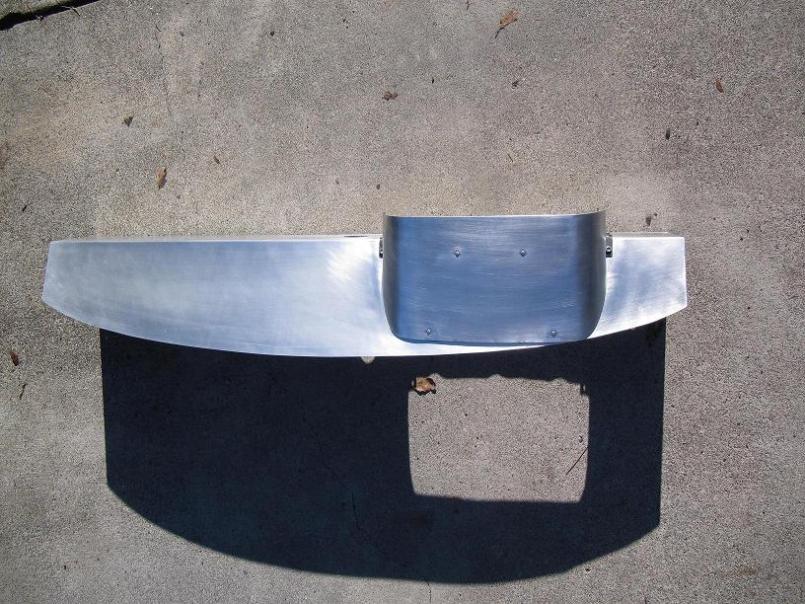
Posted by: SGB Nov 5 2010, 07:16 AM
the coolness of simplicity.
So minimalist.
Great.
Posted by: tdgray Nov 5 2010, 09:14 AM
Really Neat... like what you are doing.
Posted by: Krieger Dec 12 2010, 10:47 PM
Dash pic added. Wrinkle finished failed large flat surface area. http://http://www.914world.com/bbs2/index.php?showtopic=113057&hl=wrinkle Painted SEM Tirm Black.
Attached thumbnail(s)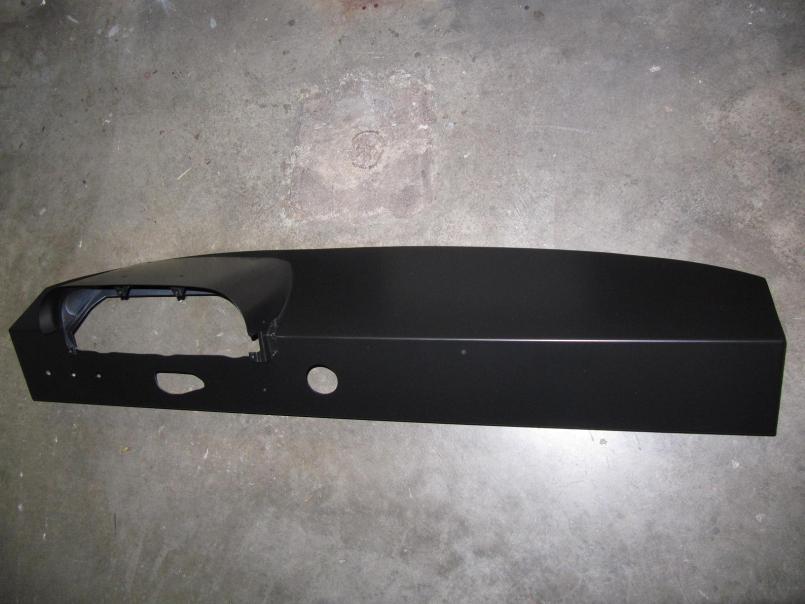
Posted by: Krieger Dec 12 2010, 11:22 PM
Got the engine lid finished. Home depot handle and pins to locate on the fire wall. Hood pins will hold it on to body
Attached thumbnail(s)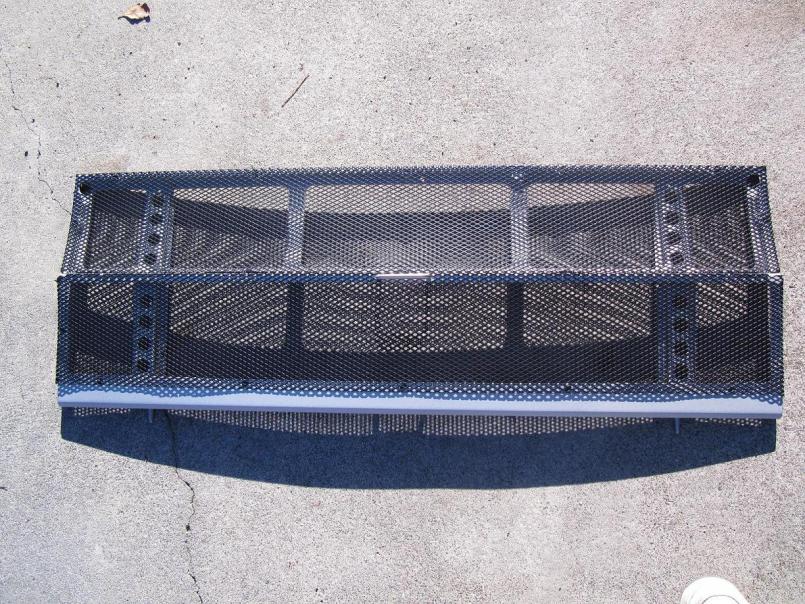
Posted by: Krieger Dec 9 2011, 06:30 PM
So I have been working on my car and its been nearly a year since I've updated. My new economy throttle linkage. $15 for two of the ball joints that the cable goes to (one spare). My goal was to get rid of the monkey motion, use a stock throttle cable and not spend much. I am using an aftermarket 914/6 cable from Patrick motorsports $50. I bought two so I'd have a spare. This set up has been tested with the engine rolled under the car and the cable installed in the car with the pedal assembly. I get full throttle and still have some adjustment that I can make to the rod lengths, cable length or bracket position.
Attached thumbnail(s)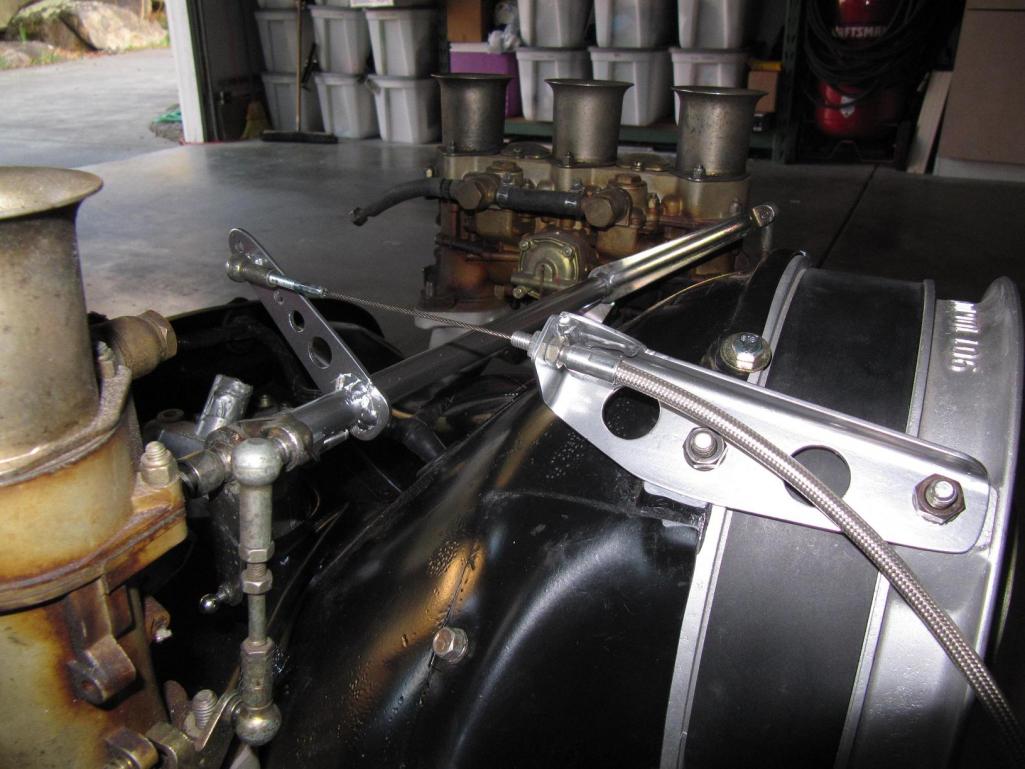
Posted by: Krieger Dec 9 2011, 06:34 PM
I need to rebuild the carbs still. The bracket on the shroud is made from a recycled chunk of steel I cut out of the rear bumper of my 75 when I was lightening it. So there is some value to those big bumpers!
Posted by: Krieger Dec 9 2011, 06:41 PM
Since this car is such a mix of parts I needed to make my own wire harness. I also wanted to eliminate the relay board. This is not a fancy connector. I found it was a big hassle trying to find just one male/female connector. I called JEGS and ordered a weather pak unit.
Attached thumbnail(s)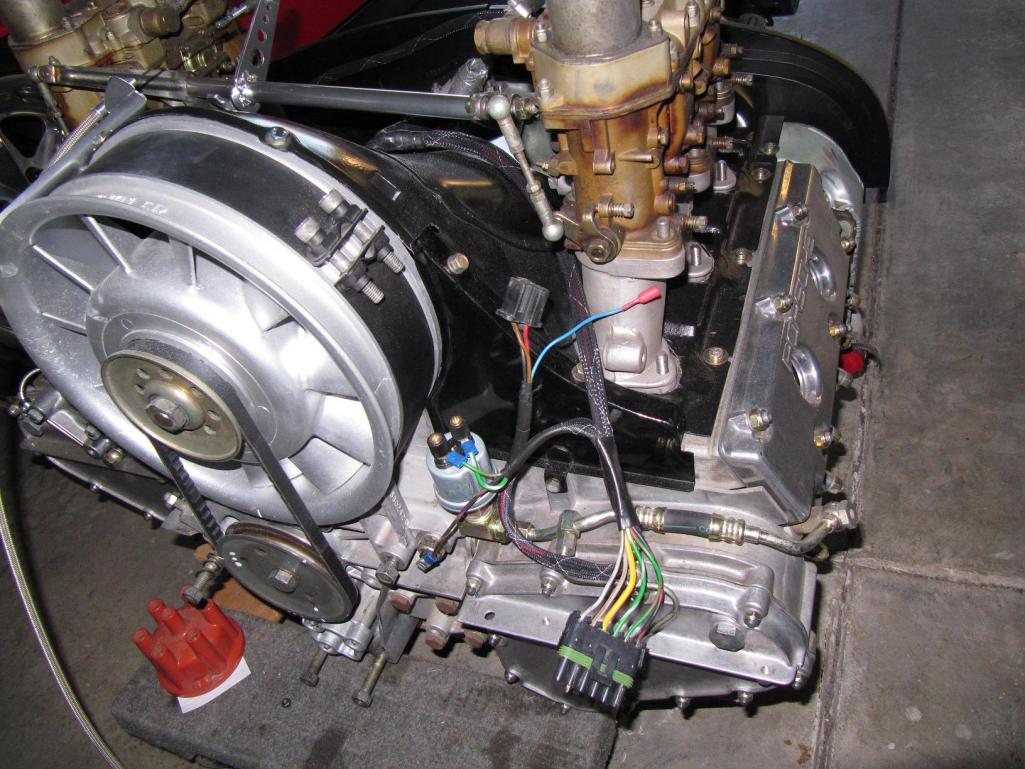
Posted by: Krieger Dec 9 2011, 06:52 PM
Here is the rest of the harness. Most of my supplies came from a local electronics supply. For the actual wires within the harness I cut the rear half of the wire harness from a 914 that was at my local pick n pull. It was in great shape. I used these wires in my new engine harness so they would match the wires in my body harness when pluggen in. Hi torque starter. Ottos built trans. I put the heavy cable from the battery to the starter in the harness as well.
Attached thumbnail(s)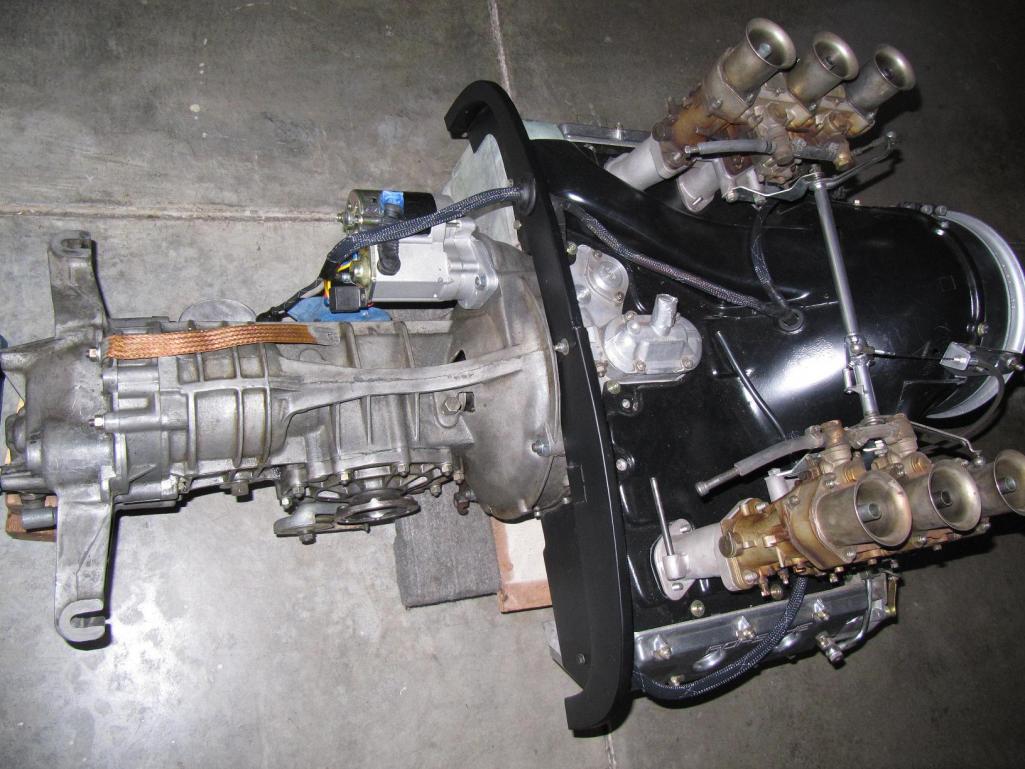
Posted by: Krieger Dec 9 2011, 06:57 PM
Here is one of my rebuilt Ferrari rear calipers. All I need for the rears are pads!
Attached thumbnail(s)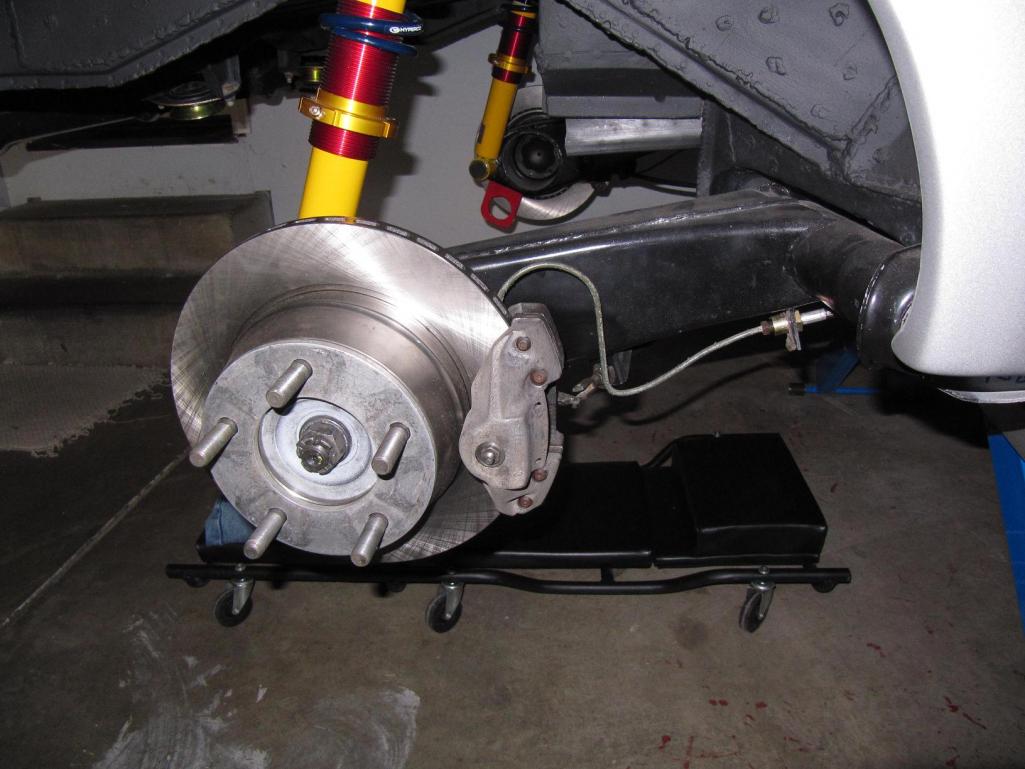
Posted by: Krieger Dec 9 2011, 07:02 PM
Front sway bar and heavy A calipers. When I learn how to drive I will replace the A's with something better. I need to run brake lines and add master cylinder.
Attached thumbnail(s)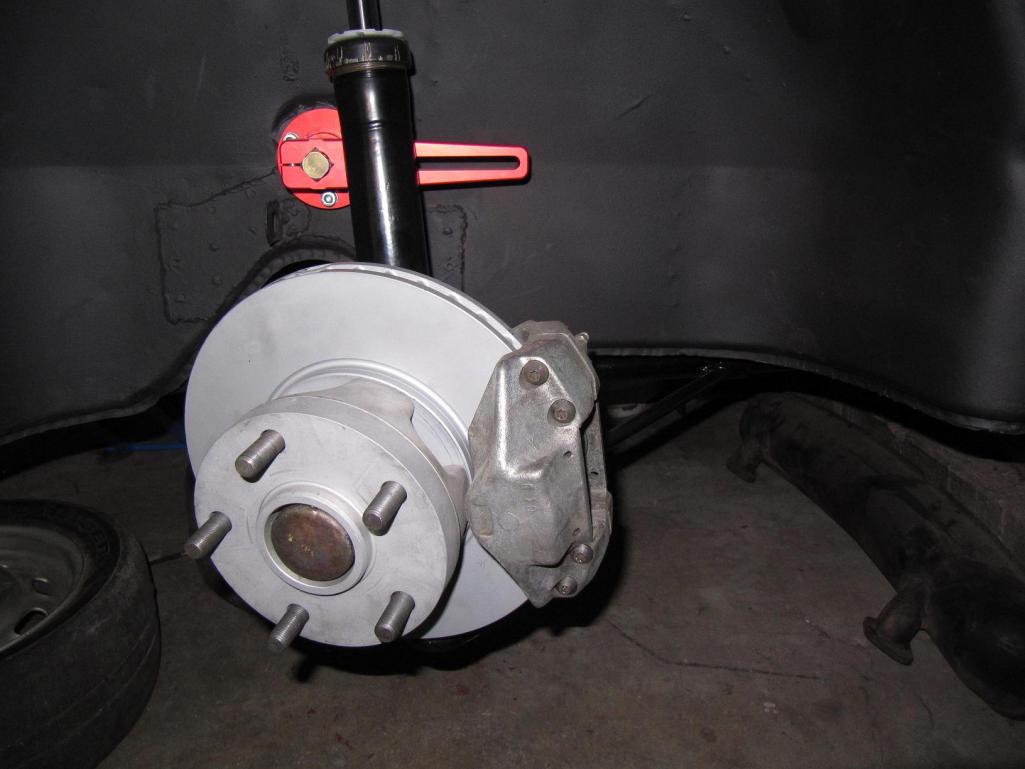
Posted by: Krieger Dec 9 2011, 07:08 PM
Something simple, cheap, light and fun. If you were in a US made jet and wanted to get out of a plane in a hurry you'd reach up above your head and grab yellow/black cable like this to punch out. Home Depot special $9. Eject label from office label maker free. Effect...priceless
Attached thumbnail(s)
Posted by: Krieger Dec 9 2011, 07:13 PM
I didn't want to do this project. I'm getting tired of projects and I just want to drive this freakin car. Oh well, it was pretty easy with my drill and jig saw. I also had some aluminum left over from making the dash. I forget how cool it is to work with aluminum. I welded nuts on the engine compartment side of the firewall to hold it down.
Attached thumbnail(s)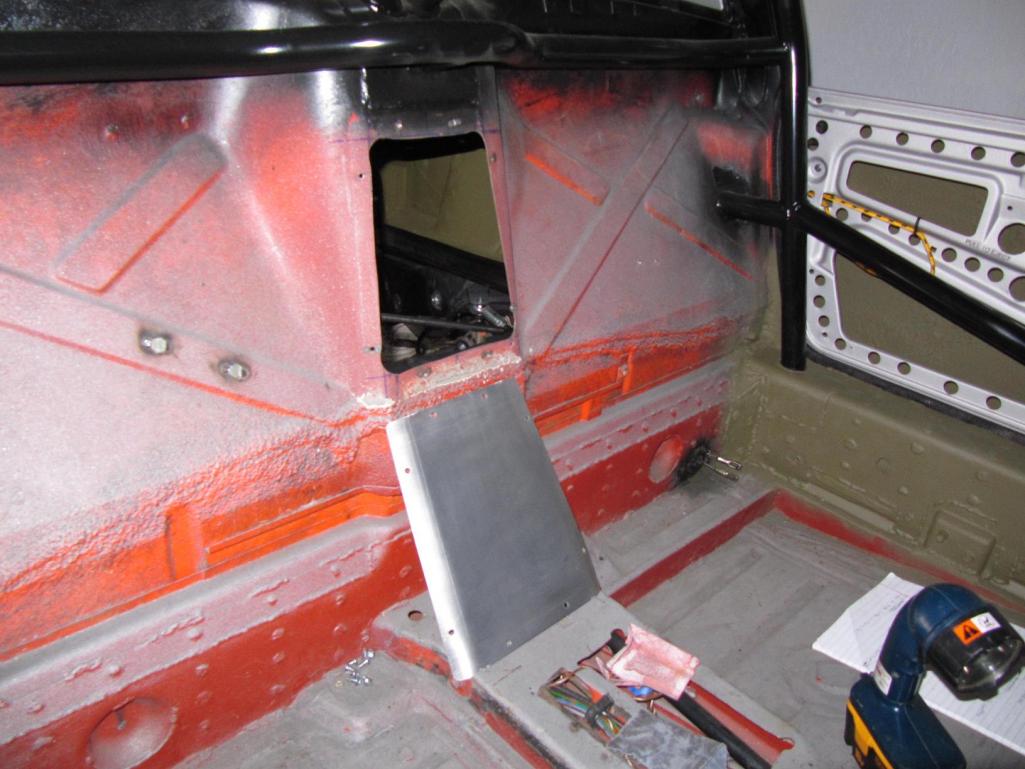
Posted by: Krieger Dec 9 2011, 07:16 PM
One of my "buddies" conviced me I needed to do the access panel. Just to the left you can see the bolt heads I tacked in place to mount the coil in the engine compartment.
Posted by: Krieger Dec 9 2011, 07:22 PM
Here is the engine compartment with my new connector eliminating the use of the relay board. I shortened a good amount of the original harness to put the plug in this location. The voltage reg was the only "compromise" if you want to call it that. I have the bracket for the engine mount temporarily mounted to help me with figuring out the oil line routing. My coil is wired in to the body harness and so is the distributor pick up lead.
Attached thumbnail(s)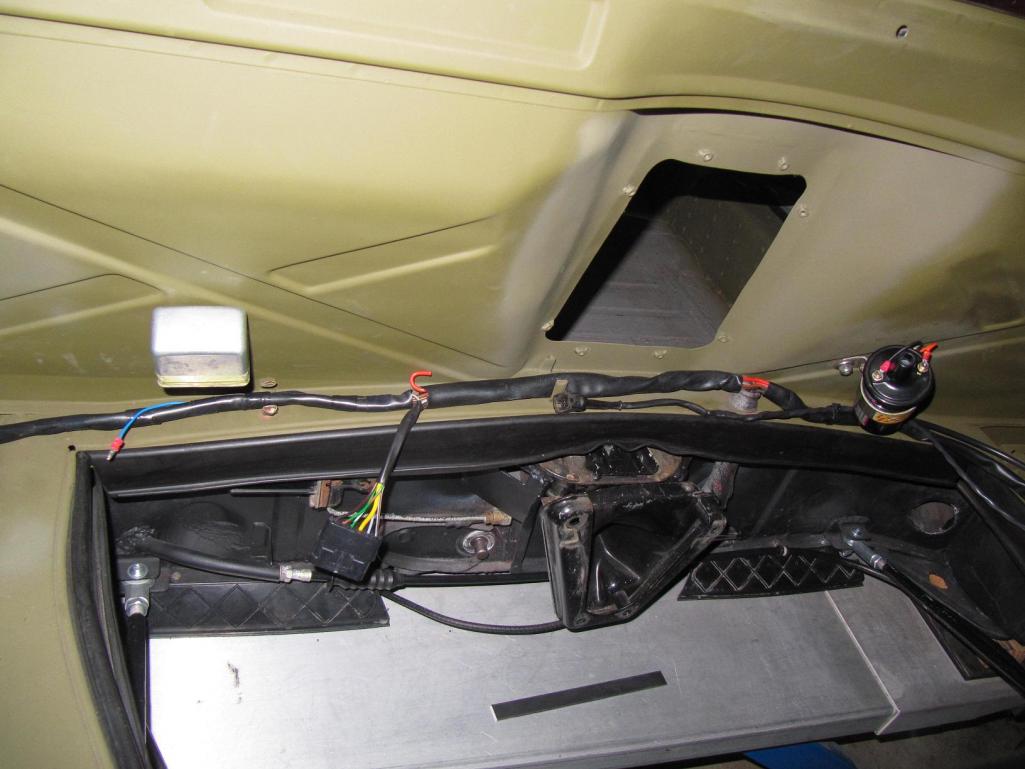
Posted by: Krieger Dec 9 2011, 07:28 PM
Oil line routing in front trunk. The lines are going in the passenger long, then into the passenger compartment. Through the front bulkhead to the cooler. 
Attached thumbnail(s)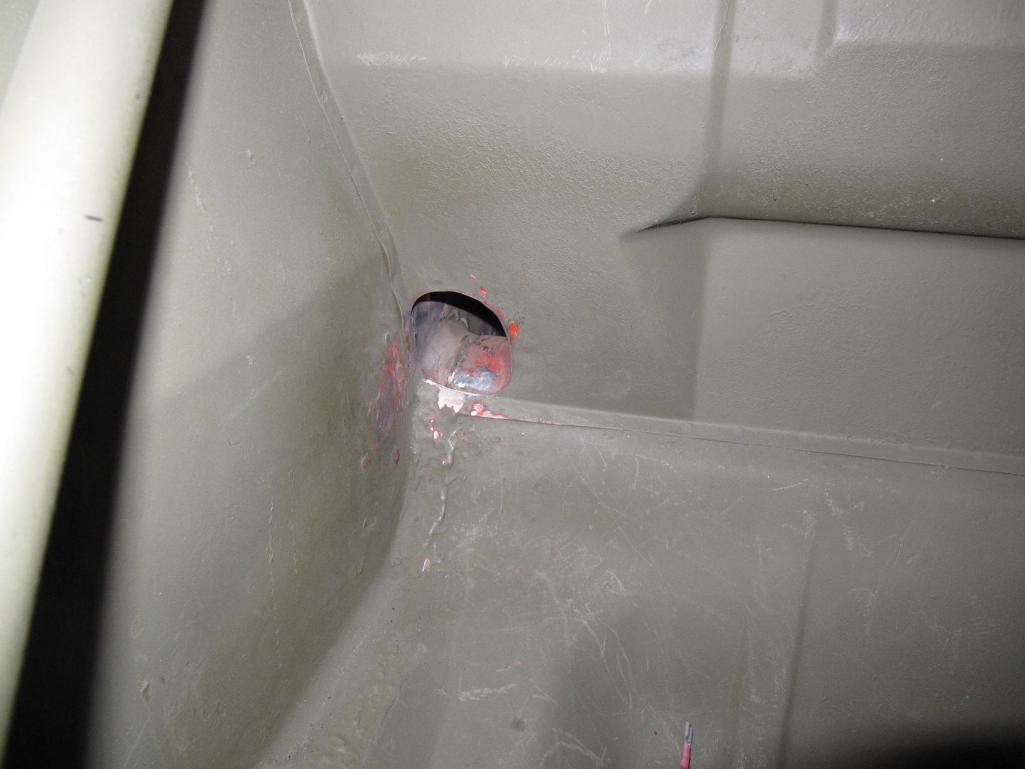
Posted by: Krieger Dec 9 2011, 07:32 PM
Passenger side. Hole saws courtesy my pal Marty.
Attached thumbnail(s)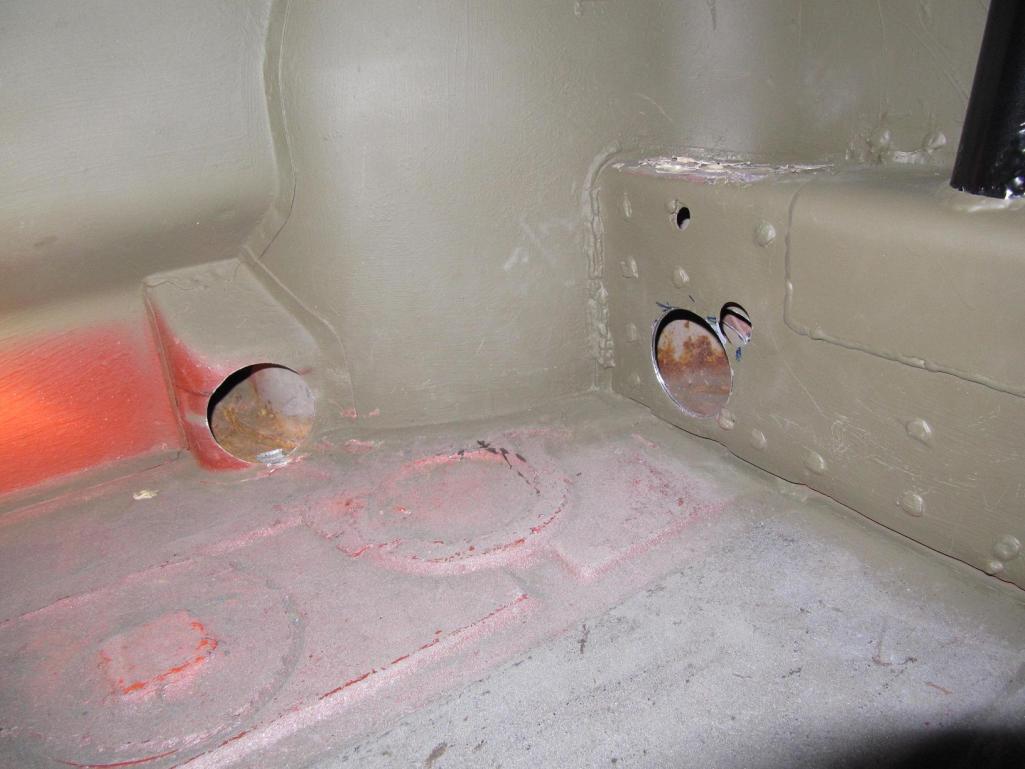
Posted by: Krieger Dec 9 2011, 07:37 PM
Windshield from that same doner car at pick n pull. It has a couple of small scratches otherwise awesome shape. I got it out, home and installed without breaking it! Rubber seal/butyl from Mikey. 3m black primer.
Attached thumbnail(s)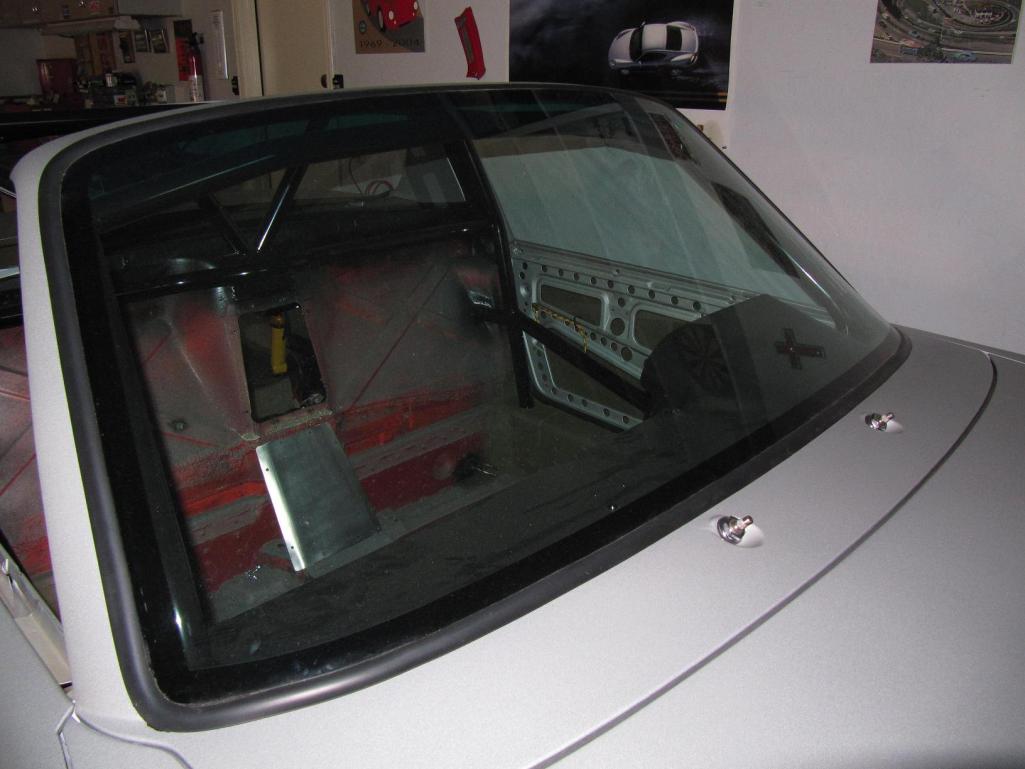
Posted by: Krieger Dec 9 2011, 07:46 PM
I liked the look of the original chrome wiper harware.
Posted by: Krieger Dec 9 2011, 07:50 PM
Almost forgot. The MSD 6AL box is wired into the harness along with the tach adapter. All I need is a couple of ends installed.
Attached thumbnail(s)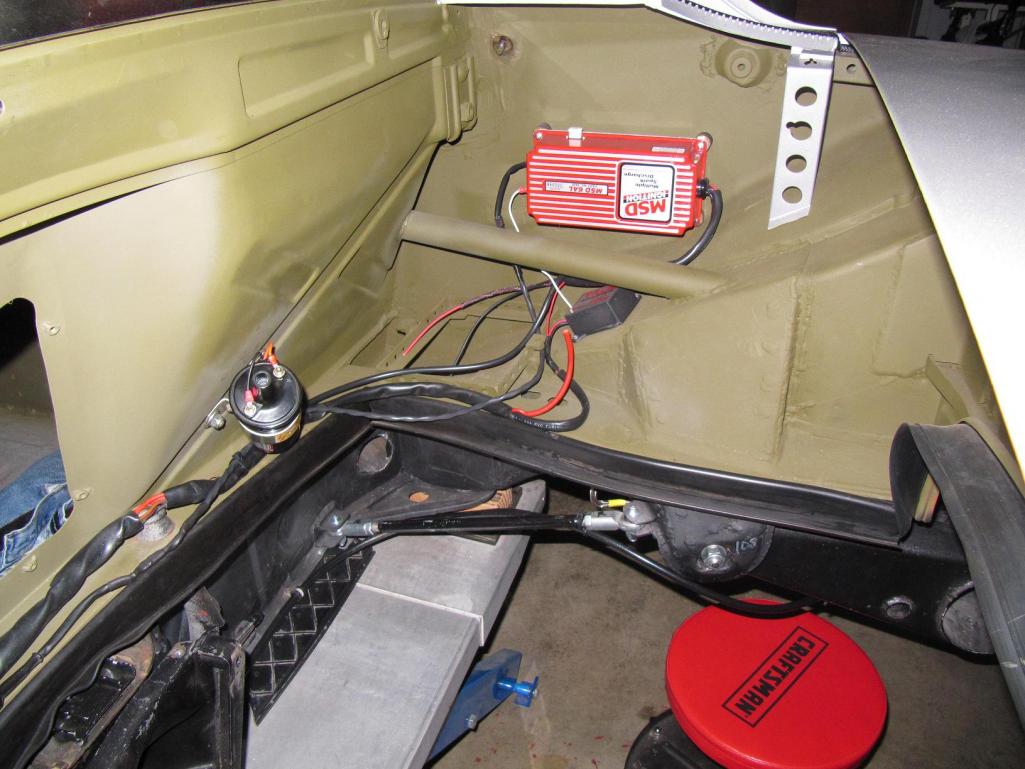
Posted by: Jeffs9146 Dec 9 2011, 11:33 PM
What year 3.0L is it? I didn't need a tach adapter for my MSD6AL on a 3.0L! My motor is an '83sc with a '79 tach! 
I didn't think the 4 cylinder tach will work even with the adaptor...maybe I am wrong?
Posted by: RobW Dec 10 2011, 06:45 AM
What you see of the wiper system is all there is...
Vent delete looks cool! How did the dash install go?
Posted by: Krieger Dec 10 2011, 09:05 AM
The engine is from a 78. The tach is from an unknown 911. If I need to I could always cut that tach adapter out. I needed a tach adapter for my 4 cylinder 75 with MSD6 box.
Rob the dash was easy to install. I used the two bolt holes on the top center. Then large (maybe 1/8") sheet metal screws on each side into the cage
Posted by: Krieger Dec 24 2011, 03:26 PM
Here is a close up of the paint, er glass beaded aluminum finish! Well the wiper nuts are glass beaded aluminum!
Attached thumbnail(s)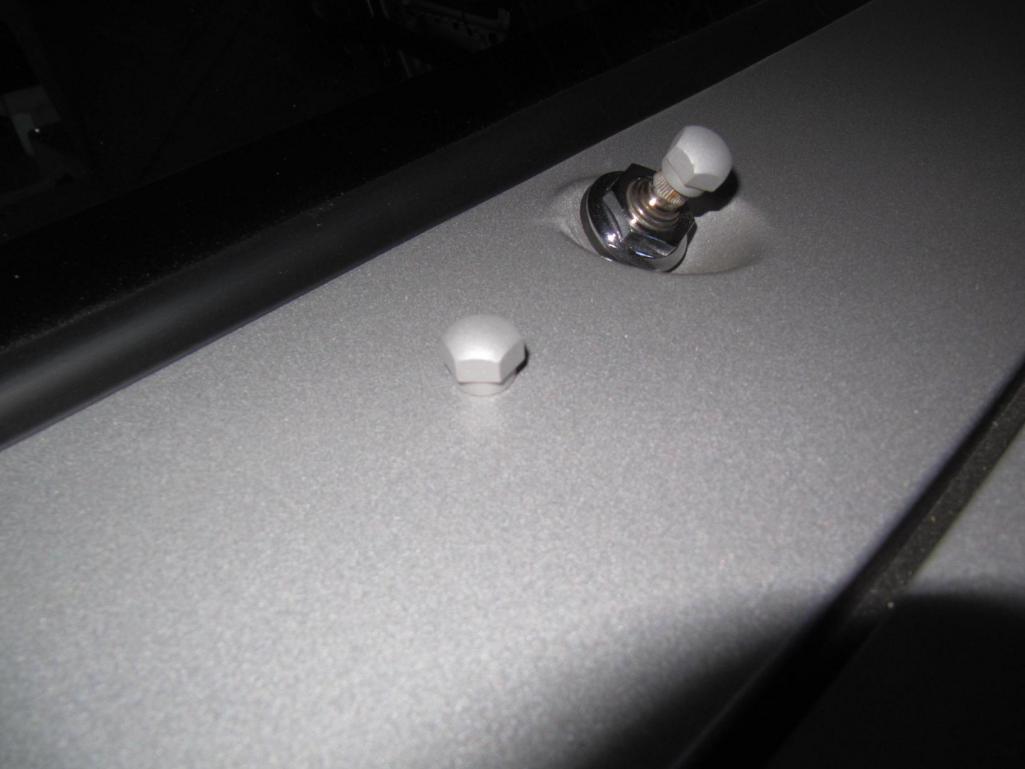
Posted by: Randal Dec 24 2011, 05:13 PM
Here is a close up of the paint, er glass beaded aluminum finish! Well the wiper nuts are glass beaded aluminum!
I really like the paint. Super cool.
Posted by: Randal Dec 24 2011, 05:16 PM
I have some more time to post pictures correctly. The car was painted last month a matte metalic silver. This paint is a polyurethane and looks awsome in the sun. In the garage it looks a little dull. Basically it looks like glass beaded aluminum! The paint is from TCP Global in San Diego. Hot Rod Flats is the color line.
Did you paint it yourself?
Posted by: Krieger Dec 24 2011, 06:03 PM
I had someone spray it in my garage. I'm good with a spray can though!
Posted by: Krieger Apr 20 2012, 11:18 PM
Got my oil lines and fuel system done! Mazda RX-7 cooler and Holley red fuel pump. Stainless fuel lines courtesy of Tangerine Racing. I have both installed even though I only am using one now.
Attached thumbnail(s)
Posted by: Krieger Apr 20 2012, 11:21 PM
I ran the lines in the long and wrapped them with a heat insulating material. A little bit of work with a hole saw and grinder.
Attached thumbnail(s)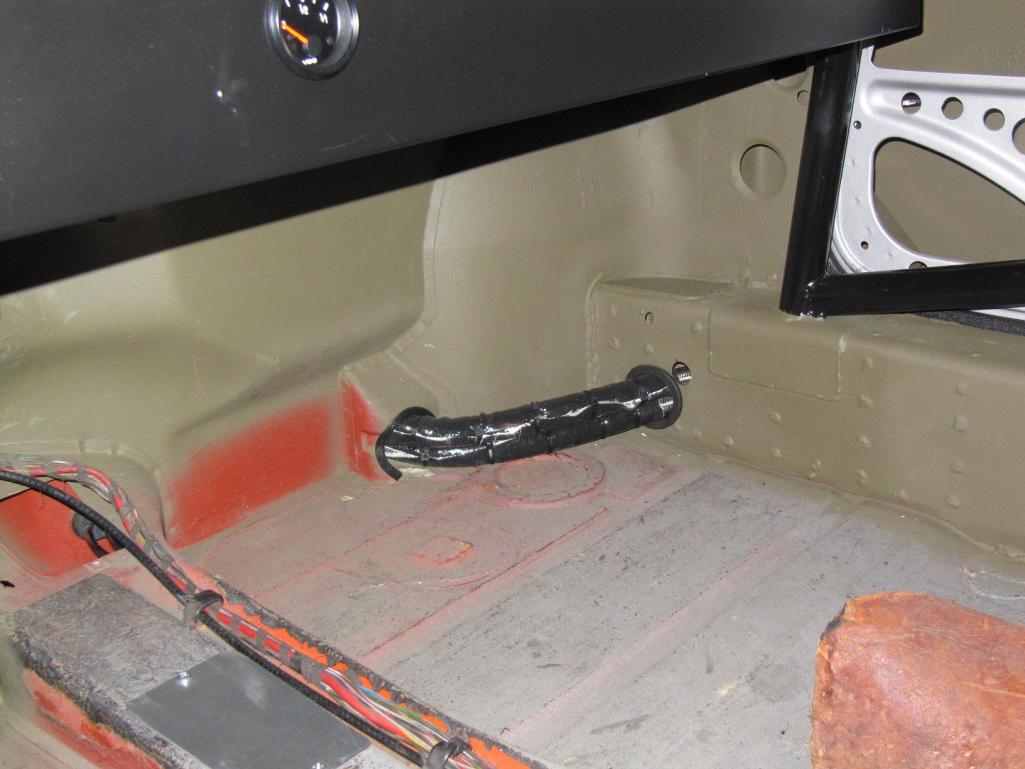
Posted by: Krieger Apr 20 2012, 11:24 PM
The left engine compartment view. Yes the line is run over the stock 6 engine mount, then fastened to the brake dampner. GT style engine mount bracing encouraged by Mr. Eric Shea.
Attached thumbnail(s)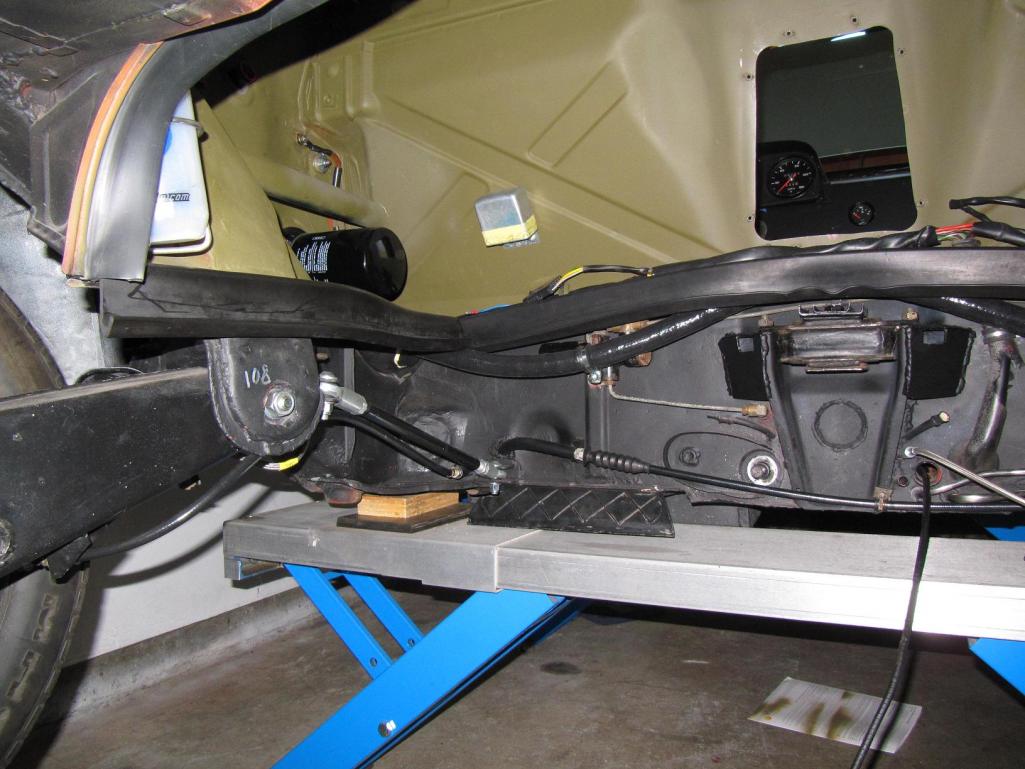
Posted by: Krieger Apr 20 2012, 11:31 PM
Here is the right side detail. with my home grown battery tray....wait till you see my "hot rod' style battery hold down. All the ignition components are wired into the body harness.
Attached thumbnail(s)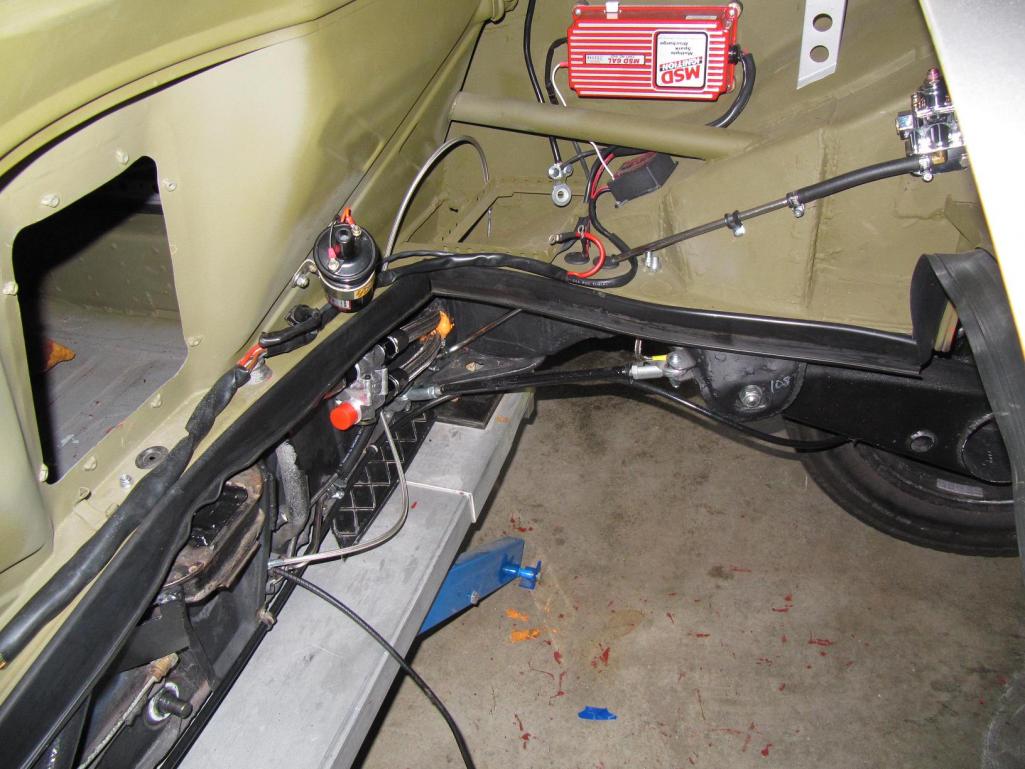
Posted by: Krieger Apr 22 2012, 08:06 PM
A better view of oil thermostat and line routing.
Attached thumbnail(s)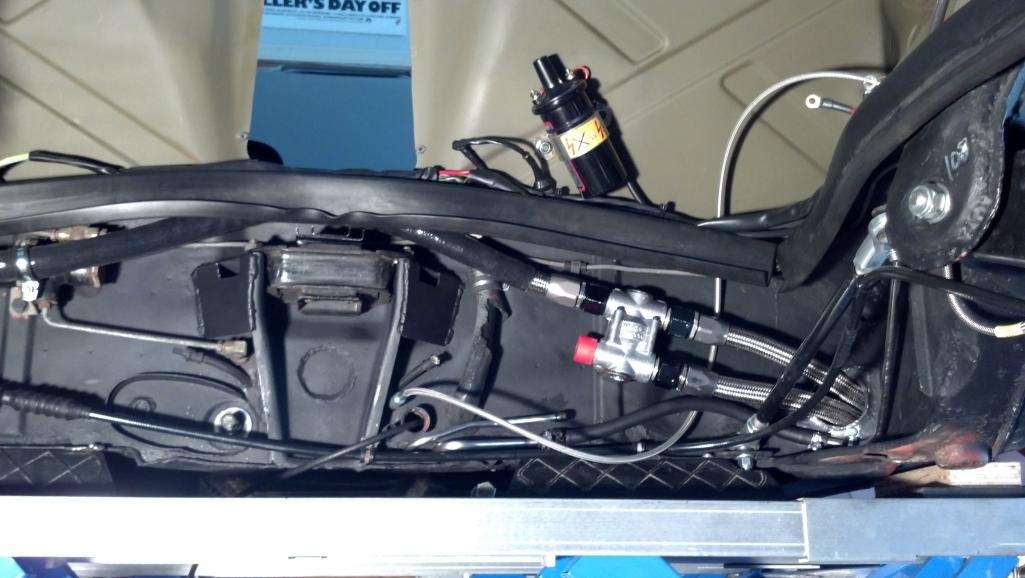
Posted by: Krieger Jun 24 2012, 12:27 PM
Carbs done! I did the float bowel mod to keep the mains fed in corners.
Attached thumbnail(s)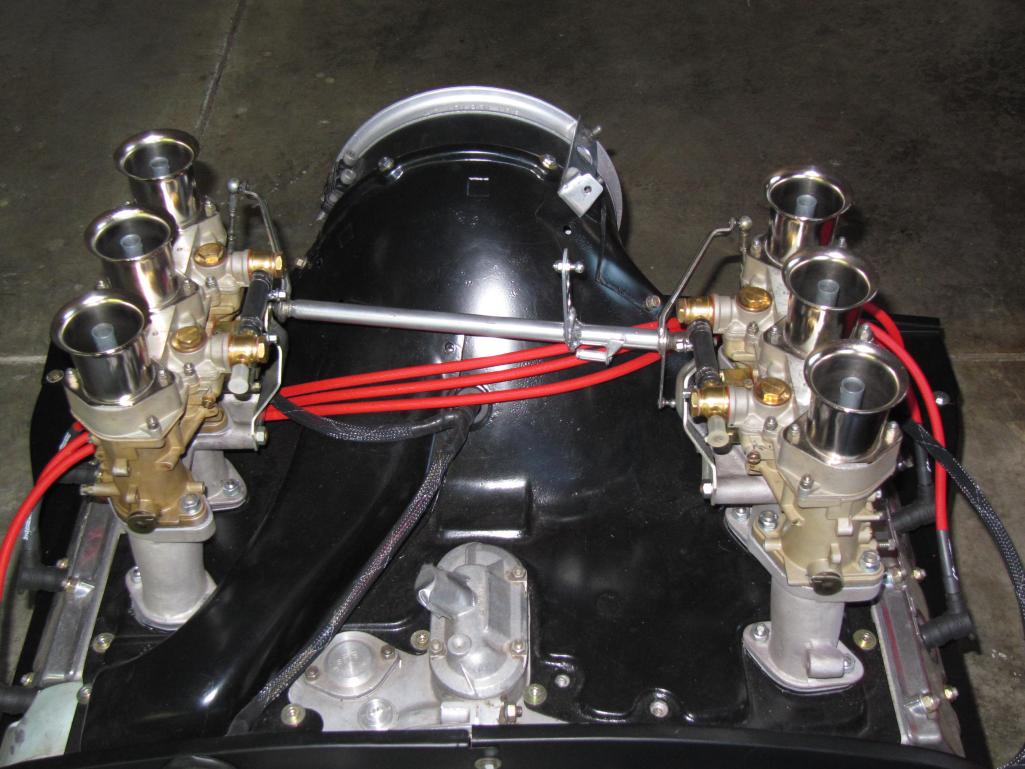
Posted by: Krieger Jun 24 2012, 12:28 PM
Engine/trans going in!
Attached thumbnail(s)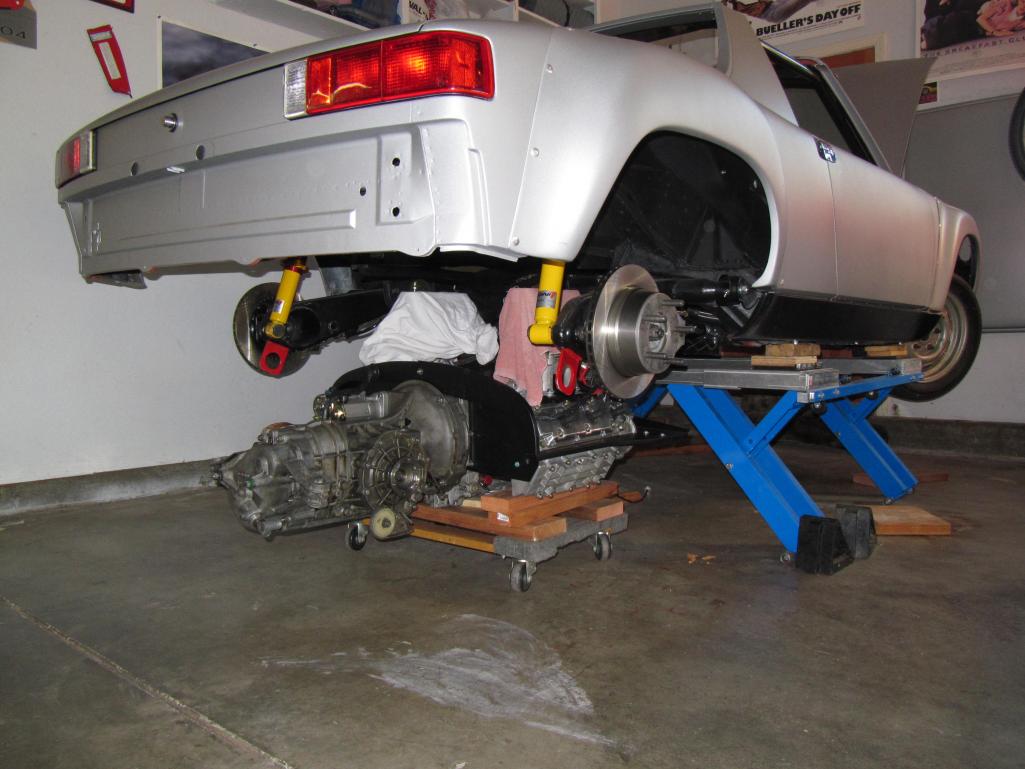
Posted by: Krieger Jun 24 2012, 12:30 PM
Bingo!! Note the fancy puke bottle set up pirated from one of the guys here.
Attached thumbnail(s)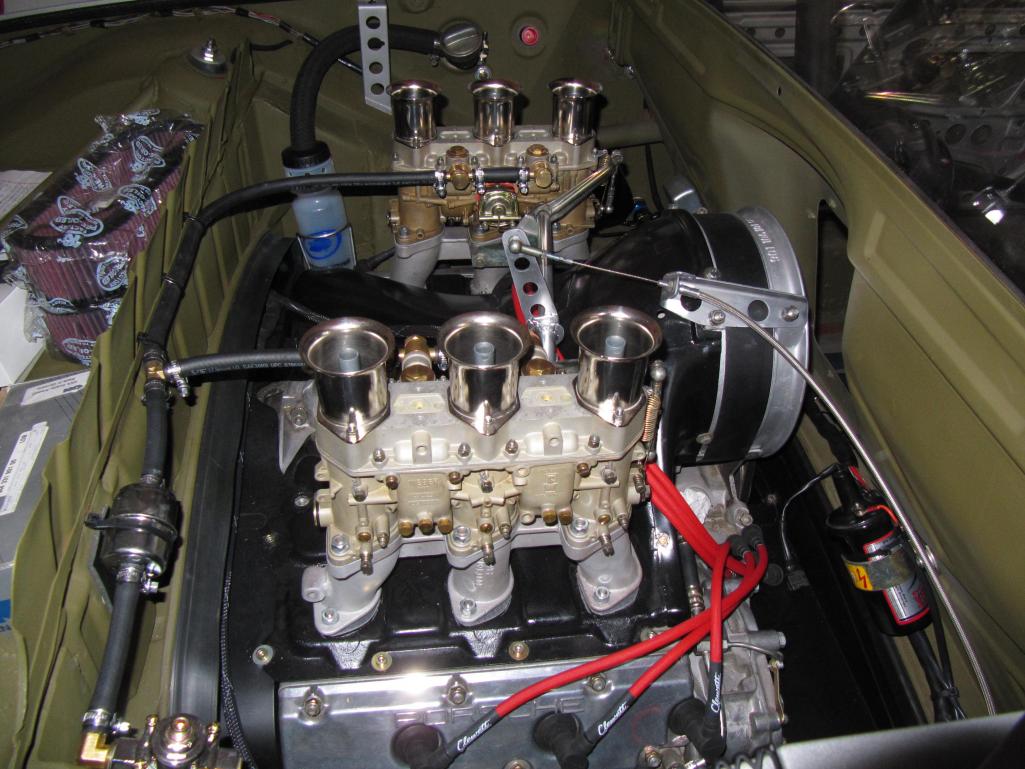
Posted by: Krieger Jun 24 2012, 12:52 PM
MSDS 1 1/2" headers ceramic coated. I am using the stock SC muffler for now. Bungs added for an oxygen sensor in both.
Attached thumbnail(s)
Posted by: Krieger Jun 24 2012, 12:57 PM
I came up with a creative solution for an oil tank drain plug. I ordered the factory oil lines from the the tank to the cooler. It came with a union. I had a face machined then drilled and tapped it for a drain plug. I drilled the plug so I could safety wire it. This is one of many parts my pal Dean machined for me.
Attached thumbnail(s)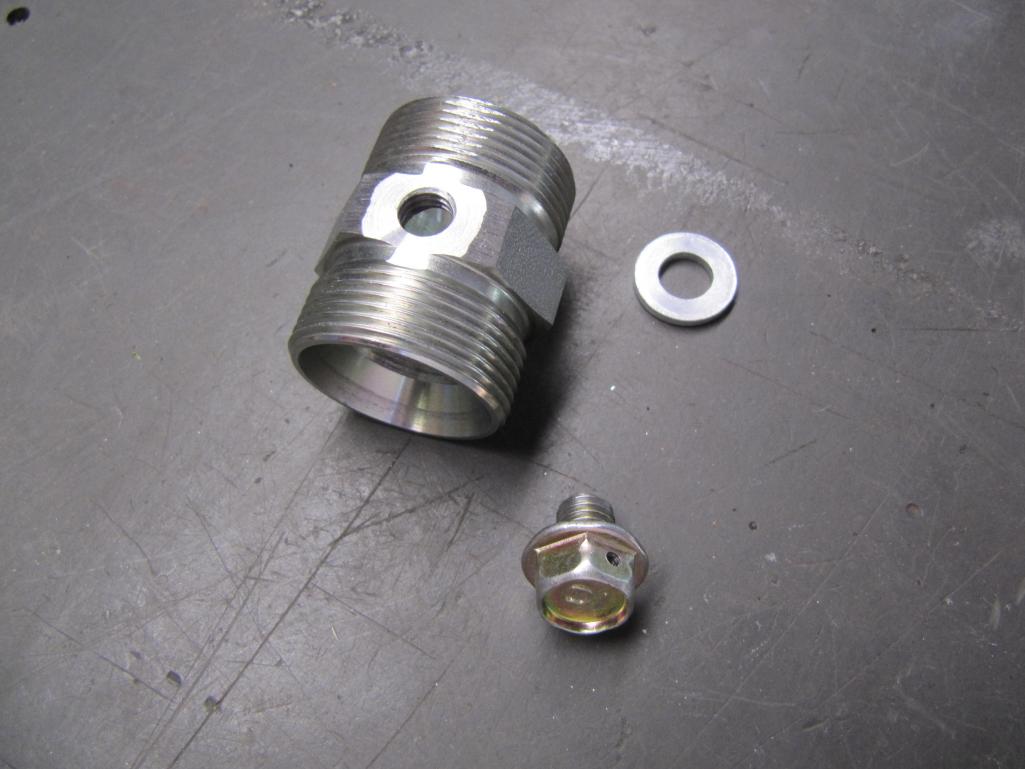
Posted by: Krieger Jun 24 2012, 01:01 PM
Installed. I welded in a bracket to support the set up. One large adele clamp to hold it.
Attached thumbnail(s)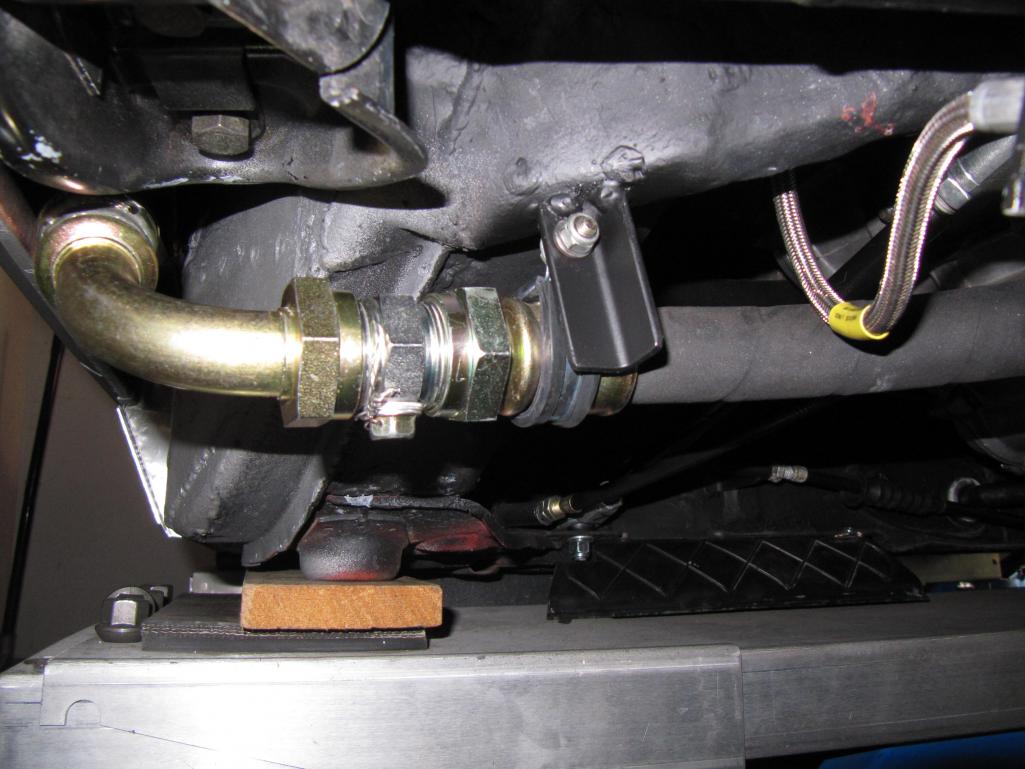
Posted by: Krieger Jun 24 2012, 01:05 PM
Sir Andy style axles. I needed loger CV bolts than the 45mm units that came with the 944 cvs. These are 55mm and need to be trimmed so they didn't interfere with the trailing arm. Not an issue on the trans flange side. I couldn't find appropriate 50mm bolts. Also note Sir Andy inspired picture quality.
Attached thumbnail(s)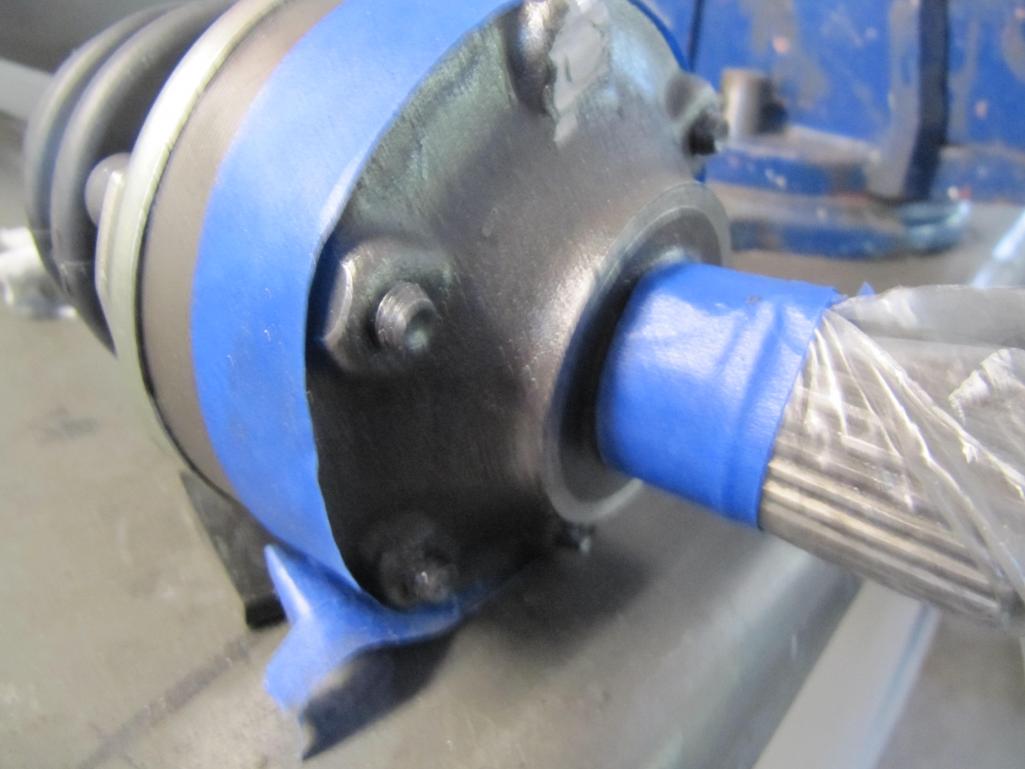
Posted by: Krieger Jun 24 2012, 01:08 PM
All trim!
Attached thumbnail(s)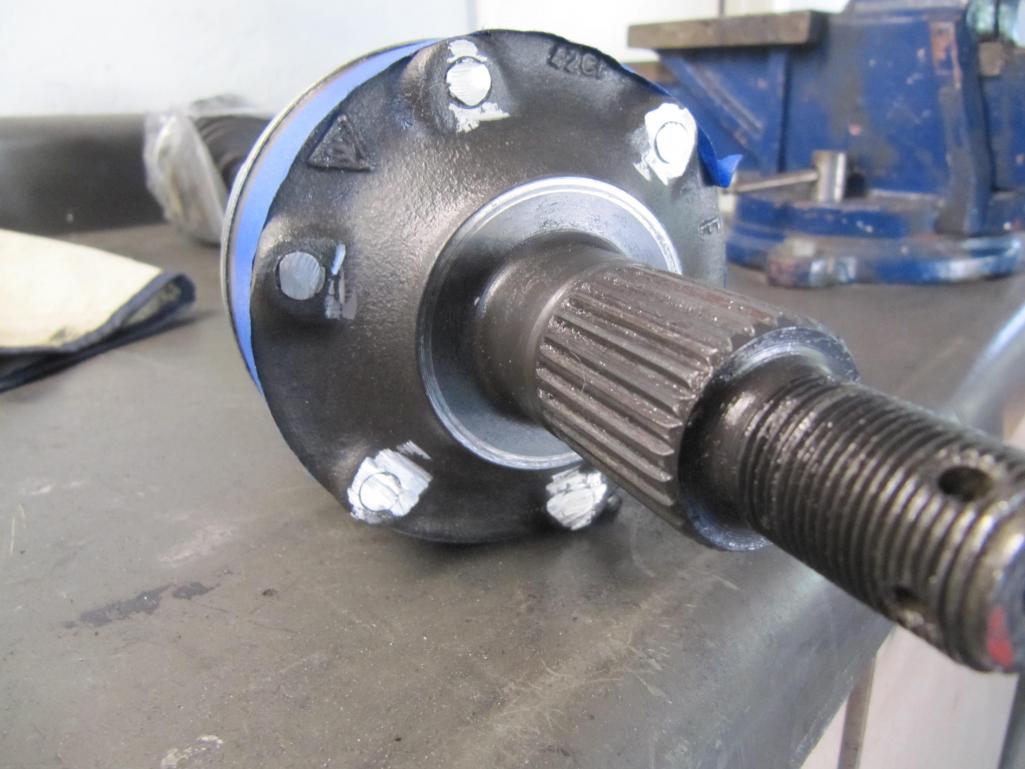
Posted by: Phil Plummer Jul 21 2012, 05:03 PM
What year 3.0L is it? I didn't need a tach adapter for my MSD6AL on a 3.0L! My motor is an '83sc with a '79 tach!
I didn't think the 4 cylinder tach will work even with the adaptor...maybe I am wrong?
Hi iam doing a 914 with a 3.0 porsche 911 sc from an 81 and was wondering if I cant install and run car without adapting any wiring or otherwise computer stuff that was in the '81 911 sc
I upgraded starter and oil tank and flywheel, bearing and clutch (from Kennedy engineered prouducts)and headers and throttle cable
Do I have upgrade anything else? and what about a 911 tach I'm putting in? please help-Phil
Posted by: Krieger Feb 2 2013, 10:49 AM
I need to do some ignition, carb sorting and alignment/balance but she is running! I decided to go with fiberglass bumpers.
Attached thumbnail(s)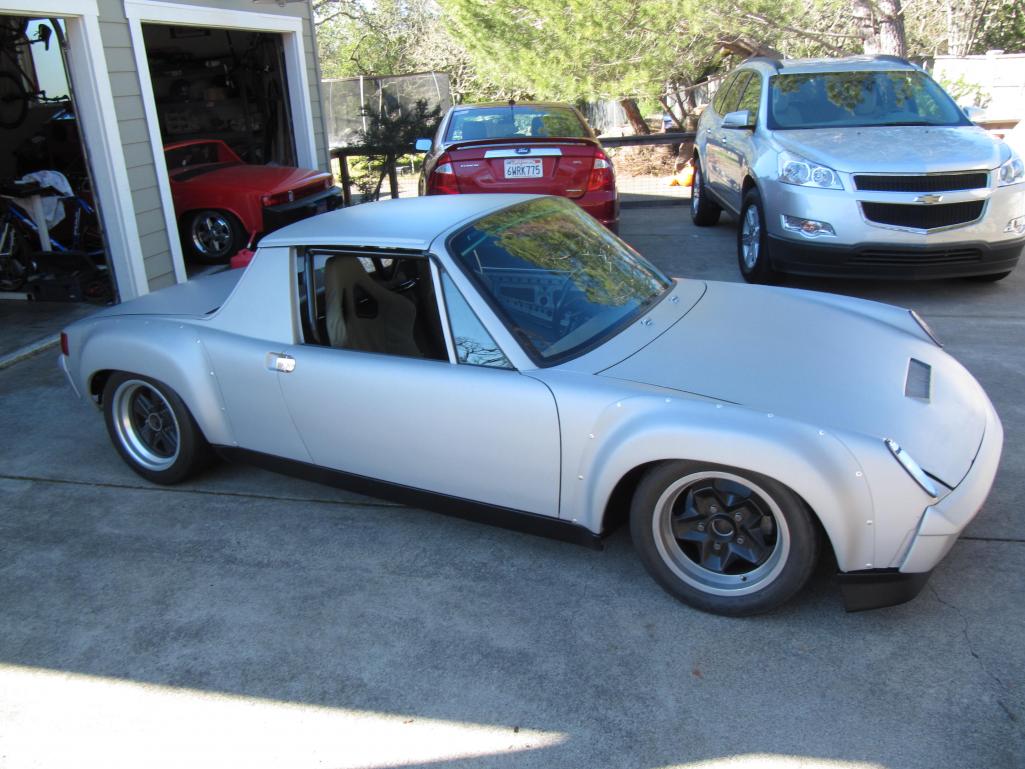
Posted by: Krieger Feb 2 2013, 10:52 AM
The rims on it now are my street wheels.
Attached thumbnail(s)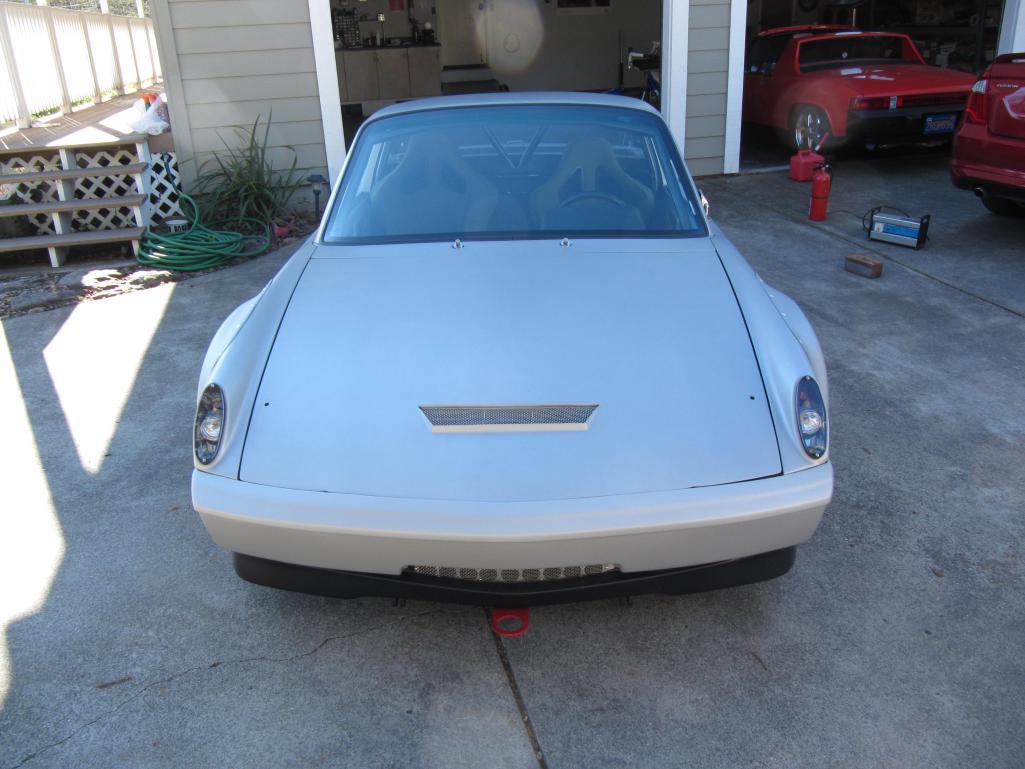
Posted by: Krieger Feb 2 2013, 10:54 AM
I had my OMP seats covered in army style heavy OD canvas.
Attached thumbnail(s)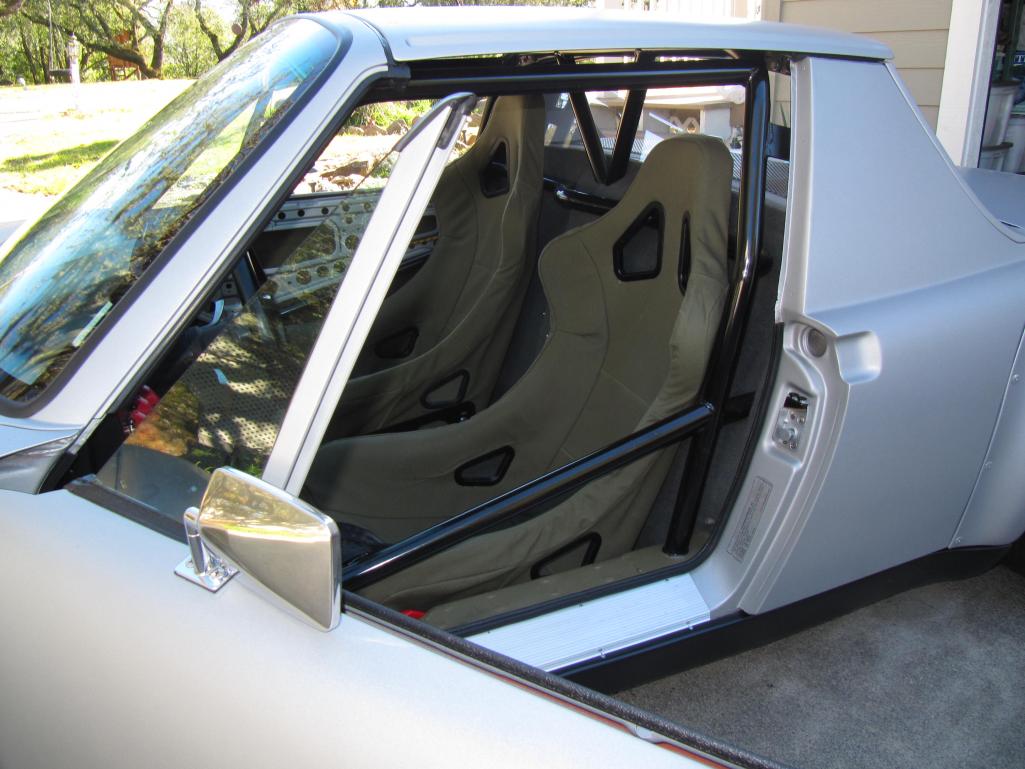
Posted by: Krieger Feb 2 2013, 10:57 AM
Attached thumbnail(s)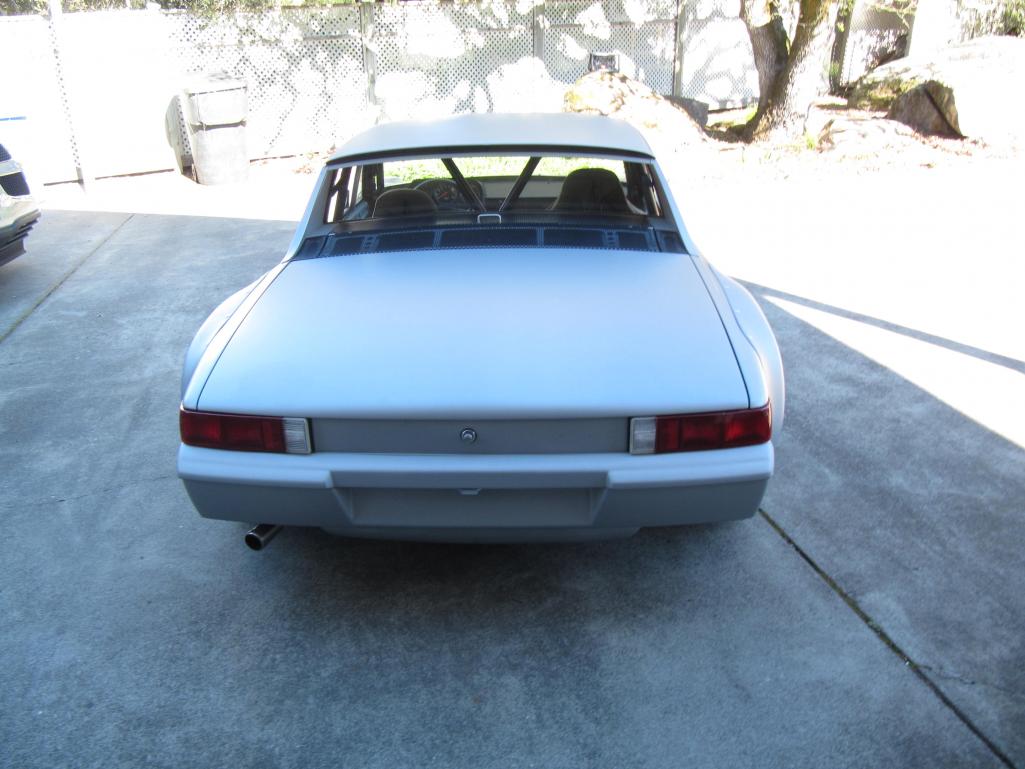
Posted by: jeff Feb 2 2013, 02:34 PM
I love it!
Posted by: Lennies914 Feb 3 2013, 10:43 AM
Looking awesome Andy!
Posted by: Phil Plummer Mar 6 2013, 08:46 PM
Hi I am building a 914/6 with a 3.0 in it from a 81 911 sc and All is ready to go just NO Spark ...Cd box humms...amd I stayed with the original injection system..coil etc all good...Please help or direct me if you can -Regards Phil
Posted by: Krieger Mar 7 2013, 06:38 PM
Hey Phil. I am totally unfamiliar with the factory ignition. I am using an MSD ignition system. Post something in the garage here and maybe somebody like Cap n Crusty will know. Do a search here, or maybe on Pelican Parts site in the in the 911 BBS where the taildraggers hang out.
Posted by: Lennies914 Mar 7 2013, 08:59 PM
Hi I am building a 914/6 with a 3.0 in it from a 81 911 sc and All is ready to go just NO Spark ...Cd box humms...amd I stayed with the original injection system..coil etc all good...Please help or direct me if you can -Regards Phil
I assisted Jeffs9146 with his 3.0 sc conversion and we had the same trouble. It was our solution to replace the factory ignition with the MSD 6L setup.
Posted by: Phil Plummer Apr 2 2013, 06:29 AM
Another rear trunk done!
Hi I have put a 3.0 from a 911 sc into my teener
It sounds awsome but will not idle on its own I have to feed gas through spray bottle
-Wur (Warm up reg is fine I think) It has power and bimetal strip gets hot and it is clean as a whistle
-cold start vavle is fine
- it all appars to be wired right and I am at wits end please help if you can
Posted by: Krieger Apr 2 2013, 01:46 PM
My car has carburetors. If you look at the pics you'd see that. I don't know but I think a warm up regulator gets you air not fuel. You should post a new thread in the garage asking for help.
Posted by: Mark Henry Jul 16 2013, 12:30 PM
Cool build 
Posted by: MATTYLITE Jul 16 2013, 01:16 PM
The headlights look great! Is that just flat lexan over the light buckets?
Any closer images of this?
Posted by: Krieger Jul 16 2013, 07:55 PM
Thanks Mark! The covers are just flat Lexan. I had the car Aligned and corner balanced and with a half a tank of gas she weighs 2050#!
Posted by: ChrisNPDrider Jul 17 2013, 11:39 AM
SWEET
Posted by: 3d914 Dec 27 2013, 07:31 PM
Looking awesome, Andy. now lets hear that thing growl!
Posted by: Krieger Jan 19 2014, 02:31 PM
For fun I had some placards made at Aircraft Engravers. $8 shipped!
Attached thumbnail(s)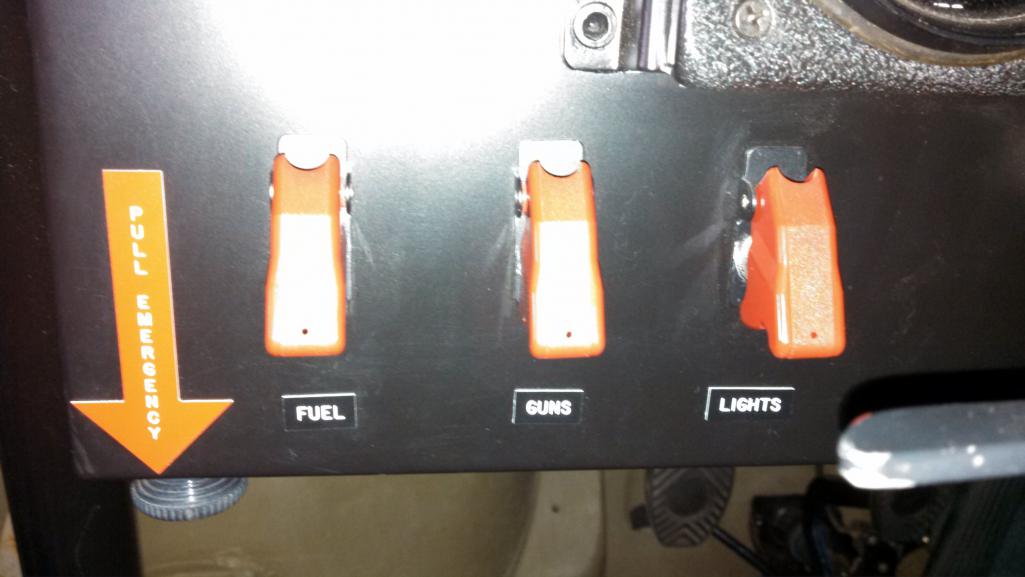
Posted by: 3d914 Mar 28 2014, 12:43 PM
Nice touch! I hope those guns are rear-mounted! My last 914 seemed to attract every manner of road-going carnivore sniffing its tail.
Posted by: Krieger Mar 28 2014, 08:50 PM
The guns operate 360* and are self tracking .50 caliber...
Posted by: 3d914 Apr 27 2014, 06:49 PM
What's the latest, Andy?
Posted by: Krieger Apr 27 2014, 08:29 PM
I've been driving the heck out of it! Lots of autocross. It was running hot at Thunderhill on a 100* day. I took both the grills off and the oil temps dropped from 250 to 210. Seriously that restrictive. I know I needed to come up with a solution that inclded a grill. Instead of having all the holes and a tight grill I made one large opening with 1/2" mesh from Home Depot. I'll be at Buttonwillow in a few weeks so
I report back. I think it looks better too.
Attached thumbnail(s)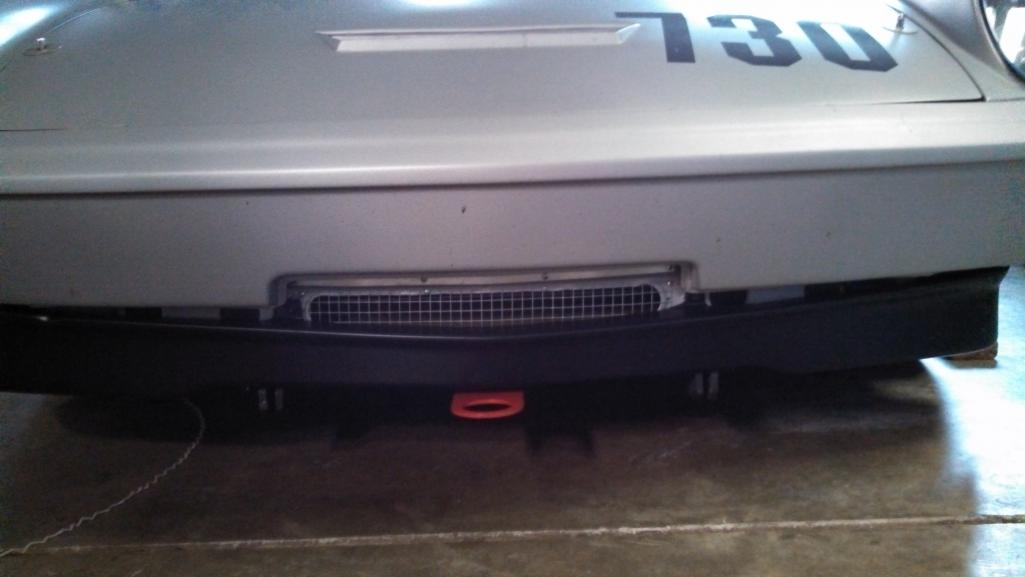
Posted by: 3d914 May 14 2014, 10:19 PM
I've been driving the heck out of it! Lots of autocross. It was running hot at Thunderhill on a 100* day. I took both the grills off and the oil temps dropped from 250 to 210. Seriously that restrictive. I know I needed to come up with a solution that inclded a grill. Instead of having all the holes and a tight grill I made one large opening with 1/2" mesh from Home Depot. I'll be at Buttonwillow in a few weeks so
I report back. I think it looks better too.
Andy, I've seen applications where additional holes were drilled in the space between the factory holes - the part behind your valance - that would also increase the air intake. Not sure if you're catching all that area though.
Posted by: Krieger May 15 2014, 07:49 AM
The spoiler that is in the pic above I only use on the street and autocross. It has never gotten hot. I use a different one on the track. The one for the track is more of a splitter style, is much lower and does not block the oil cooler opening in any way. This weekend at Buttonwillow my oil temps never went over 180*. So this small mod has been a complete success!
Posted by: 914forme May 19 2014, 05:06 AM
Andy,
On your Easy Car Lift, what size are the spacers you are using? Yours seem to clear the engine compartment, where mine hit the donuts , but make it very hard to drop the engine out.
Thanks for the update on the cooling inlet also.
Posted by: Krieger May 19 2014, 09:16 AM
Hey Stephan. My aluminum rails are 29" apart. The rear donuts are not centered on the rails when I lift. They are ofset toward the edge of the rail. Maybe 3" from the edge. I do not pay attention to the front donuts. I put 1/2" blocks of wood under the body on the edge where the rocker and under body meet.
Posted by: Krieger May 29 2014, 08:11 PM
I got tired of not being able to see the speedometer on the track, so I bought this GPS HUD on Amazon for $68! The 0 is off center, but I anticipate seeing two other digits to the left of it . It also has a port for an external GPS antenna. I tried it first in my work car and it seemed to change speeds with only the slightest delay. This unit also has the ability to be "calibrated" to the correct speed. I did so with a bone stock vehicle.
Attached thumbnail(s)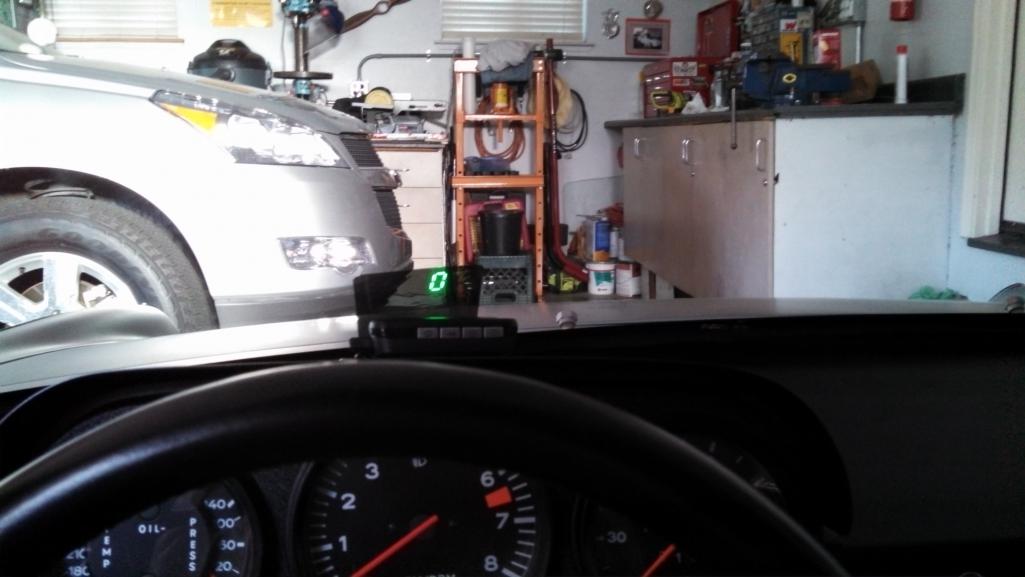
Posted by: Krieger May 29 2014, 08:30 PM
I found it was necessary to add the supplied film for better viewing and it goes with my aviation theme. You don't need to use it, but you'll get a double image because of the two layers of glass. I want to be able to have the quickest look at my speed without having to spend any more time than needed. It went on just like a piece of window tint. The unit plugs into a power port, which I had recently added, and has an on/off button.
Attached thumbnail(s)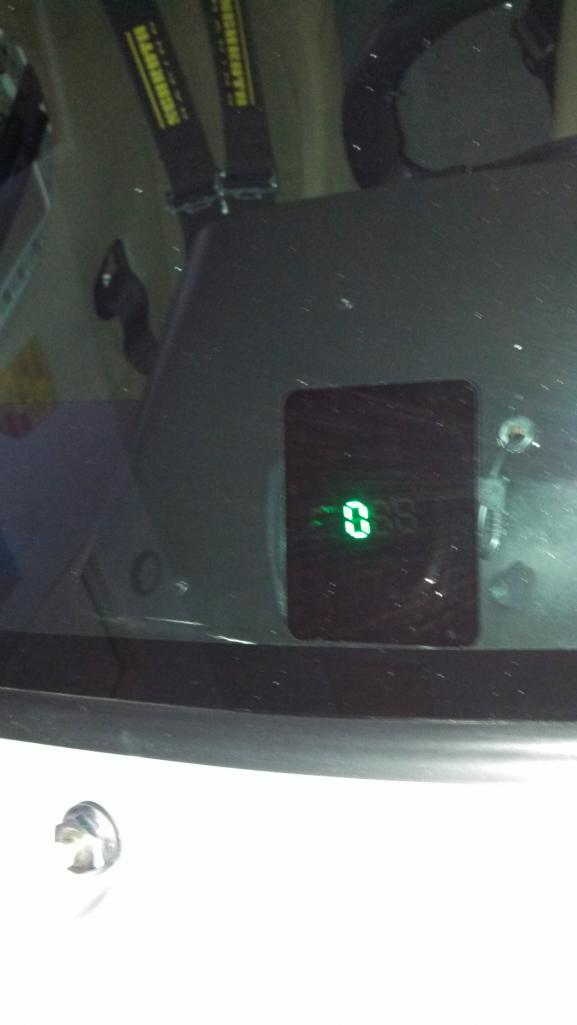
Posted by: Justinp71 May 30 2014, 12:19 PM
I got tired of not being able to see the speedometer on the track, so I bought this GPS HUD on Amazon for $68! The 0 is off center, but I anticipate seeing two other digits to the left of it
. It also has a port for an external GPS antenna. I tried it first in my work car and it seemed to change speeds with only the slightest delay. This unit also has the ability to be "calibrated" to the correct speed. I did so with a bone stock vehicle.Nice, I like that idea... easy to see without looking away from the road too!
Nice build, where do you autocross at?
Posted by: Krieger May 30 2014, 12:38 PM
Thanks. Santa Rosa airport is the place to be on some Saturdays!
Posted by: Justinp71 May 30 2014, 03:47 PM
Lucky, to have a place so close... We just get a local autocross once or twice a year by SCCA and they don't give you much seat time...Otherwise we drive to Stockton for Zone 7 PCA.
Posted by: Krieger Jul 15 2017, 07:23 AM
I am adding a transmission cooler. I want to do my best to keep this 901 alive and minimize time between rebuilds. Occasionally, I was having difficulty shifting on 100* days. This is where I decided to run the return-8 lines back to the transmission. I was lucky. I found a guy to weld magnesium. He added 2 boses for me to drill and tap for npt. I chose these two locations to cool the ring gear and put oil in the front of the case and to cool/lube the gears.
Attached thumbnail(s)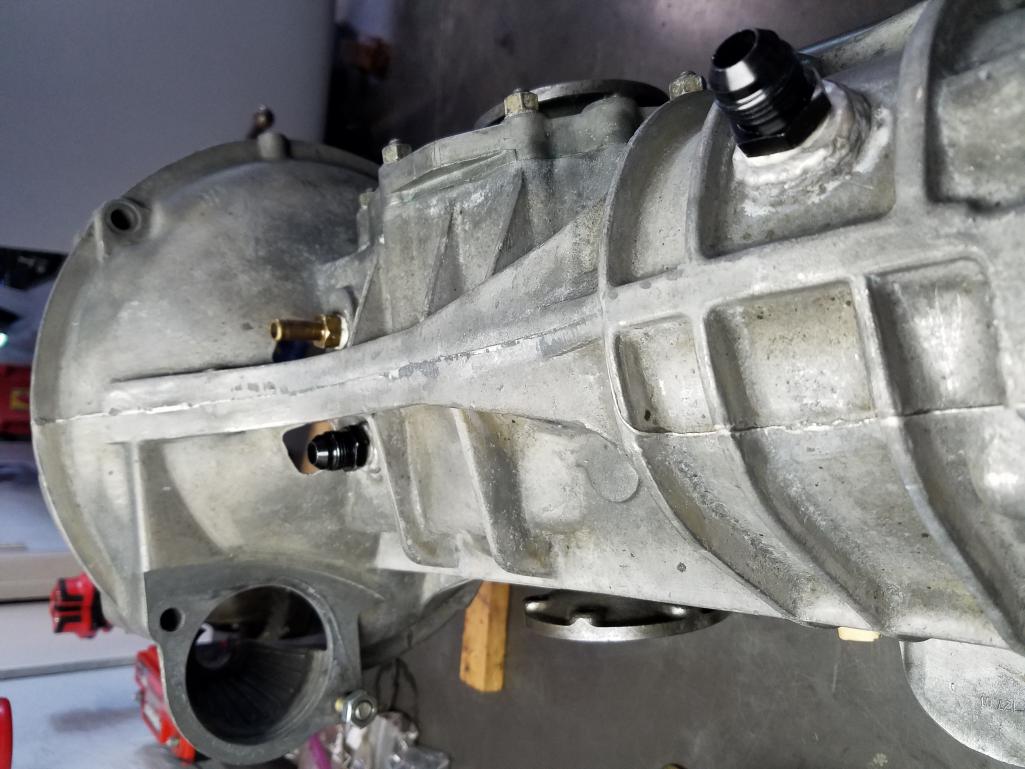
Posted by: Krieger Jul 15 2017, 07:43 AM
I bought most of my parts through BAT in Florida. I drilled and tapped the case for a temp sensor and the pump activation switch. Patrick Motorsports has the pictured oil plug to AN-8 oil pick up fitting.
Attached thumbnail(s)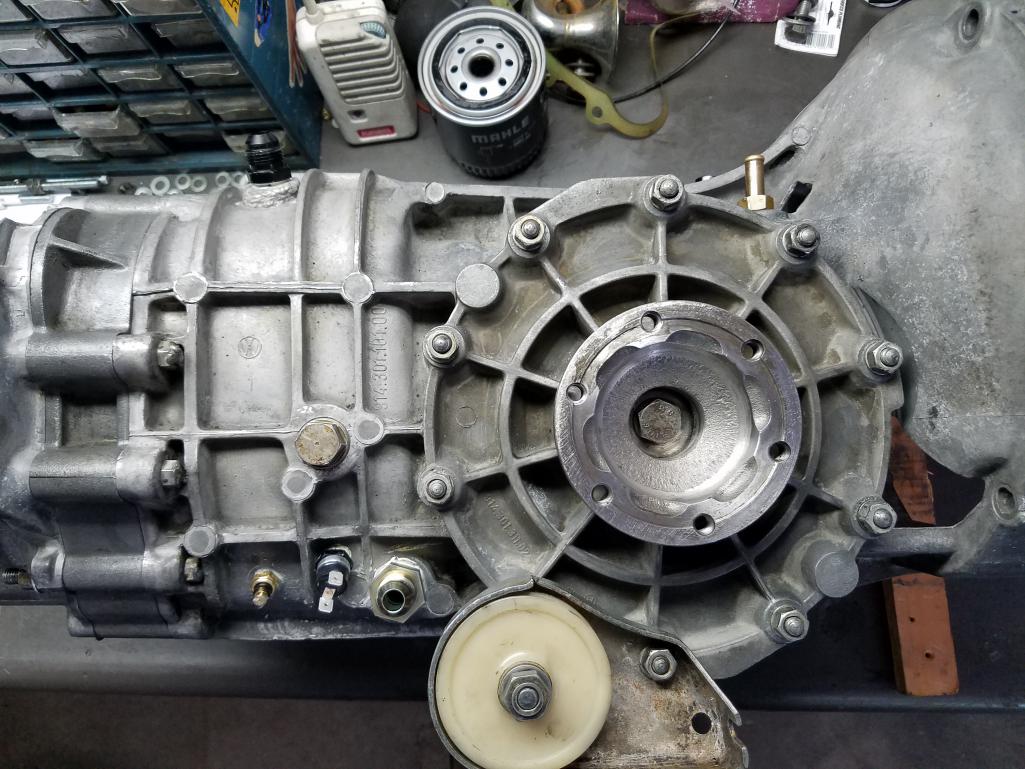
Posted by: Krieger Jul 15 2017, 07:49 AM
Here's how I plumbed the system. Still some work to do.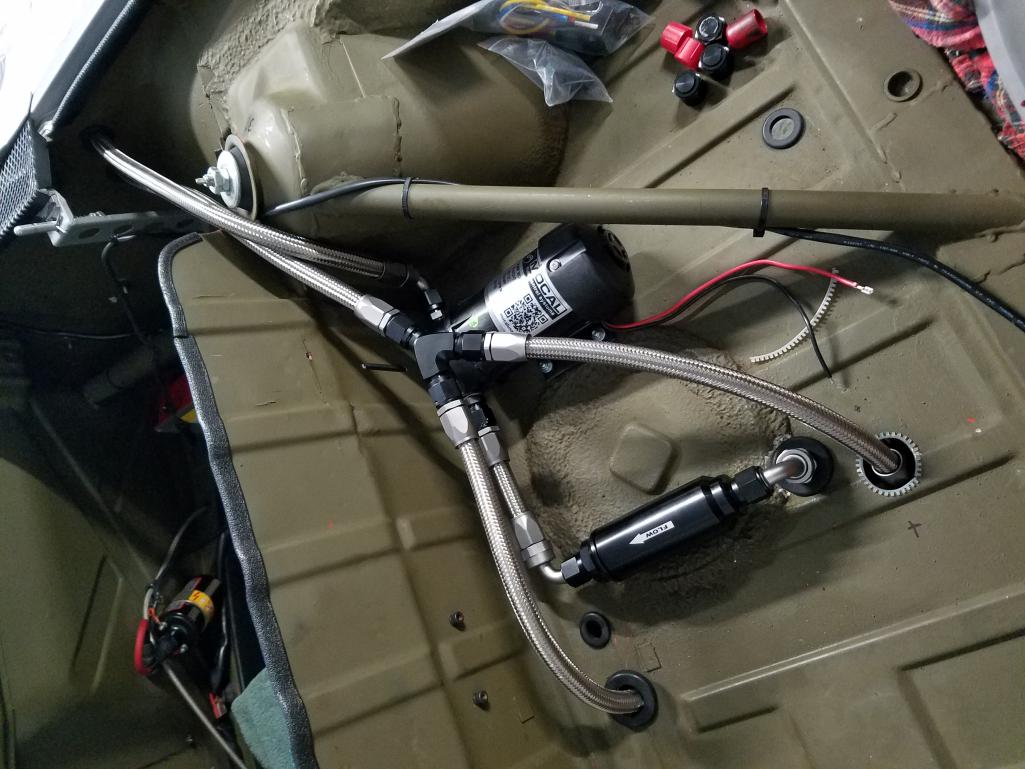
Posted by: Krieger Jul 15 2017, 08:39 AM
Here is the Setrab cooler with Permatex ultra black built up to make the seal between the fender and the cooler.
Attached thumbnail(s)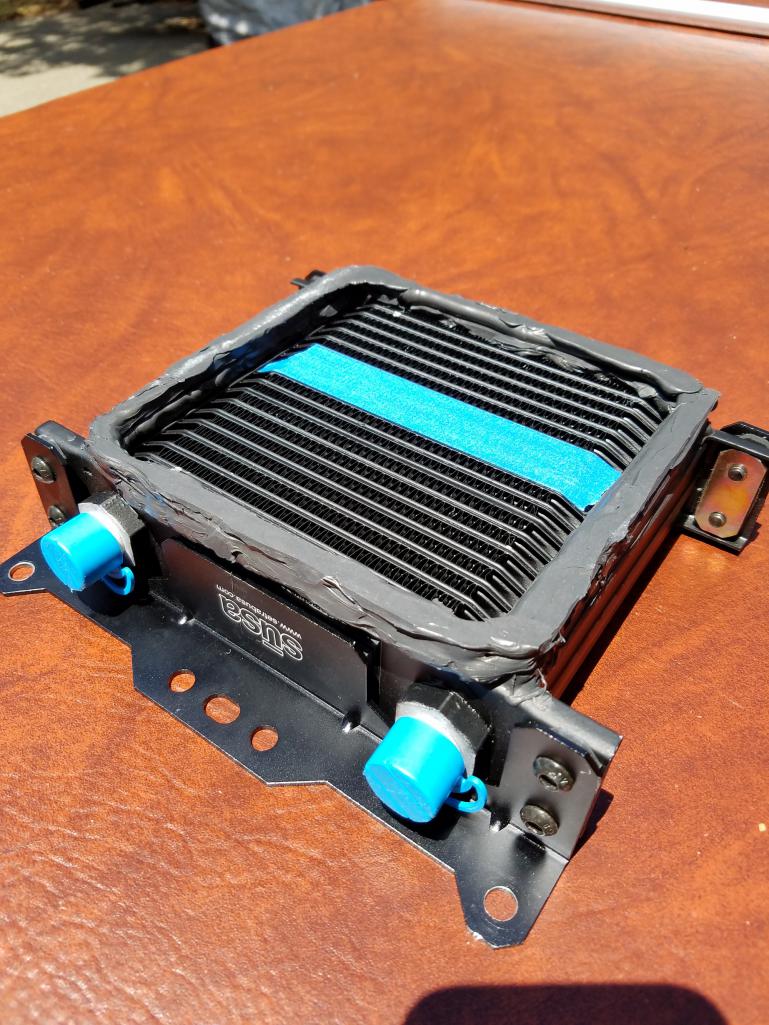
Posted by: Krieger Jul 15 2017, 08:57 AM
My patented 4 post attatchment system! Metric threaded rod, lots of nuts and washers. The nut on the bottom left I welded to the long.
Attached thumbnail(s)
Posted by: Krieger Jul 15 2017, 09:09 AM
And the scoop! It is stainless steel that I glass beaded.
Attached thumbnail(s)
Posted by: Krieger Jul 15 2017, 09:13 AM
Okay, I know for sure the last two pics were taken with my phone verticle. Why are these getting rotated?
Powered by Invision Power Board (http://www.invisionboard.com)
© Invision Power Services (http://www.invisionpower.com)