Printable Version of Topic
Click here to view this topic in its original format
914World.com _ 914World Garage _ Gear Codes
Posted by: 76-914 Oct 26 2010, 11:34 PM
A quick preface. This tranny came in my non-running car but has never been run as it had a broken support ear. So, I threw another tranny in which is fine. I recently bought another tail cone (side shifter) so that I could run the original tranny. Who am I kidding? I just wanted to excersize my Dr Evil Video. I think this tranny has appx 56K if it is the original. It looks damn good inside and only one sycro ring has a short "skid mark".
But Doc, I bought into your video so much that I mixed all the gears up thinkingknowing  it was OK. Just check the codes A-F-N-V-ZD. I wish. Here is what I'm getting T-HA-V-P-T. Help.Which gear is what? What kind of tranny do I have (Note:The 2 gears marked with "T" are slightly different diameters. One of these T gears appears to have a stamp 180' around from the "T" that reads IV. The HA gear is ground on the H but I'm pretty sure it isn't a KA or GA. Also, it appears to have an "S" stamped 180' around from the HA.)
Here is the HA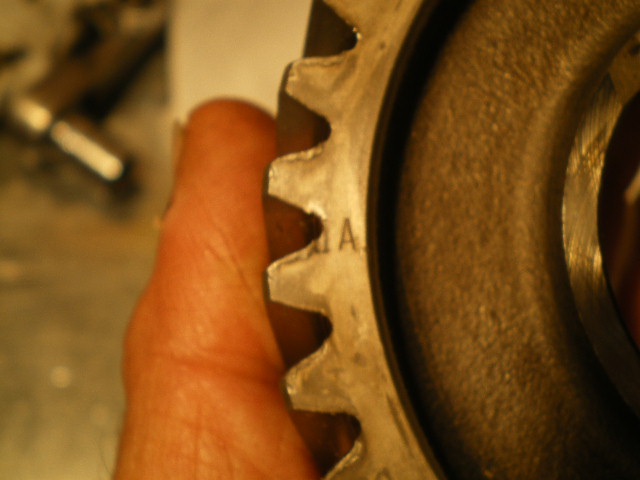
The P 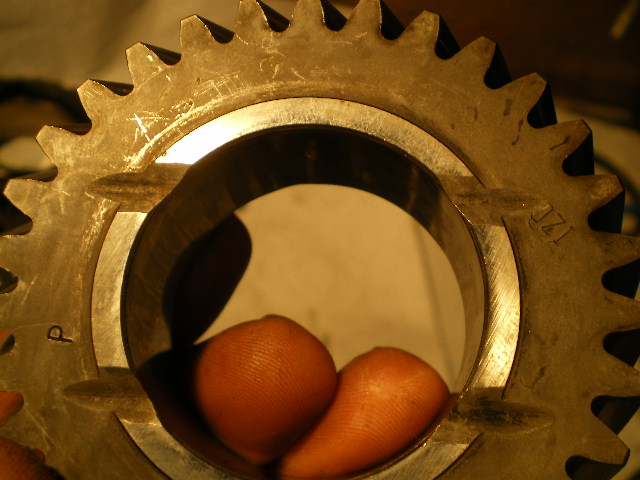
The V 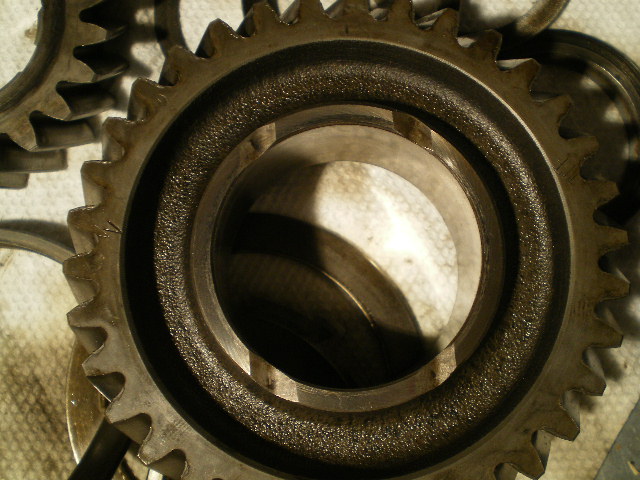
one of the T's 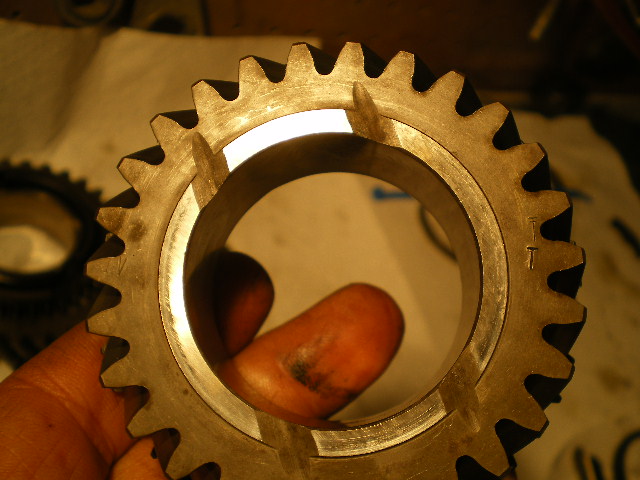
the other T 
Posted by: Dr Evil Oct 27 2010, 01:05 AM
Your first pic is your A first gear. It is labled AII.
The third pic pic is your F second.
Your P is a ZD, which is stamped on the other side, in the pic.....like I say in the video 
Your first T is a V (you can see it in the pic).
Your V in the second pic is your F second gear.
Its a pain that the "run" group is generally clearer to read than the gear letter.
Posted by: Richard Casto Oct 27 2010, 05:56 AM
When in doubt (i.e. you don't know how to decypher the stampings as well as Dr. Evil) you can always count the teeth and look them up in a gear set chart! I also think it's good to document what you have in what position as you take it apart (in case you had non-stock or flipped gears). Then there is no doubt when you put it back together.
Posted by: realred914 Oct 27 2010, 08:07 AM
i wish porsche would ditch the stupid letter codes and replace it with a more meaningful system , like number of teeth. all this lettering is crazy.
Posted by: 76-914 Oct 27 2010, 09:32 AM

Your first pic is your A first gear. It is labled AII.
The third pic pic is your F second.
Your P is a ZD, which is stamped on the other side, in the pic.....like I say in the video
Your first T is a V (you can see it in the pic).
Your V in the second pic is your F second gear.
Its a pain that the "run" group is generally clearer to read than the gear letter.
A million "thank you's" Doc. I can't see the backside of the gear, yet. I ordered the tool you described as a P284S to remove the dog teeth, yesterday. (BTW, GPR list that part number as a P225)
I'm sure I speak for others here when I say thanks to you and Cupomeat for making this video available to all of us. I know it was a lot of effort for a low return venture but we appreciate the time and your generosity greatly.
EDIT - Oh, that other side. Duh.
Posted by: 76-914 Oct 27 2010, 09:38 AM
When in doubt (i.e. you don't know how to decypher the stampings as well as Dr. Evil) you can always count the teeth and look them up in a gear set chart! I also think it's good to document what you have in what position as you take it apart (in case you had non-stock or flipped gears). Then there is no doubt when you put it back together.
Do you have a link to this gear set chart? I read the post yesterday that had all of the different gear combinations that RacerChris and others use on the AX circuit but was unable to locate the gear chart.
 Everytime that I try to avoid looking stupid the truth seeps out.
Posted by: Richard Casto Oct 27 2010, 12:04 PM
Do you have a link to this gear set chart? I read the post yesterday that had all of the different gear combinations that RacerChris and others use on the AX circuit but was unable to locate the gear chart.
Everytime that I try to avoid looking stupid the truth seeps out. I am partial to the version on the 914 Wiki as I have put it together...
http://www.roadglue.com/wiki/index.php?title=914_transmission
It has good and easy to understand basic info. There is a chart (that exists as .xls files) here on 914world.com that goes into info about re-gearing. It has a lot of info, but I think it can be difficult for the newbie...
http://www.914world.com/specs/regearing_901.php
i wish porsche would ditch the stupid letter codes and replace it with a more meaningful system , like number of teeth. all this lettering is crazy.
Actually if you understand the letter codes it makes sense. A to Z, low to high. I makes it easy to converse with people to use the standard Porsche 901 letters vs. numeric ratios. And with a gear set chart, you can convert the letters to teeth count/ratios as needed.
Posted by: 76-914 Oct 27 2010, 09:08 PM
When in doubt (i.e. you don't know how to decypher the stampings as well as Dr. Evil) you can always count the teeth and look them up in a gear set chart! I also think it's good to document what you have in what position as you take it apart (in case you had non-stock or flipped gears). Then there is no doubt when you put it back together.
How do you do that. I found the gear set chart but I don't understand how to count the gear teeth then determine which gear I have.

Posted by: silver74insocal Oct 27 2010, 09:16 PM
maybe you should have kept that bike Kent  i kid i kid
Posted by: Dr Evil Oct 28 2010, 11:21 AM
You have the standard AFNVZD setup. The gear sets have one gear with synchronizing stuff and one with out. Second gear has one of its gears, the non synchronized one, stuck on the shaft (stop looking for it), if you followed my instructions then one of the first gears, the non synchronized one, is still on the in put shaft. That leaves you with 8 gears to figure out. If you take the ones I already identified and place them in order, and then look for their complement gear, you will solve this problem. Counting the teeth on both sets gives you verification. They are listed as x:y with x being one gear and y being its complementary gear.
Posted by: Richard Casto Oct 28 2010, 02:35 PM
To add to what Dr. Evil is saying, with non-flipped gears you can use the direction of the angle of the helical teeth on the gears to determine what is on the input and output shafts.
I may get the direction wrong, but it's basically like this...
5 /// \\\
4 /// \\\
3 /// \\\
2 /// \\\
1 /// \\\
As Dr. Evil says, he has already identified some of the gears for you. Also, if you used the video, the input shaft is probably still mounted to the intermediate plate. So you also have your 1st gear (small gear on end of shaft) and 2nd gear (part of shaft) already identified. The puzzle will only go together one way and with the info you have there is little left to piece together. Remember that diameter is going to go small to large one one shaft and large to small on the other.
I may try to post a quick sketch later tonight if I have time, but I have guests in town tonight.
Posted by: 76-914 Oct 28 2010, 05:01 PM
Sorry for the confusion. I'm clear on what gear is what and where it goes. I just wanted to further my limited knowledge and was curious as to how one counts the number of gear teeth to determine which gear it is. Just in case the next tranny is a different set up. In fact, I got my seal kit from GPR today! (Damn they're fast!) So hopefully I drop the other one and open it up next week.  Then I shall have 2 rebuilt trannys for a car that may or may not start the next time I get in it; which may or may not
  return from it's next venture; which will be on jack stands at least 20 times a year......
Posted by: 76-914 Oct 28 2010, 05:12 PM
maybe you should have kept that bike Kent
i kid i kidBicycles are dangerous, Dave. Just watch...Elliot will probably break his arm riding it!
Posted by: majkos Oct 28 2010, 05:18 PM
![popcorn[1].gif](style_emoticons/default/popcorn[1].gif)

Powered by Invision Power Board (http://www.invisionboard.com)
© Invision Power Services (http://www.invisionpower.com)