Printable Version of Topic
Click here to view this topic in its original format
914World.com _ 914World Garage _ Official Sasquatch build thread Part 1
Posted by: kg6dxn Nov 20 2010, 02:20 PM
Many of you know my car. It was Steve Malmz's car he found in a yard as a roller. It was a former SCCA club racer. Malmz named the car Sasquach. Malmz put a V8 in it and drove it until his priorities changed. It was sold to a guy in Kentucky (unknown name), he regeared the transaxle and drove it little. He sold it to a PCA member in Irvine, CA. That guy used it as a DE car until I purchased it. I installed an EFI system and drove the crap out of it. Recently my clutch went out and I decided it was time for a change. The V8 is going to another member. My engine choice is Top Secret, under wraps until I make my final choices. a Turbo Rotary. I'm taking a twin turbo and converting it to a single large turbo. This mod keeps it simple and increases horsepower. My new license plate will be "914 TT".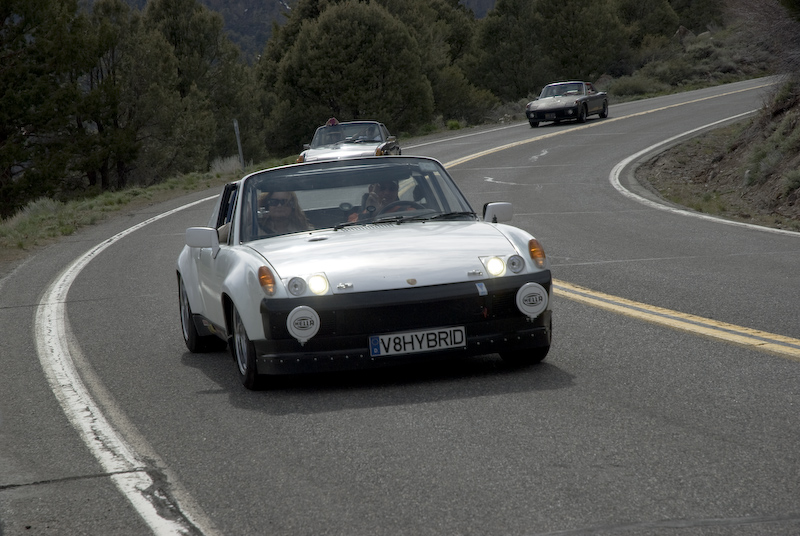
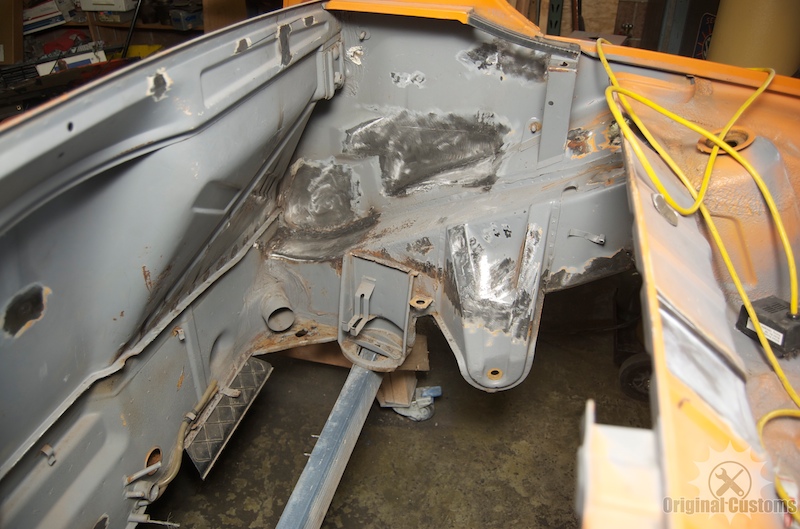
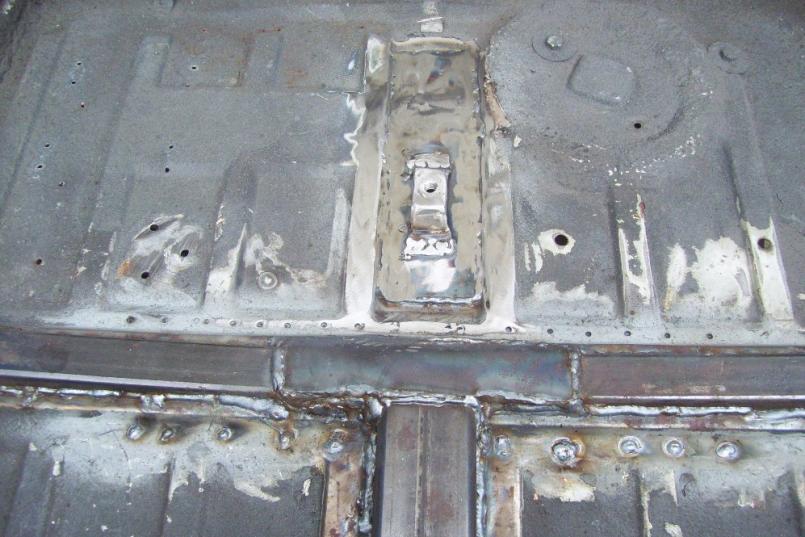
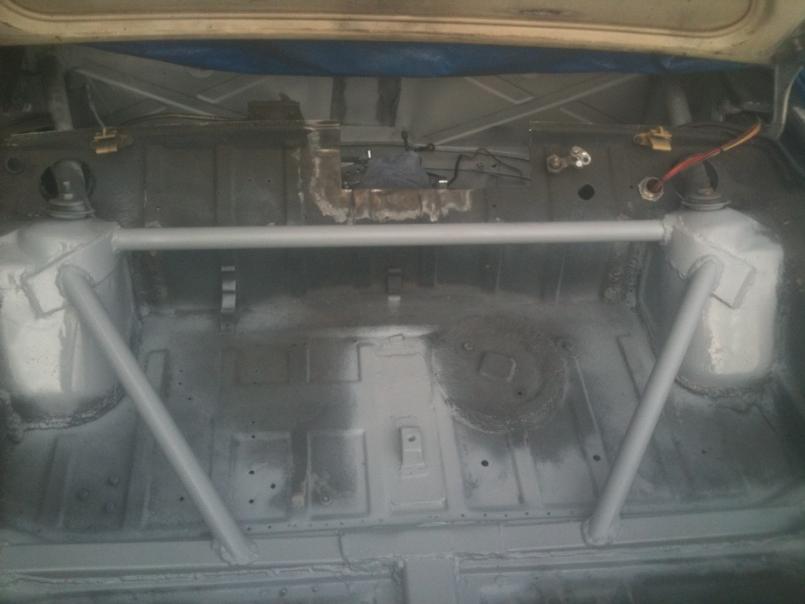
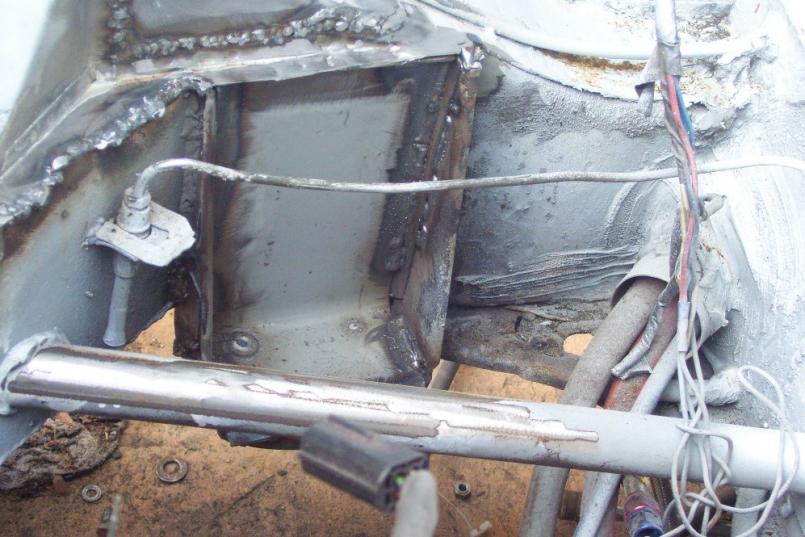
The car has 930 suspension and brakes. 930 steel flairs grafted on, a total of 8 flairs were used. Two per corner to make up the radius. There is a roll cage with removable door bars. The cage is tied to the rear suspension but not the front. The bodywork ant paint are 10+ years old and the car is several shades of white. The chassis is super solid. Only minor surface rust has been found. The Original owner/racer installer a stiffening kit and various braces. The suspension console is unusual. Steel plats replace the inboard pivots. 1/8" & 1/4" plate steel reenforcement plates are surrounding the console. A 1" bar ties in the console to the firewall.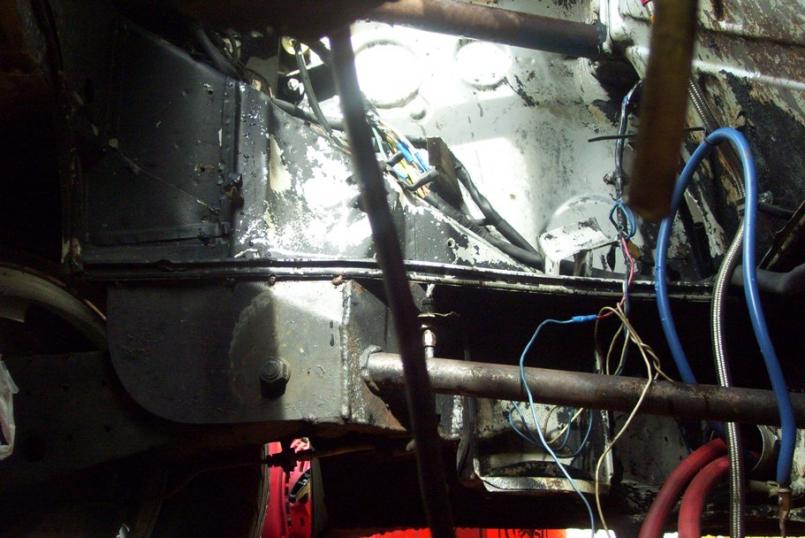
Here are the first pics of me stripping paint from the engine bay and the unusual consoles.
Posted by: kg6dxn Nov 20 2010, 02:21 PM
More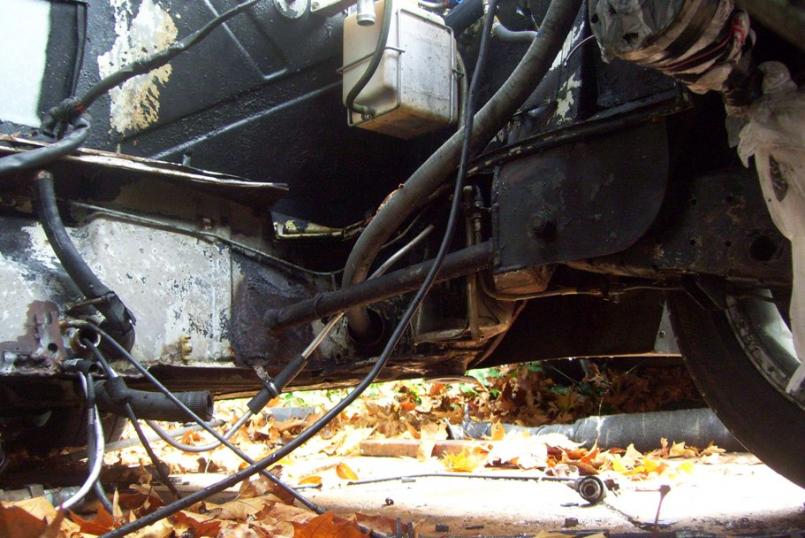

Posted by: campbellcj Nov 20 2010, 02:30 PM
Subscribed! I remember that car back when Steve had it in my neck of the woods. Look forward to seeing how it evolves.
Posted by: kg6dxn Nov 20 2010, 02:38 PM
Here's a nostalgic pic from when Malmz owned it...
Posted by: RJMII Nov 20 2010, 03:17 PM
oooh... 914 TT for a plate.  I'm hooked!
Posted by: Andyrew Nov 20 2010, 03:27 PM
Audi 2.7TT? Subaru TT?
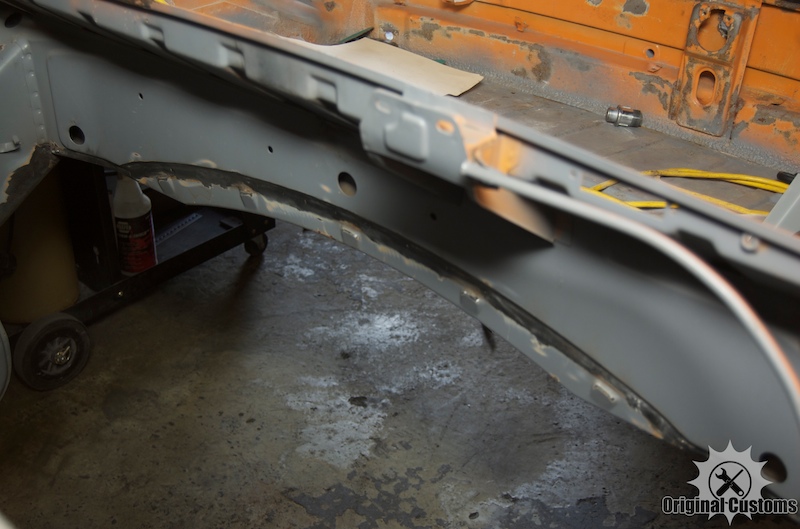
You gonna cut the engine shroud/tray's out? Now is a great time for it...
Posted by: Andyrew Nov 20 2010, 03:27 PM
Oh ps..

Posted by: RJMII Nov 20 2010, 03:31 PM
Are they held in with spot welds that can be drilled out? My engine will be coming out this winter for a TT swap also, and those shelves have got to go.
Posted by: kg6dxn Nov 20 2010, 03:44 PM

Audi 2.7TT? Subaru TT?
You gonna cut the engine shroud/tray's out? Now is a great time for it...
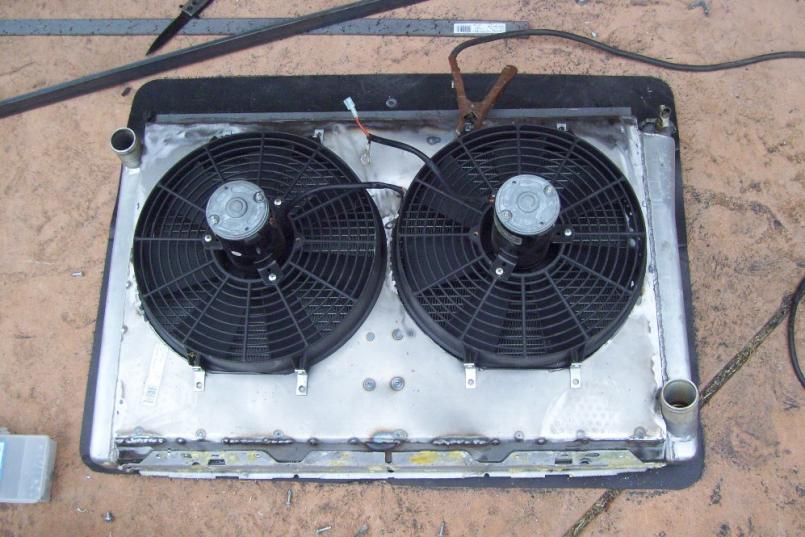
I didn't even know the tray was cut until I pulled the 800lb engine out. The firewall side will get trimmed and the little bits near the hell hole. There will be a belly pan under the engine to keep most of the road dirt out. It's amazing how much dirt comes up when you don't run engine tin. The cage in the trunk will get reworked to the tranny mounts. The radiator up front will be downsized and an inline temperature controlled water pump will provide better constant flow. Not sure about the flairs. I need to strip all the bondo off and see what they look like.
The plan is to get it fabbed up, running and in primer for the WCC 2011.
 Then I'll strip it apart, work out the bugs and paint it. The original color is silver. My friend Nelson painted the 034 MS GTI silver metalic. I may go with that because it looks so awesome!
  The medium size flake in the paint is incredible. I would also like to come up with a smooth solution for the firewall.
Posted by: McMark Nov 20 2010, 03:51 PM
Yup. Drilling spot welds for the side shelves and the rear seal strip. The front shelf must be trimmed manually since the shelf is actually part of the firewall stamping. Looks so nice with the shelves gone in conversion cars.
Attached image(s)

Posted by: ConeDodger Nov 20 2010, 04:48 PM
Cool!
Posted by: JRust Nov 20 2010, 05:12 PM
Excellent! Can't wait to see what you do with it 
Posted by: strawman Nov 20 2010, 05:42 PM
Subscribed! Good luck Mike; let me know if you need any help. Maybe we could do a build/bbq party.
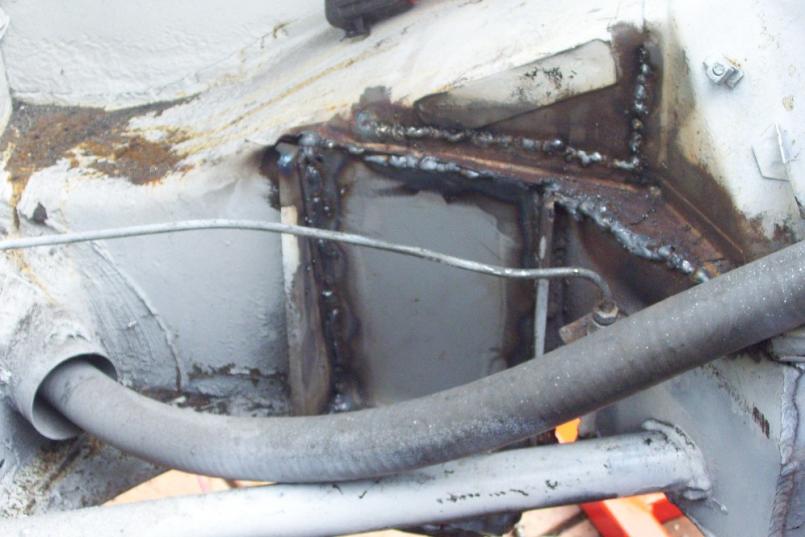
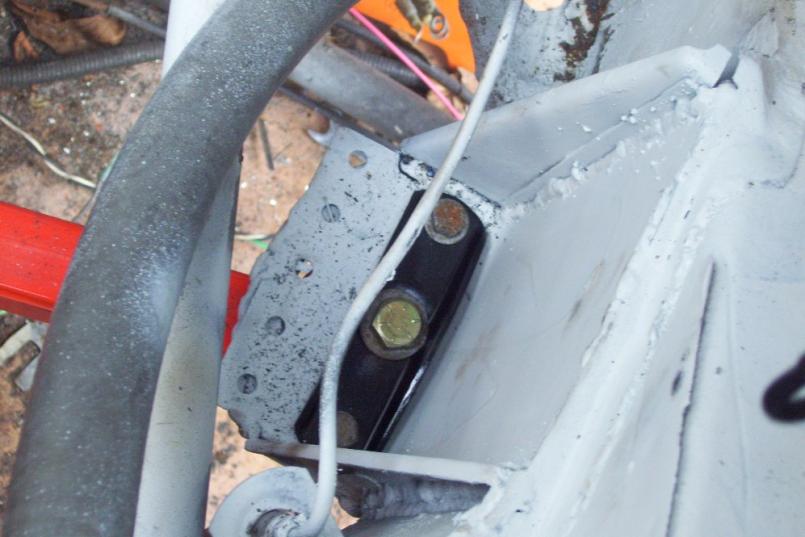
BTW, what's the story with the holes in the trailing arms? Are they rosette holes that were not welded in?
Geoff
Posted by: kg6dxn Nov 20 2010, 05:52 PM
Subscribed! Good luck Mike; let me know if you need any help. Maybe we could do a build/bbq party.
BTW, what's the story with the holes in the trailing arms? Are they rosette holes that were not welded in?
Geoff
Exactly. Not shure why the PO or PPO or PPPO did not weld them all in when they added the stiffening plates. The console has me puzzeled too. I think I will end up adding material above the engine shelf to tie it in better. Not shown in pics is the back side under the console. The entire system is seam welded under there. I looks plenty strong.
Posted by: Lennies914 Nov 20 2010, 07:32 PM
Subscribed as well.
I thought you were thinking rotary?
![popcorn[1].gif](style_emoticons/default/popcorn[1].gif)
Posted by: kg6dxn Nov 20 2010, 08:48 PM
Subscribed as well.
I thought you were thinking rotary?
In Germany we would call it a Wankel. Wankel Turbolader.
Posted by: roadster fan Nov 22 2010, 12:12 PM
Hmmm....a 13B-REW Rotary/Wankel motor would be cool in 914.....please tell me you are putting that in the car?! 
Jim
Posted by: kg6dxn Nov 22 2010, 01:44 PM
Hmmm....a 13B-REW Rotary/Wankel motor would be cool in 914.....please tell me you are putting that in the car?!
Jim
OK, I'll come clean.
YES! A Wankel 13B Twin Turbo will be installed.
A water to air intercooler will go in with it. After market ECU, bigger injectors and boost controller. I am shooting for 300-350 HP. Keeping it reliable and not pushing it too far. A 4" exhaust, 50mm wastegate and new BOV too. I going huge with the exhaust just because it will look crazy.  And it will spool faster. Intake air filter is in design at this moment.
Posted by: Andyrew Nov 22 2010, 02:03 PM
So you decided 15mpg is still OK huh?
Going from ALL torque to NO torque is going to be quite interesting to say the least!
Sounds like a cool build! Cant wait to see it!
You sticking with a 914 trani?
Posted by: kg6dxn Nov 22 2010, 02:22 PM
So you decided 15mpg is still OK huh?
Going from ALL torque to NO torque is going to be quite interesting to say the least!
Sounds like a cool build! Cant wait to see it!
You sticking with a 914 trani?
I should have around 200ft lbs. And the car will be at least 400lbs lighter. I'm going with my 901 right now. I still have 1st gear and a flipped H for 5th. At 7500 rpm that should put me over 200mph on the salt flats. I considered a Subie tranny but the Turbo dump is very close to the axles. Kenedy does make an adapter for that combo so it's not out of the question. I would need a custom exhaust manifold to move the dump. Anybody have a Subi to trade? I can't decide if I want the WG to be muffled or just dump it out.
Posted by: strawman Nov 22 2010, 03:02 PM
When I was into MR2s (albeit the early models, not the turbo models), most guys were hot-n-heavy on single vs. twin turbos. I came to understand that the twin sequential turbos were overly complicated, but my memory ain't what it used to be...
Posted by: kg6dxn Nov 22 2010, 03:36 PM
When I was into MR2s (albeit the early models, not the turbo models), most guys were hot-n-heavy on single vs. twin turbos. I came to understand that the twin sequential turbos were overly complicated, but my memory ain't what it used to be...
Agreed, but for my target HP # the twins should work fine. If I decide to exceed this level, I will look at a single or making the twins Non-sequencial.
Posted by: Andyrew Nov 22 2010, 04:08 PM
200ft lbs at what RPM?
How much tq will you have at 2k rpm's?
Curious how it will feel like in 2nd gear at ~ 15mph if you got on it..
However that boost rush will be AWESOME...
Posted by: kg6dxn Nov 22 2010, 05:34 PM
200ft lbs at what RPM?
How much tq will you have at 2k rpm's?
Curious how it will feel like in 2nd gear at ~ 15mph if you got on it..
However that boost rush will be AWESOME...
These little 1.3L turbos have more torque than you think. 200 ft lbs at 4000k. It is still more that a type 4 and same gearing. Who drives 15 mph in second gear? If I romp on it at 15 mph, I'll be in 1st! and rev it to 6k then shift. By that time I'll be doing 60mph as I shift to 2nd.
I had a NA rotary in my VW Bus. It was stupid fast with all that wieght and no turbo. I'll let you drive it Andrew, then you can decide.
Posted by: Andyrew Nov 22 2010, 05:59 PM
Wait, your using the 901 as a 4 speed or 5 speed?
1st gear in a 901 wont net you 60mph.. At least to my knowledge. 2nd gear could do it.
By no means am I saying its not going to be fast, My fear is how usable/predictable it will be with that lag on mountain roads.
However max torque @ 4k rpms with a 7.5k redline is still pretty darn good. Thats just about what my Audi is.. except my Audi has a its torque a bit lower and about 300rpm smaller redline.. And I will say that it is 100% usable from 3k on up.
Posted by: kg6dxn Nov 22 2010, 07:23 PM
Here's some stock specks from turborx7.com
" The system operates off one turbo during lower RPM's (after 2,000 RPM) and the secondary turbo spools up after the engine reaches the 5,000 RPM level. "...
" The tiny 1.3 liter (two 654cc displacing rotors) power plant put out an incredible 255-hp, and 217 lbs/ft of torque, with the help of twin Hitachi HT12 turbos. "
This the US spec with all the smog equipment. When you remove the Ac, air pump, radiator fan, open the exhaust, improved intercooler, improved air cleaner... etc... I should hit my HP goal with little work. I will try not to port the engine as this will decrease to torque and raise the peak HP higher in the RPM range.
With these stock numbers, the car will be faster than my V8.  Don't forget, I removed an 800 lb engine and I'm replacing it with a 350 lb engine with more HP. The key is power to weight ratio. It should also be very nimble in corners. As far as mountain twisties? Keep the RPMs up, keep the turbo spooled.
Posted by: Lennies914 Nov 22 2010, 07:25 PM
Mike,
Do you already have a motor? There was a guy in San Rafeal on CL last month with 2 of them for sale. $350 for both. One complete and one short block. Also one in Hollister for $100 w/engine stand. I may still have email addy's if interested.
Posted by: kg6dxn Nov 22 2010, 07:30 PM
Mike,
Do you already have a motor? There was a guy in San Rafeal on CL last month with 2 of them for sale. $350 for both. One complete and one short block. Also one in Hollister for $100 w/engine stand. I may still have email addy's if interested.
 It's on its way. I bought this one because it is complete with all the electronics.
Posted by: Andyrew Nov 22 2010, 08:32 PM
Thats the way to go.. Hack up the ECU yourself so you have only yourself to blame..
How many miles are on that engine? Im curious how long the "little" turbo lasts.. It would be pushed past its efficiency range with the big turbo...
Posted by: jmmotorsports Nov 22 2010, 10:14 PM
Here's some stock specks from turborx7.com
" The system operates off one turbo during lower RPM's (after 2,000 RPM) and the secondary turbo spools up after the engine reaches the 5,000 RPM level. "...
" The tiny 1.3 liter (two 654cc displacing rotors) power plant put out an incredible 255-hp, and 217 lbs/ft of torque, with the help of twin Hitachi HT12 turbos. "
This the US spec with all the smog equipment. When you remove the Ac, air pump, radiator fan, open the exhaust, improved intercooler, improved air cleaner... etc... I should hit my HP goal with little work. I will try not to port the engine as this will decrease to torque and raise the peak HP higher in the RPM range.
With these stock numbers, the car will be faster than my V8.
Don't forget, I removed an 800 lb engine and I'm replacing it with a 350 lb engine with more HP. The key is power to weight ratio. It should also be very nimble in corners. As far as mountain twisties? Keep the RPMs up, keep the turbo spooled. What V8 that will fit in a 914 weigh's 800 pounds ?
Jerry
Posted by: kg6dxn Nov 22 2010, 10:24 PM
What V8 that will fit in a 914 weigh's 800 pounds ?
Jerry
A cast iron small block Chevy. That is the going wet weight. Google it.
Posted by: matthepcat Nov 23 2010, 05:41 PM
Right on Mike!
I would recommend muffling the waste gate!!! Have you heard an open waste-gate? ouch ouch loud.
http://www.youtube.com/watch?v=GS2AnGXfkw0
Posted by: kg6dxn Nov 23 2010, 05:50 PM
Right on Mike!
I would recommend muffling the waste gate!!! Have you heard an open waste-gate? ouch ouch loud.
http://www.youtube.com/watch?v=GS2AnGXfkw0
Thanks Matt. Where you been? Did the car sell on CL?
Posted by: matthepcat Nov 23 2010, 06:16 PM
No that was a moment of weakness. I have been lurking.
Let me know if you need a hand with your project.
How about a Lexus ISF motor? http://cgi.ebay.com/ebaymotors/2009-lexus-is-F-engine-/230512879421?pt=Motors_Car_Truck_Parts_Accessories&hash=item35aba3673d

J/k
Right on Mike!
I would recommend muffling the waste gate!!! Have you heard an open waste-gate? ouch ouch loud.
http://www.youtube.com/watch?v=GS2AnGXfkw0
Thanks Matt. Where you been? Did the car sell on CL?
Posted by: kg6dxn Dec 11 2010, 06:40 PM
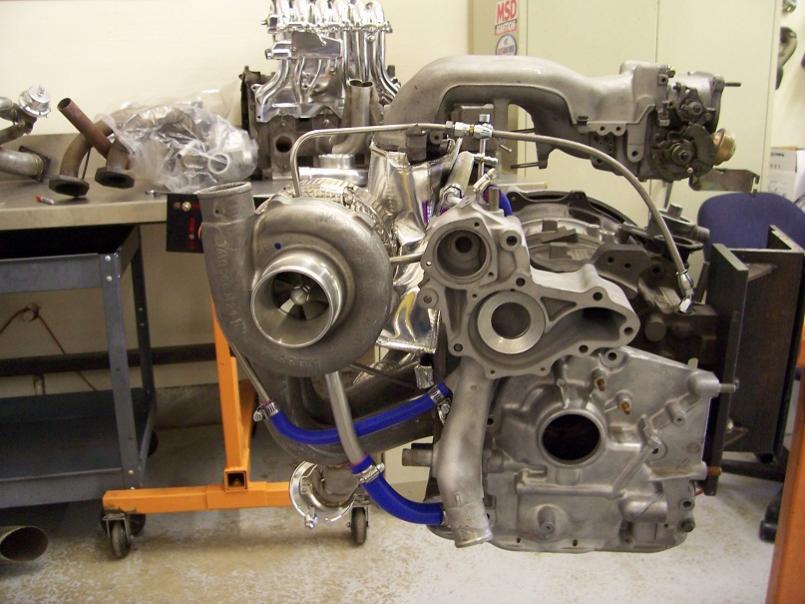
Not much to update. I've been collecting parts. Here's a pic of the cleaned and painted engine. I put my Iphone in the pic to give an idea of just how small these engines are. Picture a type 4 without heads and cylinders. This little turbo engine will make 350hp at 15 psi with 250 ft lbs @ 4k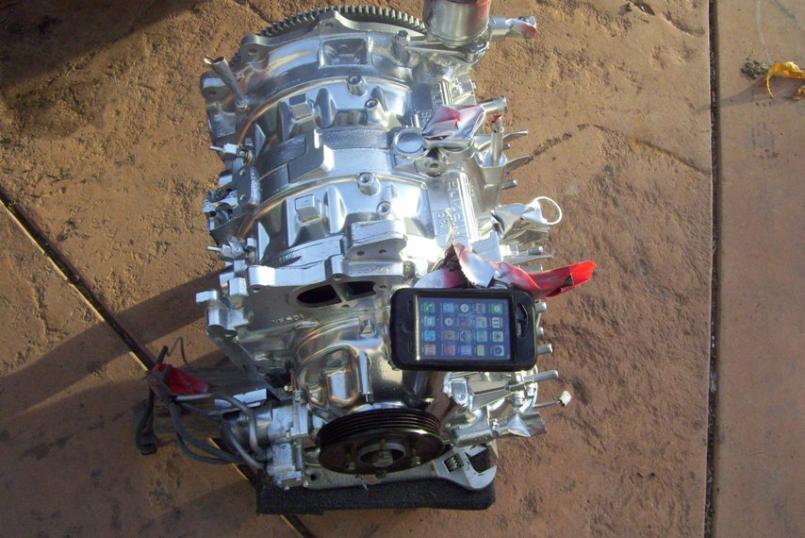
GT35R Ball bearing Turbo- oil and water cooled
HKS cast iron exhaust manifold
Haltech ECU
HKS Blow off Valve
HKS wastgate
HKS Boost controller
2000cc injectors (x4)
Areomotive fuel regulator
Custom Rails
4" exhaust
Aero Turbine Muffler
Frozen Boost air to water intercooler
Damn this conversion is getting expensive!
Posted by: RJMII Dec 11 2010, 10:20 PM
HKS cast iron exhaust manifold
Haltech ECU
HKS Blow off Valve
HKS wastgate
HKS Boost controller
2000cc injectors (x4)
Areomotive fuel regulator
Custom Rails
4" exhaust
Aero Turbine Muffler
Frozen Boost air to water intercooler
So are you switching to single turbo with the ball bearing unit?
Posted by: kg6dxn Dec 11 2010, 11:08 PM
So are you switching to single turbo with the ball bearing unit?
Yes, Single. with new manifold. The stock twin turbos are nice in stock configuration but the single is far less complicated and will yeild more power. The turbo I'm using can get me up to 450-500hp @ 25+psi but I want the engine to remain reliable hence the 17psi max plan.
It will look similar to this one...
Posted by: Andyrew Dec 11 2010, 11:12 PM
I still think your going to be pushing way more HP than that on a GT35R.... I guess at 15psi maybe... but that turbo is made to be pushed to like 35psi...
Posted by: kg6dxn Dec 11 2010, 11:23 PM
I still think your going to be pushing way more HP than that on a GT35R.... I guess at 15psi maybe... but that turbo is made to be pushed to like 35psi...
My boost controller allows a scramble mode and a dual boost setting. I may push it a little. The 2000cc injectors are big enough to support over 700hp. They were recommended by Turblown. The ball bearing should help it spool and the water cooling will help keep it from burnig up. It will definitely be capable of higher hp numbers than I plan to run normally.
Posted by: Andyrew Dec 12 2010, 03:17 PM
Holy Shit, 2000CC? how many do you use? for the A4, 4ea 1k CC injectors an push 700hp..
HKS boost controller? Which one? We have an Apexi AVC-r boost controller on the 951 and the A4. Old technology but it works like a dream..
Posted by: kg6dxn Dec 12 2010, 05:50 PM
Holy Shit, 2000CC? how many do you use? for the A4, 4ea 1k CC injectors an push 700hp..
HKS boost controller? Which one? We have an Apexi AVC-r boost controller on the 951 and the A4. Old technology but it works like a dream..
2000cc were recommended by TurBlown. The company that recently made a 650hp street driven WRX STI that runs a Benz Kompressor and a BIG turbo sequencialy. The Rotary runs 4 of them at 50% duty cycle. I thought they sound big as well. But I derfer to the expert on this one. They also recommended the Turbo choice. I should also mention that these engines typically run only 35psi of fuel and not 45psi. The stock engine runs 2 x 1600cc and 2 x 850cc injectors. I could make my HP number with the stock injectors but they would be at the limit of their duty cycle. Remember injectors are rated at 100% duty cycle @ 45psi.
My boost controller is the HKS EVC 5
Posted by: oldschool Dec 12 2010, 07:46 PM
Holy Shit, 2000CC? how many do you use? for the A4, 4ea 1k CC injectors an push 700hp..
HKS boost controller? Which one? We have an Apexi AVC-r boost controller on the 951 and the A4. Old technology but it works like a dream..
2000cc were recommended by TurBlown. The company that recently made a 650hp street driven WRX STI that runs a Benz Kompressor and a BIG turbo sequencialy. The Rotary runs 4 of them at 50% duty cycle. I thought they sound big as well. But I derfer to the expert on this one. They also recommended the Turbo choice. I should also mention that these engines typically run only 35psi of fuel and not 45psi. The stock engine runs 2 x 1600cc and 2 x 850cc injectors. I could make my HP number with the stock injectors but they would be at the limit of their duty cycle. Remember injectors are rated at 100% duty cycle @ 45psi.
My boost controller is the HKS EVC 5
Posted by: Andyrew Dec 12 2010, 08:59 PM
Holy Shit, 2000CC? how many do you use? for the A4, 4ea 1k CC injectors an push 700hp..
HKS boost controller? Which one? We have an Apexi AVC-r boost controller on the 951 and the A4. Old technology but it works like a dream..
2000cc were recommended by TurBlown. The company that recently made a 650hp street driven WRX STI that runs a Benz Kompressor and a BIG turbo sequencialy. The Rotary runs 4 of them at 50% duty cycle. I thought they sound big as well. But I derfer to the expert on this one. They also recommended the Turbo choice. I should also mention that these engines typically run only 35psi of fuel and not 45psi. The stock engine runs 2 x 1600cc and 2 x 850cc injectors. I could make my HP number with the stock injectors but they would be at the limit of their duty cycle. Remember injectors are rated at 100% duty cycle @ 45psi.
My boost controller is the HKS EVC 5
Hmm I guess that explains the injectors a little bit... As a comparison, I am running 440CC injectors on my car, stock is 200 or less IIRC. If I raised my boost to 25psi and ran ~ 375hp I would be maxing out my injectors. Its just crazy to me how much over and beyond these rotary engines are compared to your typical piston engine.. But like i've told you, I really dont know much about the rotary engines.
To be perfectly honest, it sounds to me like you have a combination that could easily be pushed to 600+hp @ ~ 25-30psi.. NOT that thats a bad thing!! Just say goodbye to your Trani if you ran to those numbers

That should be a fun boost controller!
Posted by: kg6dxn Dec 12 2010, 10:13 PM
To be perfectly honest, it sounds to me like you have a combination that could easily be pushed to 600+hp @ ~ 25-30psi.. NOT that thats a bad thing!! Just say goodbye to your Trani if you ran to those numbers
That should be a fun boost controller!
If I pull it apart and port it, swap the seals, then pump up the boost... I could get 700hp out of it.
I have no intention of looking for that number. I want to keep it driveable with the occasional stupid attack The key here is to be able to drive it like a DD. I used to drive my V8 to work! 
When a turbo is used on these engines, it is not worth pulling apart a good engine just to port it. The HP gain is not worth the trouble. Without a turbo, it is worth the gain.
Posted by: kg6dxn Dec 12 2010, 10:17 PM
Oh, I forgot...
Here are some pics for Oldschool...
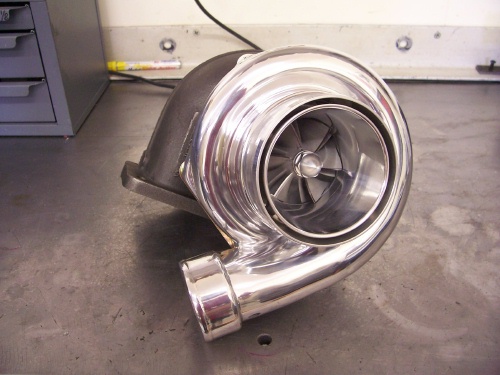
Posted by: Andyrew Dec 13 2010, 12:07 AM
Is that an HTA compressor side? If so, SWEET!! Glad you went that route! I hear NOTHING but great things with that new technology...
Not a big fan of bling though
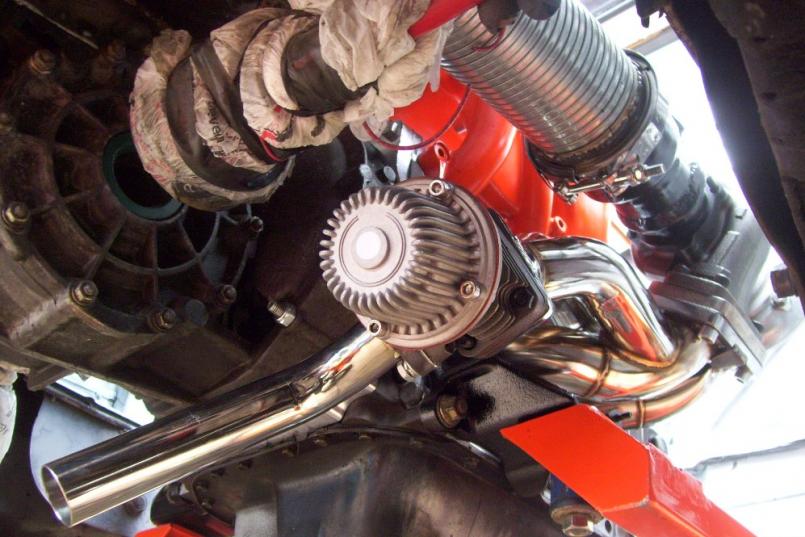
Posted by: kg6dxn Dec 13 2010, 07:11 PM
This pic is for Andrew. It shows the chosen turbo (GT35R) and the performance window the enigine is tuned towards.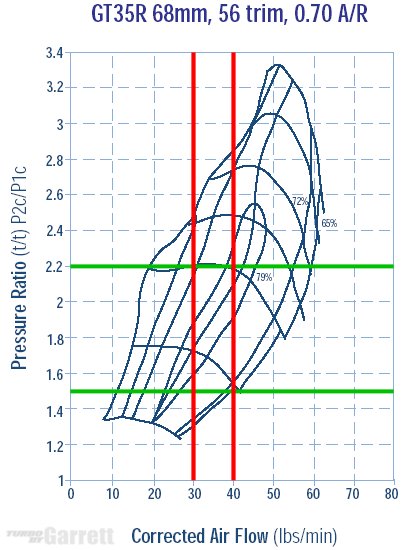
Posted by: Andyrew Dec 14 2010, 10:37 AM
Not bad, A little low for the turbo size, but still not that bad.. You probably could have bennifited from a smaller turbo with more boost...
Still not a bad matchup.
Is it an HTA compressor side? It sure looks like it..
Posted by: kg6dxn Jan 18 2011, 10:05 PM
Quick update... Home refi has slowed down my purchase power but here's some update pics...
Working on my cradle. 1.25 square tubing 0.120 wall. Waiting for my adapter plate and flywheel before final fab.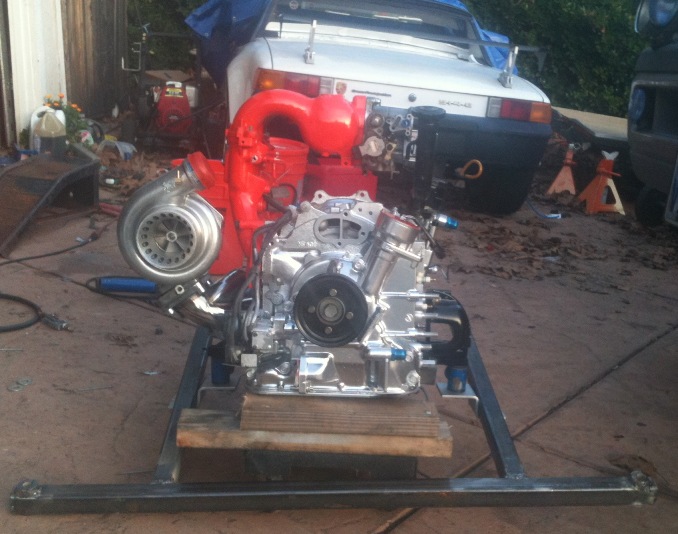
My new license plates... 914 TT Originally the engine was a twin turbo. I decided to go single turbo. Now I need help deciding what TT means... Any ideas? BTW, 914 T was already taken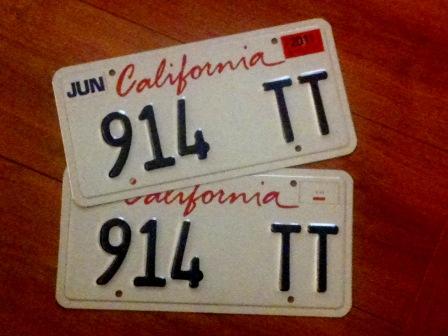
Posted by: strawman Jan 19 2011, 03:06 AM
Lookin' good Mike! At the rate I've been going lately, you'll have your car on the road before mine... keep up the good work!
Posted by: mikey63 Jan 19 2011, 11:14 AM
How about (TT) TURBO TRANSFORMATION!
Posted by: Rotary'14 Jan 19 2011, 02:56 PM
Quick update... Home refi has slowed down my purchase power but here's some update pics...
Working on my cradle. 1.25 square tubing 0.120 wall. Waiting for my adapter plate and flywheel before final fab.
My new license plates... 914 TT Originally the engine was a twin turbo. I decided to go single turbo. Now I need help deciding what TT means... Any ideas? BTW, 914 T was already taken
Nice! Turbo Too!
-Robert
Posted by: oldschool Jan 19 2011, 08:12 PM
Quick update... Home refi has slowed down my purchase power but here's some update pics...
Working on my cradle. 1.25 square tubing 0.120 wall. Waiting for my adapter plate and flywheel before final fab.
My new license plates... 914 TT Originally the engine was a twin turbo. I decided to go single turbo. Now I need help deciding what TT means... Any ideas? BTW, 914 T was already taken
Nice! Turbo Too!
-Robert
 One day us Rotary dude will all hang out.....when we get our car up and running
Posted by: 914Timo Jan 22 2011, 01:28 PM
Could you show more pics about the front lights in the first pic. They look very interesting
Posted by: kg6dxn Jan 22 2011, 02:44 PM
Could you show more pics about the front lights in the first pic. They look very interesting
Check out this thread...
http://www.914world.com/bbs2/index.php?showtopic=106380
Posted by: roadster fan Jan 22 2011, 10:21 PM
Looking Good! surfer dudes would call it Totally Turbo, dopers would call it Tweaked Turbo, JDM guys probably Tuned Turbo.
You will come up with something clever. Keep postin pics!
Jim
Posted by: thenewwazoo Feb 16 2011, 01:00 AM
Just found your build - it looks nice! A few thoughts from someone who knows a little about rotaries...
2000cc primaries are HUGE. You may well find that you have trouble making it idle with primaries that big - that's why Mazda and most aftermarket setups use smaller primaries, and large secondaries. The bigger the "jump", the harder it is to tune the transition, but the better your idle will be. I used to run 1600cc secondaries for my big-turbo setups. You do need big secondaries for big power, tho - the BSFC of rotaries is pretty high, even compared to turbo boingers.
The GT35R is a good turbo, though I agree you'll be understressing it. Some would say not using it.  It's certainly a better choice than trying to use the 13B-RE's stock twin setup. It's complex and flaky at best, though the 13B-REW's setup is even worse. If you decide to go full-on crazy, a not-too-uncommon setup is with parallel twins, using one per exhaust port. What's your turbo's hotside A/R?
You haven't mentioned it yet, so in case you don't know it, you'll need to either use a pre-89 metering oil pump setup (and, iirc, the pre-88 13B front cover), or premix your fuel like a 2-stroke.
Posted by: kg6dxn Feb 16 2011, 09:39 AM
Just found your build - it looks nice! A few thoughts from someone who knows a little about rotaries...
2000cc primaries are HUGE. You may well find that you have trouble making it idle with primaries that big - that's why Mazda and most aftermarket setups use smaller primaries, and large secondaries. The bigger the "jump", the harder it is to tune the transition, but the better your idle will be. I used to run 1600cc secondaries for my big-turbo setups. You do need big secondaries for big power, tho - the BSFC of rotaries is pretty high, even compared to turbo boingers.
The GT35R is a good turbo, though I agree you'll be understressing it. Some would say not using it.
It's certainly a better choice than trying to use the 13B-RE's stock twin setup. It's complex and flaky at best, though the 13B-REW's setup is even worse. If you decide to go full-on crazy, a not-too-uncommon setup is with parallel twins, using one per exhaust port. What's your turbo's hotside A/R?You haven't mentioned it yet, so in case you don't know it, you'll need to either use a pre-89 metering oil pump setup (and, iirc, the pre-88 13B front cover), or premix your fuel like a 2-stroke.
I was thinking about down sizing the injectors too. They will be a little hard to control in low rpm. I will most likely go with 800/1600 since I can hit my HP goal just fine.
My hotside A/R is .82 so it should spool quickly. I looked at doing dual turbos but asside from the "BLING" factor, I couldn't see the need for the complexity. The cheapest dual turbo manifold I found was around $800. I'm using the KISS method and staying with a single turbo.
As for the OMP. I ordered an electronic OMP controller from http://www.eomp.info A guy name Jason builds them to control the OMP's stepper motor. I am also using a Rotary Aviation OMP bypass to run 2-stroke oil from a seporate tank. I will however pre mix during EFI tuning just to be safe. I do have an 89 OMP and front cover just in case my plans fail.
Posted by: kg6dxn Feb 17 2011, 08:05 PM
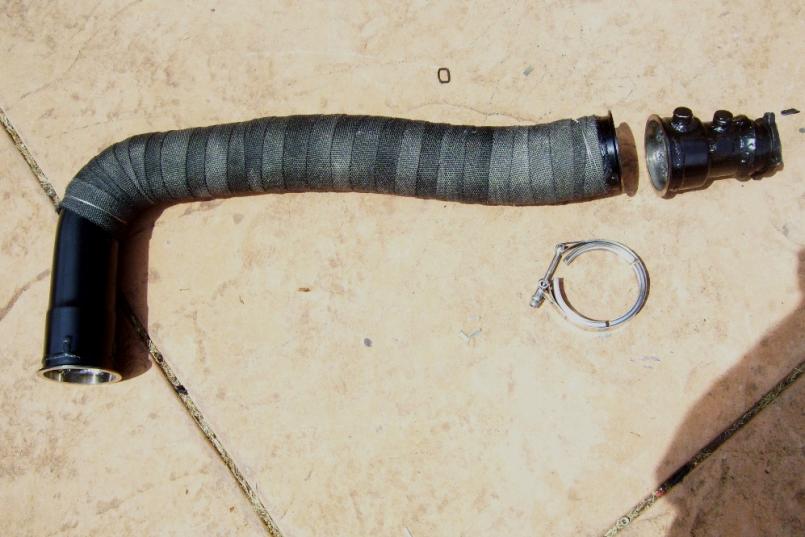
Got my V Band exhaust clamps in... 4 INCHES!!! These things are big! I can slide it up my arm almost to my shoulder.
My turbo oulet is 3" going to a 4" reducer to the first V Band. Then a flex and the exhaust will continue to the Aero Turbine muffler 4040XL, then a simple turn down.
Posted by: Andyrew Feb 17 2011, 08:07 PM
NICE! I love Vband clamps. 4" is Biiiig Are you going to keep it 4"?
muffler?
Posted by: Rotary'14 Feb 17 2011, 08:18 PM
Just found your build - it looks nice! A few thoughts from someone who knows a little about rotaries...
2000cc primaries are HUGE. You may well find that you have trouble making it idle with primaries that big - that's why Mazda and most aftermarket setups use smaller primaries, and large secondaries. The bigger the "jump", the harder it is to tune the transition, but the better your idle will be. I used to run 1600cc secondaries for my big-turbo setups. You do need big secondaries for big power, tho - the BSFC of rotaries is pretty high, even compared to turbo boingers.
The GT35R is a good turbo, though I agree you'll be understressing it. Some would say not using it.
It's certainly a better choice than trying to use the 13B-RE's stock twin setup. It's complex and flaky at best, though the 13B-REW's setup is even worse. If you decide to go full-on crazy, a not-too-uncommon setup is with parallel twins, using one per exhaust port. What's your turbo's hotside A/R?You haven't mentioned it yet, so in case you don't know it, you'll need to either use a pre-89 metering oil pump setup (and, iirc, the pre-88 13B front cover), or premix your fuel like a 2-stroke.
I was thinking about down sizing the injectors too. They will be a little hard to control in low rpm. I will most likely go with 800/1600 since I can hit my HP goal just fine.
My hotside A/R is .82 so it should spool quickly. I looked at doing dual turbos but asside from the "BLING" factor, I couldn't see the need for the complexity. The cheapest dual turbo manifold I found was around $800. I'm using the KISS method and staying with a single turbo.
As for the OMP. I ordered an electronic OMP controller from http://www.eomp.info A guy name Jason builds them to control the OMP's stepper motor. I am also using a Rotary Aviation OMP bypass to run 2-stroke oil from a seporate tank. I will however pre mix during EFI tuning just to be safe. I do have an 89 OMP and front cover just in case my plans fail.
That electronic OMP controller is so COOL! I haven't been keeping up on the latest and greatest stuff. Those Aussies sure love their rotaries. I can see you like them too. Keep the pics coming so I can get fired up on my rebuild.
-Robert
Posted by: kg6dxn Feb 17 2011, 08:20 PM
NICE! I love Vband clamps. 4" is Biiiig Are you going to keep it 4"?
muffler?
4 inch all the way. I'm running a seporate small muffler for the waste gate. Not sure which muffler for the WG but this is the muffler for the turbo...

https://www.youtube.com/watch?v=KZVRdRYdxrM
Posted by: ChrisNPDrider Feb 17 2011, 10:03 PM
I thought "TT" meant Targa Top?
You already have one of the most unique 914s I have ever seen, with this new motor your competition is shrinking. Keep up the good work! 
Posted by: kg6dxn Mar 6 2011, 01:11 AM
My adapter showed up. Now i can finish the fab of the motor mounts. I bolted my core tranny to it for fitting purpose.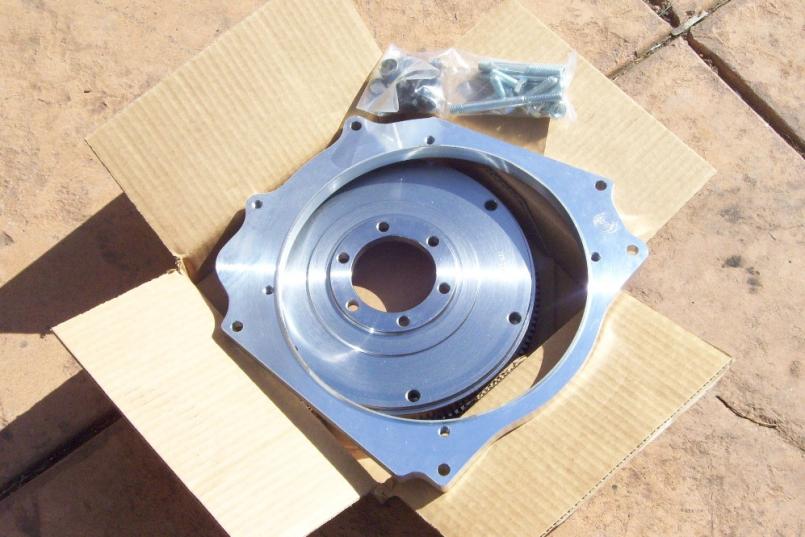
Posted by: kg6dxn Mar 6 2011, 01:12 AM
Another...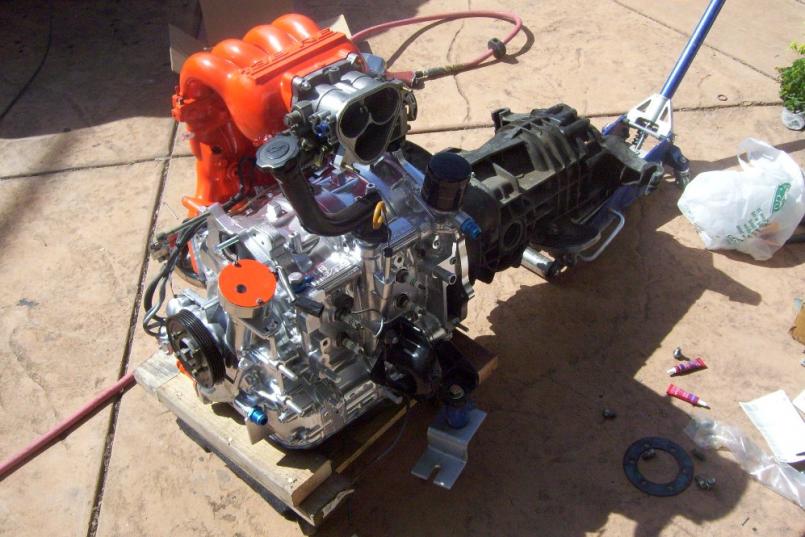
Posted by: kg6dxn Mar 6 2011, 01:18 AM
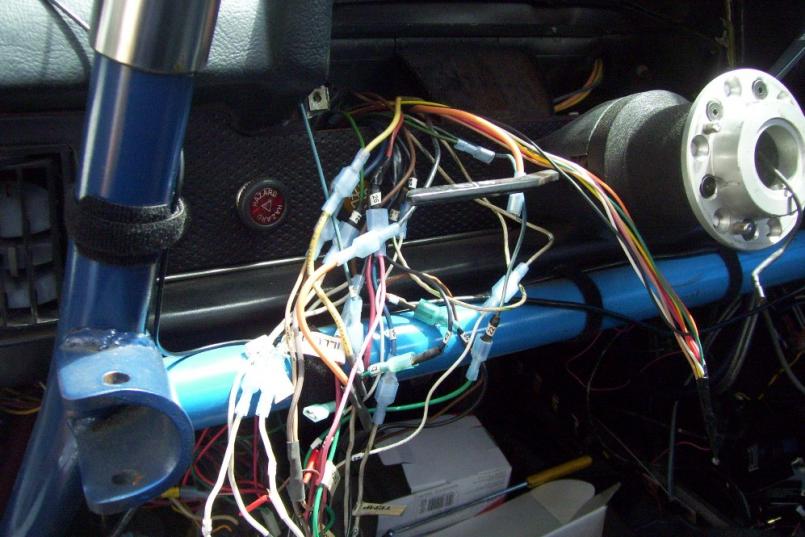
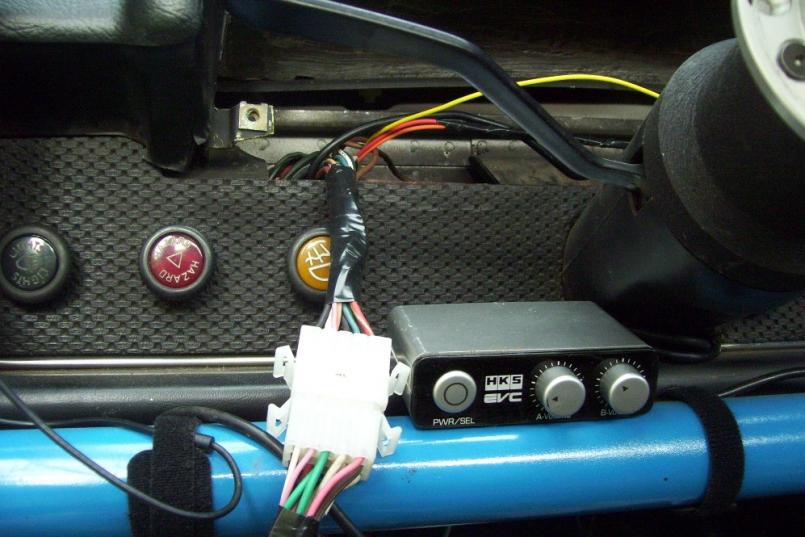
I did some work inside. I welded a bracket that bolts to the existing ash tray mounting screw holes. Mounted are my HKS Boost controller, Apexi Turbo Timer and my oil injection pump controller. I left some extra space to the right for my Navigation maybe.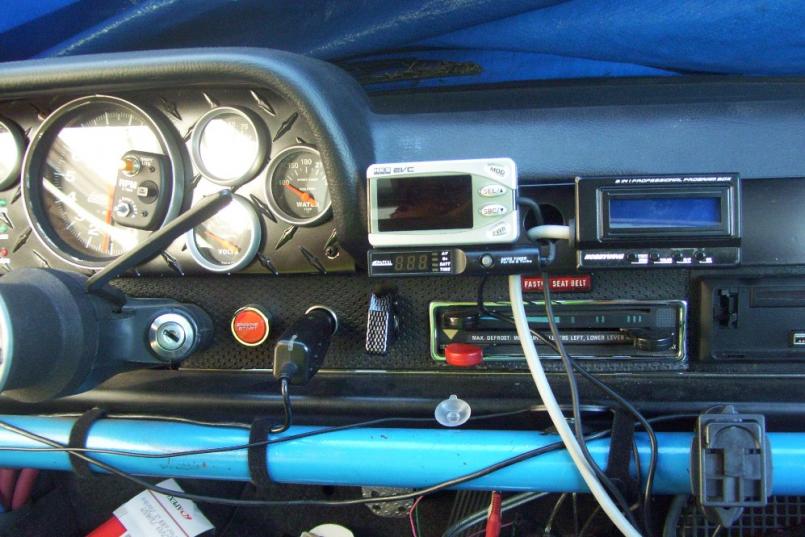
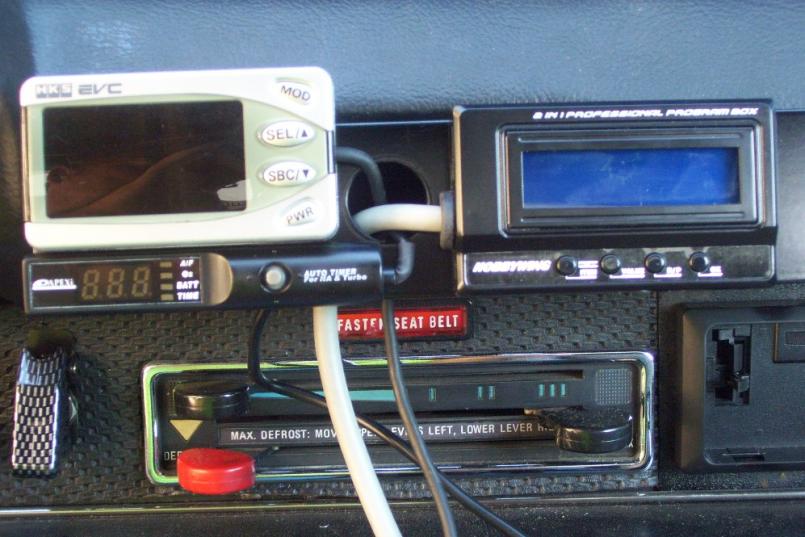
Posted by: kg6dxn Mar 6 2011, 01:23 AM
Now I have to figure out where I am putting my boost gauge. Either I redo the dash or find a cool pod for the dash.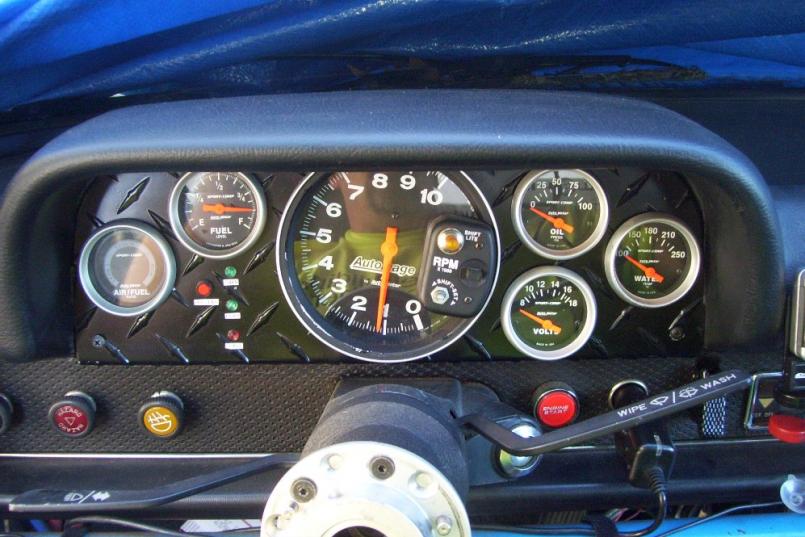
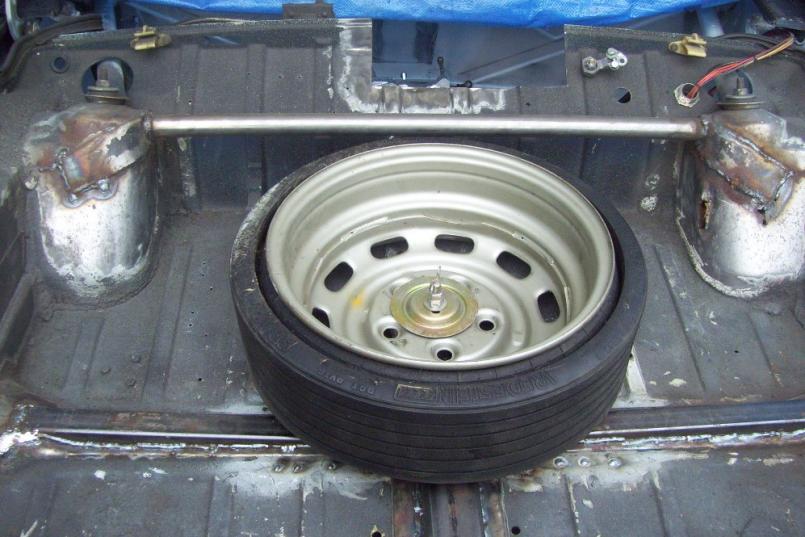
I also cut out the old cage in the trunk to make room for my spaer tire. I found some old damage on the passenger shock tower. I have a donor car in the garage to cut and patch from...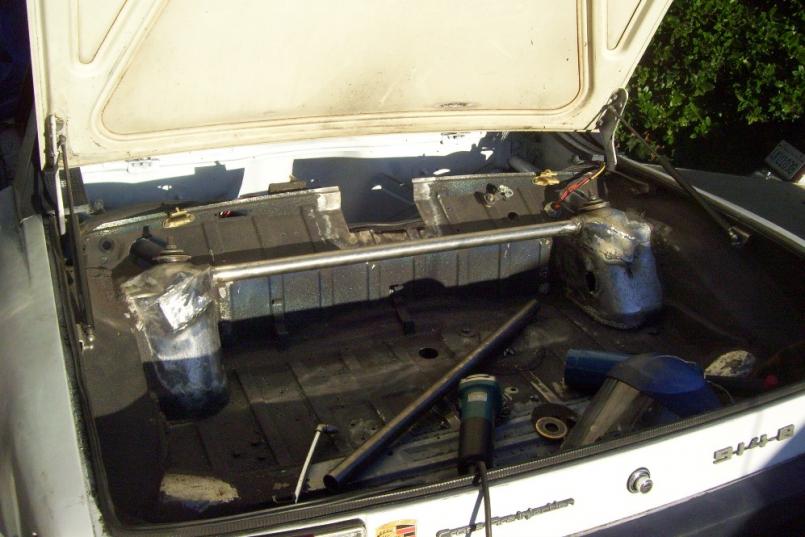
Posted by: kg6dxn Mar 6 2011, 01:25 AM
Now for the sad part. My car is outside! I was parting out the car in the garage when my clutch went out and... well... things snow balled into an engine swap...
Posted by: Andyrew Mar 6 2011, 04:10 AM
Mike it looks like your making great progress! PS, you have more visible guages than I could imagine actually using! Count one vote for navigation. I always put a spot for those in my cars, really makes for a much more enjoyable experience when you dont have to worry about that.
Posted by: Lennies914 Mar 6 2011, 10:14 AM
You are moving right along! Everythings looking good. Give me a shout if you ever need a second set of hands, I'd love to come check it out.
Posted by: kg6dxn Mar 6 2011, 11:46 AM
Thanks for the support guys!
For the historic record, here is an old pic of my rear trunk...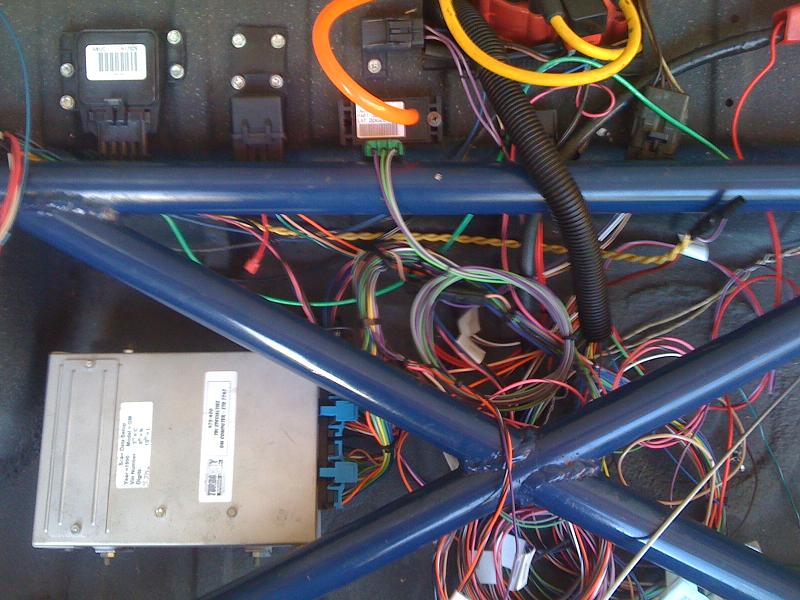
Posted by: kg6dxn Mar 7 2011, 09:51 PM
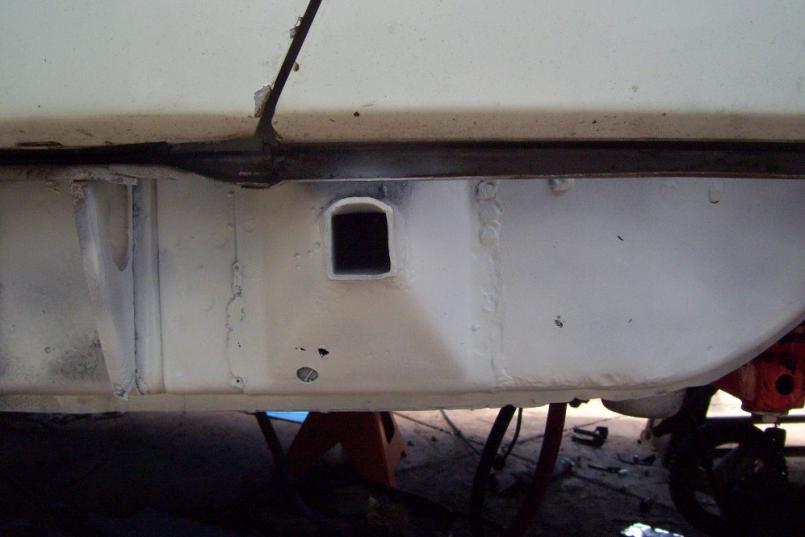
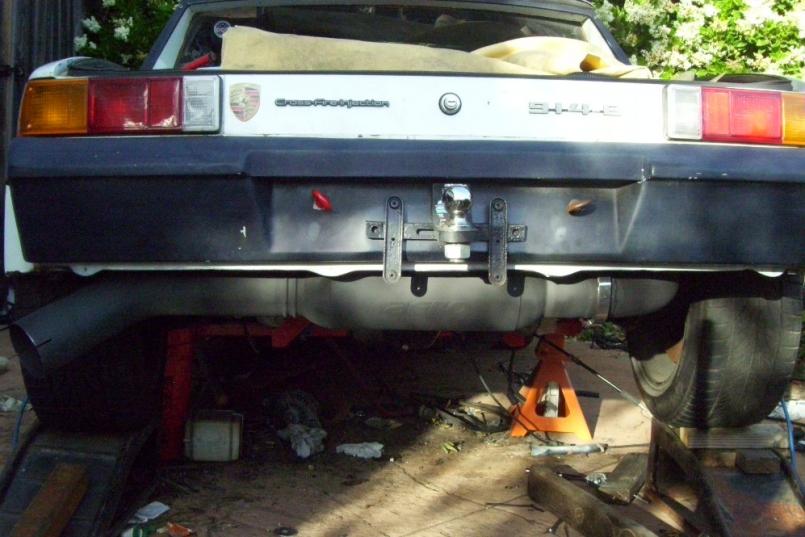
I forgot to mention. I found some major California rust on my car. I fixed it with a wire wheel and some zinc primer. I am building a trailer hitch and tying it into the roll cage. Pics of the receiver tube coming this weekend...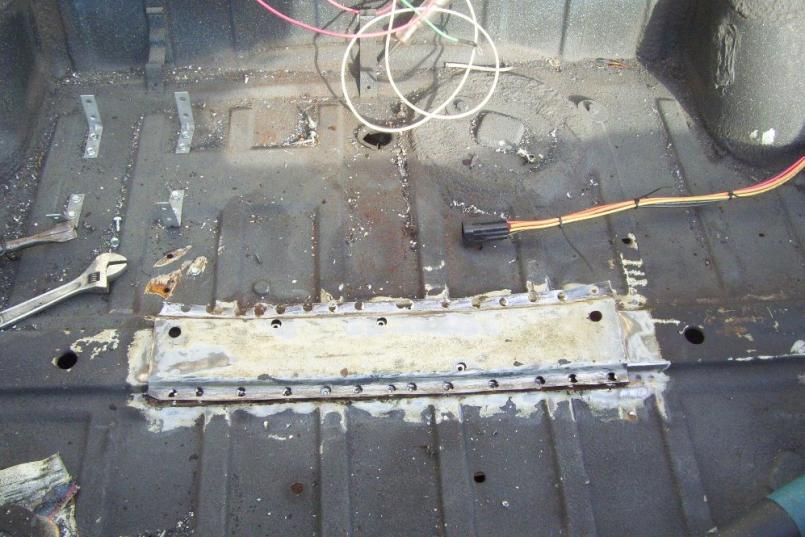

Posted by: kg6dxn Mar 7 2011, 09:53 PM
More...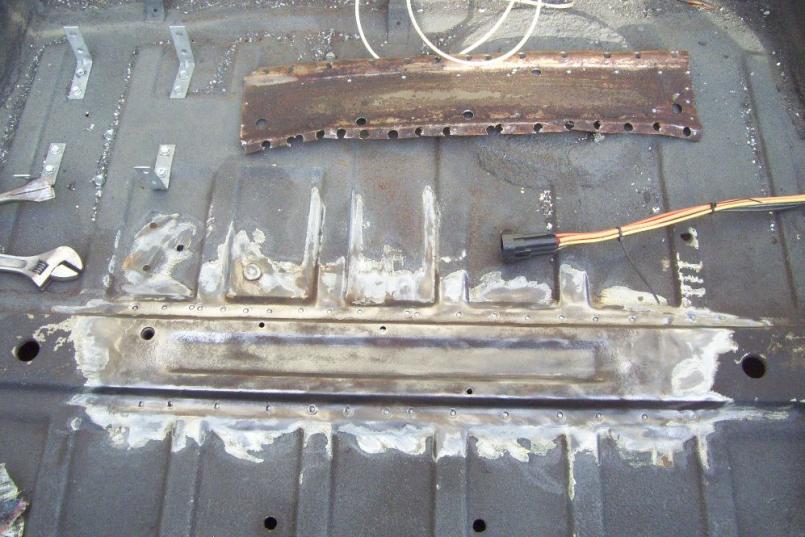
Posted by: Lennies914 Mar 7 2011, 09:55 PM
I forgot to mention. I found some major Californis rust on my car. I fixed it with a wire wheel and some zinc primer. I am building a trailer hitch and tying it into the roll cage. Pics of the receiver tube coming this weekend...
Where do we have to live to escape this damn rust!
Posted by: roadster fan Mar 7 2011, 10:01 PM
Looking good, keep up the good work!
Jim
Posted by: Andyrew Mar 7 2011, 11:11 PM
My honda has more rust than that!
Posted by: kg6dxn Mar 20 2011, 04:48 PM
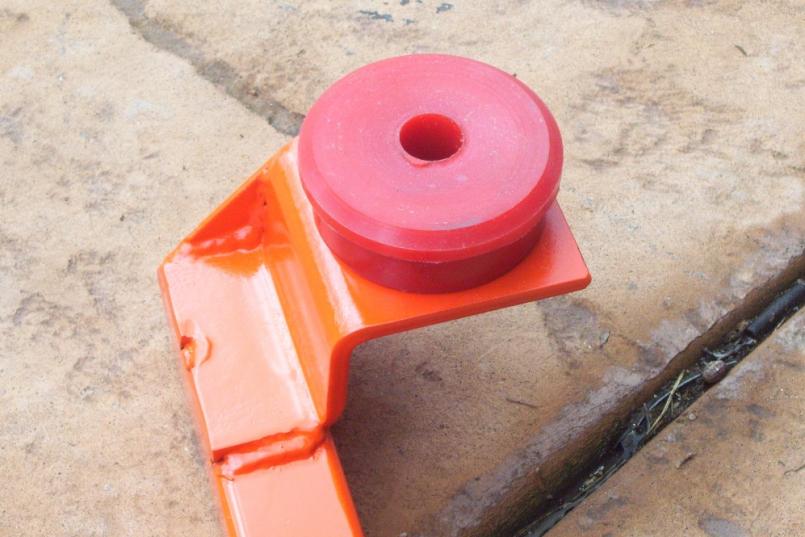
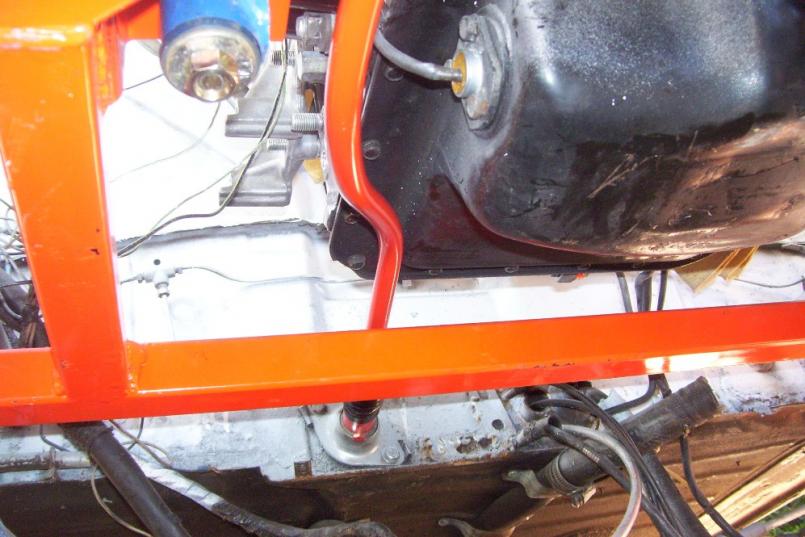
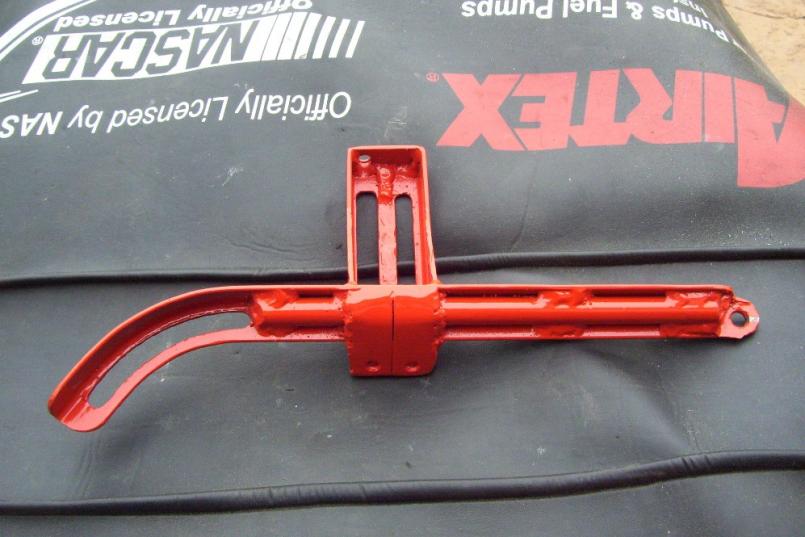
I finally got my engine mount finished and installed. The welding was complete two weeks ago. Paint last week and install today. I built it with 1.25" square tube 0.120 wall and some 1/4" steel plate. Then covered it with VHT orange/red. The bushings are high durometer poly from an old project.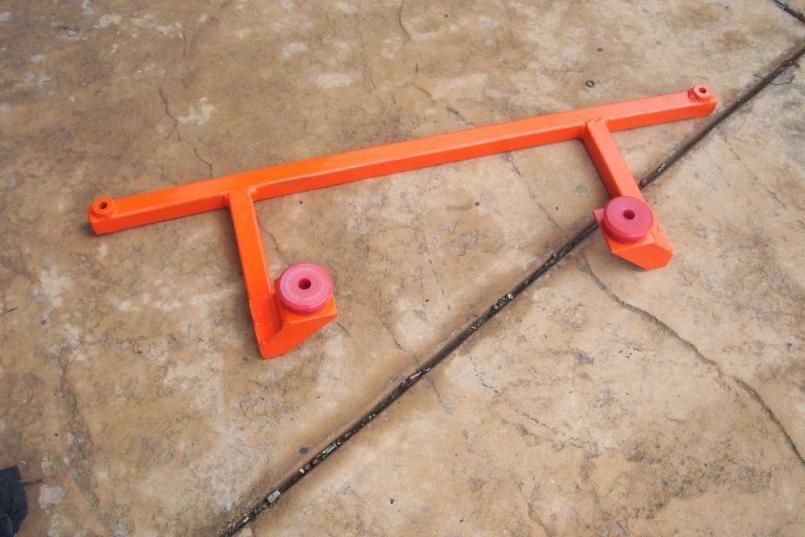
Posted by: kg6dxn Mar 20 2011, 04:49 PM
Here's another pic. The rain in Cali is really slowing down my progress...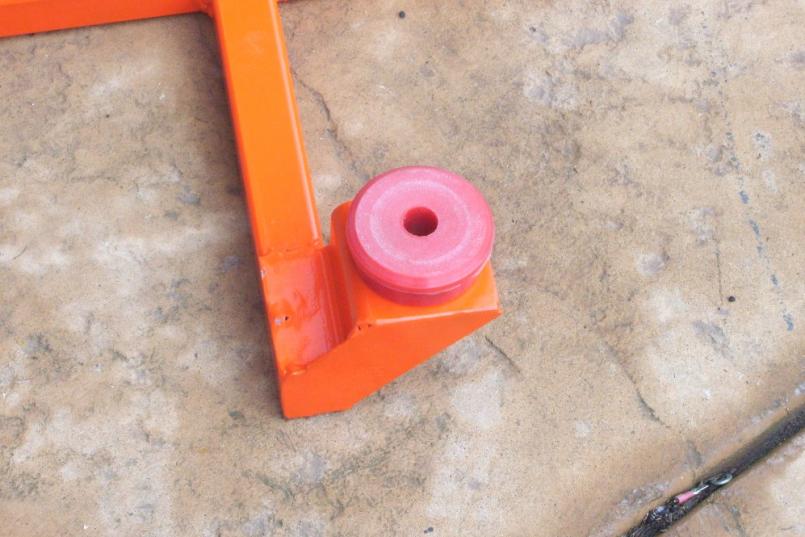
Posted by: kg6dxn Mar 20 2011, 07:26 PM
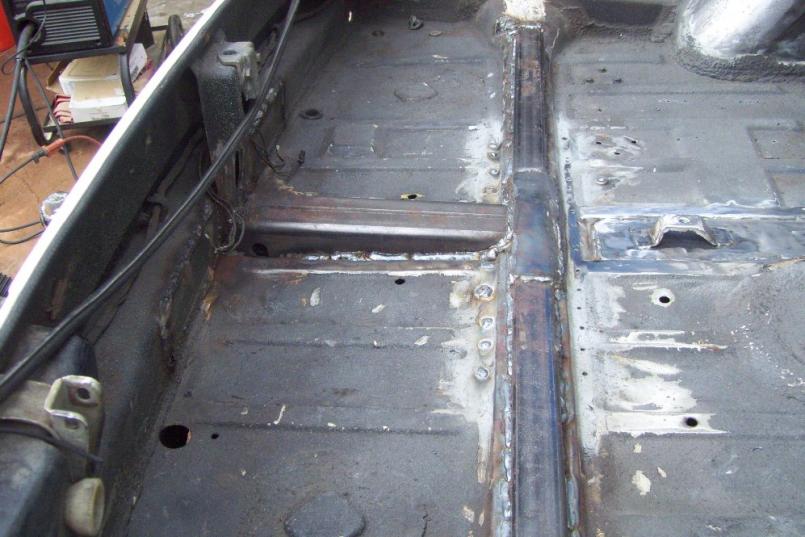
I have also been working on my trailer hitch. I took inspiration from Majkos and the car-b-que. I welded in the receiver tube. The transmission brace now has some 1.25, 0.120 wall square tubing to re-enforce the brace. Some 1/8 plate ties the two together. I drilled some holes in the bottom of the trans brace to weld some plugs on the underside. I also welded some 1/8 plate to the rear bulkhead. I welded the receiver to this and added some screw in eye bolts to tow from. The whold thing is beefy and solid. It all hides under my spring loaded license plate holder. I welded some 14ga to the center of the trunk to hold my spare tire bracket too. most of this work was done two weeks ago. Now I need to turn to the right tower damage. I suspect this happened during the cars racing career. The steel is super thin under the damage. I will cut a patch panel from the car in the garage.
Posted by: kg6dxn Mar 20 2011, 07:27 PM
More...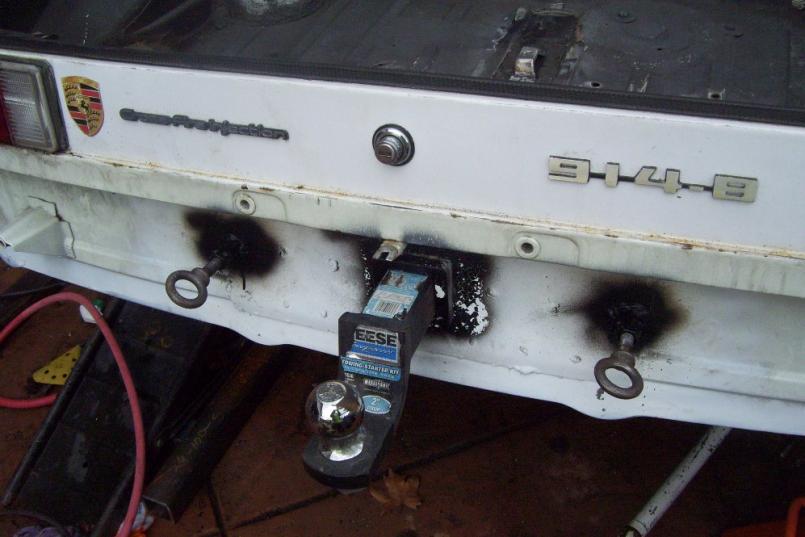
Posted by: kg6dxn Mar 20 2011, 07:29 PM
More...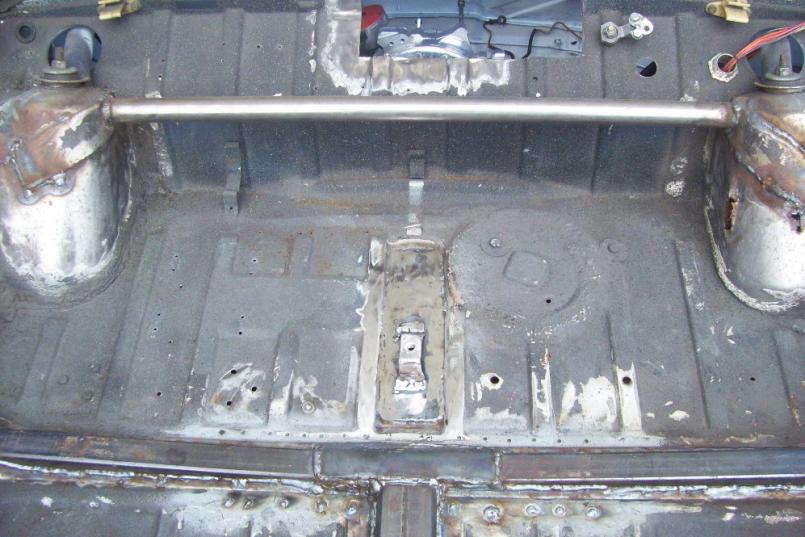
Posted by: kg6dxn Mar 20 2011, 07:32 PM
Goober welds... Before I added gas to my mig welder... I have a patch panel for this. I suspect the PO lost a shock or spring. super thin on the back side...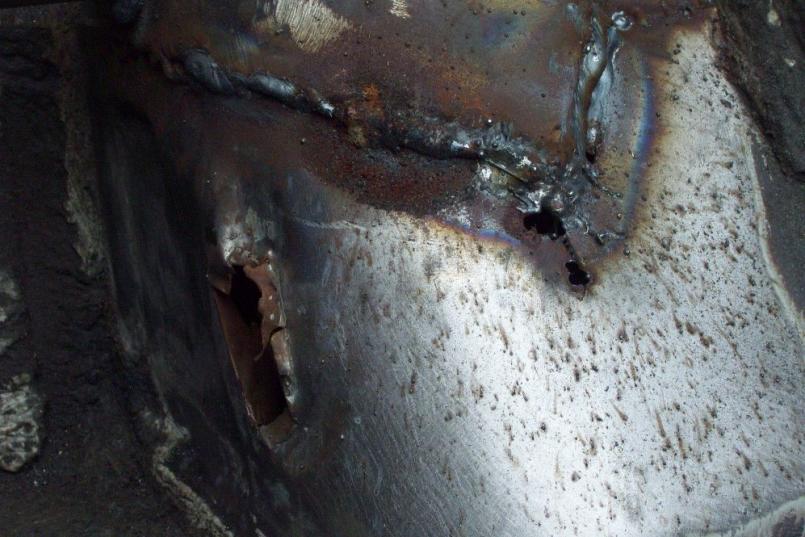
Posted by: kg6dxn Mar 20 2011, 07:35 PM
The money shot. Can't even see the motor hardley...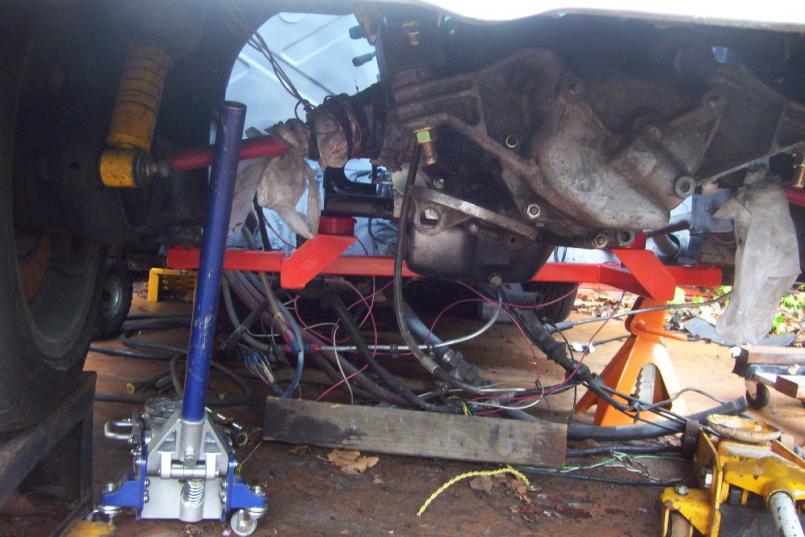
Under the receiver tube... You can see some of the plug welds too...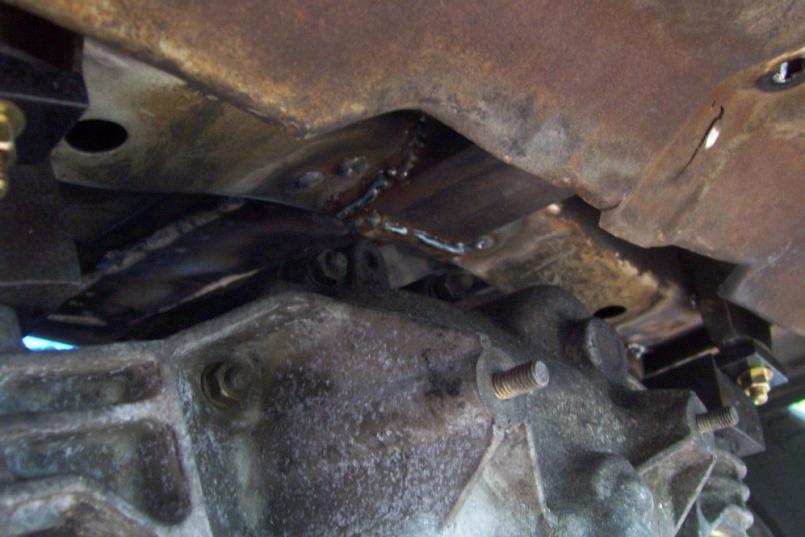
Posted by: Andyrew Mar 21 2011, 09:38 AM
I like it all!!!
Remember to primer them welds!
I have a space saver as well, Why did you put it in the center of the trunk? No room for luggage now, and I know you take trips in your 914..
Whats the details on your 914-8 emblem? Is it machined? Or just the 8 off the 1.8 emblem?
Posted by: kg6dxn Mar 21 2011, 09:50 AM
I like it all!!!
Remember to primer them welds!
I have a space saver as well, Why did you put it in the center of the trunk? No room for luggage now, and I know you take trips in your 914..
Whats the details on your 914-8 emblem? Is it machined? Or just the 8 off the 1.8 emblem?
The Luggage will go in my 914 trailer. Spare is in the center because it looks best there. Once I fix the tower metal, I will tie into the trans bracing. I only plan to carry oil, rags and an air pump back there anyway. OK maybe a jack too...
My 914-8 emblem is from Jim (RJMII) He is making me new ones that say 914-1.3 If you want the 914-8, I will give it to you. It's held on with dbl stick tape. It does need a quick sand and new clear coat.
Posted by: Andyrew Mar 21 2011, 10:10 AM
Ahh, that makes more sense. I didnt put 2 and 2 together..
I'd gladly pay you for the emblem. PM me whenever you swap them out.
Posted by: ChrisNPDrider Mar 21 2011, 12:08 PM
Awesome progress! I feel your pain about having the 914 outside. I have mine double covered after an incident earlier this winter let a lot of water in.
The engine is in there? Let's see some pics from above!
Posted by: kg6dxn Mar 21 2011, 10:13 PM
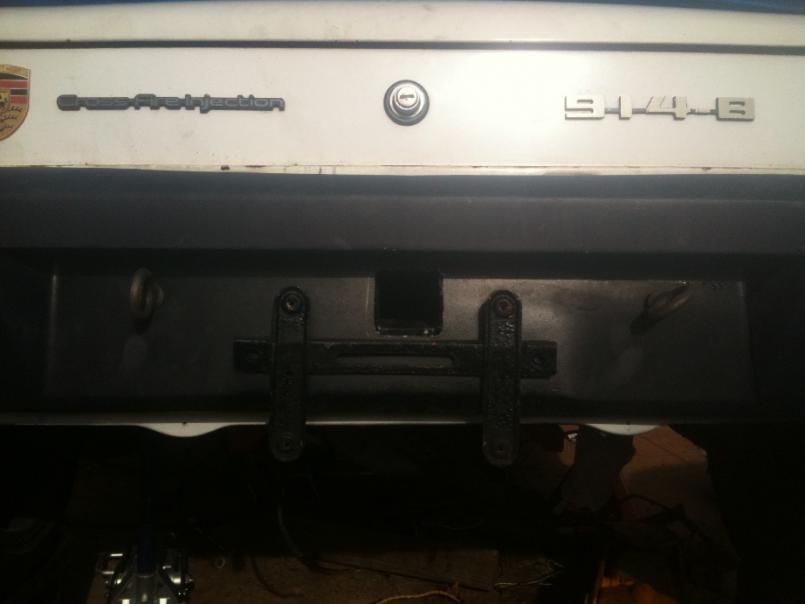
Tossed the bumper on for some quick pics. The old plate holder is shown. The new spring loaded plate holder will hide the receiver hole when not in use...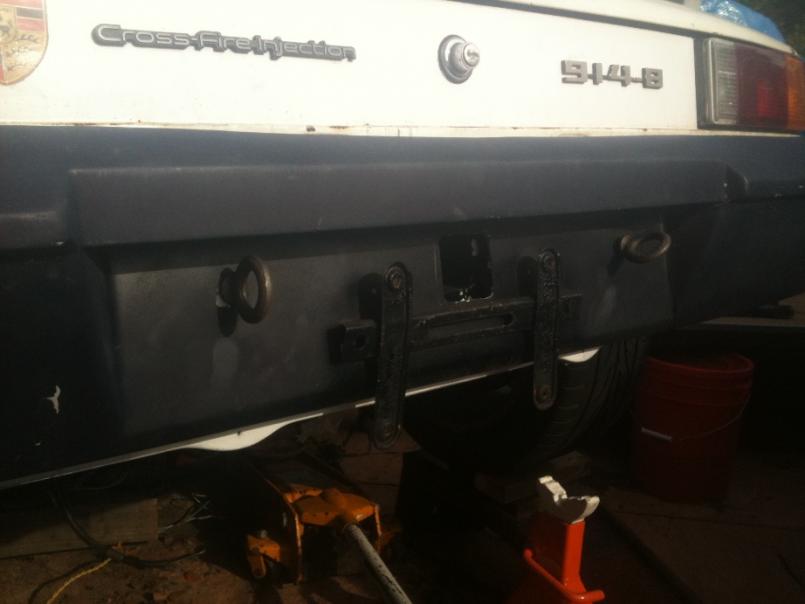
Posted by: JRust Mar 21 2011, 10:42 PM
Looking good Mike! Keep up the good work
Posted by: Andyrew Mar 22 2011, 08:24 AM
Looks Awesome Mike!
One of those mods that I have been wanting to do as well.
Whats next?
Posted by: kg6dxn Mar 22 2011, 09:27 AM
Whats next?
Injectors 4@ $180 each, 2-850cc, 2-1600cc
Fuel Rail, regulator, lines $250
stage 3 clutch $550
New Oil Injector 1@ $59
Gaskets $50
Electric water pump $250
Exhaust bits 4" $350-400
Misc wiring, ECU programming, cutting, welding, fabing... The budget is killing me... Once I finish my car, I can move on to my trailer...
Posted by: Andyrew Mar 22 2011, 09:39 AM
Ouch!
The little stuff just adds right up..
Posted by: trojanhorsepower Mar 22 2011, 06:15 PM
[/quote]
Injectors 4@ $180 each, 2-850cc, 2-1600cc
Fuel Rail, regulator, lines $250
stage 3 clutch $550
New Oil Injector 1@ $59
Gaskets $50
Electric water pump $250
Exhaust bits 4" $350-400
Misc wiring, ECU programming, cutting, welding, fabing... The budget is killing me... Once I finish my car, I can move on to my trailer...
[/quote]
A really cool 914 on jack stands...... priceless
Posted by: Lennies914 Mar 22 2011, 08:58 PM
[quote name='trojanhorsepower' date='Mar 22 2011, 05:15 PM' post='1447813']
[/quote]
Injectors 4@ $180 each, 2-850cc, 2-1600cc
Fuel Rail, regulator, lines $250
stage 3 clutch $550
New Oil Injector 1@ $59
Gaskets $50
Electric water pump $250
Exhaust bits 4" $350-400
Misc wiring, ECU programming, cutting, welding, fabing... The budget is killing me... Once I finish my car, I can move on to my trailer...
[/quote]
A really cool 914 on jack stands...... priceless
[/quote]

Can't wait to see (and hear) it on the road!
Posted by: campbellcj Mar 22 2011, 09:36 PM
LOL...whenever you get the empty wallet blues, just think about how much a comparable 300+ HP Porsche -6 powered project could cost you.
Posted by: kg6dxn Mar 26 2011, 07:30 PM
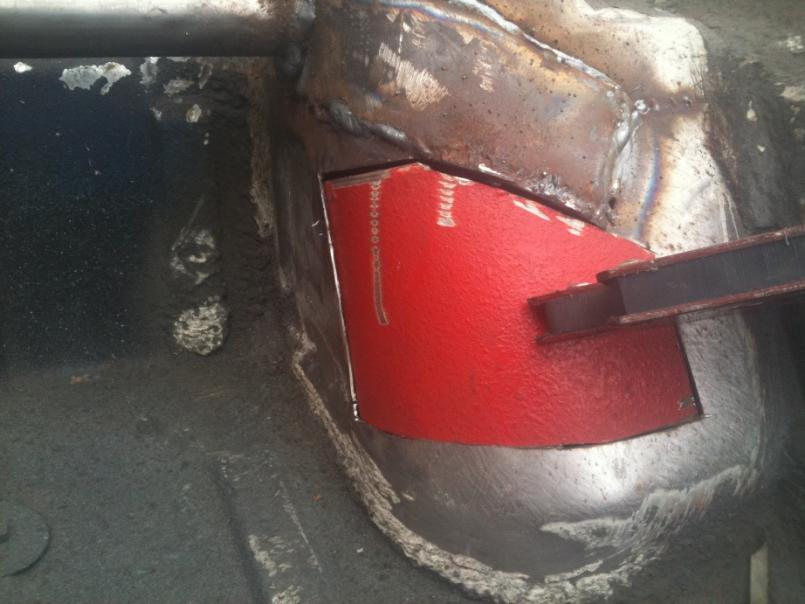
Did some more work in the trunk today. Cut out the damaged section on the tower. Cut a patch from the red car in the garage.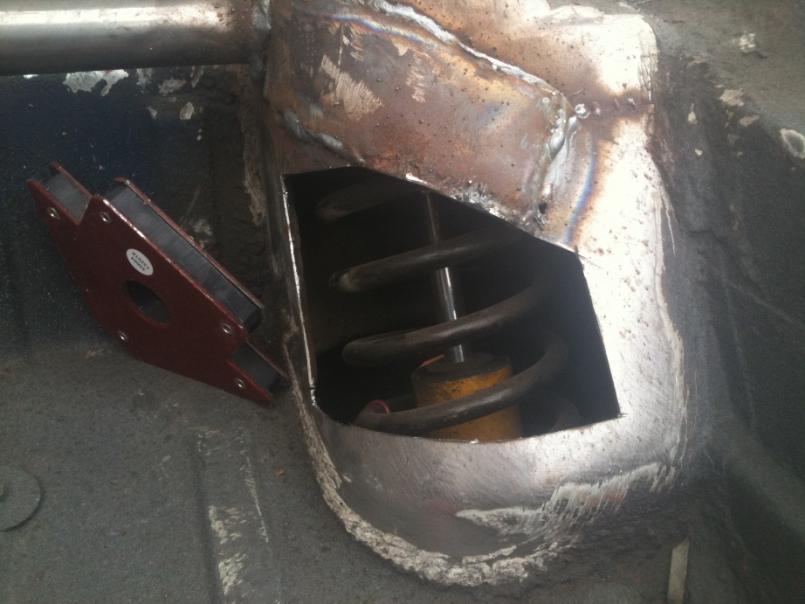
Posted by: kg6dxn Mar 26 2011, 07:33 PM
Got it trimed and welded. I also welded in some 1.25/.120 tubing to tie the hitch and tranny mouunts together. I also welded the seams of the tranny mounts below.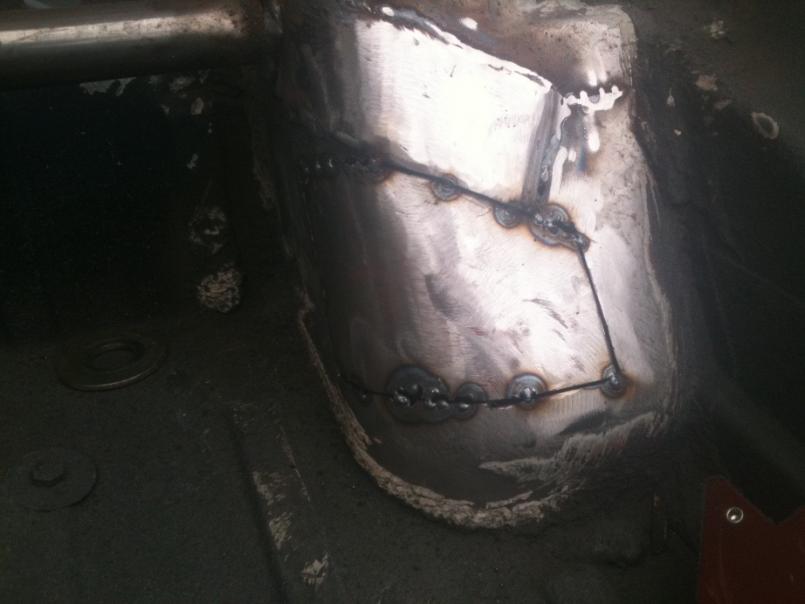
Posted by: kg6dxn Mar 26 2011, 07:35 PM
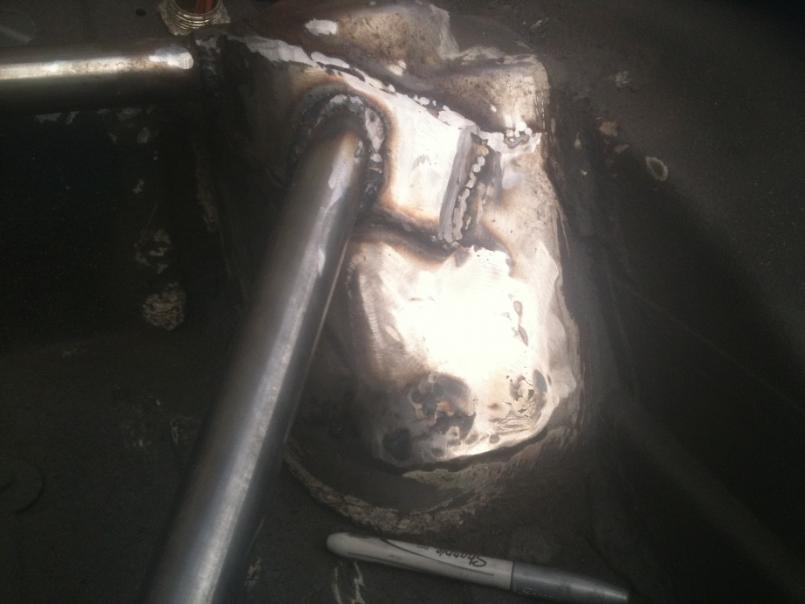
Got everything tied in and primered...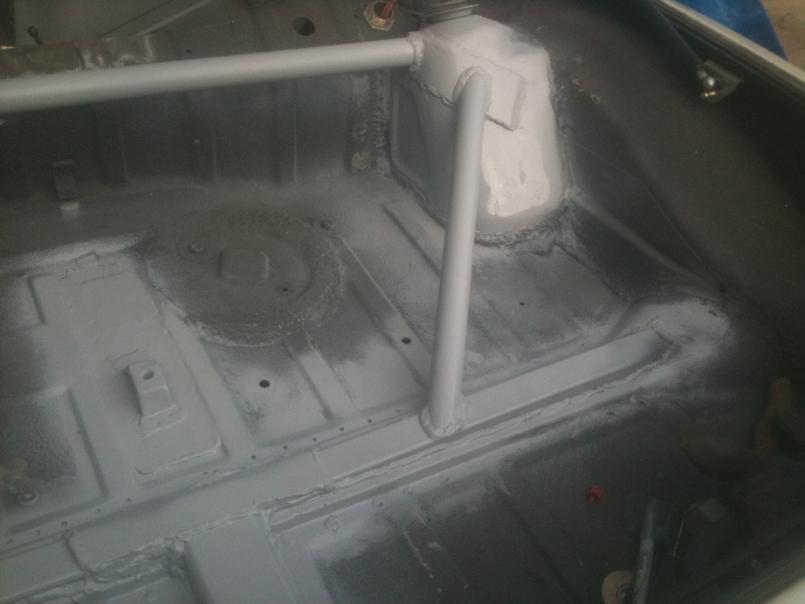
Posted by: kg6dxn Mar 26 2011, 07:38 PM
Strawman get me thinking about the engine bar mounts to the chassis. I will see about beefing them up tomorrow.
Attached thumbnail(s)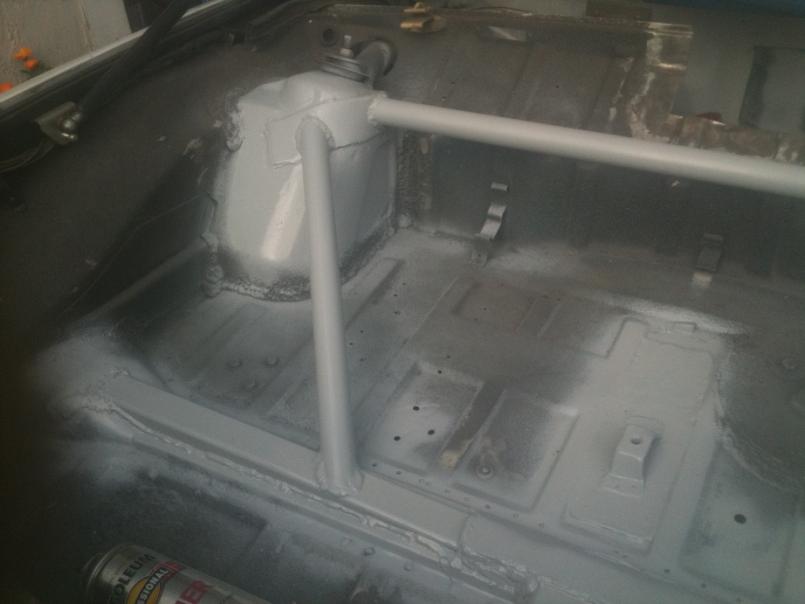
Posted by: kg6dxn Mar 27 2011, 08:30 PM
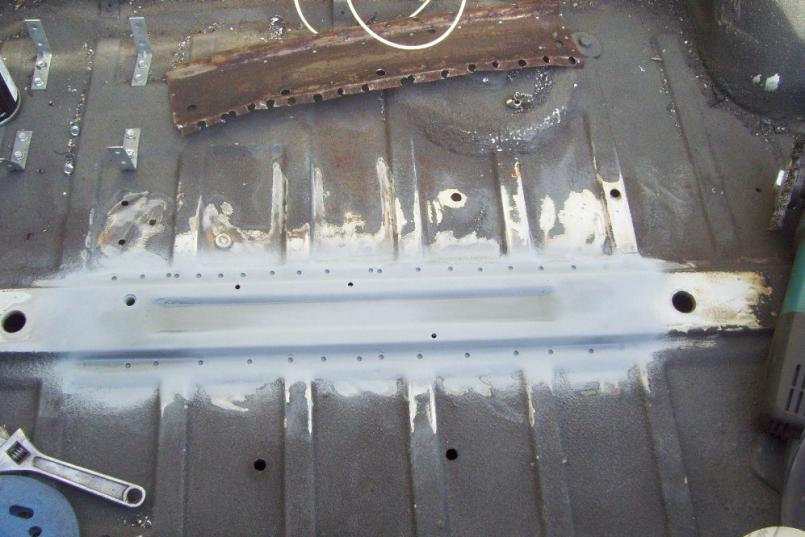
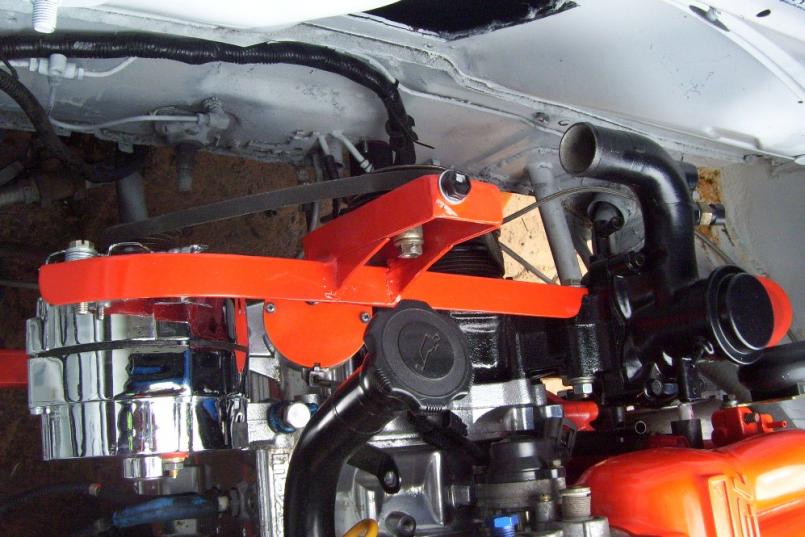
I beefed up the engine mounts with some 14ga steel. I also seam welded around here and there... Thanks Strawman for the motivation... 
Posted by: kg6dxn Mar 27 2011, 08:33 PM
I ground down the welds a little, got it in primer and re-drilled the holes... The 14ga boxed in the mount a little. Should be plenty strong now...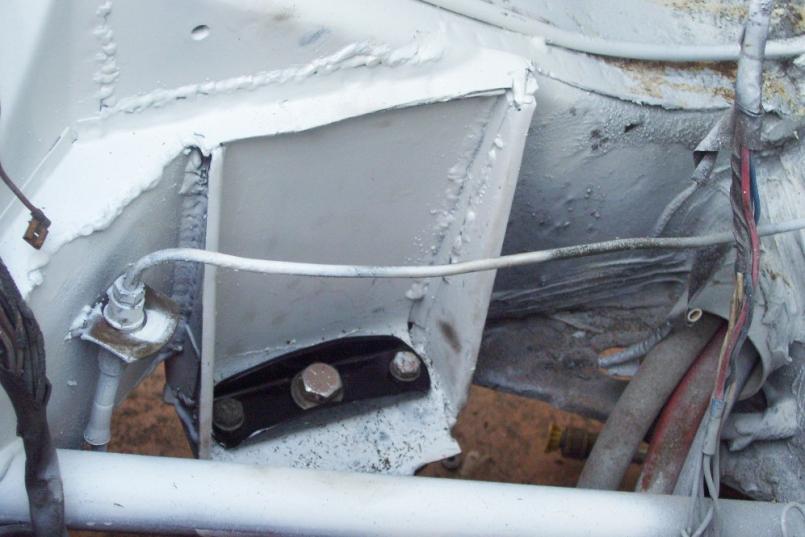
Posted by: kg6dxn Mar 27 2011, 08:38 PM
I also moved my urethane mount to the sides. I need to fab a big round plate to sandwhich to the bar...
Here is the only pic I have of the engine installed. No intake or exhaust and a rag covering. Look how tiny it is....
Posted by: Andyrew Mar 28 2011, 11:55 AM
I like the motor mount reinforcements! Probably overkill, but overkill works!
Posted by: kg6dxn Apr 2 2011, 03:12 PM
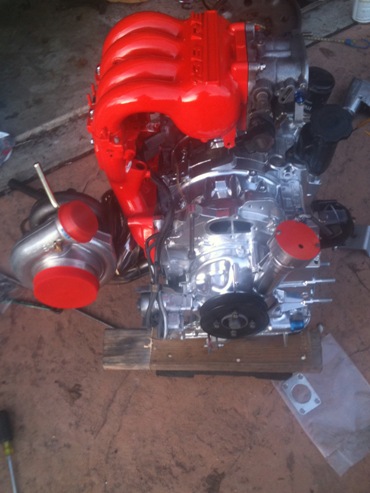
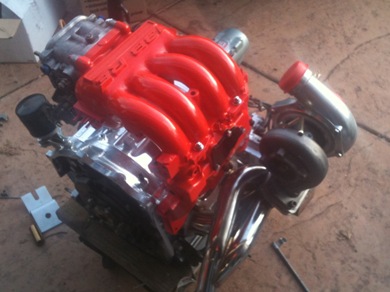
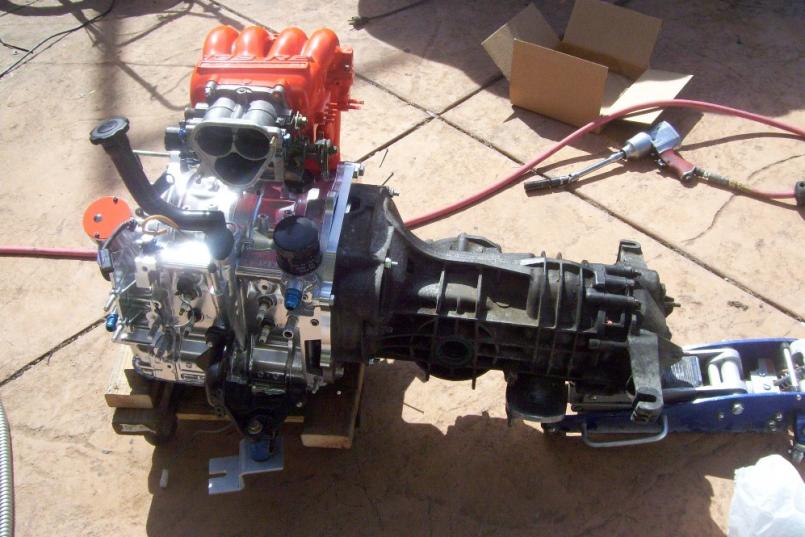
I started mocking up the intake and exhaust. Here's some pics of the almost complete engine in the bay. Sure fits nice...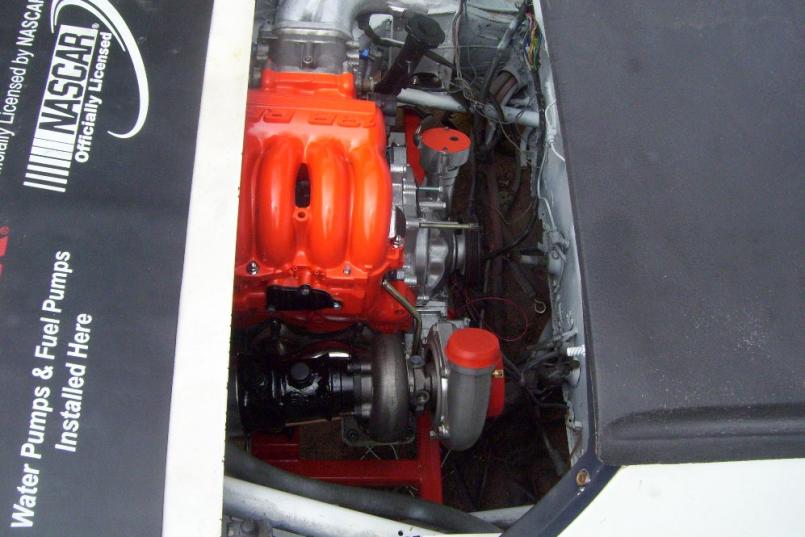
Posted by: kg6dxn Apr 2 2011, 03:14 PM
Not exactly sure what I will do with the WG dump. Notice the 3 bung holes for multiple O2 sensors...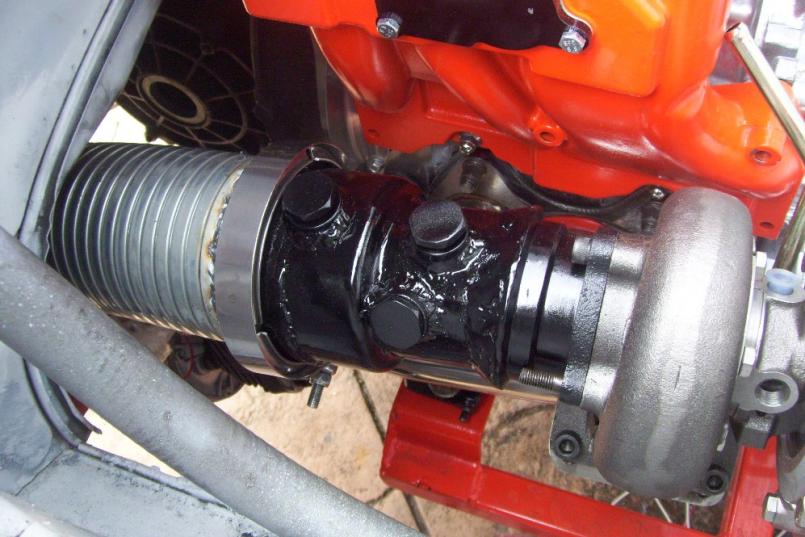
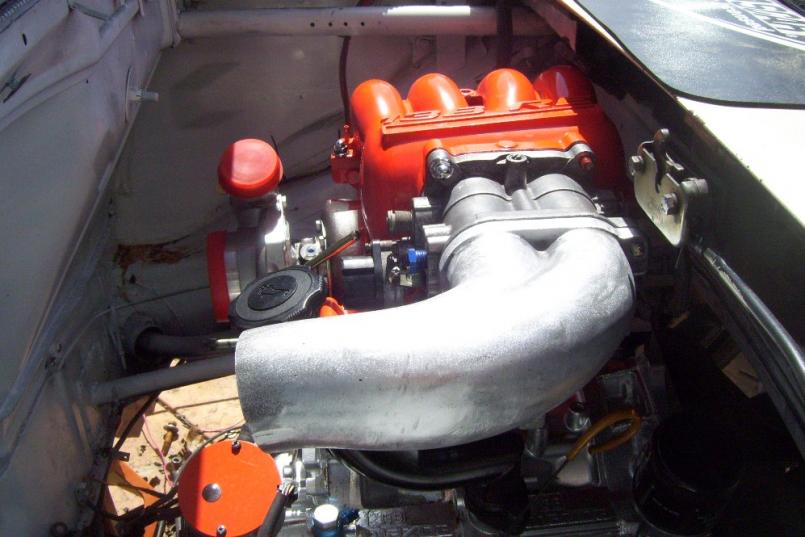
Posted by: kg6dxn Apr 2 2011, 03:19 PM
I also need to clock the turbo to its final position. The only piece I can't change is the drain line clearance. I can't put the turbo drain exactly on the bottom. It will get clocked to the 5 O'clock position. I'm using a Semi Truck 4 inch flex pipe for the exhaust...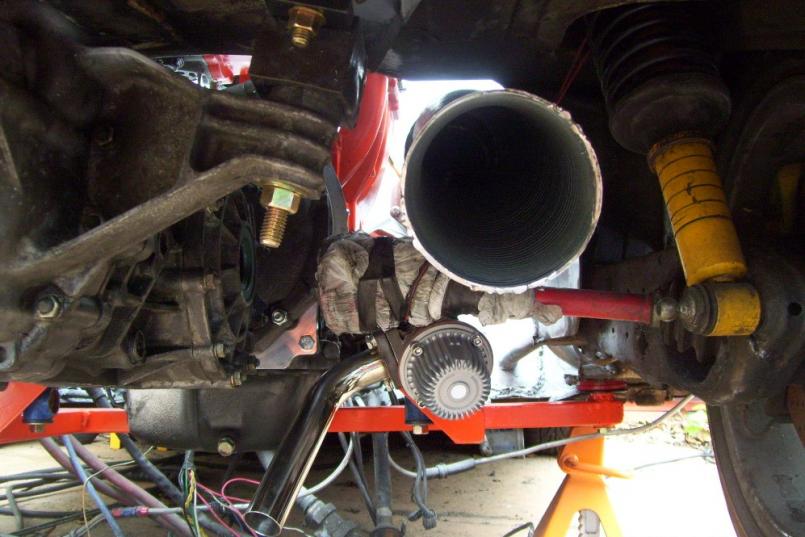

Posted by: kg6dxn Apr 3 2011, 12:23 AM
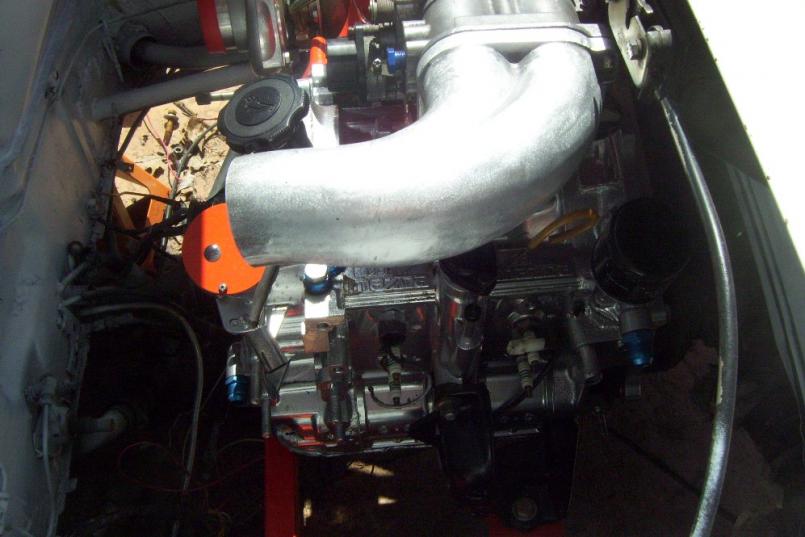
Few more pics of the engine bay...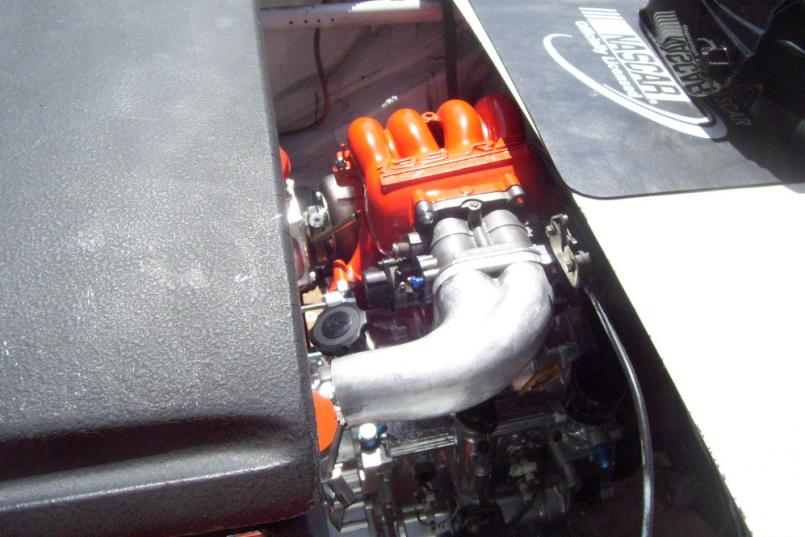
Posted by: Andyrew Apr 4 2011, 09:56 AM
That is one FUNKY exhaust... What material is that made out of? Doesnt look weldable (although im sure it is).
Im just curious.. Why Chevy orange for the engine bits? You gonna repaint your car orange or like the contrast?
I like the wastegate dump where it is (Or route it just before the rear wheel  ).
).
Posted by: kg6dxn Apr 4 2011, 12:48 PM
That is one FUNKY exhaust... What material is that made out of? Doesnt look weldable (although im sure it is).
Im just curious.. Why Chevy orange for the engine bits? You gonna repaint your car orange or like the contrast?
I like the wastegate dump where it is (Or route it just before the rear wheel
).The flex line is from a Big Rig. It is spiral lock steel. Very thin, weld with care.
I love Chevy Orange! I am considering the Red Baron theme
So the orange will work good with it.Either I leave the dump there or tie it into the exhaust...
Posted by: Andyrew Apr 4 2011, 01:02 PM
Well if you make the rest of the exhaust out of regular steel you could easily tie it into the exhaust later if/when you find out that its loud as f*&*...
Love the Baron theme!
If you go black/orange you would be opposite of my color scheme! (orange/black).
So you know what direction I vote for
Posted by: kg6dxn Apr 4 2011, 01:07 PM
Yes, The flex will be cut back and tied into a 4" mandrel bent 90, then to my muffler and another 90 turned to the rear. Only 2 bends in my exhaust. I may make the second one a 45 if it looks right.
Posted by: kg6dxn Apr 4 2011, 06:11 PM
Since I got laid off. I'm staying busy. The PO left me the piece of the firewall cut out for the V8. I spent some time welding it back together. While I was at it, I made an aluminum plats to mount my ECU and misc devices. I also cut a hole for the wiring gromet left over from the Cosmo Turbo (donar car).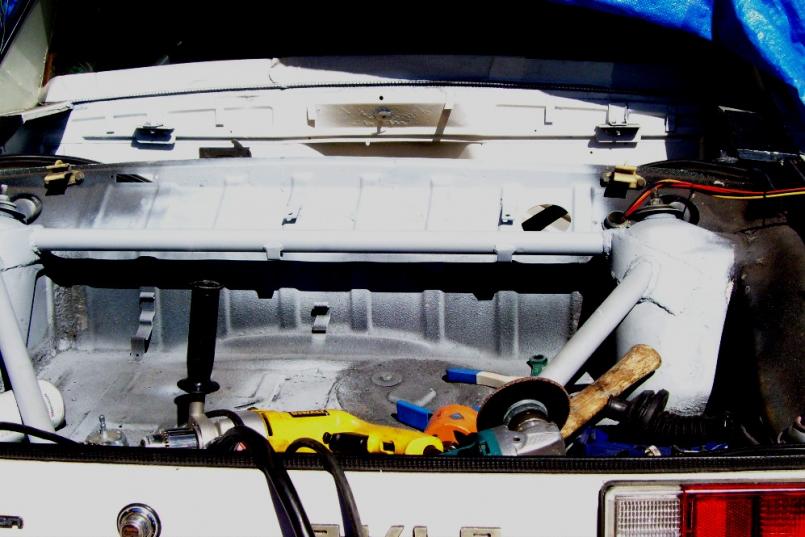
It still needs some grinding and finishing but it will do for now. I still have to pull the car back apart and snad blast it after I get it running...
I welded some mounting tabs to hold this plate. I painted it orange for Andrew...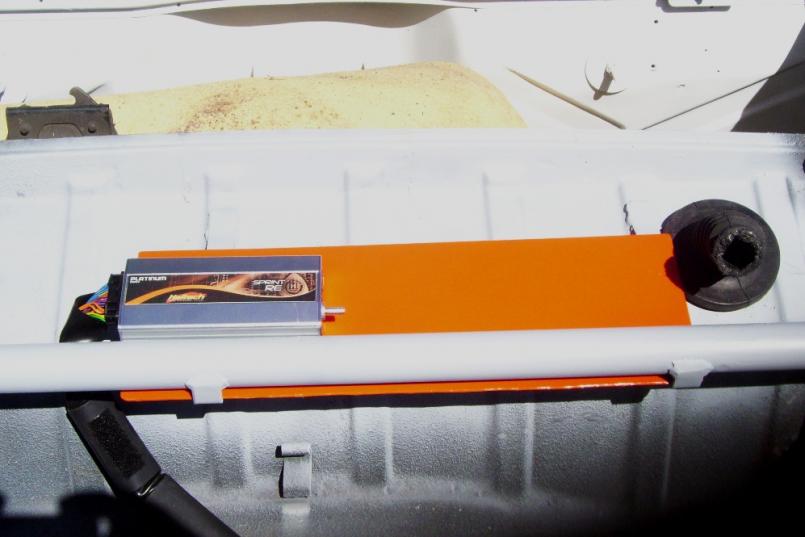
Posted by: Lennies914 Apr 4 2011, 06:29 PM
[quote name='kg6dxn' date='Apr 4 2011, 05:11 PM' post='1453714']
Since I got laid off. I'm staying busy.
Now I understand how you're making so much progress. Sorry to hear it though. 
I'm really enjoying watching Sasquach come together. It's looking great
Posted by: kg6dxn Apr 4 2011, 06:35 PM
Now I understand how you're making so much progress. Sorry to hear it though.
I'm really enjoying watching Sasquach come together. It's looking great
Yea, it sucks. First time I've been laid off in 20 years...
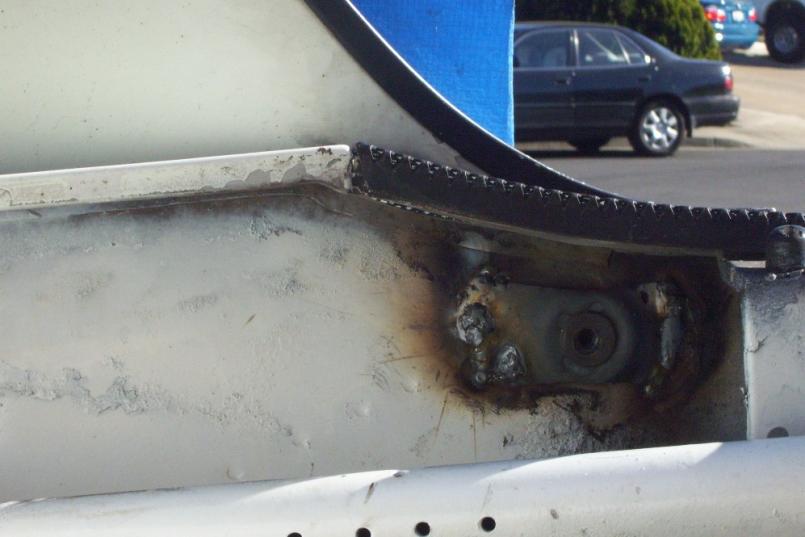
My right hinge pivot broke too. the bolt sheared off. The PO Brazed the pivot on, real crappy. Used my air chisel to pop it off. I had to drill it out and weld a metrix nut on the back side.. Grond off all the brass and welded it back on. I stole a pivot bot from the red car in the garage...
Posted by: JRust Apr 4 2011, 09:56 PM
Good your keeping busy Mike! Went throu a short stretch of being without work a few years back. Drove me nuts! Of course it didn't help that I didn't have a teener to work on at the time  . Must be why I always seem to have 4 on hand now huh
Posted by: Andyrew Apr 4 2011, 10:36 PM
My right hinge pivot broke too. the bolt sheared off. The PO Brazed the pivot on, real crappy. Used my air chisel to pop it off. I had to drill it out and weld a metrix nut on the back side.. Grond off all the brass and welded it back on. I stole a pivot bot from the red car in the garage...
This is exactly what Dave (Arkitect) needs to do.
Oh and I like orange
Posted by: kg6dxn Apr 5 2011, 01:57 PM
Deciced to build a shift rod today. The design concept is similar to the J West system. Much props to J West but I am a CSOB. The oil pan is in the way of a striaght shot to the shift console. My design includes 2 U Joints and a bent rod. On my other tranny (this one is for mock up only) I have dual bushing. One in the stock location and one on a custom bracket at the rear of the console. Just as in the J West design, the dual bushings hold the rod from flopping around and allow the use of the rear U Joint. My system is built with 5/8", 0.120 wall DOM. I had a long piece laying around. The U Joints were $7 on eBay. Remember I'm a CSOB.
First thing was to drill and tap two holes in the U Joint. I tapped for 1/4-20 thread. This will be the connection point to the front rod and the rear console rod. The bolts will allow adjustment and fine tuning the gear selection.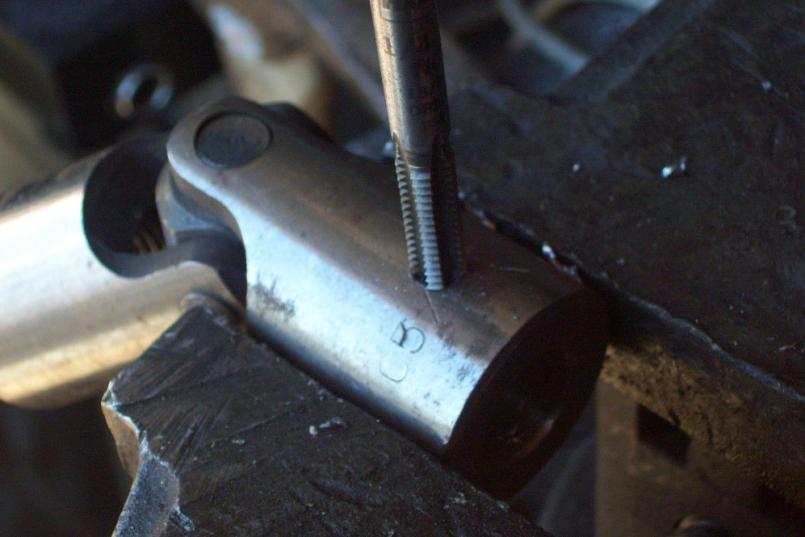
I had to hone the inside a little to fit the DOM. I had solid rod too but it is much heavier Than the tubing.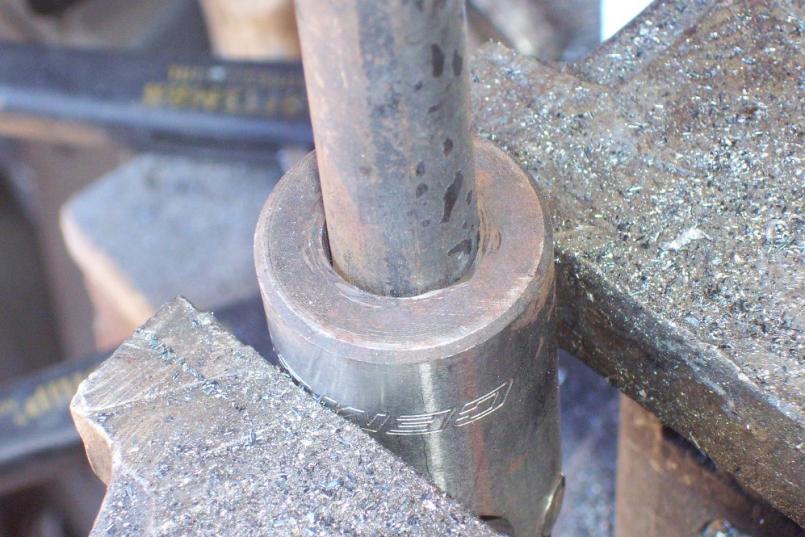
Posted by: kg6dxn Apr 5 2011, 02:00 PM
Next I had to figure how far off the rod was. From the console, I had to offset 3" around the oil pan and low oil sender.
I then bent and welded the U Joints on to the DOM.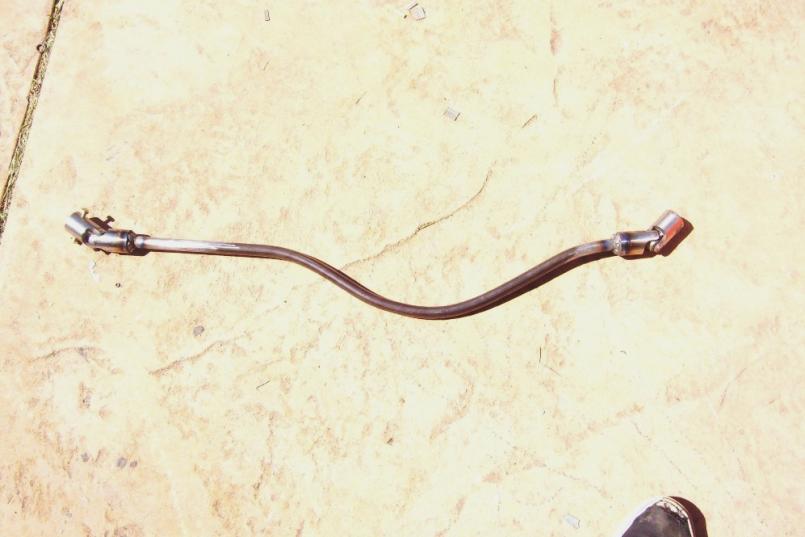
Posted by: kg6dxn Apr 5 2011, 02:03 PM
Looks like even penitration...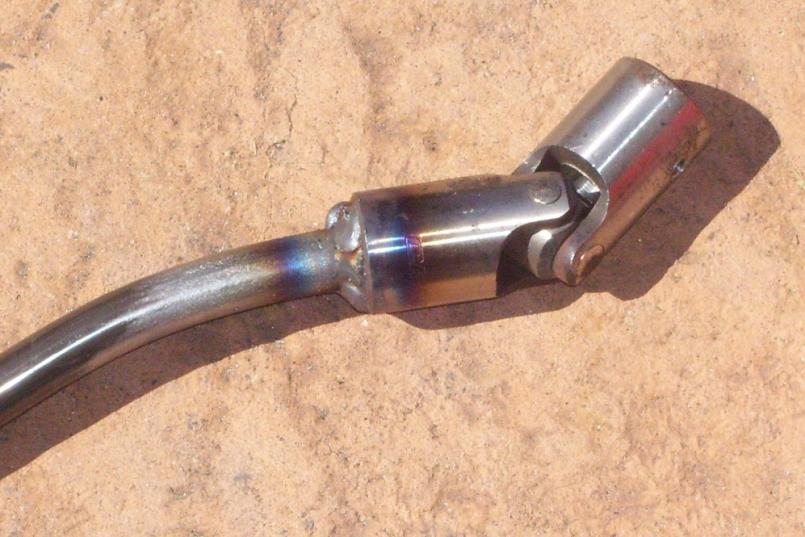
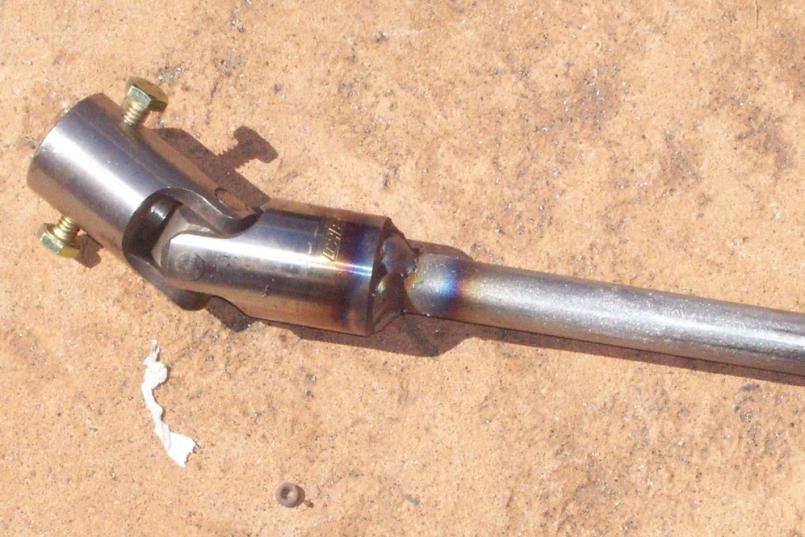
Posted by: kg6dxn Apr 5 2011, 02:08 PM
Little sanding and paint (orange for Andrew). I used a self volcanizing rubber to cover the joint. Before I install for good, I will pack the tube with marine grease. Since it is hollow. it should hold quite a bit and should flow a little as the engine bay gets warm.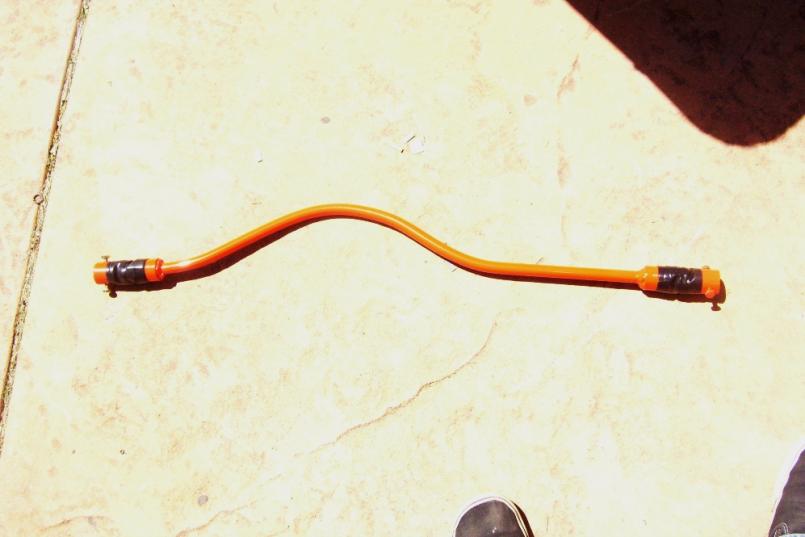
close up of the rubber. it it not sticky, but it does stick to itself. Water proof, oil resistant and heat resistant...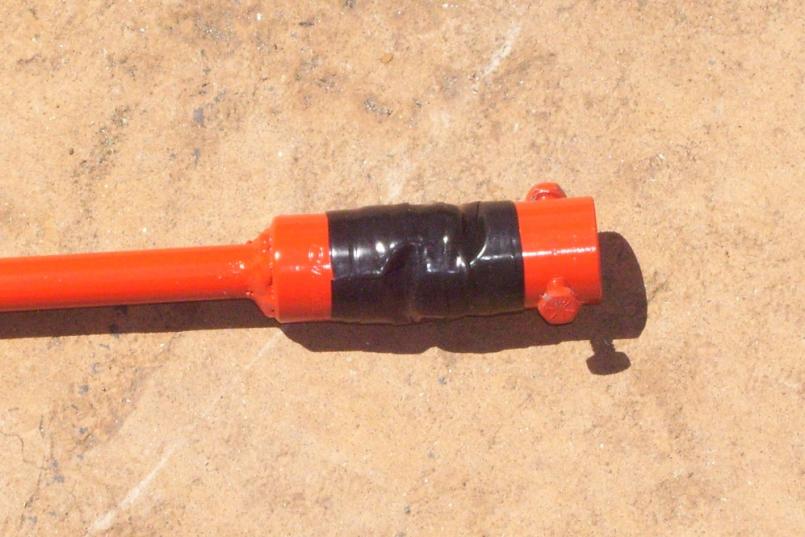
Posted by: kg6dxn Apr 5 2011, 02:12 PM
Here's a pic of it in place. I still need to fabricate the 10 inches the mounts at the shift console. I will wait until I install the good trany after Dr. Evils Disco clinic. I should also mention that I have a sperical bronze bearing at the fire wall.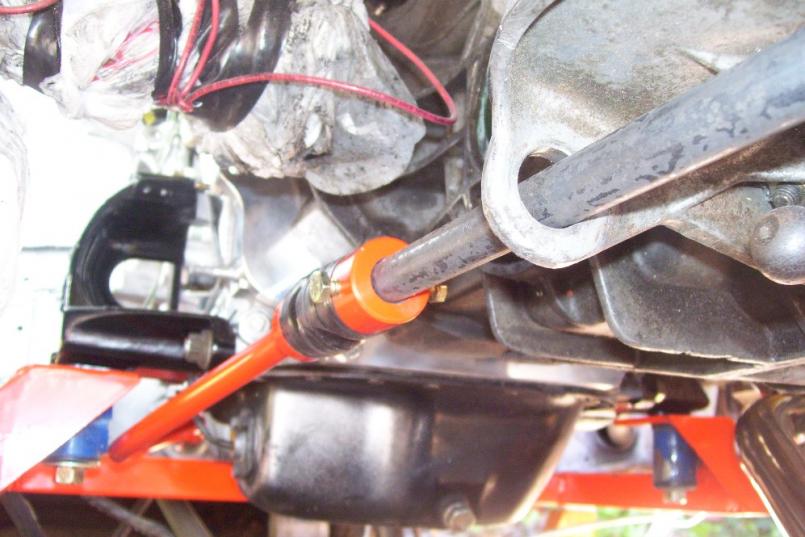
Posted by: Andyrew Apr 5 2011, 03:03 PM
Thats a nice looking setup! Dont quite understand filling the tube with grease though. Link to the joints?
And again. I like orange
Posted by: kg6dxn Apr 8 2011, 08:04 PM
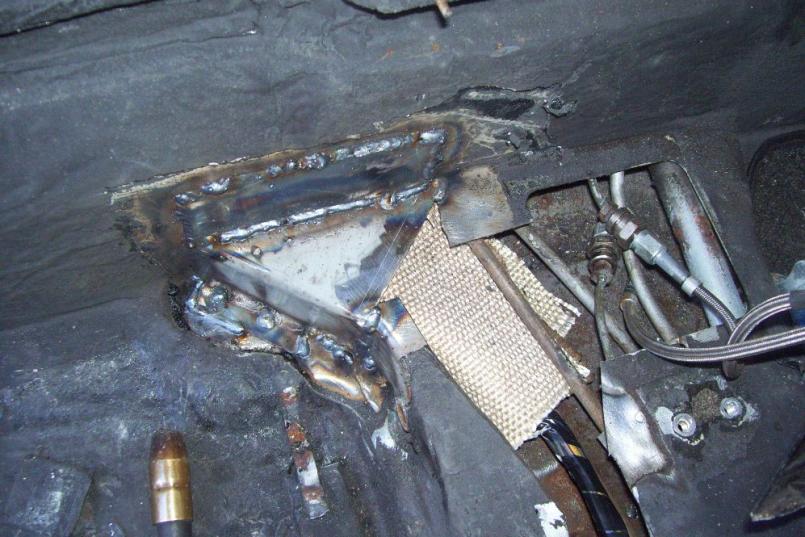
Today I tackled the wiring a little. I removed my engine tray, since I don't need it. It left my bulkhead wiring exposed and looking like crap. I decided on a bulkhead connector like a modern car. I'm sure Project Anklebiter will go with a similar system. Here is the before pic. Old factory 914 broken grommet...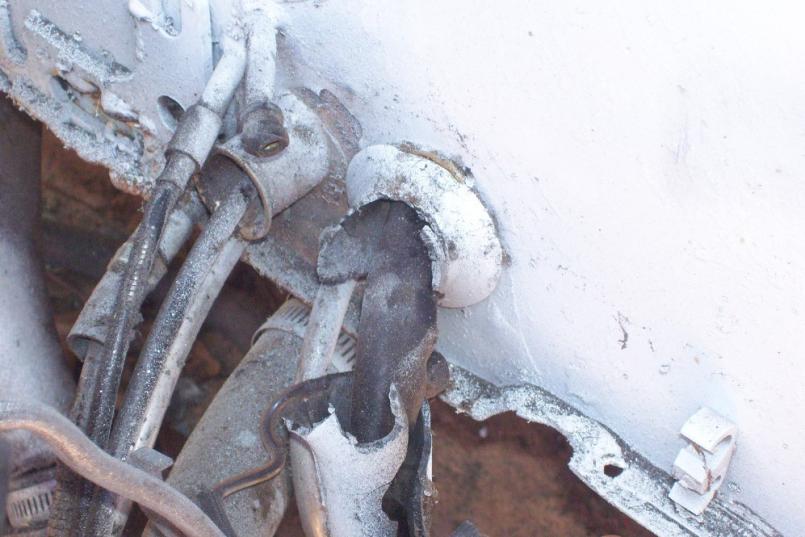
Here is the after pic. Simple, weatherproof bulkhead connector. This alows me to remove the rear harness and get it out of the way during fabrication.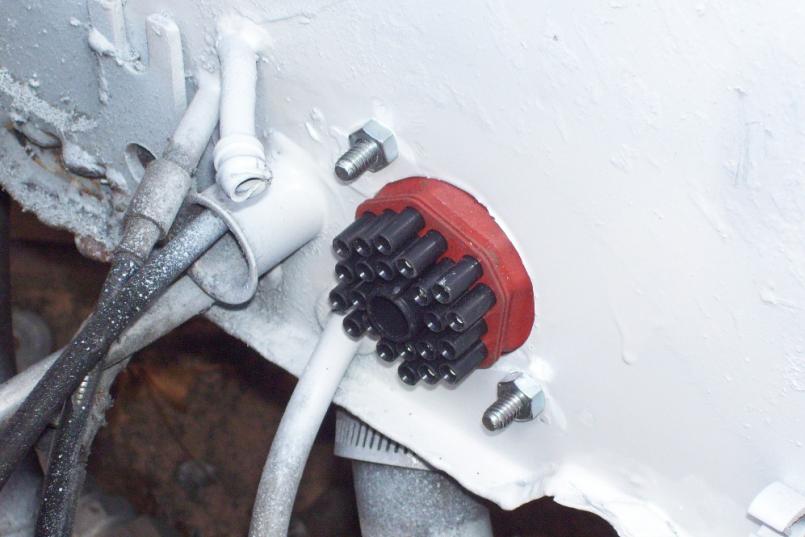
Posted by: JRust Apr 8 2011, 08:07 PM
Keep it up Mike! Looking great
Posted by: kg6dxn Apr 8 2011, 08:07 PM
I had to cut the firewall and tunnel a little to make room for the connector and allow removal when needed...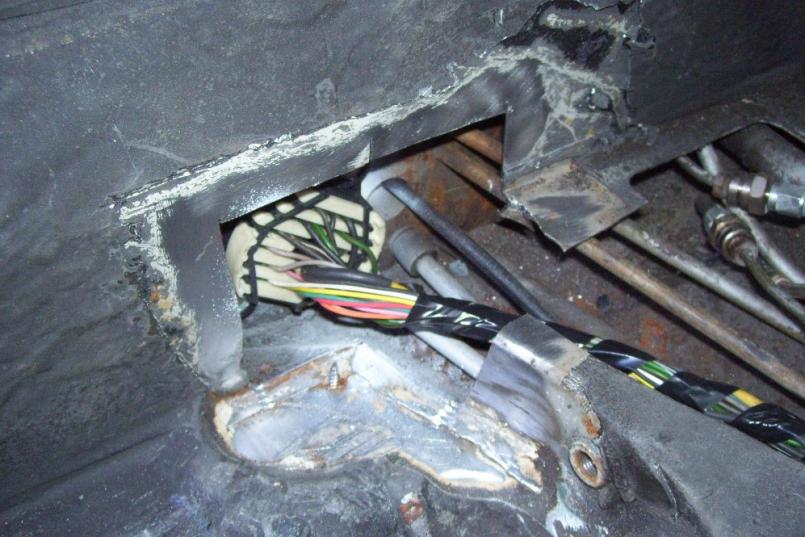
Cut some pieces of fire cloth to keep the wires safe...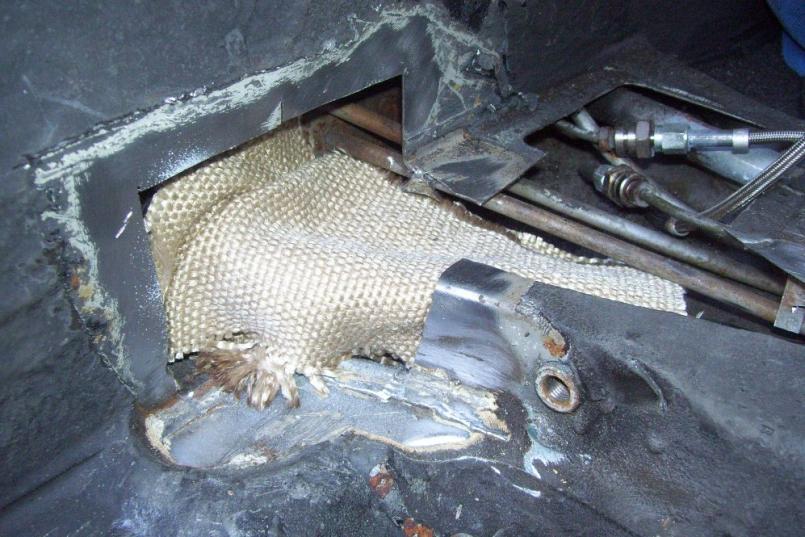
Posted by: kg6dxn Apr 8 2011, 08:10 PM
Welded up the bulkhead with 14ga plate. Might be overkill but the seat belt bolt is close by...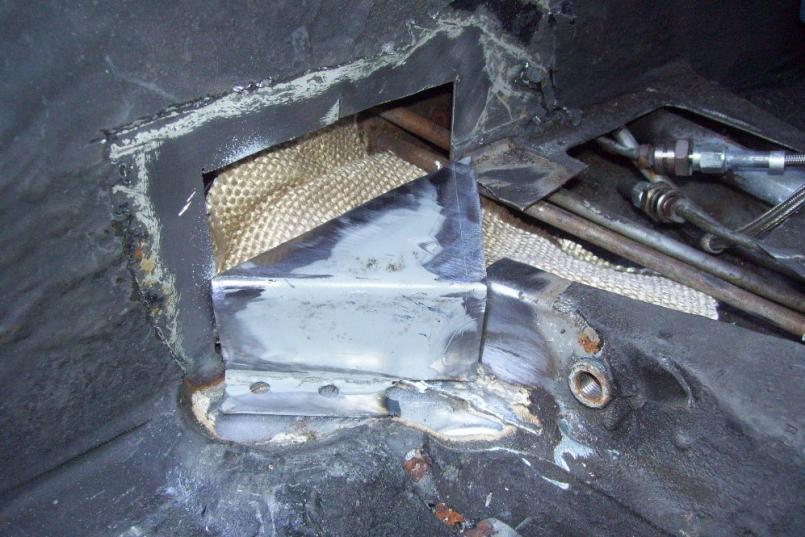
Posted by: kg6dxn Apr 8 2011, 08:14 PM
So the bulkhead connector was $25 online. I have the correct crimper tool ($149) already but there are cheap ones online too. After crimping, I soldered the crimp to make it last longer than the car...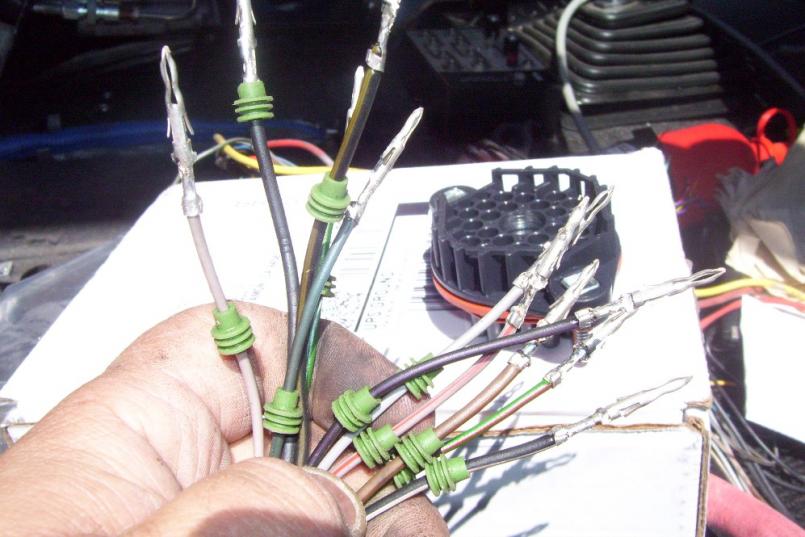
Make sure you put on the little dildos before you crimp the connection...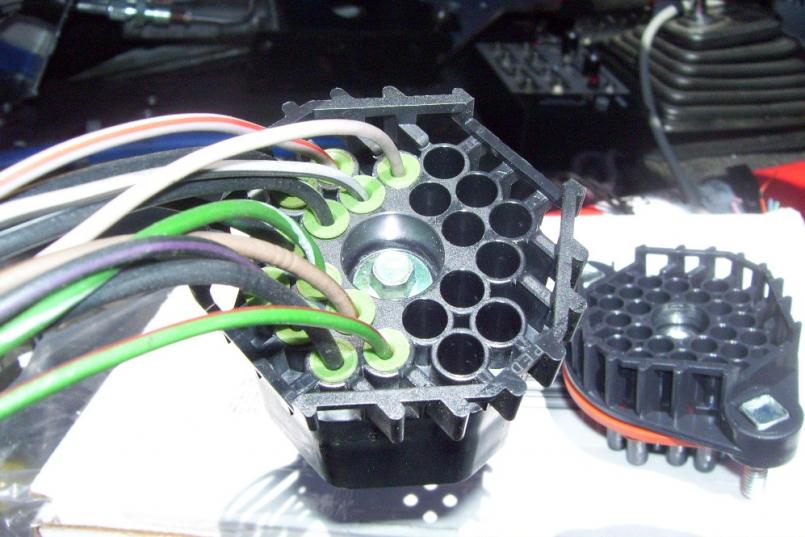
Posted by: kg6dxn Apr 8 2011, 08:19 PM
I removed the large red wires from the harness. The ones that connect to the battery and alternator. My battery is in the front, so I pulled the red wires back to the fuse panel. I will route them to the battery up front. When I was done with the 914 wires, I had 8 empty positions. I filled them with spare wires. I will use them for something I'm sure... Notice in this picture, the starter wire was split, shrink tubed and crimped to 2 connectors. This is an acceptible method of making larger wires fit in smaller connectors. I will use a relay in the back to make sure I don't over heat the connection...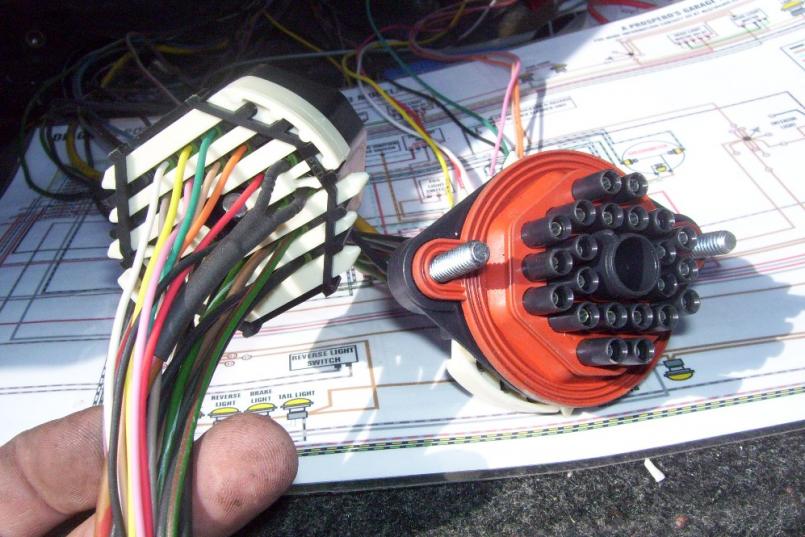
I plugged them together to amke sure all the wires match up...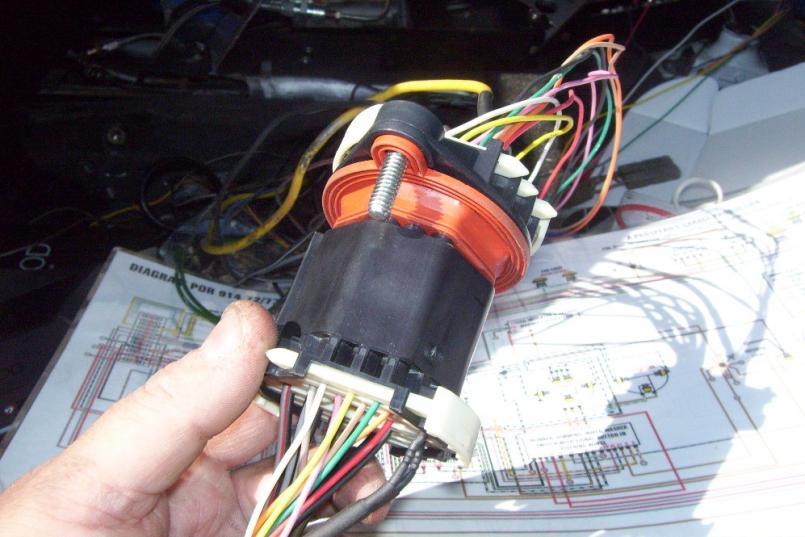
Posted by: kg6dxn Apr 8 2011, 08:26 PM
So, here is the rear harness. I do need to make some repairs to the tail light portion and connect the engine wiring to my EFI and misc sensors...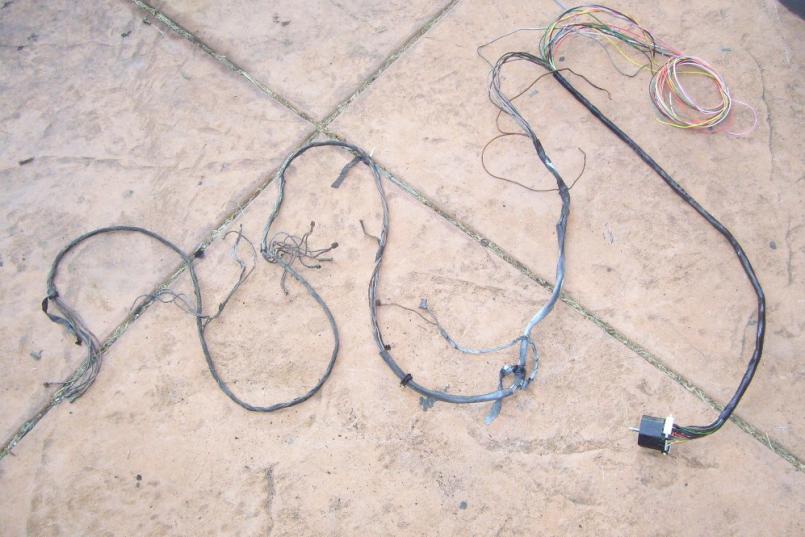
Here it is plugged in at the firewall. It's going to look great once I get it dressed up...
That's it for now...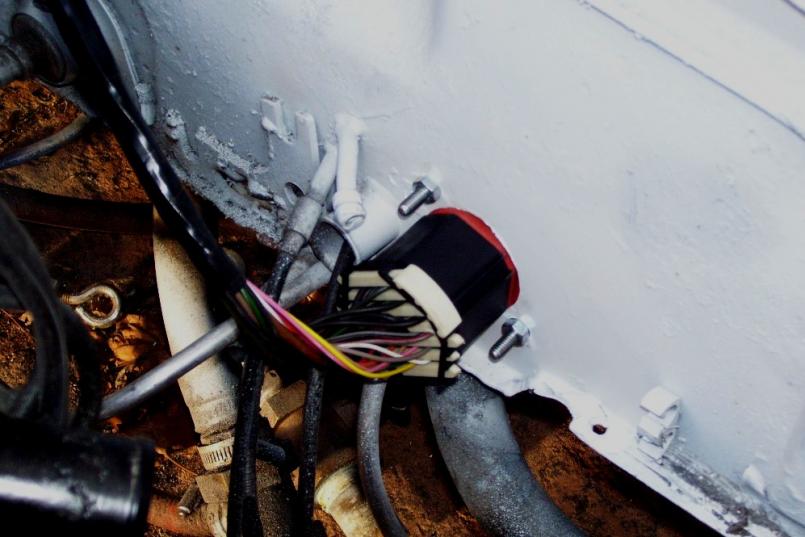
Posted by: quadracerx Apr 8 2011, 08:36 PM
Cool...nice job... DUDE! where did you get the crimps, and crimping tool....LOL?
Thanks...
Steve
Posted by: kg6dxn Apr 8 2011, 08:39 PM
Cool...nice job...
DUDE! where did you get the crimps, and crimping tool....LOL?Thanks...
Steve
The crimps come with the bulkhead connector kit (eBay). The crimper I have had for 15 years, from when I needed it for work.
Posted by: Andyrew Apr 9 2011, 06:56 PM
Figures, the wiring guy would show off his wiring skills ......
Ok im just jealous! That is awesome!!!! Keep up this awesome work!!
Posted by: FourBlades Apr 10 2011, 01:05 PM
I love those weather pac connectors.
A great build, this will be an awesome car.
Are you going to be ready for summer?
John
Posted by: kg6dxn Apr 10 2011, 01:13 PM
I love those weather pac connectors.
A great build, this will be an awesome car.
Are you going to be ready for summer?
John
If I find a job (got laid off 2 weeks ago) I can have it done by summer. At least be able to drive it and work the bugs out. Then I get to take it apart and paint it. We shall see... Running low on $$$. So I'm doing what I can without spending a lot.
Posted by: FourBlades Apr 10 2011, 01:18 PM
Good luck on your job search.
At least you are putting your extra time to good use.
You have a lot of unique and inventive things on this car already.
John
Posted by: kg6dxn Apr 14 2011, 05:29 PM
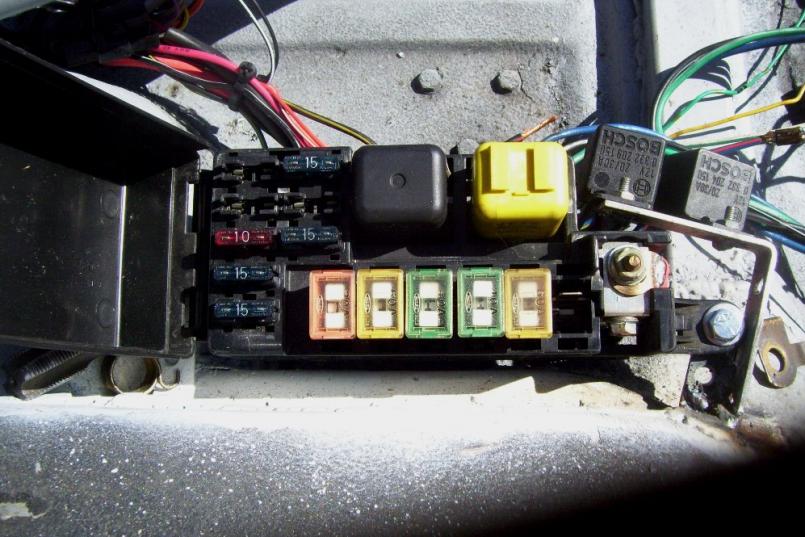
The real wiring challenge has begun. So far I have repaired and modified the rear 914 harness. I have disected the RX7 (Cosmo) harness. I have the ECU harness with it's miryad of wires...  I decided to use the Mazda engine fuse/relay panel and adaptit to my needs. It satrted by cutting it loose from the main harness and blueprinting the connections. So far I have the fuel pump and starter relays configured and the ECU power fuse. The fuse panel connections were "Hot all the time". I am using 2 Bosch relays as a master ignition control. The Bosch relays turn on the ATC fuses when the ignition is on. The Starter and fuel relays along with the Maxi fuses are Hot all the time and activated only when needed. The ECU will control the fuel pump and I have a power bypass in the cabin if needed. The starter relay is set up just like a hot start kit. I managed to get the engine sensors wired to the engine and routed into the rear trunk; Where all the magic happens. I have not decided on my final spark ignighter setup. The factory uses wasted spark on the Leading spark plugs and discrete spark on the trailing plugs. The ECU should be able to accomplish this but I am considering an MSD. I can use 4 MSD 6AL units and have 4 coils and discrete spark to each plug. This set up would allow finer tuning of the leading and trailing sparks. My budget is very limited now so the MSD will have to wait. I am taking donations.
Here are some early progress pictures. If you are scared of wires, don't look!
In this pic, I have all the wires in the trunk. buried are my note book and Mazda wiring diagram.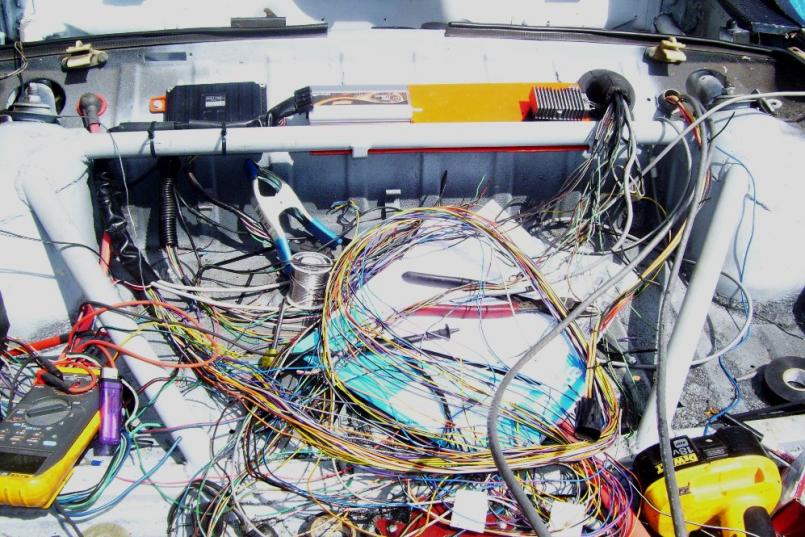
This is the engine with sensor connections in place. The wiring will get dressed up once I know they are correct...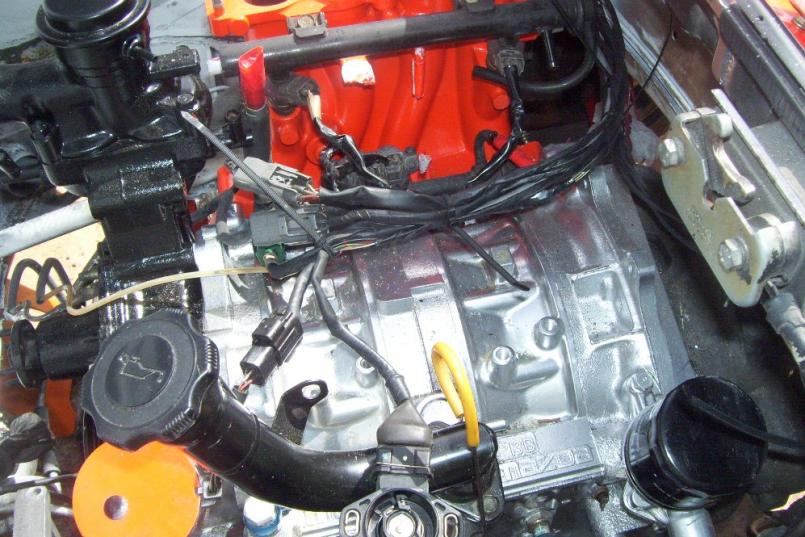
Posted by: kg6dxn Apr 14 2011, 05:31 PM
It is taking a long time wiring because a solder and shrink tube everything. I also am designing this to be removeable when I need to prep for paint.
Here is a quick pic of the fuse/relay panel. I used my label machine as I connect to the system...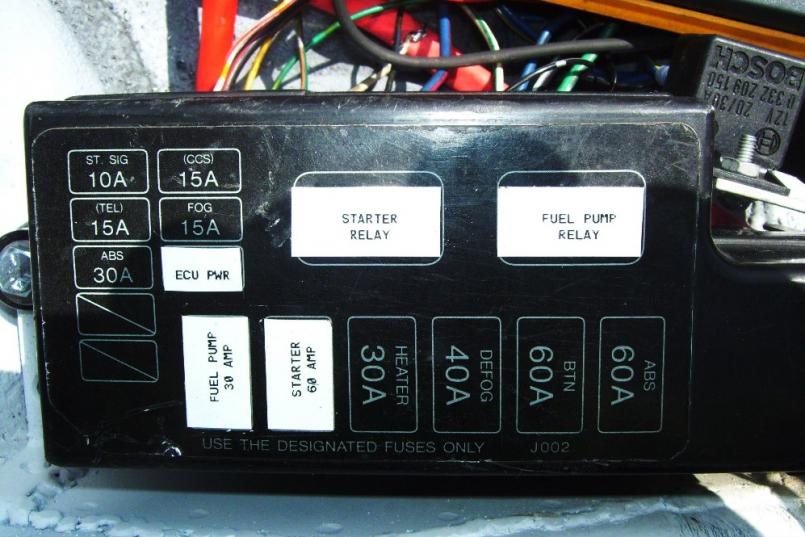
Posted by: kg6dxn Apr 16 2011, 07:50 PM
Well the ECU is 75% wired up. Still need the gauge wiring to the dash complete and some misc. I took a little break from the ECU and decided to fab up the alternator mount. Since I removed the A/C compressor, Power Steering Pump, Smog Pump and factory alternator it really cleaned up the front of the engine. The old alternator was a saddle mount and my 140 Amp Powermaster is not. So none of the factory stuff would work. I used some 1/4" steel I had laying around and made it to bolt to the existing studs on the engine. There was a massive cast aluminum bracked designe to hold the A/C and steering pump. I looked into modifiying it but it was a piece of shit. The Mazda alt pully was and easy swap from my GM V groove. Same I.D. and thread. I did realize that I don't have the curved tension bracket for my Alt so there will be some more work and a trip to the Junk Yard to pick one up.
So far I have 80 hours into rewiring this car. I under estimated the ammount of fab to go from a V8 to a Rotary. It looked so simple on paper...
Here's a couple of pics just for fun.
Mazda pully fit wo no mods...
Bracket painted and then I had to clearance the top left bracket a little...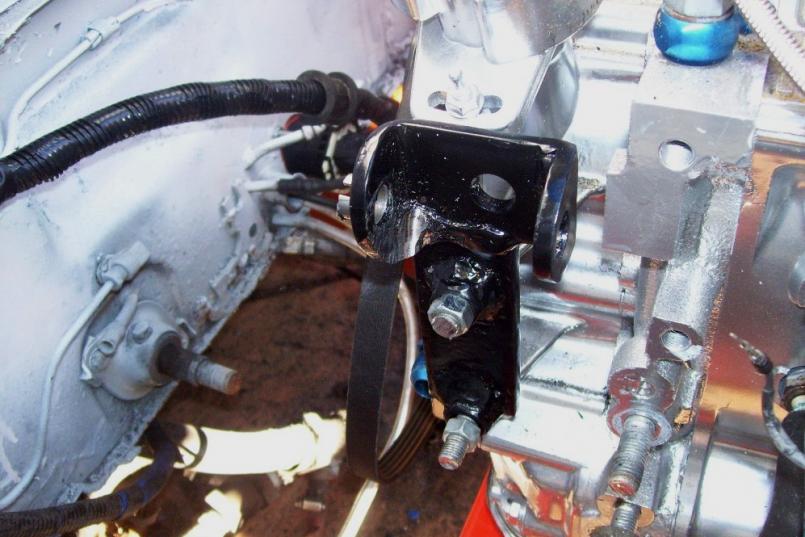
Posted by: kg6dxn Apr 16 2011, 07:54 PM
Here is a pic of the Alt bolted in...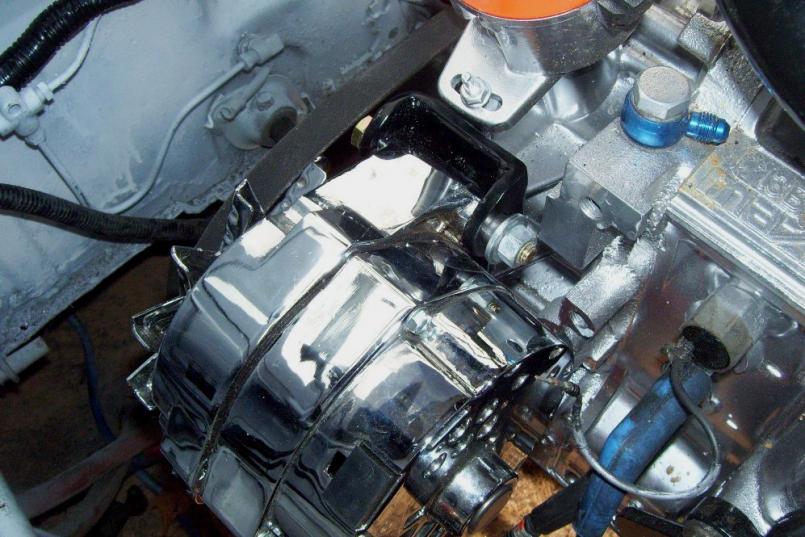
I will post pics of the completed (or as much as can be) in a couple of days. I am still missing some parts but I still have lots that I can do beofre I run out of parts ad money... 
Posted by: Andyrew Apr 17 2011, 01:26 AM
Damn Mike. 80 hours for a guy who does electrical work... That is some serious wiring work. Thats one thing I havent tackled in my car and im not looking forward to...
140amp alternator? You going to run a stereo or do you just like juice?
Posted by: kg6dxn Apr 17 2011, 09:12 AM
140amp alternator? You going to run a stereo or do you just like juice?
Both. My stereo consists of a Kenwood deck, JL subwoofer in the passenger foot rest, Infinity door speakers and an amp. I have several to choose from. Rockford Fosgate Power 300, Kenwood KAC-923, Phoenix Gold ... I'm not sure which one I will use.
I like having on demand power from the alternator. Figure if my radio is blasting the amp could draw 30-40 amps. I have HID headlights, 35 Amps. My EFI 10-20 amps? Cooling fan 30 amps. Just with those loads my worst case is a 125 Amp draw peak. The alt I ran on my V8 most of the time was 85 Amps. This one cost me $125 from my FLAPS. Less than a dollar per amp and each Powermaster comes with a spec sheet. This one makes over 100 amps at idle. Top if off, it's chrome! Chrome makes cars go faster...
Posted by: Andyrew Apr 17 2011, 10:09 AM
Good stuff! I've never been a fan of a "kickin" stereo, but your sounds mild. I have all the stuff for a mild stereo as well, but right now I have a deck and door speakers and stock speakers, last time I turned it on it kicked pretty good, but I typically dont drive with the stereo on.
Posted by: kg6dxn Apr 17 2011, 06:00 PM
Time for a wiring update. I have the ECU complete exept for the missing wide band O2 sensor and my VSS. It has some aux inputs and outputs that are undetermined right now. The gauge wiring is complete to a cannon plug in the rear trunk. I need some sensors to finish it off. When I sold my V8, I left the sending units in the engine.
The Rotary uses oil injection. similar to a 2 stroke but it is actually a 4 stroke engine. The purpose is to oil down the chamber walls a little. Just like a piston engine has oil splashing under the piston. This engine uses an electronic oil metering pump. Most tuners pre-mix the fuel and get rid of the pump. I found a controller for the EOMP in Australia. It is mounted on my dash and wires to the pump and the TPS. This controlller is yet to be wired up becaust I have an installation question. The builder in OZ has less then stellar customer service. I hope he checks his email in the next 2 weeks.
Here are some pics...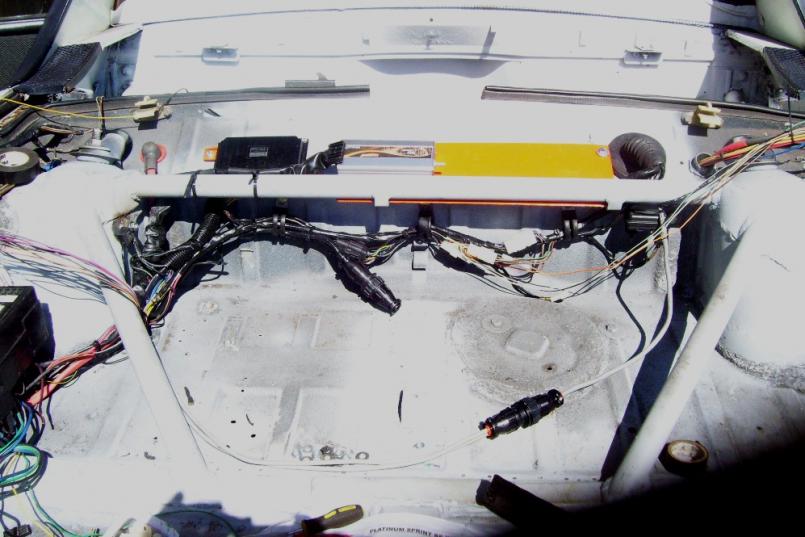
The cannon plug in the center goes to the gauge sensors when I buy them...
Posted by: kg6dxn Apr 17 2011, 06:01 PM
Here's another pic of the fuse panel...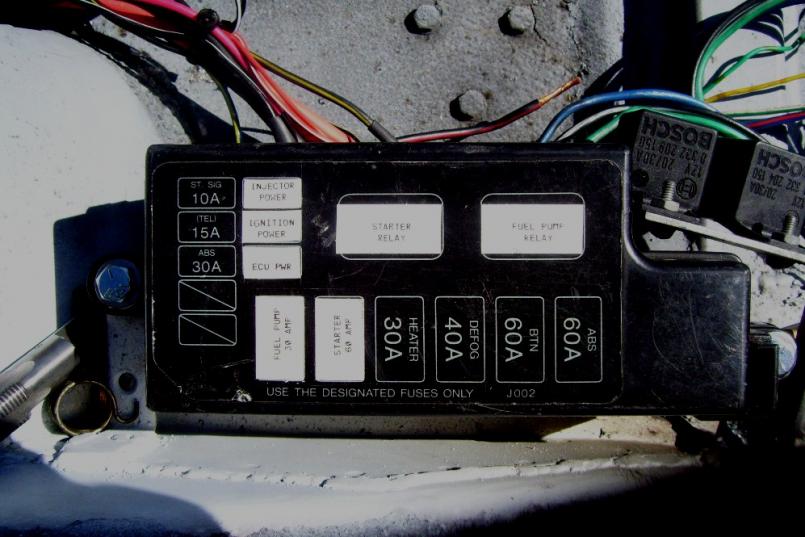
Posted by: kg6dxn Apr 17 2011, 06:05 PM
I installed a battery bulkhead connector for the main cable... Battery in the front trunk. Starter cable will connect to this terminal...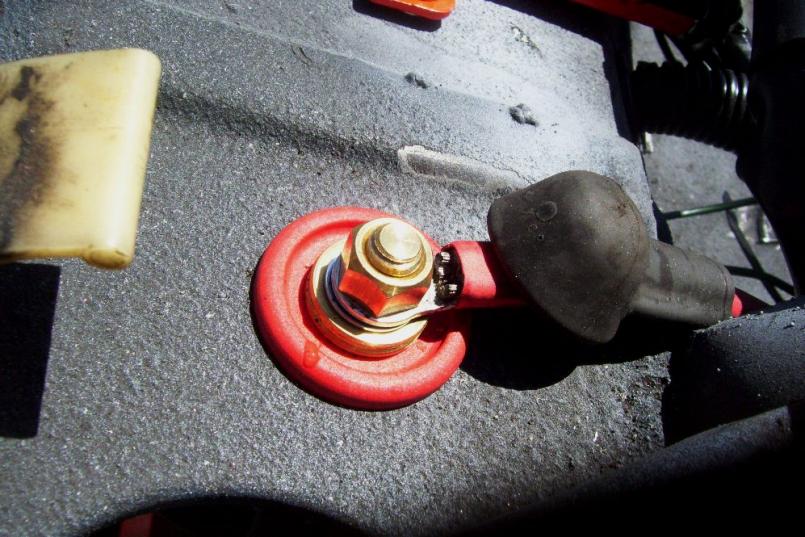
Here you can see the coil packs too...
Posted by: kg6dxn Apr 17 2011, 06:13 PM
I also fabed up a new throttle cable. I got some 1/16" SS cable and used some leftover teflon braided tubing I had. I pulled off the old ferrel that mounts to the tunnel. Pressed it onto the new tubing and covered it in shring tubing. I ran it wide into the hell hole to clear the heat from the turbo. I also fabed up a bracket to the intake. The intake side and pedal were completed with some left over Lokar parts. My cable is now 11 feet long. the teflon tube is smooth. All that's left to do is lube it up and strap it down to the hell hole...
Hard to see the bracket I made but it is super cool and maybe the best piece of fab work on the car...
Posted by: kg6dxn Apr 19 2011, 03:18 PM
Did a little work on the exhaust today. Welded my 4" 90 to my flex and added a V Band to the end. I'm going for the largest 914 exhaust award After welding and grinding, I put on a coat of 900 degree paint and wraped the tubing. I still need to get the muffler and turn down but this is a start...
Here are some pics...
Posted by: kg6dxn Apr 19 2011, 03:20 PM
Double check my ID 
Posted by: kg6dxn Apr 19 2011, 03:22 PM
Now it's time to tackle my dash wiring. Between pulling my gauges, my Engman fuse panel and rewiring the rear harness... My dash is a mess!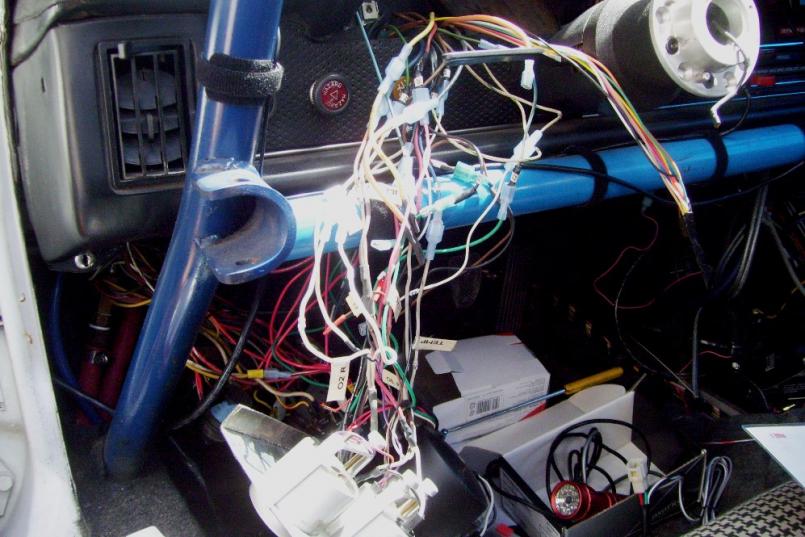
Posted by: kg6dxn Apr 19 2011, 08:27 PM
I cleaned up my gauge wiring. Got my Boost controller and Turbo Timer wired up too...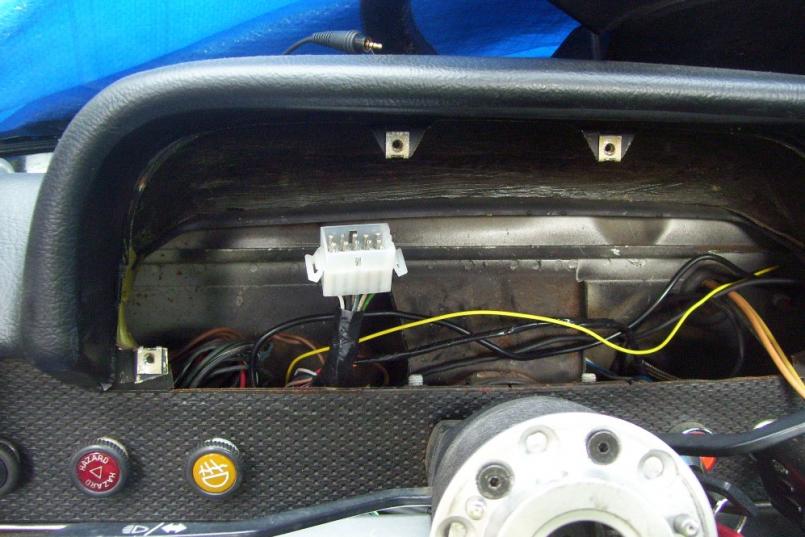
Posted by: JRust Apr 19 2011, 08:49 PM
You can't "urbo" a 914 
Posted by: kg6dxn Apr 19 2011, 08:53 PM
You can't "urbo" a 914
Fixed iT
ThaT's funny shiT
Posted by: kg6dxn Apr 20 2011, 01:36 PM
UPDATE!
I landed a new job today! Now I can afford to finish this fucking project. Yay!
Oh, Here's a random pic for all you picture lovers...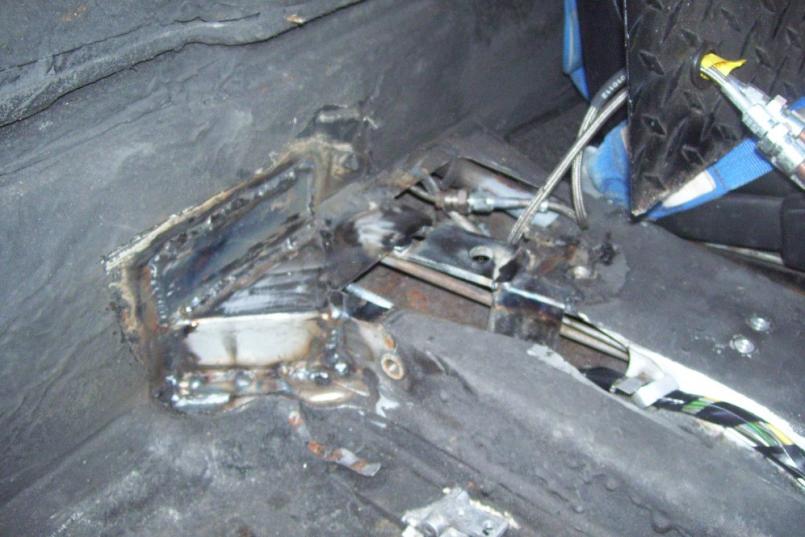
Posted by: Andyrew Apr 20 2011, 01:50 PM
WOO HOO!!!
Congrats on the job!
Posted by: Rand Apr 20 2011, 01:58 PM
Congrats Mike!!! That's awesome news!!!
Great progress thread, can't wait to see this thing running.
Posted by: kg6dxn Apr 20 2011, 02:03 PM
Thanks guys! My self worth was starting to suffer...
I did get a lot of work done in the last few weeks. I am very happy about that. There is now the slimmest of chances I can get it up to WCR this year. I'm not going to push it though. I don't want to bring a non driving car up on a trailer... Jamie...
Posted by: ArtechnikA Apr 20 2011, 02:41 PM
I have HID headlights, 35 Amps.
Really ? 'cause my HID's draw 35_W_.
low sustained draw is one reason Priiius' have 'em.
They do have a bit of startup kick but it's momentary.
HID's run just fine on stock headlight wiring which can handle nowhere near 35A.
But maybe you have some kind of lights I haven't heard of...
Posted by: kg6dxn Apr 20 2011, 05:52 PM
I have HID headlights, 35 Amps.
Really ? 'cause my HID's draw 35_W_.
low sustained draw is one reason Priiius' have 'em.
They do have a bit of startup kick but it's momentary.
HID's run just fine on stock headlight wiring which can handle nowhere near 35A.
But maybe you have some kind of lights I haven't heard of...
You are correct. I miss spoke (wrote)...
P=IxE
70W(35Wx2)=?x13.5V
I=5.18 Amps
My lights draw 5 Amps.
Now my Hella 100W driving lights...
200W=?x13.5V
I=14.8 Amps
My high beams are 60W. If I have them all on I might hit the 35 Amp mark...
Posted by: Lennies914 Apr 20 2011, 09:34 PM
That's great news Mike.
Posted by: JRust Apr 20 2011, 10:07 PM
Thanks guys! My self worth was starting to suffer...
I did get a lot of work done in the last few weeks. I am very happy about that. There is now the slimmest of chances I can get it up to WCR this year. I'm not going to push it though. I don't want to bring a non driving car up on a trailer...
Jamie...Fixed iT
ThaT's funny shiT . That won't be me this year. I go to great lengths to be remembered at each WCR Hopefully this year it will just be that I kicked your ass at the autox 
Posted by: kg6dxn Apr 23 2011, 02:43 PM
I spent about 8 hours making this bracket out of a single piece of L channel and some 5/8 DOM. I wanted to use the serpentine belt tensioner. Seems to work good. It was a pain to get the alignment... The curve was easy. I cut the slot first. Then I cut off the inside piece. made some releif cuts in the main section and bent the channel. I welded it back up. Bent the inside curve piece and welded it on. smoothed it all out with a grinder.
Posted by: kg6dxn Apr 23 2011, 02:45 PM
Then I got it installed. Of course I painted it orange for Andrew...
Posted by: kg6dxn Apr 23 2011, 02:51 PM
I pulled out the 1/4-28 tap and installed the Zerk into my shift rod. I found the center and installed it there. Now I can pump into it and lube my U Joints. I should be able to do both at the same time this way and the tubular rod will hold extra grease. The rod is super light being hollow...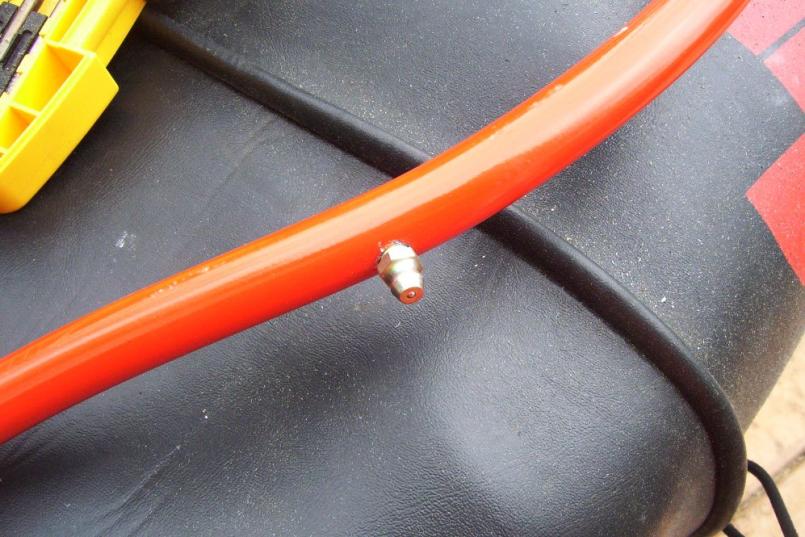

Posted by: Andyrew Apr 24 2011, 04:11 AM
Looks fantastic!!!
Posted by: kg6dxn Apr 30 2011, 07:02 PM
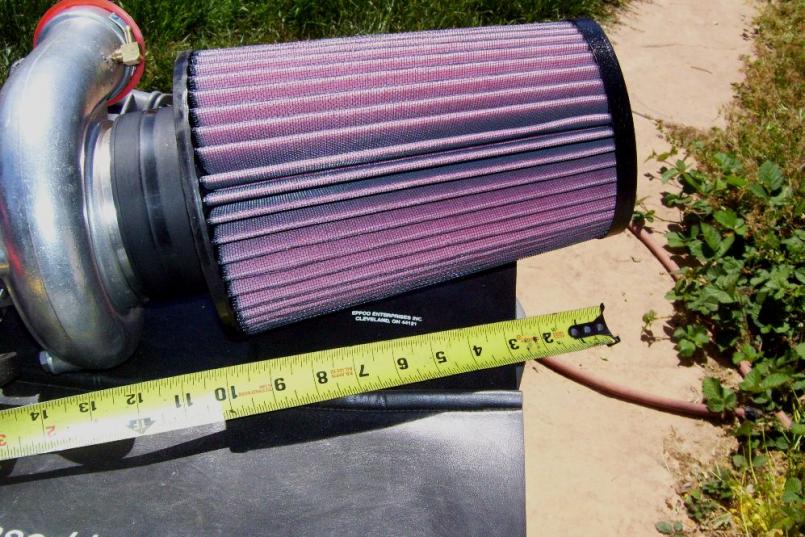
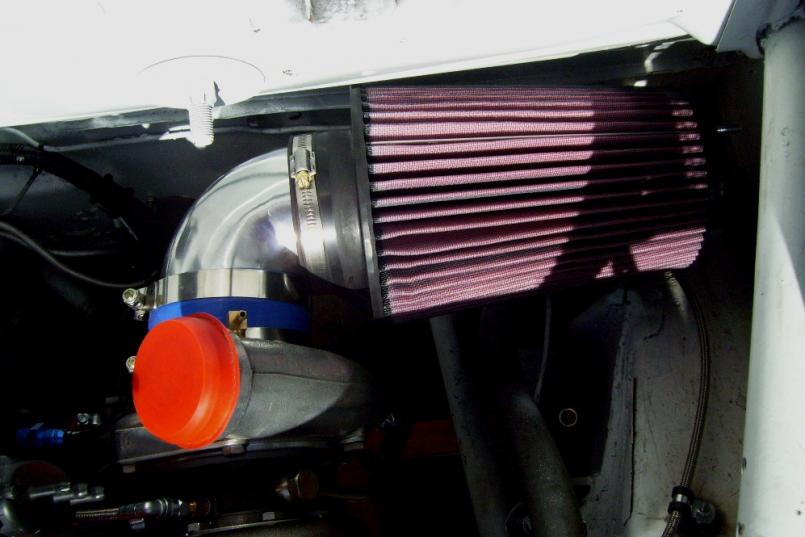
Well I'm mostly down to booring stuff and puch list items. The major stuff I still need are a clutch, air/water intercooler, Oil Cooler and lines. Time to save some money from my new job. My new Air Filter came in. Krusty won't like it because it's a K&N. 4 inch ID by 10 inches long. I have to get a 90 degree fitting to turn the filter in front of the turbo. Otherwize the filter will be half inside the cabin. I needed high flow for the inlet, that's why it's so massive.
Here is a pic of it stuck on the front of the turbo...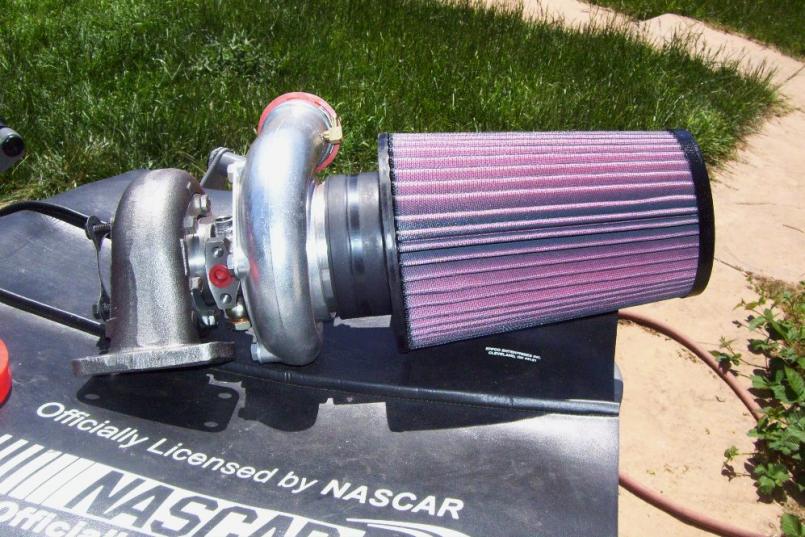
Posted by: kg6dxn Apr 30 2011, 07:10 PM
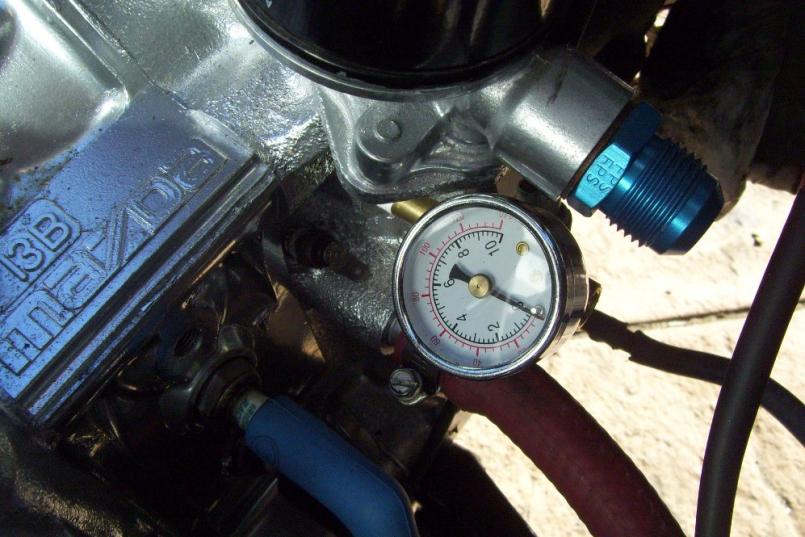
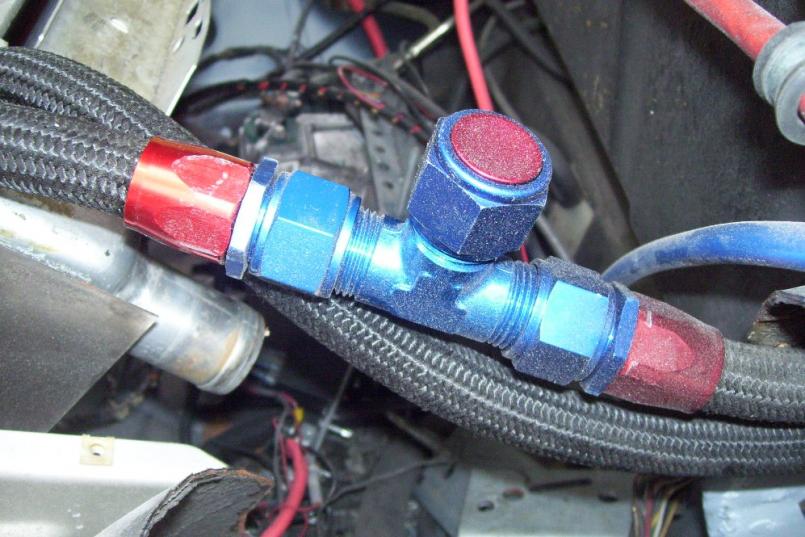
Some of the little stuff... Turbo coolant lines. I need to fab a -4AN for the Oil supply and a -10AN for the drain. I worked on the fuel lines a little. Got the hard lines routed to the drivers side. Still need the final connection to the rail... I added a 150psi guage to my oil sender bung. These little engines run 85-120psi on the oil...
Posted by: kg6dxn May 1 2011, 07:49 PM
I had to move my battery cut off switch to make room for my oil cooler. It was on the front bumper. Now it is on the cowl in front of the windshield. I ran a new main battery cable too. a 1/0 welding cable is pulled through my heater tube. Along with my #2 ground and my heater hoses. (see one of my old threads for info on my fresh air heater box). The cooler I'm running is a Setrab 25"x17" and will lay down right on the radiator with rubber spacers. It requires -12AN connections. More on the cooler when I get it mounted. I haven't decided the type or routing of the oil lines. I guess my choices are: SS Braided hose, Copper or Aluminum hard tube.
Anybody have an opinion on cooling lines?
Here's some pics...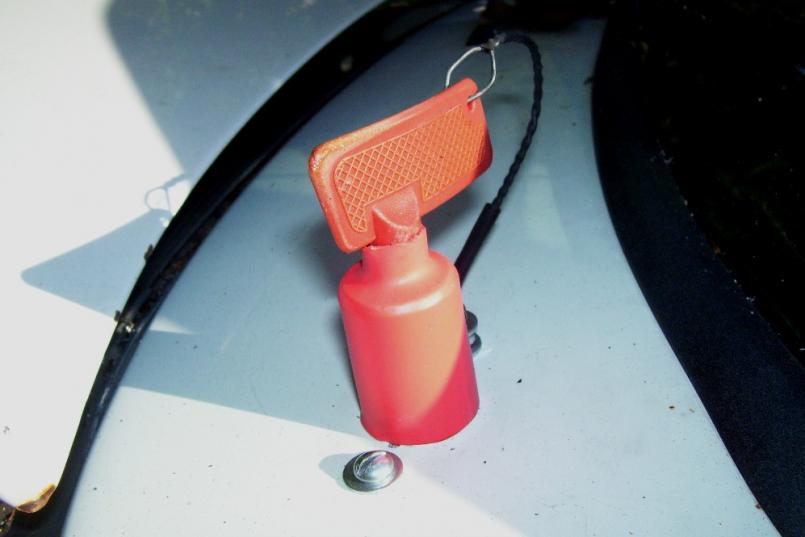
Posted by: kg6dxn May 1 2011, 07:57 PM
Here is a pick of my VW Jetta water valve. It is connected to the factory temp control slider...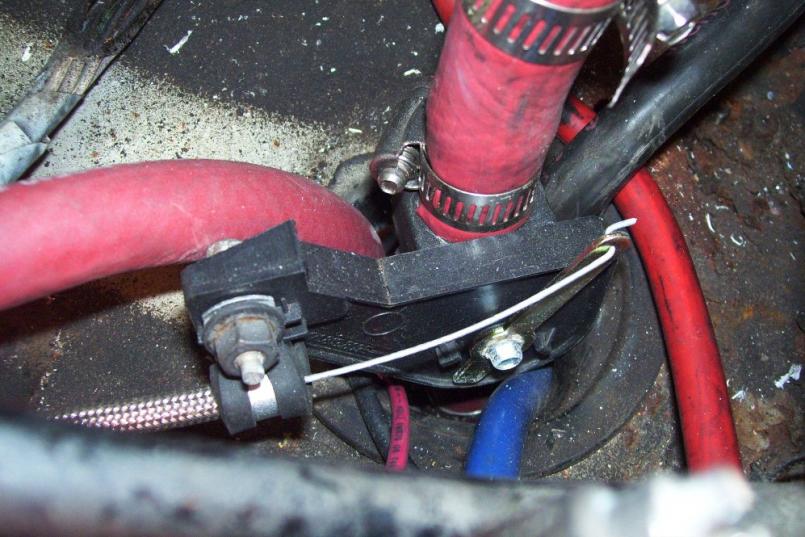
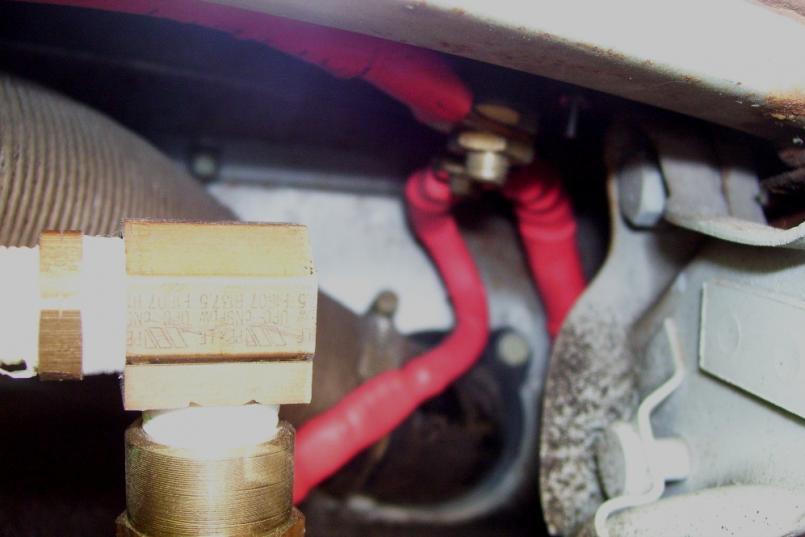
My starter cable routes from the cut off then to the battery. All other power is routed from the cut off to this 250 Amp fuse. This will give the system some protection from dead shorts.
The circuit path is: Battery, to Cut Off Switch, then 1/0 to starter.
Battery, to Cut Off Switch, then #2 to the 250 Amp fuse.
This set up does not kill the alternator but will isolate it from the battery and other electronics.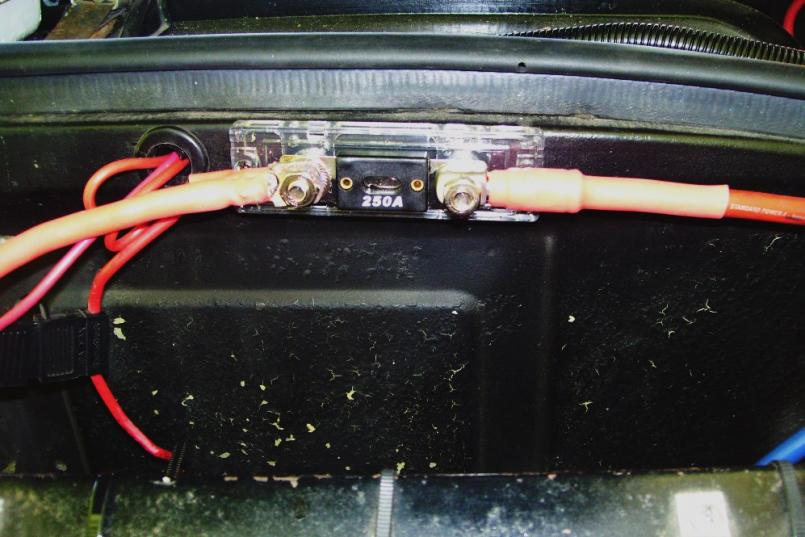
Posted by: enderw88 May 1 2011, 08:05 PM
Out of curiosity, shouldn't this be a "Yeti" build since it is white?
Posted by: kg6dxn May 1 2011, 08:12 PM
Out of curiosity, shouldn't this be a "Yeti" build since it is white?
Maybe?
 But The car was named some 3 owners ago. Steve Malmz rescued it from a yard and some how it was nicknamed Sasquach. I went through all his old posts on this and the club site. The car was referred to as Sasquach and 914 Wide Body.
Posted by: kg6dxn May 6 2011, 06:27 PM
Got some more parts in today. My Setrab Cooler showed up. It's a littly dirty but it don't leak and it will clean up. I also got a great deal on an NOS Mocal thermostat. All these are -12 AN. I guess I willl go with SS Braided lines. This Setrab is huge! 25"x18". almost as big as my radiator 31"x19". I was goint to go smaller but my V8 with this radiator was steady around 165 degrees. This Rotary runs hotter than a V8 so the big rad and cooler should help to keep temps well within normal ranges...
Radiator...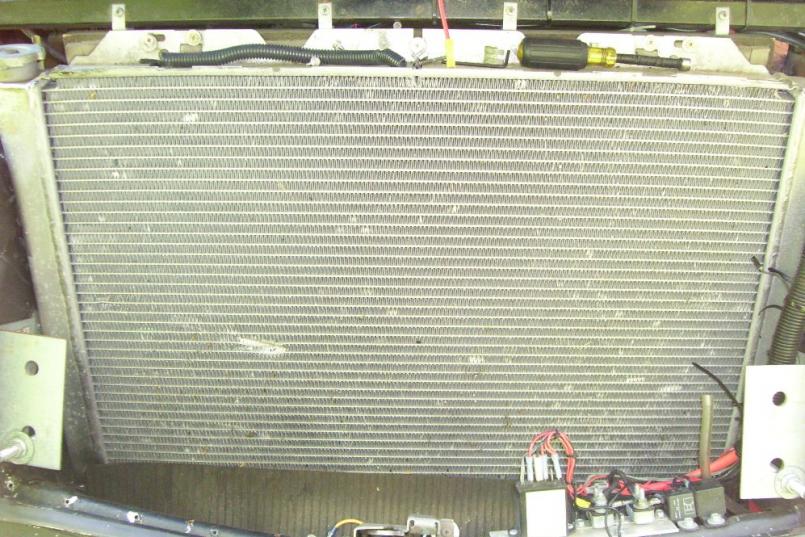
Oil Cooler...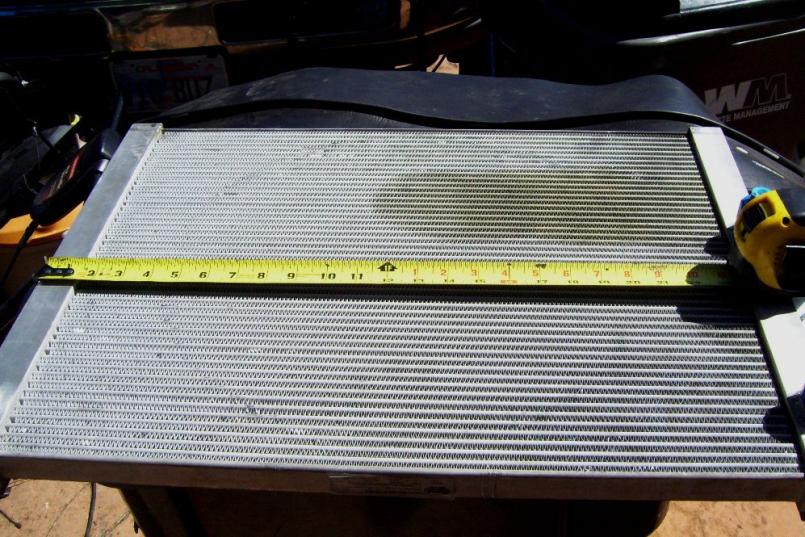
Posted by: kg6dxn May 6 2011, 06:32 PM
Here's what they looke like stacked. I need to rework the shrouding. The Cooler has a 3/8 rubber insulator between the Rad...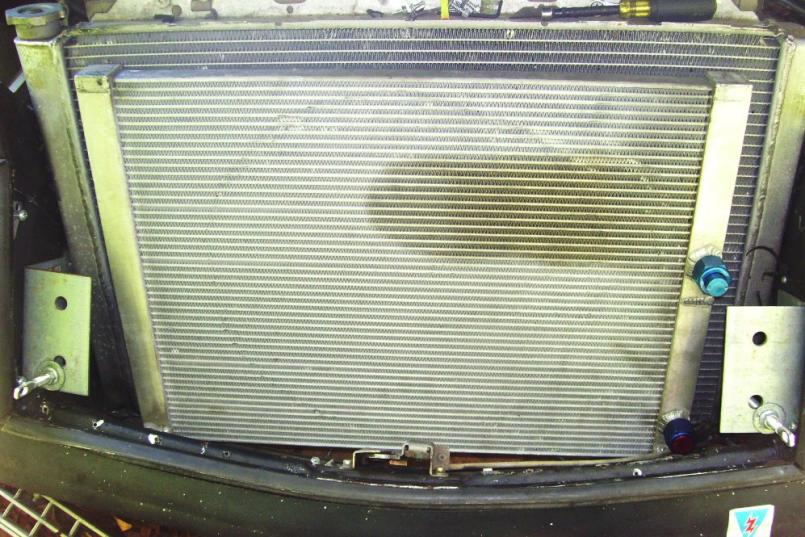
Mocal Theromstat. Has a bypass until it reaches 180 then the bypass is fully closed. It does not cut off the Cooler, only give a shorter path back to the engine until full temp is reached. As is warms up, it slowly closes off the baypass...
Posted by: kg6dxn May 6 2011, 06:40 PM
Now here's the F-ed up part. When I last dorve the car there was a bad rattle/bang in the front end. I jacked it up to check the ball joints but they were good. I figured I'd get back to it.
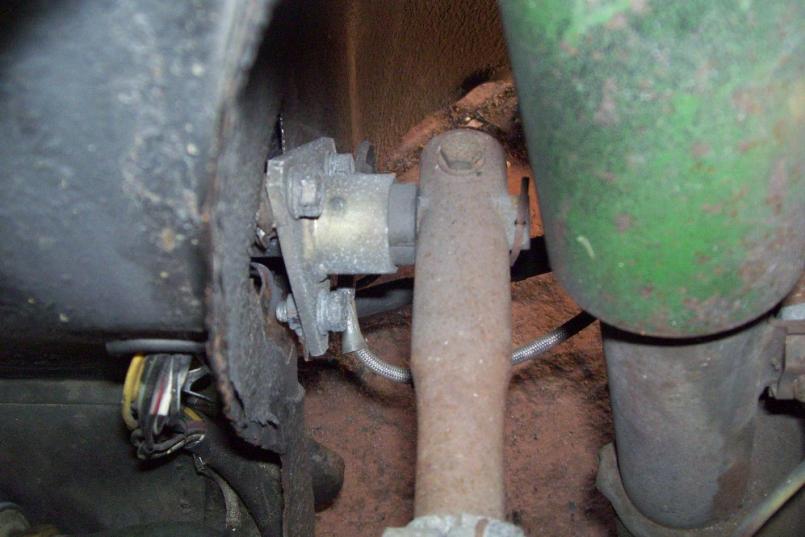
I found the source... The PPPPO used to race this car inan SCCA class. The fron end comes from a 930 Turbo. He used the 930 anti sway bar under the tank and "rigged" the mounting pivot. The rattle was the pivot ripping out of the inner fender and bouncing around. I have seen a reenforcement plate from a vendor around here. I need to track the piece down and weld it back into place. Not a difficult fix but it is a pain in the ass...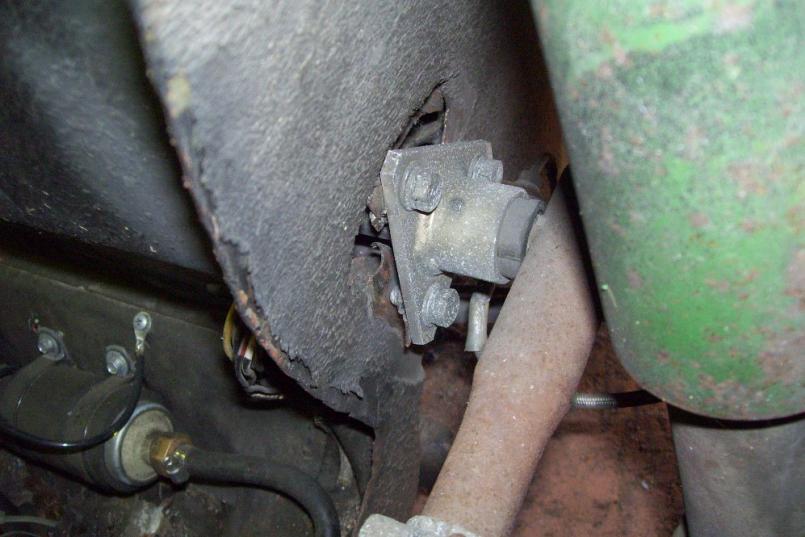
Posted by: kg6dxn May 6 2011, 08:14 PM
More goodies. 4" aluminum elbow for the filter and my -4AN oil supply line for the turbo...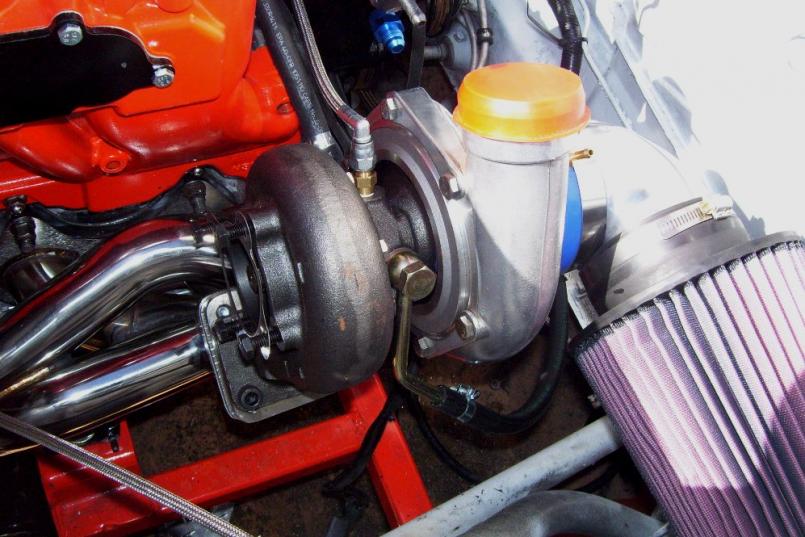
Posted by: JRust May 6 2011, 09:39 PM
Looking great Mike. I can't wait to go for a ride in that sucker
Posted by: Eric_Shea May 7 2011, 06:50 AM
Not a 930 bar...
Look for the mounting plates from Engman Parts.
Posted by: kg6dxn May 7 2011, 08:51 PM
If anyone has looked at my radiator you would have noticed the PO made a wooden shroud for the dual fans. It was time to tackle this project. In order to fit my large oil cooler and close the hood, I needed to lower and lay the Rad back a little. the wooden shroud was elevating the Rad a little. Additionally the PO used spray foam to seal the bottom of the Radiator to the trunk. I started with some metal work in the trunk. The front area was hammered flat. The PO curled it up and filled the gap with foam. That lowered the system a little but the shroud was hanging it up still. I welded up a 1/8" steel frame and clad it with 20ga sheet. The bottom was set up with a 45 angle. This will be flat on the trunk bottom when installed. It should put the Radiator right where I need it. I was almost finished when my welder gun broke. The switch in the handle wont work. Now I need to find a new one since it does not look rebuildable.
Here is the cool wooden shroud... 
Here is my new steel shroud... 
Posted by: kg6dxn May 7 2011, 08:53 PM
Here's another pic of the bottom of the shroud... This will allow it to go lower in the trunk...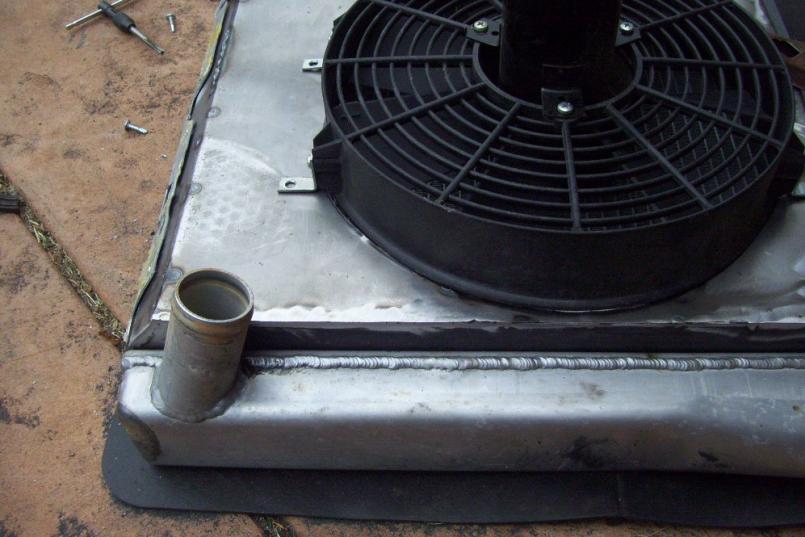
Posted by: Andyrew May 8 2011, 08:12 AM
Great stuff! Sucks about the sway bar... Should be a relatively easy fix, just time consuming...
Posted by: Krank May 12 2011, 10:43 PM
Double check my ID
Although the 4" exhaust looks kewl and will sound deep, you may run into an issue with engine temp unless the turbo you are using provides lots of back pressure. This is a problem with the newer diesel pick up guys, they go to 5" on their daily drivers and find that the engine actually runs on the cold side unless they are constantly draggin' around a 13,000 lb trailer. I'm not sure about the effect on this gas engine but a simple restrictor inside the pipe should fix any issues if it is a problem. Does anyone have any cfm numbers on this engine?
Posted by: kg6dxn May 12 2011, 11:09 PM
I don't know the exact CFM. I can tell you the engine consumes as much air as a 2.6L engine. Sometimes more. I would be happy if the engine runs cooler than normal as the rotary engines run hotter normal temps than most. This type of engine really benefits from lack of back pressure, especially with a turbo. Most RX7 guys run 3 inch or larger to get 500+hp. I will restrict it if needed.
Posted by: Andyrew May 13 2011, 01:01 AM
You are certainly BIG on the exhaust, Especially with no muffler... But I dont think your going to run into any issues with that kinda setup..
Posted by: banksyinoz May 13 2011, 01:23 AM
its great to see such a nice rotor setup in a 914, i look forward to seeing the end result.
has the fuel rail, regulator and pump been upgraded or modified also?
Posted by: kg6dxn May 14 2011, 11:23 AM
has the fuel rail, regulator and pump been upgraded or modified also?
Not yet but it's on the long list of crap to finish this project. Right now my problem is money. Since I was out of work for a month, all the bills got behind. Still playing catch up.
Ive been mostly working on the cooling system. I'm also rigging some NACA ducts for a cold air intake and cooling air for my water/air intercooler. Since my car is soooooooo far from stock, I'm not too concerned with cutting the body.
If you are a purest, don't read this thread... Maybe I should have put that comment in the first post???
Posted by: FourBlades May 14 2011, 07:46 PM
What a great build, you have some skills man.
I think the rotary is a perfect fit for a light car like a 914 and I want to do one sometime.
I love the sound of a rotary more than anything else except maybe a Ferrari V12,
which is probably too long for a 914 and I hear their parts are hard to get
In 1970, Mazda teamed up with Belgium Racing to put a rotary engine into a
Chevron B16, which was a very light English, prototype race car. The rotary
in the car was so loud it made the plaster fall off the Chevron shop ceiling.
The car raced at Spa 1000km (15th overall), Nurburgring 1000km (10th overall
and second in class), and Le Mans (retired after an hour with carb problems).
This was the first rotary car ever to compete at Le Mans.
http://www.historicmotorracing.co.uk/article_details.asp?articleID=34
http://www.mazda.com/mazdaspirit/rotary/motorsports/index05_01.html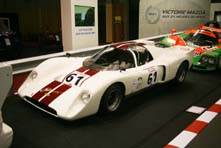
So anyhoo, there is a long history of rotarizing light sports cars. Let the pinky
benders eat your exhaust!
John
Posted by: kg6dxn May 14 2011, 08:36 PM
What a great build, you have some skills man.
Thanks, I owe my training to my Dad and working in his Gas Station when I was a kid.
So anyhoo, there is a long history of rotarizing light sports cars. Let the pinky
benders eat your exhaust!
John
I'm wondering how well received this will be by my felow PCA members. I think they liked it with the V8 after they saw me keep up with a Turbo 911...
Posted by: kg6dxn May 28 2011, 03:15 PM
I found some California rust today. Mostly dirt and red primer but there is a pin hole in the jack post support. I wire brushed it, welded the rosettes on the stiffening kit and coated it with some primer. Call it good for now.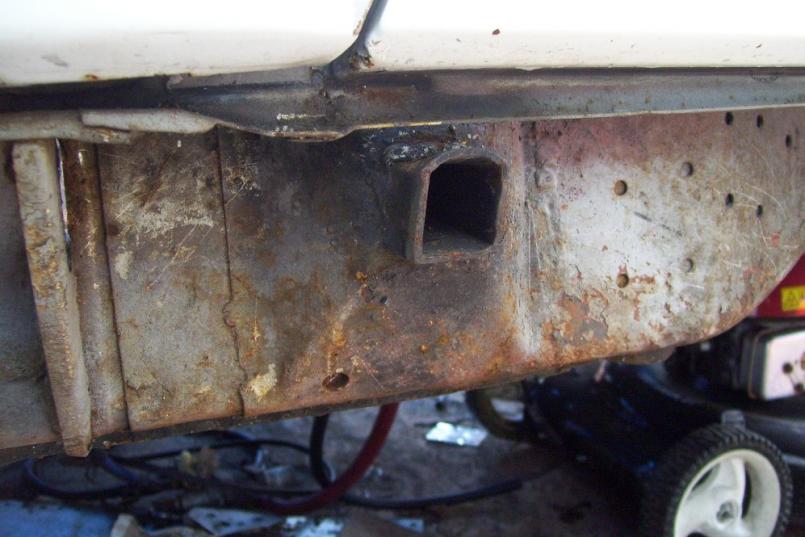
Posted by: kg6dxn May 28 2011, 03:19 PM
Here's another picture of my sway bar mount. I was thinking of buying Engman stiffening parts but I have scrap 14ga steel and I will cut my own. That will save my $60 since I'm a CSOB 914 owner...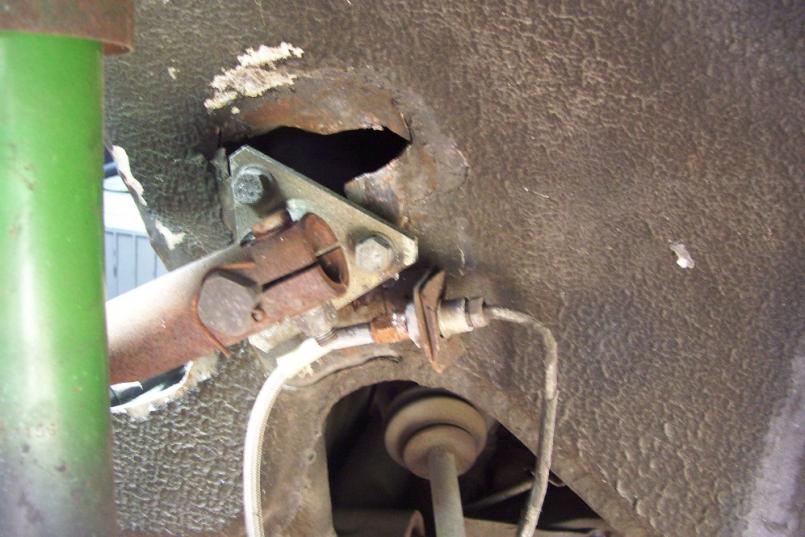
Here's my CSOB piece. view of the back...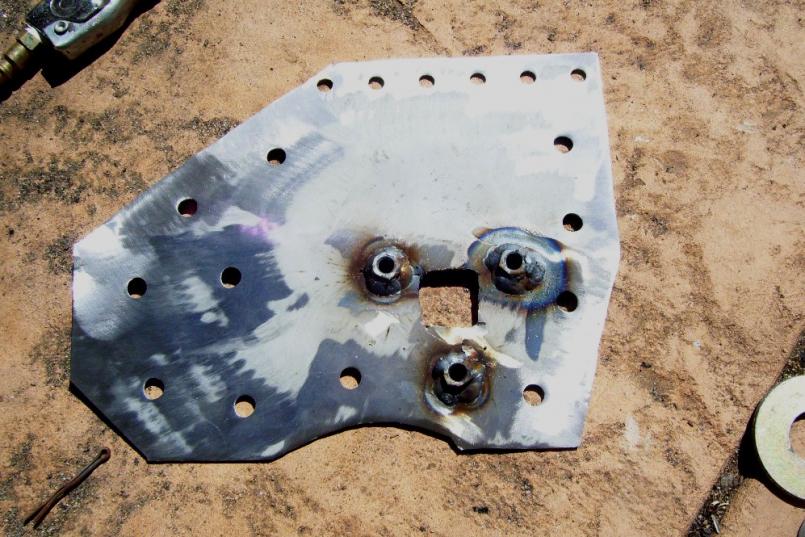
Posted by: kg6dxn May 28 2011, 06:22 PM
A little welding, grinding and primer...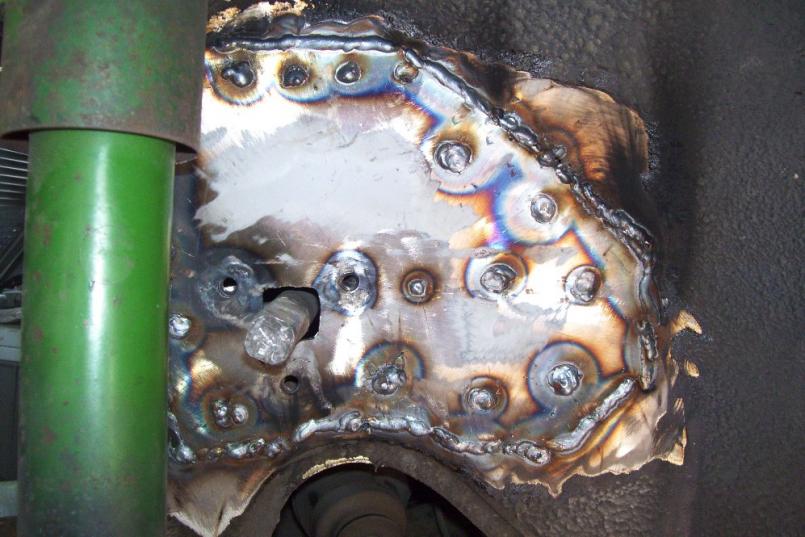
I traced the pattern to weld onto the passenger side later...
Posted by: kg6dxn May 28 2011, 06:28 PM
I have also been working on the oil cooler system. I have the largest oil cooler I've ever seen and it connects with -12 AN fittings. I bought some nylon braided hose because it's lighter and it will not poke you under your finger nails. If you have ever made braided hoses you know what I'm talikng about. I ordered 20 feet. I hade almost enough. I need a 1 foot piece with a 90 and straight fitting and I'll be complete. I installed Tee fittings in the front and rear. The front is to bleed air out. The rear is for my future oil accumulator. I ran the lines down the outer long, under the rocker.
Posted by: kg6dxn Jun 16 2011, 08:31 PM
Been too long since an update. I tore my tranny apart at the Dr Evil clinic. Not all the way because the tranny was just fine. I had the Dr inspect my syncros and re-align the forks. I also changed all the seals and swapped the tail housing.
Working with the guy at SPEC Clutches (former 914 owner) and bought a Stage 3+ clutch. Should hold more torque than I have to provide and the + part is a streetable disc to go with it. I also comes with a NEW throwout bearing and tool.
This weekend I will tackle the exhaust and some "little things". Those things that get forgotten until the end of a project. If my AN stuff from Summit shows up, I will finish the fuel system too.
Here's some pics just for fun... 
Porsche content from SPEC's website...
Posted by: Britain Smith Jun 16 2011, 08:54 PM
I have been getting my braided lines from www.aeroquip.cc You should check them out, awesome prices.
-Britain
Posted by: kg6dxn Jun 18 2011, 08:33 PM
I have been getting my braided lines from www.aeroquip.cc You should check them out, awesome prices.
-Britain
I've used them and others. Summit usually has Aeroquip within a dollar or two of that site. I use Summit mostly because they ship from Reno and I have my delivery in 2 days ground. Save a lot on shipping. Most of my -12 is Areoquip while the other ones and smaller are Summit brand. The quality is just as good and the prices are much cheaper. Never had a leak or broken fitting.
Posted by: kg6dxn Jun 18 2011, 08:39 PM
Update. I worked 12 hours toady and got a lot done. My exhaust is done! I tied the wastegate into the exhaust. I paid close attention to the direction of the exhaust spiral down the main pipe. I tied in the WG so it will not disrupt the spiral and will flow better into the stream. I still need to cut the tip of the exhaust back a little but I want to see how it looks for a couple of days before the final cut.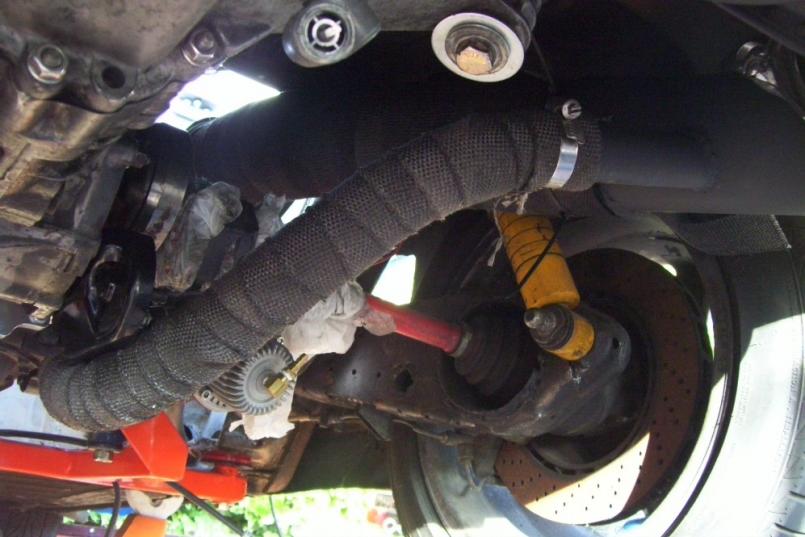
Posted by: kg6dxn Jun 18 2011, 08:42 PM
Money shot!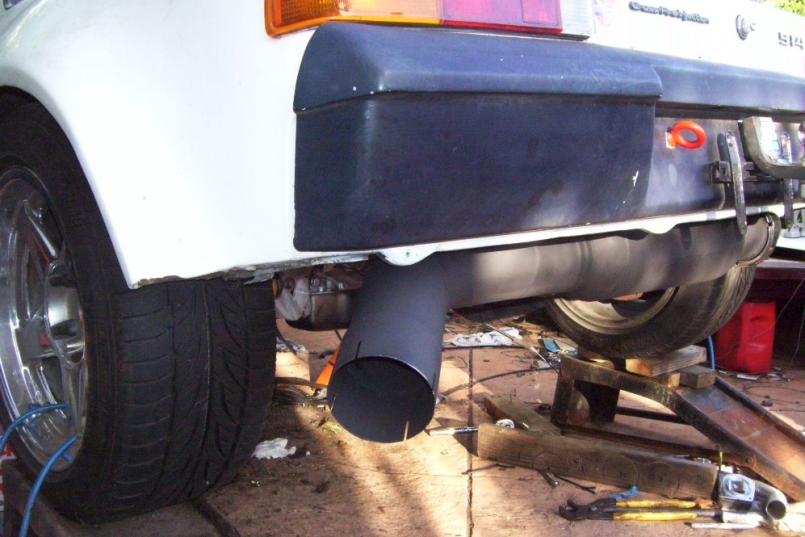
I used a stock muffler bracket and gusseted it to hold the muffler, which is large! but light weight...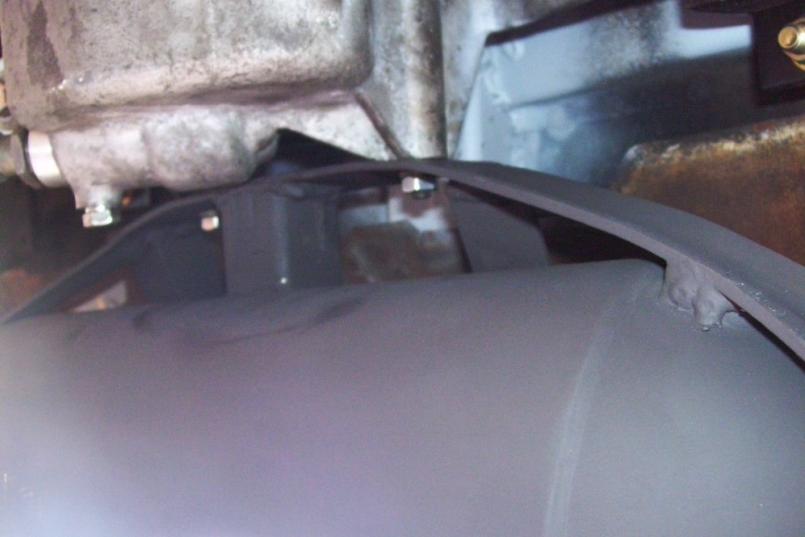
Posted by: kg6dxn Jun 18 2011, 08:44 PM
Got my fuel lines and oil lines complete. I tied into my perviously installed aluminum hard lines...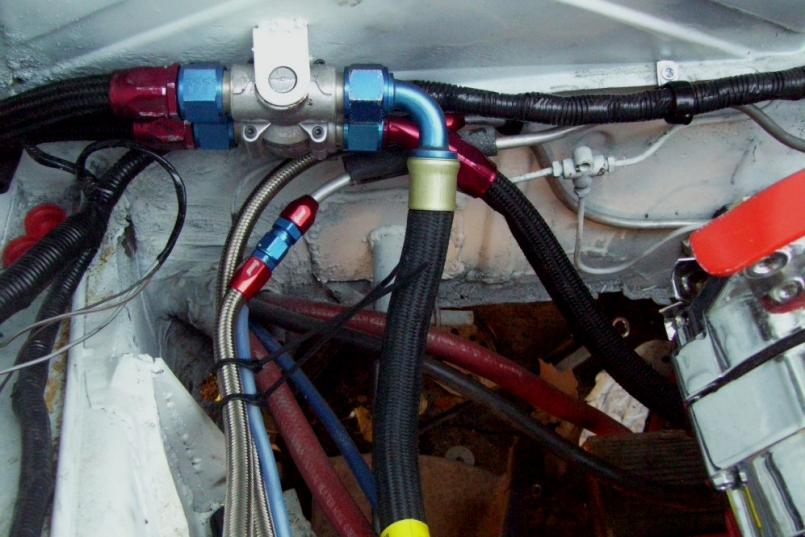

Posted by: kg6dxn Jun 18 2011, 08:53 PM
I started mocking up the mount for my Air/Water intercooler but ran out of welding wire
Much of my time was spent tightening bolts, changing gaskets, connecting hoses and the crap that I will forget to do later. Most everything was put in hand tight for fab purposes...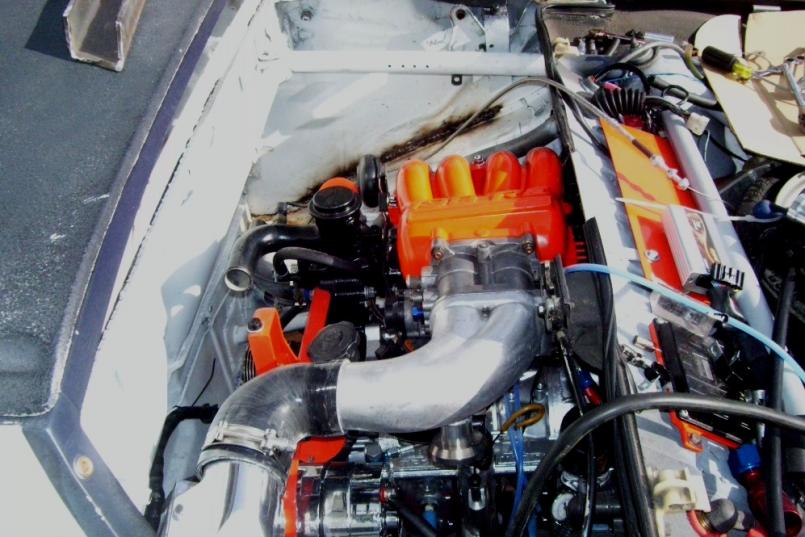
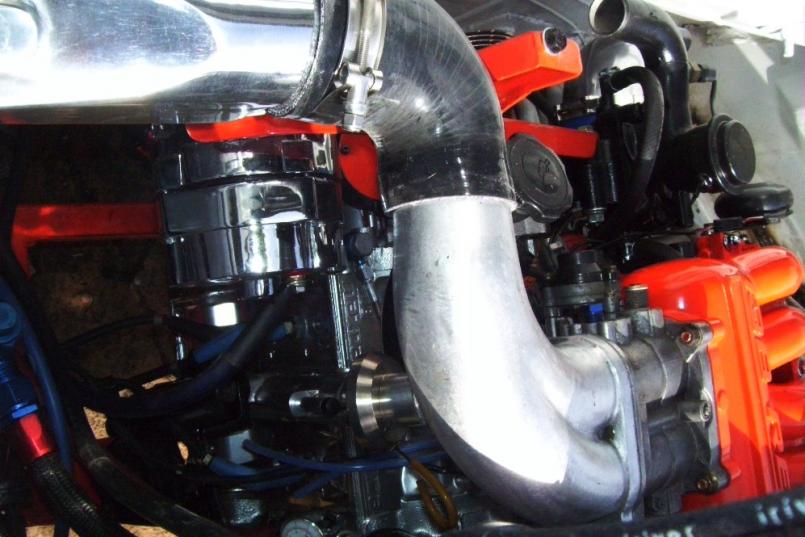
Posted by: kg6dxn Jun 18 2011, 08:58 PM
I also started fabbing my shift linkage. The main rod was done when I got the engine installed. The front rod/shifter was done back when it have a V8. Here you can see my bracket and dual bushings. J West makes much better looking stuff but this is my getto trailer park CSOB version. It works the same...
When I get more welding rod I will complete the fab...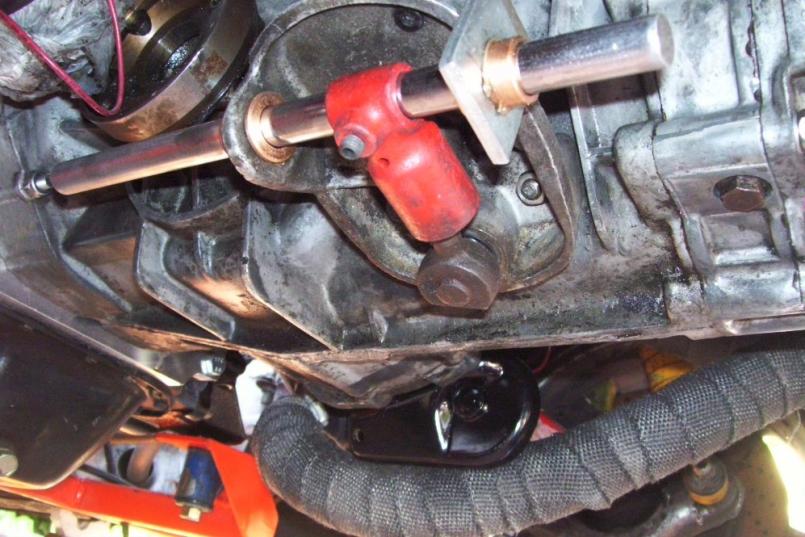
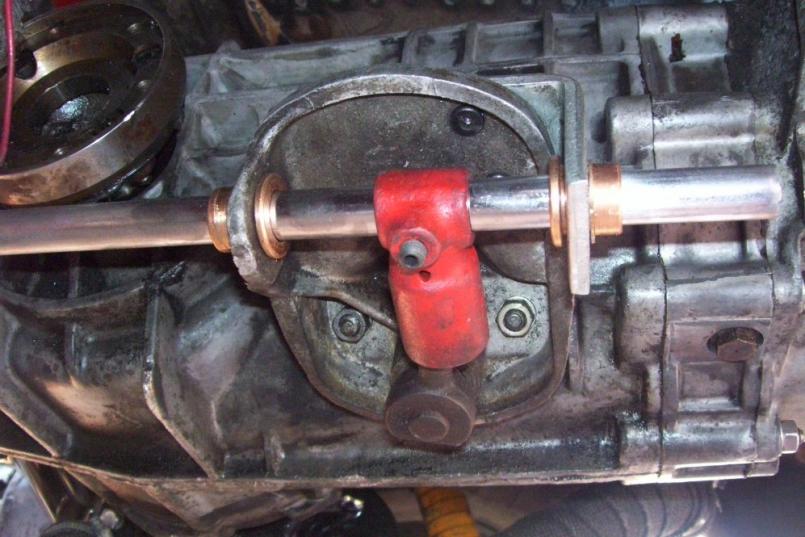
Posted by: kg6dxn Jun 18 2011, 09:01 PM
I think HD sells mig welders. I will go tomorrow and see if the have some .030 wire. I'm exhausted! time for an ice cold beer!
Posted by: geniusanthony Jun 19 2011, 07:45 AM
My local HD doesn't sell MIG wire, I have to go to Lowes for metal supplies...Your's may be the same.
Posted by: JRust Jun 19 2011, 09:20 AM
You are flying again Mike! Nice to see that coming together. I can't wait to get some video of your first drive . That thing is going to sound ??? I have no idea actualy but I bet it will be impressive
Posted by: kg6dxn Jun 19 2011, 01:17 PM
My local HD doesn't sell MIG wire, I have to go to Lowes for metal supplies...Your's may be the same.
My Home Depot carries Lincolin Welders. This morning I found welding wire!
I hope my Miller doesn't mind strange wire. The wire is in and fab is moving forward! I need to work on a list of crap to finish. All the little details. Like my crank pully is loose and water pump is only hand tight. I also have new coolant hose for under the car. Sitting in a box coiled up.
Sometimes I think I should have just fixed the clutch on the V8 and drove it. Then I think about how ridiculous and fast this car will be. I hope my 930 Turbo brakes will be enough stopping power!
As long as it has taken to get this complete, I think I will drive it for a year before I strip it for paint. That will give me time to enjoy it, work out the bugs and have fun before it sits on jack stands for another year...
Posted by: kg6dxn Jun 19 2011, 03:27 PM
I got the intercooler brackets installed. I beefed up the firewall with some 14ga steel. There is a small gusset onder the bracket. I found some poly bushings to isolate vibration. Below a bent up some 1/4" stock and welded to the lower firewall brace. everything fits and everything clears...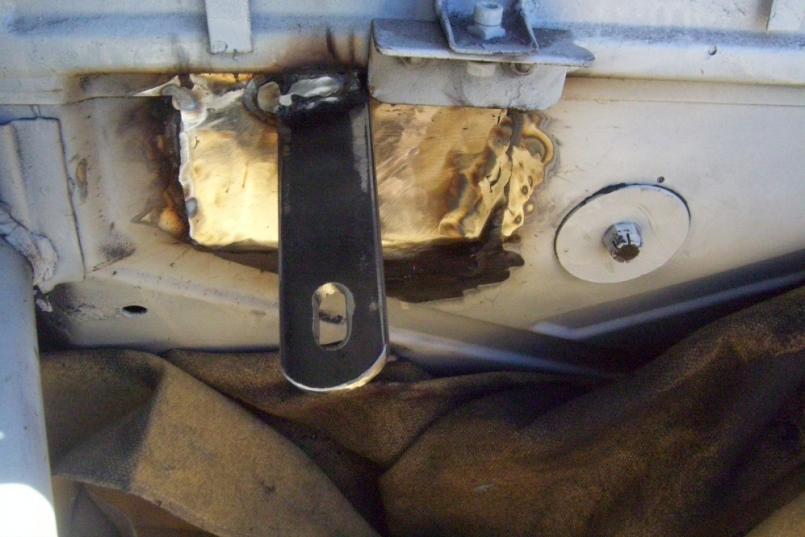
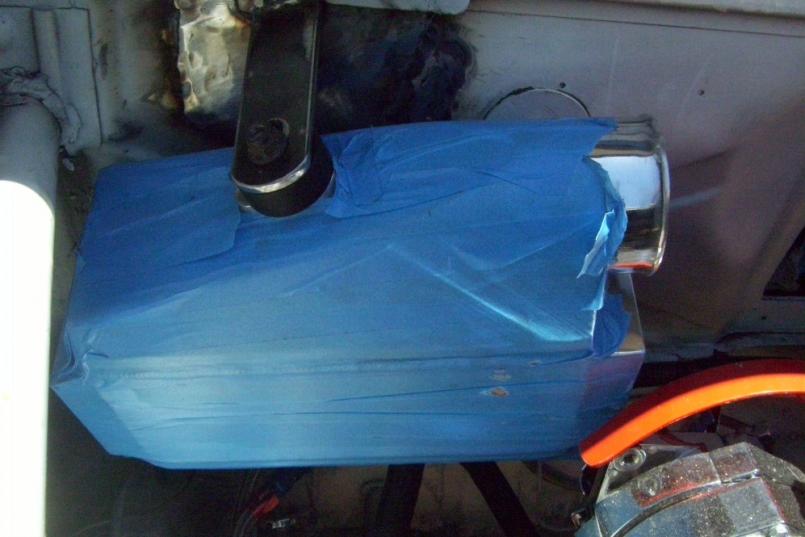
Posted by: kg6dxn Jun 19 2011, 03:29 PM
Here's a shot of the bottom...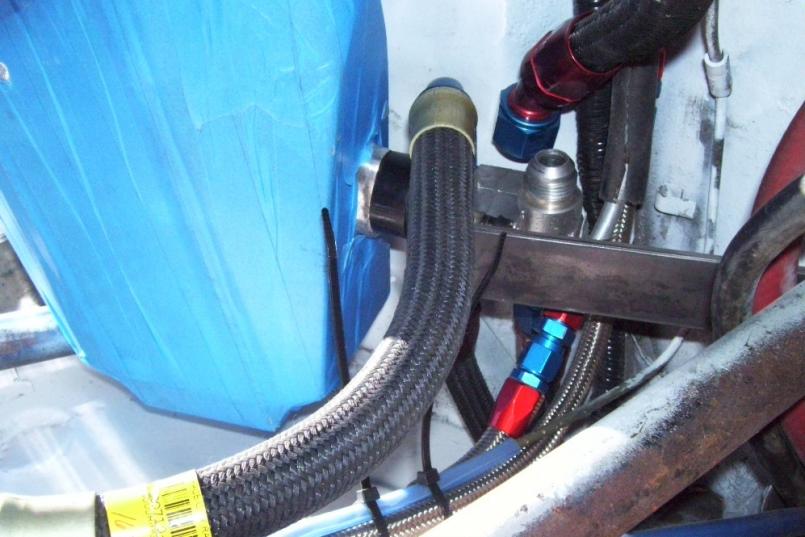
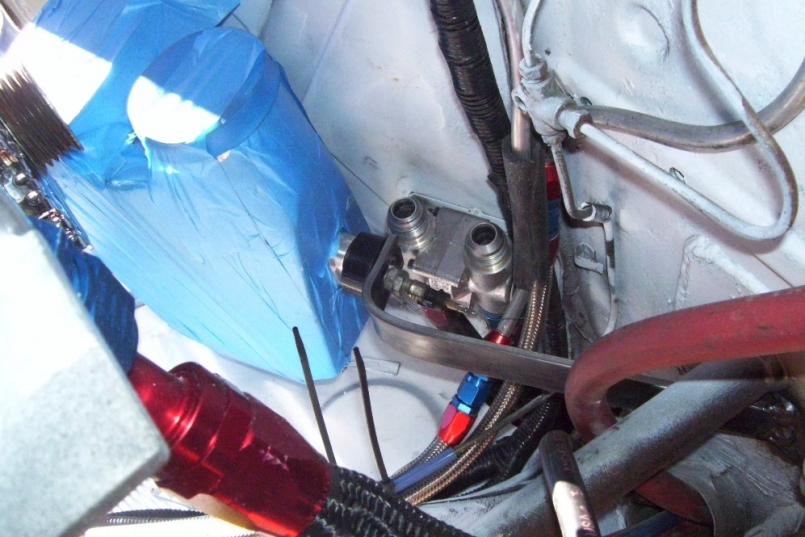
Posted by: Andyrew Jun 19 2011, 03:32 PM
Great job on the linkage and exhaust! I need to build the same linkage for my car!
I get my wire from Home Depot. I buy it in the 5lb spool and keep spares.
Posted by: kg6dxn Jun 19 2011, 03:32 PM
This engine is so small, I can work on the front of the motor... Notice my pulley with one bolt. I noticed my turbo drain line not hooked up. Missing bolt on water pump. water pump pulley missing 2 nuts... etc...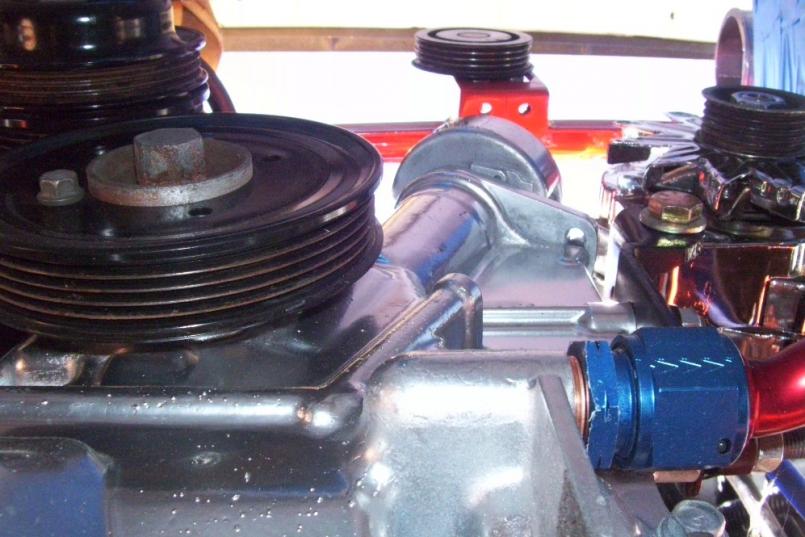
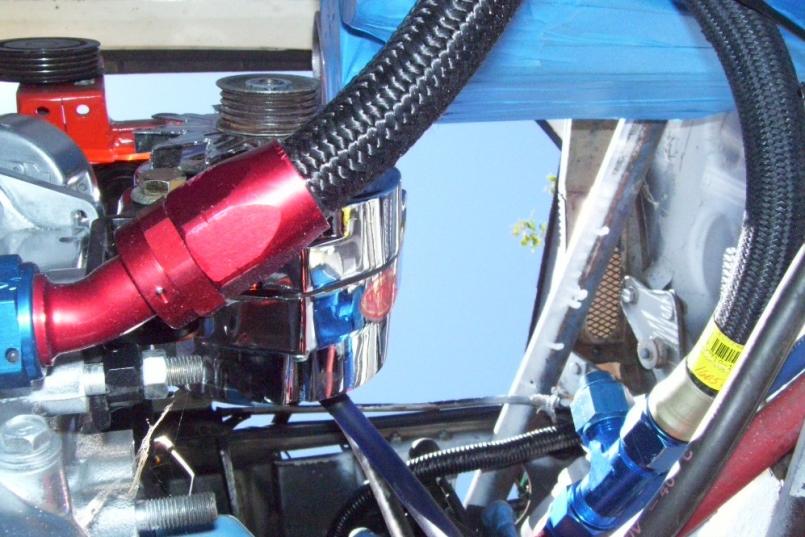
Posted by: kg6dxn Jun 19 2011, 03:35 PM
Got my shift rod connected...
I had to bend the rod around the engine but it works great. very smooth ande tight...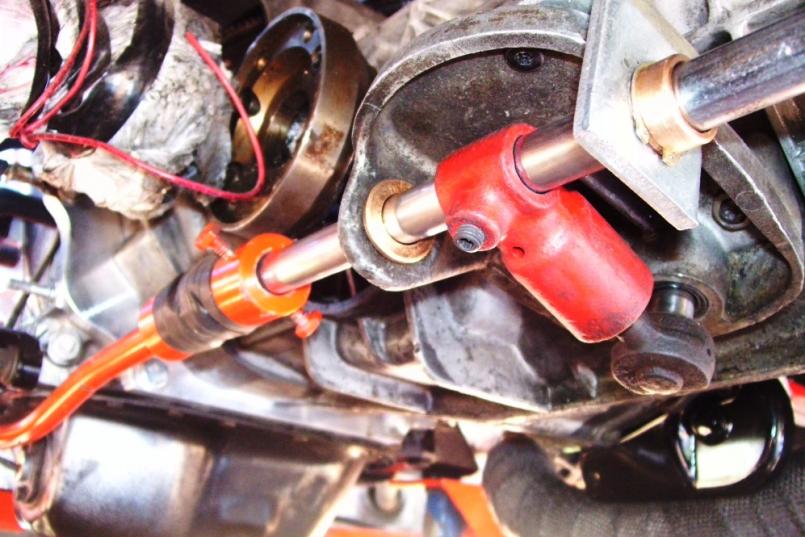
That's it for now. I have to get ready for Father's Day...
Posted by: kg6dxn Jun 21 2011, 08:55 PM
Spent a few on the car after work. Mounted my spring loaded license plate holder. This will hide my hitch receiver hole when not in use. I also cut the exhaust tip square with the rear of the car. The outlet looks even bigger now. It's a 4"x5" oval, slightly angled down. I might even be able to get a stock valence to fit. With a little mod. Anyone have one they want to get rid of?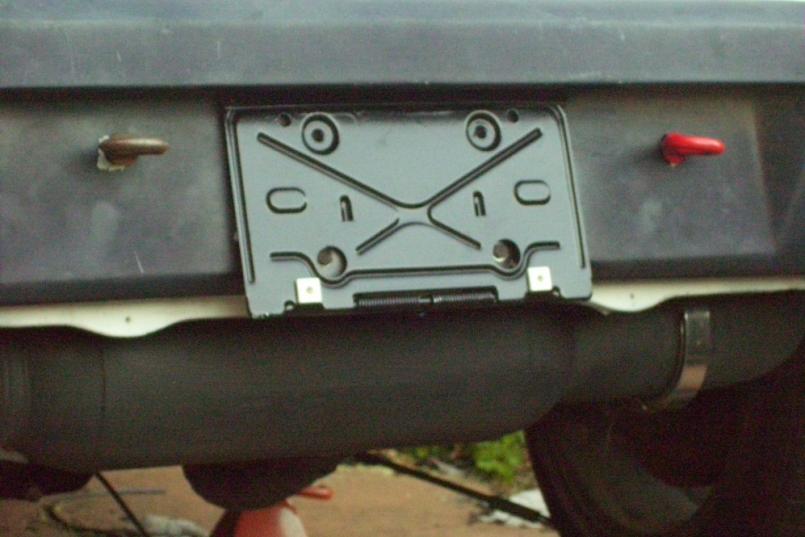
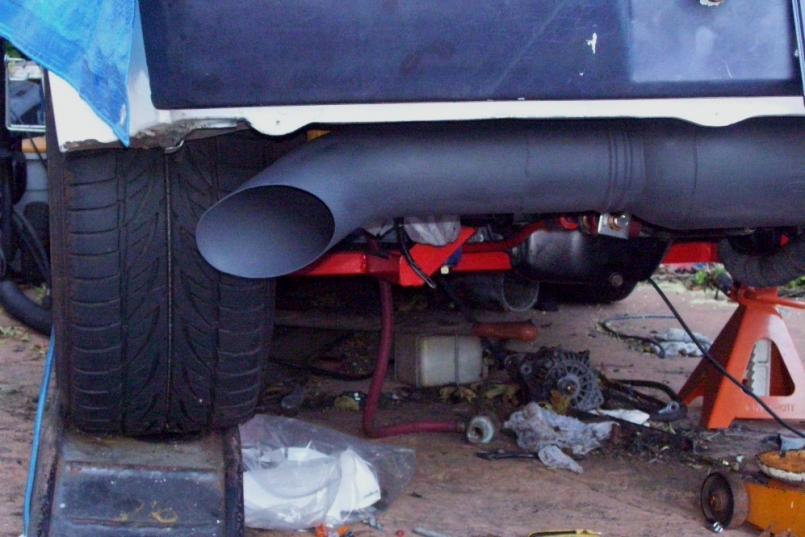
Posted by: ChrisNPDrider Jun 22 2011, 09:45 AM
Awesome progress Mike!
That exhaust looks mean.
Posted by: skaufmann Jun 22 2011, 10:49 AM
Dude, I'm expecting this to be you when you're done!
http://www.youtube.com/watch?v=UgsKjjhib0o
Posted by: kg6dxn Jun 22 2011, 12:37 PM
Dude, I'm expecting this to be you when you're done!
https://www.youtube.com/watch?v=UgsKjjhib0o
It won't be quite that radical. It will be fun!
Posted by: Andyrew Jun 22 2011, 12:48 PM
I have a feeling that engine doesnt make over 150lbs of tq..
Posted by: grantsfo Jun 22 2011, 04:00 PM
Make sure to invest in a good fire extigisher. You know the joke at most tracks is if there is a fire it must be a Mazda.
Posted by: kg6dxn Jun 22 2011, 07:07 PM
Make sure to invest in a good fire extigisher. You know the joke at most tracks is if there is a fire it must be a Mazda.
I've got 2 new ones! I've been thinking about installing a fire system. Halon maybe. Can't hurt...
Posted by: kg6dxn Jun 22 2011, 08:20 PM
Installed vacuum hoses from my BOV to my Boost Controller to my Waste Gate. Also cut a piece of 3" pipe lengthwise and welded it into the trunk. This wil alow my hitch pin to be inserted into the receiver tube. 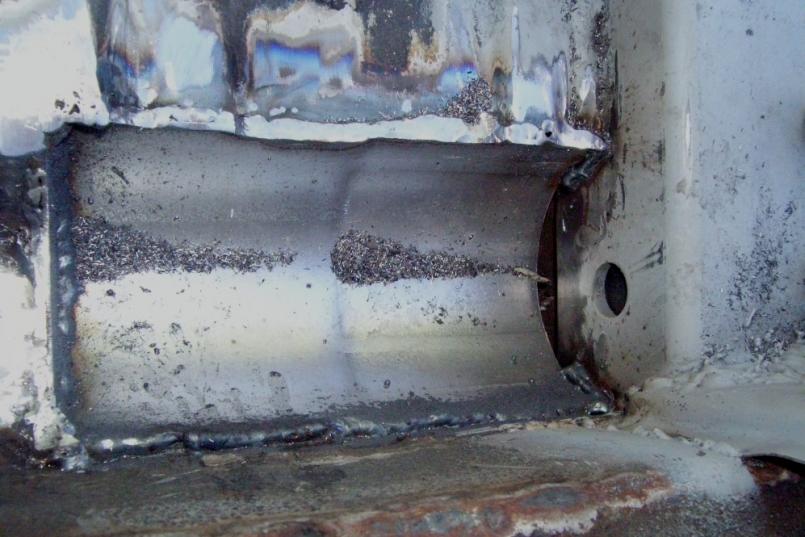
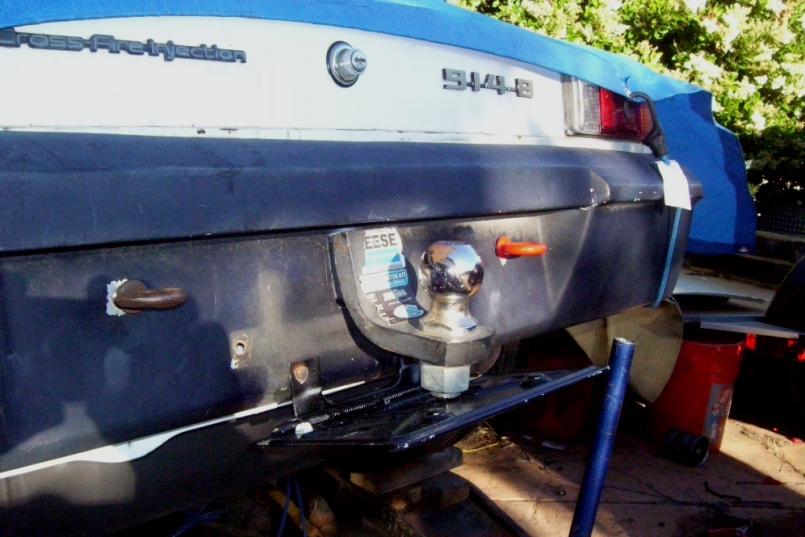
Posted by: kg6dxn Jun 25 2011, 07:00 PM
Any purists turn away now! I guess you may not be reading this thread anyway...
I installed the intercooler heat exchanger in the rear quarter panel. It is ducted with a NACA duct into the fender. It was hard deciding to cut the quarter panel but, it can be repaired if I don't like it. Im using the 914-6 oil tank knock outs to route the coolant hose to the intercooler. There will be a fan on the back side of the heat exchanger to pull ari through it. I have to fab an inner fender skirt to shield road debris. Im thinking of louvers to send the air down in the same direction of the tire rotation. This should create a slight draw of air when in motion. Here are some pics...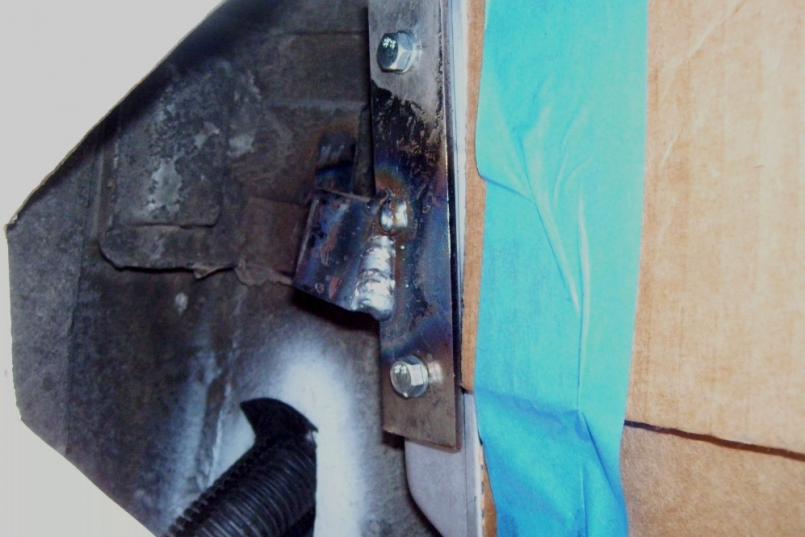
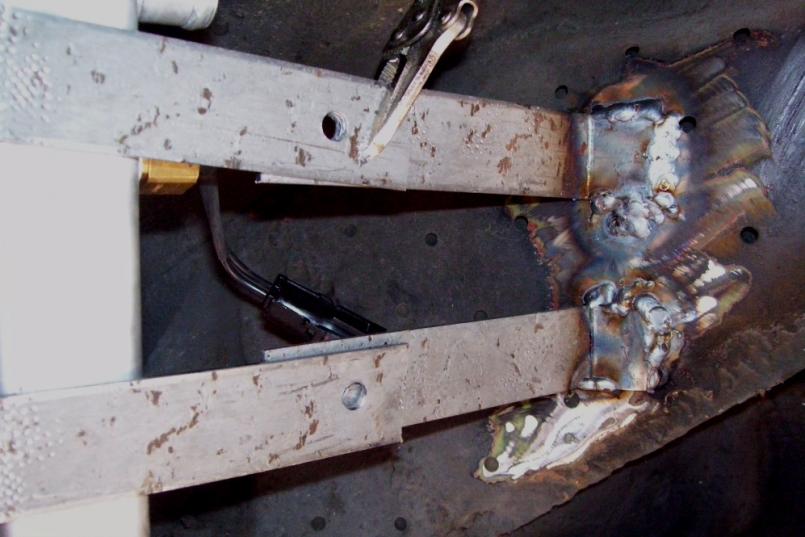
Posted by: kg6dxn Jun 25 2011, 07:03 PM
More...
They are lexan and semi flexible...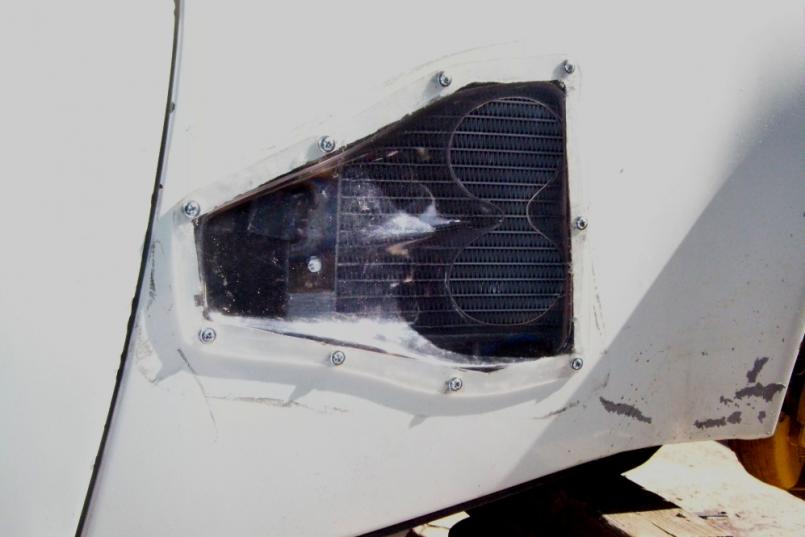
Primer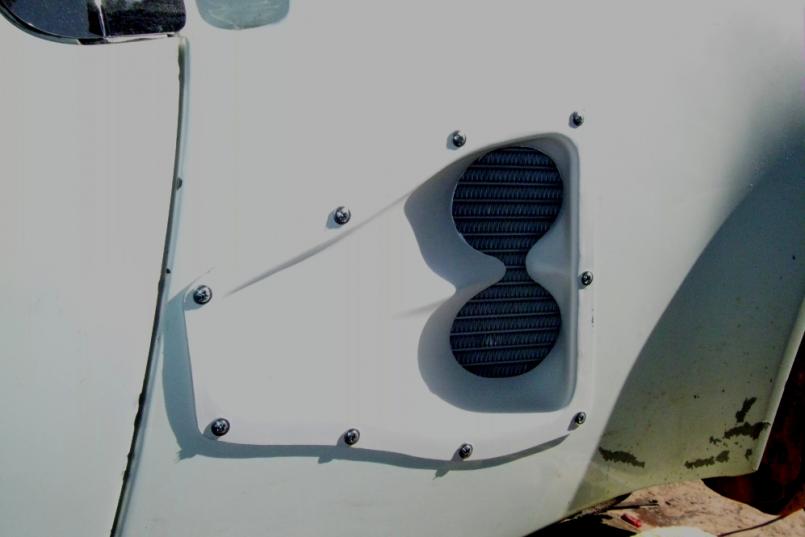
Posted by: kg6dxn Jun 25 2011, 07:05 PM
More...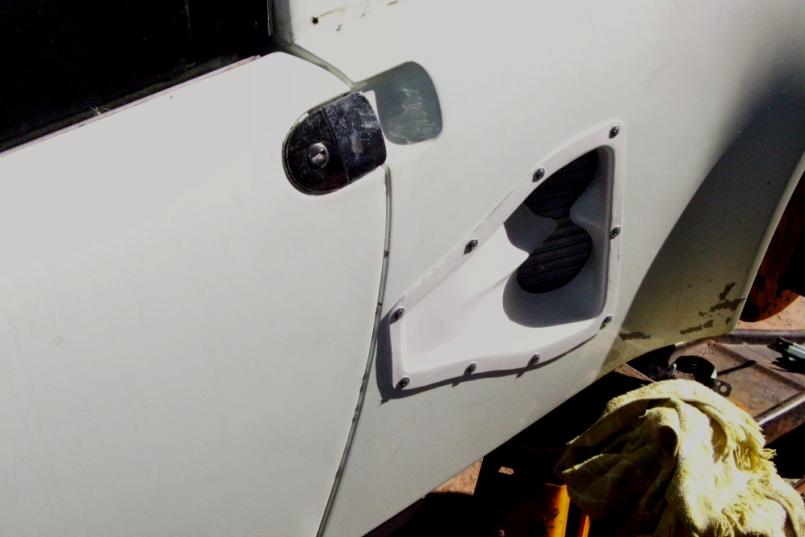
Inner fender view...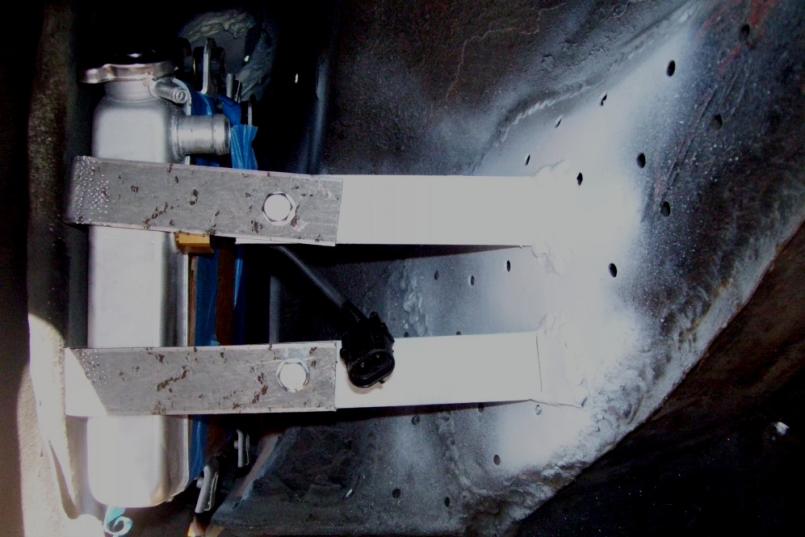
Posted by: Andyrew Jun 25 2011, 07:20 PM
Very interesting mike! That looks like it will work out pretty well.
Posted by: kg6dxn Jun 25 2011, 07:43 PM
Very interesting mike! That looks like it will work out pretty well.
I forgot to mention it's mounted at an angle. The front is flush with the inner firewall. The rear is close to the fender to make tha air flow and room for the fan.
Posted by: kg6dxn Jun 26 2011, 06:49 PM
Today I worked on the cold air intake. I used another NACA duct (can't have just one). I built a steel box, hemmed the edges and fitted a gasket where it touches the body. I need to fab the top still to enclose the air filter. I used 3" tubing welded to both the box and the side firewall. I will connect the tubes to the NACA duct with brake cooling hose. I built this old school since I don't have a metal brake. Blood sweat and tears... And a BFH! Hand hammered all of it and used some 1x4's and clamps to make a getto brake.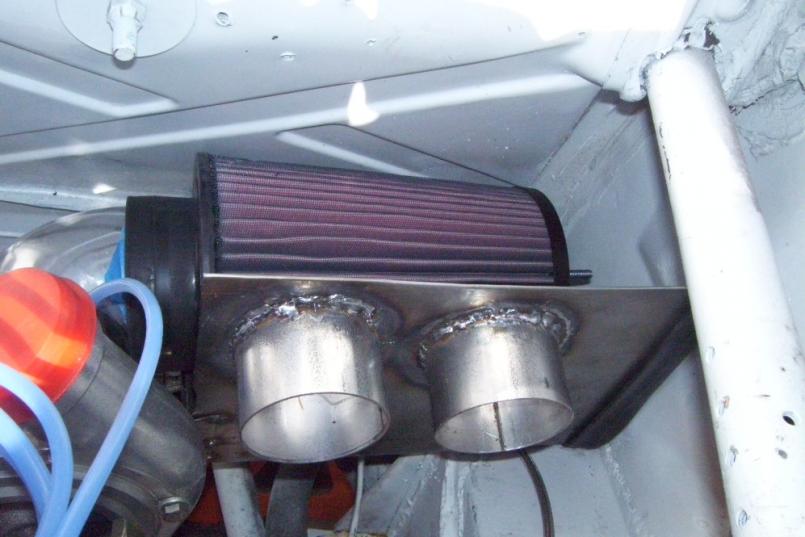
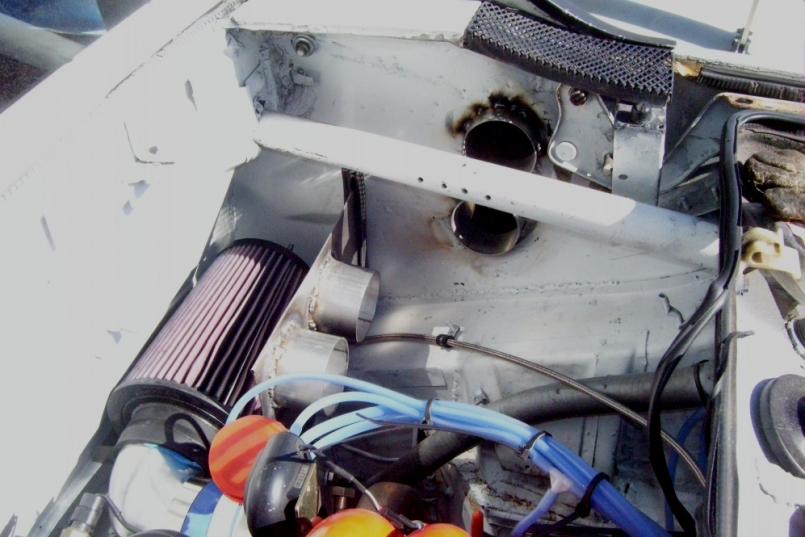
Posted by: kg6dxn Jun 26 2011, 06:51 PM
More...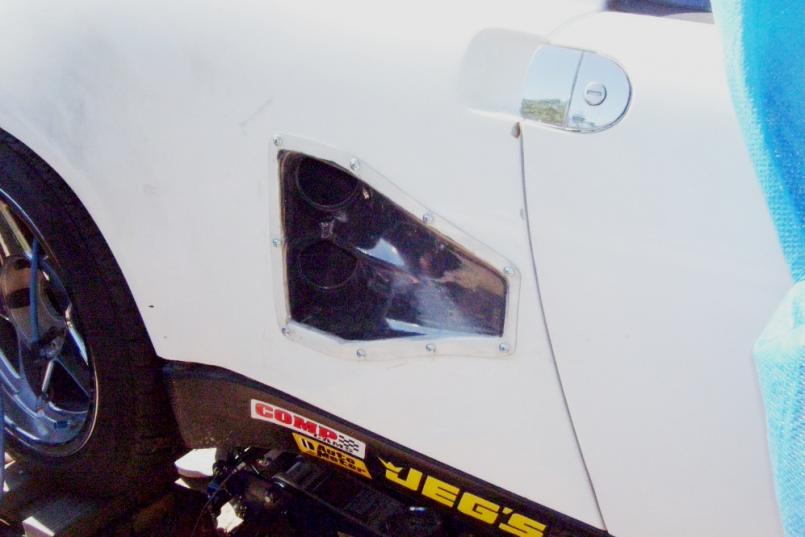
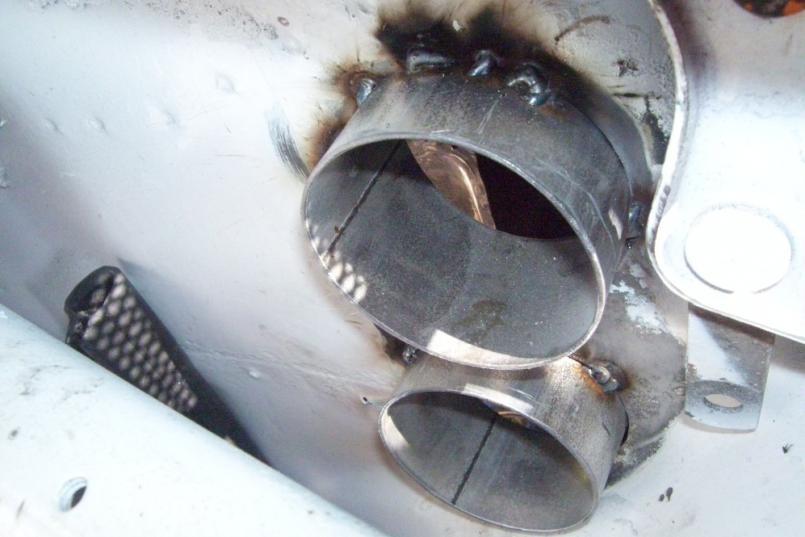
Posted by: kg6dxn Jun 28 2011, 07:38 PM
My clutch showed up today. Too bad it's raining in California toaday. It's a SPEC Stage III+ unit. Came with new Sachs TOB and tool. The disc looks like a copper composit. It even came with stickers to make my car faster! The instruction say I have to drive for 500 miles in stop an go traffic to break in the clutch. I'm worried I won't be able to find any traffic in California
Looks like great quality stuff. I can almost make my car go 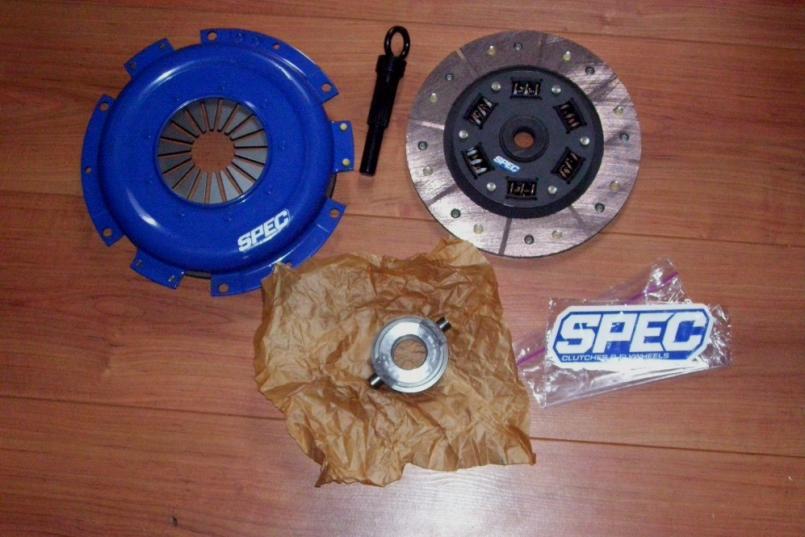
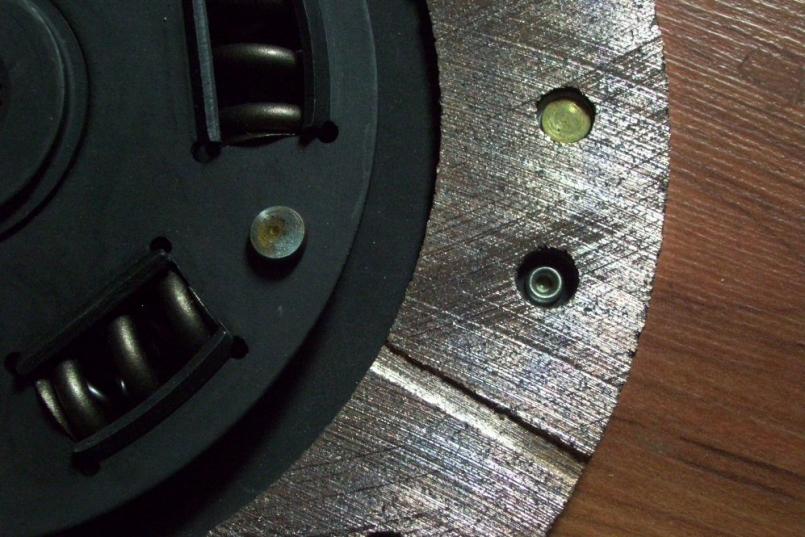
Posted by: kg6dxn Jun 28 2011, 07:39 PM
More, just for fun...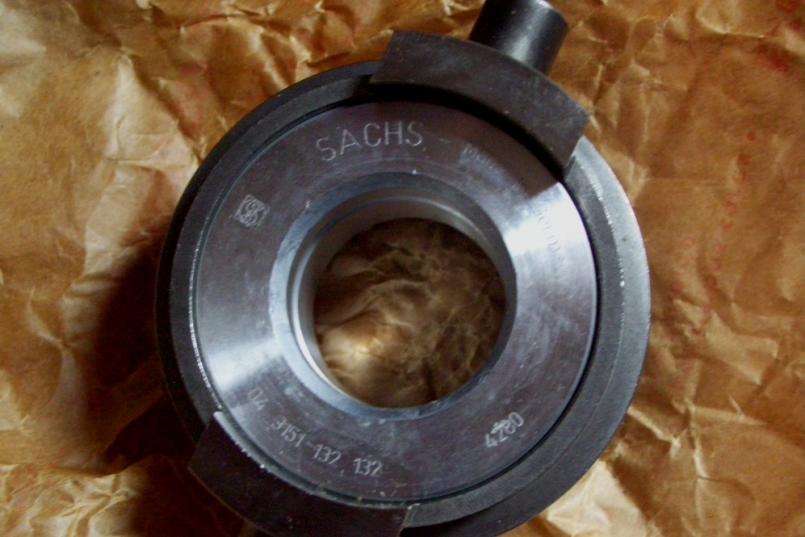
Posted by: kg6dxn Jul 2 2011, 10:16 PM
Big push on the car this weekend. About 11 hours today. I had to go backwards a little. I realized my turbo flange gasket was missing. I had to unbolt a ton of stuff to get the turbo off. Then I realized the mounting bolts were to short. Along with everything else I was doing I made 3 trips to the auto parts store, 2 trips to orchard supply hardware and 2 trips to the HD. I lost my clutch mounting bolts. They are new and in a bag in a safe place somewhere in the garage. Nobody had hardened metric bolts. I had to old school it by hardening the bolts myself. Heated them until red hot and dunk in a can of old oil; repeat several times. Not sure the actual hardness but they will work for now. Clutch is in, new bushing on the fork. I finished the top to my fresh air box and got it plumbed to the outside. My radiator overflow tank is mounted. Most of the misc loose bolts are now tight. I mounted the heat exchanger fan in the rear quarter. Need to find a pump and plumb it. Tomorrow I will try to finish the cooling system by replacing the under body hoses and finish my shroud modifications. I think I can have this running by August. I pulled the motor in November. This has raken way more time and money than I originally thought.
Here's some pics...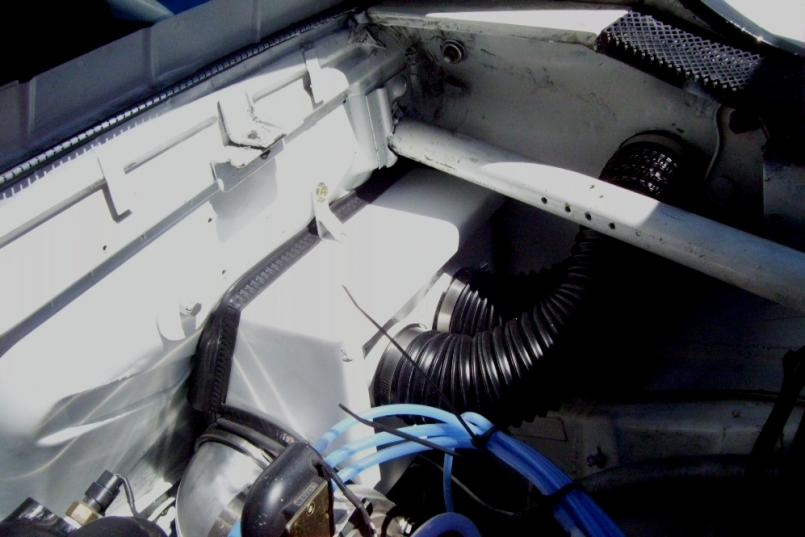
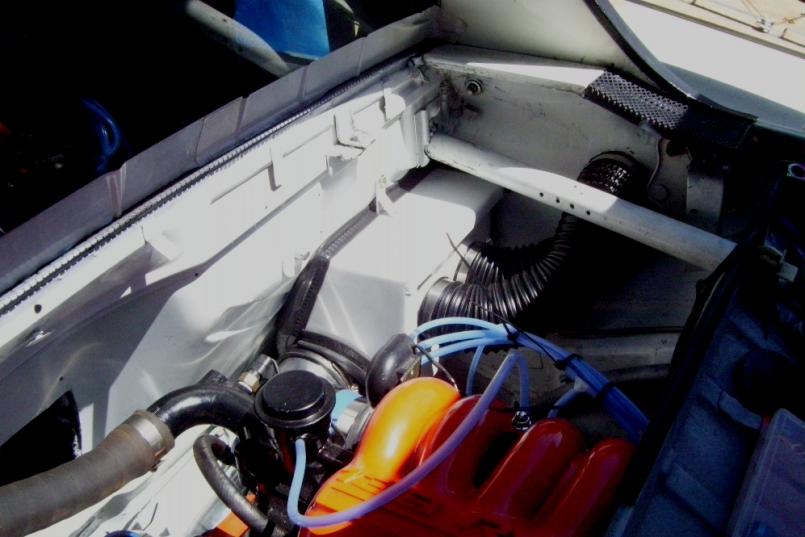
Posted by: kg6dxn Jul 2 2011, 10:19 PM
I had to clock the turbo outlet to the passenger side and use a U bend to get it in front of the motor. Two 45's later and its into the intercooler. Just need some more couplings to show up and it's done...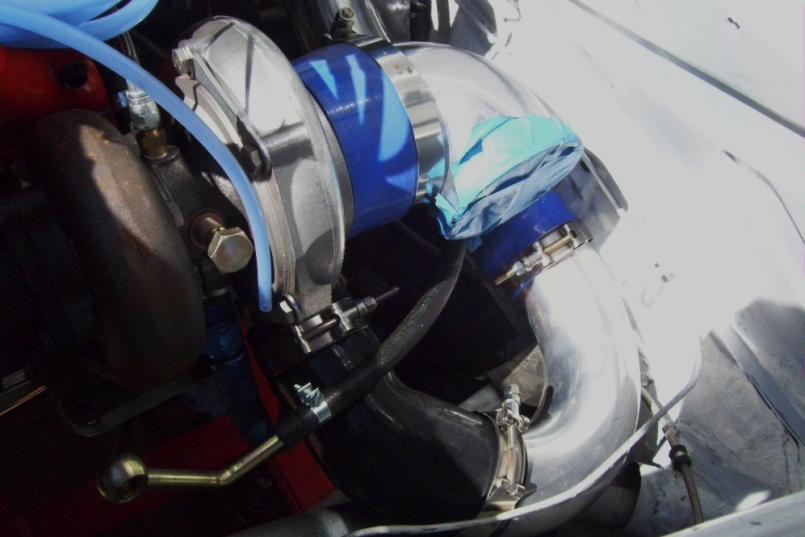
Did the tranny removal the old fashion way. On my back and lifting it in/out. It was actually easier than the floor jack...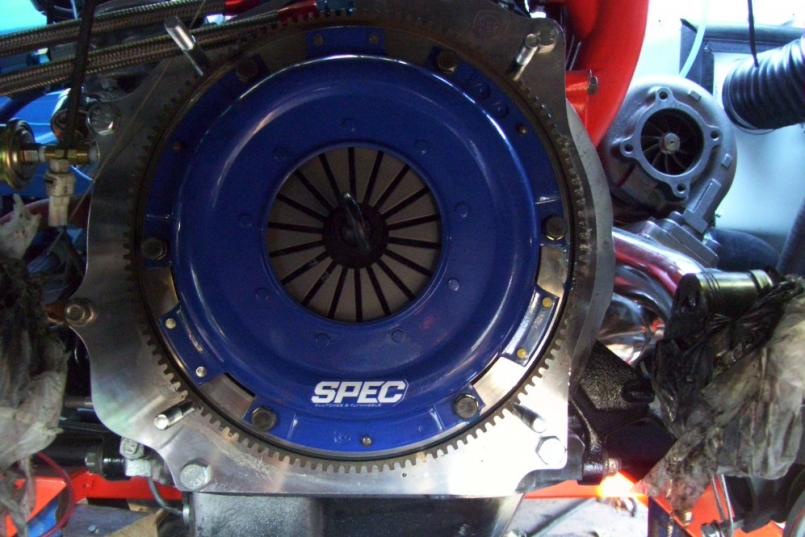
Posted by: kg6dxn Jul 2 2011, 10:23 PM
Here is the heat exchanger with fan mounted. Need to wire it up but I'm saving the remainder of wiring for the end.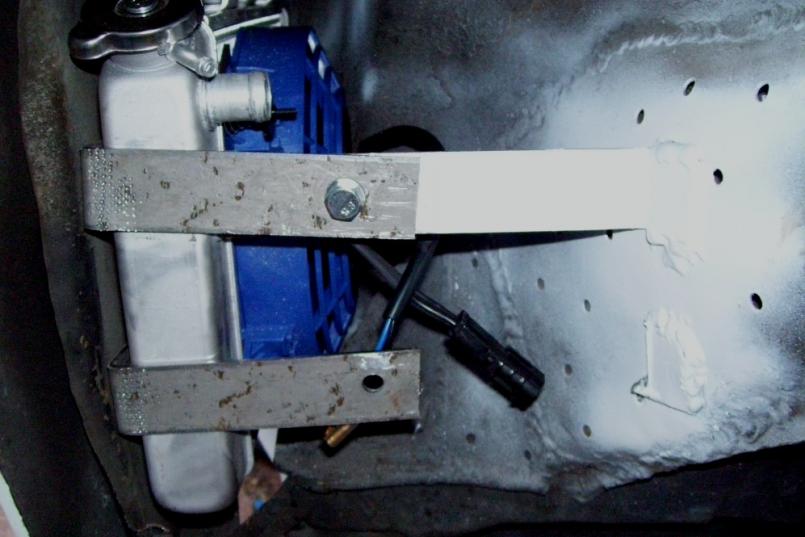
Posted by: Andyrew Jul 2 2011, 10:39 PM
Spec makes good stuff. I have a Spec flywheel in my Audi, one of my favorite purchases.
I hate those days where everything goes wrong... Good lookin progress none the less!
Posted by: Rand Jul 2 2011, 10:52 PM
....That thing is going to sound ??? I have no idea actualy but I bet it will be impressive....
Like an alien movie soundtrack. In high def, THX and all the other acronyms. Mad frickin 10' hornets swarming.
Can't wait Mike. Is it going to hunt like a banshee, or idle smooth?
Posted by: kg6dxn Jul 2 2011, 11:05 PM
Can't wait Mike. Is it going to hunt like a banshee, or idle smooth?
It's a JDM motor. I did no porting to it so it should have a good idle. When I rebuild it (enevitable) I will do a pretty serious "street port" and it will have a lopey idle. At that point I can push the boost and get around 500hp and stay reliable. I'm not sure I need more HP. FYI for those that want to know. A master rebuild gasket kit is $1300 no bearings included. they're actually fairly easy to rebuild if all the rotors and housings are good. Lucky for me, Atkins Rotary in Oregon has the gaskets I needed for the intake. Most FLAPS do not cary ANY Rotary gaskets. Not even a water pump gasket.
Posted by: kg6dxn Jul 3 2011, 11:00 PM
Today I tackeld the cooling system. I used some 1-1/8 ID high temp hose. I was running 1" green stripe hose. The added diameter should make a huge difference in flow even though the increase is small. when routing my hoses, I found the front trunk pan was cracked in 5 or 6 places. It was from the battery tray being bolted by the PO and then racing with it. Shitty setup. So I had to repair the pan before I could continue. I then welded the battery tray to the floor in 8 places. The floor pan has no flex anymore I fabed up a new shroud to cover the added oil cooler and radiator. I'm actually getting good at bending sheet metal getto style. I need to buy a brake! HF having any sales? The radiator floats on rubber isolators. No bolts to the car. I had to make a few more trips to HD and the hardware store. I made a copper reducer from 1-1/2 to 1-1/4(they didn't have one I could buy). None of my Renegade hose adapters would work on the lower rad outlet. I also ditched the Renegade water filler tank for an inline 1-1/4 unit. The rotary engine needs 13psi caps so I got 2 new ones. The one on the radiator is a Mr. Gasket unit with built in thermometer. I removed the clamps on the fuel lines only to discover I left a fuel line loose under the intake manifold. I think I have to pull it off to get to it. Once that is done I will check all the oil lines and coolant lines. I think I can fill 'er up with liquid. This is the start of my 9th month of this engine conversion. I'm ready to enjoy driving it for a while...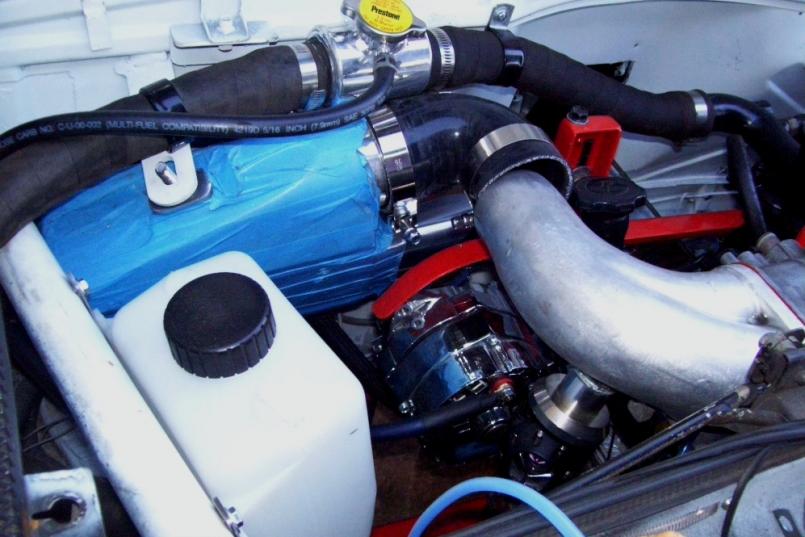
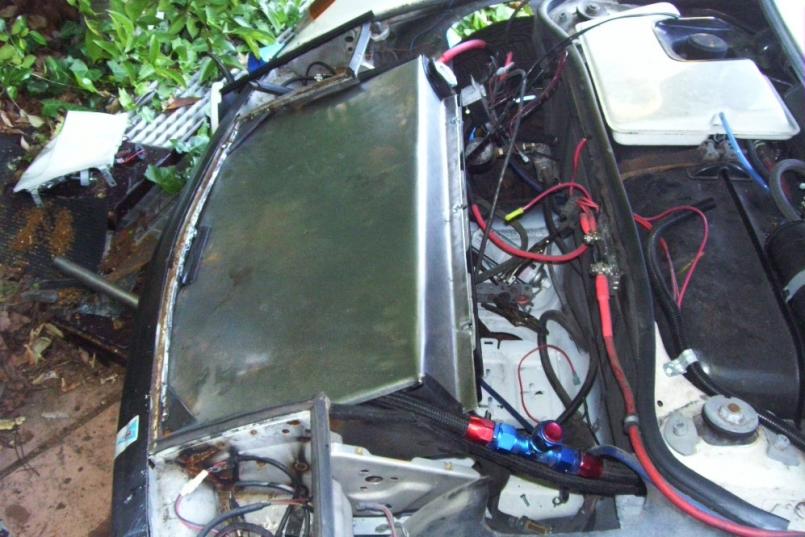
Posted by: kg6dxn Jul 3 2011, 11:03 PM
Hers a shot of the battery tray and my complete exhaust ready to go back in.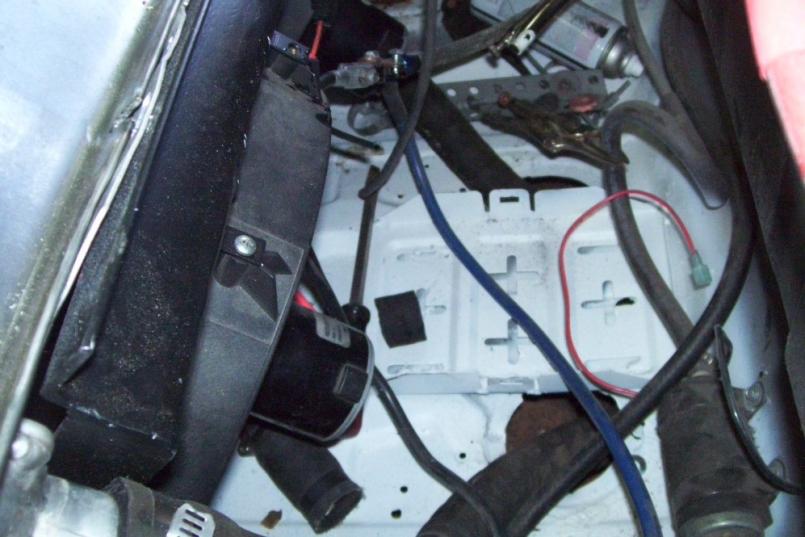
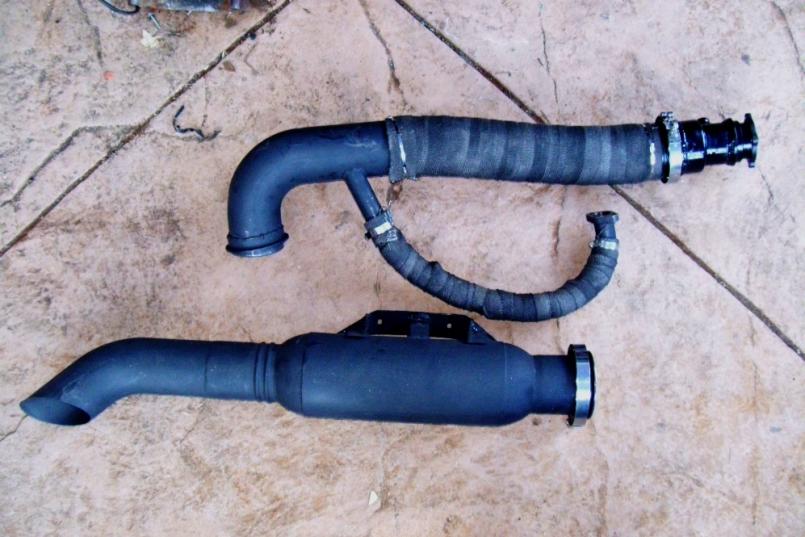
Posted by: kg6dxn Jul 4 2011, 02:56 PM
Here's a comparison of the Gates green stripe hose (Left) to the new 1-1/8" hose I'm running (right). Also pictured are the Renegade reducer fitting(left). Notice the reducer is 1-1/4" to 7/8"-3/4". The fitting on the right shows the smallest size I'm using 1-1/4" but I'm stepping up to 1-1/4" entering all devices. The 1-1/8" hose can strech over the 1-1/4" fitting. Clearly the Renegade reducer flows less than my new system. I had atleast 3 of these reducers on my V8 system. These larger reducers should help the stock RX7 water pump move liquid.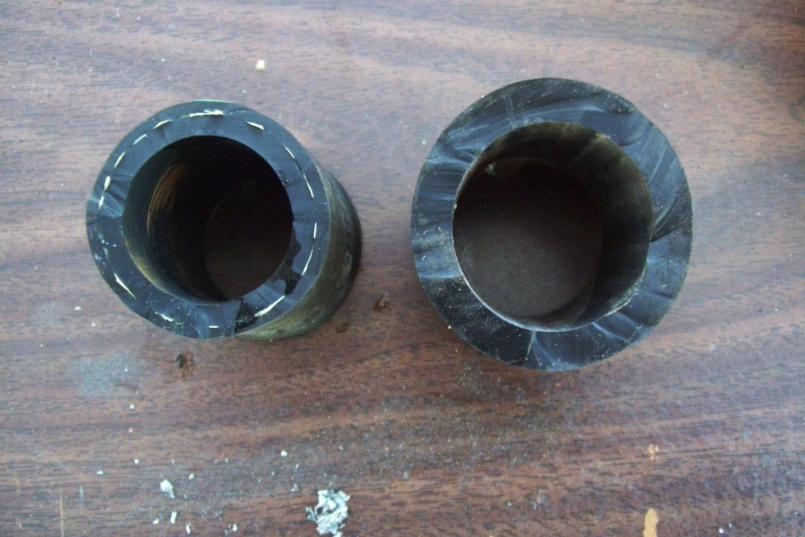
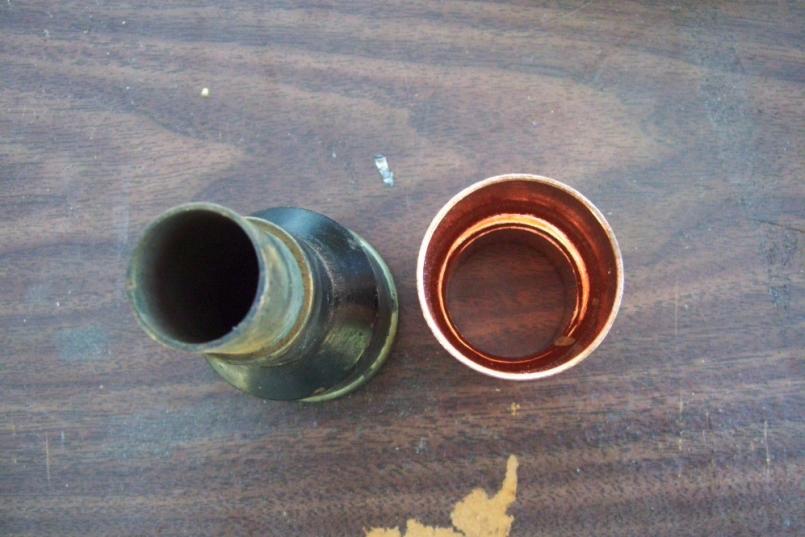
Posted by: kg6dxn Jul 4 2011, 08:19 PM
Here's a shot of the under car water lines. They run in the factory indentations and hang down about 1.5" below the car. I have hit speed bumps with my old lines with no adverse effects. There was no damage to the old lines. I just wanted to install new larger lines. Some people like copper but I would have ripped the copper apart many times over. I used insulated Adel clamps with an added layer of shrink tubing.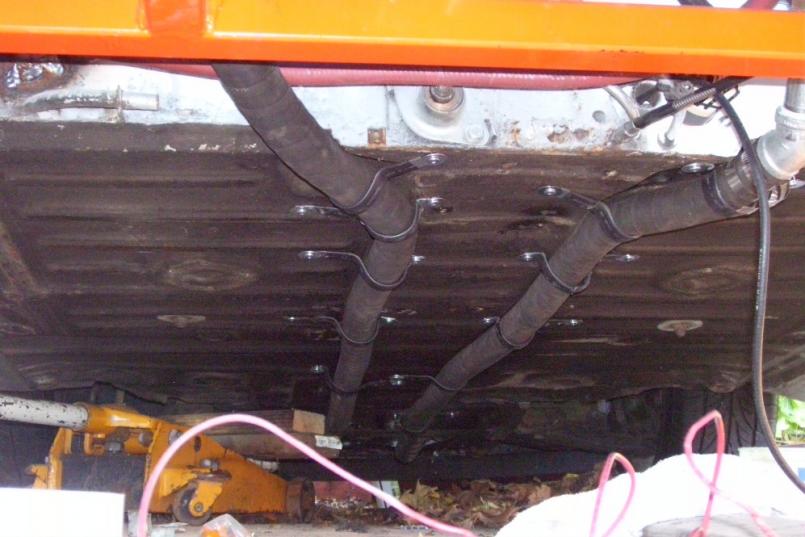
Posted by: kg6dxn Jul 4 2011, 08:23 PM
Axles are back in. You can see the interference of the wastegate pipe to the clutch cable. They don't actually touch and the wastegate is actually in front of the axle not under it. I insluated both the WG pipe and the clutch cable. I'm hoping it will be OK.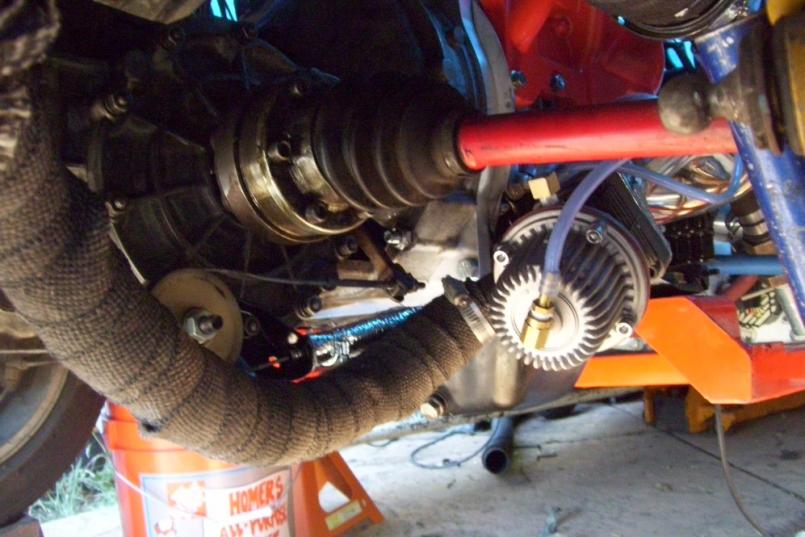
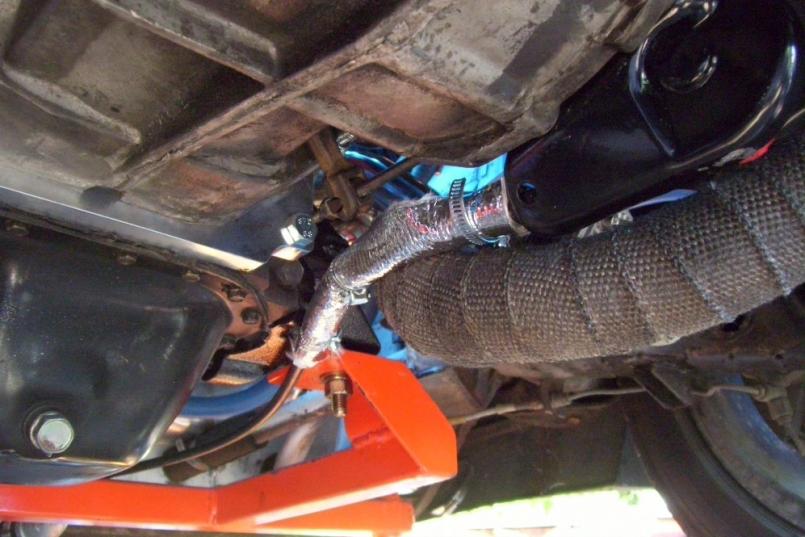
Posted by: Cairo94507 Jul 5 2011, 07:06 AM
Wow. You have done some serious work. I look forward to seeing that car running around town and hearing it.
Posted by: kg6dxn Jul 5 2011, 09:02 PM
Spent a little time tonight getting my Cold Air Duct in place to the NACA. It was a bitch working inside the fender...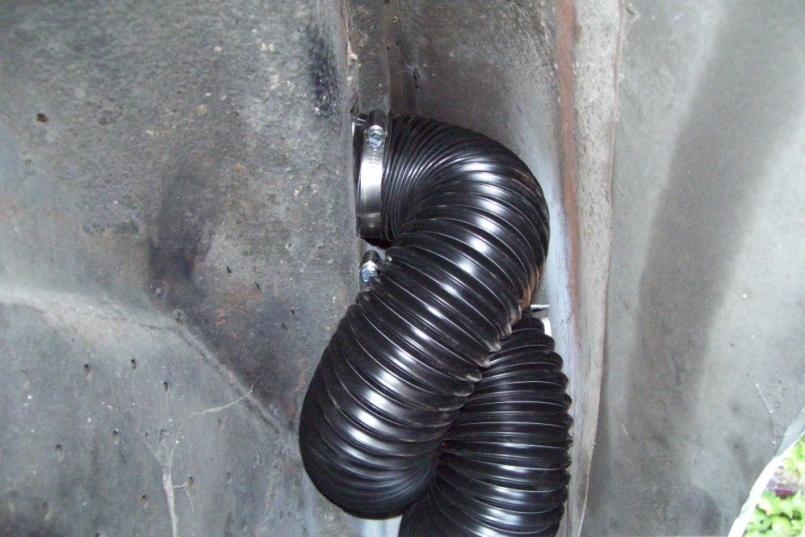
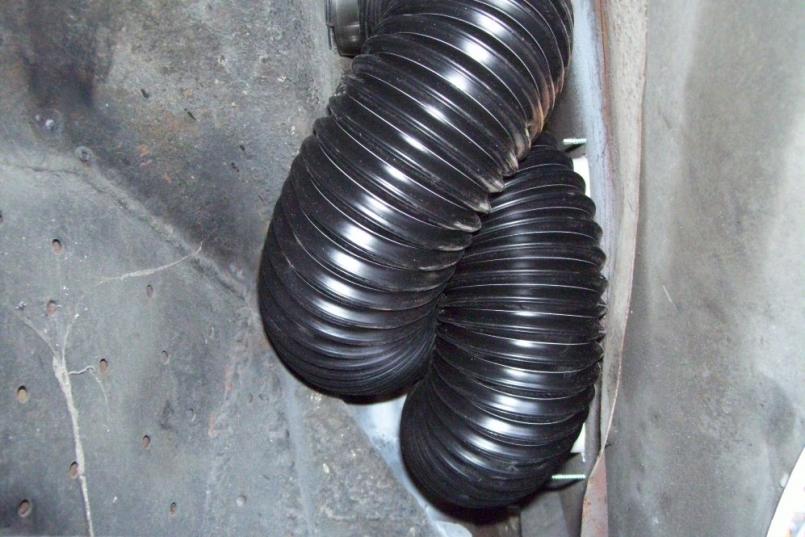
Posted by: kg6dxn Jul 5 2011, 09:05 PM
I realize I need practice welding upsidedown... I welded up this exhaust hanger to help support the front half of the exhaust.
Goober welds! 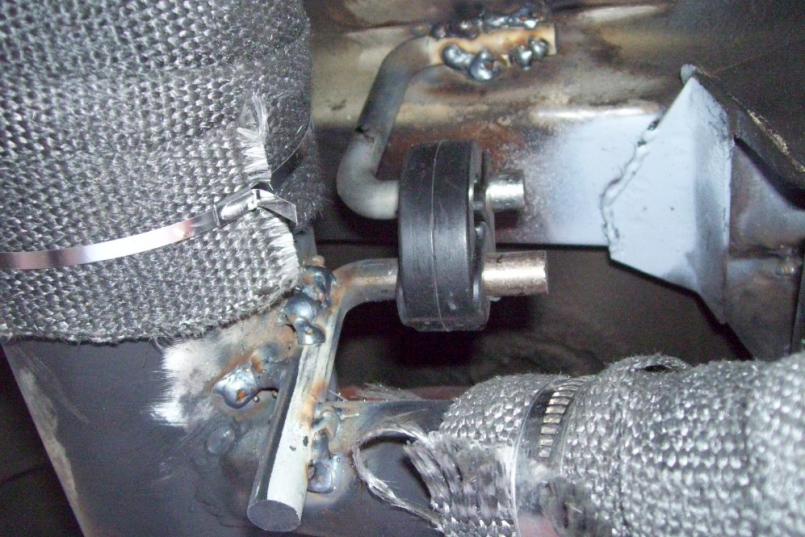
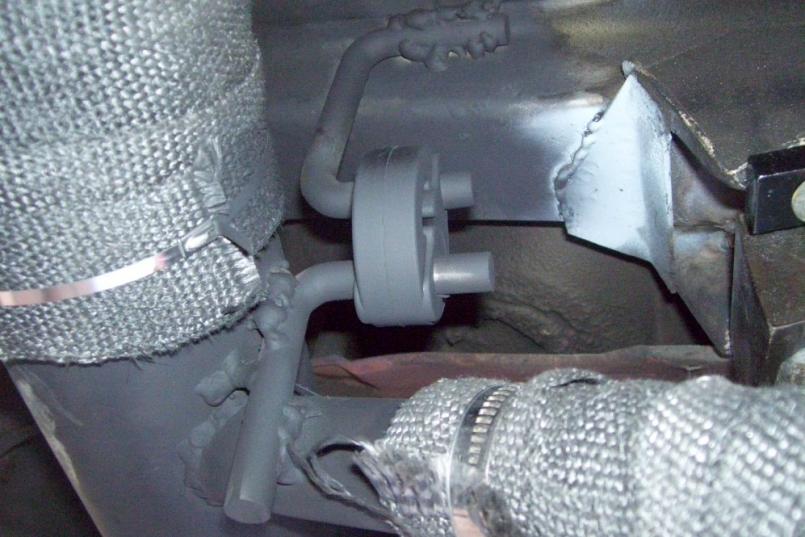
Posted by: Andyrew Jul 5 2011, 09:29 PM
I always turn up my heat setting or turn down my welding speed when welding upside down. However it looks like itll hold!
Posted by: diabolical1 Jul 8 2011, 06:59 PM
very impressive work thus far. i'm curious to hear how it sounds when you get to fire it up.
Posted by: kg6dxn Jul 8 2011, 07:07 PM
very impressive work thus far. i'm curious to hear how it sounds when you get to fire it up.
Thank You.
I'm so close to getting it running I can almost taste it! A couple more weekends of work and I'll be tuning the EFI. When I get it running I will post a video of it and you will all hear how good or bad it sounds. The part that sucks the most is the 500 mile break in for the clutch. No full throttle launches or it voids the warranty. 500 miles of stop and go traffic.
After that, I'm gonna hammer on it and see what will break...
I'm going to drive it for a year before I paint it. Unless I win the lottery
Posted by: kg6dxn Jul 9 2011, 10:21 PM
Got started on the plumbing to the intercooler. 3/4 fittings and hose. Found a cool inline filler so I don't have to go into the fender to top it off. I still need to source a pump. May hit up pick n pull for a BMW pump (Thanks Strawman). I picked up 5 quarts of Red Line Water Wetter today. I will fill both cooling systems with it. I've used it before and it works great. Royal Purple, Purlpe Ice works good too.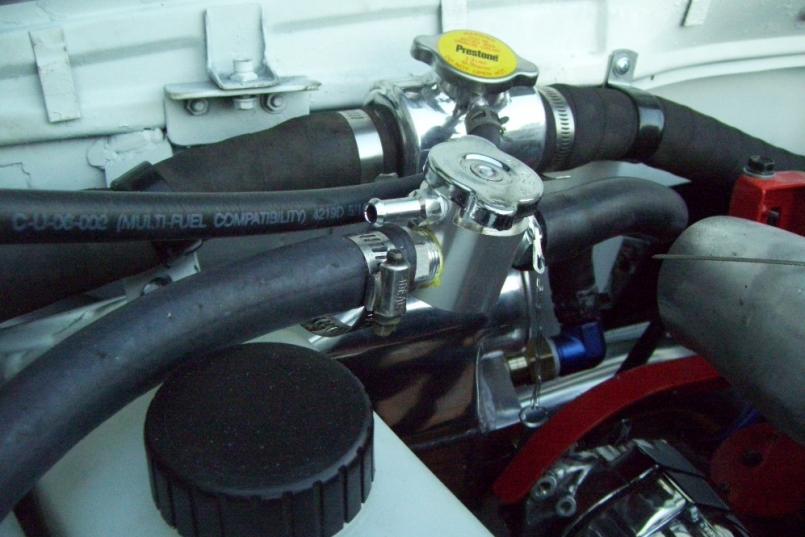
I pulled a gromet from my parts car and ran the hose through it. This is the one behind the dash normally for the heater controls. Just cut the inner hole bigger.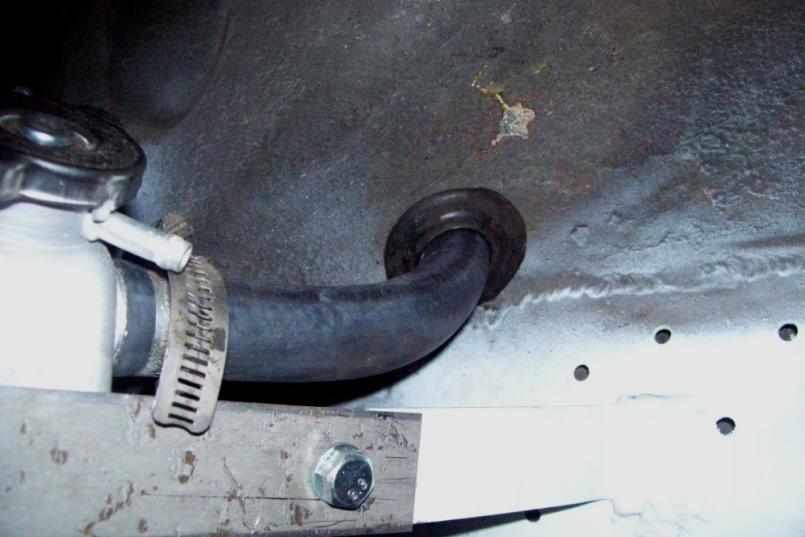
Posted by: kg6dxn Jul 9 2011, 10:28 PM
This engine requires a oil catch can/ oil breather. I searched online for one but didn't like what I found. I made this one from a scrap of 3" tubing. I welded on nuts and then drilled and tapped tham for 1/8 NPT fittings. The top connects to the air inlet right near the air filter. The bottom drains to the engine. The side connects to the oil filler tube. Welded on a bracket and painted it with "chrome" paint.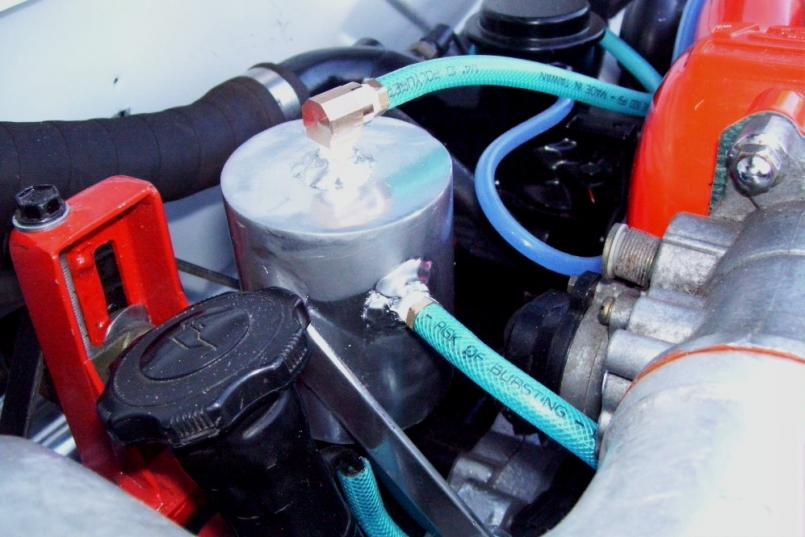
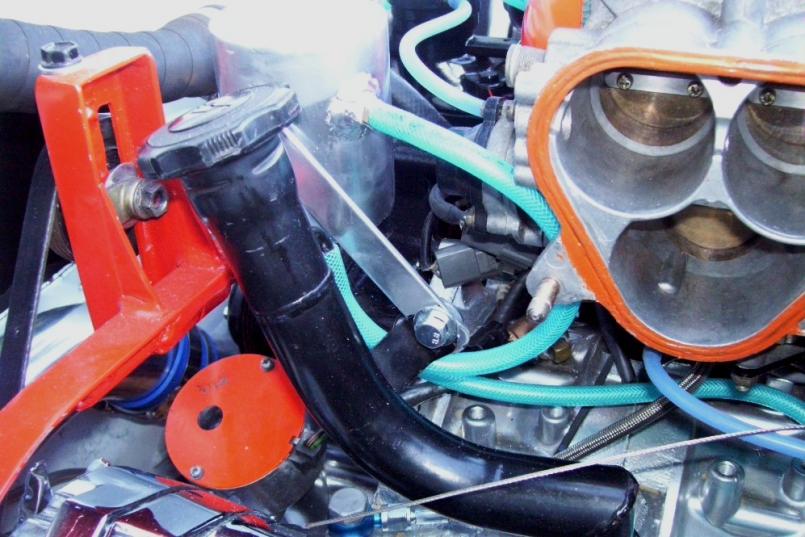
Posted by: Andyrew Jul 10 2011, 10:22 AM
Which chrome paint did you use? Progress looks great!
Posted by: kg6dxn Jul 10 2011, 09:38 PM
Which chrome paint did you use? Progress looks great!
Dupli-color. It looks more like polished aluminum than chrome. Great reflectivity though.
Attached thumbnail(s)

Posted by: kg6dxn Jul 10 2011, 10:56 PM
I went to the junk yard today to pick up some BMW pumps. I told them they were heater control valves but they said they were water pumps. I guess they're smarter in Fermont than Sacramento at pick n pull. I ended up with 3 Hella pumps. I relocated my Radiator overflow tank to make room for my heat exchanger tank. The tank is T'ed into the pump inlet. The other side of the T is to the heat exchanger. The pump outlet pushes to the intercooler. The intercooler pushes to the heat exchanger. The inline filler has an over flow line that I connected back to the tank. I drilled 3 small holes in the first stage of the cap to allow air/water to flow back to the tank. This allows the system to self bleed back to the tank. This way the air will work out of the system automatically. I ran the pump for several hours with no problems. I used my Fluke lazer thermometer to get some readings. The radiator hose was 130F in the sun. The intercooler hose was 85F. They are positioned right next to eachother. The radiator has no fluid yet so the test was not completely fair but I do think the system will work well. The radiator overflow tank has been moved to the trunk. I punched a hoe in the floor for the fill connection and ran the hose under the car back to the connection at the radiator filler. The intercooler has been finalized and the pressure tubing is connected.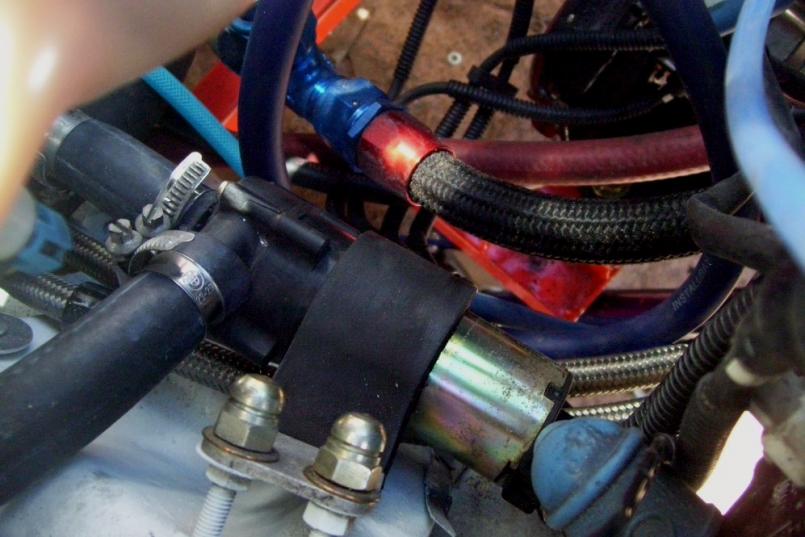
Here you can see the bottom of the overflow tank and the starter installed. I ran a 4/0 power cable from the disconnect up front. I then ran a #2 to the power terminal on the firewall to power my rear fuse panel.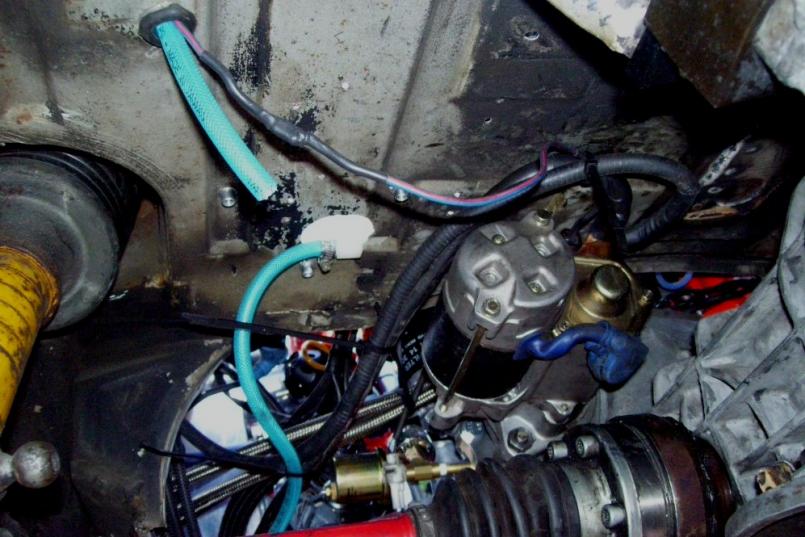
Posted by: kg6dxn Jul 10 2011, 11:04 PM
Here is a shot of the radiator overflow tank. I'm not happy about its location but I ran out of room in the engine bay at the elevation I need. I think it will be OK due to the gasketed screw on lid.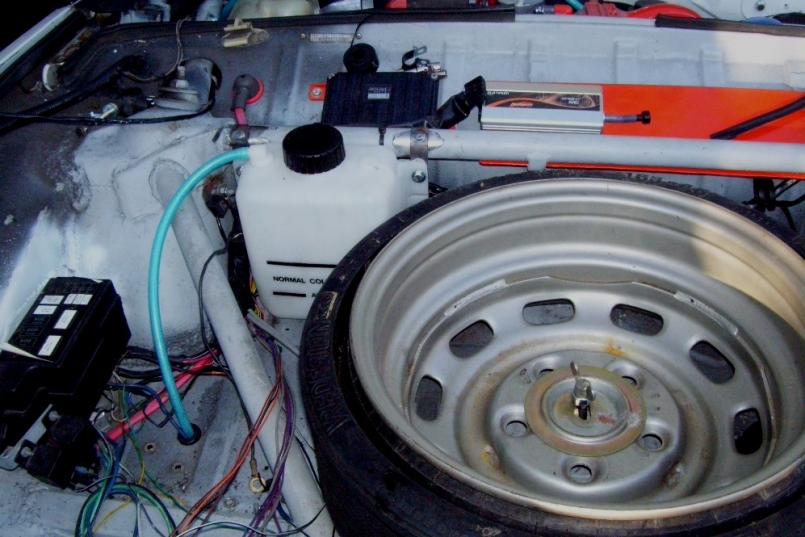
Here is a money shot of the engine bay. Everything else fits good. The only available room is too close to the turbo. I could have mounted my overflow bottle there and it would be OK as long as it had water in it. But if it ever went dry in would melt. I'm down to a little wiring, fluids and tuning. My WB O2 module should be here this week so I can finish the wiring. Then tripple check all the hoses and fill the systems and bleed. Almost there...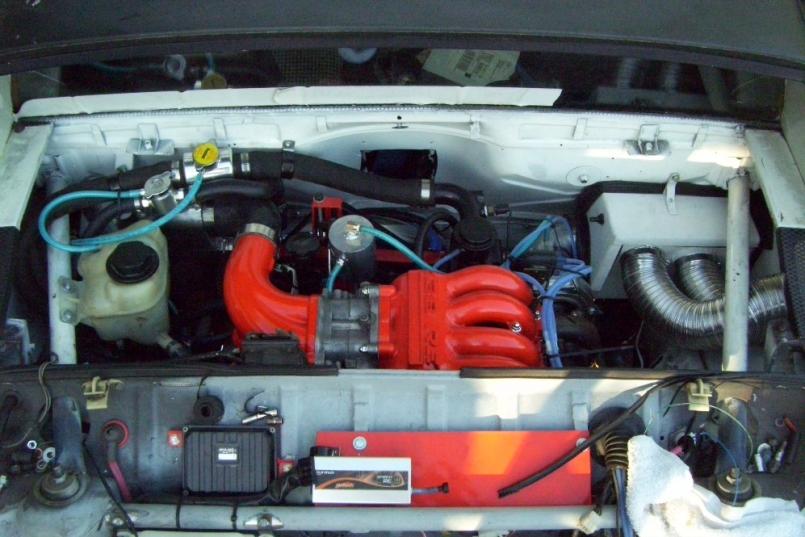
Posted by: JRust Jul 10 2011, 11:25 PM
Awesome Mike! I can't wait to see that sucker on the road. I'll be a little closer to your neck of the woods this weekend. I'll be in Monterey thursday-sunday. Just wish it was up & running so I could go for a ride. I will be flat towing the LE down so I can take off from my wife's family reunion. If your in the area at all give me a call
Posted by: Andyrew Jul 11 2011, 12:00 AM
Which chrome paint did you use? Progress looks great!
Dupli-color. It looks more like polished aluminum than chrome. Great reflectivity though.
I've used that stuff!
Everything looks really great so far! I really like the BMW pumps.
Posted by: kg6dxn Jul 11 2011, 06:41 PM
Here's is a pic of my new oil cap in honor of Dr. Evil and his proctology expertise.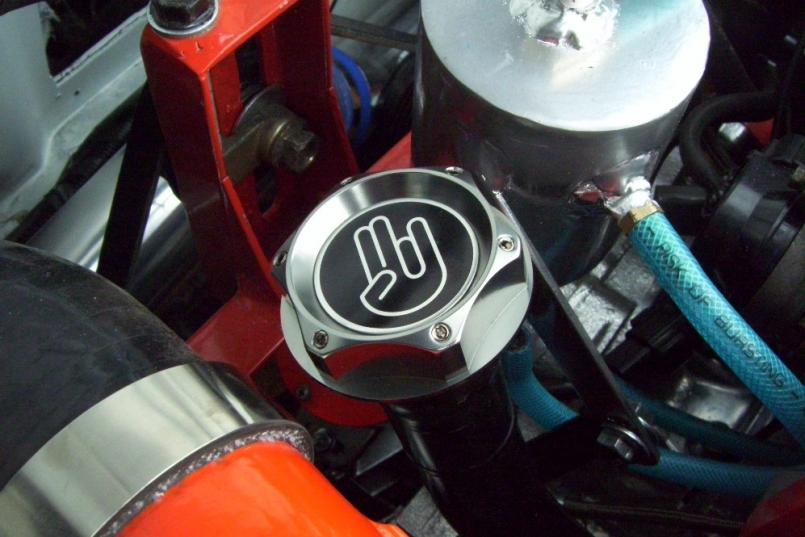
Here is a pic of my HKS blow off valve. Plumbed and ready to go!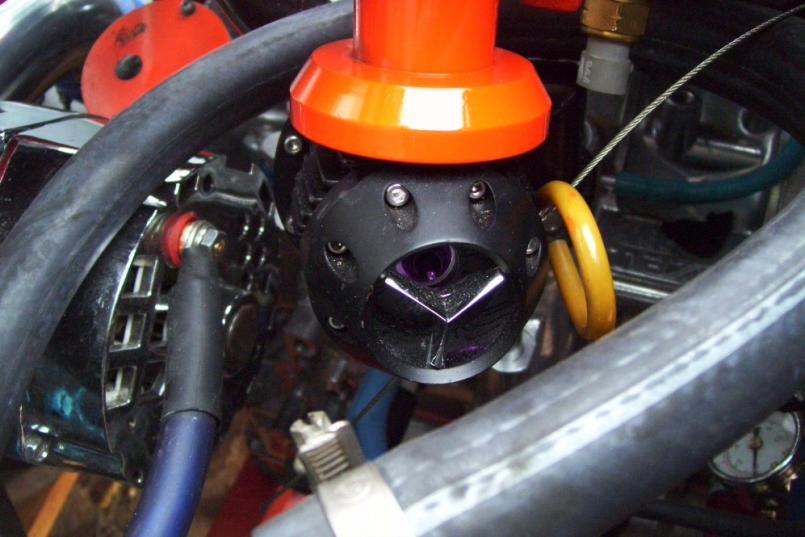
Posted by: kg6dxn Jul 11 2011, 06:44 PM
Another random pic of the intake and peripherals...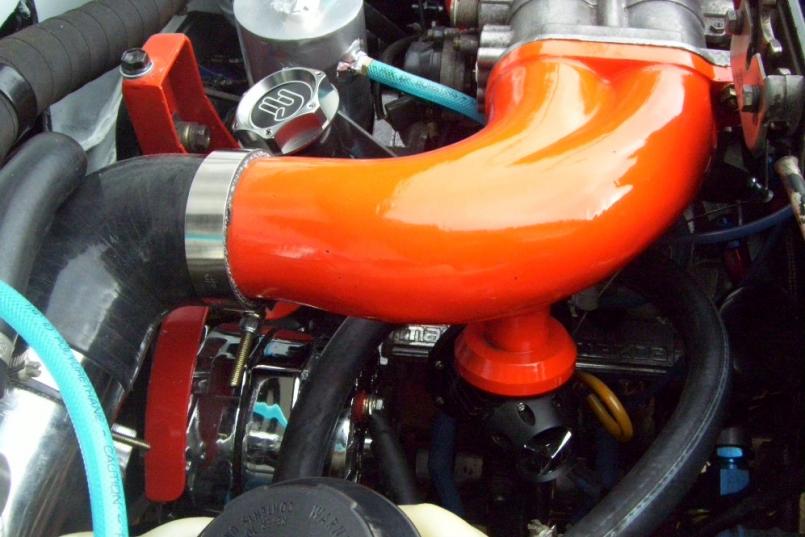
You can see some of my 3" pressure tubing to the intercooler in the background...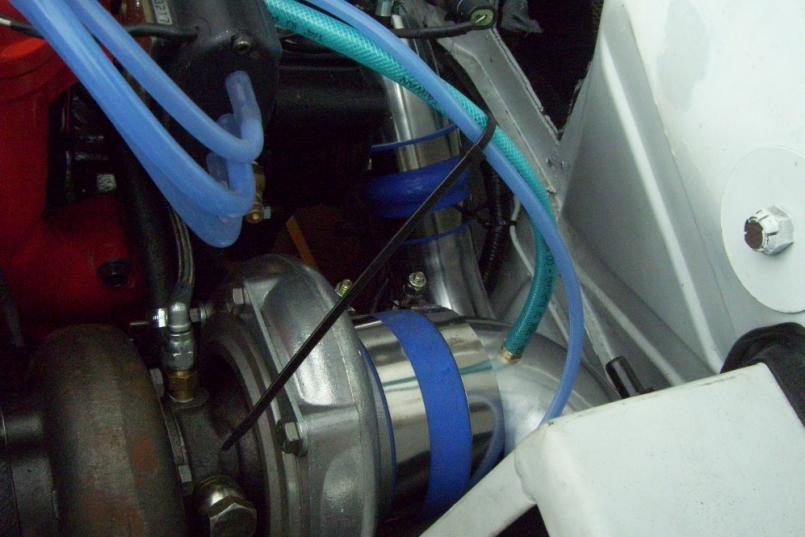
Posted by: kg6dxn Jul 11 2011, 06:46 PM
Here is the best sticker... For those that dare let me pass...
Posted by: kg6dxn Jul 11 2011, 06:57 PM
Has anybody seen my license plates? They seem to be missing... I took them off in November and put them in a safe place. So safe, I can't find them...
Posted by: Andyrew Jul 12 2011, 09:09 AM
I see water injection? Did you mention that earlier? Probably, I must have forgot..
Its looking Really good!! Love the oil cap.
Posted by: matthepcat Jul 12 2011, 06:14 PM
Nice! Love that mirror sticker:
Rocking it on my suby.
Posted by: kg6dxn Jul 12 2011, 06:39 PM
I see water injection? Did you mention that earlier? Probably, I must have forgot..
Its looking Really good!! Love the oil cap.
No water injection yet. The blue hose is on the inlet to the turbo for the PCV oil breather system.
My Haltech WB O2 showed up today. Looks like I can start tuning in the next week or so. I have to finish some minor wiring to my gauge sending units. And double check everything.
I'm almost scared to start it. All this work over the last 9 months and now I'm almost done. If it doesn't work I will be verry dissapointed
But if it does work, it's going to be a blast. I told my wife she can drive it on the road while I fine tune it on my laptop. At some point I plan on dyno tuning as well. I have to get it close first.
Posted by: Andyrew Jul 12 2011, 06:59 PM
Ahh. Gotcha.
You'll probably be fine! just keep a fire extinguisher on hand and listen carefully!
Do they have any break in procedures?
Posted by: kg6dxn Jul 12 2011, 09:55 PM
You'll probably be fine! just keep a fire extinguisher on hand and listen carefully!
Do they have any break in procedures?
I've got 5 extinguishers ready!
Break in:
Pull plugs
squirt oil in the chamber
crank engine
prime oil system
check for leaks
install plugs
connect ignition
connect fuel pump
crank engine and hold on.
It's a JDM engine with 40-50kM on it. I'm absolutly sure it will need a rebuild sooner than later. Time will tell. If all the internals are good, there is a guy on CL that rebuilds them for $900. He's local.
I am also pre-mixing some 2 stroke oil in the fuel for added piece of mind. If the oil injectors work correclty with my electronic control unit (not my ECU) then I will not pre-mix again.
Posted by: kg6dxn Jul 13 2011, 09:04 PM
Got my Haltech dual wideband O2 controller installed. I am only running one sensor right now but I have the option for another. This is the same unit as the Autometer one just re-packaged. The Autometer version is cheaper and comes with a gauge. Wish I knew that before I bought it  I will finish up the wiring this weekend after I help Jeff and Lennie get a -6 running. There is a slim chance my car will run on Sunday, July 17th, 2011(I'm setting a goal here) I suspect it will take a couple of days to get it tuned enough to drive it more than around the block. I decided to drive it to work for a week to break in the clutch. 90 miles total per day and mucho traffic both ways. The only time I get to go over 60mph is on the San Mateo Bridge. Once it is tuned enough to drive and break in the clutch... Then I will schedule some dyno time to get the fine tuning completed.
Standard Bosch 5 wire O2 sensor...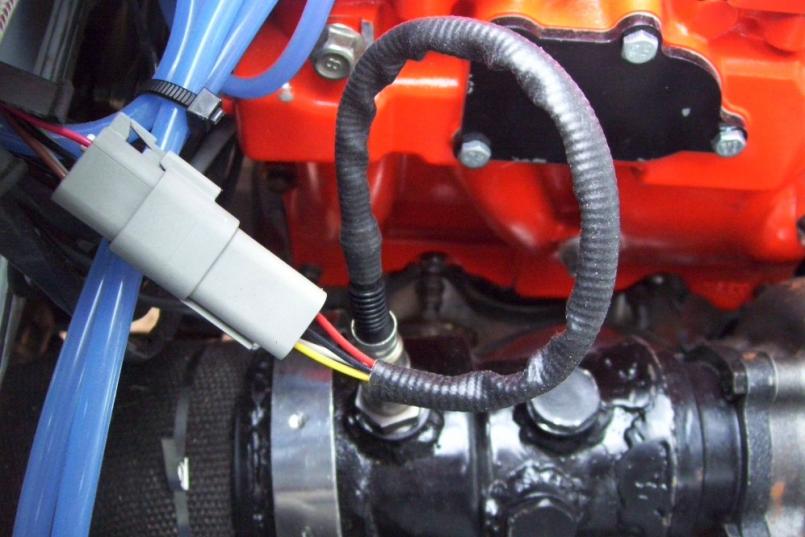
Posted by: Lennies914 Jul 13 2011, 09:41 PM
You're a hell of a guy Mike. I would have a hard time going to help someone else when you're sooo close. But I guess that's just what we do. Can't wait to see and hear the car. You're doing an awsome job.
Posted by: kg6dxn Jul 13 2011, 09:59 PM
You're a hell of a guy Mike. I would have a hard time going to help someone else when you're sooo close. But I guess that's just what we do.
Can't wait to see and hear the car. You're doing an awsome job. I'm struggling with it
I told Jeff I would come help him with the wiring while at the tranny clinic. I'll be there! He has shitty timing though I do have an eye doctor appt at 8:50am before I'll be there. stupid eyes
Posted by: Andyrew Jul 13 2011, 11:41 PM
Good idea on the clutch break in! They can be a bit of a pain..
That first couple of days is going to be tempting to open it up
Posted by: Jeffs9146 Jul 14 2011, 10:24 AM
You're a hell of a guy Mike. I would have a hard time going to help someone else when you're sooo close. But I guess that's just what we do.
Can't wait to see and hear the car. You're doing an awsome job. I'm struggling with it
I told Jeff I would come help him with the wiring while at the tranny clinic. I'll be there! He has shitty timing though I do have an eye doctor appt at 8:50am before I'll be there. stupid eyes
Awsome Project!!
Thanks for taking time out from your project to help me out this weekend!! If you need any help on yours let me know!!
Posted by: thenewwazoo Jul 14 2011, 01:41 PM
What're you having trouble with? I might be convinced to swing out there and lend a hand. I've done *cough* a few rotaries.
Posted by: banksyinoz Jul 14 2011, 01:59 PM
i know its a little late but should you consider using either a subaru 5mt or 6mt gearbox behind the 13bt in the future an elderly gent by the name of john sherman who ownes Volks conversions here on the goldcoast queensland AUS is currently building an adaptor kit for me, adaptor plate billet flywheel etc, i will post the details in a new thread when i recieve the goods,
cant wait to see youtube videos of your car when you get it running , its been giving me goosebumps just reading the posts
Posted by: kg6dxn Jul 14 2011, 02:16 PM
The only problem I'm having is work. Going to work is getting in the way of progress. I will get it cranking this weekend. Should be able to start tuning by Sunday.
I will consider a subie tranny. I almost did it but my 901 is in great shape. Kennedy Engineerd Products already makes the adapter and flywheel
Posted by: banksyinoz Jul 14 2011, 03:25 PM
I will comsider a subie tranny. I almost did it but my 901 is in great shape. Kennedy Engineerd Products already makes the adapter and flywheel
[/quote]
That's interesting when I emailed them about 8 months ago they told me they didn't do one ?? Volks conversions actually sell to and buy from Kennedy, if they had it I would have purchased one
Posted by: matthepcat Jul 14 2011, 06:38 PM
I feel your pain. Luckily your wife does not give you too much grief for hours in the garage!
We should get a local gathering in August too see your beast in person.
Matt
The only problem I'm having is work. Going to work is getting in the way of progress. I will get it cranking this weekend. Shroud be able to start tuning by Sunday.
I will comsider a subie tranny. I almost did it but my 901 is in great shape. Kennedy Engineerd Products already makes the adapter and flywheel
Posted by: kg6dxn Jul 14 2011, 08:33 PM
I feel your pain. Luckily your wife does not give you too much grief for hours in the garage!
We should get a local gathering in August too see your beast in person.
Matt
She is getting tired of this project. She wants it done! That way I will work on my honey-do list. I did help a little painting the house last weekend. Lucky for me, she enjoys painting. She also conquered her fear of the extension ladder.
I think we need a Bay Area Breakfast mid August in Fremont at the house of pancakes.
I put a blanket on my turbo to help mitigate engine bay temps. I ordered a heat sink for my O2 sensor as well. Should be here in a few days.
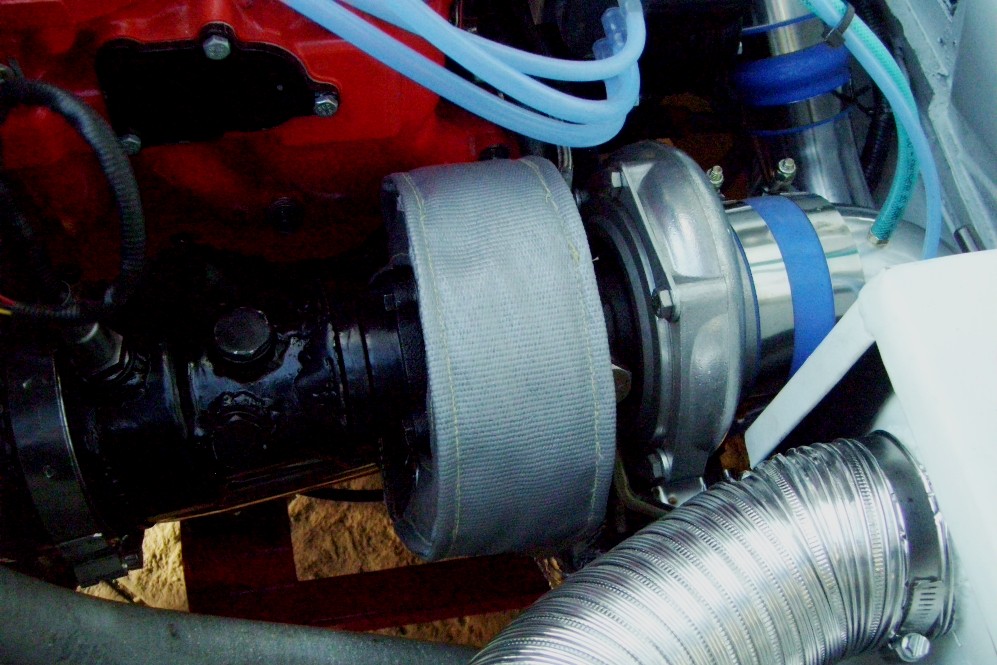
I still can't find my license plates

I also got a roll bar mount for my Boost gauge. I still need to feed the tube into the cabin and wire the lamp. I'm shooting for 15psi max. I did buy an 8psi spring for my wastegate just in case I want to drop the boost down.
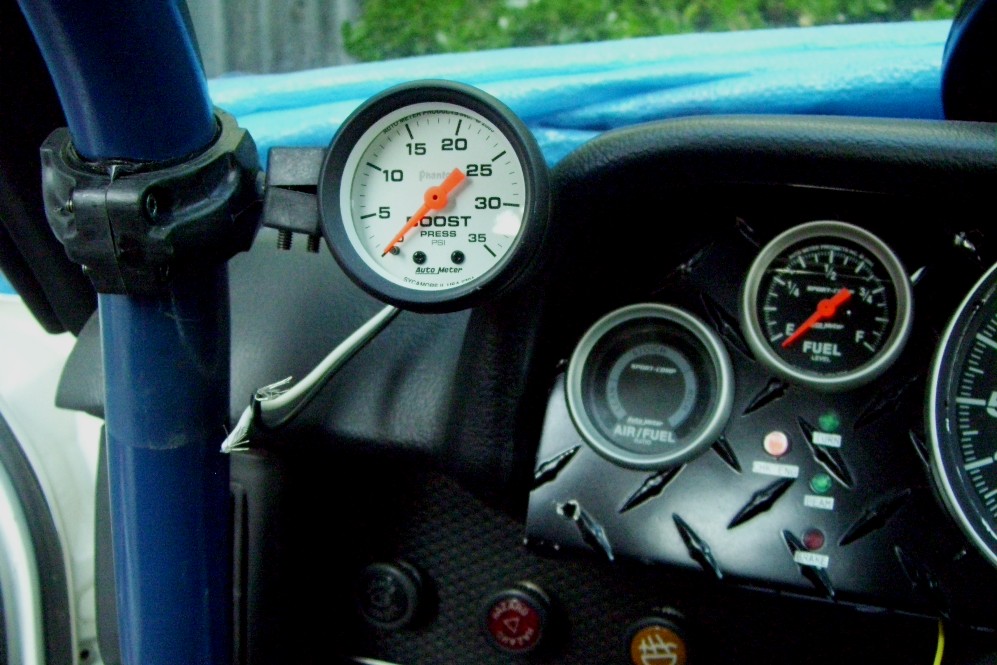
Posted by: kg6dxn Jul 15 2011, 07:19 PM
I found both my license plates They fell behind my tool box in the garage.
GPR hooked me up with a new Hella front turn signal lens. I cracked mine installing my battery up front. Guess I should have lifted it a little higher
I also picked up this book on ebay. I posted a link in Sir Andy's thread. This guy has NOS copies of this book. The last print date is 1975 and it is in mint condition. The paper has a little patina too! He has 6 left. I suggest you guys buy them up! Here's his new link... They wont last long!
http://cgi.ebay.com/ebaymotors/ws/eBayISAPI.dll?ViewItem&item=170667125143
Posted by: ArtechnikA Jul 15 2011, 07:52 PM
...He has
Posted by: Daiberl Jul 15 2011, 09:09 PM
...He has
4
Posted by: kg6dxn Jul 16 2011, 07:46 AM
I talked to the seller of this 914 book. He has a long time relationship with the author. Still alive, 83 and living in England. He buys NOS books directly from the source. Pretty cool. He has many more to sell.
Posted by: Kraftwerk Jul 16 2011, 10:25 AM
that is going in the glove box! Thanks for the heads up...
Posted by: Cairo94507 Jul 17 2011, 06:36 AM
Hey Mike- If you need labor (unskilled but can follow directions) I would be happy to come lend a hand or two since I am close to you. I would like to see your car too.
Michael
Posted by: kg6dxn Jul 17 2011, 07:35 PM
Worked my ass off today. Almost got it started. I first found a bad fuel pump relay. Had one, easy fix. Then I found the Mazda ignition module bad I need a work around. The factory Mazda part is $800. I'm looking for some MSD 6A's or 6AL's. I need 4 of them with coils. Everyone look in your parts bins and give up your extra MSD's. PM me if you have one you want to get rid of. I don't really want to buy new ones $$$. See what you have and hook a brother up!
Posted by: iamchappy Jul 17 2011, 08:13 PM
FOUR! Holy shit how many plugs do you need to fire, 24
I'm firing 2 coils and 12 plugs with one.....
Please explain i dont get it......
Posted by: kg6dxn Jul 17 2011, 08:19 PM
FOUR! Holy shit how many plugs do you need to fire, 24
I'm firing 2 coils and 12 plugs with one.....
Please explain i dont get it......
Four coils with four ignition signals to one spark plug each. My ECU can infanetly alter the lead and lag spark timing. I could get away with only 3 if I use wasted spark on the leading plugs.
The rotary has 2 leading plugs and 2 trailing plugs. One set for each combustion chamber.
Posted by: kg6dxn Jul 17 2011, 08:20 PM
I should also mention that I do not have a distributor. Just a pair of crank triggers. Leading and lagging.
Posted by: banksyinoz Jul 18 2011, 01:07 AM
Damn if I only lived over there I could drop a factory one or five around
Posted by: matthepcat Jul 18 2011, 11:49 AM
You need and MSD coil like this?
http://sfbay.craigslist.org/sby/pts/2491630329.html
And the bigger box one like this? http://sfbay.craigslist.org/eby/pts/2490164909.html
Also try e-mail this guy to see if he has a working factory unit:http://sfbay.craigslist.org/eby/pts/2496889392.html
Matt
Worked my ass off today. Almost got it started. I first found a bad fuel pump relay. Had one, easy fix. Then I found the Mazda ignition module bad
I need a work around. The factory Mazda part is $800. I'm looking for some MSD 6A's or 6AL's. I need 4 of them with coils. Everyone look in your parts bins and give up your extra MSD's. PM me if you have one you want to get rid of. I don't really want to buy new ones $$$. See what you have and hook a brother up!Posted by: ArtechnikA Jul 18 2011, 05:29 PM
I talked to the seller of this 914 book. He has a long time relationship with the author. Still alive, 83 and living in England. He buys NOS books directly from the source. Pretty cool. He has many more to sell.
My book came today - lightning-fast service! From Santa Ana, no less (where another vendor shipped something last MONDAY and won't arrive until _tomorrow_...)
Boys and girls, in case you don't know what this book is, lemme fill you in:
It is a big-print (i.e. READABLE) version of the long-out-of-print 'Technical Specifications' (i.e. - "LITTLE SPEC BOOK") of _both_ the 914/4 and the engine section from the relevant 911 Spec Book. Yeah - it says '914/4' om the cover. The /6 stuff IS IN THERE!
It is therefore an INCREDIBLE BARGAIN and means I can mostly retire my actual Little Spec Book originals to a safer location.
ALL the weights, measurements, torques. Even disassembly and reassembly instructions which the Spec Books never had. Exploded parts diagrams. Separate wiring diagram which is unfortunately in B&W and 914/4 only (year unspecified...) but still a winner inclusion.
Won't replace the Factory Repair manual, nor even probably the Haynes, but for a single concise reference for those weights, dimensions, and torque numbers - it's a home run.
BUY ONE.
(No affiliation, just a happy customer.)
Posted by: kg6dxn Jul 19 2011, 12:10 AM
I found a cheaper solution. Haltech makes an Ignitor module. I'm looking at the quad channel ignitor. This will allow me to keep the wasted spark on the leading plugs but also gives me the option to go with 4 direct fire coils. The two lagging coils are already direct fire. The leading coil is a basic dual post type. The Haltech module is directly compatible with the ECU and I won't have to loose the real estate to mount 3 or 4 MSD boxes.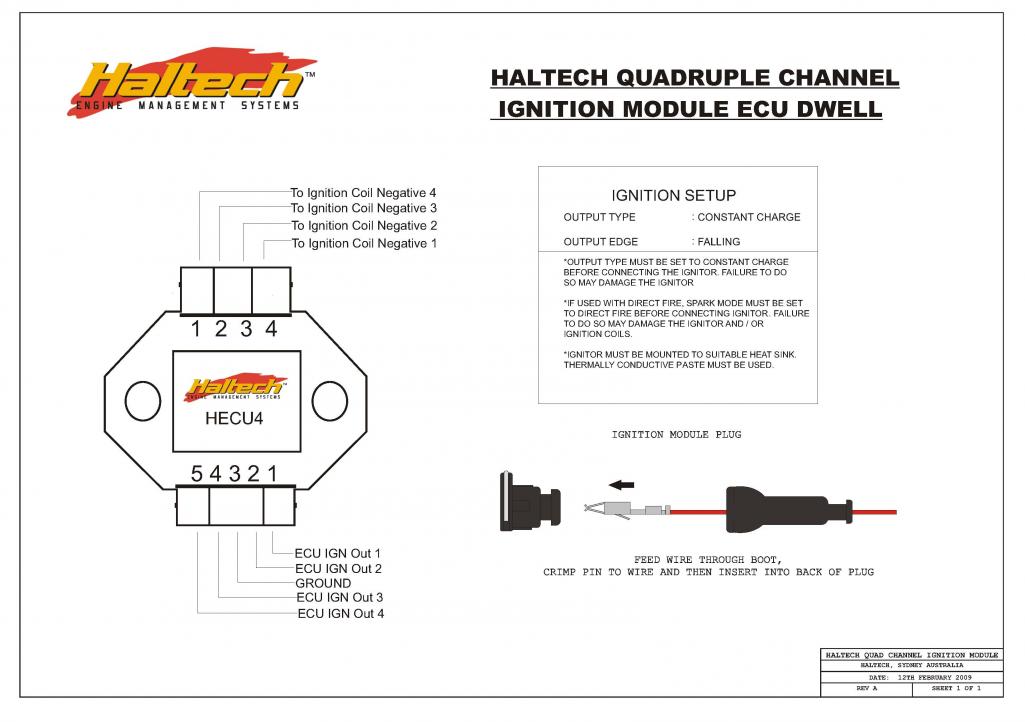
Posted by: kg6dxn Jul 23 2011, 10:11 PM
I got it running today. It doesn't run great yet but it runs. I hit up the junk yard and scrapped out parts from an RX7. Coils and ignitors. Now I have tuning and clean up to do. the interior is a mess from 9 months of work. The trunk is full of tools, documents and parts. I did notice my #1 trailing coil is not firing. Inductive timing light will not work on that wire. Works on all the others. If I can't get the trailing coil to fire by noon, I will go back and exchange it at the scrap yard. The temp at idle stabilized just under 110F. As the rpm goes up the temp comes down. Found a minor oil leak at a loose AN fitting. fixed it. all fluids stay in the engine now. It's very exciting seeing this POS run.
Big thanks to my wife for putting up with me for over 16 years!
Here is the video of the initial run. A neighbor came over and asked if it was a 4 or a 6... 
https://www.youtube.com/watch?v=NG5J0FQyxno
Posted by: matthepcat Jul 23 2011, 11:47 PM
Congrats Mike.
That's a BIG accomplishment. You deserve a beer!
Matt
I got it running today. It doesn't run great yet but it runs. I hit up the junk yard and scrapped out parts from an RX7. Coils and ignitors. Now I have tuning and clean up to do. the interior is a mess from 9 months of work. The trunk is full of tools, documents and parts. I did notice my #1 trailing coil is not firing. Inductive timing light will not work on that wire. Works on all the others. If I can't get the trailing coil to fire by noon, I will go back and exchange it at the scrap yard. The temp at idle stabilized just under 110F. As the rpm goes up the temp comes down. Found a minor oil leak at a loose AN fitting. fixed it. all fluids stay in the engine now. It's very exciting seeing this POS run.
Big thanks to my wife for putting up with me for over 16 years!
Here is the video of the initial run. A neighbor came over and asked if it was a 4 or a 6...
https://www.youtube.com/watch?v=NG5J0FQyxno
Posted by: Andyrew Jul 24 2011, 09:28 AM
Woo HOOO!!!!
Congrats man!!! Now for the hours of tuning Thats the fun part.
Posted by: strawman Jul 24 2011, 12:10 PM
Attaboy!
I can't wait to see that monster on the road.
Posted by: Lennies914 Jul 24 2011, 01:35 PM


Posted by: kg6dxn Jul 24 2011, 07:13 PM
I did some tuning and some driving today. I figured out how to use the auto tune mode with the wideband sensor. It's a 2 person job or a one person on a dyno job. This thing is waaay faster than my V8. It revs up real quick. It does like first gear but I'm hoping to be able to take off from second when I get it tuned better. I'm just not used to shifting from 1st to 2nd. I never used it with my v8. I missed almost every shift. It does not like going from 1st to 4th... BOOOOOGGGGG! The clutch is perfectly set. The shifting is tight, but the 1-2 thing needs practice.
The only bummer is that the oil injector pump does not work with the controller I have. The problem is the TPS compatability. I need to rig up a second TPS or find a dual TPS setup. My contingency plan is to swap the front cover and use a mechanical oil injector pump (I have all the parts). Then I can use a cable linked to the throttle to actuate the pump lever. Early RX7's used this style pump with a rod to move it open/close.
The temp is stable while driving between 180-190F. While parked in the driveway it gets up to 208F. At some point I will add a inline booster pump to help with flow. The stock water pump just can't push like I want at idle. There is a good one I can mount on the lower rad line up front. It has a thermostat to keep the water flowing after shutdown. When I first started the engine, the engine was at 200F and the radiator was at 75F. I revved it up and the coolant started to flow. I'm running pure water with 4 quarts of Water Wetter.
I have no idea how to use my boost controller and the instructions are confusing. The Innovate turbo timer works perfect. I just don't know how to change the time. It's set to keep the engine running for 30 seconds after shut off.
The pyrometer has the exhaust temp around 1000F tooling around the hood. I'm sure it will go up as I start driving it harder and harder... And when I get it tuned better. I set it up rich so I tune it lean. That keeps the tamps down and saves the engine.
Finally, the rotary compression cannot be used as a parking brake by leaving it in gear. I might have to source a real parking brake now. Anyone have any 930 Turbo parking brake stuff?
I'm going to have my wife help me tune while driving... unless there are any voulenteers here.
I am happpy with this conversion. It is going to be a very fast 914. Much thanks to all the PO's for setting up as a race car. I think the roll cage is very appropriate for this setup. The BIG. brake are going to help too...
Here's a pic of the water pump I'm planning to add. Pricey at $400... 
Posted by: FourBlades Jul 24 2011, 08:11 PM
Mike,
Congratulations!
It already sounds great.
Great work.
John
Posted by: Cairo94507 Jul 24 2011, 08:17 PM
Wow it does sound great. My wife had 2 RX-7's when I met her so I know how fun the rotary is to drive. Very cool.
Posted by: Andyrew Jul 24 2011, 11:42 PM
Wish I was closer... I'd love to help you tune that!
Im not sure that I would be using 1st gear all that much... I would be seriously scared of killing that trani...
Posted by: cantgo2fast Jul 25 2011, 01:11 AM
Wow, this is an awesome build, i keep going back and forth between a rotary and a subaru. If I lived closer id be all over helping you tune. Ever thought of going E85? The you shouldn't need two people for the autotune. Just set the desired AFR in the desired cells and drive. You probably wont hit every cell but after a while you'll be able to fill those in.
I think the gt35R is way overkill for only 15lbs of boost, but hey its your car. I think you could go with a smaller setup and get way more response and faster spool.
Are you using an external wastegate? Is it a manual boost controller? good instructions for hooking up a manual boost controller PM me if you want the essay version of how they work http://i21.ebayimg.com/07/s/000/77/47/c83d_1.JPG
Im not familiar with the innovate turbo timer but 30 sec is fine for any turbo. If you track it you should drive around the pits to let everything cool off a bit anyway. Dang I wish I was closer. How much was the motor if you mind me asking?
Posted by: banksyinoz Jul 25 2011, 05:33 AM
Have a look at the electric water pumps, direct replacement on series 4 onwards, weren't that expensive from memory, should be able to control it from the haltech, we have been running one on a 20b twin turbo drag car doing low 8s with no issues, I am looking to use one.
Car sounds great can't wait for more videos
Posted by: kg6dxn Jul 25 2011, 09:13 AM
Wow, this is an awesome build, i keep going back and forth between a rotary and a subaru. If I lived closer id be all over helping you tune. Ever thought of going E85? The you shouldn't need two people for the autotune. Just set the desired AFR in the desired cells and drive. You probably wont hit every cell but after a while you'll be able to fill those in.
I think the gt35R is way overkill for only 15lbs of boost, but hey its your car. I think you could go with a smaller setup and get way more response and faster spool.
Are you using an external wastegate? Is it a manual boost controller? good instructions for hooking up a manual boost controller PM me if you want the essay version of how they work http://i21.ebayimg.com/07/s/000/77/47/c83d_1.JPG
Im not familiar with the innovate turbo timer but 30 sec is fine for any turbo. If you track it you should drive around the pits to let everything cool off a bit anyway. Dang I wish I was closer. How much was the motor if you mind me asking?
The turbo spools super fast. Full boost by 4K rpm. I have a T4 manifold with a ported contoured T3 adapter. It is a ball bearing turbo, oil and water cooled. I went with this turbo for room to expand my hp. The goal is still 300-350hp with room to grow when I pull it appart to port it. Remember this little engine pulls in as much air as a 2.6L engine. That's how they make all the power from a little package. I am running an external HKS WG with an 11psi spring. I have a 6-8psi spring to swap in if needed. I never owned a Subie but I have had several rotaries. I love the rotary. quick rev and high hp with a 8k redline (or higher). I do feel the 901 is a limiting factor on how this car will be driven. I need to save my nickles for a sequencial shift tranny. It would be perfect for this setup.
The boost controller is electronic. I played with it last night. I think I got it programmed to 16psi. I need to set my ECU boost cut higher.
I agree the quick tune will work with one person, but I keep finding myself looking at my laptop while driving. It will be easier with someone else driving while I tune.
Posted by: Andyrew Jul 25 2011, 09:25 AM
Mike lets be honest here, 300-350hp is a ridiculously low goal with that big of a turbo..
IMHO with 15lbs of boost you probably will be in the 400hp range..
I know guys that run that turbo on the 1.8T audi's are making 500+hp but they have to push 25psi.
How predictable is that turbo so far? I know tuning has a lot to do with that, Im just curious how its going.
Posted by: kg6dxn Jul 25 2011, 09:36 AM
Mike lets be honest here, 300-350hp is a ridiculously low goal with that big of a turbo..
IMHO with 15lbs of boost you probably will be in the 400hp range..
I know guys that run that turbo on the 1.8T audi's are making 500+hp but they have to push 25psi.
How predictable is that turbo so far? I know tuning has a lot to do with that, Im just curious how its going.
OK, you got me. I wanted to state a conservitive HP number and not to claim something ridiculas. I will not be dissapointed with 400hp since the torque comes on slowly. tuning is going good so far. I only have about 4-6 hours into it thus far. I spent the first day tuning just to get it to hold an idle. Then I made the video. I stopped at 4pm last night to keep from getting burnt out on it. Just getting it running was a heck of a goal. it spools up to 20psi fast! then my ECU is cutting back fuel. I think I have the boost controller dialed in to 16psi now. We will see in the next few days. I might not get to it tonight due to my work schedule, but I will get to it as soon as I can. The turbo was chosen with room to grow.
Posted by: Andyrew Jul 25 2011, 09:51 AM
I think its a great "room to grow" Turbo If you love the way it spools then its perfect for you.. 4k of usable RPM range is GREAT!
Also.. You know thats a 600hp turbo...
Just curious about traction.. Are you having any traction problems when the boost kicks in? Im SURE first gear you do, but what about second?
Posted by: kg6dxn Jul 25 2011, 09:53 AM
I think its a great "room to grow" Turbo If you love the way it spools then its perfect for you.. 4k of usable RPM range is GREAT!
Also.. You know thats a 600hp turbo...
Just curious about traction.. Are you having any traction problems when the boost kicks in? Im SURE first gear you do, but what about second?
No traction problems yet. Wait til it's fully tuned. You can feel the boost kick in!
Posted by: Jeffs9146 Jul 25 2011, 10:10 AM
Congrats on getting it running!
Watch that boost in the rain!!!
I am getting closer to starting mine! I had to have a new oil line made so I should have that today!
Posted by: cantgo2fast Jul 25 2011, 01:22 PM
I agree the quick tune will work with one person, but I keep finding myself looking at my laptop while driving. It will be easier with someone else driving while I tune.
That turbo is bored at 16psi, that thing is going to be a monster with more boost. You do have to consider the turbo has to hold its airflow up into the 8k+ rpm range so it makes more sense on a rotary. My 16g wont do that but I love full spool by 3400rpm.
Well your on your own for those new fangled electronic ones. It is kinda hard to tune while driving, theres and abandoned airstrip close to my house where I dont have to worry about tuning my street car. My race car usually gets most of its tune done on an engine dyno so all you do is watch the laptop.
I love this build
Posted by: kg6dxn Jul 25 2011, 08:19 PM
That turbo is bored at 16psi, that thing is going to be a monster with more boost. You do have to consider the turbo has to hold its airflow up into the 8k+ rpm range so it makes more sense on a rotary. My 16g wont do that but I love full spool by 3400rpm.
Well your on your own for those new fangled electronic ones. It is kinda hard to tune while driving, theres and abandoned airstrip close to my house where I dont have to worry about tuning my street car. My race car usually gets most of its tune done on an engine dyno so all you do is watch the laptop.
I love this build
I know it can do way more but the goal was reliable HP, not max HP. I will push to 20psi max and see what I get but it has to be streetable too. The 4" exhaust really help the spool. I think it's at full boost before 4K. I will document it next time I drive it. I wanted to tune tonight but not sure I'll get to it.
I did lucky out over the weekend... The last time I tuned an ECU in the driveway all the exhaust smoke was flowing into the neighbor's window. Over the weekend the exhaust was going there again. They wern't home Yay! They were at a race with thier Miata. No complaints at all. Although all the people in my court knew what I was up to because they heard it.
Posted by: kg6dxn Jul 27 2011, 10:15 PM
Took my wife out tuning tonight. All was going well until my BOV blew off. I guess the circlip was not seated all the way. I still have the clip but the O-ring is somewhere on the freeway I will see if my FLAPS has one close to the size tomorrow... Anyone have an extra HKS BOV O-ring?
The car ran pretty good but... There is a stumble where the secondary injectors kick in and I need to add more histerisis (filter of noise) to the throttle signal to prevent surging at cruise.
I found a new tuner shop in Hayward (20 miles) that specializes in Haltech. They just opened and have a dyno. They claim 15 years experiance tuning Haltech. expensive though. $800 for the day or $200 per hour. They tune while I watch. When I get it close I may pay for an hour or two for final adjustments.
Posted by: kg6dxn Jul 28 2011, 08:23 PM
Got an O ring from the auto parts store. Going to be tuning again soon. I have to take off the intake snorkel to get the BOV back on. It's mounted to the bottom. I an going to ease the edge of the clip a little to help it seat all the way.
I guess I'm lucky the vacuum hose held on tight...
Posted by: Andyrew Jul 29 2011, 08:18 AM
Sucks about the blow off valve!
I bought 2 hours of tuning for my 914 when it was SBC and never regretted it when I ran that setup.
Posted by: roadster fan Jul 29 2011, 12:59 PM
That is awesome Mike. I really liked your v8 car when I saw it in Tahoe, can't wait to see and hear this version run.
Keep the updates coming!
Jim
Posted by: ChrisNPDrider Jul 29 2011, 02:25 PM
Wooohooo
Nice work
Posted by: kg6dxn Jul 30 2011, 08:31 PM
BOV is back in and the clip is seated. Did some tuning, but I keep fouling my plugs. Partially due to rich mixture and a bad coil. I have decided to ditch the rx7 stuff and go direct spark. I have sourced 3 MSD 6A boxes and now I need to get coils. I plan to stay with wasted spark on the leading plugs and direct on the trailing. Thi way I don't have to source a 4th MSD. I will if I have to. The tuning is pointless until I fix the spark issue. I'm hoping to get back to it this week sometime.
Posted by: kg6dxn Jul 31 2011, 08:14 PM
While I'm waiting for parts to show up I gat bored. I decided to make a GT style lid today. I had an extra lid sitting in the garage for a while. It's now painted semi gloss black. It's drying in the garage so pics will come later. I also picked up some Boxster quarters and vents. I may decide to swap the NACA ducts for Boxster Ducts.
I now have 4 MSD 6A boxes and 4 High Output coils on the way. I am going for a direct fire option on my EFI. This should solve all the spark issues. Then tuning can resume.
Pics to come later...
Posted by: kg6dxn Jul 31 2011, 08:29 PM
I forgot to mention, I have a rain tray for whoever wants it. It has 2 small cracks, easy fix. Looks almost perfect. Free, but I prefer not to ship it.
Posted by: kg6dxn Aug 1 2011, 09:08 PM
Here's pics of my interpretation of a GT lid. I cut windows in the top. I used a 1" punch to cut the corners. I then welded supports on the 2 center window supports. The window supports mimic the original supports under the stock grill. I also cut out the diagonal support. The diamond mesh is bigger than stock but I can live with it. If I decide to keep this style, I can use the mesh from my other lid. Or use this mesh and make a new on from my other lid. I also did not do too much paint prep. The whole car will get blasted next year for paint anyway. I reduced warping while welding with freeze spray. Worked great until I ran out. I used getto freeze spray. Can of compressed air held upside down.
Big thanks to Sir Andy for letting us post more pictures 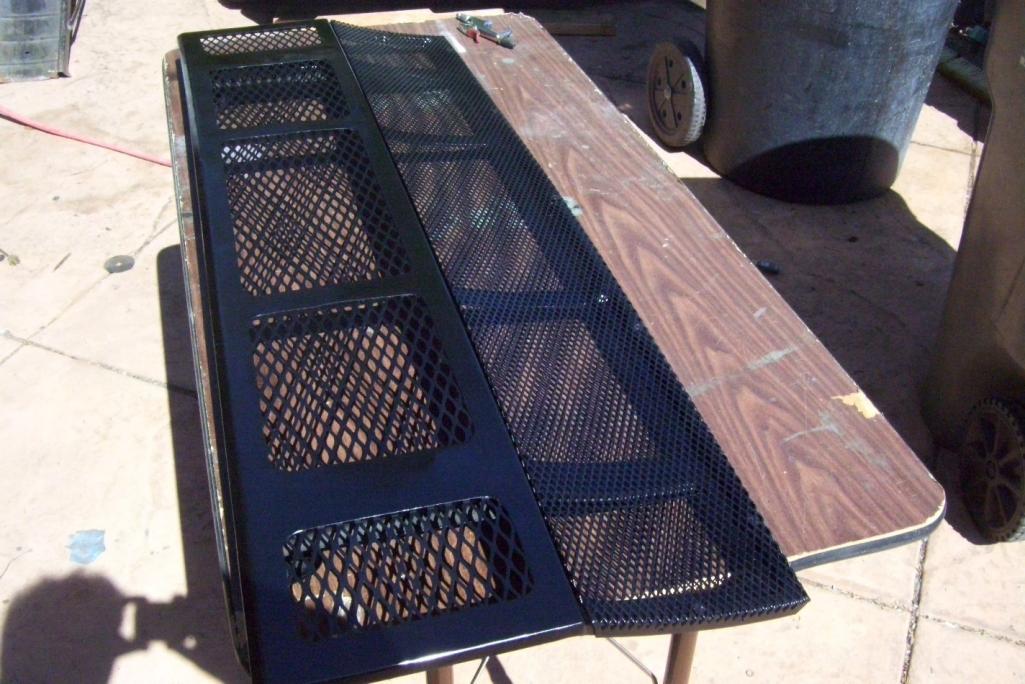
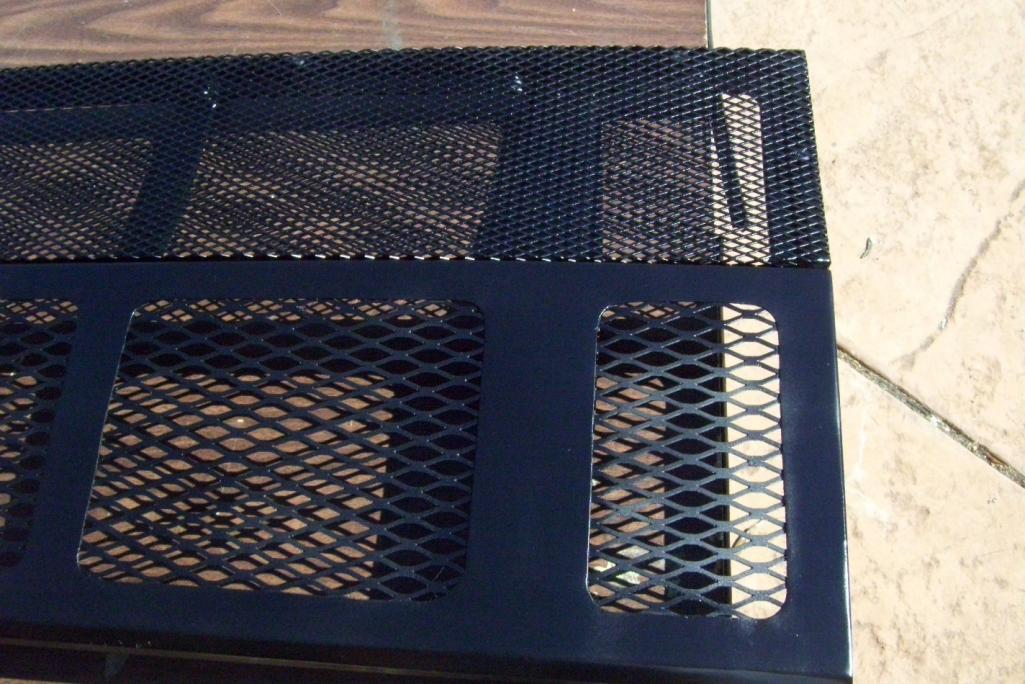

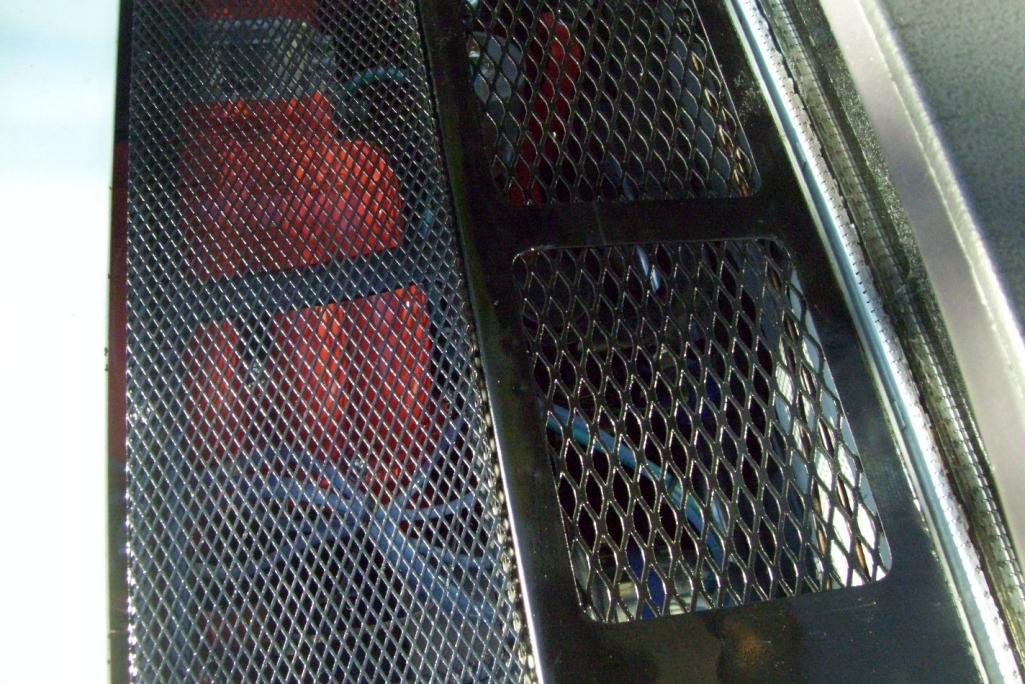

Posted by: kg6dxn Aug 1 2011, 09:13 PM
Here is the first of 4 MSD boxes. There will be 2 mounted side by side and 2 above. I have designed a simple bracket to float two on top of two. This way I can maximize the real estate. The targa top will still clear everything. The 4 coils will go in the engine bay on the rear firewall, drivers side. It is very crouded in my engine compartment now. Big difference from just the short block mocked up.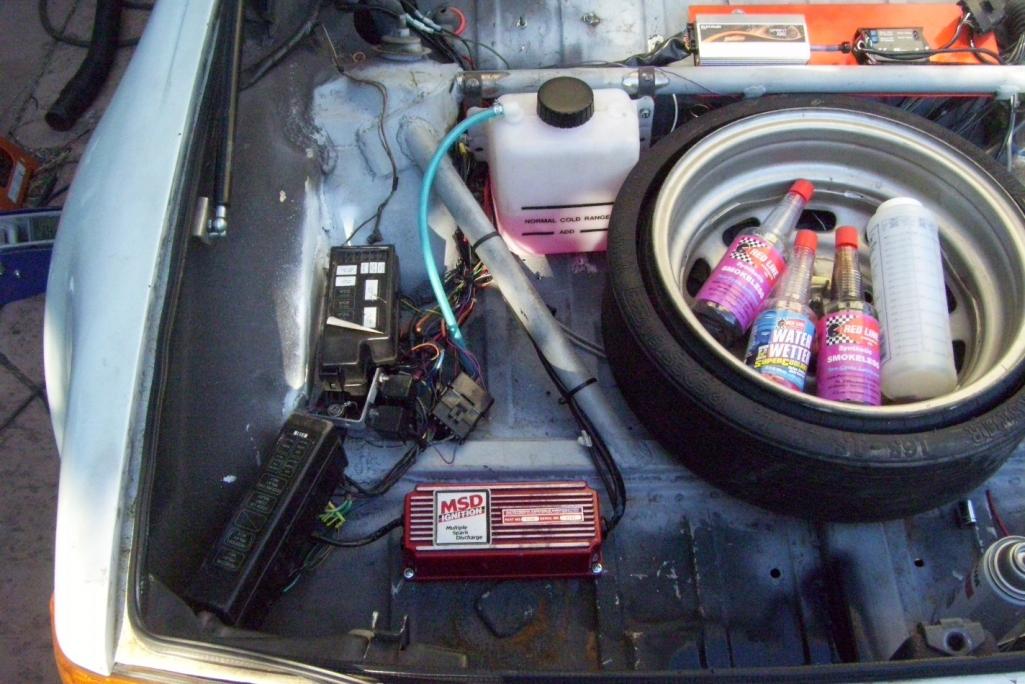
Posted by: kg6dxn Aug 2 2011, 09:22 PM
2 of 4 MSD boxes in place. The bracket is a simple 1/2"x1/8" bar stock. I used the two taillight housing nut to secure one side. The other corners with self tapping screws...
Waiting for more parts to show up... 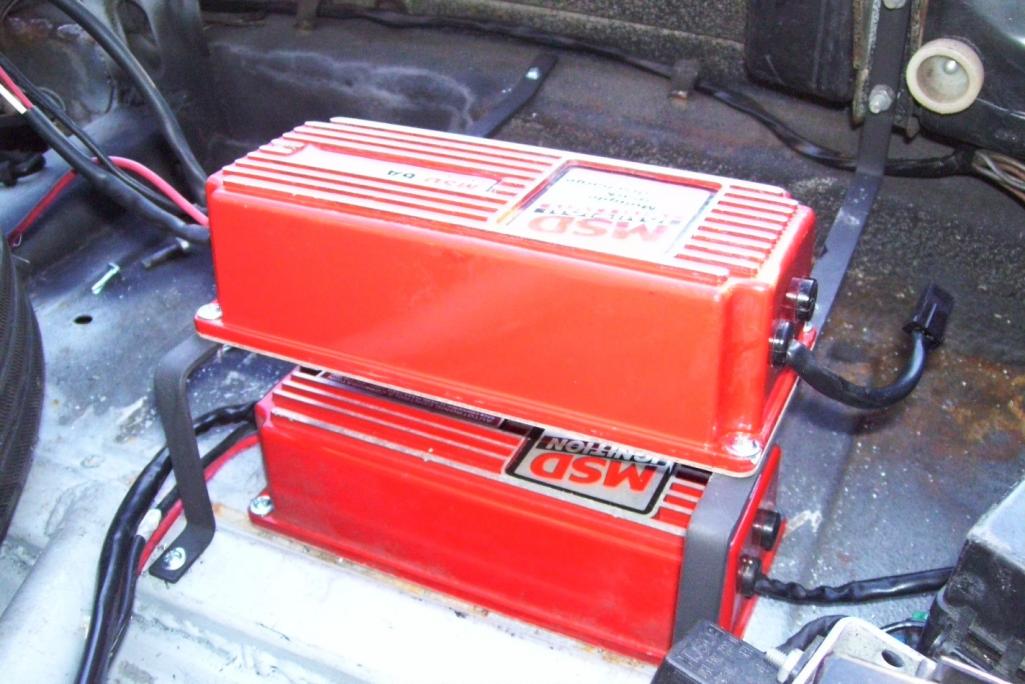
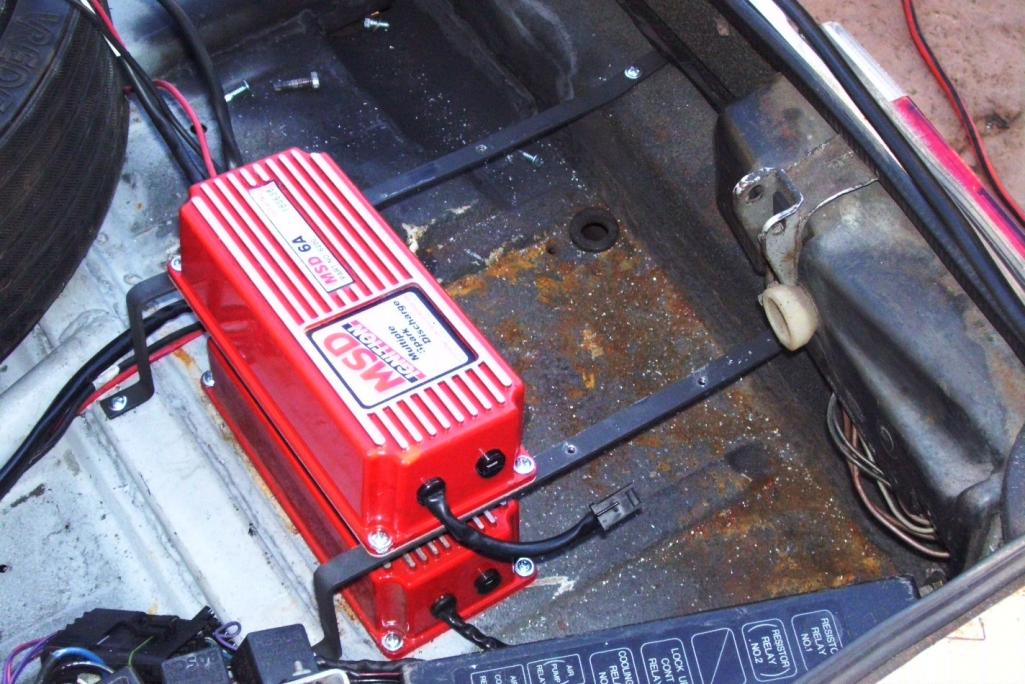
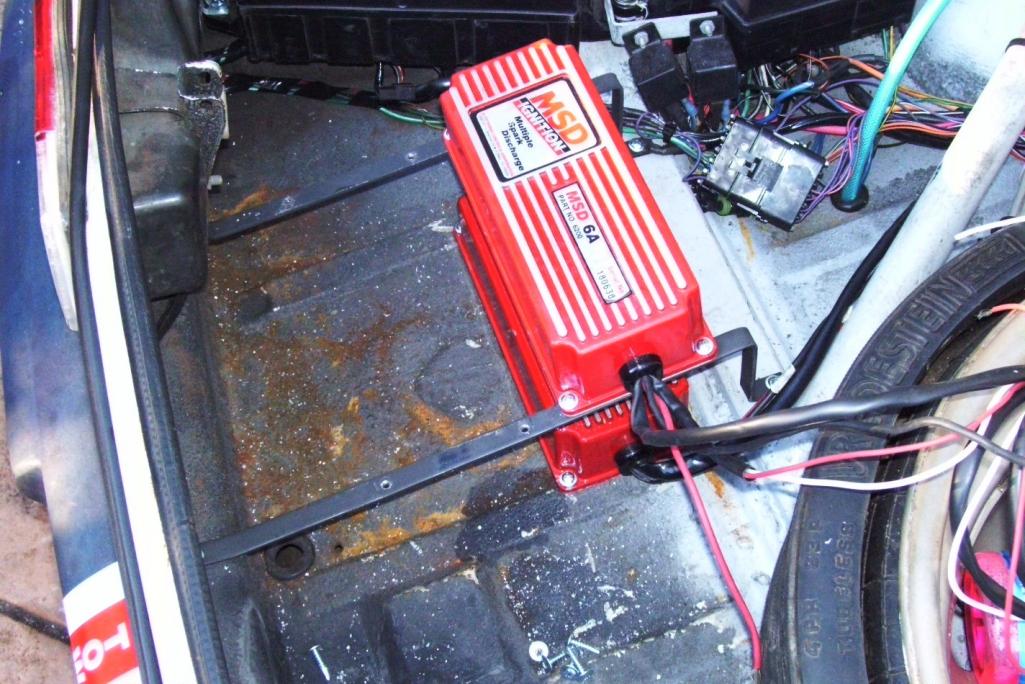
Posted by: kg6dxn Aug 3 2011, 09:24 PM
All 4 MSD boxes installed. I used a label machine to bust out tags for the boxes and cables. Leading 1 & 2 and Trailing 1 & 2. Now to get it wired and connected to the 4 coils (whenever they show up). I hope this fixes the plug fouling and bad spark problem 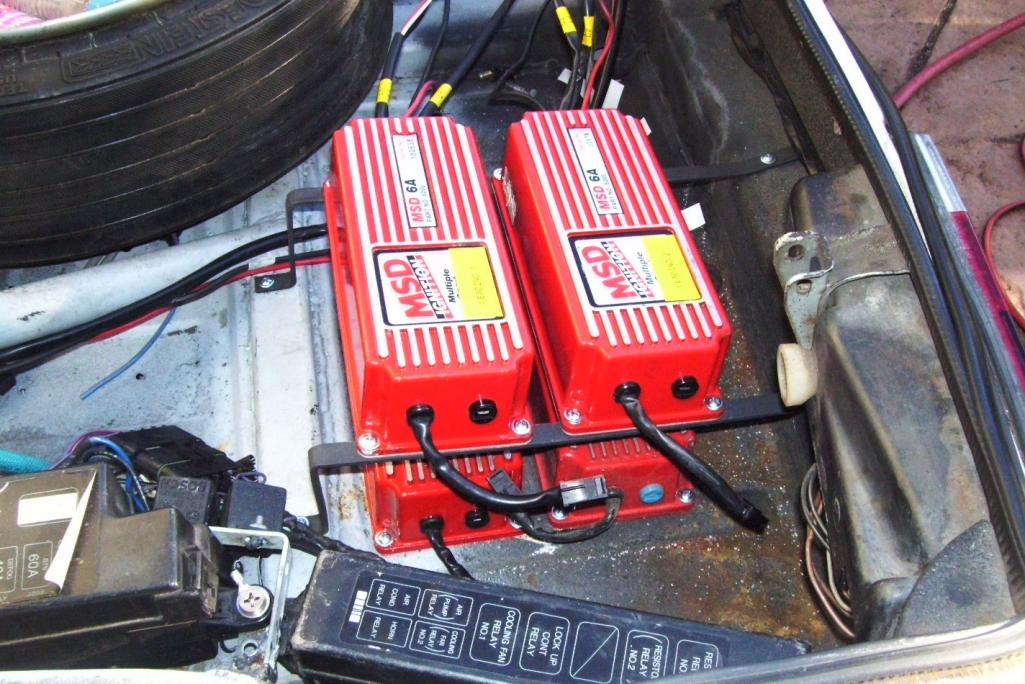

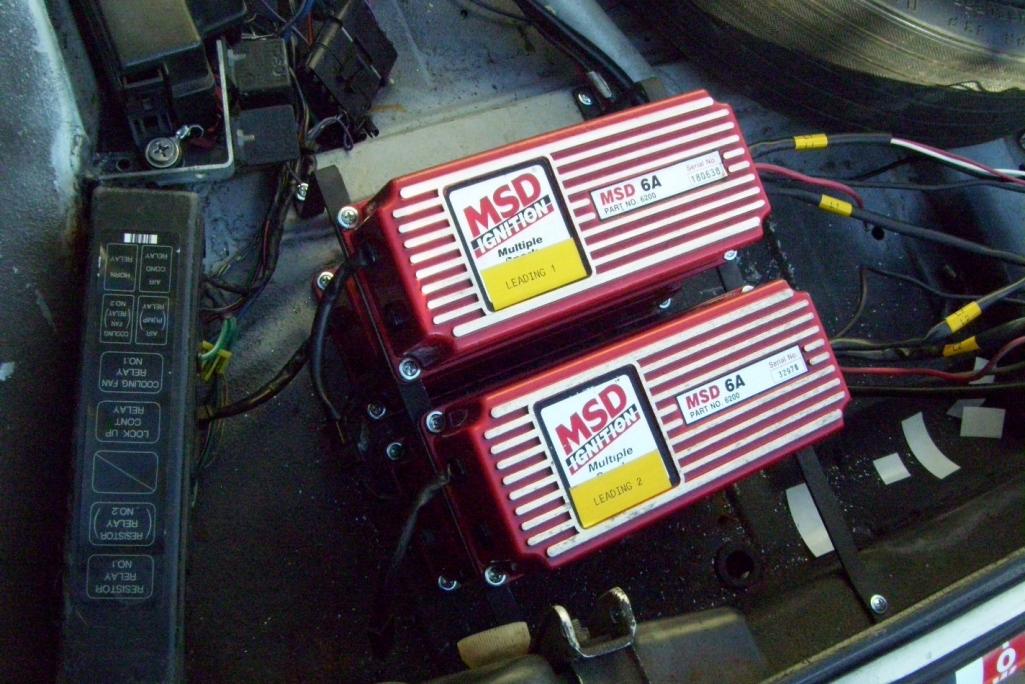
Posted by: kg6dxn Aug 7 2011, 12:40 AM
Got all the MSD boxes installed. As soon as I connected the battery, One of them fried. All the smoke fell out... My local FLAPS had one so I picked it up today. The company I bought 4 coils from only sent me one So I tested several stock coils until I had 4 that "worked". The Car runs better but I have a fuel issuel right as the boost kicks in. If I go WOT at the lead into the boost, it runs great but I have to back off or run into/over traffic. I think the problem is the "accelerator pump" mapping. I just havent figured out which way it needs to be tuned. I know it goes lean during the transition (WB tells me so), but there are 7 different tuning pages for the enrichment. This would be easier on a dyno but I'm not ready to kick down the $$$ yet. I want to get it close so I don't have to pay for a full or multiple days. I can tell you what driving I have done is a shit load of fun. The car has great power and pulls and pulls and pulls. Once it is fine tuned I will have to decide weather to get rid of my H gear. 3000rpm on this engine cruising freeway speeds (75-80mph) is bogging. I think the stock 5th would be better. I hate to pull apart a perfect Dr. Evil approved tranny. But My rear gasket is leaking. It's will come apart at some point either way.
Posted by: kg6dxn Aug 7 2011, 06:50 PM
I blew out my turbo flange gasket today. Problably due to my flange bolts coming loose It was a sandwhich type gasket POS. I ordered a new stainless steel gasket to replace. Tuning this setup is a PITA! I know I will bite the bullet and pay for tuning at some point. The only tuners that specialize in both Haltech and Rotarys are all down in SoCal. 7-8 hours away by trailer Plus $125 per hour. The fee is not to bad but it will take me $400 is gas just to tow it there and back. It does run well enough to tool it around as long as I stay out of the boost. When the boost comes on, the secondary injectors come in and it falls on its face. Going way lean.
I'm going to play with fuel maps more and see if I can get it worked out. Either way I plan to have it to the breakfast next saturday.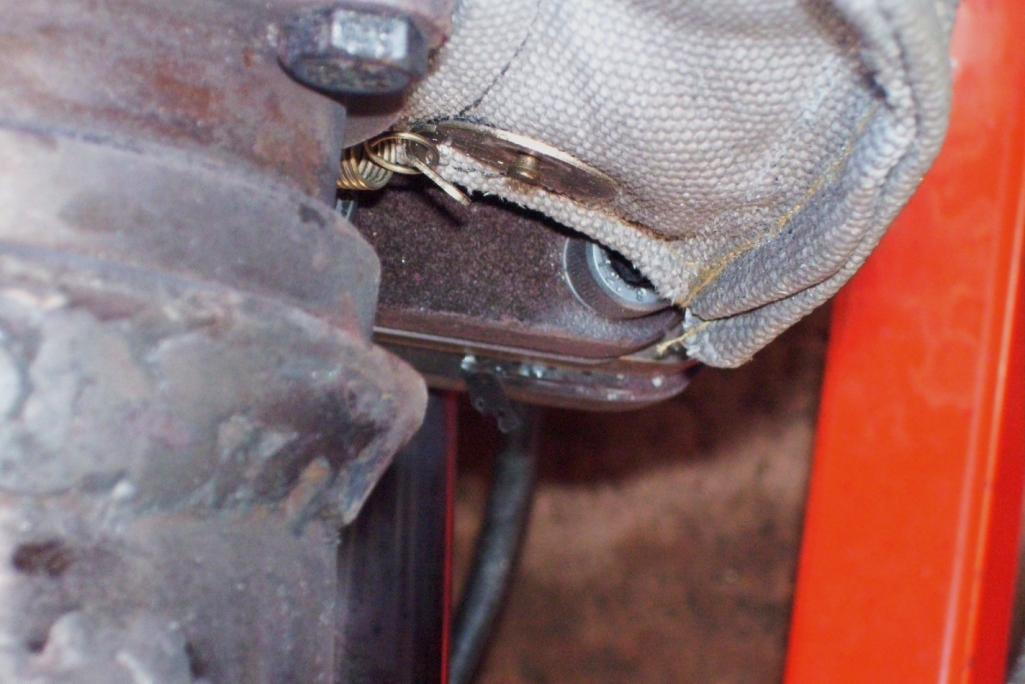
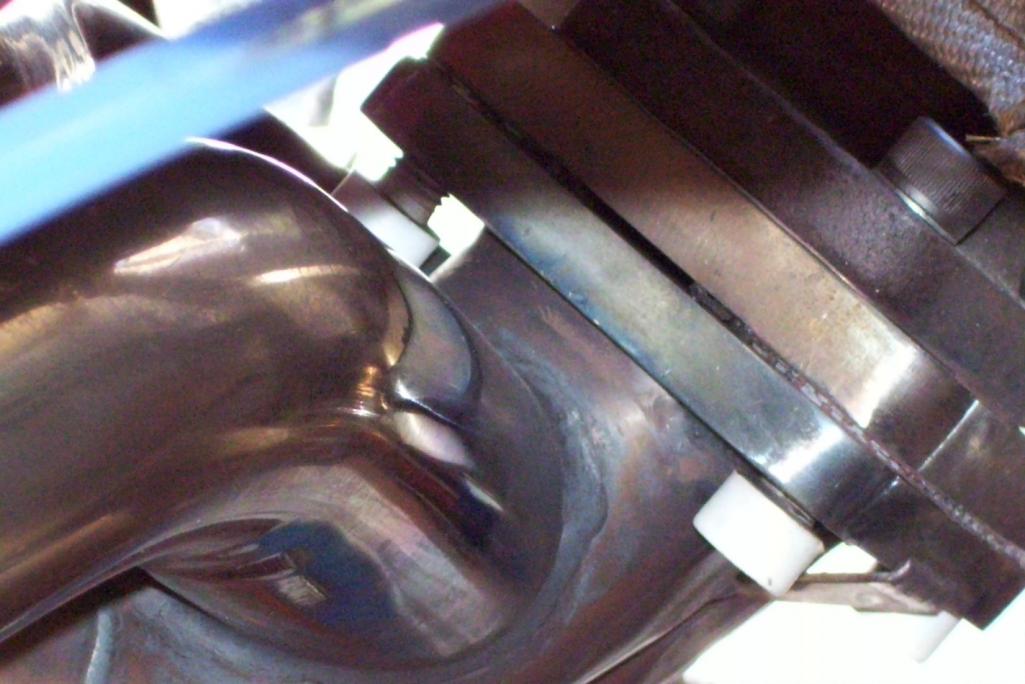
Here is my badge (Thanks Jim). It looks cool except for the speckles of tranny oil from my drip.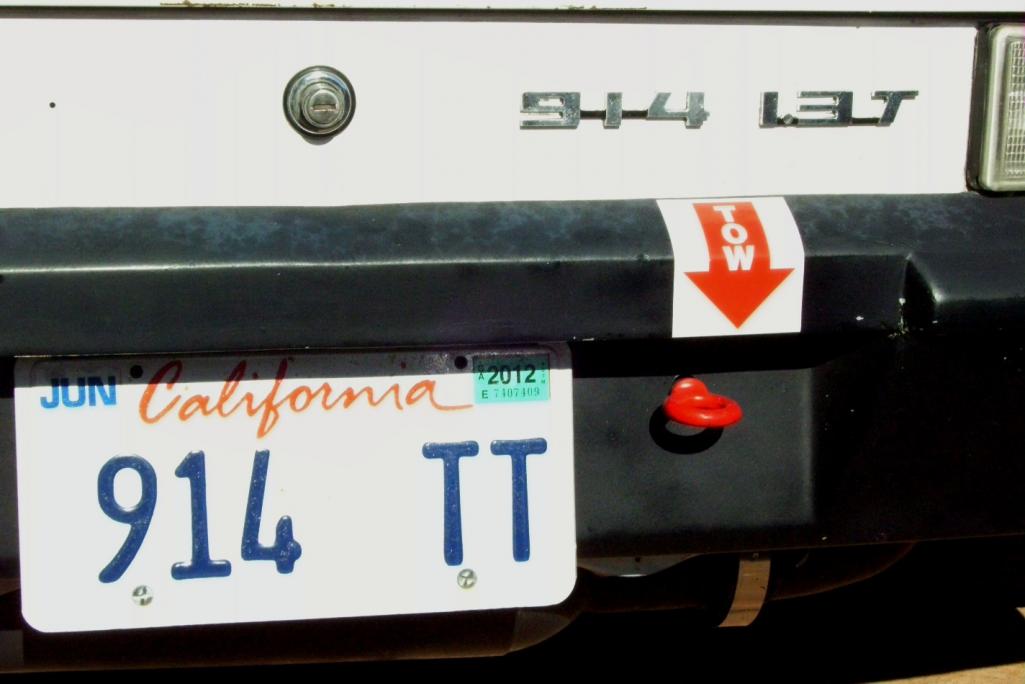
I use this setup to suck all the air out of my cooling system. Vacuum pump pulls on the storage tank. Storage tank pulls on the closed cooling system. This forces all the air out. I then pinch off the line, remove it from vacuum and put the hose in a tank of water. Then release the clamp and the cooling system sucks water back in. I leave the vacuum sucking for about an hour at a time. I do this every time I run it for a couple of weeks, or more often on a whim. It's kind of anal but my V8 ran between 160-180F. This motor in known for running hot. When you overheat a rotary it's rebuild time 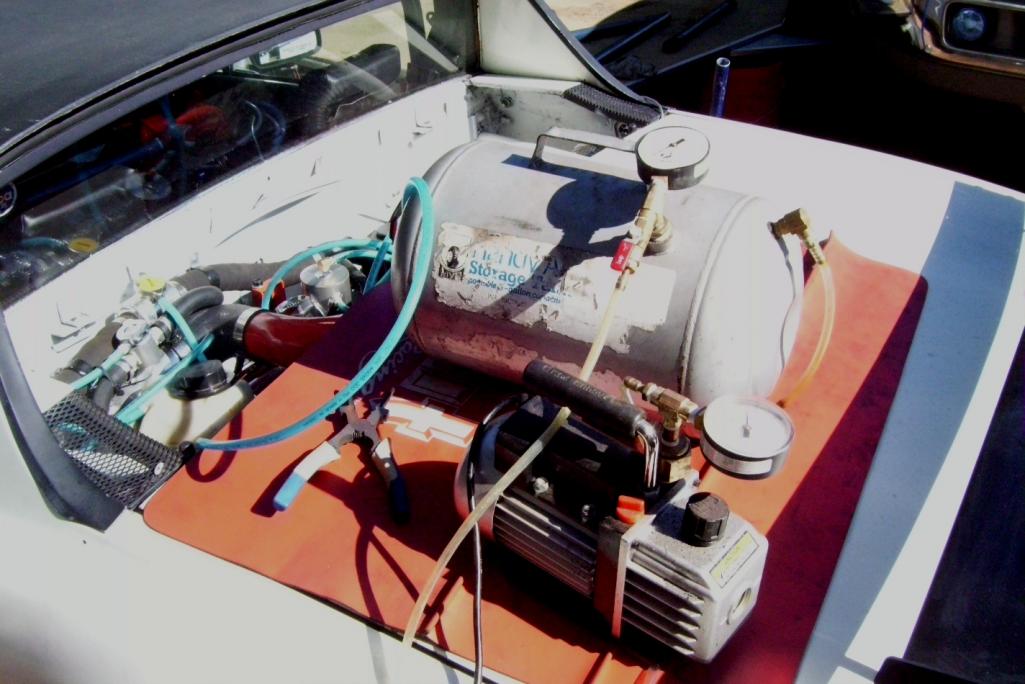
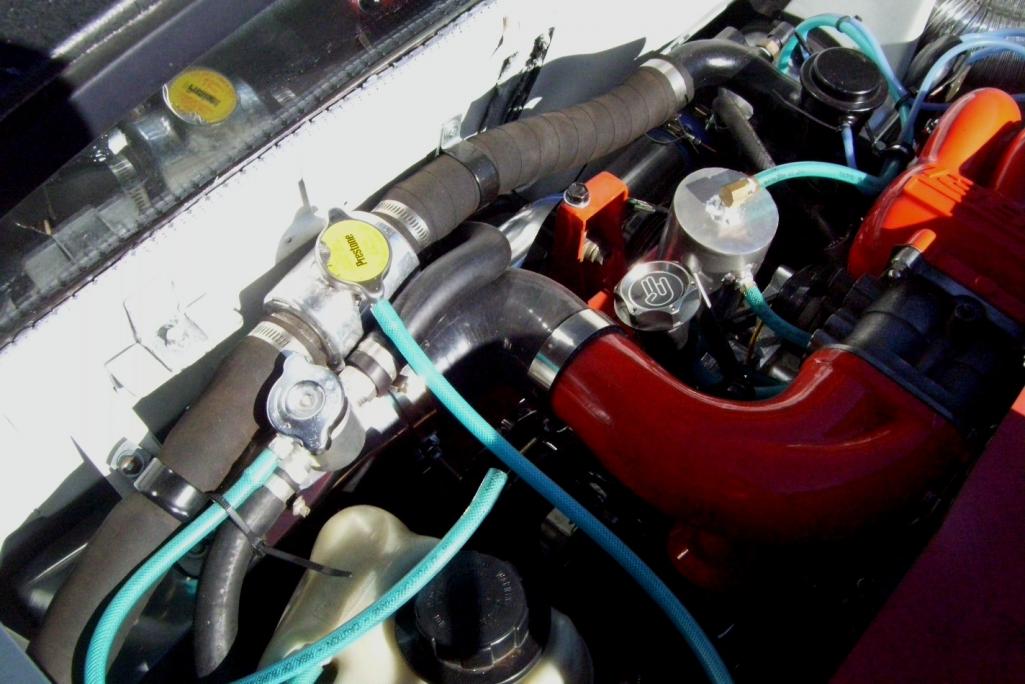
Posted by: kg6dxn Aug 9 2011, 11:18 PM
I swapped out some defective coils and my turbo gasket. I found a Haltech Guru (Claudio) that is working with me. He used to work for Haltech and runs his own tuning shop. He's on the east coast. He sent me a remote access program from his site so he can tune my car fom Florida in real time while we communicate via skype. Very cool and the price is very reasonable! Claudio is convinced he can get my car running great without actually touching it. Very cool! I will then have to take it to a dyno and do some minor fine tuning on my own. Our first session is tomorrow after work.
Posted by: matthepcat Aug 9 2011, 11:44 PM
That's awesome Mike! Make sure you have a great internet connection!
Matt
Posted by: PeeGreen 914 Aug 9 2011, 11:49 PM
This thread is great. Nice work Mike
Posted by: Andyrew Aug 10 2011, 08:21 AM
Thats a killer air removal setup!!
Posted by: kg6dxn Aug 10 2011, 11:21 PM
My tuning session went very well tonight. We spent 3 hours. Claudio uses software called Team Viewer. Every time I open the program it creates a unique login and password. I give it to him and he can operate my computer from his. Even transfer files. This is the first time he has tuned remotely. I am his test subject. We also used Skype to communicate as well. He said he needed to find a test subject with a good high speed DSL to try this type of support.
I found out my crank trigger is one tooth off. He was able to configure my setup to compensate. Timing is perfect now. He also re-mapped everything I did. The car runs very well. Tomorrow we will adjust the throttle pump circuit and boost mapping. 1-2 more sessions and I will be ready for dyno time. The car now runs better than I had it configured.
Claudio ahs been working with Haltech and Rotarys for 10 years. He actually lives in the Dominican Republic, educated in the states. He even travels back here to tune race cars. Very smart and very nice guy. I would recommend him for tuning to anyone.
Looking forward to driving this to the next WCR and everywhere in between!
Posted by: Andyrew Aug 11 2011, 06:26 AM
Awesome Mike! That is really pretty cool!!!!
Posted by: kg6dxn Aug 11 2011, 08:37 PM
I got this baby tuned! It works good until 20psi and then my injectors crap out. I never did replace them. Claudio also recommended 2000cc injectors. Big ones! I will now save my nickles and budget some new injectors The car is driveable and I plan to drive it. I will wait to fine tune it on the dyno until I get bigger injectors. I learned a lot about this system. Apparently Haltech does not use VE tables for rotarys. Most other system have setups where you identify engine size, injector size, theoretical VE and some other parameters. The system will then create a base fuel map based on your system. Haltech does not. For rotarys you must build the fuel map correctly or it just won't work right. Every other Haltech system uses VE tables. It has to do with the staged injectors on the rotary. I was told that there are no real rotary guru's working for Haltech anymore. It is a great system with a 32 bit processor. Most others are only 16 bit.
I am very happy with the results so far. Big thank you to Claudio. He can be reached at tuningtechnology@gmail.com If you are considering going to EFI send him a note. I'm sure he will steer you in the right direction.
Posted by: Andyrew Aug 11 2011, 09:10 PM
Enough with the plug!
How does the power feel? I'd bet 20PSI is about 450HP!
Posted by: Lennies914 Aug 11 2011, 09:23 PM
Right on Mike! All your hard work and $$$$ is paying off!
Posted by: kg6dxn Aug 11 2011, 09:29 PM
Enough with the plug!
How does the power feel? I'd bet 20PSI is about 450HP!
He estimated my hp at 250 @ 10psi. The 20psi number will have to wait for new injectors but I don't think you are to far off. I'm only limited by the amount of fuel I dump in. At 40psi it should be 600-750hp, but I will never run it that high.
This this is way quicker than my V8 and has better throttle response. I can hit 10psi @ 2000 rpm no problem
It's all in the amount of throttle I give it.
Posted by: JRust Aug 11 2011, 09:54 PM
Awesome Mike! Great to hear your driving it again . You da man
Posted by: kg6dxn Aug 13 2011, 09:48 PM
I took the car on its first voyage today. 50 mile round trip to the 914 breakfast. Car ran great! My new injectors should show up this week, so I hope to get them in and tuned quickly. It's very hard to stay out of the throttle. The car wants to go. Once the injectors are in and tuned, I should see what this thing can really do. For now I keep telling myself that I'm breaking in the clutch, so I have to stay out of the throttle... The next major drive will be to the 914 Family Reunion. If I don't have to tow it home from Sacramento, I will feel more confident with this new power plant. Freeway running is good no surging or wierdness. I do have a little water flow issue. Below 4K rpm the temp get to 200+ if I speed up to 4500 rpm, the temp drops by 20+ degrees. This tells me the RX7 water pump does not have enough flow at low rpm. I will have to install an inline electric pump sooner than later.
Posted by: Cairo94507 Aug 13 2011, 10:03 PM
Damn, I so wanted to ear that motor with that killer looking exhaust system. Next time for sure.
Posted by: kg6dxn Aug 14 2011, 10:43 PM
For those that showed up to the breakfast you saw my car covered in specs of rust. This was caused by over zealus grinding and not realizing the car was covered in metal dust. Covered! 9 months of fab and moisture created a nice patina on my white paint. I spent a few hous this weekend wet sanding and polishing the paint. To start with my paint is junk, but It needs to last me for a year before I strip it apart again. It looks great now (relatively). No more rust specs, just chips and cracks now. The crappy race car paint job polished up pretty good.
I also pulled my intake manifold apart to prep for injectors. Glad I did! I found 4 vacuum lines that had blown off from pressure. Most guys that use silicone lines also use a zip tie to hole them secure. Guess what I forgot to put on? I resecured them and added a little blue locktite on the barb as glue before zip tieing them in place.
I also troubleshooted my boost controller. It does not work. it is connected correctly. Programmed correctly. But alas... it no workie. It always alows me to go to full boost... Up to the point the injector duty cycle cannot keep up 17-20psi. I have decided to ditch the electronic boost controller and go simple. A manual boost controller is on the way. I also plan to use the ECU boost cut to prevent any accidental 30+psi bursts.
Just for fun today I filled up with 100 octane fuel. Good thing I have a small tank! $$$7.38 gallon.
Posted by: kg6dxn Aug 15 2011, 11:27 PM
Well I had the car apart for the injector swap and then...
"NOTICE: YOU ARE IN VIOLATION ON CITY CODE. 1) TRAILER PARKED IN DRIVEWAY. 2) VEHICAL REPAIRS WITHIN THE CITY LIMITS. PLEASE CONTACT THE CITY OF SAN RAMON WITHIN 48 HOURS BETWEEN THE HOURS OF 9AM AND 9:30 AM."
Yes I was doing that stuff. Trailer in driveway. Car in driveway. I did have a couple of jack stande and a floor jack too. This is not the first time the little old lady c*nt has called the city on me. Fucking Bitch! Husband died and she has nothing to better do. So I have to call the city within the 30 minute window to get hold of somebody... Bullshit...
So I had to slap the intake back together tonight. Quickly! and clean up, power wash, trim bushes, move trailer... etc...
BUT! I did have time to through in the 2000cc injectors. Got it tuned, sort of... WOW! This car hauls ass! All the way to 25psi. I still need to fine tune it a little at boost but... Holy Shit... Boost comes on fast and strong. I can get to full boost way before 4K and it just pulls and pulls. I did not have much time to play tonight but I will tune more tomorrow after work.
Posted by: matthepcat Aug 16 2011, 10:42 AM
Sorry to hear about the neighbor issue. That is one good thing about living in a slightly redneck neighborhood is people stop by to compliment my car on jack-stands!
So will you dyno-tune the car?
Matt
Posted by: GeorgeRud Aug 16 2011, 12:59 PM
That's just a mild violation! You should see what sort of attention you get when you start and run an IMSA Mazda racecar (unmuffled of course) up and down some neighborhood streets to check that things are bolted together correctly before loading it on a trailer to haul it to a racetrack a couple of states over!
Ah, the good old days!
Posted by: kg6dxn Aug 16 2011, 02:15 PM
Sorry to hear about the neighbor issue. That is one good thing about living in a slightly redneck neighborhood is people stop by to compliment my car on jack-stands!
So will you dyno-tune the car?
Matt
I will dyno tune the car as soon as I can finish the custom fuel rails. I did not have a chance to install my 1000cc primary injectors. I only installed the secondaries because they fit in the stock rail. Primaries will not fit.
Posted by: kg6dxn Aug 16 2011, 02:19 PM
That's just a mild violation! You should see what sort of attention you get when you start and run an IMSA Mazda racecar (unmuffled of course) up and down some neighborhood streets to check that things are bolted together correctly before loading it on a trailer to haul it to a racetrack a couple of states over!
Ah, the good old days!
This is the second time my neighbor has called the city and told them I'm running an auto repair buisness out of my garage. She also called the Police to complain I was illegally parked in front of my house. She also calls every time I park a trailer in front and tells them it's been there a week. I'm sick and tired of this bitch. I can hardly wait until she moves into a retirement home. I don't wish any ill will on her but I wish she had something better to do with her time.
Posted by: Andyrew Aug 16 2011, 02:48 PM
Eeek. Sorry to hear mike! Im glad my neighbors like me, because it really LOOKS like im running an auto buisness from my garage! Always in there painting or sanding or making noise (I always turn off the compressor at 10pm though and if I can I keep the garage door closed).
Also I cant wait to see the numbers
Posted by: mikey63 Aug 16 2011, 03:22 PM
Next time she complains about the trailer, let the cops mark it for the 72 hour move it or it gets a ticket, move it on day two to infront of her house and see how she likes that. I was in the same boat when I was younger with the ahole that lived across the street from me. I played this game for about 3 months and after awhile he gave up and found someone else to piss off.
Mike
Posted by: kg6dxn Aug 16 2011, 04:17 PM
Next time she complains about the trailer, let the cops mark it for the 72 hour move it or it gets a ticket, move it on day two to infront of her house and see how she likes that. I was in the same boat when I was younger with the ahole that lived across the street from me. I played this game for about 3 months and after awhile he gave up and found someone else to piss off.
Mike
It's already parked in front of her house! Not much choice though. I live in the back house in a court. She is next door. There are two car lengths betewwn my driveway and hers.
Posted by: mikey63 Aug 16 2011, 04:23 PM
Sorry to hear that...maybe find out if she likes to drink or why she has a problem with your hobbie/addiction.
Posted by: kg6dxn Aug 20 2011, 07:38 PM
I tracked down my overboost problem to the Wastegate. It does not open, or not enough. I instaled a 6psi spring and it still will not open. I'm going to take it all apart to see what is going on.
Todasy I spent the day cleaning my side yard and dump runs. I've been collecting to much stuff. My trailer now sits in my side yard and off my driveway.
Tomorrow I am taking the car out to Euro Sunday in Walnut Creek. After that I'm going fore an amssage with my wife.
I'm beat... 
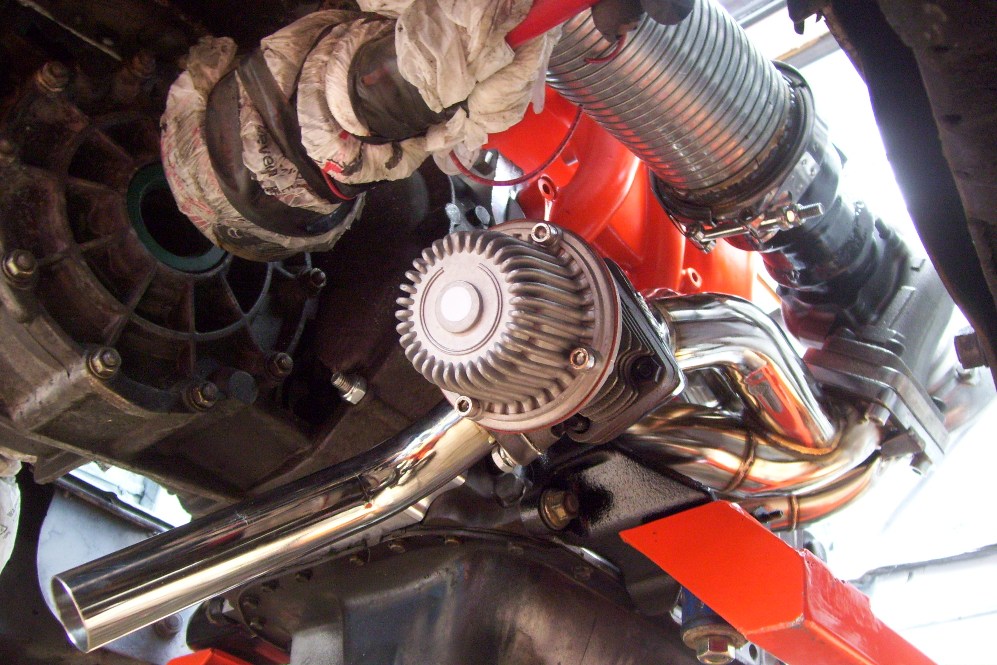

Posted by: Rand Aug 20 2011, 07:50 PM
Trailer in the yard, massage with the wife.......
Things are {boost} coming {ignition} together bro!
Posted by: Lennies914 Aug 20 2011, 08:37 PM
Mike, did you make room on the side yard for the roller I have on my side yard?
Posted by: kg6dxn Aug 20 2011, 09:28 PM
Mike, did you make room on the side yard for the roller I have on my side yard?
It will fit if I put it on my trailer...
Posted by: matthepcat Aug 20 2011, 09:59 PM
I tracked down my overboost problem to the Wastegate. It does not open, or not enough. I instaled a 6psi spring and it still will not open. I'm going to take it all apart to see what is going on.
Todasy I spent the day cleaning my side yard and dump runs. I've been collecting to much stuff. My trailer now sits in my side yard and off my driveway.
Tomorrow I am taking the car out to Euro Sunday in Walnut Creek. After that I'm going fore an amssage with my wife.
I'm beat...
What happened to your trans output flange?
Posted by: kg6dxn Aug 20 2011, 10:10 PM
What happened to your trans output flange?
Nothing. Those are install pics. One while the CV's were in bags, before bolting on.
The wastegate is the only problem right now. I picked up some fuel rail blank to make my custom fuel rails. I'll get to it in a week or so. After the city comes back to inspect my property. I can't be working on my car when they come.
Posted by: kg6dxn Aug 28 2011, 09:37 PM
Well, on the way to the 914 reunion I broke down on the freeway. They are repaving 680 NB by my house. They have ground down the road bed 2-3 inches. At the transition of an overpass the built an asphalt ramp on the freeway. I got airborn in the rear at 75mph. When it landed it hit something on the road bed and peeled the oil drain bung right off the pan. The bottom of the oil pan is almost exactly the same as my engine mounting bar. I connected the factory low oil switch to my dash mounted check engine light. That's how I knew something was wrong. The smoke and oil all over the road was another clue. I think I got lucky and I hope the engine is OK.
I took some advice from McMark when fixing the pan. I shortened it by 1/4-3/8 inch and built kick outs to hold extra oil.
Not my best welds but I had to keep fixing leaks. I built it with 14ga steel I had. The extra sump is semi isolated with baffle trap doors (hinges). They open to the center, to the pickup tube. I think I almost doubled the capacity.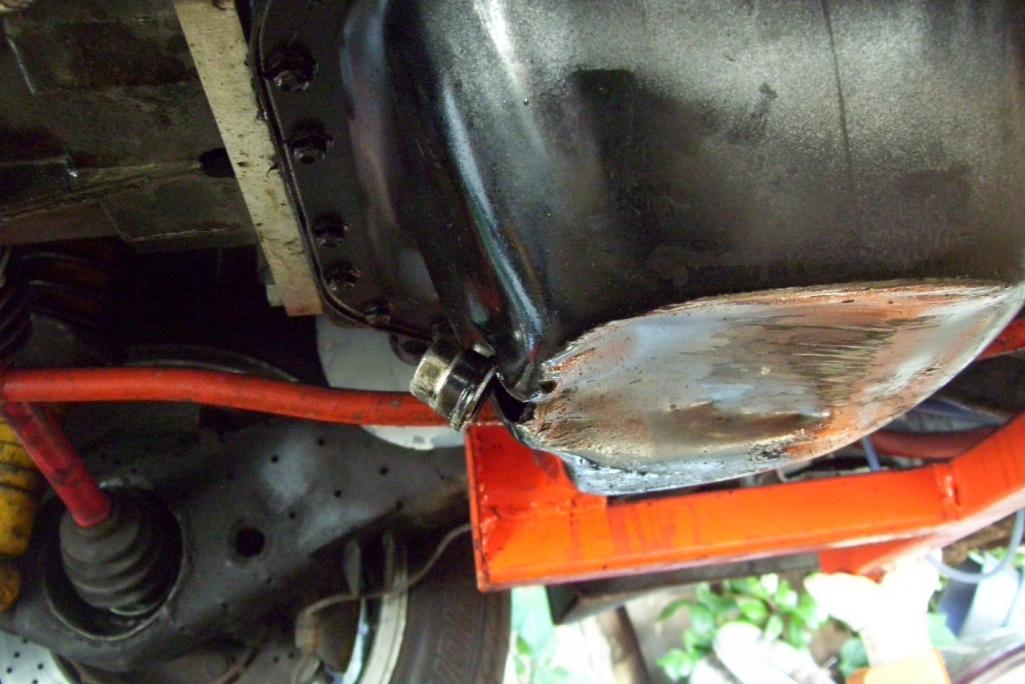
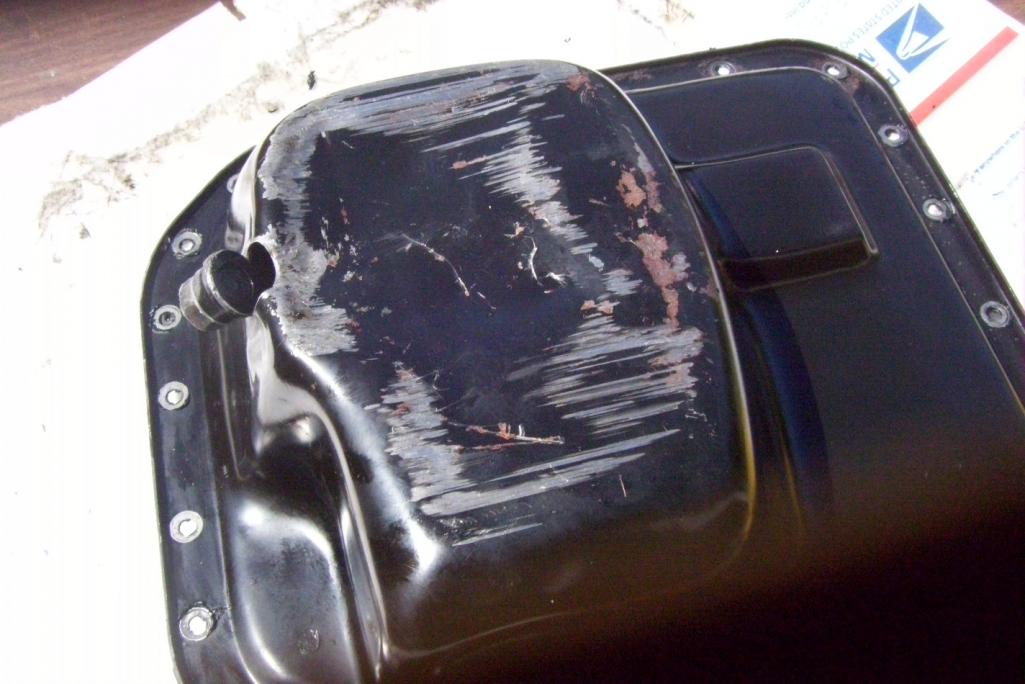
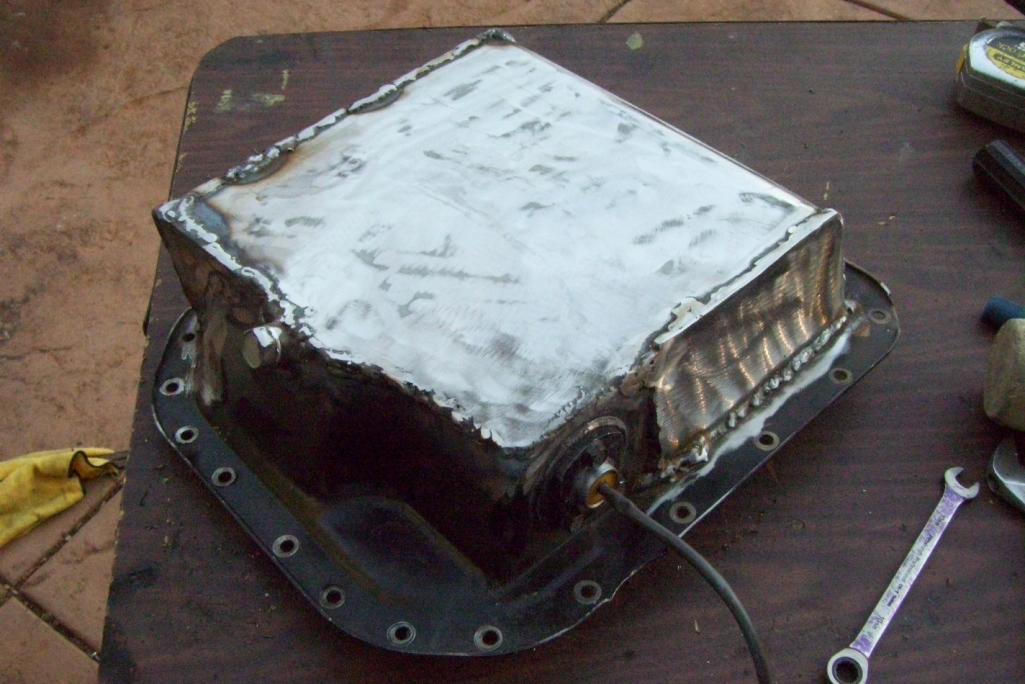
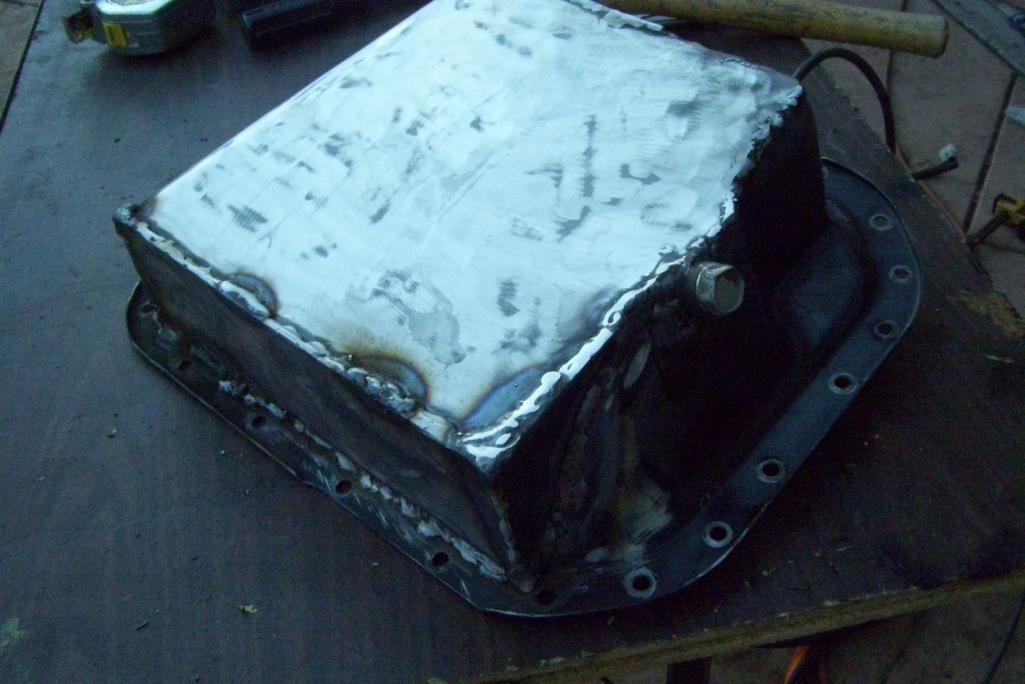
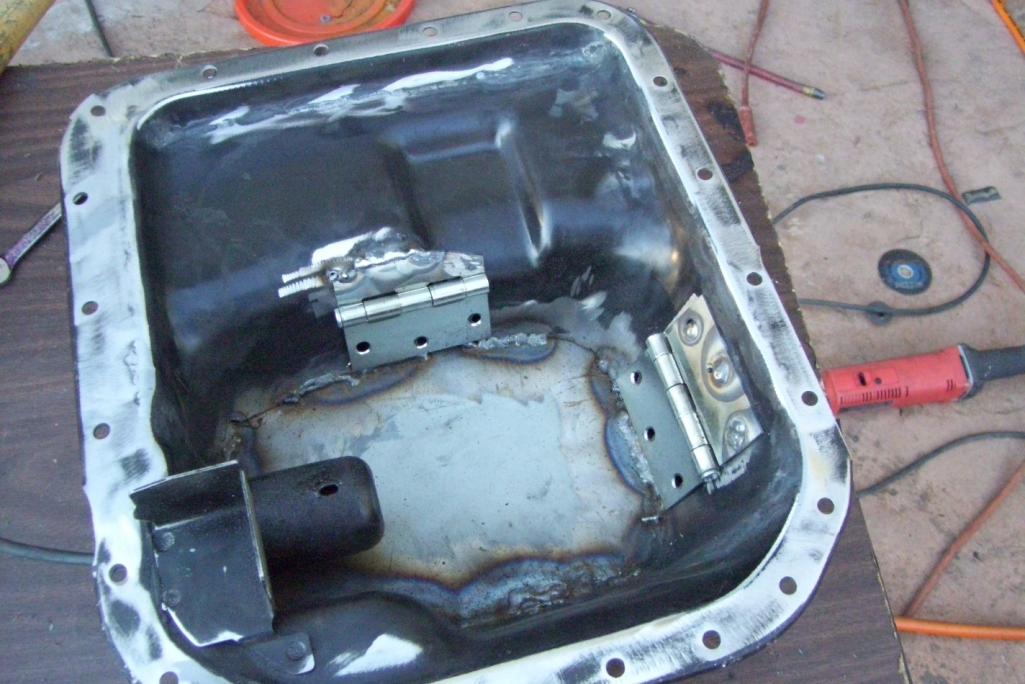
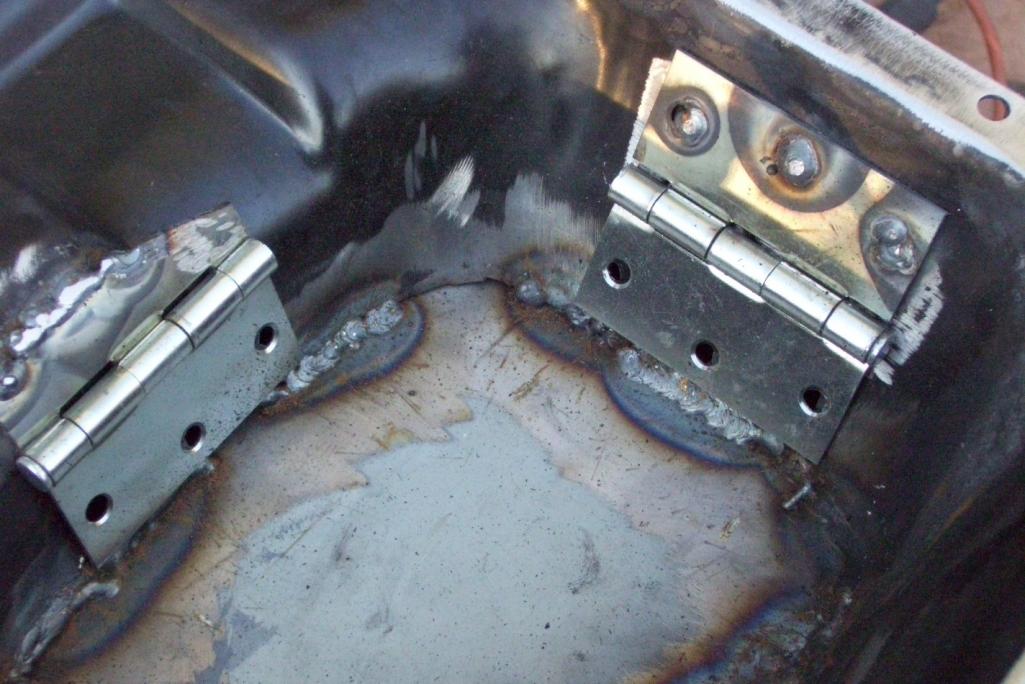
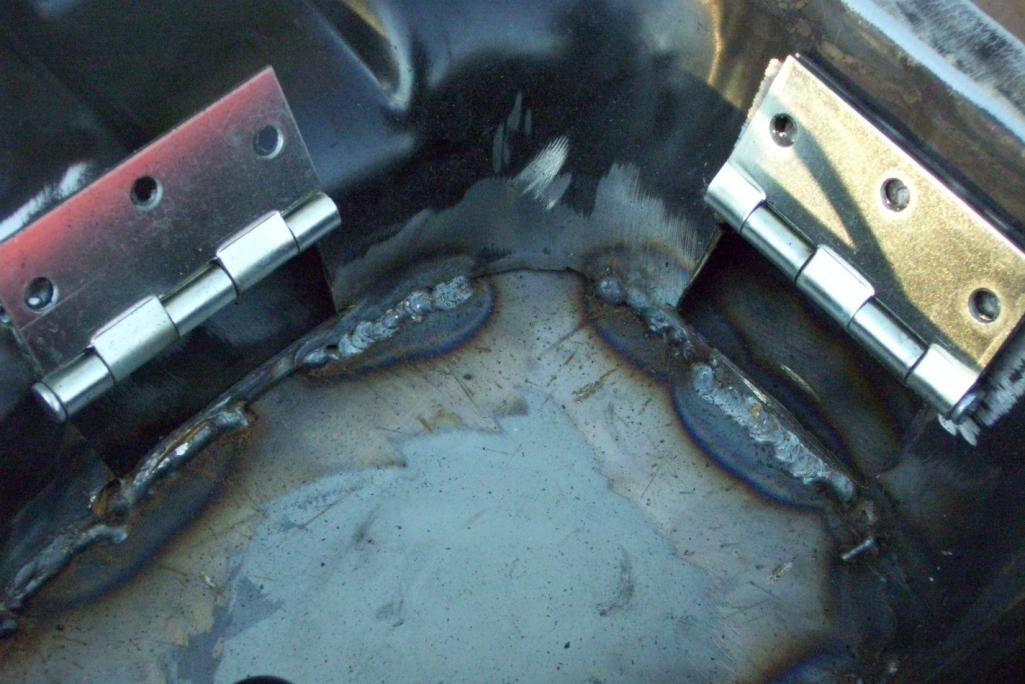
Here is my side yard. It is 20 feet wide by 60 feet long. I knew I should have installed concrete there 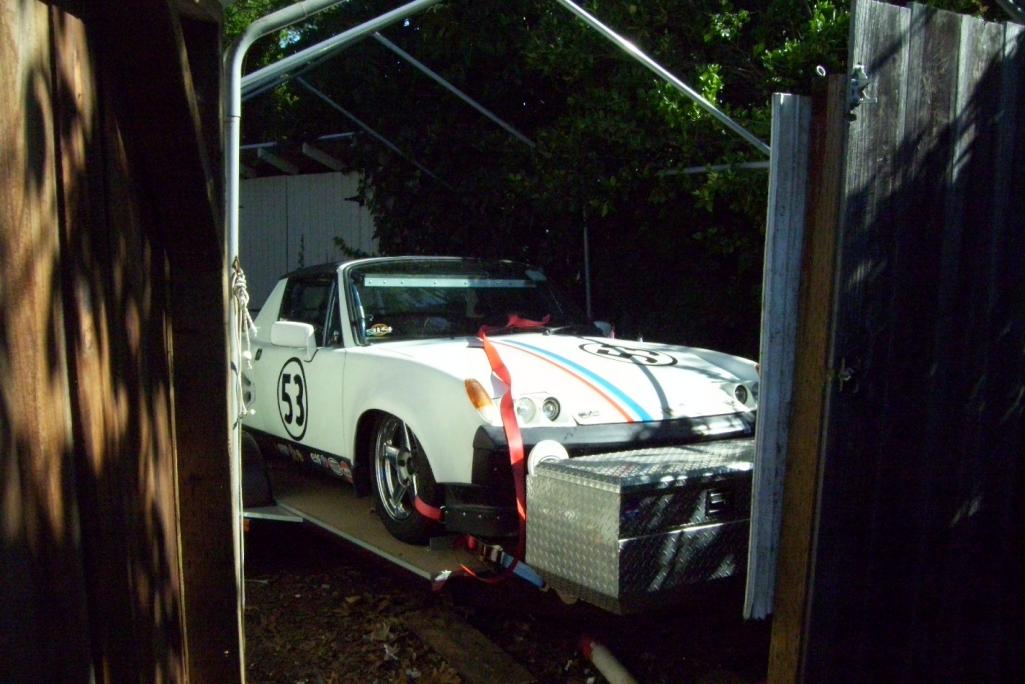
Posted by: jaxdream Aug 29 2011, 07:30 AM
What are your plans for the hinge pins ????? Are you sure they won't work thier way out ??
Pan looks great , more capacity too = A big +.
Jack
Posted by: Andyrew Aug 29 2011, 08:12 AM
AHAHAHA! I love the use of the 5 knuckle plain bearing hinges!
Very good fix!
Posted by: kg6dxn Aug 29 2011, 10:05 AM
AHAHAHA! I love the use of the 5 knuckle plain bearing hinges!
Very good fix!
This is exactly how my road racing oil pan on my V8 was set up. Hope i didn't infringe on any patents...
Posted by: kg6dxn Sep 3 2011, 10:42 PM
Got the oil pan back in. Pretty easy fix and more volume and strength. I added a littler skid plate to the rear of the pan.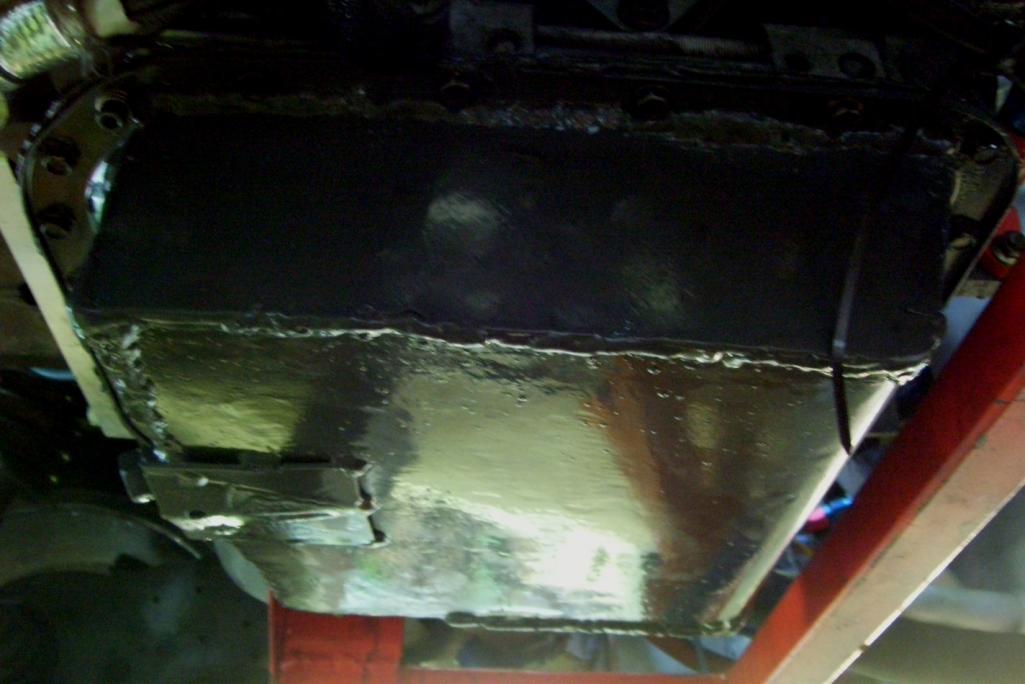
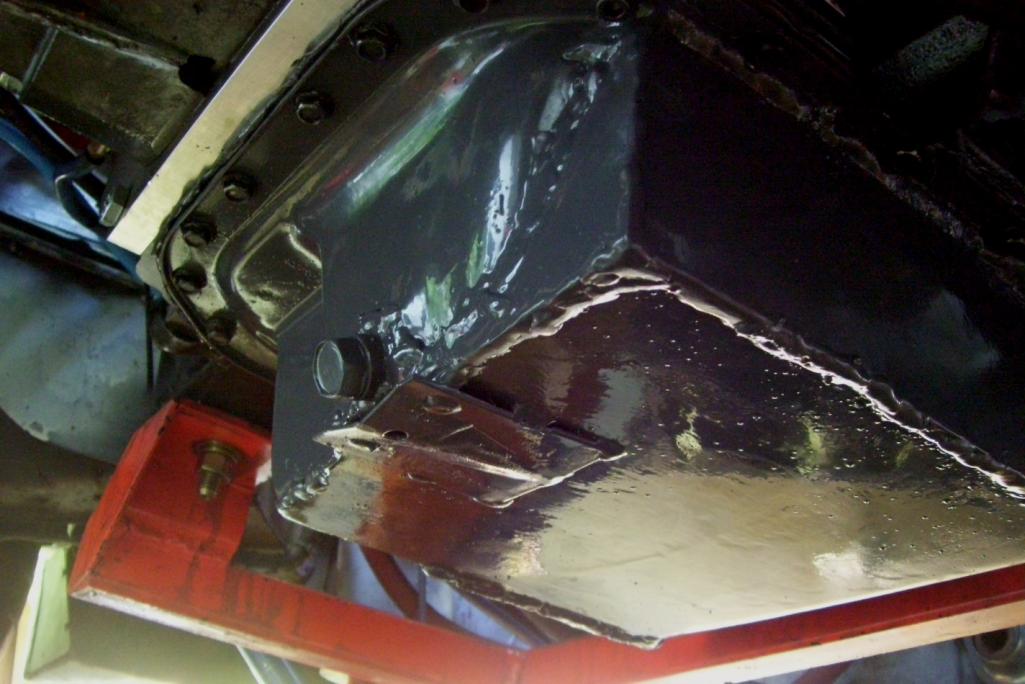
This is what it looks like inside... Not much. Oil pick up tube and oil pump chain are visible. I had to adjust the pick up tube some. I used a jack, block of wood and a folded rag to lift the pick up to its new pan depth. Worked out good.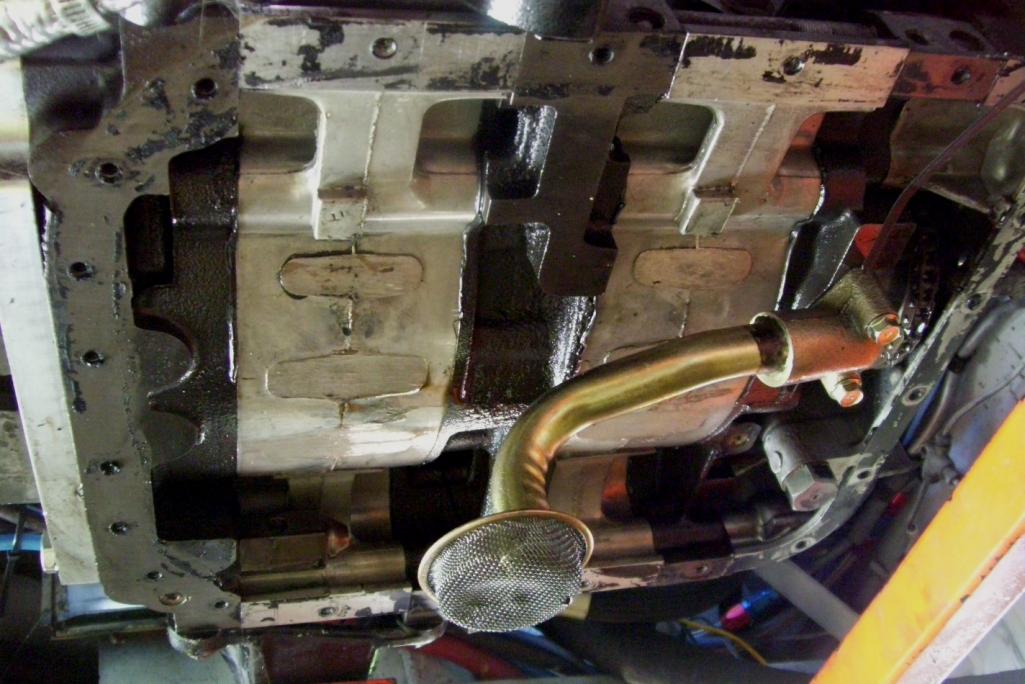
Posted by: JRust Sep 3 2011, 10:49 PM
I can almost hear the banjo's  . That is so Redneck looking I Love it
Seriously though looks very functional. I worry about all the road construction. Got a nice crack in my windshied from flying asphalt a few weeks ago . Glad to hear you were able to get it fixed.
Posted by: kg6dxn Sep 3 2011, 11:15 PM
Now the fun part. My custom J West inspired shift rod does not fit anymore. I've had parts laying around for a cable shift setup. I blew the dust off and started some fab. The shifter is a Fiero ($25 pick-n-pull). I made a slip fitter adapter for the shift console. 1" DOM, 0.120 wall tubing ($5) slips just over the ball once you remove the bushing. I drilled and taped the tube 120 degrees apart @ 3/4" from the end. I then did the same thing @ 3/8"(but rotated layout). I decided to use 2 different thread pitch set screws. 3 are 1/4"-20 and 3 are 1/4"-28. The -20 are used to index the slip fitting fore, aft, up or down. The -28 are use to secure the fitting on the ball. I then welded some 5/8" DOM inside the 1". This is used to set the depth (on the ball) and to reduce the opening. I then machined down a 1/4" heim joint to fit inside the DOM. The push pull cable will attach to the heim. I have not finished the cable brackets yet. One of the -28 set screws will be long and attach the other cable to it. I will have to drill a hole in the top of the console for this up/down movement. I am building a bracket that bolts to the lower front transmission/engine bolt. The rear attachment piont will be the shift console. This one bracket will hold both cables in position.
The shifter needed some minor tweeks too. first was excess brackets. I had to adjust the fore/aft stroke to 3.5"(3" is needed at the console), this was accomplished by removing the stock pin and welding in a bolt. This changed the geometry of the stop. Next I drilled out the cotter pin cable attachment and welded in a bolt. This is because the heim joints are thicker than the original pins would allow.
Now I have to wait for the cables to show up. I ordered one 6' and one 7'. More to come...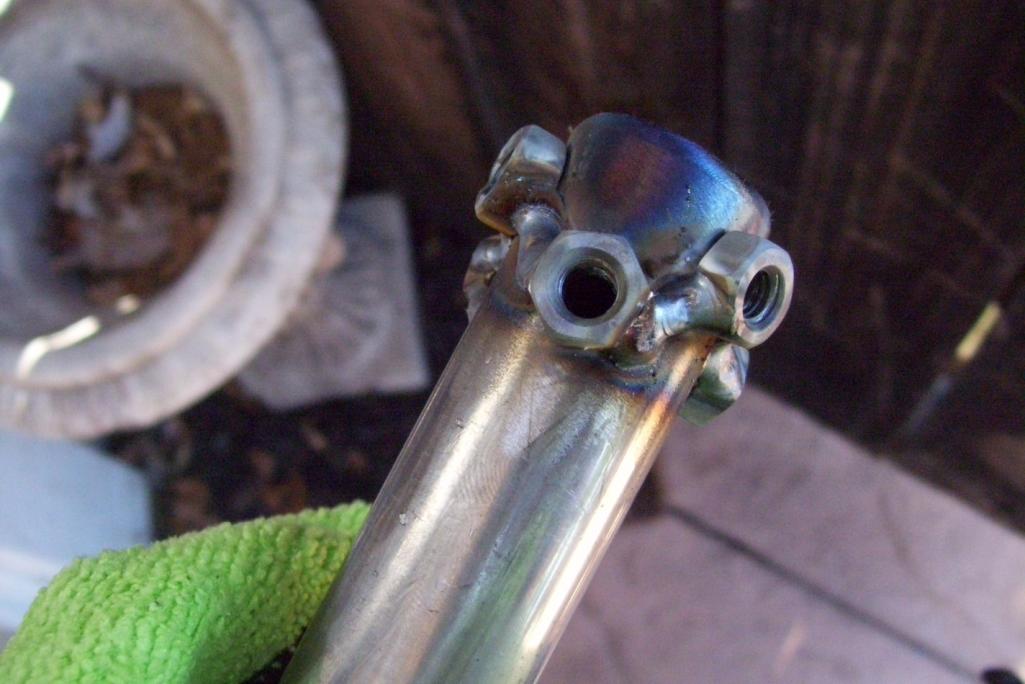
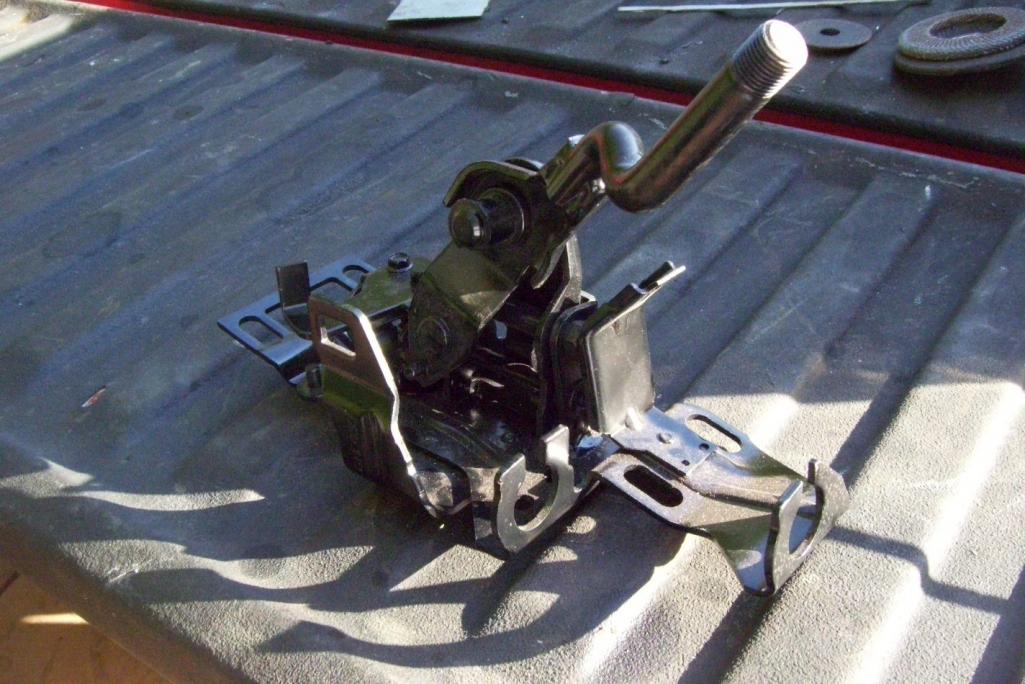
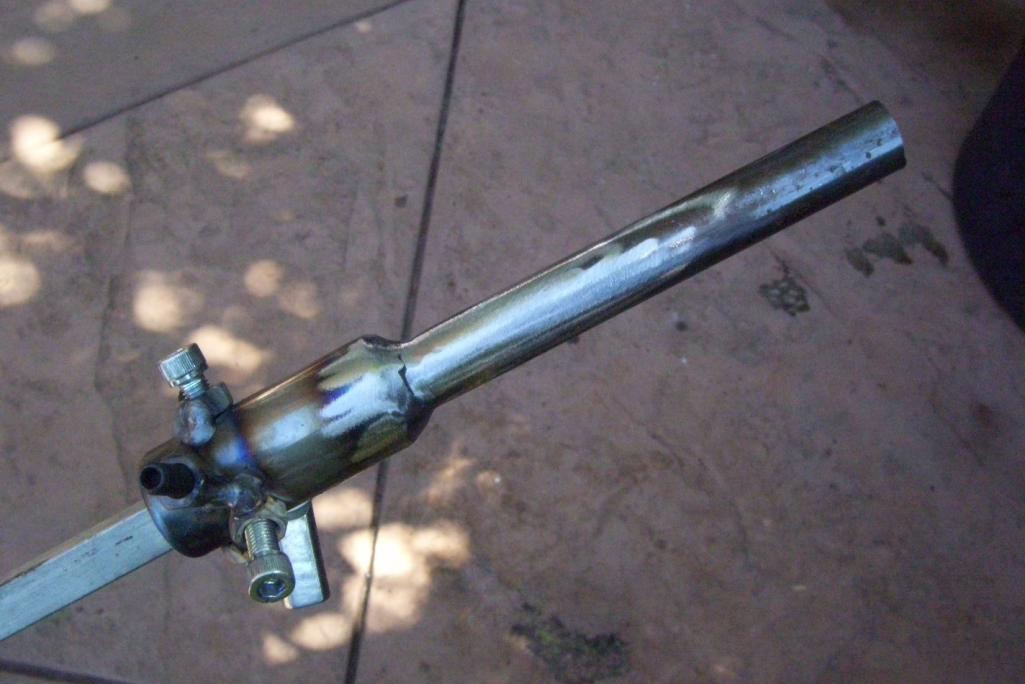
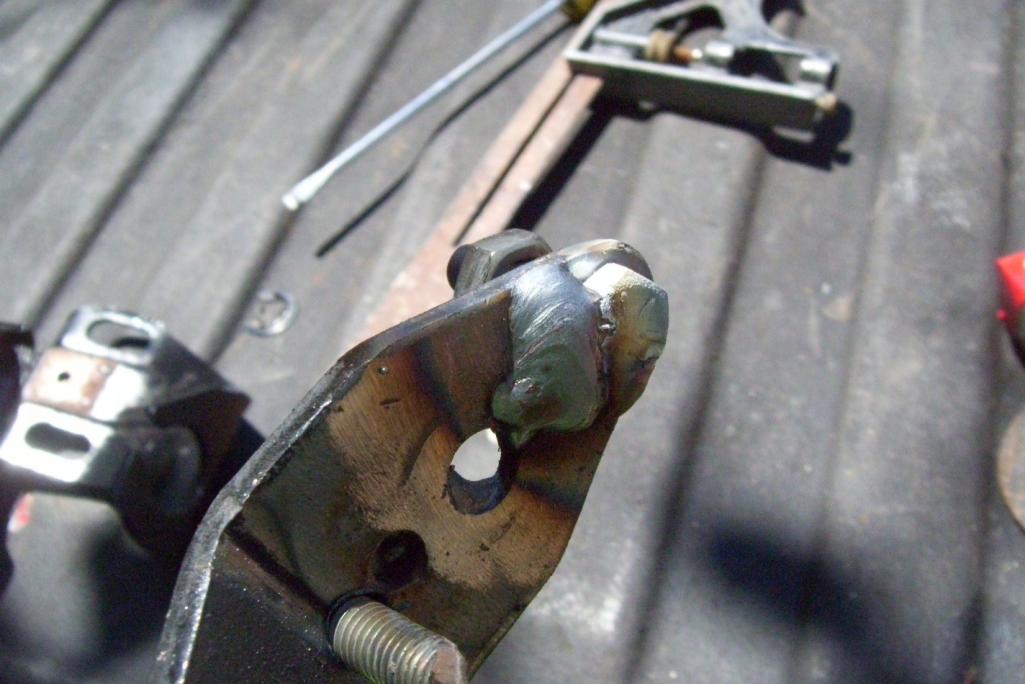
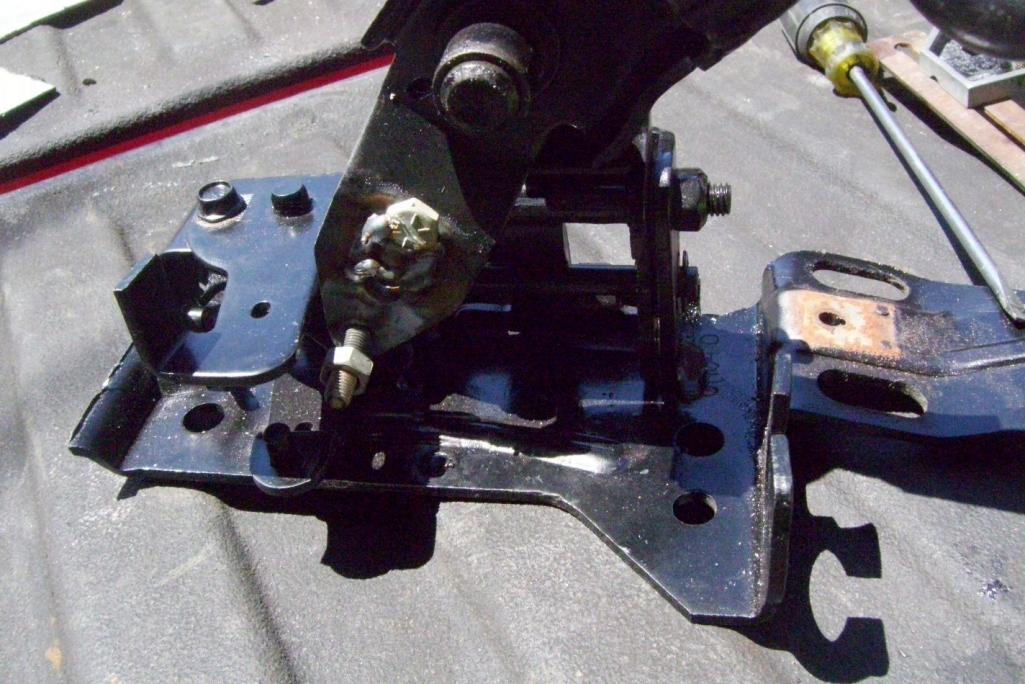
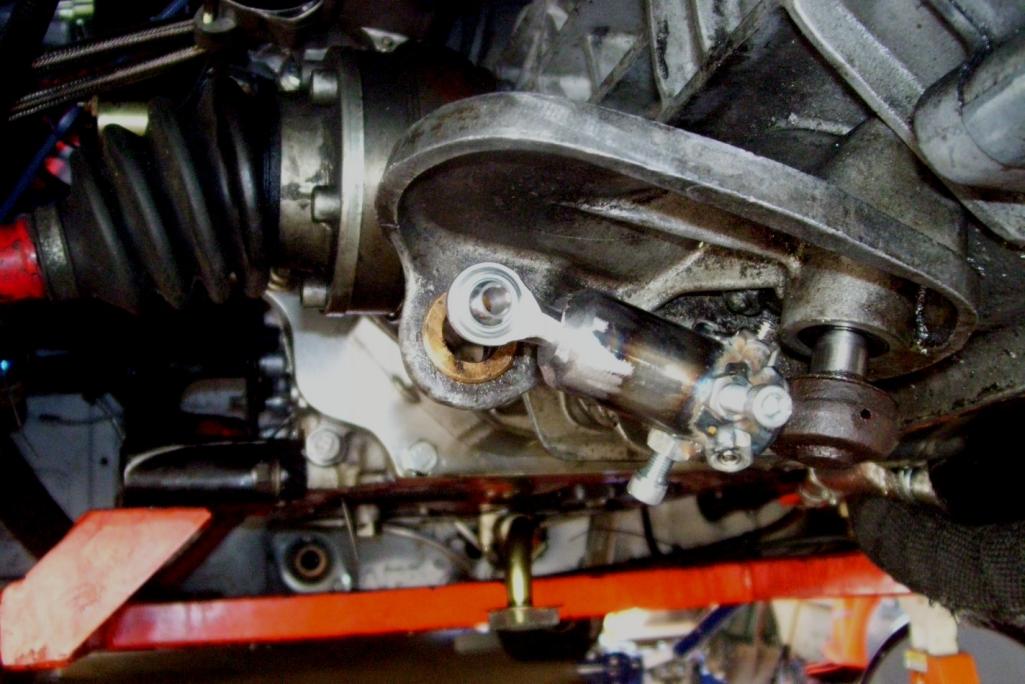
Posted by: kg6dxn Sep 4 2011, 09:59 PM
I had a little bit of time today. Started working on the bracket. I tried to make it simple and reproduceable. Not that I'm going to make more, but if you want to try, it not that hard. I made a tang to mount on the lower tranny mount. The main piece is some 2" flat stock (H.D. $8). I bent an offset to get some clearance from the CV. The rear will mount to the shift console. One of the ball/pinch bolts will double as the up/down heim connection. I machined out an opening in the top of the console for the heim. It's important to keep the heim as clost to the pivot point to avoid a large swing of the cable. The fore/aft heim will be final welded when the cables arrive. As will the cable brackets. The up/down bracket will weld to the main piece. I will use L channel vertically with a horizontal tang to hold the cable at elevation. The main piece is on the same plane as the top of the shift console, so it is not exactly level to the ground. Although I'm not a fan of cutting the console, I did. I needed to clearance for the cables.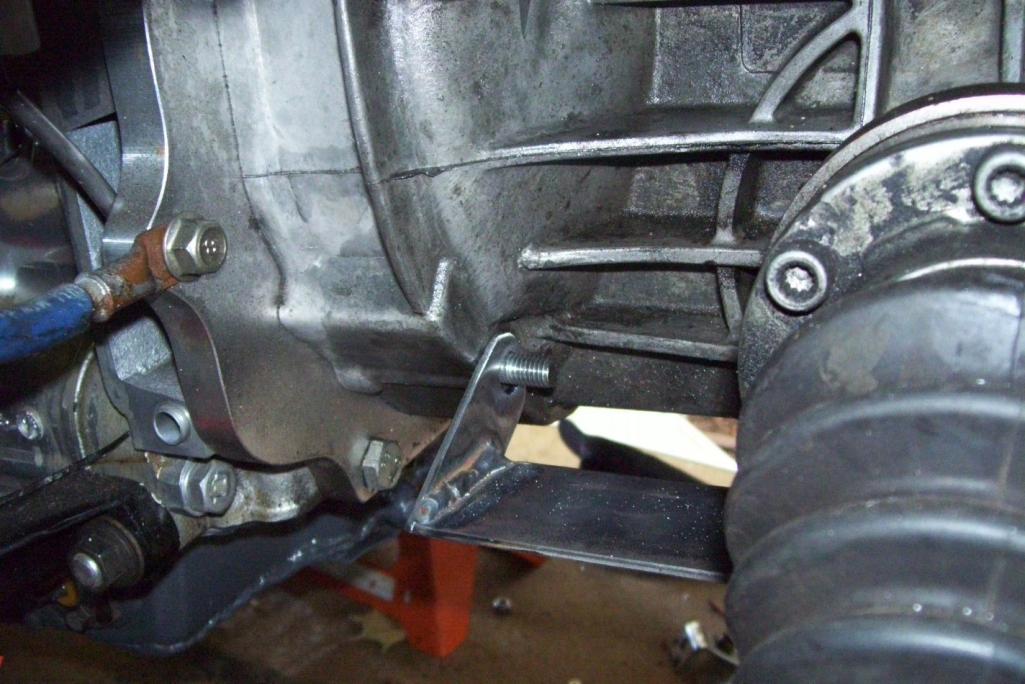
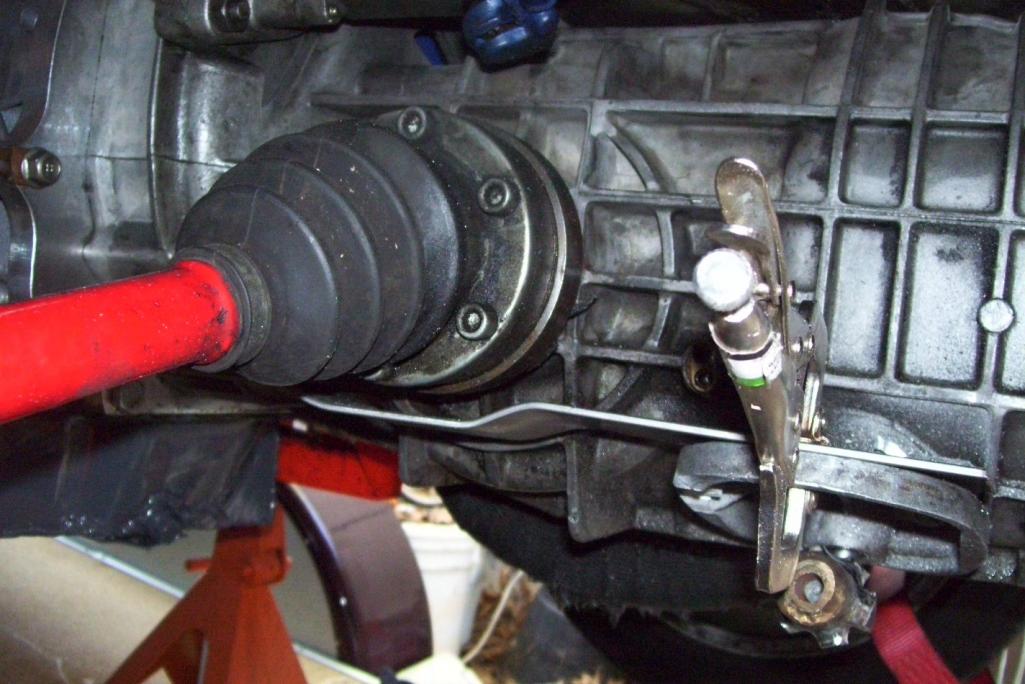
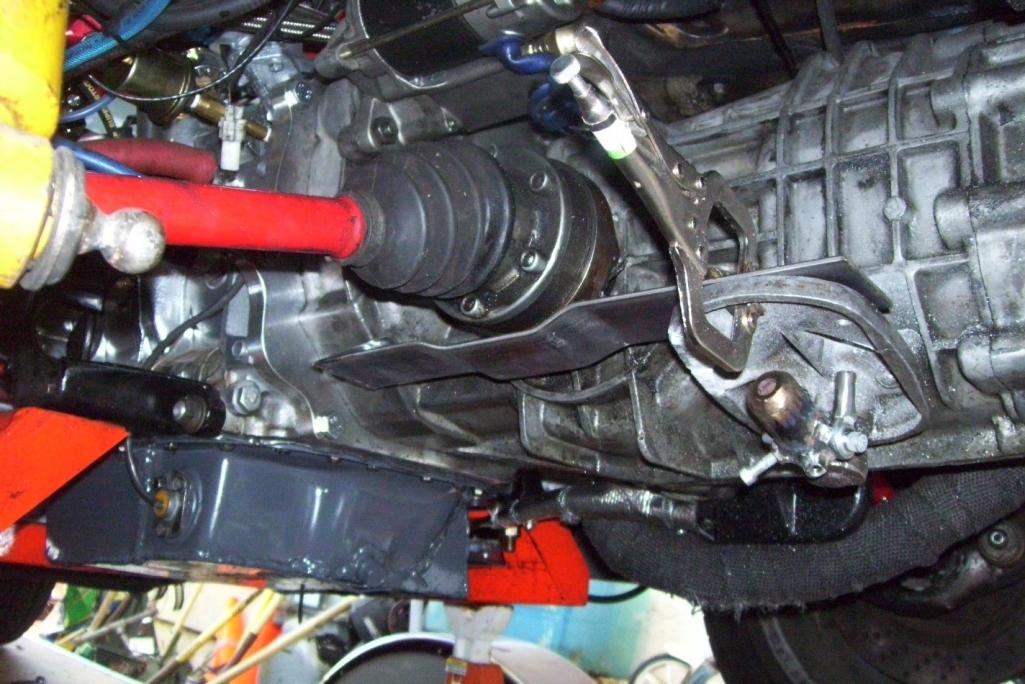
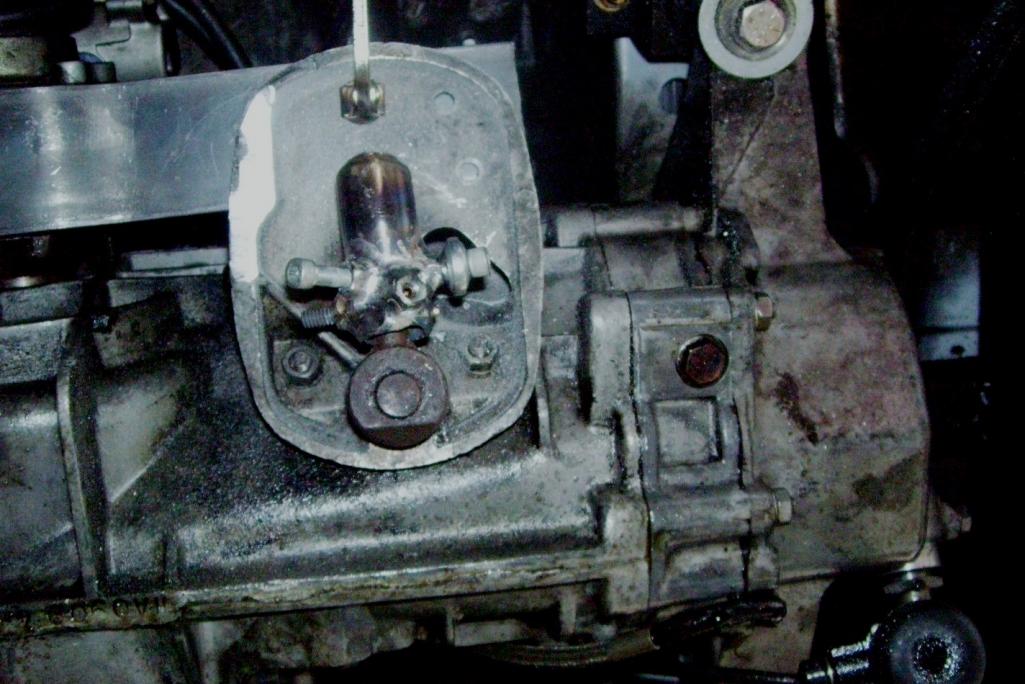
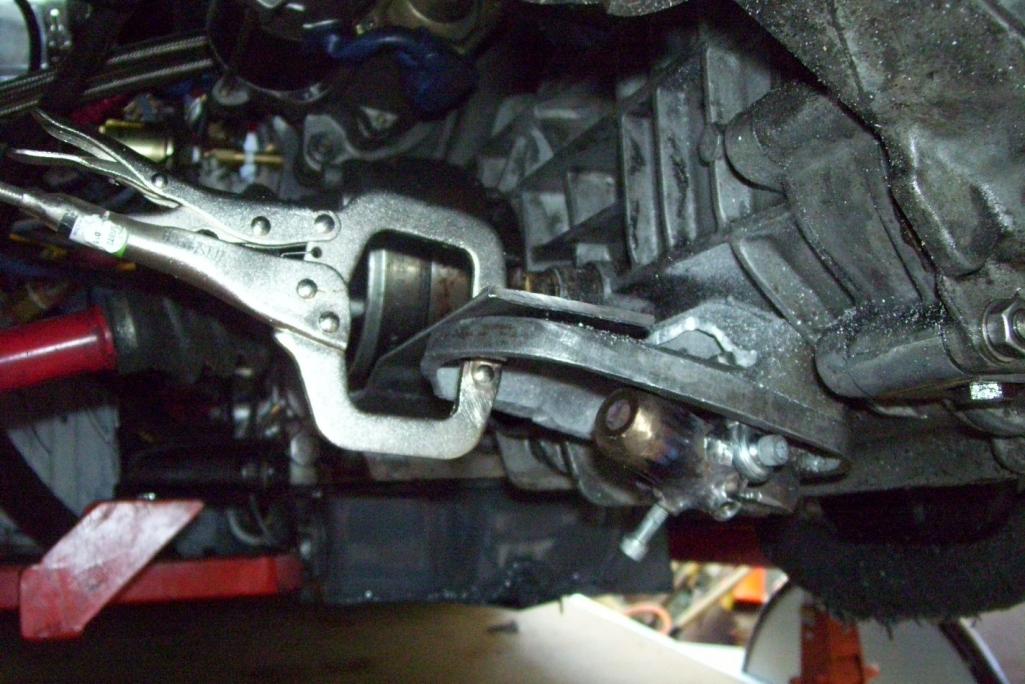
I have decided to move the shifter rearward to a more comfortable position. The original hole will get filled. My Jegs pistol grip screwed right on the shifter. When all said and done I will have less than $100 into this project. All parts come from Ebay, Home Depot and Pick-N-Pull.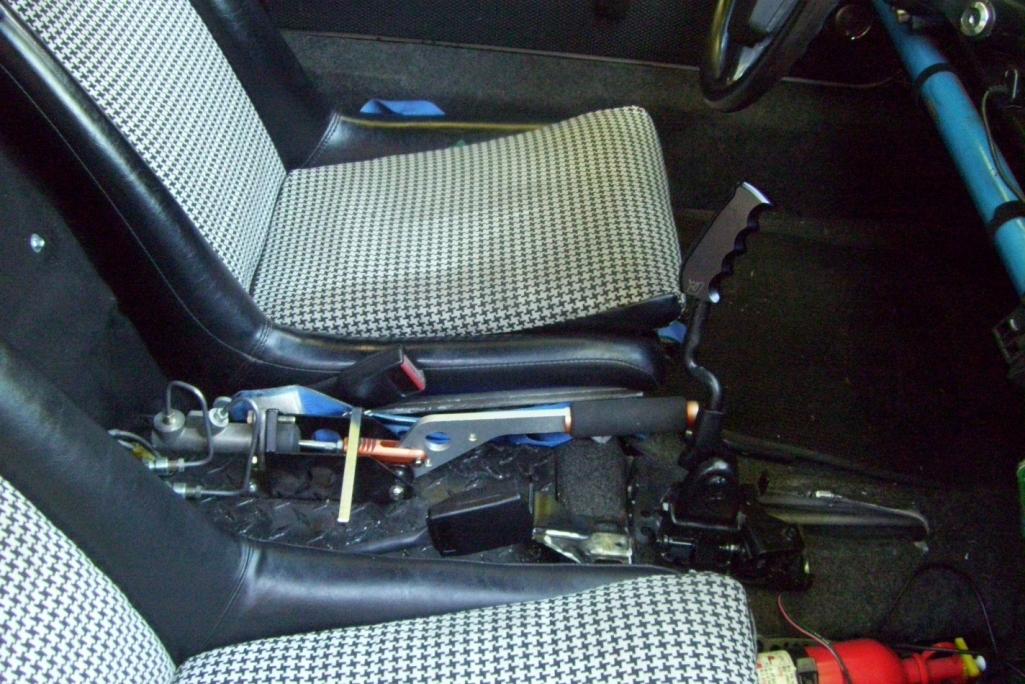
Posted by: kg6dxn Sep 5 2011, 08:23 AM
I am waiting for shifter parts to arrive. Here is my artist rendering of the final design. Thare are some vary complicated cable shift designs out there. I tried to keep this super simple in case someone else wants to fab their own. Many different shifters will work. Mine has a built it reverse/1st lockout spring on the correct side. The main issue will be fore/aft throw. The 901 per my design requires just over 3". If the slip fitter is extended, more throw is needed. The end of the fulcrum point is located where the rod was so the effort fore/aft shoule be the same as the rod (theoretically). I couldn't sleep so I started Fuching around on the computer 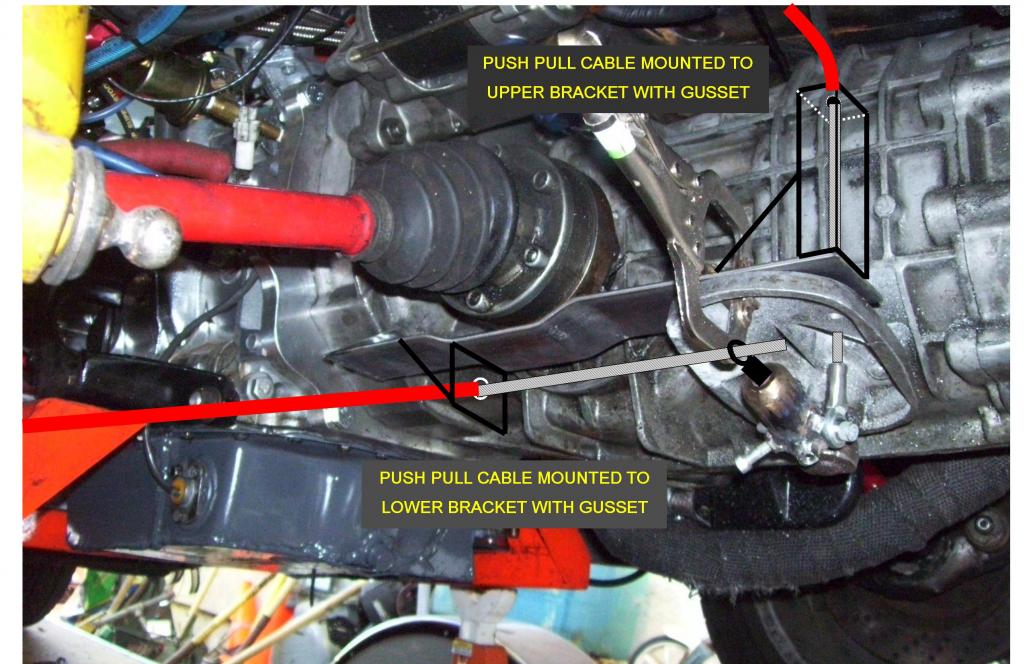
Posted by: matthepcat Sep 5 2011, 10:38 AM
Careful Mike.
People might start asking you to make them a budget friendly cable-shift solution.
Posted by: kg6dxn Sep 5 2011, 03:13 PM
Careful Mike.
People might start asking you to make them a budget friendly cable-shift solution.
That's why I'm being very detailed. You guys can make your own with my design. When it's all done I may post more details and measurements in a new thread. I can't make enough to go into buisness. I'm not looking for a new career , I just want to drive!
Posted by: Andyrew Sep 5 2011, 07:59 PM
Mmmmmm Stop tempting me!!!
Really looking good!!
Posted by: jsconst Sep 5 2011, 11:29 PM
Looking good Mike. Oil pan fix came out nice, I assume the motor ended up being OK since you've been working on the new shifter. Can't wait to see that thing run.
Jeff
Posted by: kg6dxn Sep 8 2011, 09:21 PM
Progress! Inside the car I installed rivet-nuts in the tunnel to hold the shifter in place. My cables came in. I had to move the attachment points on the shifter. I used some 3"x1/8" stock and some square washers (HD $5) to put the cables in the right place. No binding and smooth operation. I have the vertical cable bracket welded on the tranny bracket (no pics yet) I should have this driving this weekend. Euro sunday is having another event in Walnut Creek.
Cables: Ebay $26 each.
Shifter: Junk Yard $25.
Heim Joints: Ebay $20
Misc steel: $20 (maybe. I used mostly left over pieces from H.D.)
Total: $91 For a complete cable shift system. No I will not make you one Well maybe for $300 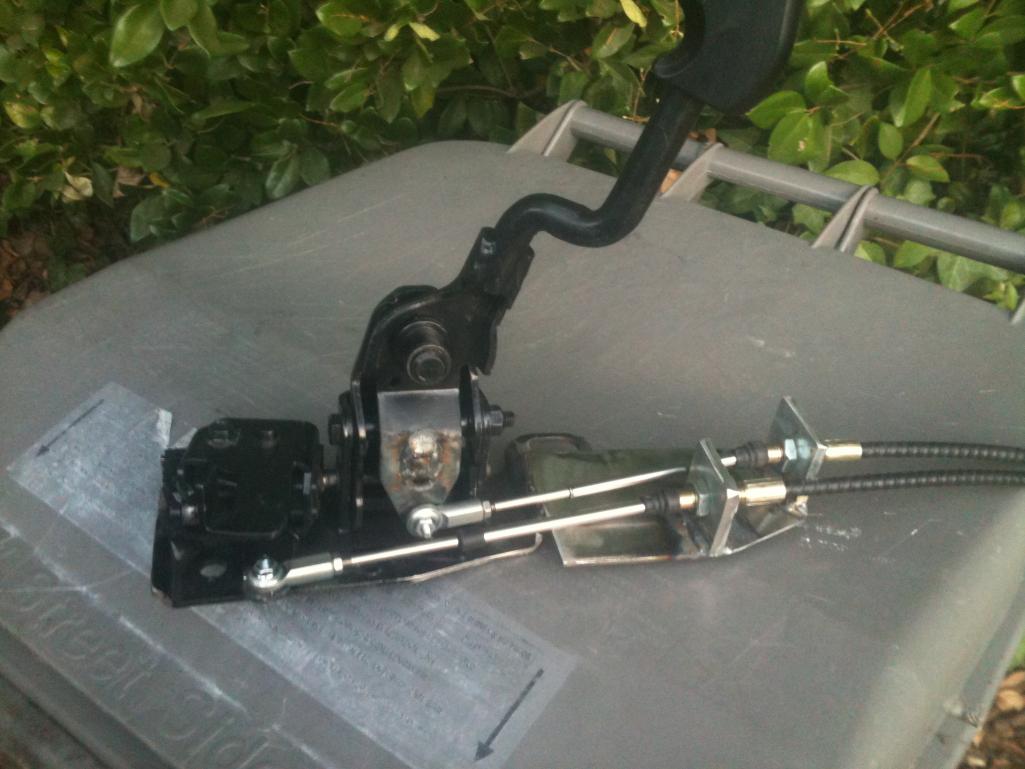
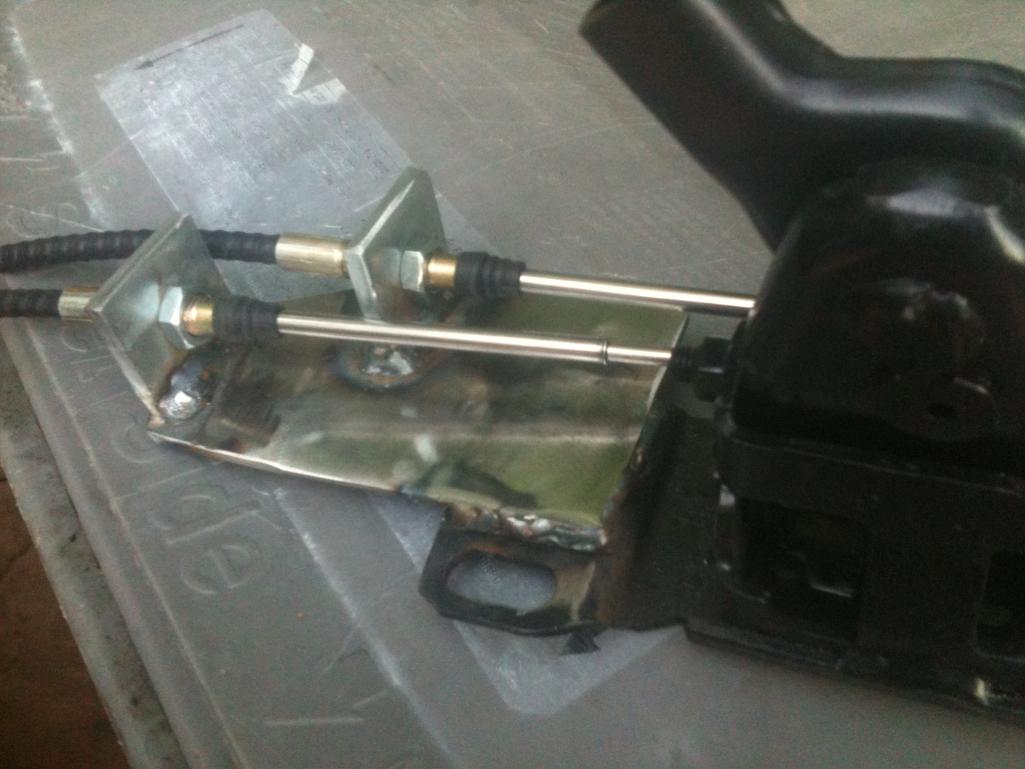
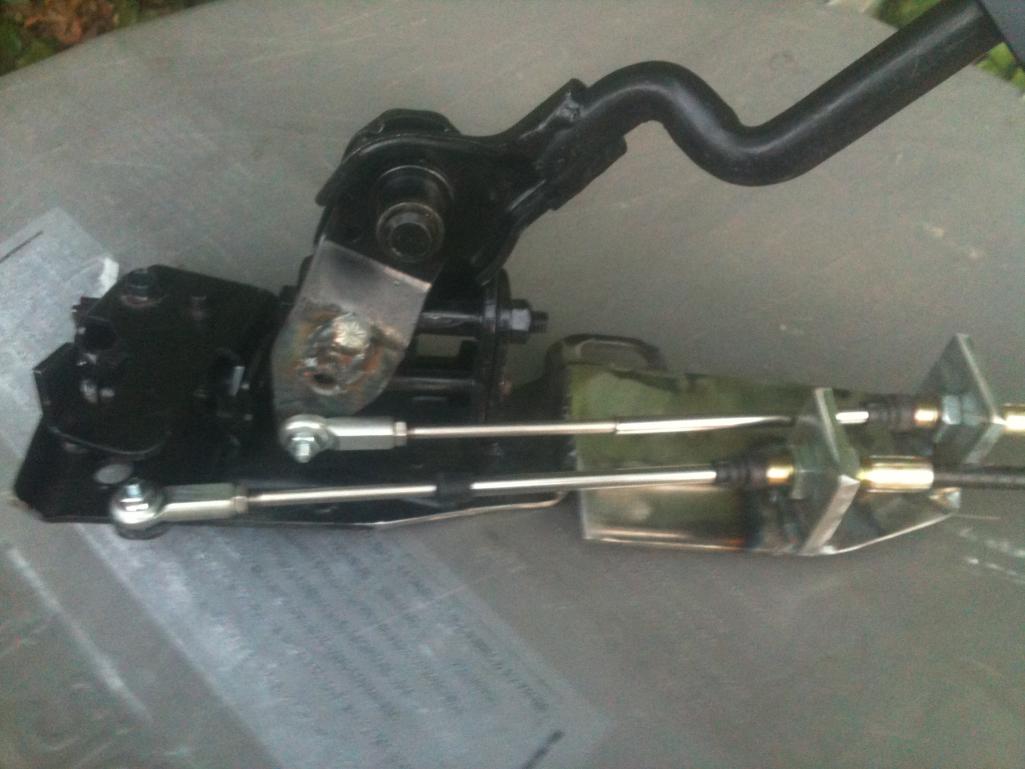
Posted by: matthepcat Sep 8 2011, 10:19 PM
Bad ass! I want one........or is it my trans?
Nice work Mike!
Posted by: JRust Sep 8 2011, 10:20 PM
Nice . The real question is how does it shift . If it is an improvement over the stock sideshift? Love to hear how it works with some driving time. Way to go
Posted by: kg6dxn Sep 9 2011, 10:57 PM
Got the rear bracket done, cables installed, shifter installed and the car shifts. It took a little while to get it adjusted, then I took it all apart to paint it. The shift is firm and positive. The only tweeking I may do is to widen the neutral gate. I need to drive it first. If I were to do it again, the slip fitter should be milled from billet steel and I would get a heim that could articulate a little more on the end. I milled down some small washers on the heim/cable connection to help prevent binding. The cable system gets rid of all the slop in the rod system. The play left over is the shift console to shift fork slop. It would take some welding and machine work inside the tranny to remove all slop. All in all, the shifting is much improved. I will get it back on the road this weekend and try it out...
The bracket turned out how I pictured it...
The top bracket was welded at a compound angle. I installed the cable to the bracked and console and tacked in place...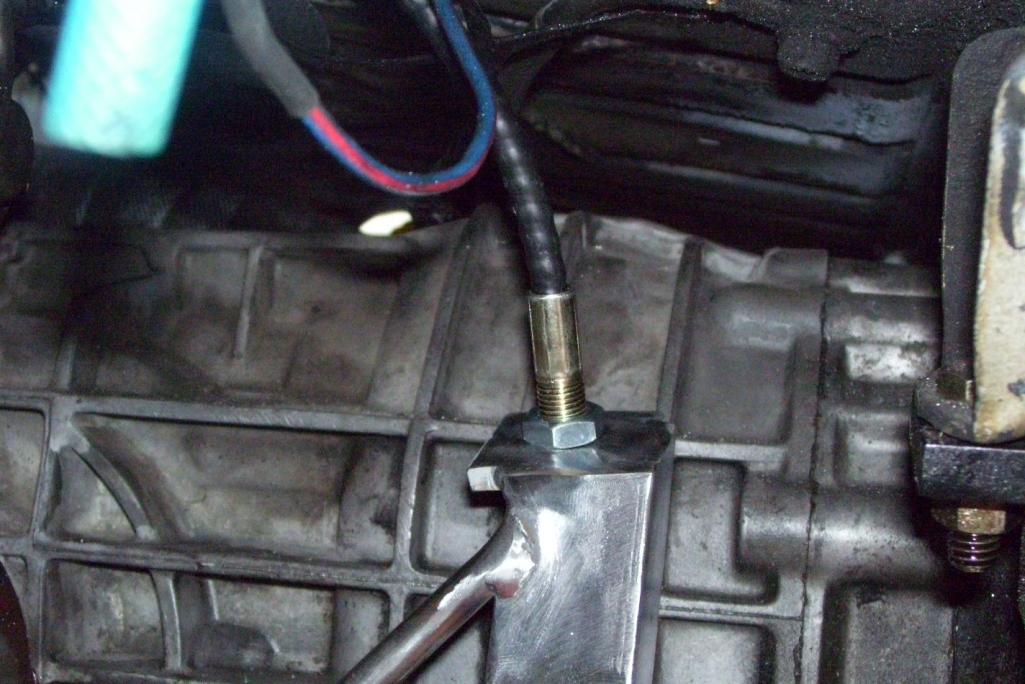
Bottom view. Slip fitter is not pretty, but it works great. Maybe Racer Chris can mill a pretty one up for me...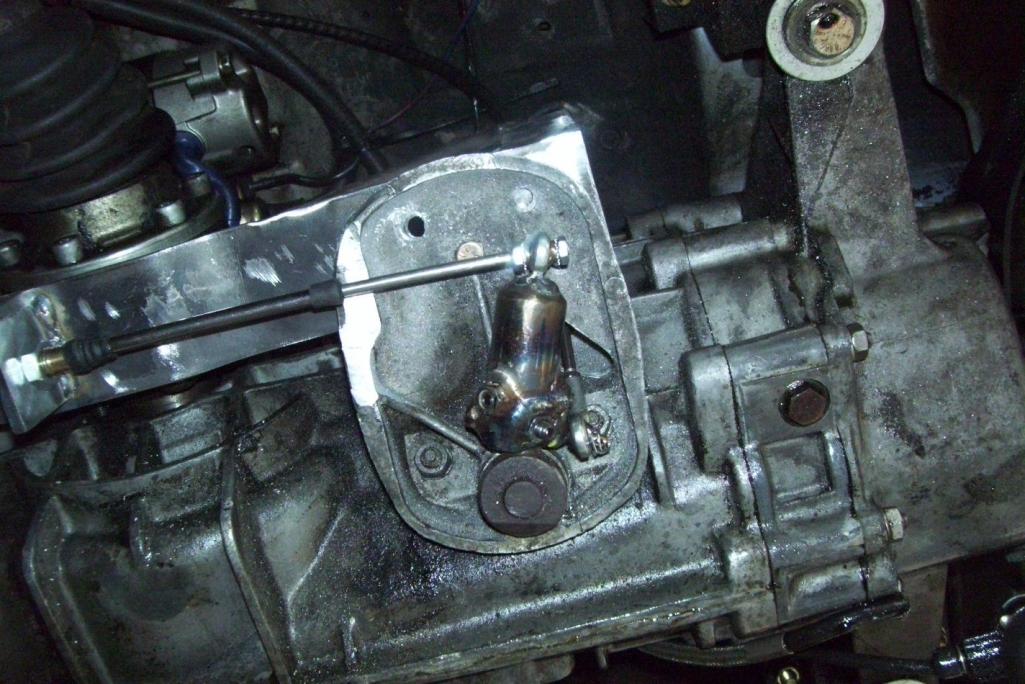
You can see the washers added to increase movement...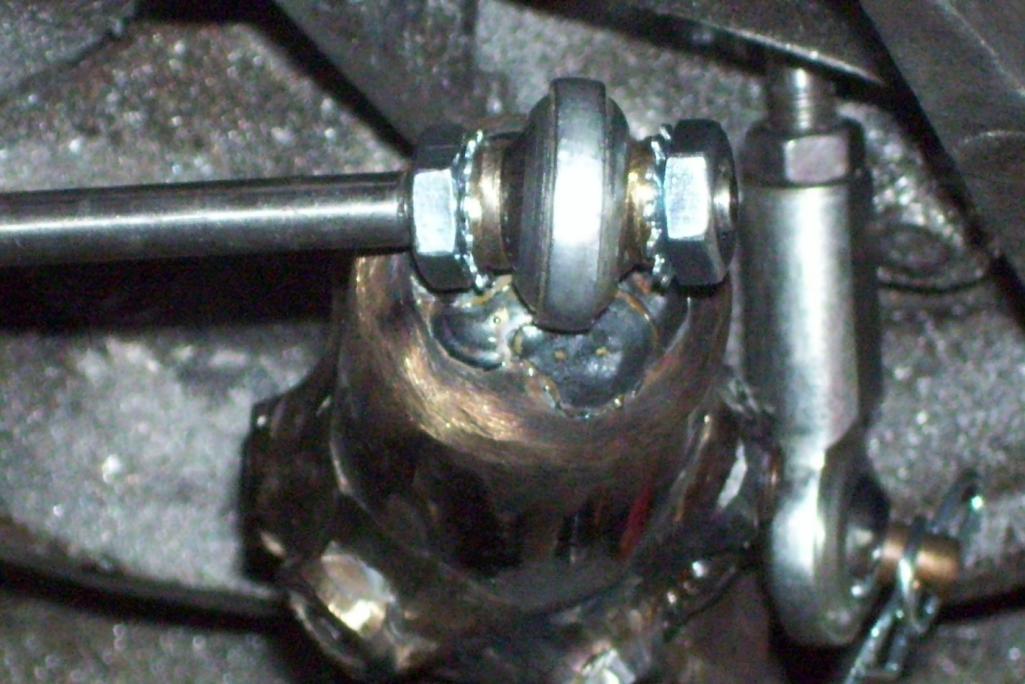
Found this cool clip at HD for $0.75 and a 3/16 pin ($1.07). I welded the pin on and then hardend the piece.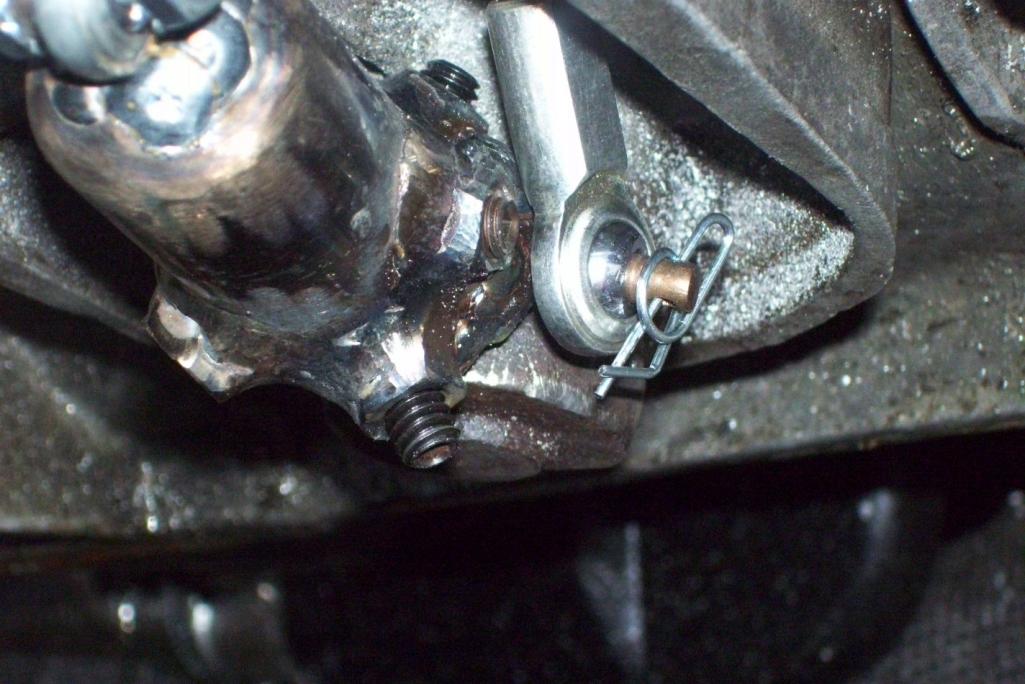
Posted by: jsconst Sep 10 2011, 12:03 AM
Looks great Mike, hopefully this drive will go better than your last. If you find yourself up this way stop by I'll be in the garage working on my car all weekend.
Jeff
Posted by: Andyrew Sep 10 2011, 09:26 AM
Wow that looks great! Very simple design!
Posted by: kg6dxn Sep 10 2011, 10:00 PM
Got it off jack stands today. Test drove it and... No first... 5th is there... Try 5th... 1st is there... A quick mod to the shifter and the throw is reversed and the shift pattern is correct now. Only problem now is 2nd. I need to increase the throw to 2nd. Since I had to reverse the throw in the neutral gate, I widened the pattern a little. Not much but enough to make me happy. It was just to narrow for comfort.
Pic of the bracket paintied and installed...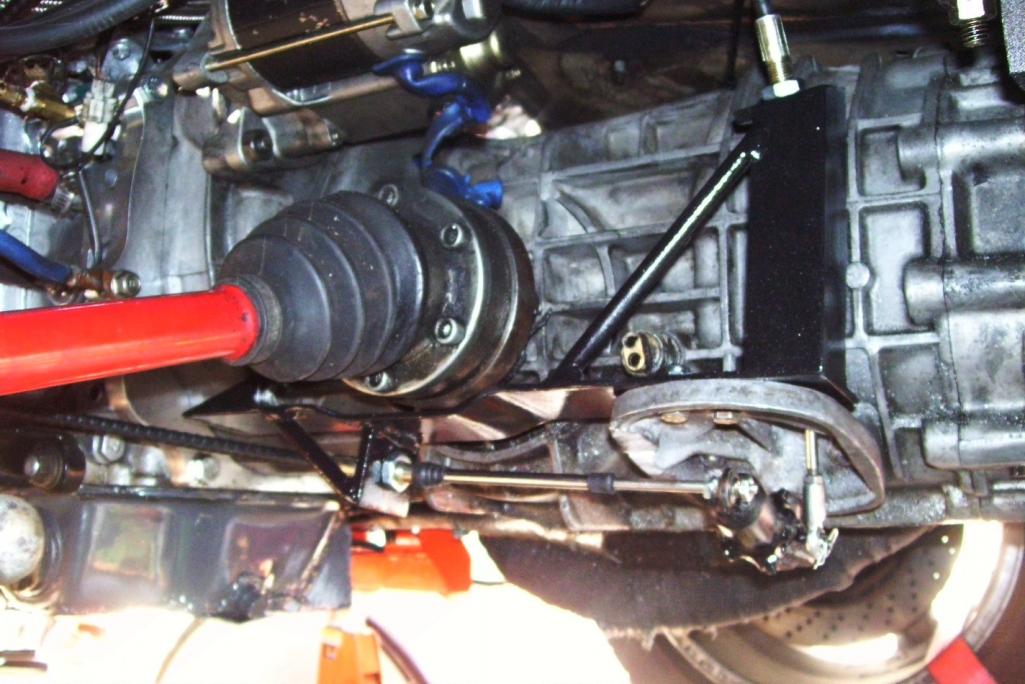
I used some more aluminum diamond plate to cover the front tunnel. It matches the piece under my hydraulic brake and my gauge panel...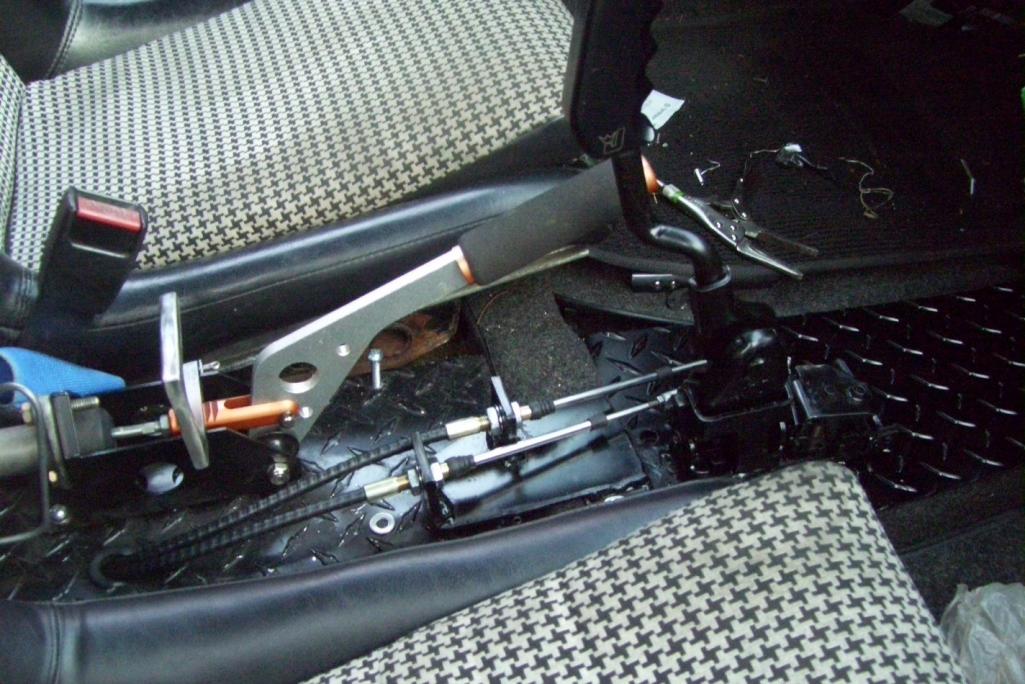
Posted by: jaxdream Sep 11 2011, 08:37 AM
Not to take away from your shifter setup , looks great , what seat belts are you using ???
Jack
Posted by: kg6dxn Sep 11 2011, 09:15 AM
Not to take away from your shifter setup , looks great
, what seat belts are you using ???Jack
I run dual seatbelts on the drivers side. 914ish retractable belts and a 5 point harness. On the passenger side I run just a retractable.
Posted by: computers4kids Sep 11 2011, 09:31 AM
Mike,
I must say...you are amazing at fabicrating on the "cheap." I like your design...very simplistic...less to go wrong. I sure hope it ends-up working for you. I would love to have a cable shifter if it improved shifting over a Renshifter.
Posted by: kg6dxn Sep 11 2011, 09:37 AM
Mike,
I must say...you are amazing at fabicrating on the "cheap." I like your design...very simplistic...less to go wrong. I sure hope it ends-up working for you. I would love to have a cable shifter if it improved shifting over a Renshifter.
Thanks! I'm a CSOB just like the rest of us. I grew up fabricating in my family's service stations. When I was young, I never had the money to pay someone to do fab for me. I guess that carried into my adult life. I do just about all my own auto repairs still. I will admit that I hate oil changes and will sub that out so I don't have to deal with the disposal.
Posted by: kg6dxn Sep 11 2011, 08:46 PM
I added a video of the shifter in motion. Shifting into 2-3, 4-5, 1-R and neutral. Works well. I need to get used to the different feel of this shifter. The gears go in so easy! Next on the list of items is my oil injection pump. My electronic controller is not compatable with my TPS. I have discovered that I can use a MAP sensor and invert the output to simulate the TPS signal. Maybe next weekend...
https://www.youtube.com/watch?v=sWks4R00uFw
Posted by: ChrisNPDrider Sep 12 2011, 02:12 PM
A cable shifting 901! The holy grail!
Keep us posted on how it works over the long-term.
I can't wait to see and hear this beast in person
My 914 is on the road again, tearing up HWY 1 with 80 HP of fury
Posted by: geniusanthony Sep 16 2011, 06:14 AM
Your e brake setup looks neat.. did i miss this somewhere in your thread? If not details please. I recently did a hydraulic brake set on my son's 50cc shifter cart and like the sterility of yours more.
Posted by: FourBlades Sep 16 2011, 07:22 AM
Great work Mike!
Very educational and entertaining.
John
Posted by: kg6dxn Sep 16 2011, 11:38 AM
Your e brake setup looks neat.. did i miss this somewhere in your thread? If not details please. I recently did a hydraulic brake set on my son's 50cc shifter cart and like the sterility of yours more.
The hydraulic brake is made for drifting. I use it as a parking brake. Comes from a company in Phoenix. My 930 e brakes were removed by a PO.
Posted by: kg6dxn Sep 25 2011, 09:58 PM
I hung out with the PCA Saturday. Had a lot of fun cruising the twisties. Got to a spot and jumped on it palying around with a 930. I smoked him and then... The engine detonated and blew an apex seal through the turbo. I found my crank trigger loose and it went too advanced under load. Time for a rebuild The turbo is toast and the engine needs a complete overhaul. This was the most fun ever blowing a motor! This car is fuching fast. Maybe too fast; Is that possible? It has easily twice the power of my V8. My tuner says areound 500hp and I beleive him! I will have it running again but I need to clear out the garage first and save the $1k for the master rebuild kit. Oh, and the turbo needs to be rebuilt or replaced. The bottom line is this combo works! It works very well. If not for a loose 10mm nut it would be perfect.
So now it's time to get working on my trailer project. It's in the garage and cannot move until it gets put together. I will post the trailer build in another thread.
Posted by: Cairo94507 Sep 26 2011, 06:09 AM
Mike, sorry to hear about that. If I can lend a hand with labor let me know.
Michael
Posted by: Lennies914 Dec 16 2011, 09:45 PM
Mike,
What's happening? I haven't seen any updates. Hope all is well.
Posted by: kg6dxn Dec 16 2011, 11:12 PM
Saving my nickles for the new motor and meth injection. I am trying to get it going for WCR but so far, WCR may not happen this year. No one wants to lead.
I'll let you know when the build BBQ will happen!
Posted by: Rand Dec 17 2011, 12:07 AM
Procrastinate later. WCR will pass you up before you know it.
Posted by: kg6dxn Dec 17 2011, 12:16 AM
Procrastinate later. WCR will pass you up before you know it.
I know, I know...
I should tear it apart and asses all the damage. In fact, the car is still on my trailer. Just like when I picked it up after the break down. Now it's covered with leaves and a tarp in my side yard. I've been dicking around with my trailer project but should be working on my car. I need to get the 914-trailer out of the garage and get my car in there... I just haven't been motivated enough I guess. Kind of depressing blowing a motor shortly after getting it running
At least I have a fix to prevent it from happening again... Methanol
It will go down in my personal history as the most fun ever blowing a motor...
This FUCHING car is stupid fast!!! scary fast!!! a shit load of fun!!!
Man,... I got to get it going again!
Posted by: Andyrew Dec 17 2011, 12:37 AM
Yes you should tear it apart!
I just found out yesterday that the issue that I had on the Audi where I thought I had blown the turbo or worse turned out to be 5 of the exhaust manifolds bolts were loose/missing. 1.5 years for me to look under the hood...
Posted by: kg6dxn Dec 17 2011, 12:46 AM
Yes you should tear it apart!
I just found out yesterday that the issue that I had on the Audi where I thought I had blown the turbo or worse turned out to be 5 of the exhaust manifolds bolts were loose/missing. 1.5 years for me to look under the hood...
Better check your oil while your in there...
Posted by: Andyrew Dec 19 2011, 12:53 AM
All fluids will be replaced obviously
Posted by: relentless Jan 31 2012, 08:44 PM
Here's a tip from my '93 RX-7 days:
Pettit Racing should still be selling the second knock detector kit for the 13B motor. That provides knock detect to the second rotor housing, since the stock motor only has one.
Posted by: kg6dxn Jan 31 2012, 08:51 PM
Here's a tip from my '93 RX-7 days:
Pettit Racing should still be selling the second knock detector kit for the 13B motor. That provides knock detect to the second rotor housing, since the stock motor only has one.
That is a good tip. I'm actually having a custom knock senor built. It will have an extra output to activate the methanol injection. I will also have a pressure sensor activate it as well as an rpm sensor. This way, I will be covered if it knocks, if it revs above 6000rpm or if it goes above 12psi. All of these settings are adjustable...
I really need to get this build going again. Maybe after my vacation next month.
Just need more green to burn...

Posted by: unpolire Feb 20 2012, 12:52 AM
I stumbled upon this thread and read it all in one sitting. I could not stop. Fascinating project and an amazing fabrication job! As both a 914 and RX-7 owner, I understand your desire to successfully blend the two, and you've truly made one very special "914"!
Posted by: kg6dxn Feb 20 2012, 04:23 PM
I stumbled upon this thread and read it all in one sitting. I could not stop. Fascinating project and an amazing fabrication job! As both a 914 and RX-7 owner, I understand your desire to successfully blend the two, and you've truly made one very special "914"!
Thanks for the compliment. I hope to get back to it soon!
BTW...

UPDATE!!!
Here is a link to part 2
http://www.914world.com/bbs2/index.php?showtopic=172455
Here is a link to part 3
http://www.914world.com/bbs2/index.php?showtopic=187914
Powered by Invision Power Board (http://www.invisionboard.com)
© Invision Power Services (http://www.invisionpower.com)