Printable Version of Topic
Click here to view this topic in its original format
914World.com _ 914World Garage _ Palindrome 914 Build Thread
Posted by: nathansnathan Dec 3 2010, 05:22 PM
I changed the title of the thread, so it's incognito now. 
- Sort of to do with the midengined-ness, my username, and of course the 420 914 thing. 
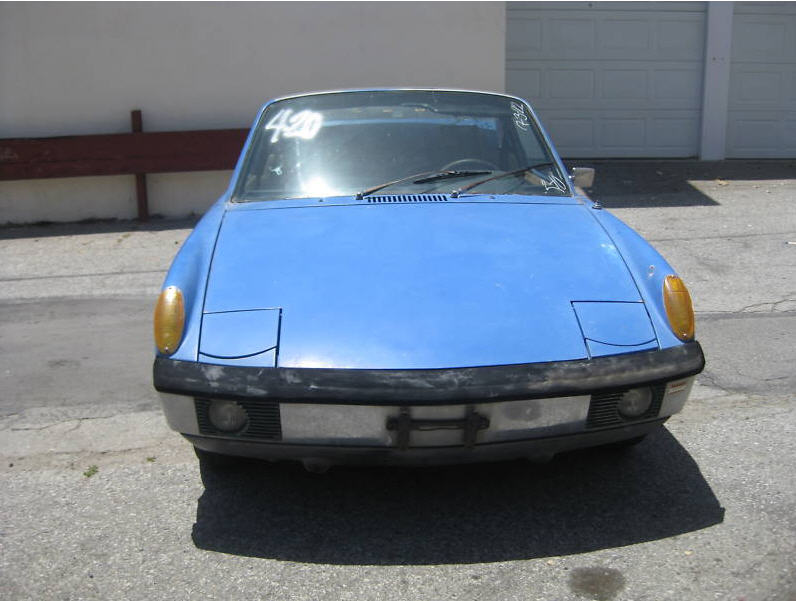
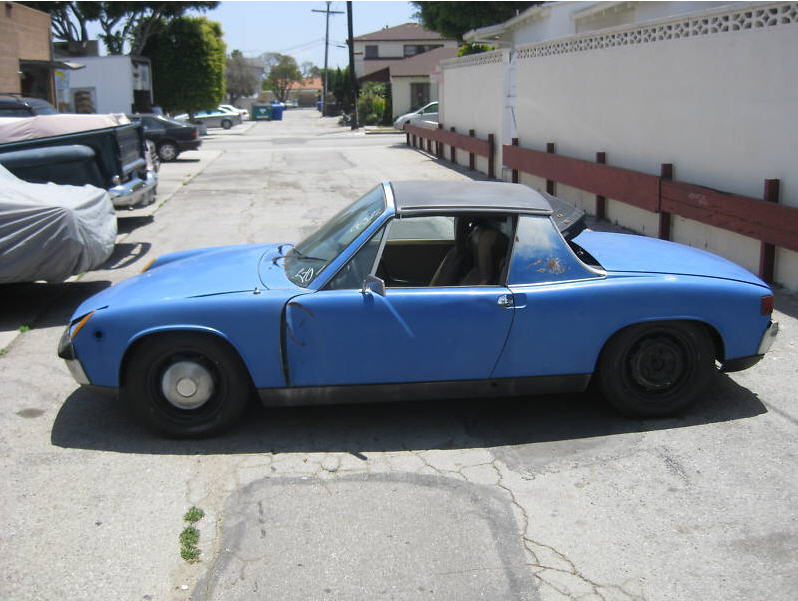
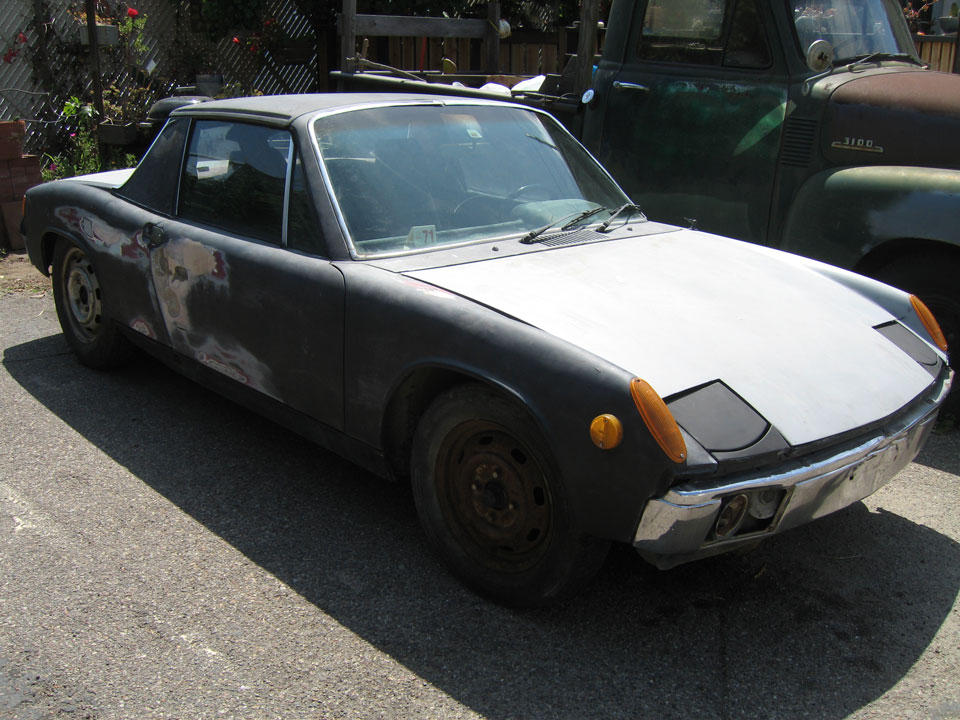
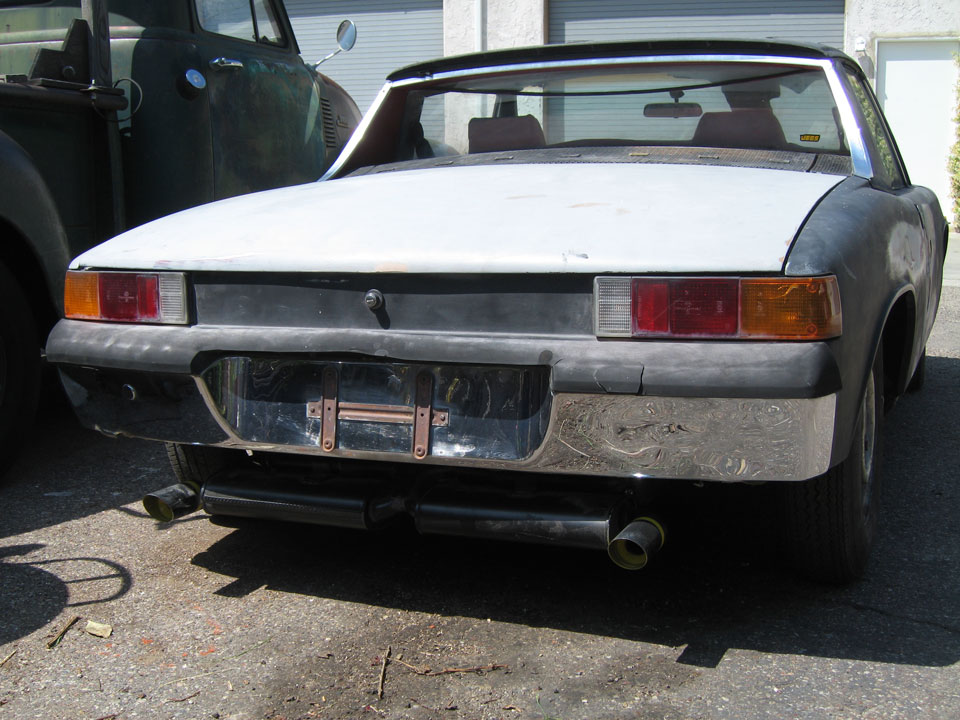
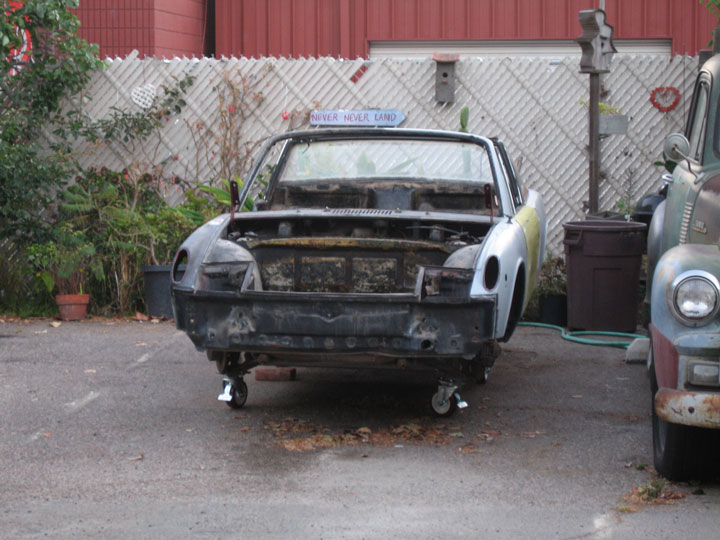
The car was very original, but quite trashed when I bought it. It's a 49 state car, purchased in Colorado judging by the sticker that was on the back opposite the badge, Bob Hagestad Dealerhip. I don't have a picture of that unfortunately... Both bumpers had 1975 UCLA parking permit stickers.
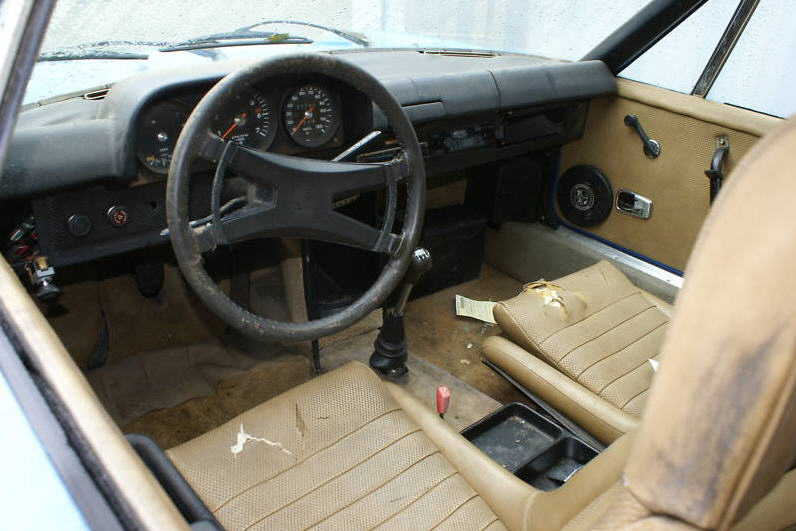
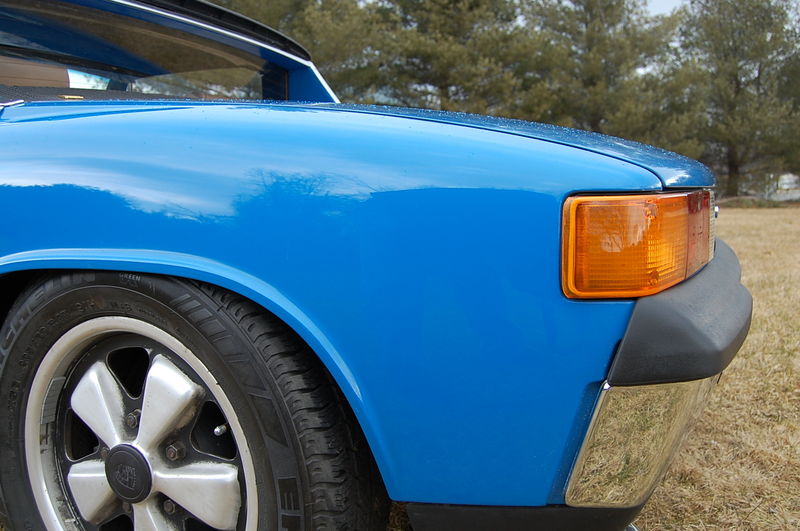
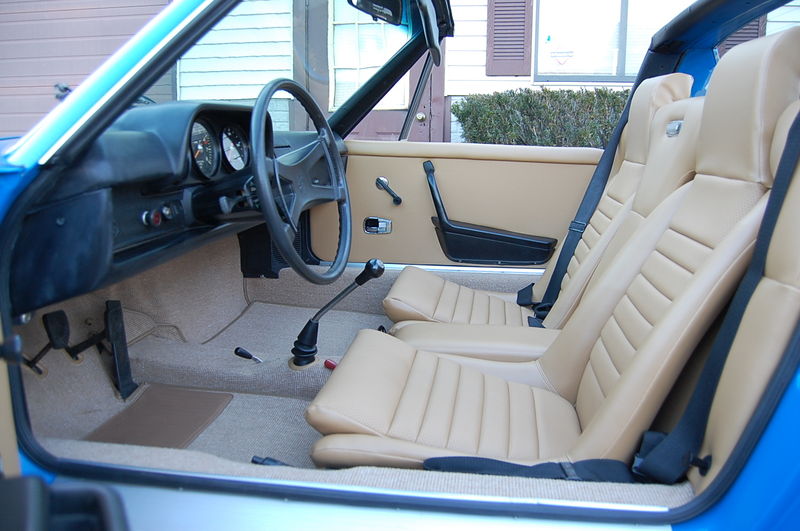
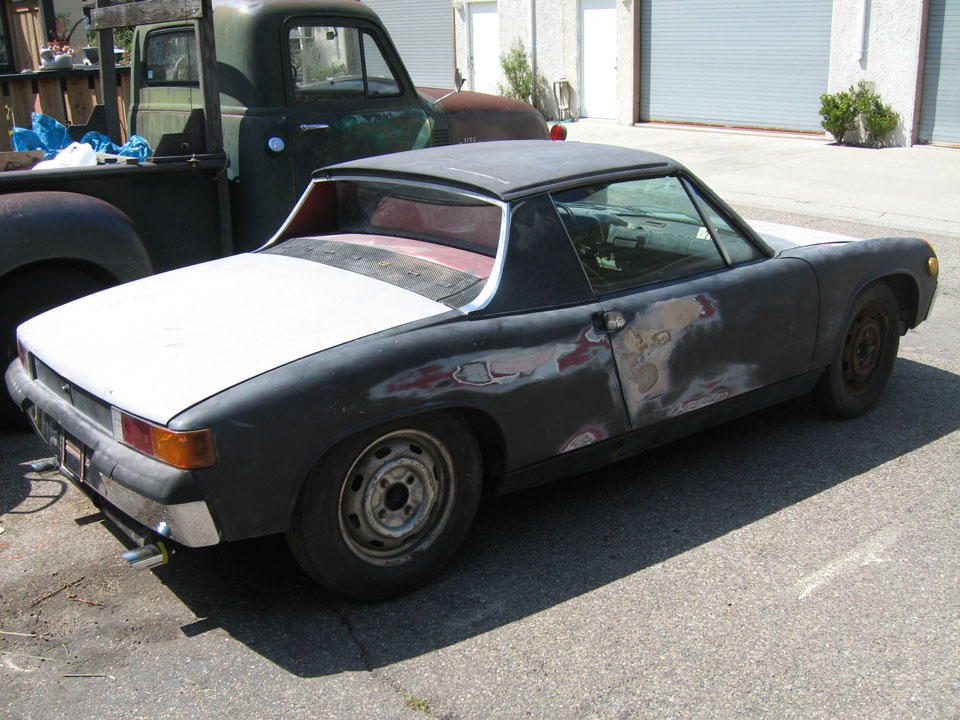
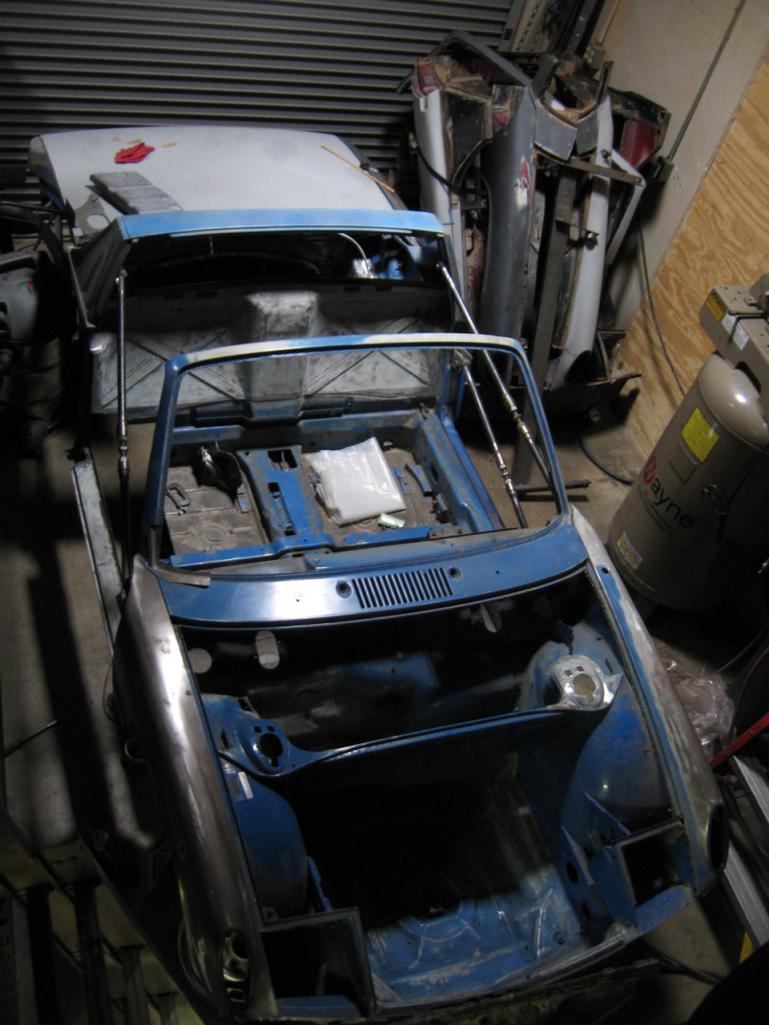
It is an appearance group car, tan square weave, late enough to get 2 real tan basket weave seats. Original adriatic blue paint, no repaints. The snowplow early rear valence. It has the original red heater lever pull which I don't see very much. Everything was there without having been hacked/modified (besides the door panels). Unmodified but fairly trashed.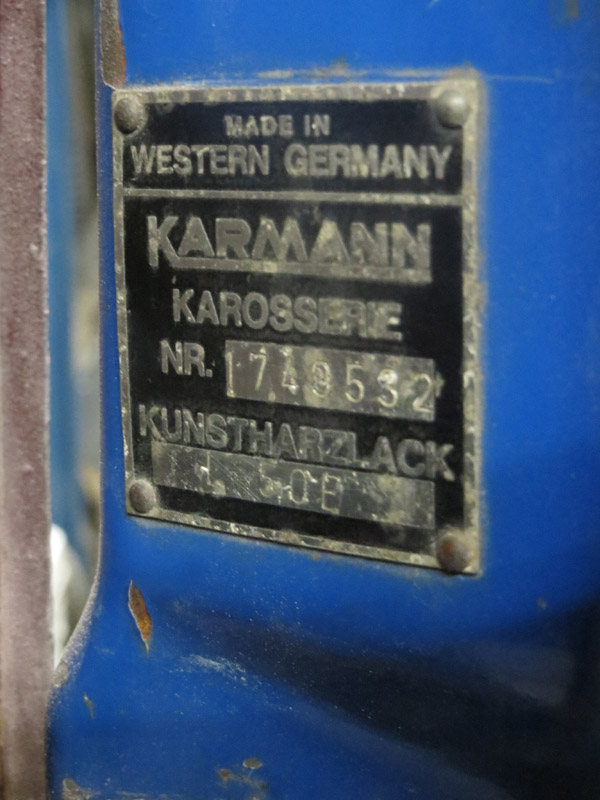
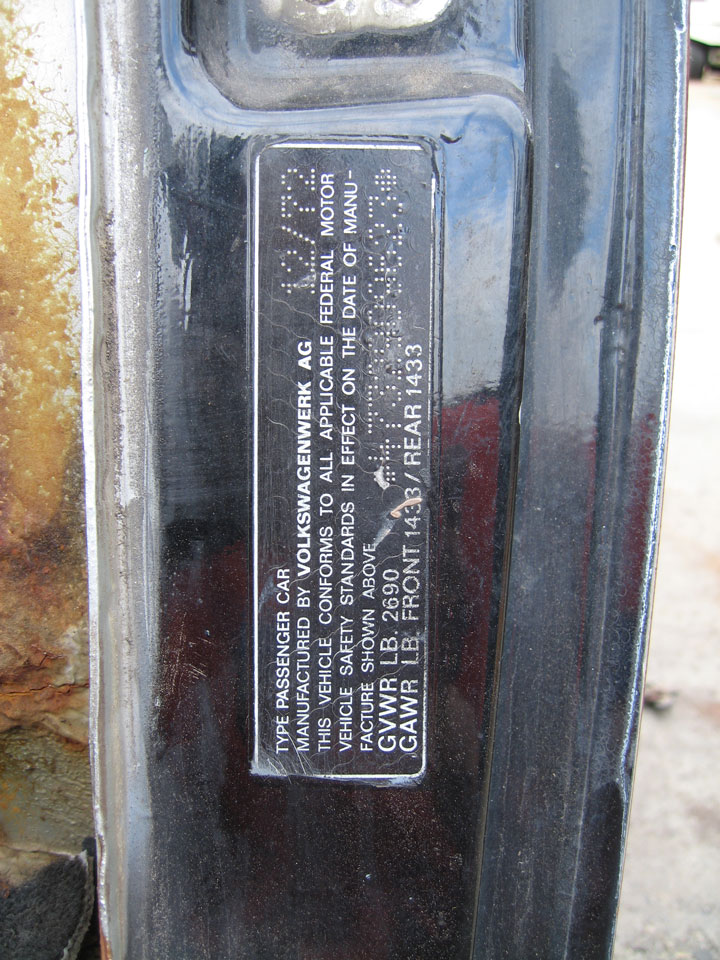
Chassis # 174932
-Meaning the chassis was built the 17th week of the year 1972 (I think it is the 17th week with a Monday the way they count it), the 4th day of that week, Thursday April 27th, 1972. -I thought it was 4/20 but I must concede it was probably a week later, the chassis production.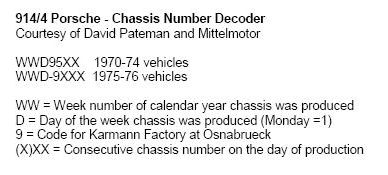
It is odd, though, the dash doesn't match.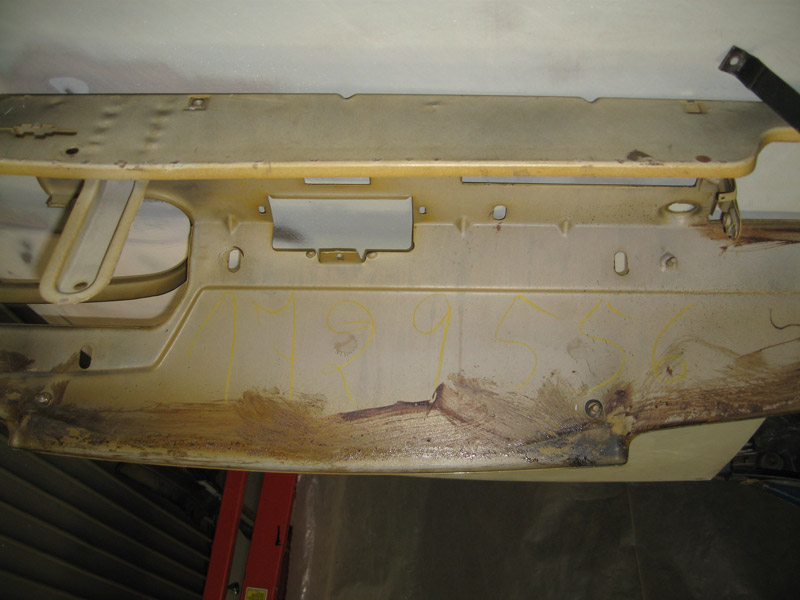
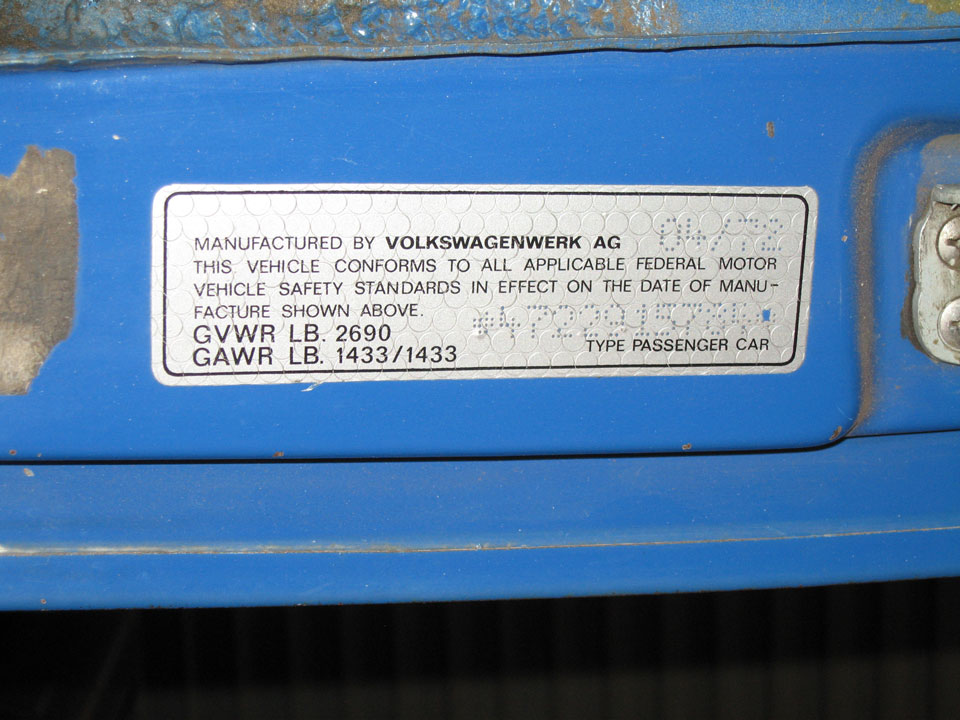
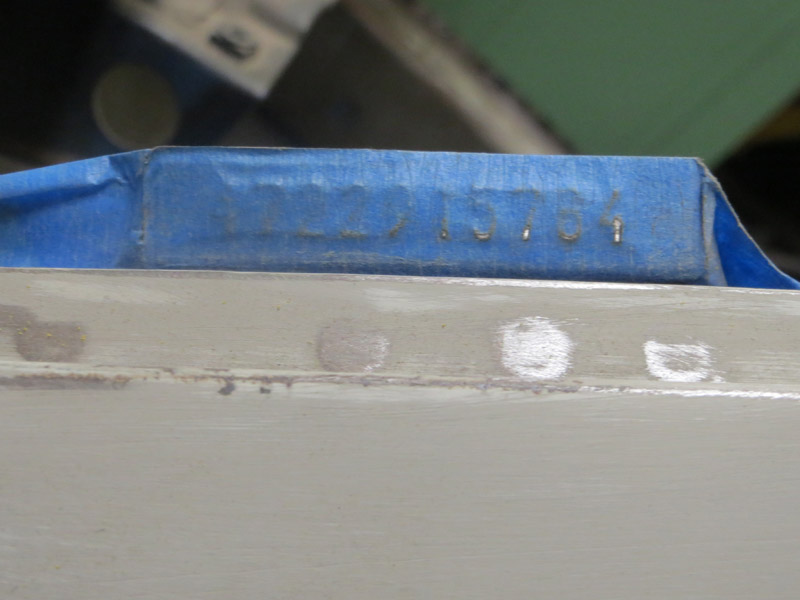
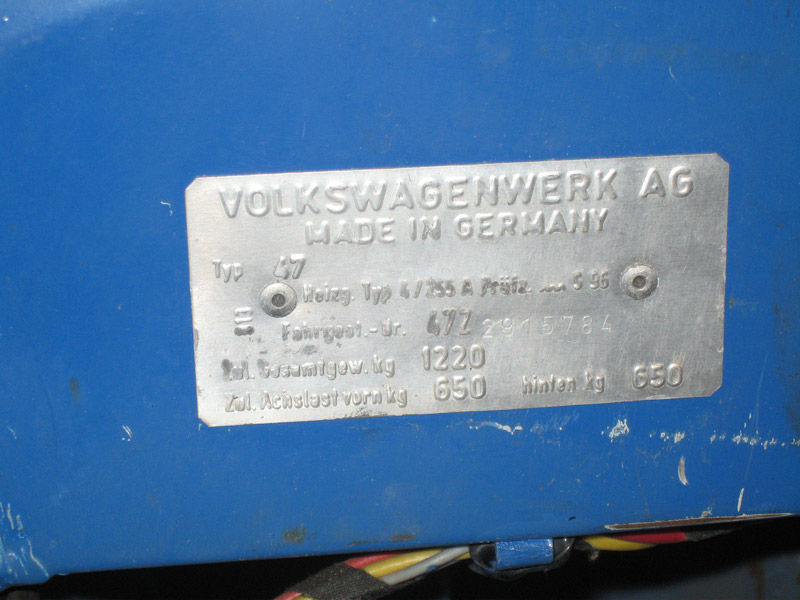
1729556 vs 1749532 which is on the Karmann plate and the trunk.
It would be from just 2 days earlier, but then I was thinking, if it was from another car, it could theoretically be from a 73 or a 74 car, too. It seems like it is original, though, as peple always bodge everything and it was fairly unmolested, the wiring, and hardware of the dash.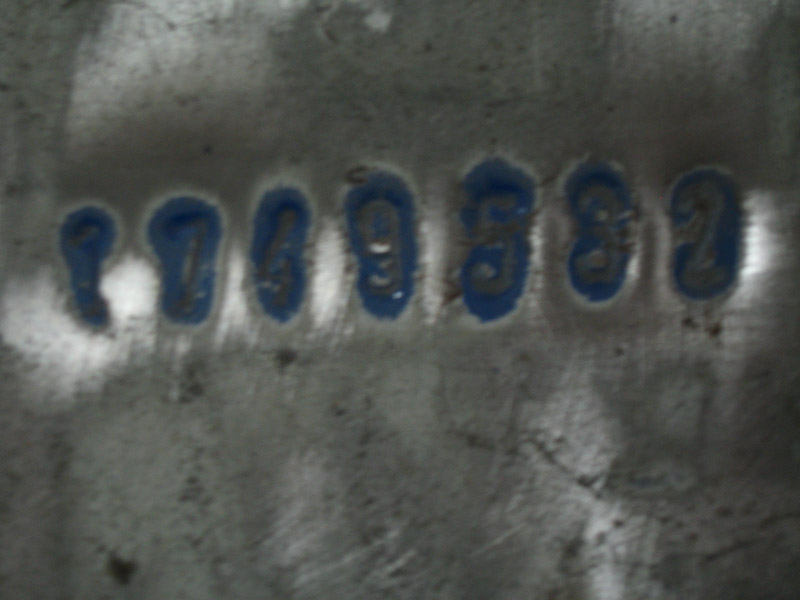
The engine number... 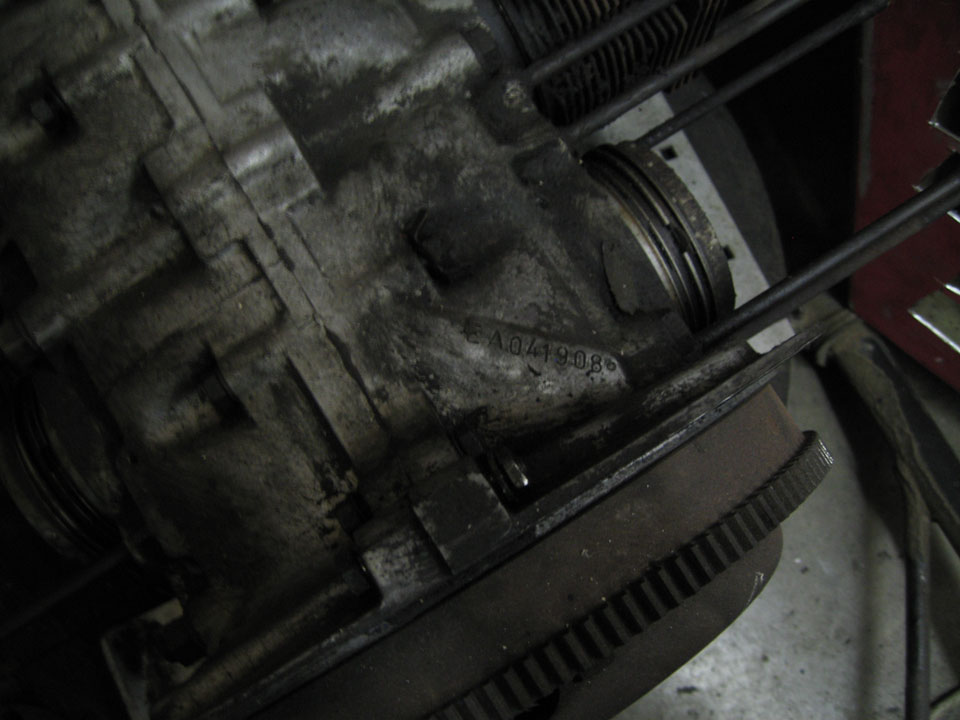
Posted by: nathansnathan Dec 3 2010, 05:27 PM
These are the first pics I saw, back in June on craigslist. The guy I got it from had bought it from a police auction on the holiday. and they paint the date of the auction (?) on the window. I bought it now'ed off eBay for $1250. I probably could have got it for $900 if I'de have got to it sooner. There were already bids for it up to $750. I'd driven all the way up to Santa Monica in my bus and back, 60 miles, and despite what anyone might say, I think it was worth it. The guy's shop was at https://maps.google.com/maps?q=2420+Lincoln+Blvd+Santa+Monica+California+90405+CA&hl=en&ll=34.008456,-118.478802&spn=0.001974,0.003141&sll=34.008854,-118.478761&sspn=0.001983,0.003141&hnear=2420+Lincoln+Blvd,+Santa+Monica,+California+90405&t=m&z=19&layer=c&cbll=34.008456,-118.478802&panoid=jN7hJiLR5aiUgdXCEazQBw&cbp=13,335.66,,0,0  "bought it now"-ed, after having driven 60 miles to see it and back.
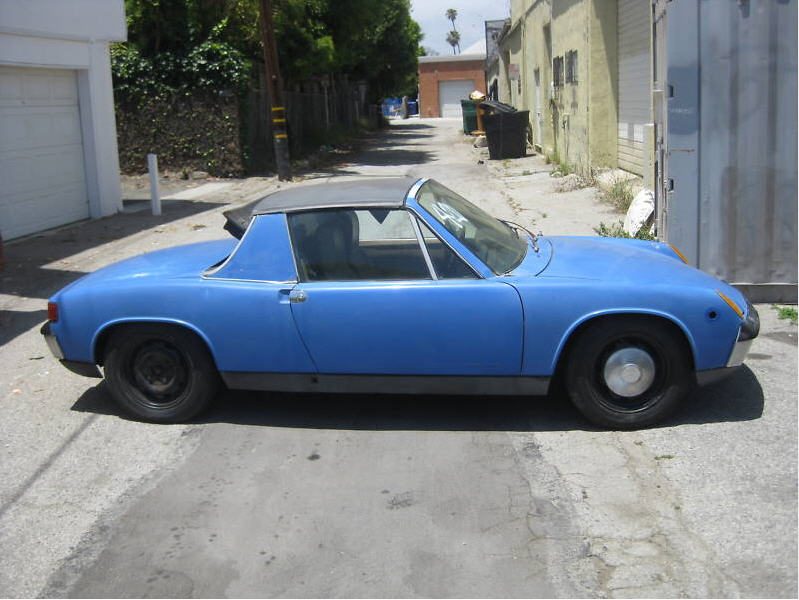
Original engine djet "will run when given starting fluid" is what the craigslist ad said.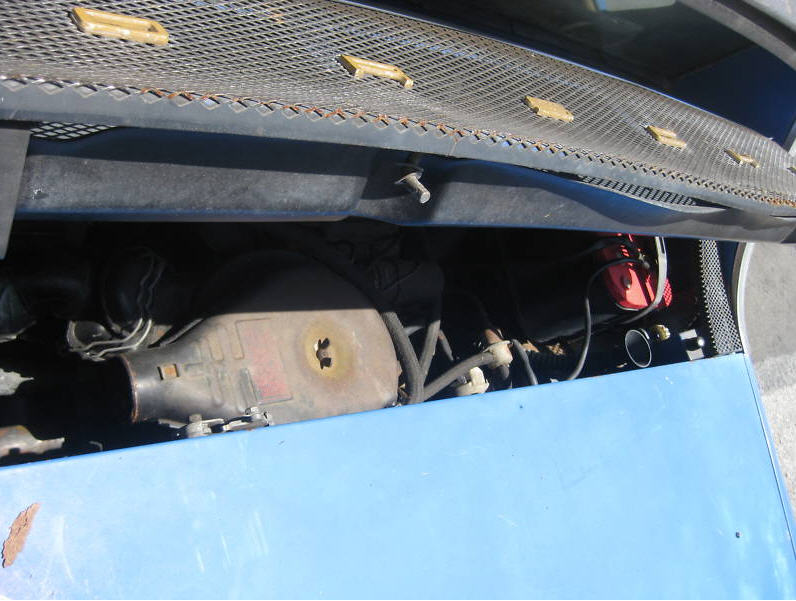
.. speaker holes in the door panels. 
The driver door is nasty-looking. At first I thought someone had hyperextended it reversing into something while it was open, but I think it may have come open rounding a corner, flew open, and got damaged that way. At one point I was thinking just find a door of the same color, and drive her. But of course that was not to be.
The hole right there is the tip of the ice berg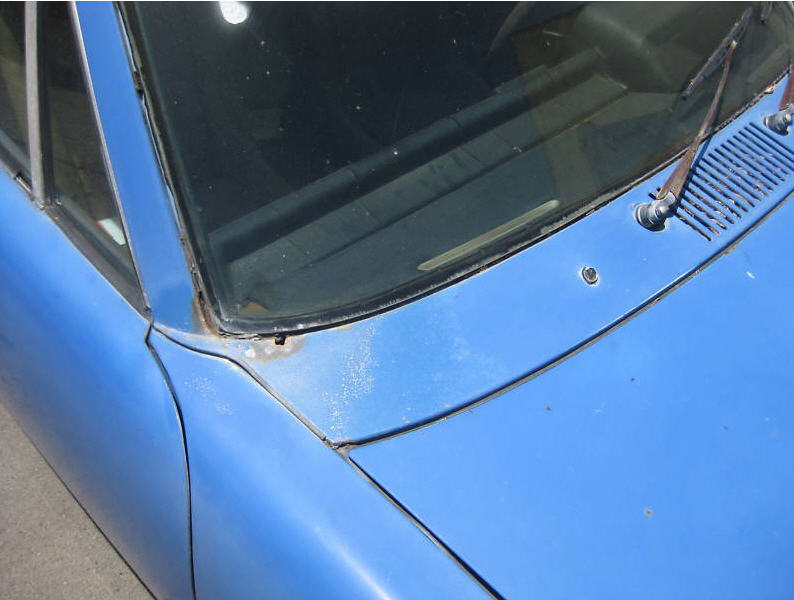
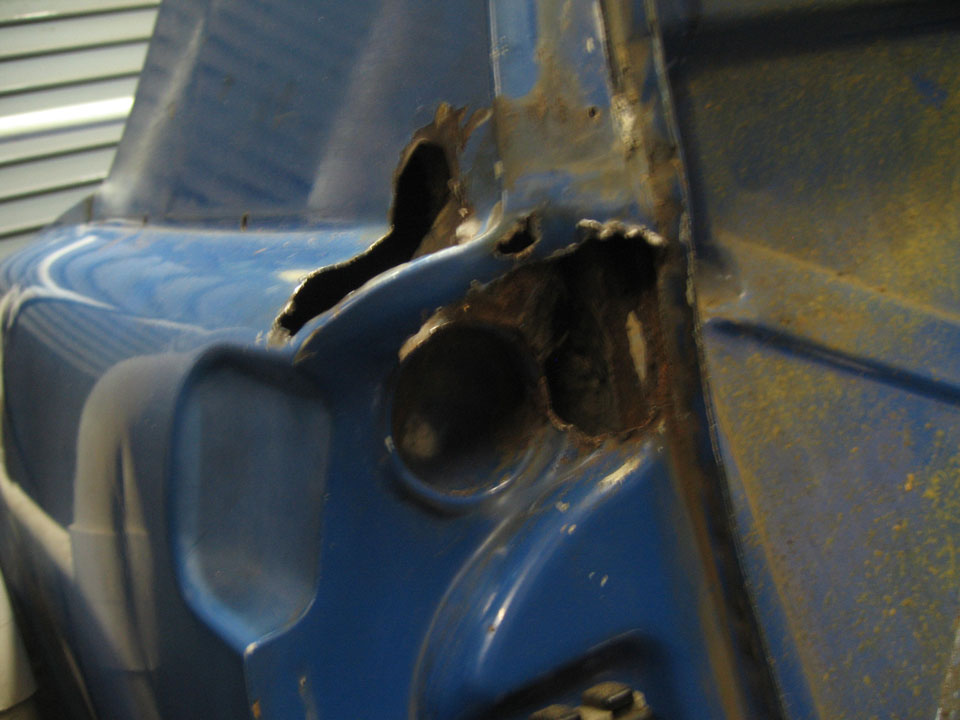
Another iceberg
There was a temporary registration window sticker I found in the car. It's funny it was dated April 19, 200? (the stamped date of the last digit of the year wasn't legible)
I had AAA, but basic gives you only 7 miles of towing. I did not know this. The 53 other miles... 420 dollars it cost to get it back to Laguna.
Posted by: nathansnathan Dec 3 2010, 05:28 PM
I sort of wanted to get it running just to see what was up, but it didn't take long after a compression test came up bad that I tore the engine out.
I constructed a platform on top of my atv jack for this.
I didn't have a camera at that time, so I've just got the pics I had my friend take for hose documentation for that part .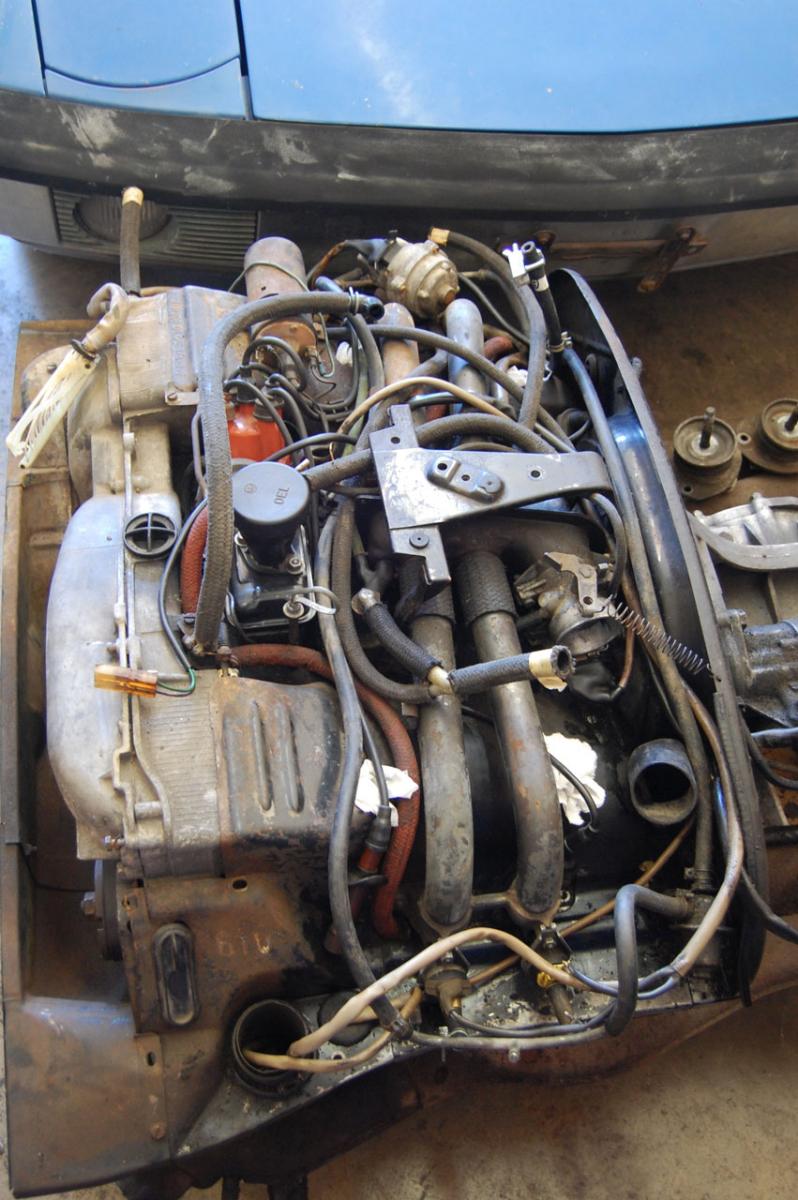
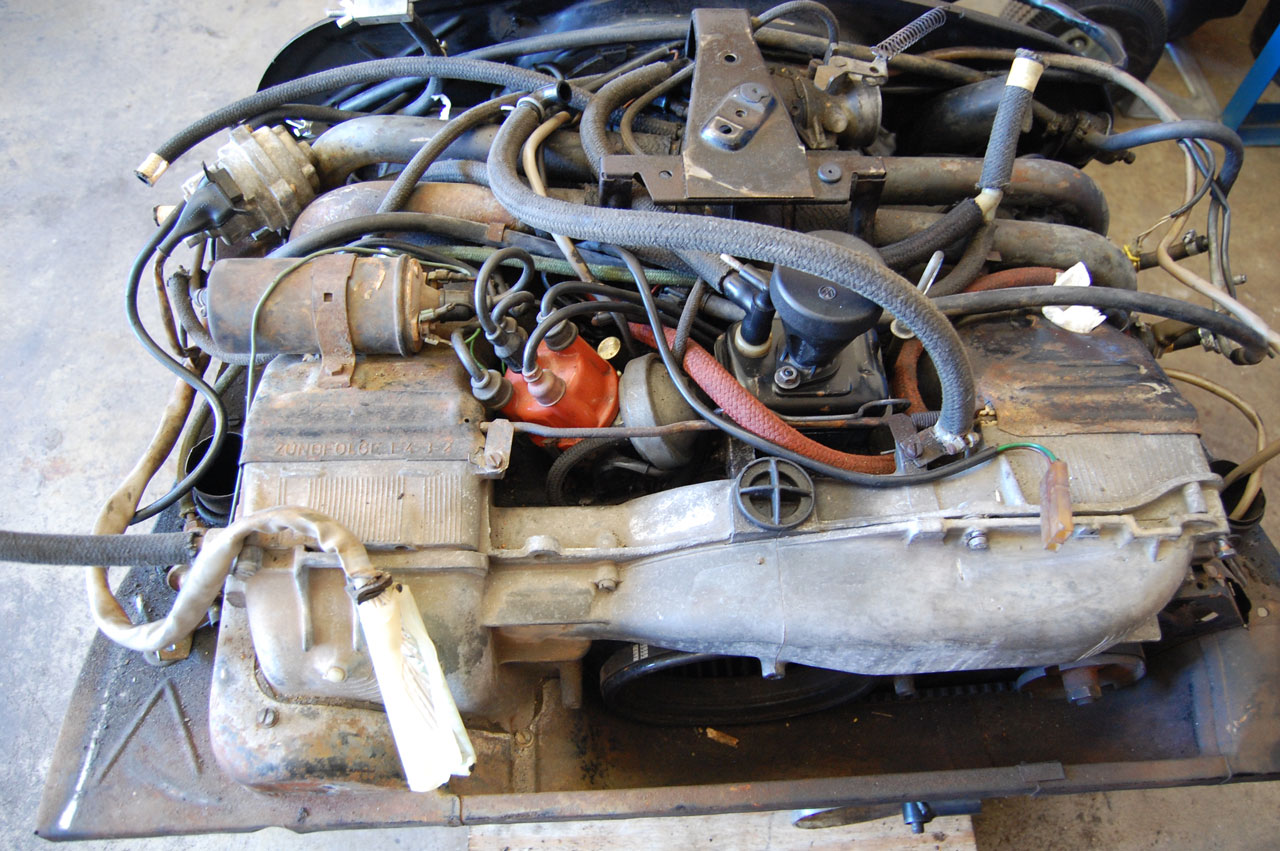
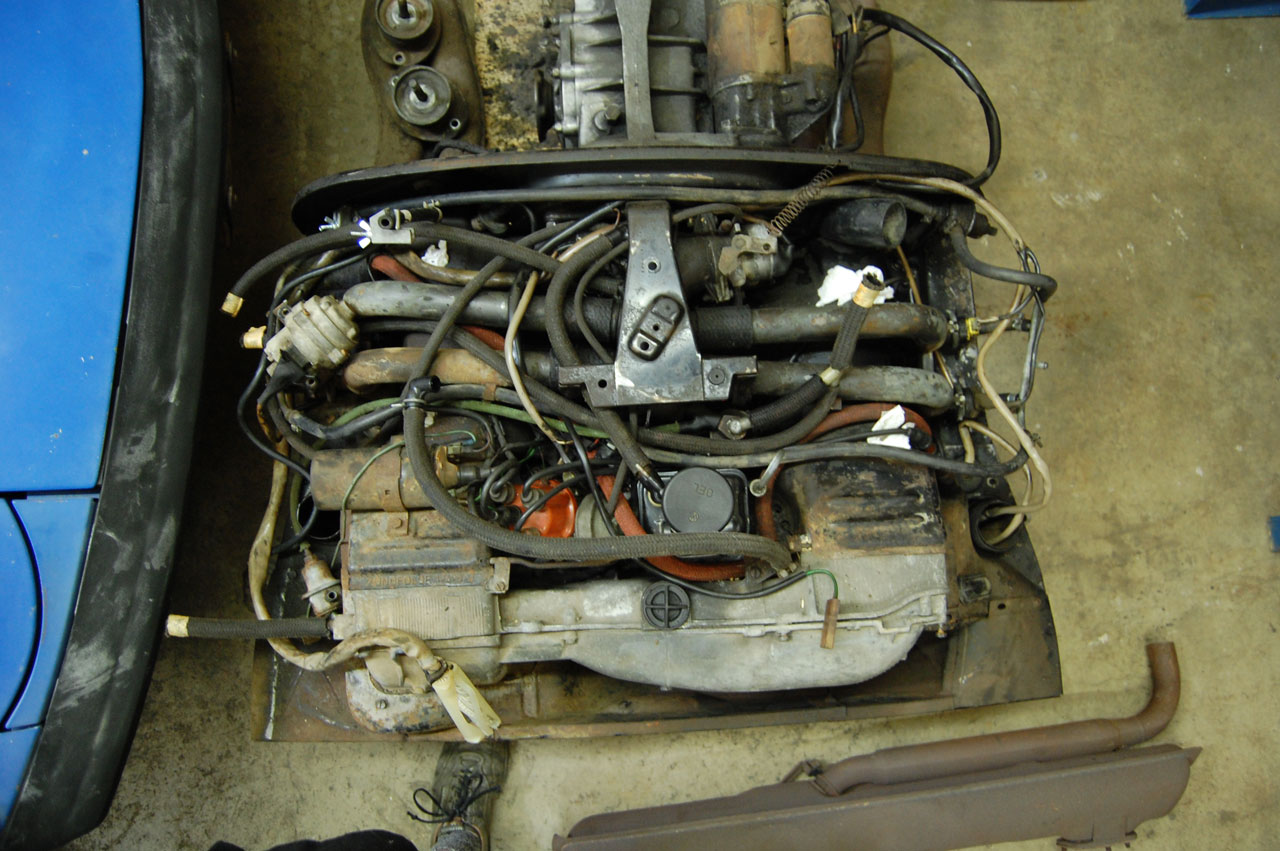
Impressively original hoses and even the routing. The spark plug wires even look vintage. The guy said this was registered as operational up to right before he got it in April. The case has never been split. I wish I could get red and green braided metric vacuum hose new.
Posted by: nathansnathan Dec 3 2010, 05:29 PM
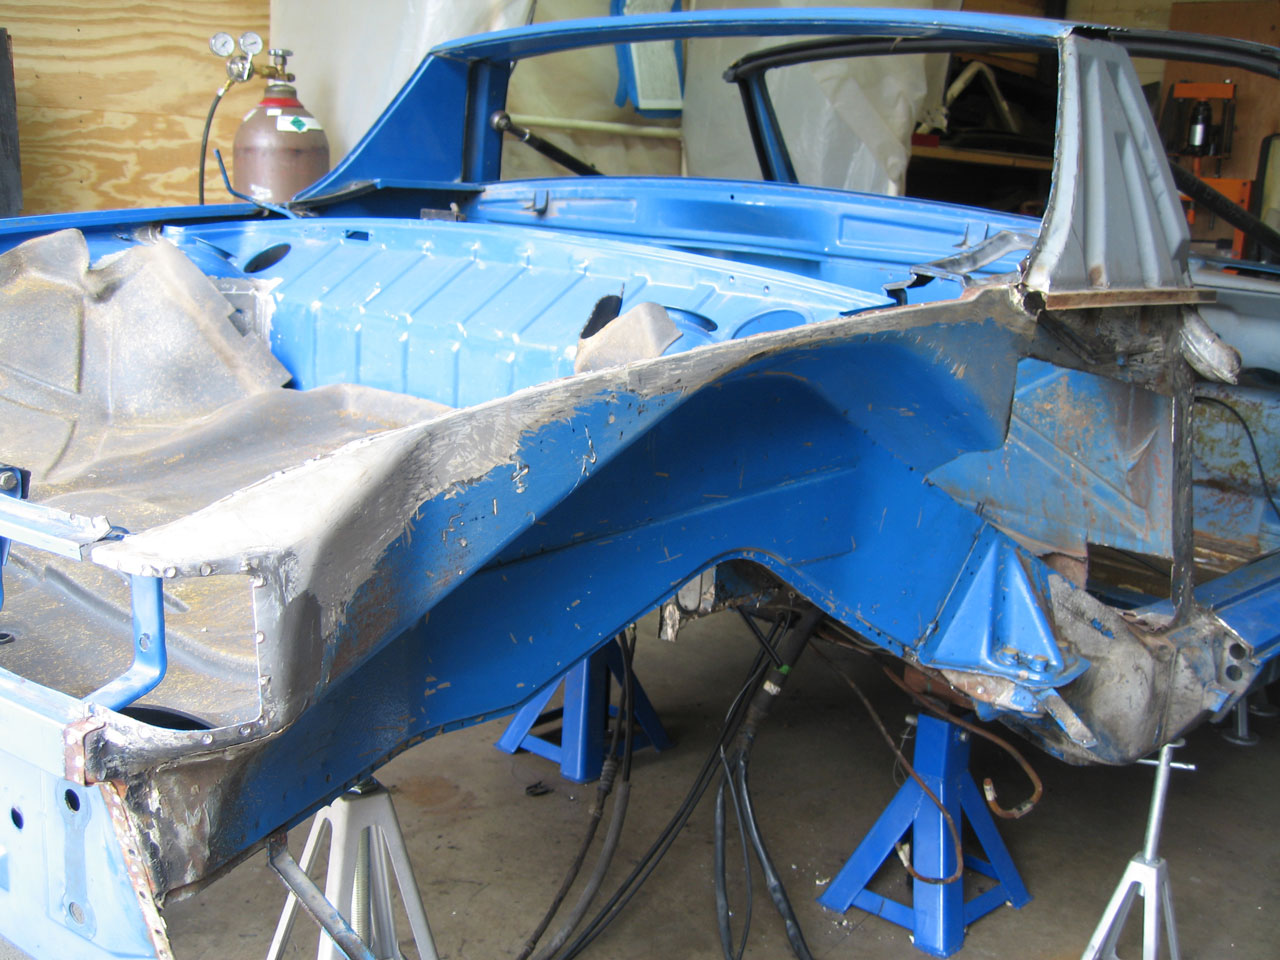
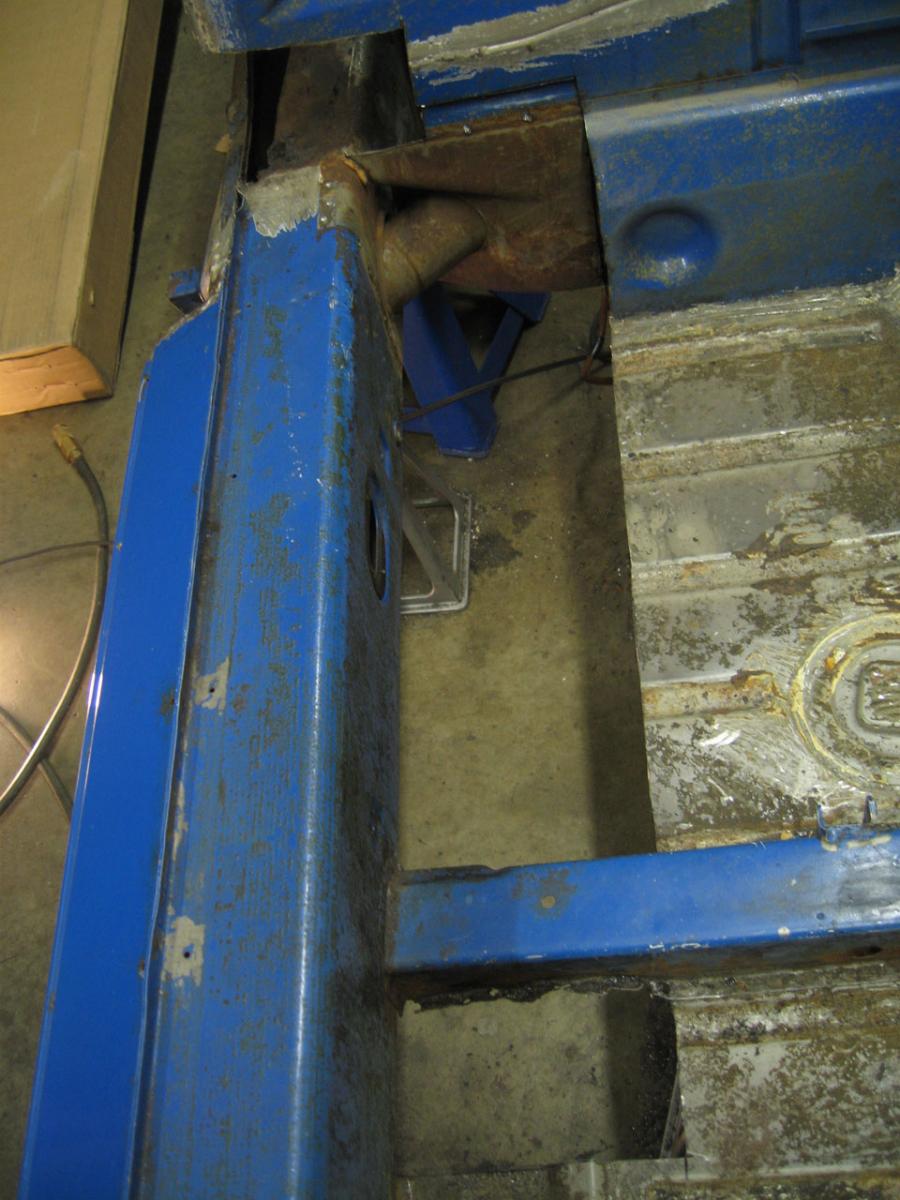
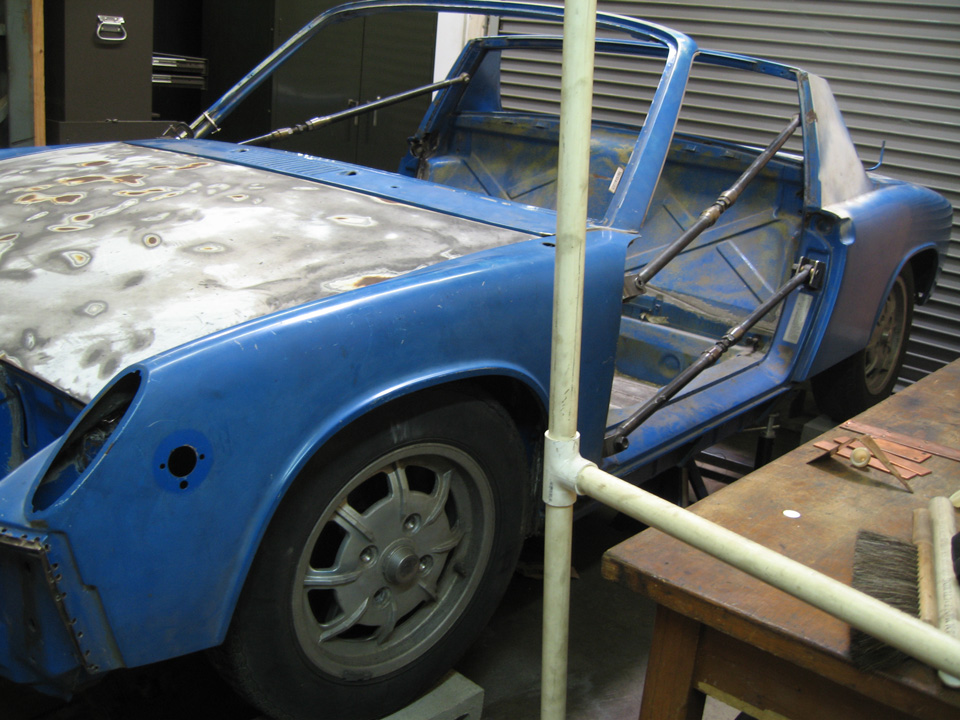
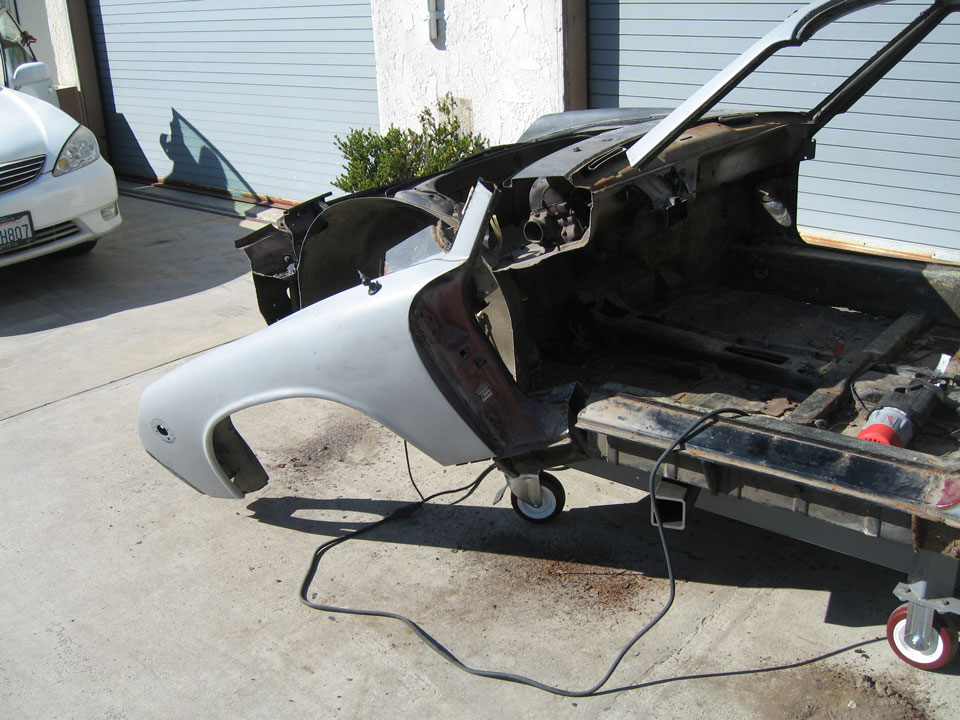
I've been stalling on updating the blog in hopes of giving the impression that I'm moving right along, when in fact I have been a bit stuck on my hell hole. I'm gonna get the metal to brace it at the doors this weekend, I think, put that together next week, and get the major cutting started probably next weekend. 
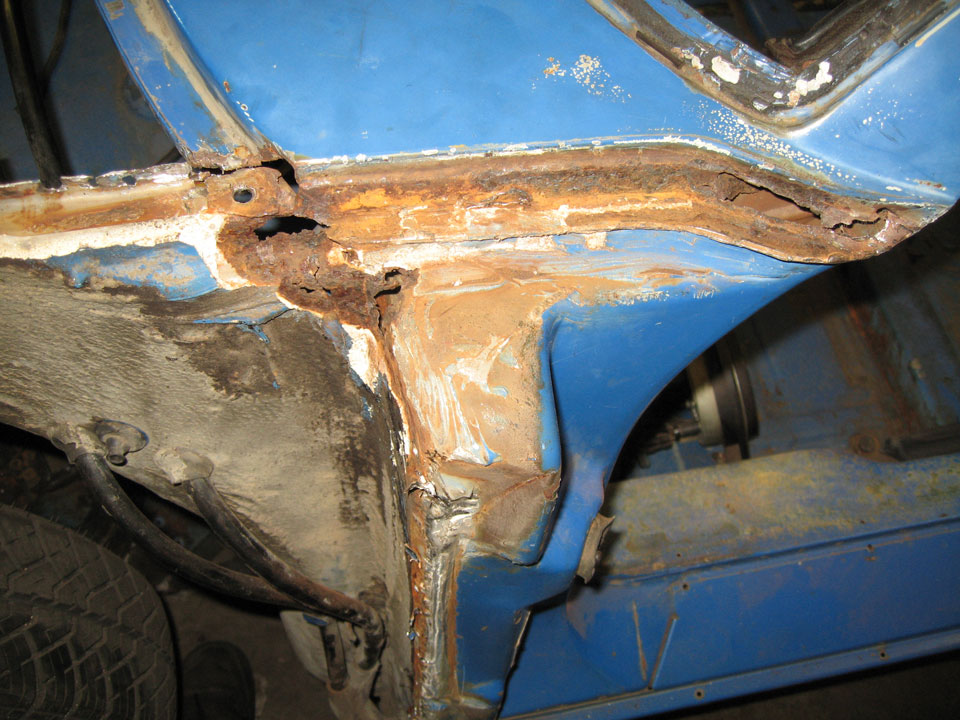
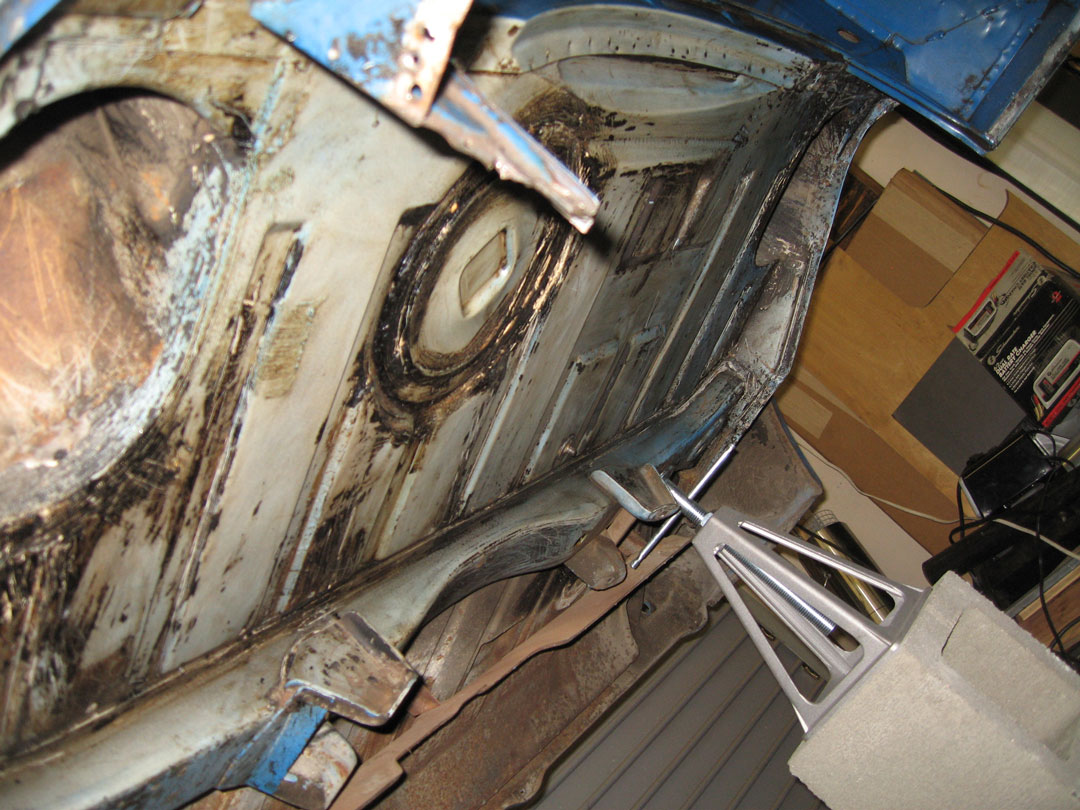
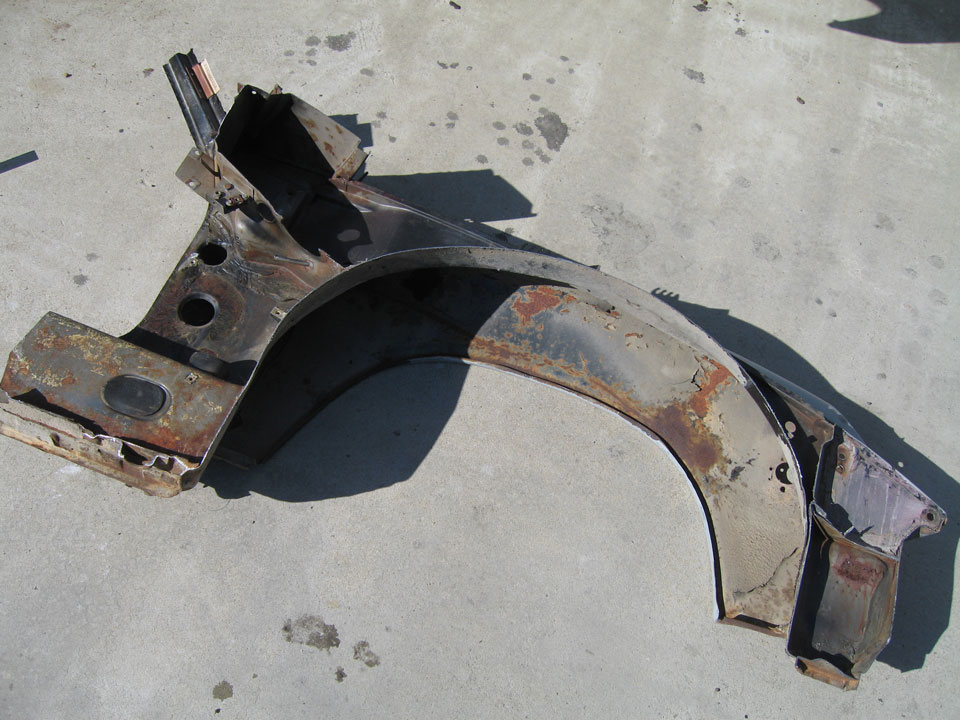
But for now, here's some madness I performed on my rusty-looking cowl/ fender/ door frame.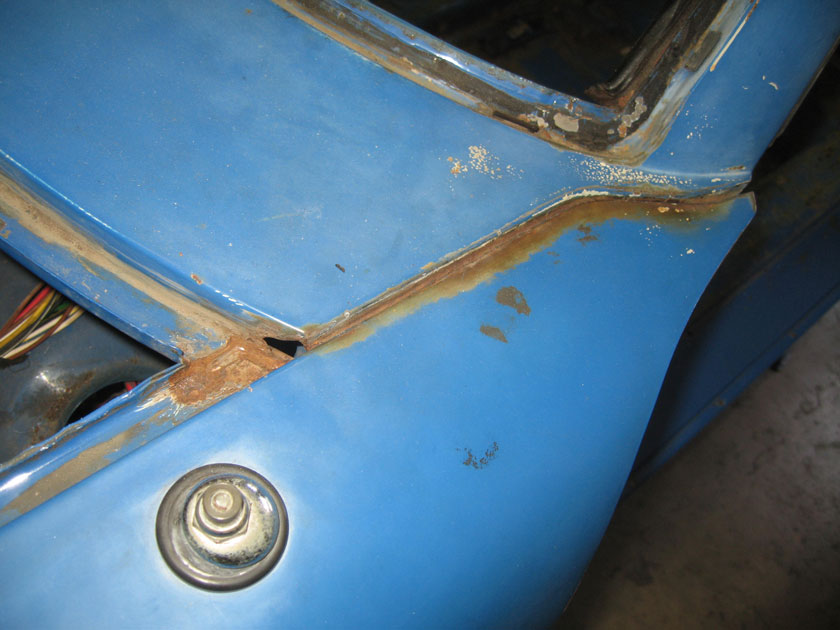
Another shot. This side actually looks better than the passenger side. 
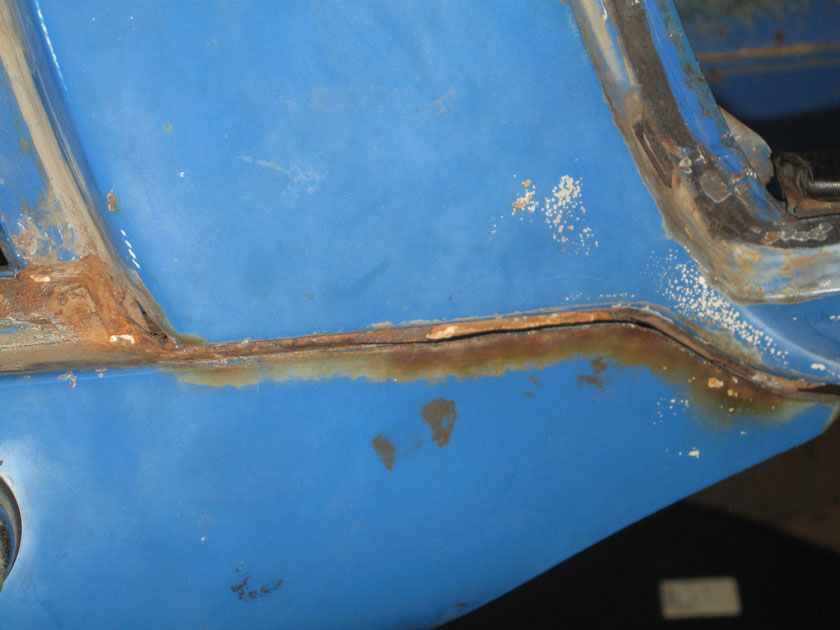
It's gotten below, to the inner fender well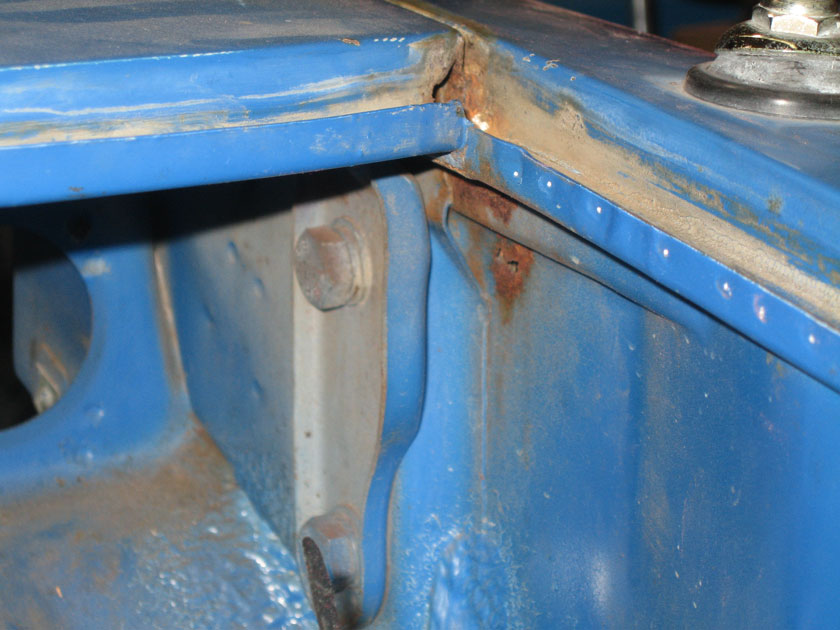
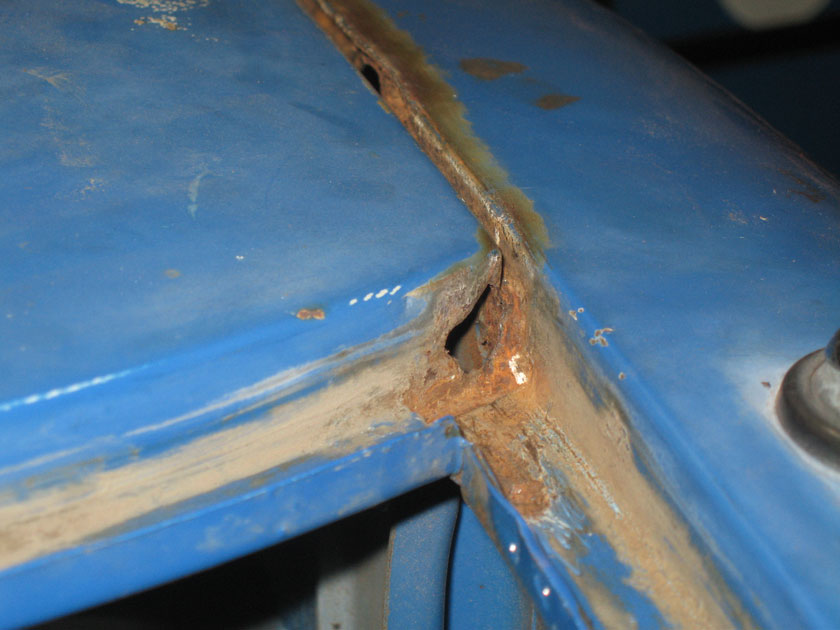
Some nastiness at the corner of the headlight bucket where the front lid seal goes.. Now just how did they expect water to exit from there? 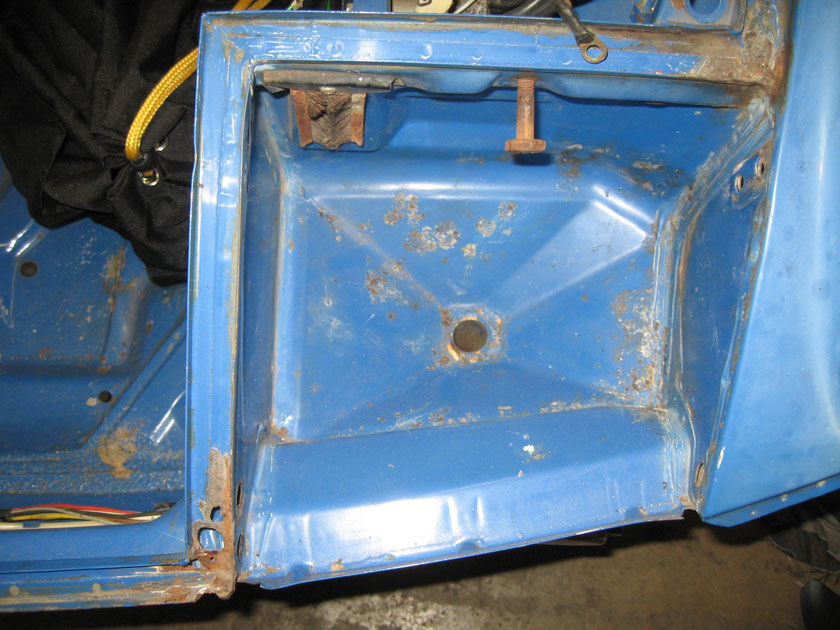
Water made its own way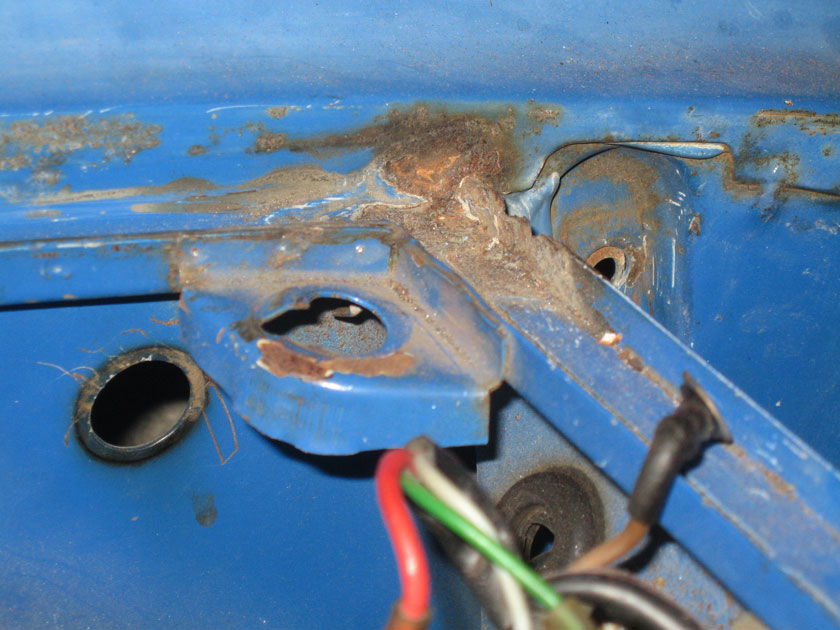
I didn't get shots of this before I scraped out all the sealer, but I can tell you it looked pretty decent hidden by the inches of the white stuff all dressed up in paint. 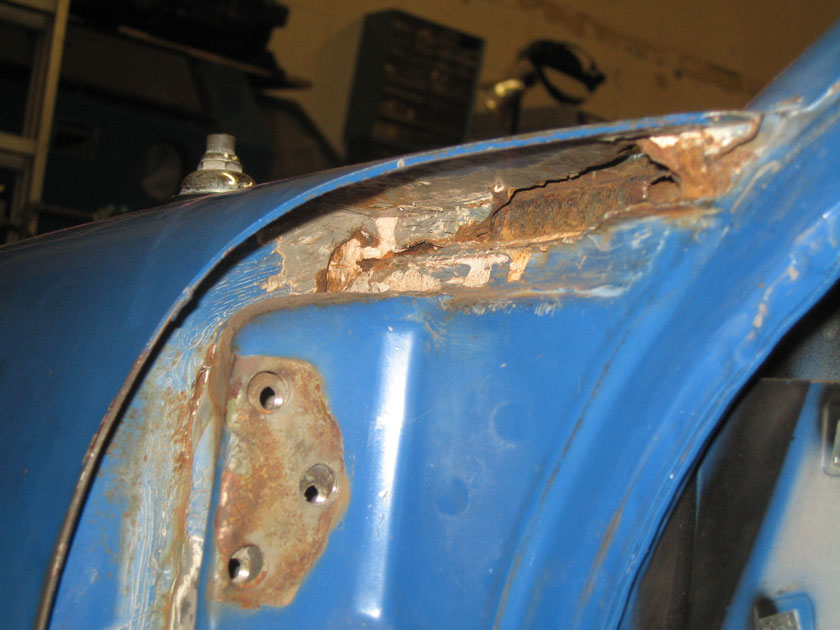
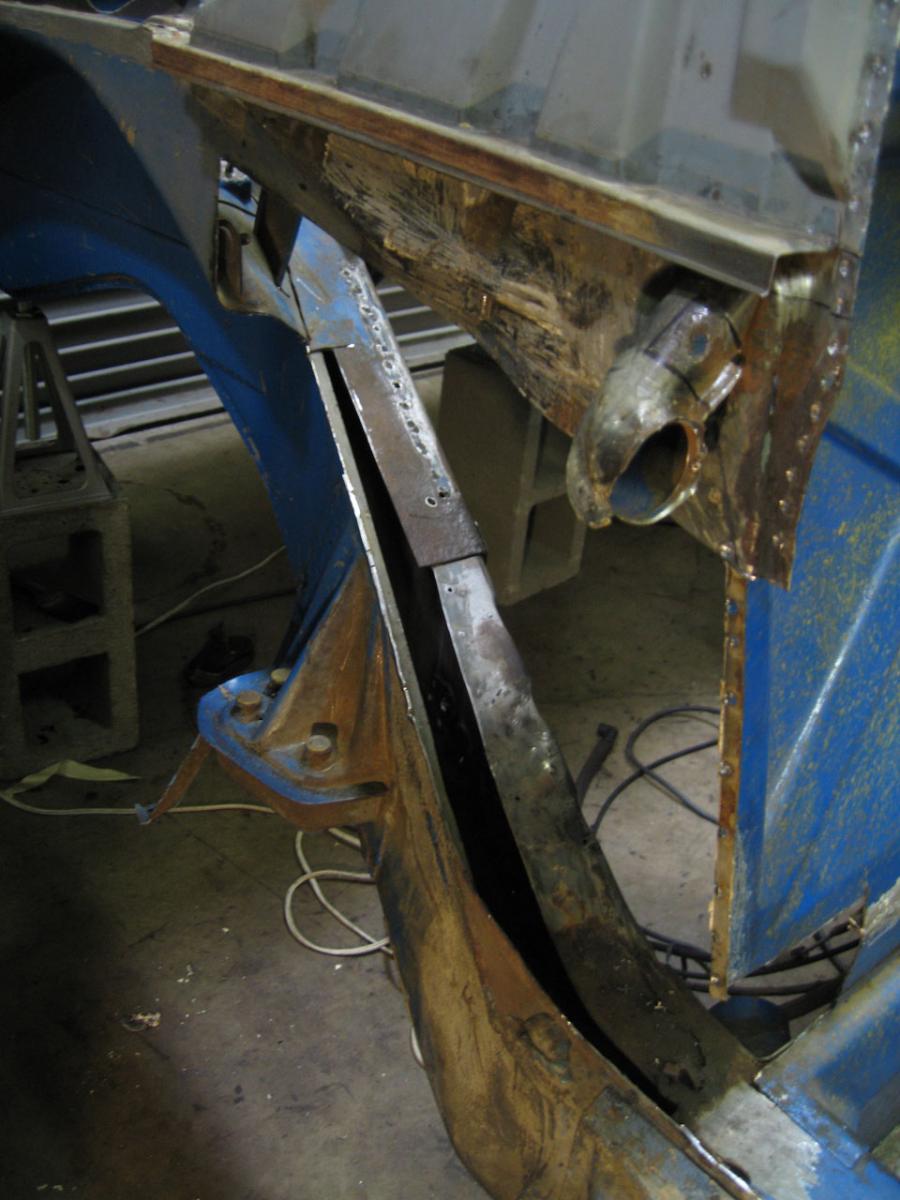
So I contemplated for a few weeks what to do about all that, so many layers all coming together in a rusty mess right there, and both sides to be taken care of. Thought about cutting out just what seemed bad, but the challenge of getting it all back together and the fear of not going deep enough, I opted to remove the entire fender. 

drumroll..... ![hitfan[1].gif](style_emoticons/default/hitfan[1].gif)
They sure put the sealer on thick, about an inch of it there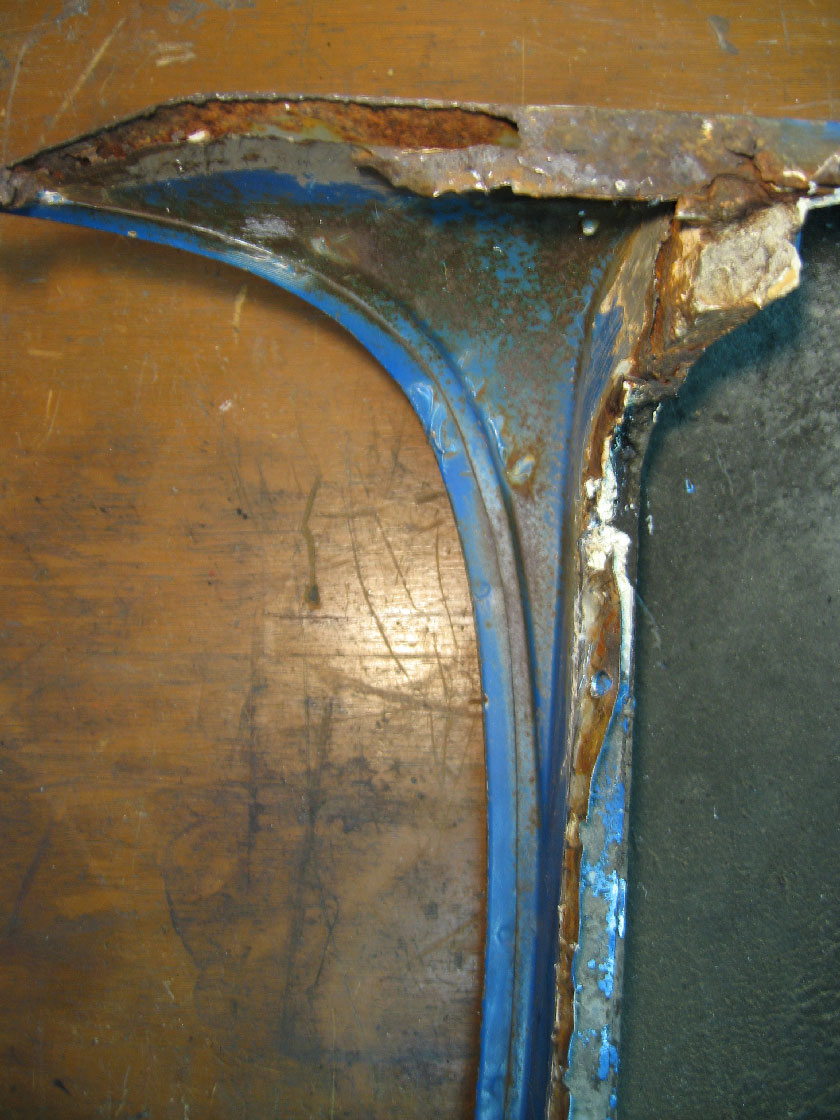
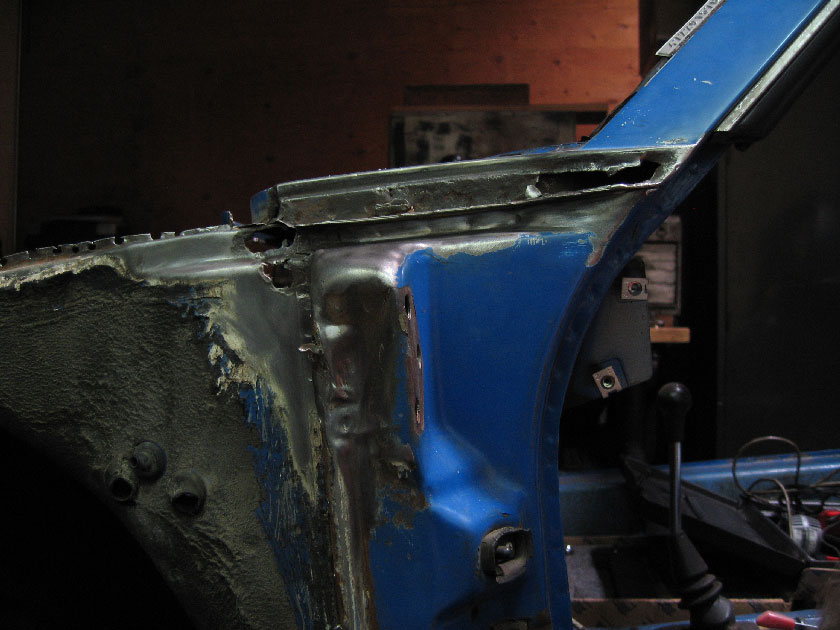
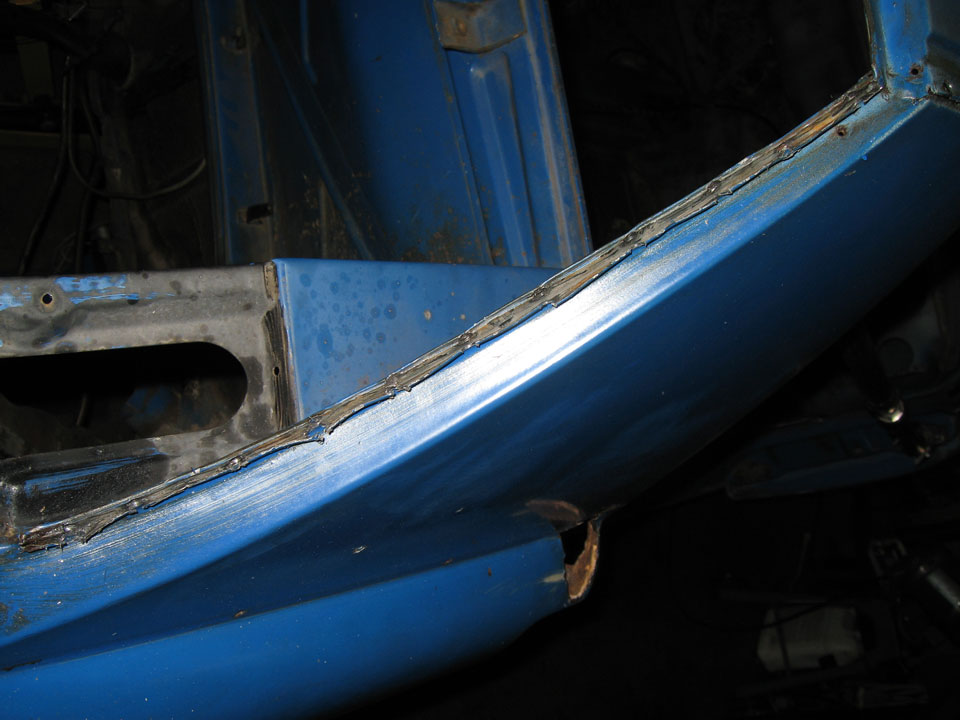
A close up. -not done, of course, but better. You can see what's going on at least without all the rusty rusty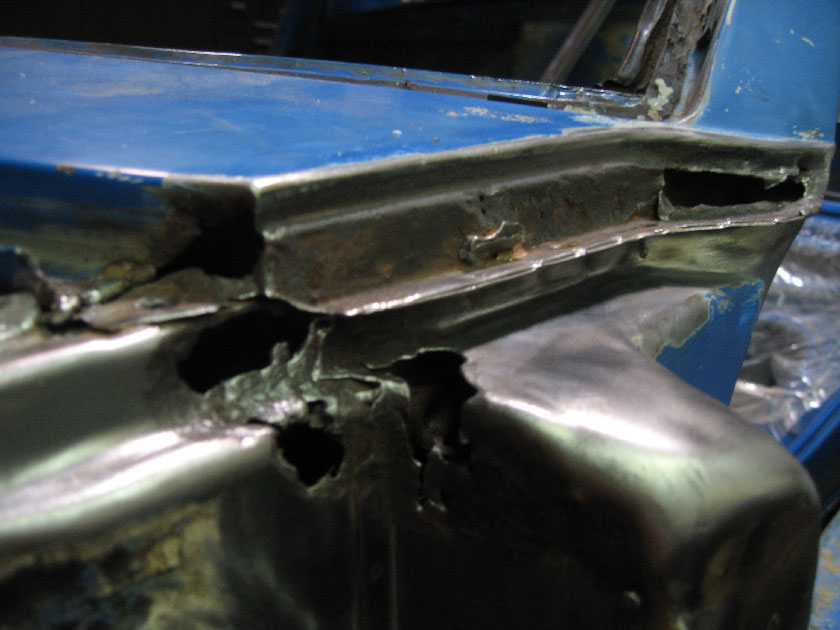
Some of the undercoat removed, some more to go. I straghtened the lip with hammer and dolly.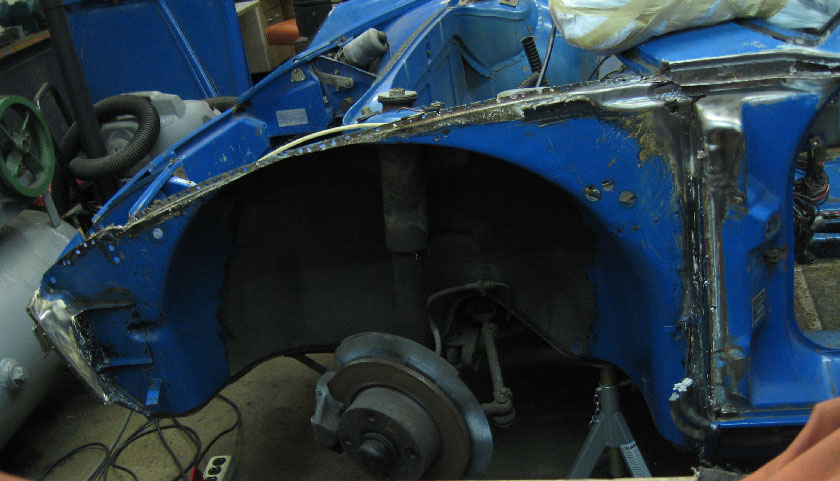
Same for the fender itself :aktion035: 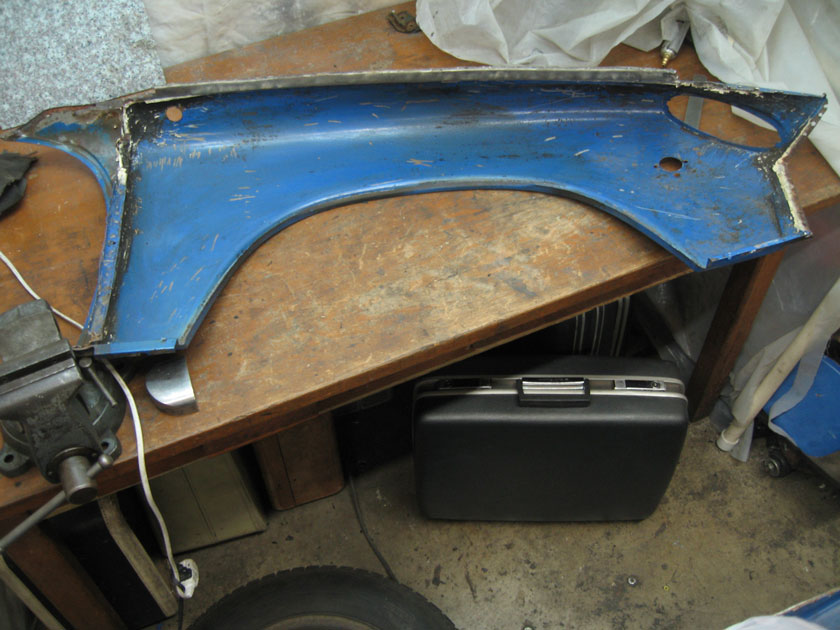
I thought I'd need a right angle drill to get at the spotwelds in the crevice inside the fender to the pillar, but that piece can come off 2 ways; the other not requiring the angle drill is what I went with. Still, quite the struggle.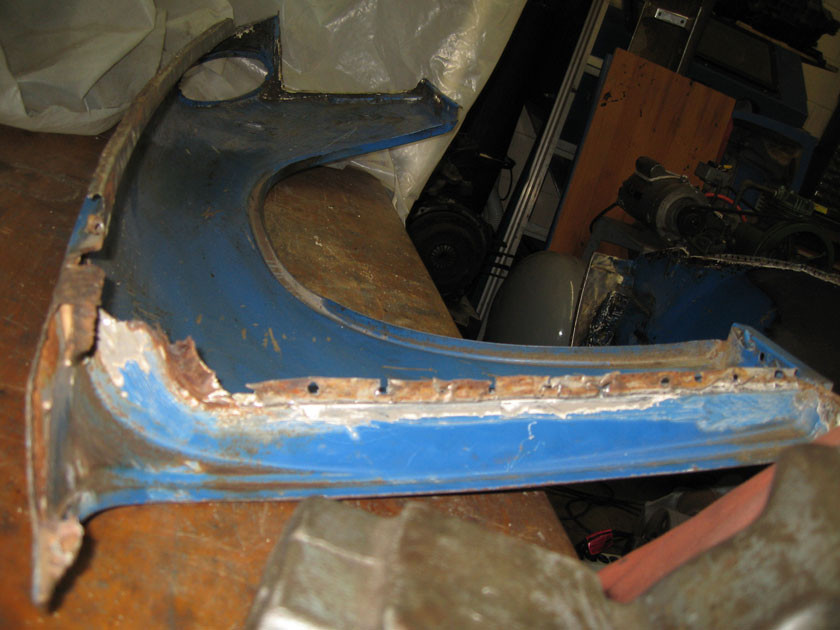
Posted by: nathansnathan Dec 3 2010, 05:35 PM
I woke up at 4:30 in the morning to go to the 914 swap meet in Riverside.
It was awesome. I met a lot of cool people, saw a lot of really cool 914's, and got a lot of smokin' deals on some parts. B)
2 brand new 1.7 fuel injectors, a free almost perfect early driver door that is somehow strangely tweaked out at the bottom. Hopefully I can figure out how to fix that. Perfect lower dash pad, also free, white headlight surround. New German aluminum windshield surround (minus the bottom piece, but what can you do for...), perfect right side front turn signal lens
2 front turn signal bases along with hardware for the rear deck lid, the little plastic covers for the screws all in the cabin, the little stainless trim the targa top sits on on the rollbar (1 side only, perfect), and also the aluminum piece that holds the rubber in back of the door. A less-blemished rear passenger tail lens, uncracked relay board cover, good fuel pressure regulator and a bunch of very misc parts, 2 used mahle pistons and cylinders.
I've been looking for one of these for years, both parts of the taco plate and the original oil temperature sender.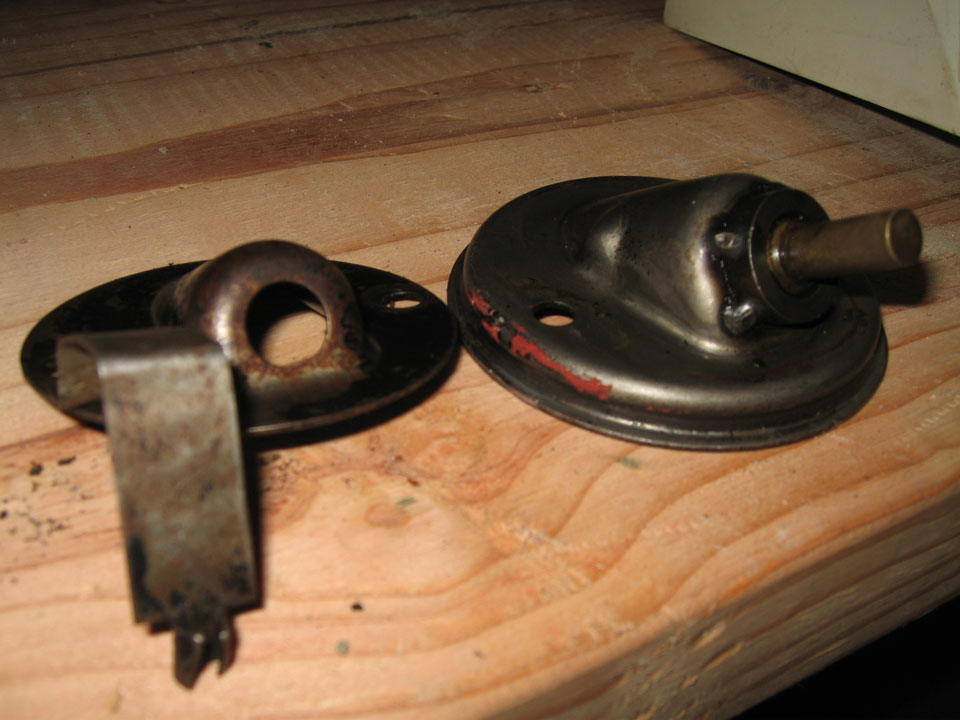
Some cool rides, it was sort of unreeal to see them actually moving as they drove before me through the parking lot to their places, instead of just sitting on jackstands like mine does.
Posted by: nathansnathan Dec 3 2010, 05:37 PM
So first things first, like many-a-914, put her up on jack stands.
I had a bit of a mental dilemma about it initially. I had a dream where the car was up on my dad's lift back in Buffalo. My (now ex) girlfriend was under there with me, like bracing it. She was using this screw jack thing. She's like, "all set!" and I look back to my horror that she's suspended the car from the anti-sway bar (I don't have an anti-sway bar). I'm like, "get out from under there!", but before there was any time to for anything, the car came down right on top of her. Somehow I got He-man strength in this part of the dream and was able to fairly easily lift/ throw the car right off her, but it was too late. Totally fucking traumatizing, I can assure you, holding your crushed (ex) girlfriend's lifeless body in your arms.
This was the day after the leveling stands came in the mail and a day before the flat tops came.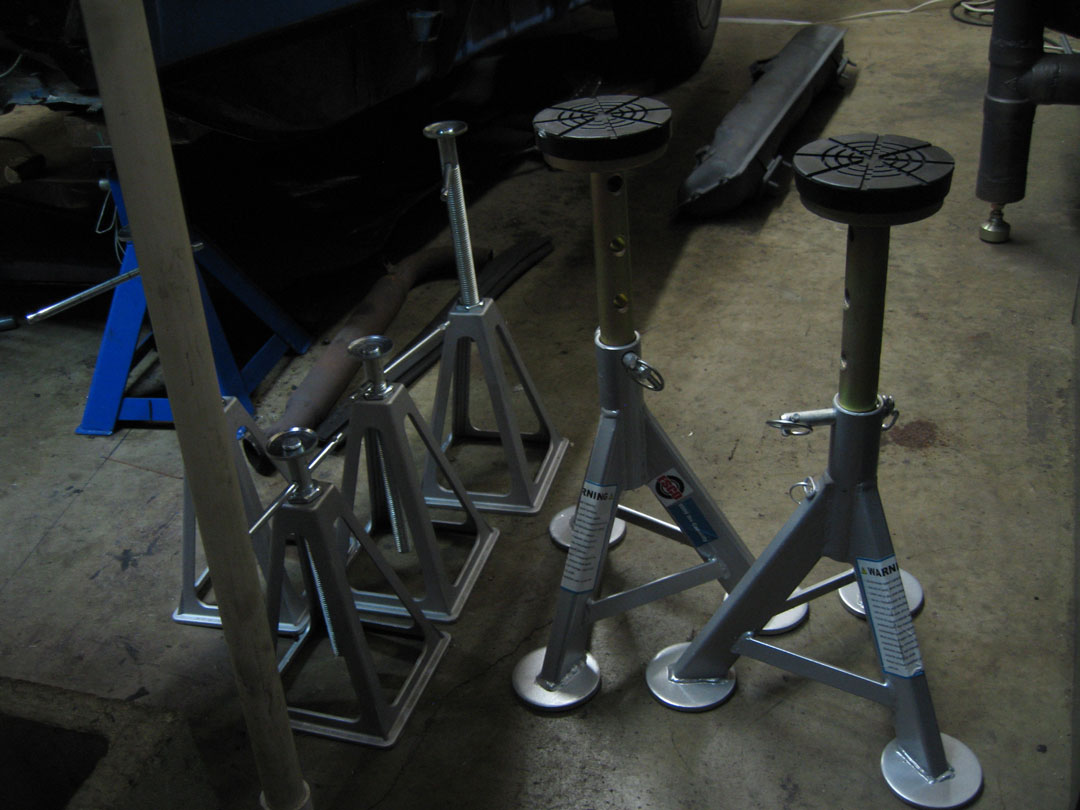
The sticker on the side of those pretty much invalidates the whole premise of a flat top jack stand. What it says is, in rather uncertain terms, not to lift up both ends of a car at the same time. So, if you're lifting one end only, pretty much everything flat on the bottom of the car would be at some angle, only the very corner of the pad would be supporting anything, and the whole stand would seemingly want to fall over I should think. The very reason I got them was with this end in mind, to get the whole thing up. It took me like days of pondering and forum posts and research to get over the dream and do the deed.
It turns out that pretty much any jack stand on the market has this same lame disclosure:
http://www.norcoind.com/norco/downloads/manuals/JackStand_Manual.pdf
Although jack stands are individually rated, they are to be used in a matched pair to support one end of a vehicle only. Stands are not to be used to simultaneously support both ends or one side of a vehicle. :bs: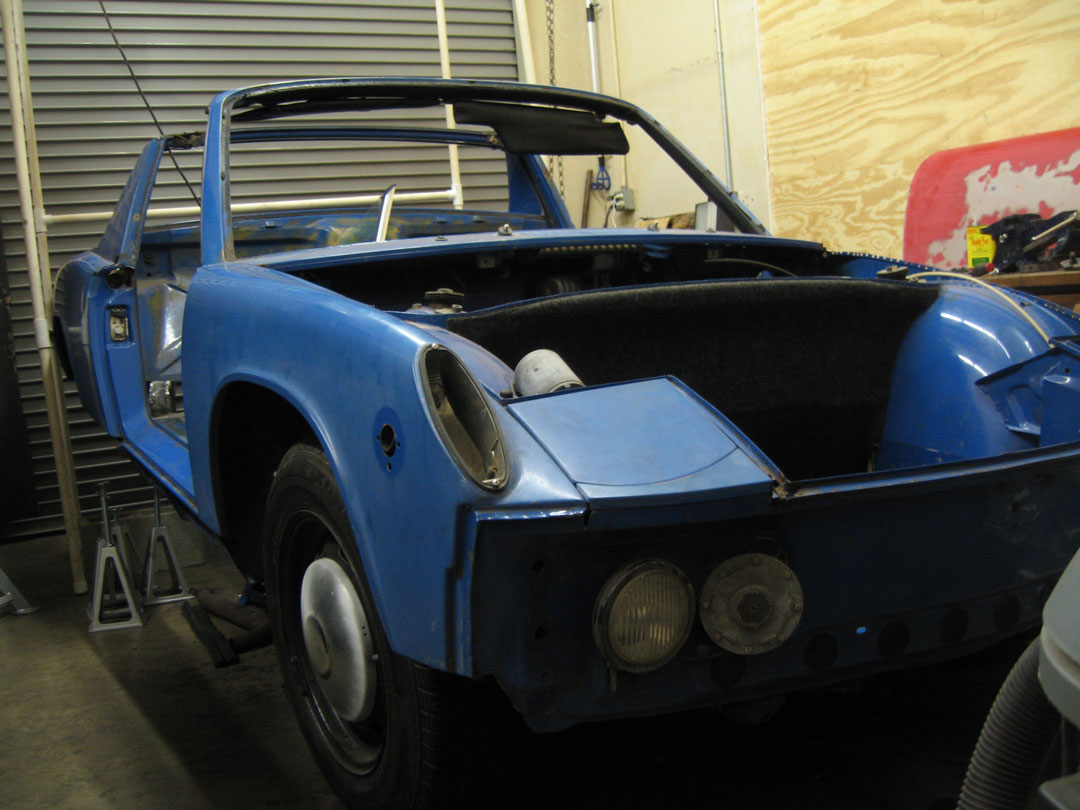
The flat ones are in front; I had this set previously. Funny that they are color matched to the car. 
First here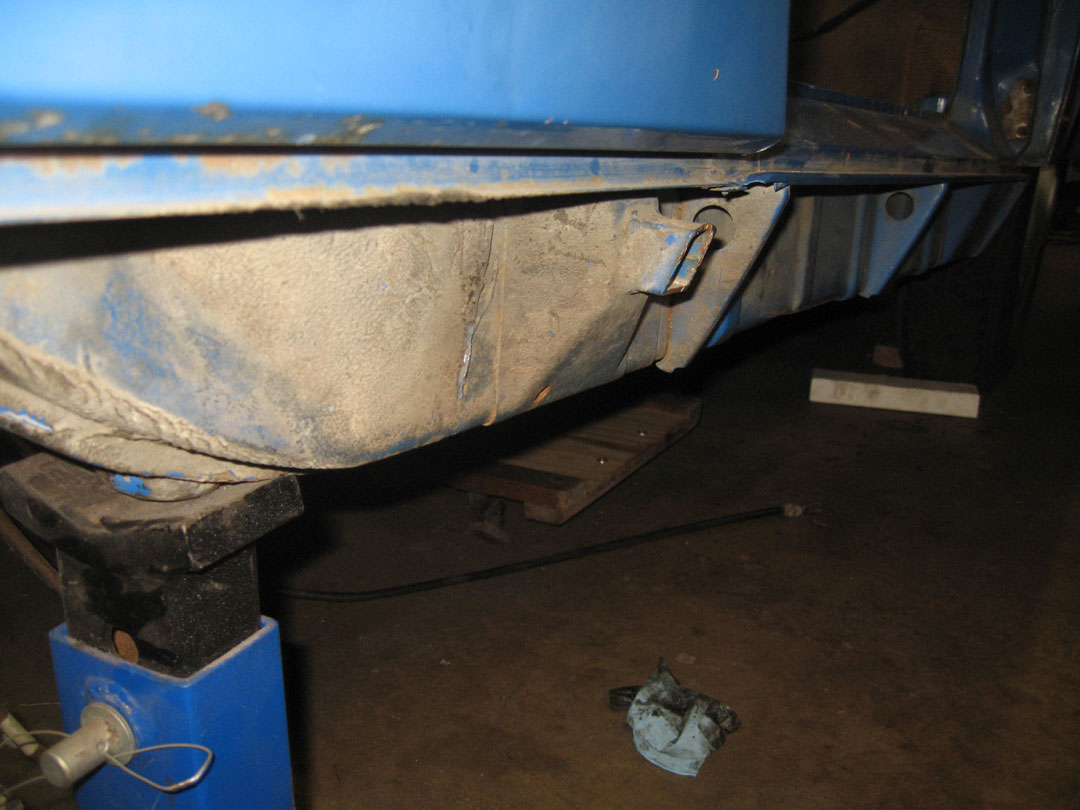
and then here when I got the jack point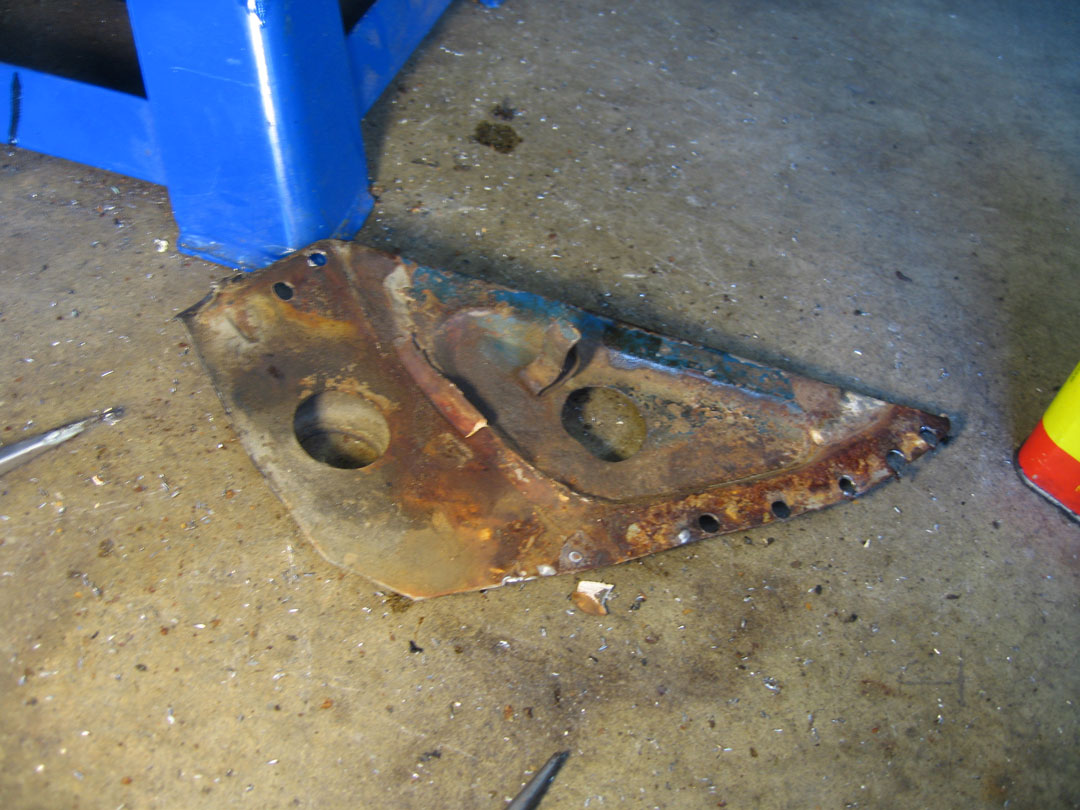
off
Posted by: nathansnathan Dec 3 2010, 05:40 PM
Unbelievable how much undercoat was used at the factory on these cars. My bus isn't built like that, thank god! What where they thinking? -probably about sound dampening.
I read that the cars delivered to Porsche for completion as 6's, the sealer was applied a lot less liberally and by hand. I'm planning on using a brush on epoxy seam sealer more like a 6. Forget this gobs of bumpy white rubbery crap. With it being softer than the paint on top of it, there's no wonder there are so many problems.
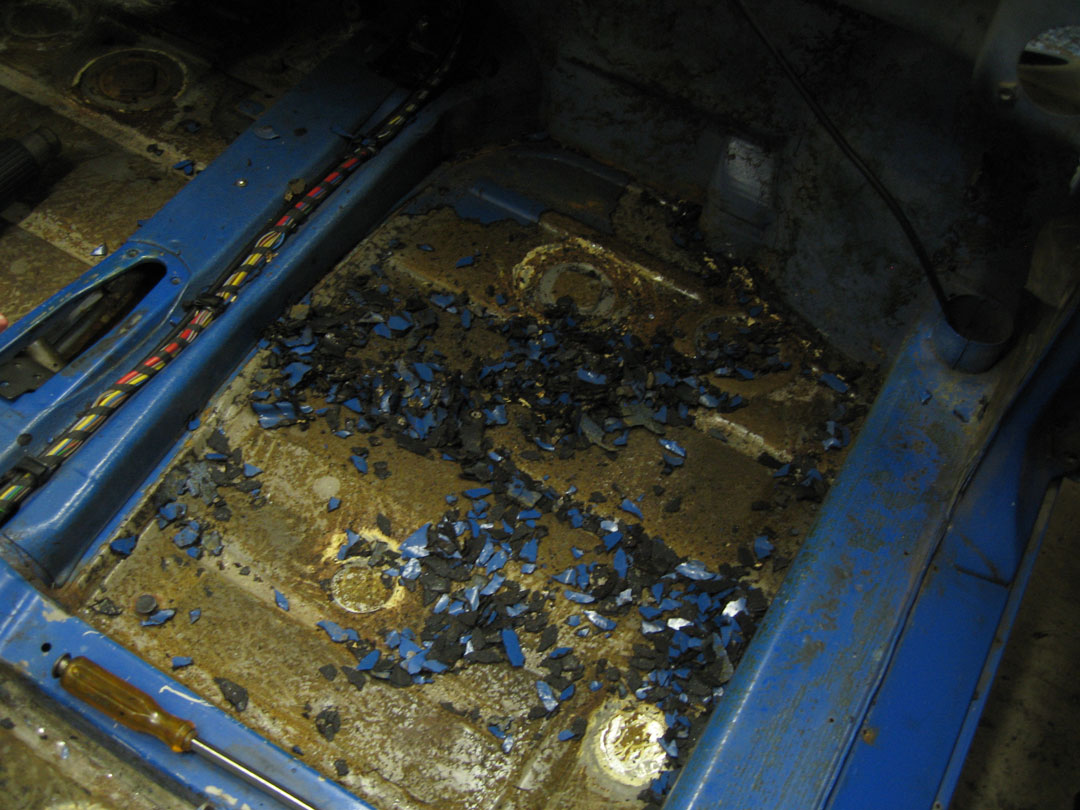
The slightest penetration, the tiniest breach in the paint shell, sometimes unnoticeable on the surface even, would create a sort of spider of rust radiating out from it underneath. I'm scraping it ALL off, me my heat gun and my big dull screwdriver
I don't have a pic of what the rear trunk originally looked like, a bit of surface rust at the back. Here's a pic of it after the initial scraping (quite conservative compared to stage 2  ) The trunk did not come with this pristine pair of ssi heater boxes, unfortunately, I had to put them in there. :-) I don't seem to have a more relevant picture of pre stage 2 for some reason.
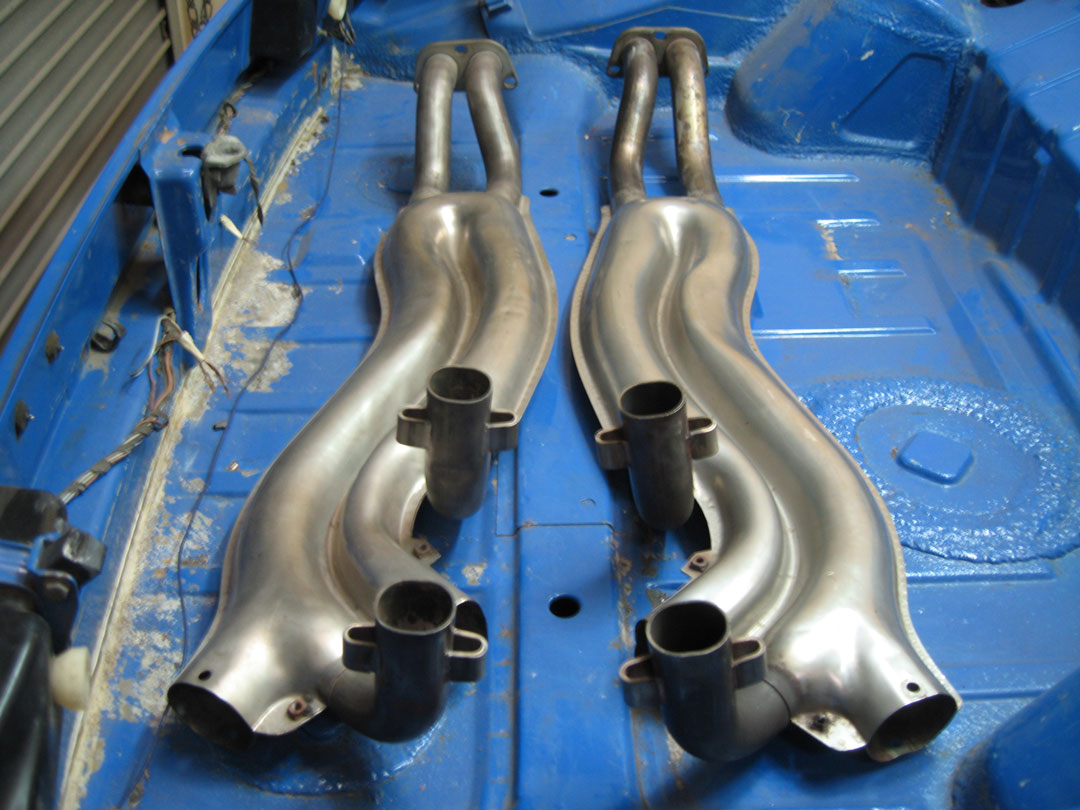
-They're hard not to look at aren't they? 
This took me awhile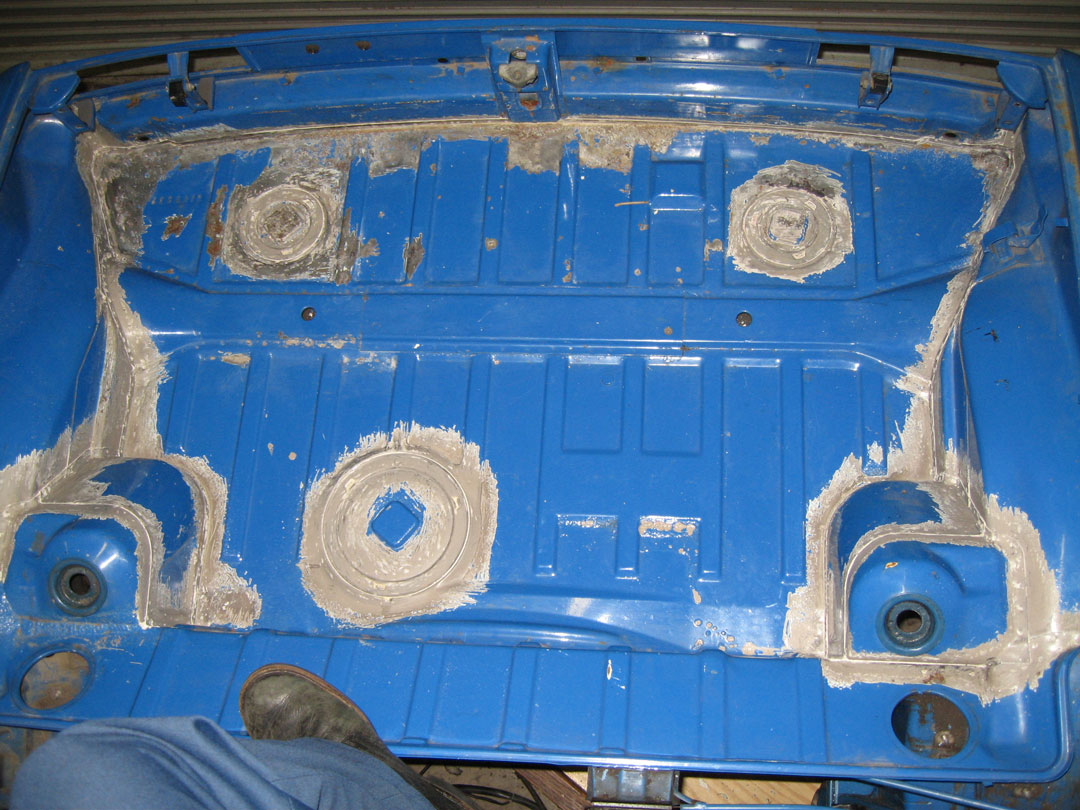
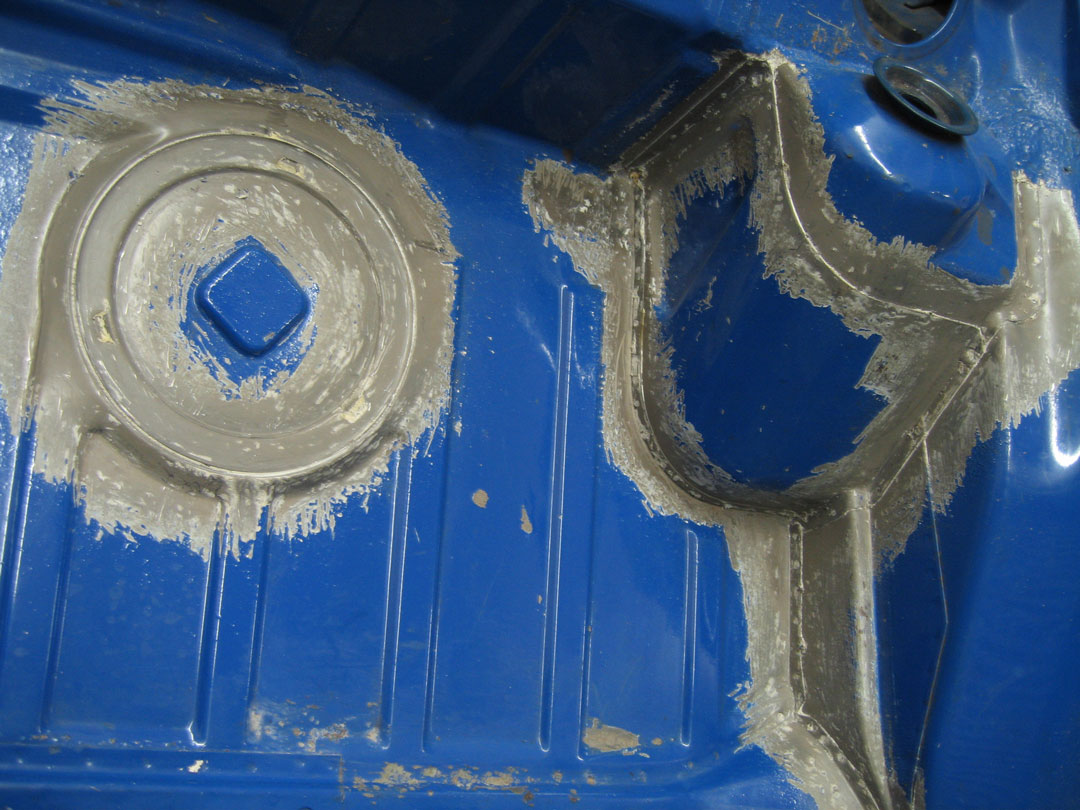
The thick-ass tar on the floor of the interior may have taken longer even. I got a few blisters getting that shite out. Here's before: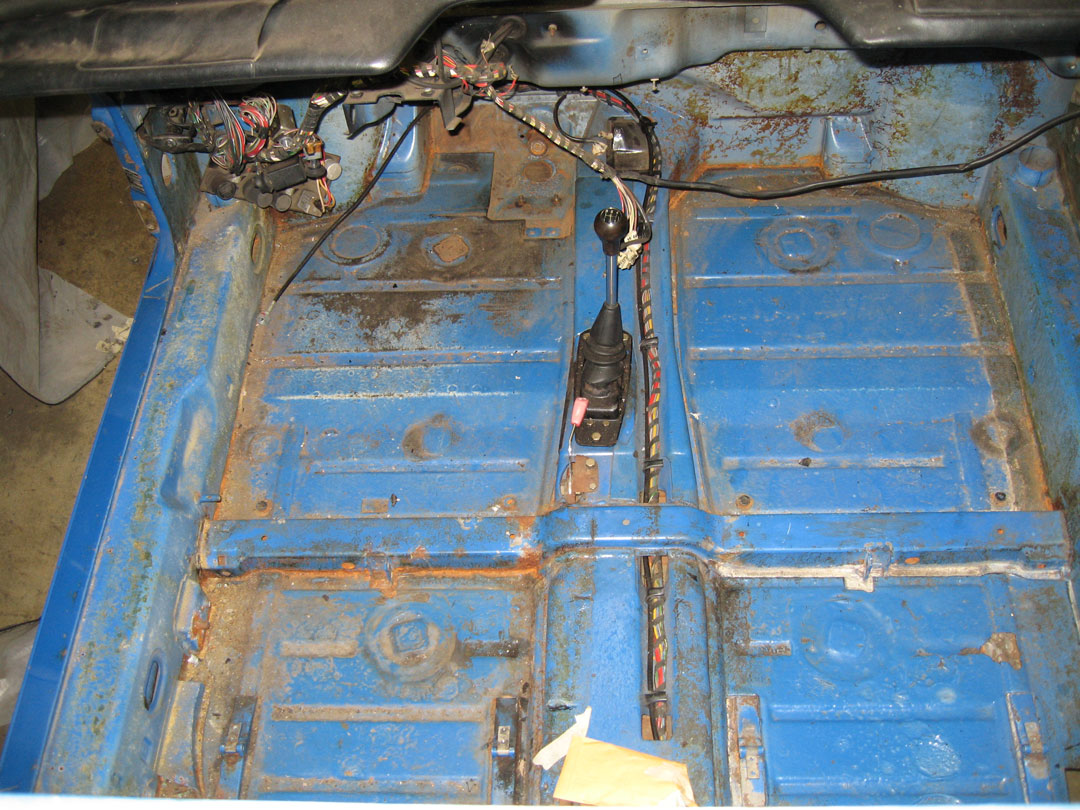
and after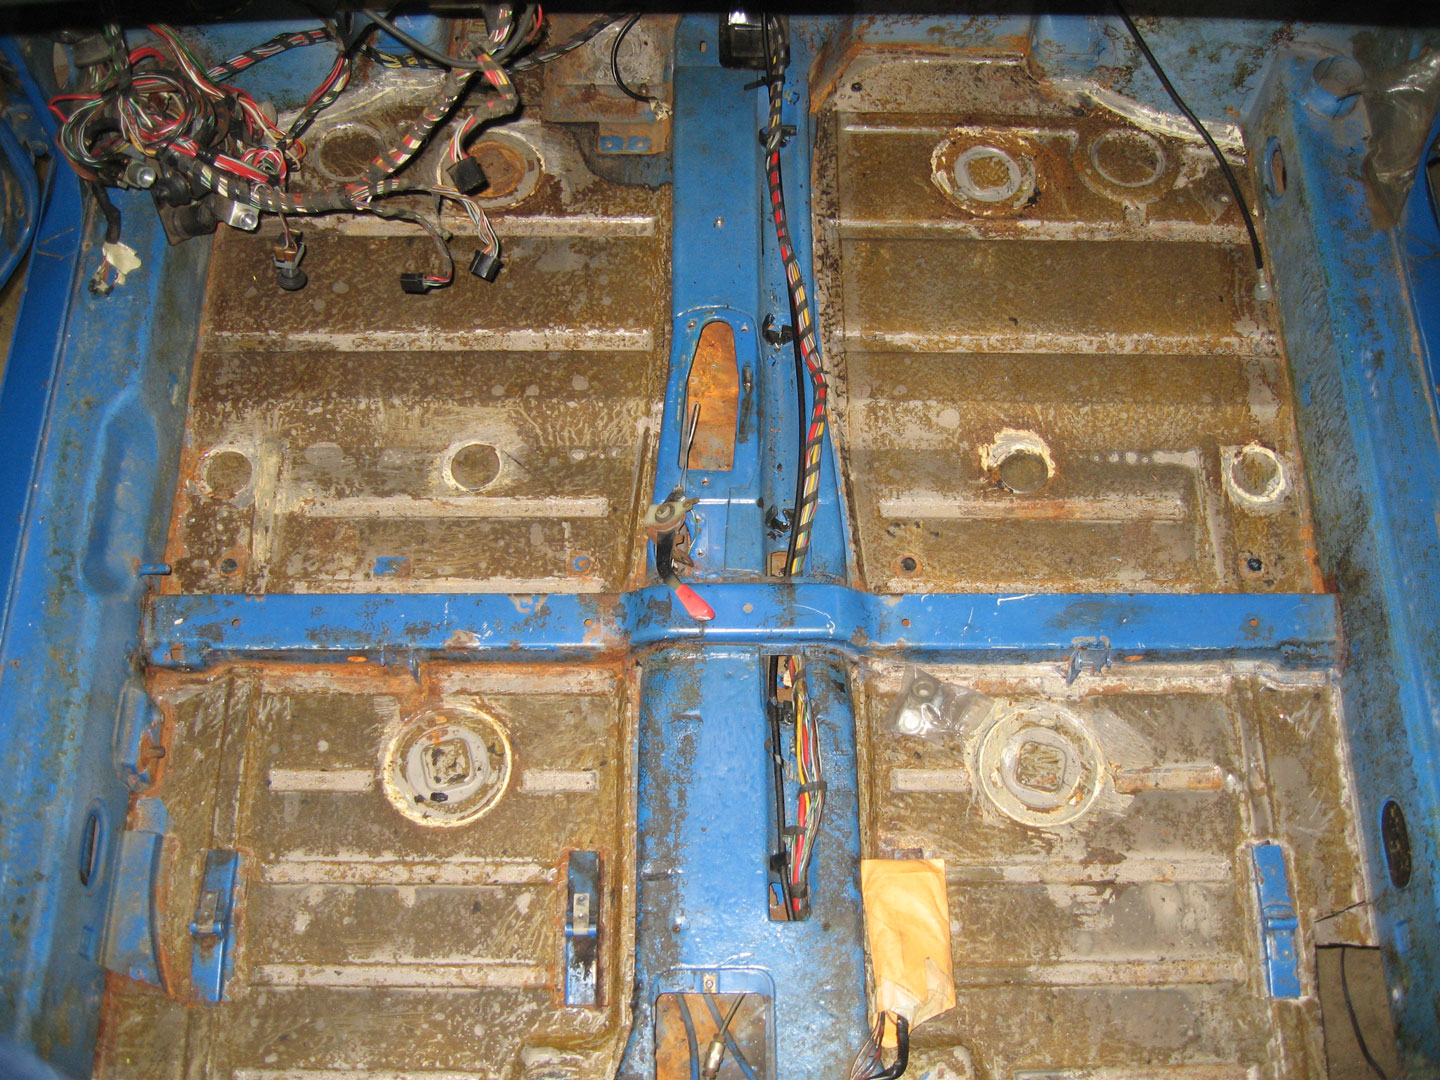
That's the weapon of choice right there, Made in Taiwan.  It is full-tang though. It got so intense, the scrapin' scrapin' scrapin' that the tang started to slide in the handle, pushing the impact plate out the back of it periodically. -Still the weapon of choice though, the tip has been through so much scraping
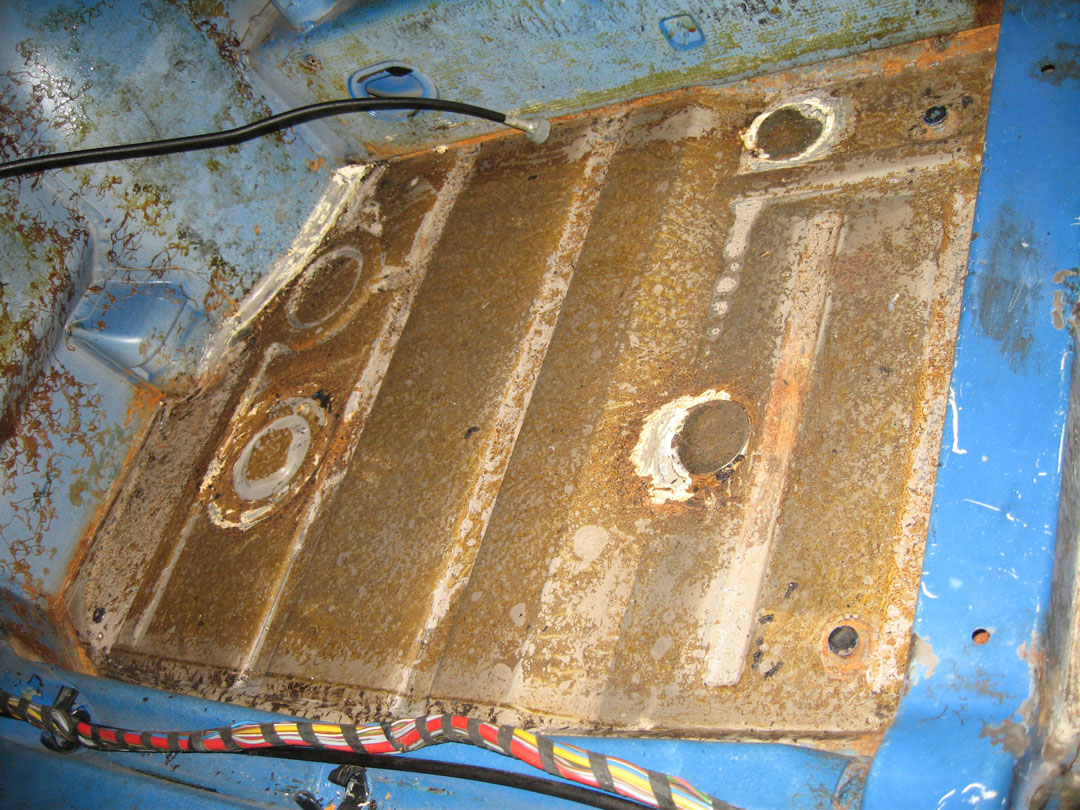
it'll take of undercoat without (barely) damaging the paint beneath.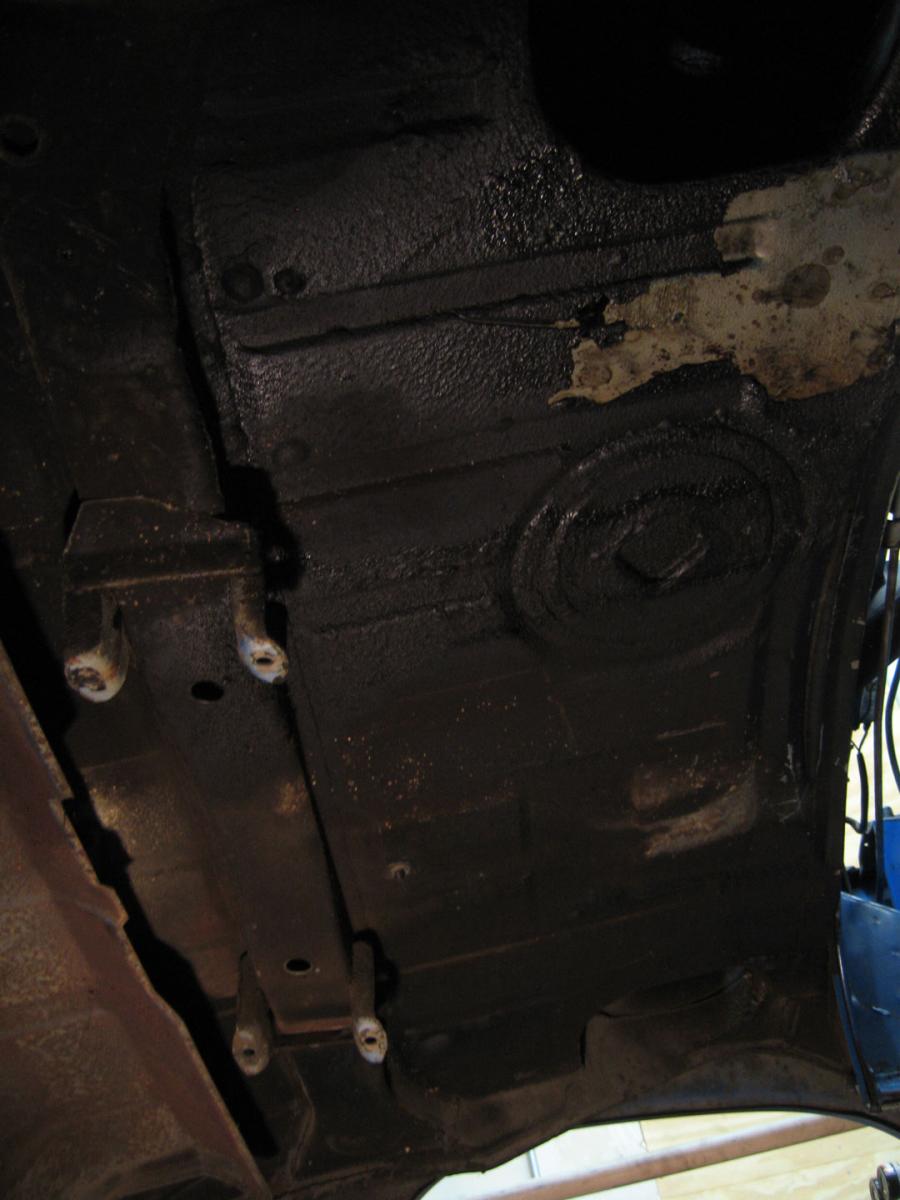
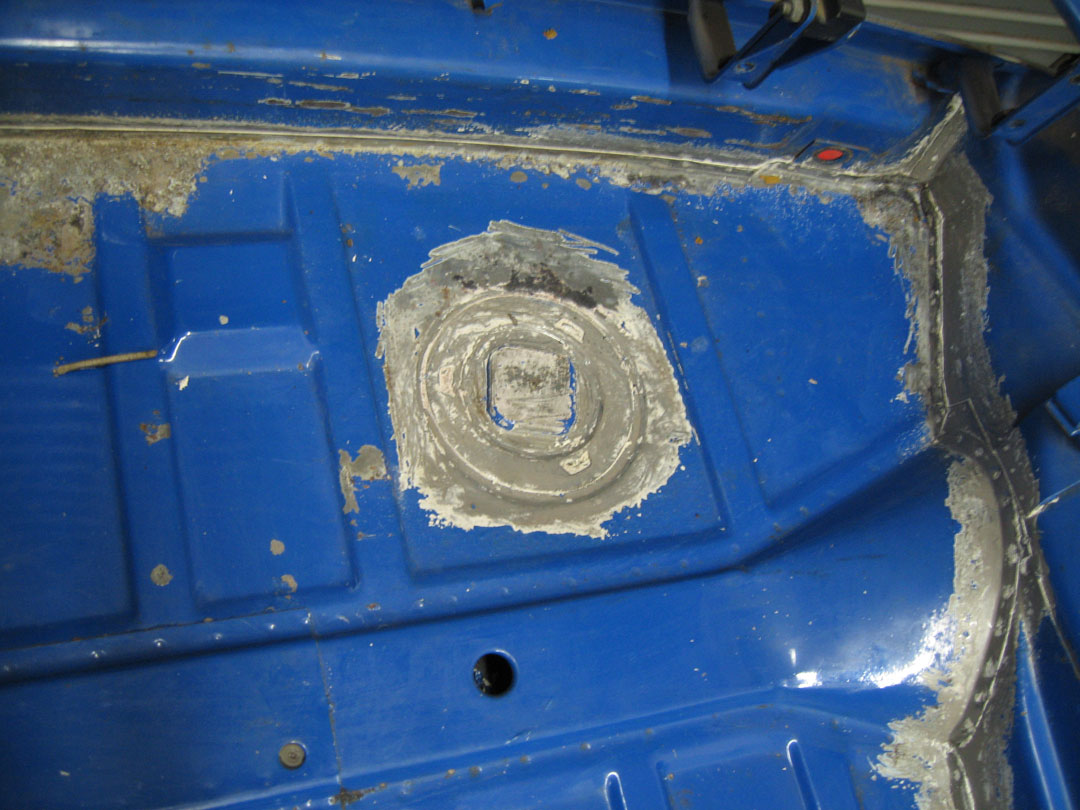
Some paint thinner will make it look pristine under there. I can't wait to take off the exhaust heat shield.
Next step, brace the doors....
Posted by: nathansnathan Dec 3 2010, 05:41 PM
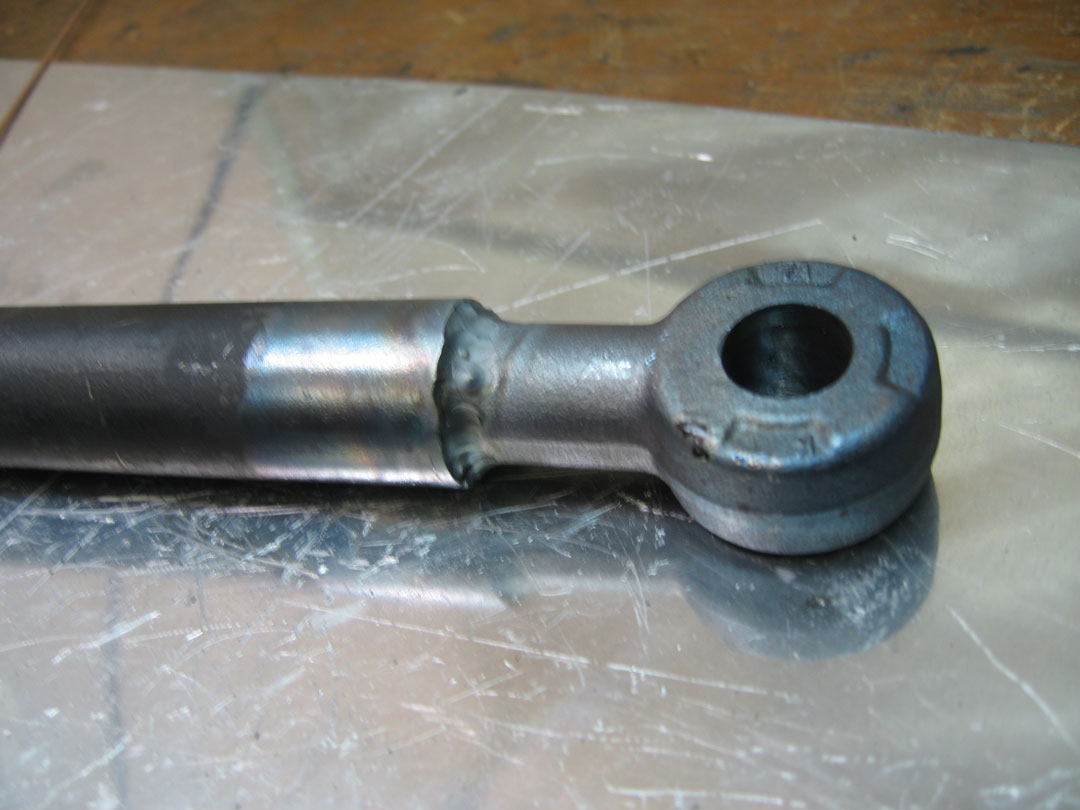
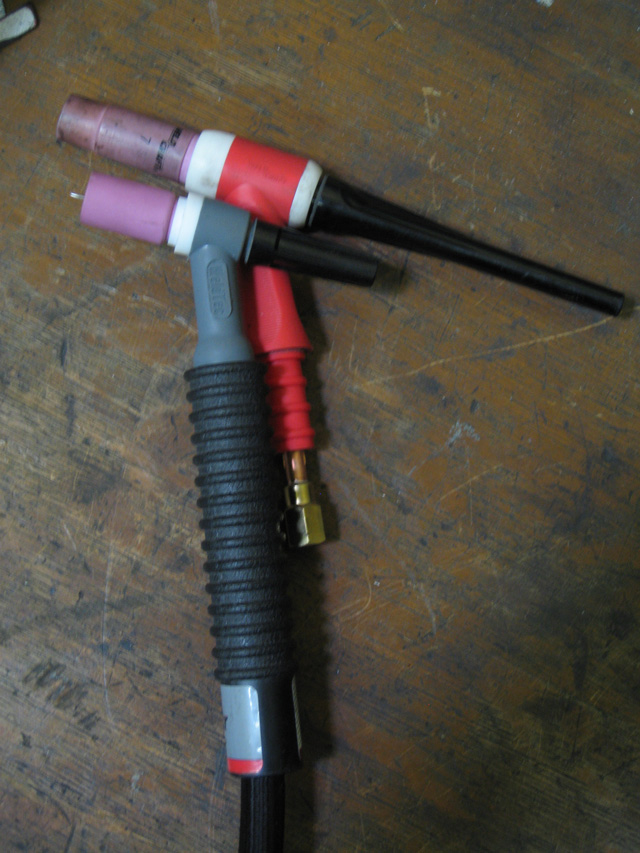
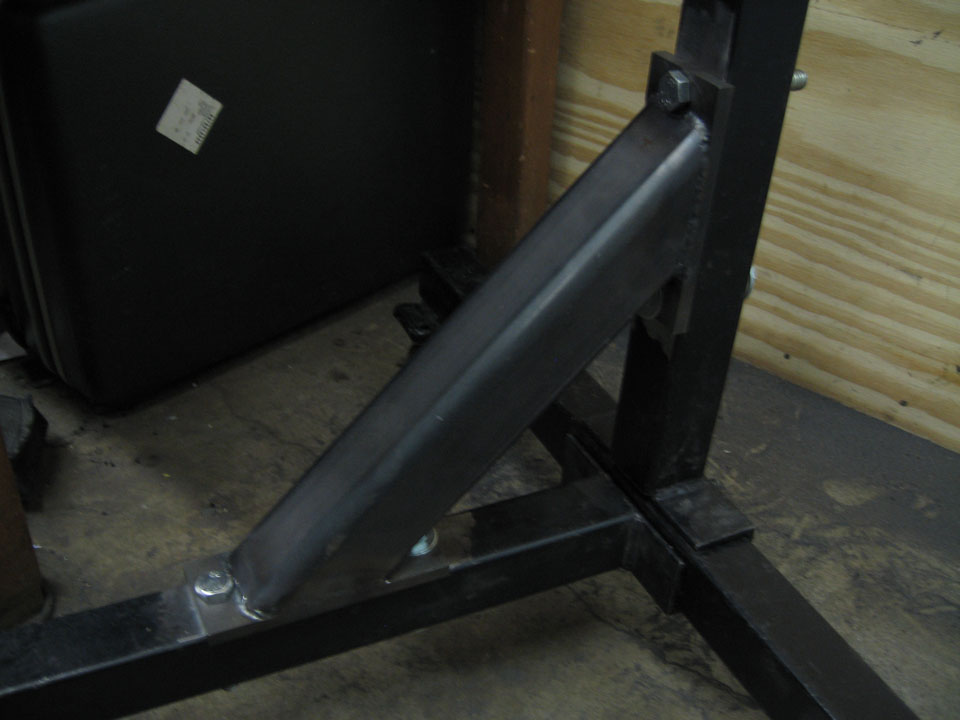
I've got one of these bad boys done so far. It's been quite a chore, as the arms are quite an assemblage.
It took me a few days of pondering before I figured out how I was even gonna do it.
I had some extra 3/4 inch black pipe around, some 3/4 inch fine threaded rod, and some 3/4 inch course threaded bolts and nuts from other projects so 3/4 inch is what I decided on. I ordered the goodies from McMaster-Carr, left handed threaded rod, right and left-handed 3/4 inch tube nuts, as well as 3/4 inch blank rod ends.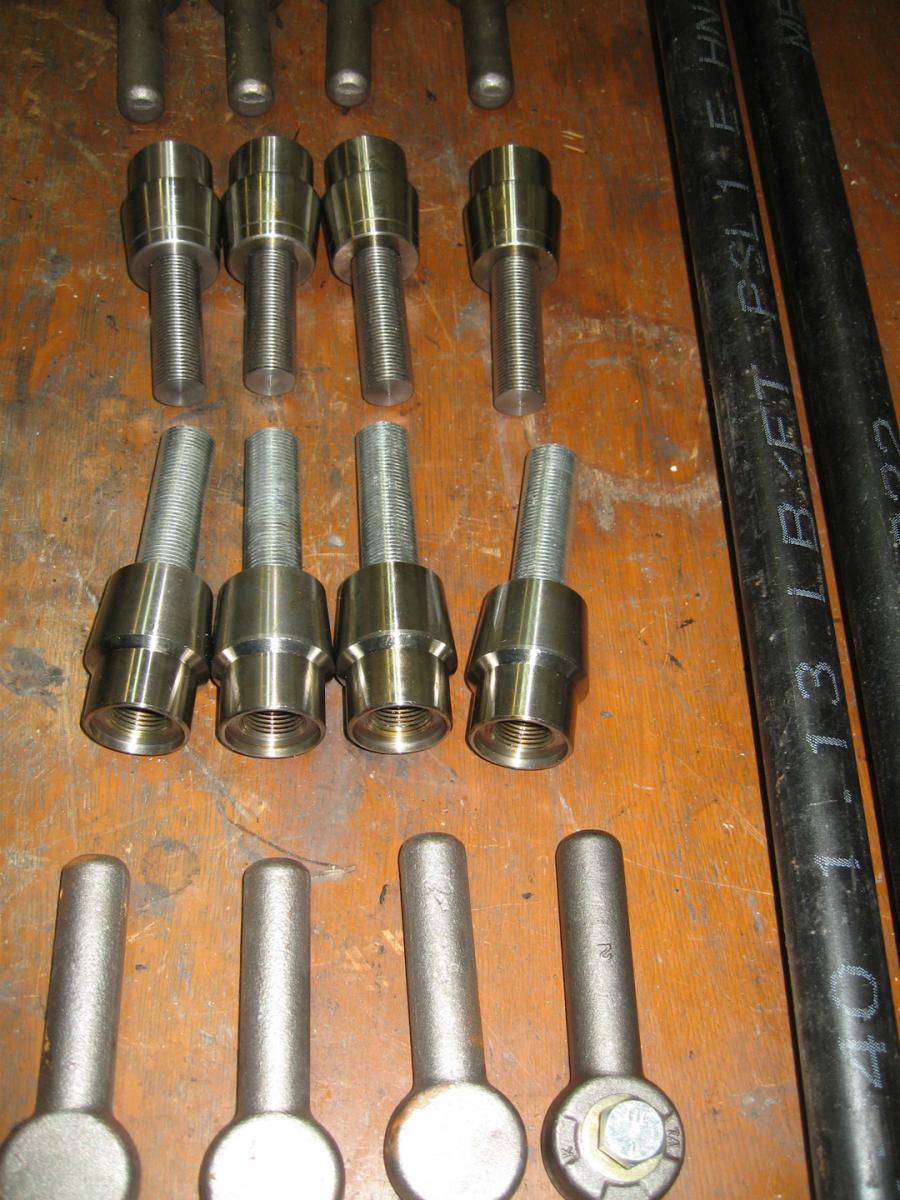
This bit of metal I got from Industrial Metal Supply which is an insanely awesome place that is right by my work.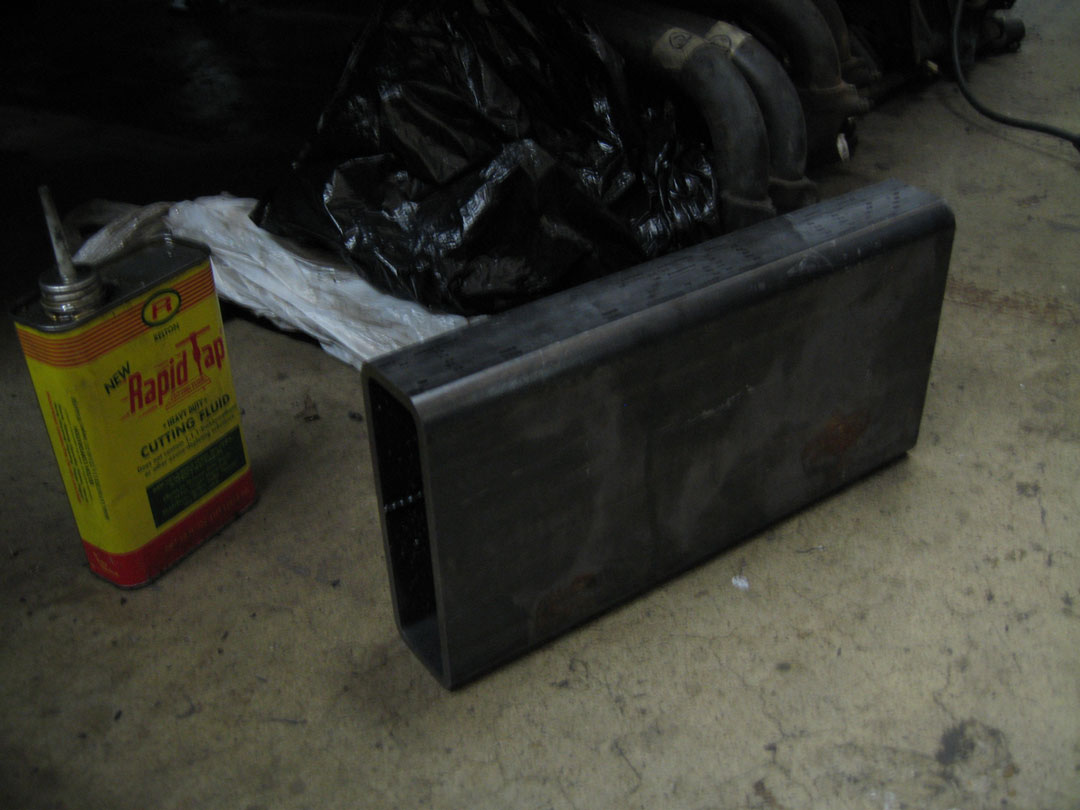
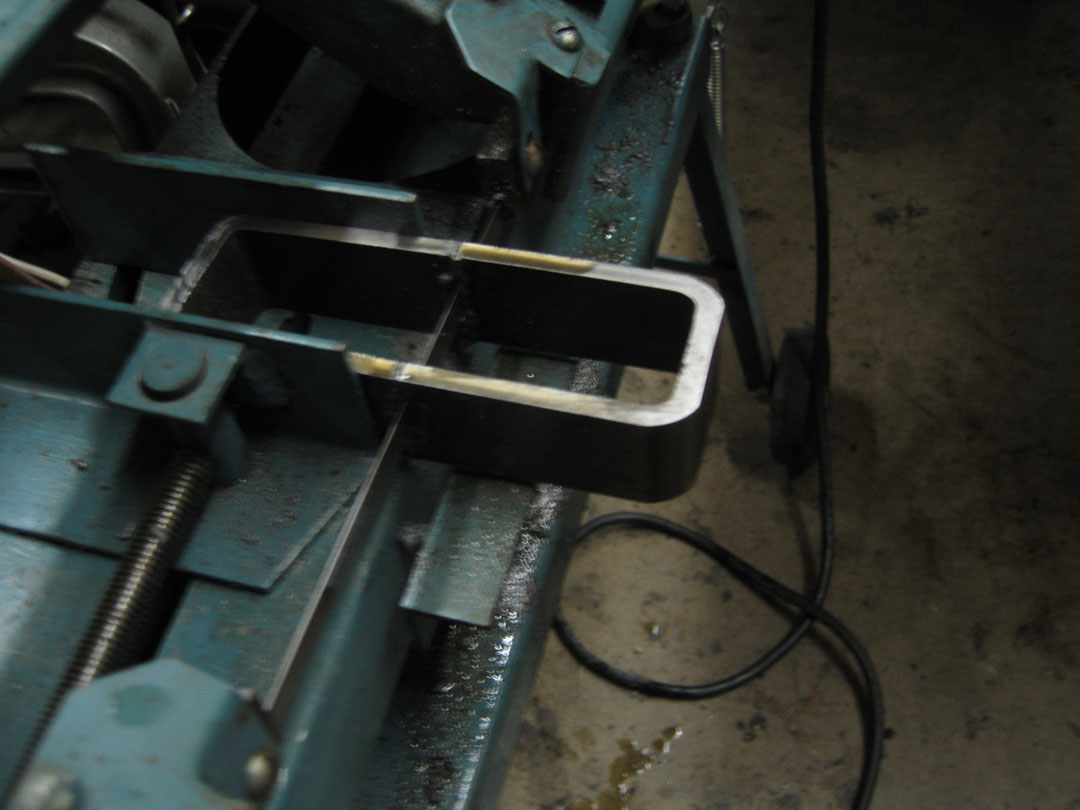
6 inch by 1 1/2 inch, 1/4 inch wall, it's about all my band saw can handle. I got this saw off craigslist for $100. I'm building the shop as I build the car.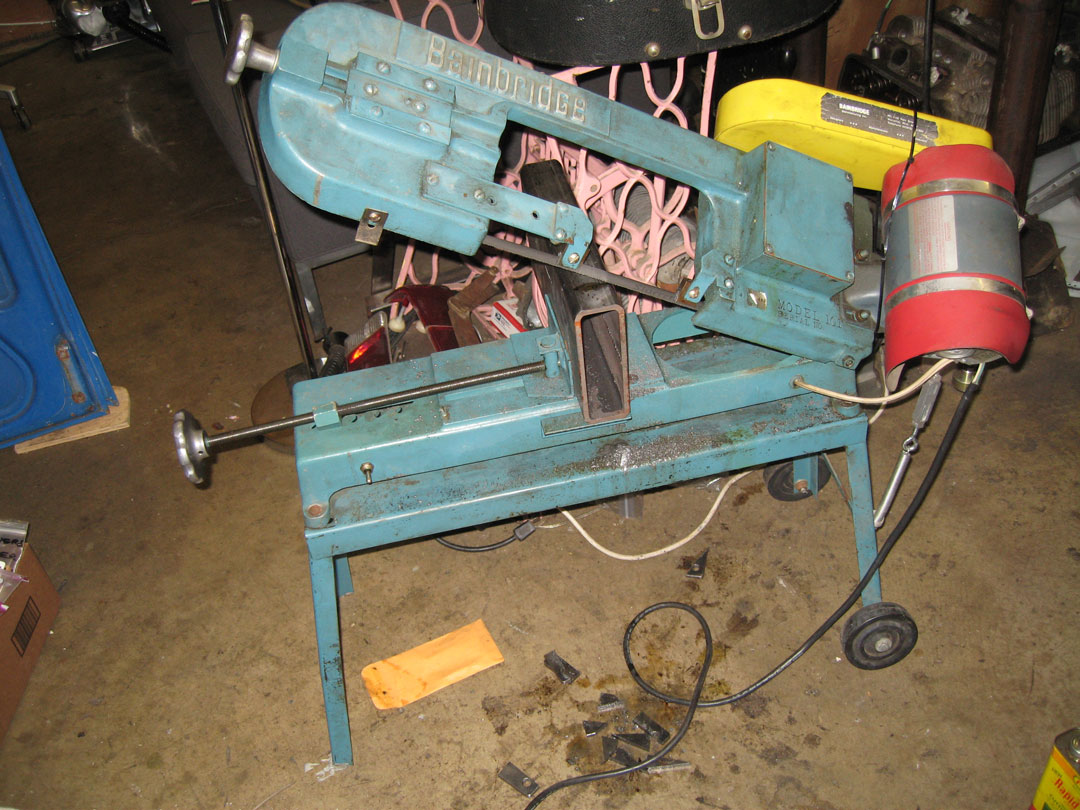
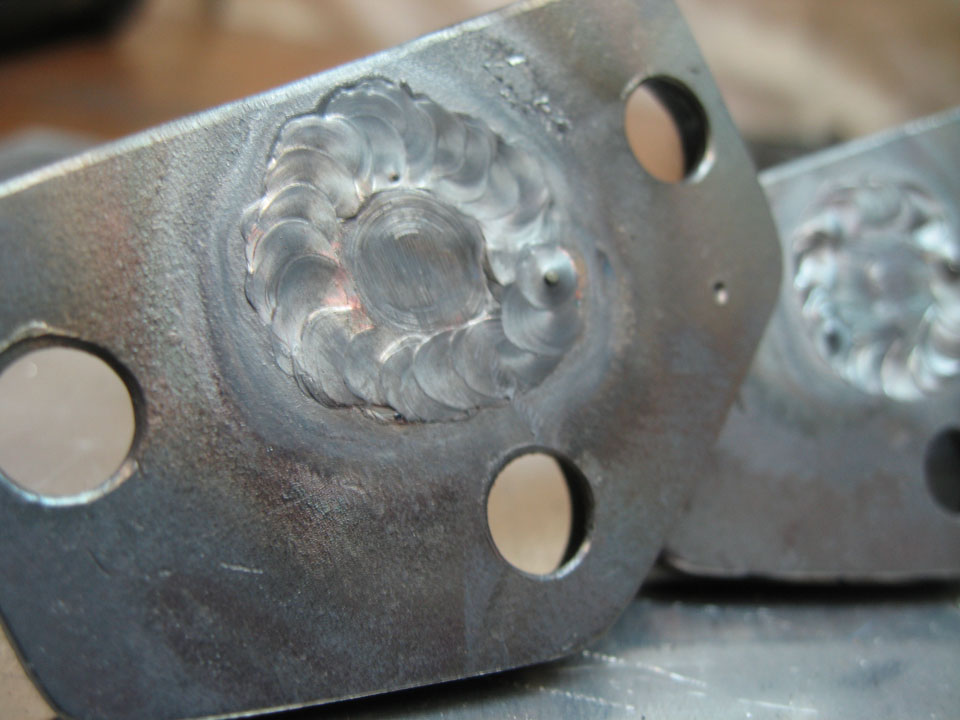
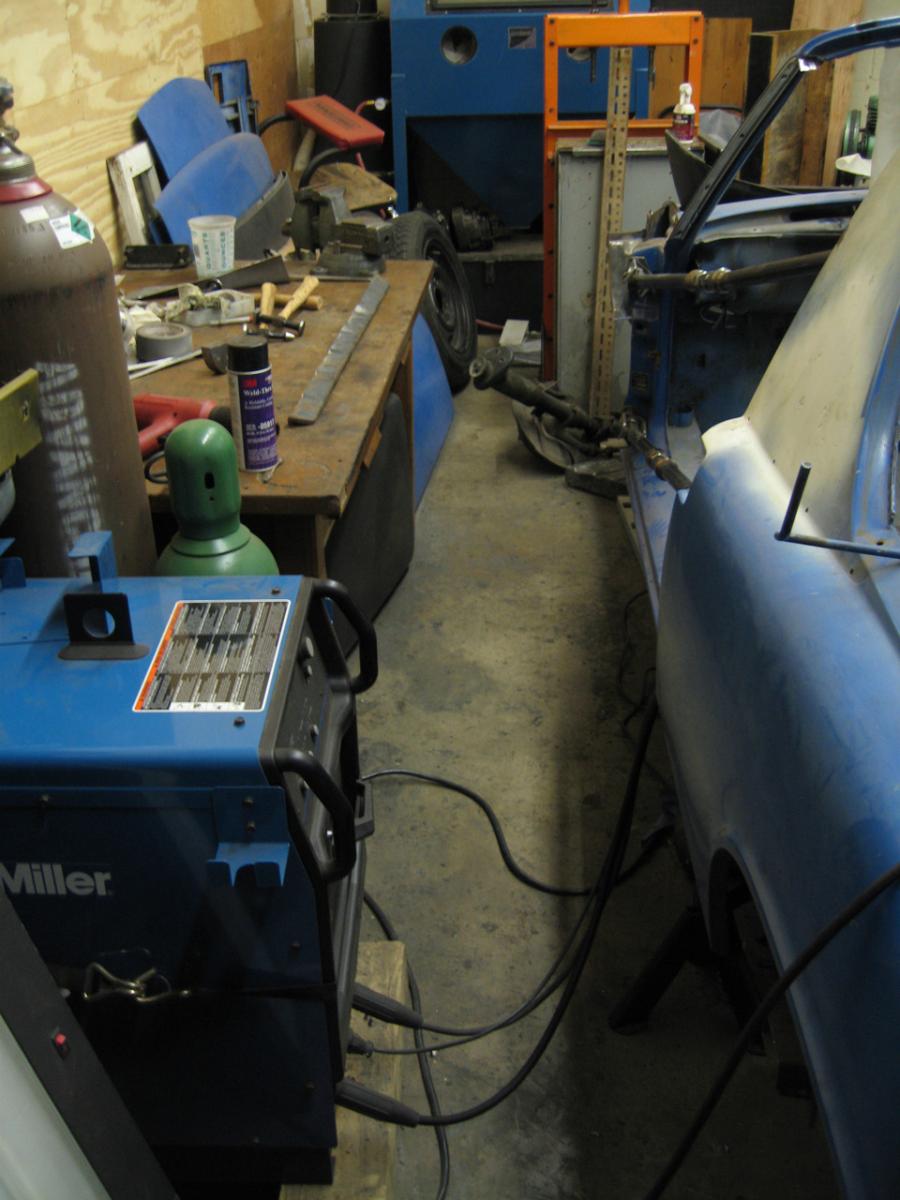
I had dreamed of getting such a welder as this for years.  It's an air- cooled
  Miller Tig with high frequency start, pulse, dig, fully digital. Synchrowave 200.
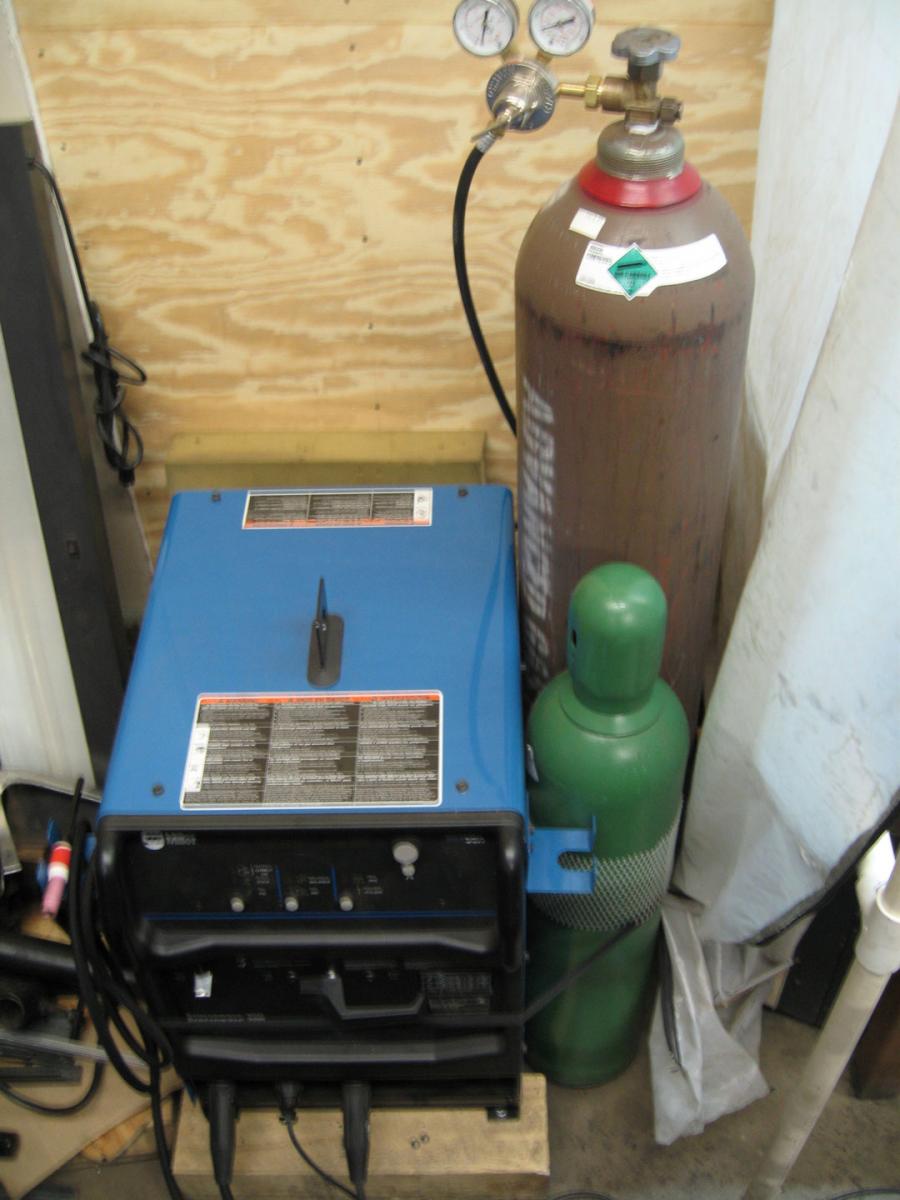
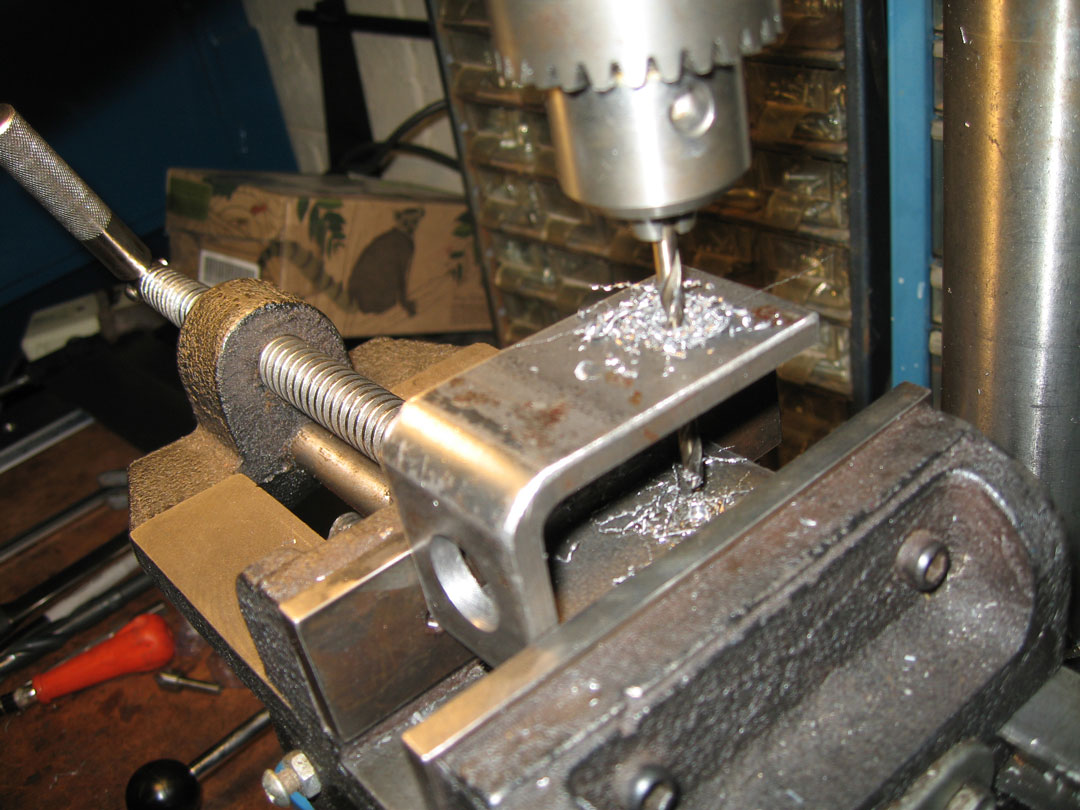
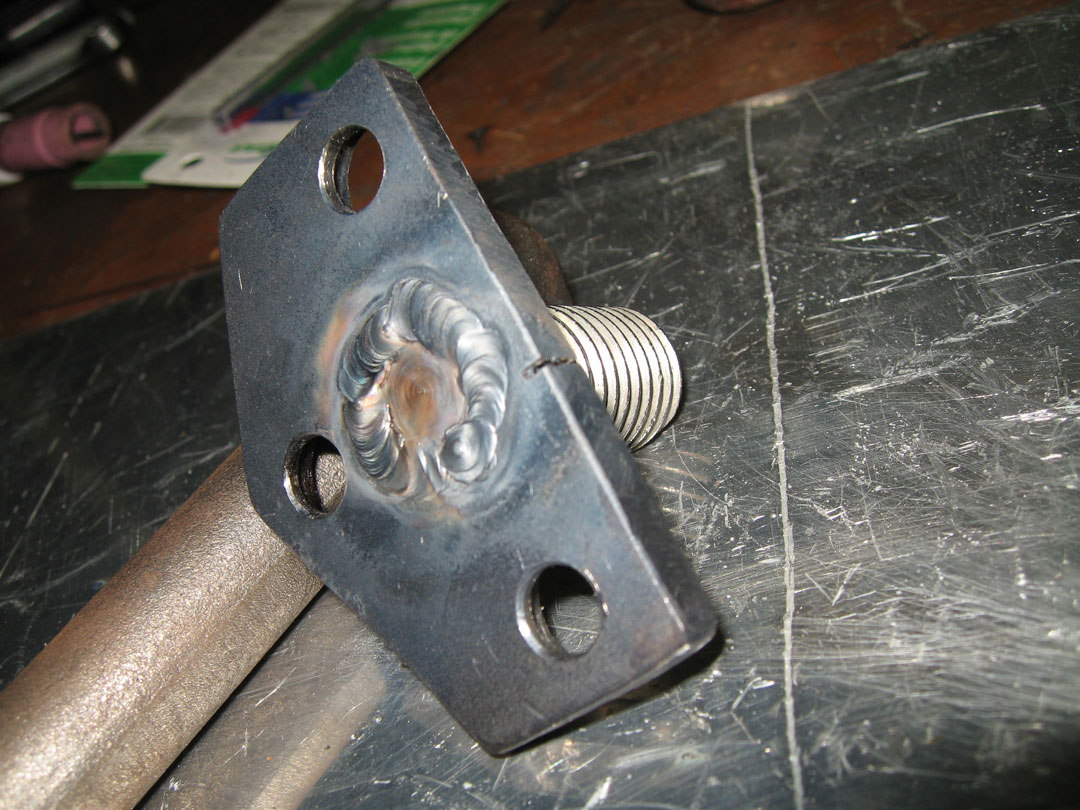
A bit of fitting up, I turned the 3/4 inch bolt (now a stud) to 5/8 inch at 1 end, put a bit of a groove around the hole it sits in with the 3/4 inch drill in order to hold the weld/ increase penetration/ minimize grinding to achieve a flat mounting. I used the door hinges as a template. 
This is my 1932 South Bend Lathe, that was a project for a bit, bringing it back.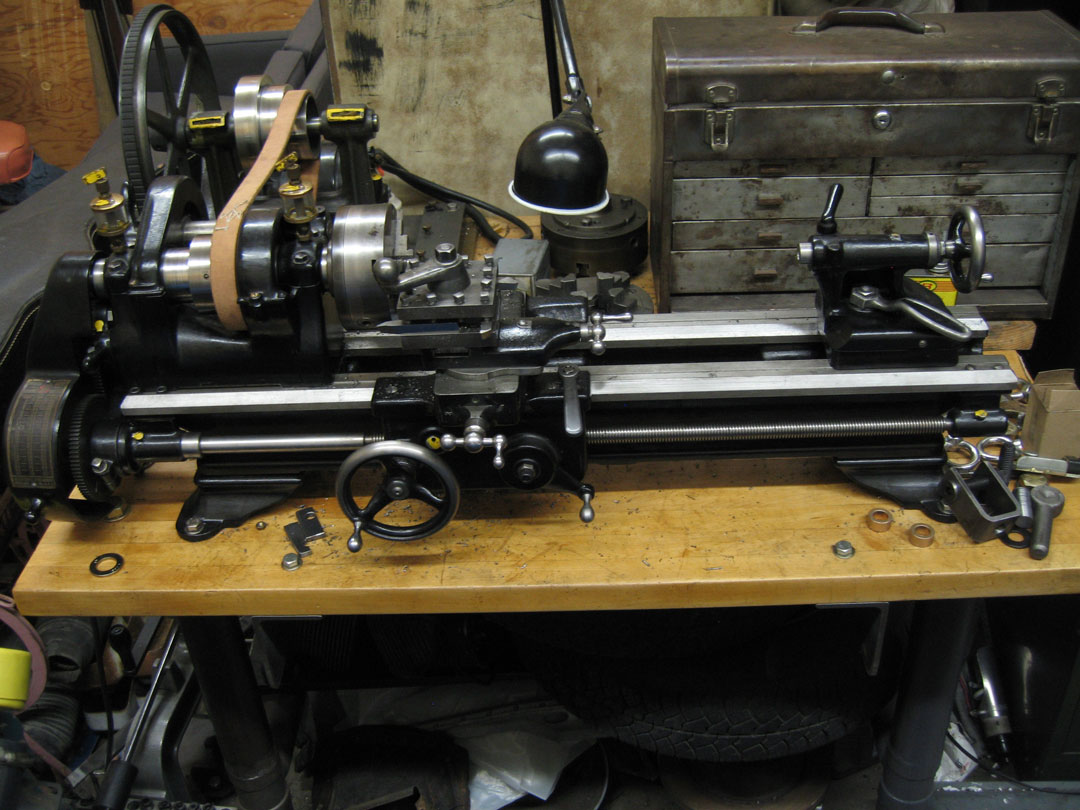
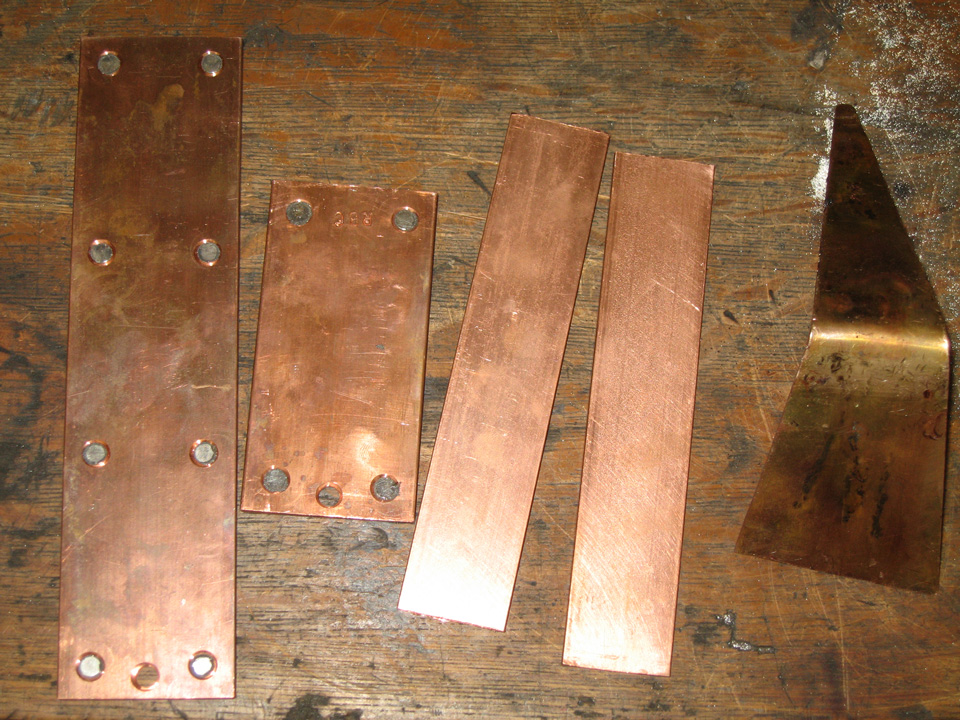
I was going to use flat heads all around to solve the clearance issues, but These 5/8 inch flat heads through the 1/4 inch wall clevis parts wasn't going to work even if I did have a countersink big enough. I opted, instead, to modify the bolts and make my own low profile socket head cap screws.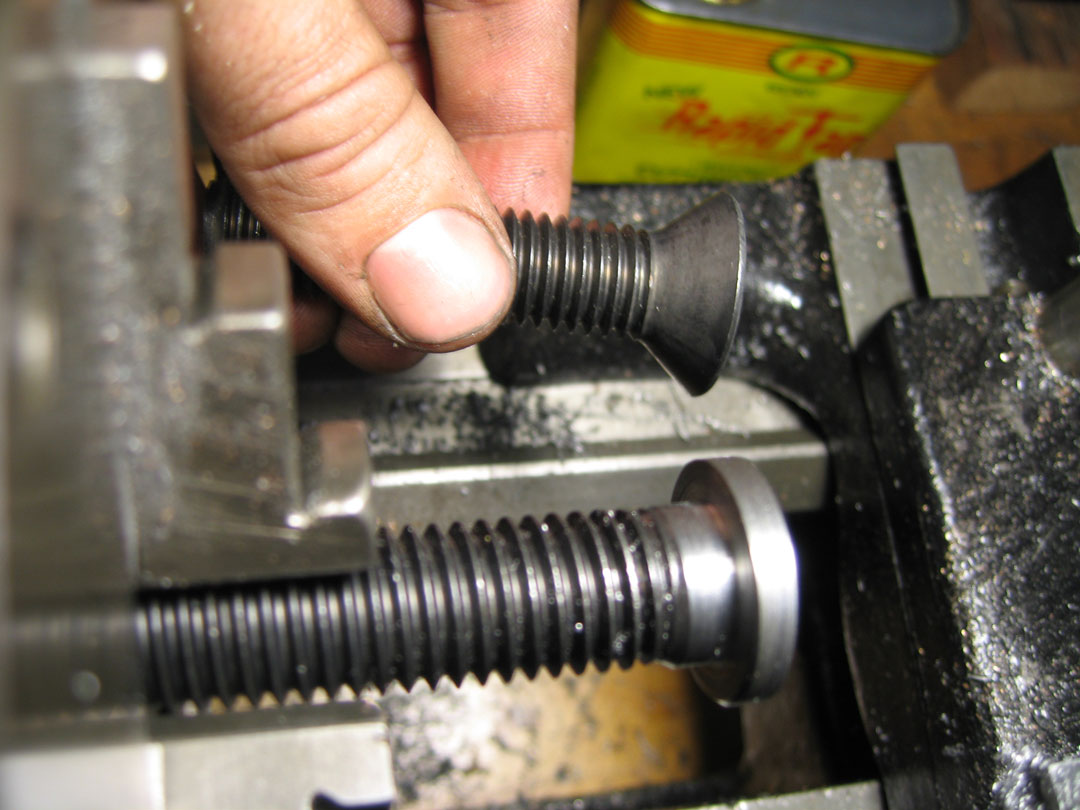
I had to do the 8mm ones for the mounts also, just at the edges, since the mounting plates are on the small side, and, well, I've only got a 1/2 inch countersink at the moment. I made the ones on the left out of the ones on the right. I went with stainless.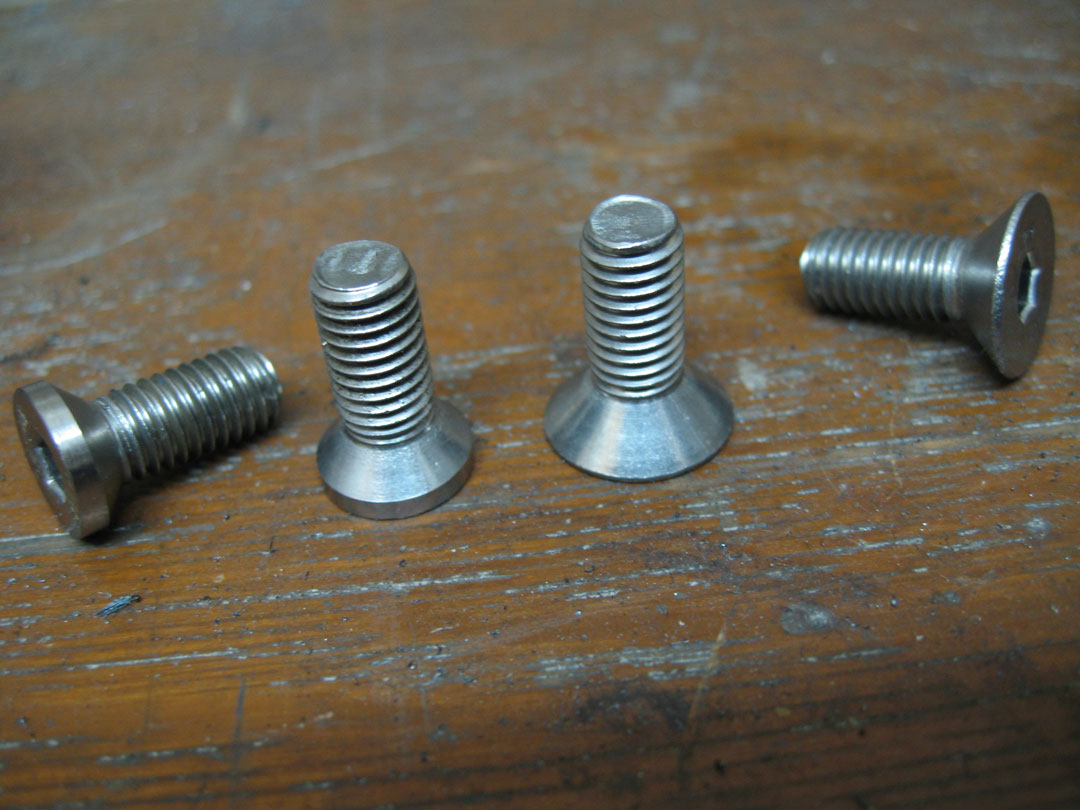
And there it is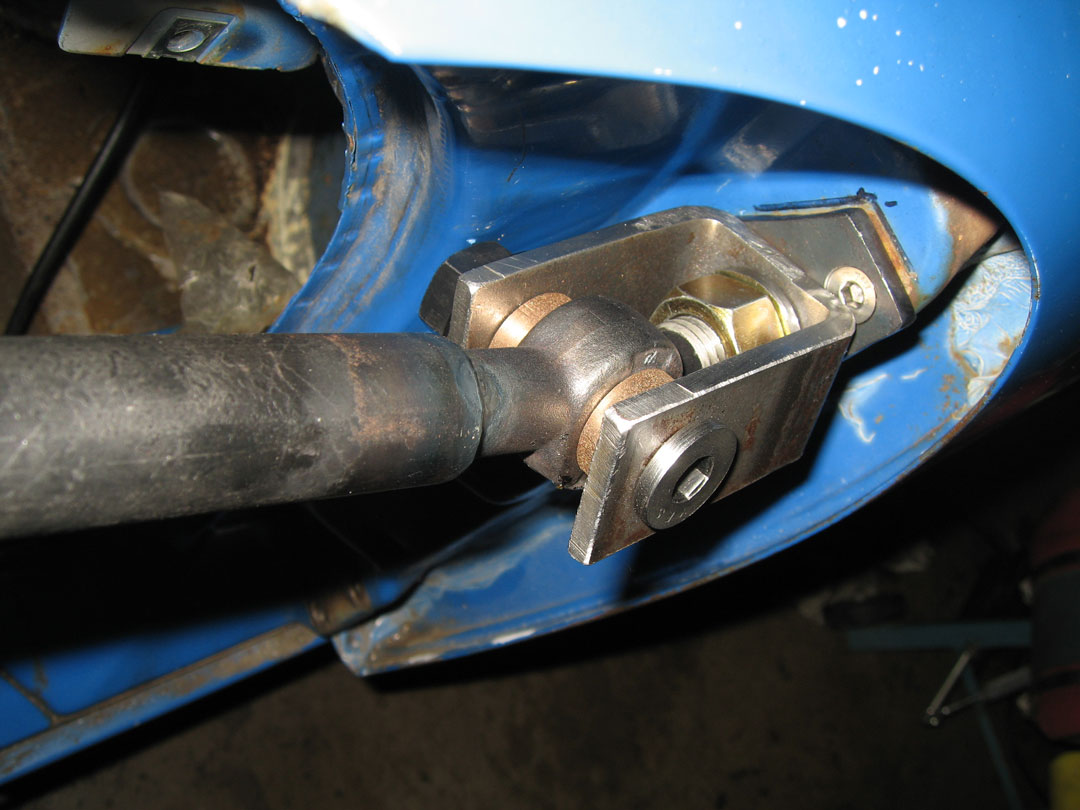
The tensioner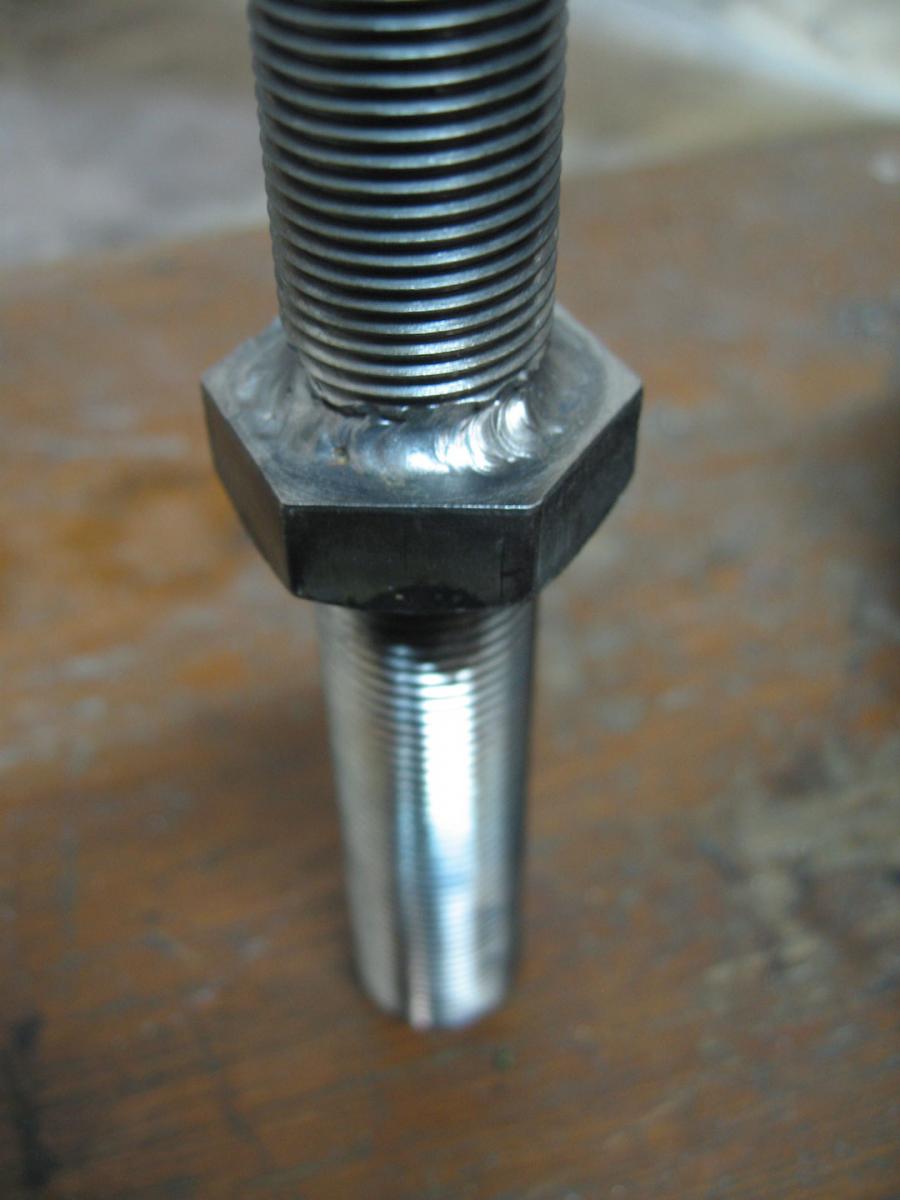
And the tensioner assembly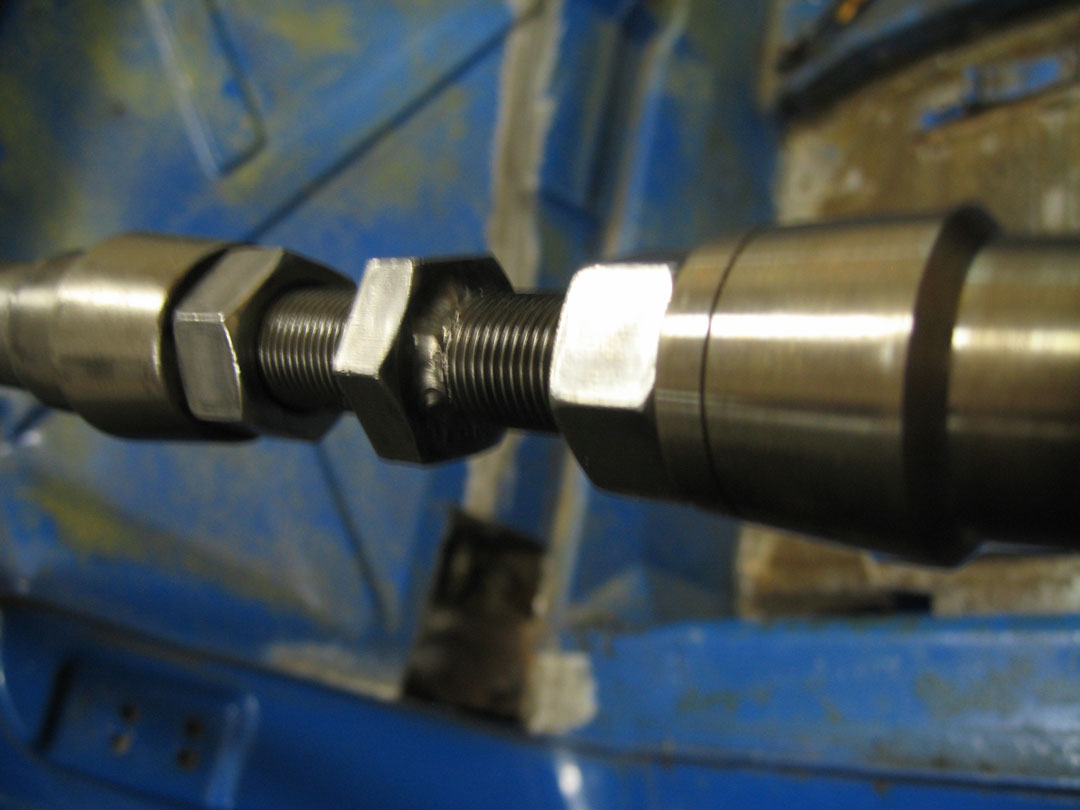
Here's the whole of it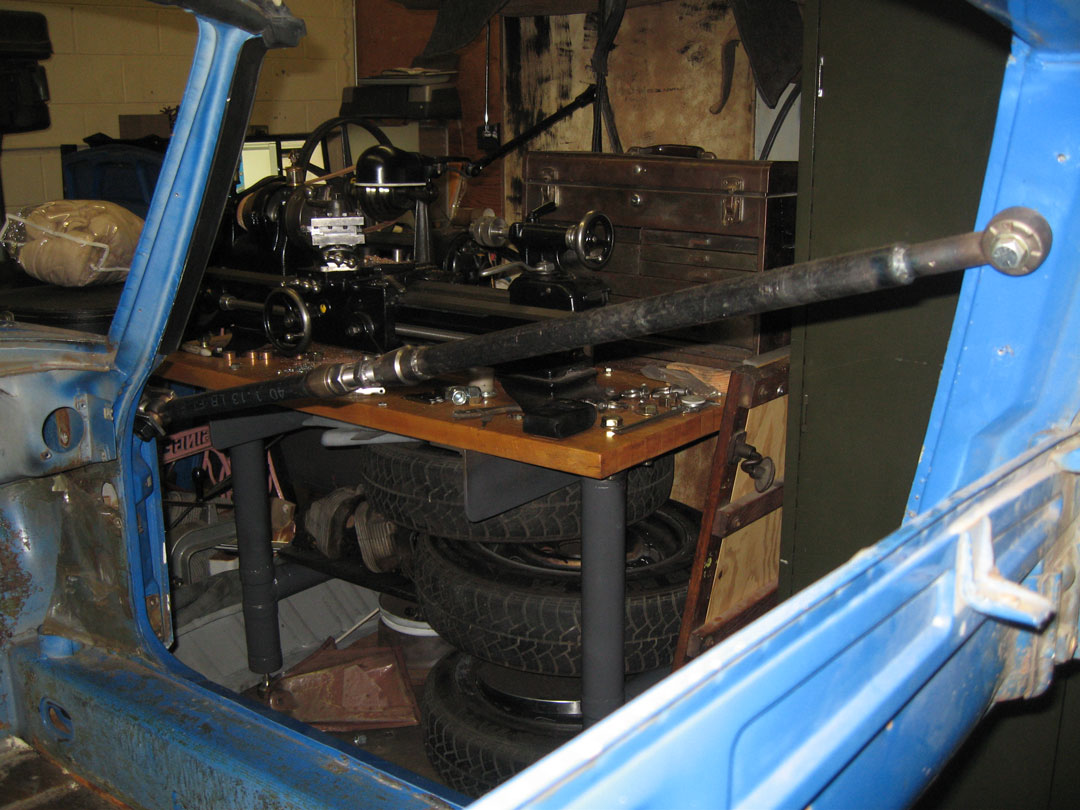
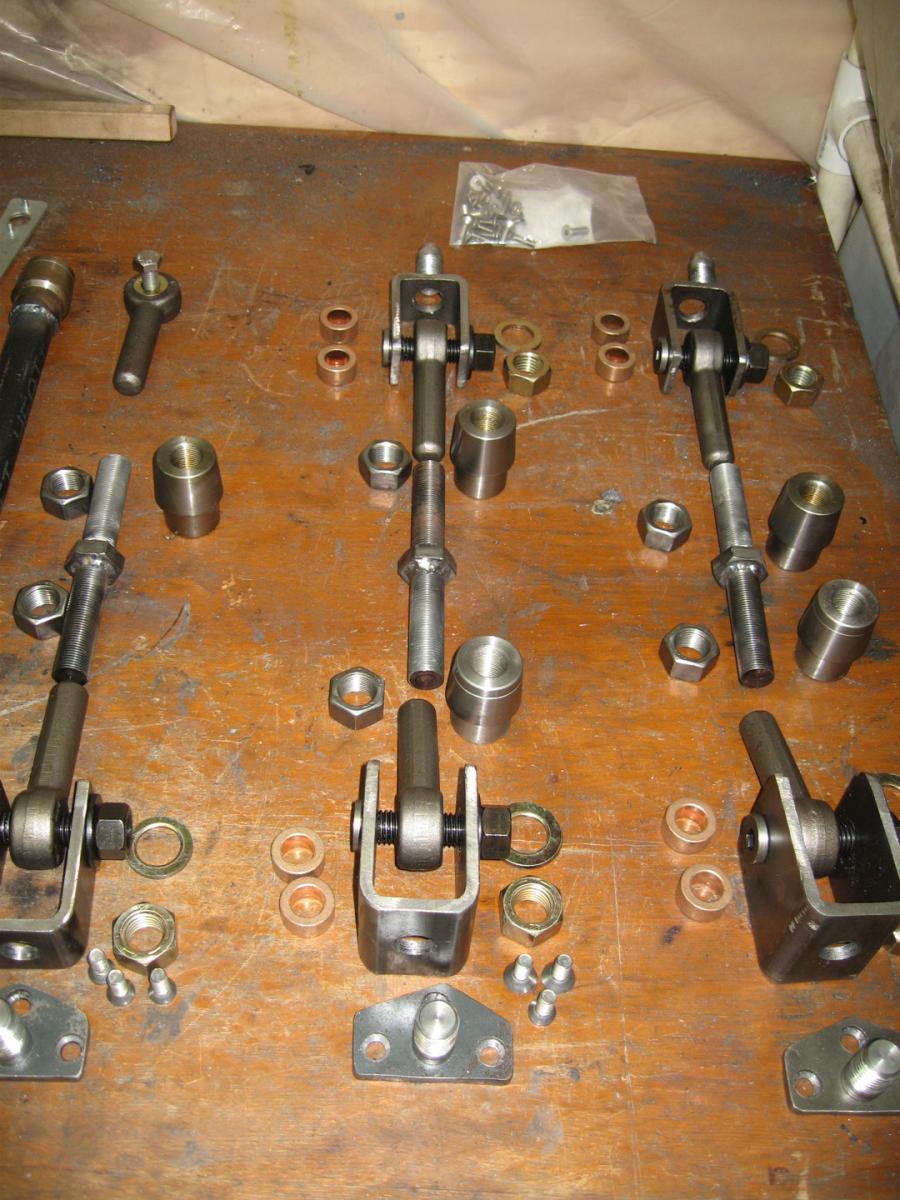
Just 3 more to go, and then we can really start cutting!
Posted by: nathansnathan Dec 3 2010, 05:42 PM
Ok, so I'm caught up to the blog over at 914club, and I'll go forward only right here on this thread. I've got the Passenger rear fender off; I'll post pics of that next. :-)
Posted by: McMark Dec 3 2010, 05:48 PM
Cool!  Looking forward to more!
Posted by: SirAndy Dec 3 2010, 06:07 PM

Cool!
Looking forward to more!
That actually looks like a pretty good tub!

Posted by: Mark Henry Dec 3 2010, 06:53 PM
From the title I thought you were restoring a 914 for Tommy Chong.
Posted by: FourBlades Dec 3 2010, 07:21 PM
Very nice work! You have done this before?
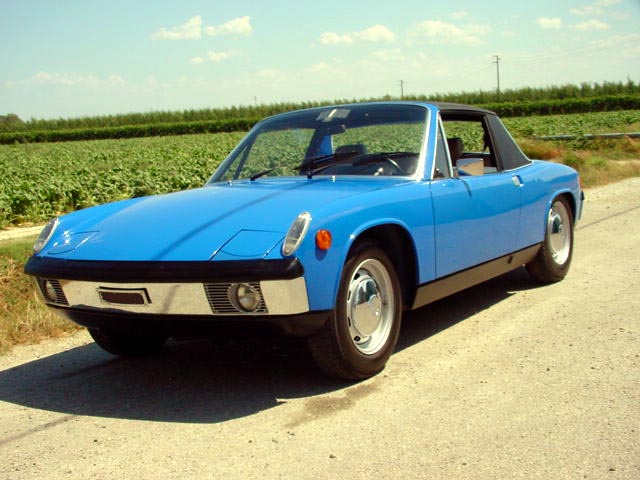
I love Adriatic Blue as well. Best 914 color.
This first picture is of the car I restored. The girl is my wife's friend from Germany.
http://www.914world.com/bbs2/index.php?showtopic=112706
John
Posted by: palmer_md Dec 3 2010, 07:42 PM
From the title I thought you were restoring a 914 for Tommy Chong.
HaHa, I had the same thought. or maybe just some tie-die paint scheme.
Posted by: Mark Henry Dec 3 2010, 09:12 PM
From the title I thought you were restoring a 914 for Tommy Chong.
HaHa, I had the same thought. or maybe just some tie-die paint scheme.
Far out man.
Posted by: nathansnathan Dec 3 2010, 09:27 PM
From the title I thought you were restoring a 914 for Tommy Chong.
HaHa, I had the same thought. or maybe just some tie-die paint scheme.
There were a lot of instances in acquiring the car and going through it that the number ... made itself known. The spray paint on the window was the date it was processed at the police auction, still on when I got it 2 months later.
There was actually quite a bit of shake, stems and whatnot all around the center console up in front of the seats under the carpet there. Also, found a 'Police Line Do Not Cross' bit of plastic around under the seat. The driver door window smashed maybe in some drug bust chase?
The engine number is 41908.
I remember and wish I would have taken a pic of the bolts at the side of the dashboard holding it in. They said '4 20' on them. It was jumping out at me everywhere.

It's all quite 'lined up' and pointing in that direction.
Posted by: nathansnathan Dec 3 2010, 09:28 PM
Very nice work! You have done this before?
I love Adriatic Blue as well. Best 914 color.
This first picture is of the car I restored. The girl is my wife's friend from Germany.
http://www.914world.com/bbs2/index.php?showtopic=112706
John
Thanks, it is my first time doing real metal working kind of bodywork and first 914. I've painted some cars before, but just bondo, sanding, mig welded panels and door skins. This will be my first time working on this since 1996 and I'm hoping to do a waay more professional job this time, hopefully no need for any bondo at all.
I love the L50E. People ask me what color I'm going to paint it. Adriatic Blue! ..of course.
The car, in the link, the color looks great. It is surprising how few there seem to be in adriatic blue.
At first I liked the color of it all faded more than the actual darker color. Now I just hope that the new paint will be the right hue more than the tint.
 Just like mine
  except the badge. no badge.

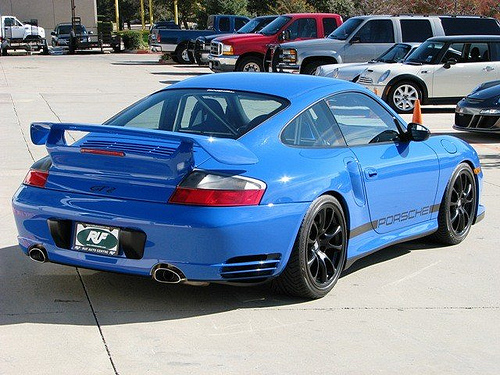
It seems to me that adriatic blue has gotten lighter over the years, though.
I think people match new paint to the faded?
For the interior, redone tan interiors always seem to be lighter, the later color and less camel. It is imperative that the interior be camel and not the later tan.

Posted by: nathansnathan Dec 3 2010, 09:31 PM
Cool!
Looking forward to more! That actually looks like a pretty good tub!
It is good in many areas; in others not so good.
The just-after-I-got it off pic got turned into an 'h' before? so I've put that up, one even rustier-looking than was on the blog.

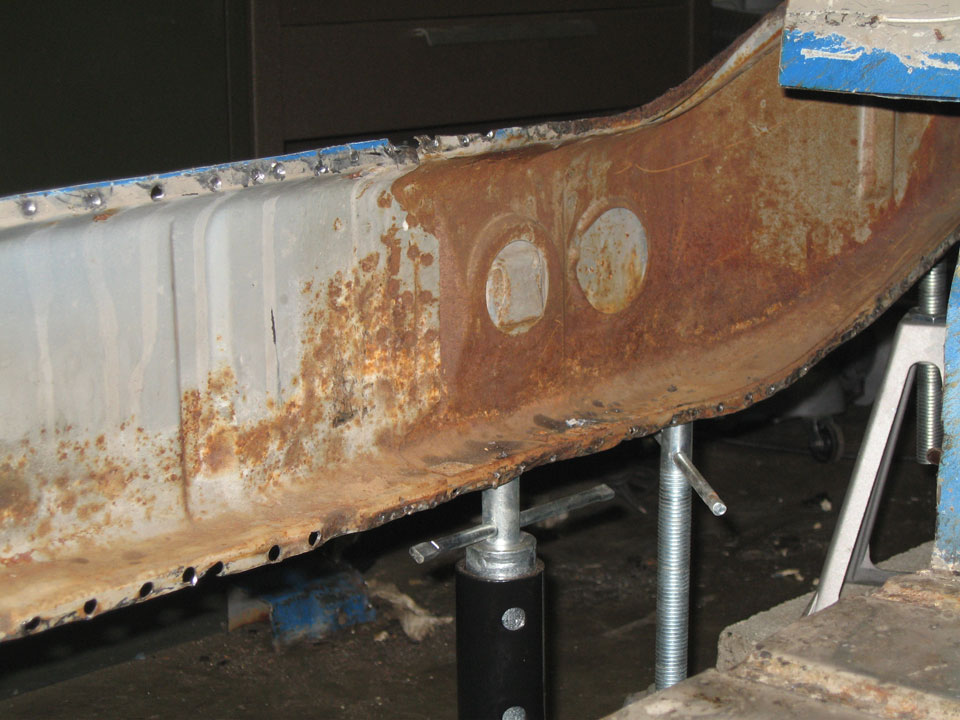
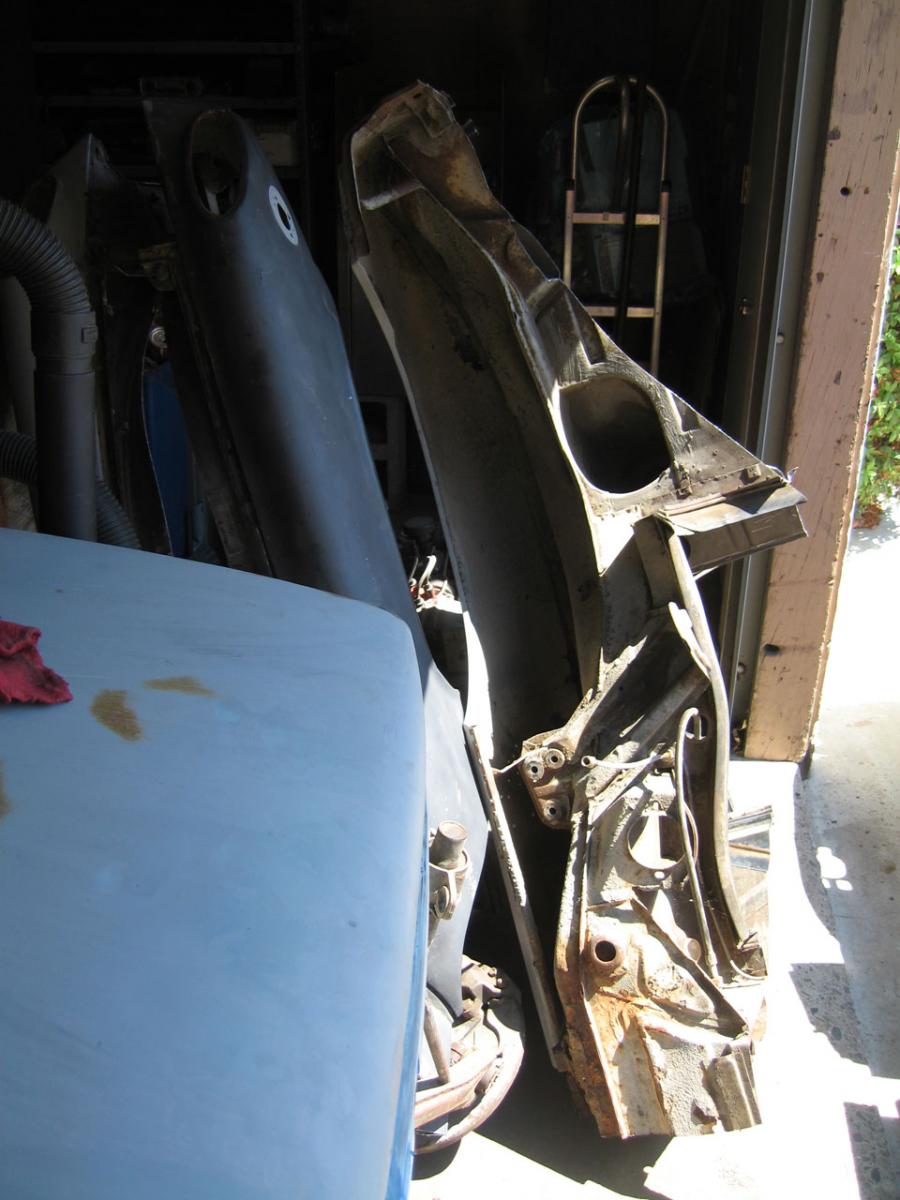
Here's some of the worst of the carnage in the multi-tiered hell hole.

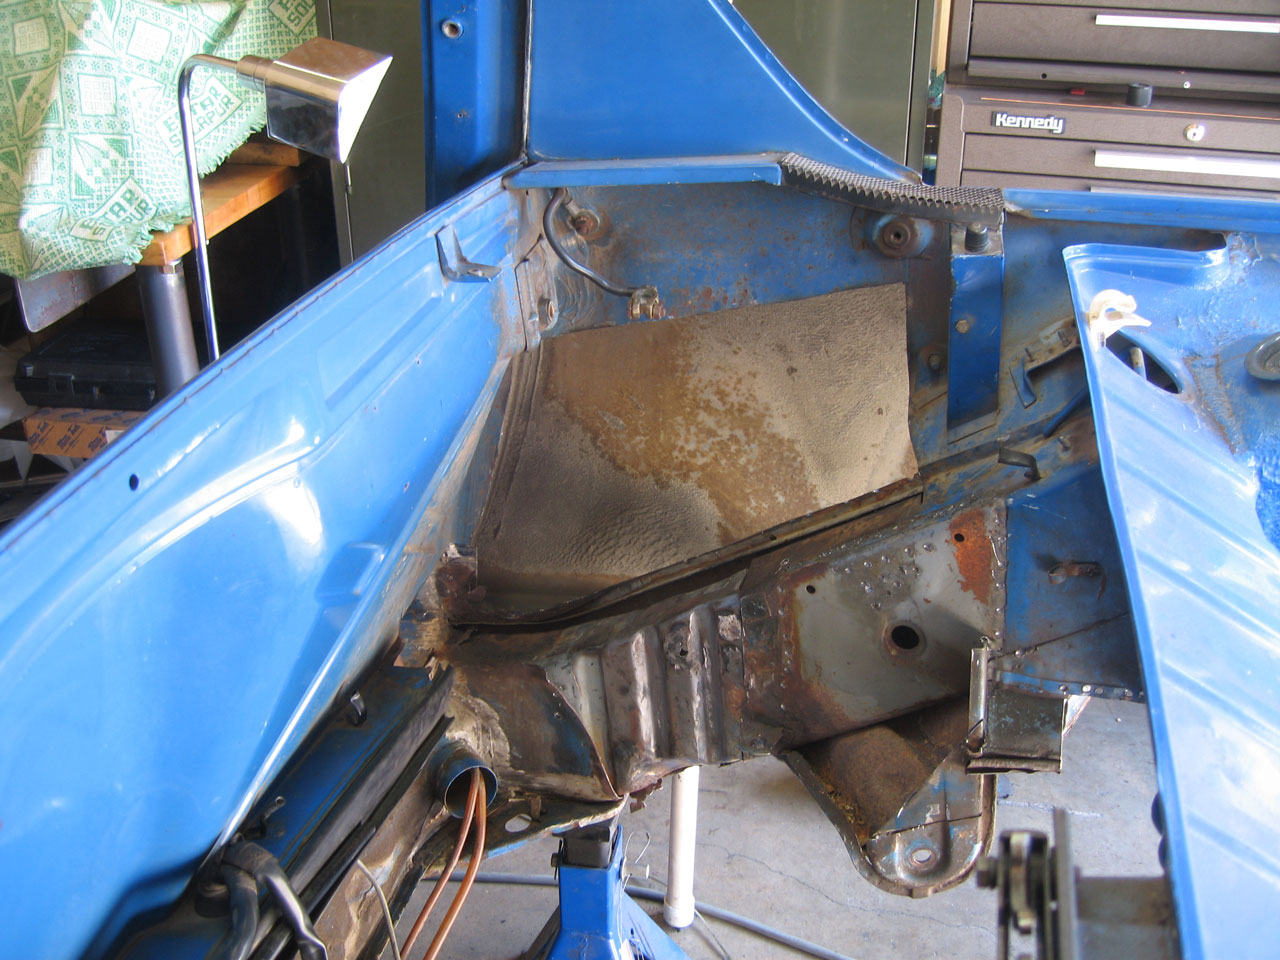
Going into the inner suspension console ear; it took me a bit to muster the will for it.
That's the current state of things right there.
It's weird the car must have spent awhile sitting level or other than the usual slanted toward passenger side as it's the inner passenger long that's messed up. I am contemplating/ leaning toward removing, sandblasting the outer suspension support, probably I can reuse it. The jack point seems really decent. I'm thinking of something less invasive there.
The inner though, I'm thinking it might be easier to cut out part of the firewall to get to the inner inner long, than to get the jackoint, and bothe layers of the outer long out to get at this business:

Besides these areas, up by the fresh air vent in the door wells ... There are areas that look remarkably good. Tunnel vision inspires me to want to get it to the point of wet sanding it. For now, my tetanus shot is current.

Posted by: SirAndy Dec 3 2010, 09:35 PM
Aha! That's more like a real 914 ...
We've all been there.
Posted by: silver74insocal Dec 3 2010, 09:41 PM
 keep on going and for gods sake repaint those stands so they dont get permanenlty attached to that little car!
good luck and if you need someone to help you make a mess just let me know
Dave
hey whered you get those stands btw..thanks
Posted by: Mark Henry Dec 3 2010, 09:44 PM
Aha! That's more like a real 914 ...
We've all been there.
I haven't! My car is 100% rust free
 ...of course that means there has to be at least a good 30% of rust hiding somewhere I can't see it
Posted by: SirAndy Dec 3 2010, 09:48 PM
We've all been there.
...of course that means there has to be at least a good 30% of rust hiding somewhere I can't see it Correction:
A lot of us have been there.
The rest will be there at some point in the future ... 
Posted by: Cairo94507 Dec 4 2010, 09:05 AM
Kind of reminds me of motorcycle riding: only two types of riders: "those that have been down and those that are going down".
914's:
"914's that have had rust repaired and those that need rust repaired"
Posted by: Eric_Shea Dec 4 2010, 10:05 AM
Holy $hit... you've got the gift. that's for sure. I have a feeling this is going to be a very cool build thread.

Posted by: roadster fan Dec 4 2010, 03:26 PM
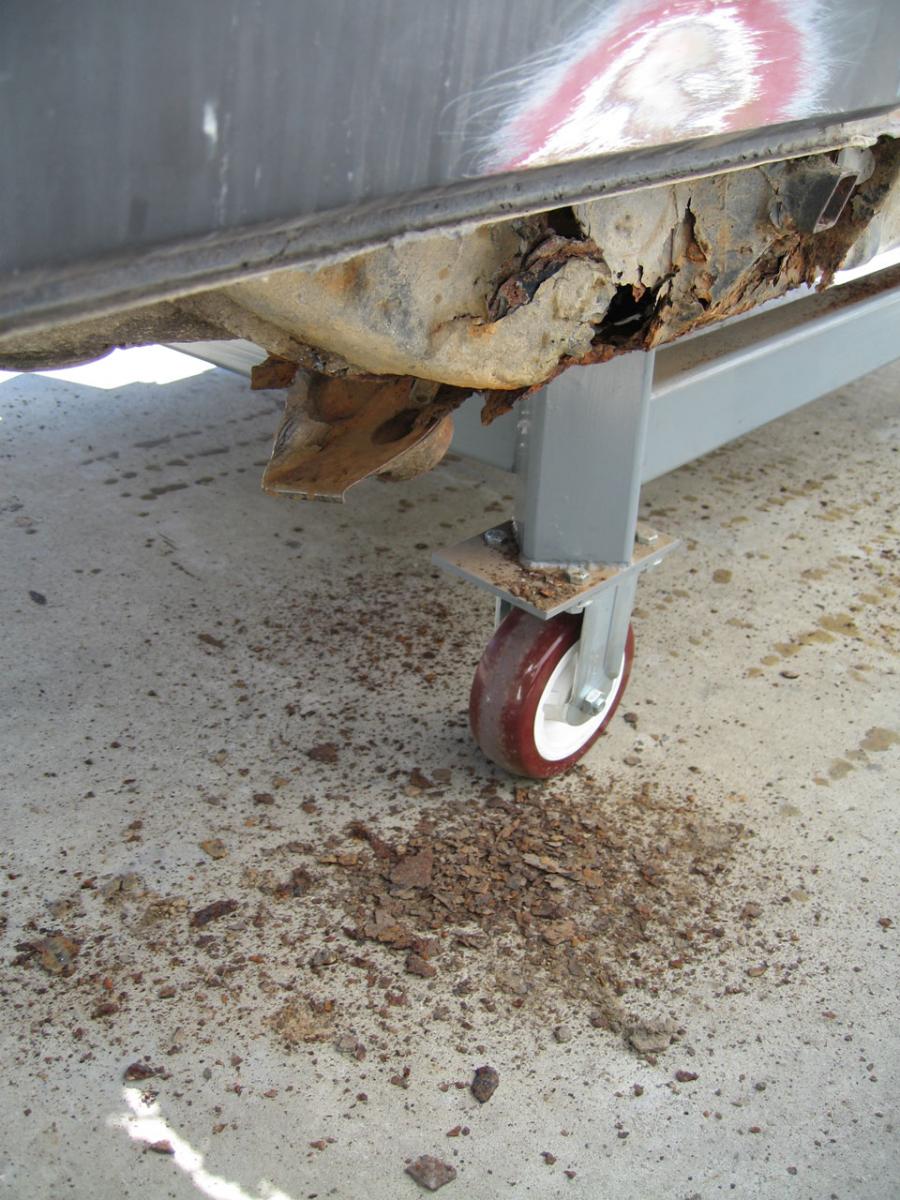
Please put that concrete block on the floor oriented the way it would be installed in wall with a 2x8 on top of it, or better yet get rid of it all together. Any imperfection in that block, and/or the orientation of it as pictured, and down comes car...
Keep up the good work, it is gonna be fun to watch the progress
Jim
Posted by: flippa Dec 5 2010, 09:10 AM
Replace the CMU Block!!!! It would be a shame for the car to let itself down on it's own  .
.
Looking forward to watching this one restored.
Posted by: nathansnathan Dec 5 2010, 05:18 PM
keep on going and for gods sake repaint those stands so they dont get permanenlty attached to that little car!good luck and if you need someone to help you make a mess just let me know
Dave
hey whered you get those stands btw..thanks
I like the color matching.
I tried to get 2 more of the blue ones originally - I'd got them at autozone for the bus. I went to 3 different ones but they either didn't have the big size or they had only the lever kind. After the pin-through style, I don't feel safe as much with the other kind now.I couldn't find pin through style anywhere, so I decided to buy the best jack stands I could. Research on the internet pointed toward flat top jack stands, a company in europe, I forget, but they'd stopped making them or at least that you could buy here and the Esco brand ones are supposed to be the equivalent replacement. I got the from Pelican Parts which offers them cheaper than almost anywhere else.
Posted by: nathansnathan Dec 5 2010, 05:19 PM
Please put that concrete block on the floor oriented the way it would be installed in wall with a 2x8 on top of it, or better yet get rid of it all together. Any imperfection in that block, and/or the orientation of it as pictured, and down comes car...
Keep up the good work, it is gonna be fun to watch the progress
Jim
I've said this same thing to a guy an the bus furum at the samba, and I agree that having superfluous jack stands are not so good an idea. -I wouldn't ever think of supporting the car back there btw; those are there in prep for what's next.
The car is held up thusly:
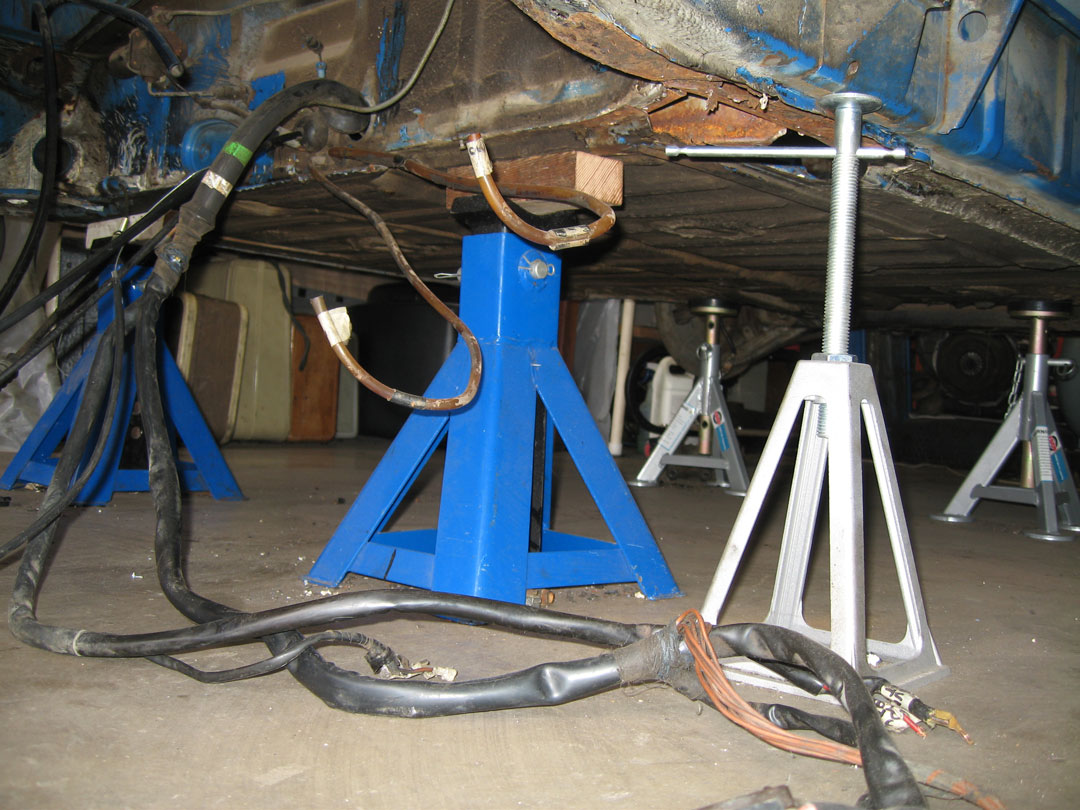
and then I've got trailer levelers to hold up the trunk only. I wouldn't trust these to hold the car up even though they say they are rated for it. Actually the back end I can probably lift up in it's entirety with my bare hands, it is that light.
The cinder blocks with the trailer levellers are to keep the trunk from sagging when I take off the rear fender(s). -I don't have a jig; I think it'as mostly only going to be able to go together 1 way.
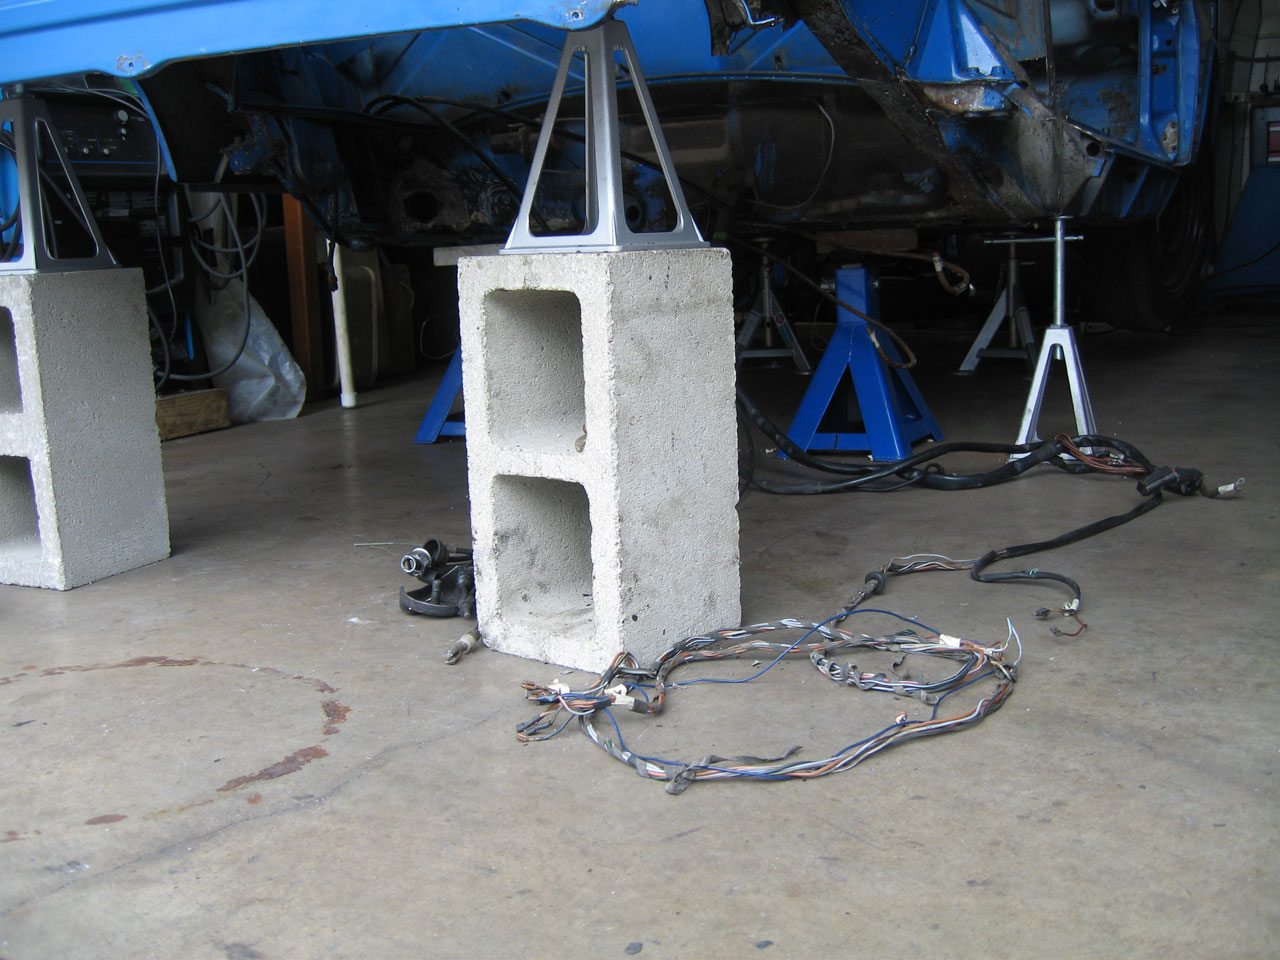
Anyway, I had them snugged up back there, then after I removed the fender the trunk ended up lifting up actually instead of drooping down. I've tensioned them up to that for now, as I've got more of the long to take out.
Anyway, thanks for the concern, I think it should be alright as long as the main stands are good.
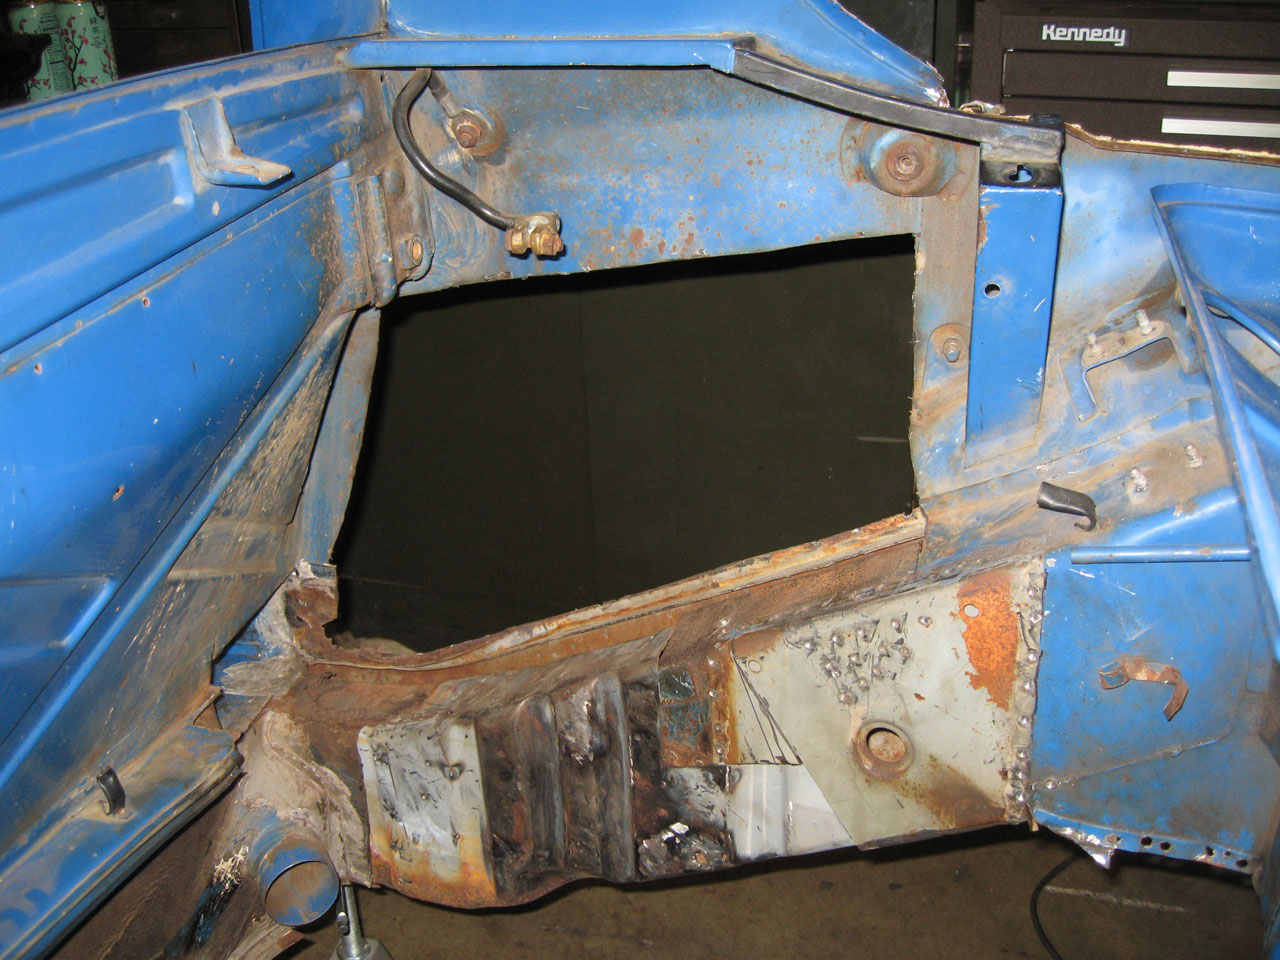
Posted by: nathansnathan Dec 5 2010, 05:26 PM
This pic is from the original eBay photos
A bit of probing with my big screw driver and some preliminary cutting and I made it look extremely scary 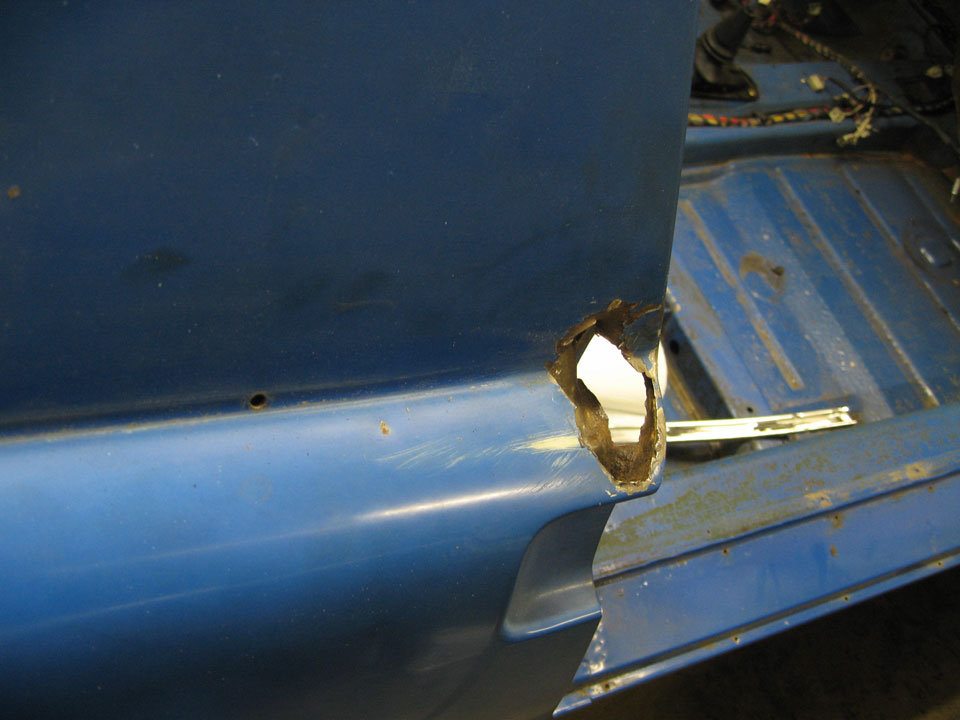
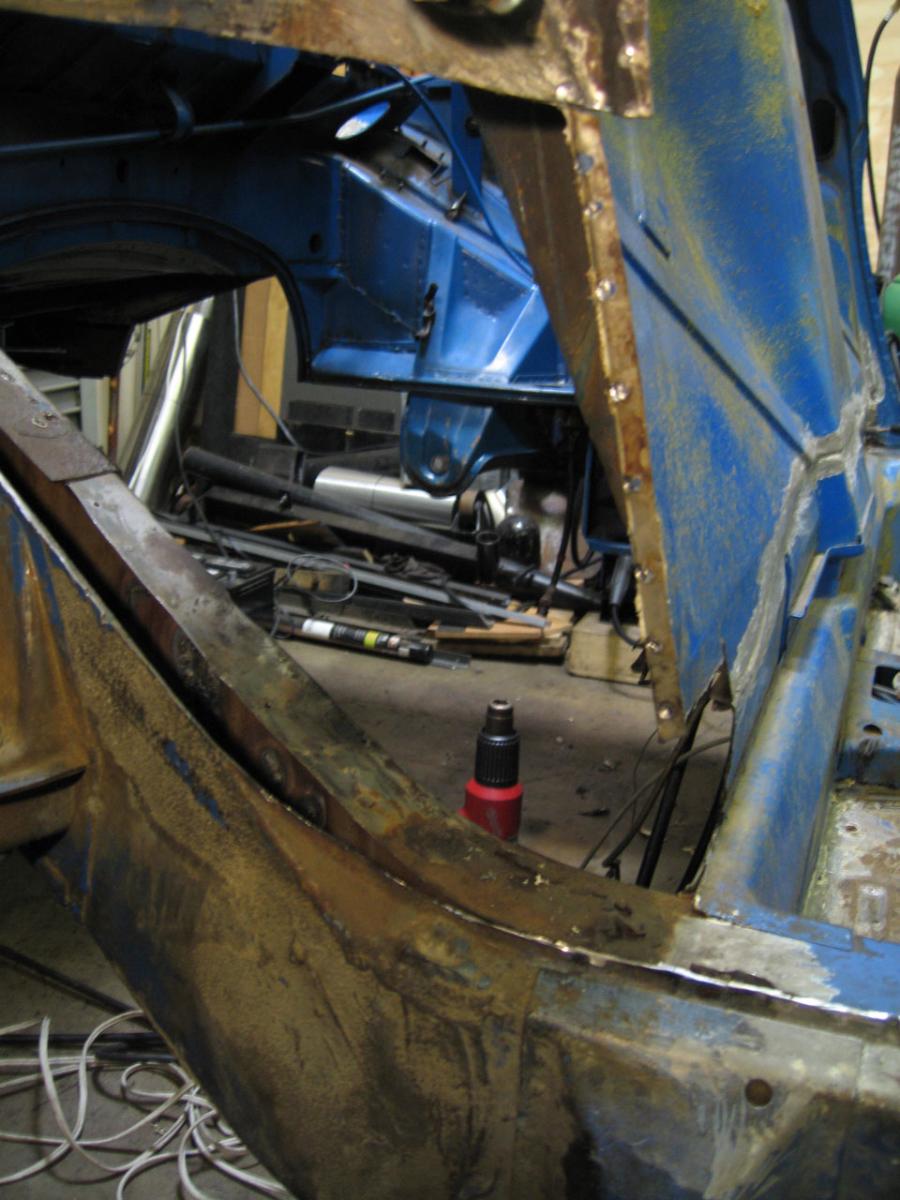
I contemplated all sorts of ways to handle this mess and, probably contrary to what anyone else would have done, decided to take off the whole fender, sail panel included.
Many spotwelds drilled, I took my time with it, taking breaks between the sections of drilling, and then the prying/ pulling. All told it probably took me 7 hours to get it off.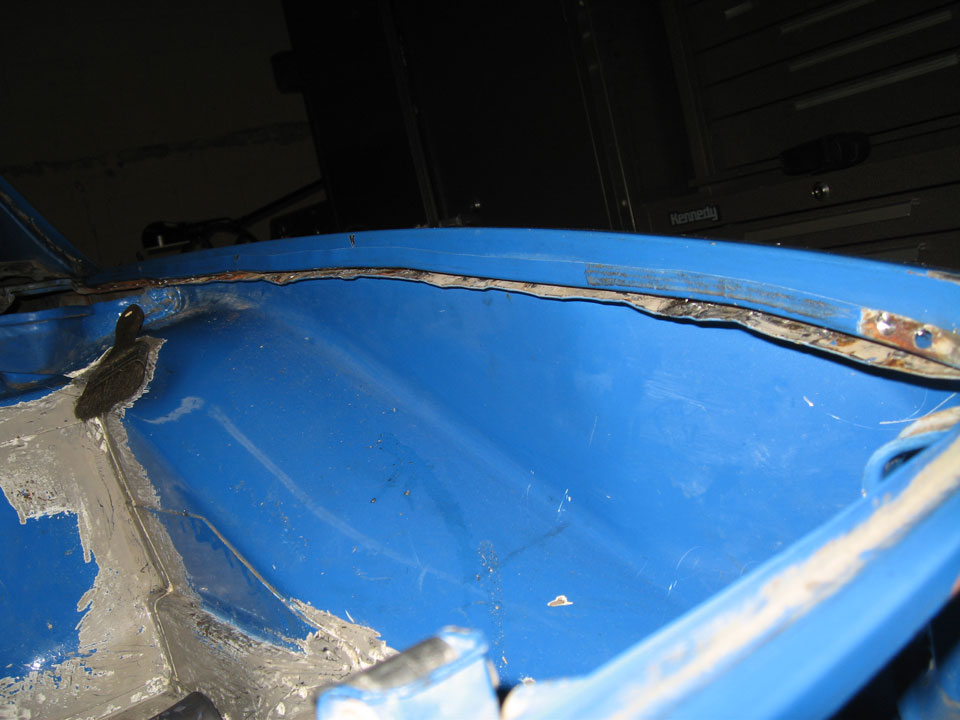
exposing the crustiness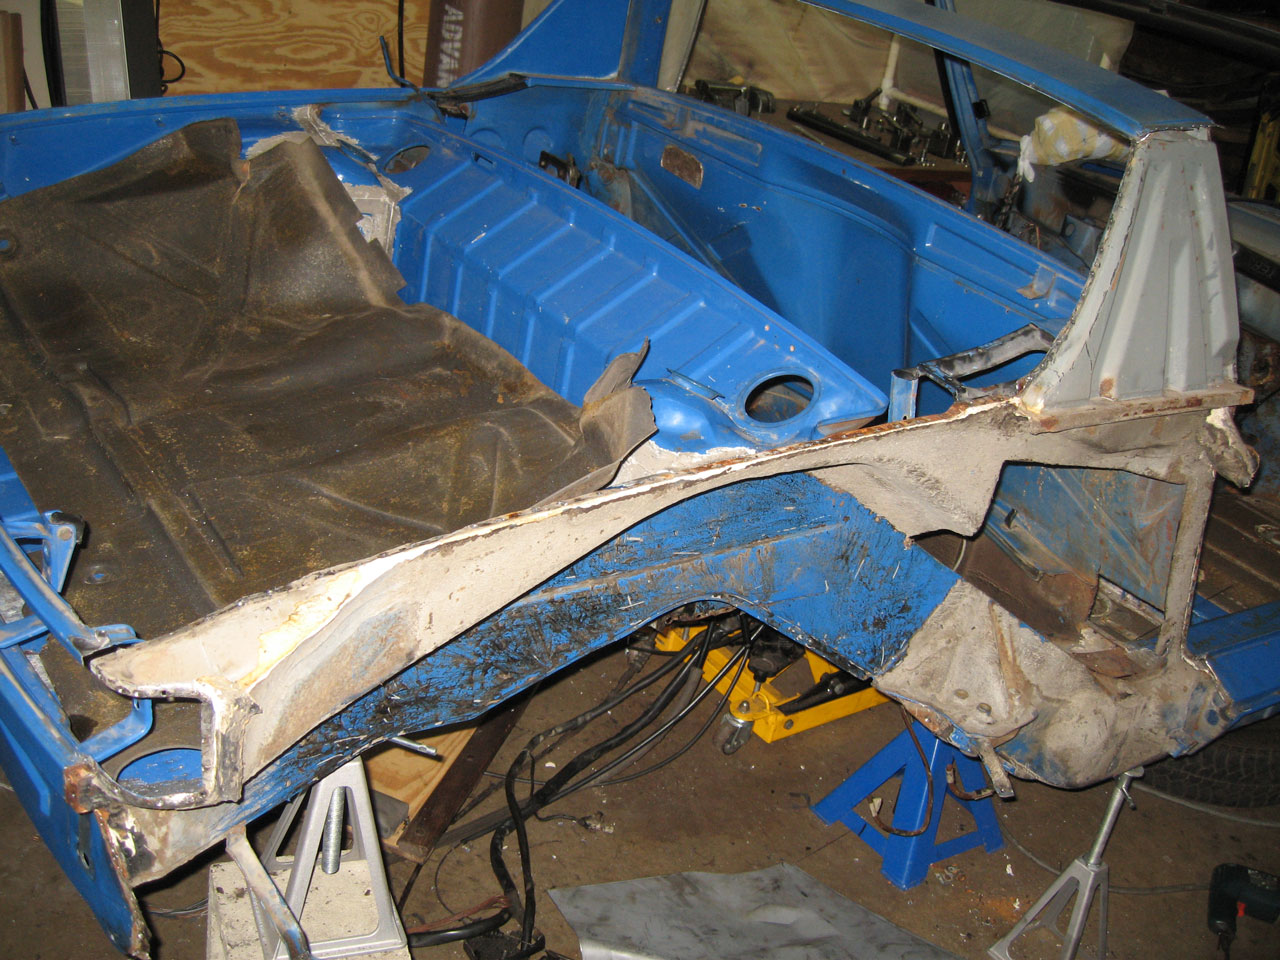
This is back by the tail light. It looks like the factory used expanding foam between the pieces there. 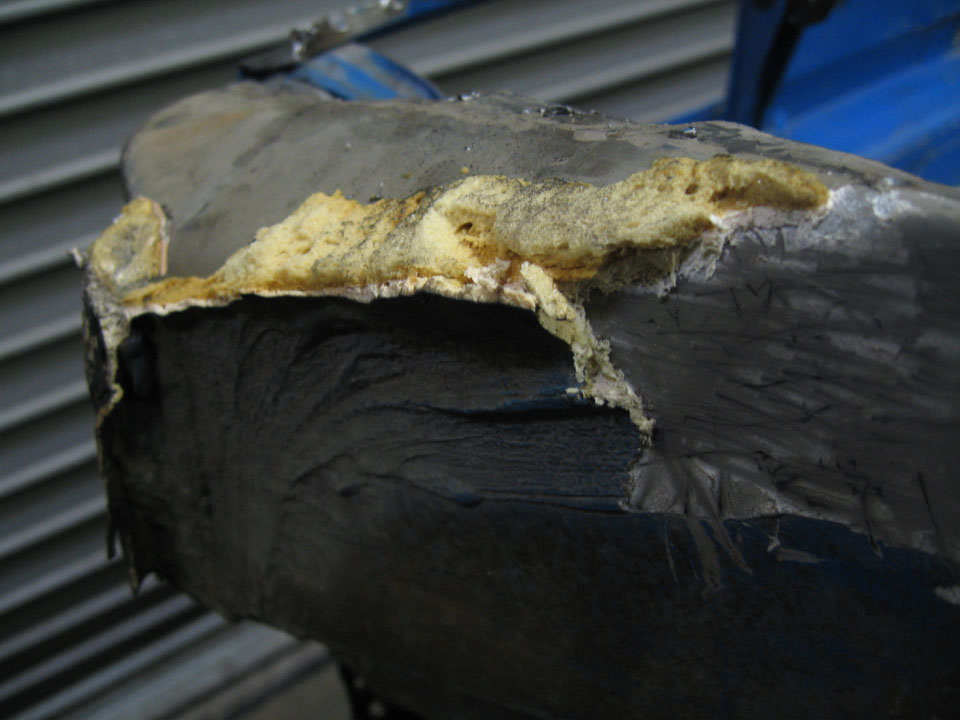
And then there's like weatherstrip foam between the sail panel and the inner rollbar, still attached to that lip.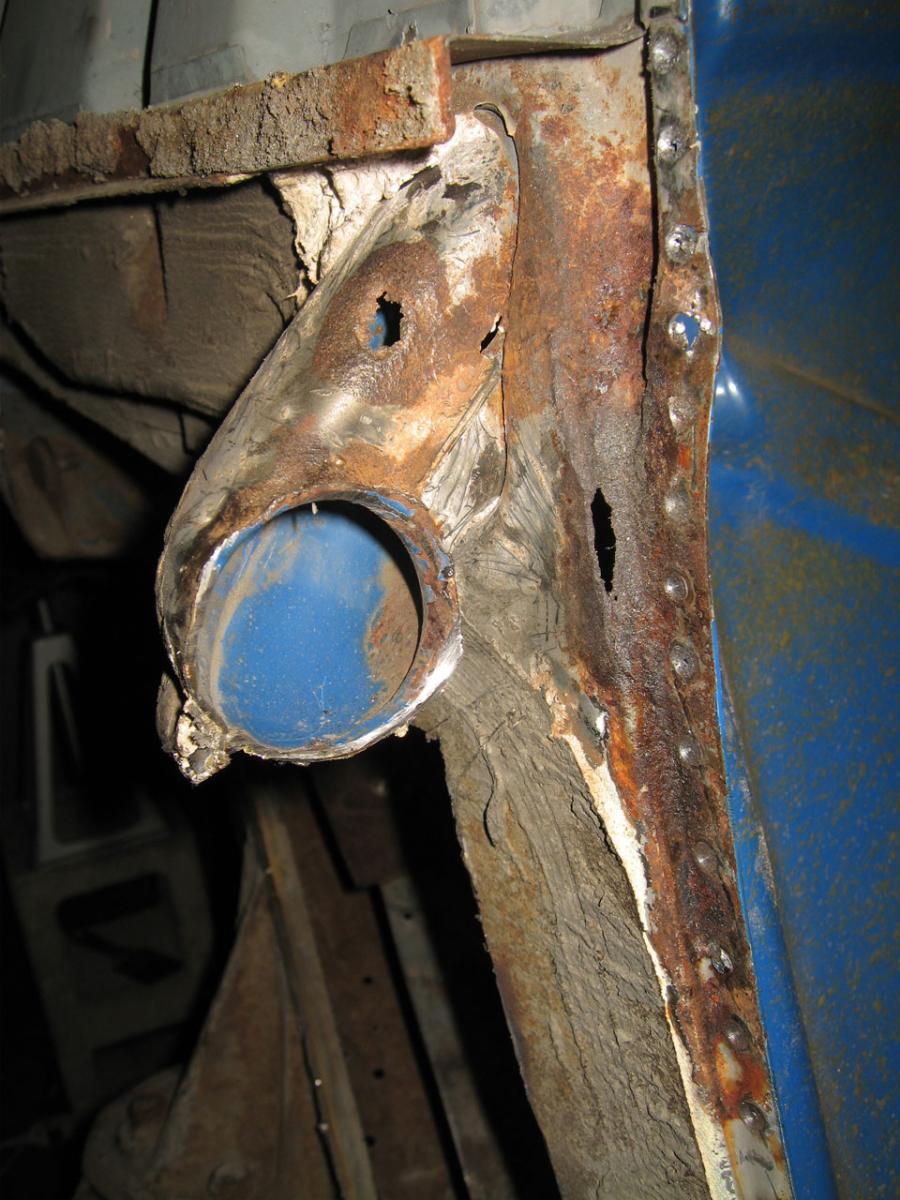
I'm going to have to get real good at the metal working pretty quick to handle all this. 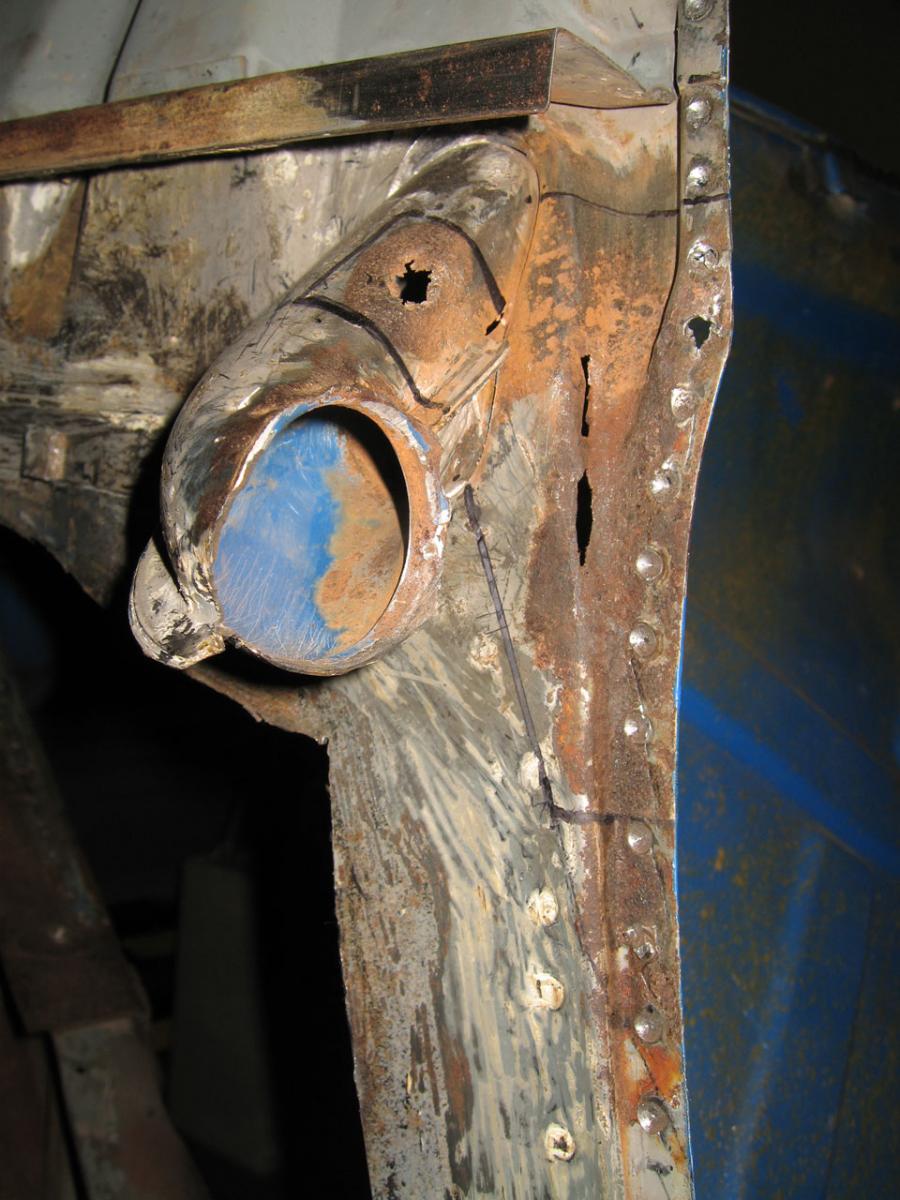
Here's the inside of the fender itself, still attached to the door well.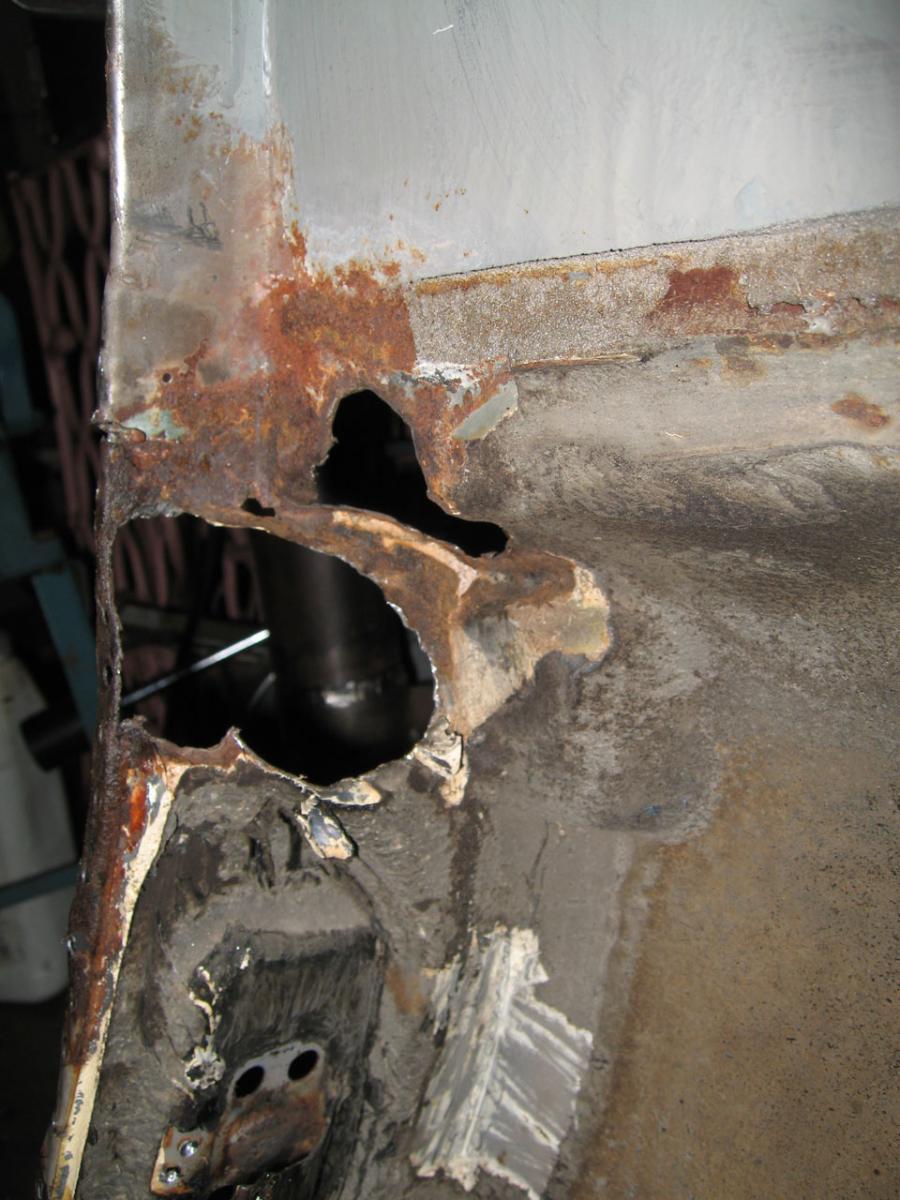
More 'deep end' metal working to be done there. I'm lloking at getting a shot dolly and some planishing and ball peen hammers. I've read the Martin "key to Metal Bumping" book and I've got a set of dolllies and hammers. I was trying to get an anvil but the guy flaked out on me.
The guy down the street was telling me I need to dip the car to get where I want to be, but I have some issues with dipping it, not the least f which is price, and so taking the car apart to this level seems to me the way to go. I can do the work, inspect/ get at everything for treatment. I'm looking for a portable sand blaster pot that is NOT from harbor freight. That and construction of a drop cloth-constructed paint booth look like some of the bigger hurdles right now.
Here's the fender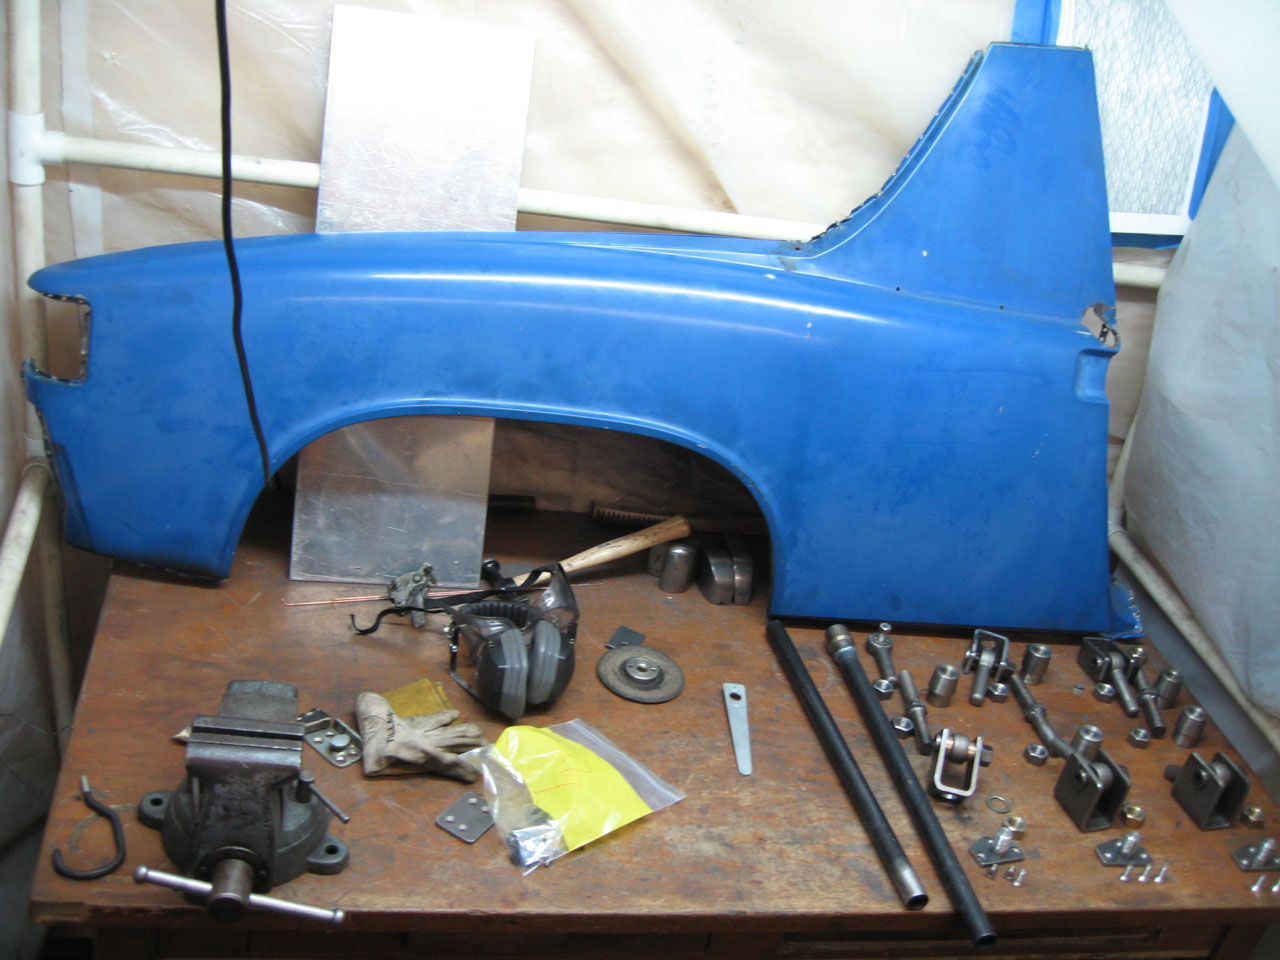
Posted by: Andyrew Dec 5 2010, 05:42 PM
Nice work!! Looks like you have quite the array of tools and can actually get this kind of rust repair done!
Posted by: realred914 Dec 5 2010, 06:44 PM
I started this, a documentation of my build progress, as a blog on the 914club, but I'm not happy with how the order of posts is reversed, the most current being at the top - it ruins the epic-ness, not starting at the beginning.
Also 914club is kinda dead and I would only post over there because my view kept reverting to list on world and I couldn't figure out how to see all the forum responses at once for awhile.

So that's why I'm starting this here.
I've been working on it for the past 5-6 months.

uhm, a "420" engine and another post isee recently about a "cracked" crank, maybe we need narcotics annonammus?
Posted by: nathansnathan Dec 14 2010, 08:32 PM
Moving slowly along, some more work on the door braces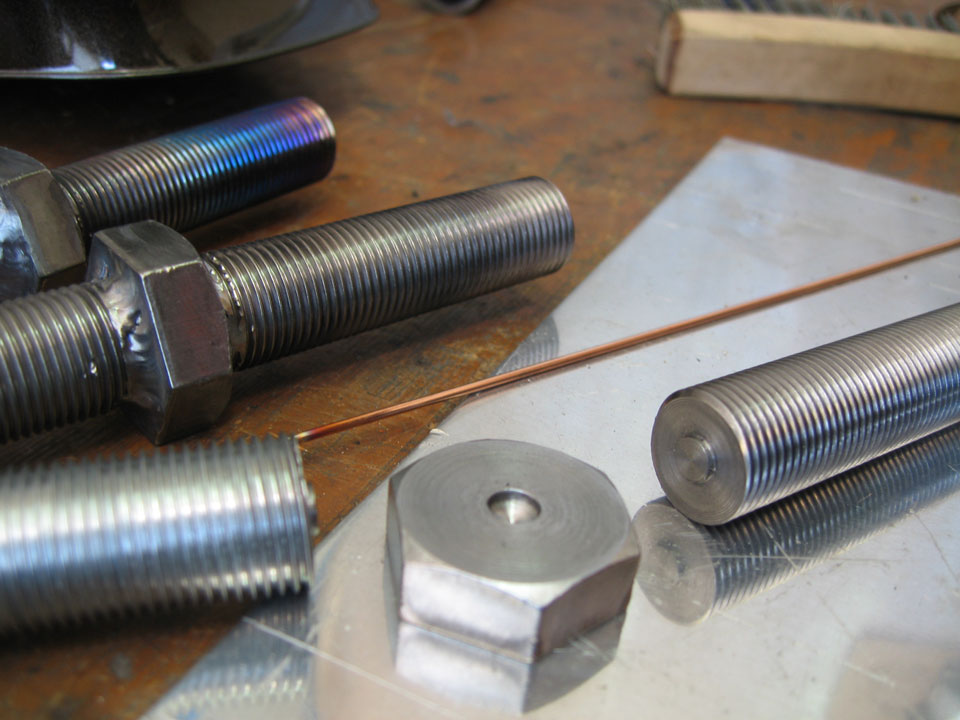
Getting better with the torch. I do wish I had the smaller torch, a 9 I guess.
I got off the front suspension; really easy surprisingly... except the brake fluid that got everywhere.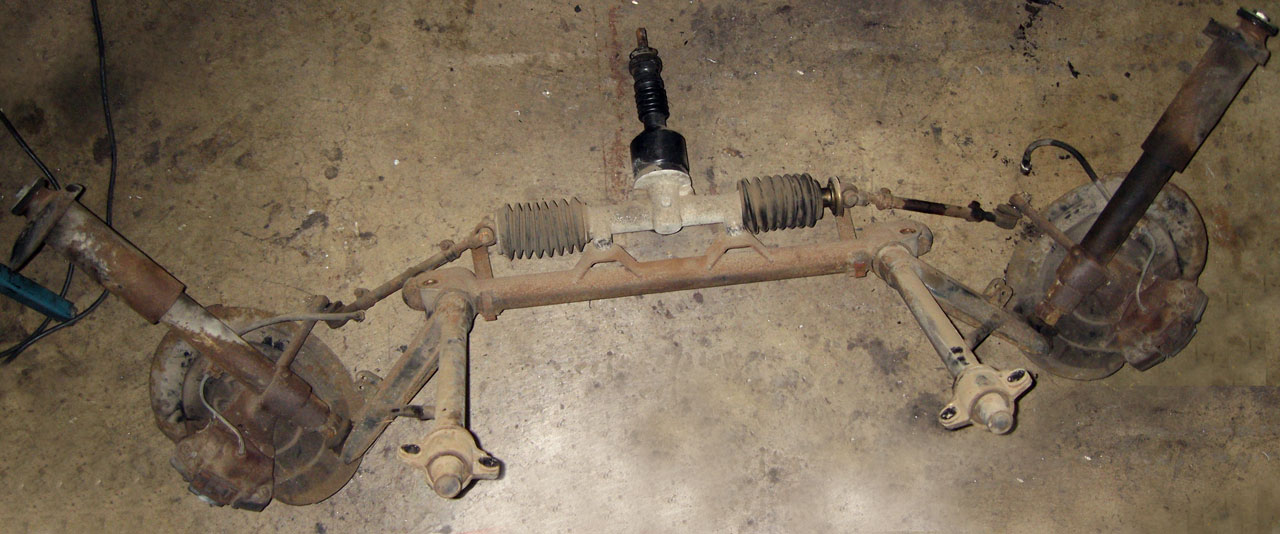
And the wiring Harness, what a challenge that was to overcome, getting that out! That's a gauge cluster in about 10 plastic grocery bags, wrapped in masking tape. 
The struggle to envision the completion of the hell hole repair is ... also coming along. 
An unconventional approach undoubtedly. I want to take the floor pan off but I have to wait until the long and fender are together before that happens, and it still seems like a challenge to support it even then.
For now the plan is to take out the entire inner long, heater tube with it. I'm mustering my strength, waiting for more jack stands to arrive before I dive in.
Replacement panel sculpture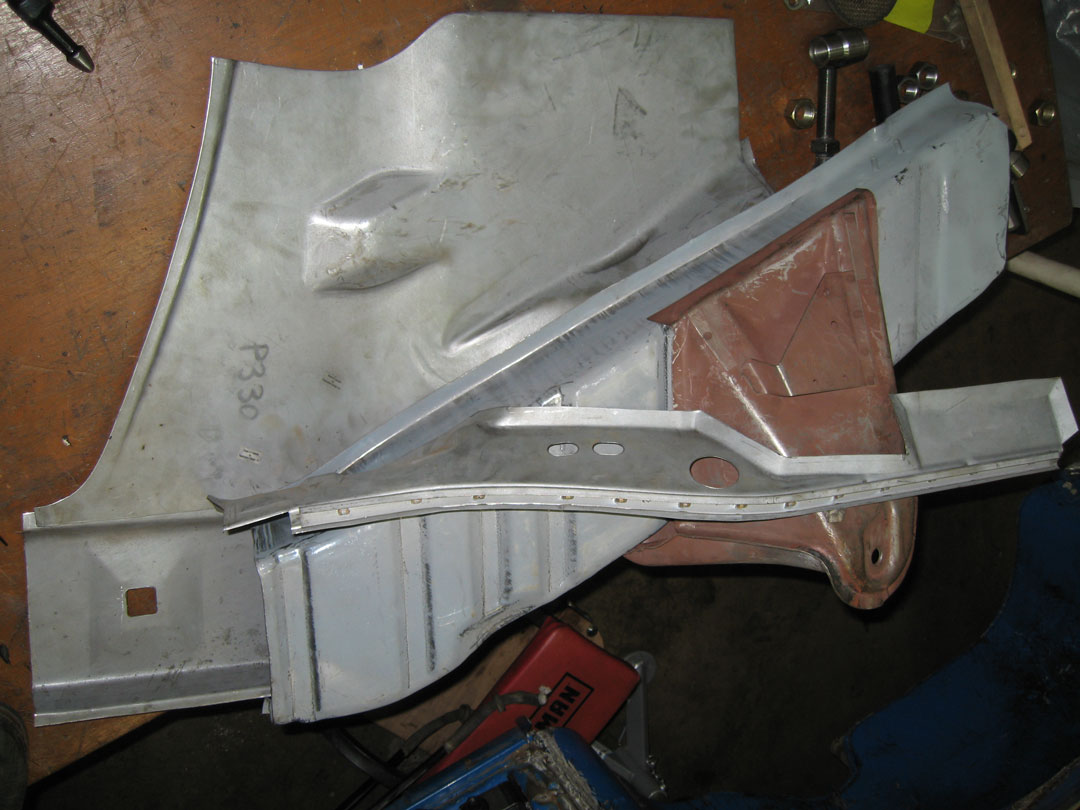
and my suspension ear wrinkle fix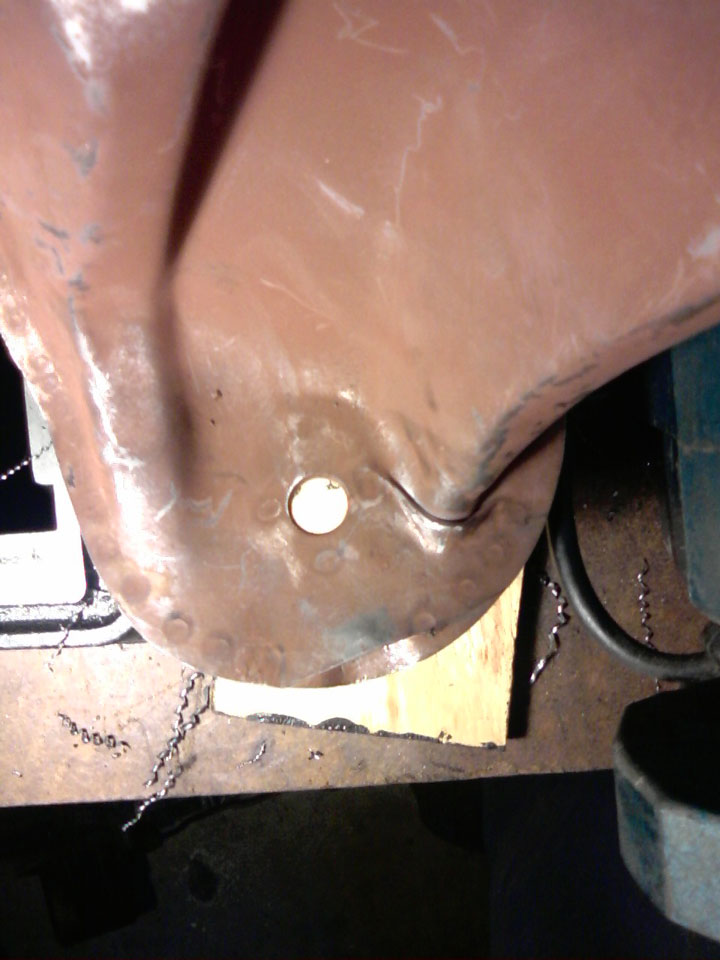
Inside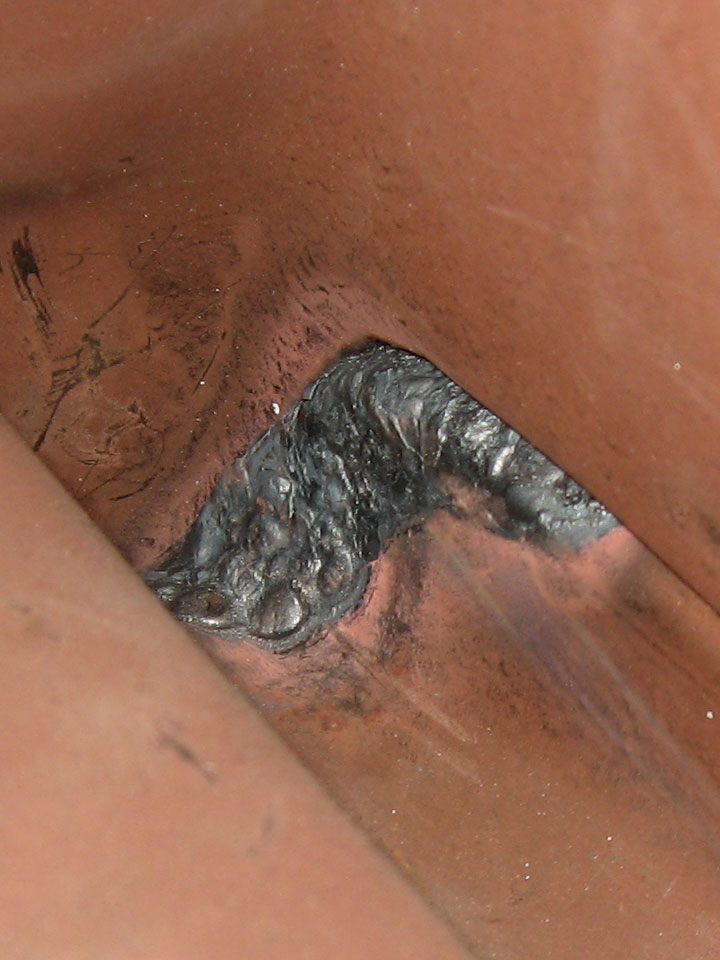
I' think I will smooth the welds in there a bit , as it is a drain passage there. Access could be better but do-able.

Jackstands... and a sand blaster. ...need sand blaster  .....
..... ![]()
Posted by: kg6dxn Dec 14 2010, 09:56 PM
Nice welding! 
I wish my skills were that good.
Posted by: nathansnathan Jan 9 2011, 11:05 AM
I want to keep the thread updated.
I went on vacation, up to the bay for about a week over Christmas.
Contemplating removal of the passenger inner long in its entirety without removal of the outer the whole time...
I'd got these additional jack stands for the inner long removal. It seems to me that you can only really have 4 jack stands actually holding up a car safely, unless additioanl ones are the leveling type. I found the black ones online. I trust them over the little aluminum ones to be sure.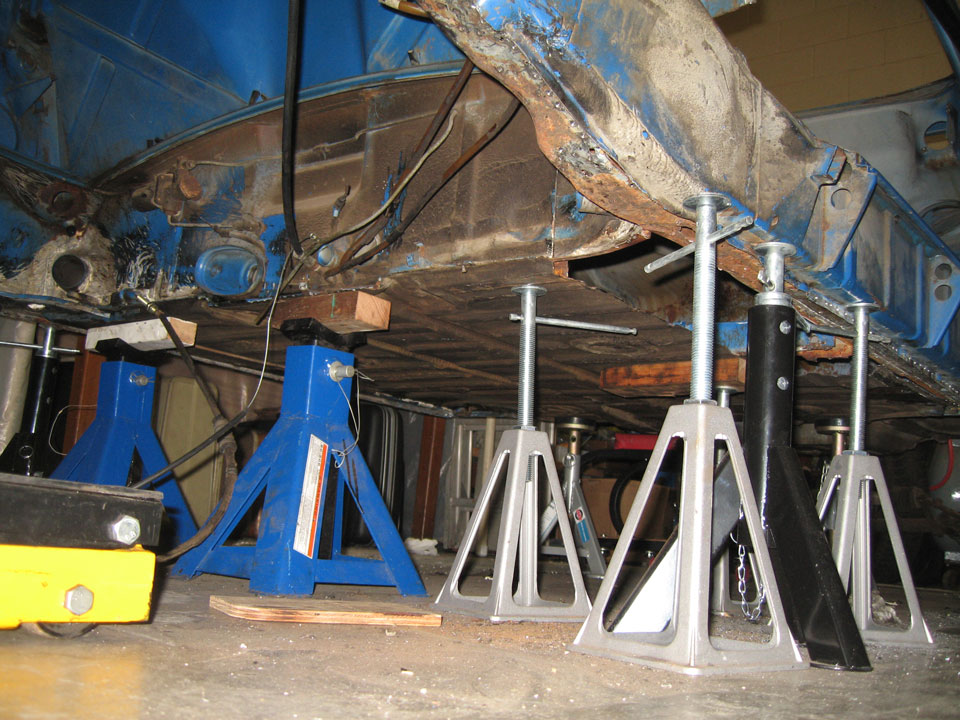
The task at hand, it took me 2 days after work drilling out spot welds, the upper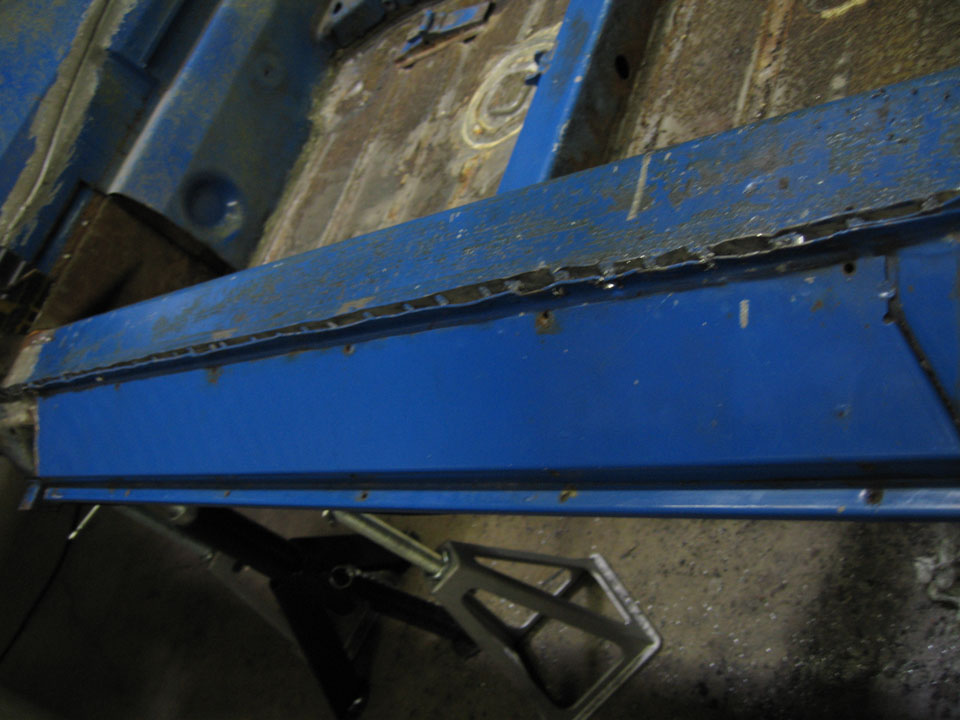
and lower, many many spot welds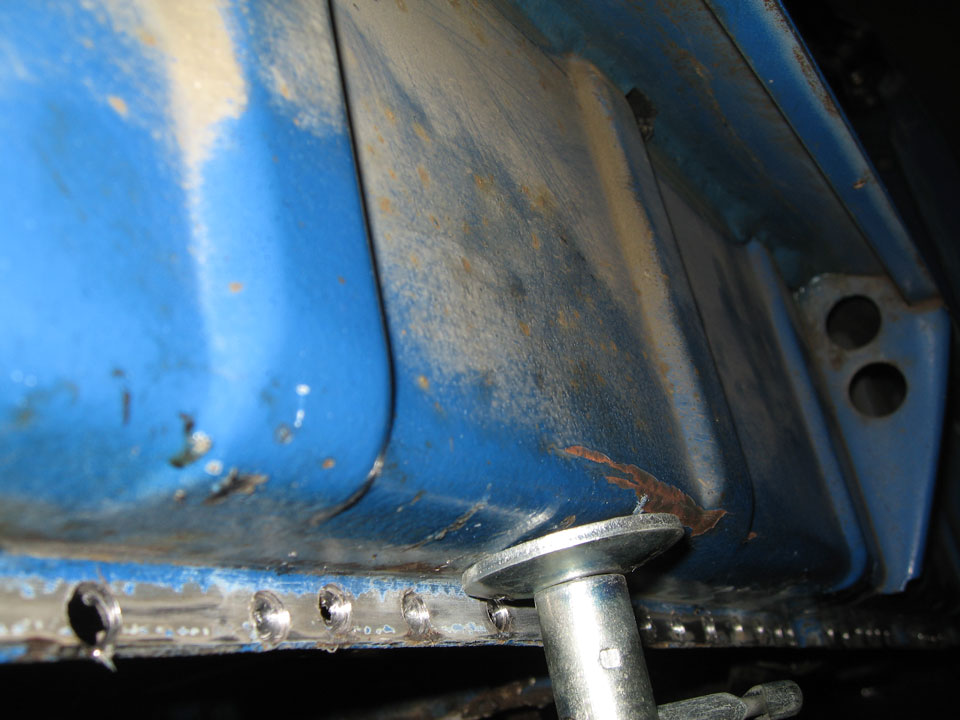
I took my time with it. It's single layer just in front of the lower p seatbelt mount bolt forward to where the front door frame swoops up. Tricky to separate the layers there. I thought of nicknaming the car The Blue Onion... for some reason.
More, grinding at the mig welds that hold it to the front firewall/ rear of the passenger wheel well - complicated by the heater tube at the front being in the way of 1 particularly ( had to do some cuttin' on account of that) 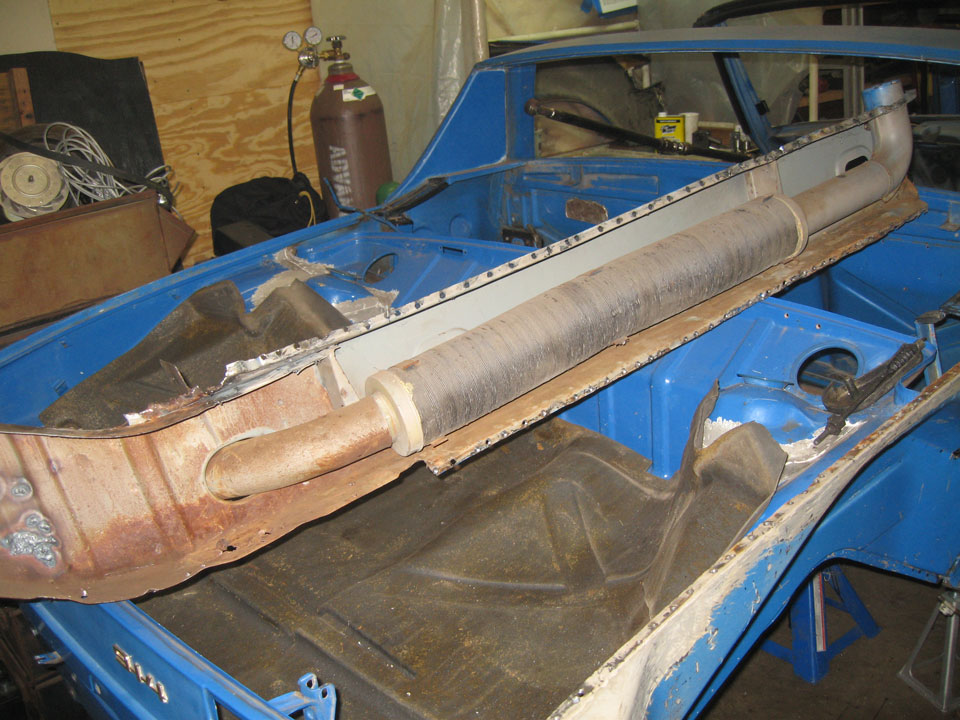
You can see where I tried to weld up some damage to the inner inner long there with all that rust. I guess just practice or wishful thinking that was...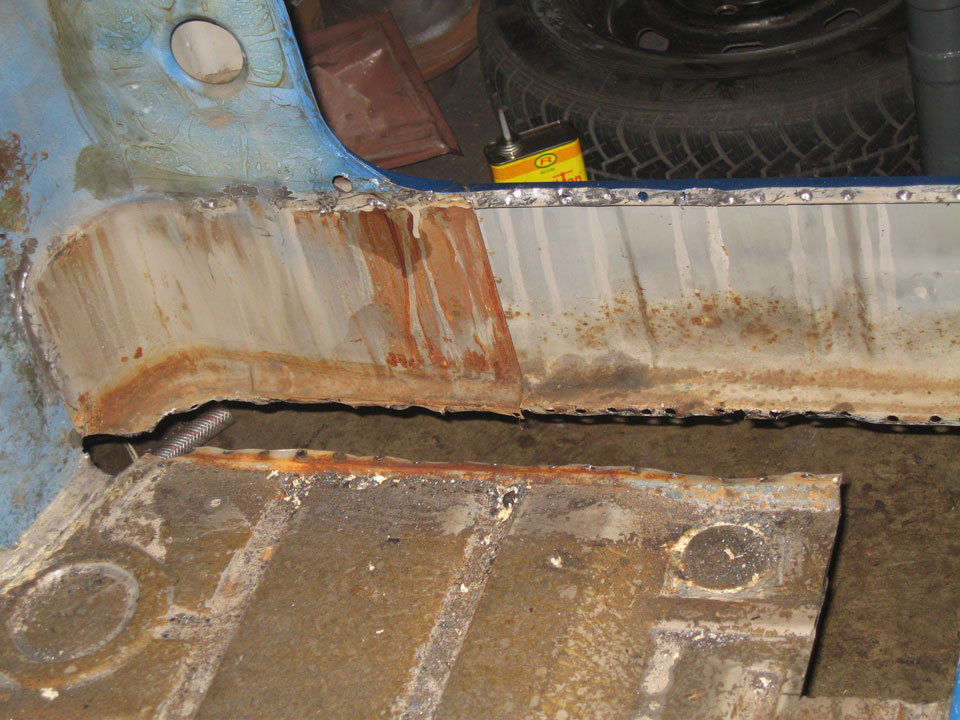
now that's a hell hole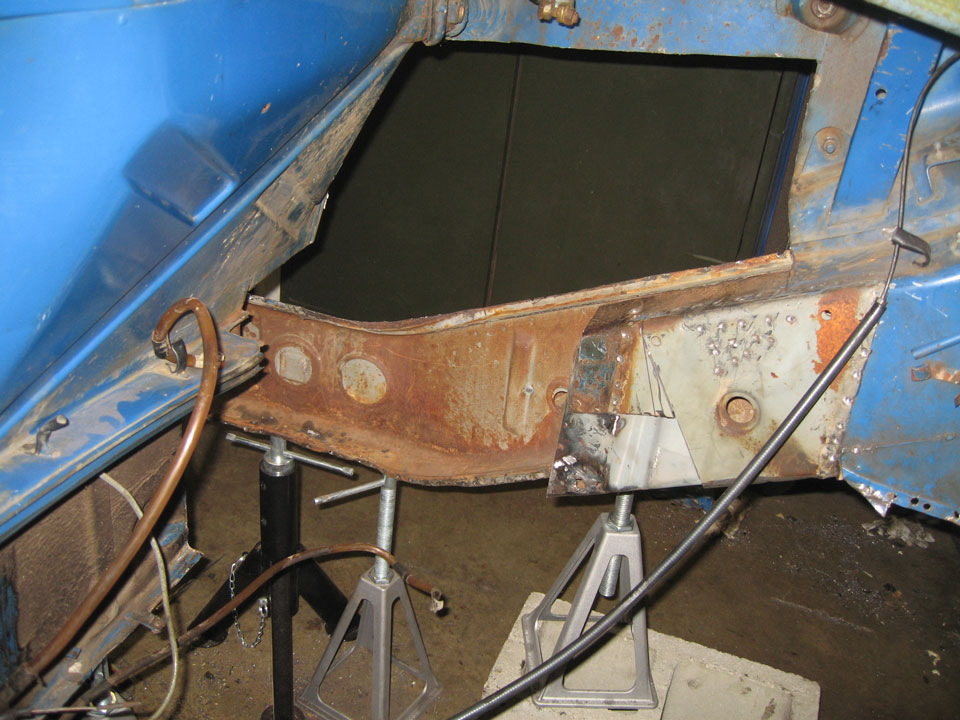
Can't wait to start putting it back together.
Posted by: silver74insocal Jan 10 2011, 11:15 PM
 you werent kidding about going deep!! keep up the work and pics . its inspiring
Posted by: porsche_dreamer Jan 11 2011, 04:43 PM
I have to say good job! Keep up the  . Ill be watching this one.
Posted by: Root_Werks Jan 11 2011, 04:48 PM

Wow!
Looks like another 914 will be saved from the rust monster!
Posted by: Dr Evil Jan 11 2011, 05:06 PM
Ya, balls deep. Yikes.
Posted by: nathansnathan Jan 31 2011, 10:49 PM
Balls deep, indeed.
Thanks for the comments, guys.
I almost got the impression I'd gone past the line of it being scary. The surface rust in the outer long isn't flattering. I sanded a bit of it, quite a lot of red powder, but I think I can save it. I put some rust dissolver phosphoric acid gel on it. 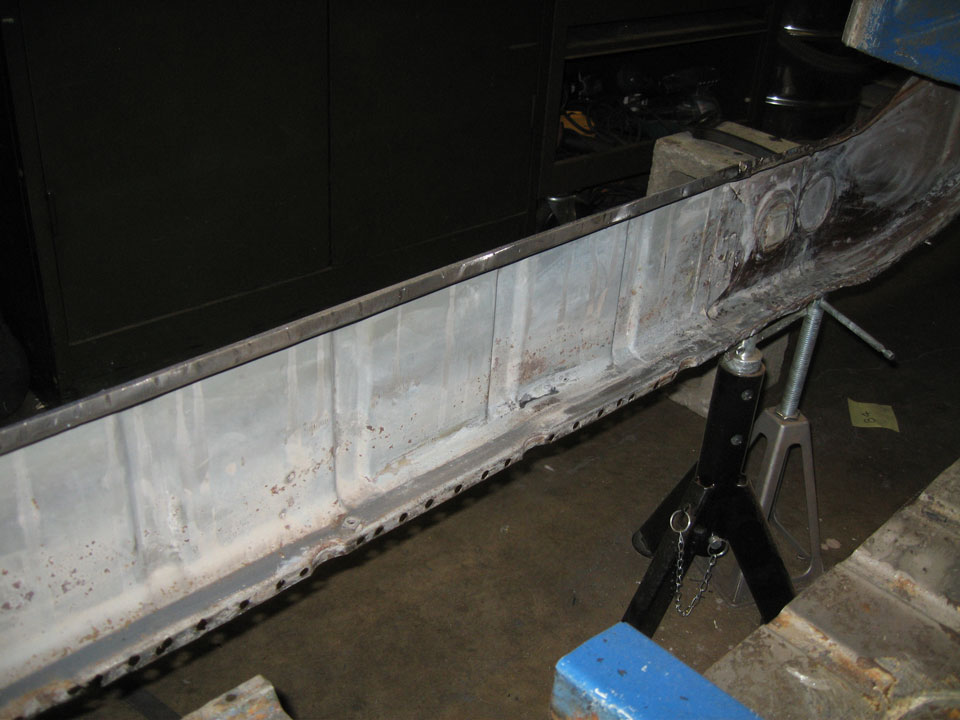
I welded up the places where I drilled too far and smoothed em out. I had to do some pretty good metal adding as it did get kinda brutal.
I need to get media, I'm thinking glass bead so as not to make it any thinner... I have acquired this.

I can't wait 
I got a gun to shoot, I think I'm going to shoot both the primer and the paint with it. My friend said I should get like a $40 gun to shoot primer with and use the good gun only for paint. It's a Sharpe Razor HVLP gravity feed, 1.5mm air nozzle so it's set up to do both. .. 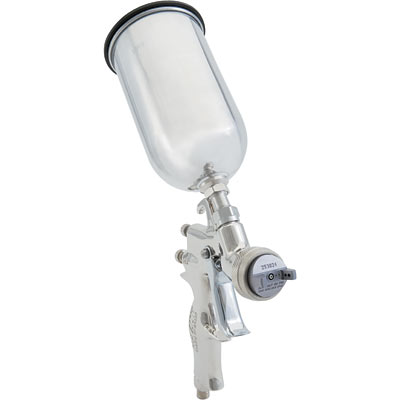
That is another story, still figuring it out.
The meat and potatoes of this post was to be about my metal-working conquest. I finally started actually fixing something, instead of just taking things off. Doing the hard stuff first, 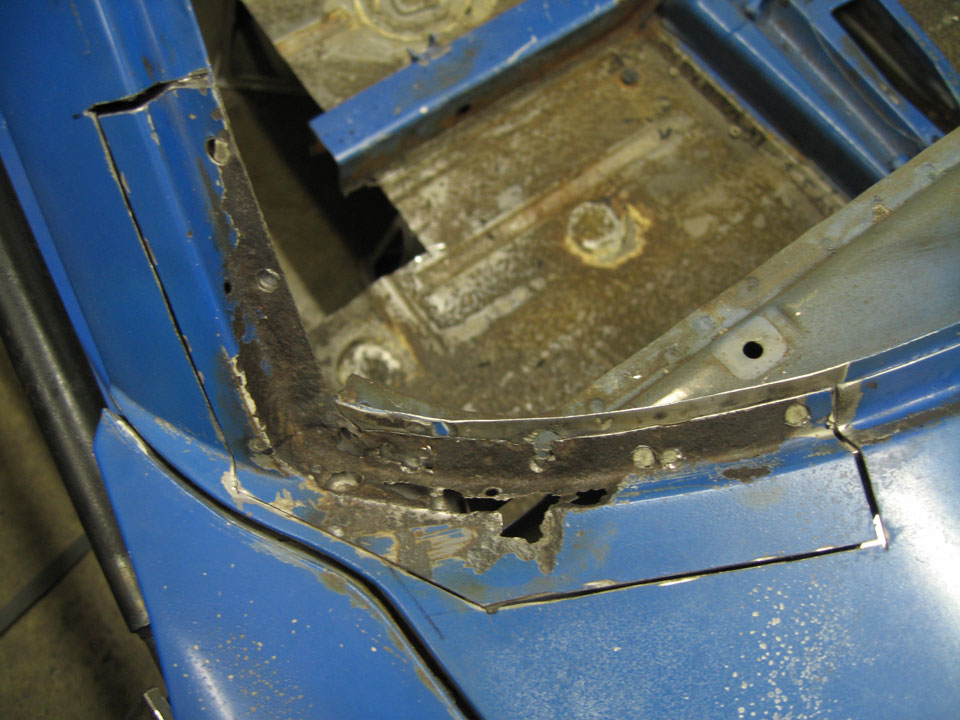
Oops I drilled through. I was supposed to be fixing like issues on the side of my firewall today, but I'm actually ill, sort of congested in my head (on one side only?)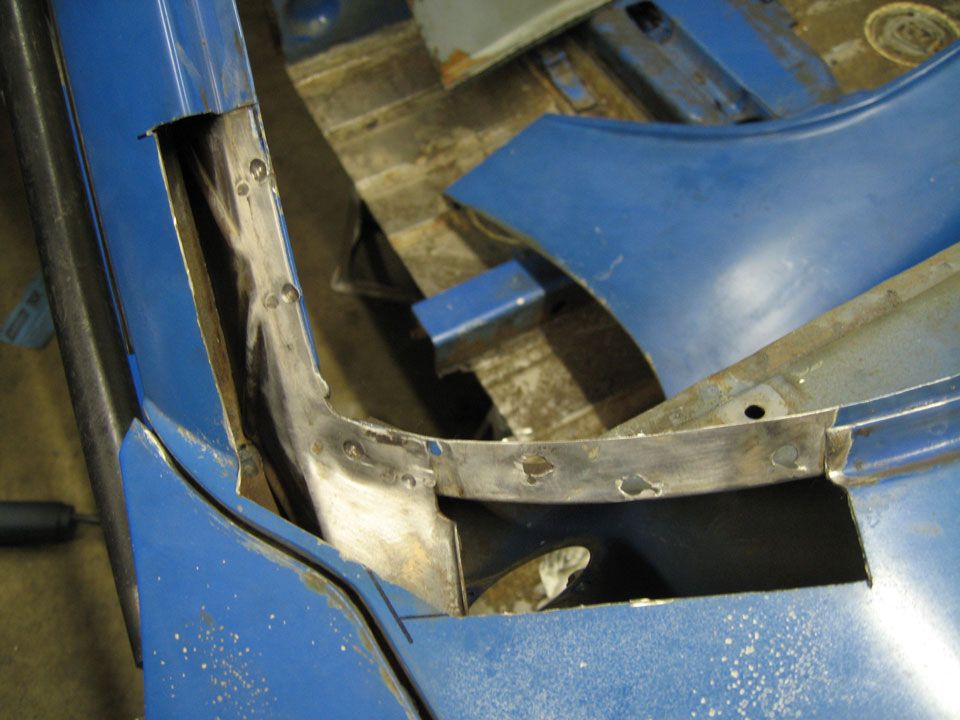
Another story is about how I have 3 driver doors and none of them will work for me. The original one, the skin is f'd. I got another one at a junk yard. Have I told this story? It ended up being a late door because I didn't know what to look for. I decided against using it for the various reasons, and I got another door. This kind guy, I think his name was Brett gave me (as well as the lower pdash pad previously mentioned) a perfect driver early door. Now the problem is that the bottom is out by an inch and a half when the top is about right, this at the back. I'm leaning toward removing the skin from the tweaked early door and putting it on my original door frame, though I haven't committed to that.
I've already removed the original door skin, but I'm saving it for part of the hellhole, so I've cut up the late door, too. Sorry if this peeves anyone. I was a bit leery of putting some crap metal home depot alloy steel in there, so ...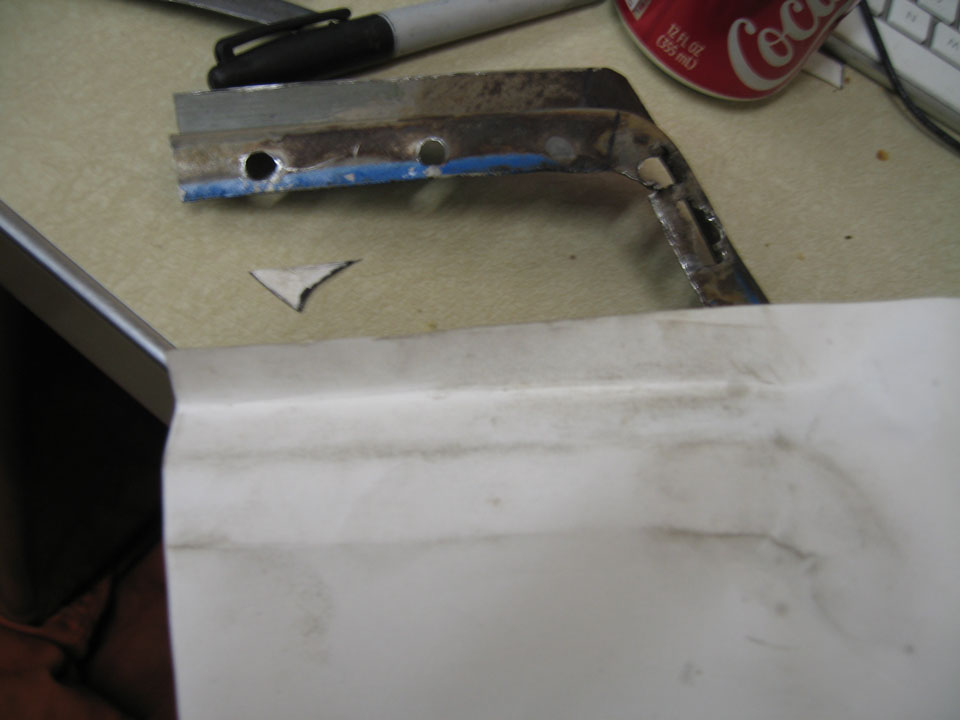
Use of dirt to form a paper template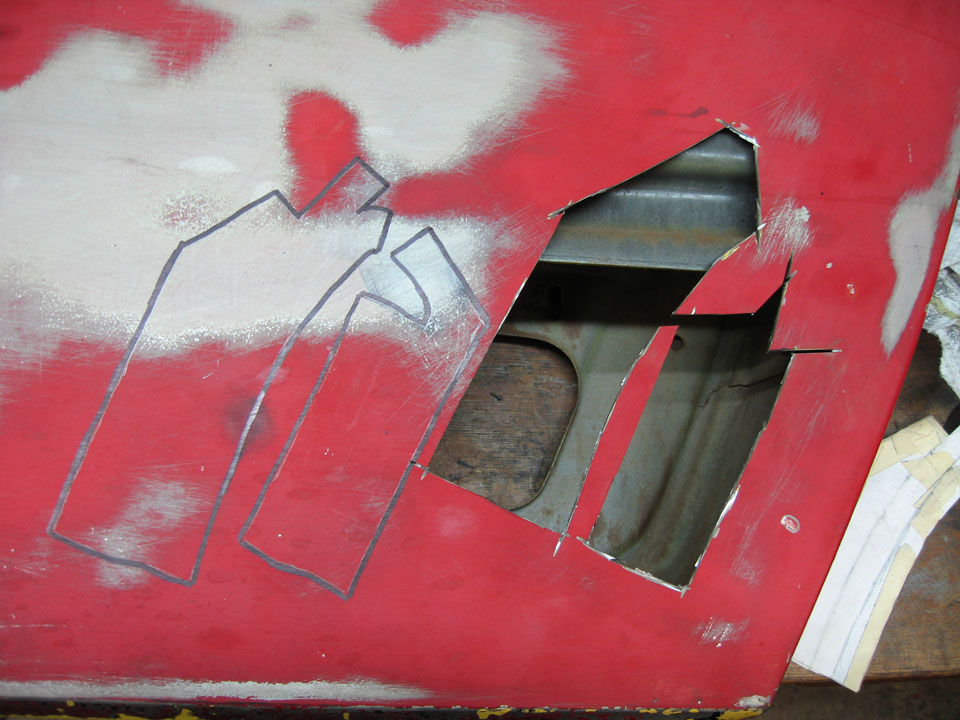
A little foreshadowing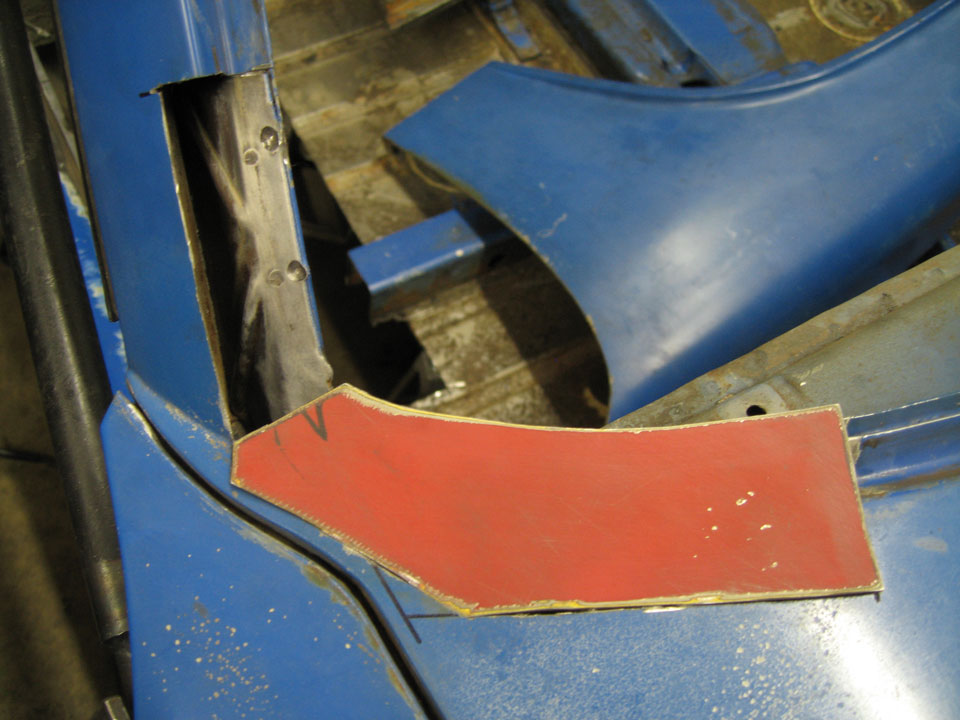
I figured out on the 2nd attempt at this that chemical stripper will leave you with more metal than removing the paint with a wire wheel.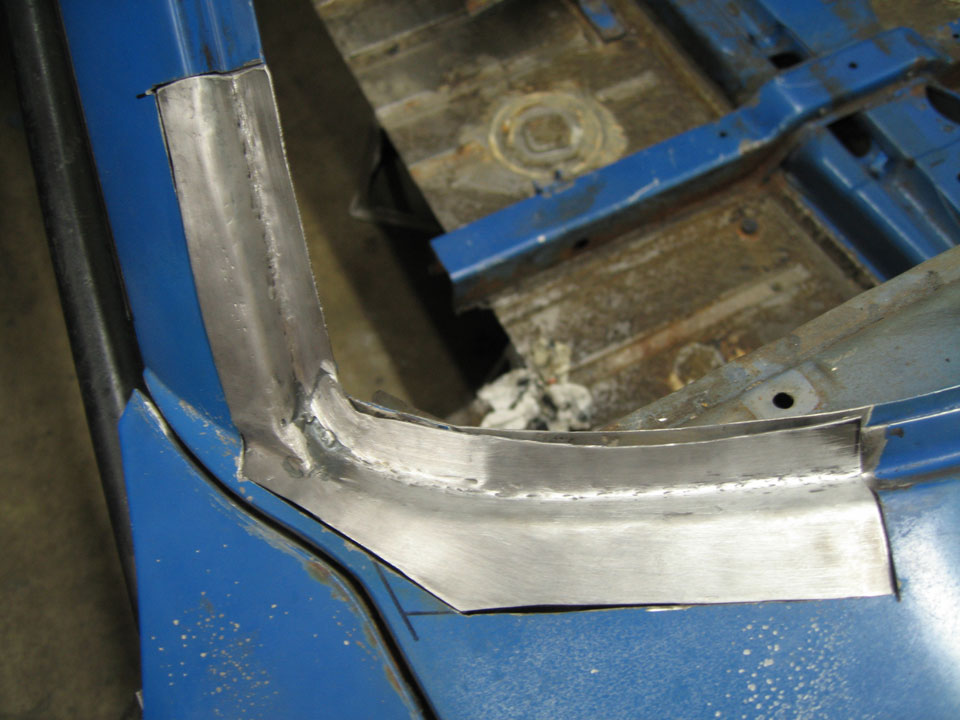
Alas, it got a lot uglier before I abandoned it. I ended up grinding down that lump on the column part and going right through. It was too 'thin and thick' everywhere, and I decided to o it again. Took me all day and it's still not done.
The template for mk II involved masking tape, and I did the joint of the 2 pieces a bit better.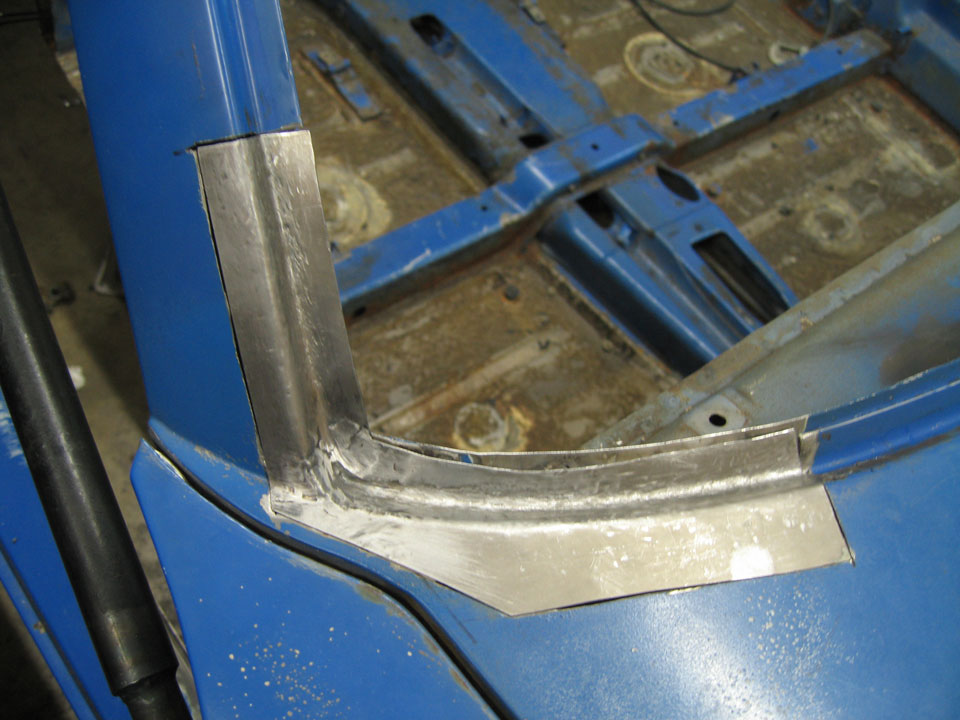
A bit more to do. I'm waiting for my girlfriend (no longer ex - I got her back, the one from the dream ) to send me her drummel tool to more precisely take the welds in the nook down. Hopefully there will be no need for mkIII.
Other happenings, sort of unrelated, I was standing there looking at her (the 914) thinking, I'm gonna have to get the cross support under the passenger seat welded to the inner long (that I've taken out) before I take out the floor pan, when from the sky 2 feet in front of me drops this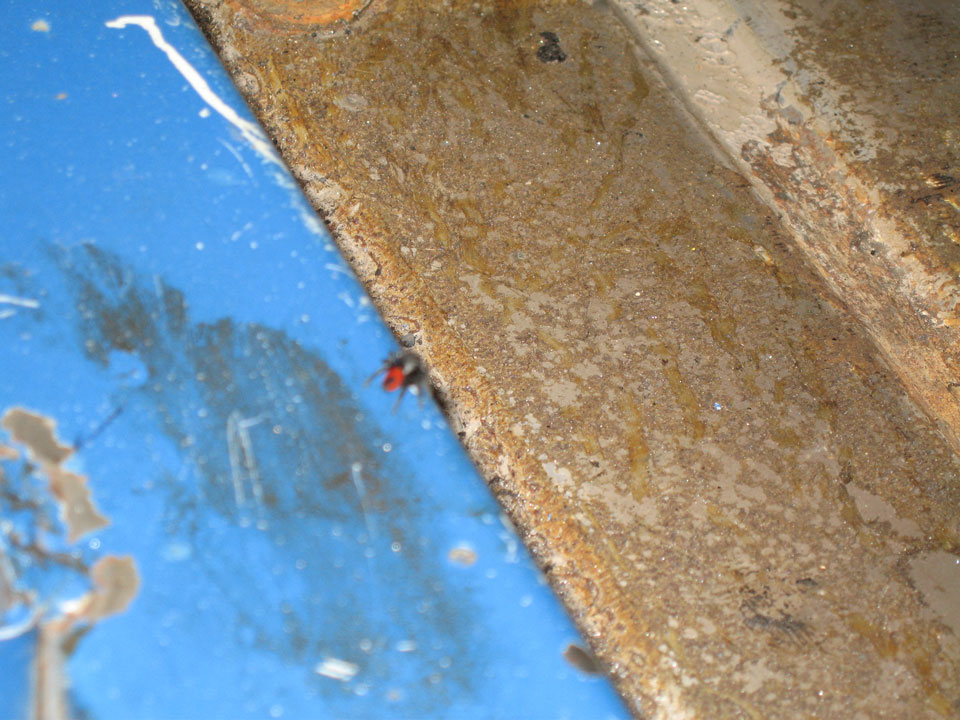
right on to the support with a sort of thud/ chink. I probably should have whacked it, because while I was busy taking this great picture of the adhesive residue on my floorpan (note blurry black widow?) He crawled into my tunnel (hopefully) never to be seen again?
Posted by: Zimms Jan 31 2011, 11:57 PM
What did you use to cut around the windshield frame? Cut off wheel, sawzaw, or airsaw?
Thanks,
Mark
Posted by: nathansnathan Feb 1 2011, 11:08 AM
What did you use to cut around the windshield frame? Cut off wheel, sawzaw, or airsaw?
Thanks,
Mark
I had to do a "kiss cut" on a lot of it, as not to go through both layers. The cutoff wheel on the mini pneumatic die grinder is what I used, a .040" width disc. It doesn't have a lot of balls, and and it seems ridiculous how long my compressor has to run to use it, but it is unmatched so far at the delicate stuff, cutting and grinding-wise. They are 3" discs but they work best once they're down to about 1 1/2".
Turns out my "illness" congestion, whatever I thought it was is actually a piece of metal in my eye. I'm trying to find a doctor who will help me take it out. I've been to 2 so far this morning. Hopefully I can get this resolved.

Posted by: Zimms Feb 1 2011, 11:16 AM
Thanks! Great looking cuts.
Sorry to hear about the eye.
Posted by: Andyrew Feb 1 2011, 11:33 AM
Your eye doctor wont do it?
They have to drill to get the rust out. BTDT.
Your eye is going to HURT LIKE HELL after...
Posted by: nathansnathan Feb 1 2011, 03:09 PM
I'm gonna have to make a firmer point to use goggles and not just glasses when I'm grinding. I made a point of it last time this happened But yes a firmer point this time.
The 3rd place was a charm, except I learned after that they don't take my medical, which means they're going to cut into my 914 fund, dammit
The guy had an impressive microscope he focused on your eye while your head/ chin rested up against it. He got it in like 3 seconds with a pair of tweezers. I'd tried it with my tweezers, too earlier, but I guess you need the microscope.  It still hurts, though. Maybe just time to heel, we will see.
Posted by: Andyrew Feb 1 2011, 03:35 PM
Did they drill any of the eye? My eye doctor is a family friend of mine and he picked it out in a second as well, BUT he also drilled some of the eye away as he said if he didnt it would rust and infect. Your issue could have been different than mine though.
I wear glasses and I always wear the goggles made to go over glasses now. They are very easy to see through and dont fog up as much.
http://www.harborfreight.com/splash-resistant-safety-goggle-97140.html
That and some ear muffs... Anytime im grinding anything.
Posted by: nathansnathan Feb 1 2011, 04:07 PM
I had read about the rust circle that will form in your eye if the shard is in there longer than 45 minutes when I was researching how to get it out myself. I would do a lot to stay out of the hands of doctors.
I mentioned it to him, and I think that's why he gave me a mini dropper bottle of antibiotic drops, 1 drop 4 times a day for 3 days.
I'm sure I'll be fine. I would break bones and not go to a doctor. Like a finger, they just splint it up and bill you $600-1500. I've been thinking about doing my own dentistry. It can't be much different than working on a 914, right? 
Posted by: FourBlades Feb 1 2011, 09:18 PM
Regular glasses will not protect you while grinding. I made that mistake years ago and went through the whole metal splinter in eye, get splinter cut out with scalpel at ER after waiting eight hours, then infection and rust ring cut out by eye surgeon a week later.
It's pretty hard to ignore serious eye pain when it hurts with your eyes open, hurts with your eyes closed.
Don't wanna do that again...
John
Posted by: nathansnathan Feb 5 2011, 02:08 PM
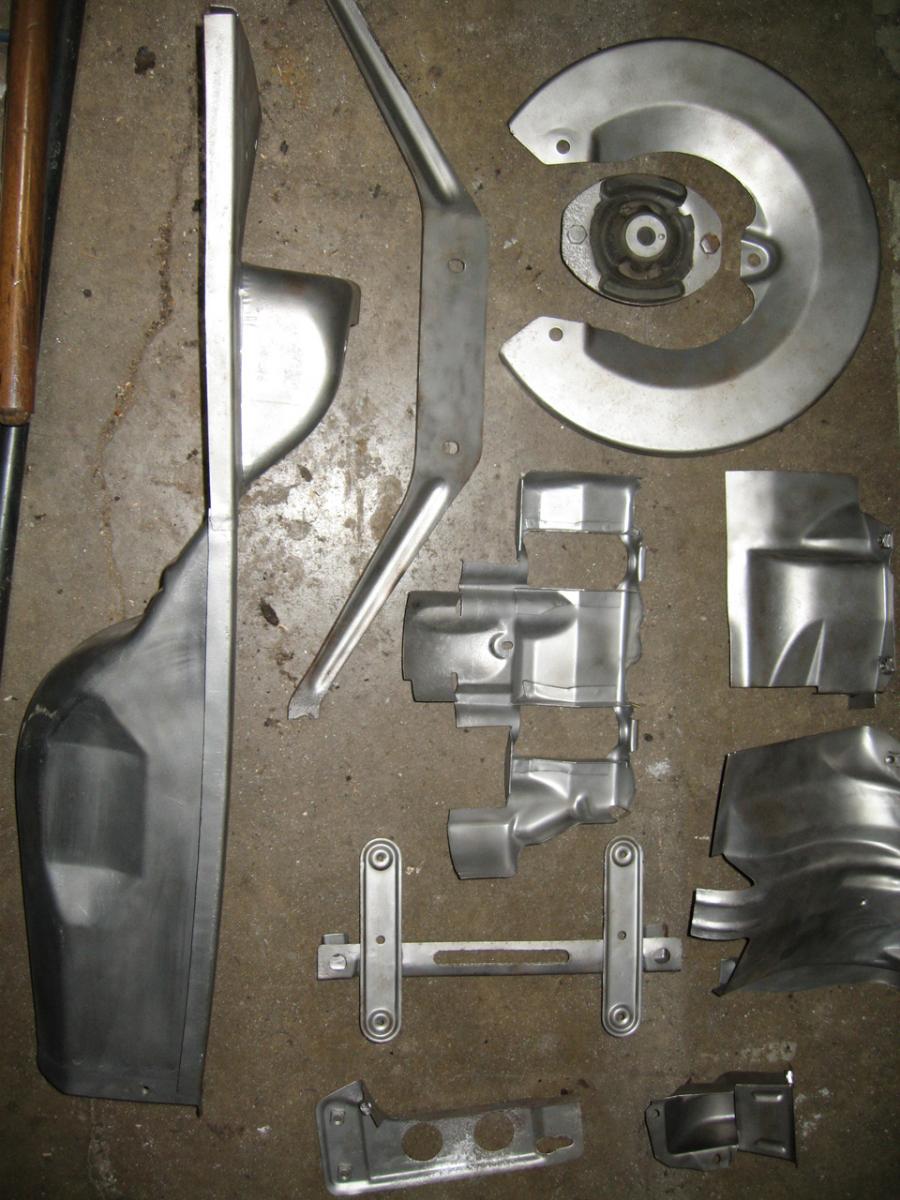
It's getting a bit cramped in here. I took some pics of my parts progress, but it veers in theme toward illustrating just how much room the parts off a car can take up.
Here's admission of my affliction, the disease that I have read about here. It started with my bus, so I've had it or a while. Actually just the sheet metal bits are 914 related in this one.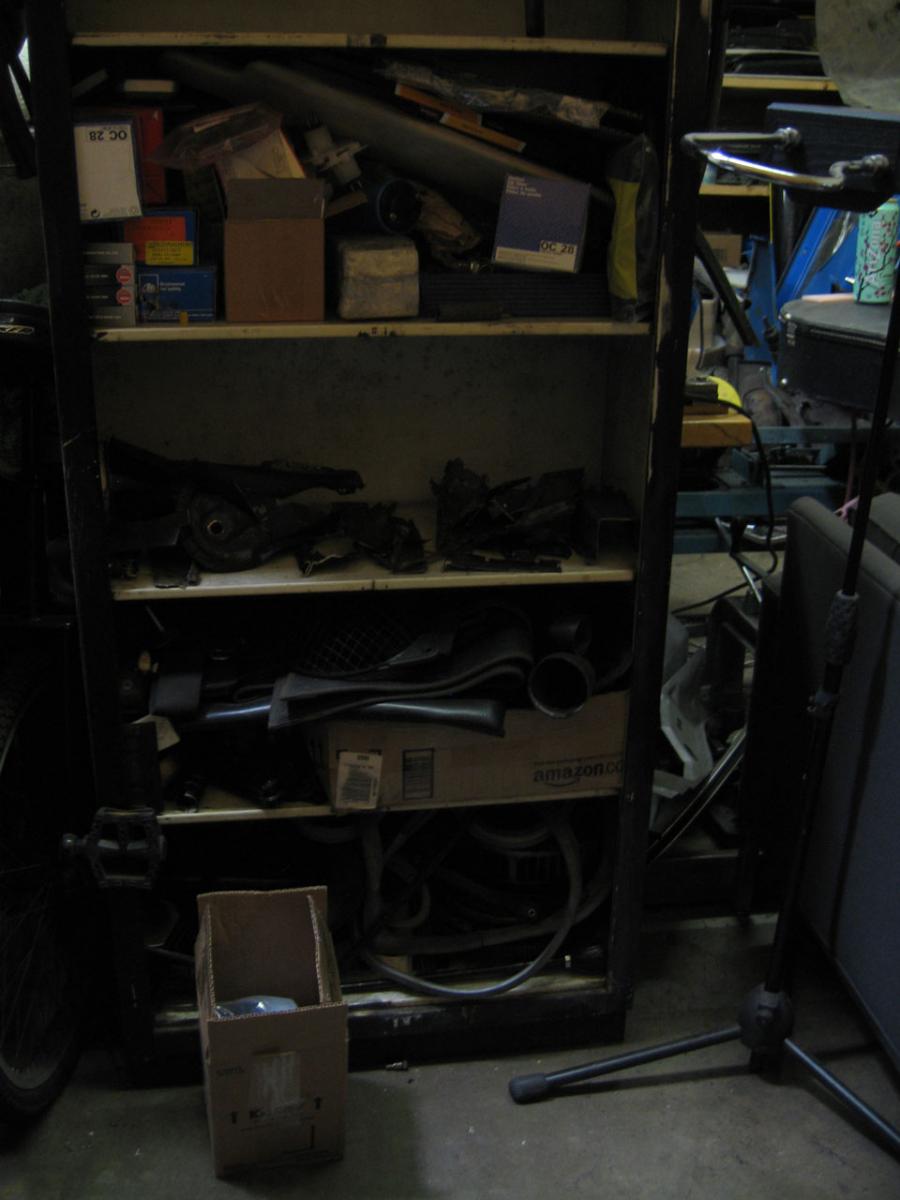
A nice bin of goodies that I've acquired and gone through. I don't think that's a real 914 mirror? I got it from a guy at the vw classic for $3 so probably not. I finally came up with license plate lights though. 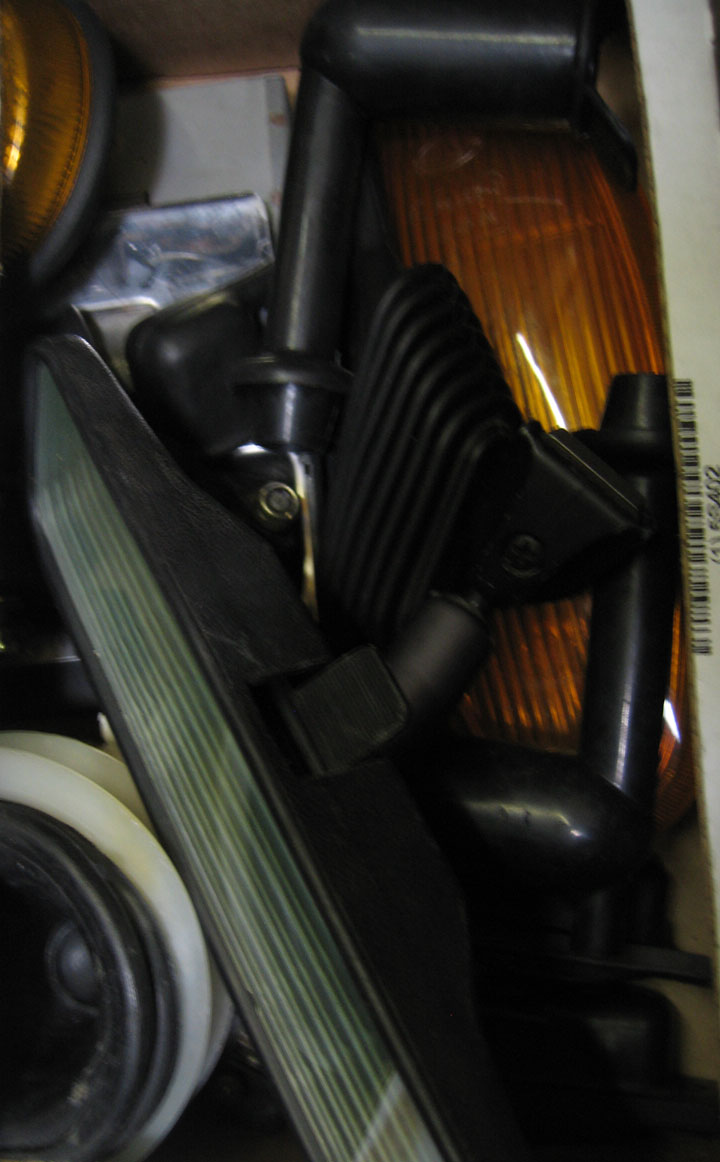
I'm not too keen on what is the only thing going for turn signal boots? They were supposed to be genuine, and for the price, they should be, but no number on them, no porsche sticker packaging, shiny finish, minutely different shape. They look to be made in China, though George assures me they are factory original, seems it's better than nothing. I hope they'll last.
Does anyone have info on inner fender guard inserts? I'd seen them talked about in a thread somewhere. It would be nice to see how they fit, maybe make some.
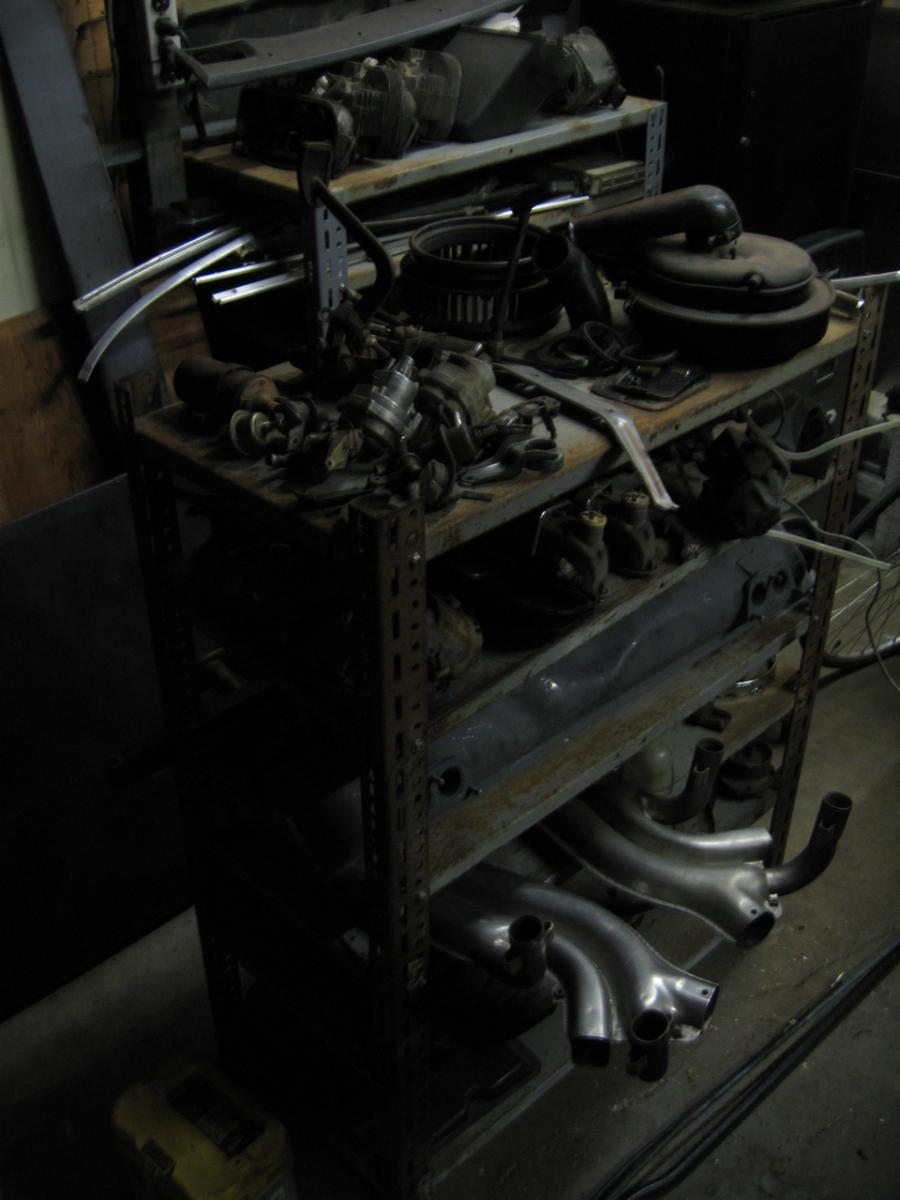
Gotta show all of it to really drive the point home. Some stuff I've gone through here. My library has been displaced to occupy just 1 shelf. That is a genuine front targa top seal there. 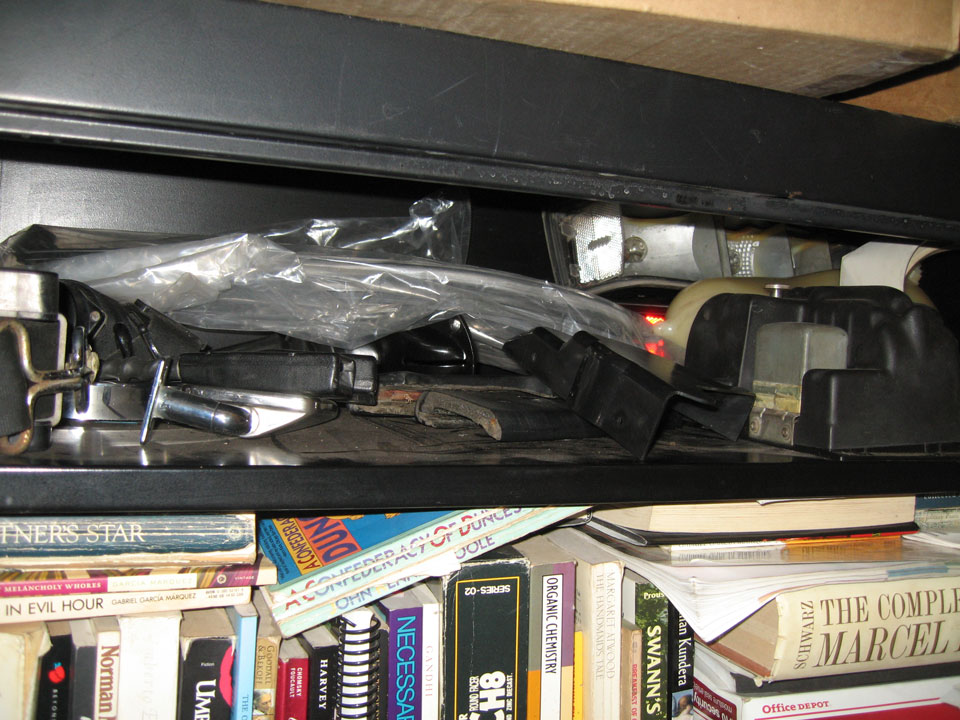
There's some room at least, the top shelf getting more full, as the parts get detailed from the bottom shelves.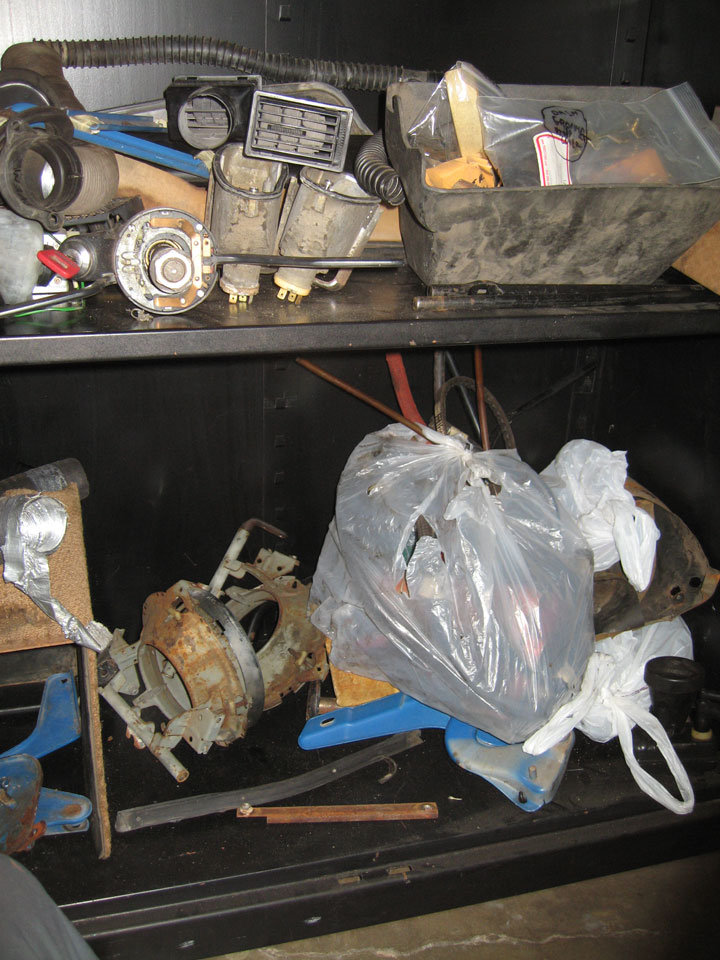
As soon as my eye is all better, I'll be cleaning my tin up. I have this plan to reproduce my "610"'s with a stencil. I'm planning on getting it powder coated, satin black, but I've got to concentrate funds on getting the body shipshape first. Man that's some crud.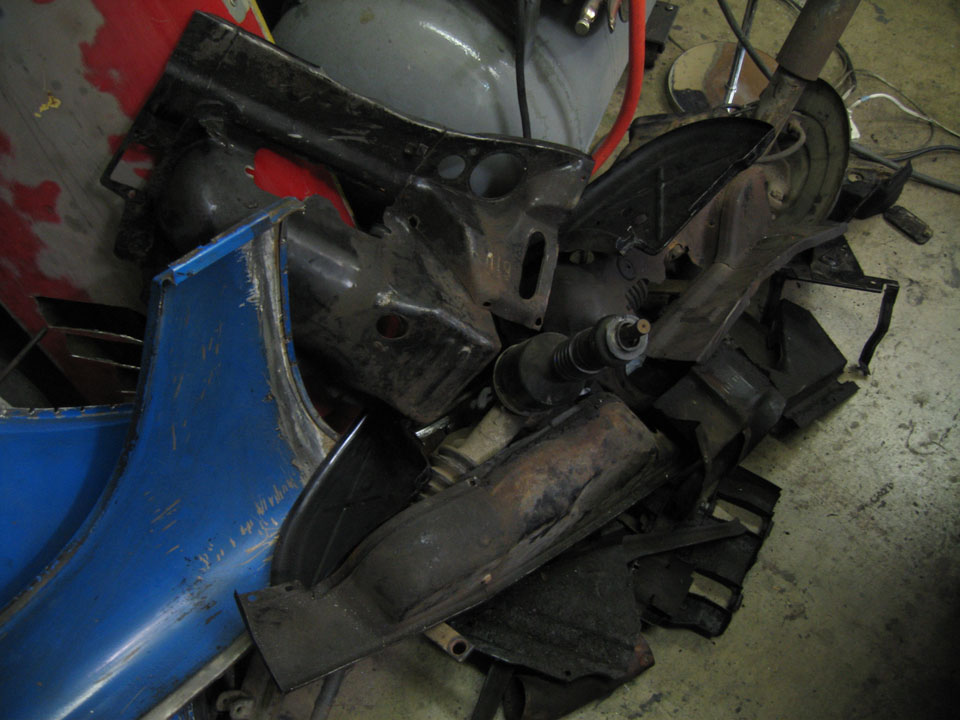
That pile is adjoined to this pile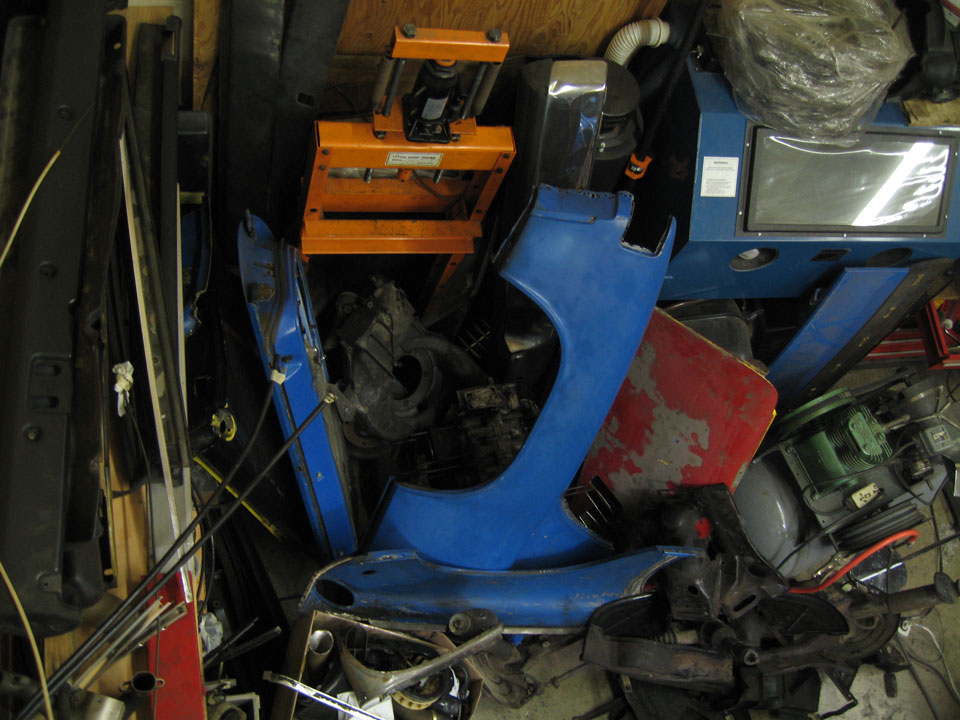
Which merges gracefully with this assemblage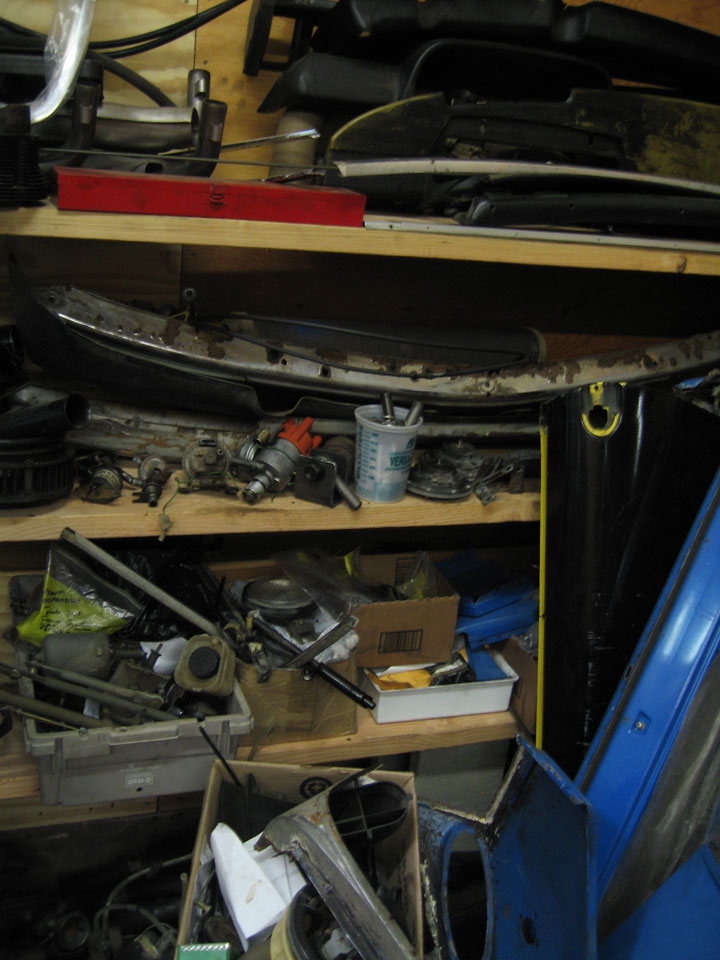
It's a shame about that bumper top. I was thinking about welding in new metal. Of course it would screw them chrome all up. People say how expensive it is to get chrome done. I thought about color matched bumpers. Then the pain/ expense of chrome removal. I did photoshop mockups. I remember seeing a thread with a color-matched adriatic blue car owned by an retired vw plant worker. I think it had sail vinyl though? - I couldn't find it. I really like what the sail vinyl adds to the car, or what it takes away, rather. I thought about painting the rollbar satin black and the same on fiberglass bumperpads, but there's something about joining the roof with the sail vinyl that I want to keep, the texture, and then the bumper pads, it feels like the sound of the car, the resonance of the wind on the front would be affected by that? I will look more, but if the new stainless insert bumper pads don't trap moisture like the original, I will go that way, despite cost. If they do retain moisture, I would rather do fiberglass painted flat black. Anyone know?
About chrome bumpers, I decided that it will only look the way I want it to with chrome bumpers,
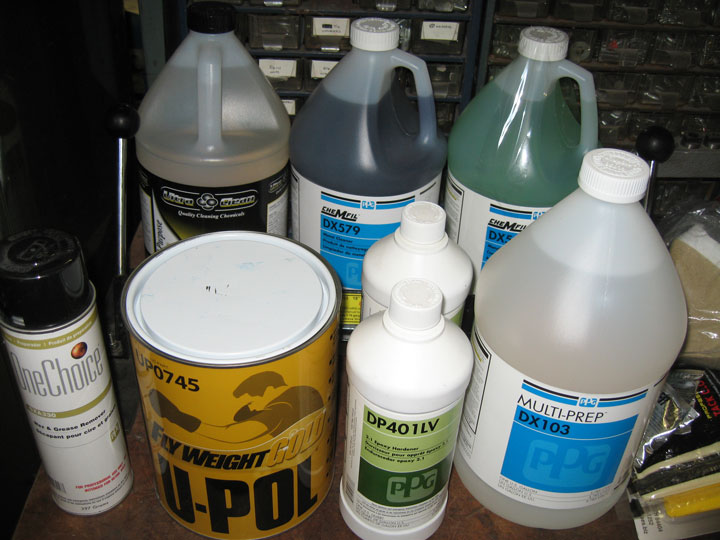
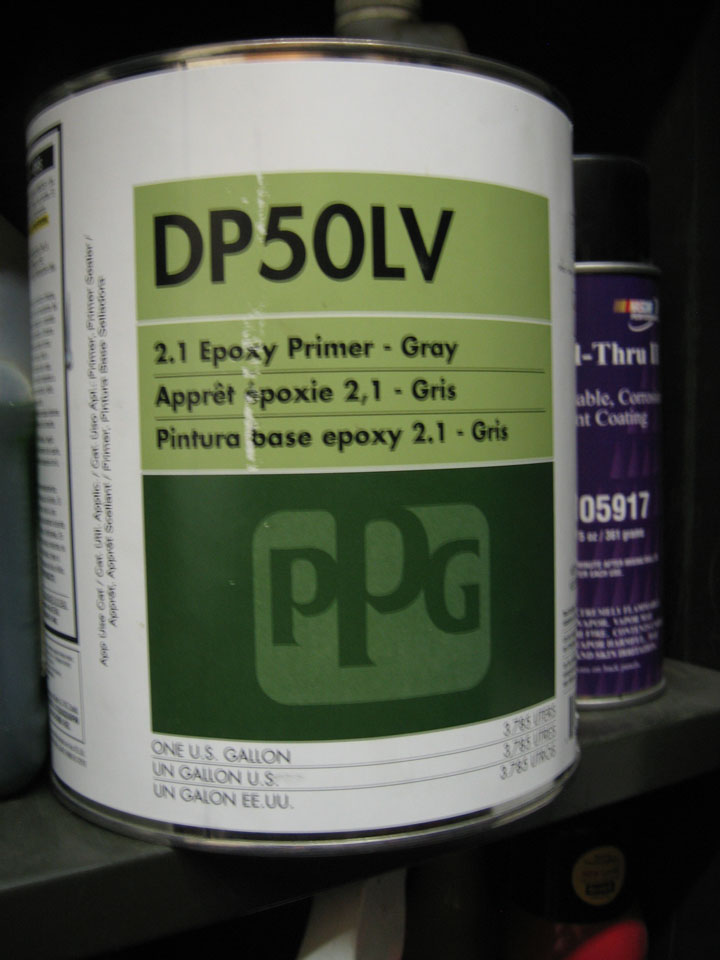
Currently, I'm building up the places where the drill went too far. Waiting on (funds for) blast media. Need to get my heeadlight buckets stripped of seam sealer. Researching primer options; I need a weldable primer that's part of a whole system. Recommendations?
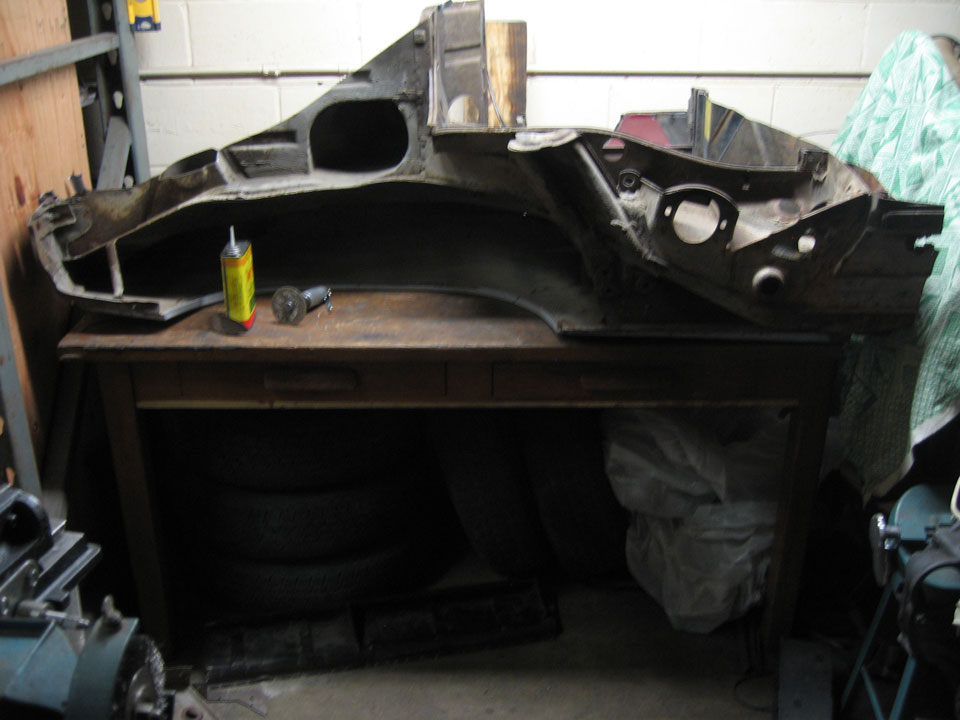
And one of the whole. A reminder that it is the driver side headlight cover that I need, not the passenger. I'd been looking for that thermostat, I was going to put it in my bus, but ended up with a type 1 version, lower temp. It's great that it is good.
I'm practicing my plug/ rosette welding. in anticipation of actually putting her back together. 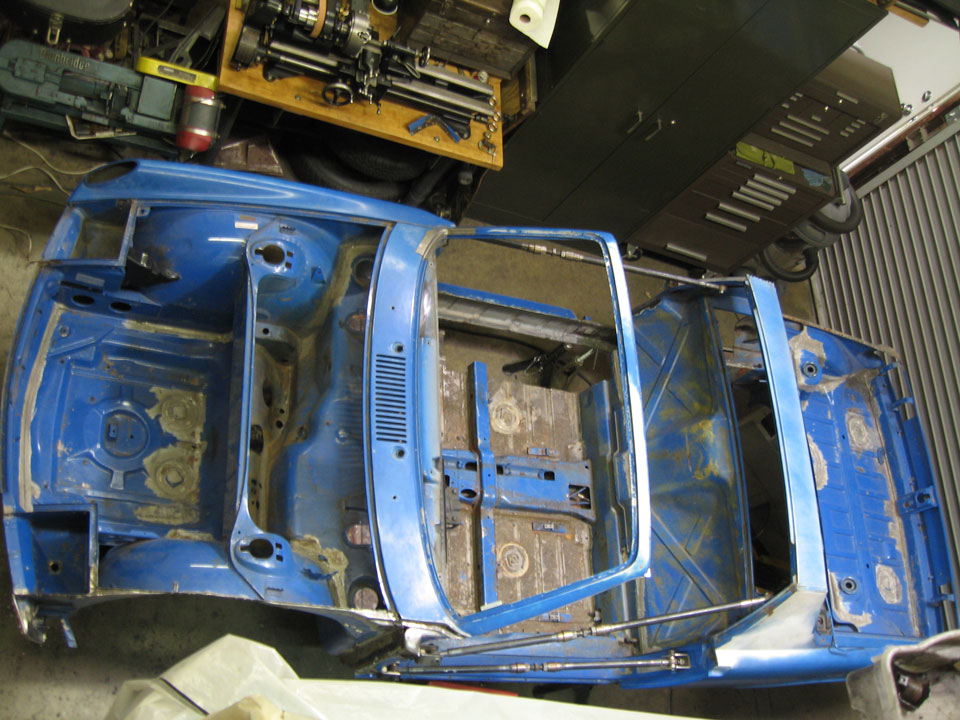
Posted by: ONTHEGRIND Feb 5 2011, 03:28 PM
Miller has sone new Saftey glasses that use neoprene around the eyes ? I have had forign object drilled from my eyes not much fun but it's
Not painful.. I use Wiley x tactical safety goggle
For Doing cylinder heads.. 90 percent of the time I get
Material in my eyes when I am not working and driving home
Posted by: MZM Feb 5 2011, 04:50 PM
I've been thinking about doing my own dentistry. It can't be much different than working on a 914, right?
Hey Nathan. You are correct, it is easy. Get a mirror and some pneumatics from HF. Look in the mirror, remember the image is backward and upside down, then drill away. No problemo. You might try getting drunk first.
Michael Z McBride, DDS
PS Very good creative work on your 914.
Posted by: bandjoey Feb 5 2011, 05:56 PM
Get a Face Mask. Goggles always fogged up so I ended up not using them. A face mask has full protection and does not fog up or get hot. Grinding wheel slag just bounces off. You're really doing a great job. Can't wait to see the new metal going on.
Posted by: Hontec Feb 10 2011, 06:58 PM
Ha, the last picture is a familiar one.. You're in deep too I see! Nice work!!
The eye thing sounds familiar too, been there 3 times, everytime drilled out and hurts like hell for 2 days.. I never go without goggles again...
Posted by: nathansnathan Mar 29 2011, 10:35 PM
I haven't updated in awhile, but I have been busy.
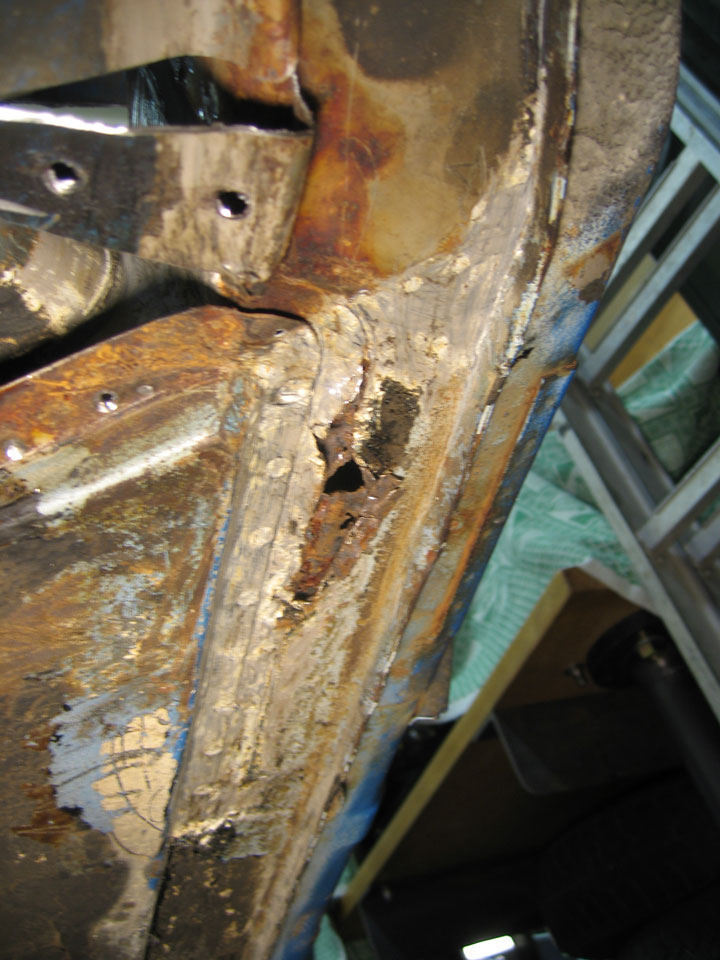
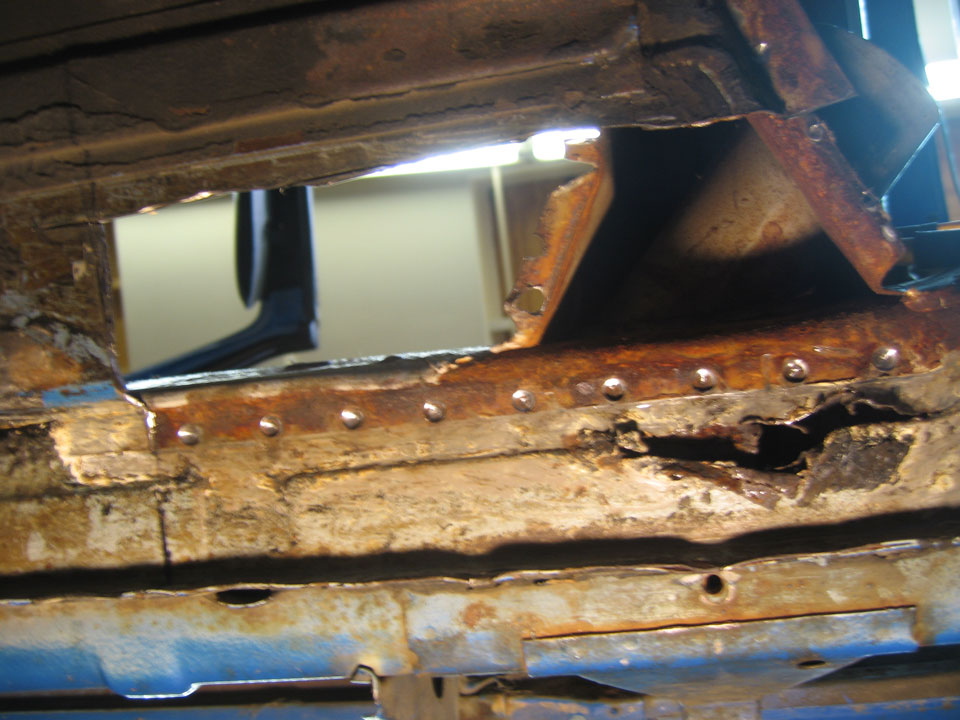
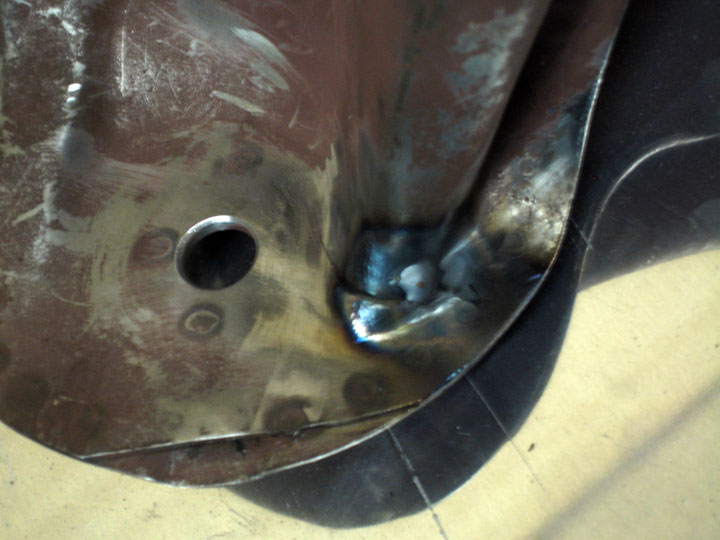
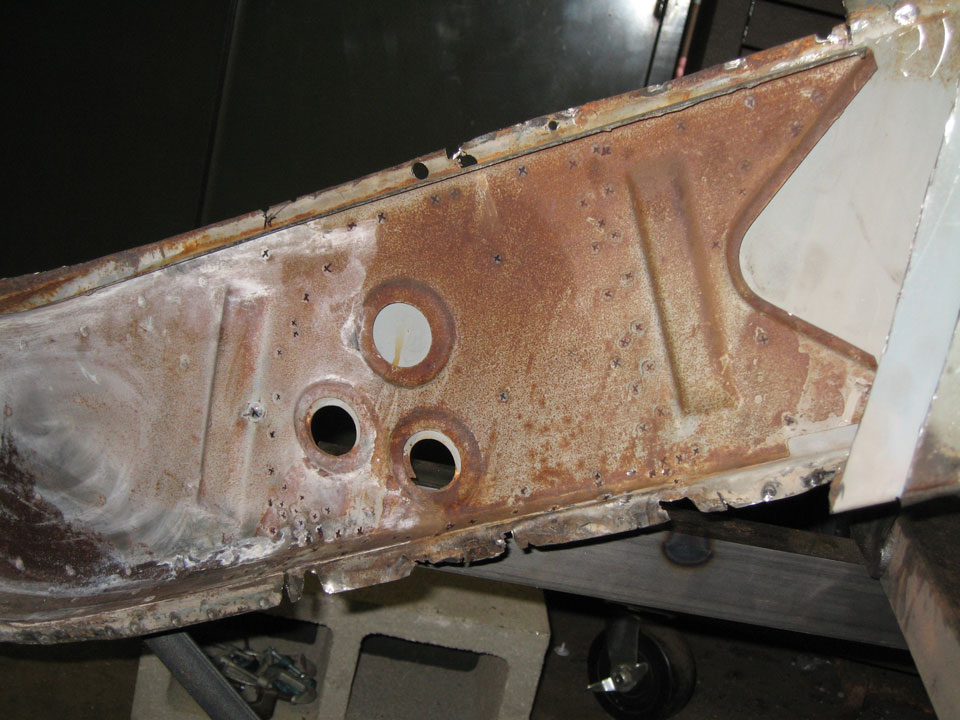
I thought I had gone to the core of it, that no more rust lay hiding, but those 2 little holes kept taunting me.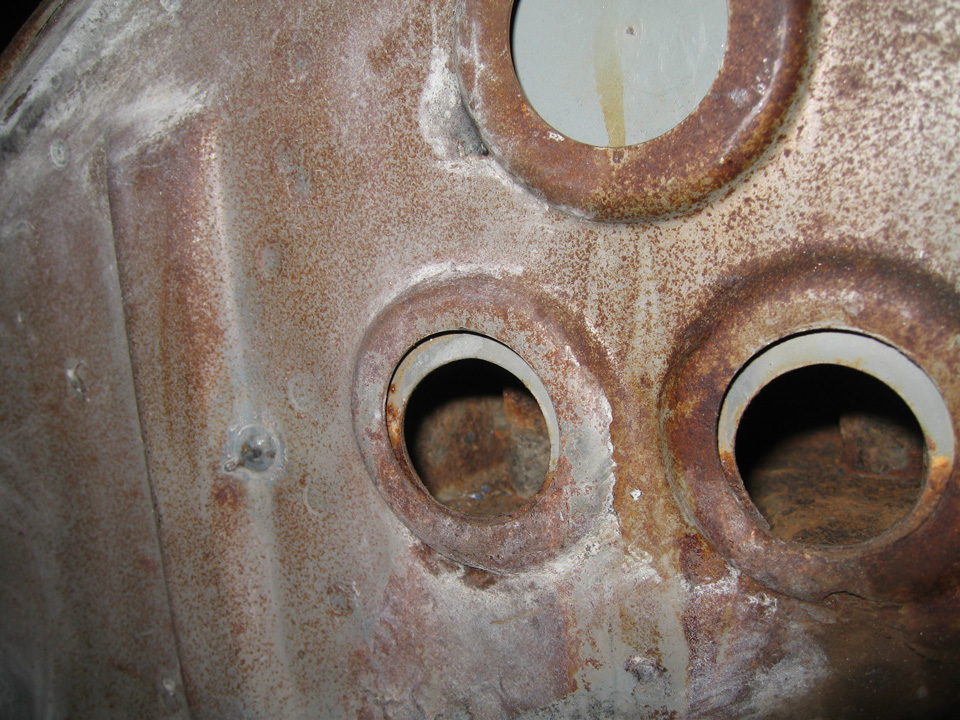
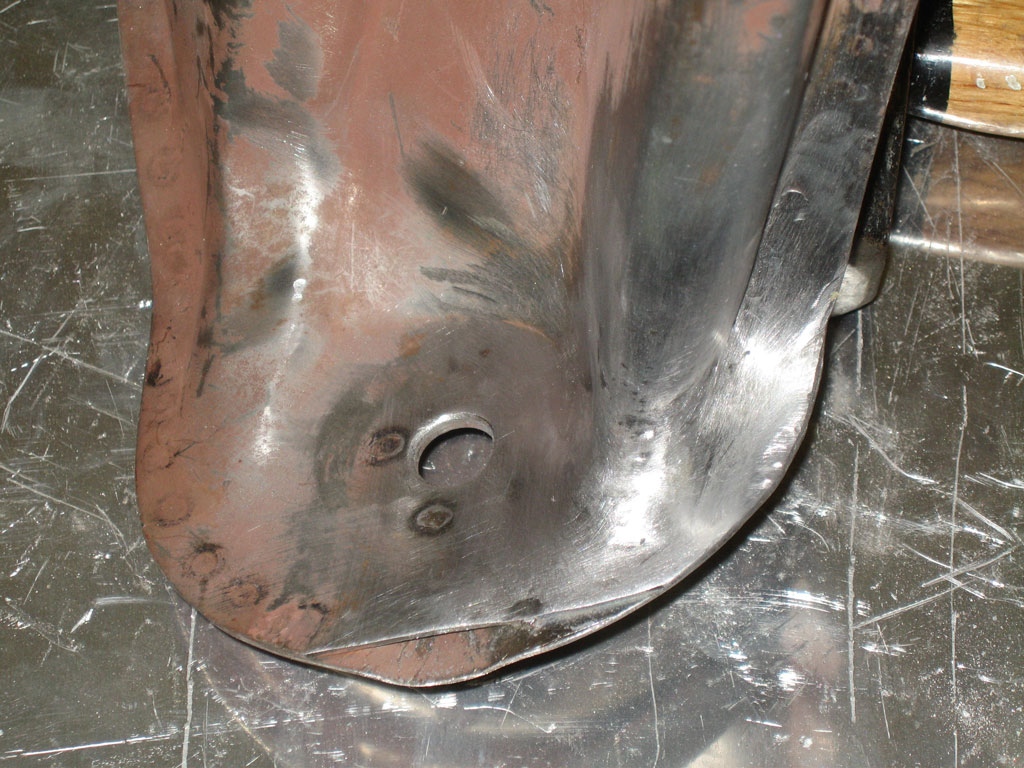
Outside it looks solid of course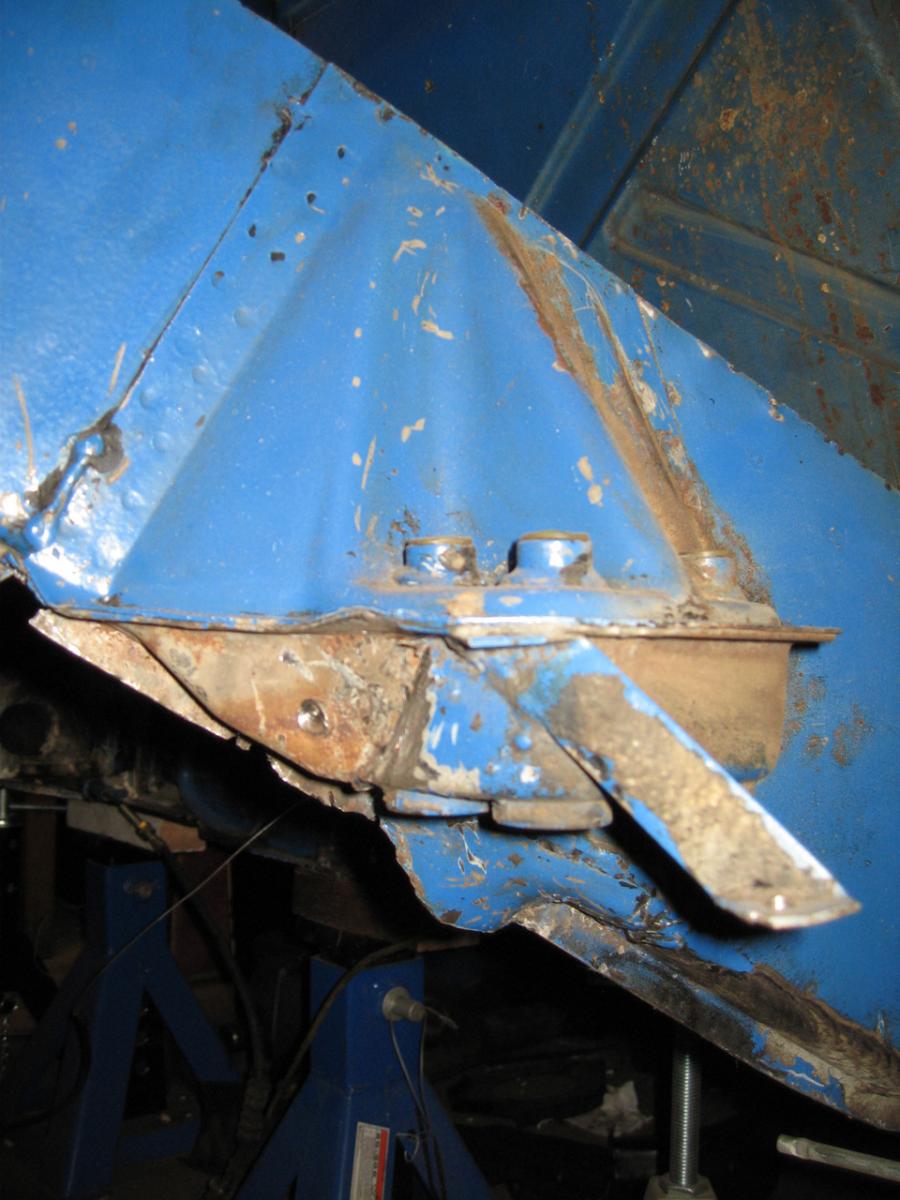
I'm glad at this point that I took it off though it was further than I ever intended to go.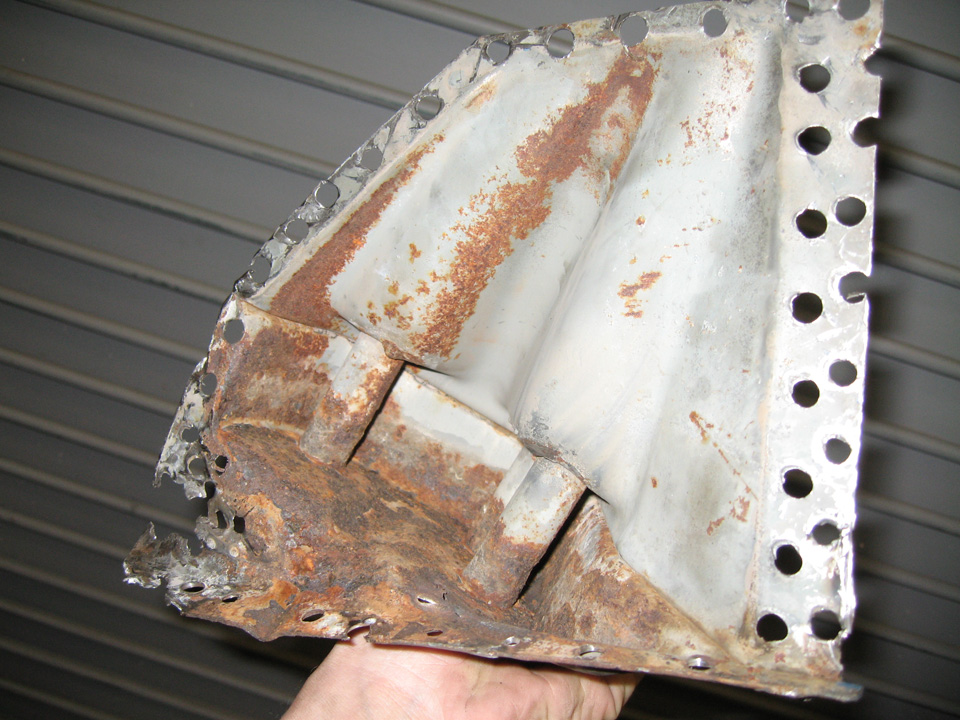
The console itself being made of thicker metal was not as bad as what lay against it.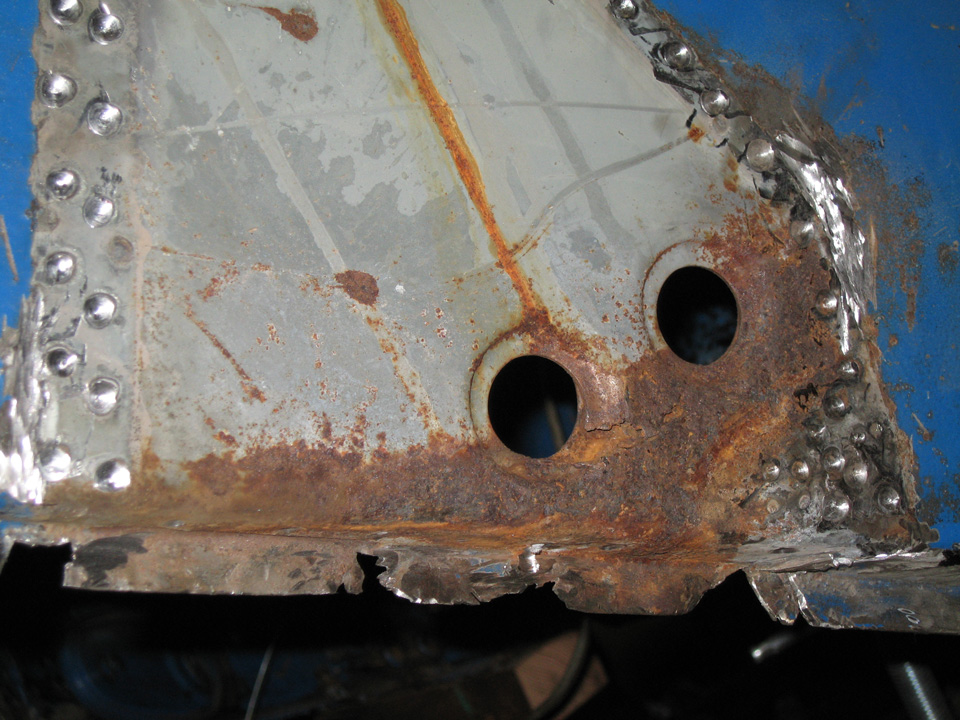
That drip there comes from a hole that comes through the long. Why they would have situated it right there to drip down on those 2 double layer holes is proof that someone was an idiot or that they made these cars to rust on purpose.
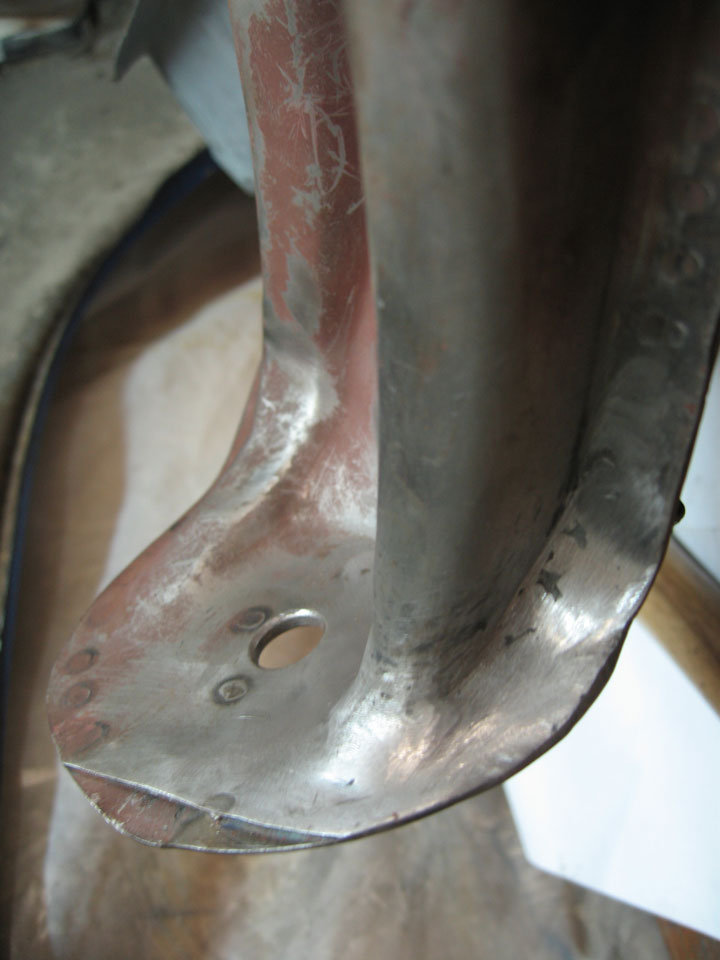
deeper 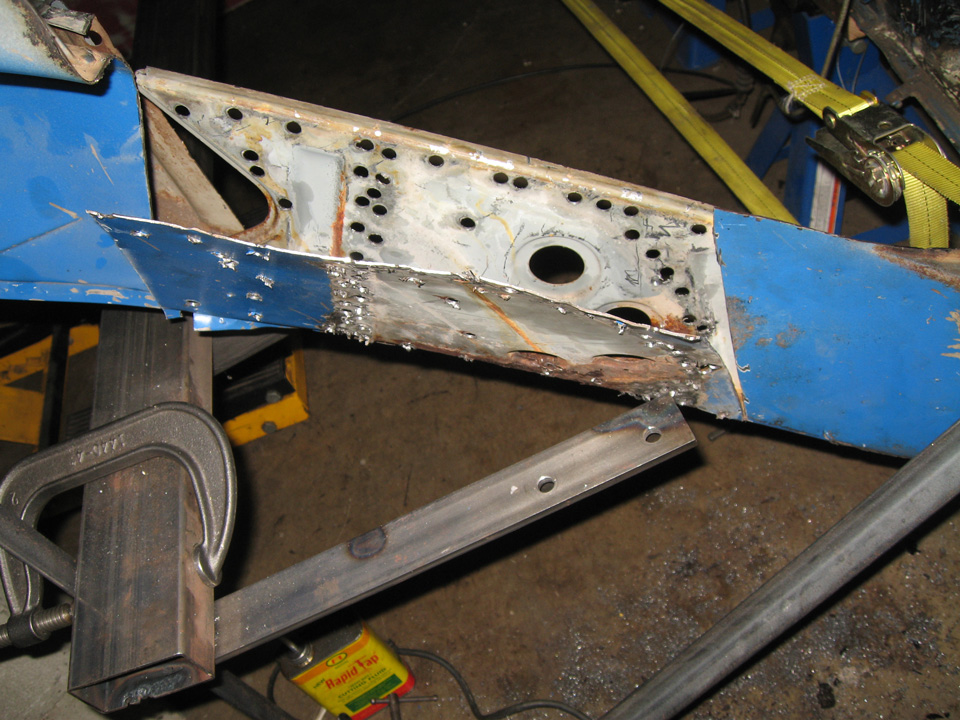
I'd stalled a bit before getting into all that, got some glass beads, 5 gallons. I tried to upgrade my compressor, but not yet, so a lot of waiting for the tank to fill.
I've put my containment chamber about the construction.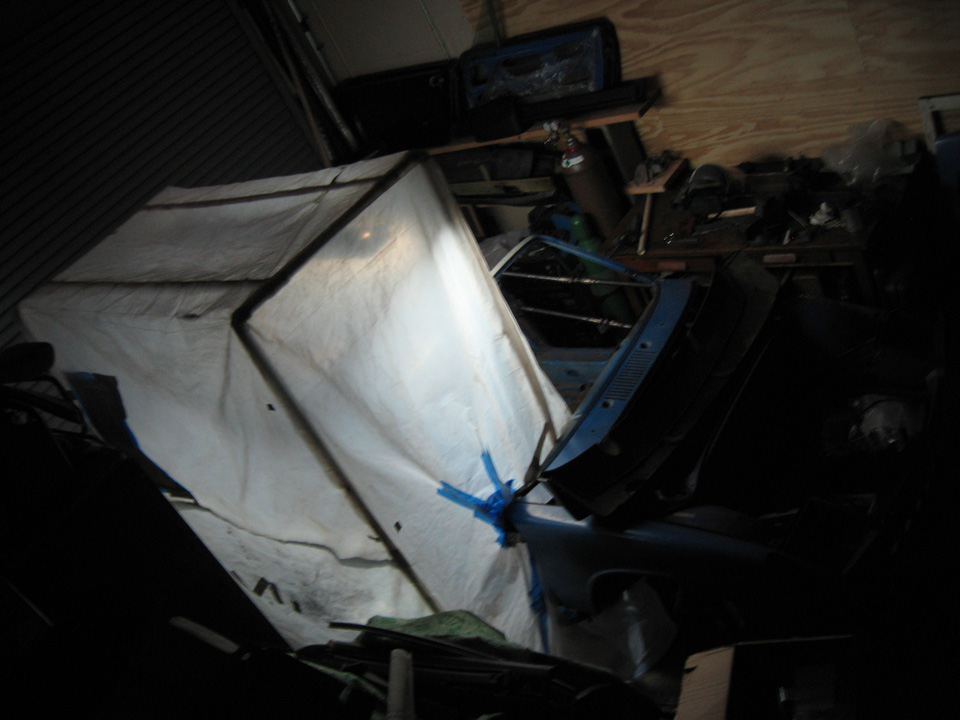
My friend made that for me, the frame of it out of pvc pipe and fittings, as a work table light support. I sewed the drop cloth surround part to contain grinding dust. I played with using it as a paint booth on a small scale. It's getting pretty rough, so I've sacrificed it, I've sectioned it around the 914, trying to contain the bead blasting.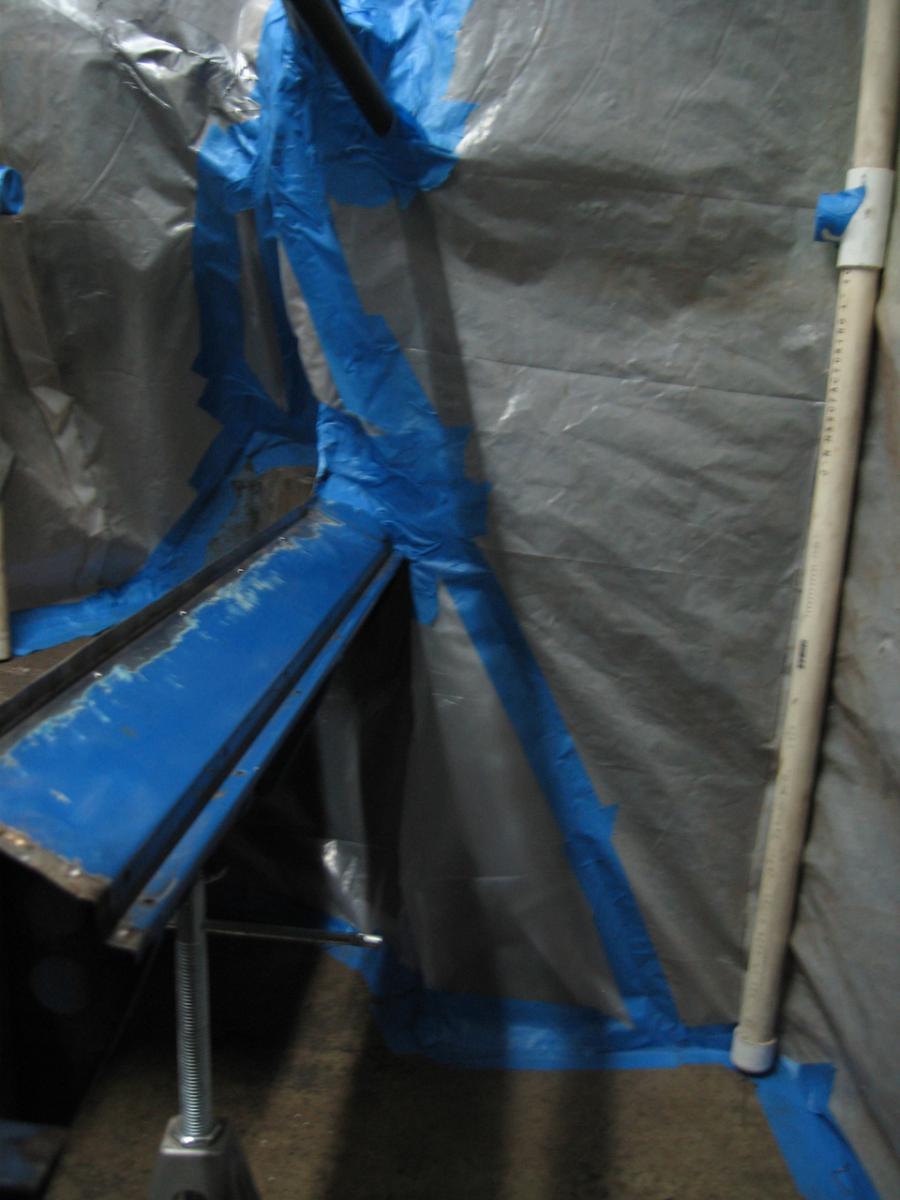
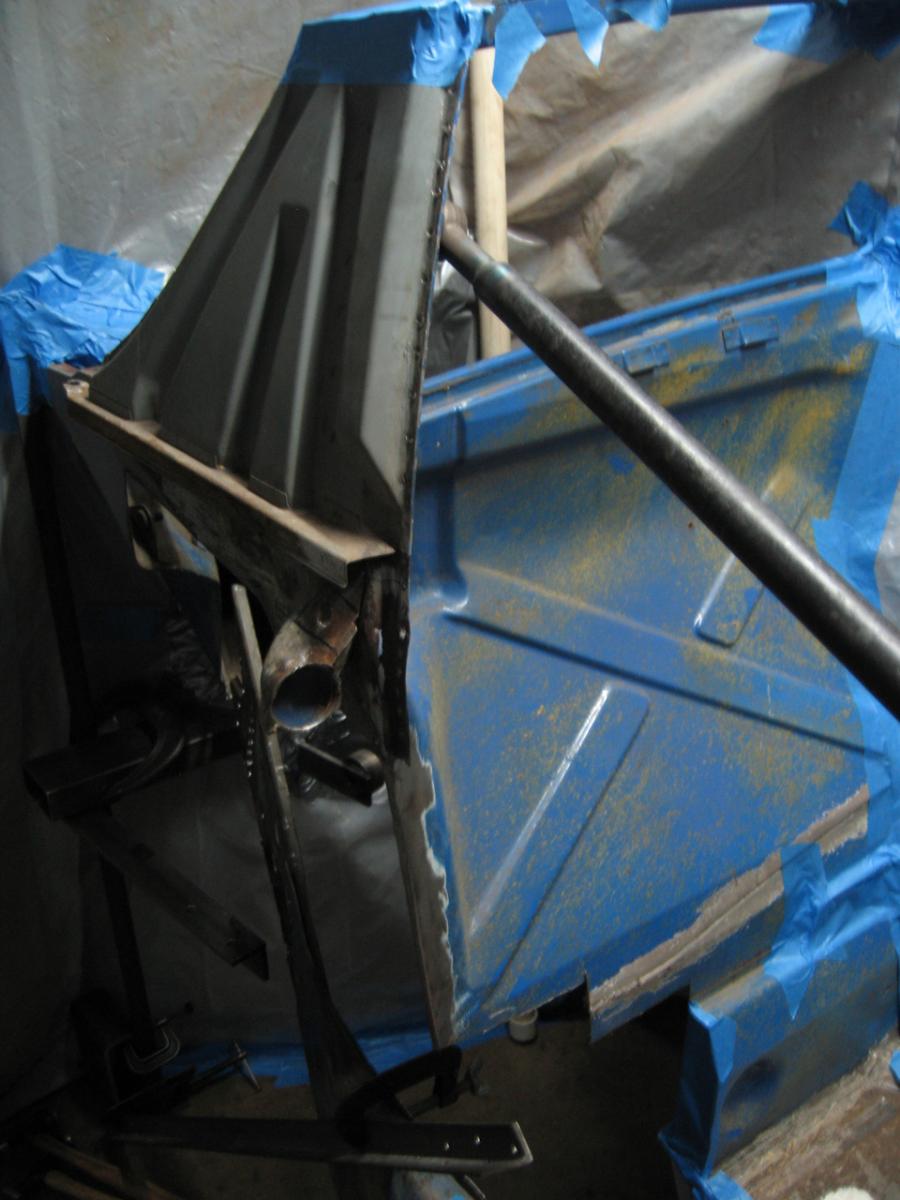
There's a glimpse of the 'jig' there for the outer suspension console. I'm trying to make that as short term as possible and also I'll be verifying placement by measurement, before trusting it at all. I may have some questions about that when the time comes (soon!).
Working my way back. The rust is starting to come back already. I'll hit it again before I etch it, got to get my etching stuff. I think I'm going to the paint store this weekend.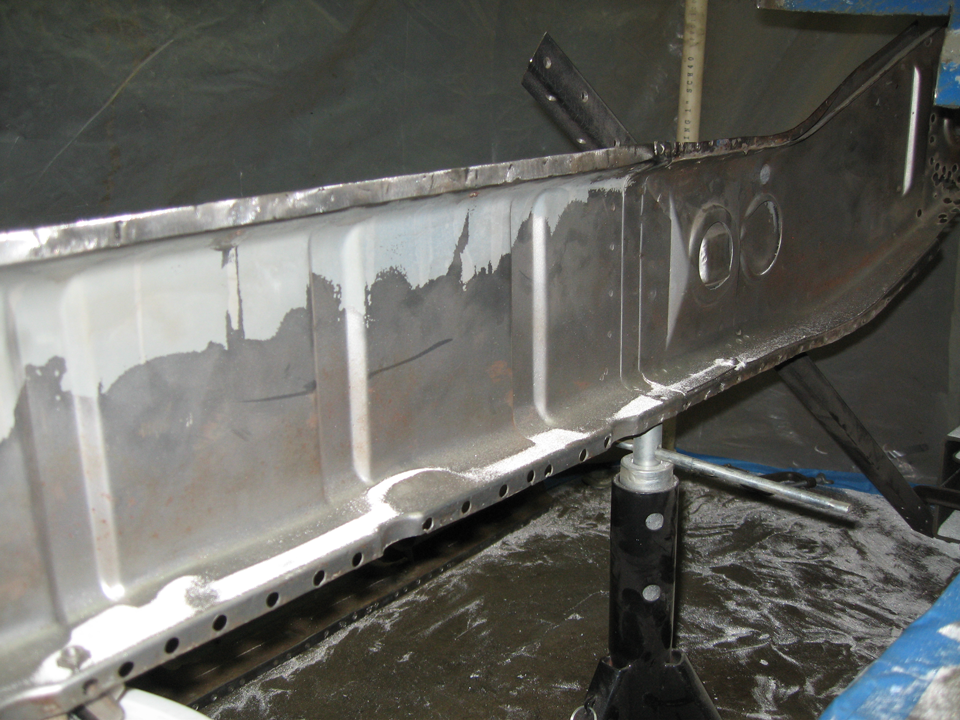
A little thin in a place or 2 but I've finally reached something solid! The suspension console outer was held on by more than a few welds.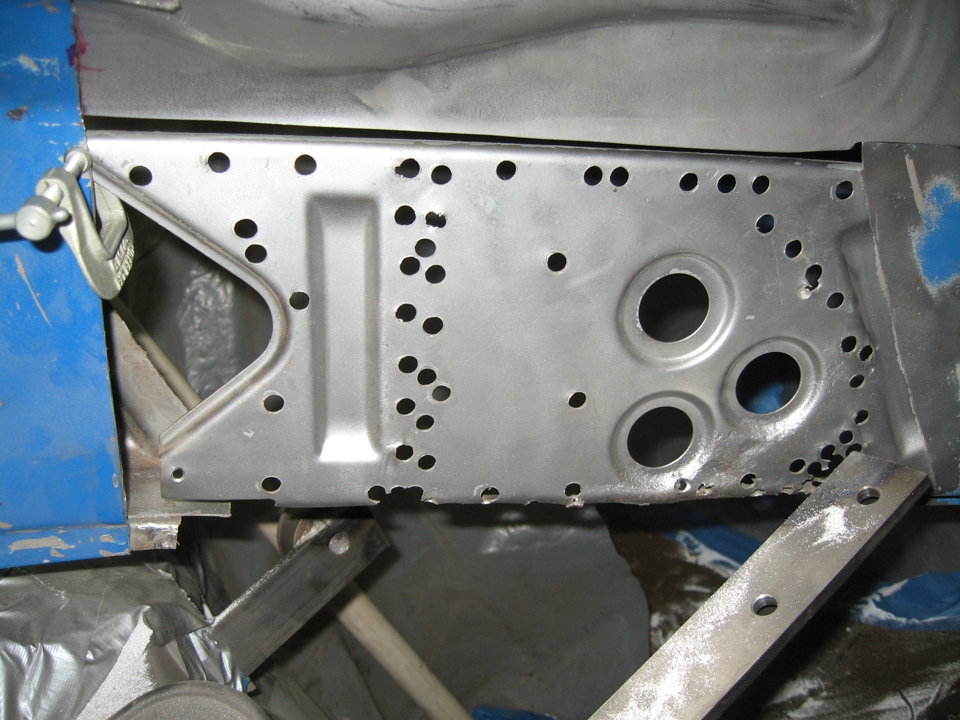
Still a little more blasting to do on this but looking much better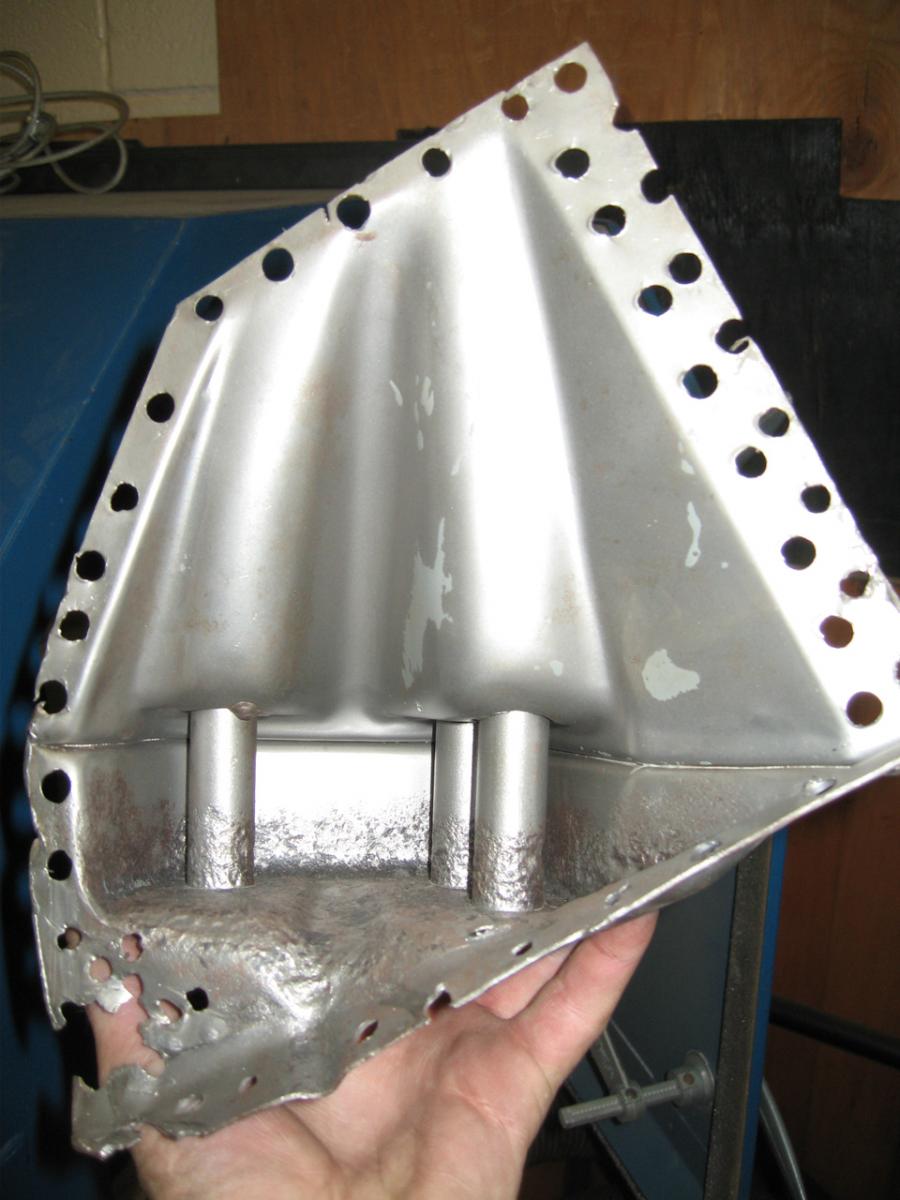
Blasting without the cabinet is a real pain in the butt. I need a hood! Can't keep the media out of my hair...or my shoes.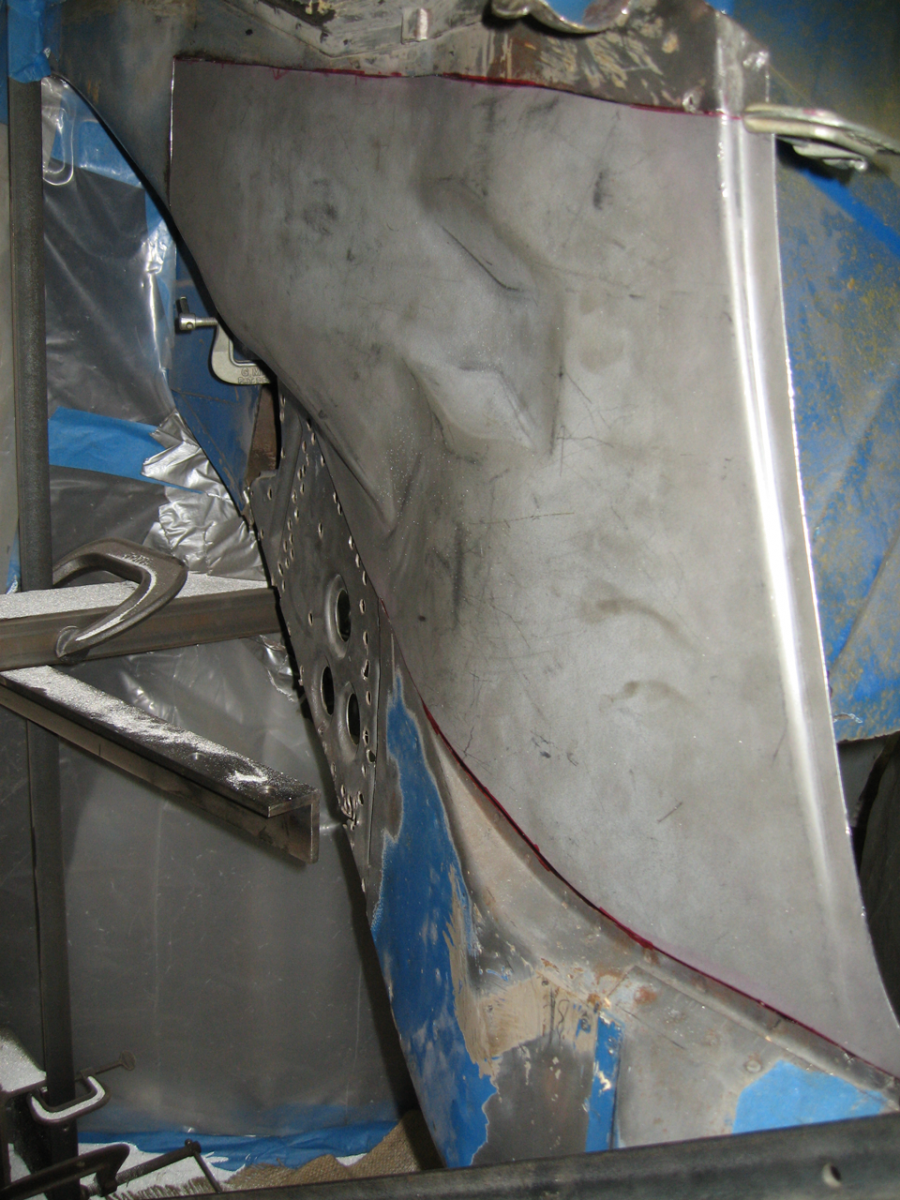
I've been filing that, the inner fender well upper for a few days now. I will start fitting the piece below tomorrow. I have 2 cans of 3m weld thru primer, and if I get the etch stuff, maybe I can be welding the outer suspension console back on this weekend!
Posted by: 396 Mar 30 2011, 05:43 AM
All I can say is – wow, good luck. What you’re attempting to do is not for the faint of heart.
Then it looks as though you have all the resources and skill set to accomplish this project.- all the best!
Posted by: Andyrew Mar 30 2011, 09:14 AM
Looking great!
Posted by: EdArango Apr 5 2011, 10:56 PM
Nathan....Great job....I'm in HB and would really like to check out your car.
Let me know if this is do-able.
Ed
Posted by: ripper911 Apr 5 2011, 11:52 PM
I cant add anything about the build other than "looks good, keep it up" but I know a little about self-surgery, I always like to get drunk first! Absinthe is great because it will numb you nicely while allowing you to keep focus, up to a point.
Also, I don't think that is a black widow. But, maybe thats a california black widow.
Posted by: nathansnathan Apr 6 2011, 09:00 PM
About my mess, I've got about a 25' x 25' shop and this is as clear as it gets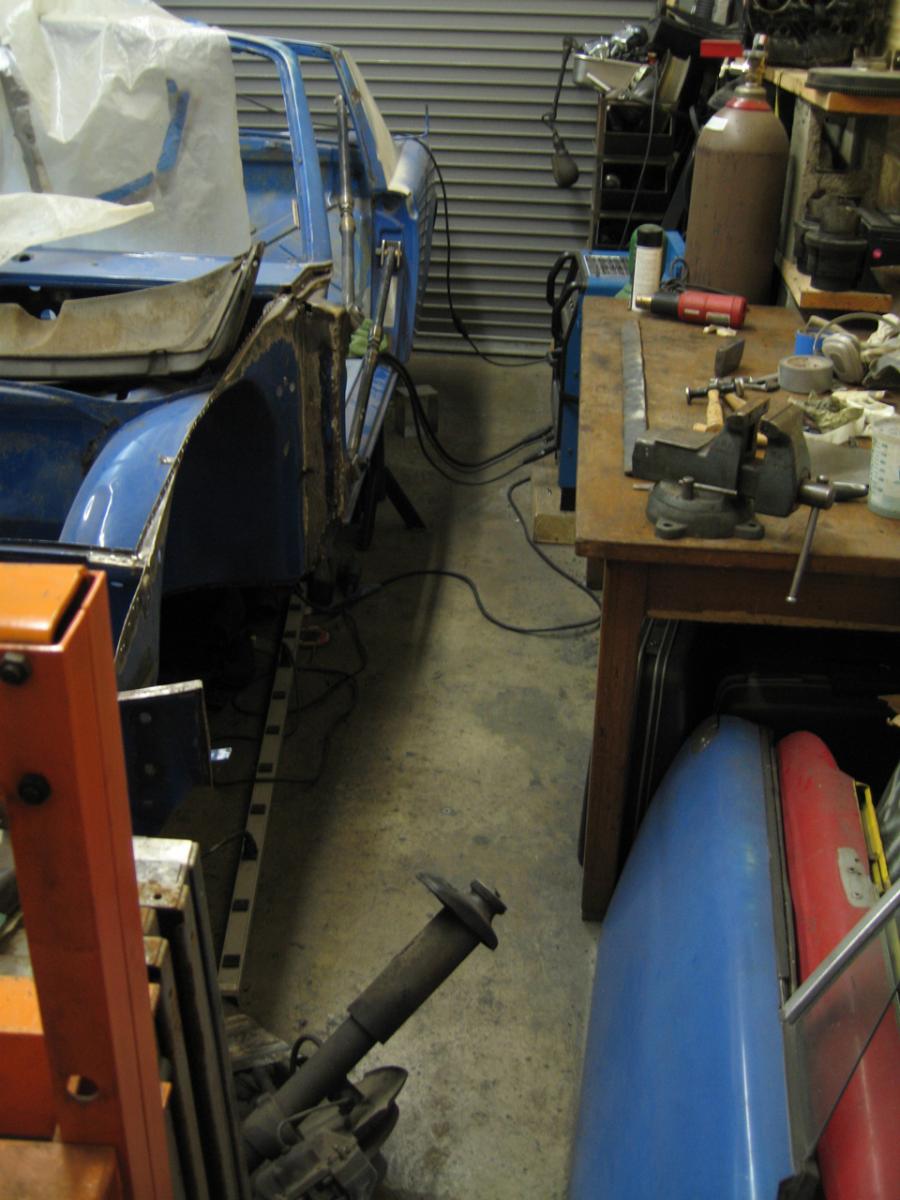
Here's the worst of it. 
and this inside the chamber currently: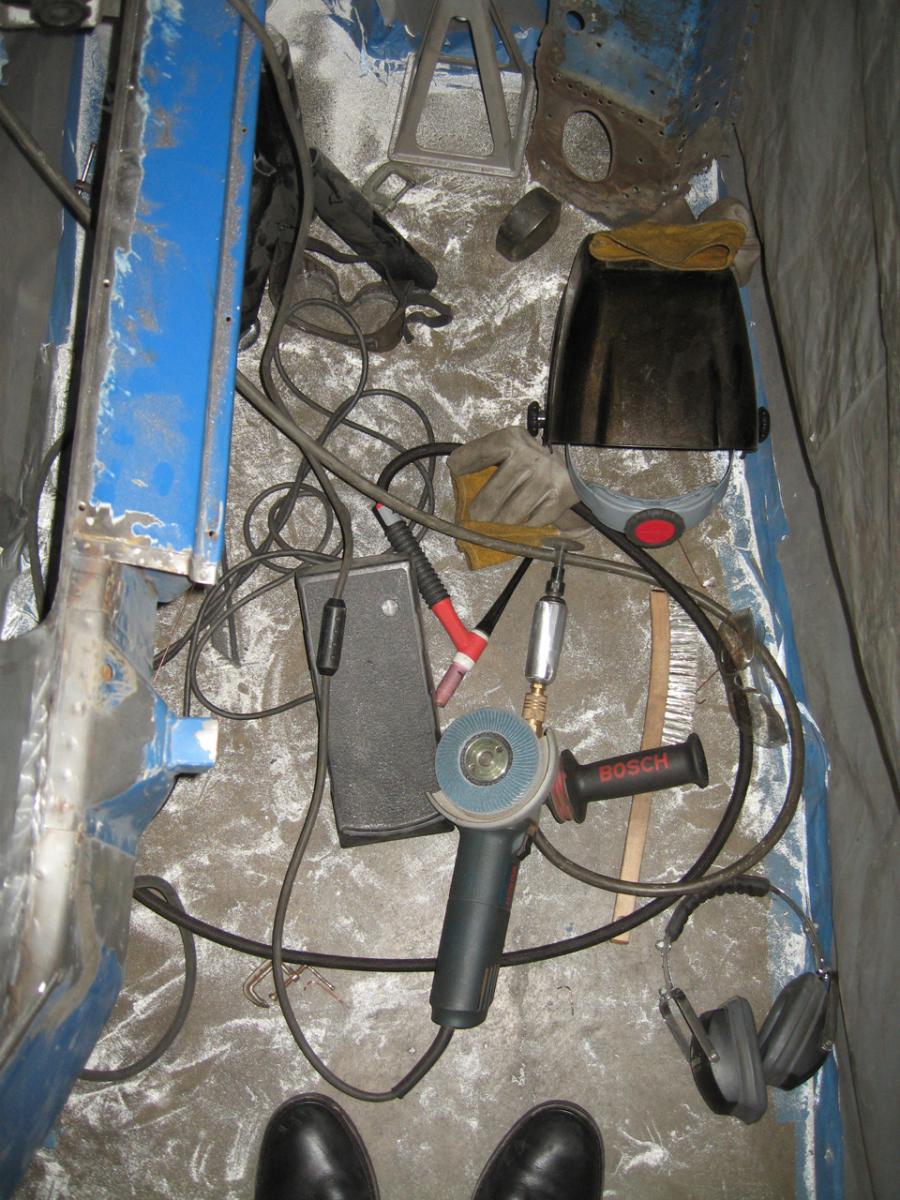
Got a little progress to show in there, the inner fender well butt welded in and ground the welds smooth. Used the diegrinder and then the flapwheel.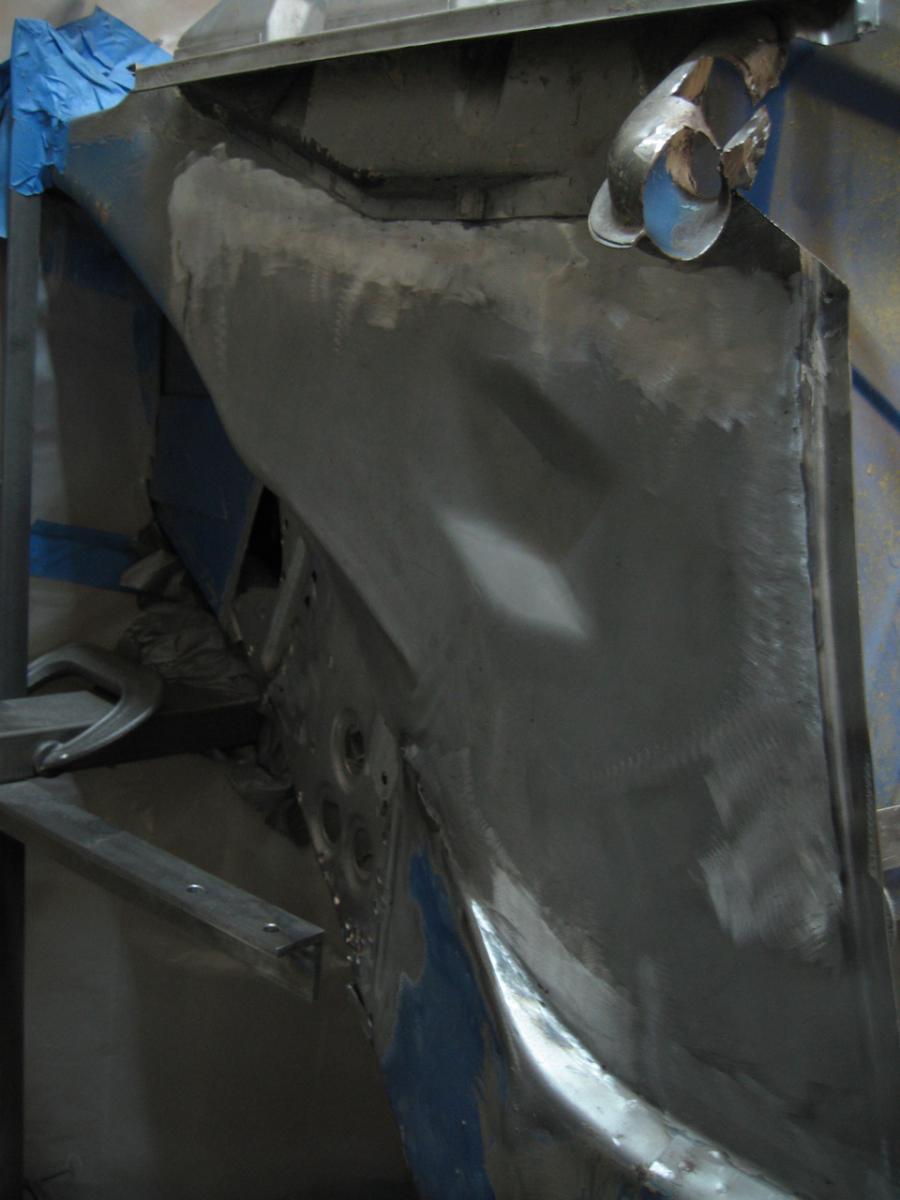
Besides the loft solution, I'm working on restoring a huge industrial shelving unit, so I have someplace to put all this stuff, but meanwhile that's taking up room, too.
I will hit you up when I get back and get this stuff taken care of.
Thanks for the encouragement, everyone. She's finally coming back together!
Posted by: nathansnathan May 10 2011, 10:42 PM
It's been awhile since I made an update. I can never accomplish as much as I'd like to it seems. I'd hoped for an attached outer suspension console by now, but.... well not yet.
I did get my tank refilled with argon yesterday, and hooked up with a #9 smaller torch for my tig, but forgot to buy back caps for it I have ordered some from cyberweld, got long, medium, and short. The short are like nothing so I should be able to really get in there.
I sort of lost some motivation, was really bummed out about losing my girl again. We're totally incompatible, despite that she's been my girl for ...11 years? - It's been a rough 11 years. Yeah, I came back early from my little vacation, lasted about 3 days of the 14 I'd planned. The bus drove awesome though both ways, and I got a chance to work on my own projects so that's a plus.
I got my mezzanine up, took me like a week. I got the 2 units for $80 a piece of craigslist. The wood was more, even, got 3/4" plywood. I've still got to paint the rest of the floor up thereg. Got to make room for the containment chamber so I can really get my mess on. 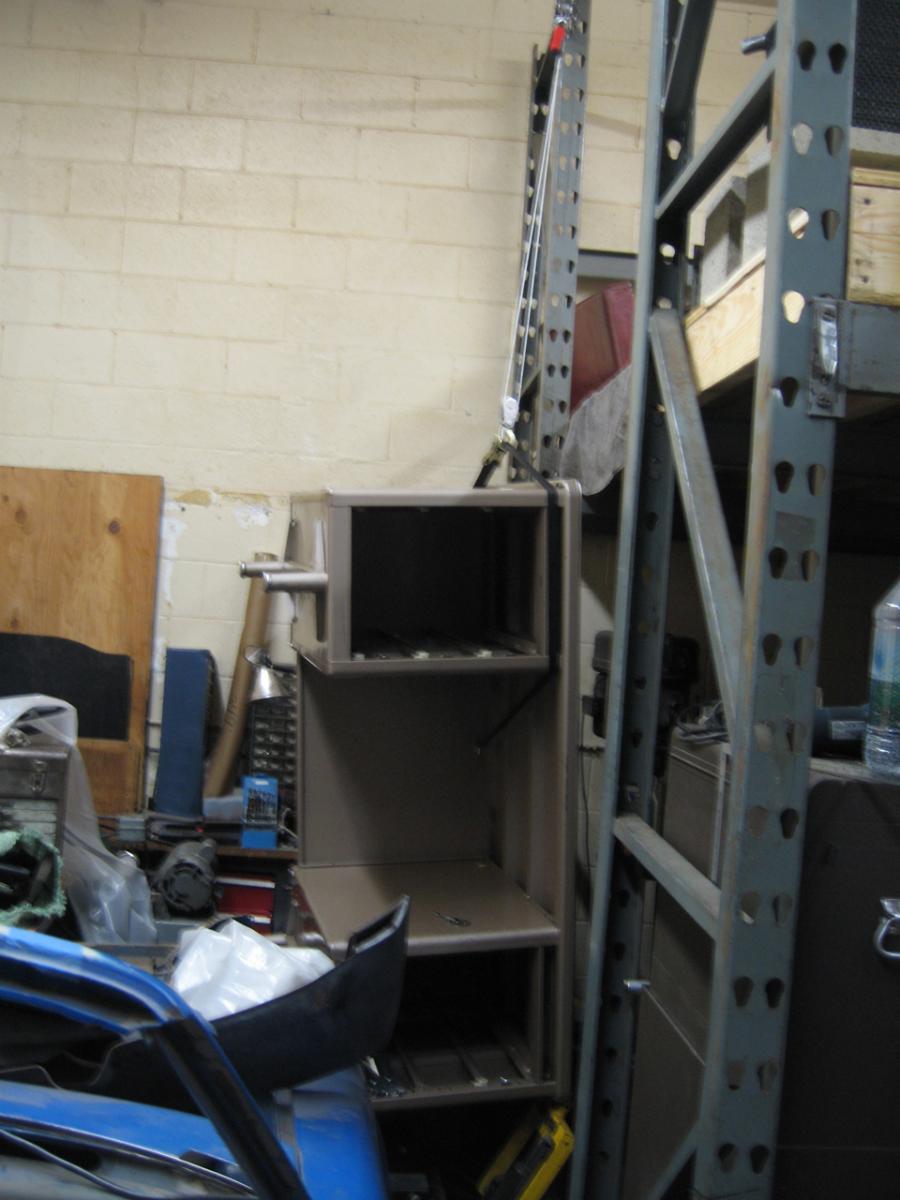
It's still a bit crowded in here, but it's not ridiculous like before. Organized some parts.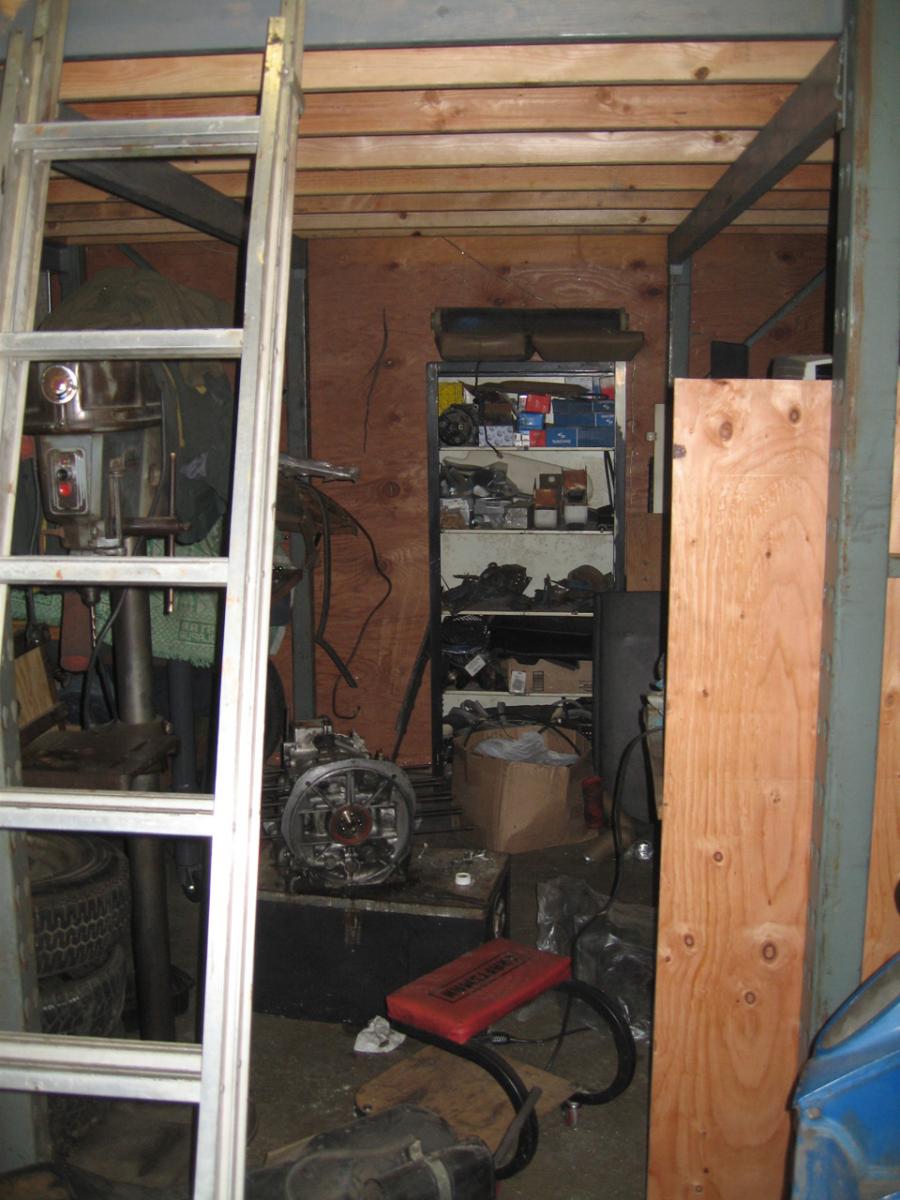
And some more parts, still need to organize a bit more.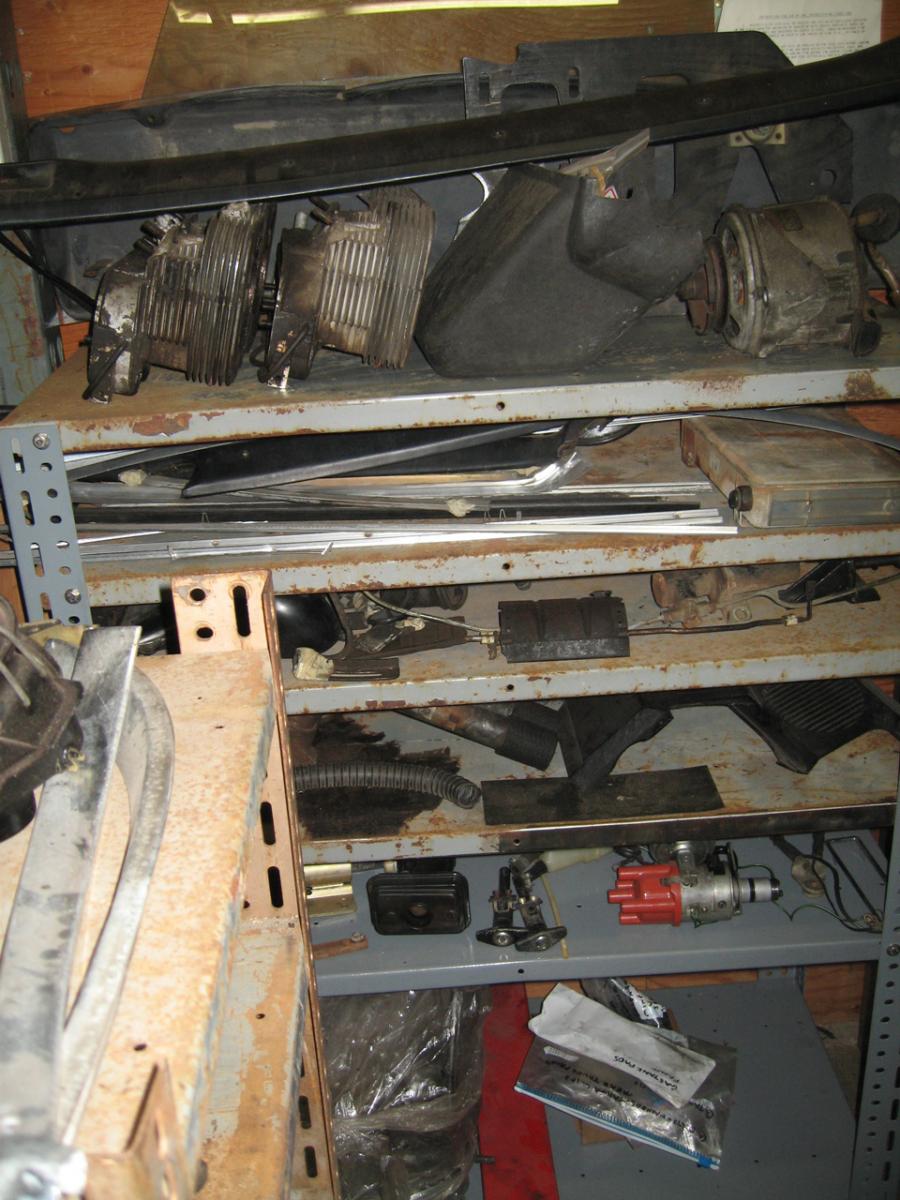
Oh, I found 1 of these. I had no idea there was anything supposed to be there, even! Is it called a splash pan?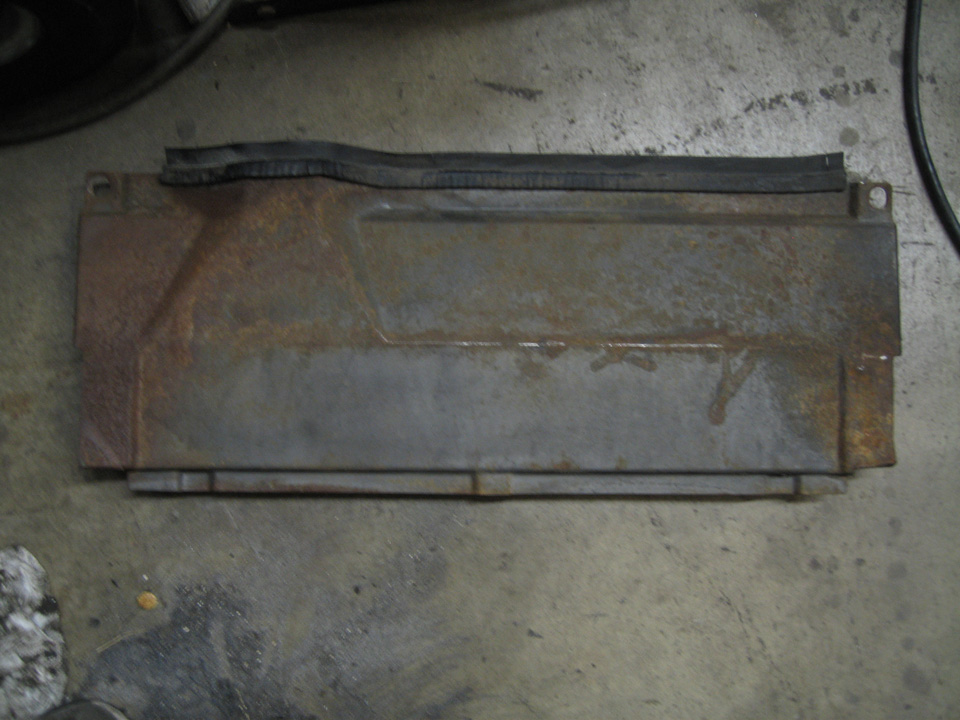
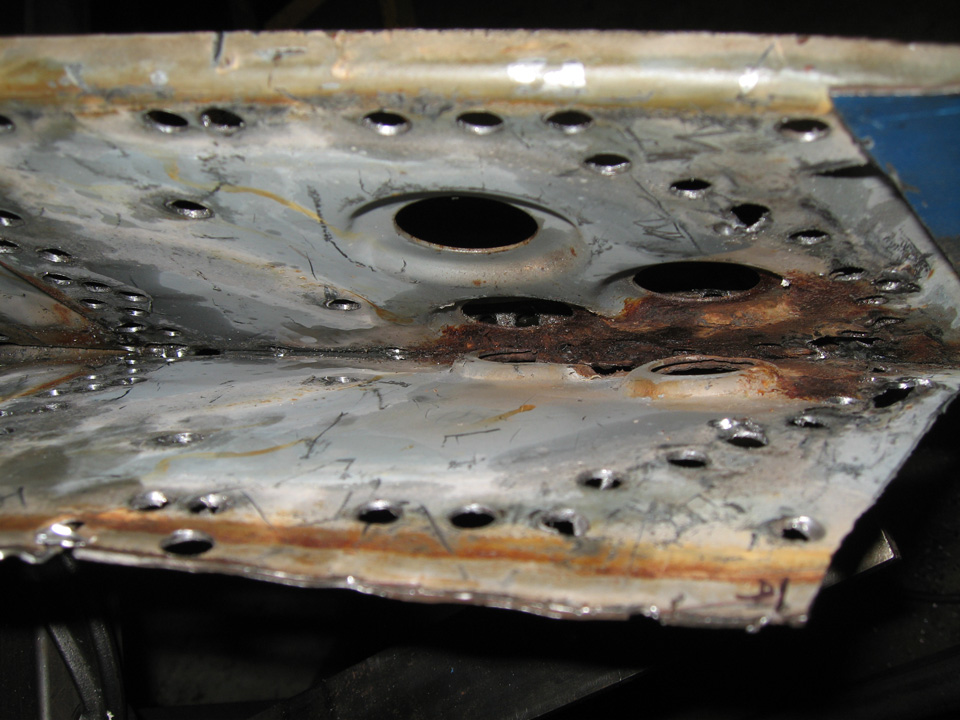
It took me forever to build up the inner inner long to get it ready for the lower inner fender well piece. I filled in like 25 holes on this thing, and built up the thin bottom section. This pic, it's not quite done. I should be putting the piece on soon so I'll have better pics then. 
Posted by: dheming May 20 2011, 04:55 PM
Nice job on the mezzanine! Must be nice to have some more room now. Speaking of which I'm about to start on my mezzanine this weekend. Are you going to enclose the top part in to keep dust out?
Posted by: nathansnathan May 20 2011, 09:12 PM
Nice job on the mezzanine! Must be nice to have some more room now. Speaking of which I'm about to start on my mezzanine this weekend. Are you going to enclose the top part in to keep dust out?
Thanks, Derek. I am pretty happy with it.

I've oiled the joints and don't notice much movement when I'm doing my dance.
I am thinking of putting in cross braces in places to tie it together, also of constructing caster mounts. The plan as far as enclosure is to divide the 2 halves of the shop during the sanding and primer stage with a heavy drop cloth curtain.
Currently I'm in the process of putting up the containment chamber on its own this time, need to make room by the cabinet (make the materials storage rack so I can slide the workbenchh down?) so I can blast the my valances and rockers, backs of bumpers etc.
I had been waiting the last 10 days for the parts from cyberweld, some mixup at my mailbox. They do have hookas for sale right in the place, the pack & ship.
Finally got the back caps, the small ones they sent me were wrong, were for the 17 torch instead of the 9 so pictured are the medium. Both of those are #7 cups.
I hooked up with some weld backing options also, these from Eastwood. The triangle is my favorite so far, used it a lot for the inner inner long.
During the wait though to do more welding, I've been detailing the outside of my engine case. Various methods employed have included a bit of acetone with lots of cotton swabs and paper towels, a bit of paint thinner and a brush, simple green some.
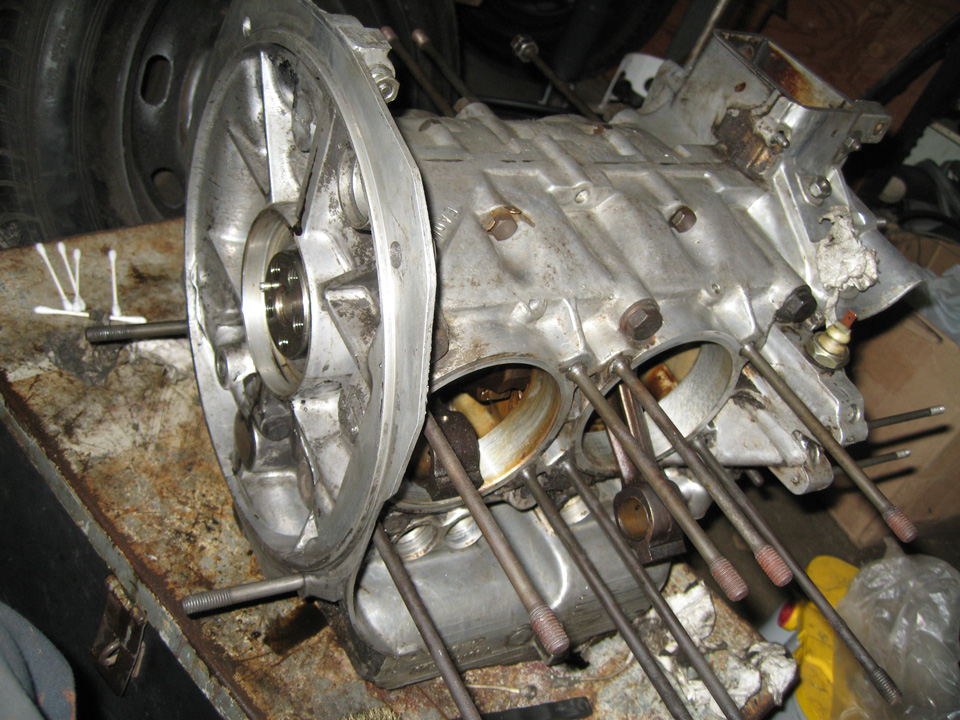
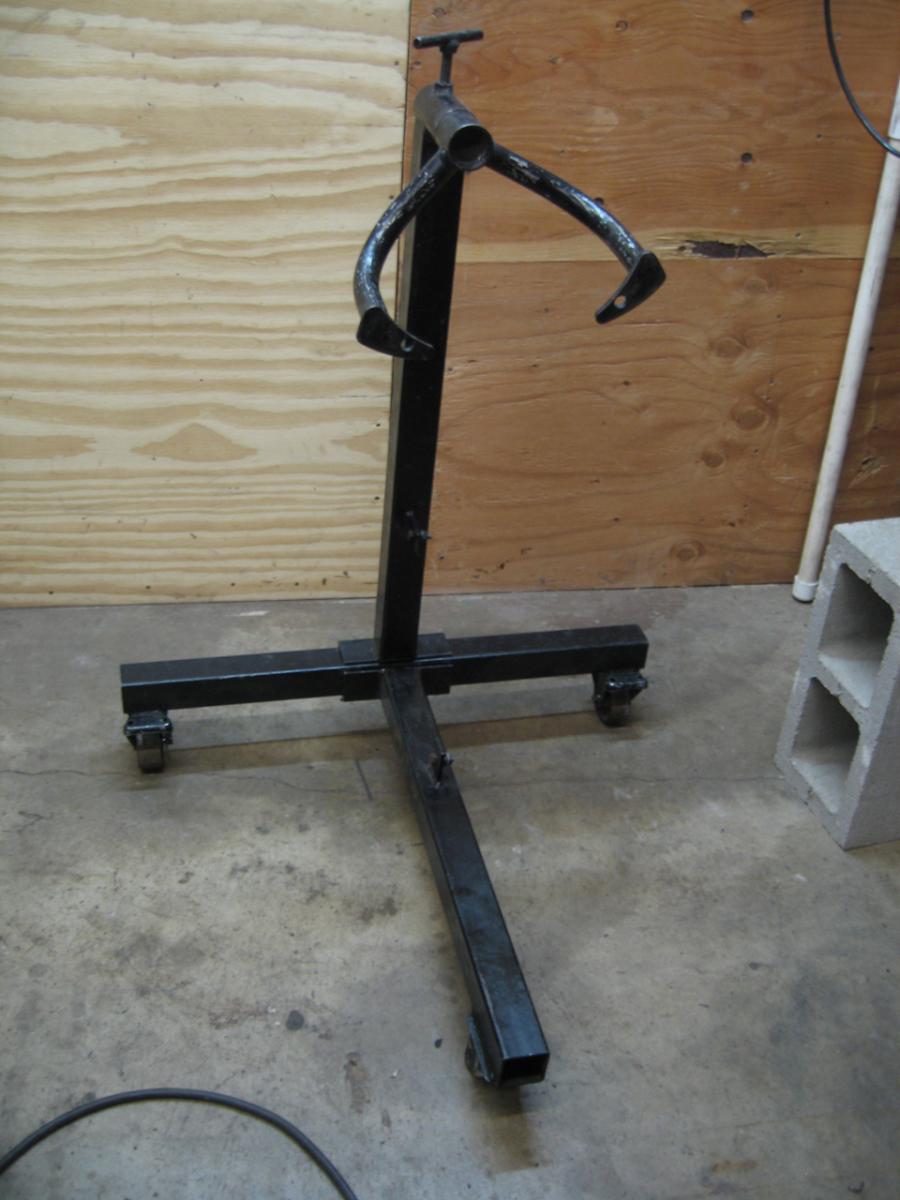
Still coming along. I won't be able to finish until I put it on the stand and that I won't bother with until I've modified it. I've purchased this yoke:
I have 2 of these coming.

I need to go to Industrial metals to get a cross beam for the front of this fan shroud murderer.
Besides that, I've been blasting a piece or so of the tin each day.
It does take awhile, the compressor is always running.
Posted by: nathansnathan May 22 2011, 11:39 PM
To update, it was definitely fun, meeting up with David yesterday, checked out his roller at his work in Orange. I should'a brought my camera. I got a few minor things like a seat rail with the adjustment handle intact, I finally got a replacement for the oh-so-elusive door striker back plate casting that I'd broken off a tap in the original of, I cut out this replacement section of the drivers headlight side marker light wiring harness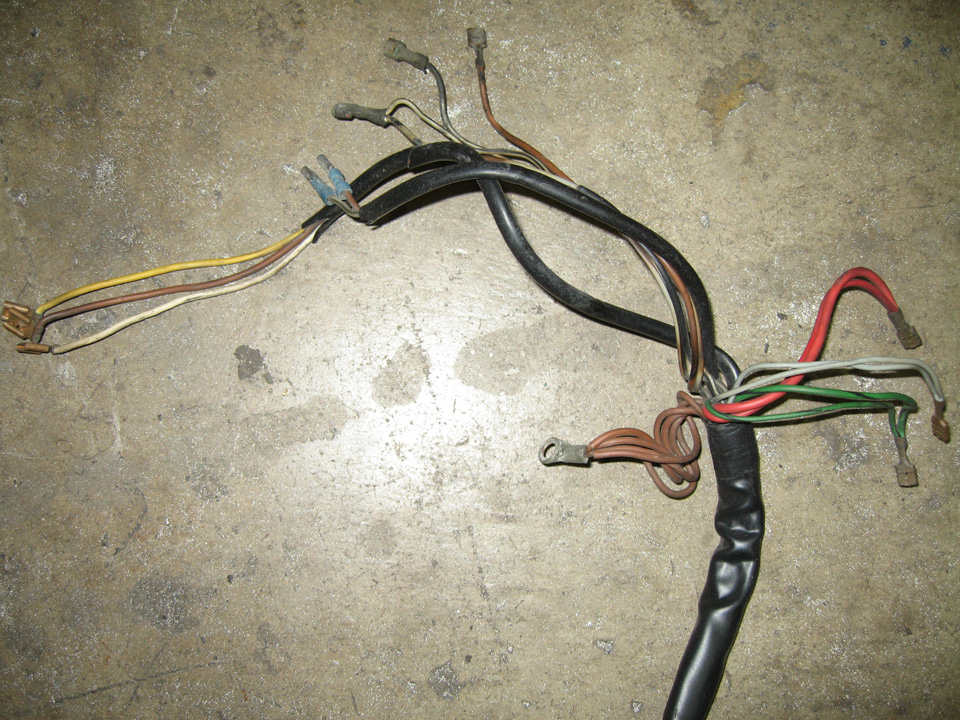
the original had got a bit toasty at some point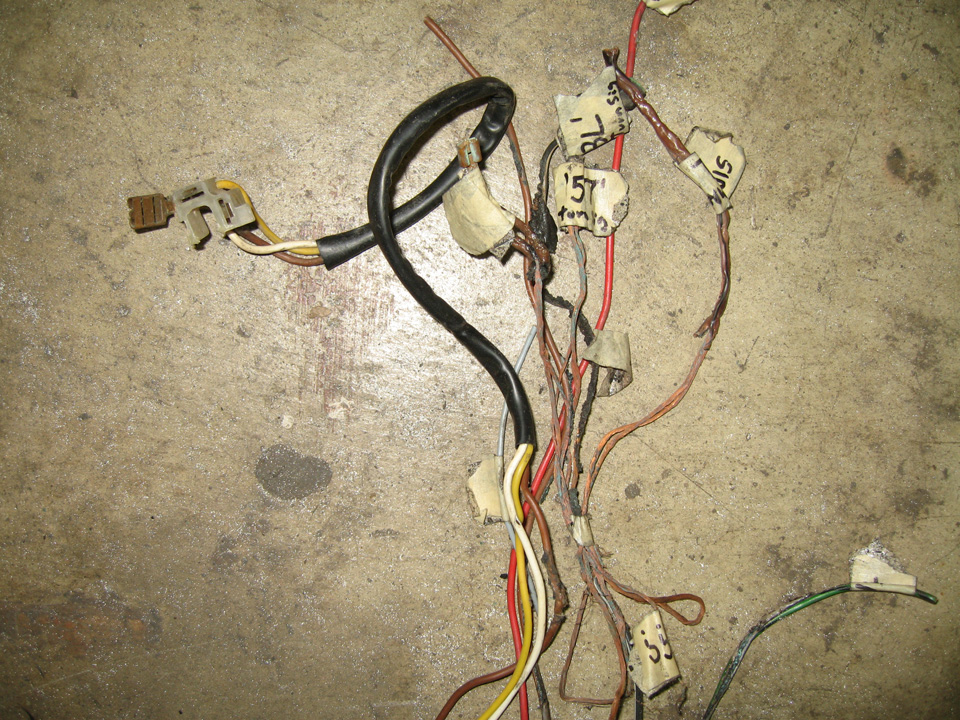
The first thing I did when I got back was cinderblock mockups of the mahles.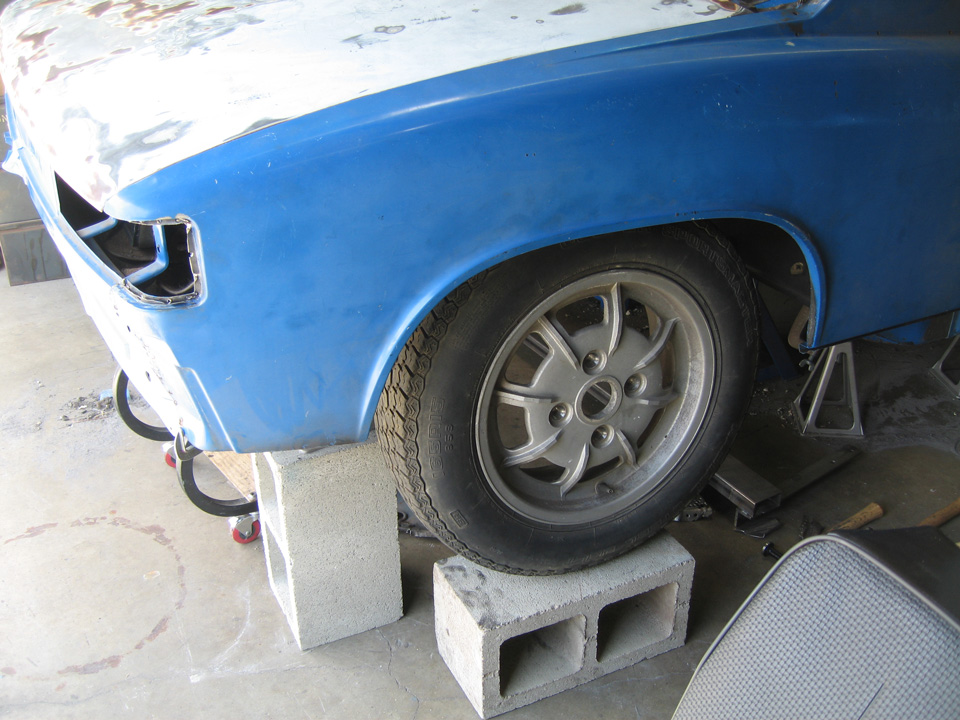
I have been just looking at them fondly from time to time.  I got the lugs also, minus 4 of them. I need to find 4 more 38mm ones and I think I have 2 but need 2 more 19's for the spare I realize now. ... details. I'm pretty happy just to have them.
I got a really good deal on all of it, $420 discount. Thanks again to David for the the good times, like I'd said, my first 914 engine compartment outside my own. 
Posted by: nathansnathan May 30 2011, 09:38 AM
I've finished enhancing my engine stand and thought I would share. I just need to paint it, maybe shorten some bolts, and weld up the T handle to lock the yoke.
As I'd mentioned in the previous post, I'd ordered the 4 arm yoke off the guy on the samba, but did it off ebay actually. The description talks about how it will fit in a 'standard' 2 3/8 inch hole. The swivel on my empi knockoff stand is like 1 3/4 inch.
I'd thought about how easy it would be to just buy a new stand. So I talked to a bunch of people off Craigslist who were selling mostly the harbor freight stand and it seems that 1 the hole measures 2 1/4 inch? Maybe they were measuring it wrong...
With this complication, I went back to plan A, to modify my stand, and with a half day of work on friday for Memorial day, I was able to go to the metal place.
Getting started, the old swivel would have to go, thankfully.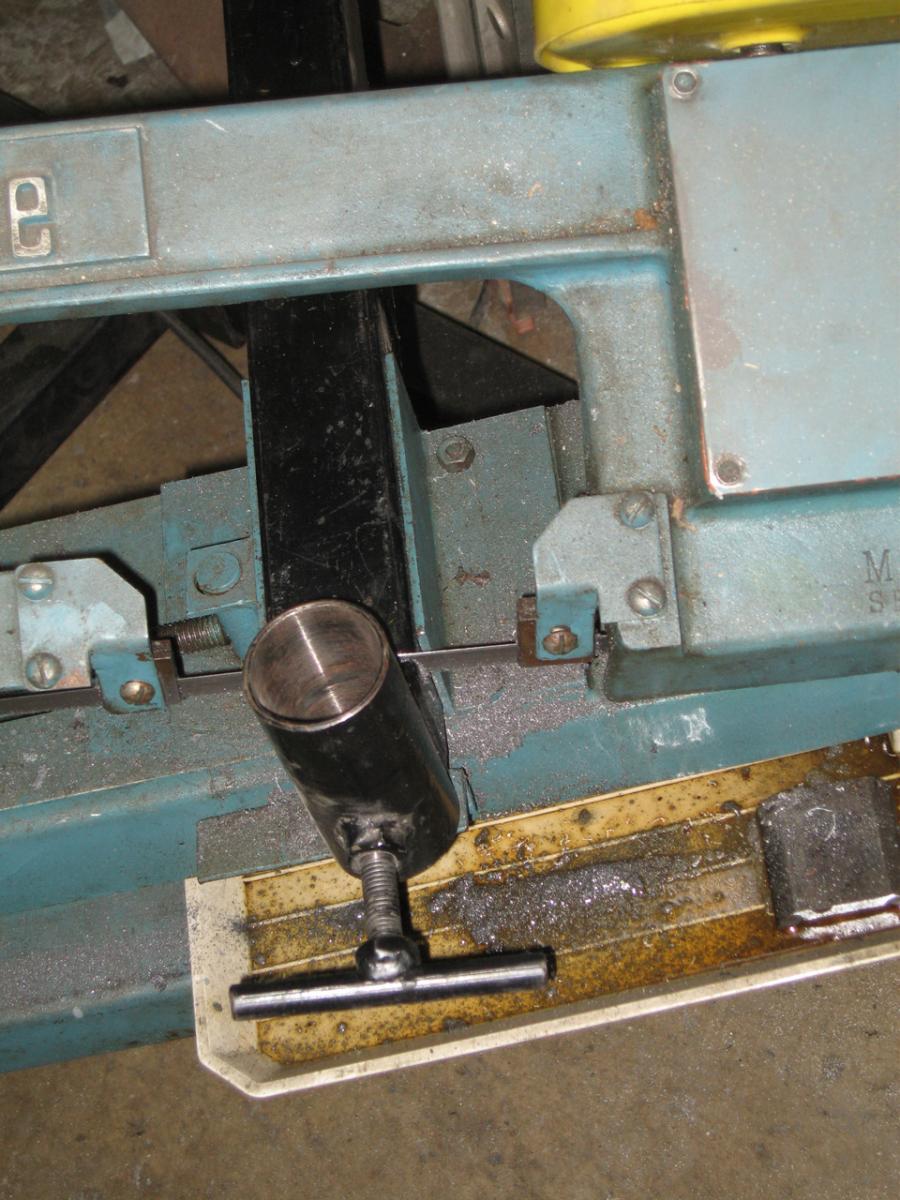
I don't have pics of it specifically but I drilled off the old swivel caster that was at the front (honestly 1 supporting leg it had out front with a swivel caster! Check the pic, that had actually broken, the pin came 'unswaged' and the wheel had fallen off  )
)
Probably the biggest improvement was the stability added by the wider track front.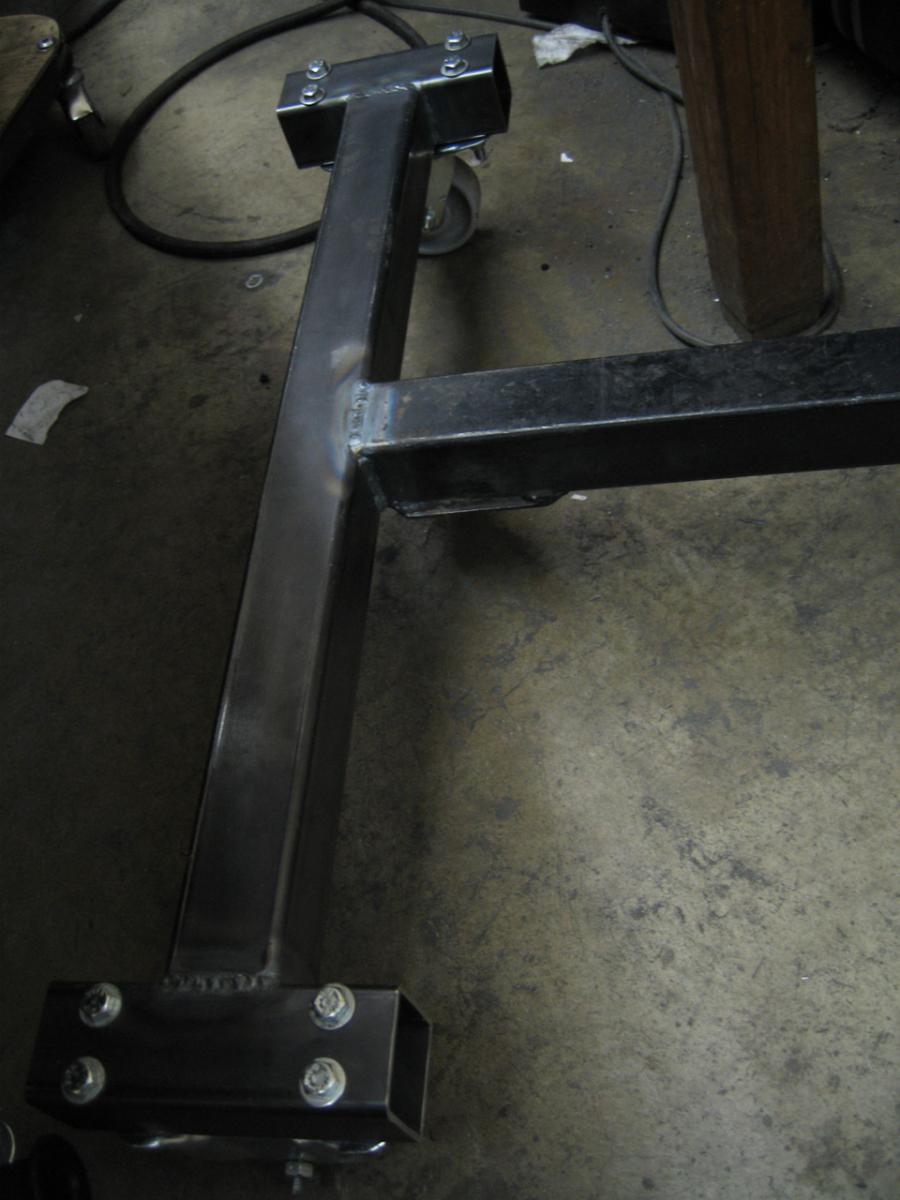
I decided to reinforce the joint between the vertical member and the lower part (previously just one bolt went through holding all pieces together, and then a flimsy cross brace above). 
I welded in through-tubes to reinforce both the members were the cross beam clamps down on them.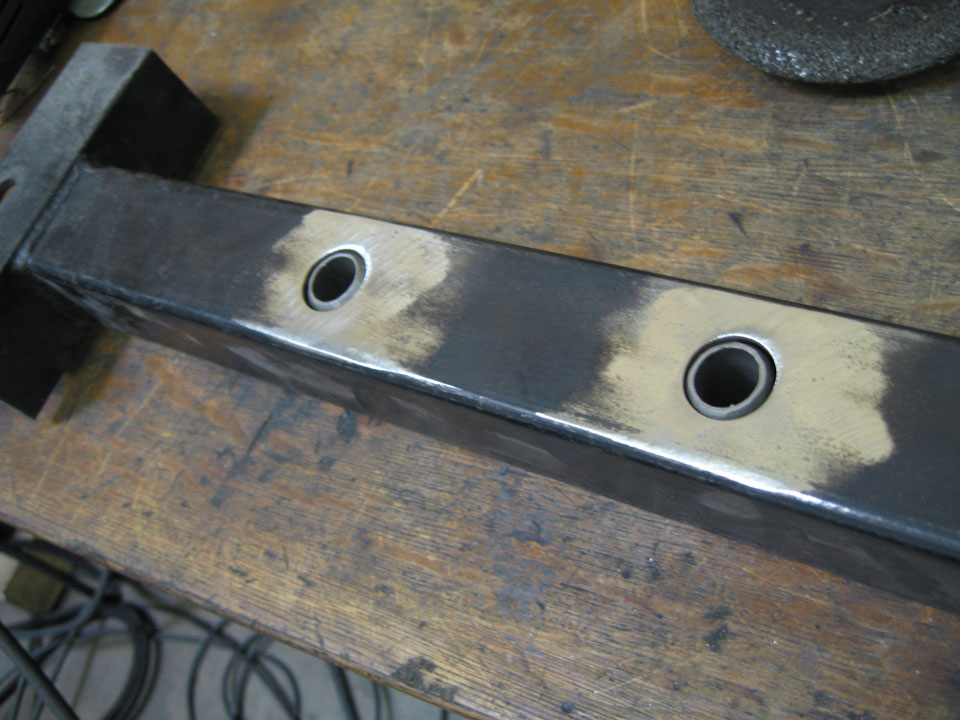
Welded, ground and sanded down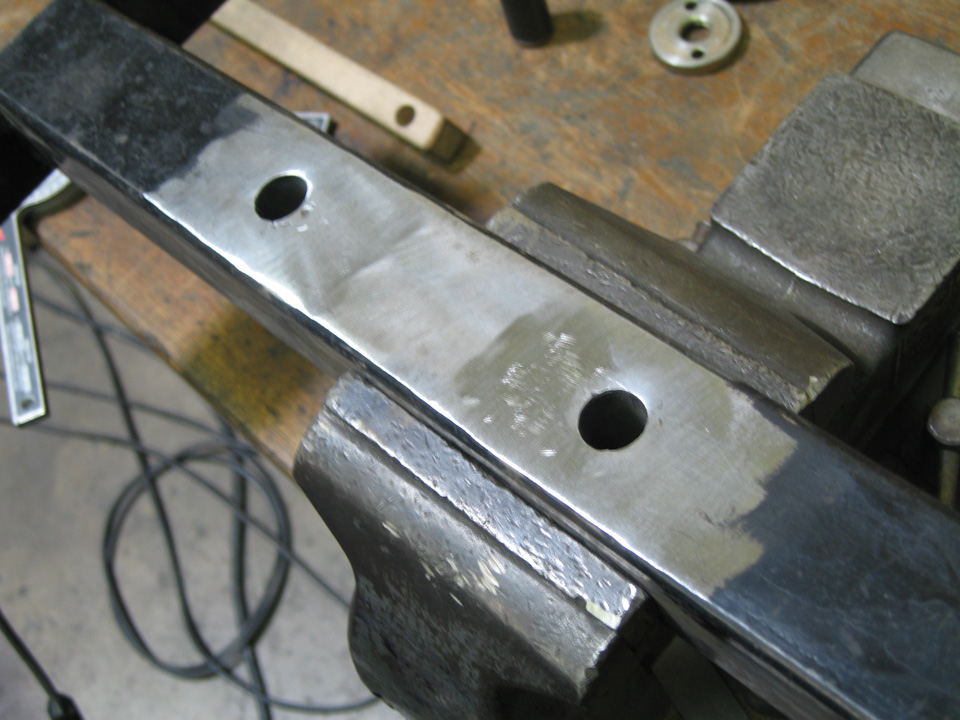
And the yoke swivel enhancement. I found the perfect stuff in the remnants section, DOM tubing, or 'drawn over mandrel' there is no weld crease evident on it and it is quite hard, maybe 1021 the guy was saying, just short of the hardness of chromoly, but weldable as a mild steel. The stuff is thick walled!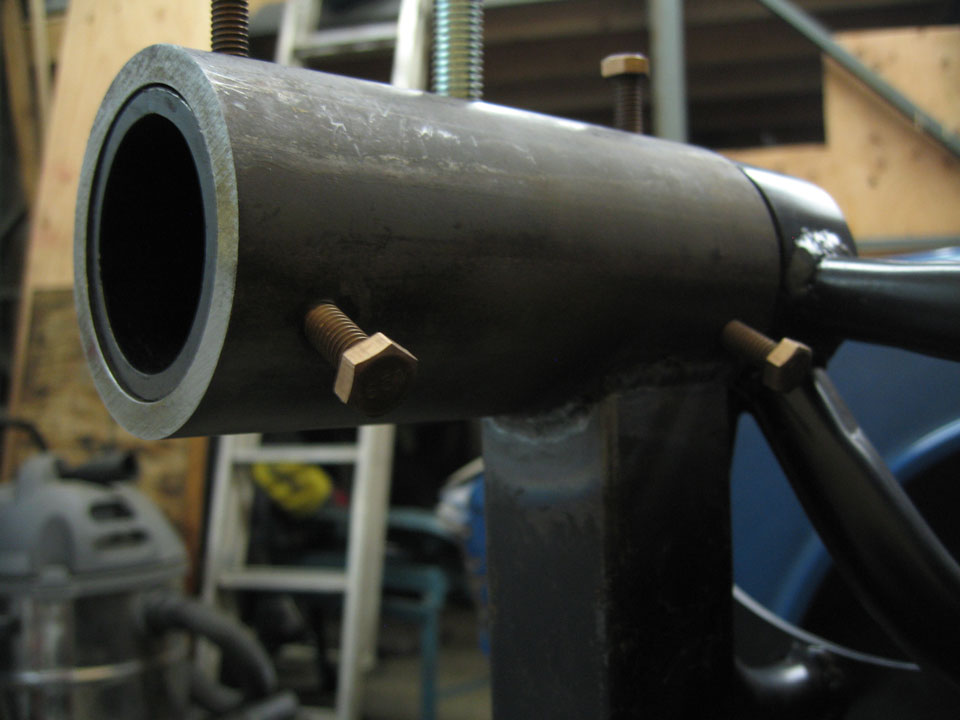
The bolts coming out are made of phosphor bearing bronze and there are 3 at 120 degree intervals at the front and the back. I'll put nuts to lock them in position. These take up the ~.015" play on either side; the difference in the id of the pipe and the od of the yoke swivel is pretty good but still a little play. 'I honed' the barrel of the yoke with fine sand paper. I think I may use way lube to check rust between. There is no drooping with the engine on it, no tendency for the engine to slide forward and out as before.
It's amazingly rigid. It feels awesome to be able to trip over it and not worry about having to 'catch' the engine or to have to leave it only in the 1 position that the yoke ears aren't strained being attached at only 2 independent points. I'm pretty happy with how it turned out.
Before: (note the tiny flat cross bar supposed to be bolted onto those tabs, is missing in the pic)
After: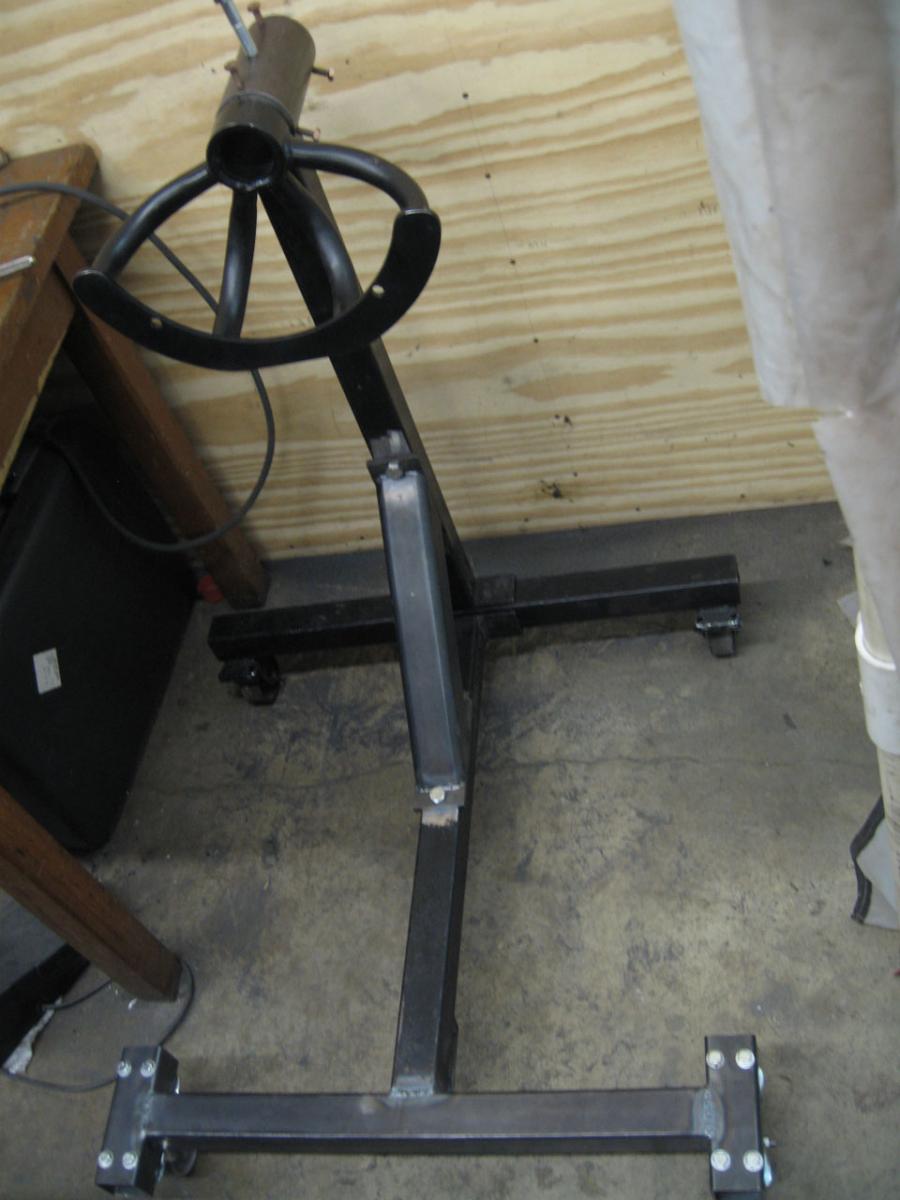
Posted by: Beach914 May 30 2011, 06:39 PM
The Mahles are going to look great Nathan. They definitely look better on your car than that black roller. I think that the original color was L96D.
I've got some misc short Lugs that you can come over and pick through when you want.
Dave
Posted by: saigon71 May 31 2011, 06:24 AM
Nathan:
Great work man! I too am attempting a teener restoration in a one car garage...it is quite challenging sometimes! My ceilings are not as tall as yours though, so I had to pick up a shed that someone was giving away for parts storage.
Keep it up!
Bob
Posted by: nathansnathan Jun 11 2011, 07:08 PM
Nathan:
Great work man! I too am attempting a teener restoration in a one car garage...it is quite challenging sometimes! My ceilings are not as tall as yours though, so I had to pick up a shed that someone was giving away for parts storage.
Keep it up!
Bob
Thanks, Bob.
Even as the parts are, I want them to be more 'out' so I can go over them in good order instead of just what I can get to. I can't recall where my glove box is...
Posted by: nathansnathan Jun 11 2011, 07:31 PM
Picking up here, update the thread.
I met up with David again, I'd been thinking about the fresh air vents on his roller ever since I'd seen a week or 2 before getting the Mahles. I got some pics this time.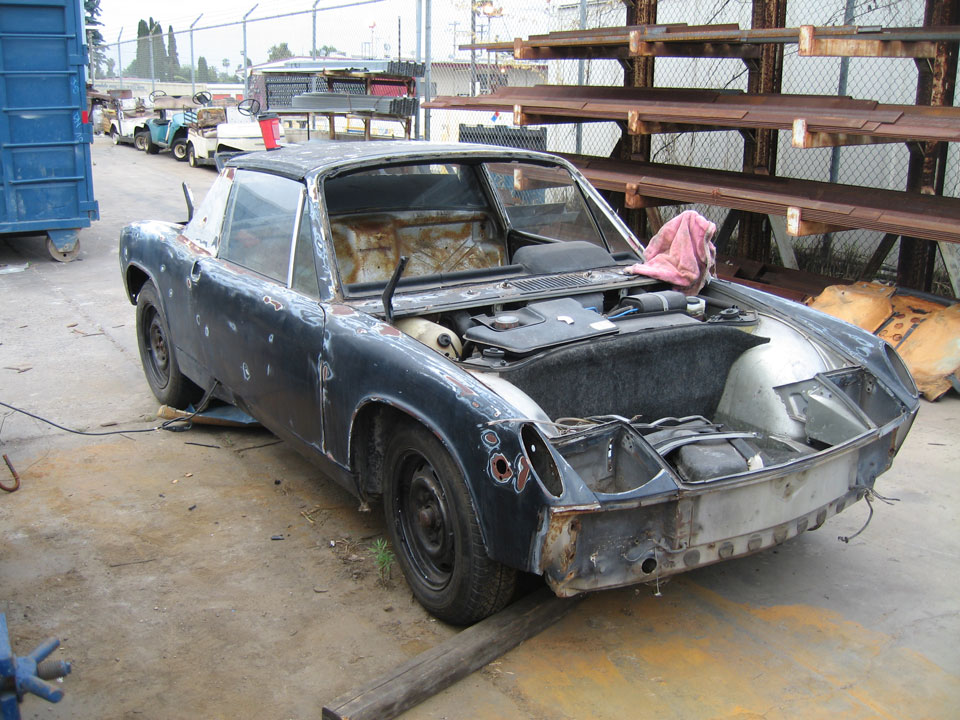
The car is pretty crusty at the longs and jack point is floating in the rocker, lower firewall is bad, and floors. She was well done, and so with the fresh air vents being very good compared to mine
Rather barbaric, I used a .40" cutting wheel on my 4 1/2 inch angle grinder.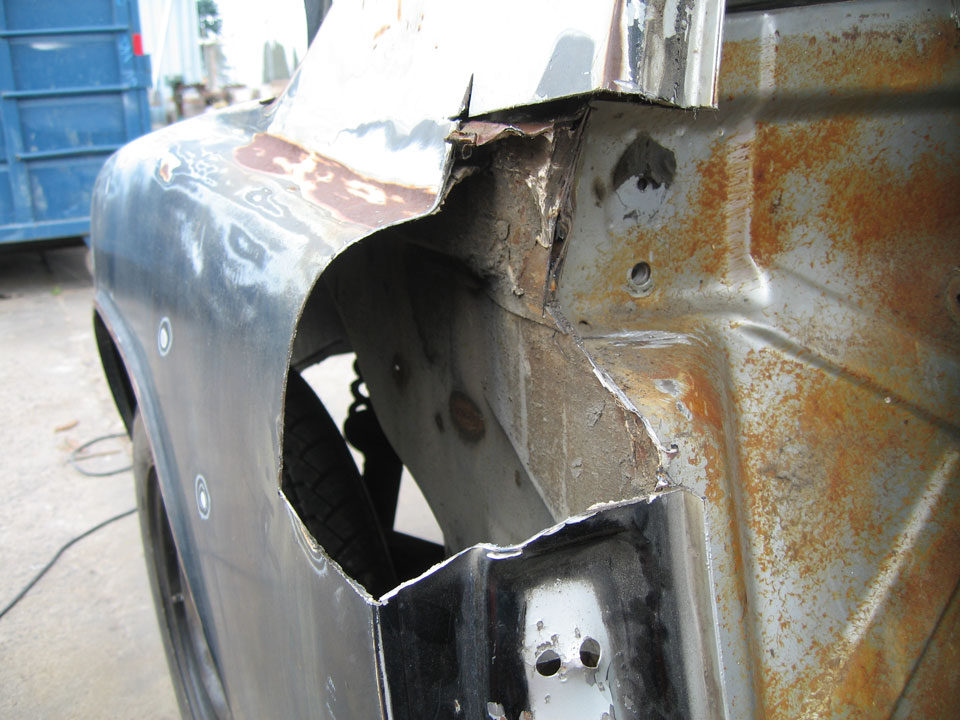

I got the seam sealers all out with the heat gun and scraping screw driver, some rust in there but solid. I've started blasting and it's looking great.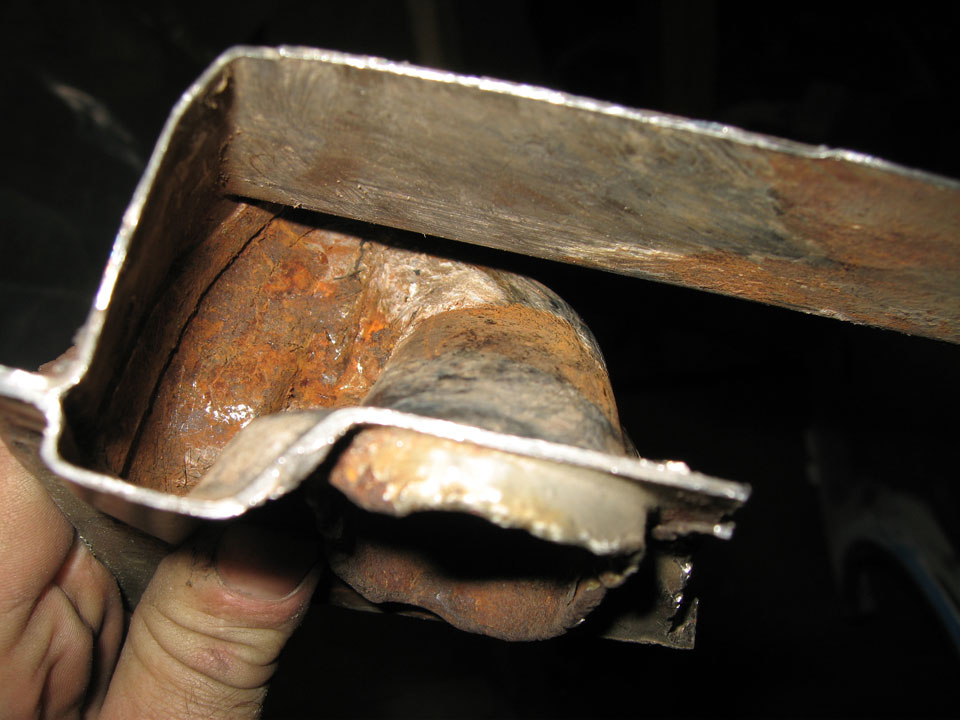
Will get a picture of after blasting and how I'm gonna install later.
Posted by: nathansnathan Jun 11 2011, 08:15 PM
It does look rusty, but honest, just a bit of pitting.
Anyway, going stronger than that,
taking it to the next level, another car has come to me. 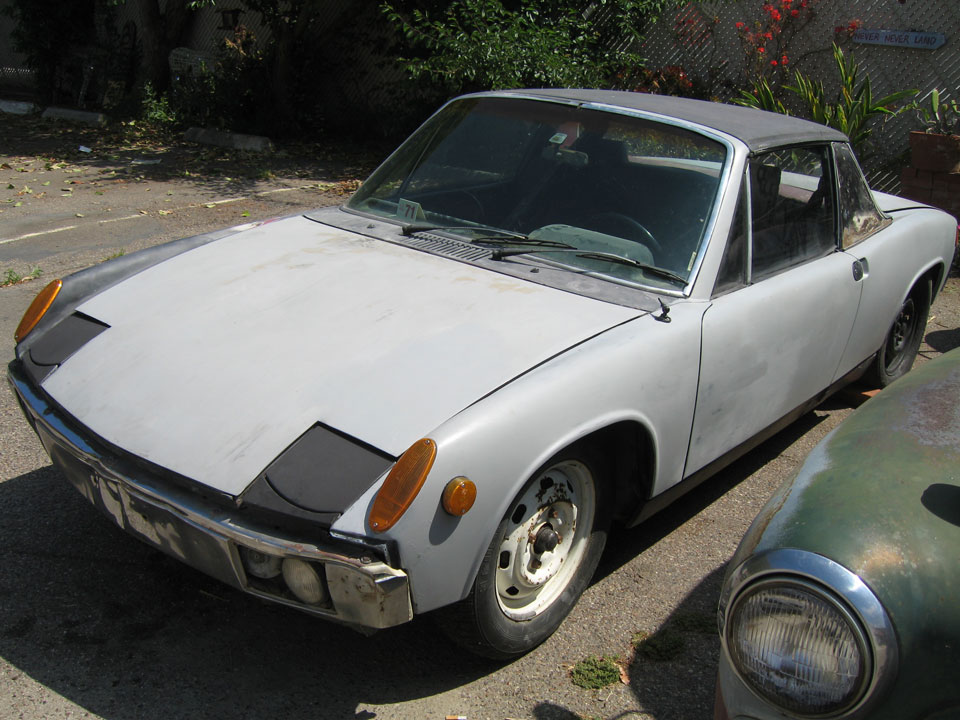
It's funny, I realized after contacting the po that it was a guy I got a $2 door handle off of the first week I had my 914, Paul, who works at Rancho Transmission in Santa Ana. He is exactly 16 miles from me and I got it towed here this morning much more affordably than the first one, thankfully, though we did have to wait it seemed 2 hours for the guy to come on his 'day off'. Good stuff though to talk shop with a guy that knows about these things, or Volkswagens anyway.
Tuning was so so, probably would have idled if it got warm. It runs, I should add. The carb is, he told me, a real one out of an actual Pinto. The valves sound good though. I will have to do a compression check. Thinking I may get it rolling with that engine while I put mine together.
Body is pretty crusty on this one, too, mostly down low though where mine is worse above, well except the hell hole, this one is the worse, the 420 car seems solid in comparison.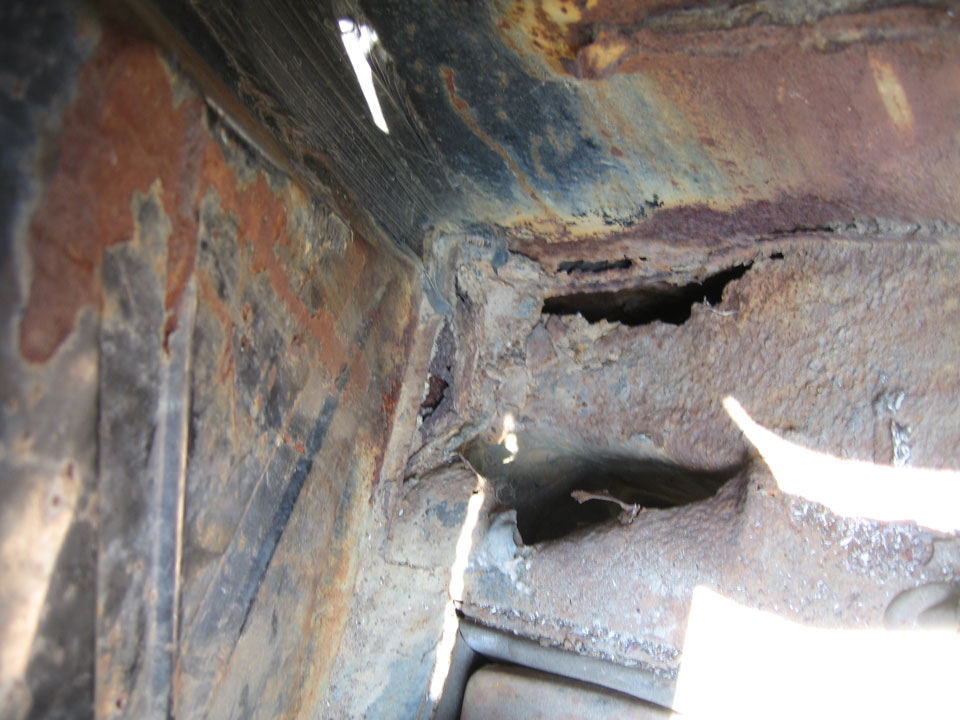
A lot of the interior is there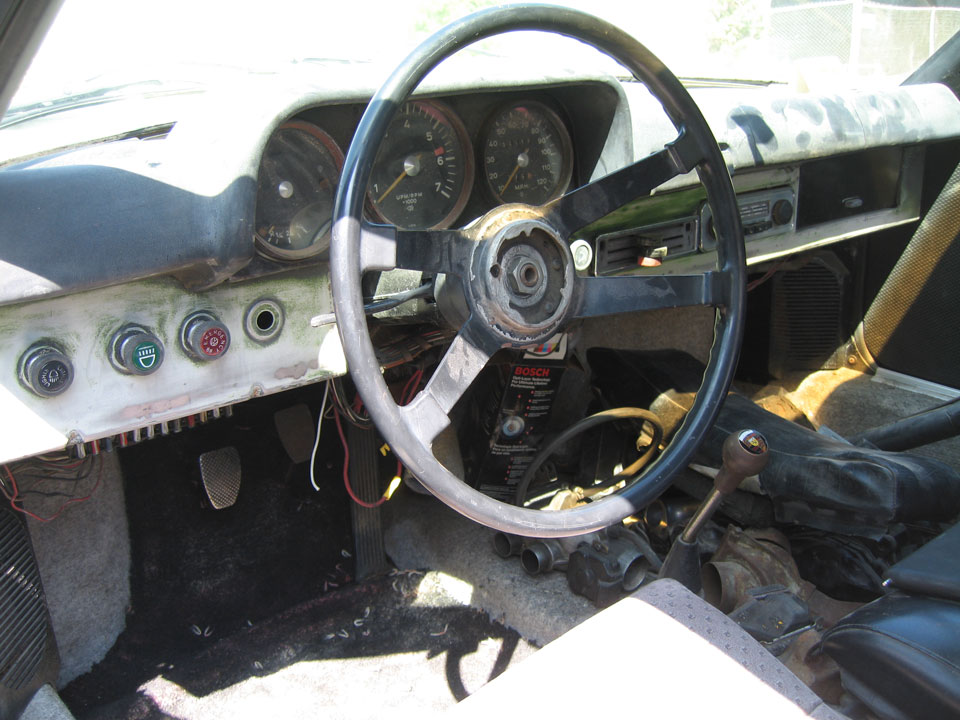
It's got some really good stuff that came with it, all 4 rotors are German and new for 1. The driver door may be the one to use. The deck lids are better than both of what I have I think. It came with a a new carpet, black though, not sure how nice it is. The windshield is what I was looking for when I found it. I'd seen it before of course, but it really made sense more looking for a windshield. It looks to be very good, PPG. The top of the front bumper is straight and solid if I can get the chrome off. My plan is to d the bumpers the same as the wheels, in 'wheel silver'. I know it's not stock but I on' like the body color plan and have qualms about the re-chroming chrome route.
Other stuff that came with but probably won't use new-in-the-box 911 ate master cylinder, also in the box the front euro lenses, seemingly more brake calipers than the 4 (no brakes on it now), stainless soft line new. The backpad is pretty nice, early though as it's a 71.
It's pretty exciting just to have an assembled 914... to sit in. 
Just wait until the battery charges (it sit's in the trunk ), I'm ganna start it. Maybe tomorrow after the Classic
Posted by: dheming Jun 13 2011, 03:55 PM
Nice score on the parts car. BTW, something like this is what I was talking about for a simple engine run stand: http://lainefamily.com/EngineStandProject.htm
Posted by: nathansnathan Jun 13 2011, 04:51 PM
Nice score on the parts car. BTW, something like this is what I was talking about for a simple engine run stand: http://lainefamily.com/EngineStandProject.htm
You call that simple?
Here's a pic I had saved, he's got the fuel injection partially attached to it, too, 914 stuff there.
Posted by: nathansnathan Jul 19 2011, 07:03 PM
This seems like a good place to talk about how I've got to get rid of the parts car as I'm still taking things off it, and it's not ready for the classifieds section yet.
I agreed with my land lord when I got permission to get it that I could only keep it for 3 months. So 1 month to go, I've got until September 1st.
Likely the shell will be mostly useless if it comes to calling the junkyard, as I would cut off what's good of the body just because it's good. A lot of it isn't.
The thing is I have to keep it rolling I'm thinking in order to get it towed or even trailered to a ..junkyard ... I'm a little nervous actually about it, whether I can just call someone to take away my cutup shell. Plus I would hate to think of the suspension and steering stuff getting crushed.
Maybe someone local has a yard or something. I'd sell it for less than most want for just the rack & pinion. We'll see how it goes. I'm just putting it out there.
Posted by: kg6dxn Jul 19 2011, 07:13 PM
If you have the title you can junk it. They can bring a flatbed and drag it. Take the suspension off. You could make a simple wood dolly on casters to move it around.
Posted by: nathansnathan Aug 26 2011, 10:55 PM
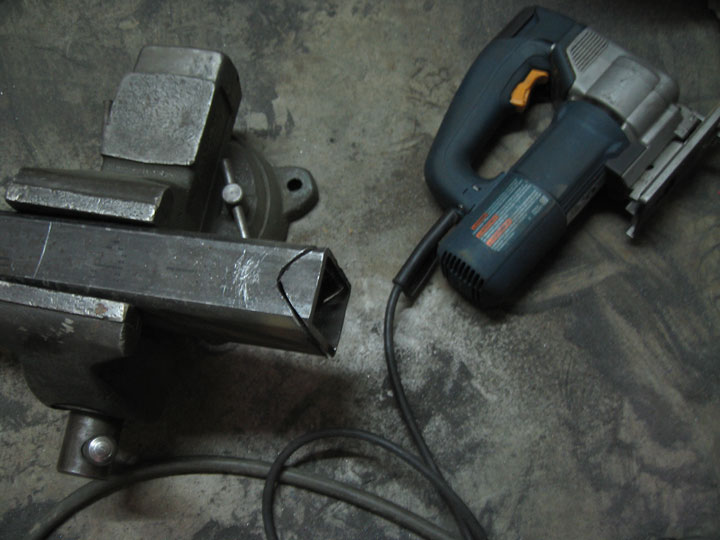
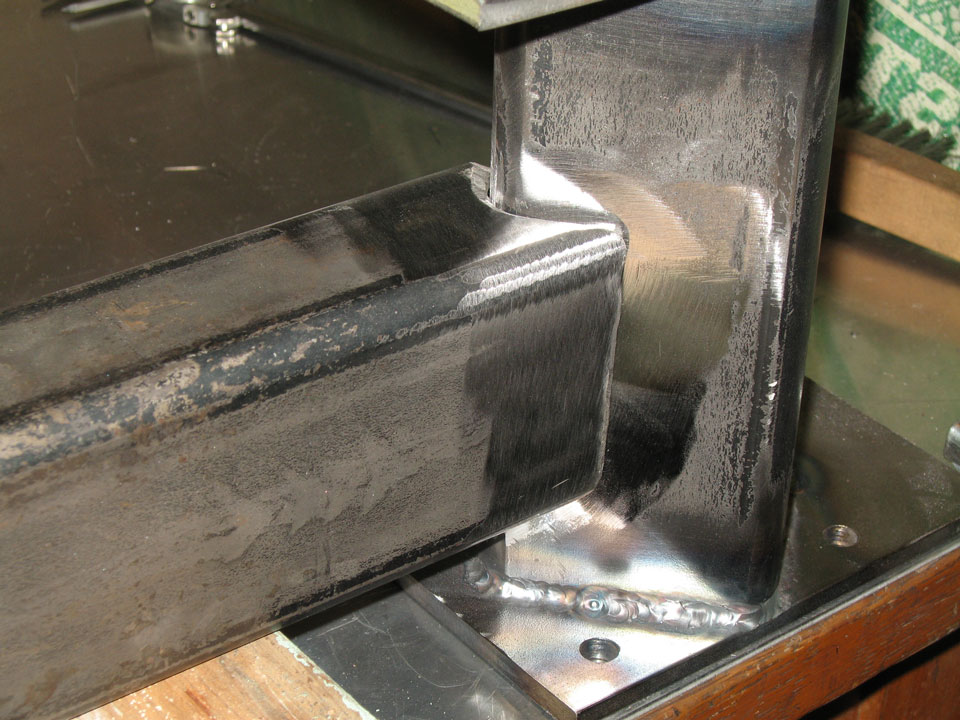
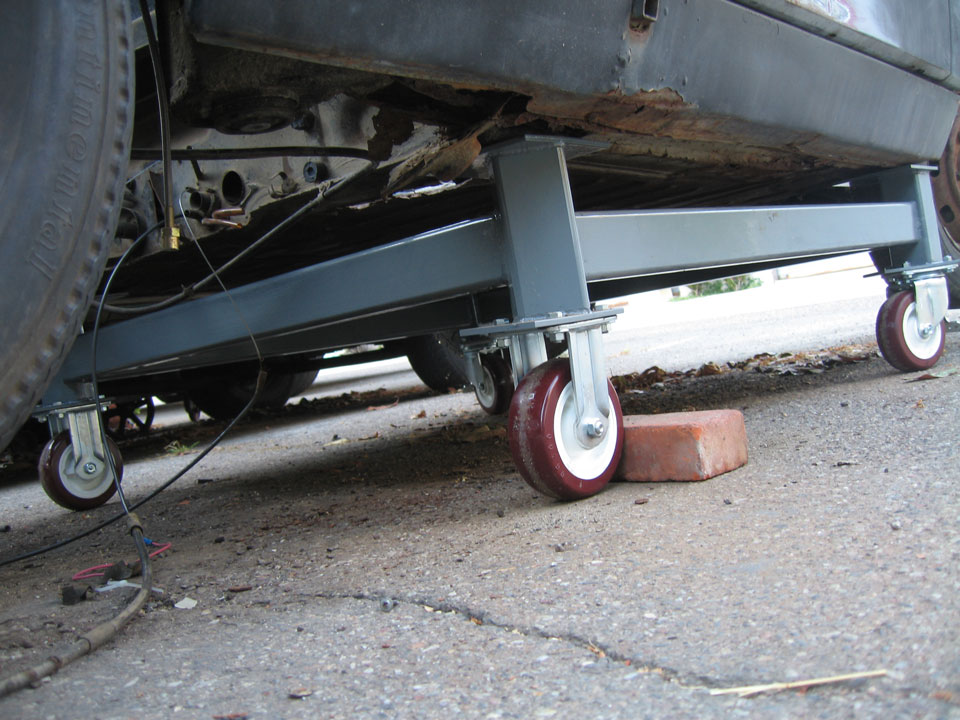
About a week to go here and I think my landlord will be ok if I go long. Unfortunately I don't have the title. I've got 2 bills of sale from the past owners, so I'm going to cut up.
I've been busy preparing. I've got a reciprocating saw ready and i've built a dolly. Once the donor is in pieces and the 420 car is more stable, I will put it on there as I need to be able to move it around to go forward.
Here are some pics of the dolly construction. 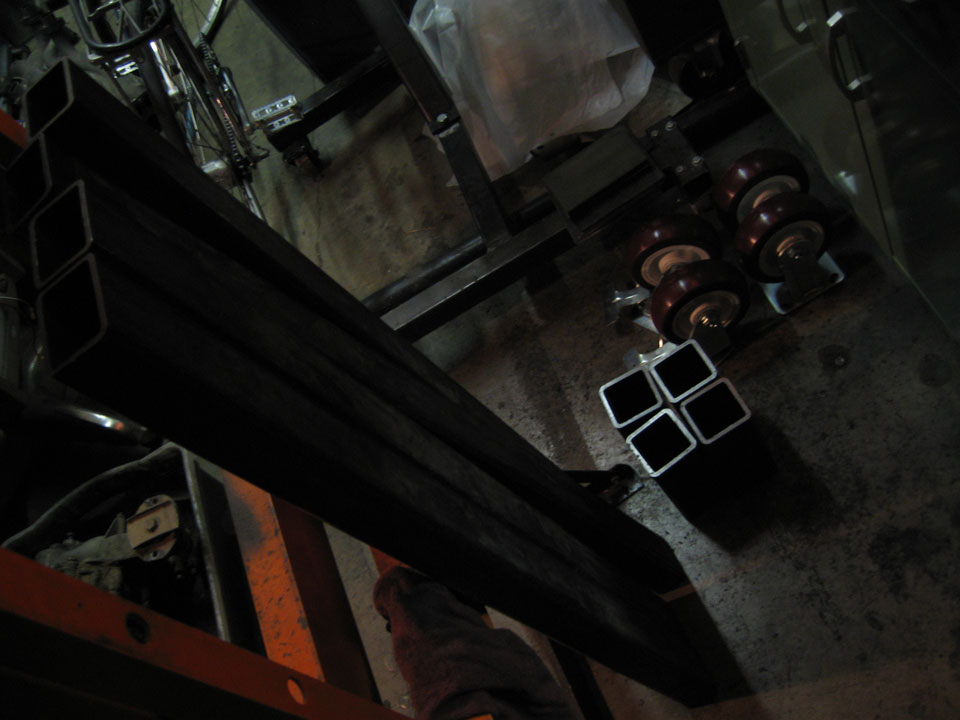
Posted by: nathansnathan Aug 26 2011, 11:13 PM
Other progress, I upgraded my air compressor. I'd got this old old Westinghose/ homemade jobber from some guy off craigslist a few years ago and I'd been working it to death with the blast cabinet. It is I think a 35 gallon. I'd been thinking about getting something better.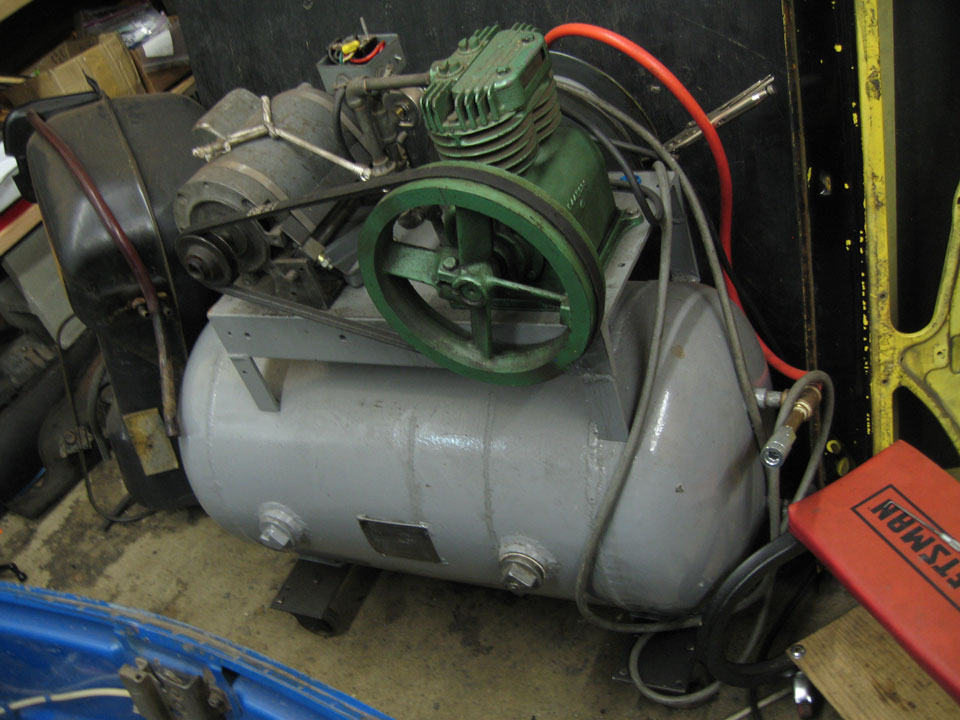
...so I found this on craigslist, got it from a tire shop in huntington Beach.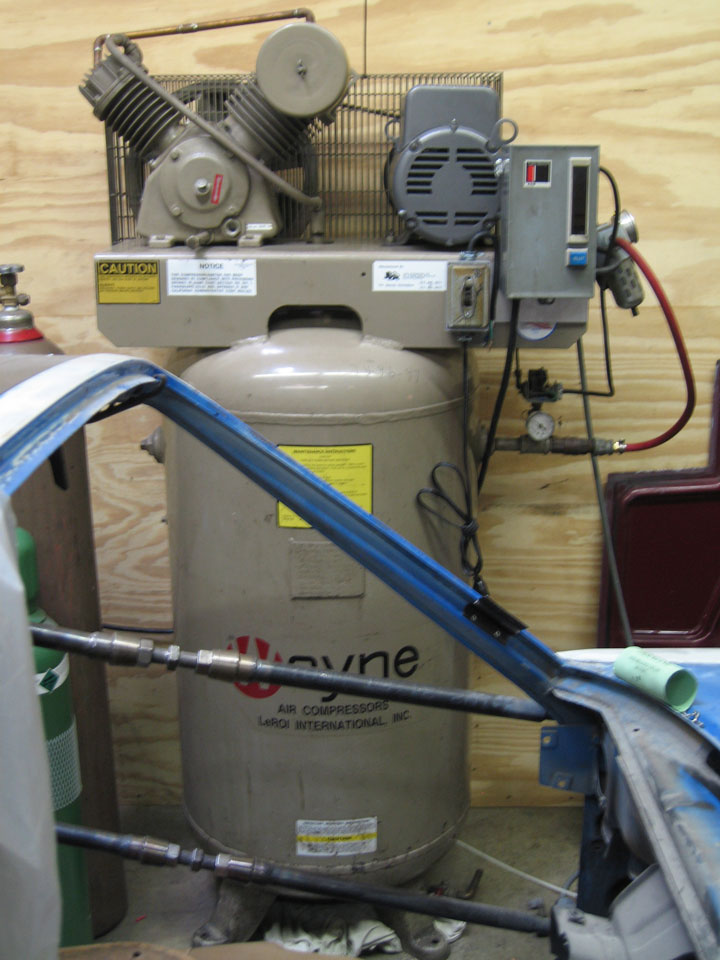
80 gallons, dual stage goes up to 175psi. It is actually made by the same company as the old one, as Westinghouse was bought by LeRoi, which actually makes this for Wayne. It is the real deal. The sort of overkill that I'd been looking for seems to come only in 3 phase, and so it was quite challenging to get it hooked up to work with single phase 220 power. I found a 5hp Baldor 220 single phase motor on eBay. It was not cheap, though I guess it could have cost a lot more for a new baldor motor of that size.
Anyway, this new compressor is a beast. I regulate it down to 90psi for the sandblast cabinet, and I can say that it does not EVER get below that. I can blast continuously and it will meet the demand. If I give it half a chance it will actually catch up and turn off.
I'd thought that the shortcomings of my cabinet were a lot due to it being not the recirculating type, but it is working a lot better with this bad boy, like it puts out a stronger 90psi than the other though I'm using the same gauge!. 
Posted by: kg6dxn Aug 26 2011, 11:38 PM
For future reference... There is a device called "Add A Phase". Available at most any electrical wholesale house. It uses an LC network to phase shift your house 220V into 3 pahse power. Small box, mounts on the wall close to your equipment. I've installed many in home garages needing 3 phase machines to function. Cost a couple hundred bucks... Easy install... 2 wires in, 3 wires out...
Posted by: nathansnathan Aug 27 2011, 10:56 AM
For future reference... There is a device called "Add A Phase". Available at most any electrical wholesale house. It uses an LC network to phase shift your house 220V into 3 pahse power. Small box, mounts on the wall close to your equipment. I've installed many in home garages needing 3 phase machines to function. Cost a couple hundred bucks... Easy install... 2 wires in, 3 wires out...
I researched variable frequency drives, rotary and static phase converters, and I found that the rotary converter was the only acceptable way to do it. Upwards of 3hp it gets very expensive to do it right... though it may have been about the same.
This is a true 5hp motor
Posted by: nathansnathan Aug 27 2011, 10:57 AM
I've got some other 3 phase/ single phase stuff to figure out. It's a little easier than the motor as a heater can be wired in different ways. This crazy thing was actually out of a Chrysler plant. Running it single phase 220 will make it less effective than the 480 3 phase but it should still be quite effective. I've read that getting the paint to off gas is the secret to a professional quality paint job, either by waiting between coats or by baking. I've read that they go up to 400 something degrees at the factory, where paint shops will heat panels up to 150 or so.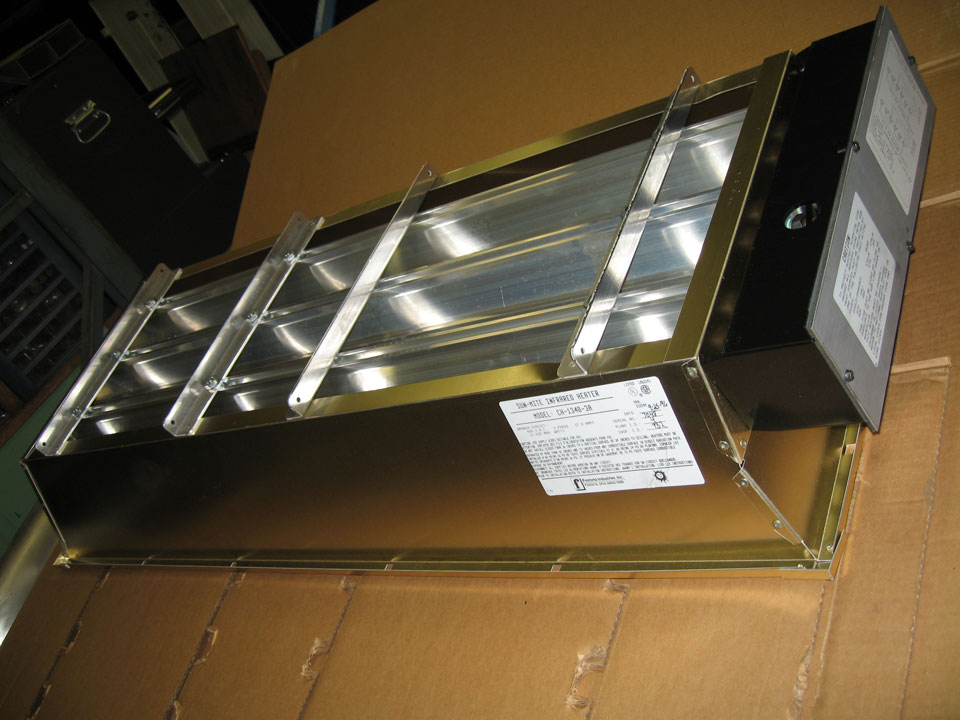

Wiring costs get pretty up there with this high amperage stuff. I needed to move my welder across the room. I ended up making my own 50 amp 20 ft extension chord and it cost me $250.
I broke down and got the runner kit for it which is ridiculous in its construction. The welder weighs 300 lbs and it's held to the rear wheel assembly only by 4 1/4-20 bolts into the sheet metal. The rear wheels look like 5 lug Fuchs though so it's worth it. 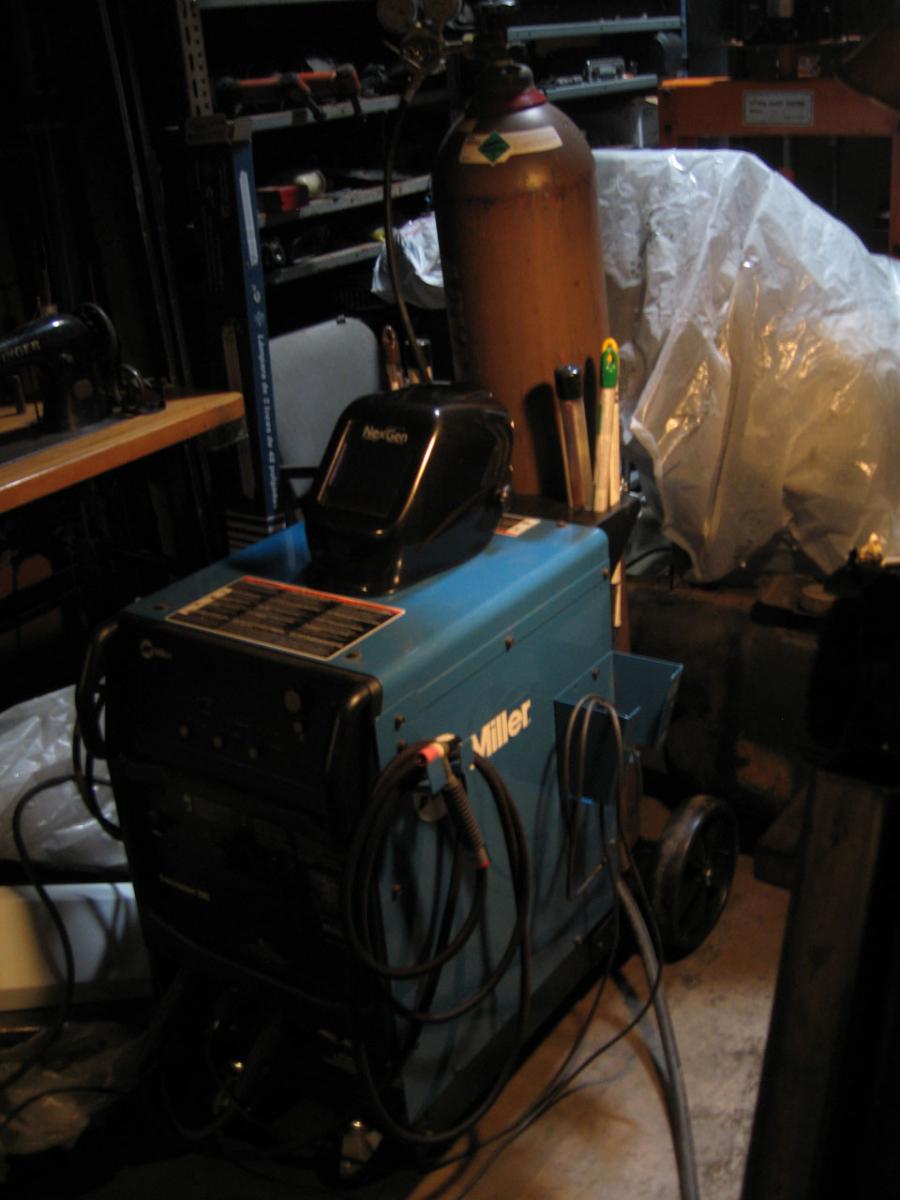
Posted by: nathansnathan Sep 3 2011, 08:21 PM
The big bolts at the rear are a bear. Oh, 3/4" Bonney! 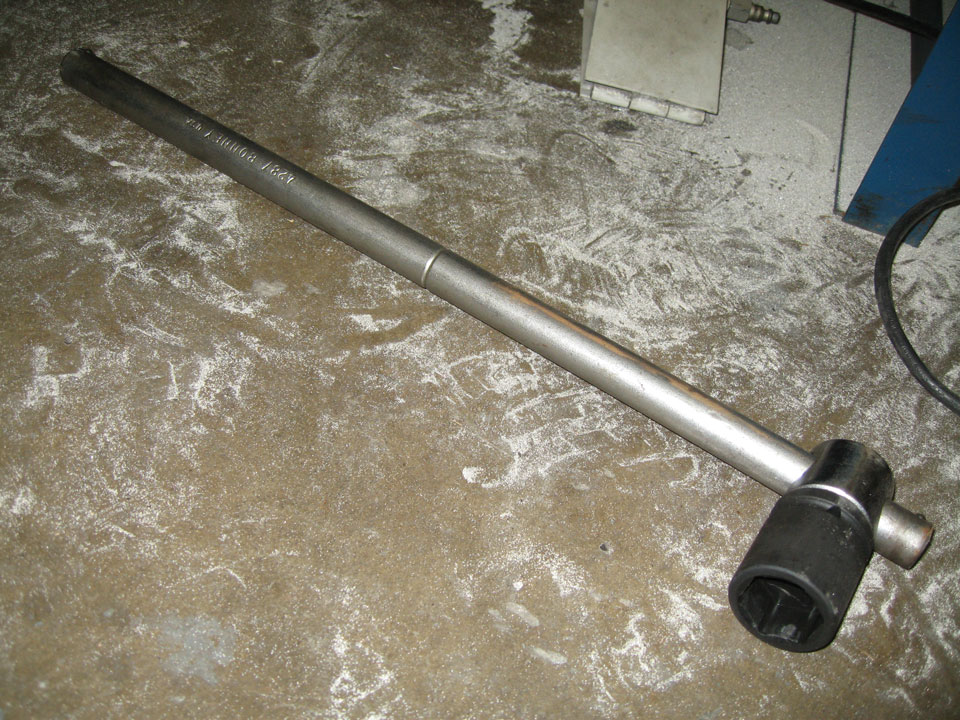
After much liquid wrench.
A giant release, a big pop and off she came.
Posted by: nathansnathan Sep 3 2011, 09:16 PM
Some progress on the parts car. September 1st was the day I agreed to have it out of here. ... landlords and non-operational vehicles
Some guy talked my ear off All Day Long on Thursday, same guy that scavenged just the head off the old compressor that I put out with a free sign leaving me to deal with the rest. I guess I was just nervous about how to proceed that I wasn't like, "I need to get to this, mister" and be on with it.
I'd got out my new sawzall.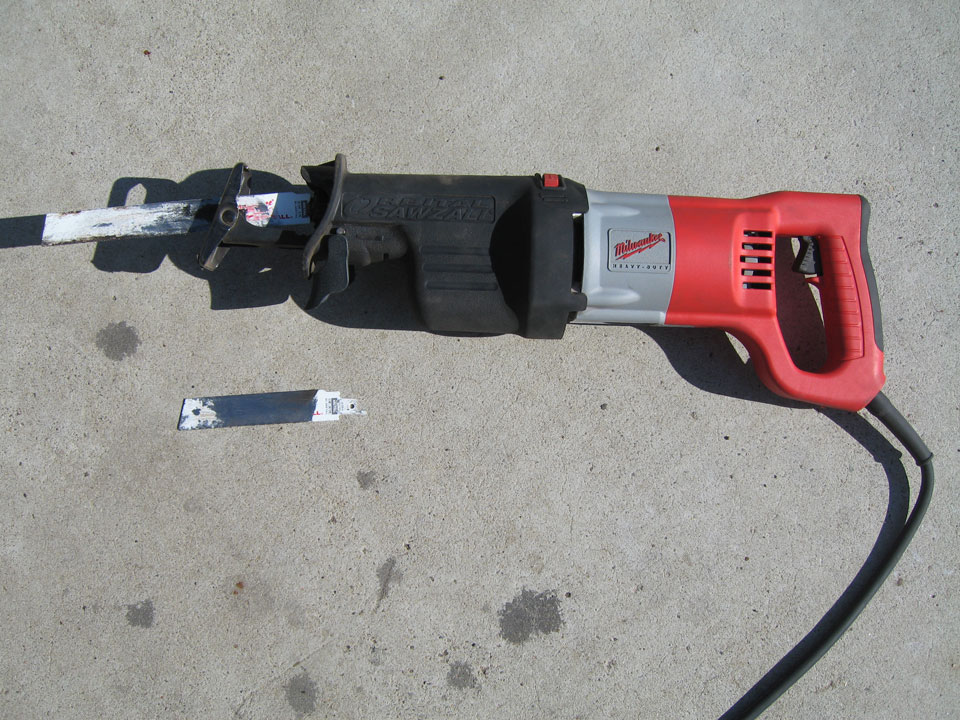
I suppose I didn't really want to cut it up. I still wonder if I should have made a jig to store it vertically. With all these parts, bring it back...
Pretty rusty in places. 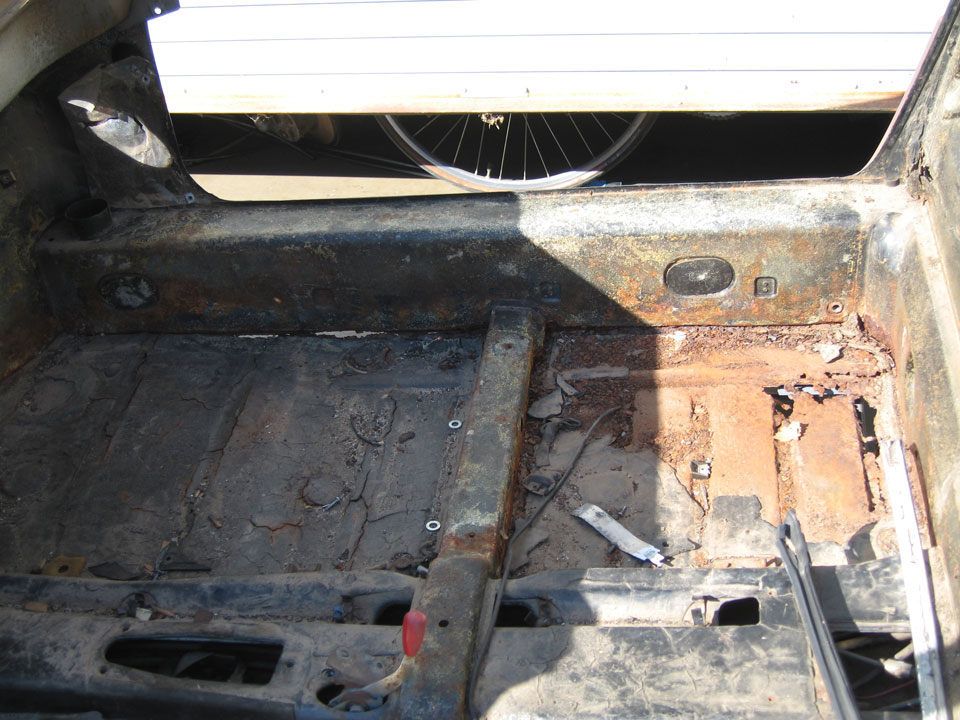
And with the deadline, on went the plan to cut it up. Someone might need the metal; I'll keep it around, will need some myself: the cowl piece may be better than mine. Thinking about modifying the driver side engine mount back to be a passenger side?
Made a rack to make some room for the chopped up car.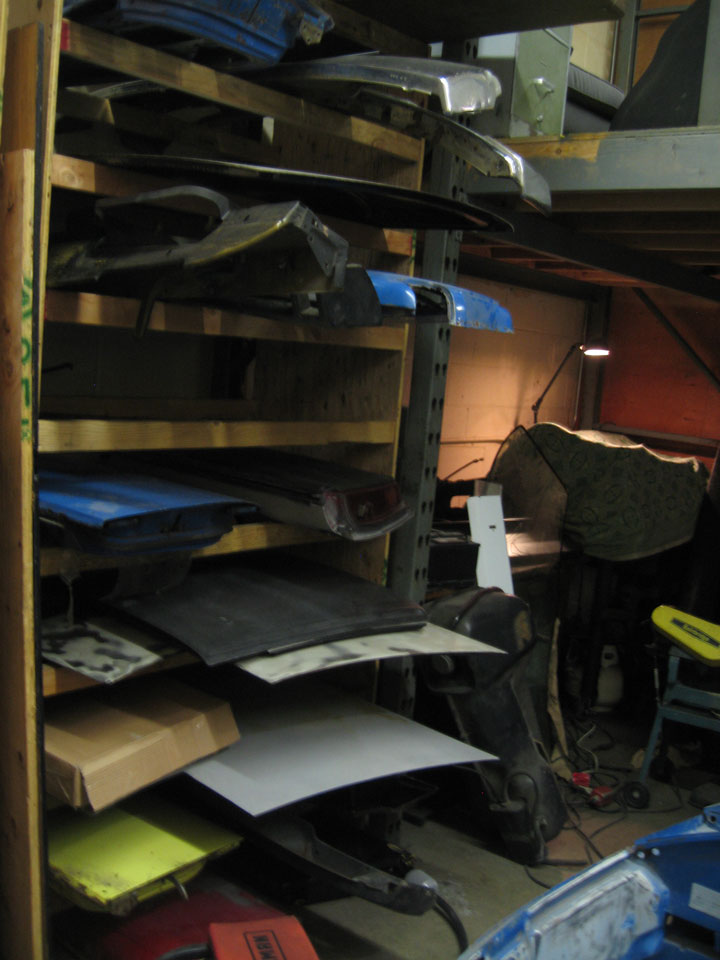
Things went better on Friday without Mr. Diarrhea mouth, got a fender off after work. 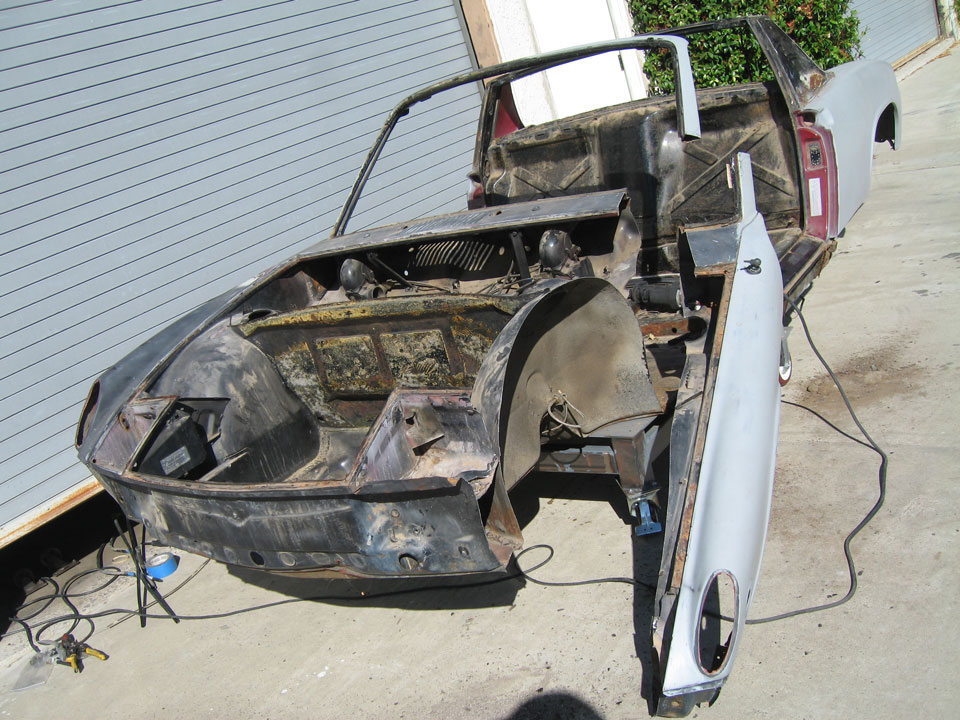
Today, I got off the other front and the driver rear, will do the passenger rear tomorrow.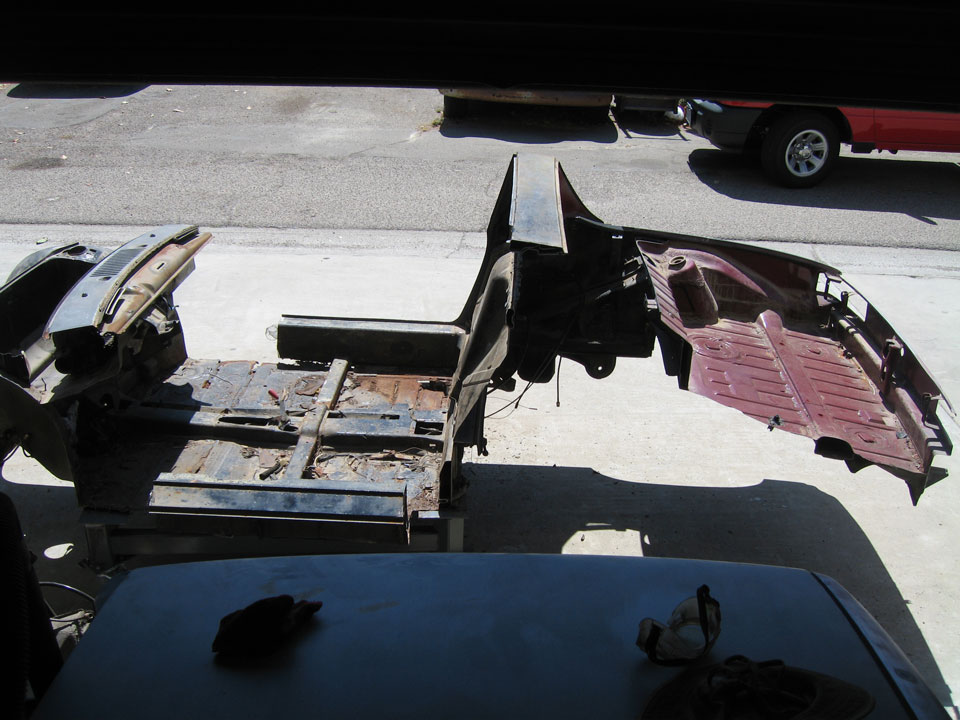
Came a long way in a week with it.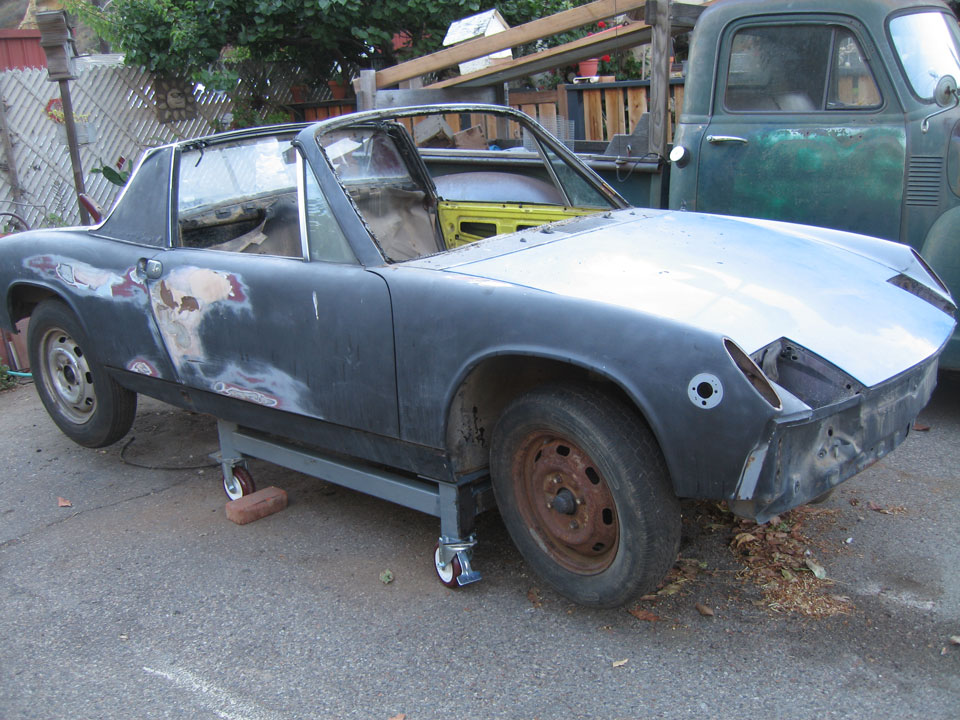
Looks like there was a fire under the dash at some point. Sure is crusty.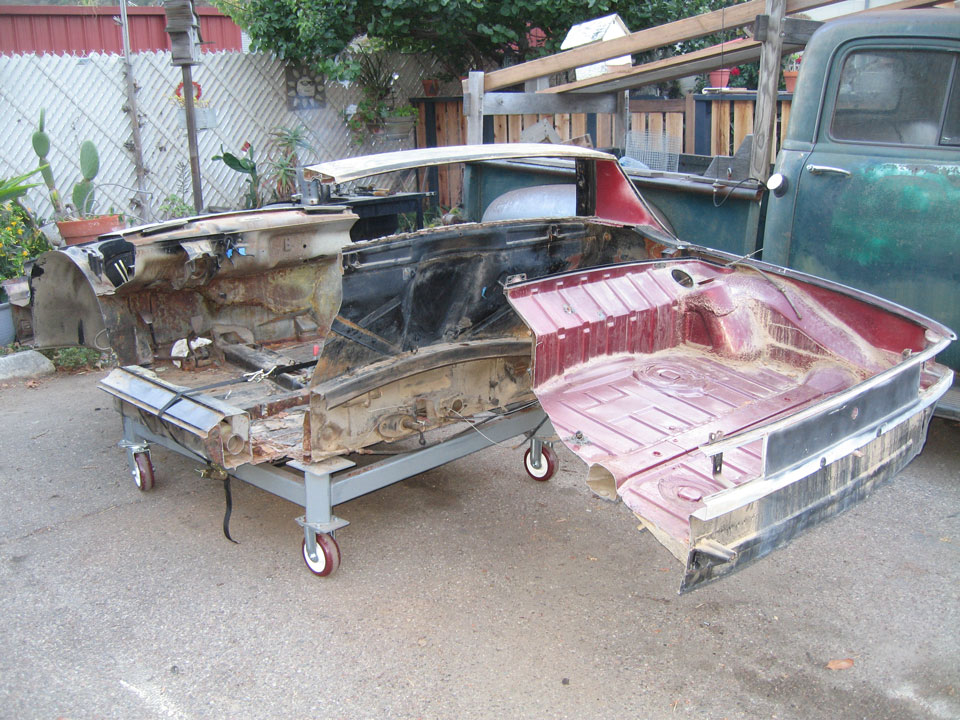
That's all for now. I'll finally be able to work on the blue car soon with this out of the way. It's actually almost not-blue as I've been taking off the paint, will show some of that later. Next step is ro get the blue car ready to transfer to the dolly, well after I get the rest of the donor cut and have made some room...
Posted by: nathansnathan Oct 1 2011, 10:48 PM
Back a step to show there has actually been progress. 
It did get brutal when I removed the old suspension console, was more than a year ago.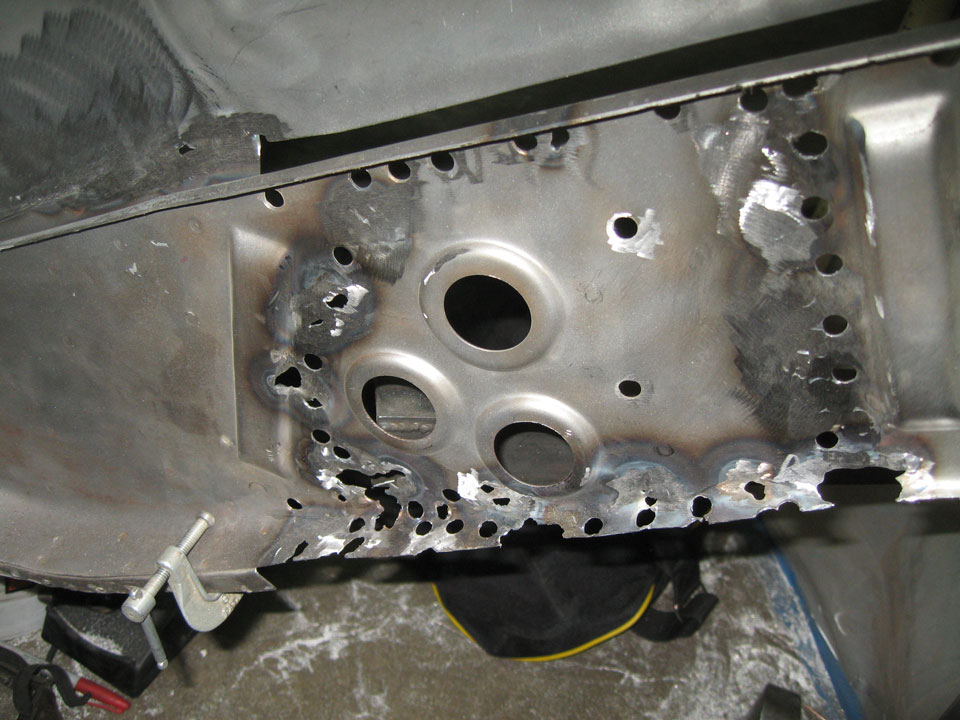

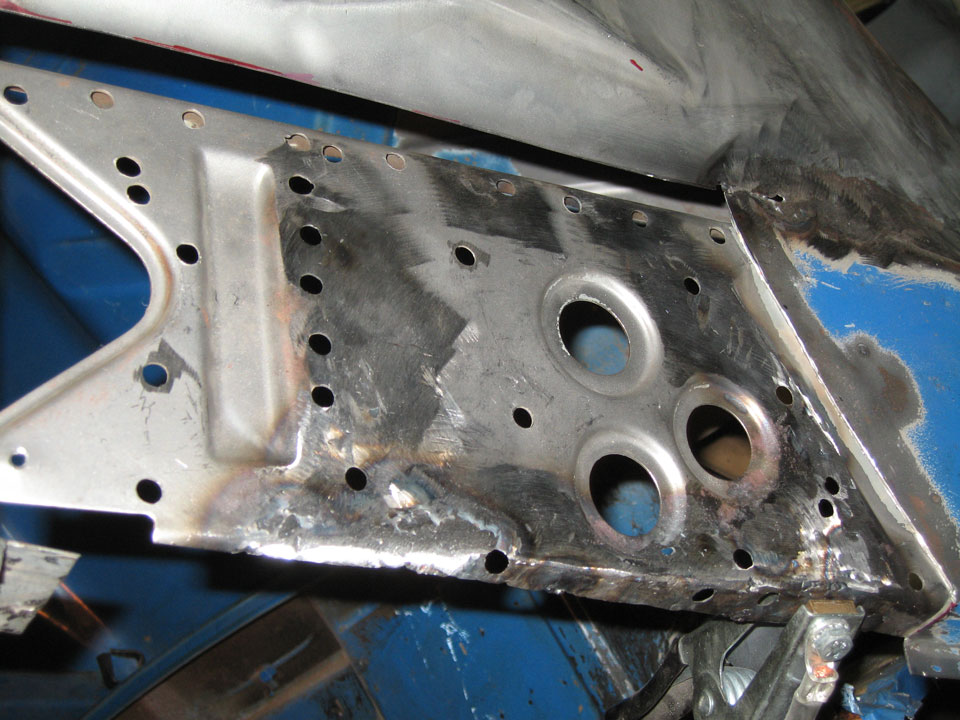
Bit of work to get both sides looking solid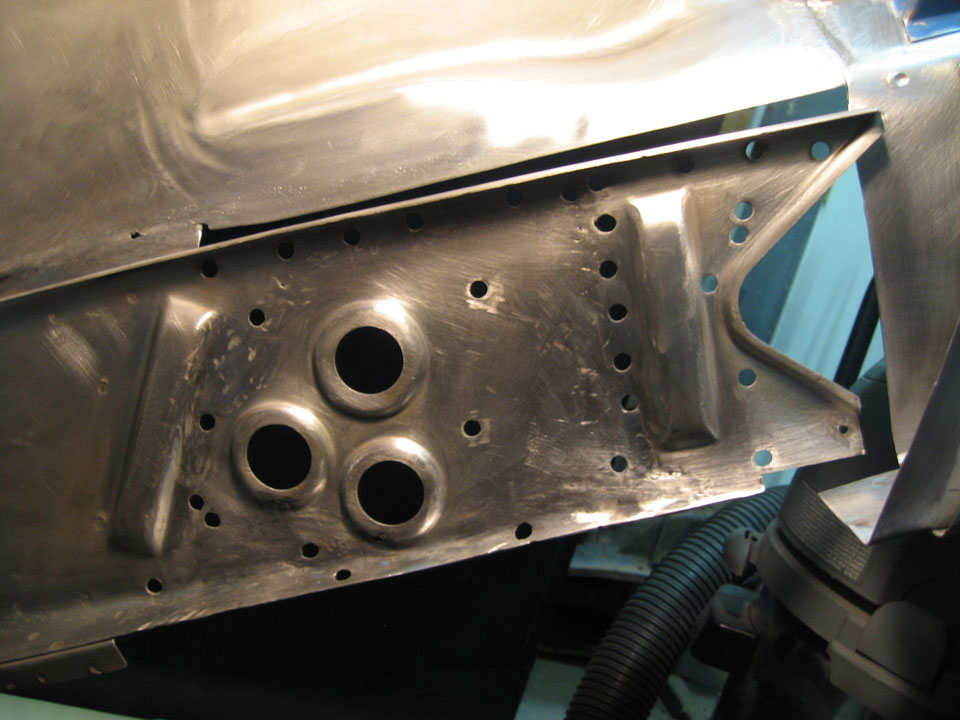
bit lumpy, but passable. They don't sell this as a replacement piece afaik. 3M weld thru primer.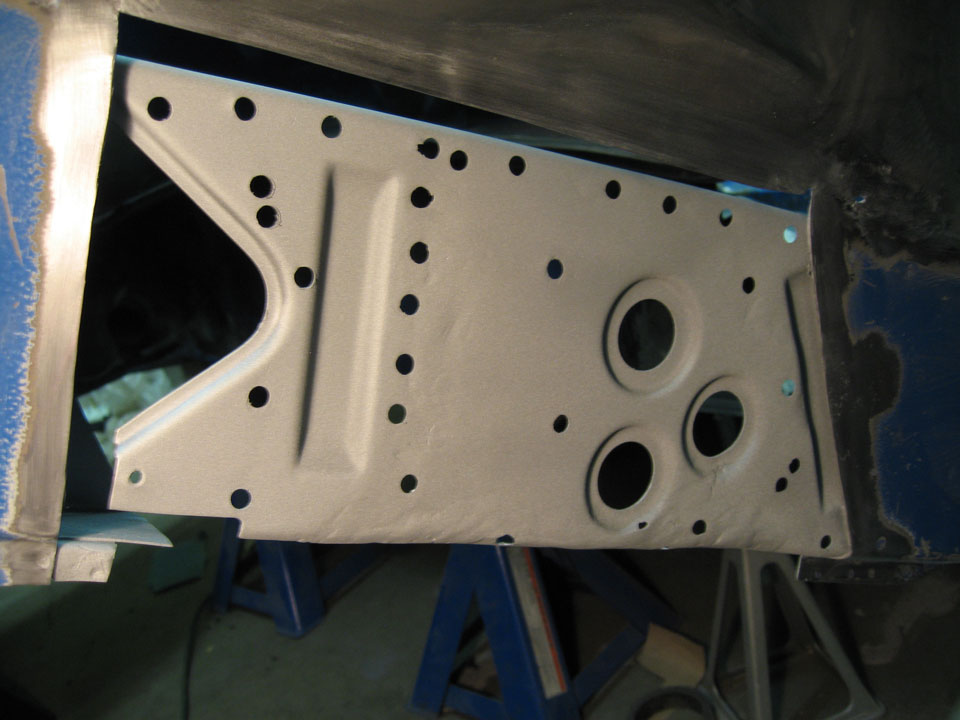
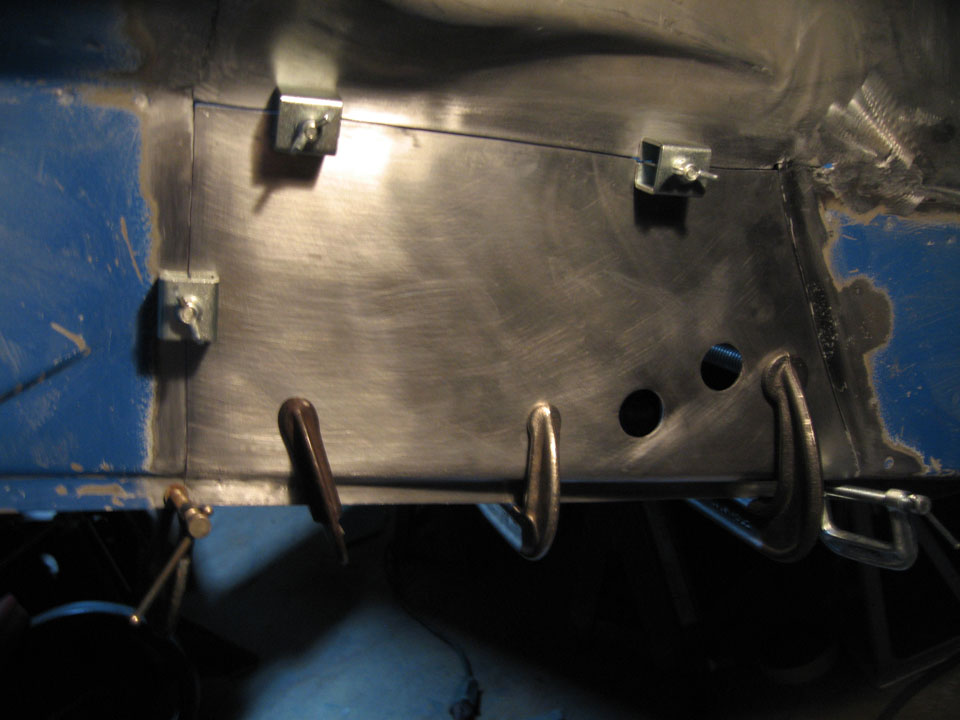
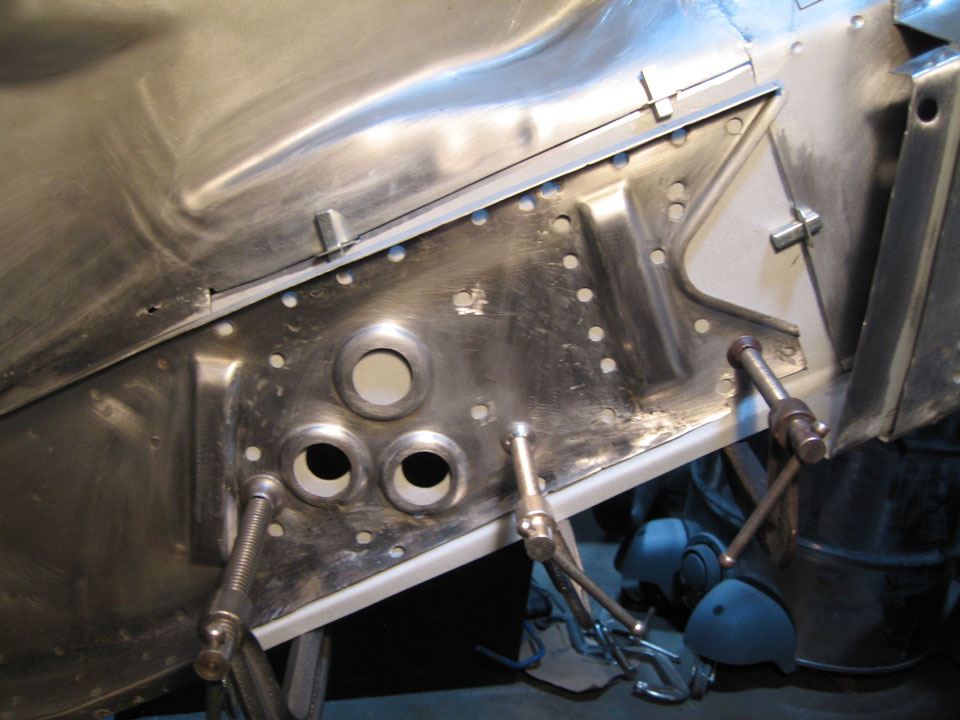
I've got some more plug welding to do; waiting on a big ass c-clamp to hold it together way in. A bit of a fit up of the outer suspension console. 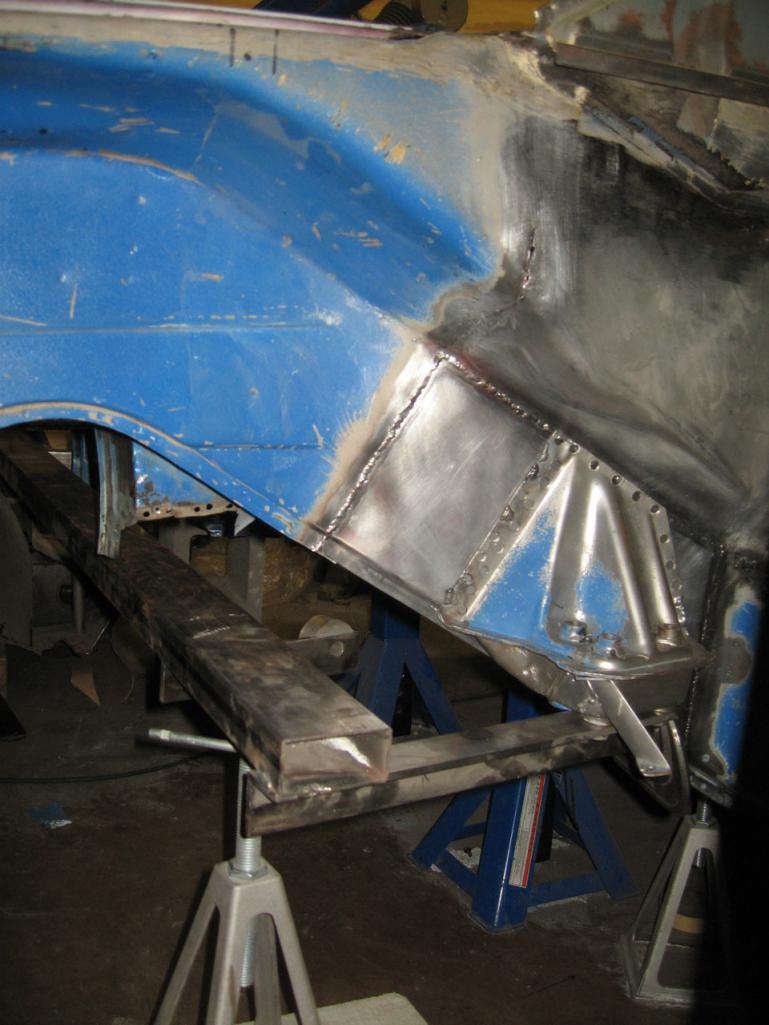
The inside, fitting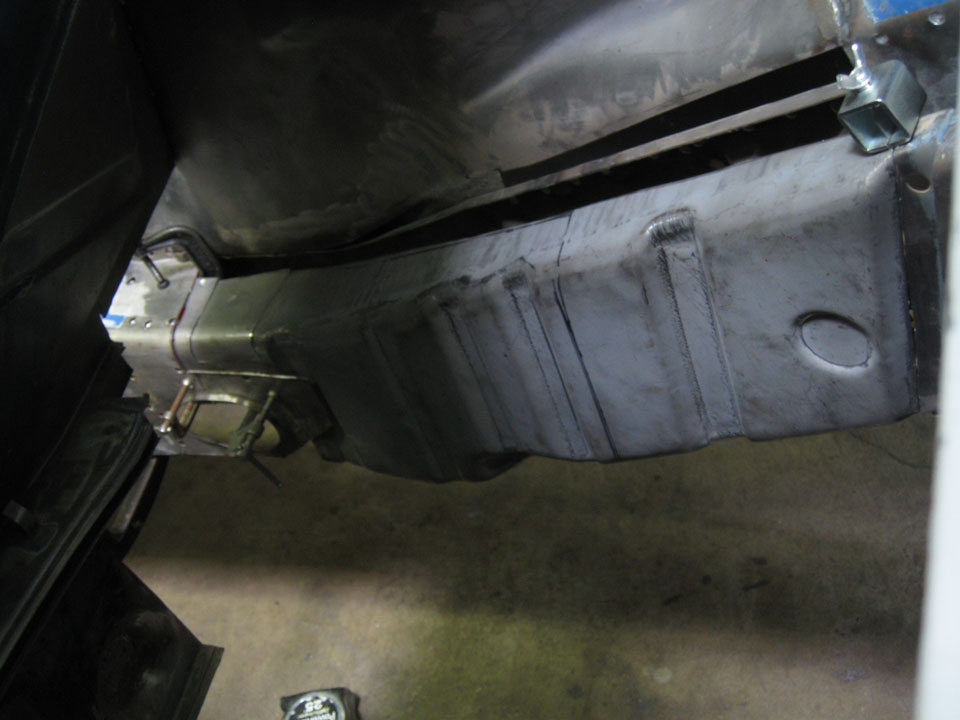
I've cut out pieces of the long from the donor car to get the curvature without having to make tooling for the bender.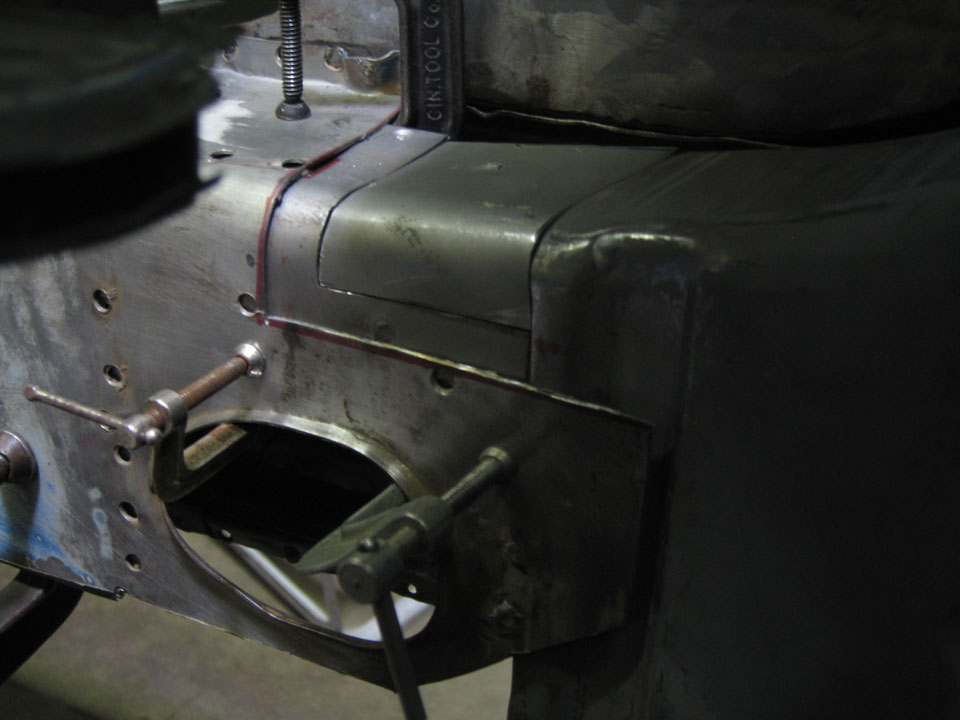
Got the driver engine mount off and seperated. This cleaned up nice (this is before ). I've got a paper template only, for the bottom part, the passenger-side version.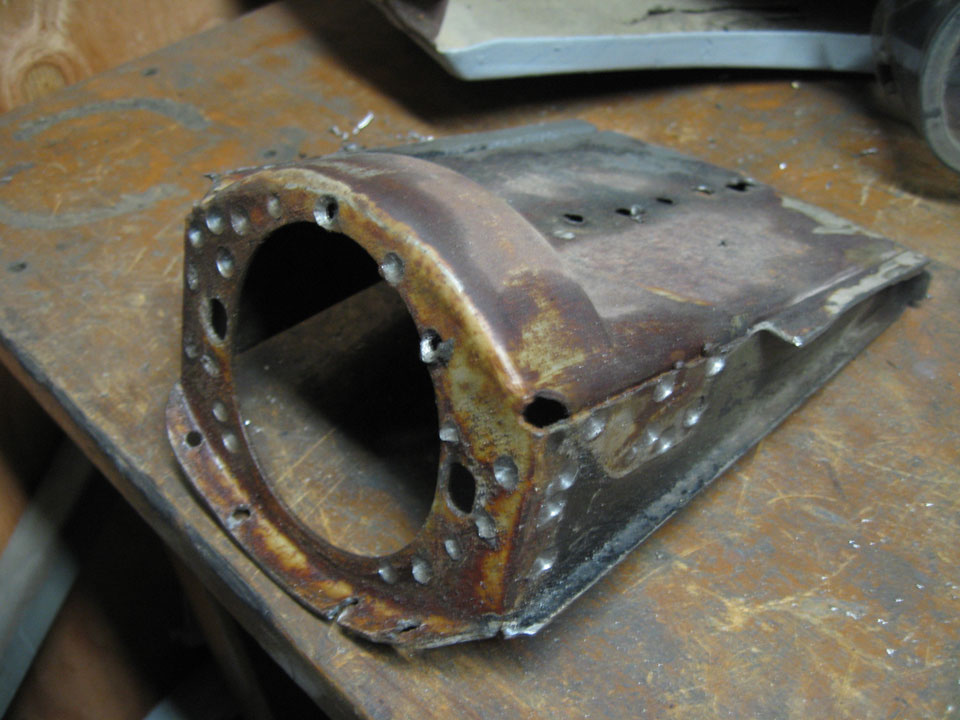
Working toward completing the inner long, those corrugations at the bottom, I can use parts of the driver-side long of the donor for the outer layer, I've got to make the inner, Richard Castro-style, as his thread is the only one I've seen really address the intricacies of the lower long.
Looked through like 3 times this many swatches. My neighbor down the way is an upholsterer and is going to help me get the interior in shape... once I get it painted. 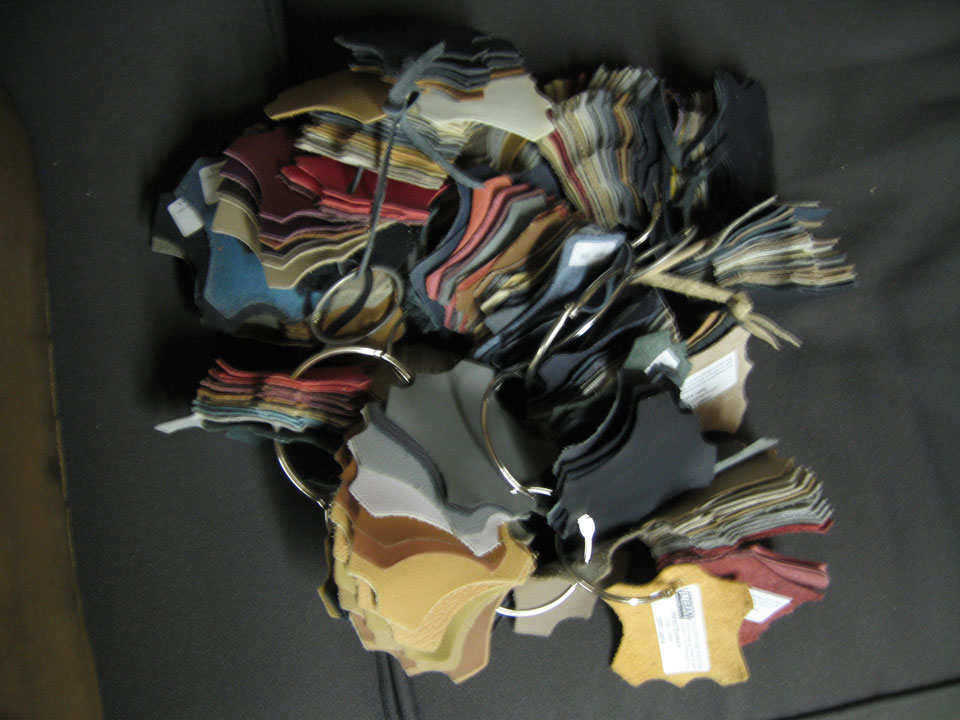
I'm not sure if it's what I will go with as I'd like it to be more 70's 'camel', but out of all the ones he had this was the closest, it's sahara beige, a 996-7 color. This is leather, not leatherette which I think I might prefer, as he says that it will be mostly labor the cost. He's going to get me some more swatches, we'll see. I'm more concerned about camel-ish square-weave carpet. 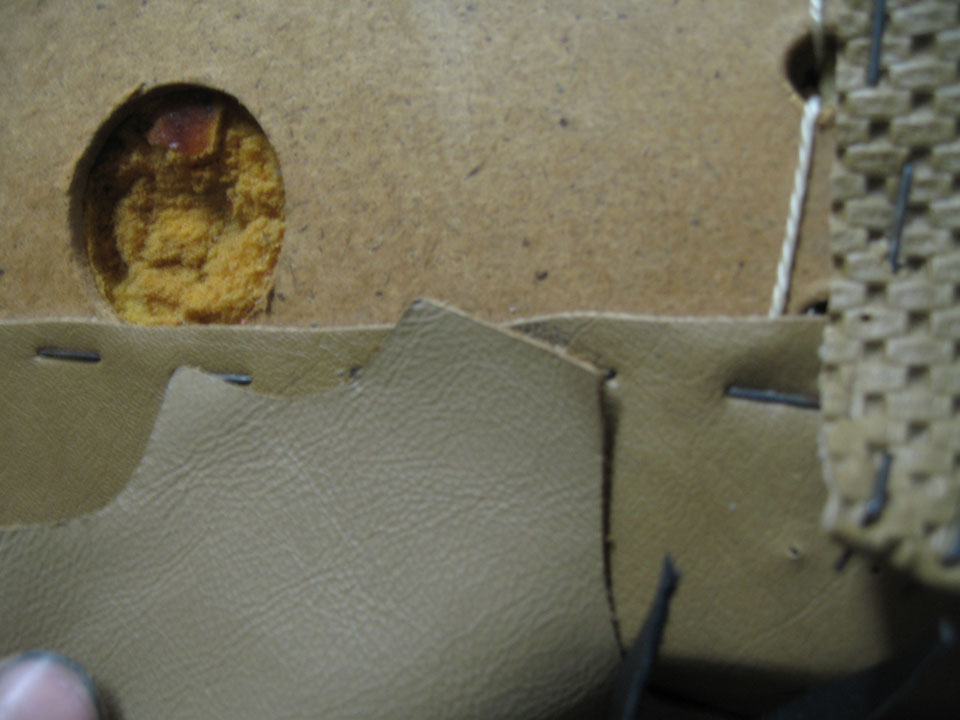
I've sanded it a bit more, got the cowl and working on the gas tank compartment now. I ordered metal prep and primer, ppg, from the paint store. I'll need to get the long together before I can move the car onto the dolly in order to set up the ladder to move the lights and hang the divider. I can't wait to cover this metal up. I don't know how the anklebiter sits around like that.
 That's the entirety of the donor car there in the corner.
Attached thumbnail(s)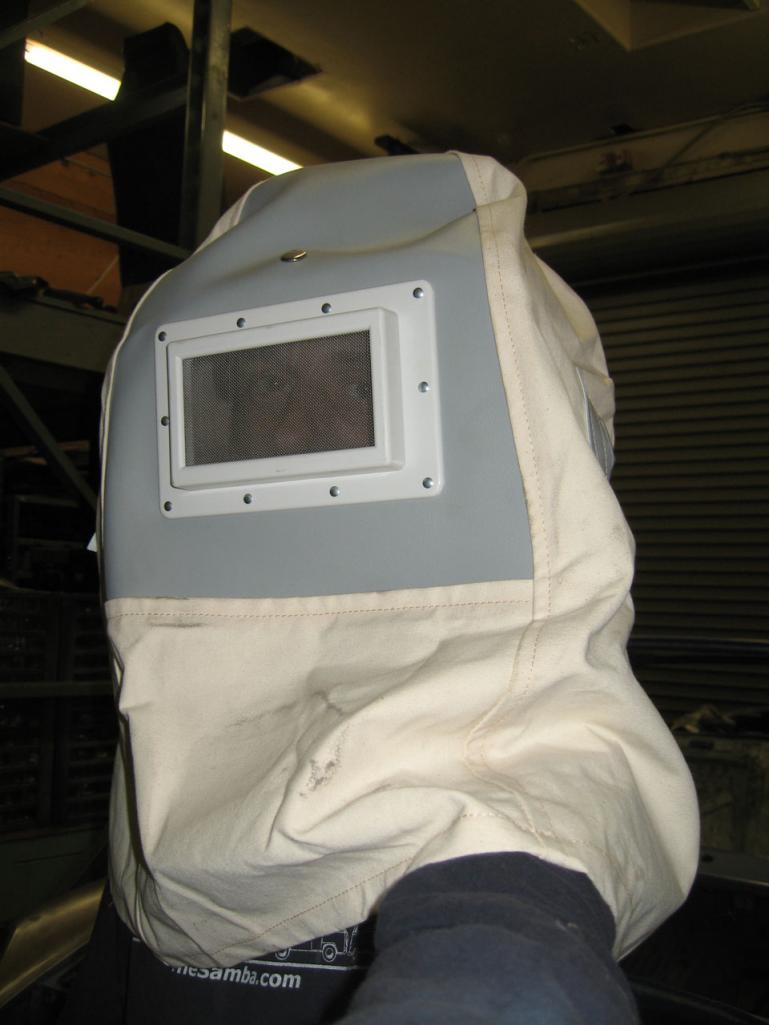

Posted by: nathansnathan Oct 19 2011, 10:59 PM
I'm pretty excited about the G&R swapmeet. Coming along slowly but surly. A few recap pics.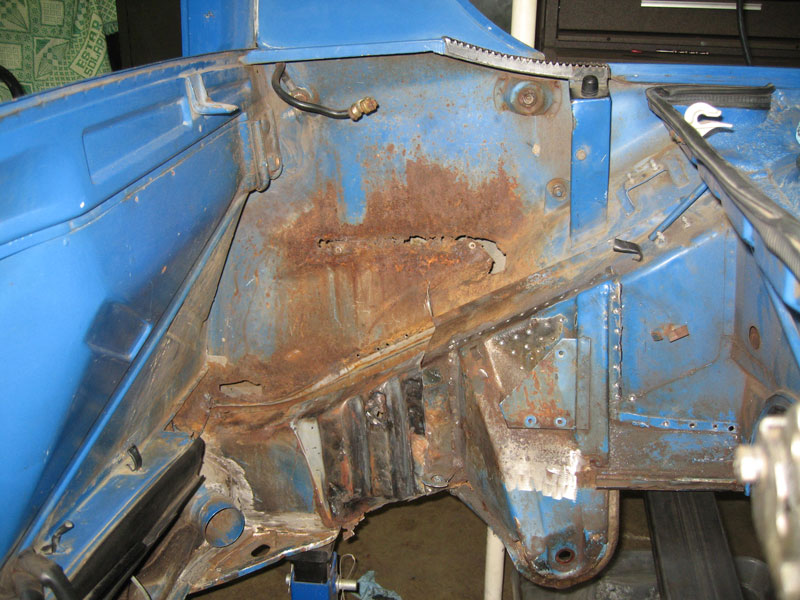
Posted by: nathansnathan Oct 19 2011, 11:04 PM
I finally made the 5th page.
The pics are a little large maybe? I've wondered if it is too much. I think I put too many in a post throughout.
I envisioned the thread as an immersive pictorial essay of 914 restoration.
The load time, though, may be too much?
800x600 seems ideal. 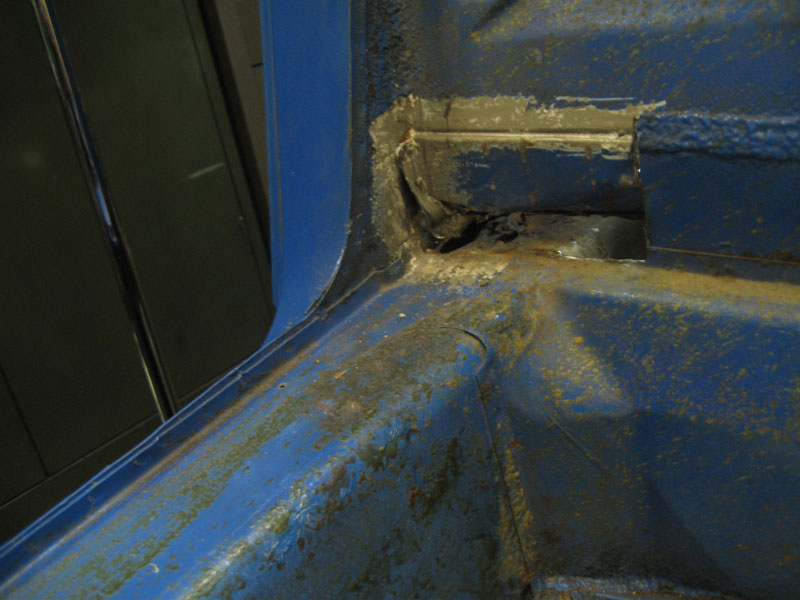

Posted by: nathansnathan Oct 19 2011, 11:18 PM
To show it before and during adds drama and makes it look like I am progressing faster. 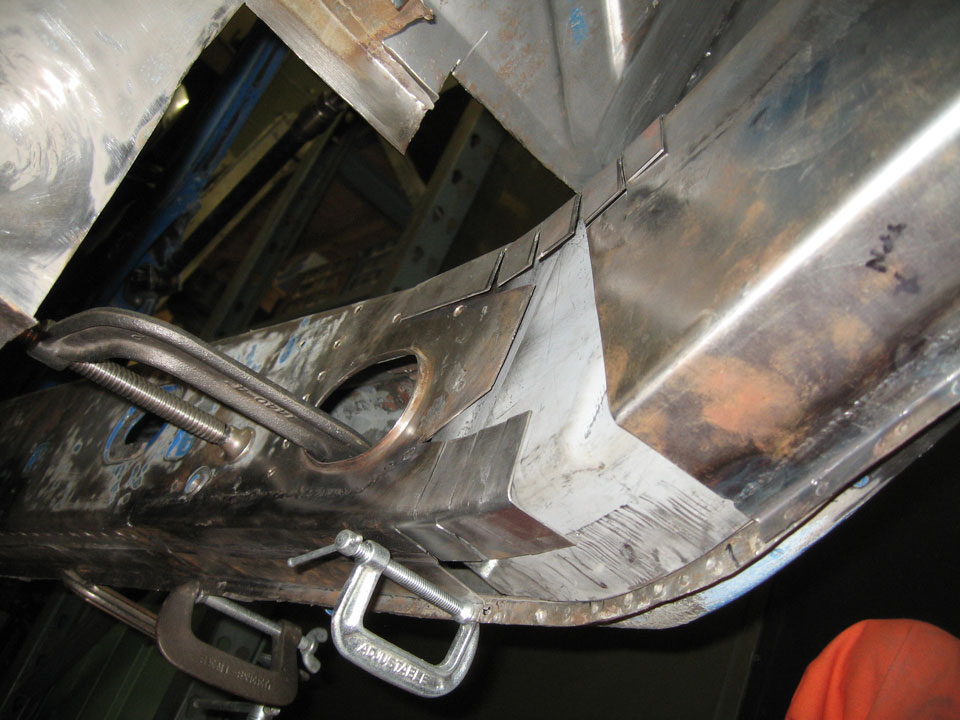
A bit of fitting up, a few pieces put together, some tricky bit to do at the bottom.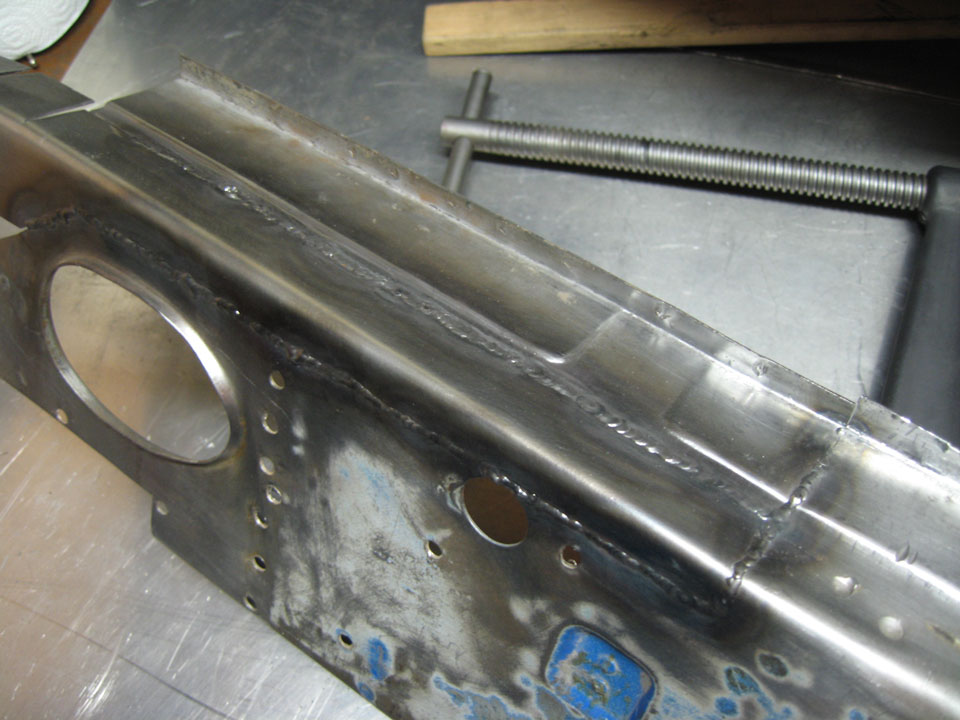
Welding is coming along, could be prettier. I will grind the butt welds though.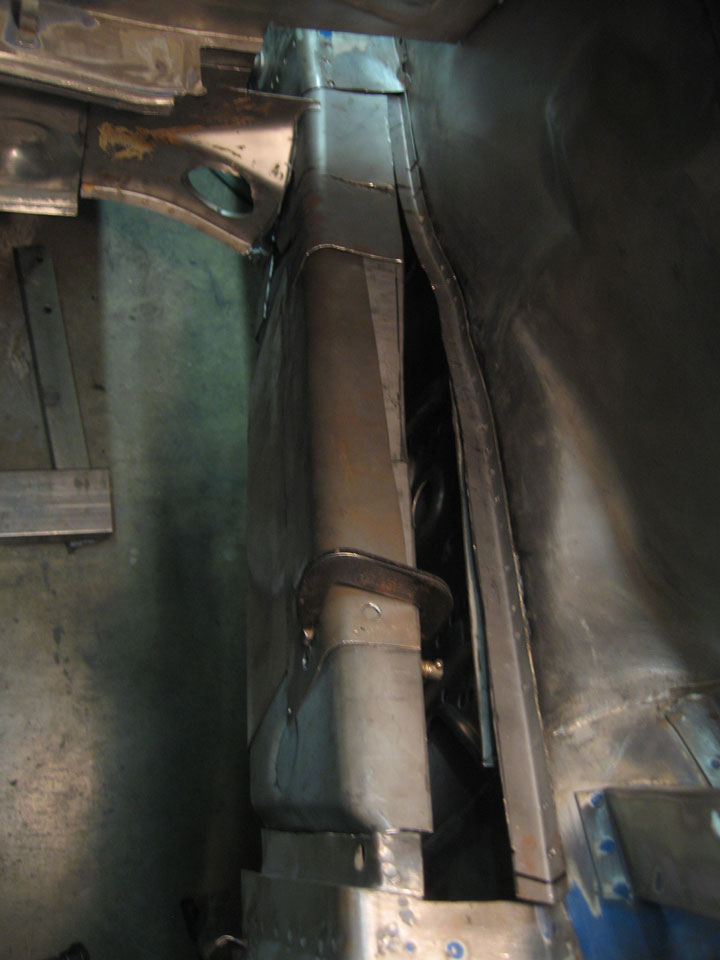
Almost have all the pieces.. I do have that back bit with the recessed hole for behind the inner console. 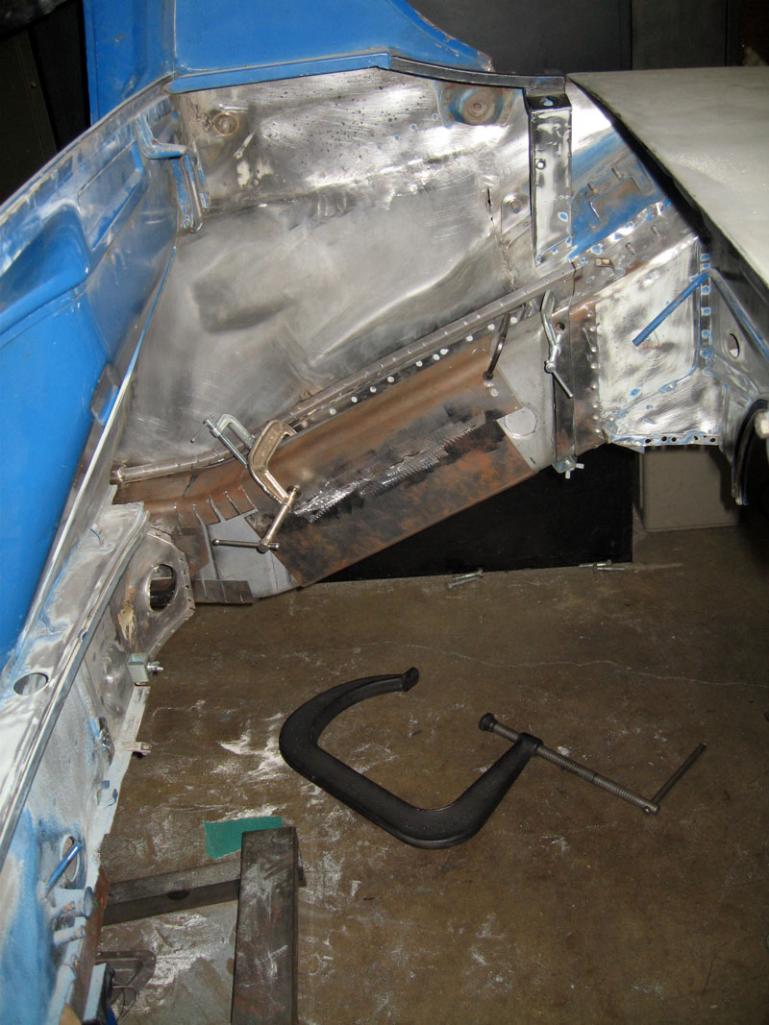
A bit of rust color there, a lot of handling going on, but well get it clean before it goes back together.
I got my big-ass clamp. Who knew 8 inches could be so big. I blasted, sanded and painted it with high temp paint.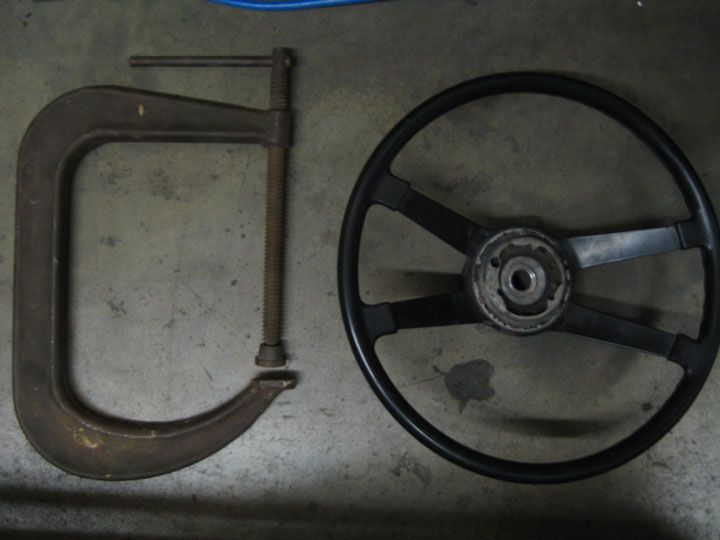
I've got the stuff to put down epoxy primer though. A few things to do before I can spray any. 
Posted by: SirAndy Oct 20 2011, 12:41 AM
Posted by: Rex-n-effect Oct 20 2011, 09:53 AM
Your work is looking really good! Have you done anymore to your B pillar air vent areas yet? That is next up on mine and some photos of your work there would really help me???
Rex
Posted by: nathansnathan Oct 20 2011, 12:00 PM
Your work is looking really good! Have you done anymore to your B pillar air vent areas yet? That is next up on mine and some photos of your work there would really help me???
Rex
Thanks man. I really appreciate the encouragement, guys.
The plan for the air vent is to cut the old one out entirely, just behind the tube where it becomes double-layered. The new piece will have part of the door jam where it comes through and include the recess just behind the door pull, so that whole "corner".
First the long, then the engine mount, the firewall, the outer suspension console, then the inner console, the inter-ties, maybe the engine shelf, and then the fresh air duct.
The rear fender I'll be fitting at the same time.Posted by: veltror Oct 20 2011, 01:30 PM
it's as if I was doing my car again..
Posted by: nathansnathan Dec 10 2011, 11:54 PM
Also, I don't think that is a black widow. But, maybe thats a california black widow.
I think it's bit me, a brown widow, though. Their venom is twice as toxic as a black widow's but they inject less and it stays more localized instead of going to the whole body.

That's me in the middle of that large red area. I felt the bump on Monday last week. I think it was in my overalls. I thought it might go away, the bump, but it spread, swelled up. I ended up at the hospital on friday, and again today for intravenous antibiotic injections, and will be back there again tomorrow. Unbelievable the amount of nasty ichor, pus? that I have witnessed spout from my arm.


I'd hoped to be putting in the long on my next post here but I have been unable to work with it going on. It is a bacterial infection, fever, shaking, headache, etc. I've got some shots of where it sits, fairly impressive with almost all of the inner long welded and the firewall and floor fitted up. I will post pics soon (of the car, not the wound
)
Posted by: kg6dxn Dec 10 2011, 11:58 PM

Posted by: nathansnathan Dec 11 2011, 12:25 AM
The long is made up of like 15 different pieces. 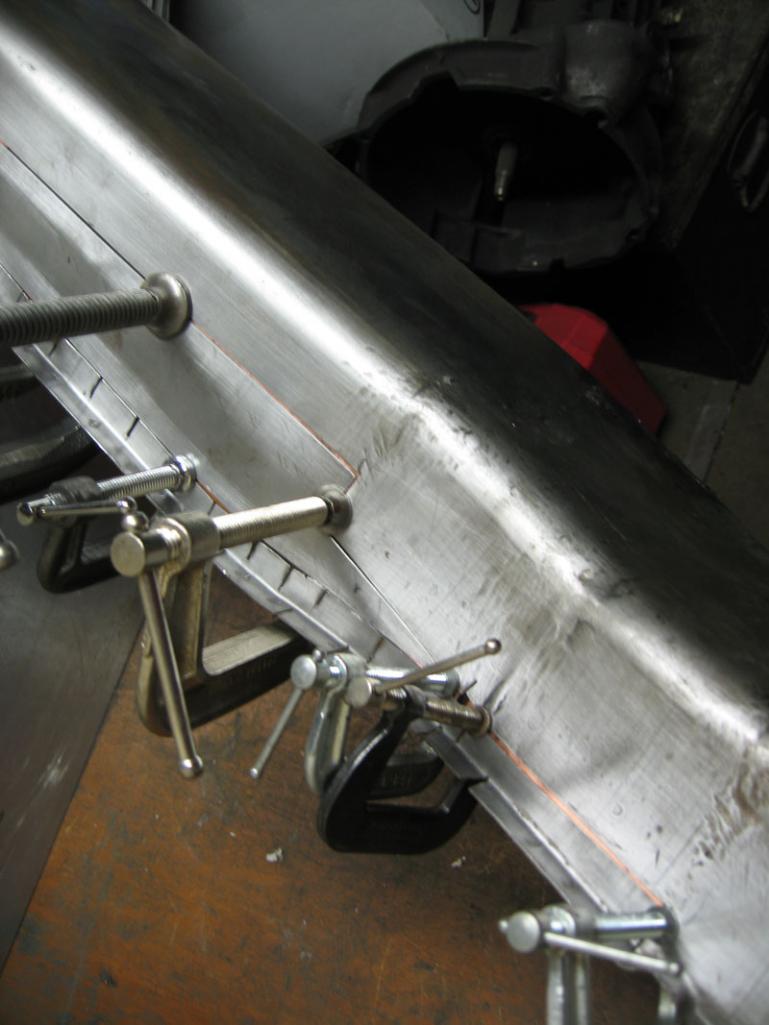

must ... conquer ... rust ...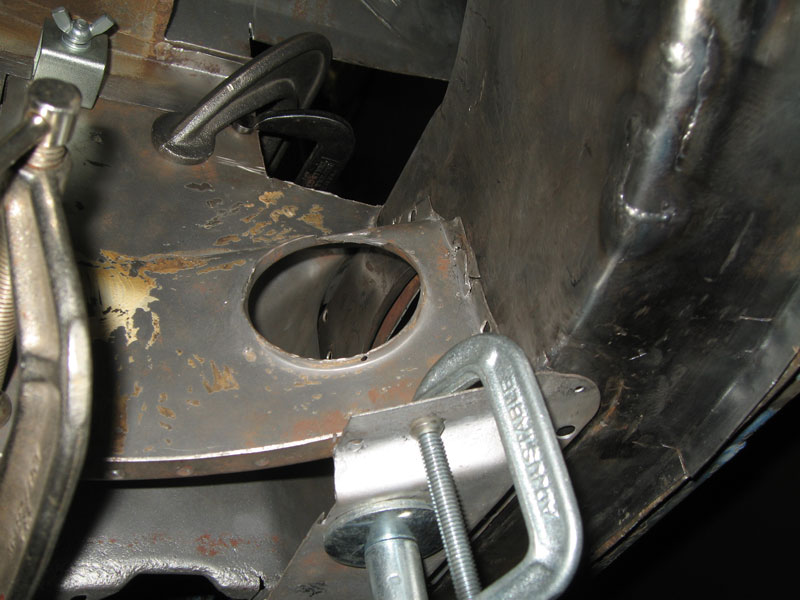
and the corner of the floor...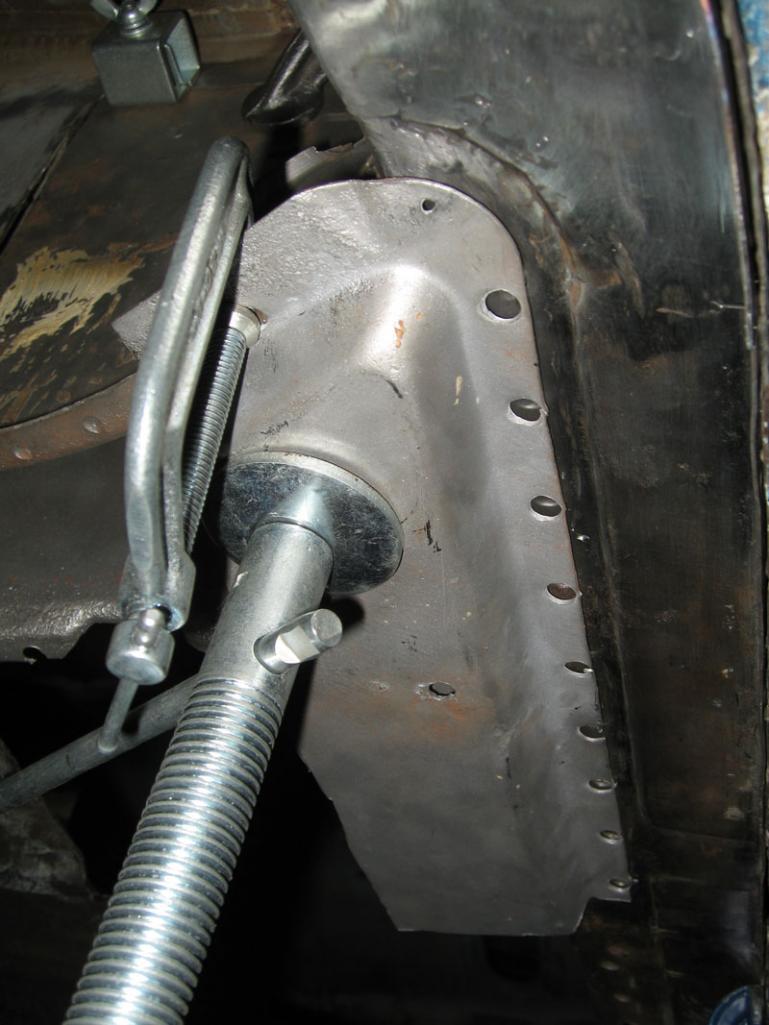
Posted by: nathansnathan Dec 11 2011, 12:30 AM
I haven't documented the bite that well. I grabbed a blurry pic with my cell phone right when they took the bandage off today. I was surprised by how much pus had come out. There is a 'wick' inserted about 3/4 inch beneath my skin and yellow green pus like "shtuff" dripping out. I'd 'expressed' it the day before, in my bus, in the parking ramp at work, projectile pus-letting, was traumatized and went to the walk-in, then urgent care, then the ER.
I can only get tiny pics off my phone through verizon's online send thing as I don't have the cable/ might not work on my mac. You kind of can imagine despite being blurry/ small. That is almost peanut butter-like ooz coming off the wick.

Posted by: Elliot Cannon Dec 11 2011, 12:38 AM
Great work on the car. Good on ya for saving one. Was that a brown recluse spider? It's good to work on the car but make sure you're healthy first.
Cheers, Elliot
Posted by: nathansnathan Dec 11 2011, 12:46 AM
Great work on the car. Good on ya for saving one. Was that a brown recluse spider? It's good to work on the car but make sure you're healthy first.
Cheers, Elliot
brown recluses don't get this far west, I saw. Thanks
getting reorganized in the meantime.
Posted by: kg6dxn Dec 11 2011, 12:52 AM
Great work on the car. Good on ya for saving one. Was that a brown recluse spider? It's good to work on the car but make sure you're healthy first.
Cheers, Elliot
brown recluses don't get this far west, I saw. Thanks
getting reorganized in the meantime.We got them up north...
Next time please get video of the projectile puss...
Posted by: FourBlades Dec 11 2011, 06:27 AM
You are a real craftsman, this is some of the most meticulous work on here.
Make sure you take care of the infection completely.
Take the time to get thorough treatment so it does not haunt you later.
John
Posted by: saigon71 Dec 11 2011, 07:32 AM
Your craftsmanship is awesome! Our cars have similar rust issues...mine is worse down low (longs, etc) but yours took a beating on the top half.
Take good care of that spider bite! I was clearing brush at my Mom's place a few years back and got bit. Still don't know what type of spider it was...but it jacked me up pretty good and seemed to "dissolve" some of the flesh on my arm.
Great work!
Posted by: sixnotfour Dec 11 2011, 08:23 AM
Spider bite , nasty, get well.
Awesome splice work, Looks like you need a shrink-er/stretch-er for your flanges.
I agree about the rotary phase converter the only way to go, I have used 4 of the little box type, I even had one switchable between 1-3HP to 3-5HP.
Yes they work, But no power, Not good for starting and stopping reversing, In the end I finally bought a rotary and love it. Esp for multiple loads.
Posted by: BarberDave Dec 11 2011, 09:00 AM
WOW, What talent !!! I did mine in 2000 , with the help of 2 great friends.
My skills improved , but never approched yours.
You fabed most of your replacement panels, why ? Money ?
There is a place called Restoration Design that makes everything you did,
along with Egrman , and other vendors here. Seems to me that would be the
quickest way. I know there is the factor of ," Why buy it when I have the
ability to do it my self". Any way you have my admiration on both the ability,
and skill set.
Now don't you know that any 914ers garage is never clean and organized
, next will come a bigger garage , then a storage shed, this and the need
too aquire more parts cars, ( just ask Jamie Rust ) in the PNW.
There is no cure and no 12 step program to help you. Your hooked!!!!
Thanks for this thread and for saveing 2 914,s. Did you sent the vins to
Andy ? Great job ! Dave 
Posted by: nathansnathan Dec 11 2011, 02:14 PM
Thanks, guys for all the compliments/ encouragement. I really can't wait to get her together!
The way restoration design does the hell hole repair isn't the same as factory from what I can figure - they omit the outer piece so just the corrugated piece is used, which I didn't want to do. Like on their site, if you click on the image for '22'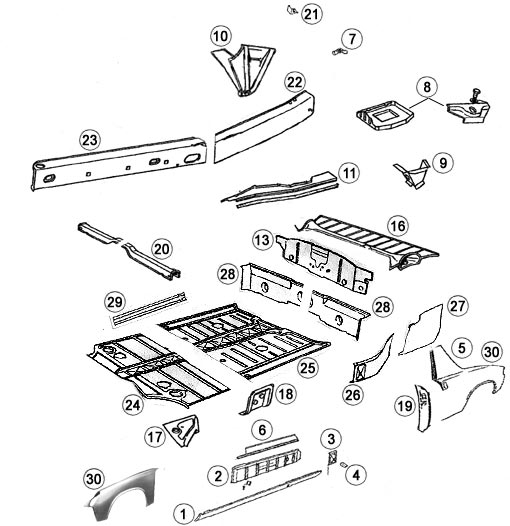
you get this, which is the inner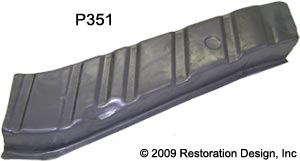
Auto Atlanta has the whole shebang, 22 and 23 as 1 piece, from the factory, but for a whopping $3000! I did think about that but, ... no.
So I'm doing it the hard way. The tig is a big help. A shrinker stretcher would be nice, like what Eastwood has, though I don't like how it rough the metal all up, how it works.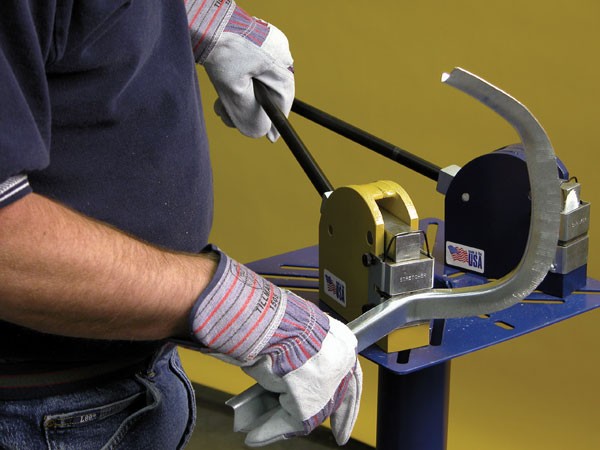
Oh, I'll be doing some more pus-letting soon - just got back from the 3rd trip to the hospital for antibiotic treatment and now I'm on my own. They 've instructed me on how to express it, insert a new wick, and dress it.... can't wait We'll see if I can get a video. Seriously, it's gross like you have never imagined, like having diarrhea out your arm, the nurses were all very impressed.
Posted by: SirAndy Dec 11 2011, 02:27 PM
I'm pretty sure RD has both pieces. There was a thread about that a while ago.
They are pretty active here, PM http://www.914world.com/bbs2/index.php?showuser=8858 if you have questions.

Posted by: nathansnathan Dec 11 2011, 05:08 PM
I'm pretty sure RD has both pieces. There was a thread about that a while ago.
They are pretty active here, PM http://www.914world.com/bbs2/index.php?showuser=8858 if you have questions.
Thanks, I've pm'd him. I can't remember if I'd called them about this, or maybe talking to Dr 914 at AA, or what but I had somehow concluded otherwise. Hopefully I was wrong as maybe they would also have, though doubtful, the piece forward of the firewall, the inner. It's got even deeper corrugations at the bottom to fit over the outer piece's corrugations. I've got nothing that is salvageable that is like that and will have to make it.
Posted by: nathansnathan Dec 11 2011, 05:08 PM
There is no cure and no 12 step program to help you. Your hooked!!!!
Thanks for this thread and for saveing 2 914,s. Did you sent the vins to
Andy ? Great job ! Dave
I'm actually subscribed subscribed to the whole Garage forum here, meaning I see every thread starting post at minimum.
I look forward to commencing work on my car for 4-12 hours per day once I heal, maybe 2 weeks.
I've finally got the chance (can't work on my car) to enter the 2nd car to the registry. I explained there how, despite her being cut up, I hope to one day fabricate an all steel narrow bodied 914 using its shell, with all of the outer panels being detachable.
Posted by: sixnotfour Dec 11 2011, 11:02 PM
I had staff infection in an incision where they had inserted a chest tube, nasty stuff.
The the gizmo I had for 2 weeks was a vacuum pump sealed to my body pulling a vacuum on the infected area sucking both fluid and promoting healing. I had to visit every other day to have the wick changed and reattach.. I had to do antibiotics through a central venous catheter.
Before this all got figured out ,I knew I was in trouble when Hard coughing to excite my lungs to regain breathing , I blew a big blob of goo out the wound , that was fine 12 hours earlier. Honey I think I need to go to Emergency Again, 10 days later was the above pump and stuff.
Take Care Man , I finally realized how fragile the human body can be.
![popcorn[1].gif](style_emoticons/default/popcorn[1].gif)

Posted by: nathansnathan Dec 13 2011, 05:37 PM
I'm pretty sure RD has both pieces. There was a thread about that a while ago.
They are pretty active here, PM http://www.914world.com/bbs2/index.php?showuser=8858 if you have questions.
Thanks, I've pm'd him. I can't remember if I'd called them about this, or maybe talking to Dr 914 at AA, or what but I had somehow concluded otherwise. Hopefully I was wrong as maybe they would also have, though doubtful, the piece forward of the firewall, the inner. It's got even deeper corrugations at the bottom to fit over the outer piece's corrugations. I've got nothing that is salvageable that is like that and will have to make it.
it took me 5 messages back and forth to clarify what I was talking about, but I'm finally sure about this now. Nobody makes the smooth piece that goes just behind the passenger suspension console, the passenger outside inner long, rear of the fire wall, nor do they make the passenger inside inner long forward of the firewall. - The way they do it, the inside inner long behind the firewall connects directly to the outside inner long that is in front of the firewall. Hope that's clear

You can see it in this pic
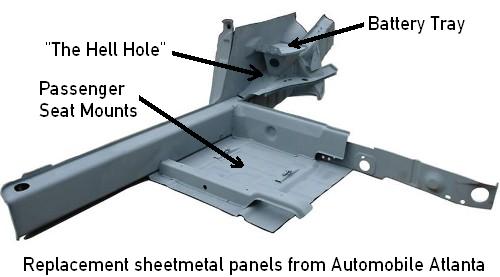
Posted by: SirAndy Dec 13 2011, 05:58 PM
Now you got me all confuzzled ...
Posted by: Krieger Dec 13 2011, 07:14 PM
Very impressive fab skills. Keep on keepen on!
Posted by: nathansnathan Dec 13 2011, 08:07 PM
Now you got me all confuzzled ...
The longs are supposed to be 2 layers of sheet metal from just forward of the seatbelt hole/ jack post all the way back to the top of the inner suspension console.
Here is quoted the message that I think made it clear. I've been told I'm wrong about this a few times so I just want to set it straight.
(adding product pic/part numbers for clarity)

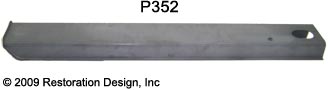
I am still unsure of what piece it is that you are referring to. Perhaps if you had a porsche part number or even take
a picture of your car and send me that picture. To the best of my knowledge there is nothing that lays over P351,
but I could be wrong.
Send me a photo to
[restoration design]
Hi, Peter,
Sending this in continuation of our conversion on 914world pm.
This is my photo, the entirety of the inner passenger long taken out. It is somewhat obscured by the heater tube,
but you can see the P351, the inside inner long, extends forward of the firewall. The part that has surface rust and
goes forward to the heater bracket is a separate piece than P352 - it goes inside it.
Similarly, P352 does not get butt welded to P351. it should be attached, rear of the firewall, to a smooth piece. You
can see in this image that the smooth piece has been partially cut away. It goes rearward to the front of the rear
trunk, and is the piece that the inner suspension console is attached to. The part that is cut away from this piece
also has an indent for the engine mount, to lay over the indent that is part of P351.
You can see the driver version of P352 attached to a smooth section - From the factory, P352 is part of the piece I
am talking about - I am looking for the part of it that is rear of the firewall.
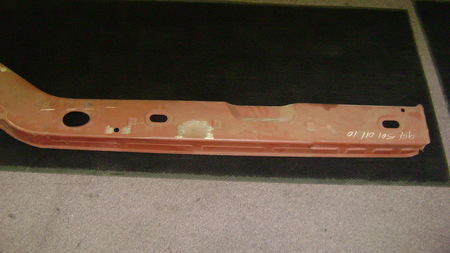
Hopefully this will make it clear, the 2 pieces that I'm talking about.
Nathan Scruggs
Nathan,
I finally see what you are talking about. I didn’t even realize that there was a piece that covers the P352. Unfortunately I do not have that piece. I have that NOS piece but will not be making that die for the foreseeable future. Looks like you will have to fab something up yourself or hack something out of a parts car. I have no used 914s here with that piece in good condition.
Posted by: SirAndy Dec 13 2011, 10:01 PM
Ok, now i get it. That inner part (with the ribs) was added on later cars, early cars don't have that.
Posted by: nathansnathan Jan 28 2012, 01:24 PM
Ok, now i get it. That inner part (with the ribs) was added on later cars, early cars don't have that.
Actually, no.
I've been thinking about his for awhile, and got distracted some matters with my bus over new years.
Sorry to get back so late Jeff Hail talks about his in his "Bringing out the dead" thread
http://www.914world.com/bbs2/index.php?showtopic=76791&st=61
Where the inner long come's together with the rear frame rail it was double walled by the factory highlited in red.
If I were to just weld the inner long to the rear frame rail without the double wall it would be a very flexible joint and eventually fail. This would be compounded by suspension movement and engine weight and torque. This area is where the rear center section of the tub (torque box) ties into the rear structure of the vehicle. This area needs to be as strong or stronger than the factory designed it to be.
Everytime the suspension compresses this area is subjected to load. Everytime the vehicle is launched it is subject to load.
All of the cars had the same construction in that area. My 71, 72, and the 75 or 76 in the link. Here is his shot of the inner layer of the inner long forward of the firewall. The lower seatbelt bolt threads are welded to that piece.
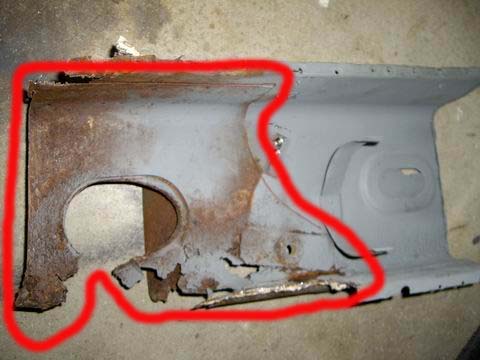
Attached image(s)

Posted by: nathansnathan Jan 28 2012, 02:01 PM
I'd hoped that I'd be posting the attachment of the whole inner piece with my next (this) post, but, well don't get me talking about my bus.
Instead, I've just gotten to prepping it for install, almost there.
I almost finished the inner layer. I've got to cut that front part where it's marked. I ended up using the shallower corrugations from the outer layer of the parts car in construction of the bottom of the inner forward piece there (accidentally attached to the post above) and the attachment, below.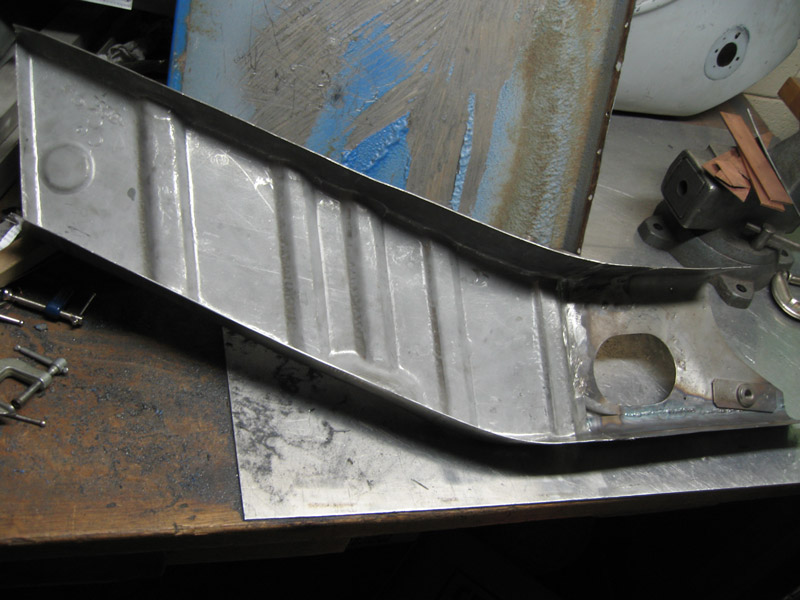
Also, I got the recess for the engine mount handled. 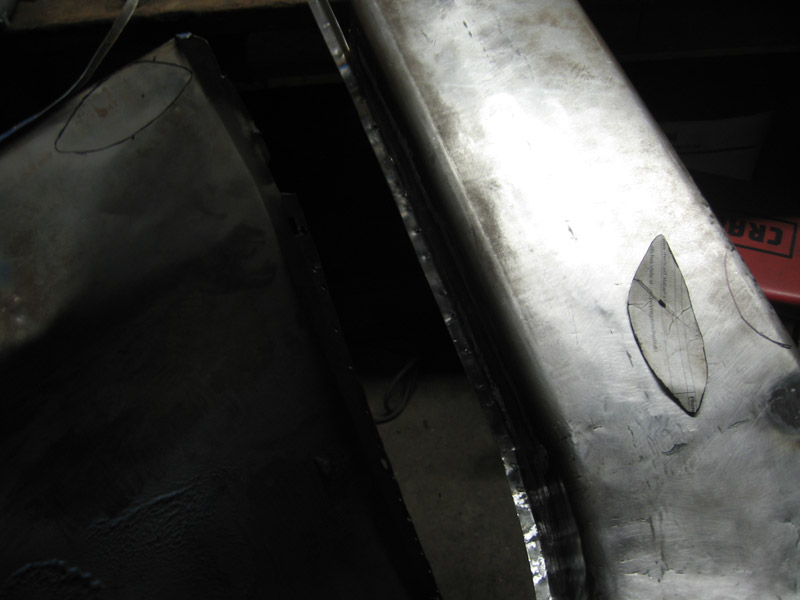
Had to cut into the virgin long.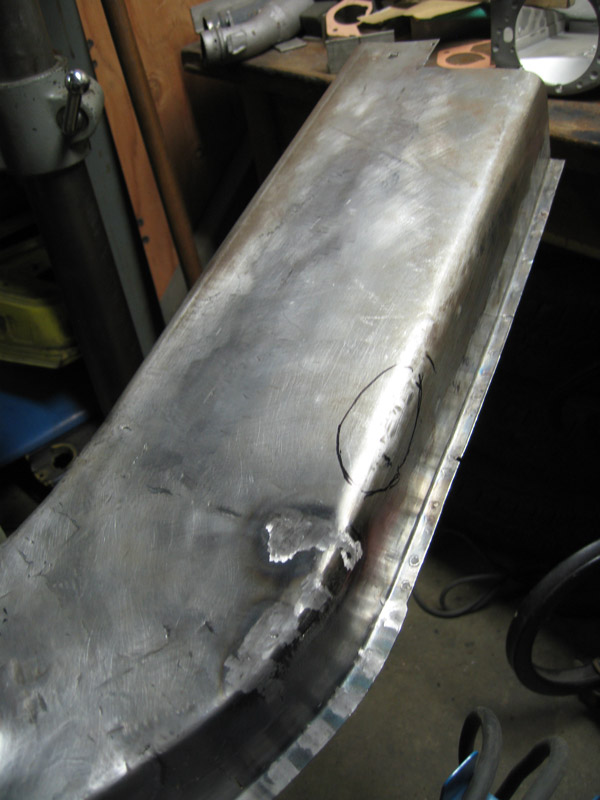
After a lot of comparing, etc to the parts car,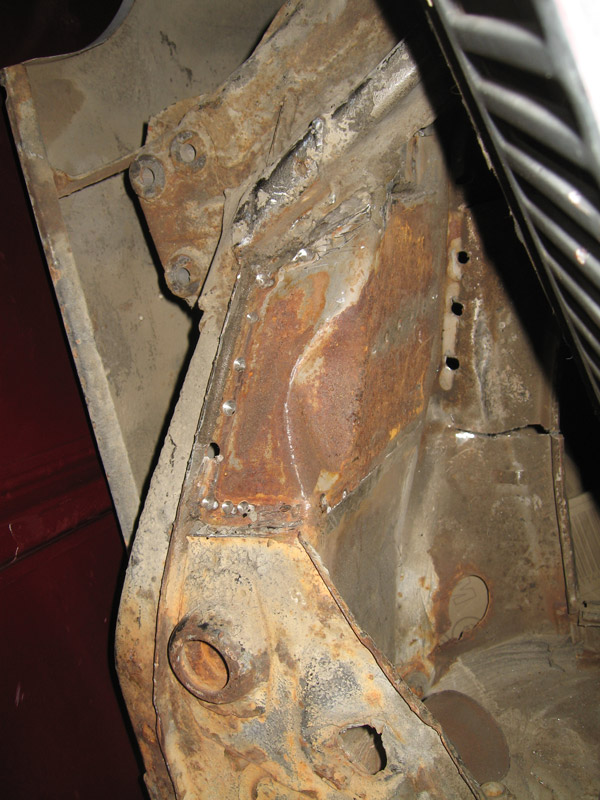
I fit up the inner and outer inner long after cutting a small hole in the outer ( no pic sorry), and ground away using a grinder to get it out to where the template said it should be.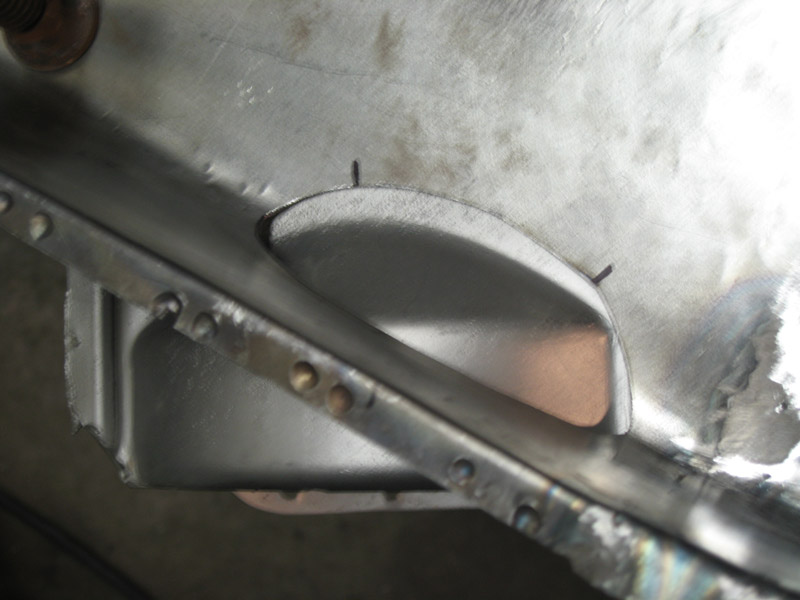
The piece made out of part of my wrinkled door skin, funny how it's creased from the halfway point of 1 side, and then angles, lining up with the arch of the engine mount - hard to explain. 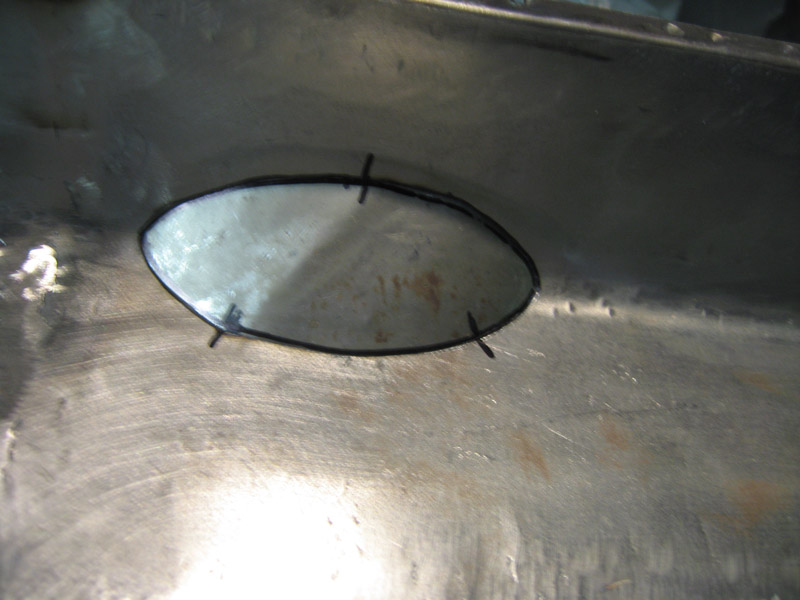
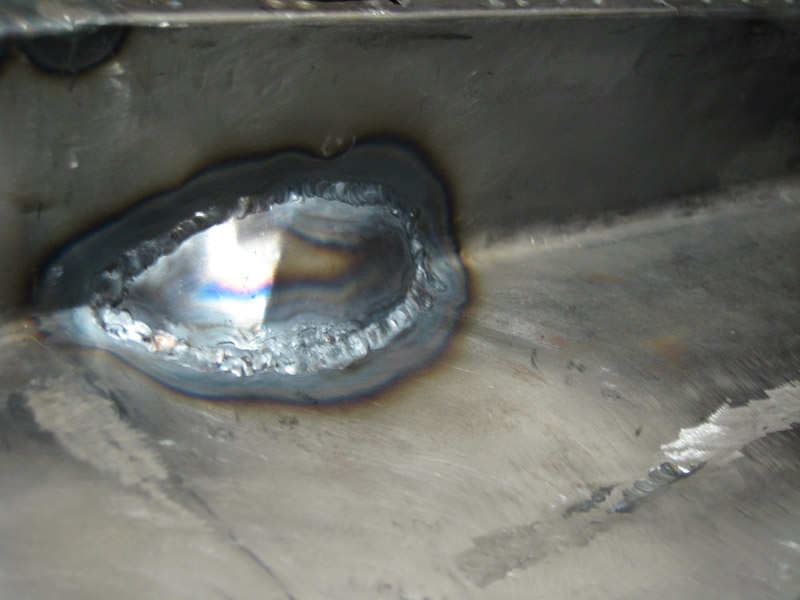
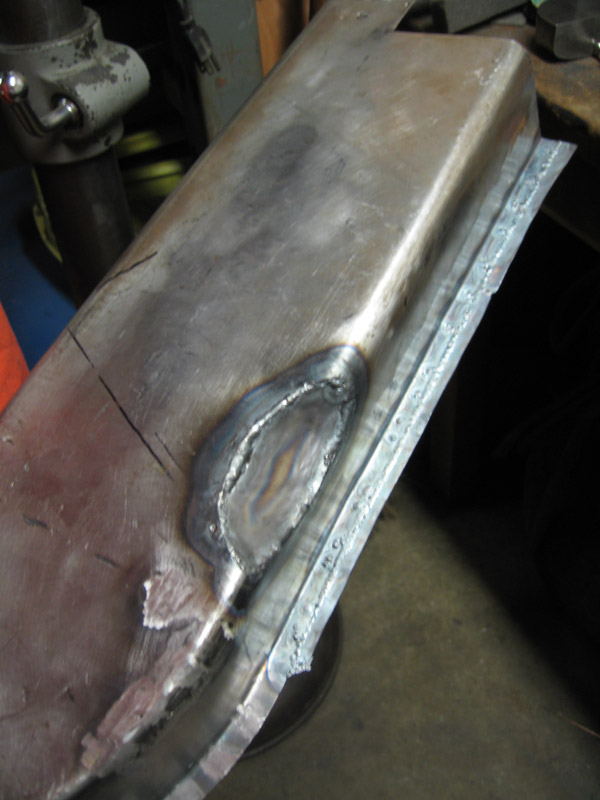
I'm currently out of of grinding/ cutting disks for my mini die grinder to smooth this all out. Yard store has a great price on an Acat pnuematic mini angle grinder. I've just ordered that to step up my grinding smoothing process, along with 2" roloc holders, sanding disks and surface conditioning wheels. It's hard to finish the welds with a straight mini die grinder and then a flap wheel on an electric 4 1/2"angle grinder as I've been doing.
... which is not so precise either to make the flange lips (? not sure about the terminology here) larger. The flanges are larger at the back, and I've been putting off enlarging the ones I've repurposed from the front of the parts car. The difference is small but significant. I had to go bigger to facilitate welding and will trim. I'm still at it actually.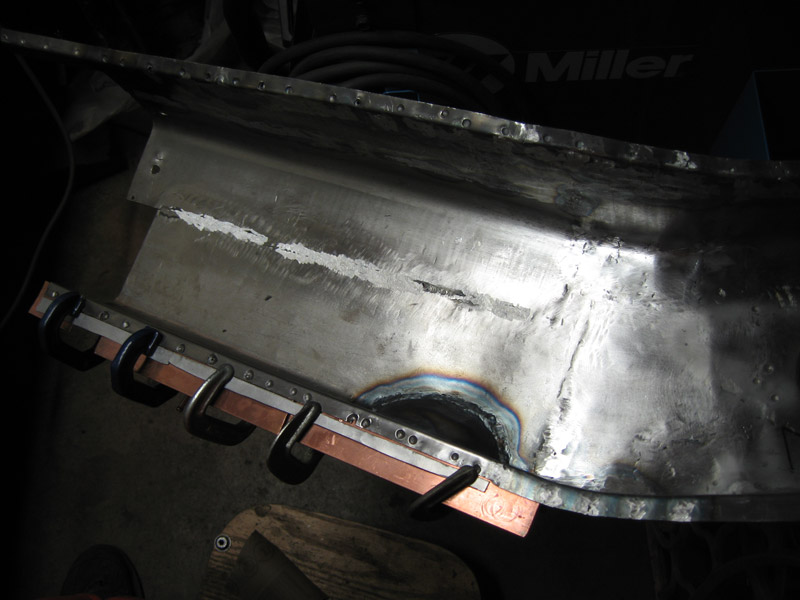
It will require more hammering also; welding brought the top and bottom of the inner in, and the outer is springing out I've outlined the inner layer in an adriatic glow. 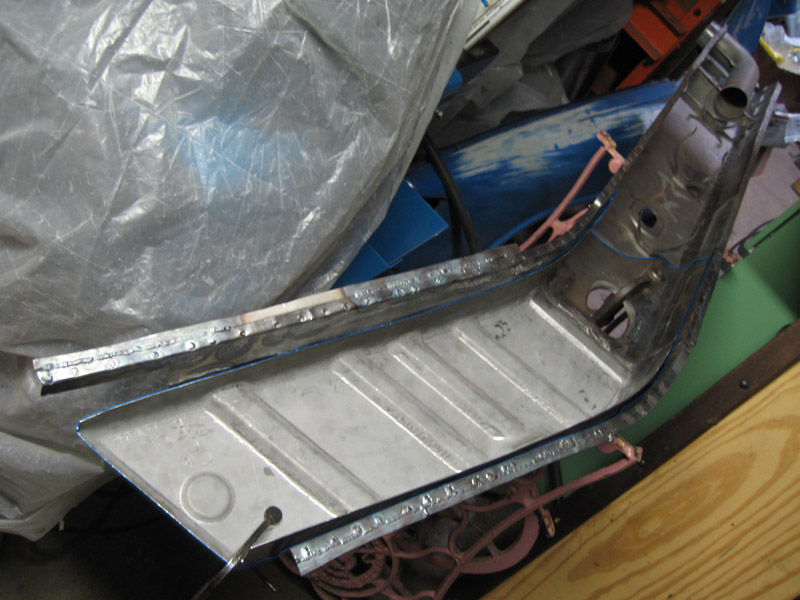
I am thinking that I will put the inner and outer layers of the long together and then put them up to the car, a bit different than how Jeff did it. I feel more comfortable being able to clamp the layers, and to back the welds. Attach the heater tube, the rear heater channel, and put it on. (!) It's a bit more complicated than that...weld thru primer...., actually, but... . The engine mount and inner suspension console will go on after. 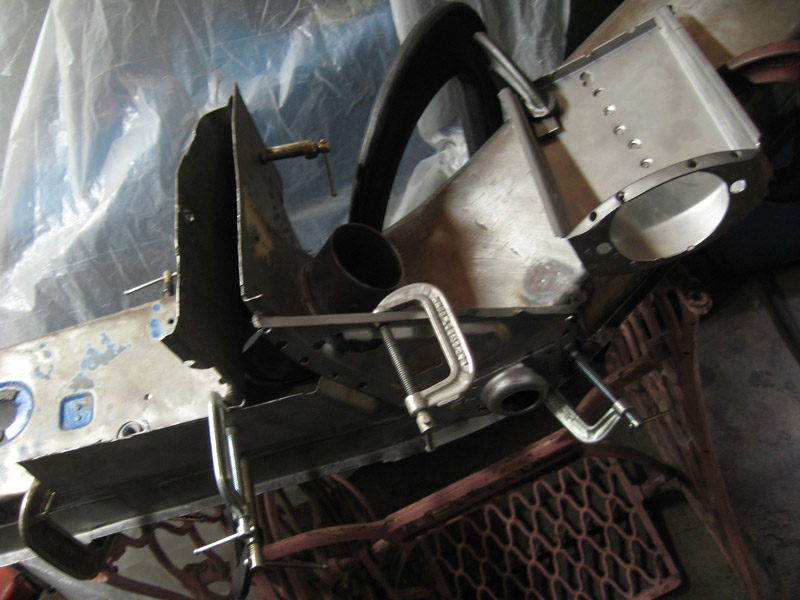
A bit of a fit up. I need to make the bottom of the engine mount, as that is from the drivers side of the donor. A bit of a difference in the upper part on the side, the flange height, but besides that (and the bottom which is symmetrically inverse) they are the same. I need to get some thicker gauge metal to make that. I'd like to have my suspension jig and inner console fitted, engine support bar going to the fitted-up mount, as well as firewall front and rear all in position before welding the inner assembly in. I don't want the bottom of the car to sit too far out and may need to use a tie down strap to pull it together. We'll see soon.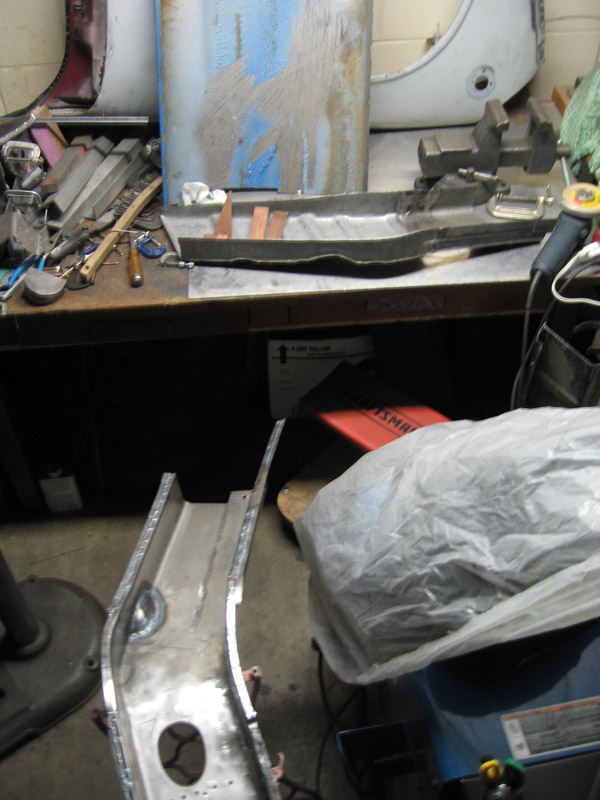
Posted by: FourBlades Jan 28 2012, 05:23 PM
Great work as usual.
Your car will be better than new when done.
At least the smooth part of the long is the easier one to make of the two, I think a lot of people end up bending something up for that area.
John
Posted by: nathansnathan Mar 18 2012, 09:33 AM
I got my outer suspension console back on, finally. Page 3 I'd left with it here
When I took it off, it looked like this
Finally got it like this. I couldn't get out all the little black spots back there, but I'm hoping it will be neutralized/ encapsulated by the etching chemicals.
I'd welded up all the carnage from removing it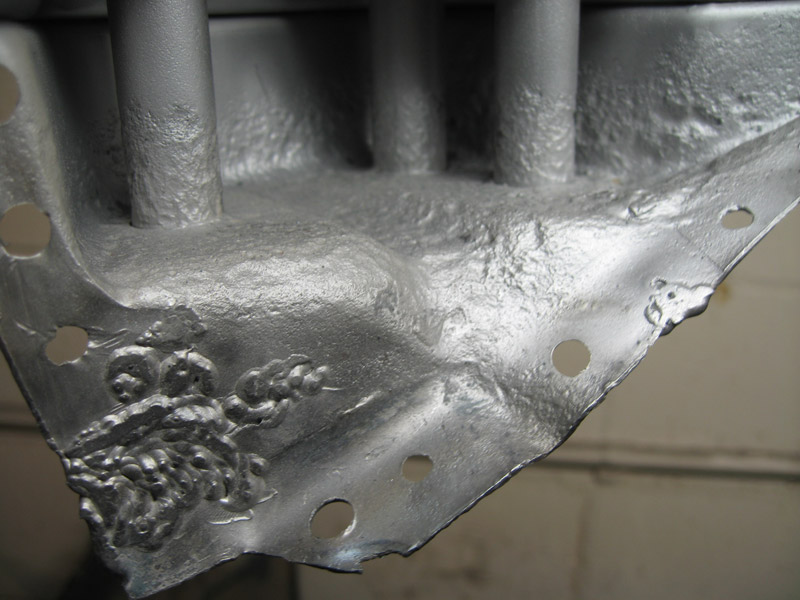
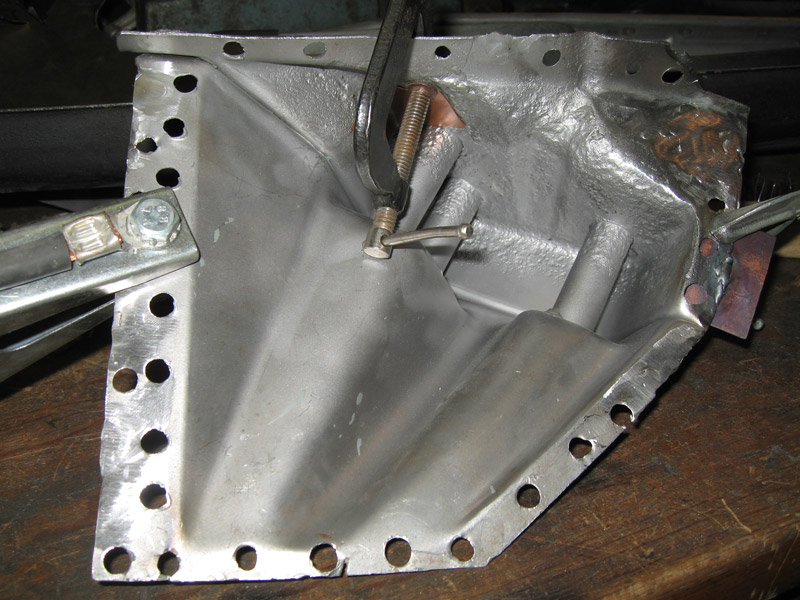
I did the ppg dx579 and dx520. Seems a lot like por's marine clean and metal ready, which I've used before, but maybe stronger even.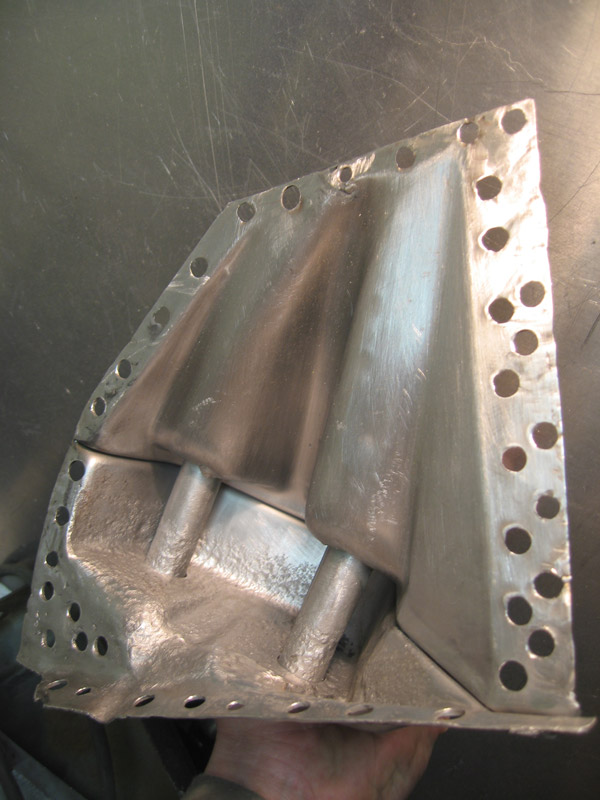
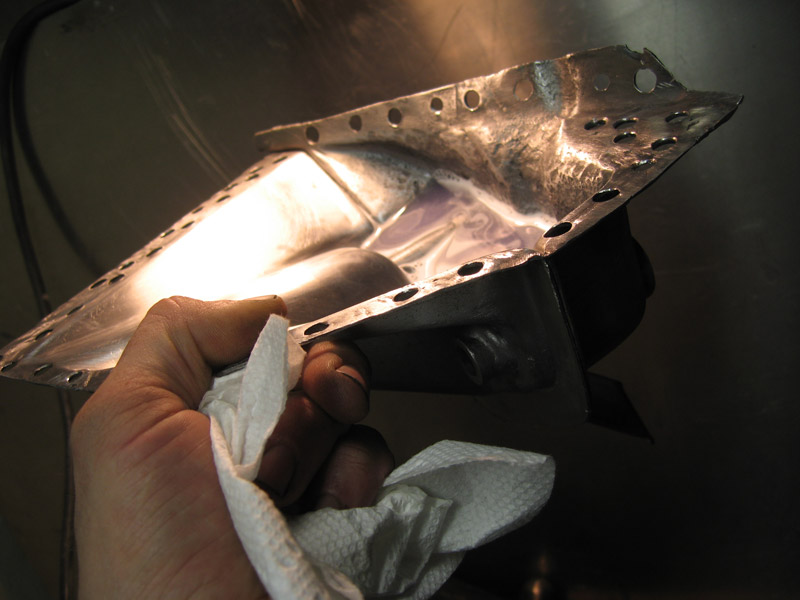

I got a bit rough with the clamp.  It bothered me for a bit, but I hope it will be ok. It is a learning experience for me here.
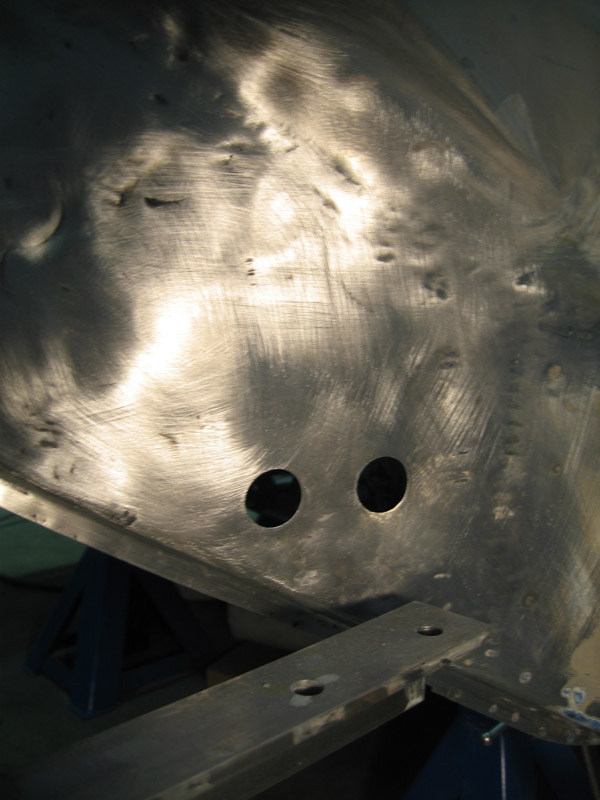
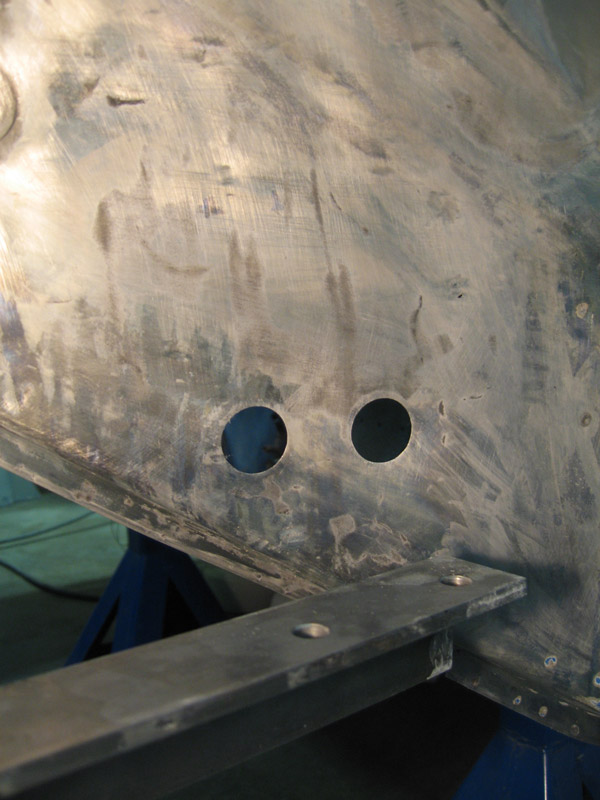
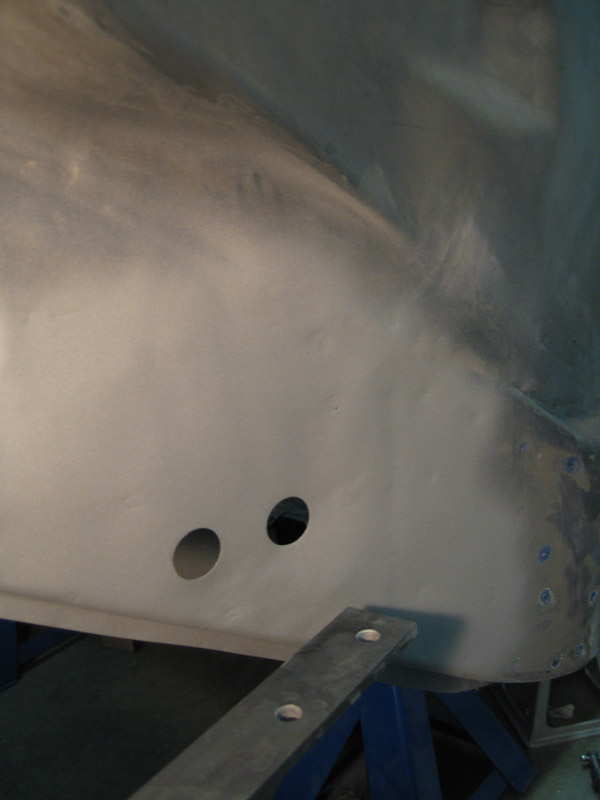
The jig I'd made before removing it. I constructed this to locate the inner suspension console actually. I didn't plan to take the outer off. 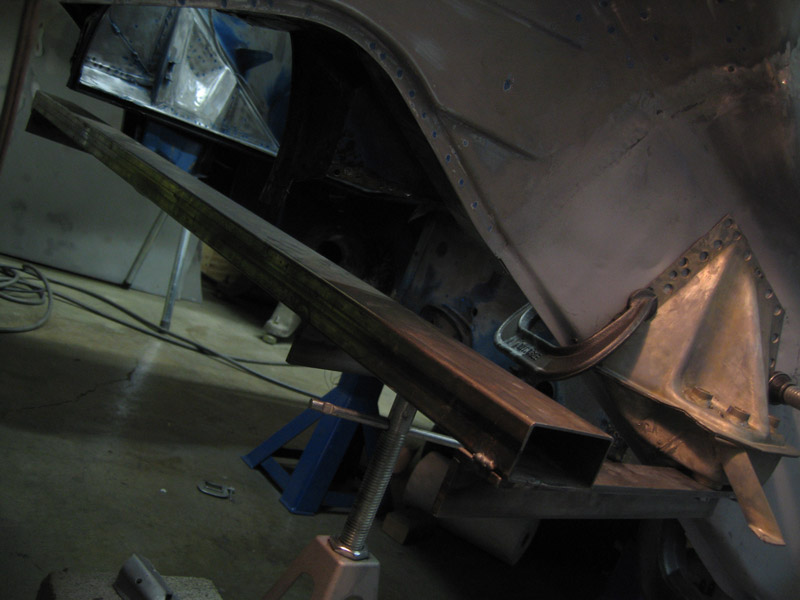
I also measured many times, comparing to the other side. I saw in a recent post,
http://www.914world.com/bbs2/index.php?act=ST&f=2&t=172145
Rick Ollah, was saying that, (these being hand-built cars), the tolerance for suspension stuff on the bodies is 3mm. I think I got it to 1/16 inch which is 1.5875mm, using a tape measure off the outside of the tops of the bolt receivers (the part that has the clear plastic plugs) It's hard to measure from the bottom where the bolts actually are going. I measured to the nook of the jackpost and receiver plate. I went back to the fender support strap which seems consistent on both sides. I also measured up to the corner of the nook of part of the muffler heat shield. Also, the flange where the top and bottom of the console is 16.5 inches exactly from the bottom of the lip up at the base of the sail, inside. I kind of forget now, but I repositioned it a few times and went from side to side measuring A LOT before I was satisfied.
I got it mostly welded in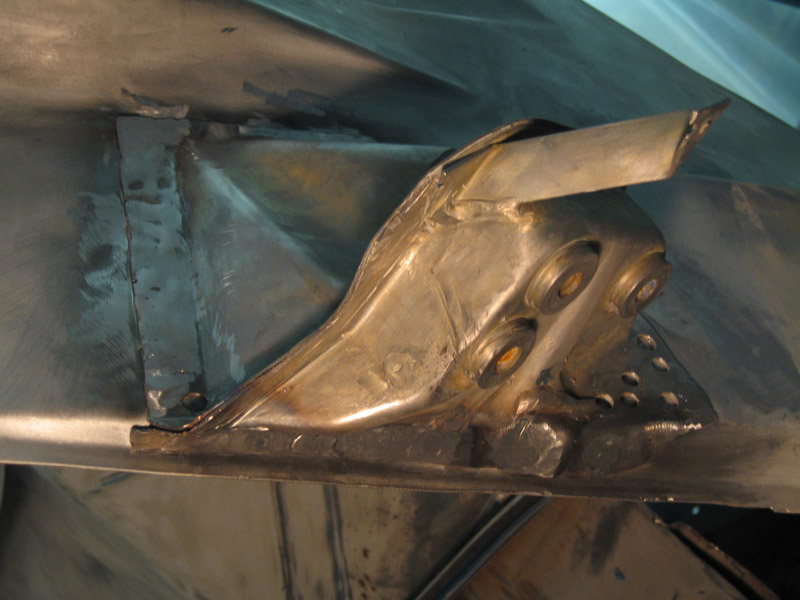
and this is when I got distracted by some blemishes I'd circled earlier on my jack post receiver plate. Not pleased with the results of a screw driver test there.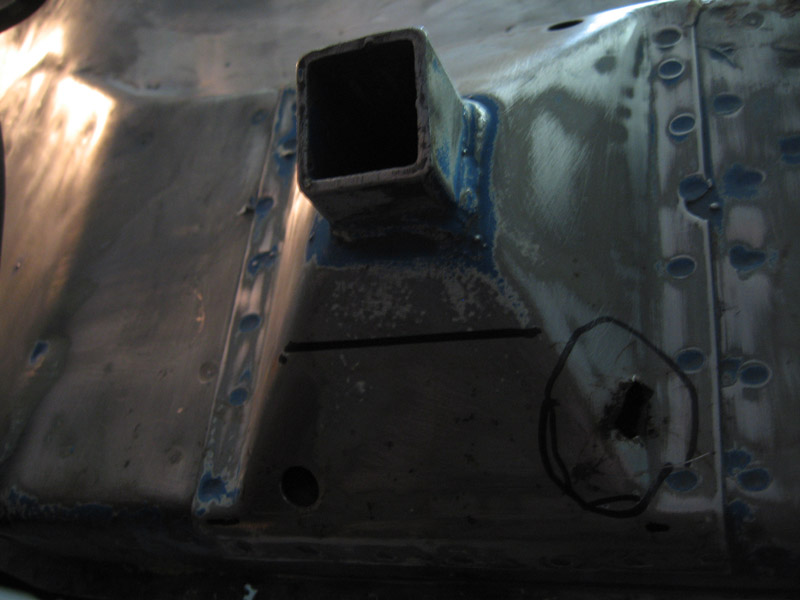
It took me several days to come to grips with this nasty turn of events. My work sent me to Austin for about a week for SXSW film music interactive festival which was awesome.
I almost managed to forget about this, but I'm back and after cleaning my shop yesterday, I've gone in again, deeper. Hopefully, I will post soon the resolution of all this. Not only is it not pretty behind the receiver plate, it's not-too-nice I see now between the 2 layers at the bottom, from the front of the plate to where it slants up a foot or so back. I've got the metal to fix it, thought I might have had to before, so maybe I can make short work of this. I won't post more pics of it until the sight of what I have done does not induce vomiting.
Posted by: Socalandy Mar 18 2012, 09:47 AM
Amazing work
Posted by: nathansnathan Jun 22 2012, 11:10 PM
Wow, it's been 3 months since I've updated. I keep thinking this next post , I will have the long back together . I'll get to some of the work I did on that in a post later. For now I'll catch up with the jack point repair.
I didn't get great pics of the first bit, where I'd cut the bottom off, and exposed all the pitting and rust. 
The piece behind the jack plate was pitted pretty good as well, on the outside. I was torn on leaving it, but worried about what might still lie beneath, took it off.
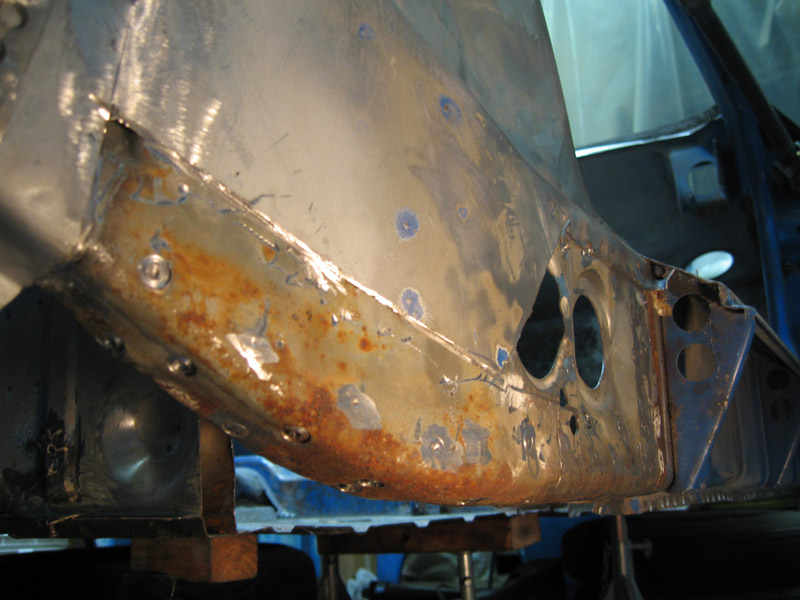
I got it under control with spot blasting and an 80 grit 1 1/2 inch roloc disk on a pnuematic mini right angle grinder.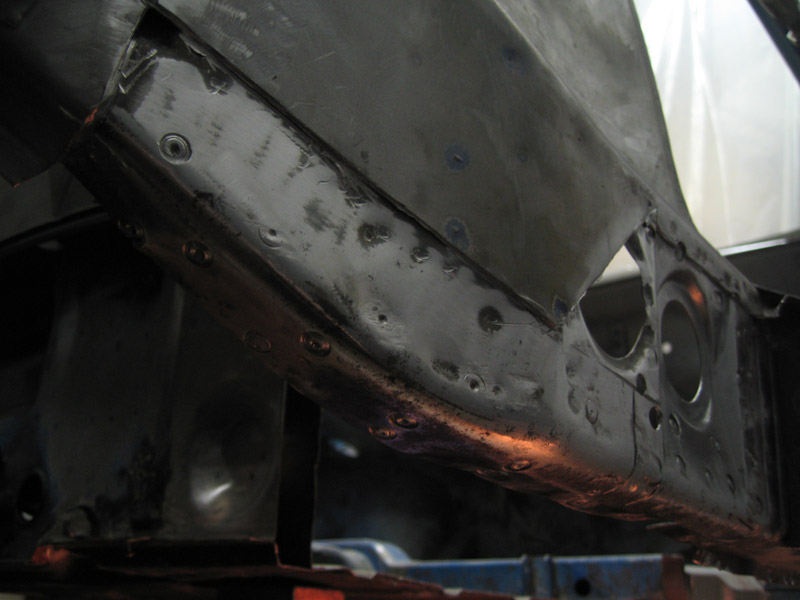
The restoration design piece was, not as ready-to-go-in as I would have liked. The original has a recess stamped in it; the rd piece, just a square hole. The replacement jack post that I ordered (wasn't sure if I'd need it) was like a gauge thinner than the original. I decided to weld the original post into the replacement hole which I made bigger.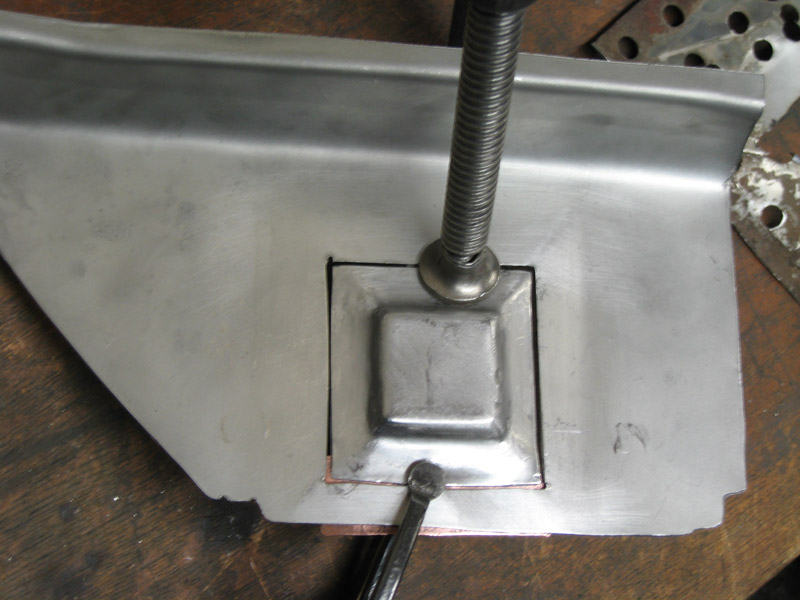
The front, also, was about a half inch short.
Attached image(s)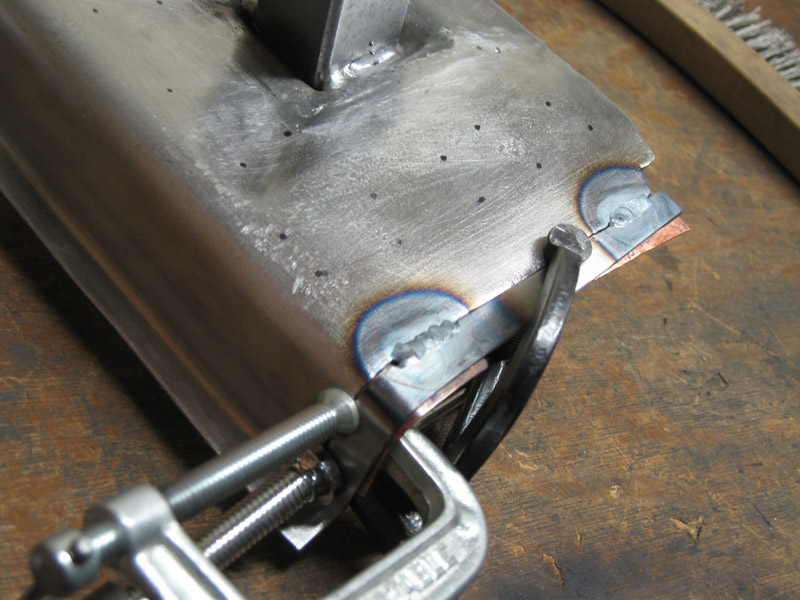
Posted by: nathansnathan Jun 22 2012, 11:36 PM
oops , I didn't mean to add so soon. got some error message? Anyway...
Had to wire wheel the whole thing to get the galvanization off, drilling the holes for where it'll need to be welded. Wasn't happy with how short the flange to weld it on ws, maybe .030" inch shorter than stock in such a critical area.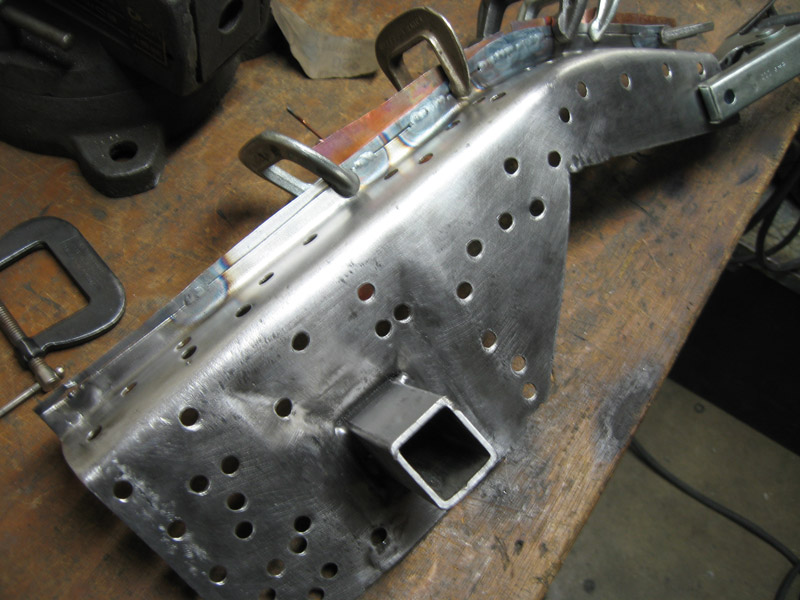
I etched everything and weld-primered the parts that would become inaccessible.
The car part and the piece inside, too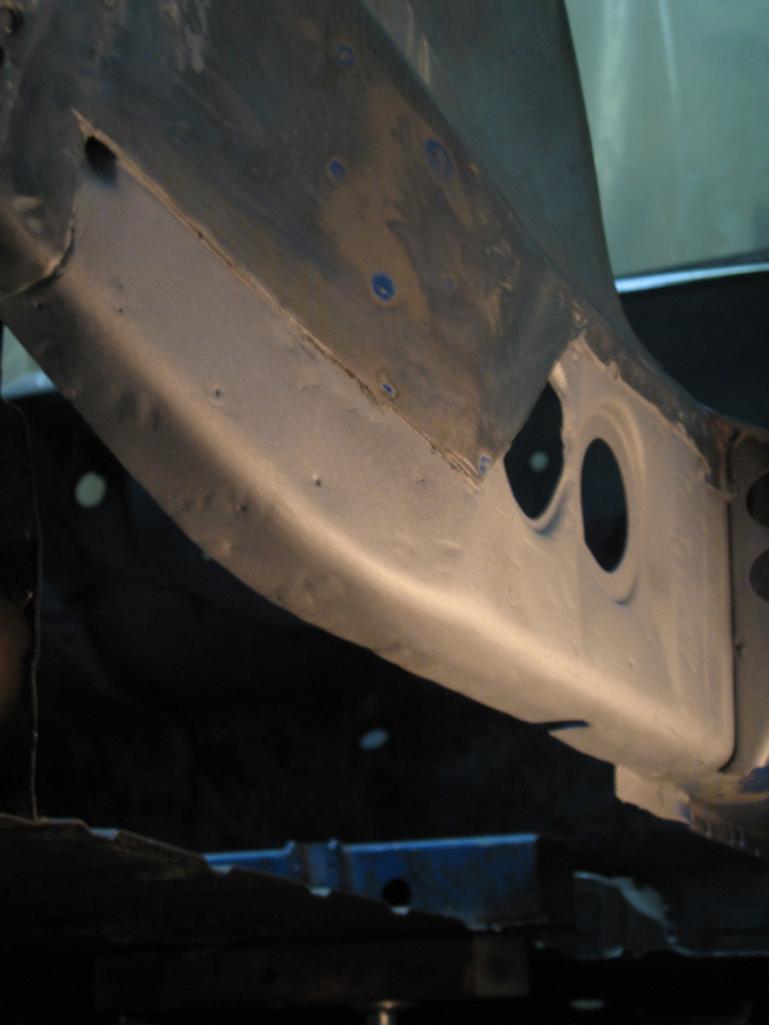
rocker nut welded in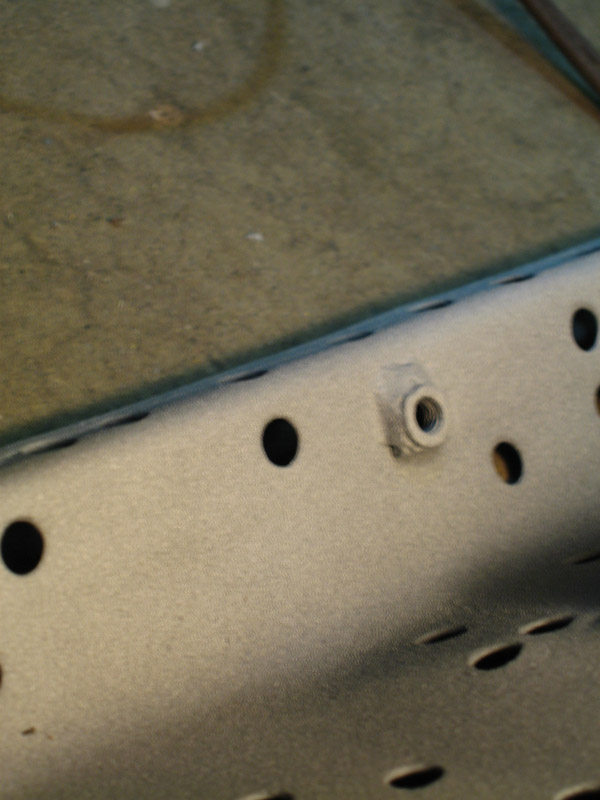
put it together, not quite done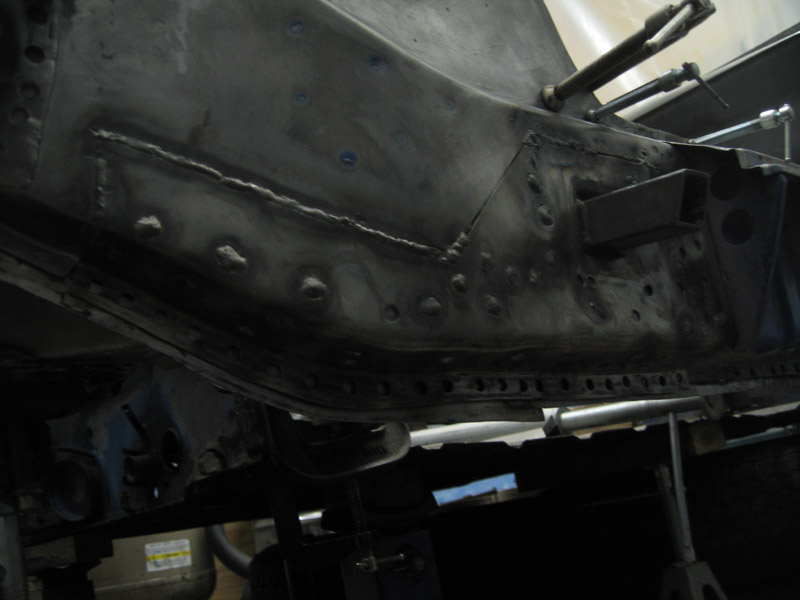
It all lines up though
At that point I moved on to a bit of my own rd oversight where I;d made the bottom of the inner long about a 1'2 inch too short kind of. I'll post pics soon of that and the fix... and the fitting, not attached quite yet.
Attached image(s)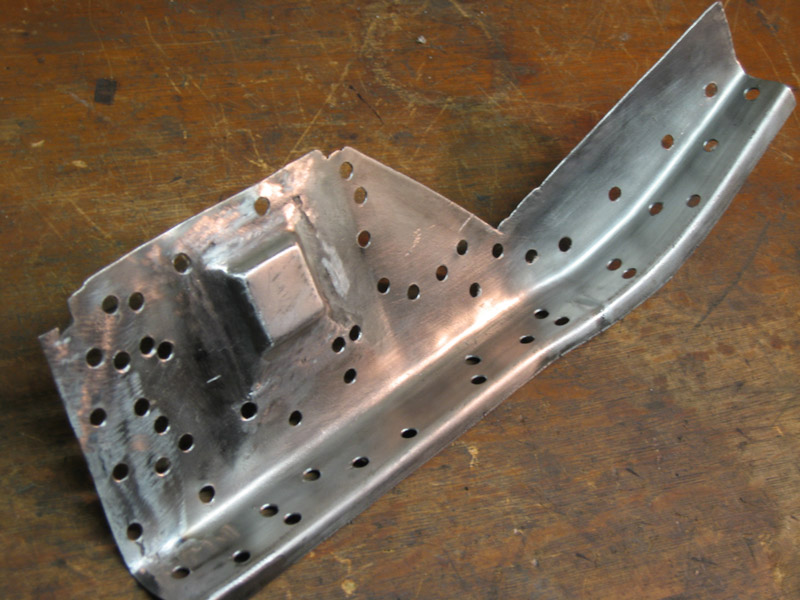
Posted by: nathansnathan Jun 23 2012, 12:00 AM
When I'd put the bottom of the long together, I had not taken the engine mount off the donor car and kind of put it, where it wanted to be.
All seems well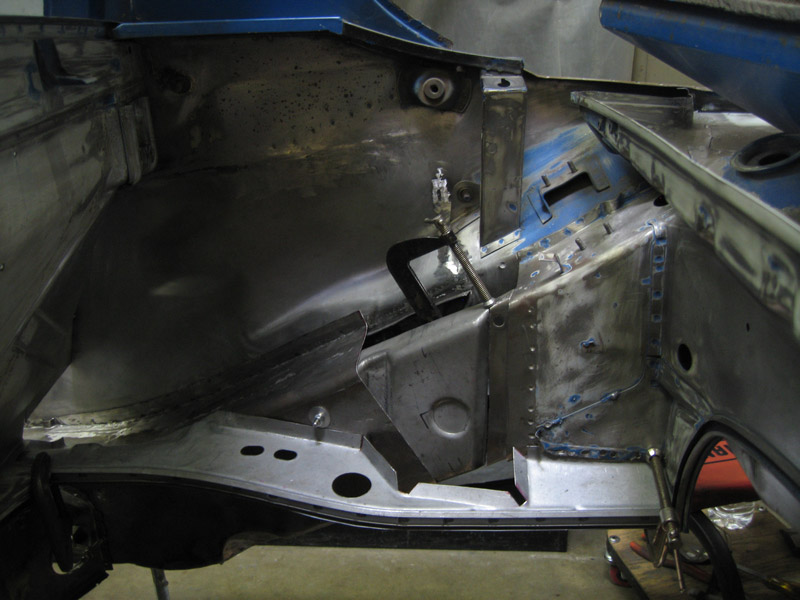

But try as I might with the bottom, it wasn't lining up right 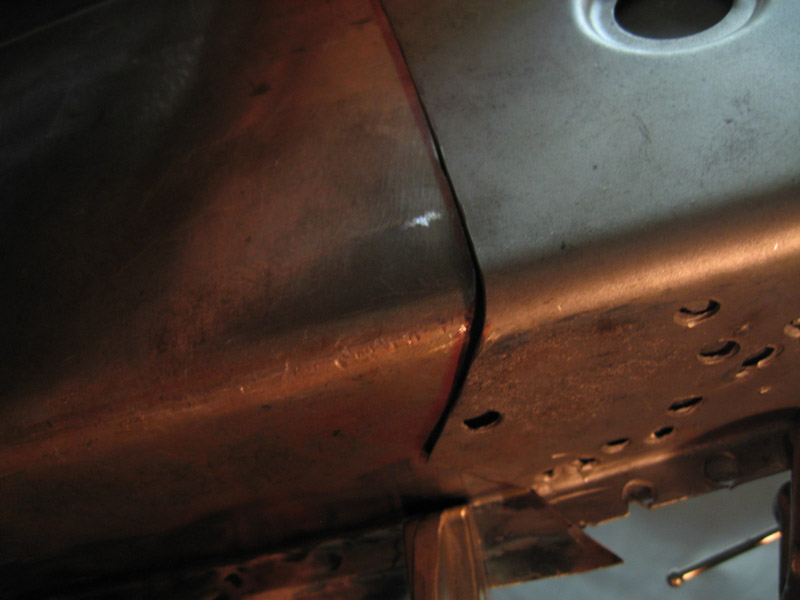
measured the donor car then to find I was off
As it went Up the long it became almost 1/4 inch off. so..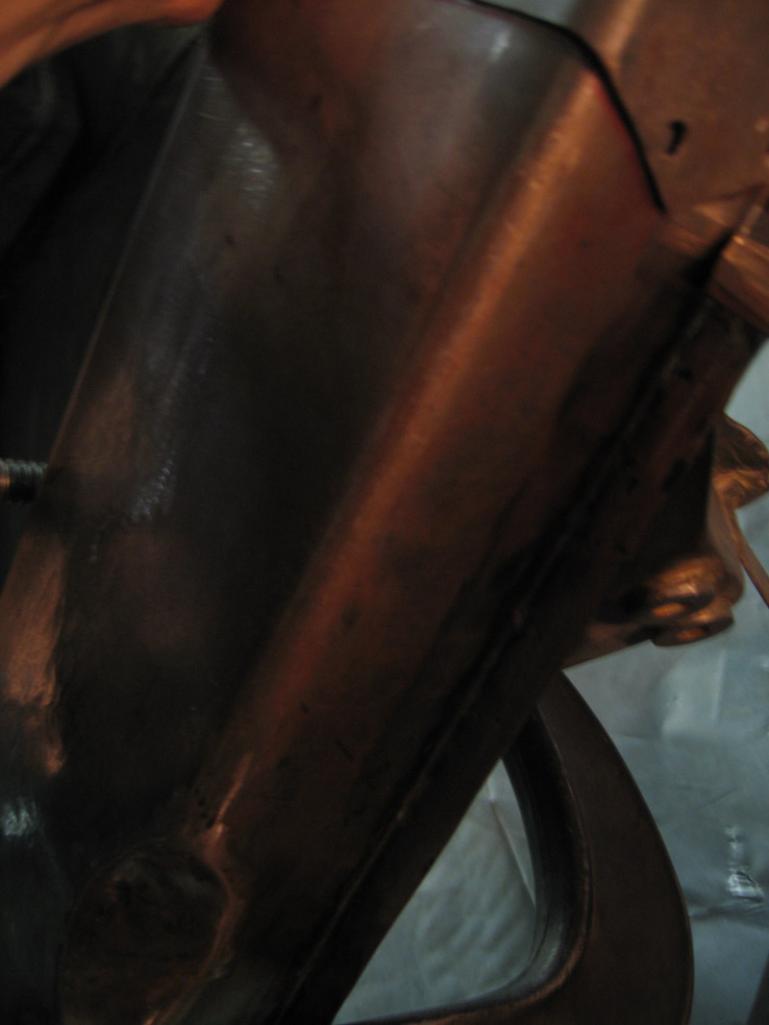
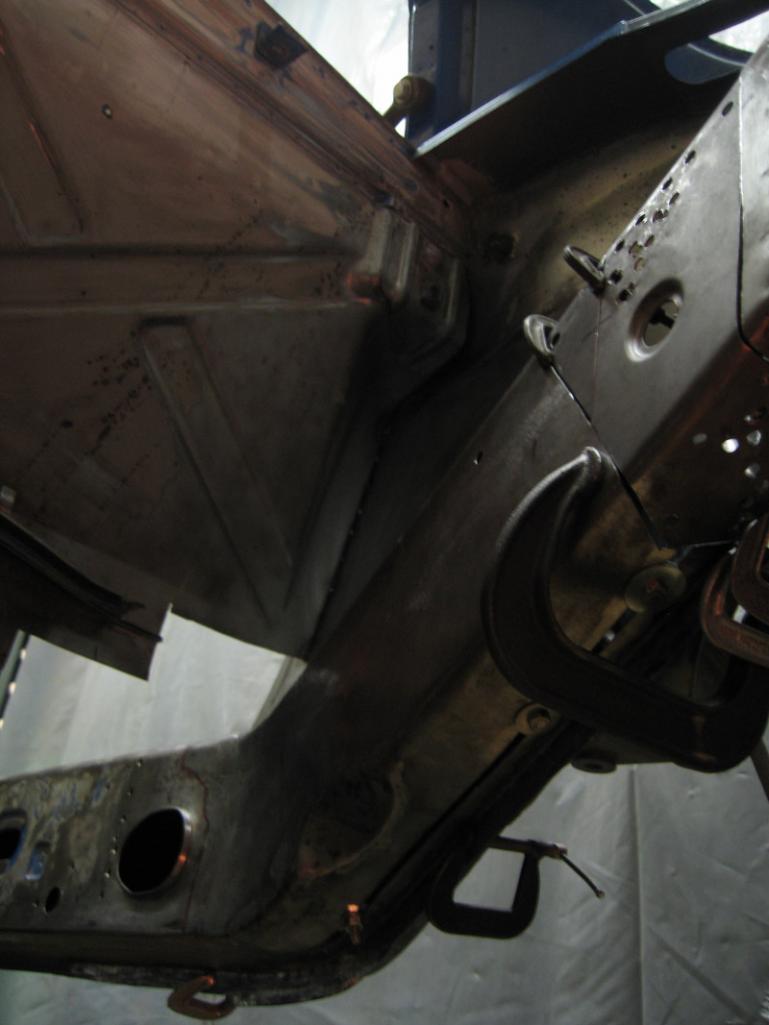
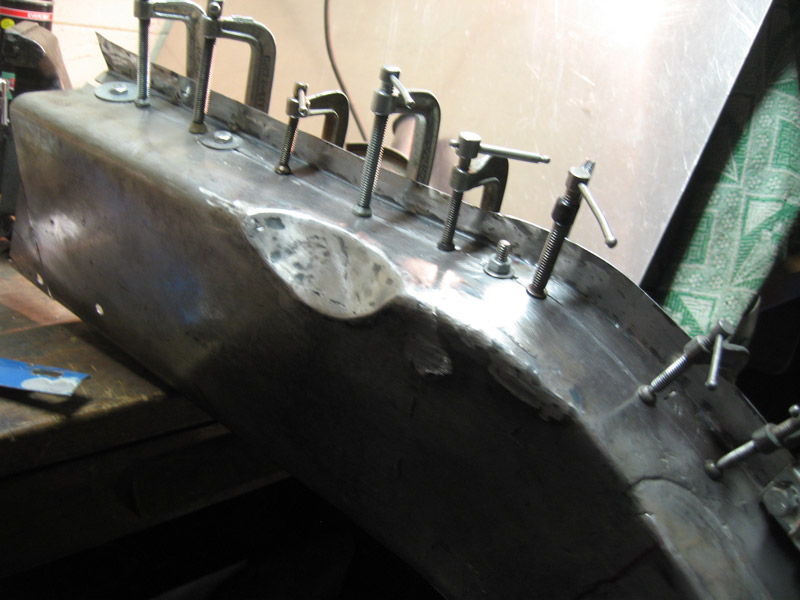
got it welded together, and smoothed even, there, I got copper flashing backing it.
no pic currently of the fit from below, I will have to update later.
moving on to the engine mount... 
Posted by: nathansnathan Jun 23 2012, 12:22 AM
I'd been worried about the engine mount.
The good bottom bit on the left id from the driver's side of the donor car.The original driver side engine mount on the right, and below that the new piece I formed of 16 gauge cold rolled sheet in progress. 
The bottom formed bit is the same side-to-side, but the top is symmetrically inverse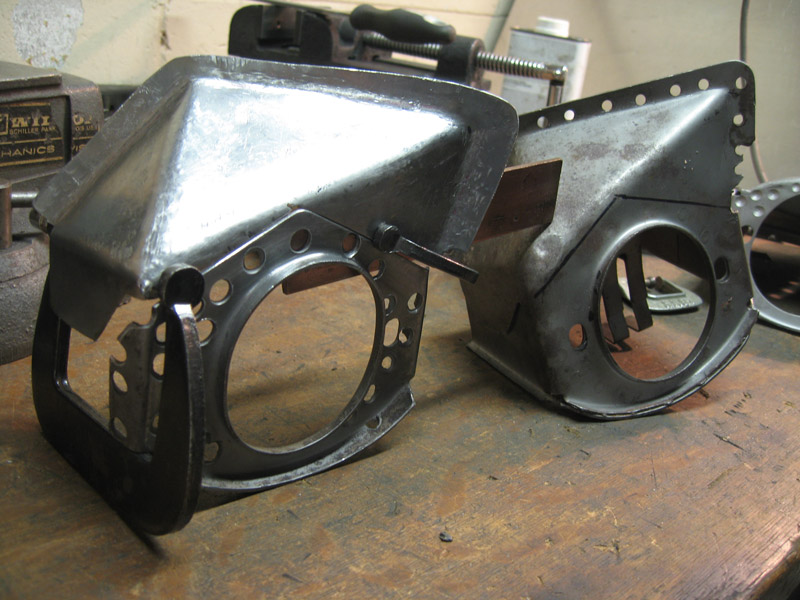
just got to ad the flange on the bottom of the one side, took it off the other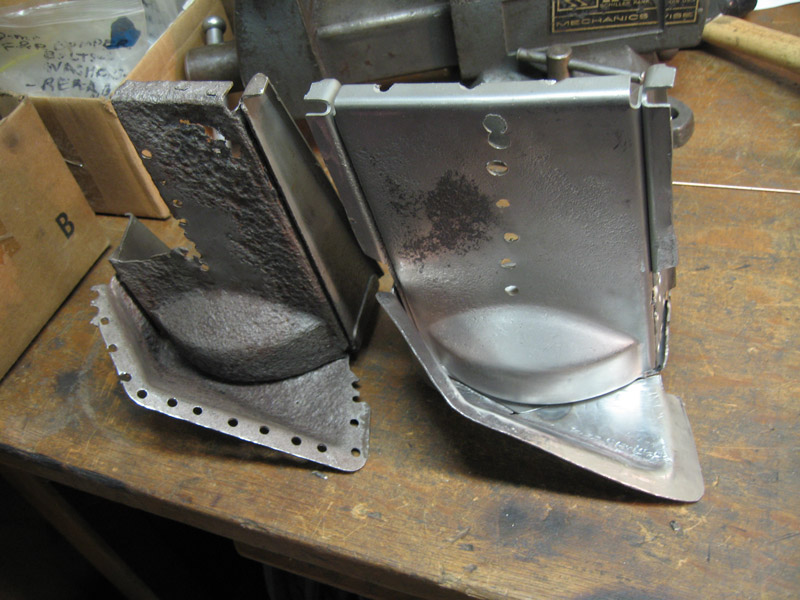
and fit up in the nook and jacked snug at the bottom 
Working on putting the firewall back together this weekend,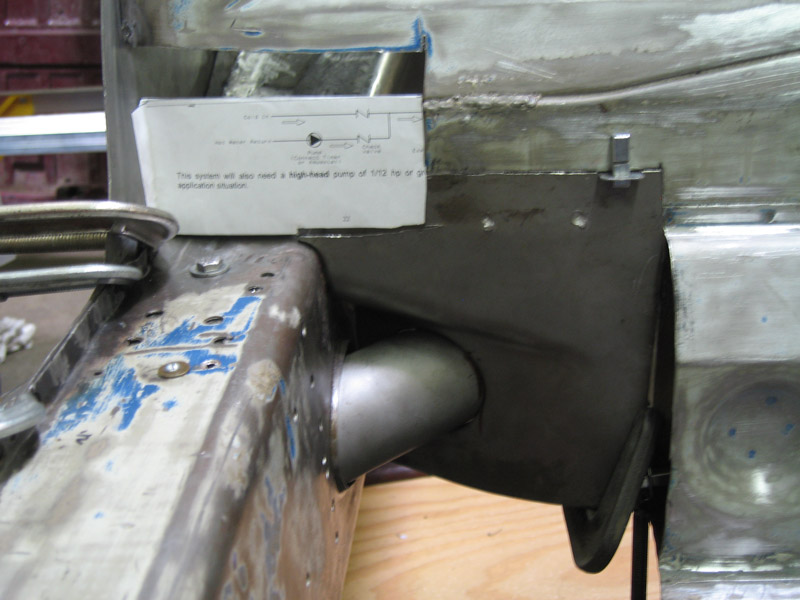
I need to bolt the firewall, tube, and long together and see if I can get it in so I can assemble it (weld) and then put it in, easier than building it on the car as you can't reach inside that way. soon fairly soon...
Attached thumbnail(s)
Posted by: saigon71 Jun 23 2012, 08:31 AM
Very impressive work man...keep it rolling!
Posted by: obscurity Jul 8 2012, 07:07 AM
This is some pretty amazing work. I have been struggling with what to do with my engine mount. This is inspirational!
John
I'd been worried about the engine mount.
The good bottom bit on the left id from the driver's side of the donor car.The original driver side engine mount on the right, and below that the new piece I formed of 16 gauge cold rolled sheet in progress.
The bottom formed bit is the same side-to-side, but the top is symmetrically inverse
just got to ad the flange on the bottom of the one side, took it off the other
and fit up in the nook and jacked snug at the bottom
Working on putting the firewall back together this weekend,
I need to bolt the firewall, tube, and long together and see if I can get it in so I can assemble it (weld) and then put it in, easier than building it on the car as you can't reach inside that way. soon fairly soon...
Posted by: nathansnathan Jul 8 2012, 09:26 AM
Thanks, man. It's really good to hear the encouragement. I've been recapping all that is left to do and I'm thinking, I need to get better at this.
Was checking out your thread. Very ambitious, what you have done, and looking good. ... makes me think I've got it easy. You're making me look bad.
Posted by: nathansnathan Jul 8 2012, 09:41 AM
A shot of it further along, still need to smooth it out with flap disk or now using roton pads on my die grinder, and to tap that bit in there.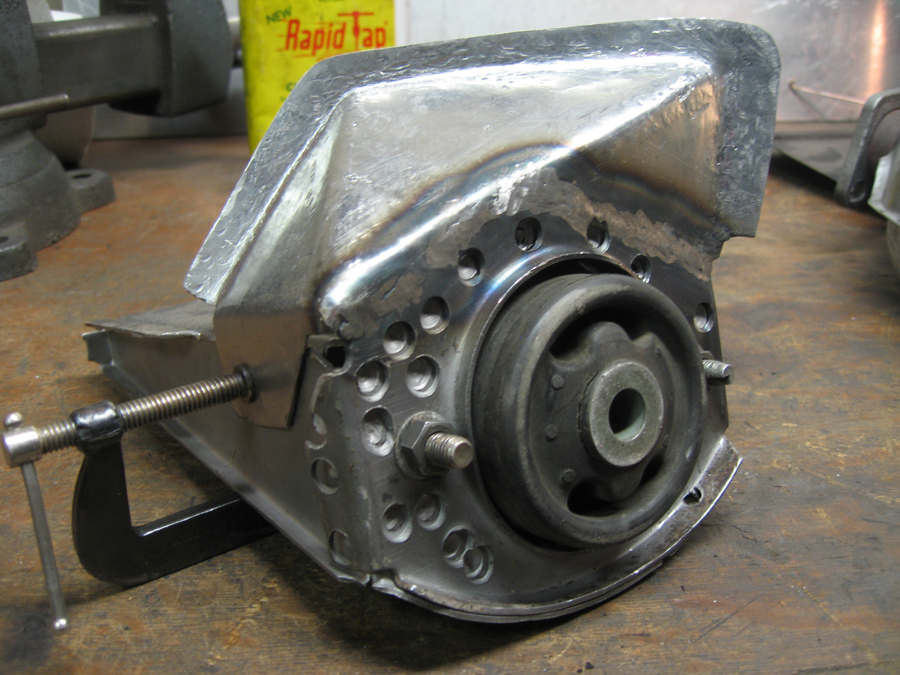
I'm pretty happy with it so far, got to put the filter holder on it still, and take it off the other, actually 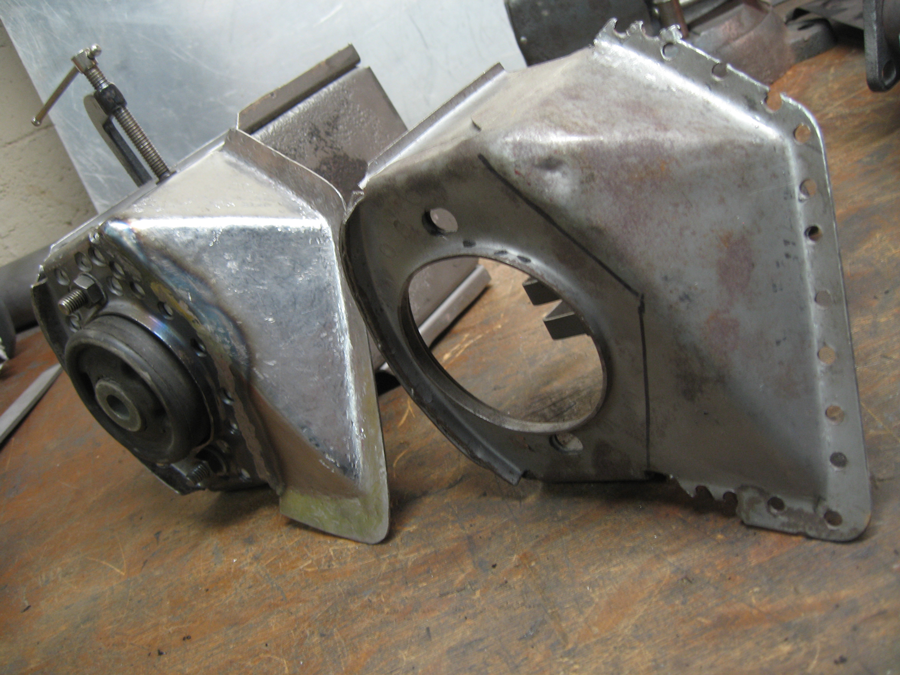
I've been smoothing/ prepping my long, both pieces, the inner removed the galvanneal mostly, to put them together.
I've been distracted by some other projects, someone hit my bus in the parking ramp at work and I spent a week straightening and painting that. This weekend I am putting egt probes in the heat exchangers.
I managed to move the car onto the dolly, though, and I'm loving being able to clean beneath it, ...and walk through the shop. 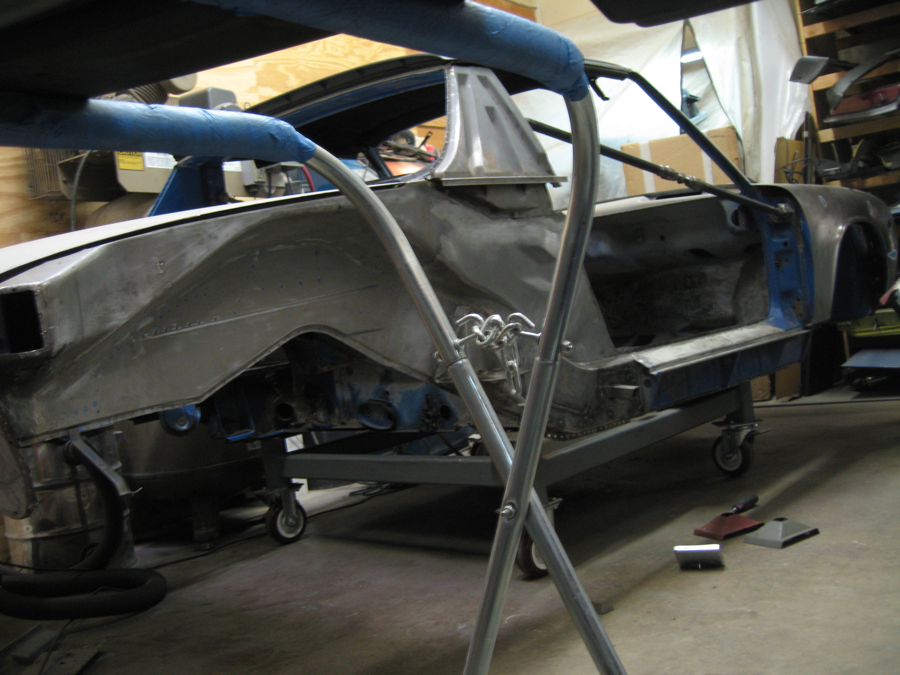
I was actually comparing the frequency of the rd jackplate piece there with an original that I found, using a guitar tuner.  Very productive, I know, but they are somehow different, like in there temper or something because they weigh about the same, but they are just different..
Thanks for the comments, again. I hope to post meaningful updates soon.
Posted by: dheming Aug 8 2012, 01:29 PM
Looking good. You should make your custom title "The Surgeon"
Are still using the same spot weld drill bit? Was just wondering how long they last.
Posted by: nathansnathan Aug 8 2012, 02:24 PM
Looking good. You should make your custom title "The Surgeon"
Are still using the same spot weld drill bit? Was just wondering how long they last.
Thanks.
I started out just using a regular drill bit, but it does make extra work. There are few options for spot weld drills, even just at Eastwood, but I went with the expensive ones. I got replacement guide bits and cutting tips, but I'm still using the same one after a ridiculous amount of welds drilled. I use cutting oil fanatically. The drawback to spot weld drills is they are all huge, the hole they make.http://www.eastwood.com/ew-skip-proof-spotweld-cutter.html#

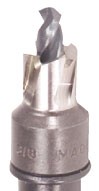
I'm currently full on building the rotisserie. I've ordered the electric cable hoists, like we talked about. I want to be able to use it on the bus someday so it's going to be pretty insane; I got the 750/1500lbs ones. -Weird that they have gone up in price since last week? They were $182 and now they are $220. I will post the drawing when I get home; it's kind of a work in progress.
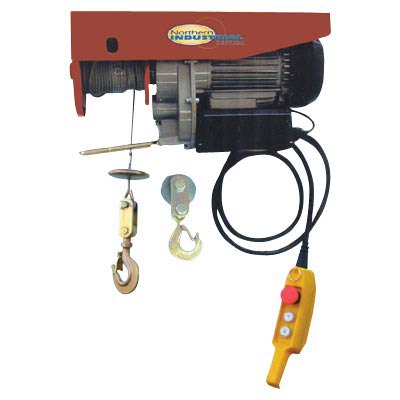

Posted by: nathansnathan Aug 8 2012, 06:48 PM
I've been turning over ideas of how to do this for months now. The challenge is to be able to lift it high enough to fully flip it, from the position it would be in sitting on its tires.
I want to be able to lift my bus on this also, just the body of course, but I've made it beefy to handle that.
Another part of the challenge is that you need to lift both sides at once, because if you don't, the car becomes like the the hypotenuse of a triangle, sort of, wanting to stretch.
The problem is that variation in the axis from end to end would also put stress on the car, in a rigid setup. And on top of this, the hoists move 3.5 inches a second direct, half that reduced with the pulley setup, but it seems inevitable that something should get off, one side higher. I can imagine tearing the car up with some stuck cable scenario, and so I've designed it to flex in the final version.
The long arm ram jacks have 19 inches of travel, and you need at least 25 so this one wasn't working. 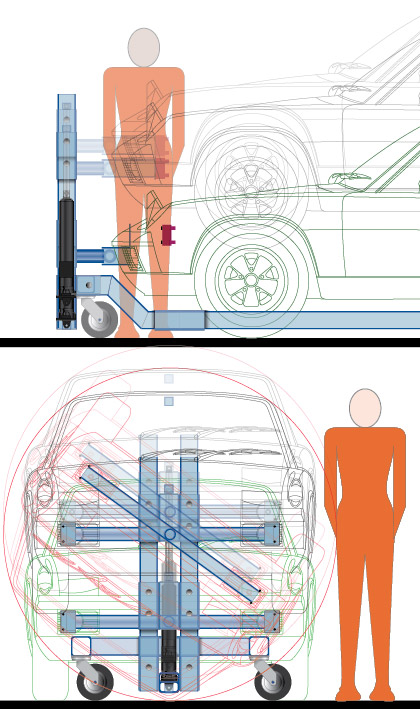
I went through more ideas in between, toying with 'samba rotisseries' which are like a pair of octagons, partial versions of that as well. But I ended up with this, trying to keep it simple 
There is to be a sleeve of plate (by my ankle there, should be in the side view but was left below), similar to that which goes up and down along the vertical support, but on the crossbeam so it can elongate - got to figure out how to limit it. There are hinges which are integrated to the mounts, and then a hinge between the pivot and the support arm. The whole car is like part of a joint. and can pivot either way at both ends, if not for the other.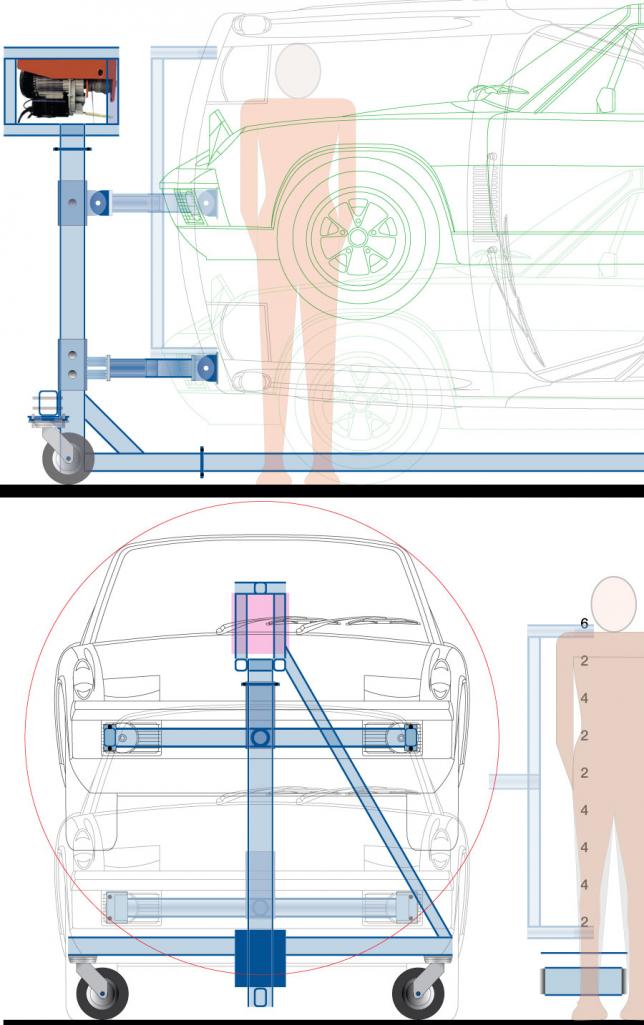
Posted by: dheming Aug 9 2012, 03:56 PM
Nice to know that the spot weld cutters last so long. Really $35 is not that bad for such a thing. If I decide to remove my pedal box I will be getting one for sure.
Glad to see you moving forward on the rotisserie. The nice thing about going with hoists is that you can also use them in an A-frame to make a small shop crane. Multifunctionality is always a good thing when buying tools.
Making the car able to flex/hinge with four joints might not be the greatest idea. The thing is that having the hinges the way you show in the drawing, as soon as you put weight on it you will effectively pull the two end towers towards each other as the load moves downwards a bit. Just visualize a rope connecting the two towers, now pull down hard on the middle of the rope. This will get worse the higher up the tower the load moves due to leverage. Also I foresee that when you rotate the car 90° to vertical that it will want to oscillate side to side a bit when you go to work on it, again due to the towers bending inwards a bit. Now if you only had two hinge joints you would still allow for unequal hoist speeds, but you wouldn't have the drooping or swaying issues. So I'd keep the hinges that are on the mounts and get rid of the ones on the vertical towers.
Also what are you planning to do for safety stops, like if the cable breaks on the way up?
As to the crossbeam elongation limiter, you could just drill a series of holes and then cut/grind the excess out to make a slot on the inner tube. Then you could just screw a bolt through the outer tube into that slot to have a limited range of sliding allowed. I imagine a slot a few inches long would be fine.
Posted by: nathansnathan Aug 9 2012, 04:38 PM
Nice to know that the spot weld cutters last so long. Really $35 is not that bad for such a thing. If I decide to remove my pedal box I will be getting one for sure.
Glad to see you moving forward on the rotisserie. The nice thing about going with hoists is that you can also use them in an A-frame to make a small shop crane. Multifunctionality is always a good thing when buying tools.
Making the car able to flex/hinge with four joints might not be the greatest idea. The thing is that having the hinges the way you show in the drawing, as soon as you put weight on it you will effectively pull the two end towers towards each other as the load moves downwards a bit. Just visualize a rope connecting the two towers, now pull down hard on the middle of the rope. This will get worse the higher up the tower the load moves due to leverage. Also I foresee that when you rotate the car 90° to vertical that it will want to oscillate side to side a bit when you go to work on it, again due to the towers bending inwards a bit. Now if you only had two hinge joints you would still allow for unequal hoist speeds, but you wouldn't have the drooping or swaying issues. So I'd keep the hinges that are on the mounts and get rid of the ones on the vertical towers.
Also what are you planning to do for safety stops, like if the cable breaks on the way up?
As to the crossbeam elongation limiter, you could just drill a series of holes and then cut/grind the excess out to make a slot on the inner tube. Then you could just screw a bolt through the outer tube into that slot to have a limited range of sliding allowed. I imagine a slot a few inches long would be fine.
About multi-functionality, I'm thinking of it with the 2 ends bolted together, fitting a sort of platform in between to make a super heavy duty stand/ lift , to like get an engine off a jack and onto an engine stand for example.
About the stress relieving hinges, there are 4 at the mounts that would pivot if one end of the car only was to be raised while the car was in its upright position. But say you want to raise or lower 1 end when it's flipped on its side, 90 degrees. For this there are the 2 pivots at the middle where these meet the verticals - these pivot in a different axis than the other. The drawing shows the top (raised up) "yoke" in both positions at once so it looks kind of like they pivit in the same axis, but no. You do start to imagine regardless, the stress, say on the bumper mounts, the tops wanting to go inward, the bottoms out, but it's necessary imo to relieve the stress of it cocking. If the car were flipped like 70 degrees, you might see some combination of the slop in both joints combined. It does stress the horizontal, and the joints between, but the verticals and the horizontals, as well as the diagonals are all 1/4 inch wall, 2x3 for the horizontals and diagonals, 4x4 for the verticals. The cross pieces to which the casters are connected, I realized after I bought them, 3/16 wall, but the stress on those should be pretty controlled.
Safety measures while lifting it? Just go up one 'hole' at a time so if it does break, the cable, it won't fall too far. Going with the bigger hoists I consider something of a preventative measure, the 200/400 has 1/8" cable, the 500/1000 has 5/32. The ones I got, 750/1500 must have a typo on the site to say 9/50 inch?
I'm thinking the slot will probably be the way for the middle section, like you've said.
Posted by: dheming Aug 9 2012, 06:09 PM
Ah yeah, I see what you are saying about the hinges. Should be fine.
If you scale up from the numbers you gave for the other cables, the 750 should have around a 0.191" to 0.242" cable. So maybe they meant 9/32" which would be around 0.281". Not sure, you will have to measure when you get them.
Posted by: dheming Sep 12 2012, 07:16 PM
Any progress on the rotisserie after getting the hoists?
Posted by: ConeDodger Sep 12 2012, 07:57 PM
Wow! I wish someone would put this much effort into building a carbon fiber body!
Posted by: nathansnathan Oct 20 2012, 12:12 AM
Any progress on the rotisserie after getting the hoists?
I didn't see this until today. I've been so busy with work, I haven't been able to keep up with email.
Funny, I see you are looking at this thread right now. I will post an update soon.
Posted by: nathansnathan Oct 20 2012, 01:32 AM
I've been working on the rotisserie for about 3-4 weeks now. I went to Guelph, Ontario for about a week with Kirsten to see the family's old farmhouse which is amazing.
I haven't gotten to assembling the hoist cages yet - I'm concentrating on what I am calling the "yokes" - the parts that attach to the car (like the yoke of an engine stand only bigger). The drawing posted above is pretty small, but here are close ups to show the pivots that have taken a lot of my time the past few weeks. I call the individual pieces of the pivots, "leaves" as they are interleaved for strength, 1/4" plate x 4", they are.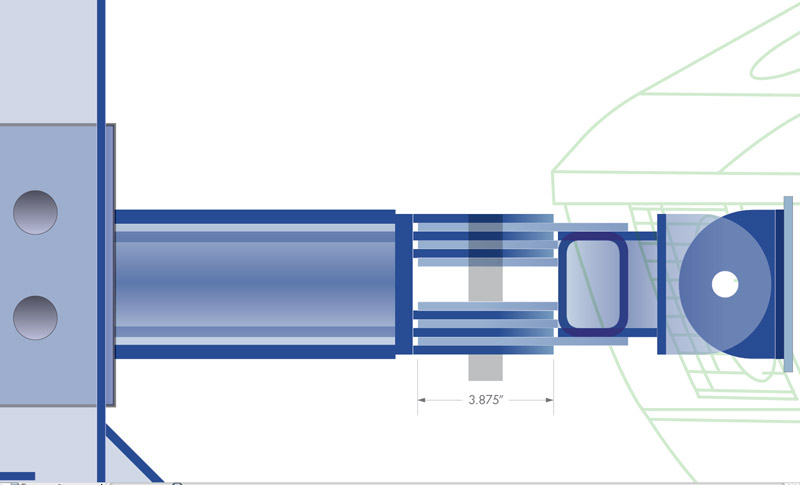
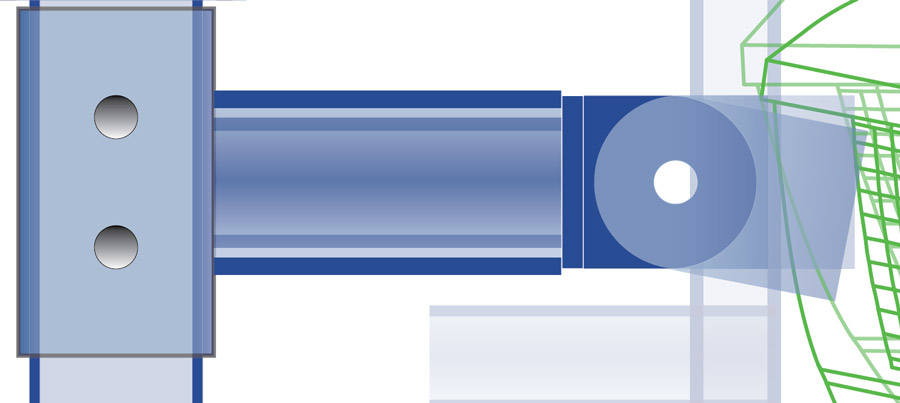
It would likely have been easier to grind the shapes from rectangles cut from a strip, but I made them from 4" squares and circles that I cut in half on the band saw and welded to each other. The ones on the far right are for the pivot at the car to yoke; there are 8 for now but I need to do still eight more.
The bigger ones to the left are for the spanning beams to the pivot plate. -I've got names for all the parts, I suppose. I changed the design to make the outers longer halfway through making them so those pieces have 2 beads on them. There are 4 outers - 2 for the 2 yokes, and a total of 20. So 4 and 20 black birds baked in a pie. You can see one of my 12" filter fans with re-useable aluminum mesh filter - I have 3 going as it is hot here, even still. 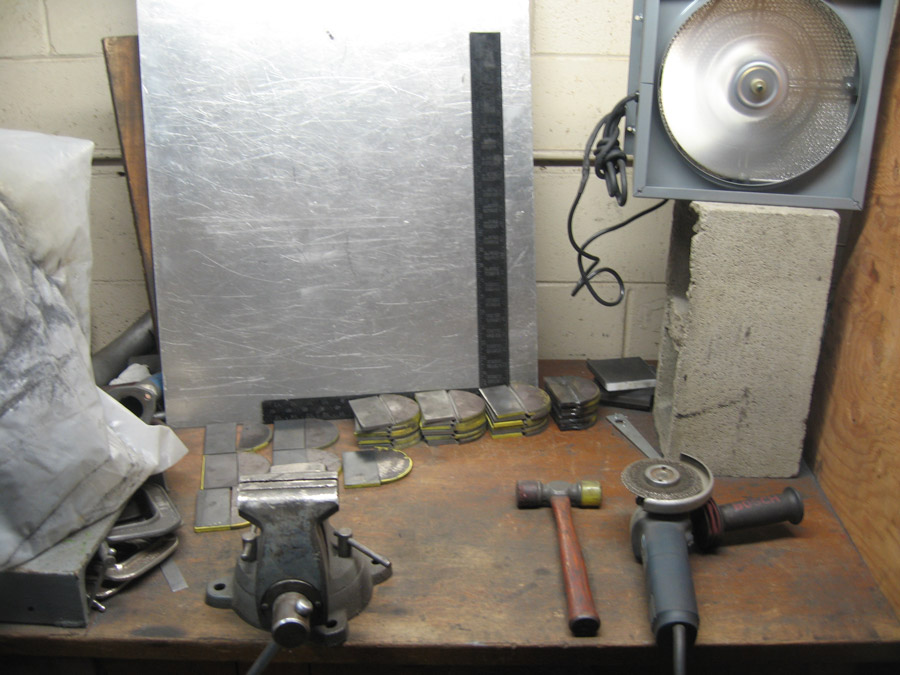
Some of my favorite clamps. The aluminum is way too thin a backer for what I am about to do here, and ends up seriously warped.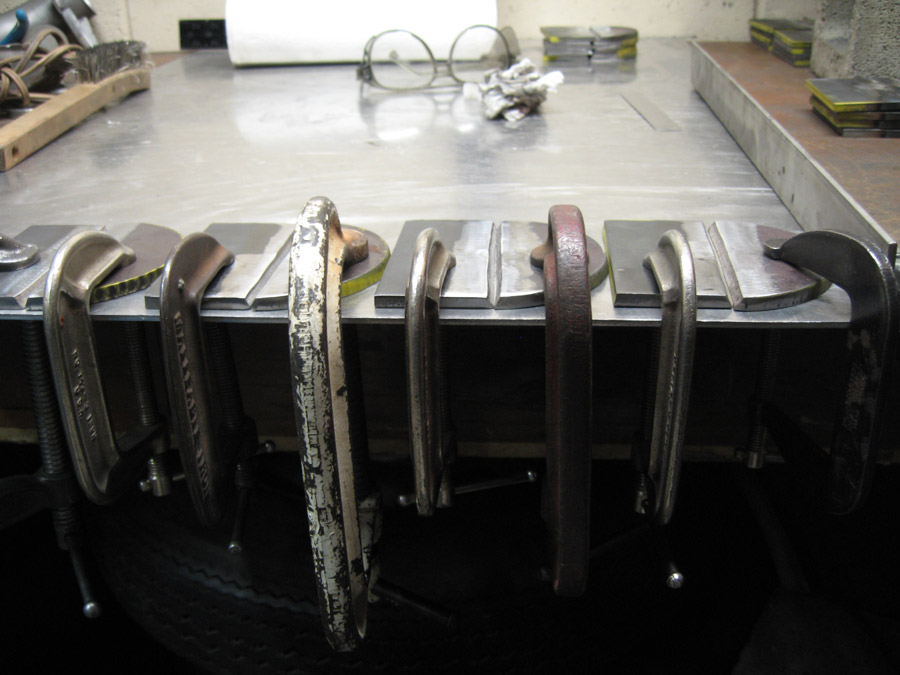
2-3 passes each, cooling between, they still warp a little with the heat. I maybe should have preheated them. I beat them flat with a hammer though. The circles ended up being a marginal bit thicker than the squares. It would be nice to have a mill, but I have a grinder. Derek, you should remember that verysame bell grinder wheel that we used on the lathe table. It has slowly got shorter.
The big plates are to be mounts for the casters. An odd size, I had to make them from cut 8" squares of 1/4 inch plate.
The smaller pieces with the 3/4" holes marked on the left are to be backing plates for where the car is attached, 3/16 plate. I made 4 But realize I have to use just washers in back as the trunk floor divides the top and bottom bumper mount holes. This would prove to be just the first complication presented by the cars rear end.
DOM tube for the main pivots, ready to be faced at right.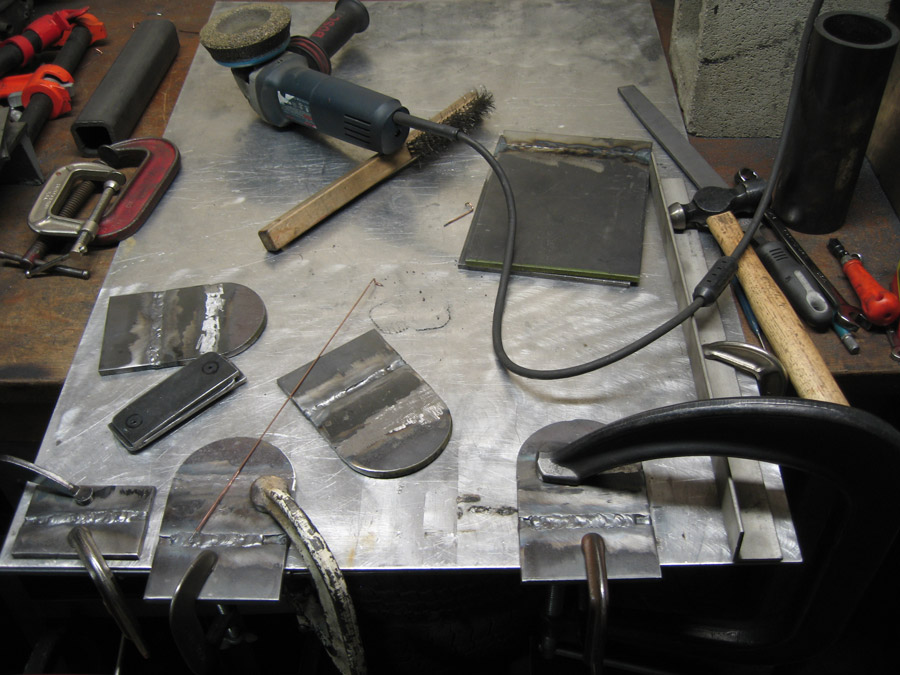
That is some gnarly stuff there, the edges on the circles I mean, My grinder will fix them.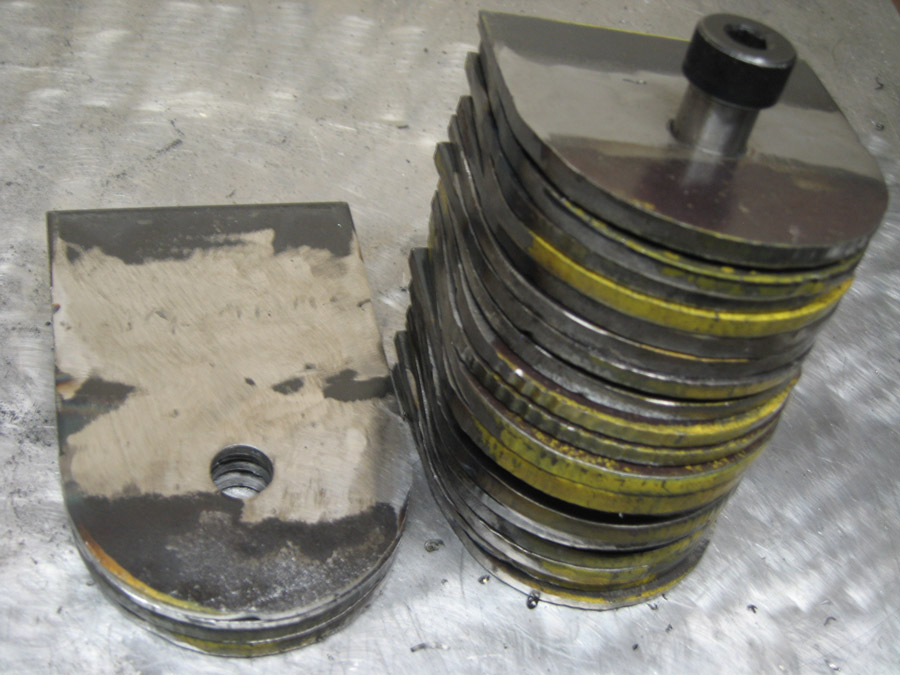
Drilled the holes first this time. These will be the mounts to the car. The saw gets its own fan.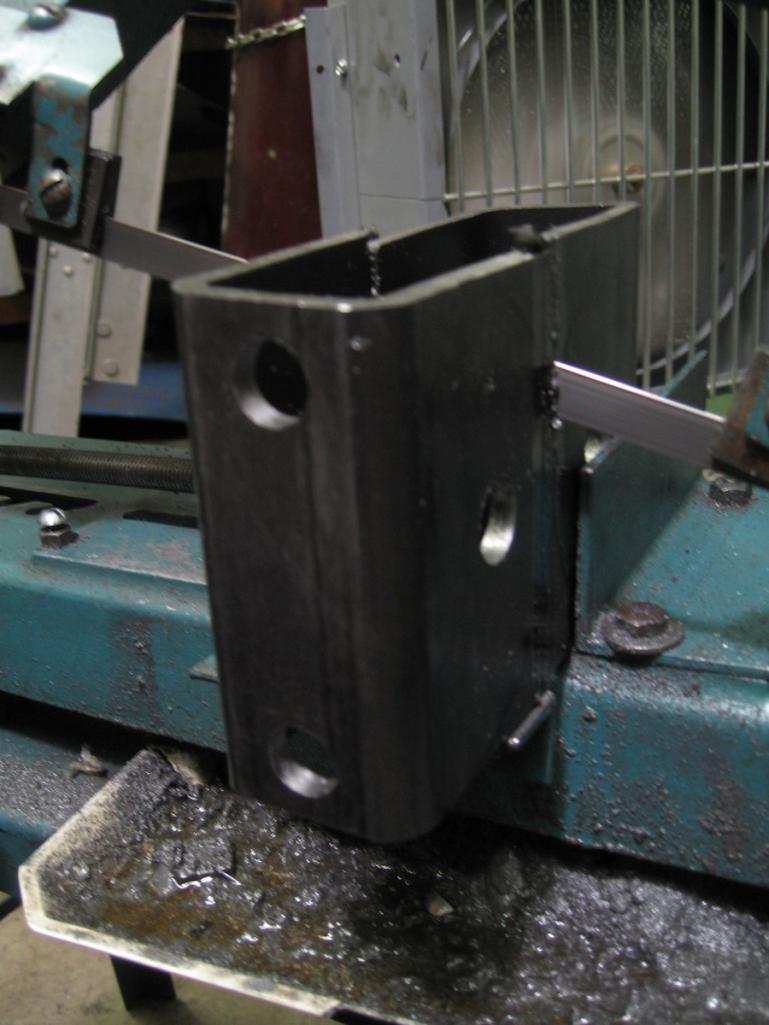
The drawing doesn't have them, but I added spacers to the design of the pivots, so the leaves don't bend under side load. The assembly just behind the flap wheel is 2 leaves joined by the spacer. To the left of that is similar with a base, and the process there in the vice.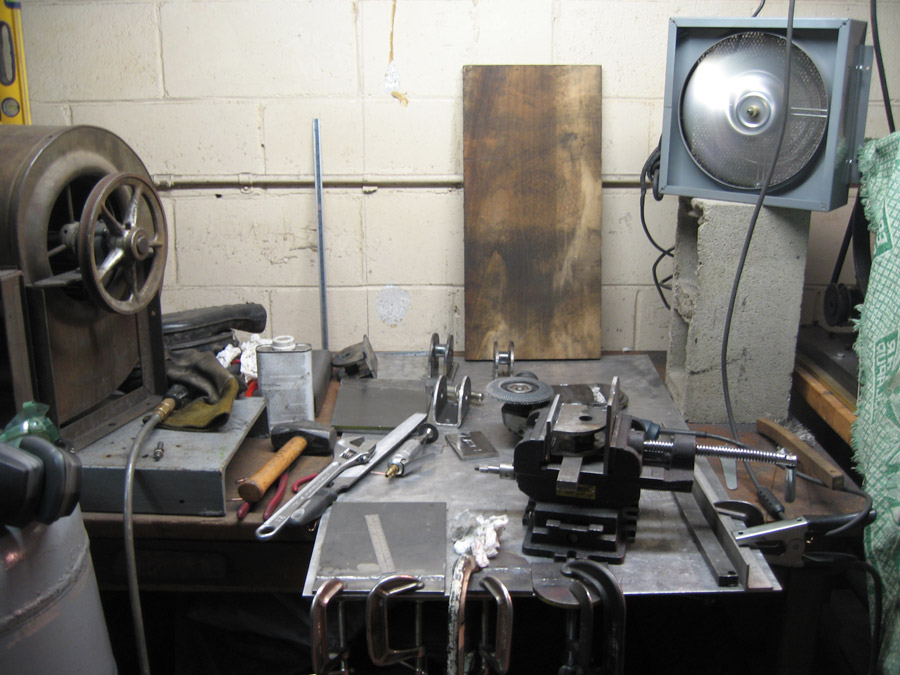
3/4" shoulder bolts. 4" long for the beam pivots and a 2.5" at each end. Got these from McMaster car, all grade eight or equivalent, I got everything in socket head cap screw, black oxide finish for the hardware. 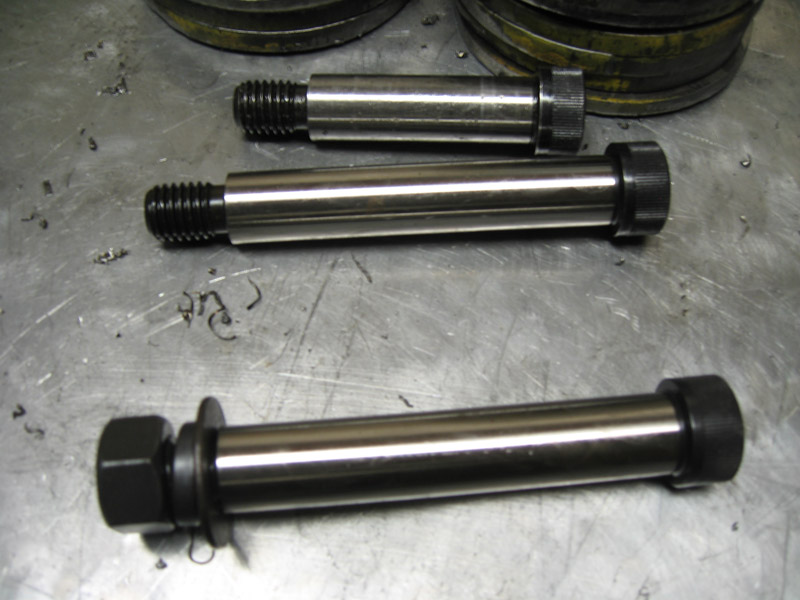
The "forearms" of the yoke are longer than in the drawing to allow greater access. 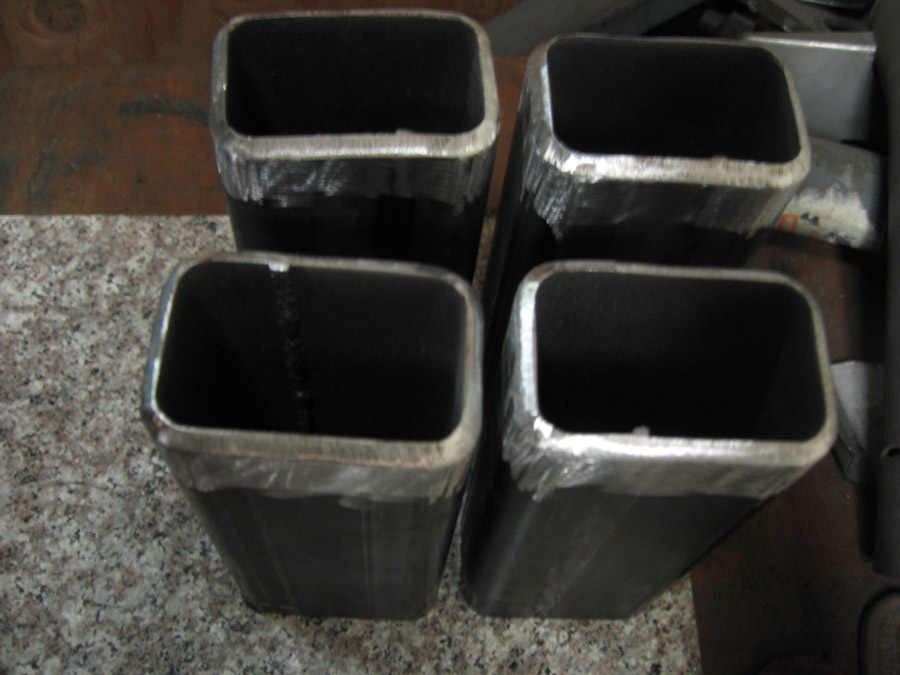
The other setback at the rear, the mounts point out by10 degrees of straight. I got this all jigged up and even tacked together before realizing the error in my thinking here. That is a box of 3 of the 15" version of the filter fans there. They do like twice the cfm's as the 12", so 750 and 1500 cfms for the 12 and 15 inch respectively, 3 of each, plus the crazy contraption seen on the bench above, I hope will be adequate for the paint booth.
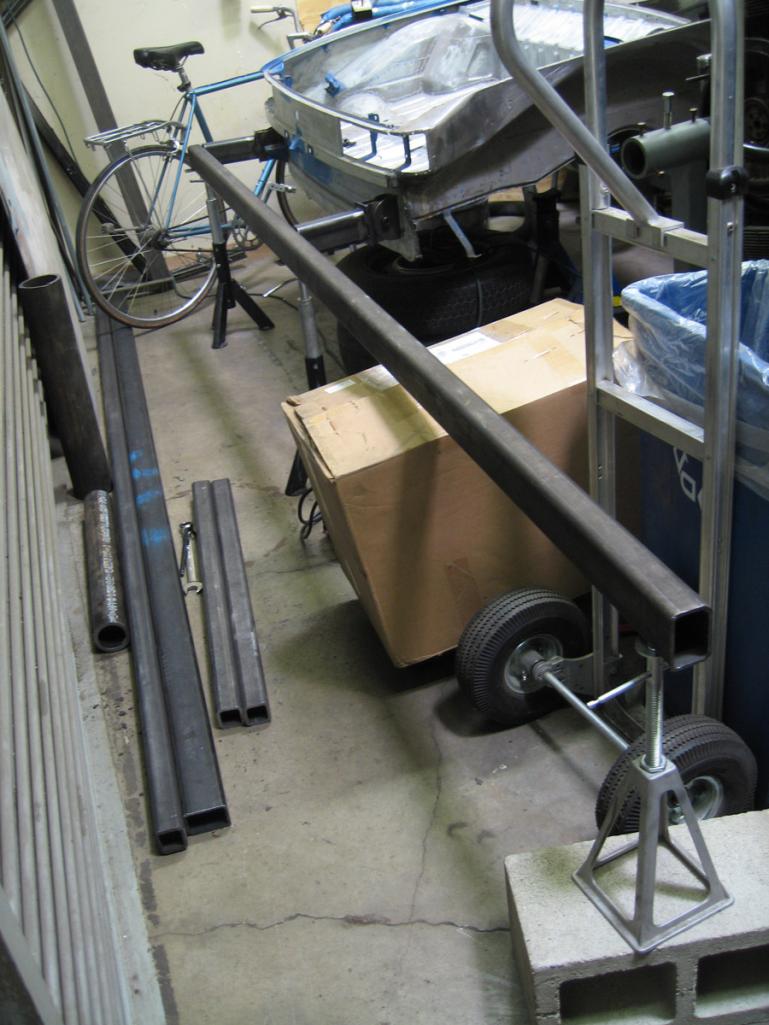
ABout the rear bumper, the plan is to do both to fit to the front which is straight on, and to make adaptor plates to fit the back, which is also closer together by a bit iirc. The outer pivots will have another set of leaves at the outers at all 4 corners - those other 8 leaves I've yet to make. I plan to triangulate, a 4" x 1/4" triangle plate at the inner of the elbows also, a web elbow for strength. I've got both ends welded, a bit more than in this pic now, and soon to mount the leaves right to the middles there.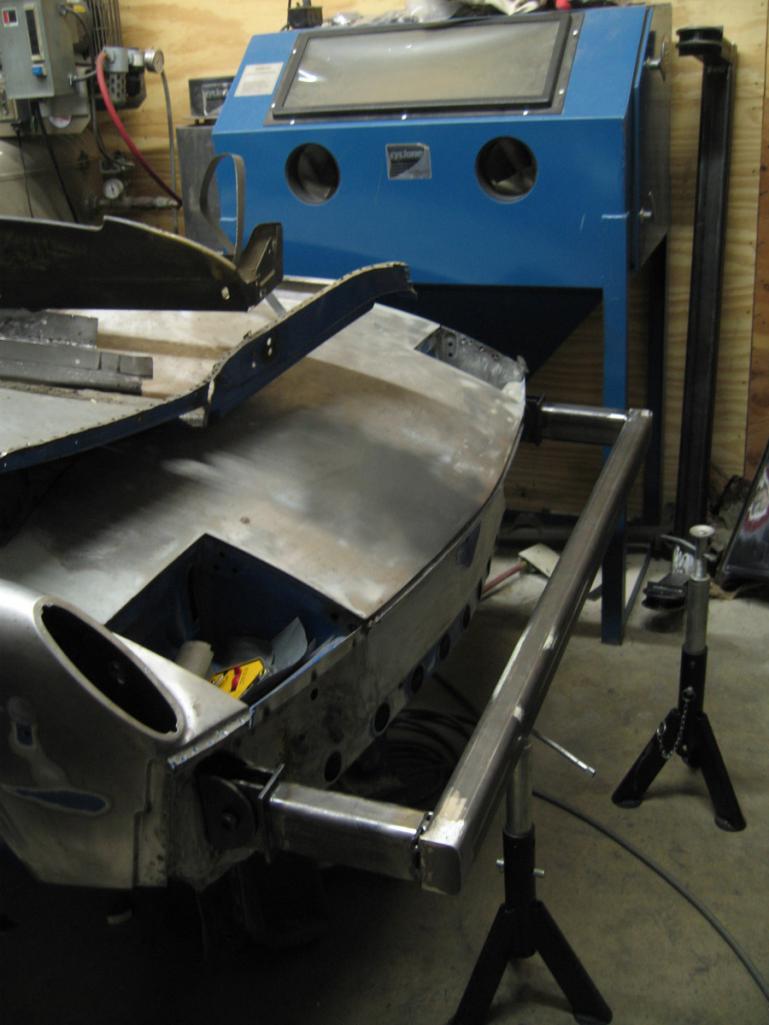
My little bandsaw has been busy. I was able to straighten out the tabs to get it to cut straight again. For a bit I was having to grind them straight, ever piece. I had to weld the vertical there and 1 of the horizontals, too as it is all remnants. With the car on the dolly, the adriatic jack stands have procreated. ... proud papa there in back. 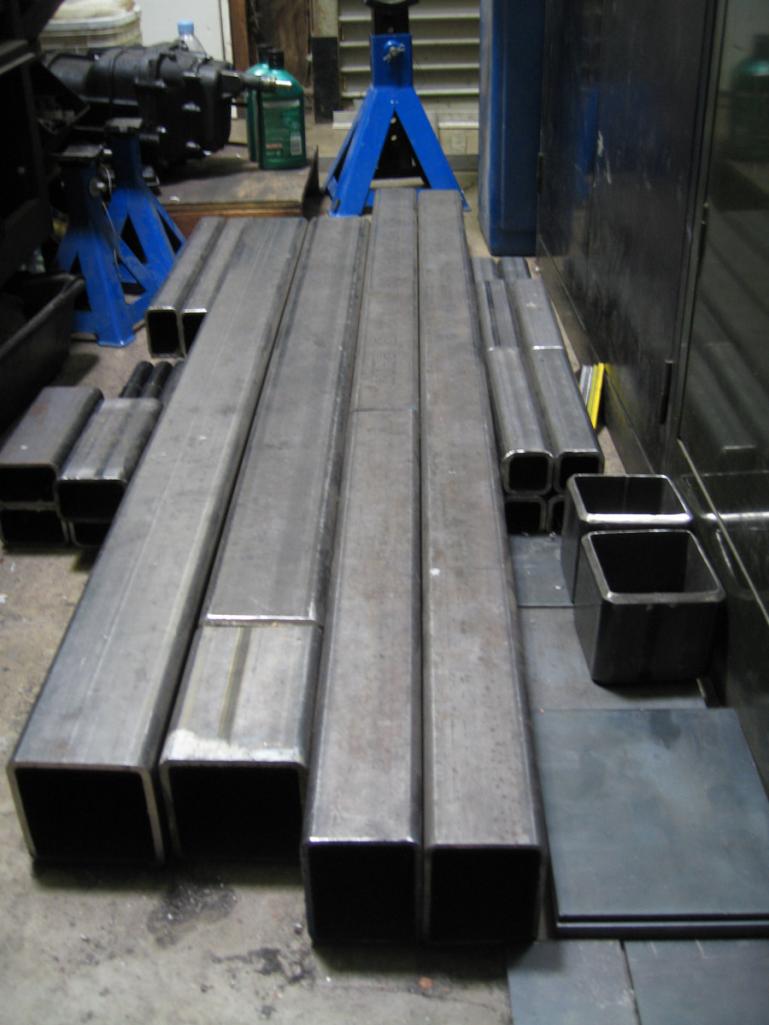
It is coming along, working on it this weekend, I will start attaching the span pivot leaves with spacers which I'll need to cut and then attach those to yokes directly.
I'm hoping that once the yokes, with the labor-intensive pivots are done, that the rest of the thing will go far more quickly .
Posted by: nathansnathan Oct 21 2012, 08:00 PM
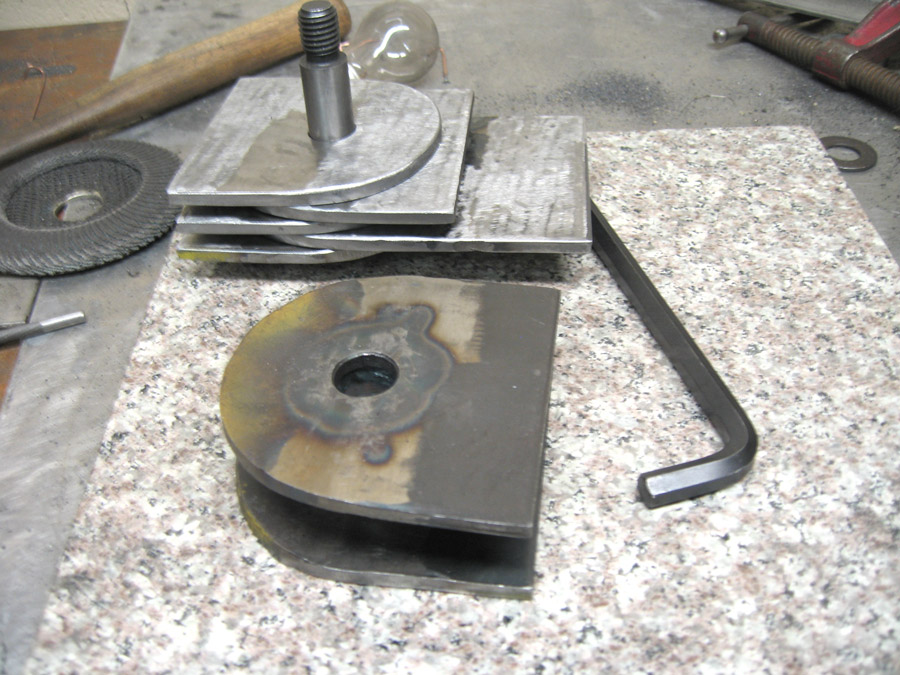
Updating where I'm at to give a better idea of the real thing 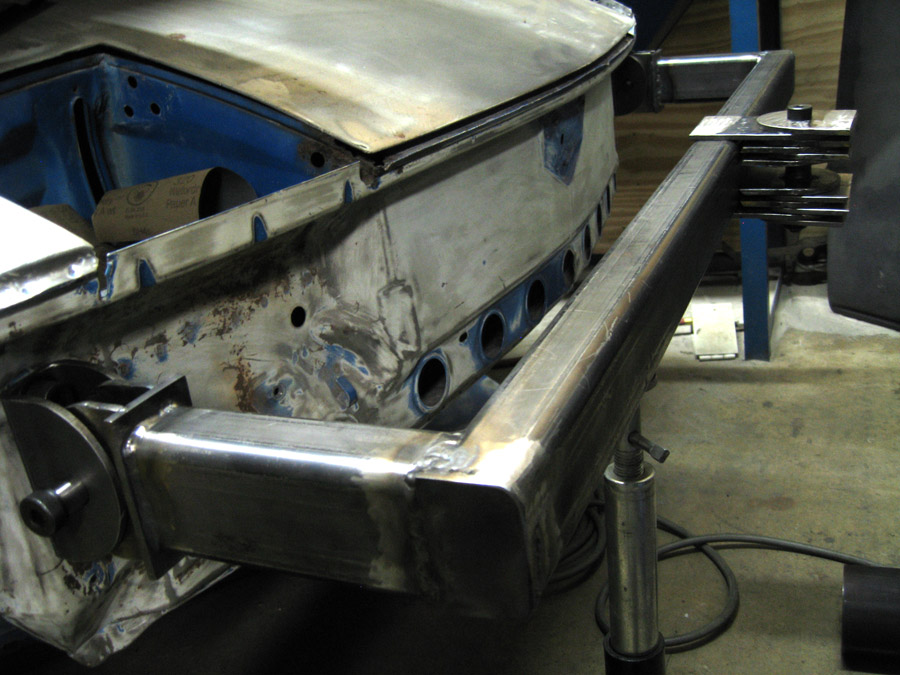
Posted by: dheming Oct 22 2012, 10:29 PM
Nice fat update, looking good. Personally I think I would have just paid someone to plasma cut all the leaves for the hinge points. More arc time for you though so it's all good. Bummer that the circles where a slightly different thickness than the flat stock.
Last time I went to ALCO they some nice fat aluminum plate drops. They had a 24" x 36" x 3/4" plate that would make a nice little welding table top. You need to upgrade from that shim stock you be using as a backer. I'll see if I can score you something from my work. 
I can't believe that grinder wheel is still doing it's thing! That mofo is 3 years old now. I love that giganto C-clamp in that pic too. Looks super useful.
Good thing you caught that that 10° mount thing before you fully welded everything up. Would have been a lot more work than just breaking some tacks apart if you had.
All those hinges look pretty sweet in that last pic. The culmination of hours of work cutting, grinding and welding must feel good to see put together for the first time.
Posted by: Archie Jan 12 2013, 02:47 AM
Picking up here, update the thread.
I met up with David again, I'd been thinking about the fresh air vents on his roller ever since I'd seen a week or 2 before getting the Mahles. I got some pics this time.
The car is pretty crusty at the longs and jack point is floating in the rocker, lower firewall is bad, and floors. She was well done, and so with the fresh air vents being very good compared to mine
Rather barbaric, I used a .40" cutting wheel on my 4 1/2 inch angle grinder.
I got the seam sealers all out with the heat gun and scraping screw driver, some rust in there but solid. I've started blasting and it's looking great.
Will get a picture of after blasting and how I'm gonna install later.
Yeah. That seam-sealer is a complete PITA to dig out, especially around the shoulder-height vents in the door jambs!
Posted by: nathansnathan Jan 12 2013, 10:08 AM
Yeah. That seam-sealer is a complete PITA to dig out, especially around the shoulder-height vents in the door jambs!
A heat gun and a big blunt screw driver gets it, but yeah it is a bear. Here is the other

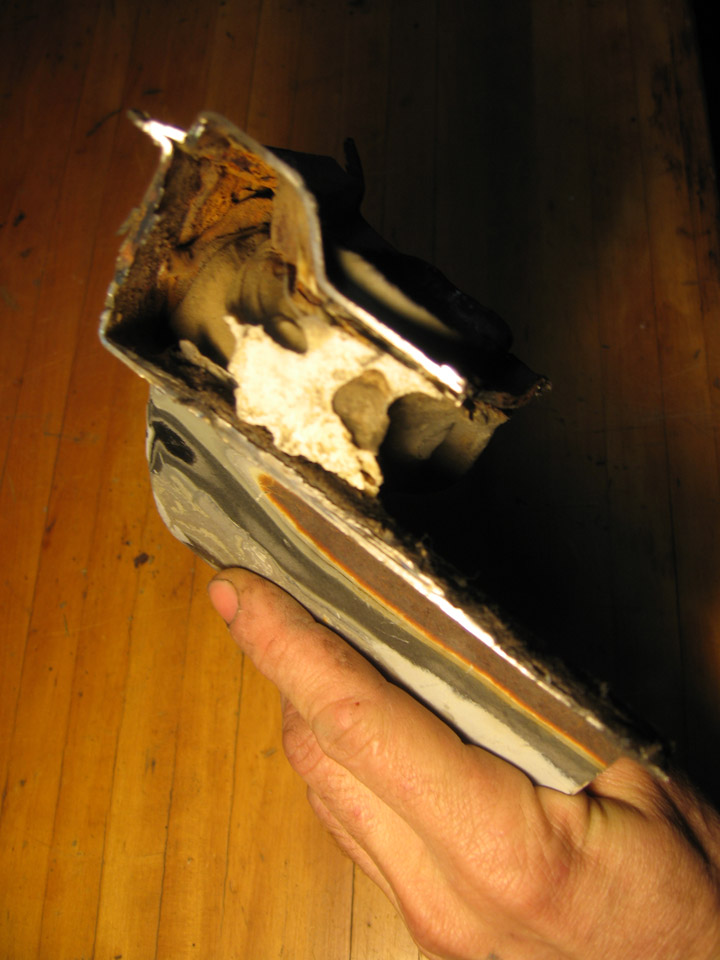
It is easier when it is cut out!
Posted by: nathansnathan Jan 12 2013, 10:18 AM
I've been eager to post a meaningful update, but .....
My welder has been out of commission since the last post which has been awhile. It is 2 1/2 years old, still under warrantee, brought it to the service place and they charge me $200 for points because they are consumables, not covered. I bring it back home, and it still won't work, like it would start but no amperage. I bring it back again and the guy looks at it right when I'm there, 2 seconds and he's like, "It's the capacitor". So another week or so to get the part from Miller, and I think it is working now. I haven't got to try it very long because I went on vacation to Guelph, Ontario for a week, then ran out of gas right before New Year's and no one was open. I finally have a tank and am ready to get started again.
I should post pics of the lights I am building for the paint booth. A little OT but, they are the best strip lights ever!
Posted by: dheming Jan 15 2013, 04:47 AM
Bummer about the welder still having problems. I remember when my machine was down for a month straight because no one had a gas hose locally.. My shop came to a standstill.
I'm looking forward to seeing the light fixtures. 100% stainless construction is not something you see everyday. How's the new welding table coming along?
I've been eager to post a meaningful update, but .....
My welder has been out of commission since the last post which has been awhile. It is 2 1/2 years old, still under warrantee, brought it to the service place and they charge me $200 for points because they are consumables, not covered. I bring it back home, and it still won't work, like it would start but no amperage. I bring it back again and the guy looks at it right when I'm there, 2 seconds and he's like, "It's the capacitor". So another week or so to get the part from Miller, and I think it is working now. I haven't got to try it very long because I went on vacation to Guelph, Ontario for a week, then ran out of gas right before New Year's and no one was open. I finally have a tank and am ready to get started again.
I should post pics of the lights I am building for the paint booth. A little OT but, they are the best strip lights ever!
Posted by: nathansnathan Feb 12 2013, 12:17 AM
Bummer about the welder still having problems. I remember when my machine was down for a month straight because no one had a gas hose locally.. My shop came to a standstill.
I'm looking forward to seeing the light fixtures. 100% stainless construction is not something you see everyday. How's the new welding table coming along?
I've just been using the welding table on top of my work bench, raised on sections of 2x6. The treadle stand was not up to the task, and I'm going to have to look for another option for a base.
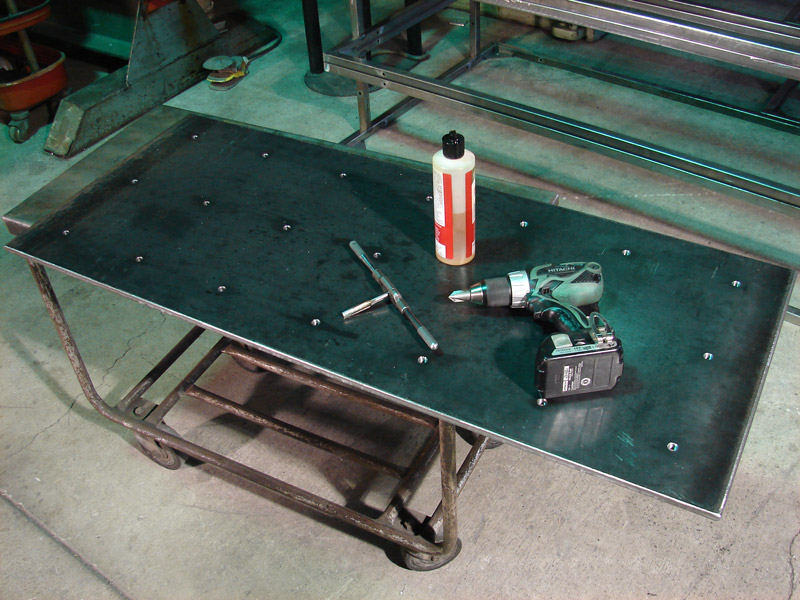
Derek at work on the table...
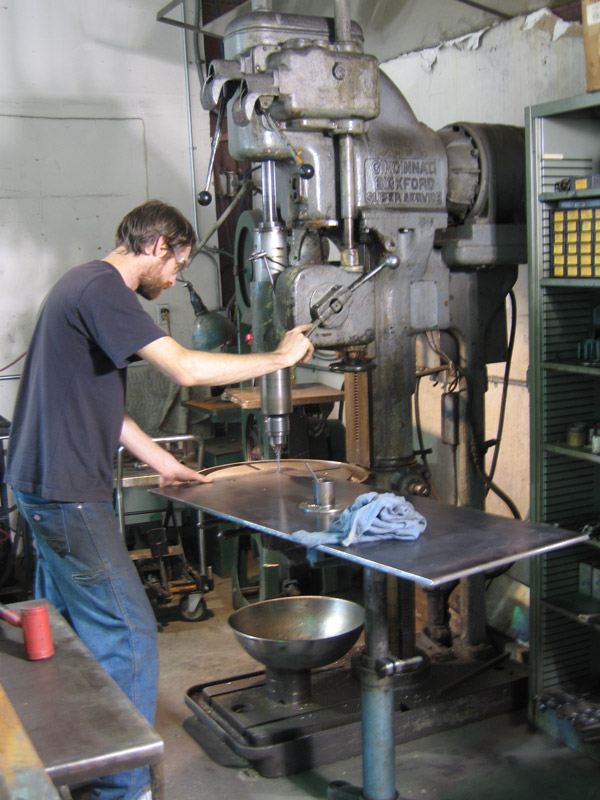
I've been working on the paint booth setup to get this handled. Lights are part of that set up. The complete picture involves a lot of fans, another palette rack and floor section, the rotisserie completed, and plywood enclosure for the booth.
Lights are coming along. I've got 2, almost 3 done. I was going to make 2 4 footers, but it turns out that I was misguided and they don't make single pin instant start 4' t8 bulbs. -for some reason I thought I had found the ballasts, but they aren't what I thought.
I will figure something out. 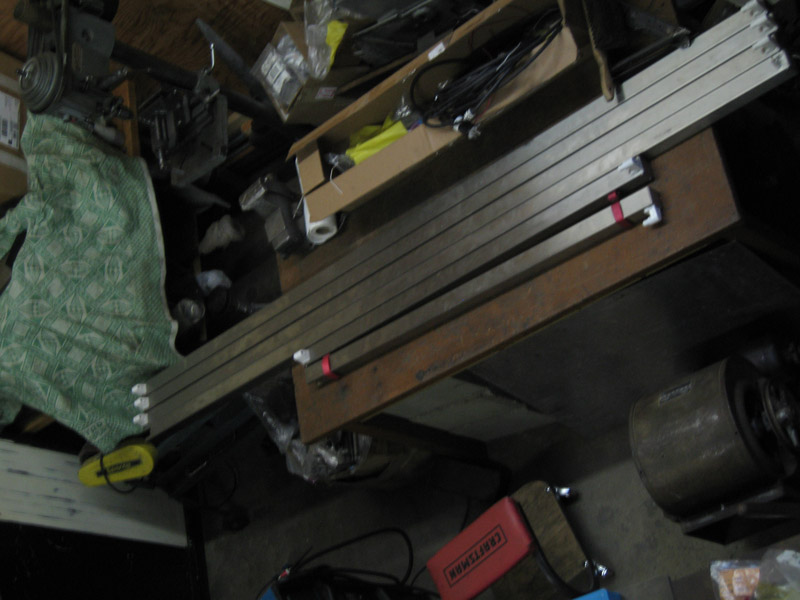
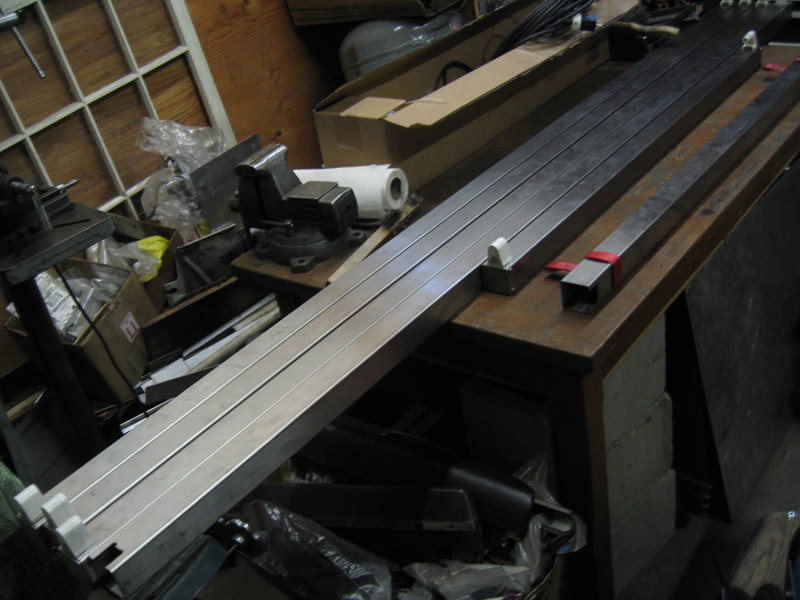
I sewed the nylon supports from pieces cut off a nylon tie down strap. I need to weld that one where I goofed with the mill to do the 4th still.
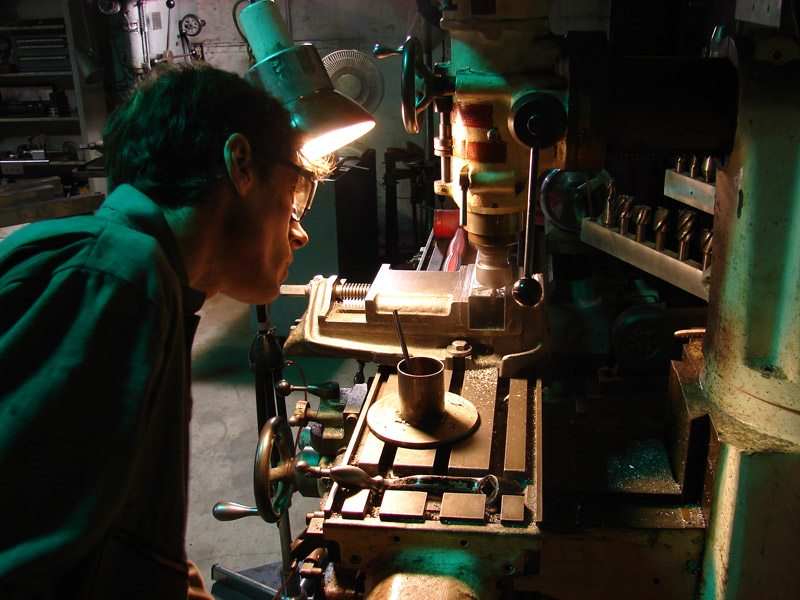
Mounting the ballasts inside with aluminum rivnuts.
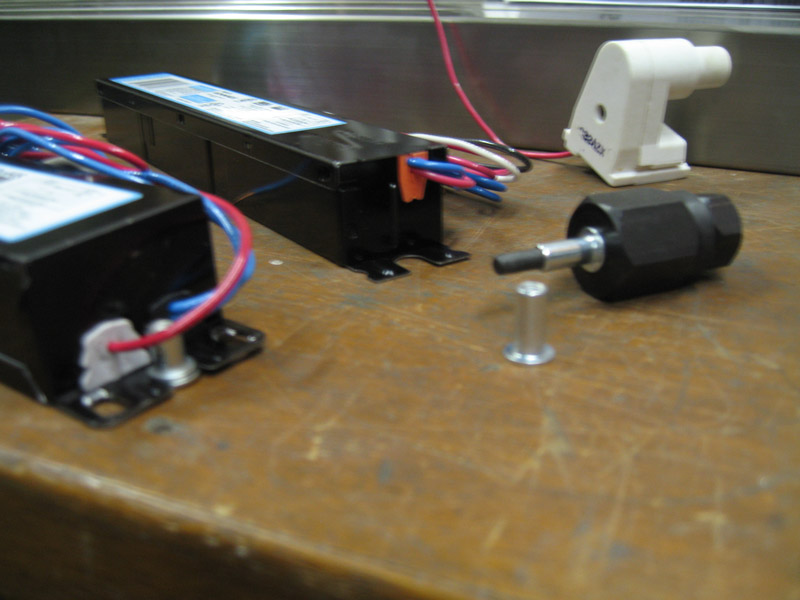
Aluminum cord strain relief, use npt thread. Stainless torx drive 10-24. Pics were blurry of the stainless square nuts I welded to the inside - quite a challenge to make the end caps.
While the welder was down, I moved the loft to the other side, to turn it into part of a paint booth. It will have to be twice as big, though to fit the rotisserie. It's great to be able to see the 914 again though. A few weeks it sat in the dark.
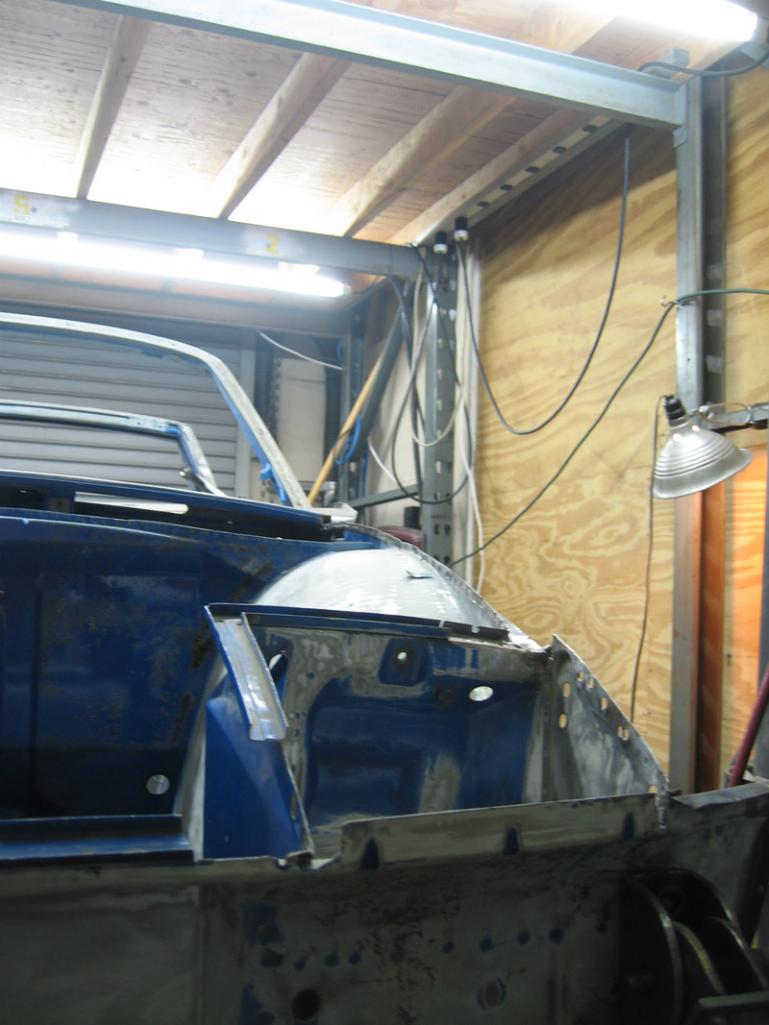
Just cleaning parts and fondling my wiring harness during that time, rubbing its brittle ends with glycerin, brass wire brushing the connector ends which are quite oxidized, I've been putting dielectric grease on them. The hot ones, I've redone the cracked off heat shrink at the ends. It turns out half the front of the harness the wires were all melted together. The driver side front side marker, parking light, and turn signal had no insulation at all, burned up. Missing the rear license plate light wires... I was able to replace it all using parts of the impressively screwed up harness from the black car. It is coming along, got to give it more going through.
I been working on the driver side fresh air duct since the lights have been up. Hopefully I will post pics of that soon. I made an impressive hole in the car there today.
Posted by: Archie Feb 12 2013, 04:28 AM
Picking up here, update the thread.
I met up with David again, I'd been thinking about the fresh air vents on his roller ever since I'd seen a week or 2 before getting the Mahles. I got some pics this time.
The car is pretty crusty at the longs and jack point is floating in the rocker, lower firewall is bad, and floors. She was well done, and so with the fresh air vents being very good compared to mine
Rather barbaric, I used a .40" cutting wheel on my 4 1/2 inch angle grinder.
Yeah. I got a crusty jamb vent on the driver's side. Looks like you're getting there though!
I got the seam sealers all out with the heat gun and scraping screw driver, some rust in there but solid. I've started blasting and it's looking great.
Will get a picture of after blasting and how I'm gonna install later.
Yeah. That seam-sealer is a complete PITA to dig out, especially around the shoulder-height vents in the door jambs!
Posted by: porsche_dreamer May 14 2013, 07:23 PM
3 months and no updates?
Posted by: nathansnathan Jun 11 2013, 10:19 PM
3 months and no updates?
Man, I did not even see this. I wasn't subscribed anymore.
Posted by: nathansnathan Jun 11 2013, 10:38 PM
Well, I decided to take on a 'little thing' in the meantime, the driver fresh air inlet.
I got the seam sealer out.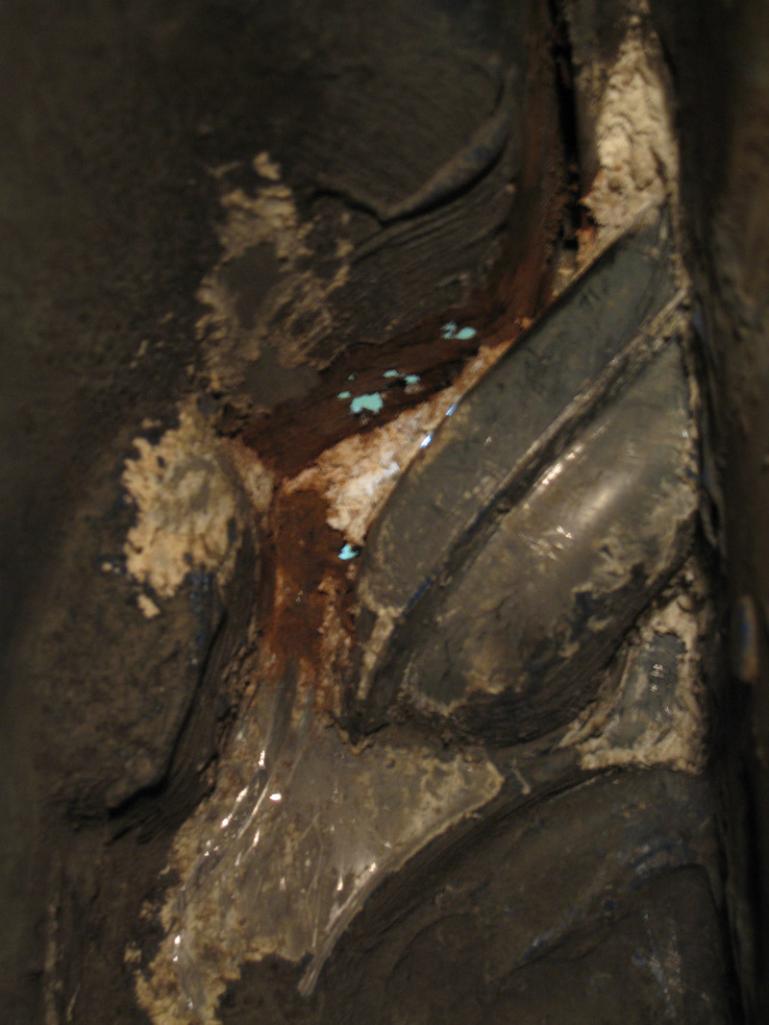
I had wondered how bad it was really.
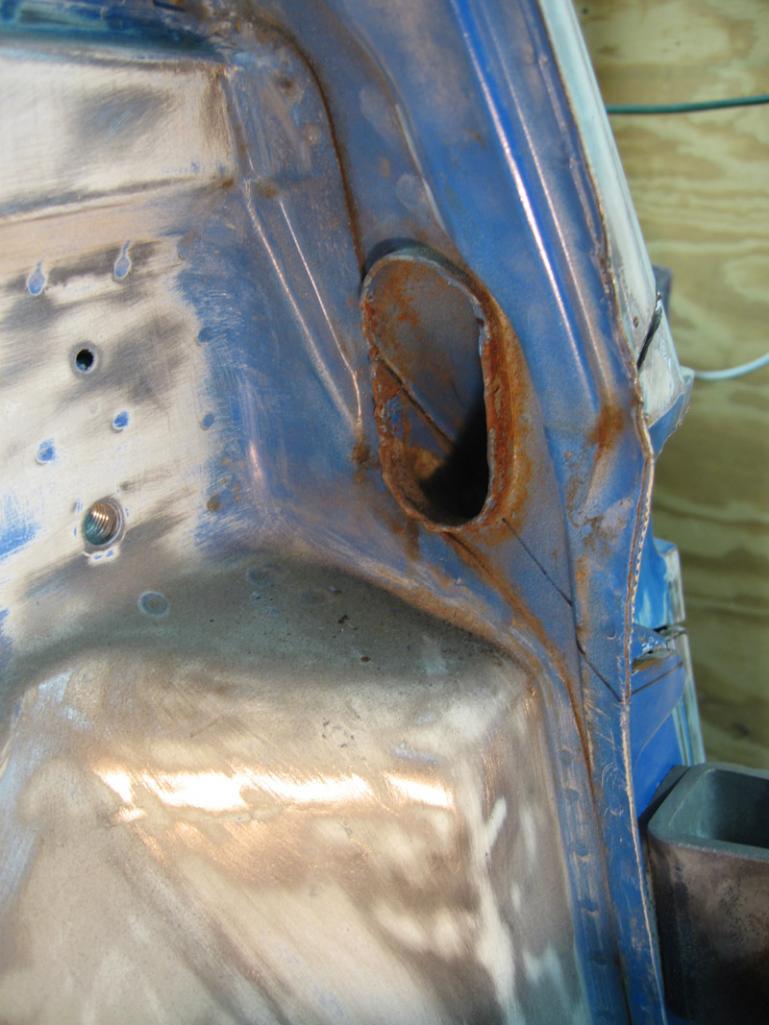
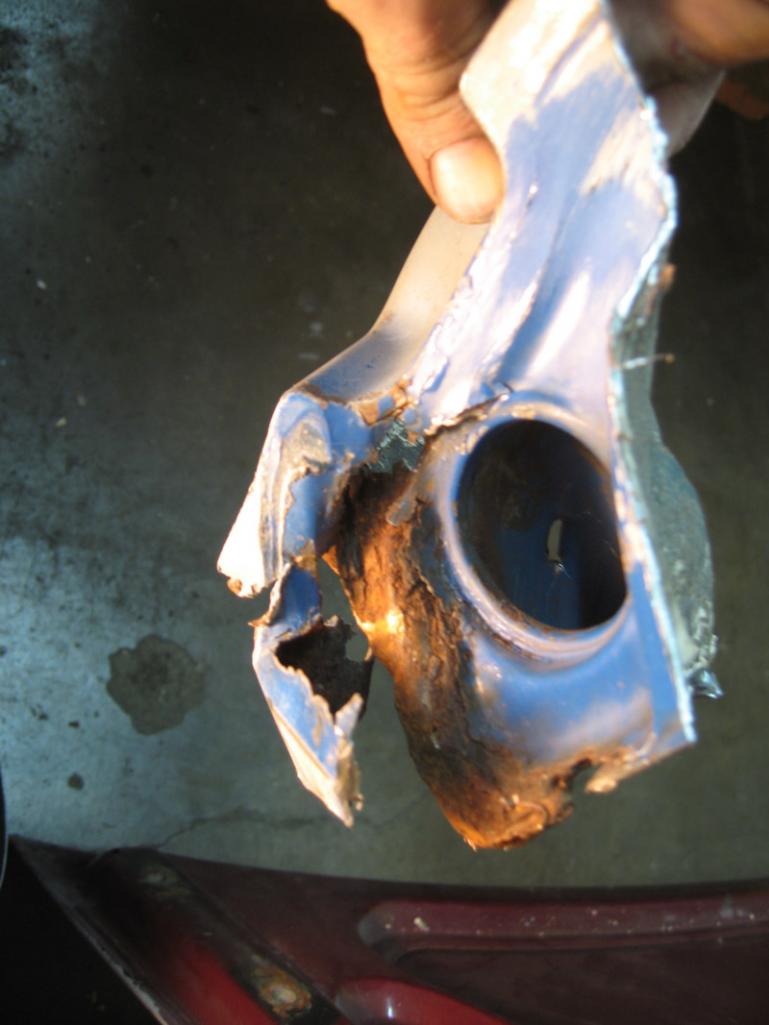
The new piece to go in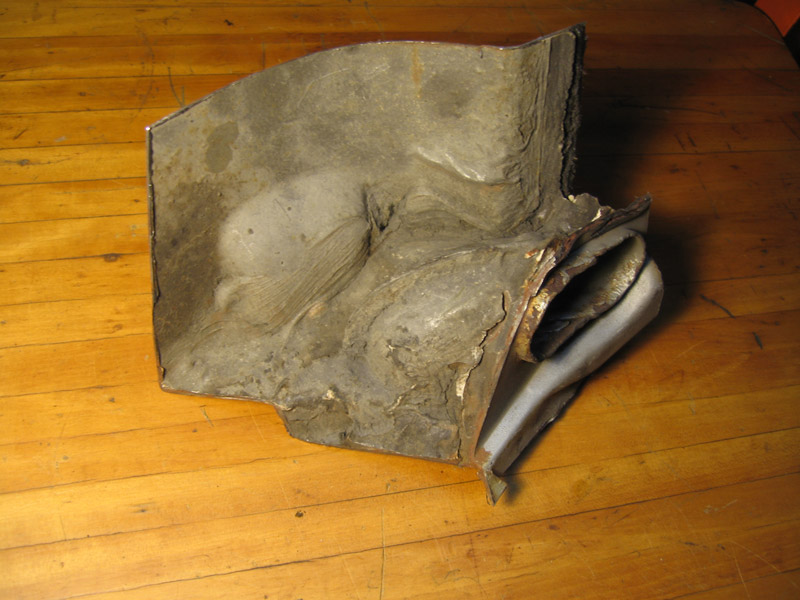
I had damaged it cutting it out, but easy to fix. Cleaned. 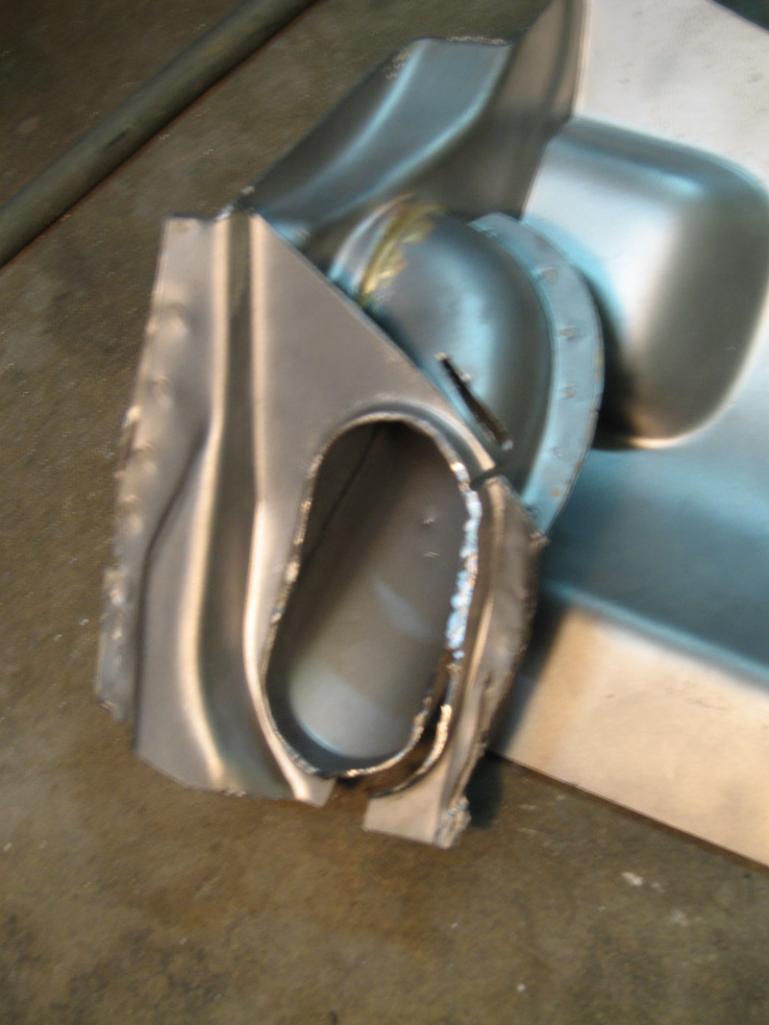
It is hard to get the ready-to-go-in shot because the shiny metal reflects and autofocus won't work.
New piece in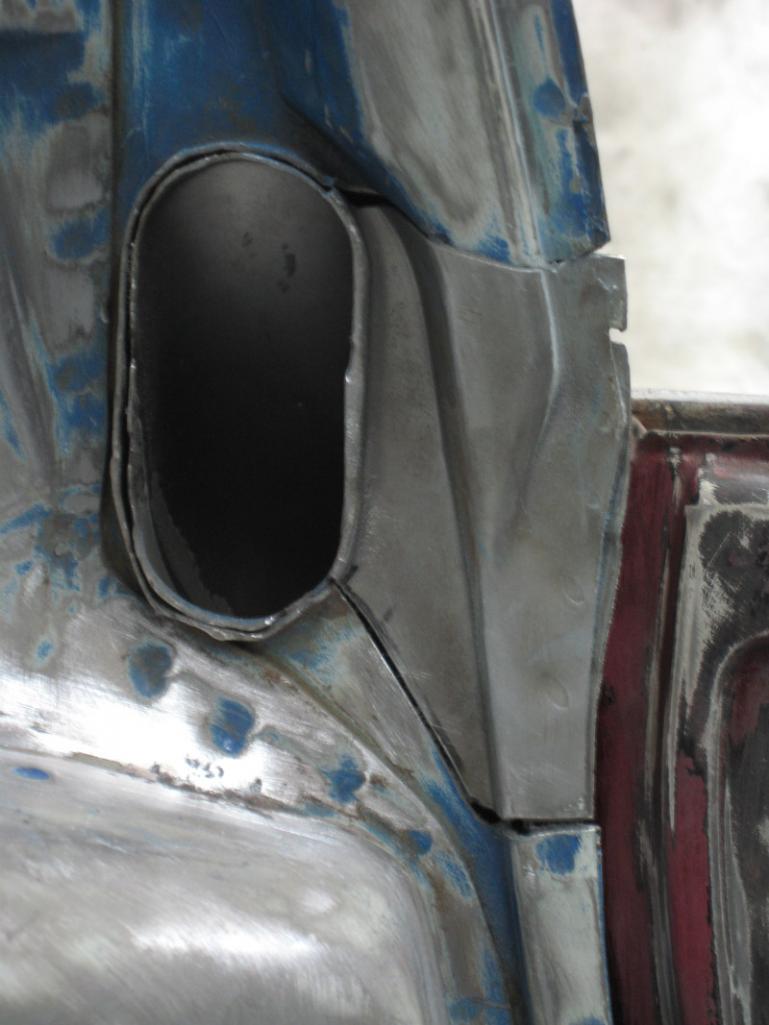
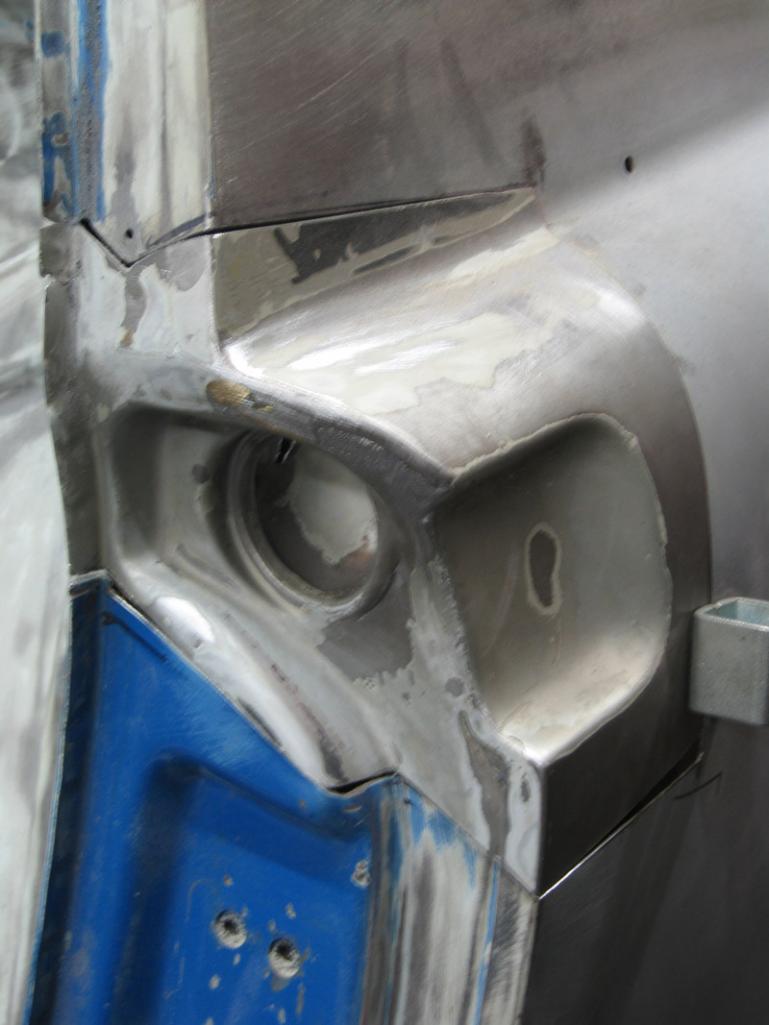
I have the car back on jack stands (off the dolly). But, besides the 2 flat-tops, they are all leveling jack stands. I've got the car leveled using a machinists level, supported by 4 pairs. - thats 2 at the firewall, 2 by the front firewall, 2 at the front and 2 at the rear trunk area. There are also some random additional stands positioning the firewall and floor for fitting purposes. I have the driver side braces removed from the door to make sure gap is right and for fitting the air inlet piece.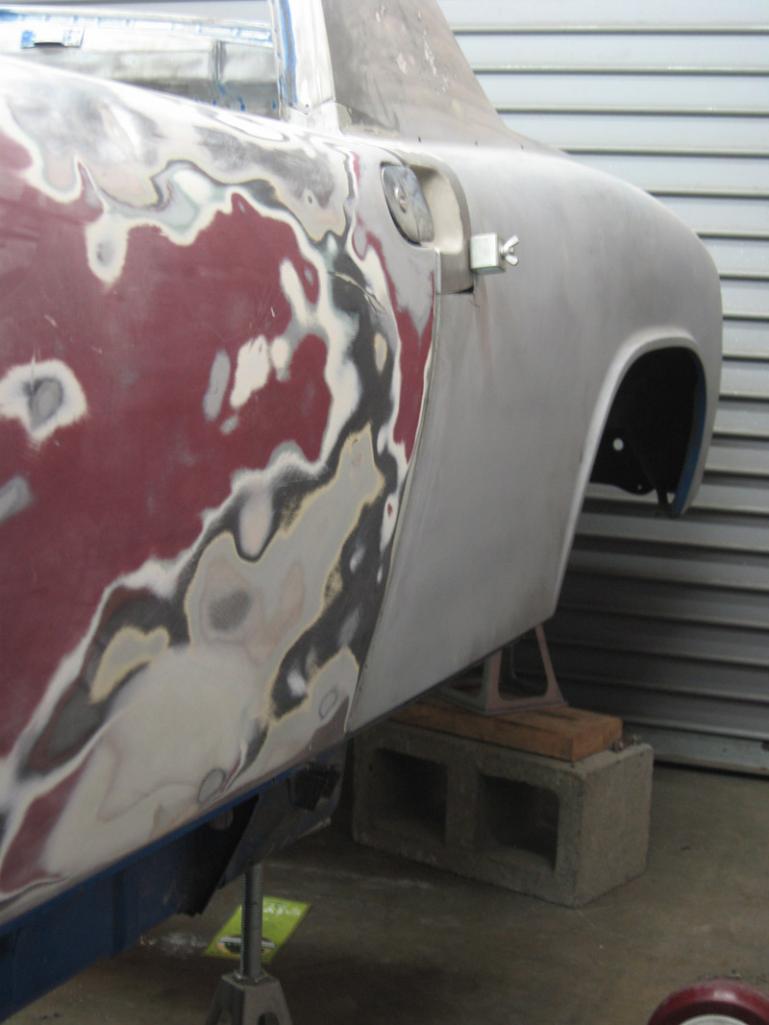
So far it is just fit up, not welded in....still wondering about this pitting.... I may get the spot blaster going on it and see what is under the white stuff.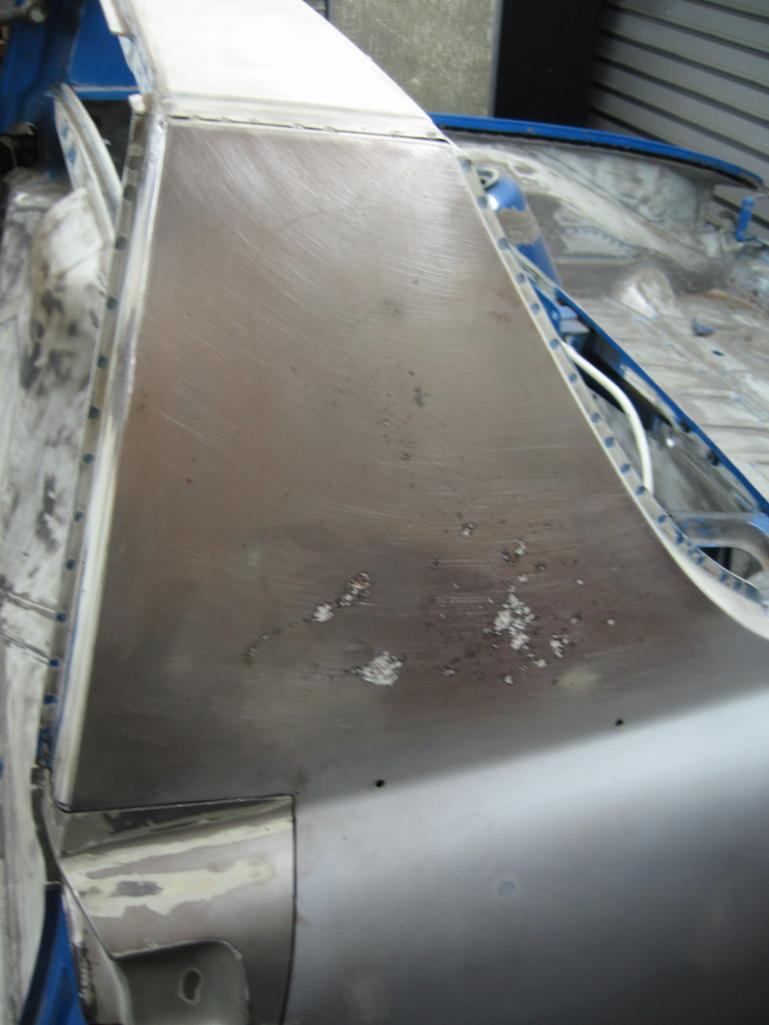
Posted by: nathansnathan Jun 11 2013, 11:06 PM
I have spent a lot of time on the rotisserie. This is my current drawing;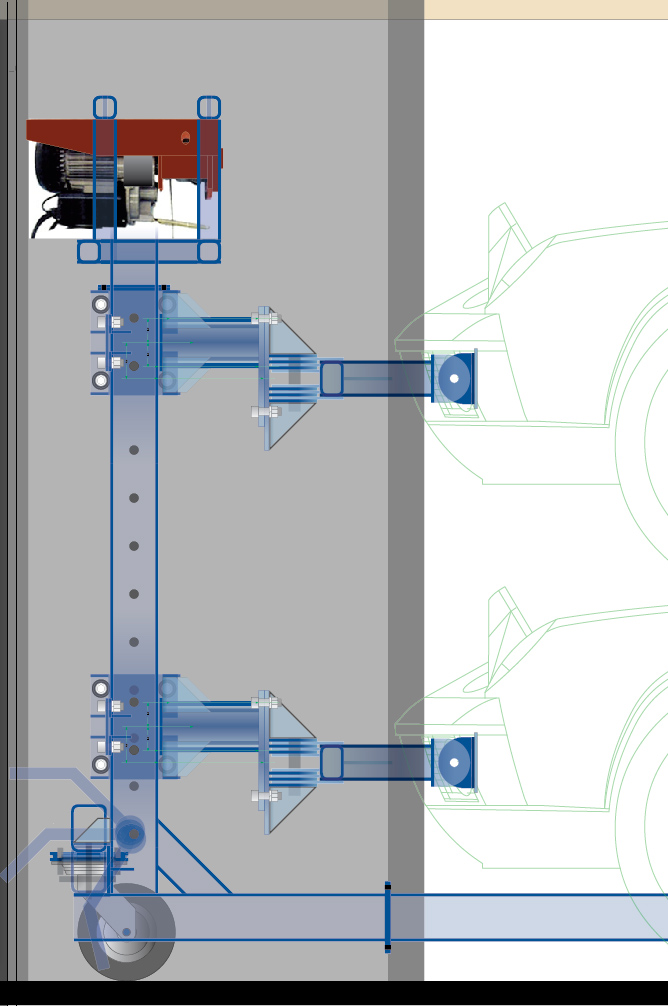
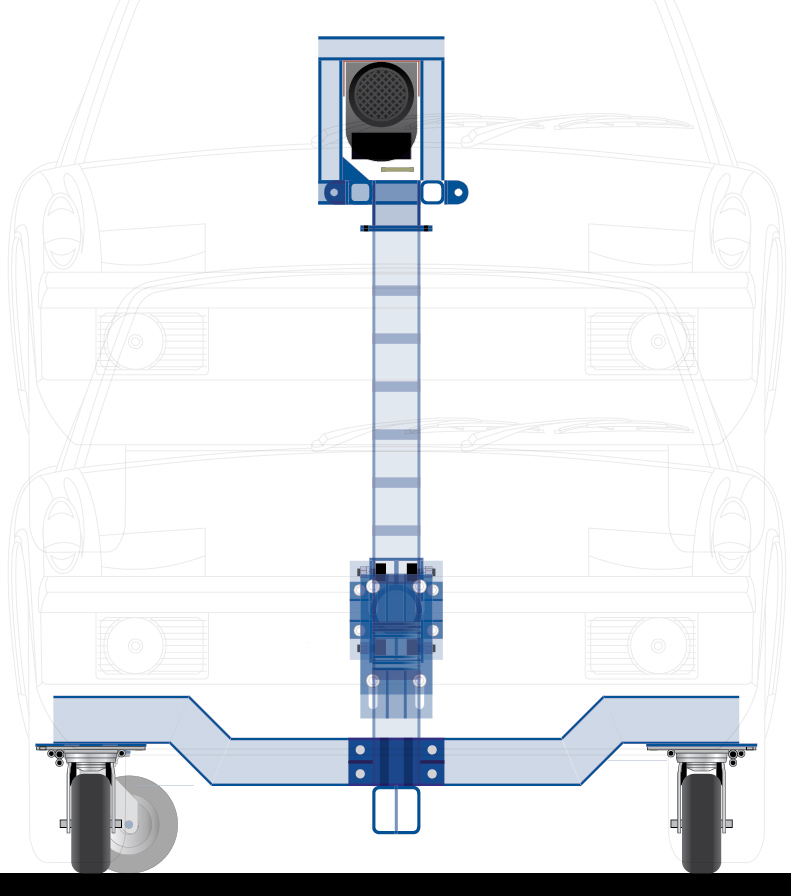
I have added adjustment for the center of gravity of the body. According to McMark, it is about an inch below the 'lip' in the front and rear. This is about 3 inches up from the line that goes through the center of the bumper mount holes. So the pivot is offset 3 inches from the beam and there is adjustability of 2 inches up and down for fine tuning. I am going up to visit Derek in Oakland, to make use of the mill at his work to form the slots.
C-notched -root pass here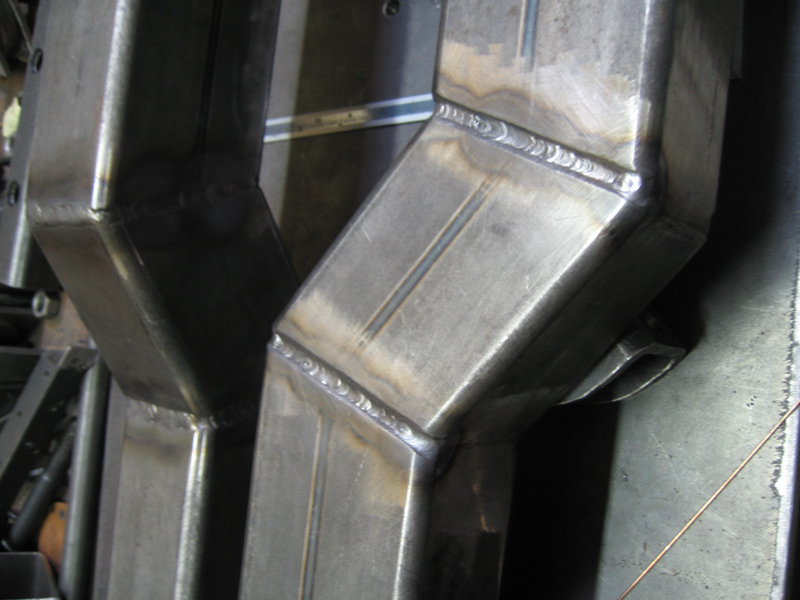
Through pipes welded in. I turned these on the lathe, .770+/-.005 inch ID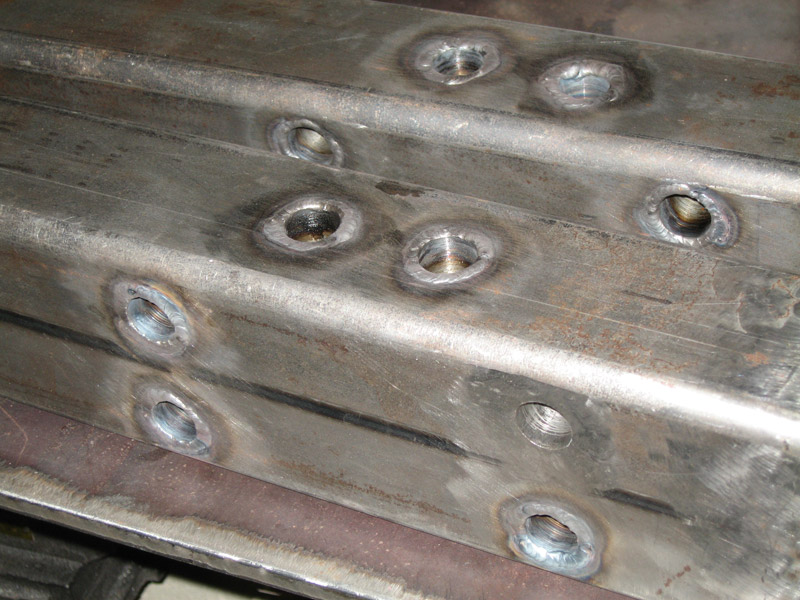
I am trying to finish the support beams smooth, with grinding wheel flush and flap disk smooth. Currently out of disks.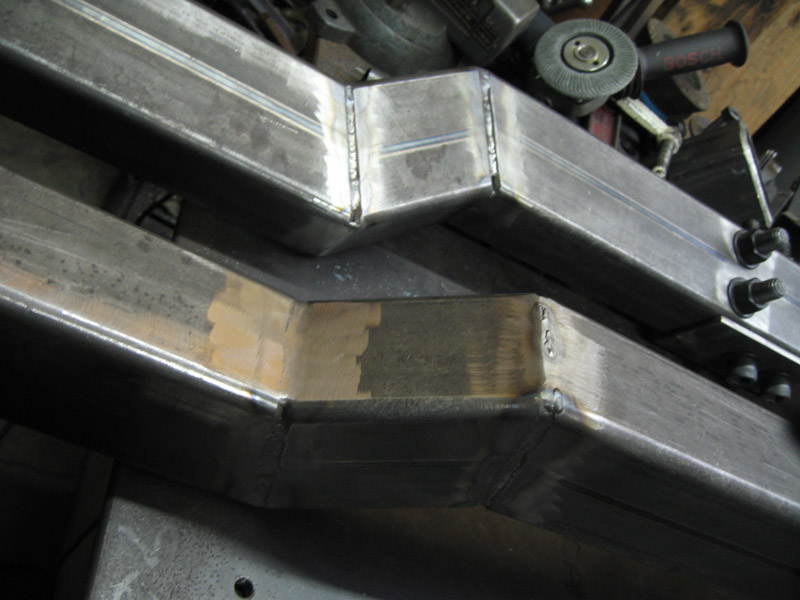
Caps fusion welded, and caster plates welded with just the root pass so far.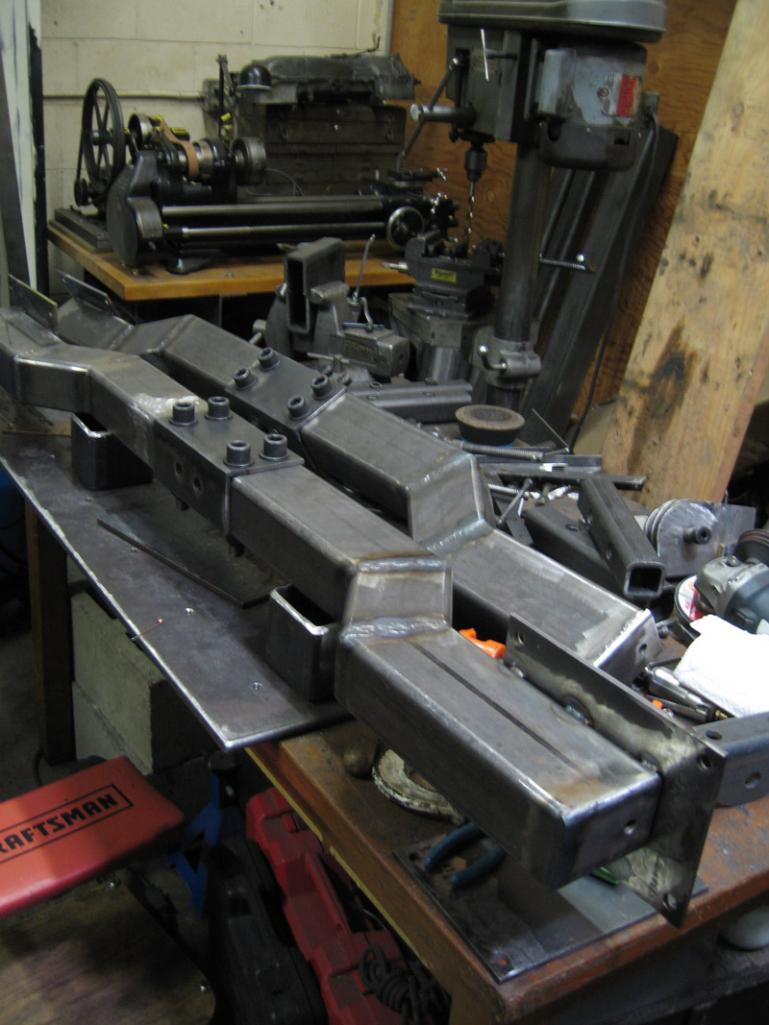
Working on the cable hoist mounts, my "cages".
Mocked up and part tacked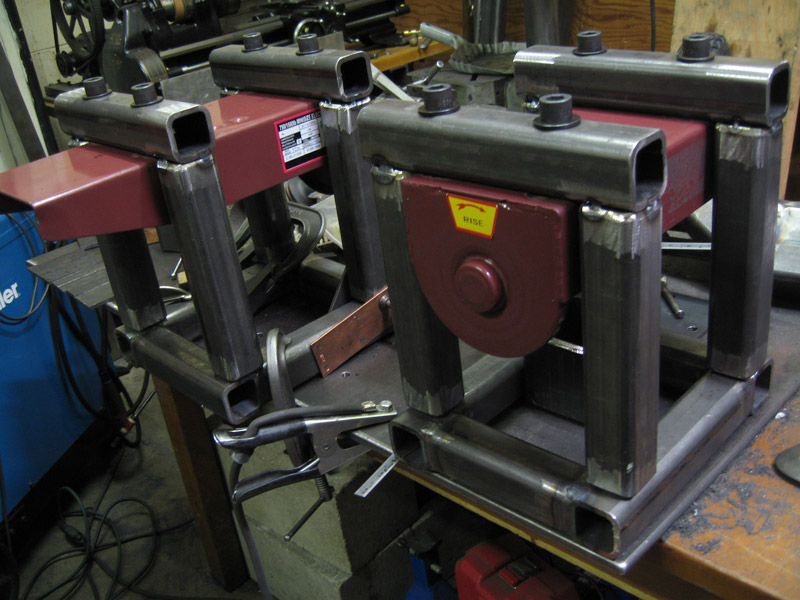
The cut material. Welding the through tubes there. Bevel-ground and mill scale sanded. 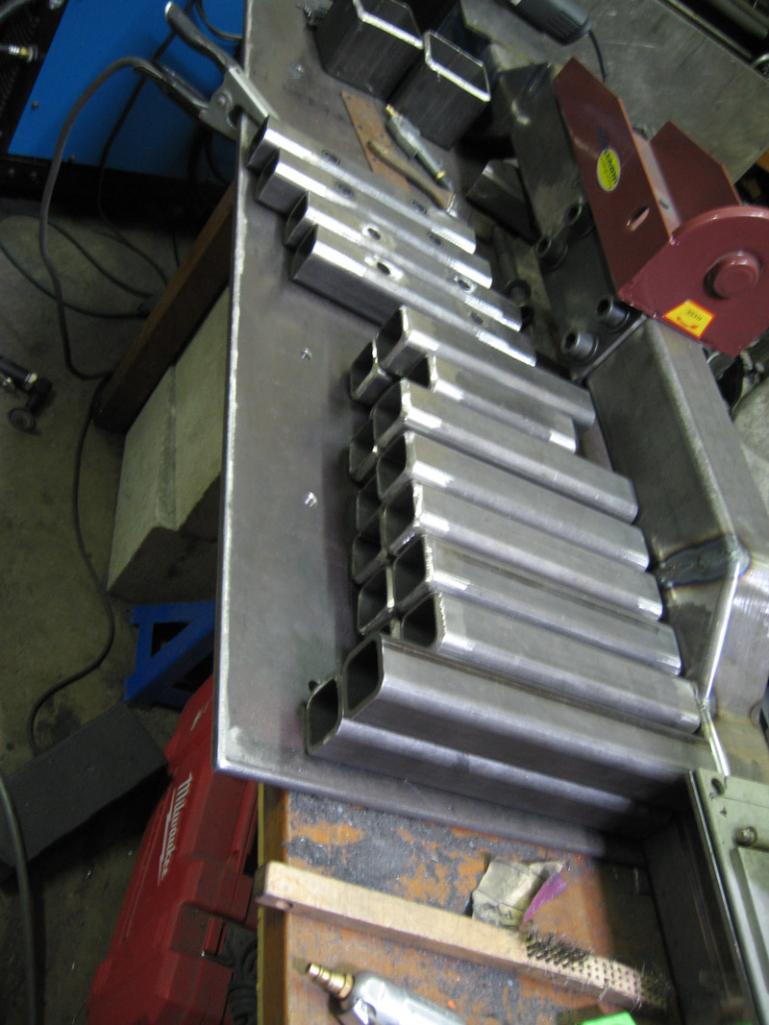
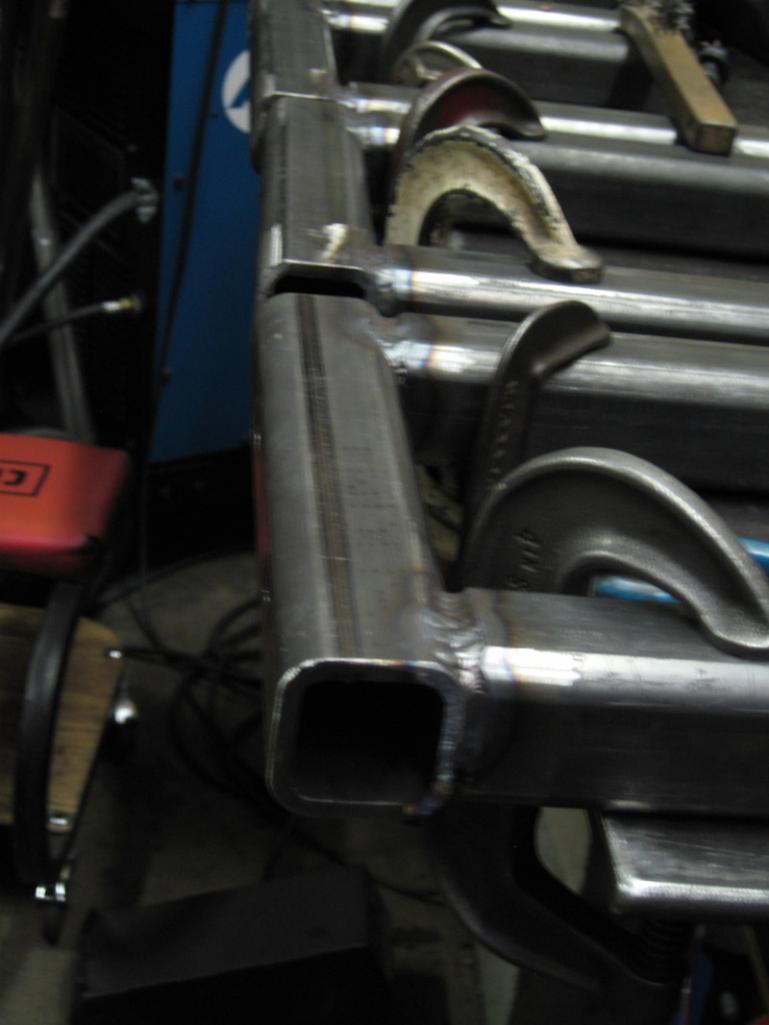
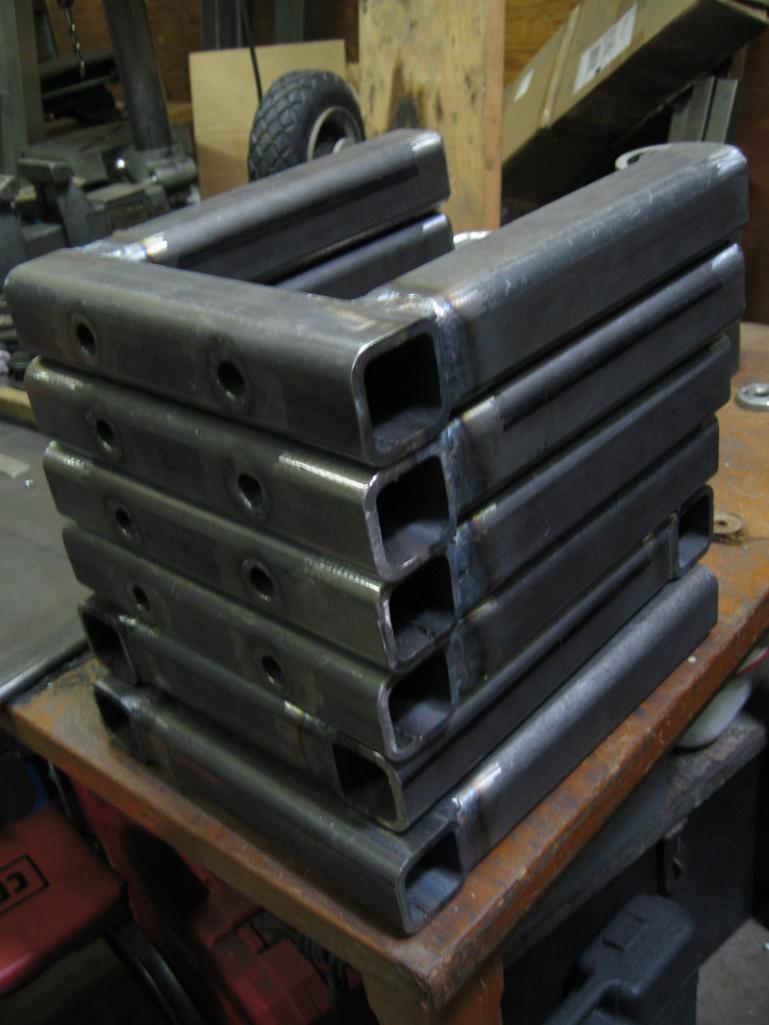
The stands tacked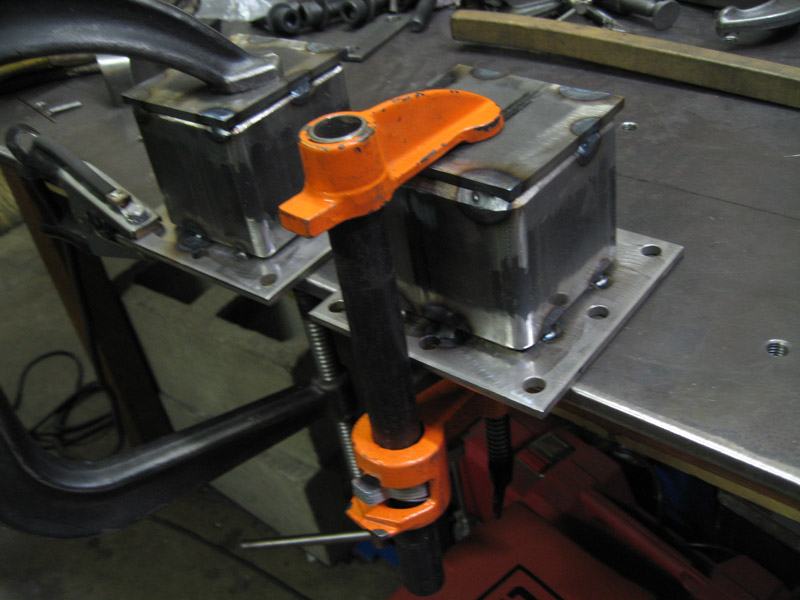
Enlarged the 7/16 nut-serts in the mounting plates
to 5/8 square weld nuts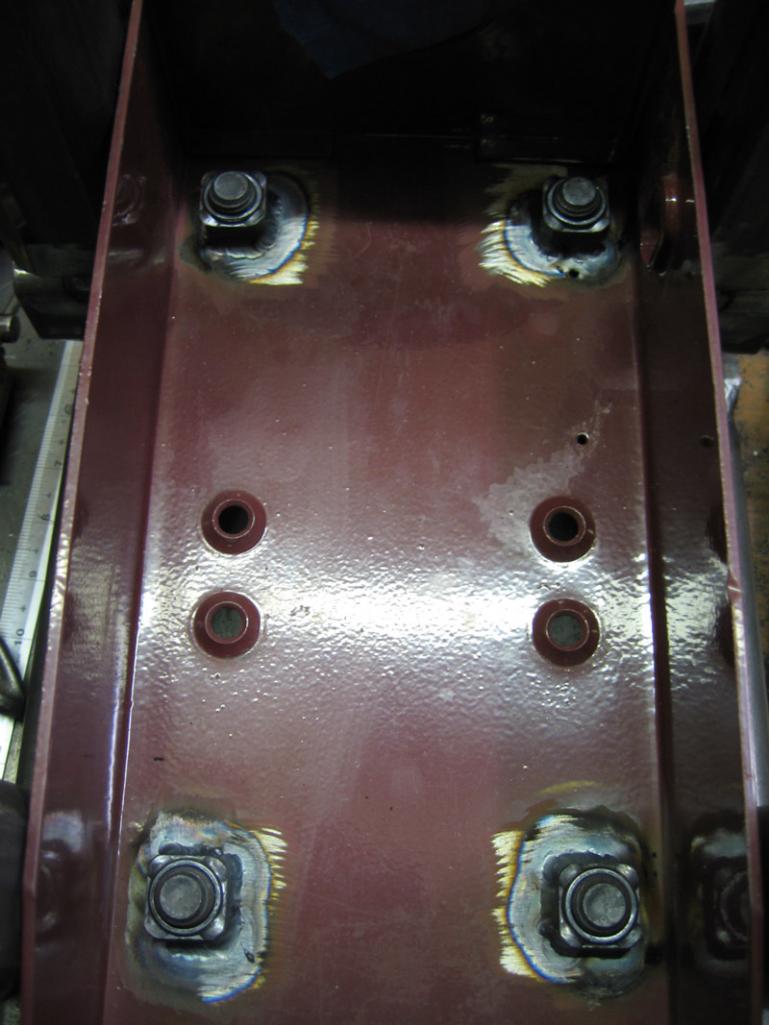
and now out of argon
I need to do the sliders to do the verticals (holes, tubes, diagonals, flanges). coming along, I guess.
Attached image(s)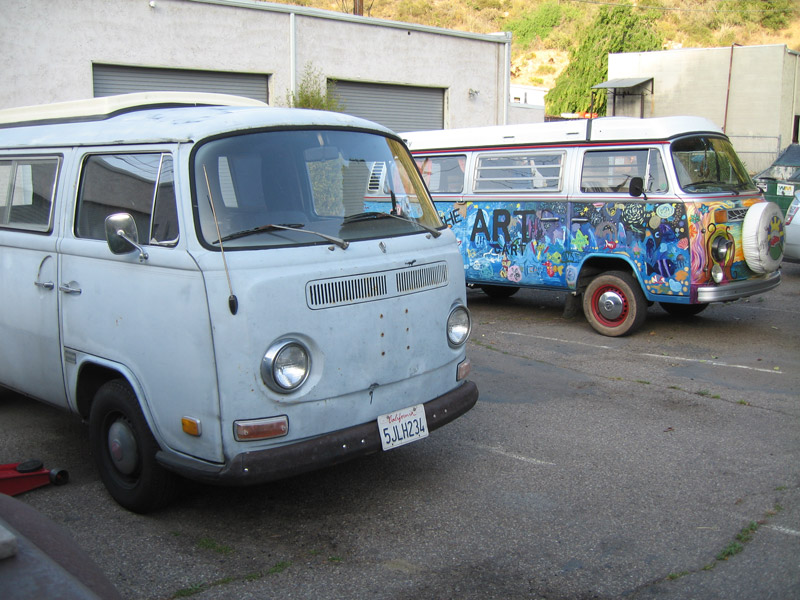
Posted by: nathansnathan Jun 20 2013, 07:26 PM
I had the tires unmounted from the wheels. They were all shot and mismatched, etc. I had 4 from the parts car. I kept the parts car's spare mounted, an unused 165 series Continental that is so vintage looking, I want to hang it on my wall. 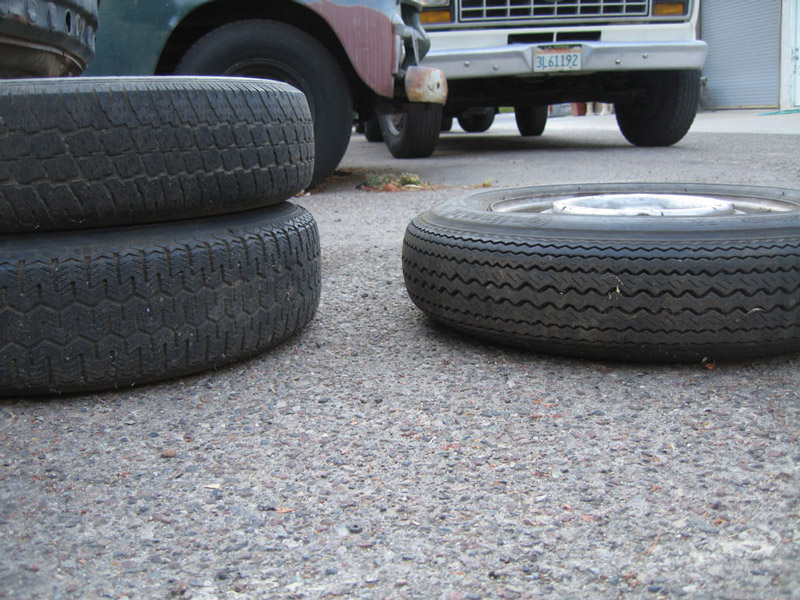
I sort of expected them all to be the same... 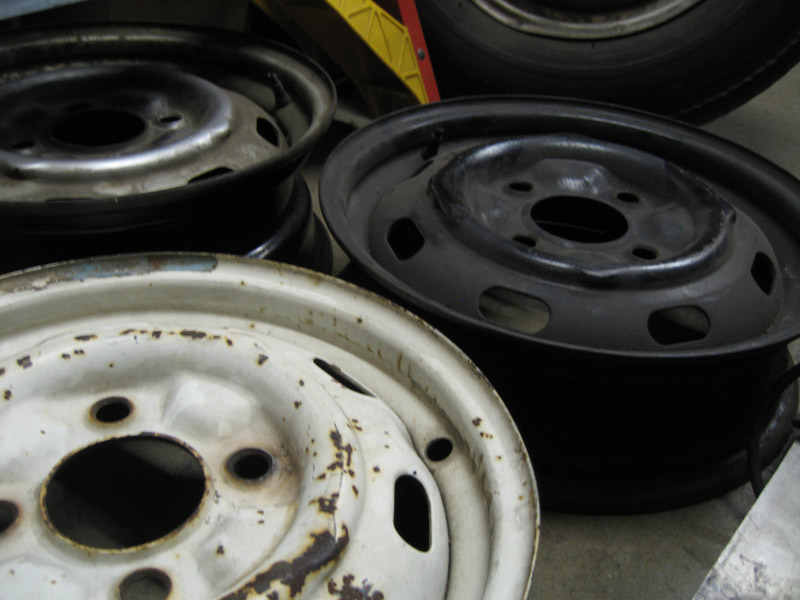
Lip to lip, they measure; the white one is 5 inches , the black is 5 1/2, and the silver is 6 3/4 inches lip to lip. I have a rust-colored that matches the white as well. I'm not sure what the spare is. It's hard to tell with the tire on. It has a sizable dent in the lip even if it wasn't serving as such great art.
So I know I had posted pics of the mahles before, and I always wanted a 914 with 'baby gasburners' (even though I used to think they were just gasburners- didn't know about 5 lug) but......I am really wanting to have silver steelies.... with 165's on them.
I know that I will never have car of the month with 165's and no one will want to be my friend here.
Unfortunately I traded the wheels that were on the blue car to Dave to keep the parts car he had rolling, so I don't have the original wheels.... I will try to get in touch with him, beach914.
The book says standard wheels are 4 1/2" and the optional steelie is 5 1/2. Where are they measuring that from? I am trying to figure out what I have here. Thinking I want the thinnest ones. Would an appearance group car automatically have had the 5 1/2's? I had thought those were pretty uncommon... but shows what I know with my 6 3/4's.
Posted by: nathansnathan Sep 10 2013, 10:43 PM
It's been awhile since I've updated. My camera had got broken, but I have been at it. 
![yellowsleep[1].gif](style_emoticons/default/yellowsleep[1].gif)
Where the inner long meets the front wheel well is mig welded and it's easier to cut out than grind the welds in place. 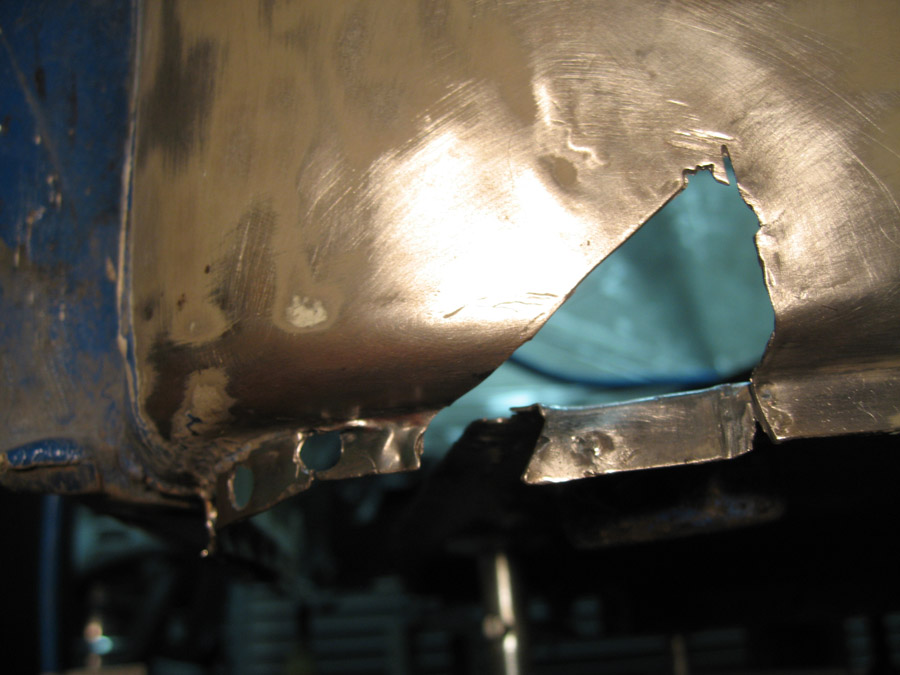
Inside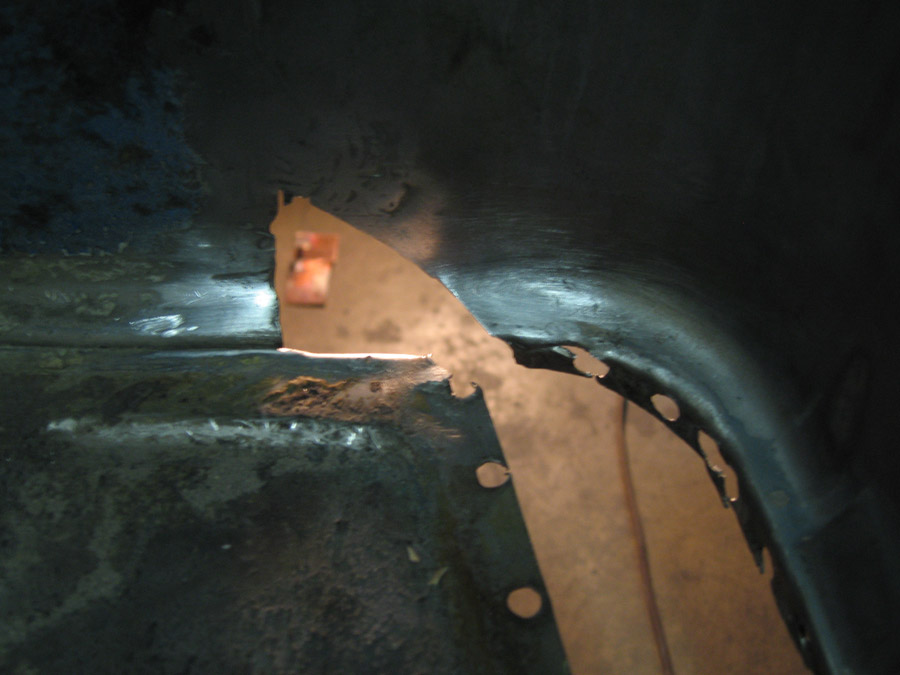
I filled and ground the holes left from drilling the spot welds, the original piece removed from the long.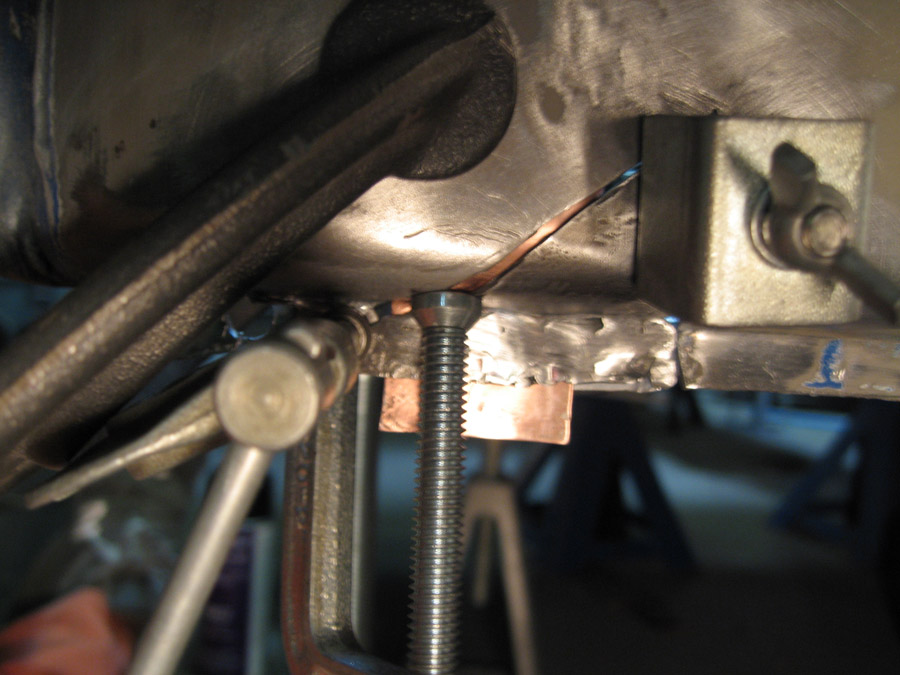
I have a thumb wheel for my tig torch. It is tricky to lie on your back.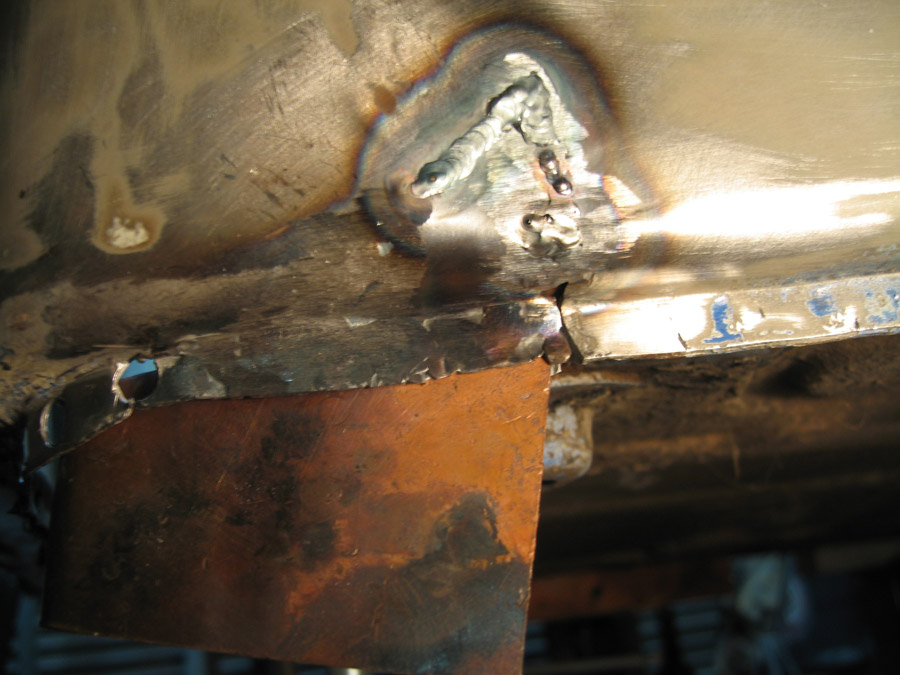
Grinding and sanding. I may fix the bottom better....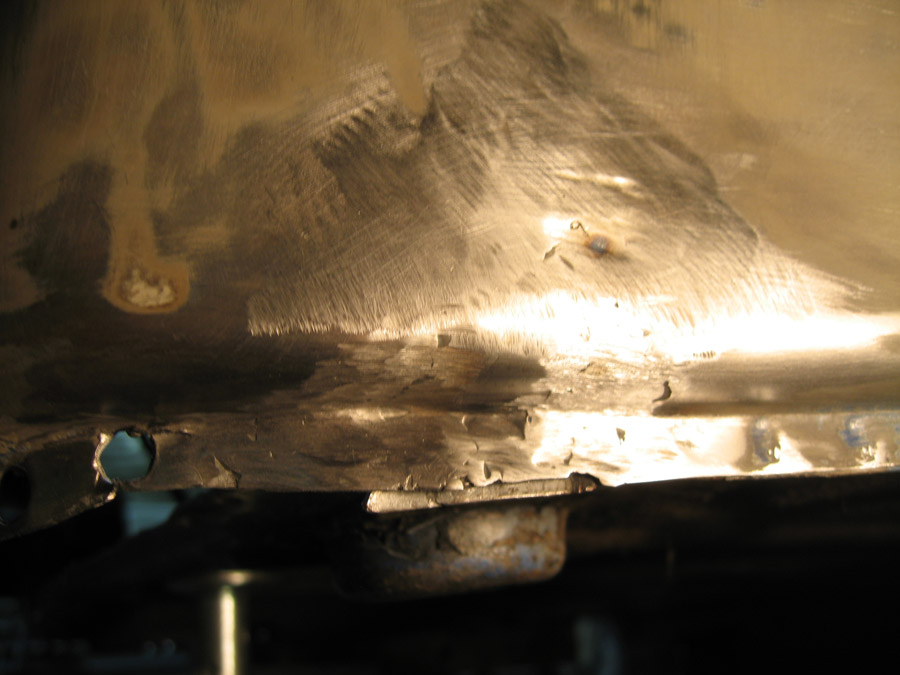
Inside again.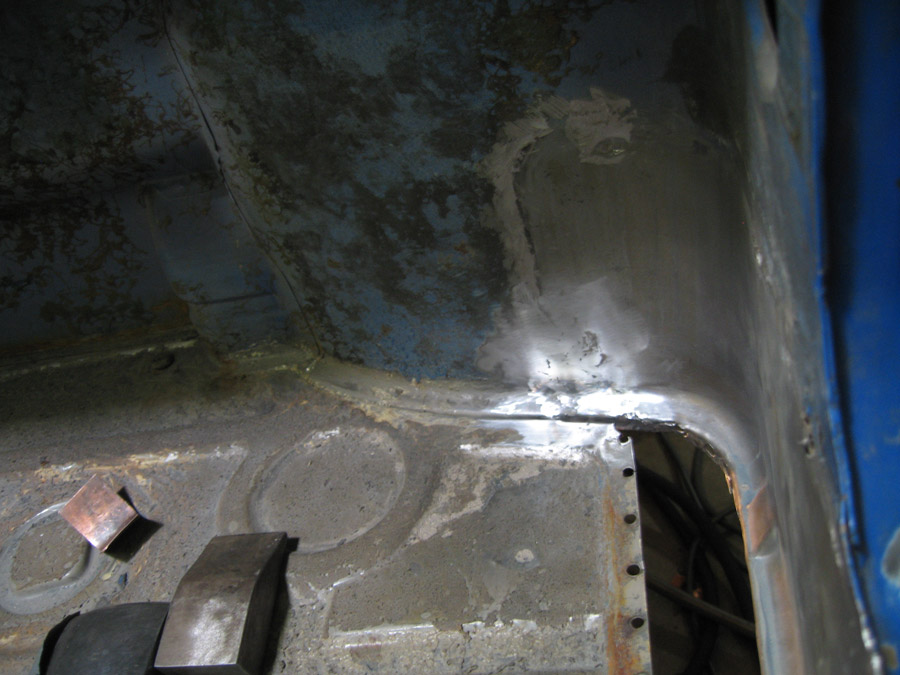
I will lead in to a post on work on the floor...
Posted by: nathansnathan Sep 10 2013, 11:00 PM
So, I had actually bolted everything together and done a test fit. I decided to cut the firewall at a diagonal and cut out the front half of the passenger floor so the whole assembly can slide in. 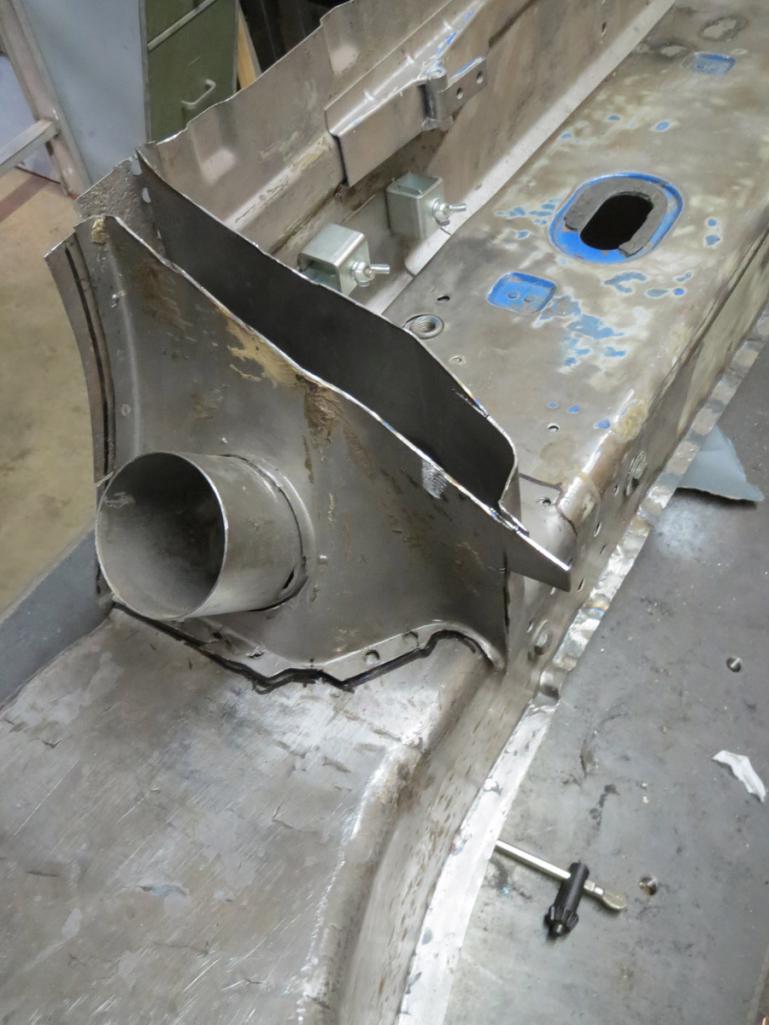
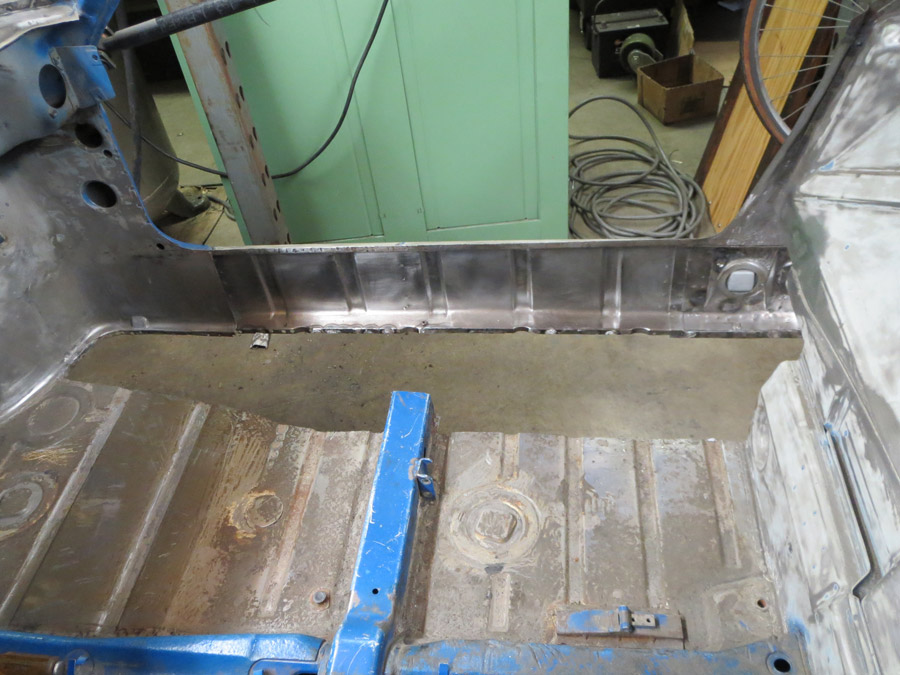
:clampsandbolts: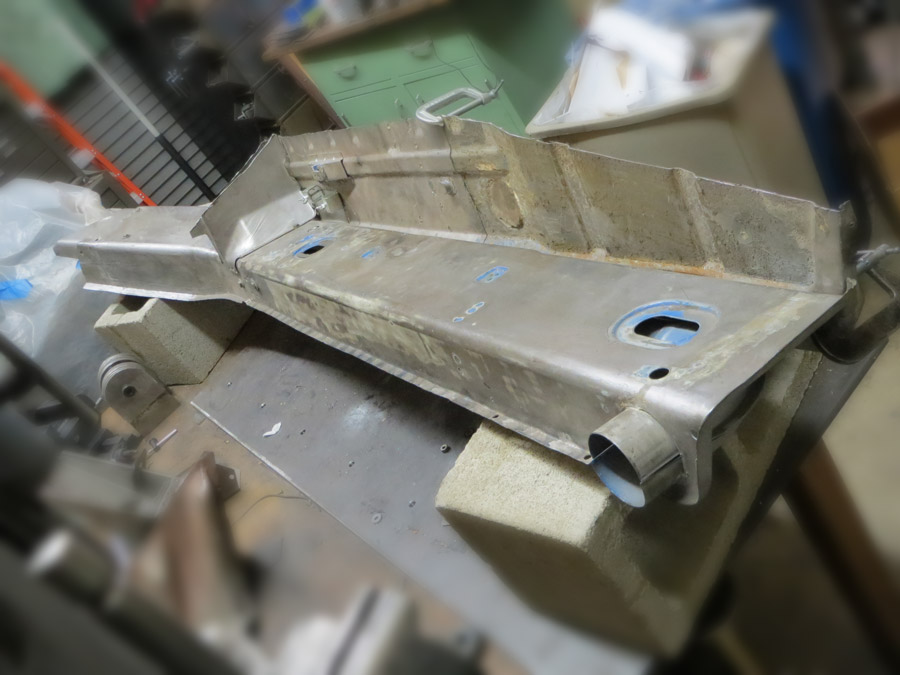
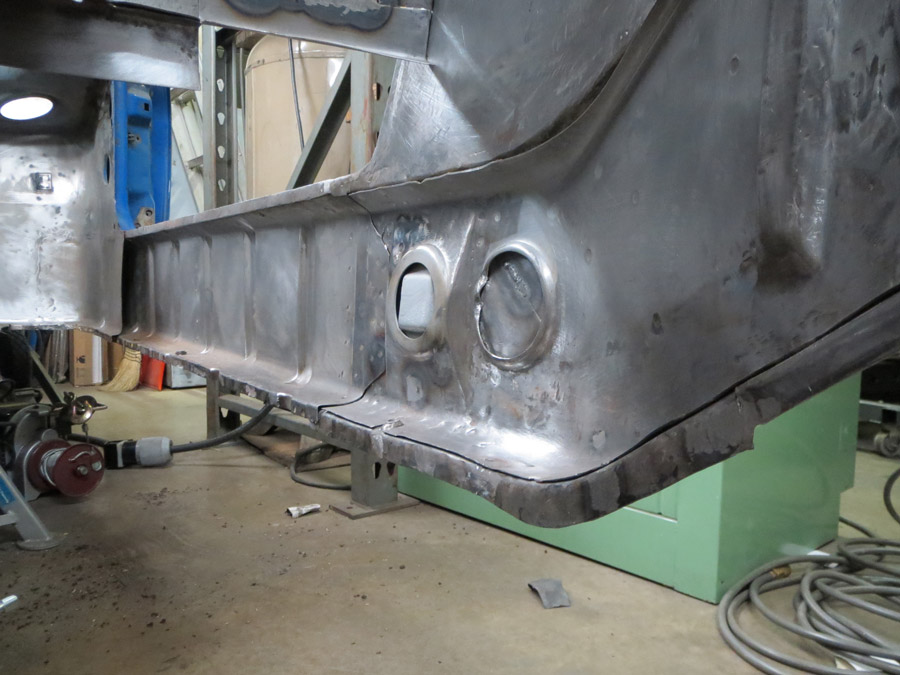
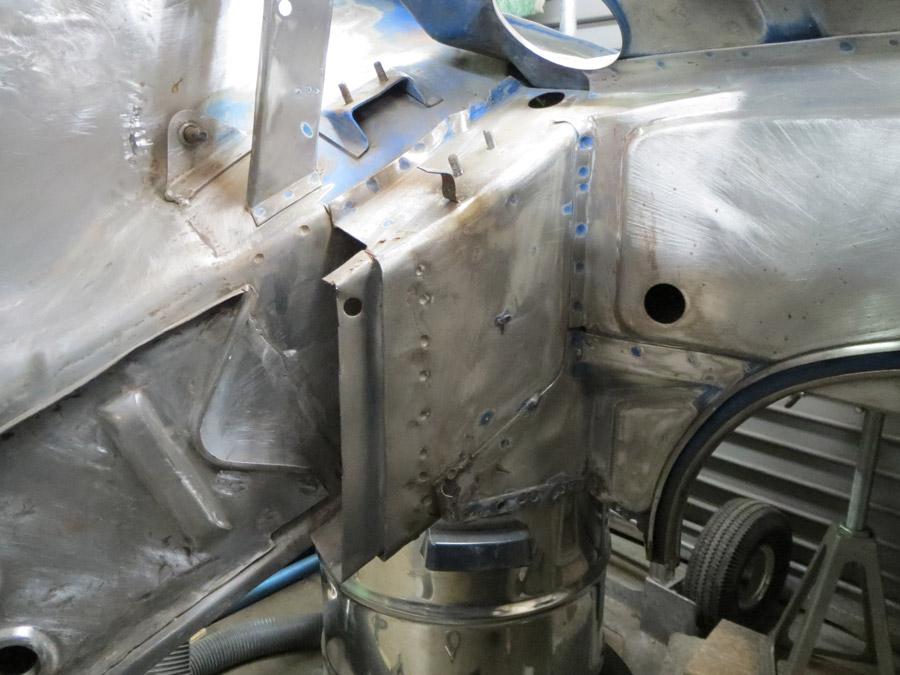
Oh yeah, the floor.... ...
Posted by: nathansnathan Sep 10 2013, 11:21 PM
An old pic here...
I got a spot welder so I need to fill in all the holes. I had thought about plug welding it using the holes, but the tig doesn't like the weld through very much. I think it will have a smaller burn area as the weld thru primer goes, between the panels.
The floor, firewall, etc, in pieces...
I was quite a butcher at the beginning.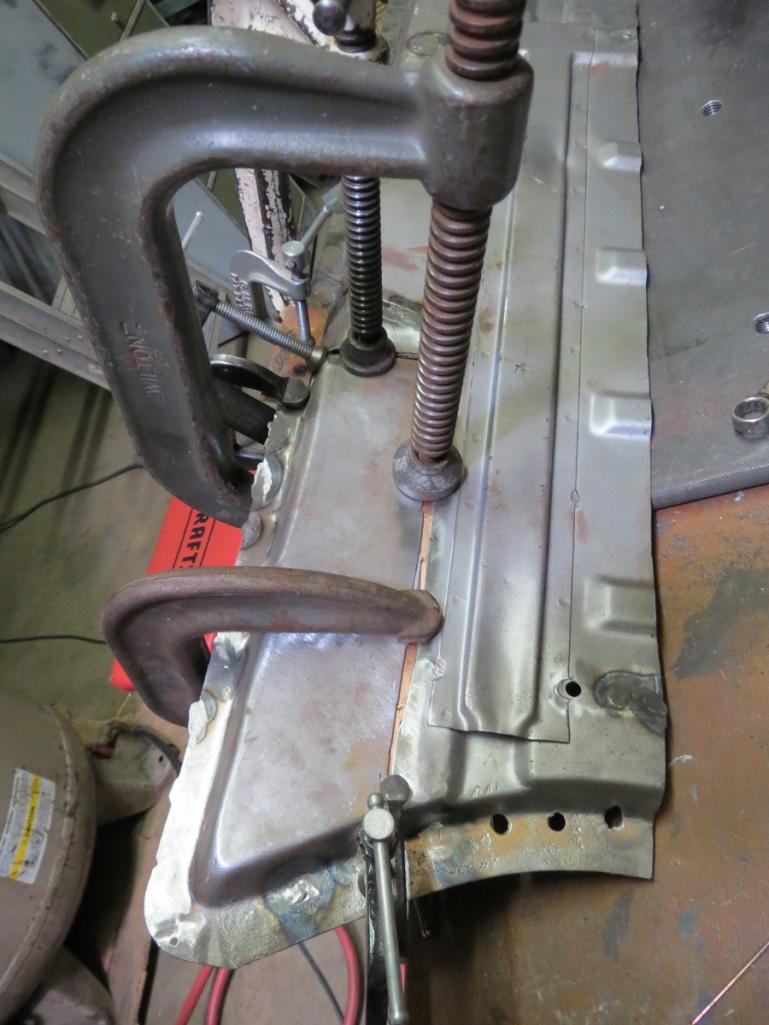
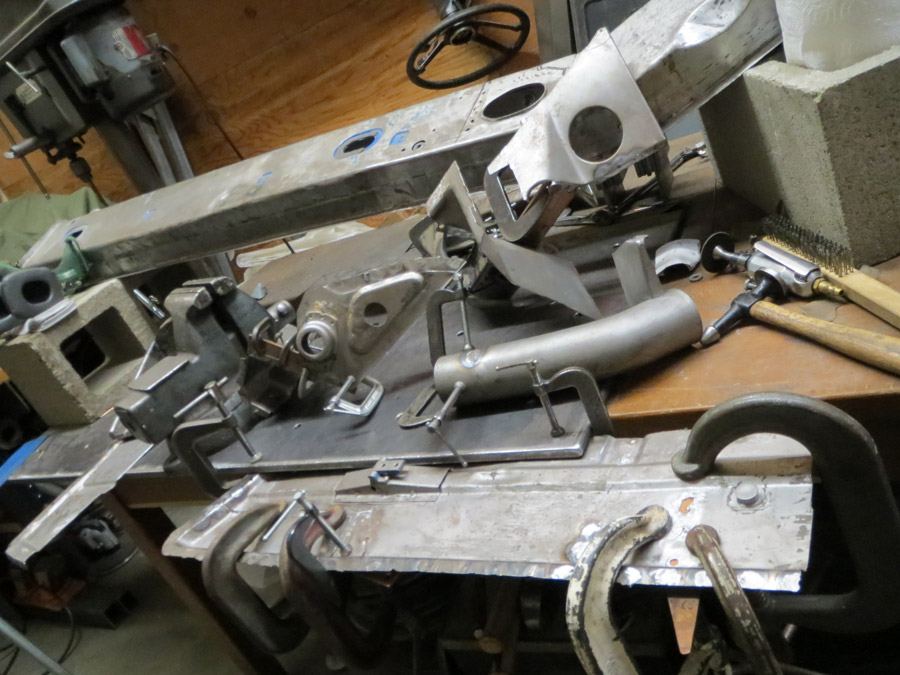
weld grind weld grind sand. I am using a mini pnuematic strait die grinder with a 1/4" arbor with a 1 1/2 inch x .040" grinding wheel to take it down just proud, and then a right angle mini die grinder with a 1/4 inch arbor also, and roloc pad. I use a conditioning pad before welding, and then after the grinding, an 80 grit sand paper pad to smooth it. THere are 100's of welds to fill in between the long, floor, firewall pieces, etc.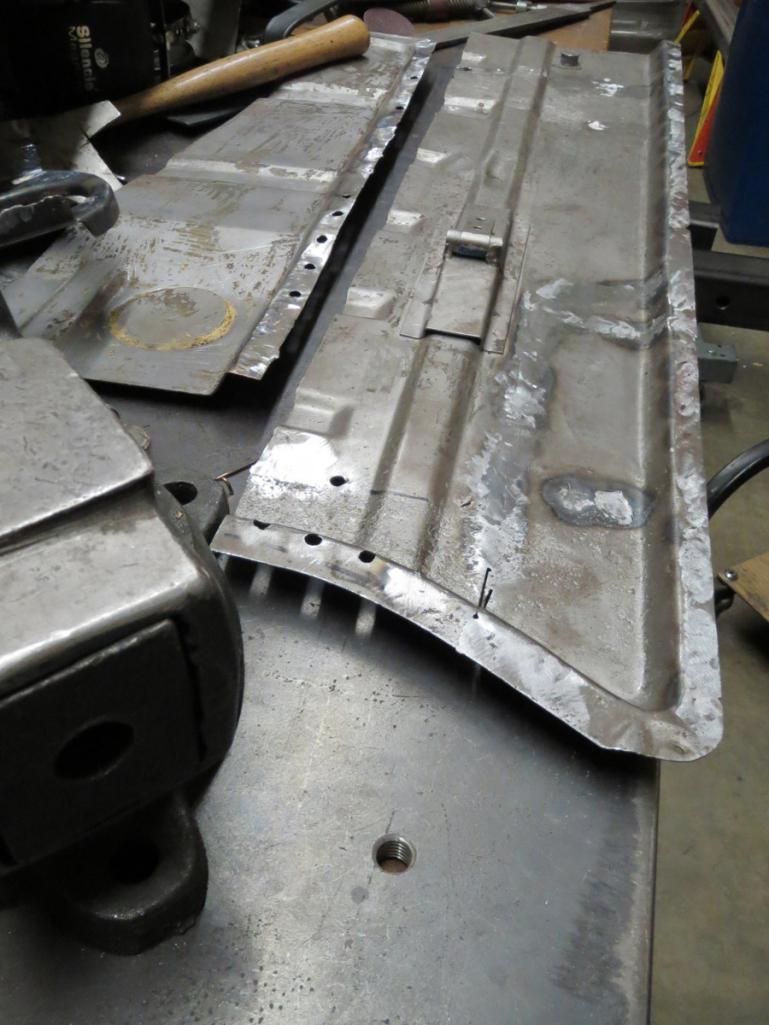
and... still some more to do... 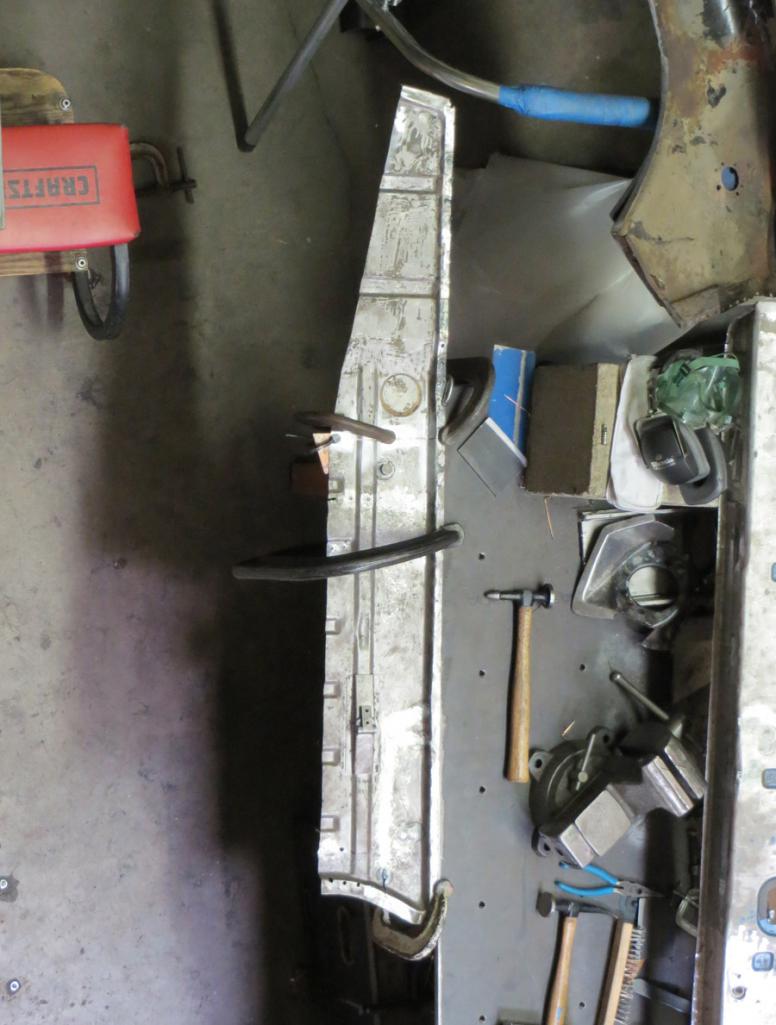
Posted by: SirAndy Sep 11 2013, 12:52 PM
Posted by: cary Dec 15 2013, 11:45 AM
Nathan how did you build/create the corrugations?
Posted by: cwpeden Dec 15 2013, 11:53 AM
This is the easy way: http://www.restoration-design.com/mm5/merchant.mvc?Store_Code=rd&Screen=PROD&Product_Code=P351
Posted by: cary Dec 15 2013, 02:11 PM
I already have that installed. The RD piece was designed to be a one piece repair section. The factory design of the inner wheelhouse long was two layers. The outer portion everyone sees is a solid metal u shaped channel. Inside of that is the corrugated section that Nathan built. It adds to the strength of the structure.
Too add to complexity, the original factory was one piece. I want the corrugated piece to strengthen the welded joint.
Posted by: cary Dec 15 2013, 02:20 PM
Here's a picture of what you get when you have the two RD pieces ready to install.
If you look at the RD wheelhouse you'll see it has flanges so it can be welded to the inner fender. One piece design.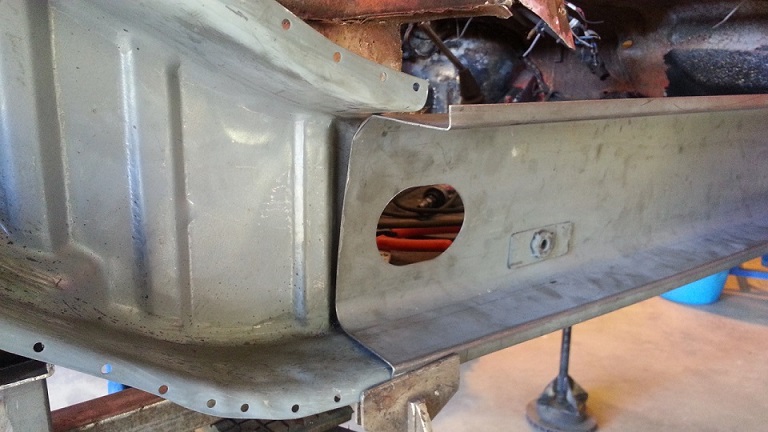
The piece Nathan built would lay inside those two piece. The seat belt nut plate would need to be removed.
Posted by: scotty b Dec 15 2013, 02:35 PM
All of Nathans parts are either original or R.D. You have the inner long attached properly. Buy the inner rocker, it is the piece with the ribs. the flanges of the 2 are spot welded together to form a rectangular box. There is only one layer for most of the length of the long, inside and out. There is a second smooth piece that covers where the kickup into the engine bay is, but no one makes that, and AFAIK no one ever has. Not sure why, as it is a appearance piece that alwaysgoes along with the repair
Posted by: nathansnathan Dec 15 2013, 04:46 PM
It's complicated to explain, "inside-outer", etc, so I made a diaagram.
I was thinking this is the best way to describe it. 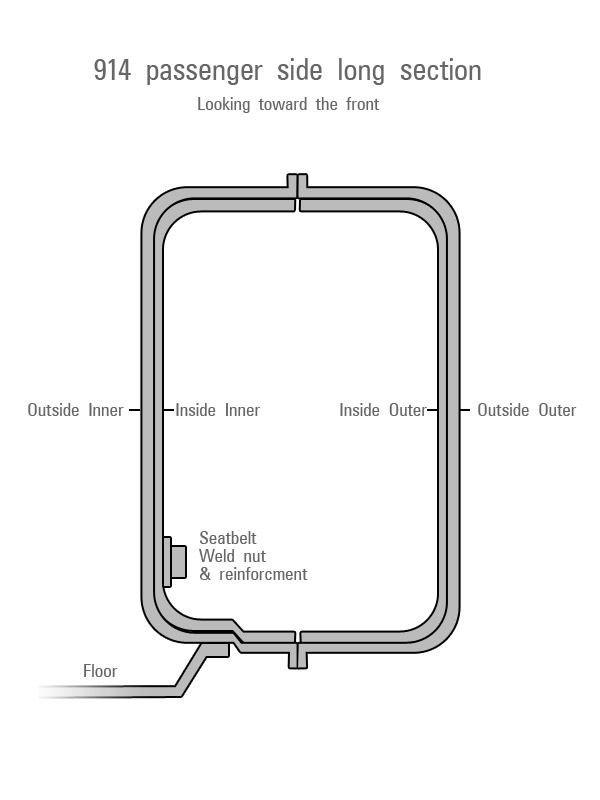
Both inner and outer are double layered from just forward of the lower seat belt bolt until they reach the trunk, but people claim that the 1 piece rd is thicker and is to be used instead of both layers from the firewall back.
I chose not to do it that way. I would rather it be smooth, and I think 2 layers would be stiffer there, just better overall. So I attached the stock inside inner piece forward of the firewall, to the RD corrugated piece. I'd posted this pic in post 109, I used a radius from the top of the long and corrugations from the bottom of the driver side of the donor car to remake the bottom.
Posted by: cary Dec 15 2013, 05:21 PM
I'm a little slow, but I'm getting it.
1. Scotty. I have a four pieces of new RD. Inner Long, Long, Inner Rocker and Inner Wheelhouse.
2. So to copy Nathan, I would build the extension on to the inner long to get a longer box and tie? Looks like it would need to lapped so it would slide inside the new RD long?
3. Looks like there's multiple ways to skin this cat.
4. Then build the box to cover the inner long inside the engine compartment.
5. I still don't like the firewall, long and inner long coming together in the same spot. Adding Nathan's extension helps a little. Anal .................
Posted by: nathansnathan Dec 15 2013, 05:36 PM
I have been meaning to post progress.
I cut out more at the back of the long. I am planning to splice it back together at one of the inside's corrugations so I can weld the inside, and then a patch to the outer to seal that up, that little piece there.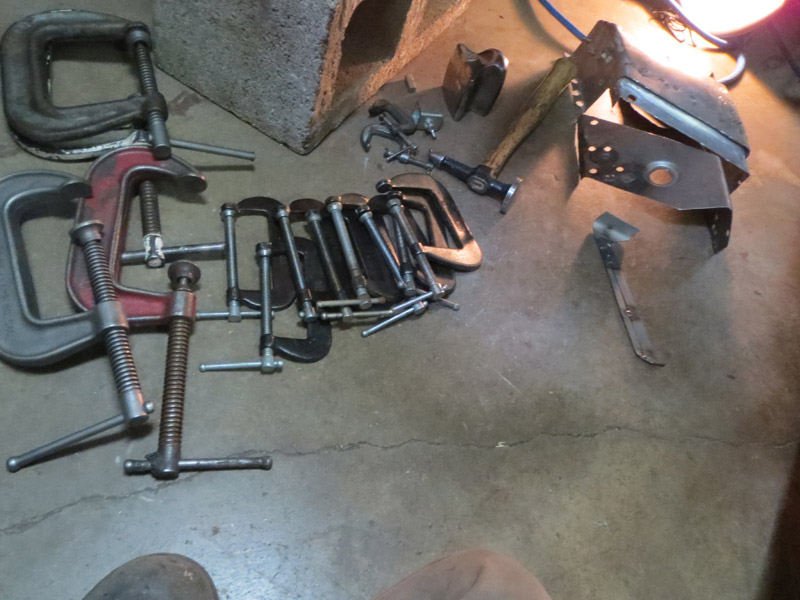
You can't go all the way back or the engine shelf becomes complicated at the corner.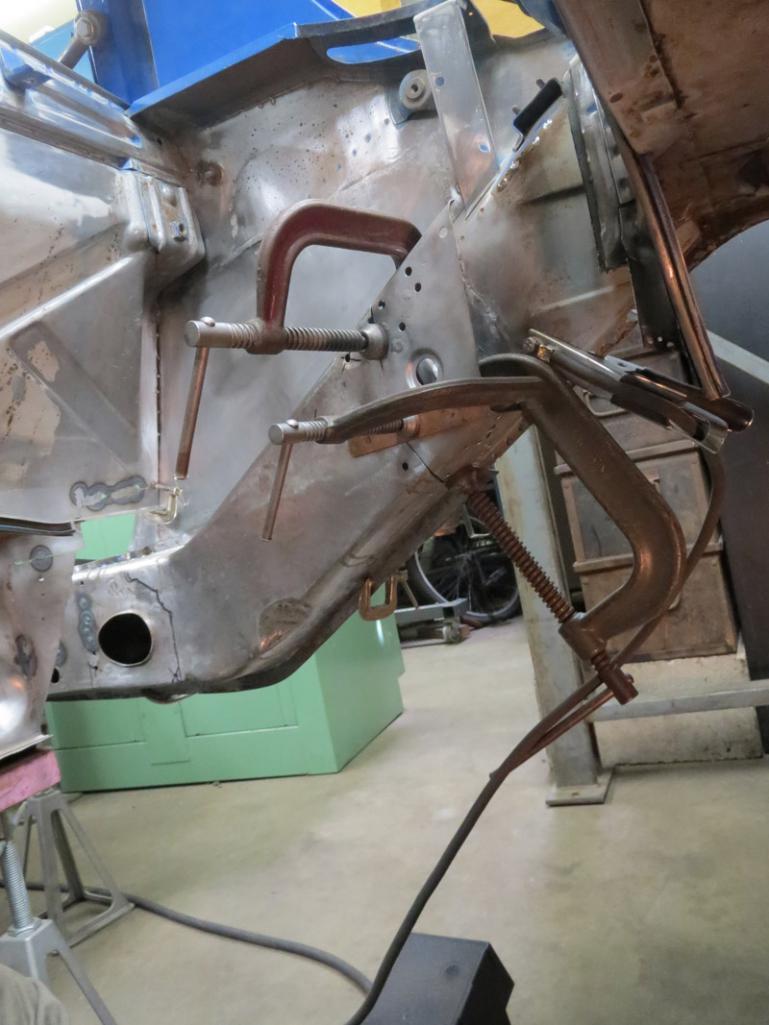
Here, attaching the piece that was going to be the patch, but the plan changed. I am trying to attach the suspension console to the long, build the whole thing and then spot weld it all in as 1 big piece, maybe even the engine shelf with it.
Pieces I cut out, inside and outside inner. It curves there, toward the outside, just rearward of the suspension console.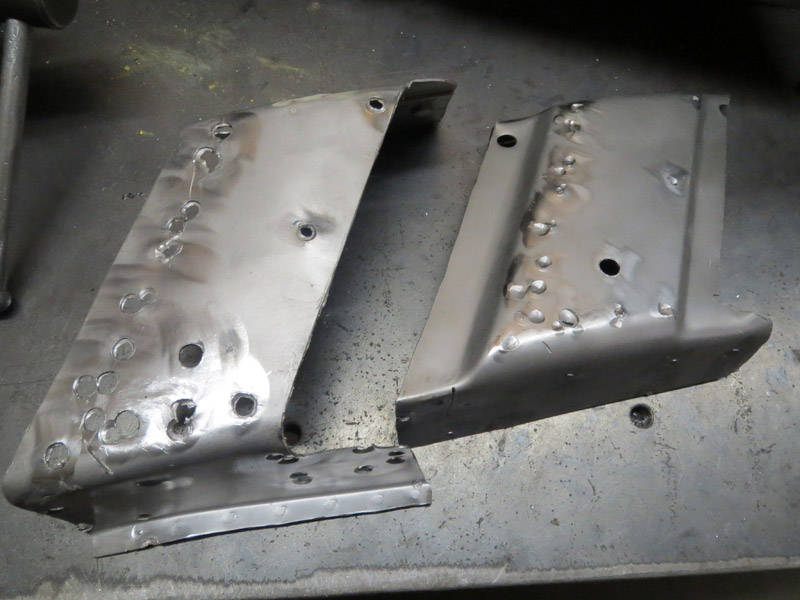
Fitting it up to put the next piece on.
[this wants to be at the end of the post for some reason]
Welding the inside to the RD piece. I had cut some of it off before. The outer didn't want to let it sit right, but I wanted to make sure it would go together right so this is how I got it all set up to weld.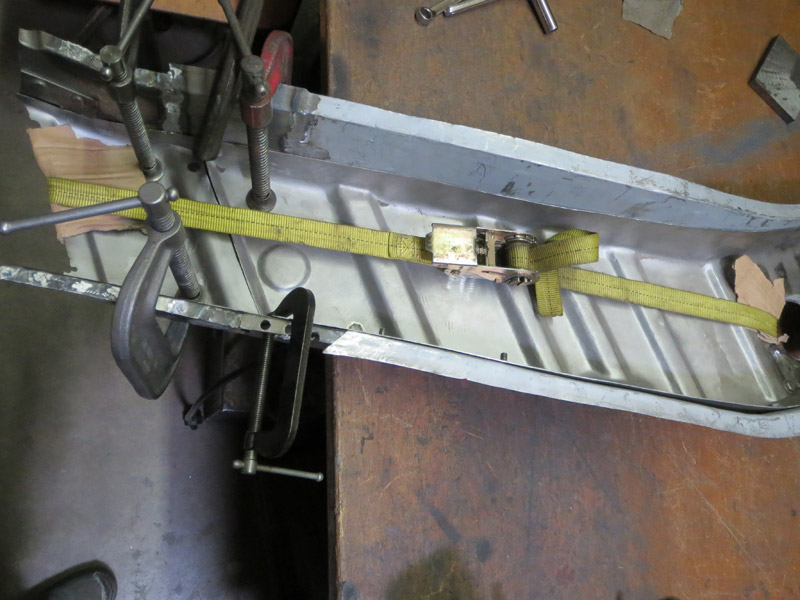
Got it tacked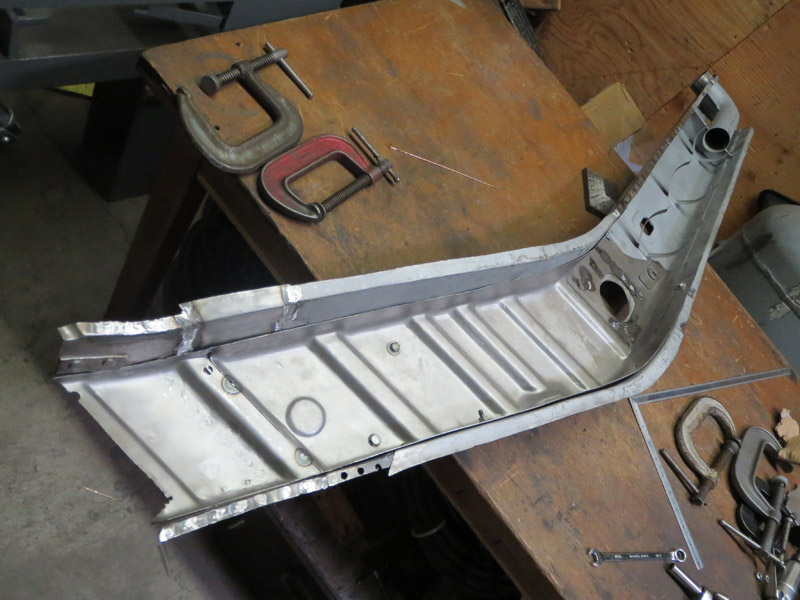
and ready to fit. Some 1/4-20 bolts holding it together.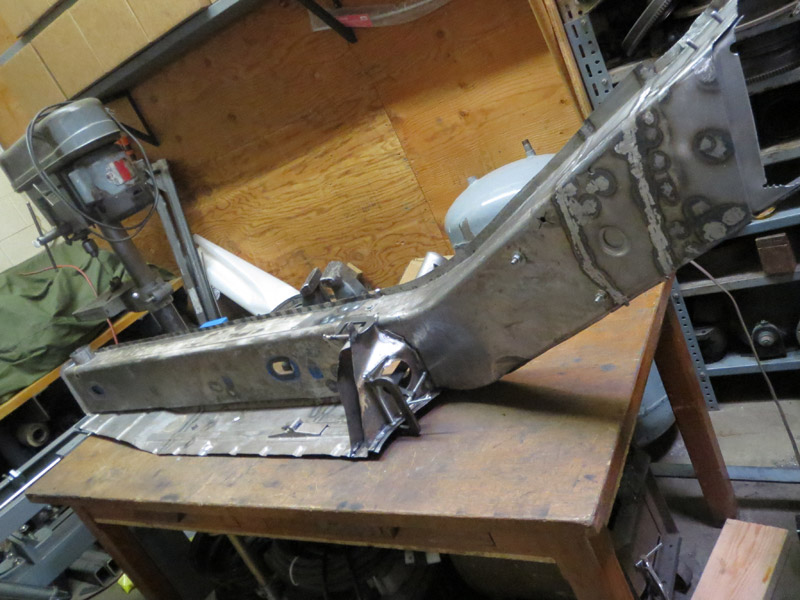
I put the rear up first and pop it in up front over the lip that sits at the base of the front wheel well. 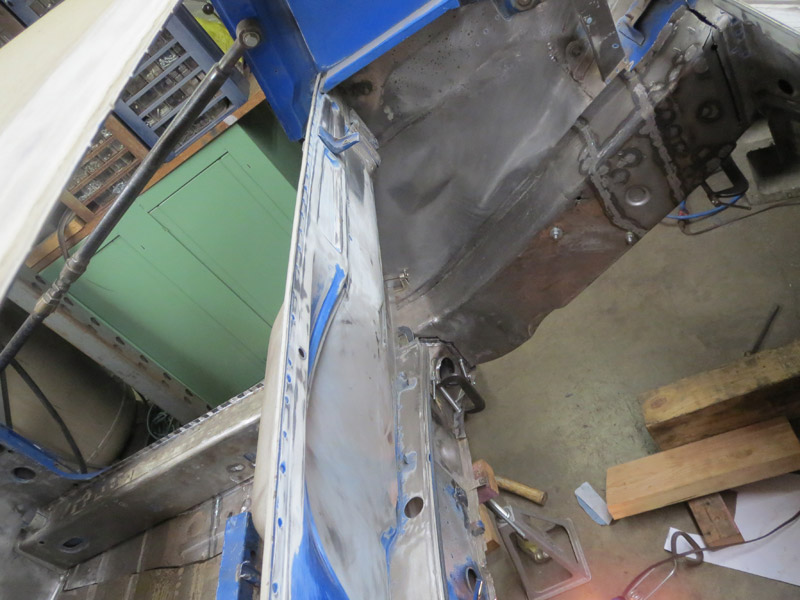
I bolted the floor in wrong, so the gap is big at the front, should have measured. I'm going to fit this again, trying it with the engine shelf attached. I can pivot it in. I will add the forward piece of the firewall, too. I think I need to cut the support under the seat at and angle to make this work for fitting 2, to come.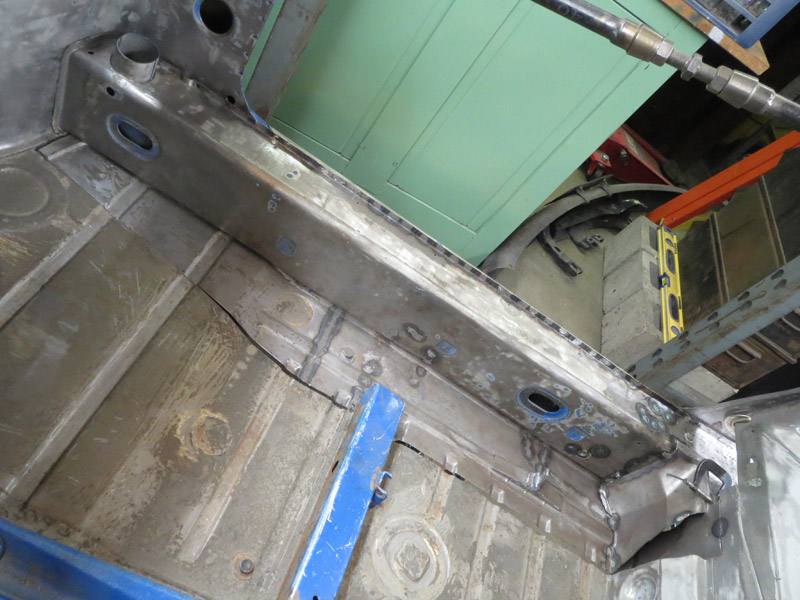
My other ride has been taking my time, discovered some nasty rust under the front bumper. I've been dividing up my 3 hours a day to work on these things. This is how I've driven my bus to work the past week and a half. I oil it up everyday, I've been using penatrol, which is like an oil paint additive that smells like linseed oil, hasn't rusted yet. No ticket for the license plate. 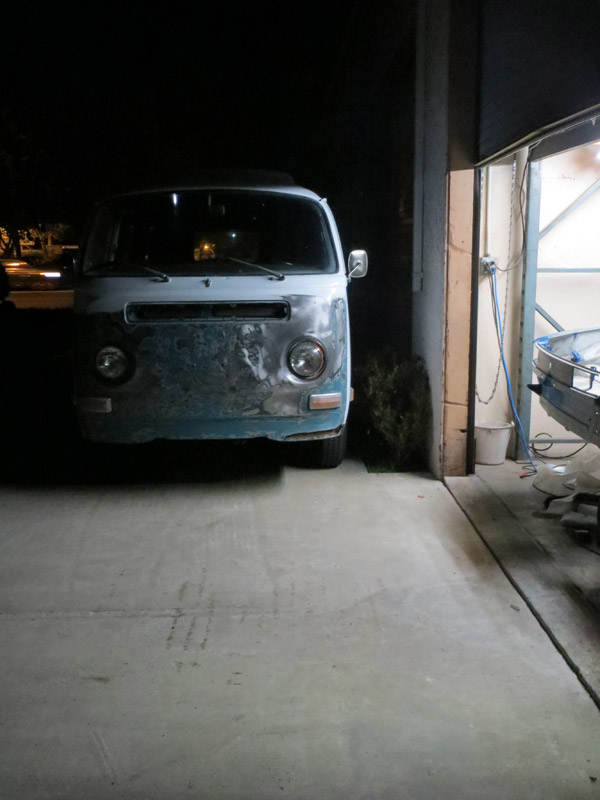
Attached image(s)
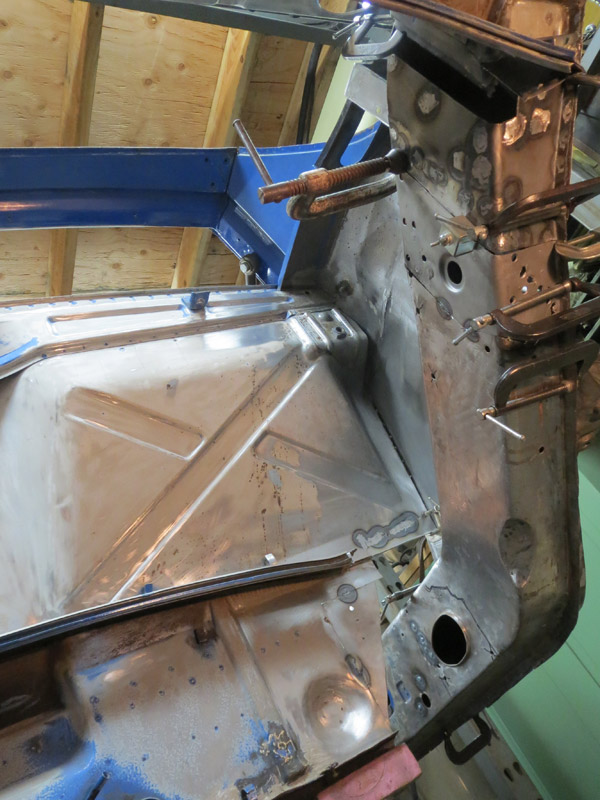
Posted by: trojanhorsepower Dec 15 2013, 06:32 PM
Look'in good!
Posted by: ONTHEGRIND Dec 15 2013, 08:32 PM
How much of the inner long is double walled Im currently in the process of replacing my rear pans and the bottom of my inner longs have some rust and pitting .. Im trying to figure the best way to repair before I weld the floors in place..in my photo you can see some minor rust where the pans sits against the long but on the outside the metal looks fairly fresh..
Should I weld the holes closed and put the pan in or cut out the bad stuff and patch in a new piece If its double walled the inner piece is un rusted as I can see down in the there
http://smg.photobucket.com/user/xr8ted/media/2F70C900-75C5-4934-9B9E-C0D4F007CFA4-1927-000001584DB8E8A0_zps7a5656e2.jpg.html
Posted by: gothspeed Dec 15 2013, 10:07 PM
This thread is awesome!!! Hats off to all the effort displayed!!!
Posted by: cary Dec 15 2013, 11:13 PM
What you're working on right now is the long. The inner long is the continuation of the same piece that goes up the wheel well in the engine compartment.
It only has a small section that is double layered.
In the blue box.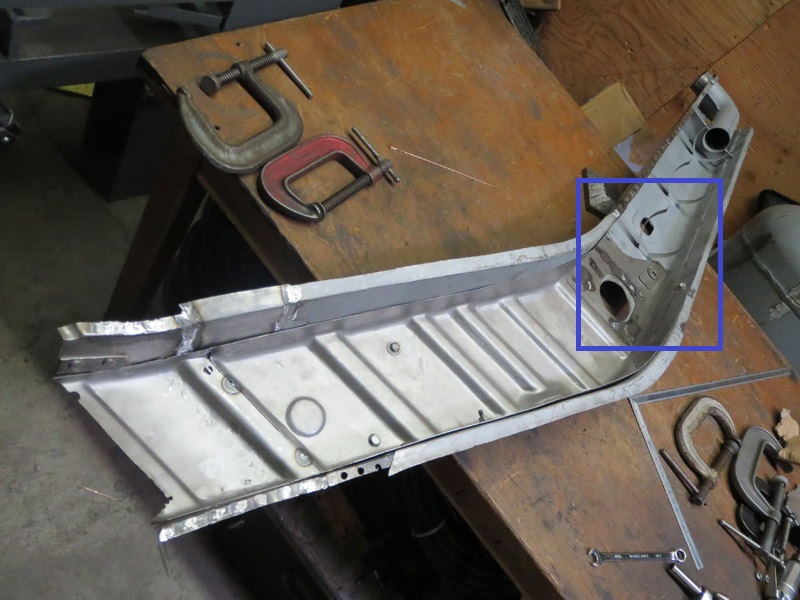
But to answer the original question. The portion outlined below in blue is the actual inner layer that Nathan exposed after he removed the outer layer. It does go further up the inner long but I can't remember exactly where it stops.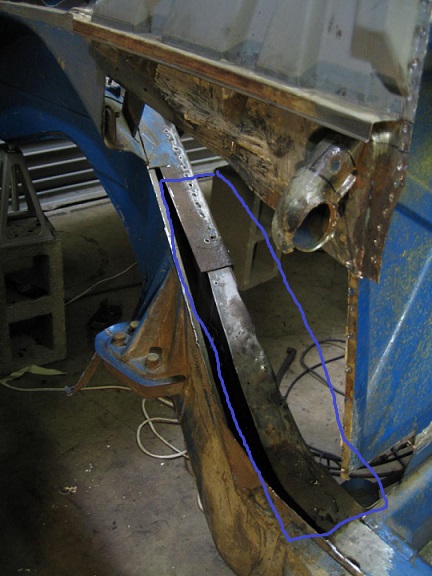
I'm going exit before I get run out of town for being a hijacker. LOL.
Posted by: ONTHEGRIND Dec 15 2013, 11:33 PM
Thanks for the response.. Great thread info like this save's these rust buckets. I can call them that cause I have filled up a bucket of rust lol..
Posted by: nathansnathan Dec 16 2013, 08:21 AM
How much of the inner long is double walled Im currently in the process of replacing my rear pans and the bottom of my inner longs have some rust and pitting .. Im trying to figure the best way to repair before I weld the floors in place..in my photo you can see some minor rust where the pans sits against the long but on the outside the metal looks fairly fresh..
Should I weld the holes closed and put the pan in or cut out the bad stuff and patch in a new piece If its double walled the inner piece is un rusted as I can see down in the there
http://smg.photobucket.com/user/xr8ted/media/2F70C900-75C5-4934-9B9E-C0D4F007CFA4-1927-000001584DB8E8A0_zps7a5656e2.jpg.html
That part is double walled. You can't see it as clearly on the RD piece, but it is there, the indent for the floor that lines up with the indent you have in your pic.
Ideally you could get the pitting to be all white metal with a spot blaster, but you could weld that as is I think, especially with a mig. If it's solid inside, I wouldn't cut. I think it would be making it harder and all the burn from welding in a patch woulds be worse than what you have, which seems not too bad. Some small plug welds seem best from there, trying to not burn the factory weld through too much. Seems you'll want to run a wand up the inside to treat it after, though.
Posted by: nathansnathan Dec 21 2013, 01:16 PM
I was reading through, planning what to do next. I changed the thread name, too, to be incognito as most views of the forums are during the work week. I updated the first post explaining, and also put up pics of my front trunk vin plate, window vin, kunstharslack plate, rear trunk chassis stamp, as well as my dash number which should match my chassis number, but doesn't.
Posted by: nathansnathan Dec 21 2013, 01:29 PM
I saw you sort of correct yourself after the first pic, but I wanted to set this straight. The inner goes all the way to the trunk. There is a flange off the rear of the inner that is spot welded to the front of the trunk. I did an outline pick in post 110, it is a bit harder to see, but outlined in blue, the inner piece. at that point it is short about 15 inches at the back.
I'm going to work on my firewall right now, or after lunch actually.
What you're working on right now is the long. The inner long is the continuation of the same piece that goes up the wheel well in the engine compartment.
It only has a small section that is double layered.
In the blue box.
But to answer the original question. The portion outlined below in blue is the actual inner layer that Nathan exposed after he removed the outer layer. It does go further up the inner long but I can't remember exactly where it stops.
I'm going exit before I get run out of town for being a hijacker. LOL.
Hijacker
I have been subscribed to your thread for awhile now.
Posted by: nathansnathan Feb 25 2014, 04:35 PM
I had some issues a few weeks ago fitting the engine mount. The details of that are in this thread
http://www.914world.com/bbs2/index.php?showtopic=230121&pid=1997390&st=0
I was pretty bummed out and didn't know what to do. My friend Derek sent me a link to this chassis jig. I posted about it in this thread of Cary's
http://www.914world.com/bbs2/index.php?showtopic=230121&pid=1997390&st=0
It is finally here at my studio. 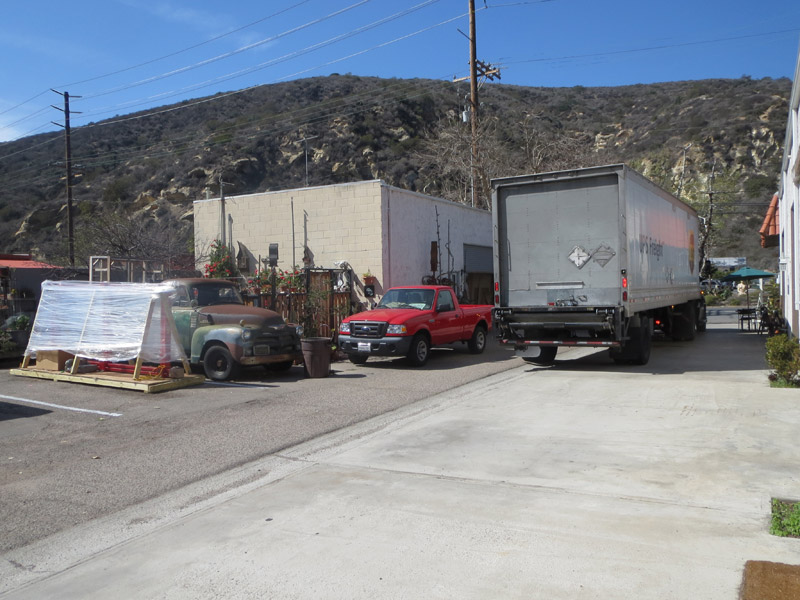
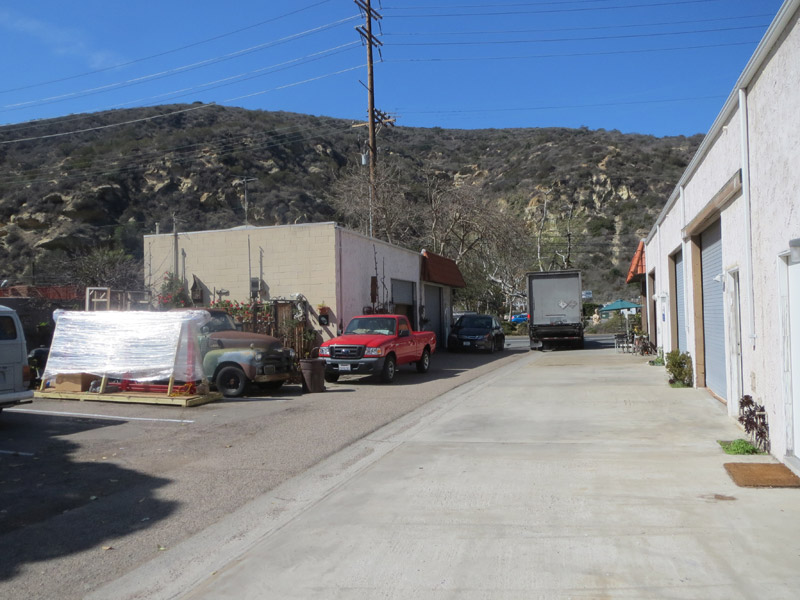
I was pretty impressed, and slightly frightened, with how the guy got it off the truck by angling it down the lift gate, at one point, with the pallete jack hanging out under it from the back. He actually moved the truck forward while it was halfway out then lowered it the rest of the way down with the lift gate. Somehow he moved the whole thing with a pallete jack while my neighbor and I dragged/slid the back of it into place in my parking spot there. 1000Lbs with the other boxes in there.
I got the unistrut from Unistrut direct- the guy actually drove it over from Bellflower over to my mailbox in Irvine.
I got the threaded rod and 3/4" hardware, but couldn't figure out what smaller hardware I'd need in advance. I put an order with mcmaster carr to get the rest of it quick. I don't have room for it in my studio with the car being on stands in there. I need to assemble it and roll it under the car, but can't do that until the hardware comes, maybe tomorrow. I can't wait to see it just up on there.
Attached image(s)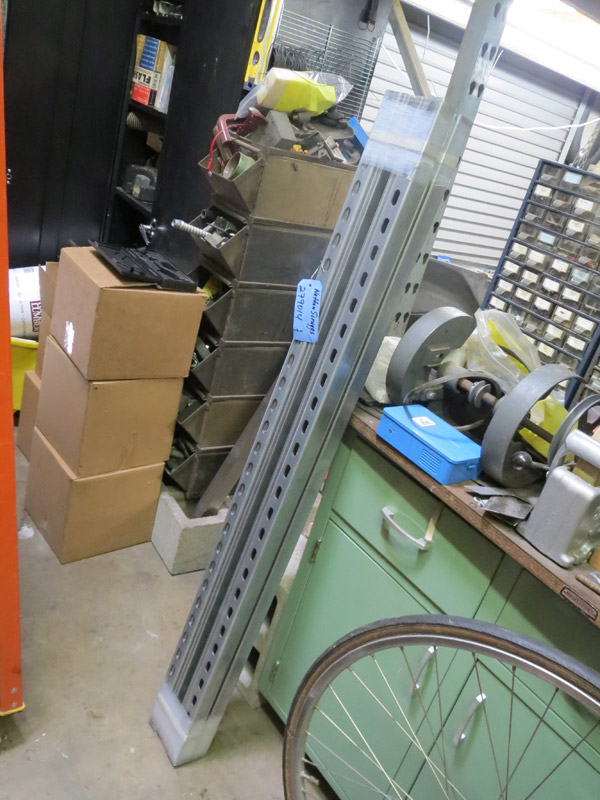
Posted by: cary Feb 25 2014, 07:57 PM
Cool ...................
Posted by: nathansnathan Feb 28 2014, 11:20 PM

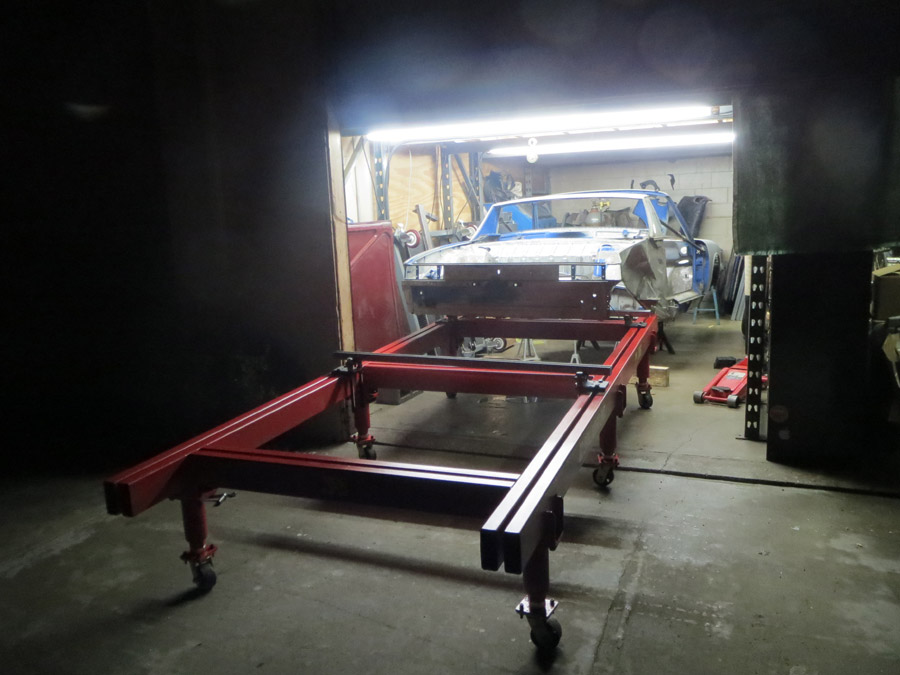
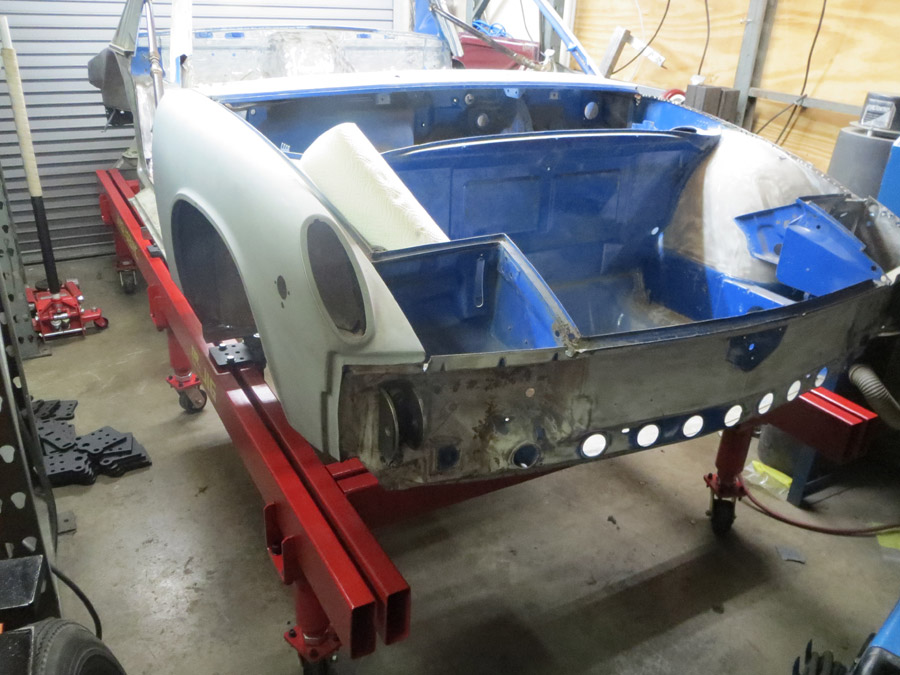
Posted by: cary Mar 2 2014, 07:49 AM
Can you post some detailed shots of how your attaching the body to the jig?
With your fabricating skills any thoughts of building shock tower hold downs like the Celette has? Following Rick's idea.
Without a lift it looks like its a bit of a bitch getting it on there.
Posted by: nathansnathan Mar 2 2014, 02:42 PM
Can you post some detailed shots of how your attaching the body to the jig?
With your fabricating skills any thoughts of building shock tower hold downs like the Celette has? Following Rick's idea.
Without a lift it looks like its a bit of a bitch getting it on there.
Currently it's sitting on 2 spans of channel, 1 under the rear firewall and at the front under the pedal area. I'll definitely post pics once I have some progress.
I've got to get it leveled, which I don't see how you could do with swivel casters. I'm going to make some leveling feet. I need to some more hardware still.
It was a chore getting it on there, took about 4 hours raising it up - ridiculously high, like 8 inches higher than in the pic above, but I was too busy to get a pic, I thought the wind might blow it down.
It was raining a bit too. I had a drop cloth over it outside a day because I forgot to buy the fat half inch fender washers for the bottom. The palette, I'd put on top of it to keep the wind from blowing the drop cloth away. It mostly worked, but 2 pools formed on each side, and pulled the cloth off the middle of the one side. There are pretty crazy storms going on the past few days.
I finally got it up and in, and it is so tall!. It makes me think that a mini monster truck 914 would be really cool.
About the fixtures for the shock towers, that was something that I was struggling with, for both the front and the back. Talking to the guy at JD2, it seems the way it is done on a jig is to mount the struts/shocks themselves to the car and measure off of them.
I think the difference between a jig and a rack is the latter is so rigid and stout that you can leverage against it to straighten what is bent or "pull" the car. On the jig, the channel strut is the limiting factor to be sure, especially torsionally.
Posted by: nathansnathan Mar 2 2014, 02:45 PM
There is this info in the specs book that I will check against.
It lists the track of the front as
1331mm or 1343 with 4 1/2 or 5 1/2 inch rims, respectively.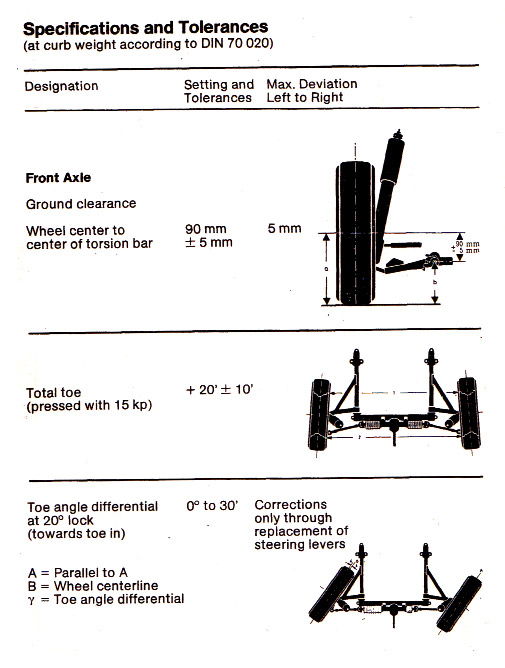
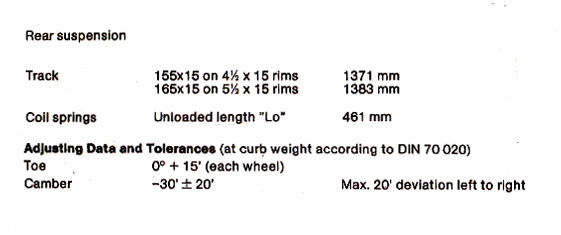
Posted by: nathansnathan Mar 2 2014, 02:56 PM
I've been setting it up, I've cut and filed the ends of 22 1 foot lengths of 3/4" threaded rod, so far. More still to do. I need to get 1 1/2" threaded rod for the leveling feet, some more hardware, and to make some fixtures, probably 1/2 inch plate, I am thinking.. 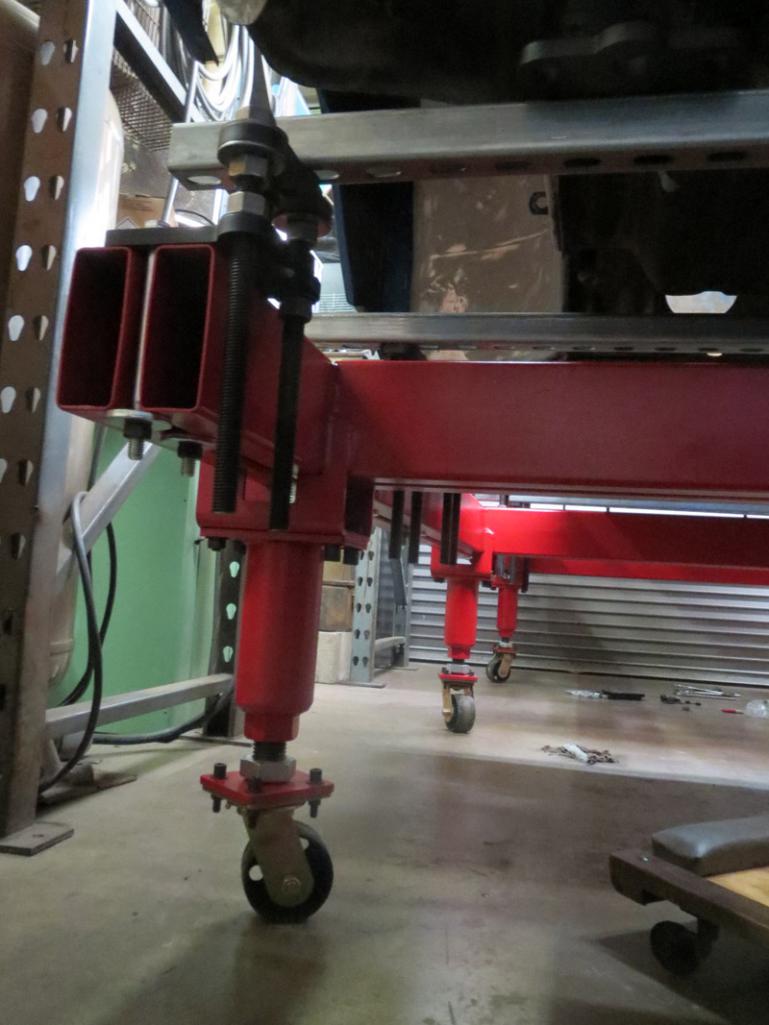
Posted by: sixnotfour Mar 10 2019, 06:30 AM
where did he go ?? hope all is good
Posted by: David Billo Mar 10 2019, 08:27 PM
Been wondering the same thing.
Posted by: mbseto Mar 11 2019, 10:42 AM
Hope so too. This thread has been a great 914 anatomy reference for me.
Posted by: sixnotfour Mar 11 2019, 02:08 PM
![]()
Posted by: FlacaProductions Mar 11 2019, 06:05 PM
It's not looking encouraging....
nathansnathan - Last Active: 1st June 2017 - 02:48 PM
Posted by: sixnotfour Mar 11 2019, 06:50 PM
I knowCA. > Is Huge >>Butt>>>
I sent an email.... we gotta track a brother down...he was no casual.......
Posted by: ctc911ctc Mar 12 2019, 08:23 AM
Wellness Check? Anyone? Anyone? Bueller?
I knowCA. > Is Huge >>Butt>>>
I sent an email.... we gotta track a brother down...he was no casual.......
Posted by: sixnotfour Mar 12 2019, 11:09 AM
@http://www.914world.com/bbs2/index.php?showuser=643
he registered for WCR2016
@http://www.914world.com/bbs2/index.php?showuser=129
Posted by: 76-914 Mar 12 2019, 01:31 PM
@http://www.914world.com/bbs2/index.php?showuser=11782 The world wants to know.
Or possibly @http://www.914world.com/bbs2/index.php?showuser=11519 as he had dealings with him and lived near by?
Posted by: Beach914 Mar 12 2019, 02:09 PM
Last time I saw Nathan was when he came by to buy a set of Pedro is and cut some parts out of a 72 chassis I had. Must have been 2014 or so. I was wondering the same about his whereabouts.
Posted by: JRust Mar 12 2019, 07:36 PM
@http://www.914world.com/bbs2/index.php?showuser=643
he registered for WCR2016
@http://www.914world.com/bbs2/index.php?showuser=129
He was from Laguna Beach. I have a number for him if someone wants to give him a ring. I'm drawing a blank on him but my memory sucks. If I saw him I'm sure I'd recognize him. I'll shoot you a PM Jeff with his number
Posted by: sixnotfour Mar 13 2019, 04:04 AM
new link 914 visualizer
http://nathansdesign.com/914visualizer/914_visualizer.html
Posted by: sixnotfour Mar 13 2019, 04:10 AM
I guess he"s done... @http://www.914world.com/bbs2/index.php?showuser=21899
Good to know he"s still around..
I should finish my own projects
Posted by: 76-914 Mar 13 2019, 07:43 AM
I hope the bench he bought didn't reveal a grand up that made him withdraw. If that's all it is he should checkout some my failures and gather hope.
Posted by: nathanxnathan Mar 14 2019, 09:08 PM
Hey, thanks to everyone reaching out. A lot of changes awhile back set me back, health problems, money problems, a bit of burnout on the project. I moved shops, got another vw bus and did a bit of a rebuild on it. The 914 kinda got on the back burner. But I still have it, waiting for the urge to do more metal work - seriously wish I could get that part tackled. Thinking of getting back to it. I'll post updates when I do.
Again thanks for hitting me up, everyone who did, means a lot.
Posted by: sixnotfour Mar 14 2019, 09:19 PM
Holy Shit...Hooray......charge up,, you got friends here....

Posted by: sixnotfour Mar 14 2019, 09:22 PM
your work is #1..enjoyed your posts..... Cheers
Posted by: 76-914 Mar 15 2019, 09:37 AM
This is a great thread and I'd love to watch you finish this. At the time, I was so consumed with my own project that I missed this one dropping off the Radar. Looking forward to the resumption of your build and hope that it isn't too far away. Kent
Posted by: worn Mar 15 2019, 05:49 PM
Hey, thanks to everyone reaching out. A lot of changes awhile back set me back, health problems, money problems, a bit of burnout on the project. I moved shops, got another vw bus and did a bit of a rebuild on it. The 914 kinda got on the back burner. But I still have it, waiting for the urge to do more metal work - seriously wish I could get that part tackled. Thinking of getting back to it. I'll post updates when I do.
Again thanks for hitting me up, everyone who did, means a lot.
Thanks for the reply. I realized how much I had followed your progress as I cut out rusty parts of my own. Kinda figured you were still around, then realized you weren’t, good to hear you are ok.
Posted by: bbrock Mar 15 2019, 05:55 PM
Hey, thanks to everyone reaching out. A lot of changes awhile back set me back, health problems, money problems, a bit of burnout on the project. I moved shops, got another vw bus and did a bit of a rebuild on it. The 914 kinda got on the back burner. But I still have it, waiting for the urge to do more metal work - seriously wish I could get that part tackled. Thinking of getting back to it. I'll post updates when I do.
Again thanks for hitting me up, everyone who did, means a lot.
Thanks for the reply. I realized how much I had followed your progress as I cut out rusty parts of my own. Kinda figured you were still around, then realized you weren’t, good to hear you are ok.
Ditto. There is a lot taken from this thread that went into my car.
Posted by: nathanxnathan May 30 2019, 12:22 AM
I've been easing back into working on the 914, been working on it like a day or 2 a week. Pretty slow going but as long as I keep making some progress, I think I'll get there.
It had been like years since I worked on it so, instead of jumping back into the hell hole, I decided to get some momentum tackling the other end which I'd always kind of dreaded getting further into.
Back on page 1 of the thread, I had this at the driver side cowl.
Somewhere around page 3 I'd taken off the whole driver front fender. I think if I had to do it again, I would have cut the fender and left the front of it on - best to plan so you can weld where you can back it, and not mess with the seams as much.
But I've been looking at this for a few years now, thinking about how to go about it.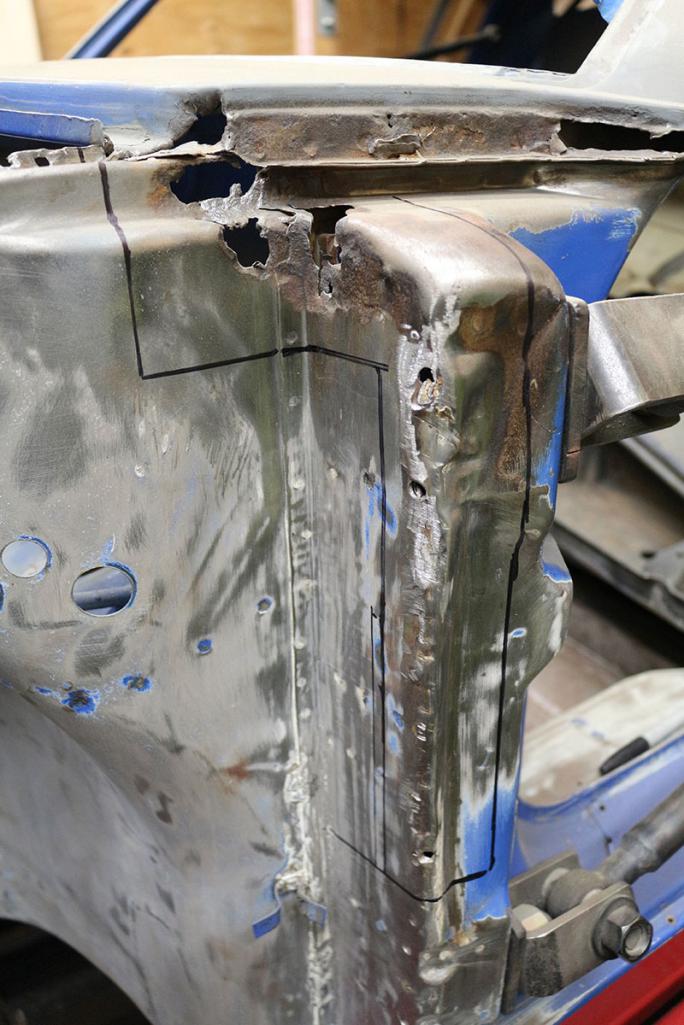
The driver door getting hyperextended did a number on the door pillar plus the rust at the top from I guess the cowl seal going bad.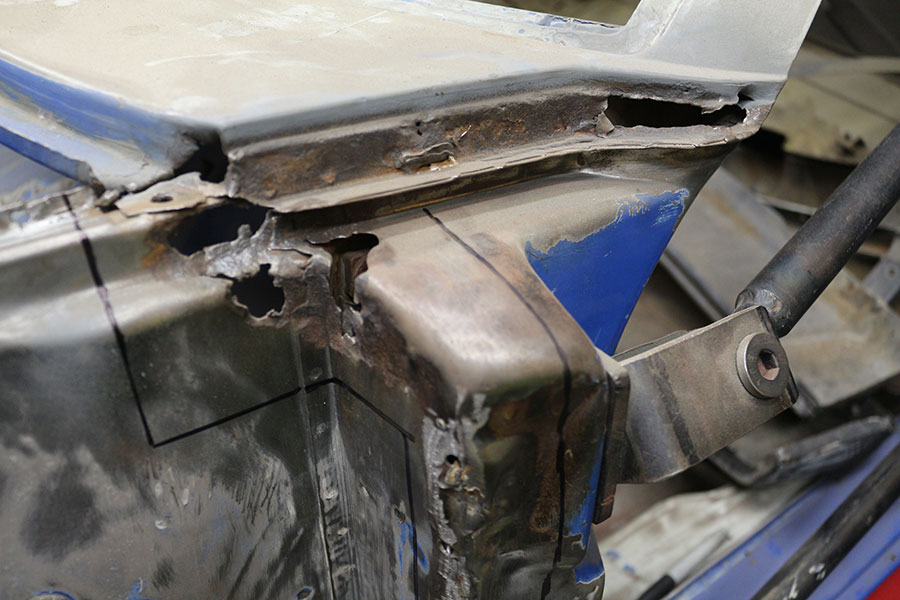
Te cowl section was rusted thin and damaged a bit when taking the fender out. -Tricky area for real. I decided to go in. I got a little out of hand on the windshield pillar, and Ill have to fix that some...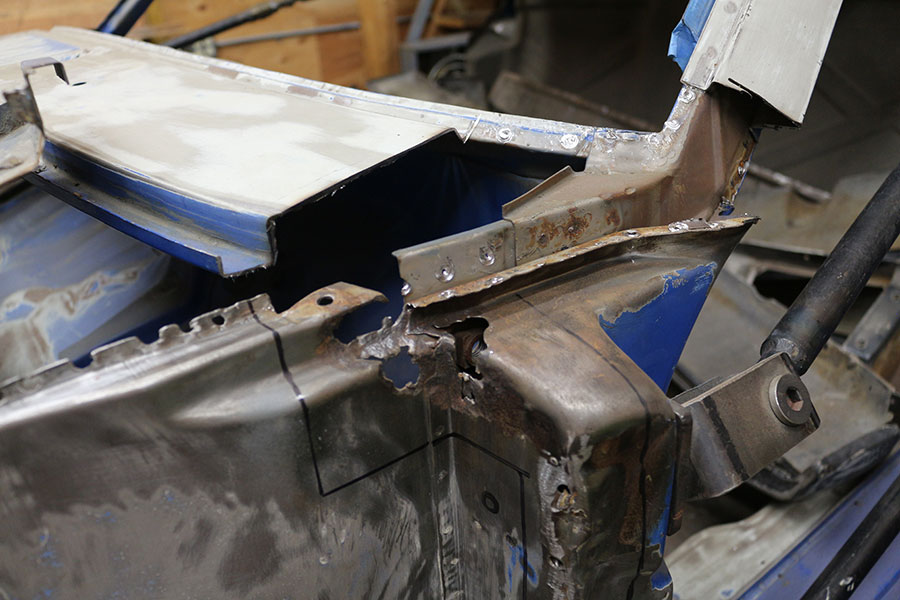
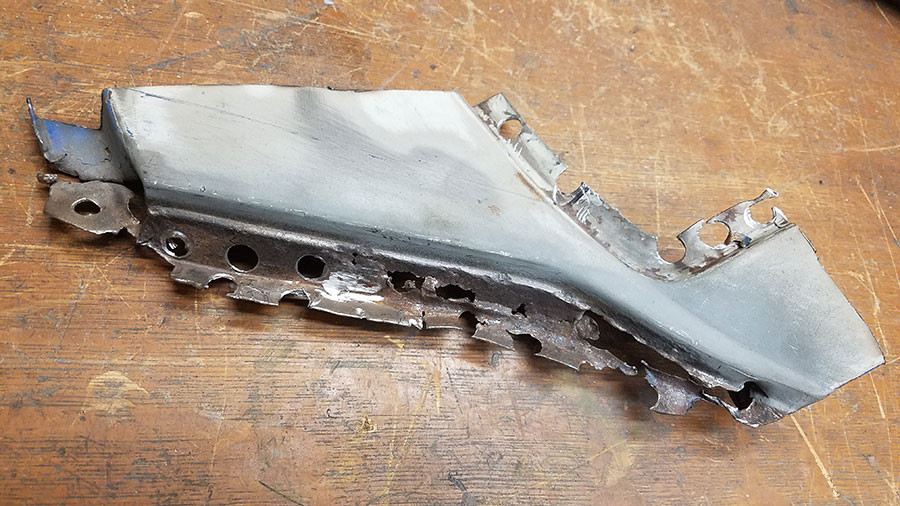
I went further in with that out of the way. The inner fender well rust and then the damaged area of the door pillar.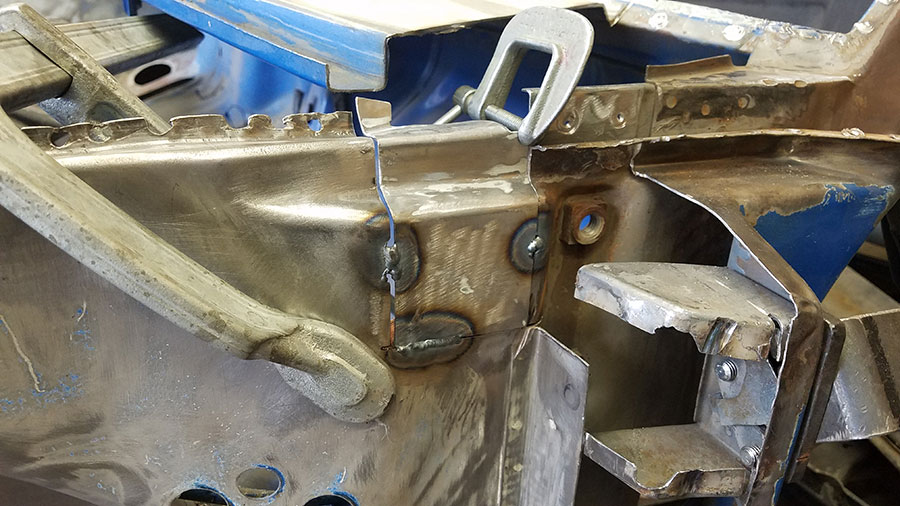
I bent up a replacement panel. The metal seems thicker here, idk. I used a bit of a scrap piece of a trunk that has a rear inner fender well that seems thicker also.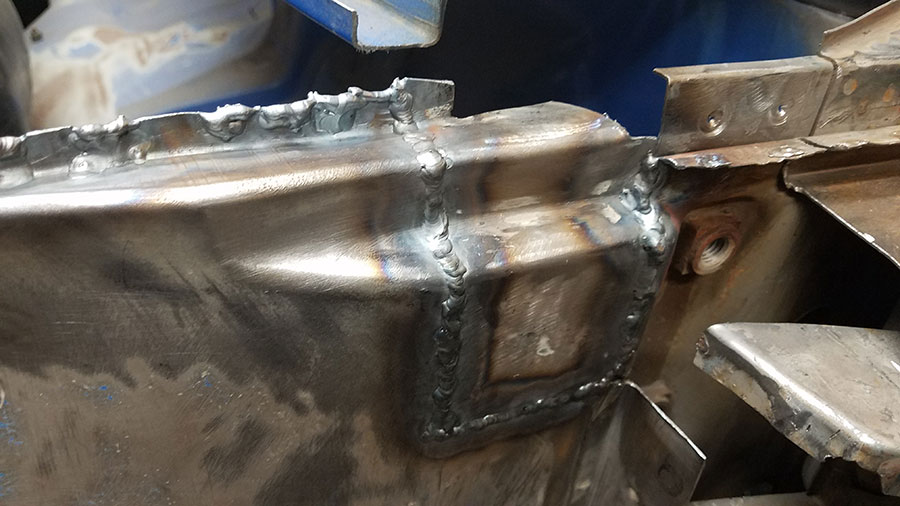
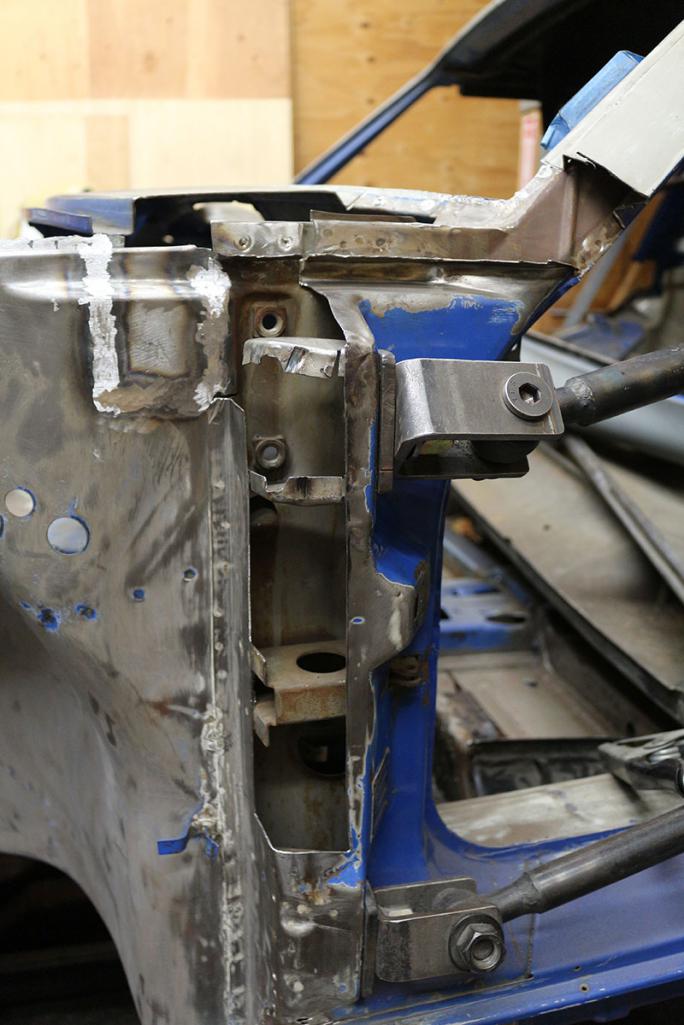
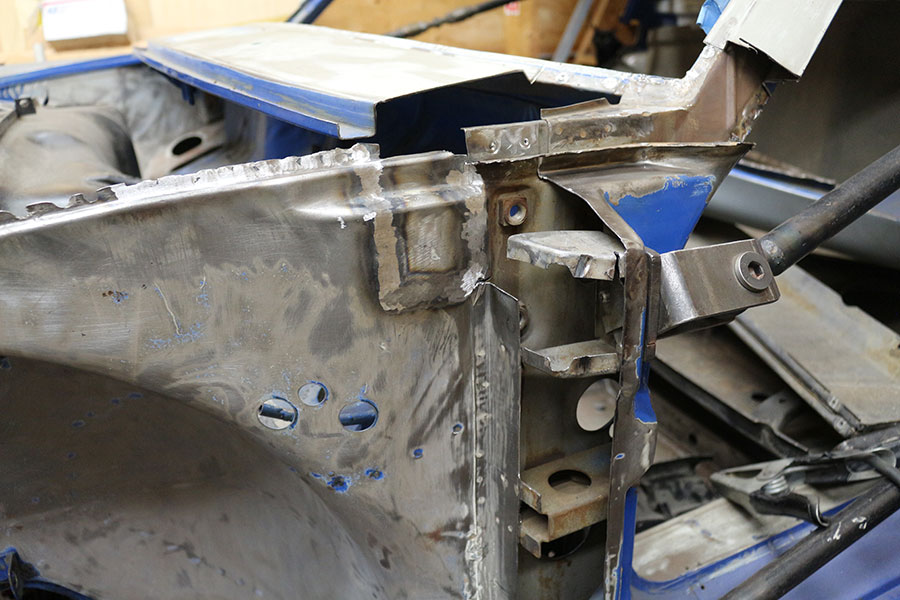
I had another door pillar from the parts car that I'd saved. It's rough getting the part I needed off. I should have taken a pic of it once I drilled out all the spot welds holding it, but you can kind of see here after closing them up and grinding them down flush.
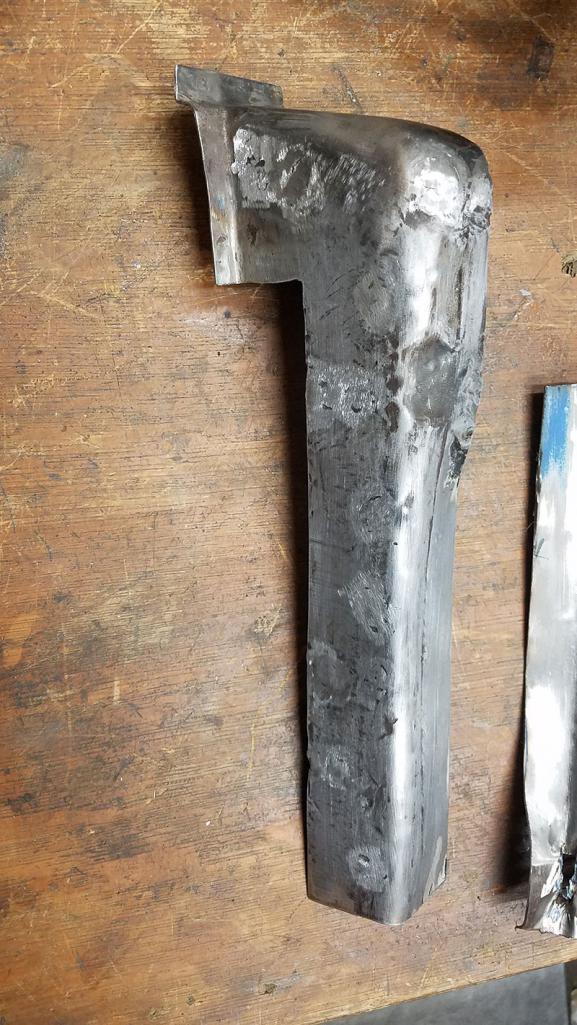
It took awhile to get the cut and the piece fitted, and I've been working on building up the lip at the top of the inner fender well where it was damaged from removing the fender, and at the front. Next to fix the fender itself and put the pillar patch back in.
I'm pretty slow, but I wanted to update even if it's now actually less together than it was lol This should be easier than the hellhole and will feel good to get conquered, needs to be done... anyway, coming along again
Posted by: sixnotfour May 30 2019, 02:28 AM
I dont know if you have a pillar patch piece, but AA made this ,,just an fyi...llookin good ..
Attached image(s)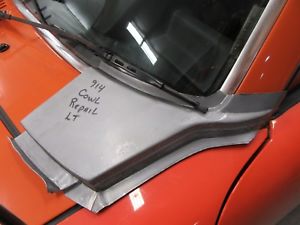
Posted by: Cairo94507 May 30 2019, 07:11 AM
nathanxnathan - So glad to see you still have the car and are back at it. We all, (mostly) know how things happen in life and projects get set aside for a bit. Life is complicated and can get messy. I am very happy to see you back at it and making progress. Soon the metal work will behind you and then it is all down hill at speed.
Posted by: Larmo63 May 30 2019, 08:29 AM
I met Nathan at the old Aliso Viejo cars and coffee. He was in a VW bus and super interested in all of our 914s.
I forgot about this thread too, good to see him back at it.
Life is too short to not drive your 914.
Posted by: nathanxnathan May 30 2019, 11:25 PM
I dont know if you have a pillar patch piece, but AA made this ,,just an fyi...llookin good ..
Wow, pretty awesome that they make it... might have to get out my wallet for it. I don't have as much in that dept as I used to, but if I value my time at anything, I'd be making out I think...
Posted by: sixnotfour May 31 2019, 12:01 AM
I dont know if you have a pillar patch piece, but AA made this ,,just an fyi...llookin good ..
Wow, pretty awesome that they make it... might have to get out my wallet for it. I don't have as much in that dept as I used to, but if I value my time at anything, I'd be making out I think...
I know you have the skillls ,,,sometimes money talks .... plus you you could recharge on the beach....
Posted by: 930cabman Nov 11 2021, 02:40 PM
Just for fun today I read through this (monumental) build thread. Wow I was hoping to see a completed awesome ride in the end, but as many of us (me included) have gotten stalled mostly because life gets in the way.
Hopefully you can get back into this, great workmanship with the completed work
Posted by: lesorubcheek Nov 11 2021, 04:25 PM
Glad this thread was bumped. First time reading and lots of great ideas. Wishing you the best @http://www.914world.com/bbs2/index.php?showuser=21899 and hopes you will get her completed. The visualizer is awesome! Many thanks for sharing this.
Dan
Posted by: jim_hoyland Nov 11 2021, 05:27 PM
Good to hear from you again
Powered by Invision Power Board (http://www.invisionboard.com)
© Invision Power Services (http://www.invisionpower.com)