Printable Version of Topic
Click here to view this topic in its original format
914World.com _ 914World Garage _ valve train geometry
Posted by: vsg914 Jan 24 2011, 07:36 AM
Does this look okay to you guys? This is at half lift.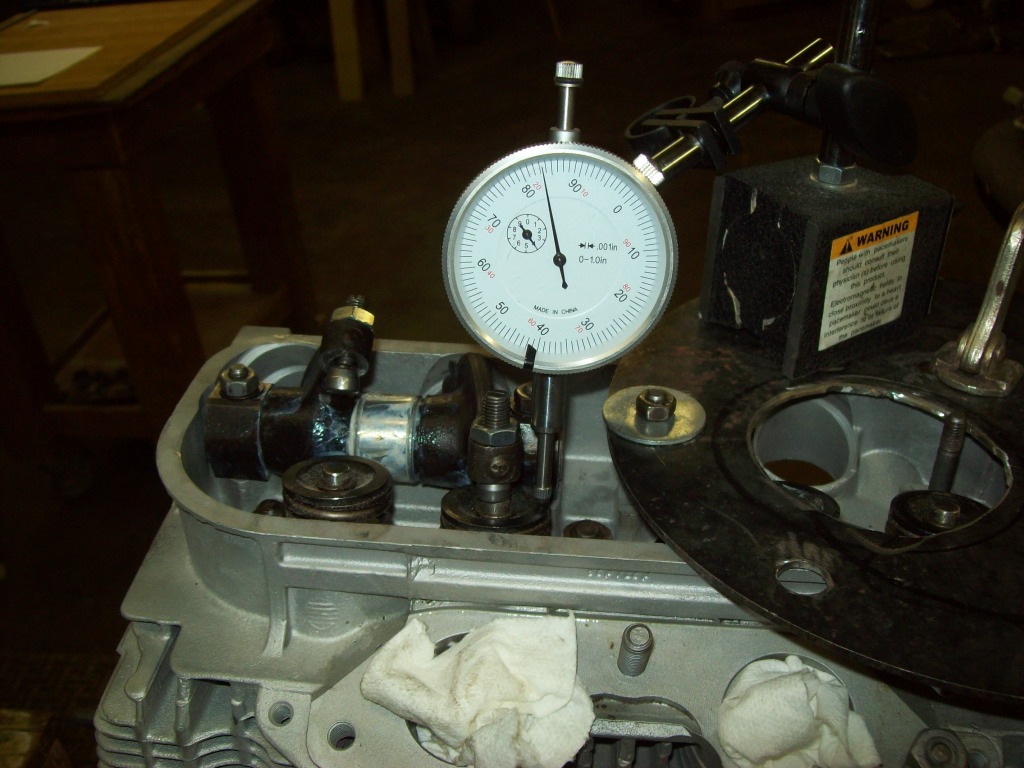
Posted by: Vacca Rabite Jan 24 2011, 08:50 AM
Looks pretty good. Seems like you are on the same plane from the stem to the lifter. Are you within 5% of the cam card lift at 100%? I can't tell, but it does not look like you ground the rockers for the elephant feet. Did you have to space them back to get enough clearance?
Zach
Posted by: nathansnathan Jan 24 2011, 09:14 AM
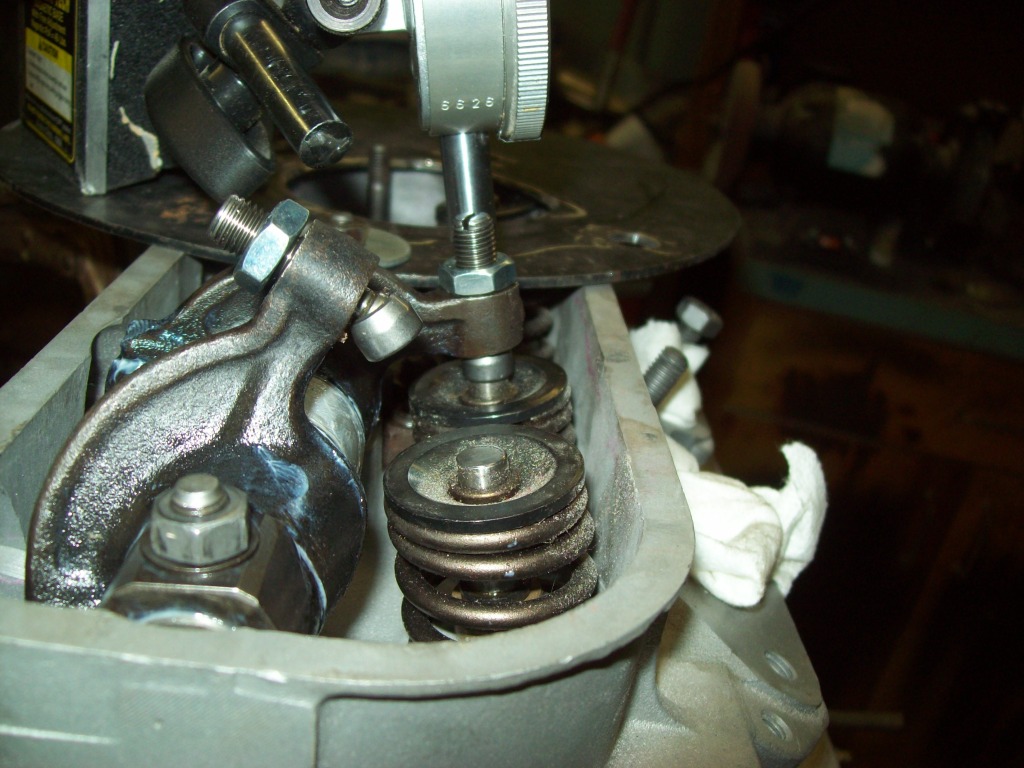
Looks like the 911 adjuster is hitting the rocker, like its adjusted out too much. It looks like they've been faced properly, but the trick will be to use shims under the rocker stands, maybe .060" or so.
The slotted end of the adjuster will be the limiting factor, it hitting the head cover. If you're willing/ able to shorten them and reslot that would be ideal.
Posted by: rhcb914 Jan 24 2011, 10:51 AM
I don't mean to pick on you but I really hope that you just bolted that head on to check your valve train geometry and your going to take it off and thorughly clean it.
There seems to be ALOT of dust and stuff on those retainers. Not good for a new engine!
Maybe it's just an anomoly in the picture?
Posted by: Vacca Rabite Jan 24 2011, 11:33 AM

Looks like the 911 adjuster is hitting the rocker, like its adjusted out too much. It looks like they've been faced properly, but the trick will be to use shims under the rocker stands, maybe .060" or so.
The slotted end of the adjuster will be the limiting factor, it hitting the head cover. If you're willing/ able to shorten them and reslot that would be ideal.

Even with facing my rockers, I still had to add a small spacer, and then grind .1 inches off the top of each adjuster and re-slot them.
Zach
Posted by: r_towle Jan 24 2011, 01:04 PM
Rockers do not appear to have been clearanced enough for the 911 adjusters.
Remove the rocker arms and grind off some more to ensure you dont have a binding issue with the swivel foot.
Ia agree, its dirty in there...
Rich
Posted by: Cevan Jan 24 2011, 01:15 PM
My rockers were faced and I ended up needing .030 spacers under the rocker shaft supports.
Posted by: toon1 Jan 24 2011, 02:58 PM
X2
Posted by: vsg914 Jan 24 2011, 04:52 PM
Thanks for the replies. Don't worry about "picking on me". I too old and thick skinned for that.
Rhcb, That is indeed an anomaly. There is no dust. That said, Everything will be taken apart and re cleaned and re lubed before final assy. That is when I don't have to take anything apart anymore.
This a test, I repeat, only a test. I was mainly wanting know if the indicator and adjuster look like they are aligned like they are supposed to be.
I'm using Jake's 9550 cam with valve train upgrade, and 96mm p&c's. I'm also using Jake's valve geometry article as this be my first time. Hey what the hell? I'm a 62 year old virgin!!!!!!!!!!!!!!! According to Jake's article, the lift of the 9550 should be .423. After measuring half a dozen times, I came up consistently with .433 total lift( well within the 5% if I did my math right) and pics are sitting at .2165.
Swivel foot is not touching, but its real damn close. I've already taken .060 off them, but have not beveled the bottom of the hole either. Is .030 the norm for shims? how do you arrive at that measurement? different size shims and traial and error?
Thanks for the replies and keep em coming please. I only wanna do this once!
Posted by: nathansnathan Jan 24 2011, 05:14 PM
About .060" off the rockers puts that surface even with the part that leads up to it... if that makes any sense. - You wouldn't want to go any further than that, so it looks like you've got the rockers right.
You'll want to leave room for adjustment so like 3 turns in, I'd start with. The rocker shims are really what you are adjusting when you set it up - you cut the pushrods to the lenght you need once you determine how far out the rockers need to be.
When I set mine up, it seemed the further out I shimmed it, the better it got, so I stopped at .060. ..again, it's the head covers in the way that are limiting.
Something else to think about, I was talking to Adrian at headflow masters about this one time. Something I haven't read in the procedures but that makes sense. Since the valve/ guide has more tendency to break/ cause wear when it's past half lift than before, to set it up so that the face of the adjuster is perpendicular to the valve slightly after half lift, and not at it. - The way I interpret this, it's going to be a compromise somewhere, so error in that direction if you can.
Posted by: Jake Raby Jan 24 2011, 07:11 PM
Looks like you need a bit more trimmed off the rocker face.. And some HD rocker studs/ nuts. Alignment looks ok.
Clean that dust off those components!!
Posted by: vsg914 Jan 24 2011, 08:19 PM
Is there a minunum thickness the rockers can be?
Have the studs, need nuts. I'll order some tomorrow.
About the cleaning, SIR, YES SIR! Haha!
Posted by: r_towle Jan 24 2011, 10:35 PM
good rule of thumb for any threaded fastener is you need the same amount of threads in contact as the diameter of the bolt or stud.
So, if the adjuster is 1/4 inch wide, the rocker should be no less than 1/4 thick at the threaded end.
You do still need to take a bit more off the bottom of those rockers..we can all see it.
The shims will also help raise up the rocker to add more clearance, but you really should be able to get the clearance you need from the rocker and use the shims to set your geometry.
For the future... A large green 50 gallon garbage bag will fit over a motor that is on a stand and keep the dust off it.
rich
Posted by: Jake Raby Jan 25 2011, 07:15 AM
ANY time I have to use shims to correct geometry I start looking for a problem.. We sometimes go a solid year or more without using them.. I can't think of a time when I've ever used them with my 9550 cam.
Powered by Invision Power Board (http://www.invisionboard.com)
© Invision Power Services (http://www.invisionpower.com)