Printable Version of Topic
Click here to view this topic in its original format
914World.com _ 914World Garage _ Jack Post Repair Question
Posted by: saigon71 May 6 2011, 03:33 PM
I welded a new jack tube on to the replacement wheelhouse section from Restoration Design today, aligning it perfectly with the square hole that came pre-punched in the new panel. When I started fitting the jack post brace, I had to adjust the bends on it by about 1/8" to get it to fit right. I am having a hard time getting accurate measurements from the old chunk of long I have because it is a disaster.
The question is, how reliable is the pre-punched guide hole? Should I just roll with it? Anyone else run into something similar?
Thanks in advance.
Pics: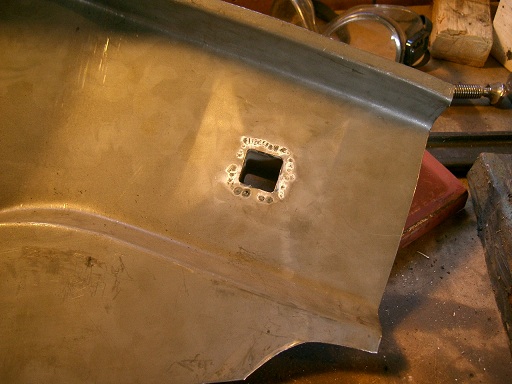

Posted by: TargaToy May 6 2011, 07:48 PM
Everything "reproduction" I ever buy requires some kind of customizing and fiddling with to get it to fit right. Is the bottom picture to show that the post is NOT fitting well? I think you're going to be fine. Once you drill it for the plug welds and get the first one done, you can use a drift to snug down the gap before each subsequent weld. I actually think that looks pretty good.
Posted by: saigon71 May 6 2011, 11:00 PM

Everything "reproduction" I ever buy requires some kind of customizing and fiddling with to get it to fit right. Is the bottom picture to show that the post is NOT fitting well? I think you're going to be fine. Once you drill it for the plug welds and get the first one done, you can use a drift to snug down the gap before each subsequent weld. I actually think that looks pretty good.
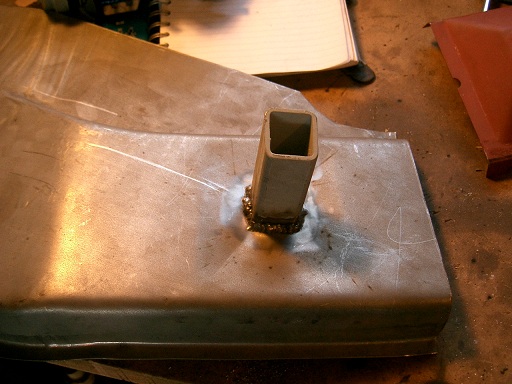
The bottom pic was to show what things were looking like after adjusting the bends on the support piece. My main concern was that I had to "move" both bends on the support piece up about 1/8" to make it fit right.
Thanks for the info...I thought I may be splitting hairs...just didn't want to end up realizing that the jack post was to high when I go to put the outer fiberglass rocker on.

Posted by: rhcb914 May 7 2011, 07:03 AM
Moving the bends 1/8 of an inch is NOTHING! These are repro parts. Some assembly required. 
Posted by: tomeric914 May 7 2011, 07:25 AM
I don't think your getting good weld penetration judging from the pictures. Looks kinda "boogery". Are you using a MIG with or without gas?
Posted by: Spoke May 7 2011, 07:46 AM
When I replaced the jack point on the passenger side, I had to sink the jack tube into the long. I was told that production longs had an indentation behind the jack tube.
My jack tube does not stick out that far from the support plate. You may have to sink the tube into the replacement long.
Check the back of the original long piece to see if it is recessed.
Posted by: saigon71 May 7 2011, 11:28 AM
I don't think your getting good weld penetration judging from the pictures. Looks kinda "boogery". Are you using a MIG with or without gas?
MIG with gas. I agree, it was not my best welding. The problem I had was that I burned through the thinner sheet metal at first and had to turn down the heat setting a bit.
Posted by: ppetion May 7 2011, 12:58 PM
Nice , I have to do one of mine soon.
Posted by: draganc May 7 2011, 02:52 PM
I don't think your getting good weld penetration judging from the pictures. Looks kinda "boogery". Are you using a MIG with or without gas?
MIG with gas. I agree, it was not my best welding. The problem I had was that I burned through the thinner sheet metal at first and had to turn down the heat setting a bit.
Start your weld and the thicker part and then let it "walk" over to the thinner sheetmetal. it happened to me as well. i had the open up as well the post cover.
d
Posted by: TargaToy May 7 2011, 07:00 PM
Hey, by the way. Did you know that wheelhouse section is supposed to be 2 ply? If you didn't get the inner part when you got the new steel, shoot Mike at Resto Design a note and he can get it for you.
Posted by: scotty b May 7 2011, 08:36 PM
i normally put the long on then fit the jack post to it using the hole in the outer rocker as my guide. That way I KNOW it is where it should be. Which BTW is usually NOT where the hole is punched but is very close. I then mark that spot, take everything off and cut the tube down to the proper depth,then weld it all together
Posted by: saigon71 May 7 2011, 08:45 PM
Hey, by the way. Did you know that wheelhouse section is supposed to be 2 ply? If you didn't get the inner part when you got the new steel, shoot Mike at Resto Design a note and he can get it for you.
Thanks for the heads up...I only have one ply. I will check with Resto Design.
Posted by: scotty b May 7 2011, 08:56 PM
Hey, by the way. Did you know that wheelhouse section is supposed to be 2 ply?
That's what makes it so squeezably soft
Posted by: saigon71 May 7 2011, 08:59 PM
i normally put the long on then fit the jack post to it using the hole in the outer rocker as my guide. That way I KNOW it is where it should be. Which BTW is usually NOT where the hole is punched but is very close. I then mark that spot, take everything off and cut the tube down to the proper depth,then weld it all together
Thanks Scotty B. The punched hole seemed a bit off to me. With your method in mind, I will clamp everything in place and make sure the outer rocker fits properly BEFORE welding the adjusted jack post support in place. It will be a PITA to get that post off the wheelhouse, but I would rather know now.
Posted by: avidfanjpl May 7 2011, 09:05 PM
I recommend ONLY Restoration Design from Canada's parts. It wasn't even close as to the quality of the other repro items out there.
I did both and had a pro weld the tube in using the plate as the guide. He even succeeded in getting the TOP of the plate welded without cutting the quarter panel.
He had it directly overhead and used a Mig or Tig something and was able to get both sides done. The jack plate was placed on measurements before the old plate was wheeled out.
Not easy, but my car will never have need for a repair on either side.
I even got to take pics of the longs with a mirror on the inside.
No rust at all.
But, not every car is the same challenge. I returned the red plate version to the company I bought it from. Resto Design stuff is killer.
Absolutely no fitting of any kind was needed.
John
Posted by: saigon71 May 8 2011, 06:58 PM
Checked the fit of the outer fiberglass long with the the outer wheelhouse clamped in place. Everything looks pretty good...so I welded the jack post support on today. I made out a little better welding the tube to the plate using the "walk" method mentioned in this thread. Overall, I am pleased with the results...but ended up grinding quite a bit. 
Thanks to everyone for their advice.
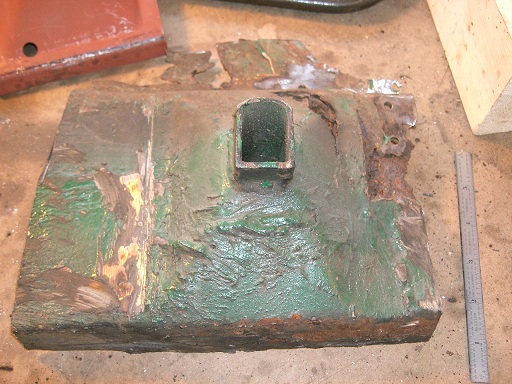
Test fitting the outer long:
Weld thru primer/rust encapsulator applied: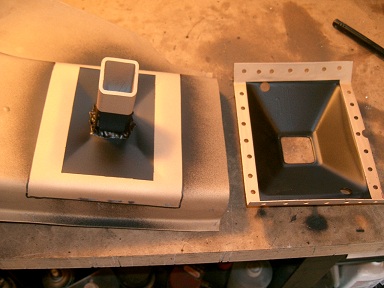
Finished product: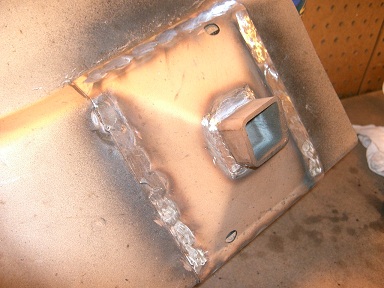
Posted by: jaxdream May 8 2011, 10:13 PM
I welded a new jack tube on to the replacement wheelhouse section from Restoration Design today, aligning it perfectly with the square hole that came pre-punched in the new panel. When I started fitting the jack post brace, I had to adjust the bends on it by about 1/8" to get it to fit right. I am having a hard time getting accurate measurements from the old chunk of long I have because it is a disaster.
The question is, how reliable is the pre-punched guide hole? Should I just roll with it? Anyone else run into something similar?
Thanks in advance.
Pics:
That hole that is in the jack post tube needs to be filled in / covered up , else wise water and such will get into the long area defeating what you are replacing. Good luck...
Jack / Jaxdream
Posted by: saigon71 May 9 2011, 02:10 PM
Hey, by the way. Did you know that wheelhouse section is supposed to be 2 ply? If you didn't get the inner part when you got the new steel, shoot Mike at Resto Design a note and he can get it for you.
Thanks for the heads up...I only have one ply. I will check with Resto Design.
Got a response from Mike at Restoration Design...they are shipping the part right away. Thanks for this info!
Posted by: saigon71 May 9 2011, 02:12 PM
I welded a new jack tube on to the replacement wheelhouse section from Restoration Design today, aligning it perfectly with the square hole that came pre-punched in the new panel. When I started fitting the jack post brace, I had to adjust the bends on it by about 1/8" to get it to fit right. I am having a hard time getting accurate measurements from the old chunk of long I have because it is a disaster.
The question is, how reliable is the pre-punched guide hole? Should I just roll with it? Anyone else run into something similar?
Thanks in advance.
Pics:
That hole that is in the jack post tube needs to be filled in / covered up , else wise water and such will get into the long area defeating what you are replacing. Good luck...
Jack / Jaxdream
Gonna wait & see if the 2nd ply addresses this, if not, I will make a cover and weld it in. Thanks for the tip!
Posted by: TargaToy May 9 2011, 04:32 PM
Here's what the two pieces from RD look like. 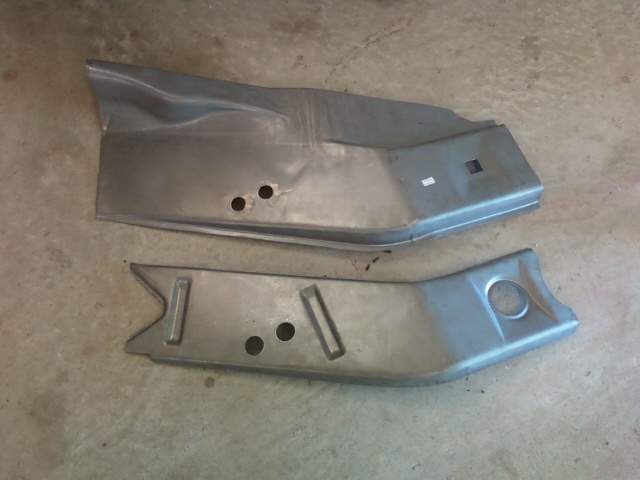
Posted by: saigon71 May 9 2011, 05:25 PM
Here's what the two pieces from RD look like.
This has been quite an education for me - thanks targatoy! Anxiously awaiting the 2nd ply to see how this all goes together.

Posted by: TargaToy May 9 2011, 08:15 PM
I just wish somebody made the same wheelhouse parts for the driver's side. Mine was nearly as rotten on that side as the PS and I had to make all of that area myself before adding the RD jack post. It's been very time consuming. ...but rewarding!
Posted by: saigon71 May 10 2011, 06:19 AM
I just wish somebody made the same wheelhouse parts for the driver's side. Mine was nearly as rotten on that side as the PS and I had to make all of that area myself before adding the RD jack post. It's been very time consuming. ...but rewarding!
I agree! My drivers side doesn't look as bad, but I still think I will end up making some parts from scratch. I may have to hit you up for some pics of what you did!
Posted by: scotty b May 10 2011, 05:35 PM
I just wish somebody made the same wheelhouse parts for the driver's side. Mine was nearly as rotten on that side as the PS and I had to make all of that area myself before adding the RD jack post. It's been very time consuming. ...but rewarding!
 I am seeing more and more rotted drivers sides that people want repaired. Mike
Posted by: retro74 Jul 21 2011, 07:54 PM
Here's what the two pieces from RD look like.
The bottom piece (the inner piece) is no longer listed on Restoration Design. AutomobileAtlanta has the inner piece. If you are just buying the outer piece, you need to fab some inner 16 gauge layers. This part of the car is indeed two layers and those two layers stop where the jackpost meets the longitudinal (horizantal) part.
Joe
Posted by: retro74 Jul 28 2011, 07:08 AM
Here's what the two pieces from RD look like.
I just got mine from Restoration Design. YES I wish that they made the Driver's side too, but so far, they do not.
The bottom piece (the inner piece) is no longer listed on Restoration Design because it is already attached (spot welded) to the outer piece. The picture above shows both pieces, bu they are now BOTH included in the purchase and are indeed spot welded together.
AutomobileAtlanta has the inner piece alone. If you buy the Restoration Design piece you get BOTH. If you buy from Automobile Atlanta, you might need to buy both the outer and inner as pictured above.
This part of the car is indeed two layers and those two layers stop where the jackpost meets the longitudinal (horizantal) part. Restoration Design solves this with the combined piece.
Joe
Posted by: peteyd Jul 28 2011, 08:32 AM
The two pieces now come spot welded together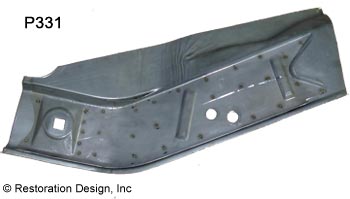
Posted by: saigon71 Jul 28 2011, 01:56 PM
The two pieces now come spot welded together
Excellent! Very helpful.

Powered by Invision Power Board (http://www.invisionboard.com)
© Invision Power Services (http://www.invisionpower.com)