Printable Version of Topic
Click here to view this topic in its original format
914World.com _ 914World Garage _ WhO's THE BEST
Posted by: mrgjones May 11 2011, 09:57 AM
Alright. There are a lot of products on the market that promise to remove rust and prevent it from coming back. From reading the threads it seems the opinions on this forum are as varied as the products themselves. This thread is about making a convincing argument... or a ludicrous allegation, which ever you find appropriate. Horror stories are welcome but please limit yourselves to the chemical rust abatement theme already established. For you slow starters, here is your motivation.


Posted by: sww914 May 11 2011, 10:12 AM
Rust Mort.
Posted by: PeeGreen 914 May 11 2011, 10:14 AM
I believe Ospho is one of the best out there. Amazing stuff.
Posted by: Bartlett 914 May 11 2011, 10:22 AM
Rust Bullet....NOT
Posted by: mrgjones May 11 2011, 10:22 AM

I believe Ospho is one of the best out there. Amazing stuff.
Is this based on other one-step products out there or would you say it's better than the three-step products as well?
Posted by: mrgjones May 11 2011, 10:24 AM
Rust Bullet....NOT
Rust bullet has a pretty convincing commerical so this is good to know. Can you share a bit of why you hate it?
Posted by: mrgjones May 11 2011, 10:30 AM
Rust Mort.
Rust Mort. I've never heard of it so I looked it up. It's an acid based product but I didn't learn much more. Is this a one-step or a three-step? It seems that there should be some sort of neutralizer to prevent acid induced corrosion.
Posted by: PeeGreen 914 May 11 2011, 10:42 AM
Rust mort is good but you have to rinse it well. The whole rinsing part is a pain.
Ospho is a one step and go product that works very well. Both of these products I would use and recomend.
Posted by: ArtechnikA May 11 2011, 11:29 AM
For light rust, tin snips.
For heavy rust, plasma cutter.
For extensive light rust, acid dip.
'rust conversion' is one thing, and the phosphoric acid stuff seems to be pretty good.
The 'encapsulation' products are starting to scare me. They're based on the premise that the coating will -never- crack, that you missed not even a pinhole of coverage, and that you were able to fully coat both sides. And that if you can't see the rust, you can pretend it's not there...
They're also hard to get off when other repair or modification is desired.
You think we have rust problems? (We do...) But the 356 guys have been fighting it longer than we have - their steel was certainly no better, the factory corrosion treatment similarly nonexistent, and they had a 20-year head start. I don't believe any of the prominent 356 restoration guys use anything like an encapsulation product.
Posted by: underthetire May 11 2011, 11:37 AM
Loctite Extend. Been using it for years. But i agree with the  method first.
http://www.loctiteproducts.com/p/7/24/s_trmt_extend/overview/Loctite-Extend-Rust-Neutralizer.htm
Posted by: dlestep May 11 2011, 12:23 PM
...I took my body down to metal and treated it with Phospho four years ago, and still no rust on any of the treated surfaces.
It leaves the surface a medium grey.
The car has been on jack stands in the garage which is vented to outside air....I live in South East Florida, so the humidity ranges from 80 to 100% !
I have also used Metal Ready, after removing all rust physically. I have used it also after I have cut out pitted areas and replaced with clean metal.
I pefer to Phospho and epoxy primer over clean metal in preparation to get maximum delay in rust. Noticed I said "...maximum delay."
I trust rust converter, like I trust the curing properties of bear shit smeared over a wound.
There are better people and methods...I would ask Scotty B, if I were you. He massages a larger cross section of cars than any of us.
Posted by: ArtechnikA May 11 2011, 12:41 PM
I trust rust converter, like I trust the curing properties of bear shit smeared over a wound.
Good point - there are many interpretations of the phrase 'rust convertor.'
When I wrote my initial response, I used it in the sense of 'reduction chemical reaction' which is what the acid products do - chemically replace iron oxide with something else. (Reduction is the opposite of oxidation.) So you're using the magic of chemistry to get the oxygen out of iron oxide.
The phosphoric acid stuff liberates the oxygen and in turn promotes the formation of iron phosphate, in addition to the zinc (an excellent corrosion inhibitor) and/or manganese phosphates present in the chemical. (Parkerizing, a large-scale rust-inhibition process, uses basically this principle.)
So that's what -I- mean when I talk about a 'convertor.'
There's a bunch of Magick Shytte products that like to call themselves 'convertors' and I agree when Dave on his assessment of their curative properties. They basically 'convert' the rust from rust you can see to rust you can't see. For at least as long as the product warranty, the terms of which seem to depend on all manner of impossible-to-attain conditions involving the dark of the moon, eye of newt, and hair of frog...
Posted by: Bartlett 914 May 11 2011, 02:06 PM
Rust Bullet....NOT
Rust bullet has a pretty convincing commerical so this is good to know. Can you share a bit of why you hate it?
I have used it with some success but... I used some on a part of my car and in no time the rust returned. A friend used it for a mount for a generator on a truck. Total rust in less then six months. This was clean new steel.
I have had some good results with Chassis saver. I have used less than 1 quart so I cannot really endorse it.
Posted by: enderw88 May 11 2011, 02:39 PM
I used Eastwood Rust Encapsulator on the steel frame of my SuperStalker. I was very careful about prep and application, following the guidelines to the letter. It chipped terribly after less than a year. I was so bad I completely disassembled the car to have the frame powder coated. I won't make that mistake again.
Posted by: Ductech May 11 2011, 03:49 PM
I used Eastwood Rust Encapsulator on the steel frame of my SuperStalker. I was very careful about prep and application, following the guidelines to the letter. It chipped terribly after less than a year. I was so bad I completely disassembled the car to have the frame powder coated. I won't make that mistake again.
That must be nerve racking to have to disassemble a car all over again.... and then to powder coat that would be a huge project i would think. I hated getting powder coated parts from powder coaters, when i worked at a bike dealership. The powder coaters were usually monkeys about powder coating in every bolt hole as to make installation a nightmare of scraping powder coat of seating surfaces and chasing threads
How much do suspect powdercoating would cost.... not including your labor
Posted by: Madswede May 11 2011, 06:16 PM
I wonder if anyone has done a large-scale electrolytic rust removal? In my mind that would be the best way if rust is pervasive but not so bad as to warrant and 
I mean it obviously will leave whatever steel left that is not iron oxide behind, so any pitting would be very evident afterwards. Could be more cost-effective than you'd think, everything you need is very cheap.
Hmm, except for ... what to put the body in? I guess it wouldn't be too cost-effective considering the largish plastic pool you're going to need! It might be doable with only 4' depth, do half the body one way then the other ... obviously some sort of rotisserie or other means of suspending the body in the solution would be required.
I say borrow a friend's pool and swingset when they're outta town... 
- Nelson
Posted by: silver74insocal May 11 2011, 06:26 PM
anyone have experience with naval jelly? ![popcorn[1].gif](style_emoticons/default/popcorn[1].gif)
Posted by: enderw88 May 11 2011, 06:39 PM
I used Eastwood Rust Encapsulator on the steel frame of my SuperStalker. I was very careful about prep and application, following the guidelines to the letter. It chipped terribly after less than a year. I was so bad I completely disassembled the car to have the frame powder coated. I won't make that mistake again.
That must be nerve racking to have to disassemble a car all over again.... and then to powder coat that would be a huge project i would think. I hated getting powder coated parts from powder coaters, when i worked at a bike dealership. The powder coaters were usually monkeys about powder coating in every bolt hole as to make installation a nightmare of scraping powder coat of seating surfaces and chasing threads
How much do suspect powdercoating would cost.... not including your labor
Well, it wasn't great, but I do enjoy building. Now that it's done (again) it is going on the market so I can pay for my next project, a 914! I actually have a VERY competent powder coater very nearby. Did the entire frame and a bunch of smaller components for $750. Required NO extra labor to clean anything. He's called "Perfection Powder Coating" and he means it!.
Posted by: mrgjones May 11 2011, 07:36 PM
I wonder if anyone has done a large-scale electrolytic rust removal? In my mind that would be the best way if rust is pervasive but not so bad as to warrant
and - Nelson
Electrolytic rust removal is a bad idea for anything structural. The process causes absorption of hydrogen which increases the brittleness of the steel. The only way to reverse this would be to bake the entire frame at a very high temp for several hours.
 Also, the process only works line of sight so it would be nearly impossible to hit all the nooks and crannies.
  I did see a youtube video about this guy in Australia who soaks body panels in pure molasses for a week or two then hits it with a pressure washer. He uses an old cattle trough as a basin. The result is pretty amazing.
Posted by: bigkensteele May 11 2011, 08:33 PM
You think we have rust problems? (We do...) But the 356 guys have been fighting it longer than we have - their steel was certainly no better, the factory corrosion treatment similarly nonexistent, and they had a 20-year head start. I don't believe any of the prominent 356 restoration guys use anything like an encapsulation product.
There is a shop here in Cinci that does high-end 356 restorations. They had a meet and greet for PCA. One car in his shop was a really sweet 356B coupe that was very nicely restored. The owner had brought it in because there were a couple of bubbles at the bottom of the hood down near the nose. It was an NOS hood that was put on when the car was restored. He showed us where he cut away the bracing on the back, and underneath was a mess. His theory was that it was stored standing on the nose end, possibly in an unheated environment, and that the condensation/moisture had no where to go.
Now think about the inside of our longs, all of those areas that are two layers of steel and/or hollow. My guess is that there isn't a rust-free 914 in existence. I like this thread.
Posted by: sean_v8_914 May 11 2011, 09:26 PM
"WhO's THE BEST, rust remover/ encapsulator"
NONE!
THERE IS NO ONE STEP SOLUTION. THERE IS NO SHORT CUT. THERE IS NO ENCAPSULATION THAT IS GOOD
there are proceedures that combine various products that MUST be used in a VERY SPECIFIC sequence. any other atempts to simplify the proper chemical abaitment is just pissing in teh wind
there is a thread here where me and scotty B divulge our techniques. I am not good with our site search engine but im sure others couldd help find that thread. there were several others in this thread who also understand the chemistry of rust
Posted by: mrgjones May 11 2011, 09:58 PM
I've been kind of eying the por 15 products but I'm not sure about the final, painting of the acrylic shell part. It looks great but I just don't like the idea of not being able to tell if something is happening underneath. As a result of his thread I'm now leaning toward a three step including marine clean, ospho, and some sort of zinc rich coating/ primer. If anyone finds those threads, that would be interesting to read through.
Posted by: avidfanjpl May 12 2011, 01:17 AM
Silver in Socal
Stay away forever from Naval Jelly.
It has to be blasted off the car. It sucks.
I had a ton to remove on my car. NO FUN.
Cut, weld, or convert. I like the POR stuff, but many have other opinions.
My car never sees rain.
Marine Clean, then Metal Ready, then anything but not naval jelly.
It is poison to a 914 finish.
John
Posted by: ewdysar May 12 2011, 01:40 AM
"WhO's THE BEST, rust remover/ encapsulator"
NONE!
THERE IS NO ONE STEP SOLUTION. THERE IS NO SHORT CUT. THERE IS NO ENCAPSULATION THAT IS GOOD
there are proceedures that combine various products that MUST be used in a VERY SPECIFIC sequence. any other atempts to simplify the proper chemical abaitment is just pissing in teh wind
there is a thread here where me and scotty B divulge our techniques. I am not good with our site search engine but im sure others couldd help find that thread. there were several others in this thread who also understand the chemistry of rust
Sean,
I found this thread http://www.914world.com/bbs2/index.php?act=ST&f=2&t=116018
Is this the one that you were referring to?
Eric
Posted by: sean_v8_914 May 12 2011, 07:31 AM
yup. I bumped it. Perry gives a good write up
Posted by: mrgjones May 12 2011, 08:48 AM
Just finished reading the other thread. There's a lot of good information there but I gotta say it left me with another question. If the phosphoric acid is converting iron oxide to iron phosphate, what is the advantage of rinsing it out? Unless there's another chemical reaction going on it seems advantageous to have a little residue on the parts (unless it interferes with paint)
Posted by: scotty b May 12 2011, 08:58 AM
Just finished reading the other thread. There's a lot of good information there but I gotta say it left me with another question. If the phosphoric acid is converting iron oxide to iron phosphate, what is the advantage of rinsing it out? Unless there's another chemical reaction going on it seems advantageous to have a little residue on the parts (unless it interferes with paint)
What is being done with the wash, is there is remaining phosphoric acid, that has not made the conversion. You are washing that off so it doesn't continue to sit on the metal and
A: eat away at the metal over time and
B: cause issues with the paint going on top of it.
Best removal = blasting
Best "converter " = phosphoric acid
Best encapsulator = B.S...... hocus pocus it's all bogus
Posted by: kwales May 12 2011, 11:35 AM
I think the electrolytic process is the way to go. There is a place in Cincinnati on Northland Blvd near the Porsche dealership called American Metal Refinishing that seems to use it and can do a whole car in their tank. I use it at home for everything with no problems. Per the line of sight, yes, but a little creativity never hurt. Can you say coathanger electrode inside a tube? American Metal refinishing can get inside of the cavities if you request it. They removed the paint, inner foam, and all of the the rust from my trunk for $60-$70. The worst that I had to do was slap the rear lip area of the trunk to knock the chunks of blackened and killed rust out of the latch hole. Not sure what process they used as the blackened rust bubbles aren't created with the electrolytic process, but it worked.
Per the hydrogen embrittlement concerns, do your metallurgy. I think you will find that hydrogen embrittlement affects really HSLA ( high strength low alloy) steels or hardened steels, and doesn't do much of anything with non-heat treated steels like the mild steels. For those of you that don't know, mild steels were the automobile steel of choice due to the ductility, low cost and ease of formability before the late 70s. The Japanese pioneered the use of HSLA steels in the mid to late 70's which made the body panels both harder and thinner due to heat treating. HSLA steels are succeptable to hydrogen embrittlement and reduced strength from heating which is why they don't recommend welding late model cars. HSLA steels are also highly prone to rust as witnessed by the notoriety of 70's and 80's Hondas as rustbuckets with shock towers shooting through the hoods, gaping holes under the bumpers, and windshield pillars rusting through for your rollover pleasure. No, I wouldn't throw a nitrided crank in the tank, and ball bearings may fall off the electrolytic list, but I have seen pristine cast iron engine blocks as they come out of the tank.
Yes, it was my amazing rusting-before-your-eyes POS Honda that made this engineer research the mild steel vs HSLA topic.
Posted by: Madswede May 12 2011, 12:39 PM
Per the hydrogen embrittlement concerns, do your metallurgy. I think you will find that hydrogen embrittlement affects really HSLA ( high strength low alloy) steels or hardened steels, and doesn't do much of anything with non-heat treated steels like the mild steels. For those of you that don't know, mild steels were the automobile steel of choice due to the ductility, low cost and ease of formability before the late 70s. The Japanese pioneered the use of HSLA steels in the mid to late 70's which made the body panels both harder and thinner due to heat treating. HSLA steels are succeptable to hydrogen embrittlement and reduced strength from heating which is why they don't recommend welding late model cars. HSLA steels are also highly prone to rust as witnessed by the notoriety of 70's and 80's Hondas as rustbuckets with shock towers shooting through the hoods, gaping holes under the bumpers, and windshield pillars rusting through for your rollover pleasure. No, I wouldn't throw a nitrided crank in the tank, and ball bearings may fall off the electrolytic list, but I have seen pristine cast iron engine blocks as they come out of the tank.
 You took the words right out of my mouth!
  I would emphasize that the most common cause of hydrogen embrittlement in steel is where there is high pressure and relatively high temperatures during the manufacturing process, both of which will not exist in an electrolytic solution. A high concentration gradient could drive H2 to diffuse into steel as well, but the reduction reaction isn't fast enough (and hydrogen is the lightest gas there is) that it won't be in very high concentration in the solution such that there would be that concentration gradient as a driving force for significant diffusion.
 Also, the "line of sight" thing is true in a way. For whatever reason this occurs (I suspect its more of a rate of reaction due to the electrical field between the anode and cathode as opposed to not working at all), from my own research it seems a large enough tank and spacing between the anode and cathode solves this problem to a large extent.
Anyway, I still think electrolysis would be a promising method for that special case where the car/parts in question have lotsa rust all over but not enough to ruin the structural integrity of the part (in other words cut it out and replace it).
Posted by: ArtechnikA May 12 2011, 12:46 PM
OK as long as we're driving down this path - what about electroless (chemical) nickel?
Sure, it would be expensive (like anything to do with early Porsches and rust is cheap...). Are there facilities big enough to do a whole tub ? Or is this just for small parts ?
Posted by: zymurgist May 12 2011, 01:14 PM
I've read good things about electrolysis on old motorcycle forums. Planning to treat the inside of the Yamaha's gas tank this way.
Posted by: kwales May 12 2011, 05:29 PM
When I went to get my trunk done at American Metal Cleaners (new name?), they were hauling a Ford model T out of the tank. Their process stripped everything off that thing, and you could see where the rusted out metal patches needed to go. They were very elusive as to the process, but they showed me a 4 ft by 6 ft wire basket that held a bunch of treated parts. I noticed , in addition to the support cable, a big assed braided electrical wire attached to the basket, and field lines burned into the stainless of the basket. That told me that acid wasn't involved. My bare assed trunk, doors and other parts sat for 6 or more months in high humidity, without rusting. About 10 years ago, they said a whole car was about $1k for treatment. Probably more now due to time, and the enviro-police.
Per naval jelly, it contains the same chemical as ospho in a jelly binder to hold it in place. In places like the side of a fender, the ospho will run off like water, and the naval jelly will stay put. Just make sure you read the naval jelley container directions. They reccomend washing the residue off before it dries. If you want ospho to stay in place on the side of a car, try a saturated cotton ball. It's better than nothing, but not much.
I've done electroless nickel plating on a lot of production parts, and it is one of the stages of a chrome part. It's also a bitch to get paint to stick to it.
Ken
Posted by: mrgjones May 12 2011, 06:48 PM
I've done electroless nickel plating on a lot of production parts, and it is one of the stages of a chrome part. It's also a bitch to get paint to stick to it.
Ken
Since we're going all out here, why bother to paint when we can reverse the leads and just electroplate the whole thing?
 Of course you're completely right about mild steels being less susceptible to the effects of hydrogen embrittlement. You can even use it on the hardened steels as long as it's treated in an industrial oven at a proper temp and time after the process. I've used a homemade setup on lots of small parts and it works great!
I've never seen a shop around my neck of the woods that does this professionally, but it seems like a great way to go. I don't think I'd trust things like motor mounts, suspension components, etc. unless they were heat treated afterwards but I'm sure a specialty shop would be able to handle all of that and give speciific info about how to care for the product.
Posted by: Madswede May 13 2011, 12:55 AM
As a chemical engineer kinda looking to branch out into other things, I am seriously considering, as a result of this thread, developing my own metal oxidation removal process/shop. There are a lot of options that the cost/benefit ratio may support such that I'm thinking this is a Good Thing to get into.
Wait. Why the hell did I just tell everyone else that idea??
Posted by: dlestep May 13 2011, 10:03 AM
...too late now, buddy...I purchased the property, chemicals and infrastructure over the phone while I was reading your email...na na, na na, na---na....
Posted by: dlestep May 14 2011, 07:29 AM
...too late now, buddy...I purchased the property, chemicals and infrastructure over the phone while I was reading your email...na na, na na, na---na....
...just kidding have at it !!!!
Posted by: kwales May 14 2011, 12:47 PM
One other thing with the electrolysis process is that it doesn't affect rubber since the solution merely needs to be conductive not corrosive. Old tires or rubber bushings should be unaffected.
Heck, since the rust removal process requires a negative electrical connection to the rusty part, the torsion bars in the front might well be suspended in the rubber bushings and electrically isolated from the current flowing through the body. That means the torsion bars would not be subjected to the electrical process, and probably wouldn't suffer hydrogen embrittlement. Without conducting, they would merely be wet while in the tank.
Taking that out a little farther, I'm betting that adding rubber insulators or clipping conducting wires from the front fender to the front "A" arms may vary the results on the front arms. The isolation/conduction tricks could be carried to other body parts to produce a desired result. 
Posted by: mrgjones May 14 2011, 01:26 PM
This has got me thinking how I can build a giant tank in the backyard. For the little setup I've got I made a grid out of rebar. I think I'm gonna need a lot more rebar.
Posted by: kwales May 14 2011, 04:52 PM
On the first try, I rusted a positive electrode steel strip through in about 6 hours. Stainless holds up much better. Being an Engineer, I saved stainess rods and tubes that were being thrown away. Have a 5 gallon plastic bucket, a plastic under the bed tray, and a cheap plastic kiddy wading pool for tanks. I use lye as a conductor, as it helps eat the paint. The teener parts can spend a lot more time in the tank due to the zinc based paint they used.
The darned druggies caused a ban on lye, but some soap sites still sell it. Theoretically, baking soda will work as a conductor. Finally found a box of "washing powder" and will try it next.
Ken
Posted by: rohar May 17 2011, 08:07 PM
There's a couple of sponges, a 2" steel strap and a rock in my hell hole right now. I've checked it a couple of times and the strap is starting to look like shiat so good things are happening.
My hell hole isn't to the point of "cut it out and replace it". Will post pics of the results.
Posted by: rohar May 17 2011, 09:18 PM
Ok, so I've had it running on 5 amps for about 4 hours. I've ground the crap off the sacrificial piece twice. Given that, it must be coming along nicely right? Right?
After the last time, I found it takes about 10 minutes for the darned thing to get all covered, shoulda been clearing the slag faster.
Posted by: sean_v8_914 May 18 2011, 07:50 AM
this thread has taken a very interesting turn.
rohar: post some pics of this magial rig
Posted by: rohar May 18 2011, 08:42 AM
I took picks, I'll have them posted shortly. This process takes a while, but it's doing it's thing. I think I'm gonna get a fist mal and beat this anode into a little better shape.
Posted by: sean_v8_914 May 18 2011, 08:59 AM
maybe a pneumatic scaling gun would help
Posted by: rohar May 18 2011, 09:13 AM
It's not the crud, there's a bit of a curve in the metal I'm trying to derust. That leaves a bit larger gap between the anode and the steel there so I'm thinking bending the strap to match will help. I'm gonna let it cook for a bit, I've got some other bad ideas that might pop up in the next few hours.
The sponges between the strap and the metal look awful and the strap keeps getting covered, so it's definitely pulling rust up.
Posted by: mrgjones May 18 2011, 09:25 AM
On the first try, I rusted a positive electrode steel strip through in about 6 hours. Stainless holds up much better. Being an Engineer, I saved stainess rods and tubes that were being thrown away. Have a 5 gallon plastic bucket, a plastic under the bed tray, and a cheap plastic kiddy wading pool for tanks. I use lye as a conductor, as it helps eat the paint. The teener parts can spend a lot more time in the tank due to the zinc based paint they used.
The darned druggies caused aban on lye, but some soap sites still sell it. Theoretically, baking soda will work as a conductor. Finally found a box of "washing powder" and will try it next.
Ken
You know when you run a current through stainless it off gases chromium.
That's one toxic kiddy pool you've got. Baking soda works great as a conductor and its extremely cheap. That's what I use. I've been using rebar welded into a grid for my cathode and haven't seen any significant problems losing material. The surface gets rusty but is cleanable. I also run it on a small battery charger so the amperage is low.
Posted by: mrgjones May 18 2011, 09:31 AM
[/quote]
I've been using rebar welded into a grid for my cathode
[/quote]
Excuse me, anode.
Posted by: rohar May 18 2011, 09:41 AM
Before, I've seen much worse: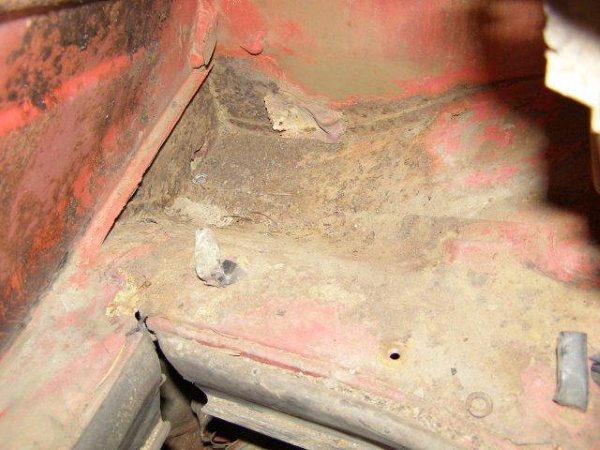
Grabbed some sponges from the local hardware store (tile section) and cut them into about 1/2" strips: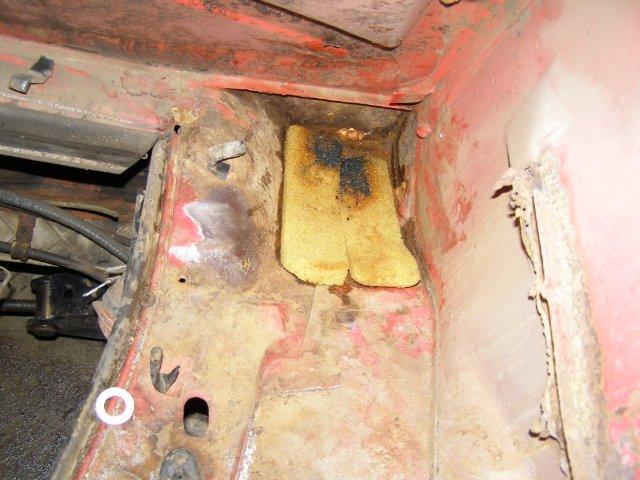
Throw a strap of 2" 14 gauge steel on it (it was a scrap from the tranny mounts I'm working on) and hook it up to electricicals: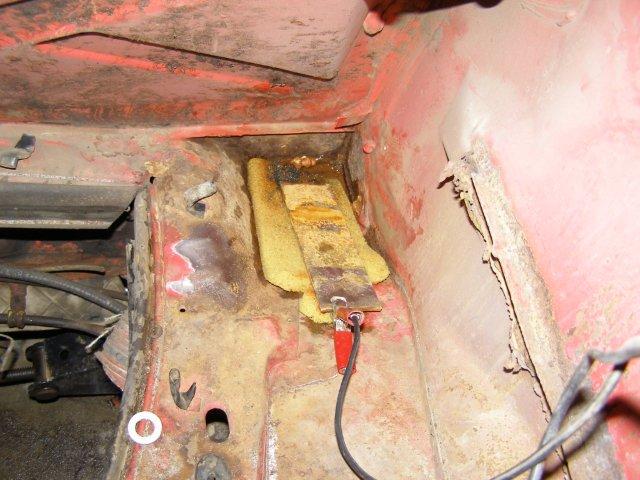
Cover it up with a full sized sponge, wet the whole mess with washing soda mix and stick a rock on it to compress away any gaps: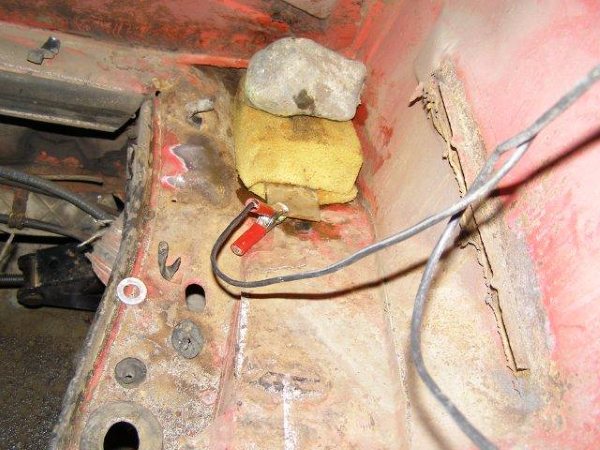
15 minutes worth of cooking: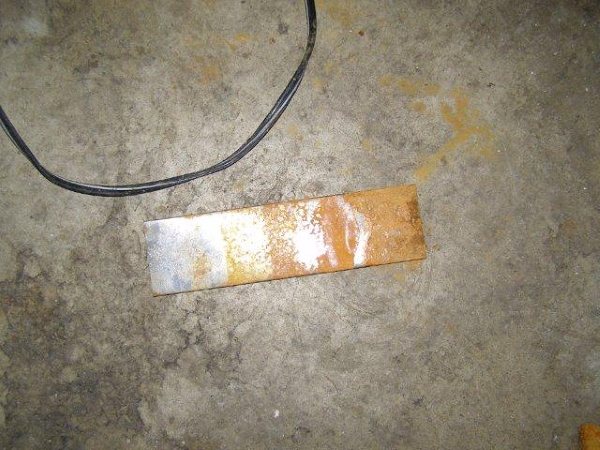
Posted by: rohar May 18 2011, 11:08 AM
I let it cook for 2 hours last time, that pulled a pile of rust through. I cleaned the anode and fired it up again. I'll give it 1 hour then do a light wire wheel to clear the scum and see where we are.
Posted by: rohar May 18 2011, 11:44 AM
Alright, I couldn't wait. I pulled everything off, dried things down and a BIG portion of what used to be rust was steel with a light black film on it. The film went away fast with a wire brush.
Overall, I'd give the process a big 2 thumbs up. Definately easier than trying to remove everything with a wheel with all those funny angles.
As a plus, now that the area's clean, I can see my long is solid! Engine shelf and firewall in that area are a bit messy, but the long is good!
Posted by: dlestep May 18 2011, 11:51 AM
...I am really liking this...if you could be so kind to post a photo of the metal on the results of this, I would appreciate it...also would like to contact you, if I may for a little detail on the procedure...I have a spot on my car I'd like to try. The surface is convoluted and I would hate to have to cut and weld on it...
Posted by: rohar May 18 2011, 12:18 PM
More pics to follow, putting it on for another cook. dlestep, I'll pm you my phone #
Posted by: rohar May 18 2011, 12:56 PM
After cooking about 4 total hours. I have maybe 10 minutes actual work into this: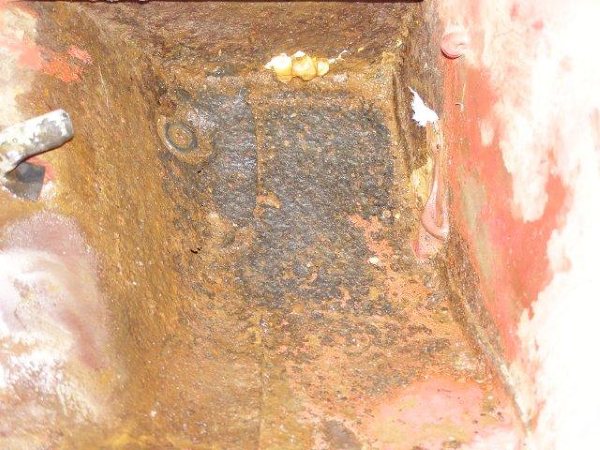
It's pitted to all get out and I'll have to address that, but that big blackish spot in the middle isn't rust 
Posted by: kwales May 18 2011, 08:43 PM
Actuallly, if you do it long enough, the black turns to slime that can be brushed off with a wire brush. I like the copper bristle brushes as they seem just about right. You need a lot more time with that sponge or you need to fill the drain hole, fill it with solution and float the positive electrode over that hell hole on a foam block.
With the big tanks, foam floats can float the positive anode over the part. Was able to clean my 48 inch mower deck that way by moving the float. Took about a week.
When you are done, the metal is bare and gray, and you can actually see the rust pits are conical. It's those conical pits that prevent sandblasted sand from getting all the way in to the root of the rust cell.
Want toxic? Add zinc to the mix. The factory used a gray primer that contained zinc and it takes a good while to get it softened up and off the parts.
The stainless holds up under the current and I have yet to eat much off of one. The lye eats the paint at a mix ratio of 1 Tbs per gallon.
And to make it go faster, I use a high power prototype electrosurgical generator.
Per the baking soda, rust removal slowed to a trickle.
Tried the spoge thing for years but it usually boils dry pretty quickly. Even tried a fish tank pump and a stainless tube as a spray device. Pumped the conductive solution out of a bucket, and into a rubber tube with a stainless tube at the end. Clipped positive to the tube, negative to the car and sprayed at the side of a car. Solution trickled down the car and back into the bucket. Didn't seem to work at all.
Ken
Posted by: rohar May 18 2011, 08:57 PM
I'm in good shape. I went with a bigger anode shaped more to the surface. I had a piece of 16 gauge sheet laying around and a sawsall. I was having so much damned fun I couldn't help myself. Shaped it to the metal with issues and drilled a bunch of holes in it. This time, I used about 5 layers of paper towels instead of a sponge. Closer contact means more reaction, but it also means you need to wet it more often. The holes helped in surface area and a path for more electrolyte to flow when things started getting dry. Had to wet it about every 4 minutes, but it was a damned site better that sitting behind an angle grinder for a few hours.
I just started watching the "charge" gauge on the charger. When it started getting close to 100% charged, it's time for another bath.
BTW, don't use a rock as an anchor. That was probably a bad idea. The bottom of the rock is all pitted and there's a bunch of green stuff in the mix now. Probably copper
Powered by Invision Power Board (http://www.invisionboard.com)
© Invision Power Services (http://www.invisionpower.com)