Printable Version of Topic
Click here to view this topic in its original format
914World.com _ 914World Garage _ My 74 In-Garage Restoration
Posted by: barada Jul 23 2011, 05:08 PM
Well Figured I would start a build Thread to share with you guys. With all the cool builds going on I had been thinking about posting.
I bought a 74 914 from this board a few years ago and have really enjoyed it as it arrived. It is a 1.8 and had served as my semi daily driver (weather dependant-not just rain when it is 95 I need AC).As I added a couple more cars this one just sat and sat. All last summer I only drove it 300 miles. At the beginning of the year I started thinking it would be worth putting some time and money into and get it how I wanted to begin with.
Car was originally White but had been resprayed Black long ago. When I got it the paint was ok but was starting to lift on the edges and was cracking in certain places. The paint shop who did it just lifted the front trunk and sprayed widly inside there so the quality was terrible.
I have a good friend who is a painter for Delta and was a hi-end painter for about 15 yrs for a local shop, but moved to Florida for about 4 years. He moved back and got in my ear about helping me with the 914. He works 3 days a week so he has a lot of free time.
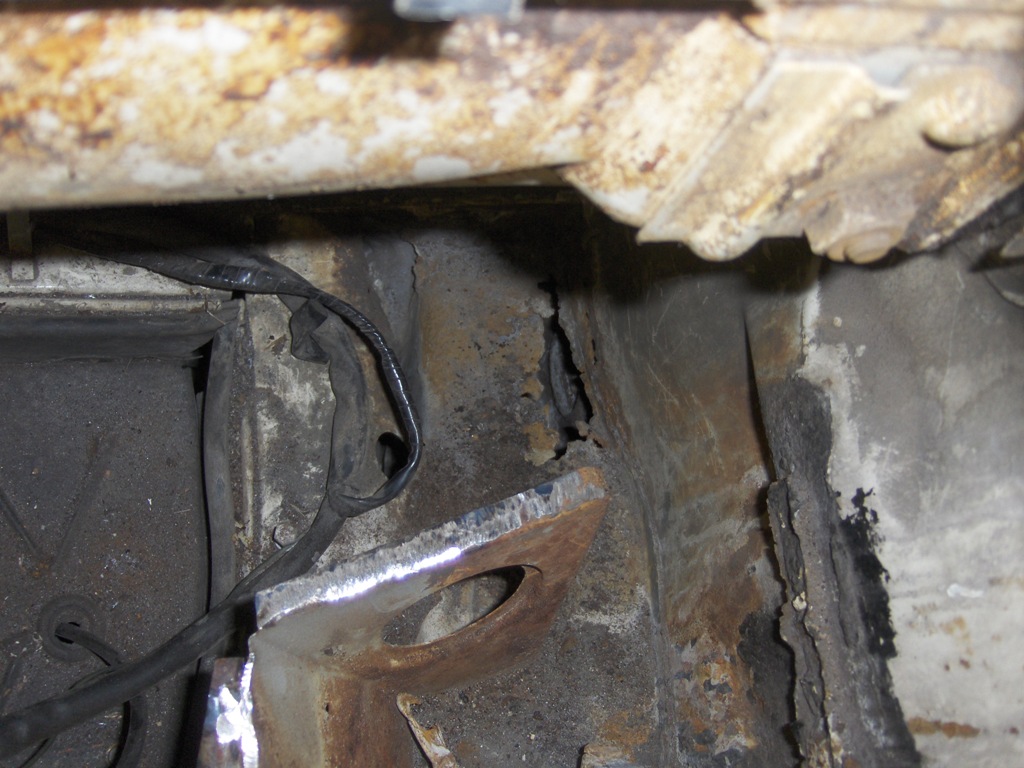
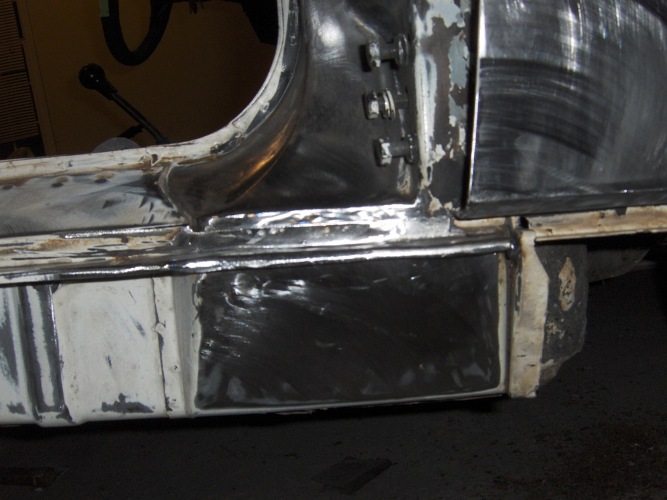
So about two months ago my son and I started tearing it down. we found a little rust, I knew the Hell hole was going to need attention as well as the rear passenger floor corner. The body wound up being very straight as we stripped it.
Thanks Phillip

Posted by: barada Jul 23 2011, 05:22 PM
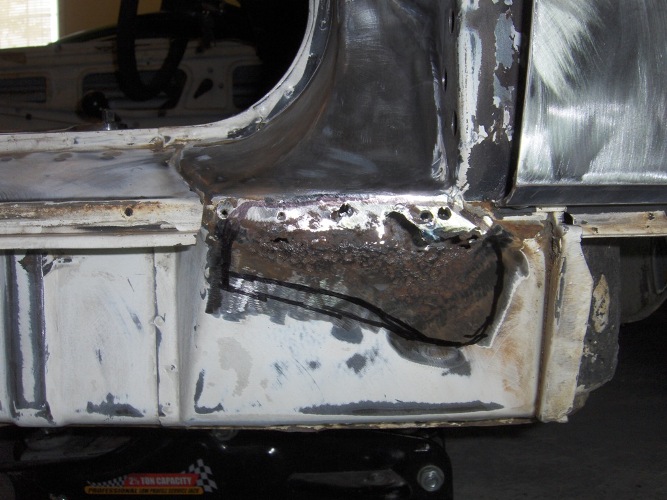
Had to address the rust. Also had to deal with a leaking rear main seal so out comes the engine and in goes some welding in the engine compartment. I am no welder and reached out to Scott H 1968Cayman on here to lend a hand on the welding.
I am not going for a concours build but wanted to fix it and not have to think about it again. I have TONS of pics but will spare you guys on each stage. First is the floor corner. We had to build the inner and outer firewall right here and a very small patch in the Long.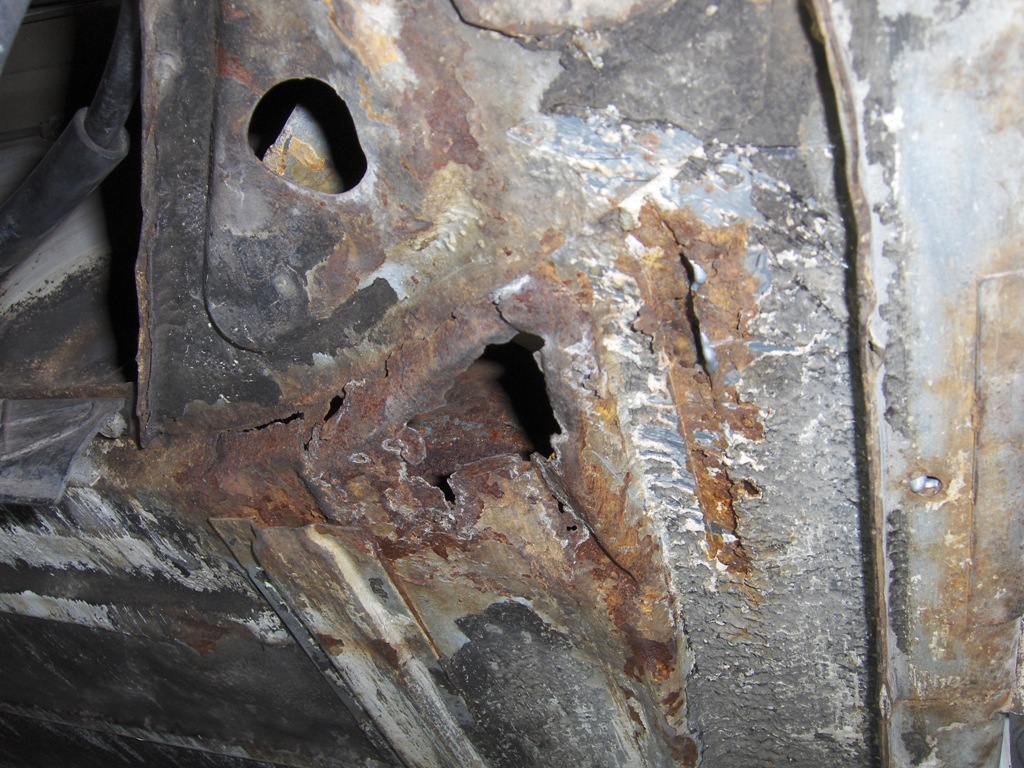
Posted by: barada Jul 23 2011, 05:24 PM
Posted by: barada Jul 23 2011, 05:26 PM

Posted by: barada Jul 23 2011, 05:29 PM
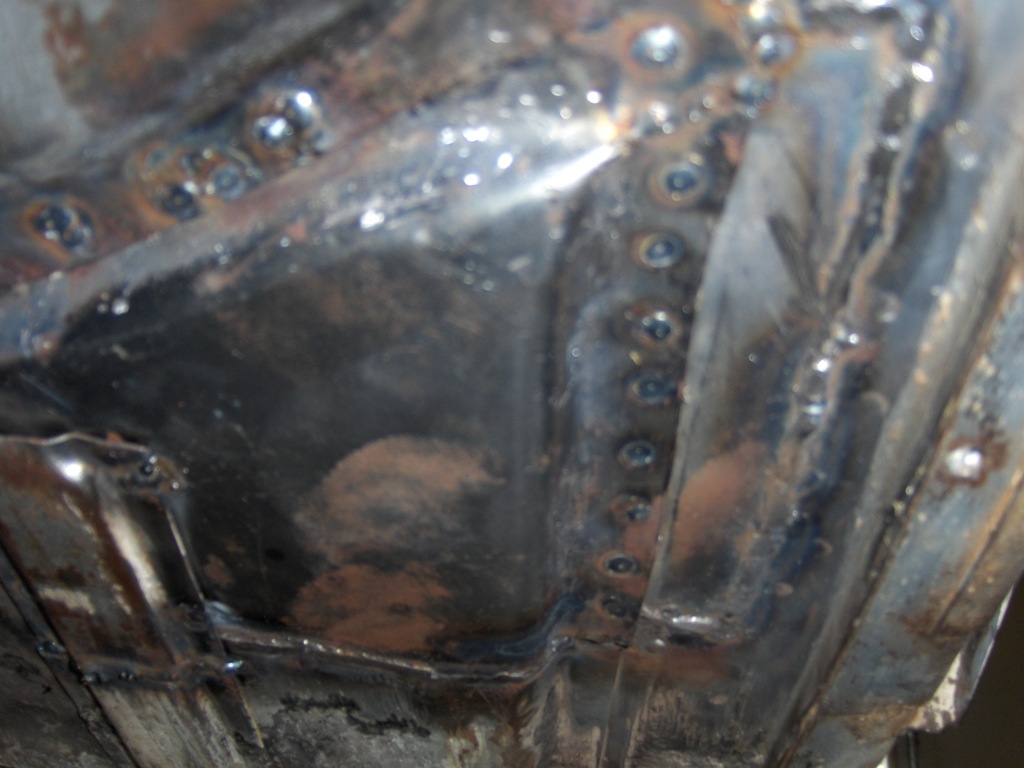
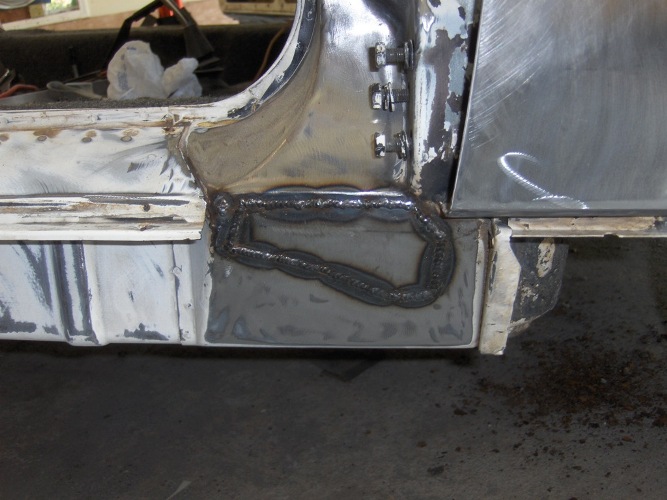
A lot of steps missing. We dug around and addressed all the rust we could find
Attached image(s)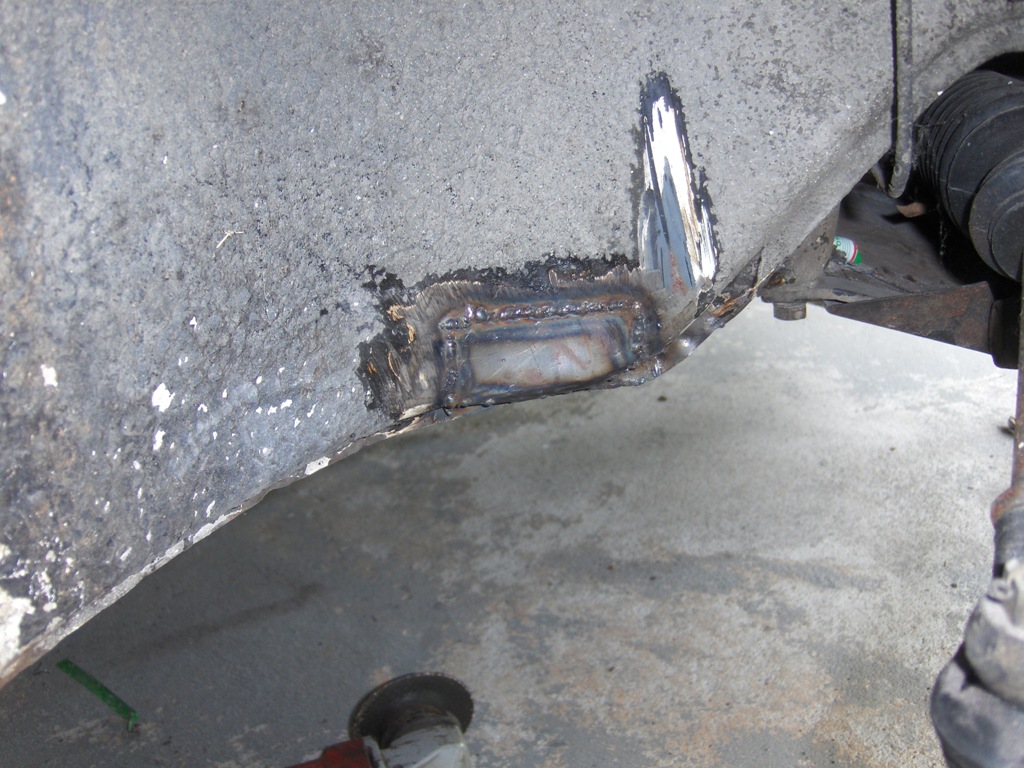
Posted by: barada Jul 23 2011, 05:31 PM
And how it sat last night before the 15 hrs blocking today. I am going to resize so I can fit more pics.
Attached image(s)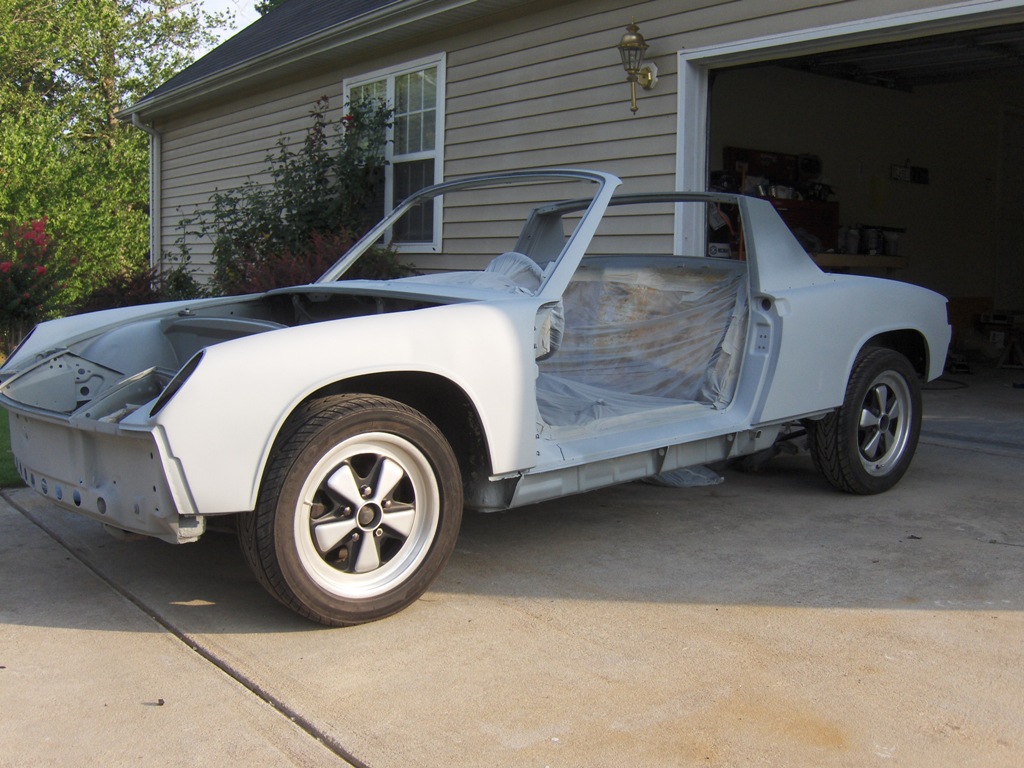
Posted by: trojanhorsepower Jul 23 2011, 06:47 PM
Look'n good! Charge on.
-Peter
Posted by: barada Jul 23 2011, 07:54 PM
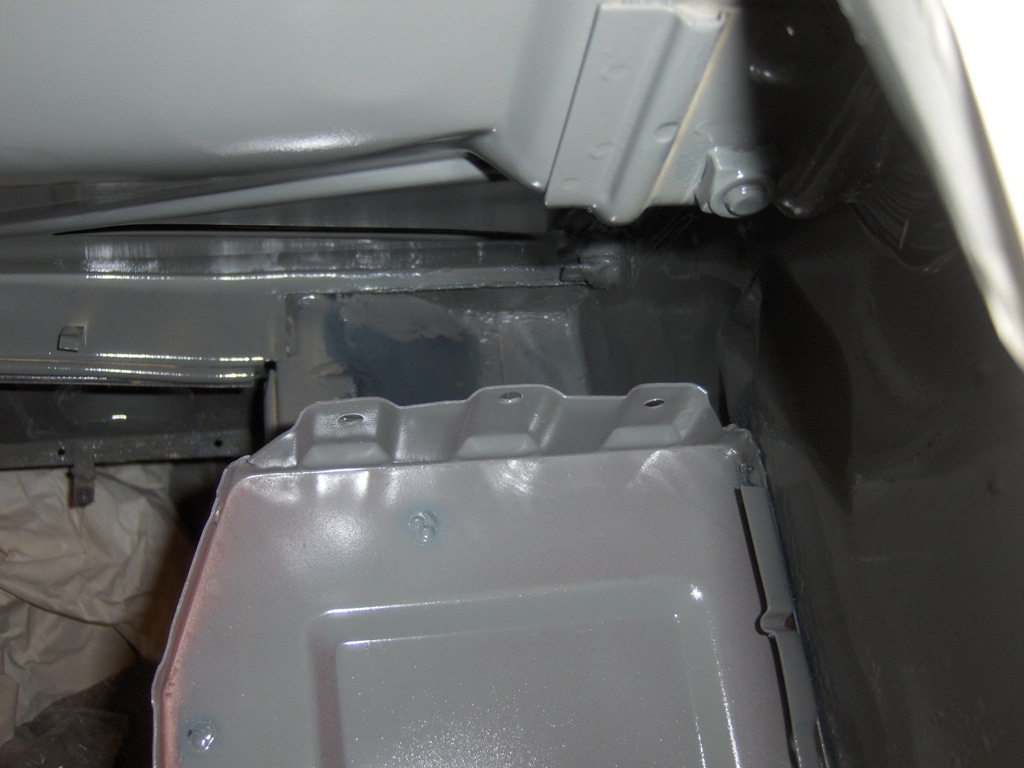
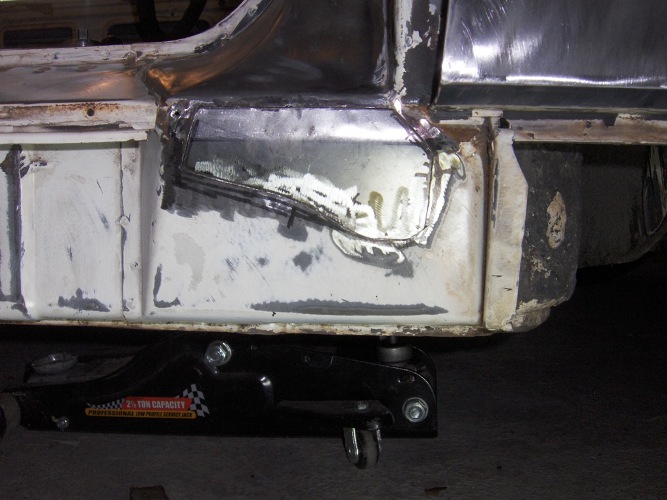
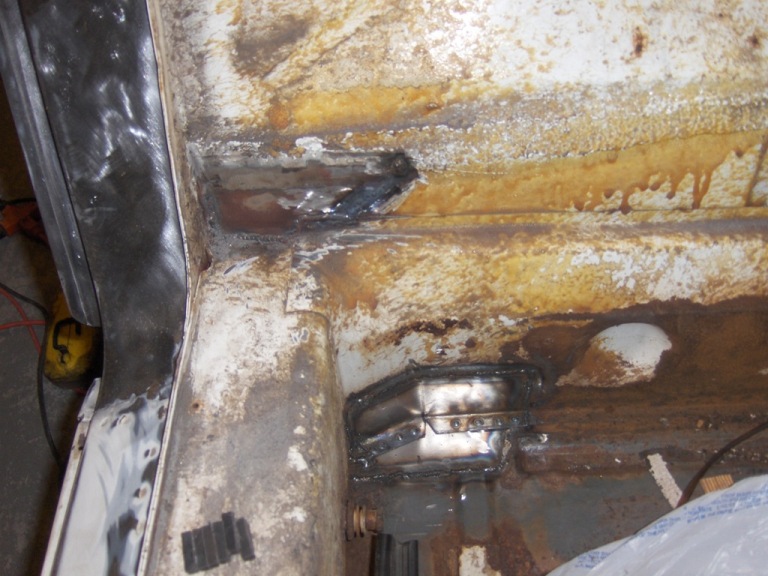
Got some not as big. This shows the process fixing the rust I had from dirt being wedged under the rocker. Pull those rockers and clean guys. This shows the steps we were doing to fix each spot.
Attached image(s)
Posted by: barada Jul 23 2011, 07:55 PM
Finished product.
Attached image(s)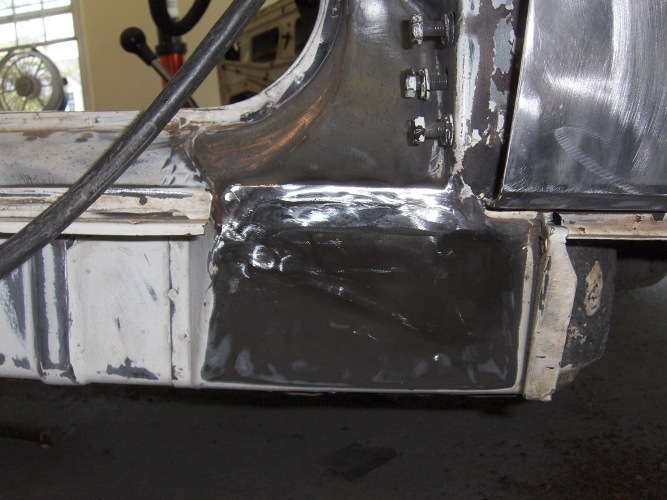
Posted by: barada Jul 23 2011, 07:57 PM
Engine clean up and engine bay clean up. Notice how it has the factory white paint while the car was black.
Attached image(s)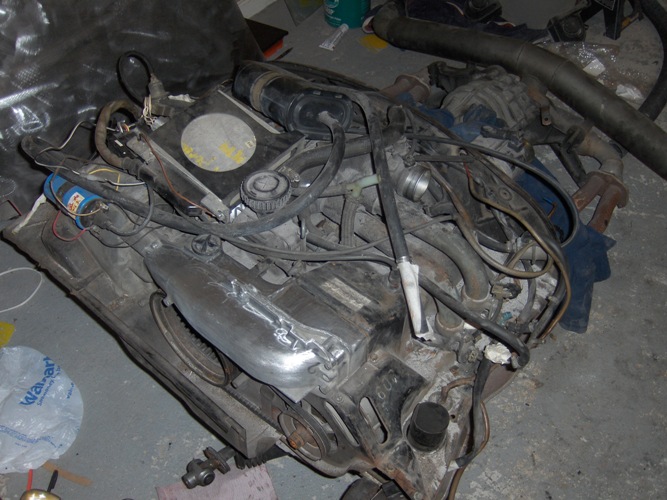
Posted by: barada Jul 23 2011, 07:59 PM
And epoxy sealed.
Attached image(s)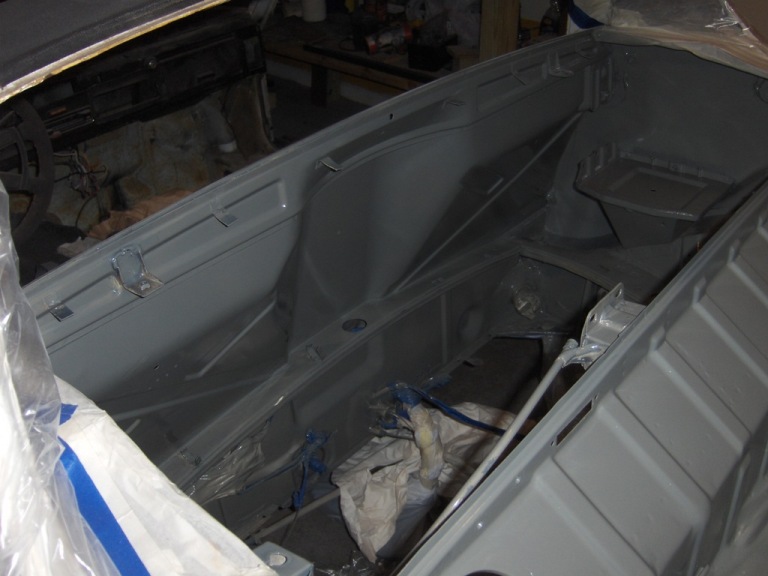
Posted by: barada Jul 23 2011, 08:03 PM
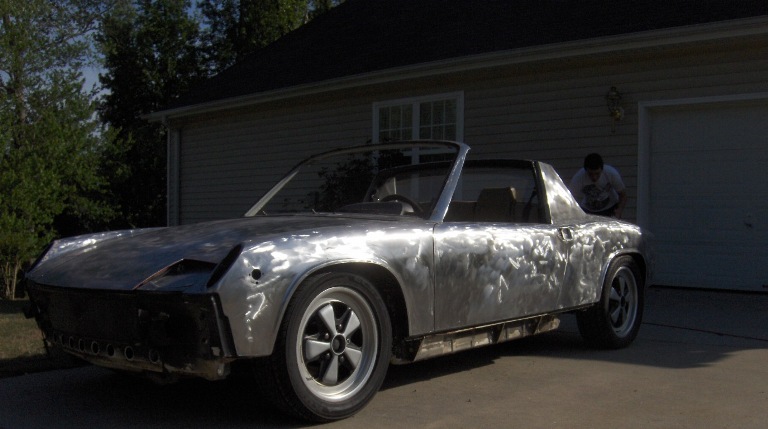
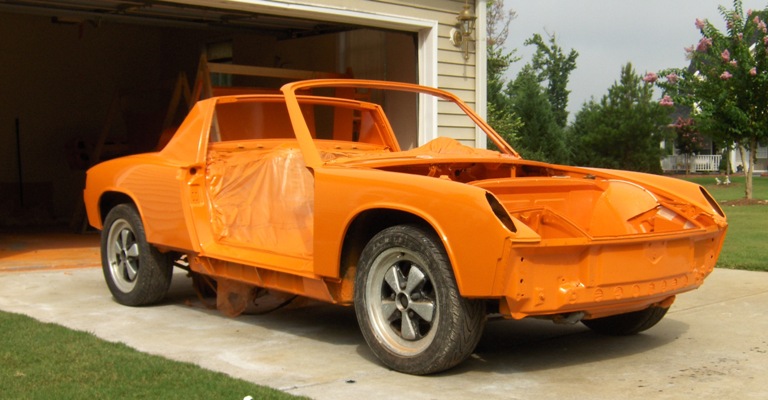
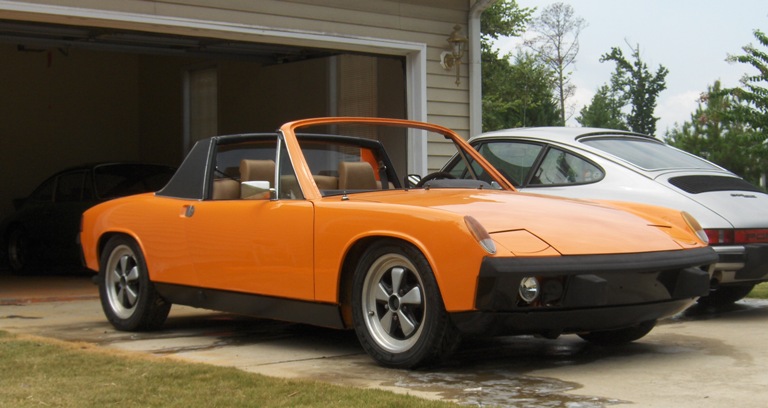
We stripped the entire car to bare metal. The black paint was cracking to the primer so it all had to go. The car is not original since I switched to the 5 lugs and figured it can be the color of my choice so I picked Nepal Orange.
Phillip
Posted by: 3d914 Jul 23 2011, 09:23 PM
Excellent job Phillip!
Tell us more about your blocking and priming. What did you use for an epoxy sealer?
Trying to get my 74 - SHO V6 back on the rack.
Enjoy,
Posted by: nsr-jamie Jul 23 2011, 09:46 PM
Looking good!! Are you going to fill in the side markers? Now would be the best time....are you going to keep it narrowed body or go with flares? Good luck with it. Cheers!!
Posted by: hwgunner Jul 23 2011, 10:13 PM
Looks great. Keep the pictures comming.
jonathan
Posted by: barada Jul 24 2011, 06:19 AM
I am using PPG products. I used DP40 as the epoxy sealer. It will be single stage PPG. I know plenty like two stage and frown on single, but my clone is Viper green in single stage.Plus since it is getting sprayed at home Single stage is more forgiving.
I did remove the side markers. I just have the photo's out of order.
So far I have blocked it one time with 320.(15 hours to block the first run as I laid the guide coat on to thick so I spent plenty of time sanding black). Truthfully if it was white we could probably get away with scuffing it on the next run but I plan on blocking it two or three more times. The rear trunk had the most low spots after the first run. The body only had about 6 very small low spots that will probably be gone after my primer coats last night.
My goal is to have it back on the Road by November although if we get paint on it in the next month it will be ready much sooner. The body work is done (wasn't much at all) so now it is just block sanding until my fingers fall off.
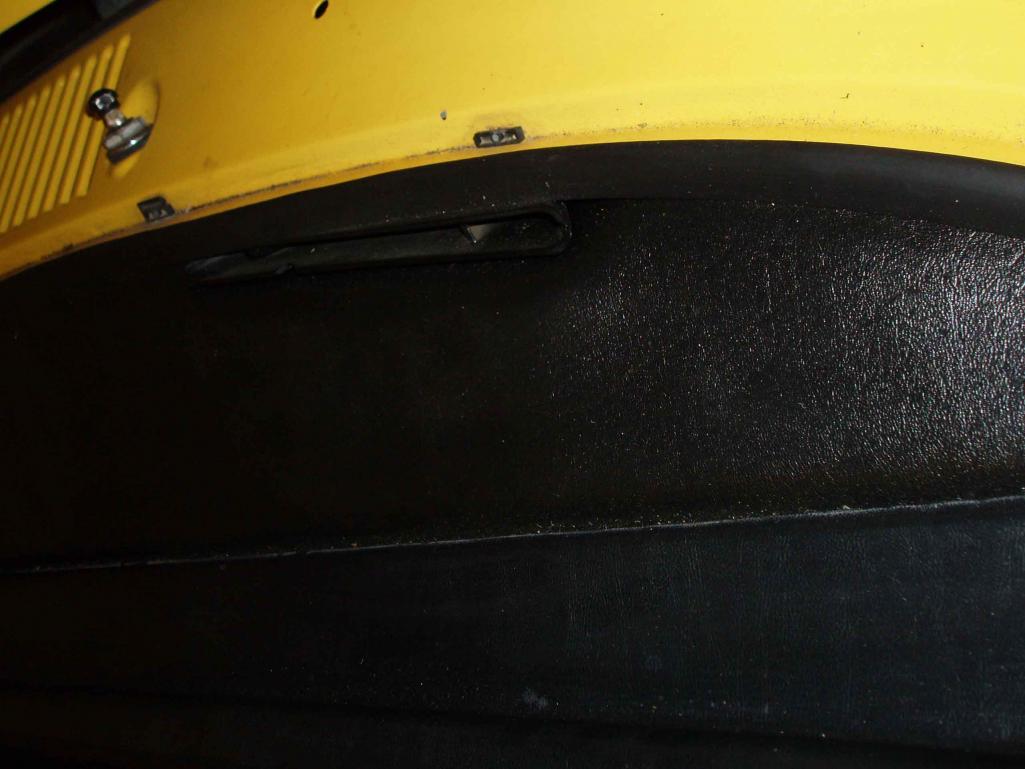
Right now I am having trouble finding good tan interior to upgrade mine. My drivers seat is worn and I have a tear on the back pad. I may leave the backpad but would like to get new door panels and seats.
Thanks for the compliments.
Phillip
Posted by: barada Jul 26 2011, 03:03 PM
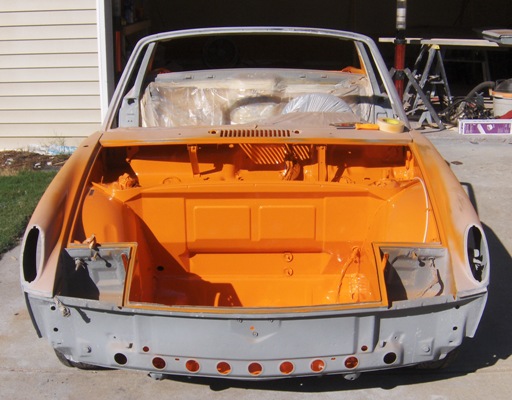
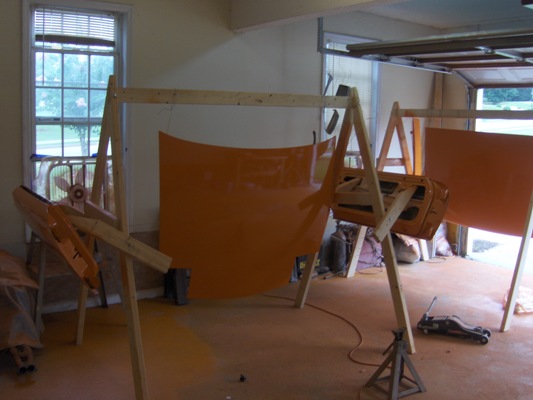
Shot some color today. We decided to shoot the front and rear trunks as well as the engine bay today. We will block off the rear qtrs, we were finishing up and had paint and said you know lets just see what it looks like laying over the qtr. We did not even clean that area but it is like a mirror there. I am Sure when it counts we won't be so lucky. We were going to shoot it all at once to avoid tape lines but with us doing it in a garage we knew chasing overspray would be a mess, so we are going to do it in two parts.Car has been blocked 3 times now and looks very straight. we will block it one more time (to clean off our curiosity). All 4 areas we sprayed turned out great. He is using his guns so we are at an advantage their as they are pretty high dollar. We plan on shooting the entire car next Monday.
Phillip
Attached image(s)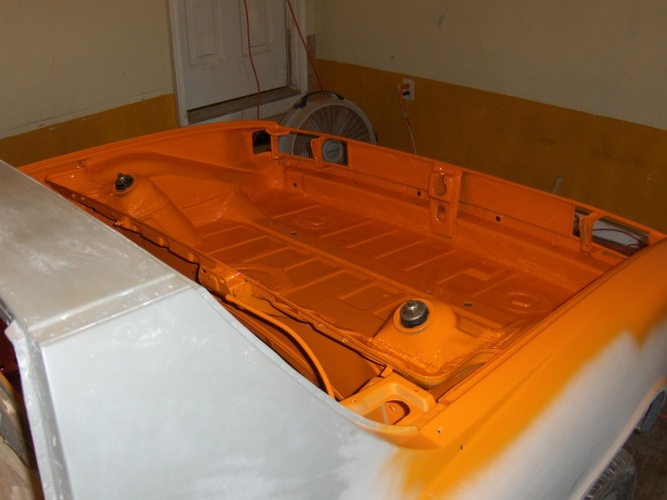

Posted by: Valy Jul 26 2011, 05:12 PM
Don't forget under the Targa bar.
Posted by: barada Jul 26 2011, 06:21 PM

Don't forget under the Targa bar.
Don't worry we won't. The entire car was stripped and everything will be orange except the floors I am going to go black for the floors.
Posted by: barada Jul 30 2011, 09:12 PM
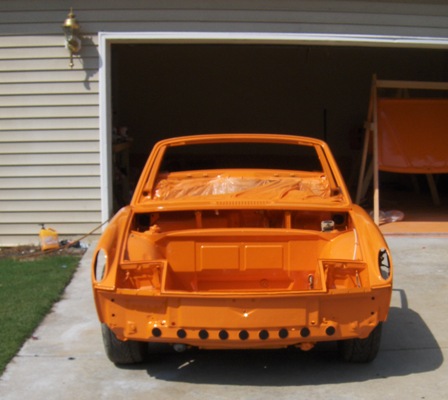
Been out of town so getting as much done as I can. Here is a shot of the front outside for the first time since it was sprayed. Very happy with how it turned out.
We have now blocked 3 times and will probably go over one last time Monday. We were shooting for Monday to spray the entire car but i am not sure that will happen. Should be in the next couple of weeks.
Here is a shot with the "guide coat" on it. I learned my lesson on going heavy so no need to correct me. I spent plenty of time sanding black paint before getting to the body.
Phillip
Attached image(s)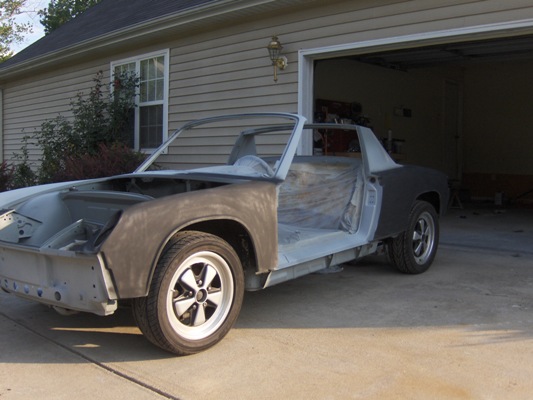
Posted by: barada Jul 31 2011, 08:58 AM
Question on the engine bay.
Would you guys put the sound pad back in? I am on the fence the paint turned out better than expected since we really on hit it with the red scotchbrite.
Phillip
Posted by: 1968Cayman Aug 1 2011, 01:21 PM
From the pictures I'm guessing your welder is either a junkie or a hopeless womanizer. He should be fired if he hasn't already od'd on some aspartame-laced substance.
BTW, I'm really going to hate you if you post pics of that car in full color before the month is up . . . no self-respecting 914 spends less than a full year on jackstands.
Posted by: Andyrew Aug 1 2011, 02:39 PM
I vote no on the backpad.
And the welds look great, They are tach welds which is good because that means that excess heat didnt go into those pannels.
Also Guide coat. In all seriousness I get a spray can and mist it in the air over each panel. This gives you tiny little overspray droplets over the body which is perfect because it wont clog up your paper to badly and you can spend all your time sanding actual paint.
Posted by: tscrihfield Aug 1 2011, 04:11 PM
I vote no on the backpad.
And the welds look great, They are tach welds which is good because that means that excess heat didnt go into those pannels.
Also Guide coat. In all seriousness I get a spray can and mist it in the air over each panel. This gives you tiny little overspray droplets over the body which is perfect because it wont clog up your paper to badly and you can spend all your time sanding actual paint.

You dont want to lay full beads! Heat = Bad things (Can I Hear Potato chip?)
Andrew, I use the same method for a guide coat! Way cheaper than that expensive crap and it takes less time and works just as well!
Love the color! That car will look great!
Posted by: barada Aug 1 2011, 04:26 PM
I vote no on the backpad.
And the welds look great, They are tach welds which is good because that means that excess heat didnt go into those pannels.
Also Guide coat. In all seriousness I get a spray can and mist it in the air over each panel. This gives you tiny little overspray droplets over the body which is perfect because it wont clog up your paper to badly and you can spend all your time sanding actual paint.
Yeah we are using a guide coat, just the first time I put it on to thick. I am heading to Utah so not sure if it will be sprayed this week. We primed it one more time to block it for a 4th time. It was very straight when looking at the reflections when the water was on it. He may be able to spray it thursday but I will not be there.
Posted by: Jacob Aug 1 2011, 05:55 PM
Love restoration threads! Thanks for posting! 
Posted by: barada Aug 6 2011, 10:42 AM
From the pictures I'm guessing your welder is either a junkie or a hopeless womanizer. He should be fired if he hasn't already od'd on some aspartame-laced substance.
BTW, I'm really going to hate you if you post pics of that car in full color before the month is up . . . no self-respecting 914 spends less than a full year on jackstands.
This is for you Scott.
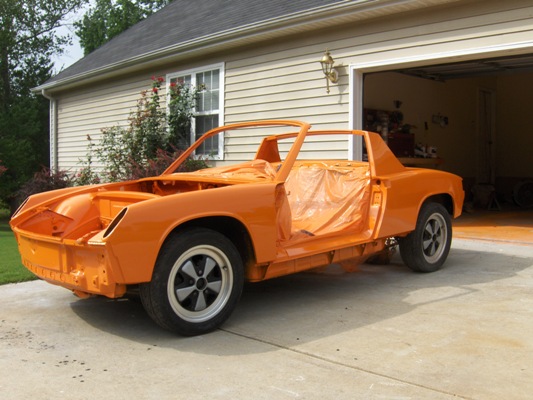
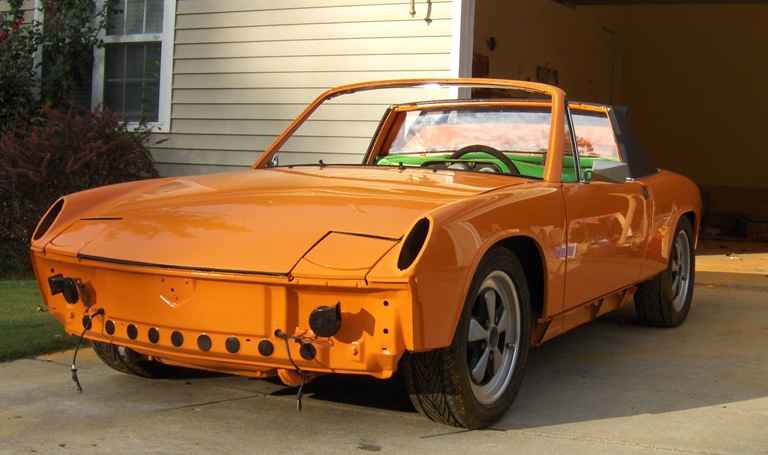
Well. I had to travel to Utah this week for work and left early Tuesday Morning. I did not expect James to be able to get it sprayed as he mentioned some family things he had to handle. When I landed last night I peeked in the garage to find that it had been sprayed this week. PPG really makes a nice product. We made stands to spray everything verticle to help cut down on trash and overspray issues.
We blocked it 4 times and the car came out really really straight. The car was pretty straight to begin with but I am very happy with the almost finished product. With us doing it in the garage we knew we would not come out perfect and planned on some serious buffing when it cured. We will wet sand and buff in a couple of weeks.
To me it turned out better than expected although he sprays with about a $800 gun so I imagine that helps. It does have some peel (very little trash)in it that will be gone after wetsanding. He said it was drying pretty quick since it was near 100 all week. he did a fantastic job taping as we had no overspray in the trunks and no overspray on any of the other panels.
At any rate time to start pulling tape and plastic and start putting some parts back on.
BTW my friend's name is James Swilley out of Mcdonough so wanted to give him a huge thanks for his help.
Still have loads of work to do but I feel like we are going down the hill now.
Here are some pics. It is really cloudy so you do not really get the full effect today.
Phillip
Attached image(s)
Posted by: barada Aug 6 2011, 03:13 PM
A taste of how poor the front trunk looked 2 months ago. To think I was torn on pulling everything out. I am certainly glad I did now.
Attached image(s)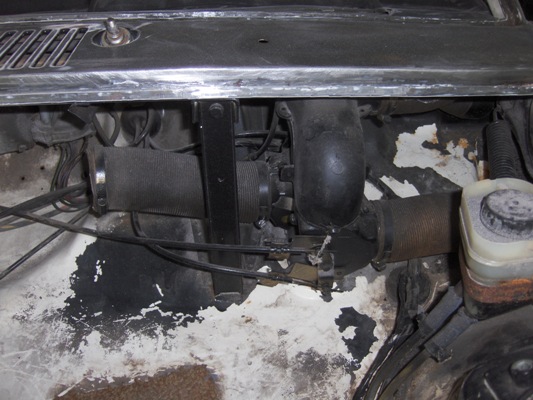

Posted by: Cairo94507 Aug 6 2011, 07:06 PM
Beautiful!!! I will enjoy seeing it come together now.
Posted by: Andyrew Aug 6 2011, 10:04 PM
Looks great! Love the fixture you made for the hoods and doors!
Posted by: barada Aug 7 2011, 03:41 PM
Thanks Andrew. we did not want to spray anything flat if we could help it. Glad to have the doors back on the car though as I was worried I would hit the stand and knock one off.
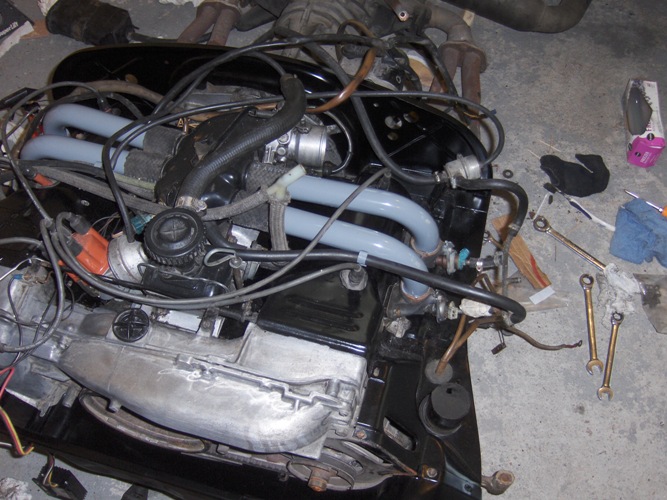
Got a little done, but mostly had to get the engine ready to go back in. I replaced the rear main seals, starter, changed the tranny fluid to swepco and all the injector seals and reinstalled the transmission this morning. Still have to replace all the fuel lines and repaint some tin that got some overspray on it then it can go back in.
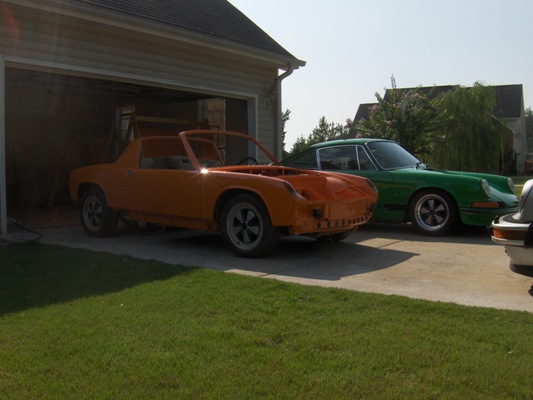
Outside shots with the the siblings as well. Green car has been at my GF's house for 3 weeks while we have been spraying. The silver 79 has become my DD while the 914 is down.
I bought new front turn signal lenses but I am leaning towards keeping the ones that are on the car in the pics now as they seem a little darker than the ones I got the other day.So may have some new euro front lenses to sell.
Thanks
Phillip
Attached image(s)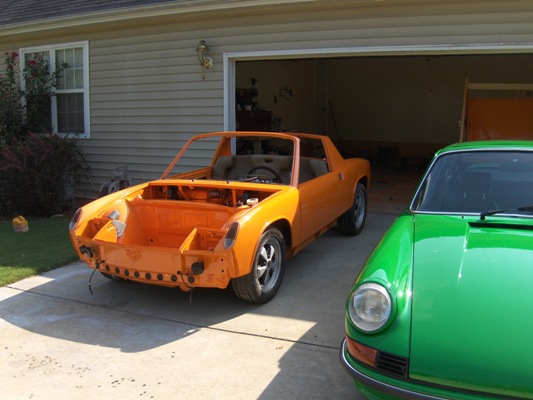
Posted by: Al Meredith Aug 7 2011, 06:10 PM
Phillip, I live in Roswell and have an OEM pad if you want it, although I don't like them. I make my own , In fact I just made two and sold one to another Atlanta teener. I use aluminum foil ( like a windshield reflector) with a clotht backing I get from J C Whitney , cut it to a template and have it bound with a vinyl tape . Looks and works great. You are welcome to come over and see it or link up somewhere. Al
Posted by: barada Aug 7 2011, 06:42 PM
Phillip, I live in Roswell and have an OEM pad if you want it, although I don't like them. I make my own , In fact I just made two and sold one to another Atlanta teener. I use aluminum foil ( like a windshield reflector) with a clotht backing I get from J C Whitney , cut it to a template and have it bound with a vinyl tape . Looks and works great. You are welcome to come over and see it or link up somewhere. Al
Al,
A tan backpad? I am intrested.
Posted by: barada Aug 8 2011, 07:26 AM
When you buy a car with really no records anything you find on the history is cool imo. I was told this was a Cali car and have seen pictures from previous owners with Cali plates on it but took it at face value.
When I was opening up the vents to clean them out came some 70's packaged Wrigleys gum and these. Proof it was at least in the state a few years after it was built. The pics I have seen with the plates on it date back to 2001 or so.
Pretty neat to me to find.
Phillip
Attached image(s)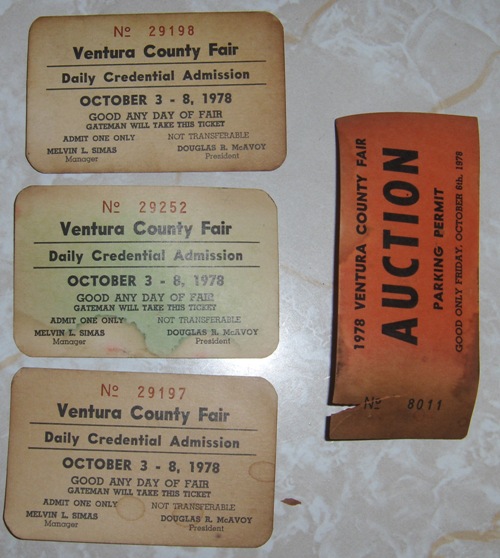
Posted by: Al Meredith Aug 8 2011, 01:51 PM
Sorry, No Tan Backpads , I just sold two dark brown ones and only have Black left. AL Anything else??
Posted by: barada Aug 8 2011, 03:07 PM
Sorry, No Tan Backpads , I just sold two dark brown ones and only have Black left. AL Anything else??
Lots,
1. Perfect passenger rocker cover- I know you are holding for you 6.
2. Gasket for the Fresh are blower for right under the cowl. Lacqeur thinner does good to remove paint but also turned it into jelly.
3. Tan Door panels
4. E30 BMW so this stays clean
5. Tool Kit.
6. Jack- I borrow from the 911's.
7. 1974 owners manual. I have one from another year not sure which would have to check
8. Plastic rivets for rockers and sill plates.
9.16x7 Fuchs all the way around. Happy with the 6's for now.
10. Fog/ Horn grilles in black- If with fogs, I would also need fog lights as I did nto have them.
11. Maybe rear black bumper. Mine is ok
12. Rear bumper top.
Thats it other than carpet that I can think of, I will order new there.
Thanks
Phillip
Posted by: Al Meredith Aug 8 2011, 03:57 PM
I do have several jacks . My problem is that I have a real 914-6 and I am saving all my best parts for that project. I may have a 1974 book as I also have a 74, 914. Al
Posted by: barada Aug 8 2011, 04:27 PM
I do have several jacks . My problem is that I have a real 914-6 and I am saving all my best parts for that project. I may have a 1974 book as I also have a 74, 914. Al
Thats cool I will find the parts.
Posted by: barada Aug 9 2011, 06:35 PM
Well why we wait on paint to cure I decided to see if I could get the motor back in. I replaced all the fuel lines (good thing one was spliced), Rear main seal, Injector seals,and all maintanence parts, New Hi torque starter, as well as repainted the tin and started to set it back in. Putting it back in was not near as nerve racking as pulling. Engine went in pretty easy enough and I wired it back up, put the gas tank back in and wanted to see if it would run. At the moment I went to the dash I remember hey dummy no oil so I was glad to catch that small detail. Filled it up with Kendall and went back to the dash. Well it turned over and over fine (new hi torque starter), but no fire. I pulled a fuel line and it was dry as a bone. I thought I was hearing the fuel pump run up front. So I poured some fuel in it and still nothing. I was about to give up and remembered one of the postive wires from the harnes seemed weak when I put it back on the battery. Sure enough barely if at all making contact, grabbed a vise gripo and went back to the key one turn and a burp, two turns and it fired right up. Now there is no muffler so it sounded pretty mean running in my garage. Checked for leaks (replaced rear main seal so nervous there) and all was dry no fuel leaks either and engine was pretty peppy. Have to do some housecleaning in there but very happy to have that marked off the list. A shame all the paint work around there is now hidden by motor tin.
Phillip
Attached image(s)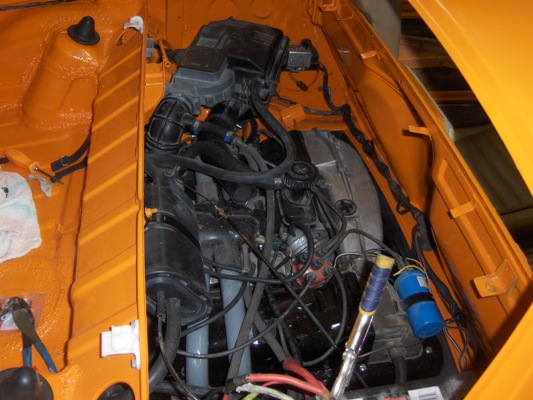
Posted by: JawjaPorsche Aug 9 2011, 06:49 PM
Awesome! I love the color! It really looks good!
Posted by: db9146 Aug 9 2011, 07:59 PM
Barada,
Just saw your thread for the first time tonight........nice job, nice color.
I'm plan on going through my '74 2.0 similarly (I hope) so I'll have to get a better look at yours one day since I'm in Atlanta as well.
Dee
Posted by: barada Aug 11 2011, 07:39 AM
James swung by while I was at work and did a little wet sanding and buffing. With him helping it is coming together much faster than I expected. My goal was to have it back on the road by 11.1.
This morning I took a look and shot this picture of the hood. This was at @6:30 so the sun was not up but it looks pretty good to me, can't wait to see it in the sun. The hood had a lot of peel in it(rest of the car not much at all). This is after the first pass, still will get some time with polishing glaze and foam pad work to bring it all the way out.
Phillip
Attached image(s)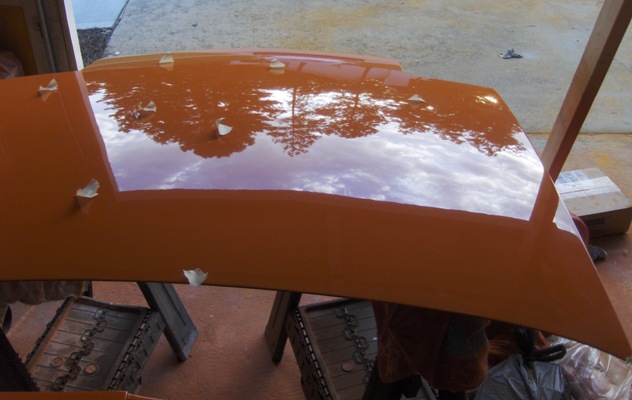
Posted by: Woodside914 Aug 11 2011, 12:09 PM
Wow!!!....this fun to read!
Great job so far 
-Ken
Posted by: barada Aug 11 2011, 06:08 PM
Thanks for all the compliments. The car is completely buffed and WOW. IMO it turned out as good or better than my Green car (which I paid well to have done at a pretty well known Porsche shop here).
Now full speed ahead on assembly. Still have to spray the hinges and the Headlight covers. Also have to paint the Bumpers and source a better passenger rocker.
If anyone has advise on the windshield I am game as I have done several 911's but no glue in type so not sure if I want to take it on or not. My original plan was to have every ounce of the car done in my garage and to this point that has happened.
Thanks
Phillip
Attached image(s)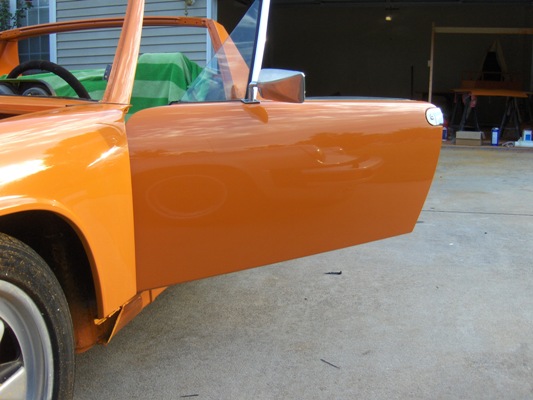
Posted by: barada Aug 11 2011, 08:12 PM
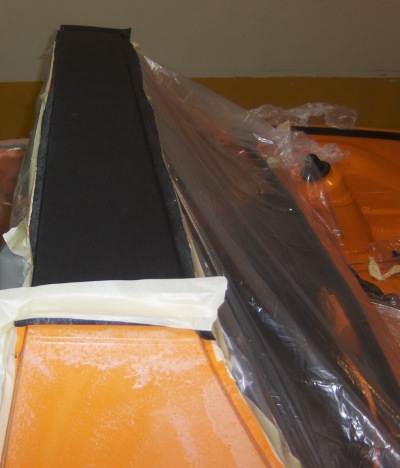
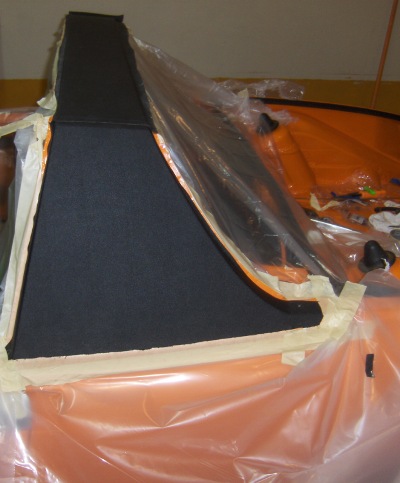
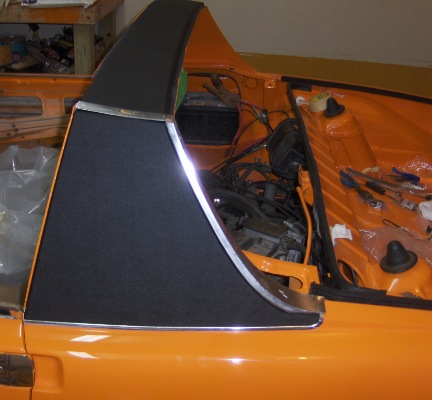
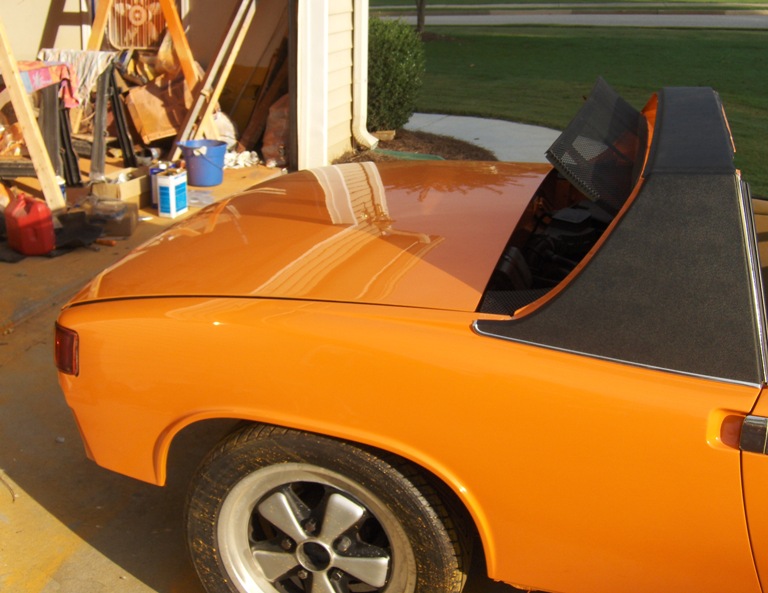
I am like a crack head. I am actually taking my time with each project just I keep wanting to do the next step. I started thinking I bet I can get the Sail covered before 9pm. I hit the panels with scotch brite, taped it off and went to work. Missed the goal by an hour (finished at 10pm) but the results were fantastic. This was a huge eye sore before we took the car apart as they were peeling up bad on both sides AND the sides were white under the vinly, so talk about fancy!
Both sides are done but figured I wouldn't bore you guys with pics of that side.
Trim is not mounted just set up for the photo op.
Phillip
Attached image(s)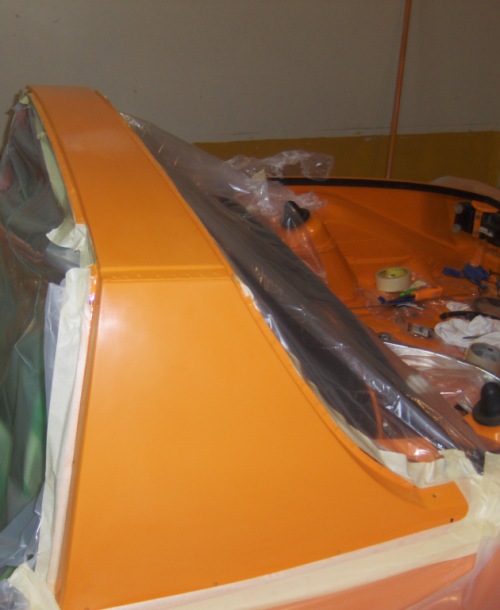

Posted by: BajaXJ92 Aug 12 2011, 04:55 AM
Great project, definitely motivation to hurry up and get mine done before winter sets in!
Oh, and more pics of the green 911 please 
Posted by: 1968Cayman Aug 12 2011, 07:57 AM
Really looks great. Hate to break this now but I think you may have left a large, noisy ratchet inside the hellhole before closing it up.
You seem to be one MB short in that driveway pic?? Tranny die?
Posted by: barada Aug 12 2011, 08:10 AM
Here is the build thread on the bird for the 911.
http://forums.pelicanparts.com/porsche-911-technical-forum/393688-my-80-sc-backdate-project.html
Posted by: barada Aug 12 2011, 08:52 AM
Really looks great. Hate to break this now but I think you may have left a large, noisy ratchet inside the hellhole before closing it up.
You seem to be one MB short in that driveway pic?? Tranny die?
Scott,
I don't expect that weld to hold so that ratchet should fall out in a couple of months :^)!
A fluid change solved the MB, but a dog and a tree took the car out about a week ago.
Have an E30 on a trailer from Texas to replace.
Posted by: barada Aug 14 2011, 07:32 PM
Looks like my bumper tops are not going to work so I suspect yet another order to 914rubber is in order. Budget was running fine. Timeline is way ahead of schedule, guess that is the way it goes. Got a lot of unseen things done. POR15'd the floors. Had a little surface rust on the firewall but otherwise factory paint. Also Installed the engine lid, rear glass and repainted the gas tank. Going to go with black leather in place of the vinyl that is on top of the dash, mainly because I have a nice stash of leather I was going to use to convert to black and decided to stay factory tan. Now just need some nice door panels and seats!
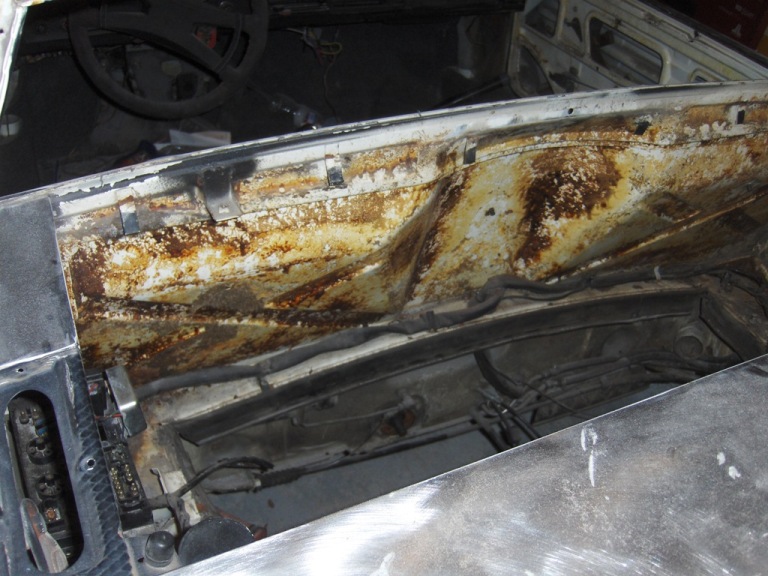
One thing that I never like on repainted cars is when the VIN tag is taped for painting.Even the best guys have some build up or the vin tag is flush with the paint when it is done. On this one I took about 2 hours massaging it off without tearing or breaking the sticker. Got to glue it back on this weekend. Nice seeing the orange behind the vin number.
Had to order carpet and front carpet kit. The hinges and headlight covers were painted this weekend so the hood and trunk will go back on sometime this week. I am out of town again so it will eat at me what does not get done before I go.
I looked in my mileage log for the car since I had to get the interior parts. Car was pulled off the road on 5-28-2011.
Attached image(s)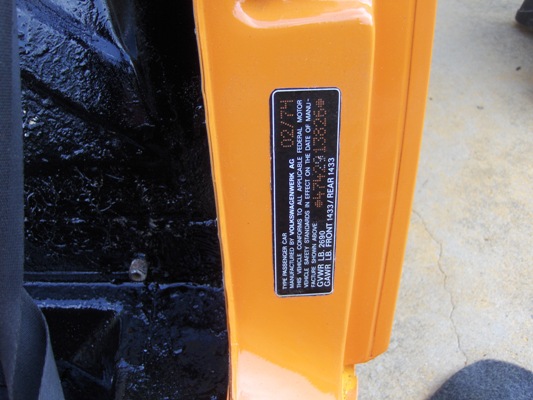
Posted by: barada Aug 14 2011, 08:03 PM
Aforementioned Leather dash top. Spot on it is from the damp cloth I wiped it down with for the photo op, did not notice it was not dry until I just edited the photo.
Thanks
Phillip
Attached image(s)
Posted by: Andyrew Aug 14 2011, 11:02 PM
Looking great man!!!
Posted by: BMITCHELL Aug 15 2011, 12:51 PM
 Looks great! I owned that car 3-4 owners ago, 1996-2005.
Believe it originally was purchased in Santa Barbara in 74.
Posted by: barada Aug 15 2011, 02:14 PM
Looks great! I owned that car 3-4 owners ago, 1996-2005.Believe it originally was purchased in Santa Barbara in 74.
Bob that is awesome. If it still looked like that I would have left it alone. iI was starting to look tired. Do you have any more pics of it? I woudl love to have them to add into the history of it.
Thanks for posting
Phillip
Posted by: barada Aug 16 2011, 08:38 AM
Got a little time in. Paint is done on everything orange. Not often do you find where the paint work is ahead of schedule huh. Installed the headlights, hinges, trunk lid and hood last night. Headlights had this fancy one up one down technique working and I was thinking how in the world can that happen. I looked at the arm, relay and everything looked good, then I noticed the ground wires just hanging free.
Still everything is fitting nicely and going back together smoothly.
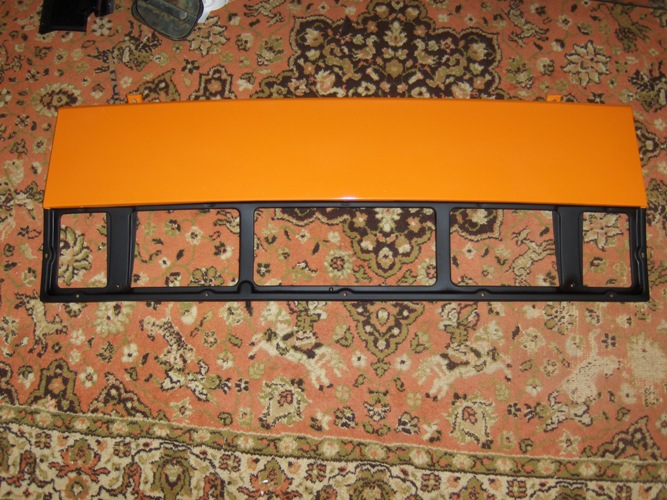
Trunk lid looks so much better one color. Before it had a 18x10 inch square of spray paint to cover a huge paint chip/flake. One of the main reasons I decided to do something with the car.
I have one question. The Hood gasket is proud and throwing my hood high towards the headlights. I have nearly perfet gaps (as good as a one man team can do- will adjust when help arrives) but the hood is not laying flush at the bottom. I have not glued it in yet as I suspected that and actually had the exact same problem with my 911 when I put it back together. Except on this car I can not raise the fender to fix. I was hoping to let it sit closed while is is so hot to compress it before I glue it in. What are the experts tricks to getting it to settle in more?
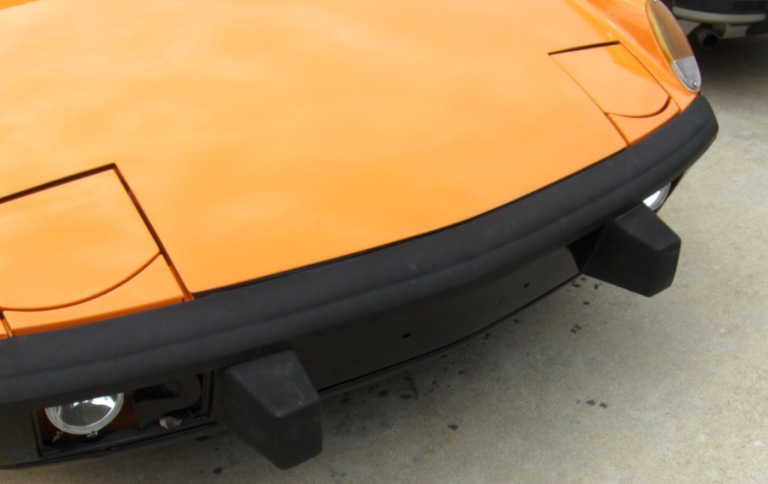
A few pics. Also will have to go with Fog lights as I can not find grilles without the holes. I looked long and hard at my bumper tops and just do not feel they will work. I was trying to stay real tight on budget since the paint job only cost me the materials. The bumper tops will match the paint cost.
Thanks
Phillip
Attached image(s)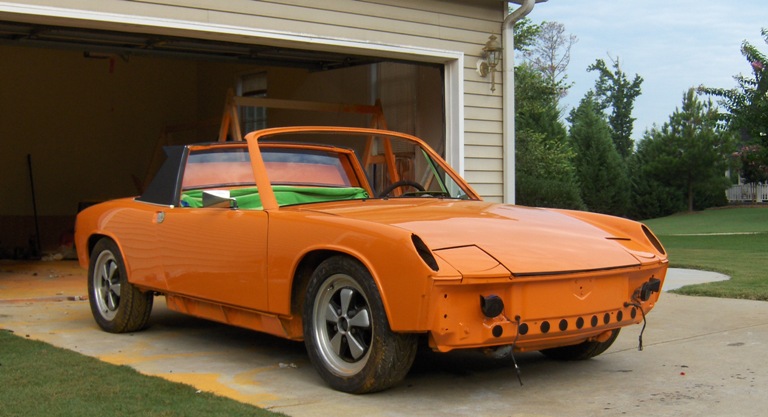
Posted by: barada Aug 16 2011, 09:03 AM
Paint on the tires are from cutting and buffing. We sprayed with them off the car.
Posted by: Andyrew Aug 16 2011, 10:34 AM
I have never seen a 914 rear hood sit flush. Mine sits high as well, Even without the seals in it. I suspect the issue with most is the trunk pivot (Mine was rewelded by myself, which I suspect is the problem).
Looks really good!
Posted by: barada Aug 16 2011, 10:39 AM
I have never seen a 914 rear hood sit flush. Mine sits high as well, Even without the seals in it. I suspect the issue with most is the trunk pivot (Mine was rewelded by myself, which I suspect is the problem).
Looks really good!
I am talking front hood. My rear one actually fits near perfect. Does not show in that pic because there is a towel on the gasket under the trunk as the powder from polishing it was getting all over everything.
With that said, I DID not re install the torsion bars in the rear. I will just have to use my head to hold it open as I did not want to add a JWEST kit or reweld or any of that in the rear. That may be what allowed me to get it to fit right.
Posted by: barada Aug 16 2011, 06:50 PM
What do you guys think about fiberglass bumpers? Come to find out my front bumper top was hiding a dent crease that will not work.
Posted by: poorsche914 Aug 16 2011, 08:23 PM
Just saw a set of non-fog grilles are on the Samba.

Posted by: Andyrew Aug 16 2011, 10:41 PM
What do you guys think about fiberglass bumpers? Come to find out my front bumper top was hiding a dent crease that will not work.
Im a fan of them

Posted by: barada Aug 17 2011, 08:30 PM
Double post sorry
Posted by: barada Aug 22 2011, 04:57 PM
Did not get much time on it at all this weekend. Troubleshooting a transmission for my son's F250 took all day saturday.
I did get some interior bits going back in. I now have bought replacement rubber for every part of the car so the drivers door will have to come apart to get the inner felts installed.
As you can see I need someone to feel sorry for me and sell me a good set of seats and door panels as they do not match up with the quality of the rest of the work. I will have to bring along a towel to strategically cover the flaws in the interior if I can not find a good set. I ran out of glue so the carpet is not down and I still need to paint the bezel for the gauges and install the new Basketweave on the dash. Thats about it. I got my new Valance Saturday so all parts are here, just have to get to sanding on them.
Was able to get my engine lid to line up much better than it was when I got it thanks to a nice notch in the lid hinges.
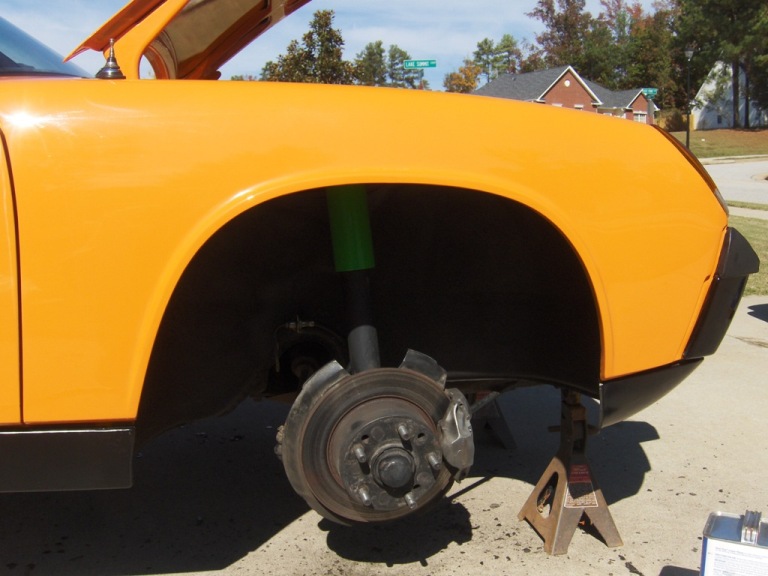
Attached image(s)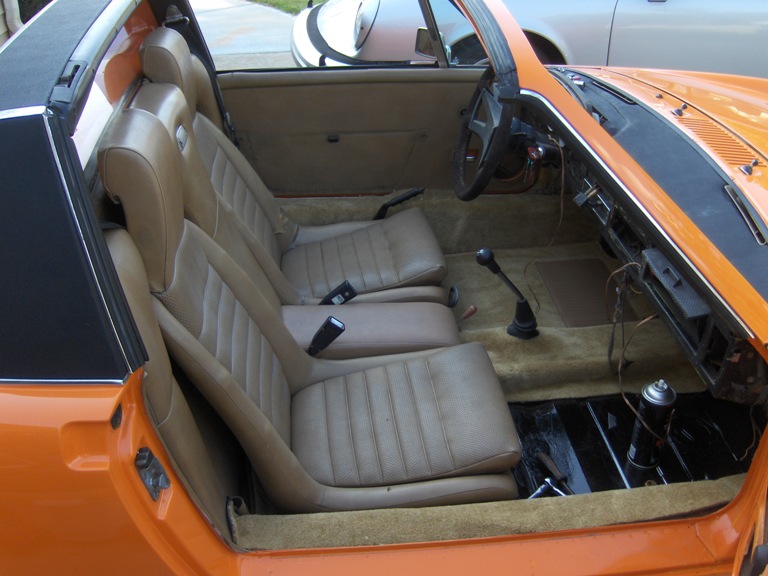
Posted by: barada Aug 31 2011, 06:43 PM
Starting to see a point where it can be driven while I keep working on it. Really just needs the windshield installed and it is street legal again. Got the bumpers done. I used HOT ROD FLATZ black for the bumpers, rocker covers and valance. I thought they would be flat black but they have a little sheen. Was happy with how the rockers turned out for sure. Also waiting on Horn Grilles to finish off the the front end.
Also figured out why my hood was so high up front, wound up being out of adjustment. The gap was uneven at the cowl and I moved it back up and now it sits pretty Flush with the gasket. If I remove the gasket it is perfect so I hope it settles.
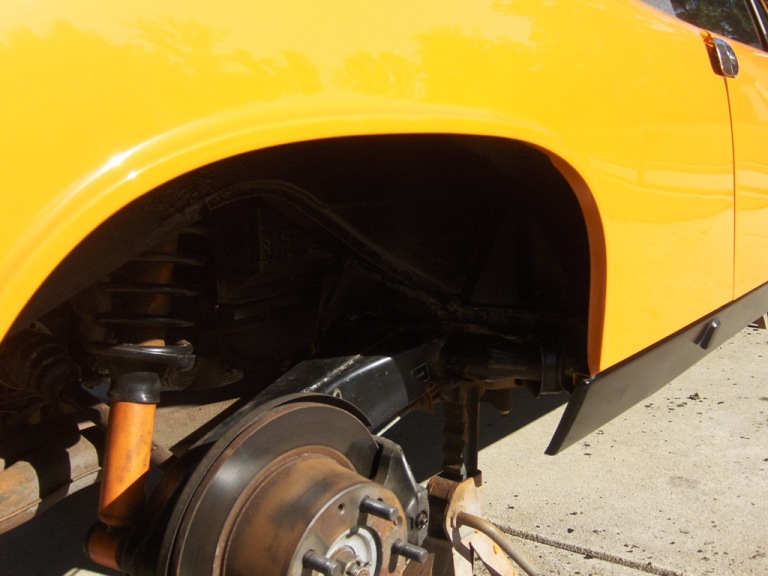
When I get it back on the road I will start stripping undercoating and reapply on the bottom and inner fender wells. I just would prefer to drive it while that happens versus just sitting.
STILL NEED TAN INTERIOR bits badly. I am going to roll with what i have but I expect to be laughed at by the 914 experts in Atlanta.
One other cool thing. Yesterday I drove it around the neighborhood and when I passed this one house there was about 4 folks outside and they starting whistling and yelling and clapping when they saw me. I do not know who they are but that is much better than calling the police.
Phillip
Attached image(s)
Posted by: barada Sep 1 2011, 12:25 PM
Trunk is close. Still need gas tank sticker and hoses. Also a shot of the front bumper finish.
We are doing the windsheild Saturday. Did a shake down run in it yesterday thanks to the Strut mount Bruce sent.
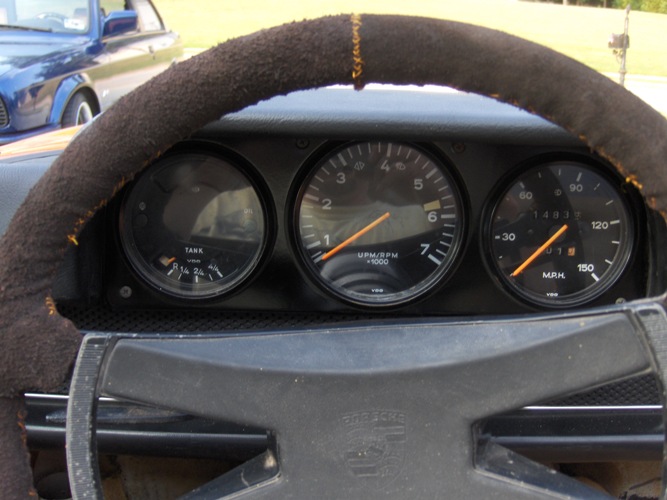
Also refinished the gauge bezel.
Attached image(s)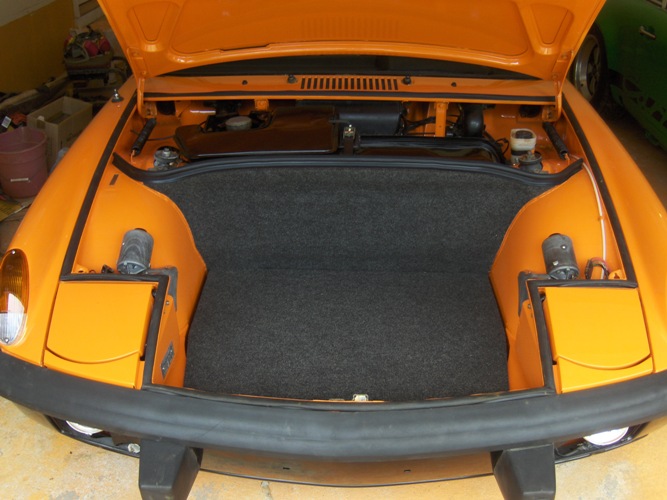
Posted by: mburkhart Sep 3 2011, 06:26 PM
The gauge bezel turned out great, looks like new. If you're not going to replace the steering wheel, I'll share how I refurbished my horn button recently.
To remove the horn button, twist it counter-clockwise.
I carefully pryed off the rubber part and wiped it down with Simple Green and then Mother's "Back-to-black". Then I sprayed the metal frame with satin black. Finally, I used some 3M weatherstrip adhesive to re-attach the rubber to the metal.
When re-attaching the horn button, make sure that you DO NOT run the horn wire through the hole in the steering column. It looks like that's where the wire should go, but it will pinch the wire and result in a broken (or stuck) horn.
The car looks great - I'm really enjoying watching you put this back together!
Posted by: barada Sep 6 2011, 06:51 PM
Thats for the compliment. I will redo the horn and will try the products you suggested.
It is back on the road. I keep up with my mileage and fill ups and when I filled it up tonight, I noticed it was exactly 4 months from when I pulled it off the road.
My log reads Date Mileage Gallons Cost if anyone is trying to figure it out.
Shake down run does not show anything that is out of whack so it will be the method of travel to work tomorrow. Still need rivets for my sills and hoses for heat ,horn grilles and such but it is ready to roll.
Attached image(s)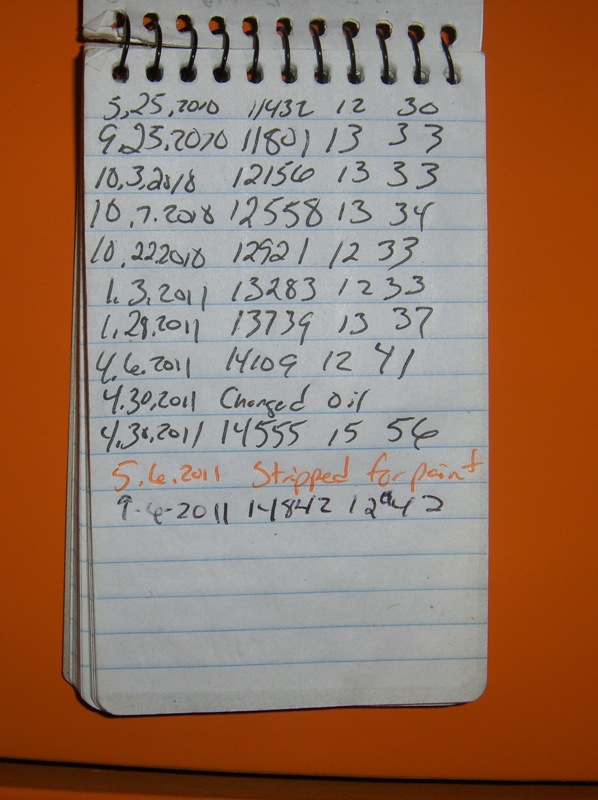
Posted by: barada Sep 6 2011, 07:03 PM
I chose not to go back with the aluminum trim on the front windsheild. I have my reasons, but I prefer this style. I did not use Butyl, had a buddy who does glass for a living glue it in for me.
Also I change the oil more than that note pad shows :^), actually as bad as it used to leak it self changed about every month. So far the underside is pretty dry so the rear main seal at least is working a little. Not sure why I even noted the oil change in there.
Posted by: barada Sep 8 2011, 05:55 PM
Had some bugs. Rear Caliper decided it wanted to leak so I had to swap it for a spare I had. Also the voltage regulator lasted about an hour. Replaced it and plan on driving it to work in the morning. At my GF house so proof it is moving.
Attached image(s)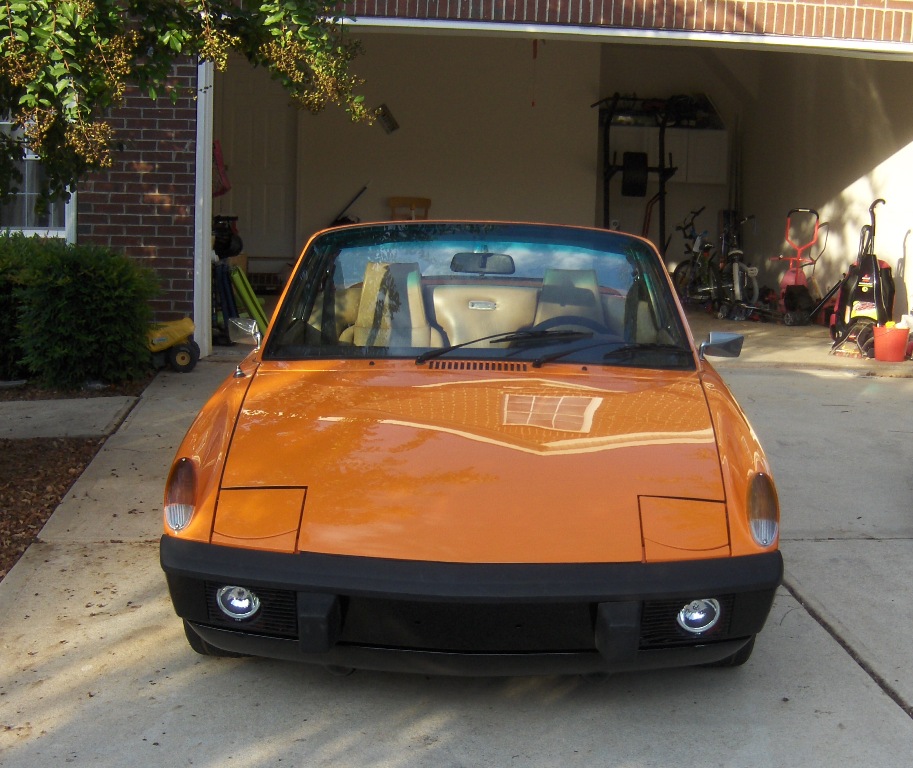
Posted by: Jeffs9146 Sep 8 2011, 06:49 PM
Aforementioned Leather dash top. Spot on it is from the damp cloth I wiped it down with for the photo op, did not notice it was not dry until I just edited the photo.
Thanks
Phillip
I taped all around those defroster vents and hit them with some black spray paint and they look brand new now!
Attached thumbnail(s)
Posted by: BajaXJ92 Sep 9 2011, 06:16 AM
Had some bugs. Rear Caliper decided it wanted to leak so I had to swap it for a spare I had. Also the voltage regulator lasted about an hour. Replaced it and plan on driving it to work in the morning. At my GF house so proof it is moving.
The car looks great! Really enjoyed reading this thread!
Posted by: barada Sep 10 2011, 09:36 AM
Thanks. I will probably just pull the vents from the front and paint them.
Car did fine. Drove it 120 miles in the past two days.
Finally have time for other things so I washed the green car for the first time in two months.
Attached thumbnail(s)
Posted by: Eric_Shea Sep 10 2011, 12:26 PM
Great job. Both cars look fantastic.
Posted by: barada Sep 12 2011, 06:38 PM
Thanks Eric.
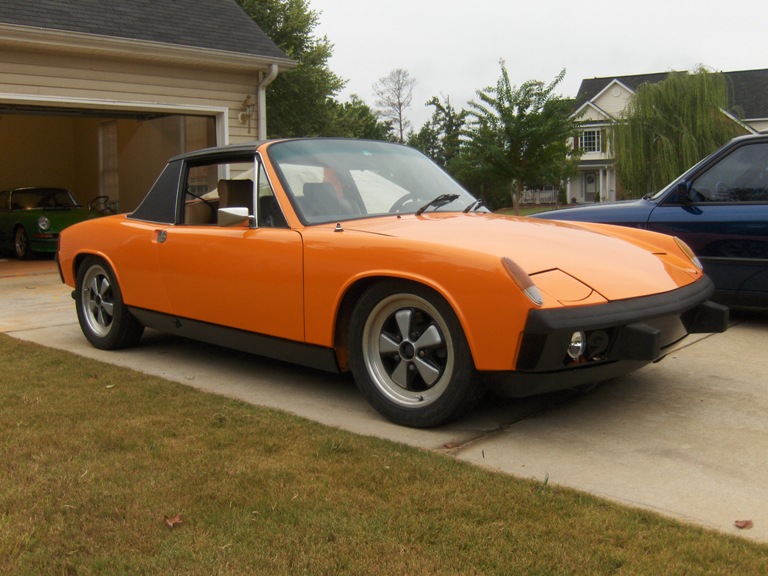
Got the rear lenses in today. Have put 400 Miles on it over the past 5 days.
Attached thumbnail(s)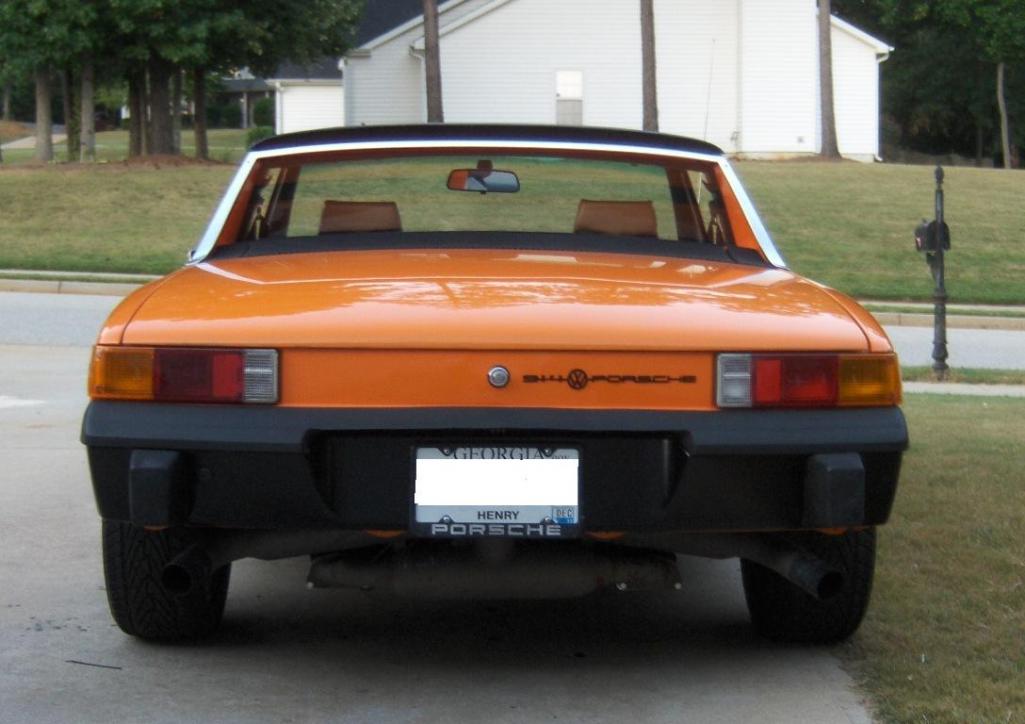
Posted by: barada Sep 16 2011, 10:57 AM
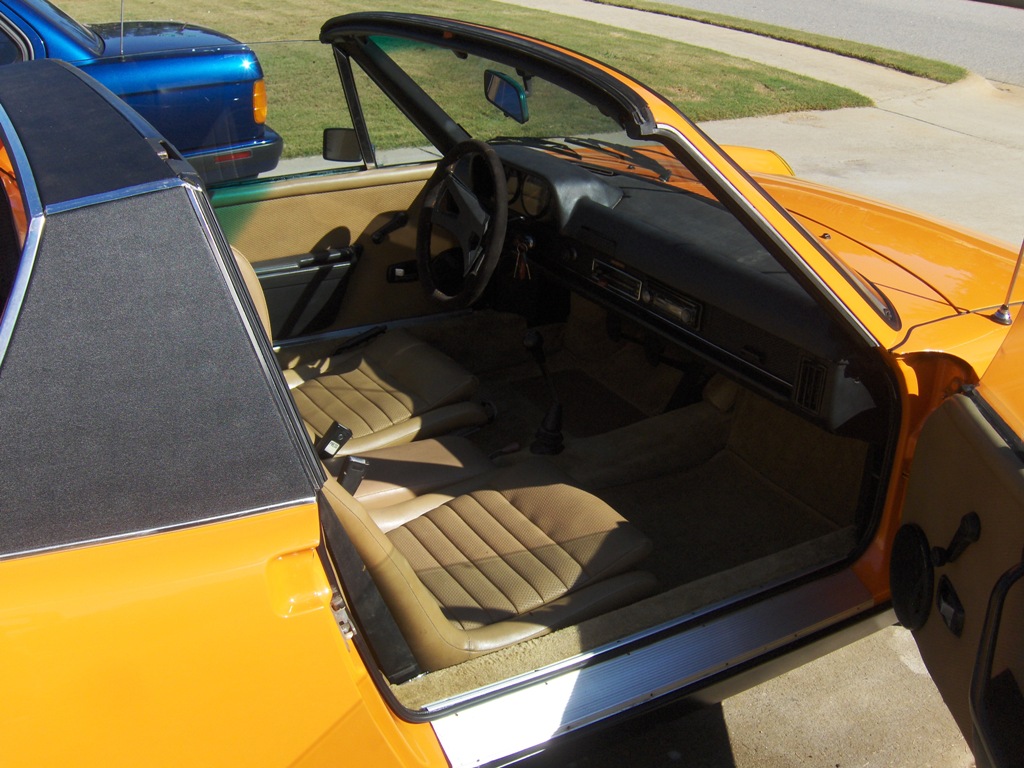
A couple of interior shots.
Thanks
Phillip
Attached image(s)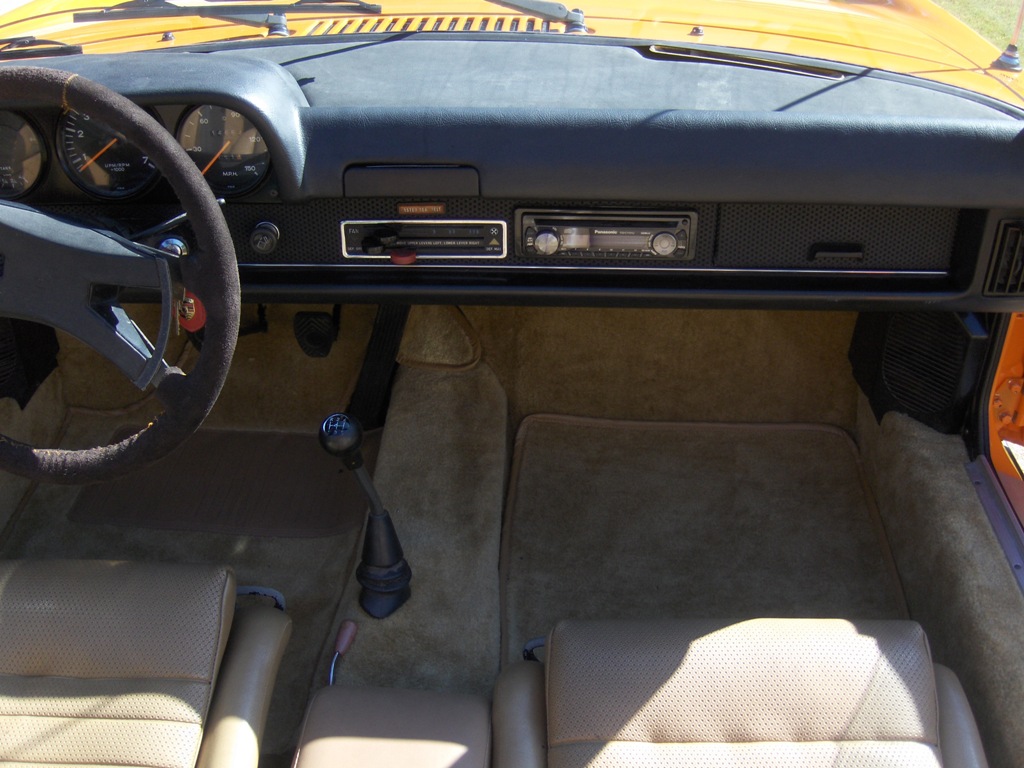
Posted by: obscurity Sep 16 2011, 12:40 PM
I am amazed with how fast you got your car done. I need to send you mine and I could be driving it by Thanksgiving. Very Impressive
John
Posted by: trojanhorsepower Sep 16 2011, 07:41 PM
Great work!
Posted by: barada Sep 16 2011, 08:41 PM
I am amazed with how fast you got your car done. I need to send you mine and I could be driving it by Thanksgiving. Very Impressive
John
Thanks John. Go ahead and bring it and the checkbook.
Posted by: obscurity Sep 17 2011, 08:18 AM
I am amazed with how fast you got your car done. I need to send you mine and I could be driving it by Thanksgiving. Very Impressive
John
Thanks John. Go ahead and bring it and the checkbook.
If only I could afford it. We should get the Atlanta folks together sometime soon. I'd love to see that car in person.
John
Posted by: barada Sep 24 2011, 02:18 PM
Well seems everything was going too good to be true. Had a axle break a bolt and I guess the other three backed out during the past month. I was driving home today and heard an enourmous "pow" I thought the motor blew as loud as it was. I now will double chekc torque at all times on these as I had a 911 do this several years ago, but do no damage.
If you know the name of this part or if you have one for sale I am in the market. And yes that is a Brand spanking new starter that is ruined above it.
Attached thumbnail(s)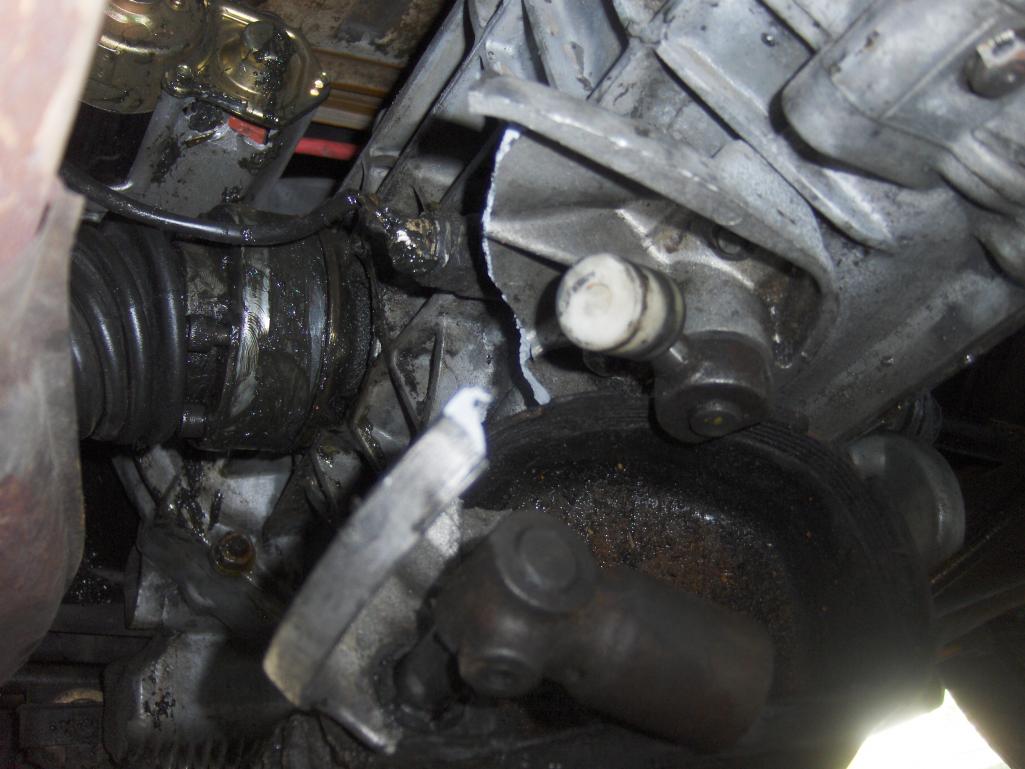
Posted by: poorsche914 Sep 24 2011, 03:59 PM
Ouch, same thing happened to me 20+ years ago when CV bolts came out and the mounting area that the starter bolts to was broken off. Sidelined my 914 for over a year (my father in law - a welder by trade - was going to weld the piece back on. Never happened  ) Never did get that car back on the road
Posted by: barada Sep 25 2011, 07:28 AM
I guess I was lucky. I have read where it has taken off a large chunk of the tranny. Believe it or not I drove it home with the bracket broken. When I was checking on the damage I did not see it as the cover was still on and holding it together. Of course when I was trying to shift to 2nd I knew something was wrong as my very tight shifting pattern was like stirring a stick in a bowl trying to find gears.
I have another hi-torque starter I was going to send back for warranty just had not got around to it yet so I will ship it back and see if they will get me a new one. I was thinking of swapping the case of the old one with the new internals but if they will swap my other one I will do just that.
Posted by: rick 918-S Sep 25 2011, 08:08 AM
Well seems everything was going too good to be true. Had a axle break a bolt and I guess the other three backed out during the past month. I was driving home today and heard an enourmous "pow" I thought the motor blew as loud as it was. I now will double chekc torque at all times on these as I had a 911 do this several years ago, but do no damage.
If you know the name of this part or if you have one for sale I am in the market. And yes that is a Brand spanking new starter that is ruined above it.
I had a close call like that but fortunately I looked under the car and noticed a few flecks of grease spattered on the bottom of the trunk pan from the loose axle. Contact Dr. Evil if you don't have that shift rod support. He may have one from a core trasaxle he can sell you.
BTW:

Posted by: barada Sep 25 2011, 09:47 AM
Yeah parts will be coming. I am going to do the safety wire set up when I fix it. Sucks as I was planning on driving it all week.
Posted by: barada Oct 11 2011, 07:31 AM
Big thanks to Bob for supplying the bracket. Shift rod was bent as well so I had to use a surgical device to get it back into range. Drove it to work Friday and all day Saturday with no issues. Did have to adjust the linkage as reverse and 2nd were right on top of each other after I put it back together.
Now I just need air vent hoses for the front and drain hoses for the engine lid and it will be back together 100%. My plan is to have it ready for the Mille at AMS in November. If I have time I will refinish the underside before it makes an official public appearence.
Phillip
Posted by: barada Oct 30 2011, 02:07 PM
Spent the weekend stripping old undercoating and overspray in the fender wells.
If this is factory undercoating, it was on pretty think, texture was the same everywhere so I assume it was done 30 yrs or more.
I did this on my 911 and forgot how much fun this is NOT to do. Was neat to clean the trailing arms and see the stamp from the factory.
After putting it back on the ground I realized you will never really see any of the hours put into it but at least it is clean.
I used heat at first to strip the undercoating and just decided to use a scraper and flake it off.
As soon as my strut hardware gets back I will shoot some pics of the front trunk. At this point I think I am going to show it next week at the Mille then put it into full time daily driver.
On a side not. I have a friend that has been wanting a 914 and I found a pretty good deal on a 76 so I am going with him to look at it tomorrow. If he passes I will probably get it and start on it next.
Thanks
Phillip
Attached image(s)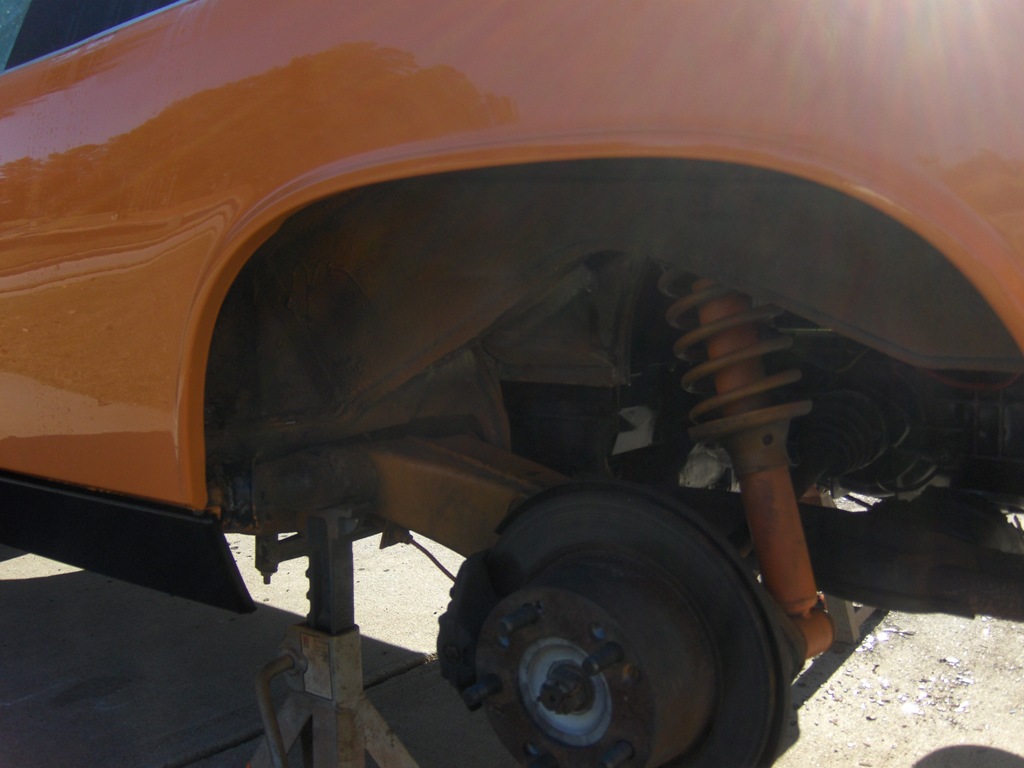
Posted by: barada Nov 4 2011, 01:37 PM
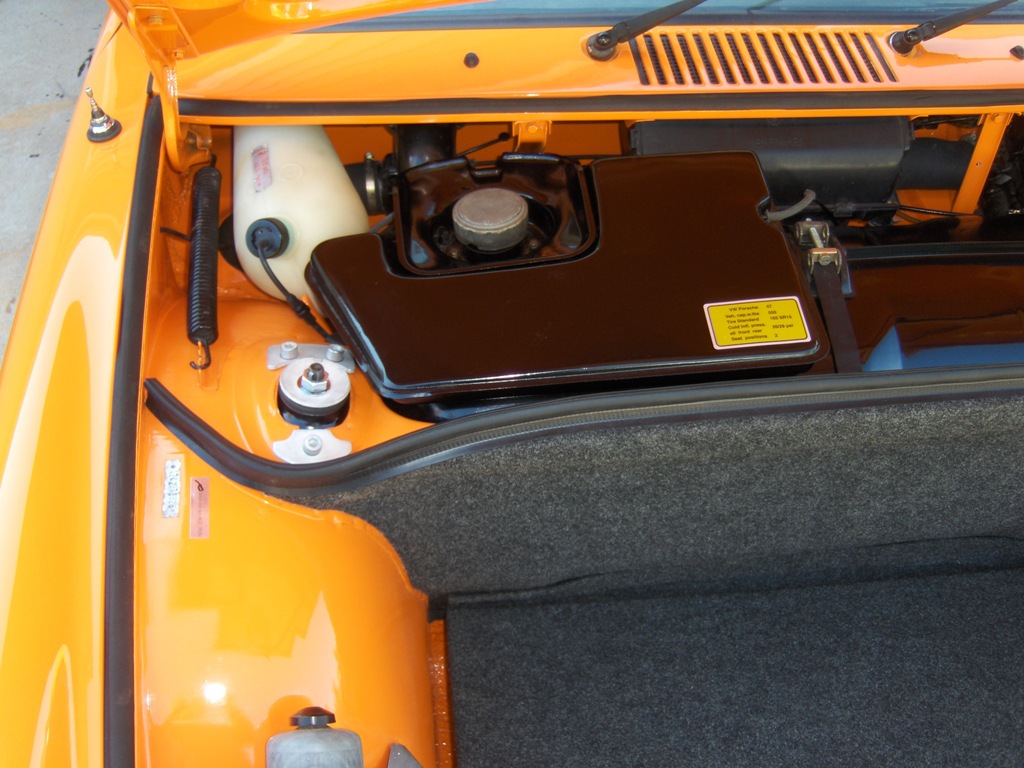
And got the Front trunk finished up. Had to buy the Heater hoses from a VW place, could not find brown anymore. Had my strut hardware plated (was suppose to be CAD) but it was free so light grey is fine.
Attached image(s)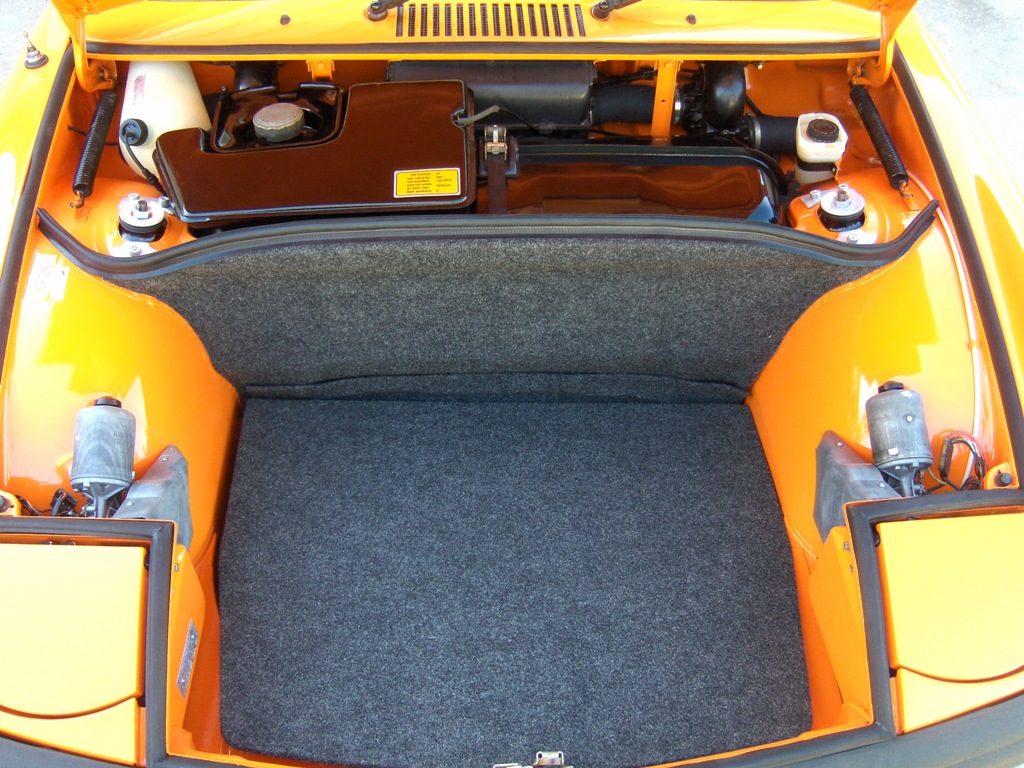
Posted by: yellow 914 Nov 6 2011, 05:39 PM
Looks like my bumper tops are not going to work so I suspect yet another order to 914rubber is in order. Budget was running fine. Timeline is way ahead of schedule, guess that is the way it goes. Got a lot of unseen things done. POR15'd the floors. Had a little surface rust on the firewall but otherwise factory paint. Also Installed the engine lid, rear glass and repainted the gas tank. Going to go with black leather in place of the vinyl that is on top of the dash, mainly because I have a nice stash of leather I was going to use to convert to black and decided to stay factory tan. Now just need some nice door panels and seats!
One thing that I never like on repainted cars is when the VIN tag is taped for painting.Even the best guys have some build up or the vin tag is flush with the paint when it is done. On this one I took about 2 hours massaging it off without tearing or breaking the sticker. Got to glue it back on this weekend. Nice seeing the orange behind the vin number.
Had to order carpet and front carpet kit. The hinges and headlight covers were painted this weekend so the hood and trunk will go back on sometime this week. I am out of town again so it will eat at me what does not get done before I go.
I looked in my mileage log for the car since I had to get the interior parts. Car was pulled off the road on 5-28-2011.
I just saw your thread. Great work. How did you take the VIN sticker off? What did you use to stick it back on?
Posted by: barada Nov 6 2011, 05:54 PM
Thanks.
I used a heat gun,Very sharp razor, and a solid hour of working it up. I cleaned the old adhesive of the sticker with 3M adhesive remover and used a Sprayable contact cement upholsters use for leather. I sprayed the sticker with all the little holes taped off so the residue did not show.
Posted by: barada Feb 3 2012, 03:05 PM
Just posting to keep this alive. I have been driving it and enjoying it during the warm winter. I am starting to get a buzzing/warning sound now at times. If I turn on the blinker it goes away so I assume I have a bad circuit somewhere.
Phillip
Posted by: etcmss Feb 3 2012, 04:08 PM
i'm in the similar process and hope mine comes out as good. a 71 with a 74 2.0L and has one registered owner with lots of original docs. thanks for sharing.
Posted by: pnewman Feb 6 2012, 09:51 PM
Looks Greeeeeeat! (Tony the Tiger)
Great Job!
Another 914 returned to or beyond its' former glory!
Posted by: DEC Feb 7 2012, 07:20 AM

Posted by: barada Mar 9 2012, 09:26 PM
Thanks Guys. I drove it a few days this week to work. Took it to a local VW show last Saturday. They got a kick out of the Rear Emblem.
Posted by: barada Dec 16 2012, 08:35 AM
I made some changes to the car lineup and now I am 100% aircooled and this car has become my daily driver and has spent time at the airport while I travel. I am going back through getting some bugs out of it I ignored like wiper arms that were stripped and bent shift rod. Hood latch became super hard to open and had to take the bumper off to get it open. Adjusted it right and it has been smooth as silk.
I have got to where I would rather drive it over the 911.
Posted by: stateofidleness Dec 17 2012, 12:20 AM
Beautiful car. Odd question for you... is that the original interior or an interior carpet kit? It looks "thick". If it's a kit, would love to know which one it is!
Thanks.
Posted by: barada Dec 17 2012, 07:01 AM
Beautiful car. Odd question for you... is that the original interior or an interior carpet kit? It looks "thick". If it's a kit, would love to know which one it is!
Thanks.
Thanks. The interior is original aside from the carpet kit.I got the carpet kit from Morph www.914ap.com
Thanks
Phillip
Posted by: barada Apr 4 2013, 12:35 PM
A little update. Car has been fantastic, still chip free and it is my daily driver when not in the company car. The leather top for the dash has faded pretty bad as it is almost tan now so I should have used vinyl. I have been working hard on my bus the past 14 months so it has been outside the last 4 months and has held up great.
Posted by: BMiller Apr 28 2013, 02:28 PM
The 914 turned out great! I'm about to pick up a Phoenix Red 74 that needs a full resto.....this was inspirational.
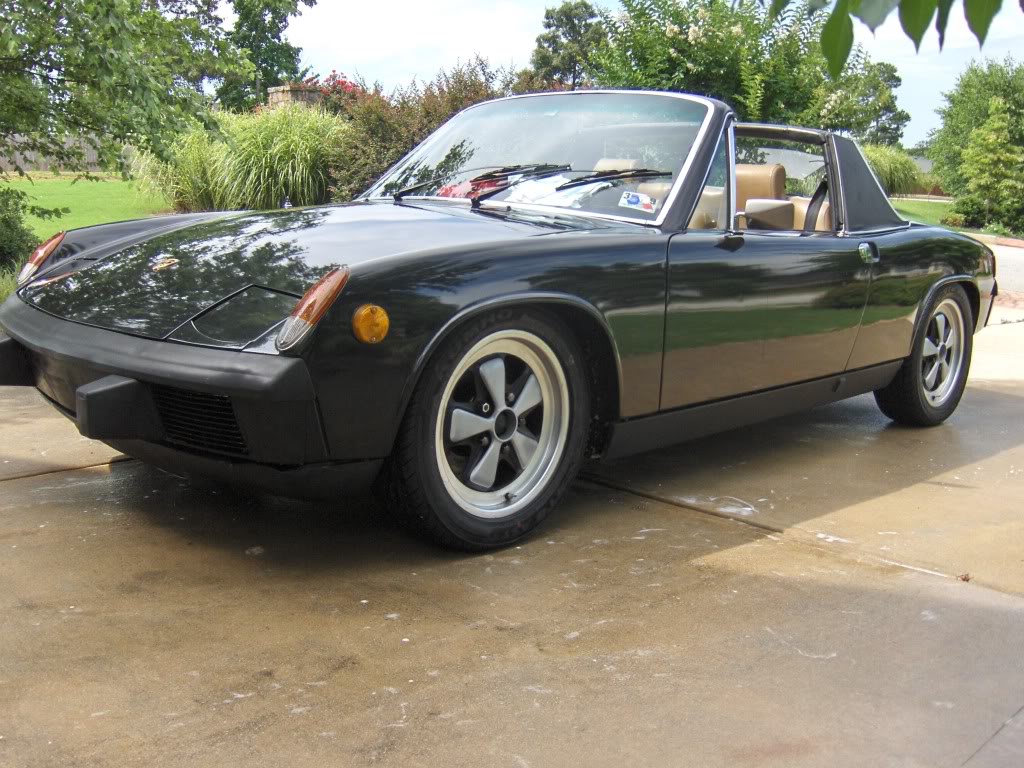
Posted by: barada Jun 22 2014, 07:35 PM
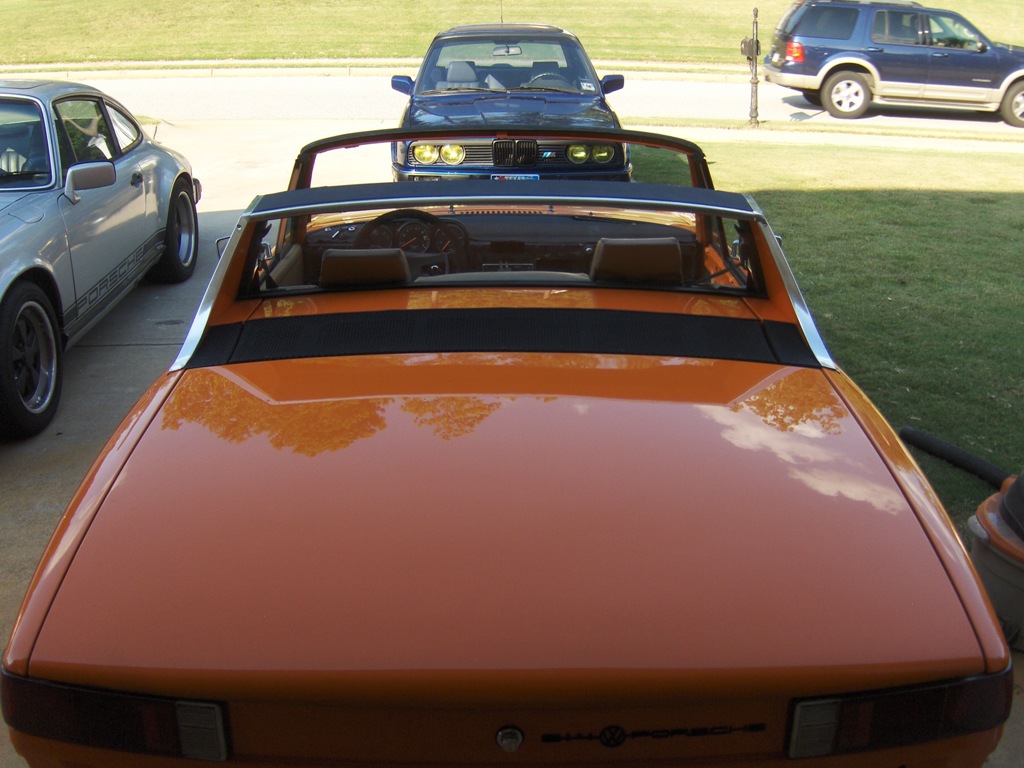
Well the day finally came for this one to get a new home. I really will miss this car and hope Wayne and his dad have as much fun with it as I did with my son. I have been so busy with other projects that I only drove it about 600 miles last year, so it was time.
Attached image(s)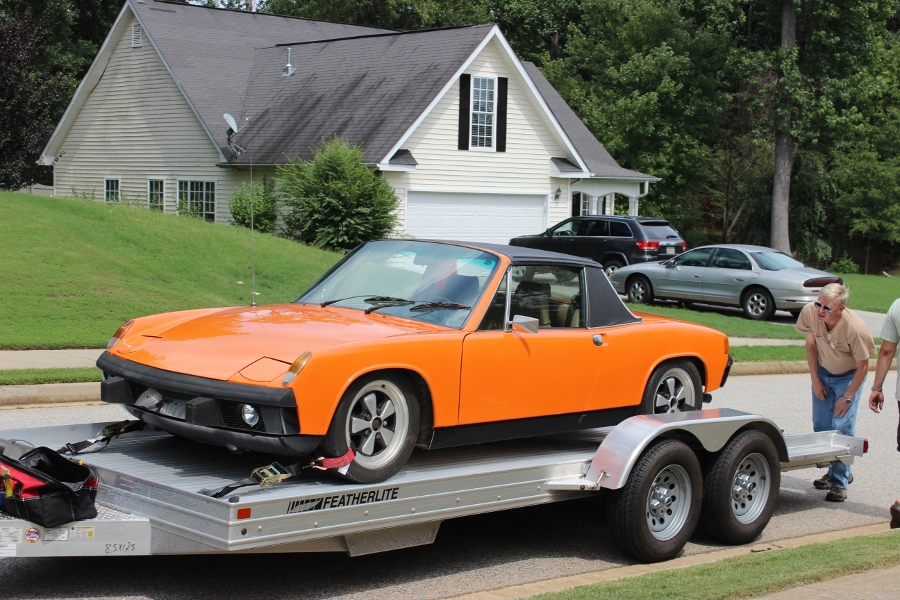
Powered by Invision Power Board (http://www.invisionboard.com)
© Invision Power Services (http://www.invisionpower.com)