Printable Version of Topic
Click here to view this topic in its original format
914World.com _ 914World Garage _ Targa Seal Installation
Posted by: kconway Oct 22 2011, 03:20 PM
I'm installing a new targa seal and need some eyes on this. I removed the old one so long ago I can't remember if something is missing. The horizontal member seems empty and the seal doesn't stay put. Am I missing something or should something go on before the seal in photo 1?
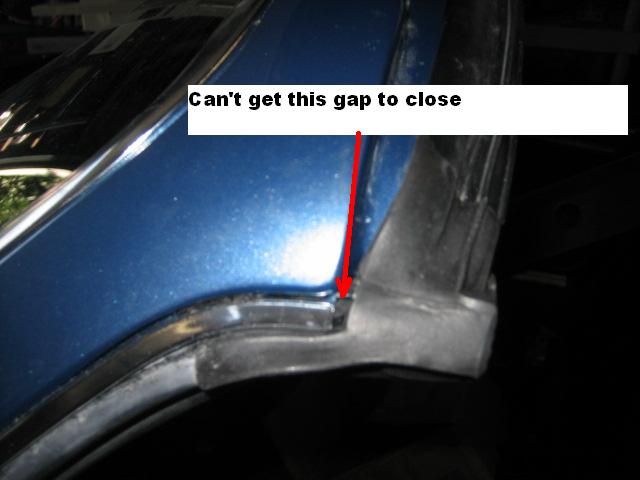
In photo 2, I'm wondering about the little flap on the a-pilar seal land. The little flap seems long and prevents the seal from seating in the corner at the transistion to the horizontal member. Does that flap stay on or do I snap it off?
Kev
Photo 1
Photo 2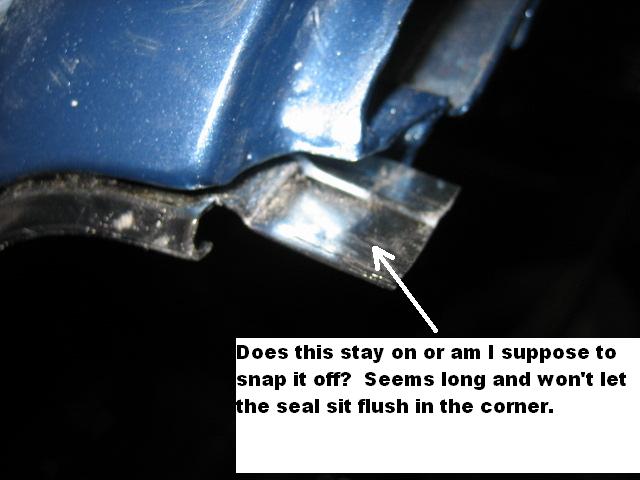
Posted by: MDG Oct 22 2011, 03:28 PM
In photo 1, do you mean the inner targa seal?
Photo 2 - no you do not snap those flimsy, PITA - did I say flimsy - tabs off. There is a slit inside the channel of the seal. You carefully work that tab into it. It anchors the seal at the corner where it makes a right angle down the side. I did say it's a pain in the ass, right?
Posted by: ellisor3 Oct 22 2011, 03:35 PM
Thre are 2 parts to the targa seal, an inner seal and the longer outerseal.
I did trim that little tab back some, especially if you have Mikey's kit. I found that mine was to long and caused it not to go all the way down. I also had to use some 3M sealant on the top of the targa seal where it meets the the area above the windshield, otherwise it will simply pull out when you remove the top.
Posted by: Mikey914 Oct 22 2011, 03:36 PM
Yes you are missing the lower targa seal. I just dropped you a set of instructions I use for my main seal. You can PM me if you need any info. I think the one you bought was mine so it should be a pretty quick install. Hoyland and I swapped his out in about 15 min. in the parking lot of the hotel I stay in.
Posted by: jim_hoyland Oct 22 2011, 03:53 PM
I did the swap with Marks help. Be sure you lube the sides so the rubber slips easily down the channeling. I used glycerine I bought at CVS.
The tricky part was the corner plugs. I had one side askew a tiny bit. Mark showed me the way. The upper end of the channeling could be a tad to long to fit into the plug as well.
Kevin, the flap has to be shortened about 1/4 to 1/2 inch. It still has to slip into the plug.
Posted by: kconway Oct 22 2011, 04:05 PM
I think I have to shorten that tab. Here's what it looks like. I can't get the horizontal across the top to stay in place it just flops back down. This is a seal I bought from the Porsche dealer about 5 years ago.
Posted by: Mikey914 Oct 22 2011, 04:30 PM
Kevin,
There is a short piece of an clip seal that the extrusion is designed to mold to, you will need that, as that's what holds the seal in place.
Posted by: kconway Oct 22 2011, 04:33 PM
I think I'm missing a "Inner Clip" for the horizontal?
Kev
Posted by: Mikey914 Oct 22 2011, 04:41 PM
You are, if you can't find it, I can send you another one no problem. Also the corner can be held up if the inner corner is not lined up correctly. I just sent you a copy of the instructions to your email, check out pg 2-3 refered to as "B". It could be that. or call me and I can talk you through it.
-Mark
Posted by: MDG Oct 22 2011, 04:58 PM

Kevin,
There is a short piece of an clip seal that the extrusion is designed to mold to, you will need that, as that's what holds the seal in place.
+1 on that. Also make sure that tab isn't folding up on itself like an accordion. One of mine did that and if so it will not seat in properly. Patience and the odd expletive is what is called for on these. If it is a factory seal you should not have to trim that tab.
There is a kind of pinch clip molded into the seal at the corners that those tabs go into; when you are stretching the seals across the frame, the pressure can squeeze them shut. Use something dull like a butter knife in the seal and try to open them up a bit - the tabs should be easier to slide in.
Posted by: HansJan Oct 8 2018, 04:17 PM
Hello,
Does anyone have a copy of the installation instructions for the front targa seal (that Mark is talking about)?
I rather not bother Mark at the moment.
Ps: any other pointers to installing seals are welcome. My car will come back from painter this week and most body/door seals need to be reinstalled.
Posted by: 1adam12 Jan 13 2019, 11:34 AM
Okay, this is my 7th attempt at trying to install the main targa seal. I keep getting hung up with the upright seal channel. Using glycerin now and only getting 5 inches or so down the channel and then nothing.
Definitely frustrating especially with the current downpour of rain were getting now and I have to mask off the targa and window gaps in between attempts.
This is the 914 Rubber version.[attachmentid=682255]
Attached thumbnail(s)
Posted by: IronHillRestorations Jan 13 2019, 01:15 PM
Don't try and slide the seal down, it will only increase your desire to say bad words.
Push the inside lip of the vertical part in the channel and the work the outer lip into the channel with a flat screwdriver, or a plastic glass install tool. 
First thing to do is make sure the corners fit correctly in/on the aluminum tab that sticks out, don't proceed until you get this to fit right, and smoothly.
I do each side first and then start in the center and work outboard (going back and forth) a little at a time. Once you get it fit perfectly you can put a couple crimps in the channel to keep the seal in place. There should be some witness marks from where this was done at the factory.
Posted by: 1adam12 Jan 13 2019, 02:15 PM
Don't try and slide the seal down, it will only increase your desire to say bad words.
Push the inside lip of the vertical part in the channel and the work the outer lip into the channel with a flat screwdriver, or a plastic glass install tool.
First thing to do is make sure the corners fit correctly in/on the aluminum tab that sticks out, don't proceed until you get this to fit right, and smoothly.
I do each side first and then start in the center and work outboard (going back and forth) a little at a time. Once you get it fit perfectly you can put a couple crimps in the channel to keep the seal in place. There should be some witness marks from where this was done at the factory.
Thanks for the install tips. I tried this method in my third attempt but I'll give it a go again. I understand fitting the seal on that tab is crucial and may need to be trimmed a little. I cut myself on that damn thing once already so here we go!
Posted by: Matty900 Jan 13 2019, 03:10 PM
I am working on a video to help but I don't have it edited yet. You can OM me and I will send you a link of the raw video files to help you in the meantime. 
Posted by: 914_teener Feb 4 2019, 07:49 PM
I.m soing this soon.
How was the outcome?
Posted by: 914_teener Feb 4 2019, 07:49 PM
So I'm Doing the lower seal this weekend. It's done raining for now.
So I PM'd Mark for instructions.
I understand for JUST to replace the lower targa seal:
Fit the corners first and then the center (the notch should be center), and then push the seal into the channel from the center outwards?
Does anybody have a picture of fitting the lower seal into the corner piece?
Thanks in Advance.
Posted by: 914_teener Feb 9 2019, 01:26 PM
![]()
Posted by: 1adam12 Feb 9 2019, 02:24 PM
I fi ally had success with this install the other week. I started with the top portion first going from center and working outwards to the corners. Once at the corners, you can determine how much you need to trim the metal tabs to make a flush fit.
At the lower portion (vertical seals) the suggestion of working inside first in the channels and then using a flat edge tool to punch the outer side into the channel worked perfectly! Definitely use some glycerin which you can find at you local CVS store.
Posted by: 914_teener Feb 9 2019, 03:56 PM
I fi ally had success with this install the other week. I started with the top portion first going from center and working outwards to the corners. Once at the corners, you can determine how much you need to trim the metal tabs to make a flush fit.
At the lower portion (vertical seals) the suggestion of working inside first in the channels and then using a flat edge tool to punch the outer side into the channel worked perfectly! Definitely use some glycerin which you can find at you local CVS store.
What about if you are only replacing the lower targa seal?
Should you unclip the top and side or should you just trim it square and be done with it?
Any info is appreciated.
I'll post a pic later.
Posted by: 914_teener Feb 9 2019, 09:02 PM
Heard from Mark.
The answer was to miter the lower seal. I used the old one on the side where it wasn't falling apart.
I'll post a pic later for anyone else.
Posted by: VG-914 Nov 15 2020, 12:44 PM
I am starting this task and see a lot of directly communicated info not placed on the forum. Does anybody know if it was posted? ...or any of the followup pics mentioned?
Tx
Posted by: morsmanlaw Nov 16 2020, 03:13 PM
I am starting this task and see a lot of directly communicated info not placed on the forum. Does anybody know if it was posted? ...or any of the followup pics mentioned?
Tx
I did this task just this past weekend. I watched the 914Rubber video on it several times and while it did help, getting the sides into the chrome trim wasn't as easy as they made it look. I do recommend trimming a bit off of the metal tabs - I did it on the passenger side, but it was too late to do the driver's, and I wish I had. An early poster on this thread mentioned having to use sealant at one top corner to hold it down, and I had the same experience, but if I had trimmed the tab on that side, it may have prevented the need to do so.
Posted by: double-a Nov 16 2020, 05:49 PM
this spring i replaced my decaying factory seal with the 914rubber reproduction. it's a great product but the install still took me awhile. a few things worked for me:
- as others have noted, prepare an assortment of your favorite swears and swear combinations in advance
- test-fit the top corners to judge how much tab to remove. i had to trim off quite a bit
- the side channels are pinched at the factory to hold the seal in place. after removing the old seal, use a screwdriver or other tool to reposition the pinched bits so that the new seal snaps in smoothly
- starting at the top corners, get the top of the pillar seal seated, popping the back side in first, then the front side, using a plastic spudger to work the seal into its groove a little at a time. use a dull tool!
- then press the top seal from each end towards the center, careful not to create a bulge of slack
- go over everything again, pressing hard on the seal to ensure it's fully seated all around
- trim off the extra rubber on the side seals using hand soap and a sharp razor blade
Posted by: Mikey914 Nov 16 2020, 06:12 PM
A big issue is the screw in the corner blocks inside the cabin. So small they often get missed. The help hold it in and need to be removed to take the old one out.
Powered by Invision Power Board (http://www.invisionboard.com)
© Invision Power Services (http://www.invisionpower.com)