Printable Version of Topic
Click here to view this topic in its original format
914World.com _ 914World Garage _ rear drop link bushing ?
Posted by: scotty b Nov 4 2011, 08:28 AM
 HOW ??
My first and possibly last time doing the rear bushings 
I've spent almost 30 minutes trying to get one of these damned things on. I popped all 4 onto the ball ends of the bar and the shock mounts, but how in the hell do you get the drop links on ? You can't put the links on first because the bushings collapse under the force without the ball insde for support. I've tried the bench vise, the press, smacking it with a hammer. All it will do is cock to one side and start compressing  I've slatherd the outside with pet. jelly, should I get that off and do it dry ?
Attached image(s)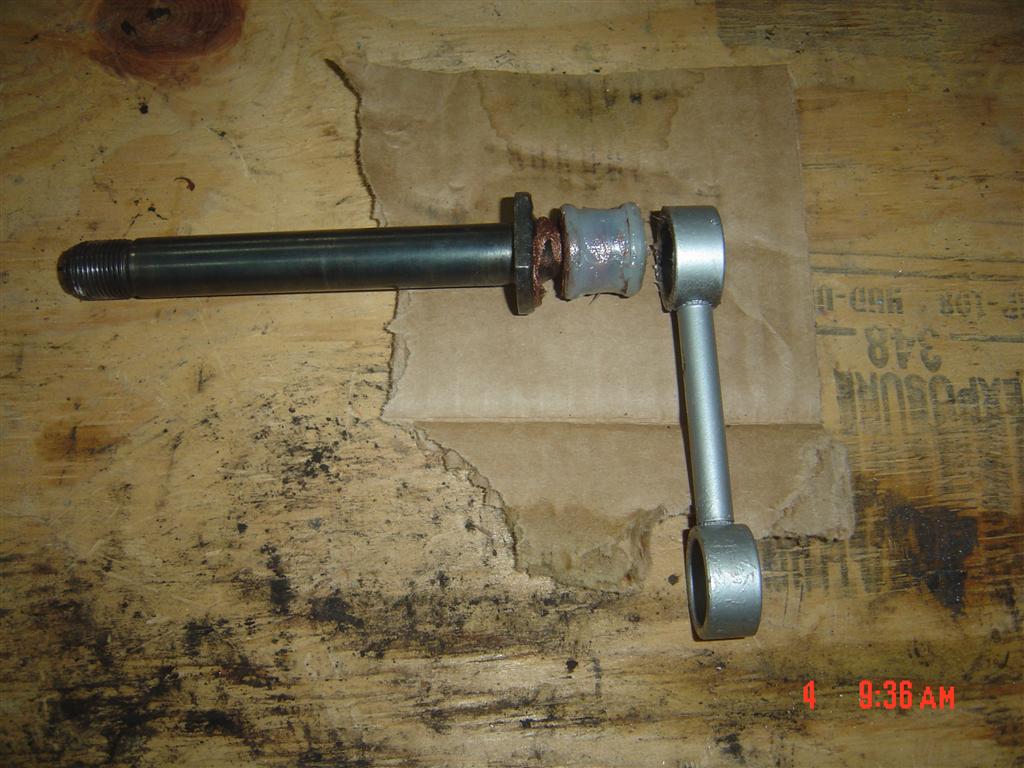
Posted by: rdauenhauer Nov 4 2011, 08:34 AM
Ive done it the opposite way you describe, install into the links first, use a C-clamp to compress/install onto the bar, then position and using a dead blow hammer smack the back side of the link/bushing onto the shock pin.
One hint is use the hot water trick just like the firewall bushing 
Posted by: Millerwelds Nov 4 2011, 08:37 AM
 Ive done it the opposite way you describe, install into the links first, use a C-clamp to compress/install onto the bar, then position and using a dead blow hammer smack the back side of the link/bushing onto the shock pin.
One hint is use the hot water trick just like the firewall bushing

Posted by: ConeDodger Nov 4 2011, 08:37 AM
I drill a hole in the center of the cup and then squeeze them in with channel locks.
I think McMark told me to do that...
Posted by: scotty b Nov 4 2011, 08:48 AM
Ive done it the opposite way you describe, install into the links first, use a C-clamp to compress/install onto the bar, then position and using a dead blow hammer smack the back side of the link/bushing onto the shock pin.One hint is use the hot water trick just like the firewall bushing
I tried doing the links first but they just buckled under the pressure so I thought installing the ball side first would keep that from happening. Maybe drilling the hole allows enough extra flex to keep it from buckling. I'll give that a try
Posted by: SLITS Nov 4 2011, 08:56 AM
Grease, vise or channel locks, screwdriver. Bushing will deform in link, but will eventually seat. Use screwdriver to pry the ends into the link. My experience anyway.
Use big ass channel locks, grease to push drop link onto ball.
Posted by: scotty b Nov 4 2011, 09:36 AM
Thanks guys, I got them in. I think lubing the outside might have been my biggest issue. It just made it to easy to slide around. I ended up taking them all off of the ball sides and installing them into the links dry. Tried drilling a hole in 2 of them and really didn't notice much difference. I still had trouble with channel locks deforming them, so I ended up inserting as much ( about half ) of the bushing as I could, then while applying hand pressure to that area, I VERY CAREFULLY worked the rest of the lip into the ring a little at a time with a screwdriver, ( good way to get instant stigmata  ) once I had the whole edge inside the ring, a couple smacks with a deadblow seated it fully. Took the shock mount and stood it on end and whacked it with the dead blow then took that assy to the bench vise, set the bar in place and tightend the vise down to pop the bar into the bushing.
Attached image(s)
Posted by: Philip W. Nov 4 2011, 10:04 AM
Thanks guys, I got them in. I think lubing the outside might have been my biggest issue. It just made it to easy to slide around. I ended up taking them all off of the ball sides and installing them into the links dry. Tried drilling a hole in 2 of them and really didn't notice much difference. I still had trouble with channel locks deforming them, so I ended up inserting as much ( about half ) of the bushing as I could, then while applying hand pressure to that area, I VERY CAREFULLY worked the rest of the lip into the ring a little at a time with a screwdriver, ( good way to get instant stigmata
) once I had the whole edge inside the ring, a couple smacks with a deadblow seated it fully. Took the shock mount and stood it on end and whacked it with the dead blow then took that assy to the bench vise, set the bar in place and tightend the vise down to pop the bar into the bushing.Scotty,
Next time put them in hot water. this is what my mechanic suggested when i did mine, and the softend up enough that they just popped right on.
Phil
Posted by: Cool914 Nov 4 2011, 10:49 AM
What is that copper wiring you have on the bar ball? I need to do this soon and wondering if that is another tick of some sort.
Posted by: McMark Nov 4 2011, 11:29 AM
Heating them up helps a lot. Install them in the drop links first. I've found that drilling a small hole in the back side will relieve the pressure since the ball and socket make a nice seal and part of the challenge of popping them onto the balls is overcoming the air pressure. Of course installing them off the car makes things easier as well. 
Posted by: maf914 Nov 4 2011, 11:33 AM
What is that copper wiring you have on the bar ball? I need to do this soon and wondering if that is another tick of some sort.
Looks like grease or copper anti-sieze.

Posted by: scotty b Nov 4 2011, 11:56 AM
What is that copper wiring you have on the bar ball? I need to do this soon and wondering if that is another tick of some sort.
Looks like grease or copper anti-sieze.
 Copper anti-sieze
Powered by Invision Power Board (http://www.invisionboard.com)
© Invision Power Services (http://www.invisionpower.com)