Printable Version of Topic
Click here to view this topic in its original format
914World.com _ 914World Garage _ Swaybar intall ANGER - help!
Posted by: nebreitling Aug 8 2004, 07:16 PM
i really hope that i'm missing something here, because it looks like the factory was smoking crack.
i had the gas tank out to replace the fuel lines. as long as it was out, i thought i'd install my recently aquired 21mm Weltmeister. My car came with the 15mm sway, so I thought it should be a pretty easy swap.
The triangle shaped bracket is secured by 3 bolts. the top two come in and out easily. the third (bottom) bolt's nut is hidden underneath some sheet metal compartment -- access to which is extremely limited by a small hole about two inches behind the nut (see pics).
with one finger in the hole, i was able unscrew and extract the nut from this 3rd, bottom bolt. Putting a nut BACK ON the bolt is another process entirely. i've tried everything -- including sticking magnets in my latex gloves to hang on to the nut. so far i've lost 2 washers and a nut down in the bottom of this "hidden compartment." i'm sure they'll make a lovely rattle as i motor down the road...
has anyone confronted this? how important is that third bolt? how important is the sheet metal covering it? (a little jig saw work could open up some access). thanks
nathan
from the outside: it's the bottom bolt i'm talking about.
Attached image(s)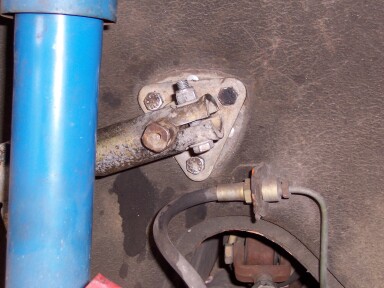
Posted by: nebreitling Aug 8 2004, 07:18 PM
from the inside.
you can see the top two bolts. the third is below that metal. also visible is the little hole i was talking about, and another (smaller) one that i just made to prepare for the jig saw...
Attached image(s)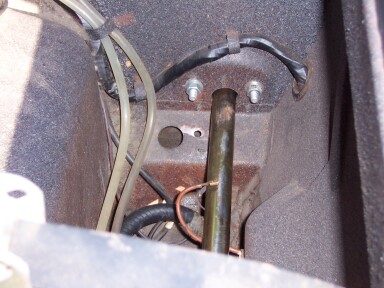
Posted by: nebreitling Aug 8 2004, 07:29 PM
and this is how i'm dealing with the frustration
Attached image(s)
Posted by: rdauenhauer Aug 8 2004, 07:35 PM
isnt it the consensus that this application requires the triangle back plates for reenforcement lest you rip the bolts thru the thin sheet metal? 
Posted by: nebreitling Aug 8 2004, 07:38 PM
how would i get them on with the metal there?
Posted by: trekkor Aug 8 2004, 07:39 PM
This might sound insane  ...but it might work.
Get a piece of wire and tie string to it.
Tie the bolt to the other end of the string.
Feed the wire through the hole, pull the bolt throught the hole and put the nut on the outside instead.
KT
Posted by: rdauenhauer Aug 8 2004, 07:40 PM
You have to cut a small notch on that rail just against the Well then use these:
http://members.aol.com/engman10/swaywld2.jpg
Chk the resouces section. 
Posted by: Rider914 Aug 8 2004, 07:46 PM
A self tapping sheet metal screw, or better yet a wood screw!
Hey, it worked for the P.O. of every car I have owned!
I have found stuff that makes me quit looking, under some of the old cars that I have owned.
Posted by: trekkor Aug 8 2004, 07:48 PM

Of course. Disregard previous "hillbilly solution", please.
Trek
Posted by: nebreitling Aug 8 2004, 07:53 PM
http://members.aol.com/engman10/swaywld2.jpg
Chk the resouces section.
thanks rich.

guess i'll put the woodscrews and bailing wire away for now.
Posted by: Demick Aug 8 2004, 07:56 PM
Here is how I did mine: Glue the nut to your finger (flat side to your finger so you can press the nut against the sheetmetal as you try and thread in the bolt from the outside). I used 3m weatherstrip adhesive. Works pretty good. And the bonus is that when you lose the nut down in no mans land, it will probably glue itself down there and won't rattle. I've got 3 or 4 nuts down there in mine and never noticed any rattling.
Demick
Posted by: Bruce Allert Aug 8 2004, 08:44 PM
The article from the Bird Board is what I followed. Quite easy... well, almost 
http://www.pelicanparts.com/techarticles/914_front_swaybar/914_front_swaybar.htm
here's a pic of the cut away area.
.........b
Attached image(s)
Posted by: SirAndy Aug 8 2004, 08:47 PM
do this:

Posted by: SirAndy Aug 8 2004, 08:50 PM
oh, and while you're in there, see that backing plate in the pic above ^^^ ???
now is the perfect time to install one and "sandwich" that area.
otherwise, the way you drive, you'll rip out those swaybar bolts in no time ...
 Andy
Andy
Posted by: Brad Roberts Aug 9 2004, 02:22 AM
Nathan,
those backing plates are 29.95. We stock them right next to the high pressure fuel line.
I also HIGHLY suggest you weld them in..
PLEASE dont use the current method with NO backing plate. I just spent 2 hours the other day removing a tank/bar/setup to weld up all the cracks on somebody's 914 track car that *almost* ripped the bar out of the car. Do it right... or dont do it.
B
Posted by: Bruce Allert Aug 9 2004, 07:03 AM
Those backing plates that Andy shows is much easier & nicer than the one I showed where you still have to screw around with the nut in that tiny space. I had to make my plates cuz the sway bar didn't come with them The bottom nut fell out of my grasp a few times before I finally got it started.
 to the one that made those wonderful plates with the nuts on'm!
.........b
Posted by: Eric_Shea Aug 9 2004, 07:23 AM
Weld in the plates that Bradhole is talking about. I believe they're Mark Engman's products.
Posted by: Engman Aug 9 2004, 07:38 AM
Yep you need to have the backing plate. I have em - $26.00 in stock. The factory install uses an integrated bracket with welded in nuts - so someone added the sway bar I see above.
M
Posted by: nebreitling Aug 9 2004, 11:47 AM
those backing plates are 29.95. We stock them right next to the high pressure fuel line.
i'll swing by today
Powered by Invision Power Board (http://www.invisionboard.com)
© Invision Power Services (http://www.invisionpower.com)