Printable Version of Topic
Click here to view this topic in its original format
914World.com _ 914World Garage _ Just made some more room....
Posted by: bondo Aug 12 2004, 10:13 PM
Just thought I'd share a couple progress pics... (Ignore the rust) 
Left side:
Attached image(s)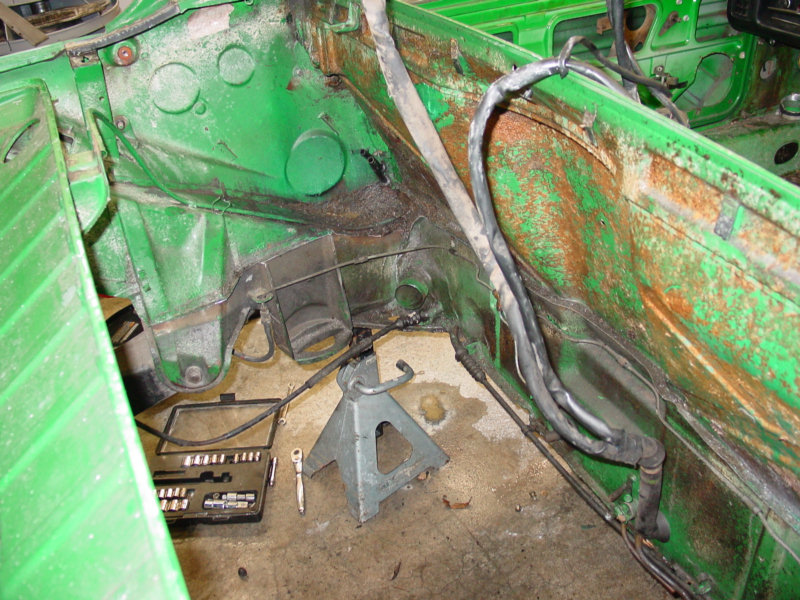
Posted by: bondo Aug 12 2004, 10:15 PM
Right side: (Notice anything missing?)
Attached image(s)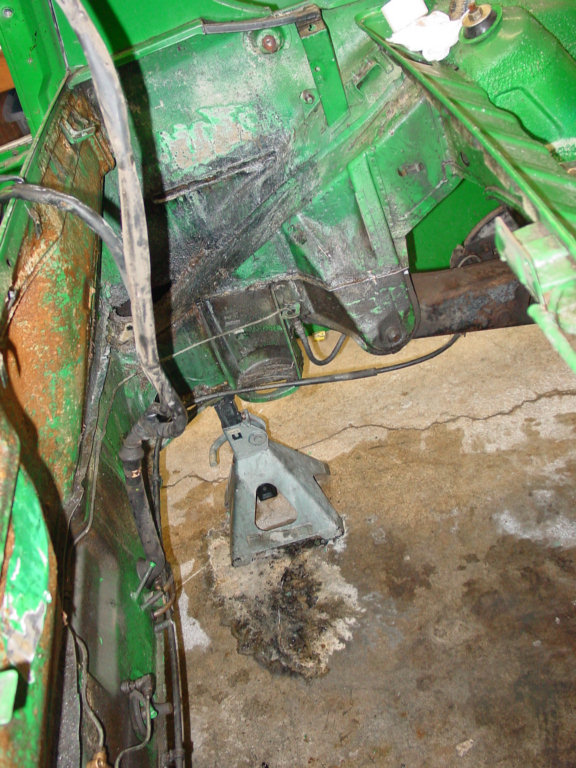
Posted by: Brad Roberts Aug 12 2004, 10:22 PM
We dont need no stinking engine shelf...
I like the green color.
First time I did that... I cut a brake line...LOL
B
Posted by: dakotaewing Aug 12 2004, 10:31 PM
So, How did you take it out...?
Drill bits....?
Sawzall?
Inquiring minds want to know.....
Posted by: bondo Aug 12 2004, 11:06 PM
I had planned on just going in there and drawing lines with the acetylene pencil... but once I got in there, I chickened out (too many brake lines, brake cables, and important suspesion members that would be right behind stuff I would cut). I ended up using my trusty $24.99 air body saw from Harbor Freight. Did all that with only two blades, and it went real fast. The blades will even bend and still cut, so you can cut things closer than you would normally think possible. For those unfamiliar with the tool: it's like a tiny sawzall that's air powered with a smaller stroke, smaller blade, and goes very fast.
Brad: Still got that used 9" kevlar clutch disk?
Posted by: Andyrew Aug 12 2004, 11:11 PM
So... Do you have to do this for a v8?
lol, im asking that now.. ya.. tell me about it..
I got myself a nibbler.. I can handle it! *grunt*
Clean cuts though!
Posted by: Brad Roberts Aug 12 2004, 11:28 PM
Still have the disc...
B
Posted by: bondo Aug 12 2004, 11:36 PM
Andyrew: I don't think so. I just want to make it as easy as possible to work on once it's in there.
Brad: How much do you want for it? I could probably get jkeyzer to pick it up for me, or maybe do it myself later this month.
Posted by: Jeroen Aug 13 2004, 05:18 AM
I'm in the middle of doing exactly that
I'll post some pics tonight so we can have a little competition 
cheers,
Jeroen
Posted by: 1bad914 Aug 13 2004, 05:43 AM
Mine is coming out this weekend. I'll use a combination of die grinder and air saw!  What is that color by the way?
Posted by: bondo Aug 13 2004, 09:00 AM
I still need to go through with a grinder and flap sander to smooth things out. I believe the color is zambezi green, but I'm doing a color change. I wish I could afford a dip, but I can't. Gonna remove as much paint as I can with chemical stripper. The green is a nice color, but it's just not for me.
Posted by: watsonrx13 Aug 13 2004, 09:24 AM
Great job.
I never thought about removing the engine shelf for a v8 implant.
It take it the shelf isn't structrual?
BTW, I'm cleaning up my engine compartment also, what a PITA to get it clean and removing all extraneous bits. But, when it's done, it's done. 
Posted by: rey Aug 13 2004, 09:28 AM
Hey Bondo, Looking good . what shelf I don't see anything Cant wait to see more pic..
what color are you ging to paint. is it possible to modify a dog house thing so a stock water pump can be used? 
Posted by: bondo Aug 13 2004, 09:48 AM
I hope it isn't structural It doesn't appear to be, although the front engine shelf is an extension of a seam in the firewall, so it probably does lend a bit of strength to the firewall from bowing, but that isn't really a strength it needs (unless you tend to put your seat back too far)
I'm going to paint it Hummer H2 Yellow. It's similar to the 914 color sunflower yellow, but brighter and maybe a little more towards orange.
Not sure what you mean by a doghouse. I am using the stock water pump, but I'm reloacating it to the front trunk and putting an electric drive on it. (it's an LT1, so it has a strange water pump and reverse cooling)
Posted by: John2kx Aug 13 2004, 10:02 AM
lol, im asking that now.. ya.. tell me about it..
I got myself a nibbler.. I can handle it! *grunt*
Clean cuts though!
It is not necessary to remove any part of the engine shelf when running a V8. You will actually be surprised at how much room you have when going "V" as compared to flat.
There is also no gain to be had when it comes to maintenance or installation/removal of drivetrain. Anything you need to access is either above or below engine shelf.
John
Posted by: John2kx Aug 13 2004, 10:06 AM
left side
Attached image(s)
Posted by: John2kx Aug 13 2004, 10:07 AM
right side
Attached image(s)
Posted by: Andyrew Aug 13 2004, 10:08 AM
John, Thanks.
I knew there was a ton of room side to side.. But what about in the front? I could cut that part out and give myself a little extra room for timing or other stuff.. Right?
Posted by: brant Aug 13 2004, 10:21 AM
Nice....
damn.. I've got to buy a digital camera (but that would take away from my car budget you know)...
I just finished the same task.. We cut away all unnecessaries and all tin work for our -6 conversion race car. I just got it back from Paint 2 weeks ago (have 35mm pictures but no scanner) and wish I could share on this thread... It really came out nice.
your pictures look good !
brant
Posted by: rey Aug 13 2004, 11:11 AM
Dog house, what I meant was to cut access hole in the firewall behind the back pad then make a door type thing. Is this a bad idea?
Posted by: bondo Aug 13 2004, 11:31 AM
I've heard of doing the hole in firewall for stock pump thing. You can't use the backpad anymore, and you may not be able to get the seats all the way back. I was actually considering doing something like that for my cam driven water pump on the LT1, until I found out about the electric drive for it. It's a pretty nifty idea, and will allow remote mounting of the stock thermostat and water pump assembly. Here's a link to a picture: http://dw-zone.gotdns.com/396/csipump.jpg They make them for inline remote mounting, which would probably work fine for a regular SBC. With my reverse cooling, I wanted to keep the cooling system as unmolested as possible to avoid problems.
Hopefully I can fit a battery, the water pump, and the radiator in the front trunk.
Posted by: John2kx Aug 13 2004, 02:04 PM
I knew there was a ton of room side to side.. But what about in the front? I could cut that part out and give myself a little extra room for timing or other stuff.. Right?
Andyrew,
I don't think cutting the front part of engine shelf buys you much either in a V8 car. There's still not enough room to be gained to time it from top side of car due to the way cabin bulkhead is angled. I actually ended up timing by ear and seat of pants vs. using the marks I installed on flywheel and harmonic balancer. Remember, the harmonic balancer, water pump, alternator and a/c compressor are all located below engine shelf. I can't imagine anything you would gain (maintenance wise) by removing it. Different animal if your going the "dog house" approach and using stock water pump.
Don't get me wrong, I don't think there is anything wrong with removing the engine shelf and think it looks pretty clean when done right..........just saying that it is not necessary.
The shelf does provide support for your wiring harness. If you cut it out, you'll need something to support harness so it does not make contact with drive belts.
John
Posted by: Jeroen Aug 13 2004, 05:43 PM
Pass. side almost done. The bottom of the engine mount still needs to go and then some final minor clean-ups
The frame rails underneath the engine mount is still solid 
Attached image(s)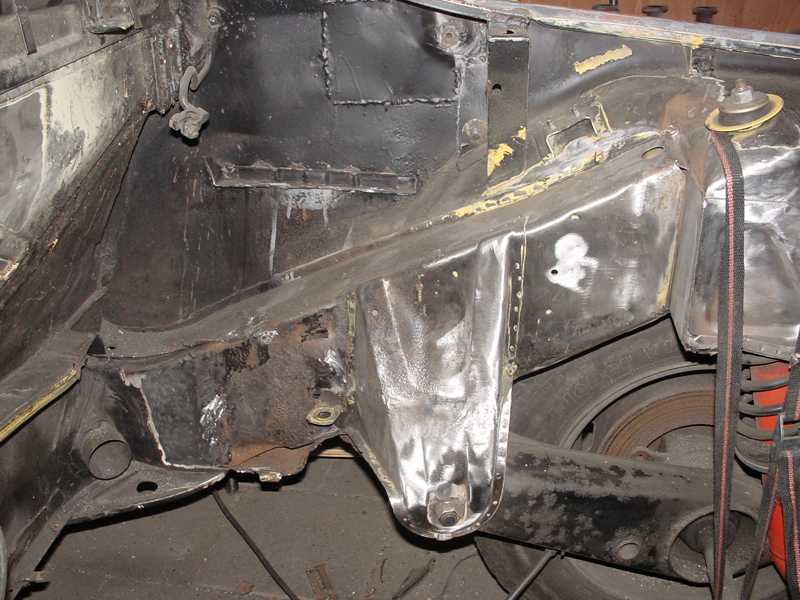
Posted by: Jeroen Aug 13 2004, 05:44 PM
Drivers side... gettin' there
Attached image(s)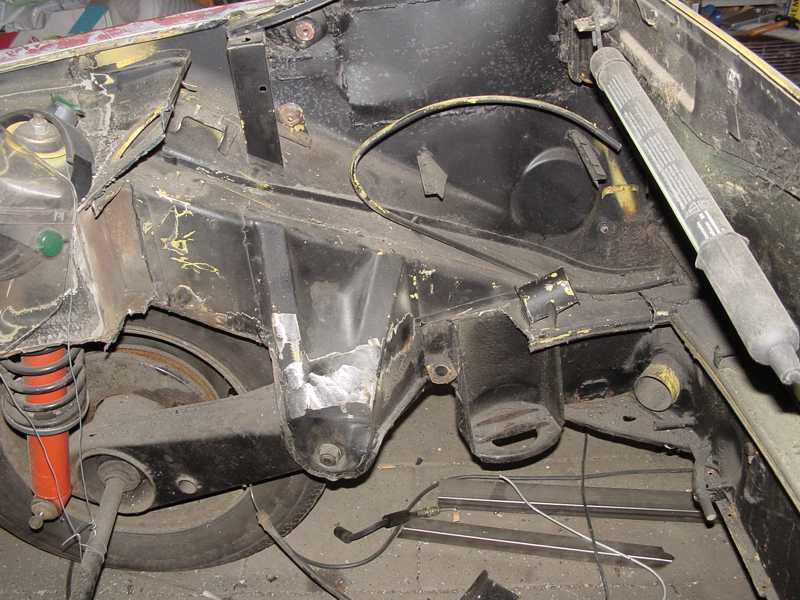
Posted by: Jeroen Aug 13 2004, 05:45 PM
Almost ready so seam-weld this puppy up 
Attached image(s)
Posted by: bondo Aug 13 2004, 05:51 PM
Jeroen: Whoo, you went a bit farther than I did. Looks good! What engine ya got planned for it? Mine is a daily driver, and I'm already going to lose most/all of the front trunk to the cooling system, so I am keeping the rear trunk.
Posted by: Jeroen Aug 13 2004, 06:04 PM
3.0 Carrera... aiming for 230 bhp and 1750#
Powered by Invision Power Board (http://www.invisionboard.com)
© Invision Power Services (http://www.invisionpower.com)