Printable Version of Topic
Click here to view this topic in its original format
914World.com _ 914World Garage _ Um...uh...this can't be good....
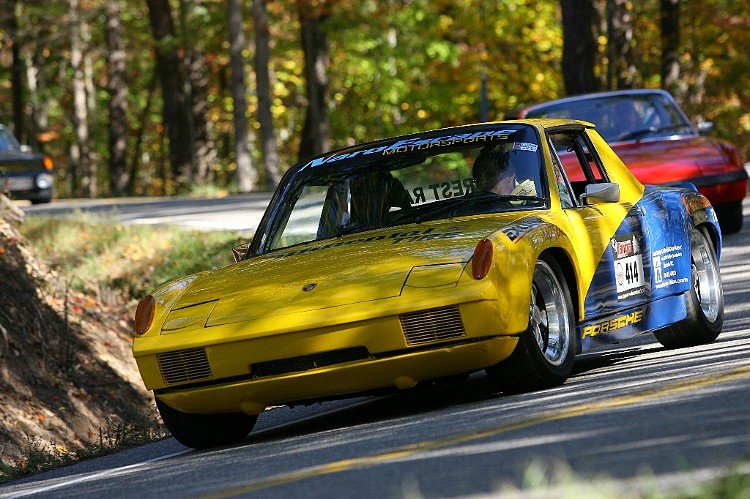
Posted by: naro914 Dec 16 2011, 03:01 PM
So I was having braking issues at our last PCA Club Race - boild the fluid issues. I think the problem was that the front calipers were not releasing from the rotors so it was like dragging the brakes all the time. It's been a long time (never??) since the calipers were rebuilt, and forever for the master cylinder so I decided to do a full brake system overhaul: rebuild all 4 calipers, new MC, new rotors, and new braided SS lines. Other than the caliper rebuild kits, I had all of the other parts already in my spares box, so this was a very cheap, easy winter project.
All that went perfect.
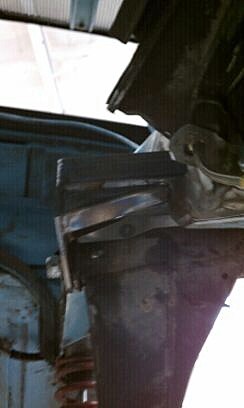
So...silly me, I decide to start scraping the undercoating off of the inside of the wheel wells with the idea I'm going to paint them (the old 'While I'm here' conversation we all have in our heads). As I was scraping, I came upon what I thought was a small crack... Nah, can't be, just surface paint crack, right?
So I investigated further, and... 
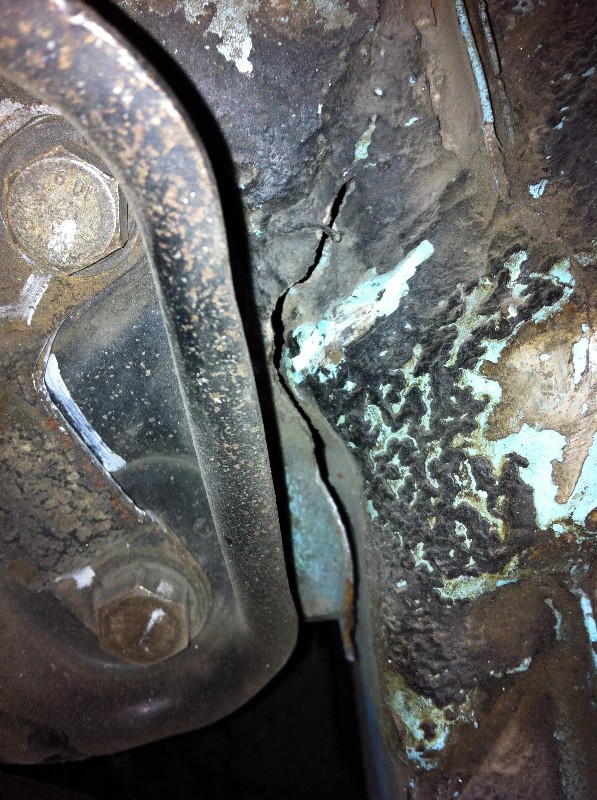
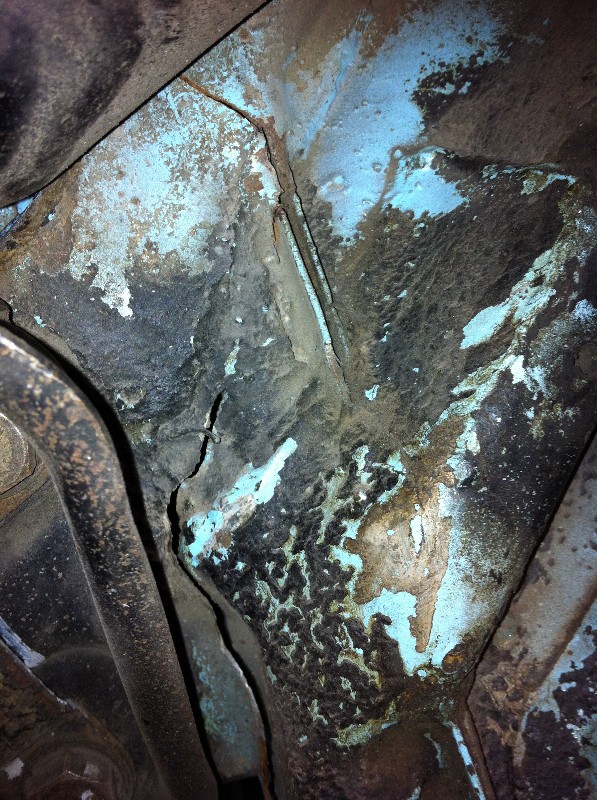
So...looks like Papa Smurf is getting some welding done  and a new stiffening kit for Christmas!
Posted by: billh1963 Dec 16 2011, 03:12 PM

So I was having braking issues at our last PCA Club Race - boild the fluid issues. I think the problem was that the front calipers were not releasing from the rotors so it was like dragging the brakes all the time. It's been a long time (never??) since the calipers were rebuilt, and forever for the master cylinder so I decided to do a full brake system overhaul: rebuild all 4 calipers, new MC, new rotors, and new braided SS lines. Other than the caliper rebuild kits, I had all of the other parts already in my spares box, so this was a very cheap, easy winter project.
All that went perfect.
So...silly me, I decide to start scraping the undercoating off of the inside of the wheel wells with the idea I'm going to paint them (the old 'While I'm here' conversation we all have in our heads). As I was scraping, I came upon what I thought was a small crack... Nah, can't be, just surface paint crack, right?
So I investigated further, and...
So...looks like Papa Smurf is getting some welding done
and a new stiffening kit for Christmas!Uh Oh....looks like you've be doing some serious flexing!

Posted by: mepstein Dec 16 2011, 03:16 PM
Better than finding out about it at 100mph.
Posted by: naro914 Dec 16 2011, 03:23 PM
Better than finding out about it at 100mph.
Yep!
Or 130 going through the Kink at CMP...
So this explains a lot: while the car was sitting on the flat floor of the garage at CMP, the drivers side looked like it was sagging a little. all of us looked at the car from the back and kept thinking something must be wrong with the alignment, ride height, etc. Plus, the rear wheel looked a bit towed out...but we kept thinking it was just the illusion of the angle of the fenders (though the passengers wheel looked fine). And it was handling great so I never suspected anything.
Our plan was to get it realigned this winter...yep, it's DEFINITELY going to get realigned now, huh?
GOOD THING I had brake issues that shortened my 90 minute enduro. This would NEVER have made it 90 minutes...
Posted by: SirAndy Dec 16 2011, 03:29 PM
That's why i don't like undercoating or even black paint on the underside of a race car.
You want to be able to see everything before it becomes a problem. Good thing you caught this before it failed. That would have been ugly!

Posted by: rick 918-S Dec 16 2011, 03:32 PM
Man, nice find! you were on borrowed time! I know Papa Smurf gets put through his paces.
Posted by: Rand Dec 16 2011, 03:47 PM
Wow, great catch. A good reminder why we need to carefully inspect these cars from time to time, especially the racers.
Looks like a fun winter project. Here's to the strongest Smurf ever. 
Posted by: Woody Dec 16 2011, 03:50 PM
Does a chassis stiffening kit address that mount?
Posted by: scotty b Dec 16 2011, 05:28 PM
Does a chassis stiffening kit address that mount?
No. That is the actual piece the suspension bolts to. The stiffening kits go around ( above ) that. IMO that area need sto be fully stripped and competently welded. The factory welds are quite bubble gummy and do not have great penetration
Posted by: BKLA Dec 16 2011, 06:11 PM
what about that tangerine raised rear pickup point kit? yes, its more work and money, but looks like it really fixes the torsional flexing at the trailing arm connection. It's an upgrade I'm considering in the future. I already have the rear pick up point reinforcing kit to be installed (next project) along with the inner console reinforcing.
Posted by: dlee6204 Dec 16 2011, 06:42 PM
Wow that is a good size crack. Good thing you found it. 
Posted by: naro914 Jan 6 2012, 05:21 PM
update:
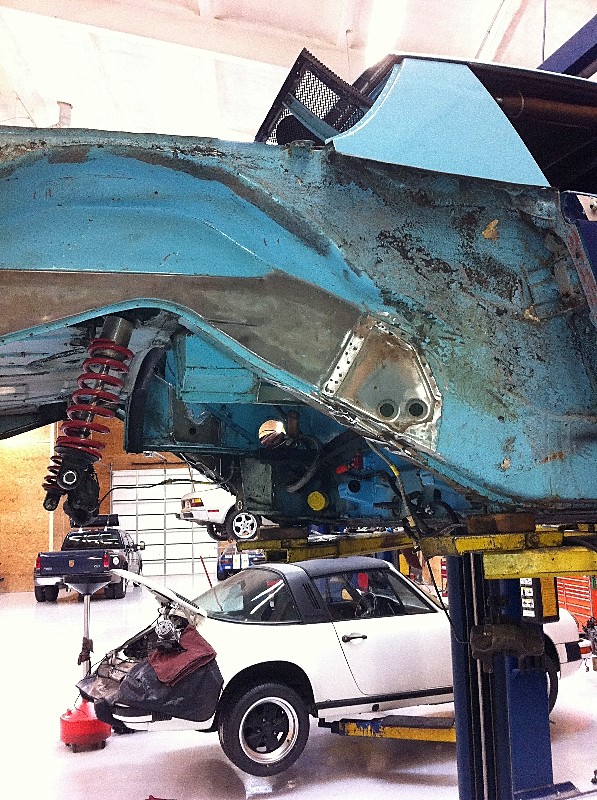
So...the crack is worse than it looked...if that's possible.
Got the car over to my shop, took off the suspension, took out the engine, so we could see everything better.
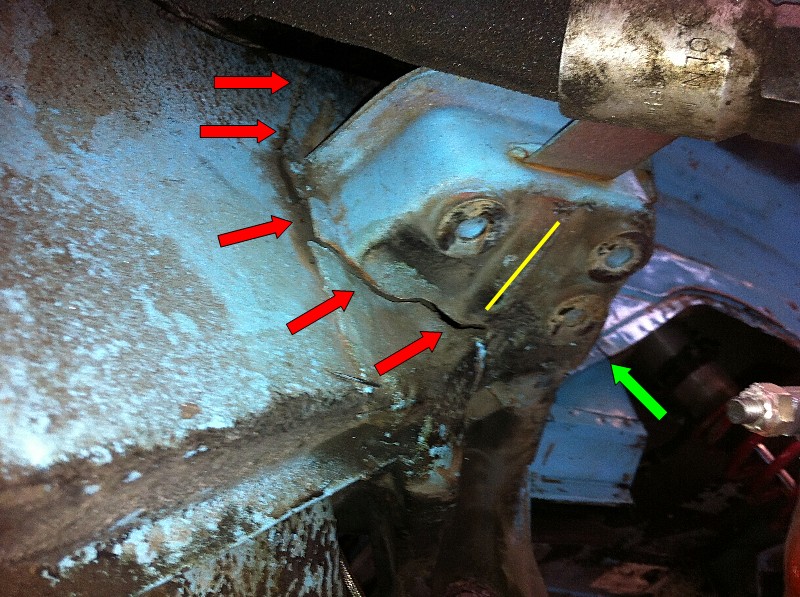
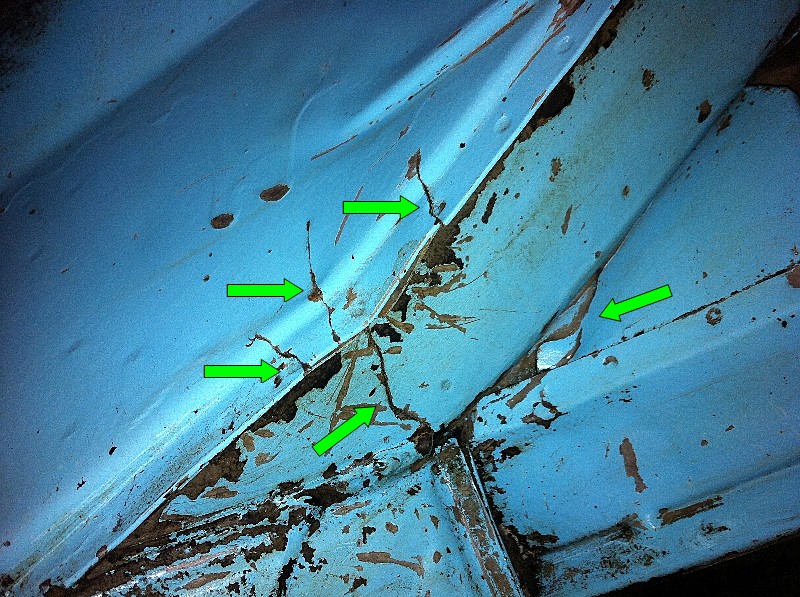
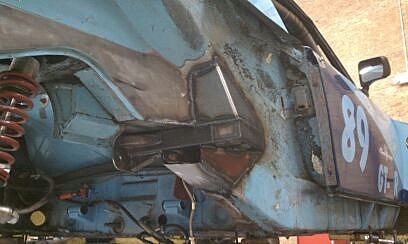
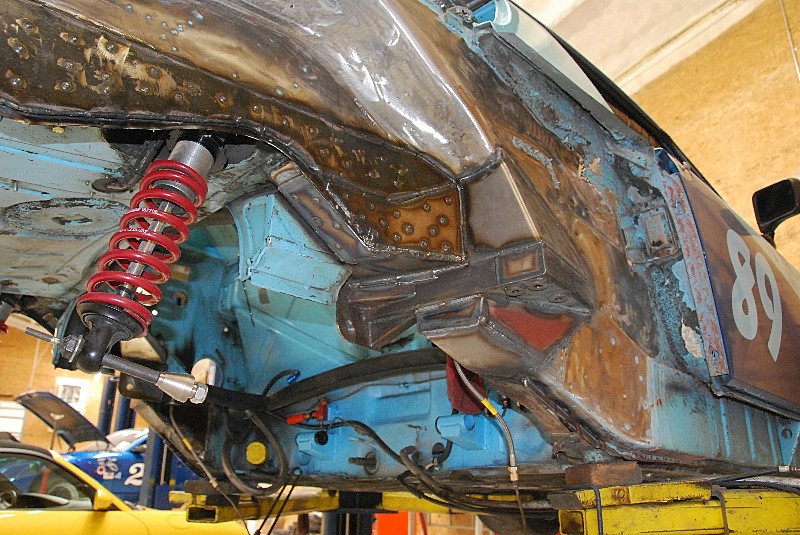
Pictures below are from my camera phone, so that aren't great, but follow along with the arrows and lines: All the red arrows are the same crack, two different pictures, opposite sides of the rear outside suspension mount. The yellow line in two pictures is the reference point so you can see the continuity ( you guys dont need it as you know what you're looking at, but some of my buddies are not 914 guys)
The green arrows are ANOTHER series of cracks...
Oh, and I just got a text a bit ago from my mechanic saying that the metal around the front suspension mount points (the 3 bolts way at the front) are cracked too...
Guess we've been stressing Papa Smurf just a little too much???
Attached image(s)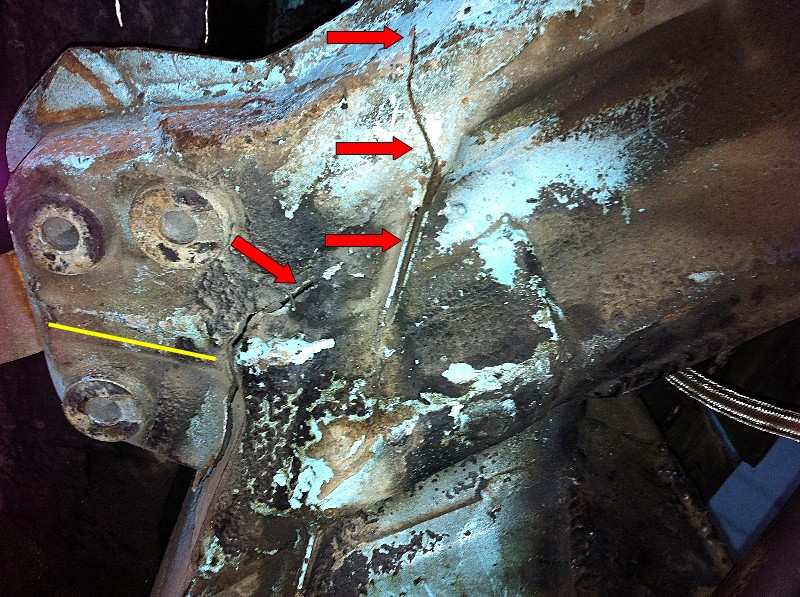
Posted by: SirAndy Jan 6 2012, 05:27 PM
Damn ... 
Posted by: scotty b Jan 6 2012, 05:28 PM
 WOW
WOW 
Posted by: PeeGreen 914 Jan 6 2012, 05:31 PM
Man, THAT'S a lot of crack.
So are you going to fix it all up with raising the whole thing..ala Tangerine kit?
Posted by: naro914 Jan 6 2012, 05:33 PM
The most amazing thing is that the last time it was driven, was in the PCA Club Race at CMP. I was doing GREAT, almost keeping up with a couple cup cars (OK, kinda keeping up, but still...I'm driving a 74 914!) and I only stopped because the throttle cable popped off...and I was having braking issues. I NEVER felt handling issues.
I only ran 6 laps of the 90 minute enduro (about 11 minutes). it's a good thing I had the issues, or this would have let go and put me in a wall or something....
Posted by: RobW Jan 6 2012, 05:36 PM
That's pretty scary... especially for folks with a race car in the garage. 
Posted by: stugray Jan 6 2012, 06:06 PM
So SELL all the crack to raise enough $$ for a new roller......
Seriously, it looks like you were close to "non-linear catastrophic structural exasperation" (Douglas Adams).
It makes me want to check my rear susp. as I had a cracked ear and was about to put it back together.
ground control rears are on already with reinforced trailing arms.
All that would be useless if I had cracks like that lurking...
Stu
Posted by: dlee6204 Jan 6 2012, 06:24 PM

![shocked[1].gif](style_emoticons/default/shocked[1].gif)
Posted by: moggy Jan 6 2012, 06:27 PM
So I was having braking issues at our last PCA Club Race - boild the fluid issues. I think the problem was that the front calipers were not releasing from the rotors so it was like dragging the brakes all the time. It's been a long time (never??) since the calipers were rebuilt, and forever for the master cylinder so I decided to do a full brake system overhaul: rebuild all 4 calipers, new MC, new rotors, and new braided SS lines. Other than the caliper rebuild kits, I had all of the other parts already in my spares box, so this was a very cheap, easy winter project.
All that went perfect.
So...silly me, I decide to start scraping the undercoating off of the inside of the wheel wells with the idea I'm going to paint them (the old 'While I'm here' conversation we all have in our heads). As I was scraping, I came upon what I thought was a small crack... Nah, can't be, just surface paint crack, right?
So I investigated further, and...
So...looks like Papa Smurf is getting some welding done
and a new stiffening kit for Christmas!You need this kit from CFR (ignore the longs reinforcements):
It would have probably prevented that. Here it is installed in my car:

Posted by: J P Stein Jan 6 2012, 06:39 PM
At risk of repeating myself, I'll say that the 914 was never built or designed for the things we do with them......even when the factory welds are worth a shit.
I don't think mine led as tough a life as yours but I put a lot more prep into it to forstall this type of problem.....and it worked.
IMO, one has to start at the ground floor. Welcome to the ground.......I say this as encourgagement to fix it. Looks to me as though it can be done, not easily but doable.
Posted by: bigkensteele Jan 6 2012, 07:07 PM
Van914 has a never-installed Tangerine kit for sale. You might want to PM him if you are interested.
Posted by: Randal Jan 6 2012, 07:31 PM
Man, those are big cracks; sure glad circumstances found you on the side. Great remainder to all of us to be checking the front and rear structures before every event.
FYI everything I've got from Chris has been stellar. That reinforcement kit will do wonders.
Time to soda blast the front and rear to be sure you can see any other issues.
Posted by: Racer Chris Jan 6 2012, 08:57 PM
Until now, this weakness wasn't addressed with my reinforcing kit sheetmetal.
The kit deals with the flex of the outer console which causes the cracks iin the first photos, but not the longitudinal cracks further aft.
My FP car with raised pickups and an extensive roll cage has the same crack on the side of the long, which I've rewelded without reinforcing and seen it recur.
So I had already decided to include reinforcing plates for the raised pickup kit.
Going forward, I'm going to include doublers in the pickup points reinforcing kit for both the bottom and the side of the long to help prevent those cracks from propagating.
Posted by: naro914 Jan 7 2012, 06:26 AM
At risk of repeating myself, I'll say that the 914 was never built or designed for the things we do with them......even when the factory welds are worth a shit.
Completely agree. But...you know how someone say something back in your life and against all logic, it sticks with you? Well, many years ago, I got a stiffening kit from someone (no idea who). It's been sitting in a box of parts for...maybe 15 years? Anyway, the reason it was never installed is one of my old mechanics told me it wasn't needed, and you really didn't want to add all that weight anyway.
so logic told me it was needed, but that comment has stuck with me all this time, so we never did it....Should have followed my own instincts.
IMO, one has to start at the ground floor. Welcome to the ground.......I say this as encourgagement to fix it. Looks to me as though it can be done, not easily but doable.
Oh, no doubt it will be fixed...being done this weekend. My buddy is a chassis builder for a NASCAR team, He looked at it and pretty much shrugged his shoulders, said 'yeah, no big deal'. And he's done a lot of Porsche and specifically 914 work, so he understands them. He's a long time PCA member and works with my mechanic shop to help restore rusted out 914's and early 911's...and anything else that comes along.
Besides the fix and stiffening kit, he's got some ideas of other body strengthening supports.
He builds roll cages and a killer 914/6 engine mount. I have one in each of my cars. He took Patricks design, made it better, and cheaper. And his welds are amazing...
I'll post pictures.
Posted by: sean_v8_914 Jan 7 2012, 09:55 AM
im sure you had fun pushing the car that hard, nice work. squeeze that lemon!
Posted by: J P Stein Jan 7 2012, 12:09 PM
I've never had the "stiffening kit" either. Seam welding did the deed for me up until I did down tubes from roll cage to he shock towers. Bout that time I also reinforced the inner ears at the rear. ....that has all been in the last 5 years or so of a 12 year running project. My only cracks were at the lower front of the rear shock towers....small but both sides in the same spot. That was pre-downtubes.
Heavy springs (275s) will do that to ya. Another re-run: I also seam welded the pinch weld seam all around the rear arches then ground them to a nice radius.
That area gets a lot of stress.....but you know that  .
.
Posted by: naro914 Jan 7 2012, 03:34 PM
OK, so here's where we are: Papa is broken. The old man is getting brittle, so it's time to install all kinds of artificial limbs....
The front suspension mount point was pretty well cracked through too. Got that welded up and are going to reinforce the entire area and tie into the shock towers. Unfortunately, that also leads to another issue with the placement of the oil cooler, so we need to redesign that too.
I've emailed Chris and need to discuss all kinds of stuff.
One project leads to another, which leads to another, which leads....
Good thing this is the off season!
Posted by: ChrisNPDrider Jan 8 2012, 12:33 PM
this thread just gets better and better
Posted by: dlee6204 Jan 8 2012, 12:45 PM
...to an empty wallet.
Posted by: naro914 Jan 8 2012, 02:12 PM
this thread just gets better and better
Glad I can entertain you...

...to an empty wallet.
No doubt!
I was really hoping the new engine would be the end of any big monetary projects for a while... NOT!
Posted by: Van914 Jan 8 2012, 02:44 PM
If you have tubes from the roll hoop to the rear, you can run tubes down to the outside susp. mount to brace. We did this to the race car.
Posted by: naro914 Jan 8 2012, 04:21 PM
If you have tubes from the roll hoop to the rear, you can run tubes down to the outside susp. mount to brace. We did this to the race car.
Pictures?
Posted by: kwales Jan 8 2012, 05:07 PM
Dang,
You are Mr. Lucky. Better buy a lottery ticket.
Posted by: SCV Jan 8 2012, 05:31 PM
Ouch. Your braking issue was fortuitous for sure. Hopefully all will be fixed soon.
Posted by: scotty b Jan 8 2012, 05:51 PM
Scary to think it might have been splitting apart on the Dragon 
Posted by: naro914 Jan 8 2012, 06:00 PM
Scary to think it might have been splitting apart on the Dragon
?? Papa is not a street car, track only. He's the one with the cracks
Huey is the street car.
Posted by: scotty b Jan 8 2012, 06:03 PM
oh yeah that one
Posted by: charliew Jan 8 2012, 07:11 PM
When I bought my 86 v6 auto gt fiero it was obvious it had been treated to some cone racing by the looks of all four corners and the wheels. I tried it out before buying it and under wot throttle shifting it would change lanes. I let my son ride in it and my vette friend and they both grabbed for something to hold on to when it shifted. I discussed this with the seller and he just shrugged. When I got it home the rear a arm was cracked 2/3 of the way across it's width. I drove that car over 100 at least twice.
How bout the broncos?
Posted by: sean_v8_914 Feb 7 2012, 12:28 PM
is Pappa all welded back together?
Posted by: naro914 Feb 7 2012, 05:49 PM
Sorry,...been so busy it's time for some updates:
Remember, somewhere in this thread i mentioned that there were two issues: the rear suspension console that i showed pictures of, and the front forward control arm mount point - yeah, that ripped right out of the front floor sheet metal too... So there are two projects going on, with the front one requiring a complete redesign of our oil cooler set up.
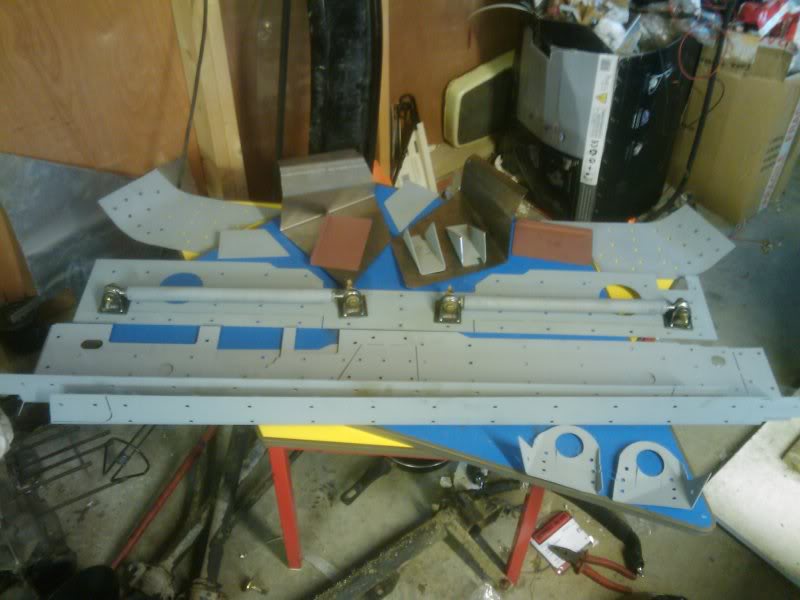
So...for the rear I ordered the Raised Mounting Point kit from Chris Foley - Tangerine Racing. GREAT product, Duke my welder/fabricator (who works for a Nascar team as a chassis builder) said it was all top notch with templates, jigs and all. Very nicely done Chris!
Anyway, first you have to cut out the entire mounting consoles: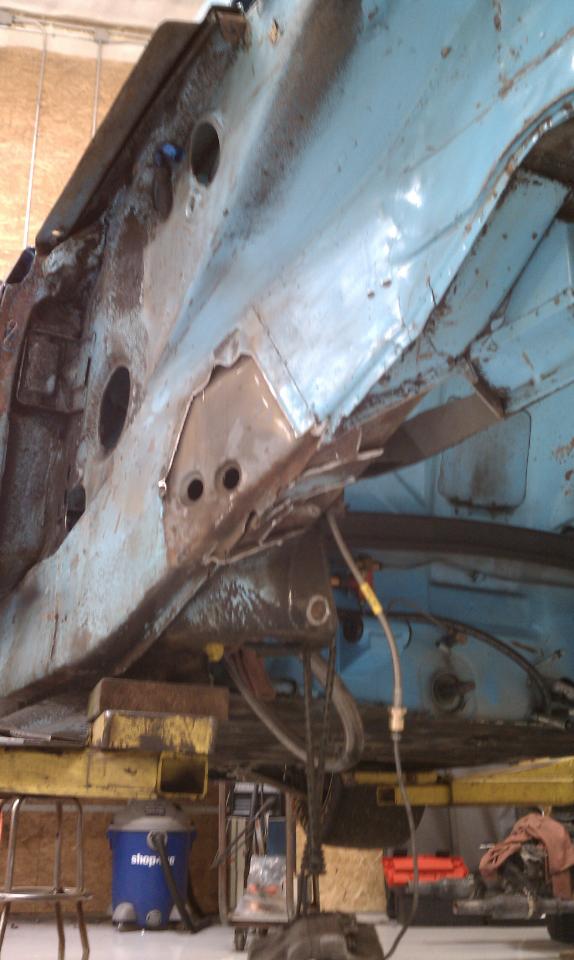

Posted by: naro914 Feb 7 2012, 05:54 PM
Next, you actually cut out into the frame rail, but I don't have any pictures of that.... 
here are a few pictures of mounting the new consoles with the jigs (sorry, not great pictures from a camera phone)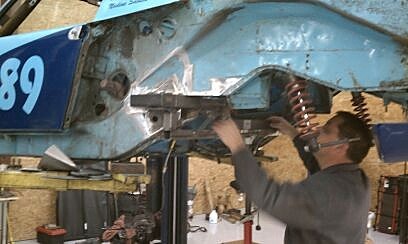

Posted by: BKLA Feb 7 2012, 05:56 PM
...for the rear I ordered the Raised Mounting Point kit from Chris Foley - Tangerine Racing. GREAT product, Duke my welder/fabricator (who works for a Nascar team as a chassis builder) said it was all top notch with templates, jigs and all. Very nicely done Chris!

Be sure to post lots o' pics. I've been thinking about this for a future upgrade, but don't think i'll attempt by myself...
Your pic's may help me decide if its something I'll feel comfortable doing without help.Very Cool!
Posted by: naro914 Feb 7 2012, 05:59 PM
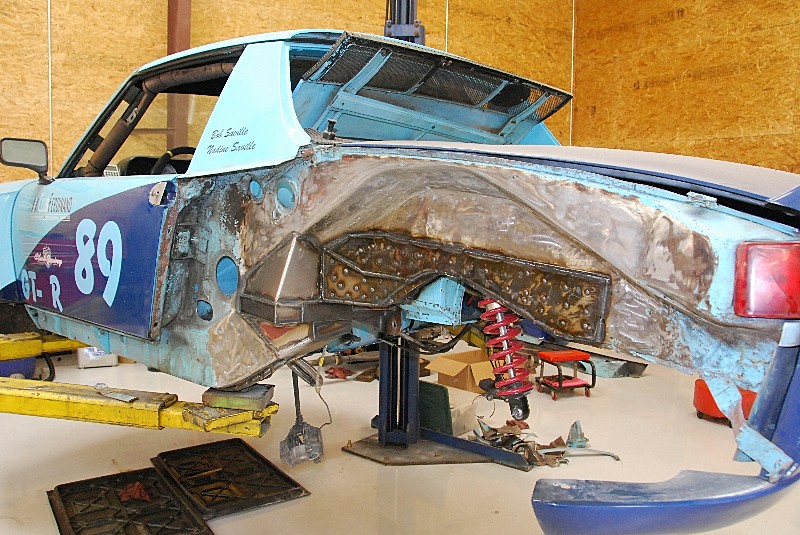
After lots of cutting,  grinding and welding , you have this:
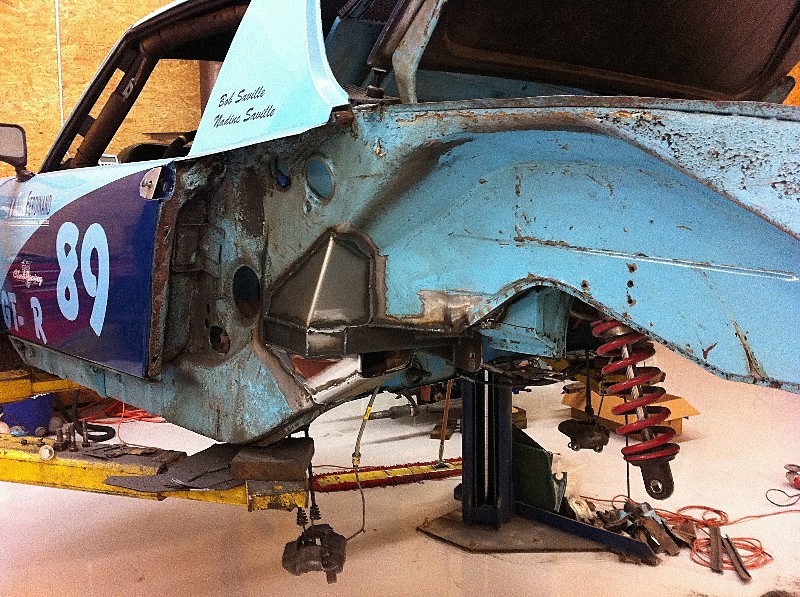
Posted by: naro914 Feb 7 2012, 06:02 PM
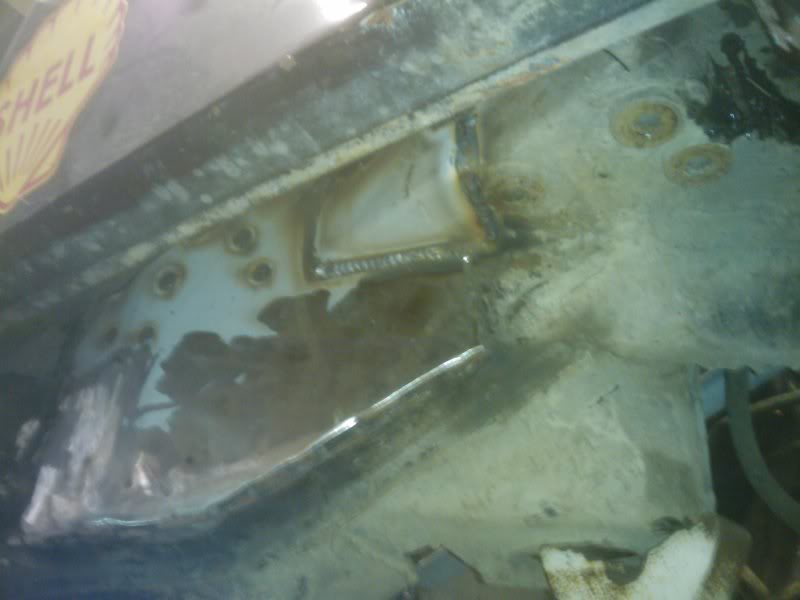
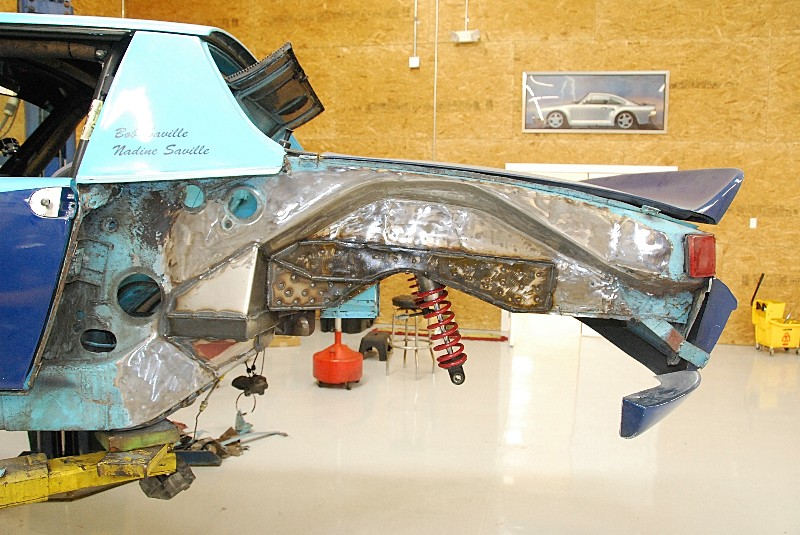
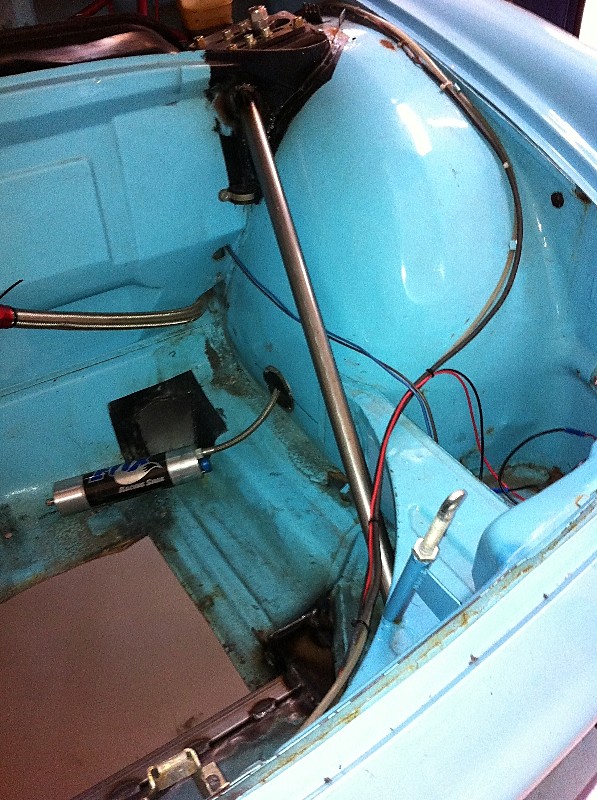
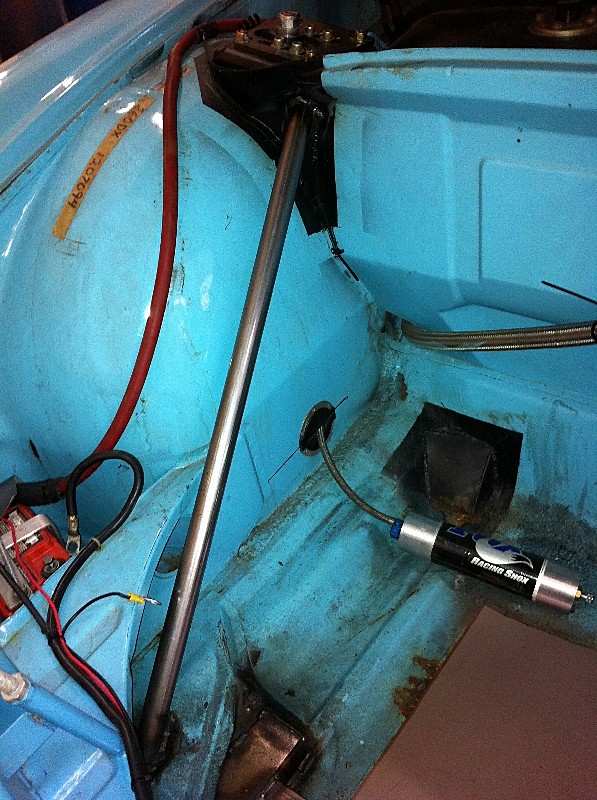
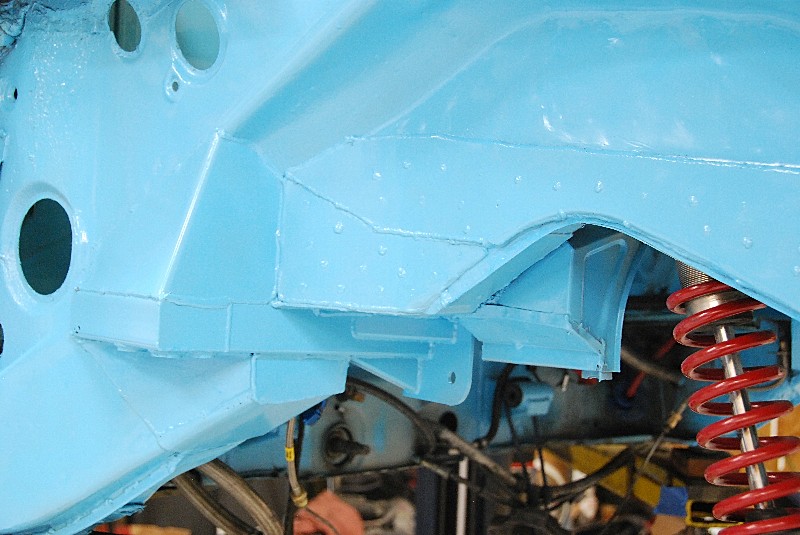
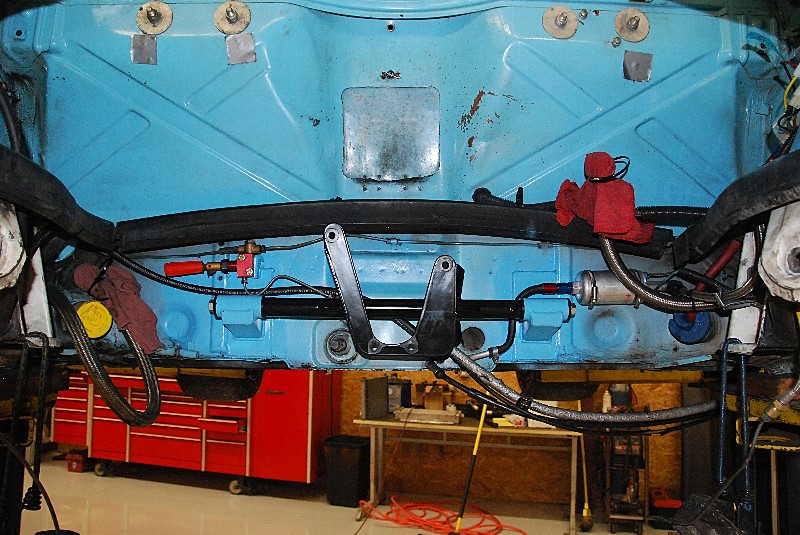
Finished up with all welding, and stripping it all to prep and paint, it looks like this: (note, these pictures were only taken yesterday 2/6/12)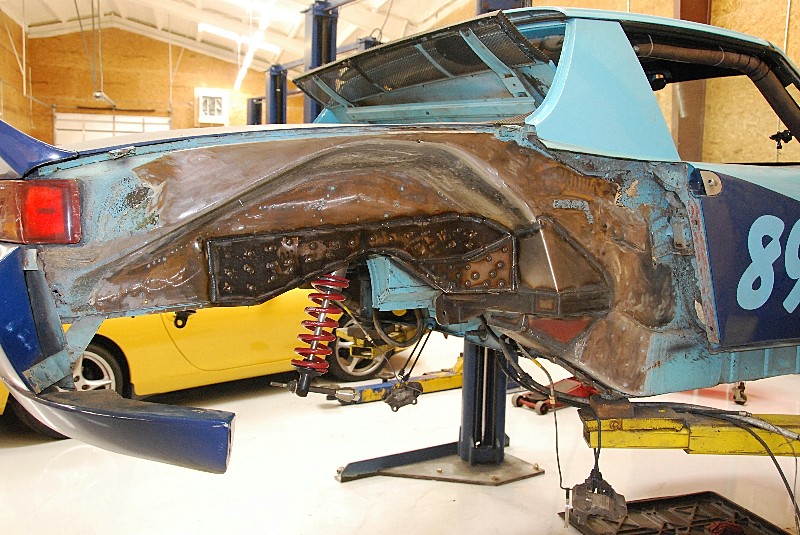
Posted by: naro914 Feb 7 2012, 06:07 PM
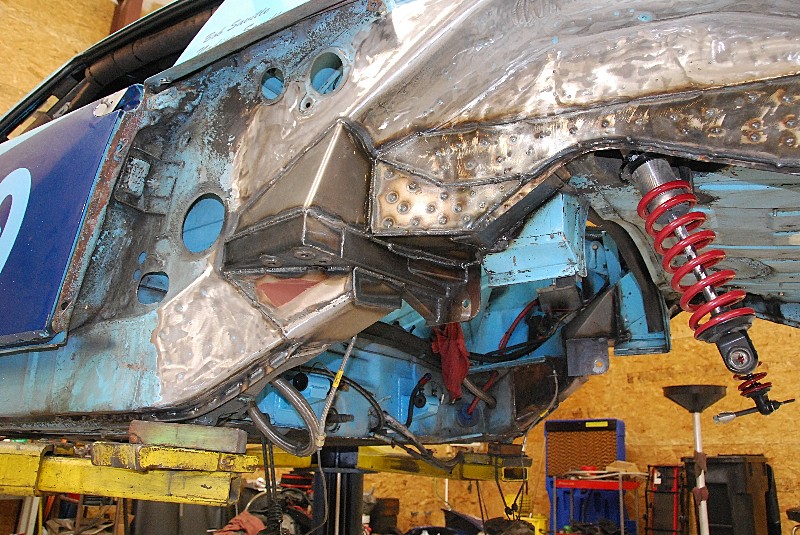
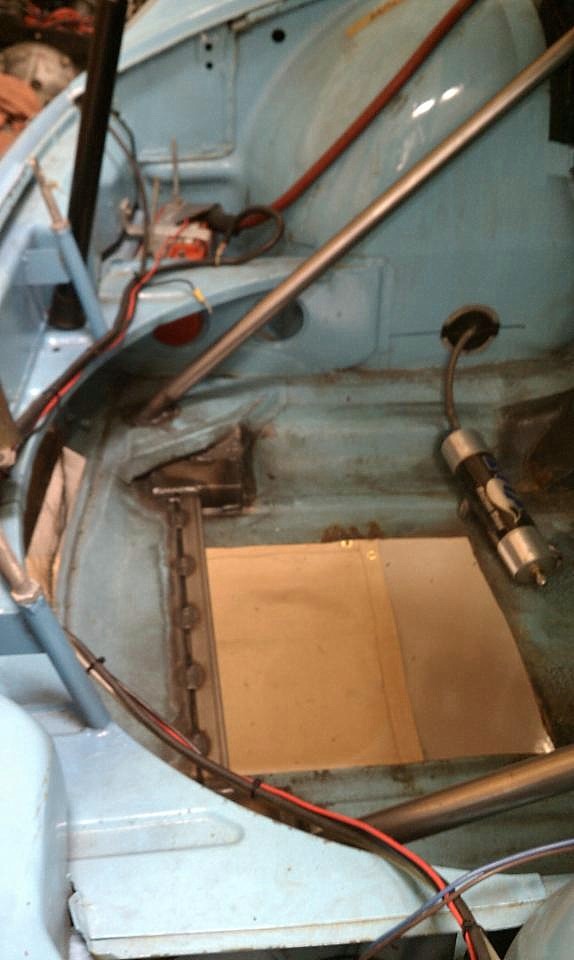
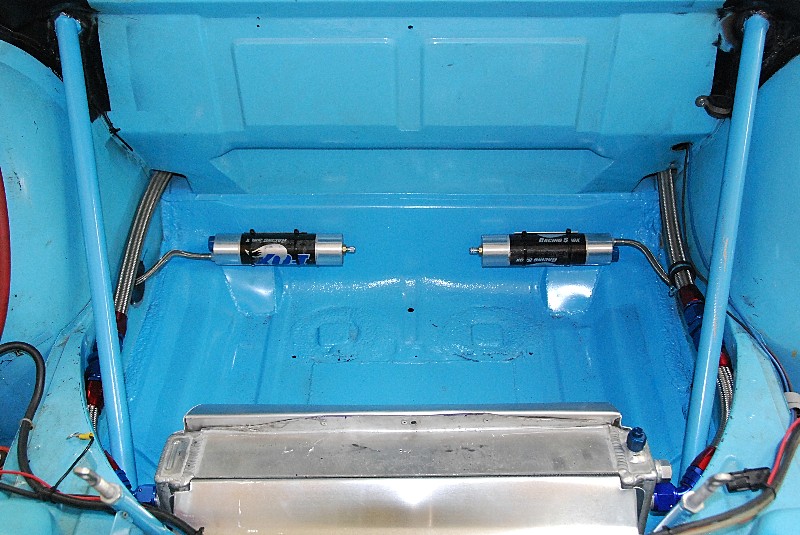
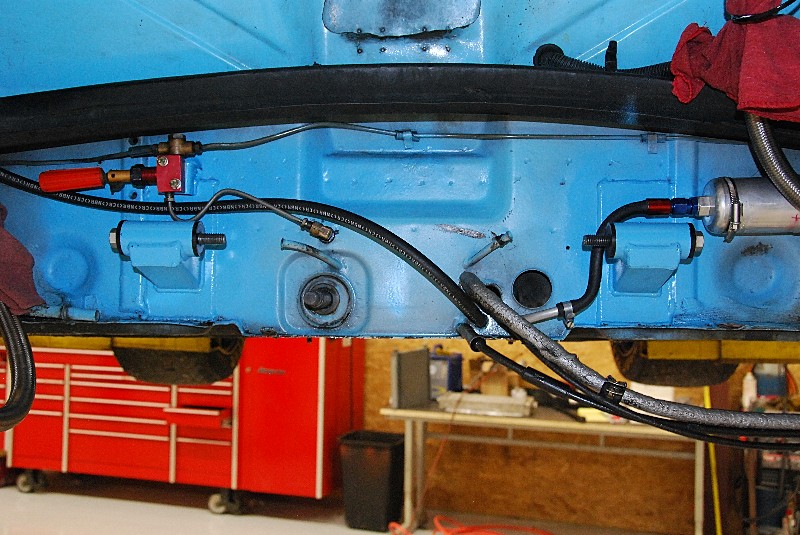
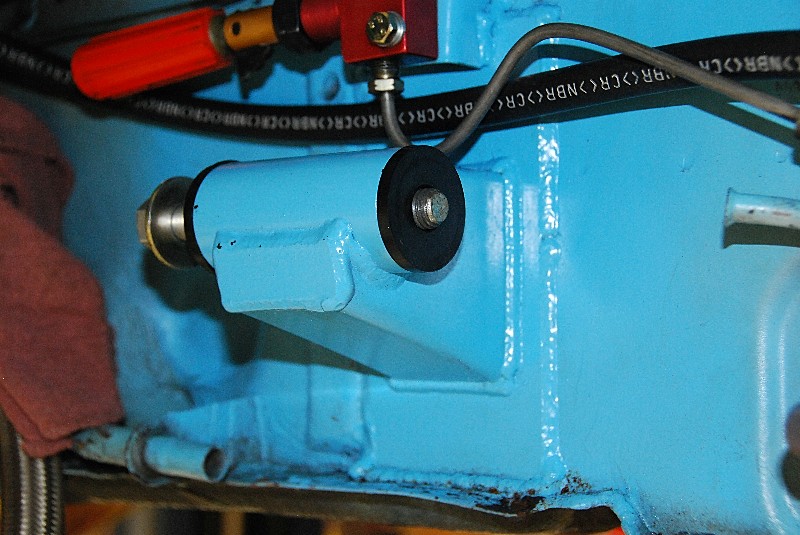
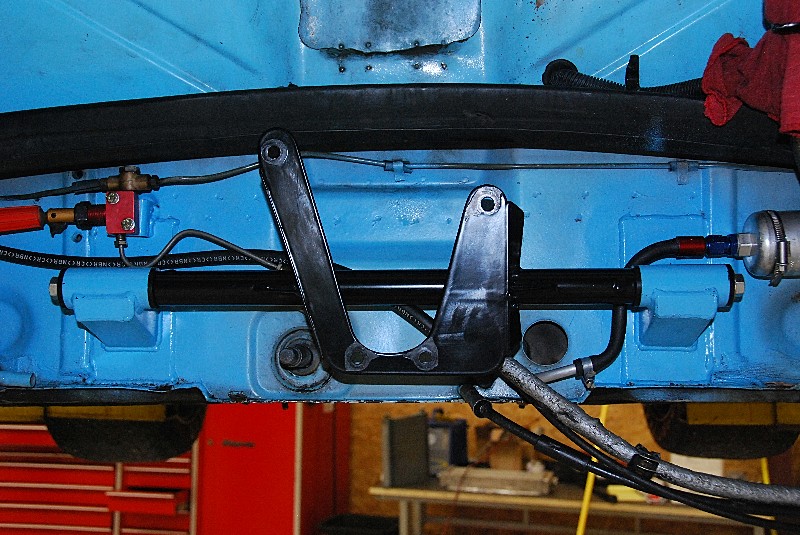
OK, lets move on to the front. As I said, I didn't take a picture of the mount ripping through the sheet metal, but here's a few pictures of the brackets and support braces:
Posted by: naro914 Feb 7 2012, 06:11 PM
Unfortunately, I didn't take a lot of pictures of the progress for the front as much was done while I was away, but here's the final look, cleaned up and painted. I needed the space on the floor to mount the cool shirt box, so it all fit nicely.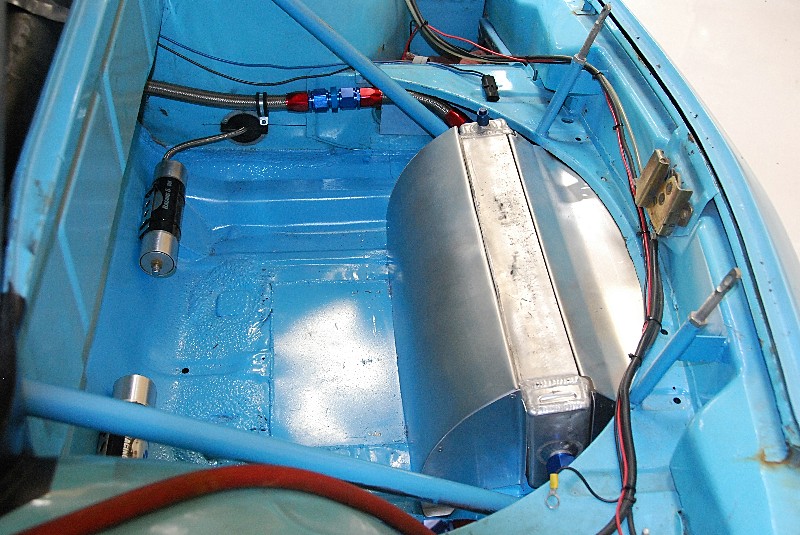
Posted by: PeeGreen 914 Feb 7 2012, 06:21 PM
 Looking good
Posted by: dlee6204 Feb 7 2012, 06:53 PM
Looks good!
Posted by: naro914 Feb 7 2012, 07:35 PM
Yesterday I primed, today I painted the wheel wells:
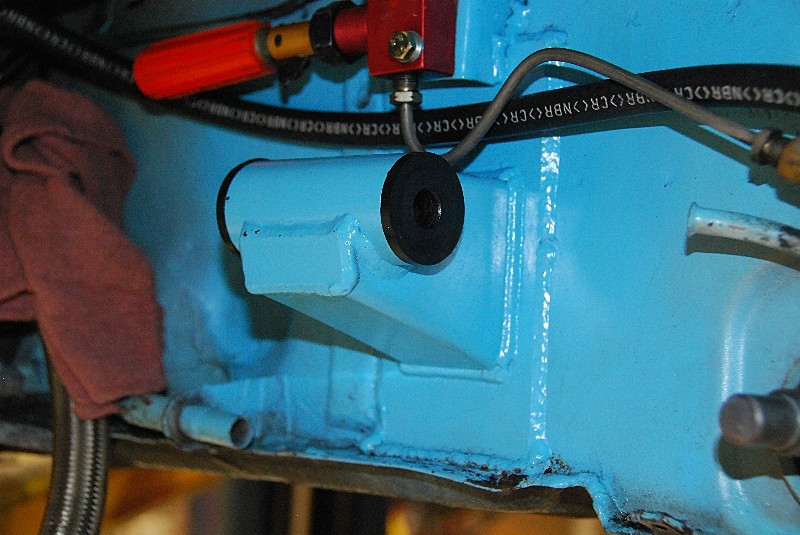
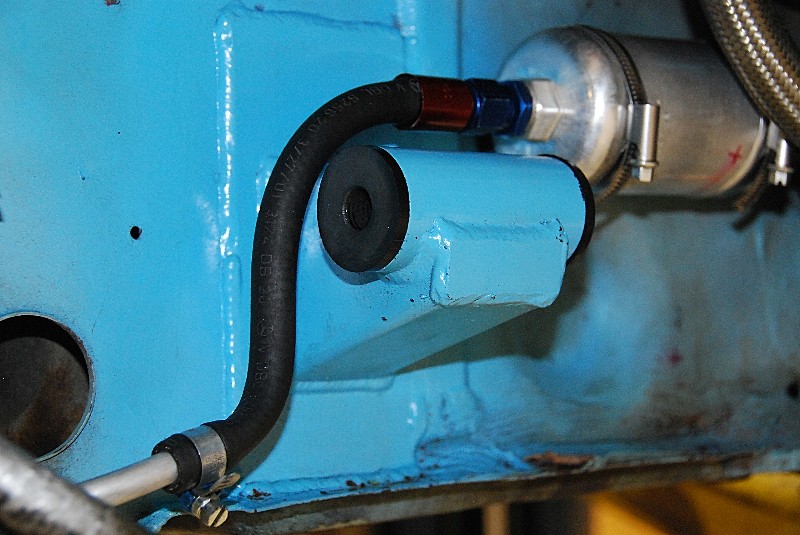
Posted by: naro914 Feb 7 2012, 07:37 PM
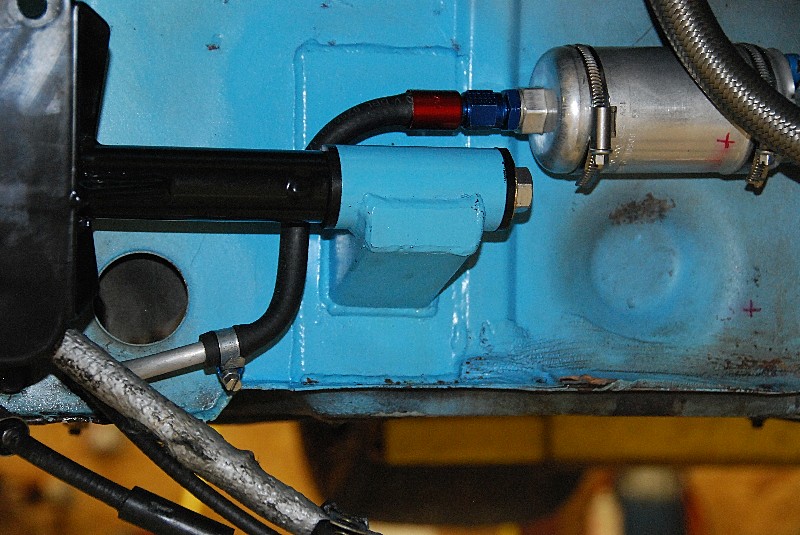
One issue we ran into was that now, the oil tank that fits in the stock 914/6 location no longer fits. The console is up too high and encroaching on the tank. So, we cut a 'notch' into the tank:
Attached image(s)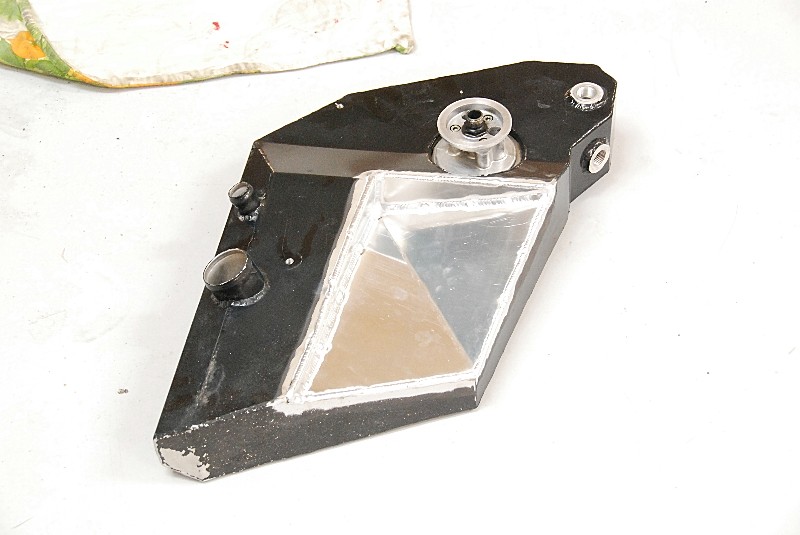
Posted by: mrbubblehead Feb 7 2012, 08:02 PM
nice work. i am jealous.
Posted by: tomeric914 Feb 7 2012, 10:38 PM
Very, very nice!
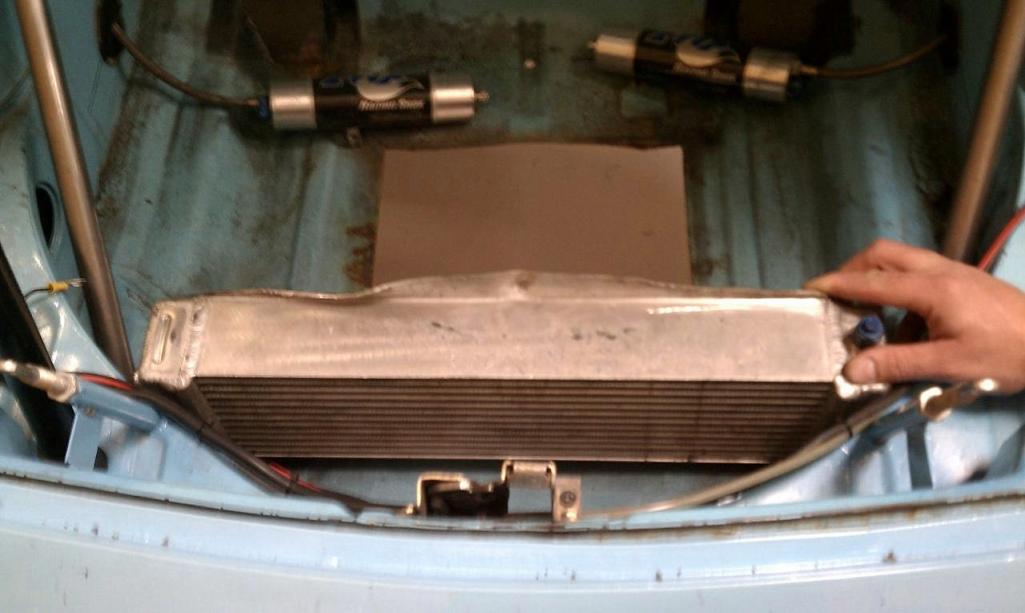
Why did you change the oil cooler? EDIT: I missed it, looks like there was interference with the new braces.
Posted by: naro914 Feb 8 2012, 06:49 AM
.... looks like there was interference with the new braces.
Exactly.
Plus, i was always planning to change anyway - this just sped up that project. Our old cooler laid flat on the floor so the air would come into the shroud, then pass through the cooler on it's way out. its been VERY efficient, but eventually I want to have the hot air exit out the hood, not under the car where it's creating lift.
When I get the nerve to cut a hole in the carbon fiber hood....we'll change the exit point
Posted by: JmuRiz Feb 8 2012, 12:20 PM
Very cool stuff, looks seriously stout!
You mentioned your guy makes a really good engine mount, any more details on it?
Posted by: tomeric914 Feb 8 2012, 12:33 PM
...but eventually I want to have the hot air exit out the hood, not under the car where it's creating lift.
I ran a similar sized fan powered cooler out back that worked, but not enough so I am relocating to the front but am conflicted about the outlet.
Bottom - would add lift
Top - Adds complexity, plus I'm chickenshit to cut my hood
Wheelwells - more complexity in ducting but I have the capability to design and build it This probably also has the likelihood of blasting hot air and brake dust into the cockpit as well.
Why don't more folks duct into the wheelwells?
Posted by: naro914 Feb 8 2012, 04:12 PM
Why don't more folks duct into the wheelwells?
I thought of doing this too, but was told not to by an aero guy and what he said makes sense: the space in front of your wheel-presumably where you would duct the air into- is a positive pressure space (think about the rotation of your wheel). Basically creating back pressure against your air flow from your cooler.
Posted by: tomeric914 Feb 8 2012, 05:33 PM
the space in front of your wheel... is a positive pressure space (think about the rotation of your wheel). Basically creating back pressure against your air flow from your cooler.
 , that's partially true, but the same could be said for air that gets past the air dam and flows under the car (in the case of dumping the air from the front mounted cooler under the car). There's no doubt that you want to duct from a high pressure area to the lowest pressure area possible, but that isn't always practical.
I'm still drooling over the rear console rework. Great job!
Posted by: naro914 Feb 8 2012, 06:49 PM
Actually under the car is negative pressure. That's why, at speed, a car with good aero actually sucks down to the ground.
This info is coming from a guy that's spent a lot of time in a wind tunnel... I believe him...
Posted by: Racer Chris Feb 8 2012, 07:38 PM
Actually under the car is negative pressure. That's why, at speed, a car with good aero actually sucks down to the ground.
Under the car is the second best place to dump the air.
I know how well it works from the way I set up the oil cooler on my race car.
SCCA Prod rules are very strict about not cutting holes in the bodywork and underbody so I had to get creative. My cooler air path is in through one fog light opening (cutting a same size hole in the panel behind is allowed) and out through the little holes behind the airdam. The vertical bumper opening has about the highest pressure of any part of the car and behind the air dam has about the lowest. My oil has never run cooler than it does with the current setup.
In cool weather I can cover 1/3 to 1/2 of the inlet and still not overheat.
The only downside is the increase in pressure under the car. At the speeds of FProd it wasn't much of a factor though.
Posted by: naro914 Feb 9 2012, 06:58 AM
You mentioned your guy makes a really good engine mount, any more details on it?
Yes, I'll get pictures up soon and was planning to get it in the FS section, but have been so busy lately that I just haven't had a chance.
Posted by: naro914 Feb 13 2012, 09:59 PM
You mentioned your guy makes a really good engine mount, any more details on it?
Yes, I'll get pictures up soon and was planning to get it in the FS section, but have been so busy lately that I just haven't had a chance.
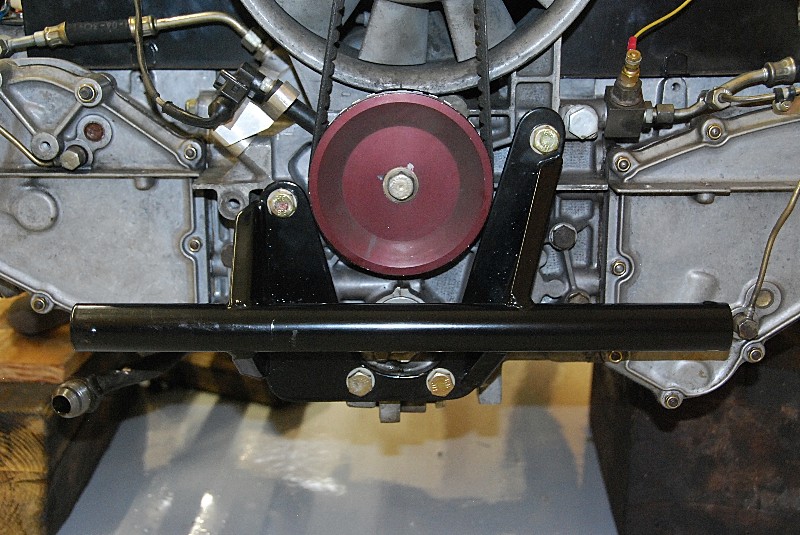
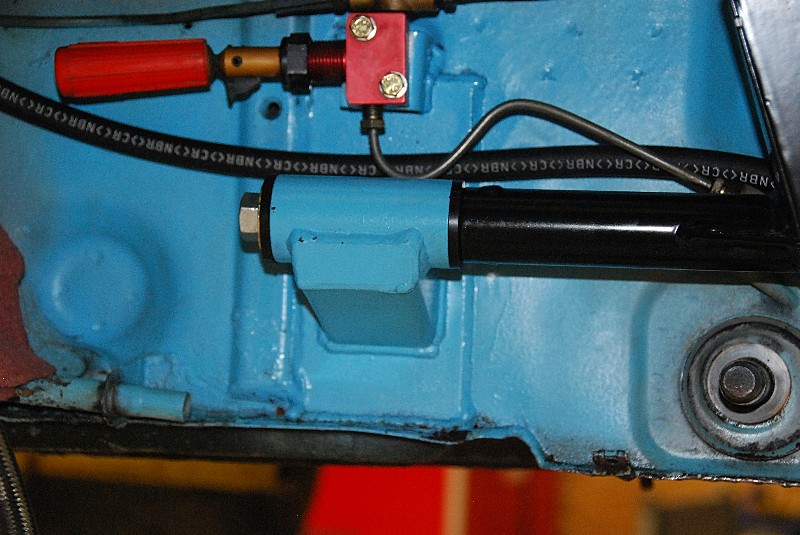
OK, so here are a few pictures of the mount in Papa Smurf. Mount comes with the black section powder coated, and the painted section bare metal since it needs to be welded.
I'll post up a picture of a 'raw', unmounted one.
Price is $375 plus shipping.
Powered by Invision Power Board (http://www.invisionboard.com)
© Invision Power Services (http://www.invisionpower.com)