Printable Version of Topic
Click here to view this topic in its original format
914World.com _ 914World Garage _ Building a Rotisserie
Posted by: McMark Dec 21 2011, 08:58 PM
Tomorrow I start cutting metal and building the rotisserie I should have had a long time ago. I'm actually quite eager to get going on this project, more than I anticipated. Not only because I've wanted a rotisserie for a long time, but also because once it's finished the 914 that's sitting on the Celette bench will go on the rotisserie. Then I can put a 66 912 project up on the bench and start building my first set of Celette fixtures. Even though they'll be for a 912, the techniques I learn will make the 914 fixtures even better.
I'll be posting pictures of my progress tomorrow, but I couldn't wait to share. 
Posted by: kg6dxn Dec 21 2011, 09:00 PM
COOL! 
Posted by: strawman Dec 21 2011, 11:46 PM
There is no way I could have stripped, repaired and completed other big jobs without a rotisserie. It is the best tool out there for a full restoration, IMHO. Good luck with the project -- I'm sure it will make mine look like it was built out of Lincoln Logs and bubble gum. 
Geoff
Posted by: Elliot Cannon Dec 22 2011, 12:20 AM

Tomorrow I start cutting metal and building the rotisserie I should have had a long time ago. I'm actually quite eager to get going on this project, more than I anticipated. Not only because I've wanted a rotisserie for a long time, but also because once it's finished the 914 that's sitting on the Celette bench will go on the rotisserie. Then I can put a 66 912 project up on the bench and start building my first set of Celette fixtures. Even though they'll be for a 912, the techniques I learn will make the 914 fixtures even better.
I'll be posting pictures of my progress tomorrow, but I couldn't wait to share.
I still don't understand how the Celette bench works. If you make your own fixtures, how will you know how accurate they are? Or are they just tools to attache to the car? Do you stretch and bend the body and then measure it with a tape, lazer, etc. till meets specs.? It'll be interesting to see the pics.
Cheers, Elliot
Posted by: McMark Dec 22 2011, 12:28 AM
The actual Celette bench is just a big-ass cart. It has a regular grid of holes in the top and a machined smooth surface on top. The fixtures for different cars are bolted to the bench via the holes.
To use the bench, you lift the chassis up and attach a couple fixtures to hold it in place. On a perfectly straight car, all the fixtures will bolt up to the body and line up with their appropriate holes on the bench. On bent cars, the fixtures won't line up.
To straighten a car you bolt up the fixtures which are correct, and then push/pull the body using whatever means necessary to move the mis-aligned fixtures into place. This is the hard part because the 'operator' must understand how the damage occurred, and how to reverse it correctly. It is absolutely possible, and frighteningly easy, to bend a chassis in the wrong way and make things worse. Definitely one of those situations where 'measure twice, bend once' is SOOOOO important.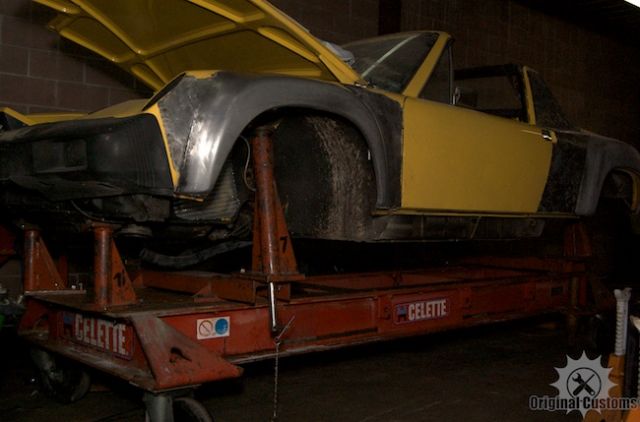
Posted by: Elliot Cannon Dec 22 2011, 12:31 AM
So it basically acts as kind of a factory jig?
Posted by: Elliot Cannon Dec 22 2011, 12:33 AM
Here he is ladies and gentlemen. The man his ownself.
Attached image(s)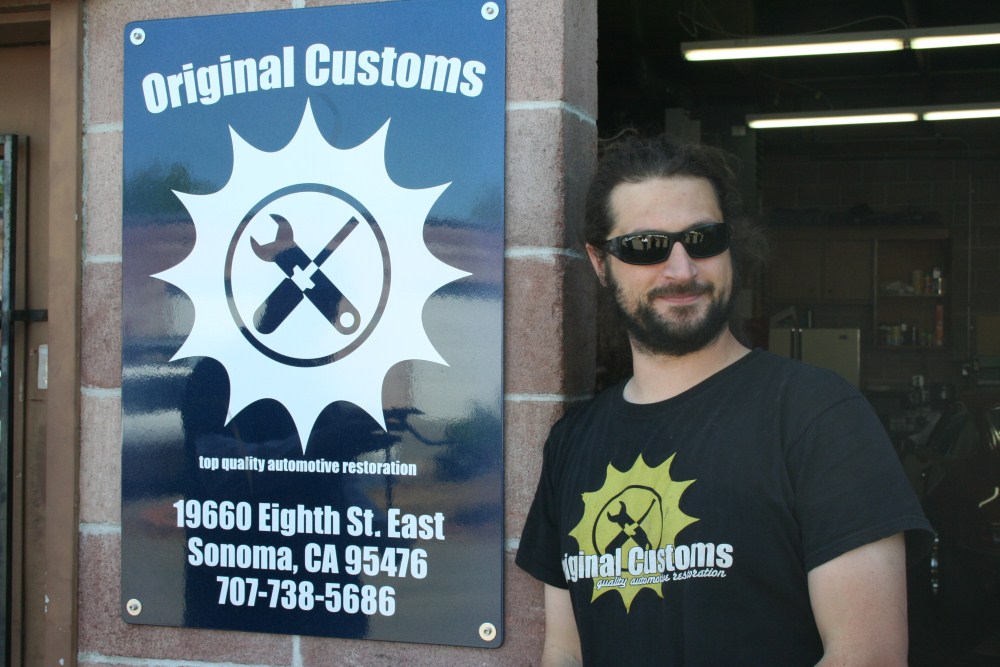
Posted by: McMark Dec 22 2011, 12:51 AM
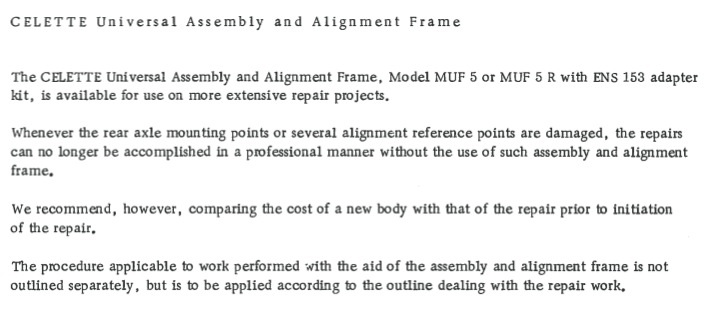
That's totally right. It's mentioned by name in the factory manuals.
Attached image(s)
Posted by: RobW Dec 22 2011, 07:42 AM

You rock Mark!
Posted by: FourBlades Dec 22 2011, 02:11 PM
Just make sure you buy enough 2x4s before you start!
You don't want to run out. I'd also suggest priming and painting it so it won't rot.
John
Posted by: URY914 Dec 22 2011, 04:07 PM
My advice is to use at least 5" steel caster wheels with locks.
Posted by: KELTY360 Dec 22 2011, 06:22 PM
Just make sure you buy enough 2x4s before you start!
You don't want to run out. I'd also suggest priming and painting it so it won't rot.
John

...and lots of drywall screws!
Posted by: 9fourteen Dec 22 2011, 06:29 PM
This may be a dumb question but how do you get the 914 high enough to bolt it onto the rotisserie? Most of the rotisserie redesigns I have seen would require the 914 to be 3 to 4 ft off the ground to bolt it on.
Posted by: jcd914 Dec 22 2011, 06:58 PM
This may be a dumb question but how do you get the 914 high enough to bolt it onto the rotisserie? Most of the rotisserie redesigns I have seen would require the 914 to be 3 to 4 ft off the ground to bolt it on.
I think it is great question, I have not attempted this, yet.
Several ways come to mind depending on what you have to work with.
A lift works really well but only a few here have them in their garage at home. I have a couple friends with shops and I could go there and put the car on the rotisserie but then I have to load the car on to a trailer while it is on a rotisserie, may not be my first choice.
A fork lift could be used but you have to have access to one or rent one. Probably more money that I want to spend.
Someone here posted some picture of an engine hoist being used to lift 1 end of the car up to get it on the rotisserie, a possibility since I have access to a couple of those. Have to figure out how to lift it without damaging the body.
Floor jack(s) and some sort of cribbing. Jack up one end at a time and stack wood or such to rest it on while you jack the other end up. going back and forth you could work it up to the right height. You have to be sure the cribbing you use is stacked stably and your jacking method is still stable as you get up off the ground. If the timing was such that I was replacing the back fence (that is starting to fall apart) I might have enough 4x4s to use for cribbing before I built the fence with them.
I also have a friend that has a couple motorcycle service lifts. They are small enough to bring 1 to my house and use it to lift the 914 body. Weight of the 914 shell would be in the range of the lift but i am not sure the height that is possible with it.
Just a thought or five
Jim
Posted by: bigkensteele Dec 22 2011, 07:07 PM
This may be a dumb question but how do you get the 914 high enough to bolt it onto the rotisserie? Most of the rotisserie redesigns I have seen would require the 914 to be 3 to 4 ft off the ground to bolt it on.
Free pizza and beer for six of your strongest friends.
Posted by: FourBlades Dec 22 2011, 07:26 PM
To get it on the rotisserie, just borrow a set of 22" wheels.
Put on the 22s, bolt on the rotisserie, let the air out of the tires. take the wheels off, simple.
John
Posted by: KELTY360 Dec 22 2011, 07:28 PM
This may be a dumb question but how do you get the 914 high enough to bolt it onto the rotisserie? Most of the rotisserie redesigns I have seen would require the 914 to be 3 to 4 ft off the ground to bolt it on.
Free pizza and beer for six of your strongest friends.
 A bare shell isn't all that heavy. Six of us lifted PanelBilly's car onto the rotis and he had like a million coats of paint on it to add to the weight.
Posted by: okieflyr Dec 22 2011, 07:46 PM
This may be a dumb question but how do you get the 914 high enough to bolt it onto the rotisserie? Most of the rotisserie redesigns I have seen would require the 914 to be 3 to 4 ft off the ground to bolt it on.
I think it is great question, I have not attempted this, yet.
Several ways come to mind depending on what you have to work with.
A lift works really well but only a few here have them in their garage at home. I have a couple friends with shops and I could go there and put the car on the rotisserie but then I have to load the car on to a trailer while it is on a rotisserie, may not be my first choice.
A fork lift could be used but you have to have access to one or rent one. Probably more money that I want to spend.
Someone here posted some picture of an engine hoist being used to lift 1 end of the car up to get it on the rotisserie, a possibility since I have access to a couple of those. Have to figure out how to lift it without damaging the body.
Floor jack(s) and some sort of cribbing. Jack up one end at a time and stack wood or such to rest it on while you jack the other end up. going back and forth you could work it up to the right height. You have to be sure the cribbing you use is stacked stably and your jacking method is still stable as you get up off the ground. If the timing was such that I was replacing the back fence (that is starting to fall apart) I might have enough 4x4s to use for cribbing before I built the fence with them.
I also have a friend that has a couple motorcycle service lifts. They are small enough to bring 1 to my house and use it to lift the 914 body. Weight of the 914 shell would be in the range of the lift but i am not sure the height that is possible with it.
Just a thought or five
Jim
There are designs that can be purchased or home built that incorporate hydraulic lifts on each end. Google- Direct Lift SPINS. I have no personal experience with them, but I like the possibilities.
Posted by: McMark Dec 22 2011, 11:55 PM
Lifting it manually is a great option. Also, the large jackstands can get it high enough, although slightly precarious.
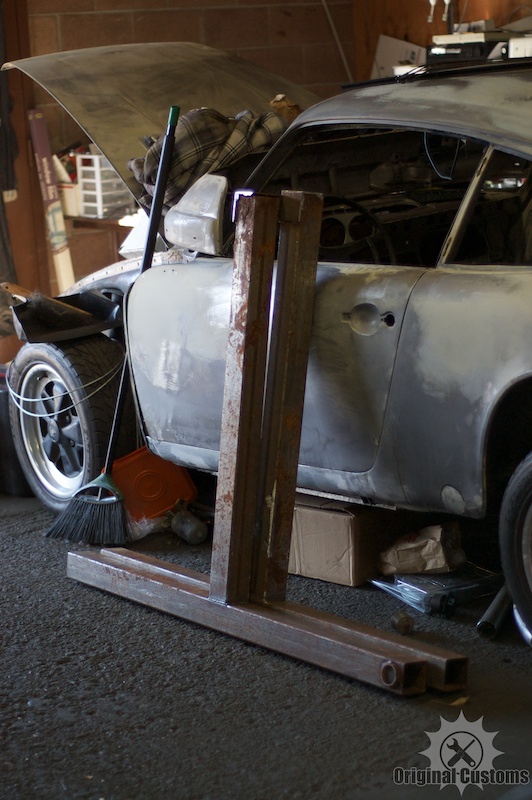
Got the uprights built today, before I ran out of cutoff wheels. 
Then left the shop without getting the pictures off my camera. 
It's been a bit of a rough day.
Posted by: leebenedi Dec 23 2011, 03:25 AM
Just one question. I plan on putting my 914 on a rotisserie but the front bumper holes are quite rusted. Is that a problem?
Thank you,
Lee
Posted by: 9fourteen Dec 23 2011, 07:53 AM
Just one question. I plan on putting my 914 on a rotisserie but the front bumper holes are quite rusted. Is that a problem?
Lee,
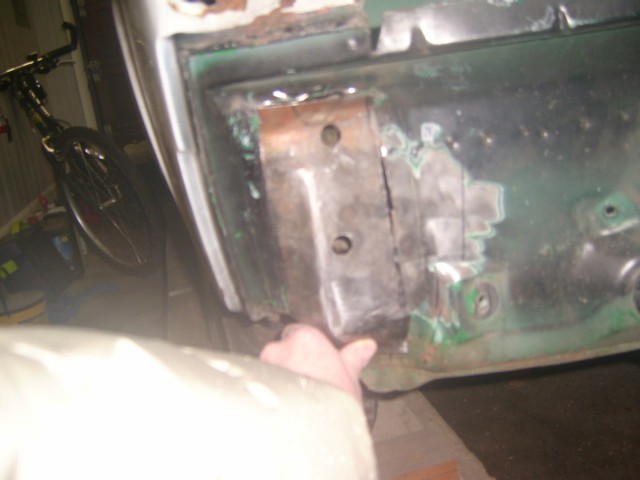
I have the same issue and assumed "yes" since that is where I plan on mounting the rotisserie. I am a complete novice on this stuff so I figured this was a good place to start perfecting my welding and metal working skills since it would not be visible and not as critical structurally.
Here is what I found when I pulled the bumper
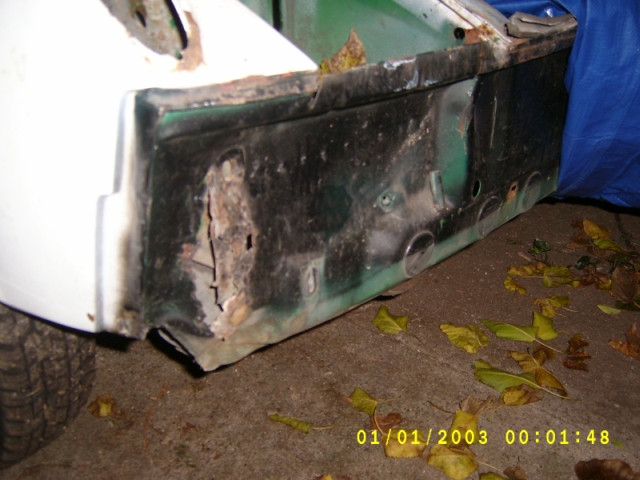
Here is what I have cut out, still need to grind it a bit
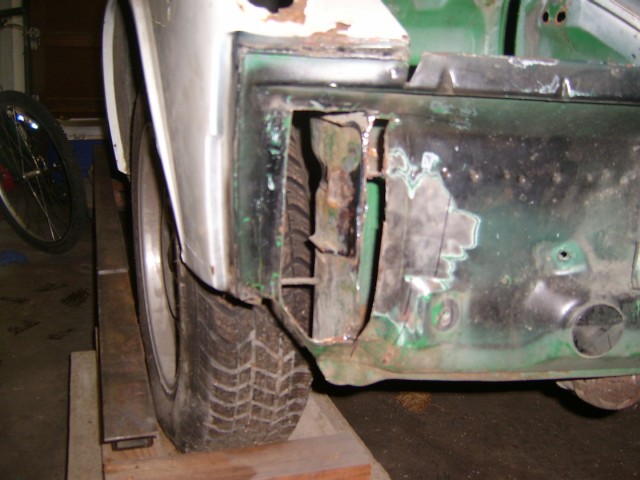
Here is my patch. (second attempt) It's starting to look ok. Just need to get it cleaned up and welded in.
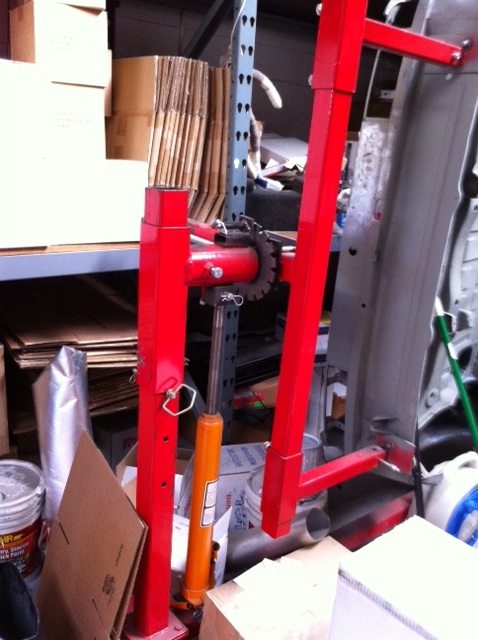
Here is a crude drawing of what I was thinking as a solution to getting the car up high enough to spin. (this drawing is missing a lot of stuff. it's just to show my raising and lowering idea)

Posted by: scotty b Dec 23 2011, 08:00 AM
I know the bumper holes are the standard mounting point, and that is where I made mine for. But IMHO the best spot is the front suspension mount. I don't think I have ever seen one rotted there, it is a much more stout spot. My initial jig was intended to be a temp until I can make the permanent ones that will mount to the susension in the front and the trans mount in the rear. I plan to then make a complete under body jig to tie the front and rear together with pickup points for the suspension ears in the rear that can be used to locate the pass side when rust repair is done. By tying the front and rear together, the whole body is well braced for hell hole repairs, basically creating a light duty Cellete / rotisserie
Posted by: scotty b Dec 23 2011, 08:02 AM
Put the jack on the inside. Placing it on the outside you are pushing the framwork into itself. By placing it on the inside you are lifting directly verticle on the load point. I would also recommenr using a hydraulic jack like on an engine hoist and soild mounting it to the lower leg. The set you have planned is going to be a little awkward with having to jack,set pins, raise jack, re-jack reset pins etc. A bottle jacks throw is VERY limited, whereas the tyype I am using has a long throw and can be mounted on the base and left
Attached image(s)
Posted by: scotty b Dec 23 2011, 08:07 AM
this
Attached image(s)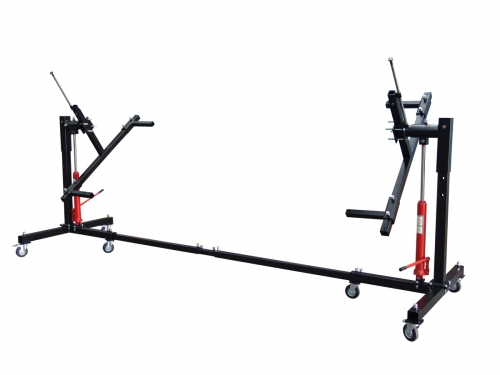
Posted by: McMark Dec 23 2011, 11:04 AM
Lee, you should fix the bumper mounts FIRST, then put it on the rotisserie.
Scotty, my thoughts on attaching to the front suspension/rear suspension points is that then you're dealing with a long lever arm, and lots of weight far away from the support structure. Are you concerned about this? Or do you have plans for additional support? Maybe that 'lever arm' isn't even a problem. Just thinking out loud...
Okay, pictures from yesterday. I also stopped and grabbed 16 new cutoff wheels. So I'm set for a little while.  Hoping to get wheels mounted today...
BTW, this is some 3" square tubing scrap I've had laying around. 
Attached image(s)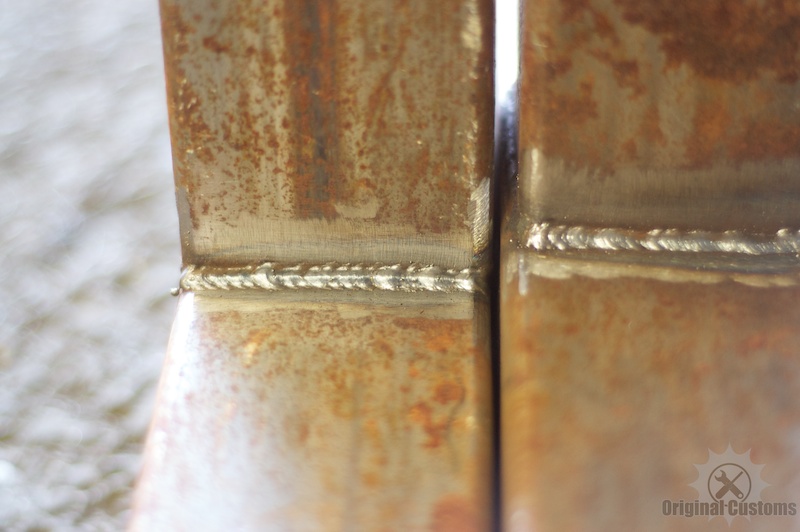
Posted by: strawman Dec 23 2011, 11:35 AM
To get the body on the rotisserie, you should strip off everything possible so the tub is as light as can be. Truth be told, I still left about 100 pounds of stuff on the tub that should have been removed first -- it would have been easier to lift the car onto the rotisserie uprights had I not rushed into it.
As mentioned above, using an in-floor lift or a combination of cherry pickers/A-frame hoists would be optimal, but human power works, too. For how I did it, I first mounted the rotisserie crossbar-mounts to the factory bumper holes. See post number 17 in the link below for details:
http://www.914world.com/bbs2/index.php?showtopic=83031&hl=suby+rustoration
As then explained in post number 21, I used a cherry picker to lift the rear of the tub while I slid in the rear rotisserie upright, and then three of us hefted the front up while a fourth person slid the front upright into the crossbar-mount. It really wasn't that difficult -- and I'm a 150 lb. weakling! I would say six normal-sized guys could lift the tub off jackstands while another person (or two) could slide the uprights into the crossbars.
I dismounted it by myself, because I have no friends. Actually, I built an A-frame/hoist during the 27 months the car was on the rotisserie so that I could raise the Subaru engine and trans into & out of the tub (again & again & again  ) while on the rotisserie as I fabricated suitable mounts. See post number 169 for pics of how I lowered the car back onto jackstands solo. The combo of a cherry picker and A-frame/hoist worked great.
Your neighbors are going to love you... 
Posted by: McMark Dec 23 2011, 02:44 PM
Goeff, adding a ring to the top of your body cross member for an engine hoist is a great idea.
Posted by: McMark Dec 23 2011, 04:14 PM
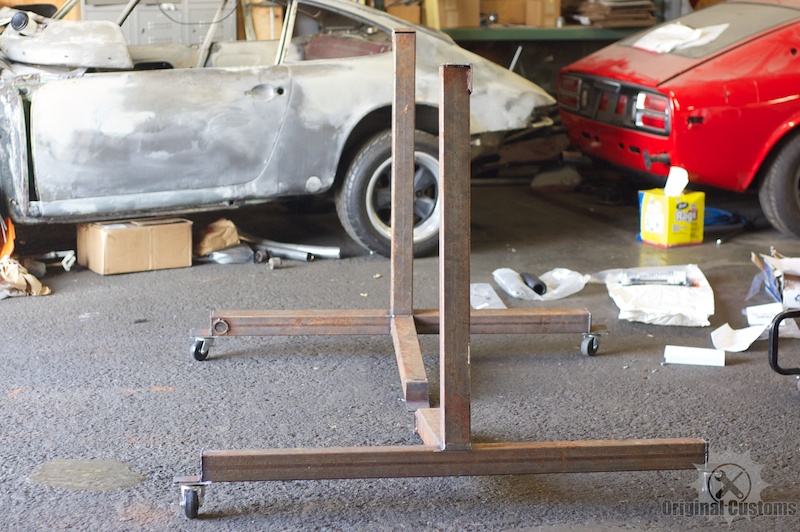
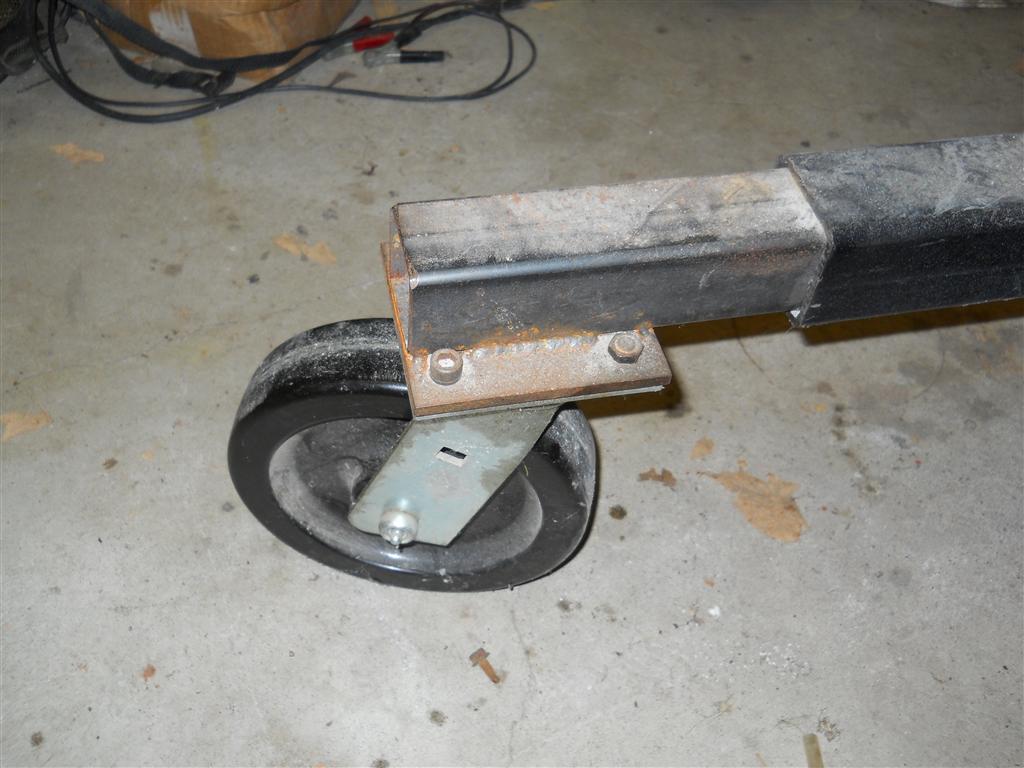
Got the wheels and the center legs completed. Now I need to get two more casters and figure out how to approach the rotational junction. The tube-in-tube setup works fine, but I'm hoping to see if I can find something slightly more elegant. Gotta shop McMaster-Carr.
Attached image(s)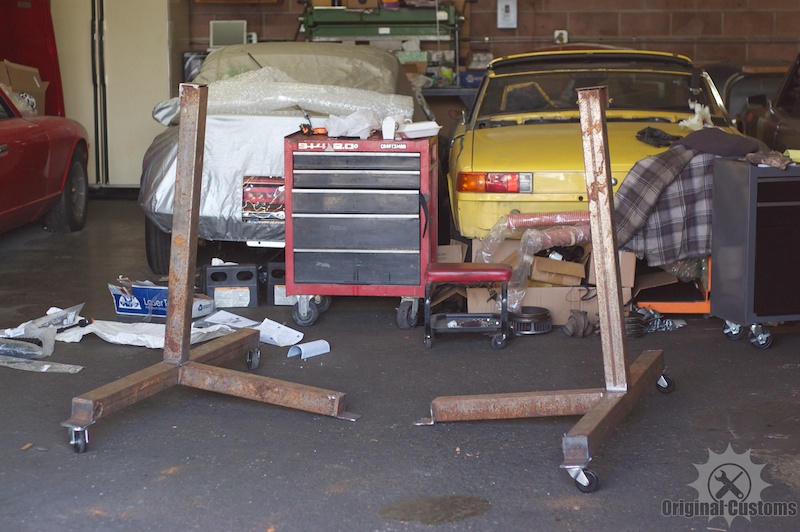
Posted by: scotty b Dec 23 2011, 05:22 PM
Lee, you should fix the bumper mounts FIRST, then put it on the rotisserie.Scotty, my thoughts on attaching to the front suspension/rear suspension points is that then you're dealing with a long lever arm, and lots of weight far away from the support structure. Are you concerned about this? Or do you have plans for additional support? Maybe that 'lever arm' isn't even a problem. Just thinking out loud...
Okay, pictures from yesterday. I also stopped and grabbed 16 new cutoff wheels. So I'm set for a little while.
Hoping to get wheels mounted today...BTW, this is some 3" square tubing scrap I've had laying around.
My thought is to use the forward A-arm mounts for the front point. That is only 10-12" ( ? ) further than the bumper holes. In the rear I plan to use the trans mount for my pickuo point. That too is only an additional 12-ish inches. ( i haven't actually measued either yet in case you couldn't tell
 )
)
Posted by: Elliot Cannon Dec 23 2011, 07:54 PM
Are those casters big enough?
Posted by: URY914 Dec 23 2011, 08:28 PM
My advice is to use at least 5" steel caster wheels with locks.
You must have missed this previous post of mine.
Did you get those casters for free? That rough concrete will eat those things up.
Posted by: 9fourteen Dec 23 2011, 08:35 PM
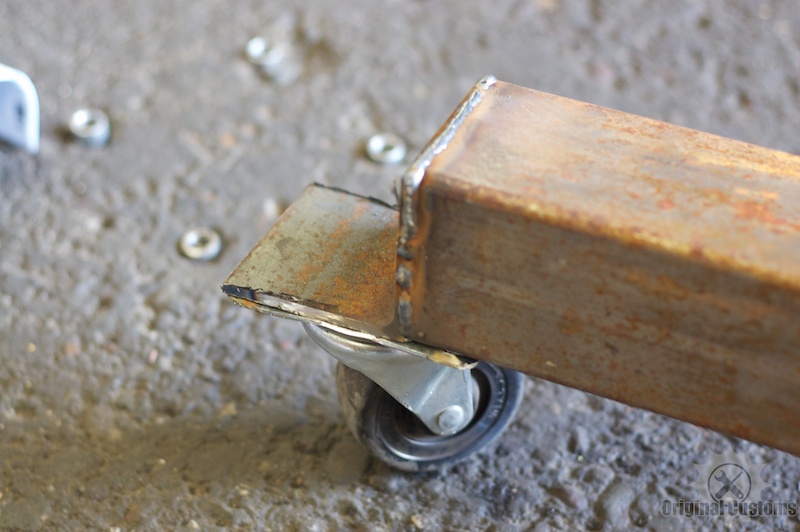
I am curious as to why you put the casters on the flat bar extensions versus putting them directly on the square tube. I would think it would be stronger on the square tube. Are they going to be bolted on?
Posted by: McMark Dec 23 2011, 10:12 PM
Casters were from another project. If they die, I will weld new ones on. I welded angle iron on the end of the square tube because I was a little shorter on the side beams than I wanted to be, so this was my fix. If I notice those bending up, I'll add triangulation.
Part of this build is just using up crap I've got lying around the shop.
Posted by: RobW Dec 24 2011, 01:09 AM
Casters were from another project.
What... Like a limo or something?
Posted by: strawman Dec 24 2011, 01:25 AM
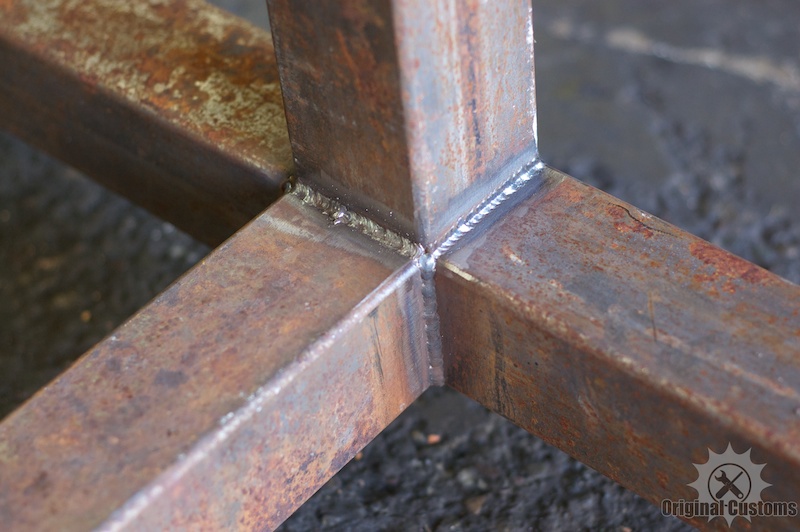
Those welds are far too nice for a rotisserie 
Where are the farmer-blow welds that a rotisserie deserves?!?!  Show-off...
Posted by: leebenedi Dec 24 2011, 01:55 AM
Thank you for the responses. My rust is not as bad, but the metal is quite thin. Sorry for highjacking the thread, what can I use to repair that area? What metal thickness should I use?
Lee
Attached image(s)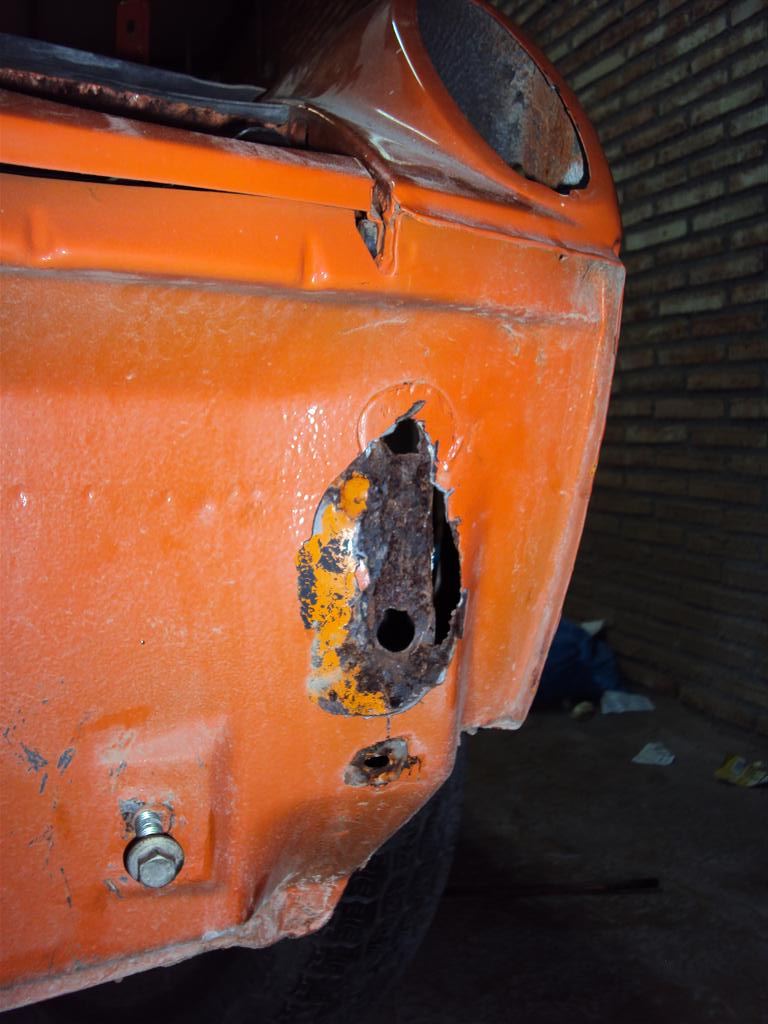
Posted by: jimkelly Dec 24 2011, 06:39 AM
looks good.
the caster brackets look like ankle biters.
no more low rise converse in the shop : )
now you have to decide if it is faster to not strip the car down to do a repair or if stripping it down is a time saver.
jim
Posted by: aircooledtechguy Dec 24 2011, 09:54 AM
My advice is to use at least 5" steel caster wheels with locks.
You must have missed this previous post of mine.
Did you get those casters for free? That rough concrete will eat those things up.
With the weight of a car on that thing, you will instantly realize that the casters are WAY to small especially for the floor finish in your shop. Change those thing out now before you have a car on it. Casters do have weight limits. . .
Posted by: mepstein Dec 24 2011, 10:39 AM
Thank you for the responses. My rust is not as bad, but the metal is quite thin. Sorry for highjacking the thread, what can I use to repair that area? What metal thickness should I use?
Lee
Scotty B did that repair on my car. There are pictures and info on the "mepstein build"
Posted by: shuie Dec 24 2011, 11:58 AM
JMO, but you should go ahead and do that now. Or, just weld some 1/4" flat plate under the square tube and forget the angle. That looks like 3/16". I built a set of shop dolly's that bolt into my suspension consoles w/ 3/16" plate like that. The ears folded over like cardboard the first time I tried to roll the tub. I'm honestly embarrassed to admit that I did something this dumb. I'm really lucky I didn't drop the car on my feet. Be careful.

The 3/16" angle may hold on yours since the caster is half under the square tube, but I don't think your casters are stout enough either, tho. I had 5" 350lb casters on my dolly's and decided to replace them after moving my tube maybe 3 times. Now I have 5"x5"x1/4" plates mounted to huge 8" 450lb casters. The dolly setup is rock steady and I can move my tub easily now without worry.
Here are the casters Im using now. These are 8" and rated for 450lbs. They were ~$18 each from Harbor Freight.

Here's the updated rear dolly.


Posted by: McMark Jan 25 2012, 05:36 PM
Finally found the bearing setup I wanted to make the rotation super smooth. 
This also sticks with my plan to just try and use up crap I've got laying around the shop. So far I have $0 invested.
Attached image(s)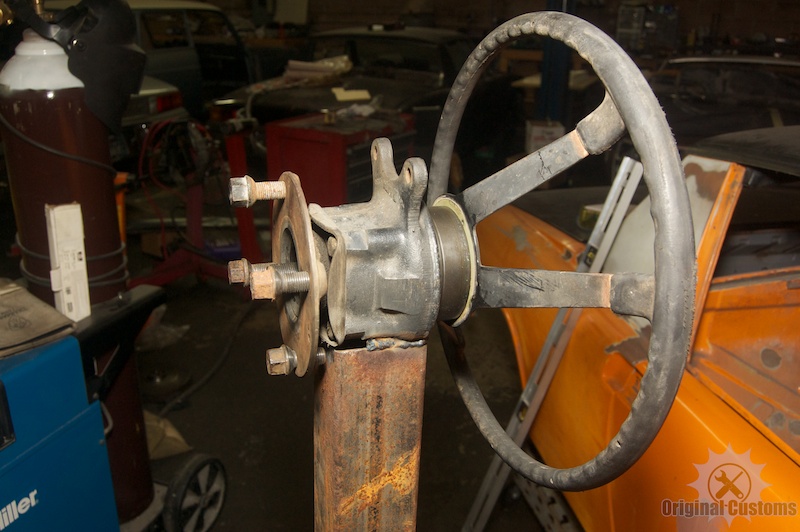
Posted by: scotty b Jan 25 2012, 05:41 PM
 I thought aboot using rear bearing's too..... 3 months after I had built mine
Posted by: burton73 Jan 25 2012, 06:04 PM
Mark,
This is on my unit I bought it for $1100. But it has a great indexing holder when you turn the car. It makes it very easy to work on the car at all different angles. With the Jacks it makes it very easy to make the car go to the perfect working height as well. Just some ideas for you.
Bob 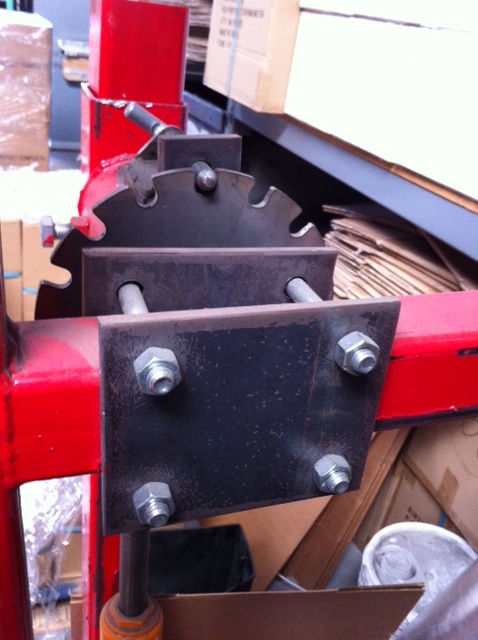
Posted by: McMark Jan 25 2012, 06:19 PM
I'm building a similar locking pin setup.
The hydraulics are nice, but beyond the scope of this project. I have a lift, so getting cars up and down is no problem. 
Posted by: mr914 Mar 10 2012, 06:49 PM
I built my rotiserie a number of years ago.
I used a combination of 2 1/2" thick wall and thin wall tubing to allow for sliding of the tubes.
Had a local machinist bore 5/8" holes on a brigeport with 2" indexes.
Did the same thing for the slip tube except for 8" centers.
I then used two heavy wall tubes that were almost an interface fit and welded them on a plate.
Never needed a bearing. it already spins easy enough.
Turtled mine today
Attached thumbnail(s)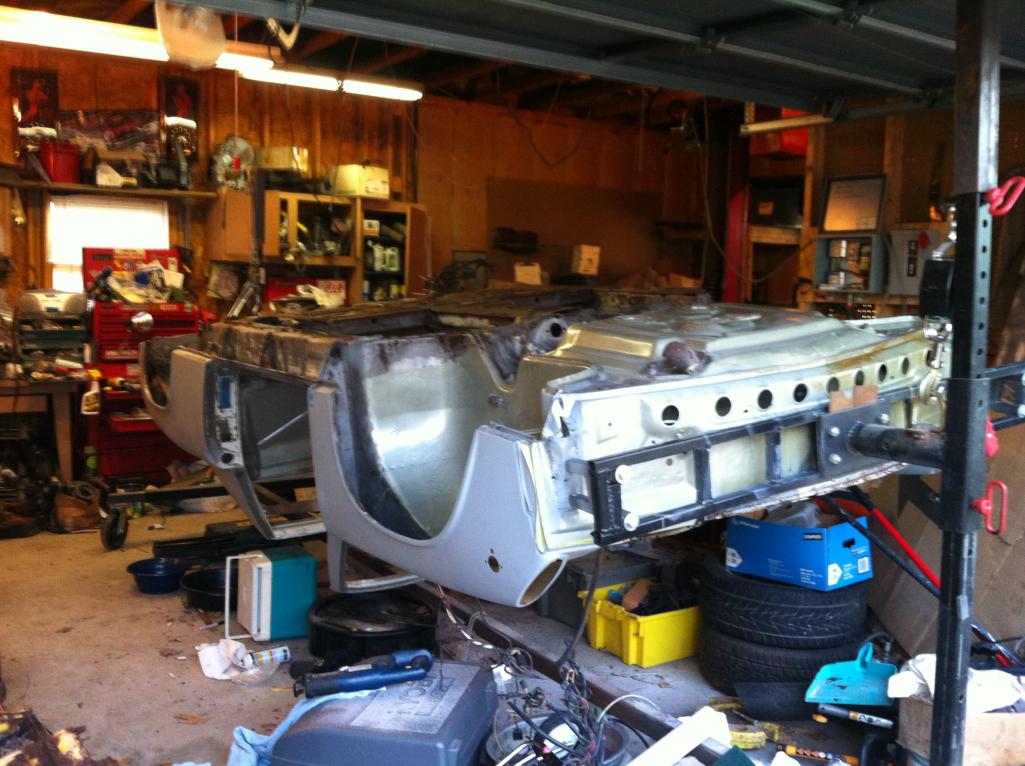
Posted by: mr914 Mar 10 2012, 07:05 PM
Built it so I could break it down and store it.
Seems to be a permanent fixture in the garage
Attached image(s)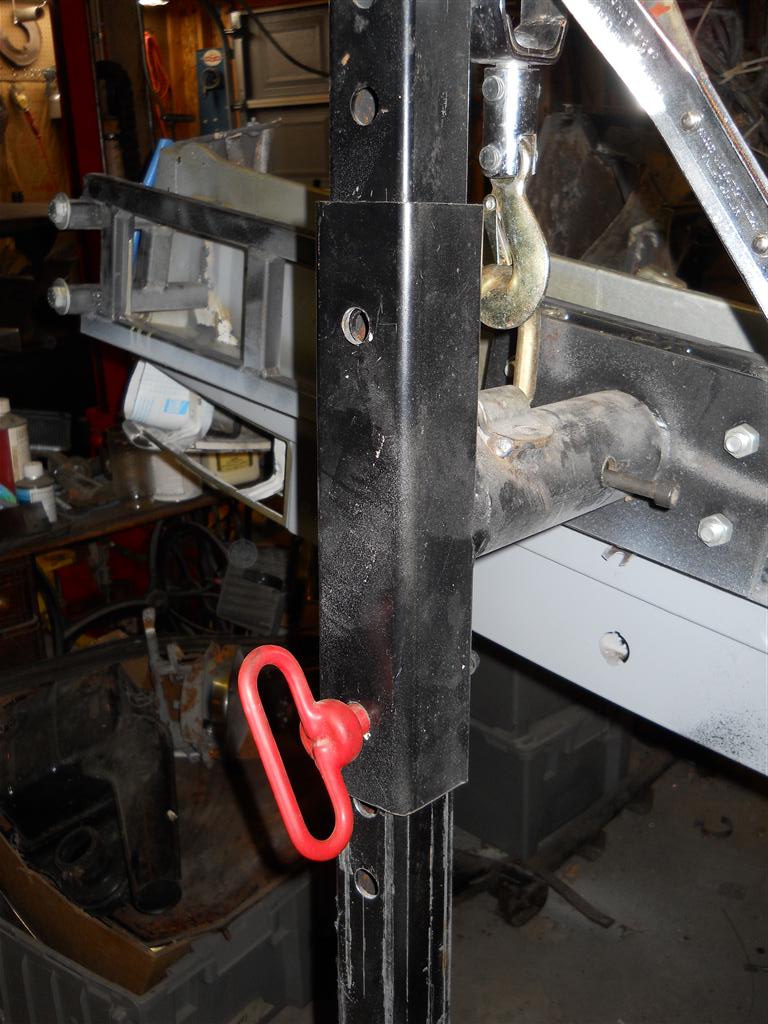
Posted by: ConeDodger Mar 10 2012, 09:20 PM
Finally found the bearing setup I wanted to make the rotation super smooth.
This also sticks with my plan to just try and use up crap I've got laying around the shop. So far I have $0 invested.
Say... That rear hub isn't from my car is it?
Posted by: sixnotfour Mar 10 2012, 09:50 PM
Say... That rear hub isn't from my car is it? av-943.gif
No... But the steering wheel Is..

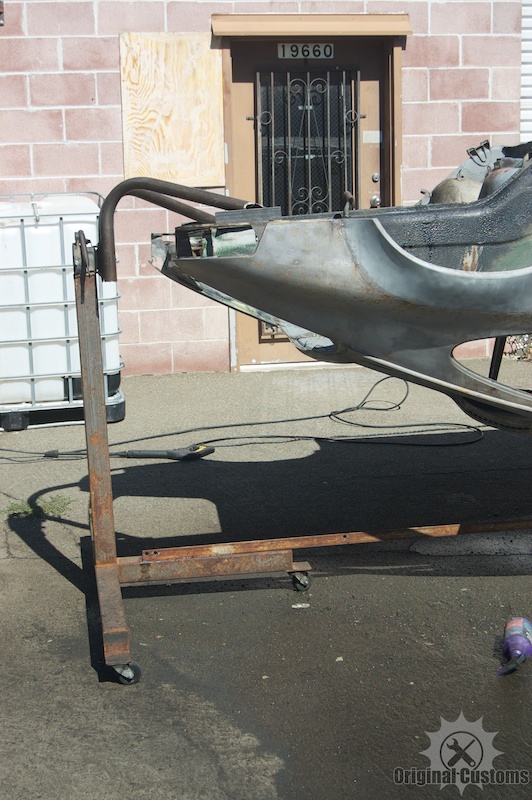
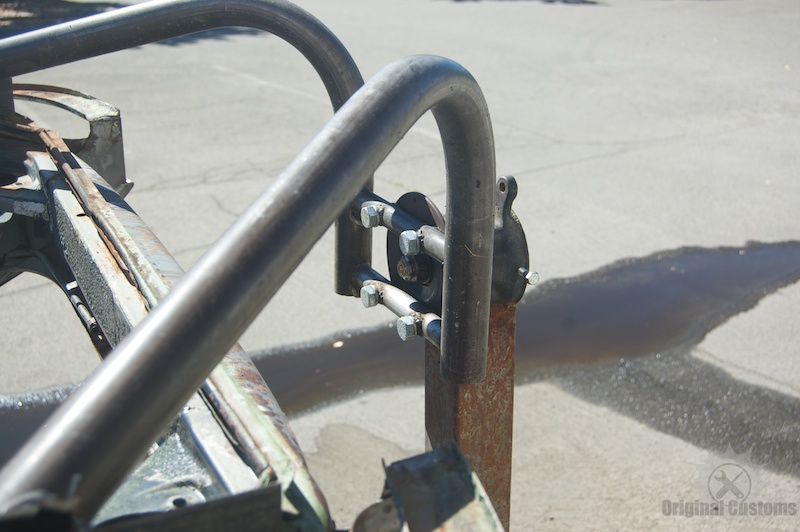
Posted by: McMark Jun 25 2012, 08:29 PM
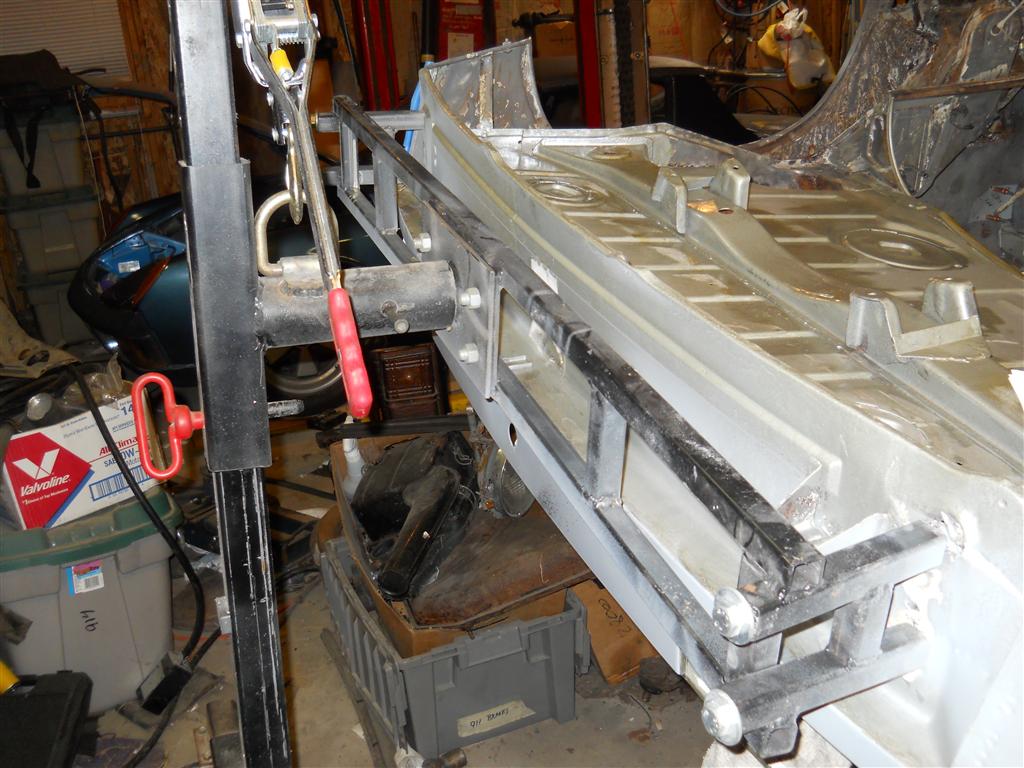
Finally finished up the brackets for the rotisserie. Used some 1.75" DOM tubing, and 1" DOM tubing I had lying around. Works really well and all the nay-sayers from above were wrong.  It rolls just fine and its super solid. I'm happy.
Yeah, it's a 911. 914 fixtures are next - gotta do the floor pans on the 914/6 project.
Attached image(s)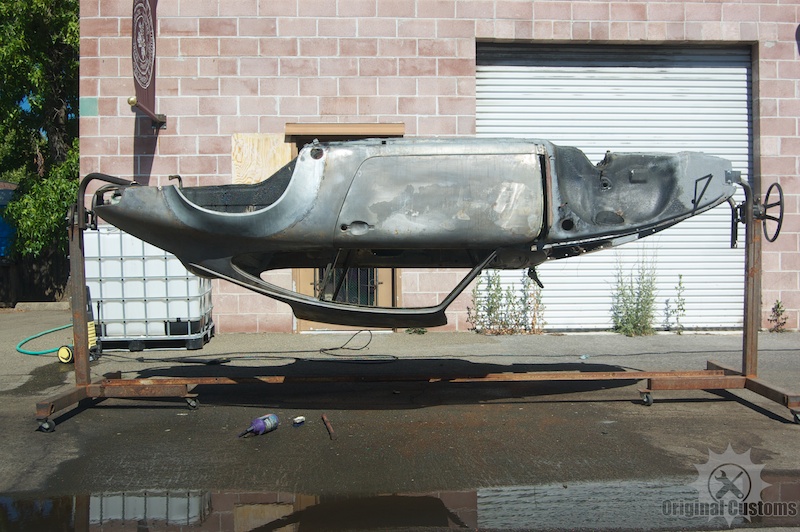

Posted by: FourBlades Jun 25 2012, 08:45 PM
Looks great! That is very innovative.
Now just add a motor and brakes. You already have the steering wheel.
John
Posted by: jsconst Jun 25 2012, 08:54 PM
I happen to be there when they were rolling it out of the shop, very stable rolled well, rotation was smooooth. Actually in person it's probably overkill, but it will last forever.
Nice job Mark 
Jeff
Posted by: scotty b Jun 26 2012, 06:13 PM
Hey Mark I've got to build another for a 911 I have coming in next month and was concerned about mounting it under the car. Does it make it top heavy that way, or does it rotate fully without trying to take off ?
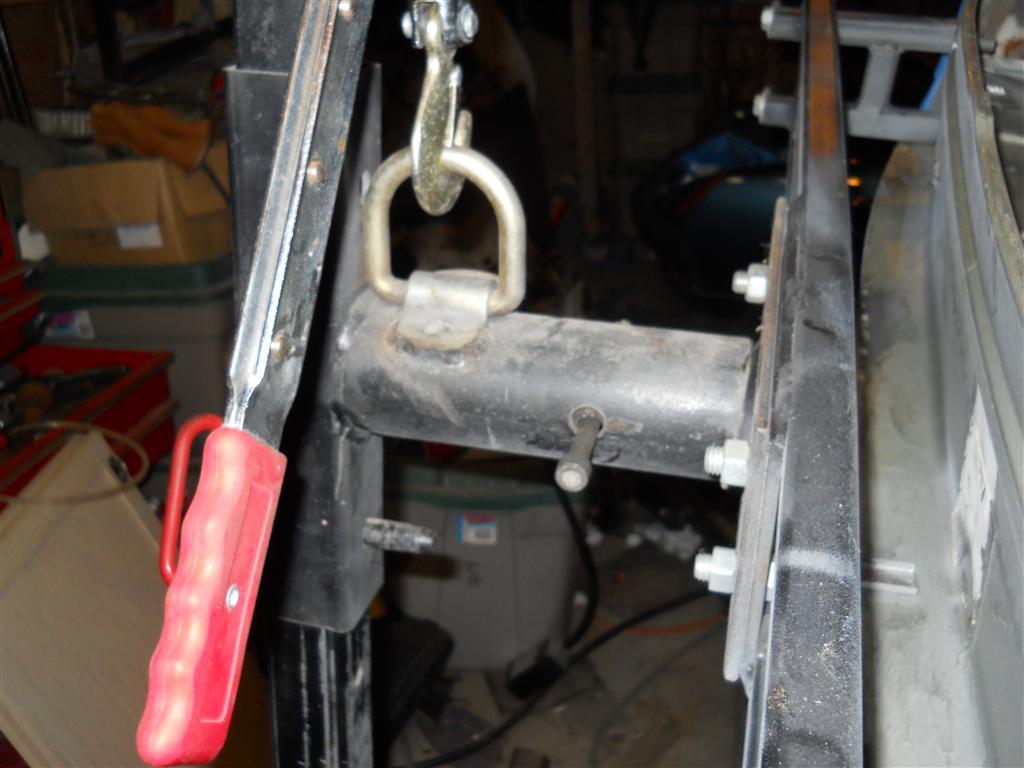
Posted by: McMark Jun 26 2012, 10:53 PM
It's balanced enough to handle by myself. I had to adjust it quite a bit from where I initially built it. The center of gravity is still slightly lower than where I have it. I can detail this some more if you're interested.
It's not so much where you attach to the chassis, but how the brackets align the center of gravity of the chassis with the center of rotation of the rotisserie.
Posted by: McMark Dec 10 2012, 08:01 PM
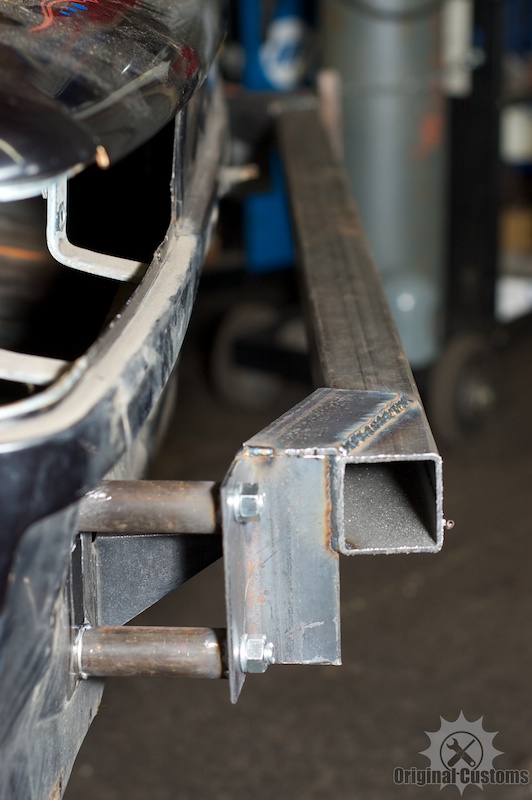
Time to build 914 fixtures since my restoration project has blossomed (see link in signature). Had this big square tube already.
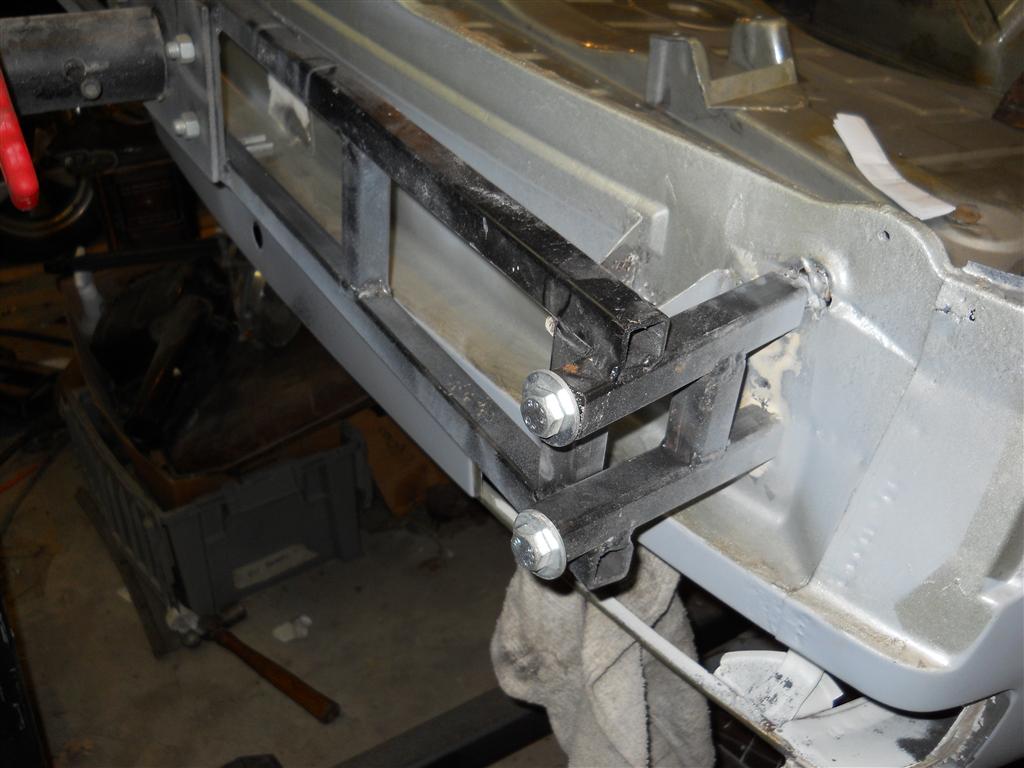
Started at the body and got some 7/16" bolts that were long enough to put the attachments far away from the body to allow maximum paint access. Used some spare 1" DOM tubing for the standoffs. Welded the 7/16" washers to the end of the tubing so the bolts aren't flopping around. Cut some sections of angle iron and drilled a couple holes (held the piece up against the body at traced through the holes with a Sharpie). Bolted that all together against the body and welded the standoffs to the angle iron. The square tube was too long and I also needed the bar to go a little farther out. So I cut off the excess on either end and welded it to the angle iron, then welded the remaining tube on. The small pieces of tubing were already there, so I just left them in place. But it's already strong enough for me to stand on.
Attached image(s)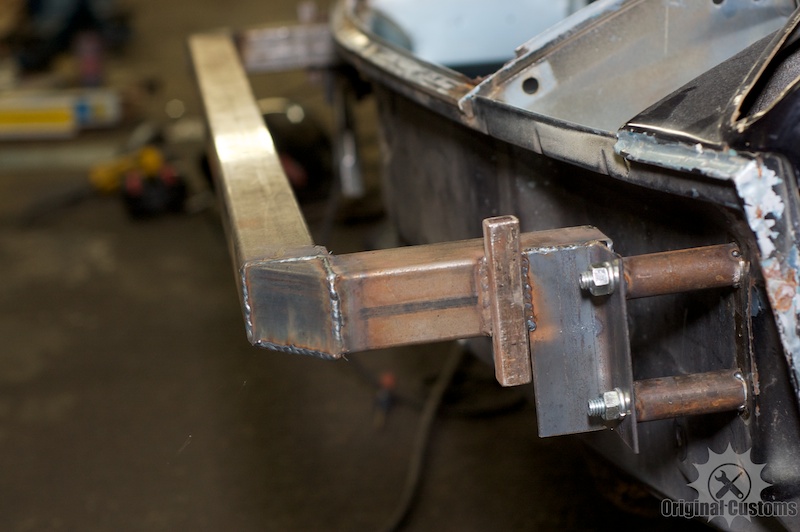
Posted by: Socalandy Dec 10 2012, 08:09 PM
Did I miss it or did everyone pass on saying...
It's an Original Custom Nice work
Posted by: McMark Dec 10 2012, 09:42 PM
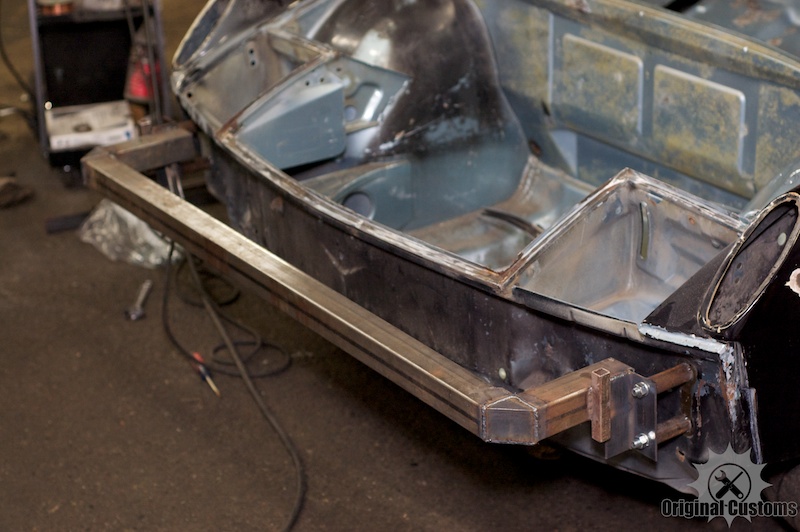
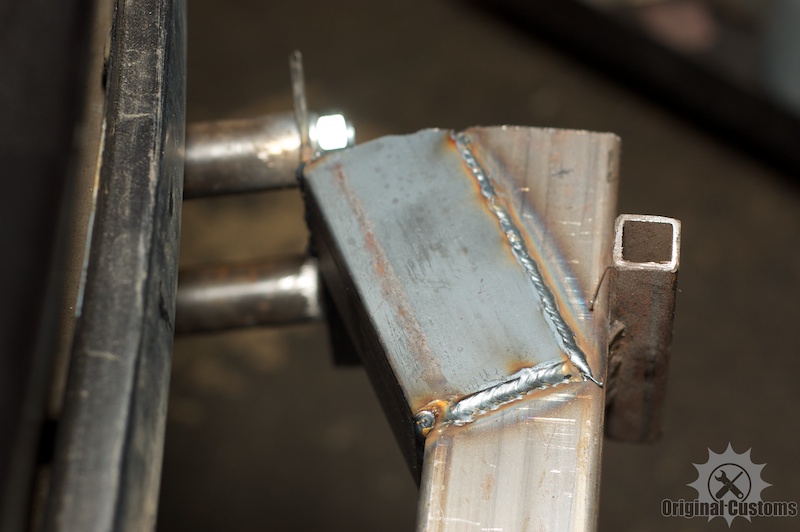
Just finished up the rear bar. Tomorrow it goes up...
Attached image(s)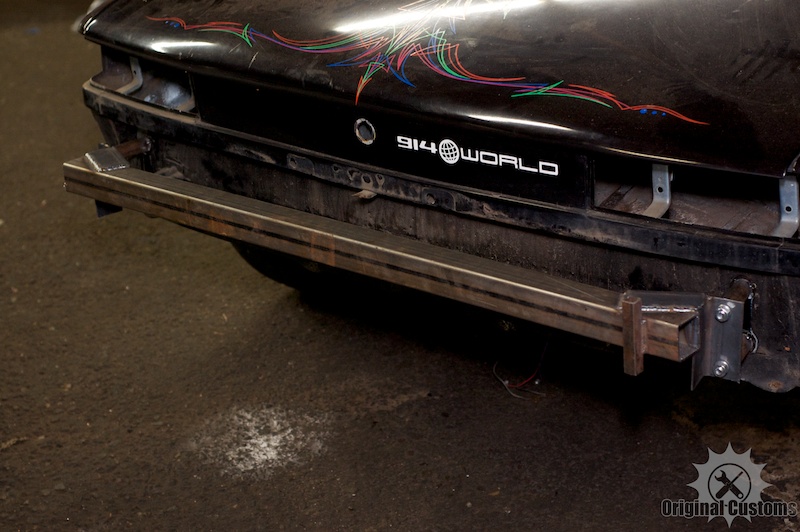
Posted by: SirAndy Dec 10 2012, 10:14 PM
Can't wait to put this to "good" use next year ...
Posted by: 914Eric Dec 10 2012, 10:21 PM
Nice!
![popcorn[1].gif](style_emoticons/default/popcorn[1].gif)
Posted by: cary Dec 10 2012, 10:40 PM
My advice is to use at least 5" steel caster wheels with locks.
Ditto ............... Ditto .................. Ditto
My big ass poly wheels SUCK. You can't get them started.
Posted by: McMark Dec 11 2012, 10:26 AM
I'm going to try out the methods described in http://www.longacreracing.com/articles/art.asp?ARTID=22 to find the true center of rotation. Hopefully this will avoid the guess-n-check-n-fix cycle for getting a good rotation. Plus this info would be easily repeatable for the next guy who builds a rotisserie.
Posted by: Gint Dec 11 2012, 11:50 AM
Love the steering wheel!
Posted by: McMark Dec 12 2012, 08:10 PM
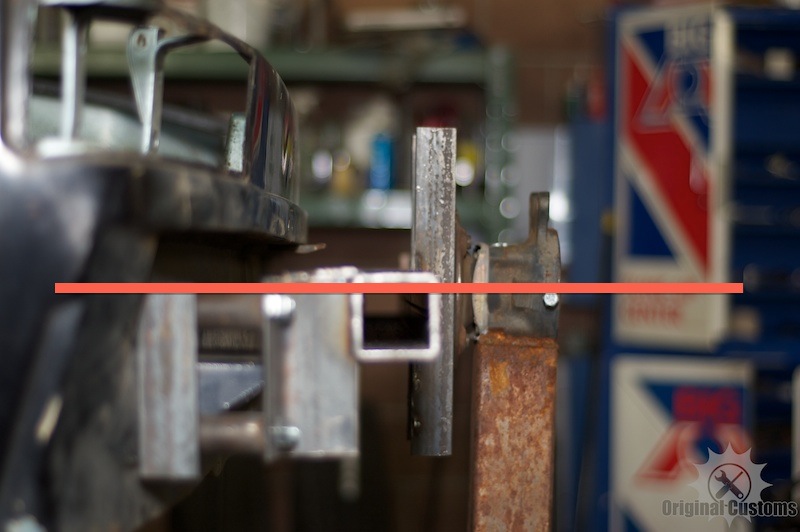
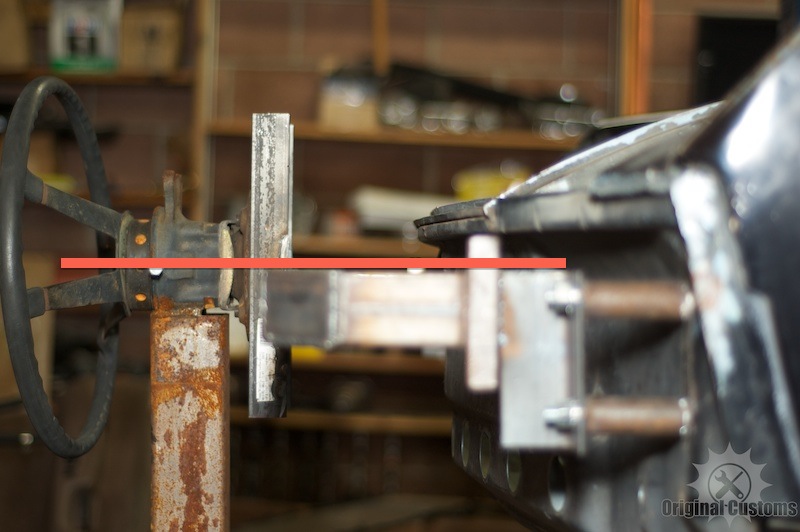
914 fixtures complete!
Spent a lot of time getting the balance as close as possible. The tech article I tried (link above) to find the CGH didn't pan out. I think the problem was the cheapass bathroom scales I was using. The resolution needed is much finer to get any sort of accurate measurement.
But through guess and check I found that placing the center of rotation about 1" below the 'lip' on the both the front and the rear (see pics below) yields a balanced stock 914 body (no reinforcements welded in). I can spin the car without effort and it will stop in any orientation without tightening the locking bolts. I'm really happy.
Attached image(s)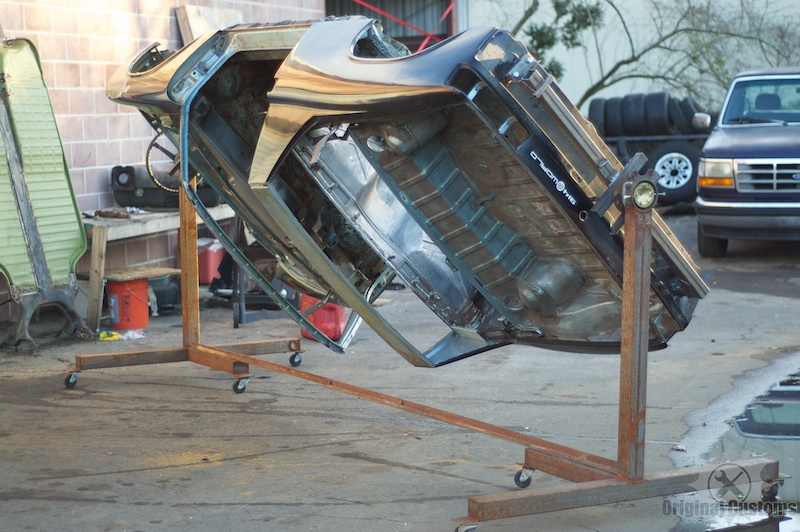
Posted by: bigkensteele Dec 12 2012, 08:15 PM
Can't wait to put this to "good" use next year ...
Can it be extended long enough to fit a limo?
Posted by: McMark Dec 12 2012, 08:17 PM
Yes.
Posted by: KELTY360 Dec 13 2012, 12:47 AM
Paint it yellow...the work will go faster!
Posted by: jaxdream Dec 13 2012, 10:50 AM
What type of chassis leaning against the wall in top pic in post #62 ??? Just curiuos ... 
Jack
Posted by: McMark Dec 13 2012, 10:54 AM
Type3 VW chassis. We welded new pans on it.
Posted by: jaxdream Dec 13 2012, 11:05 AM
Ahh , thought so , but wasn't 100% sure . VW work abounds in the right place , your garage !!! Great work Mark , keep it coming .Original Customs , even rotisseries !!!
Jack
Posted by: FourBlades Dec 13 2012, 11:14 AM
914 Limo on the rotisserie!!!
914 Limo on the rotisserie!!!
914 Limo on the rotisserie!!! 
Think of the respect 914 World will get from the Porsche world for that. 
John
Powered by Invision Power Board (http://www.invisionboard.com)
© Invision Power Services (http://www.invisionpower.com)