Printable Version of Topic
Click here to view this topic in its original format
914World.com _ 914World Garage _ Installing new Rubber Engine Compartment Seals
Posted by: euro911 Jan 12 2012, 11:30 AM
Since the drive train is out and Milt fixed the engine shelf in my '75, I'm getting ready to install new [914rubber.com] seals around the engine compartment.
The old ones were hard and brittle (what was left of them), and I had to bend the rails on the slots apart a little to get them out.
What do you guys use to lubricate new seals so they don't bind or tear when pulling them in?
![]()
Posted by: SLITS Jan 12 2012, 11:32 AM
Sliicone spray or soapy water
Posted by: Jeff Bowlsby Jan 12 2012, 11:39 AM
I use glycerin from the drugstore. Preserves rubber items too.
Posted by: andys Jan 12 2012, 12:25 PM
K-Y Jelly from the drug store works great; been using it for years......for AUTOMOTIVE purposes :-)
Andys
Posted by: aharder Jan 12 2012, 12:33 PM
K-Y Jelly from the drug store works great; been using it for years......for AUTOMOTIVE purposes :-)
Andys
Posted by: euro911 Jan 12 2012, 12:43 PM
Thanks. I didn't want to introduce [soapy] water into the slots (don't want anything to start rusting in there), so glycerin or KY sounds like a pretty good way to go.
Then, it seems that glycerin, or KY, would also work for rubber [suspension] bushings? ... I'll be replacing the front bushings and installing an anti-sway bar soon as well ...
Posted by: ellisor3 Jan 12 2012, 02:15 PM
WD 40 also works well and helps displace water, much like the other things listed. WD 40 may be easier to apply though.
Posted by: geniusanthony Jan 12 2012, 02:51 PM
From the reading I have been doing, Silicone based lube is bad for rubber items, As Jeff said.. I second Glycerin or Glycol is another name for the stuff. Works great for preserving rubber also. BMW spares product called Gummi Pfledge(sp) is also a good preservative as an FYI.
Posted by: rwilner Jan 12 2012, 02:53 PM
I lubricated mine with simple green, which is also what I was using to clean up the engine compartment. Worked great
Posted by: bandjoey Jan 12 2012, 06:26 PM
Stop and do NOT pass go. 914rubber.com recommends an Aero product I forgot the name of.........My bottle is at home and I'm at work. It not only cleans it protects for a long time.
Mark?? And he is the imperial potentate of 914 rubber.
Posted by: toolguy Jan 12 2012, 07:10 PM
OK here is the best product to use. . . It's called 'Smoothie'. . it's a painters product and is actually liquid silicon. .It's only available at profession auto painter supply stores. . . it is also a rubber preservative beside being slippy. . . it' will protec also. . . . it is absorbed into the the rubber. . . it's around $15 for 8 ounces and is clear. . . it also leaves a great sheen on the rubber. . think Armor all. .only this is good stuff. .
here's a link. . . http://solutions.3m.com/wps/portal/3M/en_US/Marine/Home/Products/Catalog/?PC_7_RJH9U5230GE3E02LECIE20S4K7000000_nid=TWCPHJJKXBgsS38K155C5Rgl6V675XC7QXbl
Posted by: McMark Jan 12 2012, 08:37 PM
I guess I'm the only one who just installs them by setting the seal in the lower lip and pushing the seal under the top lip with a flat screwdriver. I never much liked sliding seals into place unless there is no other option.
Posted by: dlee6204 Jan 12 2012, 08:44 PM
I guess I'm the only one who just installs them by setting the seal in the lower lip and pushing the seal under the top lip with a flat screwdriver. I never much liked sliding seals into place unless there is no other option.
Posted by: rick 918-S Jan 12 2012, 08:46 PM
I guess I'm the only one who just installs them by setting the seal in the lower lip and pushing the seal under the top lip with a flat screwdriver. I never much liked sliding seals into place unless there is no other option.
Posted by: markb Jan 12 2012, 09:30 PM
I guess I'm the only one who just installs them by setting the seal in the lower lip and pushing the seal under the top lip with a flat screwdriver. I never much liked sliding seals into place unless there is no other option.
Posted by: bigkensteele Jan 12 2012, 09:47 PM
I guess I'm the only one who just installs them by setting the seal in the lower lip and pushing the seal under the top lip with a flat screwdriver. I never much liked sliding seals into place unless there is no other option.
The toughest part of the project was "mitering" the front corners so they would make a nice joint when the engine is in and the bottom of the seals are tucked up under the tin.
Posted by: Elliot Cannon Jan 12 2012, 10:59 PM
![]() What with they all said. Put the lower lip in and I think I used a small putty knife to work the top lip in.
What with they all said. Put the lower lip in and I think I used a small putty knife to work the top lip in.
Posted by: John Jan 12 2012, 11:12 PM
When I lubricate rubber parts for assembly, I use P-80 rubber lubricant. It is formulated as an assembly lube and does not damage rubber.
By the way, WD40 contains no silicone.
I also push the engine shelf seals in with a small flat blade screwdriver.
Posted by: euro911 Jan 12 2012, 11:14 PM
Good suggestion, I'll give that a whirl ...
Thanks for all the replies ![]()
Posted by: 914_teener Jan 13 2012, 05:39 PM
Good suggestion, I'll give that a whirl ...
Thanks for all the replies
You can put them in upside down real easily........
Then you feel like using the KY
Posted by: Mikey914 Jan 14 2012, 12:31 PM
For rubber I do use aerospace 303 protectant. it's mostly for UV exposure. I use the large flat screwdriver method for 2 reasons.
1- I think it's easier as the track usually isn't perfect and will hang up in some spots.
2- When you pull rubber through a track, you stretch it. Rubber has memory, and will want to return to it's original shape. So with vibration and time it will make the seal shorter than you cut it.
This is a real problem with the seals on the roof at the windows. Allways intall those from the outside edge and push the lip in. ![]()
Or they will be 1/8" shorter 3 weeks later and leak.
Posted by: euro911 Jan 14 2012, 01:39 PM
Thanks Mark. When I get done with all the mechanicals and rebuilding the suspension, I'll be starting in on the interior and replacing the remaining rubber [body] seals. I still need to locate all the stuff I already purchased from you (moved everything from 3 garages over to the new shop and not sure where it was stashed) ... I'm pretty sure I need to order some additional seals though.
P.S. I finally located the SS Allen screws for the engine tin - they really finish it up nicely ![]()
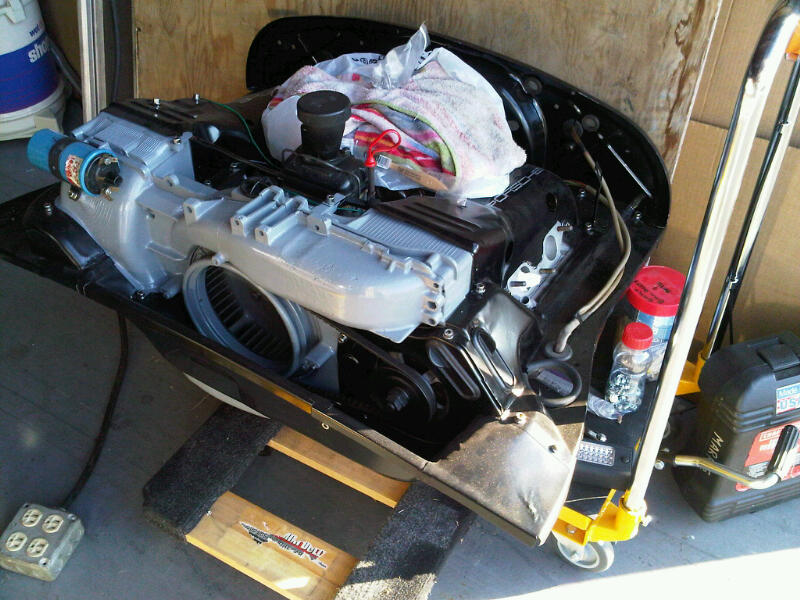
Posted by: Gint Jan 14 2012, 02:10 PM
This thingy:
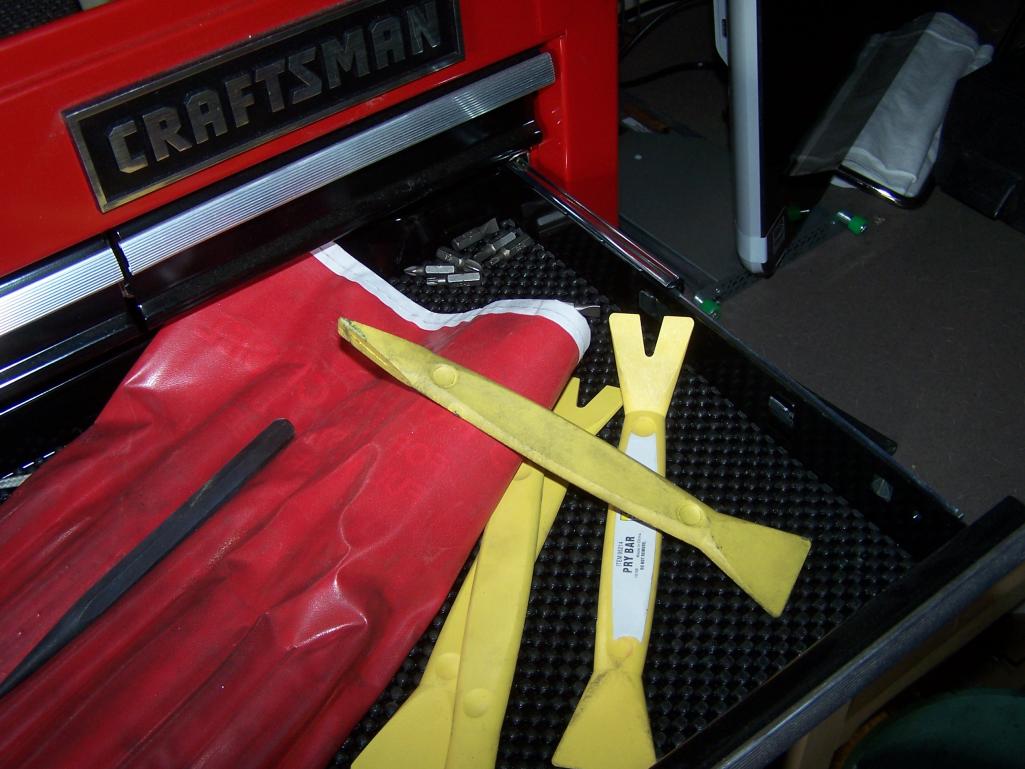
Posted by: Mikey914 Jan 16 2012, 07:48 AM
You'll like the ss screws even better if you have to remove them. The allen head will let you get a good grip on the screw unlike the cheaseheads that will stip out easily! ![]()
Posted by: CT914 Feb 20 2012, 02:26 PM
Hello,
I have a similar problem, having to replace the engine tray shelf, right side due to dreaded battery rust. So we cut/ground the old one out and before we installed the new one, went to put the rubber on and it doesn't fit. The new one has a track of .200" while the old one had a track .400". After trying to slide it on we tried to insert one lip and press the other one in. The old track wasn't a problem due to the larger width. Is there any way to insert the old seals into the new shelf?
Posted by: stugray Feb 20 2012, 05:53 PM
On the same topic... I just bought the whole kit and am ready to install.
Which way does the rear seal go?
Pointing up or down.
I has been so long since I took them off, I dont remember.
Stu
Posted by: Black22 Feb 20 2012, 06:23 PM
Hello,
I have a similar problem, having to replace the engine tray shelf, right side due to dreaded battery rust. So we cut/ground the old one out and before we installed the new one, went to put the rubber on and it doesn't fit. The new one has a track of .200" while the old one had a track .400". After trying to slide it on we tried to insert one lip and press the other one in. The old track wasn't a problem due to the larger width. Is there any way to insert the old seals into the new shelf?
I had the same problem. I had to open the channel up (very carefully) with a wide screw driver. If you do it nicely, once the seals are in place you 'll never notice.
Posted by: Mikey914 Feb 20 2012, 08:24 PM
Just think, the end of the seal attaches under the bottom lip of the sheetmetal. ![]()
Posted by: malcolm2 Apr 27 2013, 10:09 AM
Just to confirm things. I took some pictures. Don't grade my installation, I was just dry fitting the seal so I could get a cross section for the picture. ![]()
I am ASKING here. You install the front and side engine bay seals, let's call it, "upside down", correct? Like this....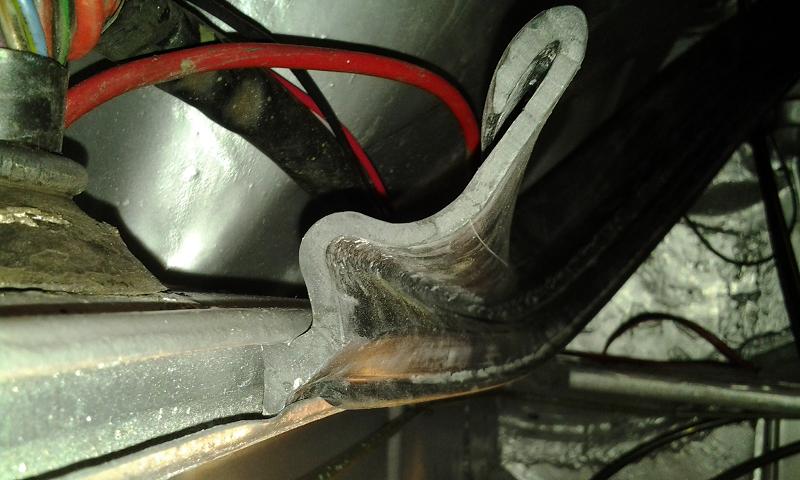
Then what is the top in the picture can curl down and grab the lip of the engine tin, correct?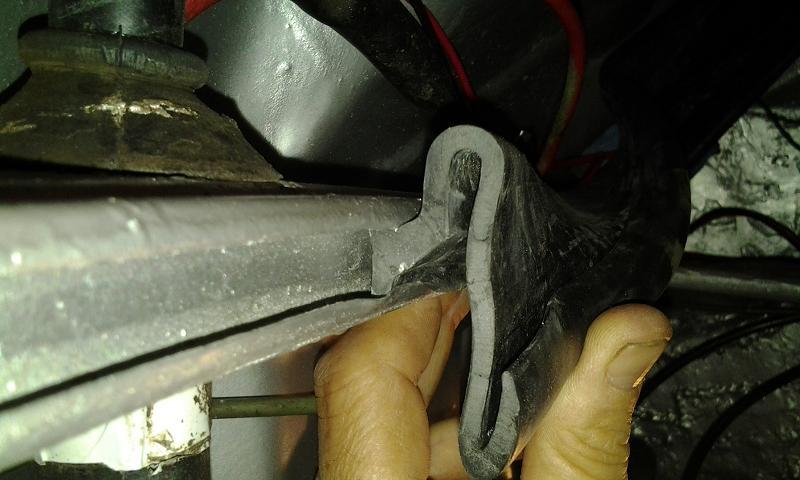
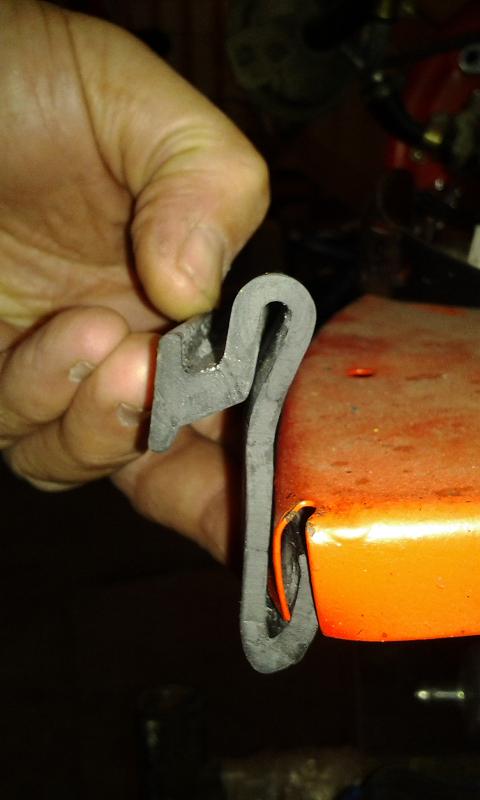
Attached image(s)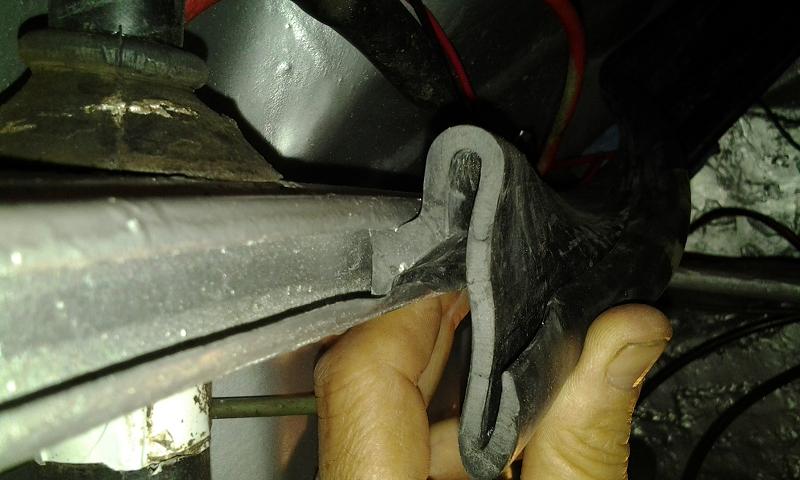
Posted by: euro911 May 4 2013, 12:02 PM
Yep.
Posted by: 80cap Feb 24 2016, 03:20 PM
I got the front and side seals in but the rear seal has unequal flaps. Does the short edge face up or down?
Thanks Brian
Posted by: 80cap Feb 25 2016, 06:56 AM
bump
Posted by: 76-914 Feb 25 2016, 09:23 AM
I guess I'm the only one who just installs them by setting the seal in the lower lip and pushing the seal under the top lip with a flat screwdriver. I never much liked sliding seals into place unless there is no other option.
Posted by: Puebloswatcop Feb 25 2016, 11:39 AM
Thanks Mark. When I get done with all the mechanicals and rebuilding the suspension, I'll be starting in on the interior and replacing the remaining rubber [body] seals. I still need to locate all the stuff I already purchased from you (moved everything from 3 garages over to the new shop and not sure where it was stashed) ... I'm pretty sure I need to order some additional seals though.
P.S. I finally located the SS Allen screws for the engine tin - they really finish it up nicely

Where did you locate the SS Allen screws, I have been looking for them as well.
Posted by: BeatNavy Feb 25 2016, 11:40 AM
I got the front and side seals in but the rear seal has unequal flaps. Does the short edge face up or down?
Thanks Brian
Not sure there's an "up or down" for how this faces, but I think I know what you mean. The seal should end up "sandwiching" the top of the rear tin, I believe. IIRC I oriented so the shorter edge ended up to the rear of the tin (yes, pointing down). The longer edge ended up going horizontally over the top of the rear tin. Not sure if that's correct, but I probably did it that way for a reason, and it did end up making a nice seal.
Not sure if this helps, but here's a pic of the rear seal. It's actually from one of McMark's jobs (OC). Looks like longer edge may be in front (inside engine bay) while shorter edge faces backward.
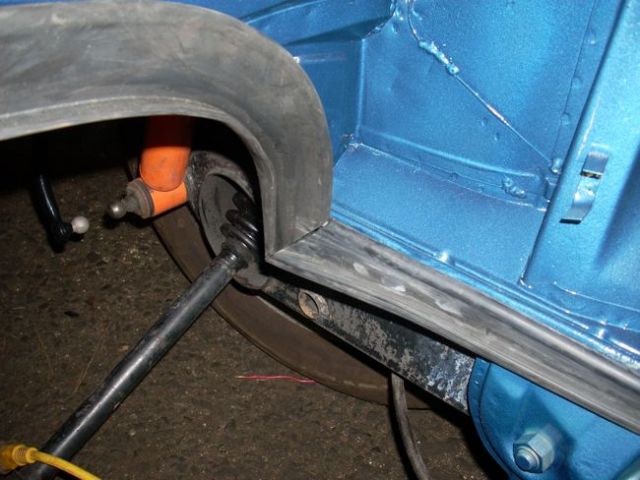
Posted by: BeatNavy Feb 25 2016, 11:41 AM
Where did you locate the SS Allen screws, I have been looking for them as well.
http://shop.914rubber.com/Engine-screw-kit-Stainless-w-washer-allen-head-ESK50SS.htm?categoryId=-1
Posted by: Puebloswatcop Feb 25 2016, 09:02 PM
Where did you locate the SS Allen screws, I have been looking for them as well.
http://shop.914rubber.com/Engine-screw-kit-Stainless-w-washer-allen-head-ESK50SS.htm?categoryId=-1
Thanks, guess I just didn't see them on the site.
Powered by Invision Power Board (http://www.invisionboard.com)
© Invision Power Services (http://www.invisionpower.com)
