Printable Version of Topic
Click here to view this topic in its original format
914World.com _ 914World Garage _ Home made ultra-sonic FI cleaner
Posted by: Mark Henry May 1 2003, 05:37 PM
I had an old electric tool engraver lying around. I hose clamped the tip to nut and another hose clamp, and then I clamped it to a small Tupperware condiment container. I then put an injector in it and added FI cleaner till it just covered the injector.
Put on the top and plugged it in, it works great. I have cleaned a couple of injectors now including one with a seized pintle (sp?) that has now freed up.
Posted by: Bruce Allert May 1 2003, 06:13 PM
Mark, I don't understand the part where you clamped the tip to nut and another hose clamp.
Could you elaborate please?
This sounds like it's a "Good thing"!
bruce
Posted by: Mark Henry May 1 2003, 07:13 PM
Yep, wish I had a digi cam for this one!
You can't put a hose clamp on the tip of the engraver alone, too small, so I put the clamp around a nut and stuck the tip in a bit and tightened it up.
At the same time, I also put another clamp through the nut clamp set up and that one went around the container nice and tight.
It's working like a charm, you should see all the crap coming off of my injectors.
BUT it is noisier then the morning after beer Schlitz!!!
I turn it on, go in the house and turn on the stove timer for 30 minutes each, so I don't have listen to it.

Posted by: Mark Henry May 1 2003, 07:40 PM
I was looking at my design.
What might work better is to put a barrel nut on the engraver tip, then put a clamp around the barrel nut and your container.
Hey, at least that sound isn't coming from my suitcase at the airport! 
Posted by: Curvie Roadlover May 1 2003, 08:44 PM
It's hard for me to visualise what you did. I'd sure like to see pics, please. Sounds very interesting.
Posted by: Bruce Allert May 1 2003, 10:15 PM
Ya, what I visualize and what it really is... well, you know
 It's like when the architect draws it and the engineer puts it on blueprints then the contractor builds it... it ain't what it started out to be!
bruce
Posted by: Jeff Bonanno May 1 2003, 11:00 PM
dying to know what this gizmo looks like...
Jeff
Posted by: Brad Roberts May 1 2003, 11:06 PM
Cool Jeff.. first post.
Welcome !!
I read it 2-3 times and still cant figure out what he did.
B
Posted by: Dave Cawdrey May 1 2003, 11:17 PM
I get it.
He put the clamp around the nut, and slid the engraver tip in between the nut and clamp. Tighten clamp, thus pinching tip against nut.
Next, attach a 4" clamp to a round tupperware container, and run clamp thru nut (like a links on a chain), Tighten 4" clamp.
Easy as pie
Posted by: Jeff Bonanno May 1 2003, 11:18 PM
thanks, Brad. i popped my...er..ah
we have these serious ultrasonic baths at the lab (work) used for ungooping microsyringes, etc. another application was jumpstarting surface reactions on metals, ie etching. maybe too harsh for straightforward cleaning. like the idea of the home version, now looking for a way to clamp tupperware...
Posted by: Brad Roberts May 1 2003, 11:24 PM
I'm betting the people at work would get a little upset if you brought in greasy nasty set of injectors for the cleaner... 
B
Posted by: Jeff Bonanno May 1 2003, 11:36 PM
 or :gilloutine: would be a good bet.
any other standard high frequency tools we can dip in solvents?
Posted by: Mark Henry May 2 2003, 06:24 AM
He put the clamp around the nut, and slid the engraver tip in between the nut and clamp. Tighten clamp, thus pinching tip against nut.
Next, attach a 4" clamp to a round tupperware container, and run clamp thru nut (like a links on a chain), Tighten 4" clamp.
Easy as pie
Dave's got it!
See smoking weed doesn't kill brain cells!

You have to solid mount the tip of the engraver to the container.
The 2nd hose clamp must also be 'pinched' between the nut and the 1st clamp, the link, as Dave put it, must be solid.
I will try to get a pic but I have no digi cam and I live way out in the country. I'll see if I have enough pic's to go to Walmart and get a pic CD burned. Might be a couple of days.
Posted by: Bruce Allert May 2 2003, 07:28 AM
Mark,
So, just the tip of the engraver is in the fluid, right?
How did you come of this idea that the engraver vibrated enough to create the ultra sonic effect? Amazing  I have stainless nipples the dogs drink from in our kennels that need cleaning quite often and we have to do each by hand (105!) This would REALLY speed up the process.
thanks
bruce
Posted by: Mark Henry May 2 2003, 07:51 AM
I'll try to get a pic.
The tip is never near the fluid.
Here is the simplest method, but it would wreck the engraver so I used clamps:
Take a soup can, on the outside bottom edge of the can mig weld (tack) the engraver tip to the can.
The whole purpose is to shake (vibrate) the can itself. When the can and engraver (vibrator) are placed on a smooth surface the can now vibrates. So you are solid mounting the engraver tip to the outside of the can.
It is the vibrating can that creates the 'waves' in the fluid. If working right the surface of the fluid will be dancing.
Posted by: Lawrence914-6 May 2 2003, 08:48 AM
Mark,
Thank you for the visual with the last post... I get it. Very cool idea.
Could one not attach the engraver tip to the injector? Too hard on the injector itself?
Also, do you change the injector cleaner part way through the cleaning process? I would be concerned about cycling crap through the injectors.
I bet there's gonna be a run on engravers on evilBay...
-Rusty
Posted by: Mark Henry May 2 2003, 09:31 AM
Check out the jewelry cleaner at Wal-mart, it's basically the same thing. They don't cost that much $30-40 US I think. Engravers are about $12.
I just did it this way because I had the tool engraver, a lot of guys do and I now have two tools for the price of one.
Not to mention the fact that I'm sometimes just a tad cheap.
I don't think putting it on the injector would be a good idea, plus you have to keep the engraver dry, being an electrical device and all.
Go through all your injectors with dirty fluid then dump it, put in some clean fluid and do them again for a bit.
I’ve had one old skanky injector that won’t free up. Also the FI cleaning fluid will not remove certain types of grease (etc.) so I cleaned and scrubbed the injector before I put it in, still you should see all the crap coming off of them. I'm running each injector for over an hour.
Also the noise, I’m going to put mine in a box and put it outside.
Posted by: Mark Henry May 2 2003, 07:37 PM
Pic's
Attached image(s)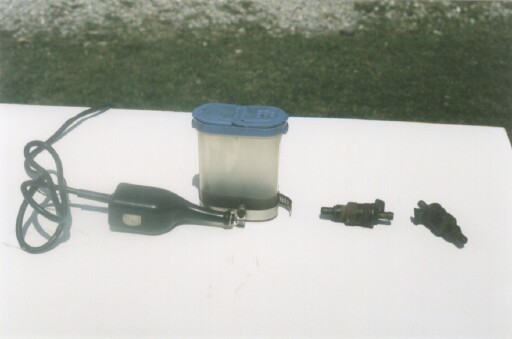
Posted by: Mark Henry May 2 2003, 07:38 PM
2nd
Attached image(s)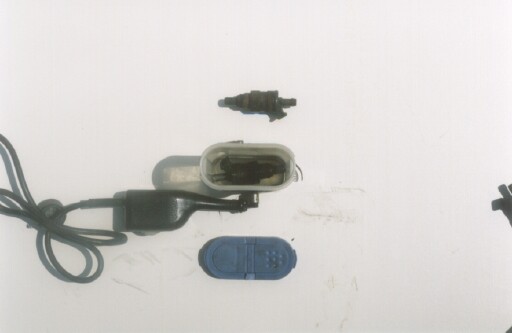
Posted by: Mark Henry May 2 2003, 07:40 PM
last one
Attached image(s)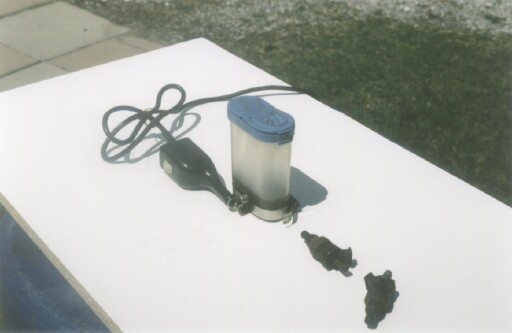
Posted by: Mark Henry May 2 2003, 07:42 PM
Hope that helps
Mark

Posted by: Dave_Darling May 2 2003, 11:36 PM
Dumbass question time--
Does the tip on the engraver rotate freely? That is, when the motor of the engraver spins, does the tip also have to spin, or can it stay stationary?
I can't figure out how else you could avoid melting a hole in the plastic...
--DD
Posted by: jkeyzer May 3 2003, 12:08 AM
Has anyone figured out the best fluid to put in these types of ultrasonic cleaners for parts cleaning?
I have an old ultrasonic cleaner but I never know what to put it in. I've tried several different things and they never work as well as I hope... I know you can buy solution too, but there must be a homebrew recipe...
I think the commercial fluids try to lower the surface tension (like acetone or alcohol) because that's what works best for the microscopic bubbles in the cleaner. Degreasers like simple green etc. are not supposed to work well because they do the opposite to help pick up the dirt.
Posted by: Dave Cawdrey May 3 2003, 12:26 AM
Does the tip on the engraver rotate freely? That is, when the motor of the engraver spins, does the tip also have to spin, or can it stay stationary?
I can't figure out how else you could avoid melting a hole in the plastic...
--DD
DD,
It doesn't spin, it vibrates virgorously. Sorta like a V8 conversion dildo

Posted by: Mark Henry May 3 2003, 07:42 AM
I’m just using fuel injector cleaner so far, it won’t take off grease (etc.) so I pre clean the body first. I only put in enough cleaner to cover the injector, I found out right away that if I overfill the container or try to clean 2 injectors at once that it dampens the vibration effect.
My engraver is a Craftsman (Sears) the tip does not turn much and you must be careful with it. I have at least 24hrs running time on mine, no problems so far.
Try to get a container with a good lid as it spits all over the place.
Posted by: Bruce Allert May 3 2003, 08:11 AM
It doesn't spin, it vibrates virgorously. Sorta like a V8 conversion dildo
Oh Baby
 Now THAT'S a possible thread that might go allllllllong way! especially wit pics
 bruce
Posted by: Mark Henry May 5 2003, 03:38 PM
OK, my set-up didn't seem to be working very good anymore, I thought my engraver was wearing out. I then found out if I pressed the tip in it worked better.
Doh! When you engrave something your always pressing on the tip!
So I've put a spring on the engraver body to the tip clamp, to pull in on the tip and it now works better then ever!
Hey I did say TIP clamp!!!
Powered by Invision Power Board (http://www.invisionboard.com)
© Invision Power Services (http://www.invisionpower.com)