Printable Version of Topic
Click here to view this topic in its original format
914World.com _ 914World Garage _ Here is a how to for dent removal Not just filling it up with plastic
Posted by: rick 918-S Mar 1 2012, 10:01 PM
Like I've said before. When your working on old cars you have to realize they are like a box of Cracker Jacks. Everyone has a surprise. In most cases it's a cheap nasty surprise. In this case The dent in this panel was not that bad. The problem became complicated but the person that filled it in. Instead of working the damage out the person took a pick hammer and drove about a hundred dents in the panel trying to chase high metal from the top of the panel being driven down. Normally I would just replace a panel that was damaged to this degree. But this is a special car. There is zero rust so I will take the time to bump the panel back into shape. There will still be a finishing glaze used but in a manor appropriate for restoration not amature night at the Drive Inn Autobody Shop.
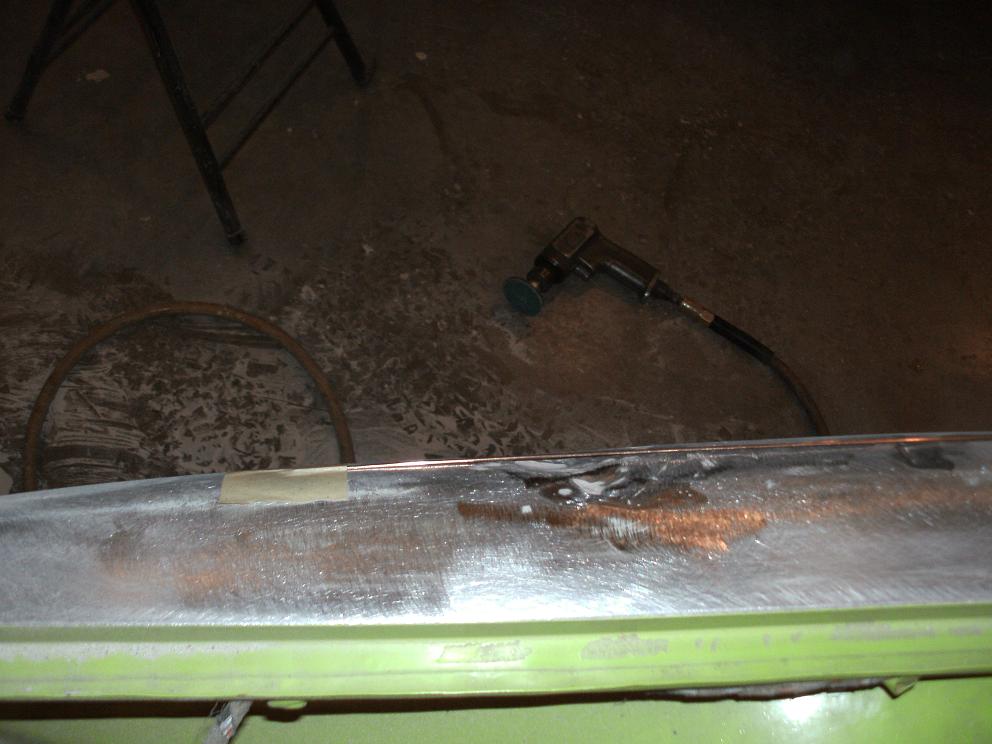
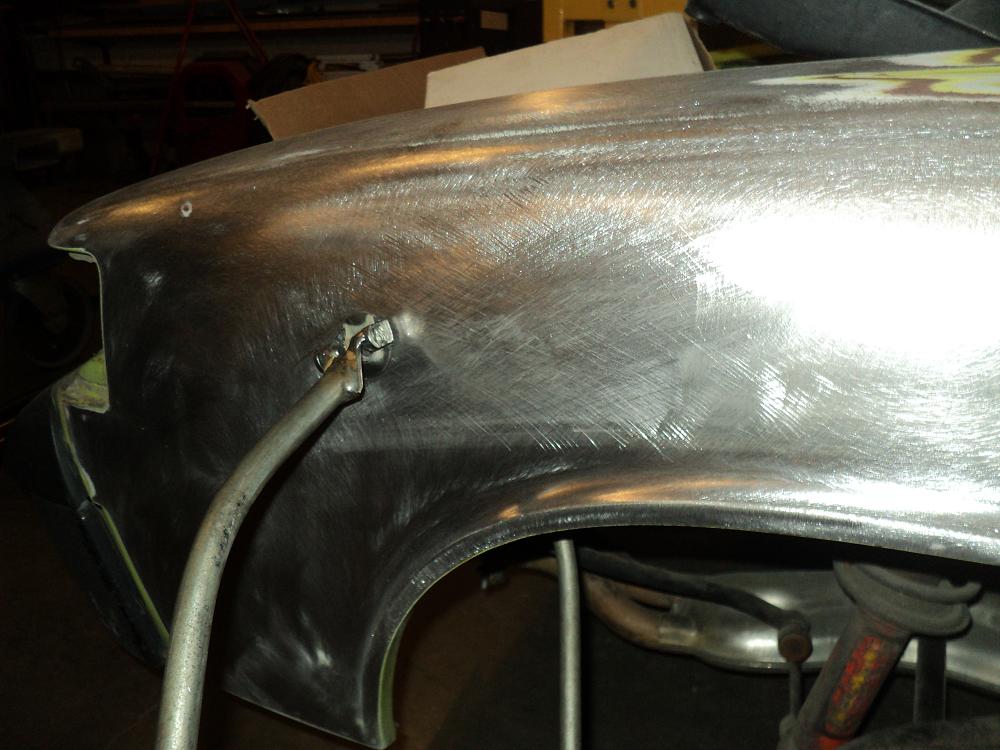
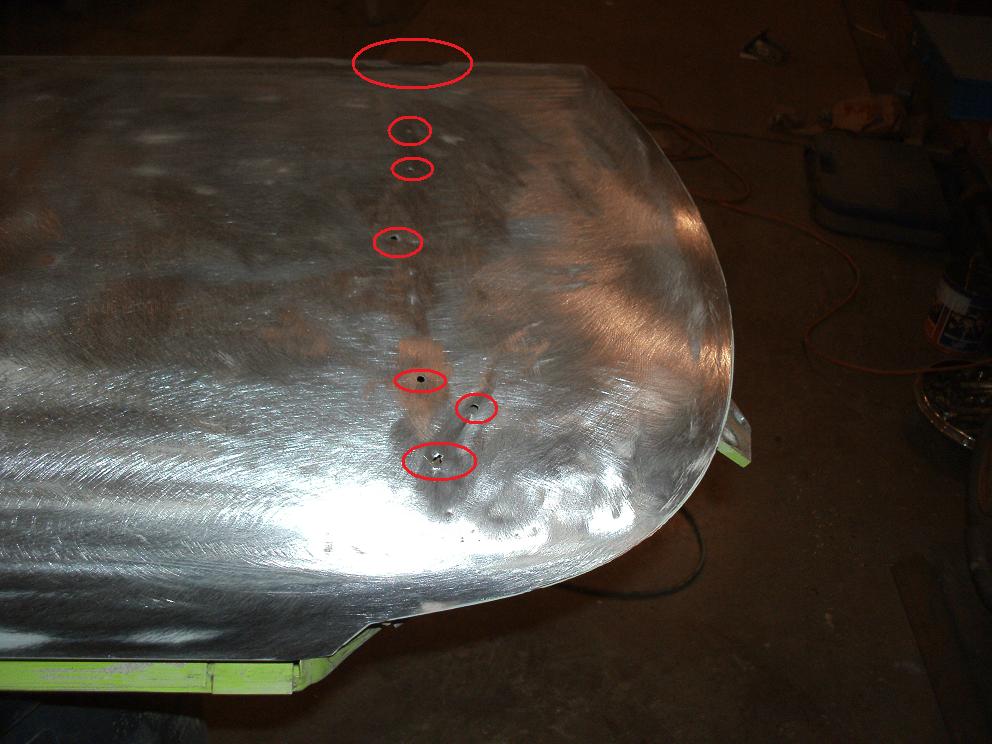
Here's what I Found when I started stripping off the panel.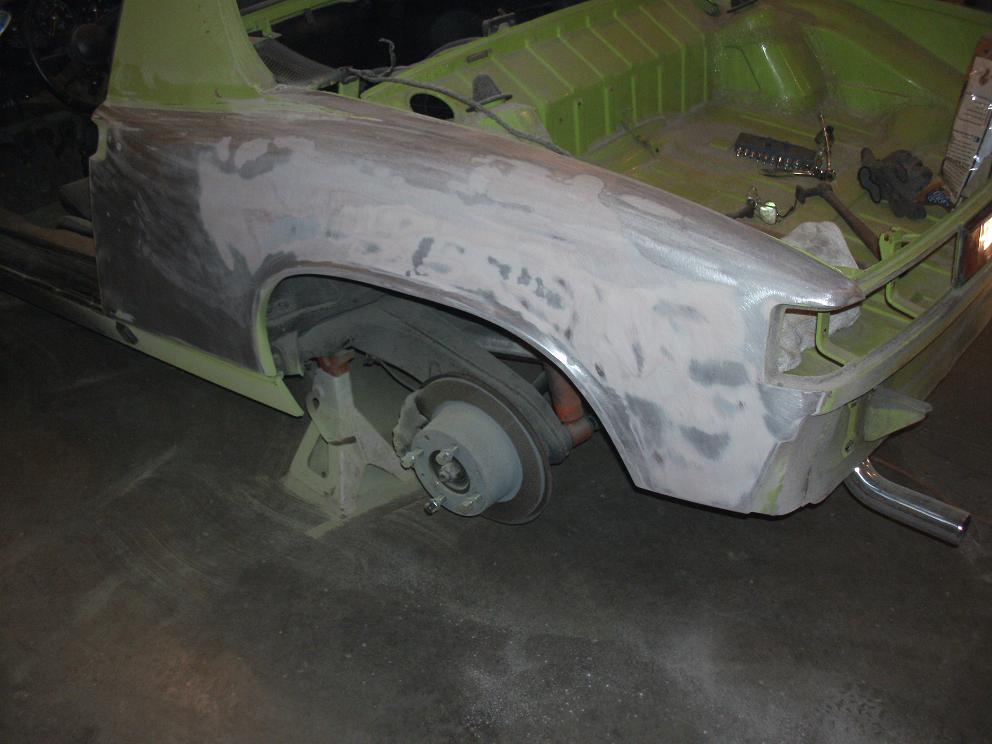
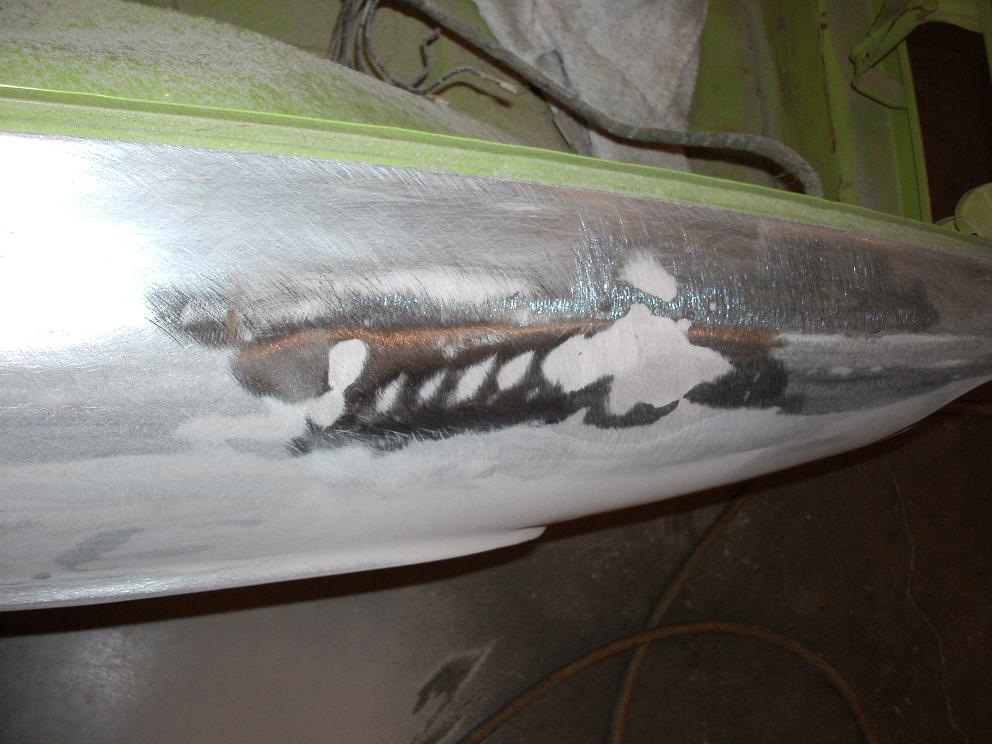
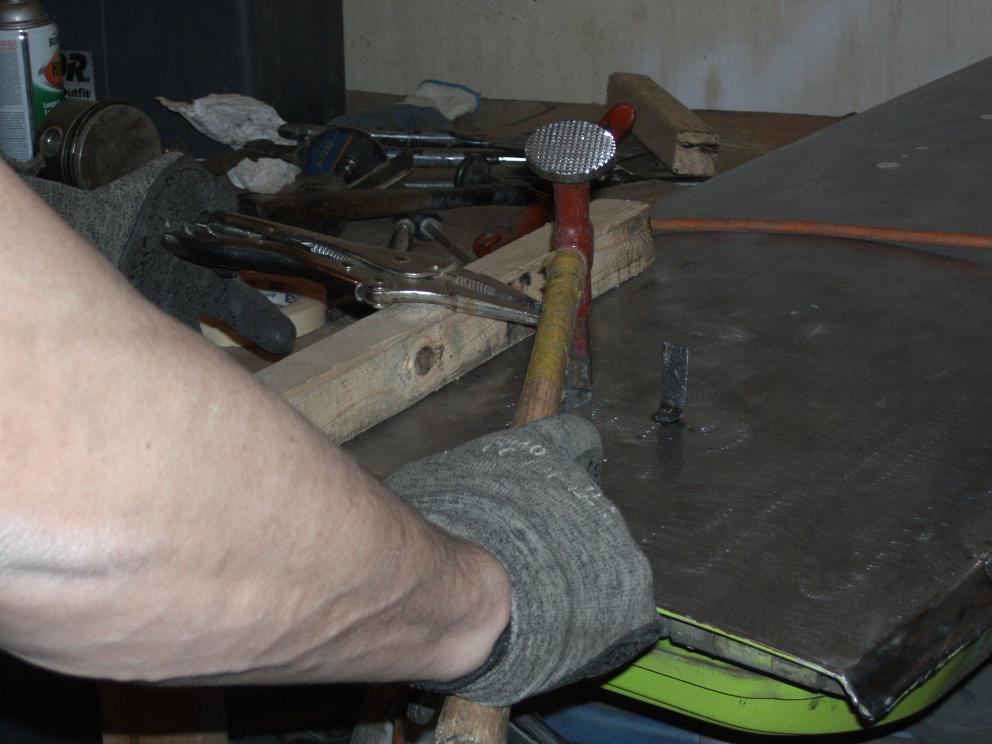
I used a Tig welding rod so you could see how deep the damage is. 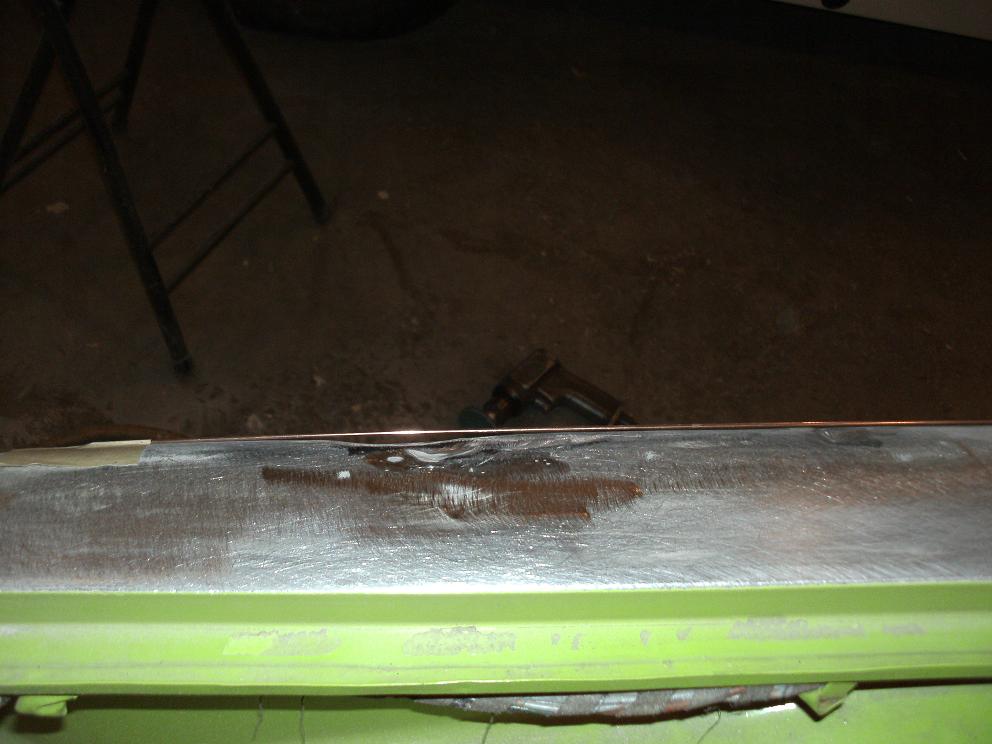
Here are only some of the tools I used. I also used a couple wood blocks ground into different contours as a backer for shrinking.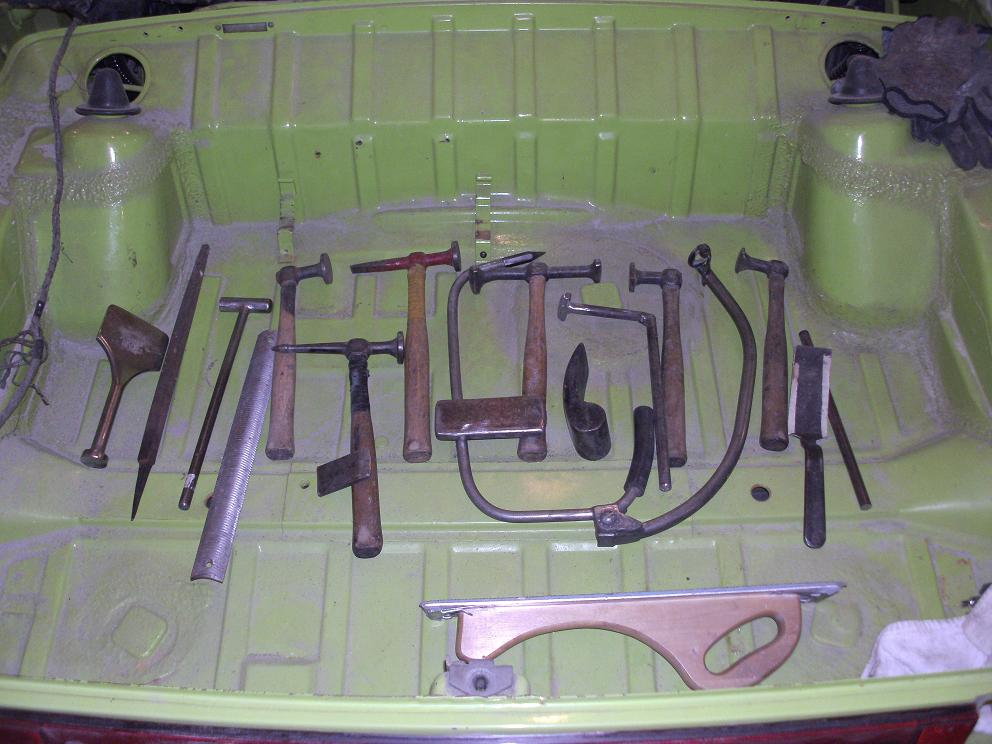
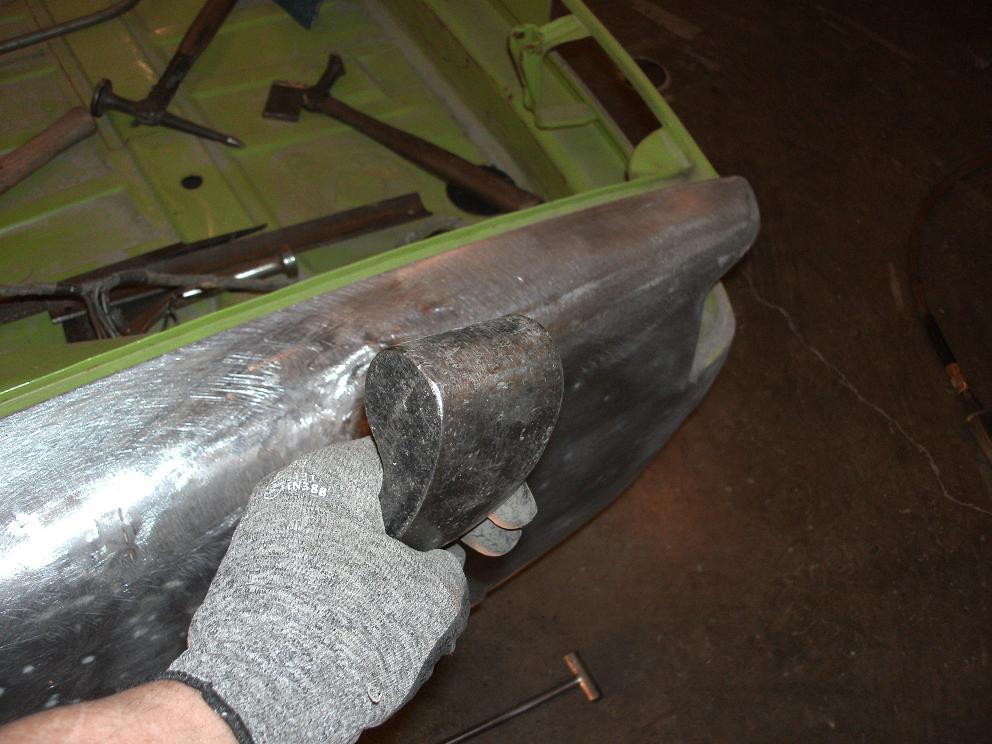
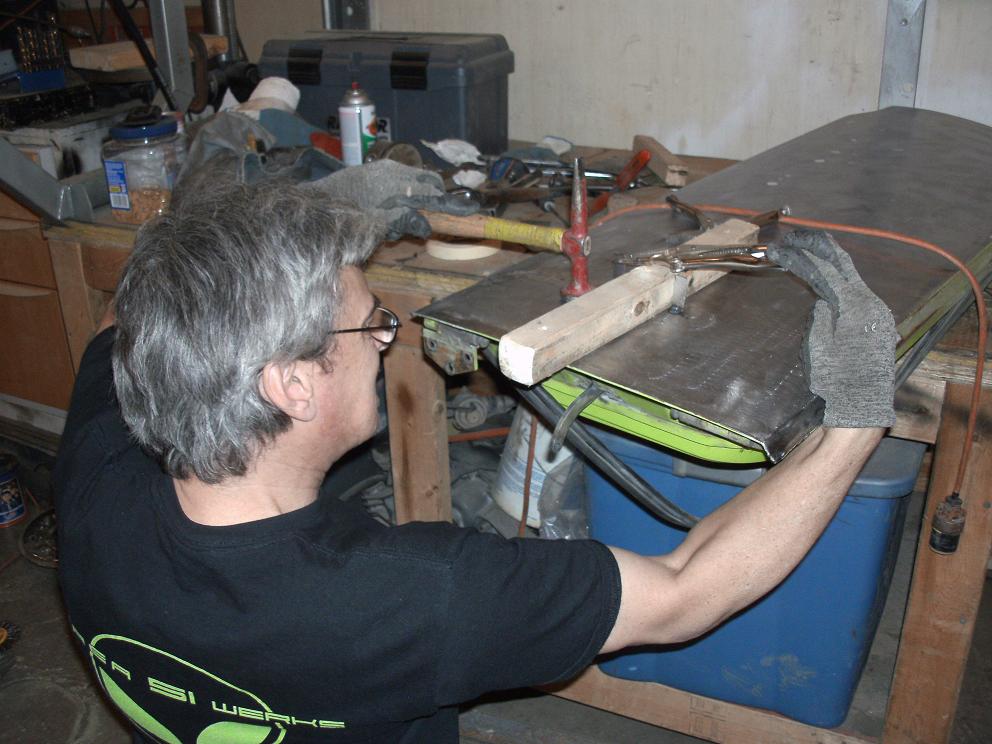
I'm sure some of you have never really tried to work a serious dent and wonder how to start. In this case I started with this heavy dolly. I used every combination and angle of this thing to get up into the curve. Don't be afraid. Worse case, you end up cutting the panel off and replacing it. 
 Think out of the box. You can't alway swing a hammer up inside a tight panel. Sometimes you need a fist!
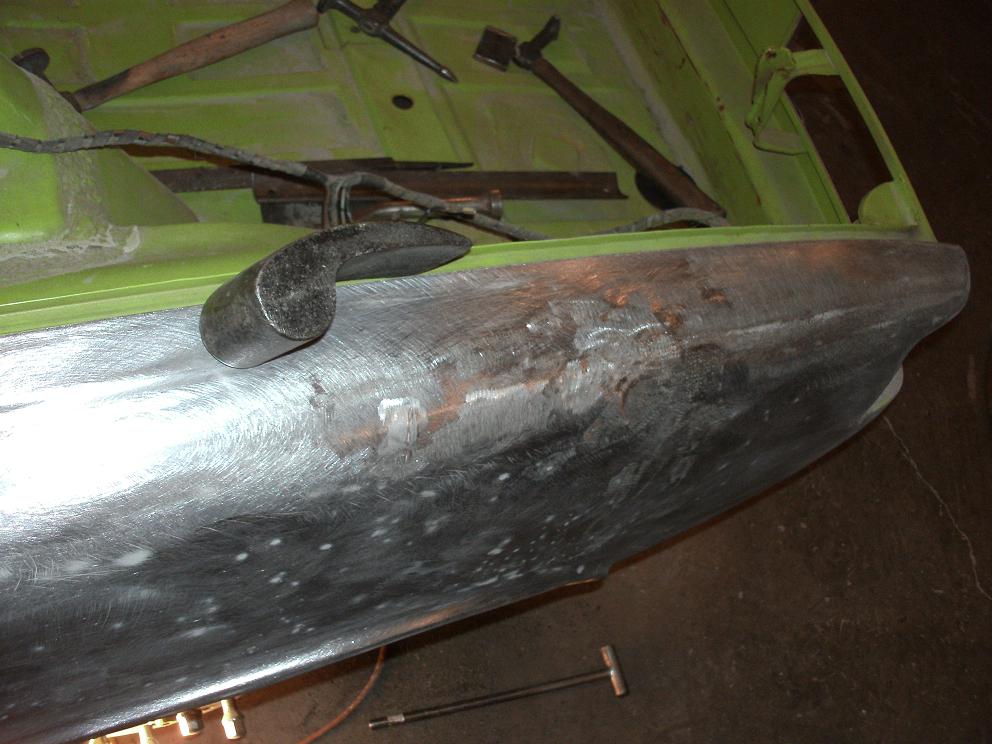
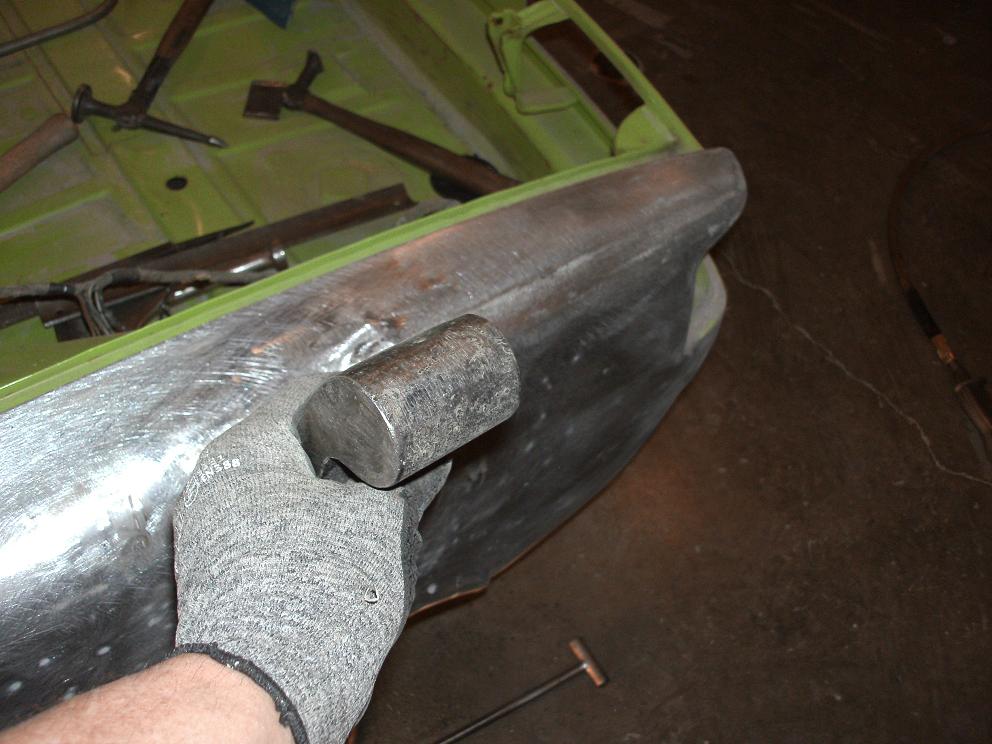
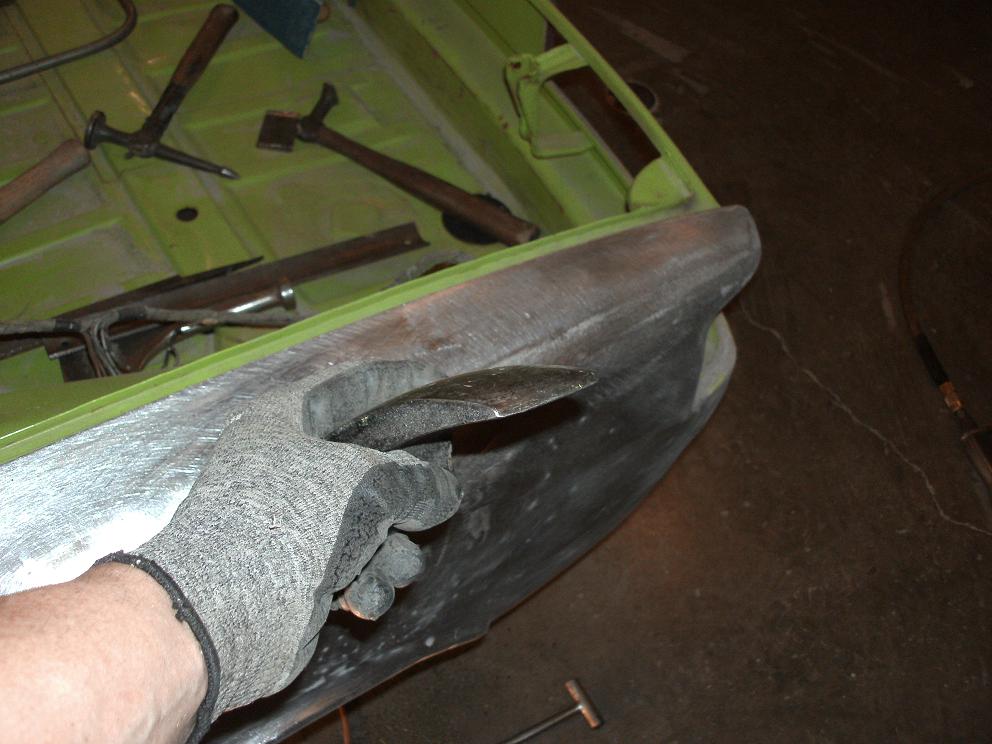
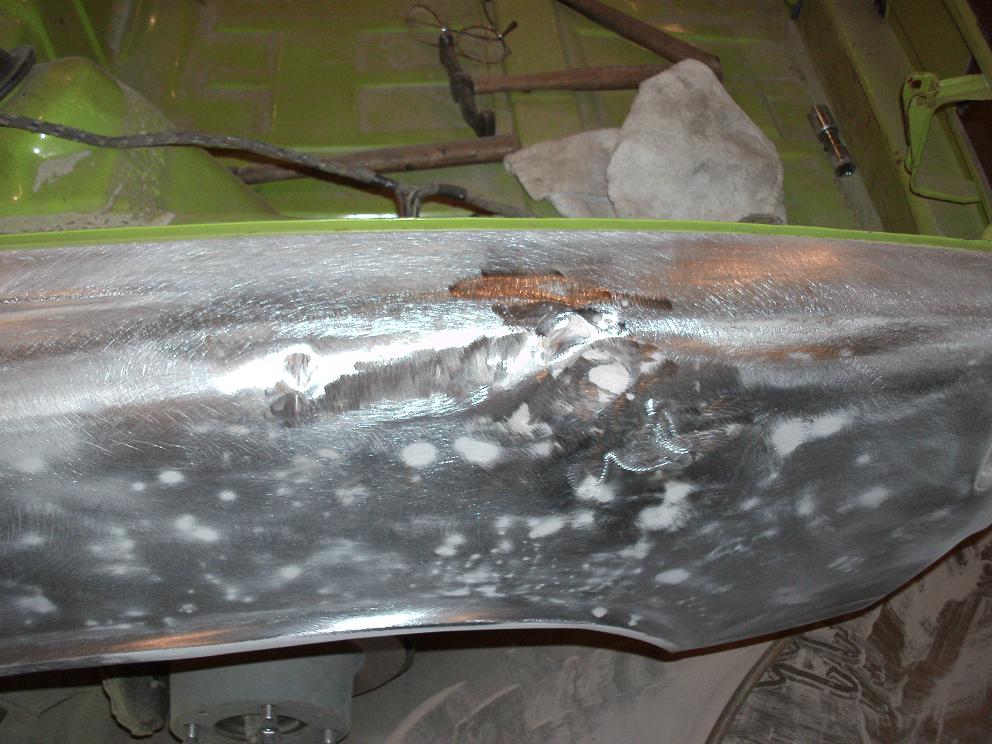
Here it is roughed in. I used the above dolly, and a couple other heavy blocks. Just because I call the tools heavy doesn't mean you abuse the panel. Lots of light blows spread out over the area while off hammering on the outside of the panel with help bring things around.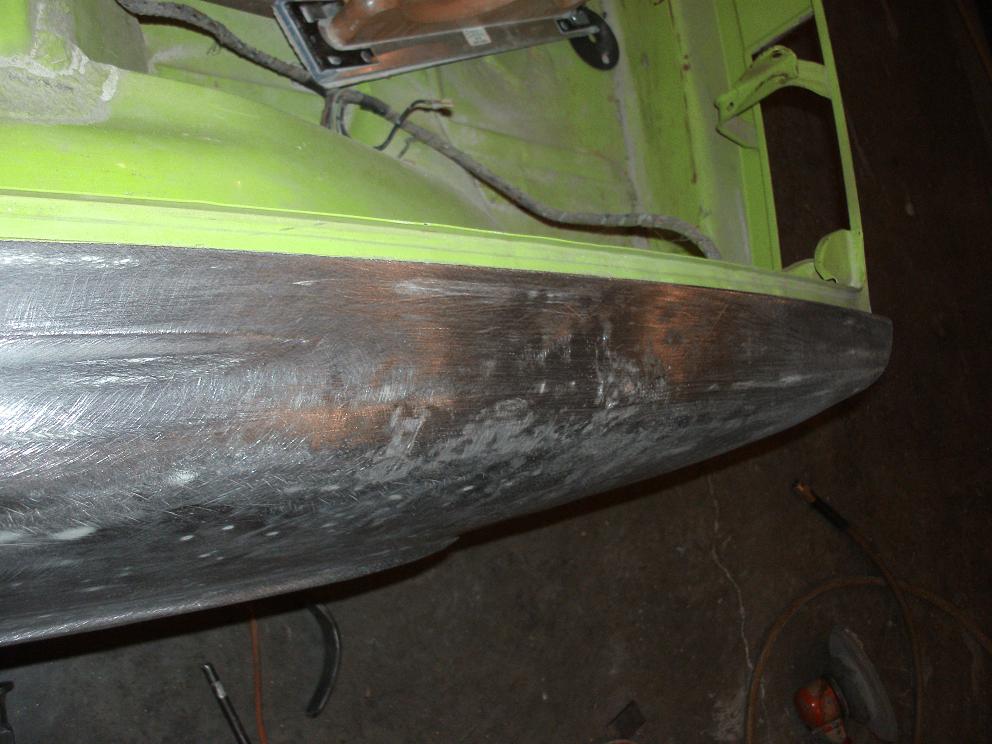
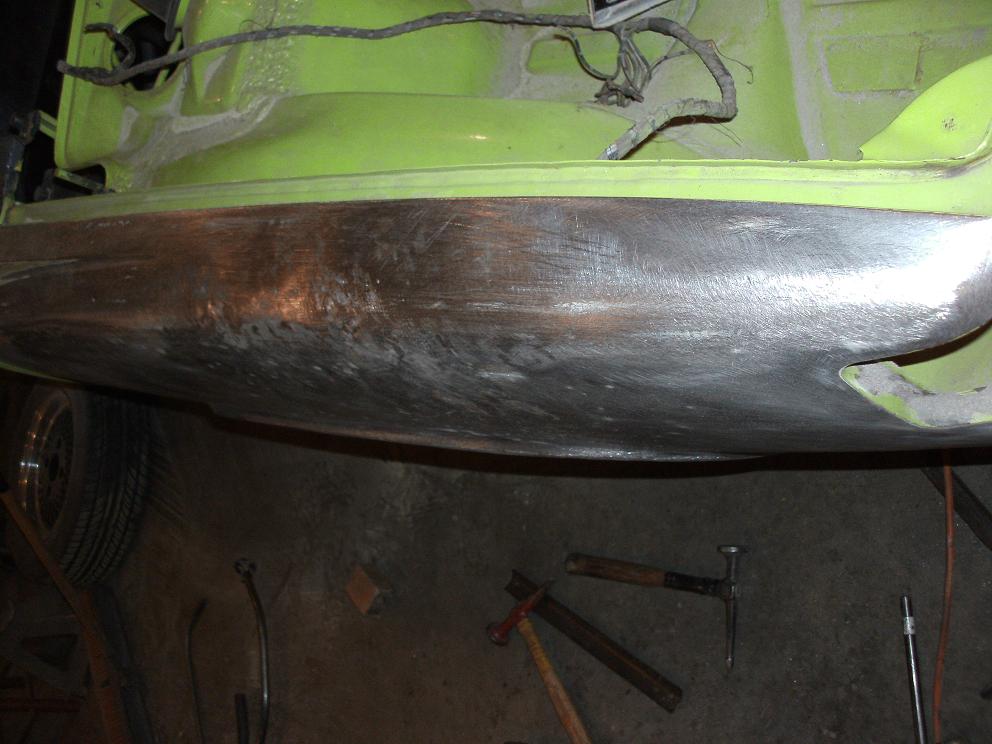
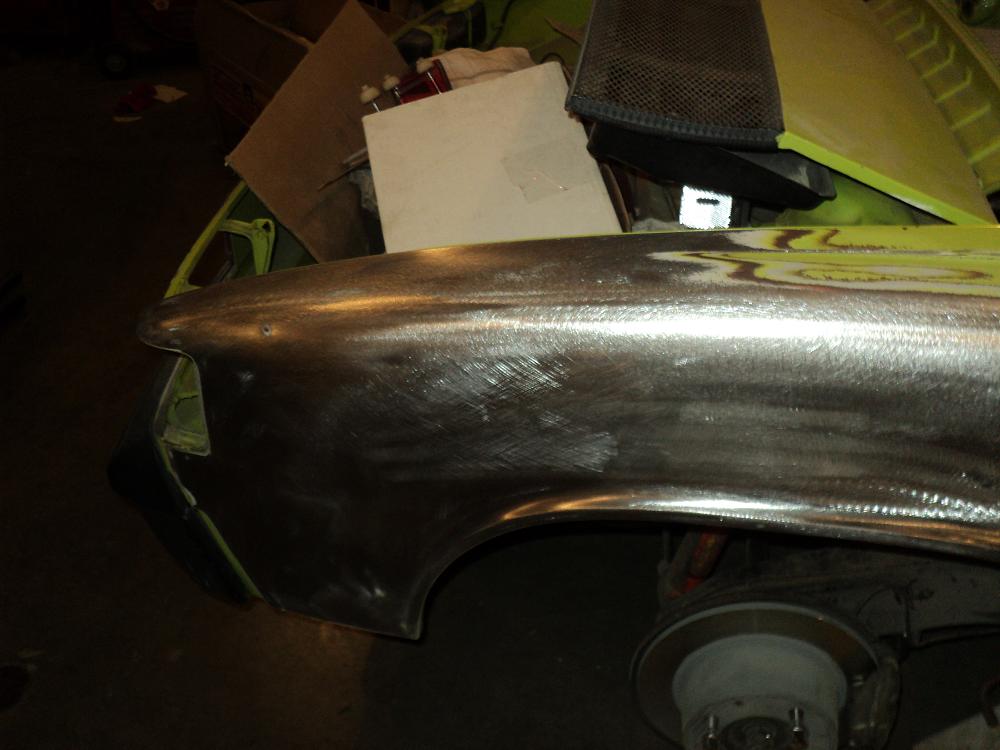
Here's the panel after about 3 solid hours of blocking, bumping and shrinking. I rough in the panel and then spray paint it. You can just dust a light coat of spray paint or use dykem if you have it. Then I use my bulleye pick and carefully and slowly work the low spots out as I check the panel with my body file. This photo is after I filed the panel then used a long board sander with a new sheet of 36 grit to check the panel. You can use the straight lines of the sander and check the panel with a light. The side panel was sanded with a 8" DA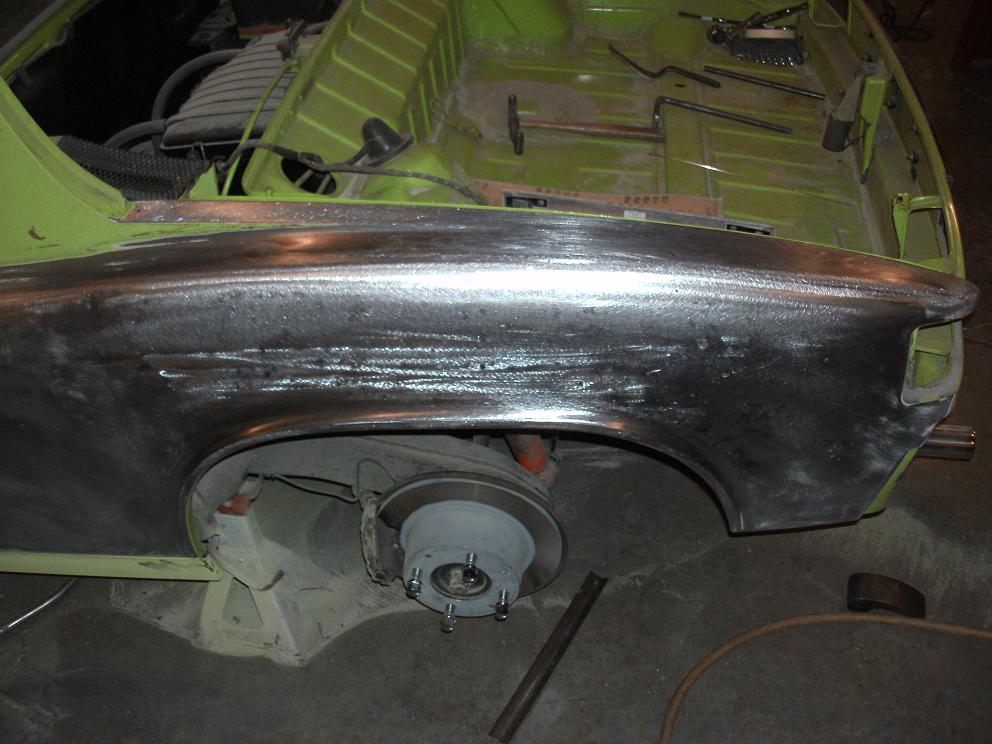
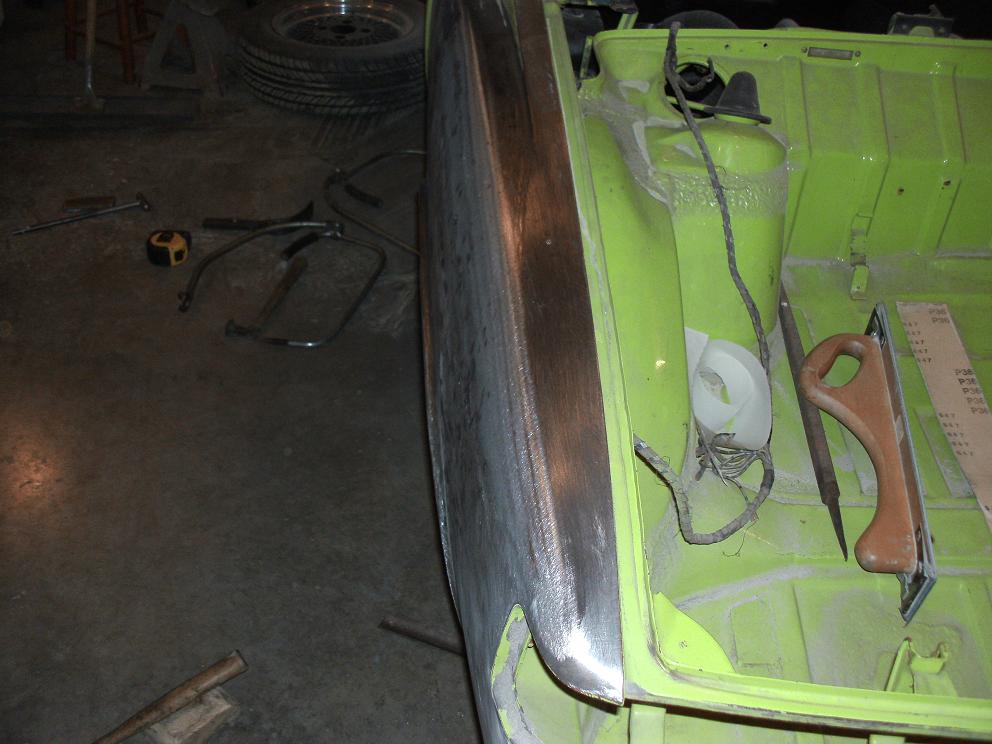
There are still several pick hammer marks left in the panel from the last guy but I will work them out over the weekend and get them close. Like I said there will still be a fine glazing filler used to define the final shape. I think you'll all appreciate the final product.
Attached image(s)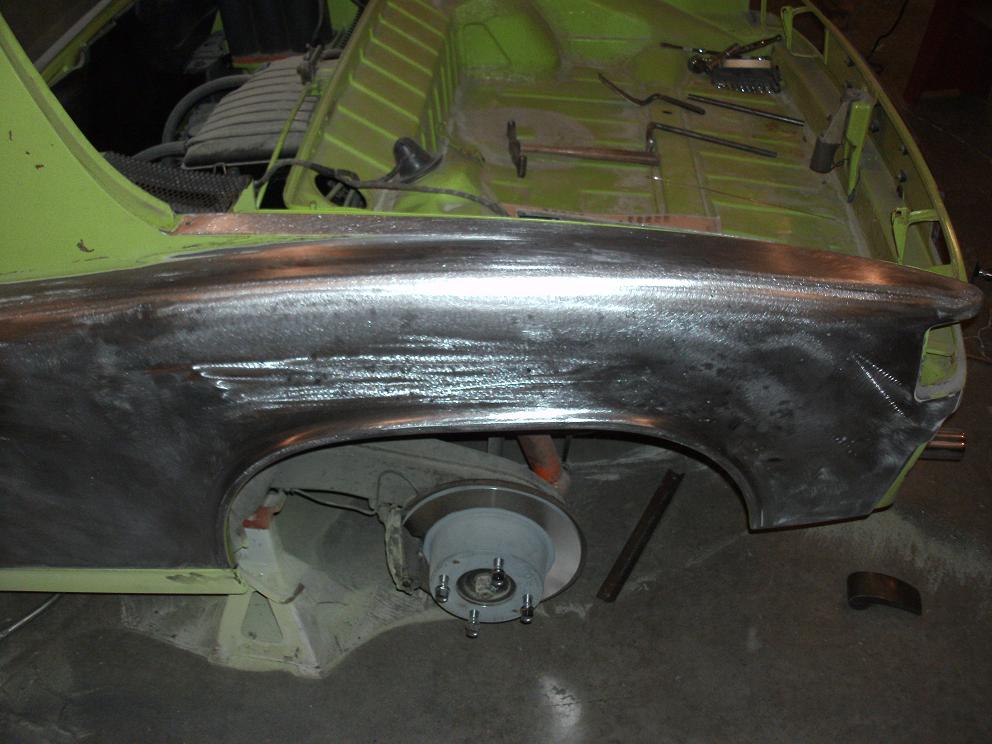
Posted by: 3d914 Mar 1 2012, 10:29 PM
Awesome work Rick. Thanks for the insights.
The dolly work I can understand, but can you elaborate on "shrinking"?
Posted by: rick 918-S Mar 1 2012, 10:33 PM
I'll add more about that later. Let me get a couple photos to add if I can.
Posted by: r_towle Mar 1 2012, 10:50 PM
I am just going to ship you my beatster....
I got one fender close, but I am about 20 steps back from your handy work and I was done IMHO...haha
Awesome work buddy.
rich
Posted by: Socalandy Mar 1 2012, 10:52 PM
Crazy mad skills sir!!!  I'm still over working the hammer and making more work for myself
Posted by: rick 918-S Mar 1 2012, 11:04 PM

I am just going to ship you my beatster....
I got one fender close, but I am about 20 steps back from your handy work and I was done IMHO...haha
Awesome work buddy.
rich
Where yout been buddy!
Posted by: rick 918-S Mar 1 2012, 11:04 PM
Crazy mad skills sir!!!
I'm still over working the hammer and making more work for myselfYour car is coming along nicely Andy!
Posted by: Tom_T Mar 1 2012, 11:10 PM
Rick,
I haven't seen a panel master like you work since my Uncle's good buddy back in the 60's on his Model A Roadster Hot Rod! 
So many shops in the 60's - 90's & even now might or might not drill & pull a bit, then just slather on the Bondo & paint! 
Thanx for sharing!
Tom
///////
Posted by: cary Mar 2 2012, 12:05 AM
Nice work.
Posted by: rick 918-S Mar 2 2012, 12:37 AM
Rick,
I haven't seen a panel master like you work since my Uncle's good buddy back in the 60's on his Model A Roadster Hot Rod!
So many shops in the 60's - 90's & even now might or might not drill & pull a bit, then just slather on the Bondo & paint!
Thanx for sharing!
Tom
///////
Ya Tom, Around here we call them California rivets when they drill holes and pack on the mud. I have purchased really nice cars from Cali and found the only thing holding the body filler on the panel was those damned rivets. I had an MGA with a crease in the rear fender that was filled that way. The body guy never even ground off the paint. Also a 100-4 Healey with the same issue. It's like the guy was too lazy to reach inside the panel and bump out the damage.
Posted by: Tom_T Mar 2 2012, 04:13 AM
Rick,
I haven't seen a panel master like you work since my Uncle's good buddy back in the 60's on his Model A Roadster Hot Rod!
So many shops in the 60's - 90's & even now might or might not drill & pull a bit, then just slather on the Bondo & paint!
Thanx for sharing!
Tom
///////
Ya Tom, Around here we call them California rivets when they drill holes and pack on the mud. I have purchased really nice cars from Cali and found the only thing holding the body filler on the panel was those damned rivets. I had an MGA with a crease in the rear fender that was filled that way. The body guy never even ground off the paint. Also a 100-4 Healey with the same issue. It's like the guy was too lazy to reach inside the panel and bump out the damage.
Rick, it's laziness & high volume quick in-n-out shops that crank out the collision work, which apparently is what they're teaching at many of the tech schools now too, unfortunately. Low bid is usually not the best work!
Usually the "mud" cracks or falls off within a couple of years!
I've seen a couple of what would otherwise be very valuable 356s around here with huge chunks of bondo coming off the body!

Posted by: zymurgist Mar 2 2012, 05:57 AM
Very cool! 
Posted by: westtexass2k Mar 2 2012, 07:26 AM
Have you ever used a shrinking disc? I haven't tried one myself a friend of mine used one aon his 55 Chevy project and got great results.
Posted by: Vacca Rabite Mar 2 2012, 07:37 AM
The same fender on my car was and is worse then that. At the time I did not have the knowledge or skills to fix it.
I still don't have the skills.
Zach
Posted by: rick 918-S Mar 2 2012, 08:28 AM
Have you ever used a shrinking disc? I haven't tried one myself a friend of mine used one aon his 55 Chevy project and got great results.
I don't have one. I've been looking at them on ebay but haven't bought one. I think the side of this panel would be a good candidate with all the pick hammer marks the other guy drove into this panel. I'm having to bump them back out then block them level. It takes hours to work some of the waves it creates. So far I haven't found anything that will require the torch and quench method. Just a serious investment of time. The panel hasn't work hardened yet so I'm still ok.
Posted by: majkos Mar 2 2012, 08:50 AM
![popcorn[1].gif](style_emoticons/default/popcorn[1].gif) Great thread, Rick.
Great thread, Rick.
You make it look so easy, but I'm glad you mention it took three hours
between pics.
You cannot rush perfection, it's a lot of Love (LABOR)
Posted by: Jacob Mar 2 2012, 08:55 AM
Nice job Rick.
Posted by: Jacob Mar 2 2012, 10:08 AM
Nice job Rick.
Posted by: worn Mar 2 2012, 10:13 AM
Nice job Rick.
Really nice job Rick. Thank you for showing this. I would have made up a home-built hammer or something - never thinking of using the dolly as a moving object. This kind of info really helps. Finding it later on with a million threads is another story

Posted by: ww914 Mar 2 2012, 10:15 AM
Nice work Rick. Looks like you've been reading Cass' book.
Posted by: rick 918-S Mar 2 2012, 10:28 AM
Nice work Rick. Looks like you've been reading Cass' book.
I should live so long to develop his skills...

 I told him last week if my wife made a little more money I would come out and be his apprentice the old school way where you pay the master craftsman not the other way around. I really miss this kind of work. If life were different this is what I would do. I pretty much took a 15 year hiatus. But I'm slowly getting back to it. At least until the next big storm and looming phone call.
Posted by: andys Mar 2 2012, 10:45 AM
Nice work, Rick.
The problem for an occasional metal working guy like myself, is a selection of different shaped dollies. I've had to make a couple of my own just to get the right contours. It's a big advantage when you can have access to the back side of a panel. When I did my late doors that have the side impact brace, it was pretty frustrating to work....Stud gun was my friend, but it alone produces less than finished results.
What did you use for shrinking? Hammer? Disc? Torch?
Andys
Posted by: rick 918-S Mar 2 2012, 11:13 AM
Nice work, Rick.
The problem for an occasional metal working guy like myself, is a selection of different shaped dollies. I've had to make a couple of my own just to get the right contours. It's a big advantage when you can have access to the back side of a panel. When I did my late doors that have the side impact brace, it was pretty frustrating to work....Stud gun was my friend, but it alone produces less than finished results.
What did you use for shrinking? Hammer? Disc? Torch?
Andys
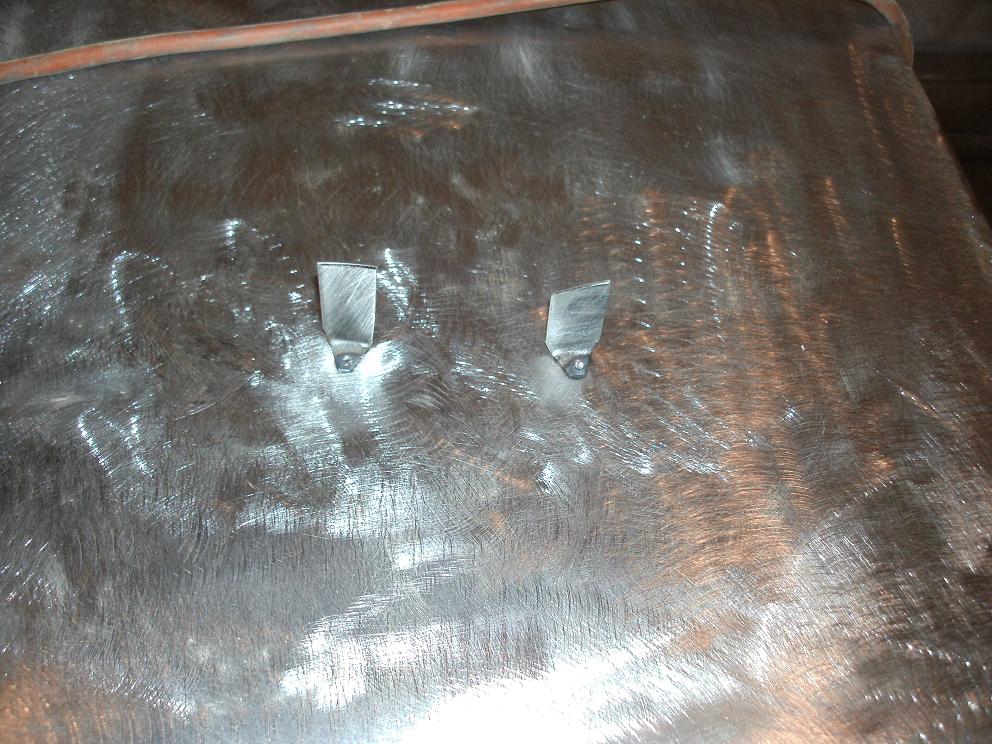
So far just a hammer with a face like a meat tenderizer and a contoured wood block for a dolly. It's slow work. Bullseye pick out the pick hammer marks, tap in a circular motion from outside to center. Check with a file, start again on the next one. There are alot if ways to do it. This is slow and steady. You learn not to abuse the bullseye pick as you can create quite the peak if you over use it. After awhile you can get to where sometimes you don't need to bump back. I made some other heads for mine and modified the target so it swivels. This was you can tip it when you can't get a good swing.
Here's what I mean about the swivel and the soft work with the bullseye pick. Here's a large door dent in this panel. If you were to try to swing a hammer from the back side you would have about a 30% change of hitting the target and not straying as you swing.
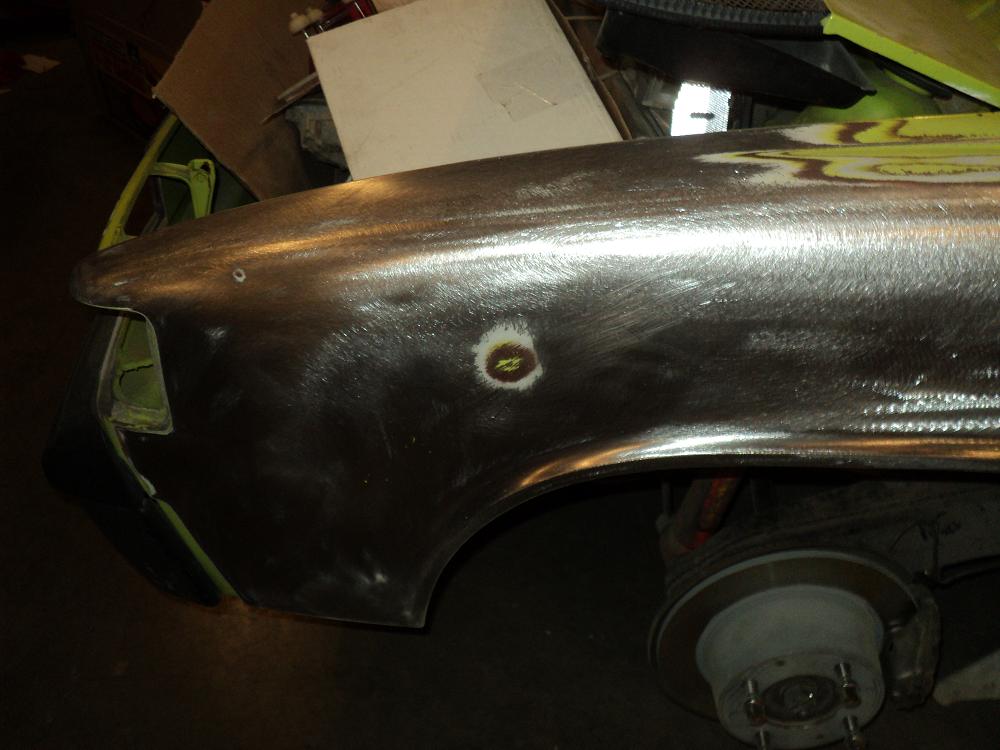
Here is the bullseye pick I used.
Here's the dent after I worked it slowly and checking it with a file. You can still see a light hint of factory sealer showing the panel is not over worked.
Posted by: bryanf Mar 2 2012, 11:32 AM
Beautiful work. I'm so glad that you ended up with that car. Can't believe that I was considering junking it...
Posted by: beech4rd Mar 2 2012, 11:35 AM
Very, very impressive work. Thanks very much for this. But you leave the rest of us feeling inadequate and now we're going to need therapy. It's tough.
Posted by: watsonrx13 Mar 2 2012, 11:43 AM
Excellent work Rick. Are you using a 15" or 25" bullseye pick? Is there any advantage to either one?
--- Rob
Posted by: maxwelj Mar 2 2012, 01:38 PM
Rick, Great work. I'll show this to my bodyman son so he can see how it needs to be done.
Also, I'm probably not telling you anything you don't know, but one of our members had a tutorial on using a shrinking disk. Search for John Kelley or go to www.ghiaspecialties.com for more info. I think he also sells them.
Posted by: gothspeed Mar 2 2012, 04:30 PM
Wow!!!!!  .............. it doesn't get any better than that!!!!!
Posted by: Rand Mar 2 2012, 04:37 PM
Awesome work Rick. I love seeing things done right by people who care about quality.
Also, I'm probably not telling you anything you don't know, but one of our members had a tutorial on using a shrinking disk. Search for John Kelley or go to www.ghiaspecialties.com for more info. I think he also sells them.
I thought of John Kelly as well. He talks about how to make your own shrinking disc too, at least on one of his DVDs. A couple more links:
http://www.914world.com/bbs2/index.php?showtopic=67022
http://allshops.org/cgi-bin/community/communityalbums.cgi?action=openalbum&albumid=9980138836765
Posted by: westtexass2k Mar 2 2012, 06:22 PM
When I went to Ron Fornier class he talked about the shrinking disc but we never used them since we were doing scratch projects with the bag and english wheel on aluminum. The concept is about the same as the torch and quench method which can really move some material. I did hail dents by the thousands that way. Bulls eye pick also a good choice with a metal file and just keep working your way around the panel. You are doing a top notch job. I cant wait to see the finished project.
Posted by: bobhasissues Mar 2 2012, 08:11 PM
Great work Rick.
Please post a photo of your hammers laid out with some basic descriptions of what each hammer is used for. I have a beginner hammer and dolly set but don't have any good instructional info on what purpose the various hammer faces serve. I keep telling myself I'll have to find an instructional book but never get around to it. I think everyone would appreciate any info you share.
My passenger side had a few shallow dings farther back toward the taillight. When I discovered them I wondered why someone didn't try to hammer them out. The dents were concealed by the factory foam on the inside of the fender so they were not accessible. There was no damage to the foam and no rust on the inner fender. I had no means to replace the foam if I were to dig it out, so I ended up cleaning out all the old filler, epoxy primed, scuffed and used Everglass for the fill coat. Even though I would have preferred to knock those dings out, I just couldn't justify $300 for the spray on seam sealer and applicator gun.
Posted by: rick 918-S Mar 4 2012, 12:16 AM
I stripped the drivers door and found several California rivets and a very poorly pulled dent. Here's how I went about repairing it. 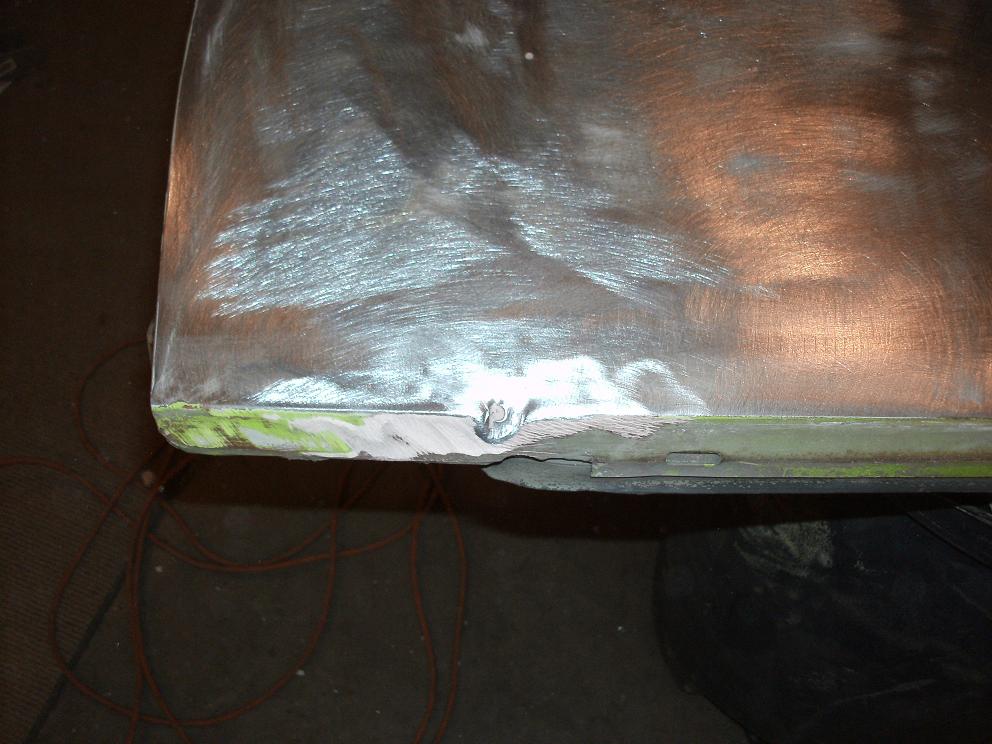
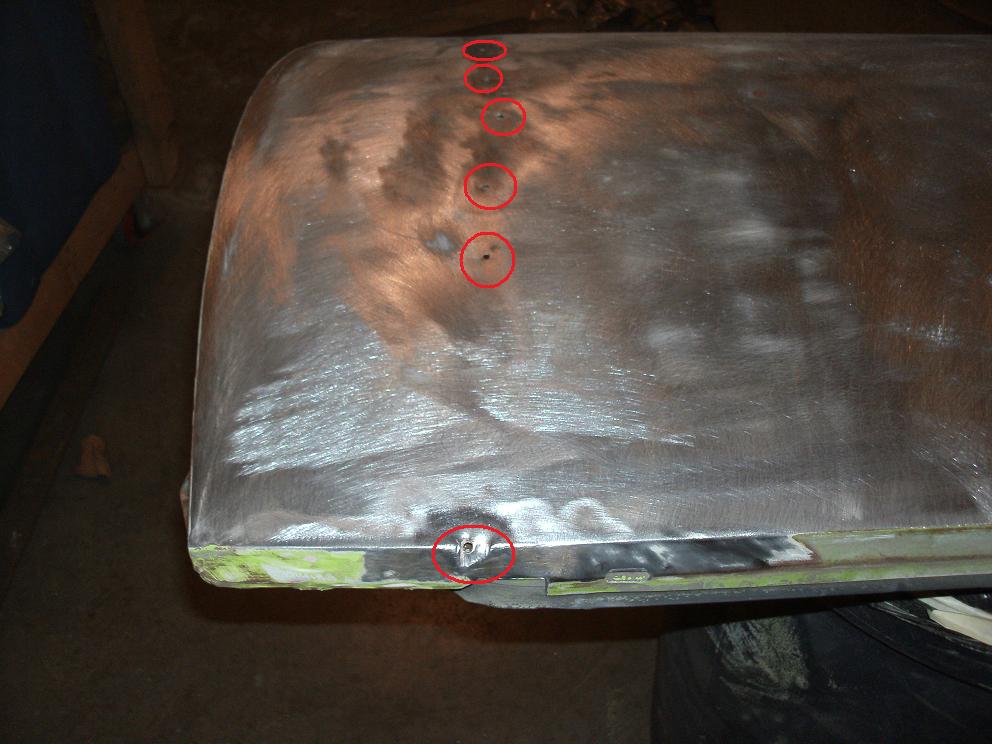
I popped one spot weld on the bottom of the skin and made a blunt chisel from a piece of 1/8" flat bar. There is a slight arch to the edge and the corners are rounded off so they won't dig into the back side of the skin. 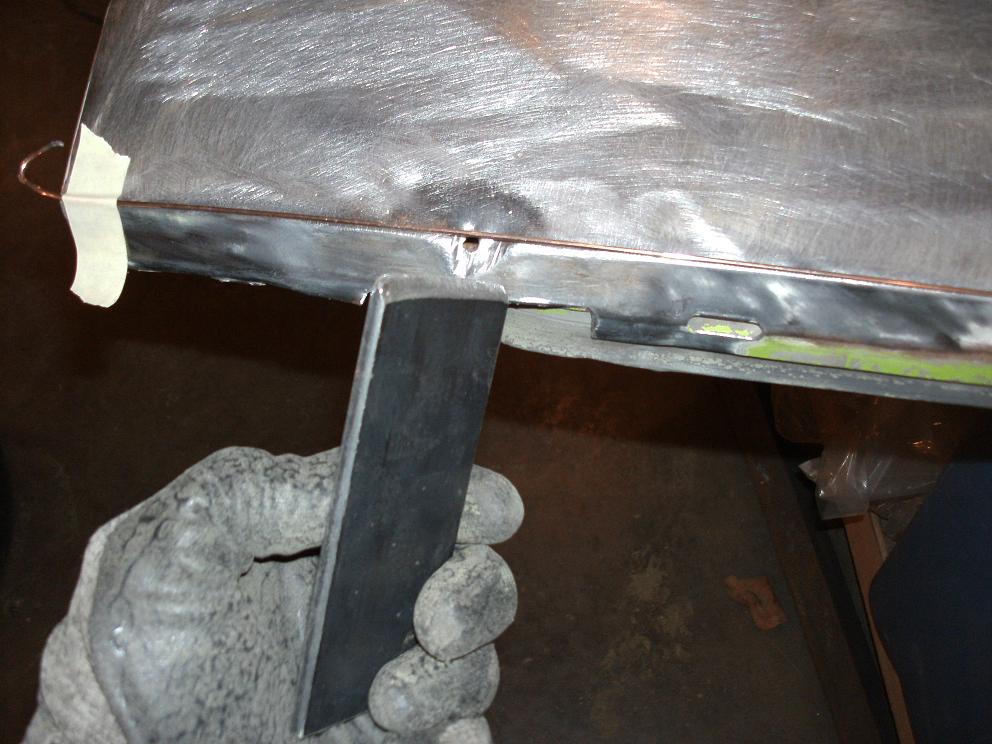
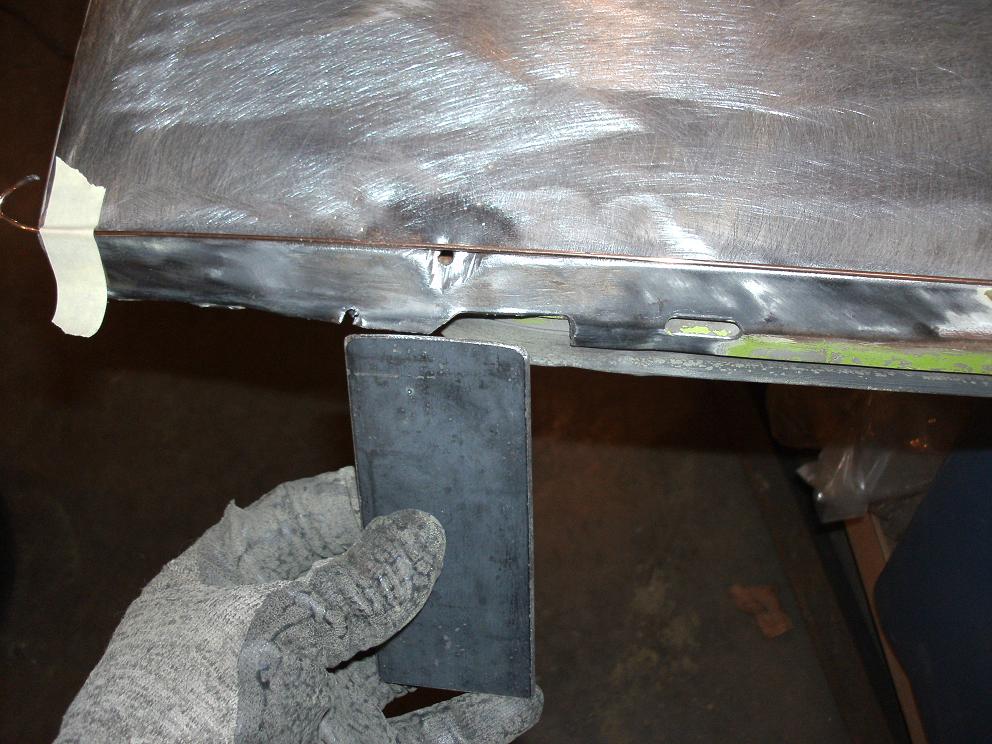
After driving the panel back into shape I tigged the spot weld back together and filled the hole.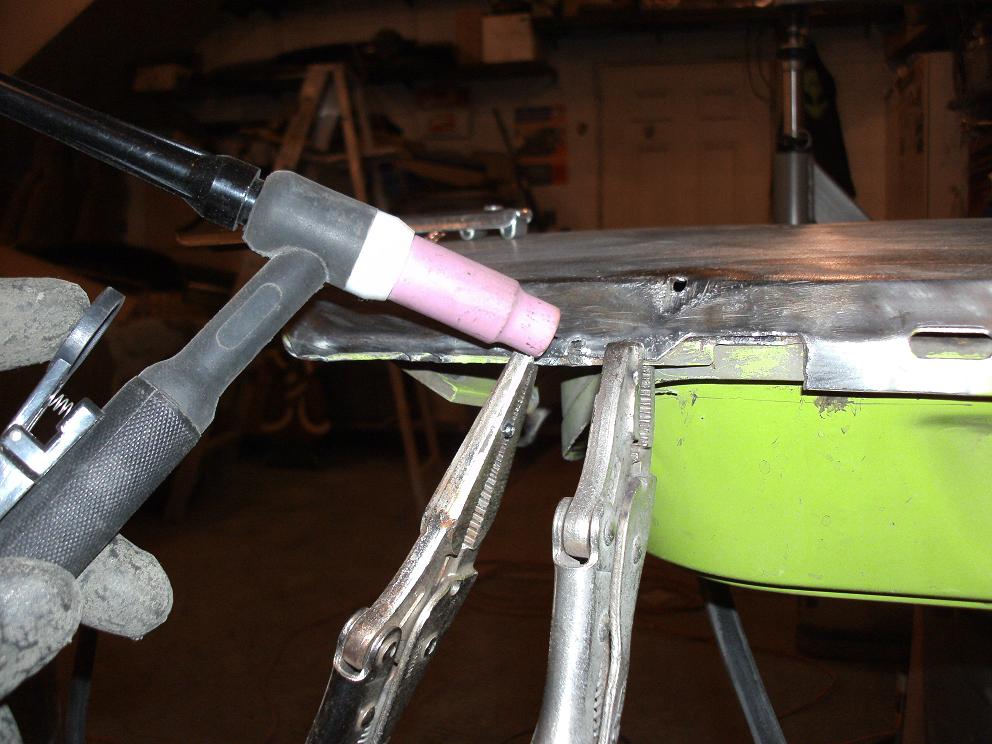
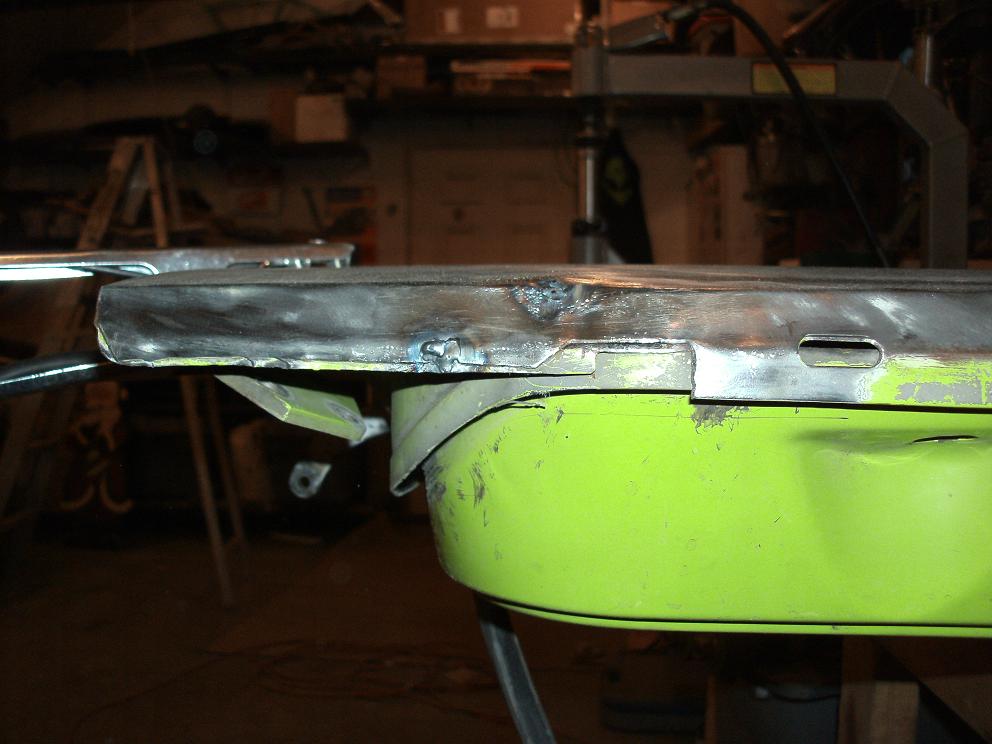
After welding a tapping the panel edge back into place.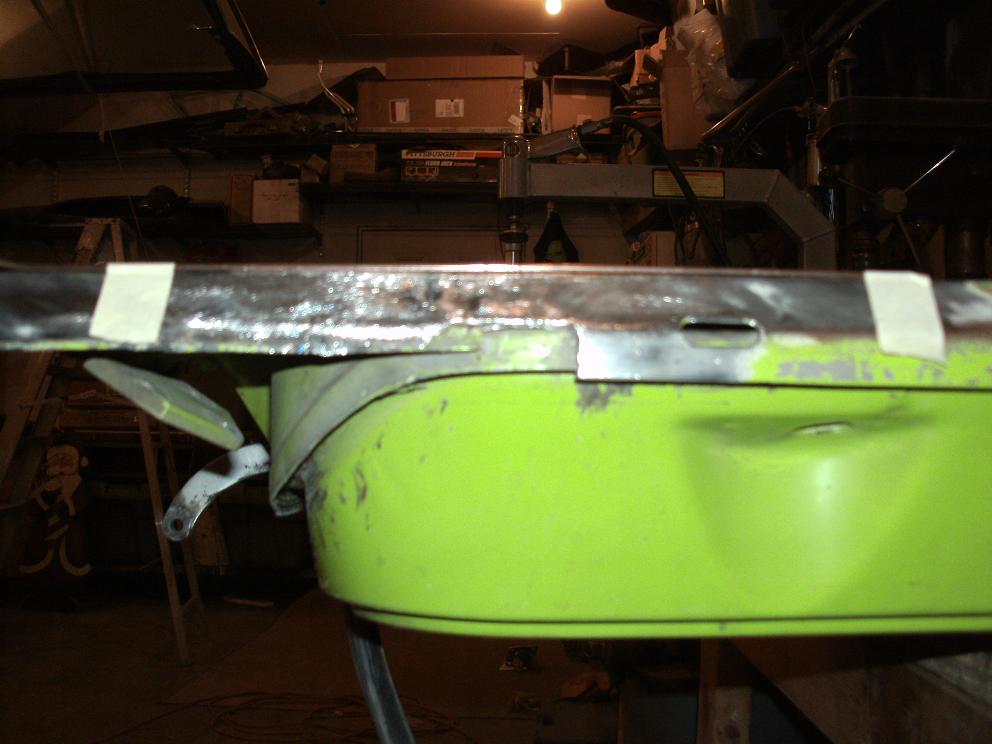
My son borrowed my pin welder to his buddy and never retrieved it. So I'm stuck trying to use my Lenco and spot weld tabs on the panel for pulling the crease. It's working but I'm going to finish when I get my pin welder back.
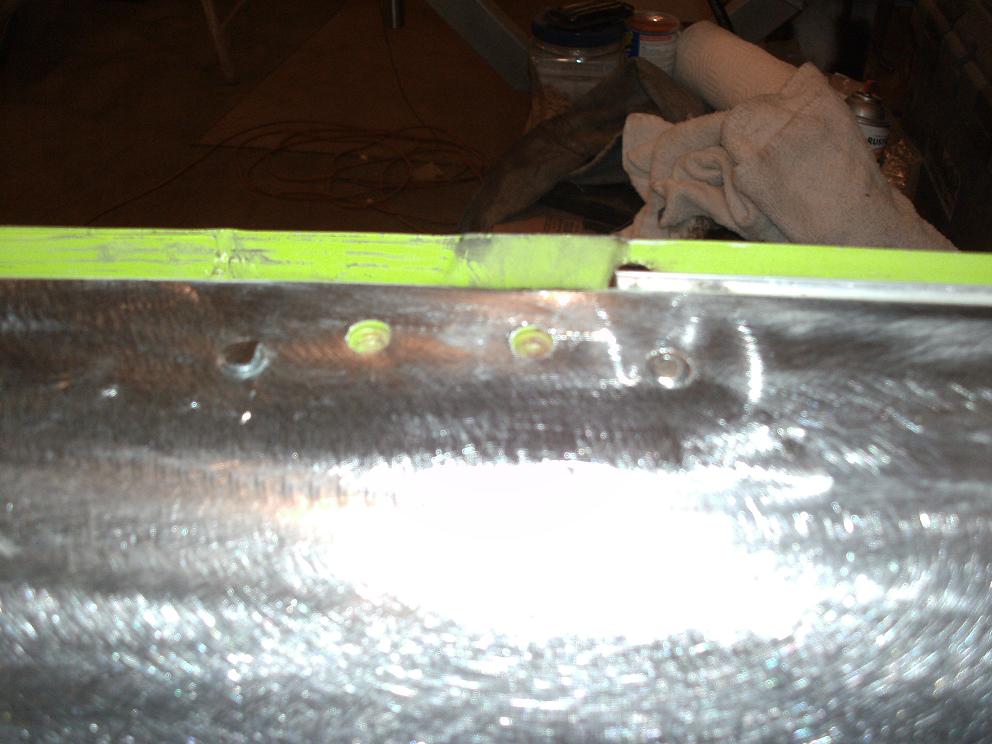
I tig welded the California rivet holes and started pulling the crease. 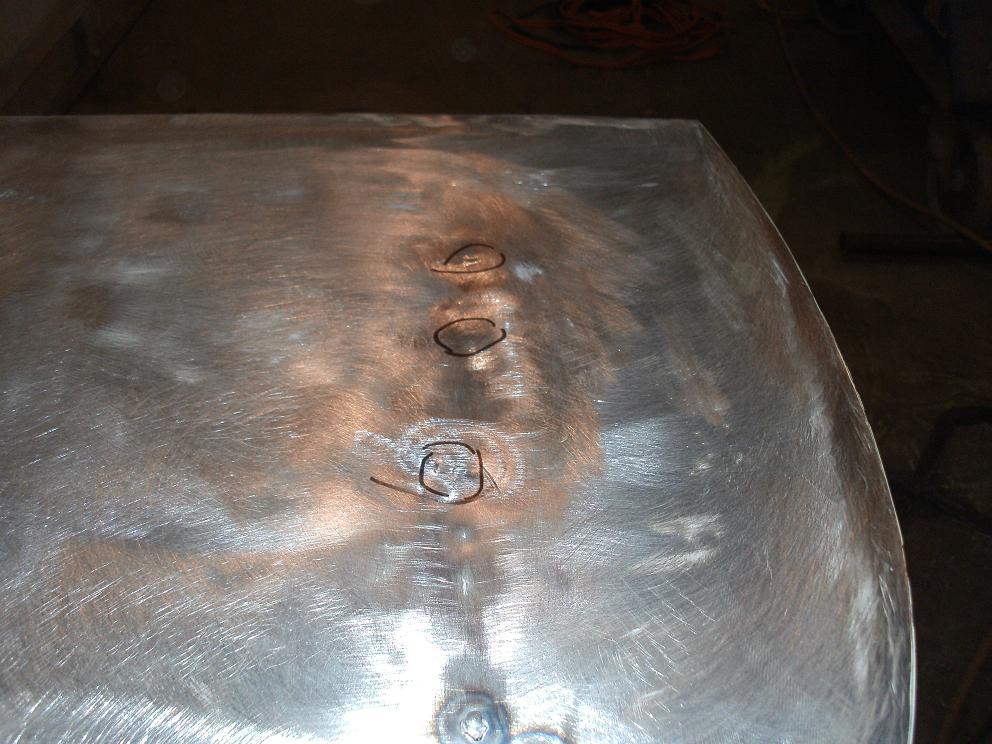
Then I tigged up the big ass holes on the top of the door from an aftermarket mirror. I cut a couple sections off a bolt to thread into the holes then tigged them in.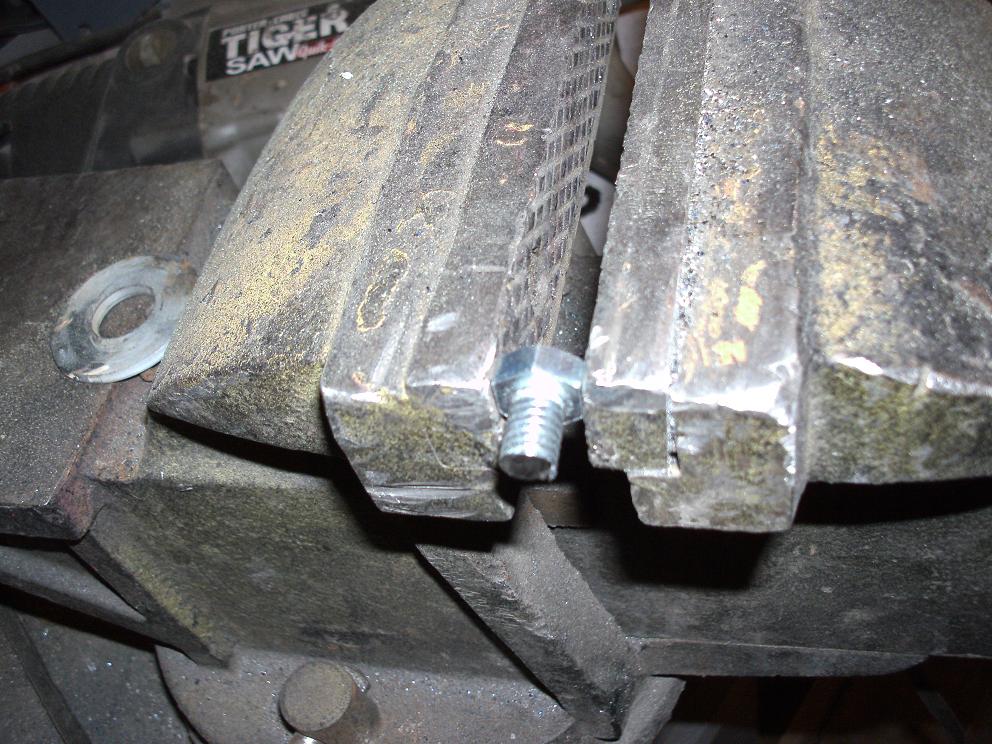
Attached image(s)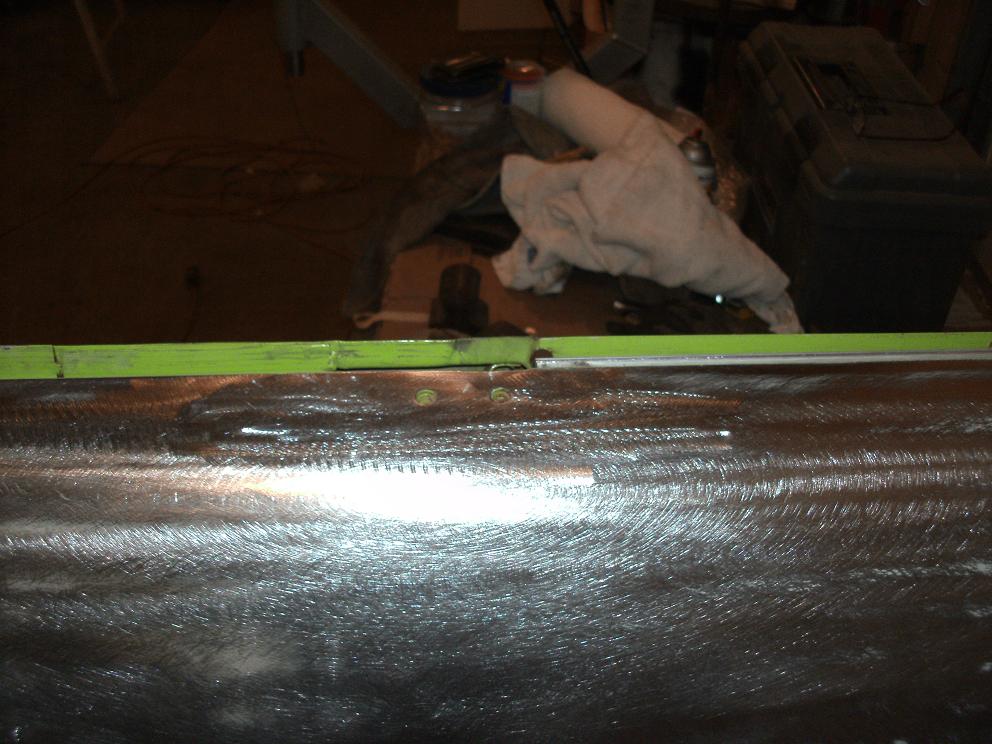
Posted by: RobW Mar 4 2012, 07:59 AM
You rock Rick! 
Posted by: ruby914 Mar 4 2012, 09:52 AM
Have you ever used a shrinking disc? I haven't tried one myself a friend of mine used one aon his 55 Chevy project and got great results.
I don't have one. I've been looking at them on ebay but haven't bought one. I think the side of this panel would be a good candidate with all the pick hammer marks the other guy drove into this panel. I'm having to bump them back out then block them level. It takes hours to work some of the waves it creates. So far I haven't found anything that will require the torch and quench method. Just a serious investment of time. The panel hasn't work hardened yet so I'm still ok.
Rick,
Thank you for sharing. This is just in time for me.
It is great to see a masters work.
I have every kind of dent and now see just how much work I have ahead of me.
You mention work hardening.
How would you know if it has work hardened and if it did how would you go about correcting that?
Posted by: rick 918-S Mar 4 2012, 10:57 AM
I was kind of searching you tube for a good example of annealing. Sometimes when you get a panel that has had serious damage and you have to work over the panel several times to move the metal back into shape the constent hammering with cause the molecules in the panel to bunch up. You'll find it very hard to get the panel to cooperate after several passes working it with a block and hammer. You can feel the difference when it happens. the metal even sounds different when your hitting it. This will require you use a torch to expand the molecules. By lighting the torch with no oxygen and blowing soot on the panel you leave a black soot on the panel. You can carefully burn it back off. This will relax the panel and give you a second run at it.
Posted by: rick 918-S Mar 4 2012, 08:56 PM
Here's the result of several hours worth of work. I ended up using the tig and tacking the tig wire to the skin like my stud gun or pin welder does. I was going to go out to my son's friends Dads house today and get my stud gun back but by the time I drove out there and back I could be done with the door as it is now. I used the tig wire like a stud. I was able to work in closer and more accurately than with the sheet metal tabs and Lenco. Here's the end result. Close enough for a light weight filler. 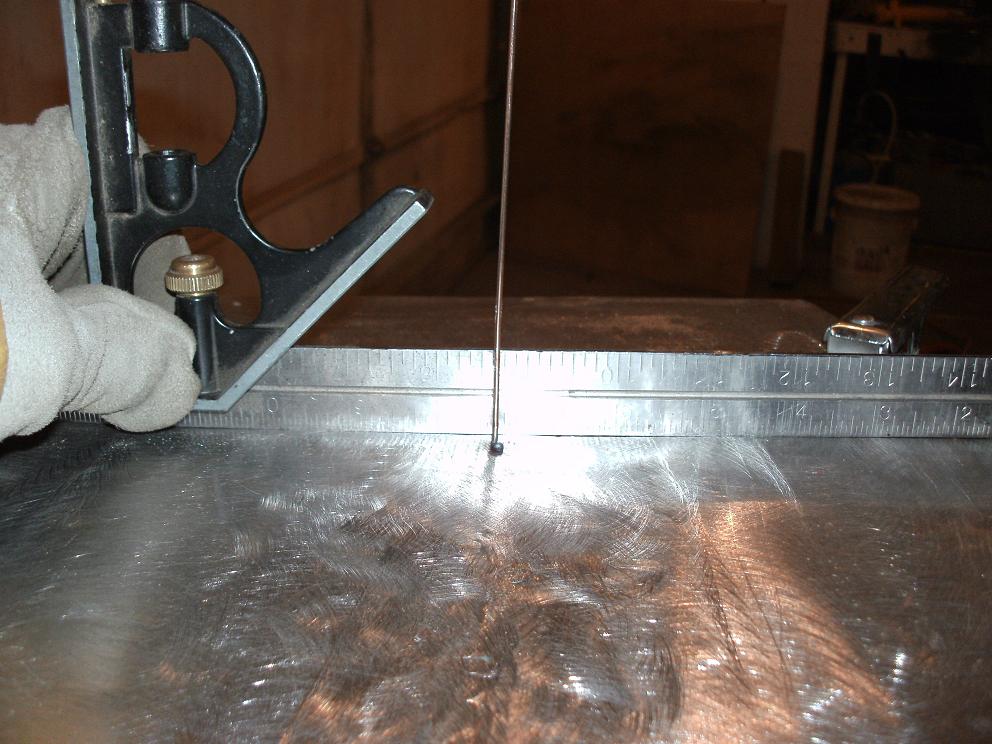
Posted by: Eric_Shea Mar 4 2012, 09:07 PM
Rock on Rick!
One of my favorite colors... that and your Raspberry.
Posted by: rick 918-S Mar 4 2012, 09:10 PM
Rock on Rick!
One of my favorite colors... that and your Raspberry.
As soon as this car is done The Raspberry car come in.

Posted by: scotty b Mar 4 2012, 09:11 PM
Awesome work as usual Rick  Get a shrinking disc, you'll love it. It takes no time to get from where you are to primer and NO skim coat with the disc
Posted by: rick 918-S Mar 4 2012, 09:13 PM
Awesome work as usual Rick
Get a shrinking disc, you'll love it. It takes no time to get from where you are to primer and NO skim coat with the discYa I need one. This is an example of what we should try to achive rather than leaving deep dents and drill holes in body panels.
Posted by: r_towle Mar 4 2013, 07:11 PM
Awesome and thank for taking my call.
I will go tack on some tabs and pull the problem just like you show it, should do the trick.
Rich
Posted by: scotty b Mar 4 2013, 10:35 PM
FWIW, and not ot steal Ricks thread, this 993 was done with only a dolly and a shrinking disc. Needed NO filler when done. Only a couple thick ( 3 ) coats of primer. Don't get suckerd into buying any expensive tools
http://kahikocustoms.com/auto-projects/993-collision-damage
Posted by: rick 918-S Mar 5 2013, 07:44 AM
FWIW, and not ot steal Ricks thread, this 993 was done with only a dolly and a shrinking disc. Needed NO filler when done. Only a couple thick ( 3 ) coats of primer. Don't get suckerd into buying any expensive tools
http://kahikocustoms.com/auto-projects/993-collision-damage
Awesome work Scotty.
Since my last post on this thread I purchased a shrinking disc. I am using on the Mercedes to finish the body seams after welding the panels. I'll have to take some photos and add it to my welding thread.
Posted by: rick 918-S Mar 5 2013, 07:48 AM
Awesome and thank for taking my call.
I will go tack on some tabs and pull the problem just like you show it, should do the trick.
Rich
Anytime Rich. I finished the plow last night.
 I'll post photos later. Gottsta go out and move some snow.
Posted by: Spoke Mar 5 2013, 10:48 AM
Since my last post on this thread I purchased a shrinking disc. I am using on the Mercedes to finish the body seams after welding the panels. I'll have to take some photos and add it to my welding thread.
Awesome work Rick. It's guys like you and ScottyB who remind us all that the American craftsman is alive and at work. Good job.
I have a shrinking disk but have not used it since I don't have a tool to spin it to 3500 RPM (I think). What tool do you use to spin it up fast enough to be effective and at what RPM?
Posted by: mrbubblehead Mar 5 2013, 12:04 PM
FWIW, and not ot steal Ricks thread, this 993 was done with only a dolly and a shrinking disc. Needed NO filler when done. Only a couple thick ( 3 ) coats of primer. Don't get suckerd into buying any expensive tools
http://kahikocustoms.com/auto-projects/993-collision-damage
Awesome work Scotty.
Since my last post on this thread I purchased a shrinking disc. I am using on the Mercedes to finish the body seams after welding the panels. I'll have to take some photos and add it to my welding thread.
how is the shrinking disc working for you rick? was there a learning curve?
Posted by: scotty b Mar 5 2013, 12:14 PM
Since my last post on this thread I purchased a shrinking disc. I am using on the Mercedes to finish the body seams after welding the panels. I'll have to take some photos and add it to my welding thread.
Awesome work Rick. It's guys like you and ScottyB who remind us all that the American craftsman is alive and at work. Good job.
I have a shrinking disk but have not used it since I don't have a tool to spin it to 3500 RPM (I think). What tool do you use to spin it up fast enough to be effective and at what RPM?
Harbor freight angle grinder. If you have a larger size disc get the big boy. A regular 4" grinder will run it, but the discs edge will be RIGHT at your fingers. I bumped it once and cut through a leather welding glove
 Later went and got the bigger grinder
Powered by Invision Power Board (http://www.invisionboard.com)
© Invision Power Services (http://www.invisionpower.com)