Printable Version of Topic
Click here to view this topic in its original format
914World.com _ 914World Garage _ smj's 914-6 clean-up thread
Posted by: smj May 24 2012, 04:08 AM
Apparently I was waiting for something before I started a thread for work on my 914-6. Whatever - the car stopped turning over while I was between mechanics and wound up sitting with a dead PermaTune box for a couple years. Better late than never, I'll start the thread now...
It's a factory 914-6 that was modified and repainted before I got it. Steel slant-nose, Brembo GT brakes up front, old fronts moved to the rear (and original rears long gone), 3.0 liter SC motor with Webers, 6 & 7 x 16 Fuchs from an '86 Carrera, etc. Started out in Signal Orange, but it's been through at least two color changes since then (white, then black). And as of late May 2012, the odometer has just clicked over 00,000 miles (believed to be the first time based on included paperwork).
VIN # 914 043 2486
Orig Engine # 64? ???? (need to order COA)
Trans # 750 2505
Karmann body # 132566 (stamped inboard of lock, floor of rear trunk)
Here's the standard shot of the car from pictures taken after I took delivery.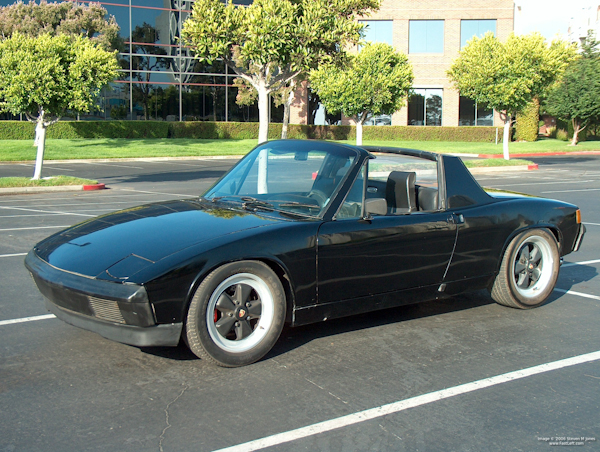
Edit 8/2014: Added various ID numbers
Posted by: smj May 24 2012, 04:19 AM
Let's get to the revival. The car stopped catching even with Thrust (starter fluid, ether, etc). As I was trying to figure out if I was still getting spark, I caught a flash from the vicinity of the PermaTune box out of the corner of my eye, then nothing's working. The car then sits as I tried to find a new mechanic (different story)...
Fast forward to 2012 and I finally call Tom Amon of Mobile Works West. Tom's a long-time Porsche mechanic and best of all, he makes house calls! He comes out, replaces the PermaTune box, works over the carbs for a bit, and gets the car to turn over. In the process, he noticed that somebody had put the secondary venturis in backwards, so that's been fixed too...
Here's a shot of the bonus fumigation service. Now I can skip this year's termite inspection...
Attached image(s)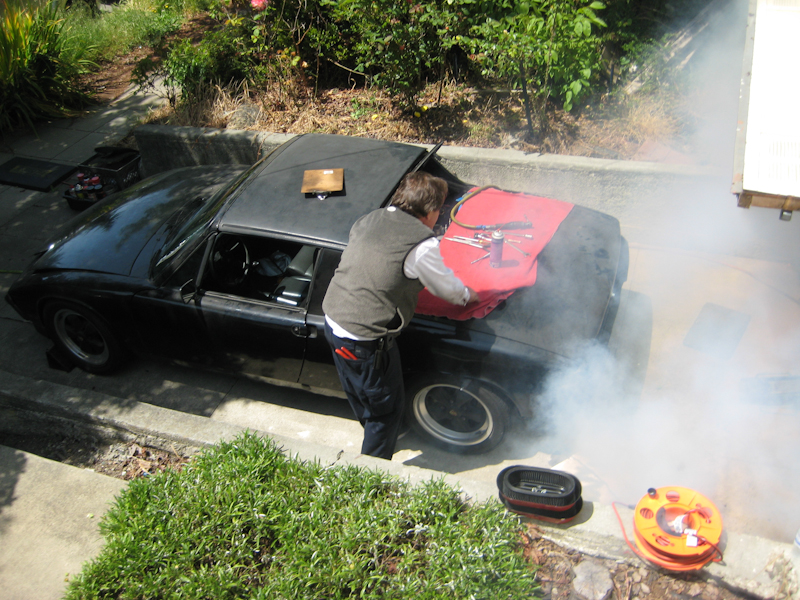
Posted by: smj May 24 2012, 04:31 AM
I changed the oil because it had sat for a couple years, even though I'd only put ~360 miles on the car. Then Tom wanted me to put a few hundred miles on the car before trying to decide if I really needed a rebuild or not. Maybe it would be smoking from oil getting by the rings, and maybe it wouldn't with some use...
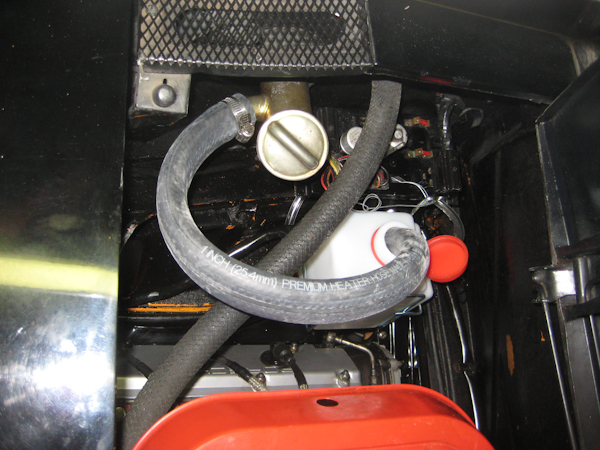
Problem was, whenever I would run the car I would get a fair bit of fluid flying out of the oil tank breather - a mix of oil and condensate getting on the engine/tin and dripping down onto the hot exhaust, causing a lot of smoke. Here's what the original positioning of the breather was like - a K&N filter rigged to some hose and pipe, hanging out almost over the valve cover. In this photo you can see that there's already some dripping from the base of the filter onto the engine bay wall below.
Attached image(s)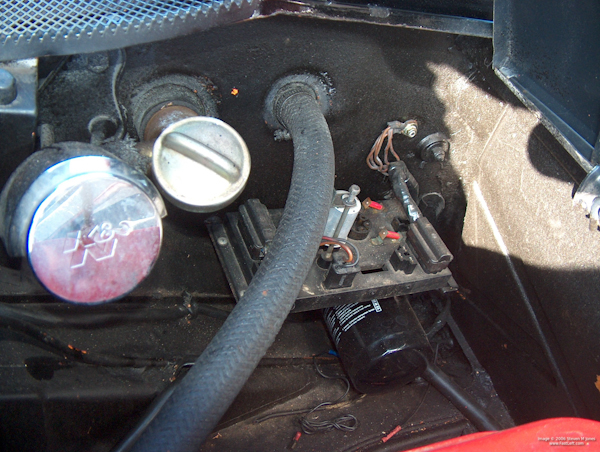
Posted by: smj May 24 2012, 04:42 AM
I finally rigged a solution tonight. With some radiator hose and a coolant reservoir from the FLAPS and some hose clamps from Ace, I was ready to go. First I removed the K&N filter and the bits that connected it to the filler neck.
Then I used some picture hanging wire through the slot in the relay board to keep this temporary catch tank upright and in-place. I figure if I get up on two wheels and this fails, I've got bigger problems. Then I attached the 1" radiator hose to the filler neck, clamped it, and inserted 6 inches or so into the catch tank.
It'll take a while to clean all the pockets of oil+stuff out of the engine bay, or let them burn off the exhaust. But after that maybe I can get a better picture of what's coming out of the tailpipe.
In the meantime the tailshifter is driving me crazy - it's every bit as vague as my old beater Golf III was. But that's a big topic...
Edit: Typo corrected.
Attached image(s)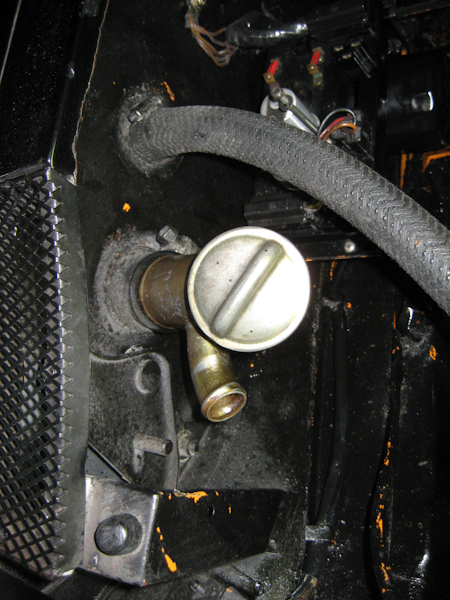
Posted by: carr914 May 24 2012, 05:35 AM
Tom Amon is a Great Guy, wish he made House Calls to Florida. Tell him I said Hi 
Posted by: falconfp2001 May 24 2012, 12:44 PM

Apparently I was waiting for something before I started a thread for work on my 914-6. Whatever - the car stopped turning over while I was between mechanics and wound up sitting with a dead PermaTune box for a couple years. Better late than never, I'll start the thread now...
It's a factory 914-6 that was modified before I got it. Steel slant-nose, Brembo GT brakes up front, old fronts moved to the rear (and no emergency brake), 3.0 liter SC motor with Webers, 6 & 7 x 16 Fuchs from an '86 Carrera, etc. Started out in Signal Orange, but it's been through at least two color changes since then (white, then black). And as of late May 2012, the odometer has just clicked over 00,000 miles (believed to be the first time).
Here's the standard shot of the car from pictures taken after I took delivery.
Love the look of that car. Are the front fenders shaved? Looks like stock rear fenders that are pulled a little to make room for the 7" Fuchs.
I like that look on the front.
Posted by: smj May 26 2012, 02:33 AM
The rear fenders might be altered a little, but there was intense rubbing at the lip with the 225/50-16's a P.O. had fitted. Changing from the 225s to 205s took care of that in back. There had been 205s up front already, and there's a little rubbing when you have a lot of steering input (inner fender wall at a guess).
I'm still not sure how I'd like to handle the rear fenders, but I don't think it will be with the traditional squarish GT flares. Just doesn't seem to fit, to me.
Posted by: GeorgeRud May 26 2012, 06:58 AM
There was a -6 in Chicago years ago that had the front fenders shaved like yours, and had 911SC flares put on the rear. Belonged to a local dentist, but eventually had an engine fire and we lost track of it after the owner died. Like yours, it was a nice looking conversion.
Posted by: falconfp2001 May 26 2012, 10:35 AM
The rear fenders might be altered a little, but there was intense rubbing at the lip with the 225/50-16's a P.O. had fitted. Changing from the 225s to 205s took care of that in back. There had been 205s up front already, and there's a little rubbing when you have a lot of steering input (inner fender wall at a guess).
I'm still not sure how I'd like to handle the rear fenders, but I don't think it will be with the traditional squarish GT flares. Just doesn't seem to fit, to me.
CFR makes the nicest looking stock fenders that give you additional room in the rear. I would prefer to go that route as I like the stock look but wold prefer wider tires.
Posted by: Randal May 26 2012, 10:47 AM
Tom Amon is a Great Guy, wish he made House Calls to Florida. Tell him I said Hi
+1
Ha, he'd probably make the trip, you'd just have to pay mileage.

Tom is always there (24 x 7) when you get into trouble, especially the night before a race and something goes wrong.
He had a fantastic 914 all set up for racing that he recently sold. Pretty trick and all it needed was a motor. Ummm...wonder who got that car?
Posted by: smj Jun 1 2012, 01:50 AM
I'll have a look at CFR's rear fenders, then. For now it's good enough to run 205's until I get other bits of the car sorted. I do recall seeing some cars with 911SC front flares worked into the rear fenders and thought that looked like it might be a good solution. I think Toast's car was setup that way at WCR2007.
Posted by: smj Jun 1 2012, 02:06 AM
While I was doing my first oil change on this car the other week I was able to confirm that it had the original 914/01 transaxle installed. (Attached photo shows the factory stamp, "914/01 7502505")
My http://www.914world.com/bbs2/index.php?showtopic=186085 has me thinking about potential half shaft replacements, not to mention transaxle replacements. I've picked through an ungodly number of threads and product pages, including SirAndy's 944 CV thread in Classics of course, but the range of options (and costs!) still has my head spinning. 
I'm gonna have to reach some kind of decision soon though, I'm not willing to just park the -6 until I figure something out... 
Attached image(s)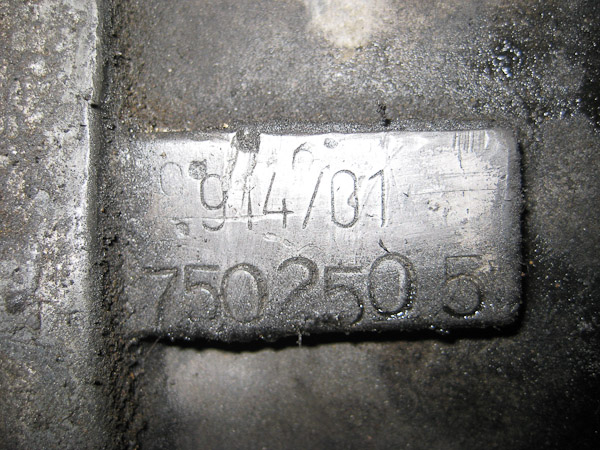
Posted by: Cairo94507 Jun 1 2012, 06:51 AM
Hi Steve: I saw your car at the Wash 'n Shine at the Livery last weekend.
Posted by: smj Jun 1 2012, 04:37 PM
Hi Steve: I saw your car at the Wash 'n Shine at the Livery last weekend.
Cool -- hi Michael!!
Sorry if I wasn't there to chat, I spent a lot of time running around with a camera. Which reminds me, I have to get the rest of those pics uploaded... I'll post a link in another thread when they're up.
Posted by: smj Jun 3 2012, 02:49 PM
Saturday I went to the FLAPS for more bullet fuses, because these are not the fuses you're looking for...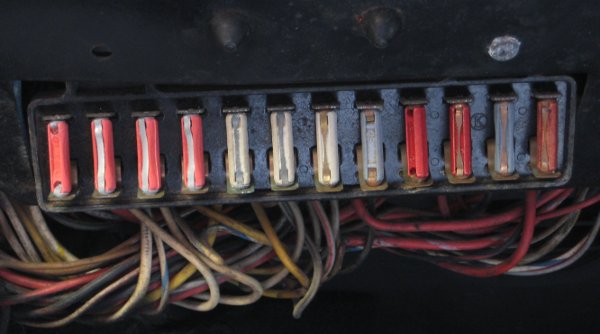
(Double the spec'd rating for the four left headlight fuses, and the other reds on the right.)
I believe they were used because they had 16A fuses on hand and lots of empty holders, not to make up for any operational issues. (Responding to sound advice here: http://www.914world.com/bbs2/index.php?showtopic=159774&st=1060# ). But half the time the headlights, running lights, and blinkers wouldn't work until I changed them to the proper 8A fuses.
So far no proof that anything was damaged by this, though I do have one headlight that won't, er, light. So, off to dig up the multimeter...
Posted by: smj Jun 4 2012, 01:53 AM
Today's exercise was the headlights - I had one screw on the passenger side retaining ring that was rusted into place, and the driver side headlight wasn't working. Some CRC "Freeze-Off" took care of the stuck screw where WD40 alone had failed. Wound up soaking all of the screws for a bit to beat back the surface rust, then rinsing, drying, and using just a little anti-seize before putting them back on.
Anti-seize is like glitter - no matter how much time you spend trying to find and remove it all, your wife/girlfriend is going to find some on you...
On the driver side headlight, the ground was bad. Or at least that was enough to get it working again, there are some ugly splices where the three prong headlight connector was replaced. Somebody also added a local ground, just on that side. A supplemental brown wire is run out to a four-way spade lug connector screwed to the outside of the bucket -- which was then painted by somebody, and the lug used for the headlight ground was only partially cleaned...  The slider was also pretty loose when fully on the lug, so I took some pliers to it and now it makes a nice tight connection.
So now instead of some really beat Cibie H4 lights, I've got the Hella H4s I salvaged from my 944S. I didn't notice anything like a date code, but the Cibies lack the three automated aiming points.
Next up is either using the spray degreaser I got at the FLAPS to finish removing the stuff that used to puke out from the breather port/filter, or try to figure out why the tacho isn't working. Maybe have a look behind the gauges and see what that area's like, then check the transaxle end.
Posted by: smj Jun 17 2012, 01:50 AM
Catching this thread up, I ordered a few pounds of bolts and lock washers from Fastenal - opted for Schnorrs instead of Nord-Locks, but it could easily have gone the other way. Received a box of CV gaskets, boots (probably too small, erk), flanges, and grease. Anyway step one is to inspect and repack the CVs I've got already. I did grab a pair of spacers from Aaron Cox for a later switch to 944 half shafts. (cf. http://www.914world.com/bbs2/index.php?showtopic=80641)
I had fun discovering how different the 914-6's shift linkage is from any of the -4 linkages, tail- or side-shifter. http://www.914world.com/bbs2/index.php?showtopic=187814
I've got more bushings on order, probably being held up waiting for some parts for the 968 so they can all ship at once. Sokay, I need to go figure out roll pins before I tackle that.
I spent a good chunk of Saturday/yesterday learning about the 914-6's unique hand-throttle linkage. http://www.914world.com/bbs2/index.php?showtopic=188482
I also took out the pedal board, which is toast - the plywood has completely separated and longs to become one with the mud.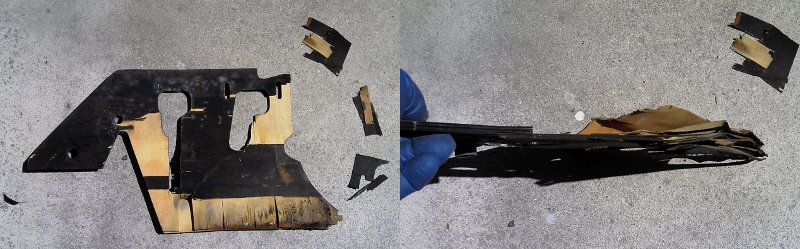
So I guess it's time to go shopping for a replacement for that. But hey now... The pedal cluster itself isn't looking so hot. Might have to go dig up some of Eric Shea's old posts about how he reconditions those.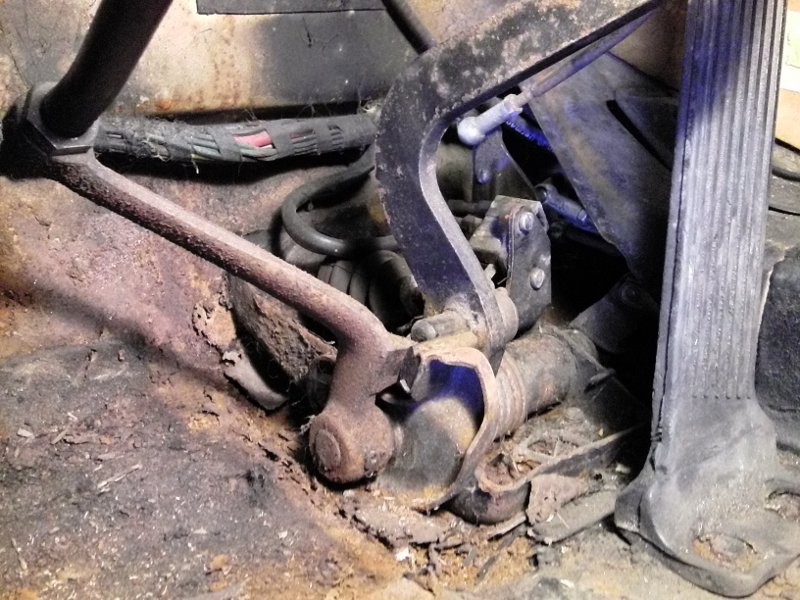
The stereo in this thing is amazingly complete, mostly working and period-correct so far as I can tell. I might start pulling that next with a view to selling it to fund ongoing work...
Posted by: smj Jul 2 2012, 03:13 AM
I've had some equipment failures recently. I did get some lumber for a couple saw horses, figuring the leftover bits could be useful for jacking pads. Since I discovered I didn't have a big enough socket for the stub axle nut, all I accomplished this weekend was actually jacking the car from the front and rear. But I noticed a couple things along the way...
This, for example, does not look good. 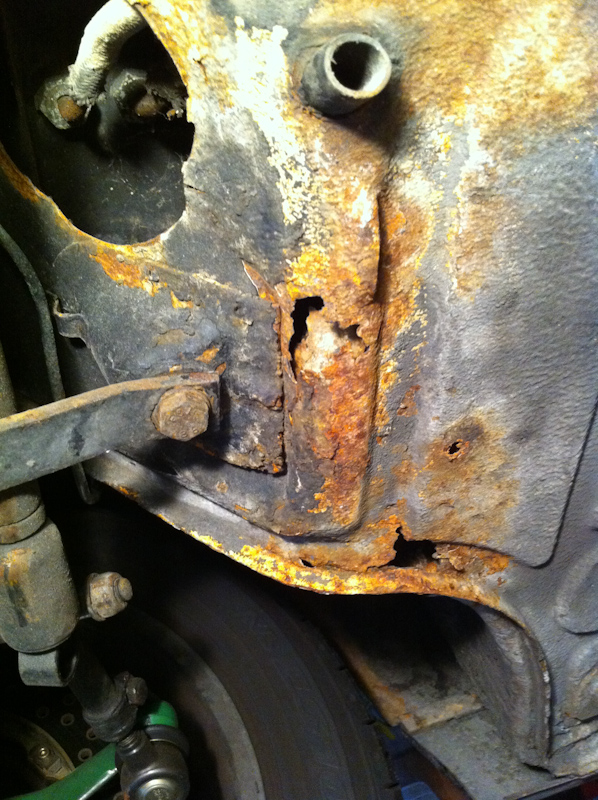
That's forward of the passenger footwell, nose of the car is to picture left. And yes it's rusted completely through bottom and side along that lower edge.
I also found two cut wires coming into the engine bay, and am wondering what they might be. I grabbed the Haynes for the 911 and looked around for the oil temp sensor, but didn't find anything - though I did get the part number to confirm that the oil cooler on the side of the motor is the original Behr 914-6 unit (901.107.059.01). Forgot to check top-side for the pressure switch/sender...
Driver side first: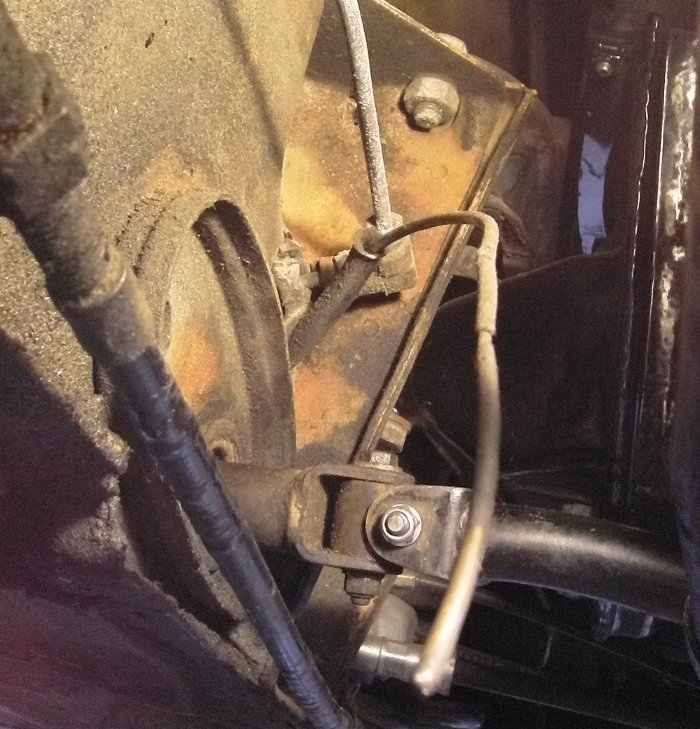
Passenger side: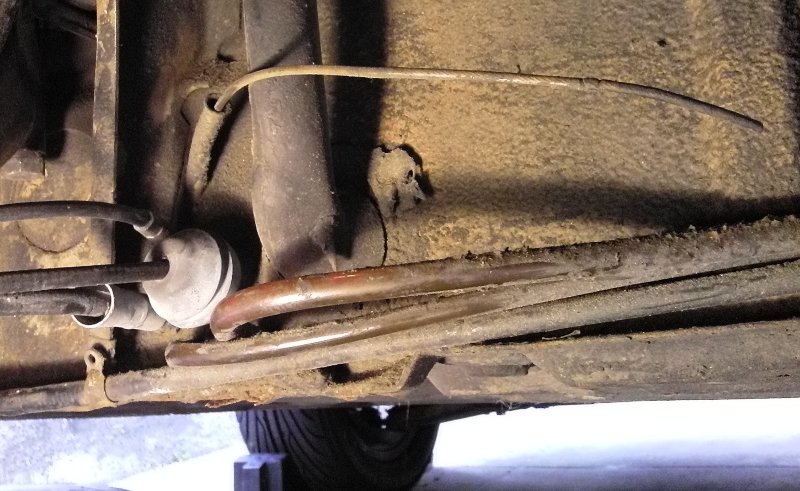
While under the front, I also noticed that the/a horn had been relocated (?) to the driver side front wheel well. And perhaps the reason it isn't working is that both wires had broken off at some point...
Posted by: Justin Fischer Jul 2 2012, 04:40 AM
Those look like the heater cables. They open the valves to let heat into the cabin from the heat exchangers.
Oil pressure sensor is topside next to the oil line that comes off the top of the case. - Edit -
Posted by: smj Jul 2 2012, 02:41 PM
Thanks, that would make sense I guess - driver- and passenger-side heat. Should've checked the -4 first. 
And thanks for the tip on the oil temp sensor, I guess the diagram I was following of the 911motor was logical - had me looking for it near one of the hard lines below.
Posted by: Mr.242 Jul 2 2012, 09:01 PM
Oil temp sensor is here...left side of fan as it sits in the car. Find the RED circle. There is a green wire that connect to this. 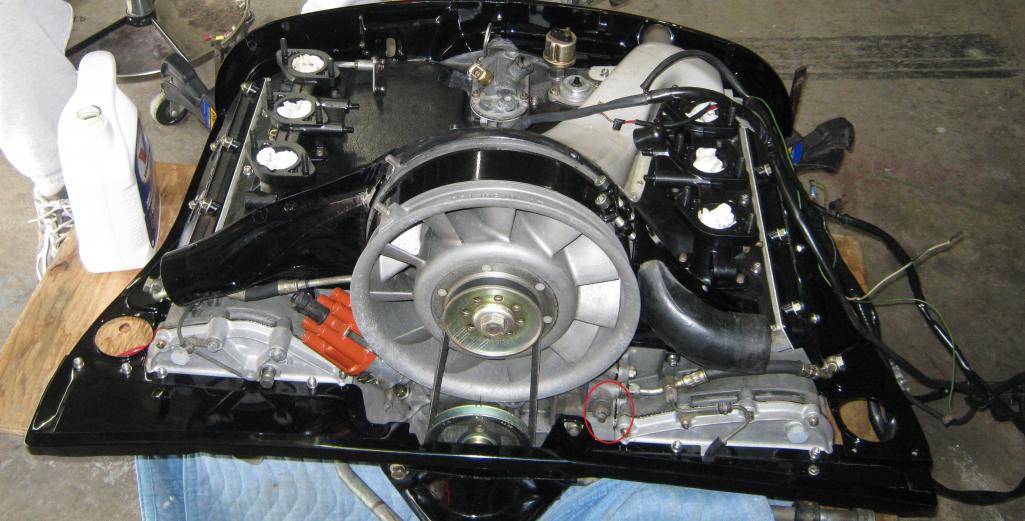
Posted by: smj Jul 2 2012, 09:36 PM
Oil temp sensor is here...left side of fan as it sits in the car. Find the RED circle. There is a green wire that connect to this.
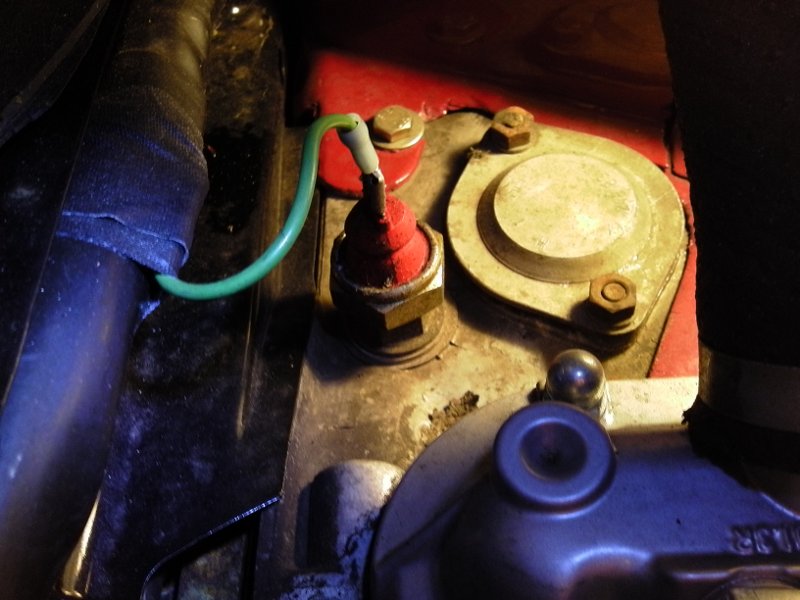
Cool, thanks. Then in the photo below this should be the oil pressure switch? Does this also act as a sensor for the oil pressure gauge in a 911, even though it's called a switch even in the 911 diagrams? (And shouldn't there be a thermostat next to it instead of a cover?)
Posted by: smj Jul 2 2012, 10:41 PM
And this should be my oil temp sensor. I felt around and made sure the green wire is connected to something (couldn't get an eye on it), but... shouldn't there be something connected to the spade liug sticking out of the top of this thing?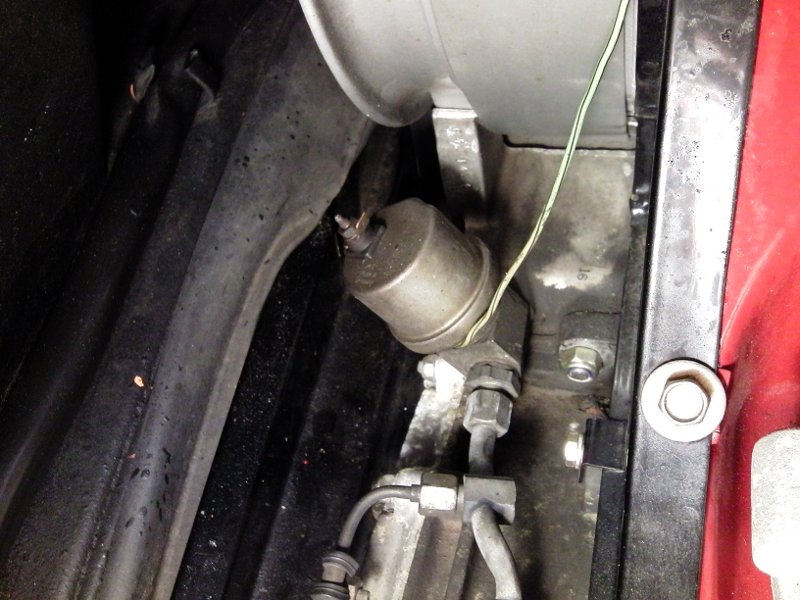
So hopefully this means I'll find signals when I try to swap an oil combo gauge for the existing combo gauge. (Yes, I realize I may need to change the senders. Right now I'll settle for confirming a signal.)
Posted by: sixnotfour Jul 2 2012, 11:44 PM
red sender = idiot light
the round one in your pic is later location pressure sender
red circle 242 should also be on your motor for temp. ( although being a late engine its probably the wrong one for the six temp gauge.
if it brass correct, chrome its later
Posted by: smj Jul 3 2012, 01:58 AM
 Okay, I grabbed a mirror and just had another look. If you note how that green w/ black stripe wire runs, it was actually making a stupidly tight/taut turn around that sensor over to - ta da! - what should be a temperature sensor in the proper location. Still couldn't get a photo, but the mirror let me see there was another spade lug that the wire ran to in what seems like the location Mr.242 pointed out earlier.
So I have the oil pressure switch (aka idiot light) in the position it should be and wired. I've got an oil temp sensor in the correct position and wired. And that can/sensor that the green line w/ black stripe was running around? Looks like an SC oil pressure sender, p/n 911.606.111.01!  Thank you sixnotfour for the clue that prompted me to go looking again.
Edit: Say, to test this notion should I be able to connect the oil pressure gauge to the chassis/ground and the lug on the oil pressure sender, then start her up?
That oil temp sender might not work with the correct 914-6 gauge, but I didn't get that with the car anyway - somebody put in a gauge with just an idiot light in the upper position, and the original didn't come with the car. However I have a pristine later oil combo gauge (p/n 911.641.103.05) that I bet will work fine with these temp/pressure senders. Though I'll have to find a wire in the harness to use for the pressure sensor, or run a new one... 
Sorry I didn't get the mirror out earlier, or realize there was a p/n on that can down by the fan.
Posted by: smj Jul 7 2012, 01:31 AM
Picked up an electric impact wrench, 30mm socket, bucket o' "parts cleaner," a few other bits - I think I've got everything to tackle the CVs this weekend. This is on top of another delivery from Pelican on Thursday...
That means I'll be trying to use the Sears super duper bolt/screw extractor thingies to get that bolt that sheared off just below flush-level with the outer CV joint. Here's hoping that goes smoothly... 
Posted by: smj Jul 11 2012, 11:35 PM
This past weekend I did manage to remove the passenger side halfshaft, extract the sheared bolt, inspect and repack both CVs (they're badly worn, but I didn't want to leave the car on stands while I decide what to replace them with), and reinstall the whole thing. Of course I reassembled the CV incorrectly the first time, but who's counting? (http://www.914world.com/bbs2/index.php?showtopic=190232 thread)
Tonight I confirmed that the bolts that came with the 944 seatbelts will thread into the shoulder mounting point (easiest to check) - I think another thread mentioned there's a US law mandating standard attachment specs. (See Cap'n Krusty http://www.914world.com/bbs2/index.php?s=&showtopic=154767&view=findpost&p=1575368) And that there appears to be the same clearance for the spools/retractors in the backpad in the 1970 -6 as there is in the 1974 -4. However I want to peel back the firewall padding in the engine bay of the -4 to see what the retractor mount is threading into, and figure that into whatever bracket/reinforcement is needed in the -6 before I proceed.
Tried to get a signal from the oil pressure sender (incorrectly identified in Post #23) to read on the oil pressure gauge in my 911 oil combo can (can p/n 911.641.103.05), but the needle just sat at 0. I hooked the lugs marked "G" and "Earth ground" from the gauge to the ground point by the engine bay relay board, and the remaining '+' lug to the lug on the sender, but no joy. Not sure that should work, so more reading to be done...
Edit 16-Aug-2012: Clarify where I saw the clearance for the seatbelt retractor.
Posted by: mikey63 Jul 12 2012, 01:43 PM
I just installed a 911 combo gauge in my car and the hook up is earth=ground, g=sending unit, +=power. this should get it to work!
Mike
Posted by: smj Jul 12 2012, 09:27 PM
I just installed a 911 combo gauge in my car and the hook up is earth=ground, g=sending unit, +=power. this should get it to work!
Now why didn't I think of that? I needed a boost today, and getting a needle on either gauge to move would do it - thanks!!
In other news, I ordered a pair of 911 flag mirrors. Gotta have those bases (and reinforcing plates) to fit the 914 door but I'd like to use the upper portions from my 944S, just to keep something from that car with me. But this way I can use whichever motors and switchgear will work out the best. (I know the mirrors from each model are wired differently, but I should be able to swap all the innards around if I wanted to use 911 switches rather than 944 switches, for example.)
Thanks again Mike!

Edit: Got the Six out, grabbed +12V from the taillight circuit, ground from a convenient chassis bolt, and ran a line from the relevant sender lugs to "G" and voilà - plausible readings on each gauge in turn. Was even able to observe increased druck when running at a faster idle.

Time to follow up on my last reminder about the triple gauge kit - I've got EL wire waiting to be used...
PS - So glad I'm capturing all the stupid things I'm doing in these threads...

Posted by: Mr.242 Jul 13 2012, 07:33 AM
Nice work...keep plugging away (no phun intended).
It is great to check off things on the car that need to be done.
Try to balance your insanity.
And have you noticed the bank account drops directly in proportion to the amount of boxes delivered to your door?
Posted by: smj Jul 17 2012, 11:56 PM
Thanks. Ordered the coarse spline, 6 bolt, 100mm transmission output flanges (923.332.209.02) and the '74-77 911 6 bolt, 100mm stub axles (923.332.232.01). Altogether $375+ - ouch, and less than halfway there. Should've been patient and posted WTB on Pelican, but... So that's this month's teener money spent on the halfshaft front.
I'm inclined to go with the Sway-A-Way #2420, which will require the 87+ 951 CVs (951.332.901.00) for everthing to have 28 splines. If I'm lucky I'll find good used CVs and could bring this in just over $1k in parts with the needed wheel bearings.
Not sure if I mentioned that the tach stopped working. And I just paid for the triple gauge kit drilled for the silver button, so I shouldn't just throw in the nearest 911SC tach w/o the button... Good news: I do have the correct tach (914.641.301.10). And while I couldn't remove the whole cluster, I did manage to pop out the combo gauge. Lots of suspicious splicing, but I did find a loose green w/ black stripe lead that's probably for the oil temp sender.
I've got pics from the CV adventure I'll post up here when I'm bored - or maybe in more of a how to (or how not to) thread...
All right, enough procrastinating - back to work...
Powered by Invision Power Board (http://www.invisionboard.com)
© Invision Power Services (http://www.invisionpower.com)