Printable Version of Topic
Click here to view this topic in its original format
914World.com _ 914World Garage _ Slothness Side Shift Linkage Build
Posted by: slothness Jun 2 2012, 12:24 AM
First off I just want to disclaimer, JWest doesn’t make these anymore and this is nowhere near the quality of a JWest part, however I figured I’d try my cheap ass hand at one. This is for a V8 car so parts listed are for a straight rod, I suppose you can cut your existing bent rod for a -4 but I have not tried it, and cannot comment on it. Also, I wanted to build this with new parts, you can source old parts but I wanted to see how much this would cost me in the end. http://www.tangerineracing.com/transmission.htm makes aftermarket linkages for -4 and -6 cars, which use the u-joint design as well. I highly recommend checking them out if you are interested.
Tools needed:
Welder, vice, cobalt bits, drill, sawzall or metal chop saw, dremel, grinder, c-clamp, round and flat metal file, black sharpie, center punch, a good attitude and some god damn patience.
Parts list:
SandParts.com (w/ discount code)
5/8 steering u-joints $23.53 x2 47.06
5/8 36 spline 2” shaft $4.72 x3 14.16
Lowes
Bronze 5/8 x 3/4 bushing $4.52 x2 9.04
3/4 weld steel tube $8.99 x1 8.99
A33 3” Angle $2.57 x1 2.57
Osh
Bronze 3/4 x 7/8 bushing $5.69 x1 5.69
M8-1.25x30 Flange Bolts $1.69 x2 3.38
8mm lock washers 0.11 x4 0.44
5/8 C-Clip $0.20 x2 0.40
1/4-20 Bolts $0.15 x2 0.30
1/4-20 Washers $0.11 x4 0.44
1/4-20 split washer $0.16 x2 0.32
Total Parts 92.79
Tax 8.75% 8.12
SandParts Shipping 8.70
Amazon.com (no tax)
12” 5/8 8620 Chromoly $7.81 x1 7.81
Grand Total: 117.42
(Yes I'm very specific)
Here's my order from SandParts. First off ignore the 12” 5/8 shaft in the pic, I had hoped to use it on the shift console instead of welding one together but it turns out its smaller than 5/8, it measures at 15mm. Which actually may not be terrible because my stock rod measured in close at 14.80mm. So instead of getting the bronze bushings in my parts list you might be able to substitute those for the sexy oilite shift console bushing Jonathan at http://www.mid-enginemania.com/products/GPR-914%252d4-73%252d76-%26-Side-Shift-Conversion-Brass-Console-Bushing-%28Oillite%29.html sells. However I did not want to risk buying 2 of them and finding there was still slop so I went ahead with 5/8 chromoly and the 5/8 bushing instead.
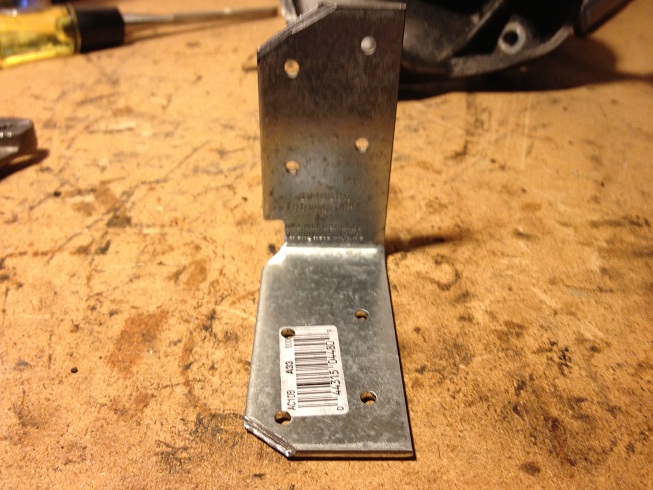
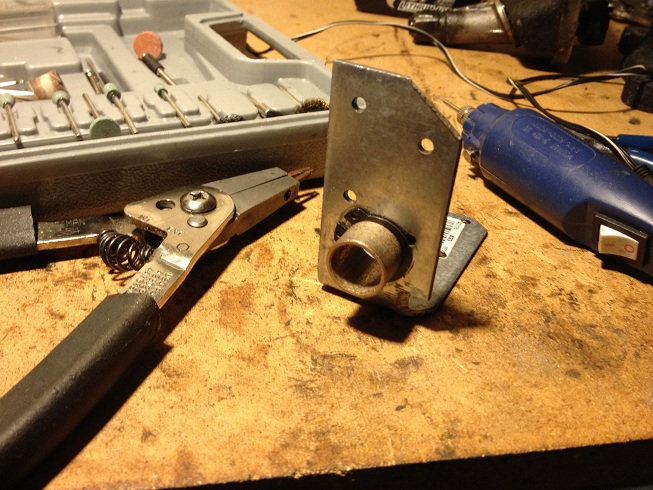
The u-joints don’t come with bolts, so you’ll have to pick some up, those are the M8-1.25x30mm. Here are some more parts, the bronze bushing, lock washer for M8 bolts and the steel builders angle (A33) I found in lumber. 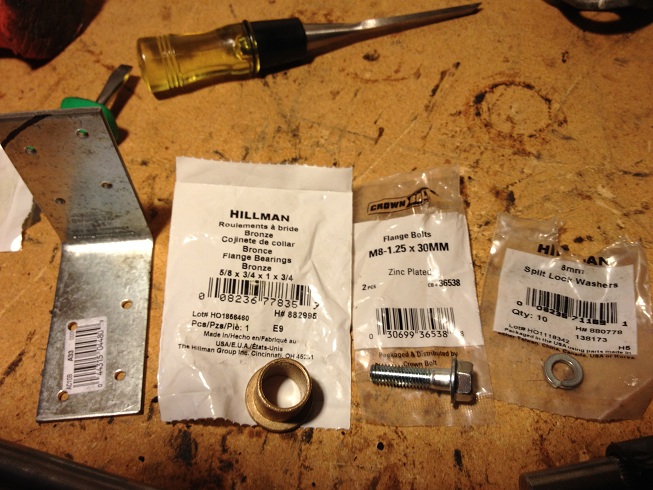
Cut the corners of the A33 and grind out a lip so it can sit flat in the console and you can get the proper height measurement. 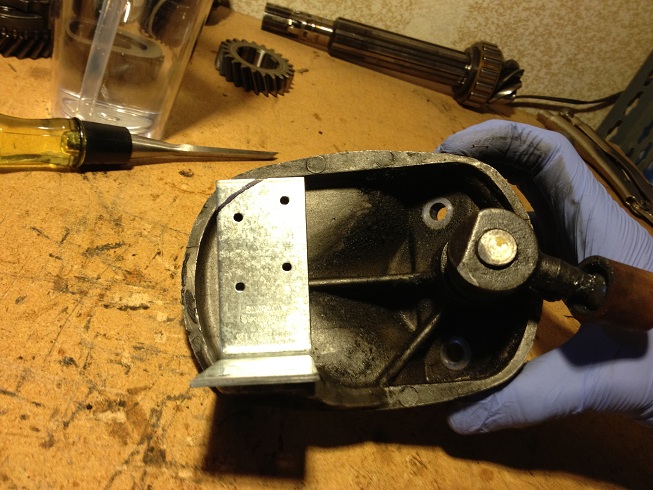
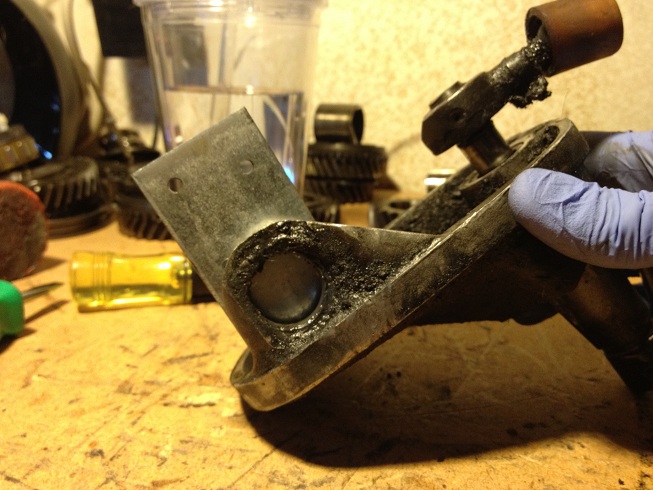
Once its flat against console draw your circle with the sharpie through the existing hole.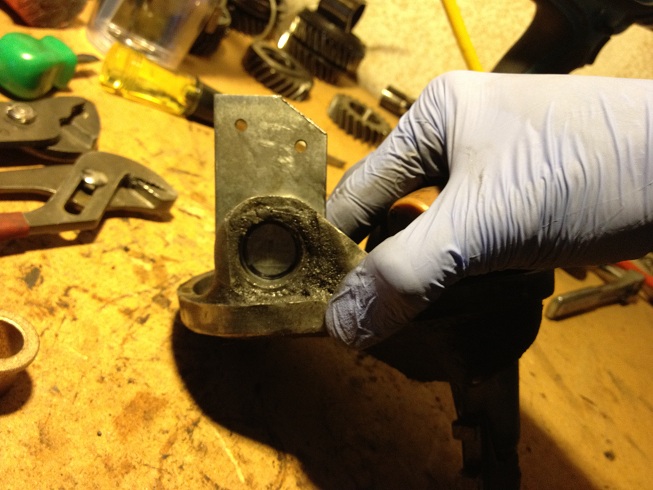
Center punch the hole and drill with your cobalt bit to 5/8”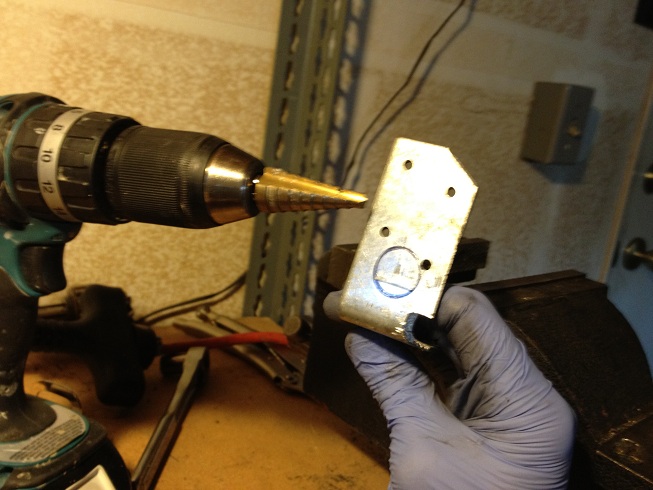
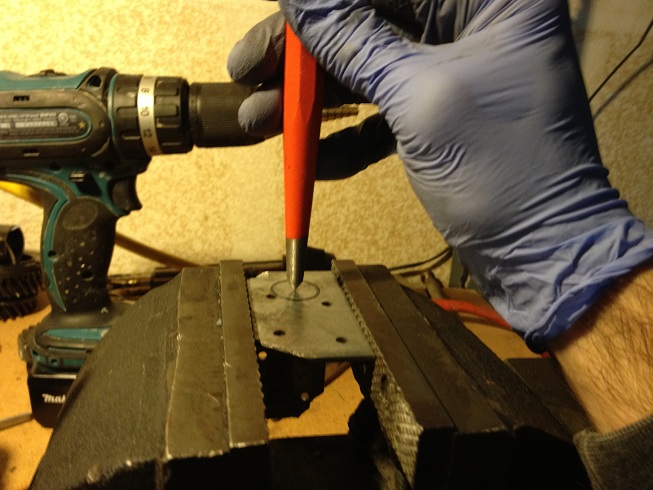
Draw your line around the bushing with it installed in the A33, then dremel a groove. 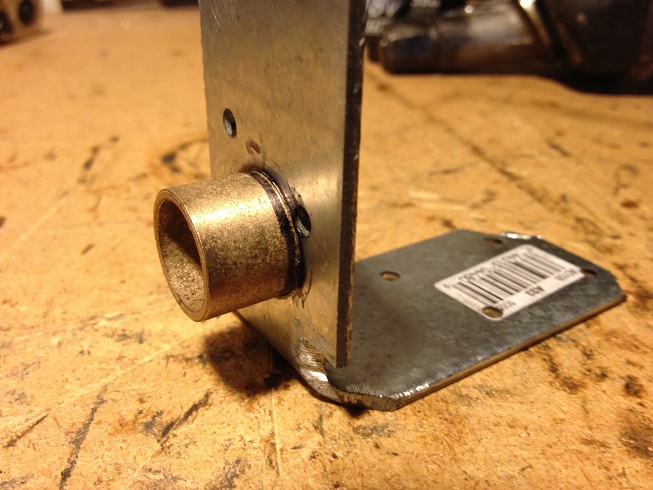
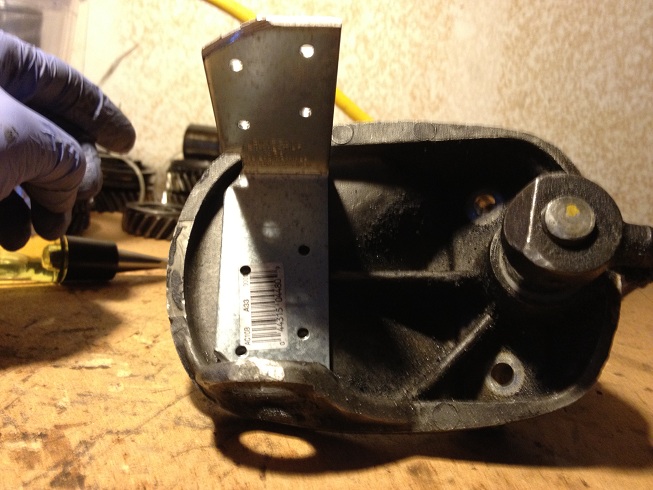
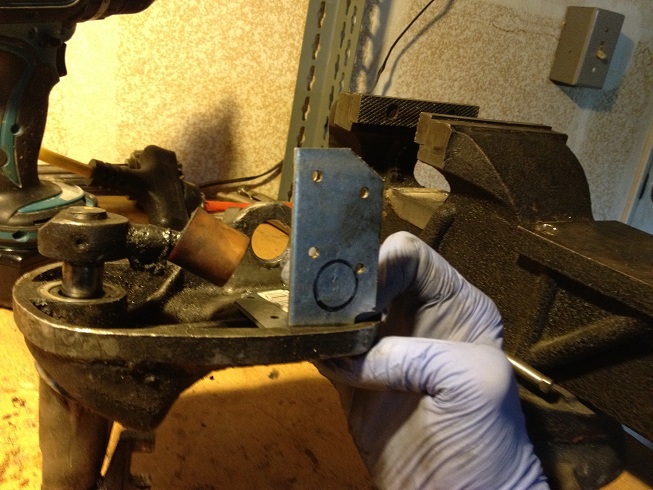
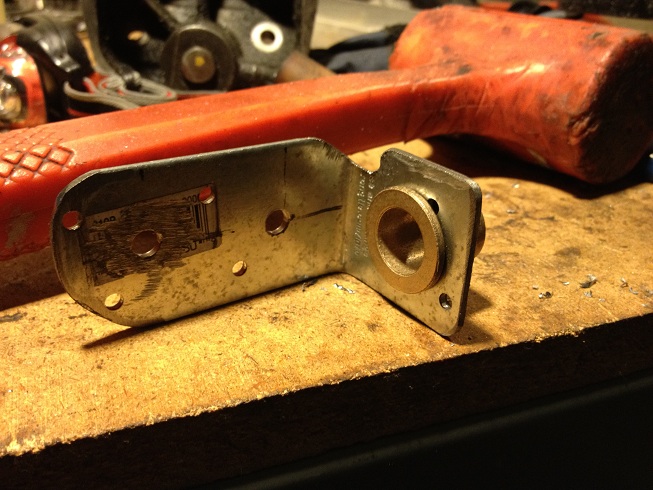
Make sure it all fits, refine the A33 by grinding off the excess top and smoothing out the edges. Also drill out 2 1/4” holes for bolts. 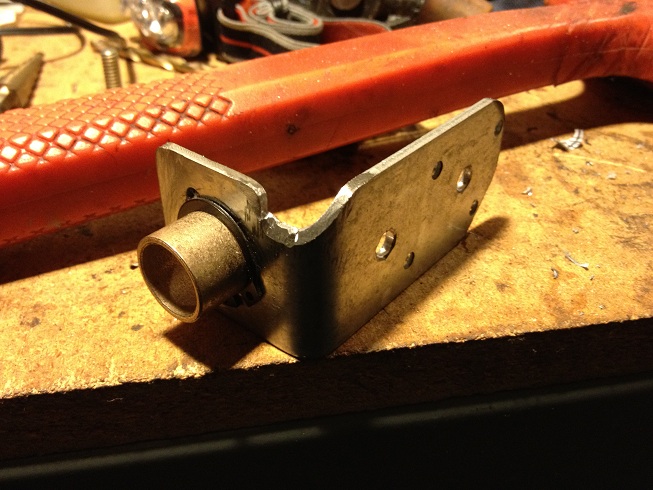
Now follow Rick Ollah's method to get the bronze shift bushing in the front of the console.
http://www.914world.com/bbs2/index.php?showtopic=99331&hl=
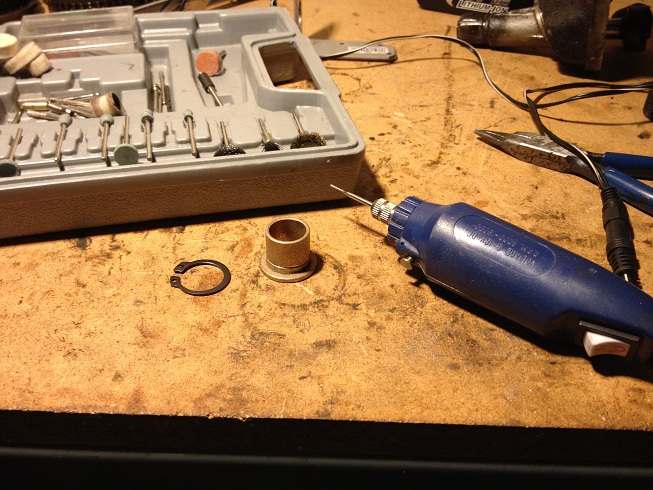
I followed his method, drilled out the console hole to 7/8” inserted the larger bushing sharpie’d where it needed to be flush against the console and cut it a mm short to not protrude out the other side. Then I measured the smaller 5/8” bushing with my micrometer and marked where it extended just past 7/8” bushing so I could cut a groove to add the c-clip (micrometer is used because the bushings are press fit together so measure uninstalled). If it doesn’t make sense then look at the finished pic (I did not take progress pics because I didn’t have my phone handy at the time).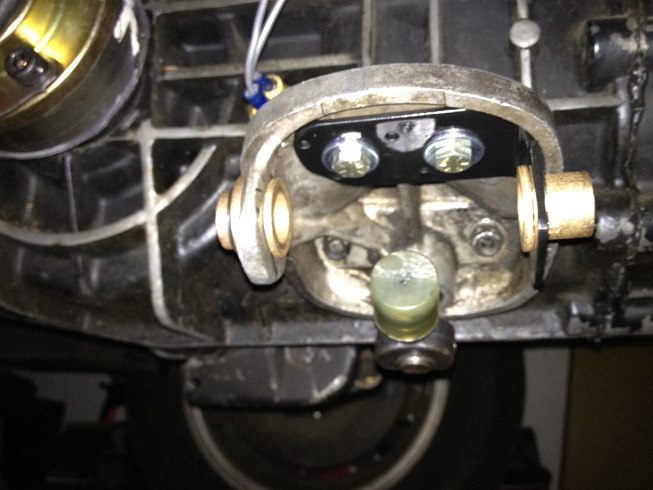
HERE IS WHERE I GOT LAZY AND STOPPED TAKING PICTURES. I can always disassemble and take pictures later if necessary.
Now insert the chromoly rod, through the new bushing and through the A33 piece you modified. Move it through back and forth rotating it to make sure it does not bind and then mark your holes, punch, drill 1/4”, install and check for binding, adjust as needed.
Hone the shift coupler with the dremel so the 5/8 rod fits through, install it all on the console and measure forward and back shifts and mark where the convex hole needs to be drilled (I used a cobalt bit). I also took a mm off of the backside of the shift coupler with a grinder so it did not interfere with the rear bronze bushing.
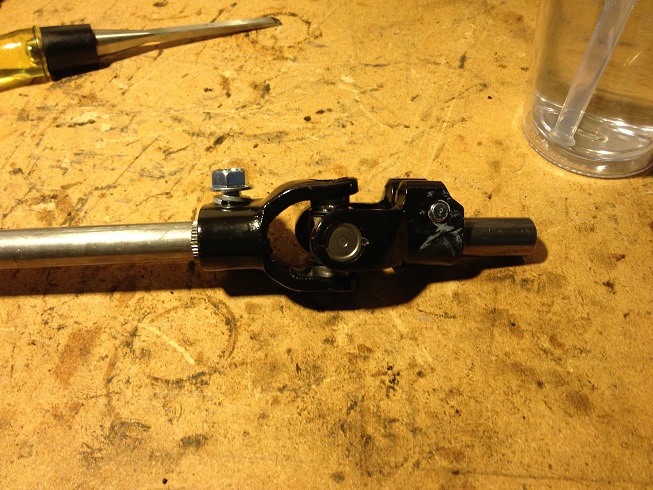
Cut an inch off of your 3/4 weld steel tube, insert a steering shaft on one end and the chromoly on the other, weld together.
Disconnect the shift rod from the shifter and pull it out through the firewall bushing. take a small rounded file and file the convex hole so there is a groove in it. Test fit the u-joint and bolt, if the bolt fits great, if not then file a little more, you want as little play in this as possible, almost snug. Once the bolt fits, tighten it up and install the rod back in the car. Attach it to the shifter, but keep in mind how far in you pushed the rod into the shifter, you need a little room for play because the u-joint will not allow you to pull the rod all the way back, so before tightening pull the rod all the way back to allow the rod to pull out of the connecter a little so the u-joint does not hit the firewall and mangle your bushing.
Once tightened install another 2” shift shaft in one end of the 3/4 steel tube, tack weld it together, and install it on the u-joint attached to the front rod. Go into the car and rest the shifter to the left against the reverse lockout and center the shifter so it is straight up. DONT MOVE IT. Get under the car and by hand on the shift console select 2nd gear, then move it to neutral from second leaving the shift fork in neutral alignment with 2nd and 3rd gear (ie if you were to push the shift selector forward it would select 2nd, back it would select 3rd).
Insert your last shift shaft into the u-joint which should be attached to the rod in the shift console, align the rod and shaft, mark with a sharpie, cut, weld. done.
Now enjoy the CLICK you get when you select a gear, incredible! 
Posted by: shoguneagle Jun 2 2012, 05:00 AM
Very nice job. Will save since i see the possibility of putting a bronze bushing at a later date. Thanks.
Steve
Posted by: Lennies914 Jun 2 2012, 08:13 AM
Nice write up. I would definitely go this route if I wasn't going to use the suby box.
Posted by: Travis Neff Jun 2 2012, 09:06 AM
Vote for classic!
Posted by: speed metal army Jun 2 2012, 10:20 AM
More pics!
Posted by: slothness Jun 2 2012, 12:18 PM
I should have a chance on Tuesday to take it apart and get more pics. I'll follow up on this.
Posted by: TargaToy Jun 2 2012, 08:11 PM
Thanks, Mark. I love pictoral how-to's. Nicely done.
I presume you're using this with a stock shifter. Has anybody tried this mod in conjunction with a Rennshifter?
Posted by: slothness Jun 2 2012, 09:17 PM
Thanks all, and thanks to James for his awesome ideas. I would assume this would work with a Rennshifter since this particular setup is entirely stock from the inside, including the center tunnel shift rod, only a minor modification to the conical hole on that rod. However that leaves the tunnel shift bushing open to the elements which is less desirable for most. Ive found a few after market boots which look like they will fit over that area to protect the bushing but the cost seems pretty high being around $35-40 just for a boot.
Posted by: ThePaintedMan Jun 3 2012, 08:26 PM
Mark,
This is really nice! Though my fabbing skills are getting better, I'm in no position to attempt something like this myself. What would you charge for a setup like this?
Posted by: slothness Jun 5 2012, 06:00 PM
Well, since I didn't take those progress pictures, I took the kit apart and took more pics of that it all looks like:
Here is the whole kit out of the car, but put together.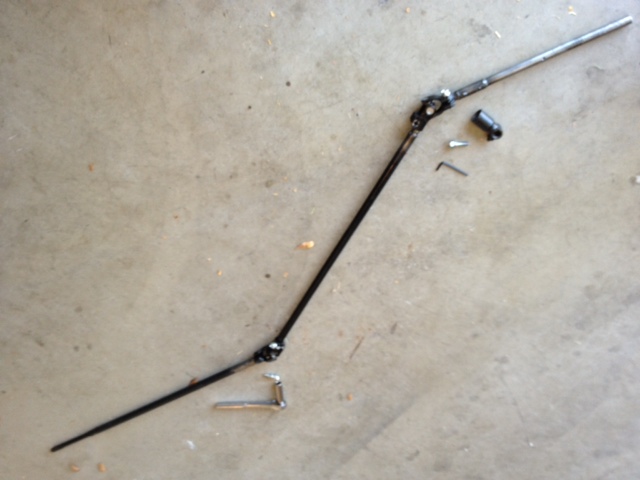
Here is the kit apart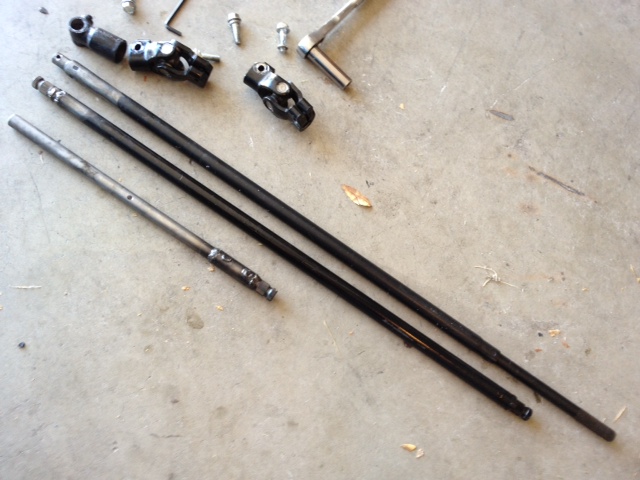
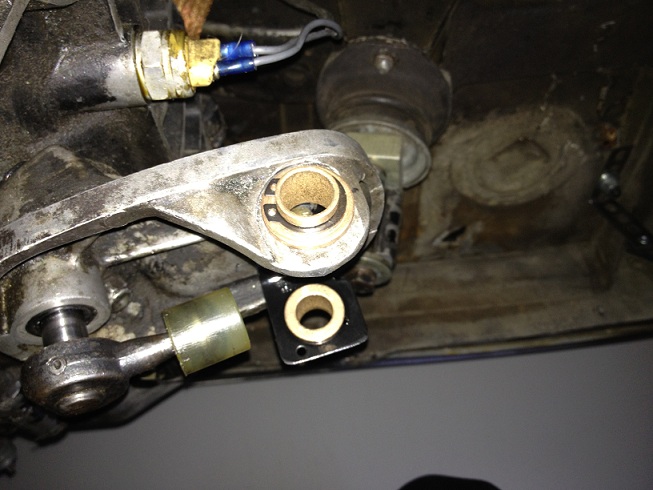
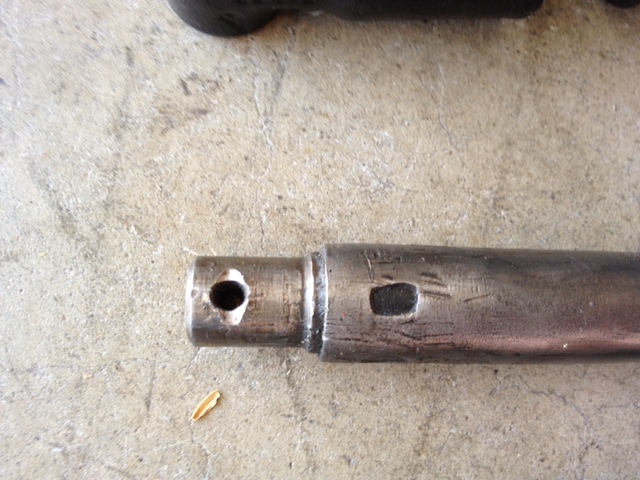
close up of shift console rod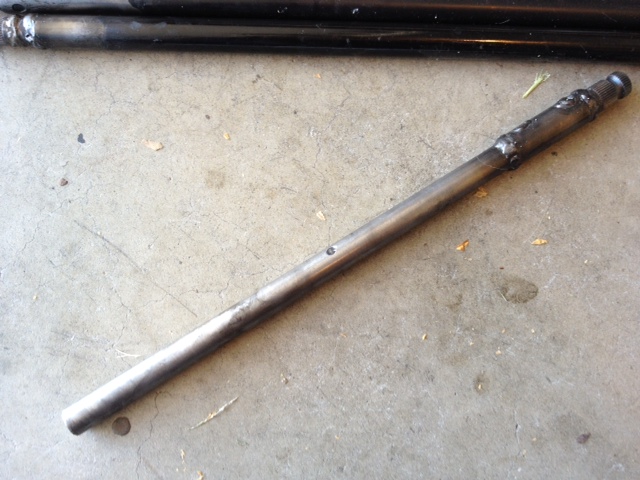
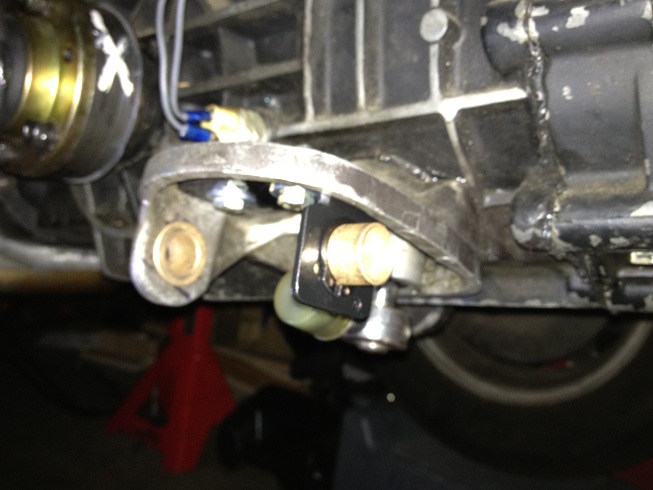
back of shift coupler, you can see where I shaved a mm off for the bronze bushing clearance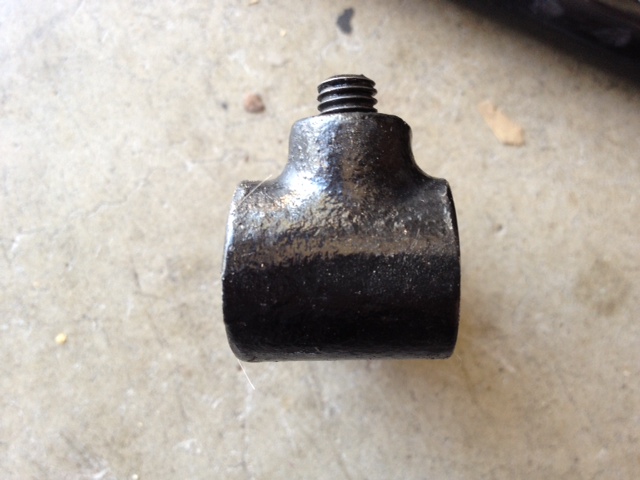
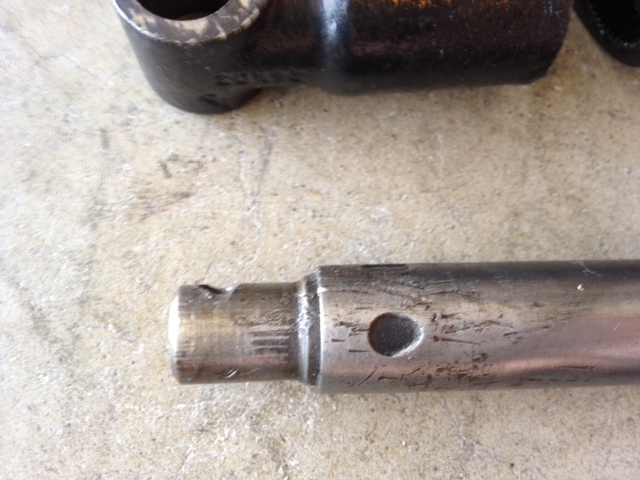
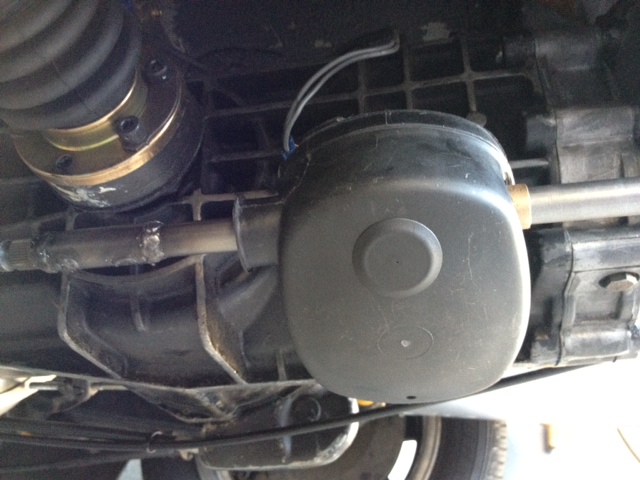
This is the end of the tunnel shift rod (which protrudes out of the firewall). I filed the convex hole rounded so the bolt which inserts into the steering joint can be inserted and tightened. I did have plans to remake this rod but due to the unusual size I decided not to bother because changing the size would require changing the firewall shift bushing and that was off the plate for me. Later I do plan on drilling out the welds, removing this end piece and replacing it with the last steering yoke I have, but for the time being this setup works great.
When filing over the hole do very little and keep checking it. If there is slop when you attach it to the u-joint and insert the bolt you might be kinda screwed unless you torque the hell out of that bolt to cinch it down. I torqued the hell out of it anyway and there is no additional movement. 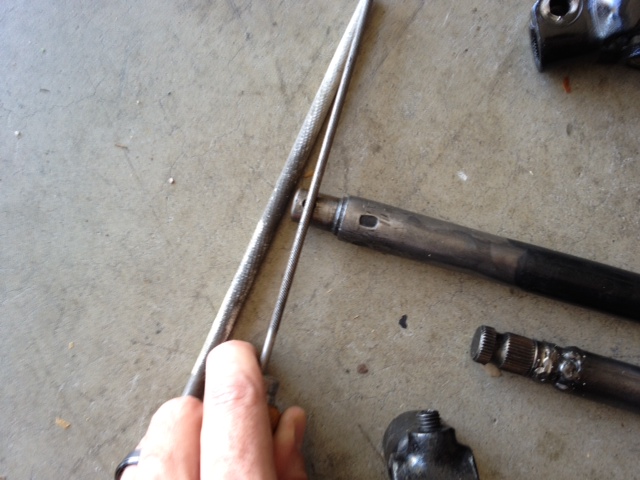
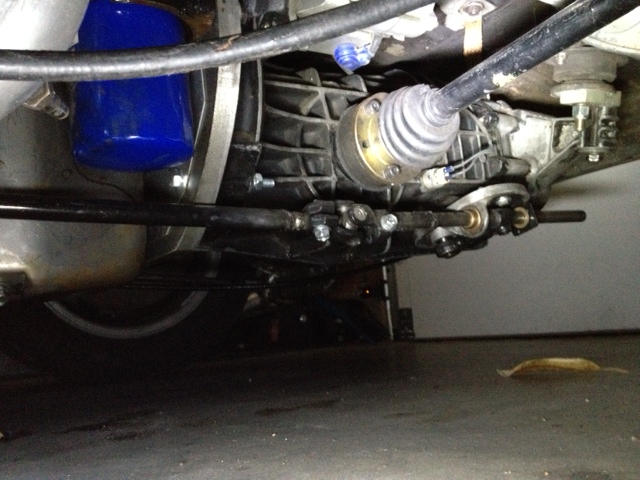
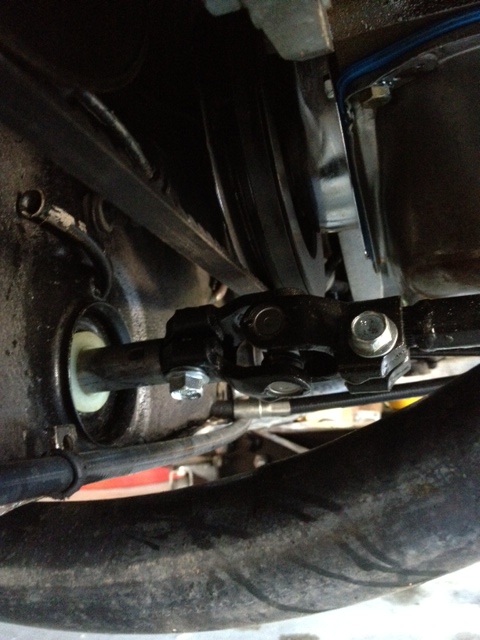
Here is a straight shot to from the console to the firewall. Leaky seals!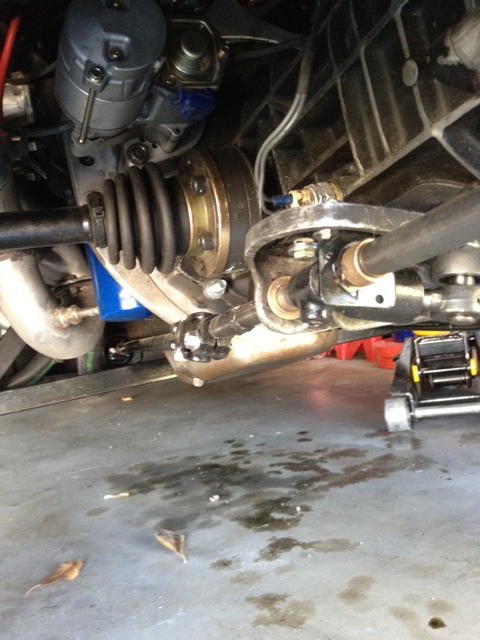
Heres the attachment at the firewall. 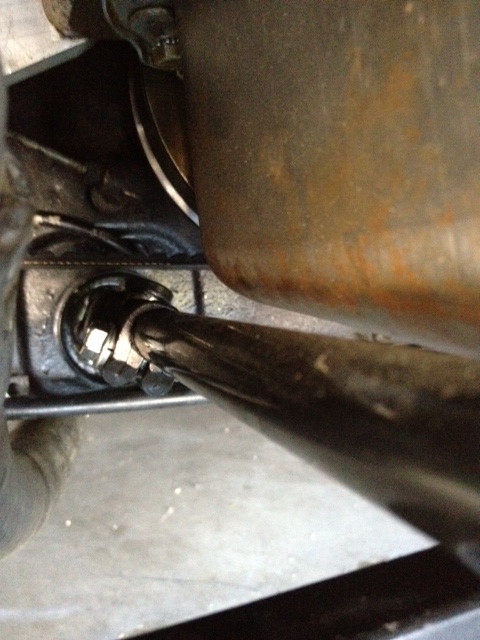
Here is the shifter straight up resting against the reverse lock out springs. This was my starting point when I adjusted the rod for the first time, testing the shift pattern in 2nd and 3rd gear. 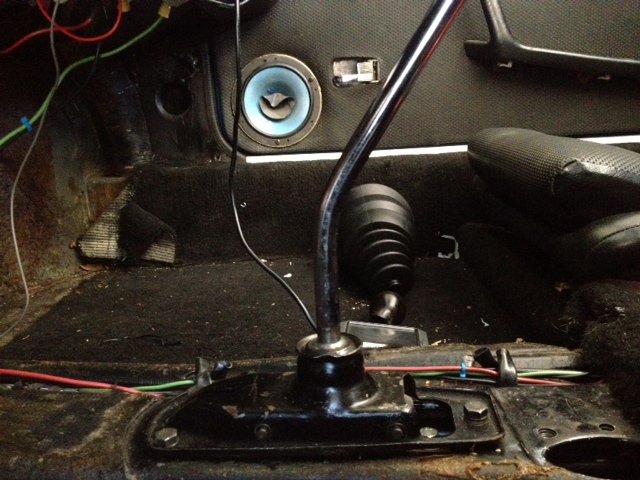
Not sure how to embed videos, here's a link shifting through gears
http://youtu.be/QMBM-bMWz6Q
Posted by: slothness Jun 5 2012, 06:03 PM
Oh, and I'd love to help with fabricating this stuff, but with a 7 month old and a 120 mile commute I'm lucky I get a Tuesday night to be off the clock for a couple of hours. 
Posted by: TargaToy Jun 5 2012, 07:46 PM
So slick. The youtube clip is great.
Any plans to develop or modify a cover for the final part of the action at the trans?
Posted by: speed metal army Jun 5 2012, 10:09 PM
Making one!
Ive got a bunch of 914 steering ujoints..They should work!
Posted by: slothness Jun 6 2012, 12:02 AM

So slick. The youtube clip is great.
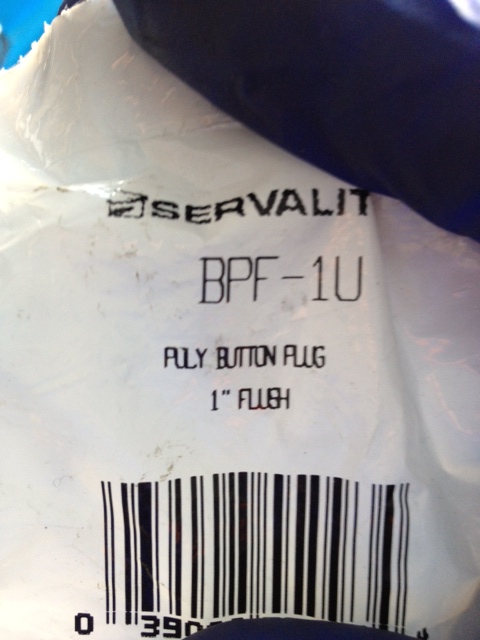
Any plans to develop or modify a cover for the final part of the action at the trans?
You read my mind. Went back to the bronze bushing section at Osh, found a 1 inch poly plug.
My boot is all crusty and weathered, JWest sells some new ones for $20, I'll have to pick one up when I order the trunk hinge kit.
Posted by: slothness Jun 6 2012, 12:55 AM
Making one!
Ive got a bunch of 914 steering ujoints..They should work!
Hell yeah! Those were the big ticket items in terms of cost, now you just need the odds and ends and some time to fab up some parts! If you get a chance post progress. Are you running 4, 6 or 8 cyl?
I know 6 uses a straight bar too but with the 4 your either going to bend one like Mike did with his rotary for the http://www.914world.com/bbs2/index.php?showtopic=113156&st=100, or cut up your existing -4 bar.
Posted by: JWest Jun 6 2012, 07:52 AM
Good job! I wish I could still sell these, but it just did not work out. Sure does work nice, though.
Posted by: slothness Jun 6 2012, 10:23 AM
Good job! I wish I could still sell these, but it just did not work out. Sure does work nice, though.
Wow thanks James!

I absolutely love this mod, and it's changed my confidence in the car when sitting at a red light, no more missed shifts either. I'm just trying to convince my wife to get me a RennShift for father day, then I'll be all set.
Powered by Invision Power Board (http://www.invisionboard.com)
© Invision Power Services (http://www.invisionpower.com)