Printable Version of Topic
Click here to view this topic in its original format
914World.com _ 914World Garage _ Sasquatch Part III Audi 1.8t transplant...
Posted by: kg6dxn Jun 10 2012, 05:41 PM
I have A.D.D. I admit it. I also can't leave well enough alone. I got really motivated by Andrew Dalen and seeing a 914 with Subie power driving to WCR12 from Idaho. What a beautiful car...
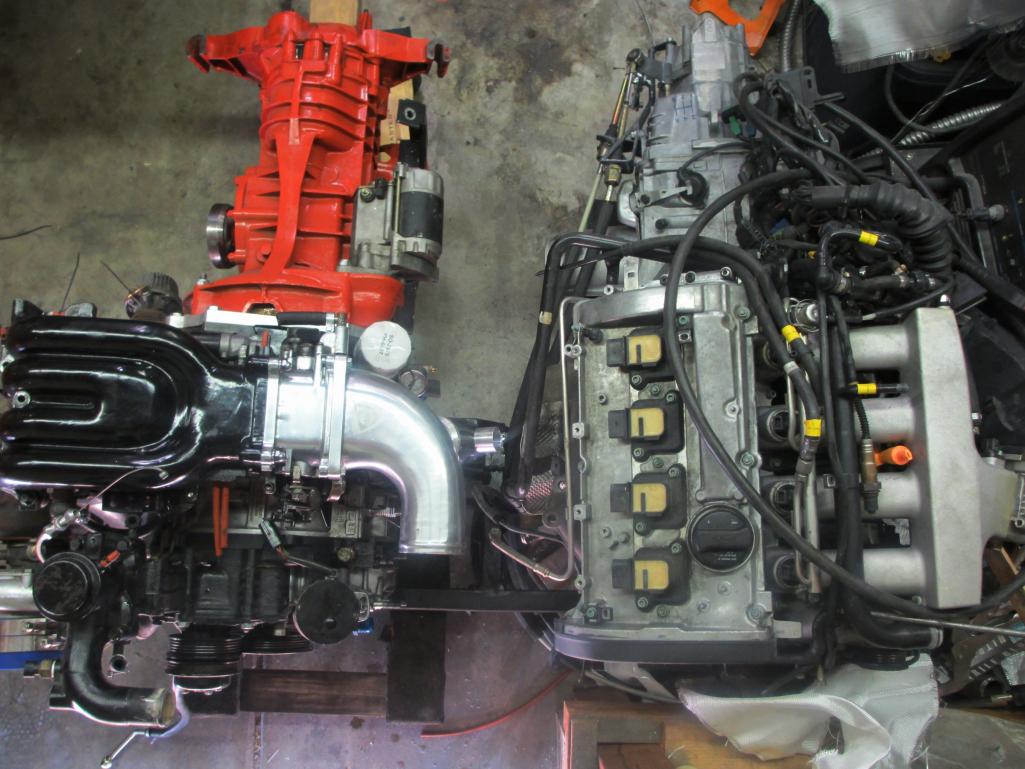
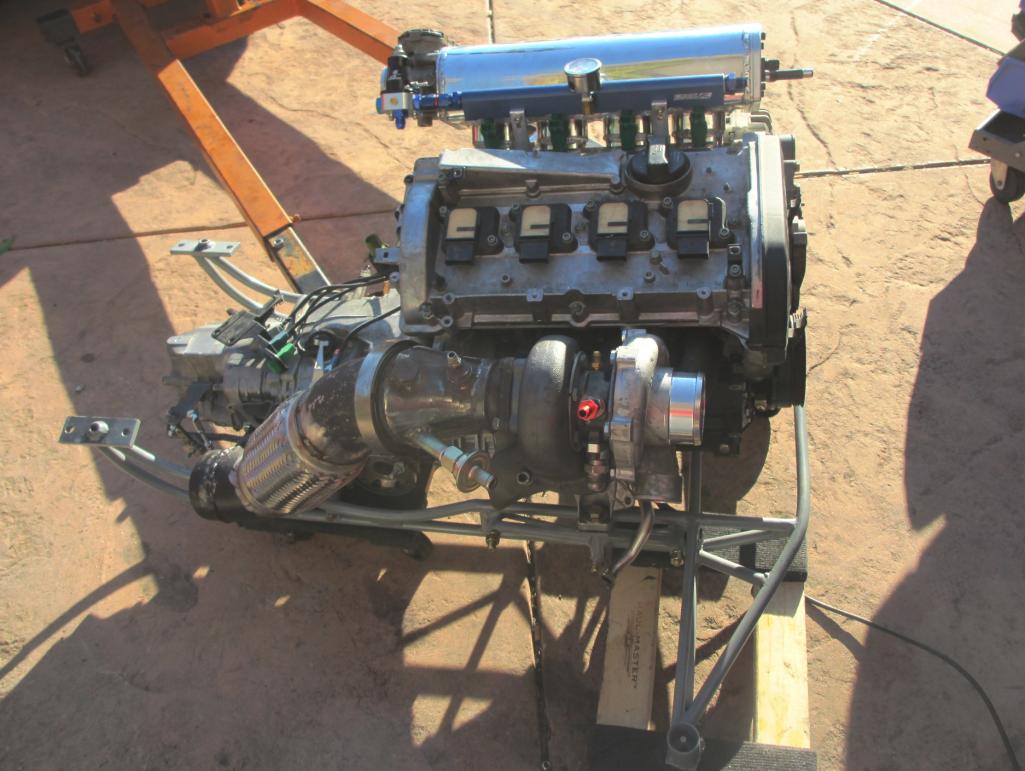
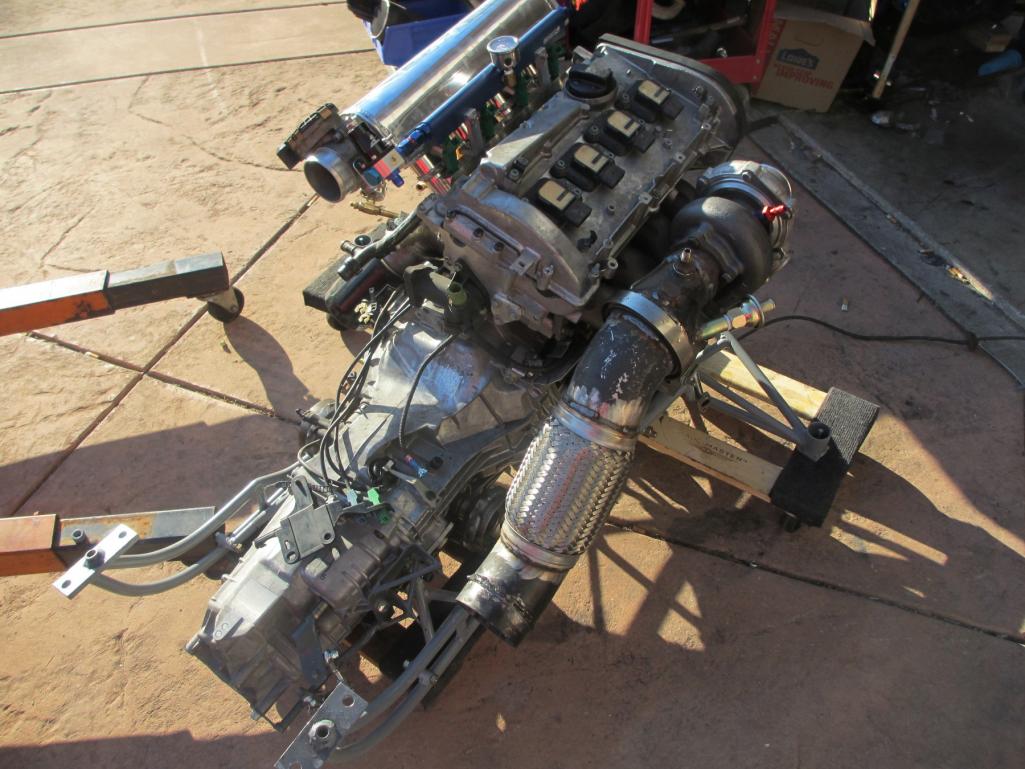
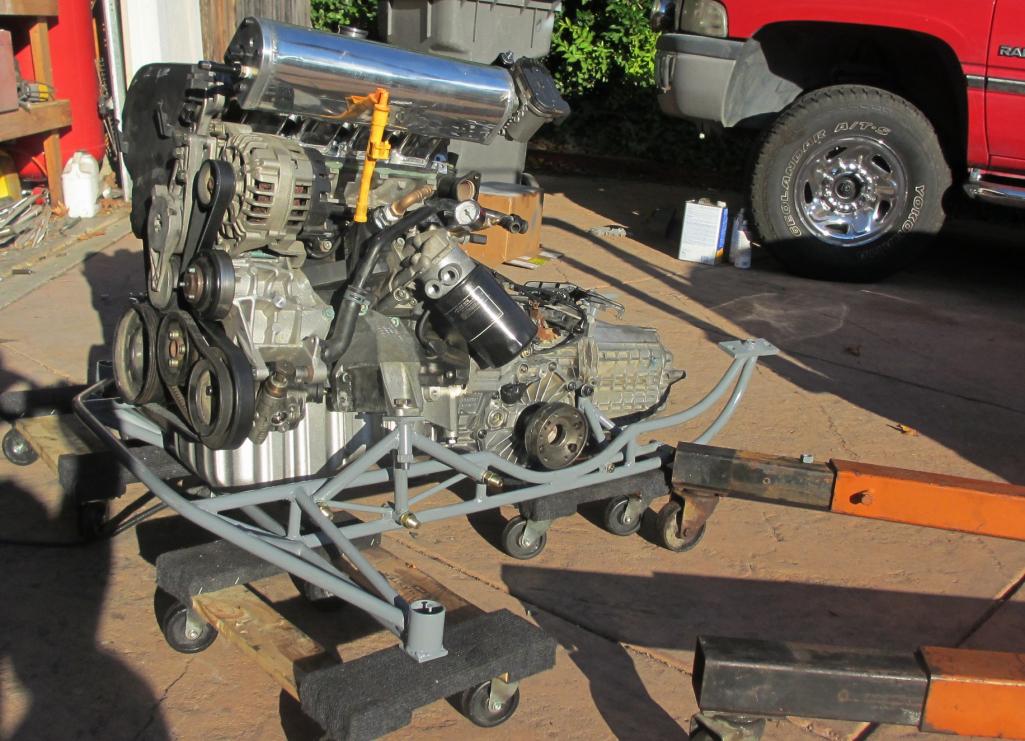
I stumbled on a steal of a deal for a 2001 Passat 1.8t, Audi ATW engine and 5 speed transaxle. Long story short and here you go. New engine cleaned and ready for fab time. The exhaust and turbo have been removed before power washing.
Here is a link to Part I
http://www.914world.com/bbs2/index.php?act=ST&f=2&t=113156&st=0#entry1396734
Part II
http://www.914world.com/bbs2/index.php?showtopic=172455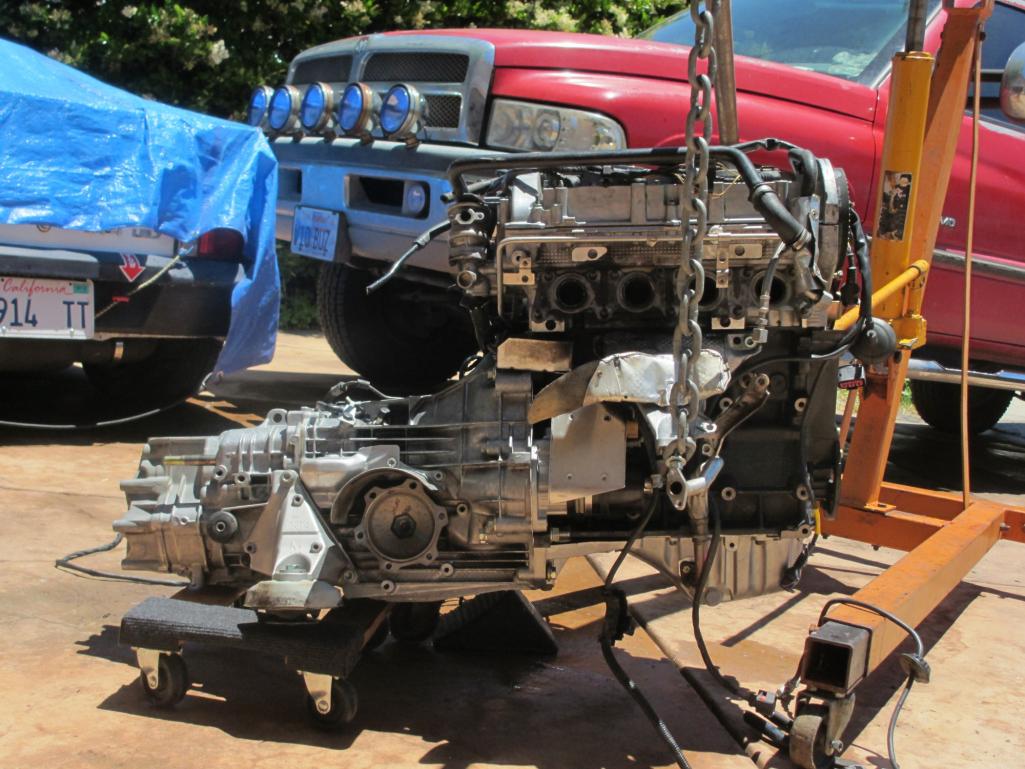
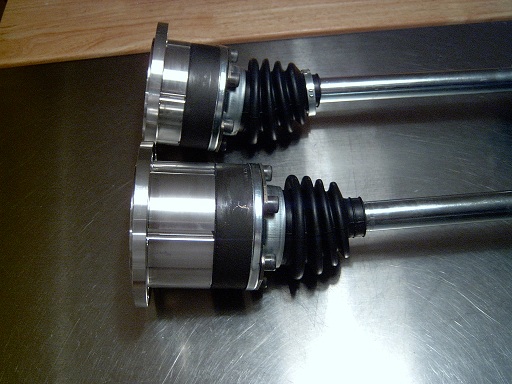
Here is the challenge. The transaxle. Either I fab an adapter, Fab an axle to take 1 Porsche CV and 1 Audi/VW CV or Replace with Boxster tranny, that will: Bolt right on, Shifter is cheap and available and requires less fab time. I'm leaning to the Boxster due to the 100mm Porsche CV flange. The Audi is 114mm.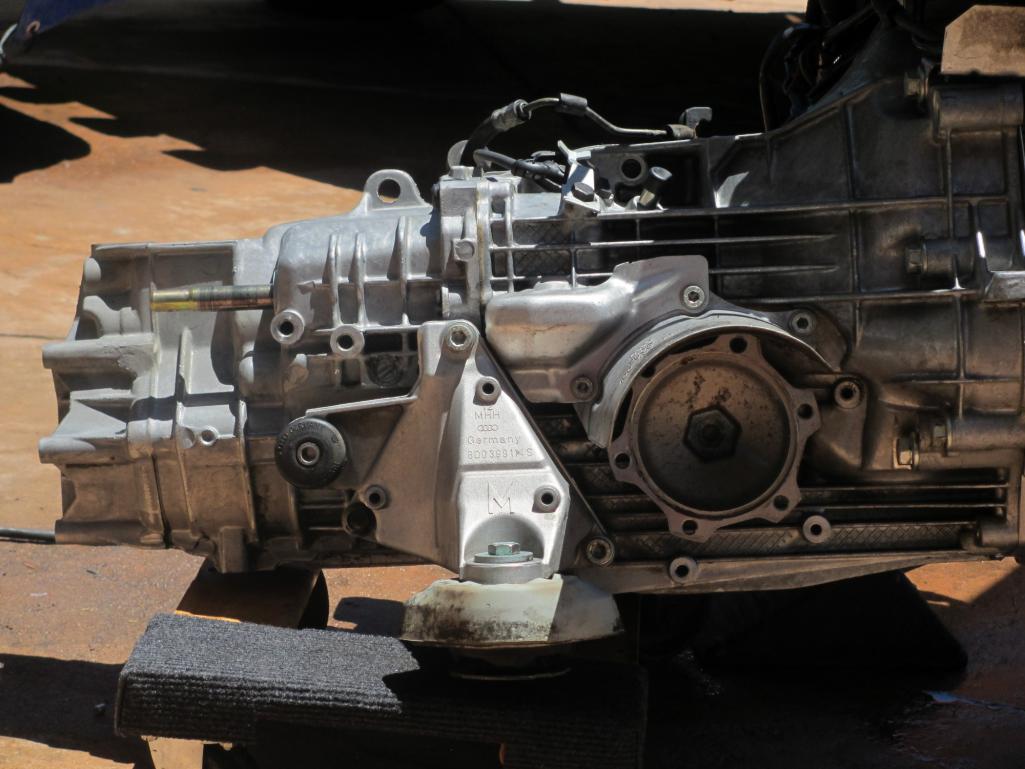
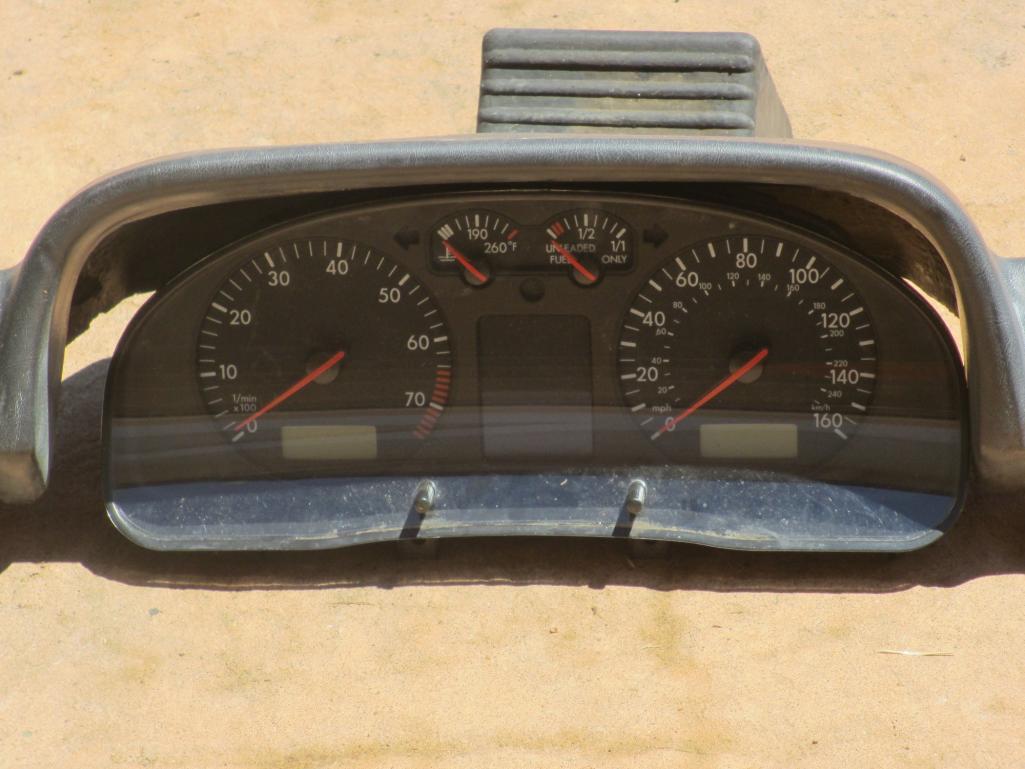
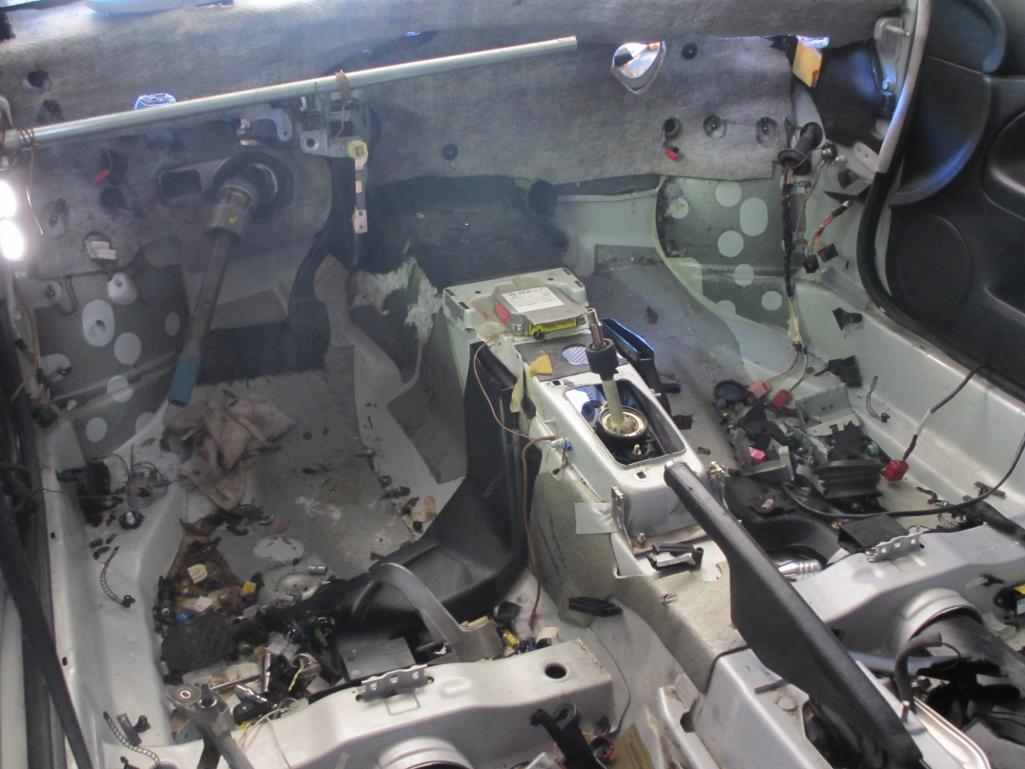
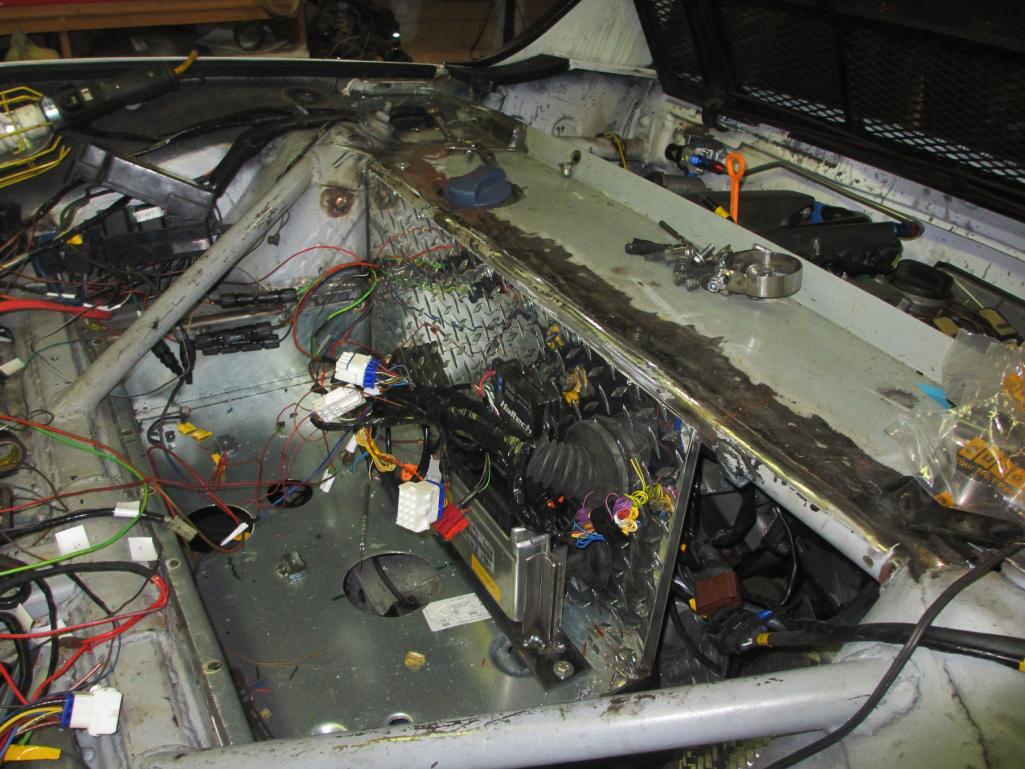
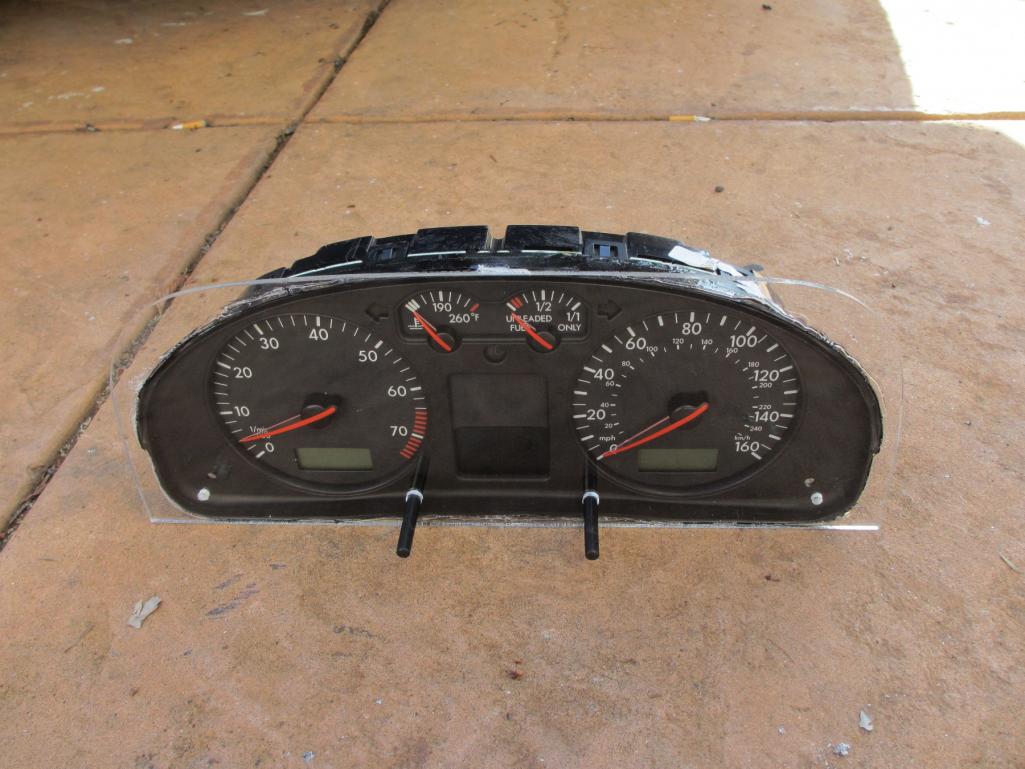
This is whats left of the wiring after the car gets gutted. The ECU and gauge cluster have a symbiotic relationship. They work together and have to stay together to run. It looks like it will fit nicely into the stock location. I may have to adjust the column lower and build an trim ring around the cluster.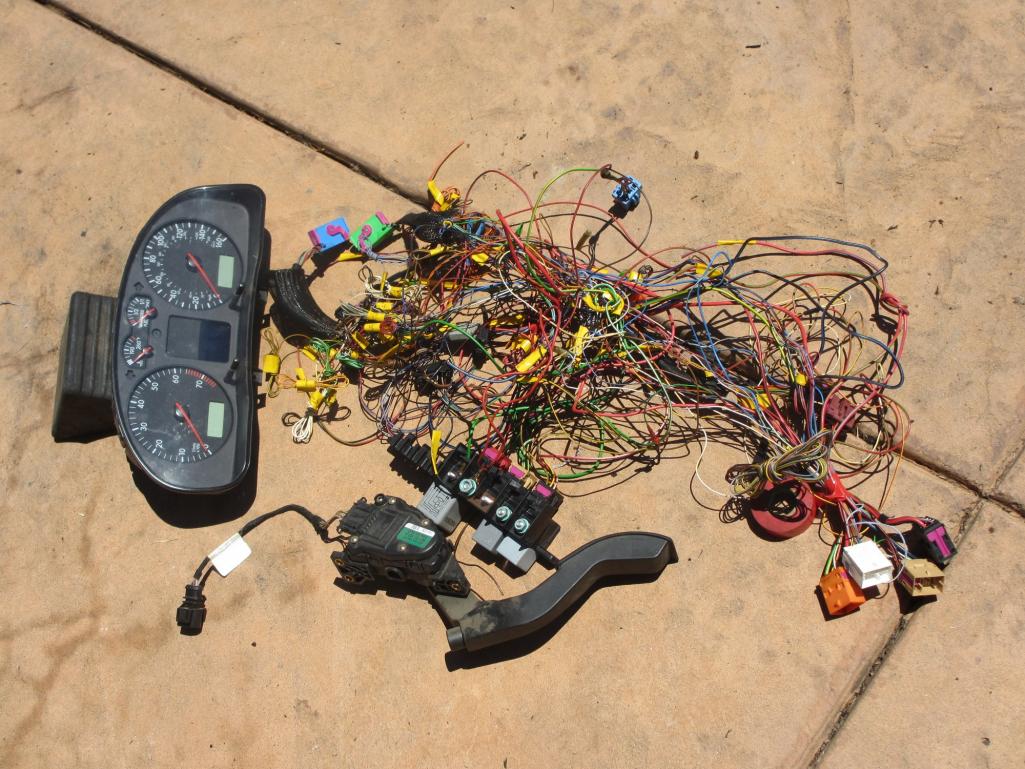
Posted by: kg6dxn Jun 10 2012, 05:44 PM
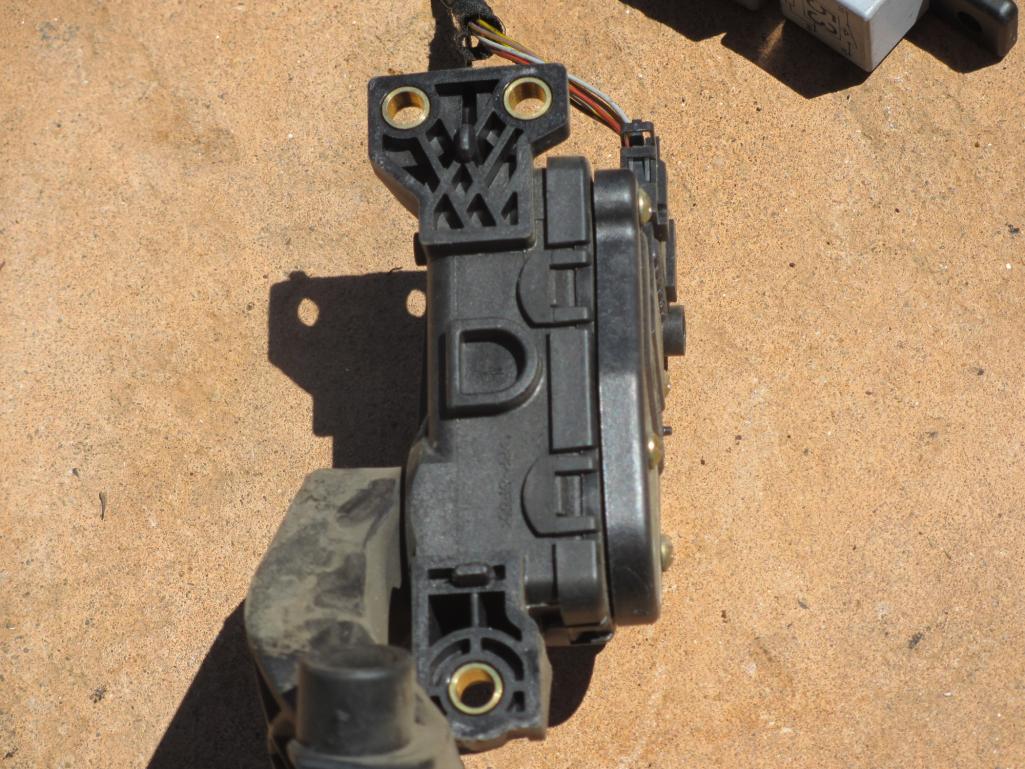
Here is the Electronic Gas Pedal... Pretty cool. Should be pretty easy to build a bracket for it...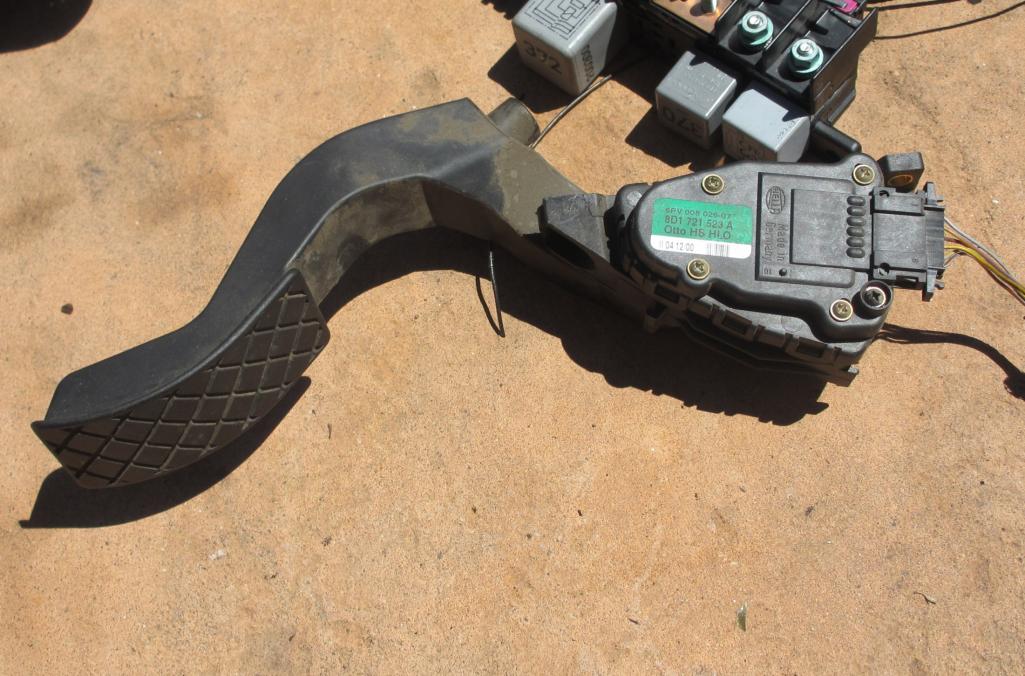
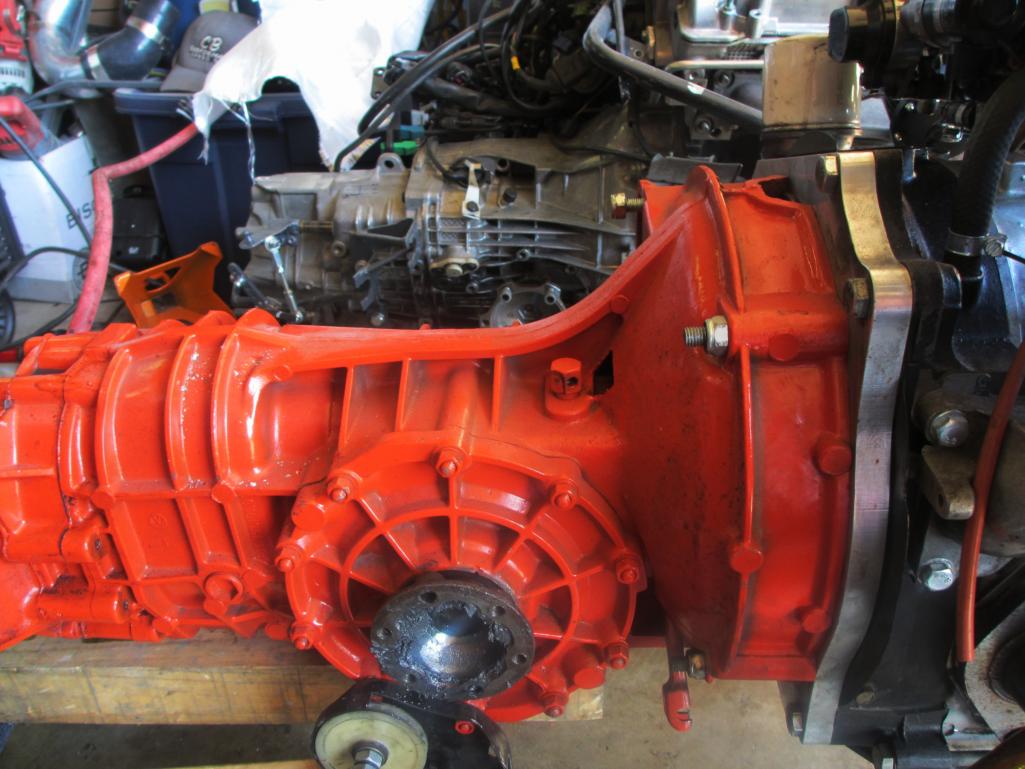
Close up of the tranny flange. The Audi CV looks like it has a thicker shaft too.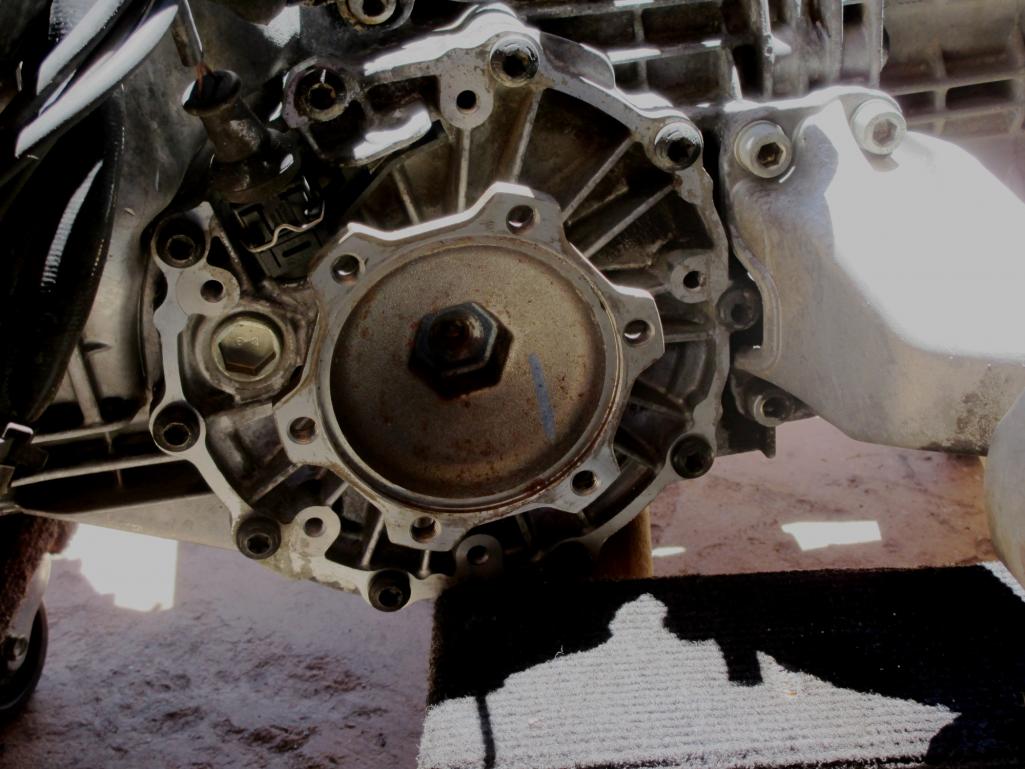
Posted by: kg6dxn Jun 10 2012, 05:50 PM
So now I need to junk this Passat. Last time I junked a car was 20 years ago. Will they pick up a car or do I have to deliver it?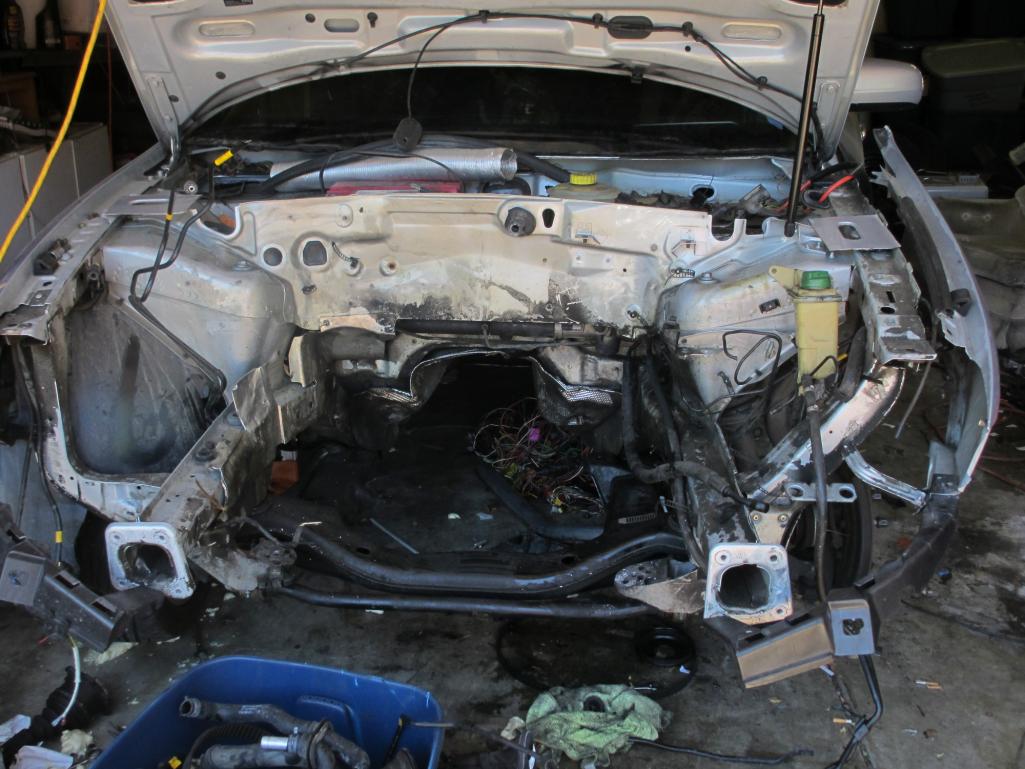
I also need to stock up on some DOM tubing and stuff. Think my welding supplies are good for now. Might need a bigger bottle for the MIG.
My back feels better too... But now I'm exhausted... 
Posted by: Dr Evil Jun 10 2012, 05:52 PM
![popcorn[1].gif](style_emoticons/default/popcorn[1].gif) Hmmmm
Hmmmm 
Posted by: kg6dxn Jun 10 2012, 05:55 PM
 Hmmmm
Hmmmm  Engine is 24" Tall by 24" deep...
Posted by: andys Jun 10 2012, 06:11 PM
I believe you can swap out the tripoid transaxle flages for the ones that are compatible with the Porsche CV. I used to know this stuff from memory, but......... On mine I went from tripoid to Porsche by machining my own adapters, but I also widened the bearing hubs. Keep in mind, the flanges on that 012 trans may not be symmetrical about the centerline of the trans; they weren't on my 01e. Inseted of goofing with axles, etc, I simply mounted the engine/trans off center by about 3/4".
Andys
Posted by: Tom Jun 10 2012, 06:13 PM
Mike,
Glad to hear your back is feeling better. Man, you sure like a challenge, don't you? Looking forward to seeing how this works out, not that I would do it myself.
Good luck to ya,
Tom
Posted by: kg6dxn Jun 10 2012, 06:51 PM
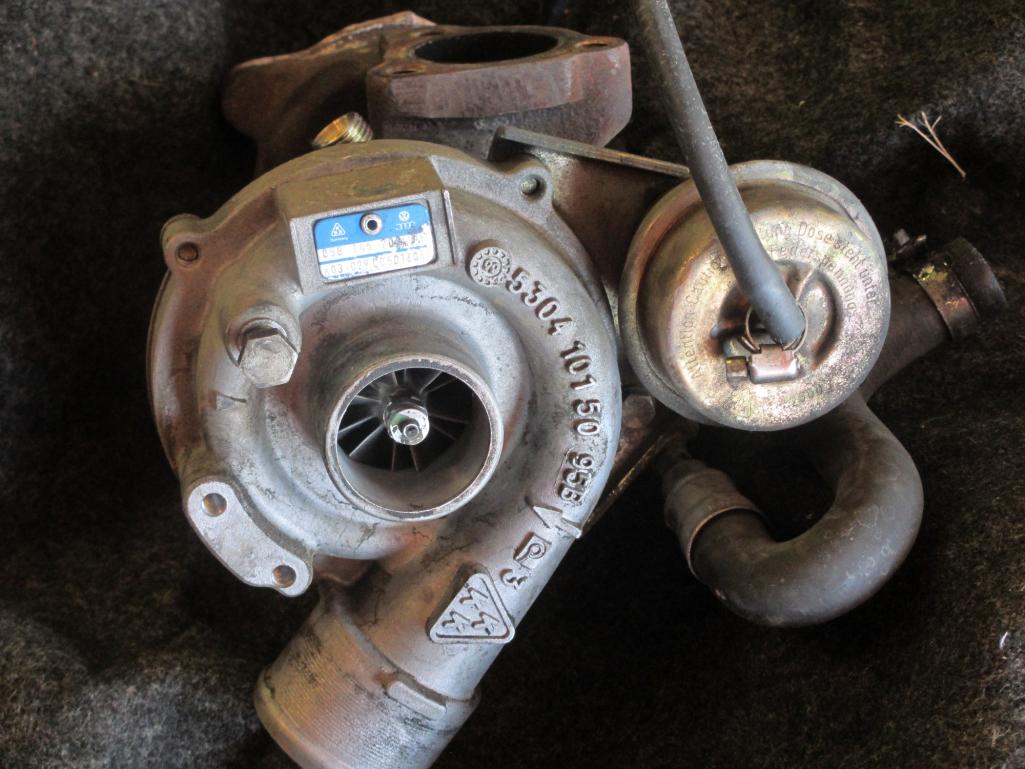
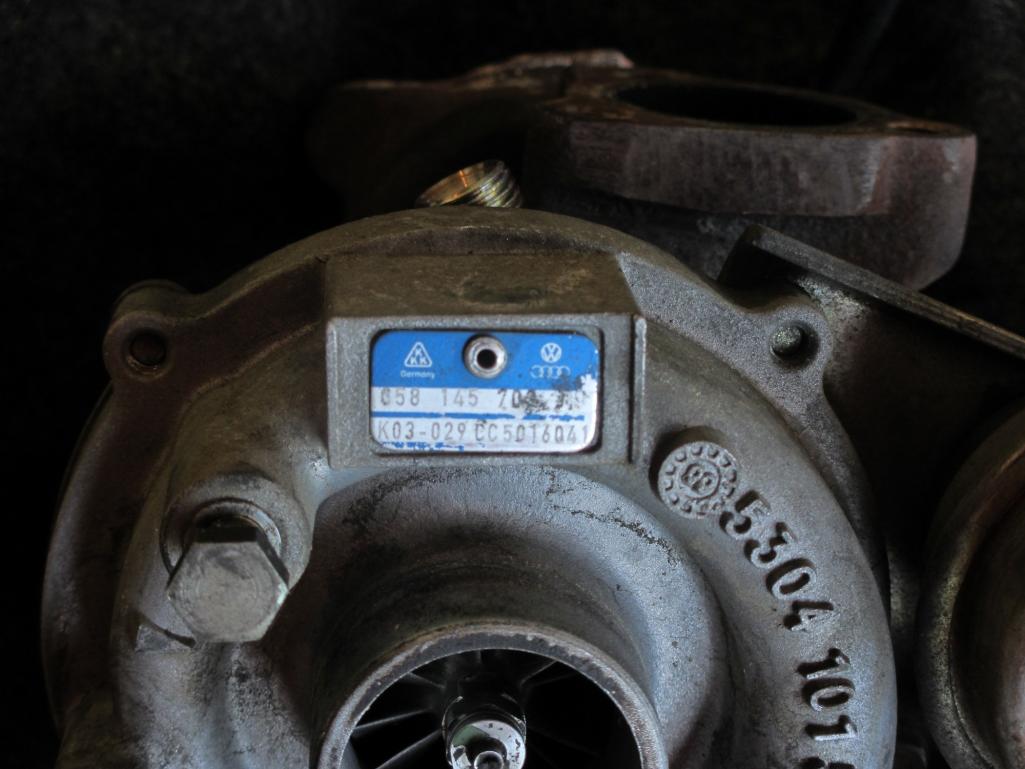
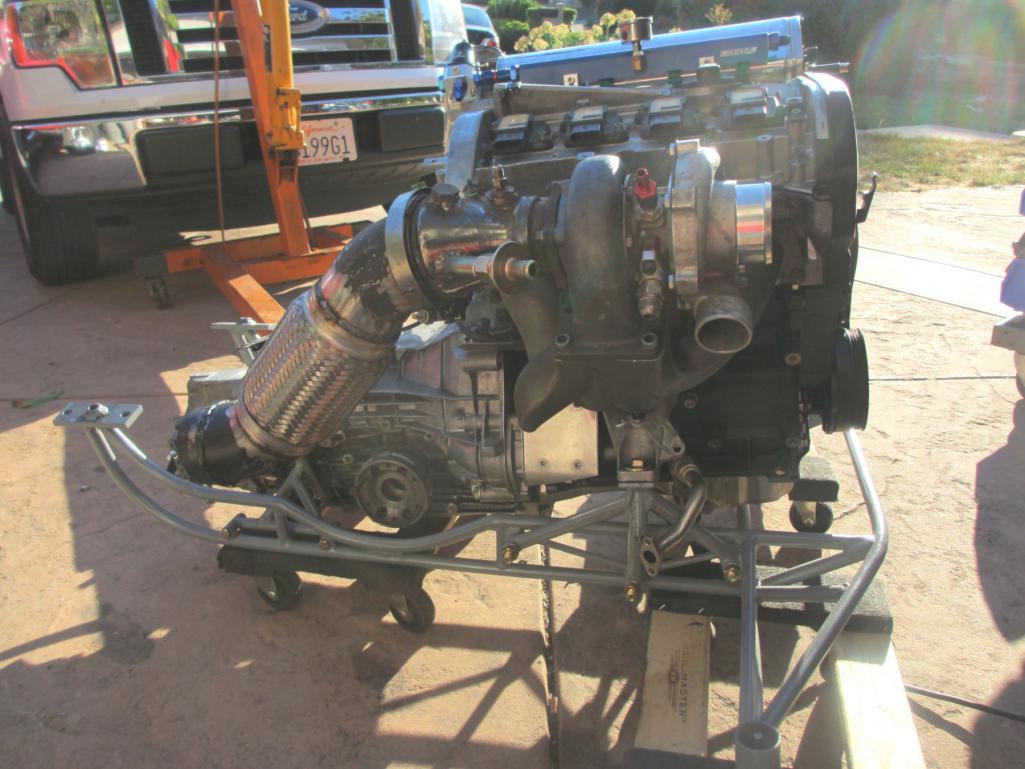
Here is the stock K03 turbo. It hangs from a chincy looking cast iron manifold. There are high flow cast replacement manifolds cheap. A K04 is a bolt on upgrade for this turbo. Bigger I guess... More better power 
The stock dump/CAT pipe is 4" OD. Looks like connecting to my 4" exhaust is easy. I picked up this 4" flex too. A V band on one side and done. I will gut the CAT and shorten the chamber after I get to engine in the car.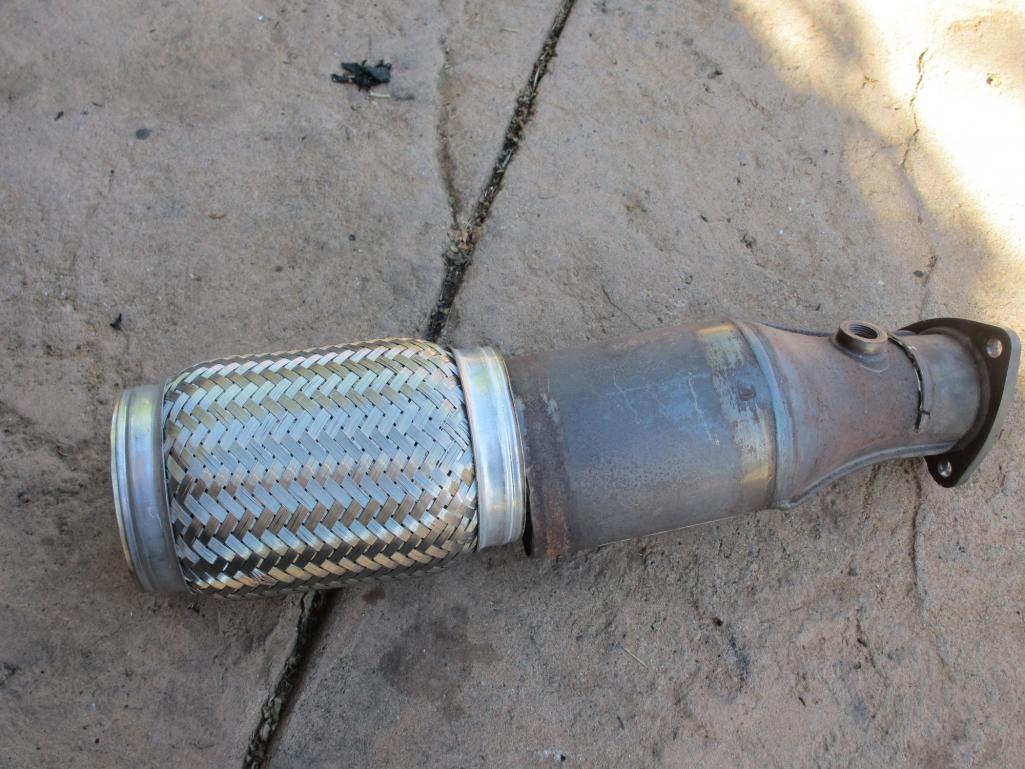
Ever wondered what was inside? Is this platinum? Should I recycle it?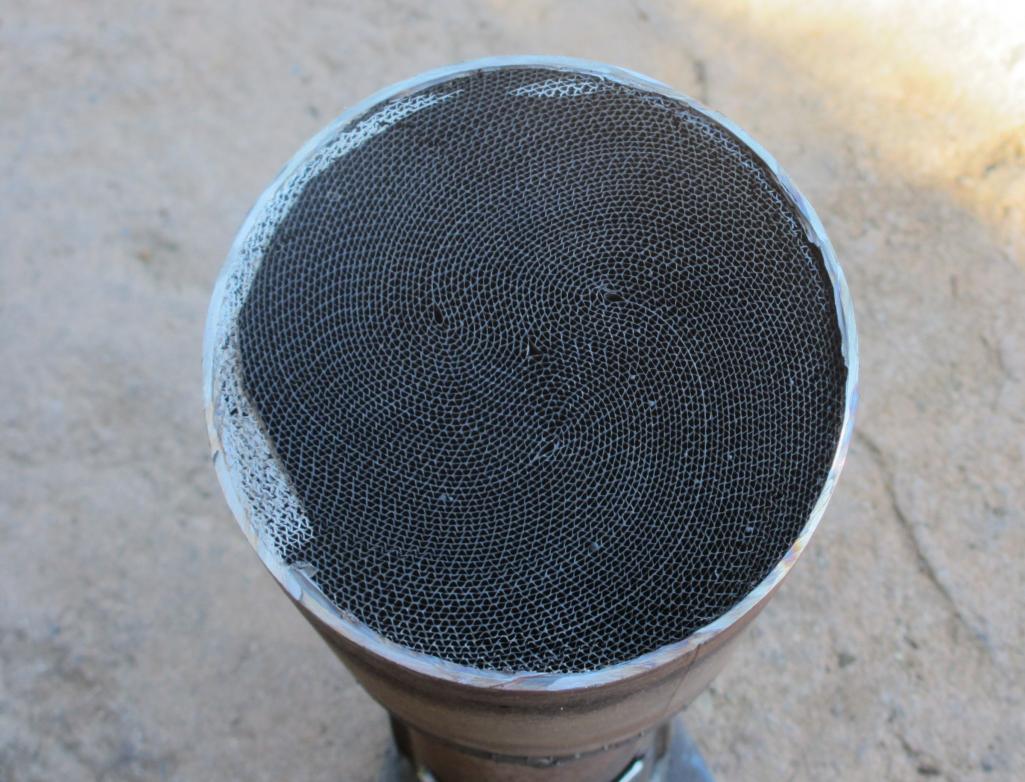
Posted by: kg6dxn Jun 10 2012, 06:56 PM
Here is a DAPO mod to boost spring pressure. You shorten the rod by bending a "Z" into the rod. This one is a "V" and bound on the edge of the canister. This boost dump would be lees predictable and may suffer from boost creep or slow dump. Do it right or don't do it...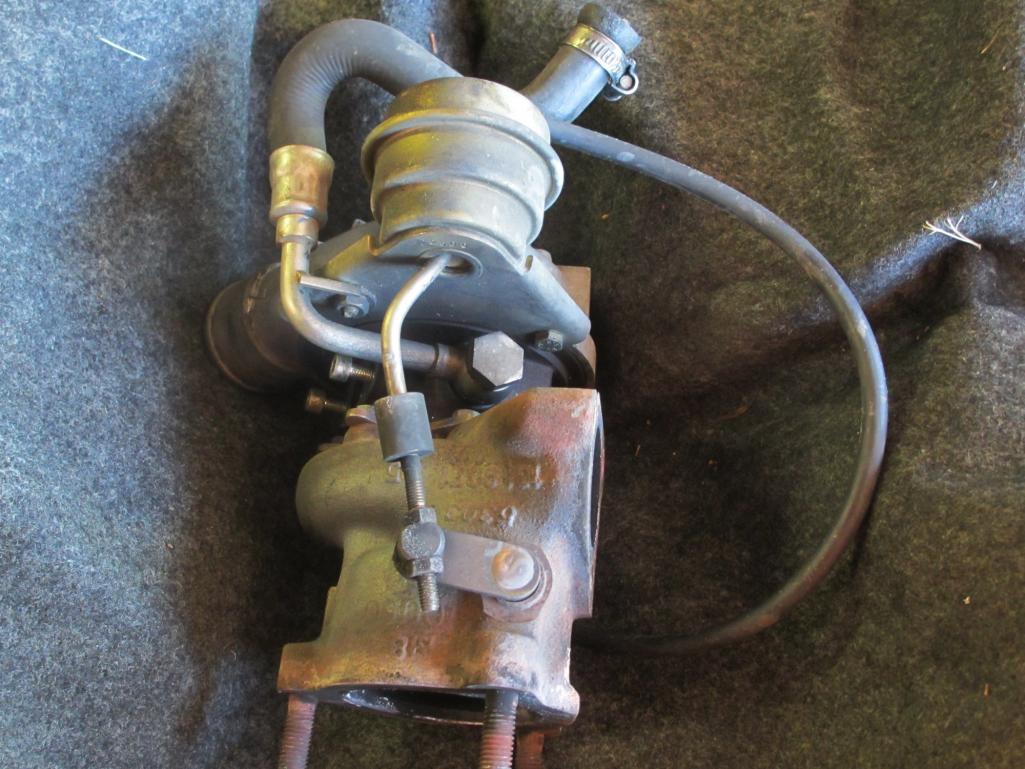
Posted by: okieflyr Jun 10 2012, 07:01 PM
Years ago I had REVO flash the ecu to eliminate the cluster and a few emission control points. When I first converted to the 012, I had custom axles with the tripoid inners. When they started to wear, I had flange adapters made that equalized the output offset and allow me to use 944 joints.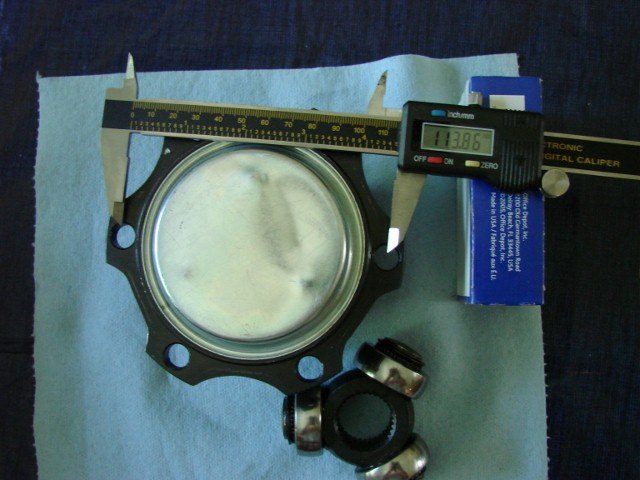
Posted by: kg6dxn Jun 10 2012, 07:06 PM
Years ago I had REVO flash the ecu to eliminate the cluster and a few emission control points. When I first converted to the 012, I had custom axles with the tripoid inners. When they started to wear, I had flange adapters made that equalized the output offset and allow me to use 944 joints.
That's exactly what I would need. Got any drawings?
Posted by: okieflyr Jun 10 2012, 07:06 PM
I do. Give me abit to find them though.
My setup fits ok top tp bottom, but some metal fab or removal will be in order for the rear of the engine. I did my VW 1.8t using a self-made crossmember to use the stock body mounting points.
Posted by: tscrihfield Jun 10 2012, 08:03 PM
I have loved the Sasquatch build btw... I actually wanted to comment on the K04 upgrade... If I can talk you out of it, I will try. The turbo is not a good add on for this engine stock. The efficiency is all at the wrong points and often blows these engines. If you want a good upgrade there is an outfit called frankenturbo that builds a hybrid for the 1.8t that is a perfect match. I drive an 02 GTI as my DD and spend a lot of time with these engines. I have thought about this same swap and I am glad to see someone doing it. Can't wait to see the progress!
Posted by: Porsche930dude Jun 10 2012, 08:17 PM
Nice ill be watching. Cat converter guts arnt worth much. the recyclers like to see the whole cat so they know what theyre getting. Since all cats have different metal content prices are all over the map
Posted by: kg6dxn Jun 10 2012, 09:04 PM
I have loved the Sasquatch build btw... I actually wanted to comment on the K04 upgrade... If I can talk you out of it, I will try. The turbo is not a good add on for this engine stock. The efficiency is all at the wrong points and often blows these engines. If you want a good upgrade there is an outfit called frankenturbo that builds a hybrid for the 1.8t that is a perfect match. I drive an 02 GTI as my DD and spend a lot of time with these engines. I have thought about this same swap and I am glad to see someone doing it. Can't wait to see the progress!
I am having 034 Motorsport re-flash the ECU. They will remove the extras (ABS, Smog, etc...). They can put in a K04 tune. This will require injectors and stuff. No big deal. Price is the same. These guys know their shit too. When running, I can have them throw it on the dyno to fine tune it to my exhaust and intercooler.
You are correct about just throwing on a K04 to a stock motor. Heck I may go with an even bigger turbo. At this point it's pennies on the dollar to go bigger. The tune is the same price and the turbo is only a couple hundred more.
Posted by: kg6dxn Jun 10 2012, 09:11 PM
I do. Give me abit to find them though.
My setup fits ok top tp bottom, but some metal fab or removal will be in order for the rear of the engine. I did my VW 1.8t using a self-made crossmember to use the stock body mounting points.
My plan is similar. Use front mounting points and then have to runners tied from there to the stock tranny mounts. Then just fab the 4 Audi mounting points. I will install it like I did my first Ford V8 914. Car jacked up, cherry picker and floor jacks to locate engine, measure and start welding...
 Need to pull the trigger on the tranny solution before final fitting. Boxster has different mounts. Anyone need a good Audi transaxle?
Posted by: RobW Jun 10 2012, 09:22 PM
Let me know if you need the trailer for the passat.
Btw- nice project 
Posted by: Chris Scott Jun 10 2012, 11:04 PM
Mike,
Check to see about poping out the drive flanges from the trans and put in the boxster ones. When we were trying to decide what to do for axels someone told me to put the 6speed boxster drive flanges in so we could get larger cvs. They were wrong but I had to pop out the flanges to verify this info and it was very easy to do.
Posted by: rhd914 Jun 10 2012, 11:16 PM
Interesting project, just wondered if they flash the ecu, does that also do away with the key coding?
Geoff
Posted by: kg6dxn Jun 10 2012, 11:18 PM
Interesting project, just wondered if they flash the ecu, does that also do away with the key coding?
Geoff
Yes. the immobilizer will be eliminated.
Posted by: Andyrew Jun 11 2012, 12:38 AM
I have loved the Sasquatch build btw... I actually wanted to comment on the K04 upgrade... If I can talk you out of it, I will try. The turbo is not a good add on for this engine stock. The efficiency is all at the wrong points and often blows these engines. If you want a good upgrade there is an outfit called frankenturbo that builds a hybrid for the 1.8t that is a perfect match. I drive an 02 GTI as my DD and spend a lot of time with these engines. I have thought about this same swap and I am glad to see someone doing it. Can't wait to see the progress!
I agree, This or a Disco Potato (GT2560 aka GT28RS) that was run in the APR stage 3 are wonderful turbo's... The K04 is almost the exact same as a KO3.
Mmmm I love this build

Posted by: andys Jun 11 2012, 11:06 AM
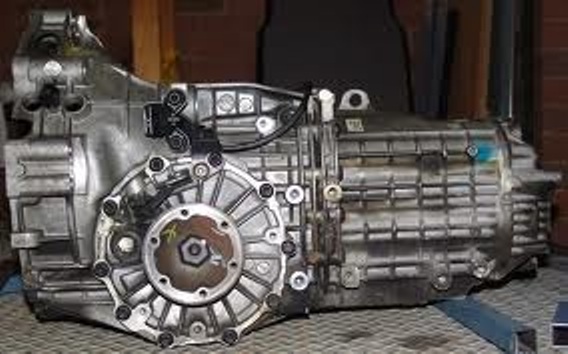
Here's a photo of an 012 trans with the flanges that are compatible with the Porsche CV's.
Andys
Attached File(s) 012_trans.bmp ( 147.32k )
Number of downloads: 298
012_trans.bmp ( 147.32k )
Number of downloads: 298
Posted by: smj Jun 11 2012, 12:29 PM
Here's a photo of an 012 trans with the flanges that are compatible with the Porsche CV's.
Could you please shrink that image a little more? It's way too big on my 14" CRT monitor...

I'm going down the road of trying to live with the 901 I've got, but a Boxster/Audi 5 speed swap is of great interest - otherwise I wouldn't give you any grief over this. (Probably.)

Part numbers for those compatible output flanges or adapters? I'll also accept a smack upside the head with a pointer to a build thread...
Posted by: kg6dxn Jun 11 2012, 09:26 PM
Here's a photo of an 012 trans with the flanges that are compatible with the Porsche CV's.
Could you please shrink that image a little more? It's way too big on my 14" CRT monitor...
I'm going down the road of trying to live with the 901 I've got, but a Boxster/Audi 5 speed swap is of great interest - otherwise I wouldn't give you any grief over this. (Probably.)
Part numbers for those compatible output flanges or adapters? I'll also accept a smack upside the head with a pointer to a build thread...
Fixed it
Posted by: kg6dxn Jun 11 2012, 09:29 PM
If the flanges are held in with a circlip, they look easy to pop out. Anyone have an Audi PET file with tranny parts?
Posted by: Justinp71 Jun 11 2012, 10:58 PM
Mike you do have ADD, ha! Your 914 is like a drivable engine test stand...
Nice project though, engine swaps are always the fun part.
Posted by: Chris Scott Jun 11 2012, 11:15 PM
Mike,
If i remember correctly the drive flanges just pop out. I just went out and looked at my car and can not remember removing any hidden clips or anything. Pretty sure about that.
Chris
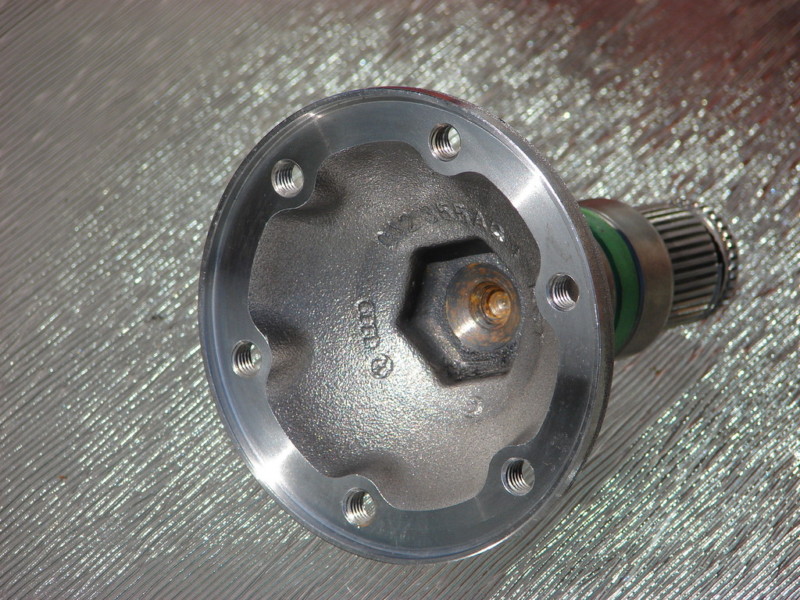
Posted by: kg6dxn Jun 11 2012, 11:22 PM
Mike,
If i remember correctly the drive flanges just pop out. I just went out and looked at my car and can not remember removing any hidden clips or anything. Pretty sure about that.
Chris
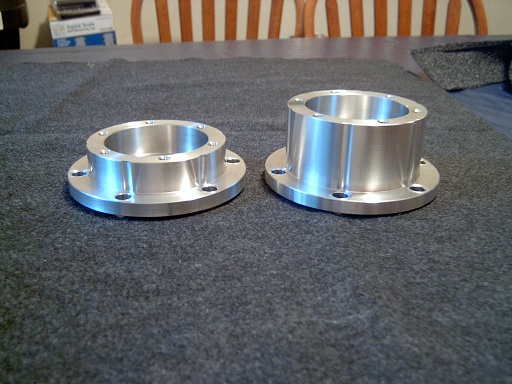
Is this what they look like?
Posted by: Chris Scott Jun 12 2012, 12:03 AM
That is what I remember
Posted by: kg6dxn Jun 15 2012, 11:37 PM
Sent the Passat to the wrecking yard today. Fuching tow truck driver stole my wheel chock. They did pick it up for free. Not much left but some interior and suspension. Body was rough, no cherry panels. Glad its gone. Now it's time to clean up the garage and get the 914 inside and stripped apart... again... 
Parts heaven wants $100ea for the axle stubs and $250 for the complete Boxster shift setup. This includes all the parts from the PET shifter page. I can get the shifter stuff from ebay cheaper but not complete. It will take weeks/months of waiting for items to pop up online. I can buy a complete but unknown Boxster tranny from ebay for as little as $400 (on a good day). Most have the axle stubs and 1/3 of the shifter parts (Tranny linkage). PH wants $2500 for a Boxster tranny with warranty (no shifter). I think I will wait for the right opportunity to jump on cheap parts. I am a CSOB 914 owner I do need the Boxster tranny mounts to get started. The Audi mounts interfere with the Boxster shifter. Those are cheap online; About $30 each.
Anybody ever pulled the axle flange on a Boxster or Audi transaxle? No bolts but there is a circlip on the stub In the diff. Not exactly sure how to pull it. Slide hammer? Puller tool? Pry bar? 
Posted by: jcd914 Jun 16 2012, 01:36 AM
Anybody ever pulled the axle flange on a Boxster or Audi transaxle? No bolts but there is a circlip on the stub In the diff. Not exactly sure how to pull it. Slide hammer? Puller tool? Pry bar?
VW says:
Place a chisel or spacer -A- behind drive flange.
Pull drive flange shaft out of differential gears by turning bolt -B-.
Jim
Posted by: kg6dxn Jun 16 2012, 09:46 AM
Anybody ever pulled the axle flange on a Boxster or Audi transaxle? No bolts but there is a circlip on the stub In the diff. Not exactly sure how to pull it. Slide hammer? Puller tool? Pry bar?
VW says:
Place a chisel or spacer -A- behind drive flange.
Pull drive flange shaft out of differential gears by turning bolt -B-.
Jim
I was considering doing this but it think it was the "correct" way.
 I guess I will go for it... Maybe I'll use 2 so I don't bend anything. Thanks!
Posted by: rohar Jun 16 2012, 01:08 PM
AWESOME swap!
I did an ABA 16v in a teener last time and it was amazing even using the 914 tranny. I'm guessing the 012 will just put the bow on the package.
If it helps any, I share your ADD. I've got a 3.6l v8 that'll bolt up to that bellhouseing. Needs a clutch solution. You could have it for shipping 'cause the wife limits me to 3 engines in the shop at a time and I've got my eye on something "better".
...gotta poke the ADD...
Posted by: kg6dxn Jun 16 2012, 02:33 PM
AWESOME swap!
I did an ABA 16v in a teener last time and it was amazing even using the 914 tranny. I'm guessing the 012 will just put the bow on the package.
If it helps any, I share your ADD. I've got a 3.6l v8 that'll bolt up to that bellhouseing. Needs a clutch solution. You could have it for shipping 'cause the wife limits me to 3 engines in the shop at a time and I've got my eye on something "better".
...gotta poke the ADD...
Sounds like fun but I have my hands full with this engine. But I should have JRust pick it up and bring it to me. He has to come here anyway...
I have a barely broken in SPEC Stage 3 clutch for a 914 I will be listing in the classifieds soon...
V8 and big 6 guys...
Posted by: stanthedog Jun 16 2012, 02:36 PM
Those 1.8T motors can make insane HP. For engine goodies/upgrades, might try Bahn Brenner in bend, Or. He has a corrado with a T motor that makes 480WHP.
John know his sh*t when it comes to water cooled VW/Audi. Sounds like an awesome build, wish I had the patience for a swap like that.
Posted by: Marty Yeoman Jun 16 2012, 02:56 PM
This one I'm going to have to stop by and see for myself! 
Posted by: stanthedog Jun 16 2012, 03:02 PM
It's downright scarey to be next to when he starts it up, sounds like nothing iv'e ever heard. rattles windows for 4 blocks  .
.
Posted by: Lennies914 Jun 16 2012, 05:43 PM
1999 5 spd Boxster M/T in Roseville. $640
http://sacramento.craigslist.org/ptd/3056620666.html
Posted by: kg6dxn Jun 16 2012, 07:20 PM
Got the flanges out. Just the the VW manual said to. The shaft looks just like the one I posted above. Seems like an easy swap to Boxster flange. Looks like no need to buy a compltete trans.
Posted by: kg6dxn Aug 11 2012, 09:17 PM
Been taking it slow on the conversion. Here's something...
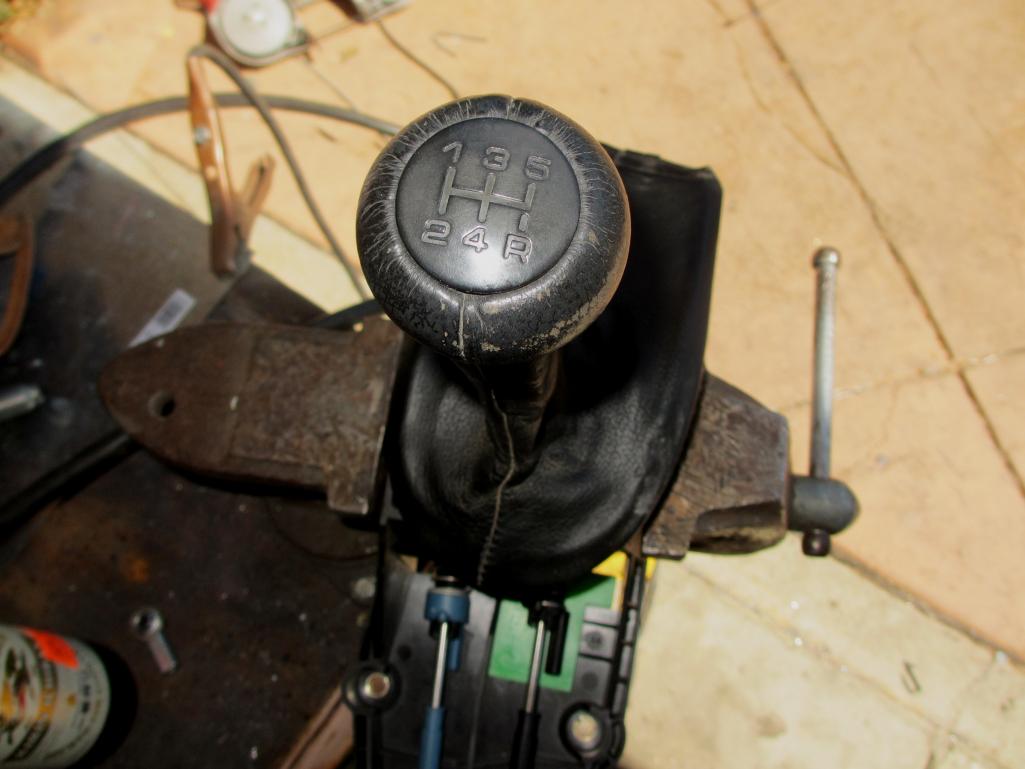
I found a Boxster shifter and cables on ebay super cheap. The hard part to find is the linkage on the tranny. I found one at a local recycler way too expensive. So I ordered some 10mm balls ($4) and with some stuff on hand fabricated the stuff I needed. I had some heim joints and rod, all the bits you see.
Since this is an Audi tranny and not a true Boxster, the threaded boss on the case for the factory pivot is not drilled or tapped. I had to fab a new pivot point and re-align the geometry a little. I used the factory linkage mounting holes to build from and picked up a mount in the rear to carry the pivot point. The pivot I used is a ball bearing adjustable bell crank from a 6-71 blower; Very stout. 3/8 rod and 1/8 flat stock make up the rest. All parts went through a heat treatment with a dirty oil bath.
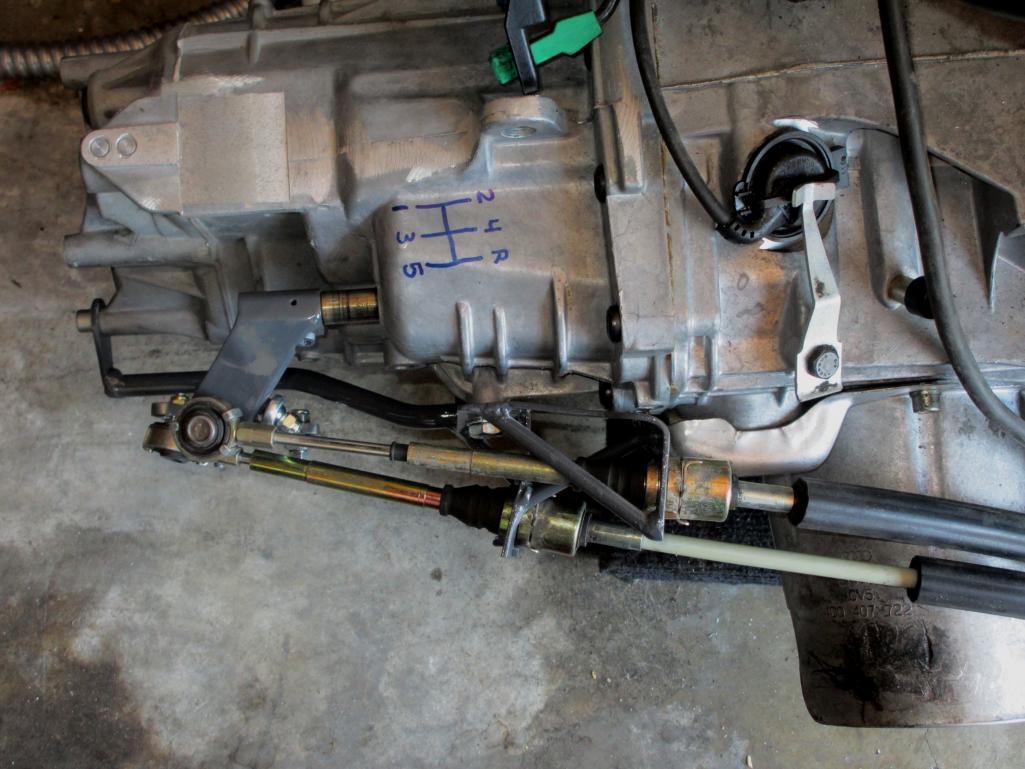
Here's the working prototype. I plan to move the Neutral gate cable more inboard to reduce the angle a little. This thing shifts super nice! I have 2-3mm of end play on the shifter. I used the Porsche design to inspire me since they did all the R&D for me. I can hardly wait to drive a 914 with a modern transaxle.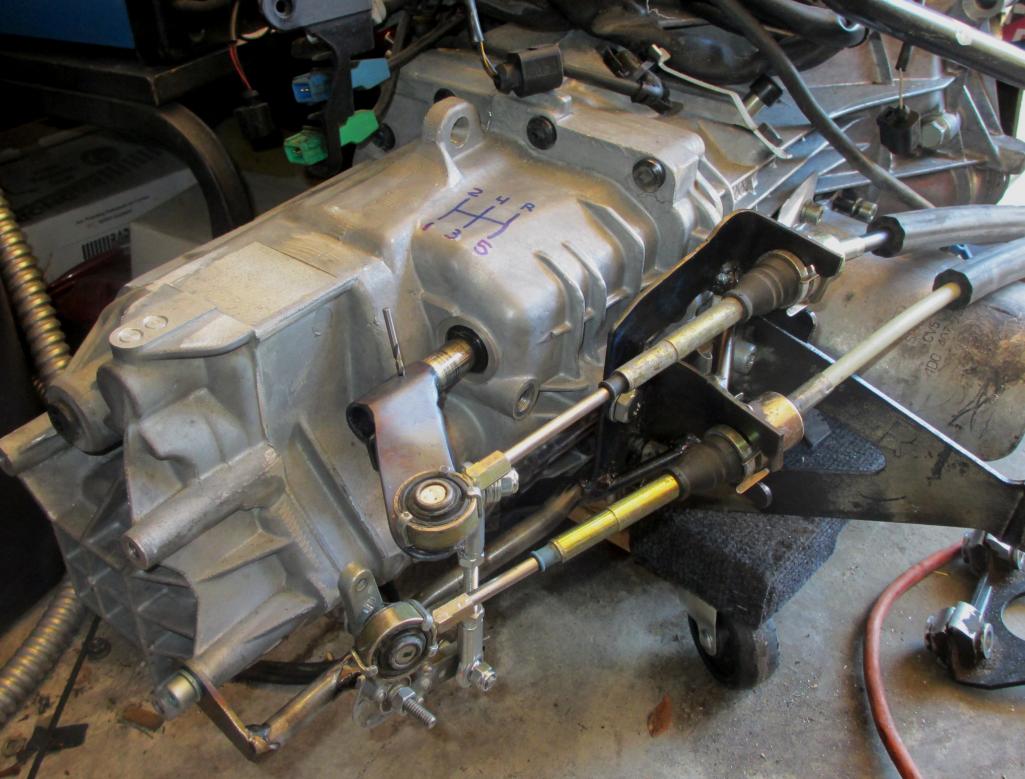
Second Gear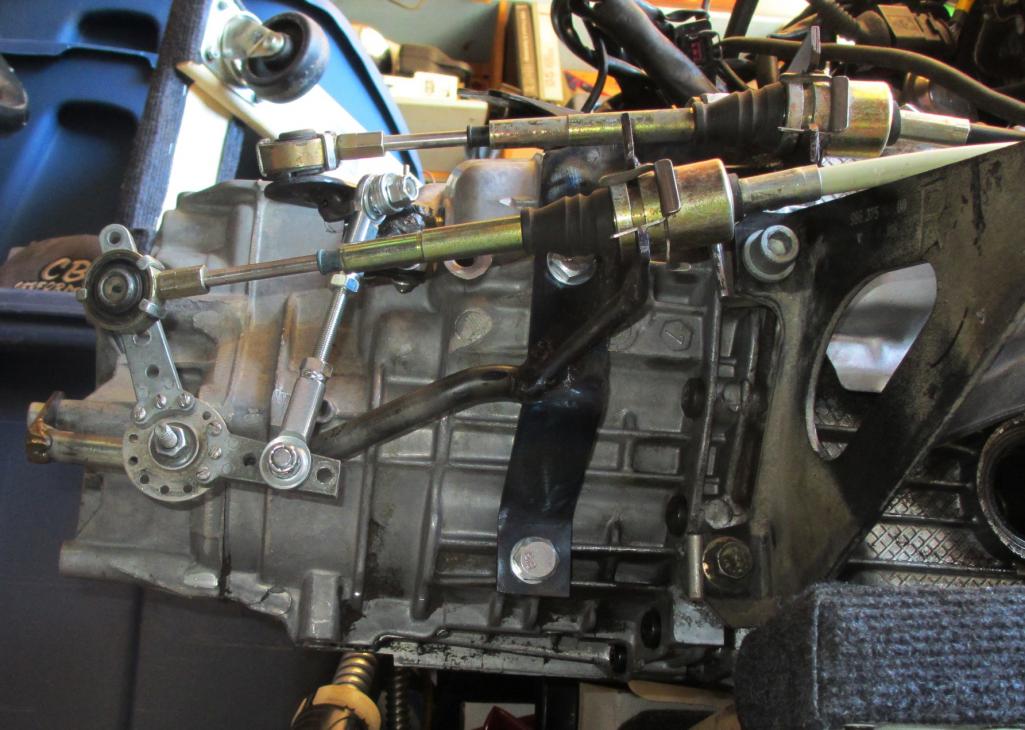
I designed the cable bracket to accept the factory locking design. Need to maching deeper and move the divots for the locking clips.
I used 0.75"/0.120" DOM to make the shift bracket. My ghetto hardening gives it a cool blue/black color, stiffens everything up real well.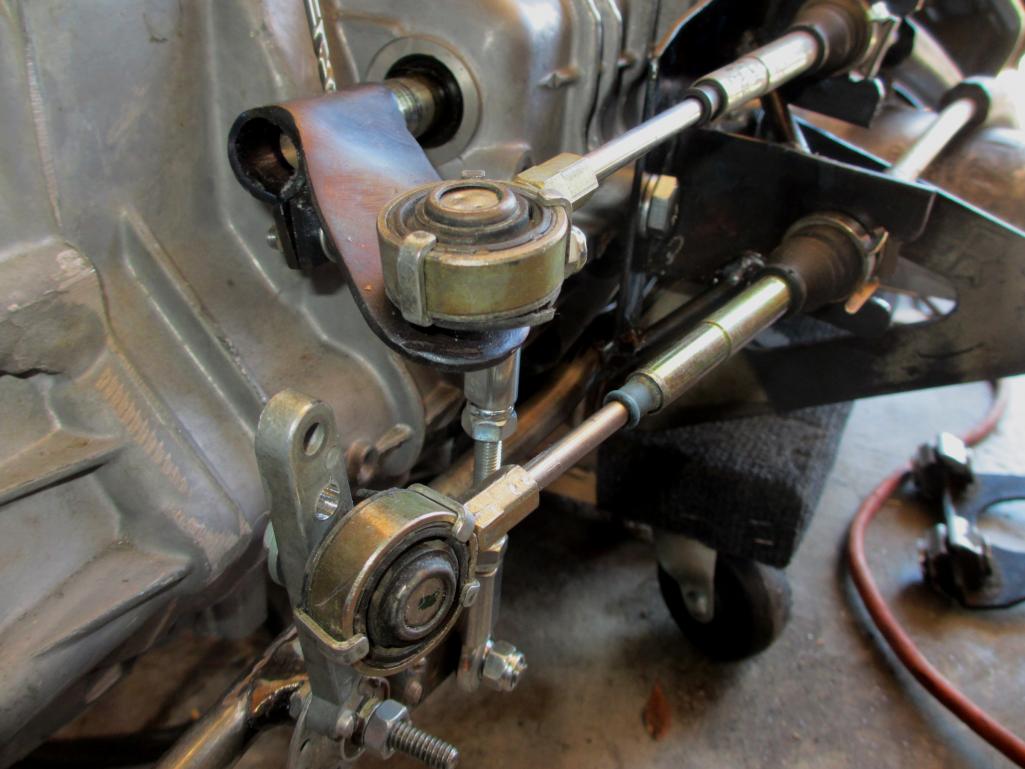
Re-aligned cable angle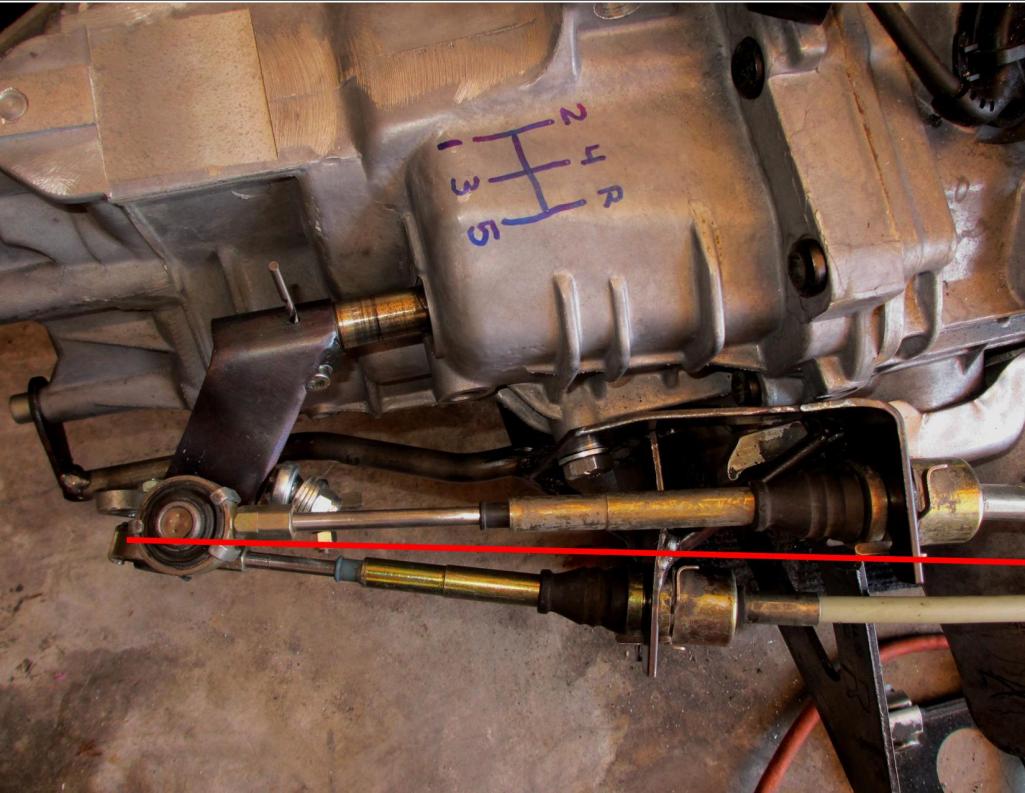
Posted by: kg6dxn Aug 11 2012, 10:30 PM
quick video... Linkage in action...
https://www.youtube.com/watch?v=fc8ZPVFrucw
Posted by: Andyrew Aug 12 2012, 03:28 PM
Mike,
That shifter setup looks awesome!
Im going to be starting the teardown for my v6 swap in the next few months after some other projects are started.
Congrats on your progress!!
Posted by: Drums66 Aug 12 2012, 03:54 PM
.....Super cool, project man.....I dig Audi powerplants!
PEACE(Porsche/Audi)
Posted by: JRust Aug 12 2012, 04:58 PM
Looking great Mike! Looks like you'll be pulling your drivetrain any day now
Posted by: kg6dxn Aug 12 2012, 06:40 PM
Got it finished and painted. Moved the cable inboard, the angle looks better. I plan to keep the (Audi Only) axle shield. But the cast aluminum Audi tranny mounts have been replaced with Boxster Steel units. This will give the mounts some symmetry over the Audi's.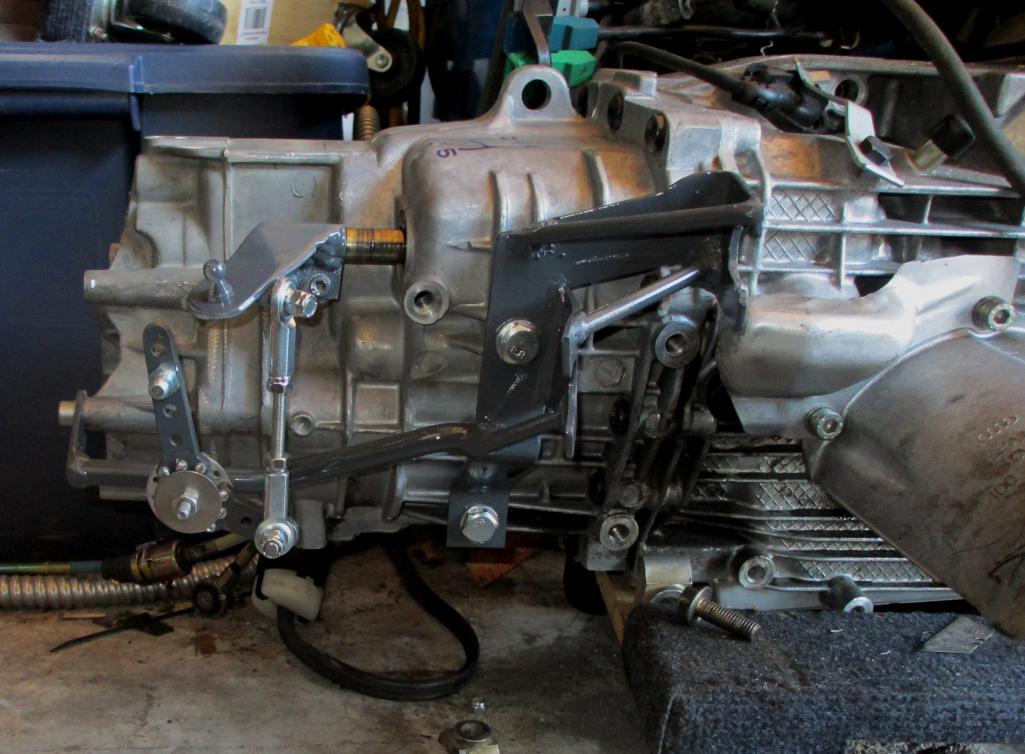
Here you can see the notch needded to capture the factory locking clip.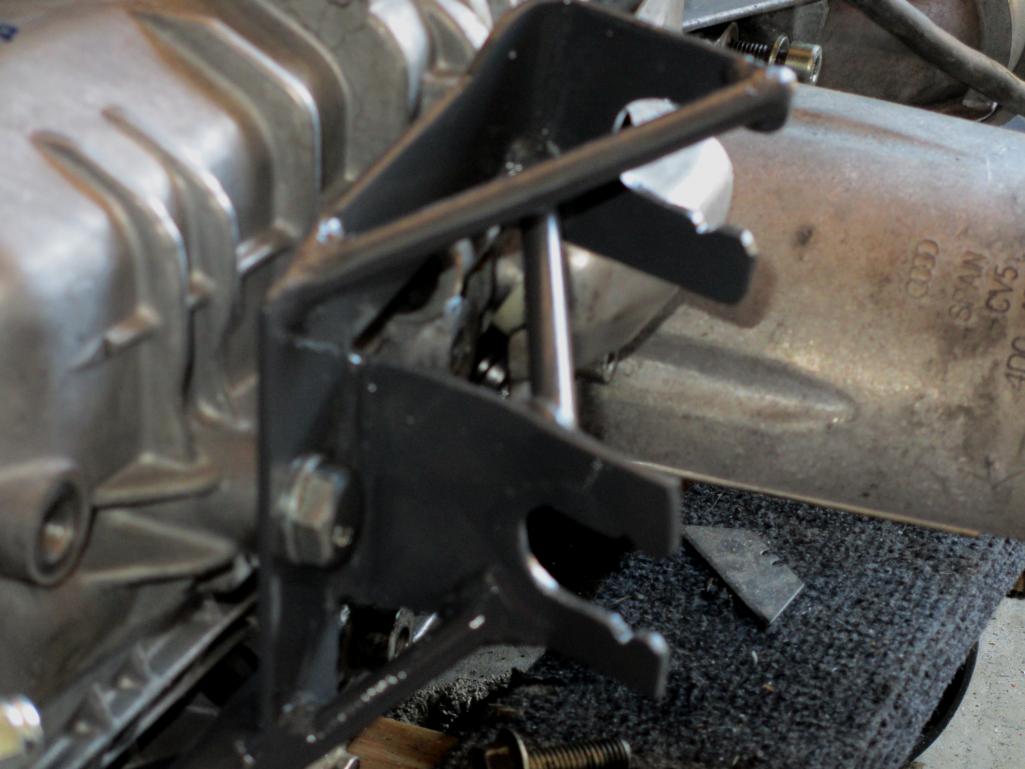
Posted by: kg6dxn Sep 19 2012, 09:54 PM
Teaser photos... Rotary gets pulled this weekend. New turbo good for up to 350hp. Not sure which exhaust manifold to use. I need to get the engine in place to see where the turbo fits best...
Garrett GT28RS Disco Potato...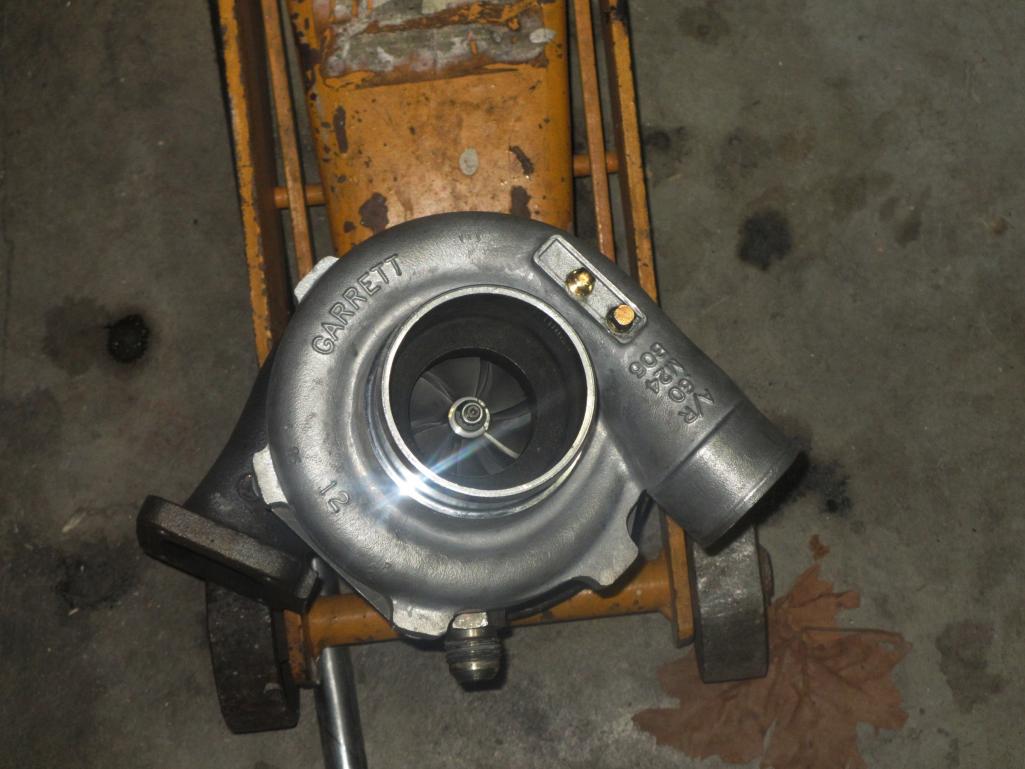
Methanol Injection... Coolingmist progressive controller gauge with vac/boost display, fail safe control, flow meter, AEM 200 psi pump, 600cc injector, hose, misc fittings. Not shown is the 2 gallon tank...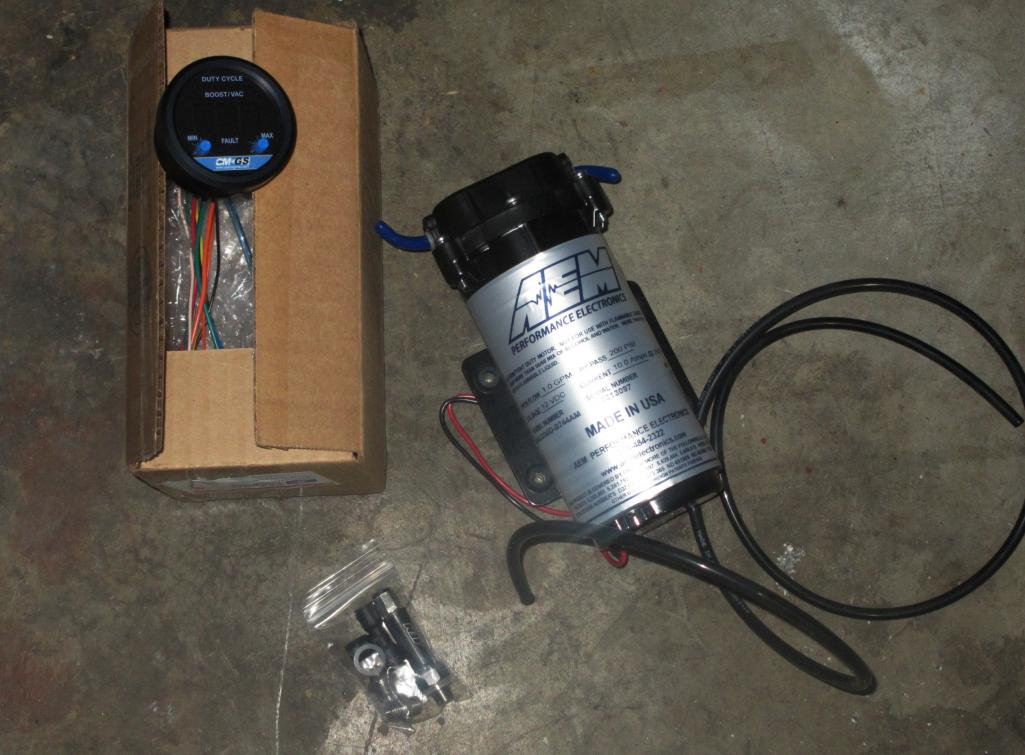
Posted by: McMark Sep 19 2012, 10:48 PM
Ooooh, does that mean the K03 is available? 
Posted by: Andyrew Sep 19 2012, 10:56 PM
Mike, are you going to run the stock turbo/tune for the initial testing and then upgrade?
GT28r is a great turbo.. I wish I took you for a ride in the Audi prior to me blowing that turbo...
Turbo should fit fine, the 914 has more side to side room than most cars, I would go with a bottom mount turbo due to the exhaust and the firewall clearance (VS going with like the SPA manifold..). Not very many available though... I see one on ebay, but not sure how long it would last before it cracked... ( My APR one is bottom, but its made of Iconell, so it will never crack...).
Posted by: Andyrew Sep 19 2012, 10:56 PM
Mark, what would you want with a lowly KO3? Planning to turbo your lawnmower?
Posted by: kg6dxn Sep 20 2012, 08:01 AM
Ooooh, does that mean the K03 is available?
Yes. You still have first dibs...
BTW, had the K03 checked out, still good...
Posted by: kg6dxn Sep 20 2012, 08:05 AM
Mike, are you going to run the stock turbo/tune for the initial testing and then upgrade?
GT28r is a great turbo.. I wish I took you for a ride in the Audi prior to me blowing that turbo...
Turbo should fit fine, the 914 has more side to side room than most cars, I would go with a bottom mount turbo due to the exhaust and the firewall clearance (VS going with like the SPA manifold..). Not very many available though... I see one on ebay, but not sure how long it would last before it cracked... ( My APR one is bottom, but its made of Iconell, so it will never crack...).
I'm going to have 034 flash the ECU and build to the tune.
I'm also running a new crankcase evacuation system to intercept the PCV system and draw constant vacuum on the crankcase. Since I'm using the Meth, the tune may be aggressive for pump gas.
Posted by: Andyrew Sep 20 2012, 08:44 AM
The PCV system tends to crack and disintegrate, especially by the block. O34 has solutions to that.. Make sure you replace all the plastic bits there..
Posted by: kg6dxn Sep 20 2012, 09:47 AM
The PCV system tends to crack and disintegrate, especially by the block. O34 has solutions to that.. Make sure you replace all the plastic bits there..
I have the 034 PCV aluminum bung to remove all the plastic bits. I need to decide if I want to build a catch can or buy one to go inlive with the evac.
Posted by: Andyrew Sep 20 2012, 06:48 PM
I would just go catch can... I run mine open because I hate the environment 
Posted by: kg6dxn Sep 20 2012, 07:11 PM
I would just go catch can... I run mine open because I hate the environment
I've seen the stuff that comes out of the catch can...
 gross!
Posted by: kg6dxn Sep 20 2012, 10:53 PM
Fenolic intake spacer. 034 says it can lower the manifold temp by 20F. can't hurt...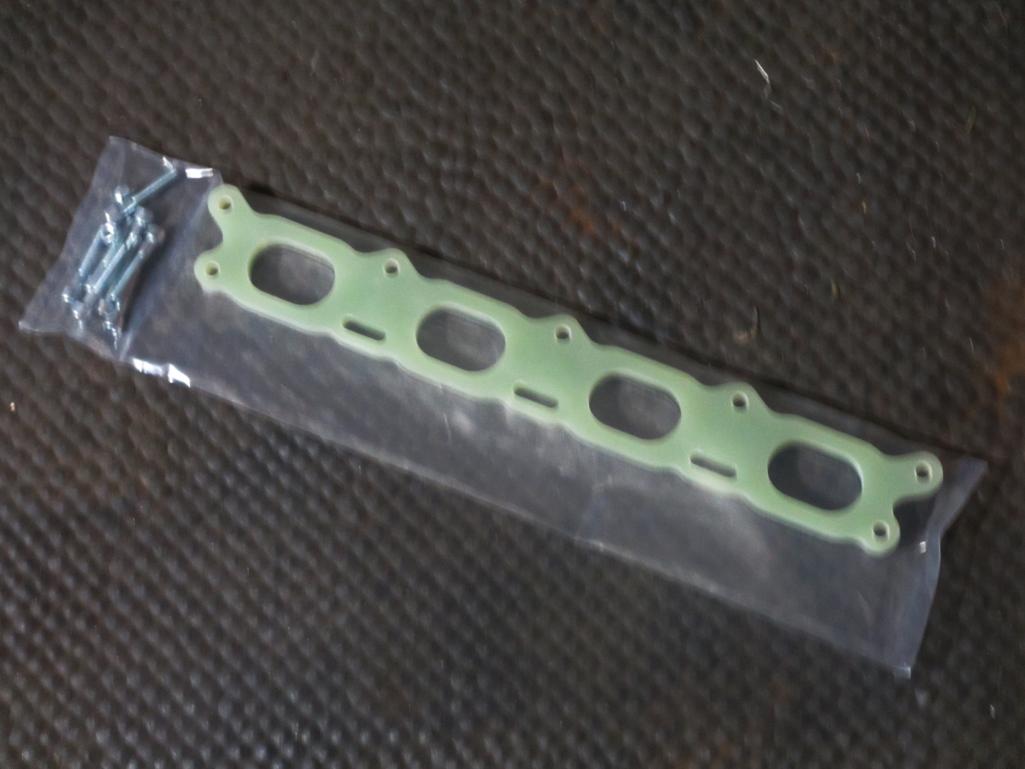
430cc injectors...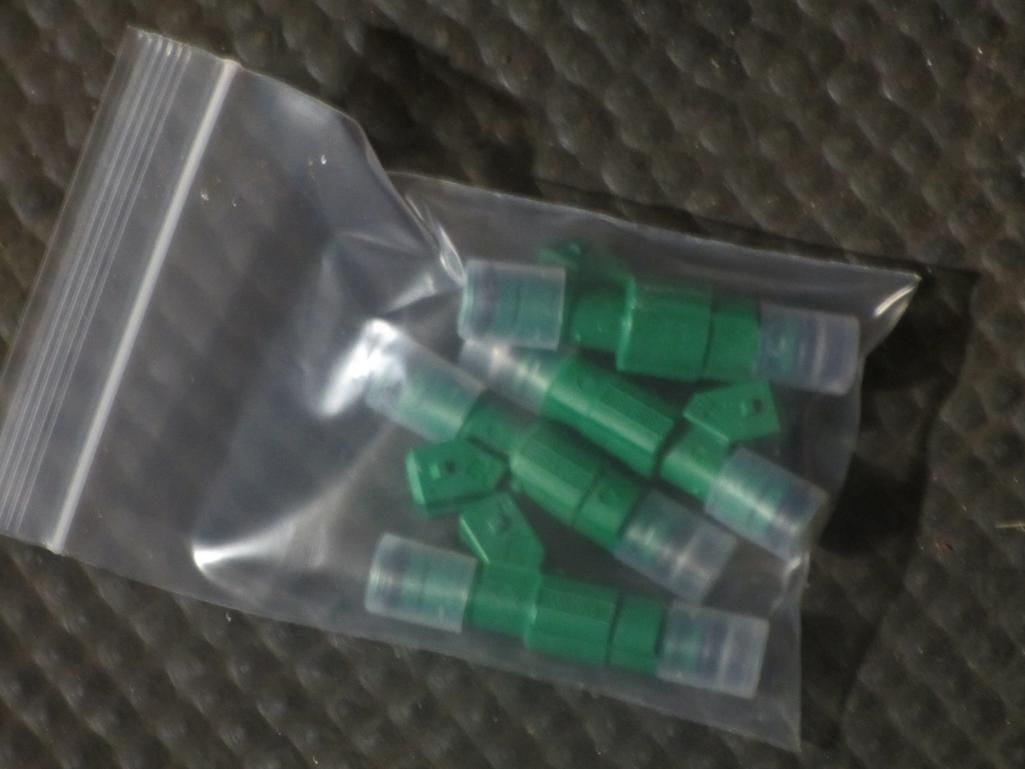
Oil sandwich to connect my external oil cooler. Now I need to flush out all the dino oil from the system...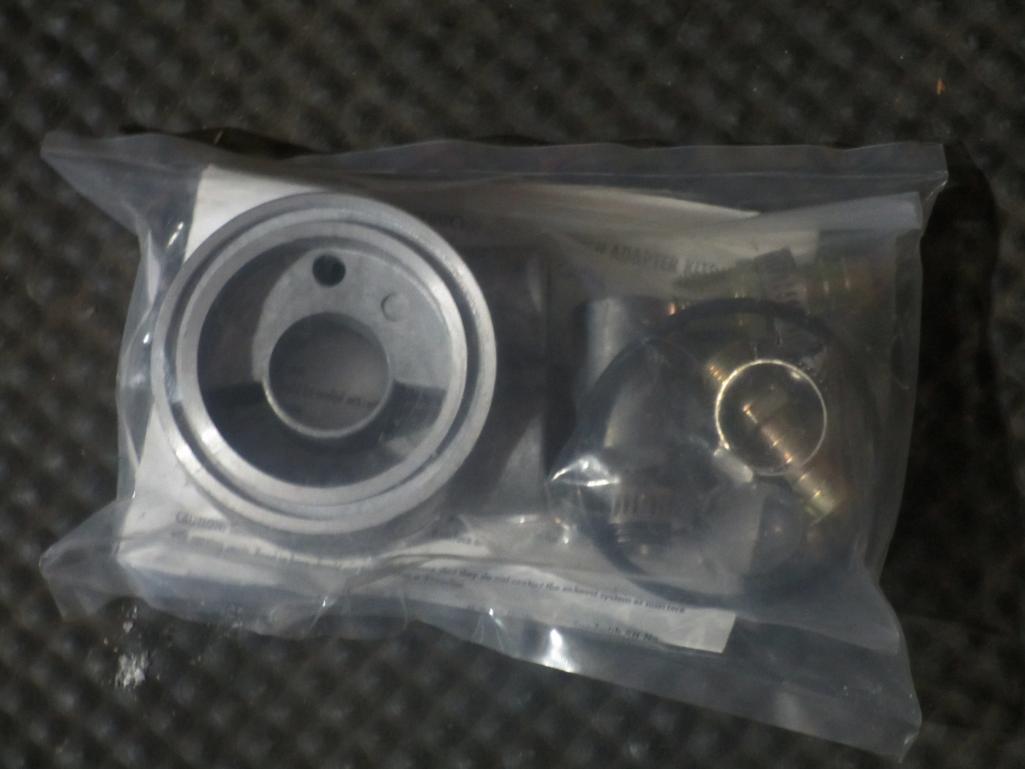
Posted by: 396 Sep 20 2012, 11:07 PM
Very very slick and trick..Good luck with your conversion!
I wish I was as talented
Posted by: kg6dxn Sep 20 2012, 11:29 PM
Very very slick and trick..Good luck with your conversion!
I wish I was as talented
Thanks for the praise.
Posted by: Andyrew Sep 21 2012, 08:55 AM
I've heard mixed reviews on the intake spacer.
430 CC's is a good match for that turbo. But you will be able to max out those injectors if you run enough boost.
Oil cooler is a good idea for this engine, the stock oil cooler tends to push the temps higher than desired on hot days.
Posted by: matthepcat Sep 21 2012, 10:34 AM
Whats going to be the fate of the rotary? Seems like it could be downsized to be a more reliable power plant for a street car.
Posted by: kg6dxn Sep 21 2012, 06:47 PM
Whats going to be the fate of the rotary? Seems like it could be downsized to be a more reliable power plant for a street car.
The rotary is for sale as a whole or part. The "whole" is everything minus the intercooler and wide band O2. The adapter, clutch and tranny (with H gear) is sold. I have a rotary buddy that may take it all. I'll know next week. He will tear it apart, port it and dump it in an RX-7. $2k for the engine package with ECU, turbo, etc... If I part it out, I'll double my money but it is more of a hassle. The ECU and harness are worth almost $1k.
We shall see...
Posted by: kg6dxn Sep 22 2012, 08:33 PM
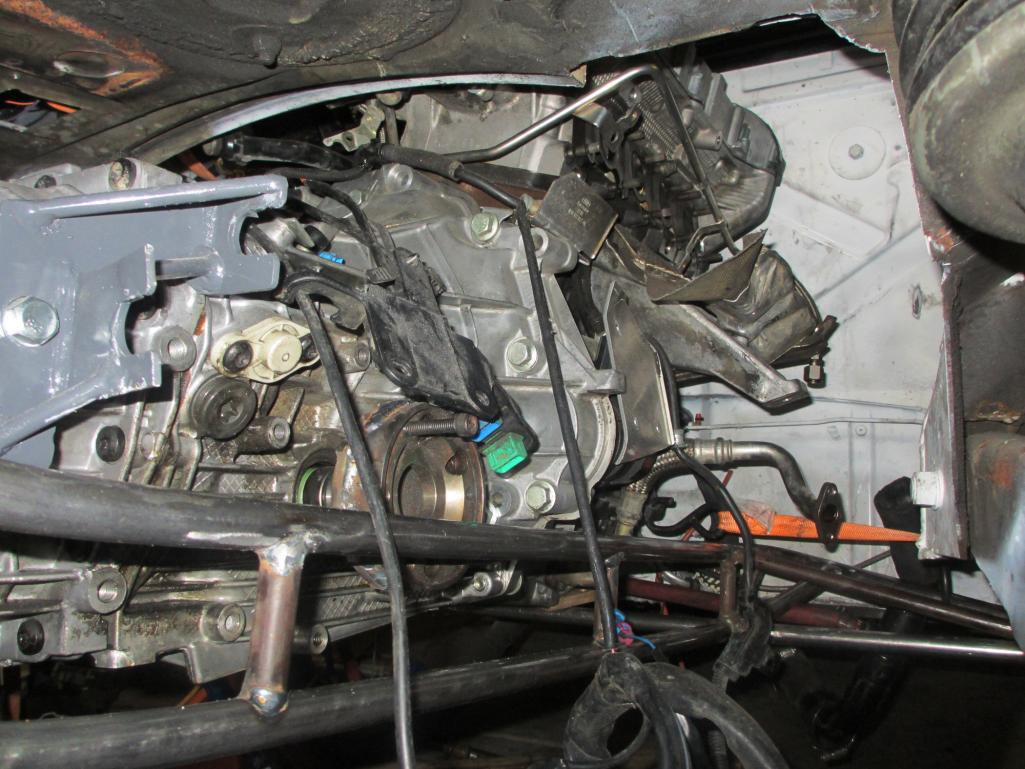
Pulled the drive train today. Kind of depressing since it still runs...  Some of these parts have new owners
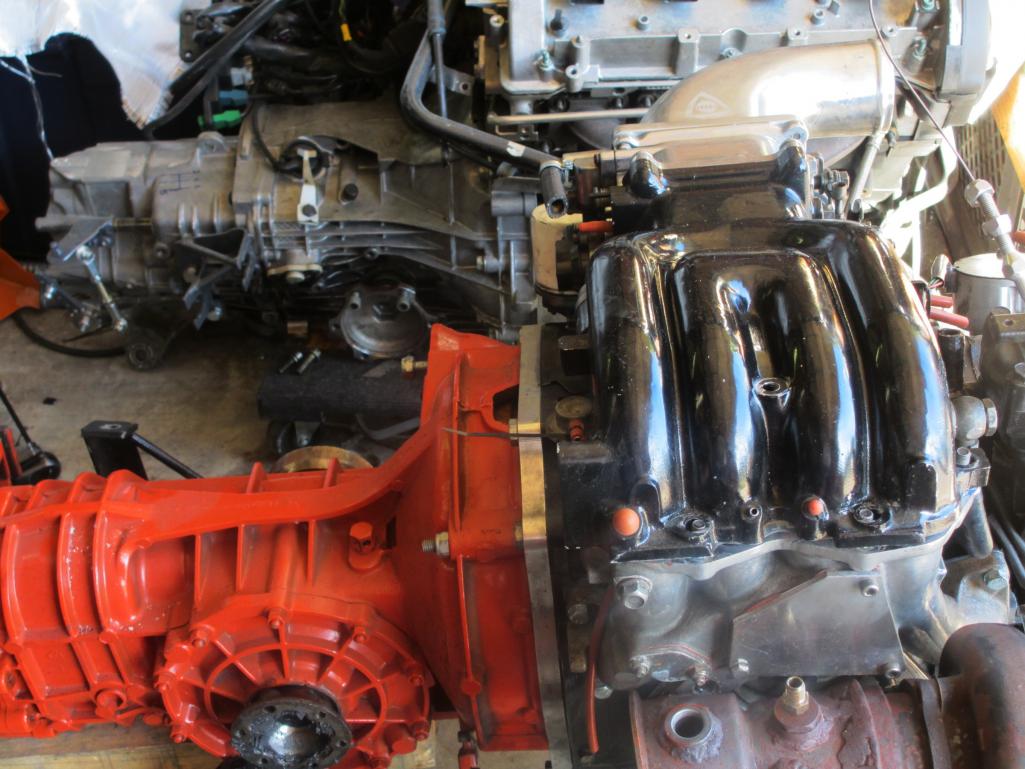
The Audi/Boxster tranny is almost the same length as the 901. Only about an inch or so longer. From the bell housing to axle center looks exactly the same. At least you can't "eye ball" any difference. I may have to move it forward for engine clearance. No more than an inch. Looks like fitting it in will be no problem compared to what I have done already. The biggest bonus will be the modern transaxle. get in line now if you want to test drive it later. This thing shifts... well, it shifts just like a Boxster. Night and day compared to a 901.
My ECU goes to 034 Motorsport next week. $850 to turn it into a 350hp ECU with no smog or un-needed junk. OUCH!  But I get to keep the drive by wire. I may have to have them put it on the dyno to fine tune the flash once it's driveable.
Here's some side by side pics for those that want to see...
Attached thumbnail(s)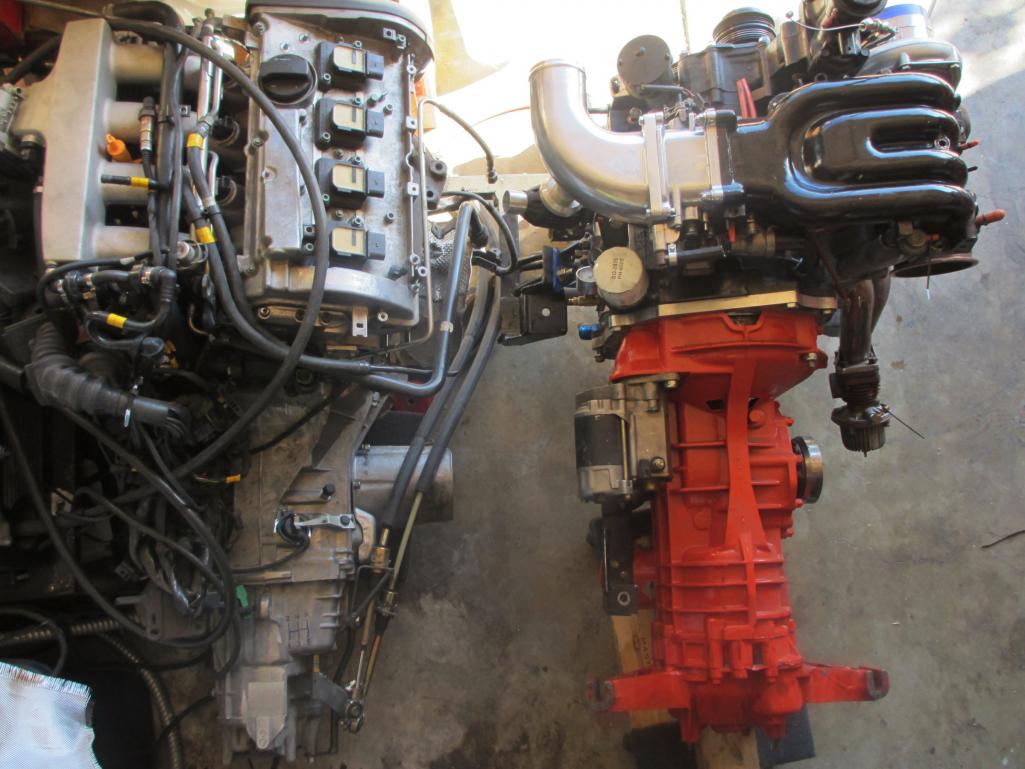
Posted by: Andyrew Sep 22 2012, 09:00 PM
Mike,
What have you decided for the axle solution?
Posted by: Andyrew Sep 22 2012, 09:02 PM
BTW I see some emission stuff still on your new engine
Posted by: kg6dxn Sep 22 2012, 09:02 PM
Mike,
What have you decided for the axle solution?
Boxster transmission stubs, sway away custom axles. Simple
Posted by: Andyrew Sep 22 2012, 09:10 PM
sway away custom axles? So 914 outer cv and boxster inner cv?
Why did you switch to boxster stub axles then instead of just going with the audi units? (I assume since they are custom axles they can make it for any cv...)
Posted by: ConeDodger Sep 22 2012, 09:10 PM
What intercooler are you running Mike?
Posted by: Andyrew Sep 22 2012, 09:19 PM
My guess is the air to water that he ran on the rotary.
Posted by: kg6dxn Sep 22 2012, 09:20 PM
What intercooler are you running Mike?
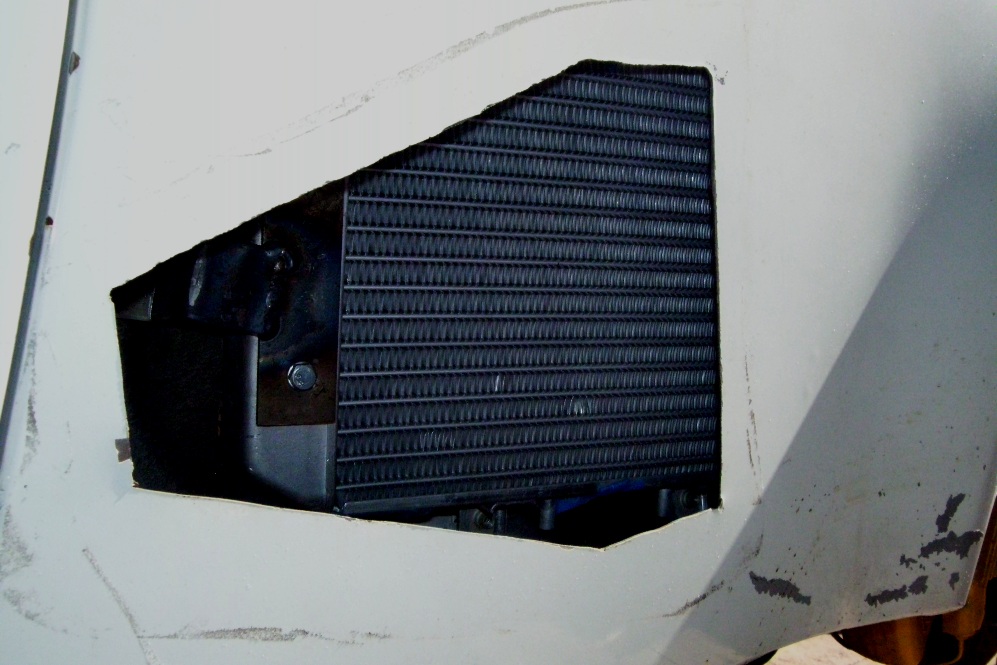
I running the same air to water intercooler I had with the rotary. The heat exchanger and fan are located in the drivers quarter panel behind the NACA duct. I may end up moving it to work better with the mathanol injection. Most "experts" (used loosely), say to inject after the inter cooler and before the throttle body. Right now the plumbing from cooler to TB is super short. If I rework the plumbing a little, I can increase the distance and get better evaporation/cooling from the meth. This may take a complete relocation of the intercooler. First things first. Get the motor mocked up and see what fits.
Posted by: kg6dxn Sep 22 2012, 09:36 PM
BTW I see some emission stuff still on your new engine
Haha! Yea, I have not stripped everything off yet. I'm going to work on the cradle first, then pull apart the Audi stuff. I ordered a cast iron SPA turbo manifold today after lining up the two engines. I'm guessing 034 will dial it in around 350hp once were all done. The SPA puts the turbo up high in the engine bay, so the exhaust will make an "S" turn down to the 4" exhaust.
Posted by: Andyrew Sep 22 2012, 09:49 PM
350 with that turbo will take ~ 22psi. I had 330hp (255awhp) at 19psi and I ran ~ 96 octane, so with meth that should be about right. That turbo will take 25psi.. If it was ME, I would run 15psi on the street without meth, then have a scramble boost option on the boost controller hooked up to the meth and run like 22-23psi.. 275hp on the street with another 100hp at the push of a button/switch... Mmmmm Tasty
That would keep the turbo and rods nice and healthy
Posted by: Chris H. Sep 23 2012, 04:49 PM
Hey Mike,
So the clearance looks pretty good? Not much hacking expected in the engine bay/trunk? Really cool build BTW.
Posted by: kg6dxn Sep 23 2012, 05:21 PM
Hey Mike,
So the clearance looks pretty good? Not much hacking expected in the engine bay/trunk? Really cool build BTW.
I may need to encroach into the rear trunk a little. Won't really know until I stuff it in there. If I do, it's important to keep room for the targa top. I think it will work out just fine.
I can hardly wait to drive this one. It will be as well mannered as a stock Audi engine until I put my foot into it.

Thanks for the kind words. It helps keep me motivated...
Posted by: kg6dxn Sep 23 2012, 05:26 PM
350 with that turbo will take ~ 22psi. I had 330hp (255awhp) at 19psi and I ran ~ 96 octane, so with meth that should be about right. That turbo will take 25psi.. If it was ME, I would run 15psi on the street without meth, then have a scramble boost option on the boost controller hooked up to the meth and run like 22-23psi.. 275hp on the street with another 100hp at the push of a button/switch... Mmmmm Tasty
That would keep the turbo and rods nice and healthy
I need a new boost controller. My HKS crapped out on me. I've been running old school with a manual boost controller.
My Meth controller is progressive. at 10psi (or where ever I set it) it will start a low flow ramping up to the max setting. So either I get a new electronic boost controller or modulate the throttle/manual boost control to keep the pressure at bay. I will have 034 tune it to the max hp that is still reliable. No more speed boat action like the rotary. Although, fishtailing the car up the on ramp with McMark was fun! We'll see if this engine can do the same...
Posted by: rohar Sep 23 2012, 05:36 PM
Hey Mike,
So the clearance looks pretty good? Not much hacking expected in the engine bay/trunk? Really cool build BTW.
I may need to encroach into the rear trunk a little. Won't really know until I stuff it in there. If I do, it's important to keep room for the targa top. I think it will work out just fine.
I can hardly wait to drive this one. It will be as well mannered as a stock Audi engine until I put my foot into it.
Thanks for the kind words. It helps keep me motivated...
After putting a 16v on a 901 in this chassis, I'm pretty sure you shouldn't have to chop up the trunk. There's a few water fittings that are gonna want to go where the body currently is. It's easy enough to fab up new flanges and re-route. Much better solution than cutting up chassis steel.
Posted by: Andyrew Sep 23 2012, 05:39 PM
I'd say you should get an EBC. You could always just have O34 tune the ECU to control the boost through the N75 valve and run a MBC to turn it down when you want. But you have enough money in it, I really think you should run an EBC... Better spool that way..
Posted by: kg6dxn Sep 23 2012, 05:49 PM
I have read about a couple guys blowing through the MAF without any problems. I am considering doing this and using a traditional BOV. wooosh! That way it doesn't go rich when it blows. They make a nice aluminum housing for the sensor instead of the stock plastic one. This engine will be set up more like a race engine than a commuter. Really all depends of what fits in the engine bay and how to plumb it.
Posted by: kg6dxn Sep 23 2012, 07:08 PM
Just for fun... Picture of my 3 turbos... Big differences
from left to right:
1) GT35R from the rotary (~600hp max)
2) GT28RS for the Audi (~350hp max)
3) McMarks future K03 from the Audi (~225hp max)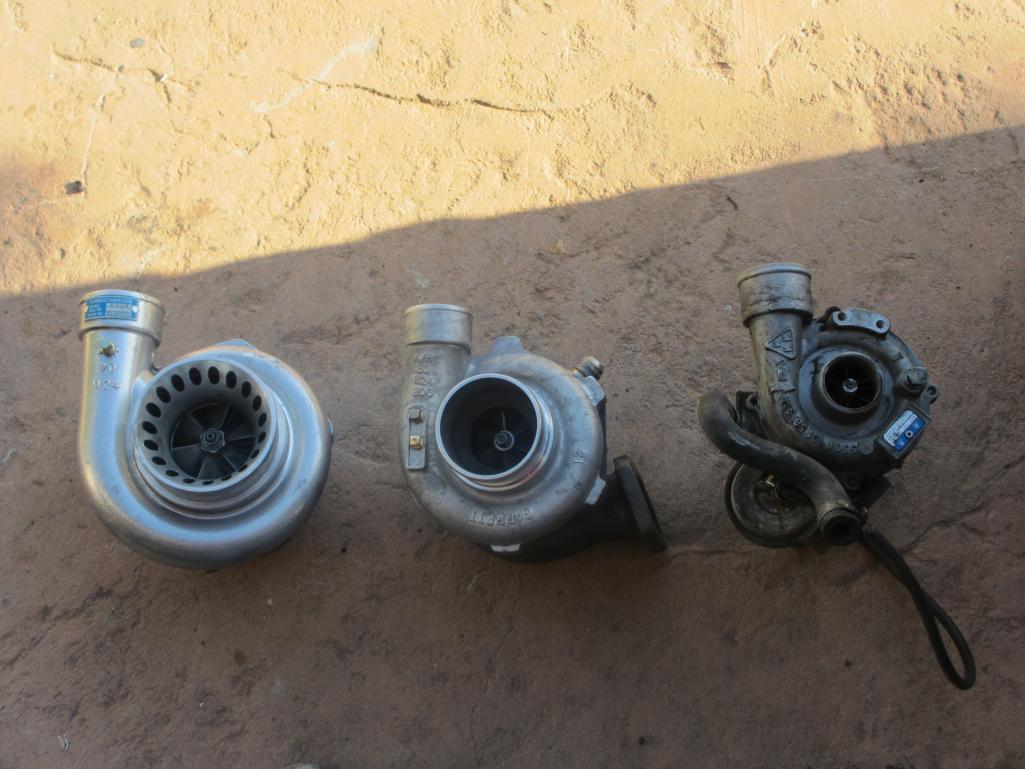
Posted by: Andyrew Sep 23 2012, 07:37 PM
I have read about a couple guys blowing through the MAF without any problems. I am considering doing this and using a traditional BOV. wooosh! That way it doesn't go rich when it blows. They make a nice aluminum housing for the sensor instead of the stock plastic one. This engine will be set up more like a race engine than a commuter. Really all depends of what fits in the engine bay and how to plumb it.
I've had issues with MAF... Gone through PLENTY. (I have a box of 6 blown MAF's... Quite a chunk of change...)
See if 034 will tune your setup for a VR6 MAF housing(3" vs 2.75" or something like that). Or even better see if you can use a ford 4" MAF, You wont break that, and its much cheaper.. The issue is the stock MAF is maxed out shortly after 300hp, and running it at that point fries the internals for some reason.. A bigger housing lets you run more air through the same mass air flow, but the ECU needs to be tuned properly.
BTW when you get tired of 350hp you can always put some rods in, put 1k in the head and put a GT35R in for a nice solid 600hp and rev it to 9k
Posted by: kg6dxn Oct 6 2012, 09:44 PM
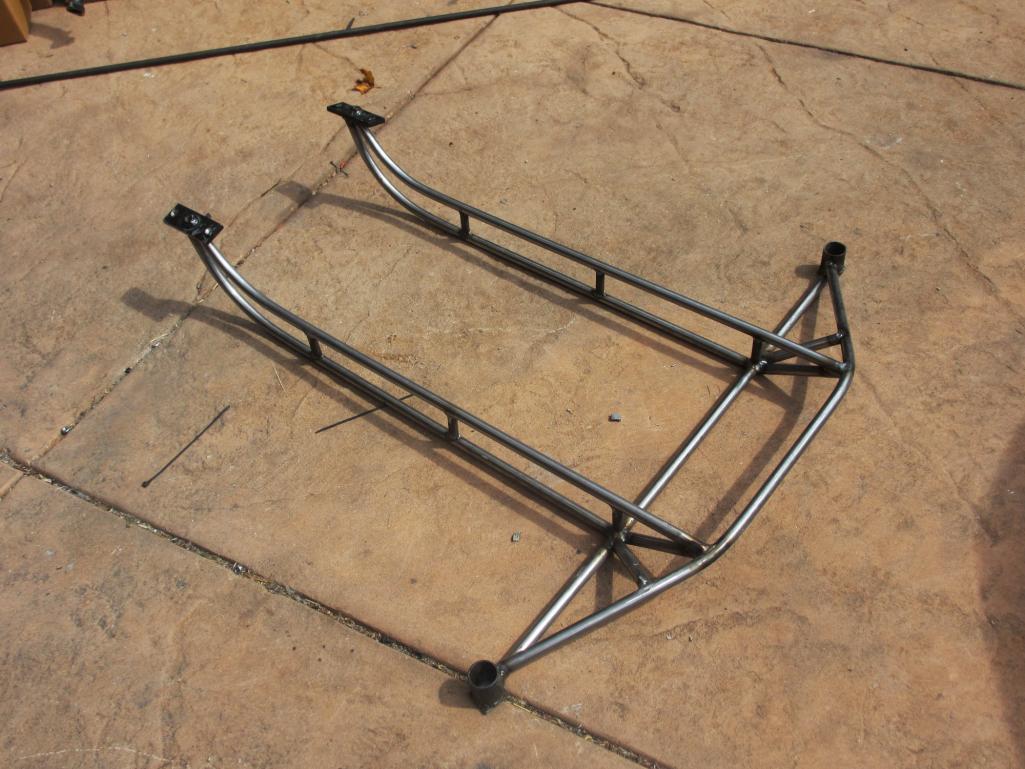
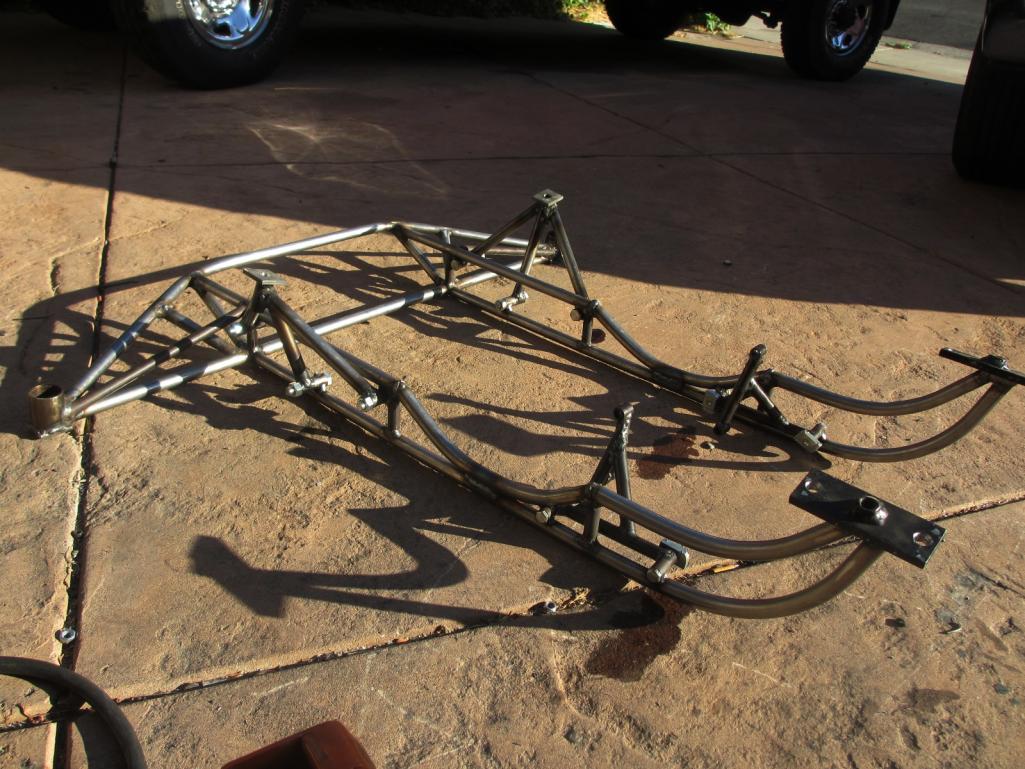
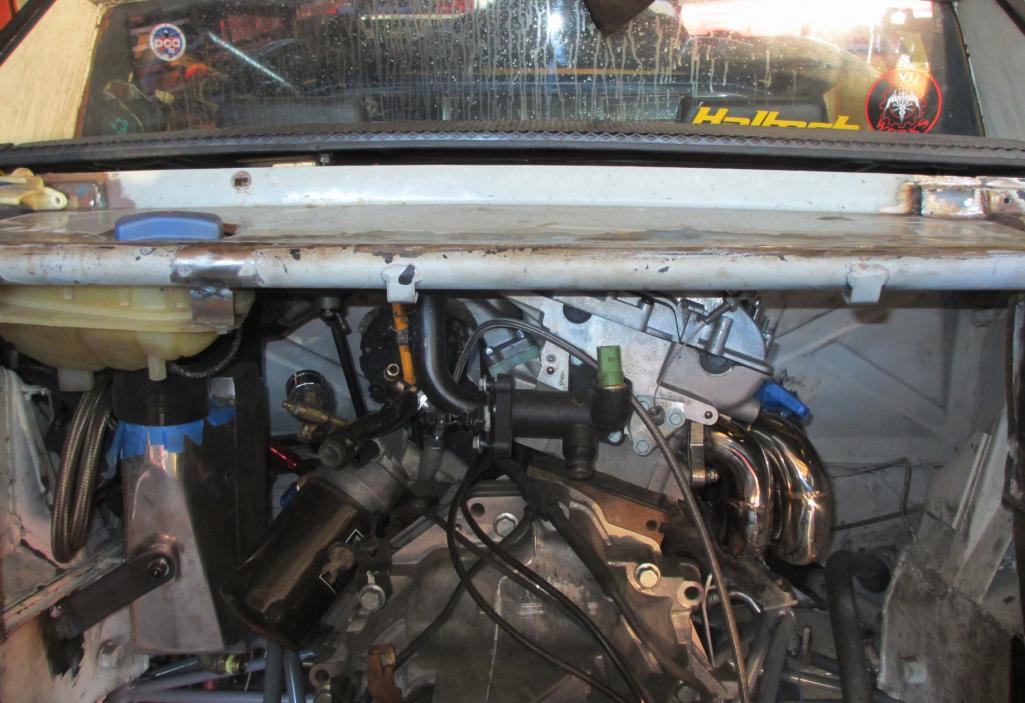
Got the cradle fabbed up. still needs some bracing and finishing. Need to cut the straight bar in front of the axle stub and weld in a drop loop for clearance. Most is 0.75" DOM, 0.120 wall and some 5/8" DOM, 0.120 wall tubing For the lattice sections. It weighs a little over 20lbs so far. Super rigid, no flex. I squeezed the engine into the bay. I have a copper shim (3/8')between the oil pan and the cradle bar. This will be the clearance for the engine. Some ratchet straps in place to hep level and center until the mounts are added to the cradle. The front has a triangulated arch and the rear is dual arches. I decided to go solid mount, no bushings. I know it will be a little louder and transmit the vibrations more, but this is the way both my V8's were and my old drag race Bug so I'm used to it.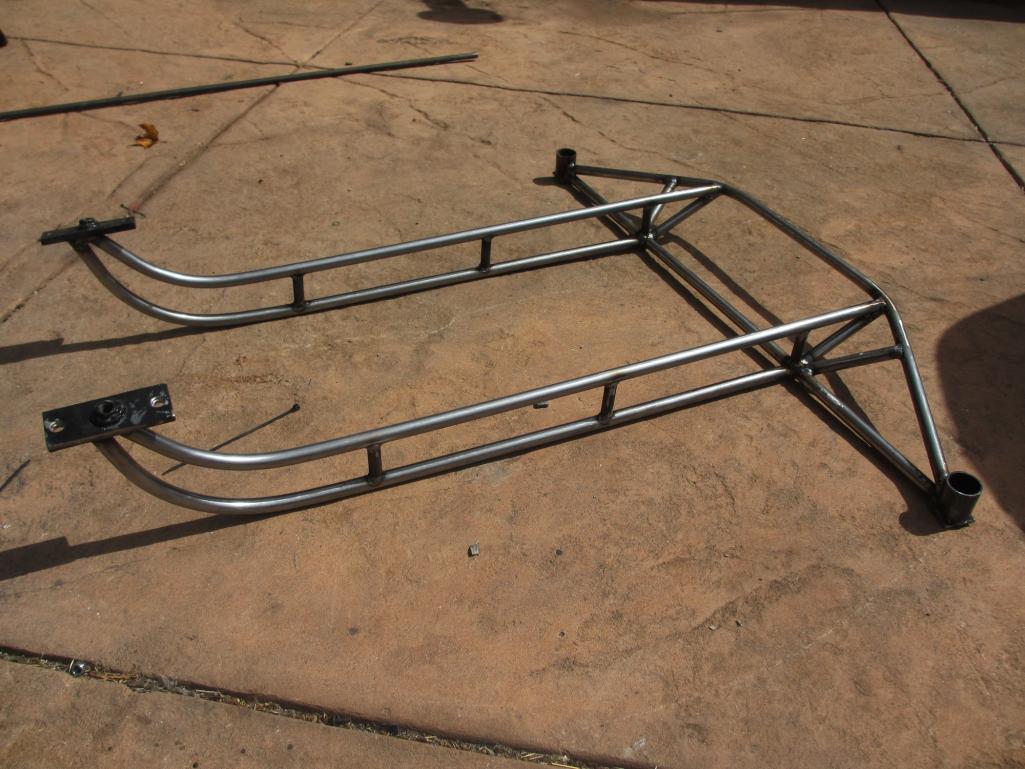
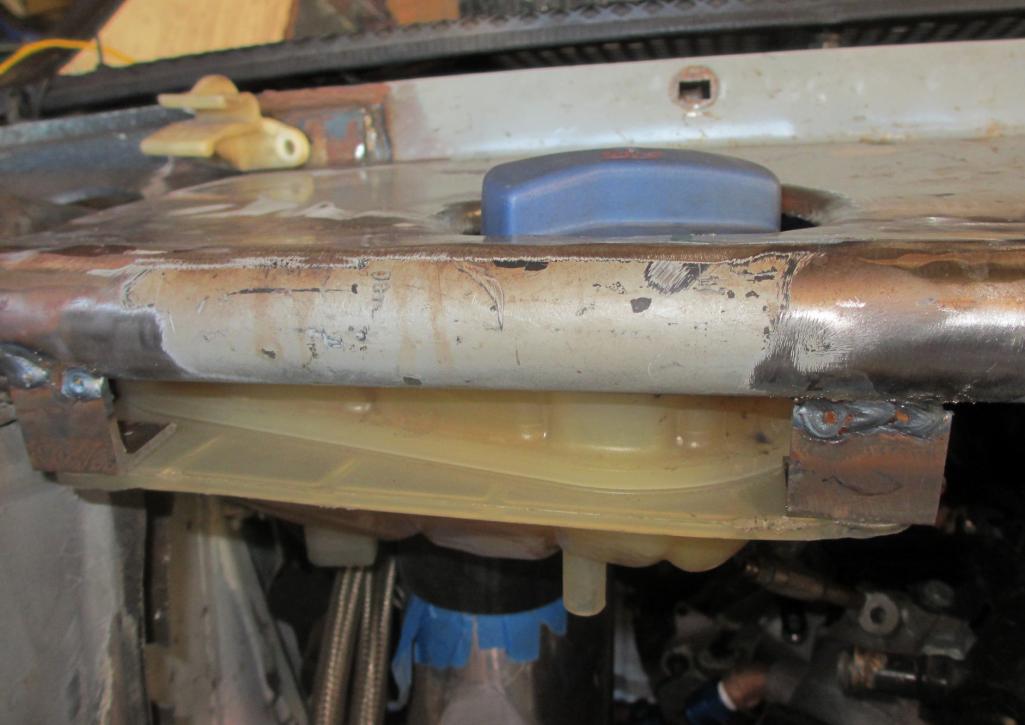
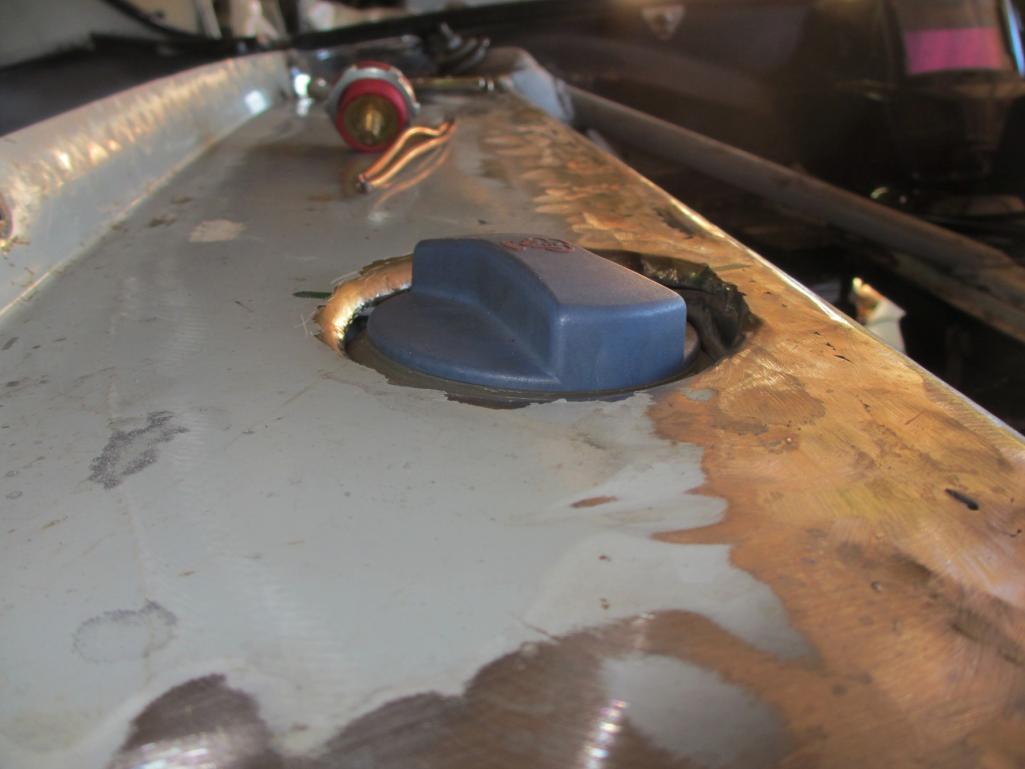
My new fuel pump showed up today. The Audi need 4 bar of pressure (65psi). This is the standard pressure for the motor. If anyone needs a good 45psi pump PM me, I'll let it go pretty cheap.
I also got a Howe Pedal and Wilwood master for the clutch. 034 Motorsport sells an adapter for the stock slave to accept a -3AN fitting. No need for a custom slave and the adapter was cheap. Now I have to decide if I want to replace the brake pedal and master. The brakes work great as is so I may just leave it for now and ad it to the honey do list after I get it on the road.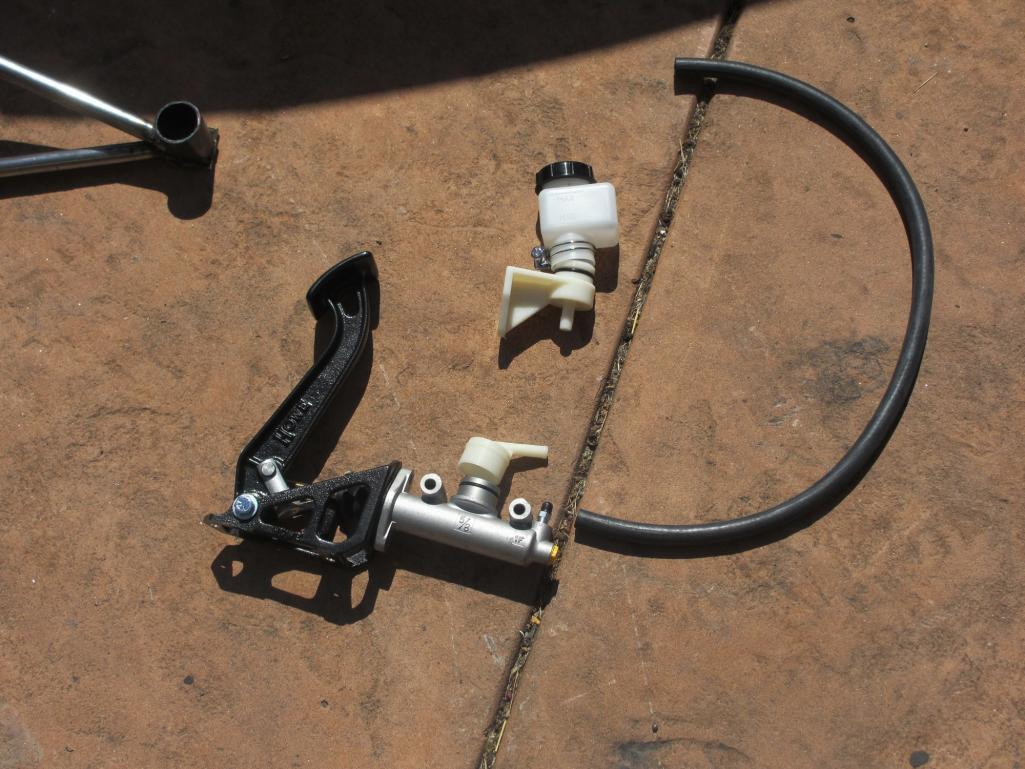
I got the ECU back from 034. Re-flashed to race car spec. No smog junk or un-needed stuff.
More updates tomorrow! 8am to 7pm toady. I'm beat!
Posted by: kg6dxn Oct 6 2012, 09:48 PM
One more just for fun...
Engine in the bay. I will have to make room in the rear trunk for the valve cover, exhaust and intake. I picked up a new aluminum intake manifold since the stocker won't work (angle problem) this one allows the TB to be installed in front of in back. I am mounting it in the back and it will also crowd the trunk a little...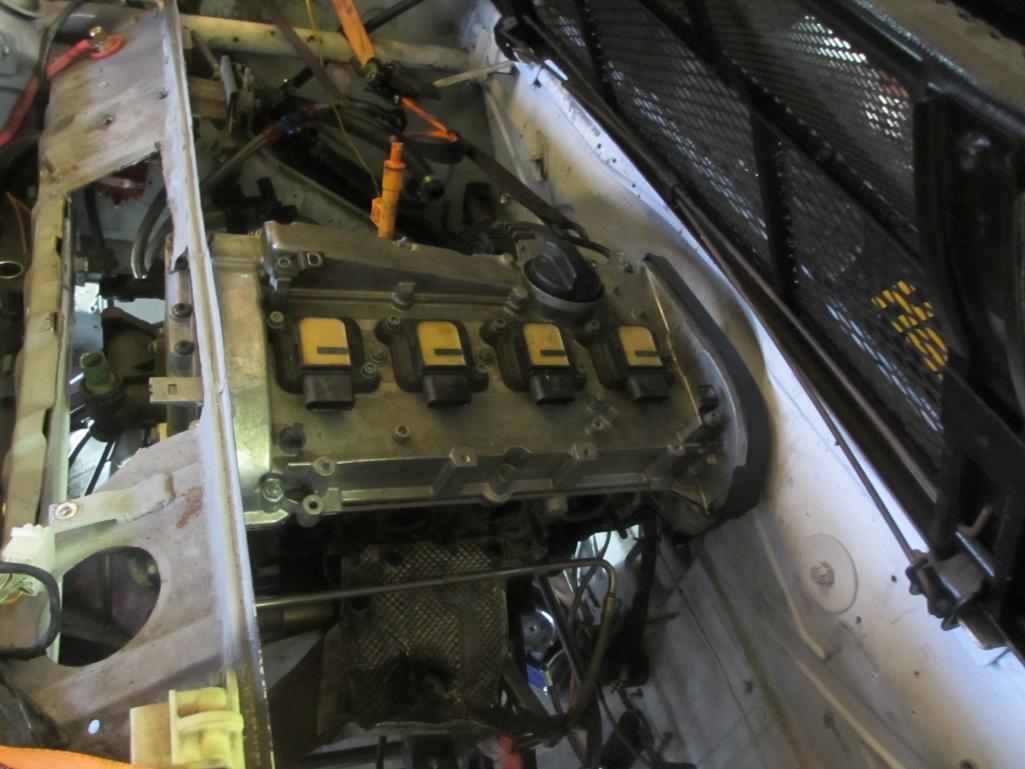
Posted by: rohar Oct 6 2012, 10:15 PM
Dude, we need to start a new club, the lightweight birdcage cradle club! It's looking nasty! I've got one more day of distraction with the 944 and I'm back to fab on mine.
Good on ya man!
Posted by: Andyrew Oct 6 2012, 10:22 PM
What manifold did you use? The VW one for the transverse engines?
Engines are pretty low in vibrations so you should be OK, If you used the A/C it might be a bit shaky.
Where in the trunk do you have to make room?
Enjoying the progress!!
Posted by: kg6dxn Oct 6 2012, 10:29 PM
What manifold did you use? The VW one for the transverse engines?
Engines are pretty low in vibrations so you should be OK, If you used the A/C it might be a bit shaky.
Where in the trunk do you have to make room?
Enjoying the progress!!
I picked up an OBX (don't laugh), It's the only one I could find that would work for under $500. It actually fits nice and the quality is good. Believe me I was worried! Its for a transverse engine setup. The funky angle on the stock manifold just would not work right.
I have to make a hump just like some of the Subie guys do. I will used my roll cage as the corner and just box in around it.. I need to make the targa top fit. That is a priority!
Posted by: McMark Oct 7 2012, 09:48 AM
Mark, what would you want with a lowly KO3? Planning to turbo your lawnmower?
Basically.
Should have it sorted with the Chinese K03 by New Years. I won't clutter up Mike's thread anymore with details, plus I'll have a whole build thread on it once it's done. If I post about it, it's on my Twitter feed. So if you're curious you can look through that. 
Mike, the crade looks amazing! Do you have a mandrel pipe bender? I can't believe the engine fits as well as it does. If you want to make the intake work without cutting the truck, you're welcome to play with my TIG welder anytime.

Posted by: kg6dxn Oct 7 2012, 10:01 AM
Mike, the crade looks amazing! Do you have a mandrel pipe bender? I can't believe the engine fits as well as it does. If you want to make the intake work without cutting the truck, you're welcome to play with my TIG welder anytime.
As an Electrician, I have access to various pipe benders. I used my hand/shoe bender for these since it is such small diameter tubing. It would have been easier and lighter if I used thinner wall tubing.
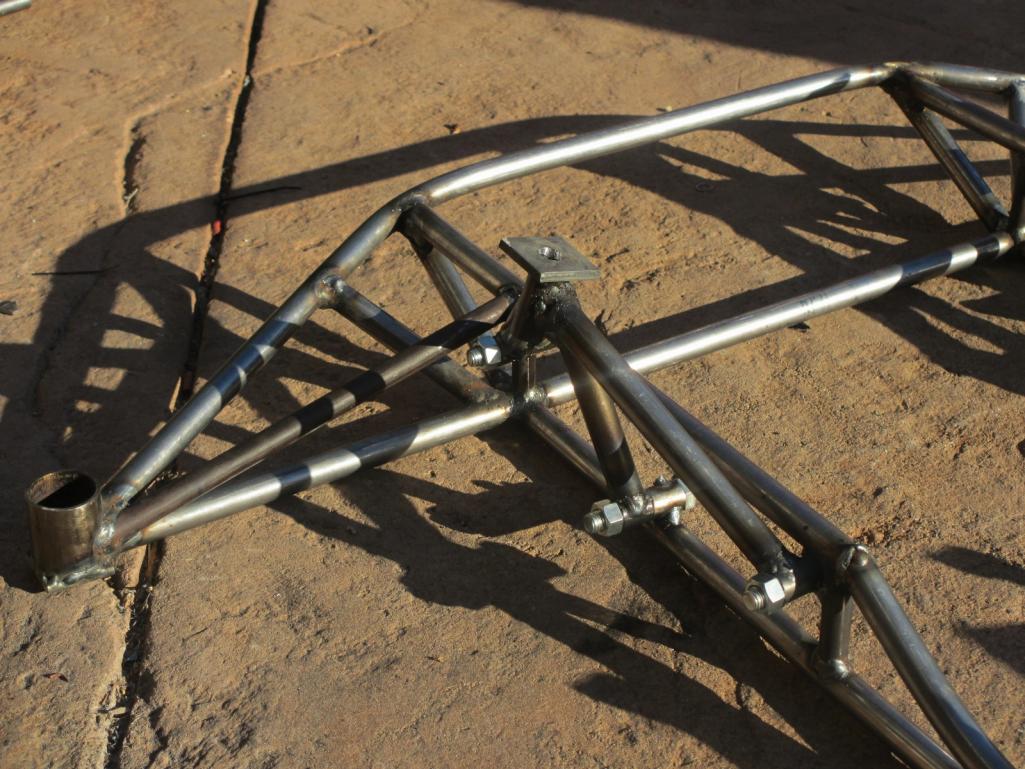
You saw how my old cradle was sagging (rotary) due to the lack of a rear support. This time I wanted no sagging or flex. I think I achieved it considering the weight of the engine is sitting on a copper shim, sitting on the single 3/4" horizontal runner.
Time to get back to work!
I added some more triangulation since these first pics. I will add more pics when I get it finished...
Posted by: kg6dxn Oct 7 2012, 08:45 PM
Today was spent, all day, fabricating mounts. I did something smart, I made mounting tabd on the cradle to pick up the tranny and motor mounts. That way If I swap engines, again, I can re-use the cradle and only fab new mounts. I also burned up almost all my DOM. Surprised I didn't run out of welding wire or gas... I'm sure glad I can fab myself, although it would be nicer if I had a shop and slowed down a little. I could not afford to pay someone to do this. This is one of those days where you would have to explain to the customer that it actually did take 10 hours to create mounts. Then try to get them to pay...
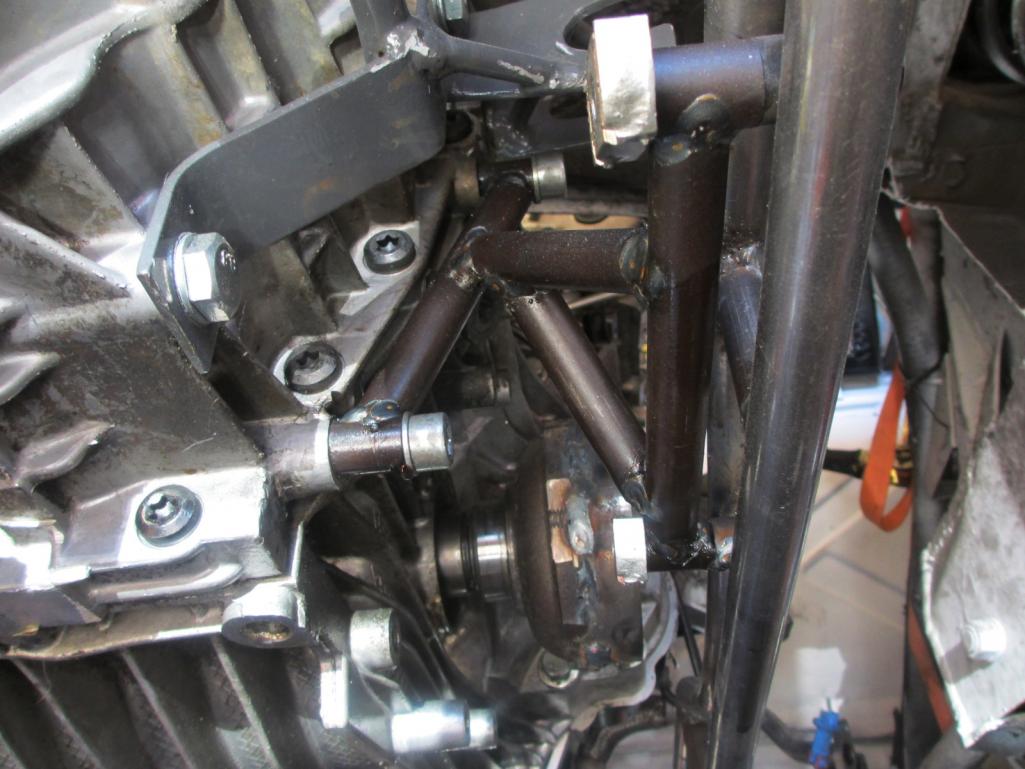
I used the axle stubs to measure for level. There are no level parts on the engine. Everything line up great... 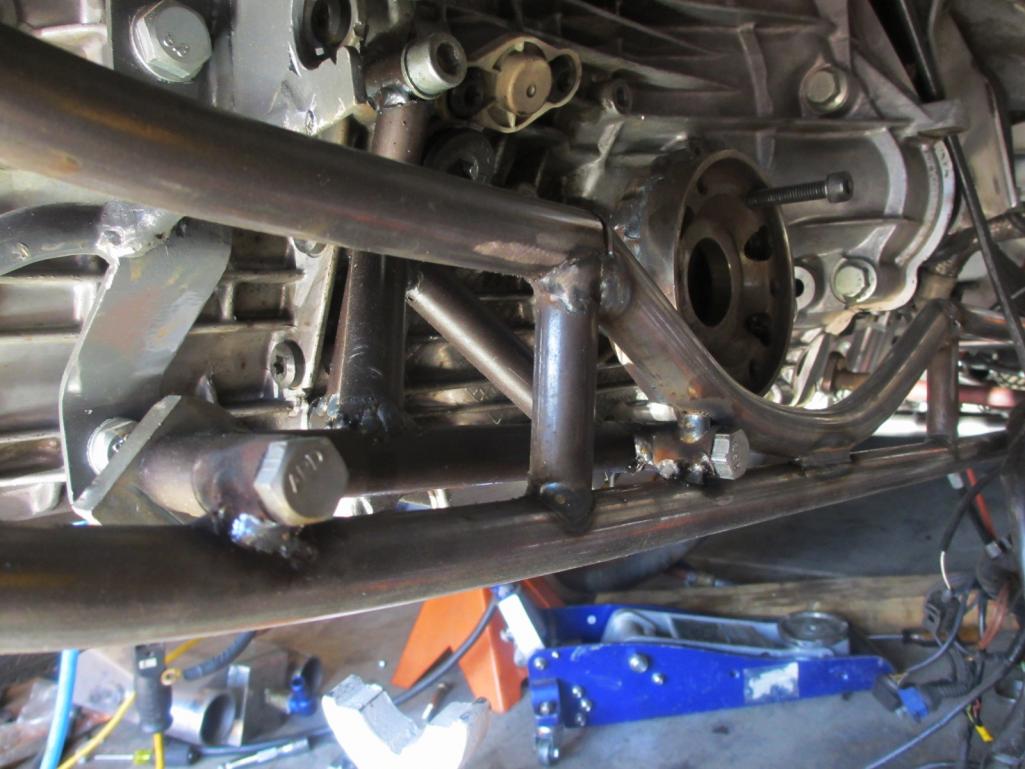
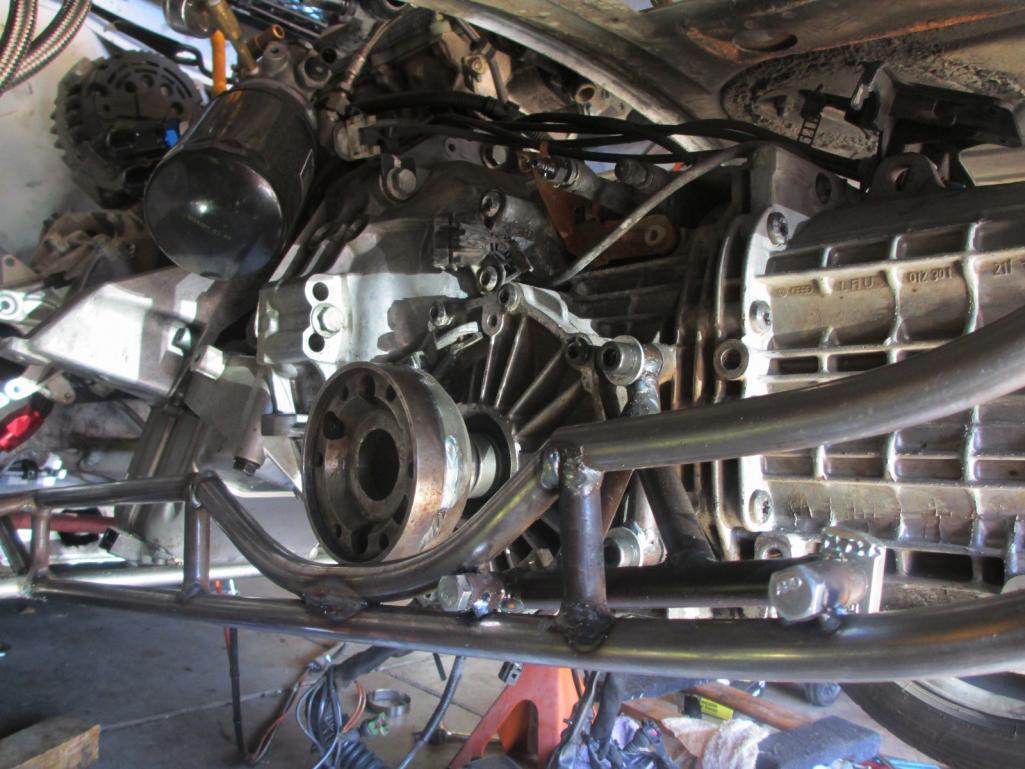
Posted by: kg6dxn Oct 7 2012, 08:48 PM
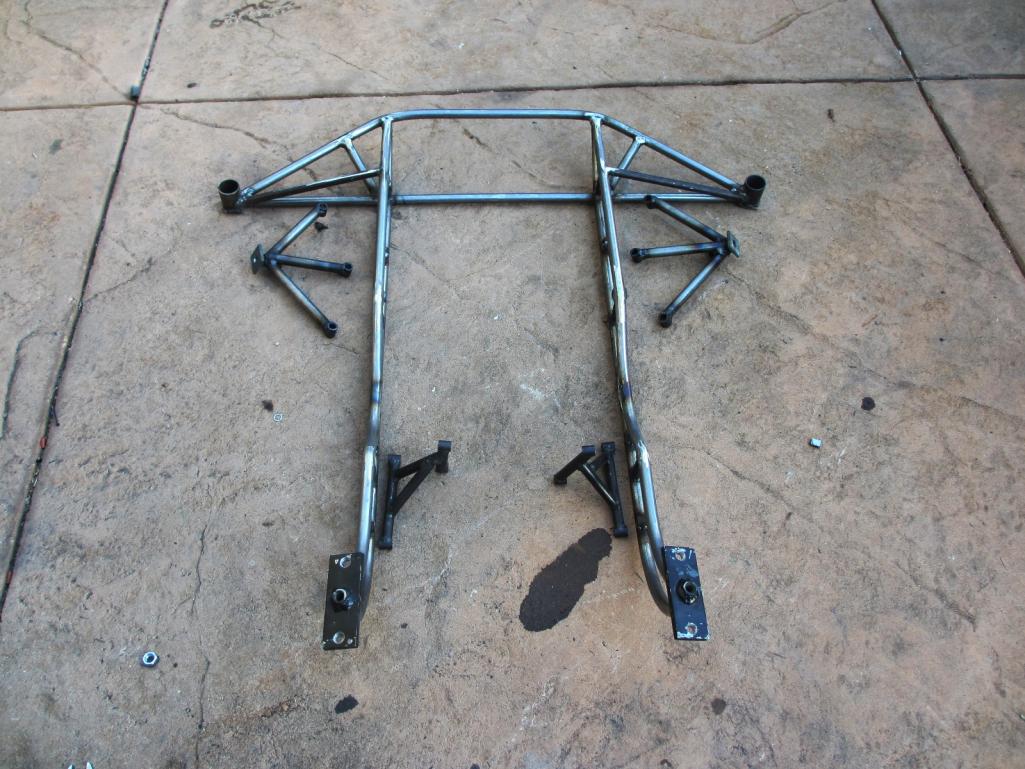
here is the final system welded. Need some more grinding and finishing but it looks pretty good. For those that are counting, the cradle weighs exactly 24.6 lbs. The engine and tranny mounts a few pounds more...
That's it for now. We'll see what I get done this week after work... BTW, the new oil stains on the driveway anr from the nounts. I gave them a dirty oil bath after welding. Apparently I missed a weld and the filled up with oil, then they drained out... 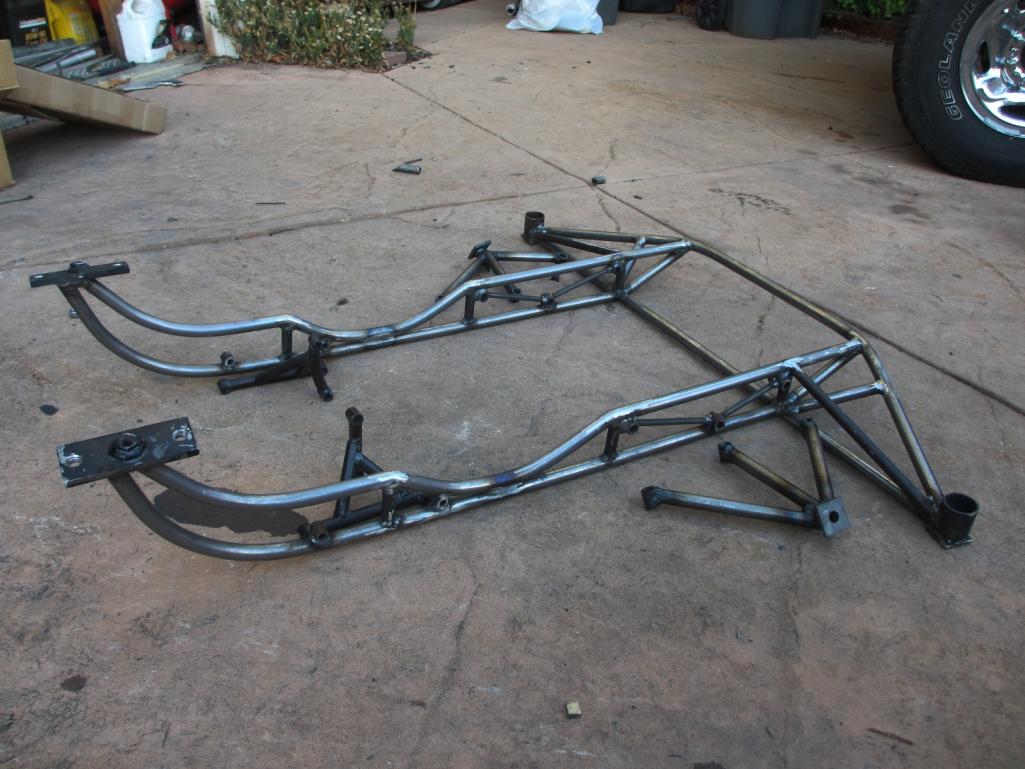
Posted by: Dr Evil Oct 7 2012, 08:59 PM
Work of art, Mike
Posted by: kg6dxn Oct 7 2012, 09:03 PM
Work of art, Mike
Thanks Doc! That means a lot from a man of your stature.

Posted by: Todd Enlund Oct 8 2012, 06:26 AM
Man, that is slick.
Posted by: westtexass2k Oct 8 2012, 07:44 AM
This is a cool build. I really like the Audi engine. Its very smooth and fat low end torque. Are you going to use a cable shifter?
Posted by: McMark Oct 8 2012, 07:45 AM
That's awesome! And your insight to make replaceable mounts is genius. An engine sub-frame is the only way to go. Keep up the great work. 
Posted by: Andyrew Oct 8 2012, 08:46 AM
Looks fantastic!!!!
Posted by: kg6dxn Oct 8 2012, 11:43 AM
This is a cool build. I really like the Audi engine. Its very smooth and fat low end torque. Are you going to use a cable shifter?
I am using a Boxster shifter. I had to fab the tranny side linkage and it works great. Shifts just like a Boxster.
Posted by: kg6dxn Oct 13 2012, 07:01 PM
Here she is in all her glory. Engine mounted to the cradle. Intake and exhaust mocked up. The cradle sure makes it east to maneuver around. The nuts on the under side of the exhaust manifold will be a challenge. So far I cannot get a wrench on the center one...
Enough work for today. I'm tired...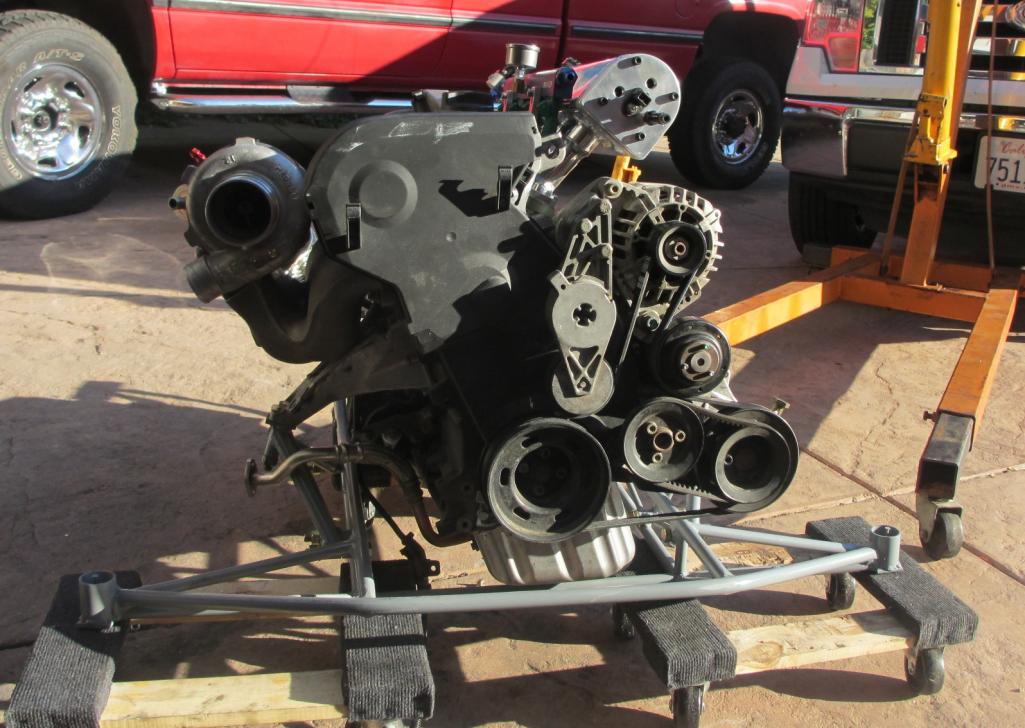
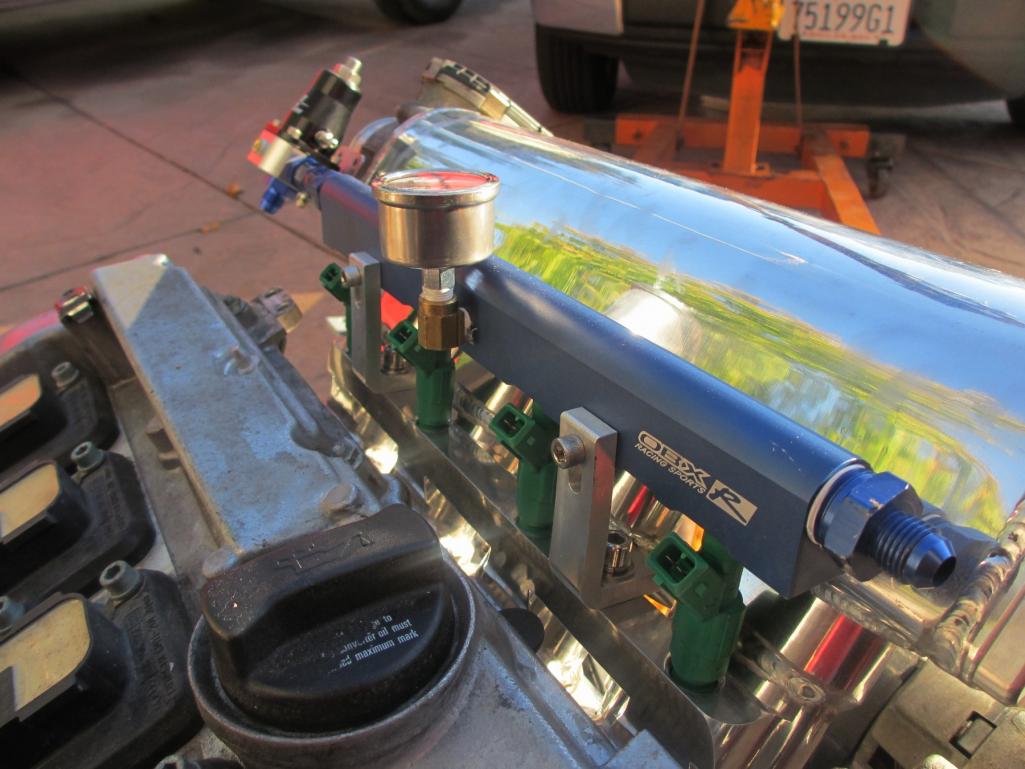
Posted by: kg6dxn Oct 13 2012, 07:10 PM
The cool thing about the OBX (don't laugh) intake manifold is the ability to swap the throttle body to the front or rear. Right now it's setup on the rear. My AEM methanol injector is on the front. The shitty thing about the OBX manifold was the fuel rail. The one that came with the manifold is polished and the -6AN fittings arn't right. They do not fit a -6AN fitting. Shitty Chinese manufacturing. I just happened to have another OBX rail and it worked with a little modification. Aeromotive 75psi regulator is hanging on the end. Not sure I will leave it there but we'll see...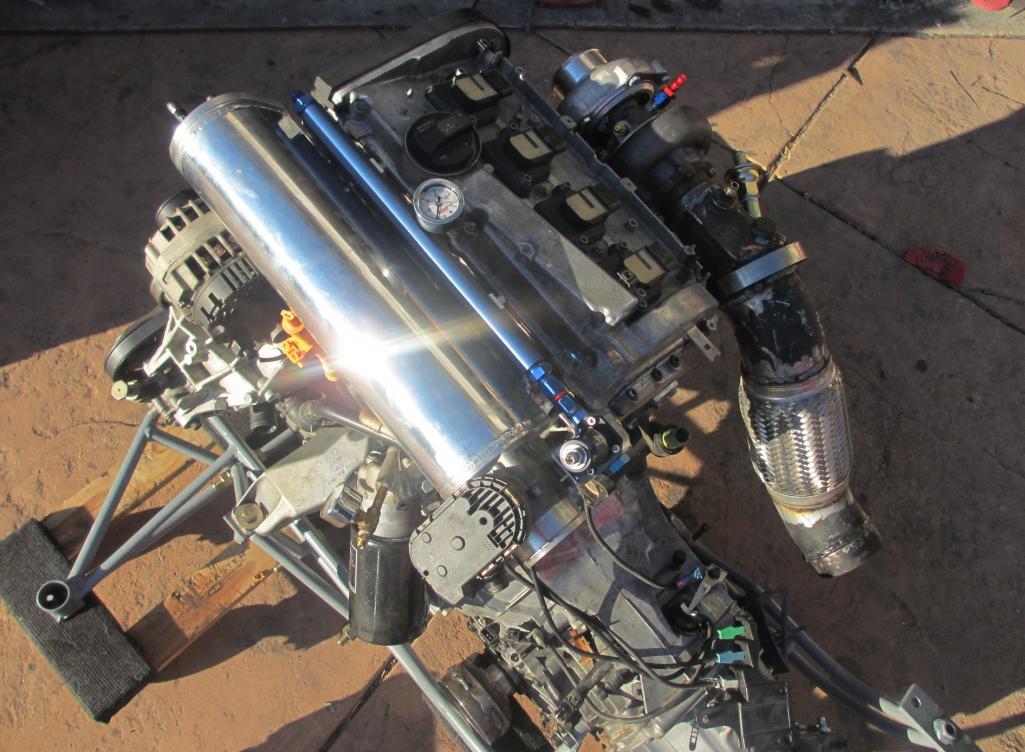
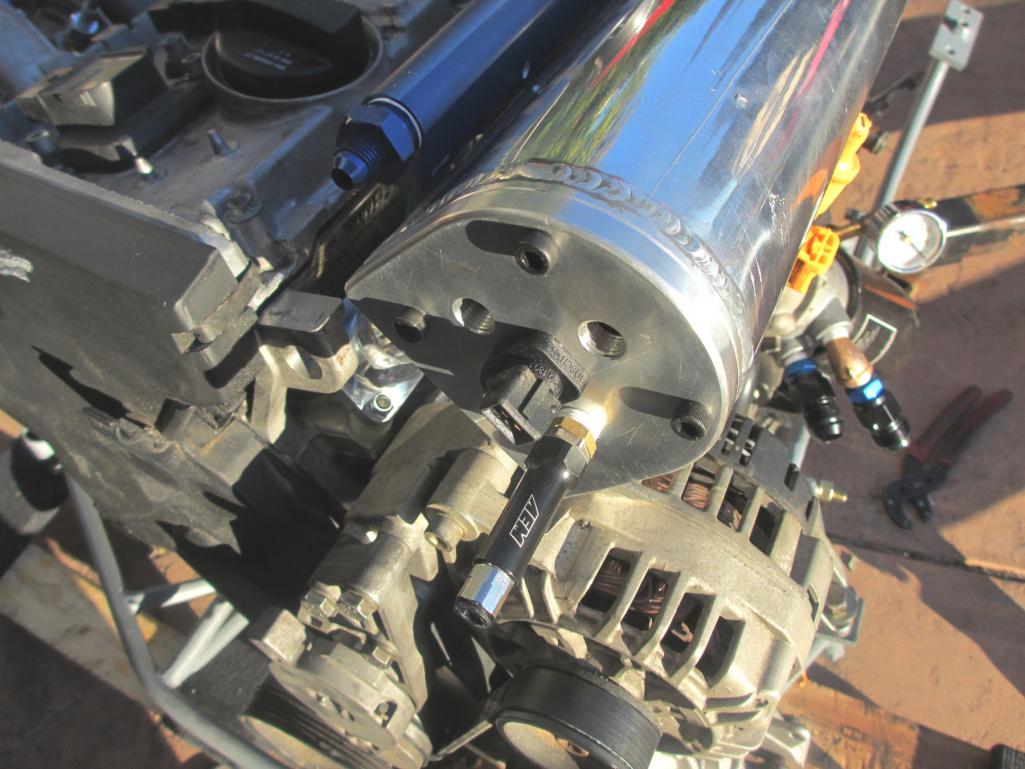
Here is the oil cooler attachment and Crankcase evacuation fitting visible. I removed the factory water cooled oil cooler and will run my -12AN oil cooler lines to it. I had to add a 45 elbow and -10 to -12 adapters. The elbow it for clearance between the -12 fittings only.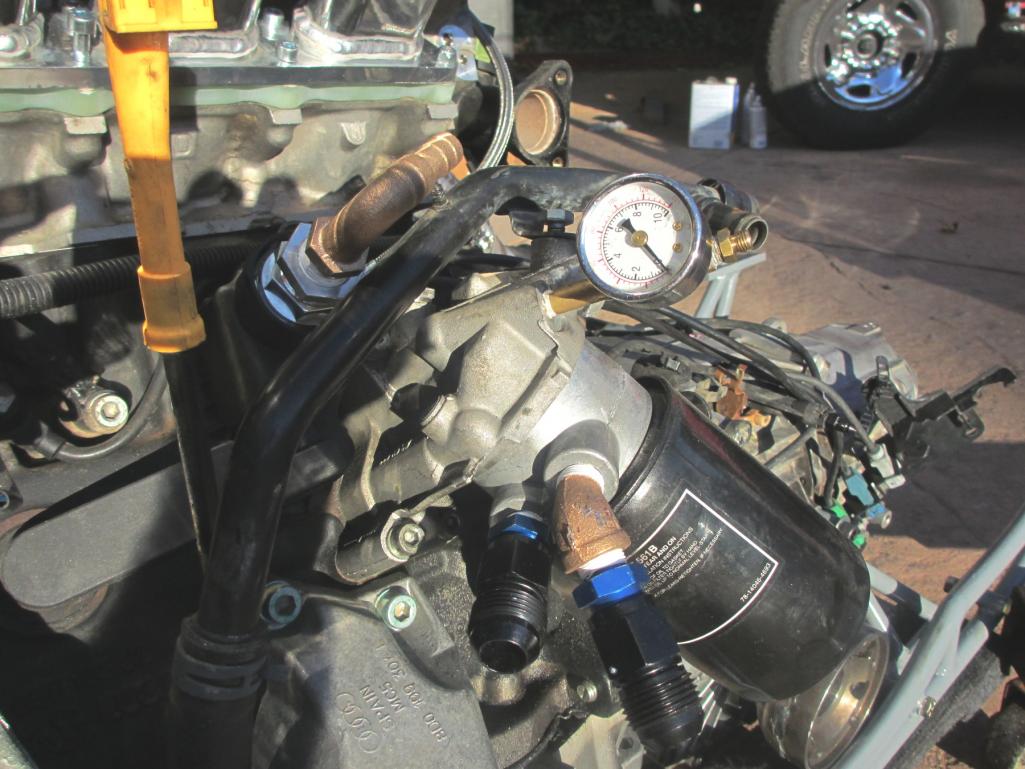
Posted by: rohar Oct 13 2012, 08:13 PM
That's really comming together. I love that you stuck with the stock 15 degree slant, it'll make things so much easier shortly down the road.
Posted by: okieflyr Oct 13 2012, 09:14 PM
Mike, have you checked your height and clearance with the OBX manifold yet ?
Are you going to use any rubber or material between the cradle and body?
The cradle will hold and transfer alot of vibration to the body. I used stock 911 mounts at my four points of engine/ body mounting and it is very effective with the vibration. My engine lid will get excited for about 2 minutes when cold, but everthing is quiet beyond that.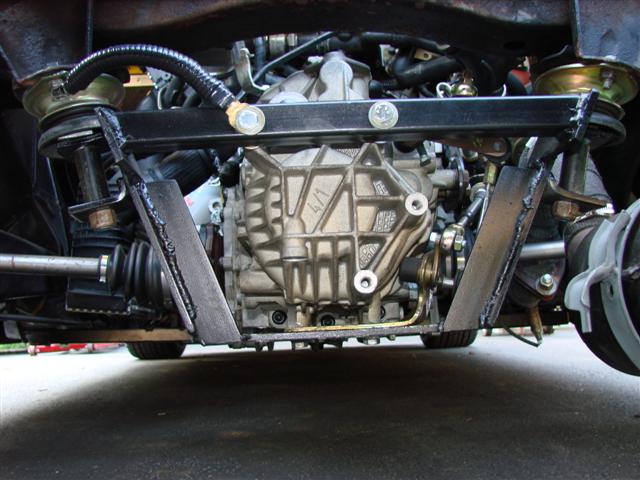
Posted by: kg6dxn Oct 13 2012, 09:34 PM
Mike, have you checked your height and clearance with the OBX manifold yet ?
Are you going to use any rubber or material between the cradle and body?
The cradle will hold and transfer alot of vibration to the body. I used stock 911 mounts at my four points of engine/ body mounting and it is very effective with the vibration. My engine lid will get excited for about 2 minutes when cold, but everthing is quiet beyond that.
I may have some engine lid clearance problems with the intake. Have to get it in and see. I can lower it down if I need to. Just have to fab new mounts. Lucky for me this is doable without messing with the cradle.
I have broken too many rubber mounts over the years. Including 911 mounts. These are solid just like my V8 was. I'm used to the added noise and vibration. I even have a set of aviation headsets for long drives when the V8 would drone on and on...
Posted by: kg6dxn Oct 28 2012, 09:17 PM


Pretty much sums it up...
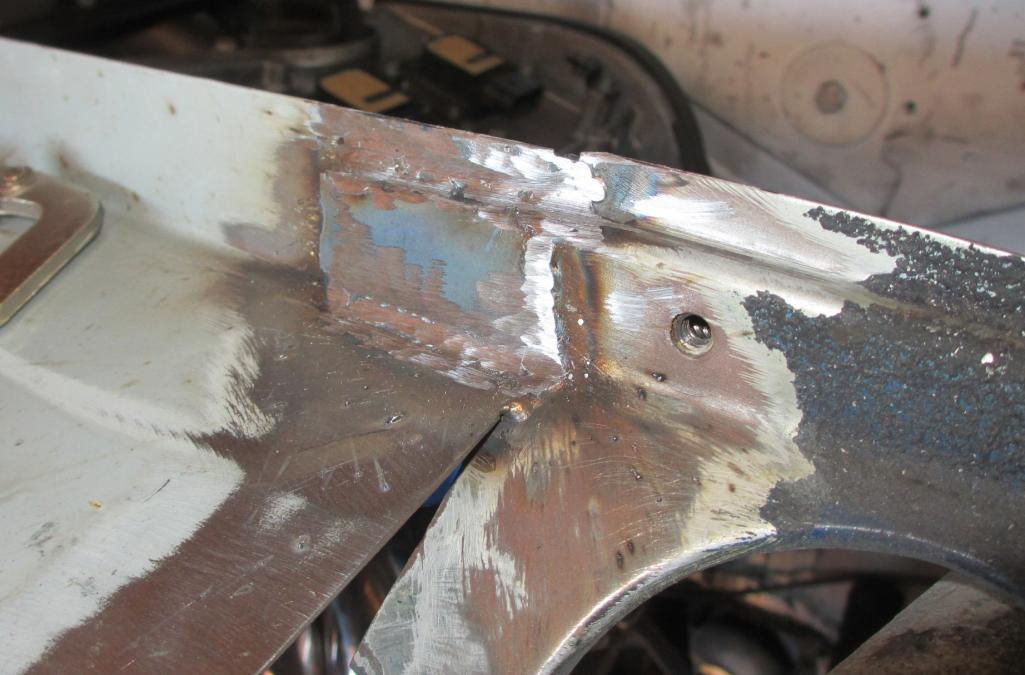
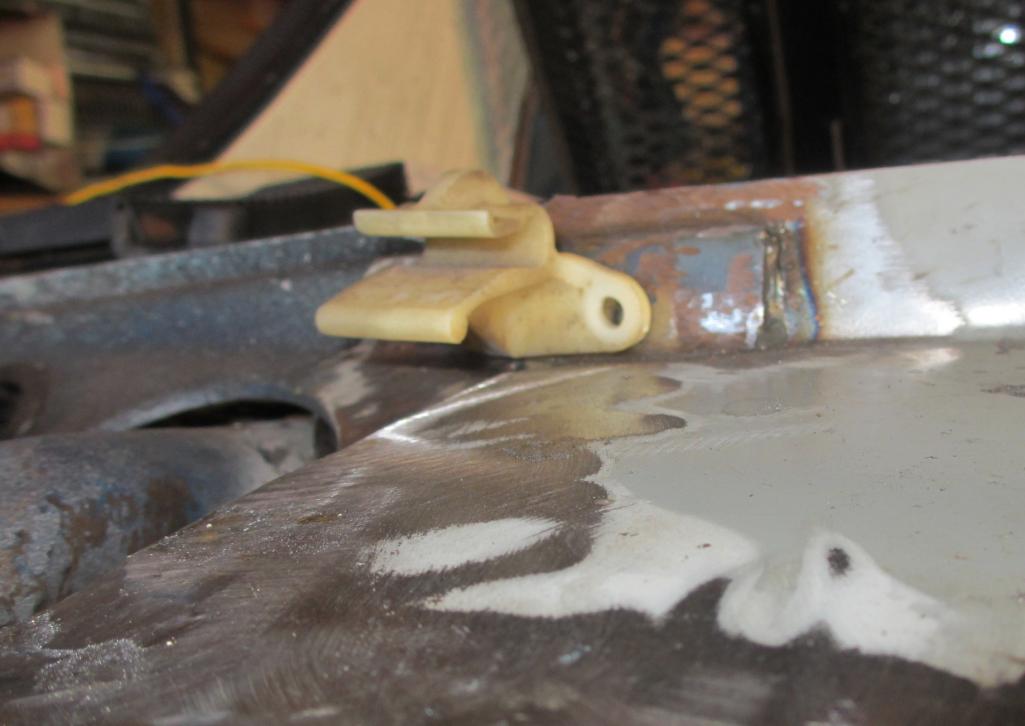
Rear firewall is being rebuilt. I curved it so it looks better and the seal will sit correctly. Basic hammer and anvil work. I might be able to put the factory latch back in too. Least of my worries. I welded dutchmen next to the plastic targa top holders. One of each mounting nuts got cut off int the process. Now I need to drill and tap.
I cut the bottom out of the trunk too. Just up to the cross member. I'm going to make a dropped removable panel. Dropped so I can fit the methanol tank and because there is 4-5" of space from the original trunk to the tranny. I may have to box in the exhaust a little. I tried 2 exhaust manifolds so far. I'm waiting on a third to arrive for mock up.
I "frenched" the coolant tank into the new firewall. The top is hammer rolled over a dolly. The placemant was coordinated with the intercooler... Next post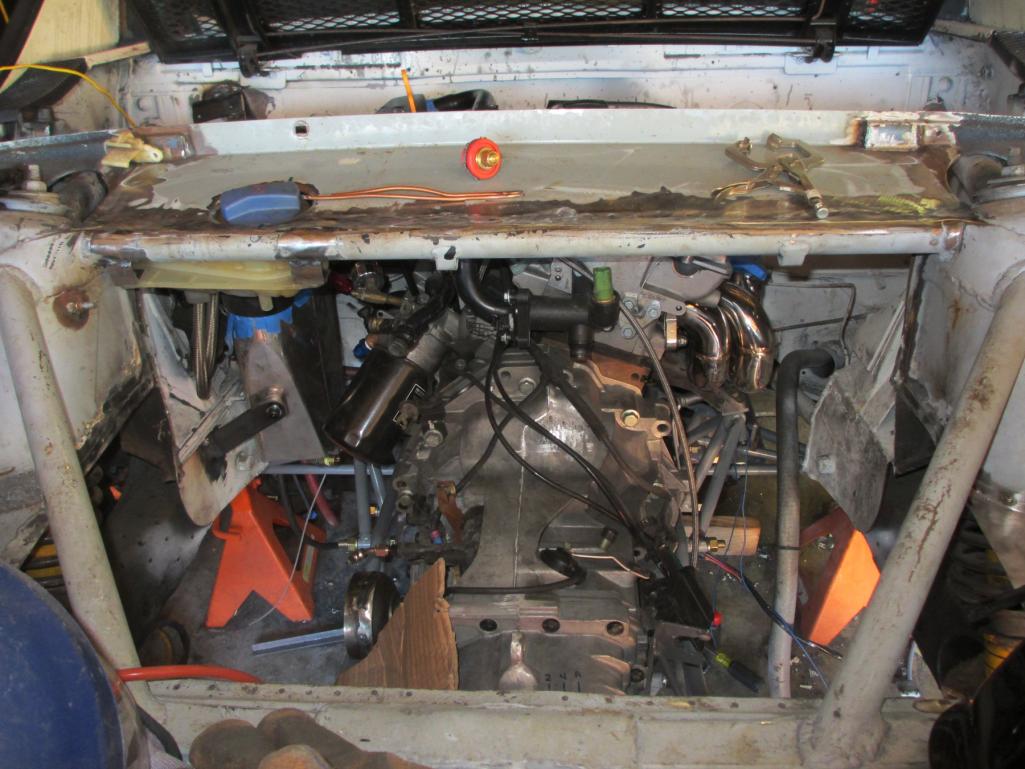
Posted by: kg6dxn Oct 28 2012, 09:24 PM
The intercooler was a challenge. I went back to the stock intake manifold and managed to wedge the intercooler into place. I have 1/4" clearance from the engine and from the side wall. I used a reducing 45 from the TB and a reducing 90 that is rotated 45 deg under the coolant tank. It all fits! This will plump to the turbo outlet with the bypass valve.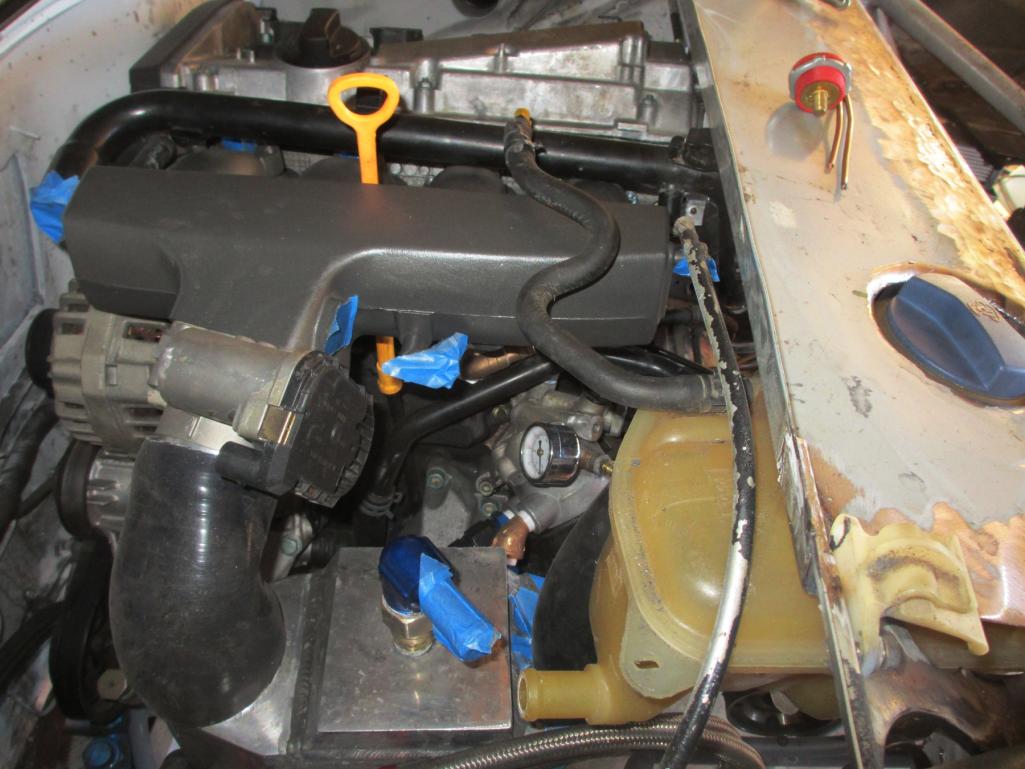

Posted by: Andyrew Oct 29 2012, 12:39 AM
Still not exactly sure why you had to raise the firewall so much. Is it because of the exhaust?
Anyways, Lots of work done! Awesome stuff!
Posted by: kg6dxn Oct 29 2012, 04:36 PM
Still not exactly sure why you had to raise the firewall so much. Is it because of the exhaust?
Anyways, Lots of work done! Awesome stuff!
Valve cover, Water temp sensor, water outlet manifold, exhaust... Those are the reasons for the firewall movement. I just incorporated the roll cage bracing as the corner. It was the best place to make the transition. It had to come back almost to the bar on the cage. With the extra space, I installed the coolant tank and the remaining space will be: Intercooler piping, Diverter valve, crankcase evacuation system, heater plumbing. I may put more in there if it fits. The crankcase evac system will be done with 5/8" aluminum tubing. The heater piping will be 3/4" aluminum tubing. I also have to squeeze the turbo oil and water lines in this space. It will get crowded! The vertical panel will be removable for access to all the stuff. The Meth tank, pump, filter will go in the recessed area (lower cut out). The meth injector and solenoid will be on the intake manifold somewhere. Overall the engine compartment will be clustered with various things...
Posted by: kg6dxn Nov 23 2012, 07:58 PM
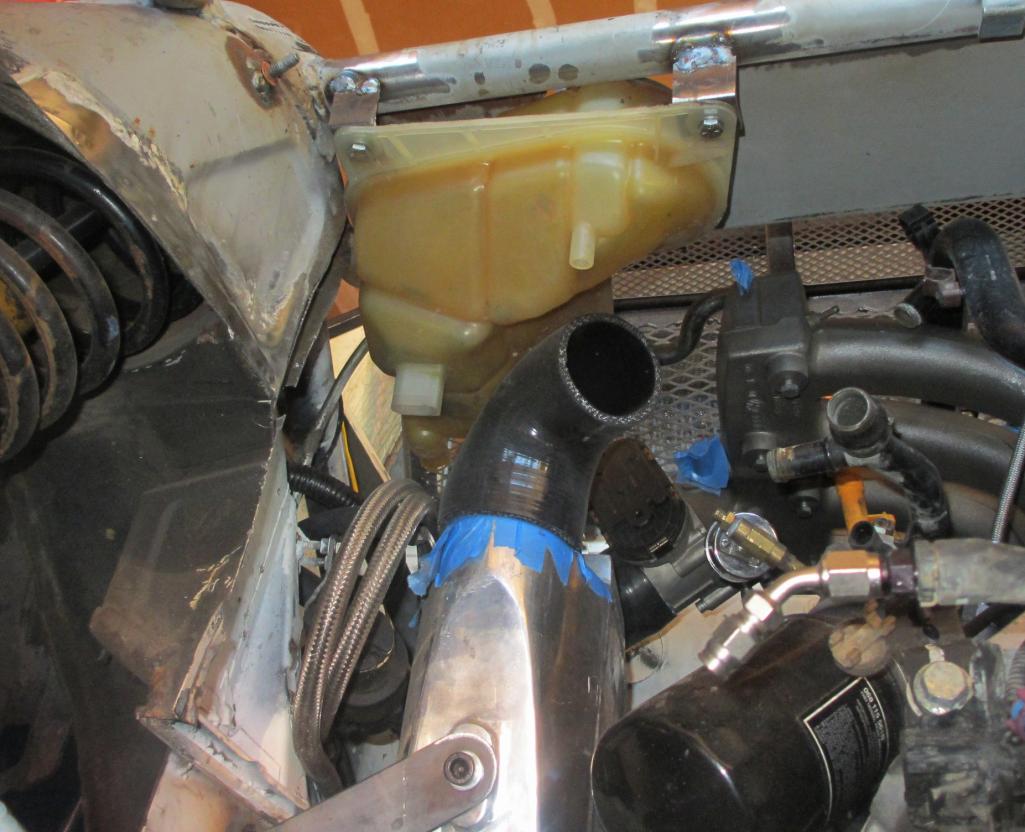
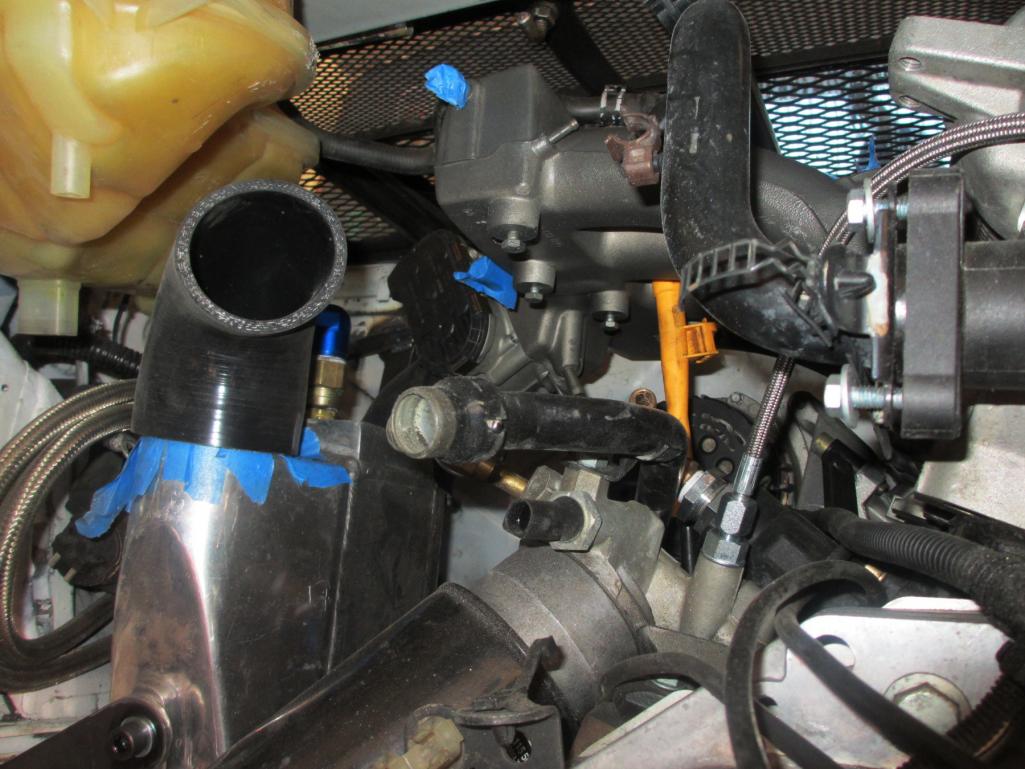
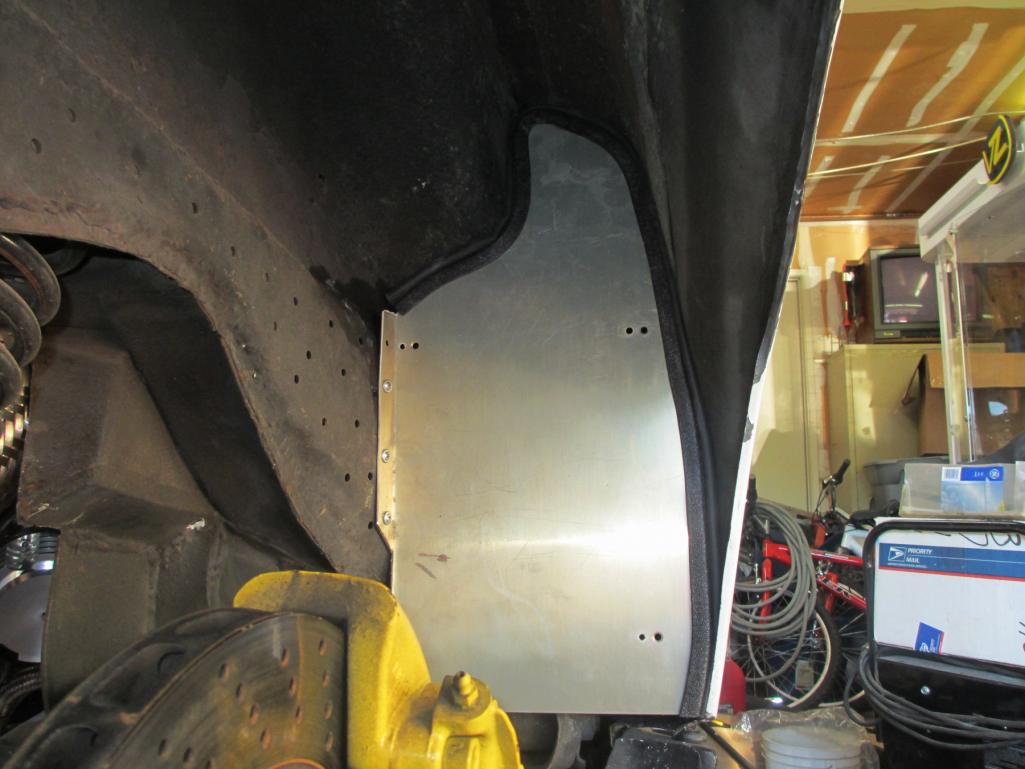
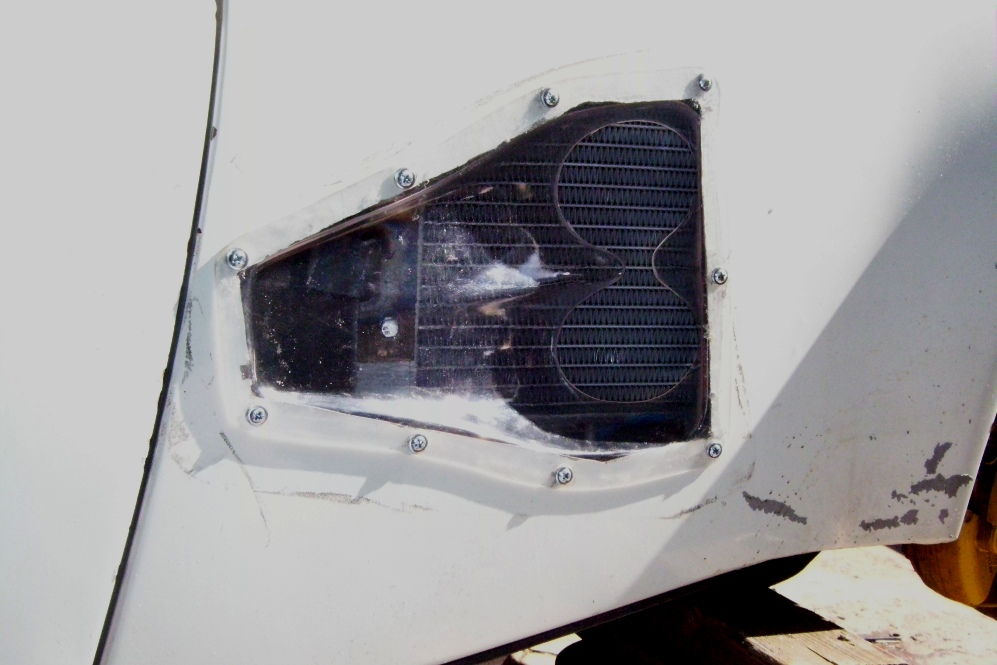
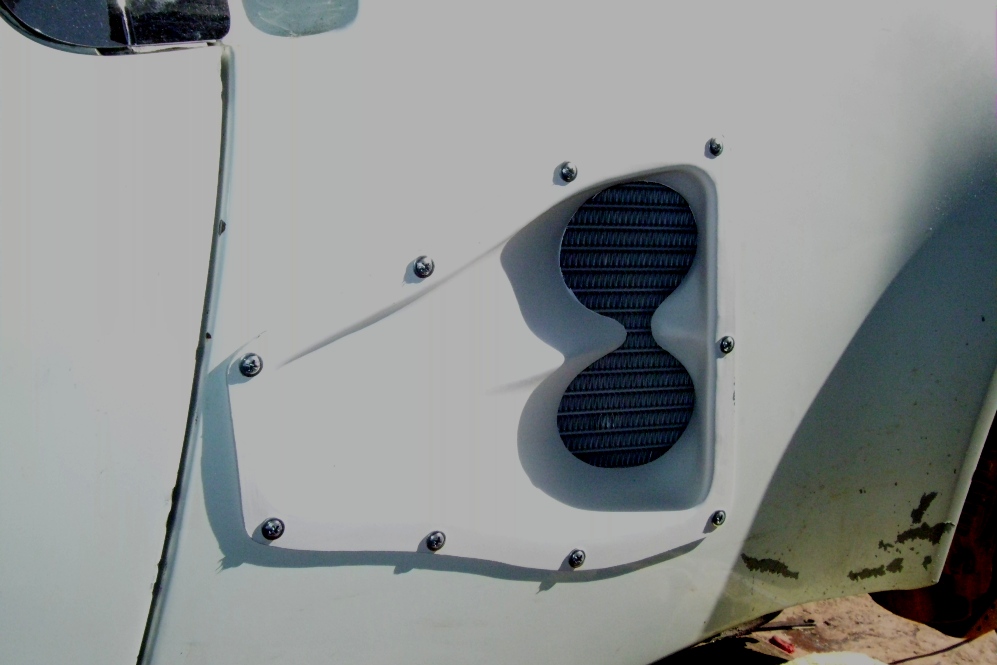
Plumbing, more plumbing... Got most of it licked! The pressure piping is red. I have a recirc valve plumbed into the turbo inlet. The recirc valve can also be a BOV but the ECU likes the missing air back. The cold air intake had to go in the fender. no room for the MAF, air cleaner and bends without hitting the turbo. I am leaving the hold in the side wall open to help draw air through the NACA. I built a inner fender liner out of aluminum to seal the chamber and keep road debris out...
I bought an 18" brake from HF and bent up an aluminum turbo shroud. Added a few knockouts for externals and done!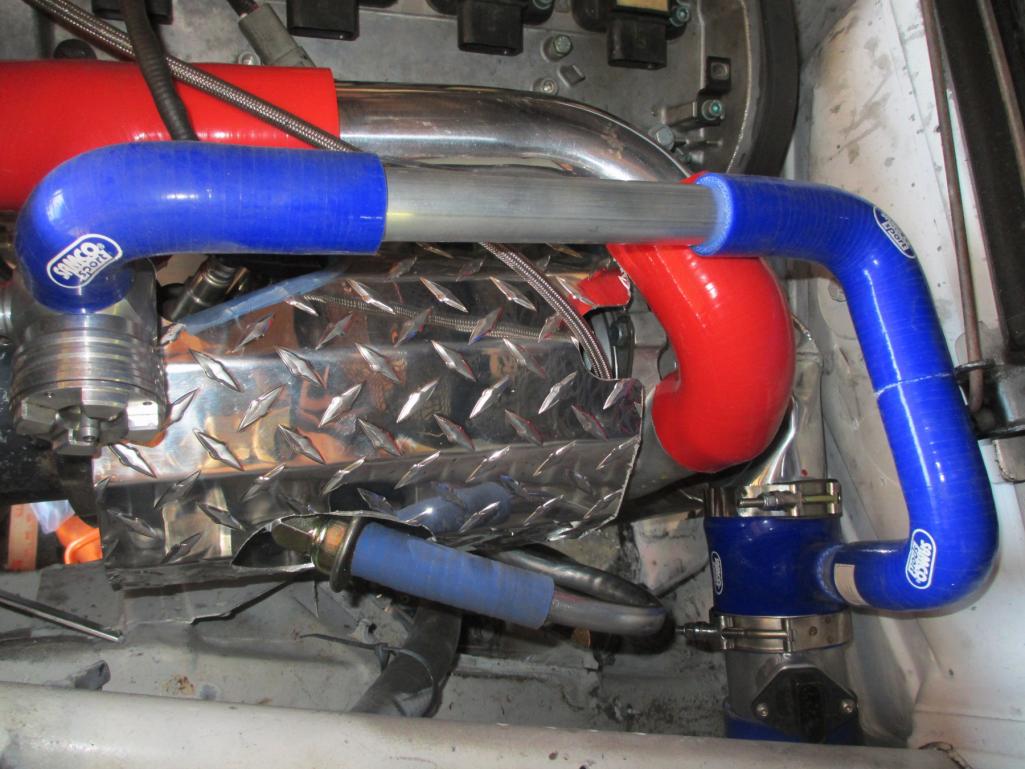
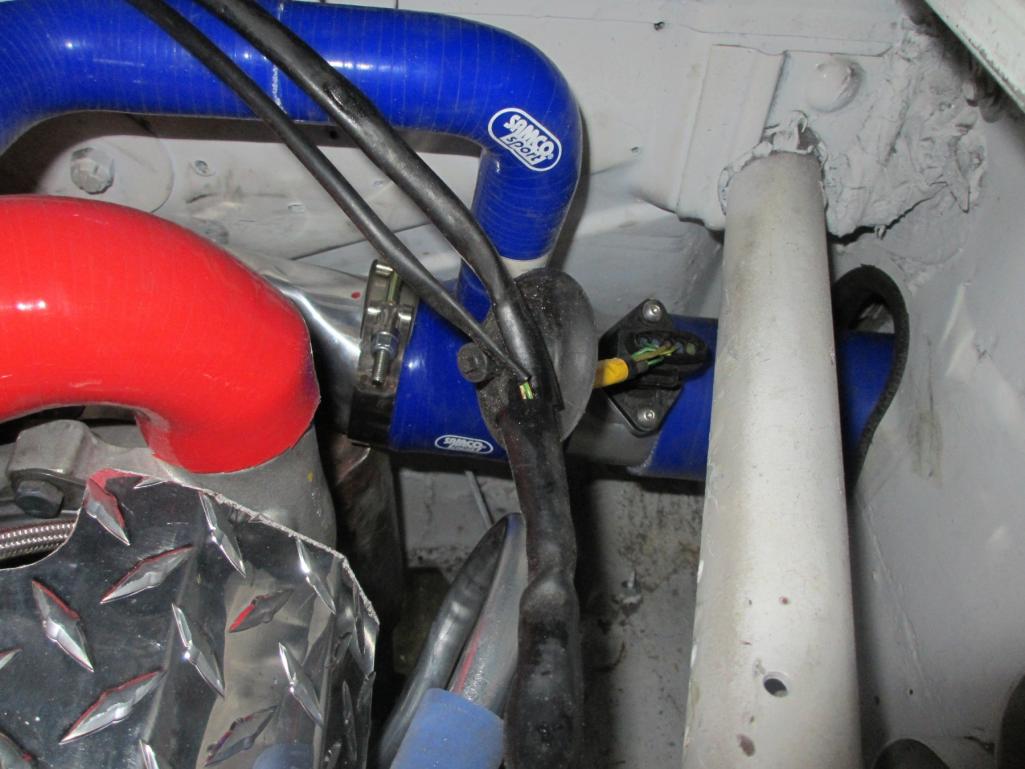
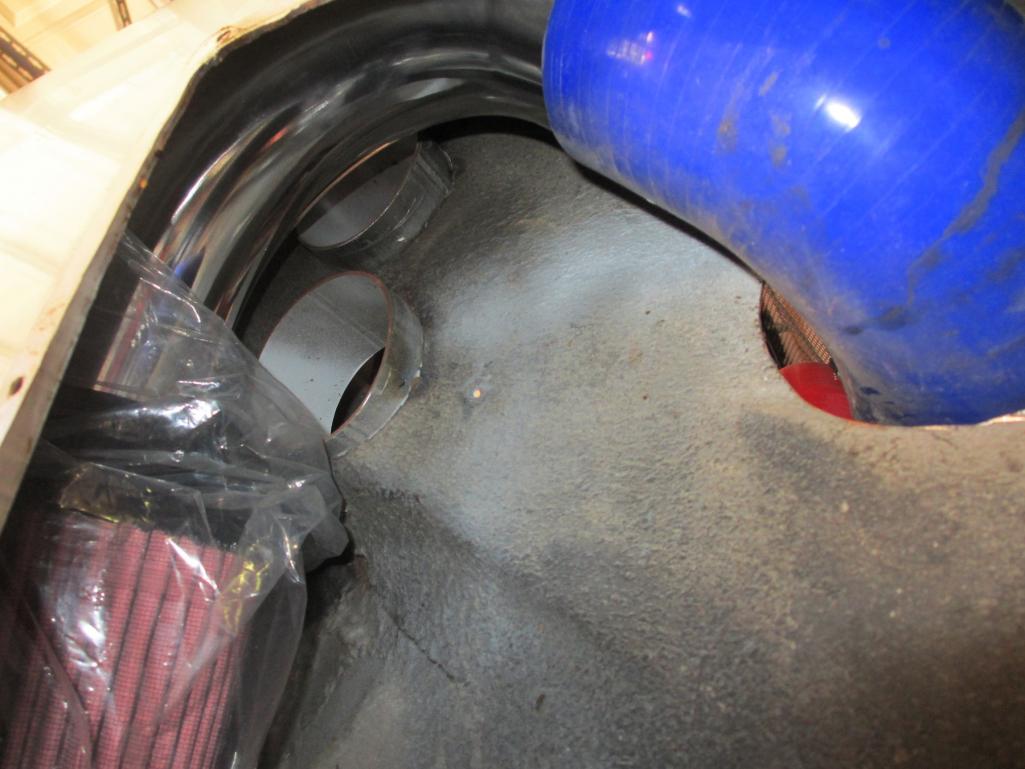
Here you can see some of the misc plumbing behind the engine... Intercooler, 2 heater lines, aluminum crank case vecuum, fuel supply... I dropped the floor 4" too...
Attached thumbnail(s)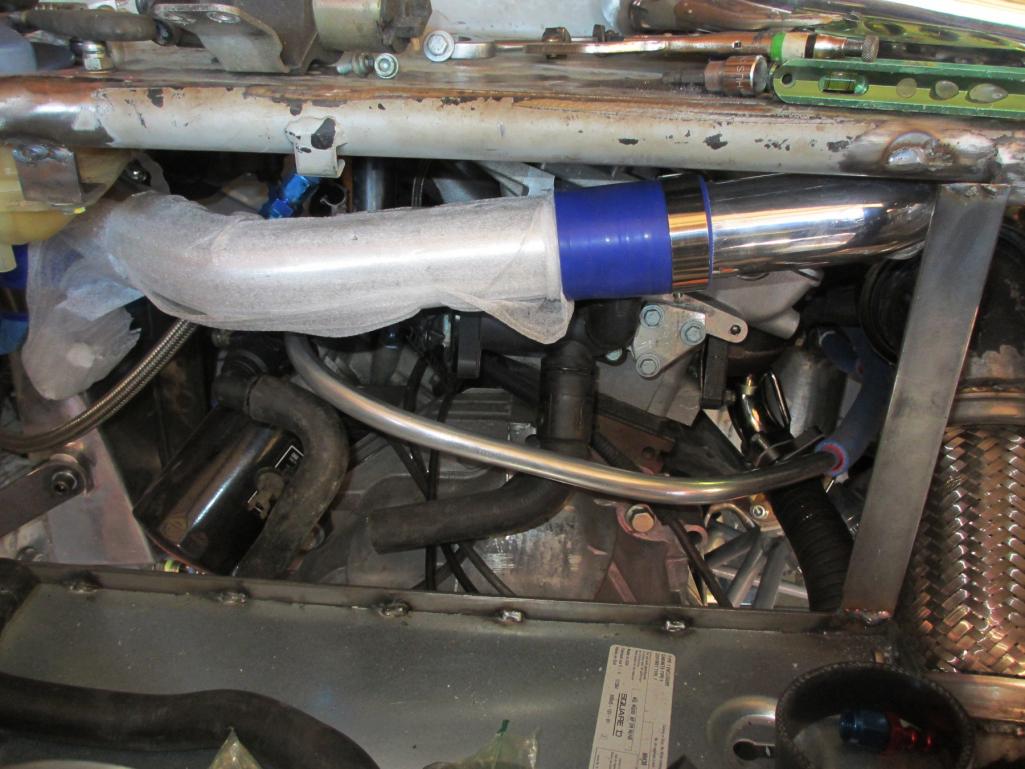
Posted by: ChrisNPDrider Nov 24 2012, 10:54 AM

Posted by: rohar Nov 24 2012, 11:24 AM
OUTSTANDING! I love the intake box in the fender. May have to steal that idea. Twice (one for each fender) on mine
Posted by: kg6dxn Nov 24 2012, 11:41 AM
OUTSTANDING! I love the intake box in the fender. May have to steal that idea. Twice (one for each fender) on mine
(1 each) long silicone 90, (1 each) aluminum 120 and (1 each) air cleaner.
It took 2-3 weeks of deciding before I cut the hole. If I didn't have the MAF, I think I could have squeezed it into the engine bay. I did not want a short 90 before and after the MAF. Since I already had it cut for the NACA, it seemed like the best solution. When done, you can see the filter through the NACA duct. I used thick copper wire to make a wire frame template of the inner fender. Worked out great!
Posted by: Andyrew Nov 24 2012, 11:57 AM
Mike, did you talkto 034 about doing mafless tune? the later ecu like you have can support it..
Posted by: rohar Nov 24 2012, 12:07 PM
(1 each) long silicone 90, (1 each) aluminum 120 and (1 each) air cleaner.
ROFL. I'm headded to chump with a V8 914, I ain't got budget for all that fancy stuff. Tractor Supply plumbing department here I come!
Posted by: kg6dxn Nov 24 2012, 04:38 PM
Mike, did you talkto 034 about doing mafless tune? the later ecu like you have can support it..
This is tuned for the 3" MAF housing. I wanted to keep the stock sensors (except the 2nd O2). the tune keeps the DBW and eliminates all smog junk. I could have done a stand alone system, maybe cheaper... I wanted the stock driveability the MAF has. The DBW is just because it's cool. After it's driving, I will take it back to 034 for fine tuning. I'm running a WB O2 sensor with a scaled voltage converter to trick the factory ECU input. This should give a WB 0-1V output signal to the NB 0-1V input.
Posted by: Andyrew Nov 24 2012, 07:18 PM
If they gave you a standard gt28rs file with 3" maf for an open exhaust I will bet you wont need to retune... The factory sensors will adjust from there. You know Im on a 2x larger turbo than my tune and I just have my boost cut in half. Roughly the same power but the same drivability as before... These modern ecu's are just awesome..
Posted by: biosurfer1 Nov 24 2012, 08:25 PM
It took 2-3 weeks of deciding before I cut the hole.
You know what they say, measure 254 times, cut once
Nice work!
Posted by: kg6dxn Nov 24 2012, 09:57 PM
It took 2-3 weeks of deciding before I cut the hole.
You know what they say, measure 254 times, cut once
Nice work!
I tried every combination of fittings I had before I bit the bullet. It's just too crowded on that side for the air path. I may have to clock the MAF for best results as well... This way I have 6" of straight pipe before and 4" after the MAF. I also wanted the MAF to be close to the turbo. The recirc valve needed to be close too.
I got started of some of the ECU wiring today also. I'm sure glad I documented it as well as I did. I still found some connectors without labels. lucky for me, they only plug into sensors and weren't a big deal.n I do need a multi conductor cable to go from the engine to the dash cluster. This will allow all the sensors and stuff to connect to the display.
Posted by: kg6dxn Dec 17 2012, 11:41 PM
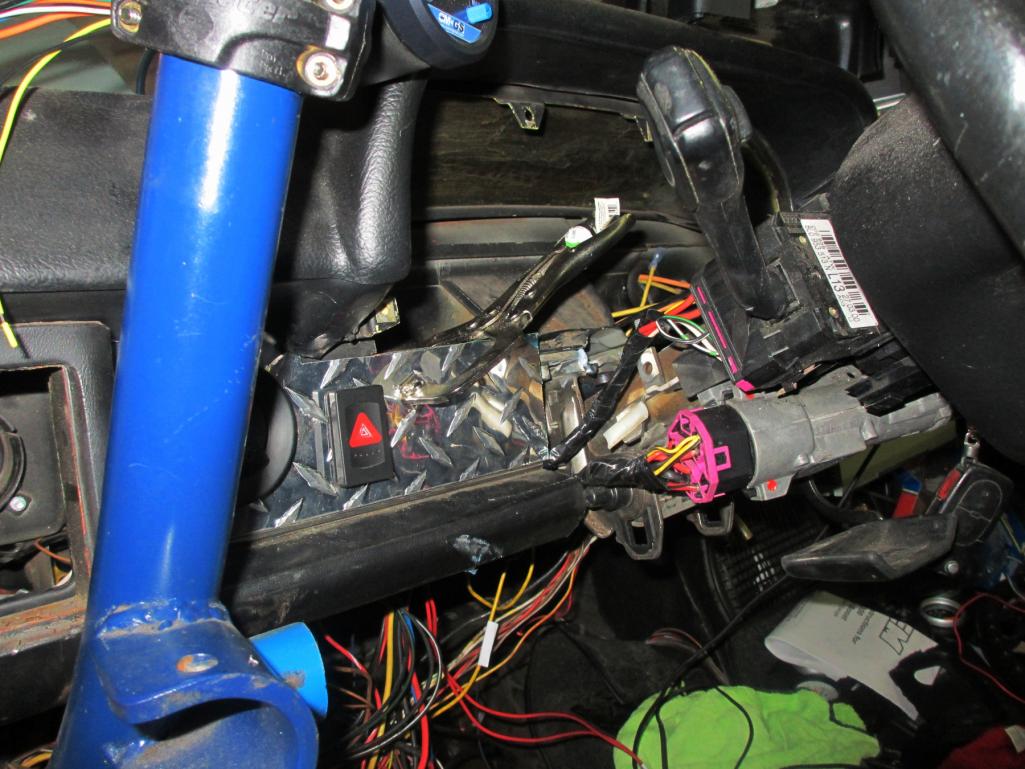
Here's a little teaser pic. I mounted the steering column in place. I cut apart a 914 column to get the mounting bracket and welded it in place of the Passat bracket. This column is about 1.5 inches longer at the U joint. I will have to cut and weld the diagonal shaft link and rework the geometry a little but it looks like it will not bind up. By doing this I accomplish a few things...
1) Cruise control
2) Intermittent wipers
3) Functioning immobilizer circuit
4) key that will crank the starter (I had a push button)
5) Tilt and telescoping wheel
I have been spending the last couple weeks knitting the electrical system together. I got to hand it to the Germans! Many of the 914 wire colors match the Passat wiring. It looks like they have stuck to their wiring standards after all these years.
The exterior light wires match perfectly. This allows for the use of the Passat flasher and hazard relay and switches. The switch contacts match too. Super easy!
The cruise control is built into the ECU and pre-wired to the column.
The windshield wiper/washer circuit is just as easy. Now I need to source a water bottle and pump.
Everything else is a connection from the ECU to the dash cluster. I'm running multi-conductor cable for this. The old ignition switch wiring matches (mostly) to the new one and the wires to the engine bay will be reused.
I'm not saying this is/has been easy but it is doable if you take your time and take a lot of notes. On top of that I have photoshoped the schematic into a color drawing. I also have a large color plotter at work to blow up the diagrams.
Shown here without the air bag (just in the way) and with only the top trim in place. Note the dual gauge pod on top of the column...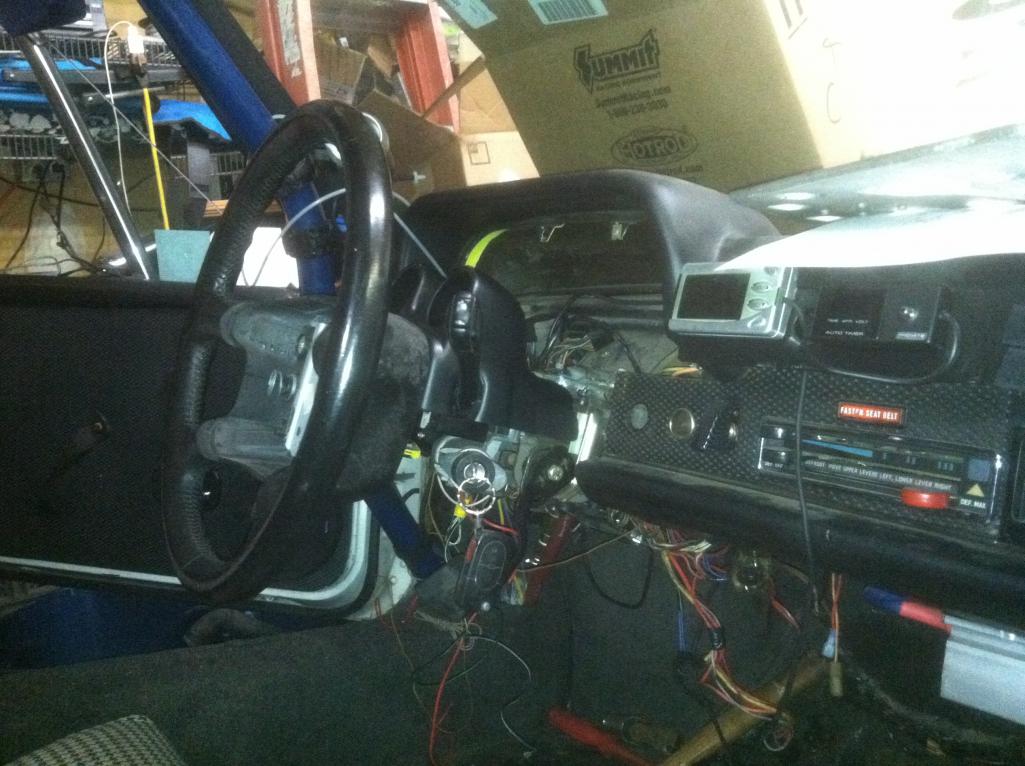
Here is one of my diagrams...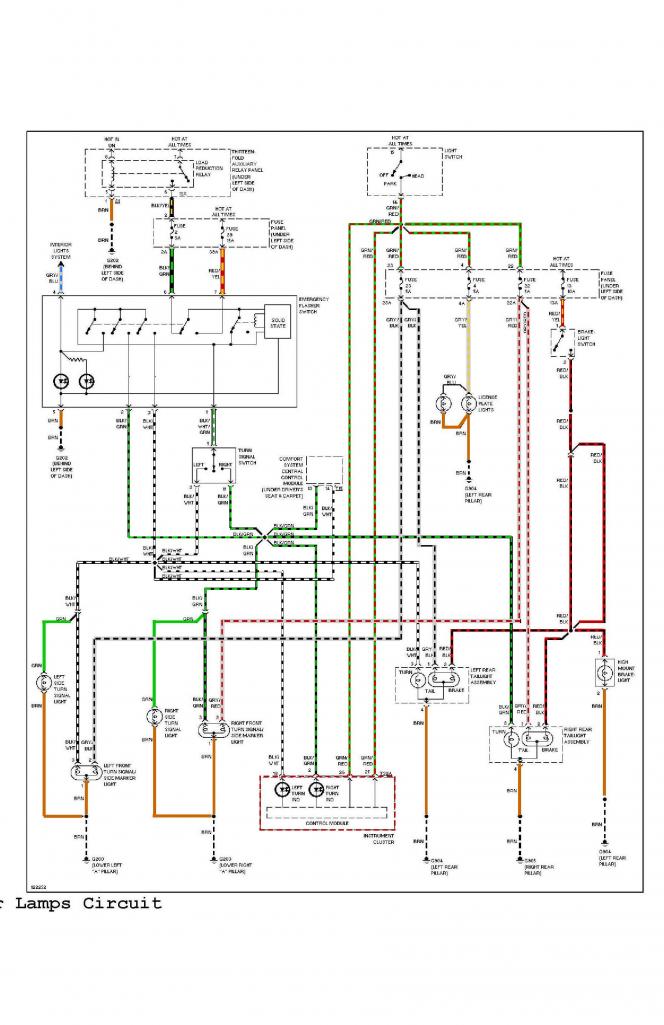
Posted by: JRust Dec 18 2012, 12:40 AM
You make me 
But with envy! Mad skills my man  . That will be one custom teener that will be the envy of many I'm thinkin. Can't wait to see it at WCR
Posted by: kg6dxn Dec 18 2012, 12:50 AM
You make me
But with envy! Mad skills my man
. That will be one custom teener that will be the envy of many I'm thinkin. Can't wait to see it at WCRIt's still going to look like a POS but it should run good. You'll know for sure if I hand you the keys for a joy ride...
Posted by: matthepcat Dec 18 2012, 01:54 AM
Outstanding! Fearless.
Posted by: kg6dxn Dec 22 2012, 08:59 PM
Progress... Since the world didn't end...
Grafted in the headlight switch and hazard switch/relay. I am building it into some aluminum diamond plate. Once complete, it will get painted black to match the other diamond plate in the cabin. I have eliminated the 914: headlight switch, hazard switch, flasher relay, fog light switch, Hi/Lo relay and all associated wiring... I still need to install the dimmer rheostat. I ordered 2 different Passat types to see which one looks best.
The Passat stuff eliminates some of the 914 complexity in the wiring. Since I'm on a roll, I will finish the wiring before any more major fab. It also helps since it's raining and welding in a closed garage sucks!
I scored a broken Passat fuel sender to check the resistance range. 300 Ohms full and 40 ohms empty. I need to find a sender to fit or have the old one modified.
Here is a pic. I'm using a clamp to hold in place for now. There is no going back without swapping the entire dash...
The switch rotates to turn the headlights on and pulls out (2 notches) for front and rear fogs. It also pushes in while off, not sure what that does yet. I am missing some pins on the harness plugs (Euro Version), so I ordered another pigtail to get parts...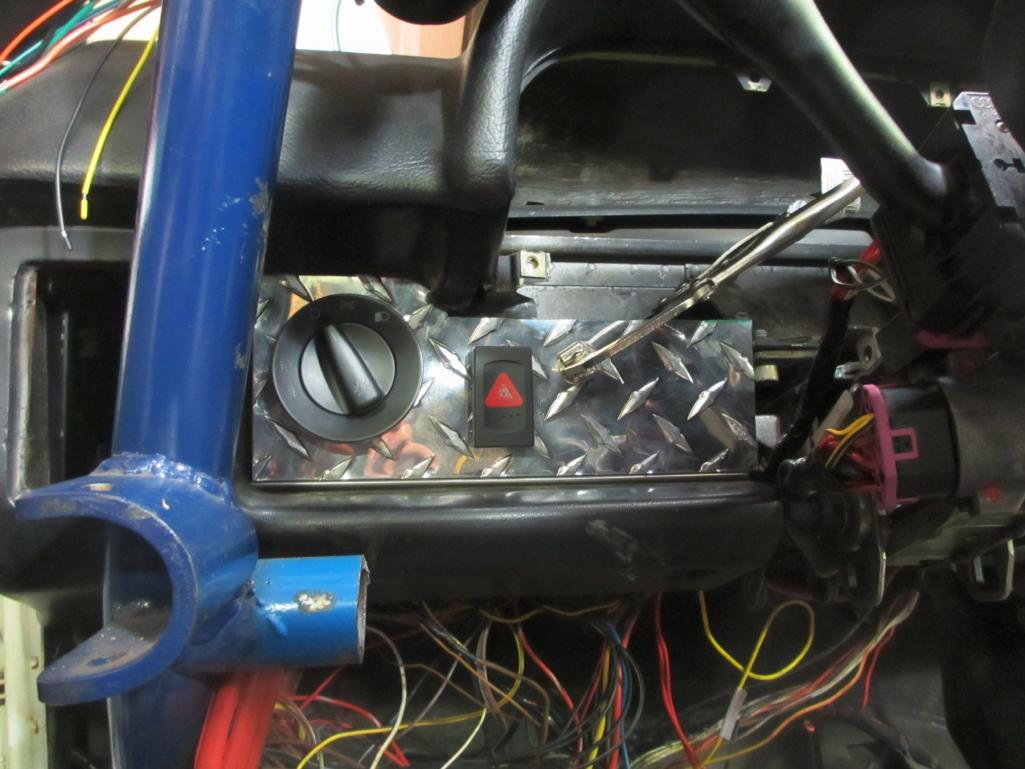
Posted by: Bob L. Dec 22 2012, 10:32 PM
That's so sweet! I hope to be able to try something like this soon.
Have you thought about climate controls? Where to mount heater core, a/c evaporator etc. Are you even going to have them?
Posted by: kg6dxn Dec 22 2012, 10:46 PM
That's so sweet! I hope to be able to try something like this soon.
Have you thought about climate controls? Where to mount heater core, a/c evaporator etc. Are you even going to have them?
I'm not using the climate controls. I have a heater built into the fresh air box. I do have most of the A/C parts for a project down the road. I have the 914 controls rigged to operate the water control valve and the fresh air fan blows through the heater core. It actually works very well!
Tomorrow I will tackle the intermittent wiper controls. I'm most excited to try the cruise control system. Since it has an electronic throttle body, the setup is super easy. Just plug in the wires to the steering column.
My original plan did not include the steering column and misc wiring but after I broke the harness down, the wiring is very simple. The only hickup (sort of) would be if I went back to pop up lights. The switch does not have the open/close circuit. So I would have to rig up a relay or two to make it work.
Since my switch can work dual fog lights, I either need a rear one or another set up front...
Thanks for the encouragement! Stay tuned...
Posted by: kg6dxn Dec 23 2012, 09:07 PM
Does this look intimidating??? I started wiring the cluster, wipers, ODB II connector and misc. All but 5 or 6 (going to removed systems) of these need to get connected. On top of this, I have the boost controller and meth injection system yet to wire, about 15 more wires. Maybe a few other mics things too...
I'm not sure yet how the system will react to the missing ABS, Climate control, Security and Air Bag systems. My hope is since it has been without power for months, any volatile memory will reset. The Data link to the missing systems will not be connected and hopefully everything will work.
You can see in the pic all the white tags I put on the wires. I have all identified except a yellow/white that connects to "thirteenfold relay position". I have to reverse engineer this connection to see what it does. All I know now is that it comes from the cluster.
Anyone on the site own a VAG-COM device? I may need to connect to the ODB and scan systems once it's running.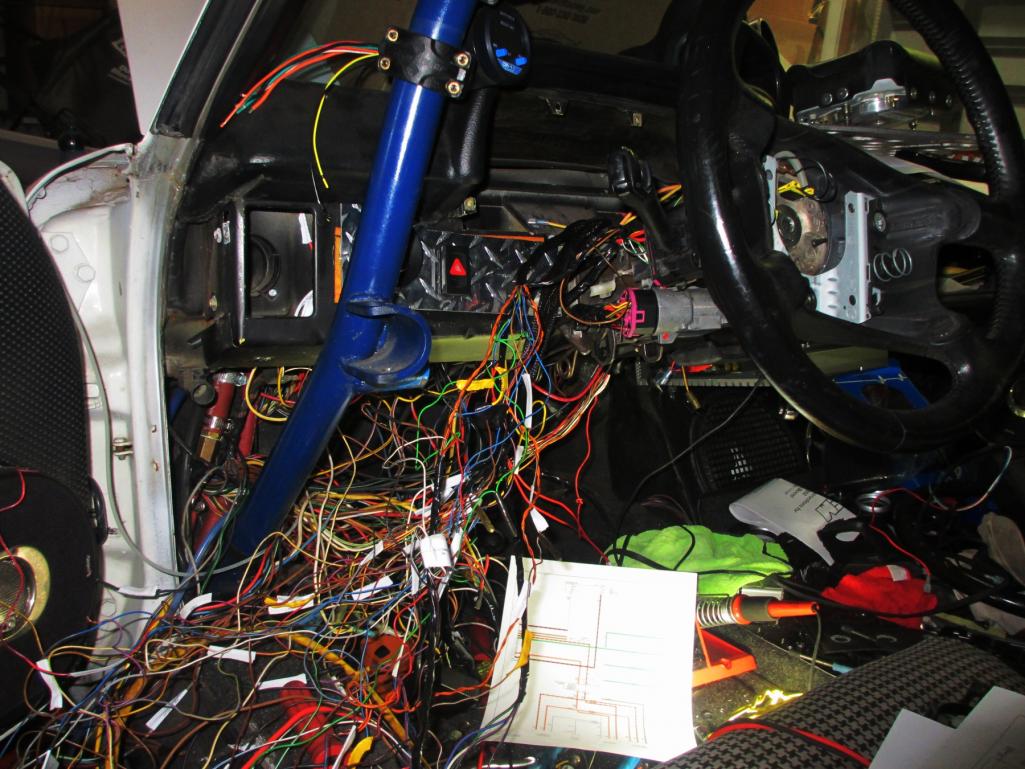
Posted by: JRust Dec 23 2012, 11:13 PM
Does this look intimidating???
 Uh not at all
 I think I'd rather drive a Pinto than figure that out
Posted by: bfrymire Dec 23 2012, 11:36 PM
Does this look intimidating??? I started wiring the cluster, wipers, ODB II connector and misc. All but 5 or 6 (going to removed systems) of these need to get connected. On top of this, I have the boost controller and meth injection system yet to wire, about 15 more wires. Maybe a few other mics things too...
I'm not sure yet how the system will react to the missing ABS, Climate control, Security and Air Bag systems. My hope is since it has been without power for months, any volatile memory will reset. The Data link to the missing systems will not be connected and hopefully everything will work.
You can see in the pic all the white tags I put on the wires. I have all identified except a yellow/white that connects to "thirteenfold relay position". I have to reverse engineer this connection to see what it does. All I know now is that it comes from the cluster.
Anyone on the site own a VAG-COM device? I may need to connect to the ODB and scan systems once it's running.
I have an obd scanner that connects to laptop and I run datalogs.
. I use it on my audi, so, It should work for you.
-- brett
Posted by: kg6dxn Dec 23 2012, 11:41 PM
I have an obd scanner that connects to laptop and I run datalogs.
. I use it on my audi, so, It should work for you.
-- brett
Cool. Maybe I'll hit you up in a few months after I get running. Thanks!
Posted by: bfrymire Dec 24 2012, 01:16 AM
I have an obd scanner that connects to laptop and I run datalogs.
. I use it on my audi, so, It should work for you.
-- brett
Cool. Maybe I'll hit you up in a few months after I get running. Thanks!
This is the one that I have:
http://www.scantool.net/scan-tools/pc-based/obdlink-s.html
Very happy with it. I can do real-time readouts, datalogging, code resets, etc. I even have the API for doing custom software for non-compliant codes. It detects and connects to all ECUs that are on the CAN buss.
-- brett
Posted by: ruby914 Dec 24 2012, 03:02 AM
Does this look intimidating??? I started wiring the cluster, wipers, ODB II connector and misc. All but 5 or 6 (going to removed systems) of these need to get connected. On top of this, I have the boost controller and meth injection system yet to wire, about 15 more wires. Maybe a few other mics things too...
I'm not sure yet how the system will react to the missing ABS, Climate control, Security and Air Bag systems. My hope is since it has been without power for months, any volatile memory will reset. The Data link to the missing systems will not be connected and hopefully everything will work.
You can see in the pic all the white tags I put on the wires. I have all identified except a yellow/white that connects to "thirteenfold relay position". I have to reverse engineer this connection to see what it does. All I know now is that it comes from the cluster.
[
Looking good, brings back memories.
Memories of a pain in the neck, sore back and how do your knees feel?
I don't think the ECU will miss the ABS, Climate control, Security and Air Bag systems... On my WRX I had issues with fuel pump and VSS. I am thinking the ECU will go into limp mode at first. That may keep it from running great but it should run.
BTW, I used a Miata fuel sender on my car, maybe you can use the Audi sender
Posted by: kg6dxn Dec 24 2012, 10:46 AM
Looking good, brings back memories.
Memories of a pain in the neck, sore back and how do your knees feel?
I don't think the ECU will miss the ABS, Climate control, Security and Air Bag systems... On my WRX I had issues with fuel pump and VSS. I am thinking the ECU will go into limp mode at first. That may keep it from running great but it should run.
BTW, I used a Miata fuel sender on my car, maybe you can use the Audi sender
I have the correct 65psi pump and the speed sensor is connected. I think these are OK. The ECU will not miss the devices, the dash cluster/computer might. I had 034Motorsport "turn off" anything that could put the ECU in limp mode. I am most concerned about idiot lights and alarms going off while driving. For example, if the oil level is low... a "STOP" appears on the dash and "dings", then describs the alarm.
With a VAG-COM (Audi/VW specific) device, you can tell the cluster when you have new devices. Ie: new ABS module, etc... So I may be able to disable the cluster from looking at these devices too. The VAG-COM is over $300 for the hex-decimal version that can make these mods. So I am going to wait and see what happens once I get it startable. I may need it to turn back on the cruise control. Many times when the ECU is re-flashed, the CC turns off. Since the throttle body it electric, it is a simple fix.
The Passat fuel sender is part of the internal fuel pump assembly. I found one at the junk yard and took the sender portion with me. That's how I found out the resistance. I ordered the adapter from the UK and they are programming it for me. Should be an easy connection and fully adjustable.
I am 80% sure this setup will work since I swapped the dash, steering column and ECU. Electrically it will think it is a Passat except the missing control modules. My worst case scenario is I have to remove the cluster from the project. The ECU will continue to run in stand alone. I do find myself checking and re-checking my wire labels. I did find a couple marked wrong. The Passat electrical schematic is very thorough and all the connector pins are numbered. Only a hand full of colors do not match (the schematic) but the do match the wire they connect to.
Posted by: Andyrew Dec 24 2012, 10:50 AM
Dont use an OBD scanner use a VAG-COM scanner. Its like an OBD scanner that you can read and monitor every electrical signal... The ECU shouldnt miss anything except maybe the climate control... You might want to have that plugged in and just sitting somewhere, I mentioned to you earlier that you can monitor some settings via this (at least in the Audi you can..). But its an intuitive system so Its the only one that scares me that you say your going to not have in place.
Crazy work!
Posted by: bfrymire Dec 24 2012, 12:28 PM
Dont use an OBD scanner use a VAG-COM scanner. Its like an OBD scanner that you can read and monitor every electrical signal... The ECU shouldnt miss anything except maybe the climate control... You might want to have that plugged in and just sitting somewhere, I mentioned to you earlier that you can monitor some settings via this (at least in the Audi you can..). But its an intuitive system so Its the only one that scares me that you say your going to not have in place.
Crazy work!
The scanner that I have will do all of that. it's not one of those simple scanners from a FLAPs. You use a laptop with it, and can see all sensors and datalog. It's based on the STN1110 chip set, and supporst the ELM327 command set. You can monitor almost every sensor, and if you have the command code, you can access the sensor if it's not in the standard codes.
From the webpage:
The free feature-packed OBDwiz diagnostic software included with the scan tool allows you to:
•Turn off check engine light, and erase stored diagnostic information
•Read and erase stored, pending, and permanent trouble codes (both generic and manufacturer-specific)
•Access freeze frame information
•Display, graph, and log 90+ real-time parameters
•Create custom digital dashboards
So, what is missing from the scanner that I have? I can probably write something to make up for what is missing.
-- brett
Posted by: kg6dxn Dec 24 2012, 01:12 PM
So, what is missing from the scanner that I have? I can probably write something to make up for what is missing.
-- brett
I don't know exactly. Check out this site...
http://ross-tech.com/index.html
Posted by: Andyrew Dec 24 2012, 02:21 PM
Dont use an OBD scanner use a VAG-COM scanner. Its like an OBD scanner that you can read and monitor every electrical signal... The ECU shouldnt miss anything except maybe the climate control... You might want to have that plugged in and just sitting somewhere, I mentioned to you earlier that you can monitor some settings via this (at least in the Audi you can..). But its an intuitive system so Its the only one that scares me that you say your going to not have in place.
Crazy work!
The scanner that I have will do all of that. it's not one of those simple scanners from a FLAPs. You use a laptop with it, and can see all sensors and datalog. It's based on the STN1110 chip set, and supporst the ELM327 command set. You can monitor almost every sensor, and if you have the command code, you can access the sensor if it's not in the standard codes.
From the webpage:
The free feature-packed OBDwiz diagnostic software included with the scan tool allows you to:
•Turn off check engine light, and erase stored diagnostic information
•Read and erase stored, pending, and permanent trouble codes (both generic and manufacturer-specific)
•Access freeze frame information
•Display, graph, and log 90+ real-time parameters
•Create custom digital dashboards
So, what is missing from the scanner that I have? I can probably write something to make up for what is missing.
-- brett
Brett,
Not dissing your scanner Im sure its a REALLY good scanner. The VAG cars have build in commands that are accessible via this scanner and probably yours as well.
http://www.ross-tech.com/vag-com/vag-functions.html
Posted by: Krieger Dec 24 2012, 02:30 PM
Mike, this car is going to be awesome when you finish! One circuit at a time.
Posted by: bfrymire Dec 24 2012, 02:49 PM
So, what is missing from the scanner that I have? I can probably write something to make up for what is missing.
-- brett
I don't know exactly. Check out this site...
http://ross-tech.com/index.html
Thanks Mike,
I found and read up on the VAG scanner. Pretty much looks like the difference is just some specific commands for VW. It's up to you, if you want to try miine.
I do think that for what you are doing, you will not need the other commands. (Some were specific to the TDI, and some other ECUs on the system.)
-- brett
Posted by: kg6dxn Dec 24 2012, 03:27 PM
Thanks everyone for the help and encouragement. It really helps keep me motivated!
This is a weekend project and I still think I can make my deadline of WCR 2013...
My extended family is coming over today for dinner, so not much will happen on the car.
Tasks:
Finish wiring
Finish steering
Install new pedals
Remove motor, finish welding
Install fuel pump
Sort out the axles
Mount shifter/route cables
Fabricate new parking brake handle
Bleed brakes
Install fluids
Modify dash for cluster
Re-install interior
Finish rear trunk floor
Install exhaust
Anything I forgot
Drive the shit out of it...
Posted by: kg6dxn Dec 27 2012, 12:43 AM
I bit the bullet and picked up a VAG COM today. I chose the HEX-USB+CAN as it has every feature available. I need to program new chipped keys anyway. Plus it can do all the ODB II stuff plus more...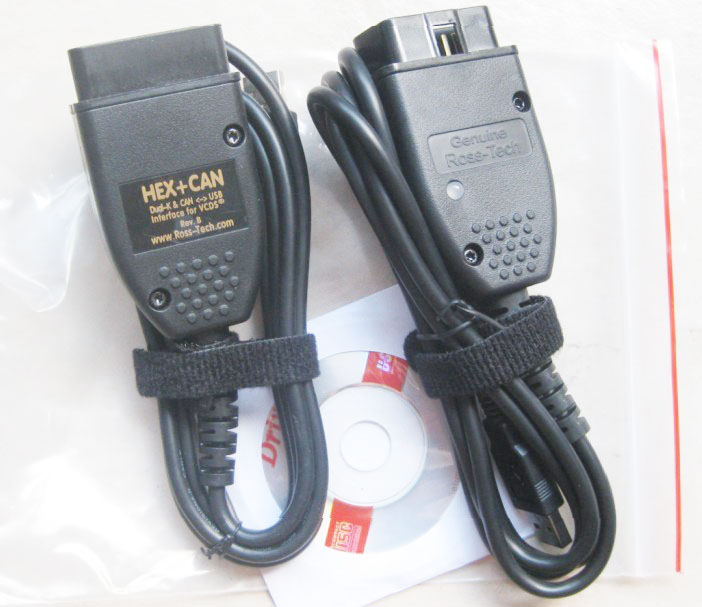
https://www.youtube.com/watch?v=9L-v31FEqoM
Posted by: Andyrew Dec 27 2012, 02:10 AM
Since your DBW you can also modify your ECU tune. But thats some custom software that I really dont know much about. I know its free though.
Posted by: Rand Dec 27 2012, 02:15 AM
Oh, and there's a T in sasquaTch. :behind couch: Rokin yur pown spelling!
Epic build bro, cant wait to see it in person and bring you a beer.
Posted by: kg6dxn Dec 27 2012, 09:35 AM
Since your DBW you can also modify your ECU tune. But thats some custom software that I really dont know much about. I know its free though.
On top of that I can get a plug in throttle response modifier. basically an op-amp amplifier to modify the input signal. I may build the circuit for $5 instead of paying $300 for the device.
Posted by: kg6dxn Dec 27 2012, 09:37 AM
Oh, and there's a T in sasquaTch. :behind couch: Rokin yur pown spelling!
Epic build bro, cant wait to see it in person and bring you a beer.
Fixed!
I went to public school...
Posted by: FourBlades Dec 27 2012, 10:29 PM
John
Posted by: kg6dxn Dec 31 2012, 11:43 PM
Got most of the rear area and ECU wired. I'm down to 6 or 7 wires but rand out of connectors. I can't believe how many wires I have connected.... 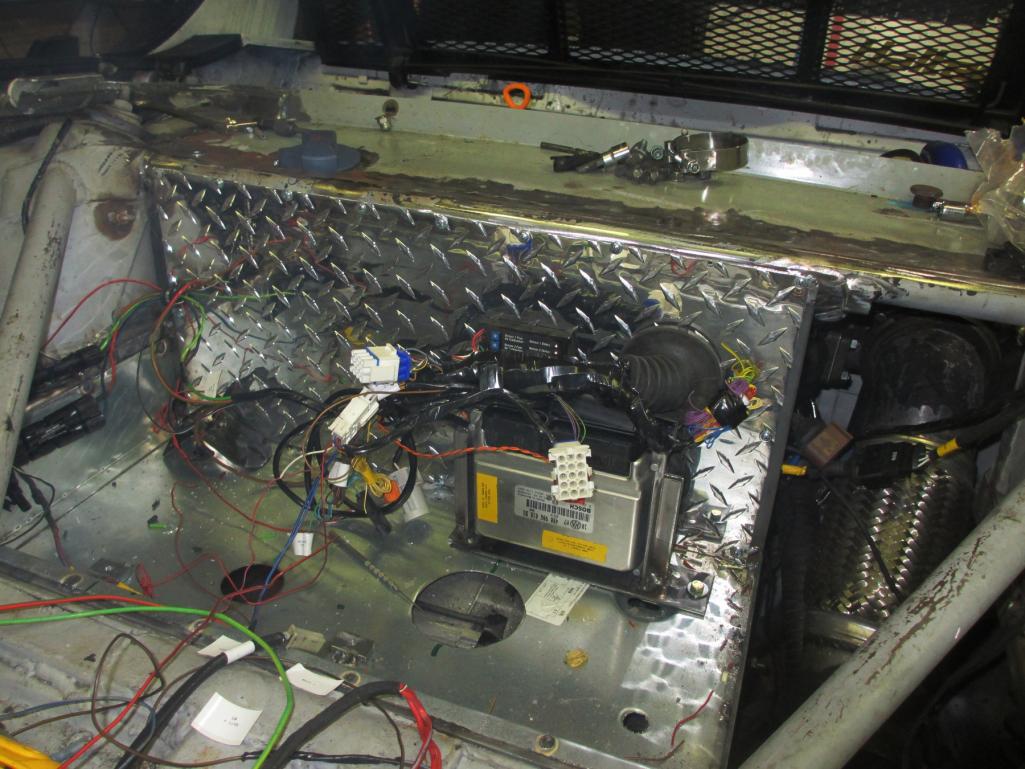
Posted by: Andyrew Jan 1 2013, 02:01 PM
I like the progress!!
Posted by: kg6dxn Jan 19 2013, 07:54 PM
Progress continues even without updates. The wiring has taken longer since I'm adding connectors and soldering connections...
Got the cluster figured out. i was going to build a custom fiberglass dash but decided to go another route.
I first broke off the factory clear lens on the cluster and cut the black surround down. I had a piece of acrylic cut to the outer shape of the 914 cluster. The Passat dash is slightly narrower but slightly taller. I used an epoxy designed to bond the ABS to the acrylic. I then painted the acrylic satin black around the edge...
I think it looks pretty good and I get to keep the stock 914 dash shape... 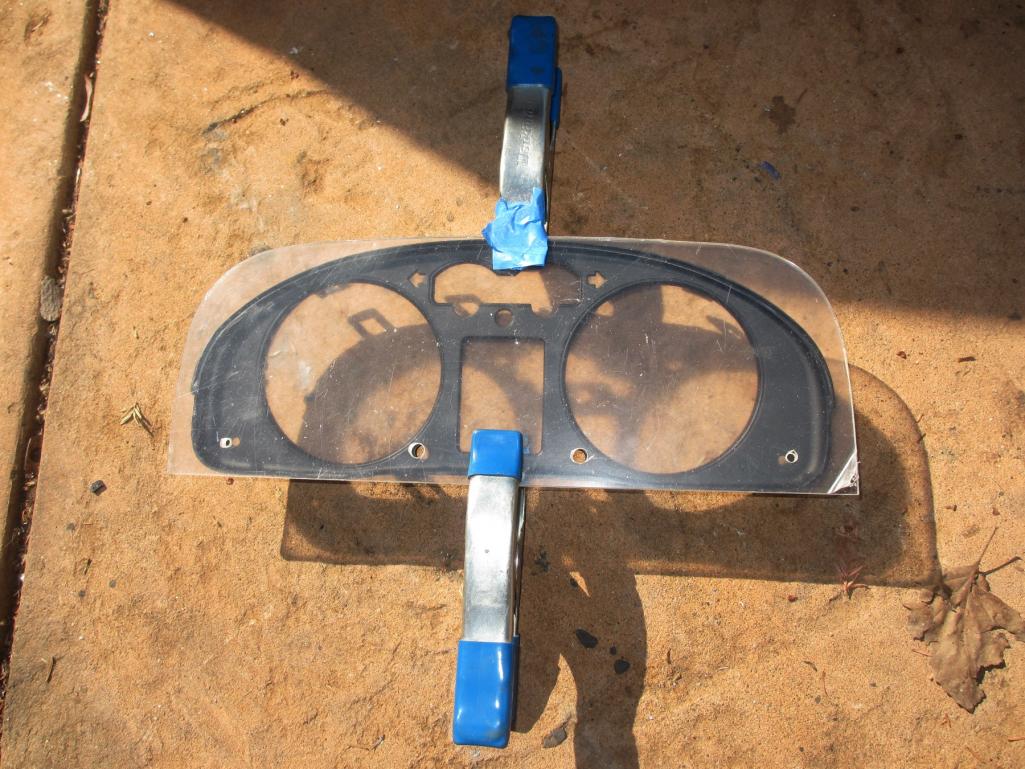
Posted by: JRust Jan 19 2013, 08:50 PM
Yeah Buddy Lookin sweet! Going to be a trip seeing that all going in your 914. A nice updated cluster & steering wheel controls. Good to see you making progress. Can't wait to see it at WCR
Posted by: Andyrew Jan 21 2013, 02:12 AM
Like the gauge cluster idea
Posted by: kg6dxn Feb 3 2013, 07:48 PM
I'm getting burned out on wiring...
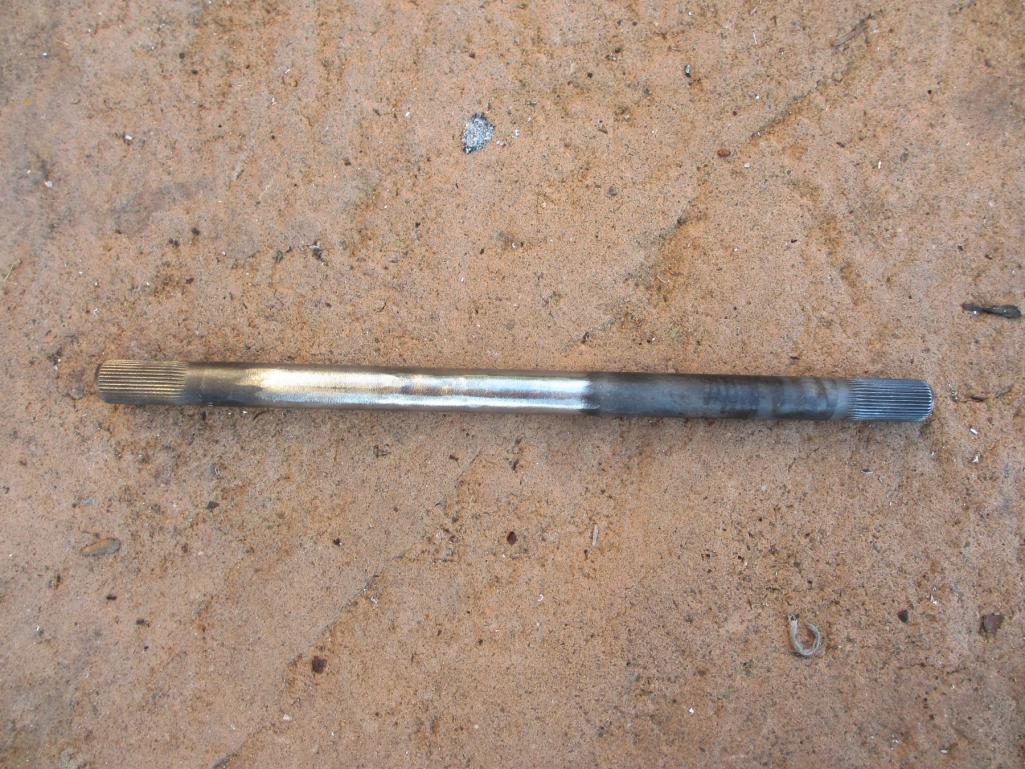
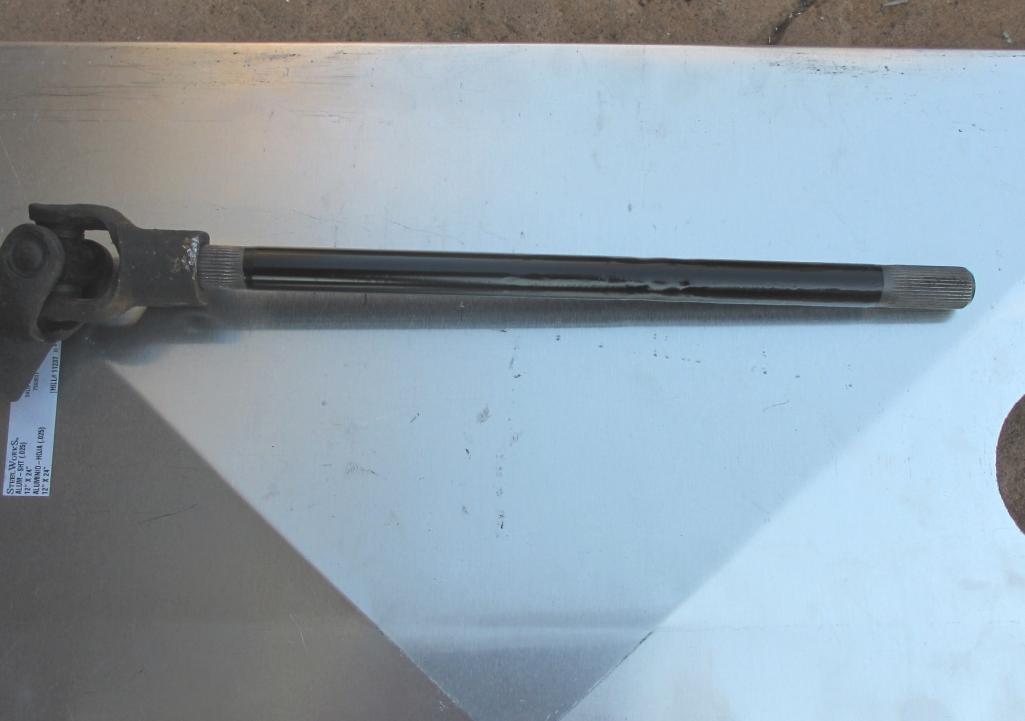
Today I switched to steering. I had to shorted the under dash steering rod by 2.5 inches. So I cut it in half, connected everything and marked it. I then cut off the excess. I don;t want this weld to fail so I did it more like a structural weld. Note the chamfers on each section. I used an angle aluminum piece in the vice and over clamped it so the heat would not pull the rod. It was welded, ground and spun... Over and over. It is not warped or bent at all. A quick coat of satin black finished it off.
I did discover the VW clock spring does 7 complete revolutions. I never looked to see what the 914 does lock to lock but I hope 7 is OK.
Kind of a boring update but if it don't steer, it don't drive...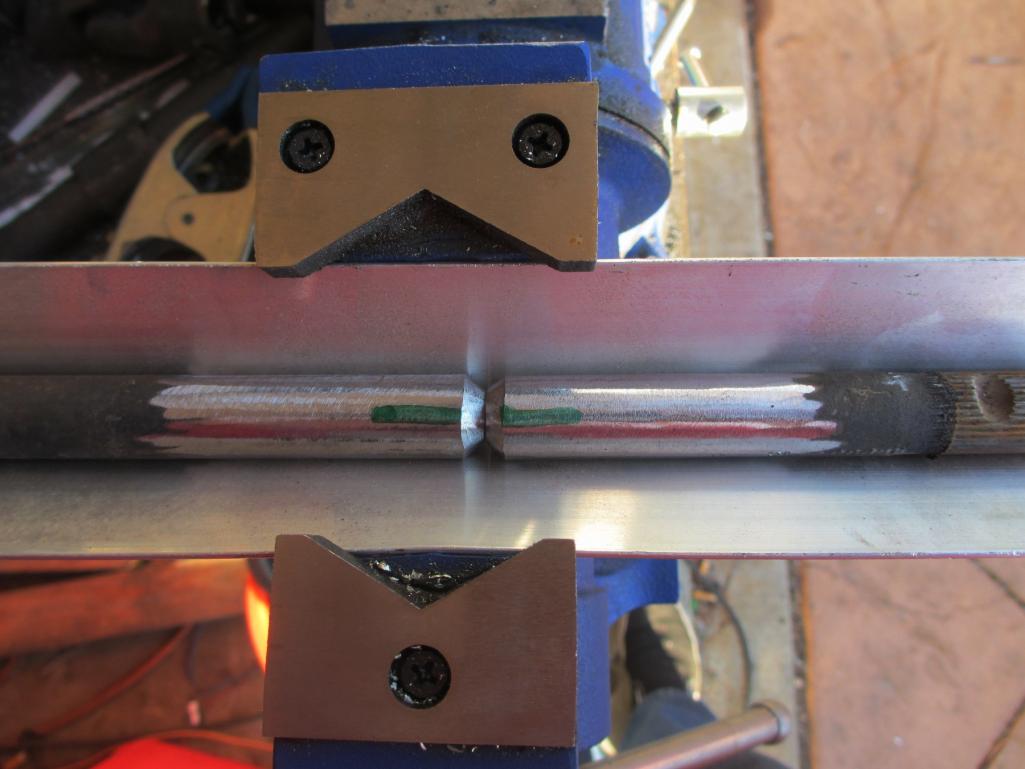
Posted by: Andyrew Feb 4 2013, 12:36 AM
Looks great! Even if it was warped a hair, its just a steering rack...
Progress good!
Posted by: Chris H. Feb 4 2013, 07:41 AM
Mike...your gauge cluster....awesome man! The gauges look factory that way!
Posted by: jeeperjohn56 Feb 4 2013, 06:01 PM
Hey Mike, Your doing a great job keep up the great work. John
Posted by: kg6dxn Mar 10 2013, 07:47 PM
Well, my car has had 930 steel flares. The right rear was hammered and rolled with a baseball bat at some point. The worse part was the execution. Since the car was once a race car, the PO or PPO did not car how it got installed. They just needed to cover the tires.
They don't look too bad from the outside...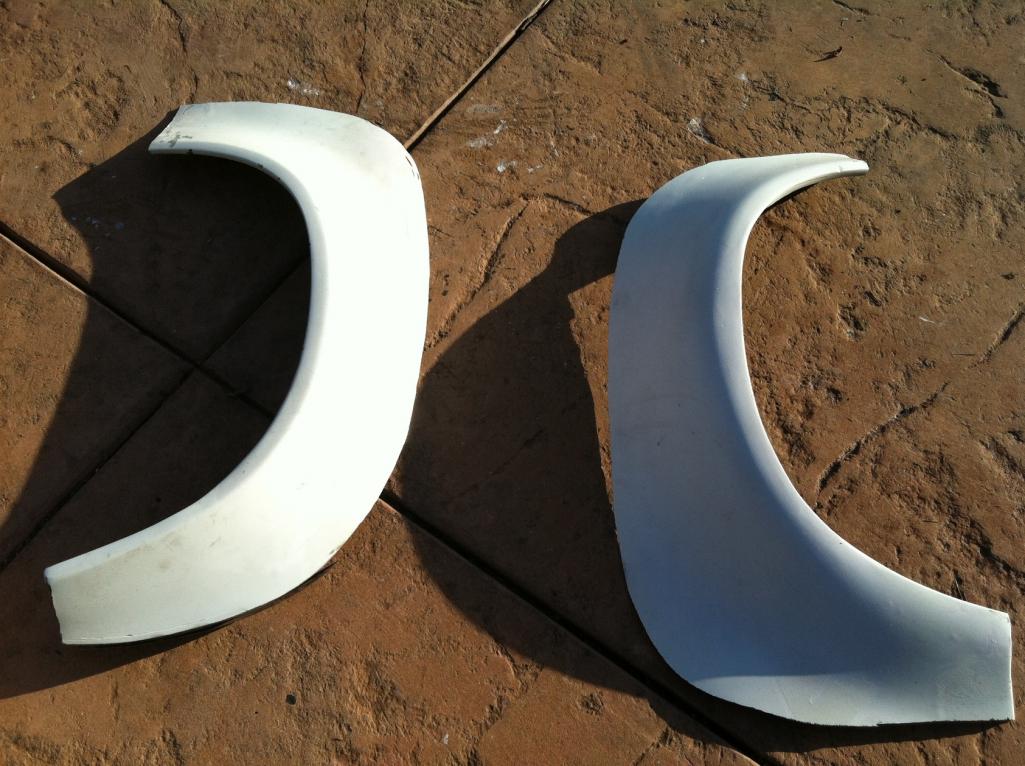
Here you can see 3 layers of sheet metal. 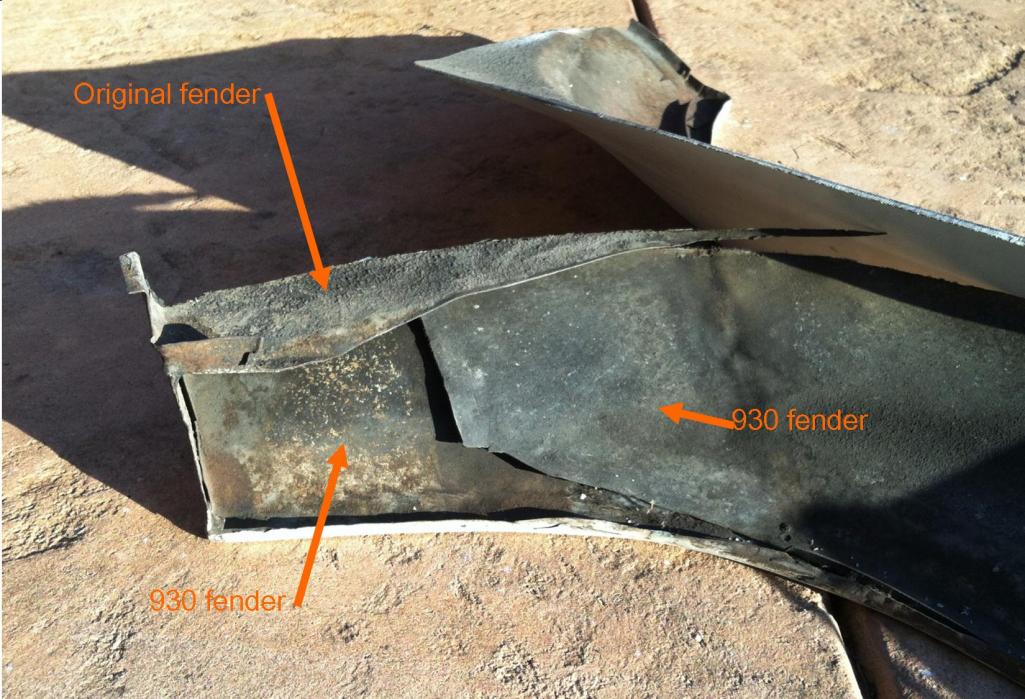
Here you can see 1/2" of bondo. White painted fender makes it look thicker.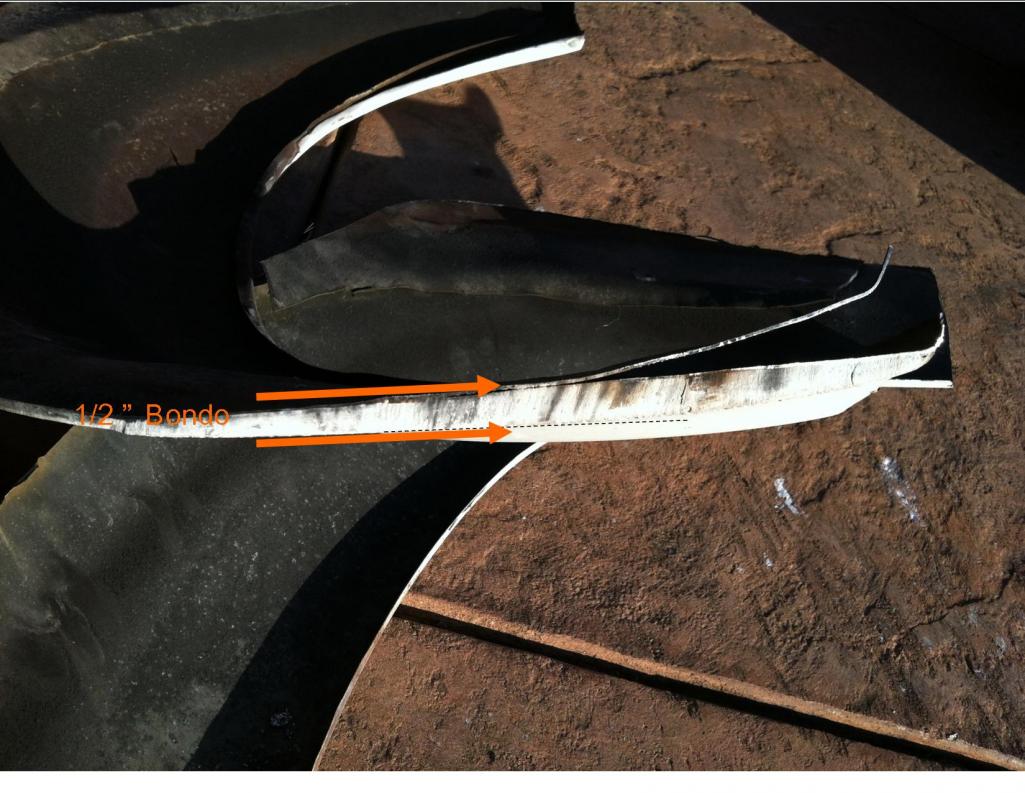
I picked up a full set from AIR and 914 LTD. I also picked up some black fender welting. right now I just have them screwed on. I have wide rivets for later down the road. I was bidding on Brad's set (including rockers), lost the bid, bought a set from AIR and then Brad sent me a second chance offer. Now I have 2 complete sets. I already had flared steel rockers but realized the length of each was not consistent. Looks like the PO installed the old flares and built the rockers to fit. All of the old flares were off set different from the opposite side; Asymmetrical. The worst was the front right which was set back a full inch from the left.
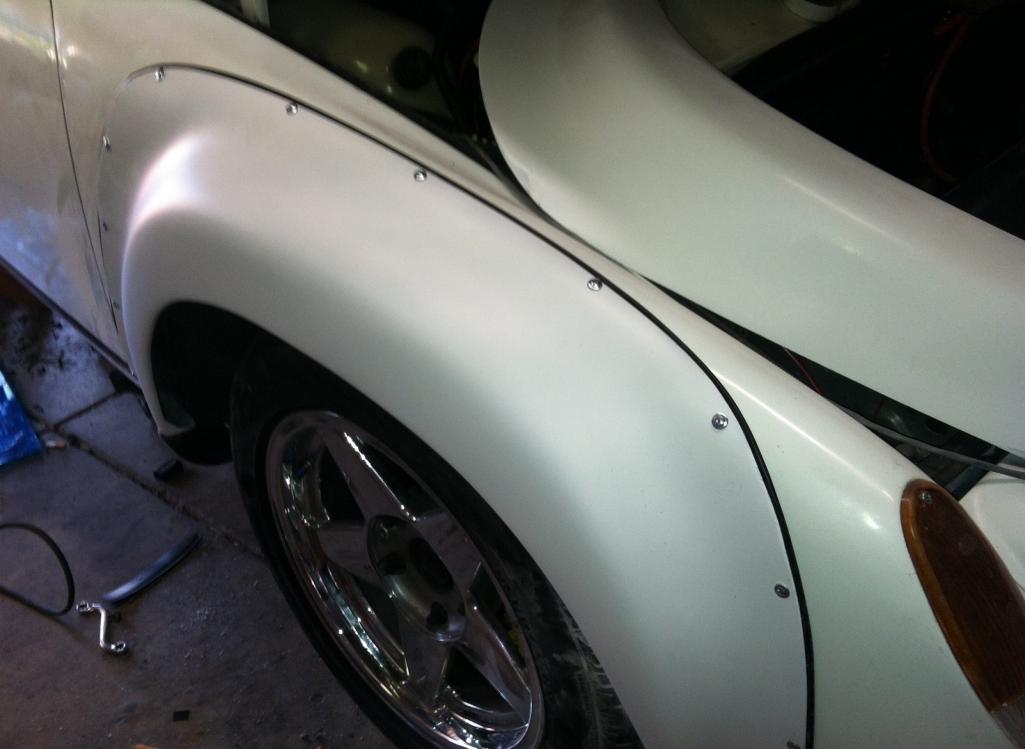
So... I installed the new rockers first and installed the flares to meet. The jack post hole was the original alignment point. The ones I chose to install are from 914 LTD. The quality of both were good. The fit was almost the same. The 914 LTD flares were slightly thicker than the AIR's. I did notice that the gel coating on Brad's is cracking. I will deal with this someday when I paint the car.
If anyone needs a set of 4 fiberglass flares PM me. I will sell them for cost. I also have some free steel flared rockers if anyone wants them.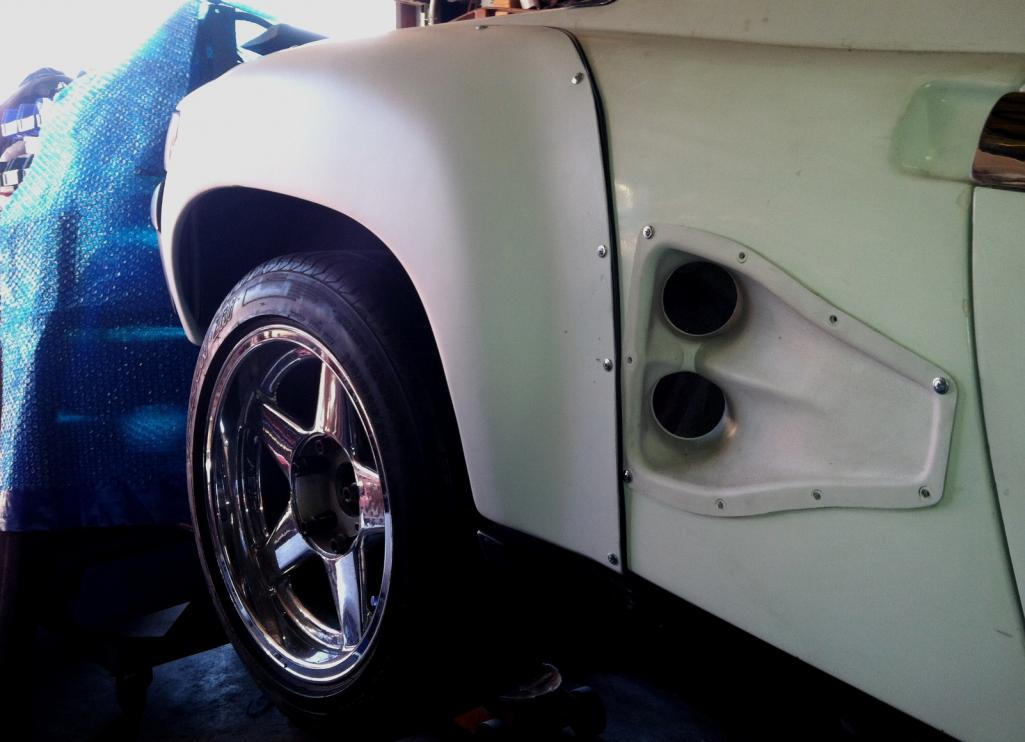
Posted by: Andyrew Mar 12 2013, 06:07 PM
Looks great! Crazy work on those original flares!
Posted by: 76-914 Mar 12 2013, 07:12 PM
That was a good idea on the dash set up, Mike.
Posted by: kg6dxn Mar 12 2013, 07:30 PM
That was a good idea on the dash set up, Mike.
Thanks,
I actually went this route because it looked easier than any other custom work. I think it turned out better than expected. The pics in the thread show it not even in final position. I just placed it there for pics. The final position looks almost factory installed. Well, if you had a 2001 914, that is...
Posted by: 3d914 Mar 12 2013, 07:32 PM
Mike, I like your approach to the gauge panel. I was thinking something similar if I decide to use the SHO gauge panel, but using stock steering column.
I'm curious about the NACA duct on the side. Is that something you added or PO? I'm looking for just that size to mount for intake air, but on the trunk.
Posted by: kg6dxn Mar 12 2013, 07:33 PM
Looks great! Crazy work on those original flares!
They look worse in person. There is 10lbs of bondo on each fender. I also found a bondo dent repair on the front right side. I cut most of it out but it will require some welding at some point. That will be in Part 4 of the build when I strip it for paint.
I think I dropped 50lbs off the car with the fiberglass flares and rockers...
Posted by: kg6dxn Mar 12 2013, 07:39 PM
Mike, I like your approach to the gauge panel. I was thinking something similar if I decide to use the SHO gauge panel, but using stock steering column.
I'm curious about the NACA duct on the side. Is that something you added or PO? I'm looking for just that size to mount for intake air, but on the trunk.
The NACA was an ebay purchase. This one is setup as a cold air intake for the turbo. It was plumbed into a plenum but now the inner fender is the plenum. On the other side of the car, the NACA is the intake for the intercooler's heat exchanger. I cut it down to match the contour of the exchanger...
Posted by: Andyrew Mar 13 2013, 10:29 AM
That should help some Not sure if thats really enough flow over the intercooler though. Something youll find out when you log your Intake Air Temps after you get the setup up and running.
Posted by: kg6dxn Mar 13 2013, 12:01 PM
That should help some
Not sure if thats really enough flow over the intercooler though. Something youll find out when you log your Intake Air Temps after you get the setup up and running.I have a 7" fan behind there too. I measured the IAT sensor at 120F after some hard driving with the old motor. I reconfigured the IC mounting to eliminate air bubbles within so I hope to have even cooler are now.
Posted by: Andyrew Mar 13 2013, 02:12 PM
Is that the air to air intercooler or is it for the air to water intercooler?
Posted by: kg6dxn Mar 13 2013, 04:07 PM
Is that the air to air intercooler or is it for the air to water intercooler?
Air to Water. I changed the mounting 90 degrees so the water inlet/outlet are up and down. This should eliminate the air bubble and give a better cooling delta.
Posted by: Andyrew Mar 13 2013, 05:41 PM
Ah, that should work great then.
Posted by: kg6dxn Mar 30 2013, 07:18 PM
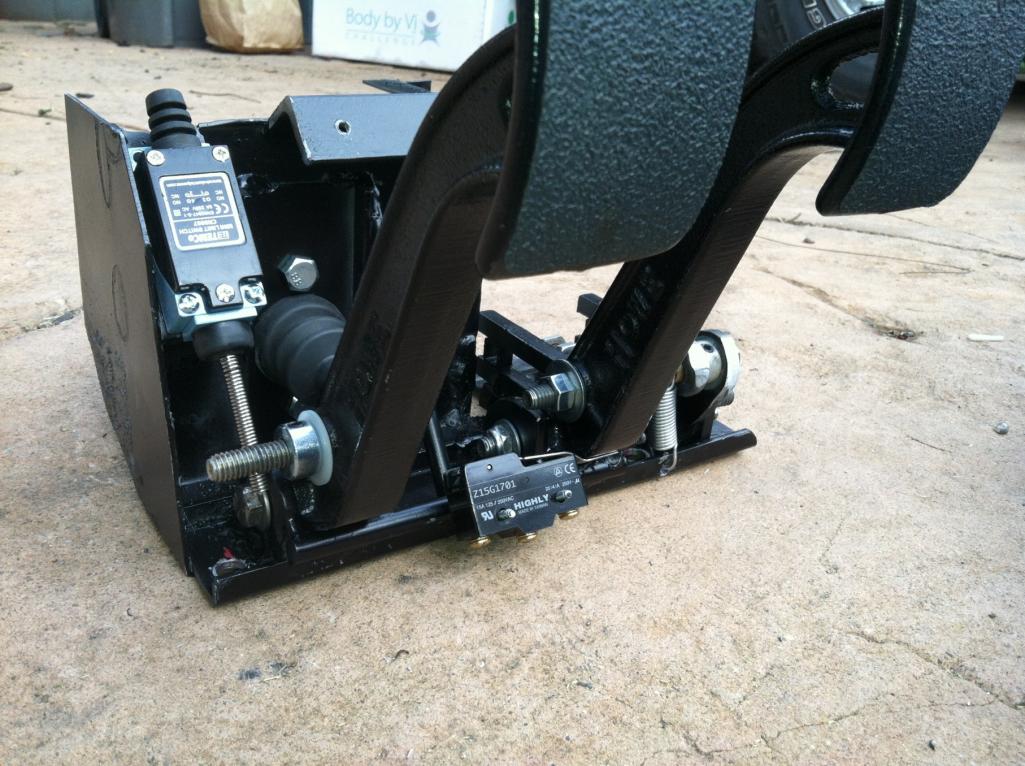
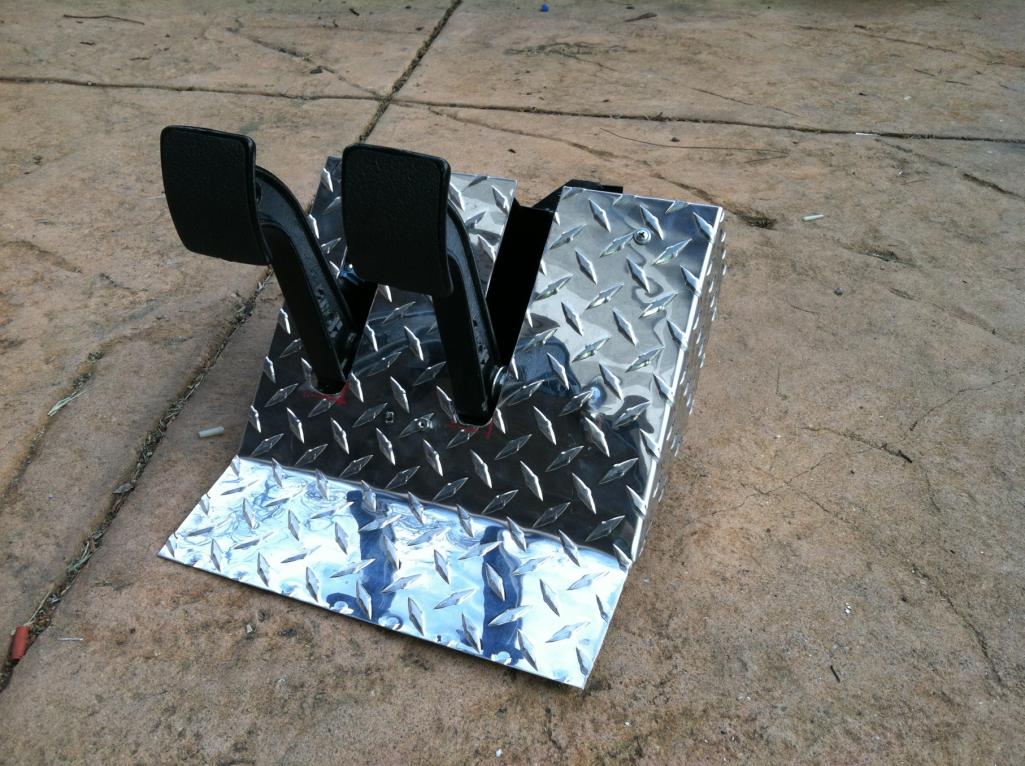
I've been creating a custom pedal cluster for the 914. I needed a hydraulic clutch and I wanted to keep the stock-ish brake master cylinder. I run a bigger master to push on the 930 calipers. The brakes work great so I did not want to mess with them.
I used Howe pedals but everything else is custom. The clutch cylinder is from Wilwood. This was the second attempt. The first one set the pedals back too far. In the original design, I used the Howe pivot brackets. In order to make it work with the brake master in the factory position, I needed to lower the elevation of the rod. The howe rod pivot point was 3/4" too high. This would have made an extreme angle for the rod into the master. I came up with an articulating rail system for the stock rod. I also needed to offset the rod to the right of the pedal.
You can see all the mechanics of it here and in motion in the video. I added a second pivot to carry the side load created by the offset. After fabrication, I hardened all the parts and shot it with a coat of satin black. The new cluster will weld to the factory cluster floor bracket and bolt to the floor so it can be removed as an assembly.
I did have to cut a hole into the fuel tank cavity for part of the clutch master to fit into the space. The fluid hose will be placed in the cabin with grommets to the reservoir in under the hood.
I tested the pedal torque by placing a C clamp in front of the sliding rail. Clamp was tight and the pedal was able to pop the clamp right off the assembly. I can't tell you the exact torque, I was more concerned with binding or breakage of the system. It appears the brakes should work fine with this setup.
You will see a couple of switches. One for the brakes and one (micro, spring, limit switch) for the clutch for cruise control deactivation.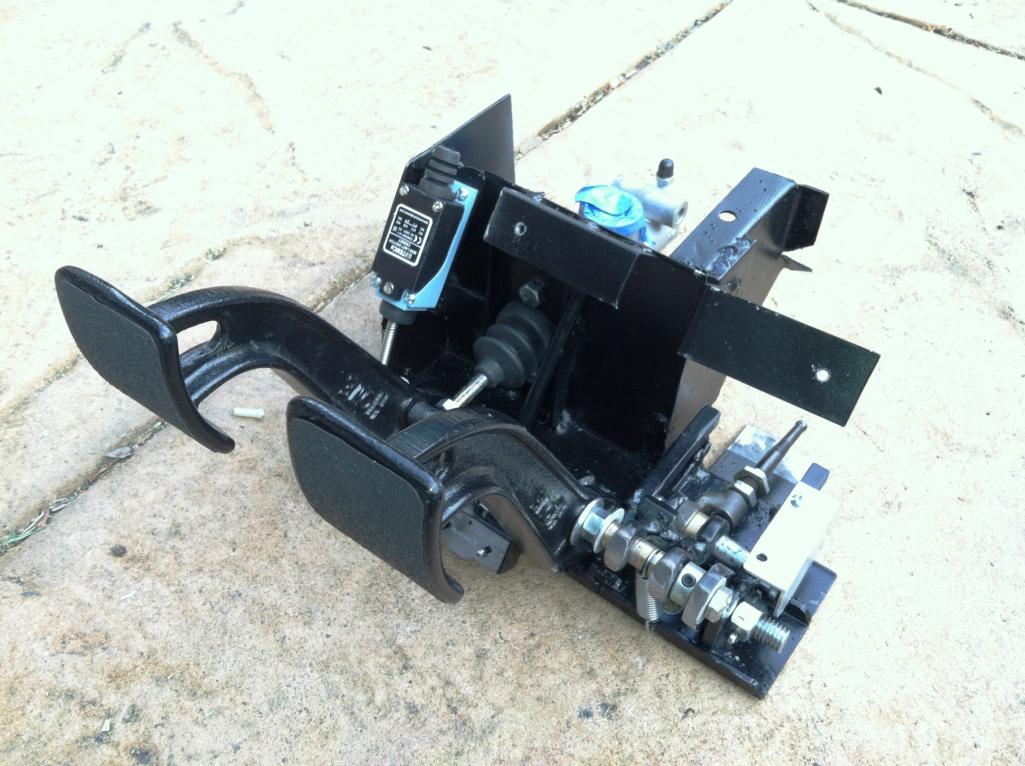
https://www.youtube.com/watch?v=PEBmgYdJ_Ow
Posted by: Andyrew Mar 30 2013, 07:27 PM
Wow thats a lot of bits on that brake lever... Looks extremely smooth but a bit complicated.
Posted by: kg6dxn Mar 30 2013, 07:31 PM
Wow thats a lot of bits on that brake lever... Looks extremely smooth but a bit complicated.
What?
I only count 20 individual pieces... It would have been much less if I would have moved the master cylinder...
Posted by: jsconst Mar 30 2013, 07:42 PM
That's awesome Mike.
Looks like things are coming together nicely, can't wait to see it finished.......finished  I crack myself up sometimes.
Your the man Mike, looking great!
Jeff
Posted by: andys Mar 30 2013, 09:10 PM
Mike,
I like your "modular" concept. Keep up the good work!
Andys
Posted by: kg6dxn Mar 30 2013, 09:29 PM
Mike,
I like your "modular" concept. Keep up the good work!
Andys
I think your work is more impressive! Thanks for the kind words!
Posted by: jaxdream Mar 31 2013, 08:04 AM
Just noticed that you are going to use VW column controls !! Great I've had 2005 VW controls for a while , got the ideas of getting the updated wiper function of the little wheel on the stalk to do intermitten , also on the signal side the dimmer switch thing . Also got a wiper motor to match , which appears to have the same bolt pattern as 914 wiper rack along with the propper relay to operate . It'll be great to see what you come up with , as well as the reat of the mods !!! Thanks for this thread , it does give hope of alternatives to the base VW systems of the 70s. 
Jack
Posted by: kg6dxn Mar 31 2013, 10:14 AM
Just noticed that you are going to use VW column controls !!
Great I've had 2005 VW controls for a while , got the ideas of getting the updated wiper function of the little wheel on the stalk to do intermitten , also on the signal side the dimmer switch thing . Also got a wiper motor to match , which appears to have the same bolt pattern as 914 wiper rack along with the propper relay to operate . It'll be great to see what you come up with , as well as the reat of the mods !!! Thanks for this thread , it does give hope of alternatives to the base VW systems of the 70s. Jack
I did swap the column for all the reasons you mention... Plus + Cruise Control! I also swapped out the VW steering wheel for an Audi sport unit. The new Porsche steering wheels bolt right on too but they are pricey! I'm not ready to spend $1000 for a wheel and air bag. But it would look cool...
Posted by: kg6dxn Apr 6 2013, 10:36 PM
Pedal cluster is in, sort of. I did not do the final welding yet. (in case I need to take it out) I had to compromise on the throttle pedal location. The perfect mounting alignment position would require the removal of the steering shaft. But then I couldn't turn. Ideally it would be a little higher but I don't want to raise the fresh air box area. But it seems OK when I sit in the seat and make engine noises... VROOM!... I got the clutch master bench bled and plumbed to the rear. Right now I just have a -3AN plug in the back since the motor has to come out still for final bolt tightening and minor chassis welding.
I also picked up a FireCharger AFFF fire system. Pretty cool and it allows me to re-charge it at will. I still need to plumb it to the engine bay and rig the pull handle, so for now I just have the location of the bottle mocked up.
I picked up a short shifter for the boxster assembly. The Boxster shift knob is a press on fit to a flat bar. So.. I cut the Lever off, drilled, tapped and installed a Mustang lever. I topped it off with a Hurst style knob with the proper 5-spd pattern embossed on top. You can see the wire frame/fiberglass console I made to snap over the shifter assembly. I cut a gauge hole in it for a future something. Maybe a vintage VW clock...
Please excuse the wiring hanging. I will dress it up once I'm sure all the wiring is complete.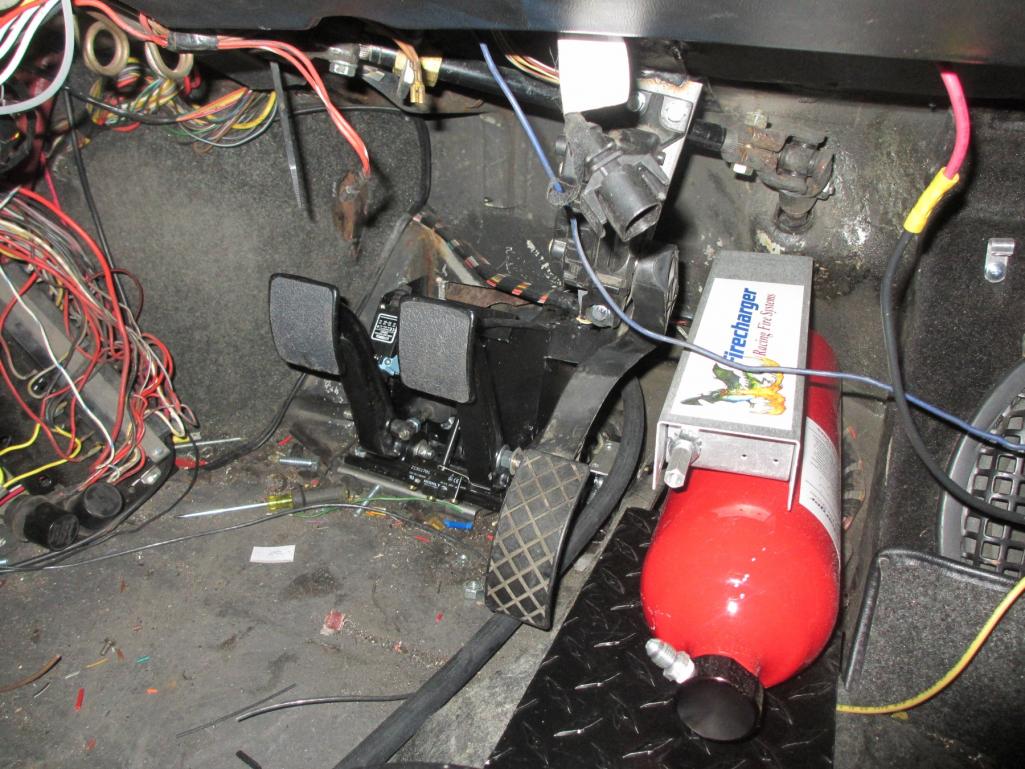
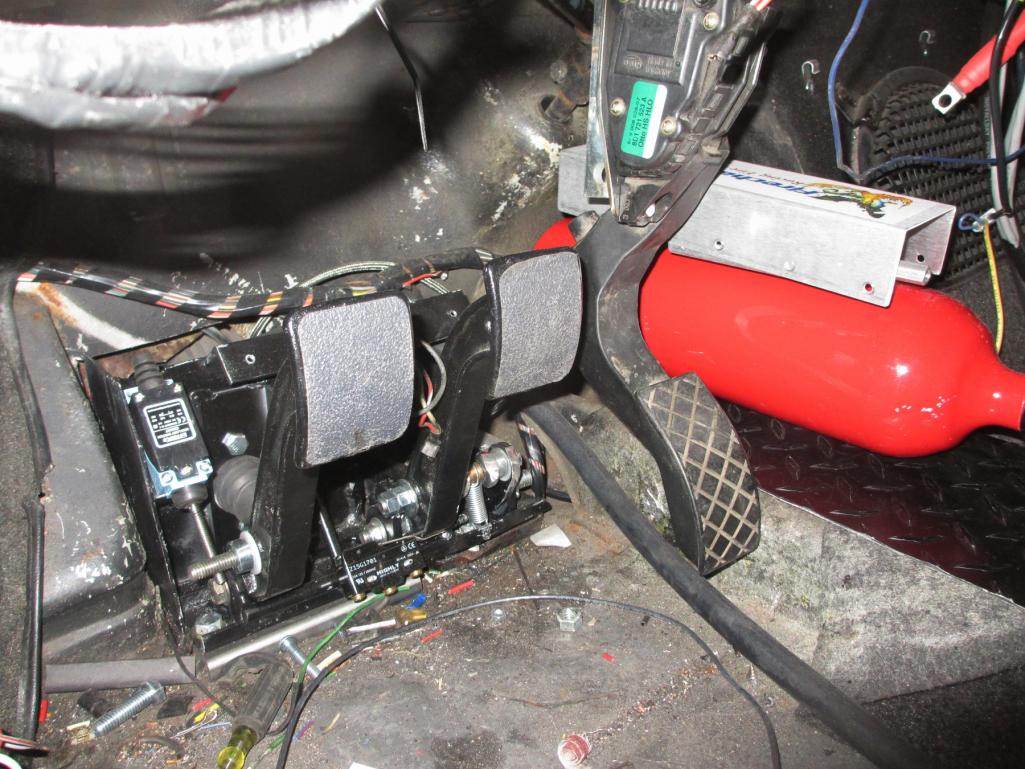
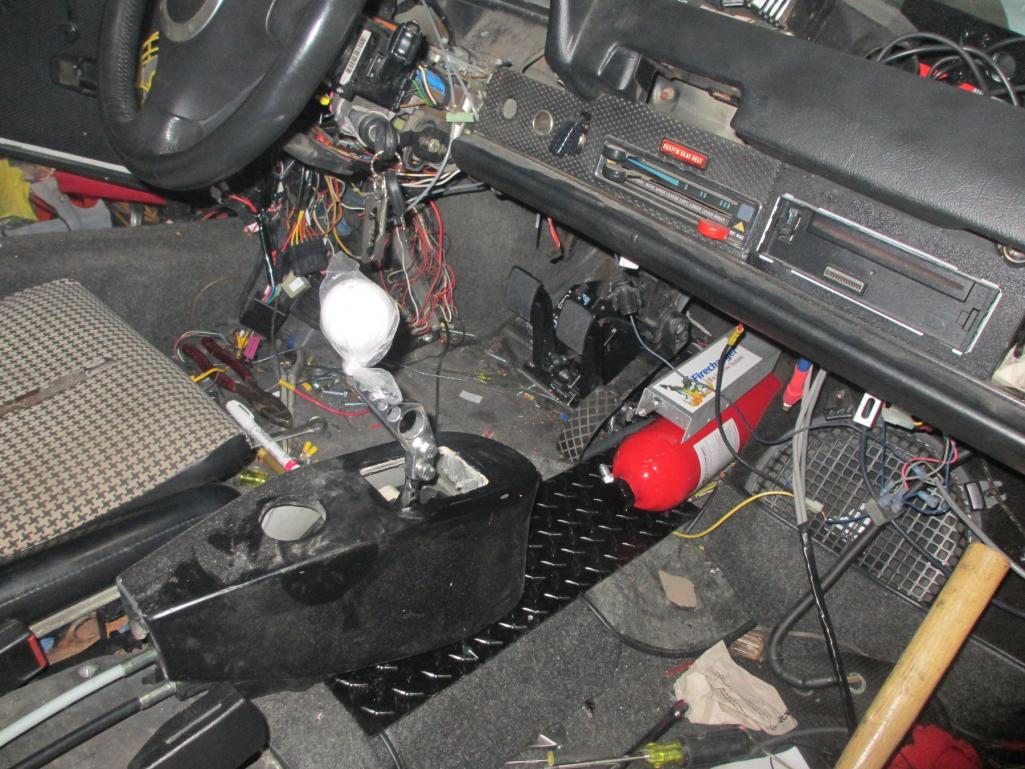
Here you can see a teaser shot of my Rat Rod 1936 Buick parking brake setup. It's modified (like everything else) to work with my hydraulic parking system.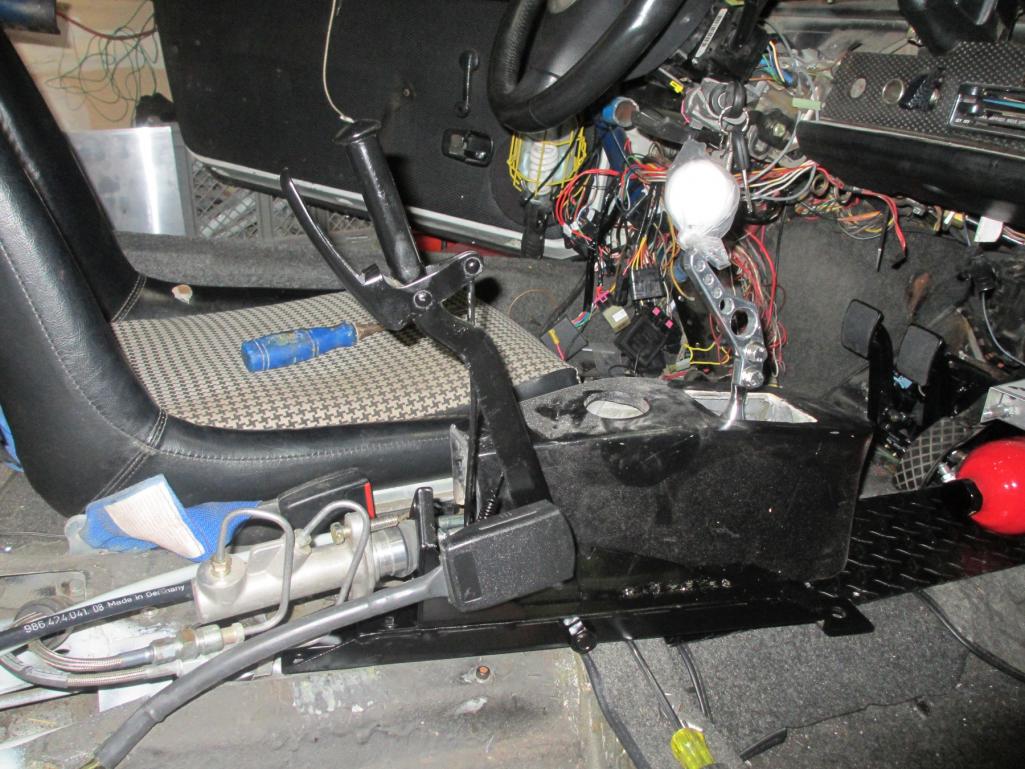
Posted by: 76-914 Apr 7 2013, 07:27 AM
Nice pedal cluster, Mike.
Posted by: JRust Apr 7 2013, 10:28 AM
That sub in the passenger footwell looks sweet
Posted by: kg6dxn Apr 7 2013, 09:18 PM
I had a bit of bad luck today, although I solved it too.
I was drilling for some rivets to hold down the aluminum diamond plate tunnel cover. The fourth one I drilled I sment gas.
I had to cut the tunnel open to get to the hard line. Yep... Hole through and through. Since the fuel system is already complete and I didn't fell like re-plumbing, I got a compression coupler from HD supply and fixed it. The aluminum hard lines use -6AN compression fittings anyway. They are designed for a brass ferrule, so I figured the brass compression fitting will be fine. It was a pain cutting the tunnel open with my air saw. No sparks!
There is a small boxed section on the passenger side next to the shifter. When I ran the hard lines, one of them made it into this small cavity. It is just big enough for the 3/8" line to fit through.
Good thing I picked up some .023 wire last week. This made rewelding the thin sheet metal easier. All fixed!
I then switched to plumbing the fire system. Might come in handy some day...
Lesson of the day... Know where your fuel lines are!
Posted by: andys Apr 7 2013, 10:01 PM
Say Mike, your seatbelt doesn't look to be stock 914; the cable to latch looks somewhat longer, if I'm not mistaken. What are you using, and will it couple with the stock 914 seat belt tongue?
Andys
Posted by: kg6dxn Apr 7 2013, 10:12 PM
Say Mike, your seatbelt doesn't look to be stock 914; the cable to latch looks somewhat longer, if I'm not mistaken. What are you using, and will it couple with the stock 914 seat belt tongue?
Andys
It came with a set of belts I picked up at McMark's swap meet. The whole setup looks just like the 914 set I took out except for the latch. And yes the 914 belt does lock in; Same shape plug.
My wife didn't like the old 914 belts and the latch was too short for her comfort. So I swapped it out. I haven't done the drivers side yet, as you can see in the picture.
Posted by: McMark Apr 8 2013, 01:11 AM
It's a 944 seat belt setup.
Posted by: kg6dxn Apr 13 2013, 11:31 PM
I pulled the motor today in order to finish some odds and ends. Just about every peripheral component needed to be tightened down. I had to make custom 12mm wrenches to get the exhaust bolted on. There isn't much space and a conventional box wrench would not work. I have about a dozen custom tools fabbed up for the series of engine swaps.
The methanol injector was mounted to the outlet of the intercooler. This is a 330cc injector good for 350hp @ 7500 rpm. Right in my range. Notice the tip is recessed. In theory, this allows the spray to form a "cone" before the air flow (passing by) cuts into the stream. By doing this it promotes better atomization. There is some debate on other forums about installing the injector within the intercooler. The argument revolves around pooling inside the cooler. In my case, I am running a solenoid before the injector to prevent dribble thus avoiding pooling. In addition, the injector will not open below 10psi and/or an analog signal from the MAF.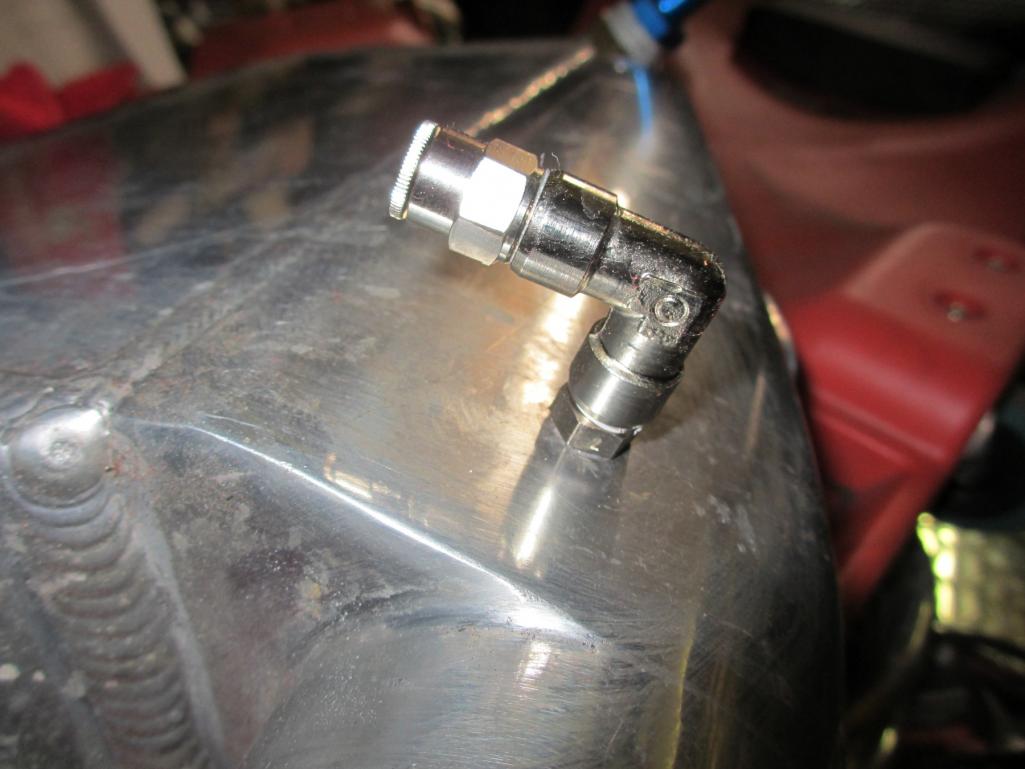
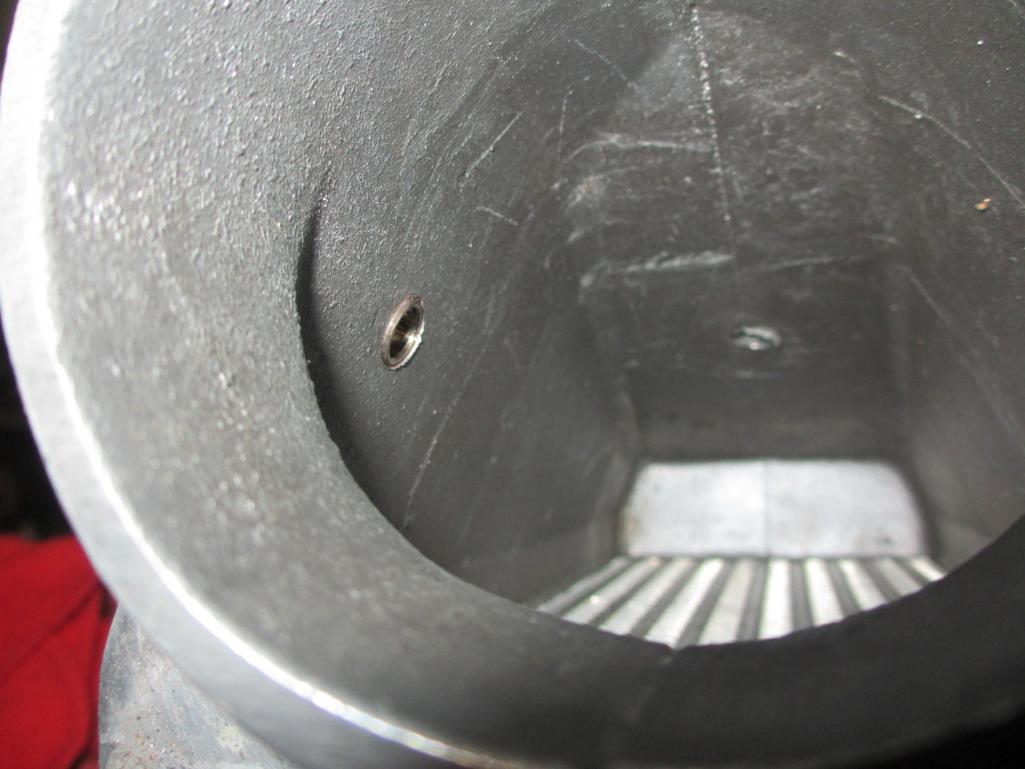
The Audi/VW motors suffer from sludge build up in the PCV system. There was even some law suit over it. I decided to mitigate problems by using a crankcase evacuation system. 034 Motorsport hooked me up with a machined aluminum fitting that plugs into the system. I added some 5/8" aluminum hard line and brass compression fittings. This is the main line that heads to a custom built 1 gallon catch can. From the catch can the line continues to the vacuum venturi welded to the exhaust. This type of system is usually found on V8 drag cars. As the exhaust flows past the venturi a vacuum is pulled on the system- on the engine crank case. It was originally designed to help seal rings on high HP engines. So I get the best of both worlds. Reduced sludge and better sealing combustion chambers.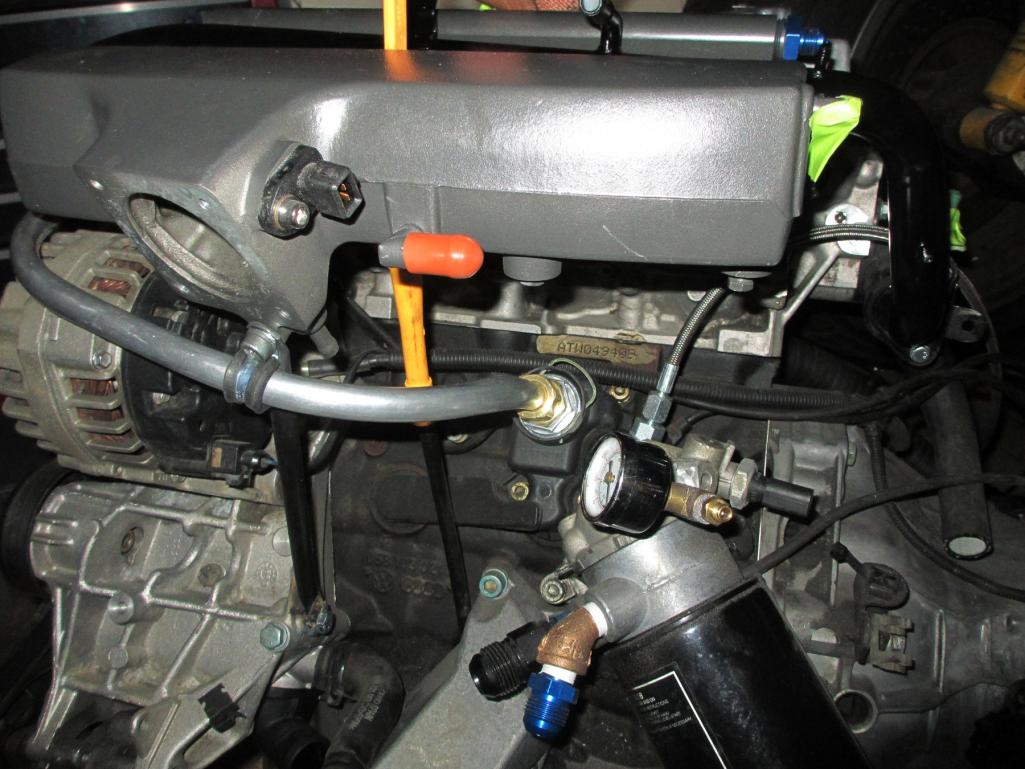
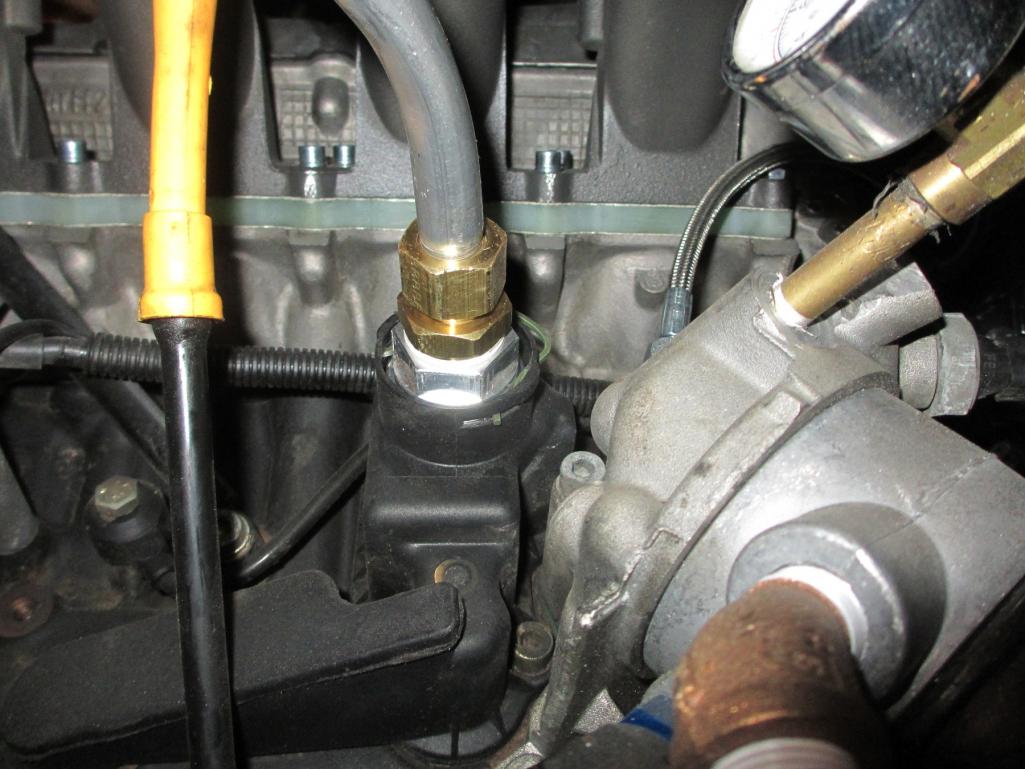
Here is a pic of the turbo oil drain. I used the lower original oil drain and some high temp hose with an -10AN fitting. After cutting the factory stainless hard line, I rolled a bead on it to keep the hose in place. I finally got to use my mini bead roller!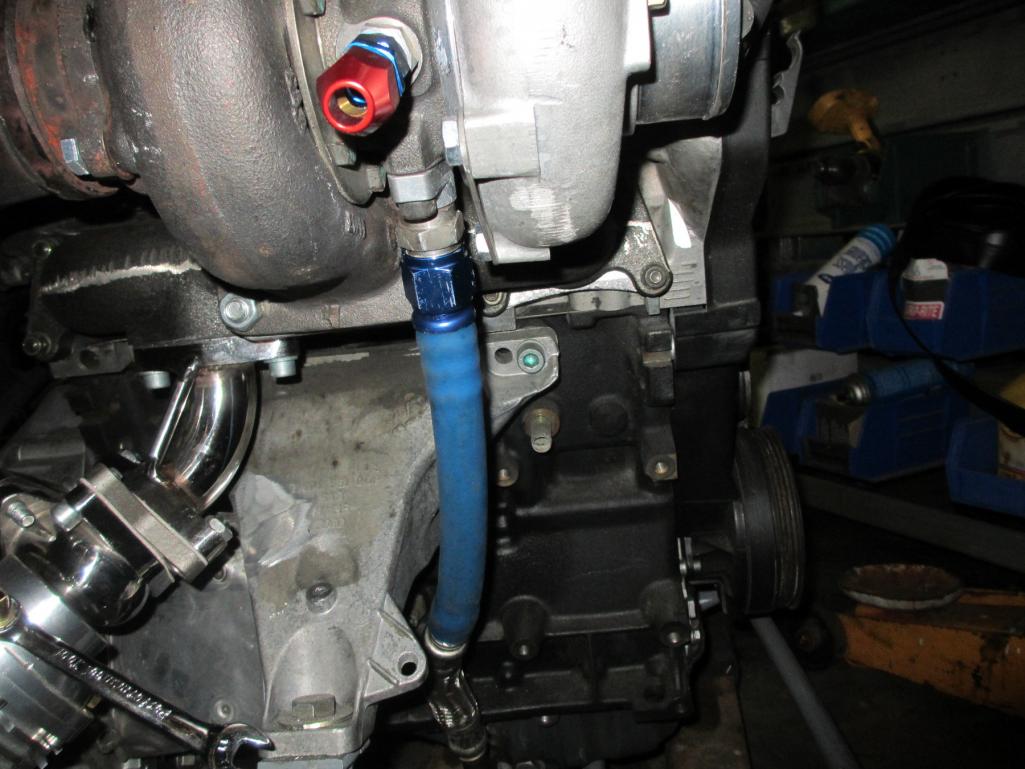
Posted by: kg6dxn Apr 13 2013, 11:43 PM
As I mentioned before, an AFFF fire system has been installed. This system is approved by many racing sanctioning bodies. This system from FireCharger is also refillable by me at any time. I runs off a compressed CO2 cylinder. You just need a refill kit and water. Very easy! I am more concerned with putting out a fire than weather or not the car will pass tech. I still keep fire extinguishers in the car any way.
The bottle and CO2 housing are mounted on the front tunnel. I mounted the handle on my shifter console. The nozzle tubing is routed on top of the tunnel, up the firewall and pops out into the engine bay at the top. The two nozzles are mounted slightly to the left of center. One over the fuel rail and one over the intake manifold. I painted the top of the tips red so they don't blend in to the rest of the stuff back there.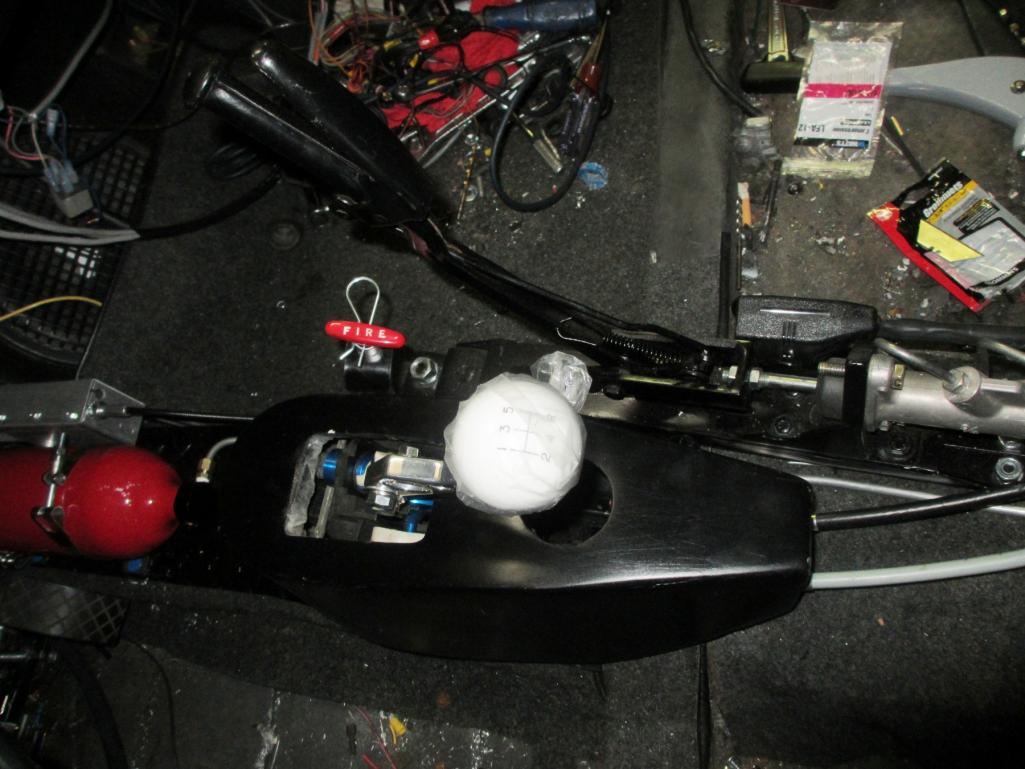
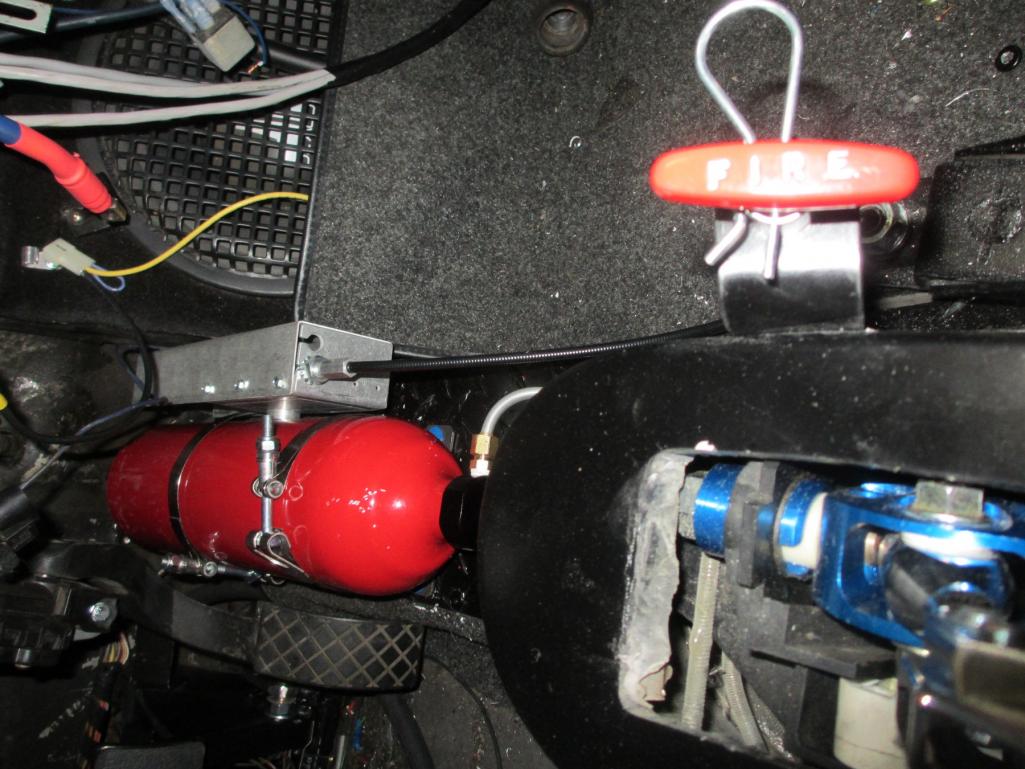
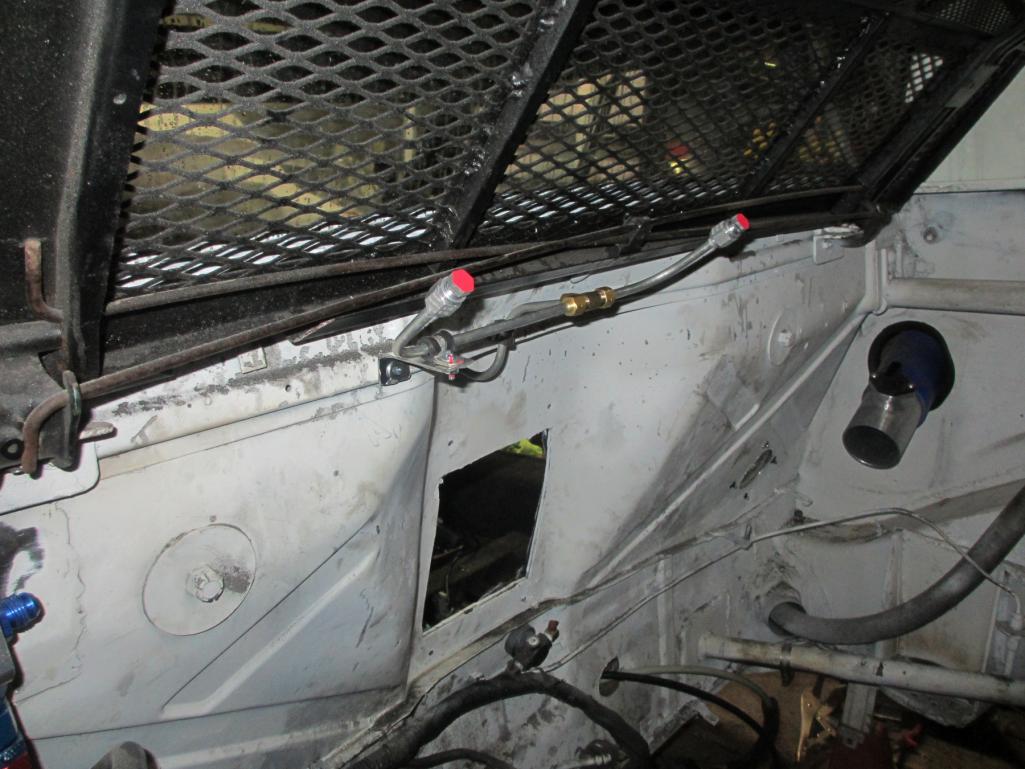
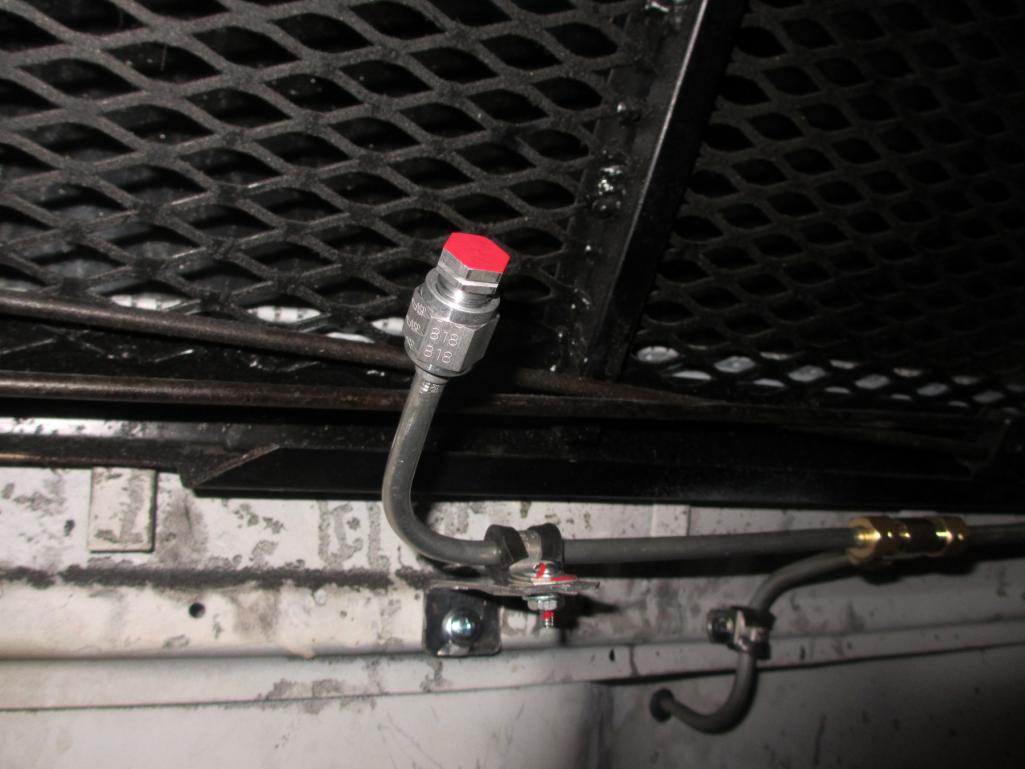
Posted by: Cairo94507 Apr 14 2013, 07:28 AM
Your skills just blow me away. I like the way you have laid stuff out and look forward to seeing this car back on the road. Great work Mike.
I will have a fire suppression system in my Six just because. I also think a nice small handy fire extinguisher is worth having in the car too. Probably mount one of those at the front of the passenger seat.
Posted by: jeff Apr 14 2013, 08:31 AM
I was drilling for some rivets to hold down the aluminum diamond plate tunnel cover. The fourth one I drilled I sment gas.
I had to cut the tunnel open to get to the hard line. Yep... Hole through and through. Since the fuel system is already complete and I didn't fell like re-plumbing, I got a compression coupler from HD supply and fixed it. The aluminum hard lines use -6AN compression fittings anyway. They are designed for a brass ferrule, so I figured the brass compression fitting will be fine. It was a pain cutting the tunnel open with my air saw. No sparks!
There is a small boxed section on the passenger side next to the shifter. When I ran the hard lines, one of them made it into this small cavity. It is just big enough for the 3/8" line to fit through.
Good thing I picked up some .023 wire last week. This made rewelding the thin sheet metal easier. All fixed!
I then switched to plumbing the fire system. Might come in handy some day...
Lesson of the day... Know where your fuel lines are!
Don't take a chance, make a new line & double check all mounting points & fittings and whatever else you have in the fuel system....you don't want to deploy that Fire system.....
Posted by: kg6dxn Apr 14 2013, 08:36 AM
Don't take a chance, make a new line & double check all mounting points & fittings and whatever else you have in the fuel system....you don't want to deploy that Fire system.....
That is partially why the motor is out. I'm checking every nut, bolt and fitting. I'm peening the exhaust connections and paint striping every other connection, so I know it's done. I need a couple weekends of fiddling around and then go back to final assembly.
Posted by: effutuo101 Apr 14 2013, 08:54 AM
Great build!
Posted by: jeff Apr 14 2013, 10:20 AM
Awesome! I'm not trying to be mother hen but it's always on my mind, I'm a firefighter and have had some terrible experiences with car accidents involving fires...
Posted by: Andyrew Apr 14 2013, 02:00 PM
I pulled the motor today in order to finish some odds and ends. Just about every peripheral component needed to be tightened down. I had to make custom 12mm wrenches to get the exhaust bolted on. There isn't much space and a conventional box wrench would not work. I have about a dozen custom tools fabbed up for the series of engine swaps.
The methanol injector was mounted to the outlet of the intercooler. This is a 330cc injector good for 350hp @ 7500 rpm. Right in my range. Notice the tip is recessed. In theory, this allows the spray to form a "cone" before the air flow (passing by) cuts into the stream. By doing this it promotes better atomization. There is some debate on other forums about installing the injector within the intercooler. The argument revolves around pooling inside the cooler. In my case, I am running a solenoid before the injector to prevent dribble thus avoiding pooling. In addition, the injector will not open below 10psi and/or an analog signal from the MAF.
The Audi/VW motors suffer from sludge build up in the PCV system. There was even some law suit over it. I decided to mitigate problems by using a crankcase evacuation system. 034 Motorsport hooked me up with a machined aluminum fitting that plugs into the system. I added some 5/8" aluminum hard line and brass compression fittings. This is the main line that heads to a custom built 1 gallon catch can. From the catch can the line continues to the vacuum venturi welded to the exhaust. This type of system is usually found on V8 drag cars. As the exhaust flows past the venturi a vacuum is pulled on the system- on the engine crank case. It was originally designed to help seal rings on high HP engines. So I get the best of both worlds. Reduced sludge and better sealing combustion chambers.
Here is a pic of the turbo oil drain. I used the lower original oil drain and some high temp hose with an -10AN fitting. After cutting the factory stainless hard line, I rolled a bead on it to keep the hose in place. I finally got to use my mini bead roller!
All great things in this post!!
I havent seen very many sludge issues as of late, But your solution for the PCV system works great! I just dump mine
Posted by: kg6dxn Apr 14 2013, 05:27 PM
All great things in this post!!
I havent seen very many sludge issues as of late, But your solution for the PCV system works great! I just dump mine
I will dump my catch can too. The difference is my exhaust Venturi will generate vacuum under boost. In fact, the more air (exhaust) flowing past it, the greater the vacuum generated. This is why it's great on a boosted engine. The factory PCV system closes and stops working under boost conditions.
Posted by: andys Apr 17 2013, 04:20 PM
It's a 944 seat belt setup.
Mark,
So does the stock 914 seat belt tongue fit the 944 latch?
I made a flat steel bar stock extention to lenghten my 914 latch, but would have prefered to find something OEM that is longer than the stock 914 cable and latch assembly. If it's compatible, how much longer is the 944 cable?
Thanks,
Andys
Posted by: McMark Apr 17 2013, 04:44 PM
Gotta use the 944 pieces. The 944 latch is either shorter or the same length as the 914 piece.
Posted by: kg6dxn Apr 17 2013, 04:58 PM
Andys,
Here is a pic of the seat belt buckles. Left 944, Right 914.
The 914 buckle I have absolutely does latch into the 944 receiver. Looks like it wouldn't but it does. I'm not sure I would trust it in an accident. Thats why I changed both parts.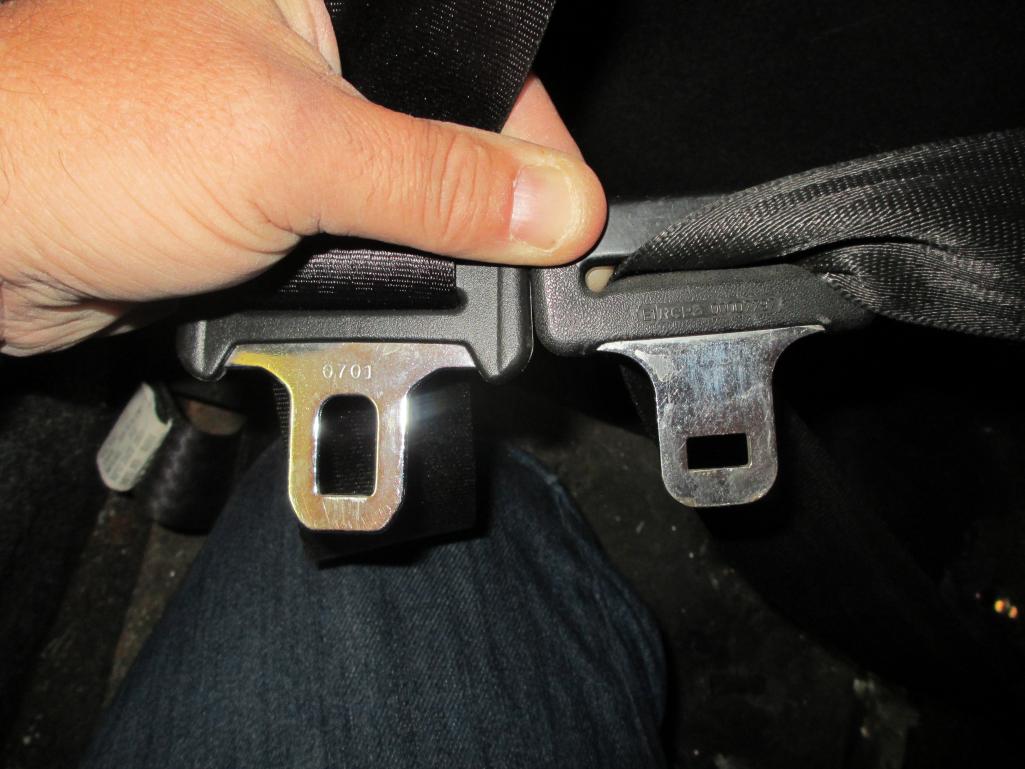
Posted by: andys Apr 17 2013, 05:35 PM
Mark/Mike,
Thanks for the quick response......Guess I'll just leave mine as-is.
Andys
Posted by: BIGKAT_83 Apr 17 2013, 06:05 PM
Those seat belts look the same as a set of aftermarket belts I got off of EBAY a few years ago. Even have the same #0701 on the buckle. The female end of the buckle has a long shaft and is high enough to be used with my Scheel seats.
Bob
Posted by: kg6dxn Apr 21 2013, 10:40 PM
Got the motor almost ready to go back in. I pulled almost every nut and bolt added some red, blue or green Locktite (depending on the application).
Bolts tight
Turbo oil lines done
Turbo coolant lines done
Exhaust manifolds tight
Coolant lines done
Vacuum lines done
Belts replaced
I also cleaned to oil (from the rotary) from the engine bay and resprayed the white. I used the "Awesome cleaner" from the dollar store. Thanks Lennie! Stuff works great. At one point with the rotary, I was racing a Carrera on the freeway. Under boost the oil filler neck popped off. A fine mist of oil was sprayed all over the car. The worst part was the top was off and I got covered. BTW, I won...
Here a few pics while I watch paint dry...
Hell hole looks pretty good.
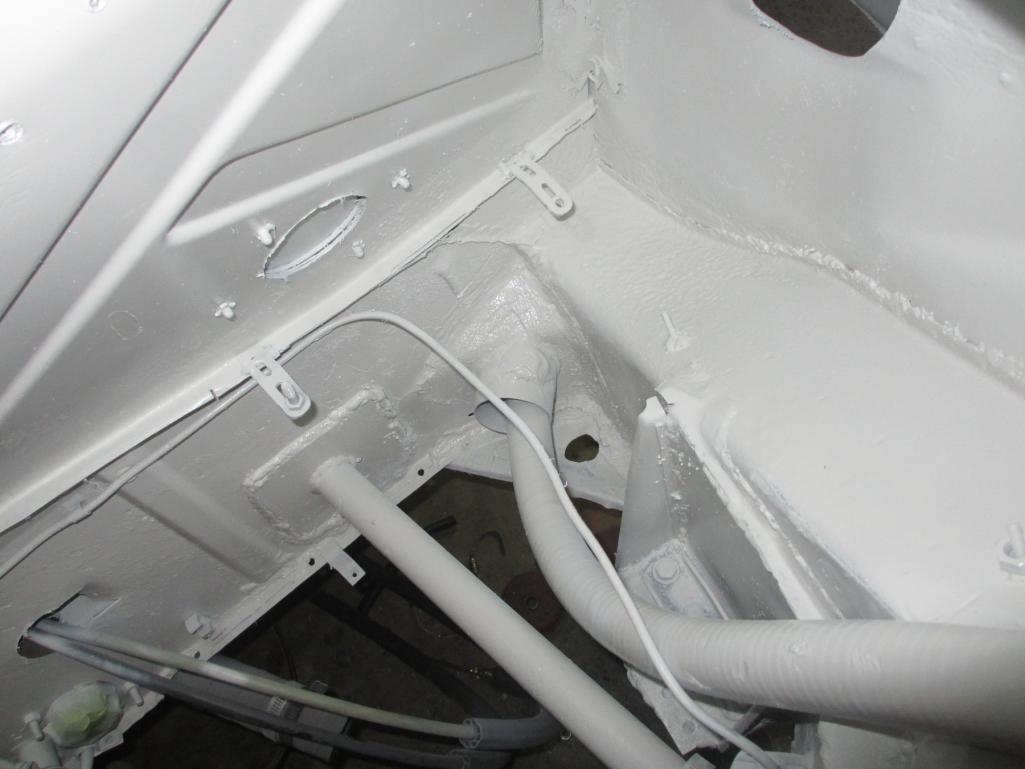
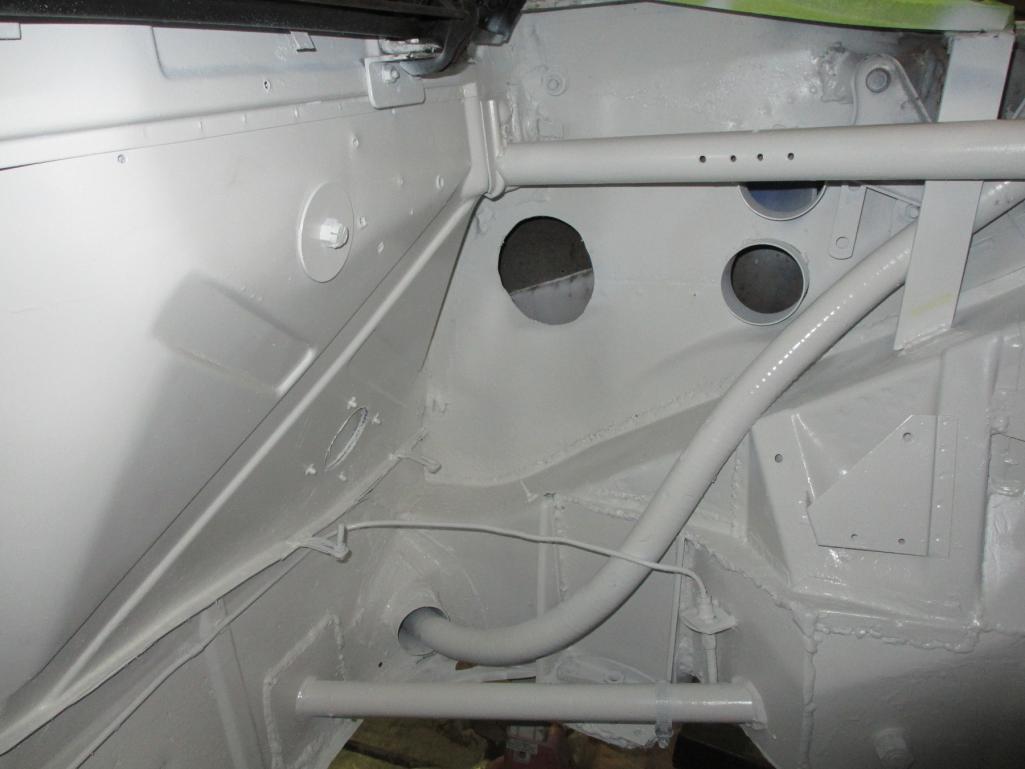
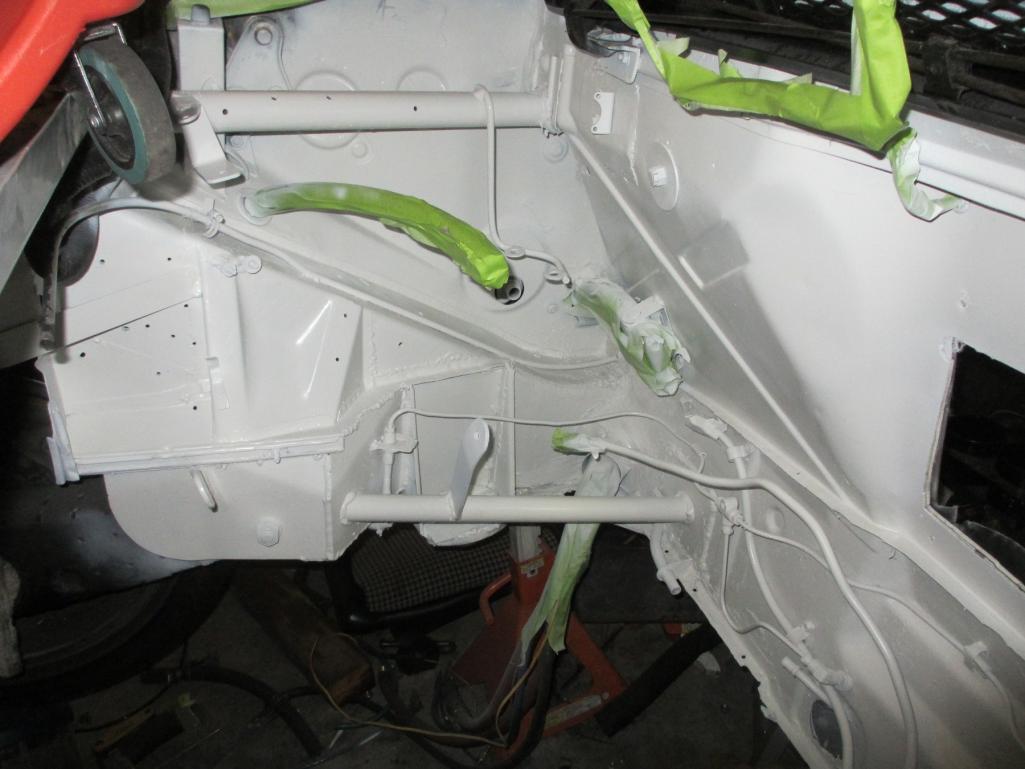
Posted by: Andyrew Apr 22 2013, 12:19 AM
Looks great!!!!
I forgot about all the weird chassis stuff thats been done to this car..
Posted by: kg6dxn Apr 28 2013, 04:36 PM
Spent some time cleaning and painting the rear trunk. I'm off tomorrow and Tuesday so I plan on getting the motor stuffed back in and commence final assembly. Paint in the engine bay has sat for 2 weeks so hopefully I don't screw it up. I'll have to be careful in the trunk.
I have a few cover plates for the trunk that still need paint. The engine side and over the exhaust are removeable. 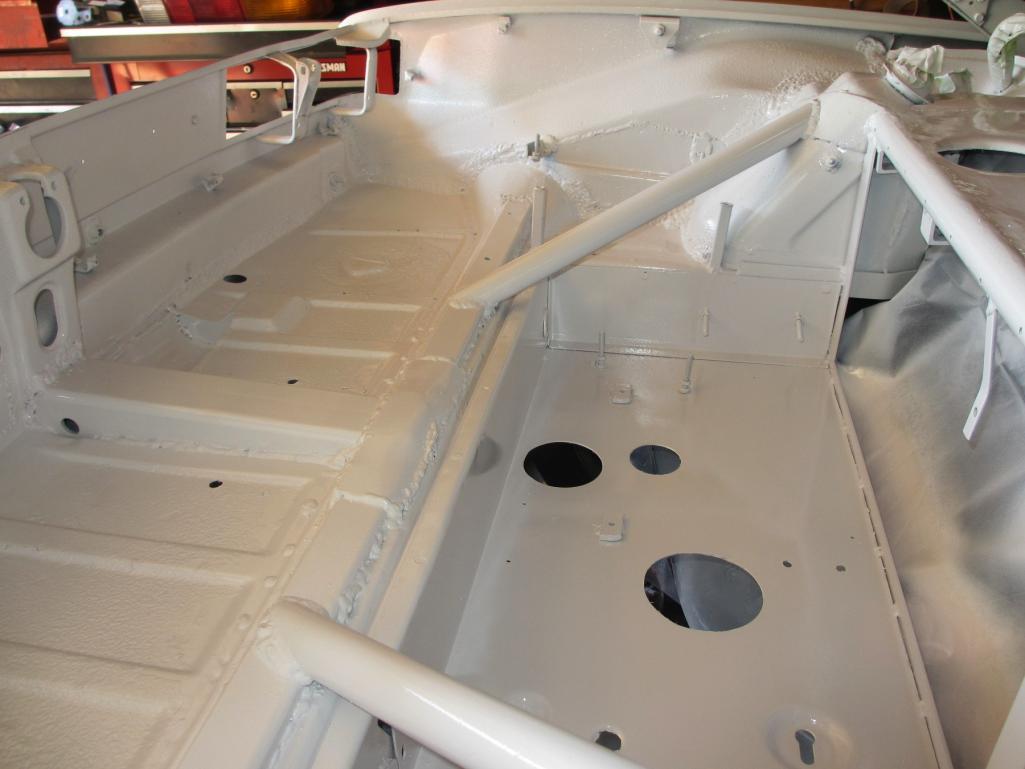
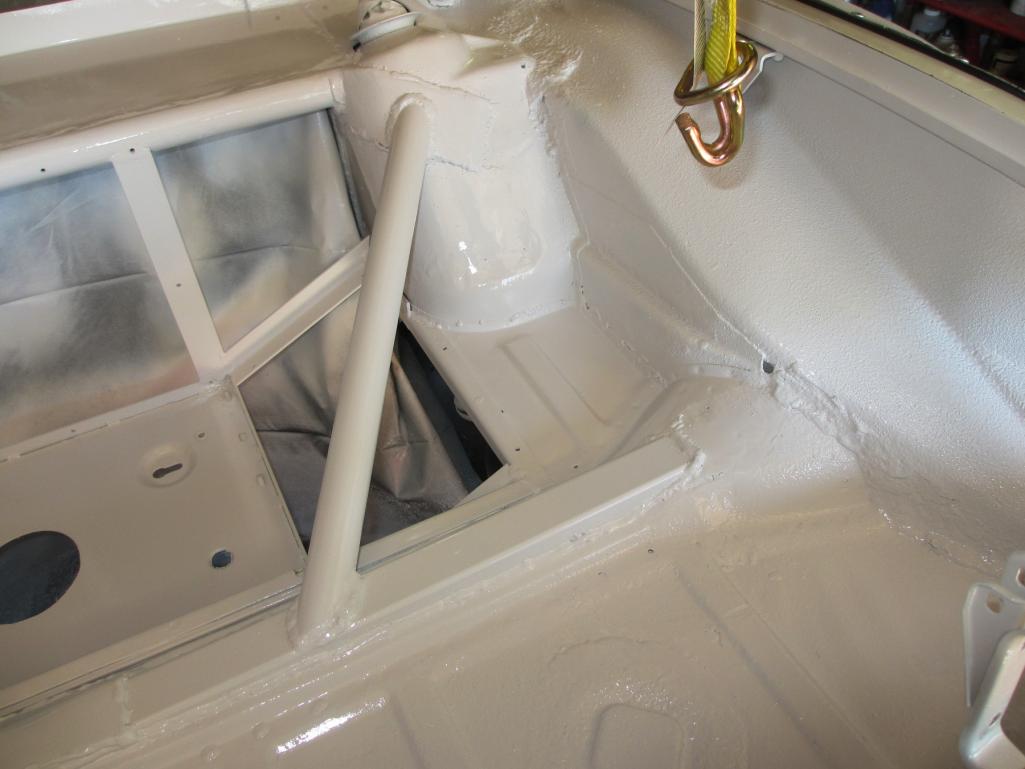
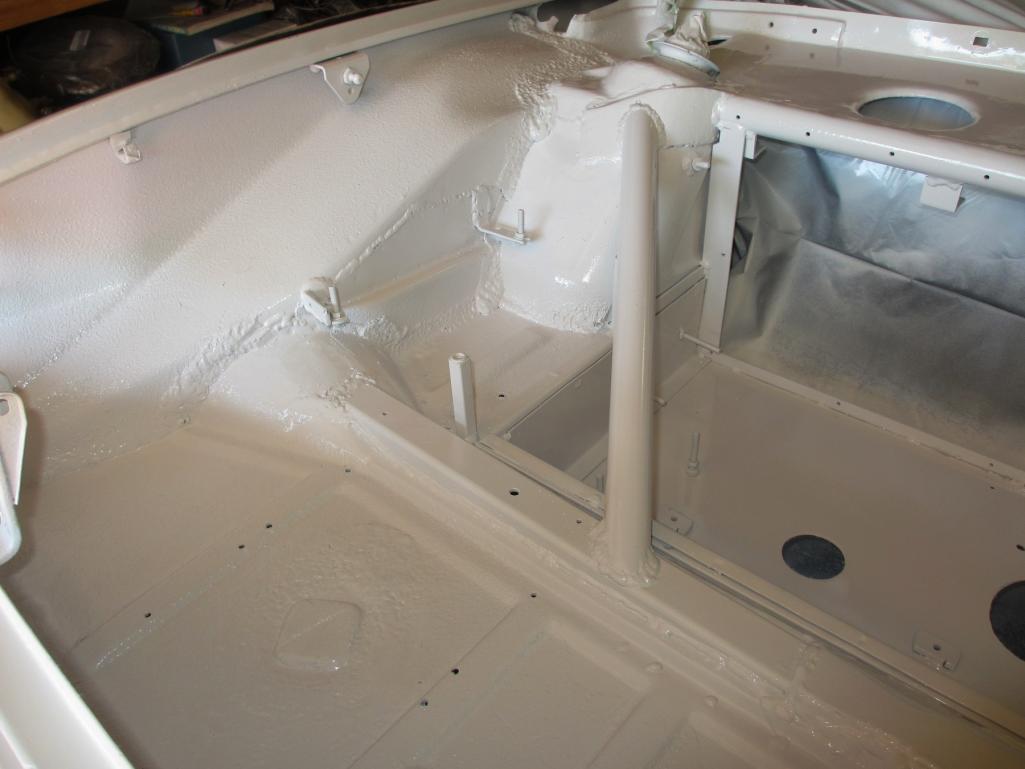
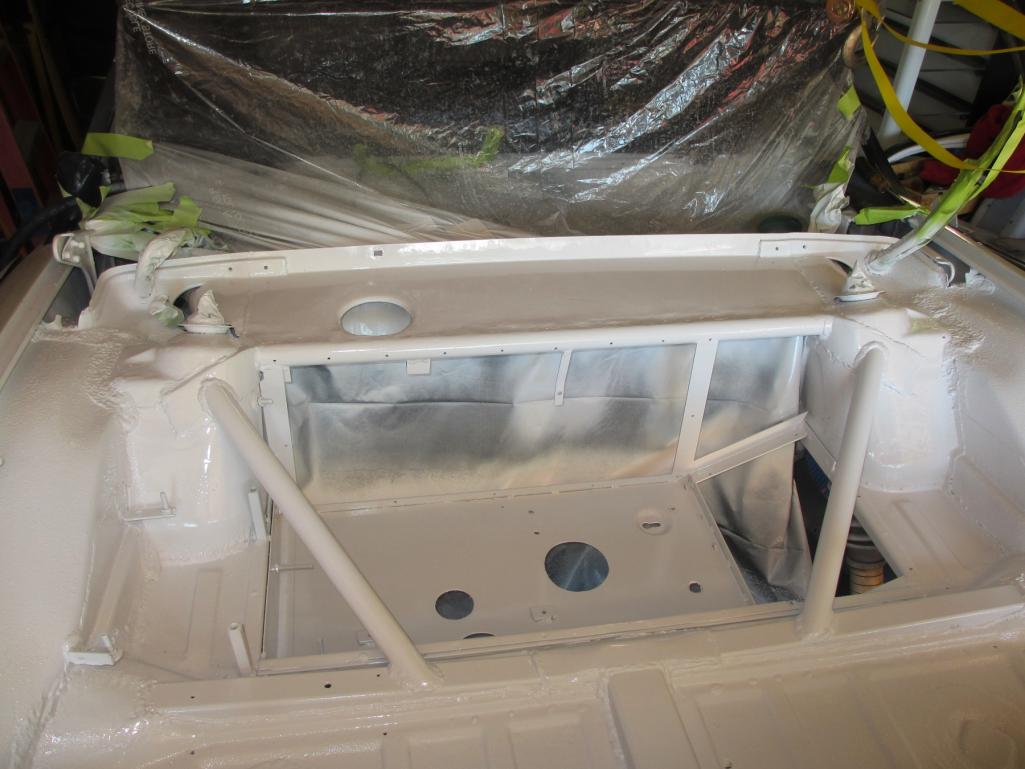
Posted by: Andyrew Apr 28 2013, 07:58 PM
Paint looks great! What are you you spraying and with what?
Posted by: kg6dxn Apr 28 2013, 08:19 PM
Paint looks great! What are you you spraying and with what?
This is just a case of rattle can. One of white primer and one gloss white. Many thin coast until the final to let it flow...
I'm keeping up with the racecar theme. One day the car will go on a rotisserie and get blasted and a proper paint job. But then I will be afraid to drive it...
Posted by: kg6dxn Apr 29 2013, 09:21 PM
Motor is in! Lots of stuff done. Lots more to do... More tomorrow...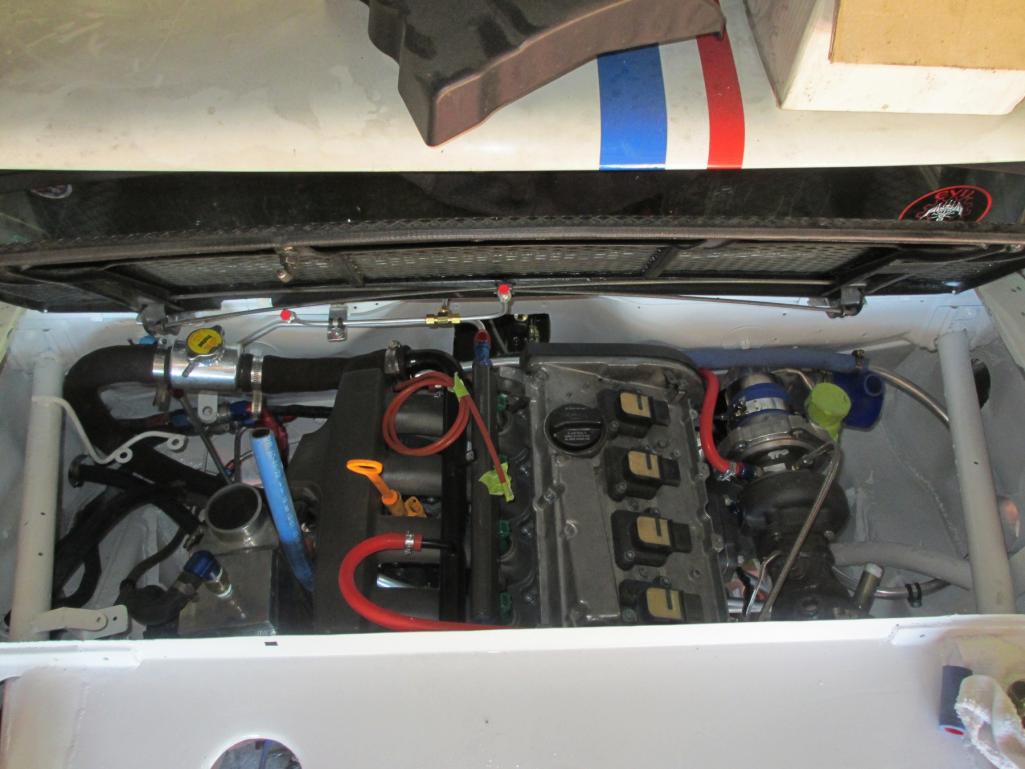
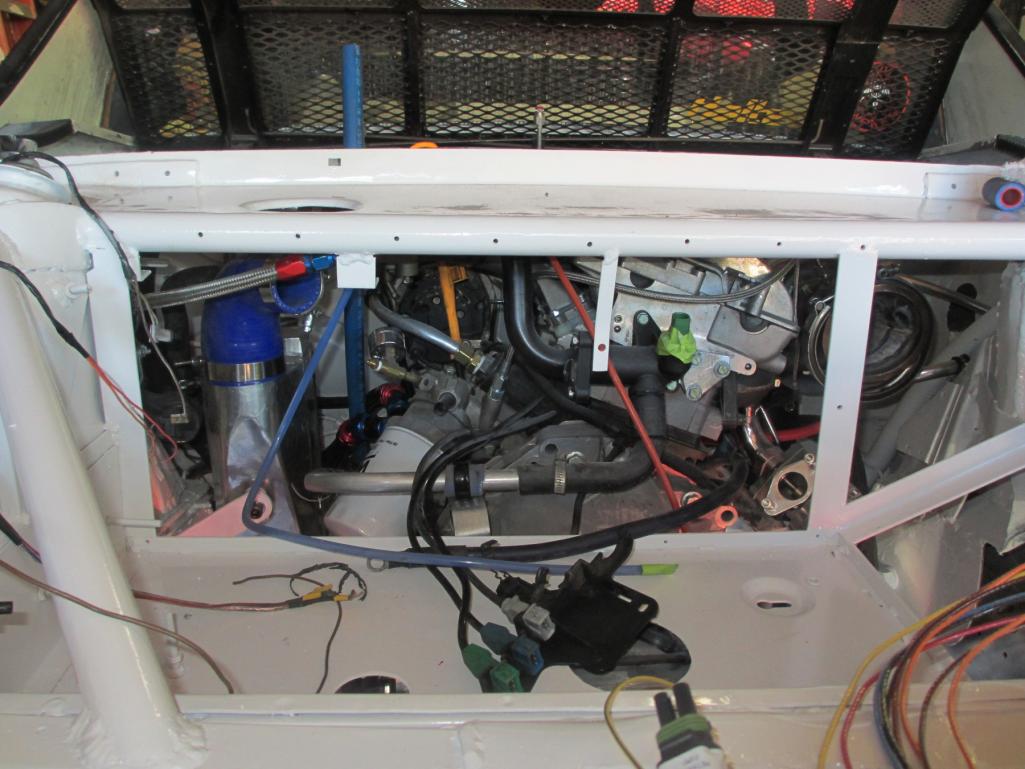
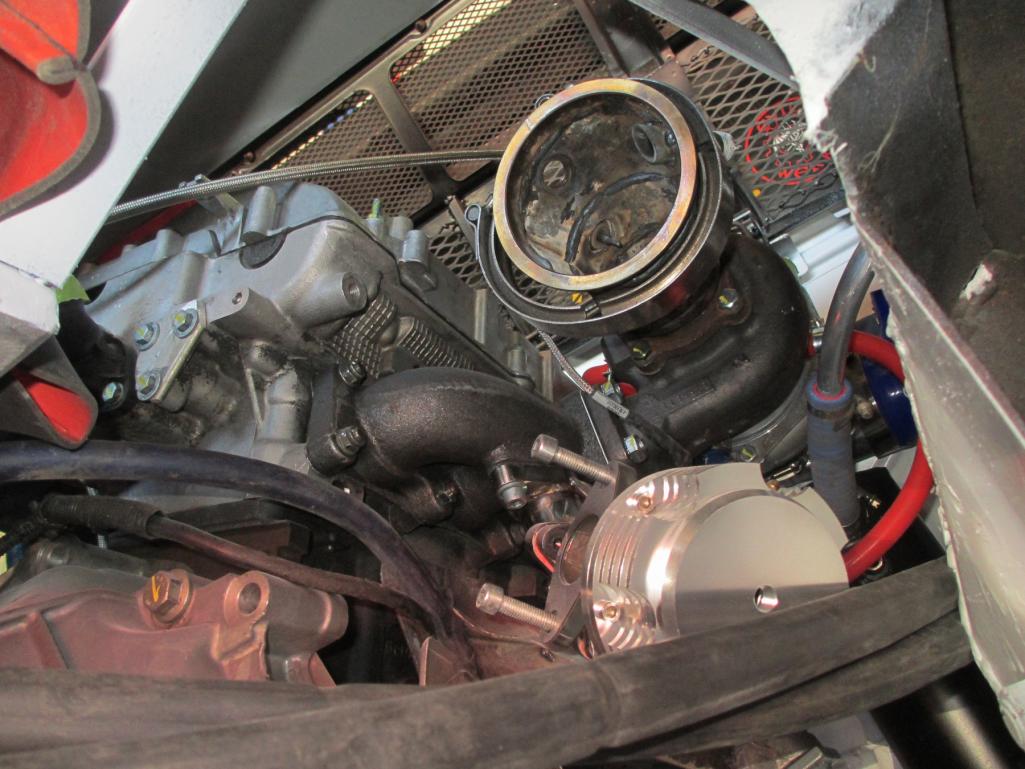
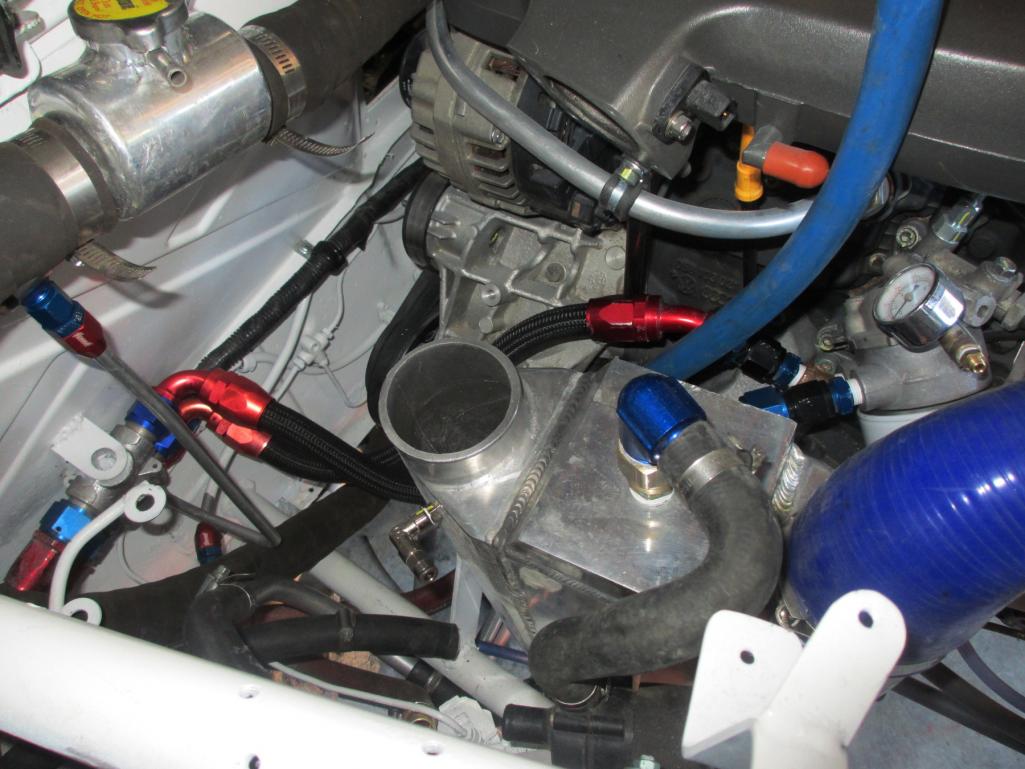
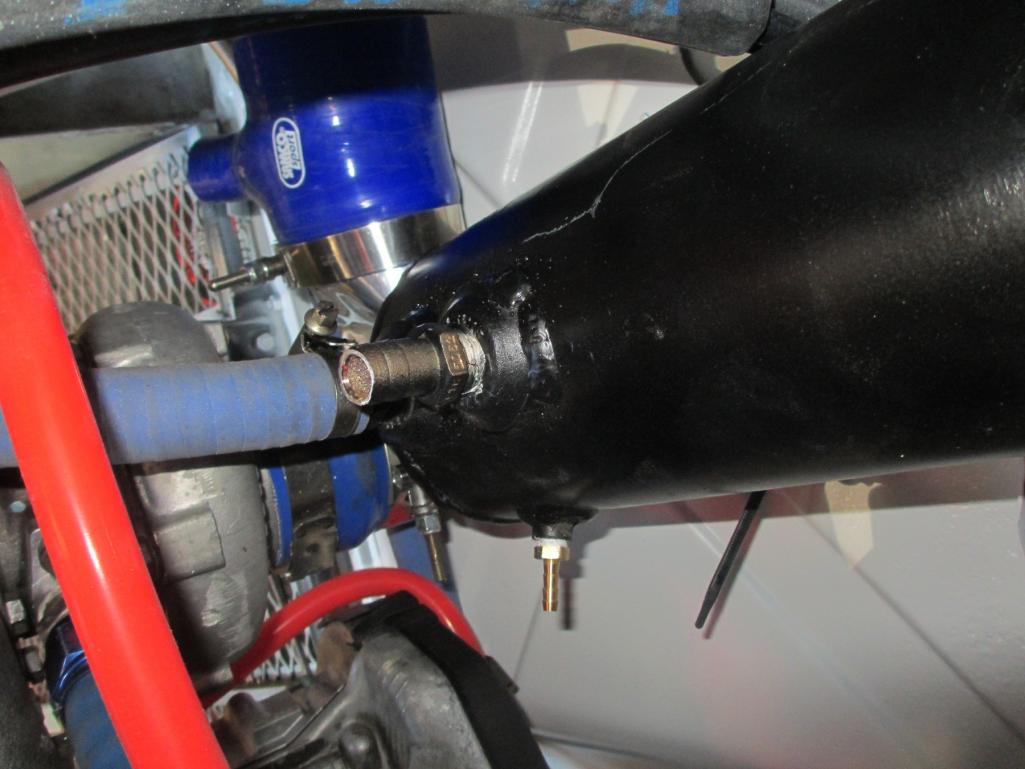
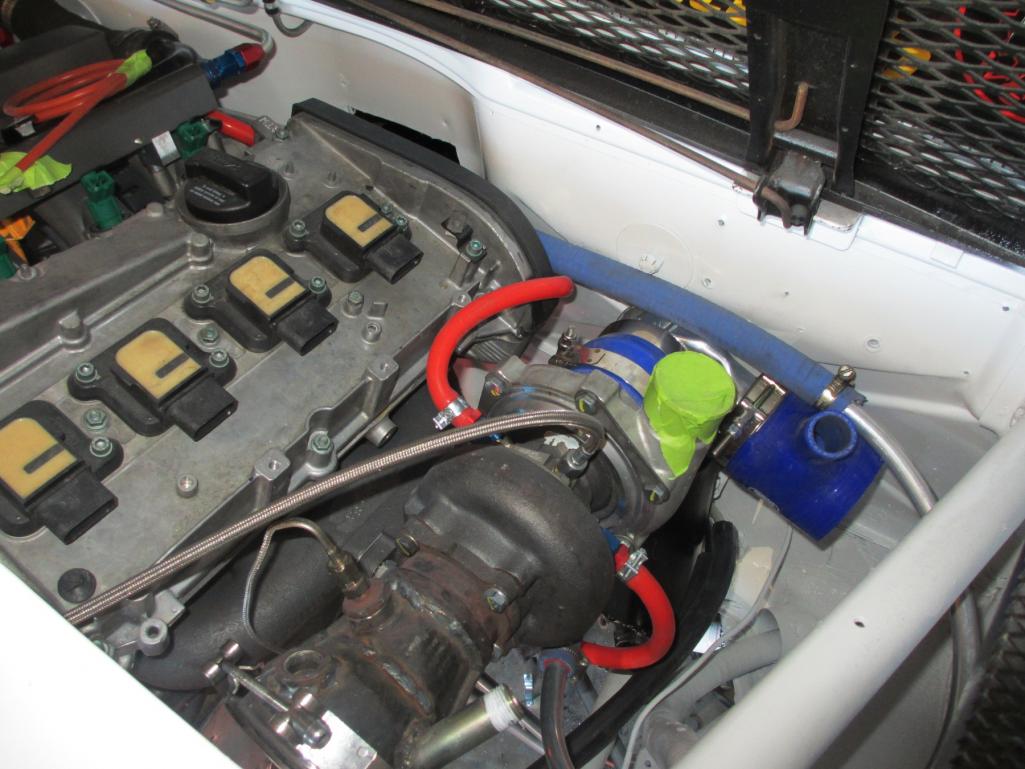
Posted by: McMark Apr 29 2013, 09:22 PM
Nice! 
Posted by: jsconst Apr 29 2013, 10:35 PM
As always, very impressive Mike, I wish I had half your fabrication skills 
Looks awesome
Jeff
Posted by: kg6dxn Apr 30 2013, 08:30 PM
More, More, More...
Radiator coolant lines: DONE
Heater lines: DONE
Intercooler lines: DONE
Intercooler pump: DONE
Oil lines: DONE
Oil pressure line: DONE
Intake piping: DONE
Recirc valve: DONE (Forge DV/BOV in DV mode only)
Turbo inlet: DONE
MAF: DONE
Aire cleaner: DONE
Fuel lines: DONE
PCV evacuation system: DONE
NEEDS:
fuel pump install
catch can drain
vacuum lines connected
wastegate connected
boost control connected
exhaust install
Wiring connected
Interior cleaning
Dash cluster install
Rear sway bar install
Fluids: motor oil, tranny oil, coolant
Axle measurement t, order and install
Clutch final bleeding
I can't believe how much stuff was bolted to this system. I waited until final assembly to plumb all the fluid lines. What a bitch. The area on the left side of the engine bay is very contested with hoses (heater, intercooler, heat exchanger, pump, oil, oil pressure).
I had one of those senior moments today. I lost my throttle body. When I took it off, I put it somewhere safe. It took me an hour to fine it... 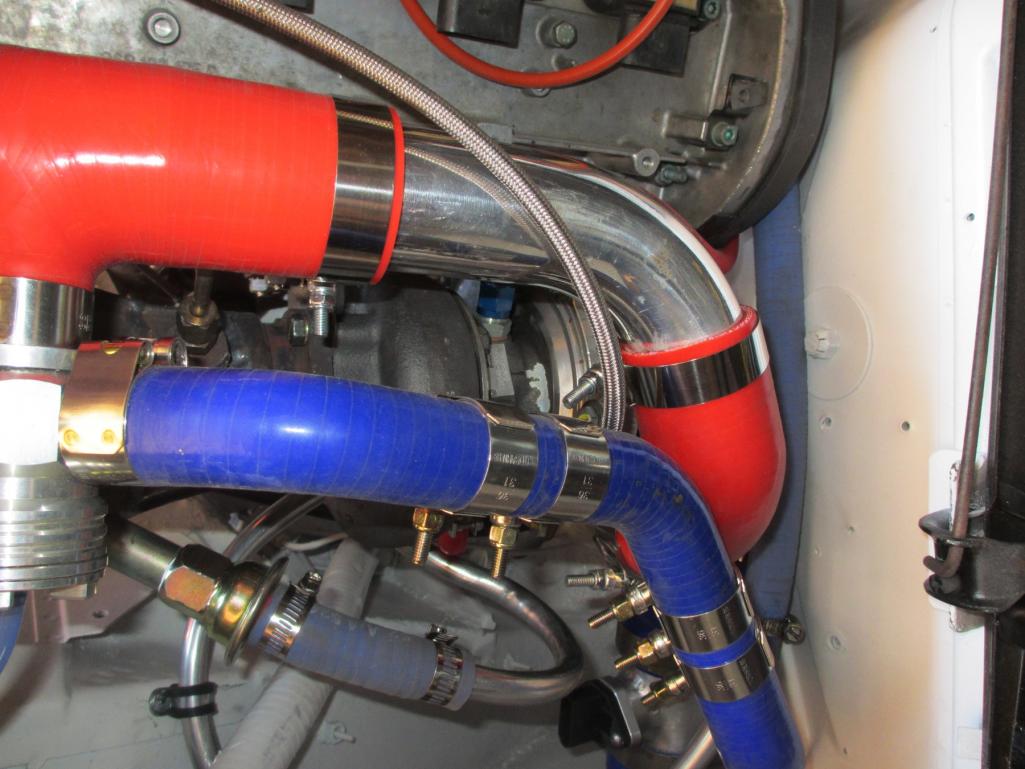
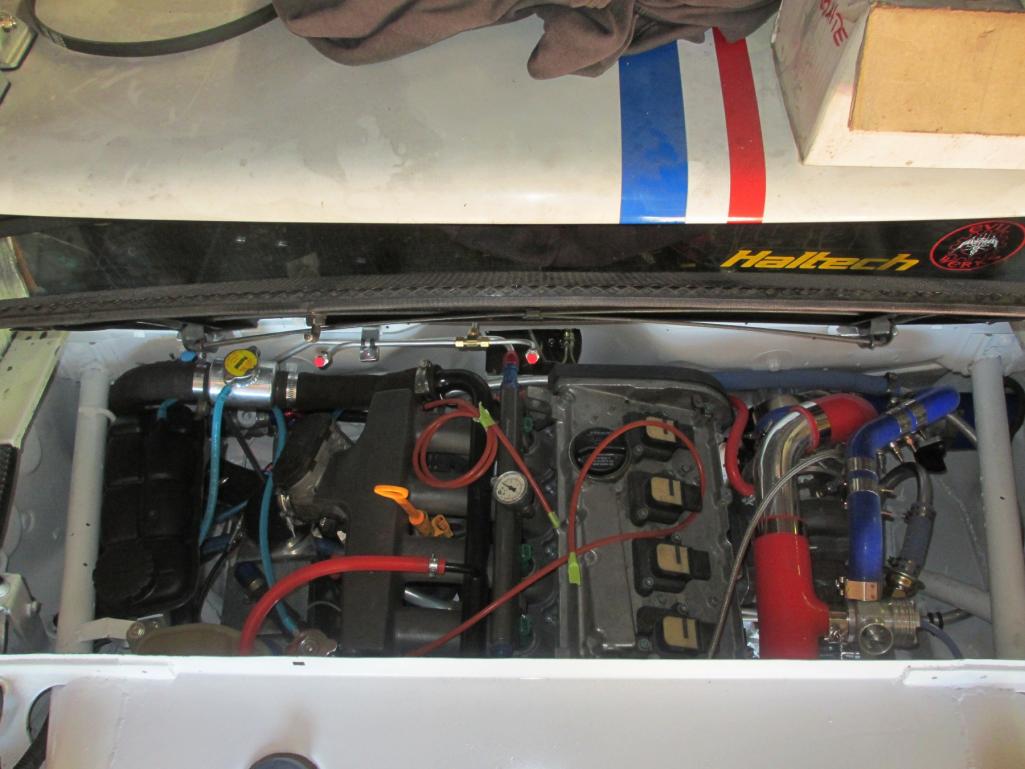
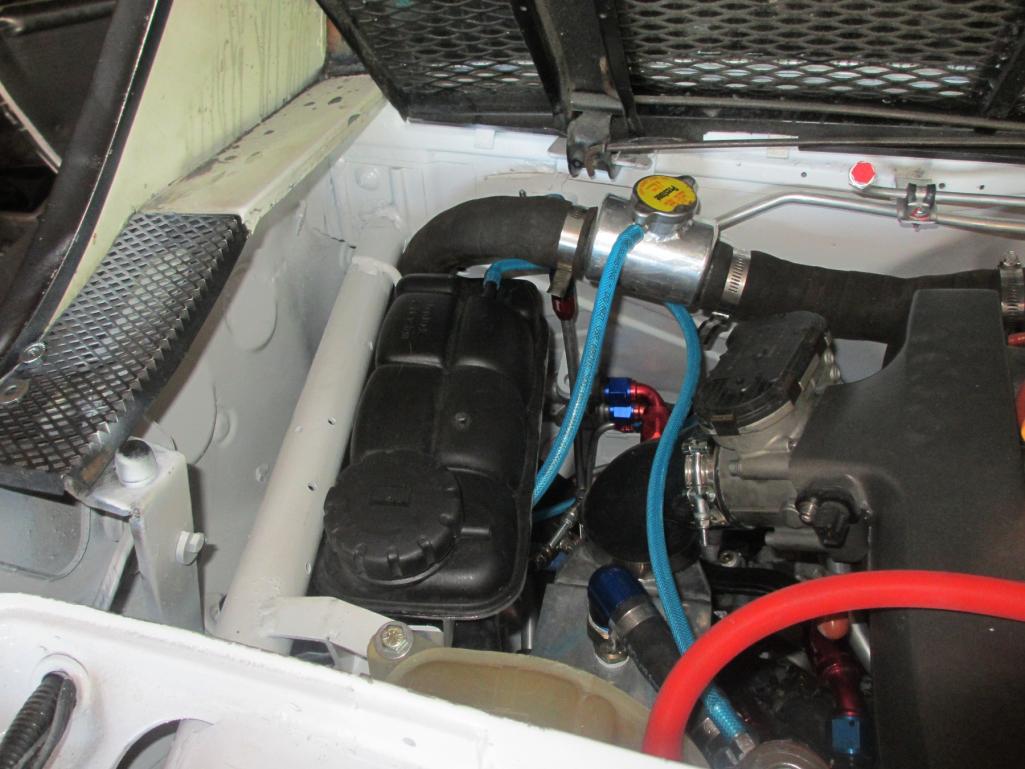
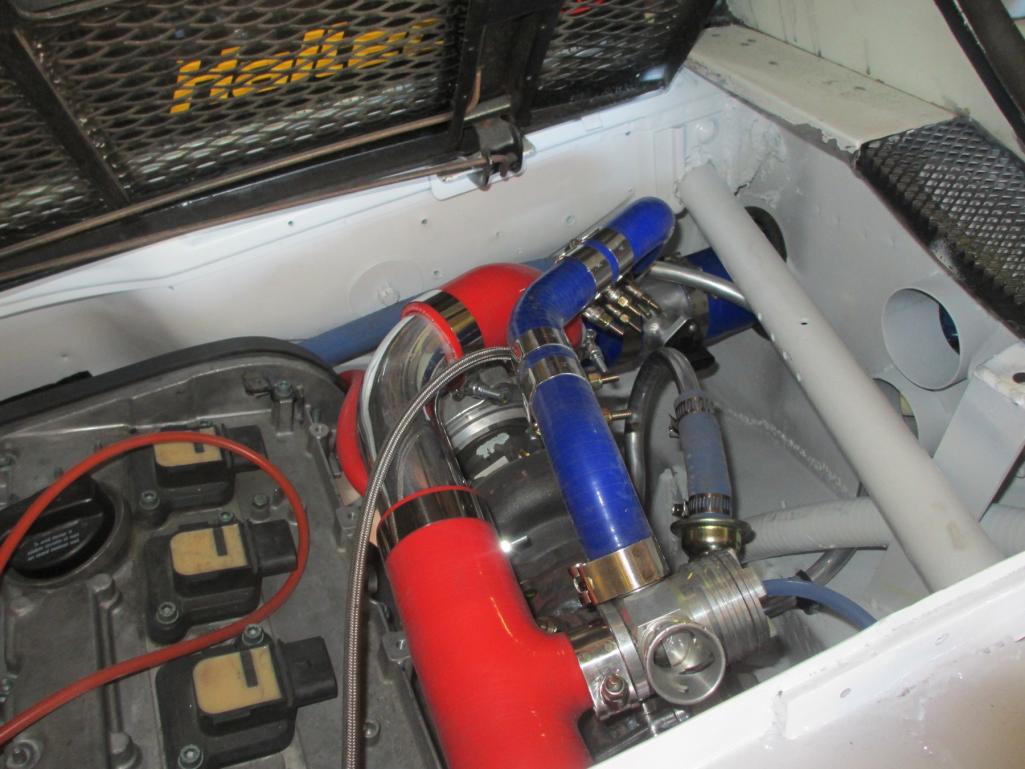
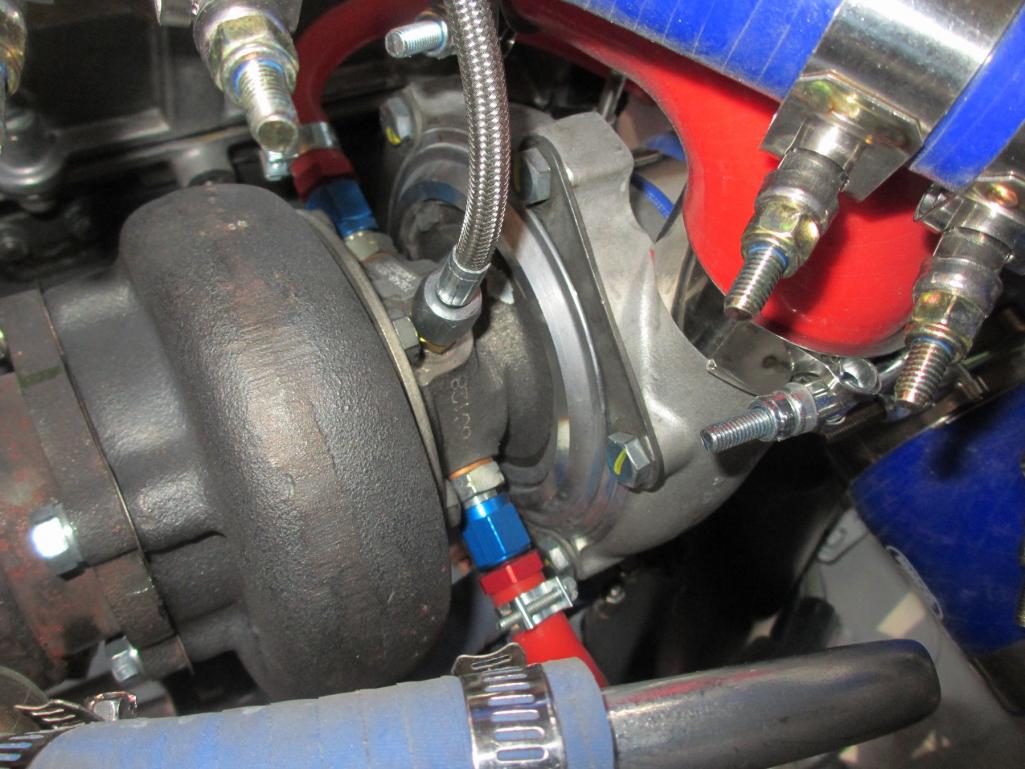
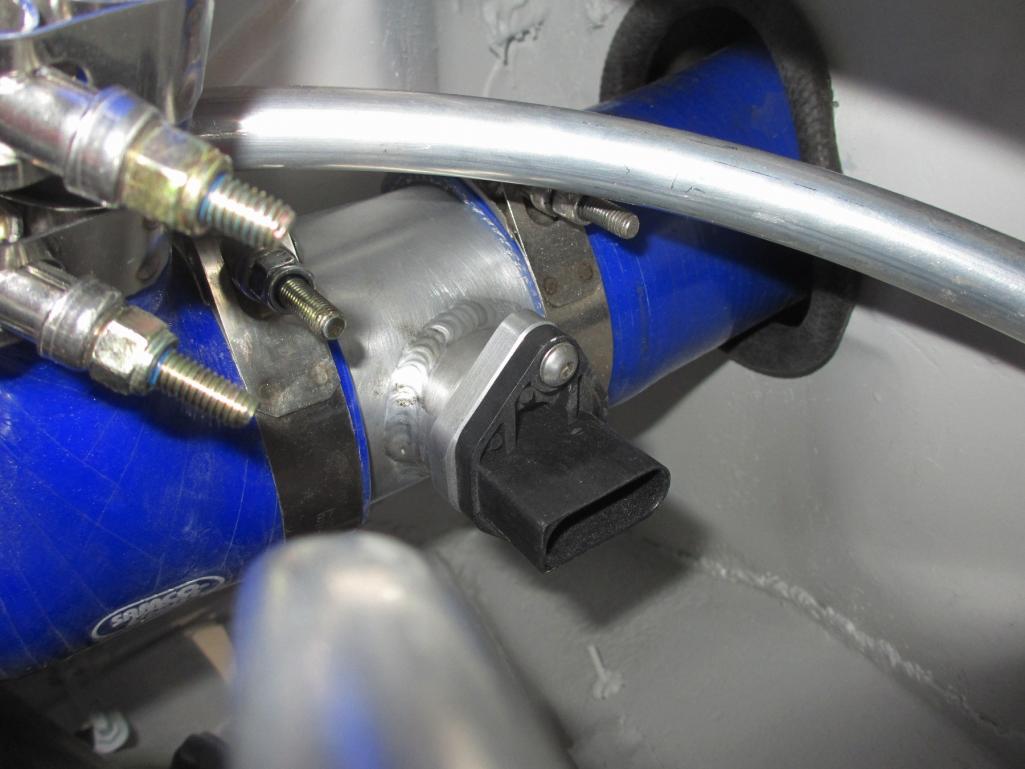
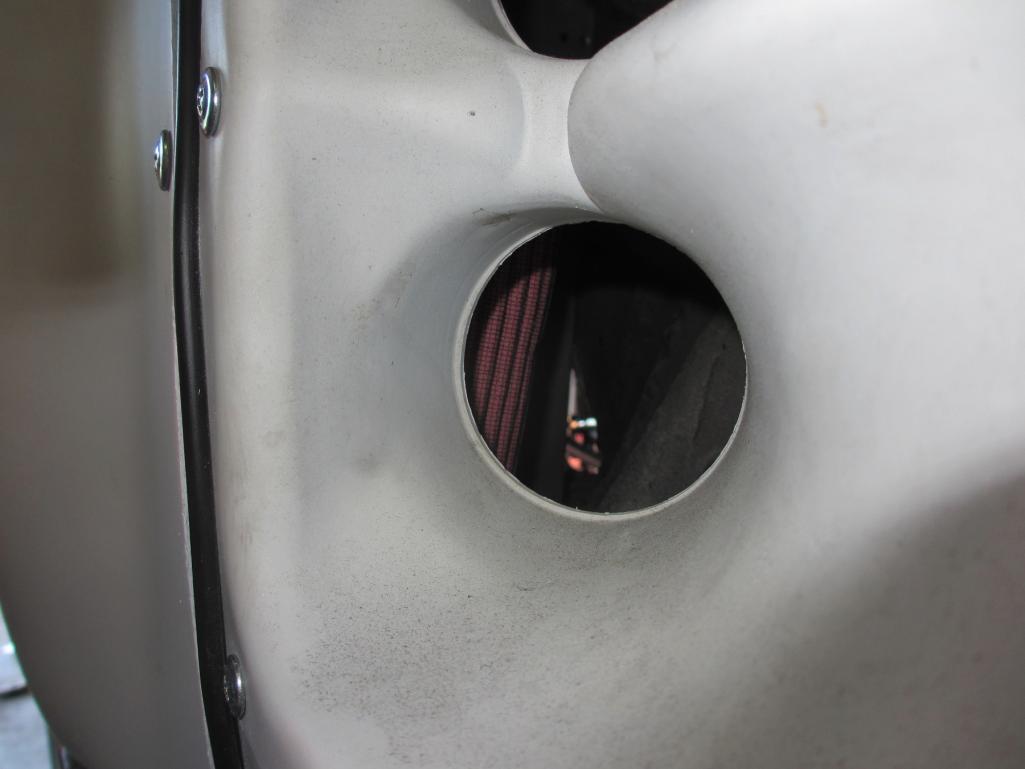
Posted by: Andyrew Apr 30 2013, 09:13 PM
Dude this is just killer!!!
Im confused on your overflow tank. Why is there 2 lines going to it?
Posted by: kg6dxn Apr 30 2013, 09:36 PM
Dude this is just killer!!!
Im confused on your overflow tank. Why is there 2 lines going to it?
It looks confusing since I have 2 tanks. One is the normal engine expansion tank. The other is the intercooler / heat exchanger tank. Both systems are setup to self bleed. Just like the factory designed...
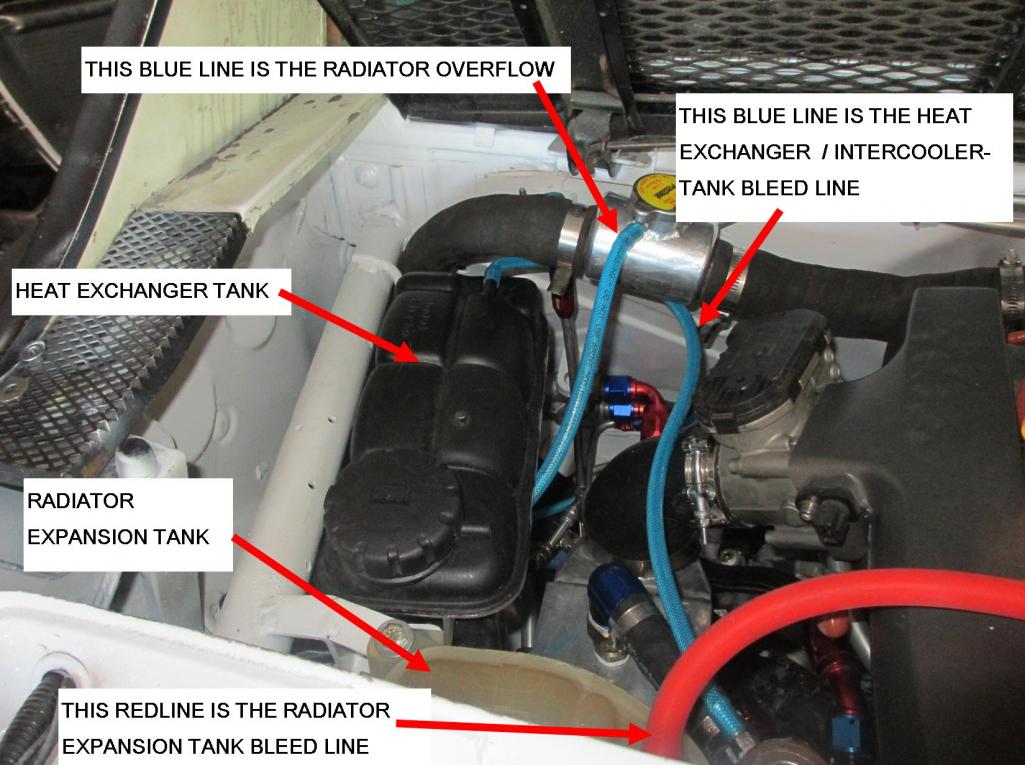
Posted by: Andyrew Apr 30 2013, 09:58 PM
Got it.
Didnt notice the Audi colored expansion tank in the pic!
Posted by: kg6dxn Apr 30 2013, 10:03 PM
Got it.
Didnt notice the Audi colored expansion tank in the pic!
Yea. The tank I used for the heat exchanger is a Mercedes unit and sender. I had to modify the guts of the sender to integrate it into the coolant level warning. Basically I turned it into an on/off switch. I'm running the 2 sensors in parallel to get an alarm to the dash. 3 sensors really since I also included the meth tank level switch. So if any of them go low, I get a "LOW COOLANT" warning on the dash.
Posted by: Andyrew Apr 30 2013, 10:26 PM
Thats really cool! You integrated that into the VW dash?
Posted by: kg6dxn Apr 30 2013, 10:30 PM
Thats really cool! You integrated that into the VW dash?
It was much easier than it sounds. After dissecting the harness, the coolant level is just a simple ground switch. So I have 3 switches in parallel. Easy!
Posted by: Andyrew Apr 30 2013, 11:08 PM
Thats really cool! You integrated that into the VW dash?
It was much easier than it sounds. After dissecting the harness, the coolant level is just a simple ground switch. So I have 3 switches in parallel. Easy!
I understood it, I just think its cool that you came up with the idea! You and your electrical background...
Posted by: kg6dxn May 5 2013, 07:27 PM
I started putting the wire harness in today and finishing some final connections. It took a while to get my head back into the wiring system. Lucky for me I labeled everything. Getting very close to cranking this thing over. I can hardly wait.
Engine harness...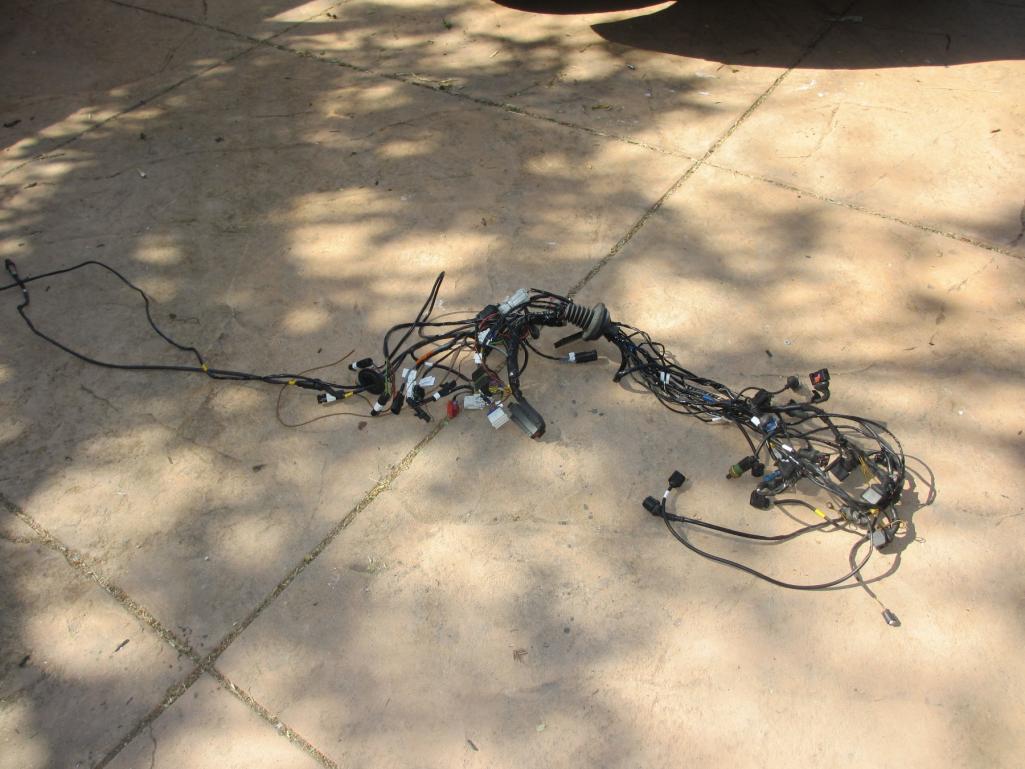
Mounted in removable bulkhead...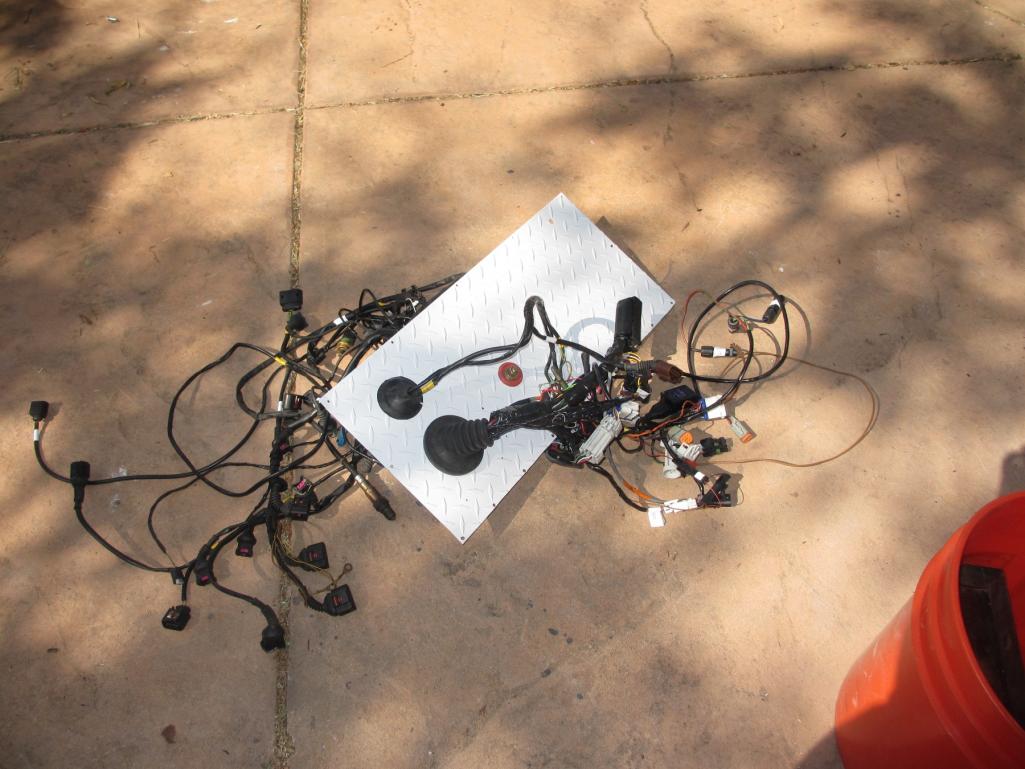
In the car...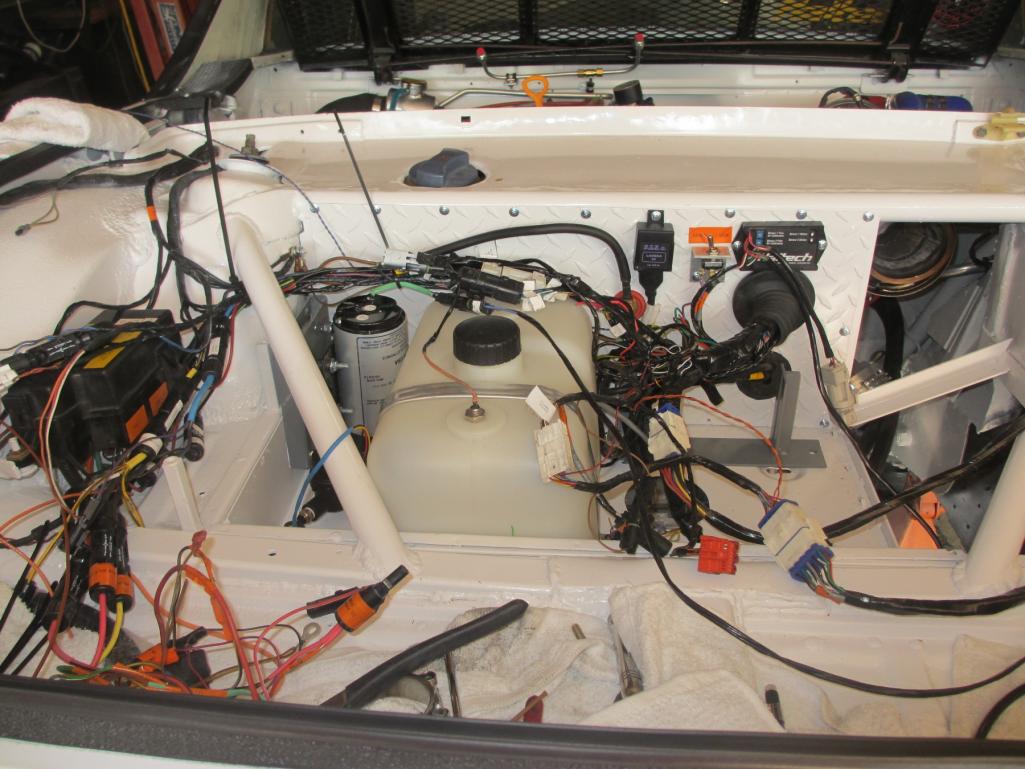
Here is my cool wide band to narrow band O2 converter (Left). It takes a linear 0-5v signal and converts it to a linear 0-1v signal. So I can feed the ECU with a scaled wide band signal, in stead of the crappy narrow band signal. The switch (center) will allow me to switch back and forth if I have any driveability or code issues.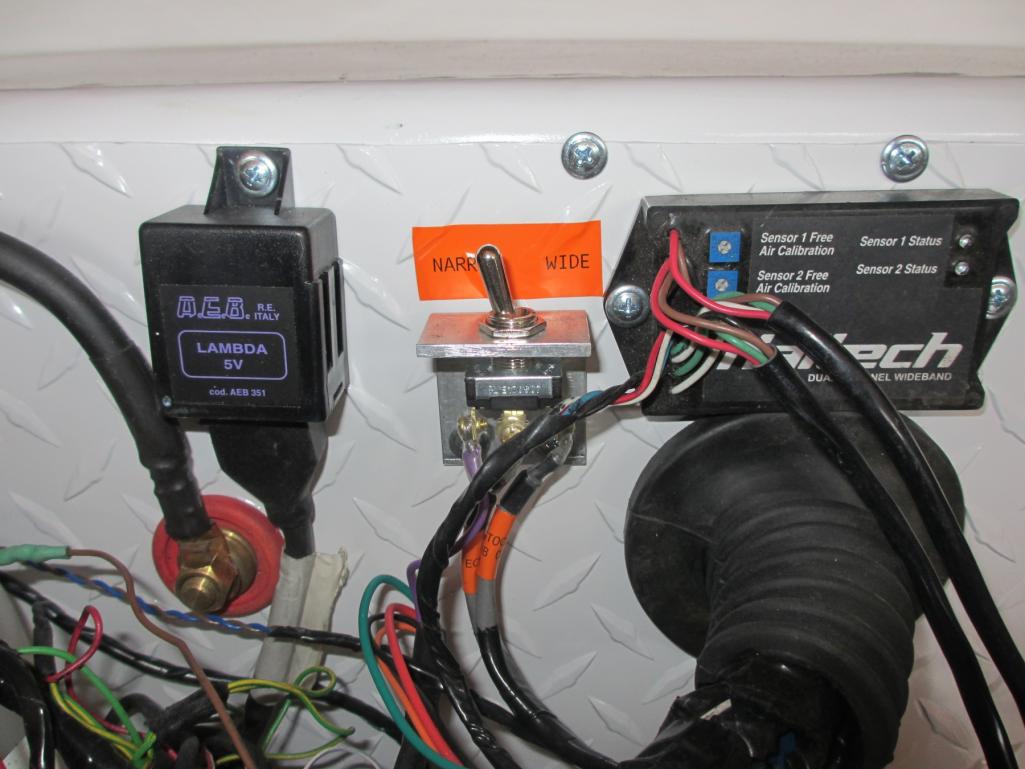
Here is the flow meter and filter for the methanol system...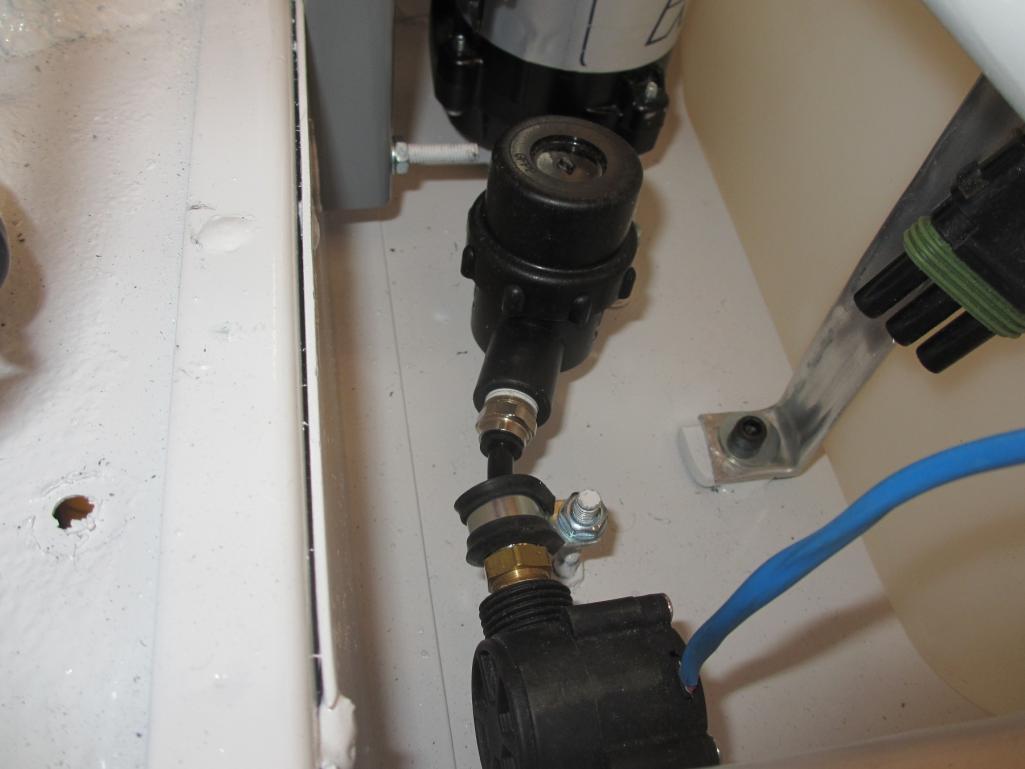
I cleaned up my Bilstein's too. Looks like I need a ~21" axle on the left and a ~22" axle on the right. I found a good source for axles from an off road VW place. It's going to cost around $200 for a pair. Pretty good pricing. I plan to clean up and reuse my 28 spline, 911 CV joints.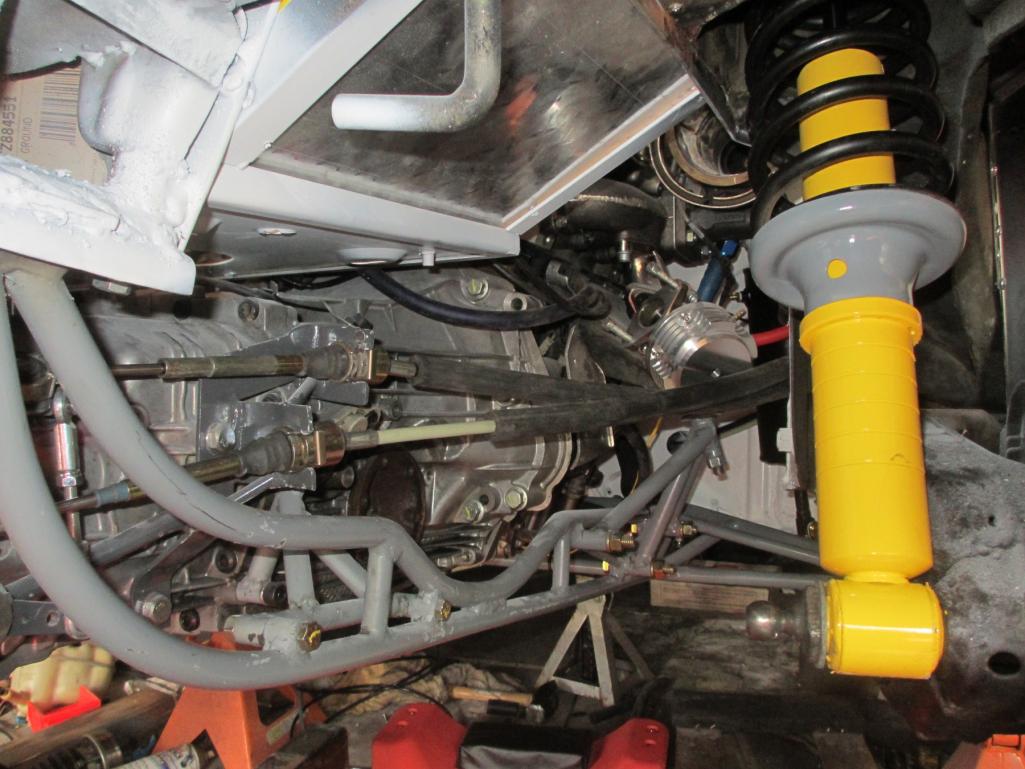
Posted by: Andyrew May 6 2013, 09:47 AM
Link to axles? Thats awesome!
Posted by: kg6dxn May 6 2013, 09:55 AM
Link to axles? Thats awesome!
http://www.pacificcustoms.com/axles.html
Posted by: ottox914 May 9 2013, 05:15 PM
You, sir, are mad.
And we are all that much better for it.
Fire that beast up and post up some vids!
Congrats on an awesome project.
Posted by: DBCooper May 9 2013, 06:53 PM
http://www.pacificcustoms.com/axles.html
Wow, a blast from the past. I bought a LOT of stuff from them back in the 90's when they first opened. Great guys, and good enough to point you to the best people in the industry to go to when they can't help any more. To me that's a good company, when they go out of their way to make sure their customers do well and are successful.
Your car looks great. Can't wait to hear your driving impressions.
Posted by: kg6dxn May 9 2013, 08:35 PM
I picked up one of these LSD units. Supposed to be a cheap alternative to the $2700 LSD for the Boxster.
http://www.phantomgrip.com/tech-tips
https://www.youtube.com/watch?v=tGLXKLFiDpA
The testimonials look great. We will see how it works very soon.
Stay tuned!
Posted by: Andyrew May 9 2013, 10:29 PM
Whats the price of these?
Posted by: kg6dxn May 9 2013, 10:34 PM
Whats the price of these?
MSRP ~$450. I found a vendor for $250 out the door with 650 ft lb spring upgrade.
Posted by: Andyrew May 10 2013, 07:11 AM
Thats pretty killer right there! This is gearbox specific correct? This would simply be awesome in conjunction with that powertrain. But I bet it'll get quick sideways on you quite quickly! Cant wait to hear the feedback.
Posted by: kg6dxn May 11 2013, 05:39 PM
Finishing off stuff here and there.
I added a momentary toggle switch to allow cranking the engine from the trunk...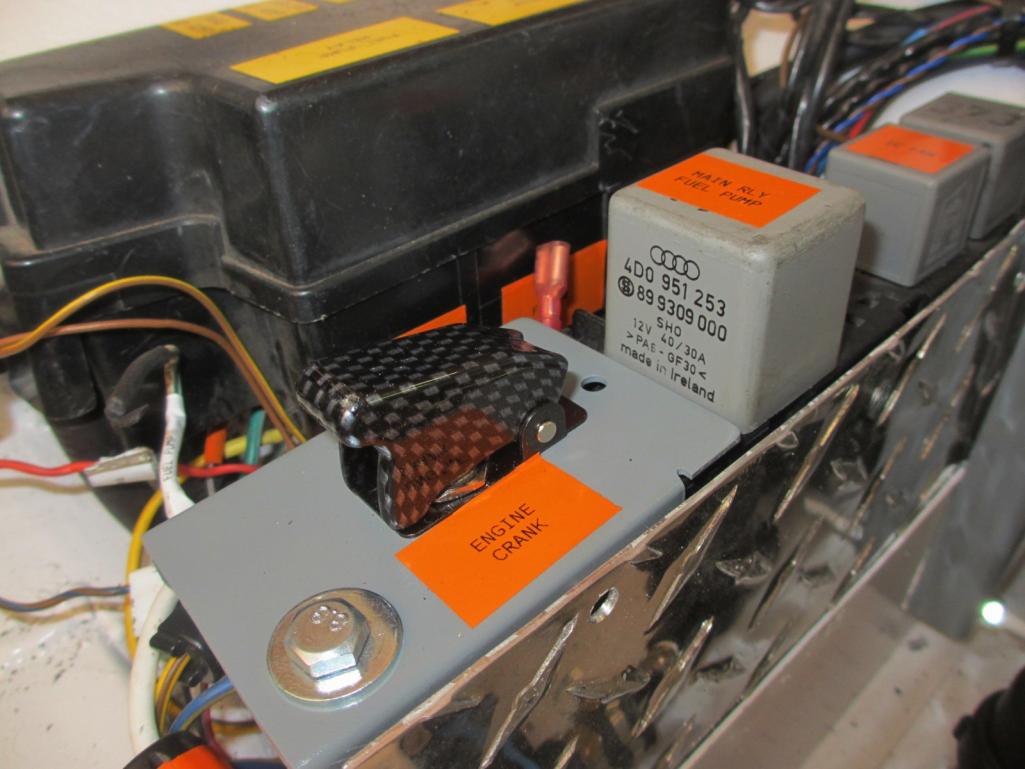
If anyone ever wondered about the Renegade Hybrids "500hp axle" kit is... It's a VW Type 2 axle with 33 spline CV's. Not sure if the CV's are T2 or 944... You can see the "VW 2" logo stamped into the end.
New axles are on the way from SoCal. Final measurements are 20.25" and 21.375".
I popped out the diff today to get ready for the Phantom Grip LSD. I was surprised how easy it was to get out. I took some measurements of the diff parts so you guys can compare to the 901 diff. I will as-built the LSD part when it arrives. This transaxle is an Audi 012, 5 speed. The spider gears are already machined flat, so I do not have to take it to a machine shop. The LSD pushes against both spiders equally to act like a clutch type LSD. If the spiders are not flat and true, the LSD will not work correctly. The other nice thing about this system; you don't have to reset any back lash since the 3 member and bearings are not really messed with.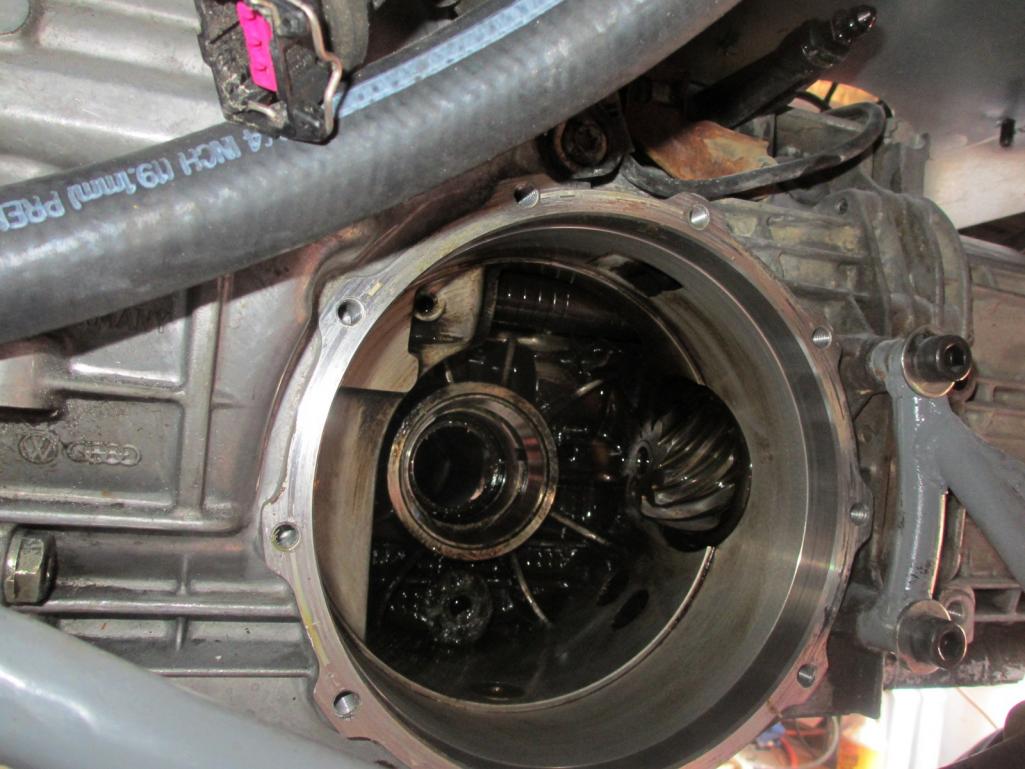
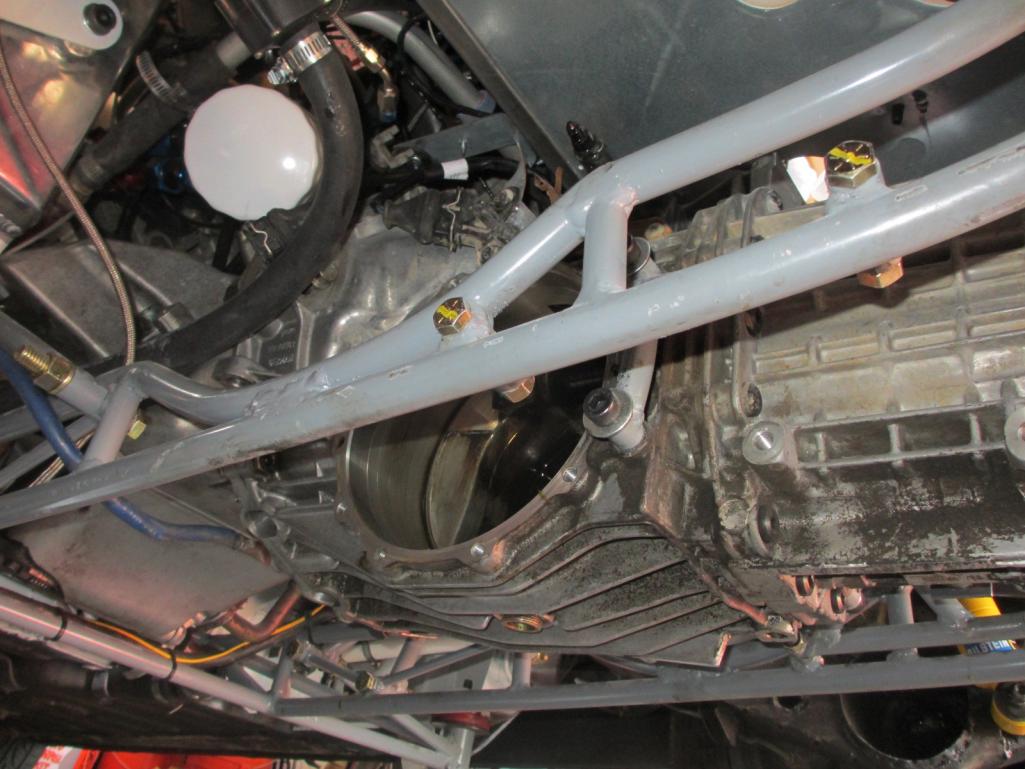
18mm shaft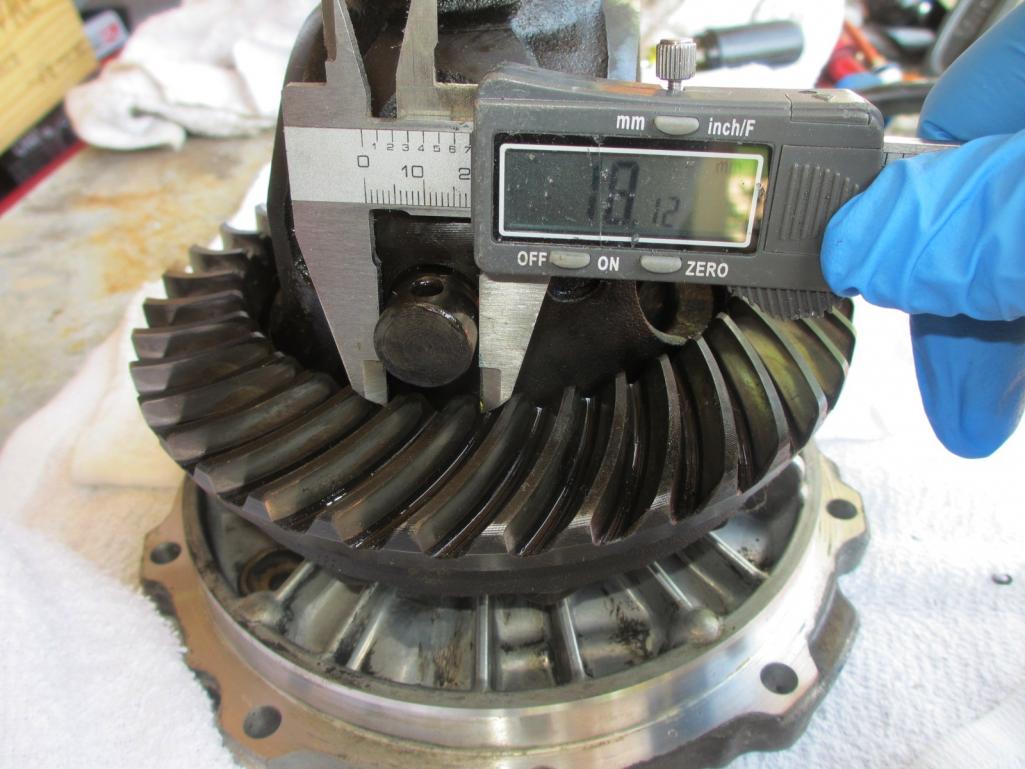
27mm between the flat surfaces of the drive gears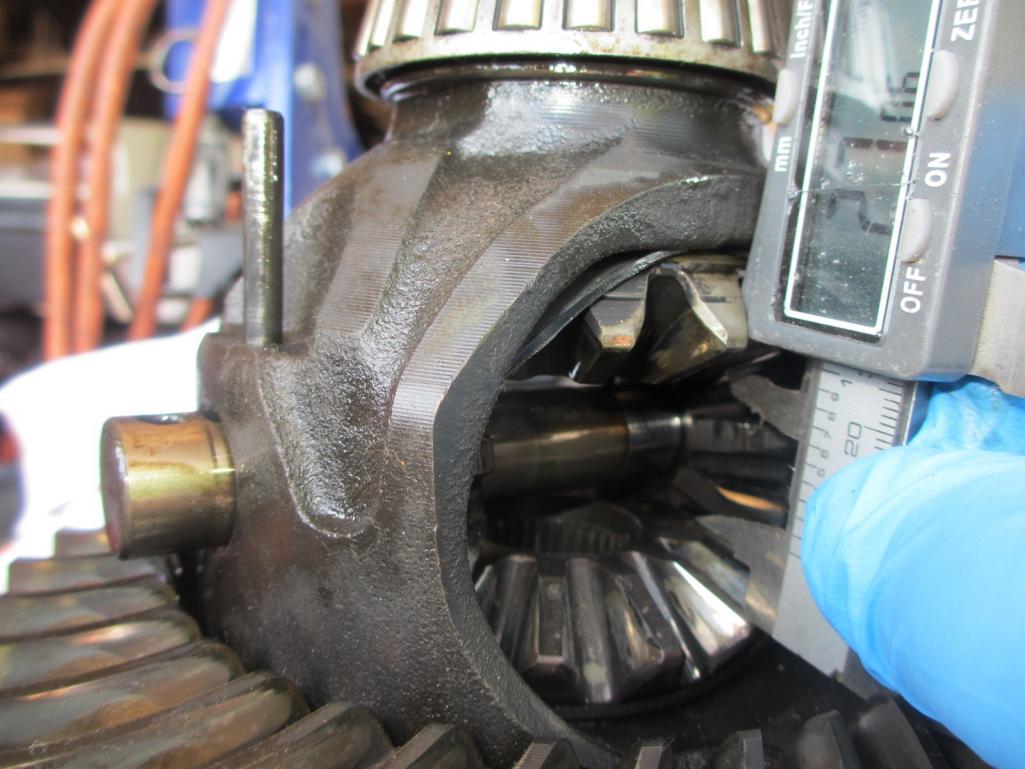
Posted by: tomeric914 May 11 2013, 06:11 PM
Trivial question (compared to the great work you've done ) what label maker did you use for your labels in orange?
Posted by: kg6dxn May 11 2013, 06:49 PM
Trivial question (compared to the great work you've done
) what label maker did you use for your labels in orange?I have a Brady ID Pal. It's pretty awesome! Various font sizes, tape styles, etc...
Posted by: kg6dxn May 16 2013, 10:54 PM
I got the Phantom Grip(PG) installed today. I did have to machine the drive gears and the spider gears for clearance. I drove to several machine and gear grinding shops today. None of them could do the job. No way to chuck them up in the machine. So I did it myself. I built a drill rig from a bolt and some washers. The drive gear has a recess on the face for the stub axle circlip. I chucked up the gear in my drill and while spinning at low speed, ground it on my bench grinder. I took my time and kept eye with a caliper and straight edge. It turned out better than I expected. Looks like a flat machine finish. I also had to clearance the PG axle hole a little. Since I machined the drive gear, the stub axle sticks through a little further. I opened the hole in the PG to allow the stub to slide in without binding. Normally the end of the stub would be in the empty center void.
2mm off the drive gears
1mm of the spiders
1mm clearance inside the PG
Light tapping into the 3rd member and done. Overall the quality of the PG seems good. The theory looks sound and the fit is snug. If I take the springs out, the system turns freely, no binding.
I took some measurements in case somebody wants to try to fit this into a 901
Fully collapsed springs in my vise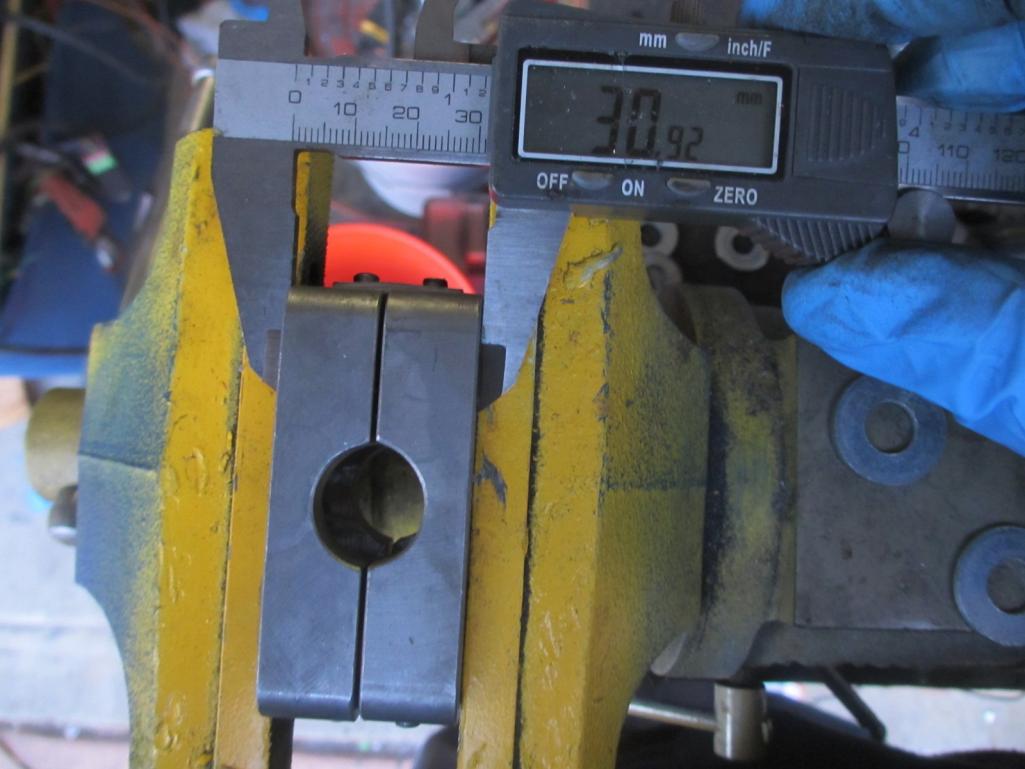
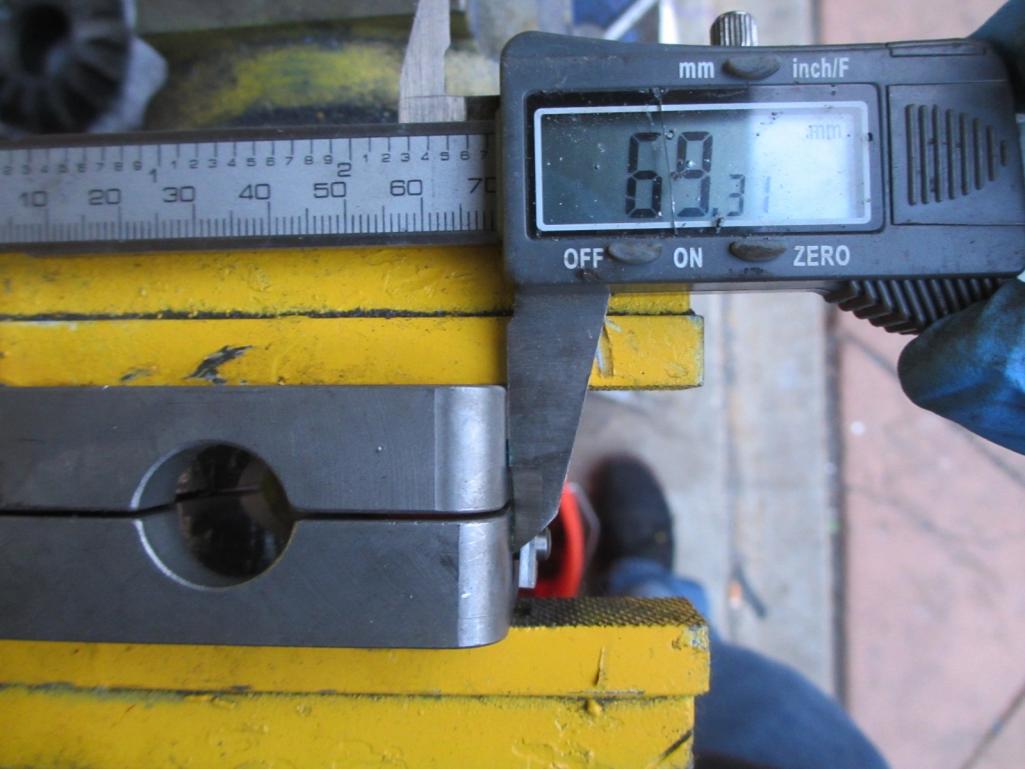
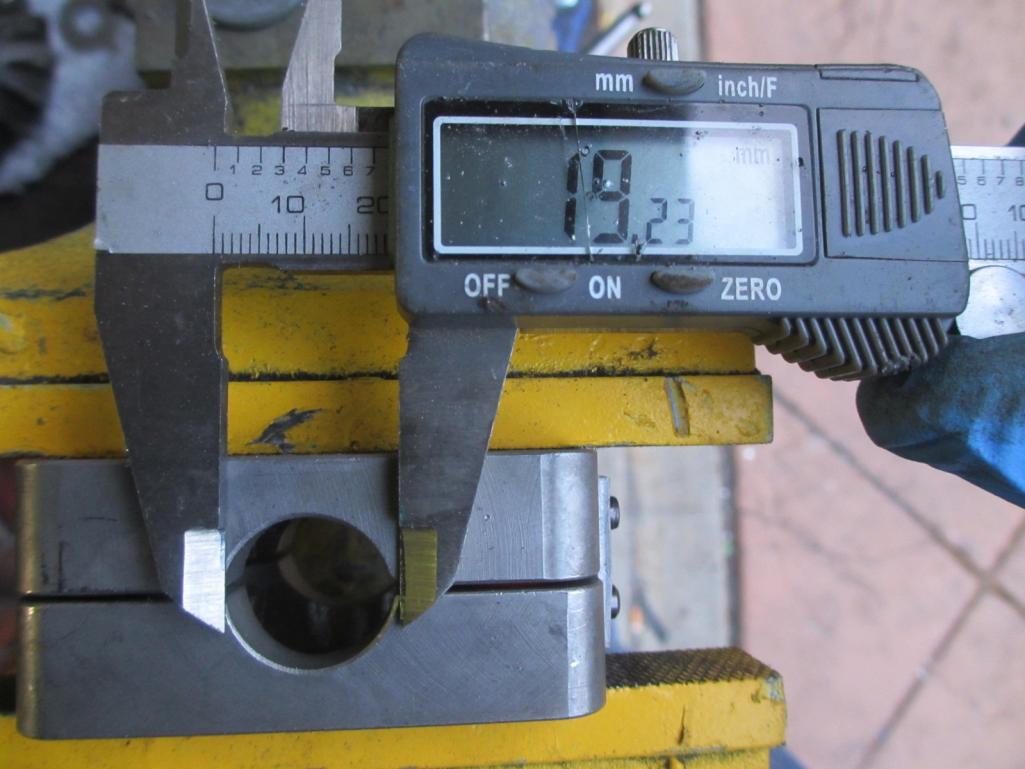
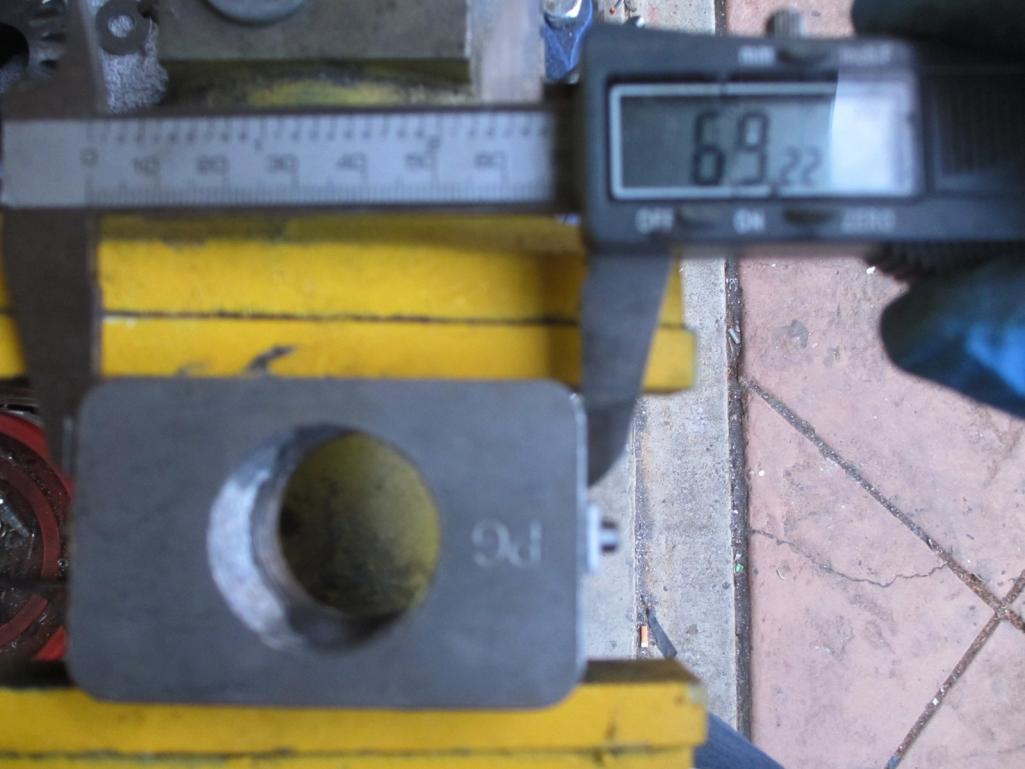
Most of the area machined has no impact on function. Only a tiny bit of the contact surface was machined, verified by the wear marks.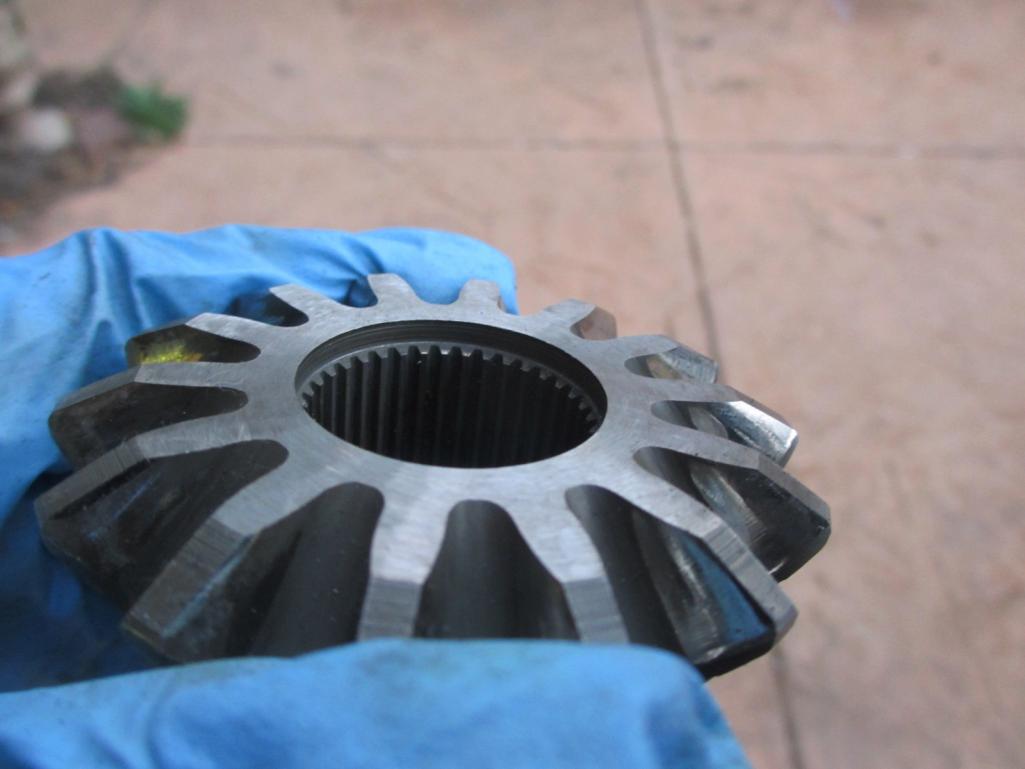
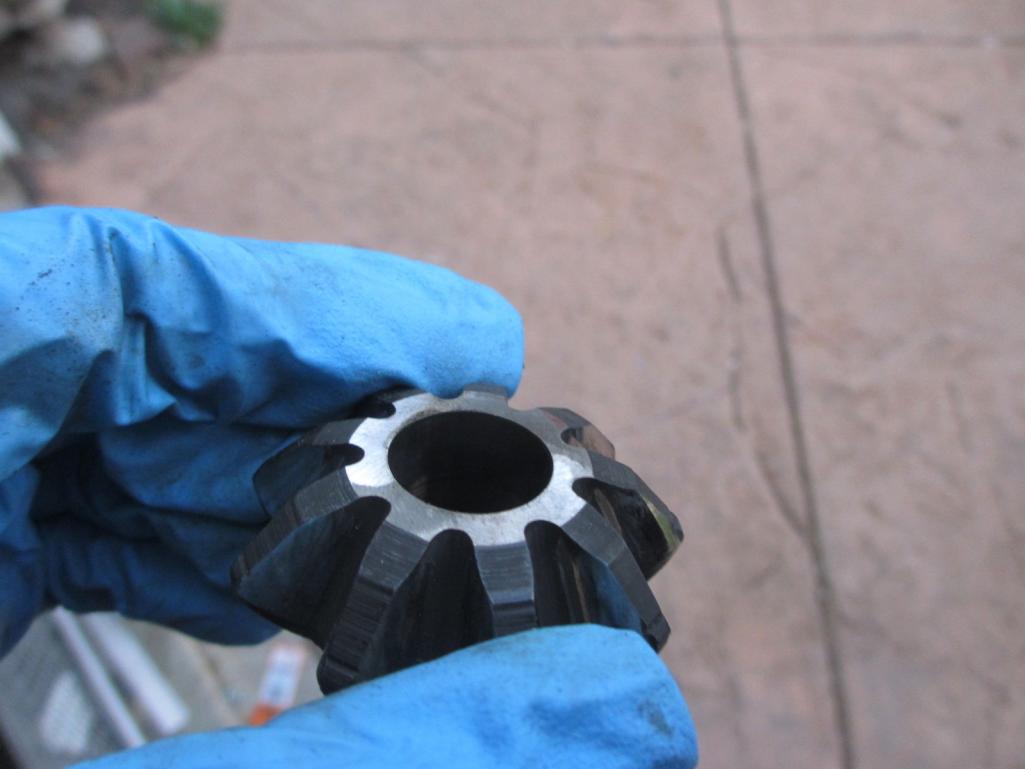
Installed. You can see the springs within the unit. These push on the drive gears to limit independant movement. It is very tight and cannot be rotated by hand. Once installed and wheels on, I will try to spin one wheel and see how much give the system has.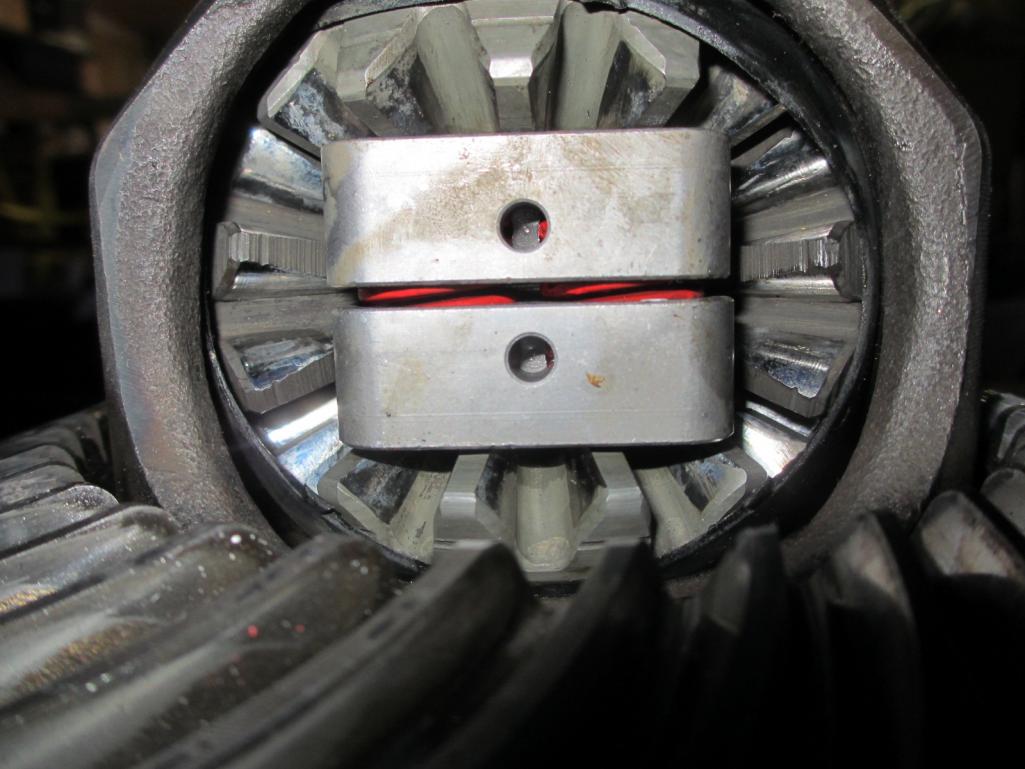
Looking into the drive gear splines. In the above picture of the gear you can see the recess for the circlip. I clearanced the PG so even the clip could go through. The stub stops on the top edge of this view. It has a shoulder the prevents the stub from going too far into the diff.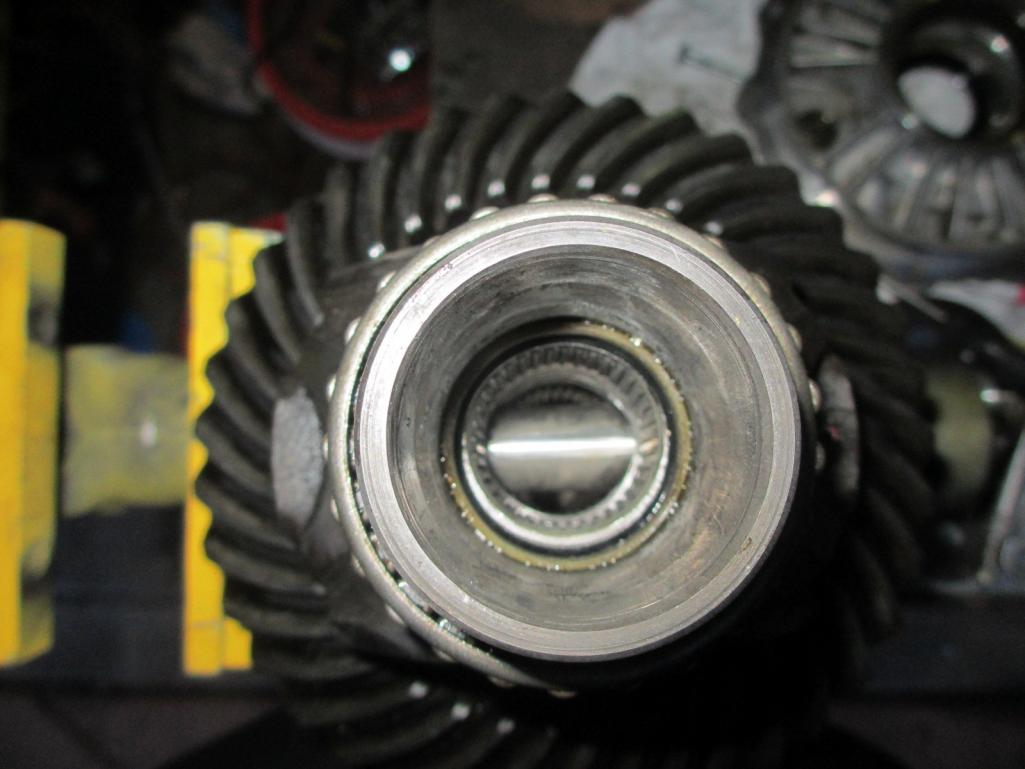
Posted by: Andyrew May 17 2013, 08:57 AM
What prevents the unit from falling out except tension?
Posted by: kg6dxn May 17 2013, 10:51 AM
What prevents the unit from falling out except tension?
The pin that holds the spider gears and the stub axle ends. Both will keep it in place from 2 axis's.
Notice in the previous pics the PG has 2 holes in it.
Posted by: Andyrew May 17 2013, 01:46 PM
Brain fart.
Posted by: Porschef May 22 2013, 10:11 AM
Electrician, my ass. Wizard is much more appropriate.
Awesome stuff, even if I got lost once you got into that diff stuff 
Thanks for taking the time to photo and post progress; like everyone else, looking forward to seeing her run
Joe
Posted by: kg6dxn May 25 2013, 09:52 PM
Got the axles installed. These are Empi with 3" splines, no inner clip. Designed for the CV to slide in/out with travel. I cleaned and repacked the CV's and tie wired up the new 914rubber bolts. I had to re-do the exhaust again. I found the run from the turbo to the muffler interferes with the axle. I borrowed a 4"- 22° pipe from work and fixed it.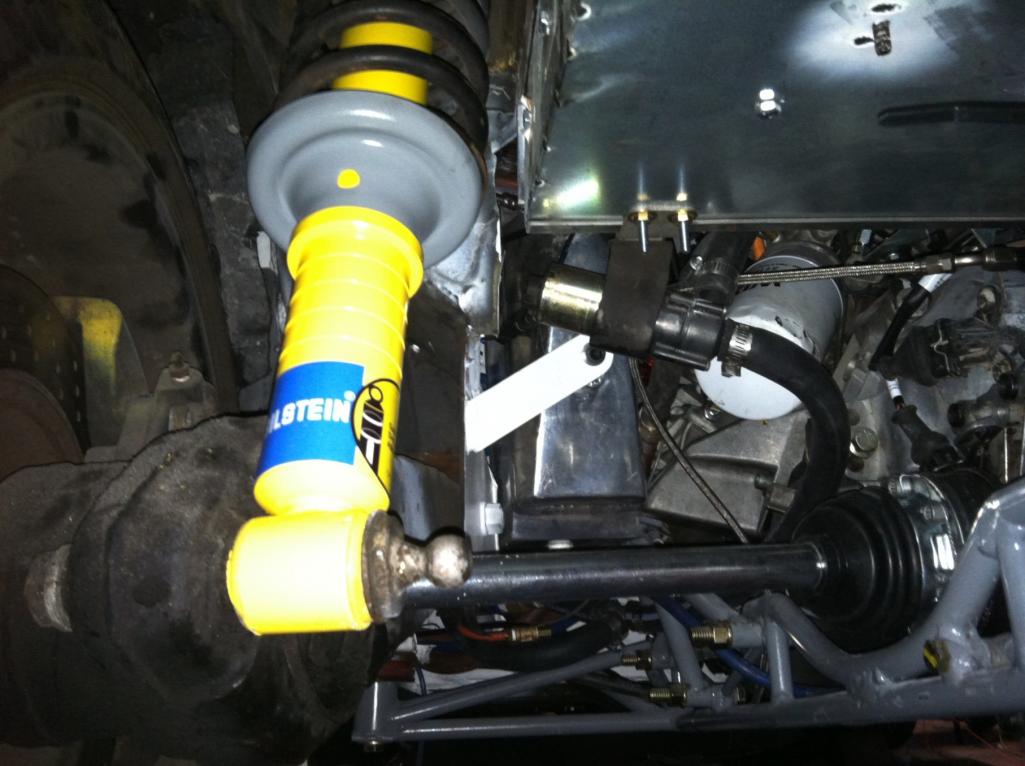
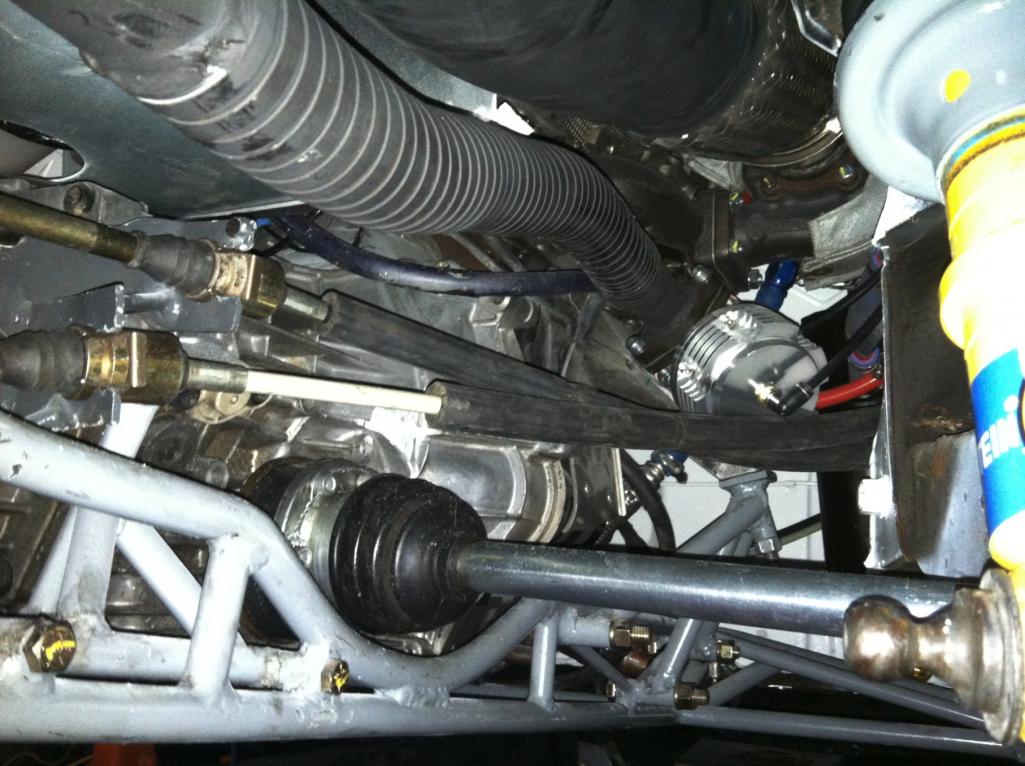
I finally powered up the car. VagCom found no communication to the ECU. When I troubleshooted, I found the main relay not powering up the ECU. Looks like some more investigation in store tomorrow... 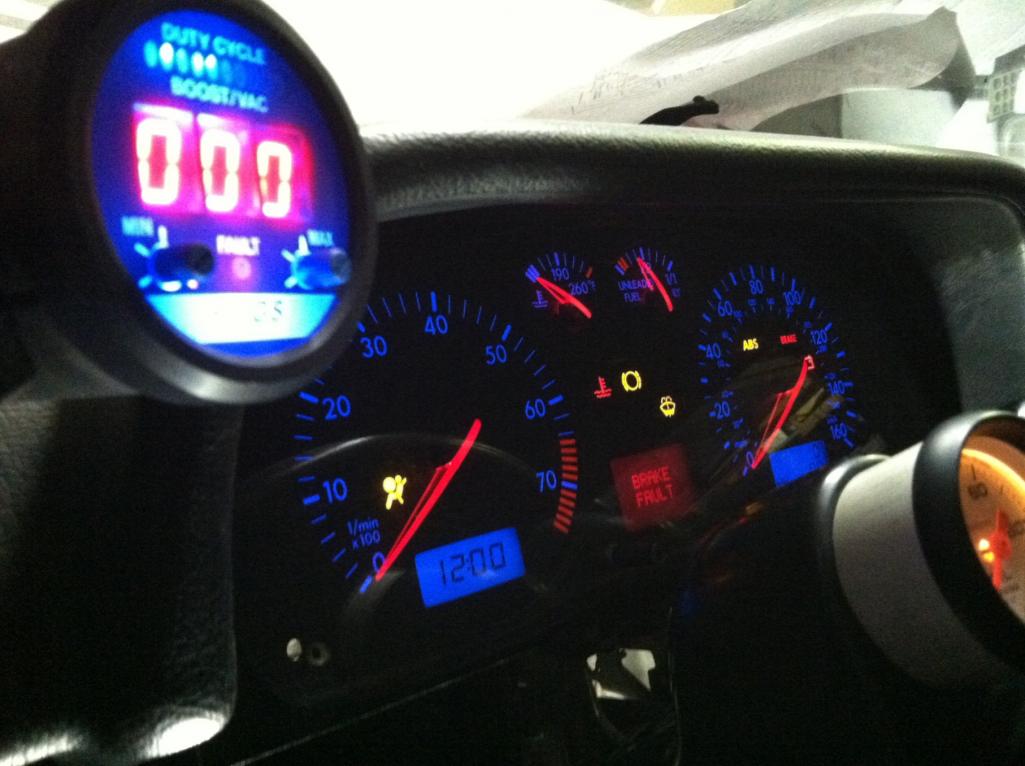
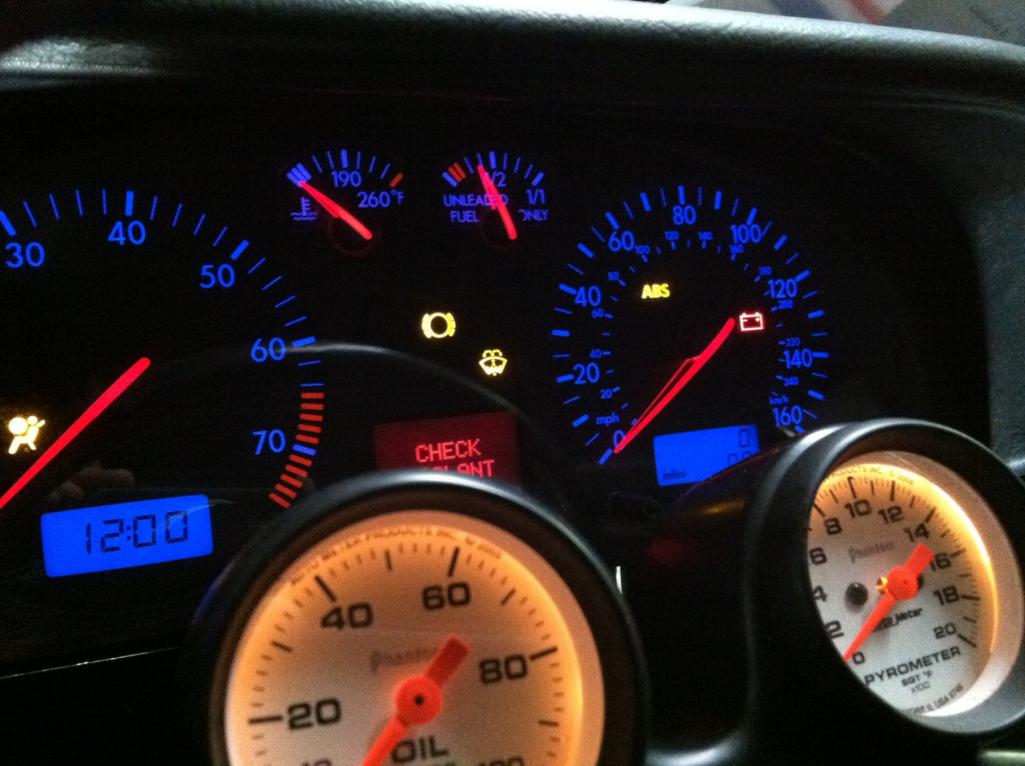
Posted by: JRust May 25 2013, 10:14 PM
Those gages look kick ass all lit up
Can't wait to hear the video of it running. Way to go man
Posted by: jsconst May 25 2013, 10:17 PM
looking good Mike!
Liking the gauges, glad I pulled the gauge cluster from my suby donor, might have to use it.
You're truly an inspiration for all!
Jeff
Posted by: Andyrew May 25 2013, 11:52 PM
Awesome!!!
Posted by: kg6dxn May 26 2013, 10:00 PM
It started today! I had to shut it down due to a fuel leak
The earlier wiring problem was a missing ground on the main relay. Easy fix.
The fuel leak was a bitch, in a bad location. I had to take the rear trunk panel off to get to it. Meth system and ECU had to come out. I'm guessing it will be driveable in about 2 weeks.
I still have to bleed the clutch, mount reservoir, swap out fuel pumps, tie up wiring, install seats and carpet, add coolant. Oh, reinstall the meth system and ECU...
I'm sure there are some other minor things to do as well.
Posted by: tscrihfield May 27 2013, 09:40 AM
Sounds great!
Wish I could say I am two weeks out... This car is going to be awesome! Probably the best all around transplant that I've seen. Good MPG (when you want it), tremendous power when you take weight into consideration and fairly cheap parts... Can't wait to see it going!
Thomas
Posted by: kg6dxn May 27 2013, 07:48 PM
Ok it runs! Drive by wire throttle works. All fuel leaks sealed. I blew an injector seal on the rail. I discovered my fuel pressure regulator don't work. Well it does work if I want the fuel pressure at 120psi but that is it. No matter how far I turn out the adjustment screw it stays at 120psi. The good news is the fuel system is holding at 120 but the ECU wants 60psi. Raw gas was coming out the exhaust... But it does rev up with the pedal and it starts right away!
My regulator is an Aeromotive and is supposed to be 85psi max. I double checked the instructions too. I even tried blowing air through it. My 125psi compressor could barely get air to come out. If I blow air the wrong way through it just chatters.
Here is a quick video...
https://www.youtube.com/watch?v=sLjDtpjFmKY
Posted by: jsconst May 27 2013, 07:58 PM
That is Awesome.
You've got to be a happy guy today, looks like you'll be driving it in no time
Jeff
Posted by: rick 918-S May 28 2013, 01:58 PM
I picked up one of these LSD units. Supposed to be a cheap alternative to the $2700 LSD for the Boxster.
http://www.phantomgrip.com/tech-tips
https://www.youtube.com/watch?v=tGLXKLFiDpA
The testimonials look great. We will see how it works very soon.
Stay tuned!
I contacted them about doing one for our 901's. They strung me along for a couple months and never did end up doing one as far as I know.
Posted by: veltror May 28 2013, 04:31 PM
stunning just stunning...
Posted by: kg6dxn Jun 1 2013, 11:52 PM
It runs. 90% of the wires are tied up. Clutch is bled. New rear springs are in. All fluids in. Seats back in.
Time to drive this bitch!
There are some minor things to finish but I plan on going on a test drive in the morning. If I get real lucky, I will drive it to the Parts Heaven swap meet. One year ago I had the car there with a turbo rotary. Looks like I made me deadline of WCR 13. Too bad I can't go...
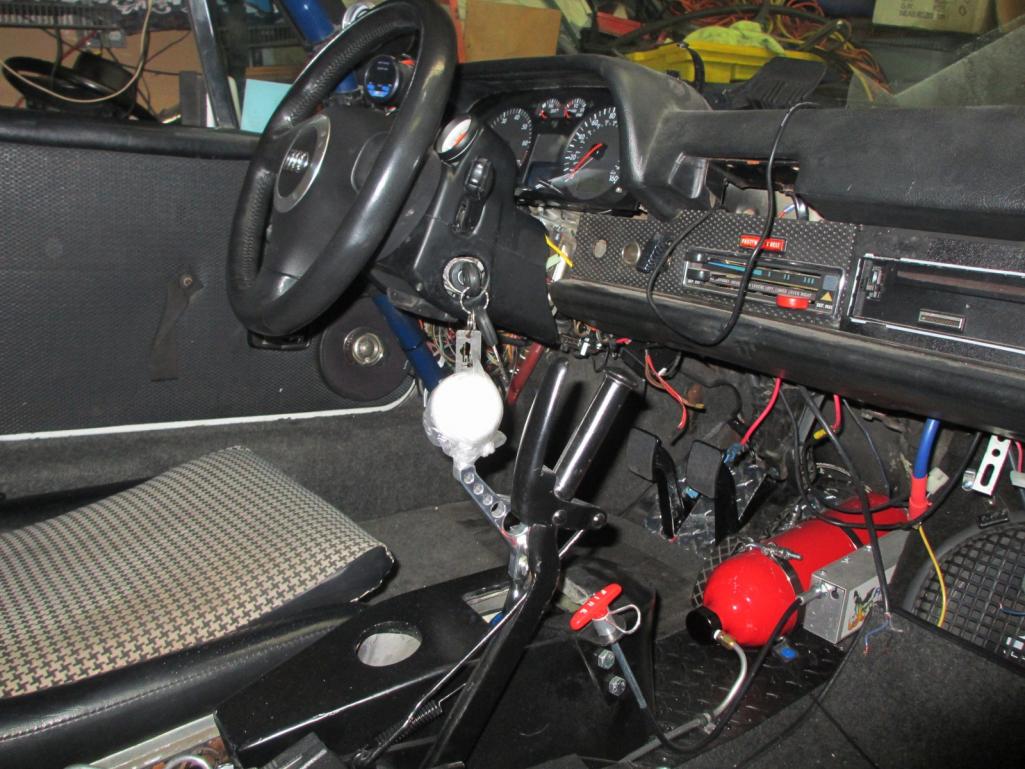
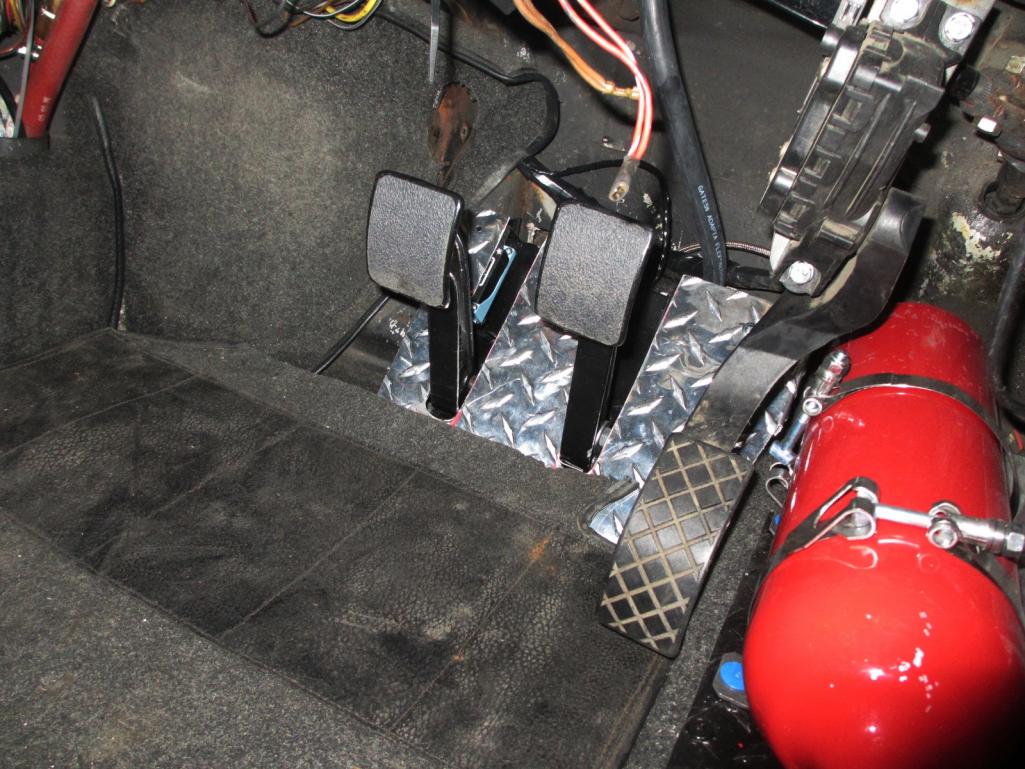
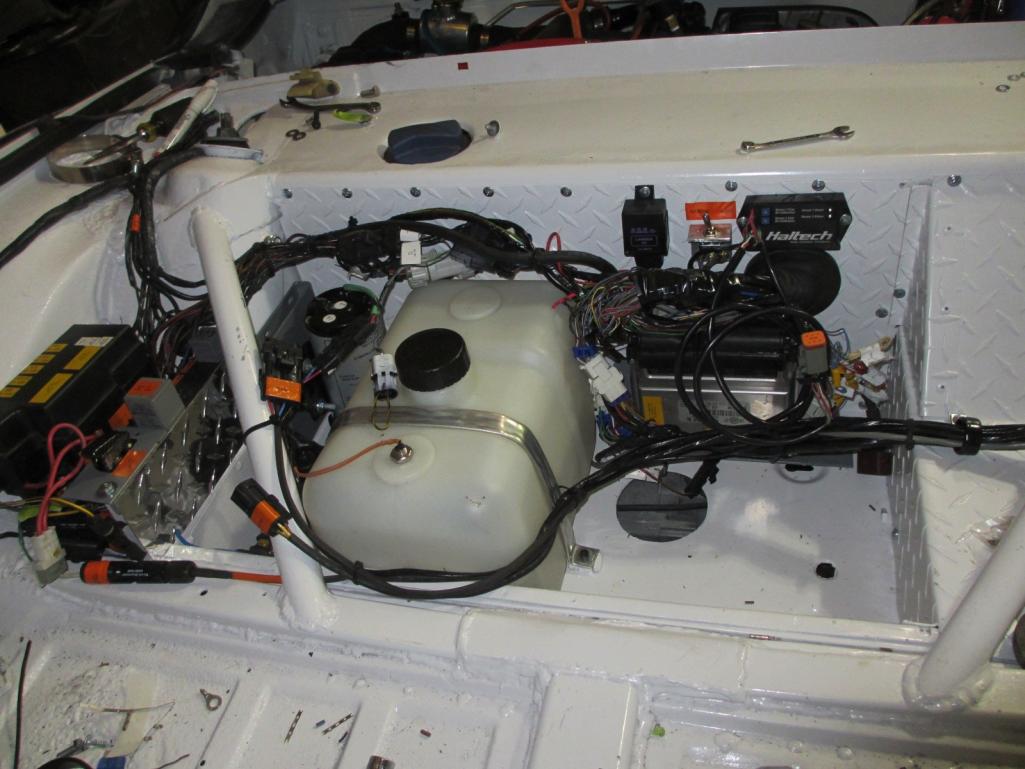
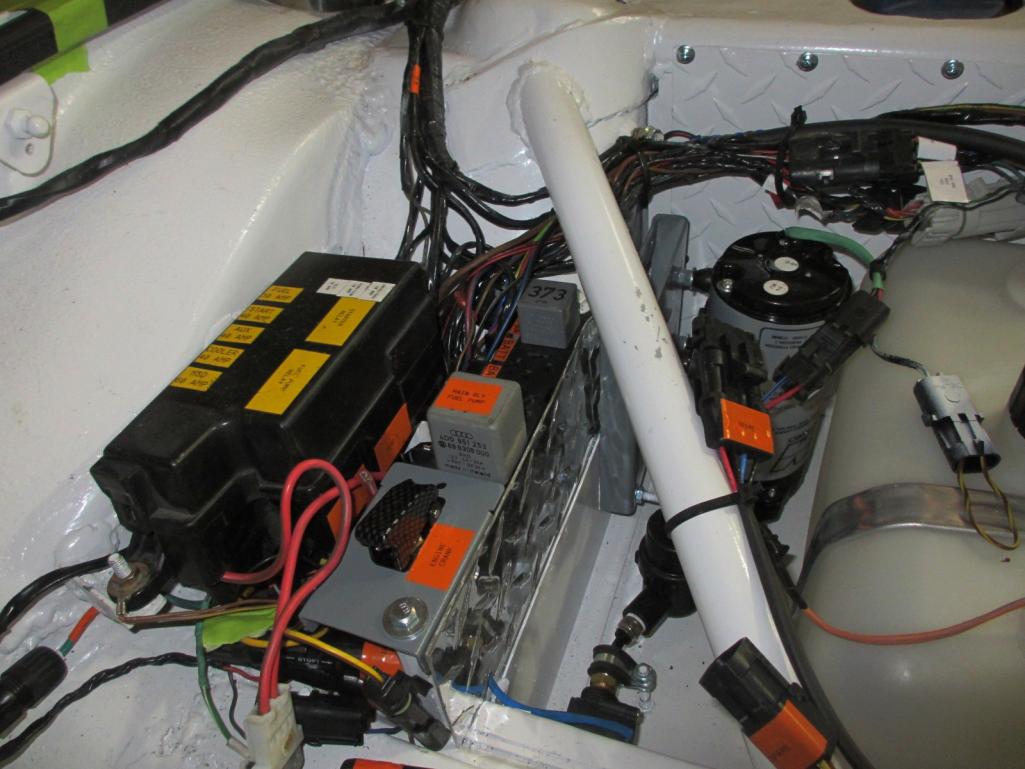
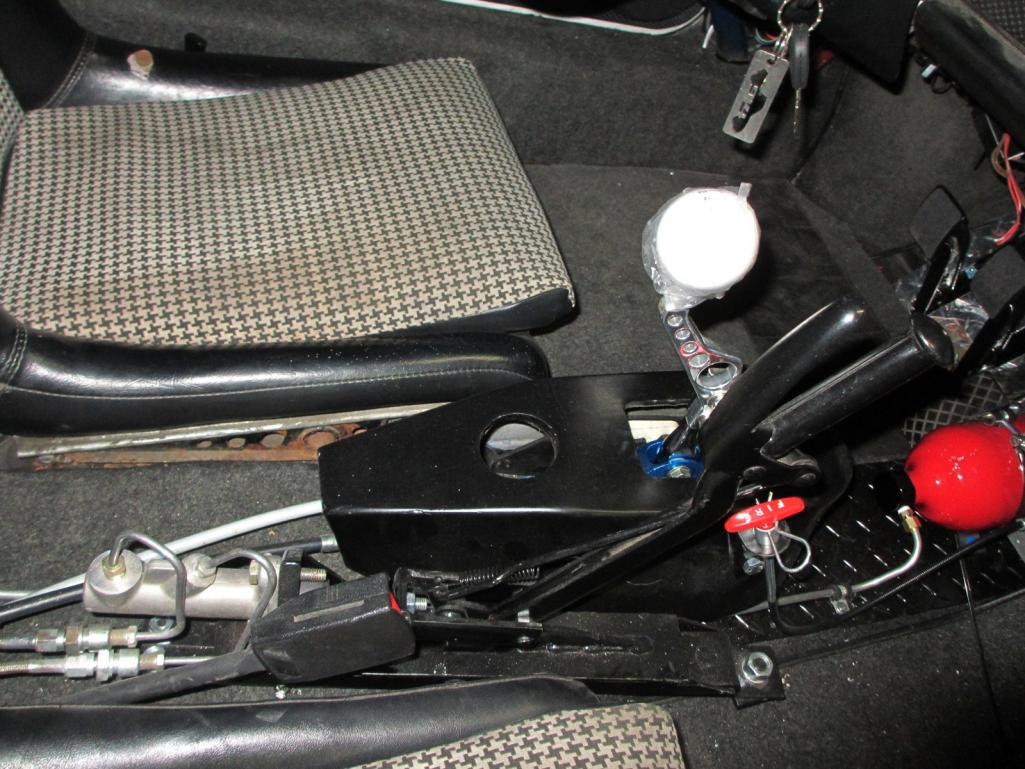
Posted by: Andyrew Jun 2 2013, 03:58 PM
Wooo!!!
We need video's asap!
Gonna take it to 034 for tuning?
Posted by: kg6dxn Jun 2 2013, 08:05 PM
No video yet. But here are some pics of it off jack stands!
So there was a glitch. The Audi water pump is not up to the task of circulating water up to the front. System was running hot in the back and cool in the front. I even heard the turbo line boiling. Lucky for me I had a Miziere pump in the garage. I mounted up front and what a difference! It runs very good. Idles perfectly. No fuel stink. Basically like an Audi with a 4" exhaust. The turbo spools very fast and at low rpm. Like 1st gear taking off from a stop sign. I have to go east and shift to second to keep it out of boost. The final drive gearing is a little low. It drives like a close ratio box. 5th gear on the freeway is a blast. Turbo kicks in and "off it goes"...
I still need to fab a mounting bracket for the pump and do a few misc things but I would not hesitate to drive it anywhere. I also need to relocate the accelerator pedal. I need to clock the pedal 90° and lift the electronics to a more comfortable position.
I bought some 220lb springs from Warren to put in the rear. Wow! what a difference. The progressives I had were way to soft for the Bilstein front setup.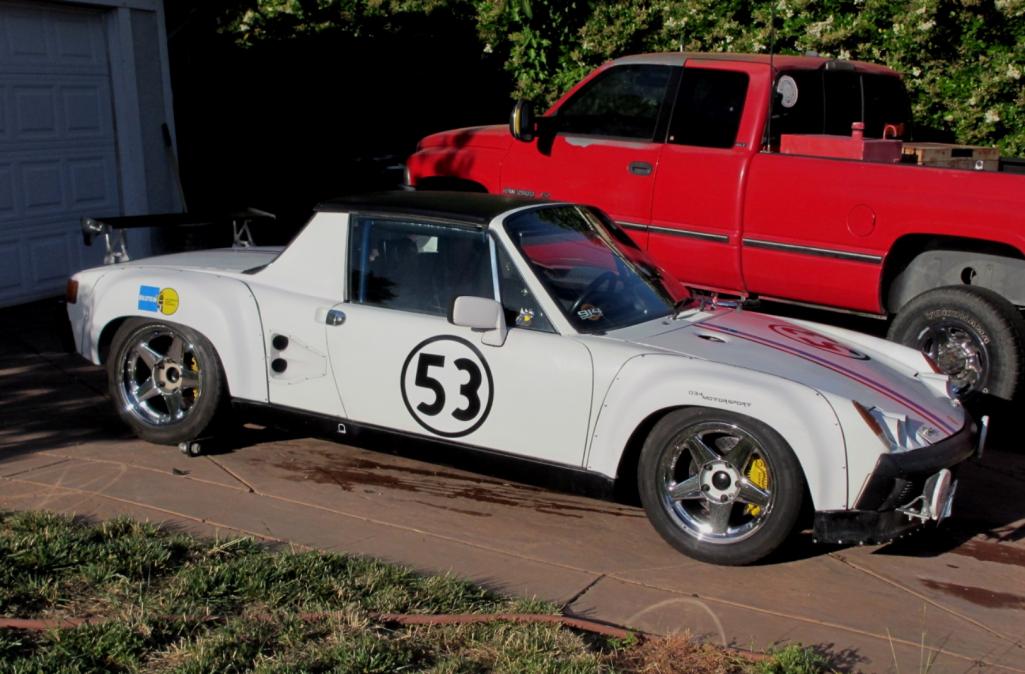
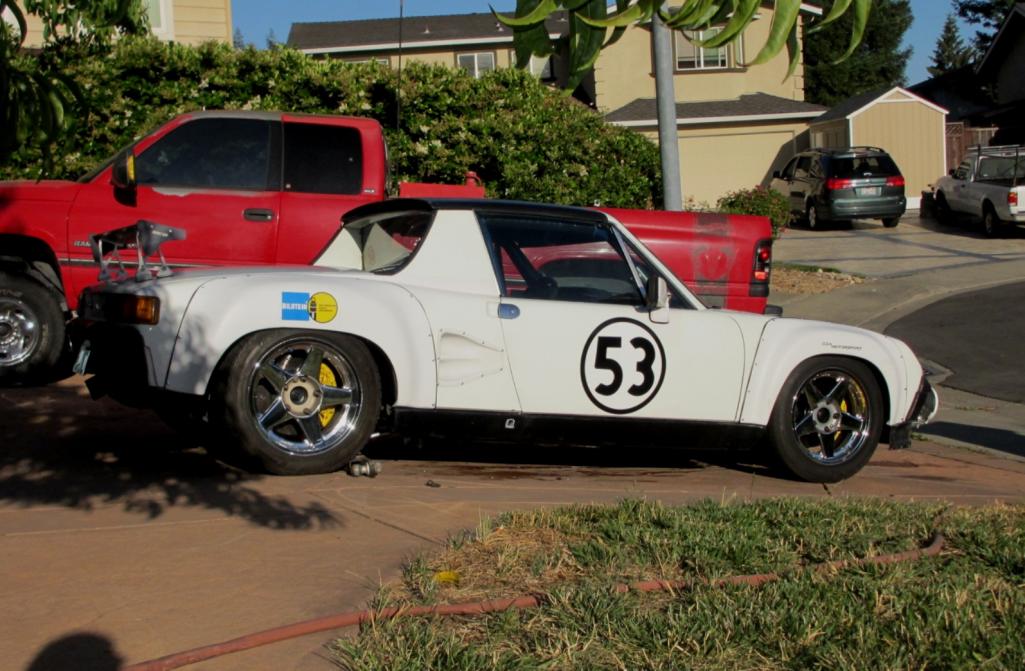
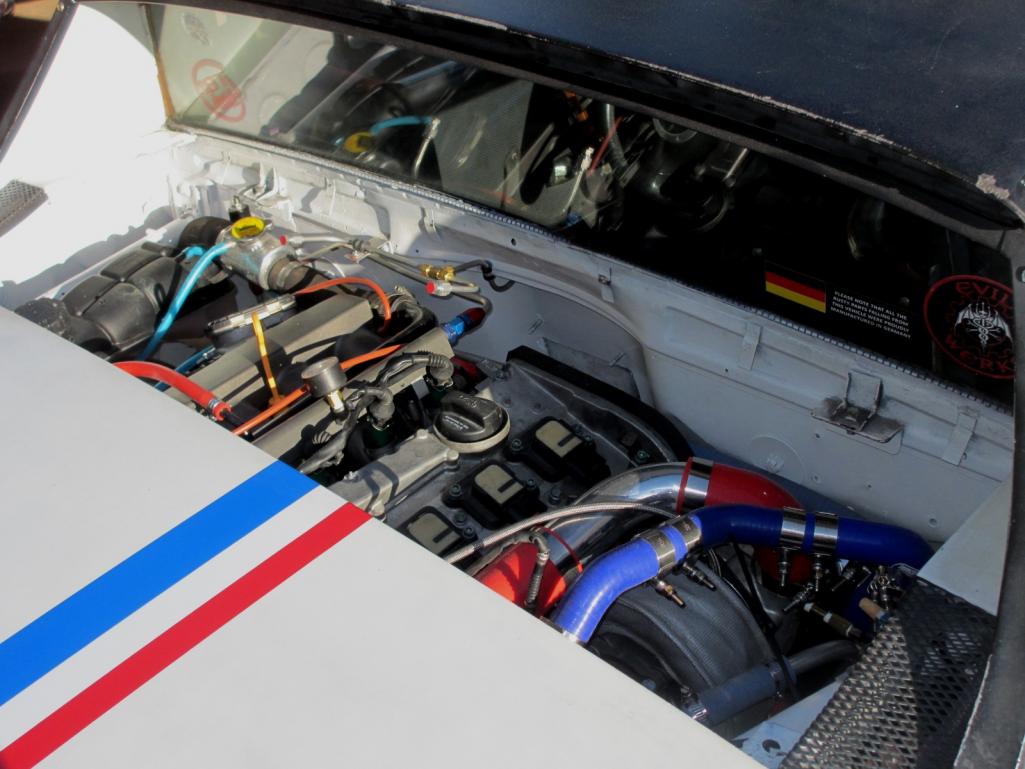
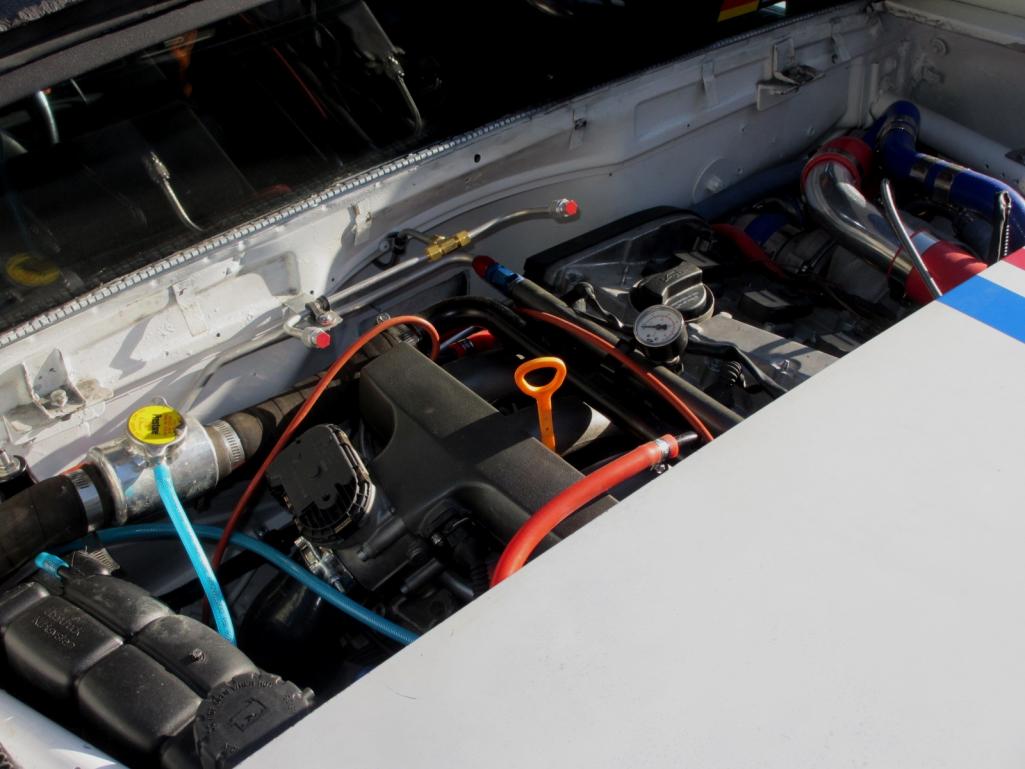
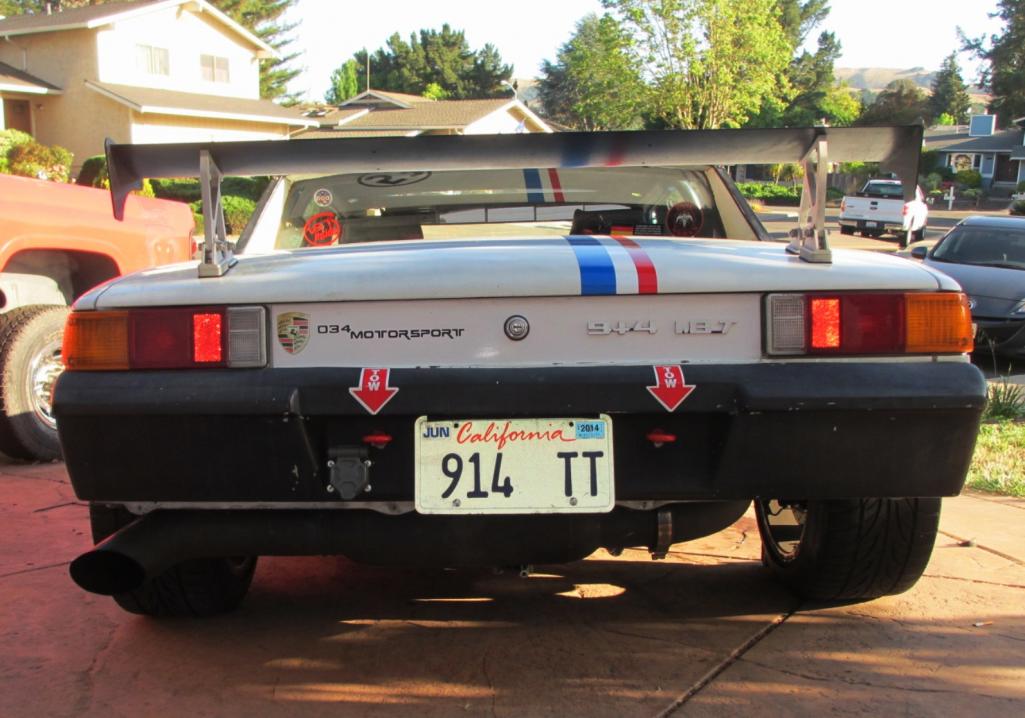
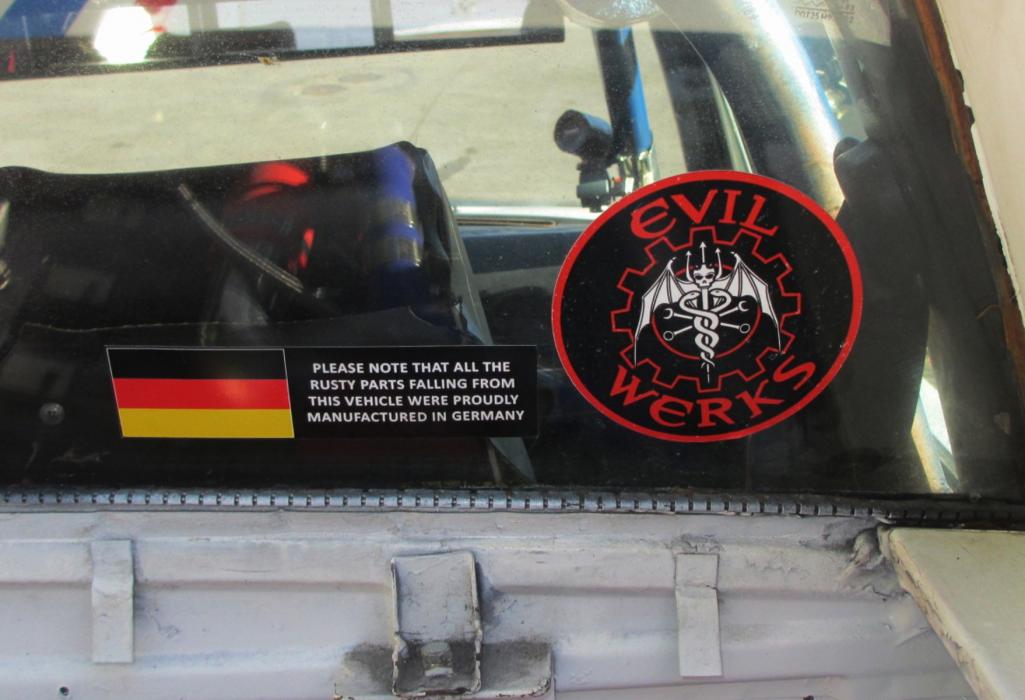
Posted by: kg6dxn Jun 2 2013, 08:08 PM
Gonna take it to 034 for tuning?
Yes. Maybe next month. I need to shake it down first.
Posted by: McMark Jun 2 2013, 08:20 PM
Nice eBrake.
Congrats!
Posted by: timothy_nd28 Jun 2 2013, 08:26 PM
Damn fine looking emblem! 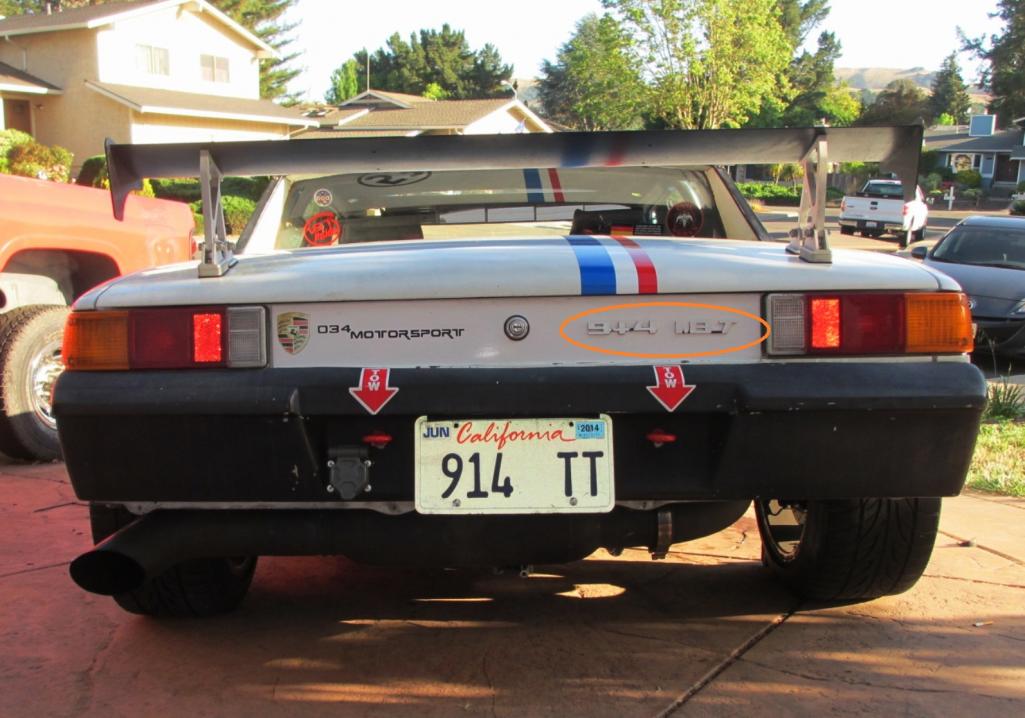
Posted by: kg6dxn Jun 2 2013, 08:53 PM
Nice eBrake.
Congrats!
From a 1937 Buick. Little taste of Rat Rod...
Posted by: McMark Jun 2 2013, 09:56 PM
No this one.
Attached image(s)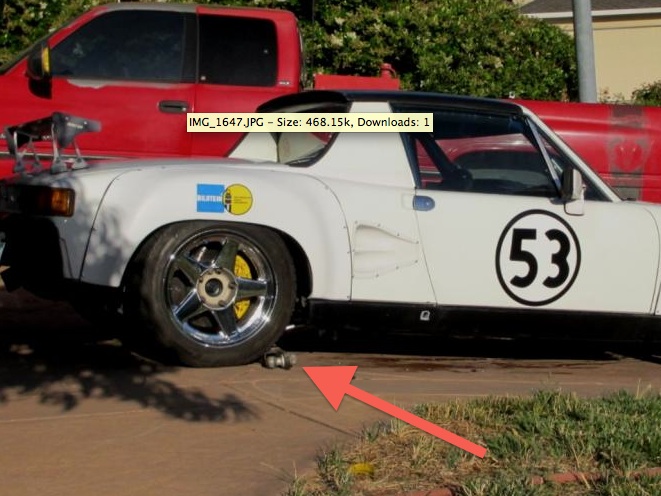
Posted by: kg6dxn Jun 2 2013, 10:01 PM
No this one.
I have a real wheel chock on the other side. I misplaced the other one. Hopefully the car won't bein the street in the morning. Btw, it's happened...
Posted by: kg6dxn Jun 2 2013, 10:45 PM
Here's a run down of some of the electrical stuff and first shakedown run. I have 60 miles on it now.
I tried the wipers by accident. They work. I grafted the Passat wiper switch and relay to the 914 motor. I now have programmable delay wipers. All I did was match up the numerical connection point and got lucky!
I have to re-flash the ECU to activate cruise control.
Turn signals and hazards work too. I did order some german dual filament lamps with the correct contacts unlike the standard 1157 lamp.
I may have to reconnect the ABS module in order to flash it out of the system. I kept it but I need to find it. This is the only CEL the car shows.
My fuel sender controller (Spyida.com) is not working so one of the projects is to graft the Passat sender on to a compatible mount on the tank. The Passat is a 250 ohm Full and 10 ohm empty. The closest I have is a Chrysler 30 ohm full and 240 ohm empty. I flipped the guts but It doesn't read quite right. The instrument cluster only wants a basic potentiometer.
I ordered a 3 minute "on delay" timer to control the Intercooler pump, Intercooler fan and water pump. Right now the start every time the key is turned on. I'm going to use the fuel pump output as the trigger. That way it will only start if the fuel pump is running.
Headlight work as they should with no issues. I have not tried the fogs yet. Not sure why, just haven't gotten to it.
I decided not to run the factory BOV solenoid so I picked up some 330 ohm, 20W heat sink resistors. These trick the ECU to think the solenoid is connected and prevent driveability issues. If I needed to have the car inspected, I could use these resistors to fake the readiness of the EVAP and SAI systems too.
The boost controller seems to work but there is a screw in brass vent screen on the solenoid making noise. This is normal but irritating so I may relocate/extend it into the trunk. Boost is set at 10psi for now.
I still have to do final calibrations to the methanol system and some testing before I turn the boost up.
This engine has much less power (right now) than the rotary but is way more driveable. As the engine gets tuned and all systems dialed in, I will do a dyno run to see what it's doing. The Motronic 7.5 system is great. It's real nice sitting at a red light and not smelling unburnt gas. If I keep my foot out of it, it runs like a stock Audi. The exhaust is very quiet at idle and has a nice throaty sound under acceleration.
Posted by: tomeric914 Jun 3 2013, 08:24 AM
Great work Mike! Can't wait for the video!
Posted by: okieflyr Jun 3 2013, 12:38 PM
On mine I cut the plastic arm very short on the accelerator pedal unit and mounted it on the front wall above/behind the pedal cluster. Using the stock pedal and heim joint arrangement to translate the signal to the shortened arm. All my pedals line up as stock. Nice work!
Posted by: Andyrew Jun 3 2013, 12:49 PM
I ordered a 3 minute "on delay" timer to control the Intercooler pump, Intercooler fan and water pump. Right now the start every time the key is turned on. I'm going to use the fuel pump output as the trigger. That way it will only start if the fuel pump is running.
Do you have this 3 min delay on an override switch? I fear if you take it to an autox you wont hit 3 minutes before you are needing it to pump (Say after its fully warm like in-between runs)
How is the powerband? When do you see full boost? You should see 10psi by earlier than 2700. This turbo should feel very natural with the engine. Not peaky, not laggy, not undersized, just very eager.
10psi on that turbo should be between 200-225hp 25psi and race gas should see closer to 375.
Do a couple of 1st and 2nd gear pulls for us! What redline is 034 going to tune to? My vote is 7300. You probably will peak around 6500, but its stays pretty strong up there.
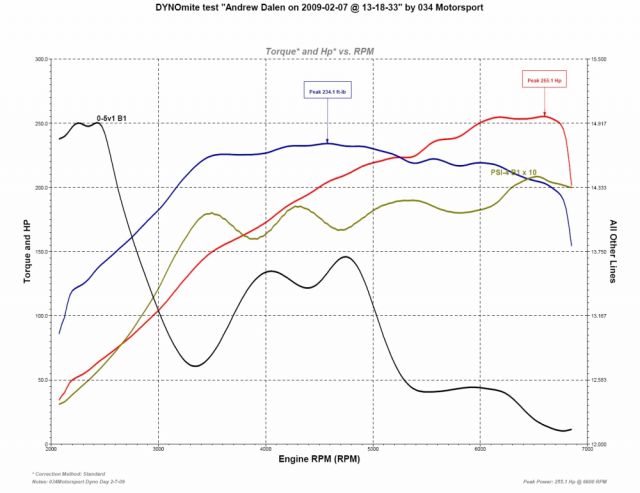
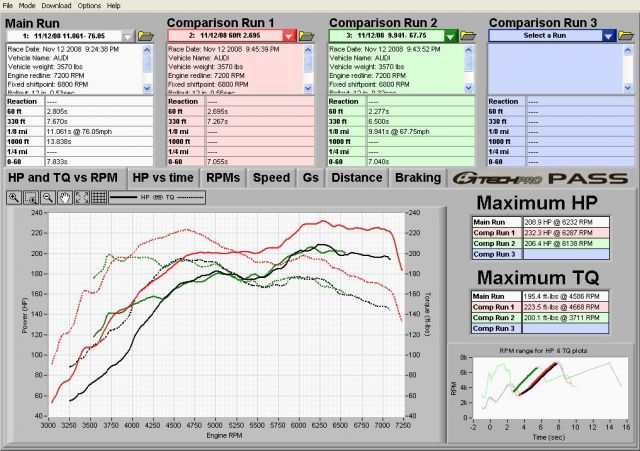
Posted by: kg6dxn Jun 3 2013, 02:08 PM
I ordered a 3 minute "on delay" timer to control the Intercooler pump, Intercooler fan and water pump. Right now the start every time the key is turned on. I'm going to use the fuel pump output as the trigger. That way it will only start if the fuel pump is running.
Do you have this 3 min delay on an override switch? I fear if you take it to an autox you wont hit 3 minutes before you are needing it to pump (Say after its fully warm like in-between runs)
How is the powerband? When do you see full boost? You should see 10psi by earlier than 2700. This turbo should feel very natural with the engine. Not peaky, not laggy, not undersized, just very eager.
10psi on that turbo should be between 200-225hp 25psi and race gas should see closer to 375.
Do a couple of 1st and 2nd gear pulls for us! What redline is 034 going to tune to? My vote is 7300. You probably will peak around 6500, but its stays pretty strong up there.
I would only need to have the engine running 3 minutes prior to the run.
I will play witht he car (drive) when I get home today. I do get 10psi by 2500 rpm, faster if I go WOT.
Posted by: tscrihfield Jun 3 2013, 03:43 PM
Car looks great Mike! You have rebuilt your car twice and I have yet to finish. Wanna make a trip out here?
What's even more interesting is if you look at our shifters... We both posted within a couple weeks and have similar looking set-ups. That was quite funny really!
Great minds think alike I hear!
Thomas
Posted by: kg6dxn Jun 3 2013, 09:32 PM
Quick video, my cameraman (son) pressed stop too early...
https://www.youtube.com/watch?v=/FTEvDUC74yI
Here is a walk around...
https://www.youtube.com/watch?v=HXjezk3rby0
Posted by: Chris H. Jun 4 2013, 10:40 AM
Awesome! Sounds really good. You've got amazing skills. Check out the HUGE exhaust!
Posted by: Andyrew Jun 4 2013, 06:38 PM
Sounds eerily familiar!
Posted by: kg6dxn Jun 5 2013, 10:44 PM
For Andyrew...
Adjustable delay on timer. Triggered by the fuel pump relay. This timer is adjustable from 0-10 minutes. Just a turn of the dial. It is running: Water pump, Intercooler pump, intercooler fan. I have it set to 2 minutes right now. this prevents the fore mentioned equipment from starting as soon as the key is turned on...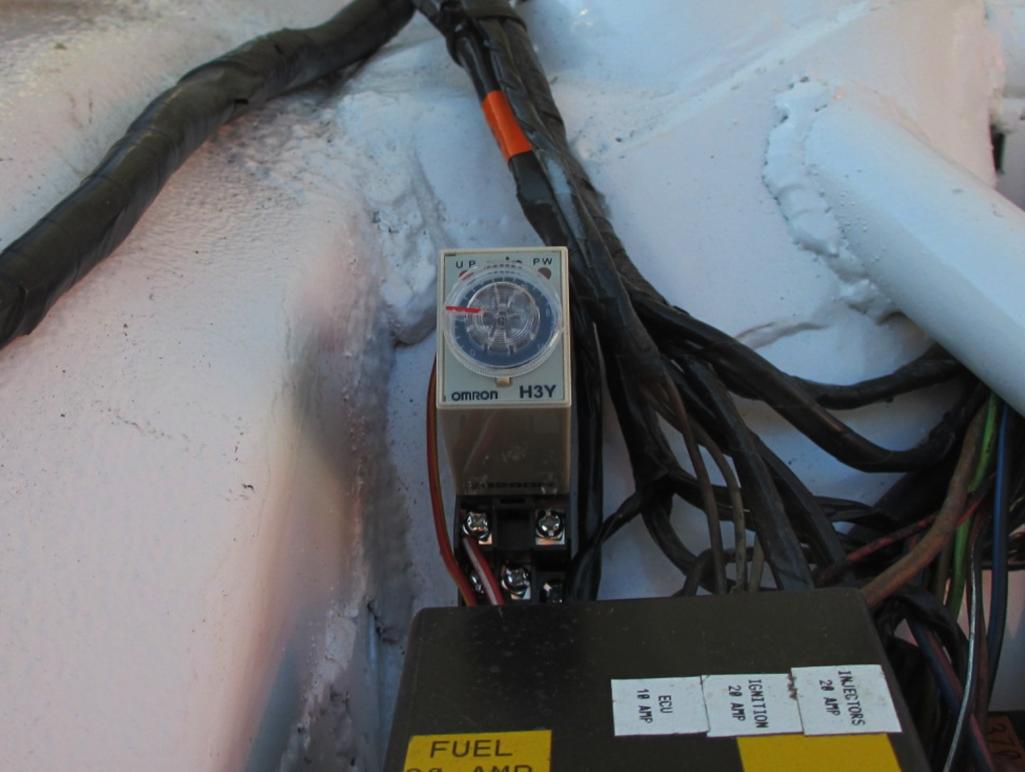
Posted by: kg6dxn Jun 6 2013, 12:06 AM
The gearing is definitely short. I'm running smaller diameter tires and the trans was designed to pull a 3800lb wagon, not a 2100lb 914. COmbine that with a 4" exhaust (read: no back pressure) and the turbo spools very quickly. 1st gear is almost no fun. 2nd gear is just a hair tall to be used as first. My rear tires are 26" tall, I may need to go with a 28" and larger wheel or swap the ring and pinion to match the weight of the car.
I clocked and relocated the throttle pedal today. Much better and more comfortable position.
I need to lube up my diverter valve. I opened it and cleaned it during construction, but forgot to lube. The result is that sometimes during shifts, the pressure does not blow off and the engine revs up rather than down.
Posted by: Andyrew Jun 6 2013, 06:13 PM
Pretty cool timer!
The Audi box has plenty of gears and such available. You might look at some 2.8 parts or even some TDI parts. I've got an audi box excel sheet somewhere with all the options, I'll post it when I find it.
Posted by: Andyrew Jun 7 2013, 10:43 AM
Here you go Mike.
Attached File(s) Audi_Gear_Ratios.xls ( 73.5k )
Number of downloads: 122
012___01W_Audi_VW_transaxle_data_simplified.xls ( 41k )
Number of downloads: 108
Audi_Gear_Ratios.xls ( 73.5k )
Number of downloads: 122
012___01W_Audi_VW_transaxle_data_simplified.xls ( 41k )
Number of downloads: 108
Posted by: rohar Jun 8 2013, 09:01 AM
The gearing is definitely short. I'm running smaller diameter tires and the trans was designed to pull a 3800lb wagon, not a 2100lb 914.
There's solutions available for that. The 012 came in LOTS of variations. The OWW variant is very tall, you can find them on the 12v V6 audis pretty cheap in the strip it lots. The output flanges are different so you'll have to swap some parts over from your existing tranny.
EDIT: Dangit, I didn't see Andyrew's post before I posted. Need moar coffee...
Posted by: kg6dxn Jun 10 2013, 08:03 PM
Well I've been playing with my boost controller. What a PITA! You would think that just following the instructions, perfectly! would yield the desired result... NO!
Started the install just like the diagram on the left. Connected exactly as pictured. The boost would peak at 12psi max. I then replaced all my vacuum lines. Same result. I double checked the entire system for leaks. None found.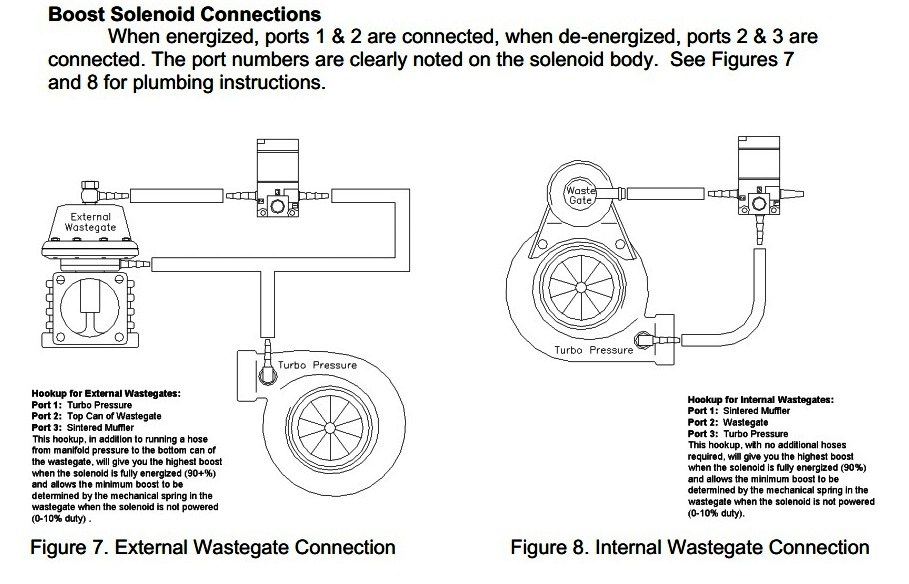
I then added a vacuum line as described on the bottom left notes. Max boost... bla, bla... Connect a line from the manifold to the wastegate can... Took it for a test drive and it immediately peaks to 30psi. No ramp up, just straight to 30psi and is virtually undriveable. In addition I broke down on the freeway (my testing ground). At 30psi the cap on the power brake fitting blew off and the car stalled. It took a few minutes to get it started, I then found the massive vac leak. I quickly wrapped the fitting in electrical tape and limped home.
Frustrated, I removed all the vac lines and drove without a connection to the wastegate. It again peaked at 30psi but was a smoother ramp, yet still quick.
Almost at my wits end, I swapped the #1 & #2 connections on the boost solenoid. NOTE: this should not work. It's now backwards. Well, it runs better than ever. Nice boost ramp to 20+psi. Drives perfectly! I'm not sure what's going on with my boost solenoid. Either there is a typo in the instructions or I was supplied with a N.C. when I should have got an N.O. device (or vise versa).
Either way, Holy shit!!!! This 914 hauls ass!!!!!
Way faster than my V8 and very close to the rotary but with more torque! So it feels like more power...
Now I need to get the axle and new tranny settled before I break something. The V6 Passat has the same gear ratio (almost) as the Boxster. The difference is .001 ratio per gear. The price difference between them is incredible. Used Passat tranny is ~$400. Used Boxster tranny is ~$1800. These are almost the same tranny, both made by Audi.  Both final drives are 3.70. My 1.8 tranny final drive is 4.11, should make all the difference...
I also added some hood pins. My original latch was removed to clear the intake manifold and now won't fit. I drilled and tapped the roll bar and then welded a nut in place. This way I can adjust the height.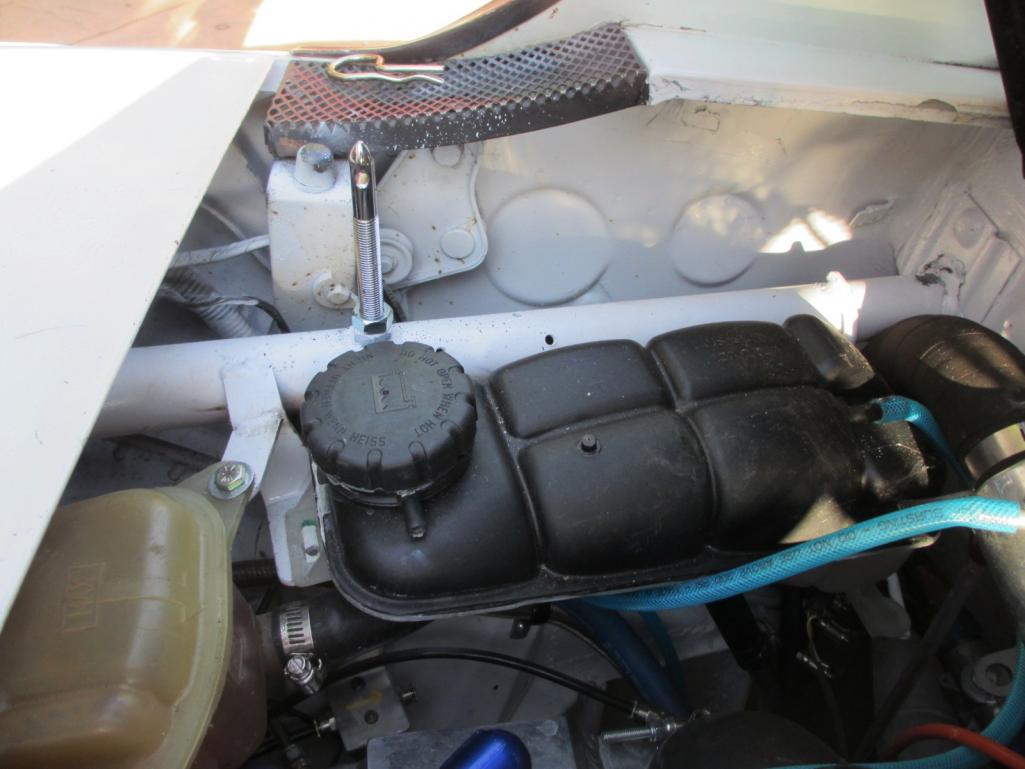
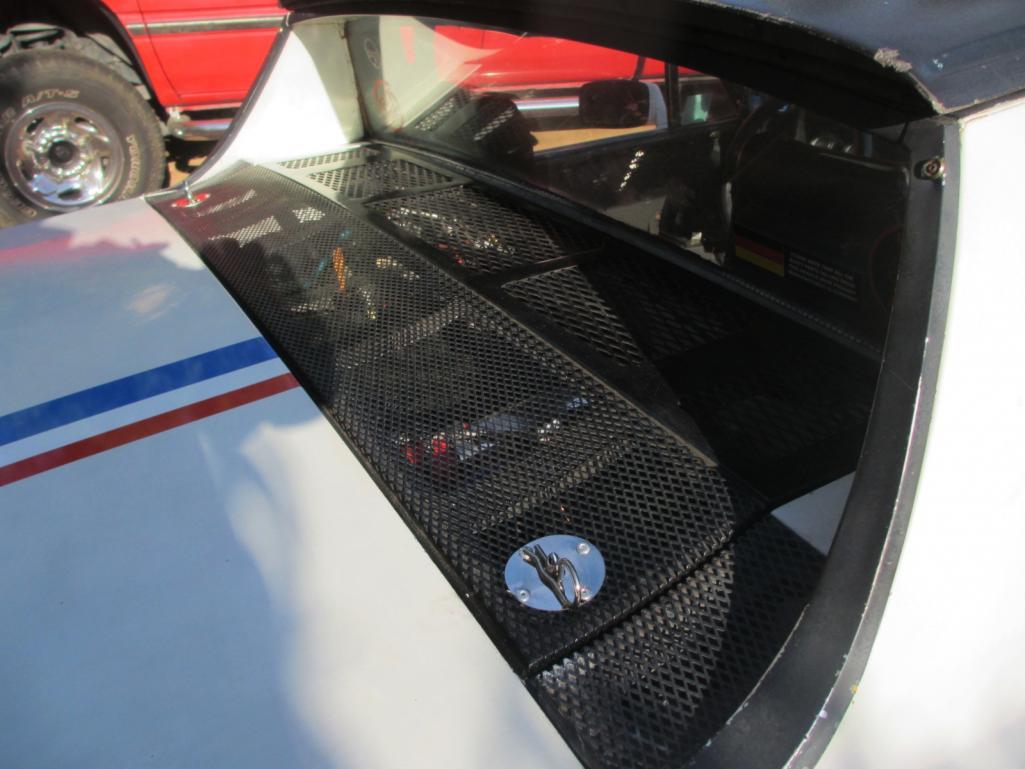
I also received my 5 year award from the PCA. Overall I have been a member longer but took a hiatus for a while...
Posted by: Andyrew Jun 11 2013, 12:27 AM
Awesome!!!
20psi should be right about 330hp.
I know how fast my A4 was and how responsive it was with that turbo so ya... Excited for you
I ran 19psi for quite a long time. You might want to dial the boost down at lower RPM so its not to much torque for your drivetrain or your rods (weak link). I havent heard this turbo blowing a rod before, but you are running less weight so who knows how that effects it in the real world.
Get it dailed in, Get 034 to build a 100 octane file for you that will let you run it to 24psi (max safe level for the turbo). With a good tune that should be 375hp+. You can have the ECU hold both the files and you can switch it with the cruise stalk or a button. That should put you sideways in third . But cruise it daily at 15-17psi is a safe and healthy number.
Posted by: kg6dxn Jun 11 2013, 09:16 AM
I'm running methanol above 18psi, effectively raising the octaine level above 100 in the high boost range (18-30psi). I added root beer fragrance to the meth. It's kind of cool smelling root beer every time I get on it on the freeway.
It's not boosting to high at low rpm now. Other than the 4.11 gearing, it's perfect. I can feel the LSD working as the turbo spools up. What an amazing ride!
Posted by: kg6dxn Jul 4 2013, 05:59 PM
As I await my Boxster/Cayman 6 speed to arrive, I decided to take the car out for a spin... Once up to temp and at speed, smoke filled the cabin and trailed behind the car... Oil pressure good, so I limped it home... Doesn't smell like motor oil, smells more like gear oil...
Pulled up in the driveway looking like a Cheech and Chong movie.  Opened the engine lid and the smoke is coming from the power steering pump...
I had to install the pump because it drives the water pump. Before installation, I removed the veins that create pressure, capped the fittings and filled it with PS fluid. I have 300 miles on the car without any issue with the pump. Not sure what the exact problem is. Inside it is now just a spinning flywheel submersed in fluid.
After the car cools down I am going to remove it completely. I think it will be OK since I'm now running an inline electric water pump. We shall see...
Posted by: McMark Jul 4 2013, 06:29 PM
Does it ever end?
Posted by: kg6dxn Jul 4 2013, 06:32 PM
Does it ever end?
Nope...
Posted by: FourBlades Jul 4 2013, 08:00 PM
This is such a kick ass project.
You really have kept after it...
John
Posted by: kg6dxn Jul 5 2013, 06:30 PM
Looks like it worked. I put on a shorter serpentine belt and bypassed the PS pump and water pump. Took a 30 mile road trip with no issues to report. Electric water pump is working just fine...
The bearings in the power steering pump are shot. I gained at least 1.5hp by disconnecting it.
Posted by: JRust Jul 5 2013, 11:50 PM
Nice. Wish I could get a ride in it while I am down here. Where the hell do you live again
Posted by: McMark Jul 7 2013, 05:39 PM
I got a surprise visit today from Mike, out on a shakedown run. It was cool to share and compare setups. The sasquatch is quite a build. I was really impressed with how well the dash turned out. The engine fits in there surprisingly well and all the systems are neat and tidy. Performance was, of course, fantastic - including the handling of the chassis. Mike, you got a really well set up car there. Looking forward to seeing it again when the tune is finalized.
Thanks for dropping by!
Posted by: kg6dxn Jul 7 2013, 05:44 PM
I got a surprise visit today from Mike, out on a shakedown run. It was cool to share and compare setups. The sasquatch is quite a build. I was really impressed with how well the dash turned out. The engine fits in there surprisingly well and all the systems are neat and tidy. Performance was, of course, fantastic - including the handling of the chassis. Mike, you got a really well set up car there. Looking forward to seeing it again when the tune is finalized.
Thanks for dropping by!
Thank You!
Posted by: kg6dxn Jul 21 2013, 09:21 PM
And then this happened... 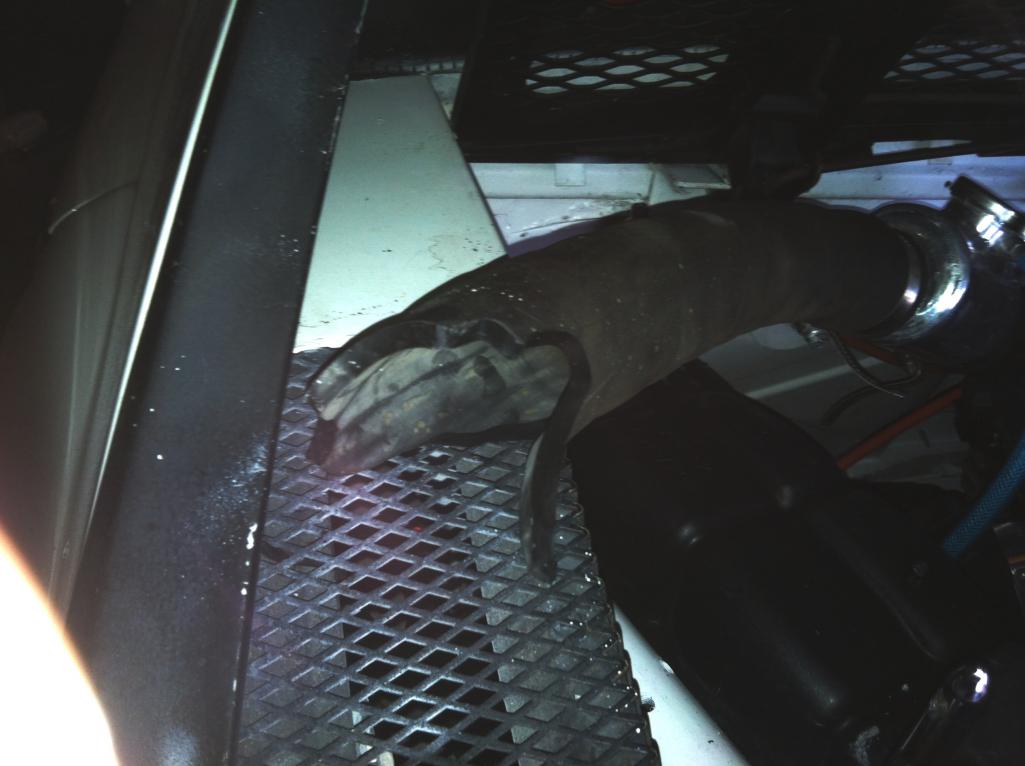
I changed out the water temp sender today. Yes, little coolant came out. 1-2 cups of fluid escaped. I decided to take it on a test drive. No, I did not top it off. I made it 7 miles when the radiator hose let go with a violent bang! Steam spewed from my GT style engine lid and coolant was everywhere. The moment the check engine light came on I was turning off the ignition...
Towed it home (See trailer thread) and parked it.
Lesson learned. Always pull the air out of the system. 
Posted by: Andyrew Jul 21 2013, 09:30 PM
Damn!!! Hopefully its an easy fix!
Posted by: Chris H. Jul 22 2013, 07:01 PM
Ugh....so that happened just because there was too much air in the cooling system? Good to know....
Posted by: kg6dxn Jul 22 2013, 09:48 PM
Ugh....so that happened just because there was too much air in the cooling system? Good to know....
It was near the high point of the system. My guess is a steam pocket...
It was Fuching loud!
Posted by: kg6dxn Jul 29 2013, 09:07 PM
My new transmission showed up today! I'm going to clean it up and paint the crusty bits. This is a 2005 Boxster S unit. Other than being ugly, It seems in good shape and I can shift all 6 forward and reverse gears. Everything spins 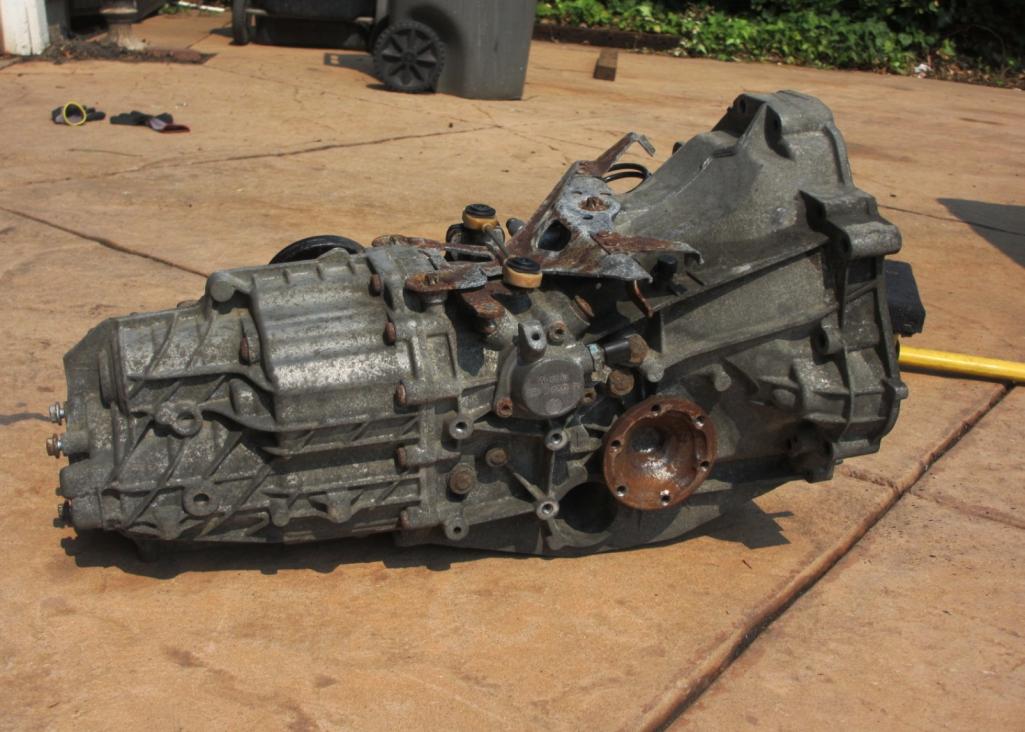
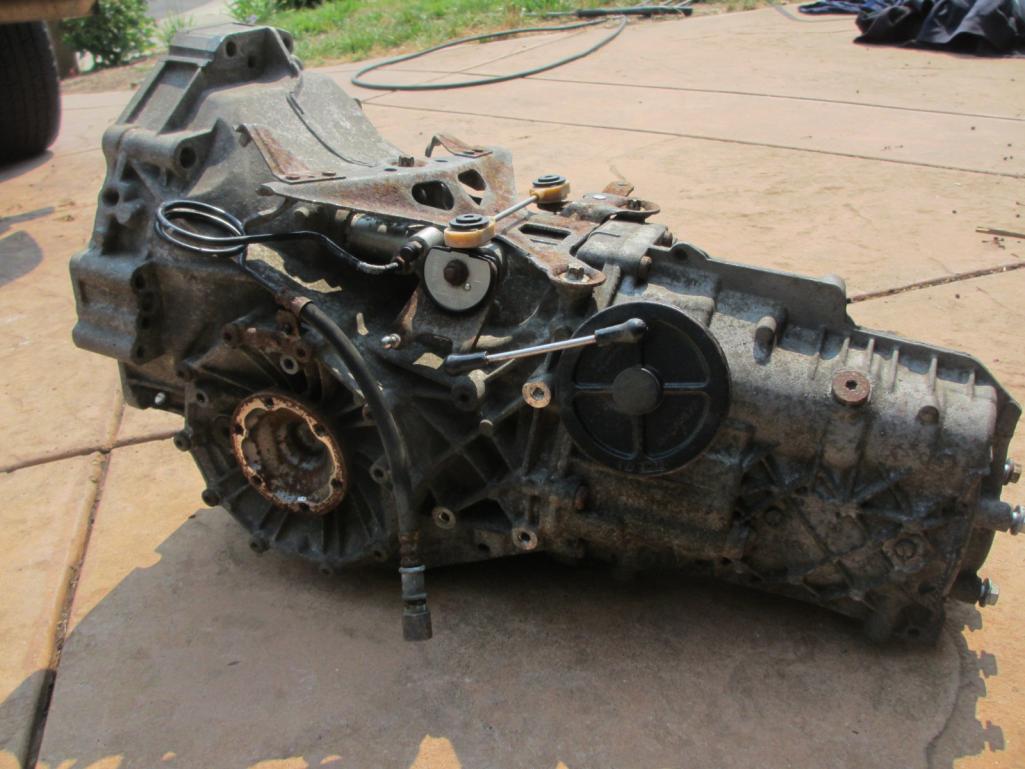
Same Bell housing as my Audi... 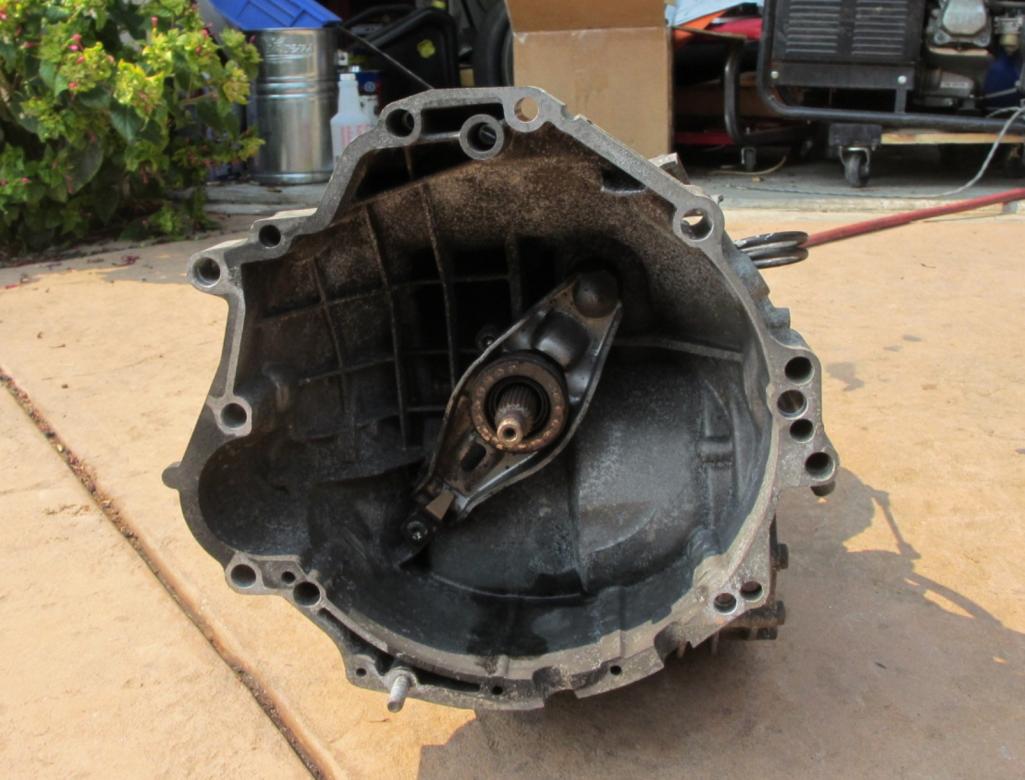
The 130mm flanges, (Only on the S transmission) work with my 930 CV's but they require 6 bolts... 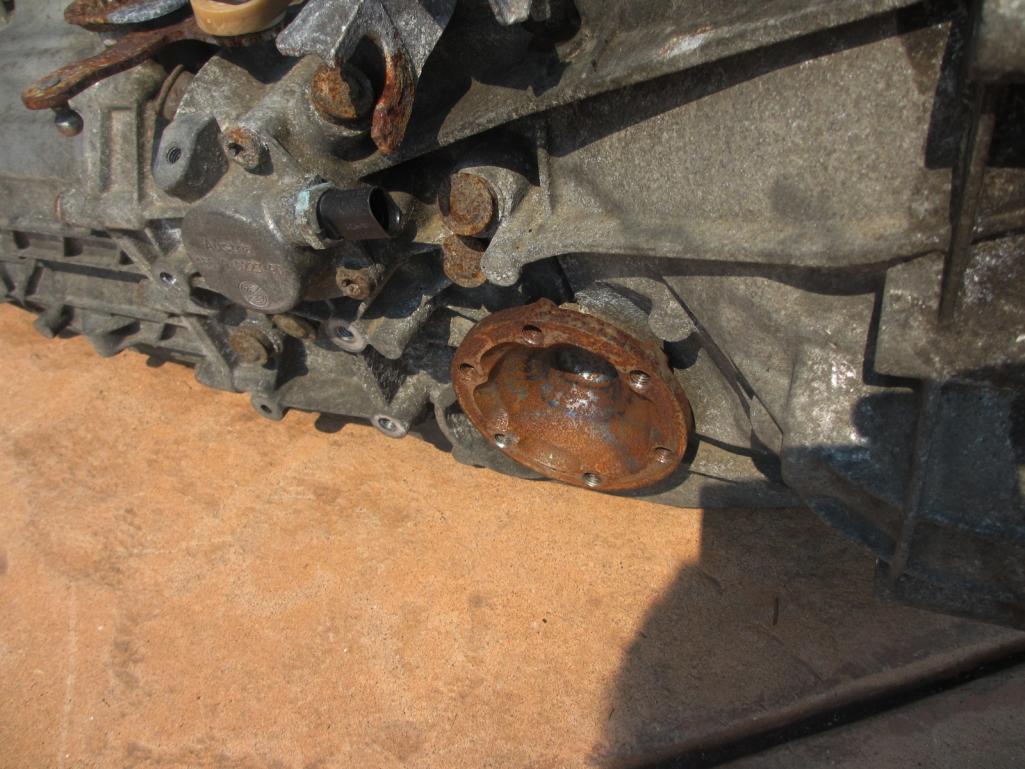
I'm old and lazy so I decided to install a SPAL power window kit. I used to install these regularly and the design hasn't changed. I did have to offset the motor slightly to clear the regulator. Once the panel is in you will never see it. It was always a PITA to use the handle since the roll bar arm bracket is in the way.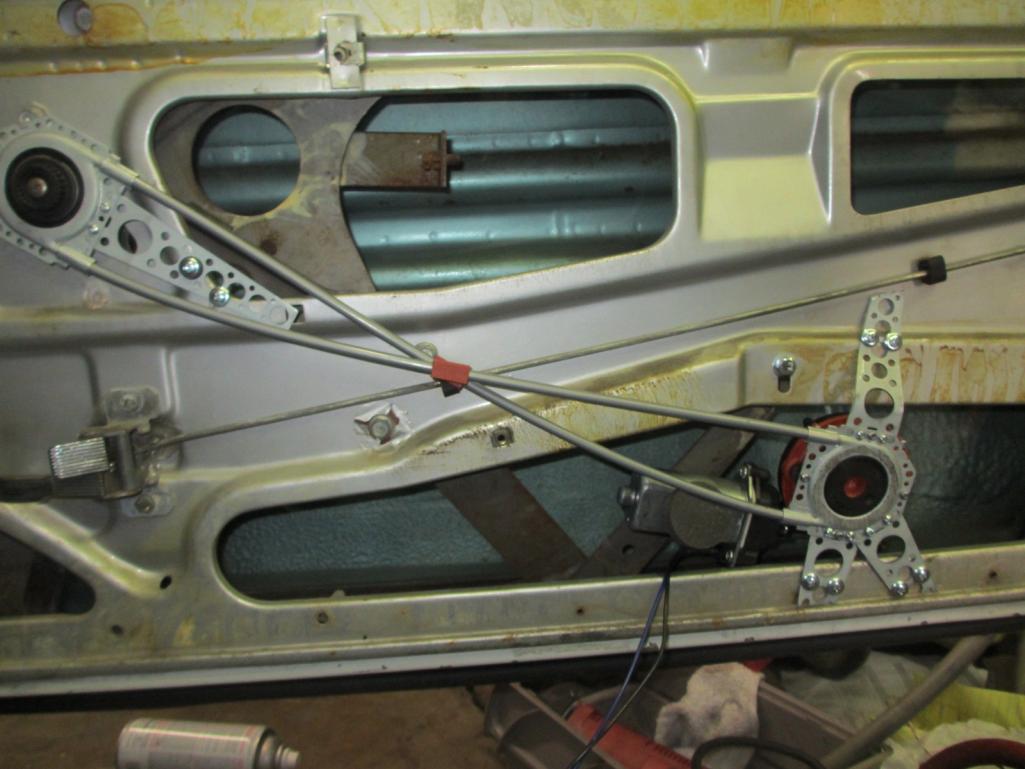
So I also decided to do proper door grommets. These are the rear hatch grommets from the donor 2001 Passat Wagon.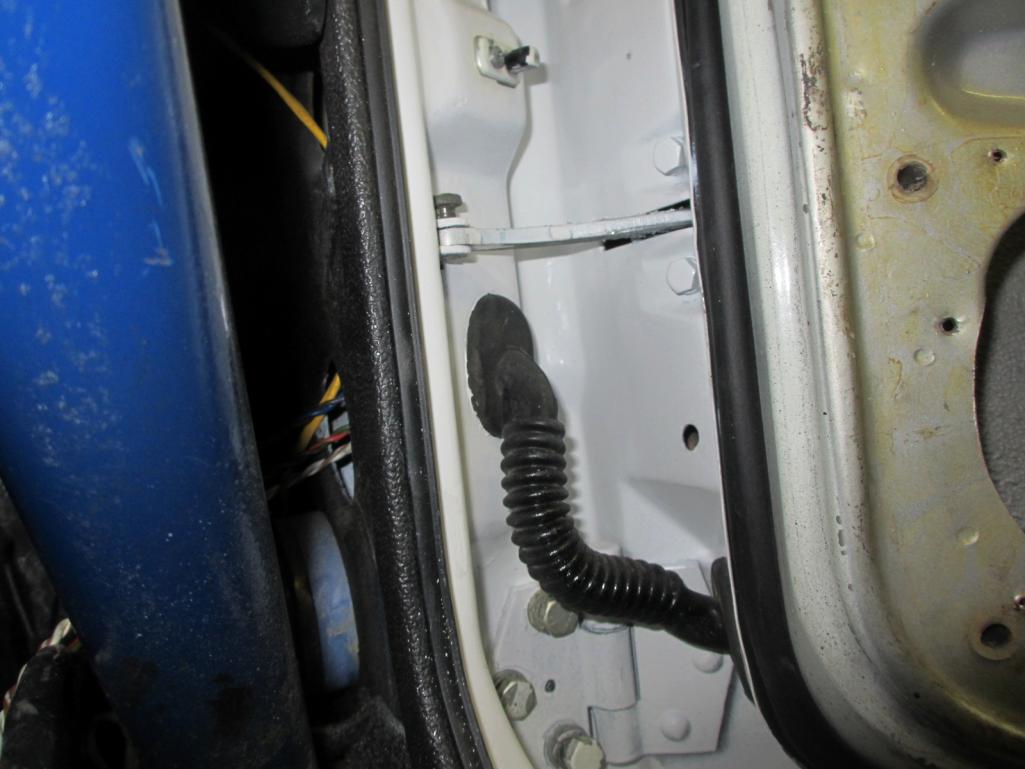
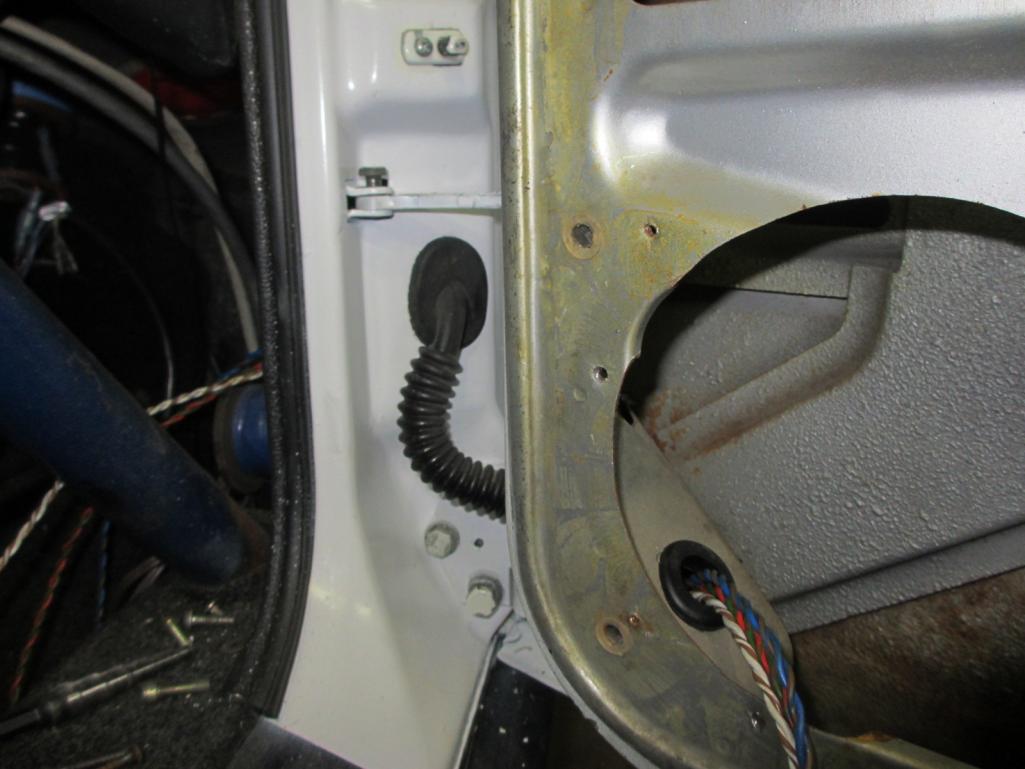
Posted by: Chris H. Jul 31 2013, 02:43 PM
I'm doing power windows too Mike! Good call. I ordered door panels and vinyl from 914rubber a while back and asked Mark NOT to cut a hole for the window winder. Can't wait to get them in. How do the SPAL's work? Pretty well?
Posted by: kg6dxn Jul 31 2013, 07:33 PM
I'm doing power windows too Mike! Good call. I ordered door panels and vinyl from 914rubber a while back and asked Mark NOT to cut a hole for the window winder. Can't wait to get them in. How do the SPAL's work? Pretty well?
The SPAL kit is cool for a universal kit. Very easy to install on just about anything.
As for no holes in the panel. It might be possible. I tried to space the regulator back a little. Right at the crank the clearance is very tight between the glass and regulator. Less than a finger width. When I spaced it, the mechanism started the drag and bang as the window went up/down. I ended up just spacing the horizontal track right above the motor. I have late style regulators.
You may need a power regulator from Electro-life http://electric-life.com/ I'm not sure if they have a specific 914 kit but I'm sure something could be modified. Then you would not have a crank at all to worry about.
Posted by: kg6dxn Aug 3 2013, 06:54 PM
I pulled my 5 speed today. It came out pretty easy without the engine and cradle. I also pulled the Phantom Grip LSD and planted it int the 6 speed. The spider gears are a direct swap, although the 3rd member is bigger in the 6 speed. The whole tranny is a little bigger. I do have to fab rear mounts but that's no big deal.
The bad news: The Boxster tranny does not have the electric speedo drive. I need to rig/fab something to work.
Here is a look at the bell housing area. 5 on left, 6 on right. Notice the 6 has more clearance for a bigger flywheel. Bolt pattern is almost identical. The Audi engine does not use all the bolt holes on the 5 speed. But all the hole I need match up on the 6 speed. BTW, this is a GETRAG Audi 466 transmission.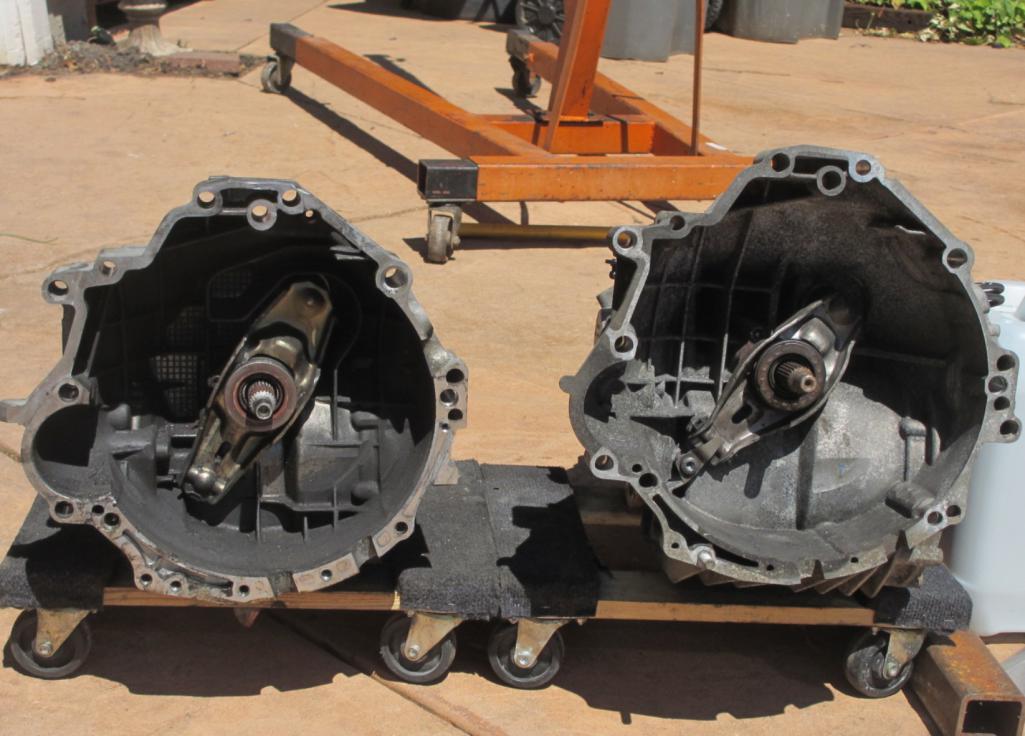
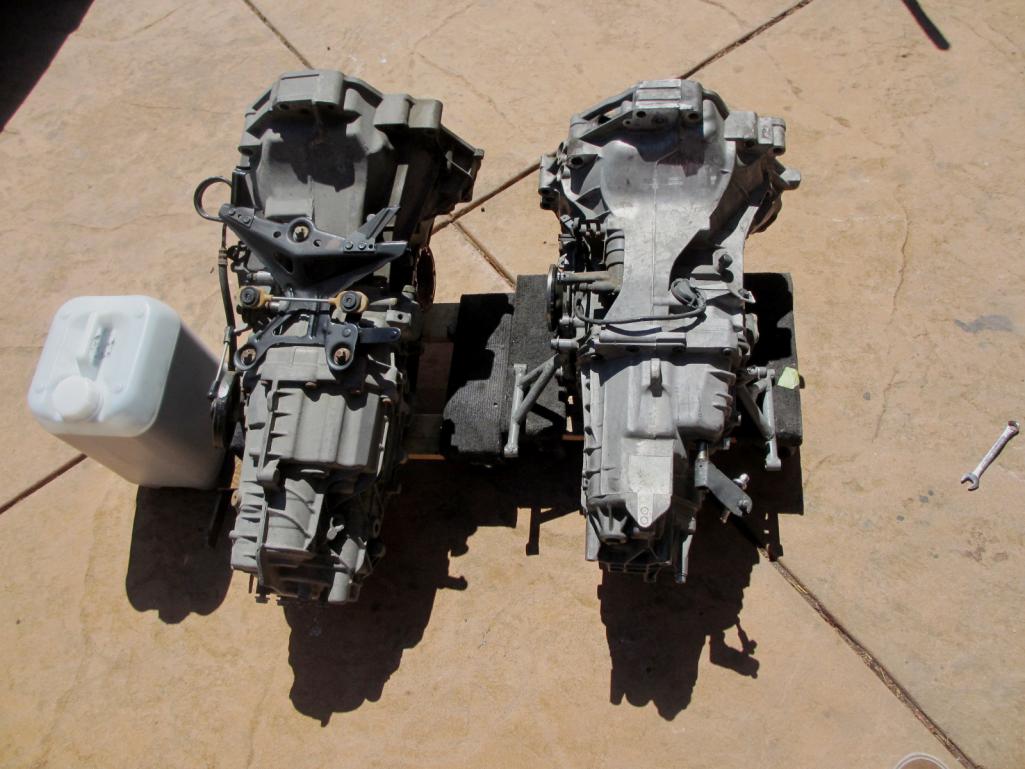
Here are the 2 diffs. 5 on left, 6 on right. The 6 is clearly bigger. I was surprised to see the spiders were interchangeable. So no new machining required.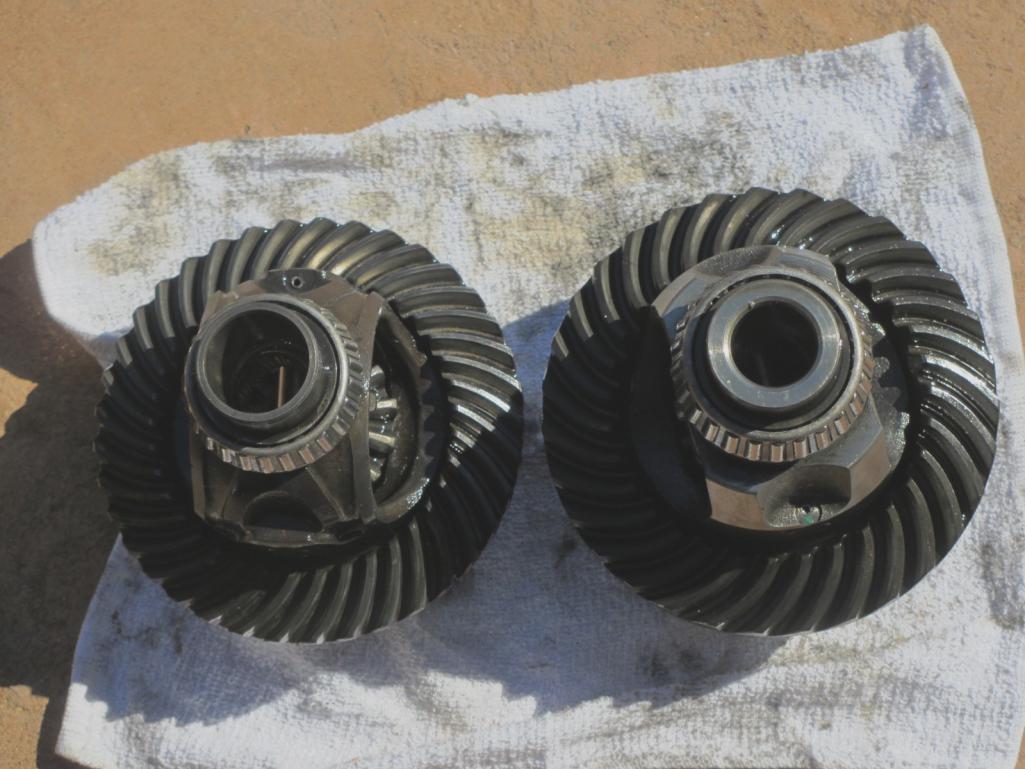
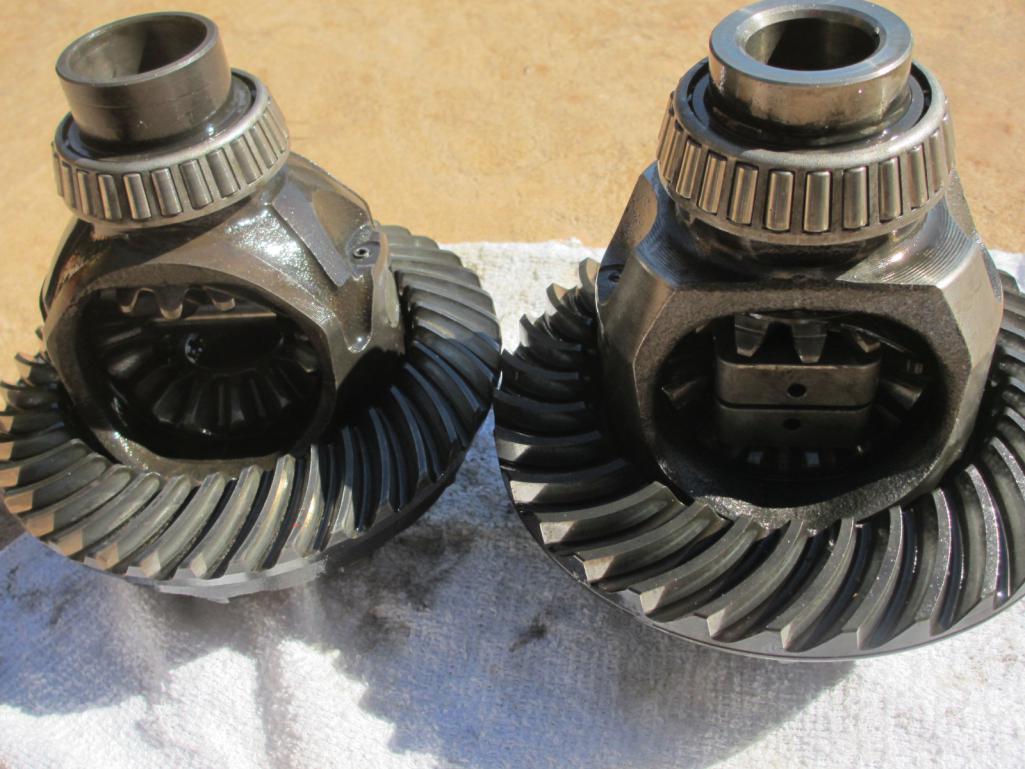
The PG LSD shows minimal wear. You can see wear marks but you can't feel them.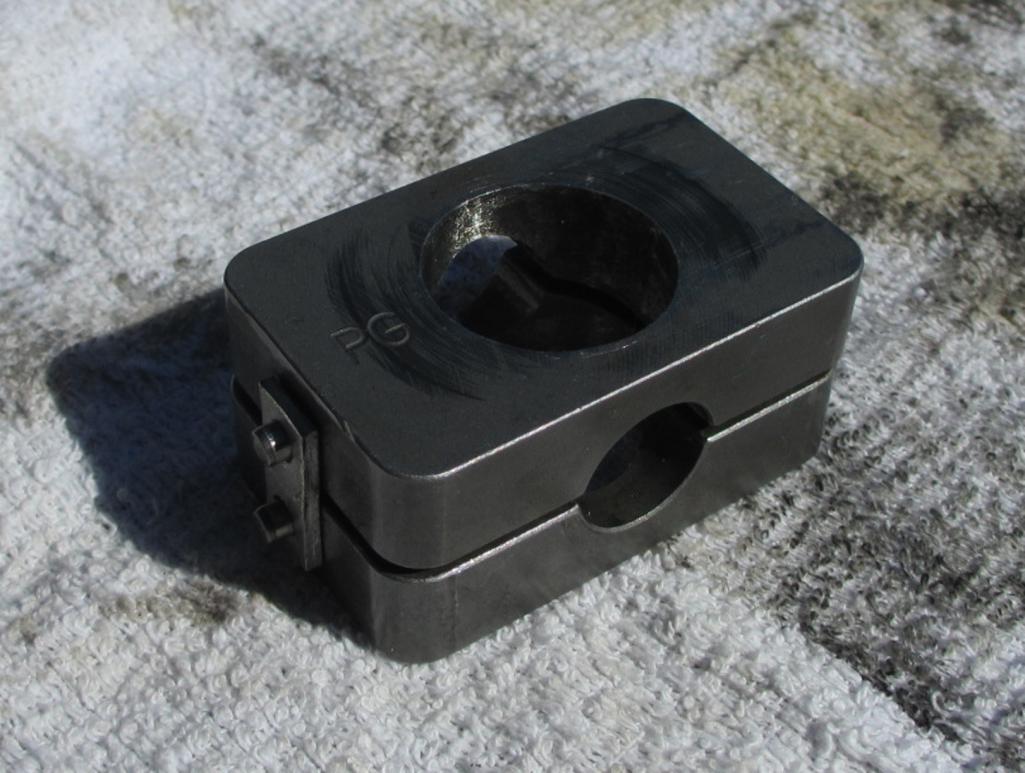
Posted by: kg6dxn Aug 3 2013, 10:41 PM
I muscled the tranny into position today. What a PITA! It is longer than the 5 speed and it hits the muffler bracket. I did a quick chop of the bracket to get it mounted. I noticed a small difference with the starter opening. The bolt pattern is the same but it is made for a slightly smaller starter. I need to machine 1/8" from the bell housing. So that means the tranny comes back out. While it's out I will modify the muffler bracket. A couple of the mounting holes I need to use need to be drilled out. I guess the Boxster uses the other holes. Once I get all this dealt with, I will fab mounting brackets for the new tranny.
So It is almost a bolt in swap. I figured it would go like this. At least the thing bolts up to the engine!
Posted by: Andyrew Aug 4 2013, 01:25 AM
Great progress as always! And to think, I havent been able to change a fuel pump in 5 months...
Posted by: 76-914 Aug 4 2013, 09:21 AM
I muscled the tranny into position today. What a PITA! It is longer than the 5 speed and it hits the muffler bracket. I did a quick chop of the bracket to get it mounted. I noticed a small difference with the starter opening. The bolt pattern is the same but it is made for a slightly smaller starter. I need to machine 1/8" from the bell housing. So that means the tranny comes back out. While it's out I will modify the muffler bracket. A couple of the mounting holes I need to use need to be drilled out. I guess the Boxster uses the other holes. Once I get all this dealt with, I will fab mounting brackets for the new tranny.
So It is almost a bolt in swap. I figured it would go like this. At least the thing bolts up to the engine!
Nice build Mike. It's always comforting to know that one doesn't have to look far for something to do.
 If it makes you feel any better, I ran into the same starter dilemma on my Suby swap, yesterday. I don't believe anyone has asked this yet but how does the new power plant compare to your previous ones?
Posted by: kg6dxn Aug 4 2013, 09:40 AM
Nice build Mike. It's always comforting to know that one doesn't have to look far for something to do.
If it makes you feel any better, I ran into the same starter dilemma on my Suby swap, yesterday. I don't believe anyone has asked this yet but how does the new power plant compare to your previous ones?The power is awesome. If I dial the boost down, if is the same as my old 283ci V8, with slightly lees torque. If I turn the boost up (25+ psi) it is crazy fast and controllable. The rotary had more peak power but this feels stronger. Probably due to higher torque numbers at lower rpm.
If it weren't for the fact that my axle angle was too severe, I would have left the 5 speed in there for a while. I needed the 108mm flanges from the 6 speed to use 930 CV's. I tried to buy just the axle flanges but none of the Porsche dismantlers would sell me just the parts. Now I have all the parts, I just have to make it work...
Posted by: kg6dxn Aug 4 2013, 07:26 PM
Got the tranny out and back in. Glad I pulled it too. I found one area where 2 teeth from the flywheel had dug into the bell housing. There is was a clearance problem at about the 5 o'clock position. Little machine work here and there and the engine cranks over just fine.
I started fabbing the rear mount. Once it's painted and installed I'll snap a couple pics.
The 6 speed is at least 20lbs heavier than the 5 speed. Kind of a PITA to R&R. My brother happened by just as I was stuffing it back in the car. Thanks Bro!
Posted by: kg6dxn Aug 30 2013, 04:27 PM
Car is on the road again!
6 Speed works great! Smooth & easy shifting, better gearing. Got my 930 CV's and axles in and my VSS reworked so my speedo works.
Now I have to track down a fuel smell. I can't find a leak or drip but I can smell it.
Now I need to get some shake down runs in...
Posted by: kg6dxn Aug 30 2013, 05:26 PM
Here is the latest picture of the car. Looks ready for the 9-14 Autocross...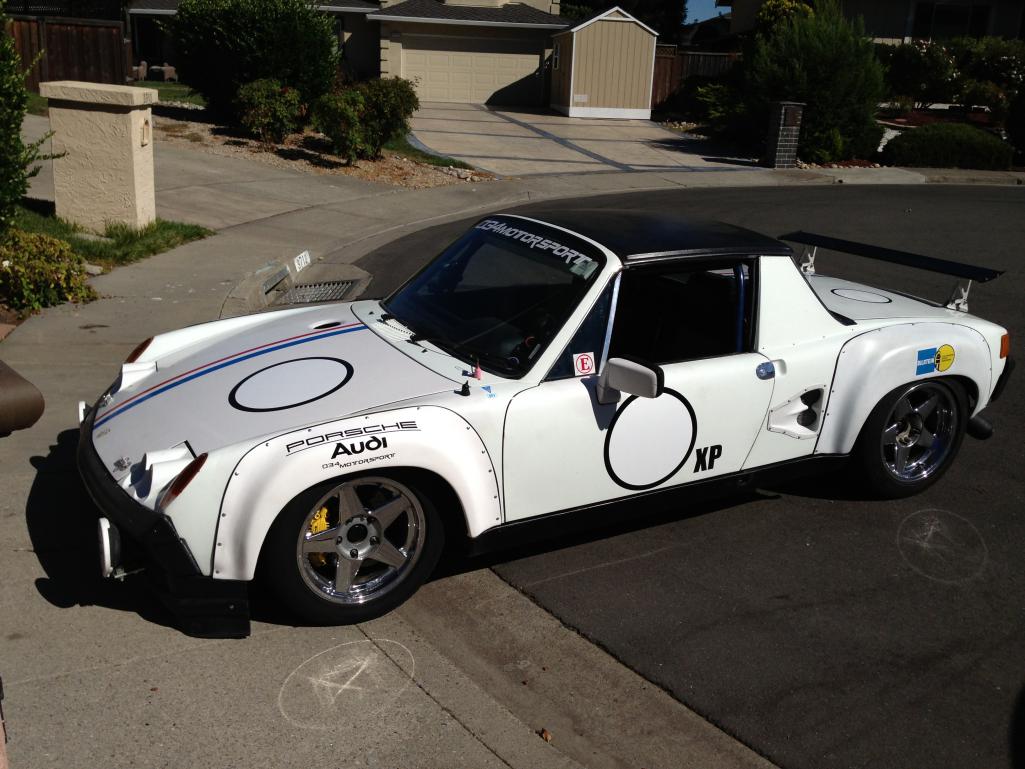
Posted by: Andyrew Aug 30 2013, 10:24 PM
Awesome!!!!
Get that fuel leak fixed!!! Check the center tunnel and under the gas tank.
Posted by: tscrihfield Aug 30 2013, 10:32 PM
Here is the latest picture of the car. Looks ready for the 9-14 Autocross...
Car looks awesome! Do you know if the wing helps? Have you drove it with it on and off?
Posted by: kg6dxn Aug 30 2013, 10:37 PM
Car looks awesome! Do you know if the wing helps? Have you drove it with it on and off?
I can feel it above 80mph. There is a difference with/without it. But, it's a high speed device. I was passing some cars on the freeway today and suddenly I was doing over 100mph.
Whoops, I slowed it down. It was the car, not me...
Posted by: 76-914 Aug 31 2013, 05:00 PM
Really looks nice. Good job Mike.
Posted by: kg6dxn Aug 31 2013, 06:40 PM
Really looks nice. Good job Mike.
Thank You!
Found my fuel leak. 1/8" NPT fitting on the pressure regulator. It was soooo loose. I can't believe I didn't find it sooner. I can't believe it wasn't leaking sooner. It is a plug where a gauge could be installed.
All fixed now!
Posted by: Cairo94507 Sep 1 2013, 07:29 AM
Hi Mike- Looking good; I do not recall seeing the GT flares on your car the last time I saw it. Car looks nice and I bet it screams too. Nice work.
Posted by: kg6dxn Sep 1 2013, 09:43 AM
Hi Mike- Looking good; I do not recall seeing the GT flares on your car the last time I saw it. Car looks nice and I bet it screams too. Nice work.
Last time you saw it, there were 930 steel flares on the car. As I found out when removing them, they were a shoddy installation on a race car. 3 layers of lap welds and bondo lifting.
I picked up 2 sets of fiberglass flares. One from Brad @ 914ltd with rockers and one set from AIR. I ended up using 3 of Brad's and 1 of AIR (front left) along with Brad's flared rockers. The welting is some 1950's style ebay fender welting product.
Posted by: tscrihfield Sep 2 2013, 01:22 PM
Car looks awesome! Do you know if the wing helps? Have you drove it with it on and off?
I can feel it above 80mph. There is a difference with/without it. But, it's a high speed device. I was passing some cars on the freeway today and suddenly I was doing over 100mph.
Whoops, I slowed it down. It was the car, not me... Yeah, it had nothing to do with that right foot.... eh!
I bet that thing pulls like crazy with that power plant.
Posted by: David J Sep 2 2013, 01:55 PM
How about a video?
Posted by: kg6dxn Sep 2 2013, 02:01 PM
How about a video?
Soon. I'm sorting out an over boost limp mode issue. The challenges of a modified drive-by-wire car...
Posted by: kg6dxn Sep 13 2013, 07:28 PM
Got my new plate today. I got the idea from a Mercedes Konzept car.
I have released "914 TT" go reserve it now on the CA DMV website...
Car is running good but not great. It stumbles rich at WOT. I need to get it in for final dyno tuning at some point. I'm driving it to the 9-14 PCA auto-x (to observe) tomorrow. Got to take it somewhere on 9-14 right? 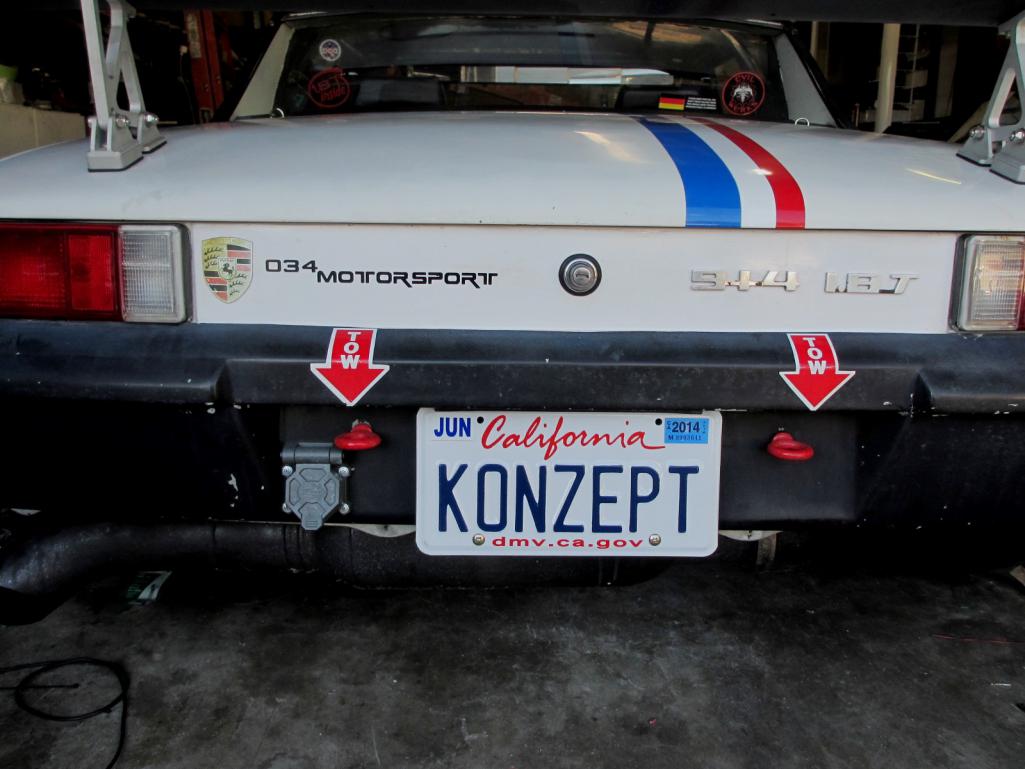
Posted by: Java2570 Sep 14 2013, 10:00 AM
Mike, it has been awhile since I looked at this thread...wow, you've really kicked ass on this build! Your car looks and sounds great! Can't wait to see some driving videos....
Posted by: kg6dxn Sep 14 2013, 03:17 PM
Just drove it 180 miles round trip to the 9-14 auto-x.
I'm at the point where it needs to get the final tune.
Posted by: Andyrew Sep 15 2013, 08:44 AM
Awesome!
Posted by: Chris H. Sep 15 2013, 11:39 AM
Mike, we need video man.....
Posted by: kg6dxn Sep 15 2013, 03:44 PM
Mike, we need video man.....
Here is a shitty video. My mount was loose. You can see the camera sway back & forth and the video is quite shakey. But here it is anyway...
https://www.youtube.com/watch?v=RXko9WlEALM
Posted by: Chris H. Sep 15 2013, 04:42 PM
Thanks for the vid Mike! It sounds really smooth! Very inspiring for those of us still tripping over stuff parts and wiring harnesses the garage.
Posted by: euro911 Oct 22 2013, 12:39 AM
Wow, Mike. I can't believe I missed this until now. Took me two evenings to go through the entire thread, but enjoyed every minute. Pretty awesome engineering you've done there
Question - Will a T4 mount up to an Audi 5-speed or a Boxter 6-speed trans? (I could use an extra high gear, or two). If not, what other options are there for us old-school air-cooled lackeys? 
Posted by: kg6dxn Oct 22 2013, 07:36 AM
Wow, Mike. I can't believe I missed this until now. Took me two evenings to go through the entire thread, but enjoyed every minute. Pretty awesome engineering you've done there
Question - Will a T4 mount up to an Audi 5-speed or a Boxter 6-speed trans? (I could use an extra high gear, or two). If not, what other options are there for us old-school air-cooled lackeys?
The problem is the starter location. The 914 and 911's have the starter mounted on the transmission backside. Ie: 901, 915, 930, etc... The later model cars have the starter mounted in front of the tranny next to the engine.
If you can machine and weld, it would be possible to mount the starter on the backside but this is not for the beginner. If you remember the automatic 914 that used an Audi 5000 transmission. This had a starter machined into the rear bell housing.
On a side note... The car is going to the dyno tuner today. a full update and pictures later...
Posted by: gryphon68 Oct 22 2013, 10:53 AM
[quote name='Andyrew' date='Sep 22 2012, 11:10 PM' post='1743052']
sway away custom axles? So 914 outer cv and boxster inner cv?
Why did you switch to boxster stub axles then instead of just going with the audi units? (I assume since they are custom axles they can make it for any cv...)
[/quote]
[quote name='kg6dxn' date='Aug 4 2013, 11:40 AM' post='1904219']
[quote name='76-914' post='1904212' date='Aug 4 2013, 08:21 AM']
If it weren't for the fact that my axle angle was too severe, I would have left the 5 speed in there for a while. I needed the 108mm flanges from the 6 speed to use 930 CV's. I tried to buy just the axle flanges but none of the Porsche dismantlers would sell me just the parts. Now I have all the parts, I just have to make it work...
[/quote]
Very interesting build thread. Interesting alternative to the Subi-swap for those looking for modern liquid-cooled power and smooth shifting.
My apologies if I missed the answers somewhere, but was curious about the two comments above.
First, why the Boxster axle stubs instead of the Audi's if you were doing custom axles?
Second, what was the issue with the axle angle? Was it due to the height or the length of the engine? Are the axles on the 6-speed in a different location relative to Rear face of Block compared to the 5-speed? Or did the 6-speed just allow the use of 930 CV's which should be more tolerant of the large axle angle (which is unchanged from the 5-spd?).
Thanks,
Posted by: kg6dxn Oct 22 2013, 01:28 PM
Very interesting build thread. Interesting alternative to the Subi-swap for those looking for modern liquid-cooled power and smooth shifting.
My apologies if I missed the answers somewhere, but was curious about the two comments above.
First, why the Boxster axle stubs instead of the Audi's if you were doing custom axles?
Second, what was the issue with the axle angle? Was it due to the height or the length of the engine? Are the axles on the 6-speed in a different location relative to Rear face of Block compared to the 5-speed? Or did the 6-speed just allow the use of 930 CV's which should be more tolerant of the large axle angle (which is unchanged from the 5-spd?).
Thanks,
I mounted the engine and trans as far forward and as low as possible in the chassis. This was to maintain the F/R balance of the car. By doing this, the transmission output flange is no longer lined up with the center of the swing arm axle stub. The tranny is forward. Additionally, the car is lowered and the transmission is lower, This raises the swing arm stub center while lowering the tranny center. Thus creating a compound angle on the CV's.
The total angle was at the limit of the 100mm 944 CV joints (22°). So I switched to 108mm 930 turbo CV's. These have a max working angle of 30° and these are used by high power sand rails. A sand rail operates at severe angles all the time.
Audi makes a 100mm and a 130mm axle flange. The Boxster S/Cayman S 6-speed has 108mm flanges. Early 911 swing arm stub axles are 108mm and a direct bolt on for my 5 lug conversion.
I could have modified the Cayman S transmission stub axles to fit into the Audi tranny with a simple spacer but none of the dismantler's would sell them too me. They are $400 each from the Porsche dealer. I found a complete Cayman S transaxle in England and had it shipped to me for a total just under $1000.
The 6 speed has better gear ratios and the flanges I needed. Win, win for me.
The custom axles are off the shelf EMPI units from Pacific Customs. They cost $275 and each one is a different length. Both sides splined for 930 CV's. No custom machine work required and they can handle more HP than I will ever have.
To summarize, This was done with all bolt in parts. Even the shifter and cables are off the shelf units.
Posted by: kg6dxn Oct 22 2013, 01:30 PM
On a side note, The tuner called in sick today so no dyno tune until I return from the PCA Escape...
Posted by: Andyrew Oct 22 2013, 08:32 PM
^
Posted by: computers4kids Oct 22 2013, 09:04 PM
If you remember the automatic 914 that used an Audi 5000 transmission. This had a starter machined into the rear bell housing.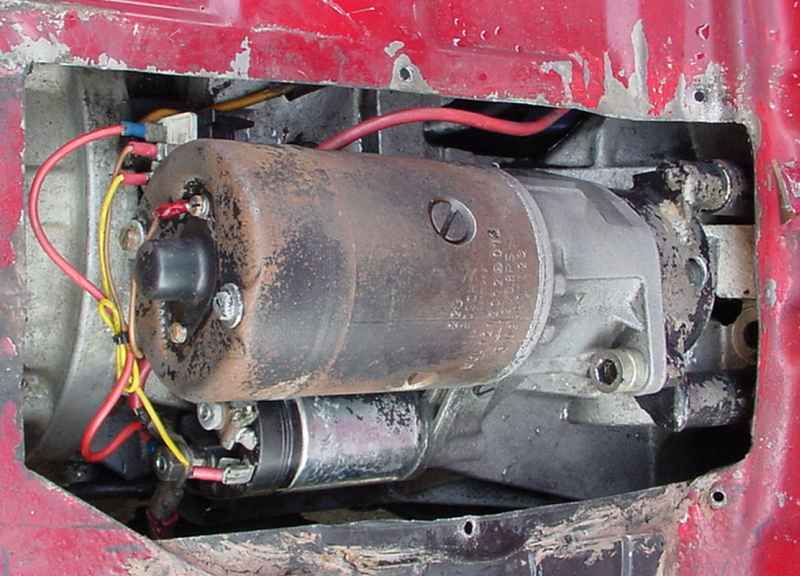
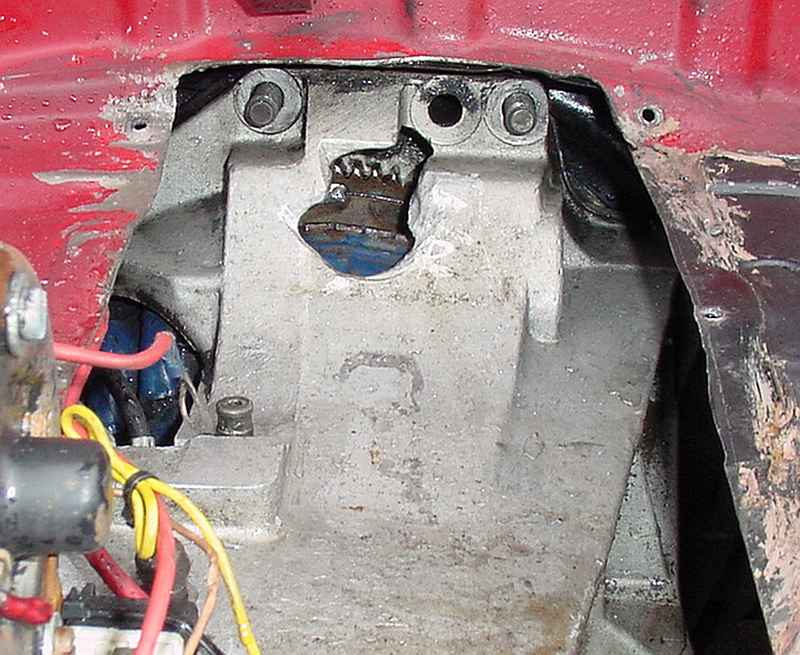
Posted by: McMark Oct 22 2013, 10:11 PM
I don't think that quite qualifies as 'machined'
Posted by: euro911 Oct 23 2013, 02:12 AM
Well, it looks like they used some sort of machine to do that
Posted by: Andyrew Nov 10 2013, 12:38 PM
How did the Retune @ 034 go?
Posted by: Mike Bellis Nov 10 2013, 12:43 PM
How did the Retune @ 034 go?
They have had the car for 2 weeks and have spent 2.5 hours working on it. The tuner left for SEMA and my car awaits his return...
Posted by: Andyrew Nov 10 2013, 12:52 PM
Ahh... Sema...
They must have been prepping their GTI,80Q,A4 for sema then..
That sucks.
Posted by: Mike Bellis Nov 10 2013, 12:56 PM
Ahh... Sema...
They must have been prepping their GTI,80Q,A4 for sema then..
That sucks.
Looks like their GTI won the Grand Turismo award.
They did replace my: Silicone cobra head, MAF housing, coil pack & spark plugs.
I was a little pissed off at the service manager for not working on the car. Now I just want it to be done. I have no idea how much money I will owe when done. Right now it's $400 in parts and 2.5 hours...
Posted by: Andyrew Nov 10 2013, 07:05 PM
.... They went and changed all the parts that they have their own name on....
Posted by: Mike Bellis Nov 10 2013, 07:08 PM
.... They went and changed all the parts that they have their own name on....
I'm running an OBX fuel rail...
They're dyno tuning time is $250 per hour so I hope the finish quickly!
Posted by: Andyrew Nov 10 2013, 07:08 PM
What did they replace the cobra with?
Posted by: Mike Bellis Nov 10 2013, 07:10 PM
What did they replace the cobra with?
My aluminum cobra with their silicone "high flow" version.
Posted by: Mike Bellis Nov 10 2013, 07:12 PM
Just for fun, here is a pic of my wife and me on the Mulholland Highway. This is a couple miles past the Rock Store, biker hangout...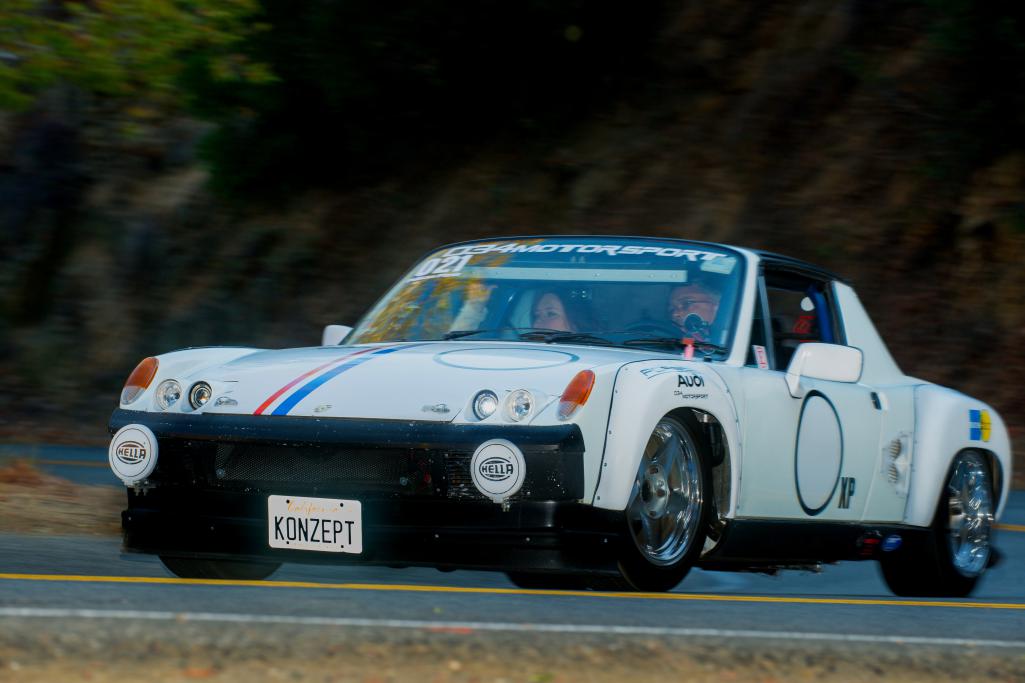
Posted by: Andyrew Nov 10 2013, 07:22 PM
What did they replace the cobra with?
My aluminum cobra with their silicone "high flow" version.
So their branded $60 version vs the universal rubber version they also sell for $30..
They change all the coil packs to the new version (The $15ea replacement version)?
A poor condition MAF could have been a real cause to your fuel issue. Also if your MAF is to close to your air inlet you'll get issues.. Changing out the coil packs could have been them ruling it out.. Its not a bad thing for the future..
I would really hope they give you some serious price breaks for all the stuff they are doing.
Nice pic BTW!
Posted by: Mike Bellis Nov 10 2013, 09:10 PM
Cobra head was $60
Coil packs $30 each x4
MAF housing I had did not have the square mesh diffuser since it was aluminum. Their housing was $130.
Spark plugs were a deal at $4 each...
Posted by: Mike Bellis Nov 12 2013, 11:53 PM
I got my car back today!
I got there and they said my turbo was falling off so they couldn't tune anymore until it was fixed. So I drove it home with an exhaust leak that got worse and worse. 5 miles into the trip, the Wastegate FELL OFF! 2 bolts backed out and that's why it was load and would not boost higher than 16psi. Duh. Oh well, easy fix. The tuner said he thought is was 90% done before the exhaust leak started. The WG was dragging on the ground after it fell off. Hopefully it's not too damaged.
At 16psi it did 229HP on a 4 wheel drive mustang dyno. Add 15% and that equates to 263HP at the flywheel. Probably more drive line loss since it was turning the front wheels too; maybe 20% or 275HP.
Either way, before the WG fell off... Holy shit! with a major boost leak this car moves!
Overall I'm happy. Once these guys got back from SEMA, the buckled down and got to my car. I wish they would have found the WG problem and fixed it and finished tuning. The tuner said he could have it wrapped up in about 30 minutes on my next visit.
Now I have to fix the CV boot shredding problem. 3 boots in 2000 miles. I think some sand rail units are in my future...
https://www.youtube.com/watch?v=RKF7fviKzM8
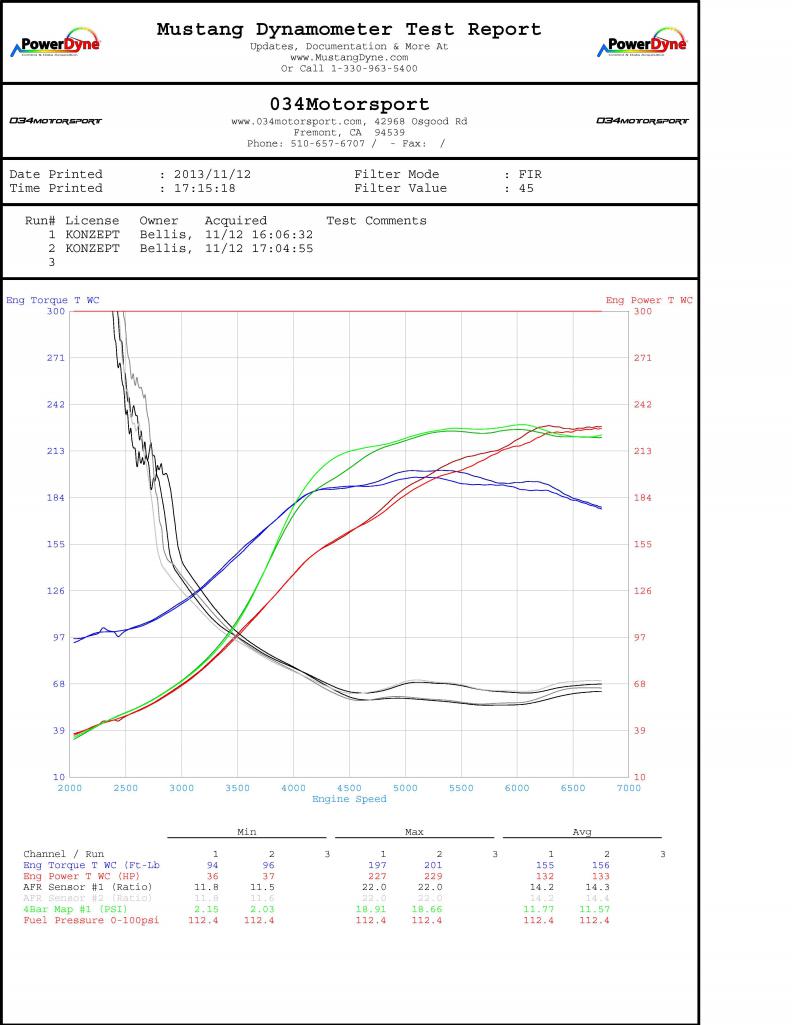
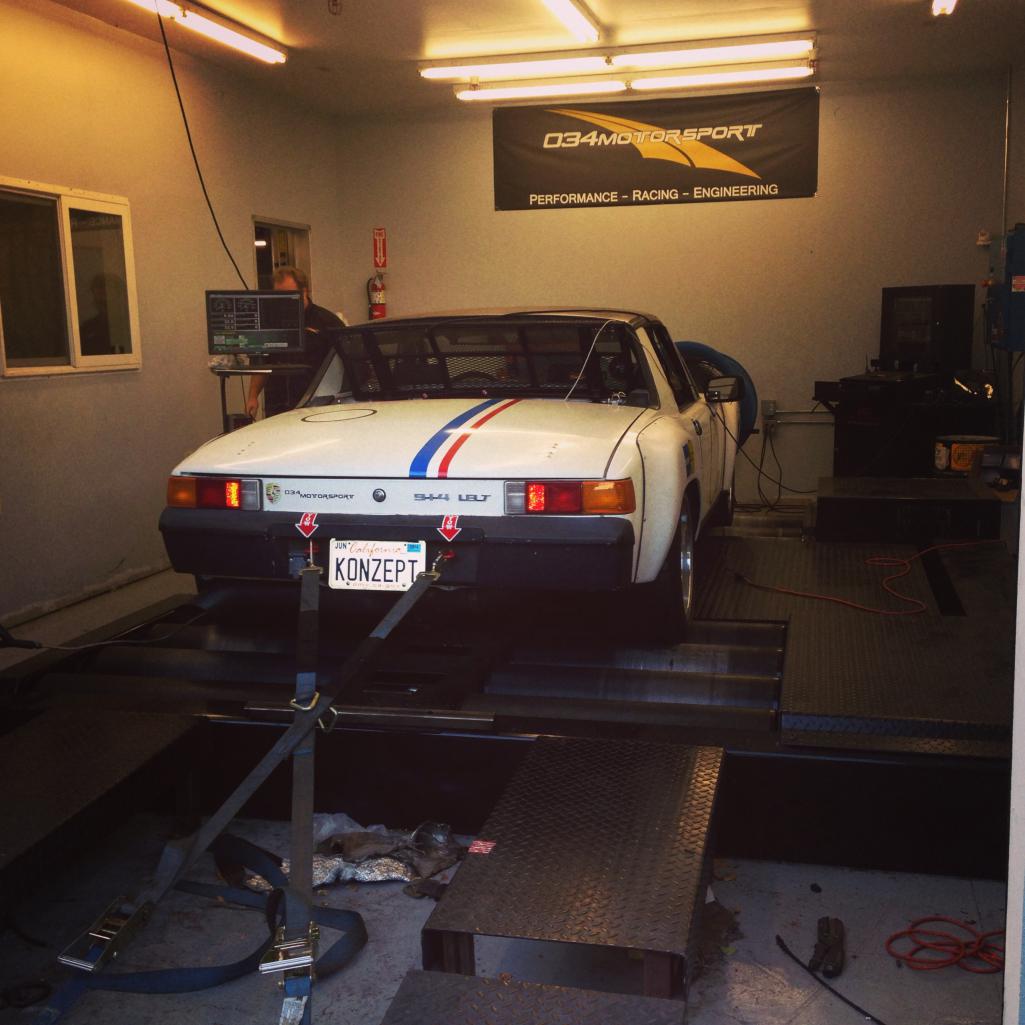
Posted by: Andyrew Nov 13 2013, 04:13 PM
Dyno looks great! For a comparison this is my dyno. I believe the boost controller was set to 19psi and I had 91 + 3 gal of 100 as I was going to crank up the boost but didnt due to my AFR being high. 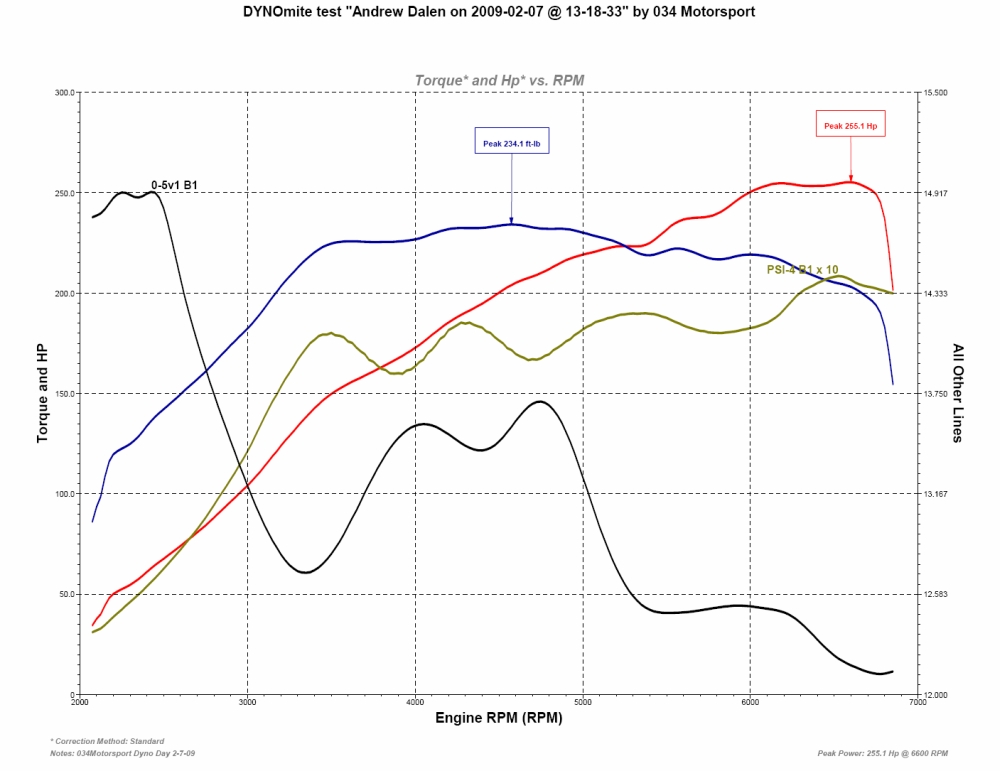
Posted by: Andyrew Nov 13 2013, 04:15 PM
What CV boots are you running?
Also what did they set the redline to?
Posted by: Mike Bellis Nov 13 2013, 04:41 PM
What CV boots are you running?
Also what did they set the redline to?
I'm running 930 CV's
Not sure where the redline is. I won't be going above 6500rpm.
They did say it was still making power at 6500. Once the WG is back on and we can boost higher... We shall see...
Posted by: Andyrew Nov 13 2013, 05:09 PM
I took mine regularly to 7200. I found it kept making solid power increase until just over 7k. People have run to 8k on virtually stock heads before and the valves done start to float until the high 7's.
Are you running Aftermaket boots (Over the shelf non oem) or OEM boots? Try getting some high end boots from Raxles.com or similar.
Posted by: jeeperjohn56 Nov 13 2013, 05:17 PM
Hey Mike, car sounds great love the sound it put's out. John
Posted by: Mike Bellis Nov 13 2013, 05:28 PM
Hey Mike, car sounds great love the sound it put's out. John
It does sound cool! Sounds even better with the exhaust sealed. At the end of the video you can hear the exhaust leak "tapping" from the wastegate. When the exhaust is working properly, the turbo makes a cool gurgle noise as you come off the gas..
Posted by: Mike Bellis Nov 13 2013, 07:26 PM
Well there's your problem... There's a hole in the exhaust manifold... No wonder it was loud and not making boost!
Looks like the bolts just backed out. Then it fell and dragged on the roadway. Look at the pic of the wastegate and you can see the self machining that happened. I ordered a new 90° adapter, it took the brunt of the damage. The WG has a little grinding on it so I may replace it too. So far the repair is $29 for the 90° and a couple bolts. Not too bad. I should have it running this weekend!
For the rest of you bean counters, the dyno tune with labor and parts cost me $1200, with $400 of it in parts. They only charged me to install spark plugs once. The first set were non resistor and the ECU went haywire. The second set were colder and resistor which made the ECU behave. I also kept all the old parts removed just in case. In CA the law requires mechanics to turn over parts if the customer requests them.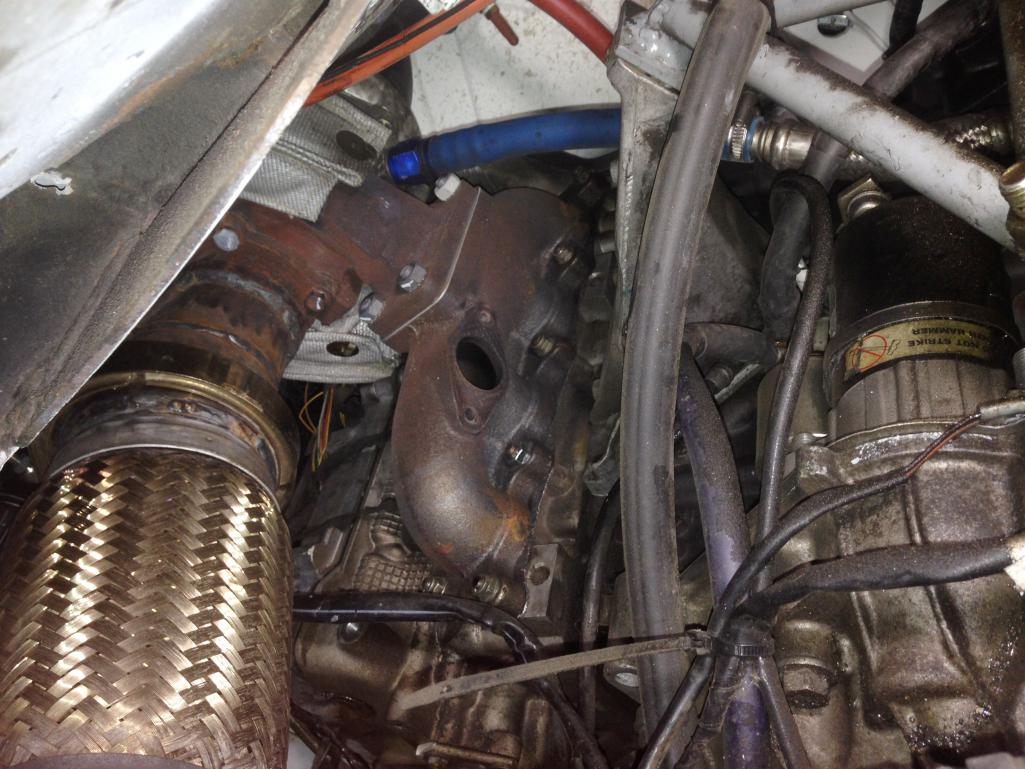
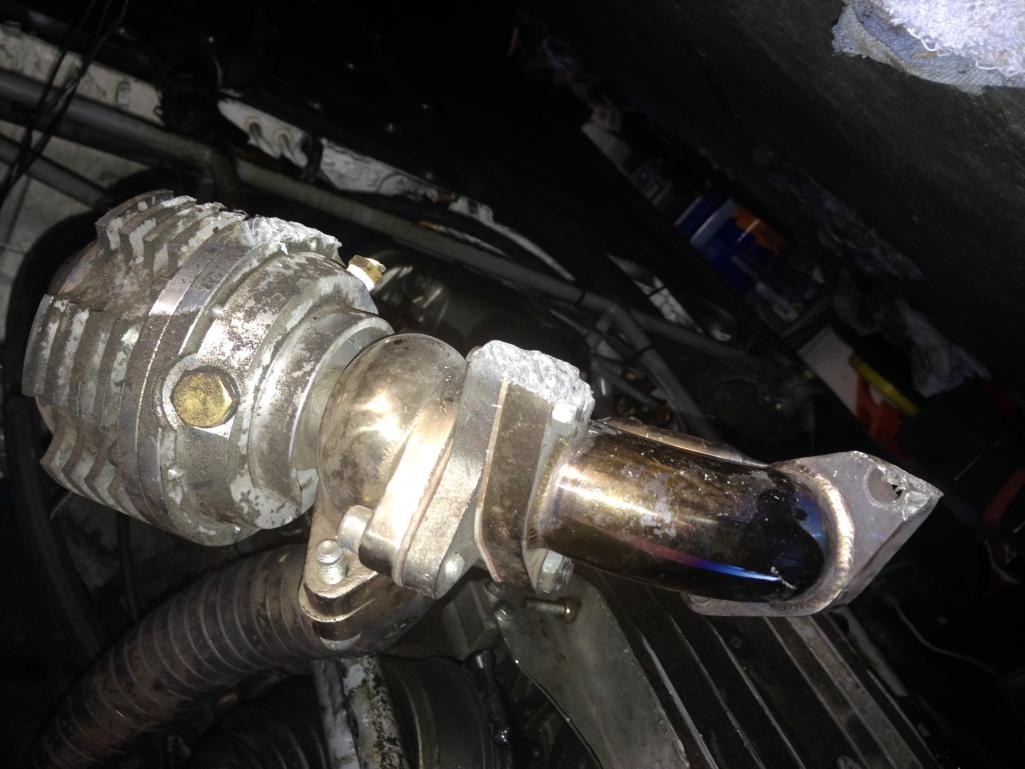
Posted by: Mike Bellis Nov 16 2013, 05:53 PM
Got the car fixed and took it for a shake down run...
HOLY MOTHER OF GOD!!!
This thing is super fast. Almost scary fast. The suspension, brakes and roll bar keep it from being scary. It's boosting to 20psi. Nice and smooth boost. I can get full boost under 3000rpm. I can hit redline in 2nd & 3rd very fast, too fast. I keep having to shift...
I like it. I thought I heard a slight detonation at 20psi and above 5000rpm. I dialed in my methanol and it seemed to go away. I still need to take it back to flash out the ABS alarm so at that time I may have them look into the ping and maybe turn the boost up.
They set up the factory boost solenoid. No other boost control is needed and the factory valve keeps a nice boost plateau mitigating spikes.
Throttle response is great! Even at +0% in traffic all the way to 100%. Give it gas on the freeway and you're quickly moving at 100+mph.
I need to get this on a track and see what it can do! The PCA is having a DE event right before Thanksgiving at Laguna Seca. I'm not sure I can get in this one but for sure the next. I think I need to put my racing seat in and get a new 5 point harness...
So 034Motorsport has redeemed themselves. Even if they had the car for 3 weeks.
I highly recommend an Audi conversion. It's way faster than my V8 and easier to control. It's way smoother than the rotary and easier to control. The Audi drives like a factory engine until you put your foot into it. Then it roars to life as a big HP motor. My v8 was 250hp, my rotary was ~500hp. This is somewhere in the middle. Based on the "seat of the pants" dyno, I have to be nearing the 300hp mark. Which meets my original build goal. Just a little more tweaking here and there and I will be "just driving" and done wrenching...
Who wants to go for a ride?

Posted by: 914_teener Nov 16 2013, 06:09 PM
Hey Mike.....
Hope to see you and your wife in Monterrey this coming June.
Glad to see you down here in the LA area..........
No more museums though!
Take care and see you in June......take my wife for a spin in your car so I can get the green light on a new motor...lol. Awesome car.
Rob
Posted by: Mike Bellis Nov 16 2013, 06:13 PM
Hey Mike.....
Hope to see you and your wife in Monterrey this coming June.
Glad to see you down here in the LA area..........
No more museums though!
Take care and see you in June......take my wife for a spin in your car so I can get the green light on a new motor...lol. Awesome car.
Rob
Rob,
We had a blast hanging with you and yours. I will be in Monterrey in June. My son graduates around the same time so the timing still needs to get sorted. See you there!
Mike
Posted by: Chris H. Nov 17 2013, 12:52 PM
Mike,
Less than half way through the 3.3 conversion I've learned it's very easy to say, "I'll just stick a bigger engine in there, it'll be great." But doing it is soooo much harder. You really engineered that car into your own thing. Getting the brakes and suspension to match the engine output without overdoing it... well... ... Nice work.
Posted by: Krieger Nov 17 2013, 01:27 PM
Nice work Mike!
Posted by: Mike Bellis Nov 17 2013, 02:48 PM
Went for a good shake down run toady. Car runs great with BIG power.
It is evident that I will need a new clutch soon. The car make too much power for the SPEC Stage 3 clutch. In between the 2-3 shift it feels like it slips a little. Once in 3rd at full boost, it does not slip at all. It's only when it grabs does it feel loose. I also smell burning rubber and hear a squeal in 3rd, 4th & 5th @ WOT and 20psi. it is either the belt slipping or the rear tires slipping. I think it's the belt.
I also need to figure out a CV joint solution. The 930 cv's are not going to last. I can hear both sides clicking and the passenger side got real load after a few full boost pulls onto the freeway. Marty (MSDS) gave me a lead to some 4000hp CV's and I might have to go that route...
Posted by: Andyrew Nov 17 2013, 04:02 PM
Mike that sounds a lot better
Sounds like my 1.8T. And if you EVER needed more power you could bump the boost up or throw a larger turbo on.
Sounds like you have a proper 350hp now. With meth, 20psi and that turbo you should be between 330-350 crank.
Take an in car pull, I'd like to see the speedo
Posted by: Mike Bellis Nov 17 2013, 04:14 PM
Mike that sounds a lot better
Sounds like my 1.8T. And if you EVER needed more power you could bump the boost up or throw a larger turbo on.
Sounds like you have a proper 350hp now. With meth, 20psi and that turbo you should be between 330-350 crank.
Take an in car pull, I'd like to see the speedo
I went out to Manteca today on my shake down. On the way back I took Altamont Pass Rd. I was just tooling along, only a few mph above the speed limit. This dude in a Honda came out of nowhere and started riding my ass. I hit the corners a little faster to see if he wanted to keep up. We then hit traffic, three trucks and a trailer. I found a safe spot to pass, hit 3rd gear and poof! I was gone. I don't know what happened to the Honda dude. He did not want to play anymore...
I don't think I need anymore power. Did I really say that?
I'm more worried about what going to break next!?!?!?!?
Posted by: speed metal army Nov 17 2013, 04:23 PM
Mike that sounds a lot better
Sounds like my 1.8T. And if you EVER needed more power you could bump the boost up or throw a larger turbo on.
Sounds like you have a proper 350hp now. With meth, 20psi and that turbo you should be between 330-350 crank.
Take an in car pull, I'd like to see the speedo
I went out to Manteca today on my shake down. On the way back I took Altamont Pass Rd. I was just tooling along, only a few mph above the speed limit. This dude in a Honda came out of nowhere and started riding my ass. I hit the corners a little faster to see if he wanted to keep up. We then hit traffic, three trucks and a trailer. I found a safe spot to pass, hit 3rd gear and poof! I was gone. I don't know what happened to the Honda dude. He did not want to play anymore...
I don't think I need anymore power. Did I really say that?
Thats pussy talk!
the renegade cv setup seems to be holding out on mine...Lotsa power is FUN in a 914
I'm more worried about what going to break next!?!?!?!?
Posted by: Mike Bellis Nov 17 2013, 04:36 PM
Thats pussy talk!
the renegade cv setup seems to be holding out on mine...Lotsa power is FUN in a 914
The Renegade CV's are VW type 2 units. I have a set with axles sitting around.
My problem is the angle. I haven't measured but I'm guessing more than 22°.
As for power, you can only go so fast... This is way more power than my V8. The low end torque is less but that allows the tires to hook up. Then the turbo and engine with help from the lightened flywheel spool up very quickly. This thing needs a PDK! As soon as I shift, I have to shift again...
Posted by: DBCooper Nov 17 2013, 06:02 PM
Ha ha ha, I know exactly what you're talking about. Fun isn't it? I think those Hondas must have run into a a lot of MGB's, so now think all older two seaters are wimpy. They do sober up pretty quickly though, don't they?
I left my outer CV's stock so they'd break instead of the 901. So far that's what happened, and I've broken three. I have a stronger transmission now so am thinking that maybe I should upgrade. I was going toward the 944 CV's, but if there's something better I'm all ears. I'm curious to see what you come up with.
Posted by: 2mAn Nov 17 2013, 06:44 PM
Who wants to go for a ride?

I will be in the Bay Area for Christmas
Posted by: Mike Bellis Nov 17 2013, 07:10 PM
Who wants to go for a ride?
I will be in the Bay Area for Christmas
PM me when you're in town and we'll see if it works out.
Posted by: ChrisNPDrider Nov 18 2013, 11:31 AM
awesome
Which turbo project will last longer before blowing up, Mike B's or McMark D's??
Have fun
PS - Sir Francis Drake Blvd through West Marin was just re-paved. No lines painted yet...still some construction. I'm hoping to inspire a West Marin 914 weekend cruise loop as soon as it's done. This is all part of Excellence Mag's various "test loops" as I've seen local landmarks in many of their photos. It's been epic fun now that it is no longer pot-hole riddled crumbly road
Posted by: Mike Bellis Nov 18 2013, 11:45 AM
awesome
Which turbo project will last longer before blowing up, Mike B's or McMark D's??
Have fun
PS - Sir Francis Drake Blvd through West Marin was just re-paved. No lines painted yet...still some construction. I'm hoping to inspire a West Marin 914 weekend cruise loop as soon as it's done. This is all part of Excellence Mag's various "test loops" as I've seen local landmarks in many of their photos. It's been epic fun now that it is no longer pot-hole riddled crumbly road
I'm going to say... Mine will blow up first


This is loosely based on horsepower levels and driving styles...
Posted by: 2mAn Jan 9 2014, 05:15 PM
Did you ever figure out what happened? kinda kicking myself that I didnt want to drive it. Maybe next time I come up I will ask
I know I will be up in the area for some Vintage Racing in Sonoma, hopefully some of you guys will be there as well!
Posted by: Mike Bellis Jan 9 2014, 05:30 PM
Did you ever figure out what happened? kinda kicking myself that I didnt want to drive it. Maybe next time I come up I will ask
I know I will be up in the area for some Vintage Racing in Sonoma, hopefully some of you guys will be there as well!
I blew a fuse that operates the wastegate solenoid, O2 sensor and MAF. Not sure why. When I replaced the fuse, the ECU is holding the WG solenoid open all the time. Not allowing any boost to build.
When I saw you, the fuse was blown so I had too much boost without the MAF or O2 working. I can't believe I didn't blow up the engine.
So the car has been sitting for 2 weeks with the battery disconnected. If the ECU will not work the solenoid, I may put in a manual boost control until I can either swap out the ECU or repair it.
I will play with it this weekend and see what happens...
Posted by: edwin Jan 9 2014, 05:43 PM
Given your experience with aftermarket ecu's are you still happy with running the factory computer? Seems like a lot of drama
Posted by: Mike Bellis Jan 9 2014, 08:45 PM
Given your experience with aftermarket ecu's are you still happy with running the factory computer? Seems like a lot of drama
When it runs good, it runs better than any aftermarket system I have tried. At low or no boost, it runs like a stock Audi. Perfect! When the boost comes on it runs like a raped ape! As much drama as it has been, the car only spent about 4-5 hours being tuned on the dyno. Compare this to an aftermarket system and the benefits show. Most of us don't own a dyno so with an aftermarket system you will be tuning for days, weeks, months and it will still run crappy in certain areas. Most aftermarket ECU's look at hundreds of variables per second. Factory ECU's look at thousands per second. Driveability are big issues with aftermarket ECU's. Poor Jim with his Microsquirt can't get rid of low rpm bucking. I can idle forward and feather into the gas and the car runs smooth as silk. So far the cost is about the same. I'm into the ECU and injection about $2k. An aftermarket system will cost you about the same after you buy all the peripherals.
So I had a phone call with my tuner on the way home today. After some phone call troubleshooting, it sounds more like I popped an intake tube off or torn a silicone coupler. The WG spring is 10psi. If the solenoid malfunctions I should see 10psi boost minimum as this is the pressure of exhaust that will push it open. I am seeing 1-2psi max which is more indicative of an intake leak. I have some piping that is really hard to get to nor can you see it. So I will have to remove some parts to get in there and look. When the fuse first blew, it was spiking boost over 30psi, so it could have esily popped a tube off.
I will know for sure this weekend... Stay tuned...
Posted by: Andyrew Jan 10 2014, 01:08 AM
I agree it sounds like you popped a hose. When did this happen?
Posted by: Mike Bellis Jan 10 2014, 09:12 AM
I agree it sounds like you popped a hose. When did this happen?
Fuse blew 2 weeks ago when I swapped my 5 speed back in. I only drove it a short while since but is had spiked to over 30psi during the drive since the WG was not functioning.
Posted by: Andyrew Jan 10 2014, 12:59 PM
Well a nice 30psi spike would definitely cause some popped hoses...
Why did you swap the 5 speed back in? Issues with the 6spd?
Posted by: Mike Bellis Jan 10 2014, 04:52 PM
Well a nice 30psi spike would definitely cause some popped hoses...
Why did you swap the 5 speed back in? Issues with the 6spd?
Bad bearing in the 6 speed making noise. I do like the shorter ratios in the 6!
Posted by: Maltese Falcon Jan 10 2014, 11:43 PM
Mike, didn't I see a Haltech Platinum ecu in the trunk of your 914, when you were down in L.A. ?
Or was it just an HECU-1 coil igniter ?
Marty
Posted by: Mike Bellis Jan 10 2014, 11:43 PM
Well a quick look at the tubing and it looks intact. I'll have to look carefully for a ripped silicone connection.
If the tubing is OK, that leaves a stuck diverter valve or a bad turbo...
Posted by: Mike Bellis Jan 11 2014, 08:21 AM
Mike, didn't I see a Haltech Platinum ecu in the trunk of your 914, when you were down in L.A. ?
Or was it just an HECU-1 coil igniter ?
Marty
That was a Haltech WB O2 controller. I do have an extra HECU-1 if anyone needs one...
Posted by: Mike Bellis Jan 11 2014, 08:21 AM
Mike, didn't I see a Haltech Platinum ecu in the trunk of your 914, when you were down in L.A. ?
Or was it just an HECU-1 coil igniter ?
Marty
That was a Haltech WB O2 controller. I do have an extra HECU-1 if anyone needs one...
Posted by: 76-914 Jan 11 2014, 09:43 AM
Well a quick look at the tubing and it looks intact.
I'll have to look carefully for a ripped silicone connection. If the tubing is OK, that leaves a stuck diverter valve or a bad turbo...
Smoke Test? Not that kind.

Posted by: Mike Bellis Jan 11 2014, 11:13 AM
Well a quick look at the tubing and it looks intact.
I'll have to look carefully for a ripped silicone connection. If the tubing is OK, that leaves a stuck diverter valve or a bad turbo...
Smoke Test? Not that kind.
I'm starting to think my WG may be bad. If you go back a couple pages you will see my WG had fallen off and was dragging on the ground. For about 10 miles on a twisty road! All I did was fix an adapter fitting and bolt it back on to see if it worked. It did and I drove it until now. I have a new WG sitting on the shelf waiting to be used.
I think it's the WG since I'm running a Forge DV in semi-blow mode. If the DV was bad, I would hear it whistle. All my intake tubing looks intact. All my silicone fittings look intact.
I'm going to pull the WG and see if the valve is stuck open. The valve may be bent from all the road rash...
The turbo still spins freely and when I turn off the engine, I can hear it spin down for some time before it stops. I think it is probably good since I never heard or felt a problem. I have to think if the turbo had a catastrophic failure, I would know when it happened. Since no FOD entered the intercooler and the exhaust still spins it, 90% chance it's still OK.
Posted by: Andyrew Jan 11 2014, 12:07 PM
The turbo would make a noise, dentist drill or similar or sound like an exhaust leak.
Forged DV's really dont go bad. It makes perfect sense for it to be the wategate that dragged on the ground Those turbo's dont just up and go bad instantaneously unless something comes in the intake and its the blades.
Posted by: Mike Bellis Jan 11 2014, 12:10 PM
The turbo would make a noise, dentist drill or similar or sound like an exhaust leak.
Forged DV's really dont go bad. It makes perfect sense for it to be the wategate that dragged on the ground
Those turbo's dont just up and go bad instantaneously unless something comes in the intake and its the blades.Exactly! FOD would have to get through my air cleaner and MAF grid first. Turbo makes no noise at all.
Posted by: Mike Bellis Jan 11 2014, 03:16 PM
There's you problem right there... 
The Waste gate broke! The two halves separated and all the exhaust pressure was going out the WG. no spring pressure at all... 
Looks like it took some abuse but it was enough to start the self disassembly process. 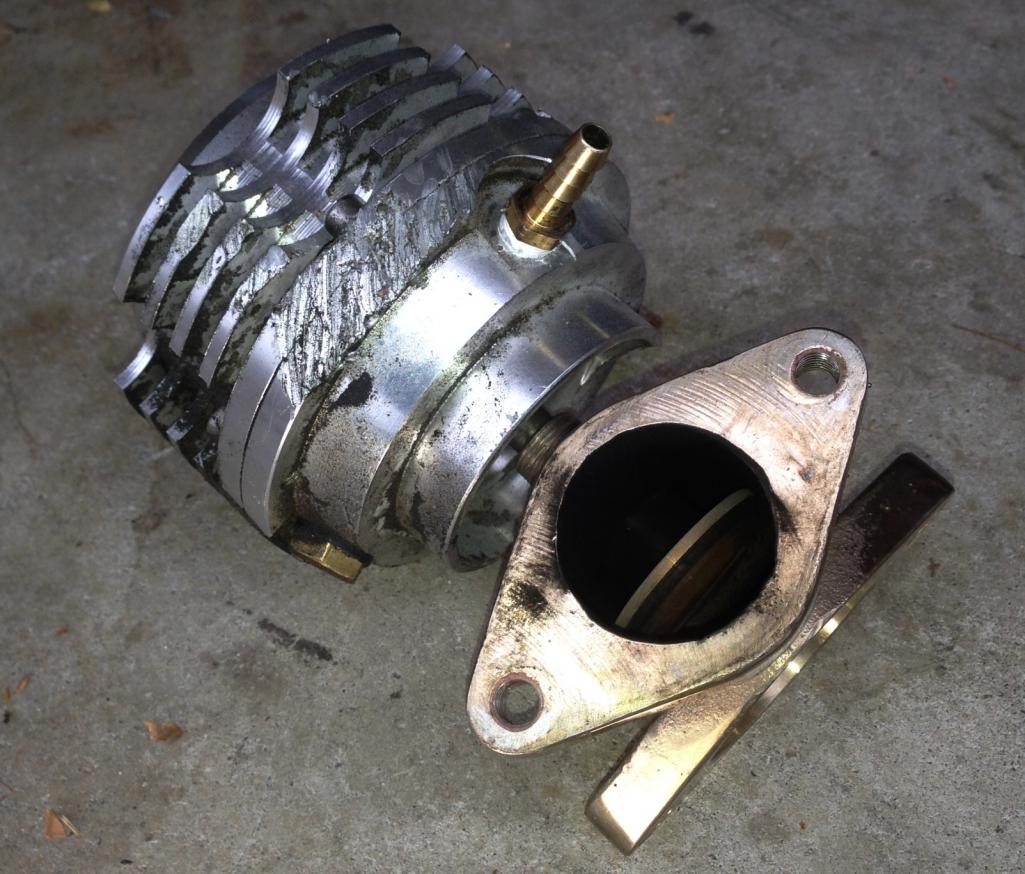
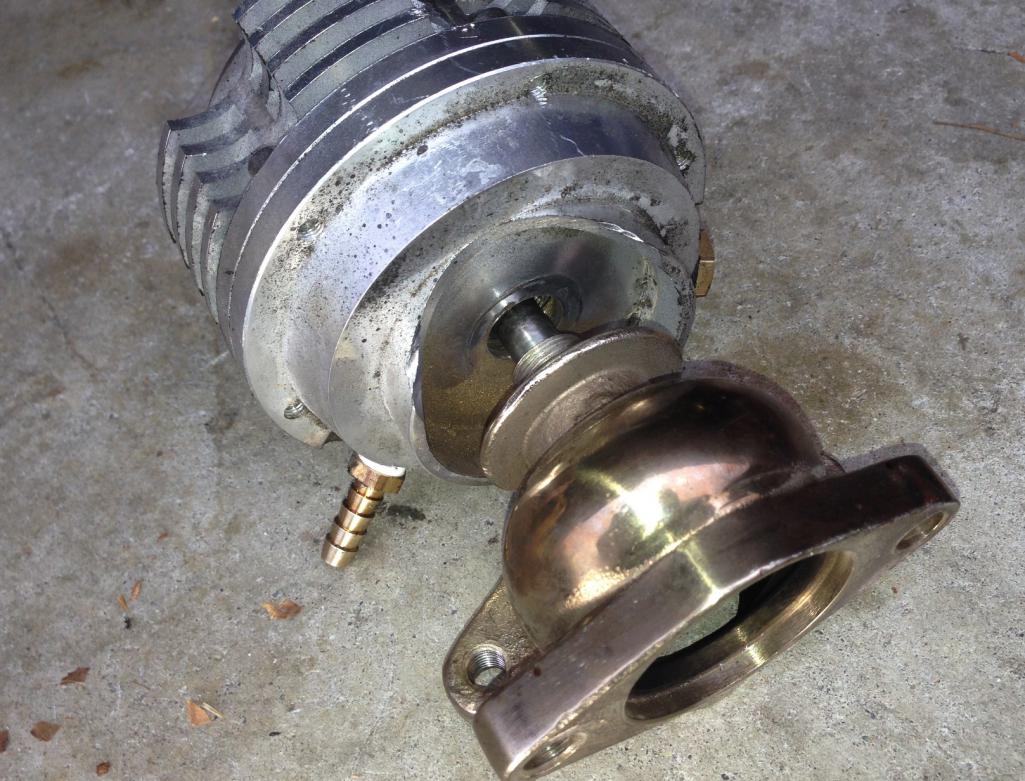
Here is the one I had sitting around. 38mm water cooled JDM POS. I have had great luck with the WG vendor so hopefully it will last long enough. This one was bolted on with new gaskets and high temp thread locker.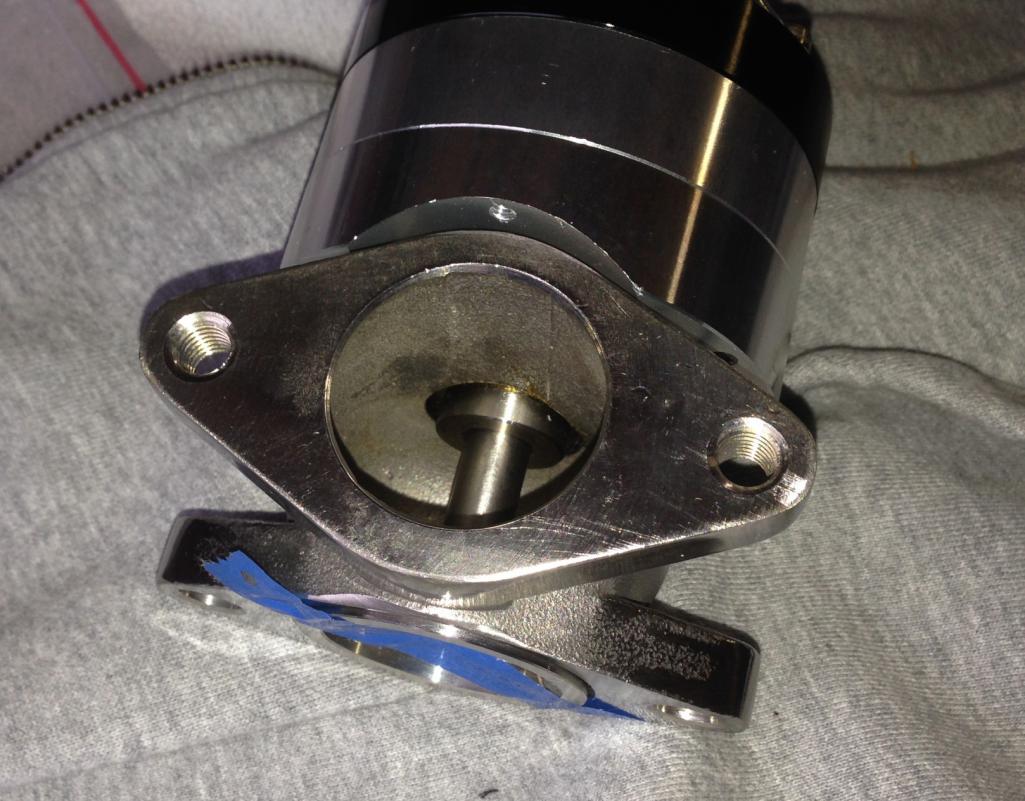
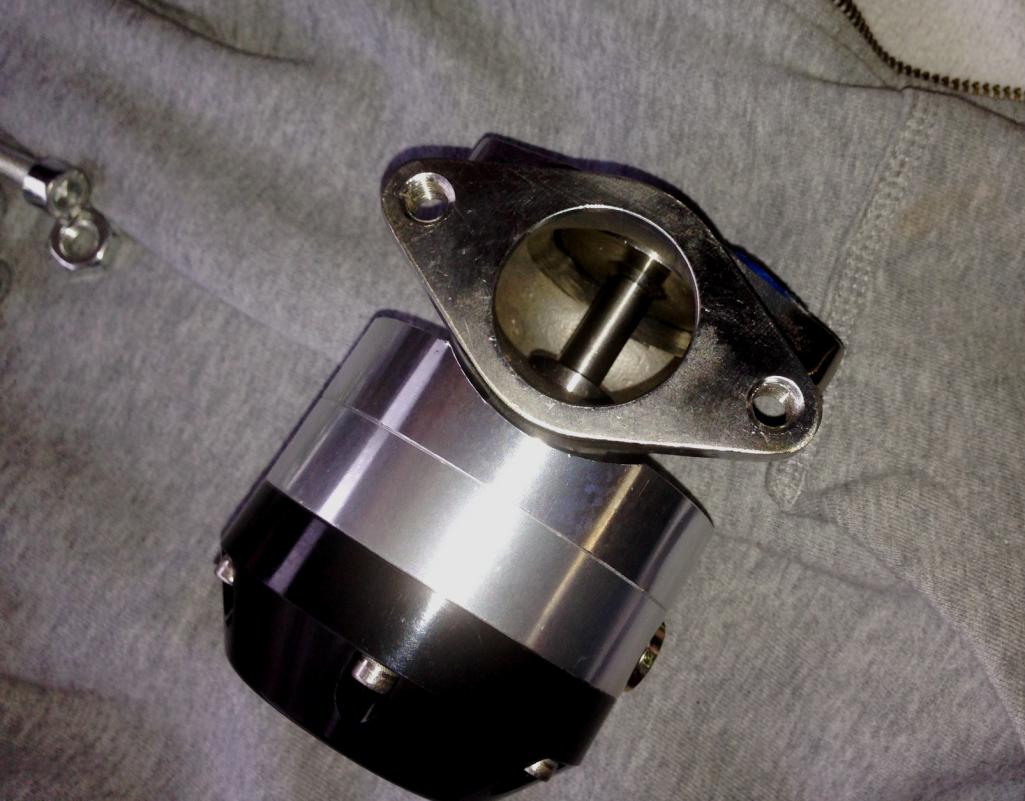
Posted by: Mike Bellis Jan 11 2014, 03:23 PM
OK. Car runs perfect again.
2nd rule in Troubleshooting:
Make sure your not chasing 2 different problems.
I had a blown fuse, then I had a no boost problem. I first started to look at this as a related problem. ECU got the blame. Turns out to be an electrical and mechanical fix. (See last post)
Now on to the next project...
Who can guess what these parts will become?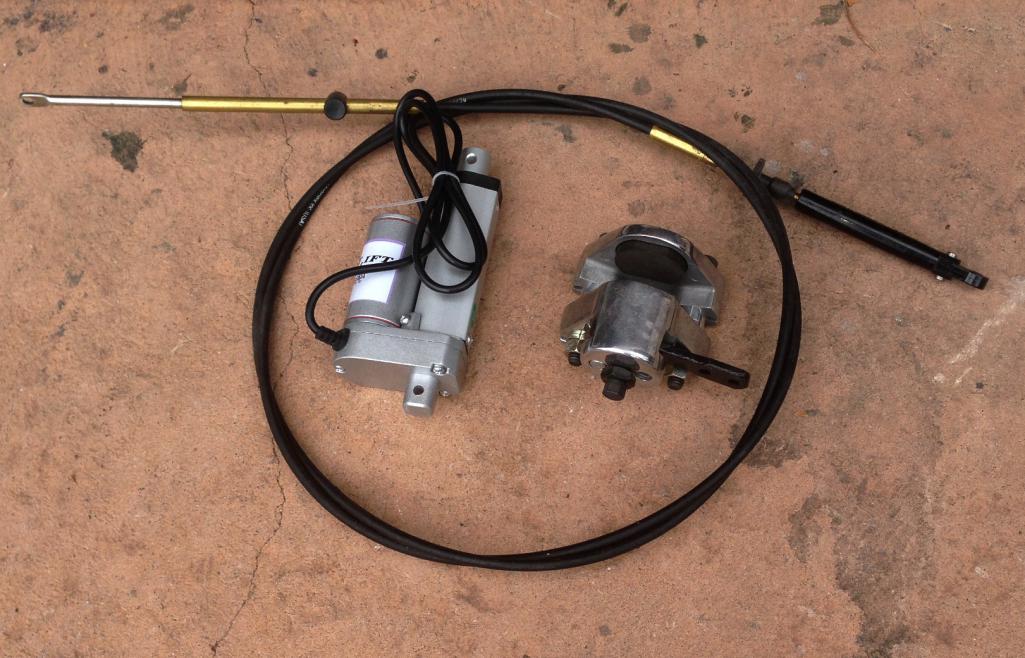
Posted by: Maltese Falcon Jan 11 2014, 03:33 PM
[/quote]
That was a Haltech WB O2 controller. I do have an extra HECU-1 if anyone needs one...
[/quote]
Mike, pm me a good guy price...I might want a spare unit in stock for 9148 gtt.
Marty
Posted by: Maltese Falcon Jan 11 2014, 03:38 PM
OK. Car runs perfect again.
2nd rule in Troubleshooting:
Make sure your not chasing 2 different problems.
I had a blown fuse, then I had a no boost problem. I first started to look at this as a related problem. ECU got the blame. Turns out to be an electrical and mechanical fix. (See last post)
Now on to the next project...
Who can guess what these parts will become?
Solenoid/ Cable operated air brakes (Raptor style) for rapid decel ?!
Posted by: Mike Bellis Jan 11 2014, 03:45 PM
That was a Haltech WB O2 controller. I do have an extra HECU-1 if anyone needs one...
Mike, pm me a good guy price...I might want a spare unit in stock for 9148 gtt.
Marty
This is what I have left. 4 Channel ignitor module. Just the module. Not sure where the used plugs and bracket are.
Posted by: Mike Bellis Jan 25 2014, 07:31 PM
Today's project was corny and trivial. I bought these "Porsche Lasers" and installed one on my rear bumper. They came from Bangood.com (China) and cost $12.50 for a pair. The kit comes with a hole saw "HSS" that worked good enough for my FG bumper. It is actually an LED with a lens that is printed with the Porsche Logo. Like a slide but. It looks better than I thought it would. I have it pointed down and will light up with the headlights. The ribbed barrel unscrews to reveal a small flange on the end of the lamp.
The kit is intended to be installed in the doors and go on with the dome light. If you want a pair go here... http://www.banggood.com/2-X-Laser-Logo-LED-Door-Ghost-Shadow-Welcome-Lights-For-Porsche-p-908117.html
The whole install was worth it since I discovered the fiberglass bonding to the mounting tabs needs some attention.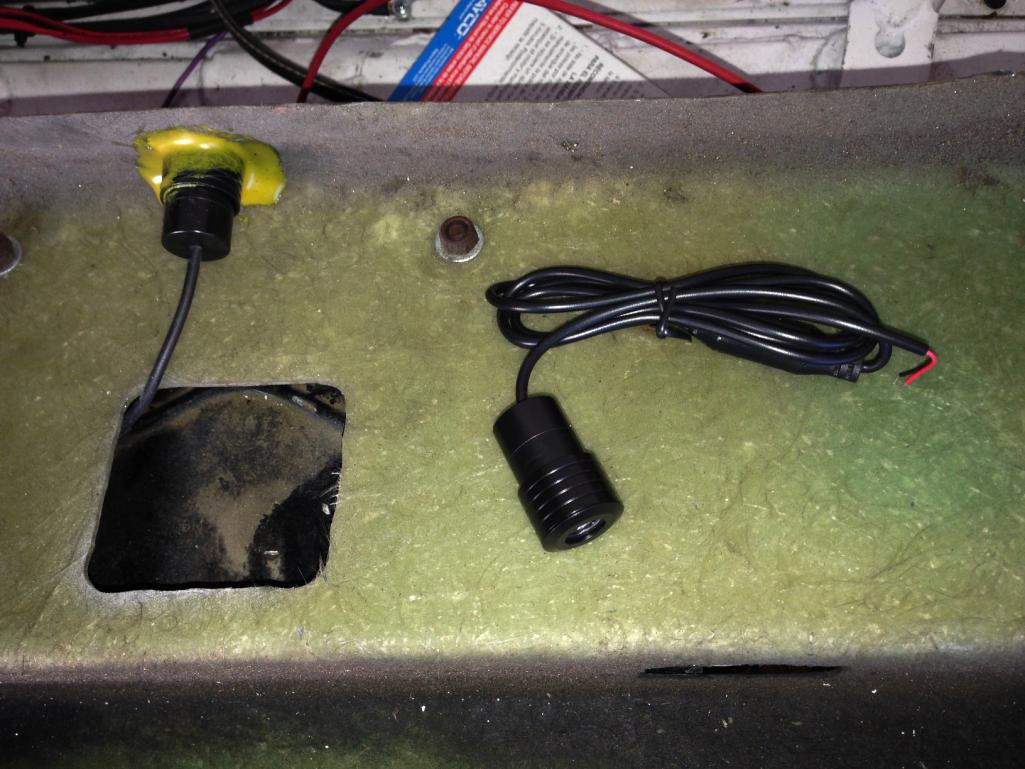
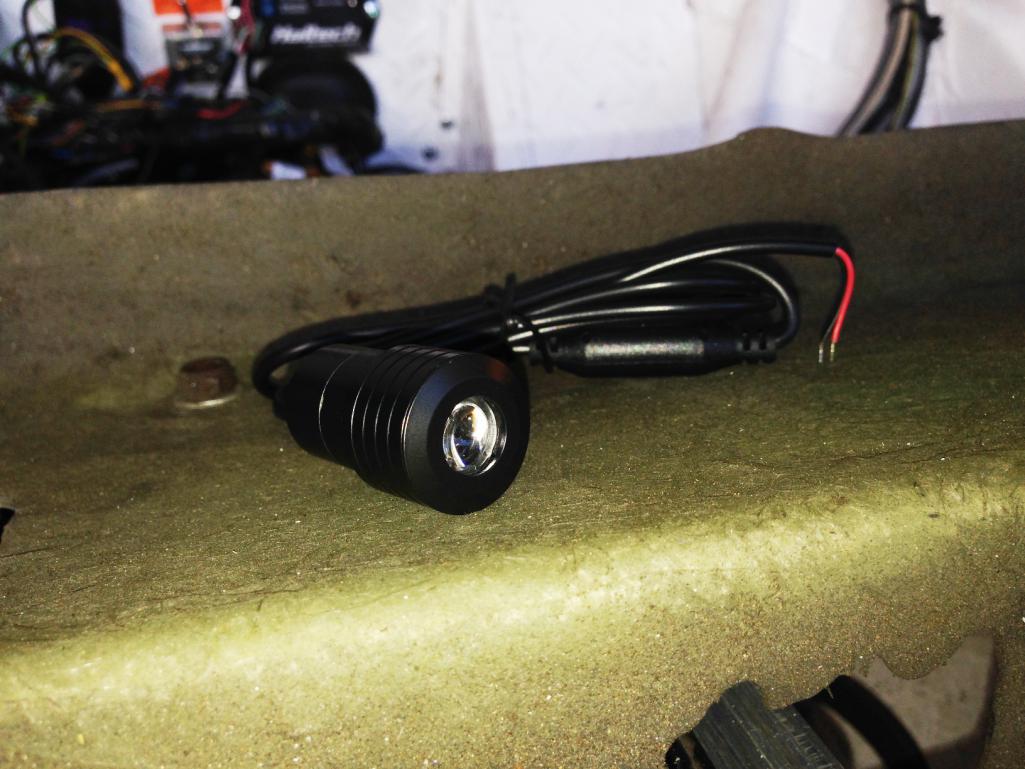
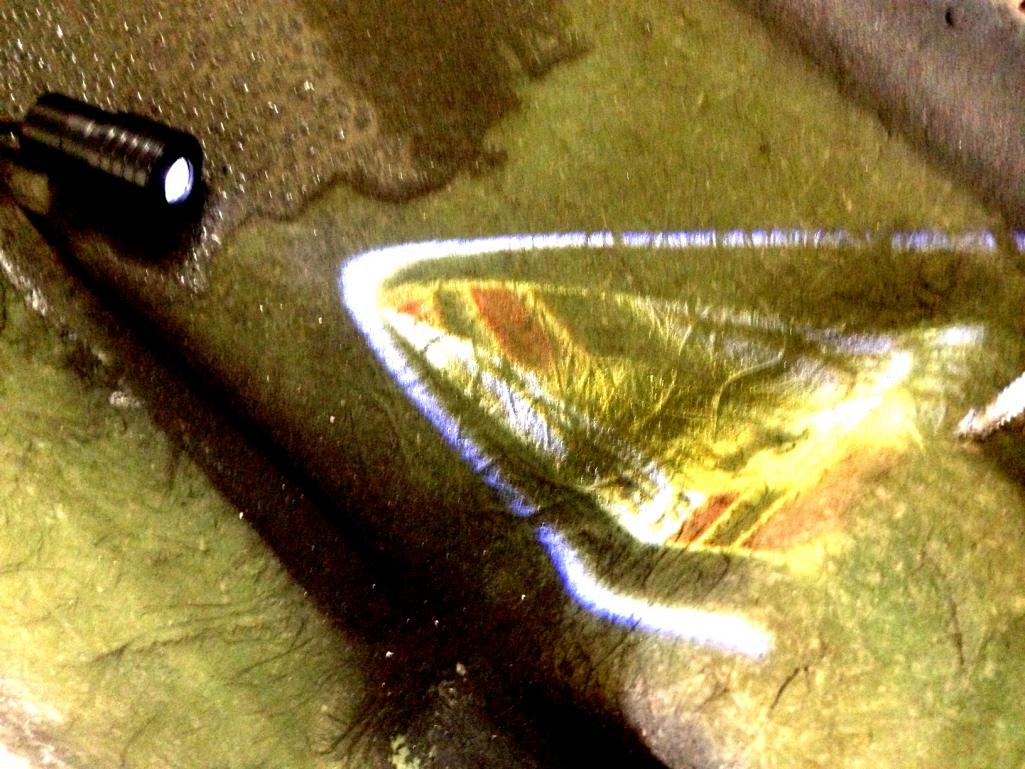

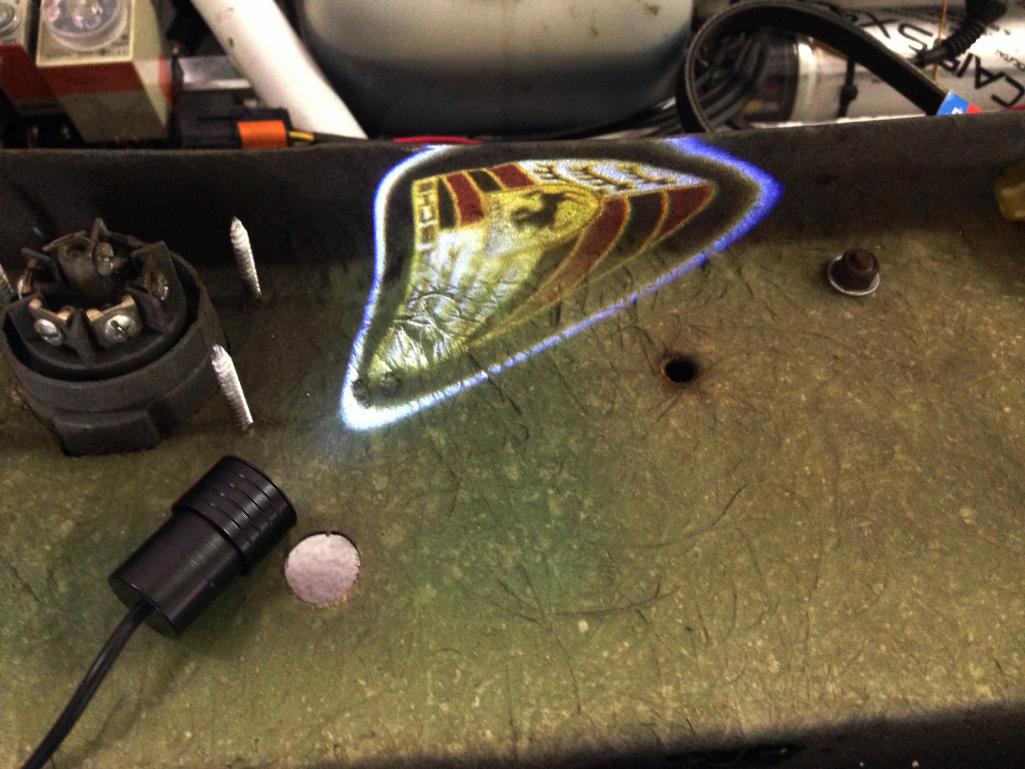
Posted by: Mike Bellis Jan 25 2014, 07:34 PM
DAPO
Who does this? 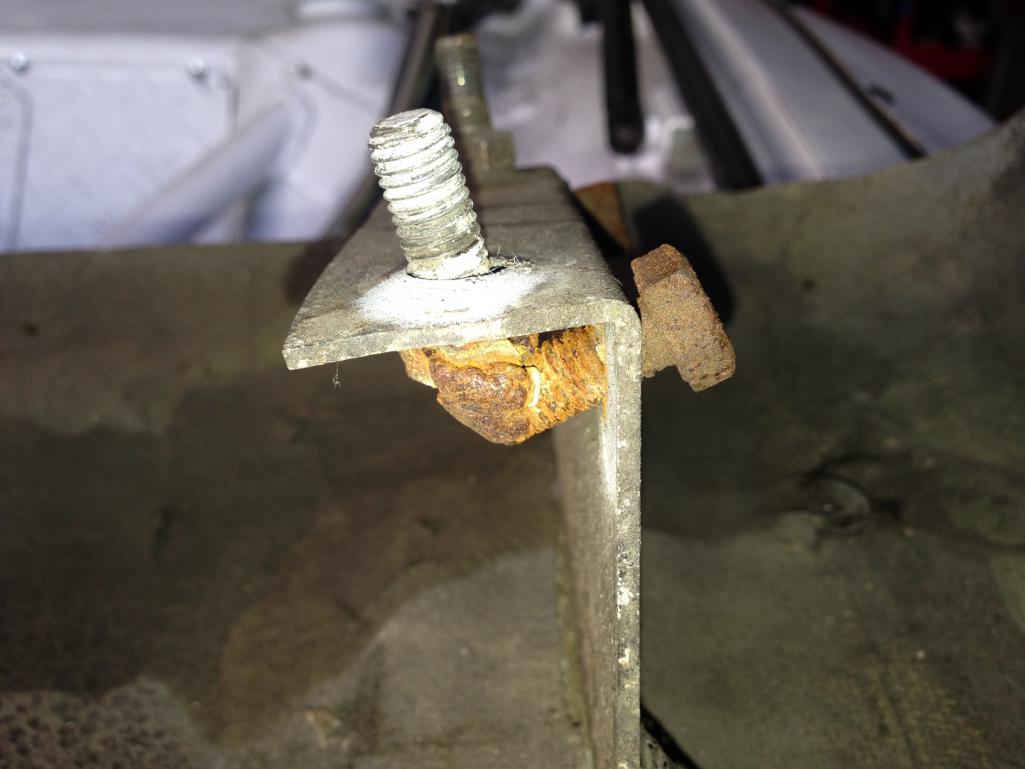
Loose fiberglass needs to be cut off and redone. I have epoxy and CF so it will be a lightweight repair. 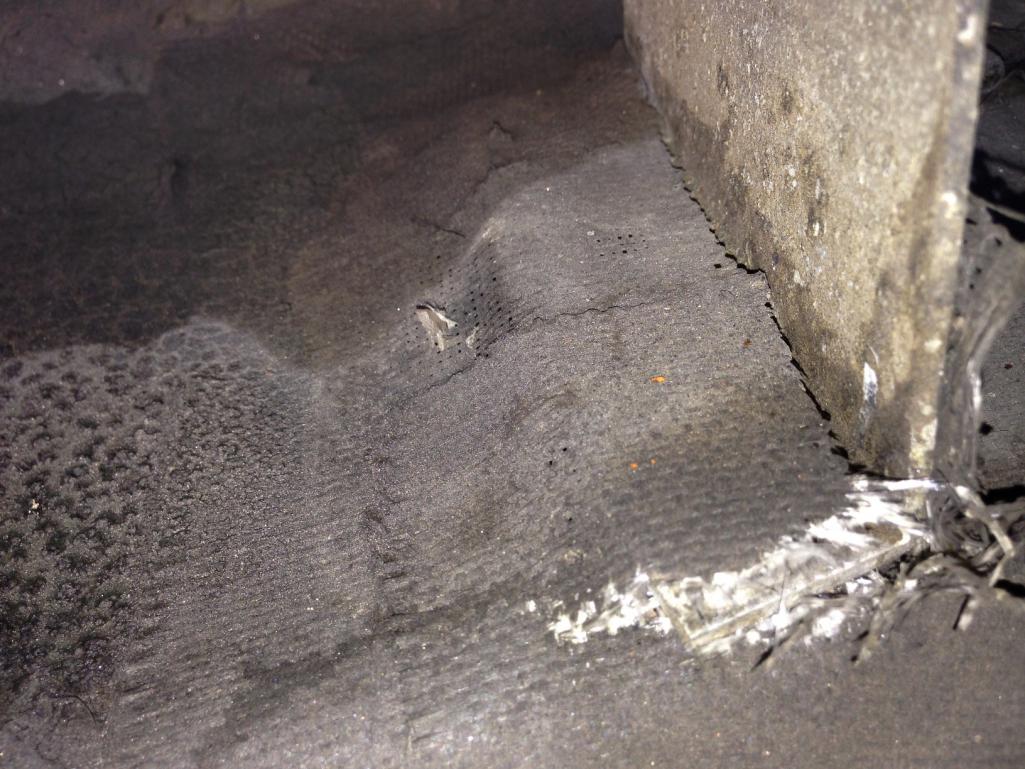
Posted by: bulitt Jan 25 2014, 08:08 PM
OK. Car runs perfect again.
2nd rule in Troubleshooting:
Make sure your not chasing 2 different problems.
I had a blown fuse, then I had a no boost problem. I first started to look at this as a related problem. ECU got the blame. Turns out to be an electrical and mechanical fix. (See last post)
Now on to the next project...
Who can guess what these parts will become?
Electric Parking Brake
Posted by: Mike Bellis Jan 25 2014, 08:18 PM
Electric Parking Brake
We have a winner!
Yes. Just waiting for a few more parts and some motivation.
Posted by: CptTripps Jan 26 2014, 04:31 PM
DAPO
Who does this?
That's just awesome.
Belongs in the DAPO. Pictures thread for sure.
Posted by: euro911 Jan 26 2014, 05:50 PM
Who does this?
Belongs in the DAPO. Pictures thread for sure.
Does this qualify?
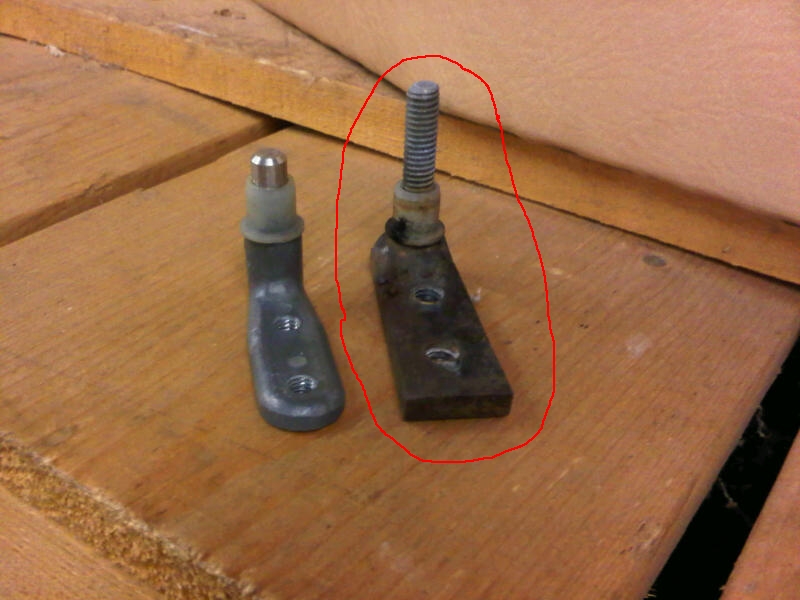
Posted by: CptTripps Jan 26 2014, 08:17 PM
There's a DAPO thread?
Yup to both!
http://www.914world.com/bbs2/index.php?showtopic=111299
Posted by: Mike Bellis Apr 25 2014, 07:54 PM
I finally got my "non plunging" 930 CV's. These operate up to 40°. The cage and star are chrome moly. Notice the bearing track is symmetrical, equal distance and 90° to the face. These require 3" of splines to let the axle slide in the CV.
My plunging CV's click due to the angle. As the axle spins, there has been a harmonic vibration of the axle. This is mostly noticed at low rpm (axle speed). On the freeway there is no vibration. These CV's eliminate the harmonic and clicking. Install tomorrow!
Non Plunging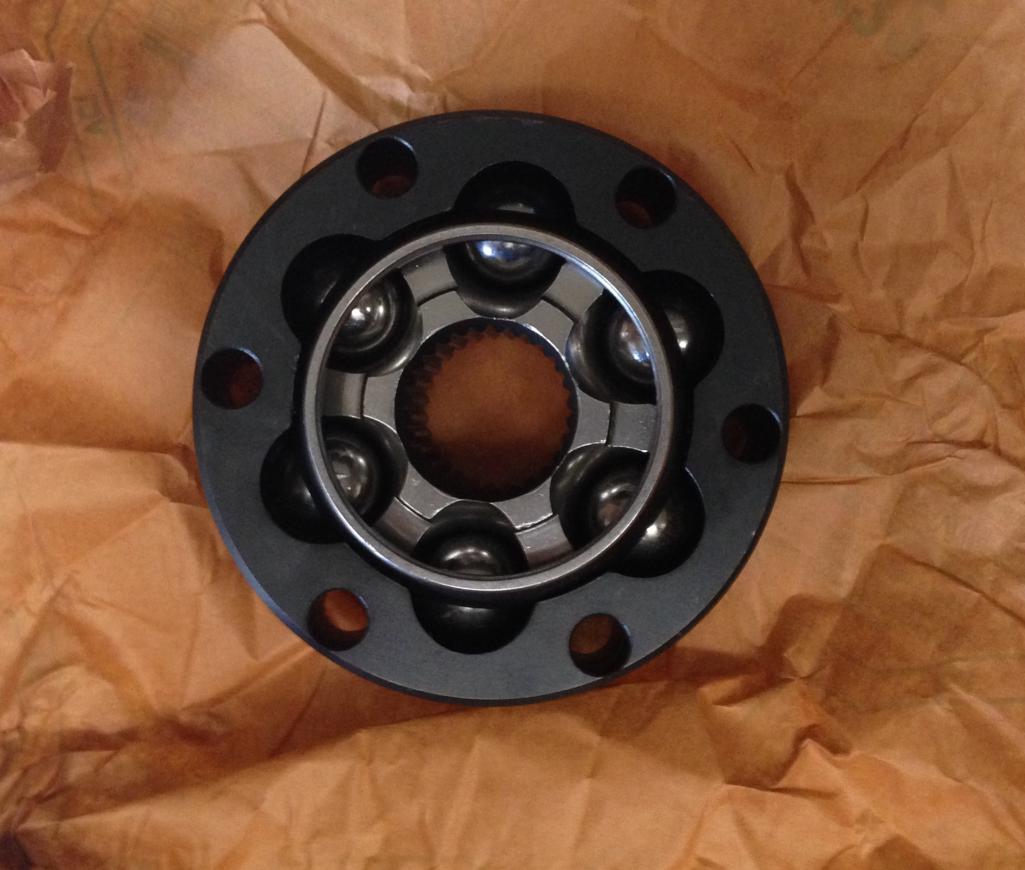
Plunging CV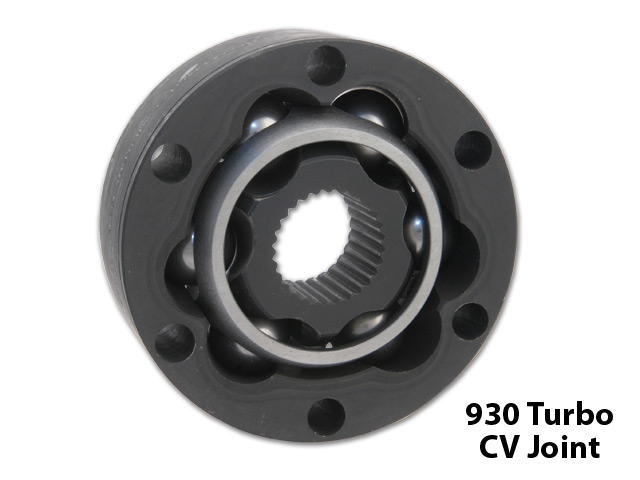
Posted by: Mike Bellis May 10 2014, 03:42 PM
Well it's going under the knife again. When I originally installed the Audi motor, I mounted it as low as as far forward as possible. This became my Nemesis. I have been fighting axle angle for too long. Every time you fix something, you find the next weakest link. I now have axles and CV's that are stronger than almost any force my car can give. But the angle is steep, 15-20°, maybe more under compression.
The next weak link... The Boxster tranny (5 & 6 speed) use a circlip to keep the stub in the tranny. The axle angle is now causing it to "walk" out of the tranny after 500 miles or so. It pops right out of the diff and spills fluid on the ground.
I just took some measurements of the car and have determined I need to move & rotate the engine/tranny combo. It will move 2" to the rear and the end of the tranny will be lifted 2". This will put the axle in a better but not perfect position. The 6 speed is much longer than the 5. If I move it back any further, the exhaust will hang out too far.
This pic shows the present position (red) and the future position (green). I only need to rebuild the motor mounts and reuse the cradle. Then I have to move 100 other things connected to the motor, inter cooler, turbo, exhaust, MAF, fuel lines, methanol tank, trunk floor, and everything else that pops up.
Good news: I'm not swapping the motor out. It runs great, needs nothing except to flash out my ABS brake alarm.
Now I have a summer project...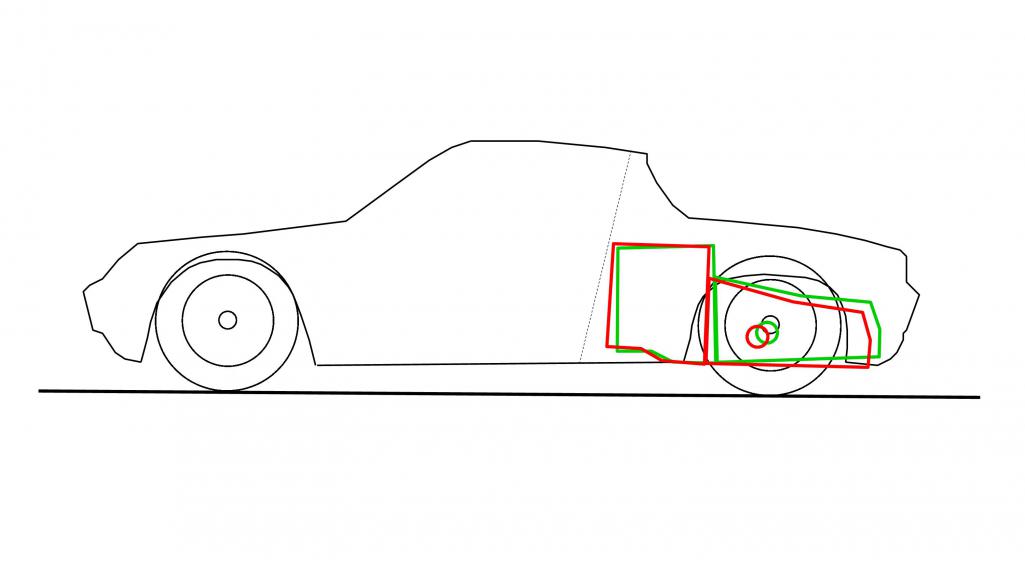
Posted by: Mike Bellis May 10 2014, 11:53 PM
Here are pics of the axle angles from the rear. Taken with my iPhone resting on level ground. The left side is worse due to the offset diff in the tranny. This does not show front to rear angle, only up/down. The angle on the left side was creating a walking motion of the CV toward center, thus pulling the stub flange out. The CV's are rated to work up to 40°.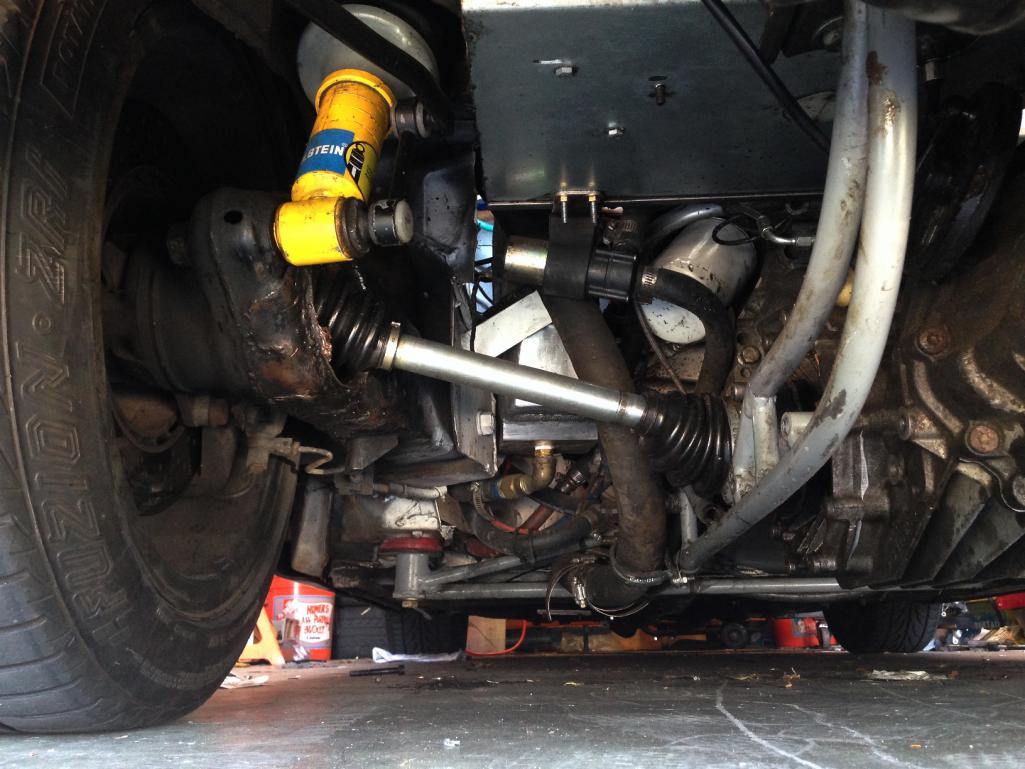
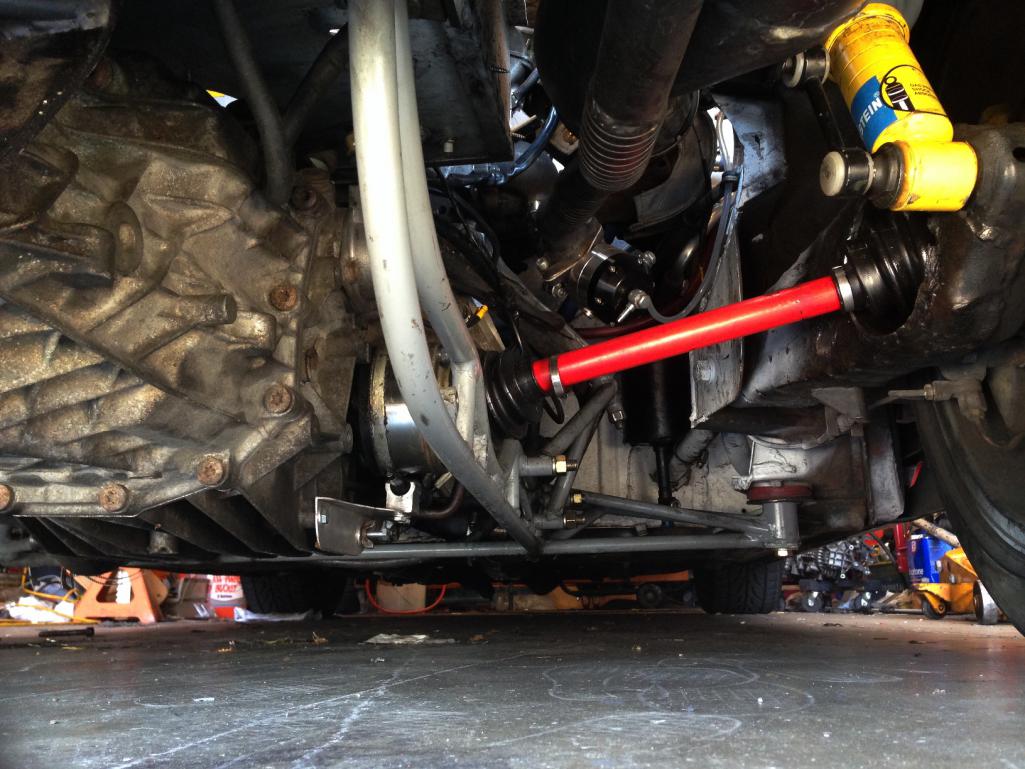
Posted by: Andyrew May 13 2014, 09:30 PM
Could you integrate the ABS from the passat? It would require redoing the brake lines and adding sensors, but doable right??
Just another awesome thought (914 with ABS would be awesome...)
On topic, that is an insane amount of angle. Really surprising you dont have more issues with it.
Posted by: Mike Bellis May 13 2014, 09:42 PM
Could you integrate the ABS from the passat? It would require redoing the brake lines and adding sensors, but doable right??
Just another awesome thought (914 with ABS would be awesome...)
On topic, that is an insane amount of angle. Really surprising you dont have more issues with it.
There is a Bosch racing unit that could be incorporated. I think the factory unit may be dangerous since its designed around a 3500 lb car with tiny brakes.
The angle is no worse than a sand rail. I now have crazy strong and flexible CV's. It's just pulling out the stub. Super easy to fix but a PITA. I don't want to drive around with a floor jack and a 2x4. So I have to fix it the hard way.
Posted by: JRust May 13 2014, 09:47 PM
Dude your making it way harder than it needs to be. Darn engineers. Just paint the drivers side red like the passenger side. That's what is throwing everything off. Pitiful when someone ignorant like me puts you in your place huh
Posted by: euro911 May 13 2014, 11:45 PM
Maybe the axles are different lengths, and he painted the Right side Red, so's he knows which one goes where
Posted by: falcor75 May 14 2014, 02:23 AM
Nice build! My own first project car was a Mk1 Scirocco with a 1.8t (180hp) swap. Would love to turbo my 914 but I want to keep the original engine and at the moment it just seems easier to build a 2.4 liter instead of going the boostroute.
Posted by: 76-914 May 14 2014, 08:05 AM
I wondered how long it would take before you got into it again. Is an amphi-car on the horizon.
Posted by: Mike Bellis May 14 2014, 04:15 PM
Well the axles are 2 different lengths and purchased at different times. So one set came raw and one came red.
I now have several pairs of various size 28 spline axles. PM me if you need an axle and I'll see if I have one.
I also have 2 pairs of 33 spline if someone needs those...
Did anyone think I could make it a full year without tearing it apart again???
Posted by: Chris H. May 14 2014, 04:23 PM
Did anyone think I could make it a full year without tearing it apart again???
Nope.
Better than waiting for something really bad to happen though right? It'll be even more awesome.
Posted by: Mike Bellis Jun 28 2014, 09:25 PM
So I finally put the car on jack stands (6) and started realigning the drivetrain. I purchased a motorcycle jack from Sears.com. It was only $140 and built a jig to hold the engine/tranny in position.
I started on the rear trannt mount first and over the next couple weekends will build the engine mounts. Lucky for me I built the cradle to accept modular motor mount attachments. I used ratchet straps to pull the motor rearward and right/left. I now have at least +2" in front of the motor now.
Here is the starting angle as viewed from above... 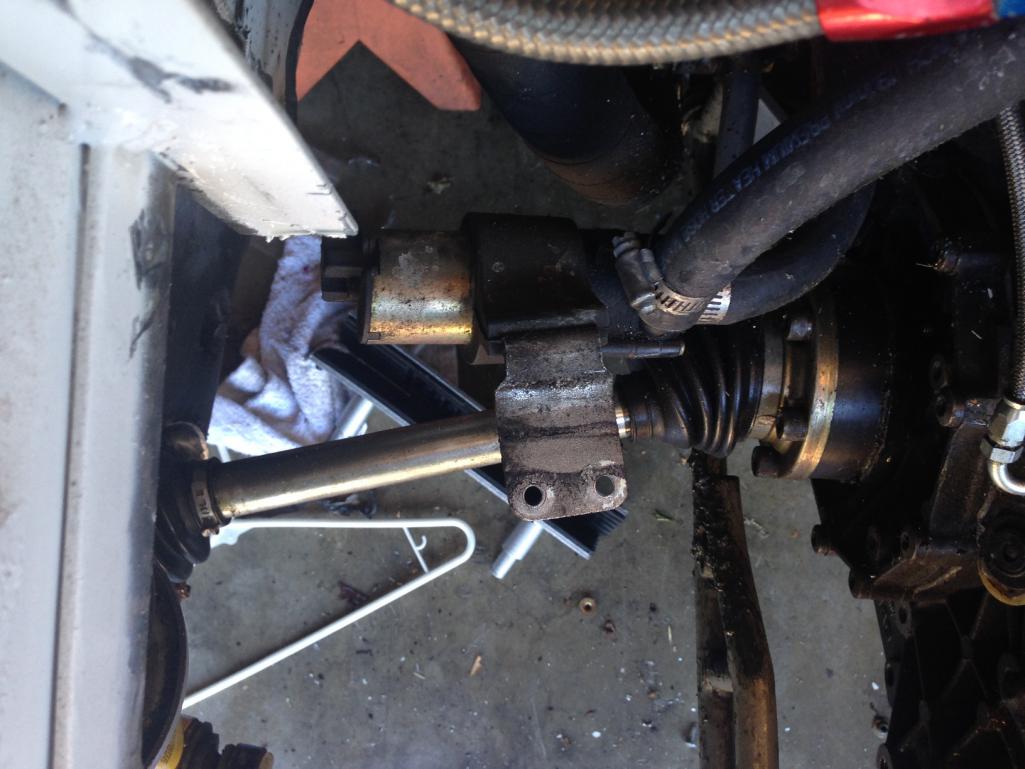
Here is the finish angle as viewed from above 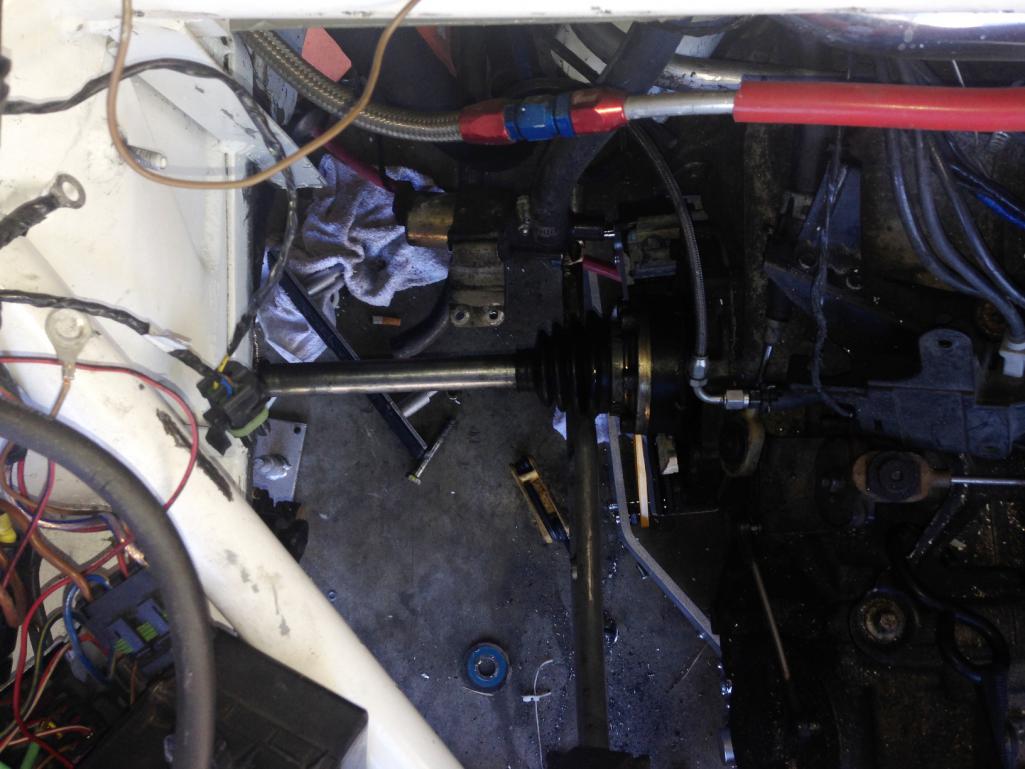
I pulled everything out of the trunk area. Originally I built a dropped trunk floor to gain more space. The new trunk floor will be the same depth as stock.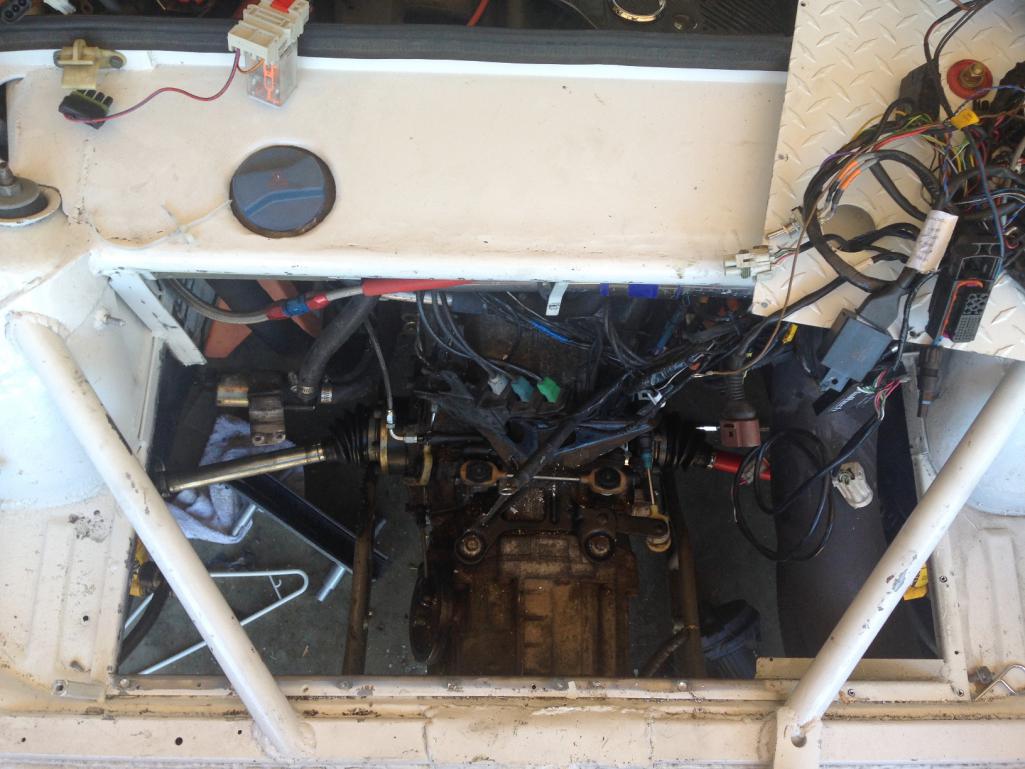
I had to cut out a section in the rear to make room for the 6 speed. I still have the 5 speed but it is smaller so it should fit no problem. I am reenforcing the area with some 1", .120 wall DOM tubing, to tie everything back together...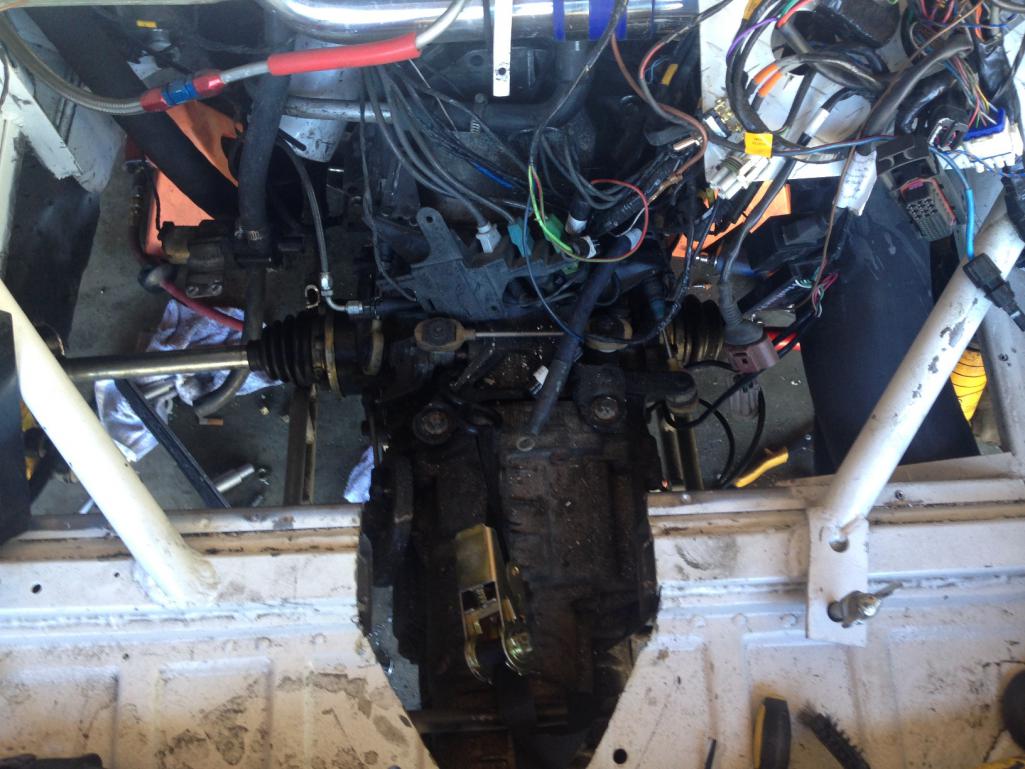
Posted by: Andyrew Jun 29 2014, 02:10 AM
Looks great!
Posted by: Mike Bellis Jul 3 2014, 11:54 PM
Got my motor mounts done today. The fronts are complete. The rear I'm not happy with so that will get reworked. The rear is triangulated and gusseted but you can't tell from the pic. The pic makes it look like a hinge...
I managed to move the motor without disconnecting and draining the radiator hoses. I did have to disconnect and drain the intercooler. This was OK since I didn't like how the intake coupling to the throttle body set before. This time I connected the coupling and let the intercoole hang from the TB, than welded new mounts. Before the 90° coupling was slightly pinched due to the angle and location of the IC. It fits much better now.
So here's the list of things to do...
Change fitting on fuel rail to a 90° since the motor is relocated and there is interference.
Re-mount the IC water pump and fill and bleed the system.
Install new circlip on tranny stub axles.
Re-work exhaust due to relocating motor and new interference issue.
clearance engine cradle for relocated axle. gusset cradle at modification.
Rebuild trunk floor.
Remount methanol system
Re-install trunk electrics and ECU
I'm sure I'll think of more to do as I continue...
A few pics. You can see just under the axle flange where I cut the cradle to clear the CV. This is where the gusset/reinforcement will happen.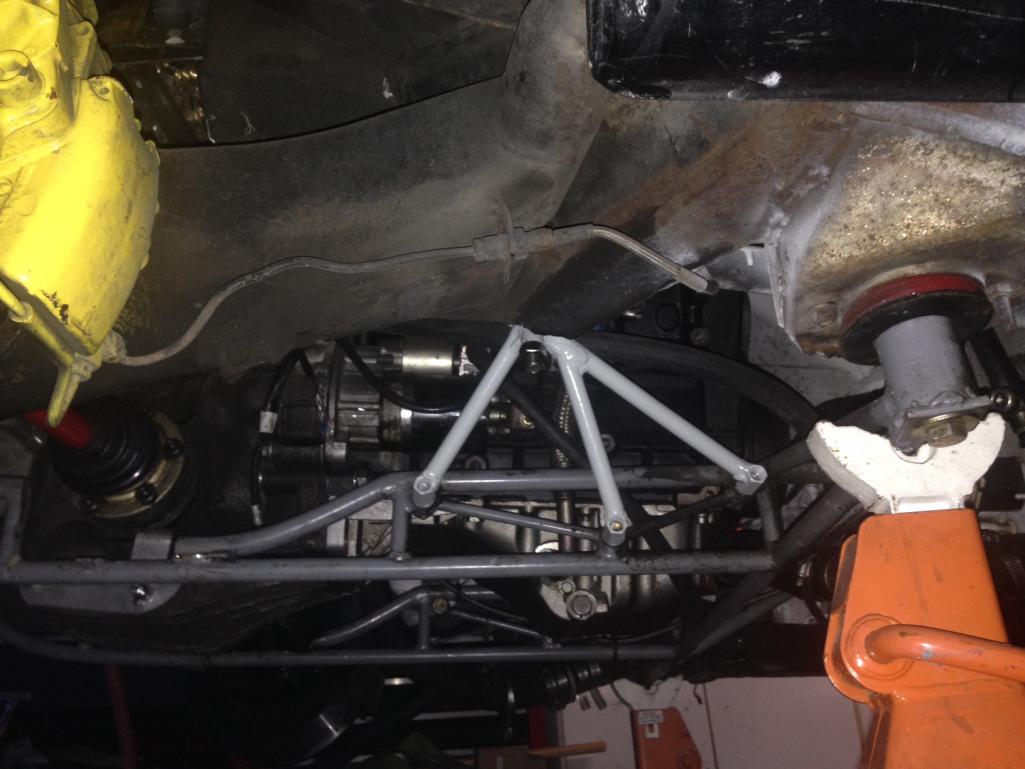

Rear mount looks like shit. I reused part of the old mount. Just not happy with the result but it is pretty strong.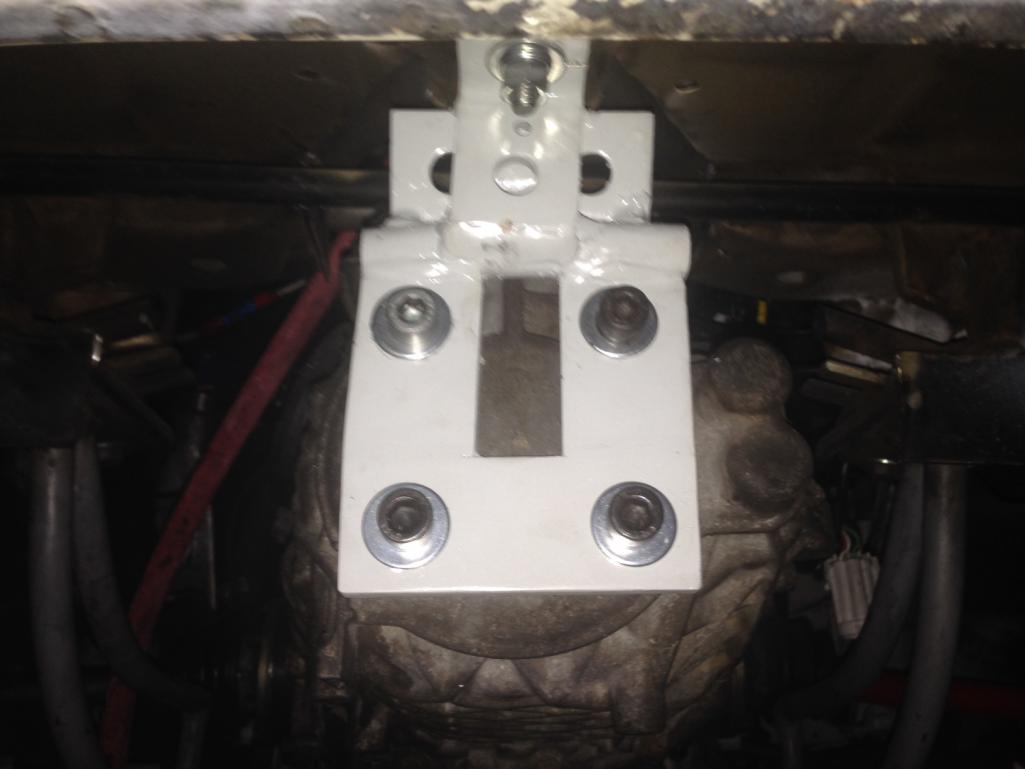
Posted by: Chris H. Jul 4 2014, 09:08 AM
Looks good Mike! Probably a lot of work. I just swapped mounts and it's taken me a couple of days to re-trim stuff so it all fits since it pushed the engine back a few inches (it's a good thing and the mount fits much better). Made me realize how hard it would be to MAKE a mount and get it level, plumb, at the right height, angle, etc.
Posted by: Andyrew Jul 4 2014, 11:33 AM
Looks damn good to me!
Posted by: Mike Bellis Jul 12 2014, 09:23 PM
Still pushing forward. Most of the engine bits are bolted back on. Exhaust is ready to install and then I can start fabricating the new trunk floor.
I drilled the fuel rail for safety wire to hold the injector clips. Works great! Now my injectors won't move lower into the intake manifold. Since I'm running fuel at 65psi, the injectors would walk down toward the manifold. New O rings on the injectors too. I painted the intake manifold red. Not sure why but it looks better than it did.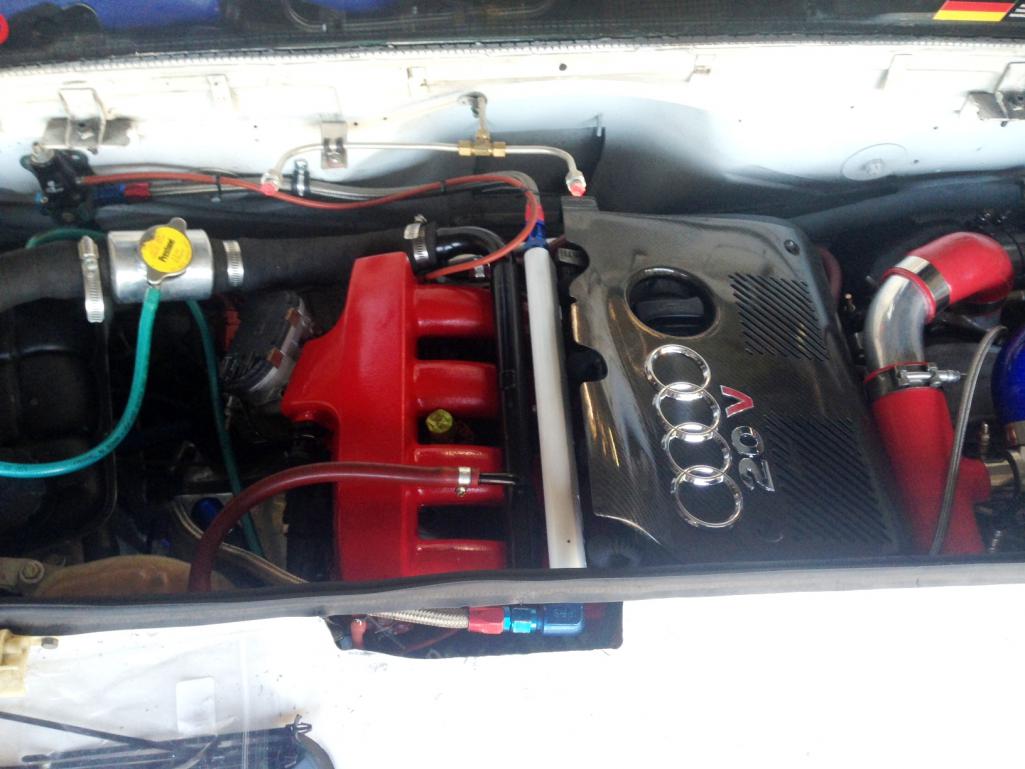
Looking down at the intercooler. The 60° reducing coupling from the throttle body fits better now. Here you can also see the methanol injector. it's mounted in the IC as this was the best place to get maximum-equal cooling. 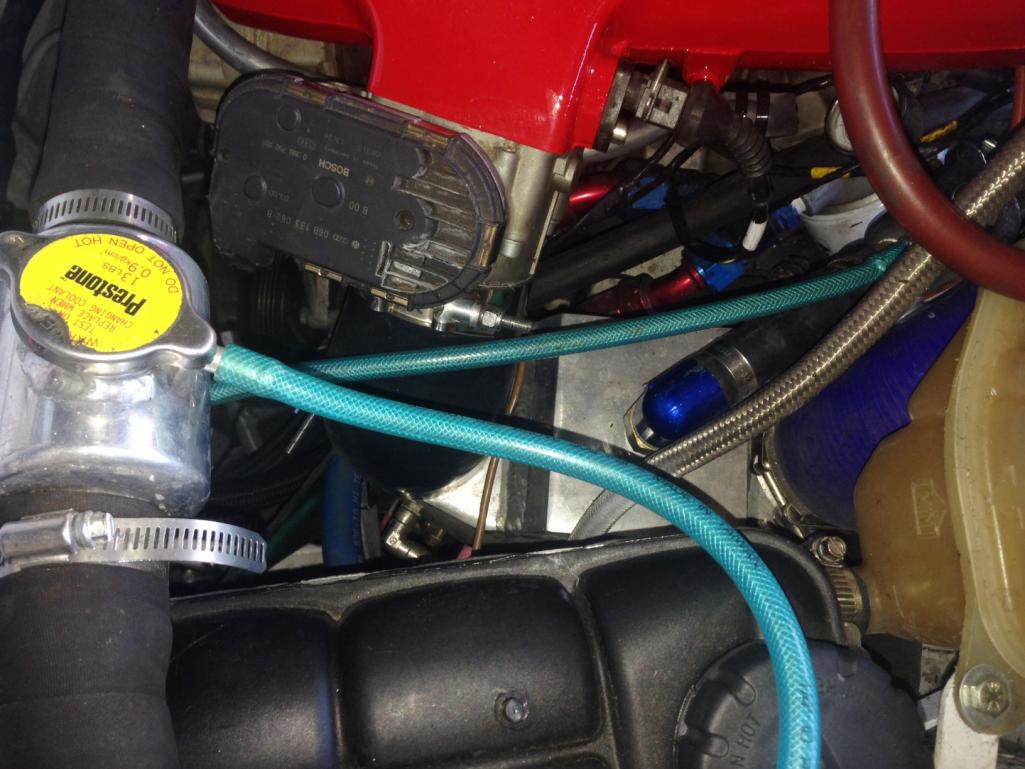
I still need to deal with the wiring harness. I figure I will build the trunk floor then decide where to route things. I need to make room for the meth tank and pump somewhere too. I had a 4" drop in the trunk floor before. Now it will be stock height.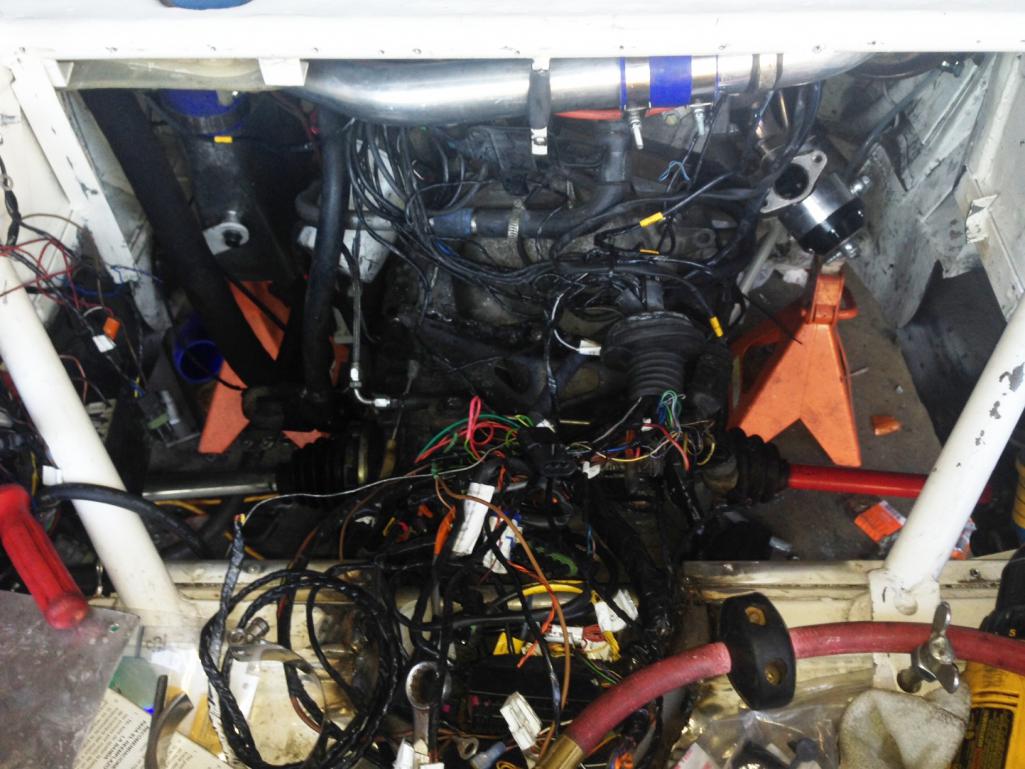
Here is the part that sucks. I had to cut the trunk shelf to clear the fuel rail and vacuum hose connection... Once I figure out what the finished product will look like, I'll clean up the cut.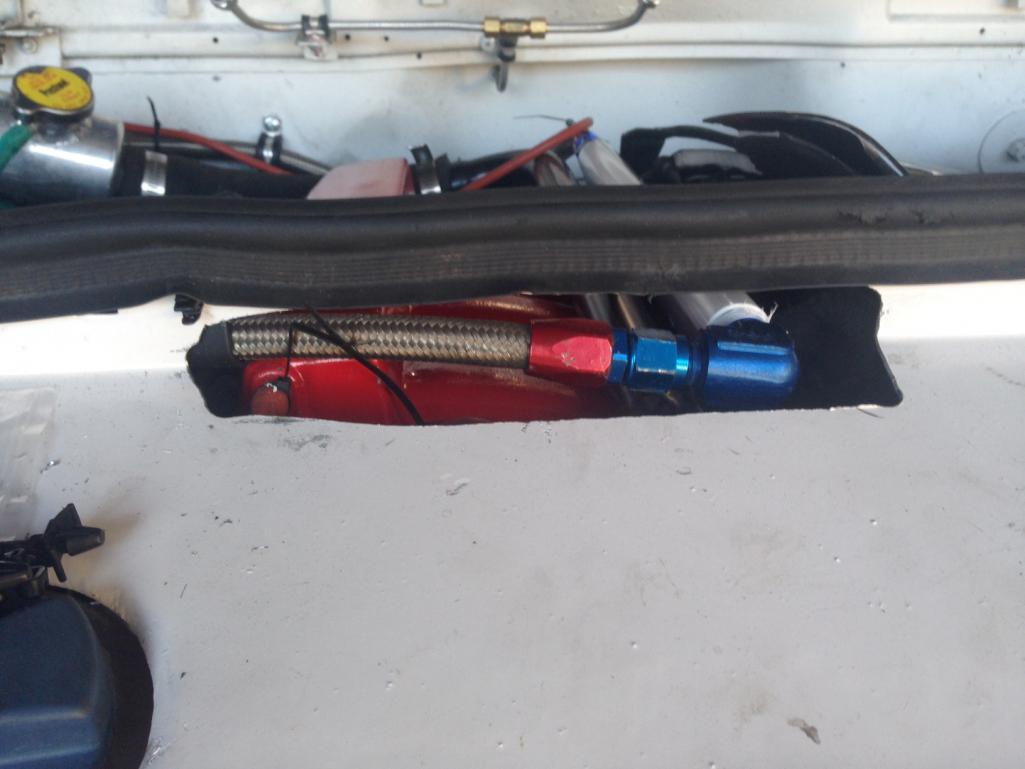
Posted by: Andyrew Jul 13 2014, 12:43 AM
Why not build a fiberglass floor that you can bolt on and off? Would make engine removal and workin on it a snap..
I mean considering the car and all the other bits on it...
Posted by: Chris H. Jul 13 2014, 09:06 AM
That's a great idea. You could do a partial overlay if you didn't want to cut the whole trunk section out. I was just wondering what I could do to make mine a little prettier. You have weird little clearance cuts for the starter and clutch fork with a Subie.
Posted by: Mike Bellis Jul 13 2014, 09:11 AM
I am making the trunk floor out of aluminum. Not fiberglass. But it will be removable. I rosette welded the old one and had to drill them out. Since this car has turned into a "drivetrain test mule" I want to make it super easy next time. I do not plan to swap engines again unless I get a deal on a water cooled Porsche 6.
Posted by: Mike Bellis Aug 9 2014, 06:26 PM
I installed a new Stewart electric water pump and got rid of the Mezerie pump. The Stewart is virtually silent with only the slightest hum. Seems to work great, simply connected to the old relay.The tamp is a little low at 170° but it was like that with the old pump too. The bearing in the old pump was going out.
Car seems to be running great. No axle or CV issues. Good boost and good O2 levels. It's ready to be driven... 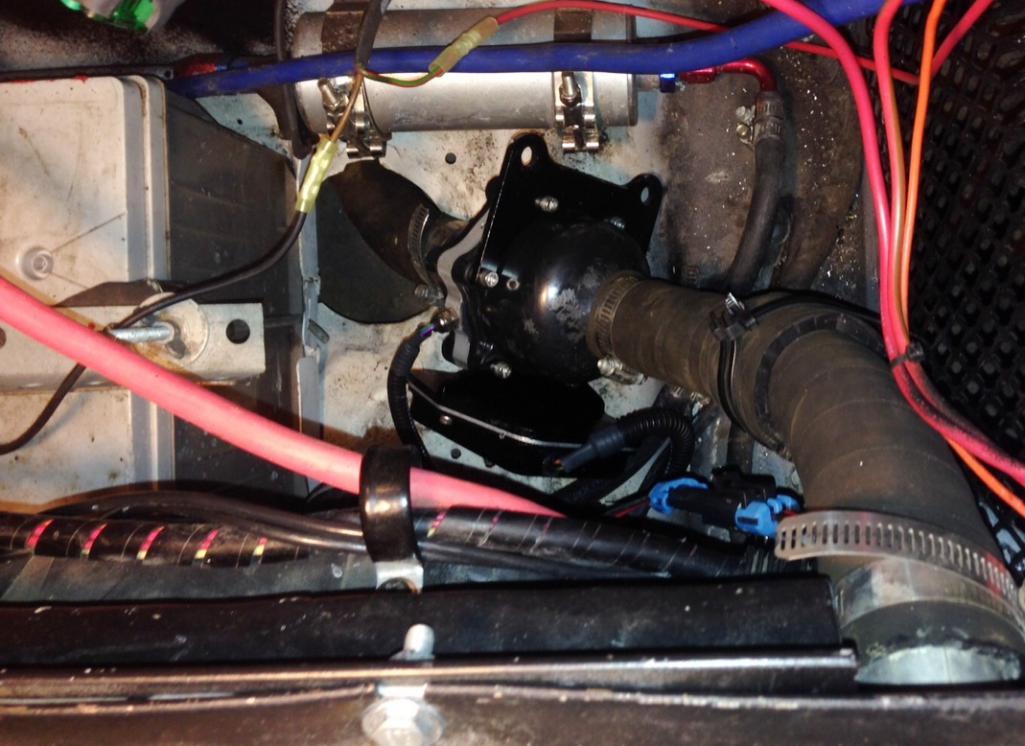
Looks like this new. Mine is black 1-1/4" in/out.
I cleaned up the rear trunk. Ready for the Werks Reunion next Friday.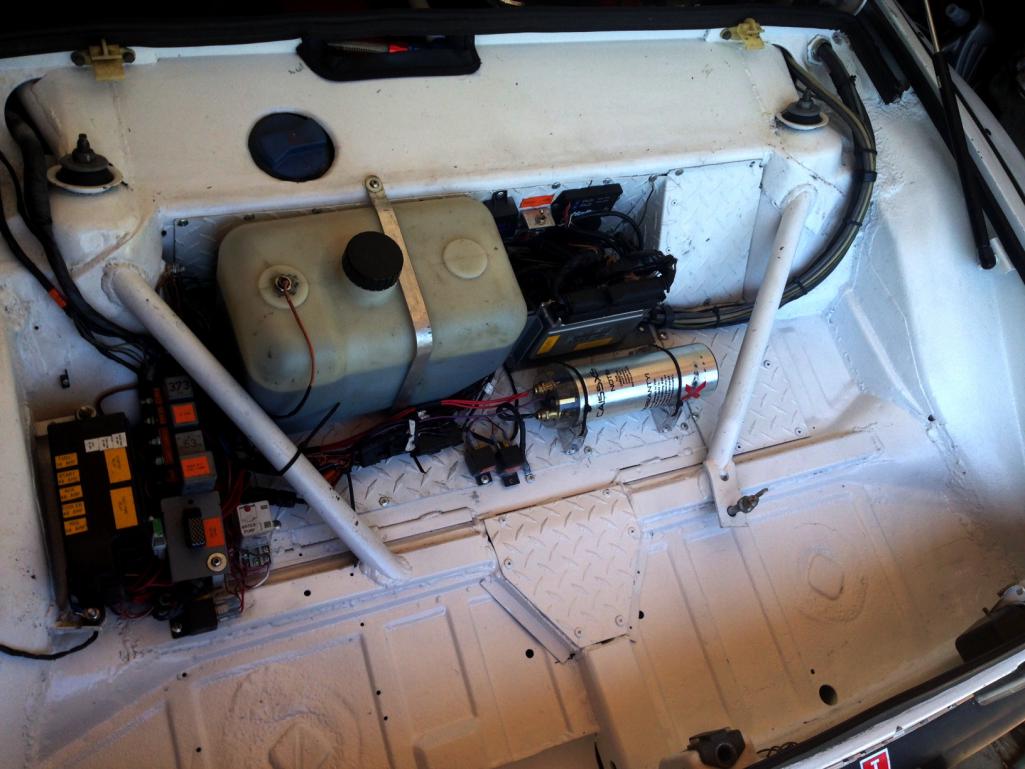
Posted by: Mike Bellis Sep 28 2014, 08:21 PM
I got poked by a member here for messy wiring in the trunk...
October 2013 while at the Porsche Escape I had to jury rig my water pump after a timer relay failed. Before that, I has some other unsightly wiring for the main power and fans. I let it run like this for almost 1 year.
Here is a before picture, at its worse...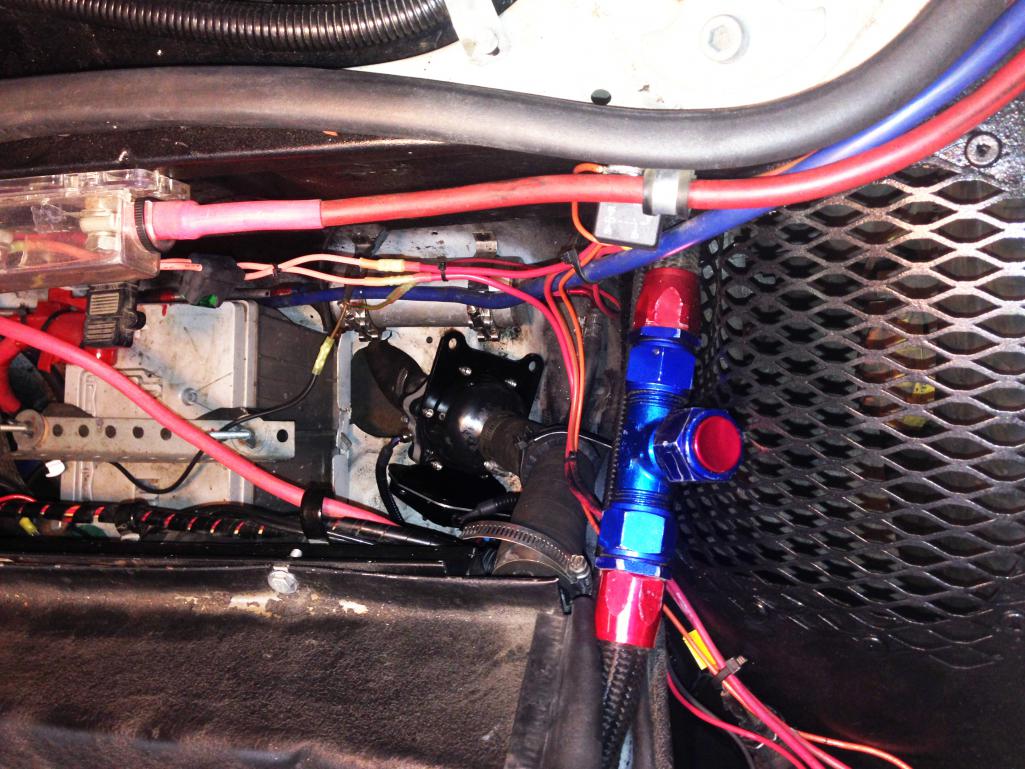
Here is the after. I used the opportunity to pull the tank and install AN tank fittings. -8 for the pump supply and a -6 for the return. I also installed AN ball valves for maintenance of the fuel system. I run the return into the trunk before the tank for access. The fuel system consists of 3/8" Aluminum hardline (soft, 250psi burst rating) and braided hose. The fuse box is a marine grade unit. It's only rated for 125A but I'm claiming the NEC 10' tap rule. 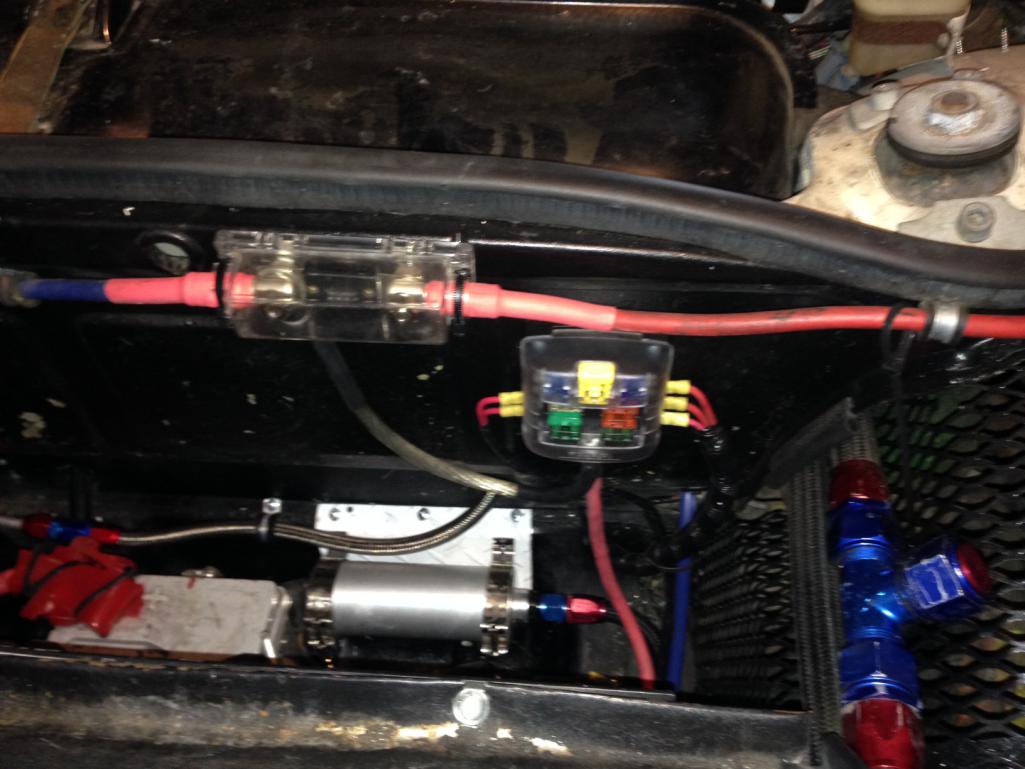
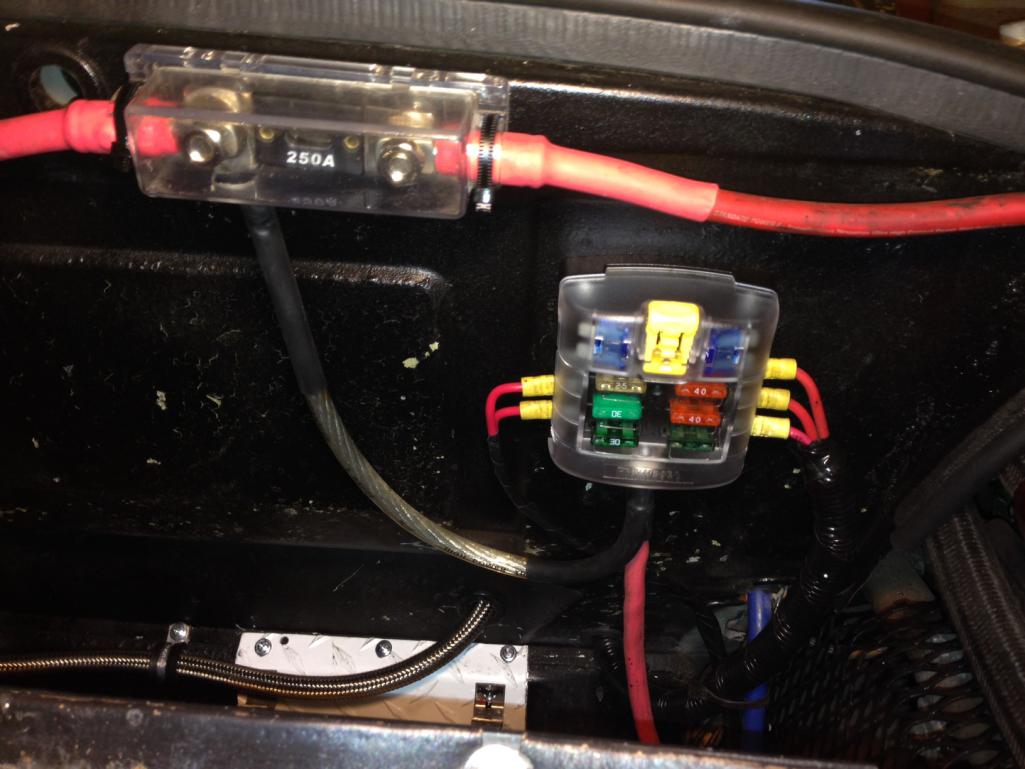
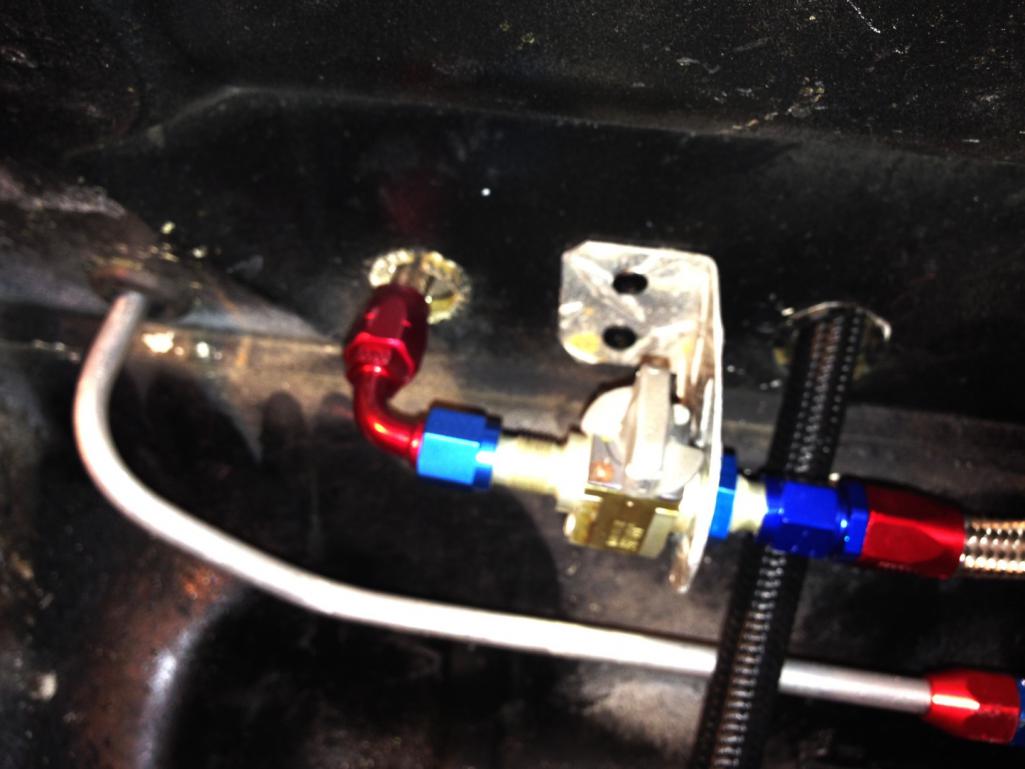
Posted by: YoungCC Dec 6 2014, 07:45 PM
Interesting project, just wondered if they flash the ecu, does that also do away with the key coding?
Geoff
Yes. the immobilizer will be eliminated.

Posted by: Mike Bellis Dec 6 2014, 10:25 PM
Merry X-Mas! Since you bumped it... Here's an update...
The 5 speed is going back in so the 6 speed can be sent out to Dr Evil for some surgery. I hope to get it sent out to Ohio early next year.
Posted by: Cairo94507 Dec 7 2014, 09:00 AM
Damn....a water cooled Porsche six huh?
Posted by: RobW Dec 7 2014, 09:12 AM
Do you have any in car video of driving this thing?
Posted by: Mike Bellis Dec 7 2014, 09:59 AM
Do you have any in car video of driving this thing?
No but I can come pick you up and let you film it...
Posted by: RobW Dec 7 2014, 10:42 AM
Do you have any in car video of driving this thing?
No but I can come pick you up and let you film it...
Deal!
Posted by: 914GTSTI Feb 22 2015, 05:43 PM
Mike. will a 930 cv bolt up to the 012 FWD A4 output flange ?
Randy
Posted by: Mike Bellis Feb 22 2015, 07:49 PM
They do not fit. The 012 tranny either comes in 100mm or 130mm CV configuration. If you could get the bearing and spacer that comes on the 012 stub, you could "fit" them on the 466, 108mm stub and pop them in the 012 tranny. The stubs are the same (almost) just missing a circlip and the above parts.
I instead machined down the 130mm stubs in a lathe. I bough some 94mm-108mm adapters from Patrick Motorsports. Designed for 914's tp use 930 CV's. I welded and spun to make sure they are true.
I have a set of 100mm stubs to use 944 CVs just in case.
Here are some dirty picks.. You can see the mounting holes used to mount on the 914 stub, they serve no purpose here. Big fat chamfered, layered weld holds everything together. It took a long time to get them tacked up true but they work very well.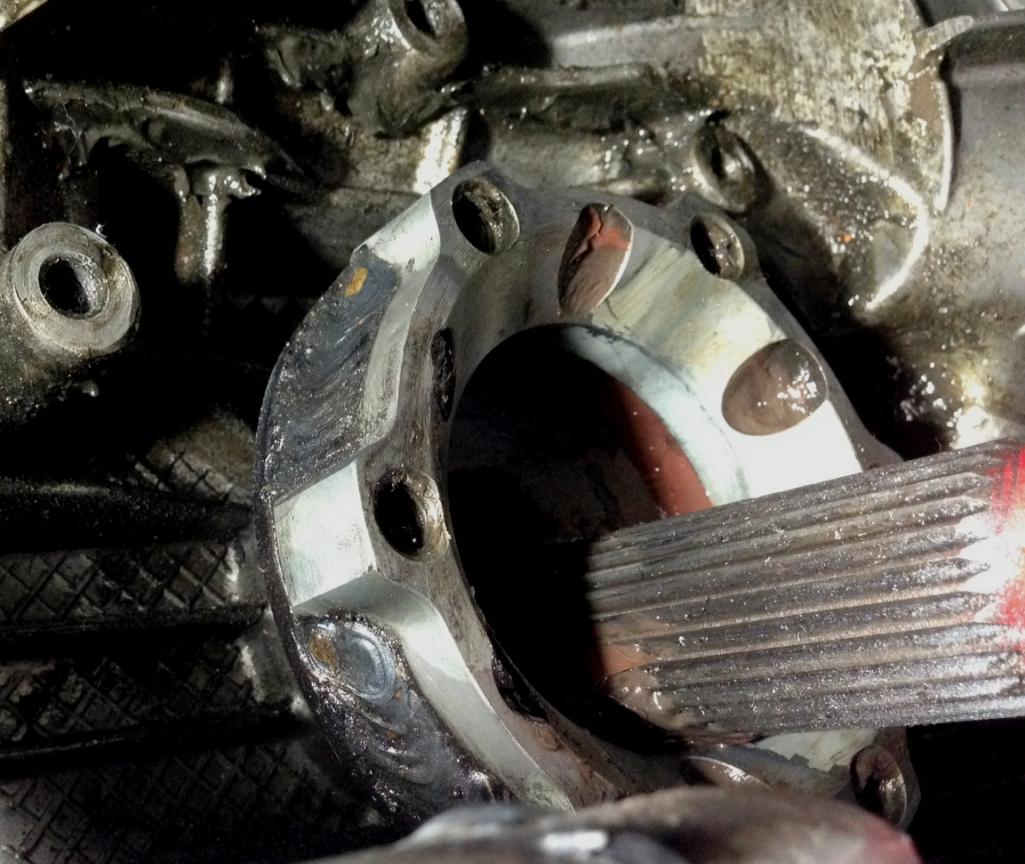

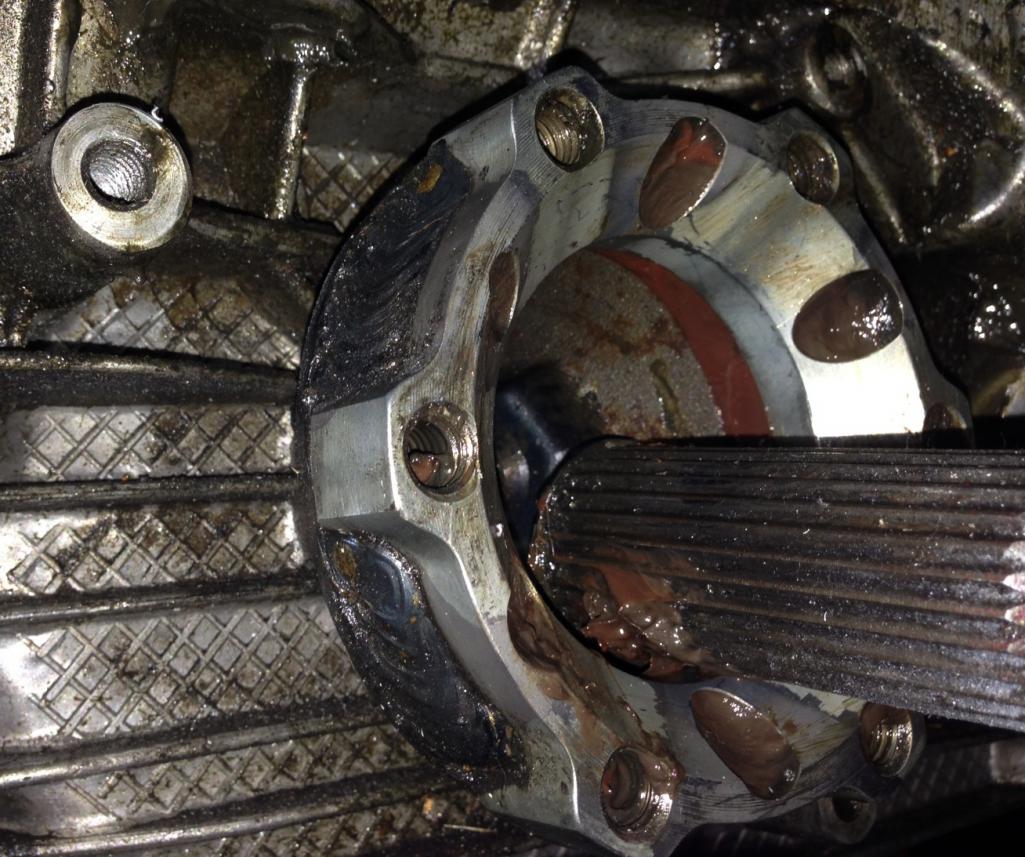
Posted by: 914GTSTI Feb 22 2015, 09:07 PM
Mike,what about something like this ? I did this for another project.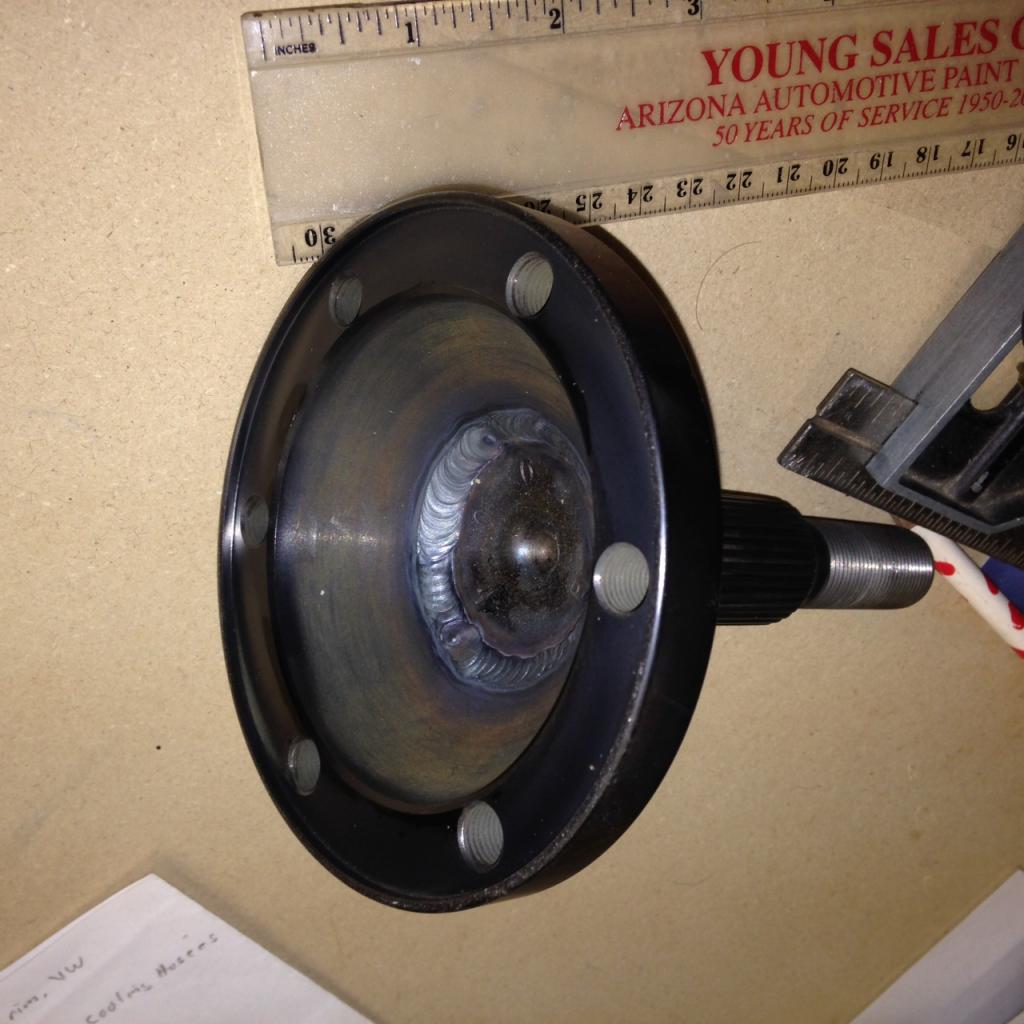
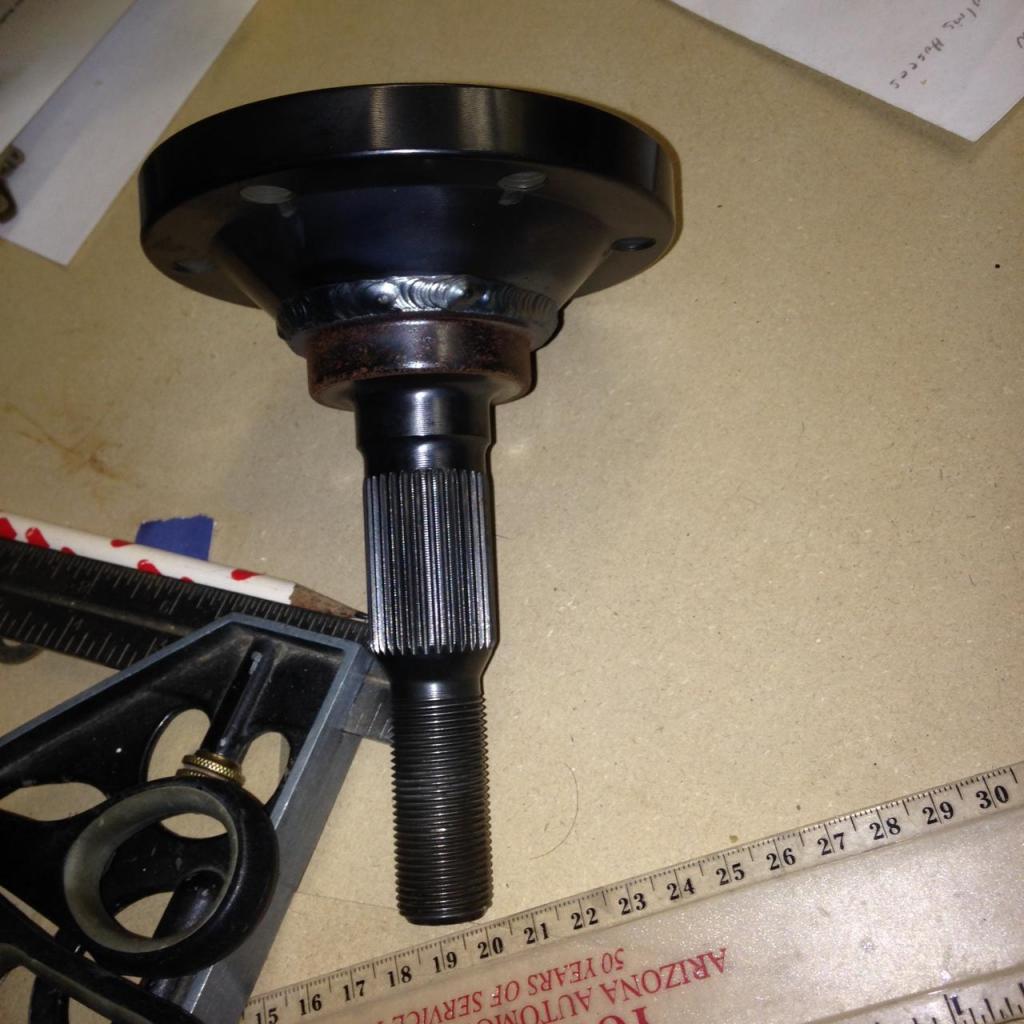
Randy
Posted by: Mike Bellis Feb 22 2015, 09:20 PM
Mike,what about something like this ? I did this for another project.
Randy
If the welds are good I suppose it would work.
Posted by: 914GTSTI Feb 22 2015, 09:22 PM
Ok, thanks.
Posted by: Mike Bellis Mar 28 2015, 07:59 PM
I swapped out the 6 speed for my 5 in order to prep the 6 for some Dr. Evil love. The 5 went in without problems, or so I thought. I could not get the clutch to disengage after the install. I tried to bleed the system to no avail. I even purchased a new master and slave (I was wanting to do this anyway). The master I had at 5/8" bore was a little small. The new one is .875 bore to match the new slave. The stock slave was plastic my new Dorman is cast iron. I just like iron better.
The new master and slave would still not disengage the clutch so I new it was time to pull the tranny and see what's doing. I spent all day, 10 hours, trying to pull the tranny away from the motor. It would not move more than 1/4". WTF? In a move of desperation I cut a hole in the bellhousing with a 2" hole saw to access the clutch retainer bolts. I removed the 6 bolts by spinning the motor and the tranny fell out (almost) on to my jack and the unit easily was removed. I cut the hole on the top of the housing away from any case webbing. Hopefully it will hold up for a while. The Passat 012 trannys are cheap to replace so I wasn't too concerned and one day the 6 speed will go back in.
I could not slide the disc off the shaft at all. It would not move. I had to use a puller to dislodge it. Once loose it was clearly galled and boogered up. My SPEC stage 3 pressure plate took some collateral damage from the hole saw so I went to flaps and bought a LUK unit to run for the time being.
I'm not sure how I fucked up the disc going in but I did use the alignment tool and it seemed to slide in good. Oh well... Tomorrow the car goes back together and I hope to be driving it before the end of the day.
Here are some glory pics...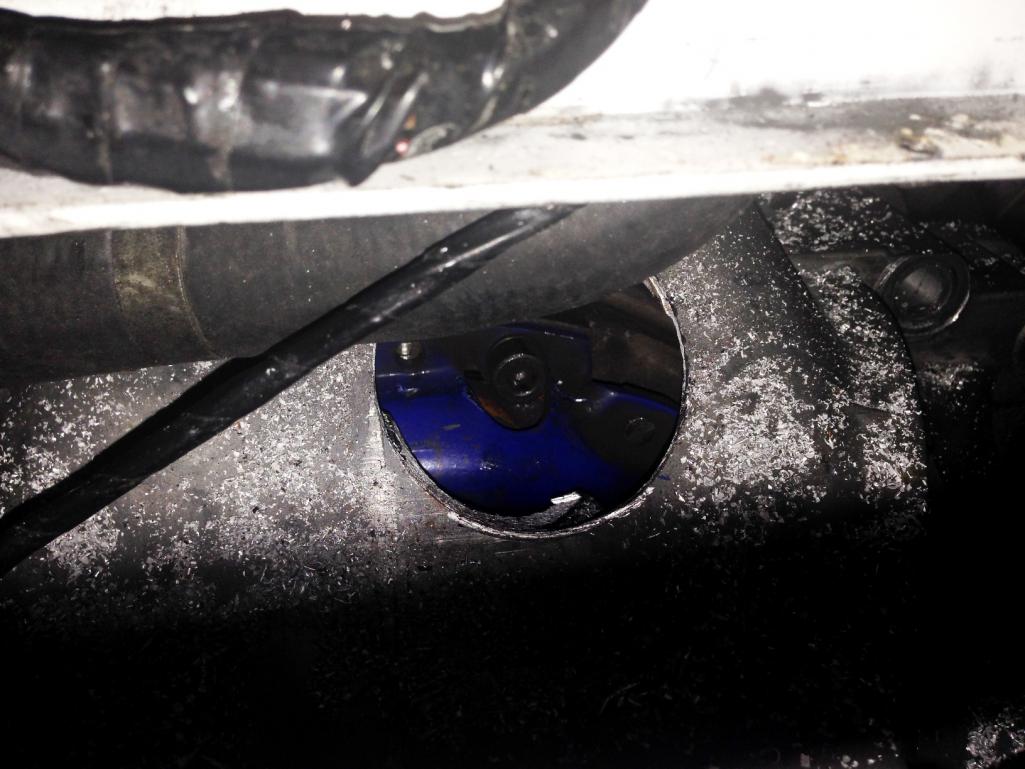
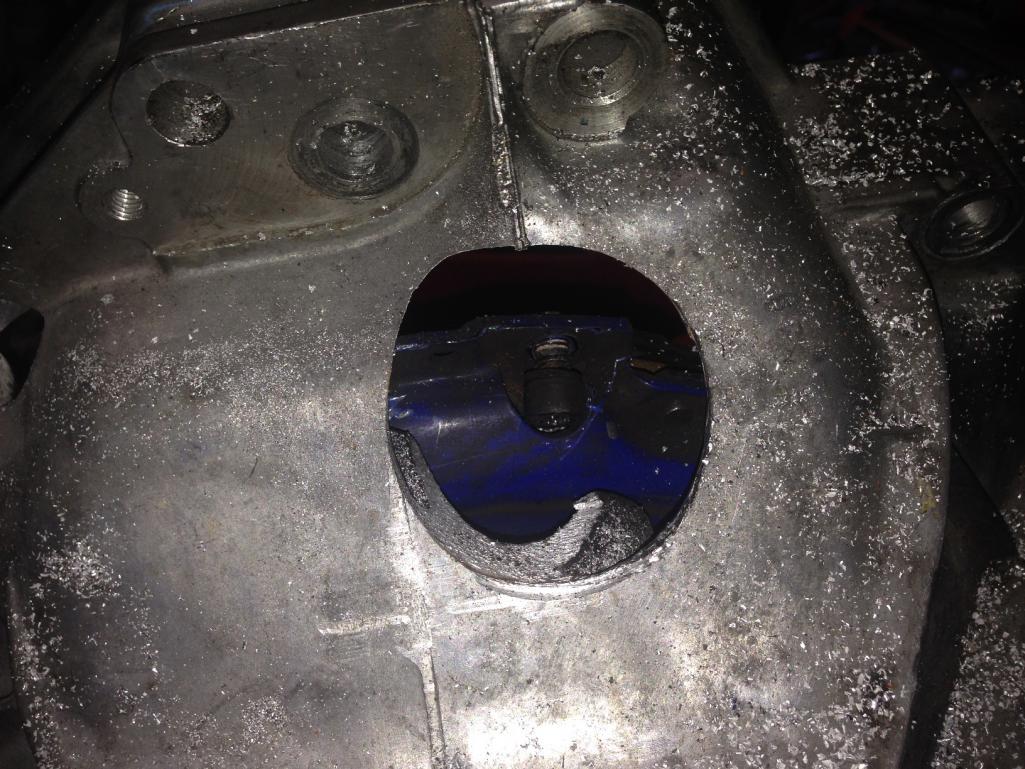
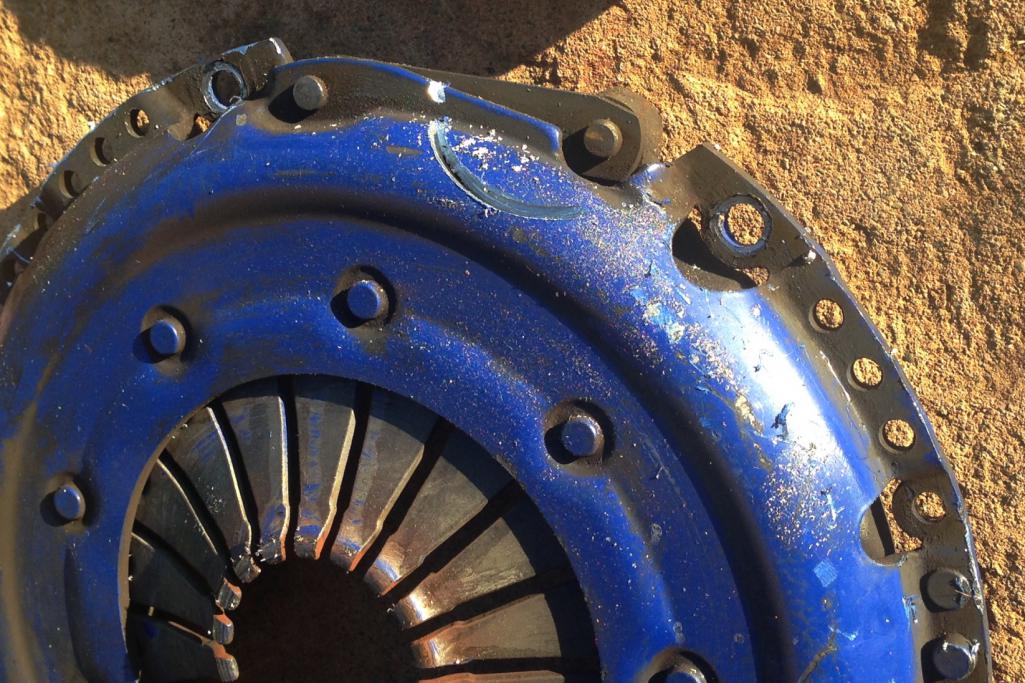

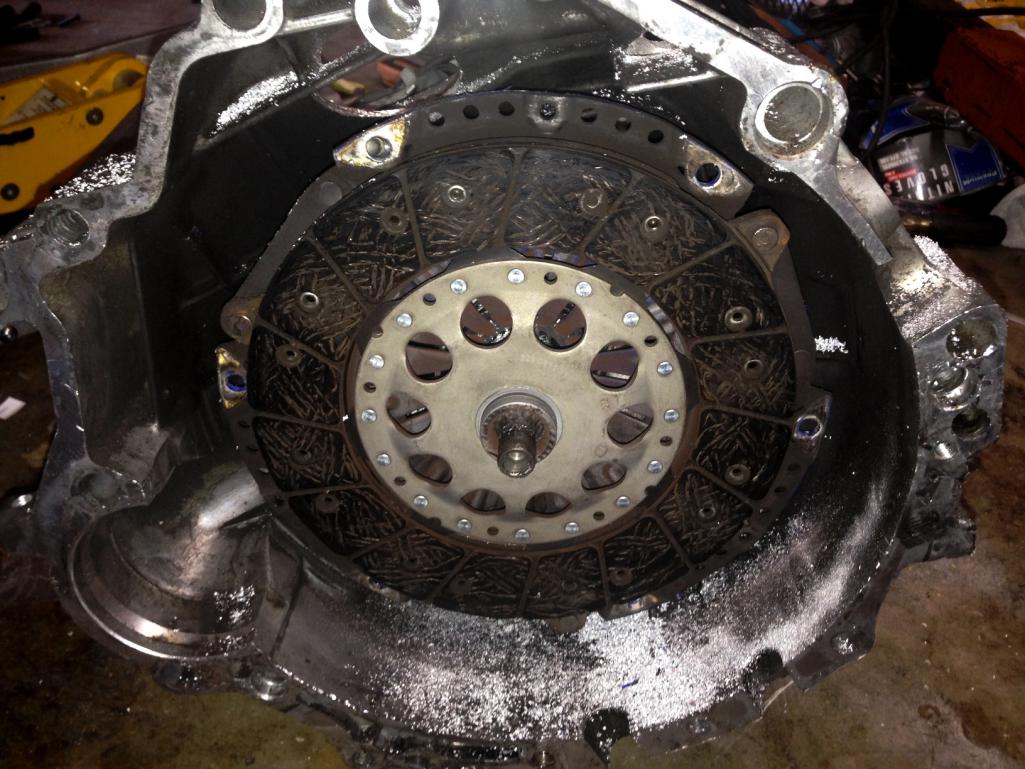
Posted by: 76-914 Mar 29 2015, 08:54 AM
Mike. That don't add up? You could slide the pilot shaft in thru the disc with ease yet they seized upon each other? I'm thinking alignment issue but how would it have slid in if it were that?
Posted by: Andyrew Mar 29 2015, 03:56 PM
Well that is nuts... I wouldnt hesitate to give Spec a call and ask them if they have ran into this issue. Maybe they'll send you a new unit, who knows..
This was the first time you tried running the 5 speed since you swapped it back?
I have a v6 FWD trani hooked up to my 2.8 v6 in my shed, I think it'll bolt on if for some reason you buggered up your trani bad and want to get it back on the road while your 6 speed is down. I just ask that you return it when you get your 6 speed installed
Posted by: Mike Bellis Mar 29 2015, 04:58 PM
More background...
The SPEC Stage 3+ clutch came in the donor car. It has worked flawlessly. When I pulled the 6 speed I inspected the copper composite disc. It was glazed and burnt a little. When I compared it to e LUK organic disc I had, the copper unit was noticeably worn. I installed the LUK disc without inspecting it or trying it on the main shaft. It was new and I assumed...
The Spec pressure plate was damaged while cutting into the tranny. I bought a new LUK assembly; Disc, Plate, TO bearing, pilot bearing. I am going to order a new HP unit but this was to get it on the road. Hopefully it will last until after WCR.
This time I slid the disc on the main shaft and it slid perfect. I installed all the new parts and use the supplied lube on the splines. This time the tranny practically fell into the car. A couple wiggles by hand an the tranny seated flush with the motor. I reassembled the car and took it out for two drives today. The first run I jumped on the freeway and the clutch slipped bad. I melowed the throttle and came home to read the breaking instructions this time. Looks like I need 500 miles of stop & go traffic before I can get into the boost.
The second run was about 25 miles around Danville and Blackhawlk. The car is running great. It did go into limp mode once and came back with an O2 code. I restarted, cleared the code and kept driving. No other problems. When I got home 10 miles later, I checked the WB/NB switch I have to the ECU and the connections look suspect. I'm going to remove the switch and WB/NB converter bot and discard it. My ECU was dyno tuned to the NB signal and I don't need this extra circuit. I have a WB sensor still with my Haltecth controller and Innovate gauge. This signal was pushed to the adapter. It converts the WB 5V+ signal and scales it down the NB voltage. It theoretically gives you a WB signal at NB voltage. Since the tuner went with the standard NB signal, I don't need it. My ECU would need to be modified to WB to use the 5V signal.
I think the first new disc was messed up I never tried it before installation so I will never know for sure. Now I have a 2" inspection port on top of the tranny.
I plan to pick up a new flywheel too along with my new clutch. I'm very happy with SPEC and have use one ion the turbo rotary without issues. I may go with a new one again. There are so many to choose from with different weights. The one I have now is 11lb (said the PO). I haven't measured it but it looks smoked and blued. The DAPO told me he had to slip the clutch to prevent stalling. I have had no issues with stalling but my car is 1000+ lbs lighter than the donor. With this flywheel, I can let the car roll forward in 1st gear with out it being jumpy at low or no throttle. I thknk the weight is perfect for the chassis/engine combo.
Posted by: Andyrew Mar 29 2015, 10:26 PM
Well the stock clutch isnt very strong but it should hold 200hp just fine. I would dial your boost back to 10psi but give it a good couple hundred miles of stop and go like you would any other new clutch.
I love my 16lb spec flywheel. Stock is like 23lb or more.
Posted by: Mike Bellis Mar 29 2015, 10:51 PM
Well the stock clutch isnt very strong but it should hold 200hp just fine. I would dial your boost back to 10psi but give it a good couple hundred miles of stop and go like you would any other new clutch.
I love my 16lb spec flywheel. Stock is like 23lb or more.
I can't dial my boost. I would need to install a MBC. My ECU keeps it at 20psi. I got about 60 miles on it today just tooling around. I can feel the clutch gripping a little better but I'm well over the 200hp mark. I think it will last a month or two.
I pulled out the O2 adapter and got another 22 miles on the car without throwing any codes. My car is running great right now. I am going to trailer it to WCR just in case...
Posted by: Andyrew Mar 29 2015, 11:02 PM
Why not just grab a bleed type boost controller (like $40 bucks on ebay?) and run that... Your ecu will adjust just fine. 20psi should make you close to 325 on pump. Certainly enough to glaze that clutch really fast. Or just put a vaccume line to your wastegate actuator and run off the wastegate.. at least till your clutch is broken in.
Posted by: Mike Bellis Mar 29 2015, 11:05 PM
Why not just grab a bleed type boost controller (like $40 bucks on ebay?) and run that... Your ecu will adjust just fine. 20psi should make you close to 325 on pump. Certainly enough to glaze that clutch really fast. Or just put a vaccume line to your wastegate actuator and run off the wastegate.. at least till your clutch is broken in.
Not a bad idea. My WG spring is 10psi. I can just plug the pressure line at the solenoid.
Posted by: Mike Bellis May 24 2015, 07:14 PM
I was recently at a 914 swap meet in San Jose. I bought a tow bar setup for $20. The bar looked like it needed some bracing and stiffening. 8' of 1/2" DOM later and it's ready to go to the powder coater.
Then I turned my attention to the bracket. Clearly home made and in need of work. It mounts to the suspension points like any other but My car is too low and it will never work. BTW, for those following the adventure, my car died when I got home from the swap meet. I found a bad fuel pump relay was the cause.
Measuring my tow vehicle, the hitch is 19" off the ground. With the tow bar flat, the ball cup is 6" off the ground. A difference of 13" places the bracket mounts into the lower section of my bumper. This should make the tow bar level while towing.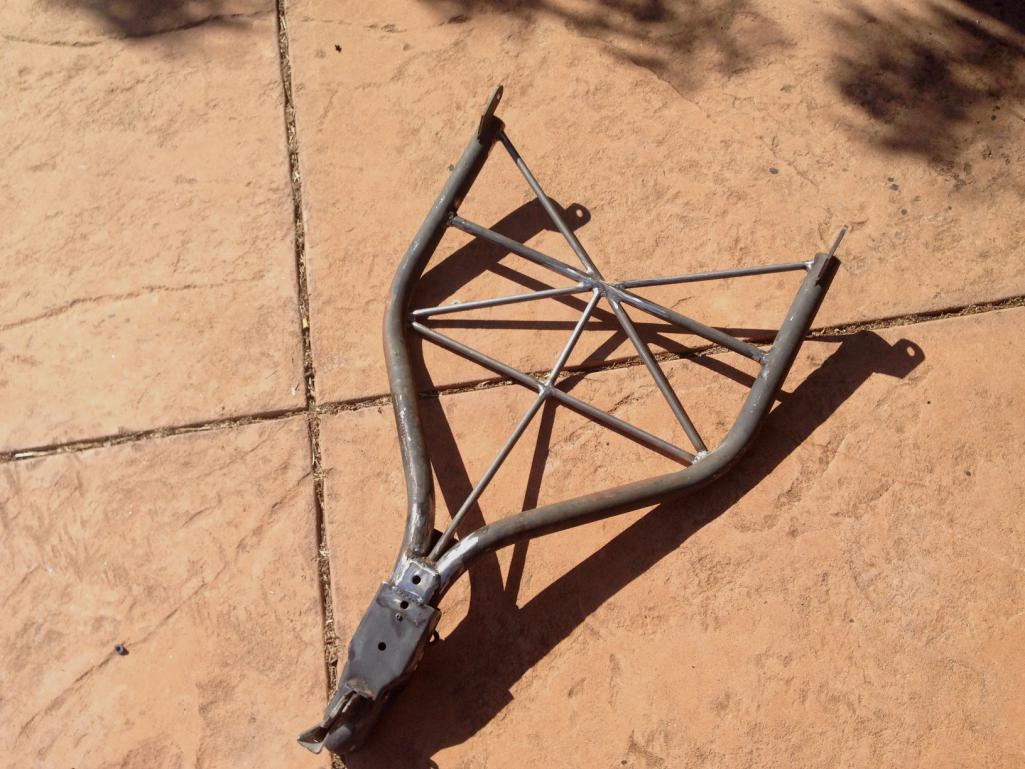
So I pulled the bumper and valence and was reminded of how ugly the front end is. The PO really cut a huge hole in the front for air flow. Too big really. I think it might be time to overhaul the cooling system. I always hated how much space is lost up front. Al at Parts Heaven is hooking me up with all the Boxster pieces I need to make a big change. I also need to down size my oil cooler to suit as well. You can see how big my setup is. The oil cooler is sitting on top of the gas tank in this pic. Black paint was too cut down on reflection through the grill.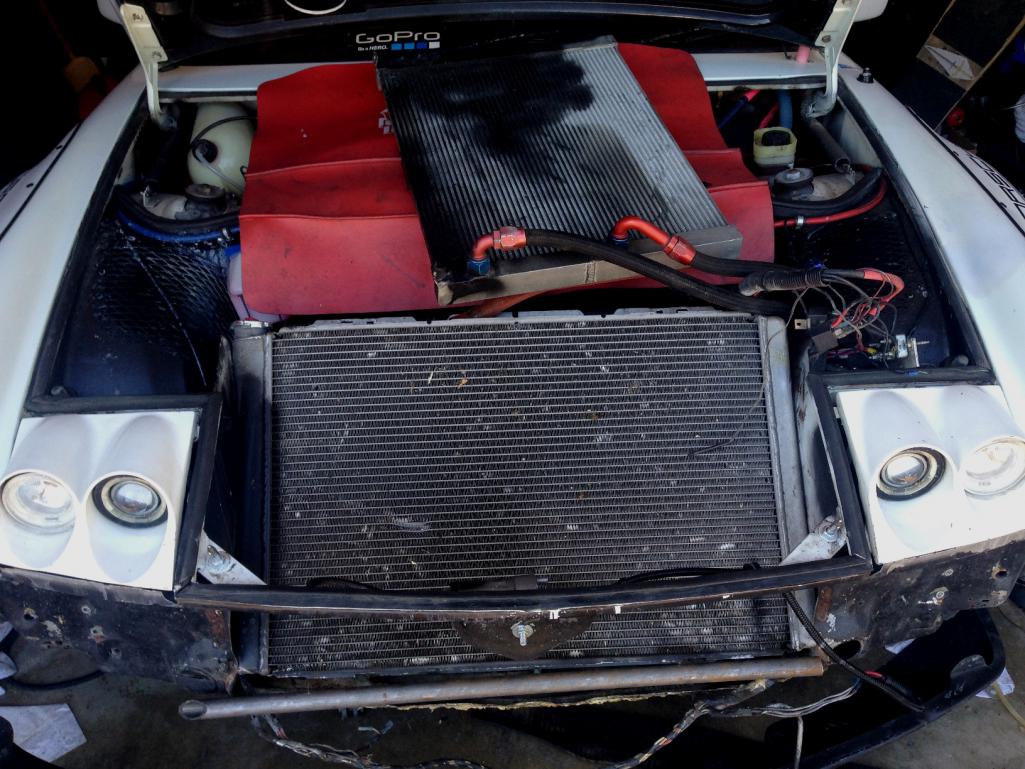
13" ends up just above the access holes. (plug missing on right) I need to get the radiator out and build reinforcements. I need to get all the parts before I decide on a final design and fabrication. The hacked hole looks terrible. I may have to section a piece from the parts car in my side yard.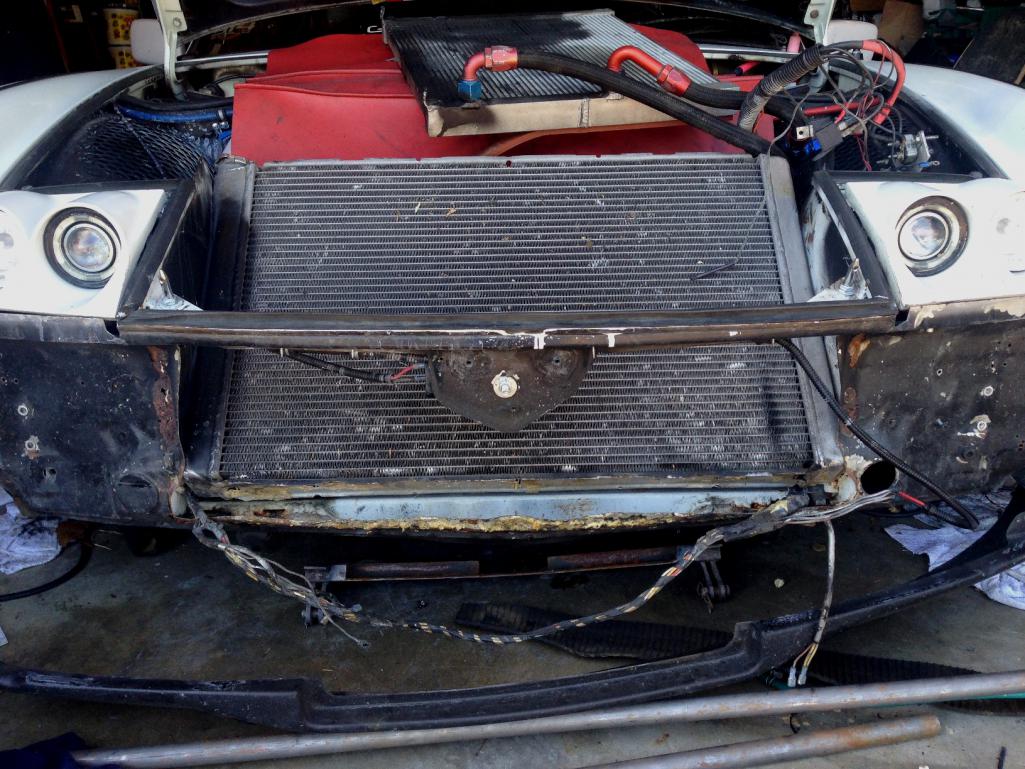
Posted by: Andyrew May 24 2015, 07:54 PM
Pretty cool about the tow bar!
I've been deciding on radiator setup as well. Thinking about a Sciracco radiator or a vw golf MK2 radiator..
Looking for something dual core and that has a A/C condenser that could fit.
http://www.ebay.com/itm/Fit-For-VW-Golf-2-Corrado-VR6-Turbo-Aluminium-Racing-radiator-turbo-16V-G60-VWO2-/300802889220?fits=Year%3A1987|Make%3AVolkswagen|Model%3AGolf&hash=item46093fd604&vxp=mtr
This is on my short list..
This is on my short list for a AC condenser 06 mini cooper
http://www.carparts.com/details/Mini/Cooper/Kool_Vue/A-fs-C_Condenser/2006/KVAC3254.html?TID=80000000CP&origin=pla&CP=1&CP_SRC=PPC&003=27372932&010=cp47b73337d8633c688b719ecafe3503c6& amp;gclid=CjwKEAjw7YWrBRCThIyogcGymQsSJAAmz_nd9EAr2PSsa4FjWoO_WeIiargx0EZUl4Yivw
dhW15CZBoCf_7w_wcB&c_aid=45534013653&c2cid=bfd43420-8499-4fdc-b564-d402804d0e79
Got an evap built in.
Here is a workup I made for the radiator front pocket where I was going to put all the stuff for my setup.
Attached image(s)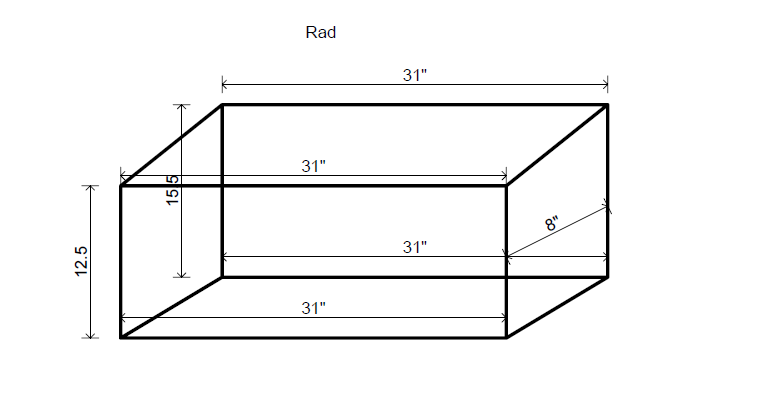
Posted by: dakotaewing May 24 2015, 08:10 PM
If the 2 of you are considering radiators, take a look at the Celica, and the MR2 radiators as well. Some of the cores are 52mm, and appear to be close to a perfect fit. The MR2's are slightly larger, and you can find them with fan shrouds, and black fans. The Celica rads also can be found with shrouds and fans, but you settle for blue or red (cheesy IMHO) fans the that case. Fan and shroud can be found for less than the radiator alone that Andy posted a link to...
Posted by: Mike Bellis May 24 2015, 08:17 PM
If the 2 of you are considering radiators, take a look at the Celica, and the MR2 radiators as well. Some of the cores are 52mm, and appear to be close to a perfect fit. The MR2's are slightly larger, and you can find them with fan shrouds, and black fans. The Celica rads also can be found with shrouds and fans, but you settle for blue or red (cheesy IMHO) fans the that case. Fan and shroud can be found for less than the radiator alone that Andy posted a link to...
Wow. The MR2 is a great fit! I will have to consider it. And, I can almost buy 3 for the price of Andyrew's Corrado radiator.
Posted by: Andyrew May 24 2015, 08:39 PM
The one I posted was just the longest one I could find
The MR2 radiator sure looks like an interesting option Has a condensor that looks like it could fit as well....
Hmmm....
The lines look like they are made for the radiator to be tilted back a bit. This could work well to fit the radiator closer to the front.
Posted by: dakotaewing May 25 2015, 05:14 AM
Most of the images appear to be posted upside down for most of the radiators for the Celica and MR2. My calculations indicated that both radiators would fit vertically, and do so forward of the back of the headlight boxes.
Posted by: Chris H. May 25 2015, 10:03 AM
I'm using the Celica radiator. It fits well.
http://www.ebay.com/itm/00-05-TOYOTA-CELICA-FULL-ALUMINUM-2-ROW-RACING-RADIATOR-DUAL-FAN-SHROUD-BLUE-/170884766820?fits=Model%3ACelica%7CSubmodel%3AGTS&hash=item27c9869c64&vxp=mtr
Get the fans and shroud if you go that way.
Mike, no wonder that thing never even comes up to temp. Sheeeeesh that's a lot of cooling area!
Posted by: Andyrew May 25 2015, 11:04 AM
Those cheap radiators scare me.. I mean they dont even know if they are a 3 row or 2 row! (God forbid if they are a 3 row...)
Im sure they would cool 1.8L just fine, Its just a fear of mine that they are total crap... The Mishimoto is a big company but they dont have a great reputation as a good radiator company.
Posted by: dakotaewing May 25 2015, 07:44 PM
Those cheap radiators scare me.. I mean they dont even know if they are a 3 row or 2 row! (God forbid if they are a 3 row...)
Im sure they would cool 1.8L just fine, Its just a fear of mine that they are total crap... The Mishimoto is a big company but they dont have a great reputation as a good radiator company.
And.... Those are the most expensive of all the radiators!
Posted by: Andyrew May 25 2015, 08:16 PM
Yup. I might try one of the cheap toyota radiators but I think if I start to heatsoak I am going to go with a dual pass VW alum radiator.
Posted by: Andyrew May 26 2015, 12:31 PM
http://m.ebay.com/itm/180901154597?txnId=1359740751008
Grabbed this one, tried to offer him a bit less but no go.
Ill be replacing the fans and giving the radiator setup a trial to see what it can do. If it ends up being junk Ill open up the ends to see how the core is made. Ill post in my thread when it comes in and give real dimensions and such
Posted by: okieflyr May 26 2015, 07:21 PM
I've been running a Turbo MR2 radiator and fans for 8-9 years now.
The car runs at 200-210* town and highway all day long. It will sit on the higher side(210) at night when the air is coolest and dense. I do have large silicone heater hoses(1.25) on feed and return so there may be some reduced flow velocity.
Most of what I've been able find says this engine in factory/mild tune likes 205*.
I am considering putting in A/C so a condenser will be a pre test of the air flow at some point while I consider trunk clean up as well.
Posted by: Mike Bellis Jun 6 2015, 07:55 PM
Fabrication started in earnest today. Both the new oil cooler and new radiator have found their place. I added some 3/4" .120 wall DOM tubing from the shock tower to the front. I have a 1.5" square tube sectioned and welded to the top of the forward suspension points and !/4" plate welded to that to pick up the load of the tow bar. The DOM ties the from the shock tower to the 1/4" plate. This should also stiffen up the front end since the PO cut massive holes in the inner fender well. I'm sure things have been flexing under load. I will add some more gussets before I feel comfortable with the strength of the tow bar setup.
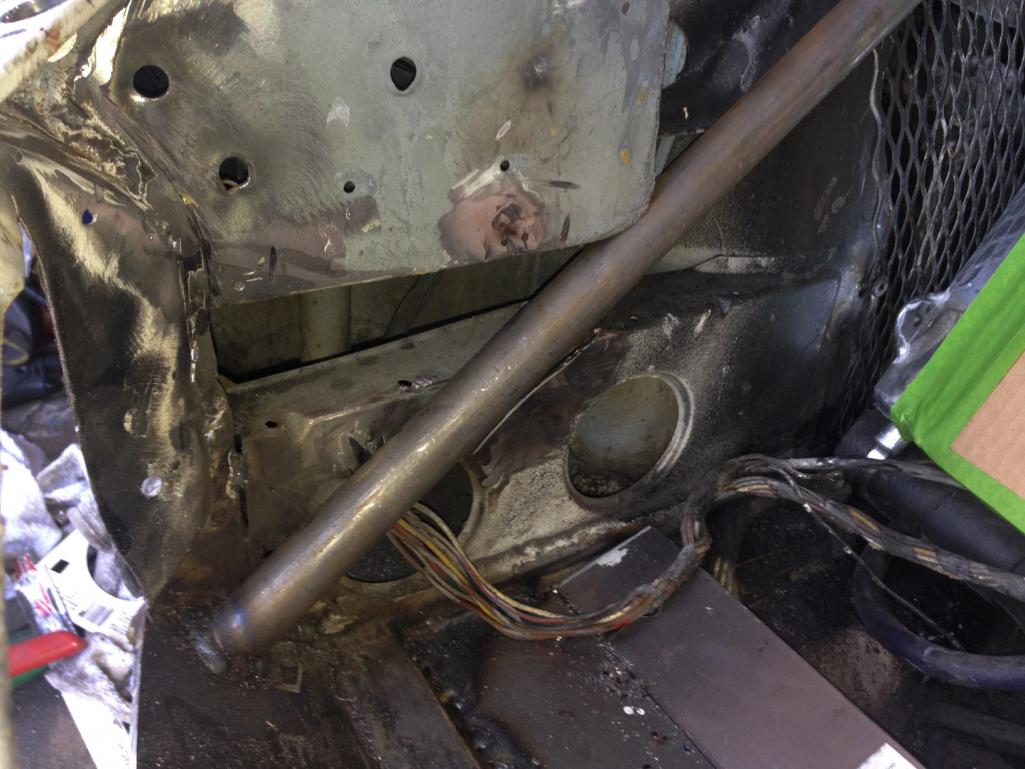
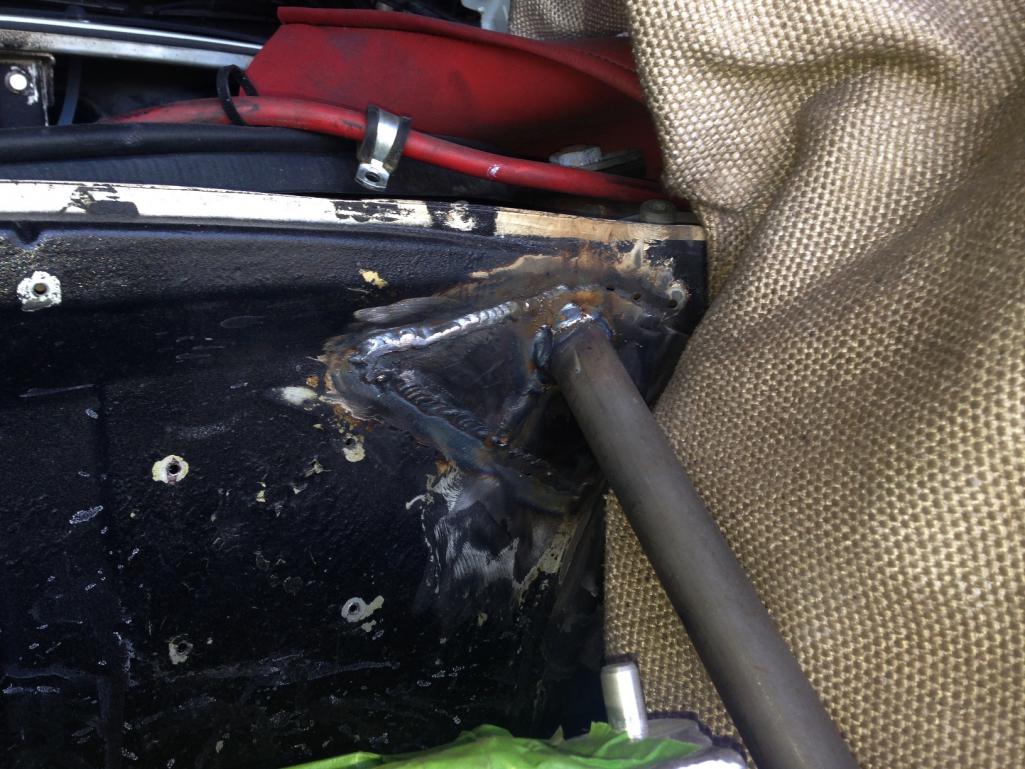
The celica radiator is a great fit between the headlights. I started to fab the shrouding too. I started with a 16ga floor with a bend to match the radiator bottom angle. 14mm holes locate the radiator in the floor. I then cut some 14ga scrap steel that had a perfect 90° in it to seal on the radiator. 914 Rubber supplied a seal (rear window to engine lid) that will seal the radiator to the shroud. The shroud had to be fit around the DOM for a good air tight seal.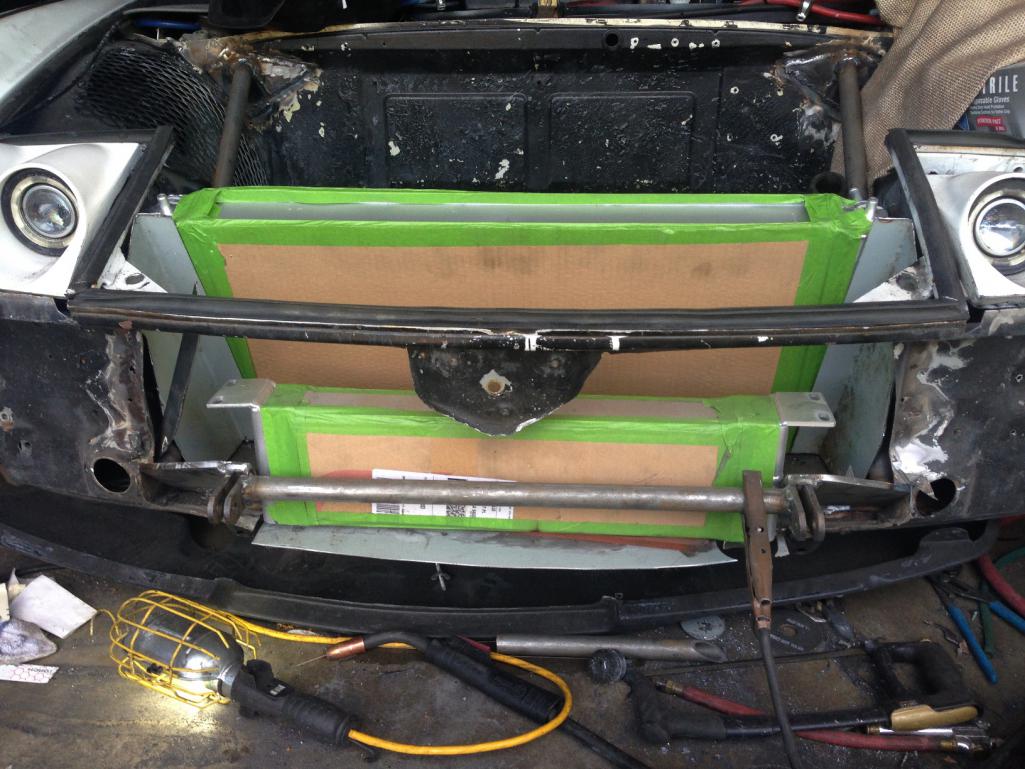
Once all the gusseting is complete, I will graft in a new nose from my parts car in the side yard. I need a new bumper too. I posted a WTB but hopefully I will find one at the swap tomorrow. It will look like a GT but the cut out will be taller to match my oil cooler and the tow bar cross brace will need clearance in the bumper too. 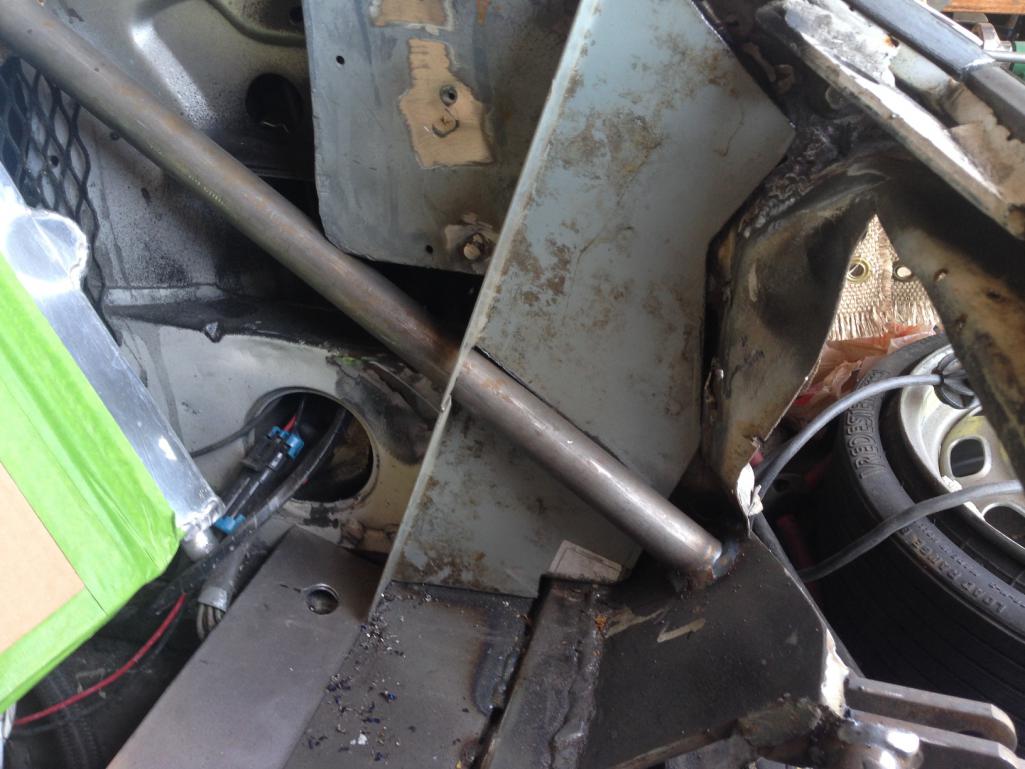
Posted by: JRust Jun 6 2015, 08:33 PM
Love the tow bar setup Mike! Been thinking of doing something similar
Posted by: Mike Bellis Jun 6 2015, 08:47 PM
Love the tow bar setup Mike! Been thinking of doing something similar
Yours kind of inspired me. Then I looked at the standard connection on my car and realized the tow bar would be dragging on the ground.
Posted by: Andyrew Jun 6 2015, 09:13 PM
Looks great! Love the support and the radiator shroud is looking pretty good! Is that going to get welded in?
Im curious with the empty area below the lights if you considered going there with your oil cooler?
I am going to see about doing dual oil coolers under the headlights like maybe two small 3x6 coolers run in sequence. and remove the fog lights.
Posted by: Andyrew Jun 6 2015, 09:16 PM
PS thats a nice looking welding blanket! Kevlar?
Posted by: Mike Bellis Jun 6 2015, 09:22 PM
My space below the headlights is reserved for brake cooling ducts. I plan to run them from the fog light grills.
Yes the blanket is kevlar shielding my oil cooler line from flying sparks! I have two of them given to me by someone? Don't remember who.
Posted by: Andyrew Jun 6 2015, 10:08 PM
Gotcha. I've been contemplating brake cooling as well. I Figured I'd put a discrete duct under the front bumper or make the fog light opening a bit bigger.
Posted by: Mike Bellis Jun 7 2015, 04:39 PM
More fun today.
Gussets and bracing done. bracket for oil cooler done. Shroud sides done. I even mocked up the gasket seal. I put some on the GT valence too. Looks like it will seal great!
Time to go cut the nose off my parts car... 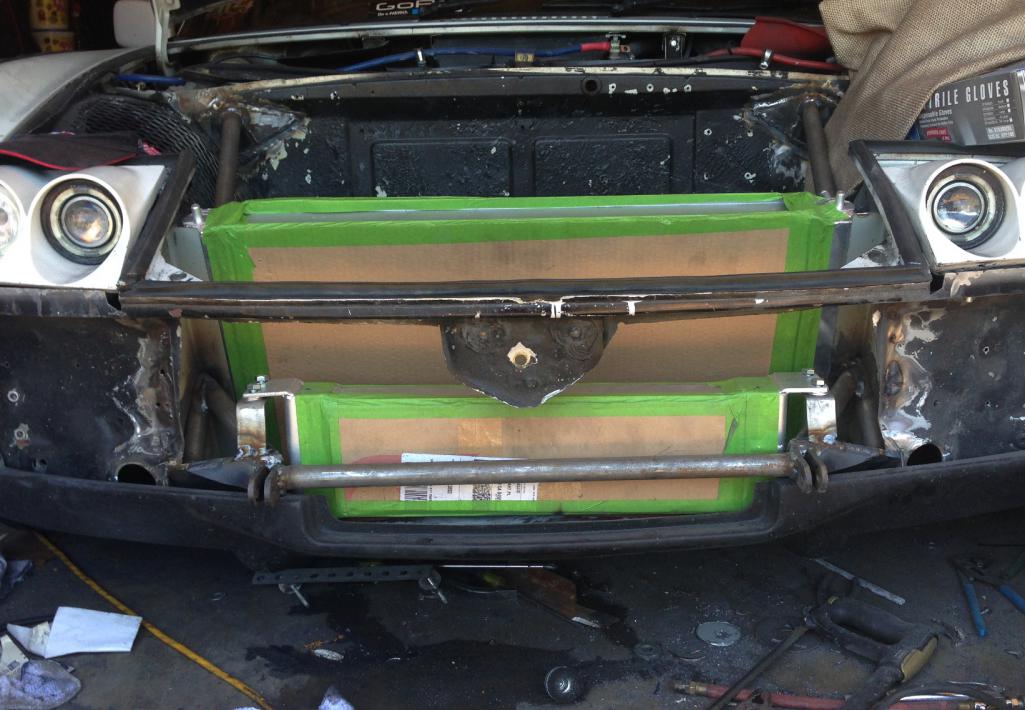
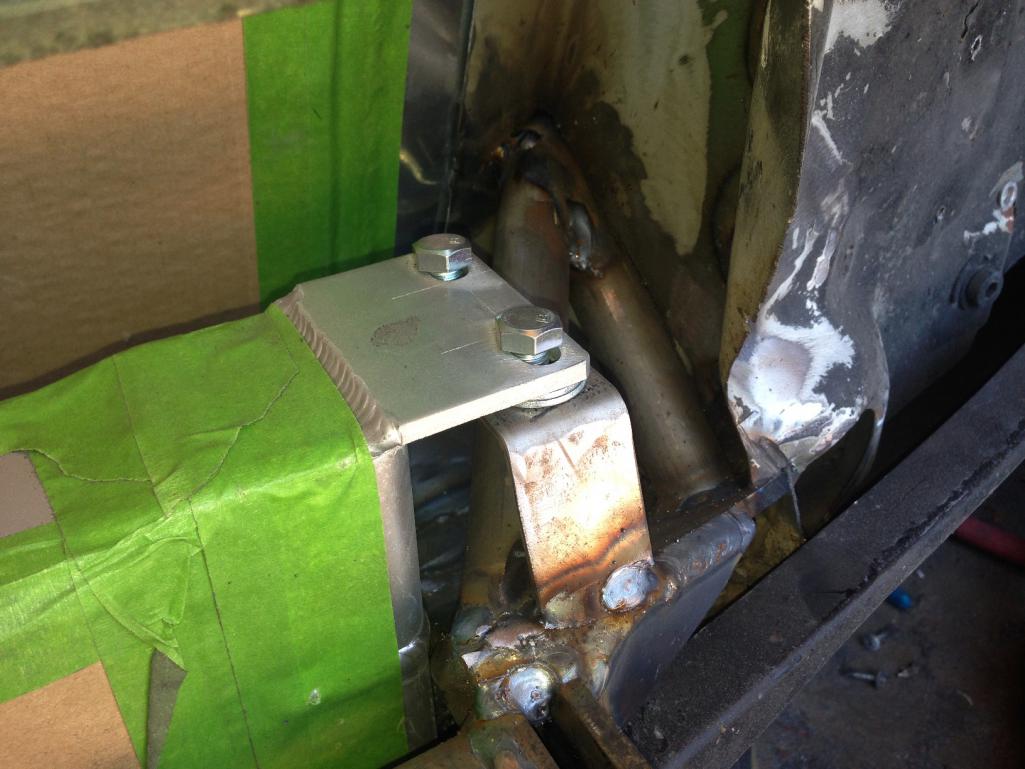
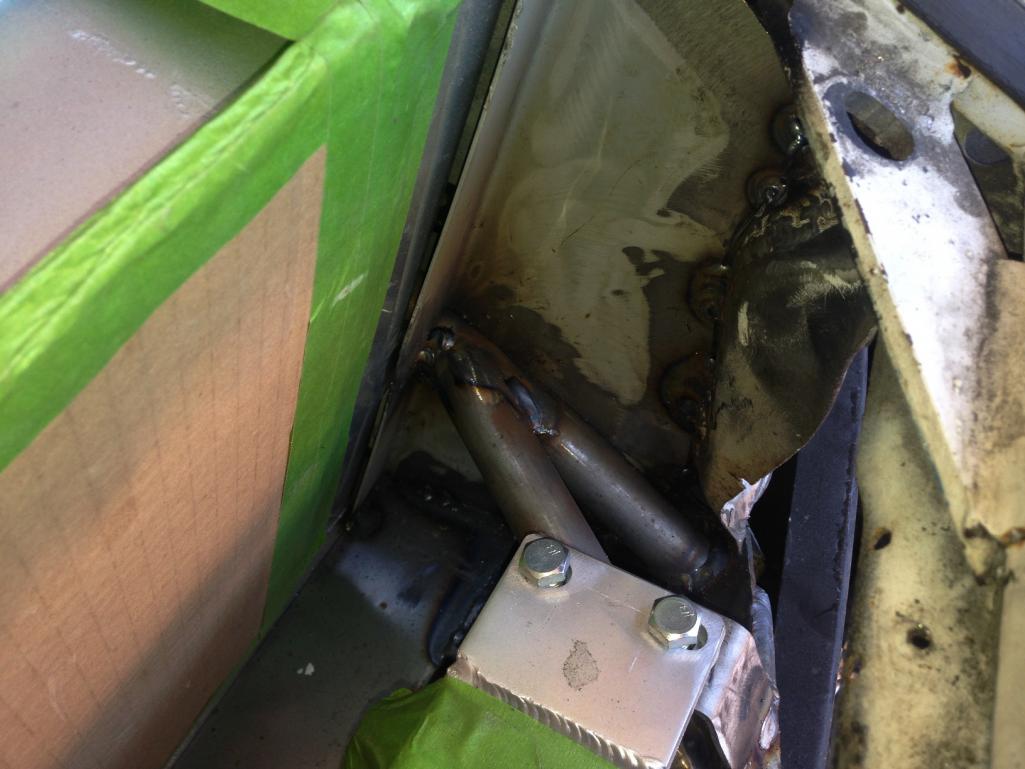
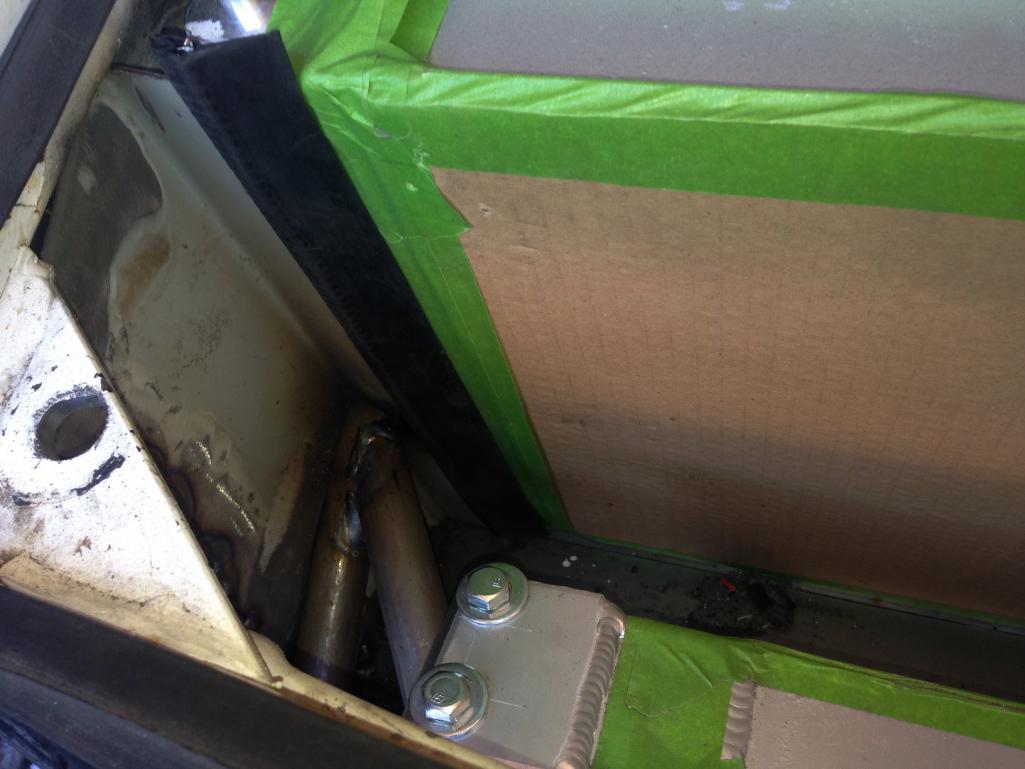
Attached thumbnail(s)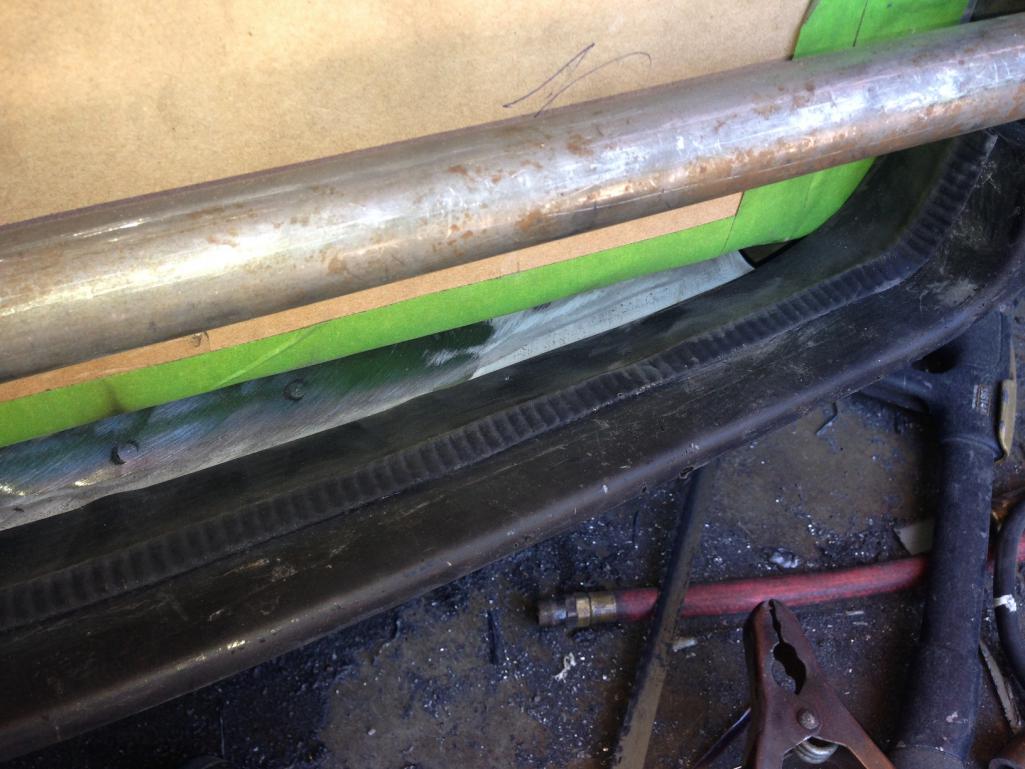
Posted by: Andyrew Jun 7 2015, 04:51 PM
Are you going to rubber isolate the oil cooler? Also is the rubber shroud the only isolation your using on your radiator?
What are you using for the rubber shroud? Looks pretty good...
Posted by: Mike Bellis Jun 7 2015, 07:28 PM
Are you going to rubber isolate the oil cooler? Also is the rubber shroud the only isolation your using on your radiator?
What are you using for the rubber shroud? Looks pretty good...
There is a urethane pad under the oil cooler. The mounting tab has a little built in flex to it as well.
You can see the bottom pan and locating holes. They sell isolating donuts for the locating pins. There will also be an undetermined gasket under it too. The sides are done. The 914 Rubber gasket is the pad and the seal.
There will also be a top plate with some kind of seal, still yet to be built.
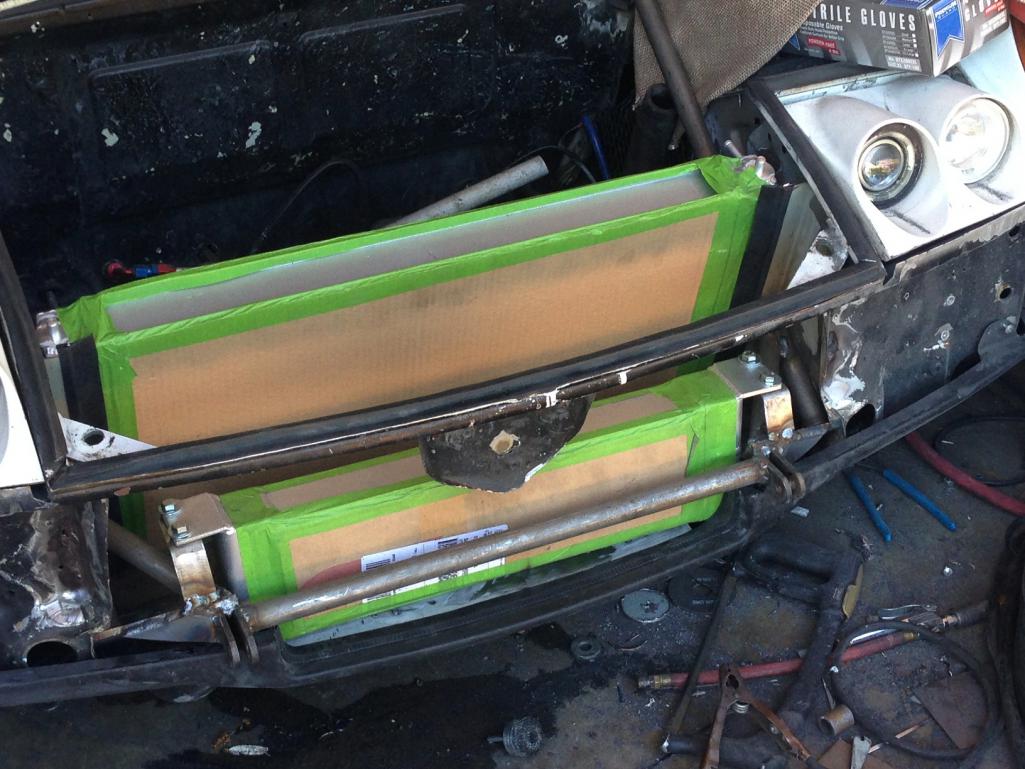
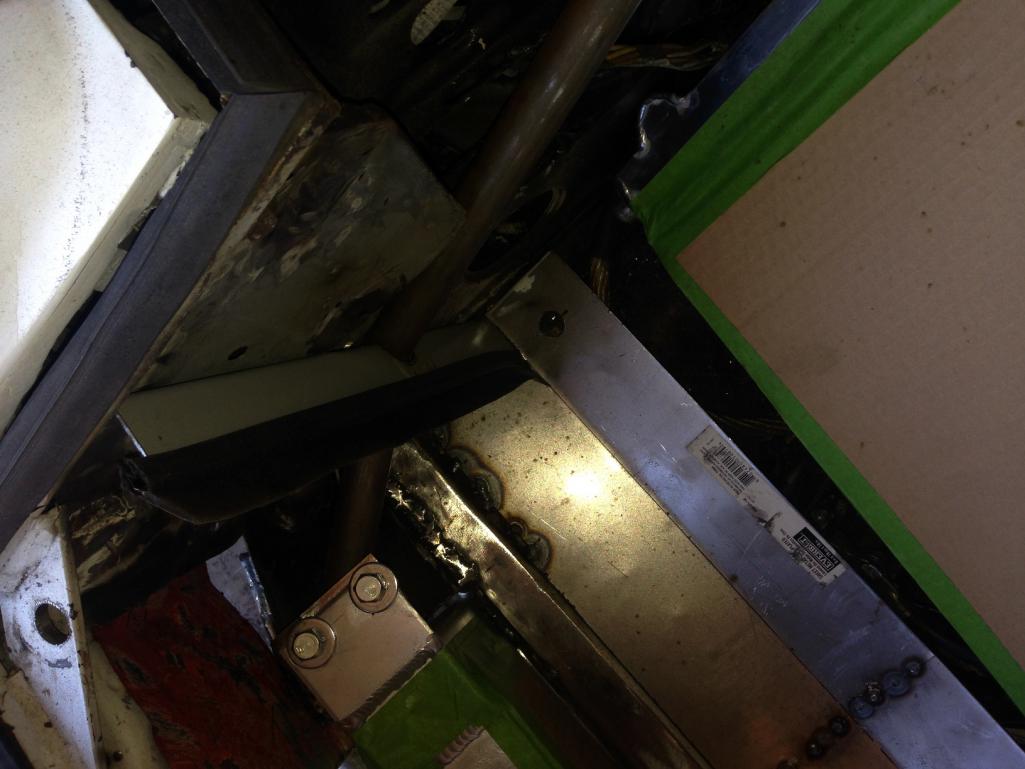
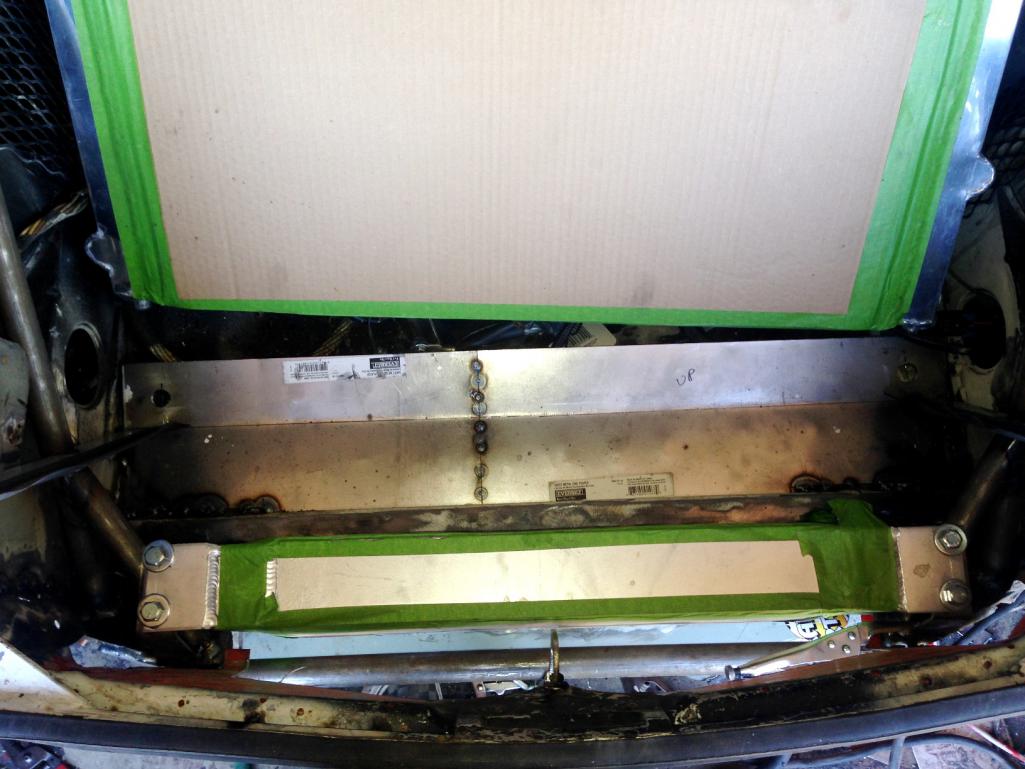
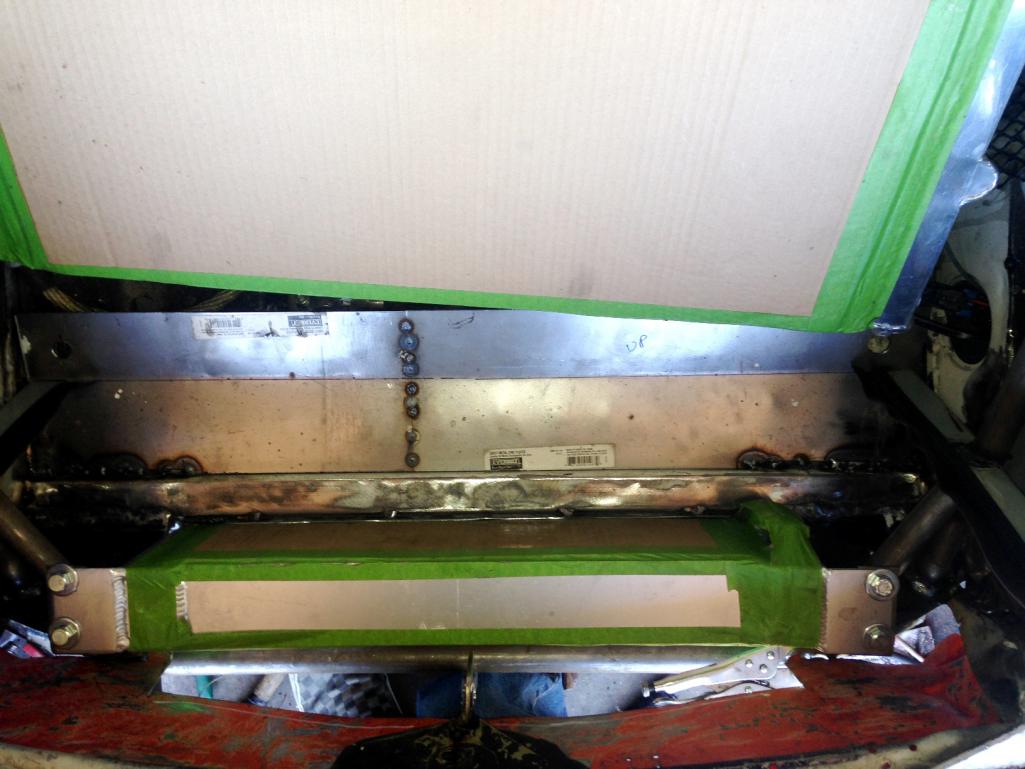
Posted by: Andyrew Jun 7 2015, 09:50 PM
It looks pretty good! You seem to be able to fabricate things much faster than me
What size inlet hole are you going to be using?
Posted by: Mike Bellis Jun 7 2015, 10:03 PM
It looks pretty good! You seem to be able to fabricate things much faster than me
What size inlet hole are you going to be using?
Inlet hole is the size of the oil cooler core. 22"x5.5". Basically a taller GT opening.
The key is to force all the air through the cooler and then the radiator. I still need to figure out oil hose routing. Its completely sealed at this point. I think I will find some grommets to run them through.
Posted by: Andyrew Jun 7 2015, 10:16 PM
Interesting, Did you eliminate your water/oil cooler completely and replace it with this cooler? Seems like your trying to cool the oil down quite a bit, I thought you were going to have the oil cooler just run open air like that maybe with a small fan behind it just in case.
That inlet is about the same size as the 916 inlet. I think I previously measured it to 21x5.5
Posted by: Mike Bellis Jun 7 2015, 10:31 PM
Interesting, Did you eliminate your water/oil cooler completely and replace it with this cooler? Seems like your trying to cool the oil down quite a bit, I thought you were going to have the oil cooler just run open air like that maybe with a small fan behind it just in case.
That inlet is about the same size as the 916 inlet. I think I previously measured it to 21x5.5
Yes the water/oil cooler has been replaced with a sandwich plate, Mocal thermostat and AN12 lines to the front.
The radiator fans will pull air through the oil cooler once the system is sealed off.
My old oil cooler was a 22"x17" Setrab unit. This one is much smaller. But with the old one hovering over the radiator, air has an opportunity to go around it. In theory this should have more air flow in total.
Posted by: Mike Bellis Jun 11 2015, 05:38 PM
I picked up a factory shroud with fans for the radiator. Perfect fit but I need to check my stash for electrical connectors. I like this one better than the cheapo Chinese fans and shroud that's sold as a package with this radiator. If these fans don't blow enough, my old fans can be fit into this shroud with a little ingenuity.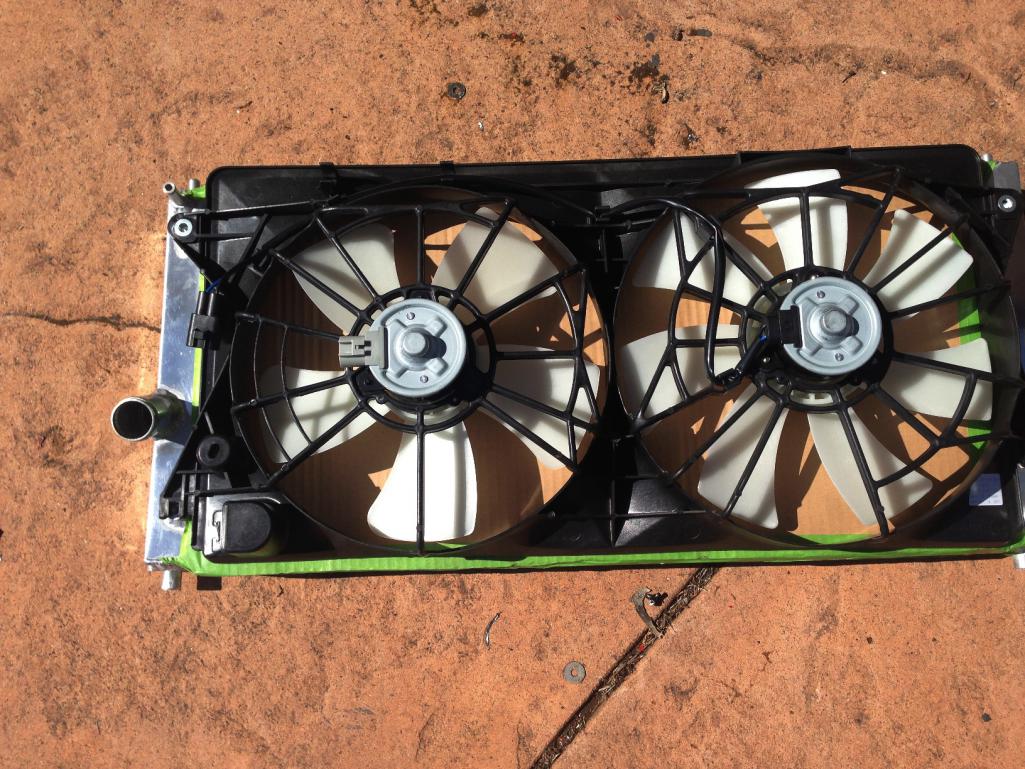
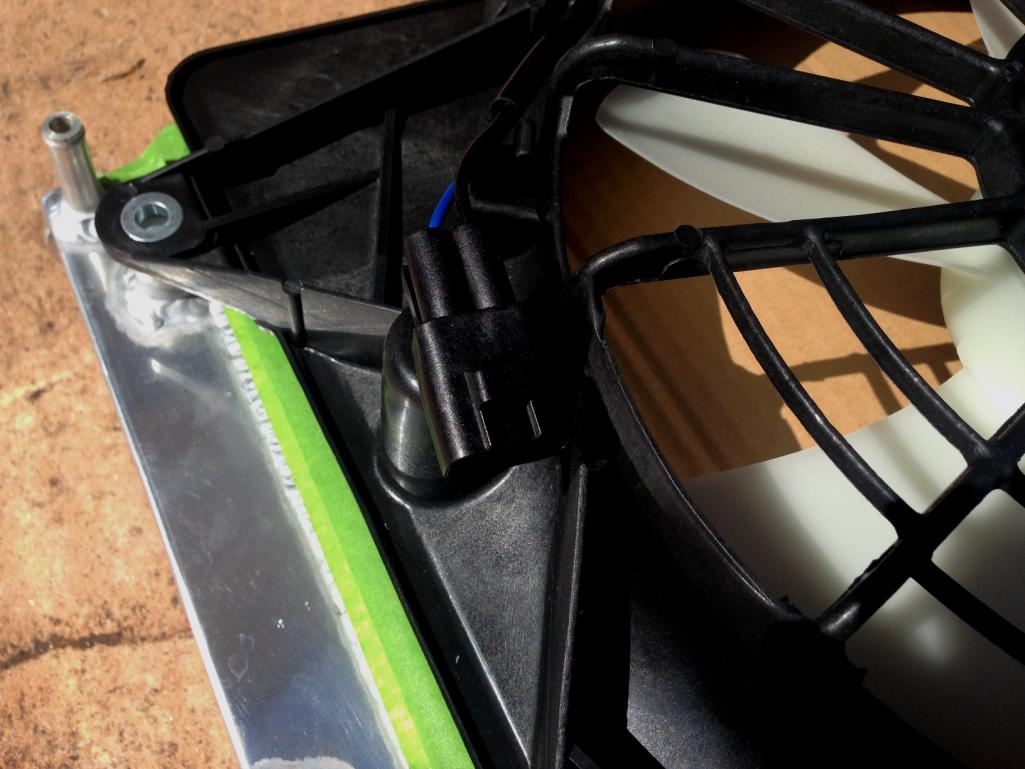
Posted by: Andyrew Jun 11 2015, 08:33 PM
What did you pay for that factory unit? Looks pretty nice. I was considering buying some nice fans but think that a factory unit would be nice as well..
Posted by: Mike Bellis Jun 11 2015, 08:41 PM
What did you pay for that factory unit? Looks pretty nice. I was considering buying some nice fans but think that a factory unit would be nice as well..
$120 ebay brand new.
Posted by: Andyrew Jun 11 2015, 08:54 PM
Not bad at all. Should work pretty well IMHO.
How do the mounting holes fit? Look slightly off in the pic.
Posted by: Mike Bellis Jun 11 2015, 09:02 PM
Not bad at all. Should work pretty well IMHO.
How do the mounting holes fit? Look slightly off in the pic.
They are a perfect fit! Pic is just a bad angle.
Posted by: Mike Bellis Jun 13 2015, 09:32 PM
I got the nose finished today. Its hard to see but there is an upper flange to seal the top of the oil cooler. It's setup to use a gasket to seal on the face of the cooler.
I bought a QRS GT bumper today; to cut up. Yes, cut. The GT opening will be raised a little and I need a notch on each side for the tow hitch mounts. I will cut it and re-glass it before painting it black again.
Just finished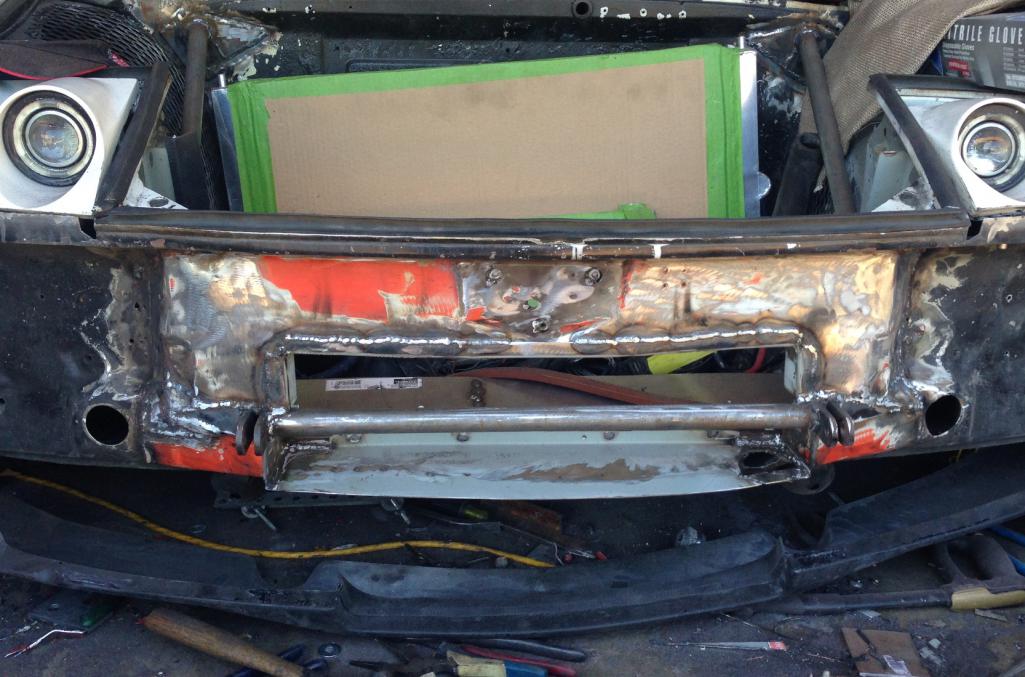
After a little satin black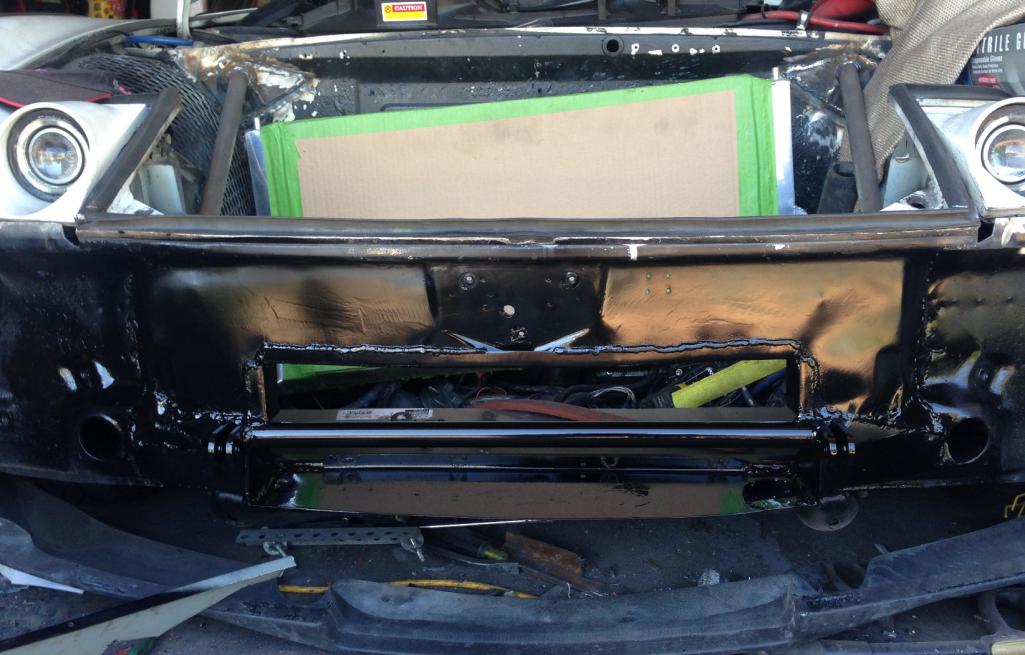
Posted by: Andyrew Jun 13 2015, 09:52 PM
Looks great! Much more clean and civilized than before.
Out of curiosity did you consider eliminating the horizontal bar and just bracing the tabs to the body better?
Posted by: Mike Bellis Jun 13 2015, 10:33 PM
Looks great! Much more clean and civilized than before.
Out of curiosity did you consider eliminating the horizontal bar and just bracing the tabs to the body better?
I did. But I wanted to ensure strength. And, I don't trust the body there. It's right about at the bottom of the headlight bucket. Not good structure. Although the DOM tubing from the tower might be enough. At least I now have some structure in front to go with my fiberglass bumper.
Posted by: Andyrew Jun 13 2015, 10:36 PM
Sounds like a smart move
Posted by: Mike Bellis Jun 27 2015, 08:36 PM
Oil cooler is mounted and plumbed. Radiator is mounted and plumbed. Bumper is cut and modified for a larger cooler size. I used kevlar to glass the section back in. Very solid. Now I need some minor body work and reassembly. I still have to rework some wiring for the fans and thermostatic switch.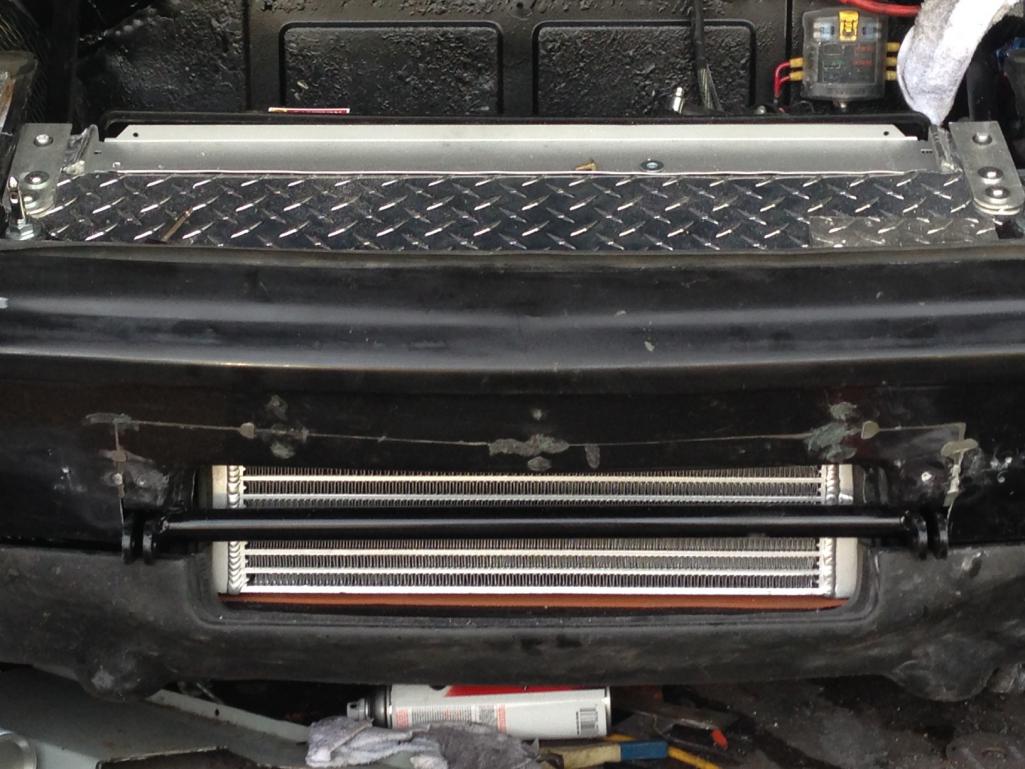
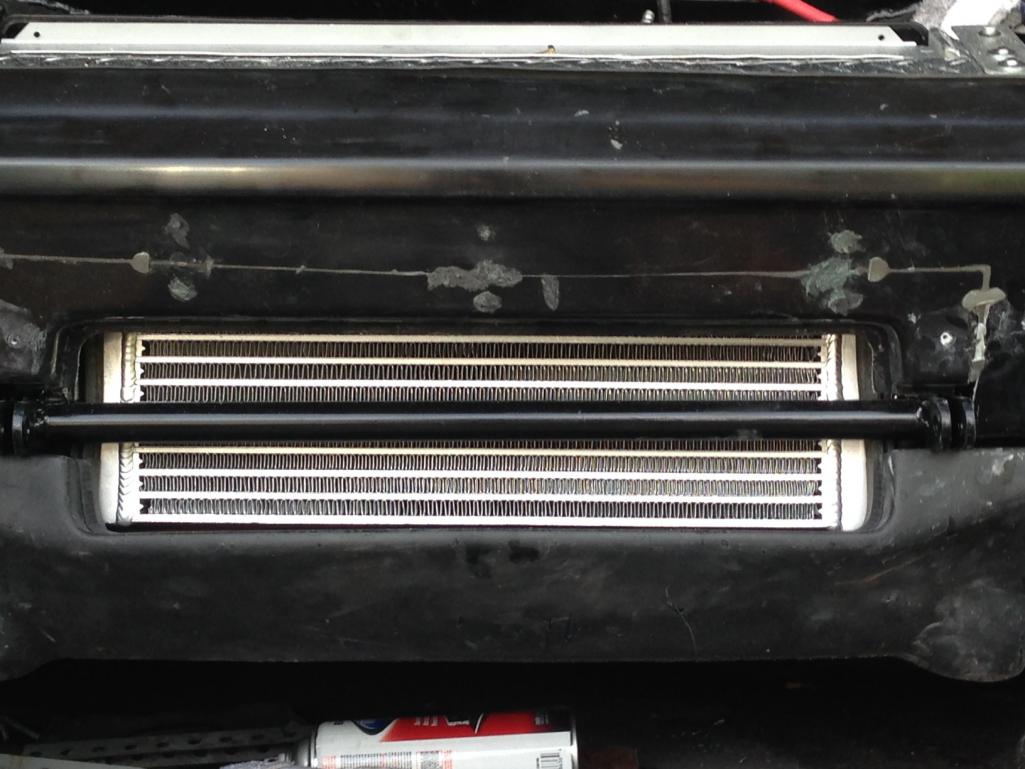
Posted by: Andyrew Jun 28 2015, 12:20 AM
Looks great! Fit is very nice to that oil cooler.
I like how you held the radiator in place at the top. Looks like you cut the tabs down as well. How much clearance do you have to the hood?
Posted by: Mike Bellis Jun 28 2015, 12:30 AM
Looks great! Fit is very nice to that oil cooler.
I like how you held the radiator in place at the top. Looks like you cut the tabs down as well. How much clearance do you have to the hood?
Before I cut them (3/16" or so) the tab would just touch the bottom of the hood rib. Pushing on the hood, I was able to make the smallest mark. I may have been able to leave them long but I was worried about hearing a random tapping noise.
I'll take better pics one I get out of the garage. I'm pretty happy with the overall fit & finish. I need to figure out where I want the fan controls. before it was hidden in the shroud. Now they won't fit there.
The oil cooler lines were a bitch because they are -12. Bend radius sucks. I had to make a little more space between the headlight bucket and the inner fender well. I massaged it for oil line clearance.
Posted by: Andyrew Jun 28 2015, 01:15 AM
I just cut mine, I think I have 3/8" left on the tabs, enough to use them if I want. I am about 1/8" currently but my radiator is going to drop another 1/4" when it finally seats on the body/rubber.
I was going to put the fan controls, fuel pump, and other stuff on the lower area of the trunk and make a false floor about 5" tall to cover it and the radiator lines. I might even make it out of multiple layers of fiberglass and incorporate it in my shrouding.
I am still debating on line size and type for mine.. Considering -8 SS but worried about pressure loss.
Posted by: RobW Jun 28 2015, 08:10 AM
Show off. Looks really good Mike.
Posted by: Mike Bellis Jul 3 2015, 08:27 PM
Radiator is done. The factory fan shroud needed a gasket. I borrowed the rear trunk main gasket and it's a perfect fit. I ordered a new replacement from 914 Rubber.
The car runs great! It warms up faster and stays at 190°. The fans pull a ton of air. With the fans running, there is enough air through the oil cooler to hold one of my shop rags from suction. I'm very happy with the outcome.
Here are some pics of the final setup.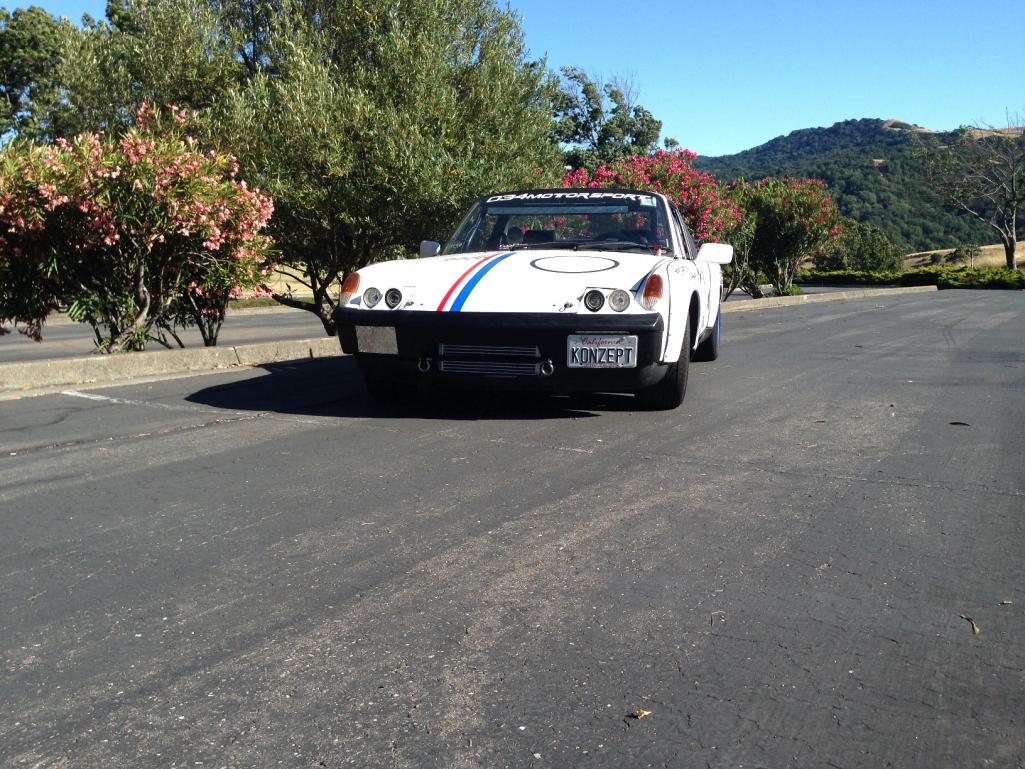
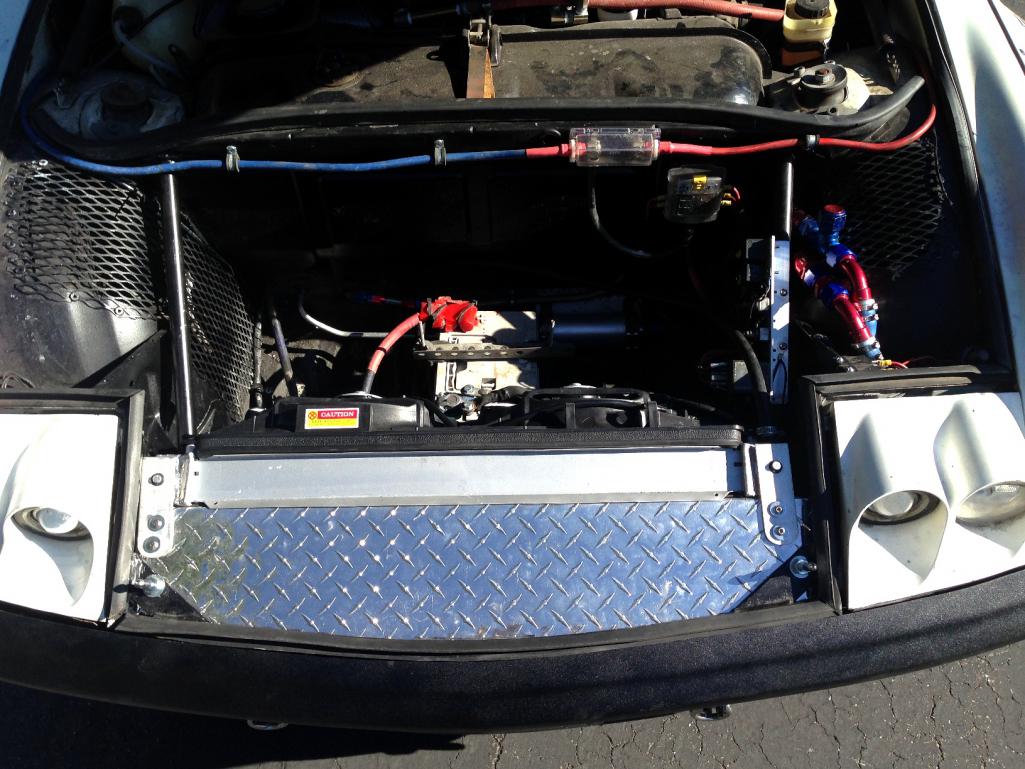
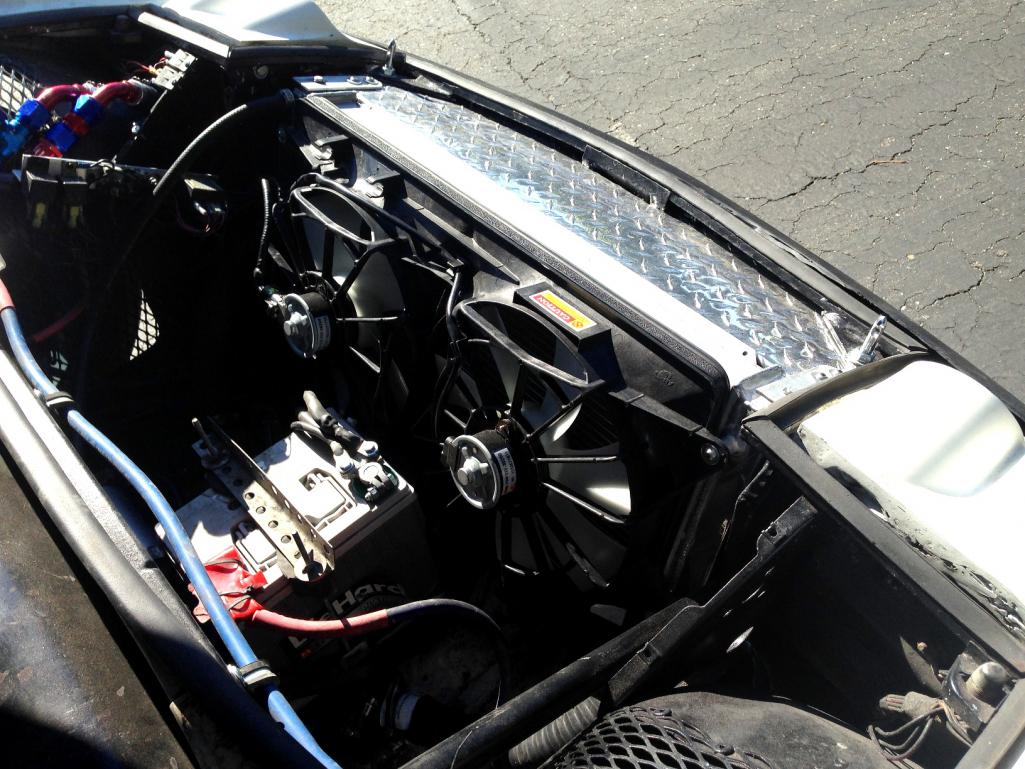
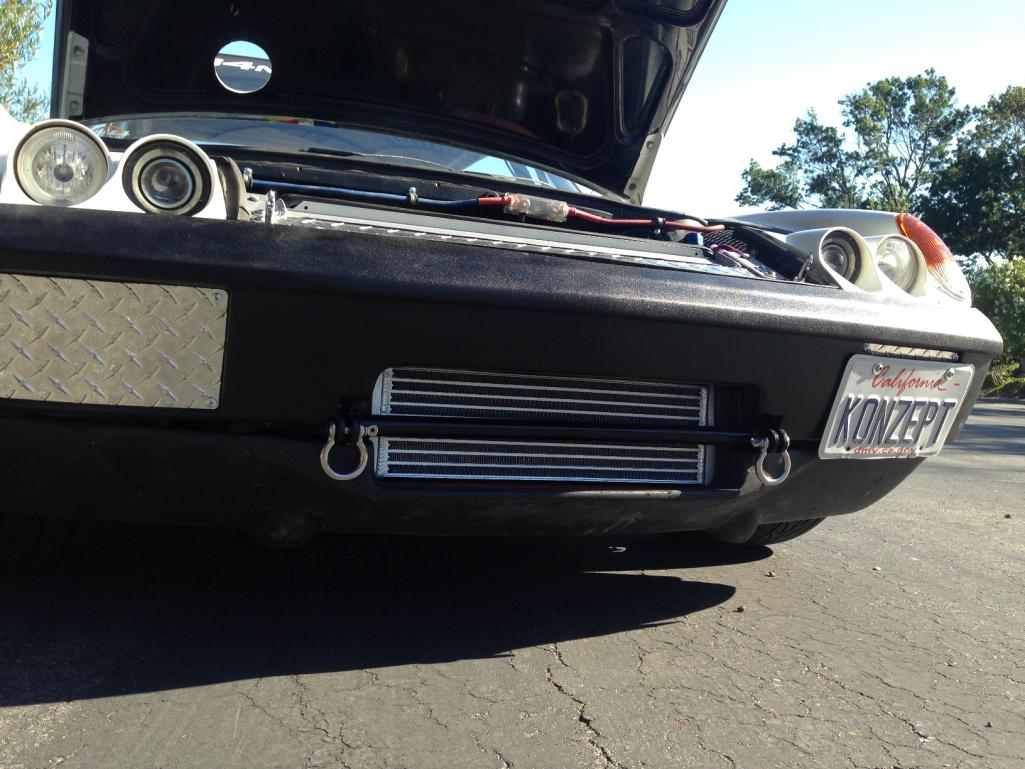
Now the bad news... On my third test drive today, I blew the coolant hose at the engine bay, right where it turns up toward the motor. Time to order some green stripe...
Good news... My tow bar setup worked perfect. I called my wife to rescue me, grab the truck and tow bar. Success! Now I need to rig some kind of connector, diodes, etc. so I can have the 914 turn and brake lights work when connected to the tow rig.
Posted by: euro911 Jul 3 2015, 10:22 PM
Highs and lows come and go in our lives, but the lows simply allow us appreciate the highs more
The mods look great though
Posted by: matthepcat Jul 4 2015, 12:23 AM
I know your an old hot rodder/4x4 guy at heart when I see the polished diamond plate.
Posted by: Cairo94507 Jul 4 2015, 07:11 AM
Great job on the radiator and cooling fans.
Are you worried about a small rock puncturing the radiator at all? Are you going to put any type of screen over the opening to protect the radiator?
Given how low our cars are and the amount of stuff on the roads these days......
Posted by: Mike Bellis Jul 4 2015, 09:30 AM
Great job on the radiator and cooling fans.
Are you worried about a small rock puncturing the radiator at all? Are you going to put any type of screen over the opening to protect the radiator?
Given how low our cars are and the amount of stuff on the roads these days......
I've considered it but not sure how I want to execute it.
Posted by: Andyrew Jul 4 2015, 10:56 AM
Considering that there are a lot of cars with exposed radiators not behind protective grills I am going to say its not going to be an issue. Think of all the FMIC's that are put right up front. I ran one in my frony bumper 4" from the ground for years, no punctures but it was painted satin black and would get the paint chipping off.
Posted by: Andyrew Jul 4 2015, 11:09 AM
Also wtf is up with your radiator hoses????
Setup looks killer!
Posted by: Mike Bellis Jul 4 2015, 11:17 AM
Also wtf is up with your radiator hoses????
Setup looks killer!
My rad hoses were procured from Craigs list. A local guy tha had a spool of 1-1/8" coolant hose. It is not the good stuff and clearly has reached its lifespan.
I need about 20' of 1-1/4 if anyone has some. Looks like I can buy a 50' roll for $350 but I don't need that much. Who wants to go halvesies on a roll?
Posted by: Mueller Jul 4 2015, 11:22 AM
Also wtf is up with your radiator hoses????
Setup looks killer!
Yep, that sure is nice....what size battery? Thought about going to smaller lighter unit or not really concerned about it?
Posted by: Mike Bellis Jul 4 2015, 11:33 AM
Also wtf is up with your radiator hoses????
Setup looks killer!
Yep, that sure is nice....what size battery? Thought about going to smaller lighter unit or not really concerned about it?
No idea on the battery. It came with the car when I bought it in '09 and all the labels are gone. It's probably time to replace it but it holds a charge and starts the car. I do not like the red top or yellow top gel cells. I've had both and they both had shorter life spans than this one.
Posted by: Andyrew Jul 4 2015, 11:43 AM
Is that the size of the toyota radiator inlets? If so ill go halvsies.
Posted by: Mike Bellis Jul 4 2015, 11:56 AM
Is that the size of the toyota radiator inlets? If so ill go halvsies.
Toyota rad is 1-3/8" but that is an odd ball size and 1-1/4" will stretch over it.
Here's the stuff I'm thinking about...
http://www.ebay.com/itm/Gates-28445-Green-Stripe-Hose-1-1-4-I-D-x-50-ft-Length-Each-/391164425655?hash=item5b133775b7&vxp=mtr
Posted by: Mike Bellis Jul 4 2015, 12:14 PM
Better price...
http://www.amazon.com/dp/B000CRHLF8/?tag=googhydr-20&hvadid=75176323745&hvpos=1t1&hvexid=&hvnetw=g&hvrand=13710580666709151993&hvpone=&hvptwo=&hvqmt=e&hvdev=c&ref=pd_sl_6tq5ssaq6a_e
Posted by: Andyrew Jul 4 2015, 12:15 PM
I havent measured, is the audi outlets 1 1/4?
Btw I am down, let me know when you order it and ill send you paypal.
Posted by: sb914 Jul 4 2015, 12:16 PM
Bellis your car rules.maybe next year you'll take me for a drive.
Posted by: JRust Jul 4 2015, 01:37 PM
Better price...
http://www.amazon.com/dp/B000CRHLF8/?tag=googhydr-20&hvadid=75176323745&hvpos=1t1&hvexid=&hvnetw=g&hvrand=13710580666709151993&hvpone=&hvptwo=&hvqmt=e&hvdev=c&ref=pd_sl_6tq5ssaq6a_e
Thats the stuff! Gates green stripe is excellent stuff. Never had a problem with those hoses in the last 10 years I have used it. Had plenty of other problems with my cars
. Gates green stripe is not something you'll have to worry about
Posted by: Mike Bellis Jul 12 2015, 03:22 PM
My new green stripe hose showed up today (Sunday USPS). This was $120 shipped to my door from Amazon. I bought the "used" but the description said damaged box. What I received was 50 feet of new hose in a damaged/repaired box. The hose itself is perfect, without even a scratch. The box was barely damaged, but torn in the center of the coiled hose. I have no idea why the Post Office delivered today but I'll take it.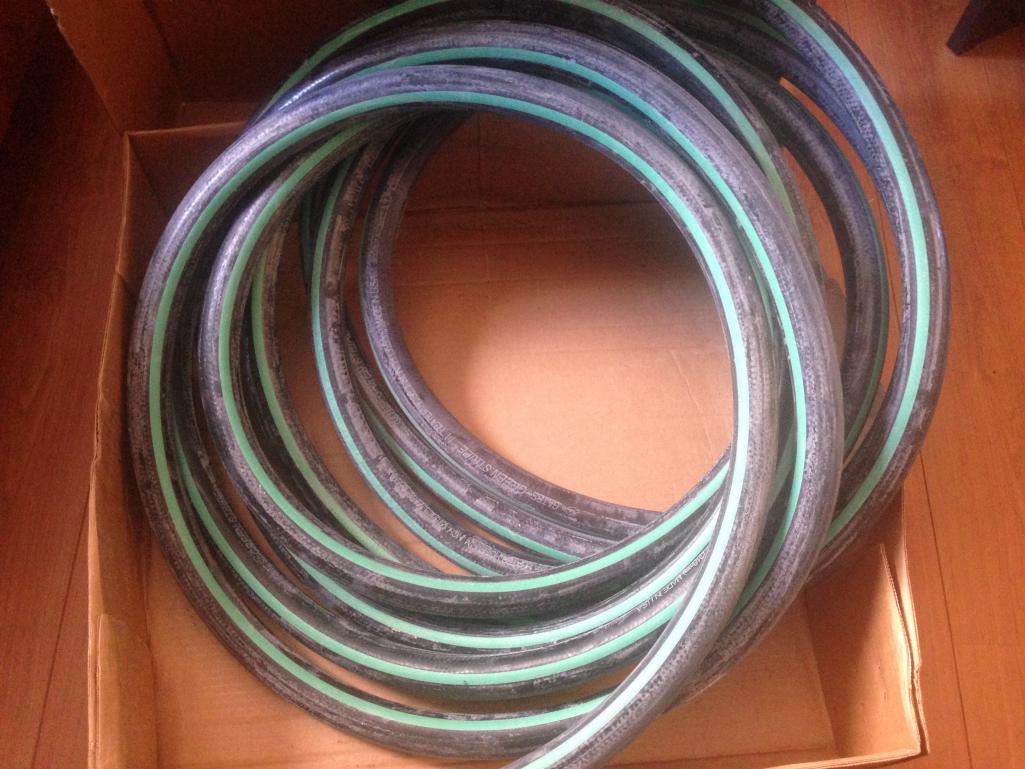
Posted by: mgp4591 Jul 12 2015, 05:12 PM
Are you planning on still running your auxiliary pump up front like you were showing me at WCR? It definetely helps in moving the coolant along!
Posted by: Mike Bellis Jul 12 2015, 05:18 PM
Are you planning on still running your auxiliary pump up front like you were showing me at WCR? It definetely helps in moving the coolant along!
Yes, it will stay up front. I might put it on the outlet of the radiator. Right now it's pushing water into it. I need to study the fluid dynamics a little before deciding.
Posted by: mgp4591 Jul 12 2015, 05:28 PM
I think that's great insurance over a stock mechanical pump doing all the work. I'd think about putting it at the end of the most convoluted side of your tubing to draw it through the twists and turns- keep the flow moving.
Posted by: Andyrew Jul 12 2015, 11:00 PM
My new green stripe hose showed up today (Sunday USPS). This was $120 shipped to my door from Amazon. I bought the "used" but the description said damaged box. What I received was 50 feet of new hose in a damaged/repaired box. The hose itself is perfect, without even a scratch. The box was barely damaged, but torn in the center of the coiled hose. I have no idea why the Post Office delivered today but I'll take it.
Let me know if you want me to PP you $$!
Nice steal!
Posted by: Mike Bellis Feb 27 2016, 07:39 PM
Looks like my random limp mode issues were part of the battery switch problem. I replaced the old switch with a Moroso unit. The new unit is much larger and interfered with the hood hinge so i had to hog out the mounting hole and make an escutcheon plate. I used some leftover diamond plate I had laying around. I also replaced a broken battery connector that was bugging me. Seems to work great. I put about 10 miles on the car today tooling around the hood, staying in cell phone range just in case...
Car is pretty much ready for WCR. I have a couple things I want to tweak on but it runs great.

Posted by: 76-914 Feb 28 2016, 09:18 AM
Are you planning on still running your auxiliary pump up front like you were showing me at WCR? It definetely helps in moving the coolant along!
Yes, it will stay up front. I might put it on the outlet of the radiator. Right now it's pushing water into it. I need to study the fluid dynamics a little before deciding.
You have it right just as it is. FWIW, most all pumps "push" water. Yes, they do make "suction" pumps but the efficiency is quite low on these type pumps.
Glad to see you quite goofing off and got Frankie back on the road. So was it an intermittent or low voltage problem?
Posted by: JRust Feb 28 2016, 11:28 AM
Car is pretty much ready for WCR. I have a couple things I want to tweak on but it runs great.
Nice! Glad to see you've got it all squared away for WCR already. Might be time to do another engine conversion. You still have a little over 2 months
Posted by: Mike Bellis Feb 28 2016, 11:30 AM
You have it right just as it is. FWIW, most all pumps "push" water. Yes, they do make "suction" pumps but the efficiency is quite low on these type pumps.
Glad to see you quite goofing off and got Frankie back on the road. So was it an intermittent or low voltage problem?The battery switch was becoming intermittent before it gave up the ghost. The computer was seeing a random missfire because of it. That would send it into limp mode. At the same time, the positive battery connector was cracked and loose.
With the DBW throttle, limp mode puts the car in idle with no throttle response. Totally sucks when you are 40 miles from home.
Posted by: Nocturnal_breed Jul 7 2017, 05:16 AM
Mike,
You've talked me into it. I've been reading this build thread since the beginning. So I have a chassis and I've been looking for the right swap, now I have it. Just picked up an Audi 1.8t donor car. The problem is that mine is a 01 a4 Quattro. I can't use the transmission like you did initially. I saw that you bought a 05 -08 boxster s 6 speed and as much as I'd like to do that now I want to put a 5 speed in to get it up and running. The only question that I'm not sure about is are all the 5 speed boxster transmissions a direct bolt up or are there only certain years that will work. From what I see on here they should all bolt up. It is really like to verify that before I buy a transmission that I can't use. Any help would be greatly appreciated. Love the build!
Posted by: Andyrew Jul 7 2017, 08:27 AM
Mike,
You've talked me into it. I've been reading this build thread since the beginning. So I have a chassis and I've been looking for the right swap, now I have it. Just picked up an Audi 1.8t donor car. The problem is that mine is a 01 a4 Quattro. I can't use the transmission like you did initially. I saw that you bought a 05 -08 boxster s 6 speed and as much as I'd like to do that now I want to put a 5 speed in to get it up and running. The only question that I'm not sure about is are all the 5 speed boxster transmissions a direct bolt up or are there only certain years that will work. From what I see on here they should all bolt up. It is really like to verify that before I buy a transmission that I can't use. Any help would be greatly appreciated. Love the build!
All the boxster and Audi FWD from the A4 and the VW passat transmissions are bolt on. If you dont want to spend money on a boxster 6 speed grab a GVT transmission from a FWD manual 06-08 Audi A4. Its a 6 speed as well at a much lower cost. Wont handle the HP of a boxster 6 speed, but should be plenty for most builds. Im going to give it a try and I have quite a bit of power.
Theres one I found in your area for $450 on www.carpart.com
2006
Transmission Assembly
Audi A4 2.0L,5 Sp,FWD 68,706 A N60462 $450 Tuscarawas Auto Parts, Inc. USA-OH(New-Philadelphia) Request_Quote 1-888-832-0066 Request_Insurance_Quote
Posted by: ndfrigi Jul 7 2017, 09:27 AM
You have it right just as it is. FWIW, most all pumps "push" water. Yes, they do make "suction" pumps but the efficiency is quite low on these type pumps.
Glad to see you quite goofing off and got Frankie back on the road. So was it an intermittent or low voltage problem?The battery switch was becoming intermittent before it gave up the ghost. The computer was seeing a random missfire because of it. That would send it into limp mode. At the same time, the positive battery connector was cracked and loose.
With the DBW throttle, limp mode puts the car in idle with no throttle response. Totally sucks when you are 40 miles from home.
Hi Mike, did u able to fix ur limp mode? If not, have u tried checking if there is no loose wire on ur trottle wiring or maybe some fluid inside the plug wire? My C-240 has limp mode issue before until I found oils along trottle cable wiring plug. I was suggested to replace trottle but after cleaning the plug wires, issue is fixed.
Posted by: Chris H. Jul 7 2017, 10:55 AM
That's an older post on the limp mode thing.
So just to hijack for a minute...How much firewall cutting is required to put a 1.8T in? I'm liking the 6 speed bolt-up idea.
Posted by: Andyrew Jul 7 2017, 11:35 AM
That's an older post on the limp mode thing.
So just to hijack for a minute...How much firewall cutting is required to put a 1.8T in? I'm liking the 6 speed bolt-up idea.
Depends on how far back you put the engine/trans. There is physically enough room to put the engine/trans in the engine bay without any cutting but you have to line up the axles with the trailing arm stub axles. if you dont want the transmission flanges to walk out of the transmission.
Brad roberts thinks that is necessary and thinks you can get away with using some material to space out the flange C pin so it retains better as thats what they are doing on the boxster/ cayman cup cars.
Personally I moved mine back about 6" (or I will). Not going to miss the space as it comes from the smallest part of the trunk. The shock towers will make the starting point for the trunk. Targa top still fits, but it will be difficult to make it work well. The rear coolant flange is the rear most item there. If you built a custom flange you could gain probably 1.5" of space. Personally I like a lot of room.
Attached thumbnail(s)
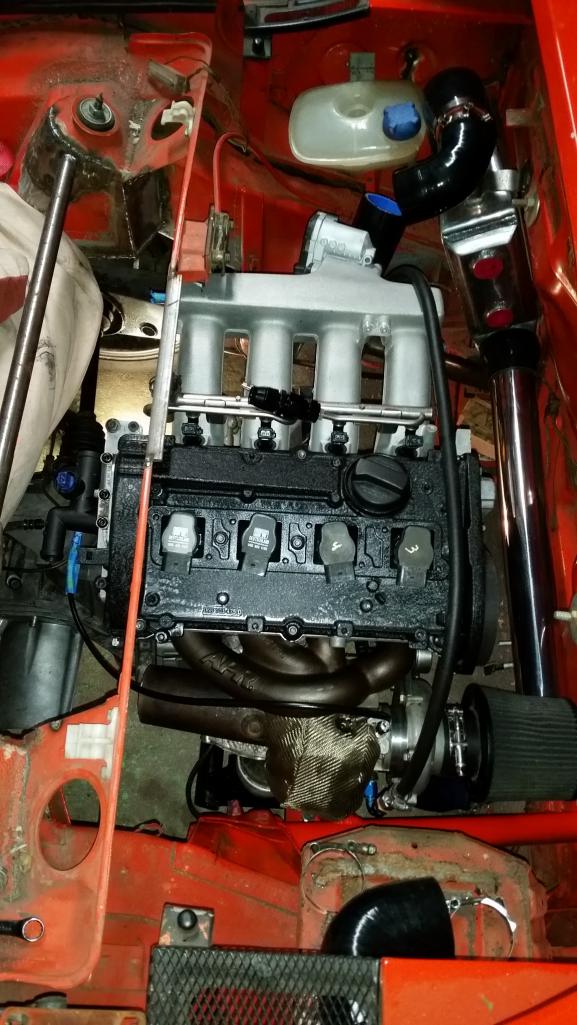
Posted by: Chris H. Jul 7 2017, 02:06 PM
Very interesting...thanks.
Posted by: Mike Bellis Jul 7 2017, 02:40 PM
Mine is moved back to where you see Andyrew's bar. My targa top still fits in the trunk too. The 6 speed is longer, invading the stock muffler space. The 5 speed has 3-4 more inches of space.
Posted by: Mike Bellis Jul 7 2017, 02:48 PM
Mike,
You've talked me into it. I've been reading this build thread since the beginning. So I have a chassis and I've been looking for the right swap, now I have it. Just picked up an Audi 1.8t donor car. The problem is that mine is a 01 a4 Quattro. I can't use the transmission like you did initially. I saw that you bought a 05 -08 boxster s 6 speed and as much as I'd like to do that now I want to put a 5 speed in to get it up and running. The only question that I'm not sure about is are all the 5 speed boxster transmissions a direct bolt up or are there only certain years that will work. From what I see on here they should all bolt up. It is really like to verify that before I buy a transmission that I can't use. Any help would be greatly appreciated. Love the build!
I Agree with Andyrew, buy a Passat tranny. They are almost the same tranny. Gear ratios are the main difference. The Passat tranny is cheap. If you had a torquey motor, I would recommen the 5 speed LUK TDI version from Europe. A 6 speed in good condition will run you around $2,500 minimum in the US. I got real lucky on mine but is does have a noisy main shaft bearing. One of these days I will send it to Dr. Evil. If you do go the 6 speed route, just remember, do not buy the tranny with the circular bell housing. You need the one that looks like the Audi/VW bell housing. All Boxster, Passat and Audi 5 speed trannies have this correct bell housing. The Boxster 6 speed has 2 variants.
Posted by: Porschef Jul 7 2017, 04:01 PM
Interesting info, would that extra 3-4" allow for installation without cutting the trunk?
Posted by: Mike Bellis Jul 7 2017, 04:29 PM
Interesting info, would that extra 3-4" allow for installation without cutting the trunk?
The extra 3-4" is on the tail of the tranny. Trunk firewall needs to be moved to clear the valve cover and align the axles. In my case, I also run the intercooler piping in this space too.
The axle center line of the tranny is closer to the motor than on a 901. You need to move everything back close to center with the trailing arm stubs.
Posted by: Mike Bellis Jul 7 2017, 04:34 PM
Page 3 or 4 of this thread has a side by side of the trannies with the axle locations centered on each other.You will see the longer ball housing of the 901.
Posted by: Porschef Jul 7 2017, 04:37 PM
Gotcha. Had I been more diligent in reading Andy's post I wouldn't have been asking that question...
It's been a while since you've done the conversion, do you prefer it to the rotary from a driving/handling standpoint?
Thanks Mike
Posted by: Mike Bellis Jul 7 2017, 04:47 PM
My car can be driven like a stock VW or Audi when not in the boost. An everyday car. Once in boost it fuching awesome and really comes alive.
I've had 3 different renditions of rotary engines. They are fun, fast, loud but lack torque. I always had to use 1st gear on the 901 with a rotary. Hated it!
The newer tranny technology is so much better. That is half the fun on the car. If I had to drive the 1.8t in front of a 901, that would totally suck. It just can't be shifted fast or smooth enough to keep the boost up.
The Boxster shifter parts are far superior to the rod as well.
Overall I love the 1.8t. It's a great motor. The Bosch Motronic 7.5 and drive by wire are awesome.
Andyrew has more power potential and that's OK. This build wasn't about maximum power. I blew up so many motors, I just got tired of it. When I saw JRust's car with the previous owner drive from Idaho to Monterrey... I knew I needed a motor that reliable. So the build is about good HP (325 @ 20psi) and reliability. The car is awesome on the street and fast as fuch on the track. I was looking for a Subaru when I stumbled on the 1.8t. All the Subaru's I found were junk needed a rebuild.
Posted by: Porschef Jul 7 2017, 05:26 PM
My curiosity is piqued because I have a shot at a 1.8 Passat engine & tranny. I should just slap myself upside the head as I don't have a smidgen of the fab skills you've got.
But, I guess I can dream...
Great stuff Mike, thanks for sharing.
Posted by: AZBanks Oct 27 2017, 07:27 PM
I just read through the whole thread. Awesome work on everything except one small detail. All these amazing fabrication projects and you are using angle bracket as a battery hold down????? This car needs something better.
Posted by: Mike Bellis Oct 27 2017, 08:36 PM
I just read through the whole thread. Awesome work on everything except one small detail. All these amazing fabrication projects and you are using angle bracket as a battery hold down????? This car needs something better.
You're right. It's original to the car when I bought it. It's just so low on the list and it works great, I never changed it. I've been waiting for the battery to fail for the last few years. It just won't die. I'm sure I just jinxed myself...
Posted by: Mueller Oct 27 2017, 08:38 PM
I just read through the whole thread. Awesome work on everything except one small detail. All these amazing fabrication projects and you are using angle bracket as a battery hold down????? This car needs something better.
You're right. It's original to the car when I bought it. It's just so low on the list and it works great, I never changed it. I've been waiting for the battery to fail for the last few years. It just won't die. I'm sure I just jinxed myself...
If Mike gave me some dimensions I'd gladly make him an aluminum hold down for it to replace the angle iron
Posted by: Mike Bellis Oct 27 2017, 08:42 PM
If Mike gave me some dimensions I'd gladly make him an aluminum hold down for it to replace the angle iron
yey big by yonder short.
Posted by: Mike Bellis Jan 3 2021, 07:10 PM
Time for a long-overdue update. My car had a couple of issues I wanted to sort out. First was poor crankcase evacuation. The ATW engine is one of the few variants of the 1.8t that did not have a breather attachment on the valve cover; only relying on a block-mounted PCV breather box. This would cause blowby to come out of the dipstick tube due to oil windage blocking the PCV system vent with oil. (at high boost)
The second issue was airflow to my MAF. I had a short 90° elbow in front of it causing turbulence at the MAF. To solve issue #1, I needed to send excess crankcase air into the intake system to be re-burned.
I purchased a used valve cover from eBay that has a 19mm breather attachment. To keep as much oil out of the intake as possible, I added a catch can. I already had an air pump pulling air from the PCV system and dumping it into the exhaust, post turbo. This never worked well due to windage. This did however place oil into the exhaust tubing and would drip a little at a V-band clamp after a long drive. The air pump is from a VW (smog pump) repurposed and controlled by a 3psi pressure switch. Once it goes into boost above 3psi, the pump pulls air from the top of the valve cover and PCV box, pushing it to the air cleaner.
I purchased a bulkhead fitting for installation on a silicone boot in from of the MAF. Introducing more turbulence into the stream. The MAF is located right next to the passenger side firewall, near the old battery tray location. A hole into the fender cavity provides cold air via a NACA duct. I used a longer fitting before the MAF to allow straight air to be metered. The PCV air enters closer to the air cleaner (also inside the fender)
So before when I drove and hit high extended boost, the cabin would fill up with smoke and it would look like I blew an oil line behind me. Very embarrassing and unsightly. Now there is zero smoke and the MAF work has resulted in increased torque at low rpm that is scary. Way scary! and fun!!!
Old valve cover, no breather tube.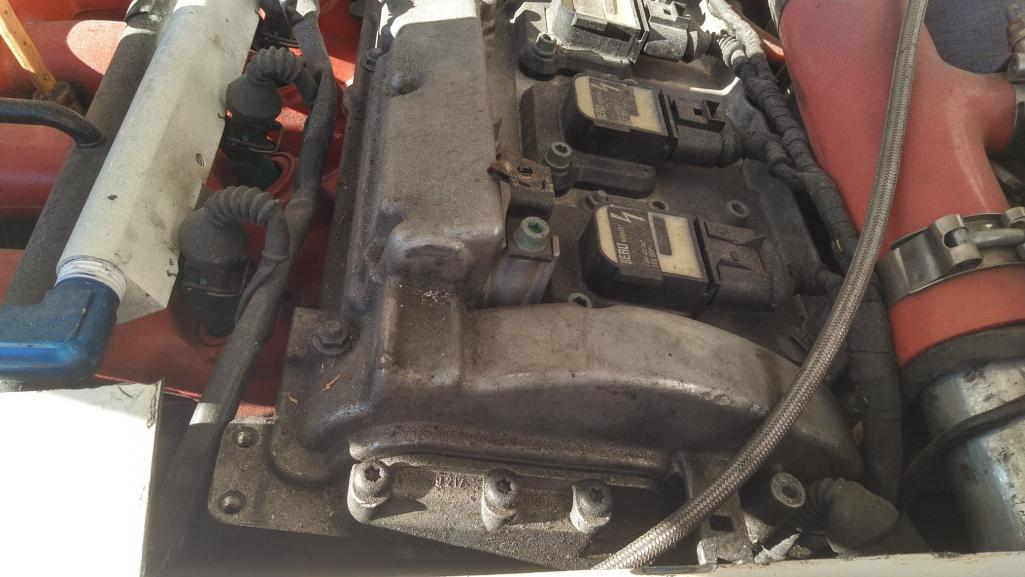
New valve cover in place. catch can on left, air pump on right. You can also see the 3psi switch on the right.
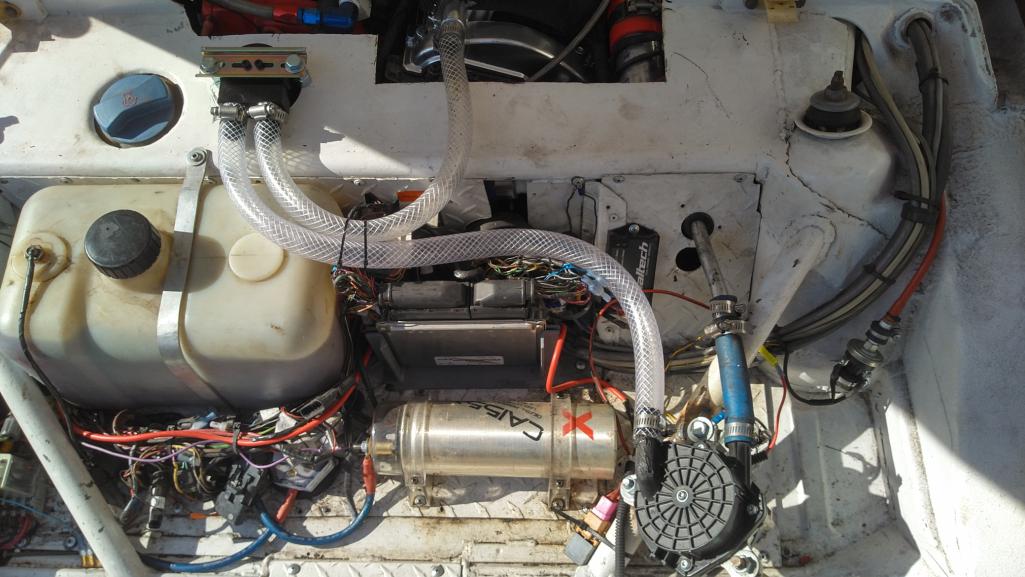
I had to clearance out the NACA duct due to the added length from the MAF. What you see cut out actually sits out proud from the NACA by 3/8".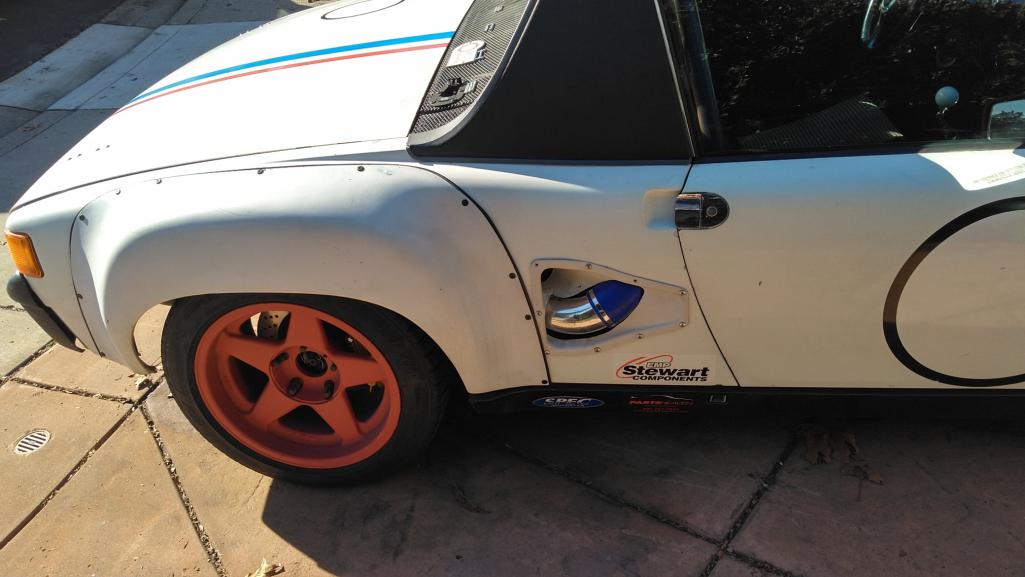
The third problem, I could not get the valve cover off without dropping the engine. A couple of cuts solved this too. The top right, under the blue boot, is the MAF. the blue boot is recirculated air from the combo recirc/blowoff valve. It reintroduces air right after the MAF since this air was already metered by the MAF. Crankcase air is unmetered and must be introduced before the MAF. It's also full of atomized oil droplets. This is what the catch can is for, pulling large droplets out of the air stream.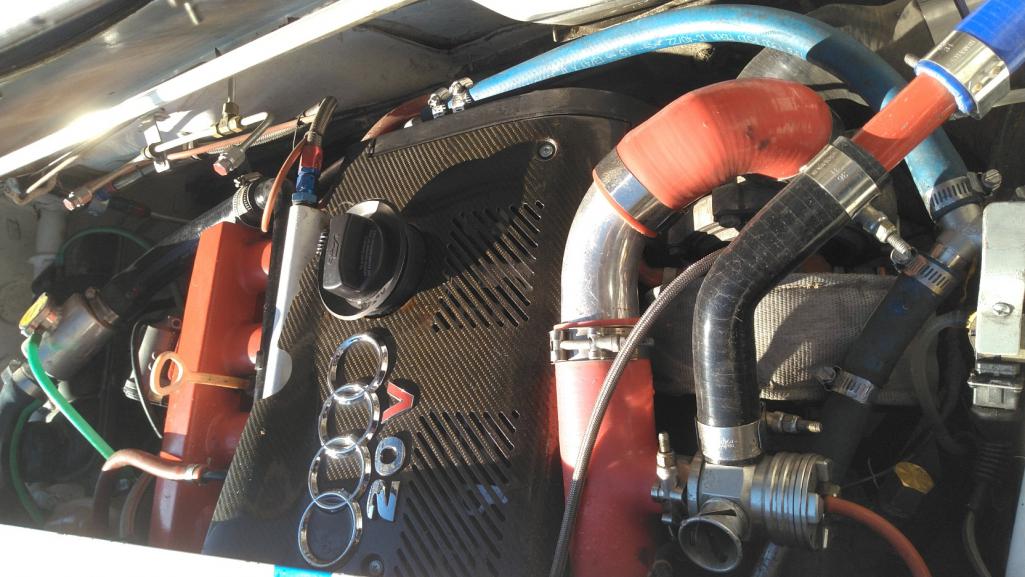
Posted by: strawman Jan 3 2021, 10:08 PM
Nice to see back at it again, Mike. I look forward to riding in your car again someday. Be well!
Geoff
Posted by: Krieger Jan 3 2021, 11:25 PM
Very nice work!
Posted by: Andyrew Jan 4 2021, 06:51 AM
Awesome! Good work! I had to run a valve cover relief as well.
I'm glad you got that torque that that setup is capable of making it's a really good setup that's extremely responsive.
Posted by: Cairo94507 Jan 4 2021, 07:31 AM
This car's development just blows my mind. I can only imagine how this car runs when you get on it.
Posted by: Mike Bellis Jan 4 2021, 11:53 AM
This car's development just blows my mind. I can only imagine how this car runs when you get on it.
It's like Dr. Jeckel & Mr. Hyde, being out or in boost respectively. 1st gear is a waste (too short) 2nd gear is crazy and too short. 3rd gear is amazing and rapidly sends you to 4th & 5th. You are now doing over 100mph in 5 seconds (if you can shift fast enough). Rolling on-ramps are especially fun.
I highly recommend way too much power in a 914.
Posted by: Andyrew Jan 4 2021, 01:19 PM
This car's development just blows my mind. I can only imagine how this car runs when you get on it.
It's like Dr. Jeckel & Mr. Hyde, being out or in boost respectively. 1st gear is a waste (too short) 2nd gear is crazy and too short. 3rd gear is amazing and rapidly sends you to 4th & 5th. You are now doing over 100mph in 5 seconds (if you can shift fast enough). Rolling on-ramps are especially fun.
I highly recommend way too much power in a 914.
I rather liked my v6 trans gear spacing for an acceleration standpoint. Third gear was a MONSTER. The close ratio 5 speed I have now I agree with your comments. Its just really closely geared. Fun for mountain driving on low boost though
Posted by: Mike Bellis Nov 29 2022, 09:11 PM
I was just checking the database for my thread. Thankfully not lost to hackers.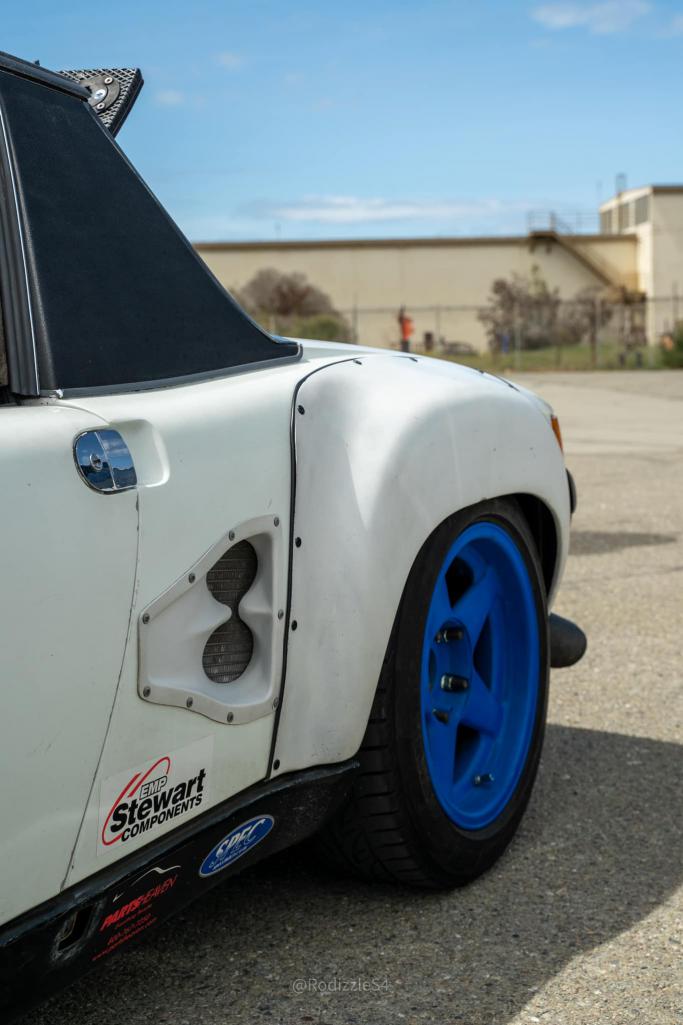
Powered by Invision Power Board (http://www.invisionboard.com)
© Invision Power Services (http://www.invisionpower.com)