Printable Version of Topic
Click here to view this topic in its original format
914World.com _ 914World Garage _ 914-6 RRC 2013 Tune Up
Posted by: map Aug 26 2012, 09:37 AM
Kevin and I started the tuneup for RRC about three weeks ago. Yesterday we learned more about the hodgepodge that is my car. I ordered a clutch kit and Pertronix ignitor for a '76 911. The flywheel delivery was more than two weeks out, so I decided to wait on it else the car likely wouldn't make RRC 2013. 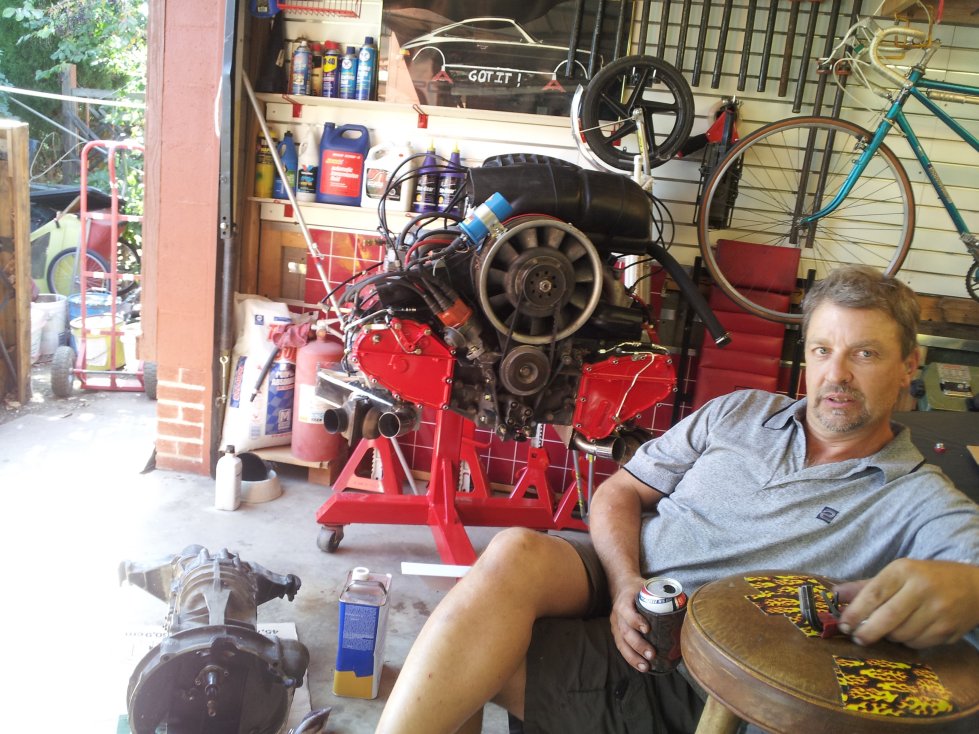
It turns out that my old flywheel is not from a '76 911. I'm not sure of the vintage, but it is slightly smaller. I can't find anything about this part #, 901 102 205 0R. I'm guessing it's from a pre '72 911 or from a 914-6. Any ideas.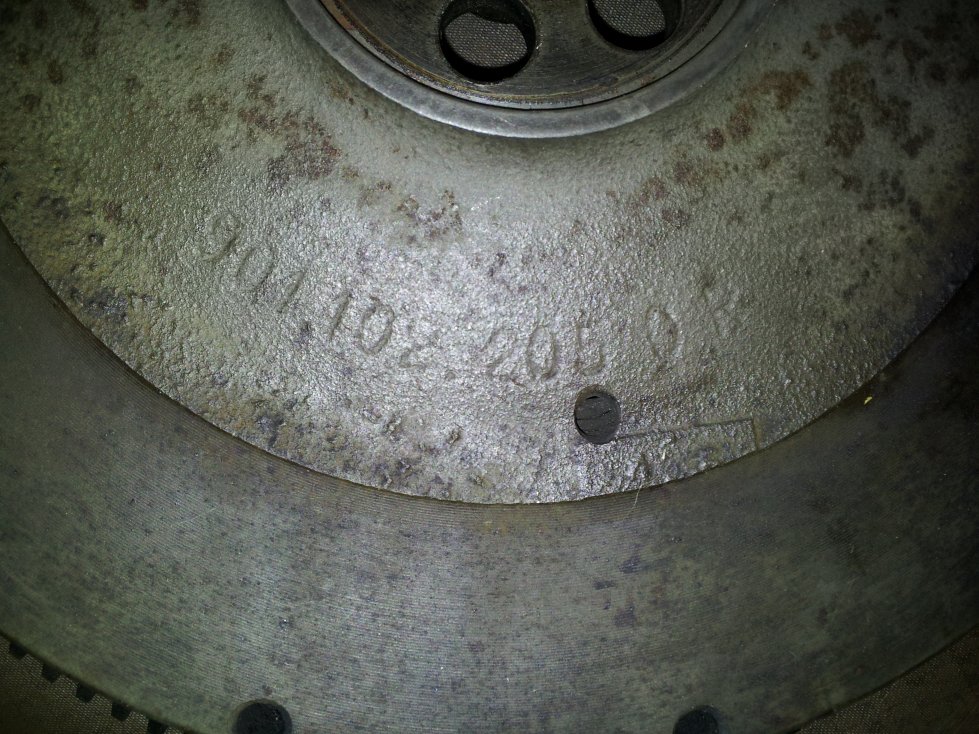

Since I couldn't get a new flywheel in time, we will reuse the old flywheel and clutch and save the upgrade for sometime in the future.
The other issue is with the distributor. Turns out it is from a '72 or '73 911 (0231 169 010). Have to get a different Pertronix ignitor.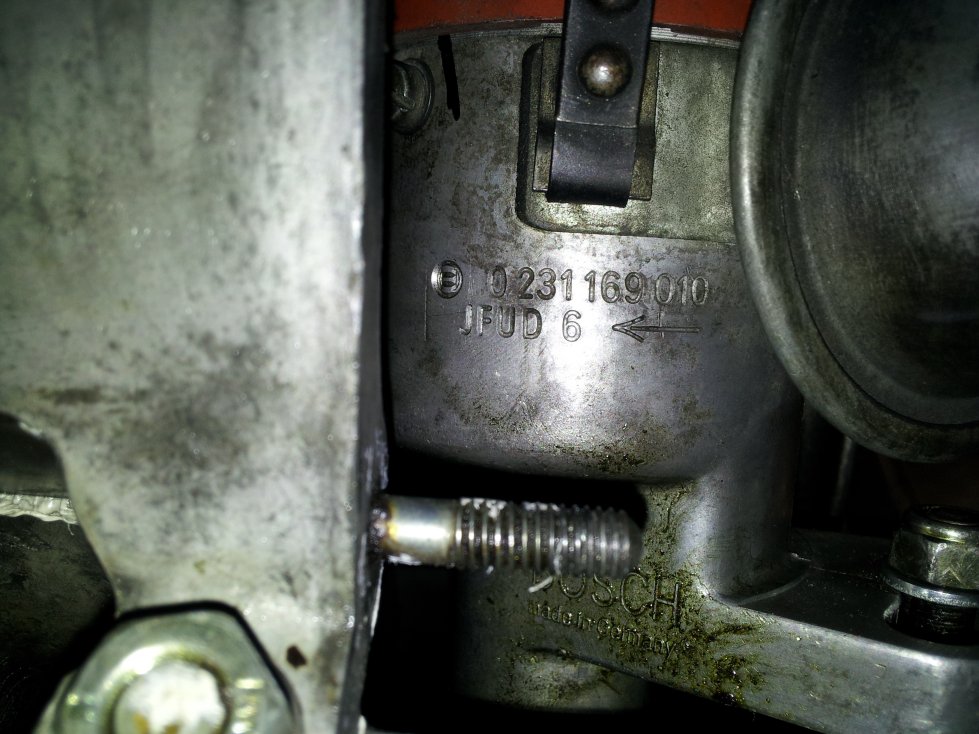
Now I'm questioning whether my engine is a '76. Is this number from the left head the engine number (901 105 111 1R)?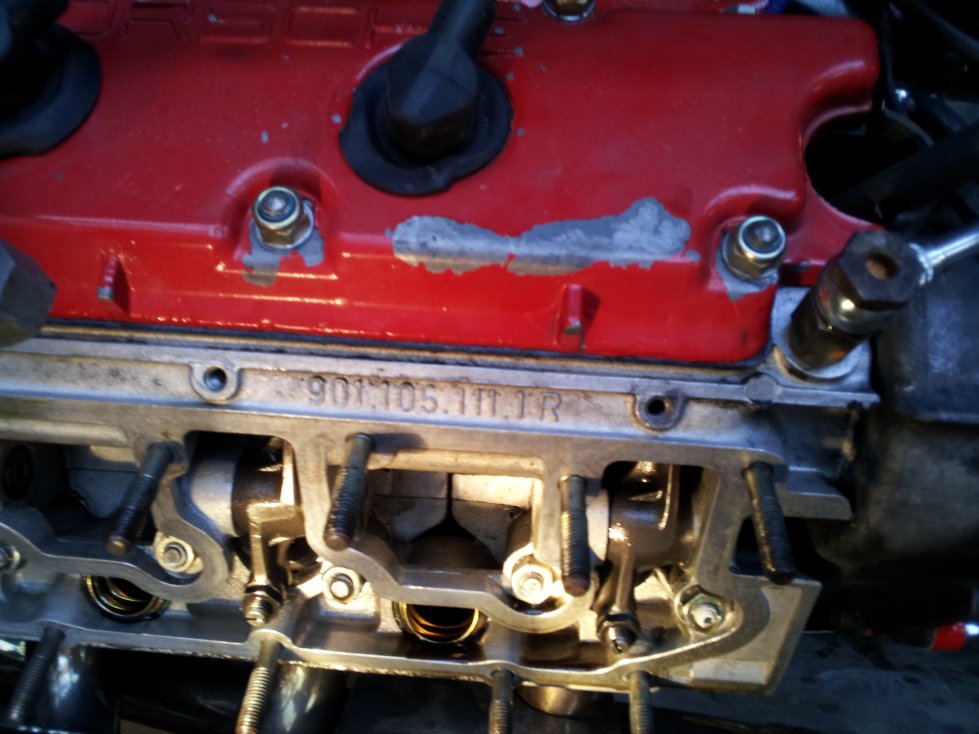
Thanks for your support.
Pieper
Posted by: sixnotfour Aug 26 2012, 10:24 AM
your distributor is a 1973 model
Posted by: majkos Aug 26 2012, 10:30 AM
any suggestion on making a better feeler gauge for a 2.7 ?
Long reach, narrower, and at a 90 degree angle.
Posted by: brant Aug 26 2012, 10:41 AM
bend one.
they sell little ones with a handle and a 45degree bent tip
but you can take a standard feeler guage and just 45degree bent the last 3/4 of an inch on it.
Posted by: JRust Aug 26 2012, 10:45 AM
Do you mean RRC 2012 in 2 weeks? If you mean 2013 you have plenty of time 
Posted by: brant Aug 26 2012, 10:45 AM
all of the 914 trannys need the 64-69 flywheel (6 bolt)
I think renegade makes some conversion ones
and if you had a 916 tranny you might have a 70's flywheel
take one more picture of the one you have.
back up and get the whole thing
but odds are its the early 2.0/6 flywheel
and if so any 4 or 6 914 clutch should work.
you can probably get a disc at the local auto parts store
just buy a 914 clutch kit (the 6 cylinder ones are probably all that is sold now, they have more springs for less stutter as you start out in 1st gear)
Posted by: sixnotfour Aug 26 2012, 10:45 AM
This one works well...I bend it to a 90..
Attached image(s)
Posted by: sixnotfour Aug 26 2012, 10:49 AM
There is alot of meat on 901 flywheels ,, As long as the grind the friction surface and the clutch mounting surface.
dont forget a washesr undr the pivot stud if you have it resurfaced.
Like Brant said lets see a pic of it.y
Posted by: mikelsr Aug 26 2012, 11:05 AM
I had a starter take out the flywheel on my 2.7. I'll try and find the paper work as to what it was replaced with. Problem is, it may take a while to find the paperwork because I moved from IL to TX and things are in boxes.
Posted by: Scott S Aug 26 2012, 05:17 PM

all of the 914 trannys need the 64-69 flywheel (6 bolt)
just buy a 914 clutch kit (the 6 cylinder ones are probably all that is sold now, they have more springs for less stutter as you start out in 1st gear)
This.
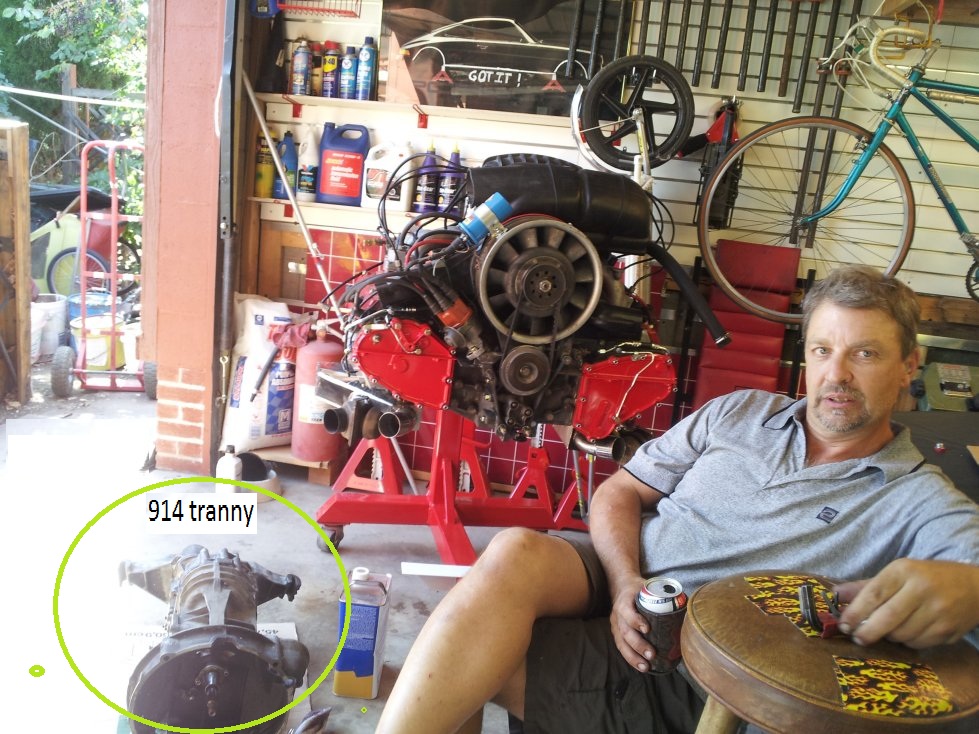
from the pics, that is the correct flywheel from an early 911/914-6. Did you get new bolts?
I have a huge binder of info (all printed from either this site or Pelican) from doing my conversion. Would you like to borrow it? I can pick it up on Thursday and drop it off on friday. Let me know.
Posted by: majkos Aug 26 2012, 06:47 PM
This one works well...I bend it to a 90..
Ooooh! I like this!
really like the curve part for the fingers.
that way the wrist does all the twisting while ya trying to slip the feeler gauge, under the swivel foot!
we've narrow down the motor to be a '73
what's the "proper" spec. feeler gauge depth to use?
or what ya recommend?
we also know the motor "built" for Auto-x'ng
I'm seeing from .003.75 to almost .006 mm

Thanks for the info all you folks has to share, deadline is looming too close!

Posted by: brant Aug 26 2012, 09:11 PM
a 1973 would be a 2.4
what is the engine type number on the upright near the fan?
Posted by: SLITS Aug 26 2012, 09:21 PM
Valve lash is 0.004" on all, cold
That is the correct 6 bolt flywheel to mate with the 914 transmission (the one with the 901 part number).
The stock six is a 215 mm clutch. The other disc is for a 915 setup which is a 225 mm clutch and the hub is larger diameter / coarser spline.
If you wanted a 225 mm clutch you either get a hold of a '70 - '71 911 transmission and have it converted for 914 use (911/901 tranny). The clutch kit for that setup retails at $800 as it is a "pull" type clutch rather than the "push" type used on the 914.
or
You have a custom clutch cover made to use with the '76 flywheel and you still have to use the friction disk from the '70 - '71 911.
Posted by: majkos Aug 26 2012, 10:19 PM
great info Ron! I'm gonna let Henna give you lot's of kisses from me
Huge headaches to track down with, 'What ya got!?"
FuchifIknow!
Posted by: majkos Aug 26 2012, 10:50 PM
a 1973 would be a 2.4
what is the engine type number on the upright near the fan?
we've really haven't remove the shrouding to determine that.
Case #.
So much time taken up on what hell we got here! "You Know!?"
Posted by: brant Aug 27 2012, 06:57 AM
you can see the number without pulling the shroud
its kinda hard to find at first but then very obvious once you find it
you really want the type number
not the serial number, not the case part number.
Posted by: SLITS Aug 27 2012, 07:04 AM
The serial number will be stamped vertically on the fan housing support. Look for a number between two stars .... ie 6?? ????
Behind it, on a ledge of the case, there will be another series of numbers, sometimes not easily seen. They will read 901/?? or 911/??. Like a 911/85 is a 1977 2.7L S motor.
Nice Billy Boat SS Heat Exchangers and Carrera Tensioners too!
I can take an image later of where to look.
Posted by: majkos Aug 27 2012, 08:12 AM
Thanks Ron!
Like Brant says, easy to read,
I feel  stupid.
anyhow, # are,
911 82
with old flywheel from '69-7?
Dist. a '73
Posted by: brant Aug 27 2012, 08:25 AM
Cool, so it is a 2.7
they may have recammed if it has an earlier distributor
hard to tell exactly what pistons/cams
the flywheel should be 64-69
just buy a standard 914 clutch or 914/6 clutch
brant
Posted by: majkos Aug 27 2012, 08:48 AM
Thanks Brant!
Pieper sure going to like that info,save $$$$
here's the old set-up,
Posted by: brant Aug 27 2012, 08:50 AM
do you still have the old parts
did you guys put hydraulic tensioners in?
any desire to sell the solid tensioners?
brant
Posted by: sixnotfour Aug 27 2012, 09:02 AM
What is making the flywheel BAD ?
teeth ? wear on clutch surface ?
Posted by: SLITS Aug 27 2012, 09:16 AM
Since it is CIS, the cams permissible are very limited. I believe the upgrade is the 964 cam profile which will net about 10 hp gain. Other gains can be had by raising the compression ratio. CIS limits the gains, but retains the fuel mileage.
The mechanical tensioners would have been ideal to leave in. I don't care what others say, I have them in mine. The stock or "upgrade" Carrera tensioners can fail with catastrophic results. Adjusting mechanicals every 10K is not a big deal.
Oh, the distributor you have was used on the 09/1971 - 08/1973 2.3L 911S engine (911/53 & 911/63)
I have a rebuilt 0 231 169 008 (09/73 - 06/77) 911/911S 2.7L but it is missing the cap clips (yours would work) in case you get crazy and want to change it.
Oh well, that's my opinion anyway!
Posted by: map Aug 27 2012, 12:15 PM
What is making the flywheel BAD ?
teeth ? wear on clutch surface ?
The flywheel is really old. Witness the difficulty reading the part number. Also there was a onetime event that scored the starter ring. I was thinking of replacing it with an aluminum one.
The clutch plate has less than 20K. For now, all of the parts will go back on the car.
Pieper
Posted by: map Aug 27 2012, 12:17 PM
Thanks everyone for helping identify what I have and need.
You too Kevin!
Pieper
Posted by: SLITS Aug 27 2012, 01:22 PM
What is making the flywheel BAD ?
teeth ? wear on clutch surface ?
The flywheel is really old. Witness the difficulty reading the part number. Also there was a onetime event that scored the starter ring. I was thinking of replacing it with an aluminum one.
The clutch plate has less than 20K. For now, all of the parts will go back on the car.
Pieper
The ring gear can be machined off and a replacement welded on. I've had it done by a machine shop myself.
Just because the part number is obscure doesn't mean it bads
Posted by: sixnotfour Aug 27 2012, 01:37 PM
Dont buy an aluminum one ,About 2-3 lbs can be removed easily and makes a difference.
as long as all the teeth are solid, a bit of the corner knock off them is common.
If you really want to spend the money ??
Posted by: map Aug 27 2012, 06:10 PM
Are these the correct flywheel bolts?
http://www.pelicanparts.com/cgi-bin/smart/more_info.cgi?pn=911-102-171-00-M153&catalog_description=Flywheel%20Bolt%20%28sold%20per%20each%2C%20%36%20required%29%2C%20%39%31%34%2F%36%20%28%31%39%37%30%2D%37%32%29%20%20
Pieper
Posted by: brant Aug 27 2012, 08:39 PM
hmmm...
that says 914/6
I've bought the early 911 ones before with a different part number
I don't understand why the real 914/6 ones would interchange with late 2.7 cars...
is it a typo?
now I'm not sure.....
brant
Posted by: SLITS Aug 27 2012, 08:50 PM
http://www.pelicanparts.com/cgi-bin/smart/more_info.cgi?pn=999-067-007-02-M260&catalog_description=Flywheel%20Bolt%20%286%20per%20car%2C%20sold%20individually%29%2C%20911%20%281965-69%29%2C%20Each
If they haven't shipped, change the order
Posted by: majkos Aug 27 2012, 10:21 PM
ok! The Flywheel
Posted by: majkos Aug 27 2012, 10:23 PM
The worst part of the gears
Posted by: majkos Aug 27 2012, 10:25 PM
And the New Flywheel bolts
Posted by: sixnotfour Aug 27 2012, 11:22 PM
was there a 6 hole washer under the flywheel bolt heads and the flywheel ?
Posted by: majkos Aug 28 2012, 08:48 AM
yup
I tried to find it, and send you a pic.
but it seems AWOL at the moment.
Posted by: majkos Aug 28 2012, 09:15 AM
anybody(in town) has the correct flywheel bolts?
Or know where I can get them, today?
Posted by: Scott S Aug 28 2012, 09:53 AM
Try these:
Storz Garage: 3-333-1911
Eisenbuds: 3-825-0322
3R: 3-781-0774
Stevinson:3-794-3550
or (even though they SUCK)
Prestige: 3-238-8101
Posted by: map Aug 28 2012, 10:18 AM
And the New Flywheel bolts


Posted by: majkos Aug 28 2012, 10:23 AM
Yup 
Posted by: SLITS Aug 28 2012, 10:28 AM
If you had looked on ClubNARP, I gave you the link to the correct bolts on Pelican. I am sure they would have swapped for the correct ones. Call Glenn @ extension 240 and I am sure he will get it corrected for you. You'll just need to ship the Clay Perrine bolts back.
The shorter bolts are for the '70 & up 225 mm FLAT flywheel with bolt on starter ring.
The longer are for the '65 - '69 215 mm flywheel that also uses the spacer between the bolts and the flywheel.
MAKE SURE YOU HAVE THE SPACER
Posted by: map Aug 28 2012, 10:34 AM
If you had looked on ClubNARP, I gave you the link to the correct bolts on Pelican. I am sure they would have swapped for the correct ones.
Thanks. Your Narp post is what made me concerned and start asking. We received the wrong bolts three weeks ago.
If, if, if...
Posted by: SLITS Aug 28 2012, 10:40 AM
Priority Mail, small flat rate box will take about 2 days to get to you. If you need a LOAN of the spacer, let me know.
And for the purpose of RRC, you can reuse the used flywheel bolts. I've been doing that for about 10K miles on my engine. They can be changed later if you are nervous and don't get stupid trying to be a drag racer.
Posted by: majkos Aug 29 2012, 10:32 AM
Newbie here!
Did you know the flywheel bolt spacer can fit in front of the pressure plate?
when the other "newbie" (Pieper) was checking out the flywheel and dumped the bolts and washer, I didn't pay attention but he put the spacer in the front recess part of the pressure plate, fits perfectly and looks like it belong there.
I barley notice the sheen of the spacer was a little different than the rest of the flywheel.
well I'm having problem sending pictures again.
gotta take my meds 
Posted by: Scott S Aug 29 2012, 11:39 AM
Hi Kev -
Your post is confusing to me. The flywheel bolts go through the spacer, then through the flywheel and into the hub. See pic....
Attached image(s)
Posted by: majkos Aug 29 2012, 03:22 PM
the "Front" of the flywheel has a recess spot that fits over the crank shaft,
just enough recess, machined out, that the spacer fits in perfectly.
wish I could send pics.
give me a min..
Posted by: majkos Aug 29 2012, 03:26 PM
pic.
Posted by: majkos Aug 29 2012, 03:31 PM
If somebody else puts it there, I've no clue where is it? LOL 
A hard lesson (I cleaned the Fuchin' garage!!) learned.
Figured to share my "Time" spent looking for the thing with everyone
It's all good
Posted by: brant Aug 29 2012, 03:41 PM
usually on the -6 the pilot bearing goes in from the back of the flywheel.
at least mine were that way and I assumed it was the correct way
it looks like your pilot may be on the other side.
Posted by: Scott S Aug 29 2012, 03:50 PM

There is a recess for the lip on the bearing....
(see the diagram I posted above)
Posted by: majkos Aug 29 2012, 03:53 PM
Brant, you are correct.
I'm simply showing, the recess section in front of the flywheel,
can accepted the dang spacer from the back 

Posted by: sixnotfour Aug 29 2012, 03:54 PM
It looks wrong because the 6 hole washer is sitting in the recess.
BTW did you know there is two different thickness of the 6 hole washer ???
Posted by: majkos Aug 29 2012, 03:56 PM
maybe this helps,
spacer almost fall in
Posted by: majkos Aug 29 2012, 03:58 PM
It looks wrong because the 6 hole washer is sitting in the recess.
BTW did you know there is two different thickness of the 6 hole washer ???
Really? I do now!
Actually I was thinking w/o the spacer, I could use the new bolts that are shorter.

Posted by: sixnotfour Aug 29 2012, 04:03 PM
The later flywheels that use the short bolts have the same 6 hole washer , about 1mm thinner.
Posted by: SLITS Aug 29 2012, 04:09 PM
A little KY and you're golden.
May I now recommend factory service manuals or at least Wayne Dempsey's, "Porsche 911 Engines"? Couldn't hurt ya know.
Posted by: majkos Aug 29 2012, 04:17 PM
The later flywheels that use the short bolts have the same 6 hole washer , about 1mm thinner.
Dam! I was close! (BTW I would NOT have done this)

Posted by: majkos Aug 29 2012, 04:24 PM
A little KY and you're golden.
May I now recommend factory service manuals or at least Wayne Dempsey's, "Porsche 911 Engines"? Couldn't hurt ya know.
The "Other Newbie" has given me two copies!
One, the book itself,
and another all printed out, so I can look, with dirty hands
 !
!And Guys! it way easy to adjust valves in theses babies!
Once you have about the "right size" bent feeler gauge, it's really easy.
also the right approach helps.
nuthin like the four cyn. style.
'course, all this done on a engine stand vs. in the 914
Posted by: majkos Aug 29 2012, 04:53 PM
ok,
I'm ready to button up the valve covers.
any sealant? who's favorite?
Hey Scott! 30 sum yrs of ski tuning pays off! 
Posted by: SLITS Aug 29 2012, 05:20 PM
No advice ... I've done all the good stuff except for sealant and they still leak ... mainly around the studs & nylocks ... someone told me they found rubberized washers that did the job. The aluminum ones don't crush enough I guess and I haven't looked for copper crush washers.
Oh, and wait till you try to do a valve adjust in the chassis ... it's damn near easier to drop the engine.
Posted by: majkos Aug 29 2012, 06:05 PM
No advice ... I've done all the good stuff except for sealant and they still leak ... mainly around the studs & nylocks ... someone told me they found rubberized washers that did the job. The aluminum ones don't crush enough I guess and I haven't looked for copper crush washers.
Oh, and wait till you try to do a valve adjust in the chassis ... it's damn near easier to drop the engine.
Oh I totally concur with dropping the motor.!
because I failed the first TWO time! trying to get the feel of what it takes to get the dagurndammit feeling gauge under there I realize,
maybe the valves are really tight! ( All this one piston # 1. where else can I go!!?)
Boys, you've all stepped up and guide me along with this process.
I knew there's a way and I've yet to find it.
back to work
Posted by: majkos Aug 30 2012, 08:08 AM
My First valve job! 
Posted by: majkos Aug 30 2012, 08:22 AM
Found another source of endless supply of oil 
Posted by: Ferg Aug 30 2012, 08:41 AM
I ordered the red reusable silicon gaskets, they work much better at sealing up, make sure when you put on the valve covers, start in middle, work your way up and down to the outsides.
Posted by: majkos Sep 1 2012, 09:25 AM
well, we've have everything installed, turned the motor over a few times,finding a leak here,(fuel line) couple of oil lines,leaked, tighten with wrench. now the only problem we have, the motor not running. chased many mistakes. we have spark,I sorta smell gas, so I assume we have fuel. then time ran out last night. Took a break from it all.
I'm in Manitou Springs, working on Pieper 2.7. we have had the luxury of using a car lift.
Finally rolled the 916/6 out of the bay last night. (Garage rental)
Walk away, hoping something new (suggestions, welcome here!) would prop up.
Posted by: map Sep 1 2012, 11:21 AM
well, we've have everything installed, turned the motor over a few times,finding a leak here,(fuel line) couple of oil lines,leaked, tighten with wrench. now the only problem we have, the motor not running. chased many mistakes. we have spark,I sorta smell gas, so I assume we have fuel. then time ran out last night. Took a break from it all.
I'm in Manitou Springs, working on Pieper 2.7. we have had the luxury of using a car lift.
Finally rolled the 916/6 out of the bay last night. (Garage rental)
Walk away, hoping something new (suggestions, welcome here!) would prop up.
We're pretty sure that we are not getting fuel to the cylinders. The pump is running. Kevin suspects that we have an issue with the wiring for the fuel injection.
Another possible cause for the inability to start, the hoist with the engine tipped over and it fell to the floor. Only visible signs are a small dent in the muffler and some scuffed paint on the right upper valve cover. Could something have come loose that prevents the CIS from working?
Any ideas on how to debug this?
Pieper
Posted by: Kirmizi Sep 1 2012, 11:31 AM
Damn Pieper, so close.
Have you double checked wiring and connections?
Maybe work downstream through the fuel system to determine if it's making it to the injectors?
Mike
Posted by: map Sep 1 2012, 11:41 AM
Damn Pieper, so close.
Have you double checked wiring and connections?
Maybe work downstream through the fuel system to determine if it's making it to the injectors?
Mike
Thanks, we'll give it a try. Also, getting some starter spray to confirm that it is a fuel problem.
Pieper
Posted by: sixnotfour Sep 1 2012, 01:08 PM
Did you lift the sensor plate to bleed the air out of the injection to the injectors , with the pump running ??
Posted by: map Sep 1 2012, 01:51 PM
Did you lift the sensor plate to bleed the air out of the injection to the injectors , with the pump running ??
More info please. Which sensor plate? How long should we lift it and run the pump.
BTW 75 lbs of pressure from the pump. Engine will fire with starter spray. Timing was slightly off. Got a backfire. Adjusted so that there is no backfire.
Pieper
Posted by: map Sep 1 2012, 02:01 PM
Did you lift the sensor plate to bleed the air out of the injection to the injectors , with the pump running ??
More info please. Which sensor plate? How long should we lift it and run the pump.
BTW 75 lbs of pressure from the pump. Engine will fire with starter spray. Timing was slightly off. Got a backfire. Adjusted so that there is no backfire.
Pieper
Do we lift the plate with the mixture adjustment screw?
Pieper
Posted by: Ferg Sep 1 2012, 02:13 PM
Did you lift the sensor plate to bleed the air out of the injection to the injectors , with the pump running ??
More info please. Which sensor plate? How long should we lift it and run the pump.
BTW 75 lbs of pressure from the pump. Engine will fire with starter spray. Timing was slightly off. Got a backfire. Adjusted so that there is no backfire.
Pieper
Do we lift the plate with the mixture adjustment screw?
Pieper
Yes, plate under where the mixture screw is, don't mess with mixture though. It should "sing" when you raise the plate with your hand...
Posted by: map Sep 1 2012, 02:38 PM
Did you lift the sensor plate to bleed the air out of the injection to the injectors , with the pump running ??
More info please. Which sensor plate? How long should we lift it and run the pump.
BTW 75 lbs of pressure from the pump. Engine will fire with starter spray. Timing was slightly off. Got a backfire. Adjusted so that there is no backfire.
Pieper
Do we lift the plate with the mixture adjustment screw?
Pieper
Is this the issue? Does this boot need to be solid and seal?

Posted by: rick 918-S Sep 1 2012, 05:49 PM
Very likely that that is part of your issue. That boot goes from the fuel dizzy to the throttle body right? You should still get the engine to fire at closed throttle. (fuel will flow to the cold start injector) But when pushing on the peddle it will stumble and die when the sensor plate doesn't react due to the huge air leak in the boot.
I wanted to leave for CO. monday but I don't think I can get out of here until Tuesday. I would love to come over and help out if I get to town early enough.
Look inside the the part with athe arrow. On the 928 it's part of the fuel dizzy. It sits between the throttle body and the fuel dizzy. There is a plate in there.
First check to see you have the fuel lines on in the correct flow. If you get the regulator on the wrong side of the dizzy the engine won't start.
Turn on the key, listen for the fuel pump, if it is working lightly press on the sensor plate. If you have pressure it will squeal pretty loudly. Then check for spark.
Posted by: majkos Sep 1 2012, 06:28 PM
Hey Rick! 
I did duct tape the hell out of it, just to see if we could get her to run!
Not!
we threw in the towel, and ponderin' the future,
But I did learn, it's not impossible to set the dizzy in the car.
And how it doesn't take much to adjust.  very sensitive, I like.
There's more room, but less room in the engine compertment vs. original 4 cyn. set-up. just depends on what you need to do.
all in all, very interesting learning experience.
but most importently, it's still a 914
Posted by: map Sep 1 2012, 06:50 PM
We're regrouping. Hard to continue with such a severely broken part.
It's been a great week working with Kevin. I'm very happy with the engine mods and the reinstall. No clue what the part availability will be, but I got to believe RRC 2012 is a long shot for this car. Time to pay attention to the rest of my life for a day or so.
Pieper
Posted by: majkos Sep 1 2012, 10:00 PM
wow Rick!
That is a nice shot of all the K-injections gizsmos!
Kinda hard to read/understand the CIS pictures, (Haynes) in a 911 body!
Actually a pretty cool system!,
but, Ugh! Vacum leaks issues, are you kidding me!?
I thought we're pass that part!
Pieper,Diane, and Henna! 
Good food from great people , Henna Happy!
Posted by: SLITS Sep 2 2012, 08:13 AM
The boot must be crack free or sealed anyway. It is what causes the airflow plate to lift and thereby feed fuel to the injectors.
As others have stated, you must bleed the air from the system on startup or it won't run.
1,) Remove air cleaner cover.
2.) With fuel pump running, lift the airflow plate a 1/4" or so for 10 - 15 seconds (maybe more)
3.) Fuel will begin to flow to the injectors and you will hear them "sing" as the air bleeds out.
4.) Once the air is bled out and the lines are full, the engine should start.
If you need the boot, I may have one and could get it in the mail on Tuesday. It would get to you on Thursday via Priority Mail ... for lotsa money it could be sent overnight via UPS.
More factors.
1.) The piston in the center of the fuel distributor must freely slide in and out. This is most important. If it is stuck in the closed position (all the way down in the head) no fuel will flow. It's what determines the fuel flow to the injectors by the cutout in the piston. It's tit rests on the arm of the airflow plate and as the plate rises due to increased airflow, the piston moves up allowing for more fuel.
2.) The mixture is controlled by the warm up regulator varying fuel pressure to the fuel distributor. You will note the line that comes out of the center of the fuel distributor and goes to the WUR. The second line from the WUR is a bleed line and goes back to the tank.
3.) While the incoming pressure from the pump is 75 psig, there is a spring loaded valve in the FD that regulates the fuel pressure to about 55-60 psig in the head of the FD. The WUR modifies this "head pressure" both electrically (heating element) and by the vacuum connection (manifold pressure). Depending upon temperature, the fuel pressure at the FD head can be 45 - 55 psig.
4.) The adjustment screw in the FD only regulates mixture at idle. Adjustment is usually made with the engine off as pressing down on it to turn it pushes the airflow plate back to rest, the piston drops in the FD and the engine will quit. Adjustments are made 1/8 of a turn at a time. Clockwise =richer ... Counterclockwise = leaner
5.) Try starting the engine by lifting the airflow plate manually about 1/8 - 1/4".


Pics are for reference only ... most FDs are the same with the exception of fuel inlet, outlet connections. Your engine probably has an 006 on it.
Posted by: SLITS Sep 2 2012, 08:49 AM
And if your plunger is stuck, a can of brake / carb cleaner and air pressure will get the plunger out. Spray around the plunger, then fill the injector outlet holes with cleaner, let sit for a while and apply air pressure to the fuel inlet. Repeat as necessary. A couple of hours work and you should be good to go.
Posted by: MoveQik Sep 2 2012, 09:24 AM
Say what you want about him but that Slits can be pretty damned helpful sometimes. 
Posted by: majkos Sep 2 2012, 12:25 PM
Say what you want about him but that Slits can be pretty damned helpful sometimes.
YUP!
Posted by: Kirmizi Sep 2 2012, 01:40 PM
C'mon Kevin, get'r done!
Mike
Posted by: Scott S Sep 3 2012, 09:52 AM
Kev/Pieper -
I have a full 2.7l FI system that was pulled off of my motor. It was working perfectly when removed and has been in one of those sealed plastic storage bins ever since (about 2 years).
Ferg has had dibs on it for a very long time, with Gint as #2 in line. If you guys can work a deal/get everyones "a-ok", then you can have the whole shebang.
The only issue is that I fly out this week and will be over-seas nearly 2 weeks. If you get the details all worked out, I can run down to the shop late this afternoon/tonight and grab it, then drop it off at Kev's this week before I leave. Throw out a note on the local board - that way I will see it on my phone when I am out an about.
Thanks!
Scott S
Posted by: shelby/914 Sep 3 2012, 10:13 AM
I'm only about 20-30 minutes from the shop and will see Kevin tomorrow. Could pick it up "IF" that was the decision.
Danny
Posted by: majkos Sep 3 2012, 10:28 AM
Pieper ? ![popcorn[1].gif](style_emoticons/default/popcorn[1].gif)
I'm working on MY 914 now. (we need a smiley wrenching)
Posted by: Ferg Sep 3 2012, 11:40 AM
Kev/Pieper, you guys are welcome to anything you need off Scott's system, If Danny wants to snag it that's cool.
Posted by: map Sep 3 2012, 12:06 PM
Kev/Pieper, you guys are welcome to anything you need off Scott's system, If Danny wants to snag it that's cool.
Thanks for the offer. I'm expecting the part on Wednesday. I'm dialing things back till then. In the meantime, I'll install the heat and launder the seat covers. It's been an intense week. I need a couple of days without a round trip to Denver.
Pieper
Attached thumbnail(s)

Posted by: majkos Sep 3 2012, 03:00 PM
whew! I don't know if I have the time to squeeze in before Beaver!
working on "Beauty" now. 
Pics. later
Posted by: majkos Sep 3 2012, 05:17 PM
"Beauty" time for attention!
Posted by: rick 918-S Sep 3 2012, 05:26 PM
"Beauty" time for attention!
Are you coming to Beaver?
Posted by: majkos Sep 3 2012, 06:05 PM
Yup,
So far,
Should I leave Your wife, FAVORITE! Tequila home?
Posted by: map Sep 5 2012, 04:17 PM
Ordered the wrong part again. I ordered the cover for a '76 911s.
Sigh...
The part number for the broken one says it's for a '73-74 911.
NBD! These things take their own time. We'll have a nice drive in the Audi to Beaver.
This isn't TV. Things don't always get finished just in time. Thanks again to everyone for your help and support.
Pieper
Posted by: rick 918-S Sep 5 2012, 04:41 PM
Yup,
So far,
Should I leave Your wife, FAVORITE! Tequila home?
She's not having any of that this time. She realized her limit!

Posted by: rick 918-S Sep 5 2012, 04:42 PM
Ordered the wrong part again. I ordered the cover for a '76 911s.
Sigh...
The part number for the broken one says it's for a '73-74 911.
NBD! These things take their own time. We'll have a nice drive in the Audi to Beaver.
This isn't TV. Things don't always get finished just in time. Thanks again to everyone for your help and support.
Pieper
Your right about that! Sometimes things just don't happen in the order we would like them to. Really, It's more about the people than the cars. See there!
Posted by: brant Sep 5 2012, 04:44 PM
Ordered the wrong part again. I ordered the cover for a '76 911s.
Sigh...
The part number for the broken one says it's for a '73-74 911.
NBD! These things take their own time. We'll have a nice drive in the Audi to Beaver.
This isn't TV. Things don't always get finished just in time. Thanks again to everyone for your help and support.
Pieper
I'm just glad your going...
I sent you a couple of PM's
but glad you will be there.
brant
Posted by: SLITS Sep 5 2012, 04:46 PM
Ordered the wrong part again. I ordered the cover for a '76 911s.
Sigh...
The part number for the broken one says it's for a '73-74 911.
NBD! These things take their own time. We'll have a nice drive in the Audi to Beaver.
This isn't TV. Things don't always get finished just in time. Thanks again to everyone for your help and support.
Pieper
I told you I would send you one!
And if you think you're strong enough you could try to pry it out of my drunken hands in Beaver. Yep, I can see it's a contest for "That Guy Award" between Jeff & I unless some estrogen type gets in the way.
Posted by: MoveQik Sep 5 2012, 07:00 PM
I told you I would send you one!
And if you think you're strong enough you could try to pry it out of my drunken hands in Beaver. Yep, I can see it's a contest for "That Guy Award" between Jeff & I unless some estrogen type gets in the way.
Just wait until Slits goes face first into the dirt. It'll be easy pickins.
Posted by: SLITS Sep 5 2012, 07:51 PM
I told you I would send you one!
And if you think you're strong enough you could try to pry it out of my drunken hands in Beaver. Yep, I can see it's a contest for "That Guy Award" between Jeff & I unless some estrogen type gets in the way.
Just wait until Slits goes face first into the dirt. It'll be easy pickins.
That was gravel the last I heard. Wondered where all the scratches on my face came from.
Posted by: map Sep 5 2012, 08:58 PM
I told you I would send you one!
And if you think you're strong enough you could try to pry it out of my drunken hands in Beaver. Yep, I can see it's a contest for "That Guy Award" between Jeff & I unless some estrogen type gets in the way.
Just wait until Slits goes face first into the dirt. It'll be easy pickins.
That was gravel the last I heard. Wondered where all the scratches on my face came from.
Oh! I can't wait!
Pieper
Posted by: map Sep 10 2012, 08:01 AM
Spent the night in Durango. Headed for Taos. Back in Manitou Tuesday night. Will probably try to start the car Wednesday. Thanks to Slits for the part and knowledge dump. Thanks to everyone else for the encouragement.
Pieper
Posted by: map Sep 14 2012, 05:28 PM
I believe that this connector was disconnected when I dropped the engine. Does anyone know if there is a home for it and what it is for? It is ganged in the custom harness shown in the second photo.
Thanks in advance,
Pieper

Posted by: SLITS Sep 14 2012, 05:34 PM
That appears to be the connector to the warm up regulator if the wire harness is long enough ... grey in color (unless you already have the electrical connected to the wur).
Posted by: map Sep 14 2012, 06:28 PM
That appears to be the connector to the warm up regulator if the wire harness is long enough ... grey in color (unless you already have the electrical connected to the wur).
I know you told me, but I can't remember. Where is the warm up regulator? Will the car start with the wur disconnected?
Pieper
Posted by: SLITS Sep 14 2012, 09:24 PM
Warm up regulator is the square thingy, passenger side, that the fuel line from the Fuel Distributor goes to, along with a vacuum line(s) from the throttle body. Has an electrical plug on it for the heating coil. Mounted between cylinders 2 & 3 on the intake runners.
It may start but will run rich as it is responsible for regulation of the fuel pressure to the Fuel Distributor.
Posted by: sixnotfour Sep 14 2012, 09:39 PM
auxiaurilary air regulator that appears you dont have one, no worries
Posted by: SLITS Sep 14 2012, 11:11 PM
Thanks Jeff ....
Warm Up Regulator (Control Pressure Regulator)
Posted by: map Sep 15 2012, 10:45 AM
Thanks Jeff ....
Warm Up Regulator (Control Pressure Regulator)
Attached thumbnail(s)

Posted by: SLITS Sep 15 2012, 10:59 AM
Yours has been modified to adjust Control Pressure manually. That's what the bolt is sticking out of it.
Posted by: map Sep 15 2012, 11:21 AM
Any tips for pulling the distributor with the engine in the car? The O ring has a firm grip.
Pieper
Posted by: SLITS Sep 15 2012, 12:22 PM
Any tips for pulling the distributor with the engine in the car? The O ring has a firm grip.
Pieper
Cut a hole in the firewall so you can get to it
Twist and pull ... twist and pull ... it will come out
or
Why are you removing it anyway if the engine was in time to begin with?

Posted by: map Sep 15 2012, 02:24 PM
Any tips for pulling the distributor with the engine in the car? The O ring has a firm grip.
Pieper
Cut a hole in the firewall so you can get to it
Twist and pull ... twist and pull ... it will come out
or
Why are you removing it anyway if the engine was in time to begin with?
Kevin pulled the distributor to replace an oil line. He thinks it's one tooth off.
Pieper
Posted by: map Sep 15 2012, 02:36 PM
Car is now backfiring instead of starting with no starting spray. Some progress.
Pieper
Posted by: SLITS Sep 15 2012, 05:12 PM
Did you prime the CIS system? When cold and with poor fuel pressure or an unprimed system they will back fire. Oh, backfiring thru the intake or exhaust?
I think I remember a post where you indicated that you could see the timing marks. If so, put it at TDC #1 (Z1) and note the position of the rotor in relation to the hash mark on the rim of the distributor. They should line up with the distributor in the middle of the swing.
Posted by: majkos Sep 15 2012, 07:13 PM
after removing the heat shroud tube thingie, I have a much better grip to the distri.
To make sure, we jack the 914 on to the driver side, turn the motor via by rotating the wheel,
all the marks, dist. and rotor, are all in correct positions.
now the fun begins!
we turn the motor over a few times and get backfire.
I slowly turn dist. clockwise, every few time we turn it over, after is stops backfiring thru the exhaust, and starts coming thru the air box (backfire)
Relax, he has pop-off valve in the air box.
but I'm dialed in right about the original timing marks,
where we're not getting any more backfire.
so you think we start by NOW!? Nope.
so what's next?
plenty of fuel, I've check each spark wire, found 5 and 4 was not firing, inspect cap , clean now they all work, but no, still life after turning the motor over.
I'm waving the white flag, for now, regroup for tomorrow
Can it be just not enough fuel,
or more vacum leak, something from the motor "rolllng" over?
can I spray carb cleaner around ,looking for leaks? while Peiper turn the key?
we are SO close, can't really get a firm grasp on it! :
Posted by: SLITS Sep 15 2012, 07:41 PM
Ok ..
1.) Did you prime the CIS system? Turn key on so fuel pump runs. Lift airflow plate to facilitate fuel flow to injectors. When you hear injectors "sing" the air is bled from the FD, lines and injectors.
Now try to start the engine.
You may even try holding the airflow plate up about an 1/8" while cranking.
If fuel is flowing properly, it should fire.
Posted by: majkos Sep 15 2012, 08:00 PM
I have so much fun, priming the CIS, I play with different tone of "singing"
yeah, their primed,
I like the idea of holding it open a mit bit,.
will the backfire hurt my hearing? LOL!
Posted by: sixnotfour Sep 16 2012, 03:36 AM
180 out of time. use the crank pulley not the flywheel.'' 2.7 crank= flywheel marks are not correct.
Posted by: majkos Sep 16 2012, 10:06 AM
top of the morn'!
so we've a few feedback saying the dist.is 180 off,
is there any other clear indication,to really check if I'm on #1 piston, TDC,
Or am I on the downstroke of the exhaust?
my big worry part, is how could I possibly turned the the dist. 180 off?
and when adjusting the valves,every 120 degree turn, everything line up?
Posted by: Jeffs9146 Sep 16 2012, 10:45 AM
Your car won't start until you hook up the vacume pipe that is missing! It plugs into the cold start injector base and should go to the vacume side of the intake boot!
Attached image(s)
Posted by: sixnotfour Sep 16 2012, 11:32 AM
1 and 4 are at top dead center at the same time. Take out #1 plug blow air into spark plug hole, have someone listen at the muffler for air noise. If no noise TDC #1 firing... If you hear air TDC #4 firing.
when #1 is TDC firing #4 is TDC overlap, (both intake and exhaust slightly open )
Posted by: sixnotfour Sep 16 2012, 11:34 AM
some years are open, some are not. Something to check for sure.
Posted by: map Sep 16 2012, 11:40 AM
Your car won't start until you hook up the vacume pipe that is missing! It plugs into the cold start injector base and should go to the vacume side of the intake boot!
Thanks Jeff,
We found a disconnected hose that comes from under the air pressure sensor. Is this what you are describing? Does it go into the rotor colored tube underneath the cold start injector?

Posted by: map Sep 16 2012, 11:44 AM
Your car won't start until you hook up the vacume pipe that is missing! It plugs into the cold start injector base and should go to the vacume side of the intake boot!
The line shown in your picture is connected. In can be seen in one of the pictures earlier in this thread.
Pieper
Posted by: map Sep 16 2012, 11:57 AM
Your car won't start until you hook up the vacume pipe that is missing! It plugs into the cold start injector base and should go to the vacume side of the intake boot!
The line shown in your picture is connected. In can be seen in one of the pictures earlier in this thread.
Pieper
Does the hose connect inside this brown thing?
Pieper

Posted by: sixnotfour Sep 16 2012, 12:46 PM
That is a plenum drain hose. The rotor colored thing may or may not need a hose. check and see if it is open or solid(closed) if solid no hose was ever on it.
Posted by: map Sep 16 2012, 01:04 PM
That is a plenum drain hose. The rotor colored thing may or may not need a hose. check and see if it is open or solid(closed) if solid no hose was ever on it.
I can stick my finger in. 5". Don't know after that.
So the disconnected hose is OK?
Pieper
Posted by: map Sep 16 2012, 01:13 PM
1 and 4 are at top dead center at the same time. Take out #1 plug blow air into spark plug hole, have someone listen at the muffler for air noise. If no noise TDC #1 firing... If you hear air TDC #4 firing.
when #1 is TDC firing #4 is TDC overlap, (both intake and exhaust slightly open )
We used this test and decided that we were 180 off. The sound difference was subtle. Kevin felt Mrs back pressure when I didn't hear anything.
No more backfiring, but no starting either.
Pieper
Posted by: map Sep 16 2012, 01:29 PM
Rhetorical question, how does one test for vaccum leaks when the car is backfiring and not start a fire?

We had a little excitement this morning.
Pieper
Posted by: sixnotfour Sep 16 2012, 02:33 PM
use a stick or wire make sure it dead ends at abput 3/4
lift the plate and then give a bit of throttle while cranking
Posted by: rick 918-S Sep 16 2012, 02:40 PM
Put a vaccum gauge inline to check for vaccum leaks. It will likely not even read or have a veryy low and bouncing reading when cranking.
Posted by: majkos Sep 16 2012, 02:47 PM
we just walked away, take a breather.
I took Jeff advise and tried the Blow air tech.
Really cool! Pieper listen to the tailpipe, but I notice no resistance when I blew in a hose, pushed up against the spark plug hole.
Popped the dist. off, after I lined up everything, turn rotor,180.,re-set dist.
nothing happened, but Pieper says it sounds better.
started turning the dizzy,turn the motor routine, got backfire,tail pipe(not as bad)
turn dizzy, other direction, turn motor, nothing, keep going, till backfire thru intake,
I notice I was about max. out on dizzy adjustment, when ahead and pull dizzy off, (Hey I'm good at this part!) turn a tooth, put it all together.
Results? backfires still there, but on either side of timing mark I made before working on the motor (Mark on dizzy and engine case.)
Posted by: map Sep 16 2012, 05:31 PM
Kevin and I are calling "uncle "for this week. We will begin studying CIS testing videos. Probably pick up a vaccum tester too.
Maybe I can take the car up north where some of our local experts can take a look.
Thanks again for the support this weekend.
Pieper
Posted by: sixnotfour Sep 16 2012, 05:37 PM
Bummer Guys
Posted by: SLITS Sep 16 2012, 09:12 PM
You keep saying that you have fuel flow. By what test? If the motor sat for an extended period of time, the center plunger in the FD can be stuck. The only way to tell this is to remove the FD from it's mount and check.
The fuel outlets in the FD can be plugged with rust. That's why I clean the FD before installation.
The injectors could be clogged. The only way to check is to pull the injectors out, place each in a separate container, fire off the fuel pump and lift the air flow plate. If they dribble fuel or none at all ... no good. They need to be cleaned. You should get a fine mist in a conical spray.
Injectors can be removed with a 2X4 and claw hammer as they are just pressed into the manifold with rubber kinda O rings (they are tight). No you don't beat them with the 2X4 and hammer. The short section of 2/4 is placed against the edge of the valve cover as a leverage point. Hook the injector underneath the top (not the plastic hose) with the claws and pry them out.
Air leaks:
1.) At the boots that connect the runners to the air box. Hell to get to.
2.) At the interface of the runner to the head.
3.) Since you have a pop off valve, I would not suspect a blown up air box, but then it has been known to happen (crack of separation of the seams).
Further, I would also check the firing order of the spark plug high tension leads. It's easy to mis-connect the wires on the cap.
You said you had two non-firing cylinders. You cleaned the cap and now you have spark. Did you see any cracks in the dizzy cap ... any black traces (little lines) inside the cap which could indicate crossfire?
Have a good week!
Posted by: majkos Sep 16 2012, 09:30 PM
Bummer Guys
Nahh, we simply didn't have a vacuum pressure gauge.
but, hey,
we did great.
Pieper as my "ears" (funny engine noises
 )
)pecking away at the Ipad for latest info.
I learned TONS!
Thanks to all of you GUYS ! Fuchin' awesome
I've gotten over the hurdle to learn, another Fuel Injection system,
and all their hang up! (dist. issues)
no, really,
the time you took, to type to help out a newbie, thru many many mistakes,
has built up my confidence to take the plunge, pop the dizzy, turn rotor 180,
in someone else $$$ motor, and start it. (after I double check everything of course)
I thank- you,

now back to the "Beest"ach
and her starter issuse

Posted by: SLITS Sep 16 2012, 09:48 PM
If you need one of the Ford solenoids (hot start relay) send me a PM with your address.
Posted by: map Sep 17 2012, 11:42 AM
You keep saying that you have fuel flow. By what test? If the motor sat for an extended period of time, the center plunger in the FD can be stuck. The only way to tell this is to remove the FD from it's mount and check.
The fuel outlets in the FD can be plugged with rust. That's why I clean the FD before installation.
The injectors could be clogged. The only way to check is to pull the injectors out, place each in a separate container, fire off the fuel pump and lift the air flow plate. If they dribble fuel or none at all ... no good. They need to be cleaned. You should get a fine mist in a conical spray.
Injectors can be removed with a 2X4 and claw hammer as they are just pressed into the manifold with rubber kinda O rings (they are tight). No you don't beat them with the 2X4 and hammer. The short section of 2/4 is placed against the edge of the valve cover as a leverage point. Hook the injector underneath the top (not the plastic hose) with the claws and pry them out.
Air leaks:
1.) At the boots that connect the runners to the air box. Hell to get to.
2.) At the interface of the runner to the head.
3.) Since you have a pop off valve, I would not suspect a blown up air box, but then it has been known to happen (crack of separation of the seams).
Further, I would also check the firing order of the spark plug high tension leads. It's easy to mis-connect the wires on the cap.
You said you had two non-firing cylinders. You cleaned the cap and now you have spark. Did you see any cracks in the dizzy cap ... any black traces (little lines) inside the cap which could indicate crossfire?
Have a good week!
Thanks Ron,
We were assuming we had good fuel flow because we could hear the injectors prime and we could smell gas in the #1 cylinder. We tried testing for vacuum leaks with starter fluid until a backfire set the starting fluid on fire. We used the timing light to verify that all plugs are sparking. Kevin verified the firing order.
We agree that the FI is the most suspect at this point. Time to get the right tools and do a thorough testing of the system. Since I am a driver and not a mechanic, I need to decide whether I want to go forward with this on my own. I can't afford pay Kevin to come down and experiment and do the testing. Unfortunately, there is a shortage of honest and reliable german mechanics in Colorado. I'll probably take another shot at finding one before I start investing in special books and tools.
The car was running great before we took it apart 7 weeks ago. It's a shame it is taking so much effort to get it back up and running. Installation of the timing chain update was straightforward. It will be interesting to find out how we hosed up the fuel injection.
Do you know where I can get the fuel injection manual?
Pieper
Posted by: Jeffs9146 Sep 17 2012, 12:04 PM
OK you guys I can tell you from experience that if you do not have a vacuume line hooked to the base of the cold start injector the motor will not run!!!!!!!!!!!!!!!!!!!!!!!!!!!!!!!!!!!!!!!!!!!!!!!!!!!!!!!!!!!!!!!!!!!!!!!!!!!!!!!!!!!!!!!!!!!!!!!!!!!!!!!!!!!!!!!!!!!!!!!!!!!!!!!!!!!!!!!!!
So if there are any questions about why it wont start then you are not listening!
Sorry, rant over!
Here is the flow of the vacuume line on my motor! It starts at the base of the cold start injector then goes to the diaphram that opens and closes depending on the temprature of the engine. Then the vacuume line goes up to the high vacuume side of the AFR on the intake boot!
PS: ANY vacuume leaking or disconnected vacume lines will also keep the motor from running!
Attached thumbnail(s)


Posted by: map Sep 17 2012, 12:21 PM
OK you guys I can tell you from experience that if you do not have a vacuume line hooked to the base of the cold start injector the motor will not run!!!!!!!!!!!!!!!!!!!!!!!!!!!!!!!!!!!!!!!!!!!!!!!!!!!!!!!!!!!!!!!!!!!!!!!!!!!!!!!!!!!!!!!!!!!!!!!!!!!!!!!!!!!!!!!!!!!!!!!!!!!!!!!!!!!!!!!!!
Thanks Jeff,
Listening is not the same as understanding. Here's a picture of the FI on my engine. I circled what I believe is the cold start injector and the associated vaccum line which runs to the base of the fuel distributor. Is this what you are describing?
Pieper

Posted by: Jeffs9146 Sep 17 2012, 12:25 PM
OK you guys I can tell you from experience that if you do not have a vacuume line hooked to the base of the cold start injector the motor will not run!!!!!!!!!!!!!!!!!!!!!!!!!!!!!!!!!!!!!!!!!!!!!!!!!!!!!!!!!!!!!!!!!!!!!!!!!!!!!!!!!!!!!!!!!!!!!!!!!!!!!!!!!!!!!!!!!!!!!!!!!!!!!!!!!!!!!!!!!
Thanks Jeff,
Listening is not the same as understanding. Here's a picture of the FI on my engine. I circled what I believe is the cold start injector and the associated vaccum line which runs to the base of the fuel distributor. Is this what you are describing?
Pieper
100% Yes!! Notice the wire with the plug and nothing to plug it into? That is for the cold start circut and goes to the vacuume diaphram that is missing on your motor! Also the vacume line on your motor that you are discribing looks like it is going to the wide open base of the cold start injector...? I can't tell from the photo but someone has removed the cold start vacuume circut. I am sure you need a larger line hooked to the intake boot and leading to the base of the cold start injector.
It is hard to see in your photo, notice the vacuume hole at the base of the cold start injector on this photo and how large it is!
Attached image(s)

Posted by: SLITS Sep 17 2012, 12:37 PM
Since he changed the boot, he could just put a rubber plug over the air inlet to the cold start injector.
Posted by: Jeffs9146 Sep 17 2012, 12:49 PM
Yes that might work but it could cause issues with cold starting or hot starting and running.
Here is a photo of the cold start sections that are missing from the motor minus the piece (diaphram) I used on my motor!
I bypassed everything except the diaphram that plugs into the cold start sensor on the front of the motor. My motor is newer (83sc) so I am still running the Lambada system with the 02 sensor!
Attached thumbnail(s)
Posted by: SLITS Sep 17 2012, 01:56 PM
His cold start valve operates off a thermotime switch. There is power to the cold start valve when the key is in the "start" position but the thermotime switch provides the ground to complete the circuit if the engine is cold enough. This changed in '85 to an ECU controlled ground.
It will not effect the hot start. Hot start is a function of the fuel pump check valve and fuel accumulator. System is designed to hold pressure in the system for 20 minutes for hot starts.
Posted by: Jeffs9146 Sep 17 2012, 01:57 PM
His cold start valve operates off a thermotime switch. There is power to the cold start valve when the key is in the "start" position but the thermotime switch provides the ground to complete the circuit if the engine is cold enough. This changed in '85 to an ECU controlled ground.
It will not effect the hot start. Hot start is a function of the fuel pump check valve and fuel accumulator. System is designed to hold pressure in the system for 20 minutes for hot starts.
I guess I ment it will affect the Air Fuel Mixture when the car is cold or hot due the the fact that the diaphram allows more or less air into the cold start vacuume port at the base of the injector!
OK so then capping it off should work!?
Posted by: SLITS Sep 17 2012, 02:08 PM
This whole thread is to get Pieper and Kevin to understand the system they are dealing with and why the engine won't start so all things discussed are valuable to them (and maybe someone else).
Keep pitchin' ideas .. some of it will eventually kick in and they will finally get it to start. I spent an hour with them in Beaver discussing it and both their faces were painted with question marks.
I will agree that if there is a hole (cold start injector) allowing air into the airbox chamber, the engine will not start = lotsa air ... not enough fuel.
Posted by: Jeffs9146 Sep 17 2012, 02:10 PM
This whole thread is to get Pieper and Kevin to understand the system they are dealing with and why the engine won't start so all things discussed are valuable to them (and maybe someone else).
Keep pitchin' ideas .. some of it will eventually kick in and they will finally get it to start. I spent an hour with them in Beaver discussing it and both their faces were painted with question marks.
I will agree that if there is a hole (cold start injector) allowing air into the airbox chamber, the engine will not start = lotsa air ... not enough fuel.
Posted by: map Sep 17 2012, 02:35 PM
It is hard to see in your photo, notice the vacuume hole at the base of the cold start injector on this photo and how large it is!
SixNotFour indicated that the loose connector is for the non-existant auxiliary air regulator and I should not worry about it.
I still need to probe the the connector bottom of the cold start injector to insure that it is closed.
BTW, I do not believe we removed any lines from the fuel injection and the engine was running great before we started the project.
I can't believe all of variations in this CIS injection system. Plus, mine has obviously been customized. When we got to Beaver, the FI seemed like a rag mop of tubes and hoses. I'm slowly starting to learn the names of the components (not necessarily their function). The info you are sharing is much appreciated, but takes awhile to digest.
I'm starting to get the bug to really understand my fuel injection just so I don't feel so stupid.
Thanks for your patience.
Pieper
P.S. I used to have a life.
Posted by: map Sep 17 2012, 02:40 PM
Since he changed the boot, he could just put a rubber plug over the air inlet to the cold start injector.
I'll plug this and say a prayer.
Pieper
Posted by: Jeffs9146 Sep 17 2012, 03:01 PM
FYI, when I was going through this process I had the same problem. I ended up getting very frusterated and decided to deal with all the vacuume issues first and see what happened!
I hooked up a cleaned out shop vac in reverse (blowing) and taped it very tight to the intake and turned it on. Then I sprayed soapy water all over the intake runners and all intake components. I was blown away at how many small leaks I had and a few larger ones. Then I was able to focus on each one until it started and has run great since then!!
Good luck!!
Posted by: sixnotfour Sep 17 2012, 03:29 PM
As I stated before you needed to check and see if was open or closed.
Here is a pic of a closed one. (it was in a fire)
You cannot just run a hose from there to the boot, you need the auxiaurily air bypass gizmo. it allows air to pass for cold sart then closes.
Pieper
Attached image(s)

Posted by: majkos Sep 17 2012, 04:28 PM
well then how in the hell it get unplugged?
when Pieper power washed the motor?
Posted by: SLITS Sep 17 2012, 05:00 PM
well then how in the hell it get unplugged?
when Pieper power washed the motor?
To many beers!
Posted by: sixnotfour Sep 17 2012, 05:11 PM
cazadores
Posted by: map Sep 17 2012, 08:43 PM
cazadores
We resemble those remarks.
Piepe r
Posted by: map Sep 18 2012, 04:40 PM
Since he changed the boot, he could just put a rubber plug over the air inlet to the cold start injector.
I'll plug this and say a prayer.
Pieper
Couldn't get the camera in the right spot to see if my cold start injector is sealed. Probed it with an allen wrench. Goes in about half an inch. I'll look for parts to plug it. Seems to be about 3/8" in diameter.
Ordered a book on the fuel injection. I want to study. No need to be in a big hurry.
Pieper
Posted by: SLITS Sep 18 2012, 04:58 PM
Lesson #1
Fuel tank to fuel pump to filter to fuel accumulator to fuel distributor to injectors.
Lesson #2
Fuel pressure in fuel distributor is modified by warm up regulator (control pressure regulator).
Lesson #3
Control pressure varies with engine temperature, throttle opening (negative pressure), altitude in some cases. This is all done by the warm up regulator
Lesson #4
Fuel is supplied to all injectors at all times. Amount of fuel injected is determined by the position of the slide in the fuel distributor which is controlled by the airflow plate and the control pressure.
End of lessons for today.
There will be a test tomorrow!
Posted by: majkos Sep 18 2012, 05:28 PM
Lesson #1
Fuel tank to fuel pump to filter to fuel accumulator to fuel distributor to injectors.
Lesson #2
Fuel pressure in fuel distributor is modified by warm up regulator (control pressure regulator).
Lesson #3
Control pressure varies with engine temperature, throttle opening (negative pressure), altitude in some cases. This is all done by the warm up regulator
Lesson #4
Fuel is supplied to all injectors at all times. Amount of fuel injected is determined by the position of the slide in the fuel distributor which is controlled by the airflow plate and the control pressure.
End of lessons for today.
There will be a test tomorrow!
can we use above notes when taking test?
Posted by: rick 918-S Sep 18 2012, 09:06 PM
Lesson #1
Fuel tank to fuel pump to filter to fuel accumulator to fuel distributor to injectors.
Lesson #2
Fuel pressure in fuel distributor is modified by warm up regulator (control pressure regulator).
Lesson #3
Control pressure varies with engine temperature, throttle opening (negative pressure), altitude in some cases. This is all done by the warm up regulator
Lesson #4
Fuel is supplied to all injectors at all times. Amount of fuel injected is determined by the position of the slide in the fuel distributor which is controlled by the airflow plate and the control pressure.
End of lessons for today.
There will be a test tomorrow!
can we use above notes when taking test?
Yes, and wait until you get the Bosch book and you can use the open book method as well.

Posted by: majkos Sep 18 2012, 09:59 PM
Lesson #1
Fuel tank to fuel pump to filter to fuel accumulator to fuel distributor to injectors.
Lesson #2
Fuel pressure in fuel distributor is modified by warm up regulator (control pressure regulator).
Lesson #3
Control pressure varies with engine temperature, throttle opening (negative pressure), altitude in some cases. This is all done by the warm up regulator
Lesson #4
Fuel is supplied to all injectors at all times. Amount of fuel injected is determined by the position of the slide in the fuel distributor which is controlled by the airflow plate and the control pressure.
End of lessons for today.
There will be a test tomorrow!
can we use above notes when taking test?
Yes, and wait until you get the Bosch book and you can use the open book method as well.
I already have the Bosch book, and have #2 pencil ready.
Posted by: map Sep 19 2012, 09:54 AM
FYI, when I was going through this process I had the same problem. I ended up getting very frusterated and decided to deal with all the vacuume issues first and see what happened!
I hooked up a cleaned out shop vac in reverse (blowing) and taped it very tight to the intake and turned it on. Then I sprayed soapy water all over the intake runners and all intake components. I was blown away at how many small leaks I had and a few larger ones. Then I was able to focus on each one until it started and has run great since then!!
Good luck!!
I bought a 5HP shop vac. Is that too strong for this test?
Pieper
Posted by: Jeffs9146 Sep 19 2012, 09:58 AM
FYI, when I was going through this process I had the same problem. I ended up getting very frusterated and decided to deal with all the vacuume issues first and see what happened!
I hooked up a cleaned out shop vac in reverse (blowing) and taped it very tight to the intake and turned it on. Then I sprayed soapy water all over the intake runners and all intake components. I was blown away at how many small leaks I had and a few larger ones. Then I was able to focus on each one until it started and has run great since then!!
Good luck!!
I bought a 5HP shop vac. Is that too strong for this test?
Pieper
Thats what I used, 5.0hp 4 gallon!
Keep in mind if the base of the cold start is open it may be to large of a hole for you to see bubbles but you would be able to feel air coming out of it!
Posted by: map Sep 19 2012, 10:04 AM
FYI, when I was going through this process I had the same problem. I ended up getting very frusterated and decided to deal with all the vacuume issues first and see what happened!
I hooked up a cleaned out shop vac in reverse (blowing) and taped it very tight to the intake and turned it on. Then I sprayed soapy water all over the intake runners and all intake components. I was blown away at how many small leaks I had and a few larger ones. Then I was able to focus on each one until it started and has run great since then!!
Good luck!!
I bought a 5HP shop vac. Is that too strong for this test?
Pieper
Thats what I used, 5.0hp 4 gallon!
Keep in mind if the base of the cold start is open it may be to large of a hole for you to see bubbles but you would be able to feel air coming out of it!
Will shop for parts to plug (double plug?) it tommorow. May take some trial and error to find the right stuff.
Pieper
Also have to figure out how to get power to the shop vac. No power in my storage unit. (Did I give away both of my inverters?)
Posted by: SLITS Sep 19 2012, 10:26 AM
Test #1 ....
What is the test specification for system pressure (fuel pump output)?
What is the residual system pressure, with engine warm after 10 mins and after 20 mins?
Assuming you have a Control Pressure Regulator (WUR) 0 438 140 017 or 033, what is the cold control pressure at 68 degrees ambient?
With the same Control Pressure Regulator, what is the warm control pressure @ 1800 RPM (fast idle).
What is Porsche Tool P378?
Posted by: Scott S Sep 19 2012, 12:10 PM
http://www.ebay.com/itm/Weber-3-Barrel-40-IDA-carbs-complete-rebuild-30-venturie-NEW-N-S-912-1007-/110932644363?hash=item19d419d20b&item=110932644363&pt=Race_Car_Parts&vxp=mtr

Posted by: SLITS Sep 19 2012, 01:57 PM
http://www.ebay.com/itm/Weber-3-Barrel-40-IDA-carbs-complete-rebuild-30-venturie-NEW-N-S-912-1007-/110932644363?hash=item19d419d20b&item=110932644363&pt=Race_Car_Parts&vxp=mtr
Sorry, substitutions are not allowed in the test.

You will have to repeat the class next year!
Posted by: majkos Sep 19 2012, 09:36 PM
Test #1 ....
What is the test specification for system pressure (fuel pump output)?
What is the residual system pressure, with engine warm after 10 mins and after 20 mins?
Assuming you have a Control Pressure Regulator (WUR) 0 438 140 017 or 033, what is the cold control pressure at 68 degrees ambient?
With the same Control Pressure Regulator, what is the warm control pressure @ 1800 RPM (fast idle).
What is Porsche Tool P378?
Now you're scaring me.
wait a minute! this is where I ask a question about a question, to buy time,
on what the HELL are you talking about?
I don't have a fancy set of PET? books to retrieve info. from.
But I do like to know what the Porsche tool is!

Posted by: majkos Sep 19 2012, 09:39 PM
BTW when had access to a fuel pressure gauge, the output was over 70lbs.
is this correct?
Posted by: SLITS Sep 19 2012, 11:29 PM
Porsche tool P378 is the gauge setup with a 3 way "T" valve. It is connected between the Fuel distributor and the Control Pressure Regulator so that one can read the pressures described in Test #1.
The pressures are outlined in the 911 Service Manuals for correct operation of the CIS system.
Answer #1 is Yes .... system pressure (inlet to fuel distributor) is between 66 -76 psig.
Posted by: SLITS Sep 20 2012, 09:05 AM
Answer #2 is 19 psig @ 10 minutes and 16 psig @ 20 mins
Answer #3 is 38 - 45 psig (no vacuum)
Answer #4 is 50 - 56 psig
Posted by: sixnotfour Sep 30 2012, 05:32 PM
Is this thing running yet ?
Posted by: map Oct 21 2012, 12:15 PM
Is this thing running yet ?
I'm back at it with Ben Martin. (remember Ben?)
Here's what we are experiencing:
TDC is verified at #1 cylinder. Engine will cough with the distributor fully retarded but as we advance it slowly, it is more reluctant to start.
Question is: what would some recommendations be to get this engine to start?
Could the distributor still be one tooth off, even though TDC is verified in the center of the distributor's swing, or maybe the points need gapped again?
TIA.
Posted by: brant Oct 21 2012, 12:35 PM
I always thought it was the leading edge of the rotor to TDC....
does that make any sense?
Posted by: majkos Oct 21 2012, 12:59 PM
did you do a vacuum pressure test?
I'm pretty sure the timing fine, but that's just me
Posted by: Gint Oct 21 2012, 01:03 PM
If Ben can't get you there, I'm no genius either. Sounds like your close Mike.
Posted by: map Oct 21 2012, 01:57 PM
pulled the #1 injector. First spray is a nice cone, then it drips. Seventeen PSI between the fuel distributor and the WUR. We suspect the piston in the fuel distributor.
Pieper
Posted by: map Oct 21 2012, 02:23 PM
pulled the #1 injector. First spray is a nice cone, then it drips. Seventeen PSI between the fuel distributor and the WUR. We suspect the piston in the fuel distributor.
Pieper
Warm pressure is 43 psi. Can't find the spec for the warm pressure. Cold should be around 24. What to do next? Look for vaccum leaks? Check the plunger? Look for blockage on the return the WUR?
Pieper
Posted by: majkos Oct 21 2012, 02:33 PM
You need fuel pressure first.
need the spray effect.maybe that's why so much fuel in tail pipe.
what's on the motor that "*could*" effect the fuel pressure,
if motor accidentally dropped and rolled,(transit)
that's where I look, if possible.
just sayin' that's all
Posted by: map Oct 21 2012, 04:32 PM
When we blow air into the intake, we get bubbles around the injectors.
No other bubbles.
?????
Posted by: map Oct 21 2012, 04:48 PM
The resistance is low on the thermotime switch.
Pieper
Posted by: map Oct 21 2012, 10:59 PM
Ben is stumped. Ideas please.
Posted by: sixnotfour Oct 21 2012, 11:13 PM
Posted by: map Oct 22 2012, 08:58 AM
Ben re-gapped the points. He said they were not opening. I believe he tried the distributor in multiple positions.
BTW, I capped the fitting under the cold start injector per your suggestion.
Thaks again for your info and suggestions.
Pieper
Posted by: sixnotfour Oct 22 2012, 12:49 PM
Pull the plug dry em off, spin the motor with the starter, put plugs back in.
Is your gas any good ? I had that problem one gas wouldnt hardly even burn.
Posted by: map Oct 22 2012, 04:28 PM
Had the car towed to a pro shop today. I may hear something tomorrow.
Pieper
Posted by: map Oct 23 2012, 01:59 PM
Took the car to Jack Heavey at German Carcraft. He has the car running. We were 3 teeth off on the distributor.
Next issue is the distributor is frozen and won't advance. Should I look for a used 2.7 distributor or have Kevin rebuild mine?
I feel much better!
Pieper
Posted by: Ferg Oct 23 2012, 02:30 PM
Took the car to Jack Heavey at German Carcraft. He has the car running. We were 3 teeth off on the distributor.
Next issue is the distributor is frozen and won't advance. Should I look for a used 2.7 distributor or have Kevin rebuild mine?
I feel much better!
Pieper
I've got a used 2.7 dizzy, pm me.
Posted by: sixnotfour Oct 23 2012, 02:48 PM
I dint think kevin should touch your 914 for a while.....Good News !!
Posted by: brant Oct 23 2012, 04:17 PM
very good news....
scary shop but glad it worked out.
if its simply a frozen advance plate then you can do this job... really not hard
and you can always find another 2.7distributor (probably the easiest one to find) if you don't like how the job goes....
if its really really wobbly or something else then a rebuild involves machining and not an at home (in the kitchen by the way) job.
Posted by: majkos Oct 23 2012, 08:37 PM
I dint think kevin should touch your 914 for a while.....Good News !!
 vacuum!
Posted by: Kirmizi Oct 23 2012, 11:02 PM
vacuum!
[/quote]

Posted by: sixnotfour Oct 24 2012, 01:02 AM

Posted by: map Oct 24 2012, 04:40 PM
I dint think kevin should touch your 914 for a while.....Good News !!
Smile when you say that!

Kevin has earned a long test drive in the car.
Pieper
Posted by: SLITS Oct 24 2012, 05:11 PM
If you get a new distributor .......DON'T LET HIM CHANGE IT
Posted by: majkos Oct 24 2012, 05:56 PM
What you guys DON'T know, while I worked on the motor,
when I removed the dist. I naturally inspect it to learn more about it.
That's when I discovered the froze vacuum advance plate.
It's all good 
Posted by: brant Oct 24 2012, 05:57 PM
It is all good.
and I'm so happy the car is back on the road
it was a long journey but it came out great!
Posted by: Nie Zu Alt Oct 24 2012, 06:40 PM
Kev,
You sure Henna didn't install the distributor? 
Doug
Posted by: map Oct 24 2012, 06:58 PM
Heavey has the car running with the replacement distributor. He said that the plug wires for 5 and 6 were swapped. Also says that two of the valves are knocking like they are very loose or the cams are out of time. Since I helped with the timing chain tensioner conversion and made sure that the chains stayed the same, I doubt that the second reason is the problem.
Time to get the car back.
Pieper
Posted by: sixnotfour Oct 24 2012, 07:59 PM
Kevin just messin with you because your Dog is awesome and I have 2 chiwawas, great effort ...sounds like a couple valves need adjusting....no biggy I will take that any day..
Party On
Posted by: map Oct 24 2012, 11:18 PM
Heavey said that the valves were knocking so badly that he was afraid to run the engine for very long. I personally helped Kevin zip tie the chains in place while we did the upgrade. There's no way we altered the cam timing.
Can the valves be so loose that there is a risk of damage? Can I drive the car back to my storage unit to check the valves, or do I need to have it towed?
Pieper
Posted by: majkos Oct 25 2012, 06:51 AM
Kevin just messin with you because your Dog is awesome and I have 2 chiwawas, great effort ...sounds like a couple valves need adjusting....no biggy I will take that any day..
Party On
My bad, I should've put a couple of good smilies in the last reply.
Wait till you see Henna newest trick! Getting beer out of beer fridge.
back to subject,
throwing this out, is there any way, because of dizzy, off by three teeth,
effect the valve adjustment? I don't think so,
but.......?
I'm actually looking to the next step,
Adjusting the valves, IN the 914. (we NEED a smilie with a wrench!!)
Gotta learn someday.
Posted by: Ferg Oct 25 2012, 09:54 AM
Heavey said that the valves were knocking so badly that he was afraid to run the engine for very long. I personally helped Kevin zip tie the chains in place while we did the upgrade. There's no way we altered the cam timing.
Can the valves be so loose that there is a risk of damage? Can I drive the car back to my storage unit to check the valves, or do I need to have it towed?
Pieper
Hard to say without hearing, loud valve tic and a knock are two different things to me... If it were me I'd stethoscope and try and pinpoint valves, do a quick valve check to see if it's that easy. Yes motor needs to be cold, so quick may be subjective...
Posted by: SLITS Oct 25 2012, 01:37 PM
While it may be expensive, if the follower is that loud pay them to adjust the valves.
A loose valve is far better than a tight valve.
Posted by: map Oct 25 2012, 05:16 PM
Broken or bent exhaust valve on the left side. 
I'll be in my room...
Pieper
Posted by: majkos Oct 25 2012, 05:23 PM
Posted by: Ferg Oct 25 2012, 08:43 PM
Posted by: Kirmizi Oct 25 2012, 09:43 PM
Ouch Pieper.
Mike
Posted by: Gint Oct 26 2012, 06:12 AM
Yikes... Sorry Mike.
Posted by: SLITS Oct 26 2012, 06:52 AM
If you need a head or 3, let me know. I believe I have a setup (heads & cam tower still bolted together) for a 2.7L.
Posted by: Scott S Oct 26 2012, 10:10 AM
cr@p. I am sorry - that really stinks.
Was the engine noisey before you guys did all of the work?
Posted by: brant Oct 26 2012, 10:29 AM
Dang. I'm so sorry. It is something that can be repaired at least. Usually the one head can be repaired and the bank put back. (Checking the cam timing). So sorry.
Posted by: sixnotfour Oct 26 2012, 11:02 AM
put a chopstick into the spark plug hole and turn the motor over .
Its along shot , but maybe you will bend it back straight.....yup yup great idea.....


Bad News.....at least now you have all winter
Posted by: RonD Oct 26 2012, 11:31 AM
I'm afraid I am all too familar with your pain. Sorry to hear about this. Kind of fits the gloomy snowy weather we are having right now.
Don't want to drive in weather like this anyway so at least we got a few months to get them fixed and ready for next season.
Posted by: SLITS Oct 26 2012, 11:56 AM
Dang. I'm so sorry. It is something that can be repaired at least. Usually the one head can be repaired and the bank put back. (Checking the cam timing). So sorry.
Brant, Pieper / Kevin are newbies to a six so you have to explain that the heads are done in 3s. They have to be matched for height so that the cam carrier will sit flat. That is why I offered a set of 3 still bolted to the cam carrier.
I suppose they could do just one because it is already matched to the other two.
Posted by: brant Oct 26 2012, 01:04 PM
I guess my hope was that the original head can be reused and the height match still matches....
hopefully a new valve and clean up will do it.
good point though..
if you can't reuse one head, you have to find a replacement that is height matched (hard to do)
it really sounds like the cam timing was off enough that it kissed some valves...
hopefully given that it ran only a little in the jacks shop.... it didn't over heat or hopefully didn't hit hard enough to damage pistons/rods/etc...
(bent is much better than broken... crossing my fingers)
so one or some, new valves and some clean up could be an option still.
brant
Posted by: sixnotfour Oct 26 2012, 01:15 PM
probably got adjusted wrong and banged the piston.
new valve or reground used and a lap , It will be fine....just a Pit Stop.
Posted by: map Aug 30 2013, 06:22 AM
Hopefully everyone understands why this thread has been dark for so long. It has taken some time to get the car back to its prior level of performance. After the valve job, I had to rebuild the rear accelerator cable mount as the custom parts disappeared in the repair process. After that, the car was still running poorly because some of the plug wire wouldn't stay connected and the ground to the fuel pump was faulty, creating fuel pressure issues.
Now the car is running great and I am back in love. Here's a recap of what was done as part of this 13 month tuneup.
Transmission Rebuild
Air Filter
Ditributor (vacuum advance on the old one was broken)
Distributor Cap
Rotor
Fuel Filter
Oil Pressure Switch
Oil Pressure Sending Unit (no guage yet)
Chain Tensioner Update
Pertronix
Valve Job
Crank Pulley (the old one was for an AC equipped car)
Plug Wires
Spark plugs
I guess I knew what I was doing when I labeled this thread "914-6 RRC 2013 Tune Up." Diane, the yellow 914 and I will be in Durango next week and I will be smiling again.
Thanks for all the help and support Kevin and I received. This is a fantastically knowledgeable and helpful community.
Pieper
Posted by: Eric_Shea Aug 30 2013, 07:10 AM
Scott, thanks for pointing out which tranny you're talking about there.
all of the 914 trannys need the 64-69 flywheel (6 bolt)
just buy a 914 clutch kit (the 6 cylinder ones are probably all that is sold now, they have more springs for less stutter as you start out in 1st gear)
This.
from the pics, that is the correct flywheel from an early 911/914-6. Did you get new bolts?
I have a huge binder of info (all printed from either this site or Pelican) from doing my conversion. Would you like to borrow it? I can pick it up on Thursday and drop it off on friday. Let me know.
Posted by: Eric_Shea Aug 30 2013, 07:12 AM
Broken or bent exhaust valve on the left side.
I'll be in my room...
Pieper
Now I don't feel so bad. But, I feels bad for you.
. Glad you got it running!
Posted by: sixnotfour Aug 30 2013, 07:59 AM
Oh Boy another yellow six RRC 2013
Posted by: map Aug 30 2013, 07:04 PM
Oh Boy another yellow six RRC 2013
An inescapable color, yellow. At least in a 914 it seems. I may be putting a green one back on the road this year. I've seen green ones win awards at RRC gatherings.
Powered by Invision Power Board (http://www.invisionboard.com)
© Invision Power Services (http://www.invisionpower.com)