Printable Version of Topic
Click here to view this topic in its original format
914World.com _ 914World Garage _ My vintage race project
Posted by: brant Nov 1 2004, 07:08 PM
Where to start....
We'll, I know there has been a lot of talk about this car but no pictures previously...
thanks to all the helpful advice I finally got my first camera, and thanks to some tech support from members of this group I think I finally figured out how to use it also...
First off in this thread, I wanted to recognize someone...
I want to recognize my father.
the "project" below is largely the results of his efforts and hard work... Its been a ton of hard work and it wouldn't be possible without him... He doesn't hear it enough from me, but I really appreciate him and what he has done for me.
Now for the pics...
the first one is a PPI picture from the seller when I bought it around 3 years ago. We got it running and drove it for 3 months before starting the demolition almost 2 years ago:
(drum roll please for my first ever pic)
Attached image(s)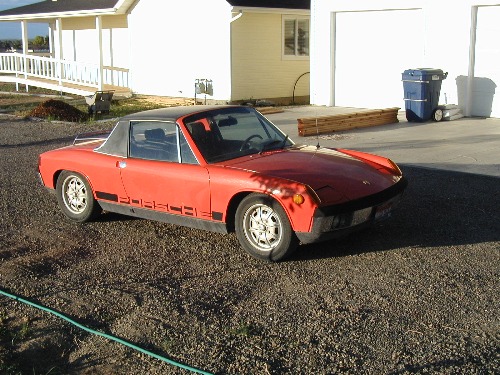
Posted by: brant Nov 1 2004, 07:19 PM
These are just some PPI pictures of the rear trunk... The chassis is a 1972/4
It was really rust free...
we decided to go with the -4 since I would of changed nearly every single thing on a -6 anyways...
our local vintage rules allow 1972 or older only...
so we took the best 1972 or earlier car that we could afford...
here are some photos from the seller that I want to document for posterity:
Attached image(s)
Posted by: brant Nov 1 2004, 07:19 PM
Uno mas...
Attached image(s)
Posted by: trekkor Nov 1 2004, 07:22 PM
Good for you 
Post often with pics.
You don't want to get the TTIWWP's bomb dropped on you!
KT
Posted by: Jeroen Nov 1 2004, 07:23 PM
keep em coming!
Posted by: brant Nov 1 2004, 09:24 PM
Wow...
just another example of the great help from admins here..
let me try this again.
this is a full view picture.
we spent about 18 months doing the welding, chassis prep, body work, metal fender flares, and priming.
we broke down and had someone else shoot the paint we had bought in order to save time.
the body is not perfect as its a race car
class rules require all metal... no fiberglass
so the fenders were done by cutting, prying, and welding in pieces of metal....
body could of been smoother, but didn't want to add much filler...
I wish I had a scanner so I could add some of the 18months worth of 35mm "in progress" pictures that I took...
anyways here she is:
Attached image(s)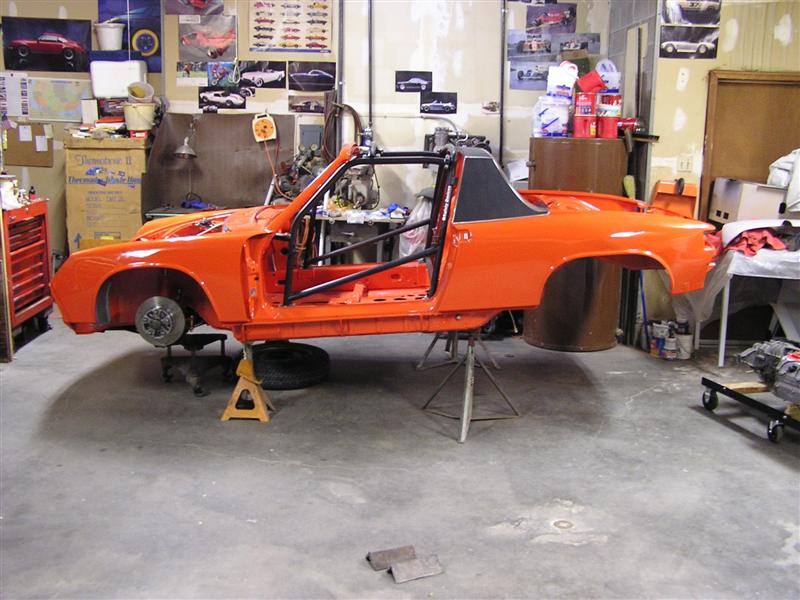
Posted by: brant Nov 1 2004, 09:29 PM
We (my dad and I) always have run our old -4 race car as a 2 driver car for drivers ed and club racing....
we always fought over heating even with our oil cooler through the hood/deep sump/accusump...
so this go around we decided to make sure that there would be no cooling issues... and we went with a pair of the fluidyne coolers.
for the vintage group we were not allowed a hood exit.
and since I strongly believe in not having a restrictive cooler exit, we chose not to compromise the exit to fit the fuel cell...
thus we wanted to try something different, and decided to go throught the head light area and into the fender well.....
here is a view of it:
Attached image(s)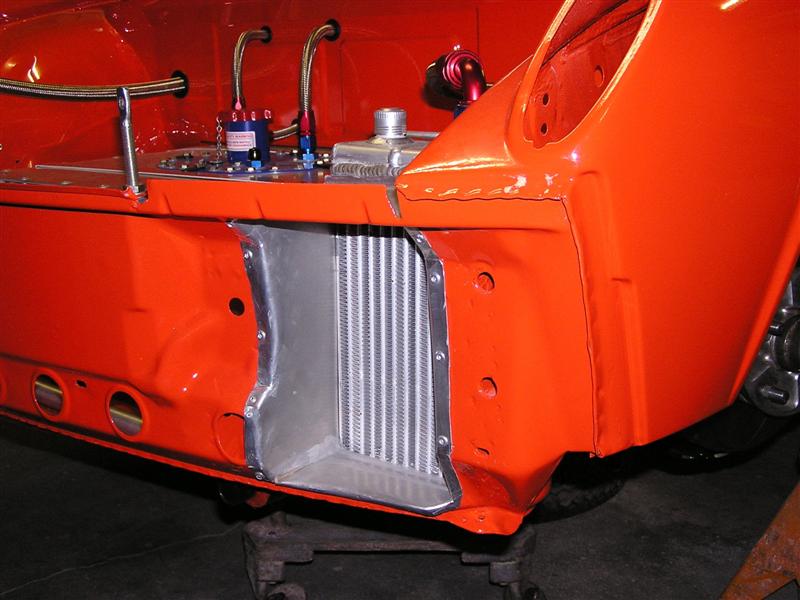
Posted by: brant Nov 1 2004, 09:32 PM
the coolers are the twin pass fluidynes...
the fuel cell is a custom job...
we bought a bladder and our race shop got a guy to custom fab an aluminum shell for it...
The front bulk head is cut open so the shell slips back into it..
I've still got to add an oil line to connect the two front coolers
I've got to tell you guys...
I can't say enough about my race shop.
Its AJRS.
the guy (allen johnson) is seriously a genious.
next:
Attached image(s)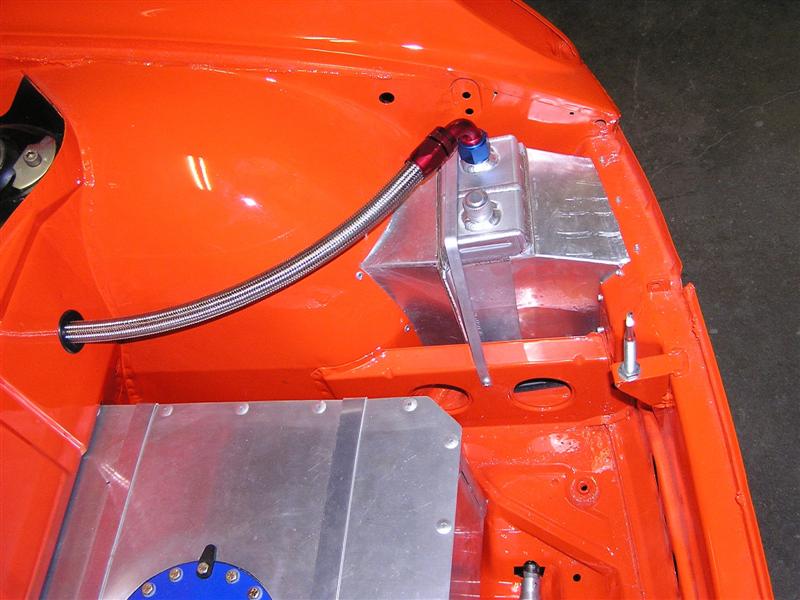
Posted by: brant Nov 1 2004, 09:35 PM
Here is a shot of the air exit.
also in this shot is some of the front suspension...
AJRS did a bit of custom fabricating on the koni's.
they are split and sectioned with a bit removed.
creates a body drop
inside the koni's are shortened Carrera shocks (front and rear)
they are customed valved for my weight and suspension.
don't know how they work, but can't wait to try.
oh.. mueller bearings in there too but not visisble.
we're going to use the drop kit for the spindles.
(changing the spindles on the strut was not legal, and neither were the cross drilled rotors)
Attached image(s)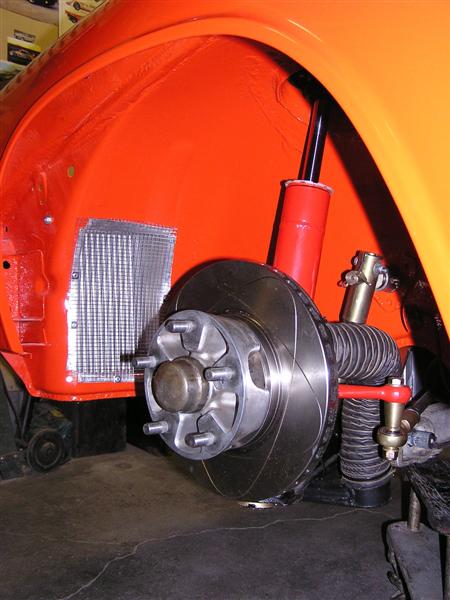
Posted by: brant Nov 1 2004, 09:37 PM
Here is the cooler on the other side...
also a close up of the front hood mount.
Inside each of the fenders I glued in a piece of neopreme material...
I learned this on my old race car.
you can get it at certain upholstry shops.
it stops all of the rock stars from sticky tires...
Attached image(s)
Posted by: Stutgart46 Nov 1 2004, 09:41 PM
Looks great. Keep the pics coming.
Posted by: brant Nov 1 2004, 09:42 PM
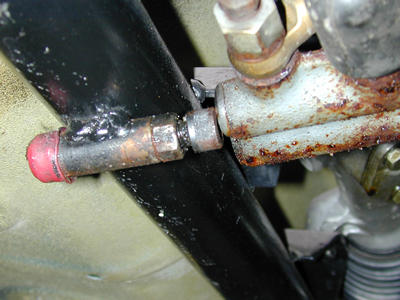
Race class rules allow no weld in bracing... only bolt in.
we wanted to do something to strengthen the front points.
Found this amazing bar.
It was in a metal scrap yard.
not sure if its even aluminum or what.
It is so hard!
perhaps anodized for hardness?
anyways when we went looking for ends to thread into it, we had to go to a specialized bolt place...
the old guy behind the counter had to make some calls because he couldn't determine the thread either...
turns out its RAF (british-aircraft) thread.
not used anywhere else.
I could of ordered a bolt from england for $40 bucks or something... So instead we had a machine shop make us some ends.
here is a shot of it installed through the front trunk floor, just infront of the cell.
Oh... on the cell. We were told not to go too small due to it being a -6 and a 2 driver car, so its a 15 gallong jobbie:
Attached image(s)
Posted by: brant Nov 1 2004, 09:49 PM
fuel system...
I learned from AJ that its tough to get the last 2-3 gallons from a cell.
we didn't want to needless carry the extra weight, so we used his fuel injection pump set up.
It supposedly will get the cell dry to the last cup. He runs it in the F.I. race cars because they are super sensitive to pressure variation.
one pump (holley) pulls fuel from the cell to an accumulator. (Fuel first goes through a filter) The accumulator is really an oil accumulator that he mods and welds some fittings to. There is an overflow line for when the accumulator is full.
A second pump (facet) pulls from the accumulator and feeds the carbs. We ran the standard brake line through the tunnel and then picked up with shielded stainless on the back side...
you can also see how the cell sticks through the bulkhead and nearly against the sway bar
there is a mess of twisted stuff in this shot but here goes:
Attached image(s)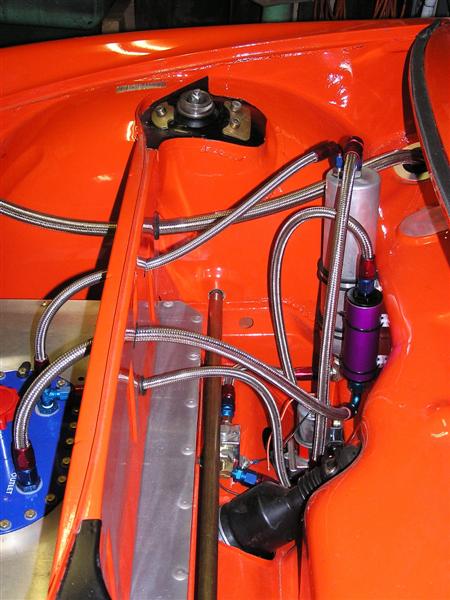
Posted by: brant Nov 1 2004, 09:51 PM
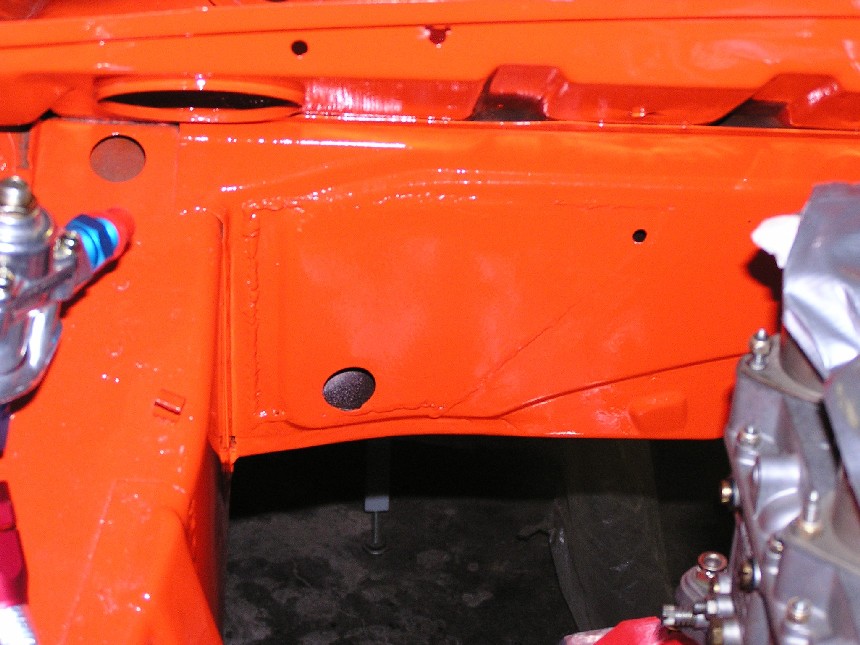
Since all of these are front trunk pictures... here are the rest of the front things...
This is the other side of the front cowl area.
we drilled everything we could for lightness.
dad ran the oil lines very cleanly...
we closed up the holes with aluminum glued in place using professional panel adhesive.
here is one:
Attached image(s)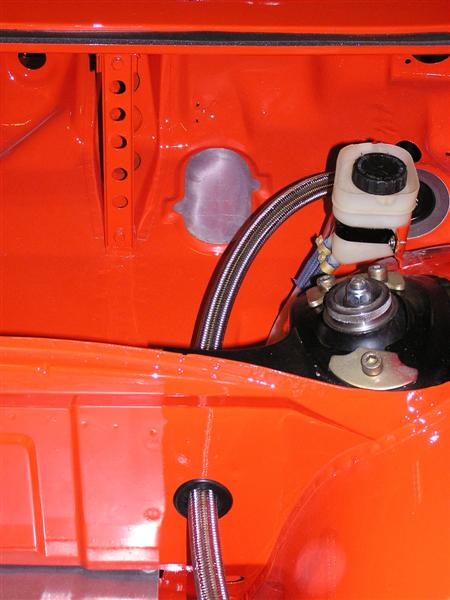
Posted by: brant Nov 1 2004, 09:54 PM
Another front item...
boy... posting pictures is fun!
These are the replacement front headlight covers that dad made. They are aluminum of course..
Rules said "metal" so I'm assuming aluminum is ok.
Also, here are the front turn signal replacements... rules require no plastic or glass lenses...
JOHN KELLEY made these up and I can't thank him enough. Beeeutiful:
Attached image(s)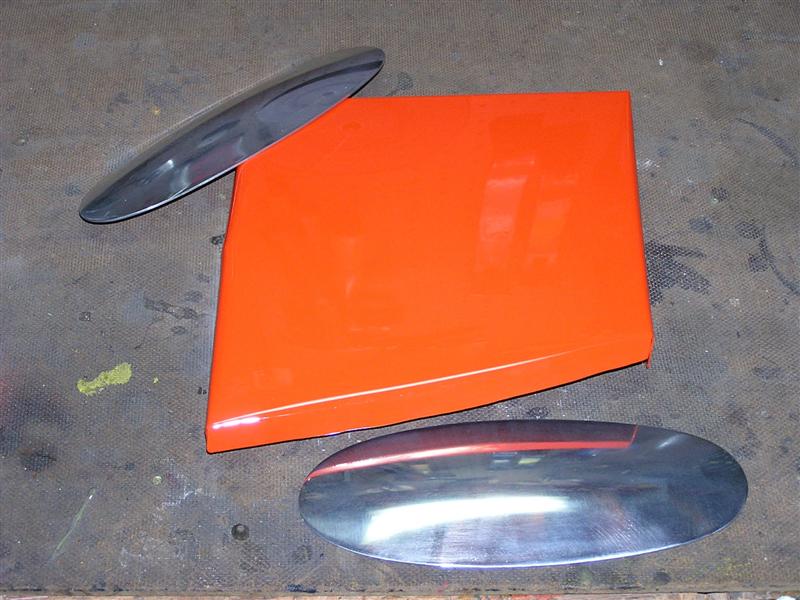
Posted by: brant Nov 1 2004, 09:58 PM
More body. I'm pretty proud of the fenders.
I did a set by hand on my first race car and they were smoother.. but on this set I went for clearance up deep in the top since I intend to really lower it.
No pictures yet, but we're running custom length carrera shocks (with the custom valving) on the rear too. Hope to get really low.
When we started building this 2 years ago our vintage group would only allow 60series tires.
Now they've changed that rule, so we hope to use the 225/50's...
Oh.. I almost forgot. There was a thread last month about mounting engine lids. Our lid (camera wouldn't hold any more pictures) has a forward pointing rod that slips into the hole at the top of the firewall.
here is the rear flare, its more obvious in real life than this picture:
Attached image(s)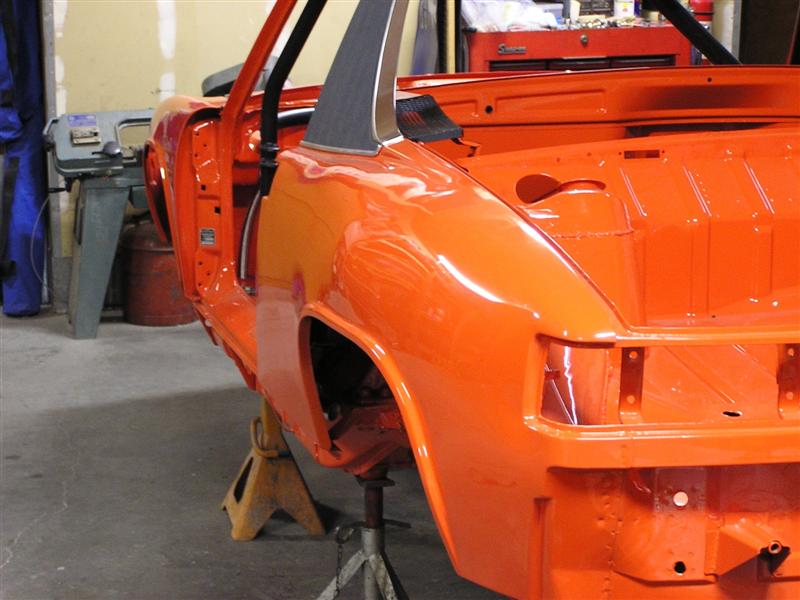
Posted by: brant Nov 1 2004, 10:01 PM
Another shot of the same fender....
also visible is the cool little aluminum trim piece that dad made up to hold down the forward edge of the sail panel vinyl:
Attached image(s)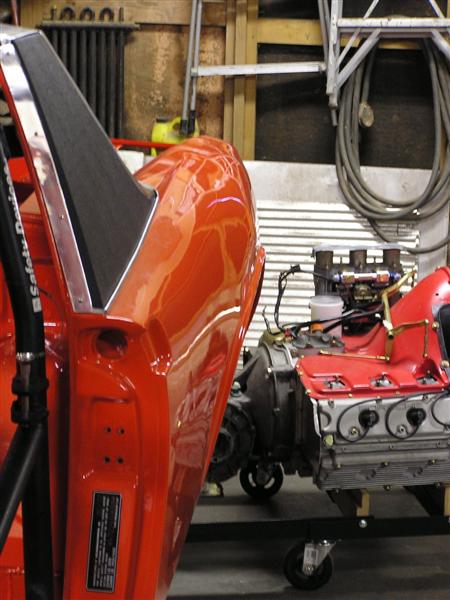
Posted by: brant Nov 1 2004, 10:05 PM
A little bit of motor pic snuck in that one.
Here is another. Motor was built by Henry Schmidt of SuperTec Its a 2.0/6 "S" motor on an aluminum 66 case.
Motor was a back up of Phil Van Buskirks, so he built his vintage 67S-911 on his original serial number'd block and built his back up on a 2nd block...
when phil sold his car, he had this back up motor which has yet to ever have oil put into it. I bought it from him and Henry shipped it straight to me.
Very stock with only oiling mods, rod mods, and an oil pump upgrade.
I was very impressed with his work. All hardware was even done correctly, all replated and powdercoated the fan even:
Attached image(s)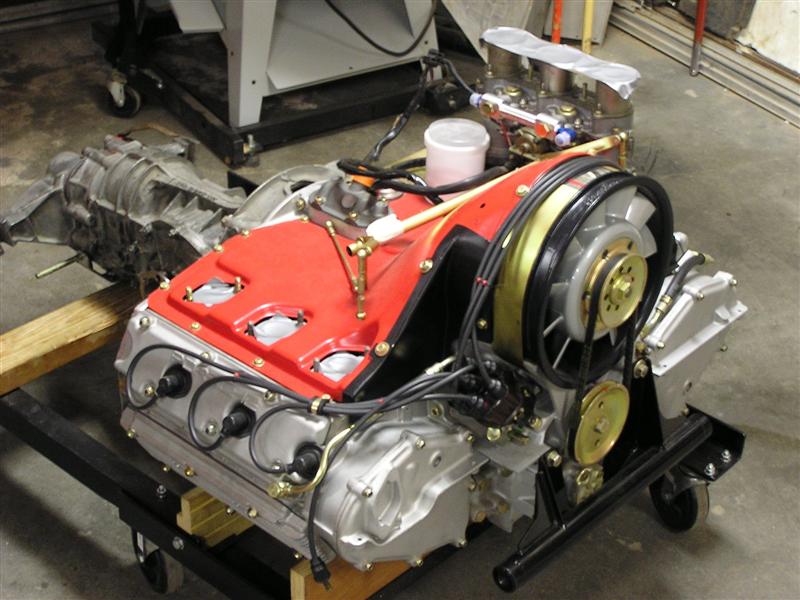
Posted by: brant Nov 1 2004, 10:10 PM
You can't see it in this shot, but here is a fuzzy one with the tranny installed.
AJ lightened the flywheel and its got 3 seperate 6inch long windows around the edge where he lightened it.
(he calls it stage 3)
Were also running the aluminum presure plate out of our old -4 car.
The box is my old race box from the -4 car. Its a locked diff with A/F/K-L/S/X gearing. Not optimum for this car, but just freshened and good enough to start with.
We hope to build up a new box for the 2006 season, but couldn't afford it right now.
Oh.. one more thing. Dad made a very cool -6 motor dolly on rollers. It as low as he could get it and still slip a jack underneath. Makes install much better:
Attached image(s)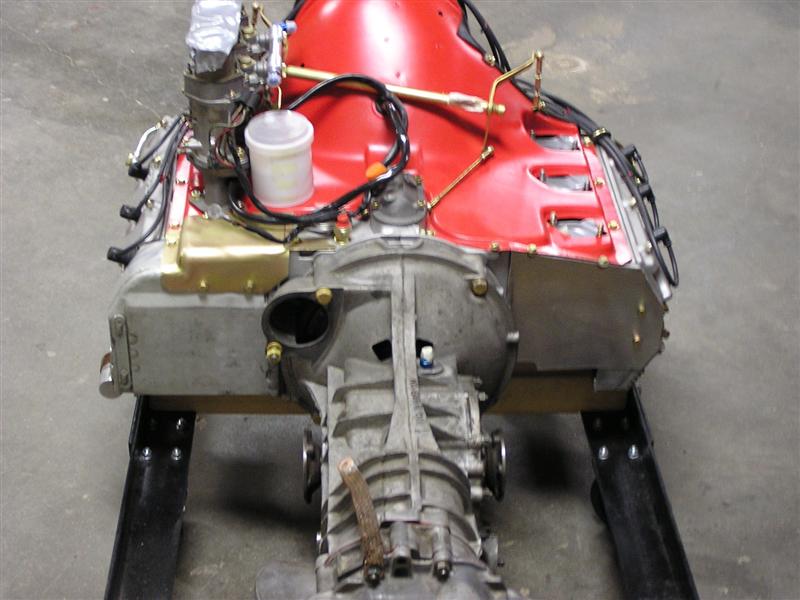
Posted by: brant Nov 1 2004, 10:14 PM
Its way past my dinner time so only another one or two for tonight...
Here is the seam welding on the rear towers outside:
Attached image(s)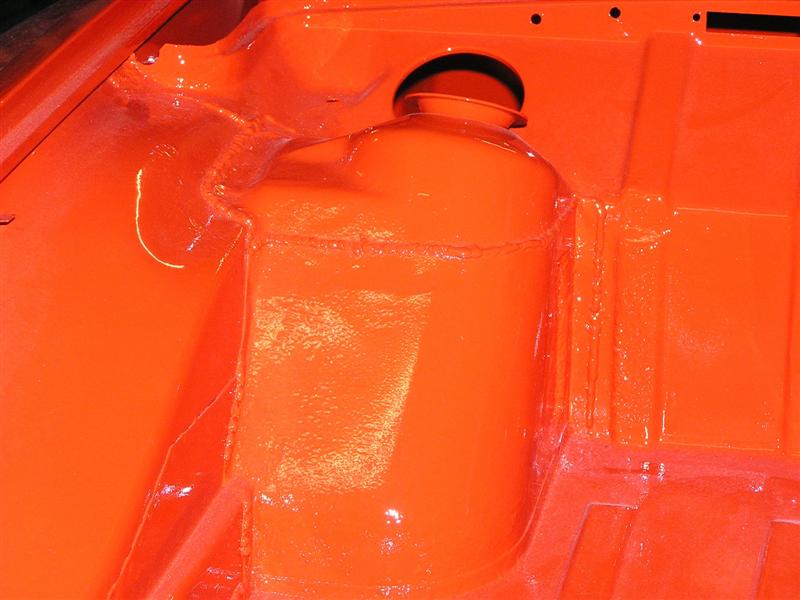
Posted by: brant Nov 1 2004, 10:18 PM
Here is the seam welding on the rear towers inside..
Jeroen, I mentioned this once a while back... I don't have to tell you not to over look this area. 1/2 of the rear seams are inside. You can't see them due to all the body filler the factory puts in there. you can grind that crud out with a wire wheel and then get to them.
I don't have a pic of it, but I also cut open to access the frame end in the engine bay. Right where it butts up to this tower. We welded that and then closed the access portal back up.. Welded it closed and you can barely tell after a bit of grinding
here she is from beneath:
Attached image(s)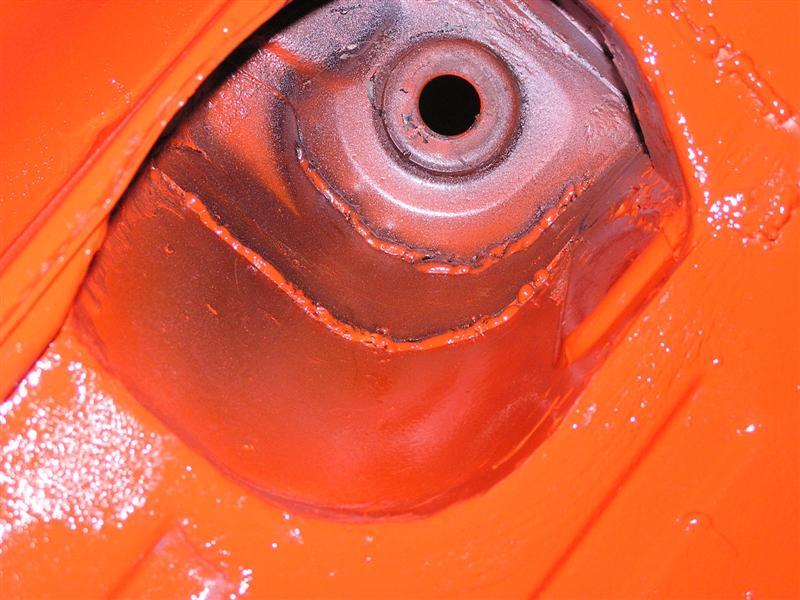
Posted by: brant Nov 1 2004, 10:19 PM
too much fun...
I've gotta go for now.
I'll send a couple more tomorrow.
brant
Posted by: campbellcj Nov 1 2004, 10:25 PM
dOOd, that is one sweet project!!!
Based on my vaguely similar (but not nearly as CLEAN) car, that gem will be an effin' blast to drive when she is ready to hit the track.
Posted by: campbellcj Nov 1 2004, 10:29 PM
BTW if John Kelley wants to make & sell those turn signal covers I'd be interested 
What kind of wheels are you planning to run? I have not yet bitten the bullet to cram 225's under my car but to be competitive, I'd have to do that on 15x7's or 16x7's depending on the organization.
Posted by: rick 918-S Nov 1 2004, 10:39 PM
Nice work!
Posted by: john rogers Nov 1 2004, 11:36 PM
Really great loking work! I'd keep a close eye on the rear side of the front oil cooler to see if the tires throw much rubber? MY Goodyears can fill up the area under the turn signal buckets on a race weekend. Also if you have not decided on a shifter and such I'd strongly recommend one of Jim's Rennshifts and also one of the aircraft type coupler and there will be no slop in the shifter at all. Again, beautiful job....
Posted by: ablose58 Nov 2 2004, 04:19 AM
Very nice, It looks like it will be a real nice ride
Posted by: Jeroen Nov 2 2004, 05:43 AM
Wow Brant. This was sure worth the wait over the pictures 
Looks like you have a very well thought out and clean package.
Absolutely amazing and definately a source of inspiration
Posted by: synthesisdv Nov 2 2004, 06:43 AM
brant,
the car looks awsome. i didn't catch which club you are running with.
can't wait to see her finished.
Posted by: brant Nov 2 2004, 11:55 AM
Thanks for all the feed back fellas...
I was so excited to get some of these picture out because I wanted to thank you guys mostly...
Seriously, I've been warehousing tidbits and advice form everyone and I can't begin to explain all of the favors that club members have done for me...
All of the admins have helped me out a ton..
Especially Ginter since he is so close to me..
he has shuttled things for me, wrenched on other cars for me, etc...
not to exclude anyone either, I have chatted with 50people to run ideas by them.
------------
synthesisdv:
its Rocky Mountain Vintage Racing out here...
they are part of the larger co-op, so I should be eligible for a couple of out of state events each year if I ever travel. Their rules are kinda weird compaired to other areas. When I started the project the car had to be a 6cylinder as no -4's were allowed. Now they have loosened up and will allow 1.7 fours only in a lower class.
Another of their rules was that the -6 had to be a 2.0 as no real six cars were built 72 or earlier with bigger motors (I know about the 916, but nobody had picked that fight yet). They also just changed their rule about tires so I get to run the 50series as previously mentioned. They also allow no fiberglass, no bracing tubes, no roll cages to suspension points... They are very stock in appearance and kinda old school. They only allowed 67 or earlier cars until just 3 years ago when they changed their rule up to 1972.
John:
good tip on the rubber in the fender wells. I'll keep an eye on it. I've got a really trick shifter already. Its an AJ special. I'm embarrased to say that I sold my rennshift that I had intended to use. AJ makes a shifter that has a bit more adjustability and he highly recommended that I go with his. He also has a few coupling tricks that I incorporated and when I get to lamar next time I'll get some shifter shots added.
Chris:
Yeah John Kelley said that he might be open to selling these when I had him make mine. I promised him I would post pictures and make noise about them. The lack of a digital camera slowed the process down, but I really liked they way they came out. I have a little mounting Idea which I will show after I've tried it.
Regarding wheels. our race class allows a maximum of 7's and will not allow 16inchers.... So we are going with 15x7 fuchs. I used to run 15x7 cookies on my 4 cylinder ex-race car so I used them as a fittment tool when I pounded out these fenders. I think they will clear, and I think they will clear even when dropped an extra inch or two.
Posted by: brant Nov 2 2004, 12:06 PM
Couple more pictures.
I don't think I mentioned earlier. The car is in my fathers garage 4hours away. I try to make 1-2 weekend trips each month with an 8 hour driving time. We work on the car on saturday's and half of sunday before I drive home.
This makes it a bit difficult to speed up the process too much. Also makes it kinda difficult for me to easily get more pictures now that I have a camera.
Hopefully I'll be down there once in november and can get a bit more done. Goal is to have it running in time for april events in colorado. We are really jonesing to do some driving as we decommissioned our -4cylinder race car after the 2002 season in order to steal and sell all of the race parts from that chassis.
That car is a 1974, and since the local vintage association only allows 1972 or earlier we had to start over from scratch.
anyways here is a roll bar picture. We stole this cage out of the 4cylinder race car. It is (or was) a safety devices cage. AJ put some extra bars into it for us, so it is no longer a bolt in. Our rules only allow so many body points, and no suspension points, and no passing through other panels.
I particularly like the dash bar. A friend of mine out here busted his knee in a small shunt in his 67S 911 when he hit the below dash brace. We wanted something higher, so here is the AJ solution. I did all of the welding on the car except for these extra braces. (figured I didn't want to really test my skills in such an important way)
you can also see one of the oil lines running forward:
Attached image(s)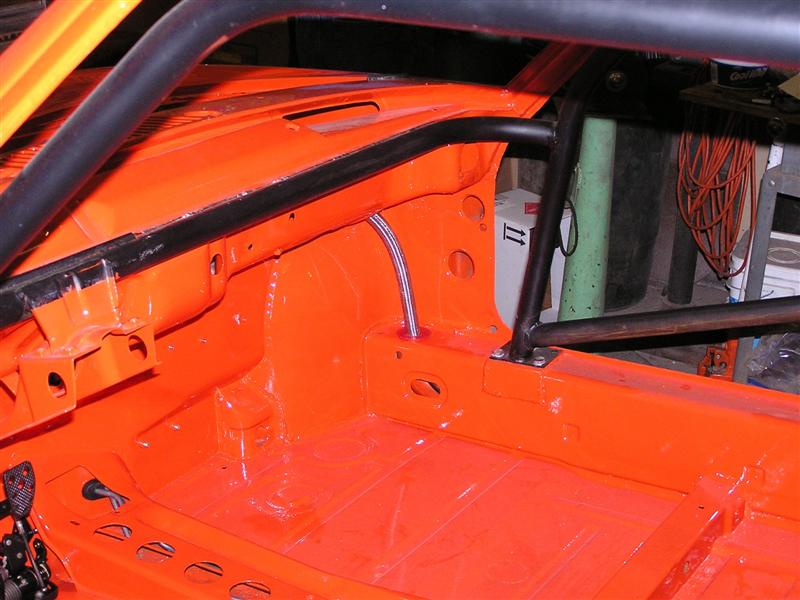
Posted by: brant Nov 2 2004, 12:08 PM
In this one there is more roll cage.
Also a bit of the pedal cluster (with lightening holes)
We also lightened where ever possible, for example the center tunnel holes.....
Attached image(s)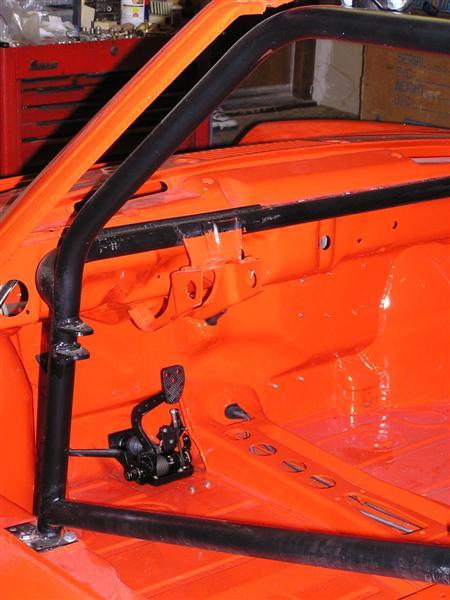
Posted by: brant Nov 2 2004, 12:09 PM
here is that pedal cluster a bit more clearly:
Attached image(s)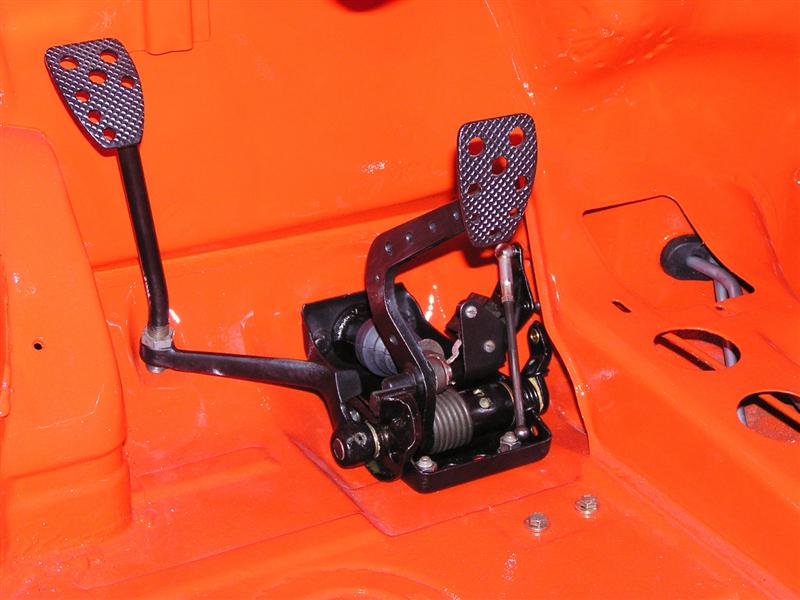
Posted by: brant Nov 2 2004, 12:13 PM
Next, I've got a few motor bay shots.
In our old -4 race car, we ripped 2 rear suspension consoles out. There was no rust what so ever. I am a VERY strong believer in a brace bar system for the suspension ears on track cars.
my old -4 car had a very simple heim-jointed brace running to the firewall... another AJ idea from 12years ago. In 12 years of use it held up very well.
So in this car of course we were going to do another brace. AJ has updated his design and uses a bit more intricate brace this time. We tilted it over for a -6 more than the -4 install requires.
Here is a shot of the forward mounting area on the firewall.
you can also see my oil filter and heat wrapped gas lines in this shot.
Oh I forgot to mention the hell hole. A tiny repair was required. I incorporated a little "L" bracket to the firewall. On the interior side I made an extra large mounting plate for the back of the cage that has another "L" that is welded to the other side of this one..
(I'm not allowed to weld braces in, but I saw these as cage mounts and rust repair..ha):
Attached image(s)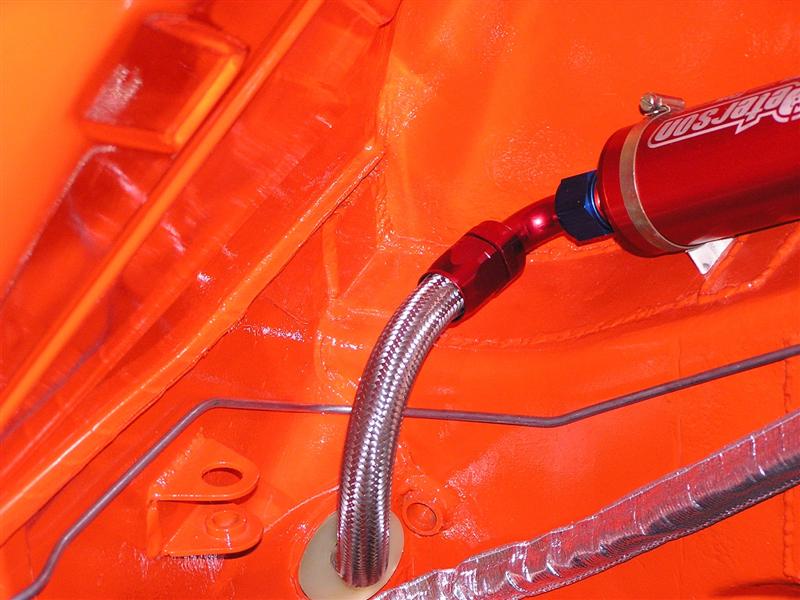
Posted by: brant Nov 2 2004, 12:19 PM
Here you can see the rear mounting point for this console brace. Its welded to the frame where the -4 mounts are normally.
you can also see our fuel pressure regulator.
also note that we will not run any tin work or chassis tin in the engine bay.
finally here is bit of the motor mount. Its a patrick-bulkhead.
Oh.. picture doesn't show it, but on the outboard side of the rear suspension there is another heim joint that is a toe adjuster. It runs forward from the suspension cup and along the longitudinal. It bolts to the long, where the jack points used to be. You can barely see the mounting bolt for it in one of the first pictures with the exposed long. (no more jack points):
Attached image(s)
Posted by: brant Nov 2 2004, 12:21 PM
Dad made up the new hard brake lines.
This picture also show the motor mount a little better
We installed only 2 of the stiffening kit's plates (didn't want to add the weight but felt that these were important ones)
The firewall shift bushing is delrin. Its hand lathed to fit, and apparently each chassis and bar varies a tiny bit depending upon how they are worn... It was a sucker to install:
Attached image(s)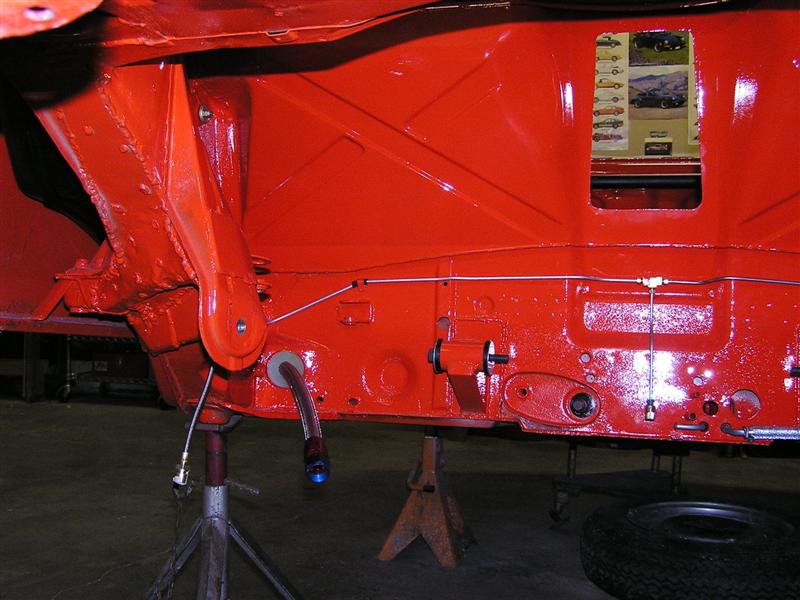
Posted by: Chris Julian Nov 2 2004, 01:28 PM
Very nice work.
The car seems to be very well thoughtout.
Chris
Posted by: Ferg Nov 2 2004, 01:32 PM
Yippie Brant has a camera! Now every else gets to see how cool your car is 
Ferg
Posted by: J P Stein Nov 2 2004, 02:00 PM
Brant:
Tho I knew you'd been plugging away at a racin' vehicle, I had no idea...........
The digital camera is a great investment for all of us.
Iff'n you have a chance, some close-ups of the suspension bracing would be a big help.....the strap thingy. It's all too Orange for these old eyes to make out clearly.
You'll have to answer to Captn' Crusty for that hole in the firewall, tho. 
Many departures from the "normal" oil cooler set-up are cobbled messes. Yours is top drawer.....well thought out and executed......just my opinion
Are you gonna do 225 tiars at both ends?
Posted by: 3d914 Nov 2 2004, 02:01 PM
Very nice car - Brant!
Can't wait to see it finished. I'll bet you can't either. 
Posted by: scruz914 Nov 2 2004, 02:07 PM
class rules require all metal... no fiberglass
so the fenders were done by cutting, prying, and welding in pieces of metal....
body could of been smoother, but didn't want to add much filler...
Looks pretty darn perfect to me! You and your dad have done a really nice job. Looking forward to next Spring and some track shots!
-Jeff
Posted by: brant Nov 2 2004, 02:12 PM
Tho I knew you'd been plugging away at a racin' vehicle, I had no idea...........
The digital camera is a great investment for all of us.
Iff'n you have a chance, some close-ups of the suspension bracing would be a big help.....the strap thingy. It's all too Orange for these old eyes to make out clearly.
You'll have to answer to Captn' Crusty for that hole in the firewall, tho.
Many departures from the "normal" oil cooler set-up are cobbled messes. Yours is top drawer.....well thought out and executed......just my opinion
Are you gonna do 225 tiars at both ends?
Thanks JP, that means a lot coming from you.
225/50 at both ends. (thats what I always ran on my -4 car too)
I'll get you some more pictures.
AJ will probably be willing to sell the parts as a kit if your really interested...
Afraid that I won't be back for 2-3 weeks to my dad's house so those pictures will take a while.
I was real happy with the coolers. Dad spent an unbelievable # of hours making the ducting out of aluminum. We had a friend in kansas who tried something similar but without the ducting... Didn't work for him on track, and he had to start over. So we paid a lot of attention to the ducting details.
brant
Posted by: brant Nov 2 2004, 02:16 PM
Let me try this re-sizing thing....
if this comes through, it is a better shot of the rear engine lid mount holes...
also a better shot of how the cage runs through the dash....
whoo..hooo... look at me Sean. I kinda got it.
brant
Attached thumbnail(s)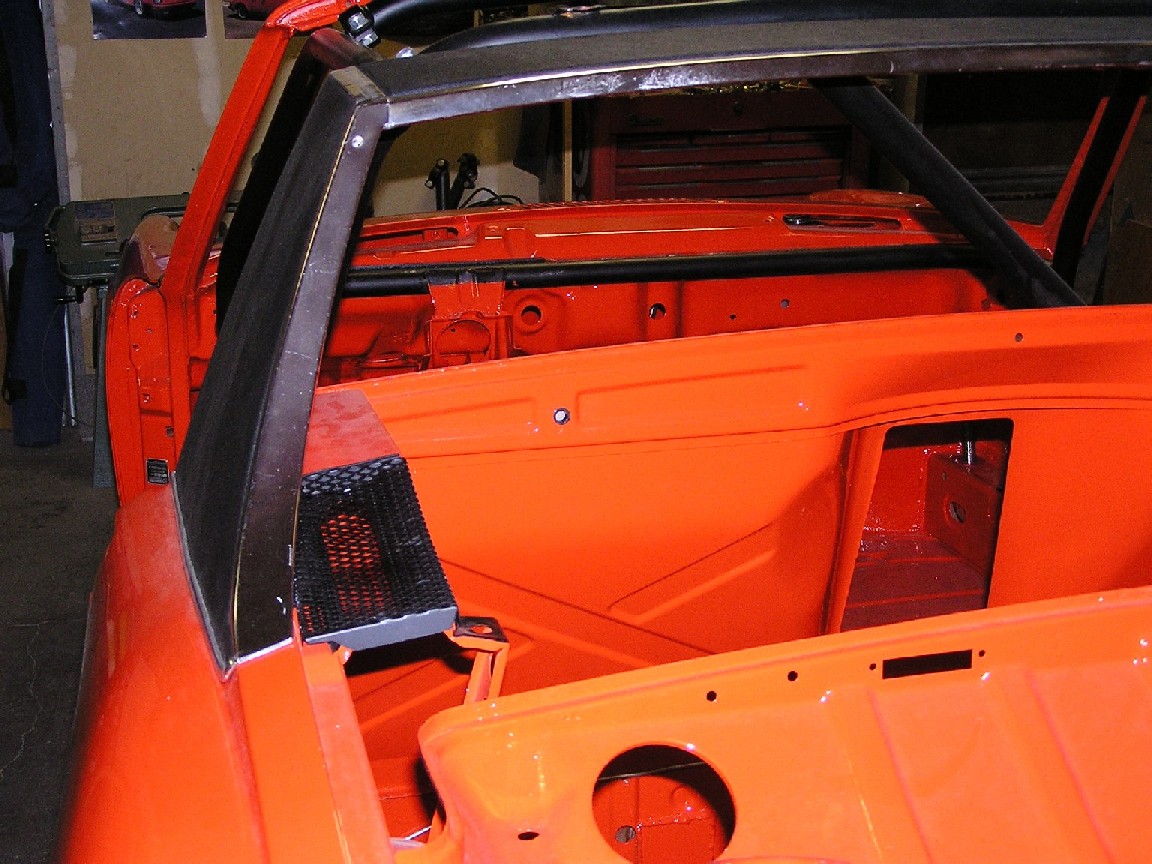
Posted by: mikerose Nov 2 2004, 02:20 PM
This is pure porsche PORN
Posted by: Quebecer Nov 2 2004, 02:35 PM
This is beautiful work Dude!
Keep it up!! 
Posted by: Root_Werks Nov 2 2004, 02:42 PM
Nice car! This thread/forum rocks!
Posted by: PorscheTom Nov 2 2004, 02:59 PM
Wow, beautiful job!
Your racing group is going to be sorry they opened up the model years to allow a 914 in there, especially a -6. I bet you'll clean a lot of clocks on the track with that car.
Great work!
Posted by: Steve Thacker Nov 2 2004, 04:19 PM
That is one of the cleanest, most thought out cars that "I" have ever seen !!!!!
Keep up the awesome work!!!!!!! Most of all keep having fun with your pops and this car.
Posted by: GTeener Nov 2 2004, 04:21 PM
Look'n real good!

Keep it up!
Posted by: brant Nov 3 2004, 09:30 AM
Your racing group is going to be sorry they opened up the model years to allow a 914 in there, especially a -6. I bet you'll clean a lot of clocks on the track with that car.
Great work!
Thanks sir,
I think my toughest competition will come from the 1972 911S' with the 2.4 motors...
There is one in particular that was built by a local race shop (3R automotive of speedvision GT fame) that is particularly well done and will be extremely fast with 8inch wheels and probably 240hp. I hope to have him beat on weight thou..
thanks everyone for the kind words.
Its dang nice and kind of you all.
brant
Posted by: Scott Schroeder Nov 3 2004, 10:24 AM
BRANT!
I am sorry - I don't mean to sound like a jerk, but I had no idea you were building a car woth that level of detail - it is simply spectacular!!!! BIG kudos to you and your Pop. I cant wait to hear the groans from the MG owners who over run that club!
Really REALLY great!!!!!!
Hope to see you soon -
Posted by: brant Nov 3 2004, 11:29 AM
Thanks Scott,
I'll get a picture of the engine grill next go around...
(IT'S your grill!)
The club won't let me run with the MG's so It will be in the big bore group with the Vette's/camaro's and mustangs... Plus those 72 911's.
brant
Posted by: Gint Nov 12 2004, 09:40 AM
Lookit Brant posting pictures!
I didn't get to read this whole thread, just look at the pictures. I'll read it all later because I laready have some questions. The paint looks great! The whole thing looks great. Bob has been busy.
Can't wait to see it hit the road (track).
Posted by: joea9146 Nov 12 2004, 10:39 AM
Very Nice .... Great job
Posted by: Eric_Shea Nov 12 2004, 10:51 AM
Gint... how about that shock tower weld thingy for you?
Brant... awesome
Posted by: brant Nov 12 2004, 11:40 AM
thanks Eric
Ginter.. I owe you a big thanks too....
Hey everyone; I think ginters car and mine are maybe the same color. They were also purchased and imported to Colorado on the same weekend, if not same day.
Hey I found a couple more of the previous owner pictures that I want to document.. (the before pictures)
Left long:
Attached image(s)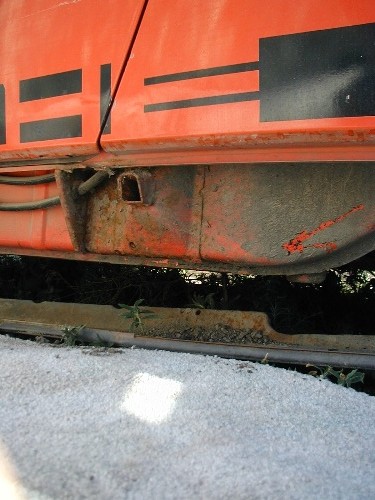
Posted by: brant Nov 12 2004, 11:40 AM
Right Long:
Attached image(s)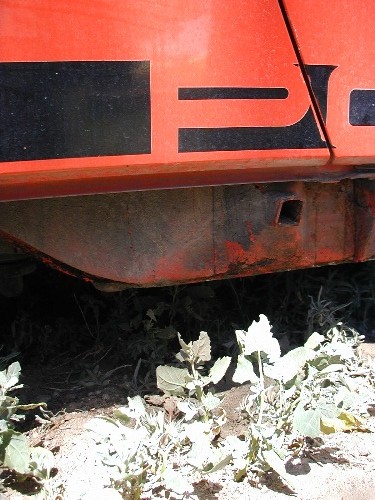
Posted by: brant Nov 12 2004, 11:41 AM
Engine bay (DIRTY!) or battery tray:
Attached image(s)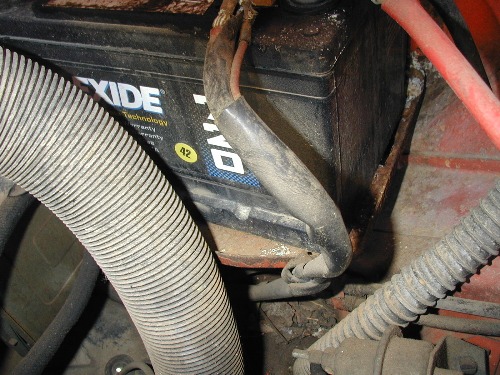
Posted by: brant Nov 15 2004, 09:49 AM
More pictures, but give me a day or two to get them in here.
Here is my new Avatar, hopefully this doesn't upset the captain:
Attached thumbnail(s)
Posted by: slivel Nov 15 2004, 10:48 AM
Brant,
Beautiful car and superb attention to detail. What club(s) and what tracks will you be running?
Steve
Posted by: seanery Nov 15 2004, 10:55 AM
Hey Steve,
would I have seen your car a couple years ago at Fontana running with Touring Car Club? 2001 or 2002 maybe? 
Posted by: brant Nov 15 2004, 03:41 PM
Beautiful car and superb attention to detail. What club(s) and what tracks will you be running?
Steve
Steve,
thank you sir...
Plan on mostly doing RMVR and PCA club racing...
but the car was built for RMVR rules...
mostly colorado tracks.. we have 5 decent ones.
Possibly will travel to affiliates for some VARA stuff, although the car won't be competetive out in your neck of the woods...
also hope to get to Laguna and Road Atlanta in the next couple of years at least once...
brant
Posted by: brant Nov 15 2004, 03:45 PM
Here are a few detail photo's that show where I deviated from the "Weight is everything" approach, and added some weight back into the chassis in the interest of aesthetics.
Here is a shot of the front park lamp signals I filled in:
Attached thumbnail(s)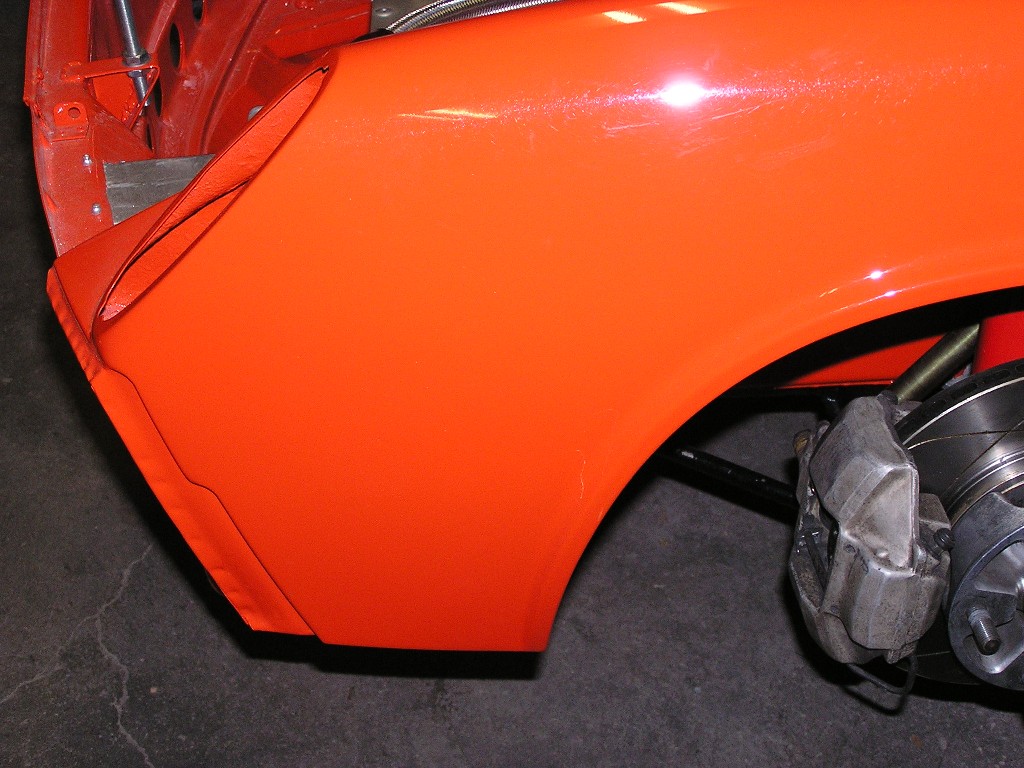
Posted by: brant Nov 15 2004, 03:53 PM
still playing with size... let me try this a tad smaller.
Here is the antanna hole that I filled (more extra weight):
Attached thumbnail(s)
Posted by: brant Nov 15 2004, 04:13 PM
One more "dead" weight picture...
I filled the trunk button hole on the rear panel:
Attached thumbnail(s)
Posted by: brant Nov 15 2004, 04:23 PM
Here are a couple of pics on weight savings items.
holes in the long supports:
Attached thumbnail(s)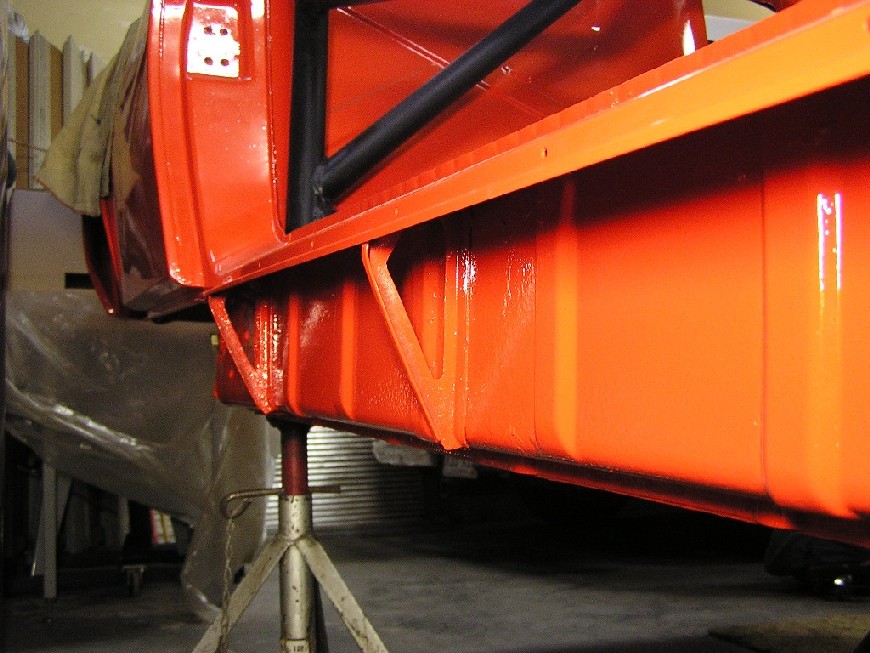
Posted by: brant Nov 15 2004, 04:26 PM
Brake reservoir attatchment:
Attached thumbnail(s)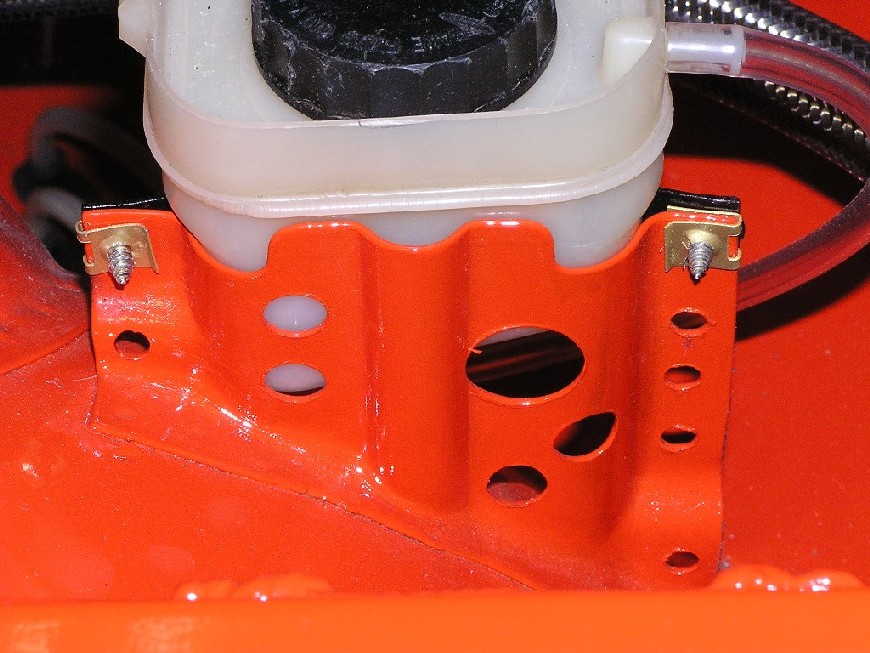
Posted by: brant Nov 15 2004, 04:28 PM
Here is the plug that dad made to replace the back-up switch:
Attached thumbnail(s)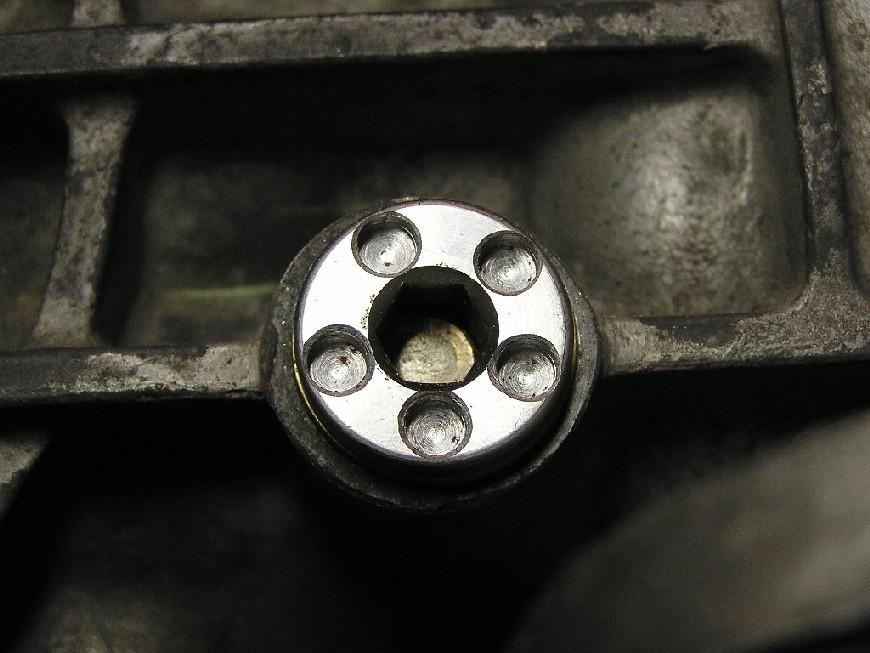
Posted by: brant Nov 15 2004, 04:48 PM
Oil filler neck, and weight saving upright:
Attached thumbnail(s)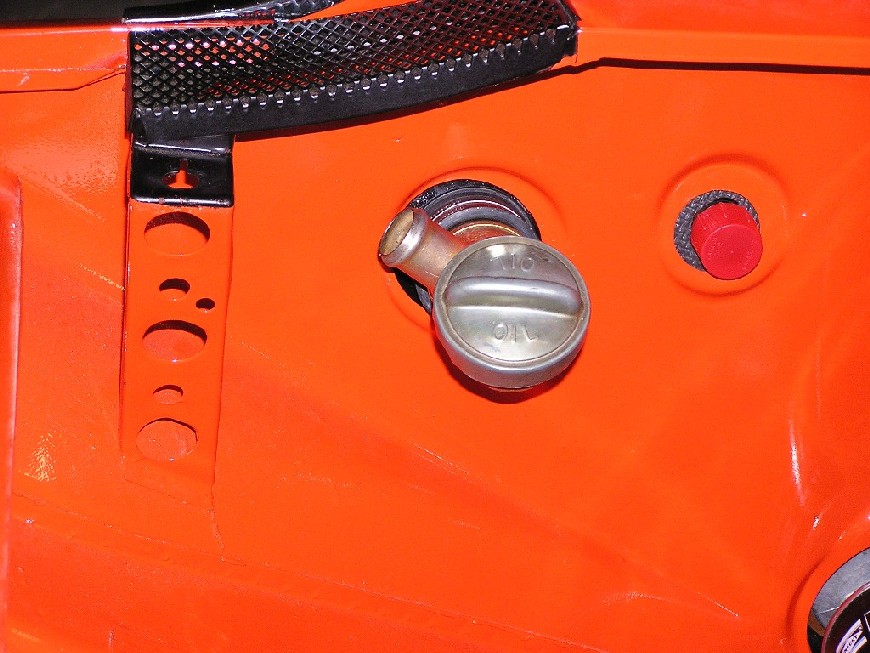
Posted by: brant Nov 15 2004, 06:18 PM
I mentioned my fender linings before.
I used contact cement to glue in a piece of neopreme on the inside of each fender. I've done this before on my old race car and it preserved my paint for 3-4 years from the rock stars that you get from track tires...
The neopreme seems to offer good compression, and more density as it compresses.... what ever.. but seems to work very well.
This picture is confusing, but I took it lying on the ground and pointing up at the ceiling. (left rear fender):
Attached thumbnail(s)
Posted by: brant Nov 15 2004, 06:45 PM
I also previously mentioned that my dad had built an engine dolly. Well I took a photo this weekend. Dolly was built to be as low as possible but still allow our jack to slide underneath.
Its got 6 wheels and the forward 4 are rigid, but the back 2 are on casters so they can spin in any direction. There is also enough of a bend in frame to keep the 2 rear wheels off the ground.
The point to all of this; it doesn't swing right and left when sliding it in from the rear... then after jacking up the forward part and attatching the forward engine mount there is a weight transfer (duh) onto the rear casters and the rear can swing right/left in order to facilitate final alignment...
don't know if that makes any sense.. Either way the dolly works great. It will suppor the engine/tranny combo, or just the engine alone. I've had the engine in a few times now during the dry fitting process and it works great:
Attached thumbnail(s)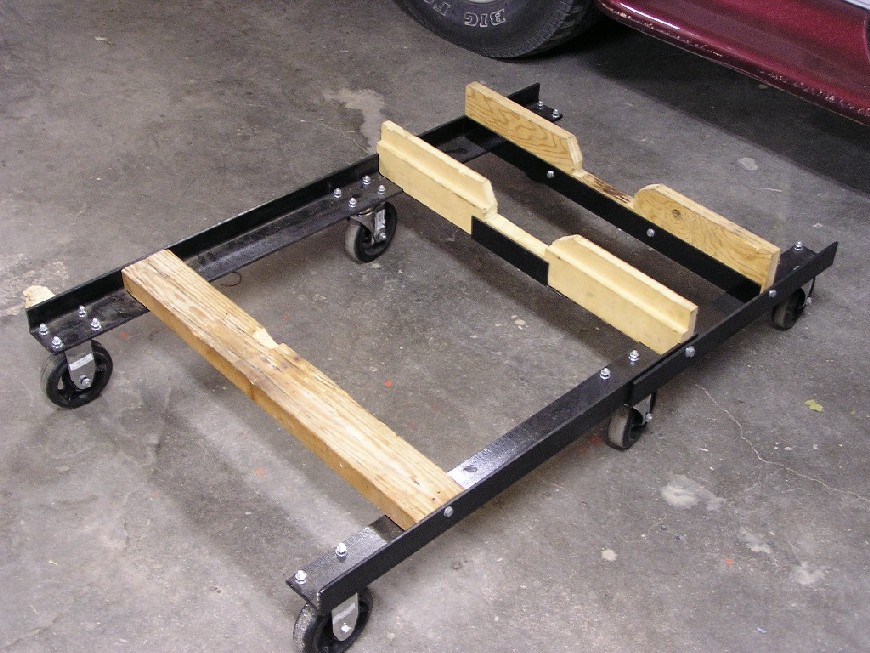
Posted by: brant Nov 15 2004, 06:53 PM
I reassembled the carbs onto the motor this weekend.
Carbs are IDS carbs, with the head blocks, perc mod, and baffles. The manifolds look to be powder coated and the carbs rebuilt
here is a shot:
Attached thumbnail(s)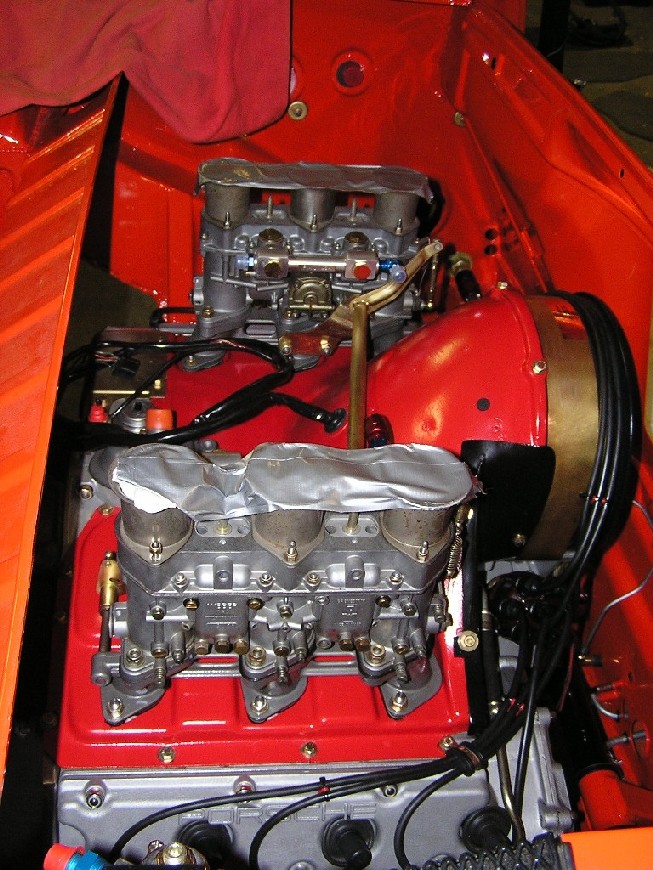
Posted by: brant Nov 15 2004, 06:54 PM
One more that shows the fuel blocks:
Attached thumbnail(s)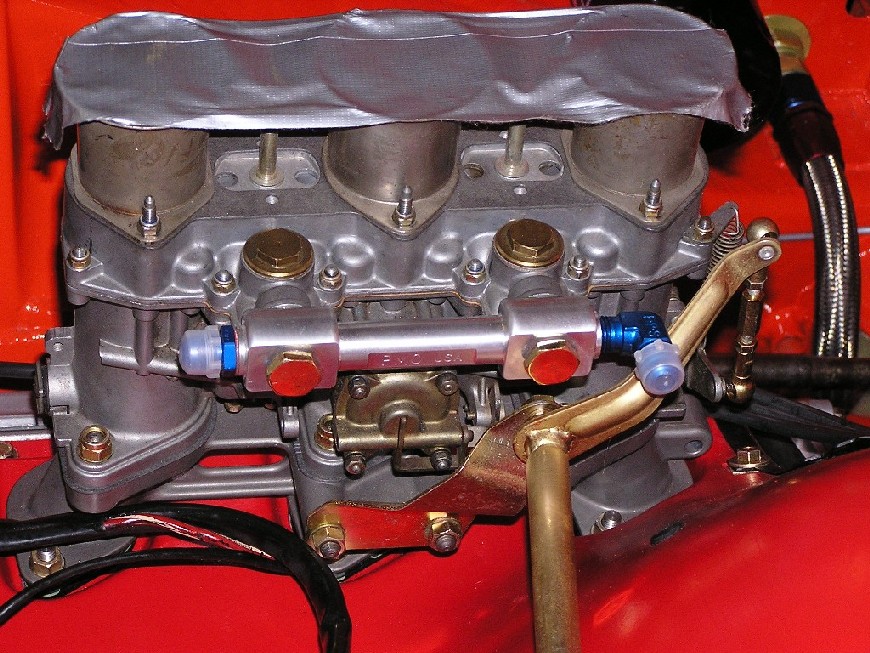
Posted by: brant Nov 15 2004, 06:57 PM
close up of other side:
Attached thumbnail(s)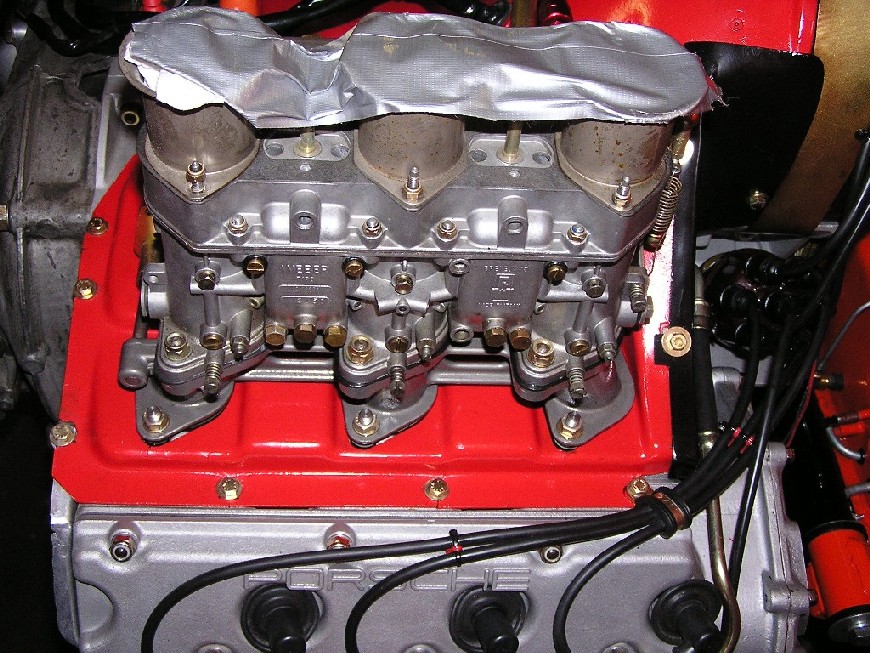
Posted by: brant Nov 15 2004, 07:01 PM
I had to take this one...
I'd like to call it "nap time"
but in reality its my dad fighting with the steering column:
Attached thumbnail(s)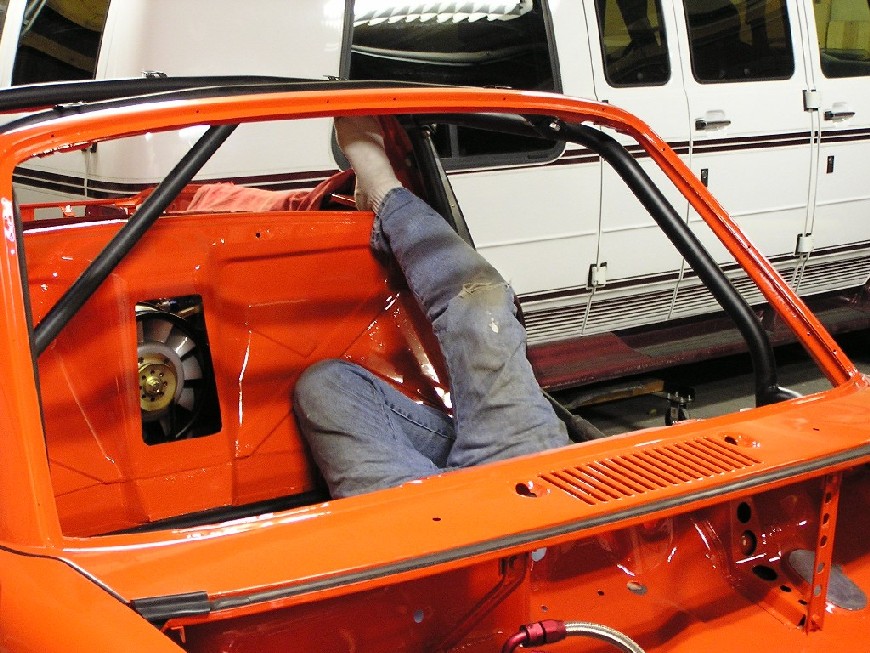
Posted by: brant Nov 15 2004, 07:06 PM
underside pic...
Here is the oil cooler that AJ modified for me (dash 16):
Attached thumbnail(s)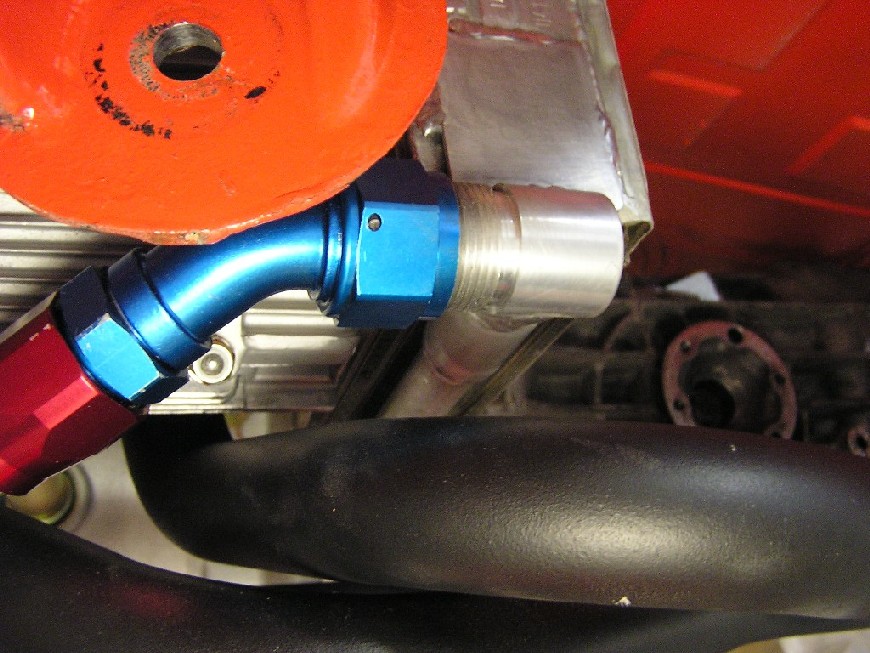
Posted by: brant Nov 15 2004, 07:08 PM
Starter off of my -4 retired racer:
Attached thumbnail(s)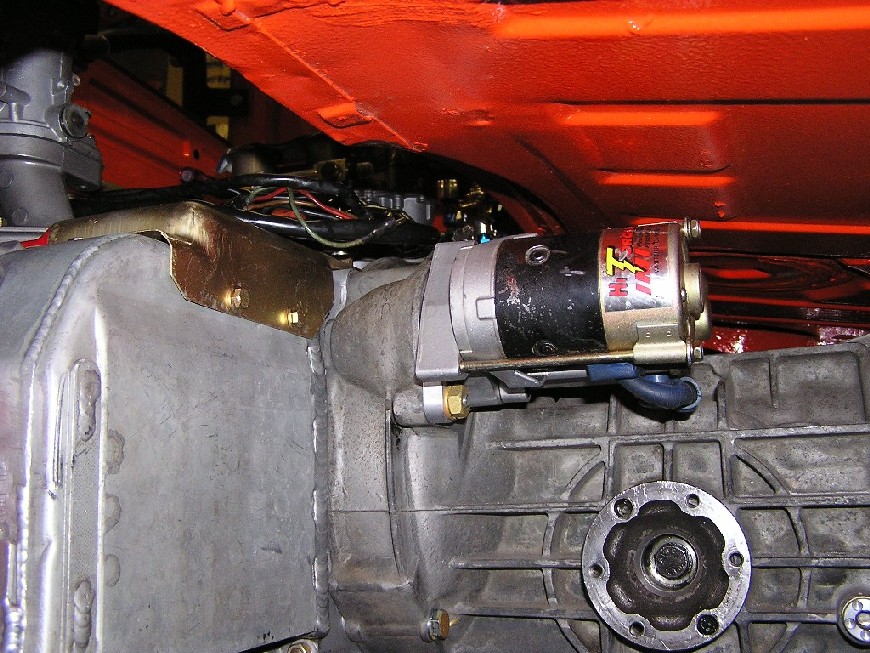
Posted by: brant Nov 15 2004, 07:10 PM
Trial fit on the header.
They are Jet hotted.
oil line will have a heat sleeve when we get done:
Attached thumbnail(s)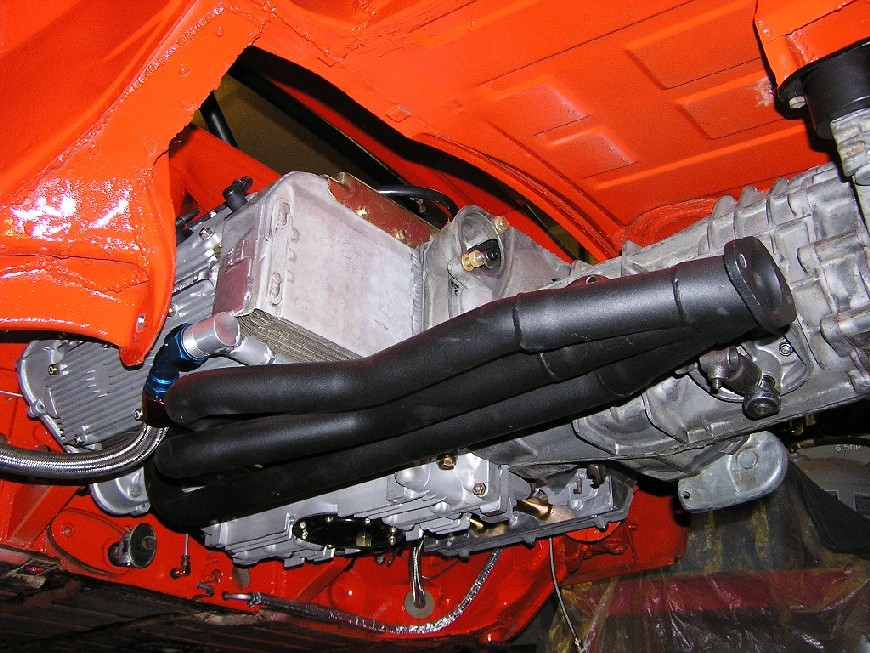
Posted by: brant Nov 15 2004, 07:12 PM
Rear tranny mounts are delrin:
Attached thumbnail(s)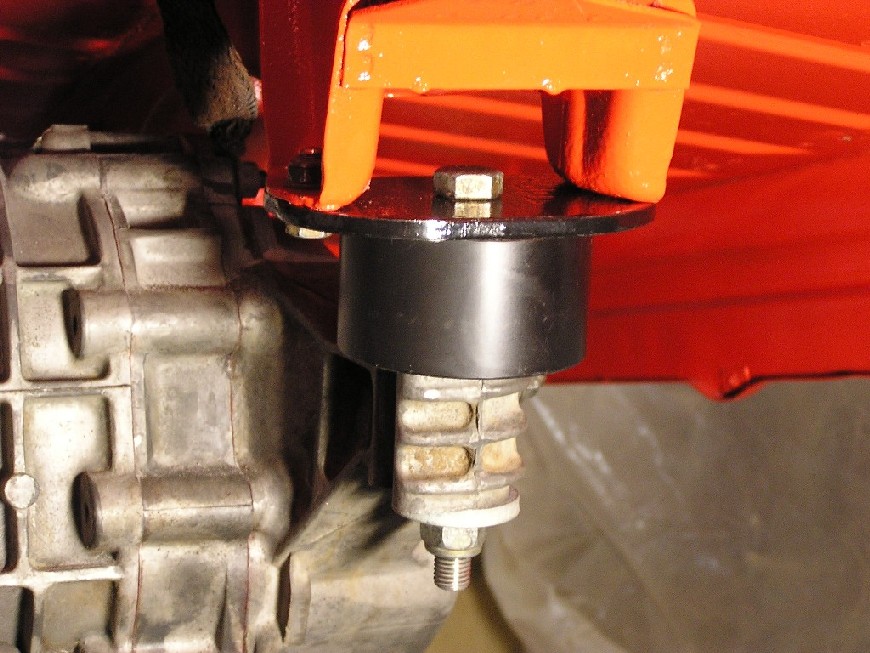
Posted by: brant Nov 15 2004, 07:14 PM
This isn't finished yet.
but here is the front tow hook (alluminum) that dad has been making:
Attached thumbnail(s)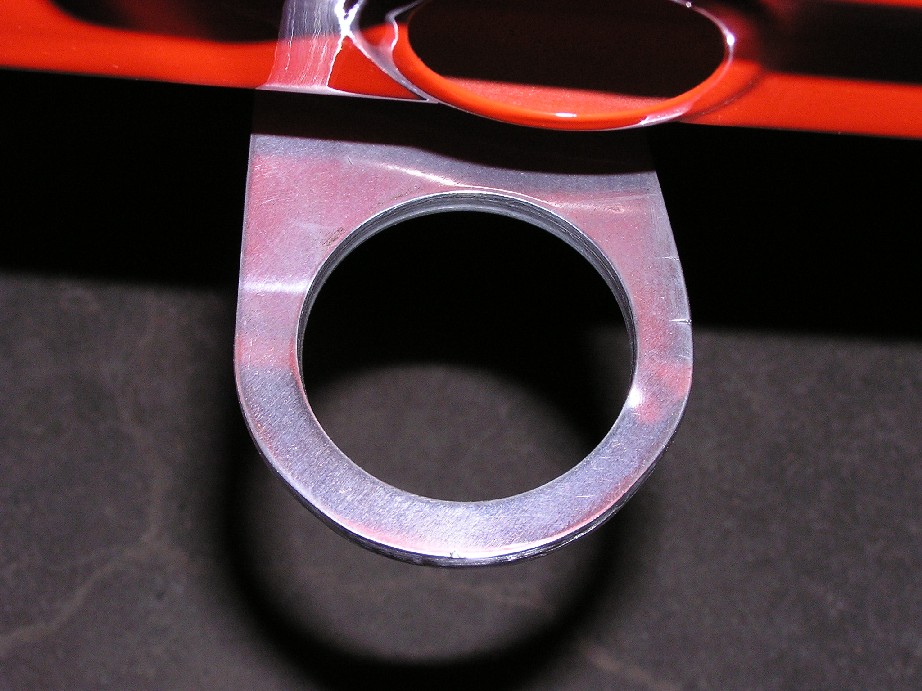
Posted by: brant Nov 15 2004, 07:16 PM
And this one is a shot of it from underneath...
Its only a test fit, and not tightened down in this photo.
This photo also shows my front bolt in brace from earlier in the thread.
You can also see the mueller bearings..
hey Mike, when you gonna come up with a cover? Just kidding...
Attached thumbnail(s)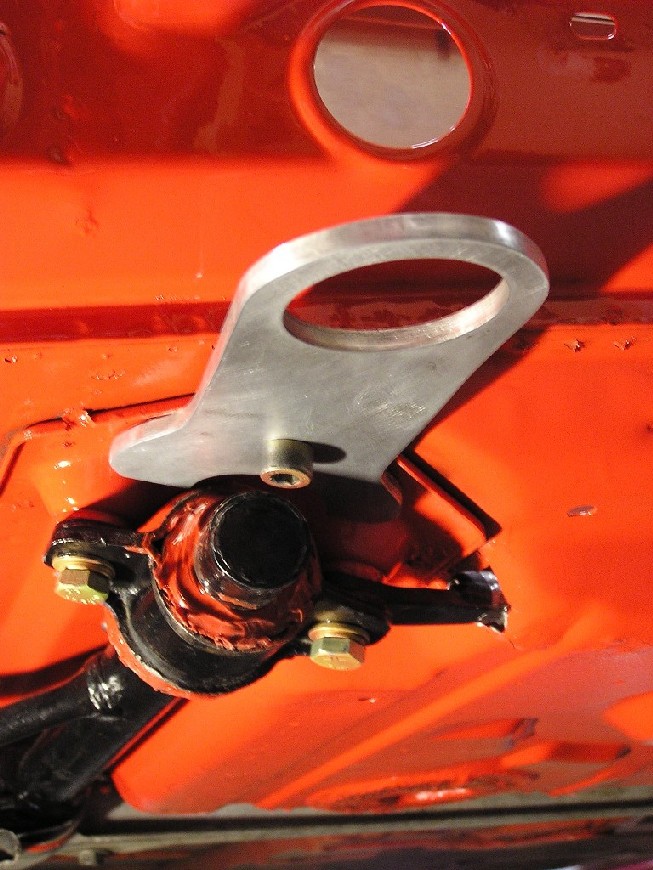
Posted by: brant Nov 15 2004, 07:24 PM
This is just a front trunk view from the second side:
Attached thumbnail(s)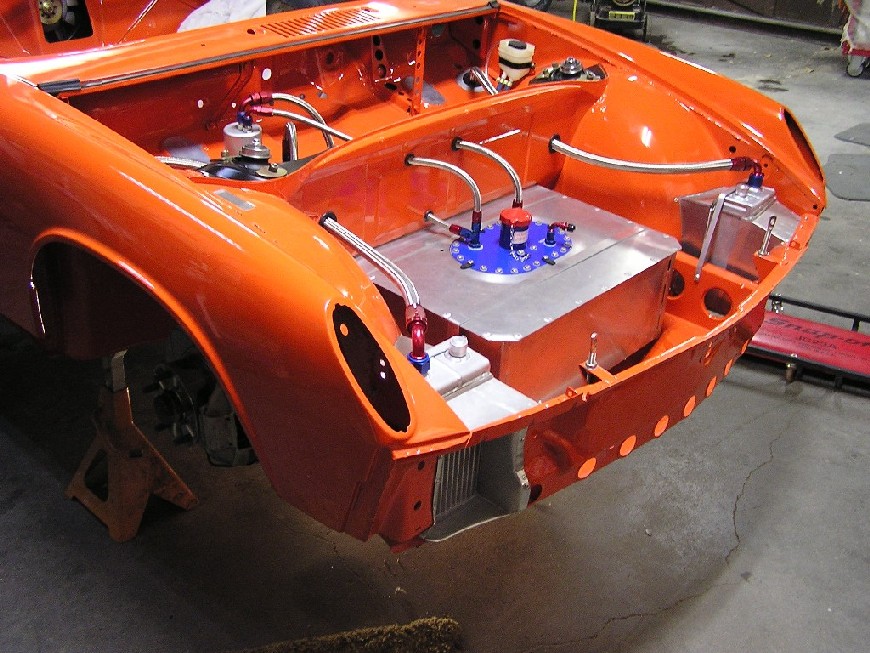
Posted by: Stutgart46 Nov 15 2004, 07:28 PM
Brant,
If you ever need someone to drive that thing let me know. I would be happy to shake it down for you.
It looks great, please keep the pics coming.
Posted by: brant Nov 15 2004, 07:28 PM
Back in the begining of this thread, I mentioned that my roll cage had extra large foot pads. Its not an Engeman kit by any means, but the foot pad is unique.
Its one piece that does a bit of reinforcing in the lower corner on the long, and also comes up and ties into the firewall.. (on the hell hole side there is a similiar bracket that ties into the back of the firewall)...
Remember, I'm not allowed to weld in bracing really... So this is technically a foot pad for my roll cage:
Attached thumbnail(s)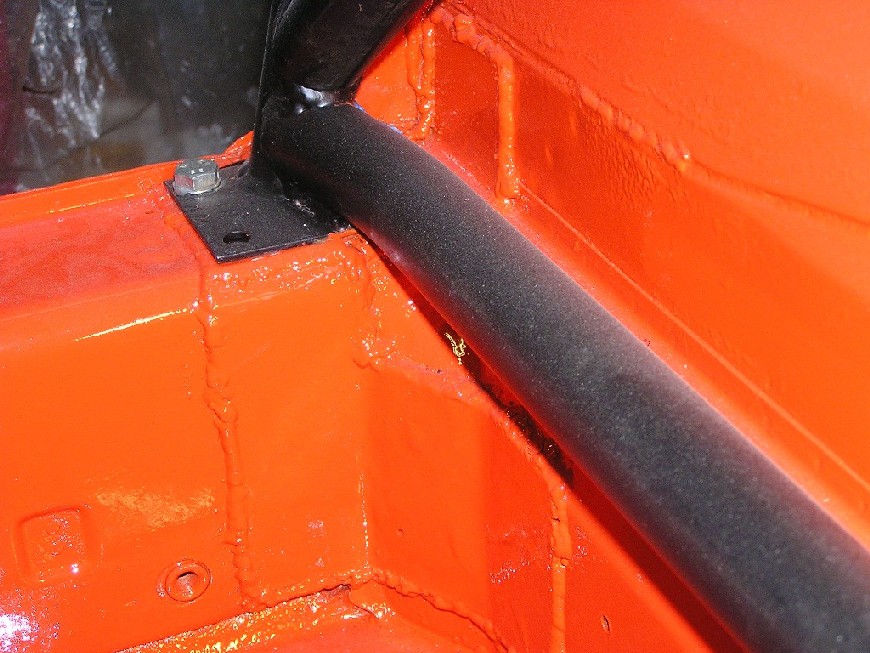
Posted by: brant Nov 15 2004, 07:29 PM
If you ever need someone to drive that thing let me know. I would be happy to shake it down for you.
It looks great, please keep the pics coming.
I thought that I might be going over the top with the pics... (If it gets annoying you can always tell me to shut up!)
brant
Posted by: brant Nov 15 2004, 07:30 PM
Another cage shot...
This rear lower cross bar was added... and has a tiny bead onto the rear firewall.
This is also where we put the bias valve:
Attached thumbnail(s)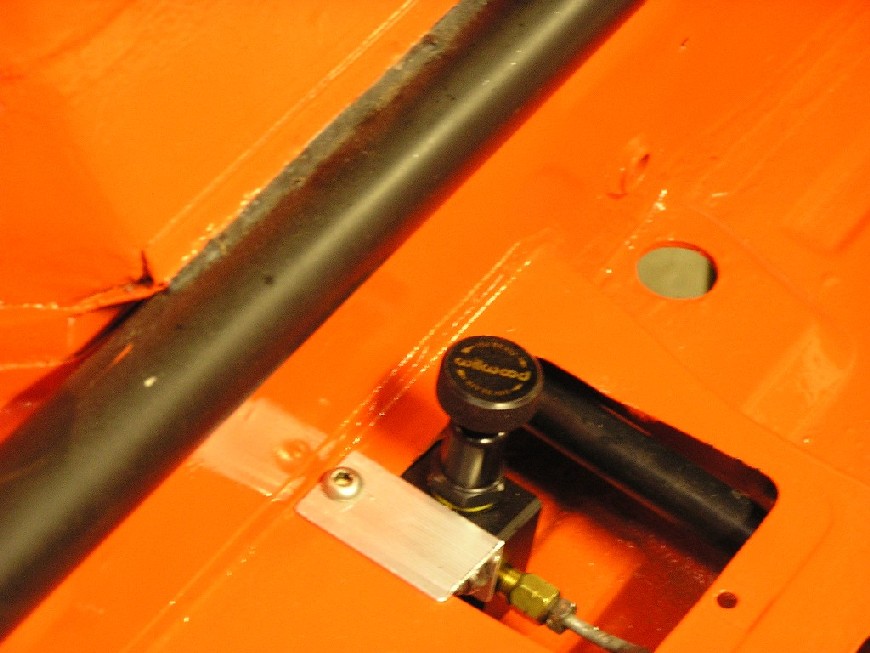
Posted by: brant Nov 15 2004, 07:35 PM
As previously mentioned... Here is the shifter we ended up using:
Attached thumbnail(s)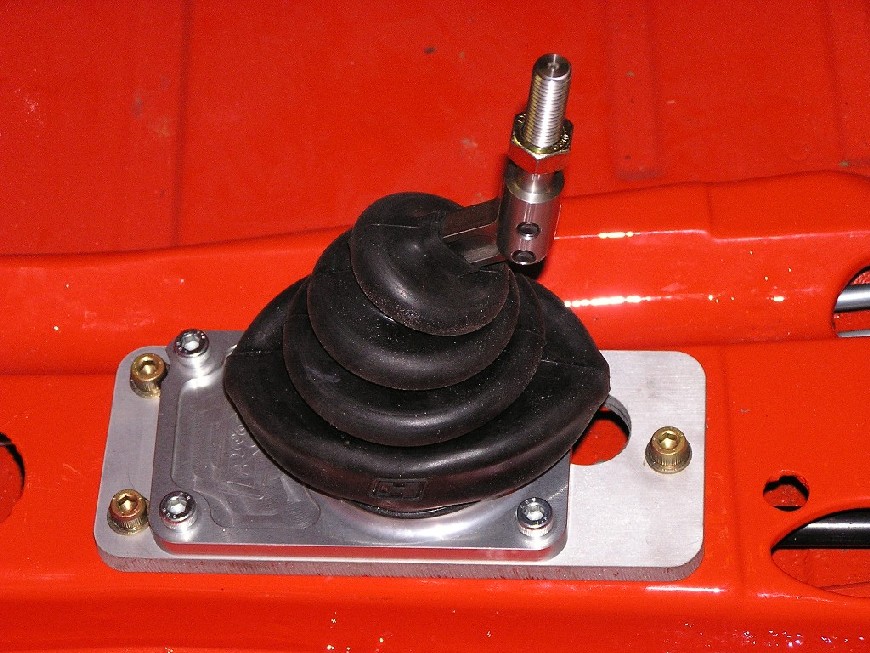
Posted by: brant Nov 15 2004, 07:36 PM
innerds:
Attached thumbnail(s)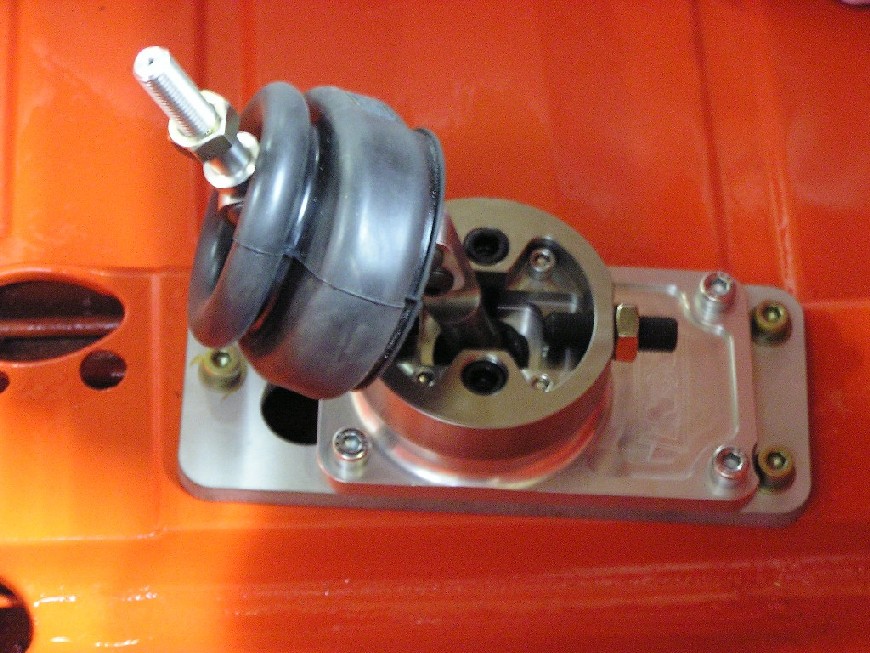
Posted by: xsboost90 Nov 15 2004, 07:44 PM
how does that hole in the firewall work, i understand fresh air, but is that safe or is it just cuz itsa racecar.
Posted by: McMark Nov 15 2004, 07:56 PM
I believe it's for accessing the front of the engine for service work.
Posted by: Gint Nov 15 2004, 09:14 PM
I finally got a chance to go all the way through your thread Brant. The car is looking great. That paint job turned out awesome.
Tell Bob he's doing a great job!
Posted by: Jeroen Nov 15 2004, 09:23 PM
Brant... please stop posting pics
I can't take any more 
Posted by: nein14-6 Nov 16 2004, 06:24 AM
As previously mentioned... Here is the shifter we ended up using:
That looks like a Mustang shifter. Do you have more pictures of that?
Posted by: 914MF Nov 16 2004, 09:08 AM
Posted by: brant Nov 16 2004, 09:18 AM
As previously mentioned... Here is the shifter we ended up using:
That looks like a Mustang shifter. Do you have more pictures of that?
I think its based off of a heavily modified mustang shifter.
I don't have any more pics right now... won't be back in lamar until christmas unfortunately.
brant
Posted by: brant Nov 16 2004, 09:22 AM
I can't take any more
Jeroen,
this one is for you.
I mentioned this previously, but I used a plasma cutter to open the frame cavity and do some welding inside to brace the rear towers..... Then closed it back up.
You can see my welding seam.. Its kinda a big triangle (about 6inches long):
Attached thumbnail(s)
Posted by: majkos Nov 16 2004, 10:46 AM
 Unbelievable!
Keep up the awsome work!
Just amazing!
In case you haven't notice, I've been paying attention to everything you say or done,theses pictures are priceless!
I'm soooooooo glad you gotten a camera!
Now if I can just figure out mine. 
Brant,you ROCK!
Posted by: Jeroen Nov 16 2004, 10:56 AM
Nice.... Verrrrrrrry nice!
Posted by: Gint Nov 16 2004, 05:20 PM
I hate to horn in here, and I'll delete this post later if necessary.
Brant, Jeroen, Brad or anyone else that has BTDT...
Can you guys all go look at http://www.914world.com/bbs2/index.php?act=ST&f=2&t=15765? We are doing the last bit of metal work on my tub and considering doing something where the long meets the shock tower.
Thanks!
Posted by: brant Nov 16 2004, 06:04 PM
Kevin,
you underestimate your self...
people don't know this, but Kevin along with Ginter and a bunch of other people have been SOOOO helpful to me.
Kevin and others have done favors, wrenched, and been an enormous support to both me and my father...
thanks again to this club, the admins, brad, and the local guys.
brant
Posted by: brant Nov 16 2004, 06:06 PM
couple more shots. I just wanted to document this for myself really... I painted it to look more pseudo-6.
It also has my cannabilized strut tops from my old -4 racecar:
(ohhhh.. the -4 vin doesn't do much for making it look like a -6, does it)
Attached thumbnail(s)
Posted by: ematulac Nov 16 2004, 06:11 PM
Awesome work, Brant! keep the updates and the pics coming!
Posted by: brant Nov 16 2004, 06:13 PM
I'm proud of this one. Here is the throttle linkage mount we made. I stole the idea from Mike Ferguson's conversion. We made it from alloy though....
The bell crank itself is not in this shot unfortunately, but you can see the mount.
Also in this shot is a bit of the speedo drive.
Again for a tiny bit of weight; we took the stock drive apart and removed the gear.
AJ then tig'd the alloy housing to seal it up.
We then reinstalled the alloy housing with the o-ring, and put a plastic cap over the hole for dirt:
Attached thumbnail(s)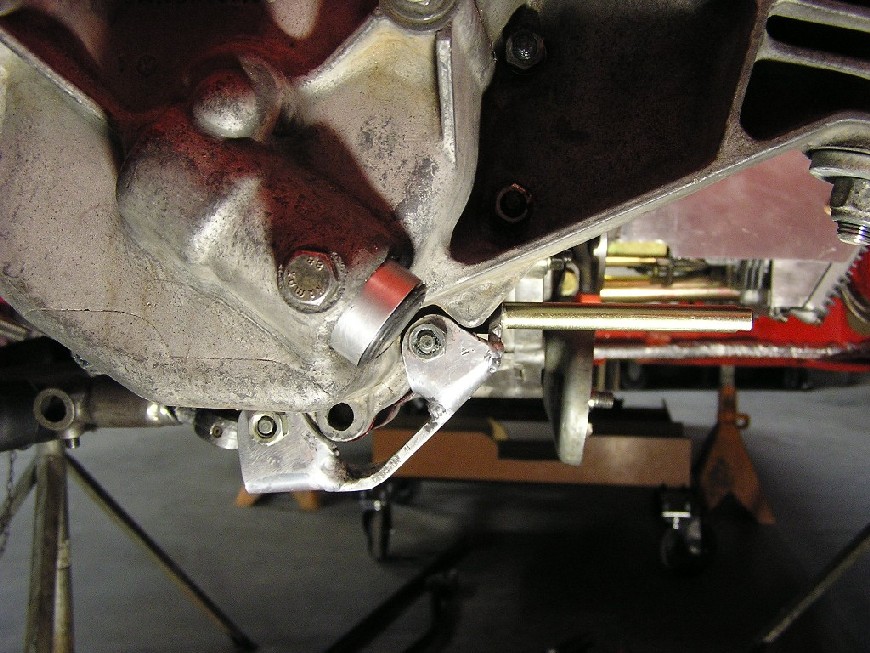
Posted by: brant Nov 16 2004, 06:16 PM
Ok, this one is for scott schroeder... (Scott thanks for the extra engine lid screen, here it is)
I have built a GT style lid previously on my -4 racecar.
So from that experiment, plus incorporating a few items from tech articles, here is the lid for this car:
Attached thumbnail(s)
Posted by: brant Nov 16 2004, 06:17 PM
here is a closer one (not full view) of the underside:
Attached thumbnail(s)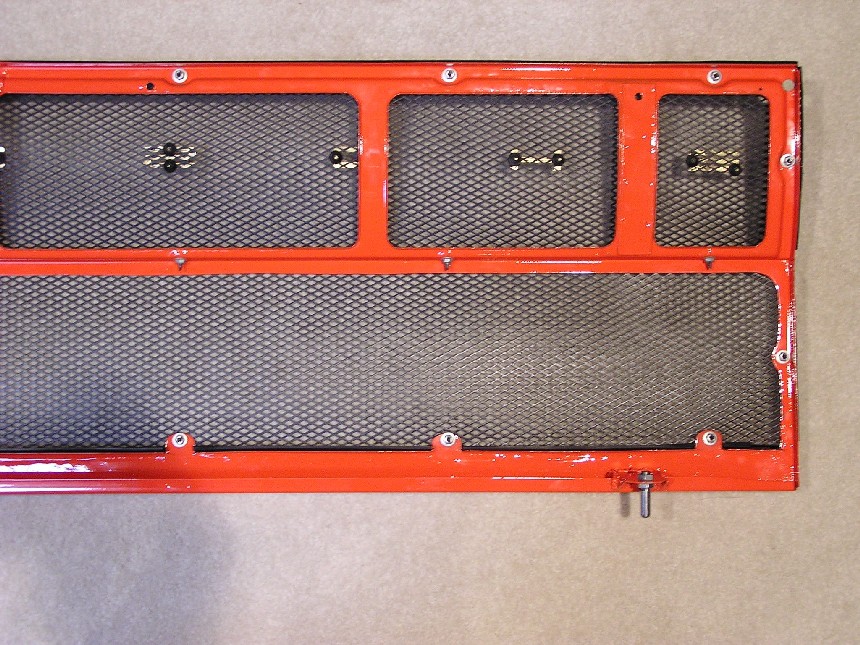
Posted by: brant Nov 16 2004, 06:18 PM
earlier in the thread I mentioned that the mounts for this lid poke into the cavity of the firewall. Here is a better view of how the forward edge of my lid mounts:
Attached thumbnail(s)
Posted by: brant Nov 16 2004, 06:19 PM
don't make fun of my welds now....
but here is the back side of the same mount:
Attached thumbnail(s)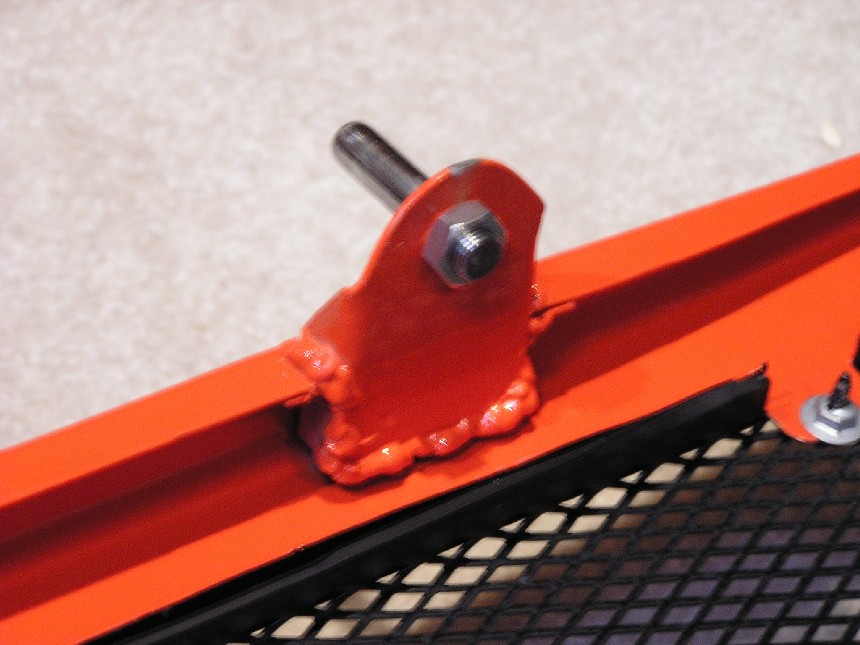
Posted by: brant Nov 16 2004, 06:37 PM
I haven't assembled all the bits of my rear suspension yet, but here is a trailer.
Ohh... another thanks to John Lush is in order. (John, here is the reason I had to borrow those rear cups. There in the mail back to you as we speak)
I'm using a toe adjustment rod on the outboard of the rear suspension. Purpose is to lock in the toe adjustment, and rule out any changes happening in the corners.
Here is the rear suspension cup:
Attached thumbnail(s)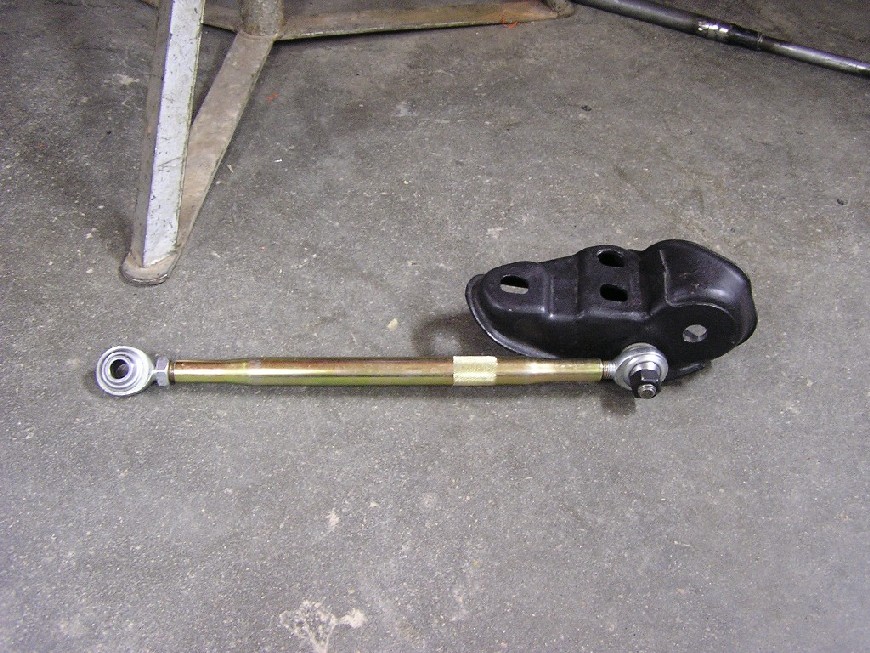
Posted by: brant Nov 16 2004, 06:37 PM
Another of the back side of the cup:
Attached thumbnail(s)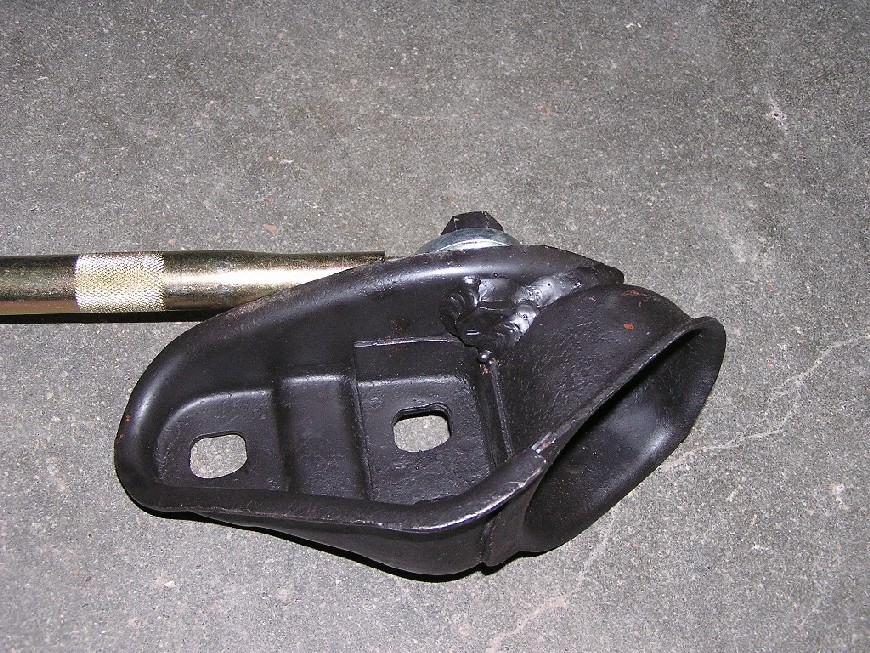
Posted by: brant Nov 16 2004, 06:39 PM
Previously in this thread I mentioned the weird/mounts in my longs. Here is a better picture. The toe braces run forward and mount to the long.
The mounting point consists of a threaded tube that actually runs all the way through the long. It also ties in the inboard and out board sides of the long.
(In some of the engine bay pictures you can see a tiny bit of the inboard view)
Here is the outboard view:
Attached thumbnail(s)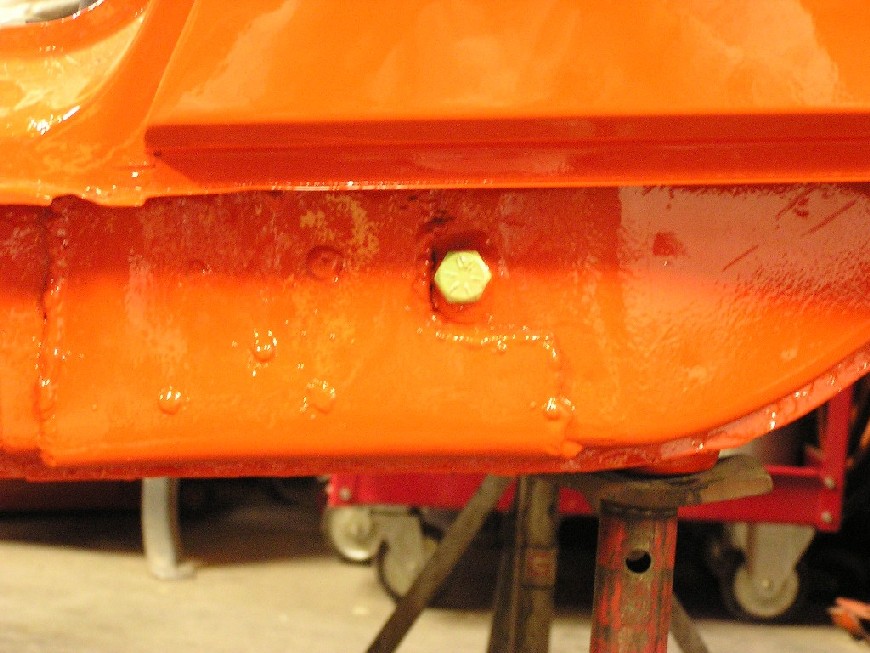
Posted by: Aaron Cox Nov 16 2004, 06:48 PM
no washer on the long mount for toe?
Posted by: brant Nov 16 2004, 06:51 PM
Don't have it actually bolted together yet..
don't think a washer will be necessary, but will see when I get the rear suspension bolted on.
brant
Posted by: brant Nov 17 2004, 01:10 PM
JP... I'll be able to add more later or tomorrow, but here is an overall view of the rear suspension console brace.
earlier in this thread I showed the attatchment points for this brace bar. And here is one with the bar installed.
On my -4 race car, I ripped out 2 rear suspension consoles. Neither of them were rusty AT ALL.
It was during the install of the 3rd console around 1994 that AJ educated me to the need for a brace. I ran his early version of brace for somewhere around 10 years on my -4 race car with no problems.
Here is the current version:
Attached thumbnail(s)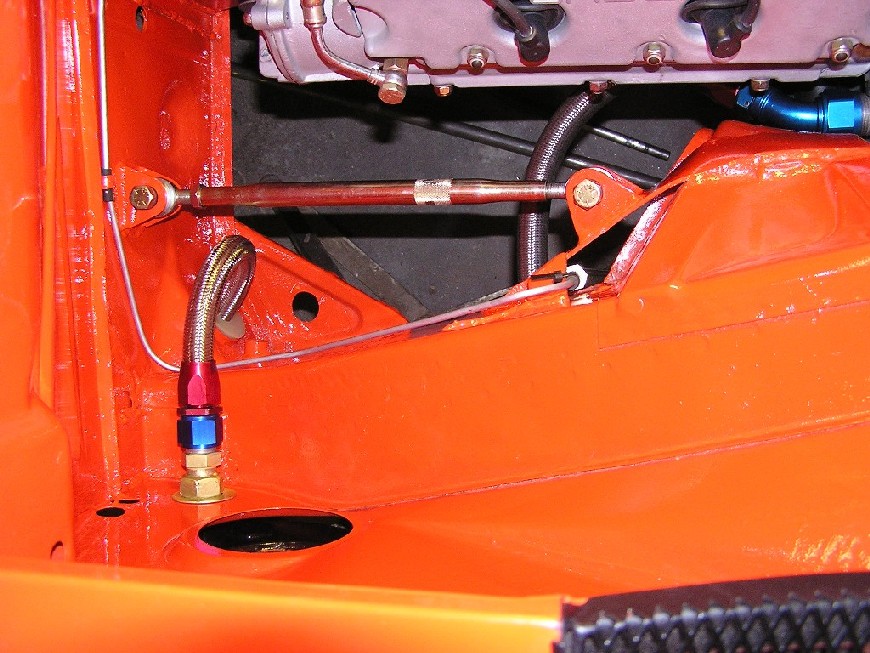
Posted by: brant Nov 17 2004, 01:48 PM
JP,
I know that these were fuzzy and hard to make out earlier in the thread. Here are a couple of close ups you asked for.
To be perfectly honest, if I was doing this car over this is about the only area I would clean up/do differently.
The problem is that this mounting point was welded in before we had finished removing the -4 mounts... If I had it to do over it would be cleaner. Still I think its strong enough and should work fine.
Here is one shot:
Attached thumbnail(s)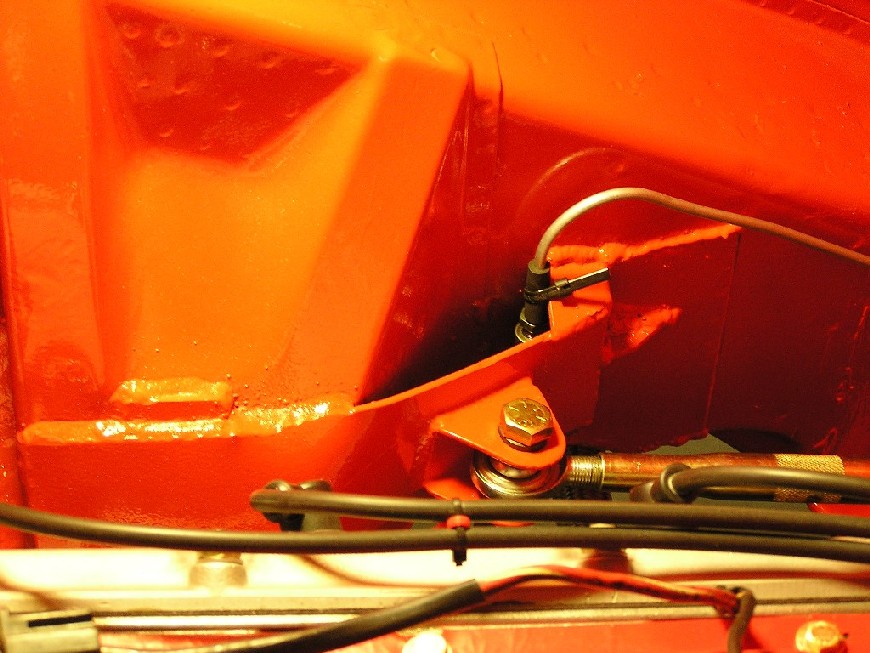
Posted by: brant Nov 17 2004, 01:49 PM
Here is a 2nd shot, slightly closer angle:
Attached thumbnail(s)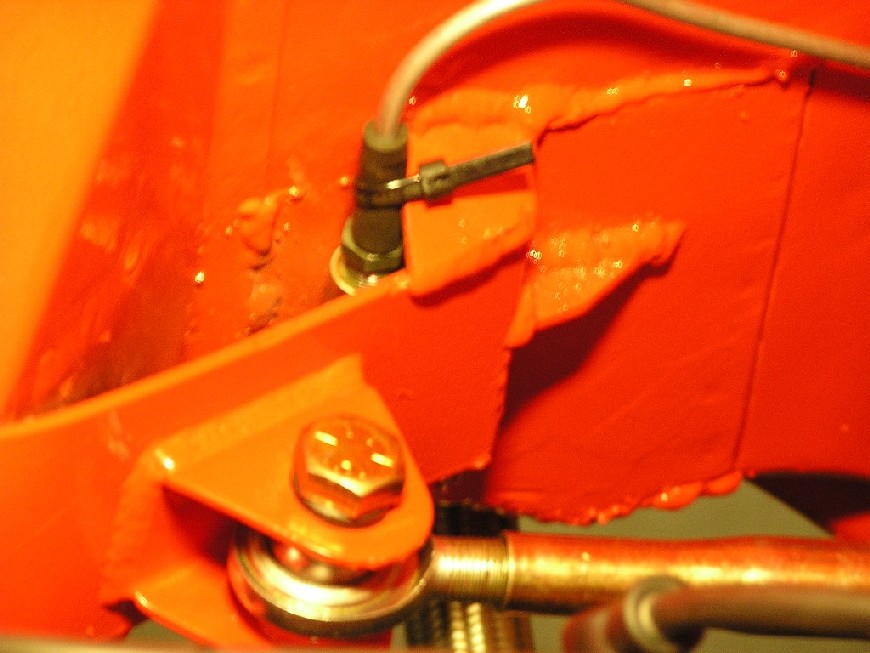
Posted by: brant Nov 17 2004, 01:53 PM
Where this brace attatches to the mounting nut of the swing arm... AJ welds an updown strip of metal into the cavity in the center of the mounting nut. Then overlaps it with this brace. I drew a picture because its kinda hard to explain. The new metal are the 2 pieces in red:
Attached thumbnail(s)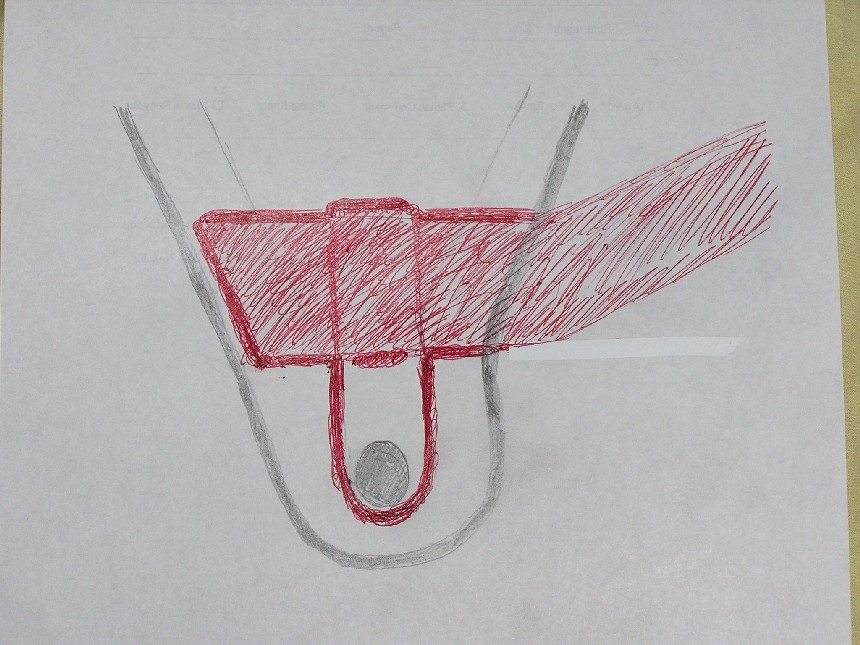
Posted by: brant Nov 17 2004, 01:55 PM
Here is a photo of it.
(This is from the opposite side of the car so its confusing in that it looks backwards):
Attached thumbnail(s)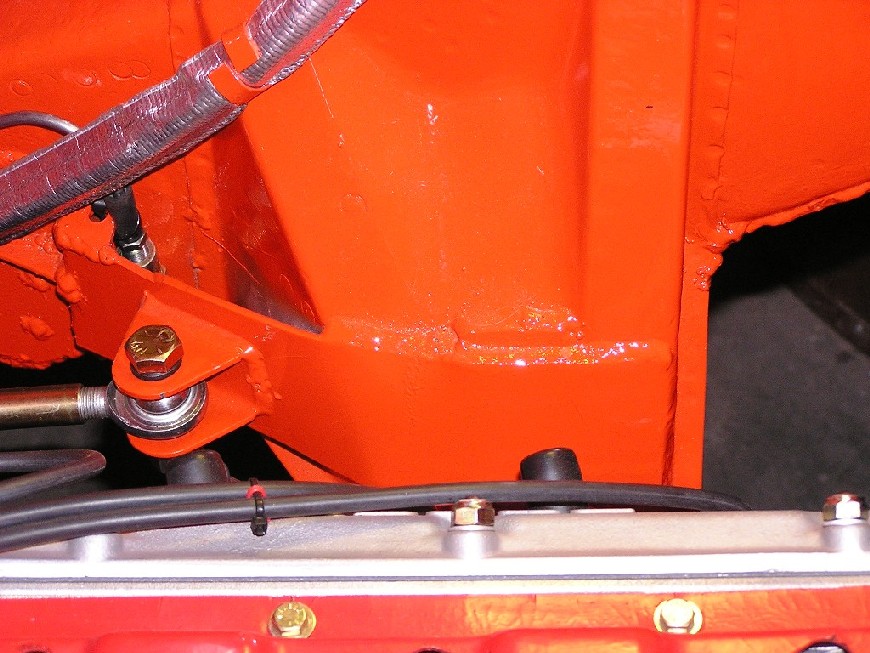
Posted by: J P Stein Nov 17 2004, 02:50 PM
Thanks, Brant.
I'm hoping to get one more season out of my ears .....and my motor. 
I like what you've done, but a question (or 2).
Why the tie rod type brace? Wouldn't a welded in tube have done the same the same job?
Is there a big freakin gusset/doubler at the firewall end under the mounting clevis?
Mine are holding up. (crossed fingers smiley here)
I seamed welded them on the outer perimeter (amongst other spots) then ground the welds smooth ...leaving the crown of the welds. I like your reinforcing piece around the hole.
The hole and the spot welds would seem the be the spots where cracks start.
Posted by: brant Nov 17 2004, 03:40 PM
I'm hoping to get one more season out of my ears
.....and my motor. I like what you've done, but a question (or 2).
Why the tie rod type brace? Wouldn't a welded in tube have done the same the same job?
Is there a big freakin gusset/doubler at the firewall end under the mounting clevis?
Mine are holding up. (crossed fingers smiley here)
I seamed welded them on the outer perimeter (amongst other spots) then ground the welds smooth ...leaving the crown of the welds. I like your reinforcing piece around the hole.
The hole and the spot welds would seem the be the spots where cracks start.
Tie rod braces instead of weld in:
2 reasons for me.
1) I'm not allowed to do weld in
2) it gets crowded in there and its nice to have them removeable (especially on a 4 cylinder as, my 4cylinder had them much more angled and the motor would have hit them during motor drops without unbolting them first)
Mounting Clevis at firewall end:
nope.
On the 4 cylinder the brace was angled to the natural and strong indent... but hopefully strenght won't be an issue on this one because it is not doubled...
brant
Posted by: brant Dec 6 2004, 09:28 PM
couple more shots.
here is a better view(s) of what we made up for a throttle bellcrank. Had to change the angles to work on this rear-ward location:
Attached thumbnail(s)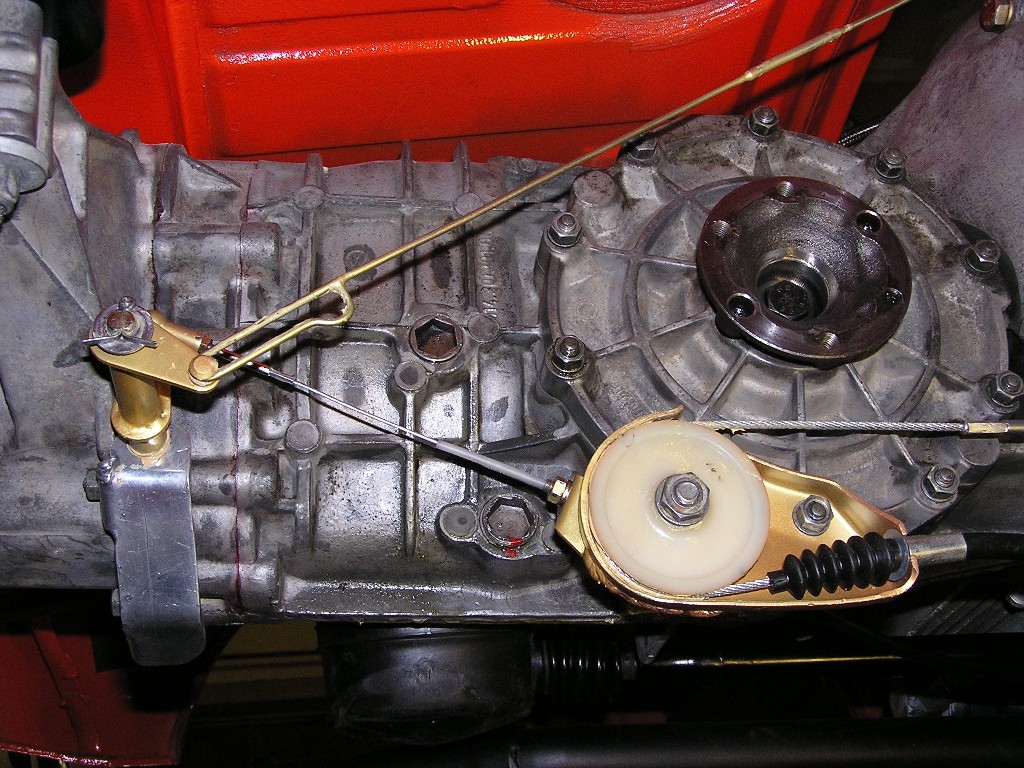
Posted by: brant Dec 6 2004, 09:32 PM
throttle cable from the back of its mount.
Its a stock -4 cable (easier to find in a time of need)
we took an extra snap-on ball from the front of a stock cable and solder-filled it in. Then re-drilled and tapped it to screw onto the back of a stock cable.
as I mentioned previously, the bell-crank mounting bracket is aluminum. The throttle cable bracket is (obviously) welded onto roller console:
Attached thumbnail(s)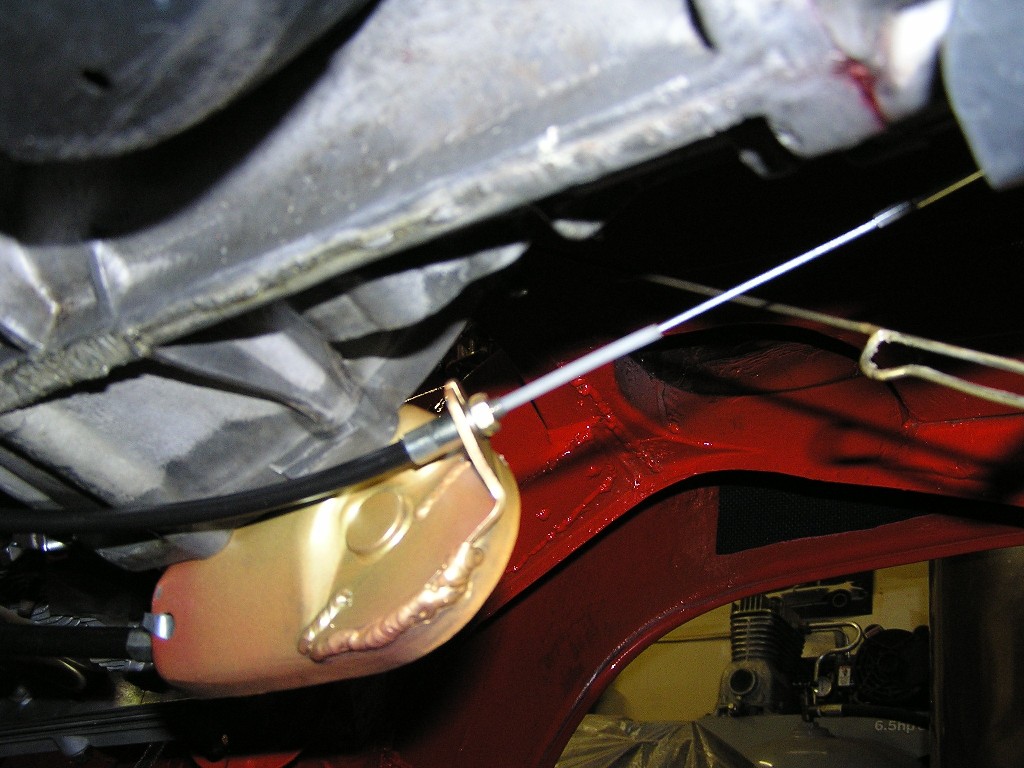
Posted by: Mueller Dec 6 2004, 09:32 PM
Brant..you suck...that car is too damn nice and clean !!!!!
totally awesome job there buddy, me like it alot
do you add any "preload" to that tie rod brace?? if so, + or - ??
Posted by: brant Dec 6 2004, 09:34 PM
last one of the bellcrank. Here you can see the aluminum bracket better. This way I should be able to unbolt my whole throttle set up and move it to a 2nd tranny without having to tap every tranny case for a -6 bellcrank
oh.. you can also see a part of the tin work my dad fabricated... That shiny piece is the one. When we removed the stock 911 tin work it was open here... so dad sealed it off since we are not running any 914-6 tin:
Attached thumbnail(s)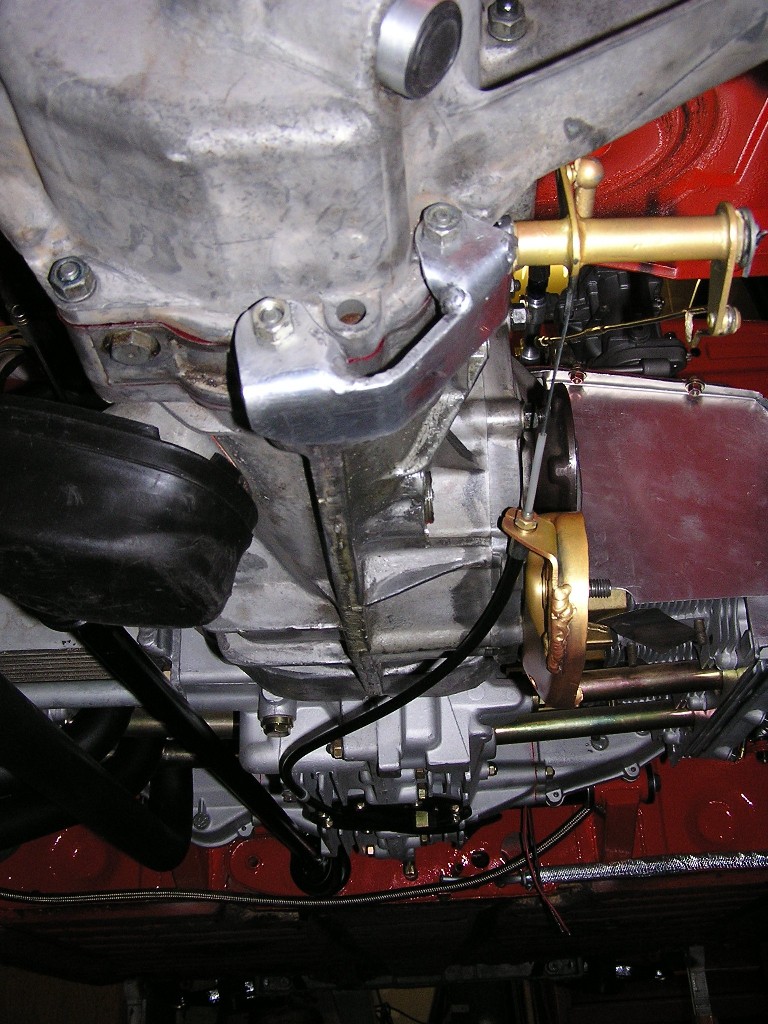
Posted by: brant Dec 6 2004, 09:38 PM
totally awesome job there buddy, me like it alot
do you add any "preload" to that tie rod brace?? if so, + or - ??
thank you sir..
no.. not much preload.
just put them in and then "push" or lengthen them until they are good and snug... then lock them down.
brant
Posted by: brant Dec 6 2004, 09:57 PM
cable routing for the new set up.
Also got the shift rod installed. Its got the delerin bushing in the firewall, brass bushings in the knuckle. Knuckle is turned 90degrees, brass bushing where the bar passes through the console, and an extension on the cup where it slides onto the shaft/ball. We made the bar as straight as possible, with only the slightest curve on the back 4-6 inches:
Attached thumbnail(s)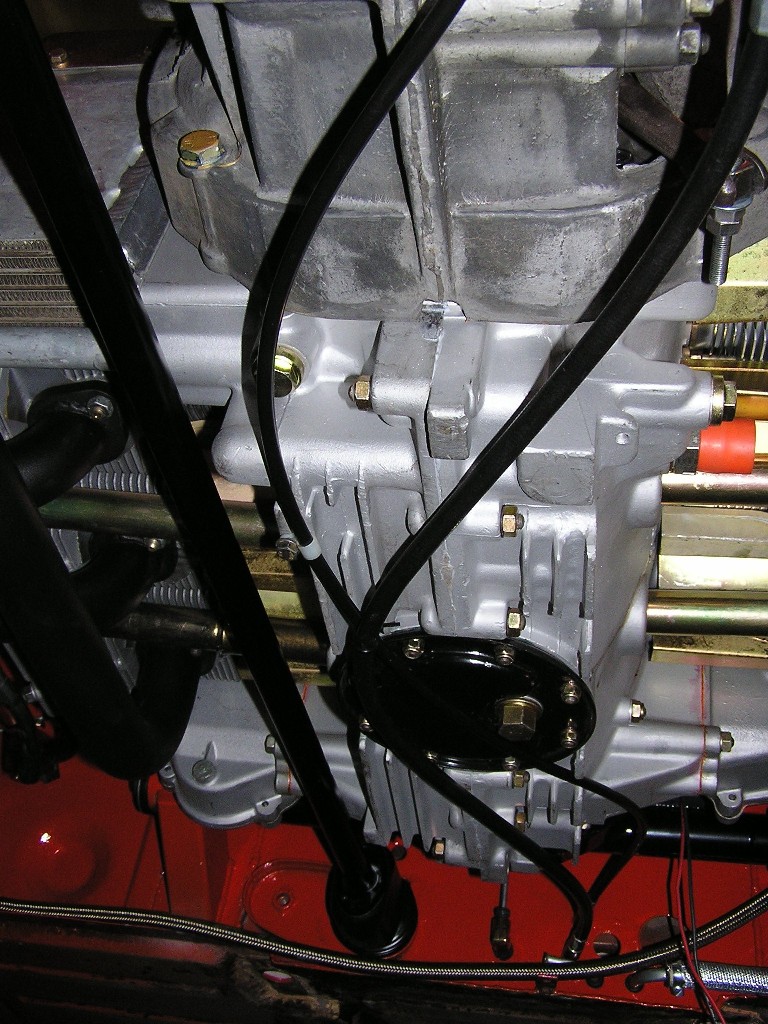
Posted by: brant Dec 7 2004, 09:51 AM
Top of the throttle linkage.
plus we got most of the heat cover, and fuel lines installed:
Attached thumbnail(s)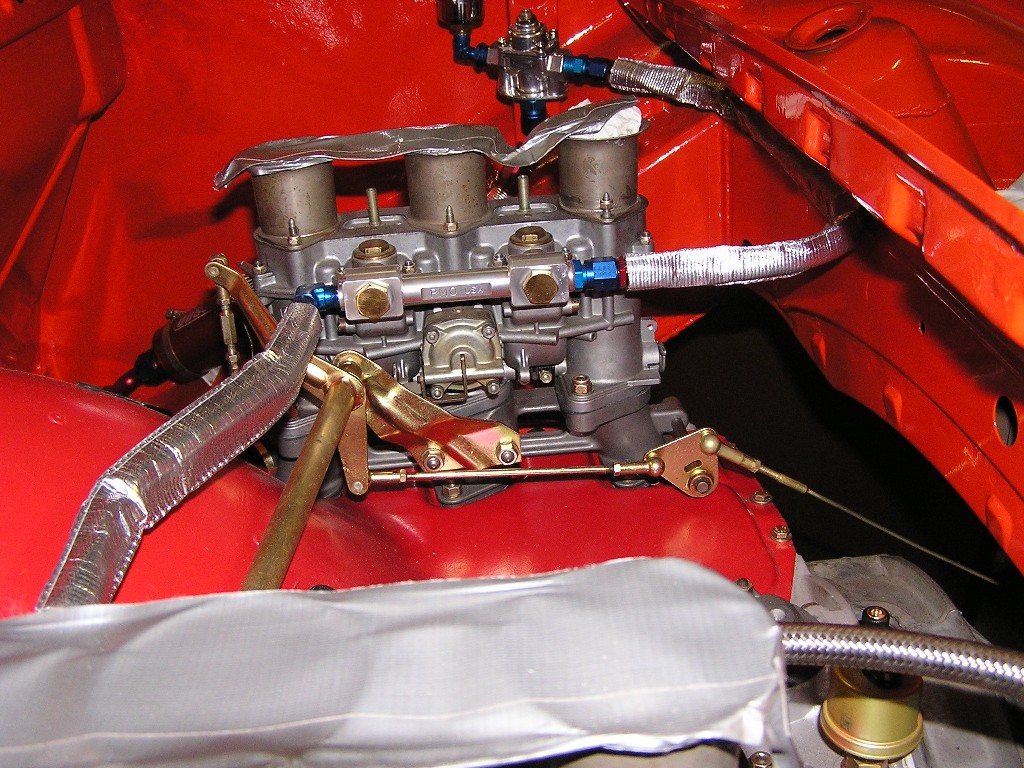
Posted by: brant Dec 7 2004, 11:31 AM
Last one for now.
We are doing some of the preliminary interior lay out.
We are building a new dash which will be aluminum (except for the guage pod) when we get done. Here are some of the templates in all there glorious colors:
Attached thumbnail(s)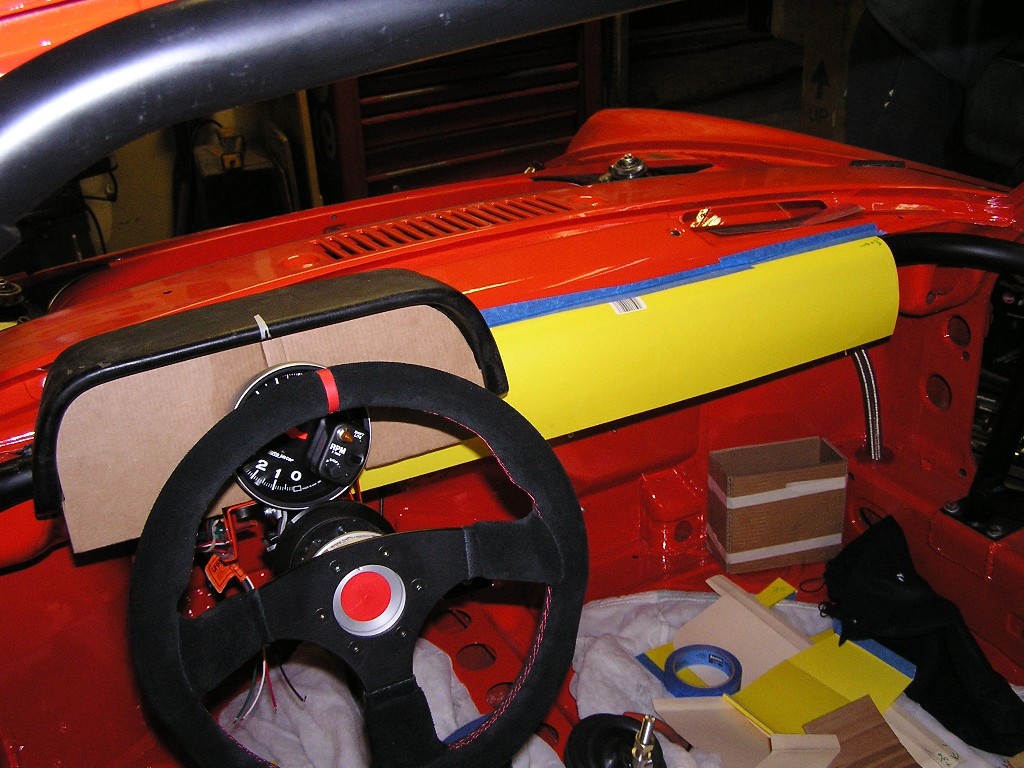
Posted by: Jeroen Dec 7 2004, 12:36 PM
is that a TC Racing quickrelease and s-wheel?
Posted by: brant Dec 7 2004, 12:38 PM
Yep...
you have one don't you?
was it on your 911?
did you like it in real world use?
I doubt the suede will wear that well, but seems like a very good release system.
brant
Posted by: Jeroen Dec 7 2004, 01:04 PM
yep I've got the same QR, it's nice
I've got a deep dish wheel (similar to the TC deepdish one)
Only drawback on the QR is that you need to have a hub that fits (which I already had )
Haven't used/tried it in the 911 though...
Posted by: seanery Dec 7 2004, 01:18 PM
I have one, too. Only used while the car was sitting in the shop though 
Posted by: brant Dec 7 2004, 01:30 PM
Sean,
In bluecar?
brant
Posted by: Root_Werks Dec 7 2004, 01:46 PM
Brant, your work is amazing! I will say your bell crank kicks butt, but looks complicated. A lot of pieces to modify, but man, looks great! 
Posted by: brant Dec 7 2004, 02:07 PM
thanks dan..
yes probably over complicated, and I sure wouldn't want to make them for sale (I'd loose money)
but thanks
brant
Posted by: J P Stein Dec 7 2004, 02:22 PM
Brant:
The food police are all het up about a double meat, double
cheese, double bacon, gut bomb.....this is national news?
Anyhow, the fire wall police are gonna object to your avatar.
Don't you realize that some 10 year old may copy your firewall & get all burnt up?
Posted by: brant Dec 7 2004, 04:13 PM
JP,
do you think it would help my liability standing if I had a warning sticker?
maybe I should have a crawl at the bottom of my posts with a skull and cross bones "do not imitate the idiot in these posts....yada yada ya..."
I'm actually sruprised the captain hasn't said anything about that hole yet...
Soon... we will make an aluminum cover for it. I know I'll certainly sleep better at night once that happens...
ha.
brant
Posted by: seanery Dec 7 2004, 04:33 PM
I thought the hole was part of a new fangled fingernail clipper 
Brant, yup Bluecar has one. I think I bought the first one in the US. They sold it on eBay before they had any distribution set up, and never sold anything else there. I like it, others have warned that you can't get out if you only have one hand, so I hope I never break an arm or a hand or anything in an accident.
Posted by: Jeroen Dec 7 2004, 04:48 PM
Have you tried any of the other QR's out there? Just as impossible to operate single handed...
(unless you've got hands like Jimi Hendrix)
Posted by: brant Dec 27 2004, 01:29 PM
Hi again...
fairly productive Christmas weekend really.
we roughed in the dash.. Took forever!
Anyways I'll post a few shots of it.
Its far from done, but at least its started...
I'm doing a stock looking guage pod, which is not ready for its debut yet... but here are pictures of the larger part of the dash where it runs across the car in the stock-ish location.
Its made from aluminum sheeting, and then rolled over the tall knee bar behind it.
In the pictures its partially covered with masking tape still (which we used to reduce installation scratches):
Attached thumbnail(s)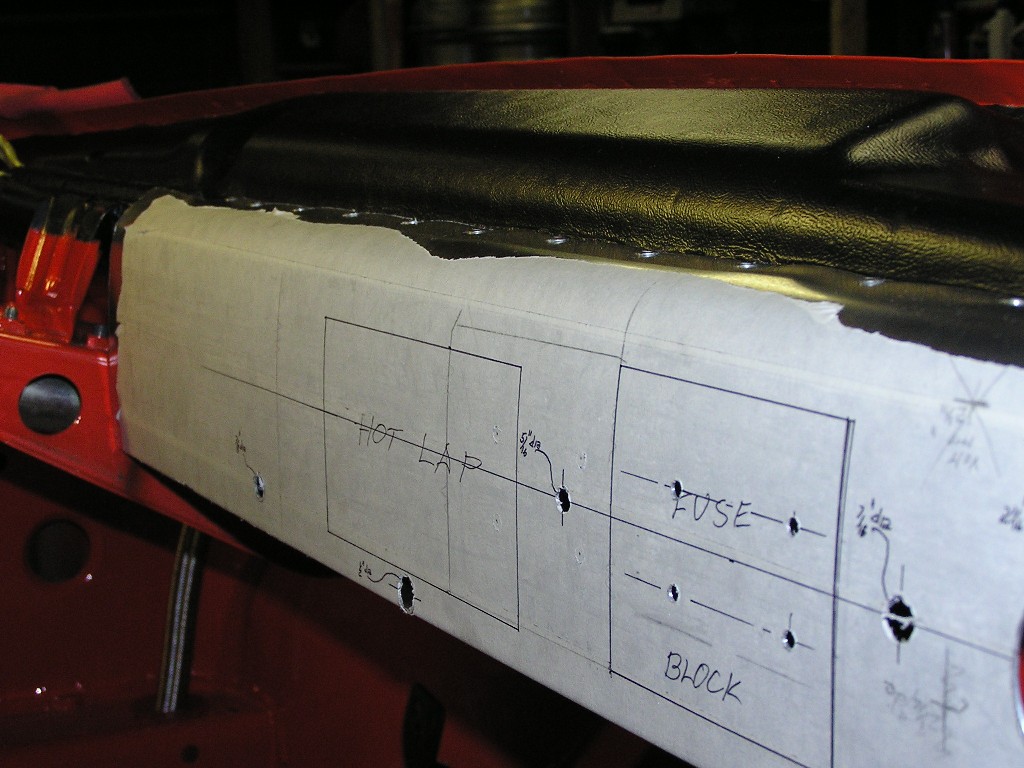
Posted by: brant Dec 27 2004, 01:32 PM
Our local vintage club has a rule which requires that the car retain a dashboard... They allow you to modify it as long as it appears to have some dash and interior left...
goes back to the "vintage look"
so anyways as you can see we removed the stock dash entirely and are making this one back up...
We upholstered the top with a black vinyl and then made the face from aluminum
here is another:
Attached thumbnail(s)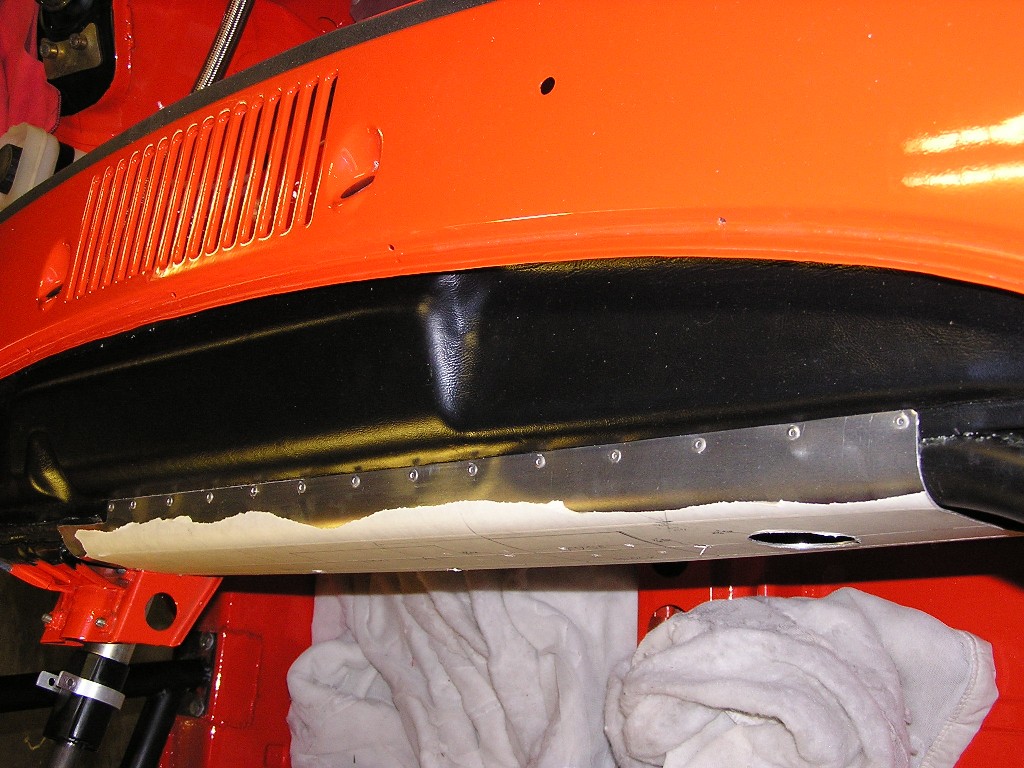
Posted by: brant Dec 27 2004, 01:35 PM
Here is a close up of the rivet line:
Installation involved riveting and then bending or rolling it down and then finally attatching the bottom:
Attached thumbnail(s)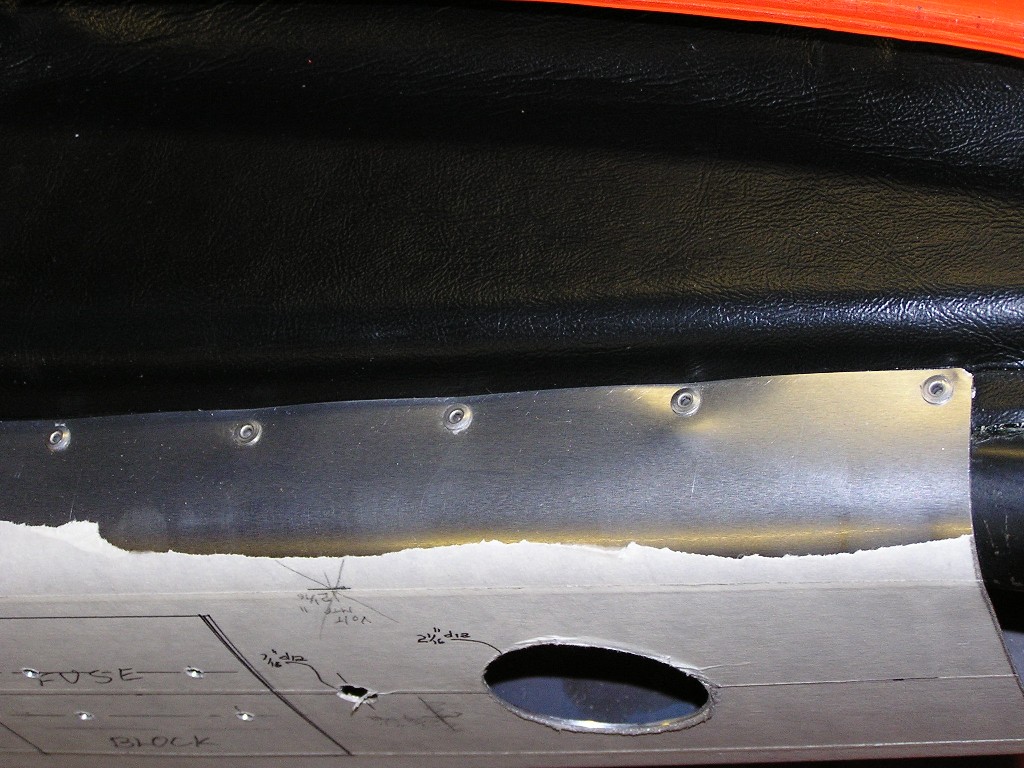
Posted by: brant Dec 27 2004, 01:41 PM
couple of last dash pics for now...
here is the underside. It was attatched to add strength and "finish" to the dash:
Attached thumbnail(s)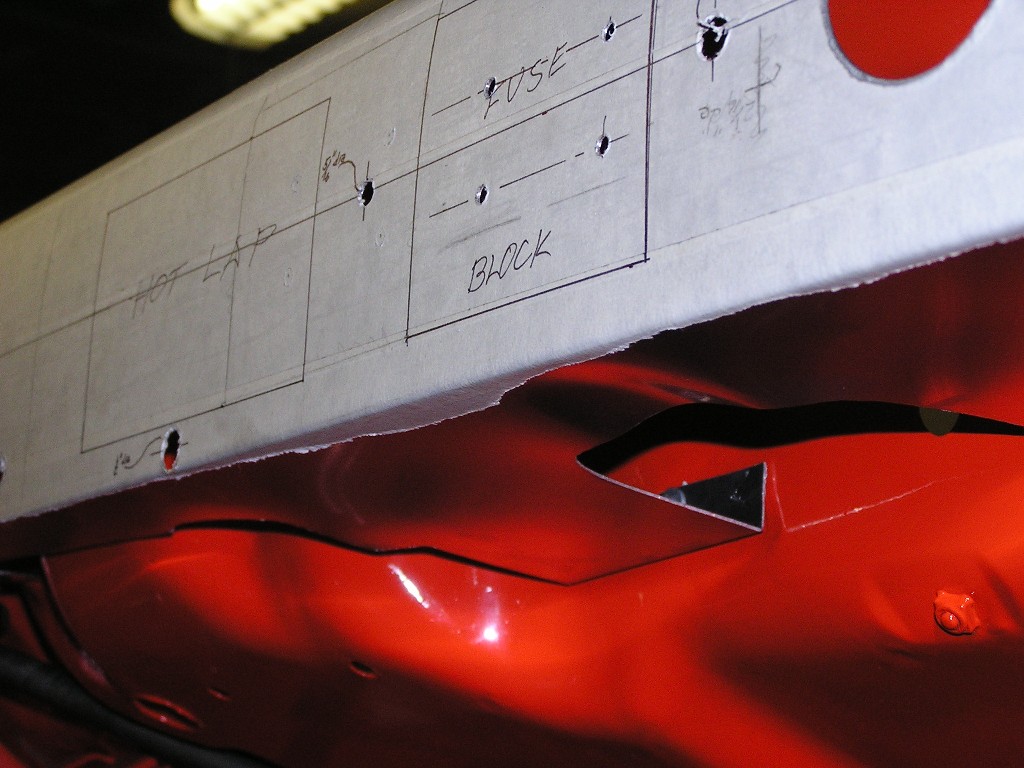
Posted by: brant Dec 27 2004, 01:43 PM
And here is inside kinda. We cut holes in the underside so that it would be possible to get your hands in there for wiring purposes....
overall, probably about 15lbs lighter than the stock frame and stock dash:
Attached thumbnail(s)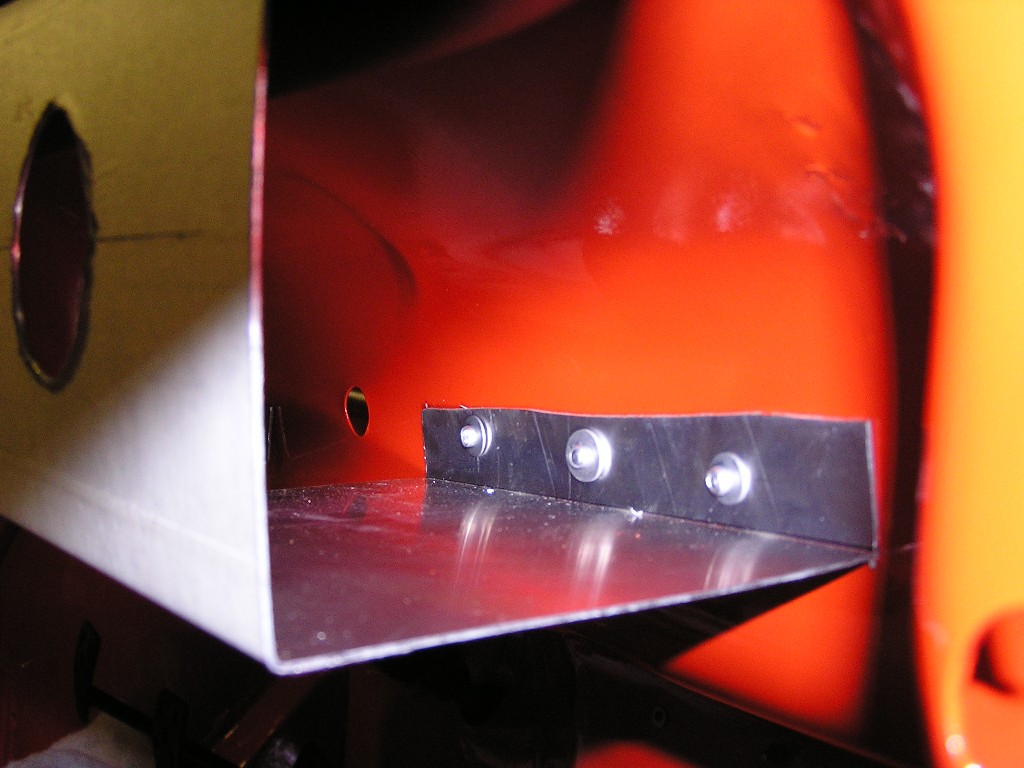
Posted by: seanery Dec 27 2004, 06:21 PM
 this looks great brant!
Posted by: brant Dec 27 2004, 06:25 PM
Here is another pic. Its a coil bracket that dad made up from aluminum. Also pictured is the aluminum bolt and nut that will pinch it tight...
I think we will probalby mount it on the firewall ... kinda over in the hell-hole area:
Attached thumbnail(s)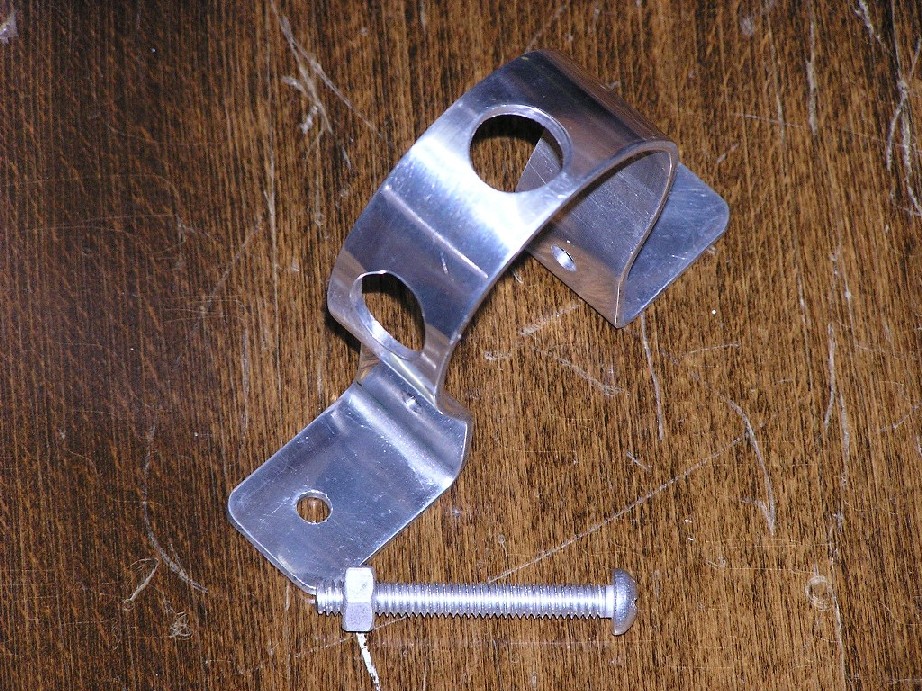
Posted by: brant Dec 27 2004, 06:58 PM
Ok we also got the rear suspension hung. I particularly like this shot as it shows the inboard and outboard braces at the same time and in the same plane of direction....
The rear busings are AJRS monoballs:
Attached thumbnail(s)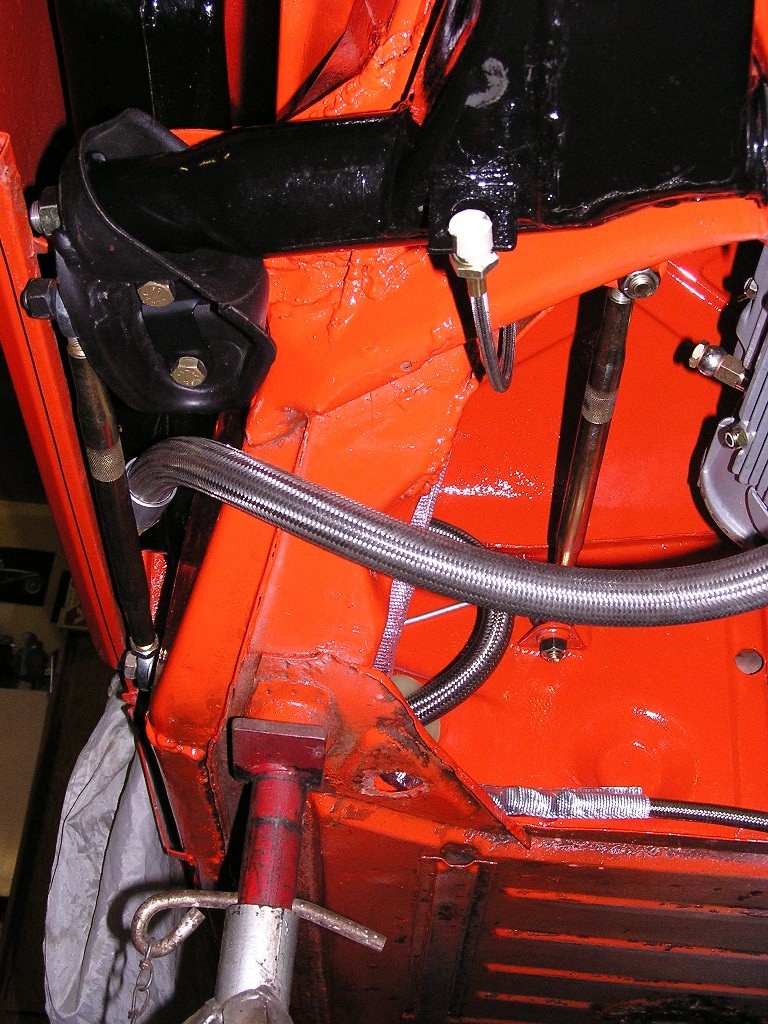
Posted by: brant Dec 27 2004, 07:03 PM
sorry for the near duplication... similar picture except the oil tank is in this one:
Attached thumbnail(s)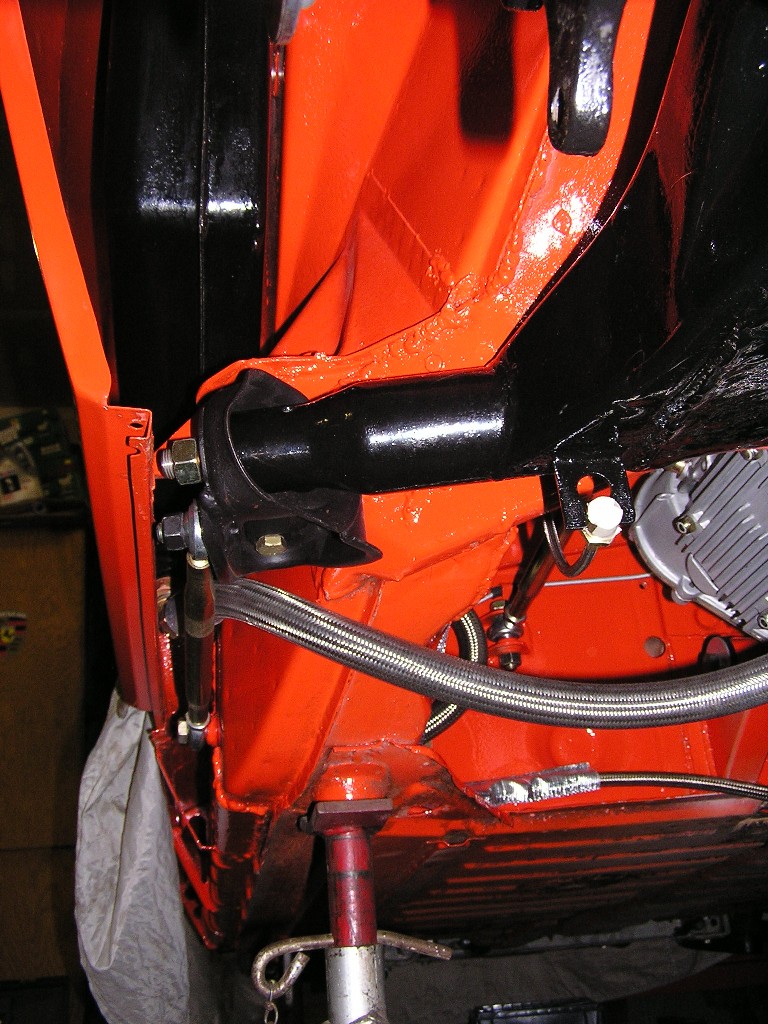
Posted by: brant Dec 27 2004, 07:04 PM
Here is a better picture regarding the toe brace. I tried to show this earlier but un-mounted. With it mounted onto the long it makes more sense.
(boy I wish that valve cover had 3 more holes with 3 more spark plugs):
Attached thumbnail(s)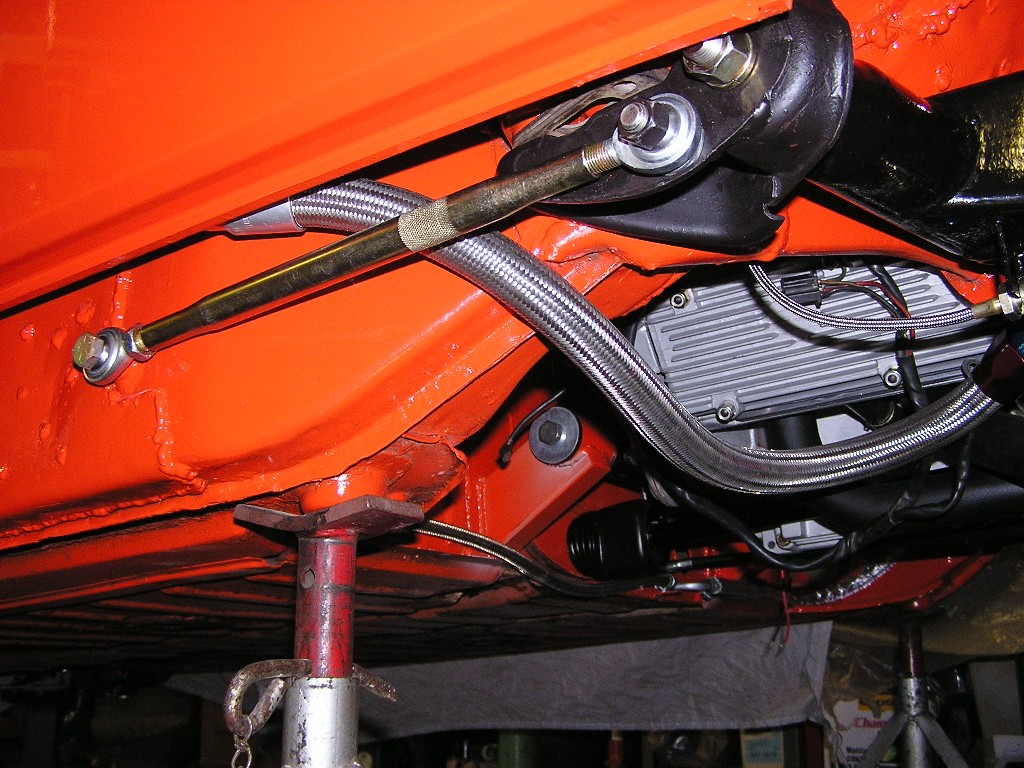
Posted by: echocanyons Dec 27 2004, 07:09 PM
Your car is amazing it looks as though everything has been thought of and accounted for.
It is sure to be a winner on the track. 
Posted by: Chris Julian Dec 27 2004, 10:57 PM
Great job Brant, and cheers to your dad. I just got thru all 8 pages and it's amazing how quickly the car is coming together. Nice job.
Chris
Posted by: cha914 Dec 27 2004, 11:29 PM
Brant,
Do you have any more info/pics of the AJRS monoball rear suspension bushings you are talking about?
Your car is an inspiration, thanks for sharing,
Tony
Posted by: Eric_Shea Dec 28 2004, 09:00 AM
Who was it that convinced him to get a digital camera?? 
It's a beauty Brant
Posted by: Gint Dec 28 2004, 09:23 AM
| QUOTE (Eric_Shea Posted on Dec 28 2004 @ 08:00 AM) |
| Who was it that convinced him to get a digital camera?? |
I'm sure it was mostly his own decision. But I'd be surprised if I wasn't a tiny bit to blame.
Looking great Brant! Can't wait to see it.
Posted by: brant Dec 28 2004, 11:21 AM
Kelley, Chris, Tony, Eric... and Mike
Thanks again for the feed back and input.
yeah... I got a bit jealous of everones cool pictures and then Ginter got a cool 2nd camera too.
Regarding the mono-balls. I actually haven't seen the inside of them so its hard for me to tell you much about them. I know they are a solid replacement for the bushing with a metal to metal contact... Its a full insert that is placed into the swing arm tube and then welded... It uses a full different shaft, and we even had to enlargen the holes for the shaft to mount to the console.
but since I've not seen one uninstalled, and I've also not seen a mueller roller bearing uninstalled its hard for me to draw comparisons.
I know AJ has been selling and installing these on 914's for a long time. But I'm not sure if he produces or buys a mono-ball kit from a producer.
Regarding AJRS. The AJ, that I refer to is not the Allan Johnson that advertises and has the big race shop and all.... Its a little independant 914 shop that doesn't even put their phone # into the local phone book. He is in Grand Junction, Colorado and this Allen Johnsen is truly a Guru...
He has been building and modifying 914's for years. He comes up with some of the most inventive ideas and he is also a heck of a driver... His -4cyclinder GT5 PCA car out runs most of the GT4 and even GT3 cars at any event he attends...
I don't like that it sounds as if I'm bragging, but this guy is truly an unknown genius of the 914 world.
brant
Posted by: trekkor Dec 28 2004, 11:31 AM
Congrats, Brant on sticking with your project. 
You serve as a motivator for the rest of us.
You're good...
KT
Posted by: brant Dec 28 2004, 11:38 AM
Thanks KT...
Ok, here are some shots of the rear shocks and suspension. I'm pretty happy with these. The shocks are a carrerra brand race shock. Since I'm planning on running the car very low, we made them up with a reduced travel range.. Supposedly they are valved for our weight and rough colorado tracks
They are an inverted shock, which theoretically may move a tiny bit of the weight off of the suspension:
Attached thumbnail(s)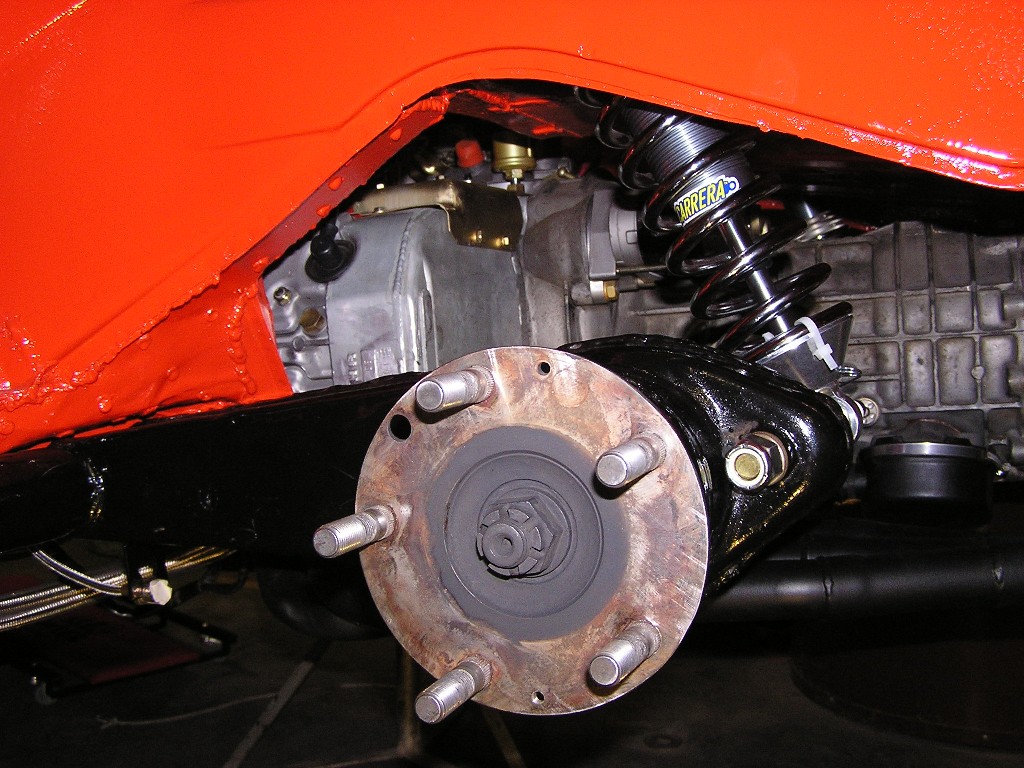
Posted by: brant Dec 28 2004, 11:44 AM
Other side:
Attached thumbnail(s)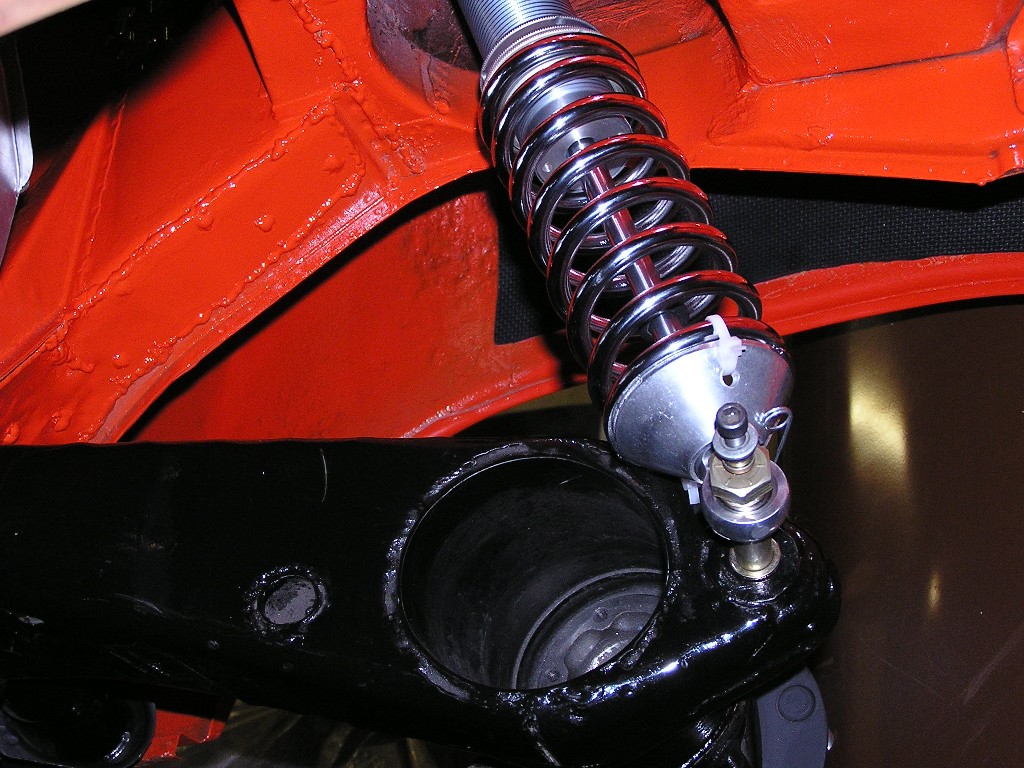
Posted by: brant Dec 28 2004, 11:49 AM
This is the top of the shock mount (inside the rear trunk):
Attached thumbnail(s)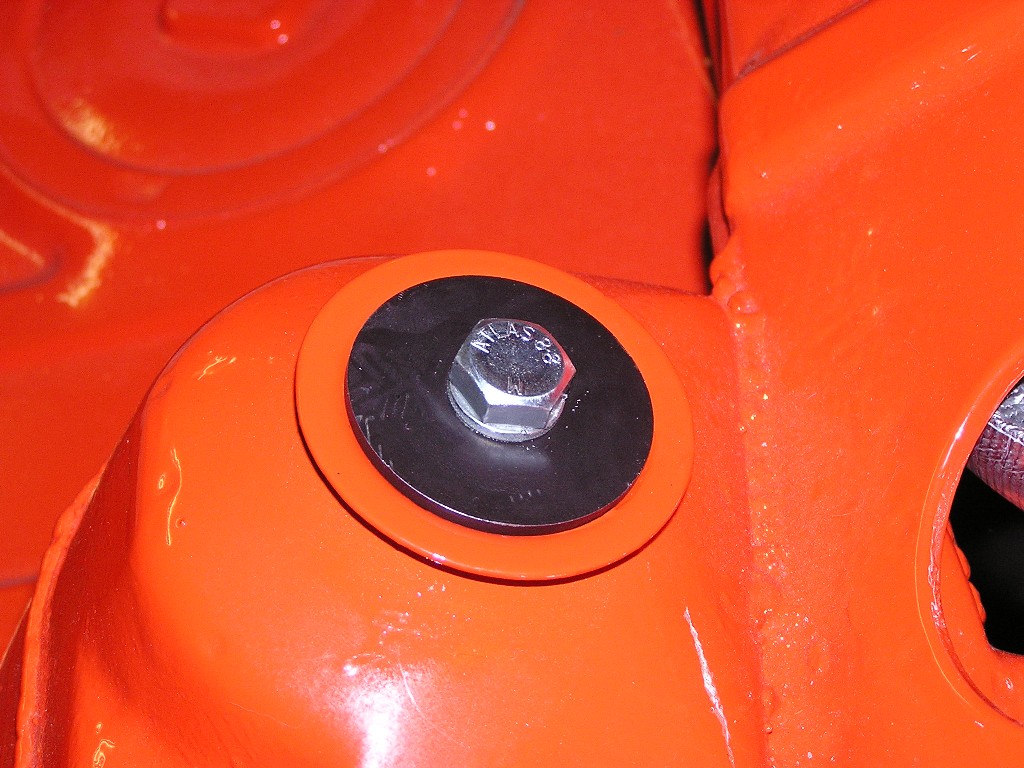
Posted by: Root_Werks Dec 28 2004, 11:50 AM
Posted by: brant Dec 28 2004, 12:14 PM
The rear shock bolt is modified for the rear sway we used to run on our old car:
Attached thumbnail(s)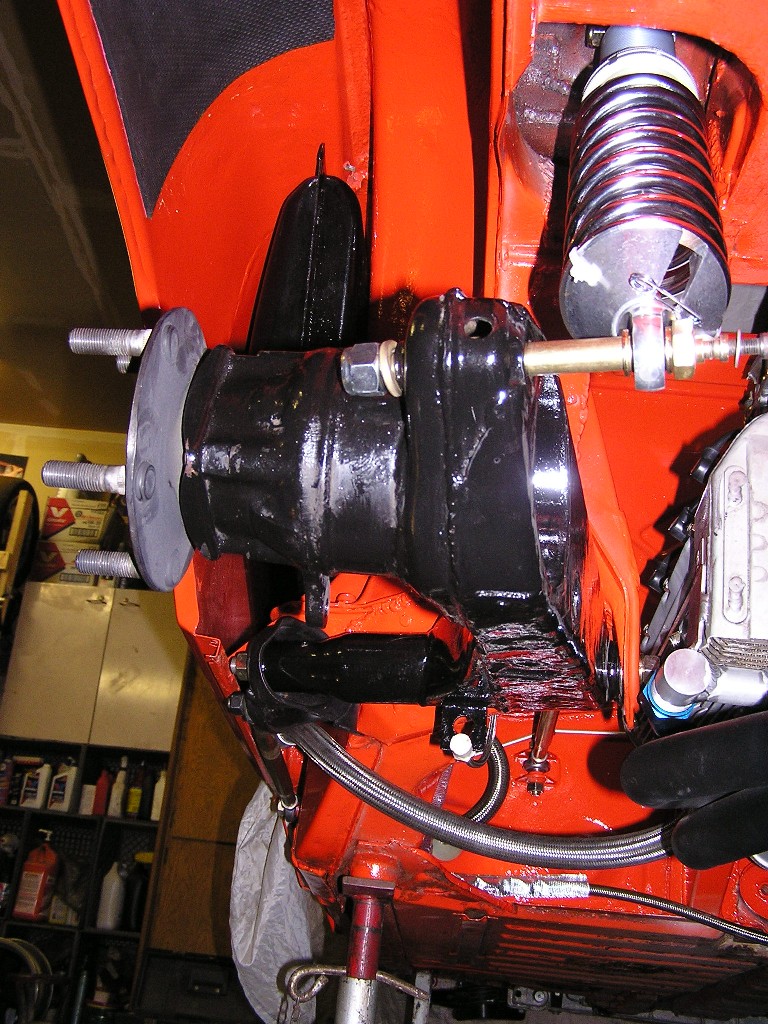
Posted by: Ferg Dec 28 2004, 01:33 PM
I'll be by tonight with some black touch up paint, I can't bear to see this scratch 
Attached thumbnail(s)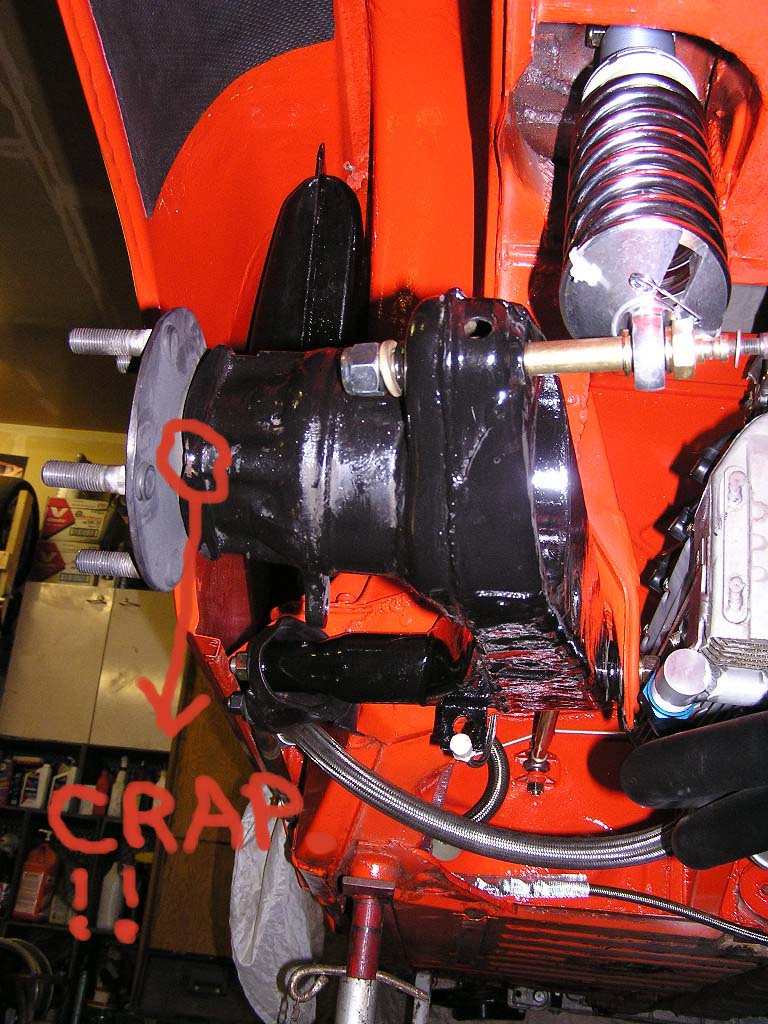
Posted by: brant Dec 28 2004, 04:54 PM
Mike,
dang.. I hadn't even noticed it..
your going to have a long drive to get to dad's house and fix that...
Sammy,
decision was made after consulting Allen Johnsen and talking with other friends that are racing these as both 4cylinders and 6cylinders...
also based decision upon saving a tiny bit of weight.
We believe that we will have plenty of cooling without it... the temp coating on the headers will help reduce some of the heat from below issues....
plus we have a plan to run an extension on the lower floorpan and cover up a part of the engine bay from the bottom with this pan.. If this happens, it will reduce the possibility of drawing in dirt or debris. Also I intend to never go off road anyways.... RIGHT?
(said while laughing to myself due to the number of "excursions" I've already experienced while racing)
brant
Posted by: brant Dec 28 2004, 05:06 PM
Here is a picture of the shock itself prior to install.
They are aluminum bodied with the adjustment threads made right onto the body:
Attached thumbnail(s)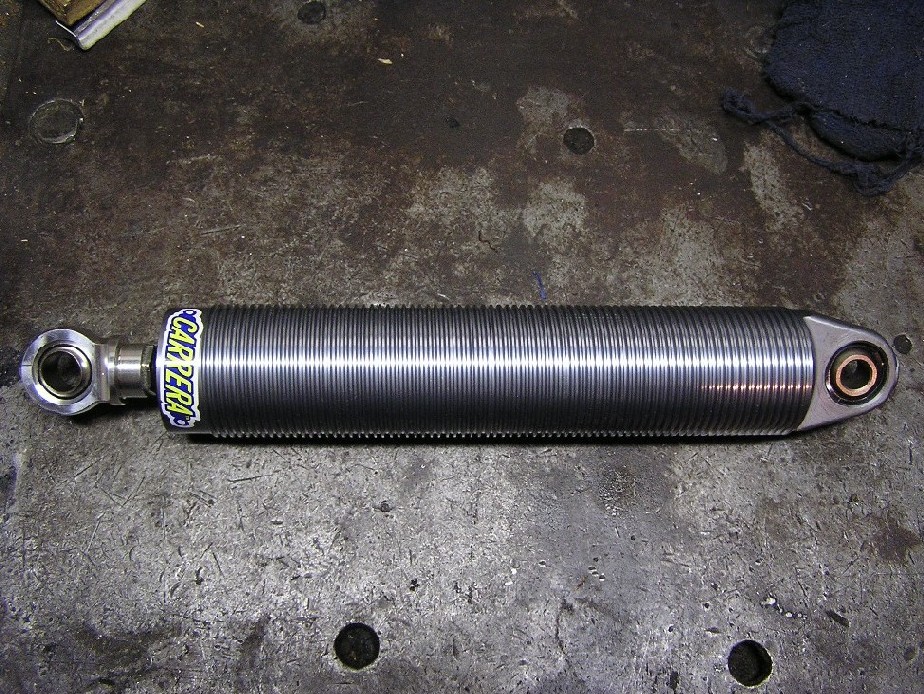
Posted by: brant Dec 28 2004, 05:10 PM
picture of the handmade tops that allow the inversion, and the 8inch springs:
Attached thumbnail(s)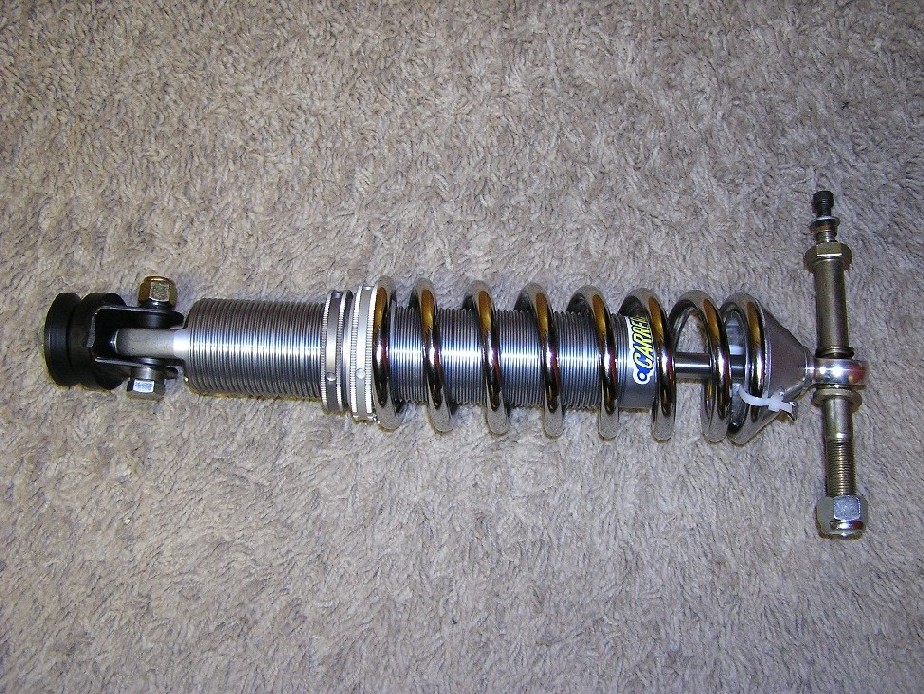
Posted by: URY914 Dec 28 2004, 09:13 PM
I would think that lower shock bolt would flex. It sure is hanging out ther.
You can't get the shock closer to the arm?
Paul
Posted by: Stutgart46 Dec 28 2004, 09:19 PM
Brant,
The car is looking great.
Can you please explain to me (like a kindergardner) the "toe brace bar"?
How does it work? What are the advantages?
Thanks,
Chad
Posted by: maf914 Dec 29 2004, 08:22 AM
| QUOTE (brant @ Dec 28 2004, 02:54 PM) |
| plus we have a plan to run an extension on the lower floorpan and cover up a part of the engine bay from the bottom with this pan.. If this happens, it will reduce the possibility of drawing in dirt or debris. |
Brant, Great looking project car. Thanks for all of the photos and info.
Concerning the belly pan. I'm surprised that your organization which has fairly strict rules for most areas, allows this sort of mod.
By the way, if you want to see some neat pans on 914's, check ot the Patrick site and its project 914's.
http://www.patrickmotorsports.com/cgi-bin/main?action=gallery
Posted by: brant Dec 29 2004, 10:07 AM
| QUOTE (URY914 @ Dec 28 2004, 08:13 PM) |
| I would think that lower shock bolt would flex. It sure is hanging out ther. You can't get the shock closer to the arm? Paul |
Paul,
your right... that bolt isn't finished yet.
It will be a little closer when done, but to keep the geometry it has to be spaced out some... A solid metal spacer is supposed to be used so that the bolt tightens correctly and shares the load... We are getting some machined from aluminum in hopes that the aluminum will be strong enough, yet save some weight.
brant
Posted by: brant Dec 29 2004, 10:16 AM
| QUOTE (Stutgart46 @ Dec 28 2004, 08:19 PM) |
| Brant, The car is looking great. Can you please explain to me (like a kindergardner) the "toe brace bar"? How does it work? What are the advantages? Thanks, Chad |
Chad,
The toe brace bar may be a tiny bit unecessary, but was recommended to us.
Apparently with the really high latteral loads (Slick tired cars) it becomes useful to lock-in the toe, or keep it from changing at all.... Also it may add a tiny bit of reinforcement to the suspension.
I doubt we will be able to create that type of G-loading with our d.o.t. tires.
However, the reason we went with it anyways was because of the Monoballs. AJRS only runs a zero toe if the car is monoball equipted. He is convinced that with other bushings and non reinforced swingarms, there is some toe "flex" and the monoball is his only solution to that. So when he puts the monoballs on he also recommends the toe brace so that the toe can be finely dialed in and then locked..
brant
Posted by: brant Dec 29 2004, 10:18 AM
| QUOTE (maf914 @ Dec 29 2004, 07:22 AM) | ||
Brant, Great looking project car. Thanks for all of the photos and info. Concerning the belly pan. I'm surprised that your organization which has fairly strict rules for most areas, allows this sort of mod. By the way, if you want to see some neat pans on 914's, check ot the Patrick site and its project 914's. http://www.patrickmotorsports.com/cgi-bin/main?action=gallery |
Mike,
your right too...
our org. will not allow aero aids..
in fact I don't think patricks cars are legal for the same reason in his sanctioning body...
but what we had in mind is MUCH smaller than patrick's.
and may or may not be allowed... have to wait and see.
brant
Posted by: URY914 Dec 29 2004, 10:38 AM
I've seen "toe braces" of verious types over the years. It seems to be a good idea.
I see you also added some meat to the outer piece that the the toe brace attached to.
RacerChris also fabs a piece from thicker material to replace the stock pressed steel piece.
You seem to be doing all the right things, looks great..
Paul
Posted by: brant Dec 29 2004, 10:46 AM
| QUOTE (URY914 @ Dec 29 2004, 09:38 AM) |
| I've seen "toe braces" of verious types over the years. It seems to be a good idea. I see you also added some meat to the outer piece that the the toe brace attached to. RacerChris also fabs a piece from thicker material to replace the stock pressed steel piece. You seem to be doing all the right things, looks great.. Paul |
Paul,
regarding the added "meat"..
just got to share this little tidbit..
where the front edge of the "toe brace" attatches... there is a threaded part in the long. Its made from taking a tube and a threaded insert and then welding them together.. Then a hole is drilled all the way through the long (all the way into the engine bay).
Then this "tube" is inserted into the hole and welded on both the outboard and inboard sides...
The reason I'm rambling is that this tube ties both sides of the long together and it was an eye opener to me that this added SO MUCH rigidity to the long itself... So as a side benefit the long is really re-braced also.
brant
Posted by: URY914 Dec 29 2004, 01:42 PM
I was actually talking about this piece (see pic), but thanks for the info.
Attached image(s)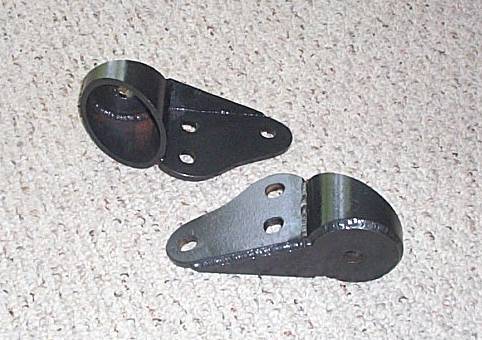
Posted by: brant Dec 29 2004, 02:31 PM
oops... my bad,
I thought you were refering to the forward point..
I've got it now.
brant
Posted by: brant Jan 10 2005, 03:26 PM
We did some more dash work this weekend. Its really close to being ready for wiring now.. Need to make up a new loom now. Thought I would add a few more shots.
This is the gauge cluster from behind.
Its and aluminum face with 3 guages, an ignition switch, and a start switch.
It looks much better with the cover on, and will be even better when we get the new cover for it.
The reinforcement braces are aluminum too... Dad took a piece of welding rod and beat them over it to give them the rolled-reinforcement-bead... Very strong actually.
You can also see the tops of my warning lites in this one:
Attached thumbnail(s)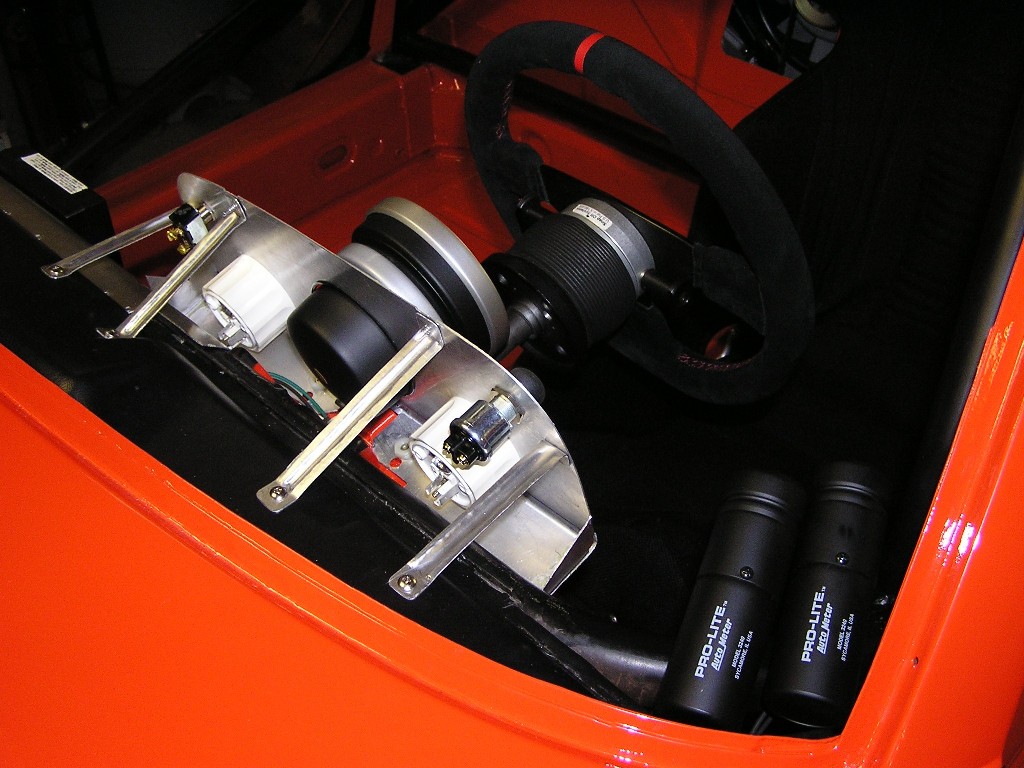
Posted by: brant Jan 10 2005, 03:28 PM
Here is the same angle with the beat up pod or cover on it:
Attached thumbnail(s)
Posted by: brant Jan 10 2005, 03:36 PM
Here are the warning lights from the important side.
Red will be oil pressure
Blue will be alternator belt
Attached thumbnail(s)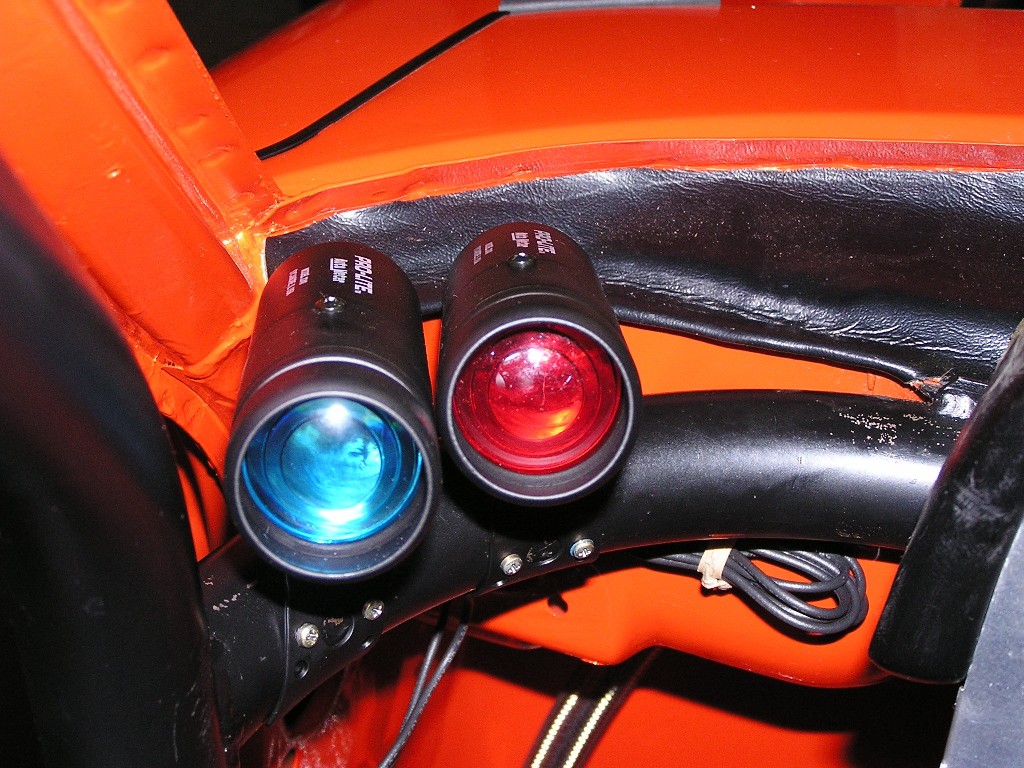
Posted by: brant Jan 10 2005, 03:52 PM
sorry for the glare...
here are the three gauges from the drivers view:
Attached thumbnail(s)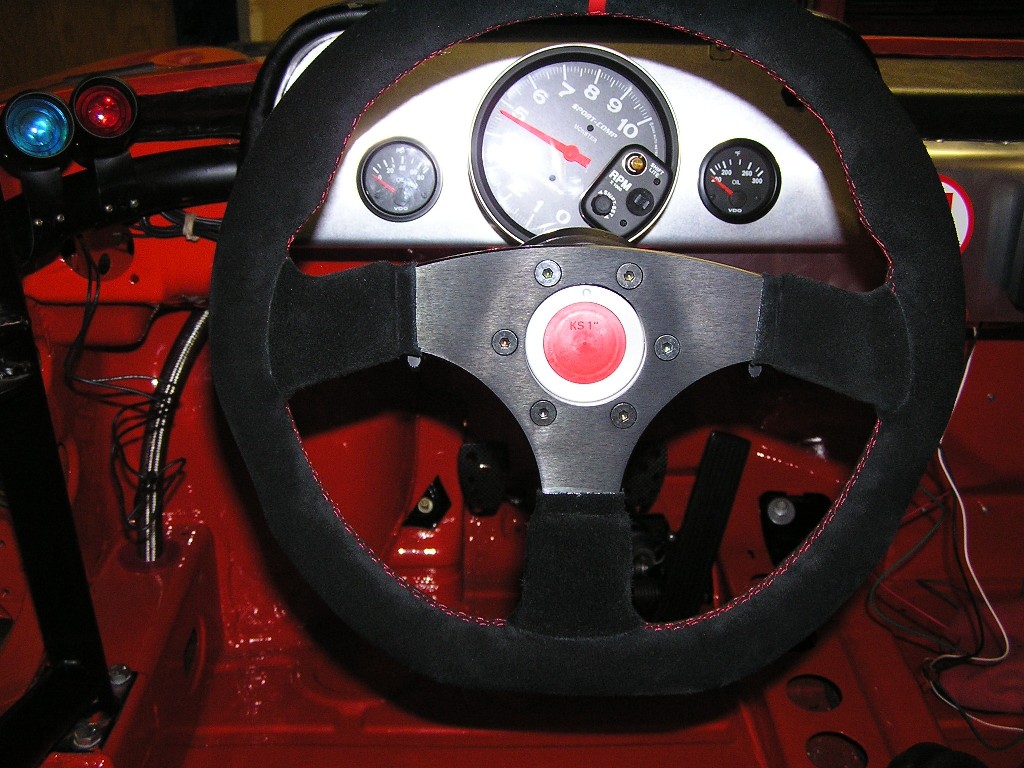
Posted by: brant Jan 10 2005, 04:06 PM
speaking of seats here is my new seat. Its an Ultra-Shield, and has a REALLY nice rake to fit a 914 contour.
Its not in the pic, but I'm moving my old corbeau over to the passengers side and changing the mounts so that it will be easy to pull.
that way I can leave it in when instructing and pull it for sprints.
Attached thumbnail(s)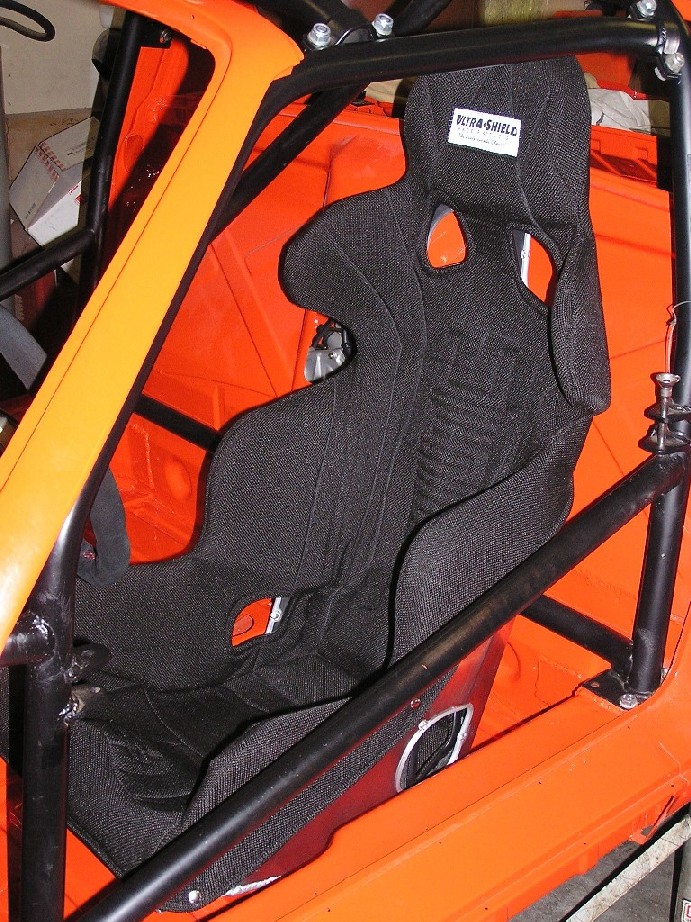
Posted by: brant Jan 10 2005, 04:41 PM
last couple of views. Lots of wiring to do now. Also, you can see that the firesystem is not bolted in yet nor the battery. The little cardboard box is my mock-up on the battery location, and the firesystem bottle will go to the left of that:
Attached thumbnail(s)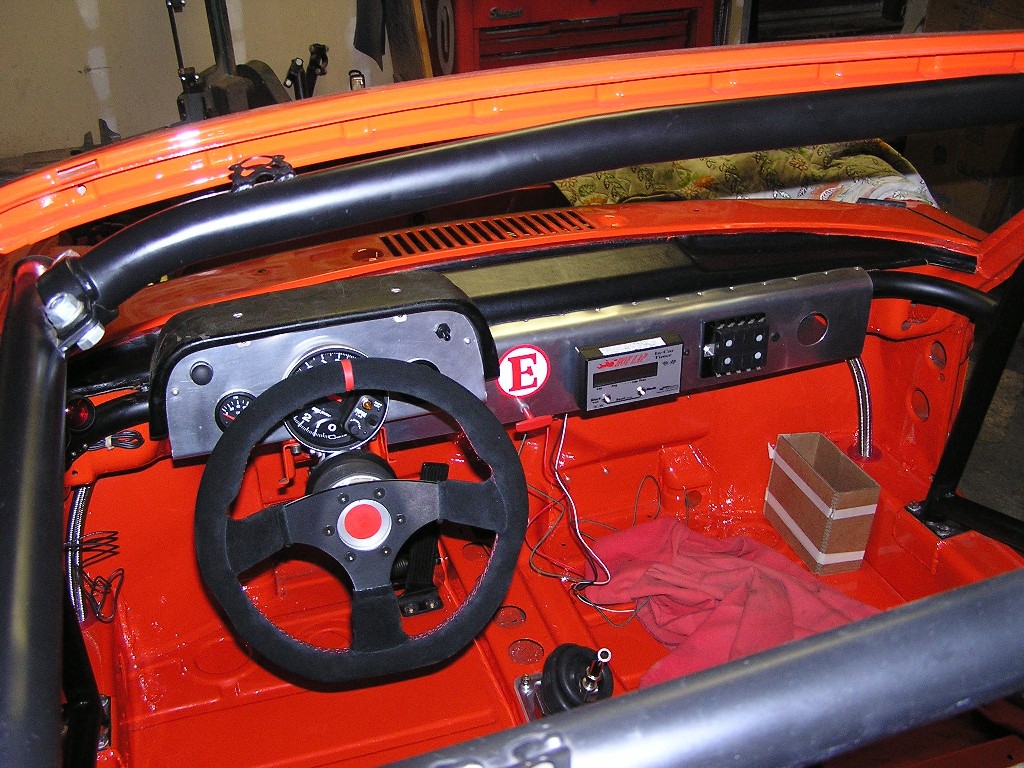
Posted by: brant Jan 10 2005, 04:46 PM
From the other side. Volt-meter was missing in that last shot, but installed in this one.
We're running a hotlap and next to it is our fuse panel
(aluminum tach mount, was another of dad's little creations):
Attached thumbnail(s)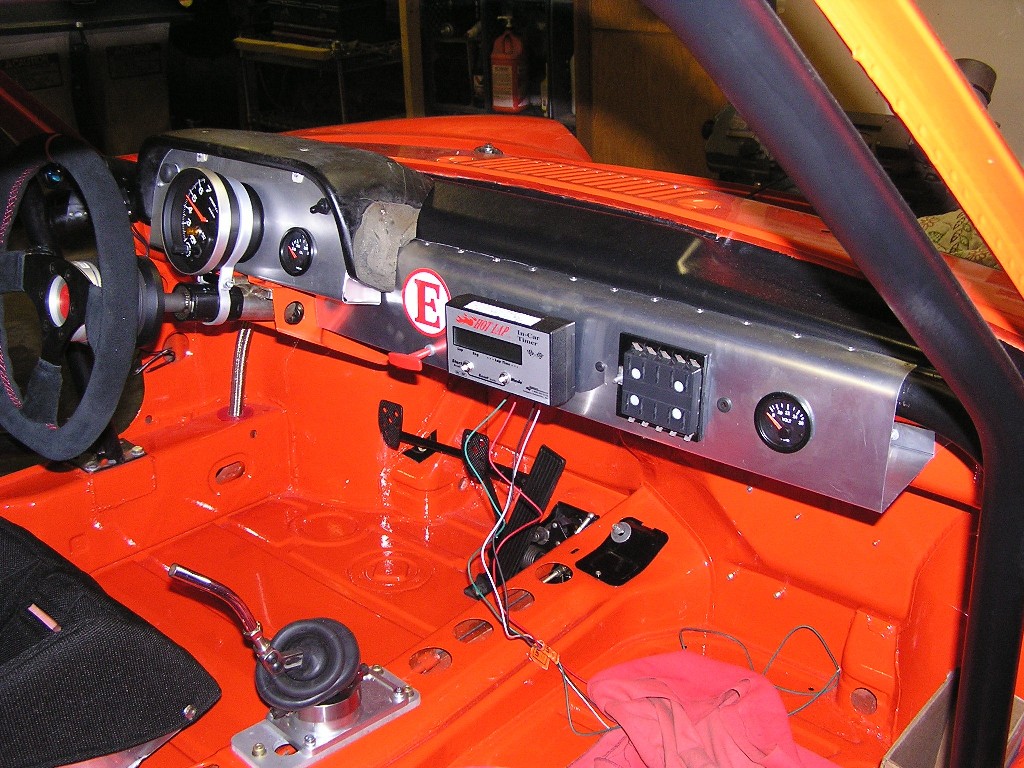
Posted by: pete-stevers Jan 10 2005, 11:57 PM
looks mighty fine
very impressive 
Posted by: MJHanna Jan 11 2005, 07:20 AM
You’re doing an excellent job on putting this car together. What are you going to run- PCA? Vintage? I ran the same tach in the 914. If you have not run one before you’ll love it. You’ll really like the shift light. It got to the point that I could see the light in my peripheral vision and stopped looking down at the revs. Looks like you’ll be on the track when the snow melts.
Posted by: scotty b Jan 11 2005, 07:48 AM
I think I need a towel. Who needs Viagra?? Gimmee more pics. 
Posted by: brant Jan 11 2005, 10:19 AM
Thanks for all the kind words. Its really a boost to hear all the feedback.
Its primarily a vintage car and will be heavily outgunned in PCA GT-5, but I'll run some PCA too just for fun.
I really like the shift light idea to help me prevent over-revs while downshifting... I've not run a shift light previously and have been told that I will learn quite a bit about my downshifting.
Our 1st event is a drivers school is march, which I would love to do again. However Its going to be tight if I can finish the project in only 8 weeks (plus my brother-in-laws wedding is in feb in NY and that will take up 2 of my weekends).
Posted by: balthazar Jan 23 2005, 10:01 PM
WOW! I just got back from spending a weekend with this most impressive car!!!!! Ladies and Gentlemen, those of you who have not had the pleasure to SEE in person, even though these pictures present this car well, they absolutely do it no justice! If you were looking up the word "sorted", there should be a picture, with attending written copy, describing this very car!!! In idle conversation, wherever car enthusiasts meet, you might hear wafting through the air "...yeah, I've gone through EVERYTHING, suspension, brakes, fuel, oil, motor, paint, roll cage, flares..." quickly followed by... "oh, you mean like the McClung car?" And invaritably, the reply would be,"oh no, I didn't have the time or the desire to go that far...."
A tangerine dream in flowing, flared form, fabulosly fabricated with wonderful aluminium accents! The Georgia peach of south-east Colorado!
All I can say is...
Posted by: Series9 Jan 23 2005, 10:12 PM
| QUOTE (balthazar @ Jan 23 2005, 09:01 PM) |
| WOW! I just got back from spending a weekend with this most impressive car!!!!! Ladies and Gentlemen, those of you who have not had the pleasure to SEE in person, even though these pictures present this car well, they absolutely do it no justice! If you were looking up the word "sorted", there should be a picture, with attending written copy, describing this very car!!! In idle conversation, wherever car enthusiasts meet, you might hear wafting through the air "...yeah, I've gone through EVERYTHING, suspension, brakes, fuel, oil, motor, paint, roll cage, flares..." quickly followed by... "oh, you mean like the McClung car?" And invaritably, the reply would be,"oh no, I didn't have the time or the desire to go that far...." A tangerine dream in flowing, flared form, fabulosly fabricated with wonderful aluminium accents! The Georgia peach of south-east Colorado! All I can say is... |
Wow!
How can the rest of us ever hope to achieve that kind of praise.
Great job Brant.
Posted by: brant Jan 24 2005, 10:27 AM
Corby...
thanks for the kind words but put down the bottle you've been cut off...
just kidding... but its not all that.
I have really tried, and I'm sure you can tell from your observation of our anal-ness that alot of heart and soul are in there... Still its just a car.
thanks man
Posted by: sgomes Jan 24 2005, 02:07 PM
All I can do is
Fantastic job!!
Posted by: horizontally-opposed Jan 24 2005, 02:39 PM

Yep! I don't feel like I can add praise higher than what's above. This is a beautiful project!
pete
Posted by: Root_Werks Jan 24 2005, 02:41 PM
Posted by: brant Jan 24 2005, 05:02 PM
Spent a short weekend working on the car... mounted a few things and took more pics to document.
Here is the coil location we picked with dad's coil mount:
Attached thumbnail(s)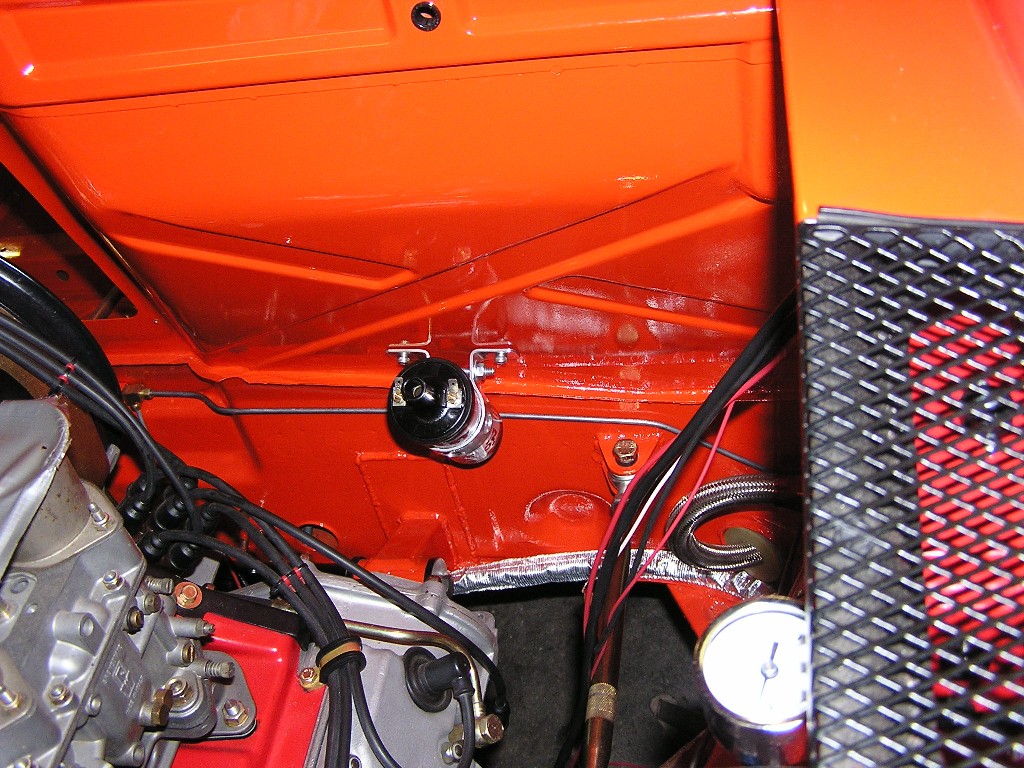
Posted by: brant Jan 24 2005, 05:03 PM
From below:
Attached thumbnail(s)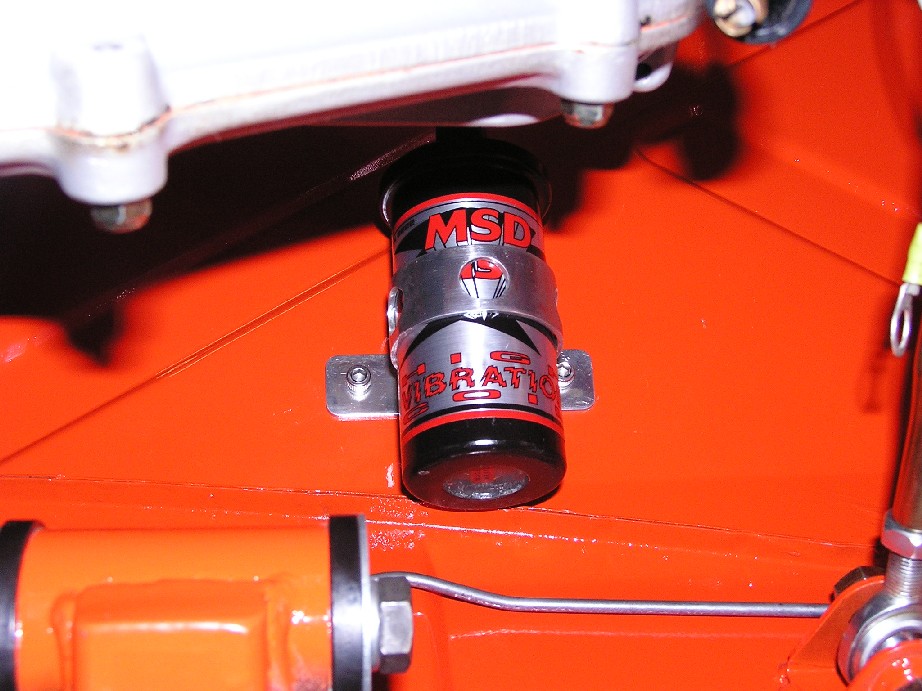
Posted by: brant Jan 24 2005, 05:05 PM
Still haven't yet created our wiring harness.. Thus the wires hanging everywhere.
but here is the MSD location:
Attached thumbnail(s)
Posted by: brant Jan 24 2005, 05:06 PM
Mounted the kill switch
(which now needs wiring completed also)
Attached thumbnail(s)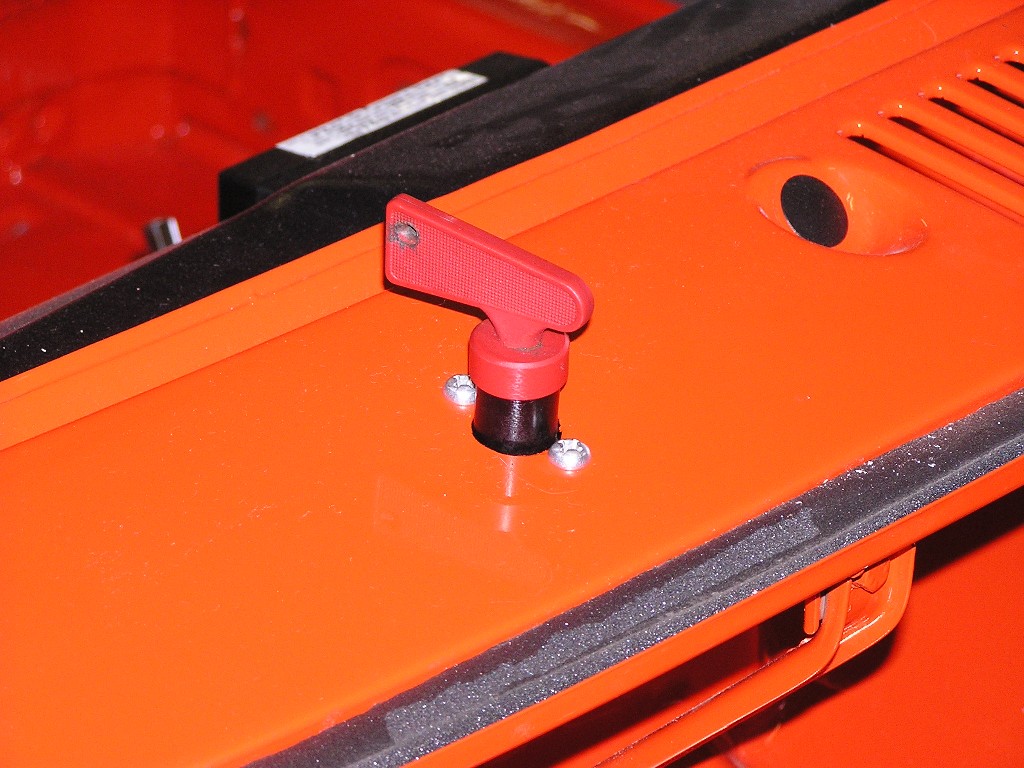
Posted by: brant Jan 24 2005, 05:08 PM
Mounted our fire bottle
(not plumbed yet)
Attached thumbnail(s)
Posted by: brant Jan 24 2005, 05:09 PM
Here are the cross brace mounting support straps:
Attached thumbnail(s)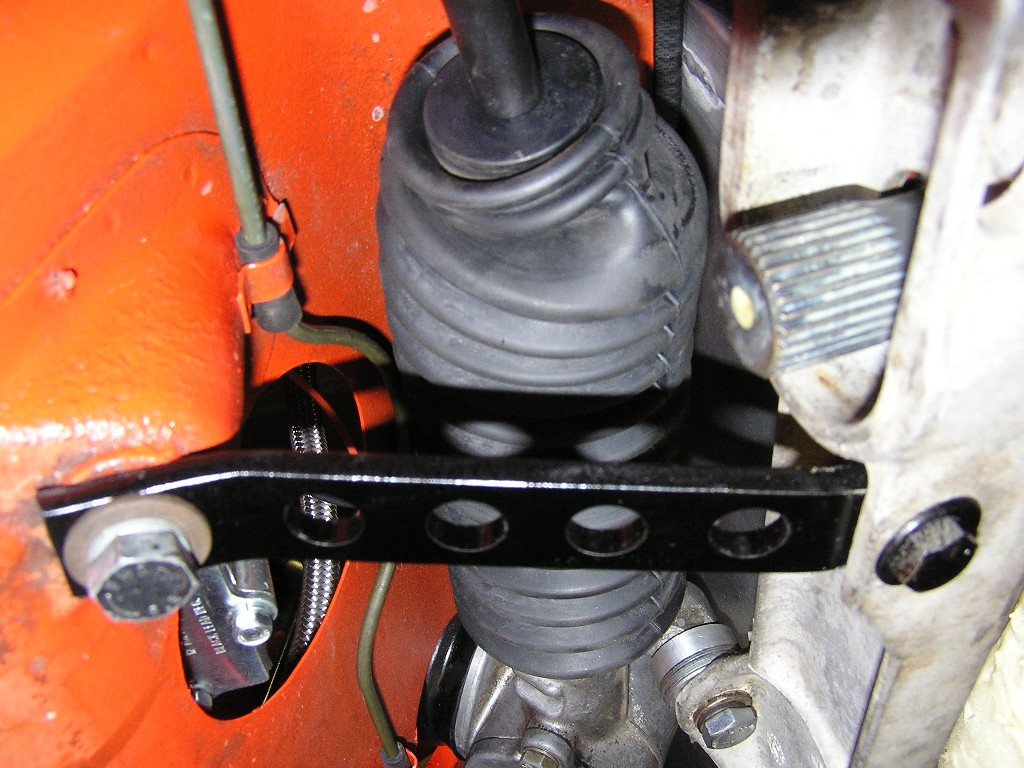
Posted by: brant Jan 24 2005, 05:11 PM
and I've applied for a waiver with the Captain regarding this one.. haven't heard back from him yet...
JP, if he doesn't grant his blessing can I get your approval?
Attached thumbnail(s)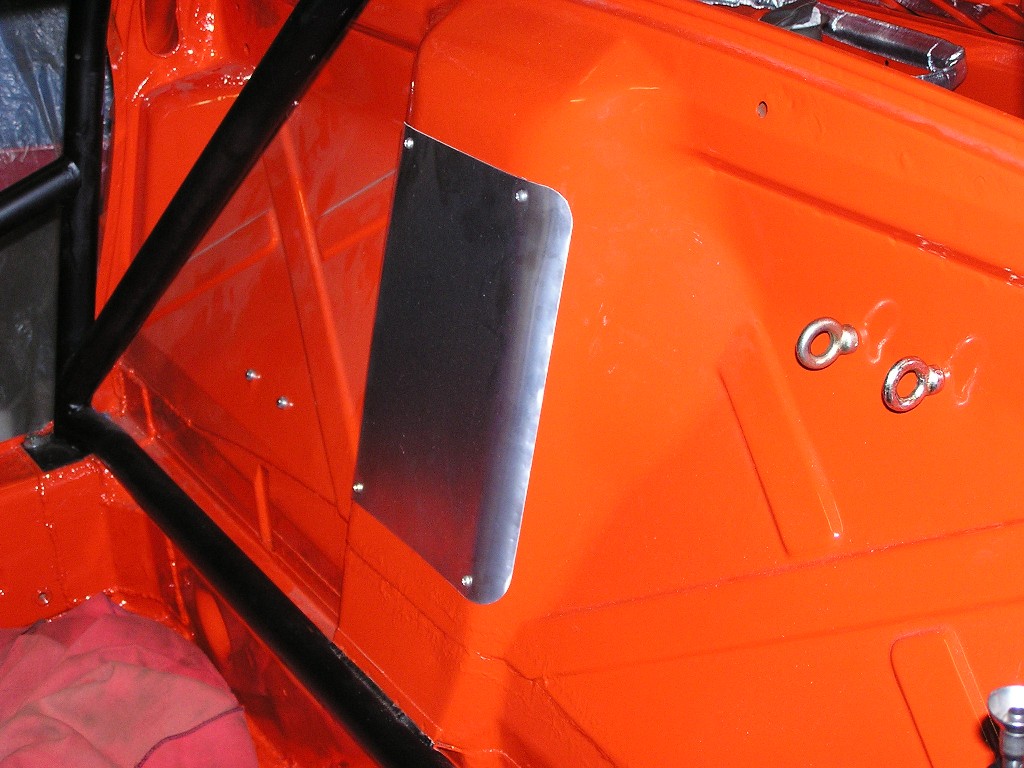
Posted by: Gint Jan 24 2005, 05:27 PM
That inspection cover looks especially nice.
Posted by: brant Jan 25 2005, 10:01 AM
These aren't all that clear, but here is our MC brace. This came up in a different thread. We've run this same brace on our -4 cylinder car for 5-8 years. It takes out the "flex" in the floorboard. Its easy to bolt it onto an aluminum cross-brace, but shouldn't be too hard to weld, or bolt to a stock steel cross-brace:
Attached thumbnail(s)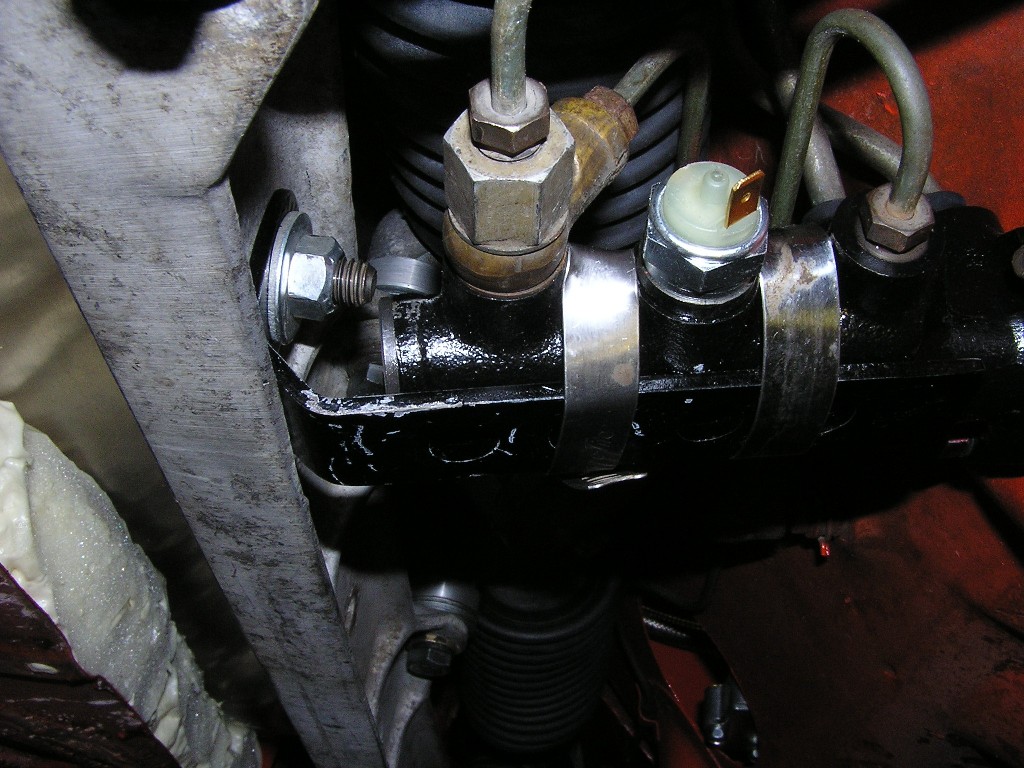
Posted by: brant Jan 25 2005, 10:04 AM
There are some lightening holes in our brace. Here is how it looks from the other direction:
Attached thumbnail(s)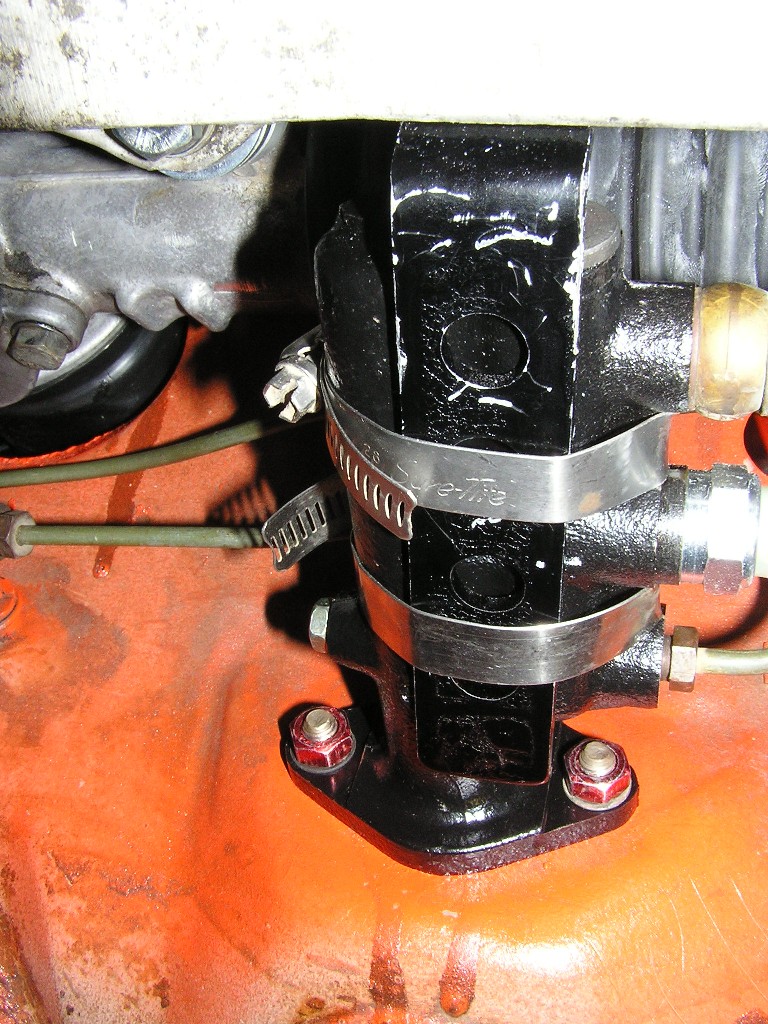
Posted by: 1973914 Jan 25 2005, 01:50 PM
I am SURE you havent looked over this tiny detail (you dont seem to miss any), but is that kill switch in the front set in that position when fully engaged (i.e. allowing power to flow)? Actually heard of someone in the SpeedVision series having a rock kick up and knock the kill switch  It looks engaged there, just making sure!
Posted by: brant Jan 25 2005, 02:51 PM
| QUOTE (1973914 @ Jan 25 2005, 12:50 PM) |
| I am SURE you havent looked over this tiny detail (you dont seem to miss any), but is that kill switch in the front set in that position when fully engaged (i.e. allowing power to flow)? Actually heard of someone in the SpeedVision series having a rock kick up and knock the kill switch :wacko: It looks engaged there, just making sure! |
I'm kind of embarrased to say this...
I mounted it 90degrees off from where I wanted
we wanted it to point forward and backwards, but screwed up and mounted it sideways when in the engaged position.
we had to take the handle apart and move the roll pin to get it shifted back into the forward back (engaged) mounting position..
good point though
Posted by: balthazar Jan 26 2005, 12:39 PM
| QUOTE (brant @ Jan 25 2005, 08:01 AM) |
| These aren't all that clear, but here is our MC brace. This came up in a different thread. We've run this same brace on our -4 cylinder car for 5-8 years. It takes out the "flex" in the floorboard. Its easy to bolt it onto an aluminum cross-brace, but shouldn't be too hard to weld, or bolt to a stock steel cross-brace: |
There was a thread on this board about the "fix" installed on the "grass roots" project.
http://www.grassrootsmotorsports.com/914.html (see picture below)
I think what Brant has done is much better! It certainly looks better IMHO!
Attached image(s)
Posted by: brant Jan 31 2005, 02:13 PM
Very little racecar work this weekend, spent the weekend working on the tow vehicle.
Here are the aluminum spacer blocks that dad made up for the rear shock bolts. The notch is for the trailer tie downs (very convienient)
Attached thumbnail(s)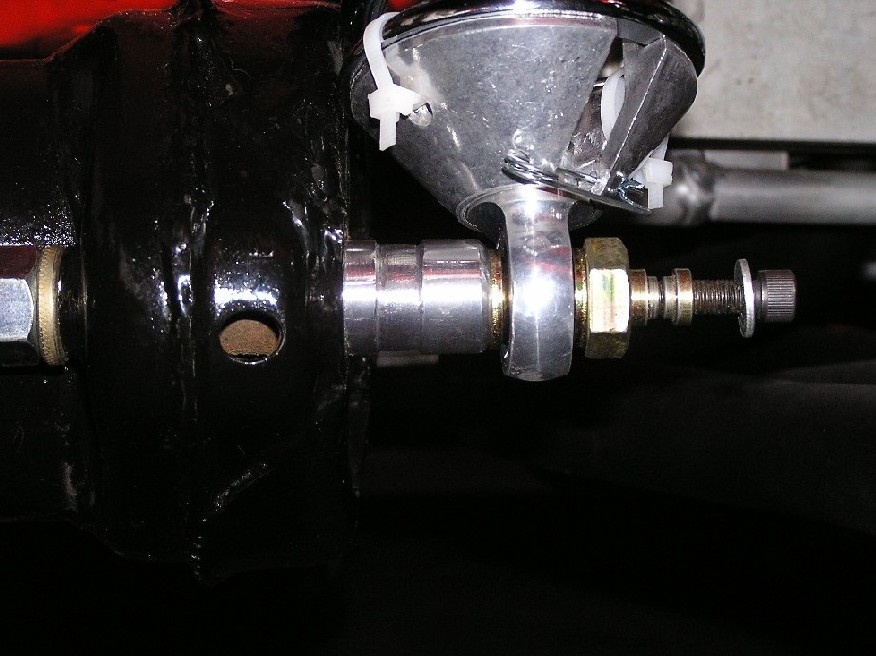
Posted by: brant Feb 22 2005, 02:22 PM
small update. We have been sorting out the details, and fighting glitches. For example we bled the brakes this weekend and spent about a day and half chasing down a troublesome leak in a brake line. Turns out that one of the "T" brake blocks we used had the wrong angle of american style face for the flare. We think it was a defective part.
But it damaged our brake lines and dad had to re-flare and repair. Ended up taking way too long, but I suppose things like that are bound to happen.
Regarding the last picture of the shock bolts. here is a picture of the stock they were made from:
Attached thumbnail(s)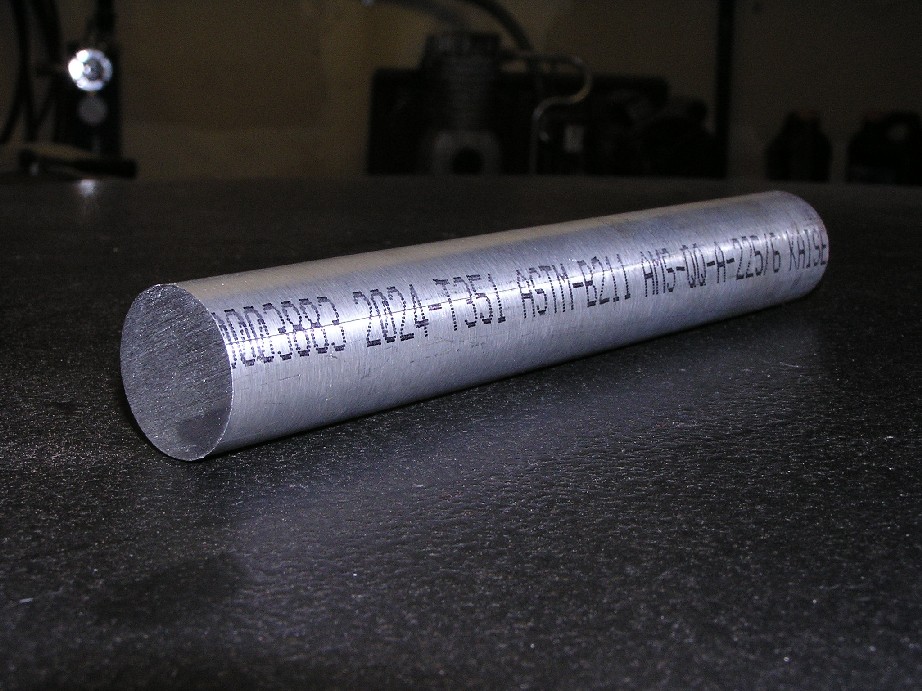
Posted by: brant Feb 22 2005, 02:23 PM
And here is a picture of the seat mount spacer made from the same stock. The seat needed a tiny spacer to help with fittment. They have a welded on mounting nut, so the spacer was machined out to fit that nut. Came out really nice:
Attached thumbnail(s)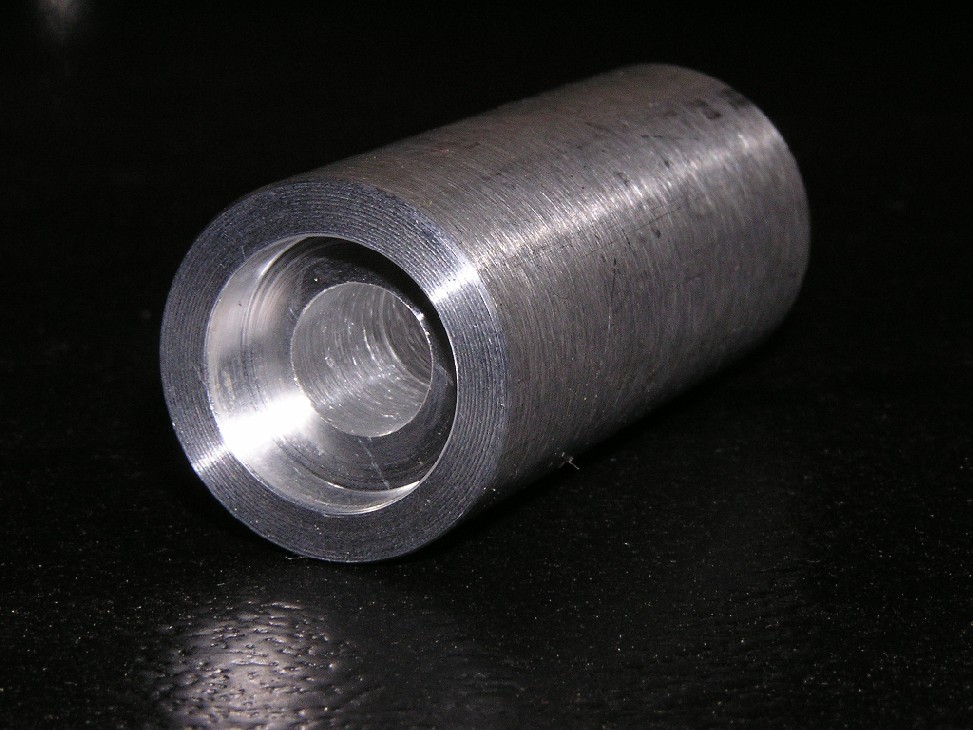
Posted by: brant Feb 22 2005, 02:32 PM
As mentioned, finally got all the brakes bled and sorted.
Front and rear are all using KFP gold pads. I really have had good experience with these on the track and have been using them for years.
Rear rotors are not allowed to be vented (my old car was)
They also do not allow cross drilled. So these are stock 914/6 solid rotors that AJRS hand machined the slots into. Rear brakes must remain porsche from the era, so were just using front early calipers moved back, as we have had good experience in the past with similar set-ups.
Attached thumbnail(s)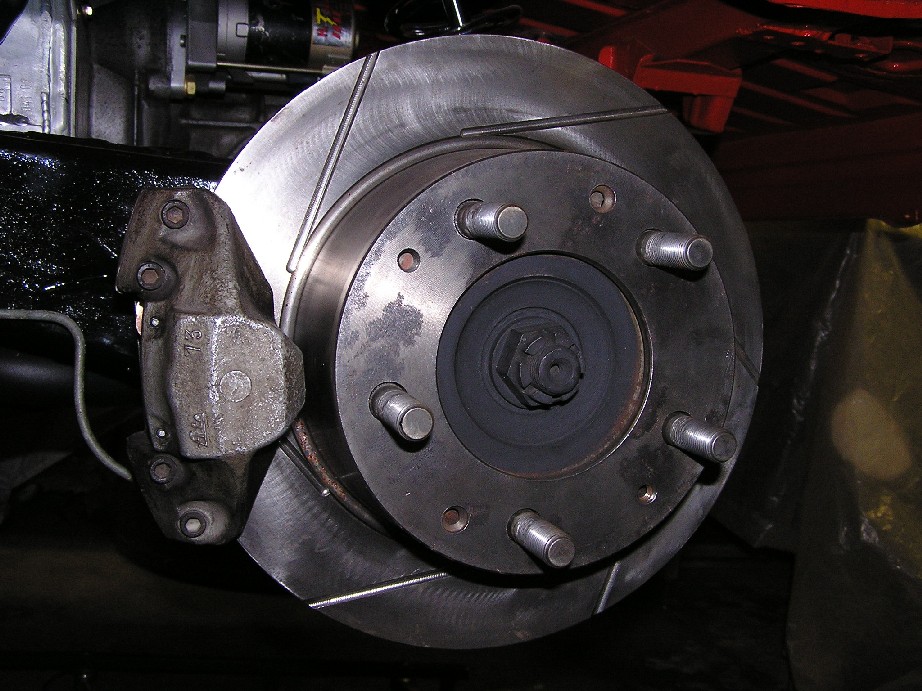
Posted by: majkos Feb 22 2005, 03:34 PM
Brant 
Just read your latest, on your simply,outrageous,painstaking,awsome piece of work! you make building a race car, a beautiful work of art!.
American Choppers and Hot Rod?
Move over, this IS what it's about, AND RACE! :driving 
Ha-ha-ha- - -
Posted by: AZ914 Feb 22 2005, 04:02 PM
Sweet Holy Moses! 
Damn, Brant (and Brant-dad)... this is the first time I actually saw this thread. The car looks great.. keep up the great work and pictures!
Posted by: brant Feb 22 2005, 05:49 PM
Thanks Kevin and thanks Jason...
(Jason good to hear from you)
dang I hope to drive it this spring still.
Got the rear sway partially installed this weekend:
Attached thumbnail(s)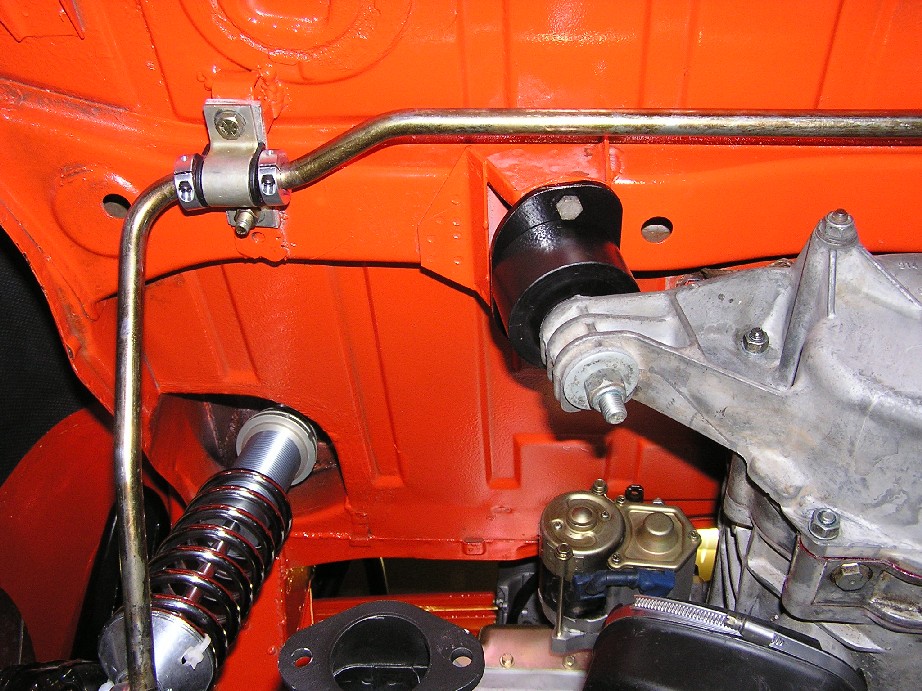
Posted by: brant Feb 22 2005, 05:51 PM
for the top part of the bracket we used an aluminum block. The locks are aluminum too. Mike Mueller turned me on to these, and they work really nice!
Attached thumbnail(s)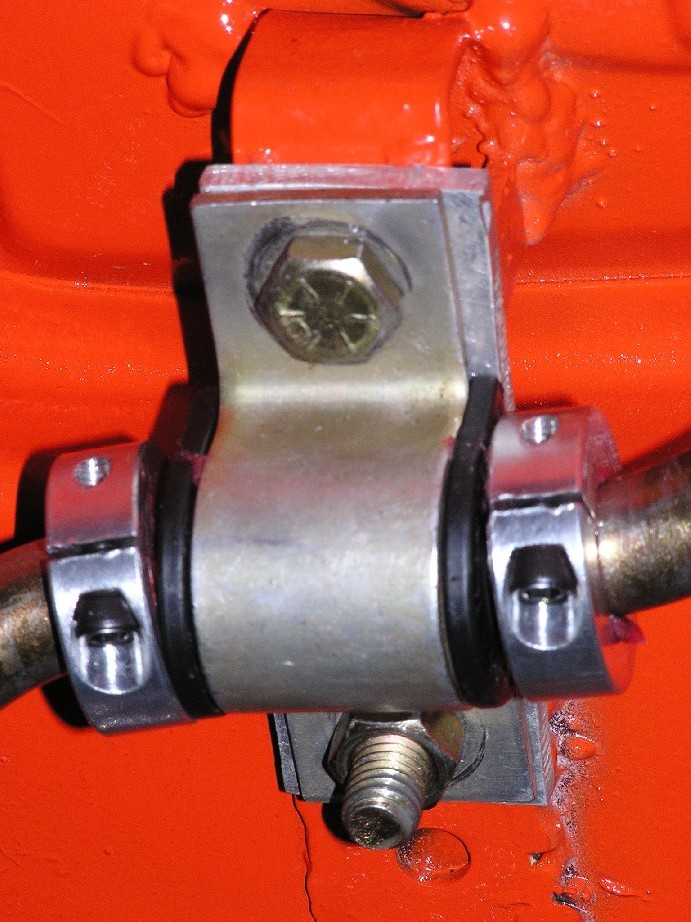
Posted by: Jeroen Feb 22 2005, 06:41 PM
Brant, I think you have 2 locks more than needed
(1 lock per side is enuf)
Posted by: brant Feb 23 2005, 09:50 AM
| QUOTE (Jeroen @ Feb 22 2005, 05:41 PM) |
| Brant, I think you have 2 locks more than needed (1 lock per side is enuf) |
Jeroen,
I only have 2 total.
probably do to my homemade mounts, I seemed to have more room on the drivers side than passengers. I would have rather had them on the right, but they fit better on the left. Only 2 total though.
Posted by: brant Feb 23 2005, 09:53 AM
Still haven't installed the dzus fasteners, but the roof panel is nearly done. I took 36grit paper on an electric grinder and cut out the rear brace entirely. Also thinned the entire panel. (in fact I thinned it a bit too much and had to go back and fix a spot where I started going through)..
New roof weighs 11lbs
plus I've now got a decent slot over the targa bar to vent air:
Attached thumbnail(s)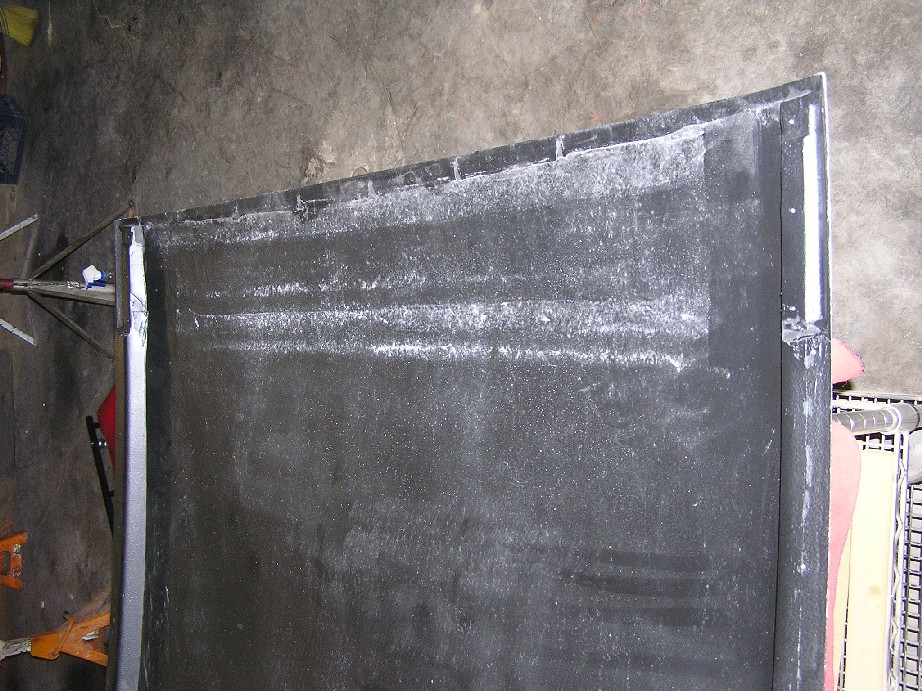
Posted by: brant Feb 23 2005, 10:27 AM
Here is one of the rear edge of roof when installed:
Attached thumbnail(s)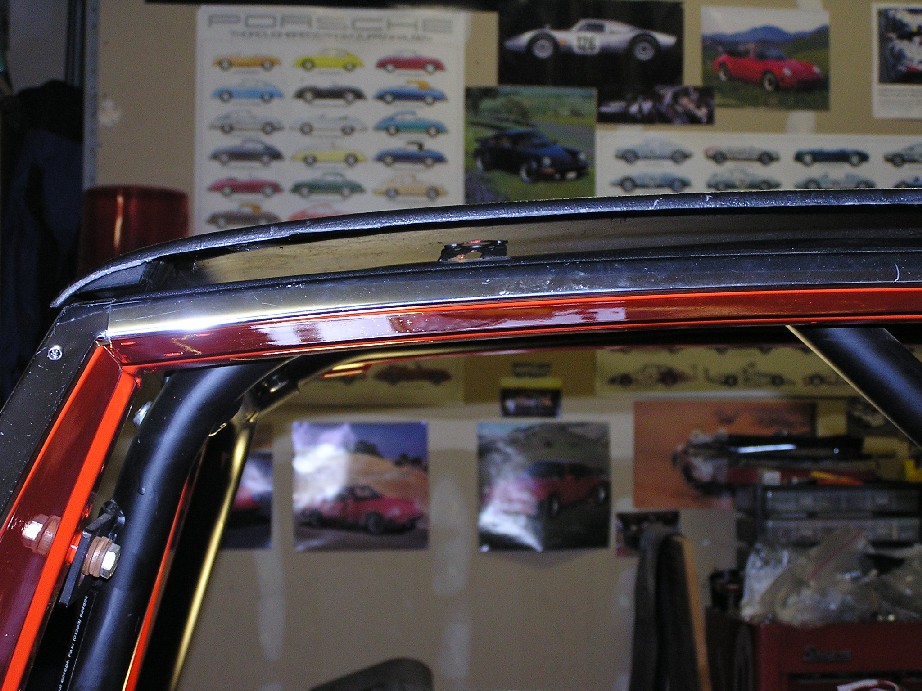
Posted by: brant Feb 23 2005, 10:32 AM
Thanks to Mark/cloudbuster, here is shot of the roof with a good front rubber:
Attached thumbnail(s)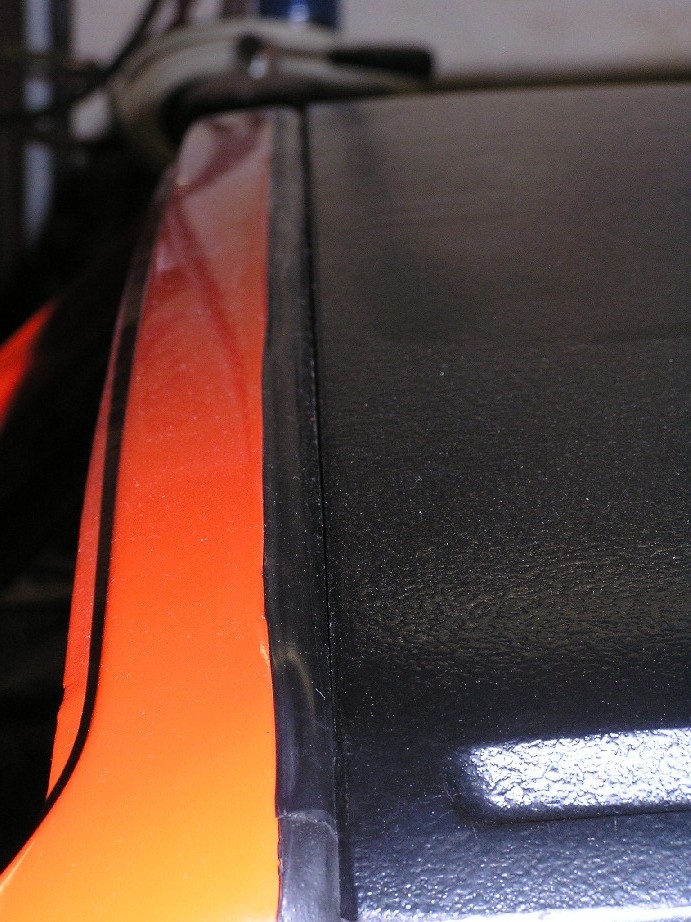
Posted by: brant Feb 23 2005, 10:34 AM
last one of the rear view:
Attached thumbnail(s)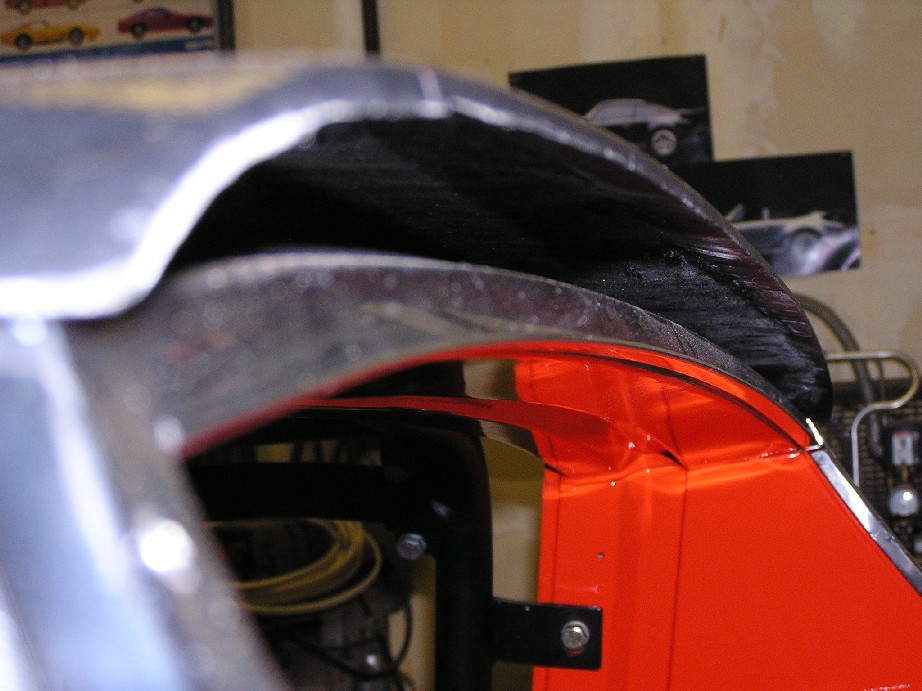
Posted by: 9144guy Mar 7 2005, 10:00 PM
I think you did a awsome job on the fuel cell and oil cooler setup looks great , i am making a custom fuel cell for the shop 914 race car.
Posted by: brant Mar 12 2005, 01:42 AM
| QUOTE (9144guy @ Mar 7 2005, 09:00 PM) |
| I think you did a awsome job on the fuel cell and oil cooler setup looks great , i am making a custom fuel cell for the shop 914 race car. |
thanks for the kind words...
tulsa huh...
you must be a regular at hallet, I'd guess.
Posted by: brant Mar 15 2005, 03:38 PM
got a bit more work done over this weekend.
My liscensing school is in 4 days... doesn't look like I'll be driving the orange car in it. Heck last year I did the school in my ford focus, so I think I'll be repeating that.
Anyways the car is coming along and starting to "feel" like the end is at least in sight. Here is the fire supression system plumbed and mounted. Front nozzle over pumps and cell:
Attached thumbnail(s)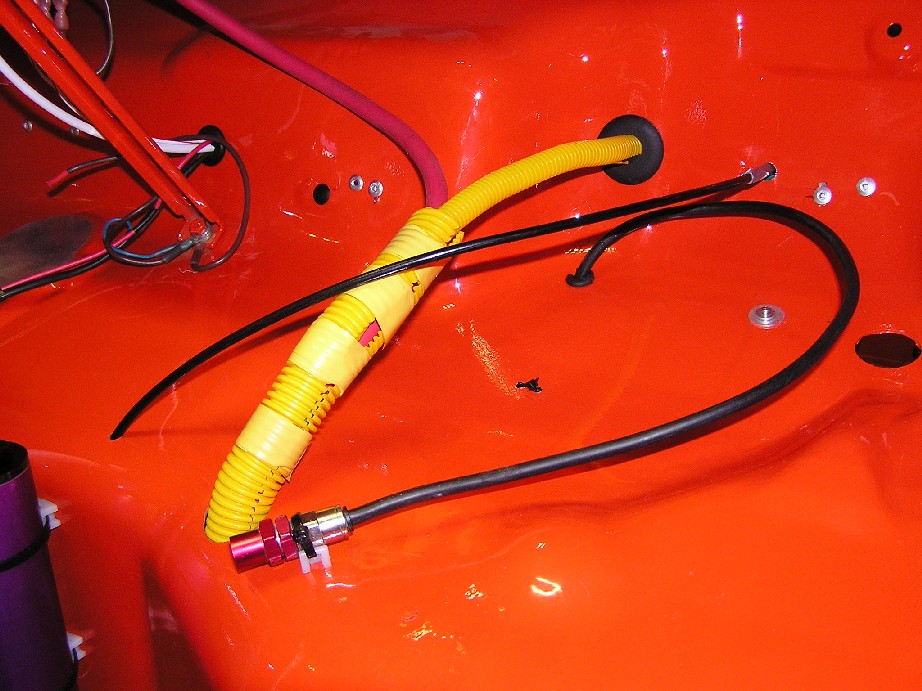
Posted by: brant Mar 15 2005, 03:41 PM
Dad made up a full wiring harness to save weight over stock. All of the wiring is from aircraft supply and is of slightly lighter weight than average. The battery cable is in that last shot (red), and fits inside the yellow sheath with the rest of the loom. Here is one angle of the bottle. I had intended to put the battery next to the bottle originally, but will now be moving the battery to keep a little bit of passenger foot room for when I'm instructing in my own car:
Attached thumbnail(s)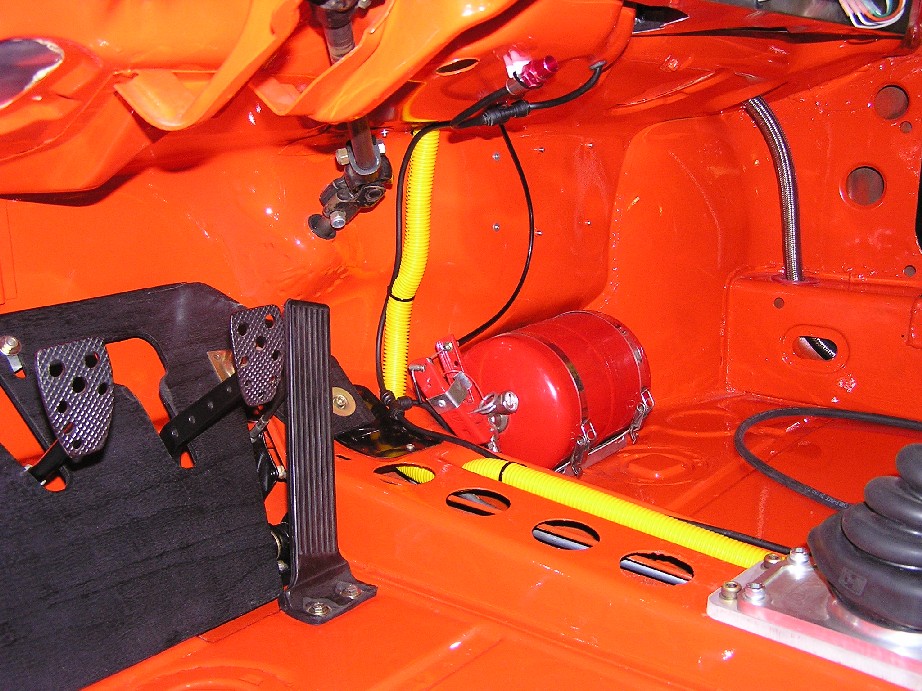
Posted by: brant Mar 15 2005, 03:43 PM
same bottle other view (shows pull cable, and cockpit fire nozzle):
Attached thumbnail(s)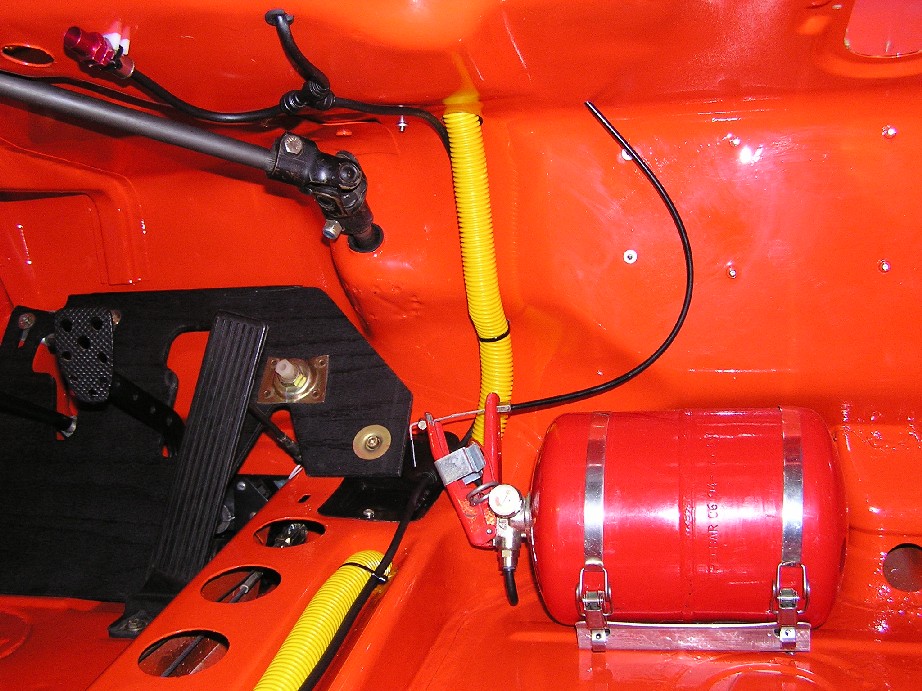
Posted by: brant Mar 15 2005, 03:45 PM
Engine nozzle:
Attached thumbnail(s)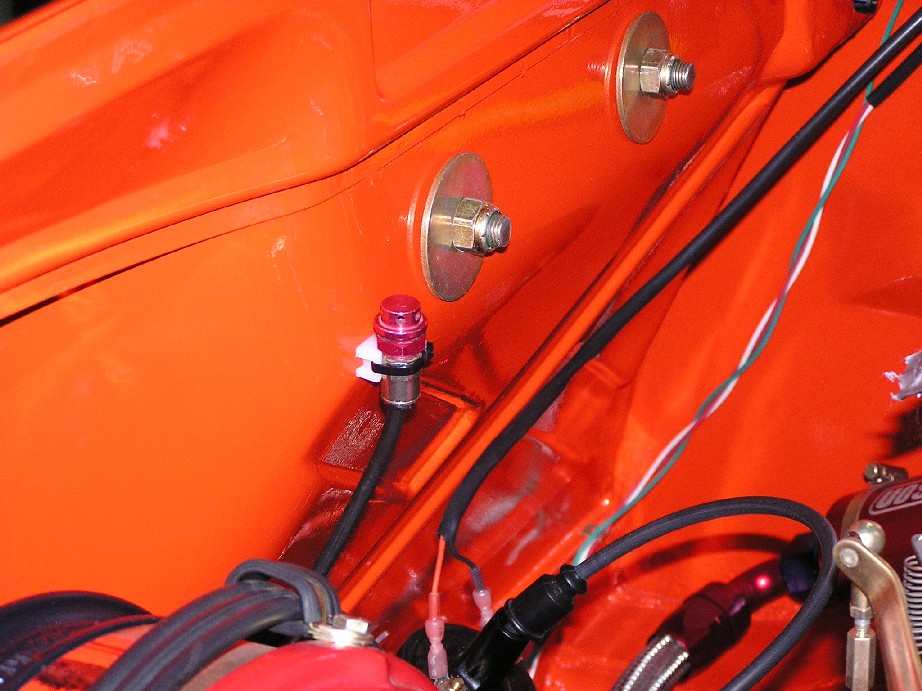
Posted by: brant Mar 15 2005, 03:50 PM
More wire loom:
Attached thumbnail(s)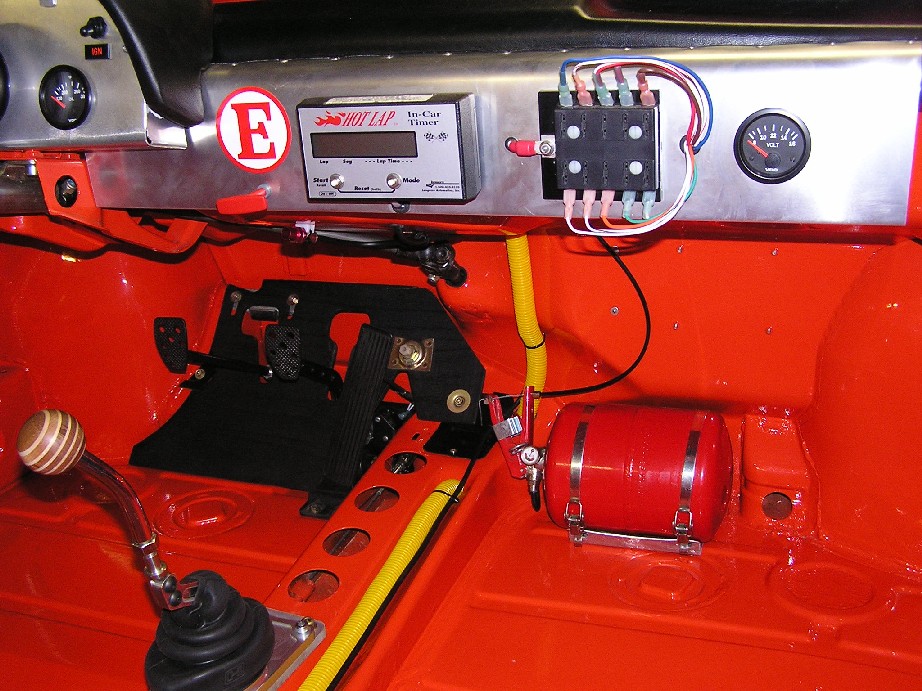
Posted by: brant Mar 15 2005, 03:51 PM
Ferg, I kinda snuck this picture in on ya:
Attached thumbnail(s)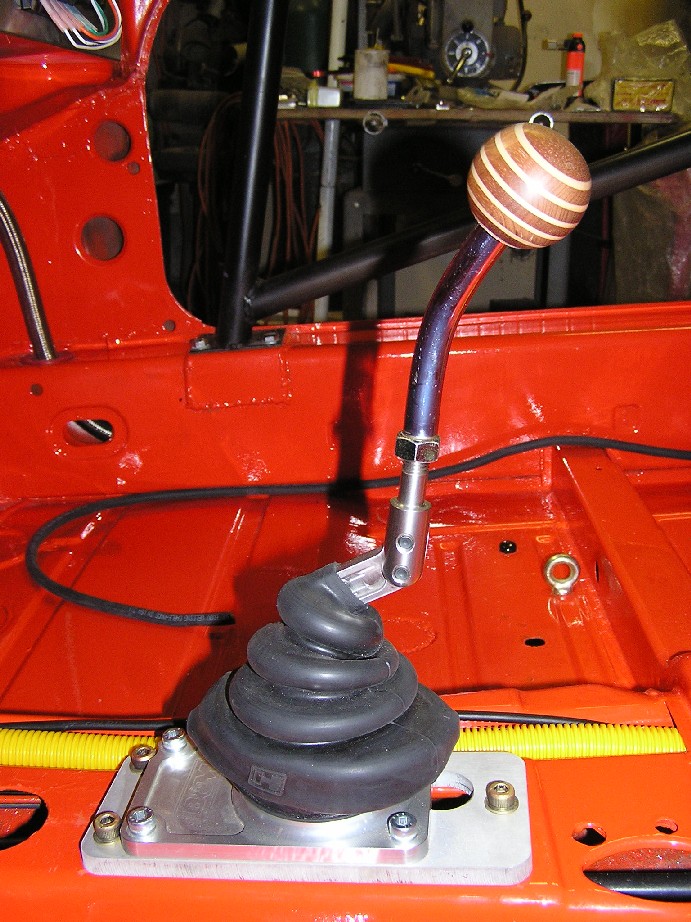
Posted by: brant Mar 15 2005, 04:23 PM
More wiring loom. The engine bay is starting to look very full:
Attached thumbnail(s)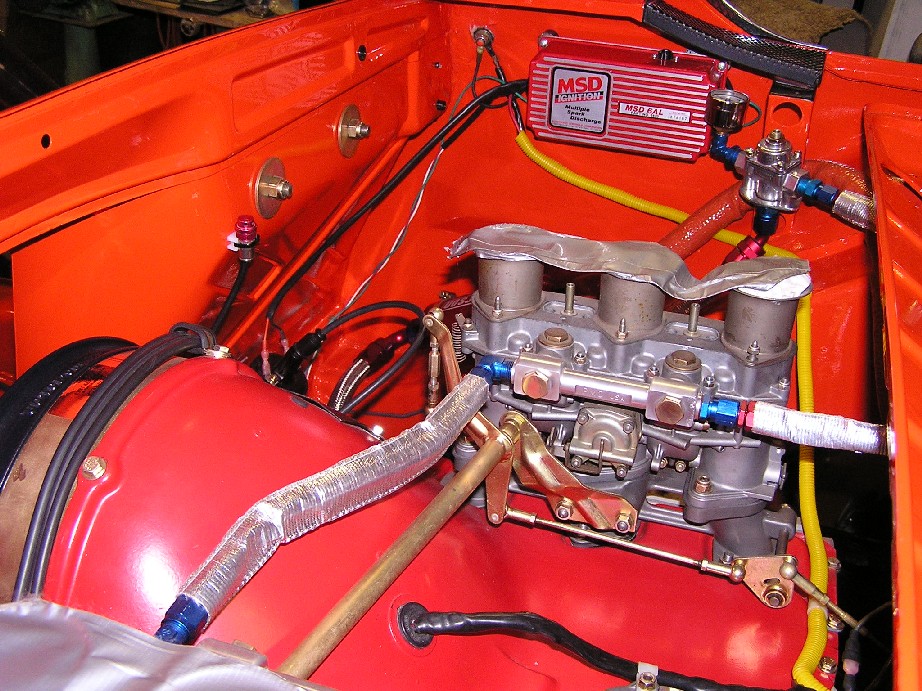
Posted by: Gint Mar 15 2005, 04:24 PM
Simply awesome Brant. Please tell Bob I said so, and "Hi!" for me.
How about some pics of the new Focus?!?!
Posted by: brant Mar 15 2005, 04:26 PM
Back of engine bay. Alternator and starter are wired in. We had to figure out a replacement diode to excite the charging circuit and then a seperate relay to trigger our large alternator/cooling fan warning light.
Here is the new vent hose and also where we installed the regulator:
Attached thumbnail(s)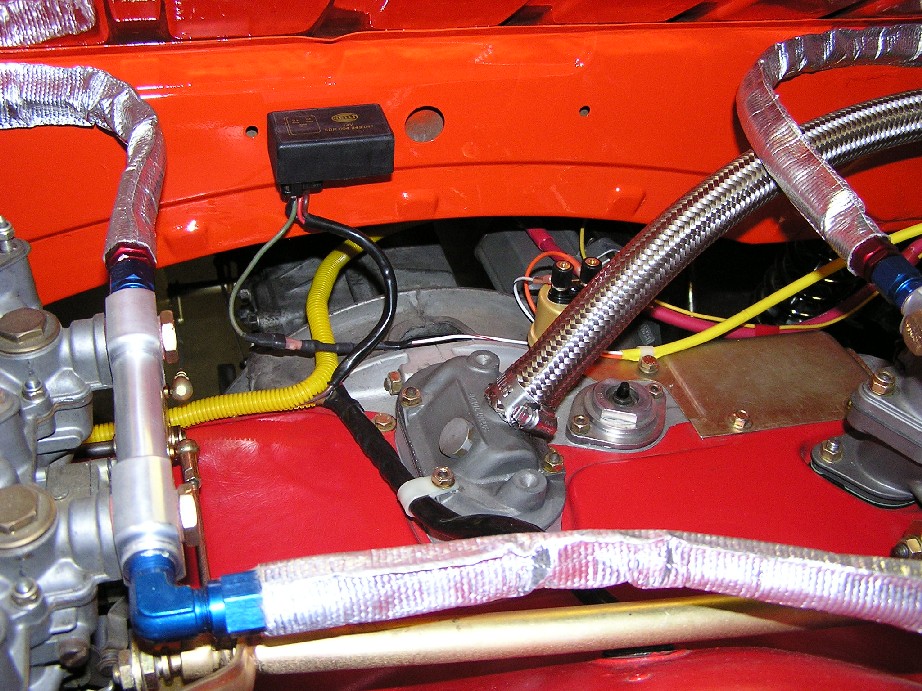
Posted by: brant Mar 15 2005, 04:28 PM
| QUOTE (Gint @ Mar 15 2005, 03:24 PM) |
| Simply awesome Brant. Please tell Bob I said so, and "Hi!" for me. How about some pics of the new Focus?!?! |
I'll tell Bob, but he reads along here regularly.
I've been trying to get him to register
you mean the big tomato?
I'll wash it up and take one.
twas the only color brighter than the yellow car
ha...
Posted by: brant Mar 15 2005, 04:29 PM
Heat shield on the oil line where is runs by the fuel line (trying to keep that fuel cool)
Attached thumbnail(s)
Posted by: brant Mar 15 2005, 04:33 PM
Tiny bit more wiring.
Brake lights will be the only exterior lights on the car. We are running them off of a very short ground and only a single power wire: (less wires = less weight)
Attached thumbnail(s)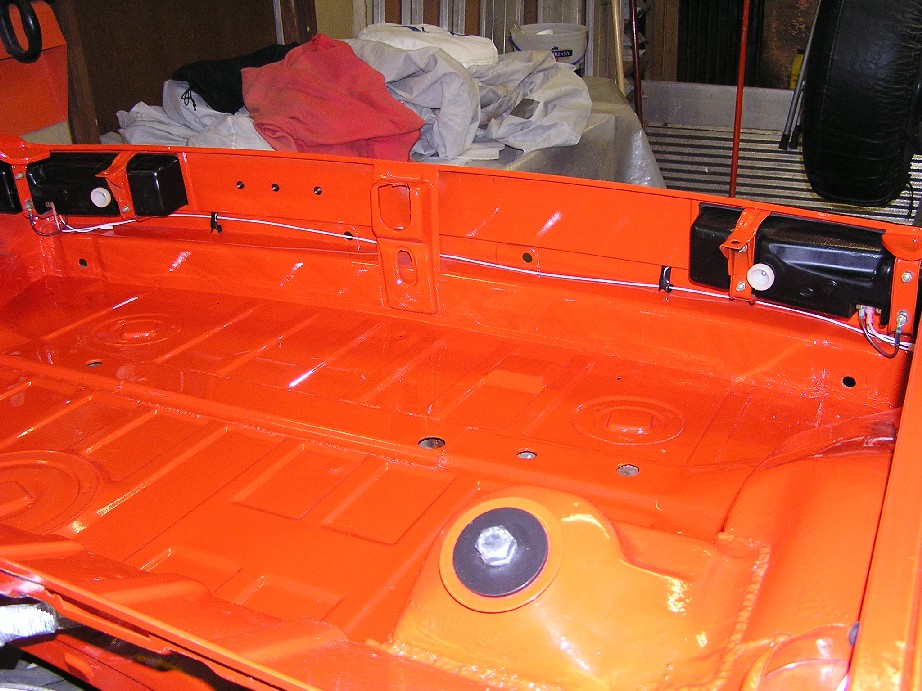
Posted by: brant Mar 15 2005, 05:06 PM
tail lights installed:
Attached thumbnail(s)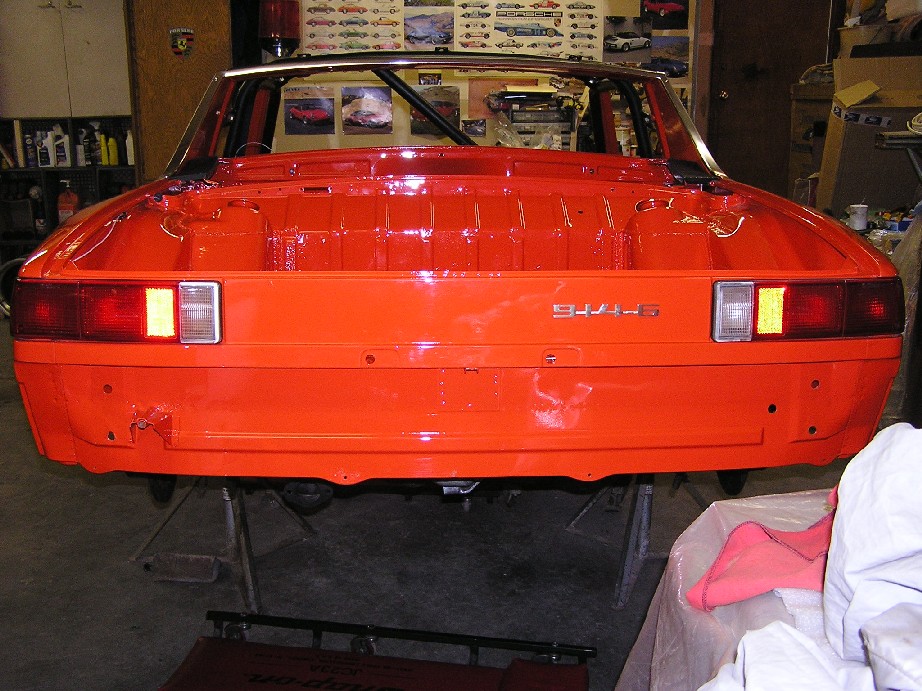
Posted by: john rogers Mar 15 2005, 05:42 PM
I am curious as to what type of plug wires you are using on the engine, solid or spiral?
Posted by: seanery Mar 15 2005, 05:48 PM
Did I miss the info about the B&M shifter?
Posted by: Ferg Mar 15 2005, 05:58 PM
Nice, I didn't weigh the shift knob to see if it is lighter than stock, but i'm sure you did! 
Ferg 
Posted by: Ferg Mar 15 2005, 05:59 PM
| QUOTE (seanery @ Mar 15 2005, 03:48 PM) |
| Did I miss the info about the B&M shifter? |
pretty sure that info is classified

Posted by: brant Mar 16 2005, 09:53 AM
John,
I'm not sure and will have to check. I've got to shorten my coil wire so will figure it out soon. They were on the motor when I bought it and look to be brand new. Motor was built by Henry Schmidt at Supertec and I assumed he put on what he generally uses.
Sean,
Shifter hmmm... how to say this. Well, I don't want to take away any credit from James' shifter. This is built off of a modified B&M that AJRS mods and sells. I haven't driven it yet so I honestly can't say how it works. I spoke with James about it and the rennshifter may have some things going for it that this one does not... plus the rennshifter is more affordable too. But this one is highly recommended by AJ and thats why I went with his. I place a ton of weight into his advice.
Mike Ferguson: little bit lighter!
Posted by: john rogers Mar 16 2005, 10:02 AM
Nice looking job. If the wires are solid core you'll have to change to the spiral type because of the MSD box I think, unless they have changed their requirements? Might want to check before you fire it up the first time.
Posted by: brant Mar 16 2005, 10:06 AM
| QUOTE (john rogers @ Mar 16 2005, 09:02 AM) |
| Nice looking job. If the wires are solid core you'll have to change to the spiral type because of the MSD box I think, unless they have changed their requirements? Might want to check before you fire it up the first time. |
John,
Thanks for the advice. I'll look into it. I love all the help, and thanks a ton to you and everyone!
Posted by: brant Mar 16 2005, 10:08 AM
Installed some heat wrap on the oil line from the tank to motor... Intention is to keep some of the header heat out of the oil:
Attached thumbnail(s)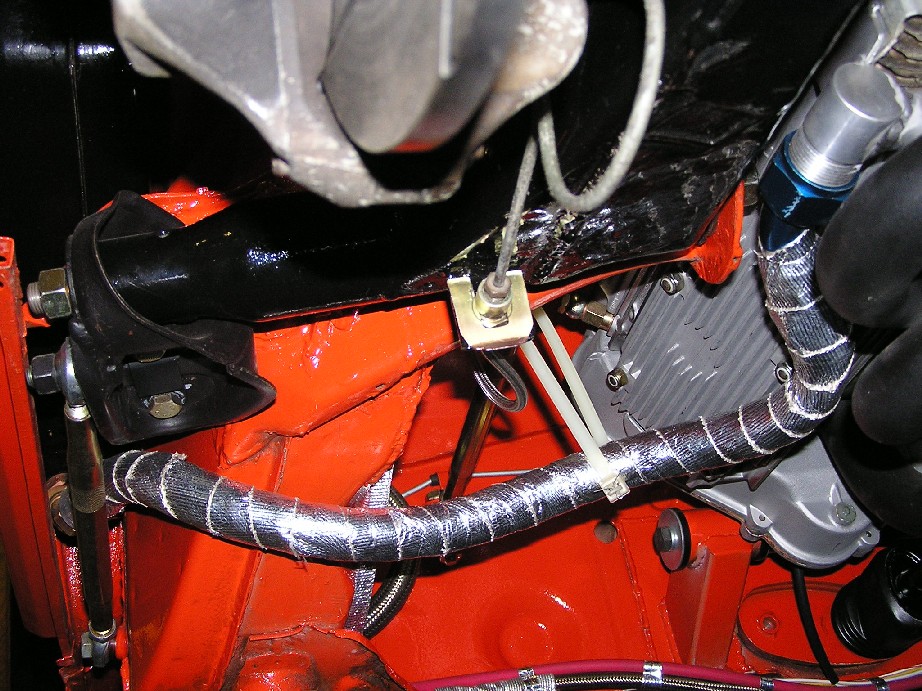
Posted by: john rogers Mar 16 2005, 10:12 AM
Here's another thing to think about. I wrapped all my lines on the race car but found that when I washed the engine off after a race weekend such as at Phoenix where it rained, they became a soggy mess and would generate tons of steam when they got hot. I finally took that off and made some removable blanket types for the lines.
Posted by: brant Mar 16 2005, 10:14 AM
Well, the dash top or pod over the gauges is finally installed and complete. I've got to throw out a HUGE thankyou to Dr. Evil on this one. Mike did such a nice job getting it smoothed out and covered. It was really in bad shape and cracked. Since the dash is moved forward about 6inches from stock, we had to custom shape all of the edges to fit the non-stock dash contours:
Attached thumbnail(s)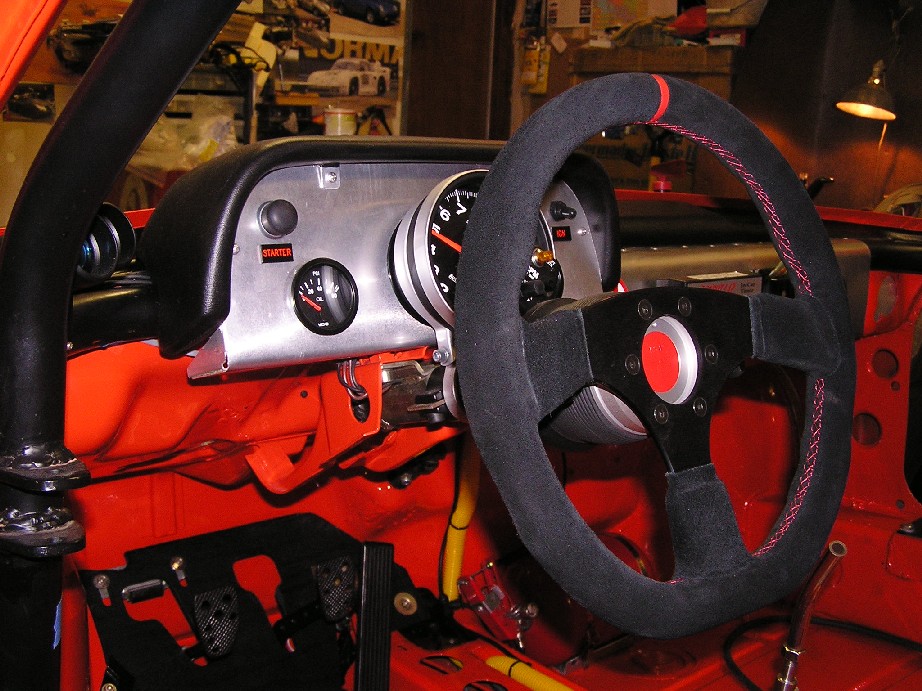
Posted by: brant Mar 16 2005, 10:17 AM
| QUOTE (john rogers @ Mar 16 2005, 09:12 AM) |
| Here's another thing to think about. I wrapped all my lines on the race car but found that when I washed the engine off after a race weekend such as at Phoenix where it rained, they became a soggy mess and would generate tons of steam when they got hot. I finally took that off and made some removable blanket types for the lines. |
more good advice.
I know the orange heat cover and the silver heat cover on all the fuel lines are the blanket type, but the one on that pictured oil line is a wrap... Its and adhesive style that may or may not give me problems. I'll definitely mull that over and watch it. Thanks again John.
Posted by: brant Mar 16 2005, 10:18 AM
Hope people aren't sick of the dash pictures yet.
It was such a ton of work and I'm really happy with the way it came out. Probably explains the shutter happy picture count:
Attached thumbnail(s)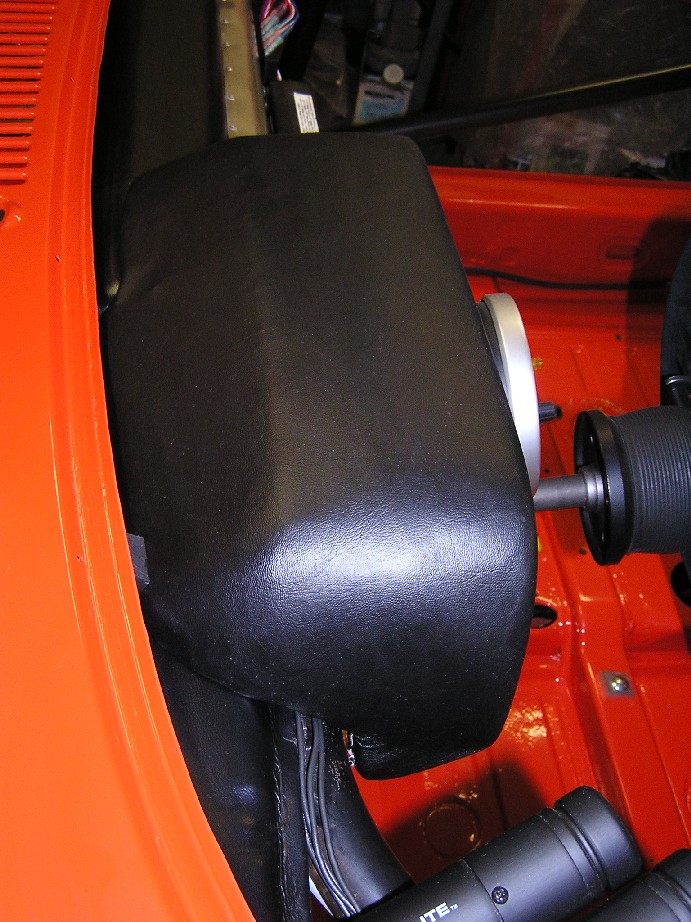
Posted by: brant Mar 16 2005, 10:19 AM
Last dash shot. You can more clearly see some of the custom contouring that went into making the pod fit the remaining dash:
Attached thumbnail(s)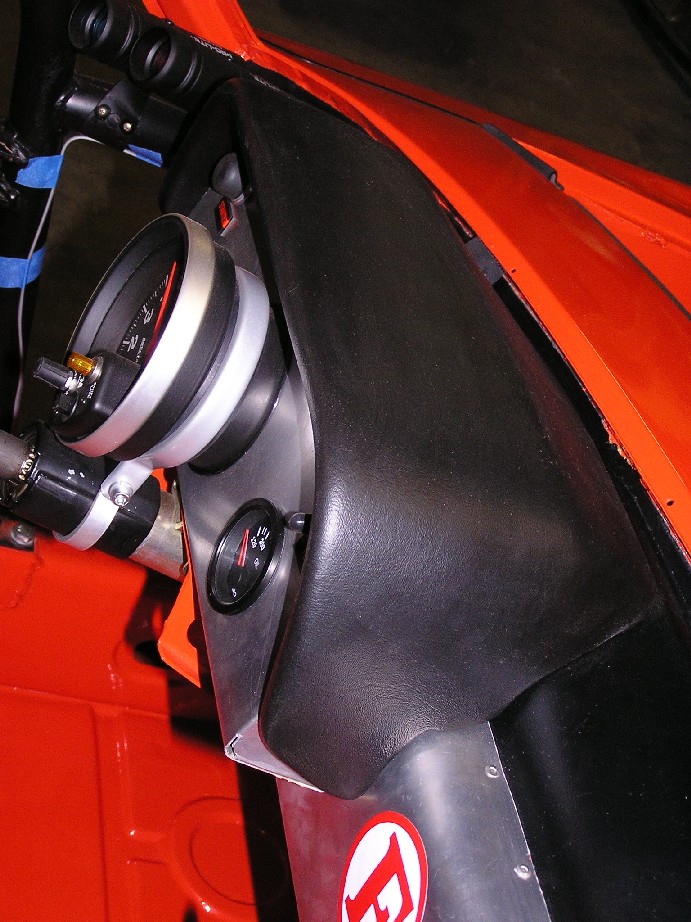
Posted by: Root_Werks Mar 16 2005, 10:24 AM
Clean parts!
I love the dash! Race bread, but still 914, great work! I love pic's, so snap away and post my friend! 
Posted by: brant Mar 16 2005, 10:33 AM
Thanks Dan. Regarding the dash that was exactly what I was shooting for. 914 - looking.
Posted by: Root_Werks Mar 16 2005, 11:01 AM
My latest six project is no race car, but some of what you have done here has inspired me to do certain things on my 914. One thing I love about this club is the great ideas you get from other 914 owners. So thanks for that!
I don't suppose you have a picture of the car as a whole handy? I gotta check the back pages of this thread...... 
Posted by: brant Mar 16 2005, 11:51 AM
Not really any whole pictures. On the first page there is a side view of the chassis in whole (with the doors/hoods/roof missing).
There is also a whole picture from the seller in the "before" state.
I should be mounting body panels and doors before too long and will have some shots at that time. I've got a few more body panel tricks up my sleeve.
Posted by: brant Mar 16 2005, 12:40 PM
Last of the pics from this work weekend. We installed the lexan rear windown. On the passenger side it has venting for interior air comfort, that we cut out. Here is the view from the inside.
The big white beast (through the window) is my new to me tow vehicle:
Attached thumbnail(s)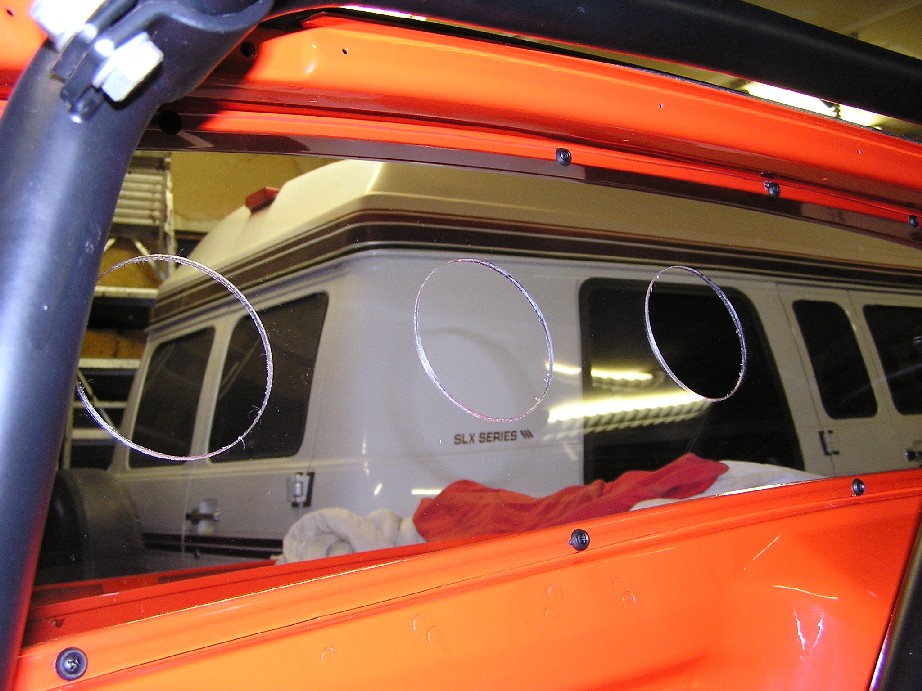
Posted by: brant Mar 16 2005, 12:40 PM
The view from the rear:
Attached thumbnail(s)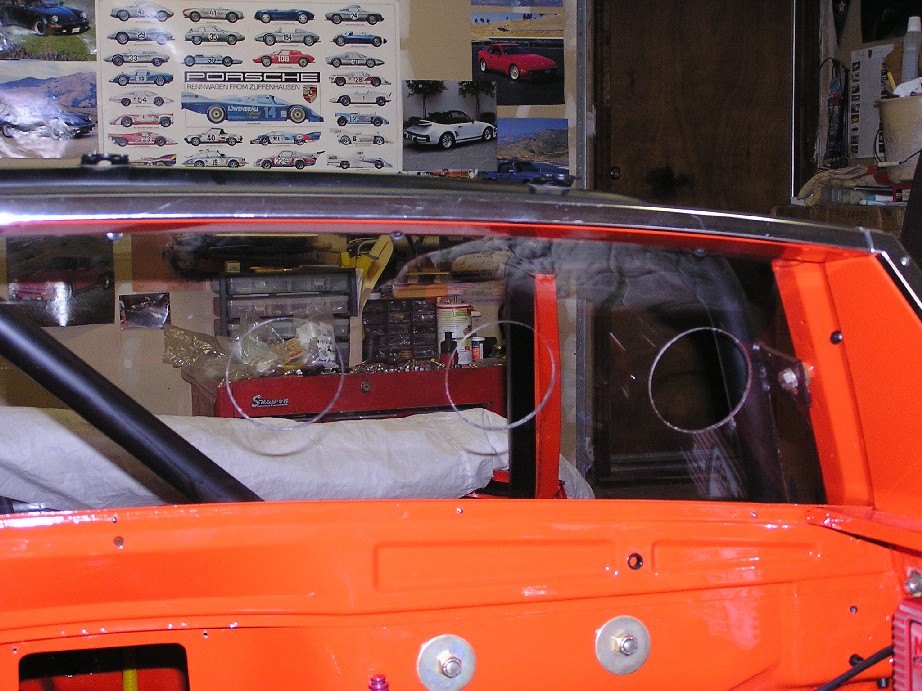
Posted by: Mueller Mar 16 2005, 12:52 PM
look'n good....I hope you have some ear plugs
Posted by: brant Mar 16 2005, 06:31 PM
| QUOTE (Mueller @ Mar 16 2005, 11:52 AM) |
| look'n good....I hope you have some ear plugs |
I think your right... I still need to get some.
Posted by: BMartin914 Mar 16 2005, 07:38 PM
TOO COOL BRANT! I can't wait to see it!
Posted by: brant Mar 18 2005, 10:31 AM
| QUOTE (Gint @ Mar 15 2005, 03:24 PM) |
| Simply awesome Brant. Please tell Bob I said so, and "Hi!" for me. How about some pics of the new Focus?!?! |
Ok, I'm pulling my own thread off topic now..
oh well, this has become somewhat of a picture book for me anyways...
Gint, here is the tomato:
(along with the bannana that I'll be doing my liscensing school in this weekend for the 2nd year in a row... but hey I took 2nd last year in the fun race to an M3)
Attached thumbnail(s)
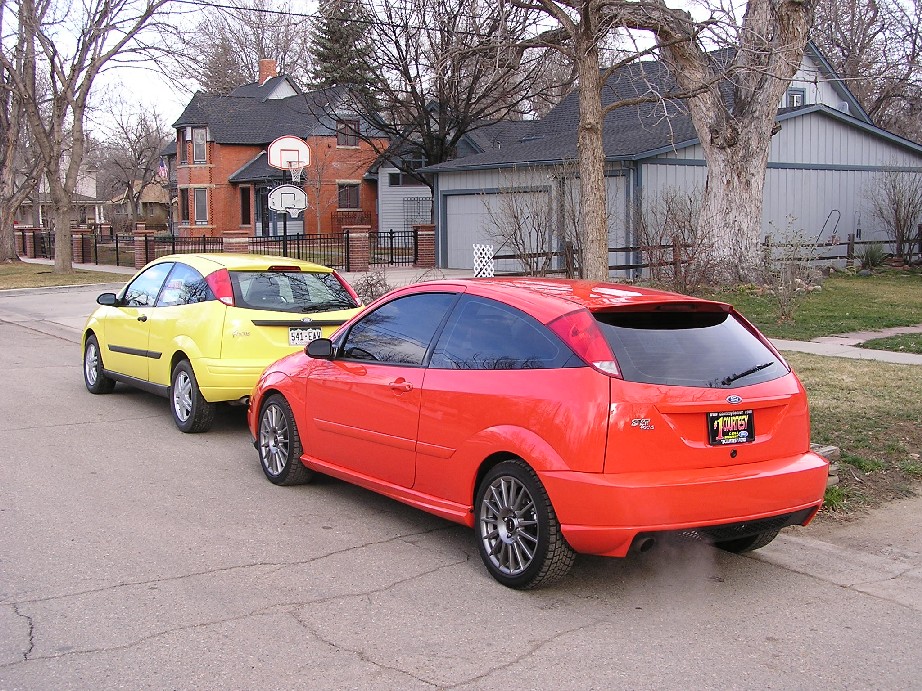
Posted by: brant Mar 18 2005, 10:51 AM
mmmm... oranges...mmmm..
Attached thumbnail(s)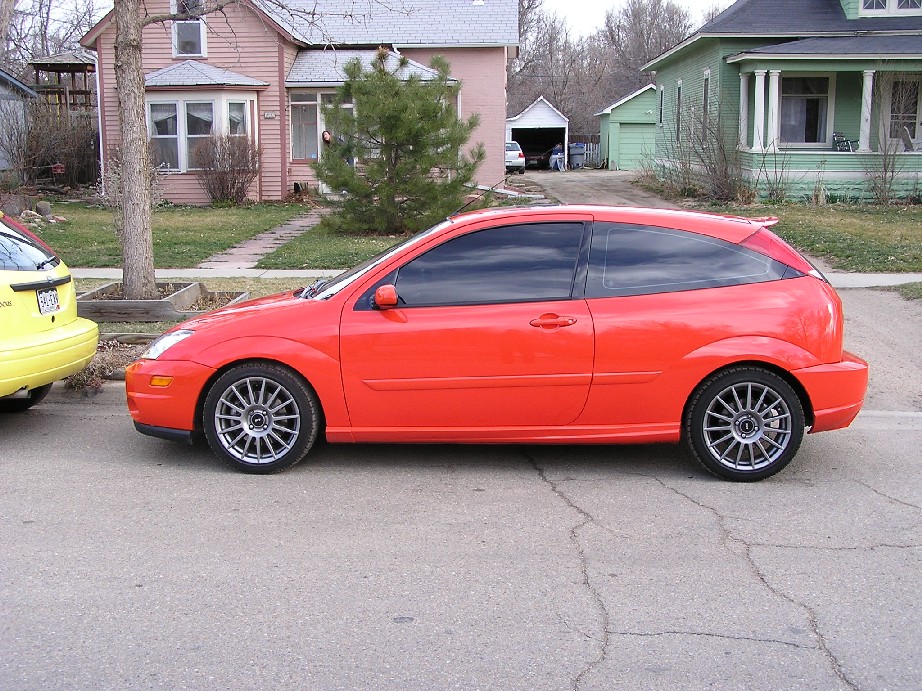
Posted by: brant Mar 18 2005, 10:52 AM
last one.. you may now resume your regularly scheduled programing:
Attached thumbnail(s)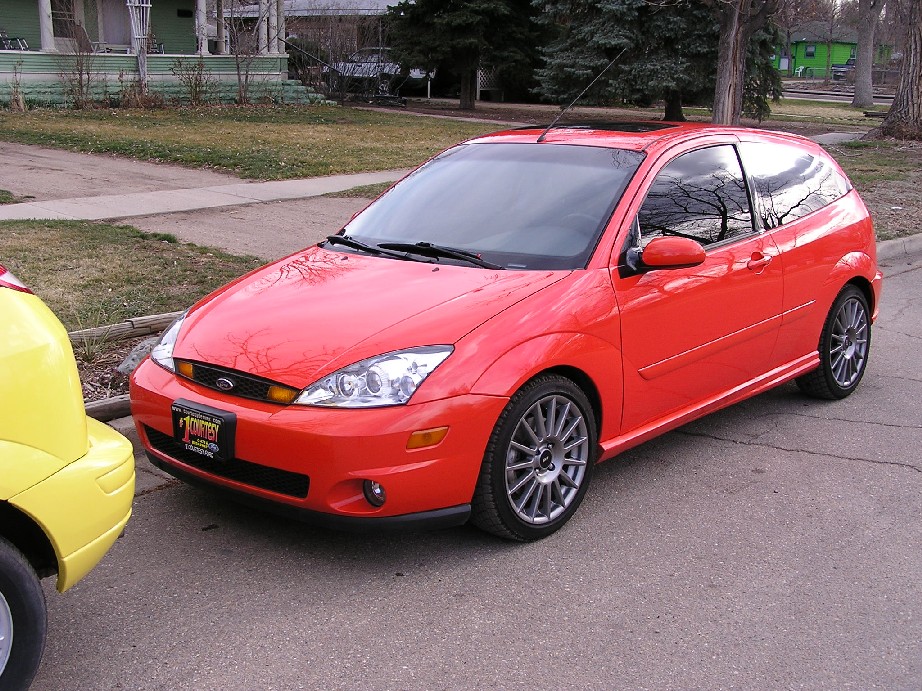
Posted by: Gint Mar 18 2005, 05:35 PM
I love it! But as you know, I'm partial to orange.
Posted by: brant Mar 19 2005, 09:11 PM
| QUOTE (Gint @ Mar 18 2005, 04:35 PM) |
| I love it! But as you know, I'm partial to orange. |
me too...
don't you think it will be a nice theme color to my race car?
"Pumpkin Racing Team"
Posted by: Gint Mar 19 2005, 09:39 PM
Posted by: brant Apr 5 2005, 04:27 PM
Update time...
On 4/3/05 the project left its jackstands.
I know its not like its running or anything, but its still a big step. It was around October or November of 02 when I quit driving it... So Two and a half years basically.
Ride height is WAY off... but here is a pic of it on its own 4 feet:
Attached thumbnail(s)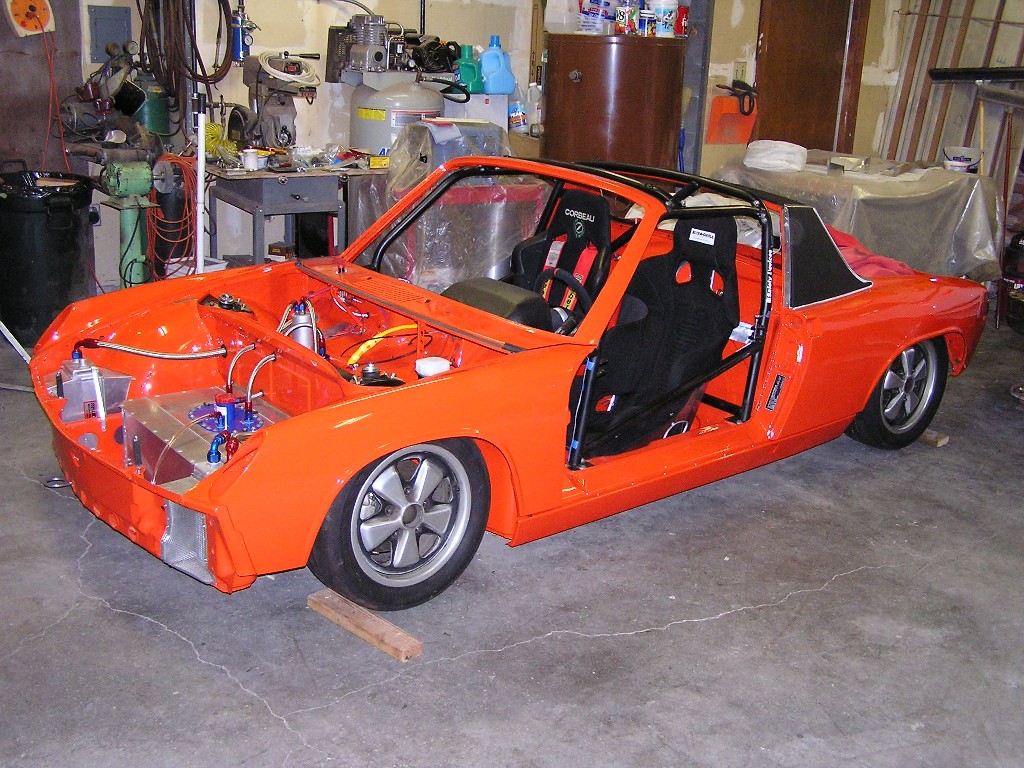
Posted by: brant Apr 5 2005, 04:32 PM
Its got nearly the correct front to rear rake right now, but even with the custom lenght shocks I don't have nearly enough travel.
Here is the rear donut ride height currently:
Attached thumbnail(s)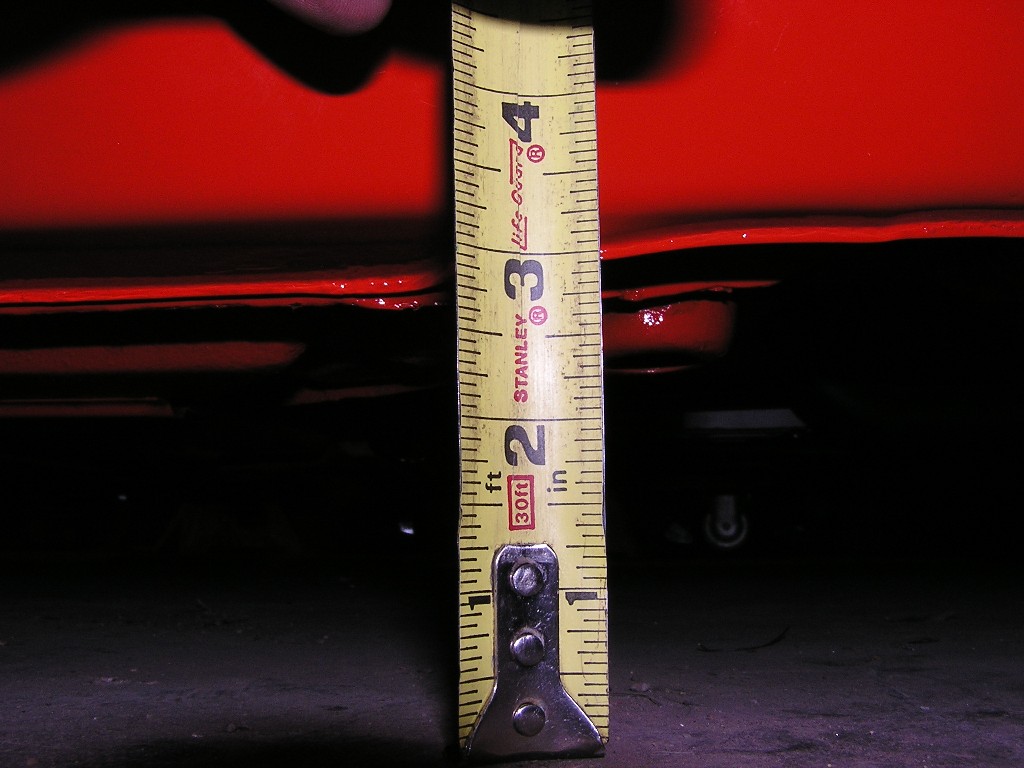
Posted by: brant Apr 5 2005, 04:37 PM
Rear fender - tire clearance looks to be pretty good:
Attached thumbnail(s)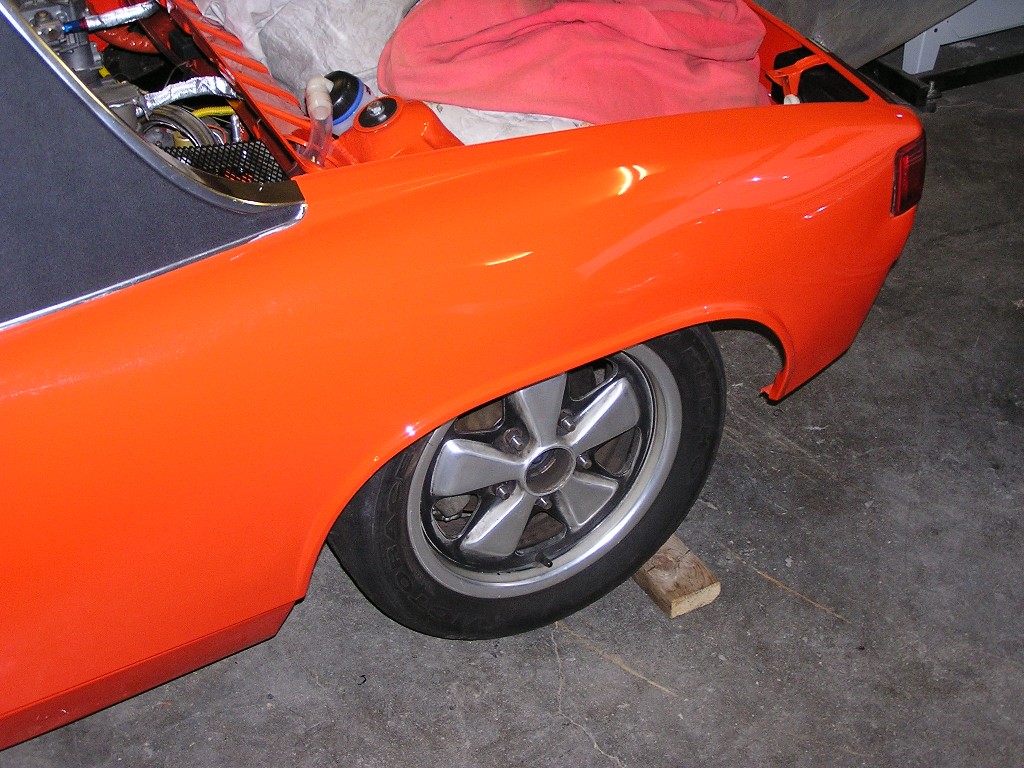
Posted by: brant Apr 5 2005, 04:38 PM
For trial purposes, these are only 6inch wheels and I will be running 7's:
Attached thumbnail(s)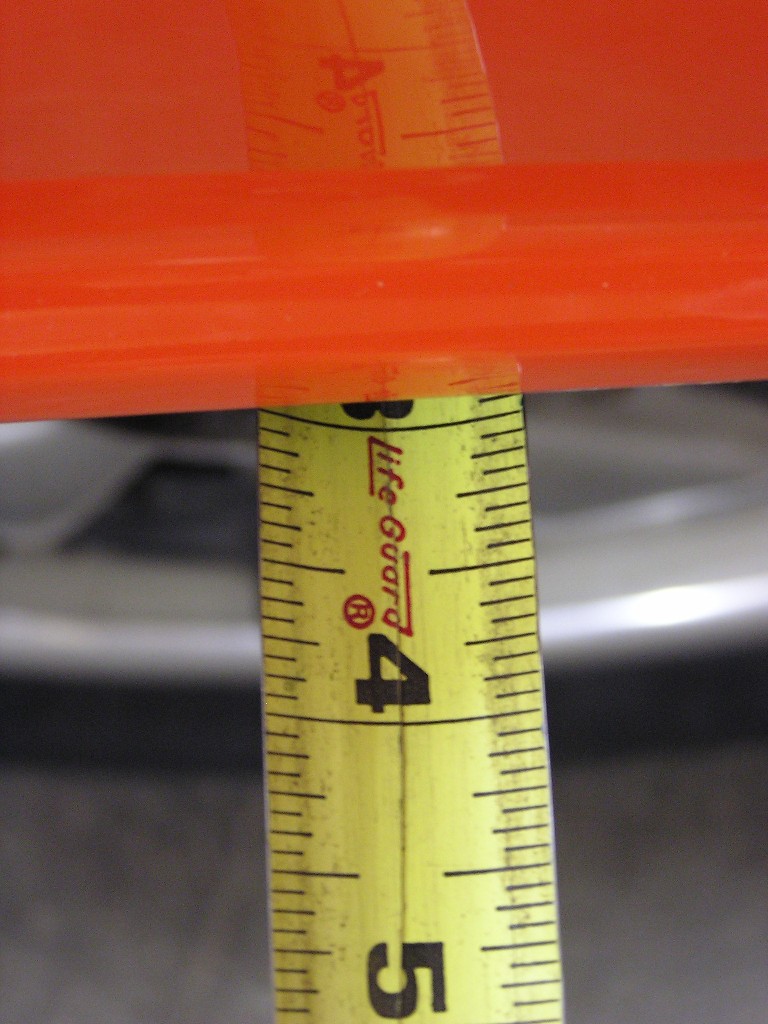
Posted by: brant Apr 5 2005, 04:41 PM
Both seats are now in:
Attached thumbnail(s)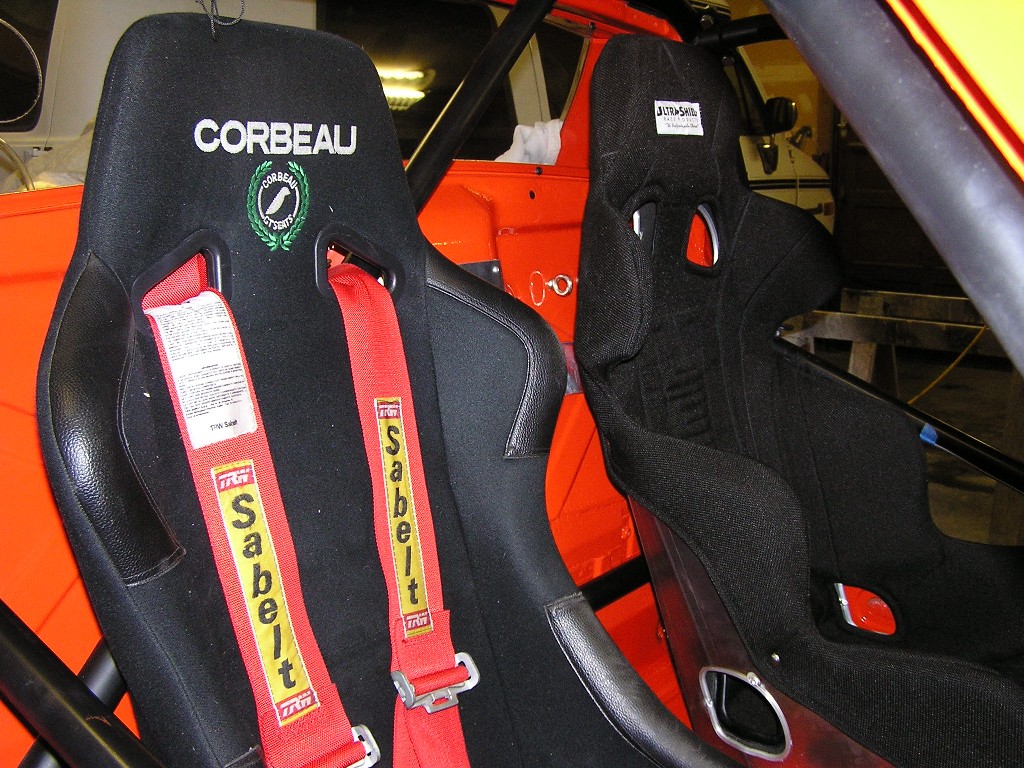
Posted by: brant Apr 5 2005, 04:43 PM
The battery is in and actually tucks nicely under the passenger seat. Here is the view with seat removed:
Attached thumbnail(s)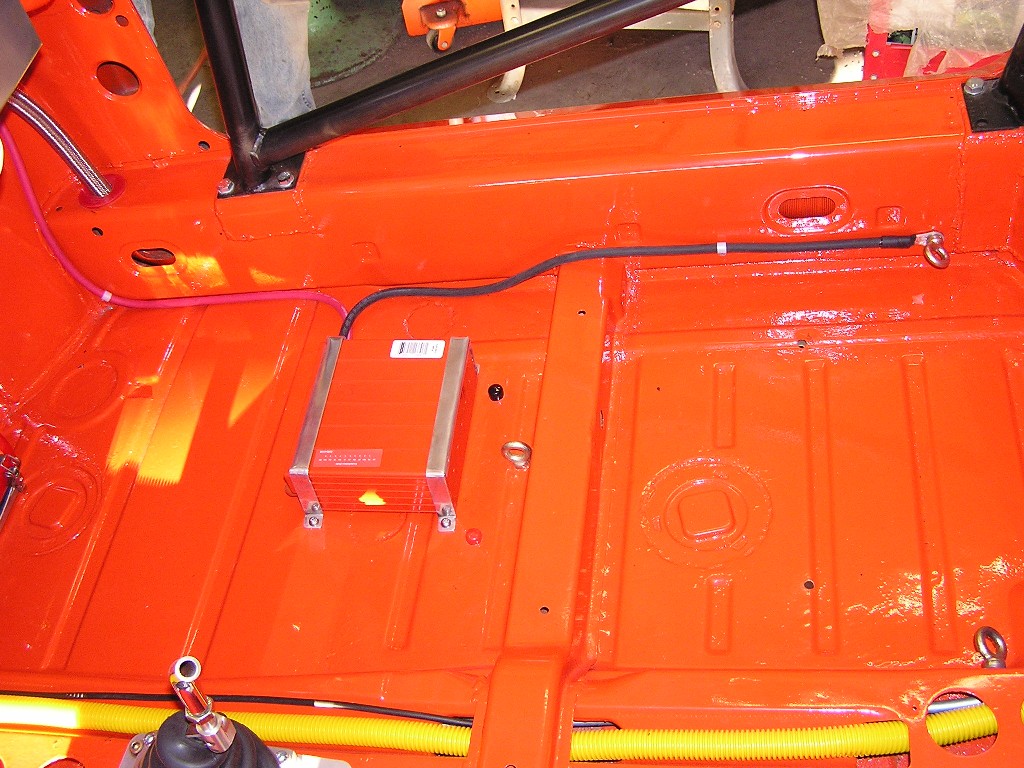
Posted by: brant Apr 5 2005, 04:44 PM
Here is the aluminum seat back brace which is bolted to the drivers seat:
Attached thumbnail(s)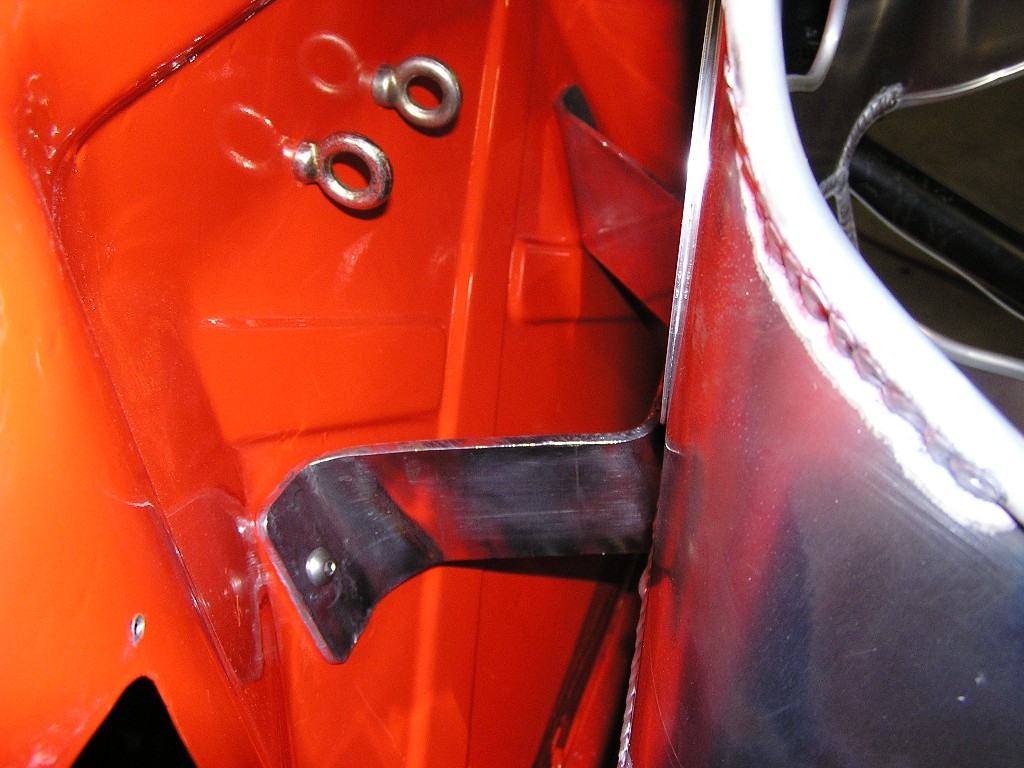
Posted by: brant Apr 5 2005, 04:55 PM
Dad got the stainless steel stone guards installed on the coolers:
Attached thumbnail(s)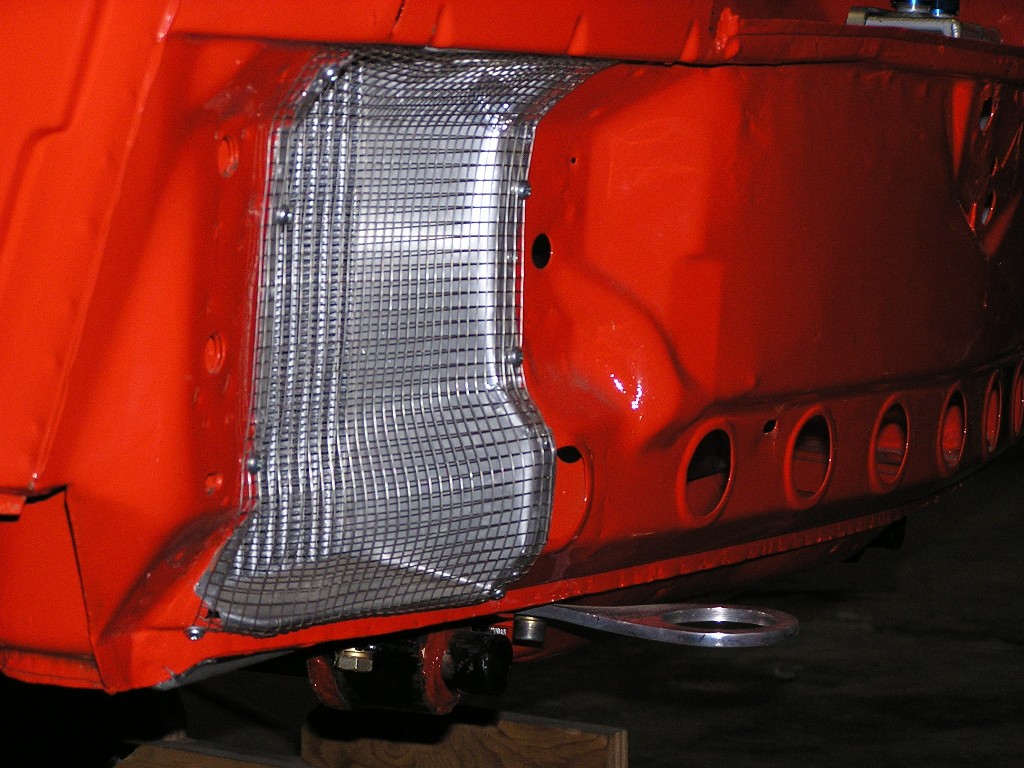
Posted by: Gint Apr 5 2005, 05:47 PM
Looks to me like you could use a nice little break...
http://www.914world.com/bbs2/index.php?act=ST&f=2&t=28620&view=getlastpost
Posted by: Jeroen Apr 5 2005, 06:23 PM
Man... I just love the details on your car!!!
The way you connected the earth-strap to the harness eyebolt
And those oilcooler protectors are jsut amazing 
Posted by: brant Apr 6 2005, 11:14 AM
Thanks Jereon, I always admire your work too and it means a lot.
Mike G, I would like to go but laura thinks I'm spending about 110% too much time on car related stuff already
Posted by: brant Apr 6 2005, 11:19 AM
Thanks to Andy and the admins for their time and money to run this club!!!!
here are a few more photos from last weekend.
I had to have 2x puke bottles per regulation. One for the tranny and the other for the motor. We ended up using large bike bottles that were just enough ounces to meet the rule. We bought bike hangers that were made from aluminum and weigh basically nothing:
Attached thumbnail(s)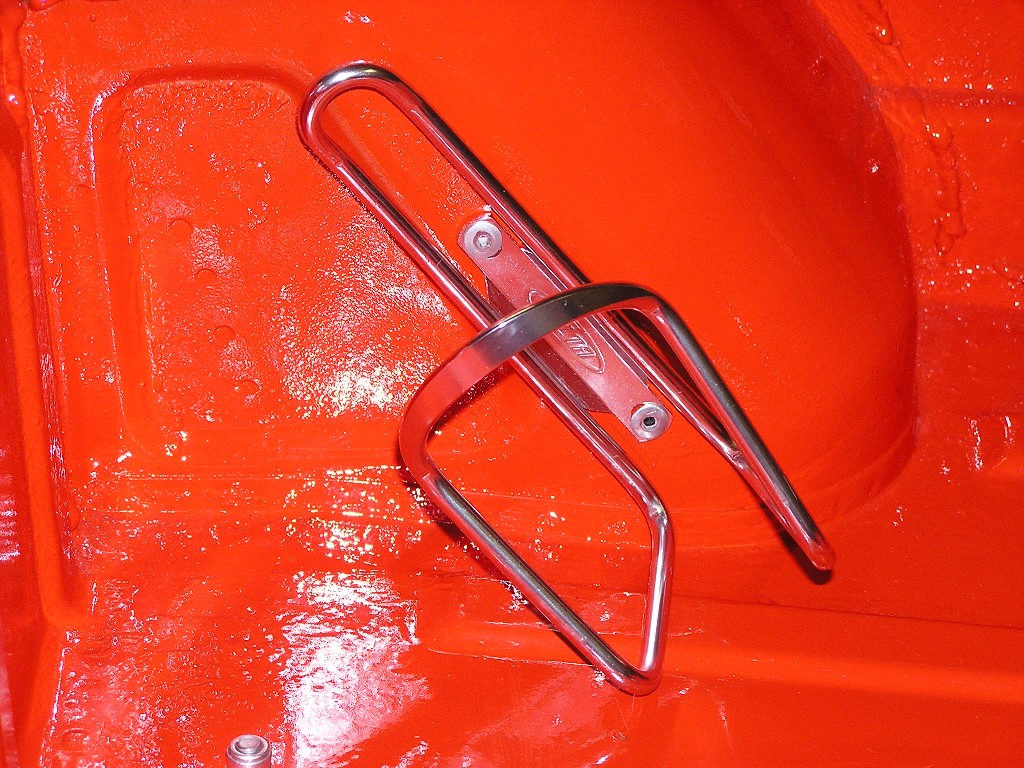
Posted by: brant Apr 6 2005, 11:20 AM
Here is the picture with the bottles installed:
Attached thumbnail(s)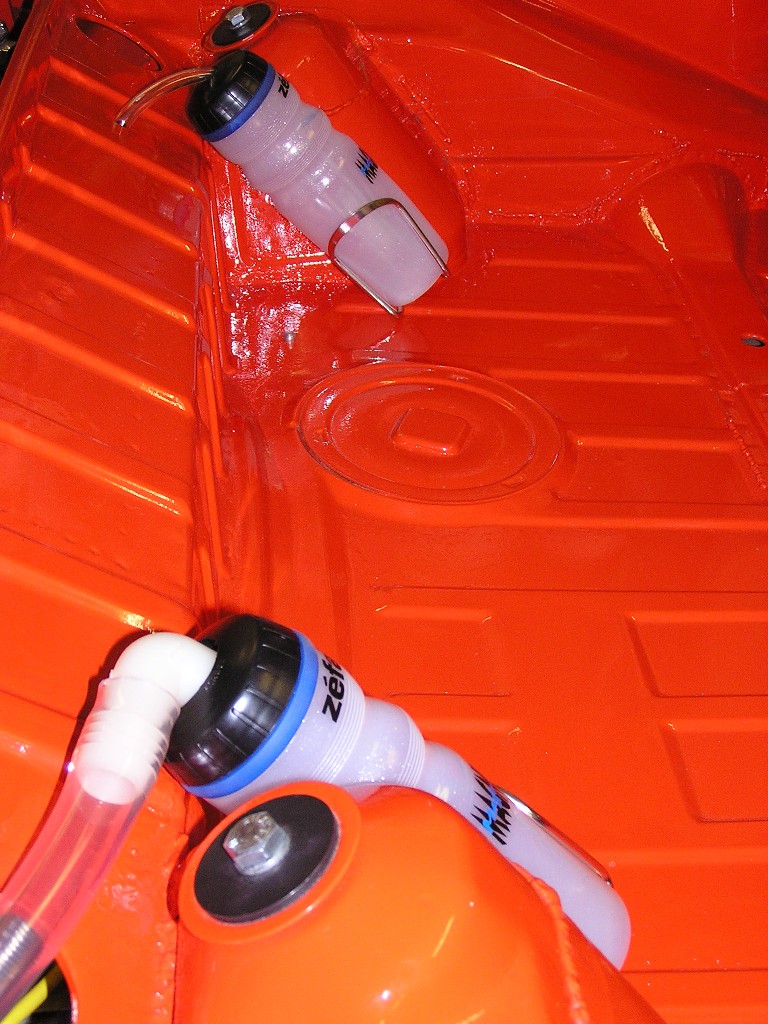
Posted by: brant Apr 6 2005, 11:31 AM
Got the front lexan windshield installed:
Attached thumbnail(s)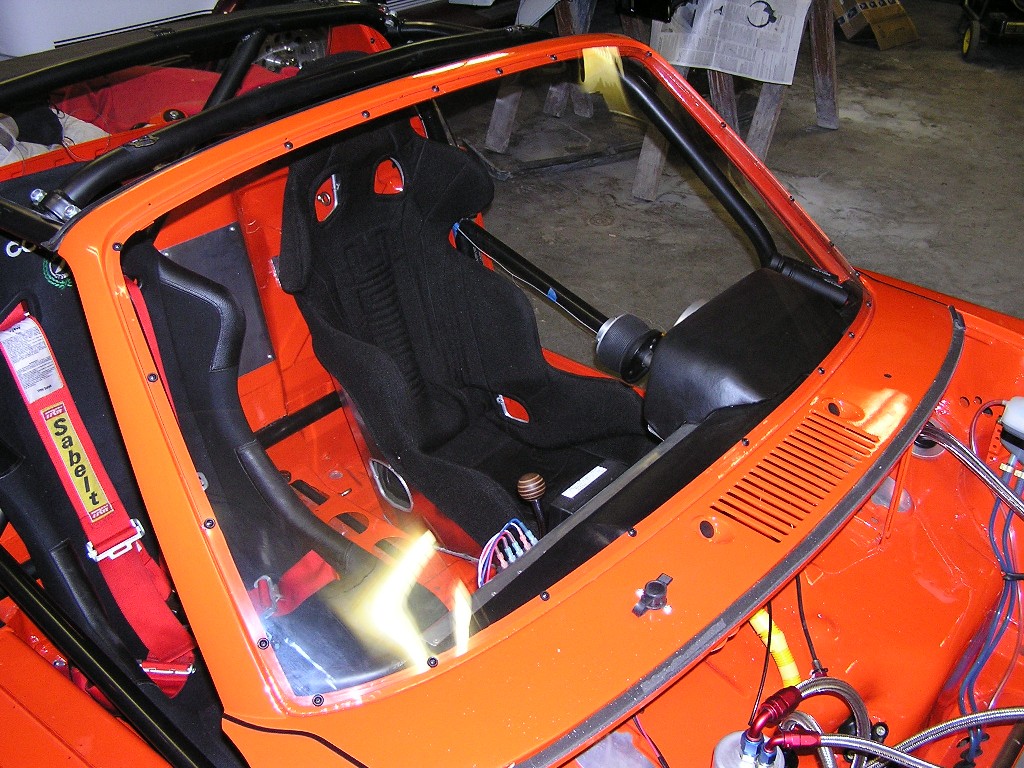
Posted by: ! Apr 6 2005, 11:34 AM
| QUOTE (john rogers @ Mar 16 2005, 08:02 AM) |
| Nice looking job. If the wires are solid core you'll have to change to the spiral type because of the MSD box I think, unless they have changed their requirements? Might want to check before you fire it up the first time. |
With the MSD box....make sure you have the suppression diode inline with the D+ circuit that goes the alt bulb in the dash...otherwise you will have engine run on when turning the ignition off...
Posted by: brant Apr 6 2005, 11:34 AM
Spent a bunch of time last weekend finishing up the paint.
We did the front and rear bumpers and also the front valance. Luckily the weather was decent and helped out with the process. We aren't the best painters, but at least we got it done:
Attached thumbnail(s)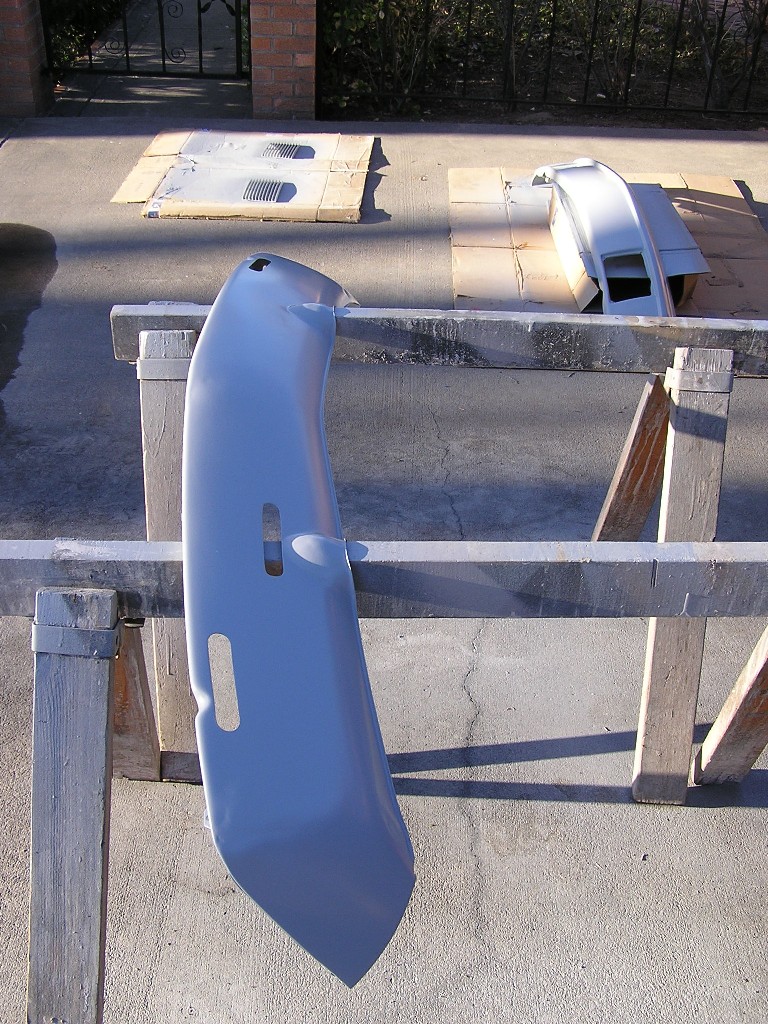
Posted by: brant Apr 6 2005, 11:36 AM
| QUOTE ("Z" @ Apr 6 2005, 10:34 AM) | ||
With the MSD box....make sure you have the suppression diode inline with the D+ circuit that goes the alt bulb in the dash...otherwise you will have engine run on when turning the ignition off... |
Good point Mike.
We put one in-line right near the regulator, you can't see it in the pics because its taped up into the loom.
Posted by: brant Apr 6 2005, 11:38 AM
Rear bumper done in black with a tiny bit of flattening agent. Here it is installed with our home-made tow hook:
Attached thumbnail(s)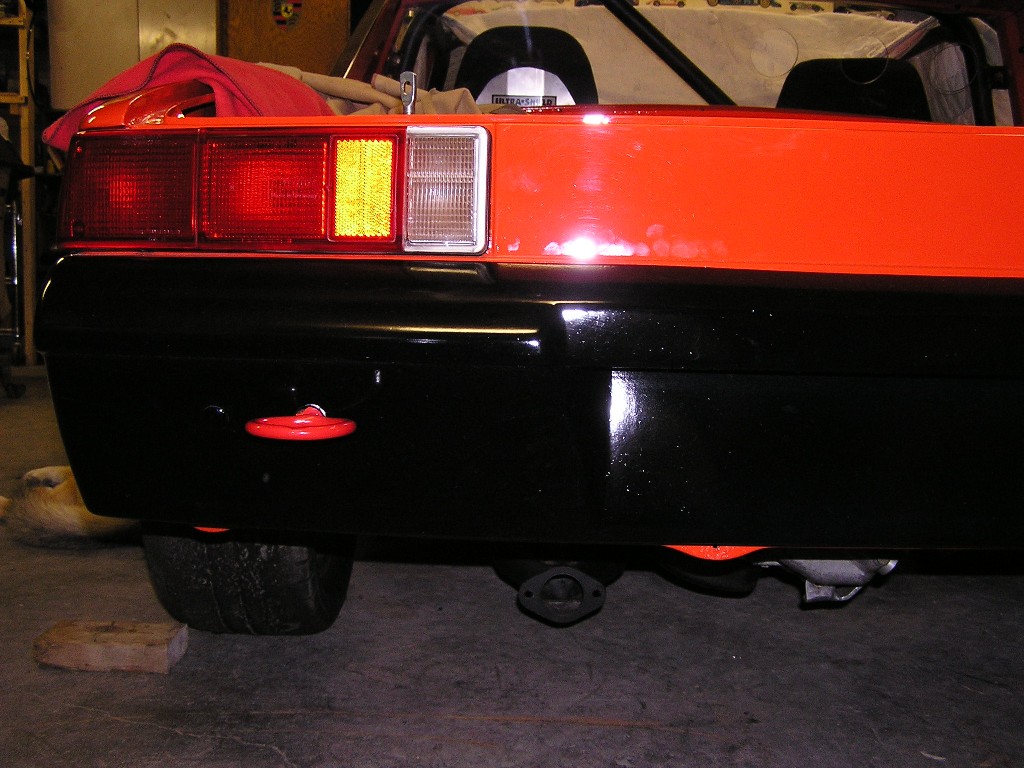
Posted by: brant Apr 6 2005, 11:41 AM
Better view of the tow hook. We bought a piece of rod and used the oxy torch to heat it and bend it around a piece of 2.5 inch pipe... Then cut it and made it round. Finally, welded it onto a bolt with the correct thread to use the factory rear tow hook location.
I have always heard the stock rear tow hooks broke, so this should be stronger than cast (plus lighter)
I'm also thinking that if the weld brakes in use then its fine with me, because I don't want them picking up the chassis from this point anyways:
Attached thumbnail(s)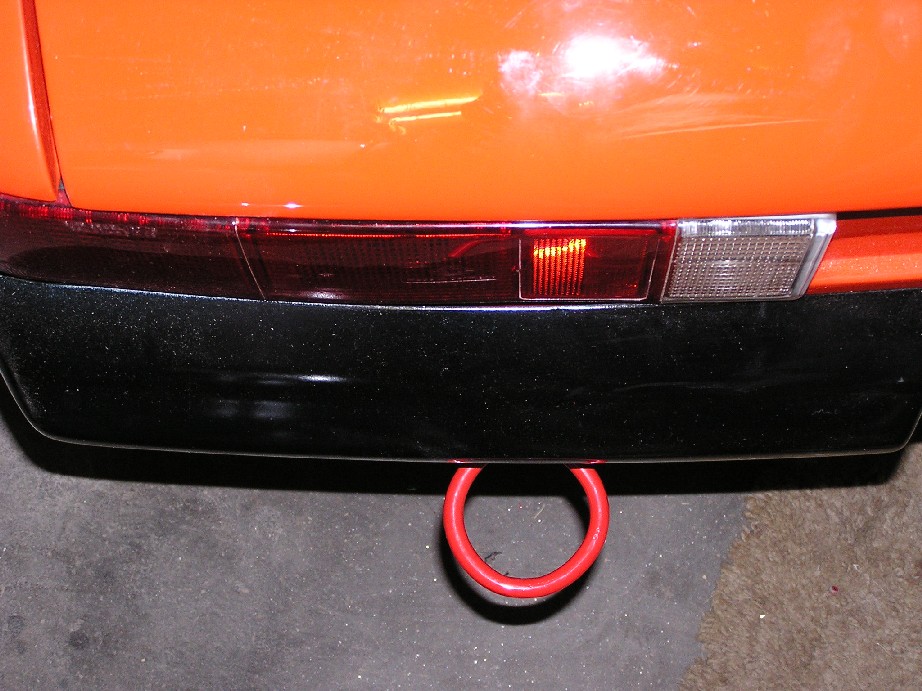
Posted by: Ferg Apr 6 2005, 11:45 AM
Looking Incredible!!!
We need to talk and formulate a engine break in plan... 
Ferg
Posted by: john rogers Apr 6 2005, 12:52 PM
Nice looking job. You might want to test the tow hook before your first race. I saw a new 911 have theirs break off when the wrecker yanked that tow strap on the way back to the pits and it sure embarised the driver!
Posted by: brant Apr 6 2005, 01:33 PM
| QUOTE (john rogers @ Apr 6 2005, 11:52 AM) |
| Nice looking job. You might want to test the tow hook before your first race. I saw a new 911 have theirs break off when the wrecker yanked that tow strap on the way back to the pits and it sure embarised the driver! |
good point John
I've been kinda worried about all of the horror stories I hear where cars are nearly lifted by their tow hooks and over zealous tow truck drivers...
So I kinda want the hook to break before the body gets bent out of shape back there.
Posted by: brant Apr 6 2005, 01:55 PM
more painting.
So here is the color scheme for the front bumper:
Attached thumbnail(s)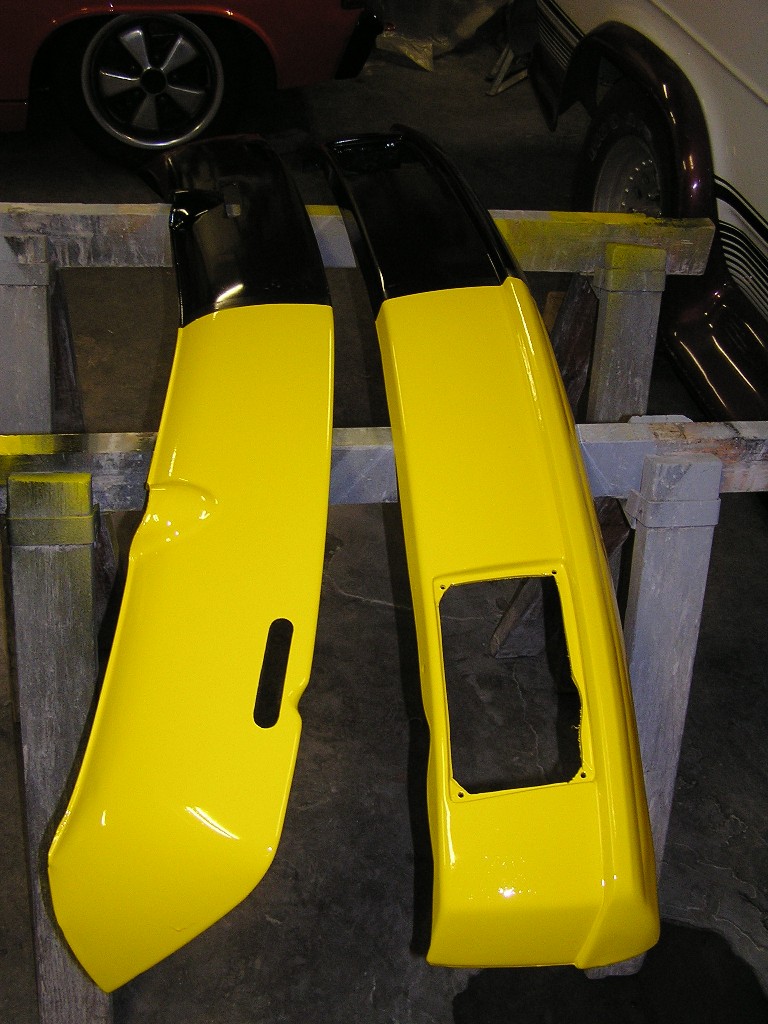
Posted by: brant Apr 6 2005, 01:57 PM
Thanks to the list and its wonderful members, I was able to come up with Horn grills for my set up:
Attached thumbnail(s)
Posted by: Ferg Apr 6 2005, 02:30 PM
sweet, i can't remember if i've seen it but what exhaust you gonna use.
Ferg.
Posted by: Aaron Cox Apr 6 2005, 02:37 PM
dude! those bumpers are hot! 
Posted by: brant Apr 6 2005, 02:59 PM
last shot of the front bumpers.
I couldn't mount them yet, due to the paint not being fully cured:
Attached thumbnail(s)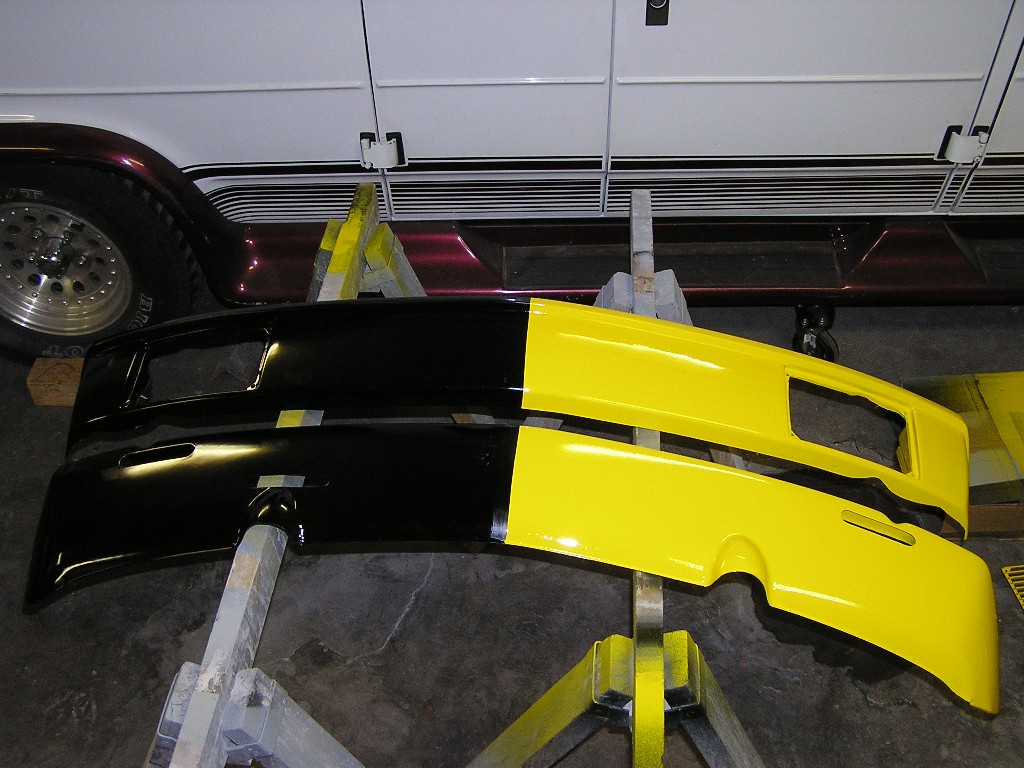
Posted by: brant Apr 6 2005, 03:00 PM
Thanks Aaron.
Ferg, I haven't gotten them welded yet.. but I have the mufflers. Twin Borla stainless steel.
one of the things still on my "to do list"
Posted by: brant Apr 6 2005, 03:15 PM
last of my pictures for now.
One last thing we got done was to mount the rear trunk lid. I've alluded to this lid before, and I'm pretty happy with the way it came out. Its a stock lid but with balsa wood reinforcement for a total loss of 11lbs. We bonded aluminum stops onto the lid and then cut balsa wood strips that are just long enough to have to bow (giving the lid the correct shape)
Here is what I mean:
Attached thumbnail(s)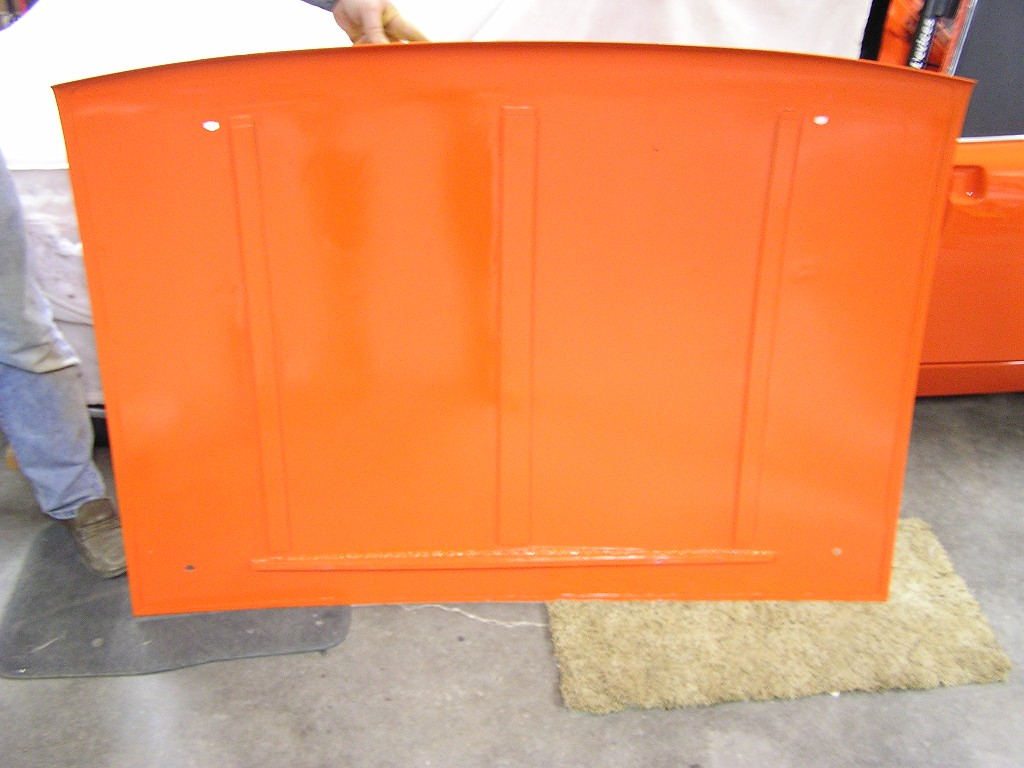
Posted by: brant Apr 6 2005, 03:15 PM
Close up of the same:
Attached thumbnail(s)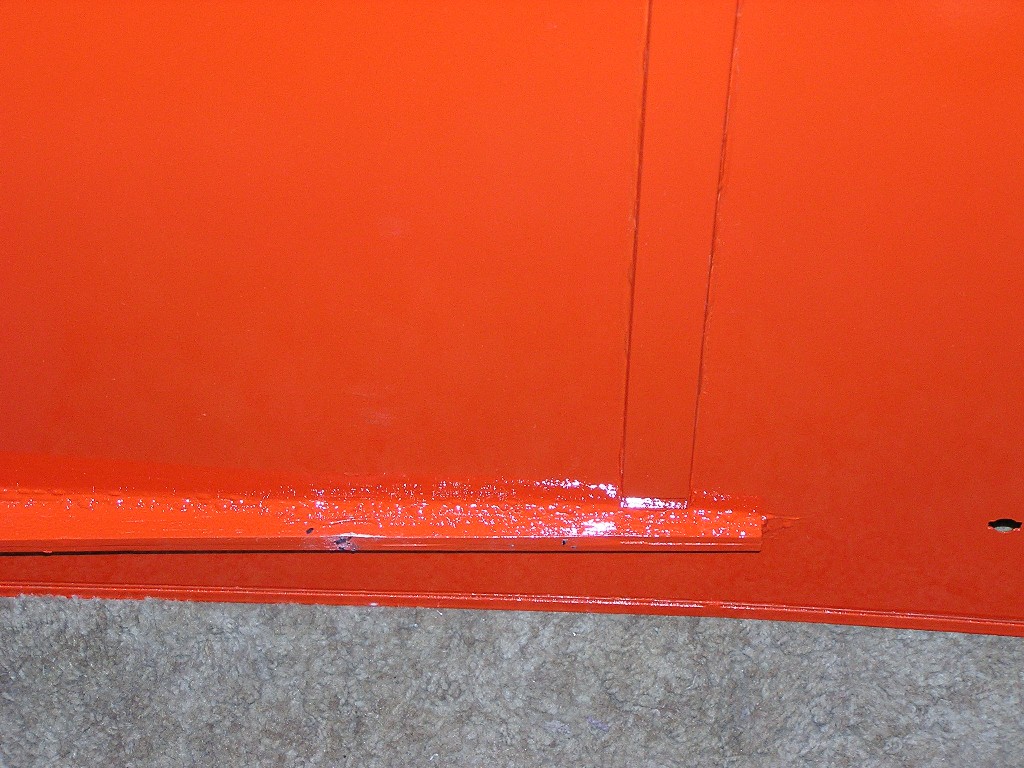
Posted by: brant Apr 6 2005, 03:16 PM
Like I said, I'm pretty proud of it and it is still a metal hood as per the rules. Here it is mounted on the car:
Attached thumbnail(s)
Posted by: brant Apr 17 2005, 07:27 PM
Another weekend passes, and a little bit more progress.
Here is the window net and hinged drivers side bar:
Attached thumbnail(s)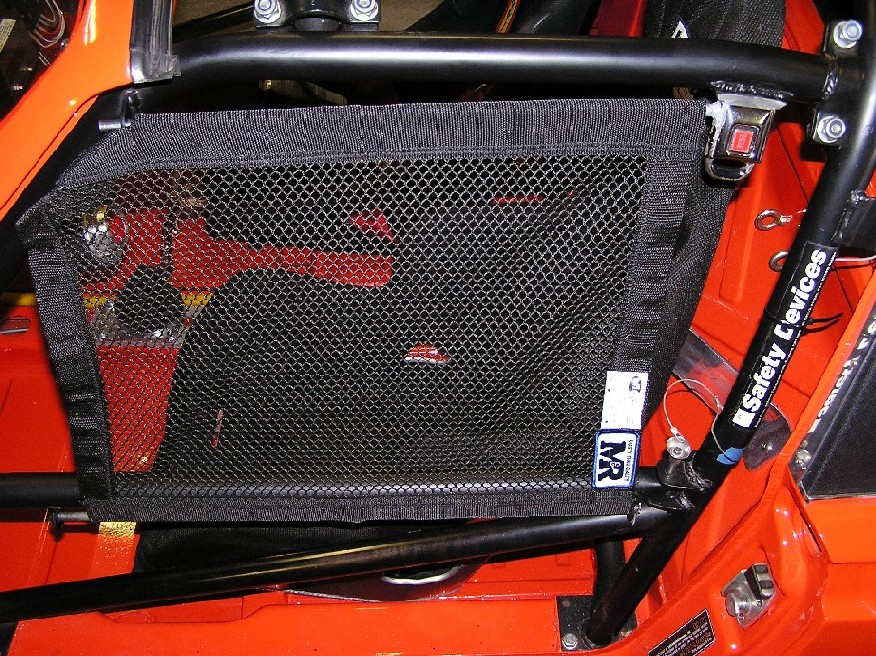
Posted by: brant Apr 17 2005, 07:31 PM
Finally got the front valance mounted.
The extra slot is additional air intake for the coolers:
Attached thumbnail(s)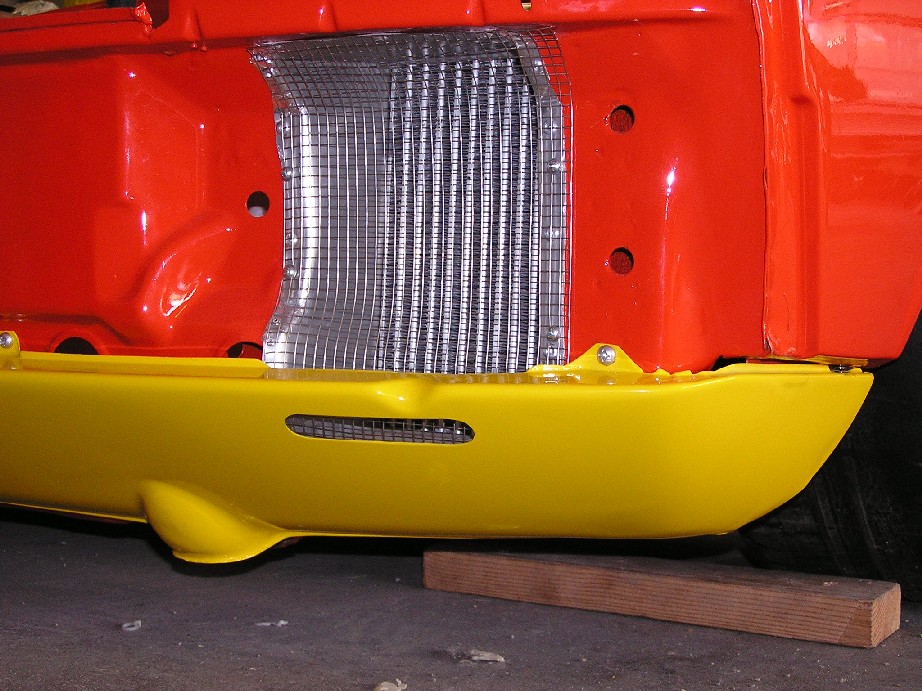
Posted by: brant Apr 17 2005, 07:33 PM
Spent Saturday morning re-painting the black half of the front bumper. I was trying to buff out an flaw in the paint and buffed through... So out came the equiptment and masking tape for a re-shoot.
Twas worth it though, I'm pleased with the finished result.
Front hood, head light doors, and turn signal covers mounting is still not finalized, but I needed to submit log book photos so here they set:
Attached thumbnail(s)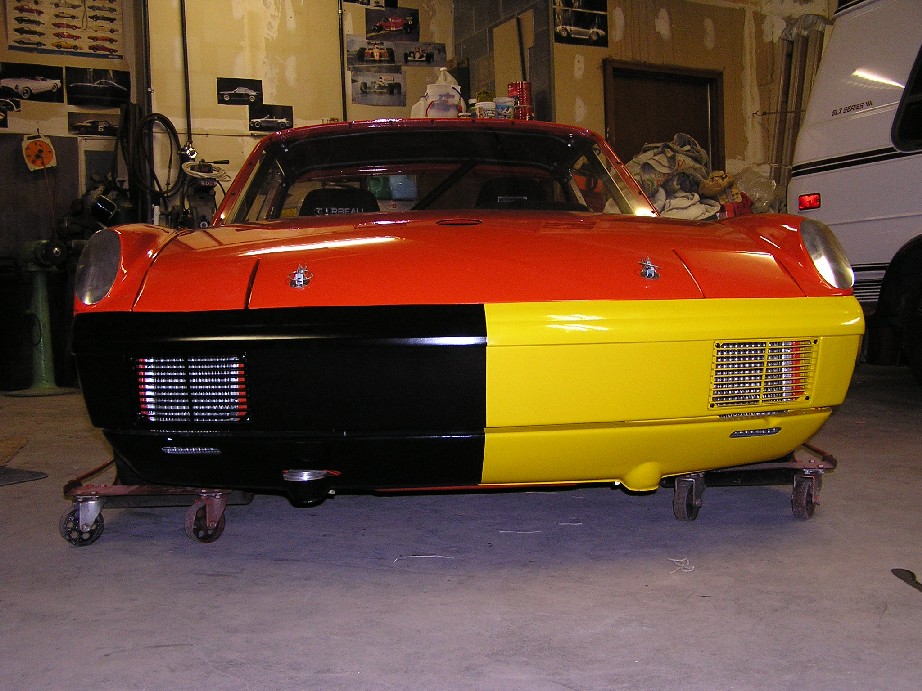
Posted by: brant Apr 18 2005, 09:04 AM
Engine lid now mounted:
Attached thumbnail(s)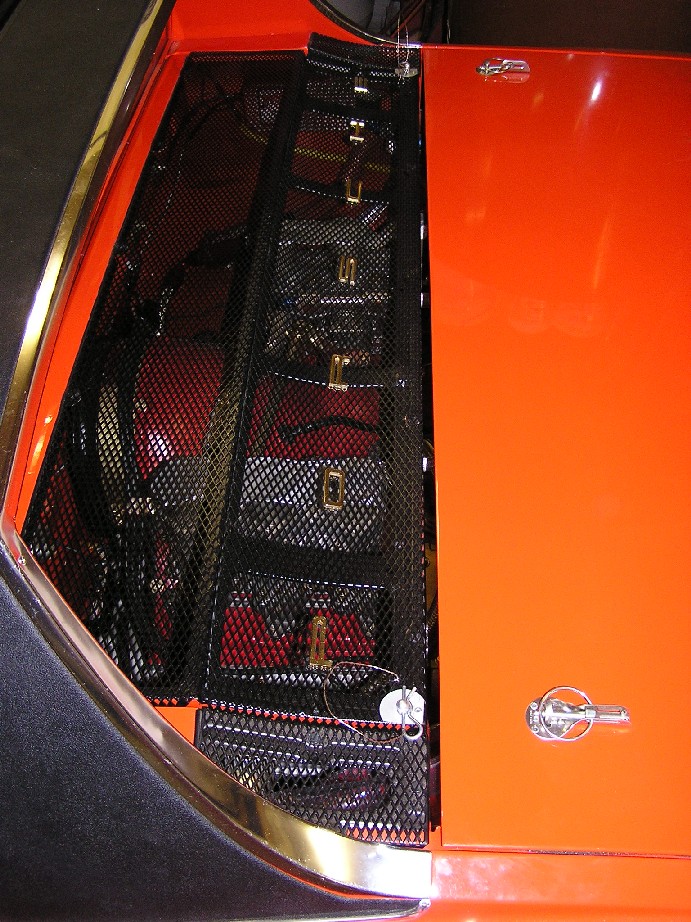
Posted by: brant Apr 18 2005, 09:06 AM
Worked on the doors. Still haven't finished the aluminum interior door panels yet. Here is a shot of the forward door hinges, with a few extra holes in them:
Attached thumbnail(s)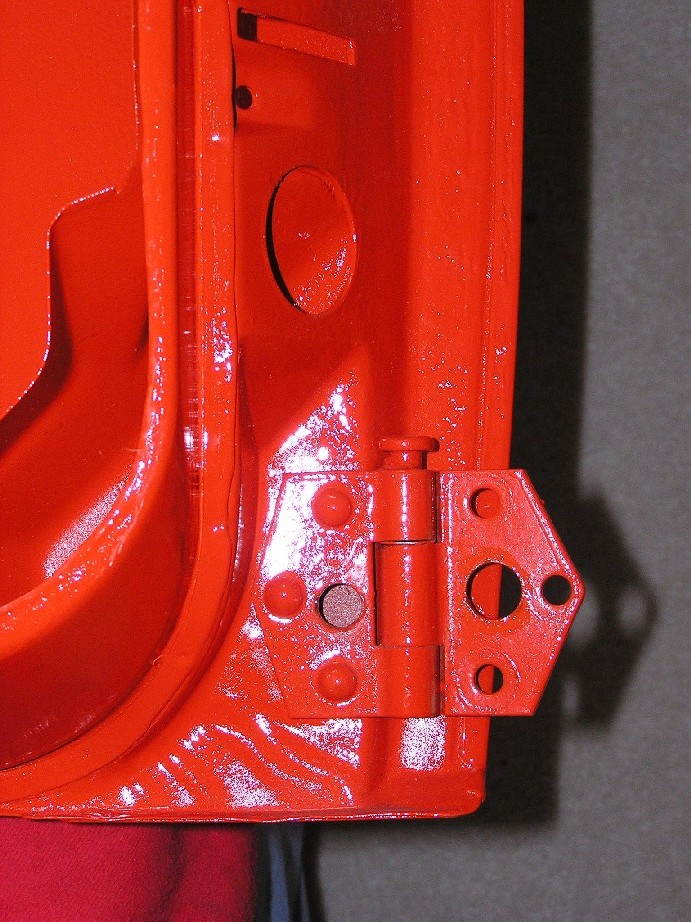
Posted by: brant Apr 18 2005, 09:07 AM
Here is drivers side mounted.
17lbs and still metal:
Attached thumbnail(s)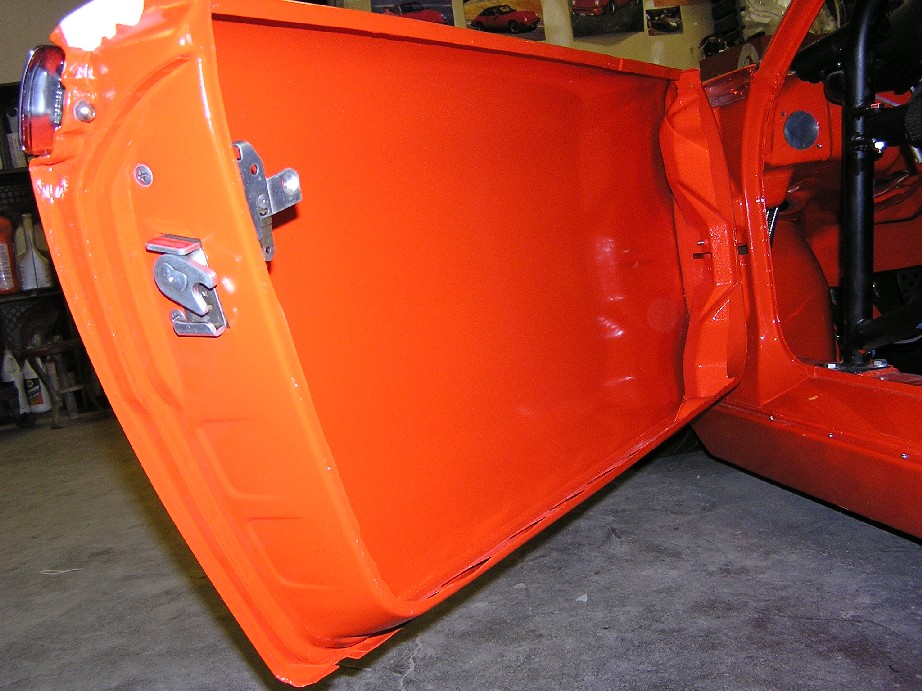
Posted by: brant Apr 18 2005, 09:08 AM
from the inside:
Attached thumbnail(s)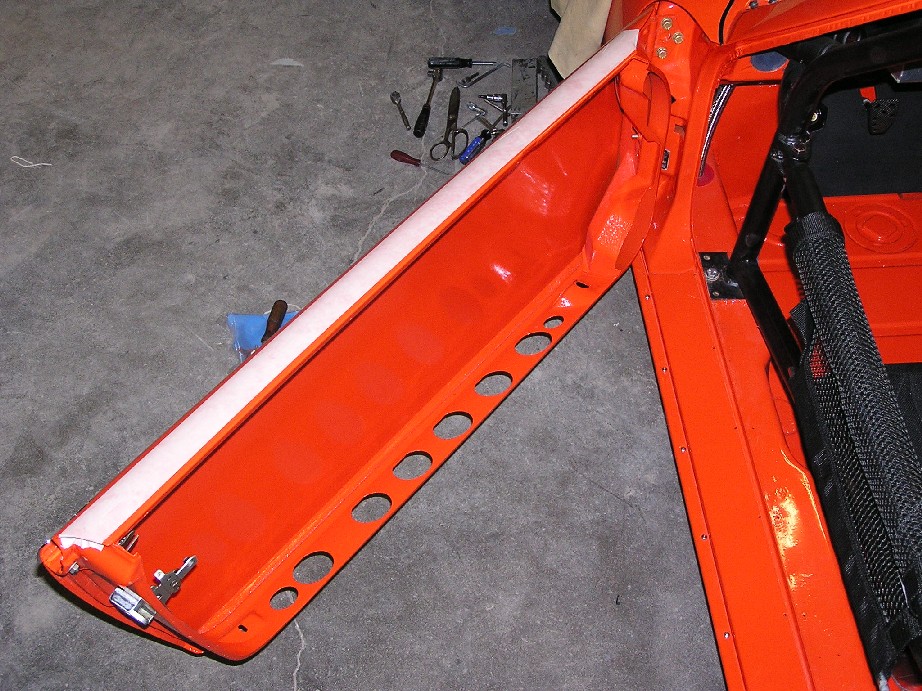
Posted by: brant Apr 18 2005, 09:09 AM
our version of a door stop. Lighter than the stock metal one:
Attached thumbnail(s)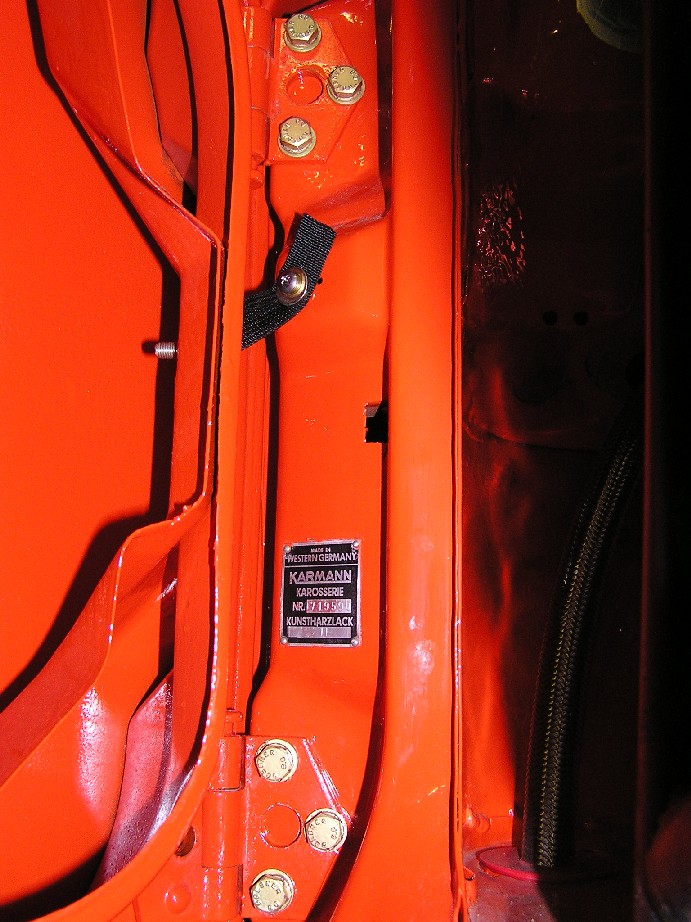
Posted by: Jeroen Apr 18 2005, 09:13 AM
Smart thinking!
I was planning the same
After all, if it's good enuf for a 911 GT1, it's good for a 914
Posted by: Jeroen Apr 18 2005, 09:20 AM
on a slightly related note...
I was thinking about grinding off the bottom part of both the door hinges (see arrow in pic)
That way, you could easily lift the door out (put them out of the way when working on the car)
Still... I can't even get the friggin' pin out of the hinge
Is there a secret to that?
Attached image(s)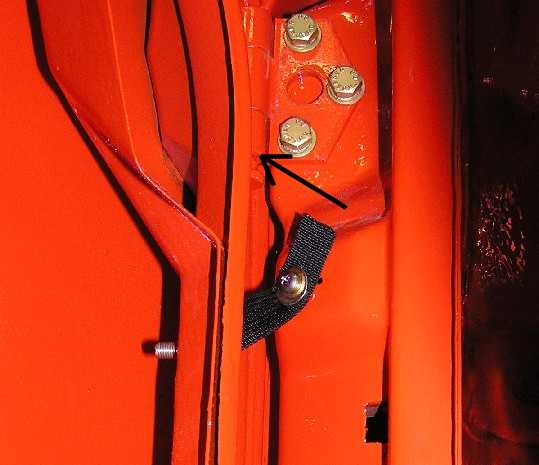
Posted by: brant Apr 18 2005, 09:25 AM
| QUOTE (Jeroen @ Apr 18 2005, 08:20 AM) |
| on a slightly related note... I was thinking about grinding off the bottom part of both the door hinges (see arrow in pic) That way, you could easily lift the door out (put them out of the way when working on the car) Still... I can't even get the friggin' pin out of the hinge Is there a secret to that? |
I couldn't get those pins to budge.
part of the reason we took the door off by pulling the 3 bolts and leaving the hinge on the door.
hanging the doors and getting the gaps is so tough. Speaking only for myself, if I was removing the doors frequently I know I scratch the heck out of the paint!
but thats a good/creative idea!
Posted by: brant Apr 18 2005, 09:40 AM
Door gaps are not perfect... but sure looks better mounted than it did in the closet for 6 months.
Lots of rear fender clearance:
Attached thumbnail(s)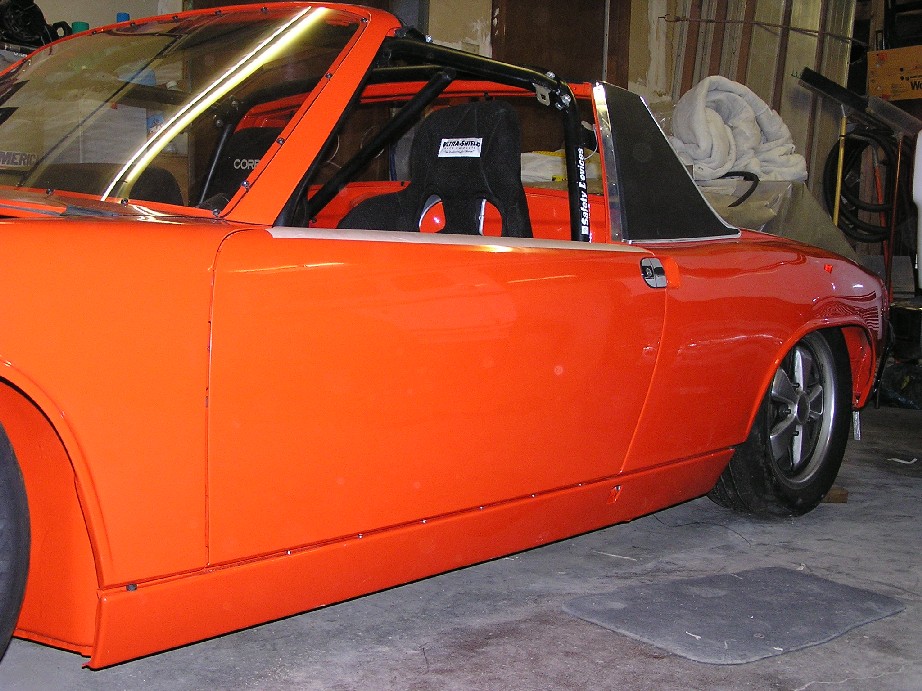
Posted by: brant Apr 18 2005, 09:42 AM
I know I'm repeating myself, but I'm real happy with the way the fenders came out and I love this view:
Attached thumbnail(s)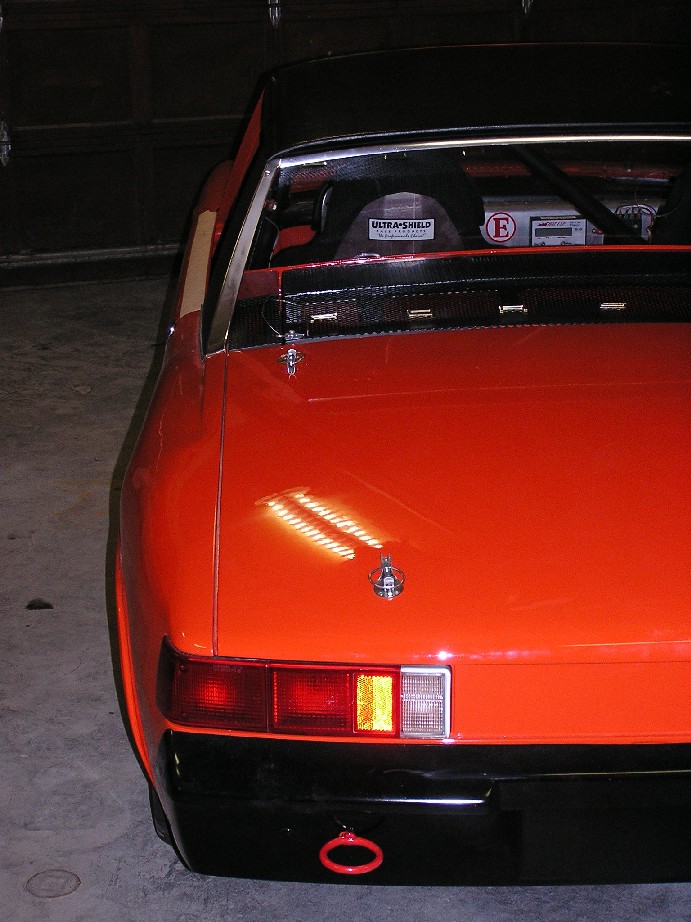
Posted by: brant Apr 18 2005, 09:45 AM
Still needing to do an exhaust:
Attached thumbnail(s)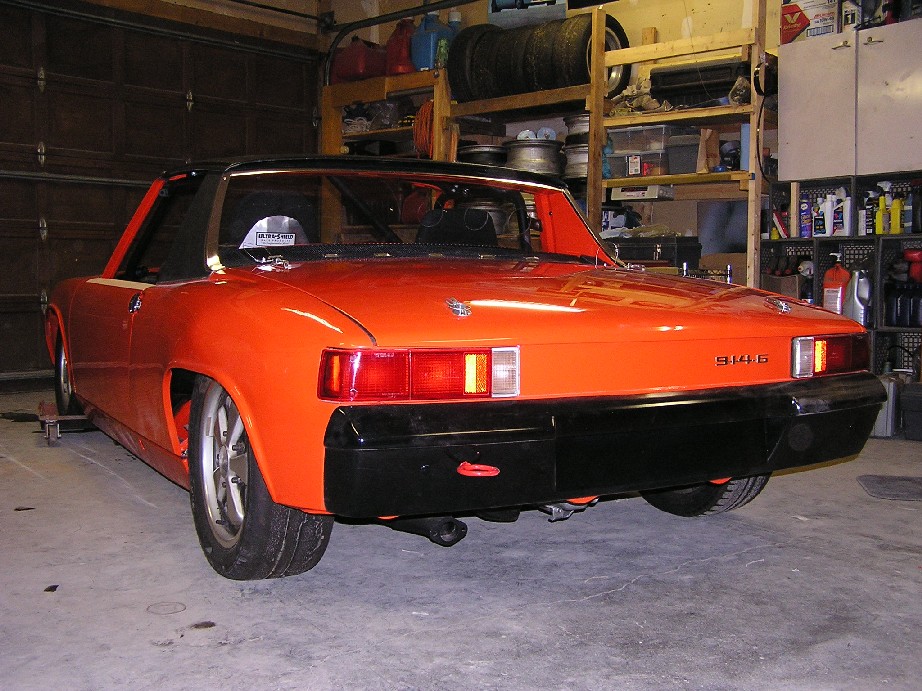
Posted by: brant Apr 18 2005, 09:49 AM
Passenger side door is on.
I have a neat little aluminum fuel door that isn't on yet, but I'm waiting on clear bra in order to finish the front end up:
Attached thumbnail(s)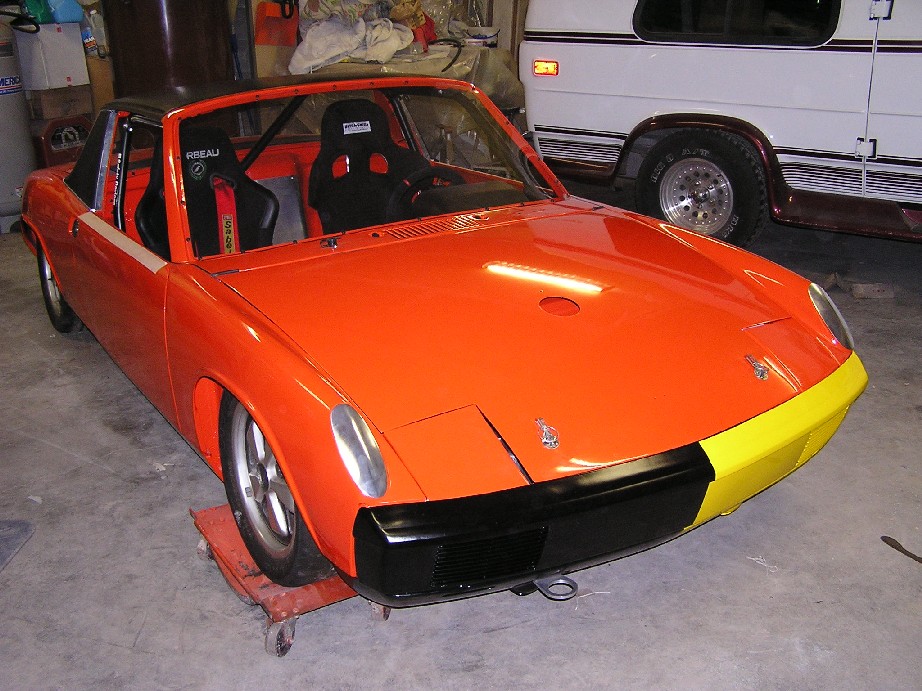
Posted by: Root_Werks Apr 18 2005, 10:00 AM
| QUOTE (brant @ Apr 18 2005, 07:09 AM) |
| our version of a door stop. Lighter than the stock metal one: |
I always wondered if you could just use the little cable ones for Type 1's when they put the 1 piece windows in?
 Lighter, simpler, cheap.
 As always Brant, your work amazes me, looks great!
Posted by: brant Apr 18 2005, 10:05 AM
| QUOTE (Root_Werks @ Apr 18 2005, 09:00 AM) | ||
I always wondered if you could just use the little cable ones for Type 1's when they put the 1 piece windows in? Lighter, simpler, cheap. As always Brant, your work amazes me, looks great! |
I'm not familiar with the type 1 version....
but I was thinking about cable also.
In fact I may still change out to that.
These stretch some, and I set them so that I would have 5 inches of safety margin from where the door starts to hit the strap and to where it would create damage.
Still 5inches wouldn't be a lot if the door got whipped by the wind.... So I was thinking about changing over to a more rigid cable.
Posted by: jgiroux67 Apr 23 2005, 10:00 PM
AMAZING WORK!!!
So how much does it way?
Posted by: sixnotfour Apr 23 2005, 10:13 PM
Nice !! They look so much better on the ground
| QUOTE |
| I know I'm repeating myself, but I'm real happy with the way the fenders came out and I love this view: |
You're rear fenders , Did you add metal ? or just beat em.
Posted by: brant Apr 23 2005, 11:41 PM
| QUOTE (jgiroux67 @ Apr 23 2005, 09:00 PM) |
| AMAZING WORK!!! So how much does it way? |
thanks...
don't know yet.
hope to (possibly) start the motor tomorrow, and corner ballance/weigh in by 5/7/05
I'll let you know as soon as I find out....
(I have to admit, I'm very anxious to see)
Posted by: brant Apr 24 2005, 12:00 AM
| QUOTE (sixnotfour @ Apr 23 2005, 09:13 PM) | ||
Nice !! They look so much better on the ground
You're rear fenders , Did you add metal ? or just beat em. |
Its sad...
but they look short to me when on the ground, because I'm so used to always seeing mine on jackstands.
regarding the fenders...
a little bit of everything including the kitchen sink.
We even had a scissor jack in to stretch things for a while.
Posted by: Dead Air Apr 24 2005, 01:30 AM
| QUOTE (brant @ Nov 1 2004, 07:42 PM) |
| anyways when we went looking for ends to thread into it, we had to go to a specialized bolt place... the old guy behind the counter had to make some calls because he couldn't determine the thread either... turns out its RAF (british-aircraft) thread. |
[QUOTE]
It is "british Aircraft" that's based on 5ths of an inch? Confirm?? A friend of mine restores old bicycles and he's found alot of it. PITA!!
Posted by: Dead Air Apr 24 2005, 01:37 AM
http://www.enginehistory.org/british_fasteners.htm
There's a link to your fastener problem
Posted by: Dead Air Apr 24 2005, 10:07 AM
Exceptional The metal work is blowing my mind!!
Posted by: brant Apr 25 2005, 09:58 AM
Dave,
I'll ask my dad if he remembers the specifics on the thread pitch... Thanks for the link and thanks for the support!!!
Posted by: BMartin914 Apr 25 2005, 10:36 AM
Looks awesome Brant! Can't wait to see it!
When do you think you will be able to get it out for it's first track day?
Posted by: Gint Apr 25 2005, 11:25 AM
| QUOTE (BMartin914 @ Apr 25 2005, 10:36 AM) |
| Looks awesome Brant! Can't wait to see it! When do you think you will be able to get it out for it's first track day? |
Good question. When does this thing hit the pavement?
Posted by: brant Apr 25 2005, 04:04 PM
| QUOTE (Gint @ Apr 25 2005, 10:25 AM) | ||
Good question. When does this thing hit the pavement? |
Ok Ben.. Ok Mike,
I'm hoping to rent a track and spend a couple of hours doing slow laps to get some break in miles on the motor....
IF that goes well
then I hope to next go to a drivers education event on My 21st in LaJunta so that I will have the chance to not be wheel to wheel until I've gotten more mileage accumulated.
As far as a local (Denver) event.
I'm not looking that far ahead.
maybe may or june.
I thought I would get the motor started this last weekend, and did get gas and oil into it... but a fuel leak slowed me down and I haven't heard it run yet.
Posted by: brant Apr 25 2005, 04:14 PM
couple of more pics from the weekend.
Went to work on the door panels.
Dad cut these from aluminum sheet and had the edge done with a brake:
Attached thumbnail(s)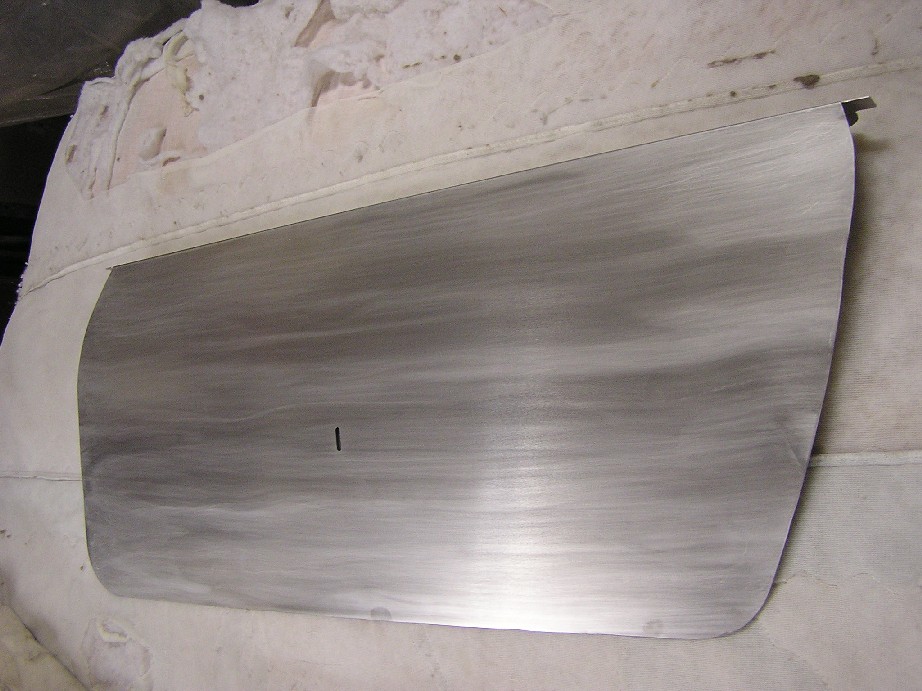
Posted by: brant Apr 25 2005, 04:15 PM
Next we riveted them on (aluminum rivets of course)
Here is the front edge:
Attached thumbnail(s)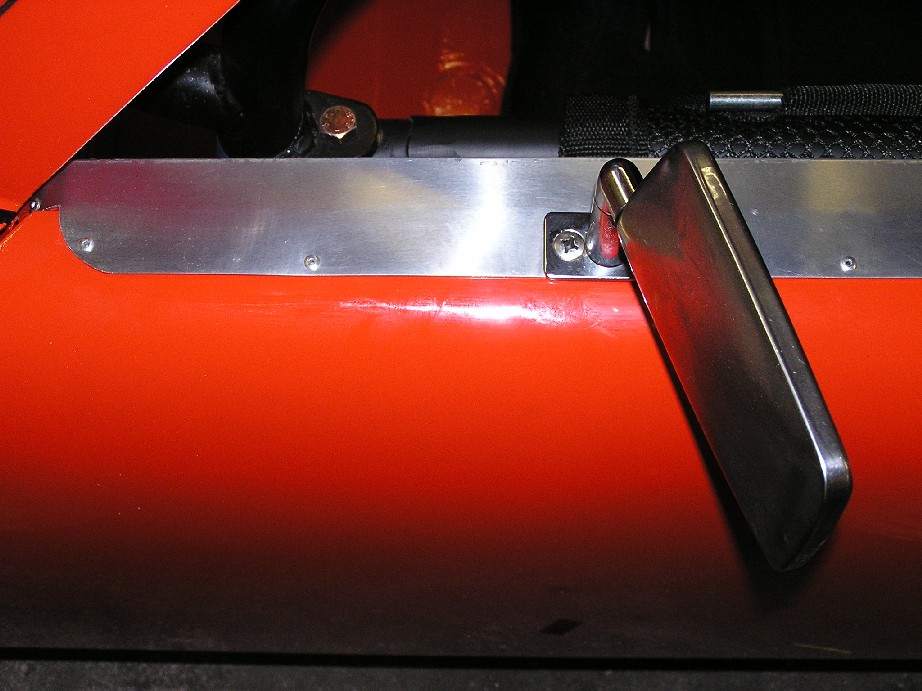
Posted by: brant Apr 25 2005, 04:17 PM
Back edge.
The top actually has two brake lines in it to get the best shape:
Attached thumbnail(s)
Posted by: brant Apr 25 2005, 04:18 PM
The inside strap is actually functional.
It's attatched to the release handle/lever... and can be pulled from inside the car to release the door.
Here is the drivers side:
Attached thumbnail(s)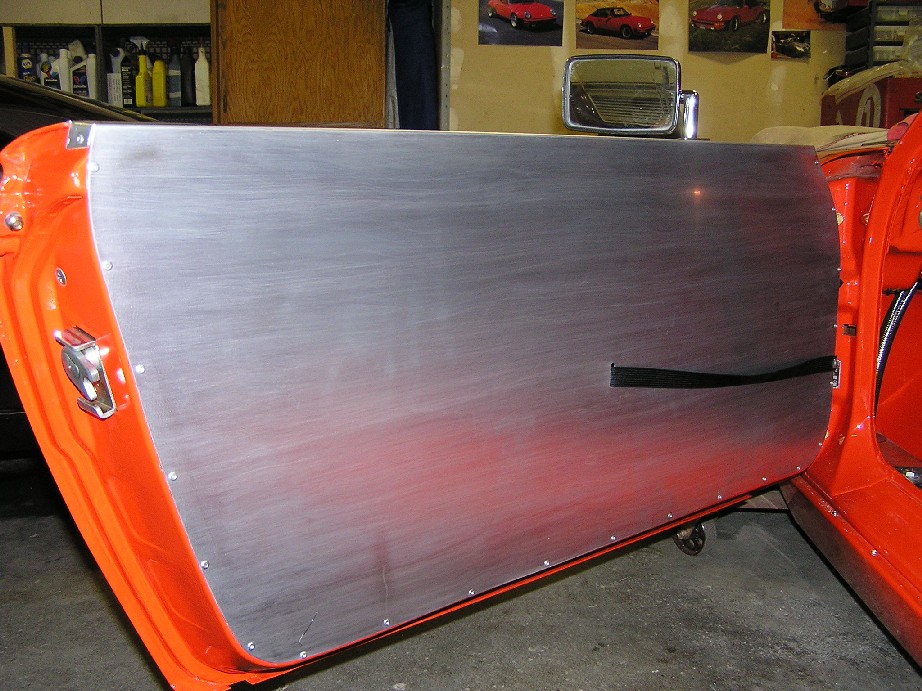
Posted by: brant Apr 25 2005, 04:19 PM
Passenger's side:
Attached thumbnail(s)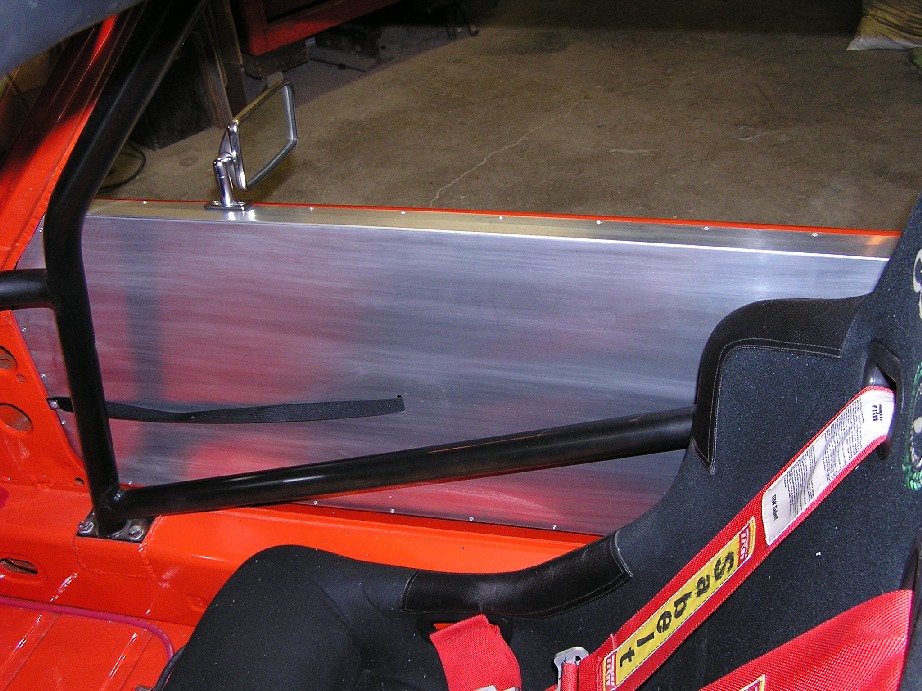
Posted by: BMartin914 Apr 25 2005, 09:18 PM
| QUOTE (brant @ Apr 25 2005, 02:04 PM) | ||||
Ok Ben.. Ok Mike, I'm hoping to rent a track and spend a couple of hours doing slow laps to get some break in miles on the motor.... IF that goes well then I hope to next go to a drivers education event on My 21st in LaJunta so that I will have the chance to not be wheel to wheel until I've gotten more mileage accumulated. As far as a local (Denver) event. I'm not looking that far ahead. maybe may or june. I thought I would get the motor started this last weekend, and did get gas and oil into it... but a fuel leak slowed me down and I haven't heard it run yet. |
At least you're thinking about us Brant.
Posted by: TGM Apr 25 2005, 10:27 PM
I am inspired!!!! Started clearing out the junk so I can get to mine again. Great engineering and fabrication work.
Two bits of safety advice:
If that's a portable fire extinguisher, it should be within reach of belted driver
I think the washers for passenger should harnesses are too small. I used 4" X 4" welded doubler plate and then large washers shown. I think some race/club rules require this.
Keep the photos coming.
Posted by: brant Apr 26 2005, 10:18 AM
| QUOTE (Dave Eddy @ Apr 24 2005, 12:30 AM) | ||
[QUOTE] It is "british Aircraft" that's based on 5ths of an inch? Confirm?? A friend of mine restores old bicycles and he's found alot of it. PITA!! |
I asked dad if he remembered the thread info on that RAF bar. He thinks it is:
"It probably was the British Whitworth thread. The Metric guy mentioned that it was used extensively by their Air Force during WWII. Bob"
either way were done with it now and hopefully won't need to find more fittings in the future.
Posted by: brant Apr 26 2005, 10:22 AM
| QUOTE (TGM @ Apr 25 2005, 09:27 PM) |
| I am inspired!!!! Started clearing out the junk so I can get to mine again. Great engineering and fabrication work. Two bits of safety advice: If that's a portable fire extinguisher, it should be within reach of belted driver I think the washers for passenger should harnesses are too small. I used 4" X 4" welded doubler plate and then large washers shown. I think some race/club rules require this. Keep the photos coming. |
cool...
thanks for the kind words TGM
regarding the safety harness. I'll double check. I think we were within spec, but its worth double checking.
thanks
brant.
Posted by: Scott Schroeder Apr 26 2005, 10:27 AM
| QUOTE (brant @ Apr 26 2005, 08:18 AM) |
| [QUOTE=Dave Eddy,Apr 24 2005, 12:30 AM] [QUOTE=brant,Nov 1 2004, 07:42 PM] anyways when we went looking for ends to thread into it, we had to go to a specialized bolt place... the old guy behind the counter had to make some calls because he couldn't determine the thread either... turns out its RAF (british-aircraft) thread. [/QUOTE] [QUOTE] It is "british Aircraft" that's based on 5ths of an inch? Confirm?? A friend of mine restores old bicycles and he's found alot of it. PITA!! [/QUOTE] I asked dad if he remembered the thread info on that RAF bar. He thinks it is: "It probably was the British Whitworth thread. The Metric guy mentioned that it was used extensively by their Air Force during WWII. Bob" either way were done with it now and hopefully won't need to find more fittings in the future. |
Brant -
If you should stumble across that stuff again, let me know. We have a pretty good pile of nuts and bolts, as well as many whitworth tools from building all of the old british junk.
Again - looks awesome!
-S
Posted by: brant Apr 26 2005, 10:32 AM
Scott,
thanks for the offer!
Here is the last picture from the weekend.
We got the mufflers fabricated, but not mounted as the paint was still drying.
I'll get mounted pictures next time in a couple of weeks when I get back to the car.
here is a before shot of one side.
Borla Stainless:
Attached thumbnail(s)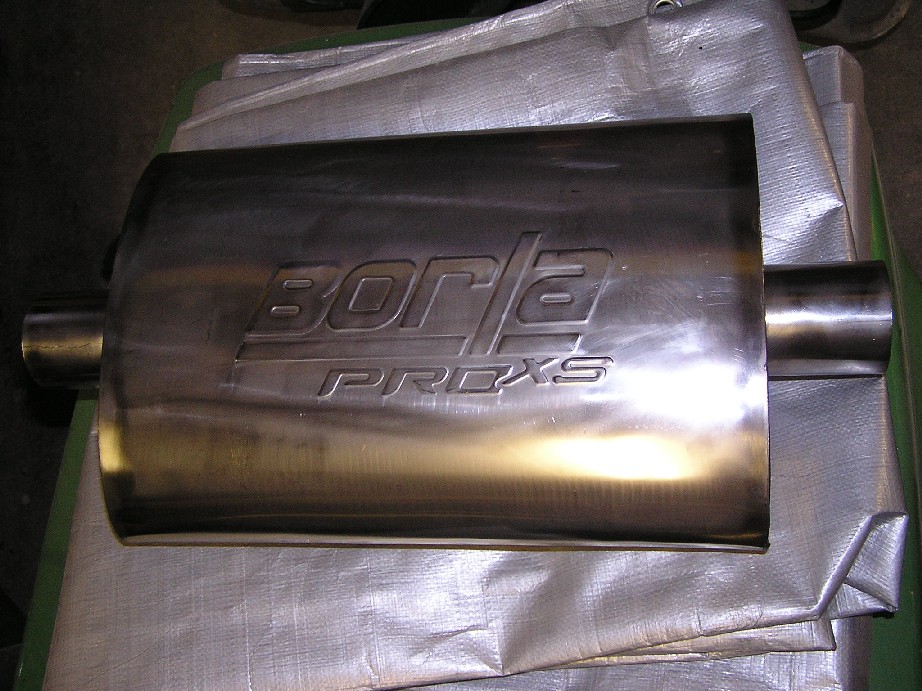
Posted by: d914 Apr 26 2005, 10:43 AM
looking at some of your older pictures, just a thought, what about a center inside brace for the windshield. I know its riveted in but a speed that center might come in ????
everybody needs to add they're two cents!! beautiful car!!!!!
Posted by: brant Apr 26 2005, 10:52 AM
| QUOTE (d914 @ Apr 26 2005, 09:43 AM) |
| looking at some of your older pictures, just a thought, what about a center inside brace for the windshield. I know its riveted in but a speed that center might come in ???? everybody needs to add they're two cents!! beautiful car!!!!! |
I welcome the input.
I contemplated some extra bracing on the front and rear.
but ultimately went with the advice of my race shop.
He runs around 10 914's with the same lexan windshields. He doesn't do it, and claims to have never had a problem.
Since the whole car was built to the philosophy of leaving out anything that weighed anything, I left the bracing out.
I know about 12 years ago he had one 914 that would flex the plexiglass inward at 150mph, but still stayed put and would "pop" back out into shape when he hit the brakes at the end of the straight away.
They are actually not rivets by the way.
they are screws with special (sp?) excusion's
So the bracing seems like a good idea, but I went with the advice of experience, and I guess I'll see.
Posted by: Qarl Apr 26 2005, 11:44 AM
Enough with your disgusting pictures already!!!
just kidding.
Posted by: brant Apr 26 2005, 02:39 PM
Exciting news.
Got a call from our vintage clubs eligibility head honcho.
Tenatively they have approved my car and will be sending me a log book. The car still has to pass the physical and safety inspection, but the wheels are rolling.
Here is the kicker.
When you submit your application, you also list 1st/2nd/3rd number choices.
(They will not assign you a number ahead of time, only when they receive the application)....
so... (drum roll please)
I was assigned # 914
cool........
Posted by: Ferg Apr 26 2005, 03:10 PM
great news brant, one less hurdle
Posted by: tat2dphreak Apr 26 2005, 03:14 PM
everything looks awesome man!! don't listen to Qarl! more pics!!
Posted by: Jeroen Apr 26 2005, 03:28 PM
| QUOTE (brant @ Apr 26 2005, 09:39 PM) |
| so... (drum roll please) I was assigned # <span style='font-size:14pt;line-height:100%'> 914</span> |
some guys have it all...
ya lucky bastard
Posted by: brant Apr 26 2005, 03:40 PM
| QUOTE (Jeroen @ Apr 26 2005, 02:28 PM) | ||
some guys have it all... ya lucky bastard |
thanks Mike
thanks Wayne
thanks Jeroen
I know in PCA that number is already taken...
so I hope that PCA lets me do 4 digits instead of 3
(I'd love to add a 6 to the end of it..)
Posted by: brant May 9 2005, 09:14 AM
Not too many pictures this go around.
we did get some things accomplished though.
The exciting accomplishment can not be captured on film...
In that on saturday, we started the motor for the first time.
It needs lots of re-jetting and tuning still.
but I put 2 heat cycles on it and have changed the oil twice now.
Speaking of oil I was very curious to see what the capacity was. Found out that it holds 18 quarts.
Hopefully this week the valves will get adjusted for the first time.
I've got a few shots of items that dad finished up.
Here is a shot of those stainless mufflers hung:
Attached thumbnail(s)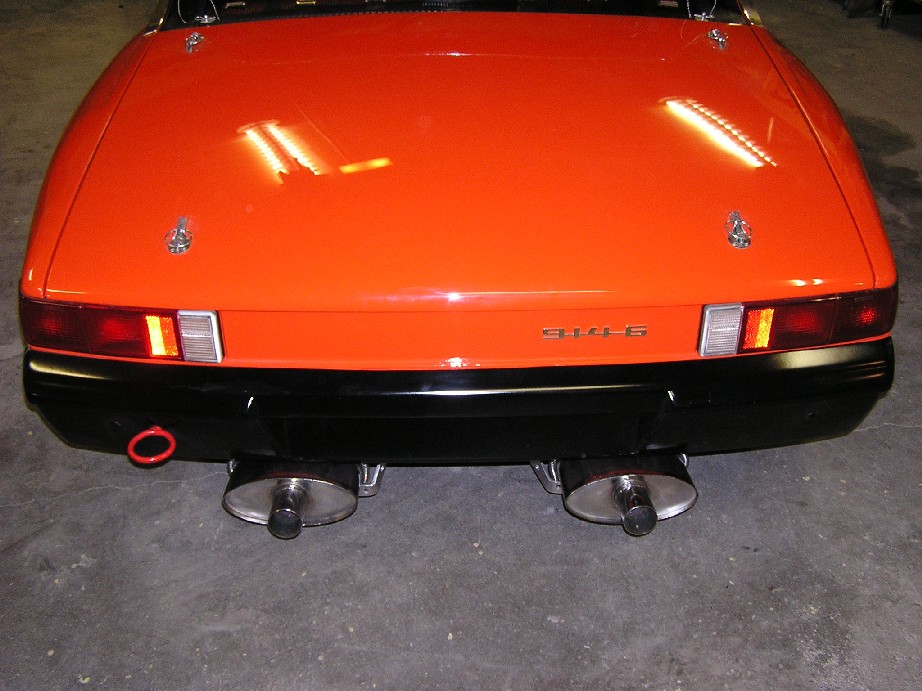
Posted by: brant May 9 2005, 09:17 AM
2nd view of the same. You can see dad's fancy aluminum muffler hanger bracket.
They sound pretty great really...
not quiet by any means but has a nice throaty tone:
Attached thumbnail(s)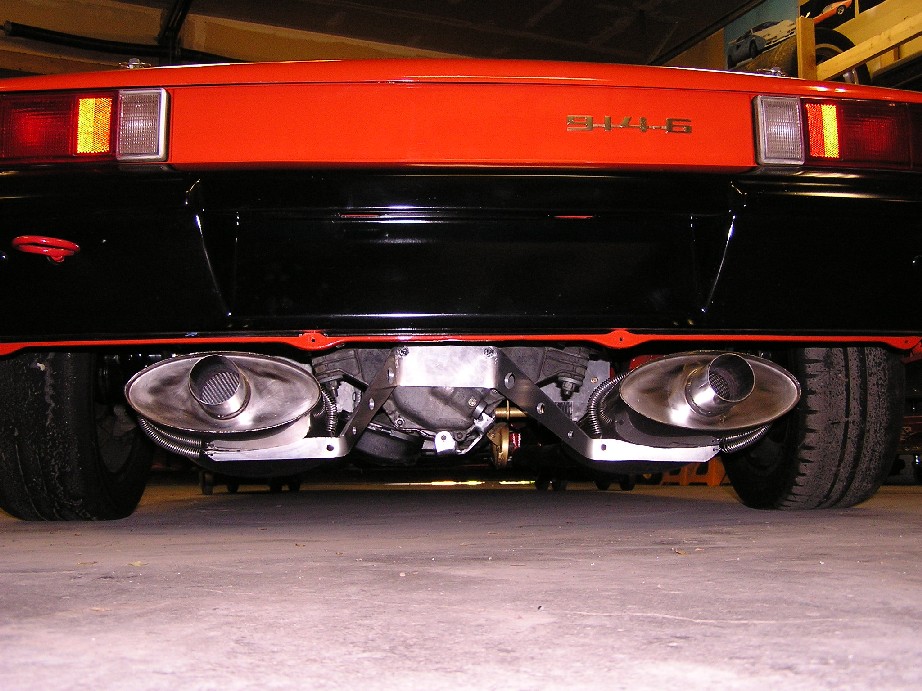
Posted by: brant May 9 2005, 09:18 AM
Little closer view of the same bracket:
Attached thumbnail(s)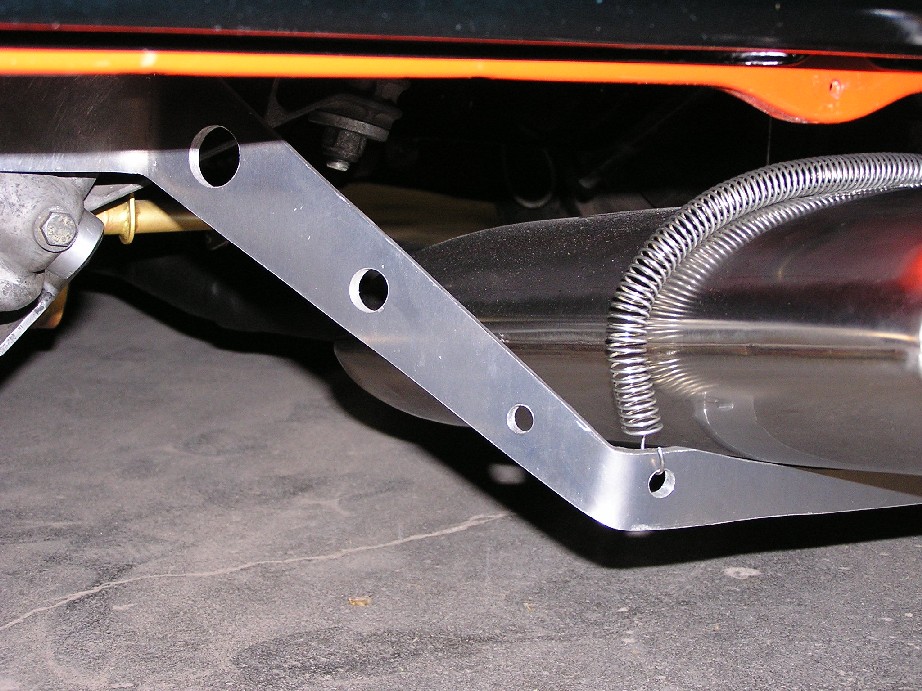
Posted by: Eric_Shea May 9 2005, 09:36 AM
Excellent job. I'm sure you're proud.
How about some shots of Dad?
(Can I borrow him when you're done? Room/Board/Food)
Posted by: majkos May 9 2005, 09:40 AM
Looking good!
But,have one question.
Shouldn't you thiking of something between Aluminmum and StainlessSteel?
A lttle too much room for vibration.
Posted by: brant May 9 2005, 09:52 AM
Eric,
I can get a couple of shots of dad.
I'd be willing to rent him out, but I might need a cut!
Kevin,
I expect the aluminum to scuff the mufflers up pretty good, but you can NOT hear any vibration when the motor is running... Something to do with the high volume (not because the hanger is quiet I'm sure)
brant
Posted by: brant May 9 2005, 11:26 AM
This one partly for John Kelley.
Its a shot of the attatchment method we came up with for his covers. an aluminum bolt is glued in with a retaining tab. The glue is Fusor brand body panel adhesive. One shows the bare attatchment, and the other shows the washers that will hold it to the body:
Attached thumbnail(s)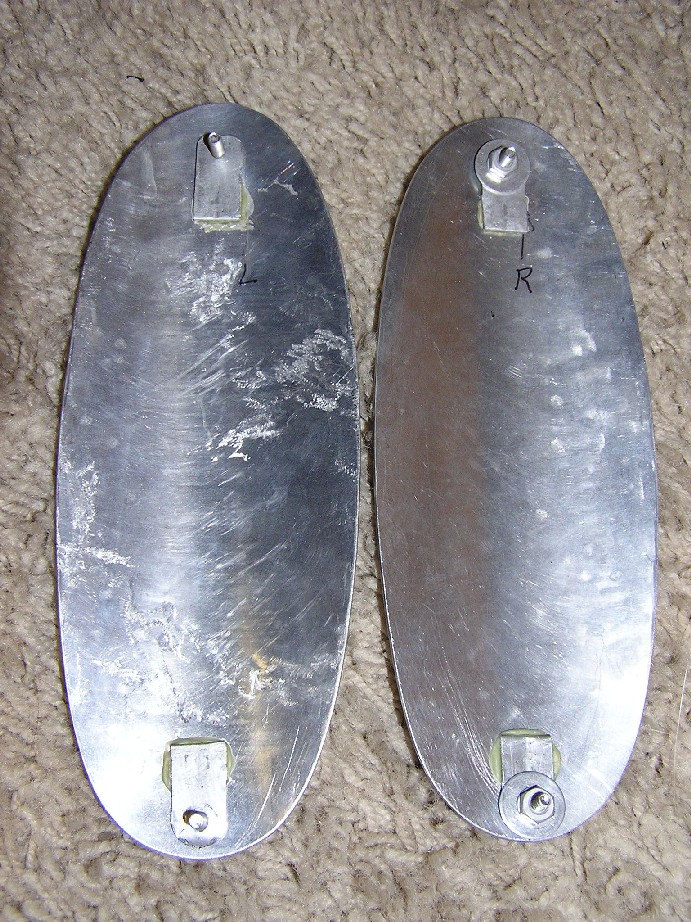
Posted by: Verruckt May 9 2005, 03:00 PM
No doubt your dad is truly an artisan. So how much to rent the guy out? 
Posted by: Jeroen May 9 2005, 03:16 PM
sorry dude, I've run out of superlatives to use in this thread...
Posted by: brant May 9 2005, 04:13 PM
| QUOTE (Verruckt @ May 9 2005, 02:00 PM) |
| No doubt your dad is truly an artisan. So how much to rent the guy out? |
Thanks for the kind words sir...
I'll pass them on to dad..
thanks Jeroen!
brant
Posted by: robicurp May 9 2005, 08:50 PM
Hi Brant,
I have been following your car build for a while now. You and your Dad have done a beautiful job.
You have got to be itching to drive it hard.
I am building my own 914-6 conversion and finally fired it up for the first time in 7 months last week end. Mine is a 2.2 liter street/autocross car.
I hope you don't mind, I have shamelessly copied some of your inovations. (The hole in the firewall sure makes timing it easy.)
If you don't mind sharing a little info, ( and I'll understand if you do), would you tell me what length of shocks you are running on back?
Also, What kind of rev limit do you plan to ultimately run on your engine?
I'm sure all of us want to see shots of your car on the move. I'm looking forward to it.
Thanks,
Curtis
Posted by: brant May 10 2005, 09:09 AM
Hi Curtis,
nice to meet you.
heck you are practically local to my dad's house. I will be at hallet before this season is over.. so maybe we can meet up or something.
Thats really great about your -6. sounds like yours went to gether quick. Good deal. Boy it was neat to fire it up for the first time, must have been for you too.
I'll try to get a rear shock measurement for you next time I'm in lamar. (2 weeks)
Regarding Redline rpm, we were debating that. At one point I called the builder to do more research on which springs and how the top end was done. We decided to go with stock-ish redline for our engine. This is a 67S motor so after its broke in we are going to run up to 7K or 7200-ish.
We hope to do cams/heads/valves/springs/and the full top end in a year or two, at which point we will raise the redline.
Posted by: robicurp May 10 2005, 09:47 PM
I'm glad to hear you'll be visiting Hallet. Our PCA chapter always sponsors the PCA club race there in October. I hope to have my car broken in and dialed in by then.
I'll be working the at the race, So I'll be watching for your car , (assuming you're going to do PCA races). I'd love to look it over in the flesh.
I need to check the Vintage racing schedule there as well.
Thanks for the redline info. I'm a converted watercooled guy so these aircooled engines are still new to me.
Curtis
Posted by: brant May 11 2005, 02:32 PM
Curtis,
I'll let you know as the dates near...
Our local vintage club is having an Enduro 10/1-2 at my favorite track in state... The same weekend as PCA is in Hallet this year...
Tough call...
but CVAR looks to be having a Hallet event on October 7th/8th/9th (the very next weekend)
Will have to see as the summer unfolds.
and if the car is still in one piece by that point.
hope to go though
Posted by: brant May 24 2005, 05:15 PM
Update:
big productive weekend.
finishing up a bunch of details, and fixing things that didn't work the first time around.
Dad took some more weight out of our seat-back brace and her is what it looks like now:
Attached thumbnail(s)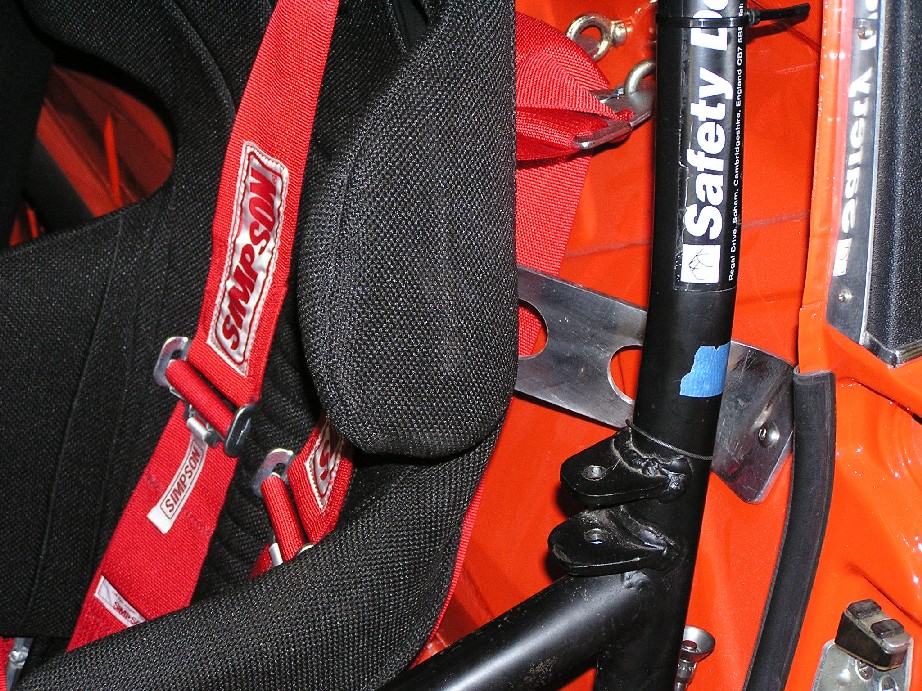
Posted by: brant May 24 2005, 05:16 PM
Wink mirror is installed:
Attached thumbnail(s)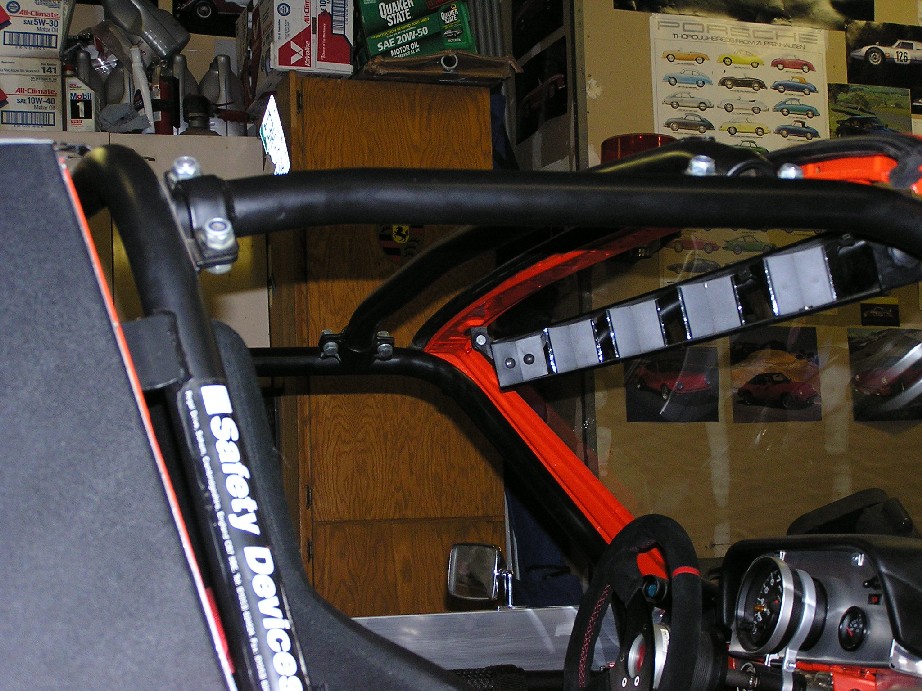
Posted by: brant May 24 2005, 05:18 PM
7 inch wheels were put on. For now I'm running my old cookies with VERY old tires. But I figure I'm only trying to break in the motor, so it won't matter.
Here is the rear fender clearance with 7inch wheels and 225/50/15 's:
Attached thumbnail(s)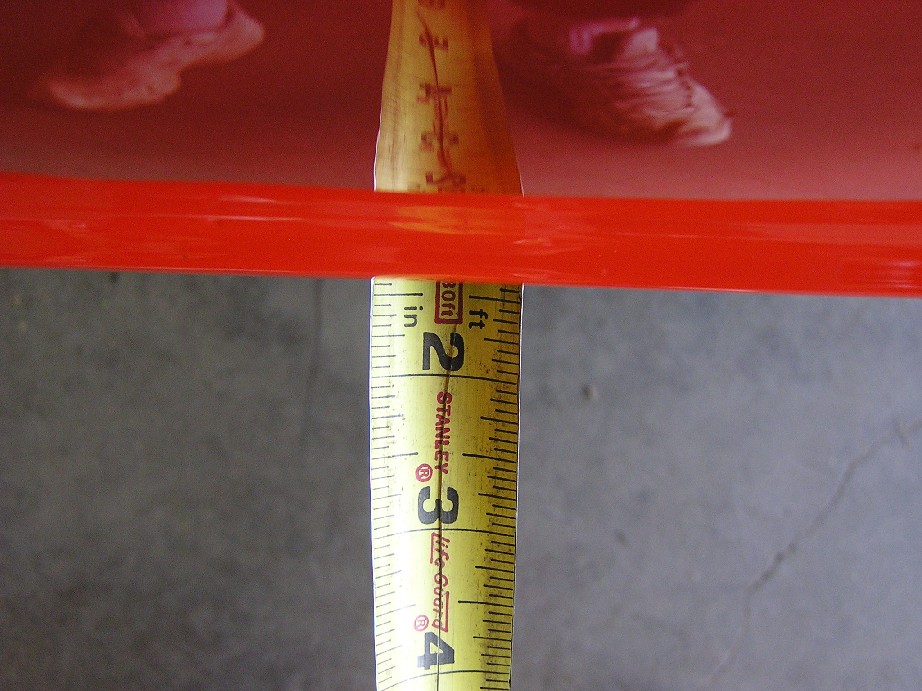
Posted by: brant May 24 2005, 05:21 PM
This one is for you JP....
my dad thought the horns looked too dirty, so surprised me by polishing them:
Attached thumbnail(s)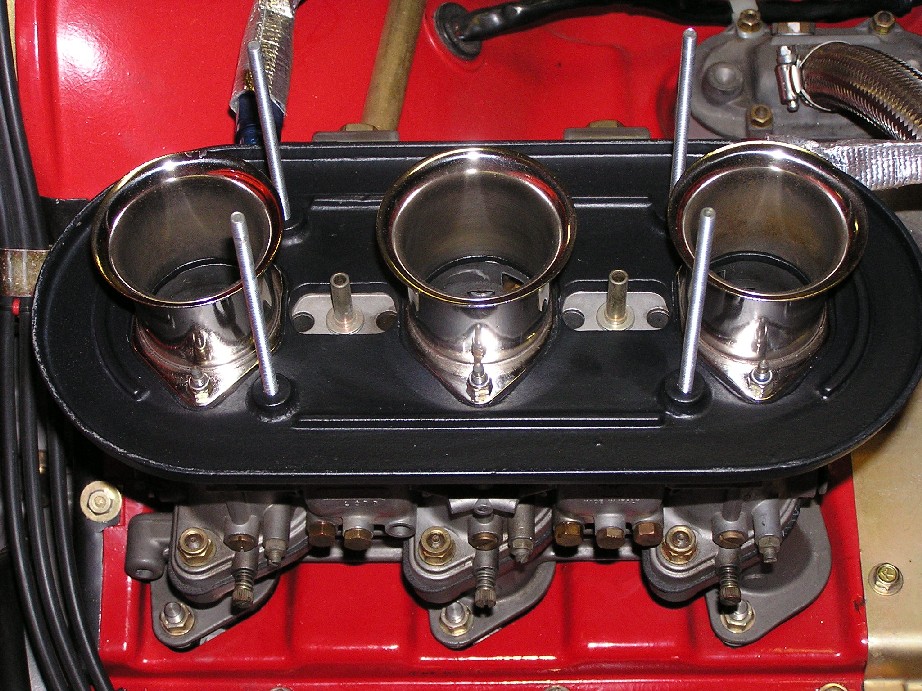
Posted by: brant May 24 2005, 05:22 PM
Here is the not so close version of that.
air cleaners are now on:
Attached thumbnail(s)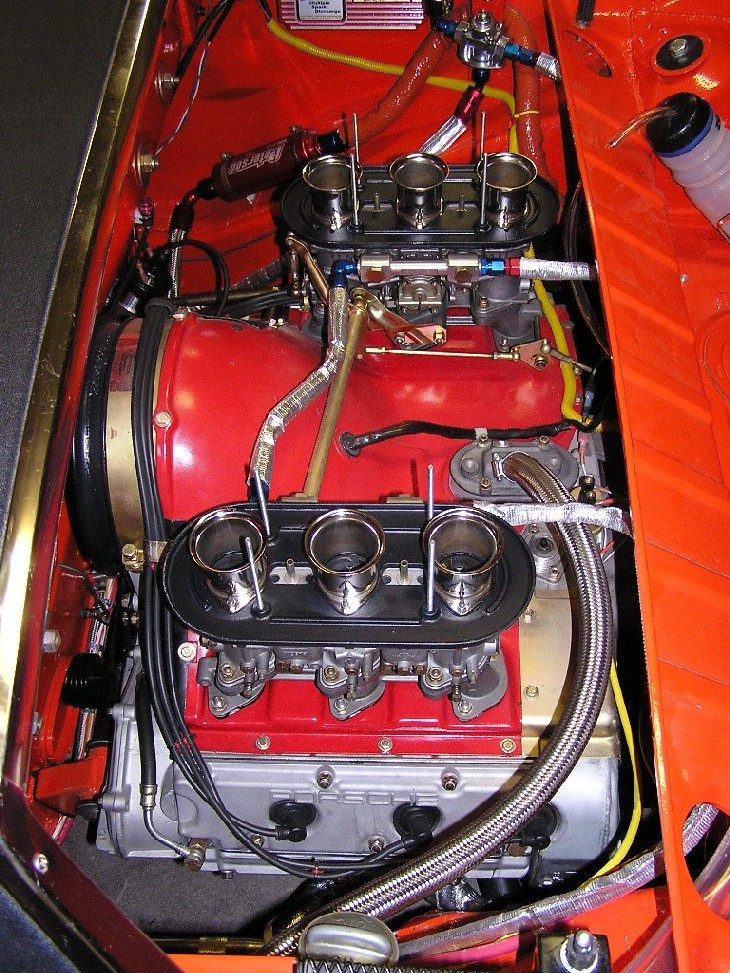
Posted by: J P Stein May 24 2005, 05:28 PM
Sanitary!.....a 60's term
Did you decide if that car weight was right?
Posted by: Travis Neff May 24 2005, 05:30 PM
Your attention to detail has paid off big time here. I hope you don't sit around with nothing to do now - so you don't become the extra ballast you might need!
Posted by: majkos May 24 2005, 08:58 PM
I'm sorry.Sir,
but i'm about to use a old clique',
But look up in the dictionary,"Clean" and it'll show you a picture of this......
work of art,Motor!
Posted by: redshift May 24 2005, 09:07 PM
Superb!
If Karl was going to do a car right, that's how he'd do it!

M
Posted by: brant May 25 2005, 08:48 AM
| QUOTE (J P Stein @ May 24 2005, 04:28 PM) |
| Sanitary!.....a 60's term Did you decide if that car weight was right? |
JP,
I can't fully verify that the scales are 100% correct.
I will be on another set of scales later this summer and hope to compare... I do know that the owner of the scales used them the day before I did, and that he Absolutely knows what his car weighs and would have noticed any discrepancys... They are semi-pro and actually make money racing. Its a whole-nother league with those guys...
But.. what I can say is that I weighed the car 12-15 separate times and found a ton of consistency each time.
We did a 1st round of corner balancing, and then took it off the scales. We strung it for toe and did a rough alignment. We then corner balanced it a 2nd time the following day.
In the other thread I mentioned this, but I'm going to say it again... I am SOOOO pleased with the weight of the car.
We corner balanced the car with the cookies on instead of the fuchs, and with 4 gallons of fuel.
The bumpers are the only fiberglass items (well, the stock top I guess too)... but the rest of the car, hoods, doors, everything is all metal.
I have a couple of ideas left to implement that will save a couple of more pounds later this summer.
Did I mention how happy I am with the results?:
Attached thumbnail(s)
Posted by: brant May 25 2005, 09:00 AM
Travis,
your right...
the next weight Item I have to start working on is me!
but I doubt I'll be real lazy this summer.
I hope to be busy driving, and I have my street car with a blown motor/tranny to rebuild still before the fall RRC event.
Thanks Kevin, thanks Redshift!
Posted by: brant May 25 2005, 09:14 AM
Front oil line is in, and headlight "doors" are mounted:
Attached thumbnail(s)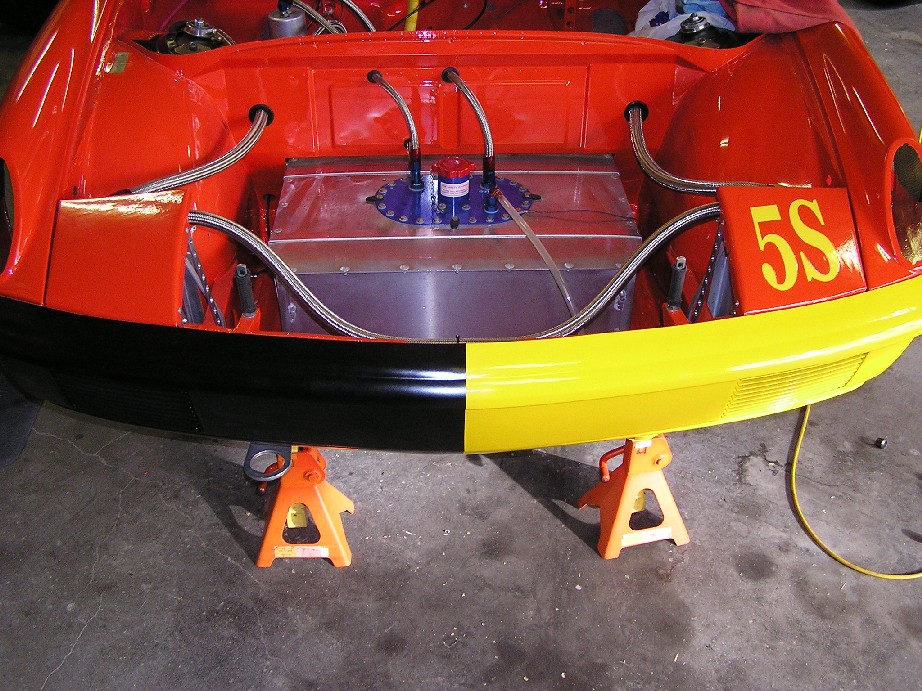
Posted by: neo914-6 May 25 2005, 09:15 AM
| QUOTE (brant @ May 10 2005, 07:09 AM) |
| next time I'm in lamar. (2 weeks) |
That place brings some memories, went to a fiberglass vendor there years ago. "Fun" flight over the Rockies in a small plane ride there.
Hope the museum quality of your car doesn't prevent you from taking it to it's limits on the track! You might as well look good when you win.
Posted by: brant May 25 2005, 09:16 AM
Headlight "doors" from the other side. Aluminum mounts with aluminum rivets, aluminum bolts, and nylon bolts holding the corners:
Attached thumbnail(s)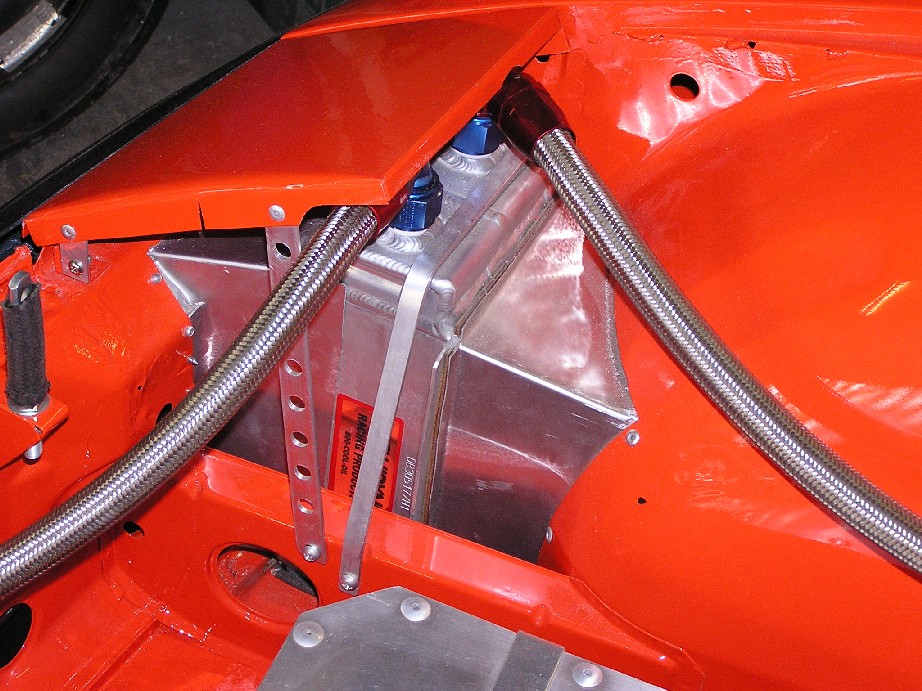
Posted by: brant May 25 2005, 09:27 AM
Finished up the hood mounts.
The back of the hood uses these aluminum prongs to slip into aluminum chanels that are bonded to the bottom of the cowl.
There are also nylon rub blocks riveted in the rear part of the hood rubber channel to help guide the hood into place without scratching the paint as much:
Attached thumbnail(s)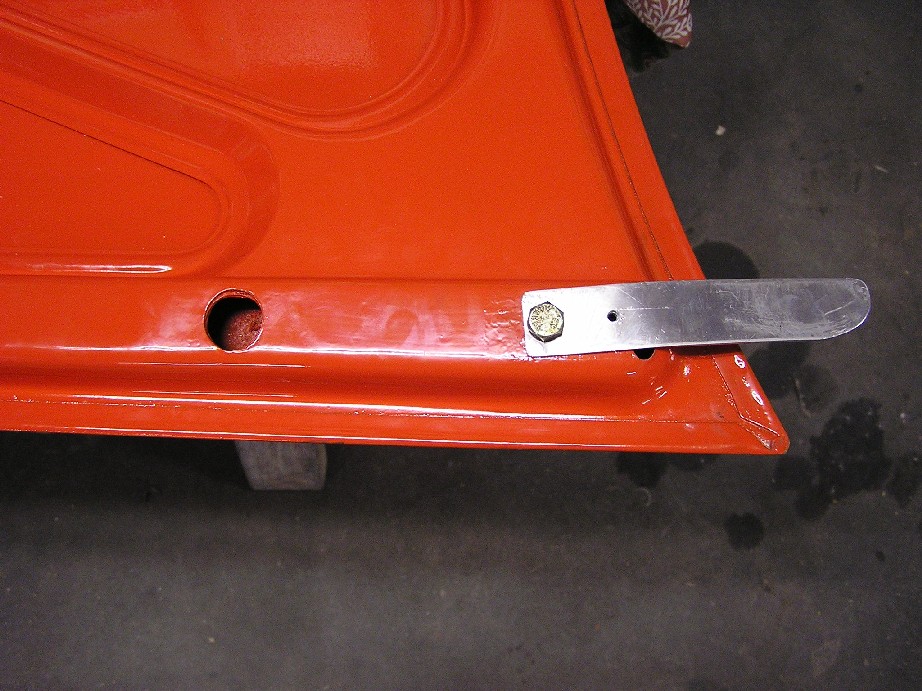
Posted by: brant May 25 2005, 09:30 AM
Due to the front hood having no hinges now (weight savings)... Its kinda a pain to remove. And since we needed to check the fuel levels frequently, we decided to cut a fuel access door into the hood. Dad made the hinged door out of aluminum and it pivots on an aluminum bolt. Here it is from the bottom:
Attached thumbnail(s)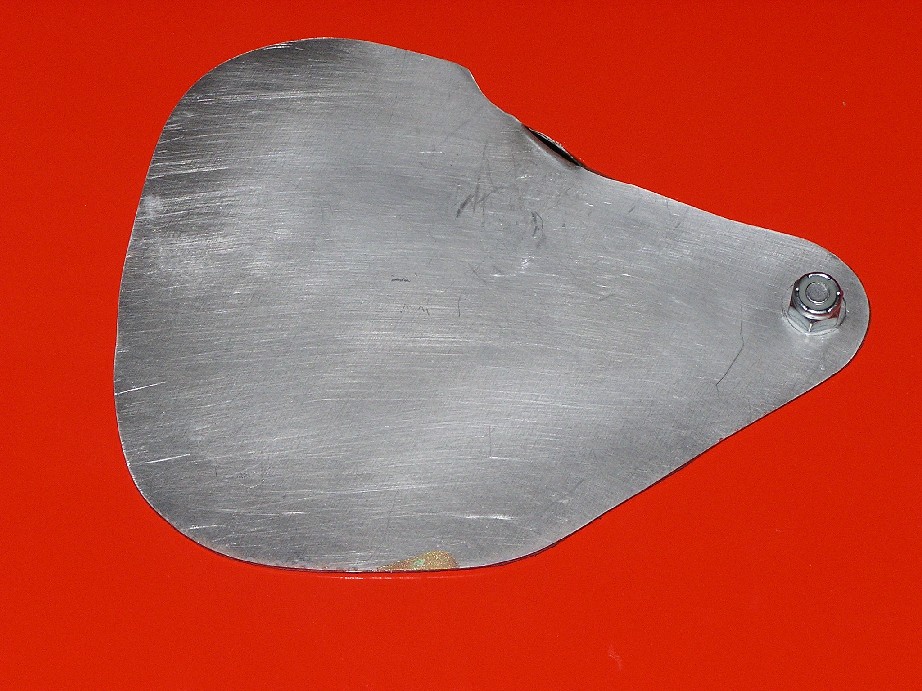
Posted by: brant May 25 2005, 09:32 AM
Here is the fuel door as viewed from the top.
We also got the front vinyl applied and then covered the entire front hood with clear bra:
Attached thumbnail(s)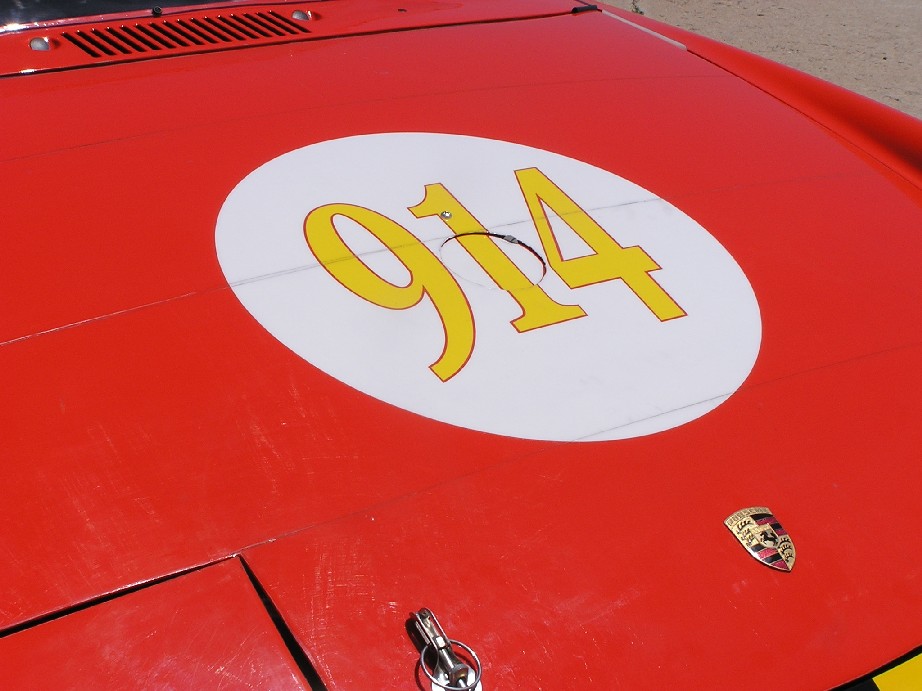
Posted by: majkos May 25 2005, 10:07 AM
Brant,you are building a classic one of a kind,
And am sooo glad you're not hesitate to drive her 
Is there any ideas you have NOT thought of as weight saving??
Keep up with theses awsome photo shoots
The pictures and all the possiblities you CAN do,
gives me more confidence of someday building a better track car
Thanks for showing,it can come true!
When we get to see it?? (Track dates? Tour?)
Posted by: brant May 25 2005, 10:28 AM
| QUOTE (Neo914 @ May 25 2005, 08:15 AM) | ||
That place brings some memories, went to a fiberglass vendor there years ago. "Fun" flight over the Rockies in a small plane ride there. Hope the museum quality of your car doesn't prevent you from taking it to it's limits on the track! You might as well look good when you win. |
Felix,
you must of went to meet with Su-trak!
They were a pretty big fiberglass place for a while.
I once had them re- gelcoat a 914 roof for me that was painted and frequently spider cracked.
thanks for the kind words...
definitely car will be driven!
Posted by: brant May 25 2005, 11:20 AM
Speaking of driving... got to do that too.
On monday 5/23/05 we got to drive it for the first time.
We caught some minor items and problems, but fixed most of them at the track.
We rented the LaJunta Raceway, down near dad's house.
We were the only people there.
started out with slow laps and trying to accumulate motor miles. Still fun though and we pushed it a bit.
ran a 6K chip and generally shifted around 5K. The sound is great and the suspension is smoother than the old car.
Hoping to get another session in before the first race.
Still have a list of items to finish.
Here is the pic:
Attached thumbnail(s)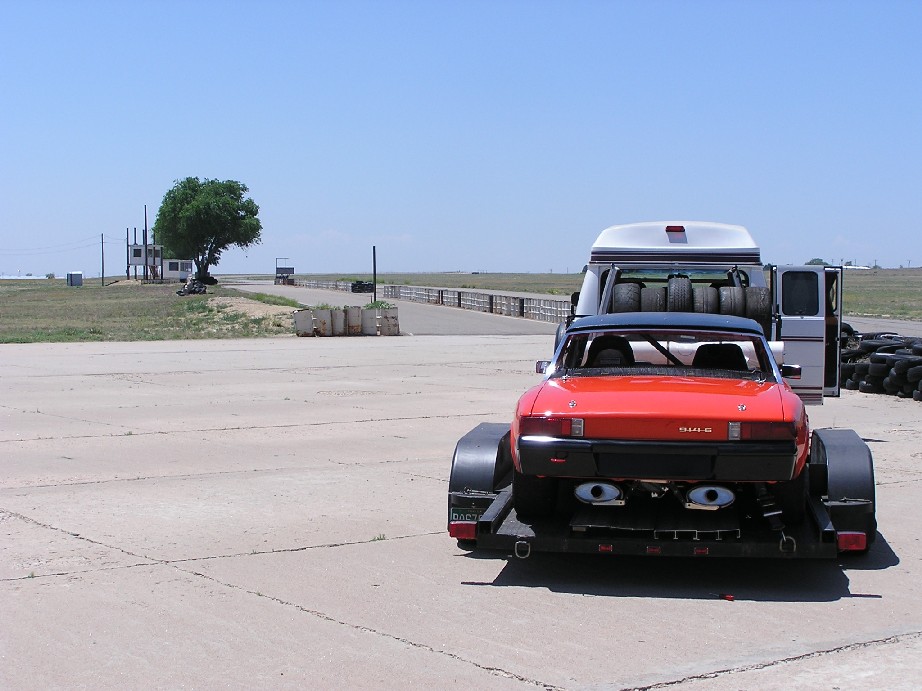
Posted by: neo914-6 May 25 2005, 11:20 AM
| QUOTE (brant @ May 25 2005, 08:28 AM) | ||||
Felix, you must of went to meet with Su-trak! They were a pretty big fiberglass place for a while. I once had them re- gelcoat a 914 roof for me that was painted and frequently spider cracked. thanks for the kind words... definitely car will be driven! |
Sound familar but they have grown and are now called http://www.cfmaier.com/products/vehicles.htm Appears they do race car bodies but I had them build bus parts when I worked with them. I believe the owners are German and they loved country music so much they bought a radio station. Nice folks.
Posted by: brant May 25 2005, 11:24 AM
Felix,
your right they did change the name.
and I remember being over there once when they were building the spec race bodies... Don't know if they still do that or not.
They came into town the same time as the german Neoplan bus plant came. They started out doing fiberglass for A/C bus systems and then expanded from there.
Posted by: Gint May 28 2005, 02:59 PM
You and Bob have done an awesome job with the car.
Thanks for the ride today Brant! I really enjoyed that.
Posted by: brant May 29 2005, 05:02 PM
Your very welcome Mike!
so the car update is that this friday 5/27/05 the car made it up to get a real alignment.
The alignment by the way, came out absolutely amazing.
I trust the shop and they even used to set up Dave Fergusons car when he and ellen went to Solo nationals.
Still the numbers came out very.. very.. good.
We got: -2.8 degrees of camber at ALL 4 CORNERS
So Friday was going really well until that night when we found a fried Trailer bearing. Saturday (5/28) my dad and I split up and I went out to the Second Creek Raceway for the drivers meeting while he tried to find a replacement bearing for the trailer. I was able to do a couple of sessions in the focus, and then dad suceeded and made it out around 11am. We ended up getting a few things dialed in (brake bias), and driving until we were tired. After about 2-3 hours of on track time we called it a day and decided to quite while we were ahead (and before we ran out of fuel)
We headed back to my house and then had the chief of eligibility come over (he lives local to me) and to our car's annual tech inspection. We passed with flying colors. So unless something goes terribly wrong I should be driving my first vintage wheel to wheel race next weekend (6/4) at the Pueblo Motorsports track!
Posted by: Eric_Shea May 29 2005, 07:22 PM
Stop the press!
Is that a "real" hood emblem vs. a decal? What the ^%#$ are you thinking? 
Thing-o-beauty Brant
Posted by: redshift May 29 2005, 07:30 PM
'Tis beautiful!
M
Posted by: SGB May 29 2005, 07:43 PM
| QUOTE |
| Thanks for the ride |
the whole 20 page ride.
Posted by: brant May 30 2005, 11:05 AM
| QUOTE (Eric_Shea @ May 29 2005, 06:22 PM) |
| Stop the press! Is that a "real" hood emblem vs. a decal? What the ^%#$ are you thinking? Thing-o-beauty Brant |
Dad wants me to tell you that we used metal to "make weight"
Posted by: brant May 30 2005, 11:07 AM
I have a few pics of additional build items. Here are the fasteners for the roof:
Attached thumbnail(s)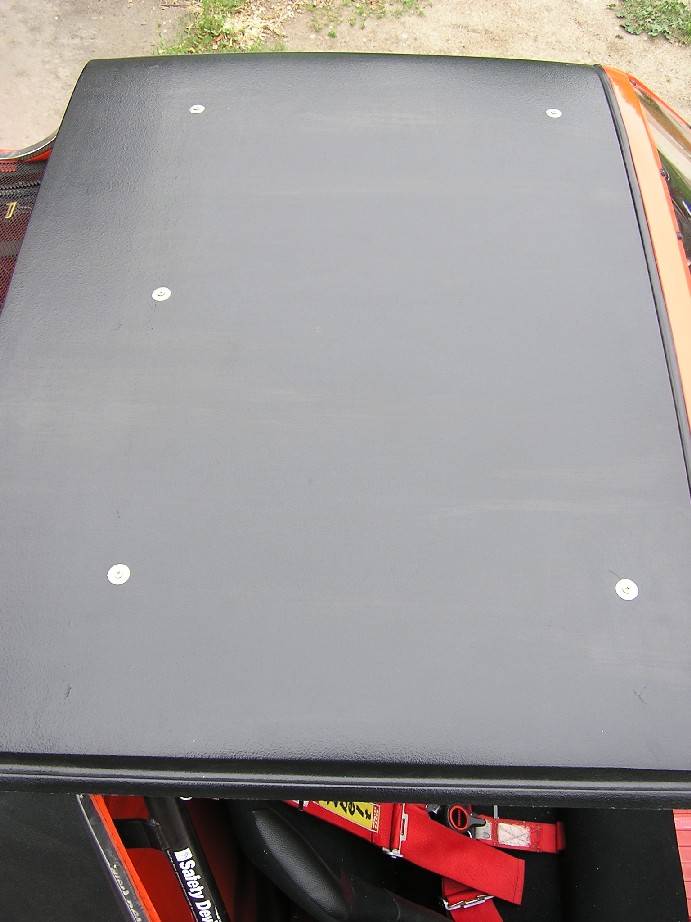
Posted by: brant May 30 2005, 11:15 AM
and a more close up shot:
Attached thumbnail(s)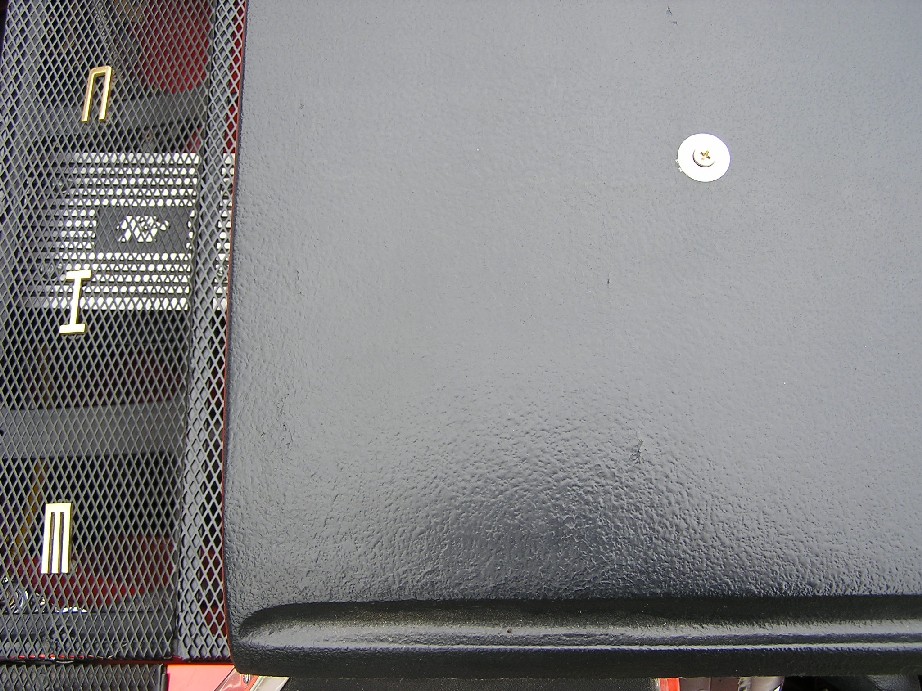
Posted by: brant May 30 2005, 11:17 AM
Here is the rear drop links that dad "shortened"
you can also see that the car is strapped down in this picture and we are using those rear shock spacers/bolts as a tie down point:
Attached thumbnail(s)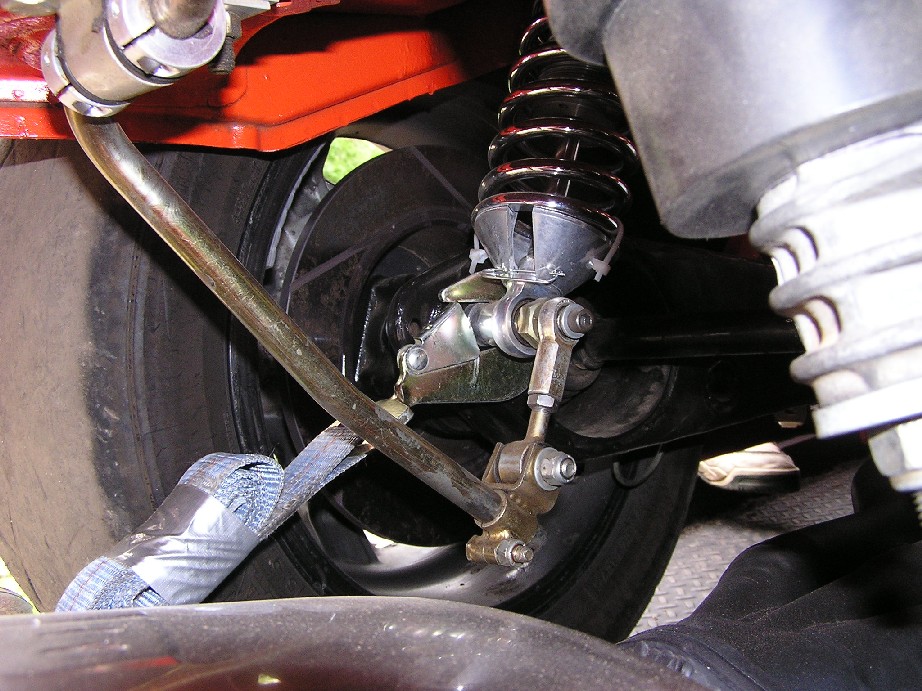
Posted by: brant May 30 2005, 11:18 AM
There was a photographer at the test -n- tune day this weekend. He took shots of both my orange teener and my orange focus:
http://www.printroom.com/ViewGallery.asp?userid=mattdan12&gallery_id=182526&curpage=9
Posted by: J P Stein May 30 2005, 11:28 AM
Damn....ya mean it actually runs?
Ain't it great? 
Posted by: brant May 30 2005, 11:33 AM
| QUOTE (J P Stein @ May 30 2005, 10:28 AM) |
| Damn....ya mean it actually runs? Ain't it great? |
Yeah. it feels pretty great.
I don't really have a sense that its faster than my old car yet.... but I'm rusty and have been running on 5 year old yoko's
so hopefully with some more seat time and fresher tires I'll start to pick up the pace. Plus we hope to pull the MSD 6K pill by sunday, so that we can stop short shifting!
sound really nice though
everything I thought it would be
Posted by: brant Jun 5 2005, 08:13 PM
Update...
just got back today from a wheel to wheel event at my favorite colorado track. Good weekend overall. Not as fast as I would have liked but still fun. t'was the 3rd track I've been on in 13 days. Think the motor is now fairly close to being broke in. The -4 cylinder gearing is definitely hurting me, however the driver is probably hurting the lap times too.
I ran .7seconds slower than my Personal Record at pueblo. The only saving grace is that these are the same exact pair of kumhos that I set my PR with in 2002 (and they also ran the track in 2001) So they are 4 year old tires... Still I'm running more hp and 300lbs lighter and I'm slower, so I know the driver is not up to speed yet!
The car also had its first scratch. I'll post pics, but its very repairable. We had a trailer incident, where the car rolled over the stops on the trailer and came to rest on the tire rack. A little fiberglass repair and another (3rd one) paint job on the bumper and it will be fine. Could have been much worse, so really we were pretty lucky.
pics will follow tomorrow. I'm sunburned and need to go rest right now.
Posted by: brant Jun 6 2005, 04:26 PM
got all the decals on.
they came out nice.
I would of rather had one of our club members do it, but just couldn't get the timing to work out:
Attached thumbnail(s)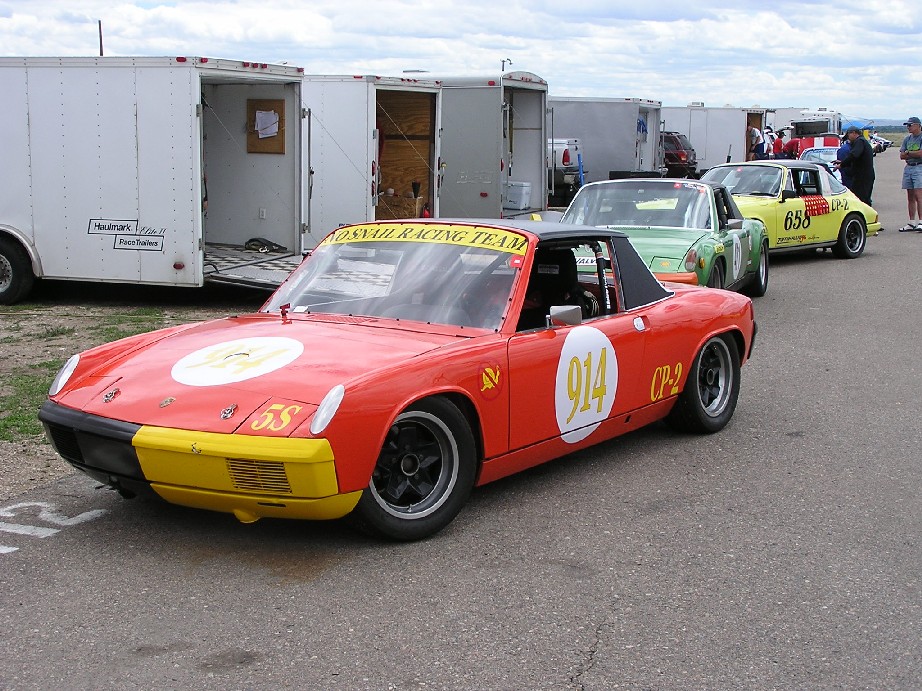
Posted by: brant Jun 6 2005, 04:27 PM
repeat front view of the windshield banner:
Attached thumbnail(s)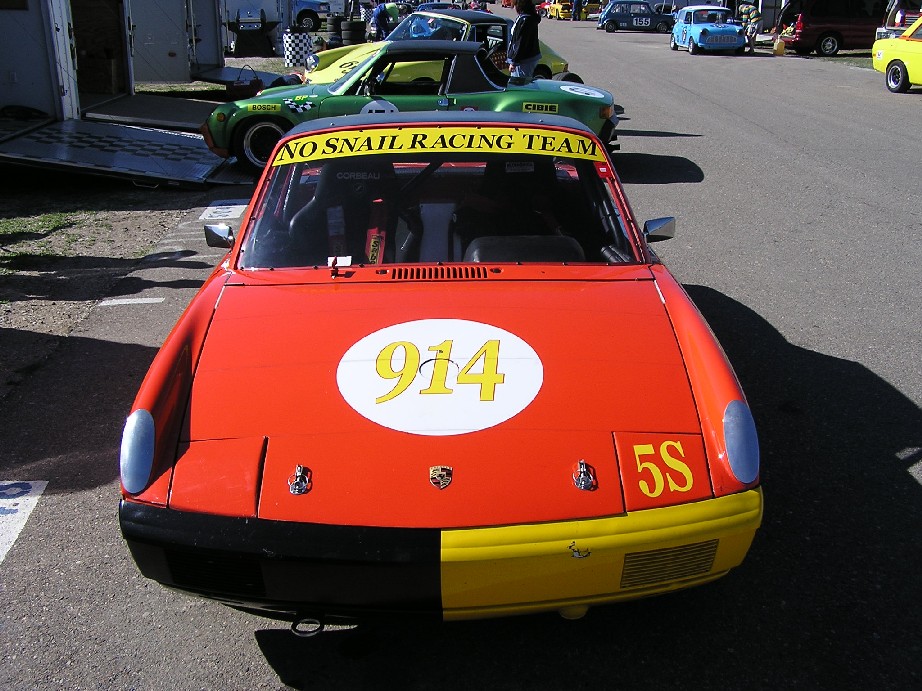
Posted by: brant Jun 6 2005, 04:28 PM
Other side:
Attached thumbnail(s)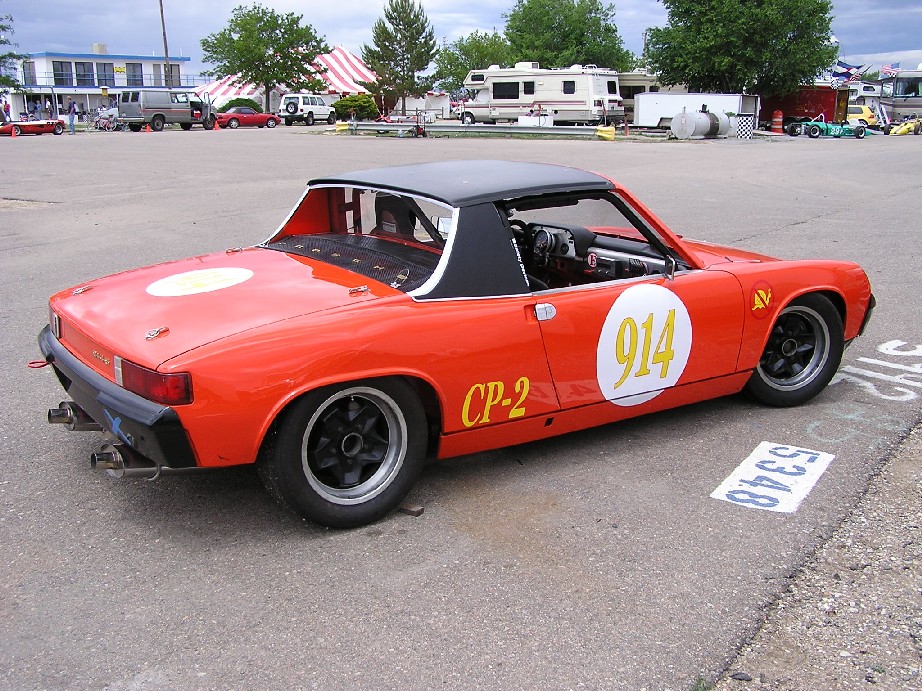
Posted by: brant Jun 6 2005, 04:29 PM
close up of my mascot decal:
Attached thumbnail(s)
Posted by: brant Jun 6 2005, 04:32 PM
As mentioned above... car got its first scratch.
very repairable.
the bumper got cracked and is pushed back a little bit (under the hood)
I think a little glass work and a reshoot of the bumper and it will be fine.
you can see the damage on the yellow side more than on the black side:
Attached thumbnail(s)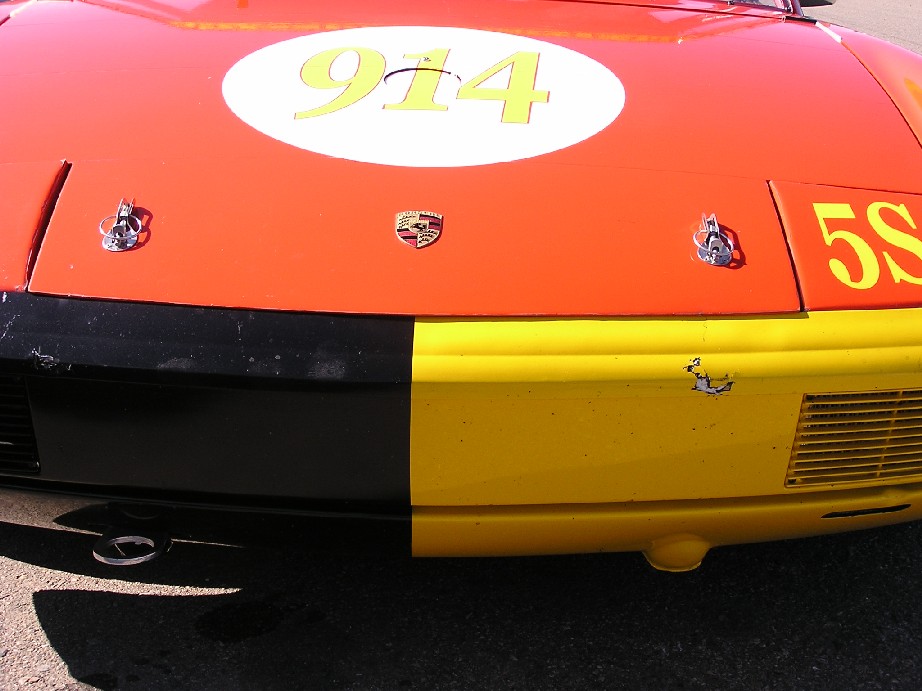
Posted by: john rogers Jun 6 2005, 04:33 PM
Hummm, I stopped using metal to metal at the car for the tie down points as there was a lot of rubbing going on which can easily create stress raisers. I use some loop type straps instead now at the same place you do. I still use the metal hook at the trailer though.
Posted by: brant Jun 6 2005, 04:34 PM
Here are 3 tired and dirty fellas...
My dad is on the left, and Allen Johnson is on the right.
These 2 deserve all the credit for the car finally coming together:
Attached thumbnail(s)
Posted by: J P Stein Jun 6 2005, 05:13 PM
| QUOTE (brant @ Jun 6 2005, 02:34 PM) |
| These 2 deserve all the credit for the car finally coming together: |
Yeah, but you're taller
The old "bondo on the bumper" trick will take care of that
battle scar.
Posted by: Jeroen Jun 6 2005, 06:33 PM
| QUOTE (brant @ Jun 6 2005, 11:32 PM) |
| As mentioned above... car got its first scratch. |
they're only pretty once... right before you drive 'em
and heck, that's what they're for!
Posted by: brant Jun 7 2005, 08:16 AM
John, good point... and you have given me a ton of good advice. The aluminum is just a spacer and doesn't carry the strength of the mount, but still worth keeping an eye on it.
JP, my plan too... a little bondo and anothr re-shoot.
Jeroen, I agree... it will get more nicks and scratches before long. I intend to drive it as hard as I can!
Posted by: Eric_Shea Jun 7 2005, 08:23 AM
Great journey Brant. Thanks for taking us with you.
Now... about your Dad. What's his favorite food? The guest bedroom is ready
Posted by: BMartin914 Jun 7 2005, 08:29 AM
Lookin' real good Brant! The black cookie cutters look real good! Damage isn't too bad either - adds character right?
Posted by: brant Jun 8 2005, 05:30 PM
Thanks again Eric!
Thanks again Ben! (hopefully, I'll get the fuchs painted and on it before you see it in July)
last couple of shots.
guess I should close this thread down.
Laura took a coupld of action shots for me at the race.
Here I am coming out of a hair pin corner:
Attached thumbnail(s)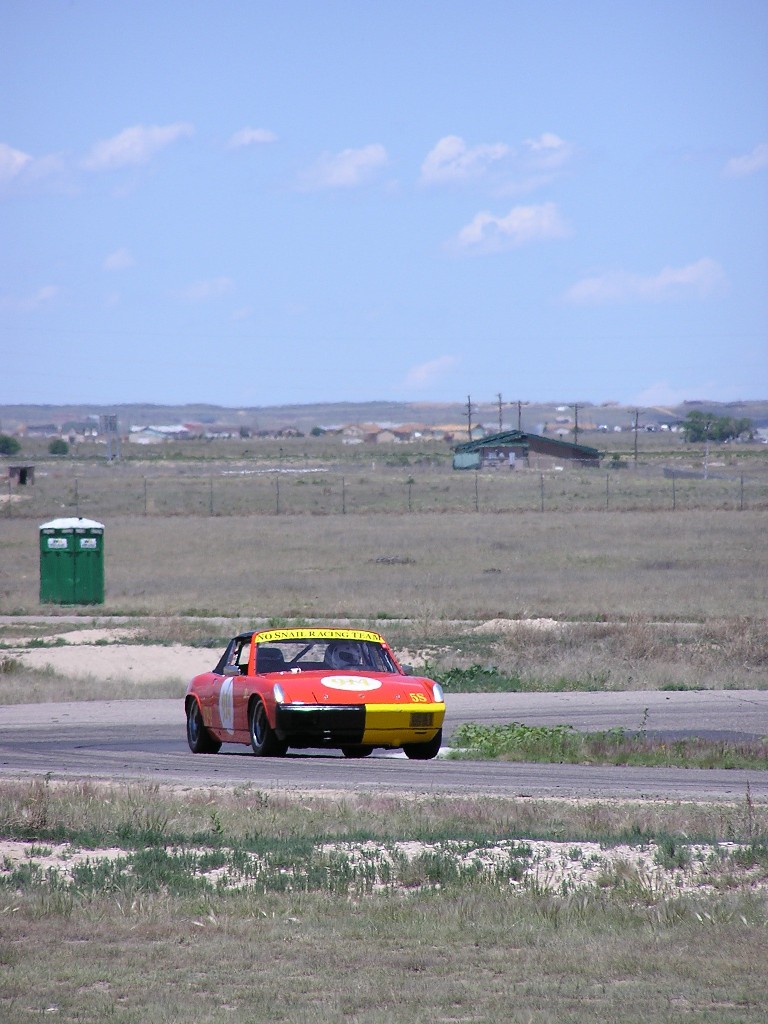
Posted by: brant Jun 8 2005, 05:31 PM
Here I'm actually passing someone..
whoo... hooo...
Attached thumbnail(s)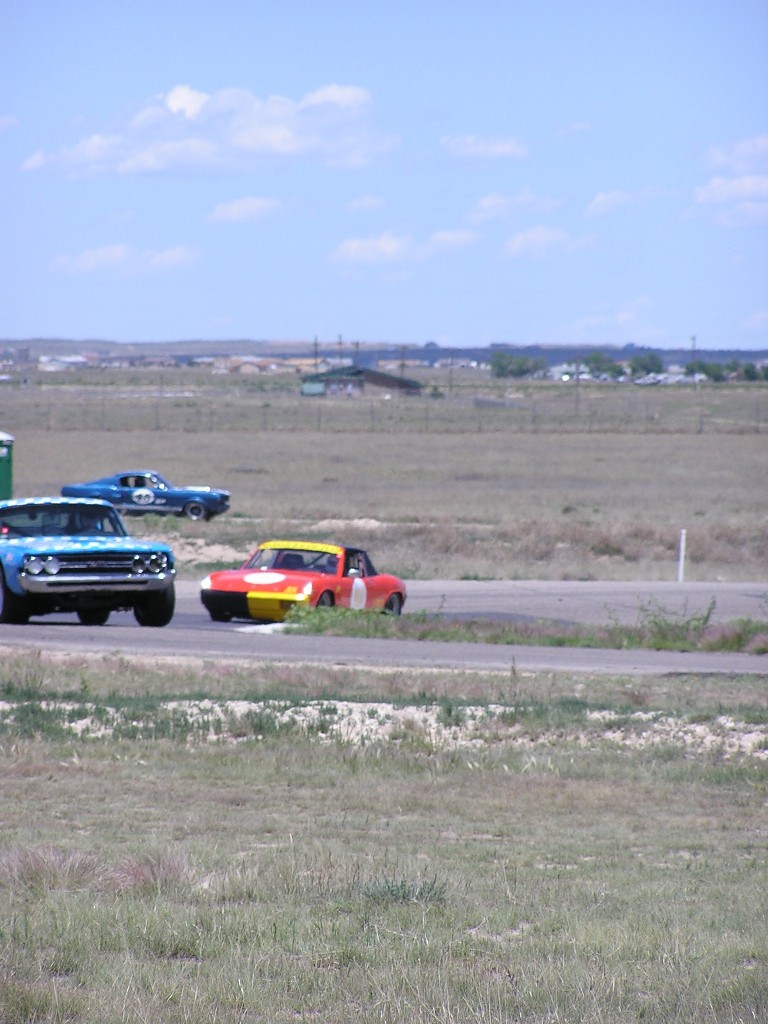
Posted by: brant Jun 8 2005, 05:33 PM
driving off into the sunset:
Attached thumbnail(s)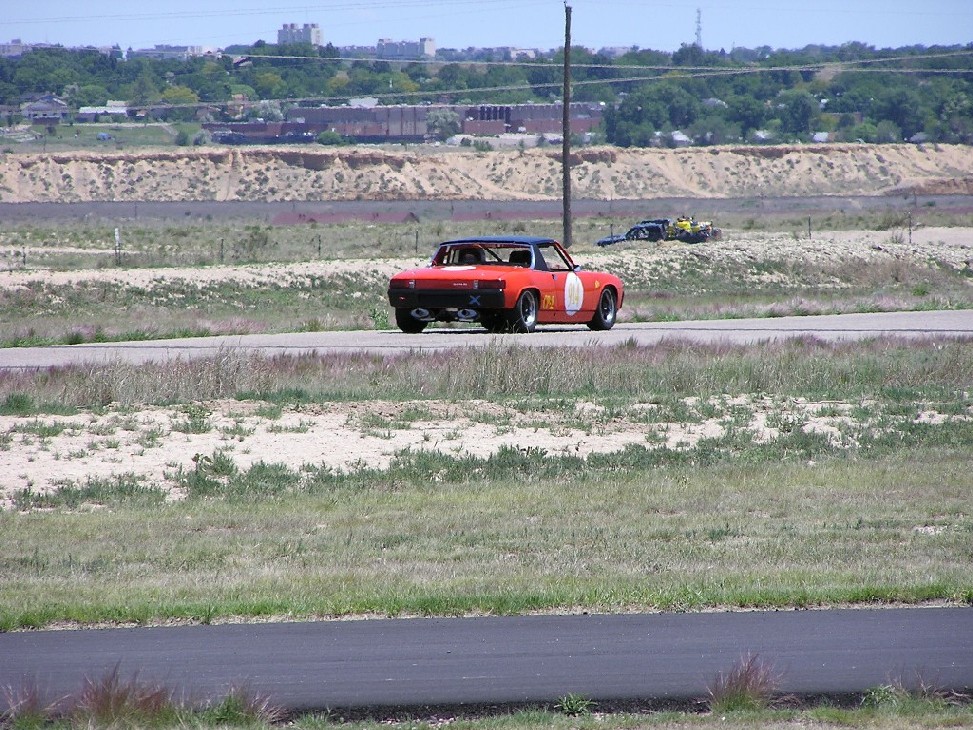
Posted by: majkos Jun 8 2005, 06:46 PM
Yea Baby!
Coming out of that hairpin,she's LEVEL!
God THAT should feel good!! 
Posted by: BMartin914 Jun 8 2005, 08:52 PM
Posted by: brant Aug 29 2005, 04:56 PM
Ok...
this isn't so much an update as it really is just me storing a few more pictures I wanted to keep together.
too lazy to do a blog at this point.
This one is the underpan for the front MC and fuel pumps.
Its aluminum of course:
Attached thumbnail(s)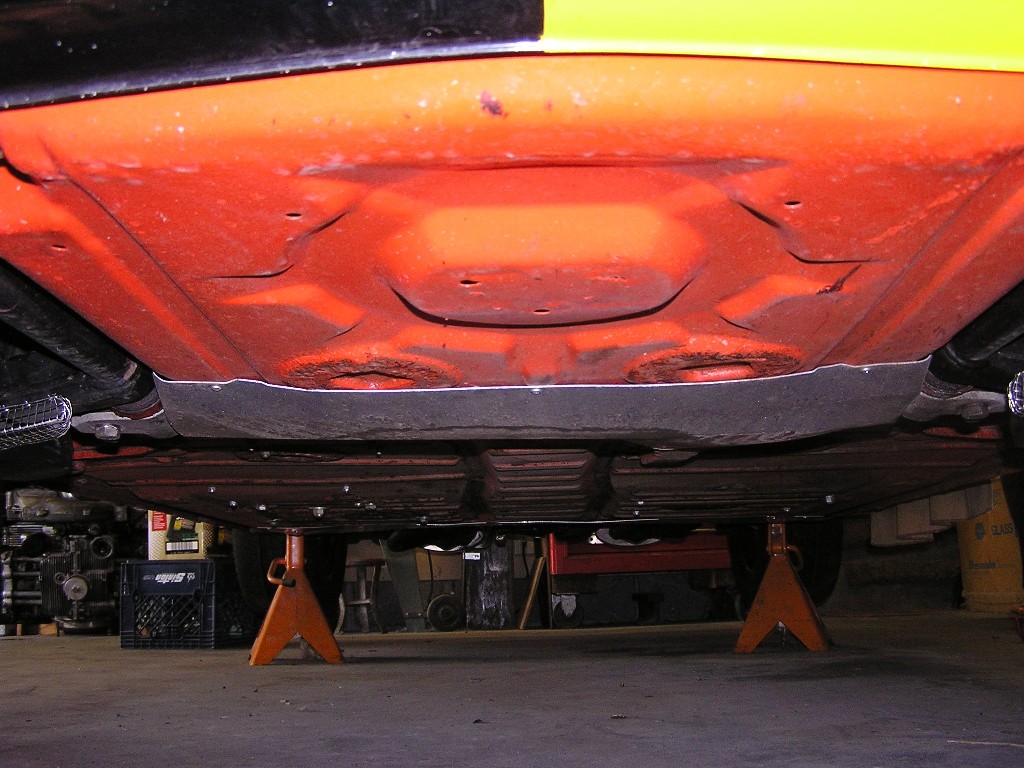
Posted by: brant Aug 29 2005, 04:57 PM
Here is a shot of the stainless grill over the brake ducts...
Its amazing how much rubber gets inside the vented rotor without the screen:
Attached thumbnail(s)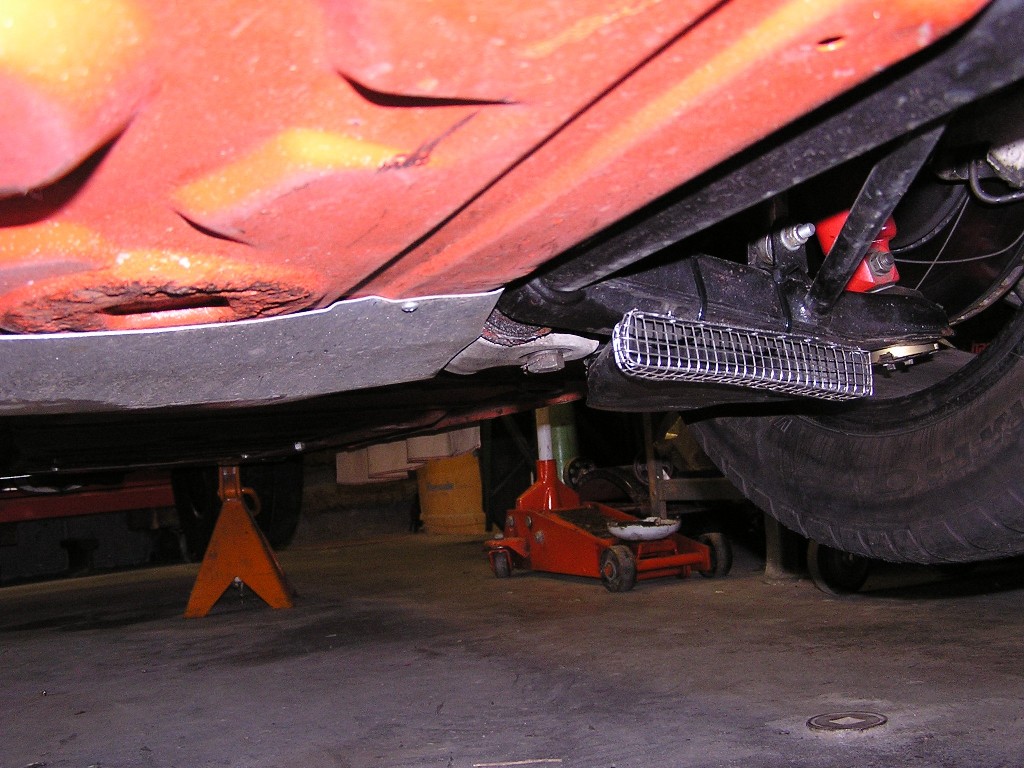
Posted by: brant Aug 29 2005, 05:00 PM
About a month ago we trailered to Grand Junction and got onto a chassis dyno to tune the carbs. We were there from 8am until 5:30 and got 12 pulls in during the day with lots and lots of tuning inbetween. The temp grew significantly from 90degrees to 104F.....
very happy with the results.
I picked up a stutter for sure, but I'm going to customize/modify a set of emulsion tubes to try and cure that. Over all still very happy with the dyno work and the motor for just being such a stock 2.0S
Attached thumbnail(s)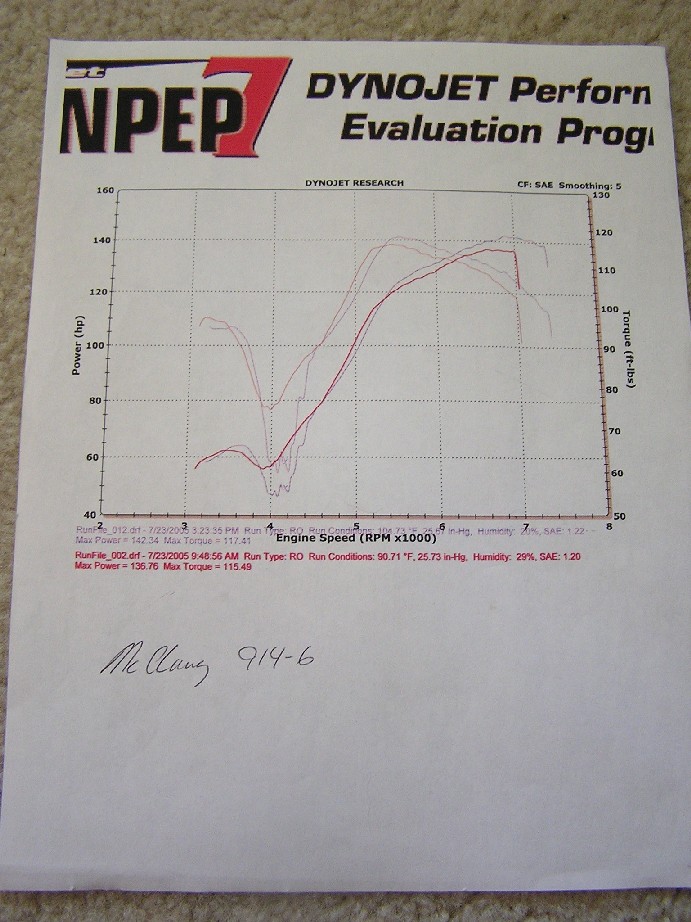
Posted by: brant Aug 29 2005, 05:01 PM
a tiny bit more legible. This was at the wheels, at altitude, and at 104F
Attached thumbnail(s)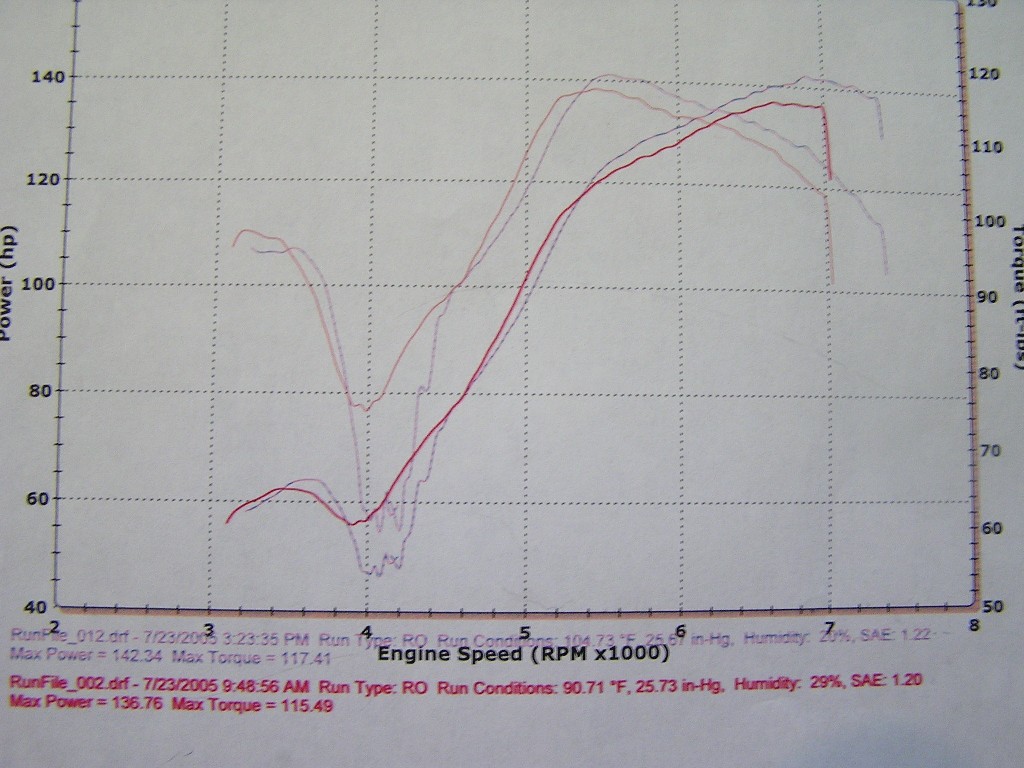
Posted by: brant Sep 15 2005, 10:37 AM
We started refinishing wheels.
Dad did all the work.
only the first 2 are done so far but they came out great!
they were a bit curb scratched when he started. He hand polished them and then we masked and shot with a wheel paint:
Attached thumbnail(s)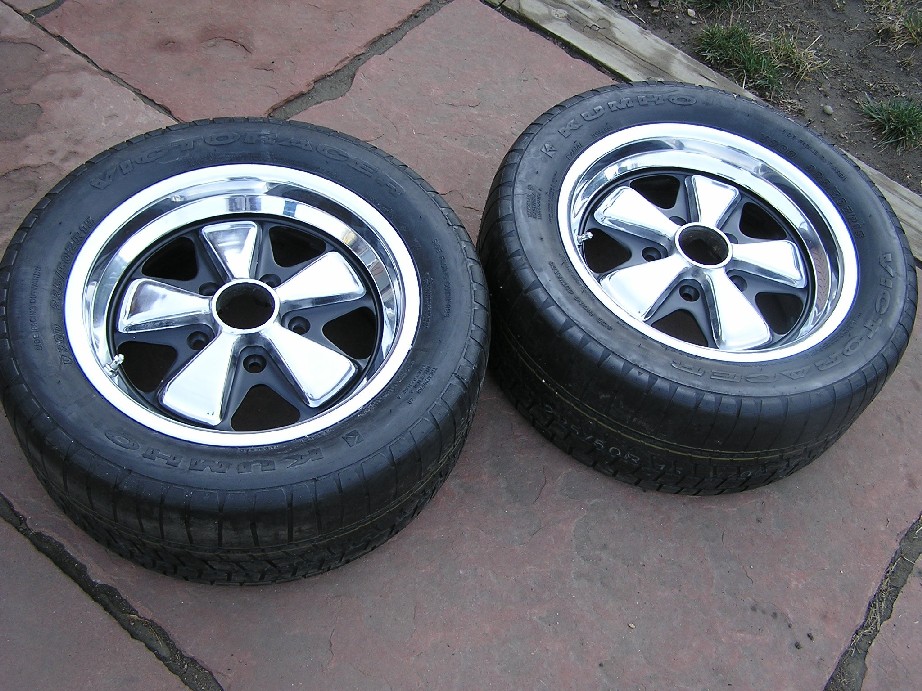
Posted by: brant Sep 15 2005, 10:38 AM
7 inchers to replace our cookies:
Attached thumbnail(s)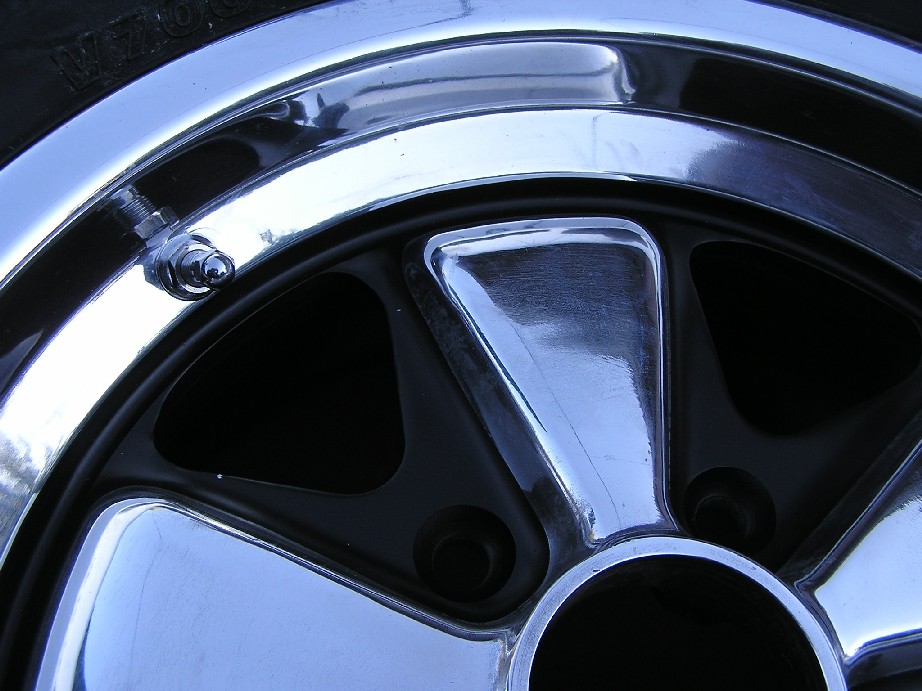
Posted by: brant Sep 15 2005, 10:38 AM
new tires will be fun too:
Attached thumbnail(s)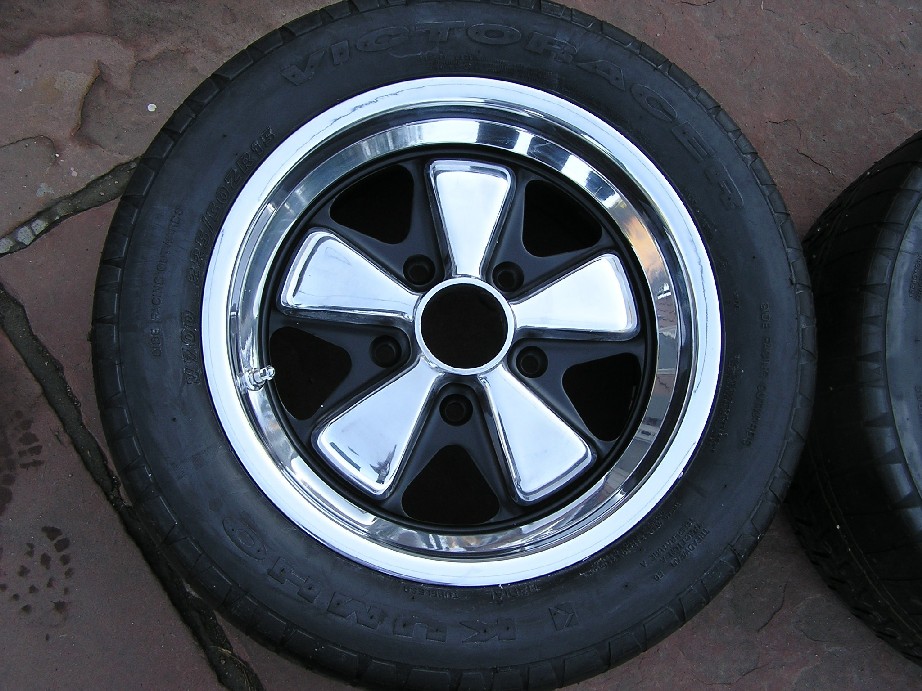
Posted by: Ferg Sep 15 2005, 10:49 AM
Need some center caps?
Ferg
Posted by: brant Sep 15 2005, 10:58 AM
| QUOTE (Ferg @ Sep 15 2005, 09:49 AM) |
| Need some center caps? Ferg |
nah...
race wheels.
no centercaps allowed
Posted by: J P Stein Sep 15 2005, 11:25 AM
Nah, keep the thread alive. It's an island in a sea of drivel
Posted by: meares Sep 15 2005, 12:31 PM
that's BEAUTIFUL!!!!!!!!!!!!!!!!!! please keep the pics coming!!!
Posted by: dion9146 Jan 11 2006, 10:28 PM
Just took the last hour drooling through this thread. Fantastic car. Not too many words to describe this one. 
Dion
Posted by: MW 914 Jan 11 2006, 10:59 PM
| QUOTE (dion9146 @ Jan 11 2006, 08:28 PM) |
| Just took the last hour drooling through this thread. Fantastic car. Not too many words to describe this one. Dion |
It looks like a nice car, but my god...there are holes everywhere!
Posted by: brant Jan 11 2006, 11:16 PM
| QUOTE (MW 914 @ Jan 11 2006, 09:59 PM) | ||
It looks like a nice car, but my god...there are holes everywhere! |
holes come natural to a 914....
if you don't believe me, ask anyone.
thanks Dion, thanks Michael!
brant
Posted by: brant Apr 14 2006, 03:38 PM
race car update.
she is just about ready and serviced for the upcoming season #2
I don't have pictures of most of the updates we did.
I'll get them later... they are all pretty minor anyways.
the neatest is the front hood and thats not ready for show yet anyways.
Dad is doing his vintage school in one week to get a liscense with that group.
should be a very good time
Here is the new muffler bracket.
smaller, and lighter than the old one.
about 50% weight reduction in just the bracket:
Attached thumbnail(s)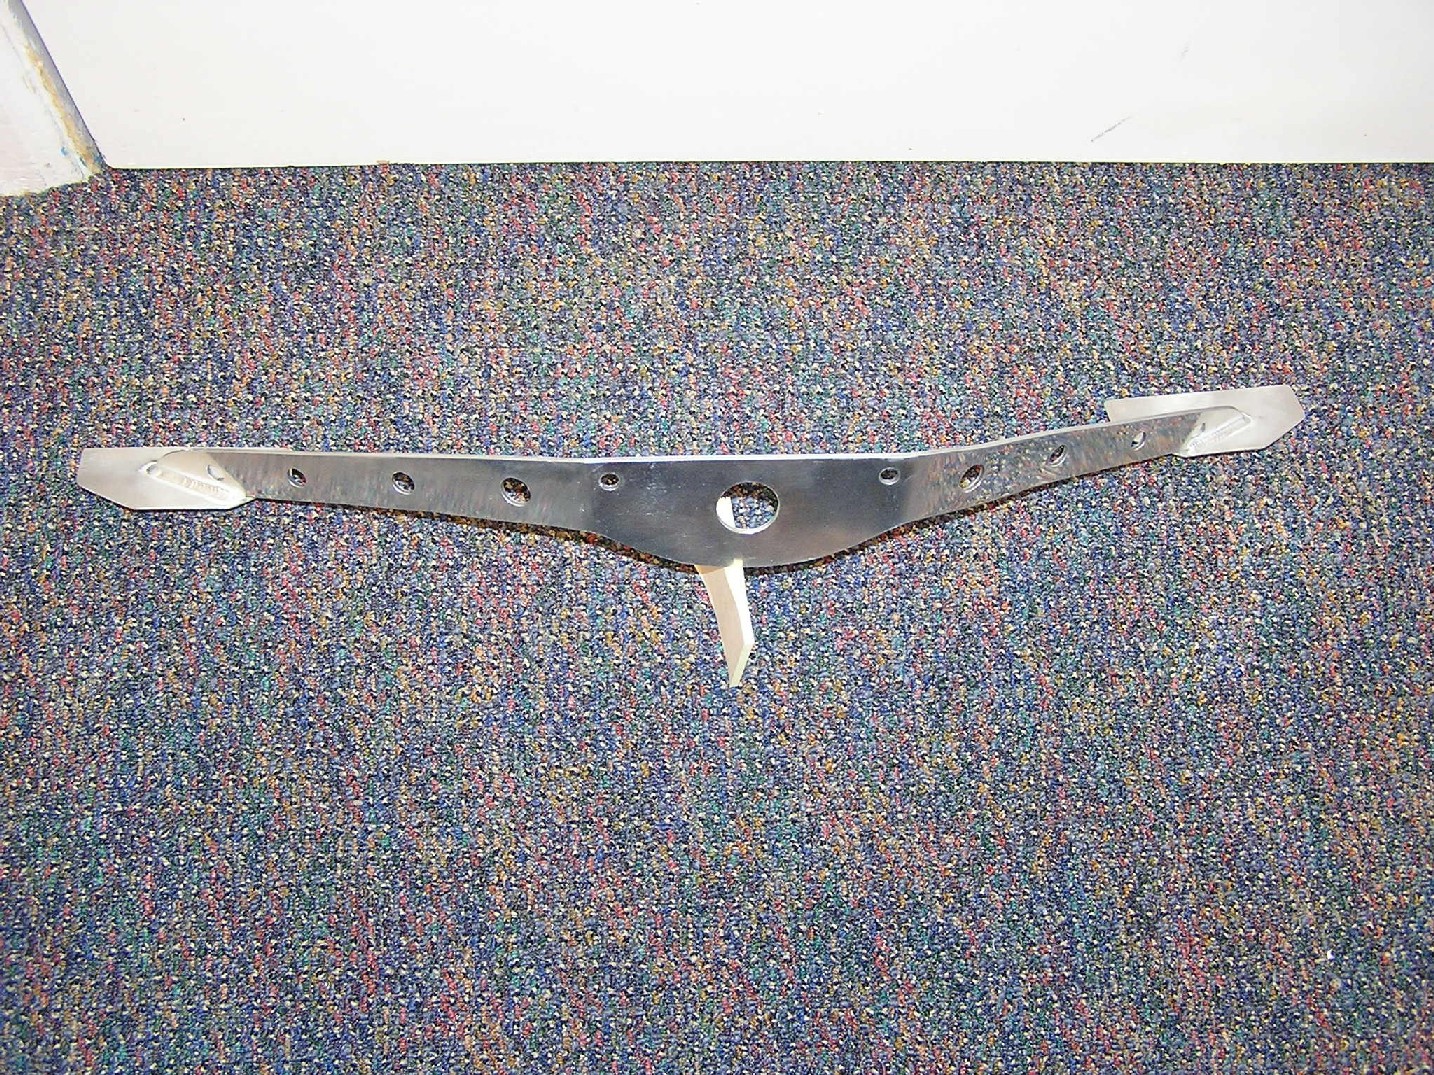
Posted by: brant Apr 14 2006, 03:41 PM
The feet to this bracket are clamped to the muffler with stainless clamps.
my welding isn't up to this level and I didn't want the vibration to cause failures so I didn't do the welding.
The welding is amazing.
a guy in longmont runs an alloy speciality shop.
he is good enough that he does some helicopter work.
pretty:
Attached thumbnail(s)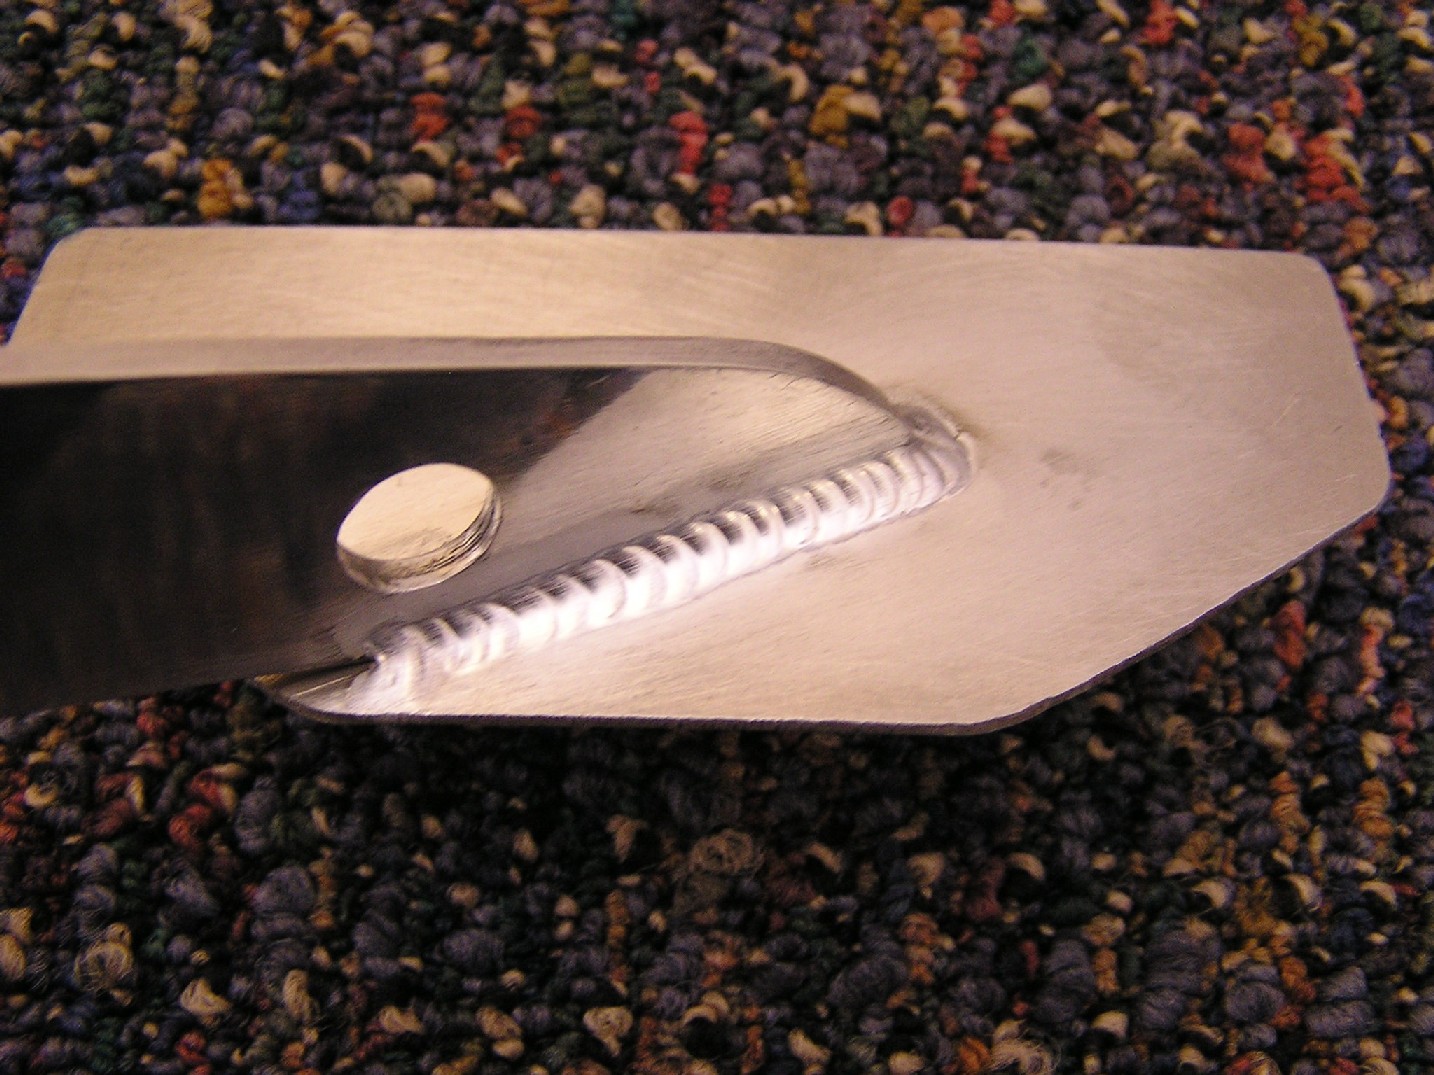
Posted by: brant Jun 21 2006, 08:32 AM
I have a few updates to add.
I have a few less than stellar pictures of recent developments.
First here is that muffler bracket installed.
saved a few ounces over our old one and should provide a more smooth aero shape under the car:
Attached thumbnail(s)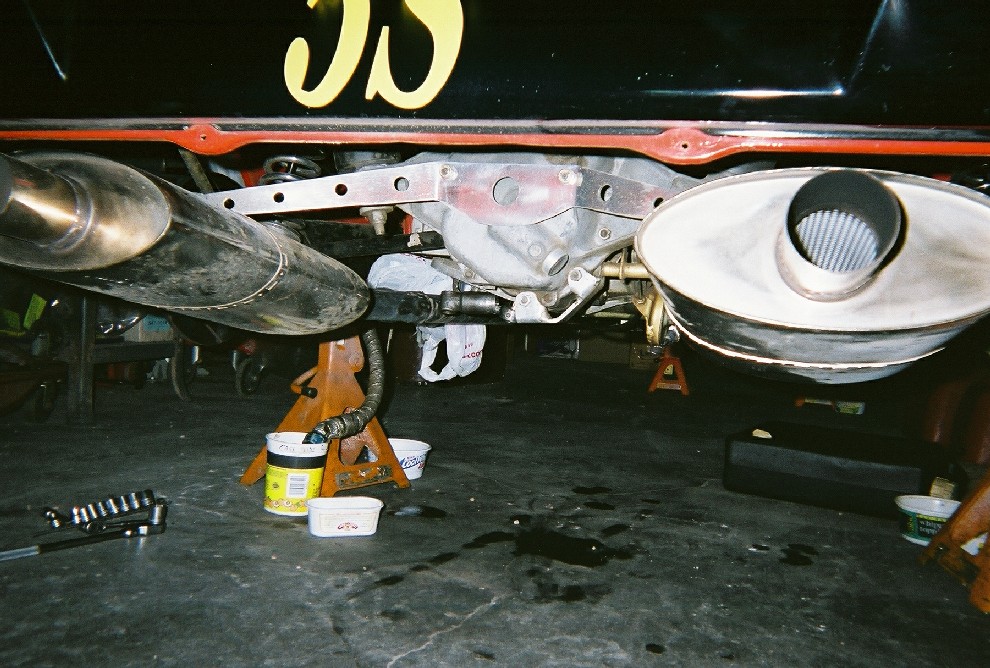
Posted by: brant Jun 21 2006, 08:35 AM
Next is my clutch/flywheel upgrade.
didn't yet finish the install, but things are started and should be ready for the next race. Using a Tilton system, which hopefully will provide quicker acceleration-revs.
really excited to try this out and also nervous about the combo of using it with my new gearing:
Attached thumbnail(s)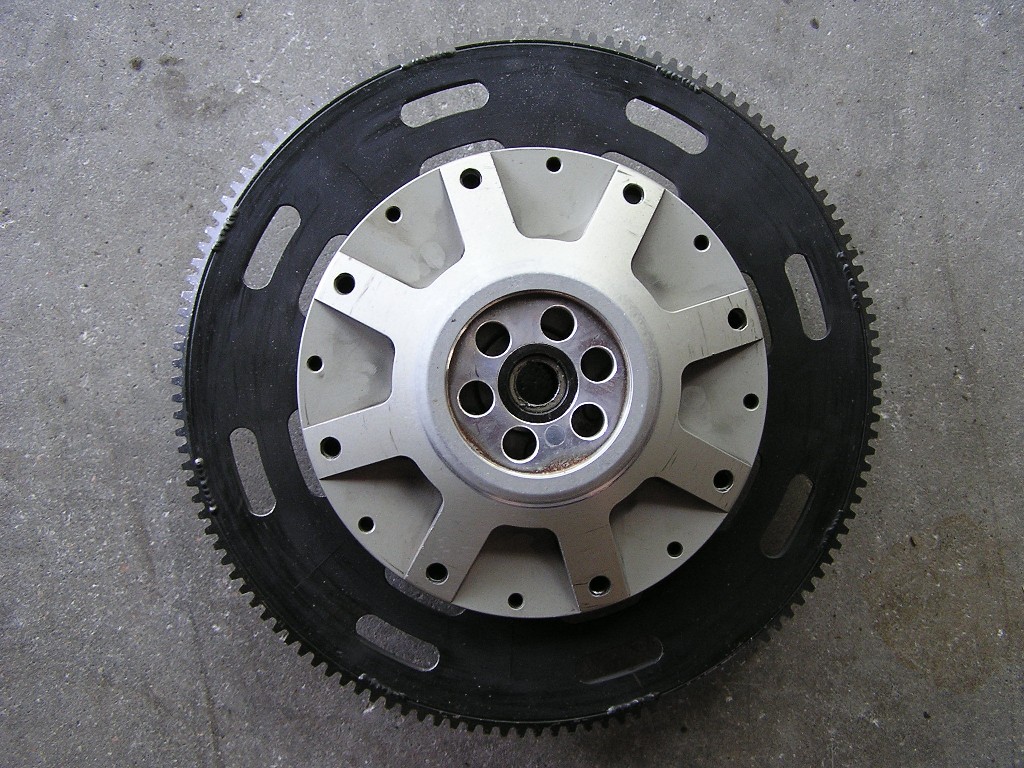
Posted by: brant Jun 21 2006, 08:38 AM
my crappy bathroom scale tells me its 14lbs with the complete flywheel, pressure plate and clutch. Not as light as I anticipated, but the big key should be "where" that weight is located.
front side:
Attached thumbnail(s)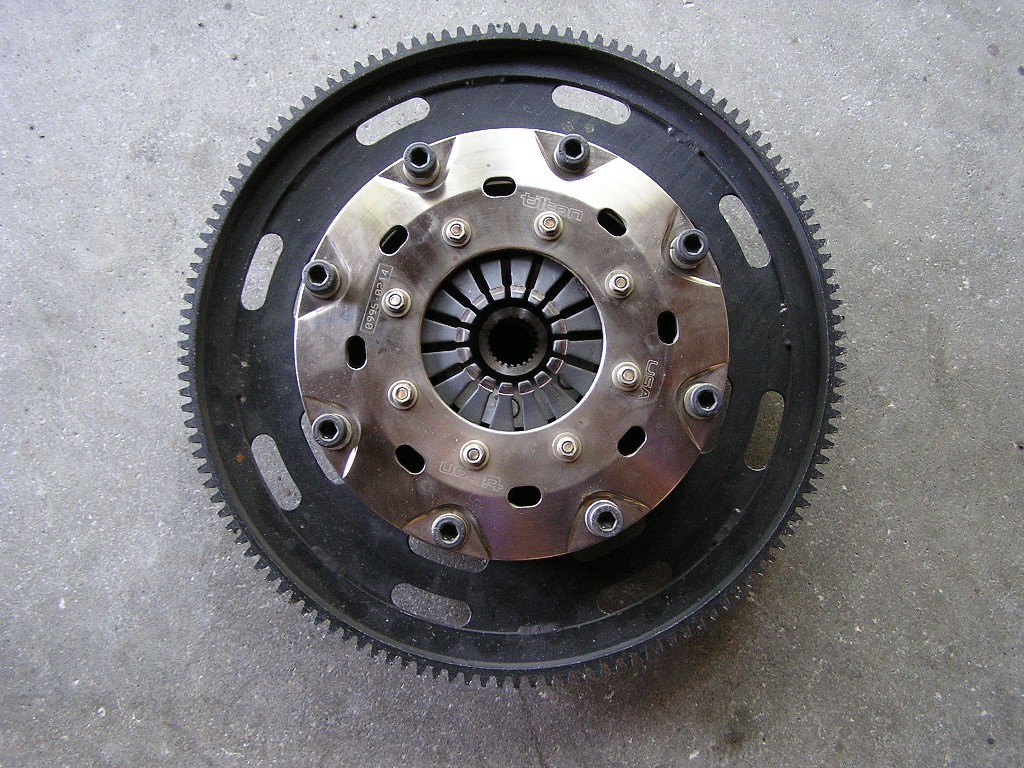
Posted by: brant Jun 21 2006, 08:44 AM
Here is the neat one...
got the new tranny..
really looking forward to trying this one out.
gearing is: F / J / O / S / V
should provide an awesome combo for both long and short tracks since all 5 of the gears can be actually used.
AJRS has tested this set up in bigger and much more powerful motors (including his own for 2+ years) so it should be amazing!
The specs really look decent and I'll post a chart. The MPH between gears looks promising:
Attached File(s) this_one.doc ( 67.5k )
Number of downloads: 157
this_one.doc ( 67.5k )
Number of downloads: 157
Posted by: brant Jun 21 2006, 08:51 AM
That was weird... I've never tried a chart before.
Anyways. The new tranny has a quaffe in it
We did a lot of research and actually found some information that the quaffe could potentially be better than a ZF style diff for a 914 track car.
guess time will tell
I'll not have reverse gear anylonger due to the active first.
infact the magnesium case has to actually be welded to make this work.
the case was quite corroded, and we were advised to provide some type of sealant to avoid further corrosion. This led to an interesting theoretical discussion about what color would shed heat best...
one theory is that silver reflects.
however, a lot of things that need to radiate instead of reflect are actually painted black. For example... radiators...
alot of the serious sand rail guys go with dark colored 914 tranny's...
anyways we decided to try black and see.
I doubt I'll ever be able to tell a difference
we used epoxy appliance paint:
Attached thumbnail(s)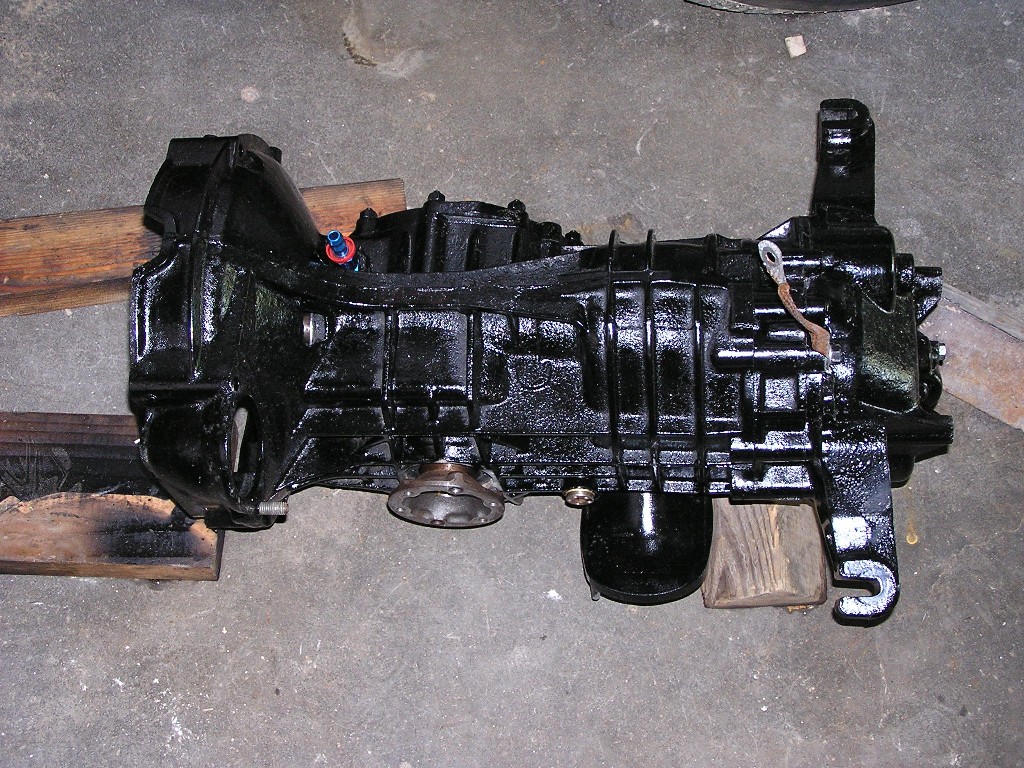
Posted by: brant Jul 3 2006, 10:43 AM
Update from doing a little wrenching.
got the old clutch out and the new clutch/tranny in.
haven't yet finished up installing all of the exhaust or axles, but its pretty close.
my next race in Hastings was postponed and I didn't get selected to run the vintage exhibition at the Denver Grand Prix (street course sounds so fun!)
So at least there is no time crunch to finish this now.
Anyways, I have a few extra pictures to preserve of the changes.
Here is the old clutch flywheel combo that came out:
Attached thumbnail(s)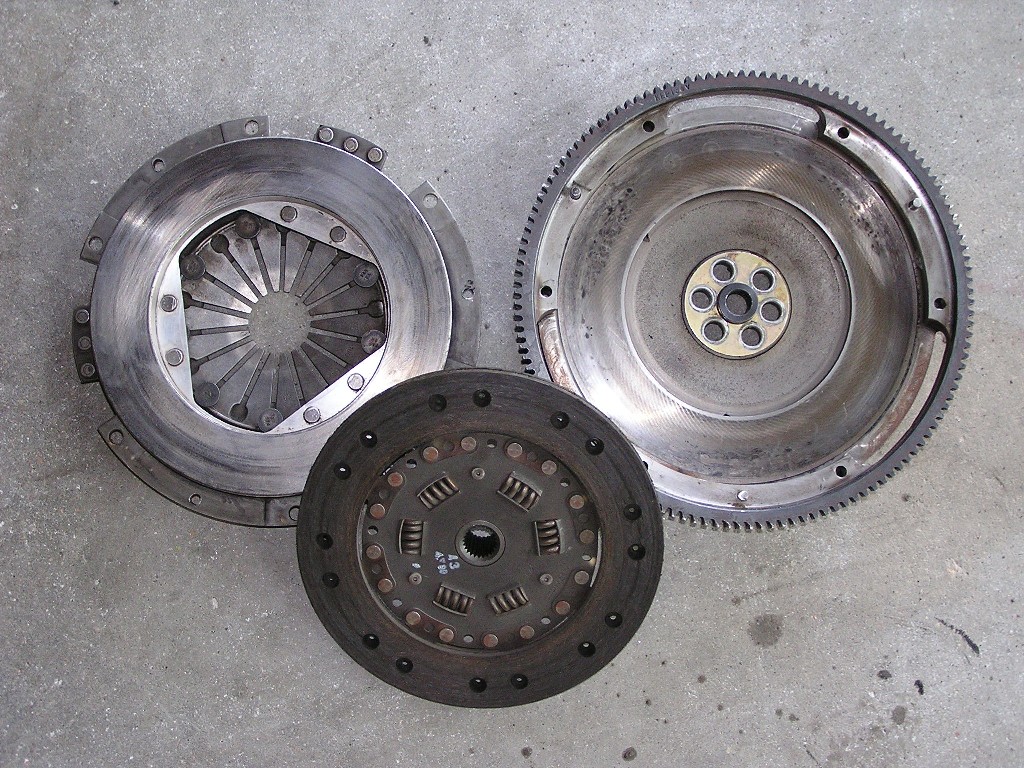
Posted by: brant Jul 3 2006, 10:44 AM
Its a stage 3 AJRS combo
a "window'd" flywheel
10lbs flywheel:
Attached thumbnail(s)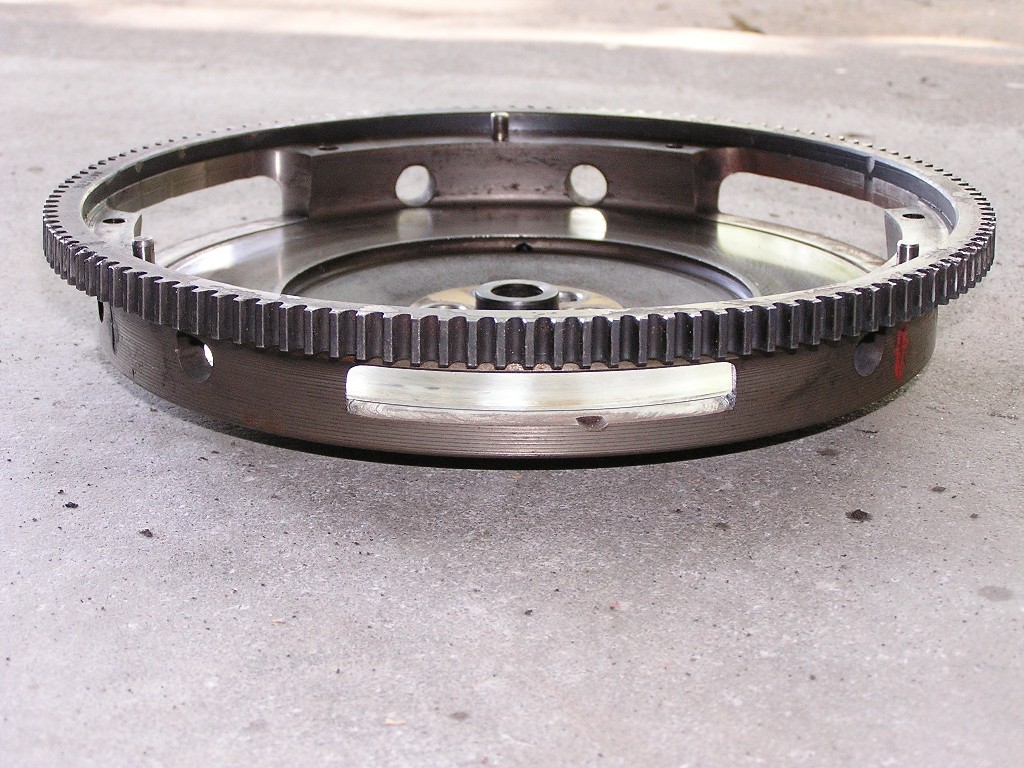
Posted by: brant Jul 3 2006, 10:45 AM
We were running it with the 911S aluminum pressure plate/disc
The full set up was 20lbs.
(10 for the flywheel, 10 for the disc / pressure plate / throw-out / bolts):
Attached thumbnail(s)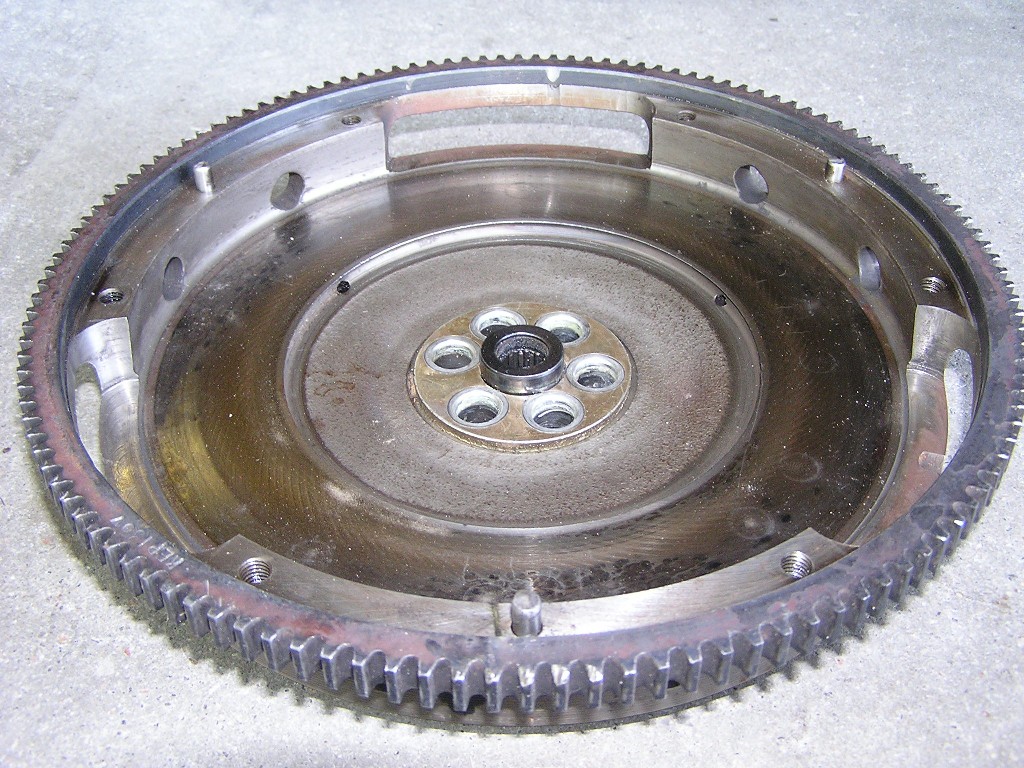
Posted by: brant Jul 3 2006, 10:47 AM
side by side:
Attached thumbnail(s)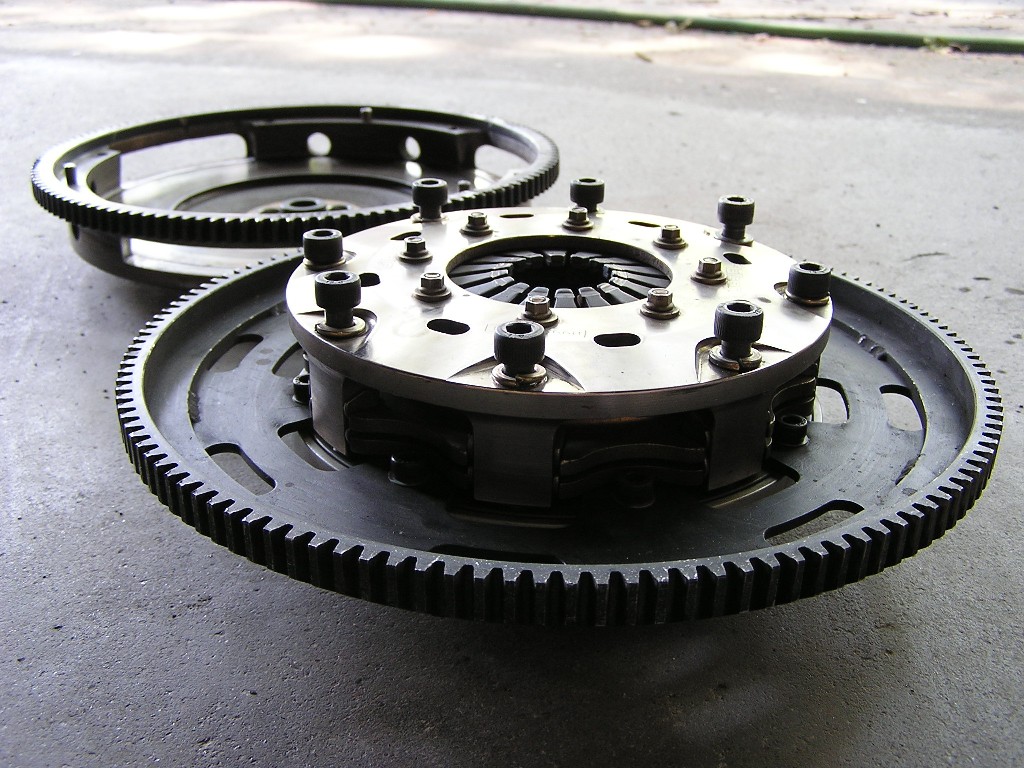
Posted by: brant Jul 3 2006, 10:50 AM
So the new flywheel is 6lbs, and the full assembly including bolts, weighs in at 14 total:
Attached thumbnail(s)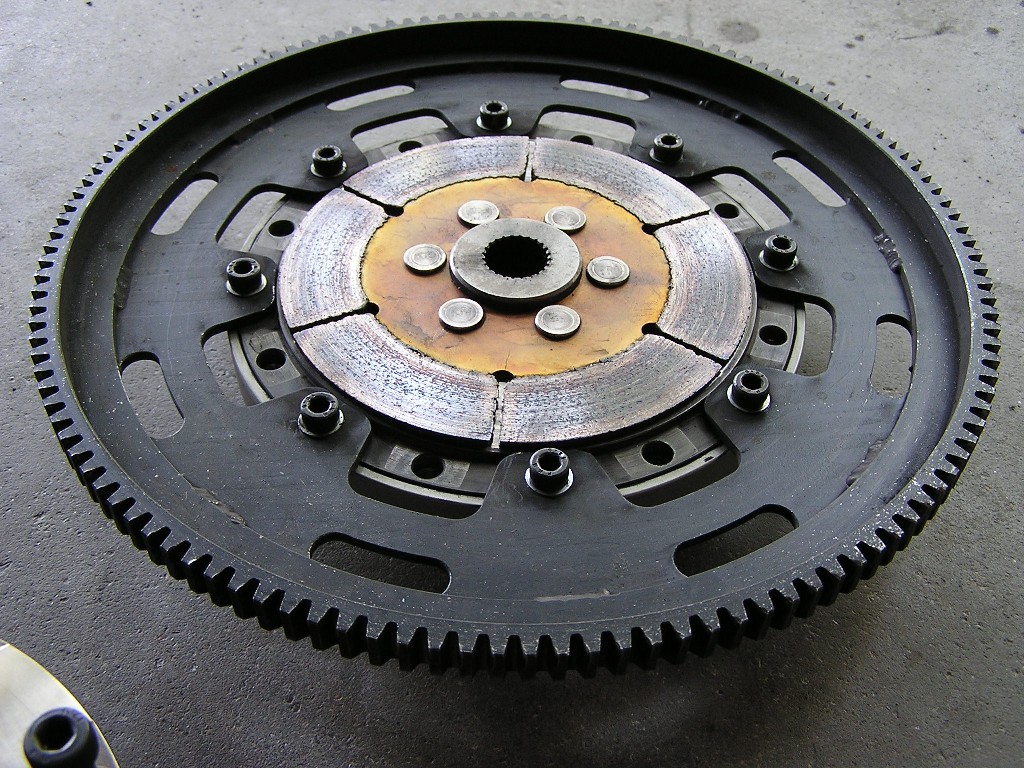
Posted by: Aaron Cox Jul 3 2006, 10:50 AM
schwing!
nice parts!
Posted by: brant Jul 3 2006, 10:51 AM
6lbs net... but most importantly all of the weight is moved inward and the mass doesn't reciprocate in as large of a circle:
Attached thumbnail(s)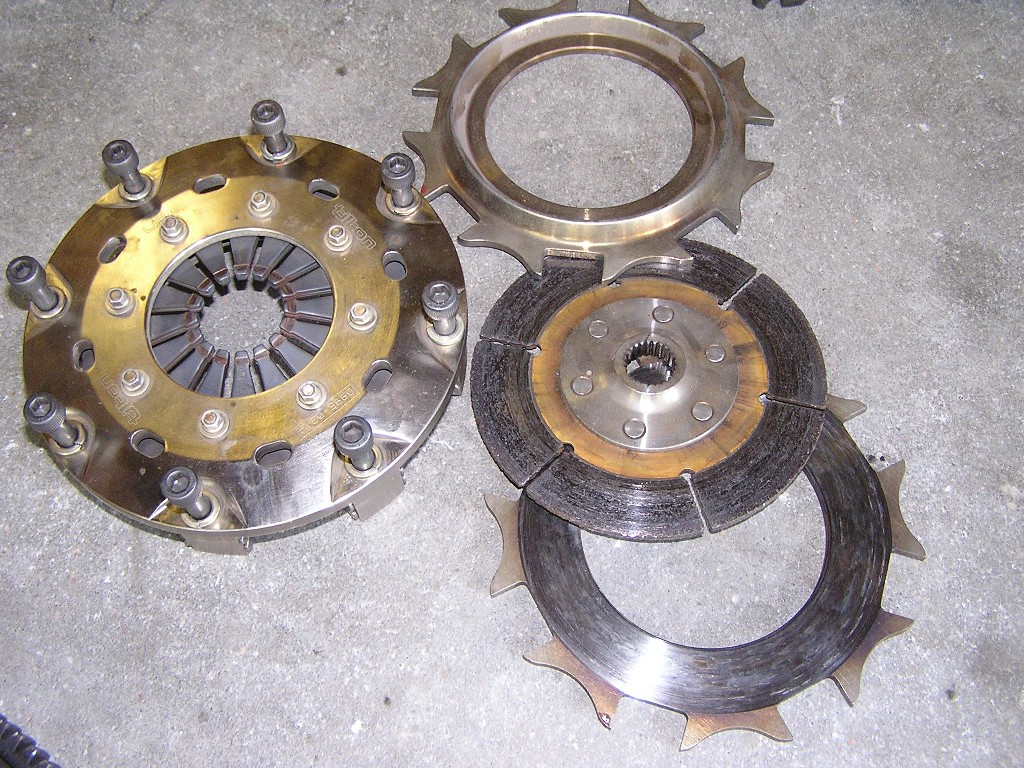
Posted by: brant Jul 3 2006, 11:03 AM
last couple...
here is a pic of the aluminum engine tray dad produced.
its for keeping dirt out of the engine bay:
Attached thumbnail(s)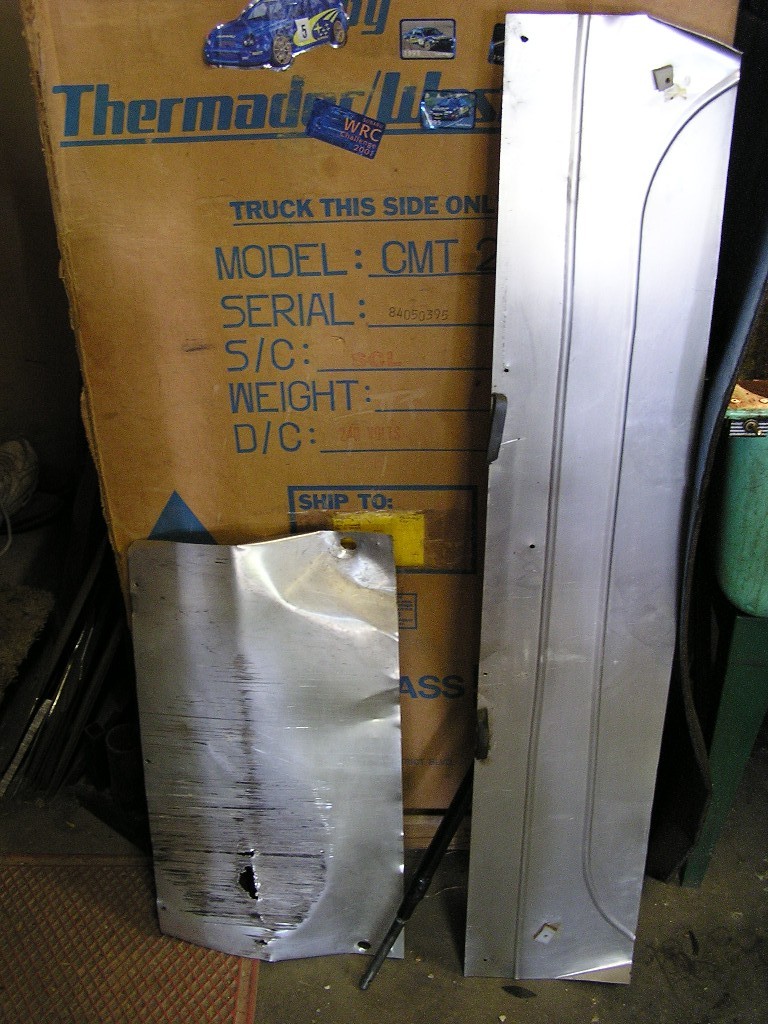
Posted by: brant Jul 3 2006, 11:06 AM
and finally the "after" shot of the aluminum front skid plate with battle damage.
here is what happens if you put 2 wheels off the outside of corner #7 at pueblo.
even worse, I bugger'd one of the pipes on the right bank header..
its still useable though
and "its just a fleshwound"
Attached thumbnail(s)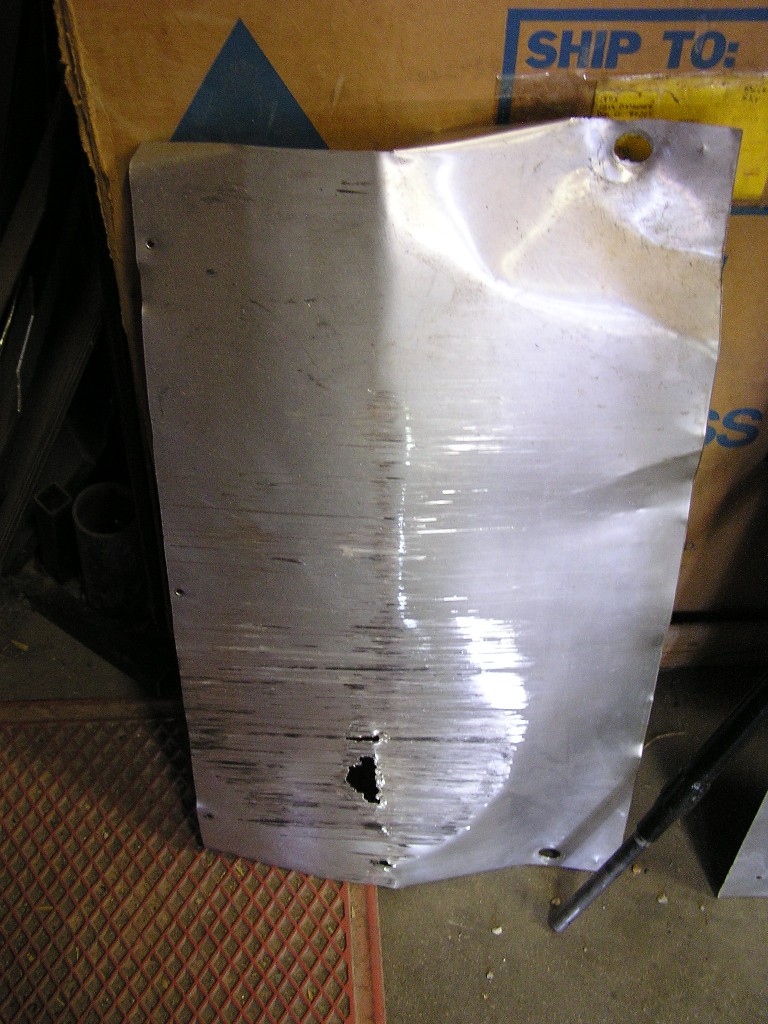
Posted by: brant Aug 22 2006, 02:22 PM
Its time for a few more updates.
we did another corner balance with all of the changes over the last year.
we added weight with:
- TB differential
- aluminum motor pan
- aluminum skid pan
- wide band O2 sensor
Here is a picture of our innovate installed:
Attached thumbnail(s)
Posted by: brant Aug 22 2006, 02:24 PM
and here is our read out. Its the XD-16 guage by innovate:
Attached thumbnail(s)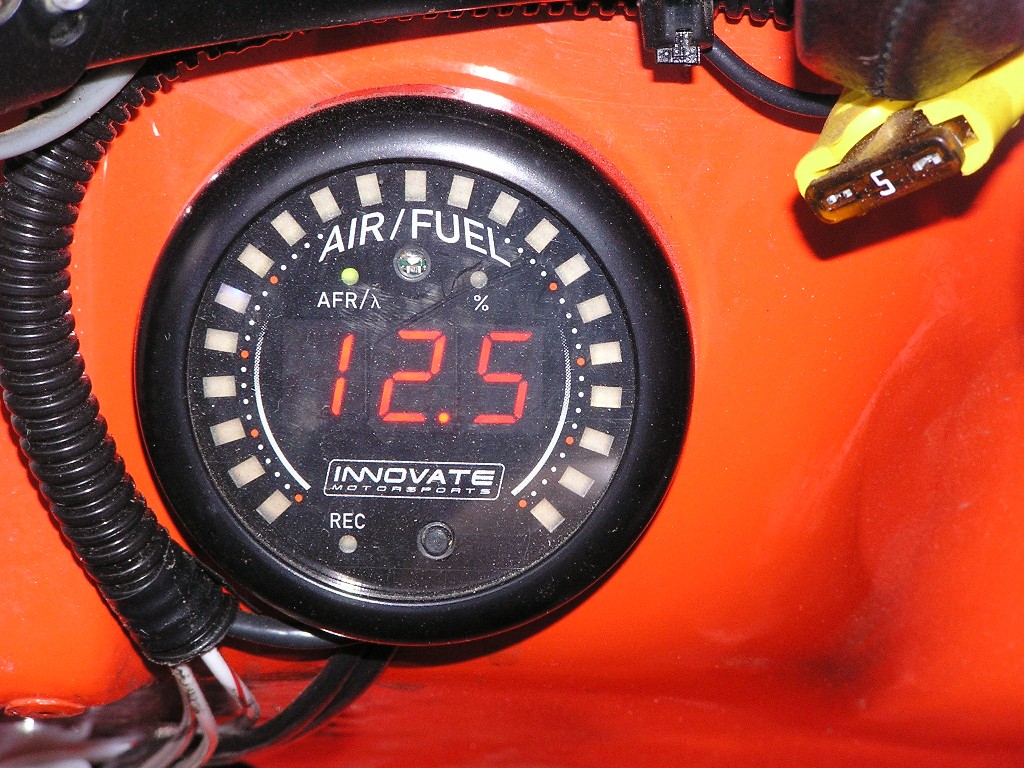
Posted by: brant Aug 22 2006, 02:26 PM
A little bit better picture that shows out placement. I used it this weekend to rejet at a race in Hastings, NE.
works very well.
allows real time info that is far superior to seat of the pants jetting.
I had the car running the way I "thought" it should be... and then found out I was lean (14.0+) above 7000rpm. No way you could tell that without the data, as the car felt just fine:
Attached thumbnail(s)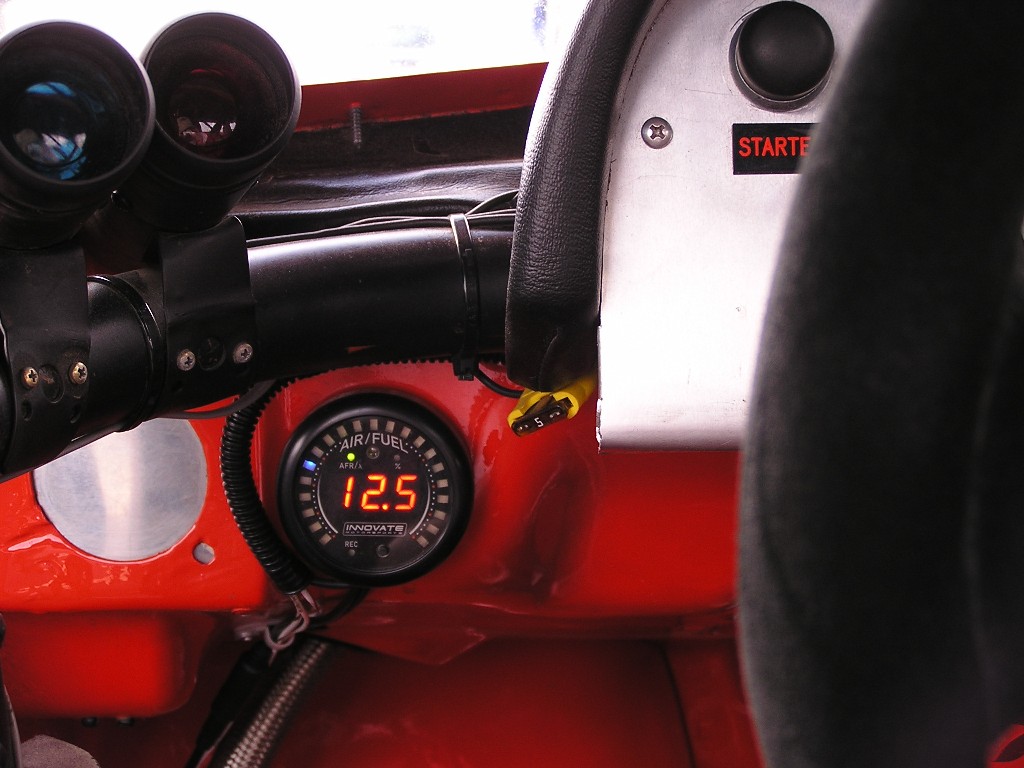
Posted by: brant Aug 22 2006, 02:56 PM
On the good side of the great weight debate... we did a few things during the last year to save weight. Such as:
- lighter clutch and flywheel
- new muffler bracket
- lighter air filters
- and this little hood project
Here she is unpainted:
Attached thumbnail(s)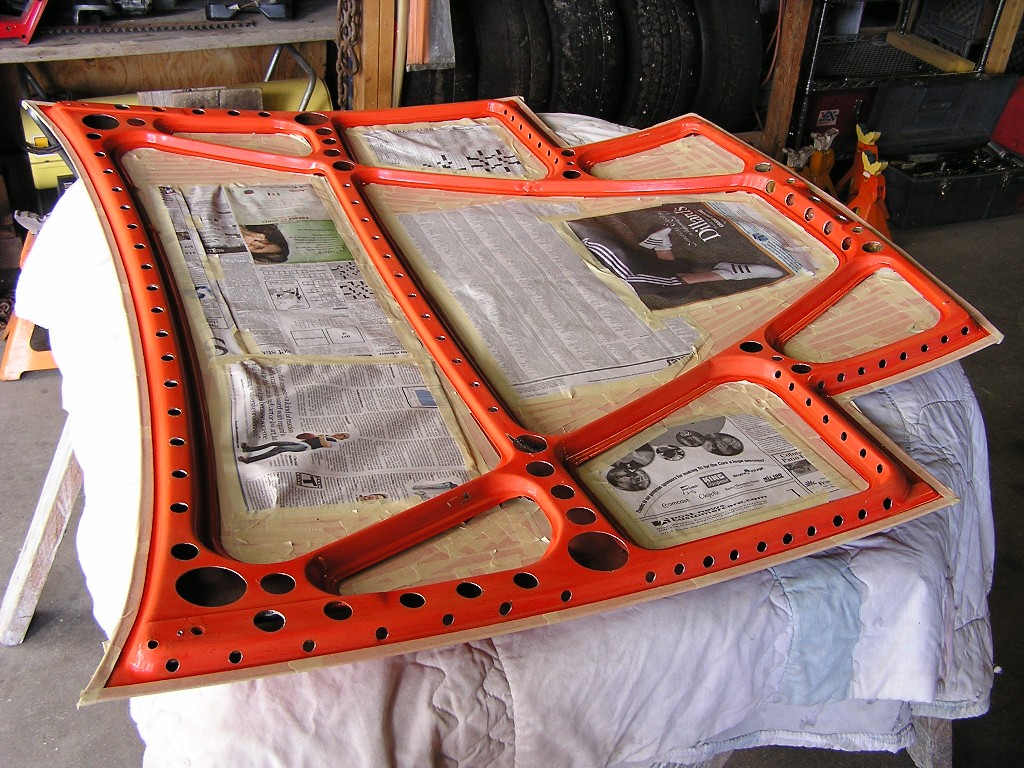
Posted by: byndbad914 Aug 22 2006, 03:12 PM
Brant - looking good  So, two questions (maybe I missed this)
1. You mention doing a current corner balance, but what is the current weight of the car?
2. How much weight was removed from the hood (i.e. what was the weight before, then after the holes)? Curious as I may just stick with my nice stock hood instead of fiberglass if what you did really got the weight down...
Posted by: brant Aug 22 2006, 03:19 PM

Brant - looking good
So, two questions (maybe I missed this)1. You mention doing a current corner balance, but what is the current weight of the car?
2. How much weight was removed from the hood (i.e. what was the weight before, then after the holes)? Curious as I may just stick with my nice stock hood instead of fiberglass if what you did really got the weight down...
It doesn't really get the weight down as much as you'd like.
its more of a visual thing at this point and showed only a 5lb savings
(with MANY MANY hours into it)
I'm required by rules to keep a metal car and metal fenders/hoods
let me double check my numbers..
I had already removed and lightened it before, so I think I was at 35lbs pre
and 30lbs post drilling.
regarding total weight...
this one I'm happy to talk about
we were able to get the corner balance VERY close this time
using the formula for ideal, we were able to get each corner within 1.5lbs of ideal
we re-aligned too and that came out pretty well with -3 camber on the rear now.
I shed 13lbs total (still with my heavy kumhos)
here is the new weight:
Attached thumbnail(s)
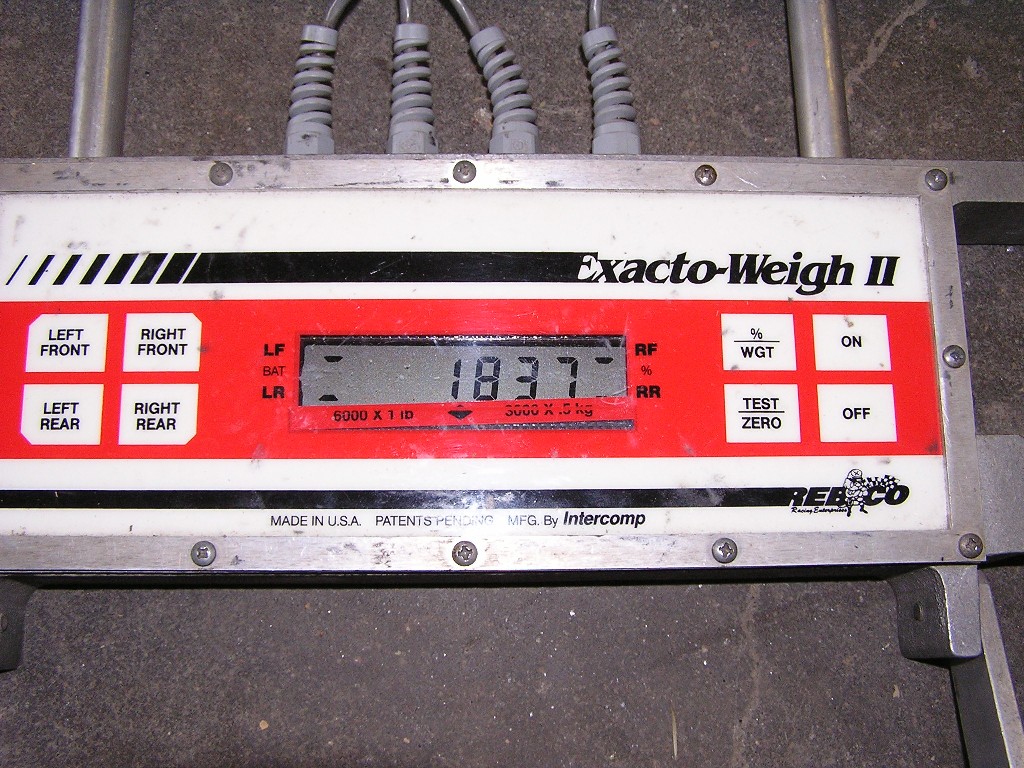
Posted by: brant Aug 22 2006, 03:21 PM
more front hood (post paint, artsy shot):
Attached thumbnail(s)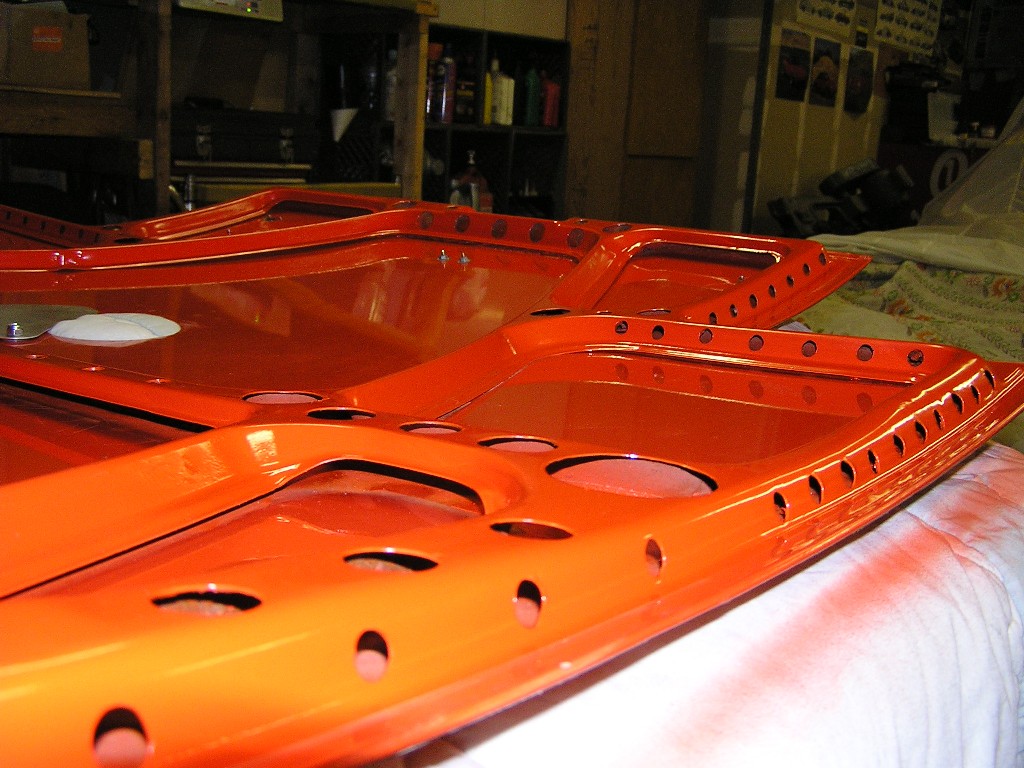
Posted by: brant Aug 22 2006, 03:28 PM
last hood shot:
Attached thumbnail(s)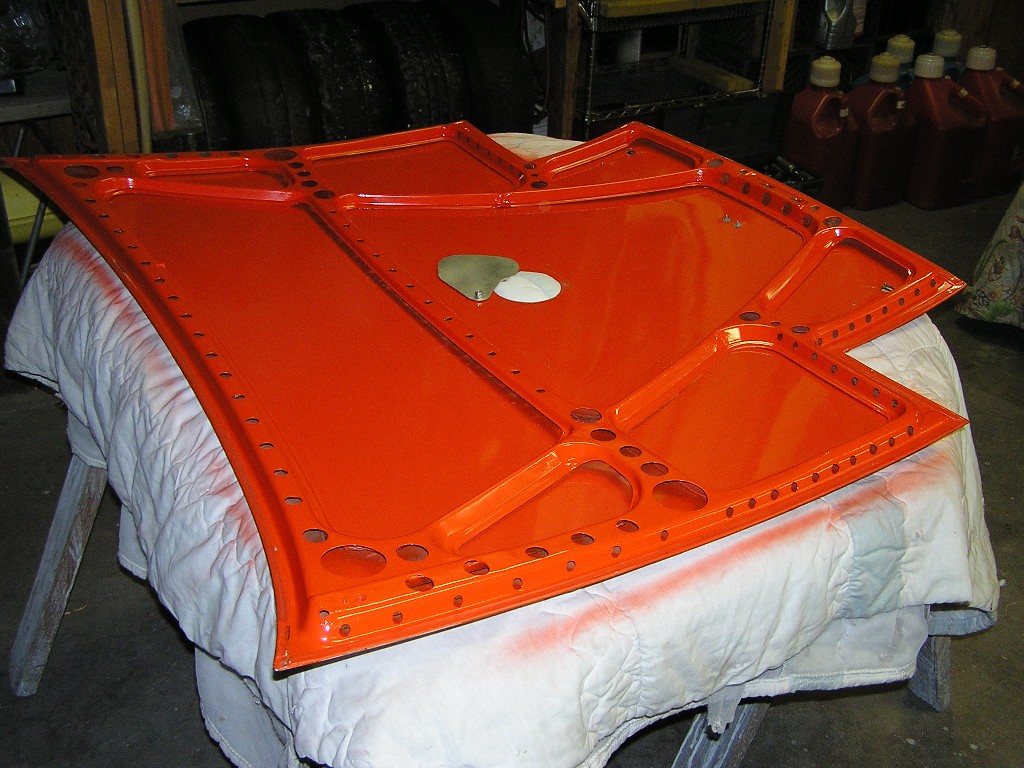
Posted by: byndbad914 Aug 22 2006, 03:31 PM
honestly, I am really impressed with your car. Obviously I have a little bit different school of thought (build a brick sh!thouse and put 525HP into to get it around ), but the fact you have a 914 that still has the windshield, targa top, and steel body and so forth down at 1837lbs is pretty cool. You really put a lot of effort into making a lightweight 914 racer, not just "914-based" racer if you catch my drift.
I am lazy enough I wouldn't sand the roof down, I would just get a fiberglass cap for instance, which is why your efforts rarely go unnoticed  Solid job on a sweet car.
Posted by: brant Aug 22 2006, 03:39 PM
honestly, I am really impressed with your car. Obviously I have a little bit different school of thought (build a brick sh!thouse and put 525HP into to get it around
), but the fact you have a 914 that still has the windshield, targa top, and steel body and so forth down at 1837lbs is pretty cool. You really put a lot of effort into making a lightweight 914 racer, not just "914-based" racer if you catch my drift.I am lazy enough I wouldn't sand the roof down, I would just get a fiberglass cap for instance, which is why your efforts rarely go unnoticed
Solid job on a sweet car.thank you sir..
that means a lot!
(and its been a crap load of work, to attempt to stay within the rules of a strict club)
Posted by: Casper Aug 22 2006, 09:16 PM
Brant,
I didn't know that there was anything going on in Hastings last weekend. I knew they are developing a track, but I was unaware that they were having events other than demostration runs.
Next time you make it back that far give me a shout and I'll get the "Omaha Crew" to come out and lend you some moral support.
Tom Cooper
Posted by: brant Aug 22 2006, 09:23 PM
Brant,
I didn't know that there was anything going on in Hastings last weekend. I knew they are developing a track, but I was unaware that they were having events other than demostration runs.
Next time you make it back that far give me a shout and I'll get the "Omaha Crew" to come out and lend you some moral support.
Tom Cooper
shoot... it would of been fun to have you there.
I met a couple of people that came down from omaha this weekend
next year for certain then, you have to come!
brant
Posted by: brant Aug 19 2008, 10:58 PM
I was having fun reading this and thought I'd throw in another pic.
lots has changed... I got T-boned by a spec miata along the way
some improvements, some repairs, different flywheels, tranny's and a new lump of gold is on the way...
I did some wrenching yesterday as a matter of fact
here is the new carter fuel pump with built in regulator
its on a custom aluminum mount that dad made (with plenty of holes):
Attached image(s)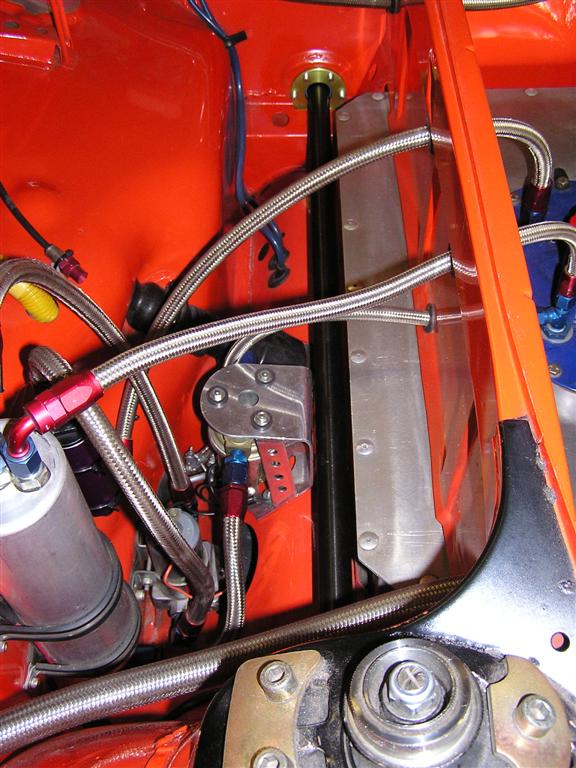
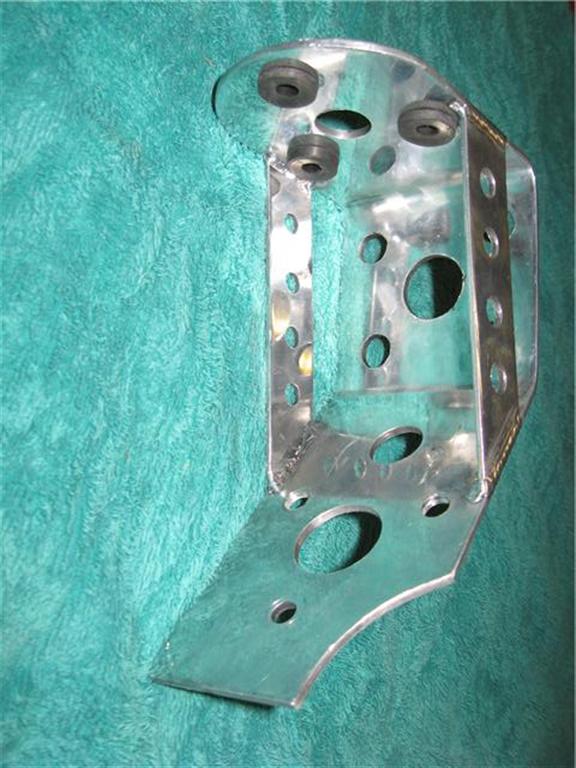
Posted by: brant Aug 19 2008, 10:59 PM
also in that picture (and this one) is the new 27mm hollow SMART bar:
Attached thumbnail(s)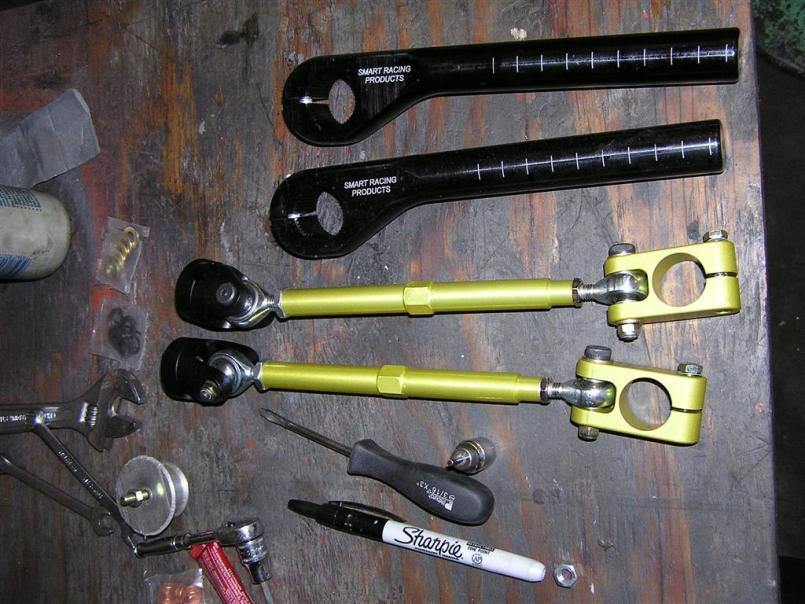
Attached image(s)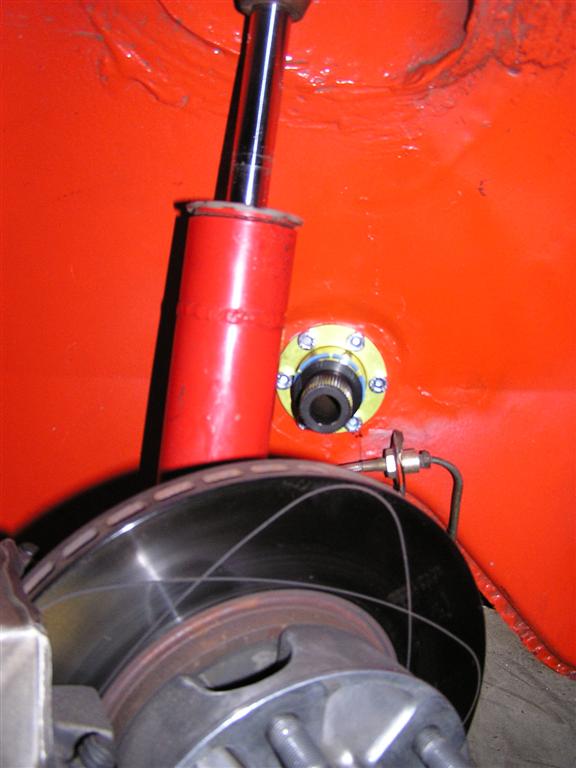
Posted by: SirAndy Aug 20 2008, 11:54 AM
also in that picture (and this one) is the new 27mm hollow SMART bar:
how much did that set you back ???
Andy
Posted by: Phoenix 914-6GT Aug 20 2008, 01:43 PM
Wow Brant, your car is very nice. I'm getting there but I still have a ways to go before I have all the goodies you do.
Posted by: Eric_Shea Aug 20 2008, 01:43 PM
What I wanna know is... who gave Brant my home phone number! 

Posted by: r_towle Aug 20 2008, 03:04 PM
What I wanna know is... who gave Brant my home phone number!
Did you ask your wife???
Posted by: brant Aug 20 2008, 03:18 PM
Andy,
too much really... probably not worth it
although the craftsmanship is very impressive
Phoenix,
thanks sir
Eric,
a ha...
even though I can't remember my own name I write things down
thanks for your advice and time !
brant
Posted by: Eric_Shea Aug 20 2008, 03:19 PM

Posted by: Sleepin Aug 20 2008, 03:22 PM
Yep, whenever I think I have something nice, I just review Brants thread and I realize.....I have a bunch of junk.
Posted by: BKLA Aug 20 2008, 03:29 PM
Yep, whenever I think I have something nice, I just review Brants thread and I realize.....I have a bunch of junk.

Posted by: brant Aug 20 2008, 03:31 PM
Colorado Eric, Brett,
not true
salmon eric... hmmm... WWSD (what would slits do)
Posted by: Eric_Shea Aug 20 2008, 06:16 PM
Are you refering to Rich's post? Slits would probably be fooling around with my wife too you "home-wreckers!"
Posted by: r_towle Aug 20 2008, 06:23 PM
Slits knows your home phone too!!!
Rich
Posted by: MoveQik Aug 21 2008, 12:43 AM
Are you refering to Rich's post? Slits would probably be fooling around with my wife too you "home-wreckers!"
Me thinks salmon boy should be in Torrey to settle the score.

Posted by: Phoenix 914-6GT Aug 21 2008, 01:44 AM
Are you refering to Rich's post? Slits would probably be fooling around with my wife too you "home-wreckers!"
 I think my daughter looks more like Ron than me. I really don't want to know

Posted by: Phoenix 914-6GT Aug 21 2008, 01:52 AM
Okay, in a seriousness. So Brant, what do you think was the biggest weight savings you did? I basically have my car stripped but nothing really removed.
Posted by: MoveQik Aug 21 2008, 02:00 AM
Brant....tell Jon about your secret drill bit size VS horsepower ratio formula. 
Posted by: brant Aug 21 2008, 10:39 AM
Jon,
no one thing was the "simple" answer to weight savings
I think I took about 400 - 450lbs total out of the stock chassis
(I figure I'm about 300 below the stock 4 weight, and thats with a motor that is 150 heavier than my old 4 racecar)
but that 400 was no single one thing
all of the undercoat, engine bay sheetmetal, lack of bondo, brackets welded tabs probably totaled a few hundred of that... and that was labour intensive weight
my secret formula was $50 per a pound.
(I figure my labour is worth basically nothing, so it was easier to put 100 hours into scraping tar than spend money)
when it came to buying lighter weight components, I calculated out what the weight savings would be and used the $50=pound formula to see if it was worth it.
taking off weight can get real expensive at some point.
Posted by: Phoenix 914-6GT Aug 21 2008, 11:41 AM
Thanks Brant. I figured as much. I have my car down to 2050lbs and now it is time to get creative.
Posted by: brant Aug 23 2008, 12:47 AM
The new flywheel (not installed yet)
its the 4th different flywheel now
we upgraded once
we broke one
3rd one is not to be discussed
and here is the 4th, lightest one yet.
this one is for the new motor in a few months:
its actually used and came from Frank Beck's race car....
Attached thumbnail(s)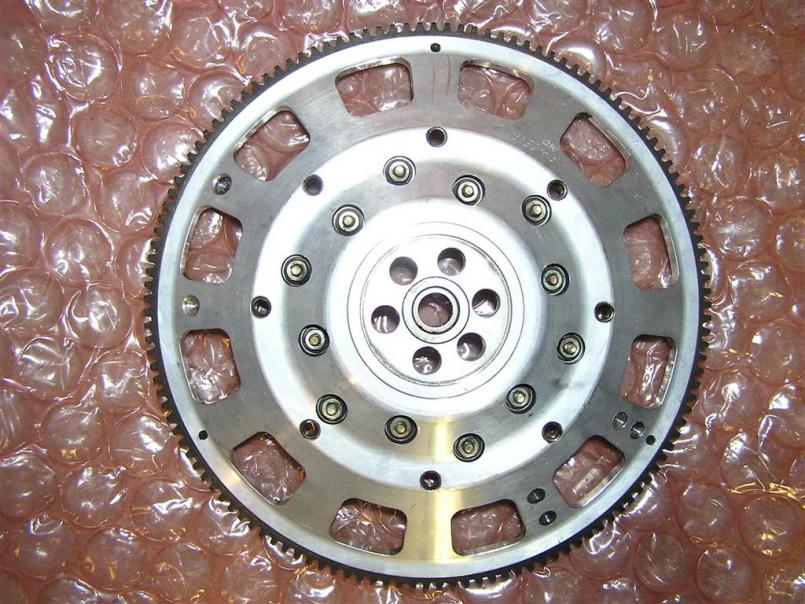
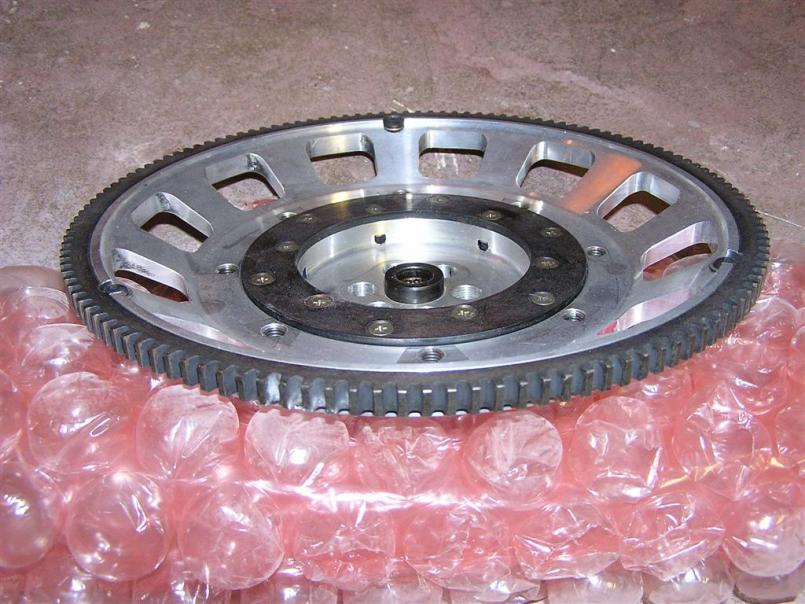
Posted by: brant Aug 23 2008, 12:47 AM
and:
Attached thumbnail(s)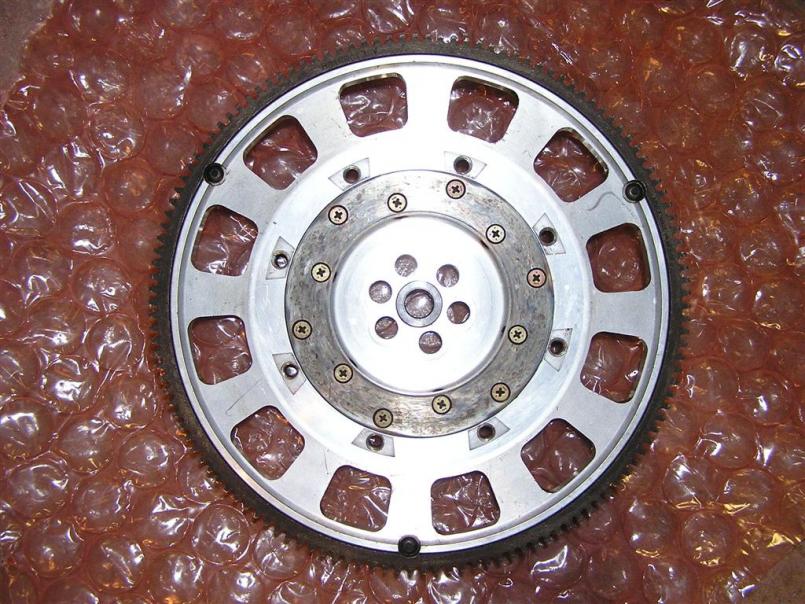
Posted by: Todd Enlund Aug 23 2008, 02:28 AM
Dude, that's pornographic.
Posted by: seanery Aug 23 2008, 08:39 AM
Dude, that's pornographic.
Everything in this build is true porn quality! 

Posted by: wallys914 Dec 14 2008, 02:58 AM
![]() Updates Wanted!!!!!!
Updates Wanted!!!!!!
Posted by: degreeoff Dec 14 2008, 07:06 AM
Dude thats not a clutch its so tiny.......?
Posted by: brant Dec 15 2008, 01:56 AM
I don't have many updates to make....
today we did "out with the old"
the old is tired and dirty.
I don't have any "in with the new"
but hope to in a few months.....
Attached thumbnail(s)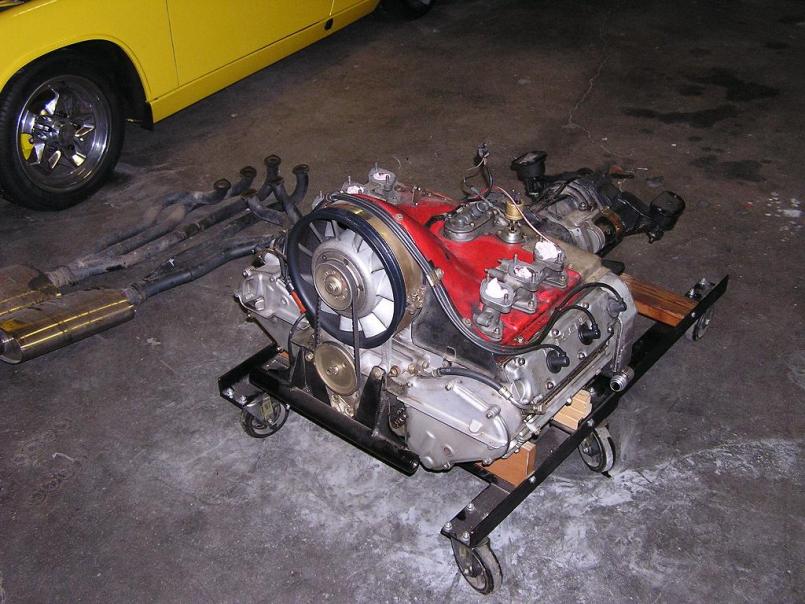
Posted by: brant Dec 15 2008, 01:57 AM
another:
Attached thumbnail(s)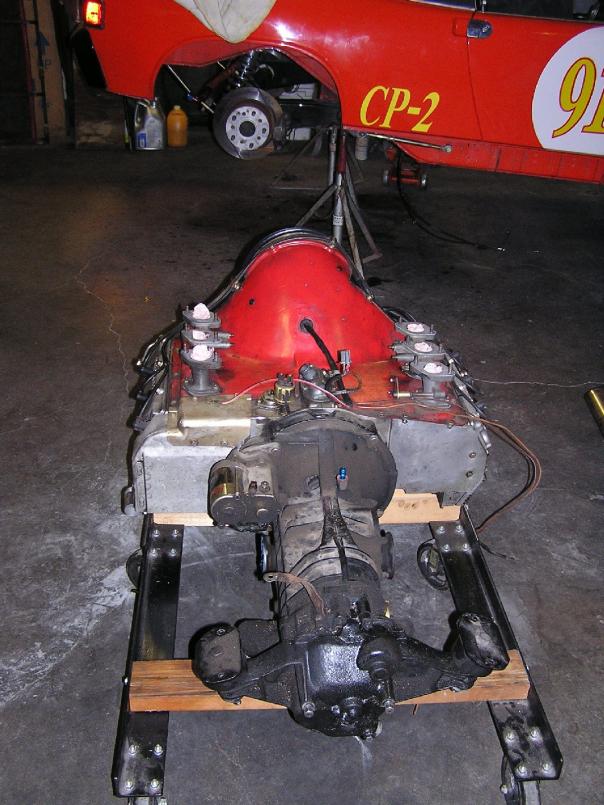
Posted by: brant Dec 15 2008, 02:00 AM
last dirty picture for now....
things will look better in the future:
Attached thumbnail(s)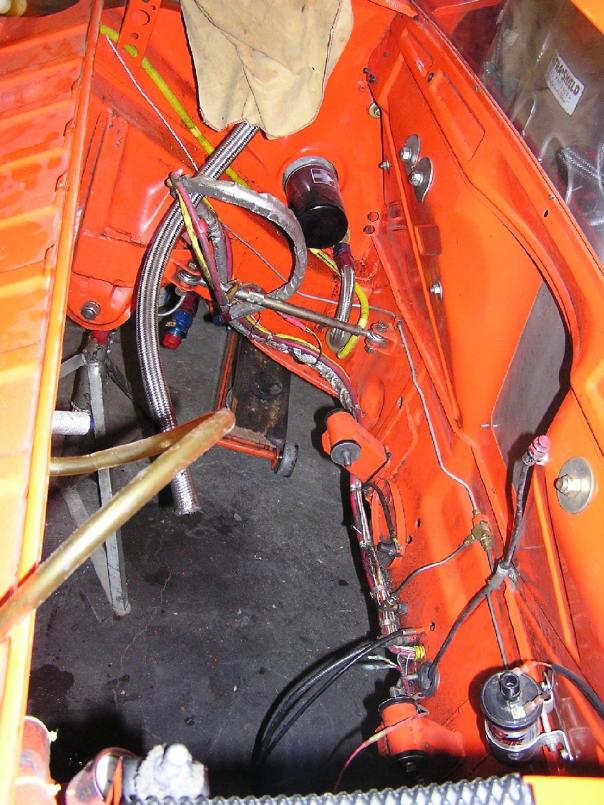
Posted by: jhadler Dec 15 2008, 02:51 PM
Brant,
Your concept of "dirty" qualifies you for a white cotton glove courtesy of Ferg...
That motor looks cleaner than most fresh rebuilds that are put back -into- cars. And that one is coming -out-...
-Josh2
Posted by: Ferg Dec 16 2008, 12:51 PM
Motor is "OK" but that Trans does not pass the test
When is that yellow car gonna be in my garage?
Ferg 
Posted by: brant Dec 16 2008, 09:26 PM
Ferg,
It's all dirty... although you must realize that trans is painted black and even cleaned up it doesn't look "normal"
when can yellow car come to your house.
she is pretty much ready to join your herd:
Attached thumbnail(s)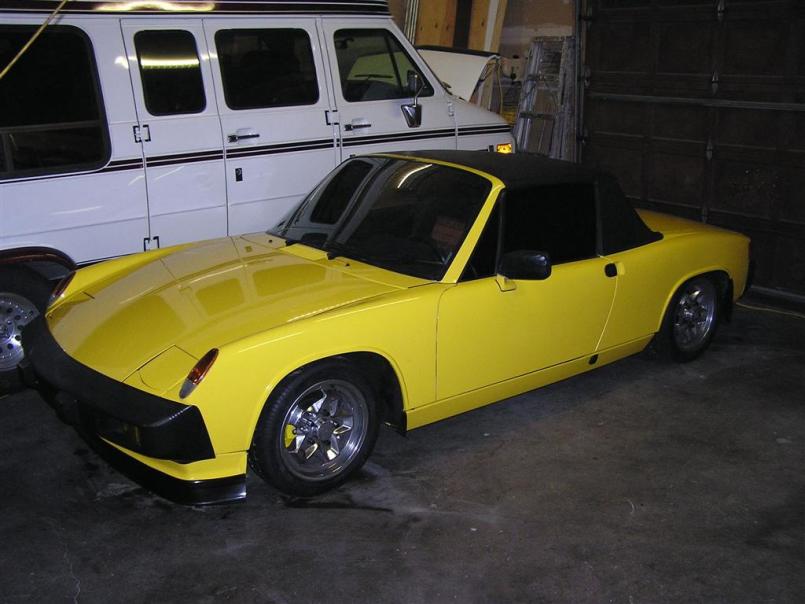
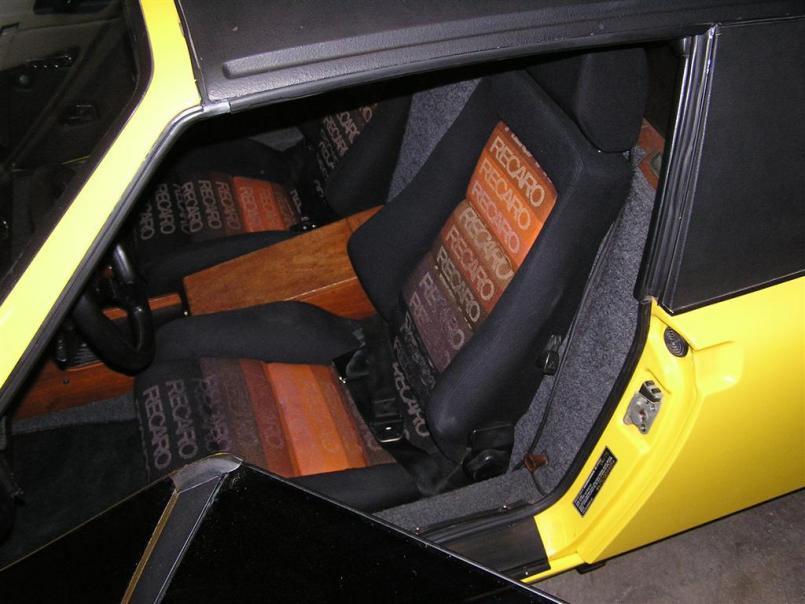
Posted by: Ferg Dec 16 2008, 11:22 PM
Anytime. Room in the Garage.
Ferg 
Posted by: brant May 30 2010, 08:21 AM
whew...
found my thread in a search for something else
I need to get with it..
a year later:
-orange car is still running the old motor
-orange car has been hit again and both rear fenders are stripped currently.
-and I drive yellow car daily... (need to sell it)
time to start following through and doing!
Posted by: Casper May 30 2010, 09:02 AM
Brant,
Are you going to try and make Hastings this year. I am out there next weekend for the Great Plains Carrera GT. Then in August we are going to have a "national" 924 gathering starting with a track day at Mid America Motorplex near Glenwood, Iowa. Let me know how your other little problem turned out.
Tom
whew...
found my thread in a search for something else
I need to get with it..
a year later:
-orange car is still running the old motor
-orange car has been hit again and both rear fenders are stripped currently.
-and I drive yellow car daily... (need to sell it)
time to start following through and doing!
Posted by: brant May 30 2010, 09:17 AM
Tom,
its great to see you again
I really do hope to make hastings
current goal is for car to be back on track mid july, and then definitely attend hastings...
really nice to see you again
the 924 gathering sounds very cool
good to see 924's getting some attention!
brant
Posted by: brant Jun 15 2010, 09:49 PM
need to store these somewhere...
here is post-accident..... the day of.
now both rear fenders are re-worked and in primer
going in for top coat tomorrow-ish
torn weld:
Attached image(s)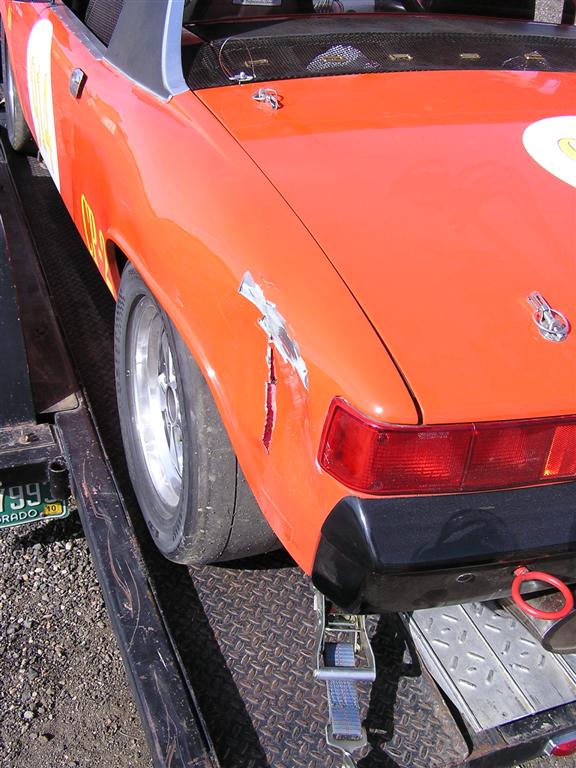
Posted by: brant Jun 15 2010, 09:50 PM
and:
Attached thumbnail(s)
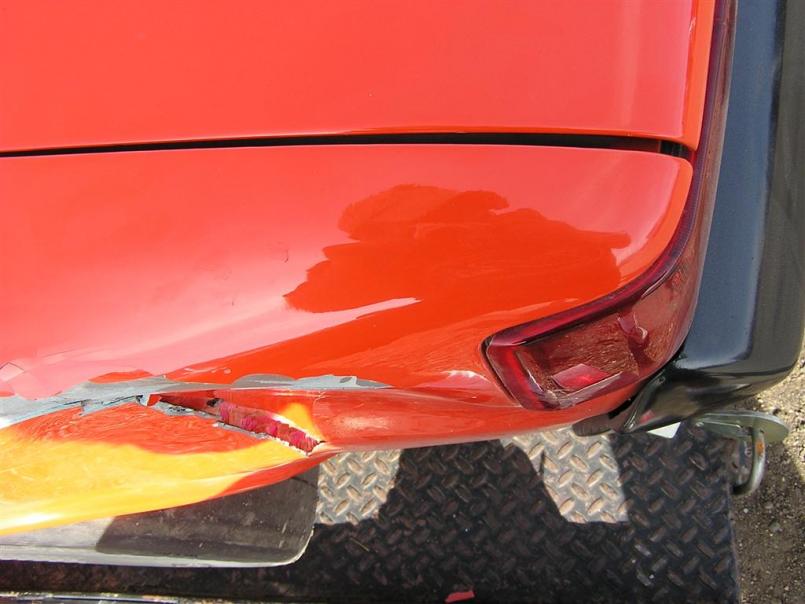
Posted by: brant Jun 15 2010, 09:52 PM
new motor is still coming together
here is the new distributor:
Attached image(s)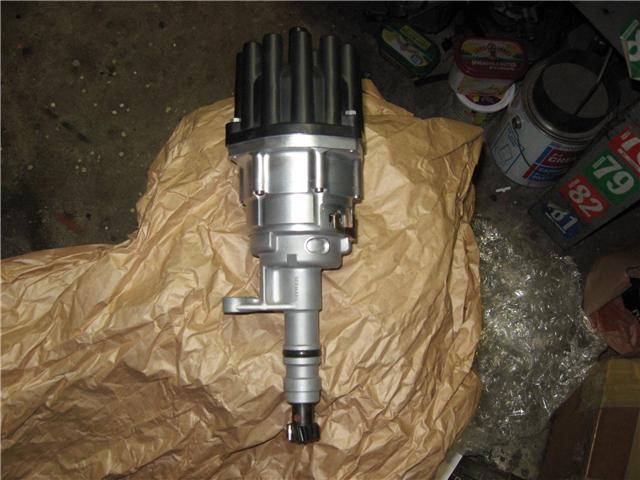

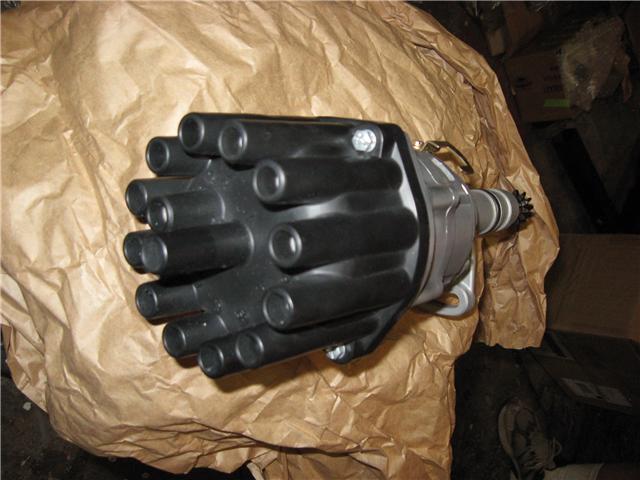
Posted by: carr914 Jun 16 2010, 01:19 AM
new motor is still coming together
here is the new distributor:
Who made that one? I have an Electromotive crank-fire unit ready for my Twin-plug, but thinking of selling it and getting a 12 Dizzy from J-B Racing
T.C.
Posted by: brant Jun 16 2010, 07:12 AM
new motor is still coming together
here is the new distributor:
Who made that one? I have an Electromotive crank-fire unit ready for my Twin-plug, but thinking of selling it and getting a 12 Dizzy from J-B Racing
T.C.
funny.. I bought an electromotive too (for sale soon)
this one is from Aaron at Rennworks. We did a lot of research and found out that many of the manufactured units don't have upper bearings. The heavier than single plug rotors are causing lower bearing failures and upper wiggle due to racing and extended high rpm. This one has an upper bearing unit installed to prevent that
Posted by: brant Mar 2 2011, 09:36 PM
Time for an update.
Last summer was rough.
Above are the pictures of the wreck in the first event of last year (april)
well we did body work (again) and paint (again) and brought the car back out last July 2010.... well first day back the motor let go
nothing catastrophic.... just a smoke cloud and down on compression in one cylinder. We are hoping its only a broken ring or something that didn't damage too many parts. 100 race hours, 5 years (and all at high rpm) so I'm not unhappy at all.
Well today I installed the new motor
were taking 4 days vacation to wrench in grand junction and hope to pour oil in tomorrow...
here is the new tilton (all new plates, discs, and housing) bolted to mr. Becks used flywheel:
Attached thumbnail(s)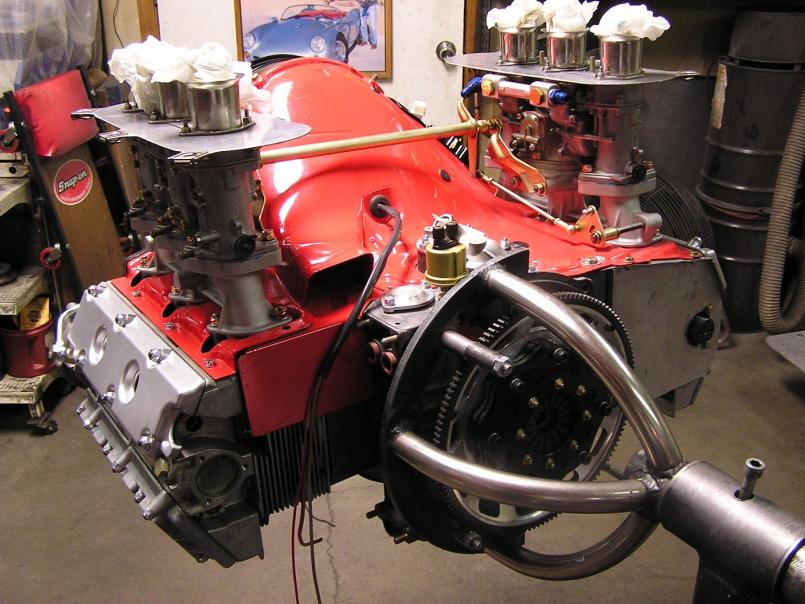
Posted by: brant Mar 2 2011, 09:40 PM
Carbs were rebushed last year...
new ITG foams
(I painted the shroud)
New upper and lower valve covers
a mild compression full motor
pauter rods, trick heads, 81mm bore
Mr. Shea had all of the zinc plating done for me
1973 7R case
PMO tall manifolds (ported)
rennwork distributor
all replated fan, etc.....
should probably be safe to 8k
Attached thumbnail(s)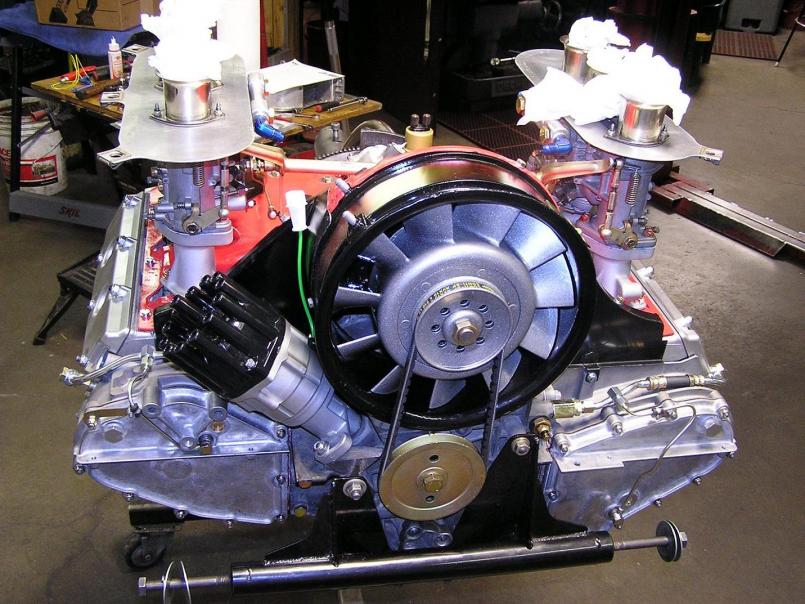
Posted by: brant Mar 2 2011, 09:42 PM
a couple more I need to store here:
Attached thumbnail(s)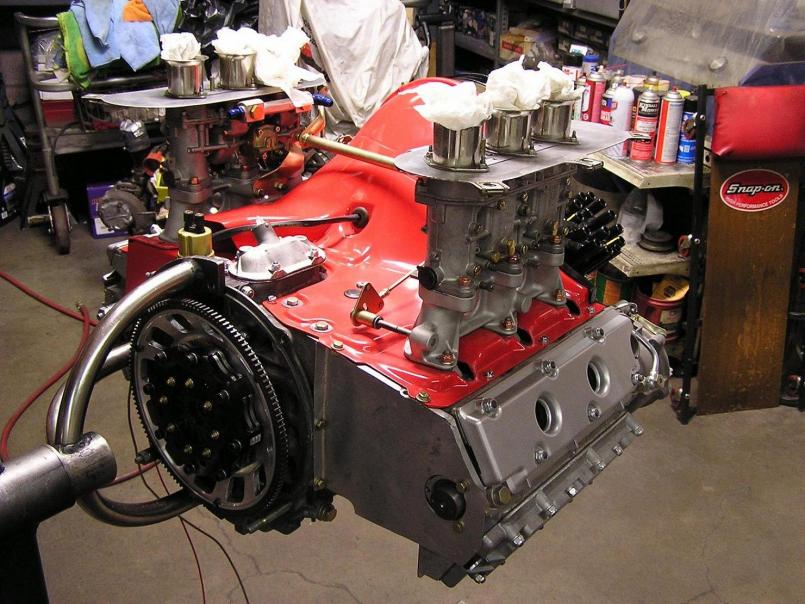
Posted by: brant Mar 2 2011, 09:43 PM
and
Attached thumbnail(s)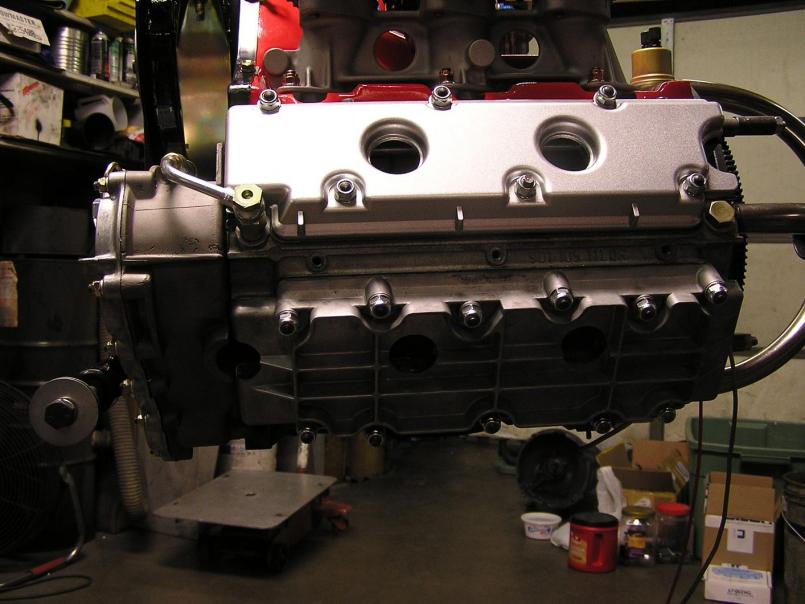
Posted by: brant Mar 2 2011, 09:45 PM
Hopefully I'll be on the dyno saturday
Attached thumbnail(s)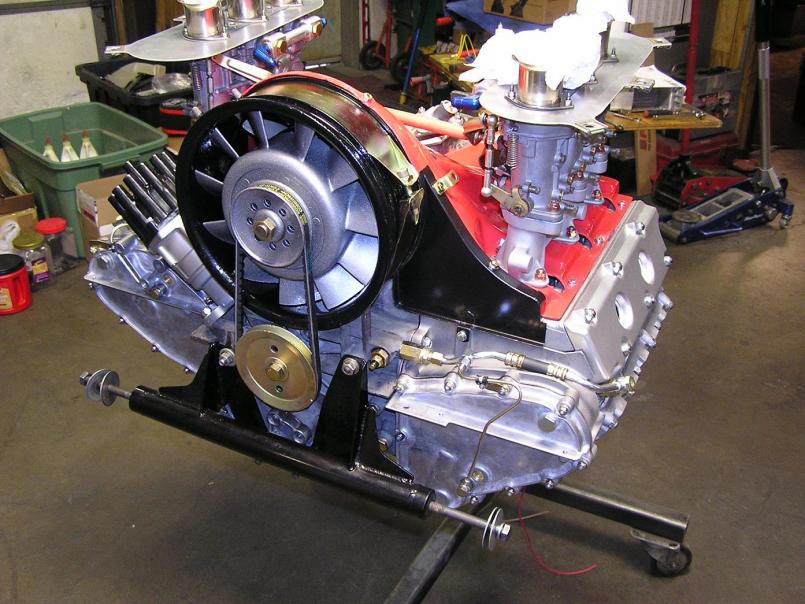
Posted by: MoveQik Mar 2 2011, 10:05 PM
Thats purdy Brant!
Posted by: brant Mar 2 2011, 10:10 PM
Thats purdy Brant!
thank you sir
and the mag case should be 20lbs (or so) lighter.....
Posted by: euro911 Mar 2 2011, 10:29 PM
Looking real nice there Brant.Dang'd computers ... Is there a way to DELETE duplicate posts?
EDIT: Thanks Gint ...
Posted by: PeeGreen 914 Mar 2 2011, 11:42 PM
That's sweet Brant  Can't wait to hear how you do
Posted by: Gint Mar 3 2011, 06:53 AM
Looking great Brant! Come to Coffee and Cars Saturday so we can chat.
Looking real nice there Brant.Dang'd computers
... Is there a way to DELETE duplicate posts? What duplicate post?

Posted by: Ferg Mar 3 2011, 12:07 PM
Cool, say Hi to AJ for me
Looks real clean 
Posted by: JmuRiz Mar 3 2011, 04:10 PM
Great looking motor, what's the size? I'm guessing rather high c:r with the twin plugs.
Is that the Patrick Motorsports engine mount...looks cool.
Posted by: Gint Mar 3 2011, 07:45 PM
Posted by: brant Mar 3 2011, 10:41 PM
Great looking motor, what's the size? I'm guessing rather high c:r with the twin plugs.
Is that the Patrick Motorsports engine mount...looks cool.
its tiny
a 2ltr, with the class legal 40thousandths overbore
so only 2040cc
not too wild of compression but race gas and race compression
Mike G. won't make it saturday as you figured out
but I owe you a beer. I should run out and bug you some time soon when its good for you.
Ferg. Hope you have a great turn out saturday. Take pictures
Posted by: JmuRiz Mar 4 2011, 09:41 AM
Cool, I'm sure it'll scream real nice :-)
Posted by: maxwelj Mar 4 2011, 11:02 AM
coming to Hallett this year?
Posted by: brant Mar 7 2011, 10:51 PM
coming to Hallett this year?
going to miss the spring hallet that is about to happen
but should be ready for the fall hallet event
(need to get some more break in time on the motor and sort a few things)
Posted by: brant Mar 7 2011, 10:57 PM
the install trip was a success
I have a few things left to fabricate and rewire
but we did get it installed, got a couple of hours of break-in time
and some rough dyno time
we had to limit the rpm since the motor isn't broken in yet
I didn't have time to increase the venturi's or nail down the jetting
this is 6900rpm with small vents and really mild timing
hopefully once its broken in we can bump the redline up, bump the timing, add bigger jets, and pick up another 10-15hp
(the hp was still climbing without hittings its peak yet)
this is at the rear wheels:
Attached image(s)
Posted by: Ferg Mar 8 2011, 08:32 AM
Those are great hp numbers, congrats Brant!
Posted by: sean_v8_914 Mar 8 2011, 09:54 AM
what is that dip at 4500?
Posted by: brant Mar 8 2011, 10:01 AM
what is that dip at 4500?
I think that is actually the beginning of the dyno run when he first "floored" it.
the moment the accelerators pump in and all of the gas hits the motor
we geared the car to stay above 5K, and try to never drop below 5k in any corner.
Posted by: Casper Mar 8 2011, 12:53 PM
Brant,
Will you make either Topeka or Hastings this year?
Tom
Posted by: brant Mar 8 2011, 02:39 PM
Brant,
Will you make either Topeka or Hastings this year?
Tom
possibly both
for sure hasting... but I'm trying to stretch out and do a bit more this year, so possibly both.
(we will see if gas goes over 5$ a gallon)
it would be great to see you again!
Posted by: Casper Mar 8 2011, 03:08 PM
Brant,
Will you make either Topeka or Hastings this year?
Tom
possibly both
for sure hasting... but I'm trying to stretch out and do a bit more this year, so possibly both.
(we will see if gas goes over 5$ a gallon)
it would be great to see you again!
When is Topeka? I tried checking the Heartland Park website, and could find anything listed for vintage racing.
Tom
Posted by: brant Mar 8 2011, 03:42 PM
[/quote]
When is Topeka? I tried checking the Heartland Park website, and could find anything listed for vintage racing.
Tom
[/quote]
weird, I couldn't find it either.
I'm wondering if its going to fall off the schedule now
I see that HVR is still co-sponsoring the Hastings event
(I've heard that CVAR is also tri-co sponsoring Hastings as well, so Hastings should be fun and busy this year)
brant
Posted by: brant Mar 22 2011, 10:52 PM
a couple of pictures to save of the motor installed:
Attached image(s)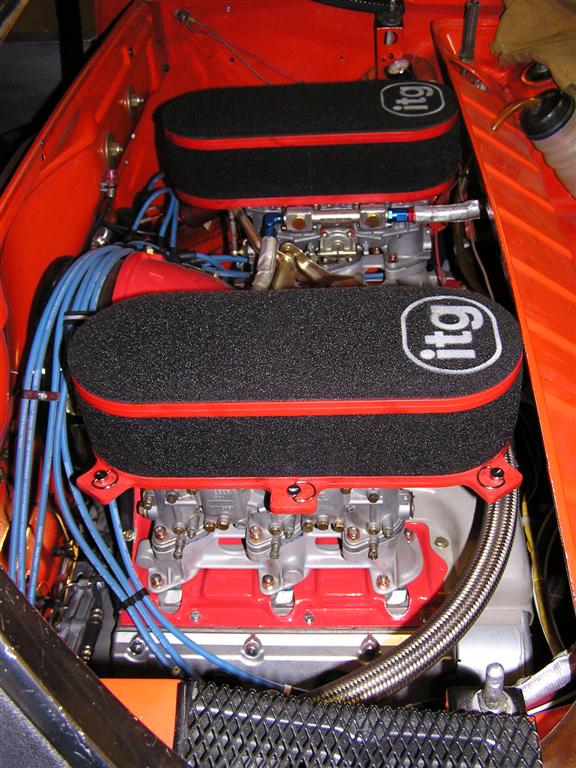
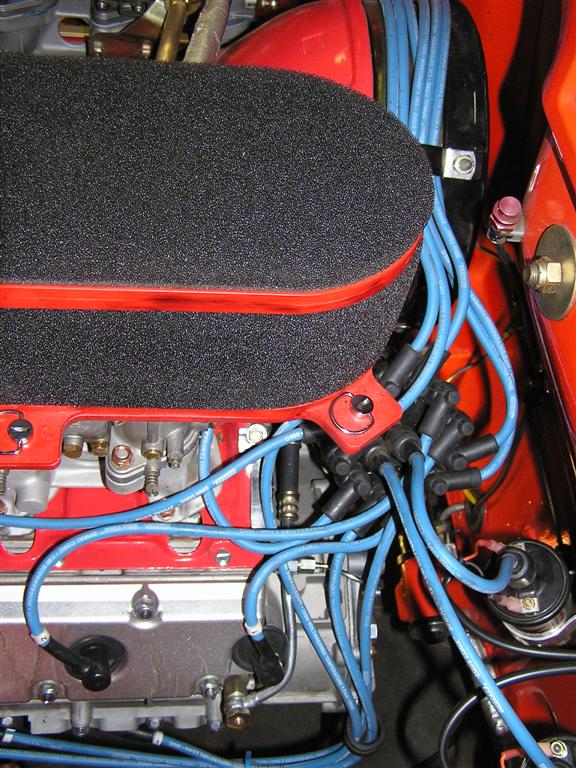
Posted by: brant Mar 22 2011, 10:55 PM
A very trick new shift console and rod.
very very straight with a pair of Apex bushings
Attached thumbnail(s)
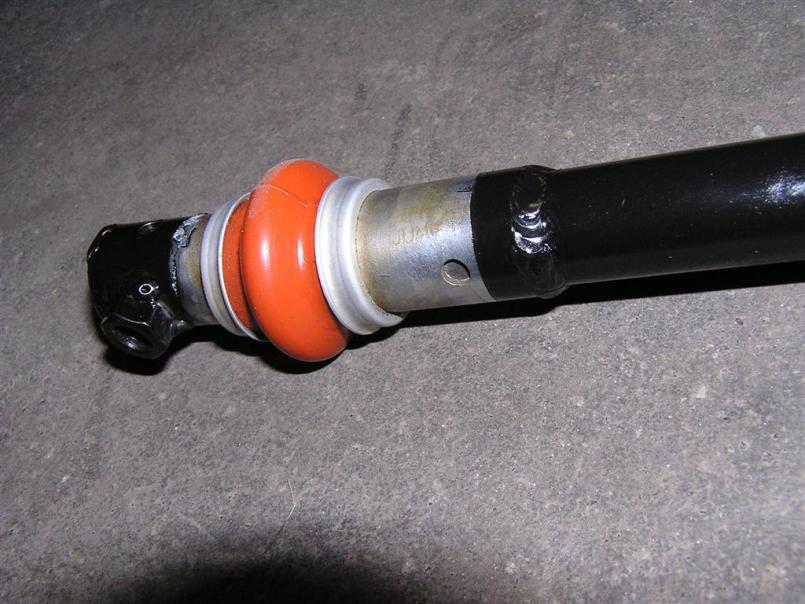
Attached image(s)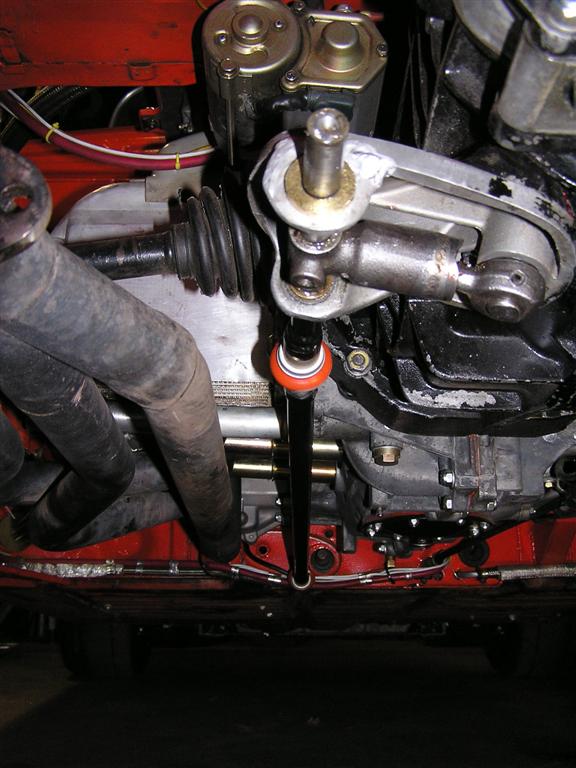
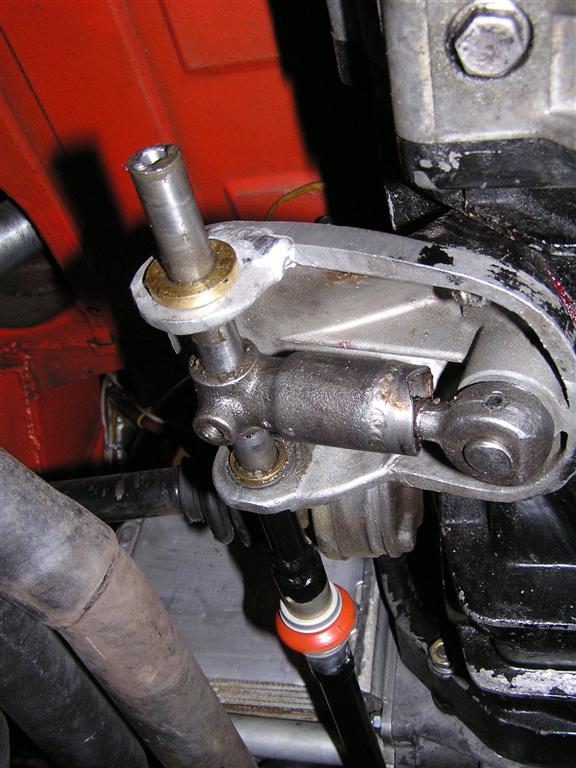
Posted by: brant Mar 22 2011, 10:58 PM
The new merged exhaust
no horse power gains on the dyno
but lots of midrange torque numbers showed up
Attached thumbnail(s)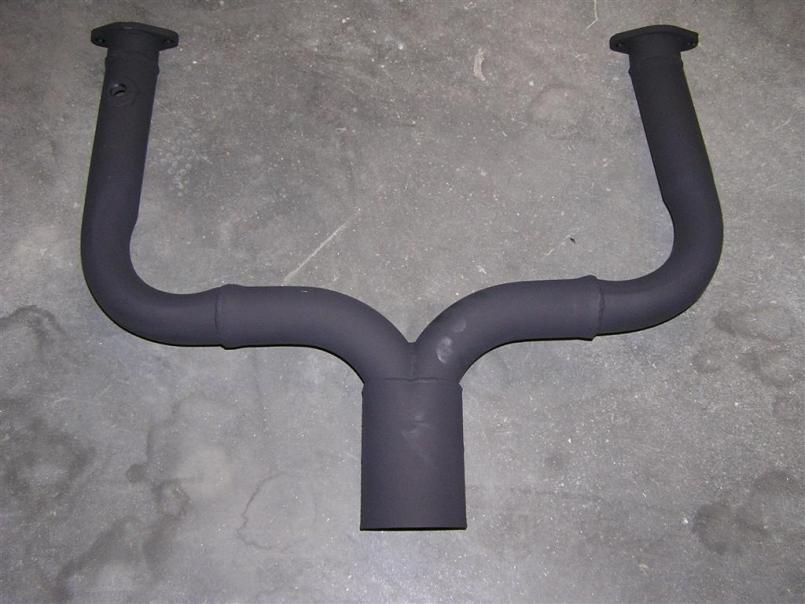
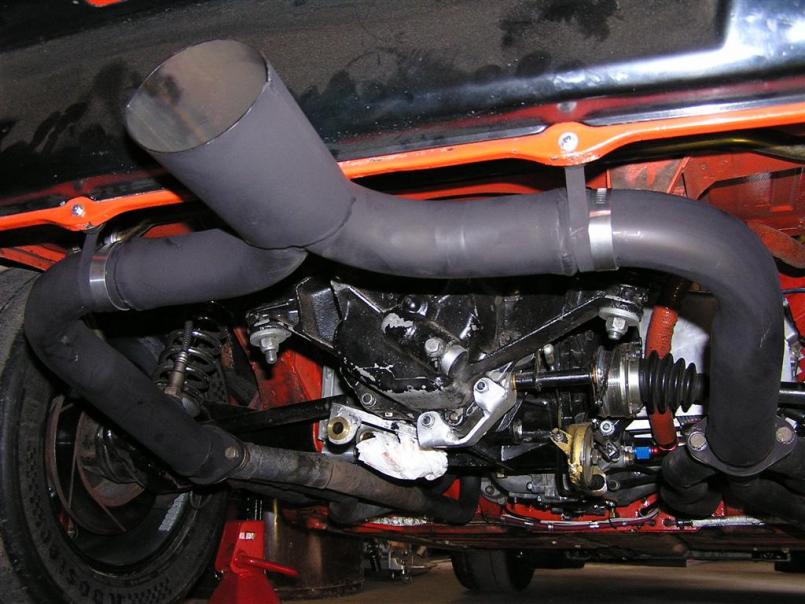
Posted by: euro911 Mar 22 2011, 11:04 PM
very very straight with a pair of Apex bushings
Cool, Brant ... and I assume it was way less $ than the other white meat? Posted by: brant Mar 23 2011, 08:44 AM
very very straight with a pair of Apex bushings
Cool, Brant ... and I assume it was way less $ than the other white meat? the machinist and tig work plus apex bushings all are pricey
some savings.
but hopefully the bushings are a little more precise
making the cover is a pain in the butt though!
Posted by: Gint Mar 23 2011, 06:59 PM
I guess I know what you're doing every weekend this summer!
Posted by: brant Mar 23 2011, 07:05 PM
I guess I know what you're doing every weekend this summer!
I hope a few weekends anyways
I really missed it last summer when the motor blew in July.
Hey, you want to travel or at least come out for a local event this year
(you can visit the lovely and exotic locations of oklahoma, texas, kansas, and nebraska if you want)
I promise not to force you to mix buckets of concrete... not even one!
Posted by: shelby/914 Mar 23 2011, 07:15 PM
Aren't you going to run any events at High Plains? It's a lot closer than any of those other places you mentioned and a really fun track. We've been doing two open track events there every year since it opened.
Danny
Posted by: Gint Mar 23 2011, 10:04 PM
I really missed it last summer when the motor blew in July.
Hey, you want to travel or at least come out for a local event this year
(you can visit the lovely and exotic locations of oklahoma, texas, kansas, and nebraska if you want)
I promise not to force you to mix buckets of concrete... not even one!
 What do you do for fun then? All the plains hotspots. That's pretty tempting.
Posted by: brant Mar 24 2011, 11:42 AM
Danny,
definitely going to be at hpr
rmvr season opener is may 14th
come out and have lunch if you can make it... I've always got extra food and water around.
(I'm trying to get some travel in this summer and love ECR(texas) as well as Hallet(OK)... although nebraska is not as fun of a track as hpr, I love the event and the tom-foolery of the party, so hope to go to Nebraska too. Even trying to get accepted into the Corando Festival of Speed down in San Diego for the fall.
Mike,
seriously, if you ever want to take a 3-4 day weekend and travel with dad and I to an "exotic" locale your always welcome to come ride along
brant
Posted by: brant Oct 1 2011, 01:53 PM
We re-scaled and recorner balanced after switching over to the magnesium case motor. We hoped to loose a few pounds by switching out of the aluminum case. It paid off, here is our new wet weight with 19quarts of oil and 4.5 gallons of gas on board.
Attached image(s)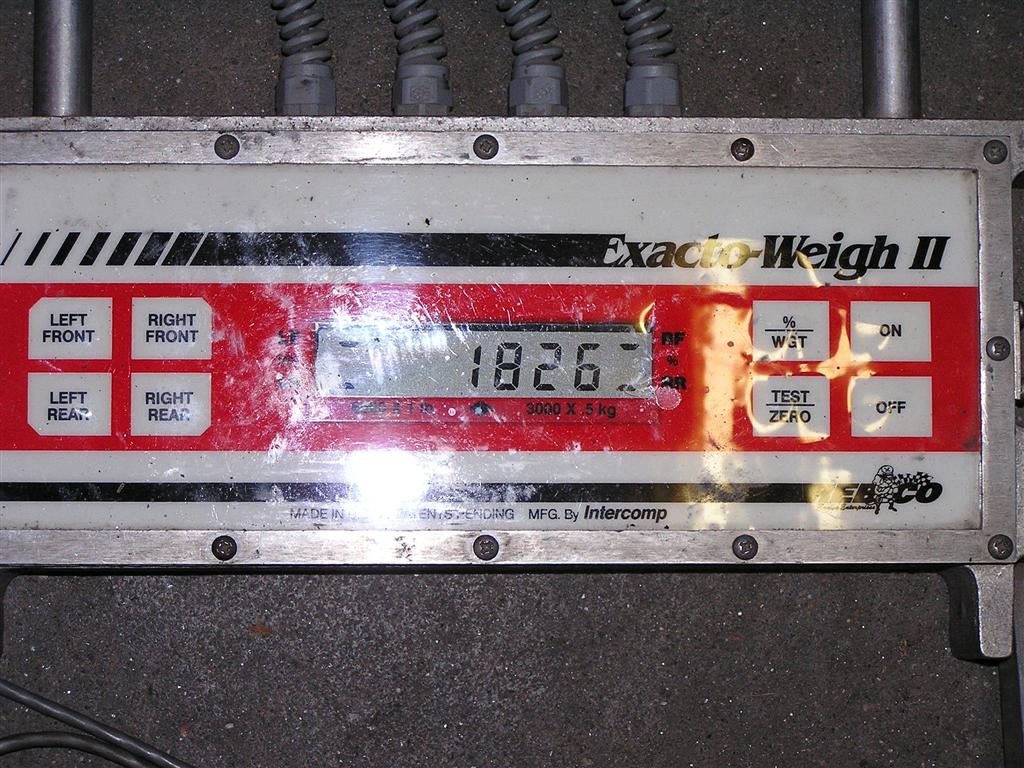
Posted by: KaptKaos Oct 1 2011, 02:36 PM
I love that merged exhaust. Like the old 356 Sebring style ones.
Posted by: bryans914 May 18 2012, 11:43 PM
Great story and pics! Would be a good book. Where, when will you run the car?
George, SoCal, also on a long term project.
Posted by: brant May 22 2012, 01:15 PM
Hi George,
I've been running it mostly in colorado for about 6 years
I've done events in Oklahoma, texas, nebraska also
I was able to participate in fleetweek last fall at coronado island, in san diego also.
Posted by: stuttgart46 May 23 2012, 06:58 AM
Let me know when you run TWS next time. I'd love to help out. And I work for cheap. (like a sandwich and beer cheap) LOL
Posted by: seanery May 23 2012, 07:04 AM
One of my all time favorite threads!
Posted by: 396 May 23 2012, 07:26 AM
Very cool! Your -6 has always been one of my favorite.
Congrats on all your new mods.
Posted by: brant Sep 19 2012, 06:43 PM
25 hours on my last tranny rebuild wasn't acceptable
I have been running the car with 2 drivers on the track and I think this is a big factor in my situation at altitude......
I don't believe I need to update the 901 yet as I am not ripping things apart like the big HP guys do with 901's
all signs point to heat
so I decided to add cooling
I just couldn 't find a location that had the air flow I wanted
I'm running a center exhaust now and that eliminated some cooler location options
I hate adding the weight, but hopefully it improves reliability
the weight is in the worse place too, so we kept everything as light as possible and as far forward on the chassis as we could.....
the pump is heavy, but the ducting up high weighs nearly nothing. The cooler is light too.
I considered heat shields next to exhaust and header locations and also didn't like things that close to exhaust heat.....
we really wanted the pump to self prime as overall that is a good thing, and we can avoid using a one way valve (one less thing to fail) So a low mounted pump became a priority for us. and also factored into the plumbing.
after much thought... I decided to go inside the trunk with duct work
the trunk offers me its own built in heat shielding
the down sides is that it requires the duct work.
dad and I hand built some aluminum ducts.. a scoop and a "hood" to disperse the air. the scoop really came out nice and it was all my father's work. too bad we don't have tig yet, but it still looks great with only rivets....
I added a gauge and sensor in the speedo drive location
we used a stock speedo aluminum piece by cutting off the top and bottom, gutting the seal, and tapping the center... it really came out nice and is in a good oil flow
I intend to pull the gauge after we verify the ducting (or possibly modify things if necessary) so the gauge is temp mounted in the cockpit and is extra weight that will go after 3-4 events prove it out.
anyway here are some pictures:
Attached thumbnail(s)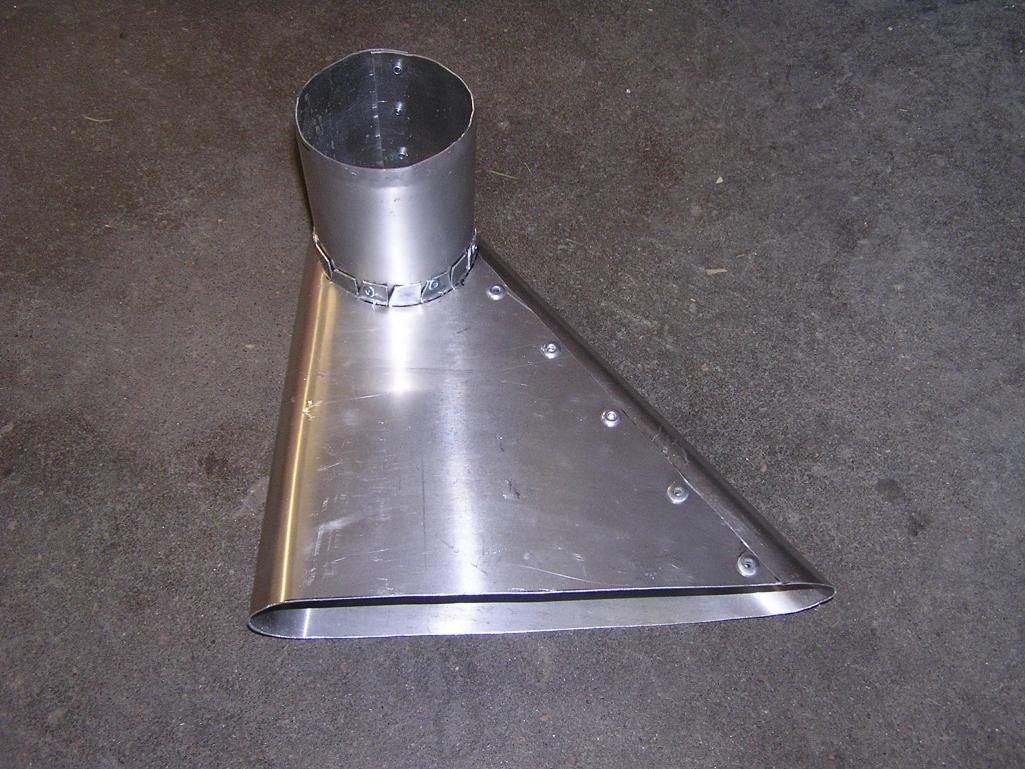
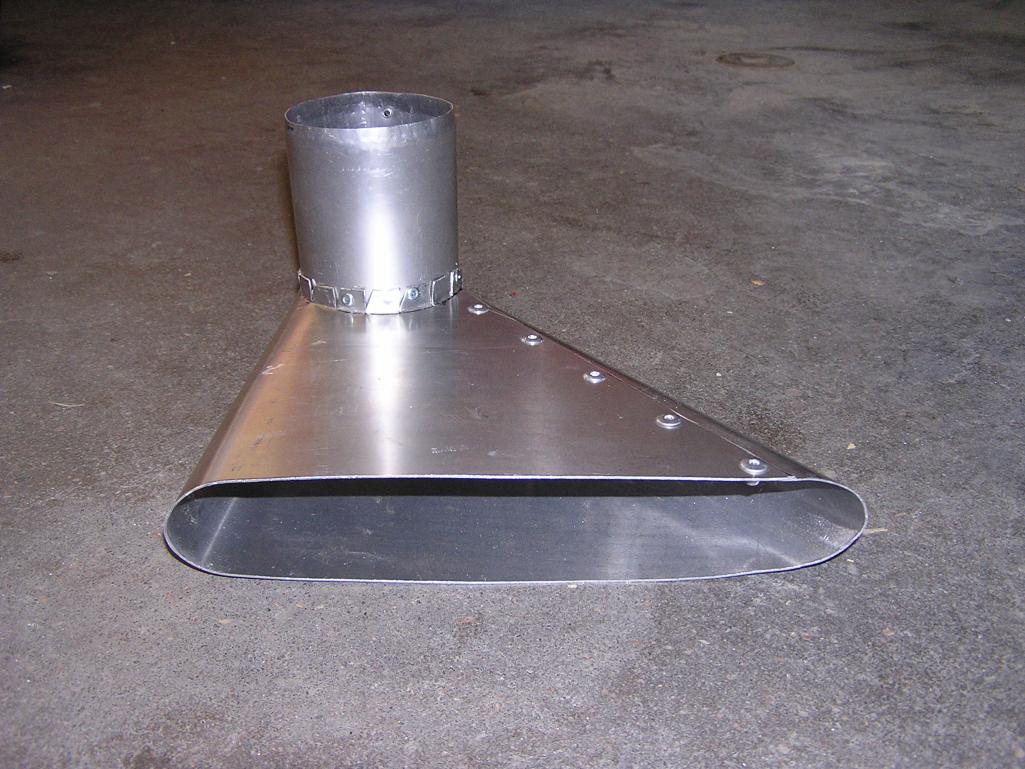
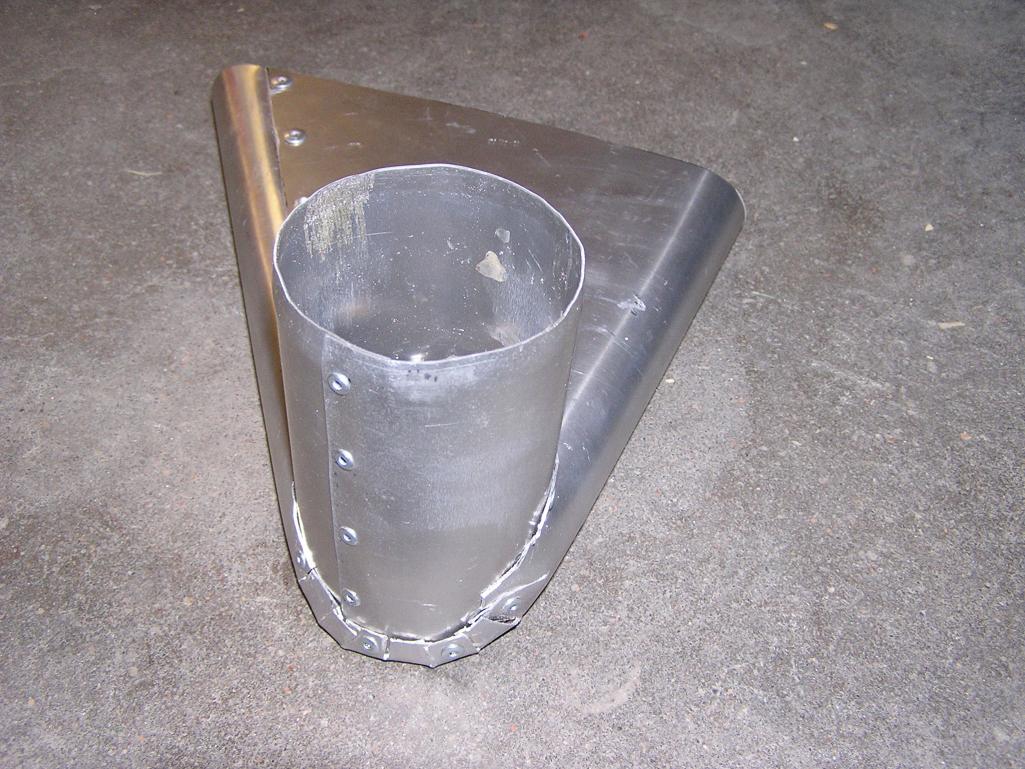
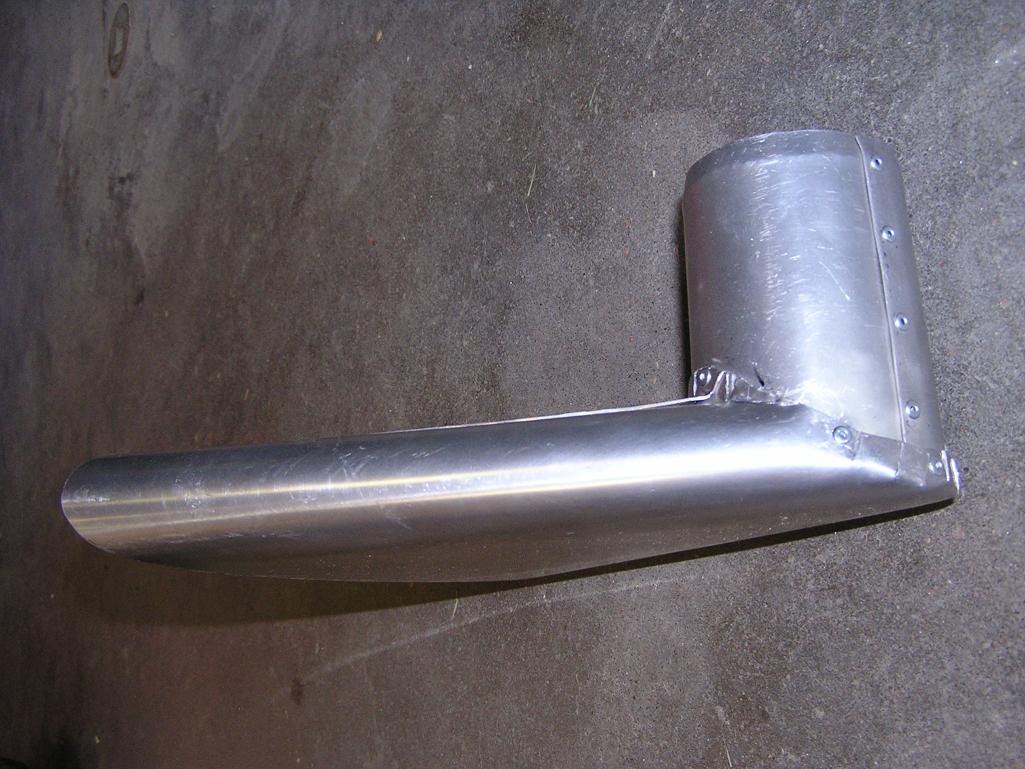
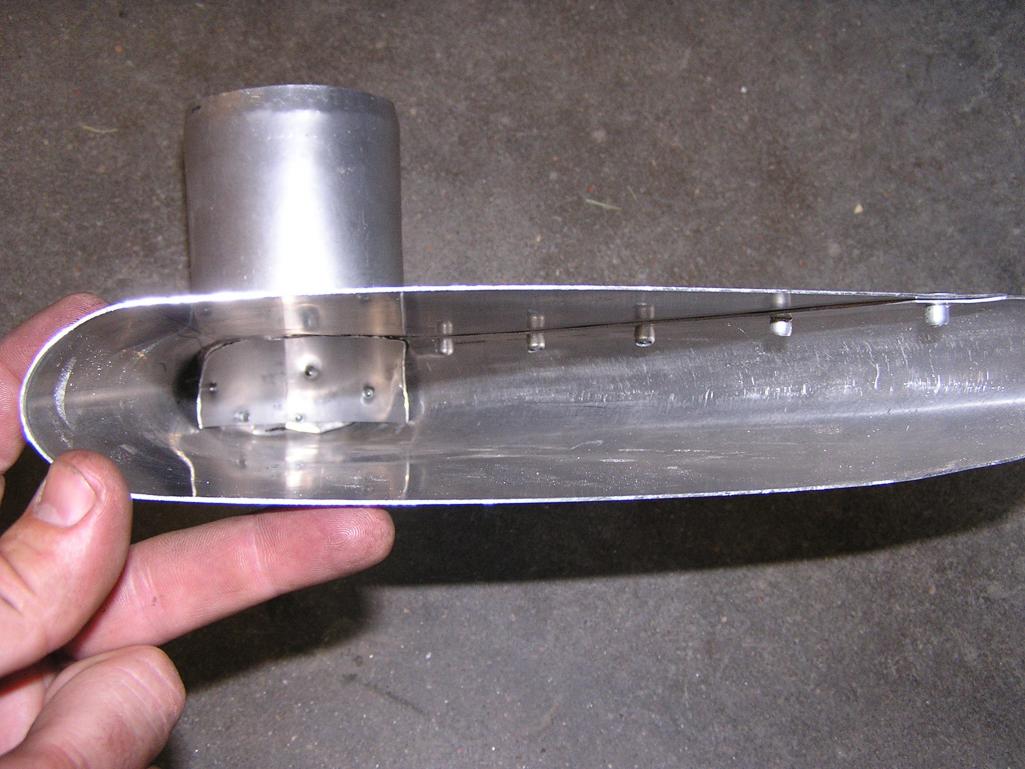
Posted by: brant Sep 19 2012, 06:45 PM
Here is the cooler in the trunk without the duct work attatched:
Attached thumbnail(s)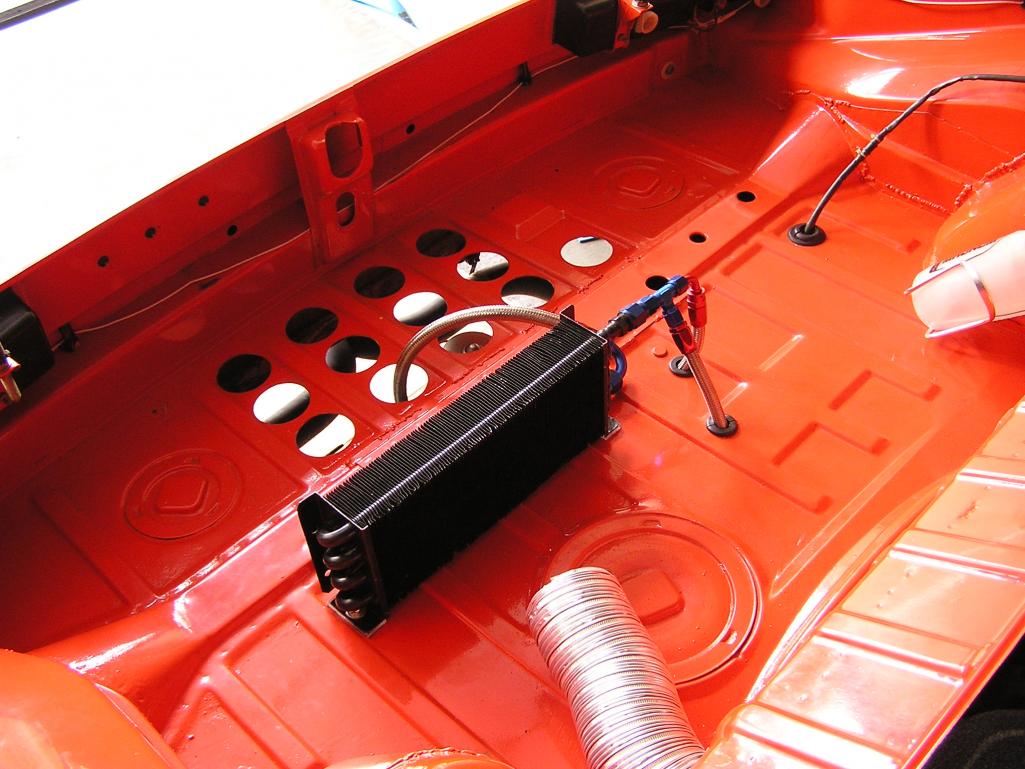
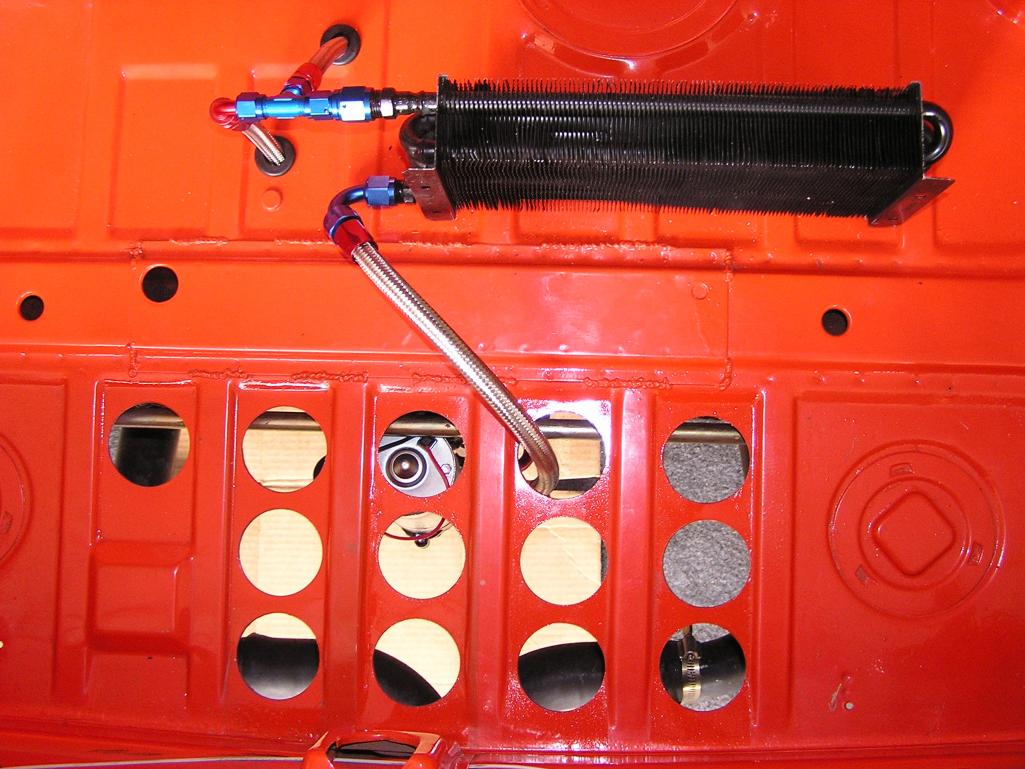
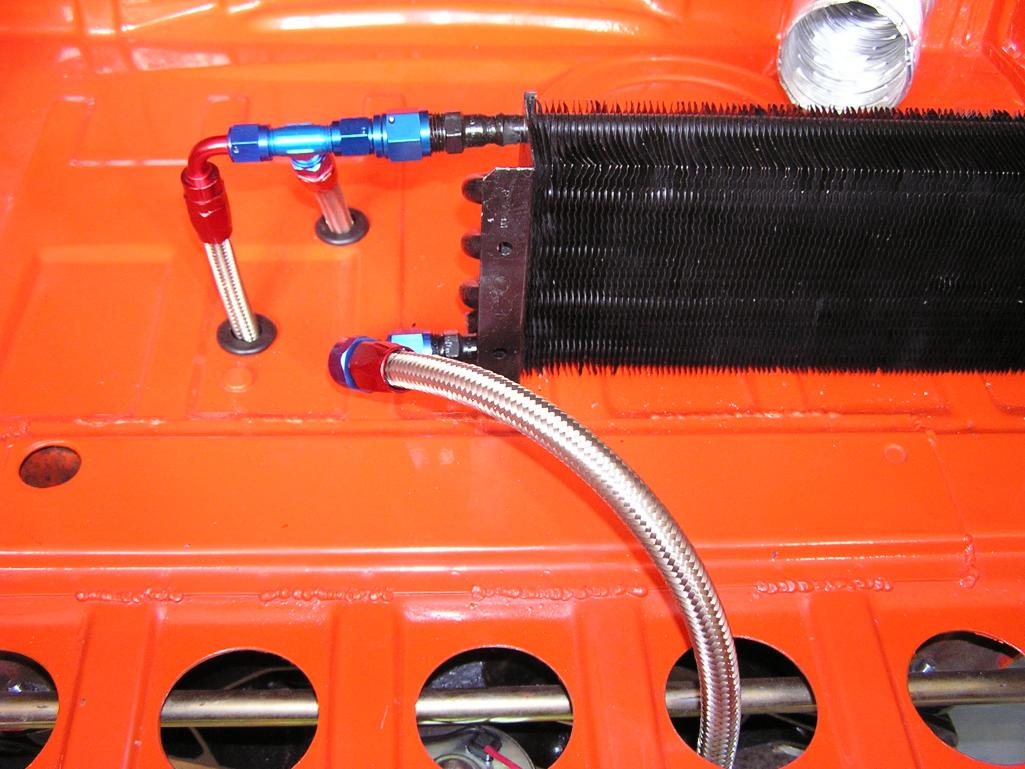
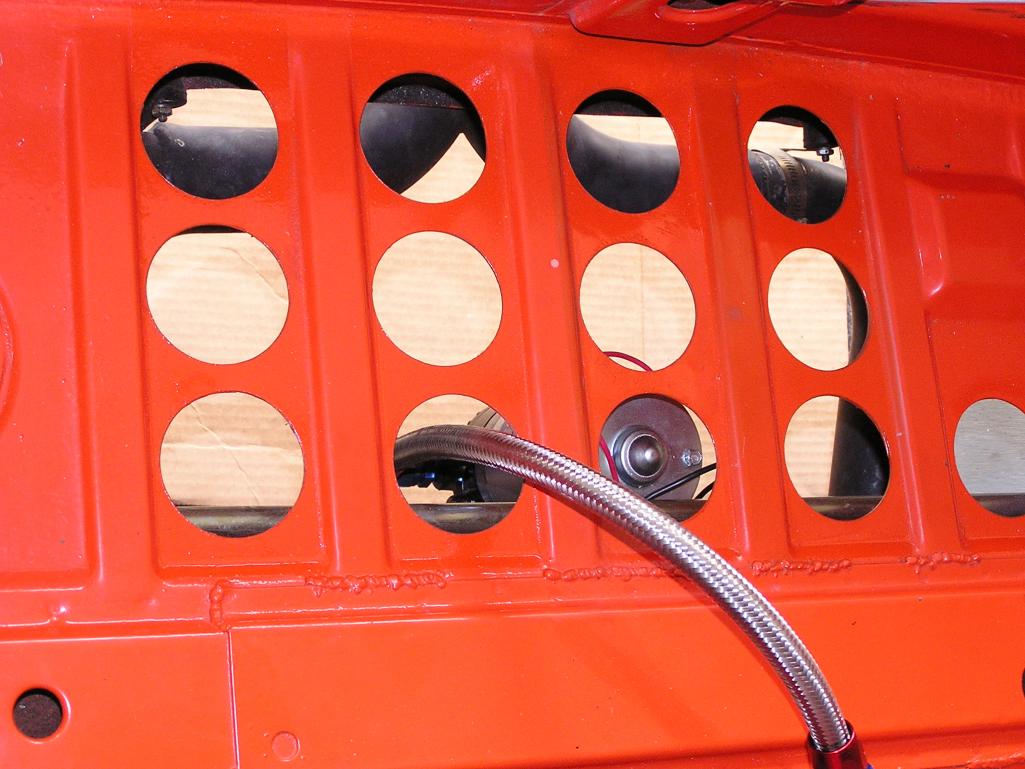
Posted by: brant Sep 19 2012, 06:47 PM
underneath:
Attached thumbnail(s)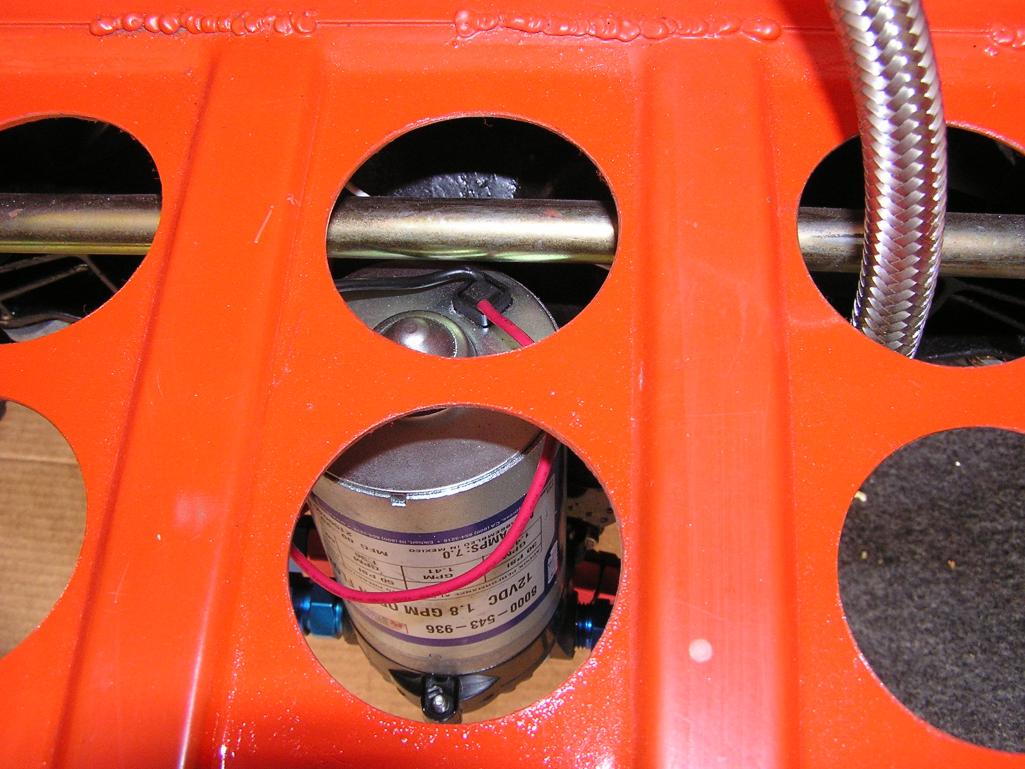
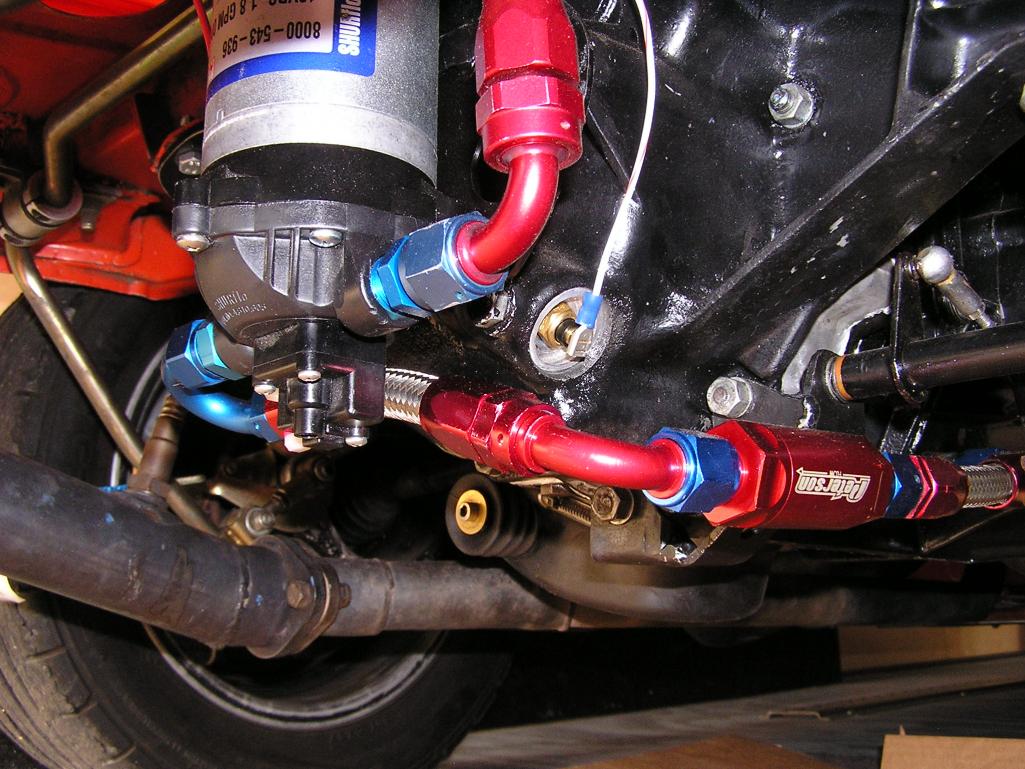
Posted by: brant Sep 19 2012, 06:50 PM
the aluminum hood:
Attached thumbnail(s)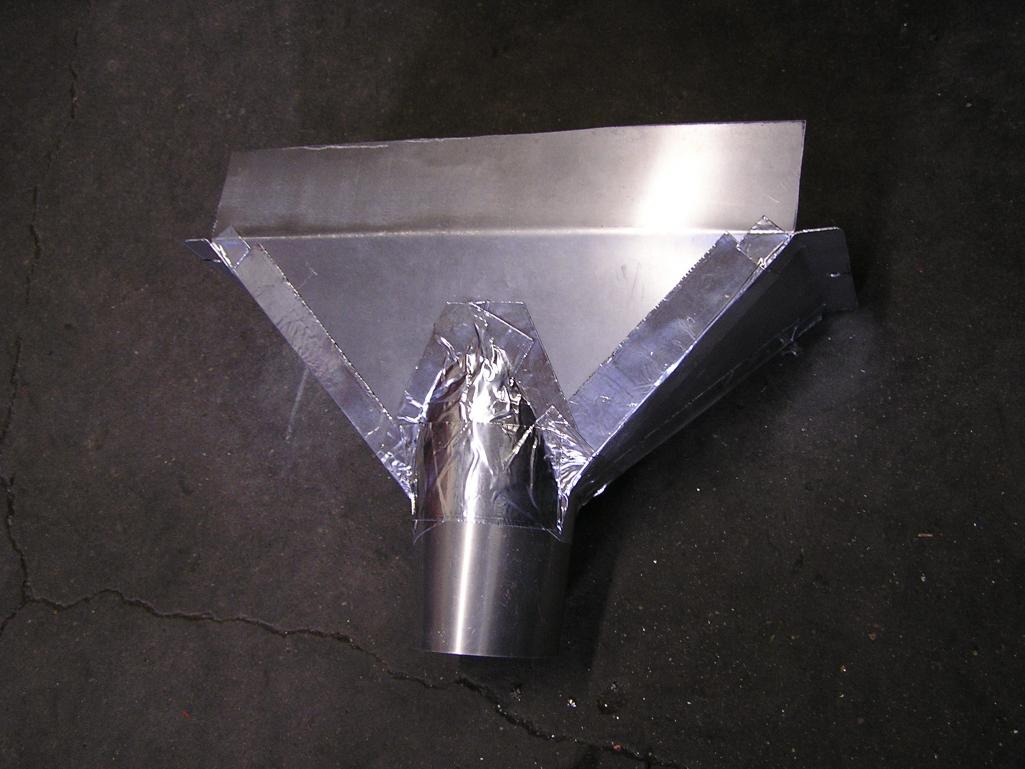
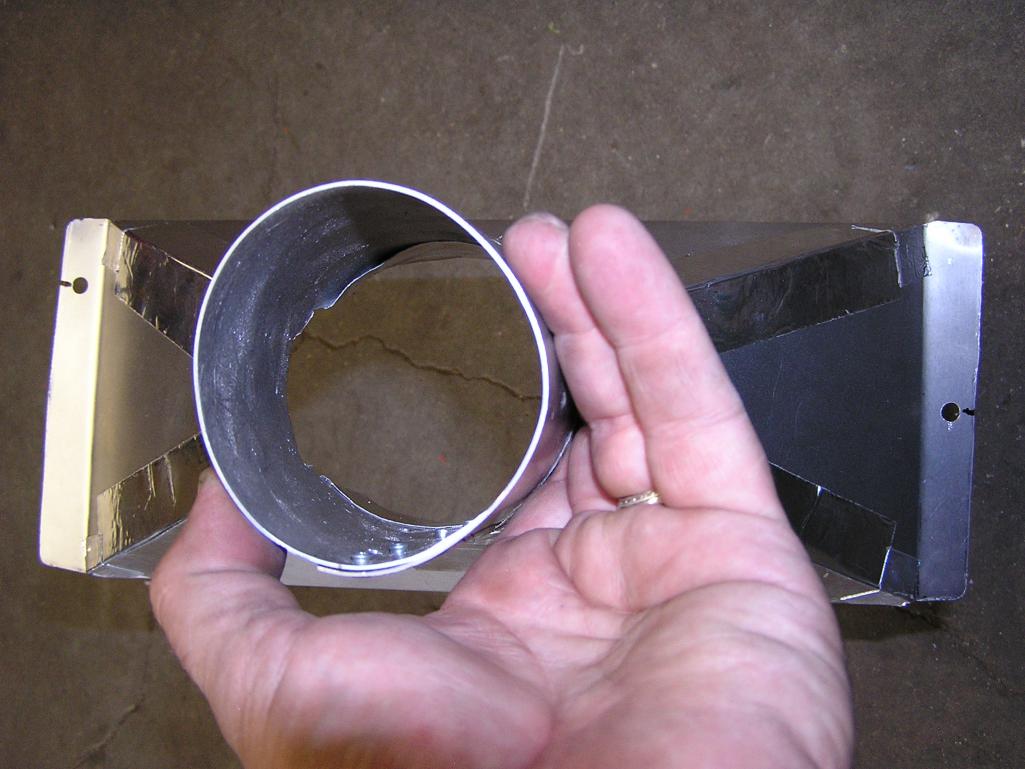
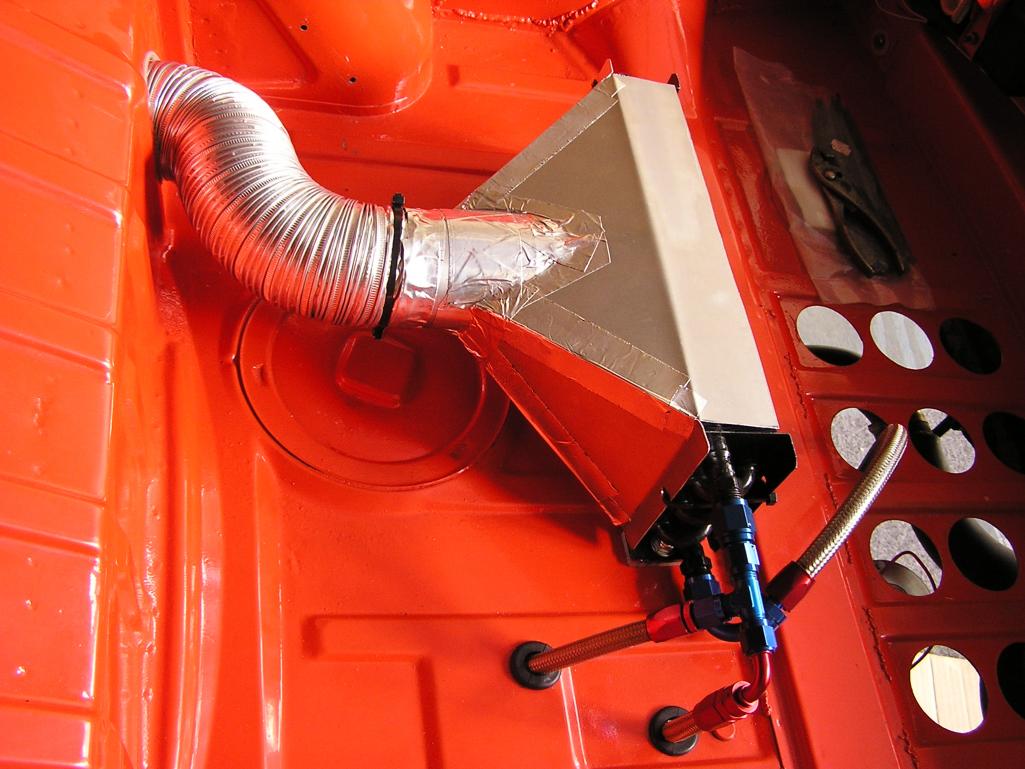
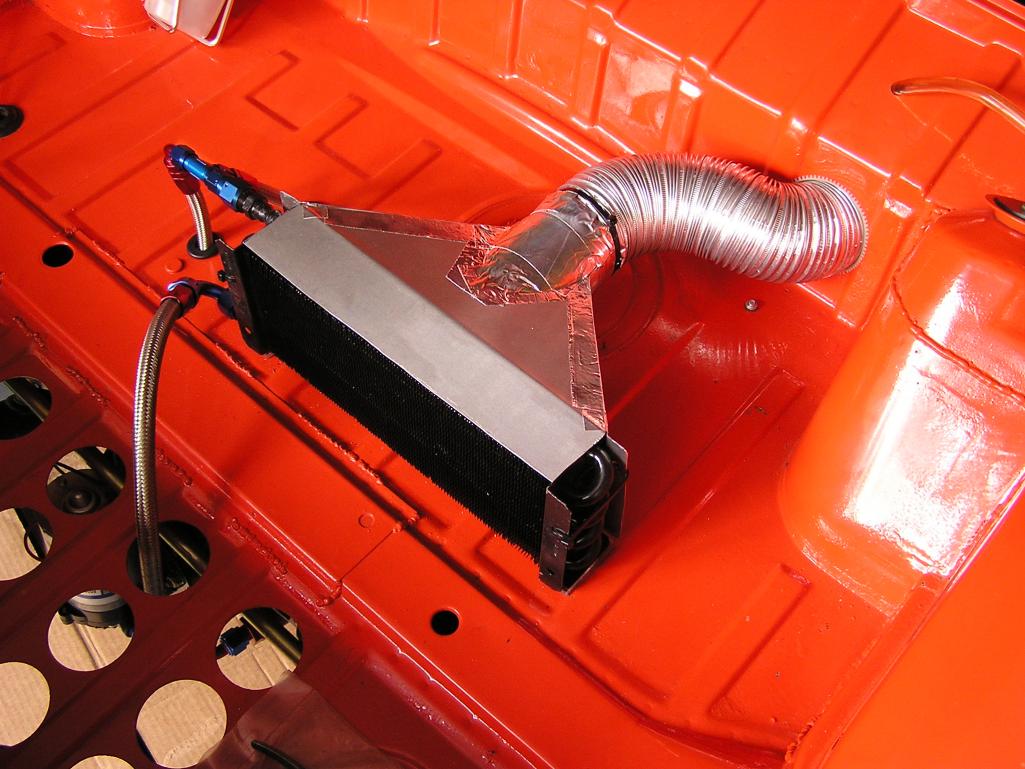
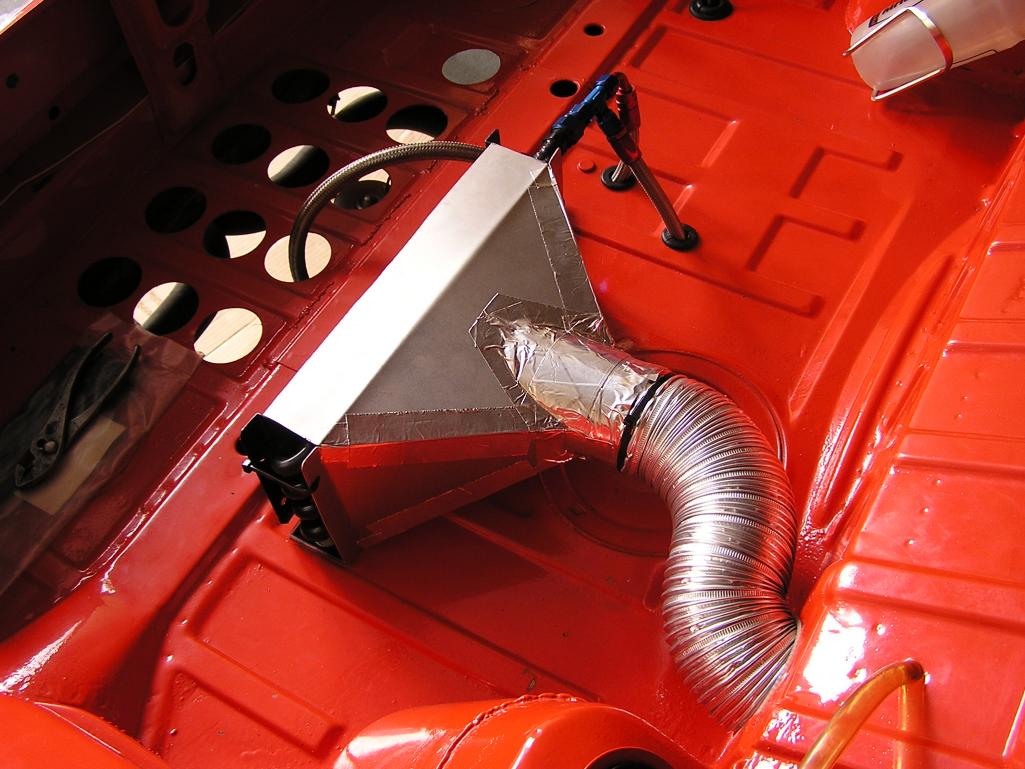
Posted by: Ferg Sep 19 2012, 07:09 PM
Cool! 
Posted by: MoveQik Sep 19 2012, 10:54 PM
Where is the "scoop" located back there to give you more pressure in front of the cooler than behind it? Looks cool!
Posted by: brant Sep 19 2012, 11:15 PM
Where is the "scoop" located back there to give you more pressure in front of the cooler than behind it? Looks cool!
Good question. Approximately at the lower firewall, where the 4 cylinder turblance flaps would be. We will see if it gets enough airflow according to the gauge.
Posted by: stuttgart46 Sep 20 2012, 06:39 AM
Beautiful work as always.
When are you going to get to try it out?
Posted by: brant Sep 20 2012, 12:08 PM
Beautiful work as always.
When are you going to get to try it out?
I should be on the track at coronado tomorrow morning if there are no surprises. We crossed the california border and have another 175 miles to go
Posted by: Ferg Sep 20 2012, 02:46 PM
Beautiful work as always.
When are you going to get to try it out?
I should be on the track at coronado tomorrow morning if there are no surprises. We crossed the california border and have another 175 miles to go
Posted by: Cracker Jan 11 2013, 08:47 AM
OT: Coronado in Sept? I had the family in SD on vacation Thursday (20th) evening in Coronado and pulled over quickly because I saw what appeared to be a "mini-car show" (BMW 2002's, 911, etc) and vintage race cars. After scrambling for a parking space, we rounded the street on foot to see them as they all roared off. It was a bummer for me and my son. The folks there said they were racing at Coronado (air field?) in the morning. Small world possibly, but were you there that "closed street" deal Thursday evening (about 5:00-6:00)? I understood that to be an autocross set-up. Had I known you or other teeners were there I would have come by Sat. AM. Bummer!
Just for the record: I have an understanding wife who encouraged me to go the next morning to the races but we were planning on heading back up to Newport Beach/Check out, etc. and I didn't feel like cramping the "family" schedule so I didn't go. I wish I had now...
Posted by: brant Jan 11 2013, 09:30 AM
The cars in town are really more of a parade lap into town (not really an autox)
they park in town on the street and display for a half hour and then tour back.
The race is a full race track set up on the runways of the navy
Its where the fighter jets normally land/take off.
(I think maybe where they filmed the top gun scenes)
Its on base, and one of the few times where they allow civilians to come on base.
they have about 300 cars racing wheel to wheel in 10 run groups
plus air shows of the navy equiptment and seals doing skydiving into the track
oh... and tours of some of the ships, aircraft carriers etc...
I'm bummed you didn't make it in
its a 3 day race and the paddock is open
approximately 20,000 spectators.
I didn't tour into town that evening, but I ran the 3 days of the event.
We had a good number of 914's, including Hans with his Real factory built GT-twin plug, and the Altec-Lansing 914 was running also.
Here are http://www.914world.com/bbs2/index.php?showtopic=195372&hl=coronado
Posted by: brant Jun 3 2014, 08:16 PM
a couple of photo updates
good to save them here
we changed torsion bars, re-thinking some of the suspension and ride height with the traqmate numbers...
of course the annual re- corner balance also:
Attached thumbnail(s)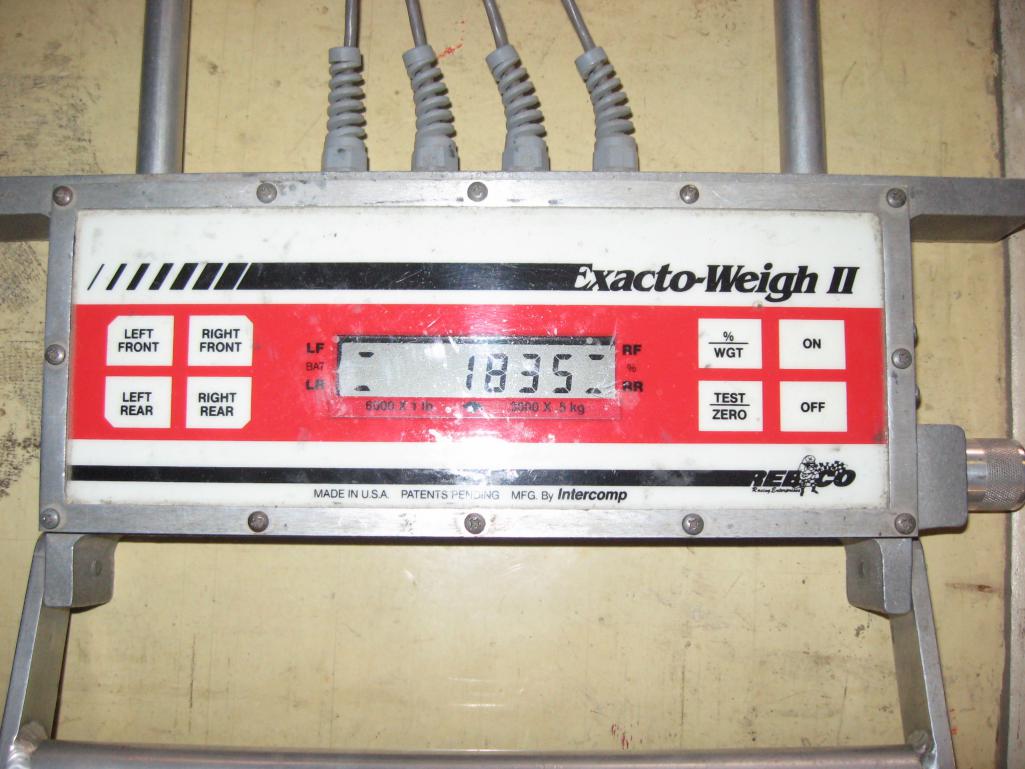
Posted by: brant Jun 3 2014, 08:24 PM
last season we did some more experimenting with our tranny cooler.
ran a scoop in the passenger side window opening to pull cooler air
alot more air was the result and the tranny gauge showed the temp drop.
here is the new scoop to the same old cooler:
Attached thumbnail(s)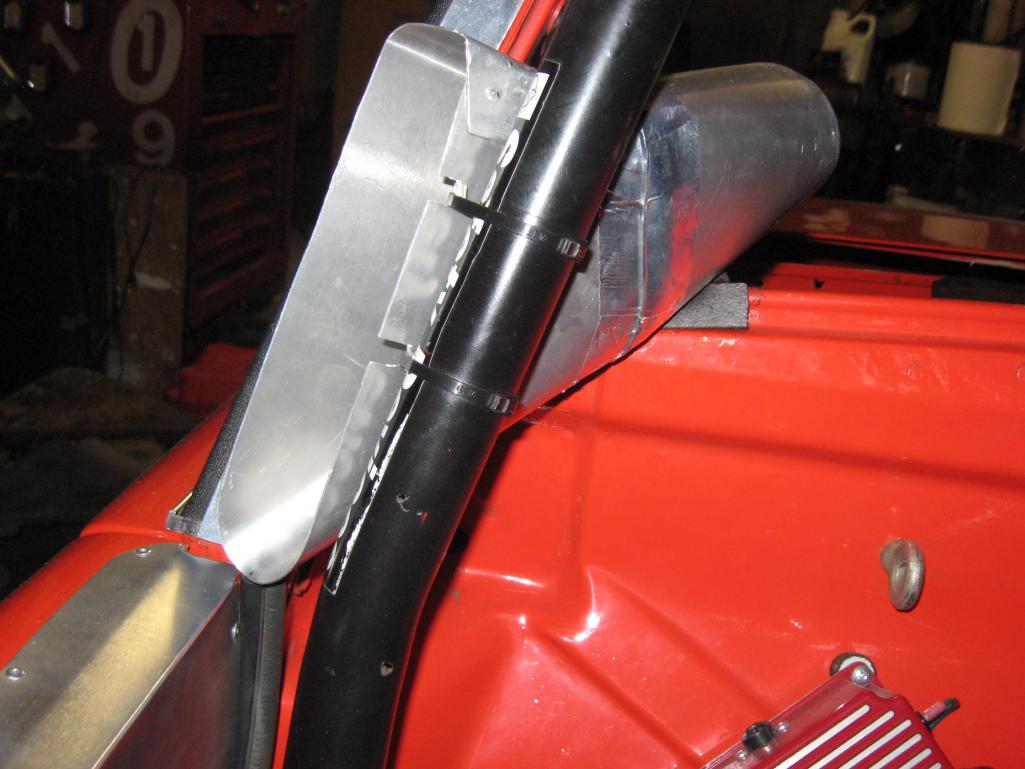
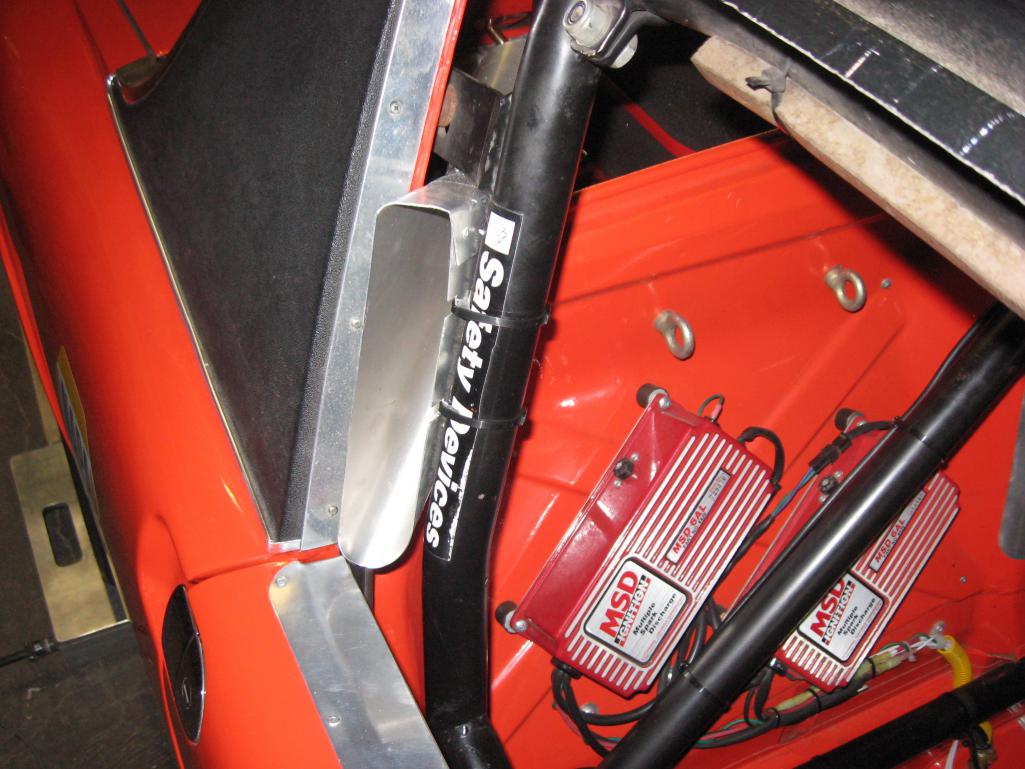
Posted by: brant Jun 3 2014, 08:26 PM
and:
Attached thumbnail(s)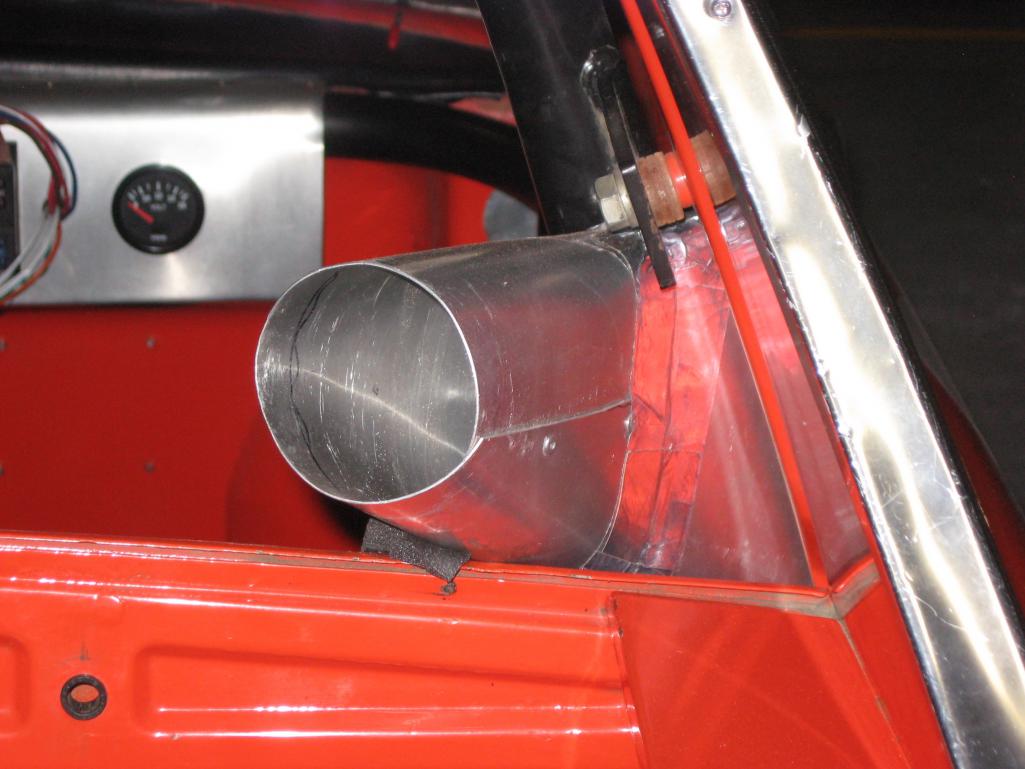
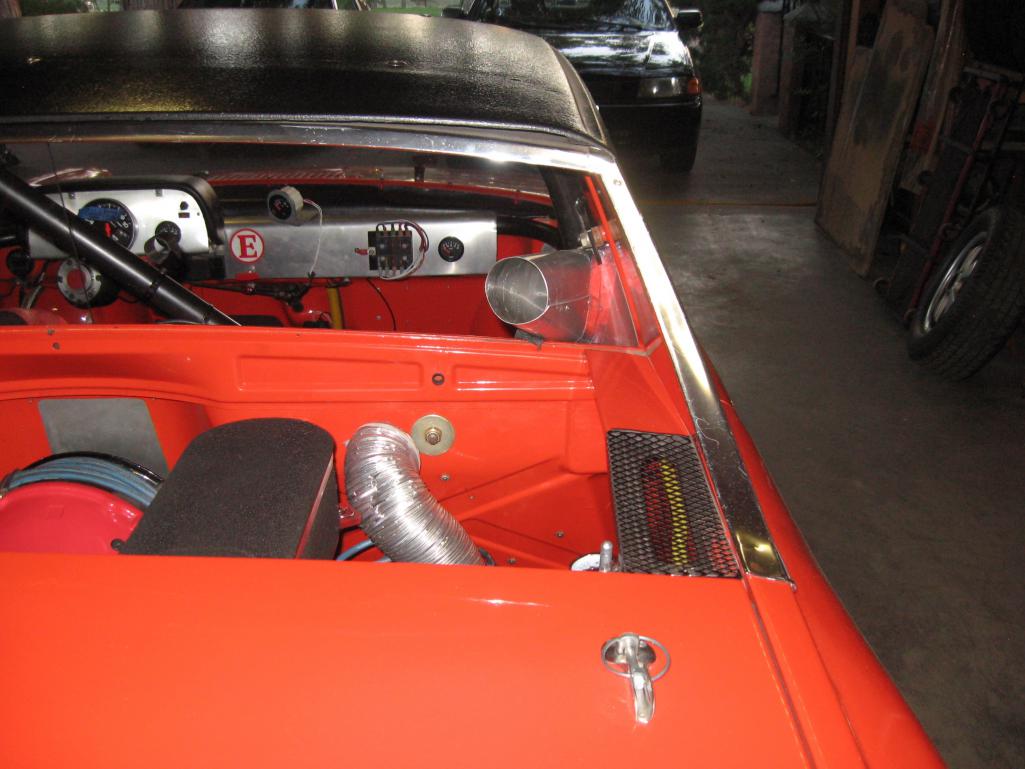
Posted by: brant Jun 3 2014, 08:28 PM
we were shooting for minimal drag:
Attached thumbnail(s)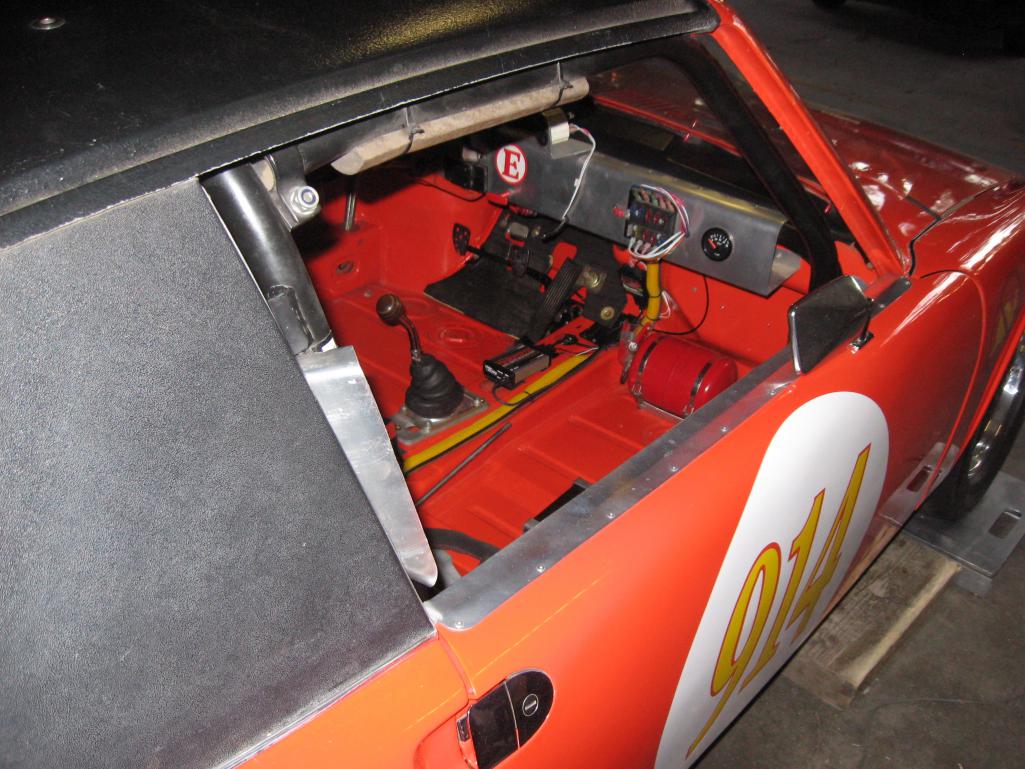
Posted by: rick 918-S Jun 3 2014, 09:20 PM
Car looks great Brant!
Posted by: brant Jun 4 2014, 06:26 AM
Car looks great Brant!
thank you sir!
Posted by: Woody Jun 4 2014, 06:39 AM
Posted by: bulitt Jun 4 2014, 06:51 AM
we were shooting for minimal drag:
How about a plexiglass side window with a NACA duct?
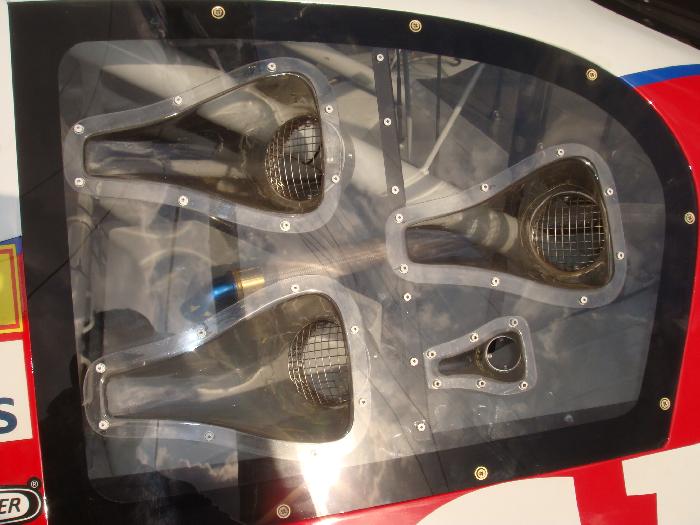
Posted by: gms Jun 6 2014, 05:29 PM
Looks good now get out there and race it
Posted by: brant Jun 6 2014, 07:04 PM
Looks good now get out there and race it
Thank you
And definitely!
I should be at fleetweek for the HMSA festival of speed on Coronado island. COTA for the national vintage championchip with SVRA in Austin. Hallet Oklahoma with CVAR. Plus events in Colorado and Nebraska yet this year with RMVR
I'm praying for the price of diesel to stay down
Posted by: Jetsetsurfshop Jun 15 2014, 03:53 PM
Hey Brant,
Have you had a chance to finish the duct work? Looking to know if you had an improvement with the trans cooler?
Shane
Posted by: brant Jun 15 2014, 04:45 PM
Hey Brant,
Have you had a chance to finish the duct work? Looking to know if you had an improvement with the trans cooler?
Shane
Shane,
I did run about 5-6 races with this new duct in the passenger side window
post #544 The silver hose goes onto the back of the duct at the rear window area.
it dropped my trans quite a bit.. another 10-15 degree's with the same trans/motor/cooler/etc.
now I'm building a new engine lid to allow the hose to pass through...
Posted by: effutuo101 Jun 16 2014, 10:23 AM
Nice work Brant!
Posted by: brant Oct 18 2014, 12:40 PM
New engine lid is fab'd, and painted:
Attached thumbnail(s)
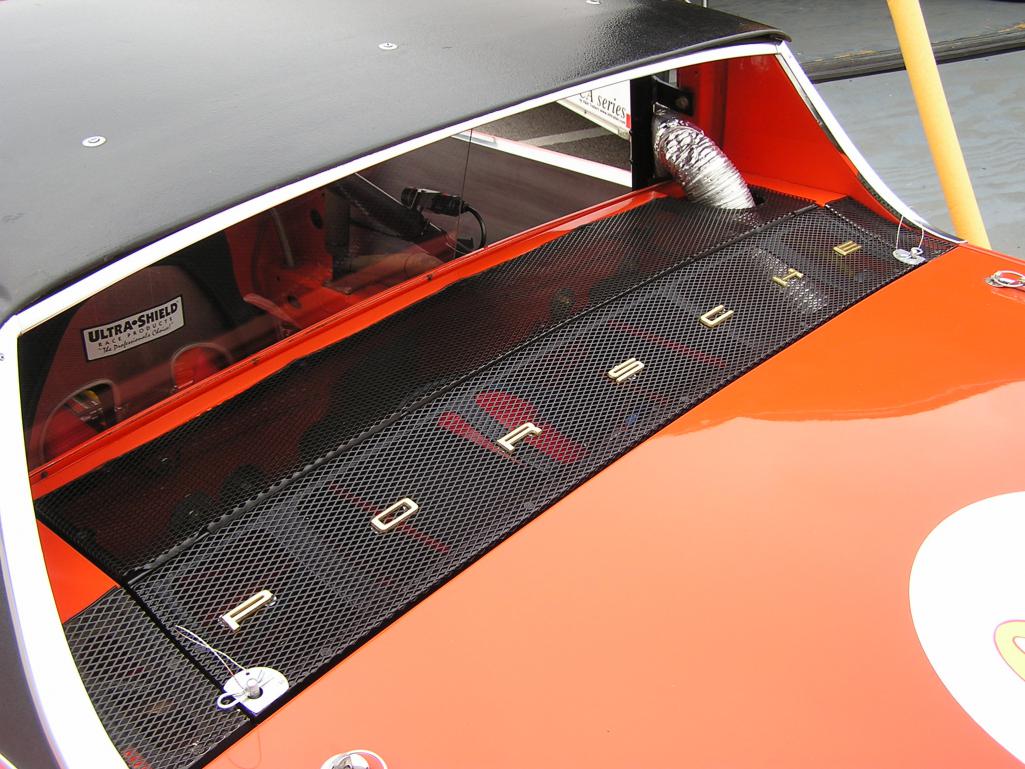
Posted by: brant Feb 22 2018, 07:32 AM
Spent last weekend doing winter maintenance and corner balancing with Dad. Just want the archive this here.
Wet with 4 gallons of fuel
(I forgot to switch the wheels or would have beat my weight goal with the Hoosiers)
Attached thumbnail(s)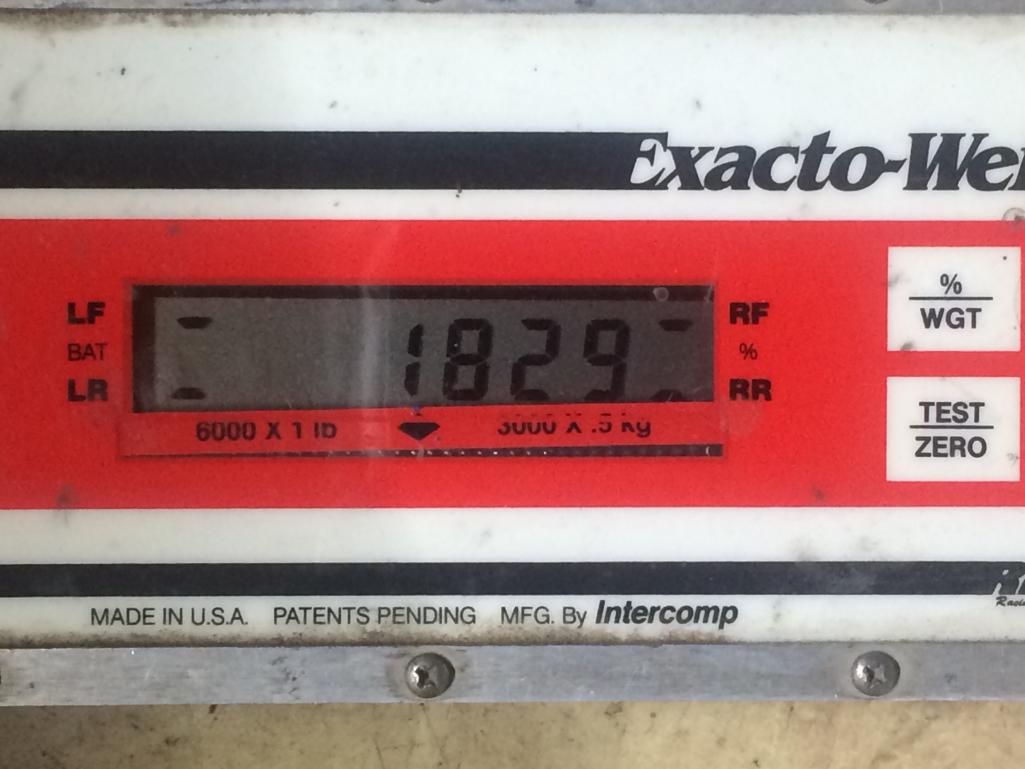
Posted by: jmitro Feb 22 2018, 08:23 AM
wow, that is super lightweight!
Posted by: brant Apr 1 2020, 10:07 PM
Today was a productive day
Picked this up and hoping to get some garage time soon
Attached thumbnail(s)
Posted by: davehg Apr 2 2020, 12:55 AM
Mmmmm. Twin plug....
Posted by: brant Apr 2 2020, 05:08 PM
One more to document
With the motor fixed and these parts to fix my suspension
I should have enough to build it back
SVRA, COTA 10/19 has /is going to bring many hours of work
Attached thumbnail(s)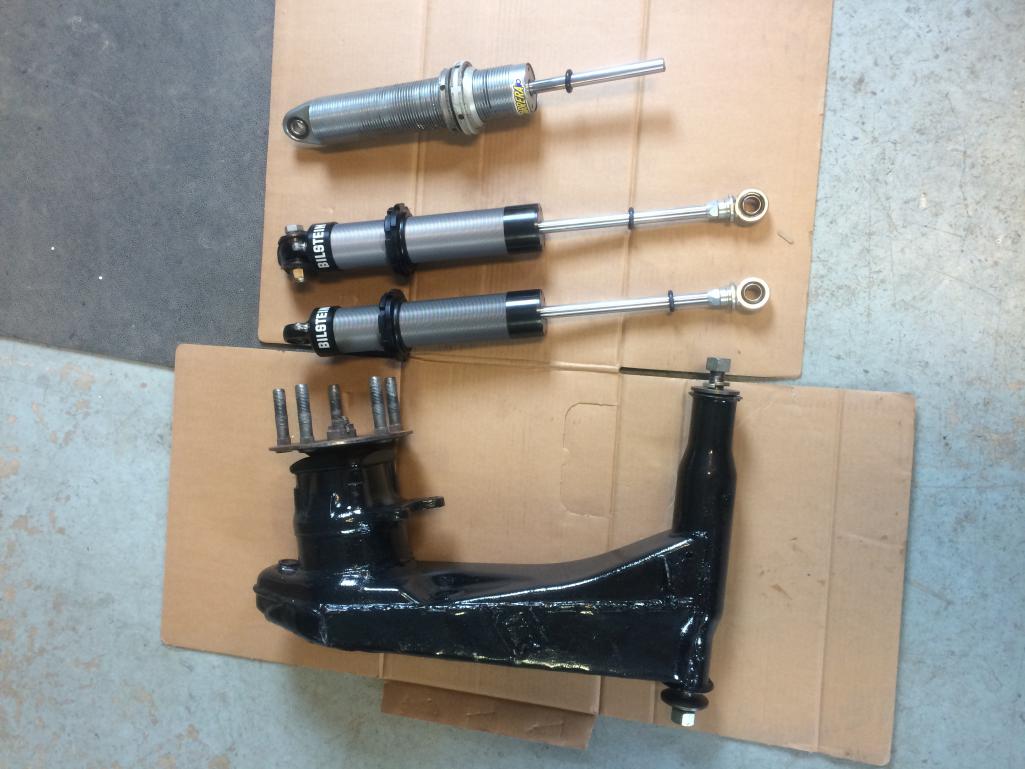
Posted by: brant Aug 25 2020, 11:58 AM
Got the engine in. The suspension on. And just finished corner balance:
Attached thumbnail(s)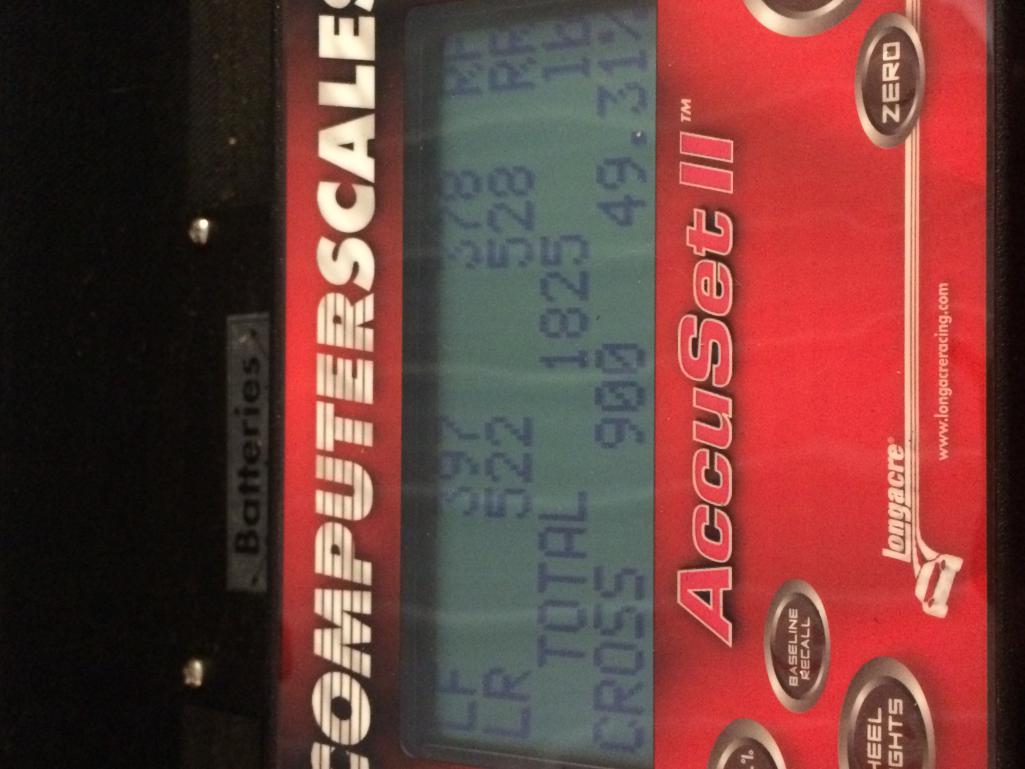
Posted by: sixnotfour Aug 26 2020, 05:18 PM
Posted by: MM1 Nov 20 2020, 09:29 PM
Just stumbled on to this and was captivated - thank you, Brant!
![popcorn[1].gif](style_emoticons/default/popcorn[1].gif)
Posted by: brant Nov 21 2020, 08:39 AM
Just stumbled on to this and was captivated - thank you, Brant!
Thanks!
Posted by: Superhawk996 Nov 21 2020, 09:42 AM
1825 lbs is pretty amazing.
Would love to get my car on a diet to shed 100 lbs
The main issue is that when I was younger I did that by dumping all NVH treatments, heat exchanger shells, etc., but now I'm older and want a quieter more cofortable car.
This thread has lots of great ideas in the post about light weighting - need to see what I can incorporate to my street car.
Unfortunately 2.4L six currently planned will be a net negative to weight and will need offsets.
Posted by: Gint Nov 21 2020, 11:37 AM
Is it running yet? 
Posted by: brant Nov 21 2020, 06:43 PM
1825 lbs is pretty amazing.
Thanks. It was a lot of work
Gint
Runs and mostly broke in
I’m going to do a winter service. But after that looking forward to some covid free road trips.
Possibly Road America this year
Posted by: sixnotfour Nov 21 2020, 07:04 PM
Powered by Invision Power Board (http://www.invisionboard.com)
© Invision Power Services (http://www.invisionpower.com)