Printable Version of Topic
Click here to view this topic in its original format
914World.com _ 914World Garage _ 1973 2.0 Original Survivor
Posted by: 914Eric Nov 7 2012, 04:07 PM
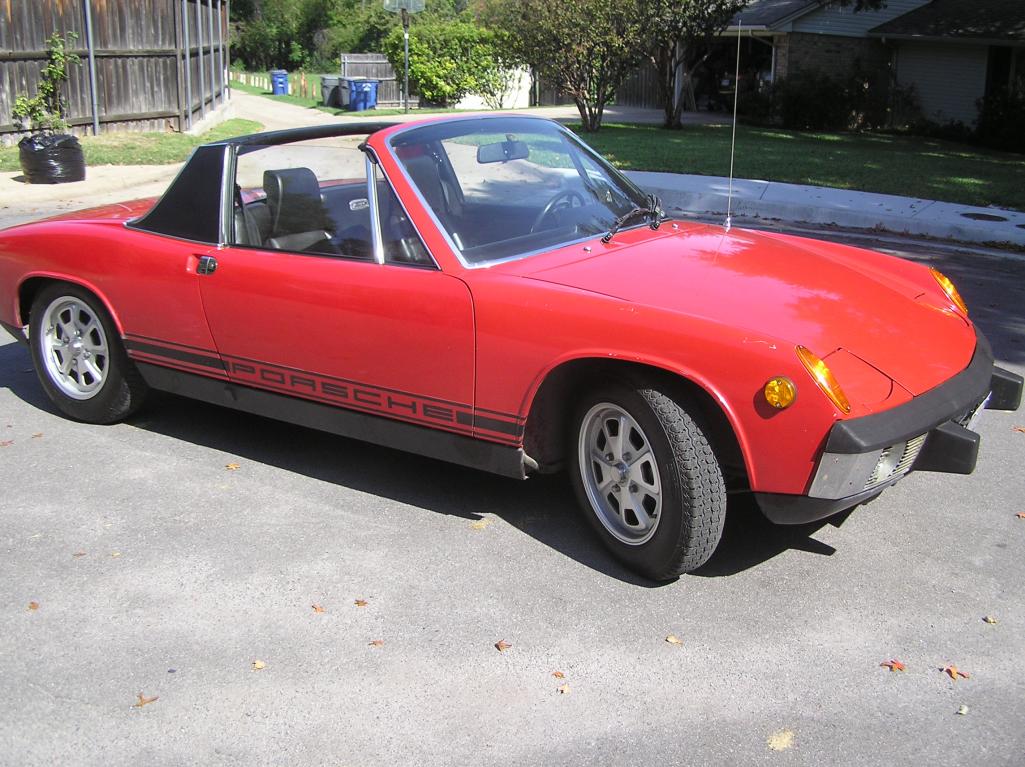
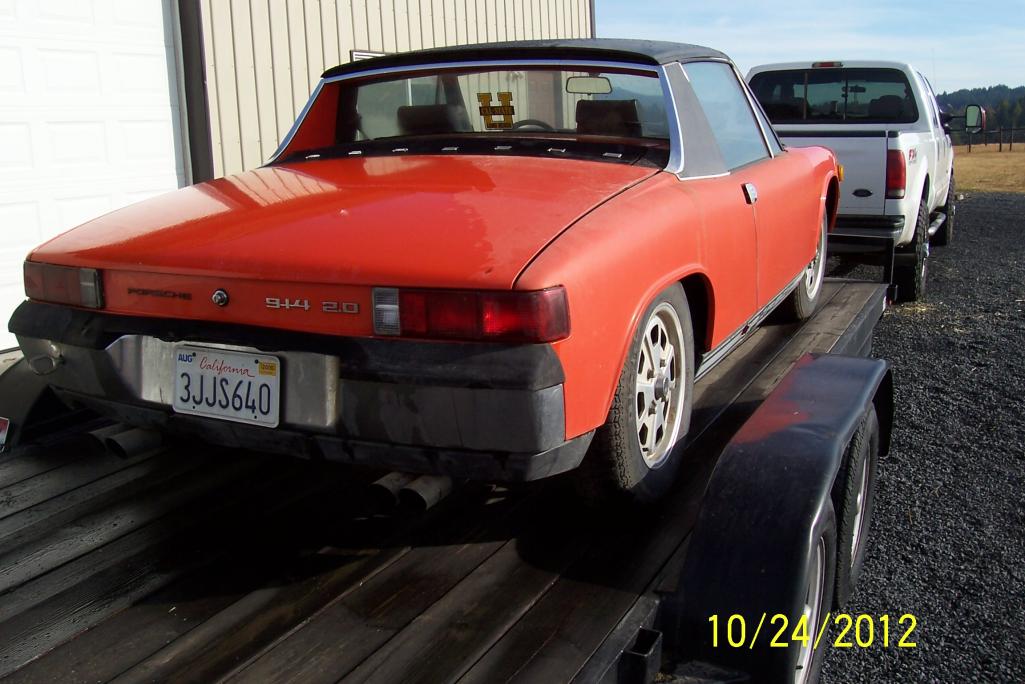
Well I'm a newbie, but looking forward to help, comments, and thoughts as I bring my 73 x19 2.0 back to life. It is Phoenix Red, and I am the original owner, well my dad was, but it was always his and my car. I drove the car to my senior prom in 1974.
Dad passed a few years ago, and I finally freed up the time to get started refurbishing it this winter. This is an original California car has been in storage since 1993. I got it out of storage last month after making room in my shop, and am beginning to take it apart.
I will post pictures as I go and keep a running blog going so all of you guys (and gals) can keep me from messing anything up. I want to do it right.
Thread Index Pages
1-2 Intro photos; 3 Rear tunnel access; 4 seat belts, underbody; 5 fuel tank removal;
6 shocks, sway bars, brakes; 7 engine; 8 engine, ECU; 9 hell hole; 10-11 exhaust;
12-13 originality; 14 wheel align; 15 heater hoses; 16 heat exchangers; engine out;
17 vacuum elbow, fuel pump; 18 wiring; thermostat; 19 cooling flaps, pedal board;
20 pedal cluster; 21 cooling fan; 22 main seals, injector manifolds, rotor; 23 thermostat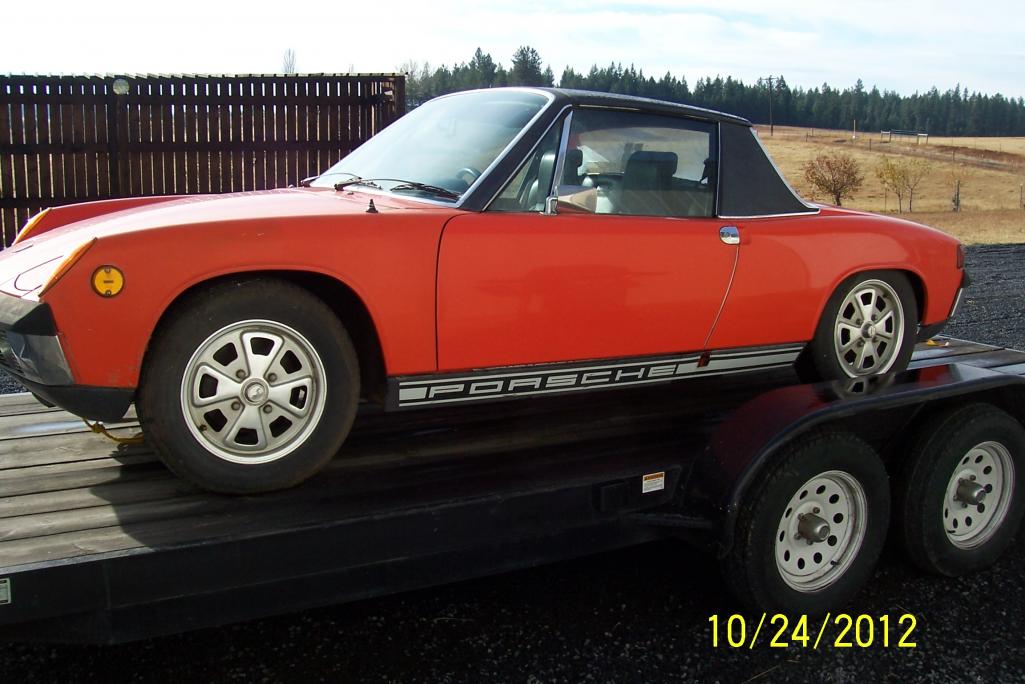
Posted by: dlee6204 Nov 7 2012, 04:16 PM
Awesome! ![popcorn[1].gif](style_emoticons/default/popcorn[1].gif)
Posted by: MDG Nov 7 2012, 04:40 PM
Sweet! One of the rare ones with the black windshield frames too. Nice.
'73 2.0 Phoenix Red. One of my favs too 
Posted by: 914Eric Nov 7 2012, 04:49 PM
Good catch MDG. I started doing research the last year or so in preparation for the restore, and came across the fact that some had the vinyl on windshield posts, and others were painted.
It's funny because it had been in storage so long, I couldn't remember which one I had. lol
Here is a close up of the posts.
Eric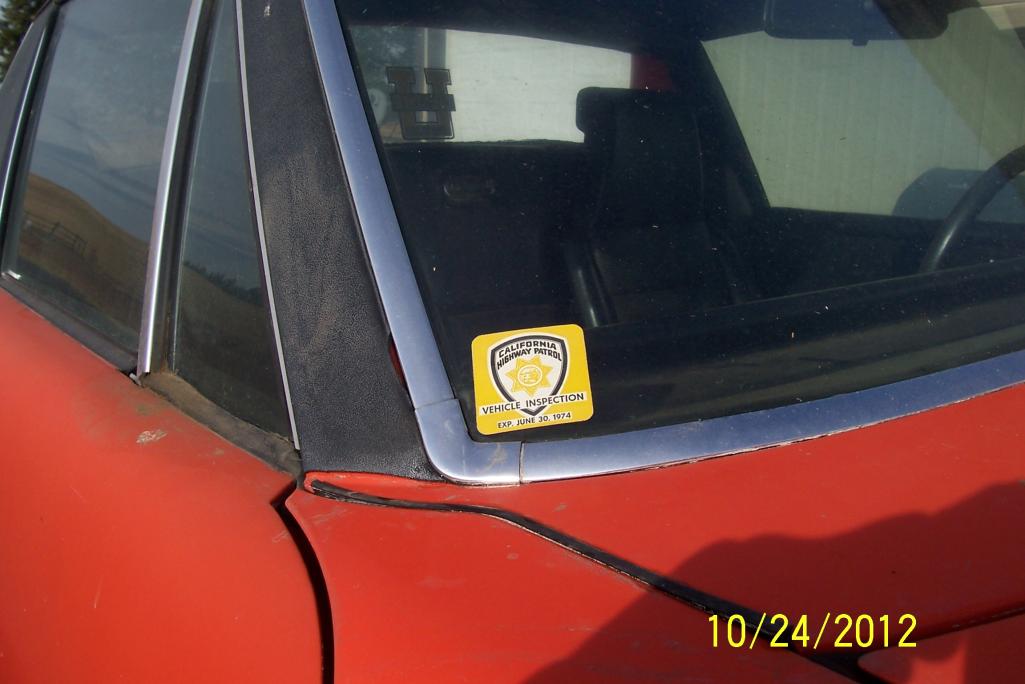
Posted by: GatorLCA Nov 7 2012, 05:02 PM
I too just got mine out of storage to get it back on the road and there's one thing I missed when I got back in it...and it's that musky car smell.
Mine in the same position as yours
Posted by: billh1963 Nov 7 2012, 05:13 PM
Looks like my Phoenix red '73! 
Posted by: kbrunk1 Nov 7 2012, 05:40 PM
 Here is my 73 in Baha Red.
A big thanks to all the guys in this forum for helping me with my 150 questions.
Unfortunately I have more questions.
Posted by: brp986s Nov 7 2012, 05:42 PM
Alright! Nice cars all. Get plenty of baggies and containers for parts. Projects get started and then unexpectedly drag out over time and things get lost.
Posted by: 914Eric Nov 7 2012, 05:43 PM
Nice KBrunk...yours is the first one that isn't on a trailer. 
Everyone that has been posted also has painted window posts.
Posted by: billh1963 Nov 7 2012, 05:53 PM

Everyone that has been posted also has painted window posts.
One less place for rust to form!
Posted by: 914Eric Nov 7 2012, 06:09 PM
Everyone that has been posted also has painted window posts.
One less place for rust to form!
True...and I actually think it looks better painted. But given the originality of the car, I'd hate to change it. It was the first think MDG noticed when you saw the picture.
Posted by: turk22 Nov 7 2012, 06:21 PM
Eric,
Would love to see more pictures of your car, engine and interior, I also have a very original 73 2.0L and love to see where mine may not be original anymore.
Slather this thread with pictures!
Posted by: MDG Nov 7 2012, 06:42 PM
True...and I actually think it looks better painted. But given the originality of the car, I'd hate to change it. It was the first think MDG noticed when you saw the picture.
Yes - they are fairly rare. That vinyl is probably dried out and brittle by now. You can source a proper match for it and replace if you need to. I would if it was original to my car. The texture should be the same as what's on the sail panels.
Posted by: 914Eric Nov 7 2012, 06:45 PM
Eric,
Would love to see more pictures of your car, engine and interior, I also have a very original 73 2.0L and love to see where mine may not be original anymore.
Slather this thread with pictures!
Will do Steve. I have lots of pictures, be carful what you ask for. I made sure I took a lot so I would be able to get it back together when it's done.
And yes BRP...All parts, screws, etc...going in labeled baggies.

Posted by: SirAndy Nov 7 2012, 06:50 PM
First 1000 made in '73 ...
Here's some more info:
http://www.914world.com/bbs2/index.php?showtopic=61696
http://www.914world.com/bbs2/index.php?showtopic=67592
http://www.914world.com/bbs2/index.php?showtopic=40443

Posted by: ConeDodger Nov 7 2012, 06:54 PM
 Good luck with your restoration!
Posted by: 914Eric Nov 7 2012, 07:00 PM
Good luck with your restoration! Thanks ConeDodger! Keep an eye on me so I do it right.

Posted by: 914Eric Nov 7 2012, 07:02 PM
First 1000 made in '73 ...
Here's some more info:
http://www.914world.com/bbs2/index.php?showtopic=61696
http://www.914world.com/bbs2/index.php?showtopic=67592
http://www.914world.com/bbs2/index.php?showtopic=40443
Great info Andy...Thanks!! Also...my VIN is 47329-01147, so they must of went a little more than the first 1000 with the window post vinyl.
Posted by: Gint Nov 7 2012, 07:04 PM
Dude that's so cool.
Posted by: 914Eric Nov 7 2012, 07:13 PM
Dude that's so cool.
Thanks Gint. When I get her done, Idaho to Colorado is just the kind of drive the 914 was designed for.
Posted by: 914Eric Nov 7 2012, 09:19 PM
Here is the first picture I took of the interior once uncovered after 20 years. About an inch of dust, a few mouse droppings, but all in all...everything in very good order. No cracks in the dash. One small 1 inch split in the drivers seat seam. Easy repair.
Notice the sun visor in the floor.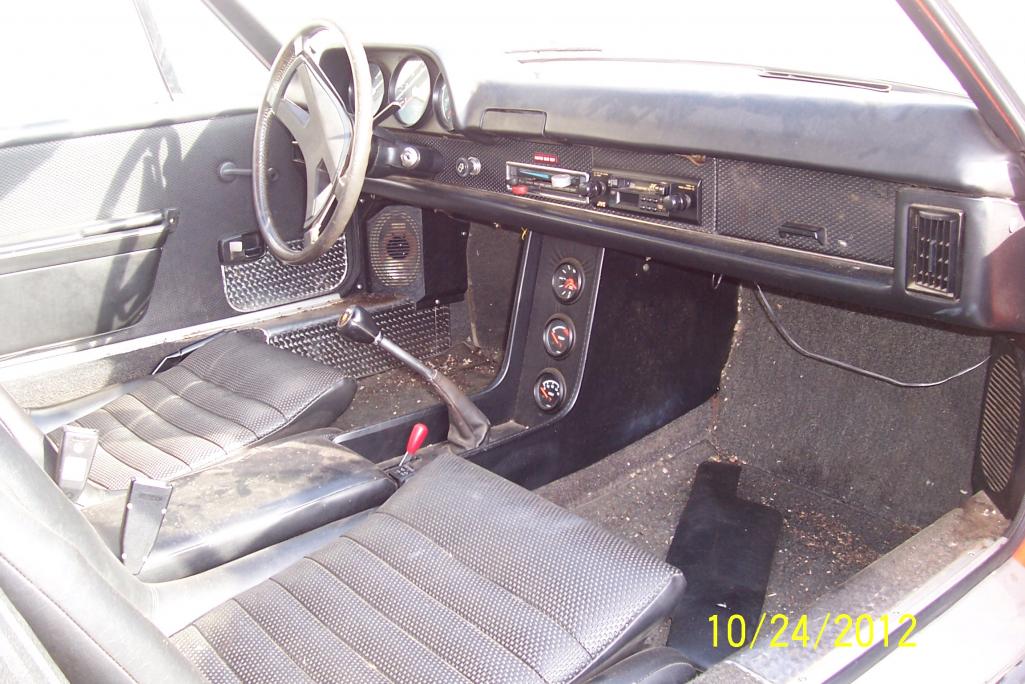
Posted by: Cairo94507 Nov 7 2012, 09:22 PM
What a great story and this will be a cool thread to watch as you return this car to its former glory and get it back on the road.
Posted by: MDG Nov 7 2012, 09:52 PM
The floor is where we all keep our sun visors. Eventually.
Posted by: 914Eric Nov 7 2012, 09:55 PM
Was amazed how good the original paint looked after 40 years. If you look close, you can see my dogs reflection in the drivers side door.
Should be fun Cairo. Glad I don't have to restore some of the rusted out shells I've seen pictures of here on this site.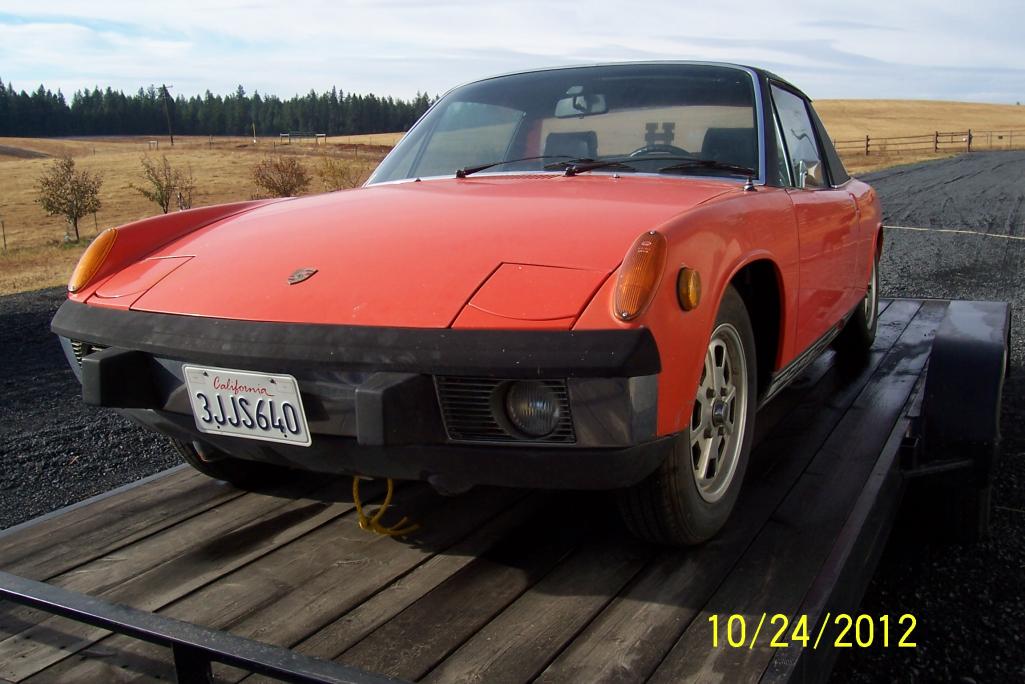
Posted by: 914Eric Nov 7 2012, 10:01 PM
Notice the original tow hook in the bumper. I used it to tie to getting the car home. It was right in the tool kit where it belonged. 
Posted by: rjames Nov 7 2012, 10:19 PM
Great story, great car! Looking forward to watching this one! Hopefully I'll have my 914 long enough to pass to my 4 year-old son someday.

Posted by: 914Eric Nov 7 2012, 10:37 PM
Looks like my Phoenix red '73!
Beautiful car Bill...Looks very original.
Posted by: 914Eric Nov 8 2012, 12:02 PM
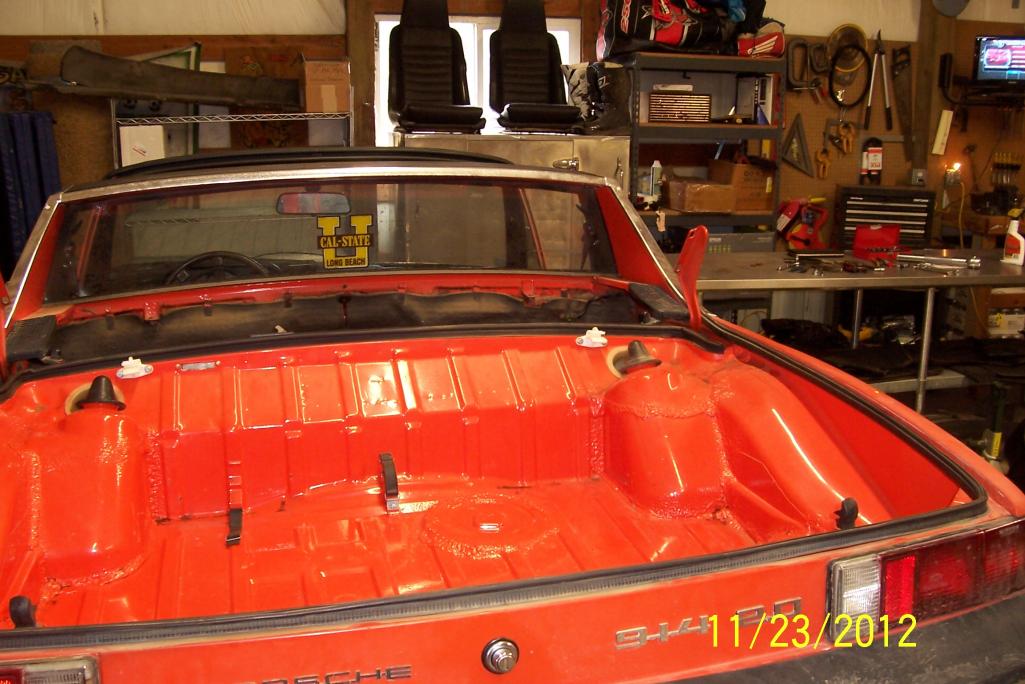
Getting all the carpets and seats out, and rocker panels off.
Front Trunk...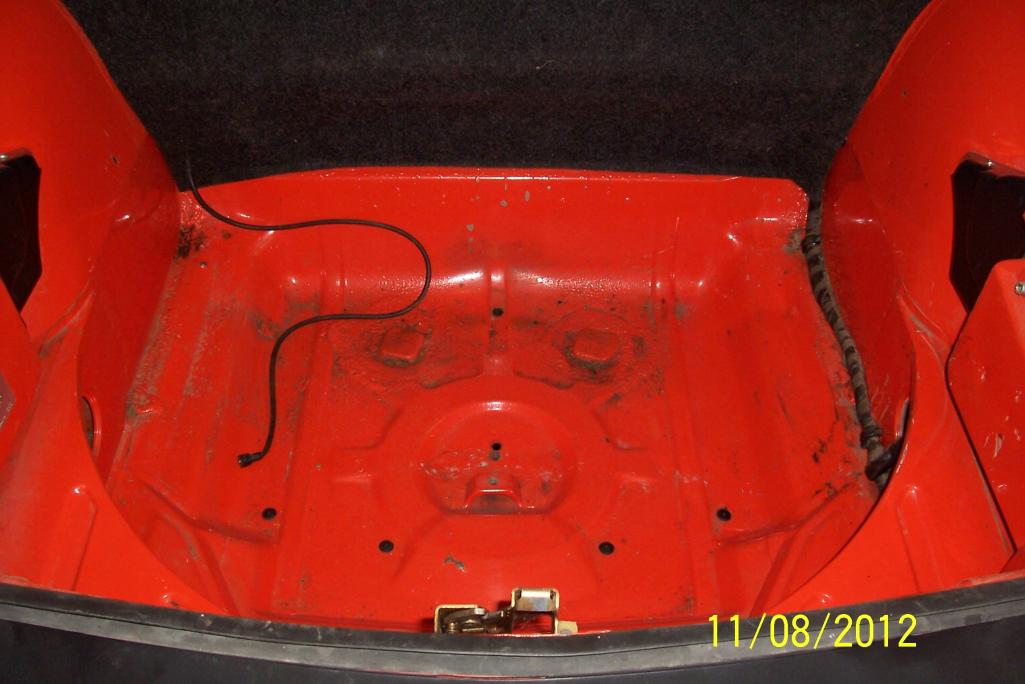
Posted by: 914Eric Nov 8 2012, 12:04 PM
Rear trunk...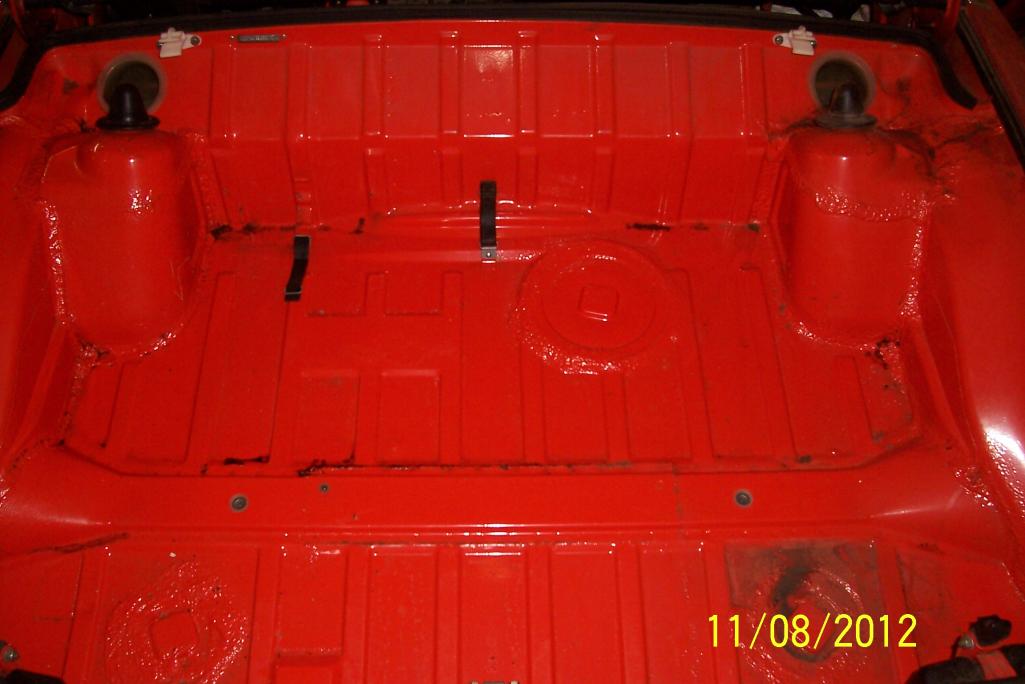
Posted by: 914Eric Nov 8 2012, 12:07 PM
Rockers off... Funny part was if you look close at the floor, their is literally half-gallon of sand that fell out when I took off the rocker panels.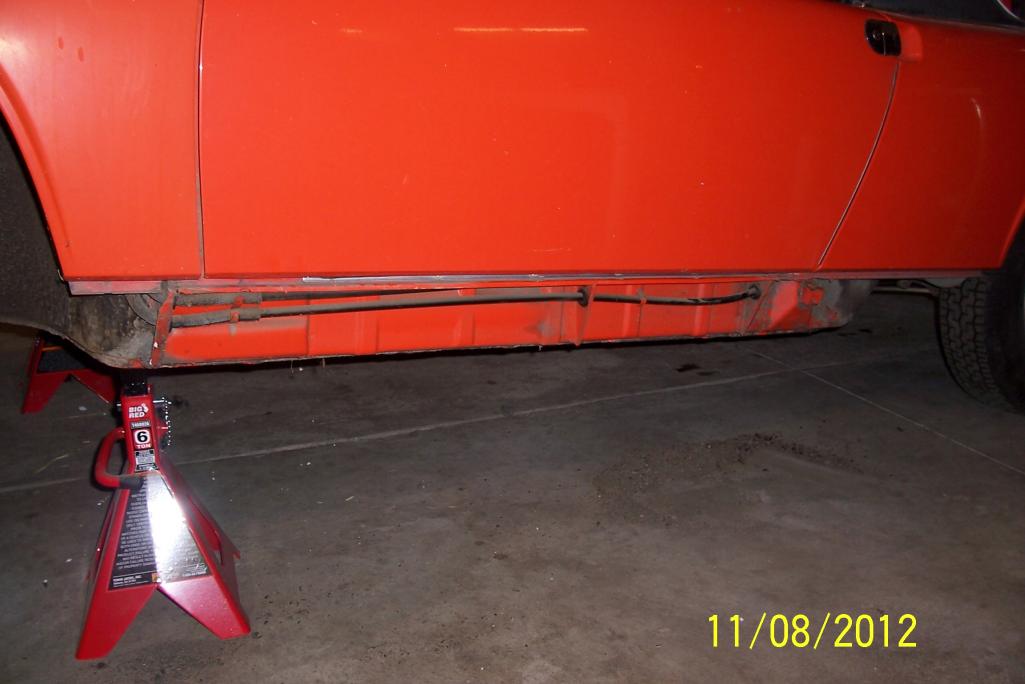
Posted by: rnellums Nov 8 2012, 12:41 PM
Looks beautiful!
Posted by: bandjoey Nov 8 2012, 12:51 PM
Super looking car! Get out the polishing wheel and it'll look showroom.
Ps. You might move the jack stand to the round tube on the suspension about 6" behind the donut. Donuts are known to bend in. It's not a real jack point.
Posted by: Socalandy Nov 8 2012, 01:02 PM
great looking car and look forward to seeing your progress!!
Posted by: 914Eric Nov 8 2012, 01:24 PM
Super looking car! Get out the polishing wheel and it'll look showroom.
Ps. You might move the jack stand to the round tube on the suspension about 6" behind the donut. Donuts are known to bend in. It's not a real jack point.
Bill,
I see the round suspension piece on the rear, by the donut, but not on the front where my jackstands are. Is it OK to use the front donut for the front end, or should I move the jackstands somewhere else? Don't really see anything else on the front end?
This is exactly why I wanted all you folks watching me.
Posted by: 3d914 Nov 8 2012, 01:25 PM
Good luck with your restoration! Ditto! Lookin good Eric. Post lots of pics as you progress.
Posted by: turk22 Nov 8 2012, 02:11 PM
Eric,
Looks great, can't get over how good those trunks look. At least you know what the color will look like once its buffed out.
Interior is amazing as well, you may have to spring for new carpets, but the seats/dash/console are in incredible shape.
Posted by: 914Eric Nov 8 2012, 05:52 PM
Thanks Gerard, Steve,
Yea Steve...I was pleasantly surprised how nice the trunks looked. I haven't even washed the car yet, so after a good buffing and wax...should look OK.
Posted by: bigkensteele Nov 8 2012, 07:45 PM
Eric,
If I were you, I wouldn't restore your car. It will be a lot cheaper to go through and clean everything up and preserve it. It is already in very good condition, so it should also be worth more preserved than restored, I would think.
Why doesn't it have blue plates?
Beautiful car and story!
Posted by: 914Eric Nov 8 2012, 08:38 PM
Eric,
If I were you, I wouldn't restore your car. It will be a lot cheaper to go through and clean everything up and preserve it. It is already in very good condition, so it should also be worth more preserved than restored, I would think.
Why doesn't it have blue plates?
Beautiful car and story!
Ken,
Thanks. I probably use the words restore and preserve interchangeably when I shouldn't. My original thought after reading many stories over the last year in preparation for this was that I would have some degree of terrible rust that needed taken care of, and the only way to do it right was go to rotisserie. Since getting the car out of storage, and having a couple weeks to look it over, fortunately that just isn't the case. So far I only have a couple real small areas of surface rust with the exception of the battery tray which has a little bit of rust. Don't have the engine out yet, but hopefully the engine compartment will look as good. I agree with you that a car with 100% original paint and everything else is probably worth more than even a perfectly restored one. Even with the few paint chips that it has.
The car was running when it was stored, but at a minimun I'll need to pull the gas tank, replace all fuel lines, all vacuem lines, and I'm not sure what else, but then I can check compression and see if she still has more miles left in her. She only has 80K, so I hope so, but after 20 years...who knows.
"Why doesn't it have blue plates?"
You really know how to hurt a guy. I worked for McDonnell Douglas in St. Louis for 3 years building F15s from 1987-1990. That is when the plates got switched to Missouri, and then back to California. My Missouri plate was "1973 914S" which I still have, but not the original blue and yellow Cali plate. I wasn't very smart back then.

Posted by: bigkensteele Nov 8 2012, 09:59 PM
Eric,
If I were you, I wouldn't restore your car. It will be a lot cheaper to go through and clean everything up and preserve it. It is already in very good condition, so it should also be worth more preserved than restored, I would think.
Why doesn't it have blue plates?
Beautiful car and story!
Ken,
Thanks. I probably use the words restore and preserve interchangeably when I shouldn't. My original thought after reading many stories over the last year in preparation for this was that I would have some degree of terrible rust that needed taken care of, and the only way to do it right was go to rotisserie. Since getting the car out of storage, and having a couple weeks to look it over, fortunately that just isn't the case. So far I only have a couple real small areas of surface rust with the exception of the battery tray which has a little bit of rust. Don't have the engine out yet, but hopefully the engine compartment will look as good. I agree with you that a car with 100% original paint and everything else is probably worth more than even a perfectly restored one. Even with the few paint chips that it has.
The car was running when it was stored, but at a minimun I'll need to pull the gas tank, replace all fuel lines, all vacuem lines, and I'm not sure what else, but then I can check compression and see if she still has more miles left in her. She only has 80K, so I hope so, but after 20 years...who knows.
"Why doesn't it have blue plates?"
You really know how to hurt a guy. I worked for McDonnell Douglas in St. Louis for 3 years building F15s from 1987-1990. That is when the plates got switched to Missouri, and then back to California. My Missouri plate was "1973 914S" which I still have, but not the original blue and yellow Cali plate. I wasn't very smart back then.
Sorry, didn't mean to hit a sore spot on the plates.
Last year, I went through what you are about to do - pulled the engine, trans, tank. I cleaned everything to pretty high standards, and then installed all new fuel lines, clutch/accelerator cables, engine seals, you name it. It was actually really fun getting to know the car and, in the end, knowing exactly what I have. My engine tin was pretty crappy, so I repainted it. I wouldn't do that if I had your car. Mine is a '75 1.8, which is about the least desirable 914 ever produced, whereas yours is one of the most highly coveted cars. The one single thing that you MUST do is to replace the tunnel fuel lines with stainless steel. Mine cracked into pieces when I pulled them. There are a couple of member vendors here who make them, and both make very nice pieces.
You will also need to address your brakes. Eric Shea (PMB Performance) is the only guy to go to. He is also a great source for many other parts. He is a brake guy, but I was able to get a lot of other misc. parts through him at a good price.
Unless anyone else chimes in, you may need to turn to Automobile Atlanta for the braided fuel line kit. I couldn't find it anywhere else, and it really looks nice when installed.
Best of luck! I am bookmarking this thread, as this is going to be a really great car when you get it where you want it.
Posted by: partwerks Nov 9 2012, 05:12 AM
Don't know the the aluminum deck plate on the door and threshold was original?
Posted by: nathansnathan Nov 9 2012, 09:31 AM
Don't know the the aluminum deck plate on the door and threshold was original?
I don't think that is original. It looks like there is some trim on the edge of the outside of the driver door also that would have been added. The hood badge and the 'porsche' badge on the back, and can't tell, but the shift knob looks to be added also, and the muffler.
The positive stripe porsche sticker on the rocker is different, but cool- the positive ones were applied at the dealer I've read, so they decided to put it there I guess instead of above where they usually are. That is a sweet 914 though.
Have you checked in front of the computer for rust, like in front of the battery stand, down in the nook there? -that's where the real hell hole would be lurking. Pics of the motor?
Posted by: 914Eric Nov 9 2012, 11:41 AM
Don't know the the aluminum deck plate on the door and threshold was original?
I don't think that is original. It looks like there is some trim on the edge of the outside of the driver door also that would have been added. The hood badge and the 'porsche' badge on the back, and can't tell, but the shift knob looks to be added also, and the muffler.
The positive stripe porsche sticker on the rocker is different, but cool- the positive ones were applied at the dealer I've read, so they decided to put it there I guess instead of above where they usually are. That is a sweet 914 though.
Have you checked in front of the computer for rust, like in front of the battery stand, down in the nook there? -that's where the real hell hole would be lurking. Pics of the motor?
The brushed aluminum kick plates on the doors and thresholds were added by the dealer (Greene in Norwalk Calif) as was the Porsche stripe. Since they were put on by the dealer before sale, I consider them original. I know all the front and rear badges are original and verify exactly with Dr. Johnson's authenticity guide.
Yes there is an aftermarket muffler on it, but I still have the original as well. There is some rust on the battery tray, but I haven't gotten to the engine compartment yet. Patients...I'm getting there.
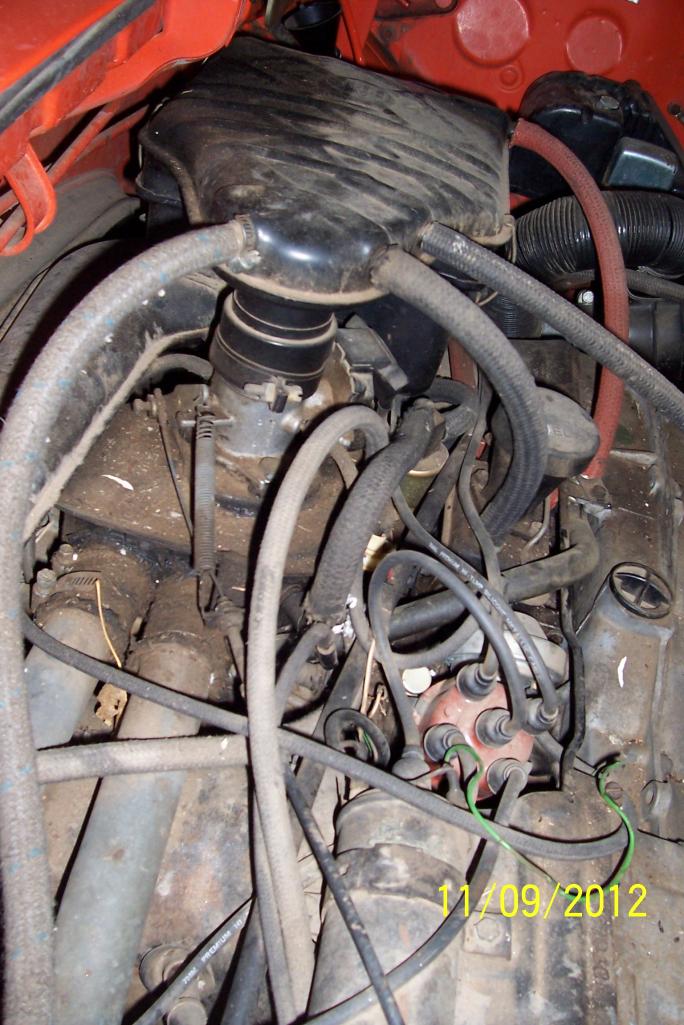
I'm going to be dropping the engine in the next month or so, but I guess I can snap a couple through the engine lid just to get something of the engine.
Haven't examined the hell hole yet...I'm afraid...Everything else has turned out better than I had hoped and I know that is my last hurdle...other than getting the engine purring again.

Posted by: nathansnathan Nov 9 2012, 02:10 PM
Looks like mice; they love the type 4 engine. They like to build a nest on top of the oil cooler, so you'll want to check that out when you drop the motor.
They still sell the 2 liter intake runner braided couplers. It's like a time capsule in there with those spark plug wires.
Some say the soundmat in the engine compartment will trap moisture and rust behind. I haven't messed with later cars at all though. Yours looks pretty solid.
The whole car looks well taken care of. 
Posted by: 914Eric Nov 9 2012, 02:43 PM
They still sell the 2 liter intake runner braided couplers. It's like a time capsule in there with those spark plug wires.
Dad was a stickler for keeping everything original. He went through several mechanics, because as soon as they started with the "You really should get rid of the FI and put carbs on"...They weren't his mechanic any longer. I appreciate it now.
I swear he never fully forgave me for replacing the original crappy 8 track radio with something that would play decent tunes.
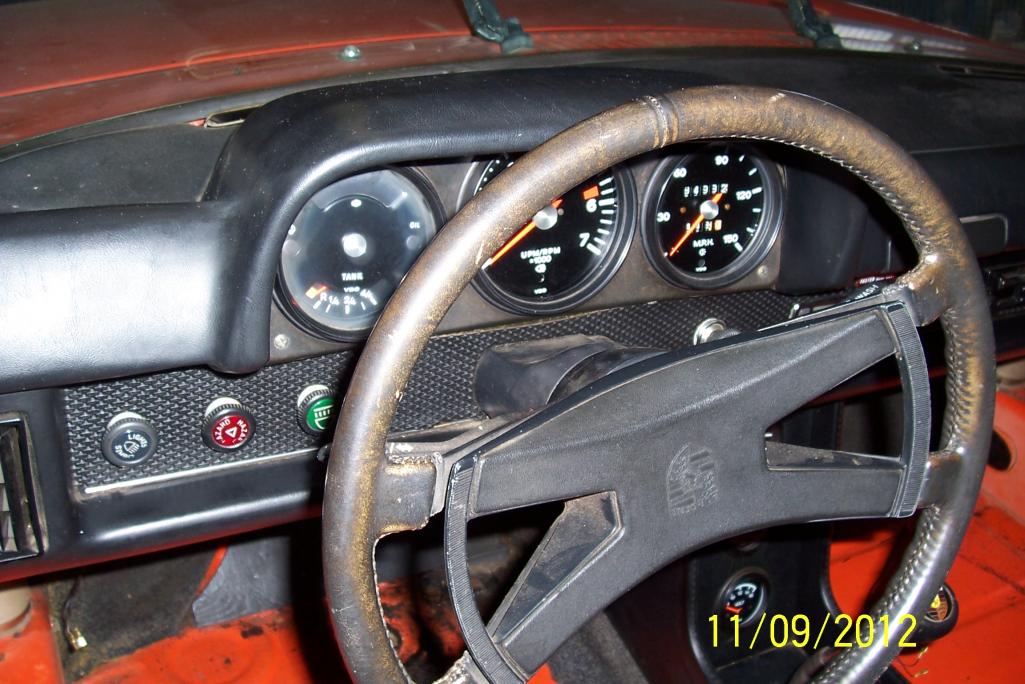
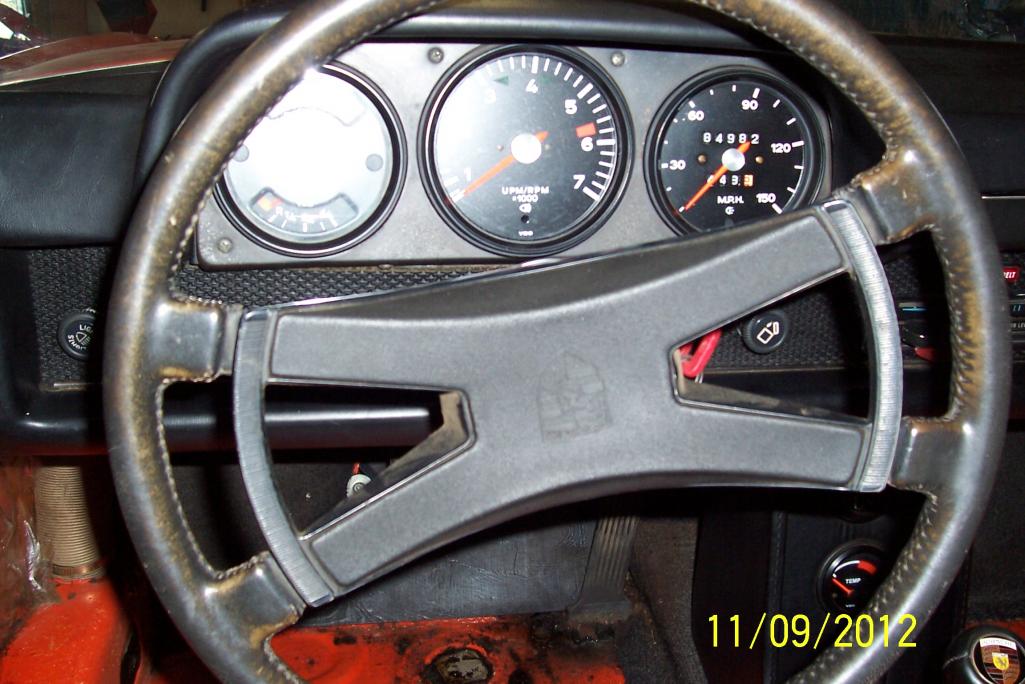
Got most of the interior out and gave it a quick wipe down. Looks like the steering wheel and shifter boot are going to need a little dye and Neat’s-foot oil.
Posted by: 914Eric Nov 9 2012, 04:05 PM
Posted by: 914Eric Nov 9 2012, 05:43 PM
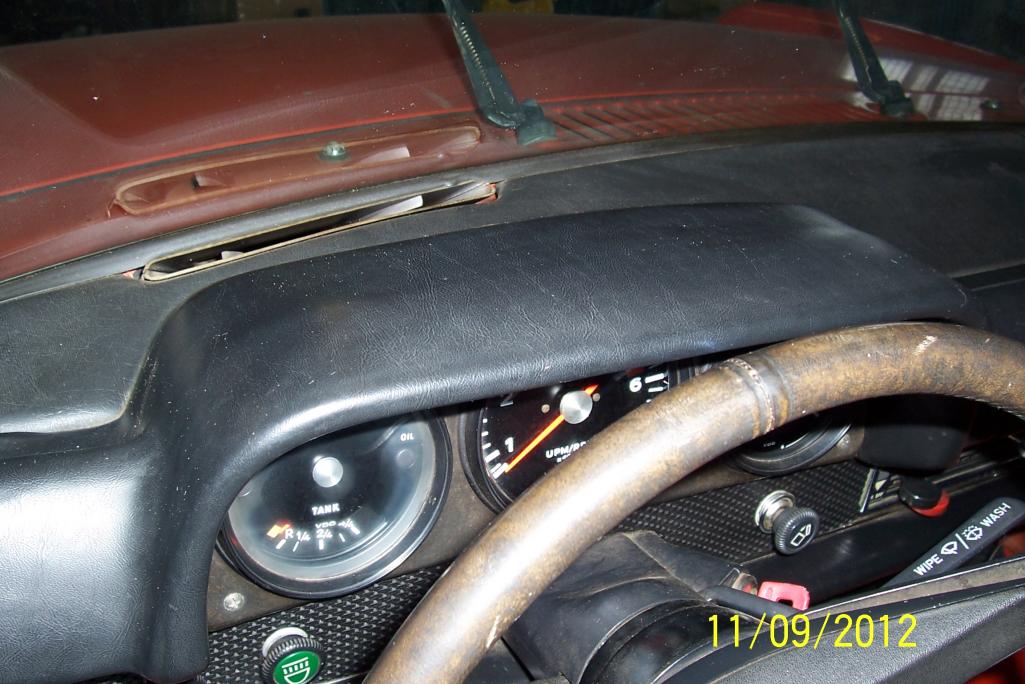
Last couple of pics for the day.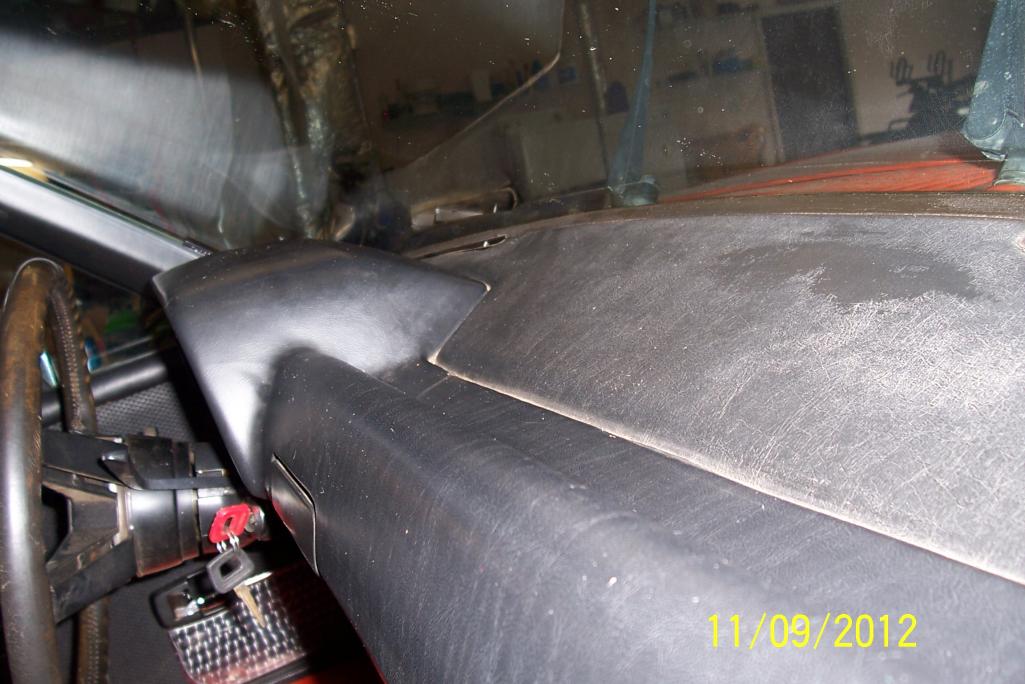
Posted by: 914Eric Nov 9 2012, 06:25 PM
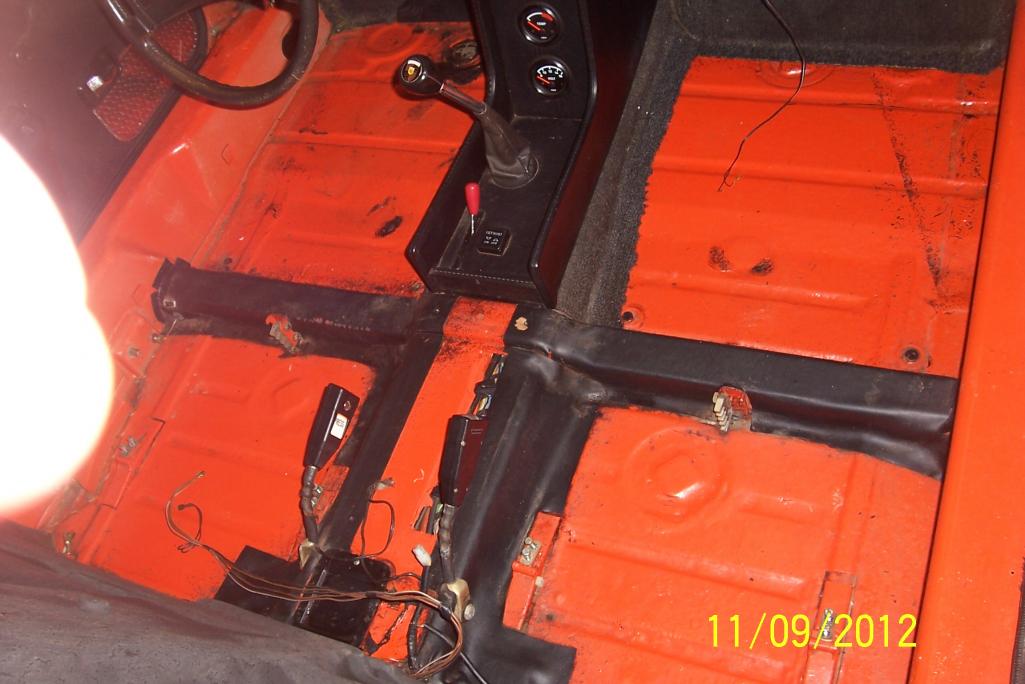
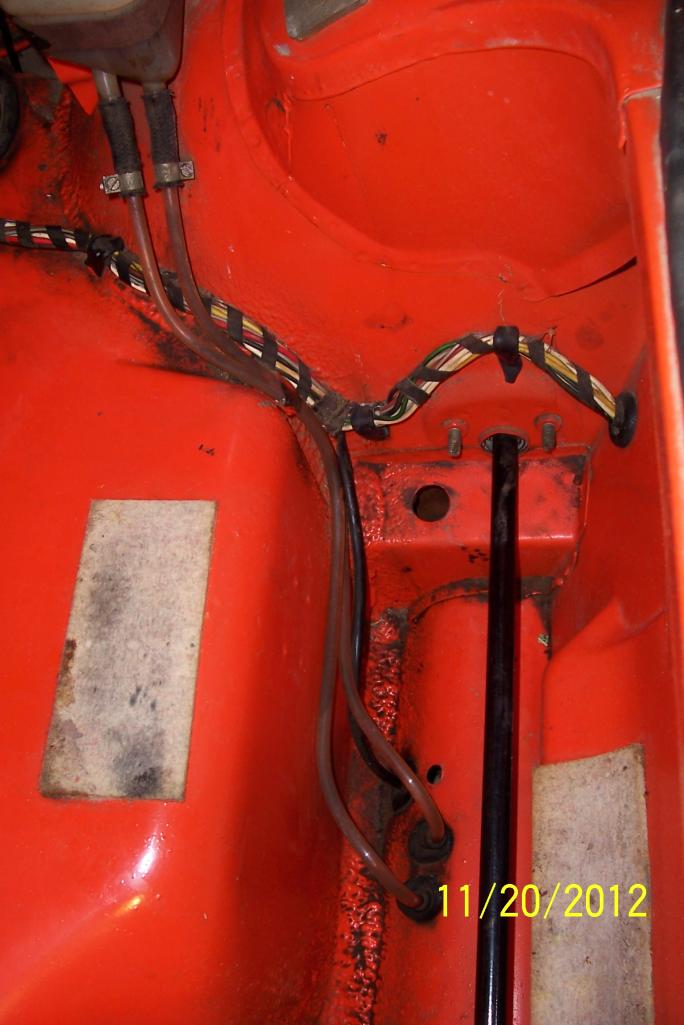
OK...I need some help on what I'm looking at in this picture please.
This is a little 4X4 hole with a little sheet metal access cover with one screw holding the cover. It is under the center console near the rear engine wall, between the seat belt connectors.
There are 5 things in this access tunnel:
A set of wires that can't be seen in the photo
A big black tube which I determined was the shift linkage at the very bottom of the access hole and half of it can be seen in the photo
some type of hydraulic fitting or connection that is ????
And the 2 red super heavy red duty wires that are ??? They are so heavy duty that they almost feel like steel bars painted the body color?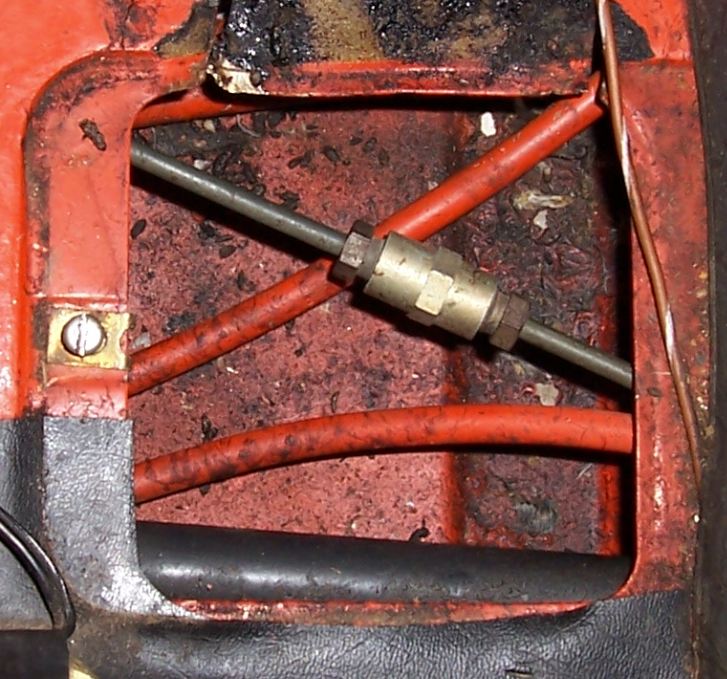
Posted by: Kirmizi Nov 9 2012, 06:36 PM
Shift rod, speedometer cable and tubes for the clutch, accelerator and heater cables.
The "hydraulic" fitting as you called it is the brake line going to the rear firewall.
Mike
Posted by: bigkensteele Nov 9 2012, 06:45 PM
The two red tubes visible in the photo house the heater cable that open the valves on your heat exchangers. They are controlled by the lever in your console.
If you feel around down under the black shift rod, you will find tubes for your clutch and accelerator cables.
If you feel around inside the area that is in the top of the picture, you will find that there are two more plastic tubes. These are your fuel lines, and they MUST be replaced if you want to safely drive the car. After 40 years, they become very brittle. Mine cracked in two when I removed them. If you look in the member vendor forum, you will find them available from Racer Chris and Rotary14. Both are great products at a reasonable price, and actually pretty easy to install. Rotary's thread has a youtube video of the installation.
Posted by: 914Eric Nov 9 2012, 06:59 PM
Thanks guys,
Well if the fuel lines are running down this channel, what are the two lines running down behind the driver's side rocker panel? I thought those were the fuel lines?
Posted by: bigkensteele Nov 9 2012, 07:11 PM
I cant say for sure, since I have only owned later cars, but I think that those might be for the charcoal canister. Our fuel systems have a recirculation circuit that runs from the expansion tank on top of the gas tank back to a charcoal canister in the engine bay that filters the vapor, which is pumped back into the fuel system via pressure from the fan housing. Not sure if those lines are for this or not. I have never seen them before.
Post #30 on page 2 for those that might want to chime in. I completely missed those when I looked at that picture.
Posted by: RobW Nov 9 2012, 07:14 PM
Thanks guys,
Well if the fuel lines are running down this channel, what are the two lines running down behind the driver's side rocker panel? I thought those were the fuel lines?
Those are vacuum lines. The fuel lines run in the center channel. You need to change all the fuel lines and the fuel if the car has been sitting. Your FI seal are likely bad too.
Posted by: RobW Nov 9 2012, 07:17 PM
In fact, your fuel lines are almost in your picture of the square center tunnel opening. If you feel underneath, two lines are fixed up in there.
Posted by: 914Eric Nov 9 2012, 07:21 PM
Damn...they run the fuel lines through the cab??? 
I'm most definately going to change those to the strongest aircraft quality that exists.
No wonder so many 914's burn up.
Rob...Vacuem lines to what? Sorry just wondering. I'm sure I'll figure it out once I get the fuel tank and engine out. And yes...all the vacuum hoses are just falling off in my hands. I'm sure the FI seals are all toast as well.
Posted by: jls914 Nov 9 2012, 09:51 PM
I wouldn't exactly call them vacuum lines. They are as mentioned above, the fuel vapor lines. Look in front hood at the fuel tank and cannister near it. Then look into engine bay and you'll see them come through the divers side and run along the firewall to where they connect to fan hosing and engine. These are normally rigid plastic and should not need replacing. But, please do change out the fuel lines through the center tunnel.
Nice car, enjoy.
Jim
Posted by: dlkawashima Nov 9 2012, 11:01 PM
I know all the front and rear badges are original and verify exactly with Dr. Johnson's authenticity guide.
I don't mean to bust your balls, but that "PORSCHE" badge on the back of the car really doesn't look right. I looked through the Doc Johnson book and can't find anything regarding that badge. I only mention this because it seems from your posts that you are trying to keep the car as original as possible.
Posted by: 914Eric Nov 9 2012, 11:44 PM
I know all the front and rear badges are original and verify exactly with Dr. Johnson's authenticity guide.
I don't mean to bust your balls, but that "PORSCHE" badge on the back of the car really doesn't look right. I looked through the Doc Johnson book and can't find anything regarding that badge. I only mention this because it seems from your posts that you are trying to keep the car as original as possible.
Dave...very interesting. I went back through the Doc Johnson book and it seems you are correct. I checked the engine cover lettering and the 914 2.0 lettering in the book, but seems I didn't check the PORSCHE lettering.
Since the dealer added the aluminum kick plates and Porsche stripes on the rocker panels...Seems they also added the black anodized Porsche badge as well. Guess I'll chock it up to another "Dealer upgrade". That is the nice thing about being the original owner...I know for a fact that it was there when we brought it home.
This is exactly why I wanted to do this restore on 914 World, because I knew there were a lot of people who know more than I. Thanks for your help.
Posted by: 914Eric Nov 10 2012, 01:03 PM
A couple of thoughts after my first week of disassembly.
I’m going to need to start putting together a long list of parts I need, and wasn’t sure the best way to do it in the thread. Since I will need input on what to include on my list I wanted to keep it in one place so it would be easy to see and track. I guess there are 2 ways to do it. I could keep editing my original post and adding parts there which would show up at the top of every page. Or I could start a different thread just for the list of parts. It just seems like it would be a little hard to track the list of parts through page after page of pictures and comments. Anyone have thoughts and suggestions? What have others done?
Also, in my Haynes manual it said that when removing the rocker panels I would need to remove the plastic expansion rivets. Well, I don’t know about others, but mine weren’t plastic, they were real metal rivets.
Posted by: 914Eric Nov 10 2012, 05:19 PM
Well...I found my first minor problem. The backpad that is on the engine wall and mounted under the seat wells has 2 of the 4 metal tabs torn away from the cardboard.
Given that it is metal riveted to cardboard...I sure don't see an easy fix. I'm sure there must be a past thread on this topic?
Posted by: bigkensteele Nov 10 2012, 05:46 PM
Well...I found my first minor problem. The backpad that is on the engine wall and mounted under the seat wells has 2 of the 4 metal tabs torn away from the cardboard.
Given that it is metal riveted to cardboard...I sure don't see an easy fix. I'm sure there must be a past thread on this topic?
If you do a search, there is a fantastic thread where a guy restored the cardboard of his backpad using fiberglass. If you read that thread, you will see that it's an easy fix.
http://www.914world.com/bbs2/index.php?s=&showtopic=38186&view=findpost&p=662056
Posted by: 914Eric Nov 11 2012, 10:41 AM
Thanks for the link Ken. That is some quality work. Going to really have to step up my game to be in that league.
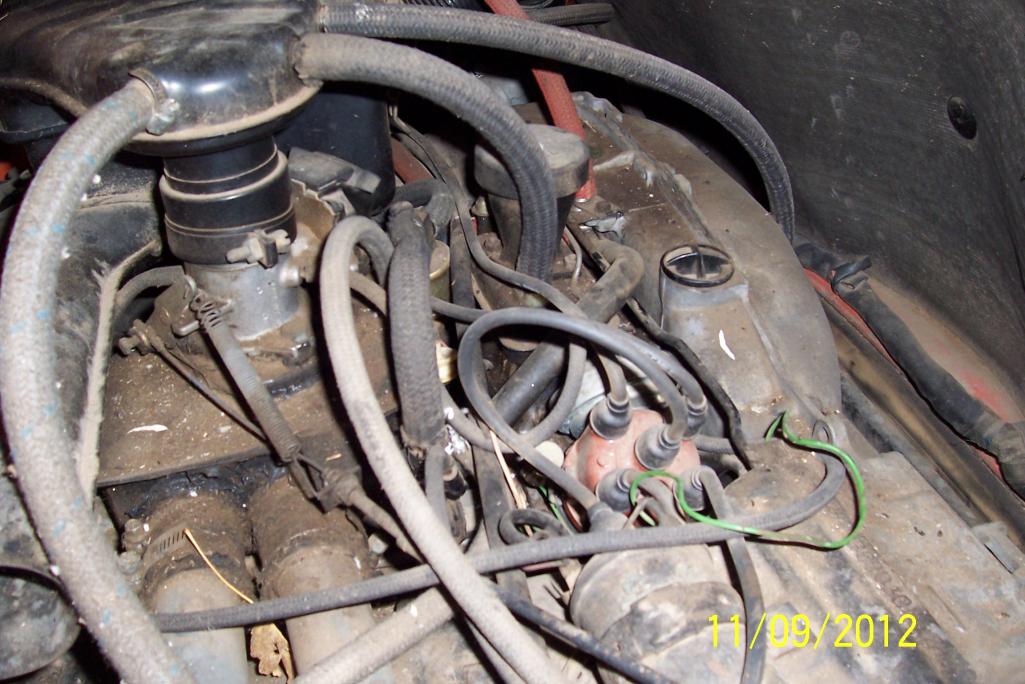
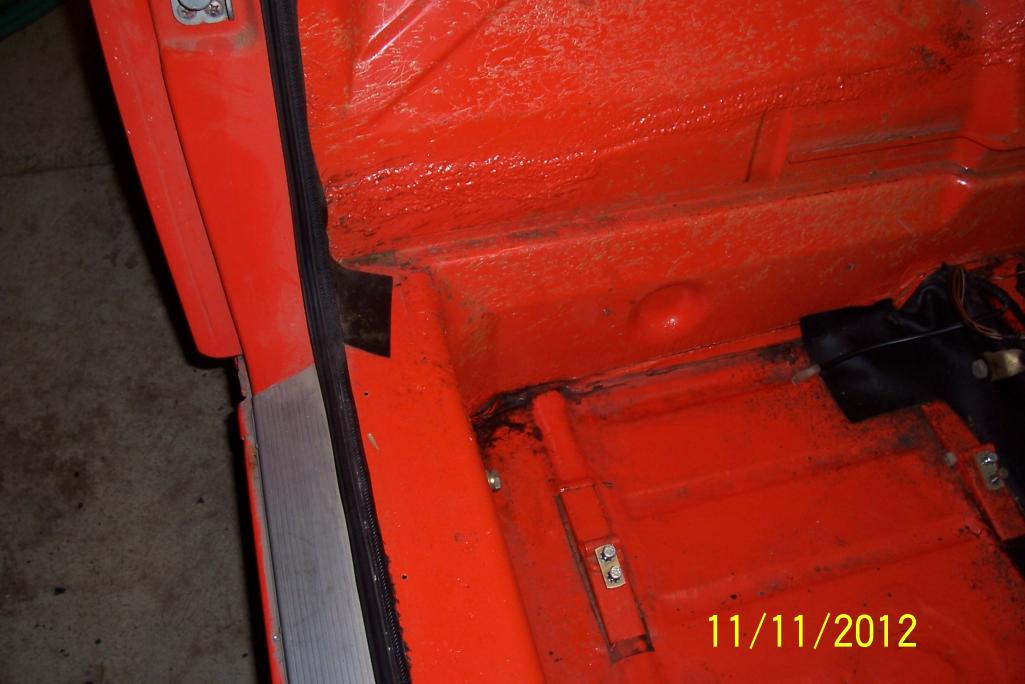
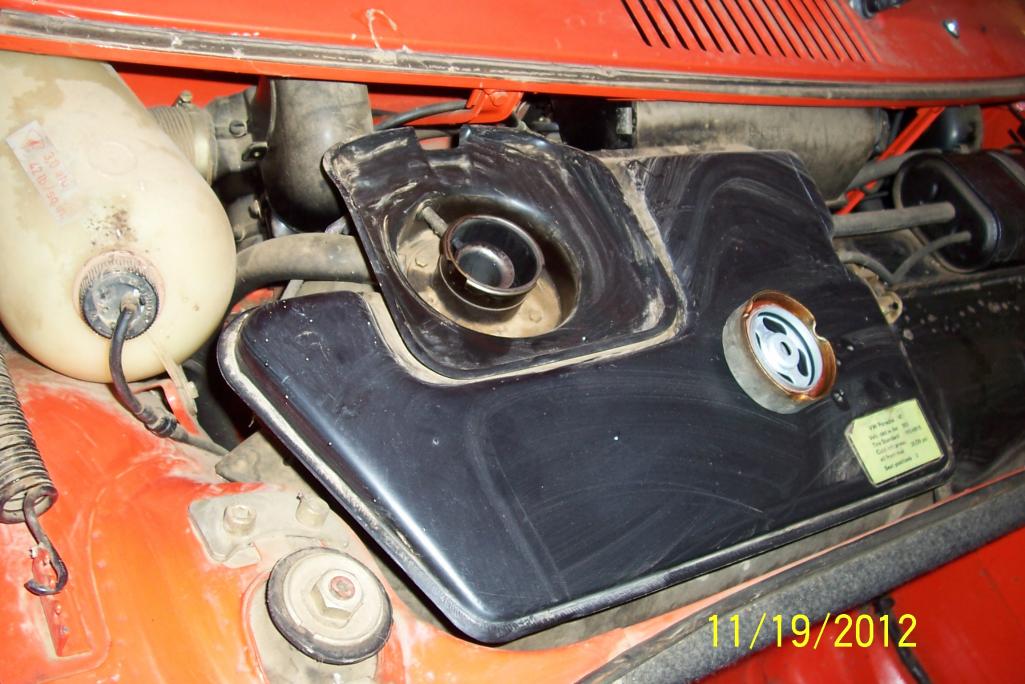
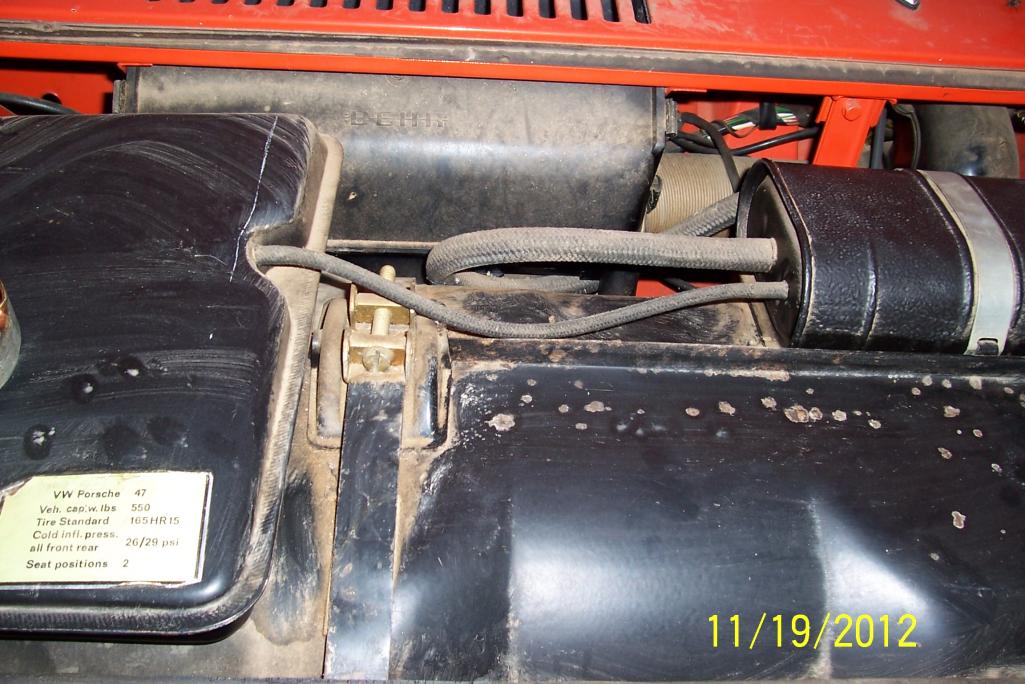
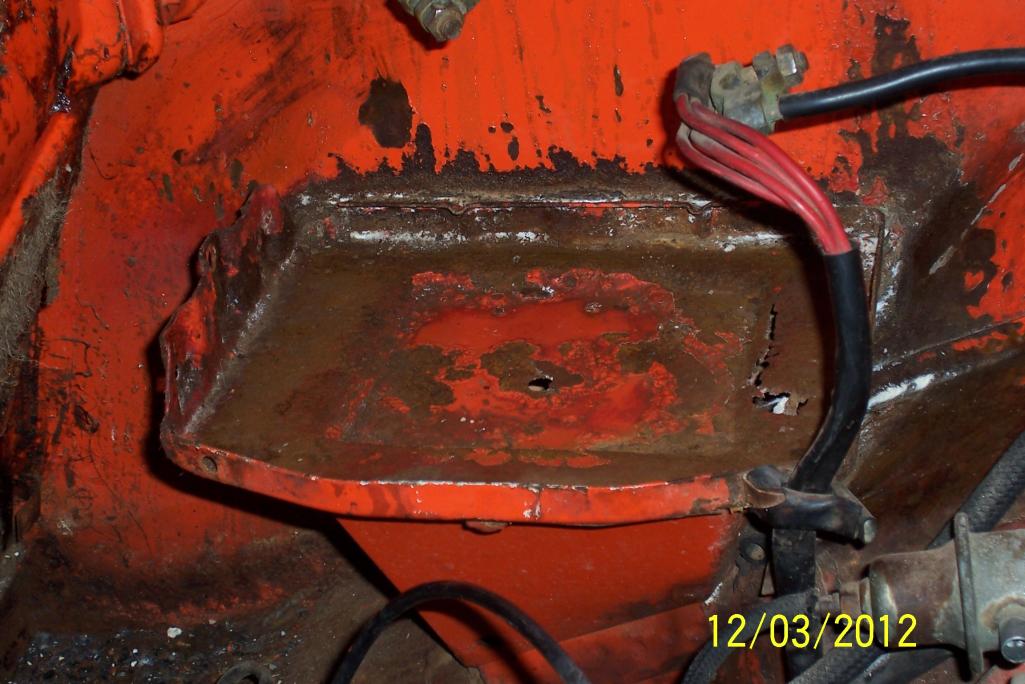
Here is a pic of the engine wall after removing the backpad. The second pic is of the hell hole area from the cab side. Still no rust yet. Hope I'm as lucky when I get to the engine side.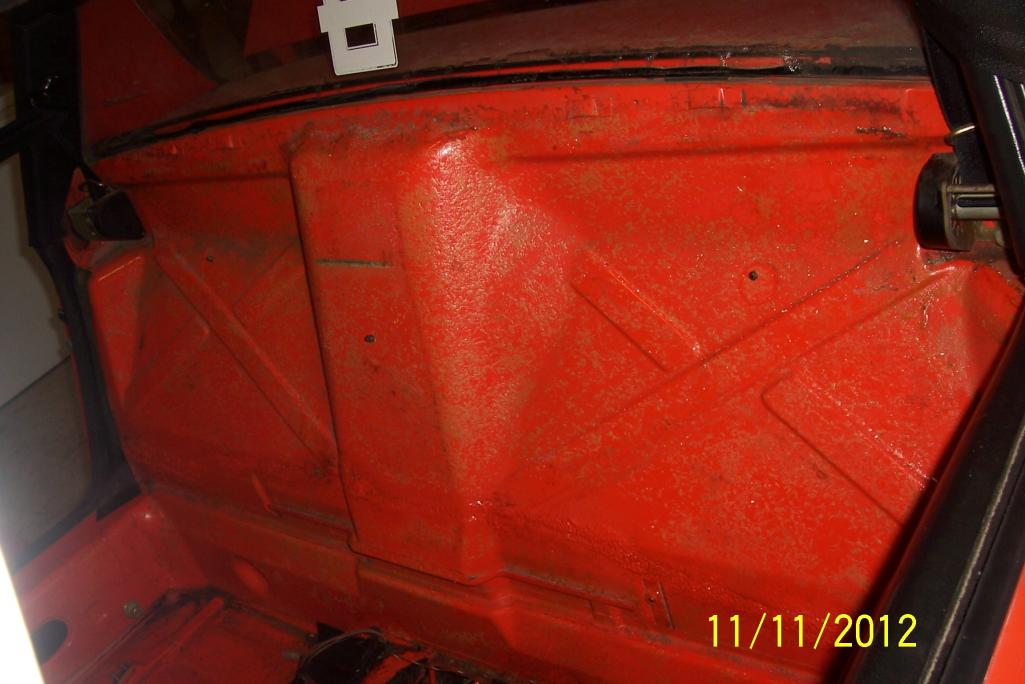
Posted by: Hammy Nov 11 2012, 09:12 PM
Looks like a very solid early 73 2.0!
Posted by: type47 Nov 12 2012, 11:31 AM
[...my VIN is 47329-01147, ...
You should add your VIN to the site db. In the upper right margin you should see "914 Info", click on that and go to "members VIN numbers" and add yours...
Posted by: 396 Nov 12 2012, 11:59 AM
Good luck with your resto....I'm sure it will bring back great memories
Posted by: 914Eric Nov 12 2012, 02:39 PM
Thanks Zack and 396...Been looking forward to doing this for a long time. Will absolutely bring back memories and be a labor of love. Going to take it slow and steady...refurbishing one mechanical system at a time. Brakes/shocks/suspension, fuel tank and fuel lines, all the electrical, and of course the engine and fuel injection.
Jim...My VIN and other info is now in the 914World database.
Eric
Posted by: 914Eric Nov 12 2012, 03:57 PM
I tried a simple trick that I found in Dr. 914s Tricks and Tips 700 book. Wash the seat belts, spray with scotchguard, and then full extend them and lube.
Didn’t really work. Might have helped a little, but no more than 25%. I guess those 40 year old springs have just lost their spring. 
Posted by: biosurfer1 Nov 12 2012, 05:10 PM
Get a hold of Paul (PRS914-6 on the site)...he rewinds springs for the seat belts.
Posted by: 914Eric Nov 13 2012, 09:22 PM
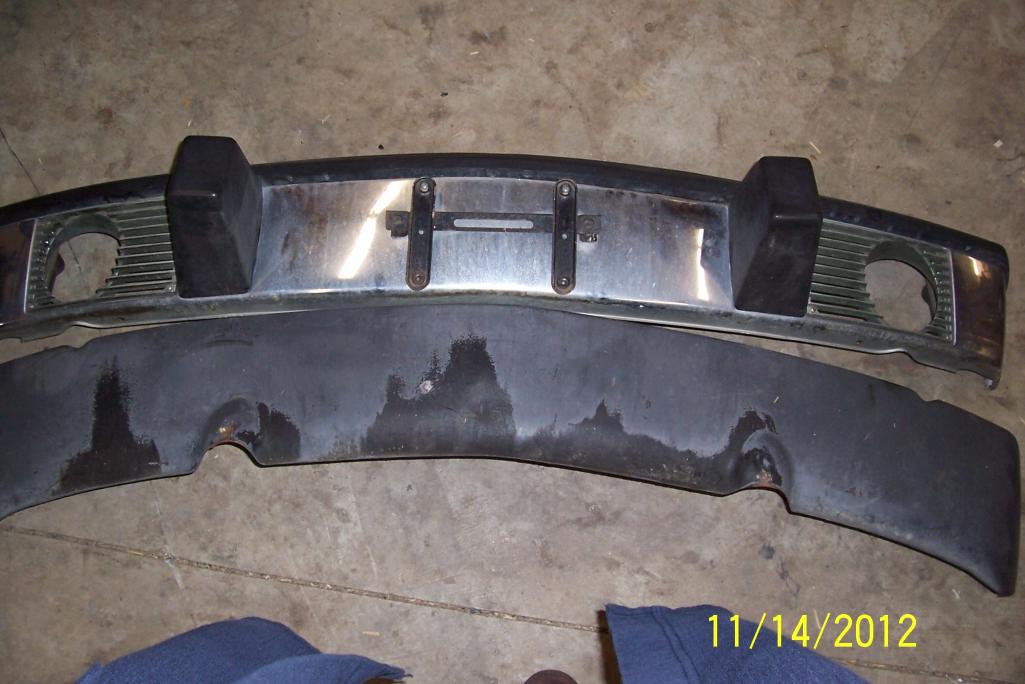
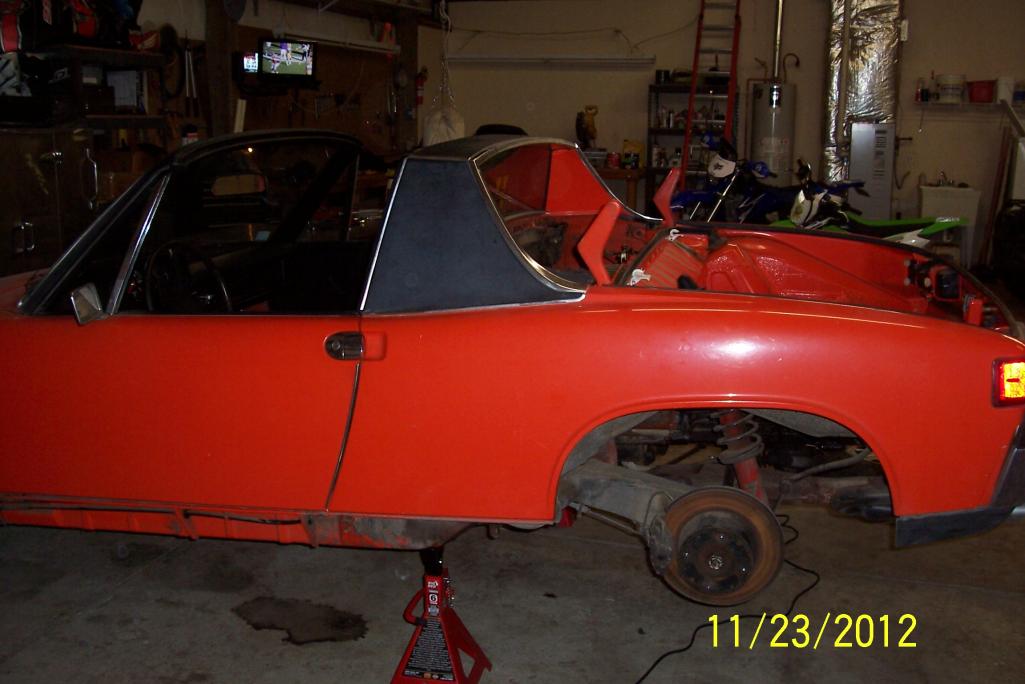
Front bumper and panel removed. 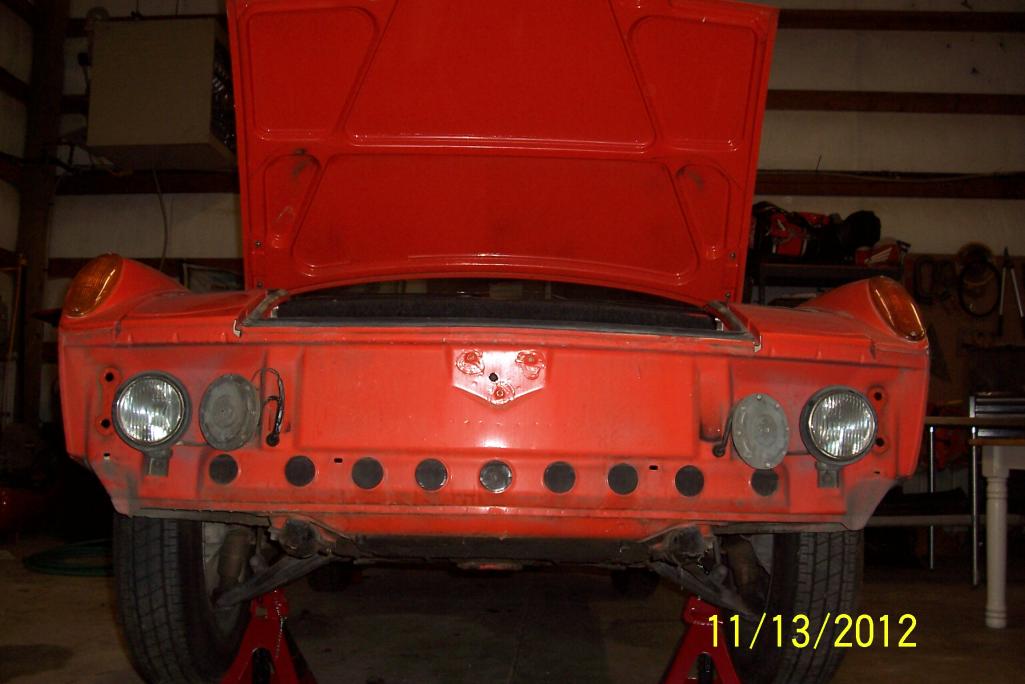
Posted by: 76-914 Nov 14 2012, 09:41 AM
Wow, nice car. And thx for those previous posts, Andy. I discovered that one of mine is this early '73. 
Posted by: 914Eric Nov 14 2012, 12:00 PM
I discovered that one of mine is this early '73.
Nice!
The front bumber is in great shape. A little polishing and it should be good as new.
The front panel has a few bumps and bruises, but should be able to be straightened up without too much trouble.
Posted by: 914Eric Nov 15 2012, 01:01 PM
Pulled off the gravel shield so I can drain and pull out the fuel tank.
Posted by: McMark Nov 15 2012, 01:14 PM
Awesome!
Posted by: turk22 Nov 15 2012, 01:46 PM
There really is no rust on that sucker! pretty amazing
Posted by: 914Eric Nov 15 2012, 03:50 PM
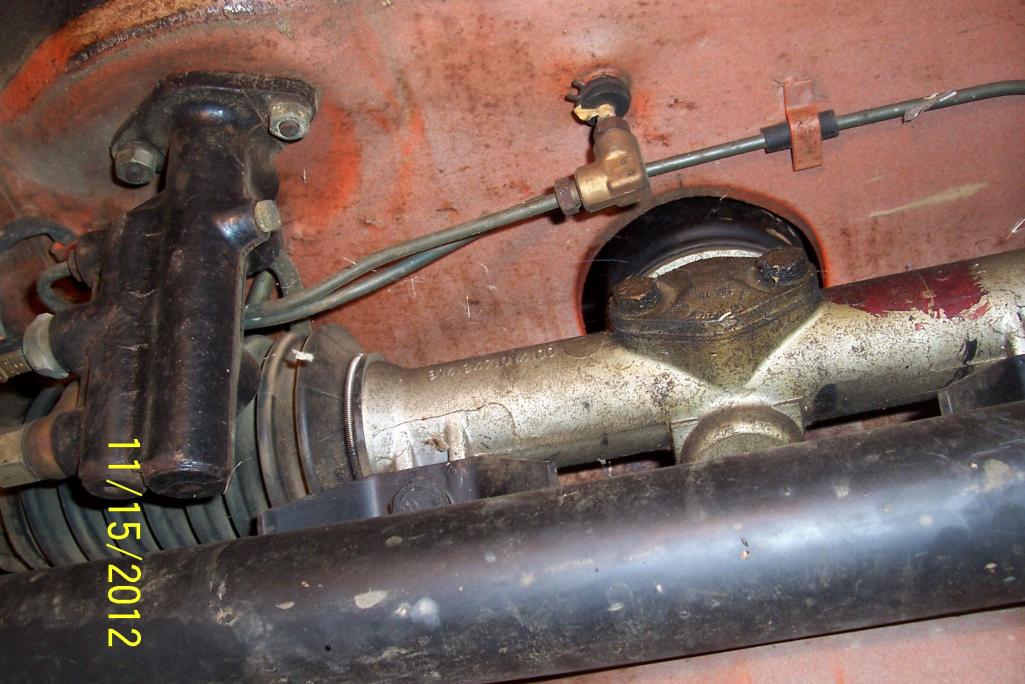
Since I was under there, I snapped a few more.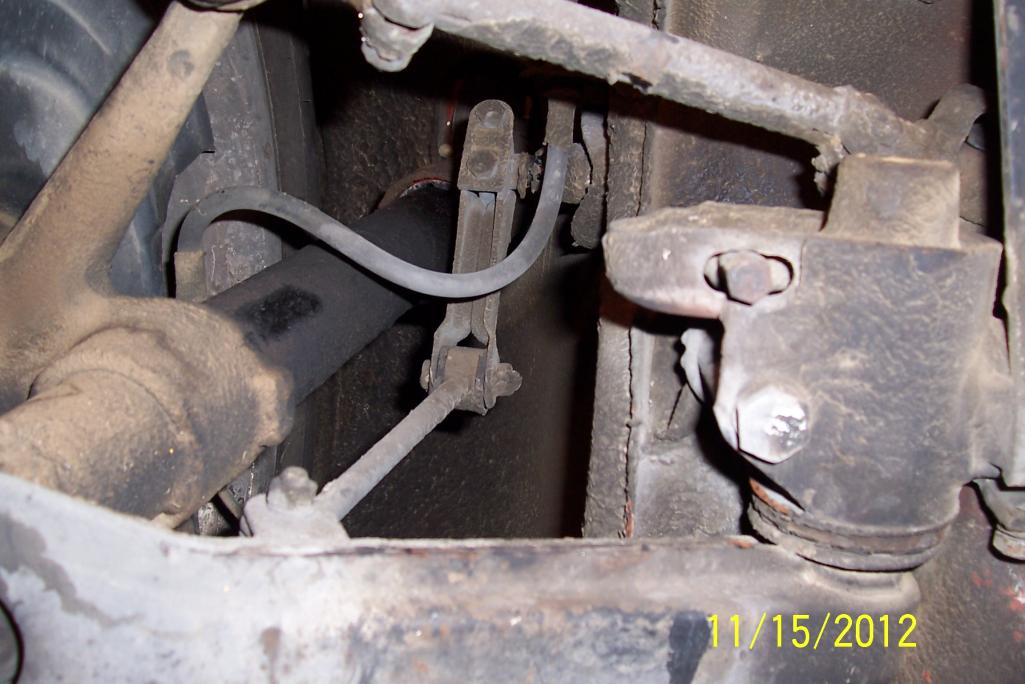
Posted by: 914Eric Nov 15 2012, 03:54 PM
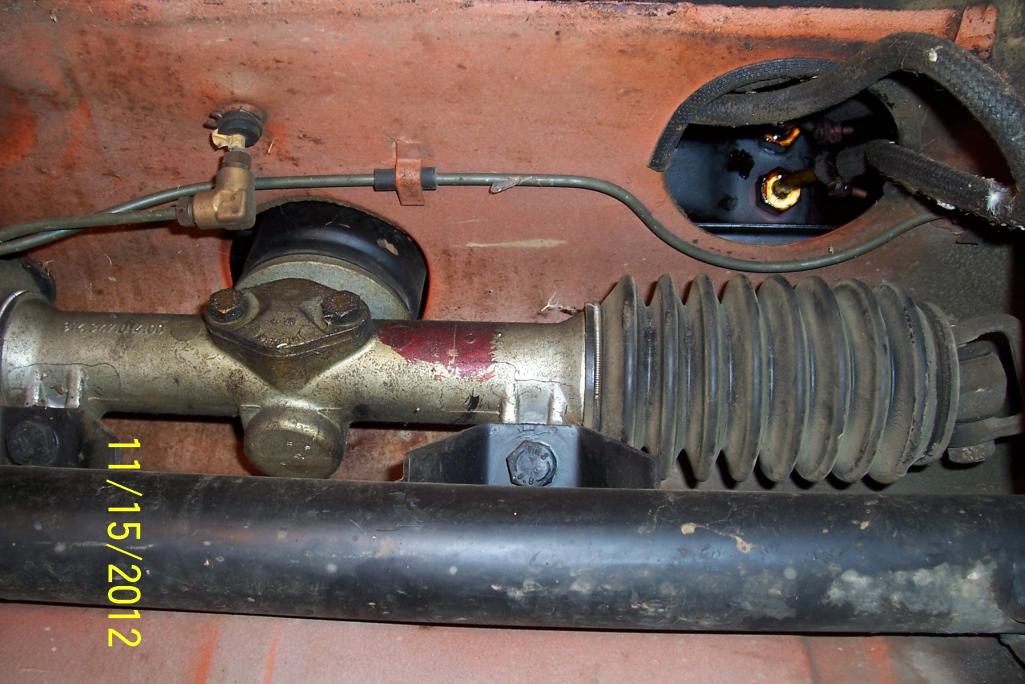
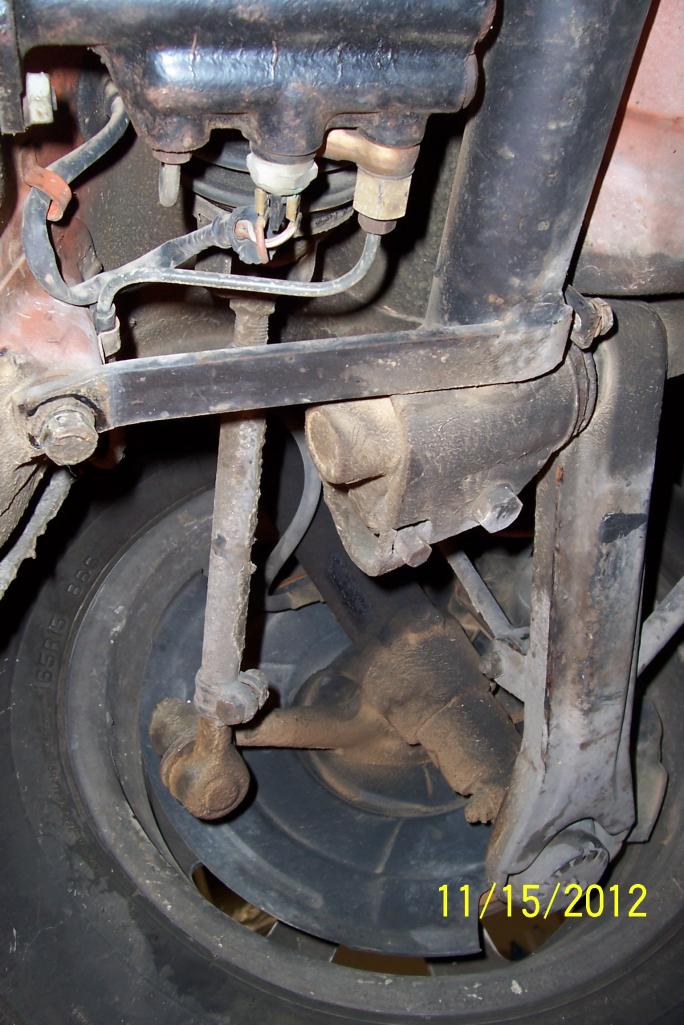
Curious what this little (Steering?) access panel is?
Hard to see in the pic, but there is a nut there...so it must come off. 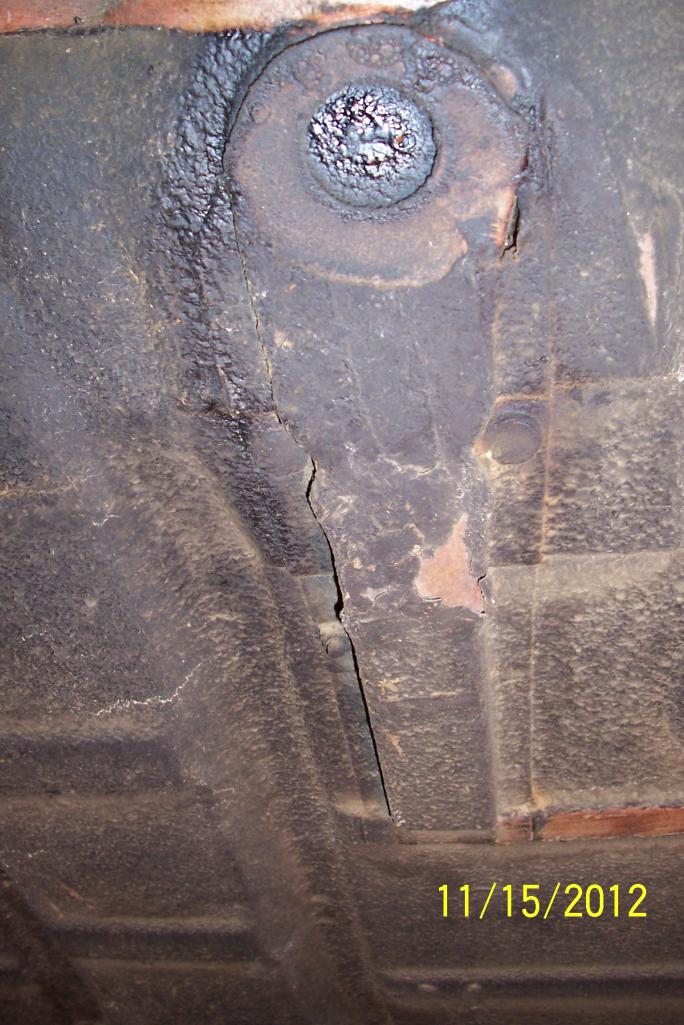
Posted by: rnellums Nov 15 2012, 06:51 PM
That little nut on the lower left is welded to the floor so you can bolt something in from the other side (gas pedal?) Don't try to remove it.
Posted by: 914Eric Nov 16 2012, 12:13 PM
Seems straight and original coating appears in good order. A few spots where there is a little cracking in the coating from age. 
Posted by: Garold Shaffer Nov 16 2012, 08:44 PM
That little nut on the lower left is welded to the floor so you can bolt something in from the other side (gas pedal?) Don't try to remove it.
Yep, gas pedal mount.
Posted by: 914Eric Nov 16 2012, 10:24 PM
Yep, gas pedal mount.
Thanks Garold...and nellums.
Still haven't got the tank out yet. Dad must of just fueled up last time he drove. Sounds like there is 10-15 gallons of fuel in the tank, and I haven't figured out an easy way to drain it yet. I could do a couple of gallons at a time...But that really sounds messy.

Posted by: bigkensteele Nov 16 2012, 10:53 PM
Yep, gas pedal mount.
Thanks Garold...and nellums.
Still haven't got the tank out yet. Dad must of just fueled up last time he drove. Sounds like there is 10-15 gallons of fuel in the tank, and I haven't figured out an easy way to drain it yet. I could do a couple of gallons at a time...But that really sounds messy.
Go to Home Depot and get 3 of the orange buckets and lids. They are cheap. If you are lucky enough to find an employee who knows the store, ask if they sell a siphon pump and where you might be able to find it. If you don't have any luck, go to Harbor Freight and buy one. It is also cheap. Then you can drain your tank from the top-side in a controlled manner. You will still have 10 - 15 gallons of old gas to get rid of, but at least now it will be in buckets, rather than your tank.
After you have done the above, there is still a little gas left in your tank, so you will want to clamp off the lines as close as possible to the nipples on the bottom of the tank. Once they are clamped, just cut them since they will be replaced. Do not have your face directly under the hoses when you cut them unless you like either the taste of old gas or smelling like it for two days.
Following the above procedures, you will have a tank ready to be freed, and 2 or 3 buckets of old gas that you will need to get rid of. I used most of mine in my lawn mowers until the carb on my push mower became gummed up. After that, I cut it with new gas for the mowers until it was finally gone. Since you are in California, I would assume that you probably risk arrest for even owning old gas, but there is most likely an EPA office at the end of every street block that can tell you what to do with it.
Posted by: 914Eric Nov 16 2012, 11:12 PM
Do not have your face directly under the hoses when you cut them unless you like either the taste of old gas or smelling like it for two days.
Since you are in California, I would assume that you probably risk arrest for even owning old gas, but there is most likely an EPA office at the end of every street block that can tell you what to do with it.
Ken,
In general, your suggestions are pretty good. I didn't like the idea of trying to drain 2 or 3 gallons of fuel at a time out of the bottom.
Regarding my face...LMAO...Pretty sure I wouldn't have put my face under it. Do I sound that lame in my posts?

Also...I don't live in California any more. Moved to Northern Idaho in 2004. Your stereotypes about Cali have a lot more truth than you would think. That's why I moved to Idaho.
Thanks...
Posted by: bigkensteele Nov 16 2012, 11:27 PM
Do not have your face directly under the hoses when you cut them unless you like either the taste of old gas or smelling like it for two days.
Since you are in California, I would assume that you probably risk arrest for even owning old gas, but there is most likely an EPA office at the end of every street block that can tell you what to do with it.
Ken,
In general, your suggestions are pretty good. I didn't like the idea of trying to drain 2 or 3 gallons of fuel at a time out of the bottom.
Regarding my face...LMAO...Pretty sure I wouldn't have put my face under it. Do I sound that lame in my posts?
Also...I don't live in California any more. Moved to Northern Idaho in 2004. Your stereotypes about Cali have a lot more truth than you would think. That's why I moved to Idaho.
Thanks...
My attempt at humor. A large percentage of the guys here are on the left coast - I was really just throwing them a little softball.
With regard to draining the tank, I was stuck in the same place as you about a year ago. It needed to come out, and I had a few gas cans to drain into. I filled them all, and there was still fuel in the tank, so I put a tiny bit in each of our cars. Probably not a good idea, which is why I recommend buying the HD buckets. There are actually many places to dispose of old gas. The siphon pump from HD worked fantastically - much better than trying to drain from below.
Posted by: Dave_Darling Nov 17 2012, 11:57 AM
Looks like the clutch tube came loose at one point, and it was fixed by a U-bolt. That's not the typical spot for it (usually the bolt would be further forward), so it could be some other add-on.
--DD
Posted by: 914Eric Nov 17 2012, 12:40 PM
Looks like the clutch tube came loose at one point, and it was fixed by a U-bolt. That's not the typical spot for it (usually the bolt would be further forward), so it could be some other add-on.
--DD
This is probably a dumb question, but do you say that becasue there should be no u-bolt threads and nuts hanging down underneath, or because they are in the wrong place?
Posted by: Dave_Darling Nov 17 2012, 10:25 PM
There wasn't a U-bolt in there originally. The most common reason for a U-bolt in the floor of the center tunnel is a broken clutch tube, which is not uncommon in the 914. But it's not in the typical place for that repair, so it could be something else.
The car looks really nice, BTW!
--DD
Posted by: 914Eric Nov 18 2012, 10:17 AM
The car looks really nice, BTW!
--DD
Thanks Dave, and also for the clarification.
Yea...I thought the U-bolt didn't belong. Will add to my list of things to fix...properly.
Posted by: 914Eric Nov 19 2012, 12:48 PM
Fuel tank drained...Ready to remove.
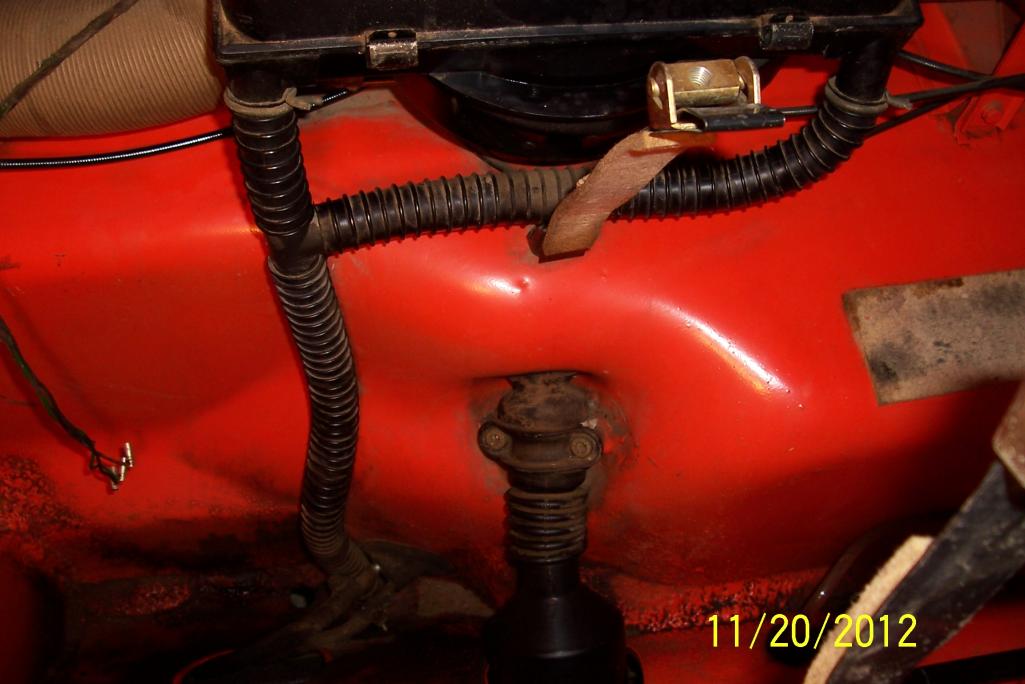
Posted by: 914Eric Nov 20 2012, 04:09 PM
This is the first time the fuel tank has ever been out, so what you are seeing is exactly how it left the factory in August of 1972.
Posted by: sixnotfour Nov 20 2012, 04:29 PM
Wow that things a mess, better go to the east coast and get a real project, for cyrin out loud...
Posted by: 914Eric Nov 20 2012, 05:28 PM
A couple of more pics...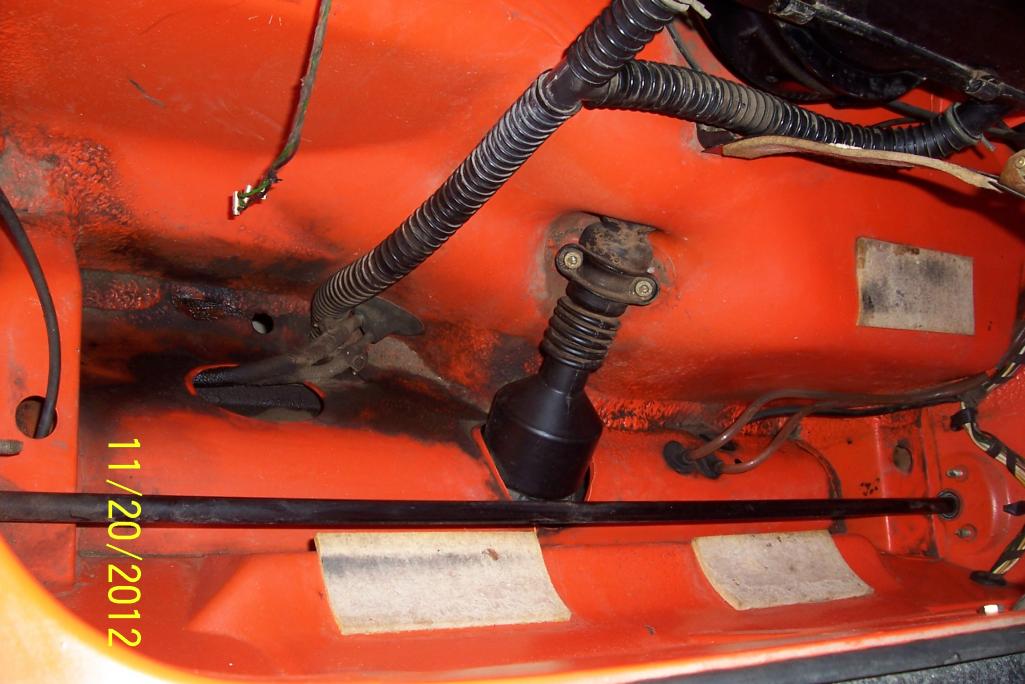
Posted by: Madswede Nov 20 2012, 06:03 PM
Hey Eric, this has been really cool to follow! Great looking car! I see you're in Northern Idaho. My family lives in Boise, and I'm headed up that way for Christmas, driving me and my dog in my truck. Depending on how far north you are and what Highway 55 is looking like, I'm usually in Boise for most of the week between Xmas and New Year's.
As a fellow Phoenix Red 73 2.0 owner (well, OK, it was a 2.0 ... see my sig) I have a small bunch o' FI parts and some other odds n ends that you probably don't need seeing as yours is as good as mine was when I got it in '07. But if there's something you're needing, let me know and I can try to see ask my mechanic if I have it.
Posted by: 914Eric Nov 20 2012, 08:15 PM
As a fellow Phoenix Red 73 2.0 owner (well, OK, it was a 2.0 ... see my sig) I have a small bunch o' FI parts and some other odds n ends that you probably don't need seeing as yours is as good as mine was when I got it in '07. But if there's something you're needing, let me know and I can
Thanks Jon,
If you have all of the original FI components, I might be interested in the whole set if you would be willing. Having a few spares would be nice. Work me up a price and let me know.
Posted by: 914Eric Nov 21 2012, 01:15 PM
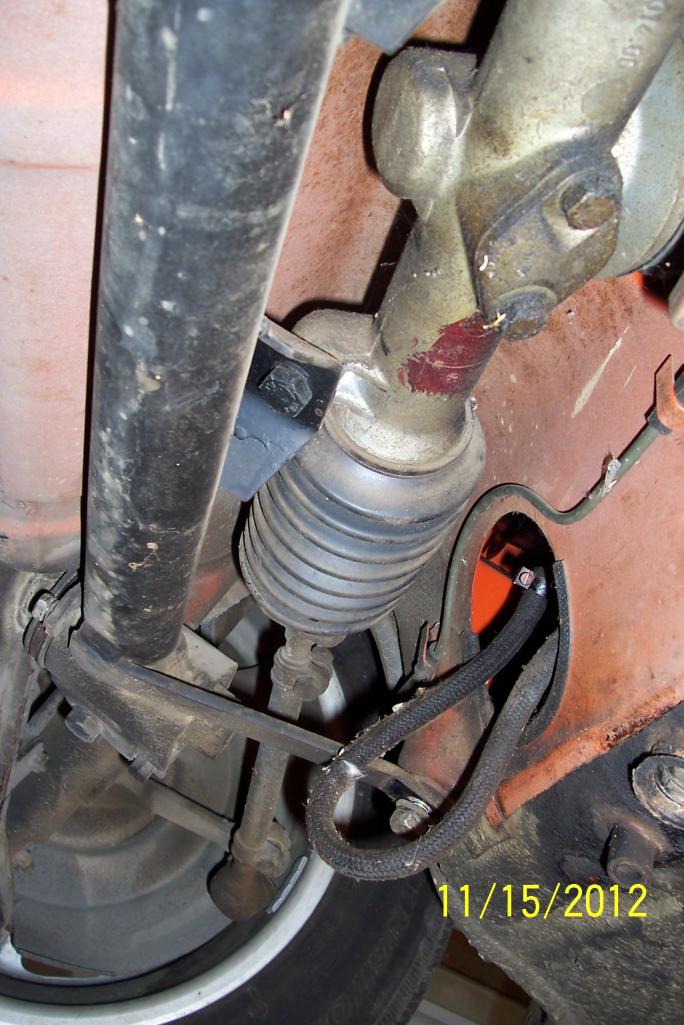
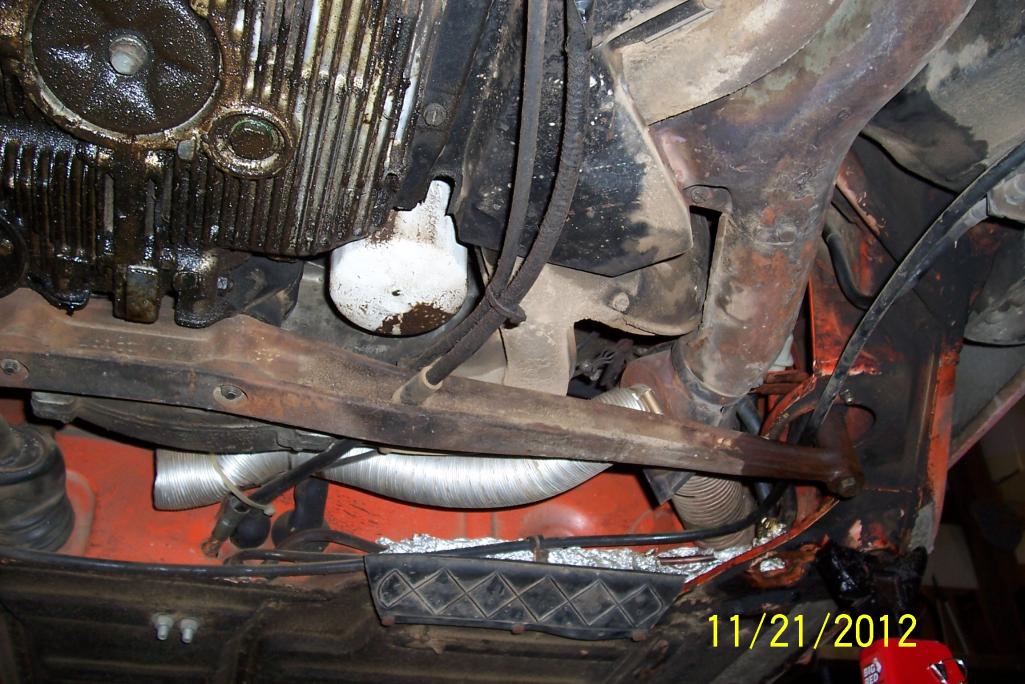
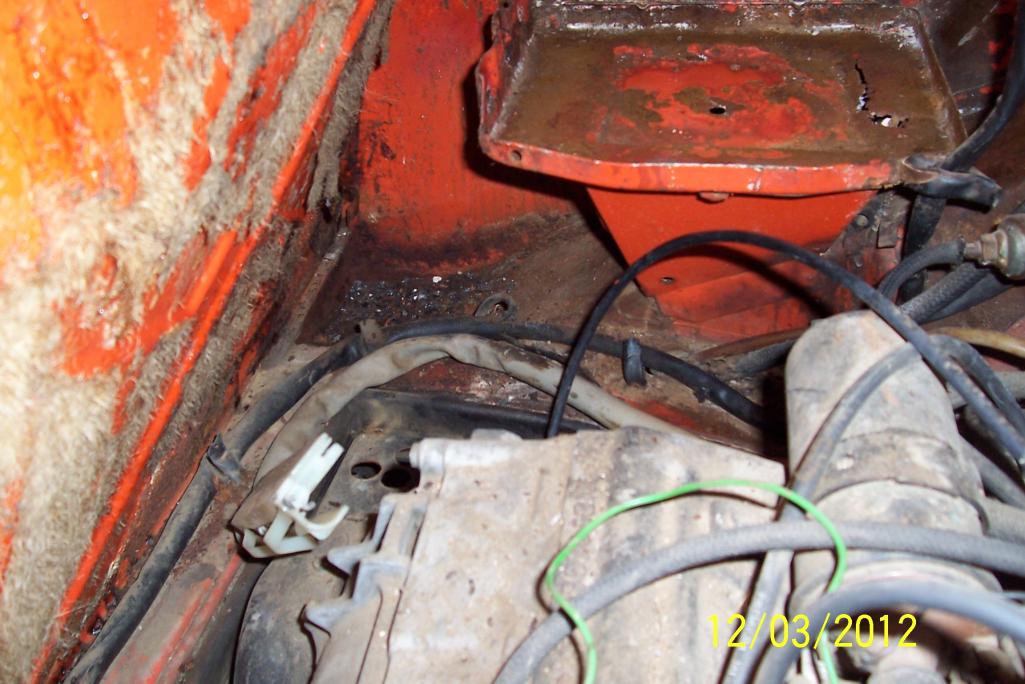
Bottom of the tranny has a nice oil "crust" all along the bottom. The other thing that jumps out at me in the second picture is the duct from the heat exchanger just hanging in the breeze connected with a zip tie.
If you look close, you can also see the aluminum foil wrapped around the fuel lines as a kludge fix to the "won't start when hot" problem. Really Dad??
The u-bolt fix of the clutch is also clear. The good news, is that I'm still not seeing any rust. 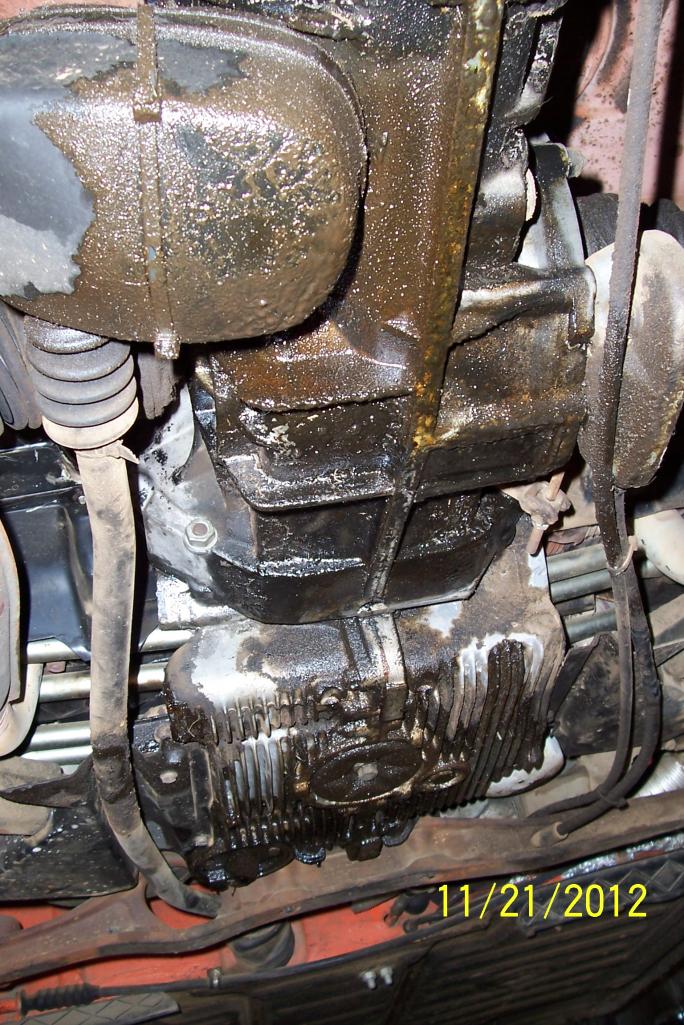
Posted by: SirAndy Nov 21 2012, 01:22 PM
Actually, someone added that hose to route hot air away from the fuel pump. The heater valve just dumps the hot air under the car when the valve is closed. Someone added a hose to the valve outlet to redirect the hot air away from the pump.
Not really a bad idea ...
Posted by: SirAndy Nov 21 2012, 01:24 PM
Oh, and the rubber cooling flap on that side is mounted upside-down. The edge needs to point downward for it to work properly.
Posted by: 914Eric Nov 21 2012, 06:46 PM
Oh, and the rubber cooling flap on that side is mounted upside-down. The edge needs to point downward for it to work properly.
You have a VERY good eye Andy.
I was wondering about the flaps. One is mounted flush with the underbody and curved down...Which pushes air away from the engine.
The other has two inch bolts exposed and hanging down from the underbody with the flap mounted between the bolt head and another nut. This flap is curved up so that the air comes in the two inch gap and is then directed up into the engine. This actually looks like it would work better, but I was pretty sure that it was the one that wasn't the original design.
How does the one that pushes air away from the engine actually cool it? Some kind of low pressure drawing it away?
Posted by: Pat Garvey Nov 21 2012, 07:09 PM
Alright! Nice cars all. Get plenty of baggies and containers for parts. Projects get started and then unexpectedly drag out over time and things get lost.
Don't forget a Sharpie to tag the bags!
Posted by: bigkensteele Nov 21 2012, 07:40 PM
I was wondering about the flaps. One is mounted flush with the underbody and curved down...Which pushes air away from the engine.
The other has two inch bolts exposed and hanging down from the underbody with the flap mounted between the bolt head and another nut. This flap is curved up so that the air comes in the two inch gap and is then directed up into the engine. This actually looks like it would work better, but I was pretty sure that it was the one that wasn't the original design.
How does the one that pushes air away from the engine actually cool it? Some kind of low pressure drawing it away?
Eric, you are correct - the flaps are designed to create a low-pressure area in the underside of the engine bay. The engine is cooled by pulling air in from the top, pushing it through the tin and out the bottom. I don't think the flaps were on the early cars, but I can't tell you exactly when they were introduced.
Looks like someone did a fairly clever modification to yours in the hopes of keeping the fuel pump and lines cool to prevent vapor locks. The fuel pump was moved up front under the gas tank on '75/'76 cars for the same reason. Moving the pump up front is a common and relatively easy modification to earlier cars.
It is pretty clear from the extensive tweaks back there that your dad had a problem with vapor locks. I would think about moving the pump up front.
Posted by: cwpeden Nov 21 2012, 08:49 PM
ok, why cant i see Eric's pics. The curiousity is killin me.
Posted by: 914Eric Nov 21 2012, 09:02 PM
It is pretty clear from the extensive tweaks back there that your dad had a problem with vapor locks. I would think about moving the pump up front.
Ken...true story.
Dad used to like to drive the 914 to Vegas on the weekends, and also to Parker and Lake Havasu City for the boat races if he wasn't bringing his boat. So I'm guessing the 110+ degree temperatures had a lot to do with it.
Since I'm in Idaho, and my favorite run will be down highway 12 (Lewis and Clark Trail) to Missoula Montana in temps of 50-90...I think I'll put it all back original and see how it goes.
Hwy. 12 from Lewiston to Missoula is absolutely the worst road on earth to pull a trailer. But it will be absolutely the BEST road to wind out a 914. Up/Down/Left/right hairpins...A 200 mile long Molholland Drive. A beautiful drive through almost total wilderness. Once I get the car sorted out...I'm going to be looking for 914World folks up here to do it with.
Posted by: 914Eric Nov 22 2012, 12:13 PM
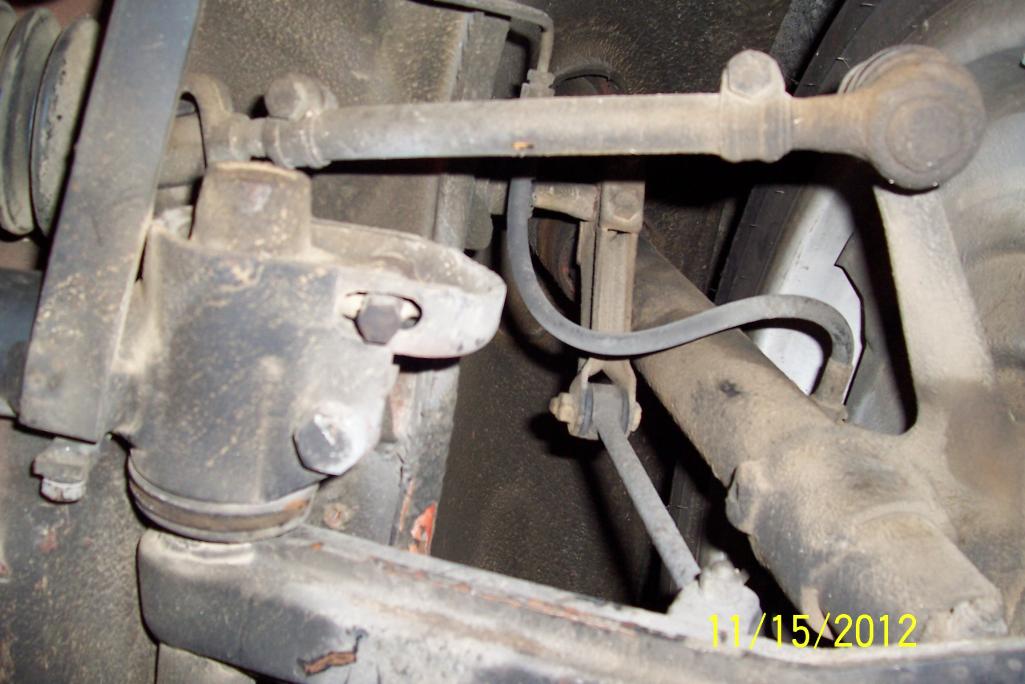
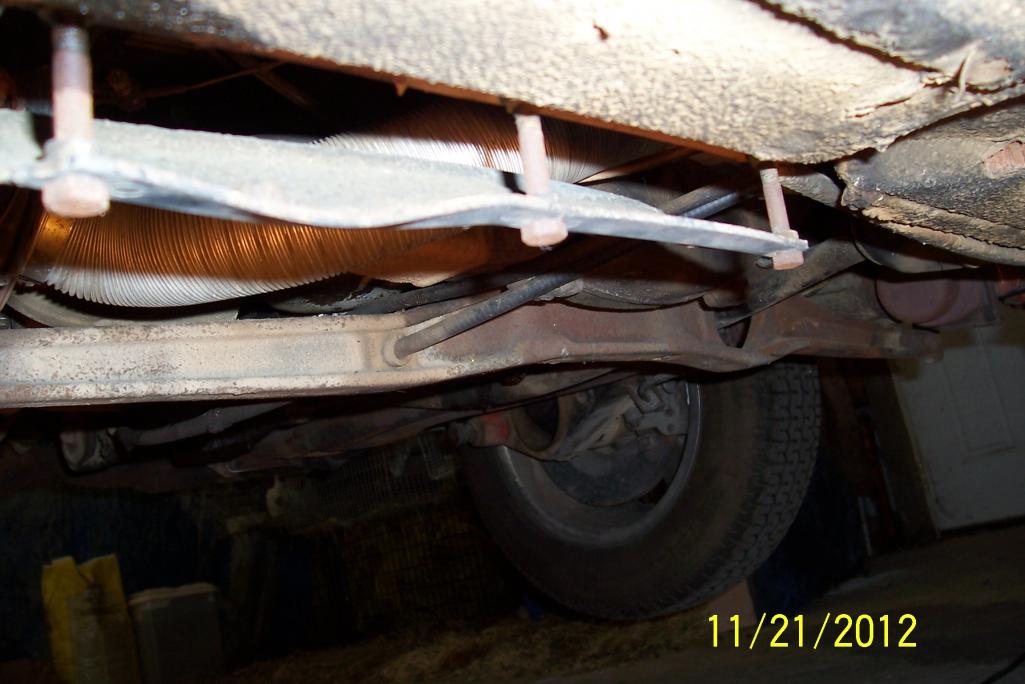
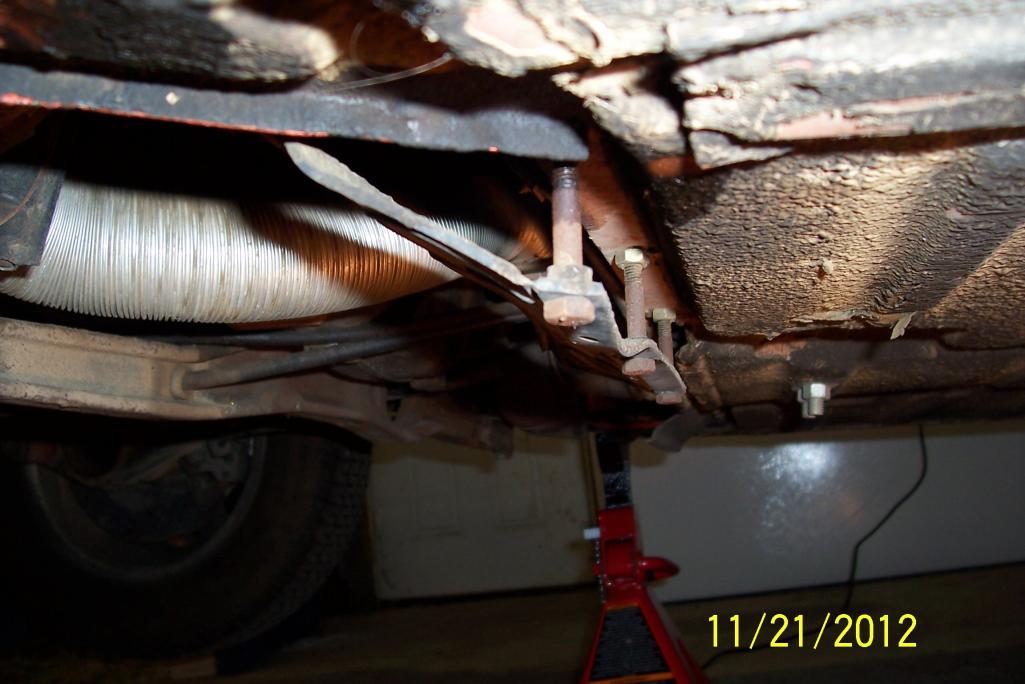
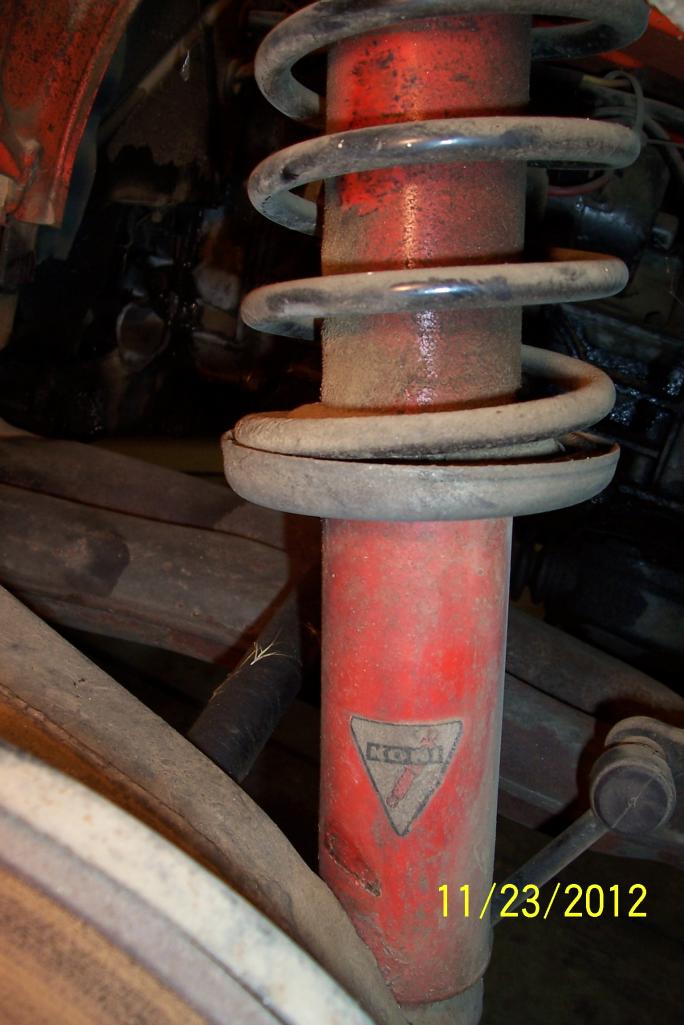
Picture of the rear sway bar/shock.
So...is something bent; just worn out; or does it always mount crooked like that?
Also any idea if these are the original (orange) shocks? I have a folder of reciepts, and could look it up, but thought one of you guys might know off the top of your heads. 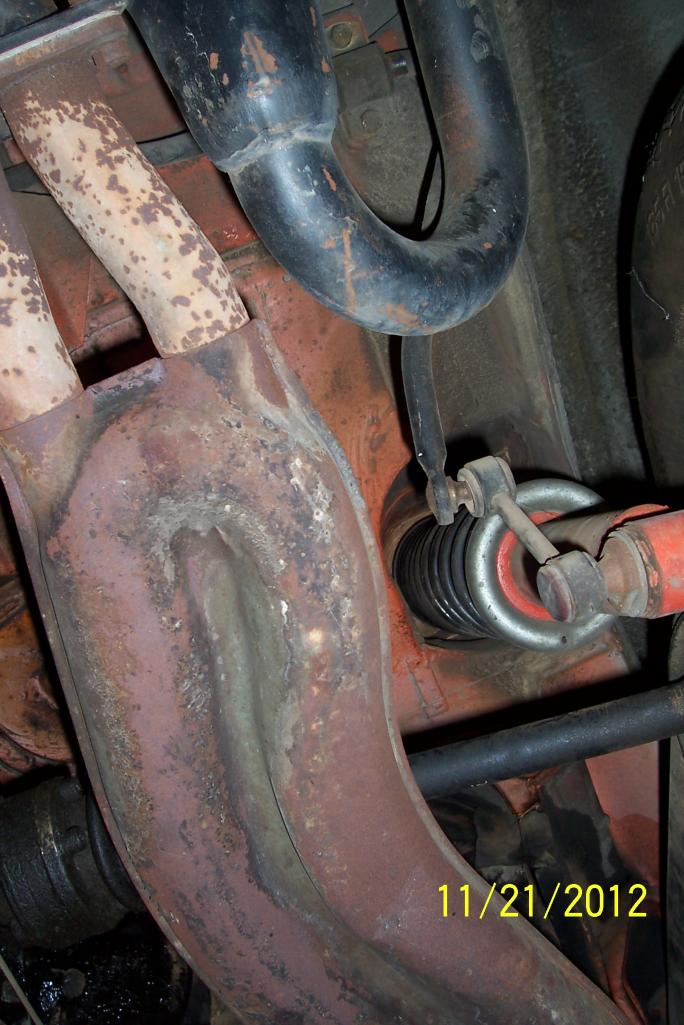
Posted by: Gint Nov 22 2012, 01:54 PM
Doesn't look to out of place to me. I'm too lazy to go out to the garage and lift mine up to compare from the same perspective.
Posted by: SirAndy Nov 22 2012, 02:19 PM
So...is something bent; just worn out; or does it always mount crooked like that?
Judging from the fresh marks (lack of dust) where the bar goes through the top bushing it looks like the bar was kicked/moved to the right recently.
That would also explain the slight angle where the "knob" slides into the droplink bushing.
Posted by: bigkensteele Nov 22 2012, 04:35 PM
Koni shocks are red. If you take a damp paper towel and wipe off the bottom part of the shock, there should have a brand stamping somewhere. Konis would be a nice upgrade if they are still working well.
I think that I have Boge on my car, and I believe that they are bright orange. Not sure if they are original or not.
Posted by: Gint Nov 22 2012, 04:48 PM
I recall a shock available in the period called Mulholland (I think). If memory serves me they were orange.
Posted by: 914Eric Nov 23 2012, 01:59 PM
Koni shocks are red. Konis would be a nice upgrade if they are still working well.
Koni shocks they are...although they aren't working well. When we put it on the trailer, the back was leaning where one shock was stuck. Somewhere on the journey home the bouncing got them both unstuck...but I'm pretty sure they need rebuilding or replacing. Are Konis rebuildable?
Also the springs have 3 green paint marks on them. I'm sure that tells me something, although I don't know what yet?
Lastly, the wheels barely spin. The bearings are frozen and make a "Chalkboard" sound when you force the wheels to move. The rotors look bad, but are actually very smooth and the rust is just surface. The rotors should clean up nicely with a .003-.005 shave.
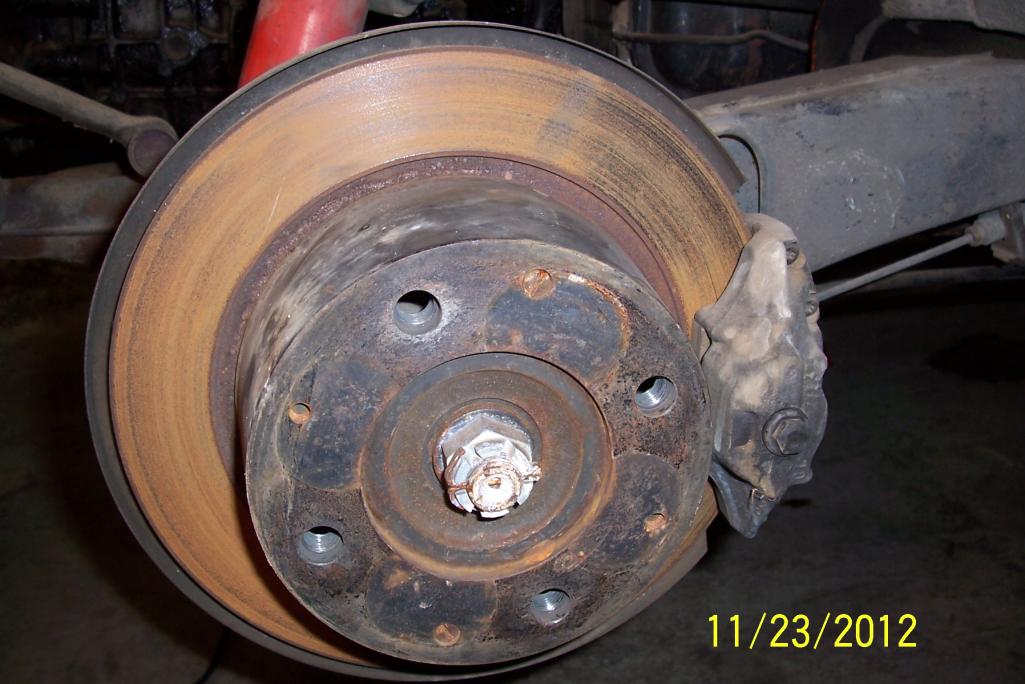
Posted by: billh1963 Nov 23 2012, 02:22 PM
More than likely the brakes are dragging.
Posted by: Gint Nov 23 2012, 02:33 PM
Loosen up the two calipers bolts on each and then try to turn the wheel.
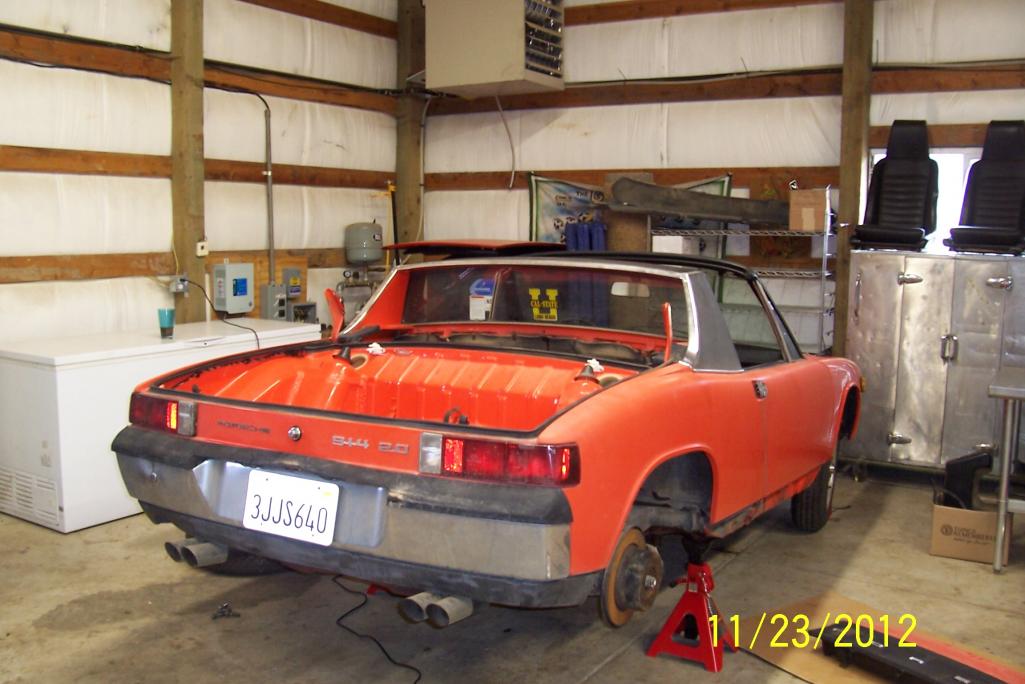
Posted by: 914Eric Nov 23 2012, 06:30 PM
Slowly getting her apart. Doesn't get any better than this. Cheers Pops!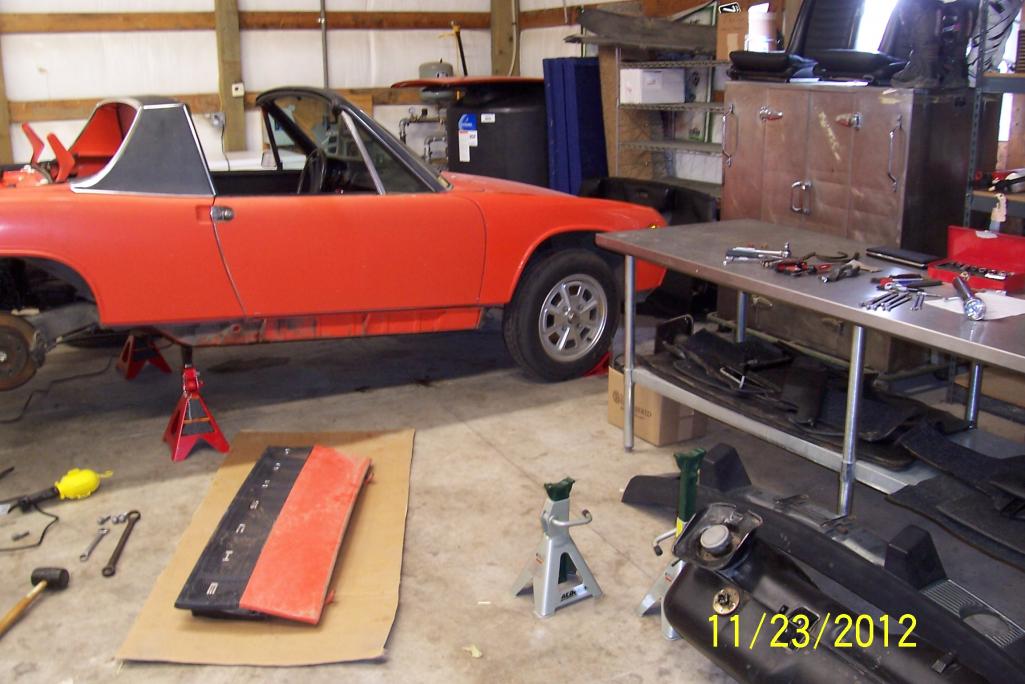
Posted by: Dave_Darling Nov 23 2012, 08:02 PM
Do you have a good way to secure those ratchet-style jack stands? The ones held by a pin through them are preferred, because the ratchet can let go if you bump it just wrong. One of our members here wound up needing facial reconstruction surgery when one of the ratchet-type stands let go while he was under the car.
--DD
Posted by: tod914 Nov 23 2012, 08:36 PM
The Konis can be rebuilt. But, it's more expensive than buying new ones. Better off with new and painting them red/orange. Some where in the Originality forum I posted the paint that they use at Koni. I might even have an unused can of it if your going that route. Very nice find btw. Should be a fun project.
Posted by: 914Eric Nov 24 2012, 10:29 AM
The Konis can be rebuilt. But, it's more expensive than buying new ones. Better off with new and painting them red/orange. Some where in the Originality forum I posted the paint that they use at Koni. I might even have an unused can of it if your going that route. Very nice find btw. Should be a fun project.
Well...Seems I've made my first big decision...I think.
I"m leaning towards Bilsteins shocks all around. They seem to be everyone's first choice, and they were also an original option on the car.
I'm going to start a parts list in the original post that shows up on every page.
Posted by: rnellums Nov 24 2012, 03:07 PM
I was able to get mine rebuilt for about 173.00 by a bilstein shock rebuilder four years ago. but that didn't include painting, which I did myself. Those look to be the period, internally adjustable ones, meaning you have to remove the shock, remove the springs, and fully compress the shock to adjust the stiffness.
Posted by: bigkensteele Nov 24 2012, 05:32 PM
The Konis can be rebuilt. But, it's more expensive than buying new ones. Better off with new and painting them red/orange. Some where in the Originality forum I posted the paint that they use at Koni. I might even have an unused can of it if your going that route. Very nice find btw. Should be a fun project.
Well...Seems I've made my first big decision...I think.
I"m leaning towards Bilsteins shocks all around. They seem to be everyone's first choice, and they were also an original option on the car.
I'm going to start a parts list in the original post that shows up on every page.
I think that there is a guy out in AZ who can rebuild them for a pretty fair price. Perhaps someone can chime in. I have a pair just like those that I would like to have rebuilt.
Posted by: rnellums Nov 24 2012, 07:11 PM
Thats who I had rebuild mine, but I have heard recently that he is no longer doing Koni's ( TSM Enhanced in AZ) there are a fer shops in Cali that can do it too.
Posted by: 914Eric Nov 24 2012, 07:49 PM
Do you have a good way to secure those ratchet-style jack stands? The ones held by a pin through them are preferred, because the ratchet can let go if you bump it just wrong. One of our members here wound up needing facial reconstruction surgery when one of the ratchet-type stands let go while he was under the car.
--DD
Dave...I know what you mean. the one pair I have don't have a safety pin, and I don't get under them. The red Torins you see under the car actually have a safety pin as well as the ratchet.
Posted by: 914Eric Nov 24 2012, 07:57 PM
I was able to get mine rebuilt for about 173.00 by a bilstein shock rebuilder four years ago. but that didn't include painting, which I did myself. Those look to be the period, internally adjustable ones, meaning you have to remove the shock, remove the springs, and fully compress the shock to adjust the stiffness.
I saw some bilsteins on pelican parts. Not sure exactly which ones I would need. Maybe Mr. Dave Darling could clarify.
Posted by: 914Eric Nov 24 2012, 08:03 PM
Auto Atlanta also has a nice selection of OEM Bilsteins. They list a "Heavy Duty" as well as a "Sport" front unit. Anyone know the difference between the two?
Posted by: turk22 Nov 24 2012, 08:45 PM
Eric,
Let me/us know which way you end up going, I'm going to need to follow you on this as I work thru the same area's. It looks like your going to be ready to move forward faster than I will.
BTW, your shop looks like a great setup, is that at your house, or a seperate 'offsite' location. Looks like you have room for a lift!
I'm enjoying watching you progress, and the pictures, since I have a 73 2.0l like you, and every question or solution, I can apply directly to my car as well.
Posted by: 914Eric Nov 24 2012, 10:13 PM
914
Eric,
BTW, your shop looks like a great setup, is that at your house, or a seperate 'offsite' location. Looks like you have room for a lift!
Thanks Steve...This is my 40X40 man cave at the house. Been thinking about a lift. We'll see if my new passion for the cars continues.
Also just had a member point me to Eric Shea and 914 Mikey...thanks Ken. They both have LOTS of stuff I need.
Posted by: silver74insocal Nov 24 2012, 11:38 PM
you should talk to Eric at PMB (look in the member vendor section on here) about your bilsties, i shopped all over for mine and his pricing was as good as the big boys . i also like to support the little guy vendors on here.
during my strut studies i beleive i read that the sports are way to stiff for street use so i went with HD's luv em.
oh and keep up the good work 
Posted by: 914Eric Nov 25 2012, 12:38 PM
you should talk to Eric at PMB (look in the member vendor section on here) about your bilsties, i shopped all over for mine and his pricing was as good as the big boys . i also like to support the little guy vendors on here.
during my strut studies i beleive i read that the sports are way to stiff for street use so i went with HD's
luv em.oh and
keep up the good work Thanks Silver74...That is what I needed to know...HD's it is. Eric...You there Eric?
Silver...FYI I lived in Rancho Cuc from 1992 to 2002. Way up Haven.
Posted by: Dave_Darling Nov 25 2012, 02:37 PM
I saw some bilsteins on pelican parts. Not sure exactly which ones I would need. Maybe Mr. Dave Darling could clarify.
The HD struts would be roughly stock-equivalent. The Sport struts are stiffer, and a better match with stiffer torsion bars. I'm not sure why we only have the one selection for the rear, though.
I have never tried to adjust Bilstein shocks. I assume the Sport ones are adjustable as mentioned earlier, but you have to remove them from the car to do so.
I have externally-adjustable Konis on my 914. I like them, but they are stiff, even on the softest setting.
--DD
Posted by: 914Eric Nov 25 2012, 07:45 PM
Anybody seen one of these little parts before?
About an inch and a half long...Found it in the fuel tank compartment when I removed the tank. Not sure if it's something that came off the car or just something totally unrelated that fell in there over the last 40 years?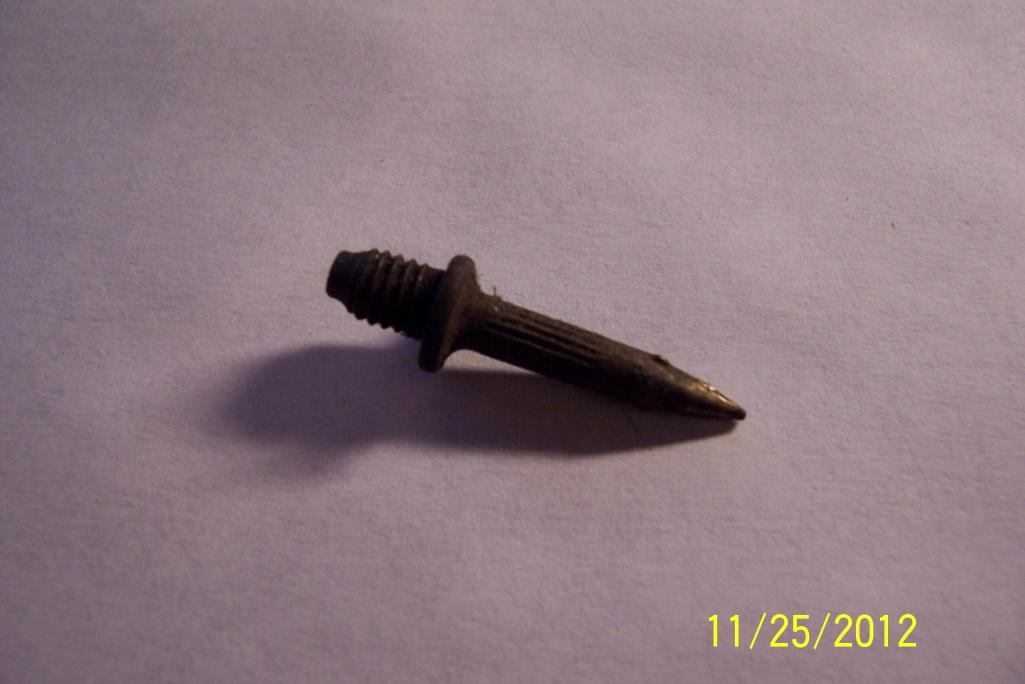
Posted by: rnellums Nov 26 2012, 07:30 AM
I have only seen flutes in in the shaft like that on suspension bolts, that said, I don't recognize that one.
Posted by: 914Eric Nov 26 2012, 12:56 PM
Trying to take the engine compartment noise insulation pad out, and am not sure how these little black plastic grommets come out. Seems like if I pry them out, they will break? Tried to unscrew them and they just spin.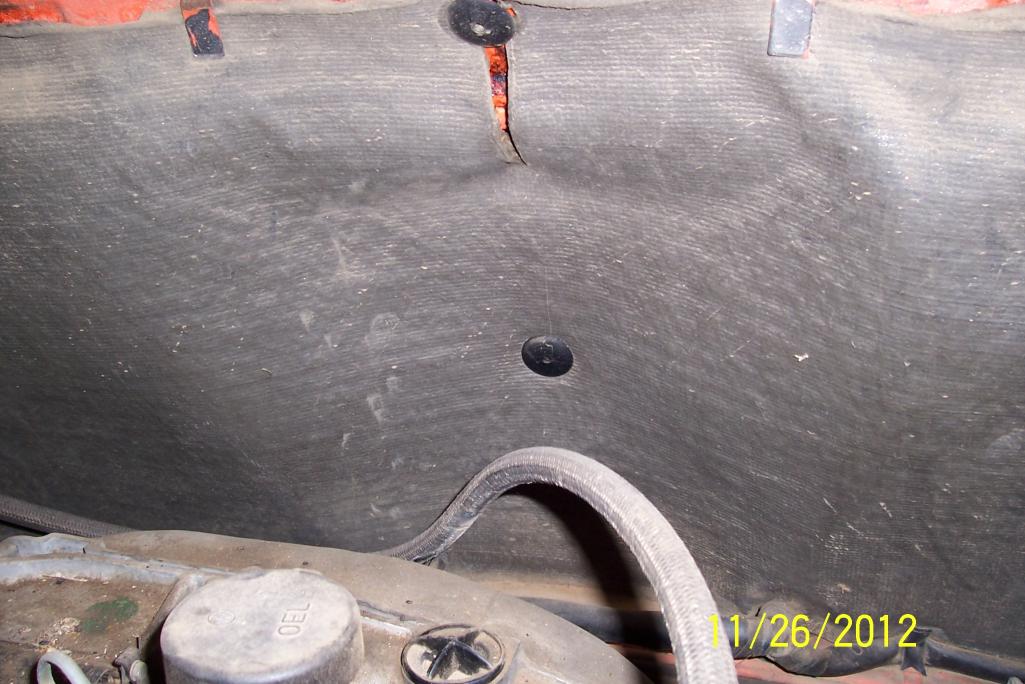
Attached thumbnail(s)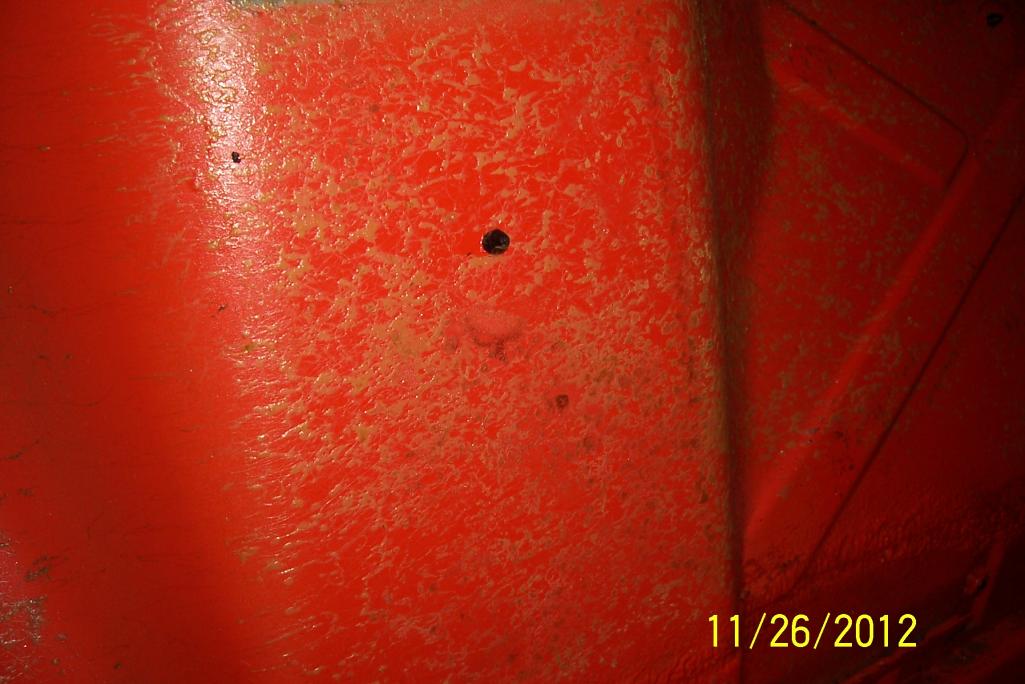
Posted by: rnellums Nov 26 2012, 06:09 PM
They are pressed in and have plastic locking tabs that hold them in. They can be removed(pried out) very carefully, but I think it would be wise to buy some to have on hand, I think my rate is about 50% destroyed during removal.
Posted by: 914Eric Nov 26 2012, 06:16 PM
They are pressed in and have plastic locking tabs that hold them in. They can be removed(pried out) very carefully, but I think it would be wise to buy some to have on hand, I think my rate is about 50% destroyed during removal.
THANK YOU!
Kind of what I thought, but just wanted to be sure...hate to start "Breaking Stuff Off".
Posted by: SirAndy Nov 26 2012, 06:21 PM
Is it metal? If so, it looks like one of them nails that you shoot into concrete with an air-gun ...
Posted by: Gint Nov 26 2012, 06:23 PM
Doesn't look like any 914 part I've ever seen.
Posted by: 914Eric Nov 26 2012, 06:34 PM
Well...engine isn't much to look at right now. But I guess after 20 years of driving, and 20 years of storage...It could be a lot worse. Sure won't look like this in a few months when it goes back in.
The good news is that when the car went into storage, it was running strong and had just had a compression test that showed only 8 lbs PSI difference between the 4 cylindars if I recall correctly. So we'll see.
Once I get the new fuel lines, fuel filter, and plug wires on and all the new vacuum lines on and fresh gas, and a new battery...What are the odds it will start? Seems like at least some of the FI will need to be tweaked after 20 years don't ya think?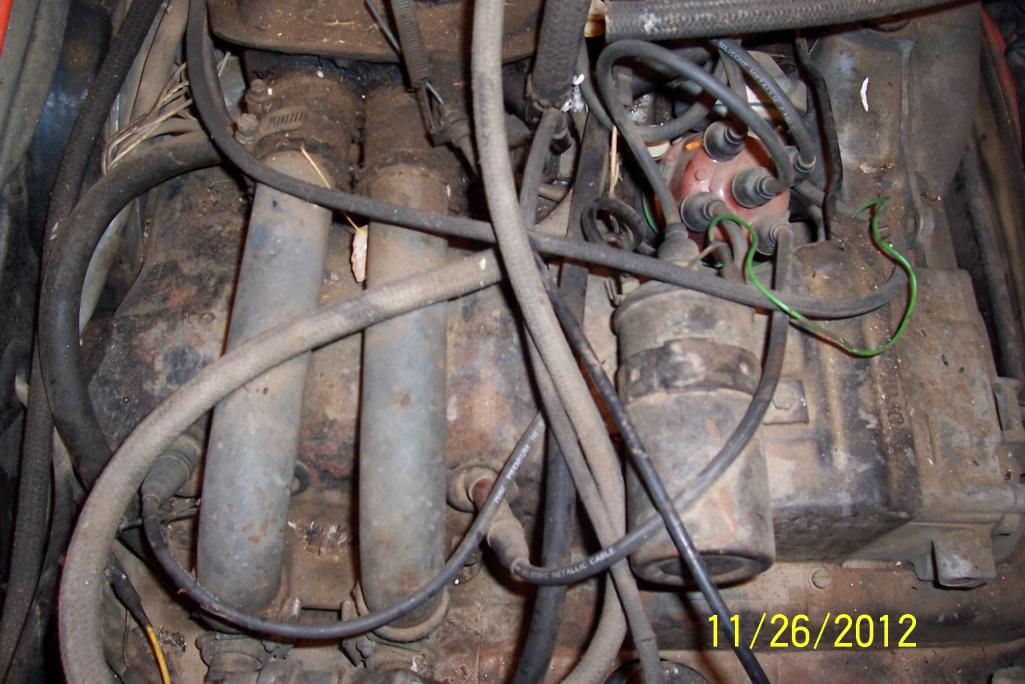

Posted by: 914Eric Nov 26 2012, 06:46 PM
Is it metal? If so, it looks like one of them nails that you shoot into concrete with an air-gun ...
lol...it is metal and DOES look sort of like an odd concrete nail or something. OK good...if you and Gint haven't ever seen one I'll put it into the "Who Knows-Who Cares" box.
I appreciate all you guys help very much!
Oh...And I did find a 1975 penny in the trunk as well. I took that as a good omen.
Posted by: mtndawg Nov 26 2012, 07:27 PM
I don't know if this has already been called out. I notice your fuel lines have the worm drive rather than a solid band. This is very common (it's common with "mechanics" who should know better) and probably should be addressed when you do the hoses.
I'm doing the hoses in a car that hasn't been started in 5 years and found the spray nozzle in 2 injectors to be stuck.
I'm wondering about the condition of your injectors and the fuel pressure regulator.
Posted by: ScoopLV Nov 26 2012, 08:04 PM
There are a lot of rubber parts that will degrade just sitting in storage. That's the story with my '74. It only has around 50K miles on it (the condition of the cylinders and pistons bears that out, the mechanic said).
But my 1.8 is still lying in pieces all over a shop because none of the gaskets are any good. Clutch and flywheel are also worn beyond their years -- guess the last owner rode the clutch a lot.
Rather than deal with one little thing at a time, I decided it would be cheaper to drop the engine once, fix everything right, and not have to worry about it for 100,000 miles.
I'm glad you're keeping yours mostly stock. I can see why people want to soup up their cars and turn them into 930-turbo meets a Ferrari 308 kind of thing. But you do that with a beat-up junker 914. Not something you and your dad kept in good shape all these years.
Posted by: silver74insocal Nov 26 2012, 09:58 PM
Bottom of the tranny has a nice oil "crust" all along the bottom. The other thing that jumps out at me in the second picture is the duct from the heat exchanger just hanging in the breeze connected with a zip tie.
If you look close, you can also see the aluminum foil wrapped around the fuel lines as a kludge fix to the "won't start when hot" problem. Really Dad??
The u-bolt fix of the clutch is also clear. The good news, is that I'm still not seeing any rust.
check it out!
http://www.914world.com/bbs2/index.php?showtopic=198887&hl=
scrolling through this dudes for sale add check out post #7...this was actually a dealer repair it seems. thats pretty cool ...literally
Posted by: silver74insocal Nov 26 2012, 10:06 PM
lol Eric small teener world eh? cool now i know someone in idaho if i can ever escape this place
Posted by: 914Eric Nov 26 2012, 11:02 PM
There are a lot of rubber parts that will degrade just sitting in storage. That's the story with my '74. It only has around 50K miles on it (the condition of the cylinders and pistons bears that out, the mechanic said).
But my 1.8 is still lying in pieces all over a shop because none of the gaskets are any good. Clutch and flywheel are also worn beyond their years -- guess the last owner rode the clutch a lot.
Rather than deal with one little thing at a time, I decided it would be cheaper to drop the engine once, fix everything right, and not have to worry about it for 100,000 miles.
I'm glad you're keeping yours mostly stock. I can see why people want to soup up their cars and turn them into 930-turbo meets a Ferrari 308 kind of thing. But you do that with a beat-up junker 914. Not something you and your dad kept in good shape all these years.
Scoop,
I agree with you on the rubber stuff. What I think I'm going to do is completely replace every piece of rubber in the engine/fuel/FI then put the engine back in and see IF, and how well it runs. If the engine is still solid, I can get another 10K miles or so of driving over a couple of years. If the engine just won't cut it after 20 years in storage then I'll have no choice but to do it all. With that in mind...The following question.
SCOOP, Steve Garvey, and others who lean towards originality: Do you feel a 2056cc FI rebuild is original, or not much different from a 2270cc with carbs?

Posted by: Bleyseng Nov 27 2012, 03:24 AM
A 2056 w/Djet looks completely OEM Stock while a dual carb engine never was built by Porsche (except in Europe).
If you want duals take all the FI stuff and put it in storage so you can put it back on when you sell it or get tired of fussing while the carbs.
Posted by: ScoopLV Nov 27 2012, 10:05 AM
SCOOP, Steve Garvey, and others who lean towards originality: Do you feel a 2056cc FI rebuild is original, or not much different from a 2270cc with carbs?
I would just rebuild the 1971cc engine and keep it injected. Then again, my car will never see any time on a track. I'm sure someone out there is reading this, and spitting coffee on their screen and saying, "You fool! Why spend all that money on a rebuild and NOT get the extra horsepower????"
There are certainly good reasons either way. But since your engine doesn't have a whole lot of time on it, may as well put it back together in it's original configuration. And definitely FI, unless you want to fiddle with carbs for the rest of your life. That's how I look at it, at least. But I'm hardly the expert here.
As for a 2056 being original, you already know the answer. It isn't. But nobody is going to care, either. And you'll pick up 30 extra HP. That's quite a big jump from a car that only had 95 to begin with.
But you're getting an answer from someone who is happy with 70hp. (Or would be, if I can ever get my car back.)
Posted by: turk22 Nov 27 2012, 12:04 PM
Eric,
I plan on keeping my car original as well, and would consider the 2056. I would have to do more research, but if its simply upgrading the pistons/heads, and the camshaft stays the same, I would seriously consider it.
I would never replace the FI with carbs, and I would want to know if there were any issues with the stock FI running with a 2056.
The other upgrade I would/will do is the Petronix in the distrib. Stainless fuel lines, and brakes/suspension. (If my car was a 20k concours car I wouldn't do those, but with with 100k+ miles, I plan to drive it as often as I can, and want those items to make it more useable and enjoyable)
Turk
Posted by: ScoopLV Nov 27 2012, 12:27 PM
I'd do the fuel lines anyway. Even in a concours car. Car-B-Cues are never any fun. If I was docked points and never won anything, at least I'd still have the car.
Posted by: 914Eric Nov 27 2012, 05:44 PM
Eric,
I plan to drive it as often as I can
Turk
As do I turk...That is why I'm trying to think this through carfully. Even though you can't tell it has the bigger 2056 cylinders, or a slightly different cam, or the heads have been modified a little, etc...Does that take away from the value of the car?
I don't disagree with the arguement that you can always bolt back on the original cylinders, heads and cam if you wanted to. First and formost, I want to drive the car a few years. I'm not a total concourse geek where you have a bunch of cars and can't drive any of them. Never could understand that either.
Posted by: dlkawashima Nov 27 2012, 08:56 PM
I'd seriously consider the 2056, too. Visually, I don't think you would see a difference but you would definitely feel a difference. I had an opportunity to drive a 2056 before I bought my 2 liter and it was NICE. Splitting hairs here, but I'm not sure you'd actually get 125 horsepower with the 2056 with FI ..... more like 110-115 so I've been told.
Posted by: bigkensteele Nov 27 2012, 09:19 PM
I think that it would actually add to the value of the car, in a preserved state. If it was original down to the tires and fuses, it might be a different matter.
Why be concerned? If I am not mistaken, the next time this car will be available to purchase will be at your estate sale. Do with it what you please and enjoy it as you see fit. Just my $.02.
Posted by: Gint Nov 27 2012, 09:21 PM
2056 is still better than stock.
Nope. For me it adds value to the car.
Posted by: 914Eric Nov 27 2012, 11:30 PM
Why be concerned? If I am not mistaken, the next time this car will be available to purchase will be at your estate sale. Do with it what you please and enjoy it as you see fit. Just my $.02.
True story Ken...

My kids can worry about it. lol
Posted by: euro911 Nov 28 2012, 02:40 AM
Drill an extra hole in the bottom corner of each of your jack plates while you have the rocker panels off. I couldn't believe how much dried mud I pulled out of the ones on my car.
------
EDIT: Not mine, but a good example of what could be hiding back there: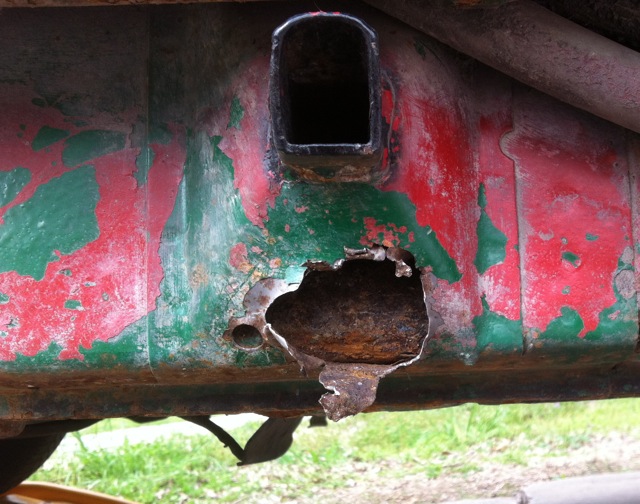
------
Since it's been siting a long time, and judging from the undercarriage pix, it looks like your front main seal is leaking. You'd be wise to replace both front & rear crank seals, oil cooler seals and oil pump gasket while you have the engine out.
I'd replace the input shaft seal on the tranny while it's separated from the engine too.
Nice project you have there ... 
Posted by: 914Eric Nov 28 2012, 10:46 AM
Since it's been siting a long time, and judging from the undercarriage pix, it looks like your front main seal is leaking. You'd be wise to replace both front & rear crank seals, oil cooler seals and oil pump gasket while you have the engine out.
I'd replace the input shaft seal on the tranny while it's separated from the engine too.
Nice project you have there ...
That is the type of specific advice I'm looking for.
Thanks Mark
Posted by: billh1963 Nov 28 2012, 02:55 PM
Since it's been siting a long time, and judging from the undercarriage pix, it looks like your front main seal is leaking. You'd be wise to replace both front & rear crank seals, oil cooler seals and oil pump gasket while you have the engine out.
I'd replace the input shaft seal on the tranny while it's separated from the engine too.
Nice project you have there ...
That is the type of specific advice I'm looking for.
Thanks Mark
Actually, you should sponsor a Dr. Evil transmission clinic out west. I'm sure the resident doctor would enjoy a trip to potato land and there should be enough interest to make it worthwhile. I attended one at Scottyb's in April....well worth the money!
Posted by: 914Eric Nov 28 2012, 05:27 PM
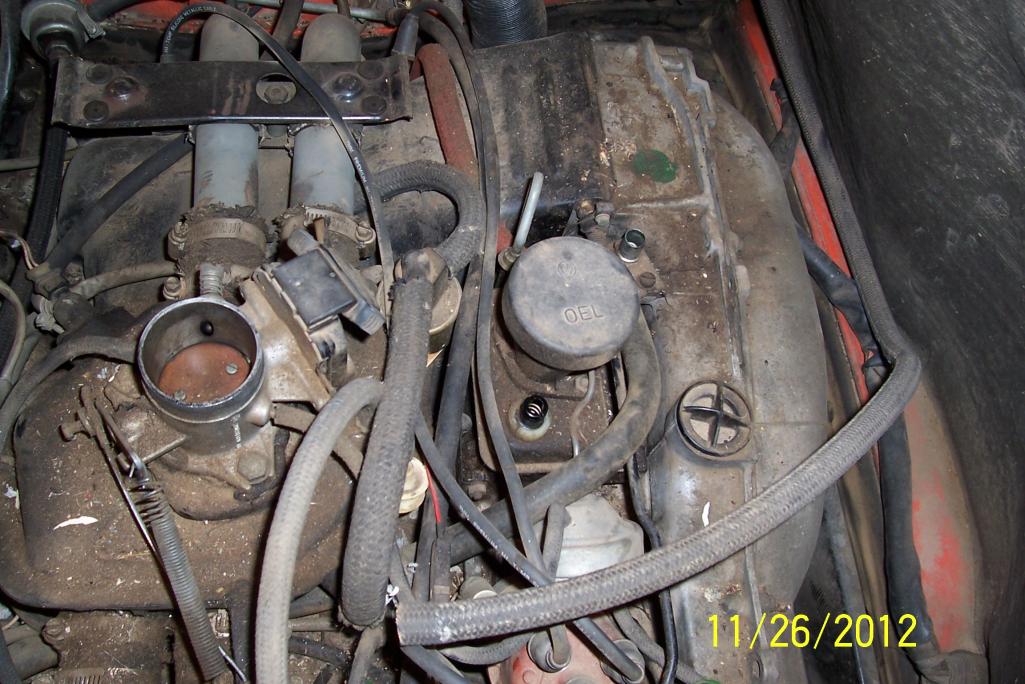
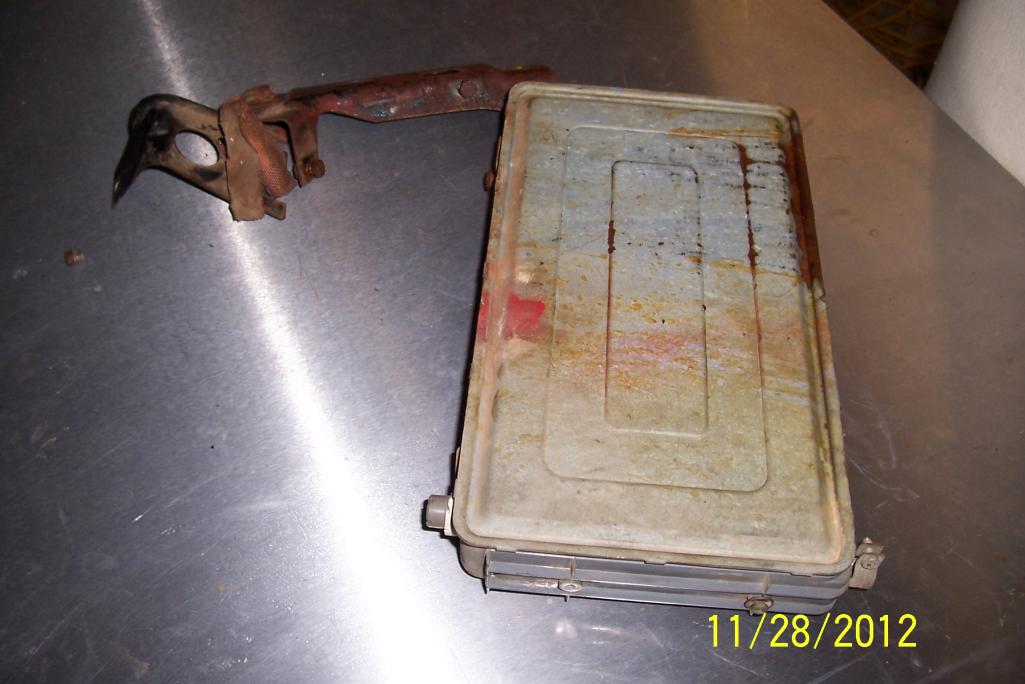
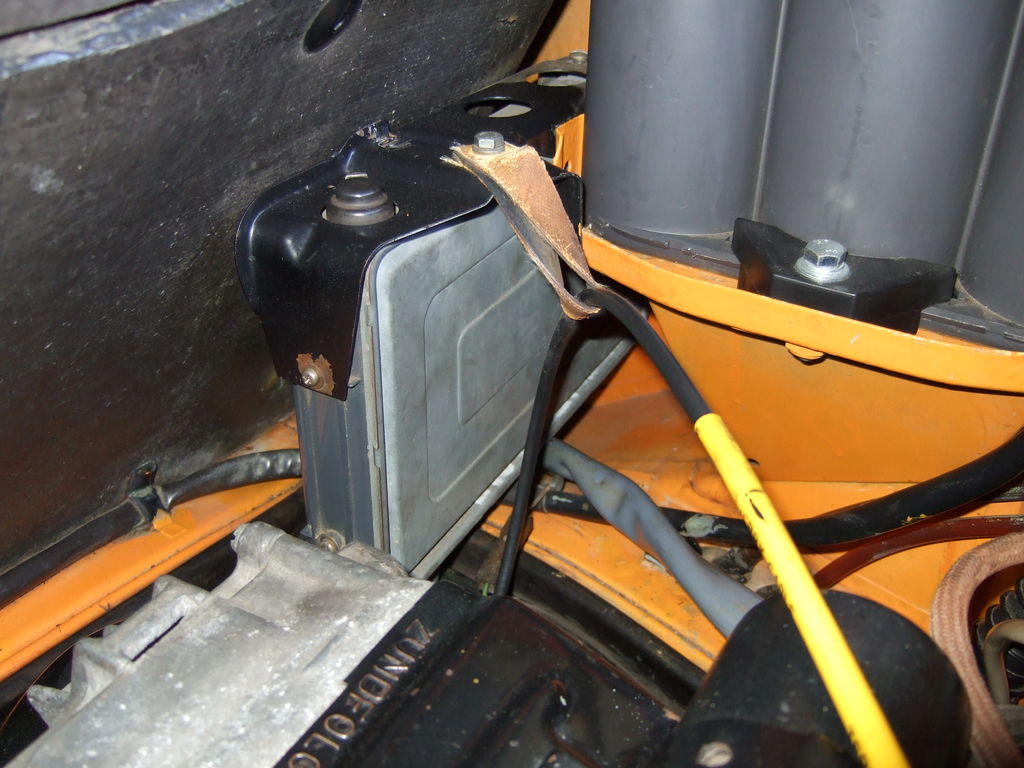
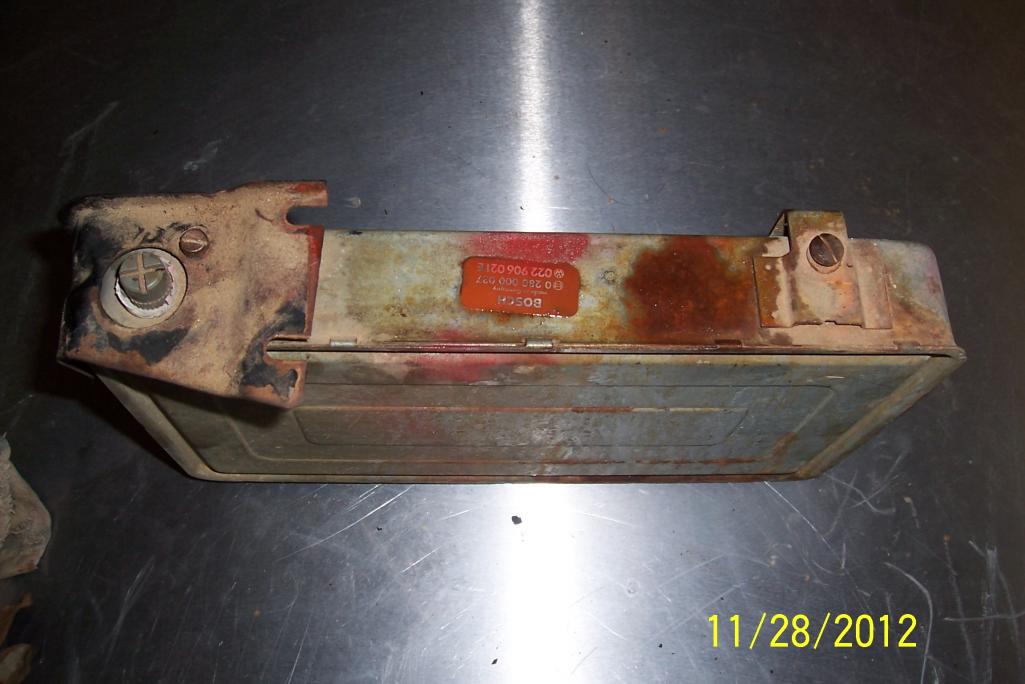
The ECU is a little disappointing. Not sure what I was expecting, but I have seen lunch boxes that are better built than the cheap galvanized box the FI brain lives in.
One thing I see is that there is a strap (Ground?) just hanging. If it is a ground it must attach somewhere. Anybody???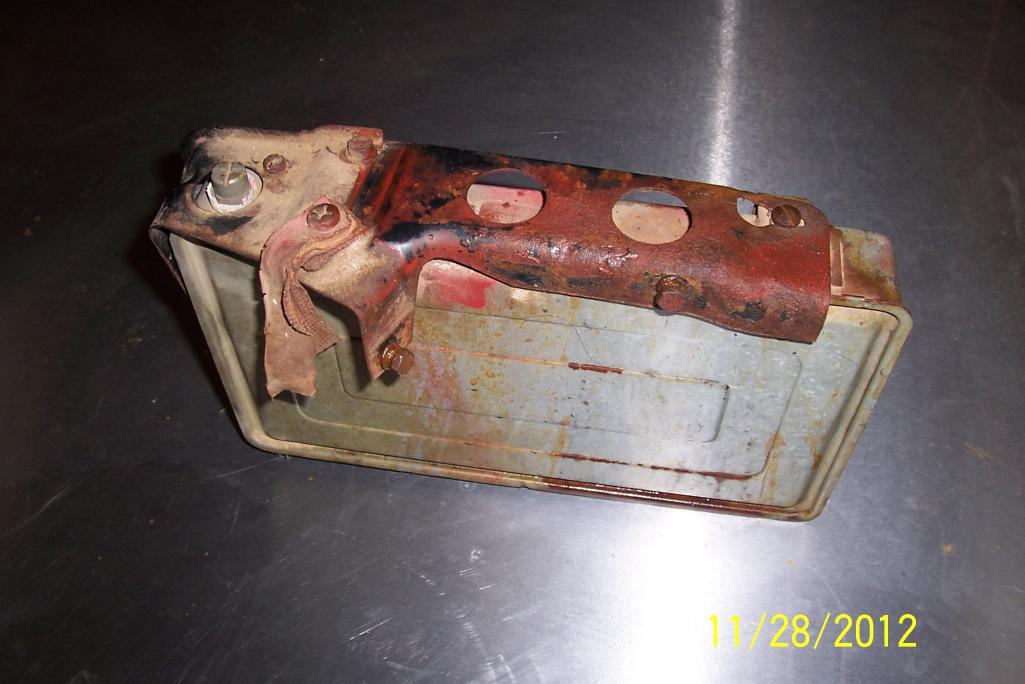
Posted by: dlee6204 Nov 28 2012, 05:33 PM
That's not a ground strap. It was a loop to hold up the wiring harness. IIRC
Posted by: 914Eric Nov 28 2012, 05:36 PM
That's not a ground strap. It was a loop to hold up the wiring harness. IIRC
Probably going to look very stupid here, but what is "IIRC".
Seen this all over and am not familiar with the acronym.
Posted by: dlee6204 Nov 28 2012, 05:51 PM
If I Recall Correctly
Posted by: euro911 Nov 28 2012, 06:03 PM
I had an ECU that was rusted worse than yours ... I just sanded it down and rattle-canned it light gray.
You could probably just address the minor rust and spray it with a high-temp clear ... or have it re-plated if you really want to go that far 
As for the bracket, bead blast and paint (or powder coat) it.
IIRC = "If I Remember Correctly", IIRC
Posted by: turk22 Nov 28 2012, 06:31 PM
Eric,
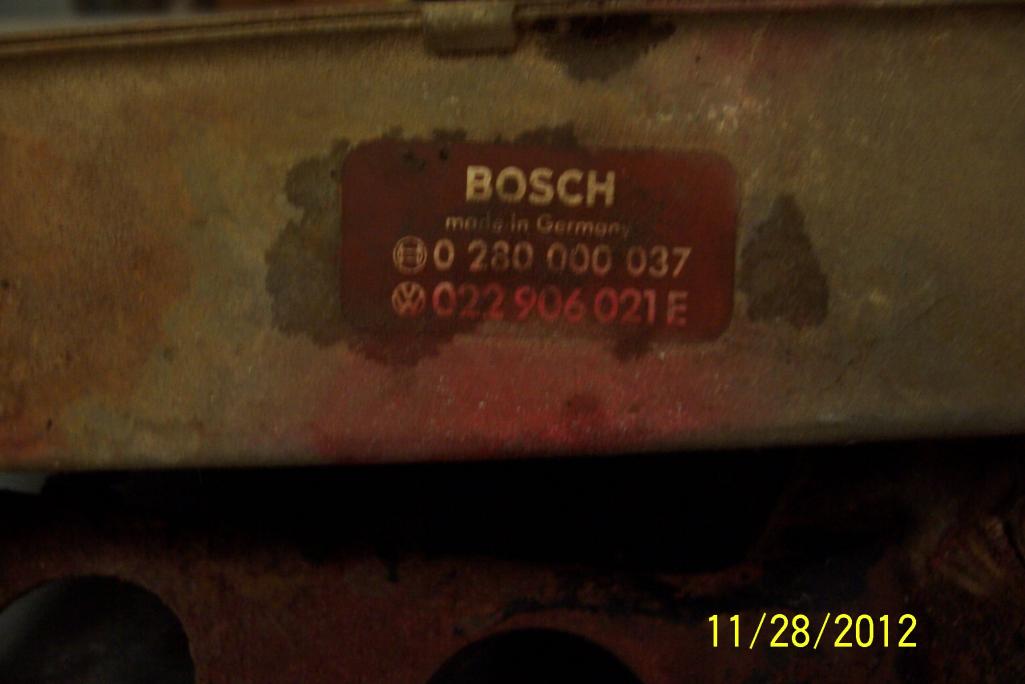
where is that part number sticker, on the bottom of the ECU ?
Posted by: dlkawashima Nov 28 2012, 06:38 PM
That's not a ground strap. It was a loop to hold up the wiring harness. IIRC
For reference. To be honest, I don't know if that is correct but that's the way it was set up when I got the car.
Posted by: 914Eric Nov 28 2012, 07:21 PM
That's not a ground strap. It was a loop to hold up the wiring harness. IIRC
For reference. To be honest, I don't know if that is correct but that's the way it was set up when I got the car.
Great picture Dave...Thanks
Posted by: 914Eric Nov 28 2012, 07:24 PM
Eric,
where is that part number sticker, on the bottom of the ECU ?
Turk...Actually it's on the top under the bracket. Here's a better picture.
Posted by: 914Eric Nov 28 2012, 09:03 PM
Actually, you should sponsor a Dr. Evil transmission clinic out west. I'm sure the resident doctor would enjoy a trip to potato land and there should be enough interest to make it worthwhile. I attended one at Scottyb's in April....well worth the money!
Bill,
Do you have any idea what is involved in such an endeavor? I do need Dr. Evil. Besides having some leaky seals...I recall the beginning of a grinding synchro in first and reverse if memory serves me.
Posted by: bigkensteele Nov 28 2012, 09:37 PM
Actually, you should sponsor a Dr. Evil transmission clinic out west. I'm sure the resident doctor would enjoy a trip to potato land and there should be enough interest to make it worthwhile. I attended one at Scottyb's in April....well worth the money!
Bill,
Do you have any idea what is involved in such an endeavor? I do need Dr. Evil. Besides having some leaky seals...I recall the beginning of a grinding synchro in first and reverse if memory serves me.
You might want to PM the Doc. I attended one here, and it was a blast. Dr. E is one of the most unique and enjoyable guys you will ever meet. Now that he is a practicing physician, I can't say how much time he has to do these things, but if you can get enough interested folks committed, my guess is that he will find a spot on his calendar.
Posted by: Gint Nov 28 2012, 10:05 PM
Seen this all over and am not familiar with the acronym.
In my case IIRC means I have CRS but I'm trying man!
Posted by: 914Eric Nov 29 2012, 11:04 AM
Seen this all over and am not familiar with the acronym.
In my case IIRC means I have CRS but I'm trying man!
Gint...It's not that we can't remember, It's that after so many years, we have so much knowledge that no one brain can possibly keep track of it all.
Posted by: euro911 Nov 29 2012, 01:11 PM

Posted by: billh1963 Nov 29 2012, 02:32 PM
You might want to PM the Doc. I attended one here, and it was a blast. Dr. E is one of the most unique and enjoyable guys you will ever meet. Now that he is a practicing physician, I can't say how much time he has to do these things, but if you can get enough interested folks committed, my guess is that he will find a spot on his calendar.
PM the Doc....
If you get enough people attending and have enough food and drink I bet he would show up!
Posted by: 914Eric Dec 1 2012, 04:20 PM
I was in St. Louis from 1987-1990 building F15E. This was the plate I had during that time. That is how I lost my blue/yellow original California plate.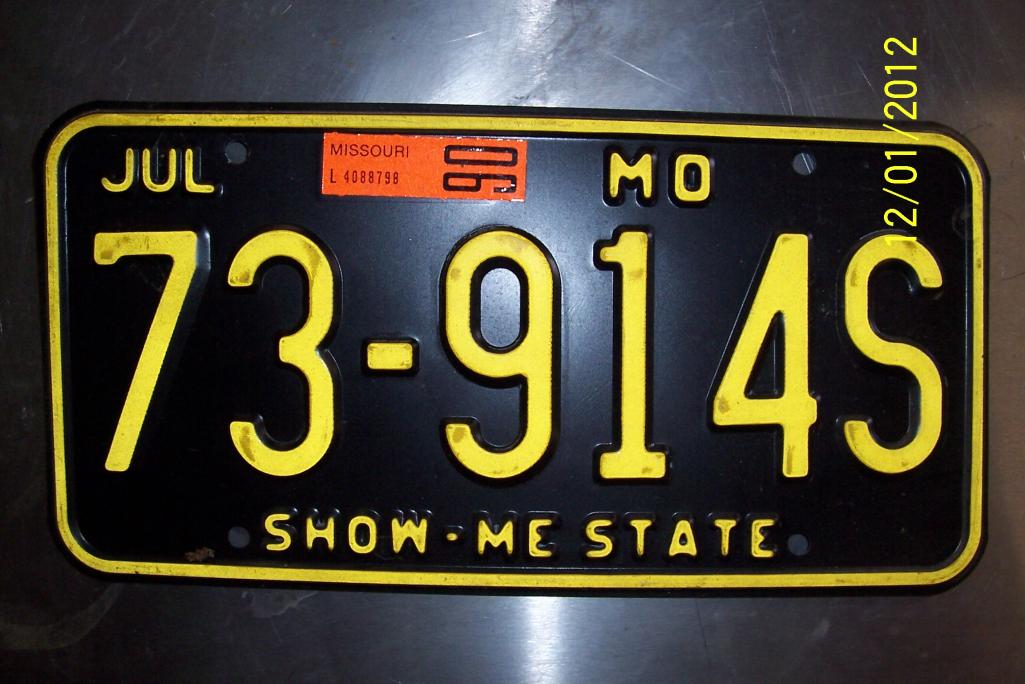
Posted by: nathansnathan Dec 3 2012, 12:54 PM
Don't know the the aluminum deck plate on the door and threshold was original?
It looks like there is some trim on the edge of the outside of the driver door also that would have been added.
The brushed aluminum kick plates on the doors and thresholds were added by the dealer (Greene in Norwalk Calif) as was the Porsche stripe. Since they were put on by the dealer before sale, I consider them original.
I saw a similar guard on ebay, which led me back to bowlsby's page. he identifies the brushed gaurds as being made by Haneline. They seems to be around still, making brushed stainless dash gauge plates. Interesting that they are in Idaho, too? Seems sns classics is hainline, but I can't tell for sure what is up. It looks like they make rear bumper recess and throttle plate trim also.
http://bowlsby.net/914/Classic/Accessories.htm
Posted by: 914Eric Dec 3 2012, 02:07 PM
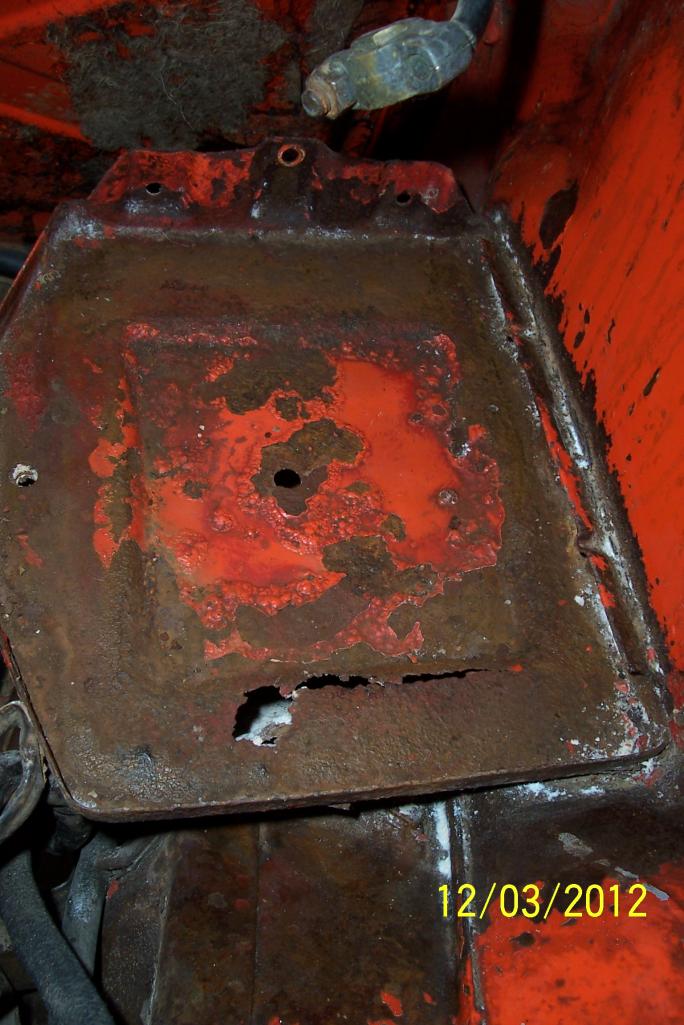
Well...finally got to around to the Hell Hole.
Guess it was too much to hope for that it would be perfect after 40 years. Some rust on the battery tray and a rusted out grove...not terrible though. Hell hole has a little surface rust but is structurally solid.
Since the car is in such good shape overall and I'm not going to rotisserie restore and paint the entire car right now, what is the best way to "Stabilize" the hell hole till I get to it at some point in the future?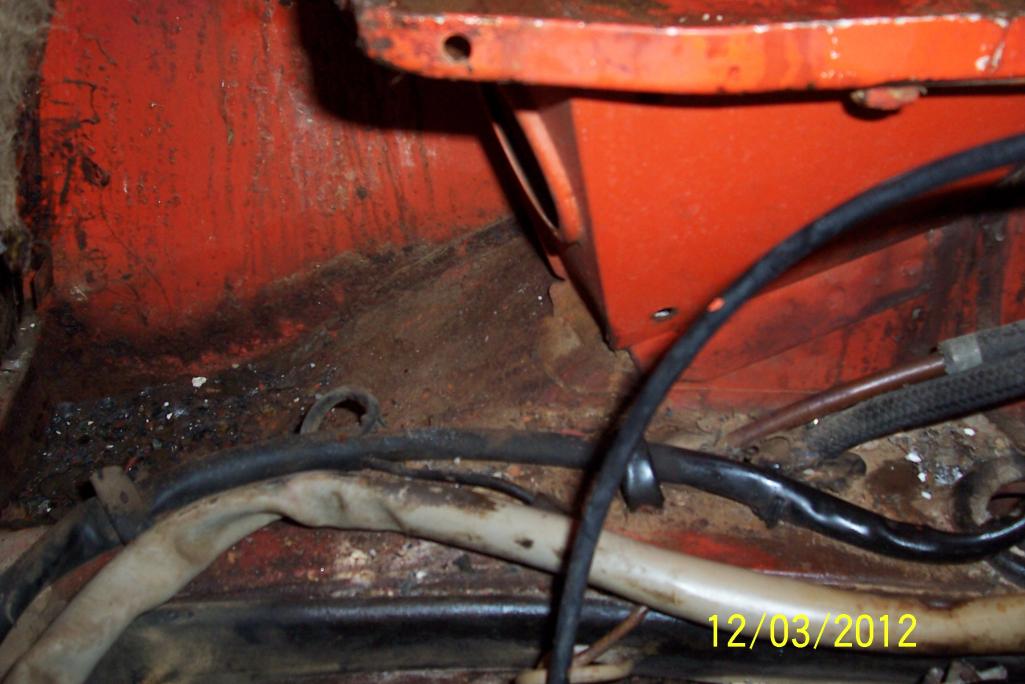
Posted by: 914Eric Dec 4 2012, 09:35 AM
Since I'm not going to rotisserie restore and paint the entire car right now, what is the best way to "Stabilize" the hell hole till I get to it at some point in the future?
Posted by: rex66m Dec 4 2012, 10:45 AM
Since I'm not going to rotisserie restore and paint the entire car right now, what is the best way to "Stabilize" the hell hole till I get to it at some point in the future?
I am interested in the answer to this, as I have some surface rust in the hell hole, too.
Posted by: nathansnathan Dec 4 2012, 01:01 PM
I would start with a screw driver. If it is solid enough/ there are no holes, I would get off what I could from the surface with physical means, then use a process with phosphoric acid, like marine clean/ metal ready, or oshpo, or ppg dx579/ dx520. Often there are 2 parts to these treatments. it's all about 'etching' with the acid to neutralize the rust.
Posted by: 914Eric Dec 4 2012, 01:09 PM
I would start with a screw driver. If it is solid enough/ there are no holes, I would get off what I could from the surface with physical means, then use a process with phosphoric acid, like marine clean/ metal ready, or oshpo, or ppg dx579/ dx520. Often there are 2 parts to these treatments. it's all about 'etching' with the acid to neutralize the rust.
Nathan...Thanks.
OK...so:
Scrap and clean
Use phosphoric acid treatment.
Rust proof Primer??
Touch up paint??
Doesn't sound too difficult.
Posted by: nathansnathan Dec 4 2012, 02:36 PM
I do scrape with a screwdriver, my special scraping screw driver , but I was saying you should forcibly poke at the recess there to see if it will go through. You really aren't hurting it if it does go through, but if it is solid, like my 'heckhole' is, having jabbed it some, I feel better about it now, even through it is pitted.
I was thinking more along the lines of a metal brush, a welding or grill brush. I'm not a fan of wire wheels on angle grinders. You will make good metal thin that way, and tear right through marginal areas. The acid will turn the rest, convert it, encapsulate it, whatever it does, turns the pits black. The products have zinc in them, too.
Etching primer is just primer that has similar chemical actions, but not as good as doing the whole etching thing, like shampoo and conditioner in one, but can't hurt to get that kind if you're going rattle can, "etching" or 'metal' primer.
There are many levels of dealing with it, depends if the screwdriver goes through. I would poke at the front of the jack post plate that is below there, too. That can hide some nastiness sometimes. I would take a good look at the suspension console ear on that side, too.
Here's mine to give you some idea what can go first. I'll link the image, it is pretty grotesque.
http://www.914world.com/bbs2/uploads_offsite/www.eggscollective.org-11782-1291433480.1.jpg
Posted by: Cairo94507 Dec 4 2012, 03:07 PM
If that is the worst rust you have on your car you have nothing to complain about for sure. However, as clean as your chassis is I would want the hell hole addressed correctly the first time and then you are done. If you do not feel up to the challenge for whatever reason, there is surely a shop in your general proximity that someone on here can recommend that can fix that correctly and then shoot the area in the factory color so it look as nice as the rest of the car. Just my opinion, of course, but I figure I have the time and hard earned money to do it right once and I don't want to have to do it again.
Posted by: 914Eric Dec 4 2012, 04:24 PM
I would want the hell hole addressed correctly the first time and then you are done.
I figure I have the time and hard earned money to do it right once and I don't want to have to do it again.
Thanks Mike for helping me keep it in perpective.
I'm going to have the engine out soon, so I will be able to poke around and get a better look. If it is only surface rust which it appears, then it will be fairly simple. If more than scrubing and phosphoric acid is required, then I'll have to see.
Even though I'm not going all the way to rotisserie right now because it isn't needed, (AND I CAN'T WAIT TO START DRIVING IT)
 I still plan on doing everything right the first time.
 So if anyone sees me doing anything less than perfect, they have my permission to
 or
or 
I've been fixing and rebuilding my own race/dirt bikes since I was 12, so I'm pretty good with a wrench, but when it comes to bodywork...not so much. I have seen just about every episode of Overhaulin', so how hard can it be.
Thanks for all the help.
Posted by: rnellums Dec 5 2012, 07:35 AM
When you have the engine out is the best time to get the repair done! I found a similar area to that (perhaps slightly worse) on mine last year during the winter and had a new engine shelf and battery holder welded in and had the area painted for less than 700. If that's the biggest rust spot on the car, and you don't plan to rotisserie it, I'd say get it taken care of properly.
Posted by: pete000 Dec 5 2012, 12:11 PM
Mine looked like that, once you clean it up you might be surprised that it is not too bad. Once I gave it a good cleaning I used some POR 15 and it is all good.
Optima sealed battery will prevent this from ever happening again.
Get in there and clean it up and see what you have under the grunge. Hopefully its solid.
Posted by: McMark Dec 5 2012, 12:30 PM
Learn something new every day. That accelerator strap is actually in the PET parts diagrams, PN 999.706.005.80 (suspension strap). It's listed only as for 914 2.0 though, which is interesting.
#71 in the diagram below
Attached image(s)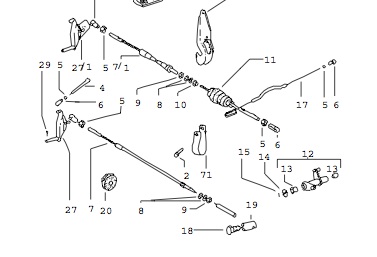
Posted by: Chris H. Dec 5 2012, 12:59 PM
Mine looked like that, once you clean it up you might be surprised that it is not too bad. Once I gave it a good cleaning I used some POR 15 and it is all good.
Optima sealed battery will prevent this from ever happening again.
Get in there and clean it up and see what you have under the grunge. Hopefully its solid.
I totally agree...had some very scary looking rust in my engine bay when I got the car, turned out to be surface only and ground right off. Gone... POR 15'd it, replaced the tray, all good. From 2000 miles away that hell hole looks like it's nothing major.
Posted by: 914Eric Dec 5 2012, 01:23 PM
Learn something new every day. That accelerator strap is actually in the PET parts diagrams, PN 999.706.005.80 (suspension strap). It's listed only as for 914 2.0 though, which is interesting.
#71 in the diagram below
Mark,
Do you think that is the strap that is hanging from my ECU? Or one mounted somewhere else?
It appears from the diagram that the strap is actually for the accelerator cable and not the ECU strap as Dave Kawashima showed in the picture on the prior page of my thread?
The PET parts list also showed the same part for the 914-6.
Posted by: 914Eric Dec 5 2012, 03:25 PM
That's not a ground strap. It was a loop to hold up the wiring harness. IIRC
For reference. To be honest, I don't know if that is correct but that's the way it was set up when I got the car.
Using Dave's picture, and the parts diagram from Mark, definitely seems to be a throttle cable support strap.
Posted by: 914Eric Dec 5 2012, 04:36 PM
OK...Exhaust is off. Anybody know what it is? I do remember it had a pretty nice sound.
I looked at it closely and couldn't find any name or markings.
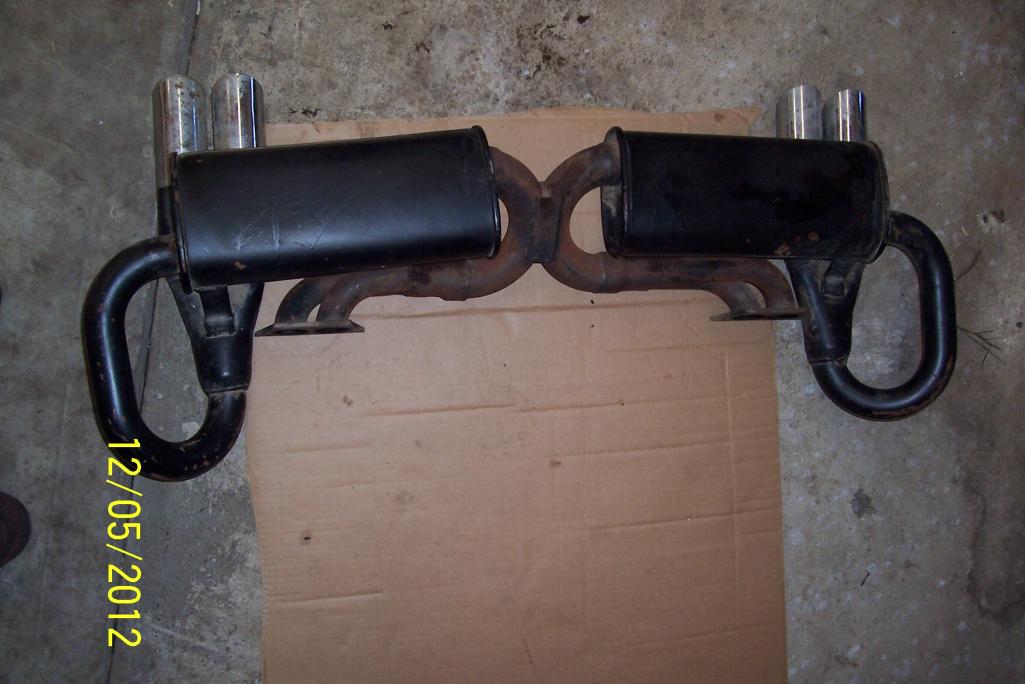
Posted by: McMark Dec 5 2012, 05:08 PM
Monza. 
I say toss it off a cliff.
Posted by: 914Eric Dec 5 2012, 07:20 PM
Monza.
I say toss it off a cliff.
OK...so dad bought a crappy exhaust. I looked up Bursch on their website and found this:
• BX 1421 - Street
• BX 1422 - Comb.
• BX 1423 - Quiet Street
• BX 1424 - Quiet Comb.
Which one do I want? What is the difference between street and comb? What is combo? What is the difference between Street and Quiet street?
Posted by: bigkensteele Dec 5 2012, 09:12 PM
Monza.
I say toss it off a cliff.
OK...so dad bought a crappy exhaust. I looked up Bursch on their website and found this:
• BX 1421 - Street
• BX 1422 - Comb.
• BX 1423 - Quiet Street
• BX 1424 - Quiet Comb.
Which one do I want? What is the difference between street and comb? What is combo? What is the difference between Street and Quiet street?
I have a Bursch, and I don't care for it. 50% of the paint will be gone after your first long drive, and it is pretty loud. In fairness, I don't recall which one I have, as I bought it many years ago, but only installed it last year.
If I had to do it over again, I would buy a Triad. They are well-built and get great reviews here. However, they are a dual tip - one tip in the factory spot, and for the other tip, you will need to modify your valence.
If I had your car, I would look for a used factory muffler in good shape or shell out for a Dansk replacement, which is the most original currently on the market.
Posted by: silver74insocal Dec 5 2012, 10:08 PM
dont forget the triad option, those things sound awesome!
the best sounding 4 i have ever heard: Ceaser's (phat nine11 on here) stainless heat exchangers and a banana sport muffler (dansk i think? ) it makes me drool everytime
Posted by: Gint Dec 5 2012, 10:21 PM
Dave will make you a single tip Triad.
Posted by: bigkensteele Dec 5 2012, 10:26 PM
Dave will make you a single yip Triad.
Who would want a single YIP muffler?

Posted by: turk22 Dec 5 2012, 10:30 PM
This one is closer to stock. and closer to $600....
http://www.ebay.com/itm/Porsche-914-2-0-73-74-Muffler-Dansk-Brand-New-/140617354562?fits=Make:Porsche|Model:914&hash=item20bd728d42&item=140617354562&pt=Motors_Car_Truck_Parts_Accessories&vxp=mtr
Posted by: euro911 Dec 5 2012, 10:39 PM
This is what the Triad dual outlet looks like ... (I painted mine though)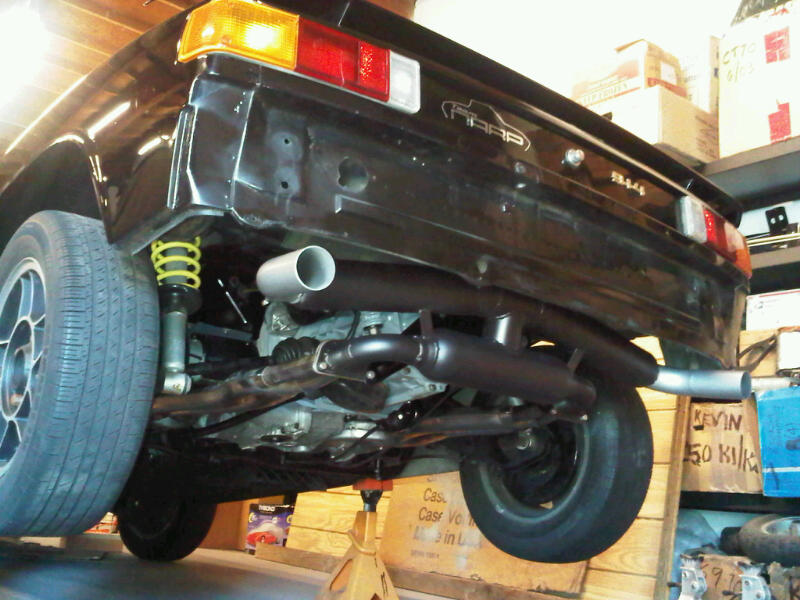
It is a bit loud, but it does sound sweet.
I think new ones go for around $350 or so these days
Posted by: Gint Dec 5 2012, 10:39 PM
It is a bit loud, but it does sound sweet.
I think new ones go for around $350 or so these days
No louder than a bursch IMO. Maybe quieter even. And a much better sound.
Posted by: 914Eric Dec 5 2012, 10:44 PM
This one is closer to stock. and closer to $600....
http://www.ebay.com/itm/Porsche-914-2-0-73-74-Muffler-Dansk-Brand-New-/140617354562?fits=Make:Porsche|Model:914&hash=item20bd728d42&item=140617354562&pt=Motors_Car_Truck_Parts_Accessories&vxp=mtr
This Dansk looks very much like the stock exhaust; Which I still have. Perhaps internally it is different to give a better sound.
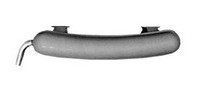
Posted by: 914Eric Dec 5 2012, 10:49 PM
Dave will make you a single tip Triad.
That is an interesting thought. I don't want to change or cut the rear panel/valance, so that might be an option.
That might kill the sound that everybody likes out of the dual tips though.
Posted by: euro911 Dec 5 2012, 10:53 PM
 , use it.
Posted by: 914Eric Dec 5 2012, 11:25 PM
If you already have a OEM banana muffler
, use it.I do have it. I'll post a pic tomorrow.
Posted by: Gint Dec 5 2012, 11:36 PM
We know what they look like.
I had one on mine for a while. I like the sound of the stock muffler. Too quiet on decel though. For me anyway... I like more burble.
Posted by: bigkensteele Dec 5 2012, 11:40 PM
, use it. As I recall, the stock muffler is right up at the top as far as flow and performance. If you still have it, it is probably your best bet as far as performance and sound. You might want to think about having it acid dipped and then ceramic coated. That muffler is worth some money these days, and even if it is not what you want to put back on the car, it is still worth nice money to an ever-growing group of folks who are restoring these cars.
Posted by: McMark Dec 6 2012, 12:58 AM
Stock is my #1 choice. Triad is a close #2.
Posted by: oldschool Dec 6 2012, 01:04 AM
dont forget the triad option, those things sound awesome!
the best sounding 4 i have ever heard: Ceaser's (phat nine11 on here) stainless heat exchangers and a banana sport muffler (dansk i think? ) it makes me drool everytime

Posted by: Scarlet75 Dec 6 2012, 09:36 AM
I am partial to my Tangerine Evo IV silencer. If you haven't heard one in person then you are missing out. Yes I have heat since it does get cold up here.
Posted by: Kirmizi Dec 6 2012, 10:34 AM
Doesn't Triad also make a dual tip with the passenger side outlet facing down?
That way you can still use the stock valance.
Mike
Posted by: rjames Dec 6 2012, 05:31 PM
I think the Bursch gets a bad rap. I like mine. Got it used for $25 and it has lasted me 4 years or so and still looks great. (car doesn't get driven in the rain).
Previously I had a Monza and I second McMark's comments. Way too loud (set off car alarms as I drove by) and rediculously heavy.
Posted by: 914Eric Dec 6 2012, 05:38 PM
We know what they look like.
Haha...you got me there Gint. But you have never seen MY OEM banana.
Posted by: turk22 Dec 6 2012, 06:18 PM
I have the Monza on mine, I like the way the dual tail pipes look, and I don't really have anything to compare it too, sound wise... but that being said, I plan to replace it with a banana when I get a chance.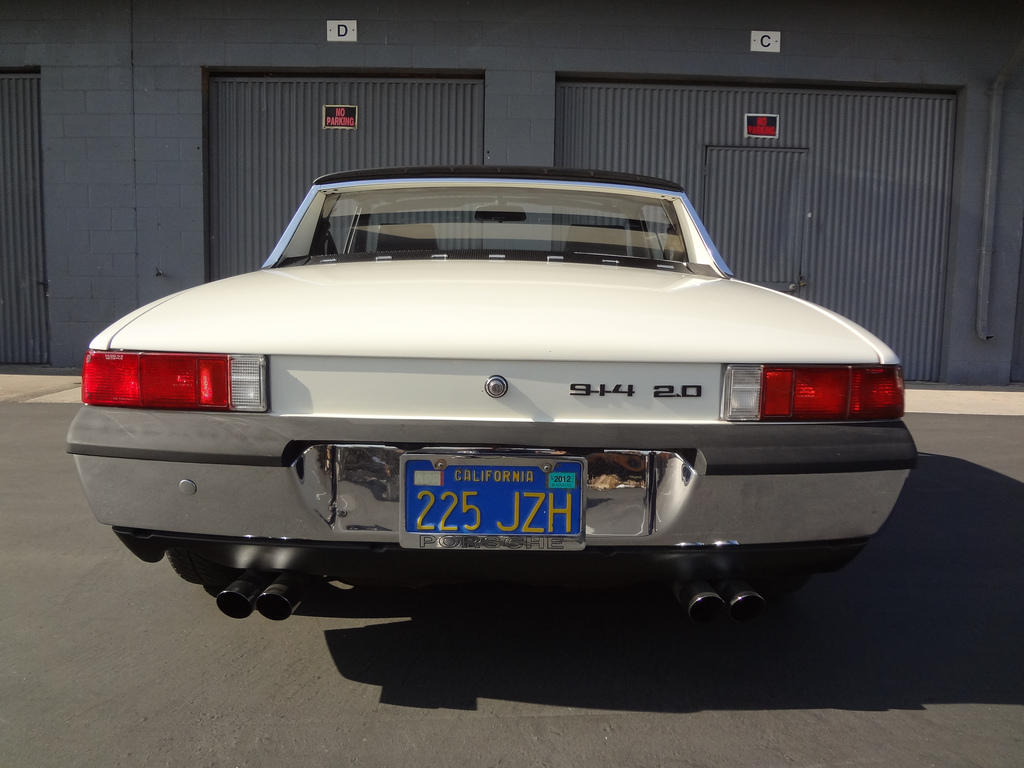
Posted by: Gint Dec 6 2012, 07:19 PM
Ok... so we're posting pics... 
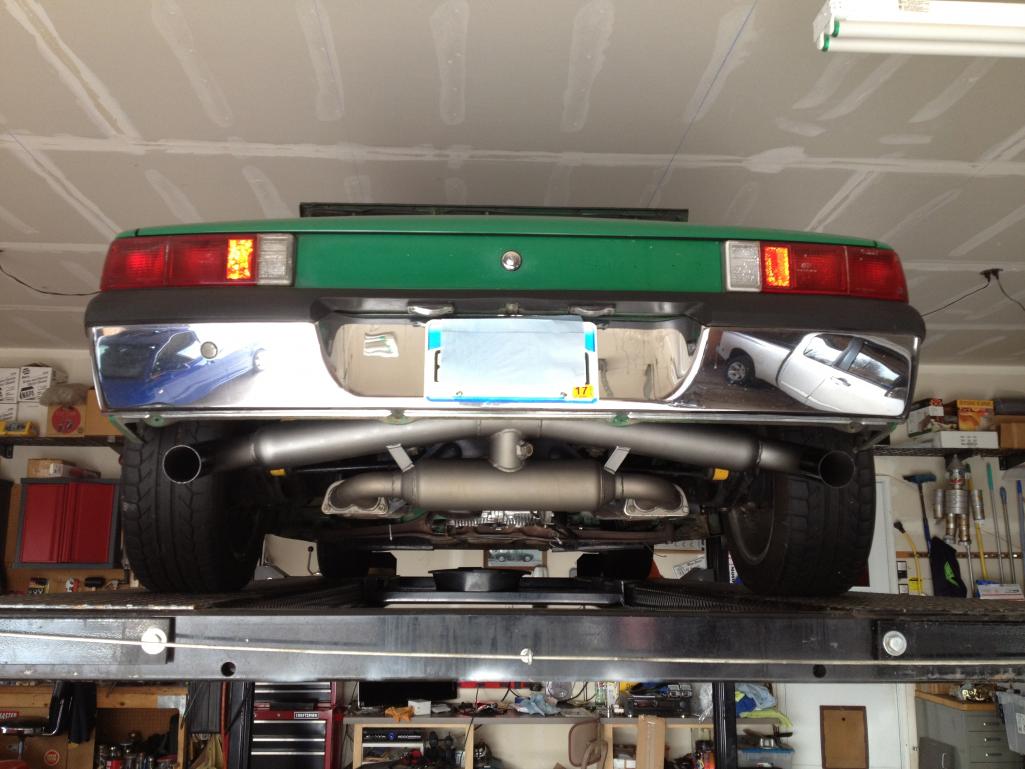
Posted by: euro911 Dec 6 2012, 10:10 PM
I didn't know you had a lift, Mike
Posted by: bigkensteele Dec 6 2012, 10:17 PM
I didn't know you had a lift, Mike
Any sane man who experienced what Gint did would own a lift, or give up working on cars altogether. I will never forget that thread. I am buying a lift as soon as I figure out what type makes the most sense for me.
Posted by: euro911 Dec 6 2012, 11:23 PM
I'm hep, I remember the incident. I hate jack stands and would let the car sit on them for a couple of days (shaking the car several times) before climbing underneath.
Recently had two different vehicles up on the lift - with numerous up/down operations required. Unbelievable amount of time and frustration avoided
Posted by: 9146986 Dec 7 2012, 06:48 AM
You didn't have a STOCK muffler as one of the choices? For that car I'd have to go with a stock banana style muffler, FWIW they aren't bad on performance either.
Posted by: Chris H. Dec 7 2012, 03:06 PM
Doesn't Triad also make a dual tip with the passenger side outlet facing down?
That way you can still use the stock valance.
Mike
Yes they do make one like you describe. Great option if you don't want stock.
Posted by: 914Eric Dec 8 2012, 11:02 AM
Think I'm going to go back to the OEM banana to start; Especially since I have it.
Can McMark, or any of our other resident engine builders say whether the OEM banana is compatible with a 115 h.p., 2056cc engine build?
Then maybe the one exhaust tip, or one tip turned down Triad if I want a better sound.
Posted by: euro911 Dec 8 2012, 03:15 PM
You'll have no problem with the banana.
Posted by: Gint Dec 8 2012, 04:07 PM
Think I'm going to go back to the OEM banana to start; Especially since I have it.
Can McMark, or any of our other resident engine builders say whether the OEM banana is compatible with a 115 h.p., 2056cc engine build?
Then maybe the one exhaust tip, or one tip turned down Triad if I want a better sound.
I've had a lift for 10 years. I moved it from the old house to new. With the help of my local 914 pals that is. "We" moved it.
Posted by: 914Eric Dec 8 2012, 06:24 PM
I love this site!! The longer I hang out, the more cool stuff I find.
Just added an Eric Shea pedal rebuild and Engman Pedal board to my list of Parts and services to buy. All because a 7 year old thread on the pedal rebuild popped up.

Posted by: McMark Dec 8 2012, 10:34 PM
Yup, the 2056 doesn't really put out enough flow to necessitate a bigger exhaust. You can give up a few HP with a bad setup, but you're not doing anything wrong that I can see, so you've got nothing to worry about. Run any of those mufflers and have fun.
Posted by: 914Eric Dec 9 2012, 08:42 PM
My OEM banana pic just for Gint.
I've also got a nice Monza, 4-stinger exhaust for sale if anyone is interested. 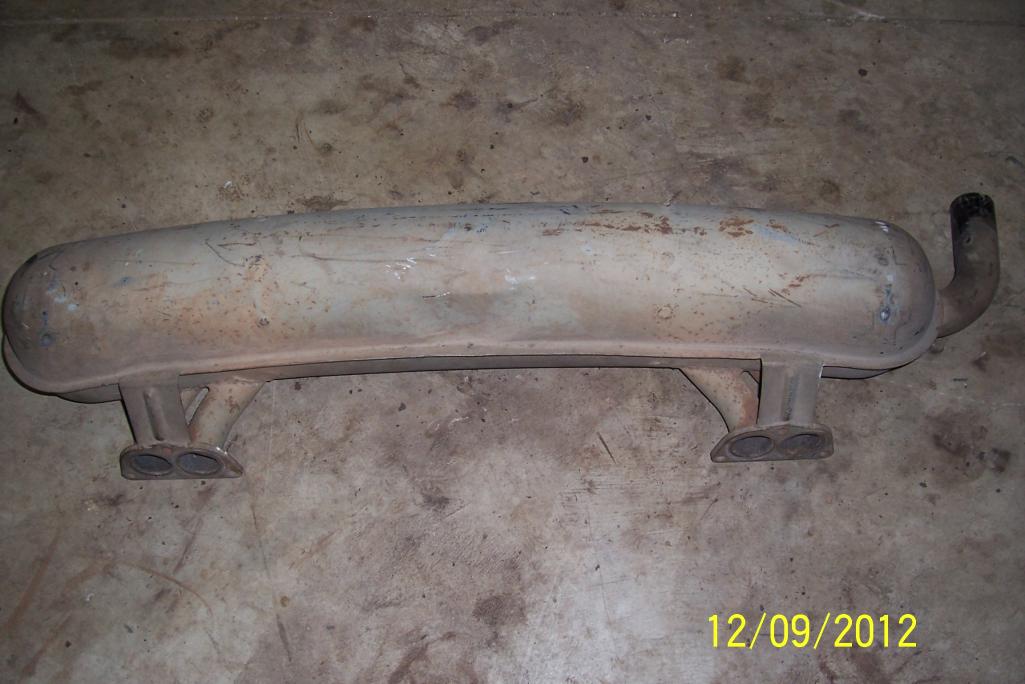
Posted by: 914Eric Dec 11 2012, 11:13 AM
Looking over the service records of the car, and see that Dad had a full brake job done less than 2K miles before it went into storage. Obviously the pads are still near new, and the rotors are unworn and smooth. Problem is that the rotors have rusted slightly over the 20 years in storage. Not terrible, just a very light coat of minor surface rust.
I'm planning on having Eric at PMB do a caliper restoration on all 4 corners and I guess I'm wondering if I'm going to need to turn down the rotors as well, or will a couple of hundred miles of driving take care of the rust?
Anyone have any thoughts?
Posted by: jbyron Dec 11 2012, 11:27 AM
that doesn't look like much rust. A little steel wool will take off a good bit of it, and I'd bet the rest is gone in just a few minutes of driving.
Posted by: Gint Dec 11 2012, 12:00 PM
That will come right off with driving. But I'd probably hit it with scotchbrite disk on a die grinder first. Easy-peasy...
Posted by: 914Eric Dec 11 2012, 02:09 PM
that doesn't look like much rust. A little steel wool will take off a good bit of it, and I'd bet the rest is gone in just a few minutes of driving.
That will come right off with driving. But I'd probably hit it with scotchbrite disk on a die grinder first. Easy-peasy...
Thanks fellas...That's what I was hoping to hear. One less thing on the list...so I can start DRIVING it in the spring.
Posted by: 914Eric Dec 11 2012, 04:37 PM
Hmmm...seems it's time to get the engine out and start doing "Real" work down in the hell hole. I am excited though, once the engine is out, it will really seem like the project is underway.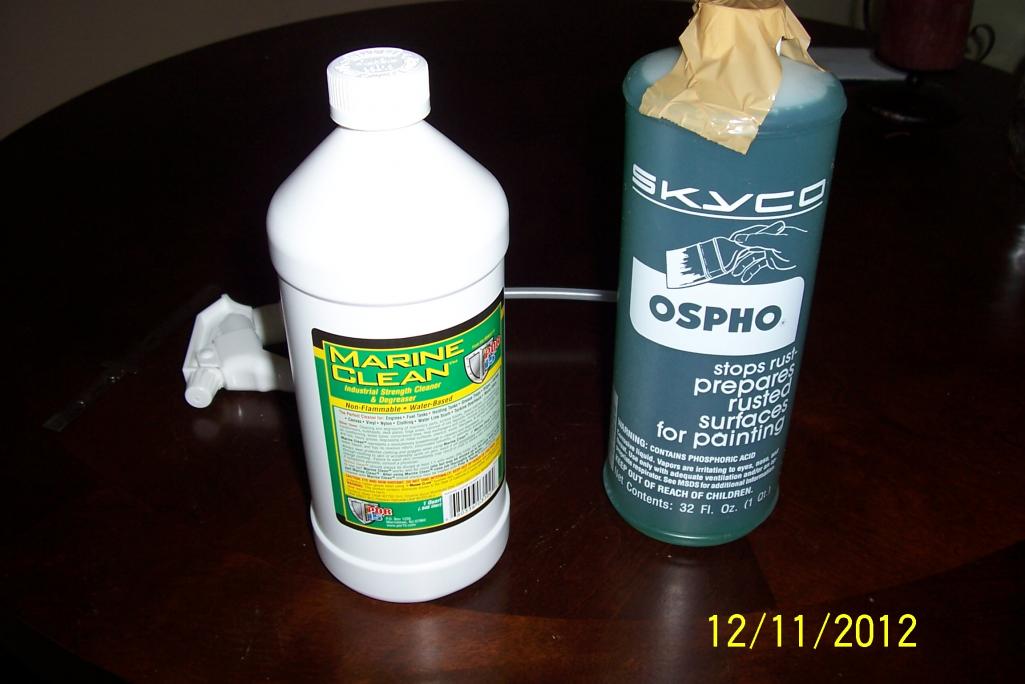
Posted by: euro911 Dec 11 2012, 05:30 PM
Posted by: 914Eric Dec 11 2012, 07:24 PM
Most definitely. Putting those beautifully restored Eric Shea calipers back on without painting and cleaning up the hubs would be a crime.
Posted by: 914Eric Dec 12 2012, 12:09 PM
Once I get the engine out...should I paint the engine tins with VHT paint, or get them powder coated?
Posted by: billh1963 Dec 12 2012, 12:14 PM
Get them powder coated.
By the way, you may want to start new threads for these topics. Once a thread gets too big people tend to lose interest and you may not get the audience you want
Posted by: sda4property@gmail.com Dec 12 2012, 03:44 PM
I am sorry to hear of your dads passing however; What an amazing gift to remember him by. I hope my kids will remember their father by driving the OG 914.
Attached image(s)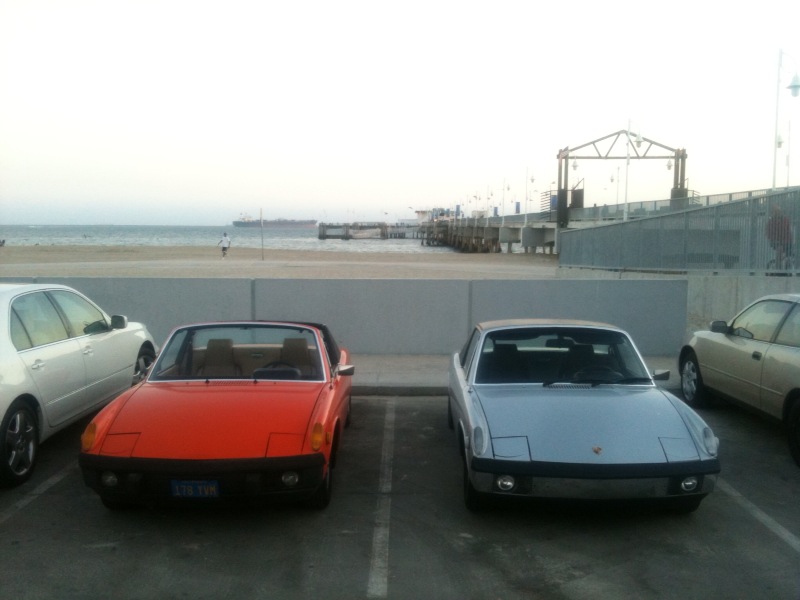
Posted by: 914Eric Dec 12 2012, 06:17 PM
I am sorry to hear of your dads passing however; What an amazing gift to remember him by. I hope my kids will remember their father by driving the OG 914.
Thanks for the kind words. We shared the car for literally...35 years and every time I work on it, it reminds me of him.
Cheers Pops!
Posted by: 914Eric Dec 15 2012, 10:41 AM
I am sorry to hear of your dads passing however; What an amazing gift to remember him by. I hope my kids will remember their father by driving the OG 914.
Couple of nice looking cars Scott. Take them on weekend runs with you. If you are sure you won't ever need to sell them, tell the kids "Someday" these will be yours and get them involved. Pretty sure that will turn the cars into family heirlooms.
Posted by: nathansnathan Dec 15 2012, 12:25 PM
It's not necessary to use high temperature paint on the tins. A good argument for painting them yourself is that you can touch it up. Also, they are painted from the factory.
I think it's cool to see the offset stamped markings, so cool. That's mostly just me though. Interesting, I don't see your engine tin code in Bowlsby's list.
http://bowlsby.net/914/Classic/PLM.htm
Posted by: 914Eric Dec 15 2012, 01:21 PM
It's not necessary to use high temperature paint on the tins. A good argument for painting them yourself is that you can touch it up. Also, they are painted from the factory.
I think it's cool to see the offset stamped markings, so cool. That's mostly just me though.
Interesting, I don't see your engine tin code in Bowlsby's list.http://bowlsby.net/914/Classic/PLM.htm
That is interesting.
I went out and checked and the tin code on mine is EA349 over 621. and not in Bowlsby's list. What do those numbers signify?
OK...please school me on what an "Offset stamped markings" are???
Posted by: oldschool Dec 15 2012, 02:34 PM
I am sorry to hear of your dads passing however; What an amazing gift to remember him by. I hope my kids will remember their father by driving the OG 914.
scott,
We have a bunch of teener in and around L.A. if you need anything.
Posted by: nathansnathan Dec 15 2012, 03:18 PM
It's not necessary to use high temperature paint on the tins. A good argument for painting them yourself is that you can touch it up. Also, they are painted from the factory.
I think it's cool to see the offset stamped markings, so cool. That's mostly just me though.
Interesting, I don't see your engine tin code in Bowlsby's list.http://bowlsby.net/914/Classic/PLM.htm
That is interesting.
I went out and checked and the tin code on mine is EA349 over 621. and not in Bowlsby's list. What do those numbers signify?
OK...please school me on what an "Offset stamped markings" are???
I was just referring to how sloppily done they are, difficult to copy that look. They indicate what build the engine is. I have a 621 and a 613, 49 state and CA 1.7. I'm not sure what yours mean. You might have a 0.22 somewhere or others even. It is a bit of an unknown. There is a thread somewhere..
Posted by: 914Eric Dec 15 2012, 04:28 PM
I was just referring to how sloppily done they are, difficult to copy that look. They indicate what build the engine is. I have a 621 and a 613, 49 state and CA 1.7. I'm not sure what yours mean. You might have a 0.22 somewhere or others even. It is a bit of an unknown. There is a thread somewhere..
Ahhh...gotcha. The numbers were definitely smeared on mine.
Posted by: euro911 Dec 15 2012, 04:40 PM
I think Pat Garvey was going to have a stencil or a stamp made to reproduce the numbers.
Posted by: 914Eric Dec 16 2012, 10:13 AM
Had the county sheriff out to inspect the 914, and a quick 5 minute VIN number verification turned into an hour of close inspection. He was the duty sergeant and driving the big SUV that the sergeants drive. Seems he owned a body shop and restored a few cars in his days before joining the force. Let’s just say he couldn’t keep his eyes off every inch of the car.
He took a rag and some ArmorAll I had on the shelf and gently rubbed out a small spot where the paint had the worst oxidation. Paint shined up really nice. He assured me that the car would buff out beautifully.
As he departed, he told me not to be frightened next summer if I get pulled over by the sheriff’s SUV with flashing lights. He wants to see the car when it’s done. I promised him a ride.
Posted by: SirAndy Dec 16 2012, 12:39 PM
I went out and checked and the tin code on mine is EA349 over 621. and not in Bowlsby's list. What do those numbers signify?
OK...please school me on what an "Offset stamped markings" are???
You need to spend some time here:
http://www.914world.com/bbs2/index.php?showforum=44
There's a thread about those tin markings. There's also a thread about suspension markings.
If i had a car that was still close to original, i would take great care to preserve any markings or stickers etc.
Posted by: 914Eric Dec 16 2012, 09:12 PM
I went out and checked and the tin code on mine is EA349 over 621. and not in Bowlsby's list. What do those numbers signify?
OK...please school me on what an "Offset stamped markings" are???
You need to spend some time here:
http://www.914world.com/bbs2/index.php?showforum=44
There's a thread about those tin markings. There's also a thread about suspension markings.
If i had a car that was still close to original, i would take great care to preserve any markings or stickers etc.
Andy,
Couldn't agree more. That is why I'm taking my time and taking it apart one little piece at a time. And taking literally...hundreds of pics. I really want this to be as nice as beige Steve's car when I'm done.
Thanks for the push over to the originality forum. I really do need to spend some time there reading and learning. I was reading about the rocker panel rivet controversy.
Oh...for the record...My car is an early 73 car with the aluminum door thresholds, and my rocker panels were attached with white, METAL rivets. They WERE NOT plastic. I also know that the rocker panels had never been removed, so this is how the car was delivered.
Posted by: 914Eric Dec 17 2012, 03:07 PM
Since this came up elsewhere, I thought I should document it here in the build thread.
My dealer, Greene in Norwalk, added the aluminum kick plates, Porsche lettering on the rocker panels, and the most controversial of them all…An additional Porsche badge on the rear.
On inspection of the additional Porsche badge, you see that it is made identically to both the 914, and 2.0 badges. Same exact pins in the back, as well as the same exact mounting hardware and special washers. They are not some peel-n-stick junk that a salesman on a whim decided to slap on.
So if I choose to remove the badge, I would need to fill and sand the holes, and then re-spray perfectly Fine original paint on the back of the car. That seems counterproductive to me.
I’m pretty sure people wouldn’t remove Yenko engine parts or graphics that weren’t “Factory” and then re-paint the car. So my opinion is that what came from the Dealer is what's original. Others might think that I should remove this piece and repaint the car. I think repainting an original paint car is far worse than the added badge. And I think the badge looks cool. 
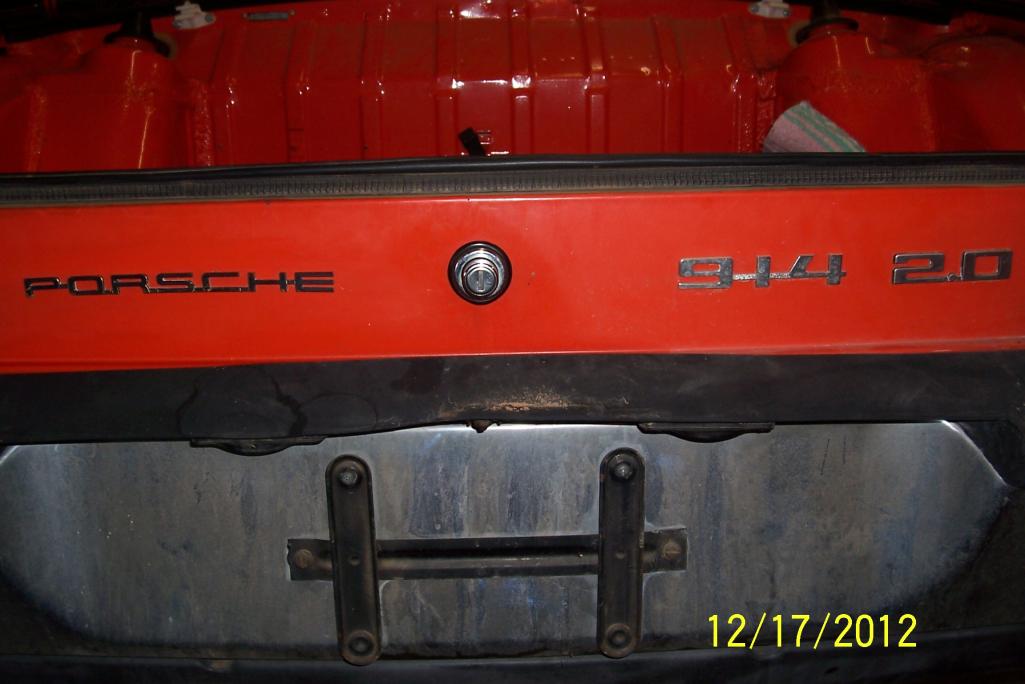
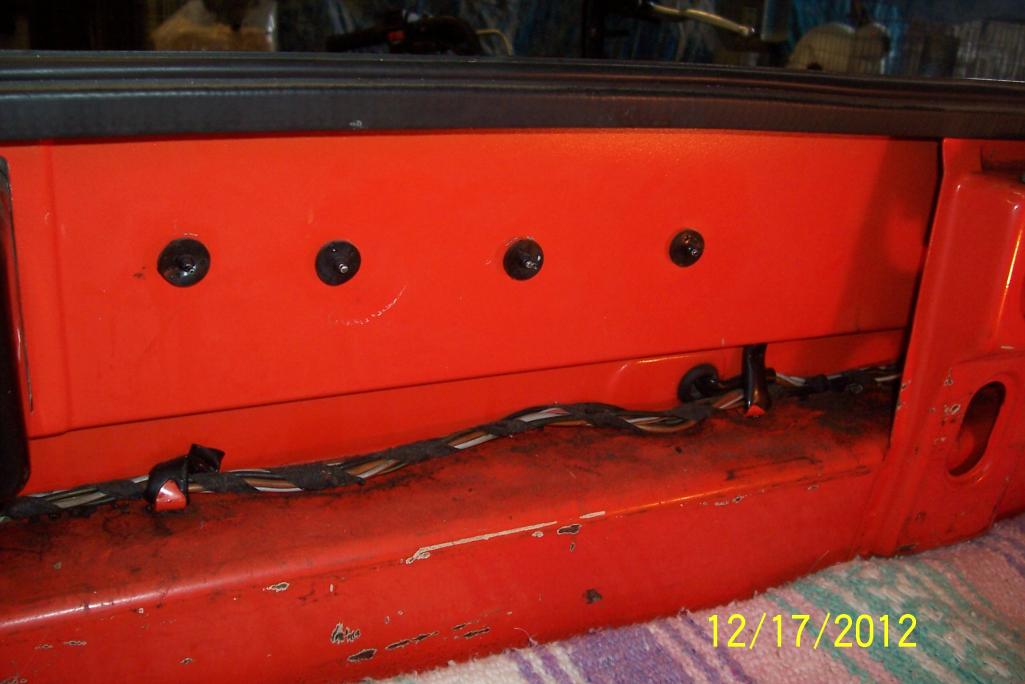
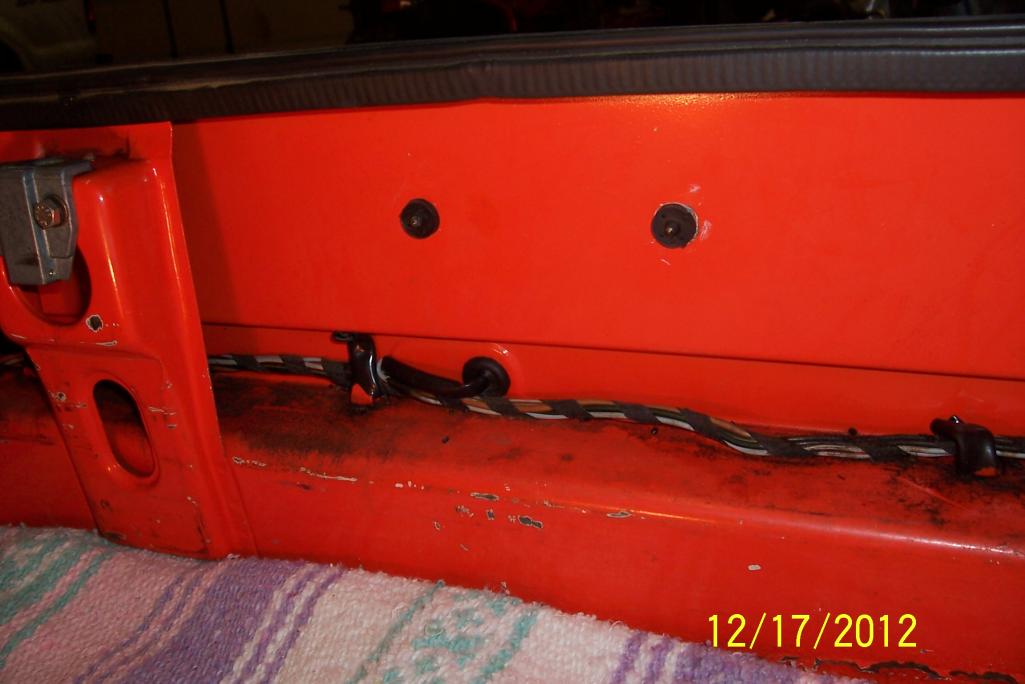
Posted by: McMark Dec 17 2012, 03:37 PM
I agree with your logic. What's actually original is so incredibly nebulous that it's almost irrelevant. For example, if you've replaced your brake pads, your car isn't original anymore. 
Posted by: tod914 Dec 17 2012, 04:00 PM
Leave the logo on there. It's a conversation piece There was an light ivory 75/76 that was being sold roughly five years back that also had a "special" dealer treatment. I'll see if I still have the coorespondence. I believe it was either an Ohio or Georgia dealership that did it.
Also anxious to see what you use on your fan shroud to clean it. Mine is abit grungy too and also has that green dot. Take great care with those vacuum lines. They get quite brittle at the connection points over time. The salmon colored you can't get anymore, and the black/grey is dyed differently now. Nice to see that your trying to preserve as much as you can.
Posted by: turk22 Dec 17 2012, 07:35 PM
Eric, I would keep it as delivered. I think your logic is spot on, if it was delivered from the dealer that way, it should stay.
In my opinion with so much of the 914 being dealer installed (like the AC), those options are all part of the "original" car.
Posted by: dlkawashima Dec 17 2012, 10:08 PM
<snip>
So if I choose to remove the badge, I would need to fill and sand the holes, and then re-spray perfectly Fine original paint on the back of the car. That seems counterproductive to me.
<snip>
I PM'd Eric about it, but since I was the one who started the controversy by whining about the badge, I feel I should publicly say that I agree with Eric's decision. My complaint stemmed from a purely aesthetic viewpoint. I should have realized that the way the badge was installed would not lend itself to easy removal.
BTW, I'm pretty sure the badge is meant for a 356, like the one below .....
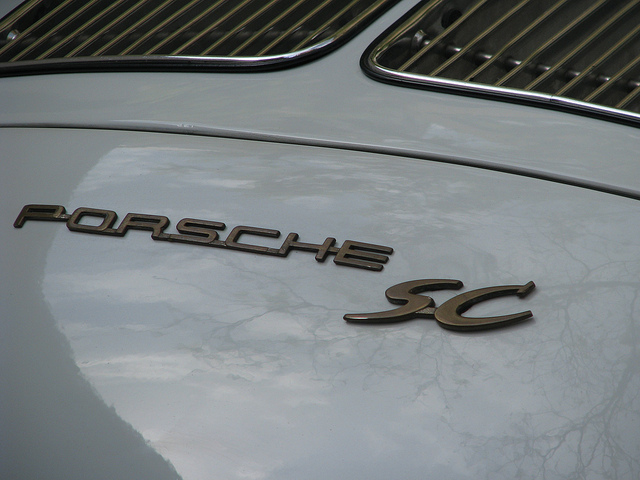
Posted by: nathansnathan Dec 17 2012, 11:16 PM
I thought my whining about the badge started it
I would be torn about the badge but I would probably leave it, even though it drives me crazy, being too high up and too far to the right and too small a size, redundant with the lid lettering.... sorry, I'll stop. 
Posted by: bigkensteele Dec 17 2012, 11:38 PM
If that is how it was delivered to the customer from the dealer, it is original in my book. Dealers have been adding things for nearly 100 years to increase their margins, not just in the US, but all over the world. Undercoating on 914s is a perfect example.
Suppose I found a '70 Six in pristine original condition down to the brake pads, but it was undercoated by the dealer, would I buy it and then take on the task of removing the undercoating, respraying the entire under-carriage, or would I just clean everything up and present it as original?
In my estimation, since this is the way the car was delivered from the dealer, it is original and should be kept intact. It may not be Karman original, but it is "delivered" original.
Please keep in mind here that Eric owes nothing to anyone. It is his car, and not the property of some concours judge. If I owned this car and had memories of my Dad bringing it home as it looks now, there is nothing in the world that would make me want to "bring it back to original".
Posted by: dlkawashima Dec 17 2012, 11:59 PM
I thought my whining about the badge started it
Hey, you're right Nathan, you started it. I feel better now.
Posted by: 914Eric Dec 18 2012, 09:55 AM
I thought my whining about the badge started it
Hey, you're right Nathan, you started it. I feel better now.
Sorry Dave, but it was you.
Posted by: 914Eric Dec 21 2012, 12:29 PM
Pulling off all 4 of my disk brake calipers to send out for restoration right after new year, and was wondering if I need to do anything with the brake lines?
They seem fine, and there has never been a problem. But after 20 years of storage are there any issues I should check for while they are apart? What about any other part of the braking system?
Posted by: bigkensteele Dec 21 2012, 12:40 PM
Pulling off all 4 of my disk brake calipers to send out for restoration right after new year, and was wondering if I need to do anything with the brake lines?
They seem fine, and there has never been a problem. But after 20 years of storage are there any issues I should check for while they are apart? What about any other part of the braking system?
You will want to replace the rubber lines. Just add them to your order from Eric.
Posted by: Gint Dec 21 2012, 05:19 PM
They seem fine, and there has never been a problem. But after 20 years of storage are there any issues I should check for while they are apart? What about any other part of the braking system?
Get new rubber lines.Posted by: 914Eric Dec 23 2012, 07:55 PM
So I finally got the rear bumper, valance, and bumper rubber apart. Couple of little dings in the bumper rubber.
I'm guessing this rubber is some kind of soft metal with rubber moulded around it? What is the best way to work some minor dings out of the bumper rubber?
Hammers and dollys or ???
I'm sure there is a thread on this somewhere though I couldn't find a link to one after a search. 
Posted by: dlkawashima Dec 24 2012, 08:57 PM
Eric, I'm not sure that can be repaired. Is it rippled? Others may know better than me, but if it can't be repaired, Mikey914 (Mark) makes a real good reproduction at a reasonable price.
Below is a picture of a NOS bumper cap (front) and the Mikey914 rubber cap (in the back). Click the image to make it original size so you can see the texture of the two. The Mikey914 cap is glossier but as you can (hopefully) see, the texture is very close.
Posted by: 914Eric Dec 24 2012, 10:53 PM
Eric, I'm not sure that can be repaired. Is it rippled?
No...not wrinkled or rippled, just "dented" slightly. It's like the soft metal frame that the rubber is moulded around is dented. If there are new ones available then I guess I can try to work it with a vise, body hammer ans some dollys and see if I can't gently work it back into shape.
Or maybe I should just leave the tiny dent...for character. I mean an original paint car is expected to have a couple chips and dings isn't it?
Most people wouldn't even notice...except anal car crazies like us.
Posted by: 914Eric Dec 29 2012, 11:36 AM
OK...so I'm finally spending $$$. Got my order in with Racer Chris for a MPS rebuild kit. 914Central for injector seals and DJet Temp Sensor, and emailed Mikey for a product list of all the Rubber goods he offers.
Merry Christmas to me.

![]()
Posted by: 914Eric Dec 29 2012, 01:25 PM
Ahhhh...and I just closed the deal for a set of factory manuals from ConeDodger.
Posted by: 914Eric Dec 30 2012, 11:46 AM
OK...I'm getting ready to order new suspension, and I thought that I was convinced that the green Bilsteins were the way to go. Somewhere along the line, Dad put orange Konis on the car.
Since the Bilsteins were a desirable factory option, and reading and listening to different opinions that was the way to go. Now I'm hearing from other that they are just rough and too harsh while cruising.
I remember the original Boges and the car were firm and seemed plenty tight on the high speed curves, but I’m no 100 MPH auto-crosser; although I might like to do it once or twice once I get the car all dialed in.
Those of you following the build know that I'm serious about originality and while I'll never be in a concourse, I'd like to know that I could if I wanted and do pretty well.
So…Black Boges or Green Bilsteins??
Posted by: Gint Dec 30 2012, 11:52 AM
I'm putting the heavy duty Bils in the front of my /6 instead of the sport's. They are supposed to be a little more stock-like than the sports. Won't know for a long while whether that's true or not.
Posted by: rnellums Dec 30 2012, 11:57 AM
I have always heard that Bilsteins give the best all around ride. That said, I have one car with original Boges and one with Koni external adjustables. I certainly prefer the ride of the stock shocks. Its not that sporty perhaps, but as a fun cruiser I couldn't ask for more.
Posted by: hot_shoe914 Dec 30 2012, 12:01 PM
I say green Bilsteins. But I am not real smart like some of these other fellas.
Posted by: tod914 Dec 30 2012, 01:47 PM
Being you have sway bars, the Boges might be ok. I find them to be alittle soft in a car without. If your planning on the stock tire size, then the Bilsteins shouldn't be too rigid, and will be a notable improvement in handling. Regarding concours events, in the northern nj region, they do not judge under carriage or engine bays. You'll likely only see that in zone or parade events. I had the grey paint matched from an original set of Boges. If you need the info, let me know. Tough choice. I went with the Boges for mine, just to keep it as original as possible. If doing it over, I might leen towards vintage Konis, if I could find a set.
Posted by: 914Eric Dec 30 2012, 01:58 PM
I had the grey paint matched from an original set of Boges. If you need the info, let me know.
Hmmm...Thought I read somewhere that the original Boge suspension was black?
OK....never mind...It's the 914-6 that are black...the 4's were grey.
Posted by: dlkawashima Dec 30 2012, 02:52 PM
When I got my car, it had Konis with 140lb. springs. One of the first things I did was take the car down to Ken's Sportech. Dan Thompson (who was there with his '75 2.0) and Mark Villegas (the owner) both recommended I replace them with Bilstein HD shocks/struts and 100lb. springs. Noticeably softer ride, but certainly not soft. I really like the compromise between comfort and performance. BTW, the rear shocks are yellow, the front struts are green.
Posted by: 914Eric Dec 30 2012, 06:00 PM
BTW, the rear shocks are yellow, the front struts are green.
Oh goodie! A red/orange car with yellow on one end and lime green on the other. I'll look like a bowl of rainbow sherbert.
Posted by: 914Eric Jan 4 2013, 11:45 AM
Labeling stuff on the engine getting ready to drop it, and found this laying in the bottom/corner of the engine compartment. Some kind of a little roller wheel.
Okay...what is it?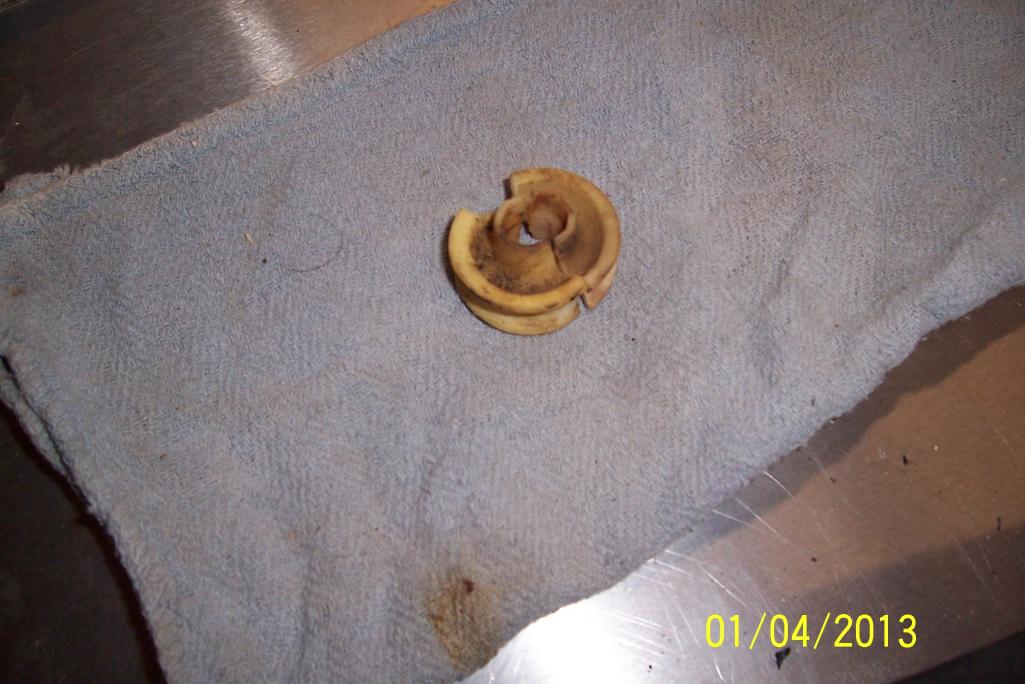
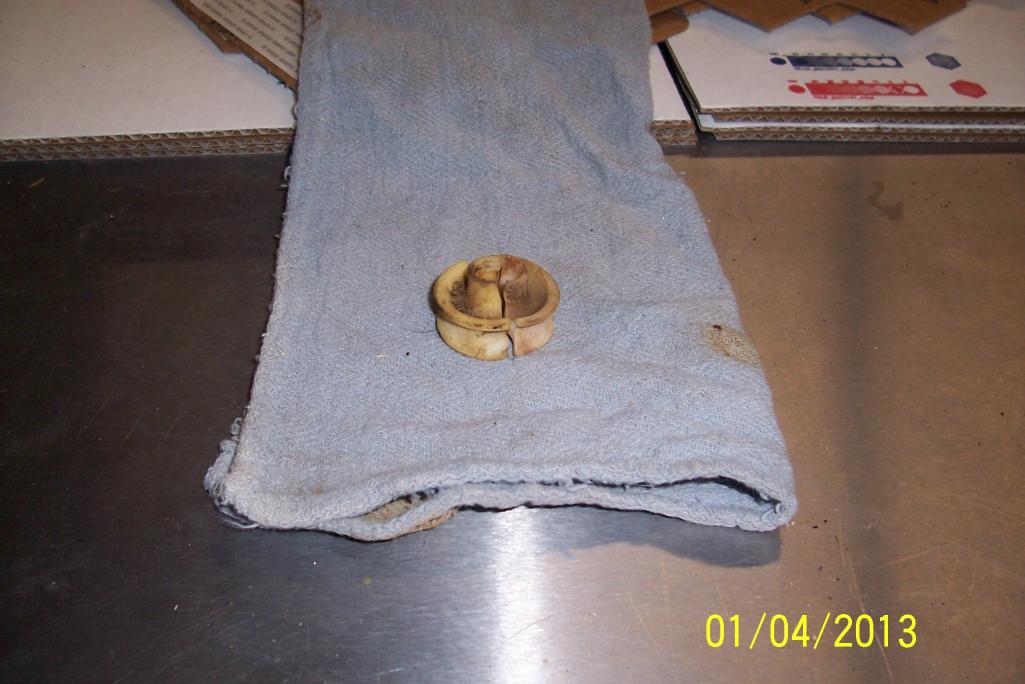
Posted by: bigkensteele Jan 4 2013, 12:03 PM
That is a roller for you engine lid. There is one on each side. Hopefully, it broke long ago and has been replaced.
Posted by: rhodyguy Jan 4 2013, 12:10 PM
rear trunk torsion bar roller. you'll need 2 new ones. vendor mikey914.
before you ask, open trunk and use a prop stick to hold the trunk up (this helps to take the pressure off the bar) find a 1/4" drive deepwell socket, 8mm?, that fits the end of the rod and tap it on. now take an extension and and use it as a lever to pull the rod up, clean and lube the pin the roller slides on to. place roller on pin. set the end of the rod on the groove of the roller. repeat for the other side. don't pinch your fingers.
Posted by: 914Eric Jan 5 2013, 02:18 PM
Couple of more 40 year old parts that have reached the end of the line.
Hose from the heater blower.
Relay cover from behind the drivers seat has cracked where the thumb screw holds it down.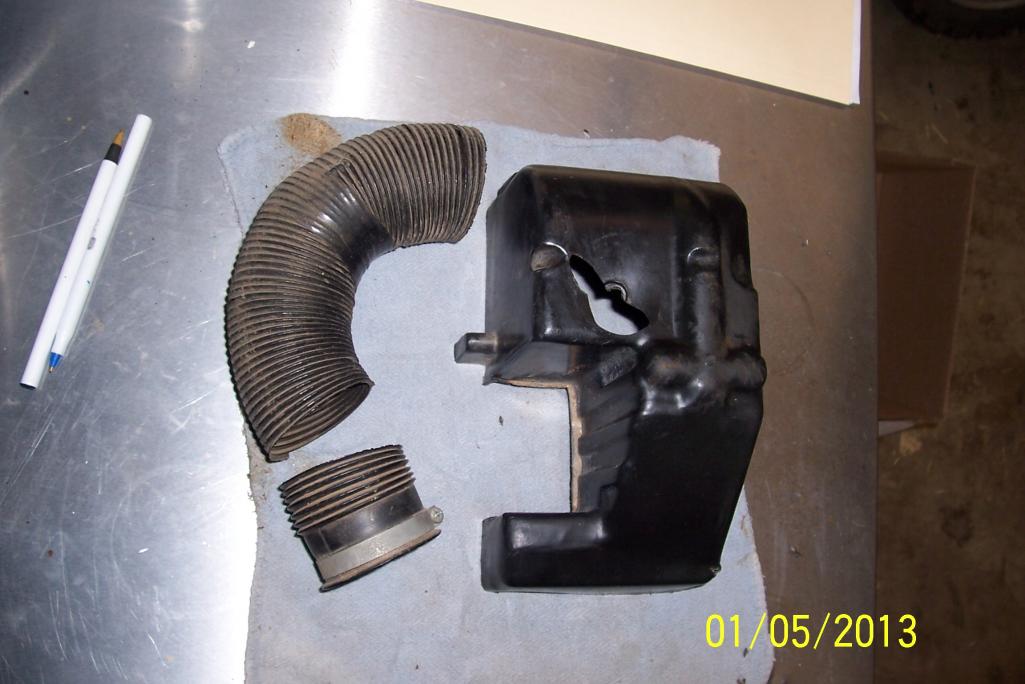
Posted by: 914Eric Jan 8 2013, 12:56 PM
OK...So I'm putting on new Bilstein rear shocks, new wheel bearings, and getting the disk brakes refurbished.
My question is after 20 years in storage do I need to do the bearings in the trailing arms while I'm at it? I know the answer...Yes I should.
But if I replace them, then I will loose the camber and toe-in settings on the rear and I'm not sure how to do a proper job shimming them and getting everything aligned again??? How hard is it to set it up?
Or maybe I just take it to Les Schwab when I'm done and pay them to do the alignment and setup on all 4 wheels?
What do you guys think?
Posted by: brant Jan 8 2013, 01:11 PM
OK...So I'm putting on new Bilstein rear shocks, new wheel bearings, and getting the disk brakes refurbished.
My question is after 20 years in storage do I need to do the bearings in the trailing arms while I'm at it? I know the answer...Yes I should.
But if I replace them, then I will loose the camber and toe-in settings on the rear and I'm not sure how to do a proper job shimming them and getting everything aligned again??? How hard is it to set it up?
Or maybe I just take it to Les Schwab when I'm done and pay them to do the alignment and setup on all 4 wheels?
What do you guys think?
I think a proper 4 wheel alignment by a good shop when your done.
they are not bearings really...
they are rubber bushings that are volcanized in
they can't be replaced to work the stock manner
so the best way to replace them is with a bearing or poly bronze
you can use more affordable plastic bushings too
but the replacment parts become a bearing and not vulcanized in the way the factory design worked...
the stock ones flex, instead of turn
there are 20 threads about this and its more than I can write here
but yes a 4 wheel alignment when you are done
preferabbly by a good shop with 914 experience.
and you can (when supported off the ground) wiggle the stock arm and get a feel for any slop or effectively judge if your stock ones are worn out or not...
brant
Posted by: 914Eric Jan 8 2013, 03:51 PM
yes a 4 wheel alignment when you are done preferabbly by a good shop with 914 experience.
brant
Is there such a place?
Posted by: brant Jan 8 2013, 06:32 PM
yes a 4 wheel alignment when you are done preferabbly by a good shop with 914 experience.
brant
Is there such a place?
we have one
it just changed ownership
although the alignment guy is still there.
but they set up all of the race cars in the state practically.
they set up a national winning autox car 914/6 that took 2nd about 15 years back.
plus all of the local racers
and a bunch of cobra and bugatti's that go to monterey.
Posted by: Gint Jan 8 2013, 06:45 PM
I'm putting Elephant Racing rubber replacement bushings in the front and rear on my /6. Or Eric is anyway.
Posted by: 914Eric Jan 15 2013, 11:36 AM
Been a little tied up for a week or so, but that all has to change now. Received my set of factory workshop manuals in the mail yesterday. I bought them from one of the regulars here on the board.
Spent about 5 hours reading them last night before bed. I'm thinking that must makes me some kind of geek or person without a life. lol
Best part is that now I can stop asking so many "Dumb" questions.
Posted by: McMark Jan 15 2013, 11:41 AM
If you don't have a good 914 alignment shop, you get to learn all about it and ask to be present when the car is worked on so you can lend guidance. You can actually get a decent alignment with some strings, 4 jackstands, and a tape measure.
Posted by: 914Eric Jan 19 2013, 01:20 PM
First batch of new parts have started to arrive.
MPS Diaphram rebuild kit from Chris at Tangerine.
Ebrake boots, large and small injector seals, and DJet temp sensor from 914 central.
Heater hose and Relay cover donated to me from Kevin(rhodyguy). Unfortunately, the relay cover is an early one without the 45 degree cutout so it doesn't fit. Anyone have one to trade?
Set of factory manuals from ConeDodger.
All transaction were fast and smooth.
Thanks Guys.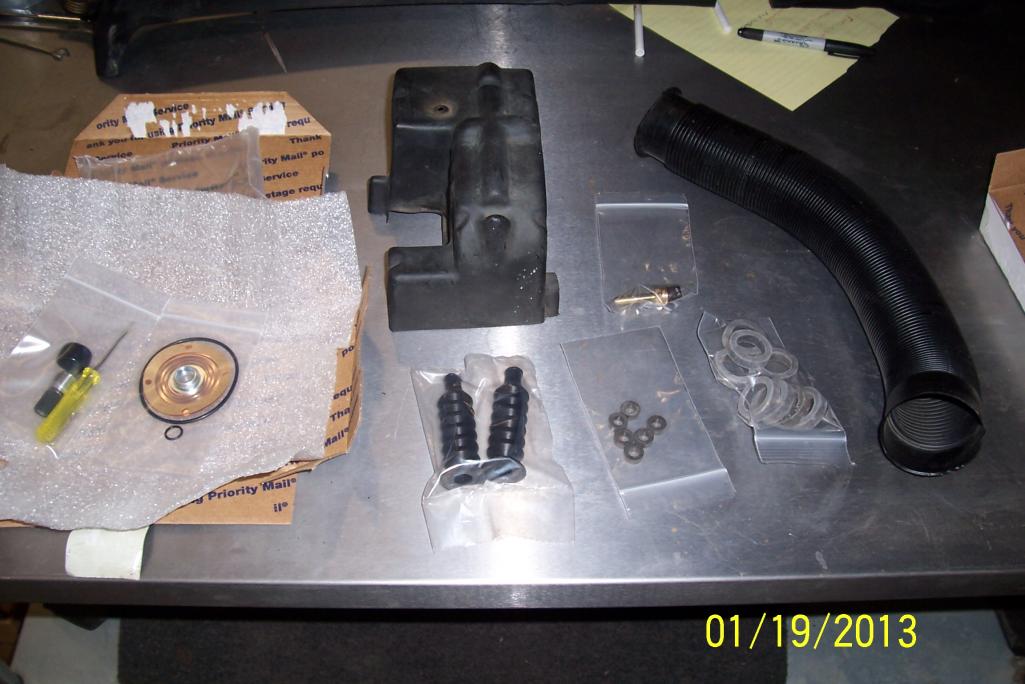
Posted by: Gint Jan 19 2013, 10:36 PM
So take it from a guy with experience. Buying parts won't get your 914 done! Ask me how I know...
Posted by: 914Eric Jan 20 2013, 07:17 PM
So take it from a guy with experience. Buying parts won't get your 914 done! Ask me how I know...
Thanks for the motivation Gint. Turned the heater on in the shop, and turned the TV on to Supercross, then 1 and a half football games. By the time I was done I had the engine ready to drop with the exception of the axles. Engine will be out SOON.
Posted by: 914Eric Jan 21 2013, 03:57 PM
OK...so as I'm disconnecting and labeling everything to drop the engine I see this 3" pipe sticking up through the engine tin with a plastic cap and hose clamp holding the cap on. At first I thought it was for heater blower hose that one of Dad's mechanics capped off when he was trying to fix the fuel pump/won't start issue.
But then I look at some of Pat Garvey's engine bay shots, and on a 73 2.0, the blower hose just goes down to the vent right under the blower and doesn't tee off and go to both sides.
So what is the purpose of this pipe/fitting? It's just to the left of the battery? Looks like it connects to the heat exchanger, but if it is capped off...What good is it?
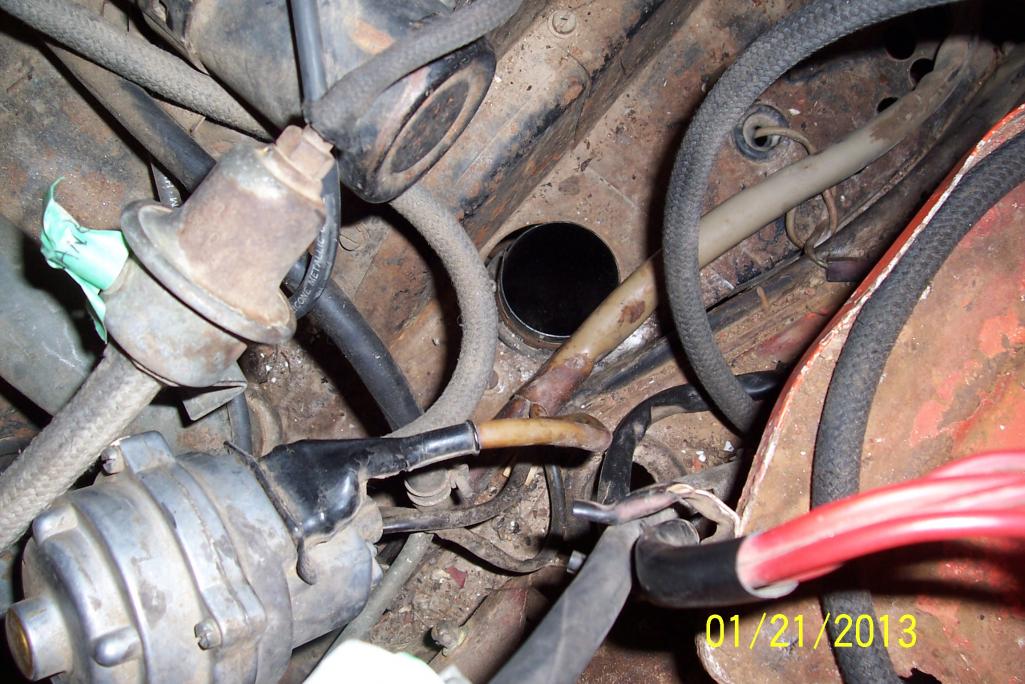
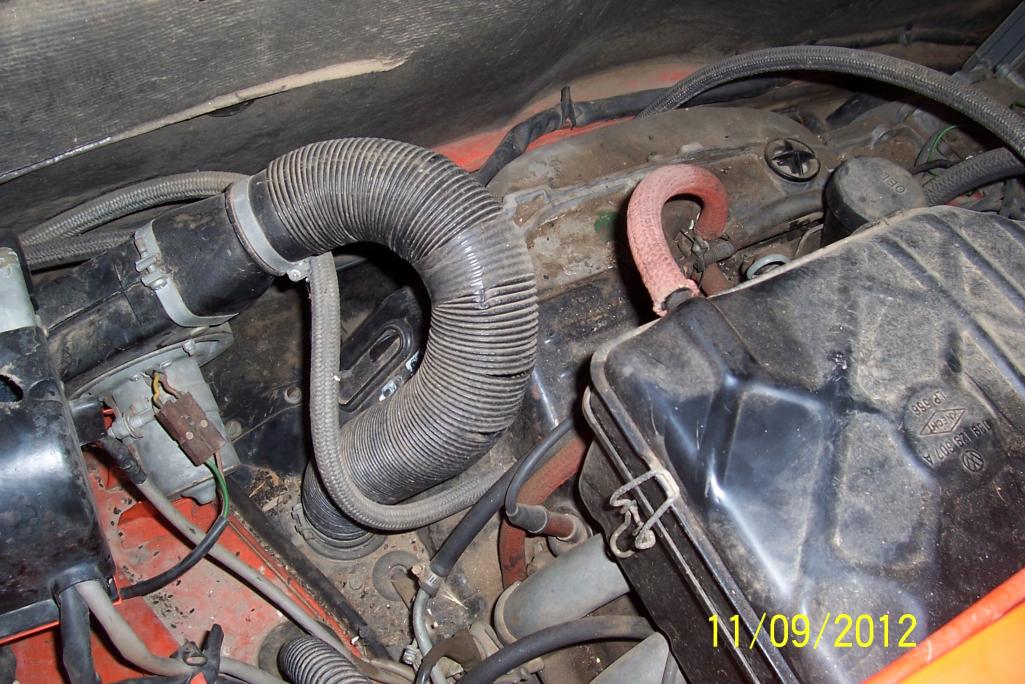
Posted by: turk22 Jan 21 2013, 04:57 PM
Eric, mine is the same way, not sure the reason, but from all the photo's I've seen, its the norm.
If you look at the Sahara Beige car, its the same (which is the car I'm using to look at original configuration)
Attached image(s)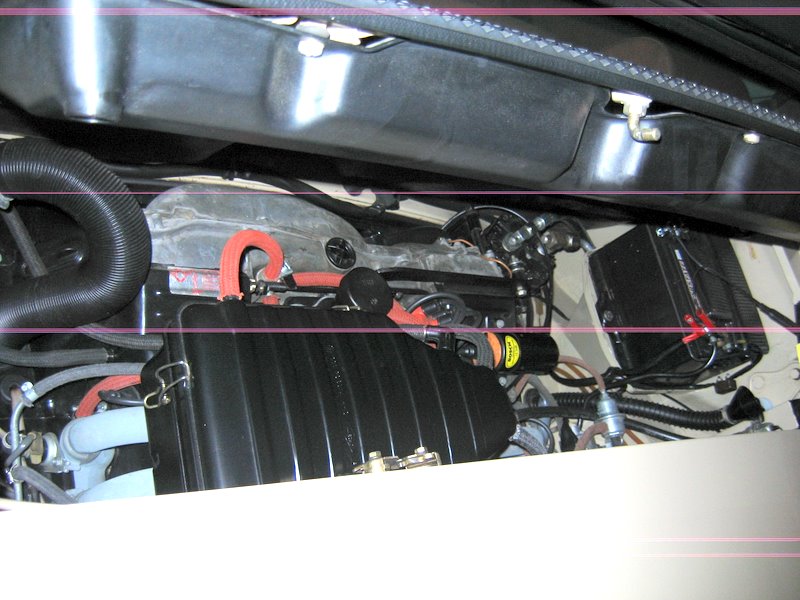
Posted by: Kirmizi Jan 21 2013, 05:16 PM
There's a splitter available that fits onto the heater blower that allows 2 hoses to connect to both heat exchangers. Very nice addition if you drive in cold weather.
The "cap" is a way to cover the passenger side inlet when it's not used.
Mike
Posted by: Dave_Darling Jan 21 2013, 09:03 PM
In the 70-72 cars, the heater blower had two outlets. One went to the J-tube on each side. The 73+ cars had fans with a single outlet. In 73-74, they simply capped off the right-side J-tube. That's the cap you found. On 75-76 cars, they changed the fan outlet to one that split to two fittings, so they could hook up the right-side J-tube again.
TLDR: That's normal for a 73-74 car.
--DD
Posted by: 914Eric Jan 22 2013, 12:21 AM
Thank you Dave, Mike, and Steve...Pretty sure I could have researched for days and not gotten all of that info.
Hmmmm, So...73-74 cars only ended up getting 1/2 of their heater hooked up. That explains why the few times I used the heater in the car it didn't seem to give out much heat.
PAT GARVEY...YOU OUT THERE??
I was just wondering if I will get de-merits on my original car if I hook up ALL of the heater???
I mean...I want my car original; But only using half the heater seems pretty stupid.
Posted by: rnellums Jan 22 2013, 08:57 AM
The whole heater still works. The way I understand it is this: The electric fan boost the flow of air when the engine is moving slowly. So technically if you re-route the air, to both pipes you still get the same amount of air into the cabin either way. Though perhaps at lower temperatures since you would only be using one heat exchanger at idle in stock configuration. At speed I am not sure you would notice a difference since the impeller fan output would far surpass the output from the electric motor, and the fan DOES go to both sides.
Posted by: 914Eric Jan 22 2013, 11:04 AM
The whole heater still works. The way I understand it is this: The electric fan boost the flow of air when the engine is moving slowly. So technically if you re-route the air, to both pipes you still get the same amount of air into the cabin either way. Though perhaps at lower temperatures since you would only be using one heat exchanger at idle in stock configuration. At speed I am not sure you would notice a difference since the impeller fan output would far surpass the output from the electric motor, and the fan DOES go to both sides.
Does sound logical, but in my mind, I still can't get past the fact that Porsche went back to connecting BOTH sides in 75. They must of thought using both sides was better for some reason or they wouldn't have swithched back after connecting only one side for the 2 years? And since they used both sides for the first three years of the car...Why did they EVER go to using just one exchanger? Weird I say.
Posted by: bigkensteele Jan 22 2013, 11:23 AM
My 75 has both sides hooked up with my exhaust backdated to 73 - 74 stainless heat exchangers. I don't think that my fan is even working, and I get plenty of heat into the cabin. The way I understand it, the electric fan just generates additional airflow to what the motor's fan is already putting out.
Posted by: brant Jan 22 2013, 11:33 AM
Eric,
with it disconnected the system is still using both sides.
the electric fan is only supplimental
it is a tiny bit of boost
so yes with both sides connected then both sides are getting the boost
but the engine fan is the workhorse
the boost may help at idle
but the motor fan is 75% of the work at load
so both heat exchangers are used in all years.
Posted by: Kirmizi Jan 22 2013, 01:26 PM
My 75 has both sides hooked up with my exhaust backdated to 73 - 74 stainless heat exchangers. I don't think that my fan is even working, and I get plenty of heat into the cabin. The way I understand it, the electric fan just generates additional airflow to what the motor's fan is already putting out.
I've got the same set-up on mine, and like Brant stated, the electric fan is only supplemental (at best).
Keep your revs up and you'll have more than sufficient cabin heat.
Mike
Posted by: turk22 Jan 22 2013, 01:34 PM
Yea Eric, I guess the way to look at it/understand it is.
when you pull up on the red handle in the cabin, both heat exchangers are supplying heat to the cabin, but when you engage the fan with the lever controls on the dash, the fan is pushing extra heat from only the driver side exchanger.
Its not the passenger side is not used/connected, its just not connected to the fan... if that makes sense..
Posted by: brant Jan 22 2013, 01:49 PM
Yea Eric, I guess the way to look at it/understand it is.
when you pull up on the red handle in the cabin, both heat exchangers are supplying heat to the cabin, but when you engage the fan with the lever controls on the dash, the fan is pushing extra heat from only the driver side exchanger.
Its not the passenger side is not used/connected, its just not connected to the fan... if that makes sense..
small correction
the fan knob on the dash is a different fan (fresh air usually cold)
the knob that opens the flapper boxes and turns on the heat to both sides also turns on the small booster fan (that can boost one or both sides depending on how its hooked up)
but yes... good explanation... you have heat from both sides if your flapper boxes are working and adjusted correctly. I have found that adjusting flapper boxes for full open can increase the heat dramatically without regard to the booster fan.
Posted by: 914Eric Jan 22 2013, 03:47 PM
Thanks fellas for all the info on the heat exchanger.
Got the shift linkage removed and found a broken bushing in the rear linkage. I'm hoping that this might explain the rough/notchy 1st gear shifting I recall when it was last driven back in 92.
Another part for the parts list. Hopefully it's not a NLA part.
All that is left is to get the CV Joints off and then I'll be able to drop the motor. 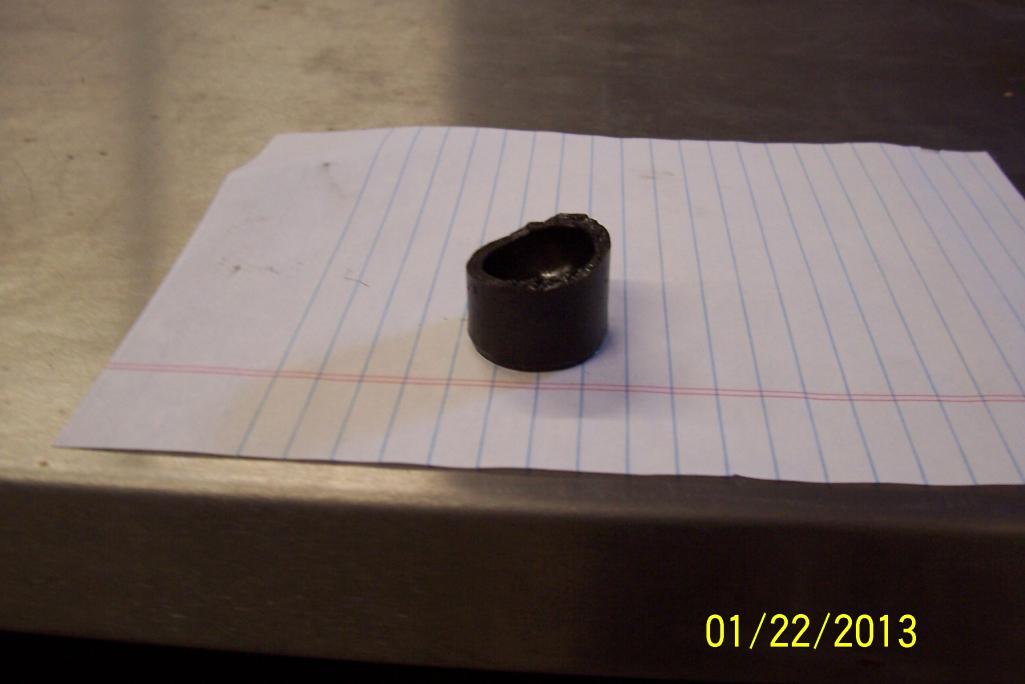
Posted by: bigkensteele Jan 22 2013, 03:56 PM
Thanks fellas for all the info on the heat exchanger.
Got the shift linkage removed and found a broken bushing in the rear linkage. I'm hoping that this might explain the rough/notchy 1st gear shifting I recall when it was last driven back in 92.
Another part for the parts list. Hopefully it's not a NLA part.
All that is left is to get the CV Joints off and then I'll be able to drop the motor.
Mark at 914rubber.com sells a complete shift bushing kit for a very reasonable price. You will need them all, and they make a huge difference.
Posted by: rjames Jan 22 2013, 11:21 PM
I was reading through your old posts and came across this pic: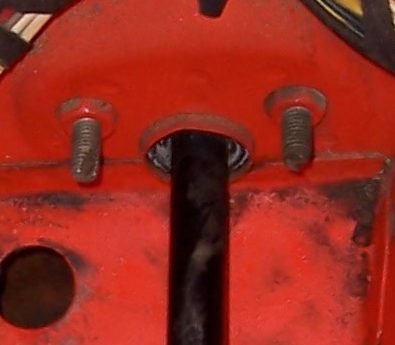
Your sway bar mounting plates just look to be bolted on from the outside through the sheet metal rather than bolted to a plate welded on the inside.
Picture of the plate: (pic from Pelicanparts.com)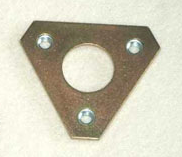
Pic of the plate mounted on the inside (before I welded it in). Note you have to cut a slit in the sheet metal shelf to position the plate correctly.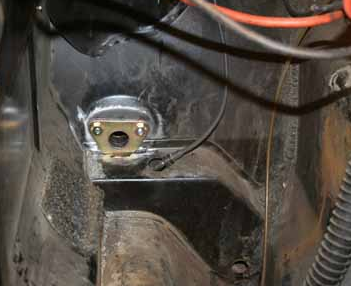
Posted by: rhodyguy Jan 23 2013, 09:35 AM
eric, just go to the hardware store and buy a 3"(?) rubber pipe cap for the pass side j-tube. look in the plumbing dept. use a large stock clamp like the one i sent you to secure the cap. at speed, the 2 little doors on the fan housing outlets close when the engine cooling fan starts pushing the air thru the heat exchangers. plan on R&R every shift linkage bushing. email sent.
k
Posted by: 914Eric Jan 23 2013, 10:41 AM
Your sway bar mounting plates just look to be bolted on from the outside through the sheet metal rather than bolted to a plate welded on the inside.
Picture of the plate: (pic from Pelicanparts.com)
Robert,
That's the way it was made by the factory and I am keeping the car original. Seems to have held up well so far.
Posted by: 914Eric Jan 25 2013, 12:56 PM
The other thing that jumps out at me in the second picture is the duct from the heat exchanger just hanging in the breeze connected with a zip tie.

EDIT: Ooops...Picture added
SirAndy left this comment regarding this picture and i thinks answers my question, but I wanted to clarify:
"Actually, someone added that hose to route hot air away from the fuel pump. The heater valve just dumps the hot air under the car when the valve is closed. Someone added a hose to the valve outlet to redirect the hot air away from the pump".
This is the passenger side heat exchanger. My question is: Does the nozzle in the heat exchanger where the hose is attached just sit there? In other words, if I just remove the metal hose...Is it back to original?
Posted by: tod914 Jan 25 2013, 02:16 PM
Taking off the silver hose would make it back to original. That's a clever idea. First time I seen that.
Posted by: euro911 Jan 25 2013, 04:14 PM
Eric, when you remove the [aftermarket-fix] flex hose, you'll find that the cap on the heater valve is missing.
I think the metal caps were originally designed to keep varmints from entering your heating system to build their nests
Posted by: 914Eric Jan 25 2013, 04:24 PM
Eric, when you remove the [aftermarket-fix] flex hose, you'll find that the cap on the heater valve is missing.
I think the metal caps were originally designed to keep varmints from entering your heating system to build their nests
How right you are Mark. Once I removed the hose and valve, it shows that whoever rigged up this [Aftermarket-Fix] busted off all the tabs on the H.E. valve that go through the cap and secure it.
So...seems that now instead of needing just the cap...I need the entire passenger side valve. Unless possibly, one of you folks here on the World knows a clean way to secure the cap without the mounting tabs?
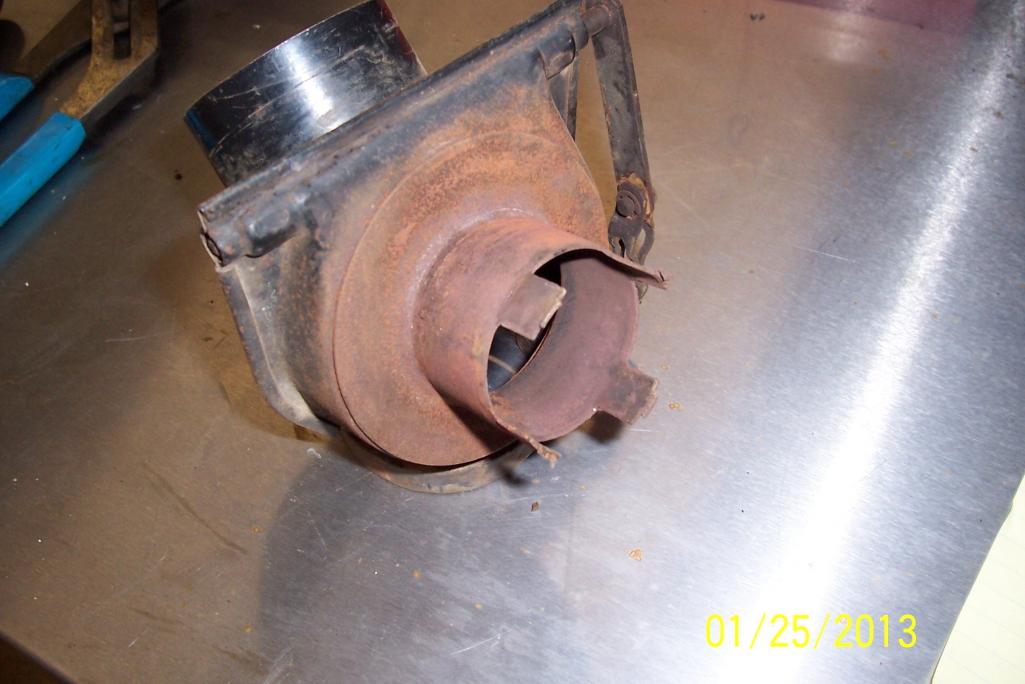
Posted by: euro911 Jan 25 2013, 04:35 PM
If you still have the old cap, you could try to weld it back on where the slots are, but you might be better off locating another valve ... they're not hard to come across for cheap. I'll see if I have any extras laying around the shop.
Posted by: Kirmizi Jan 25 2013, 06:13 PM
Allegedly, popping that cap off was a factory authorized "fix" years ago, to prevent the fuel pump from overheating.
Posted by: 914Eric Jan 25 2013, 06:31 PM
Allegedly, popping that cap off was a factory authorized "fix" years ago, to prevent the fuel pump from overheating.

Posted by: bigkensteele Jan 25 2013, 07:30 PM
Allegedly, popping that cap off was a factory authorized "fix" years ago, to prevent the fuel pump from overheating.
Actually, I think that he is right. I believe that somebody posted a TSB from Porsche detailing the modifications done to your car. So, while not original, they are factory-blessed.
Posted by: rhodyguy Jan 26 2013, 12:35 PM
the wadded up aluminum foil (what it looks like to me) around the fuel lines is weird. the air deflector seems wonky too.
k
Posted by: 914Eric Jan 26 2013, 01:54 PM
the wadded up aluminum foil (what it looks like to me) around the fuel lines is weird. the air deflector seems wonky too.
k
Kevin,
Yes it WAS aluminum foil around the fuel lines. and the air deflector was modified to direct air UP into the engine, rather than down. And then of course the aluminum hose connected to the H.E. valve. All will be put back to original. If I run into any vapor lock problems, I'll just move the fuel pump up to the front and solve the problem correctly.
Since I'll be driving in the PNW, and not through the Mojave desert in the summer like my Dad did...I'm hopeful that the vapor lock problem will no longer be an issue.
Posted by: 914Eric Jan 28 2013, 05:24 PM
OK...so what is the secret for getting the heat exchanger unscrewed from the cylinders?
I got three of the 4 nuts off on the driver side, and Only 2 on the passenger side. The space is so tight that my 13mm socket won't even fit up there.
I'm ready to drop the engine, and this was the last thing to do. Are they easier to get off once the engine is out? Doesn't seem so to me, but I'm a rookie so what do I know.
Thanks in advance guys.
Posted by: Dave_Darling Jan 28 2013, 06:23 PM
The trick for me was to use 1/4" drive sockets. They tend to be a little thinner-walled than 3/8" drive ones, and fit slightly better into those cramped spaces. Also, some brands are thinner than others. For instance, I know that a 10mm 1/4" drive socket from Snap-On will fit into a 911 seat rail, while a 10mm 1/4" drive socket from Craftsman will not.
I also used a "wobble" extension as well on the heat exchanger nuts to give me more approach angles. Not sure that I actually needed it, but I had one on hand.
--DD
Posted by: Jeff Bowlsby Jan 28 2013, 06:38 PM
Allegedly, popping that cap off was a factory authorized "fix" years ago, to prevent the fuel pump from overheating.
True. Using asbestos cloth on the fuel lines, not aluminum foil.
http://bowlsby.net/914/Classic/zSB_1973-10-06_P213.pdf
Posted by: 914Eric Jan 28 2013, 07:18 PM
The trick for me was to use 1/4" drive sockets. They tend to be a little thinner-walled than 3/8" drive ones, and fit slightly better into those cramped spaces. Also, some brands are thinner than others.
--DD
You're the Man Dave! 1/4 drive fit right up there. Came off nicely with the exception of one exhaust stud which came out.
So should I use some RED LockTite when I put the stud back in, or is there a better way to keep it from coming out?
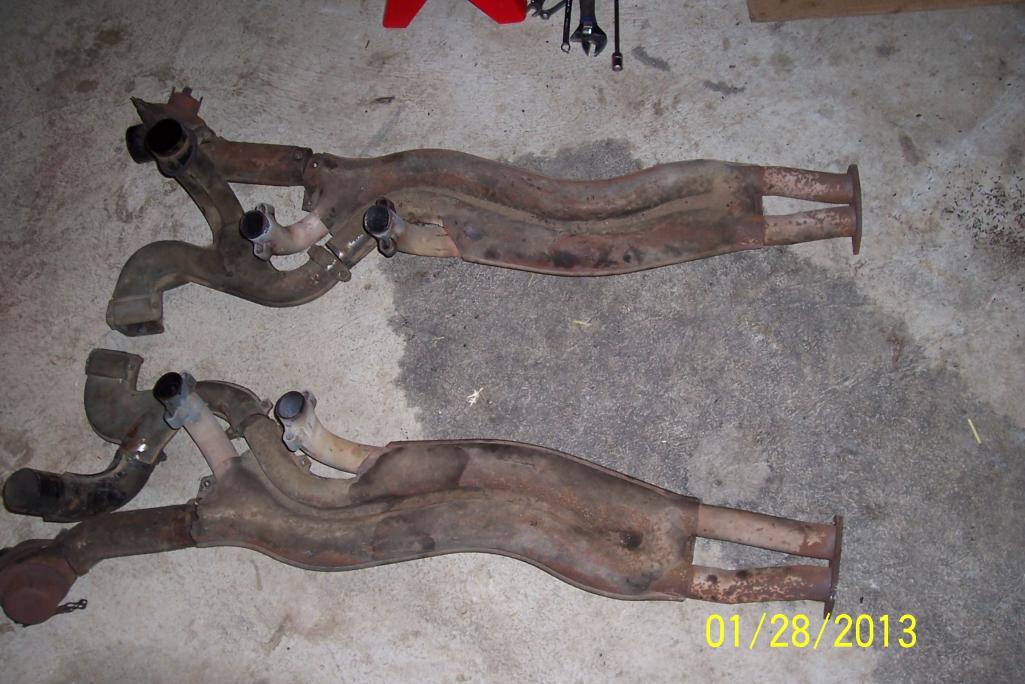
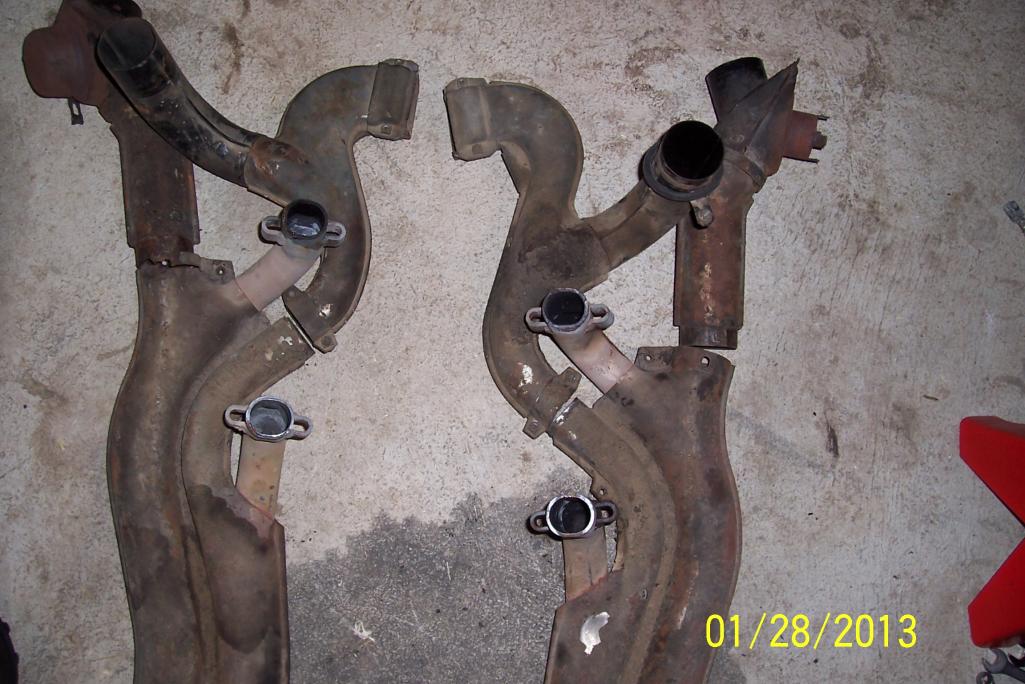
Posted by: bigkensteele Jan 28 2013, 07:30 PM
So should I use some RED LockTite when I put the stud back in, or is there a better way to keep it from coming out?
If anything, you should use anti-seize. Exhaust studs/nuts/heads are notorious for stripping and or breaking. Better that the stud comes out of the head than breaking off.
Posted by: 914Eric Jan 28 2013, 07:37 PM
So should I use some RED LockTite when I put the stud back in, or is there a better way to keep it from coming out?
If anything, you should use anti-seize. Exhaust studs/nuts/heads are notorious for stripping and or breaking. Better that the stud comes out of the head than breaking off.
Yea...Great point Ken...Thanks...I don't know what I was thinking.
That's why I ask a lot of "Stupid" question and think out loud on here. For a hobby mechanic, it's real easy to do something dumb.
Posted by: bigkensteele Jan 28 2013, 07:47 PM
So should I use some RED LockTite when I put the stud back in, or is there a better way to keep it from coming out?
If anything, you should use anti-seize. Exhaust studs/nuts/heads are notorious for stripping and or breaking. Better that the stud comes out of the head than breaking off.
Yea...Great point Ken...Thanks...I don't know what I was thinking.
That's why I ask a lot of "Stupid" question and think out loud on here. For a hobby mechanic, it's real easy to do something dumb.
The only stupid question is the one you don't ask, and then make a mistake as a result.
 We have all been in the same boat that you are in now, and I can't speak for everyone, but I enjoy imparting what little knowledge I have on others. Even the old-timers here were newbies once. Except for the Cap'n.
Posted by: Kirmizi Jan 28 2013, 07:59 PM
Looks like one copper gasket is still on the passenger side HE, did you remove the other three from the heads?
Posted by: nathansnathan Jan 28 2013, 07:59 PM
Allegedly, popping that cap off was a factory authorized "fix" years ago, to prevent the fuel pump from overheating.
Actually, I think that he is right. I believe that somebody posted a TSB from Porsche detailing the modifications done to your car. So, while not original, they are factory-blessed.
I was going to mention that. I might do this on my car if there is a problem. http://bowlsby.net/914/Classic/zSB_1973-10-06_P213.pdf
Posted by: euro911 Jan 28 2013, 08:32 PM
'Someone' I know had an exhaust leak and we found two copper gaskets stuck up in one of the ports when we removed the HEs
Posted by: 914Eric Jan 28 2013, 09:39 PM
Allegedly, popping that cap off was a factory authorized "fix" years ago, to prevent the fuel pump from overheating.
Actually, I think that he is right. I believe that somebody posted a TSB from Porsche detailing the modifications done to your car. So, while not original, they are factory-blessed.
I was going to mention that. I might do this on my car if there is a problem. http://bowlsby.net/914/Classic/zSB_1973-10-06_P213.pdf
I'm familiar with the "Recommended Fix". I was laughing because I know it didn't work worth a crap. After this was done, Dad still had problems. Knocking off the cap and adding a hose, and wrapping the fuel lines in tin foil, did not fix the problem.
Like I said earlier, Dad liked to drive the car to the river and Vegas in 110 degree temps, so I'm hoping since Idaho is more 50-80 degrees...It won't be an issue any more.
I think the only TRUE fix is to move the fuel pump up front, and that's what I'll do if this is ever an issue in the future.
Posted by: 914Eric Jan 29 2013, 03:50 PM
Well...There's 40 years of ugly that needs to be knocked off. Now what? lol
So I'm going to clean and paint the tin, changing fuel lines, and vacuum lines, injector seals, throttle body gasket, major tune up, etc...
OK guys...Here's where I need your inputs: What should I NOT FORGET to do while I have the engine out?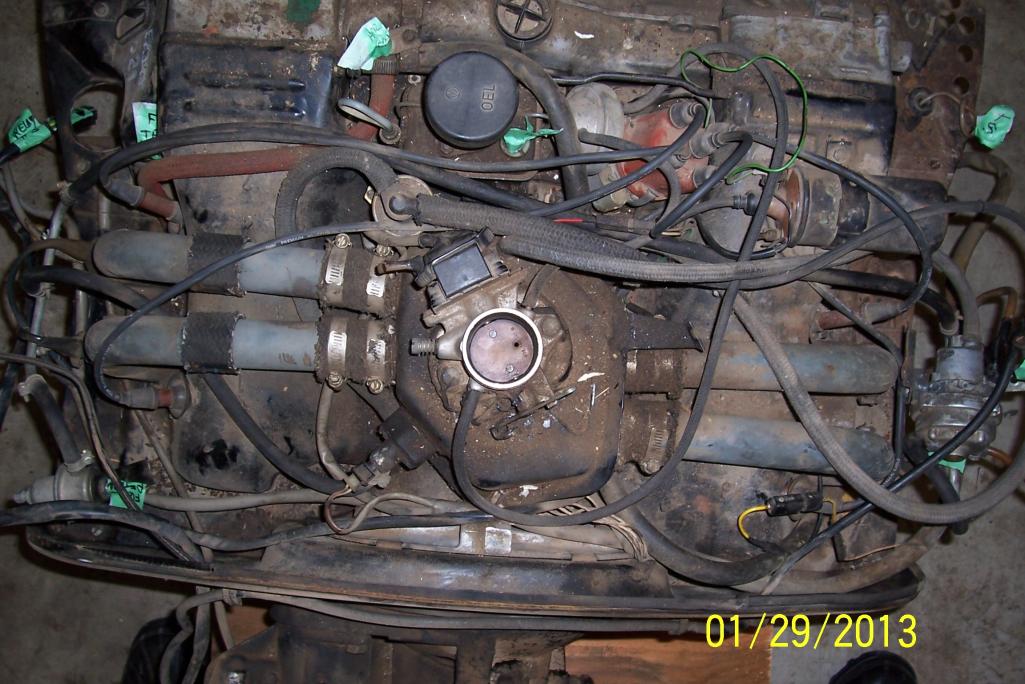
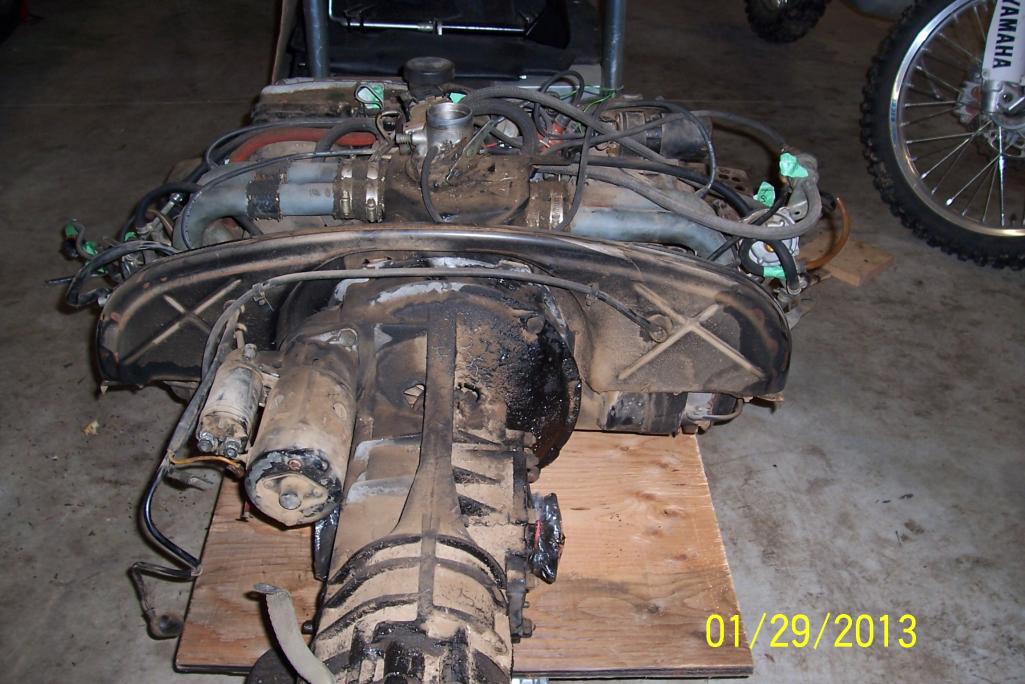
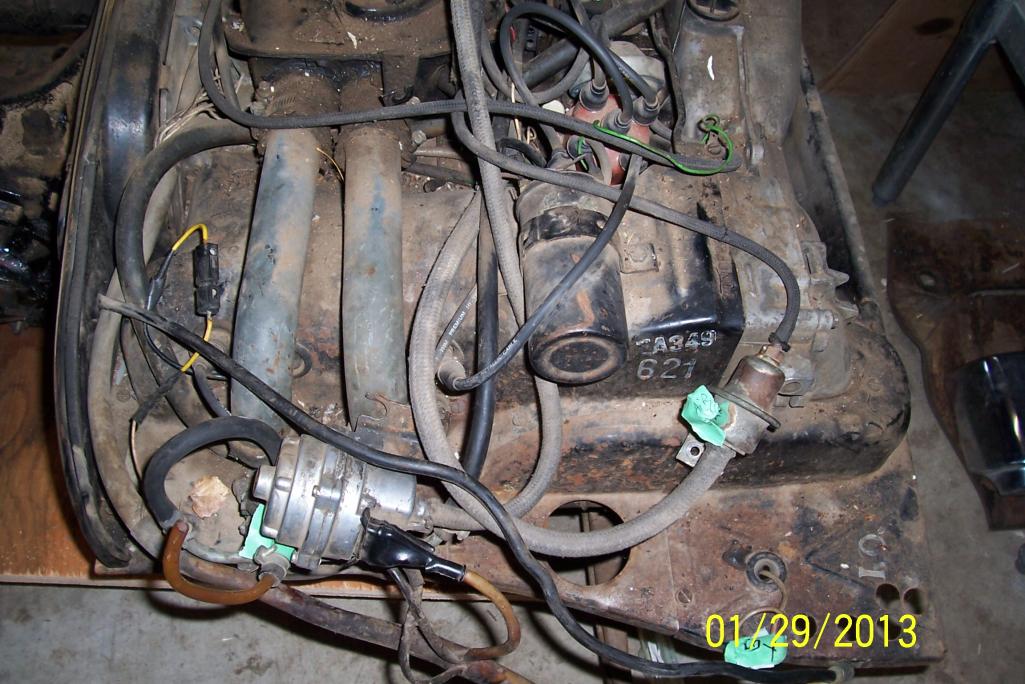
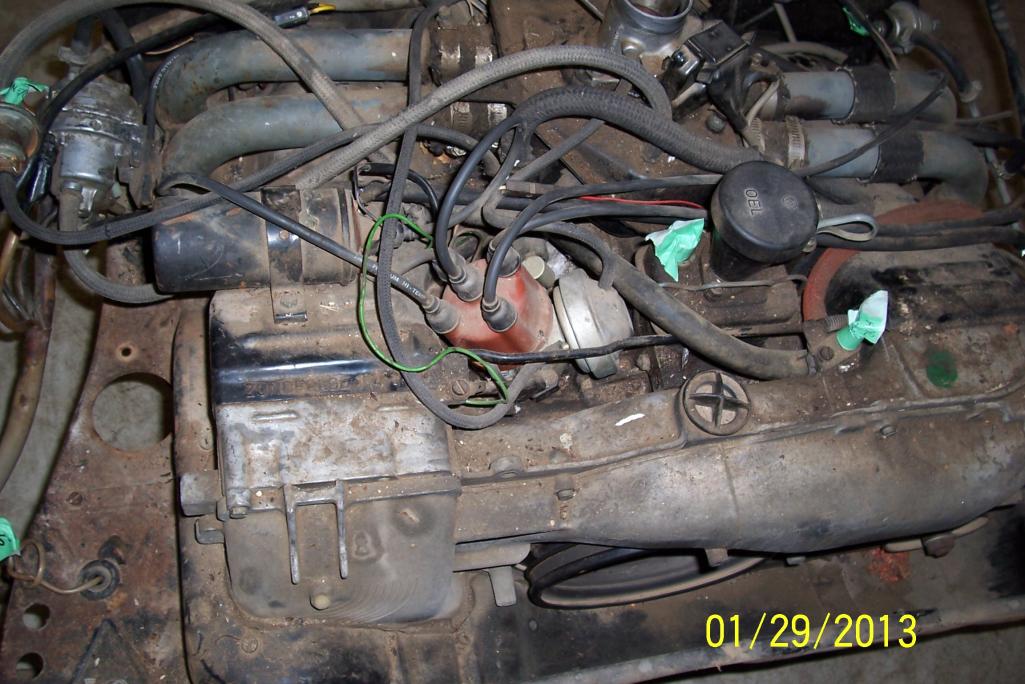
Posted by: bigkensteele Jan 29 2013, 03:59 PM
You might want to get a complete gasket set and replace everything you can reach. It also comes with new exhaust gaskets, which you willl need anyway.
However, the gasket set will not include viton pushrod tube seals and front and rear main seals. I got mine from Eric Shea.
Take pictures of the markings on your tin holding a ruler by them. That way if you will be able to replicate them with a stamp after you paint the tin.
If I can find my checklist, I will pm it to you.
Posted by: Dave_Darling Jan 29 2013, 09:25 PM
If you're going to pull the flywheel off for any reason, epoxy over the oil gallery plugs on the back of the motor. If you're going to pull the fan shroud off (probably a good idea if you're painting the engine tin) you can epoxy over the gallery plugs up front. After a few decades' worth of heat cycles, they can get a little loose and pop out one cold morning when you start the car.
--DD
Posted by: 914Eric Jan 30 2013, 08:38 PM
So before I dropped the engine, I was removing the shift linkage and when I removed the plastic cup that surrounds the rear shift linkage it was full of oil...probably a cup. I'm guessing there is a seal of some sorts that seals the shifting arm? Is this an easy fix of something that requires Dr. Evil or equivalent?
Posted by: Dave_Darling Jan 30 2013, 09:53 PM
Easy fix. Remove the two nuts that hold the side shift console on. Pull it out of the trans; you will need to tilt it at one point to get the rake to clear the hole in the trans. Drain it first or you'll dump your gear oil when you do this...
Press out the roll pin that holds the rake onto the shaft. (Leave the pin that holds the bottom arm onto the shaft in place.) Slide the shaft out of the console, replace the seal, then put it all back together. Don't forget a new O-ring around the shift console.
--DD
Posted by: 914Eric Jan 31 2013, 12:42 PM
Ok, so I spent an hour looking through the Parts DVD trying to find the name of this with no luck. I remember seeing a thread about it a couple of months ago, but since I don't know the name of the part, searches gave me nothing.
So what's it called and does anyone remember the thread that this was discussed in?
The rubber is cracked and I need a new one. I seem to remember from the thread that discussed this that they are NLA? Say it ain't so.
An interesting aside is that the top AAR connection was plugged into this part rather than the connection next to the oil filler which means they were switched. I know this because I have a Dave Darling created schematic of the vacuum system that I got from somewhere that has been a BIG help with labeling and understanding where everything goes.
Posted by: Dave_Darling Jan 31 2013, 01:57 PM
"Stacked Elbow". NLA as far as I know, but Mikey914 was going to make repops of it.
My vacuum diagrams have the two large hoses to the decel valve switched around, BTW.
You can get away with eliminating this piece, hooking the large hose directly to the manifold, then splicing a tee into the vacuum retard hose from the throttle body for the small hose that would plug into the elbow. Not quite optimal, but it will work. Especially in the short term.
--DD
Posted by: championgt1 Jan 31 2013, 01:58 PM
Stacked vacuum elbow. I do believe they are NLA. I would put up a WTB add here and see if anyone has one laying around.
Posted by: JawjaPorsche Jan 31 2013, 04:09 PM
Ok, so I spent an hour looking through the Parts DVD trying to find the name of this with no luck. I remember seeing a thread about it a couple of months ago, but since I don't know the name of the part, searches gave me nothing.
So what's it called and does anyone remember the thread that this was discussed in?
The rubber is cracked and I need a new one. I seem to remember from the thread that discussed this that they are NLA? Say it ain't so.
An interesting aside is that the top AAR connection was plugged into this part rather than the connection next to the oil filler which means they were switched. I know this because I have a Dave Darling created schematic of the vacuum system that I got from somewhere that has been a BIG help with labeling and understanding where everything goes.
I think Auto Atlanta sells the stacked elbow:
http://www.autoatlanta.com/Porsche-Stacked-Vacuum-Elbow-Parts-PN-B022129637B.html
Hope this helps.
Terry
Attached image(s)
Posted by: championgt1 Jan 31 2013, 04:22 PM
I bought one of those. Never again!!! A vacuum elbow is no good when it is "new" and has holes in it!
Posted by: JawjaPorsche Jan 31 2013, 04:24 PM
Well...There's 40 years of ugly that needs to be knocked off. Now what? lol
So I'm going to clean and paint the tin, changing fuel lines, and vacuum lines, injector seals, throttle body gasket, major tune up, etc...
OK guys...Here's where I need your inputs: What should I NOT FORGET to do while I have the engine out?
Replace air intake manifold gasket and hose. Pelican has them:
http://www.pelicanparts.com/cgi-bin/smart/more_info.cgi?pn=039-133-241-M21&catalog_description=Intake%20Manifold%20Hose%2C%20each%2C%20914%201.8L%2F2.0L%20%281973-76%29
http://www.pelicanparts.com/cgi-bin/smart/more_info.cgi?pn=039-129-707-M17&catalog_description=Intake%20Manifold%20Gasket%20%282%20per%20car%2C%20sold%20individually%29%2C%20914%202.0%20%281973-76%29%2C%20Each
Also paint your air intakes and injector brackets. See picture how it really makes your engine look better. I used heat paint.
Attached thumbnail(s)
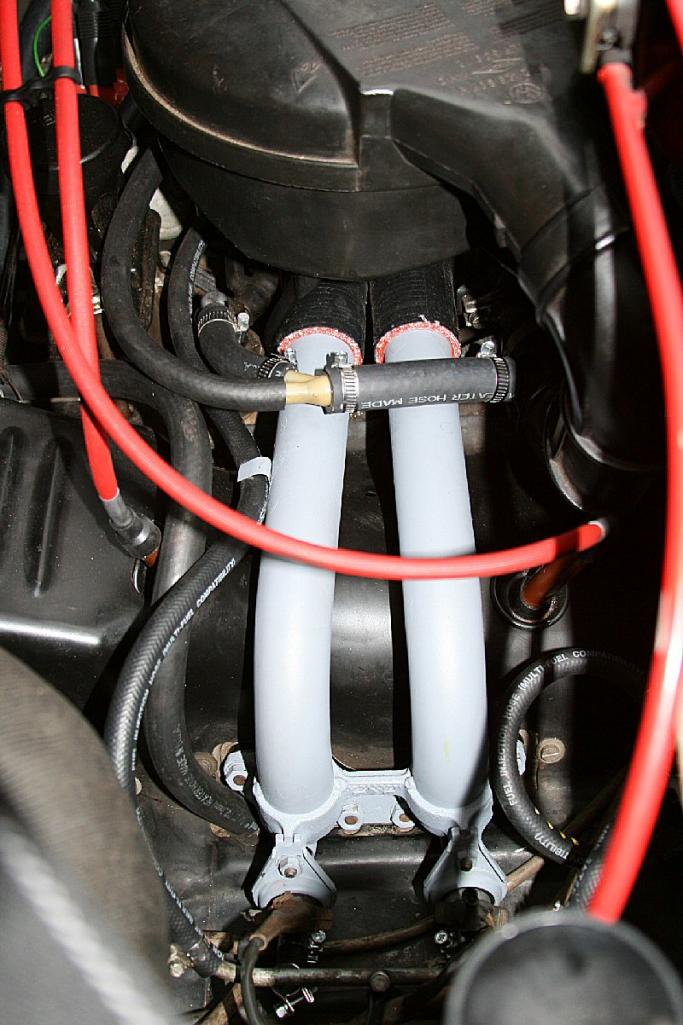
Posted by: Jeff Bowlsby Jan 31 2013, 07:26 PM
Well...There's 40 years of ugly that needs to be knocked off. Now what? lol
So I'm going to clean and paint the tin, changing fuel lines, and vacuum lines, injector seals, throttle body gasket, major tune up, etc...
OK guys...Here's where I need your inputs: What should I NOT FORGET to do while I have the engine out?
I rarely self-promote, but you asked...I gotta say your wiring looks marginal at best. I know someone who can make it all better for you...
Free repair quote if you will send it all to me, PM/email me for details. FI harness, Ignition harness, Oil temp sender wire and Alternator harness...check them all over.
Posted by: JawjaPorsche Jan 31 2013, 07:36 PM
Well...There's 40 years of ugly that needs to be knocked off. Now what? lol
So I'm going to clean and paint the tin, changing fuel lines, and vacuum lines, injector seals, throttle body gasket, major tune up, etc...
OK guys...Here's where I need your inputs: What should I NOT FORGET to do while I have the engine out?
I rarely self-promote, but you asked...I gotta say your wiring looks marginal at best. I know someone who can make it all better for you...
Free repair quote if you will send it all to me, PM/email me for details. FI harness, Ignition harness, Oil temp sender wire and Alternator harness...check them all over. Jeff is the best.
Posted by: 914Eric Jan 31 2013, 09:26 PM
I rarely self-promote, but you asked...I gotta say your wiring looks marginal at best. I know someone who can make it all better for you...
Free repair quote if you will send it all to me, PM/email me for details. FI harness, Ignition harness, Oil temp sender wire and Alternator harness...check them all over.Jeff is correct in that the wires are all very brittle and some have black tape covering scrapes and breaks. I haven't looked at all the connectors yet but the few I did look at seemed OK.
Posted by: tod914 Jan 31 2013, 09:31 PM
You'll be more than pleased with Jeff's work. Top notch. Very accomodating. He even sourced the correct color sheathing for me on a previous 914.
Posted by: zambezi Jan 31 2013, 10:13 PM
clutch, throw out bearing, adjust valves
Posted by: rhodyguy Feb 1 2013, 10:53 AM
i saw the repro stacked elbow championgt1 received from AA. pos, junk ( i warned him ). they wouldn't sell him one of the nos ones they claimed to have in stock. if you buy a repro be sure to save the metal tubes as the repros don't come with them.
Posted by: tod914 Feb 2 2013, 12:43 AM
What about using a 1.7 elbow. A little different configuration, but should work. NOS ones are still around.
Posted by: 914Eric Feb 2 2013, 10:23 AM
What about using a 1.7 elbow. A little different configuration, but should work. NOS ones are still around.
I'll look into that Tod...Thanks.
Posted by: 914Eric Feb 2 2013, 10:33 PM
I got the fuel pump out and all the fuel lines in the engine compartment. Also got the fuel rails and injectors out. I'm trying to make sense of the how it works.
I have 4 questions
The "S" suction line on the left coming from the fuel tank is obvious.
The damper "D" line in the middle runs to the passenger side fuel rail, and the factory manual says that it "Sends" out fuel.
1)Why is there a short piece of original plastic spliced between the the two rubber ends? Why not just use one long piece of rubber fuel line?
The "R" line on the right has a splitter with the long piece going to the fuel pressure regulator, and the short piece going to the ruturn line.
2) What I don't understand, is how any pressure can be built up for the regulator to regulate, when there is an open connection splitting off and going into the return line? Seems like that as fast as the fuel pump sends it out, it would just drain right off into the return?
It also seems odd that the "D" line even exists since the two fuel rails are connected after the fuel pres. reg. connects to the driver's side fuel rail?
3) Why not just cap the passenger side fuel rail where the "D" line connects to it?
4) Is this what they did on later models that only use 2 prong fuel pumps?
Thanks as always...and ENJOY the game tomorrow.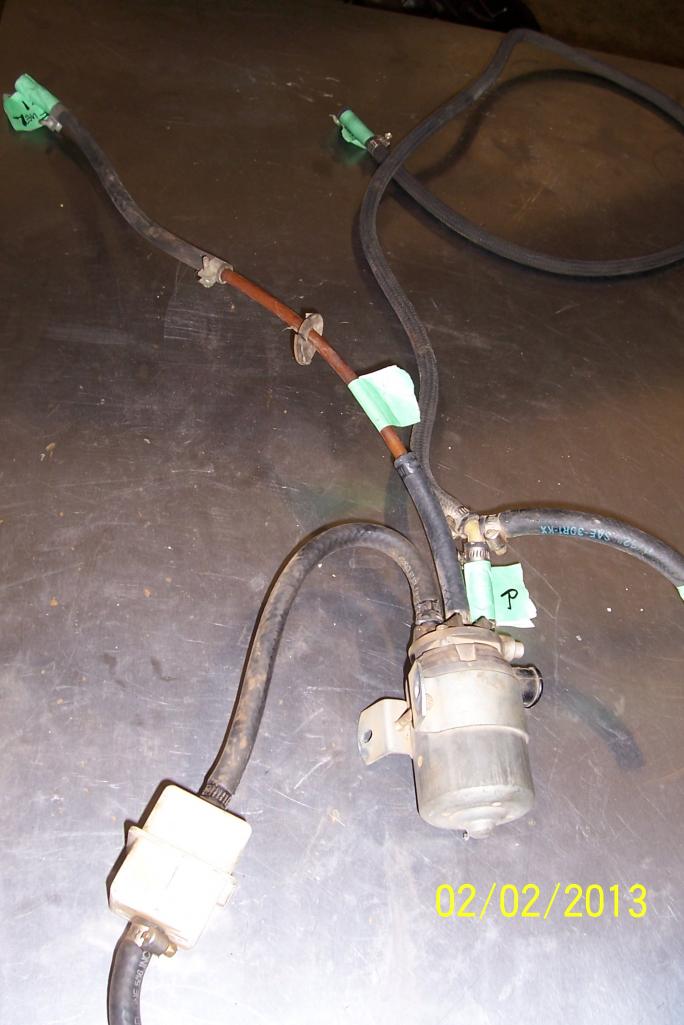
Posted by: davesprinkle Feb 2 2013, 10:44 PM
The third fitting on the pump is the outlet of an internal pressure-relief valve. Under normal circumstances, it will never flow fuel. It only operates if you've got something like a pinched fuel line that causes an over-pressure condition.
Posted by: Dave_Darling Feb 3 2013, 12:46 AM
The plastic in the supply line is to go through the engine shelf. There should be an angled grommet in both holes on the engine shelf, and plastic lines should be going through them. The stainless lines that Racer Chris sells (and possibly others) are good replacements for all of the plastic lines.
"D" stands for "Druck", which is German for "Pressure". There is no damper for the fuel, and if you see one on a diagram that would be an error.
The pressure regulator acts kind of like your thumb over the end of a garden hose. It plugs up the return from the high-pressure fuel loop (the fuel rails are part of that) until the pressure in the loop is high enough, and it opens to bleed off pressure over that.
The line coming from the regulator is just a way to dump excess fuel back to the tank. The Y lets the pump also dump excess fuel to the tank.
--DD
Posted by: 914Eric Feb 3 2013, 01:30 PM
The plastic in the supply line is to go through the engine shelf. There should be an angled grommet in both holes on the engine shelf, and plastic lines should be going through them. The stainless lines that Racer Chris sells (and possibly others) are good replacements for all of the plastic lines.
"D" stands for "Druck", which is German for "Pressure". There is no damper for the fuel, and if you see one on a diagram that would be an error.
The pressure regulator acts kind of like your thumb over the end of a garden hose. It plugs up the return from the high-pressure fuel loop (the fuel rails are part of that) until the pressure in the loop is high enough, and it opens to bleed off pressure over that.
The line coming from the regulator is just a way to dump excess fuel back to the tank. The Y lets the pump also dump excess fuel to the tank.
--DD
Excellent Dave...thanks. For some reason I thought "R" line that ran directly to the fuel regulator was the pressure line and obviously that wouldn't work.
Posted by: 914Eric Feb 4 2013, 05:57 PM
Pulled the 6 cheesehead screws out to remove the rear engine shield. On the left are the 2 grommets where the Red starter wire, yellow starter wire, and the 2 backup light wires go through.
On the right is the grommet where the black battery connection to the starter goes through and runs above the transaxle being held up with 2 plastic ties that snap into the engine shield. One of the plastic ties is broken. Anybody know if these are still available?
Its hard to see in this picture, but there are two seals that run along the top left and right corners on the inside. Seals and grommets are in surprisingly good shape. 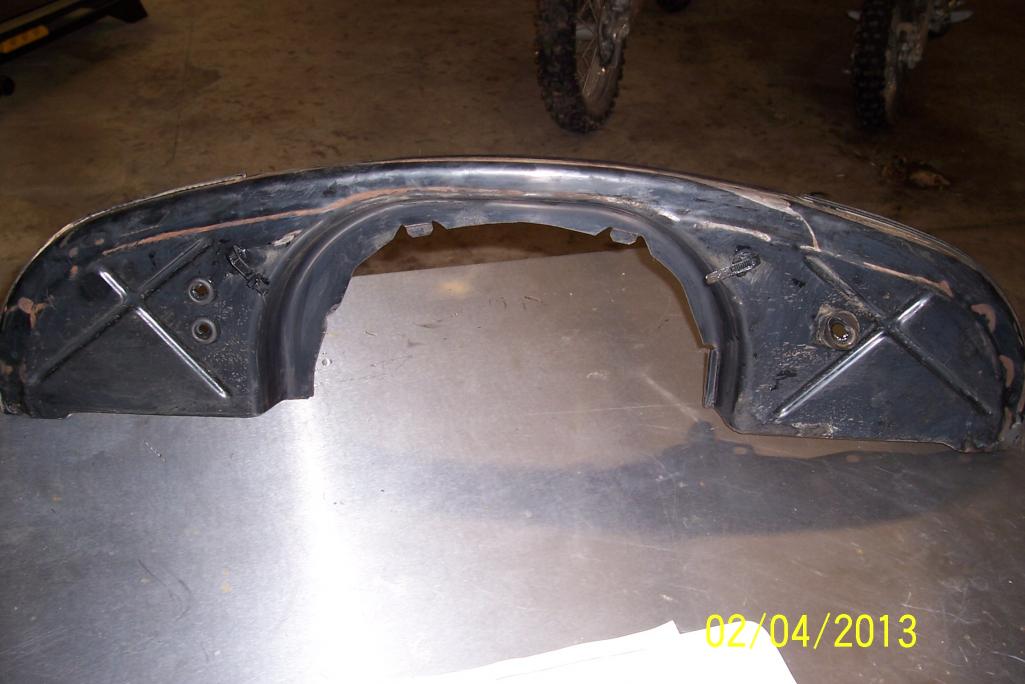
Posted by: 914Eric Feb 5 2013, 12:59 PM
Peeling everything back and trying to document all the wiring. In this photo, it's interesting that the white wire connects to a red wire which runs to the AAR. Seems odd that the colors would switch like that?
Also you can see a green wire with a connector taped down to that same harness that goes nowhere. Hate seeing wires hanging and not going anywhere. Guess it's possible that it was just an extra in the harness from the factory and that is how it was sent out. Seems more likely though that some mechanic along the line left off something that wasn't "Required".
Hmmmm... 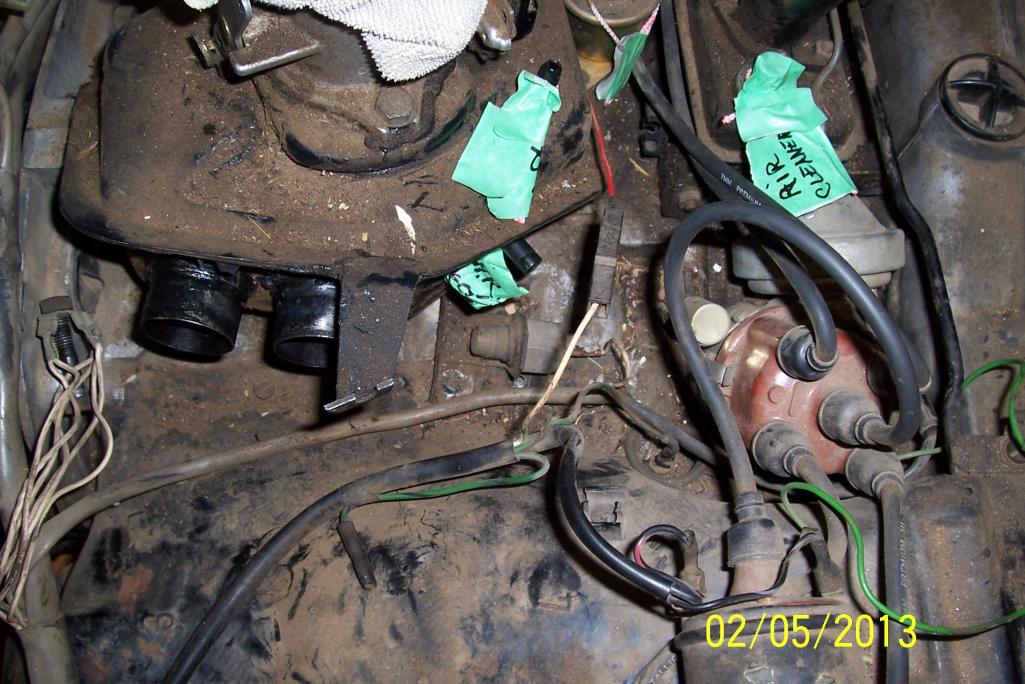
Posted by: Dave_Darling Feb 5 2013, 03:13 PM
The AAR power wire is part of the fuel injection wiring, so the wire is white. For whatever reason, the wire coming from the AAR itself is red. They all seem to be that way on the D-jet AARs.
The green wire in the distributor harness looks like it has a black stripe. If so, it would be for oil temp, but I don't believe the oil temp wire should be in the ignition harness on a 2.0 motor. Could you have an ignition harness from a 1972 1.7 on your motor? I believe those did have an oil temp wire, even though it was not hooked up to anything.
--DD
Posted by: 914Eric Feb 5 2013, 03:54 PM
The AAR power wire is part of the fuel injection wiring, so the wire is white. For whatever reason, the wire coming from the AAR itself is red. They all seem to be that way on the D-jet AARs.
The green wire in the distributor harness looks like it has a black stripe. If so, it would be for oil temp, but I don't believe the oil temp wire should be in the ignition harness on a 2.0 motor. Could you have an ignition harness from a 1972 1.7 on your motor? I believe those did have an oil temp wire, even though it was not hooked up to anything.
--DD
The green wire does have a black stripe. I'm almost certain that is the original harness Dave. I traced the Green/black wire back to the relay box. See photo. It is the left side...second connection down. On the back of the relay plug it says it is pin #3. Does that give you any help?
Posted by: Dave_Darling Feb 5 2013, 10:25 PM
The #3 pin should not be connected in a 73 914. Actually, the only place I see the #3 pin connected is in the 71 wiring diagram, not the 72 one. And it is shown as going to an optional oil temp sensor.
Note that in the 73, the temp sensor wire runs over to the right side of the engine bay and joins into the main wiring harness there.
Looks like you have an oddball ignition harness. Either swapped in by a previous owner, or perhaps the factory using up something that they had on hand.
--DD
Posted by: rhodyguy Feb 6 2013, 08:23 AM
eric, those black plastic cable holders are retained with little plastic pins that push out. most times the holders have been cut, rendering them useless. the grommeted clamp like the one pictured will do the trick. hardware store.
Attached thumbnail(s)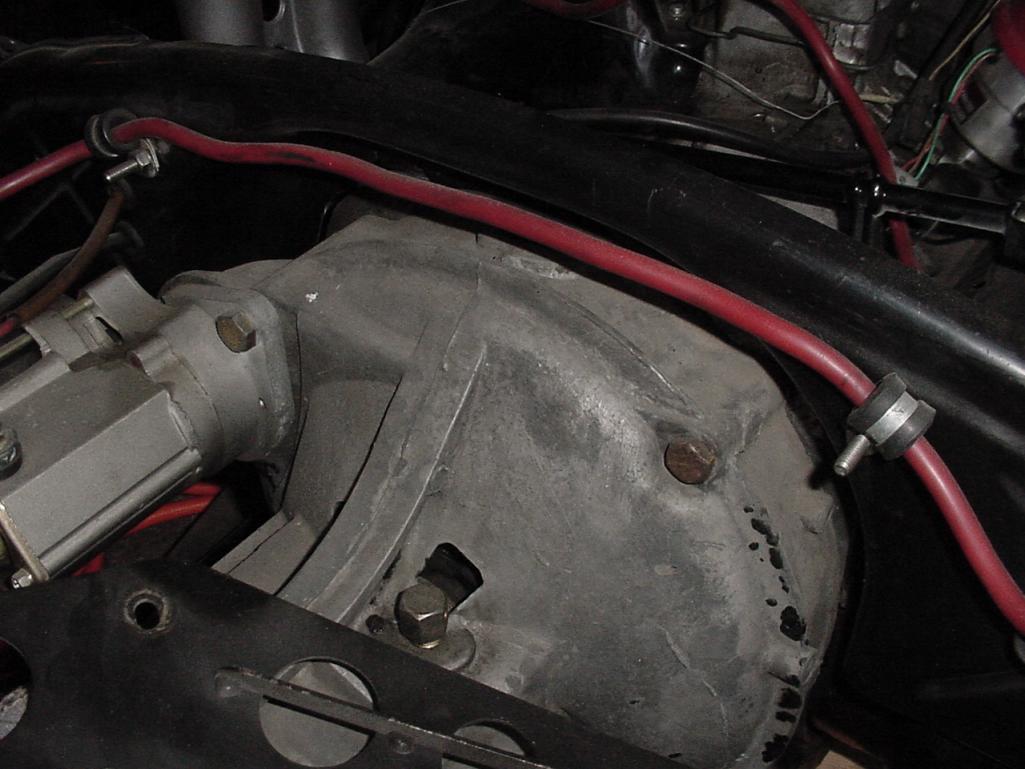
Posted by: McMark Feb 6 2013, 09:47 AM
McMaster-Carr PN: 6686K21 is the closest thing to the correct zip tie I've seen. But the hole in the tin is slightly too large. If you put a grommet in the hole first it should work. The OE zip ties are also 'removable' so you could replace the cable. These aren't.
Posted by: 914Eric Feb 6 2013, 11:06 AM
The #3 pin should not be connected in a 73 914. Actually, the only place I see the #3 pin connected is in the 71 wiring diagram, not the 72 one. And it is shown as going to an optional oil temp sensor.
Note that in the 73, the temp sensor wire runs over to the right side of the engine bay and joins into the main wiring harness there.
Looks like you have an oddball ignition harness. Either swapped in by a previous owner, or perhaps the factory using up something that they had on hand.
--DD
Dave...I'm happy to hear that my year and model car doesn't use pin 3. So the fact that it is cut and taped down onto the harness isn't a problem and done at the factory.
Dave, My Dad and I are the original owners so that is how I know the harness hasn't been replaced. After disassembly, it is clear to me that the wiring is original. The way it is brittle and formed. Also still in all the factory ties, cheesehead screws that have never been out...Etc.
My best theory on what is happening is that my car is one of the first 73's with the vinyl windshield posts (Build date of Aug. 72) and that is how they did the harnesses on the early cars until they got the harnesses for the "real" production run.
Posted by: nathansnathan Feb 6 2013, 12:26 PM
My best theory on what is happening is that my car is one of the first 73's with the vinyl windshield posts (Build date of Aug. 72) and that is how they did the harnesses on the early cars until they got the harnesses for the "real" production run.
According to Bowlsby's wiring harness chart, 72's weren't supposed to have the green and black one in the ignition harness either - not sure where it would have been in 72 actually?
http://bowlsby.net/914/WiringHarnesses/914WiringHarnessIDGuide.pdf
Posted by: 914Eric Feb 6 2013, 06:03 PM
Another rookie question for you guys.
Temp sensor 1 is in the top of the air distribution box and measures the temp of the intake air.
Temp sensor 2 goes into the head near cylinder 2 and measures engine temps.
What is the thermoswitch, and what is it measuring?
Posted by: Dave_Darling Feb 6 2013, 07:28 PM
The thermoswitch on a 2.0 sits on a bracket that sticks up from one of the "feet" holding the manifold (plenum) onto the top of the crankcase. Its function is to provide a ground for the cold-start valve. When the sensor is colder than about 40F (some versions, as low as 32F, maybe lower?) the switch grounds the connector on it to its threads.
The CSV is powered from the same yellow wire that powers the starter, so it only opens up when the starter is cranking and when it is "cold enough".
--DD
Posted by: 914Eric Feb 6 2013, 07:43 PM
The thermoswitch on a 2.0 sits on a bracket that sticks up from one of the "feet" holding the manifold (plenum) onto the top of the crankcase. Its function is to provide a ground for the cold-start valve. When the sensor is colder than about 40F (some versions, as low as 32F, maybe lower?) the switch grounds the connector on it to its threads.
The CSV is powered from the same yellow wire that powers the starter, so it only opens up when the starter is cranking and when it is "cold enough".
--DD
So then what I'm hearing is that most of the time they do nothing, and then if it's a below zero Idaho morning, only while starting.
Thanks again Dave...I'm going to have to start paying you a retainer.
Posted by: 914Eric Feb 7 2013, 12:29 PM
Got the front engine tin off and noticed that I seem to have a ground connection with nothing attached. All my wires were labeled and everything seems accounted for so I'm not sure if and/or what attaches to this ground.
If you look below the distributor, surrounded by the green coil wire, you see a cheeshead screw with the connector attached.
The second picture is a closeup with everything removed.
After studying the wiring, I think this is my last "mystery".
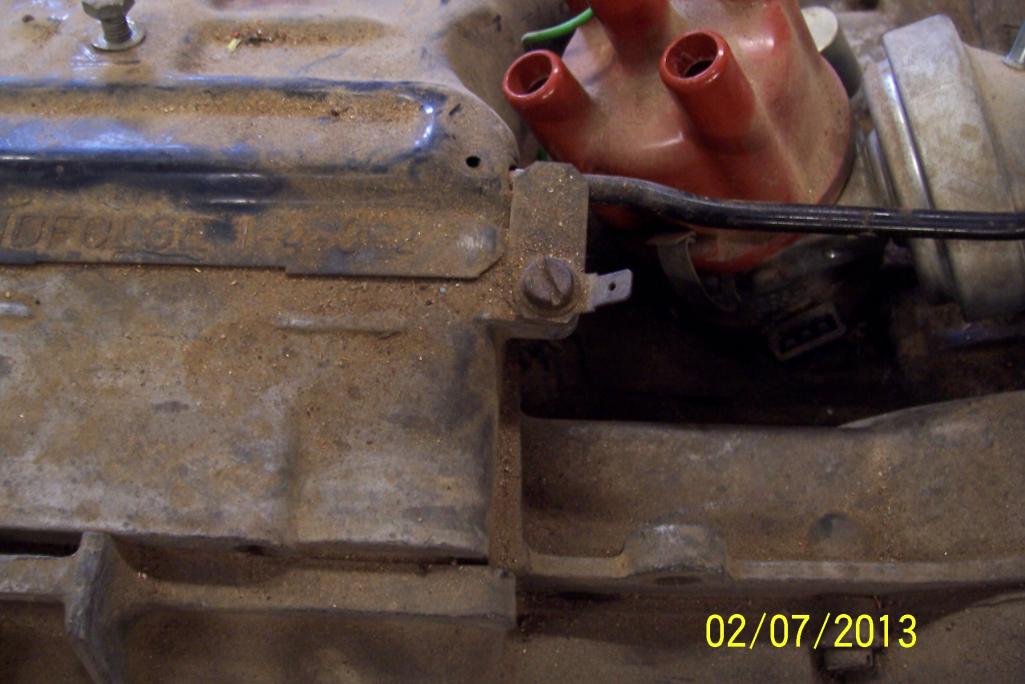
Posted by: rhodyguy Feb 7 2013, 12:42 PM
the green wire? fact oil temp sender wire. it is attached to the front of the case and runs behind the shroud.
Posted by: Kirmizi Feb 7 2013, 01:16 PM
That metal looks pretty dull as though it hasn't been used for awhile.
I don't recall ever seeing a spade connector there.
Mike
Posted by: 914Eric Feb 7 2013, 04:12 PM
That metal looks pretty dull as though it hasn't been used for awhile.
I don't recall ever seeing a spade connector there.
Mike
Yea...it is dull and nothing was connected. I just want to make sure that it was never connected...and not something a sloppy mechanic just forgot to connect. although there isn't any wires just hanging anywhere or even cut off. Not sure why the factory would add this ground to the cheesehead screw if it wasn't going to be hooked up to anything?
Hopefully, one of our resident engine gurus can answer this.
Posted by: turk22 Feb 7 2013, 07:08 PM
Eric, you got me curious so I went out and checked mine, no ground connector there...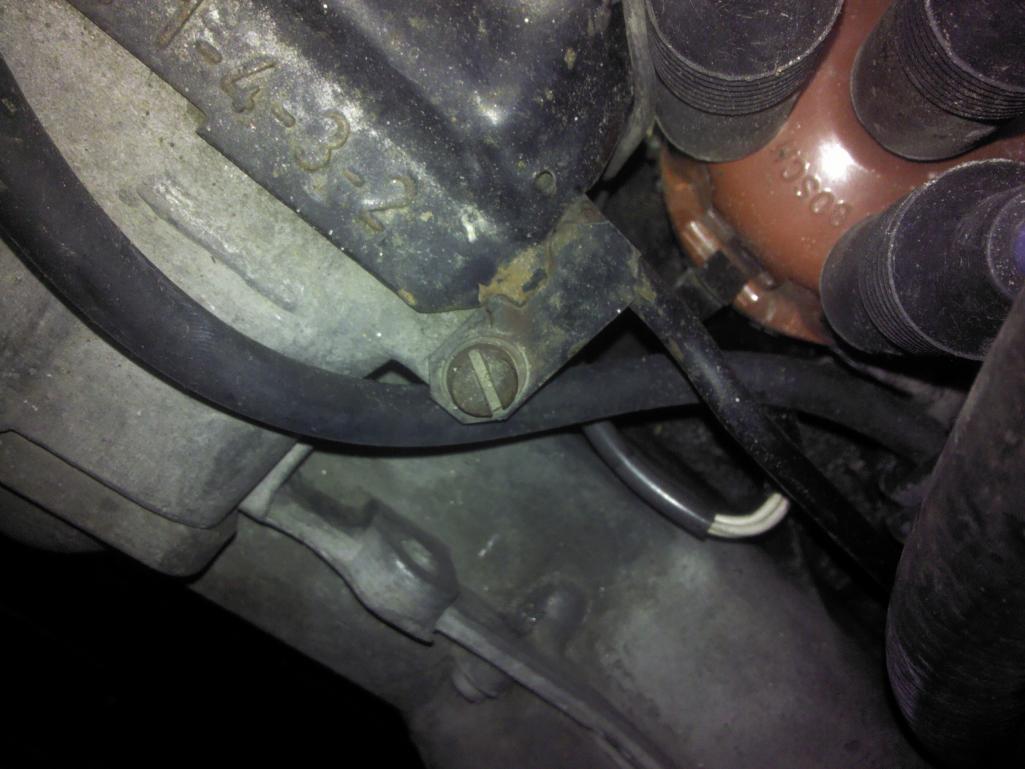
Posted by: 914Eric Feb 7 2013, 08:40 PM
Eric, you got me curious so I went out and checked mine, no ground connector there...
Thanks Steve...I appreciate it.
Hmmmm...Not sure what to make of it.
Posted by: McMark Feb 8 2013, 02:43 AM
I've seen that a few times, but never seen anything attached to it.
Posted by: larss Feb 8 2013, 09:08 AM
I have this connector on all four of my type 4 engines, never seen anyting connected to it...handy ground point for the test instrument but sure there is another reason...
Lars S
Posted by: 914Eric Feb 11 2013, 02:18 PM
So my thermostat is shot...wide open in 40 degree weather. I believe I've read that OEM thermostats are NLA, so what is everyone using now?
Also...I was a little surprised at how the flaps seem to work. In my mind, I expected that when the thermostat expanded, both the flaps would open. My flap linkage seems to be working smooth and properly, and what I'm seeing is that when cold, the driver's side is closed and right side is open. When hot, the driver's side opens, and the passenger side closes. Is this correct?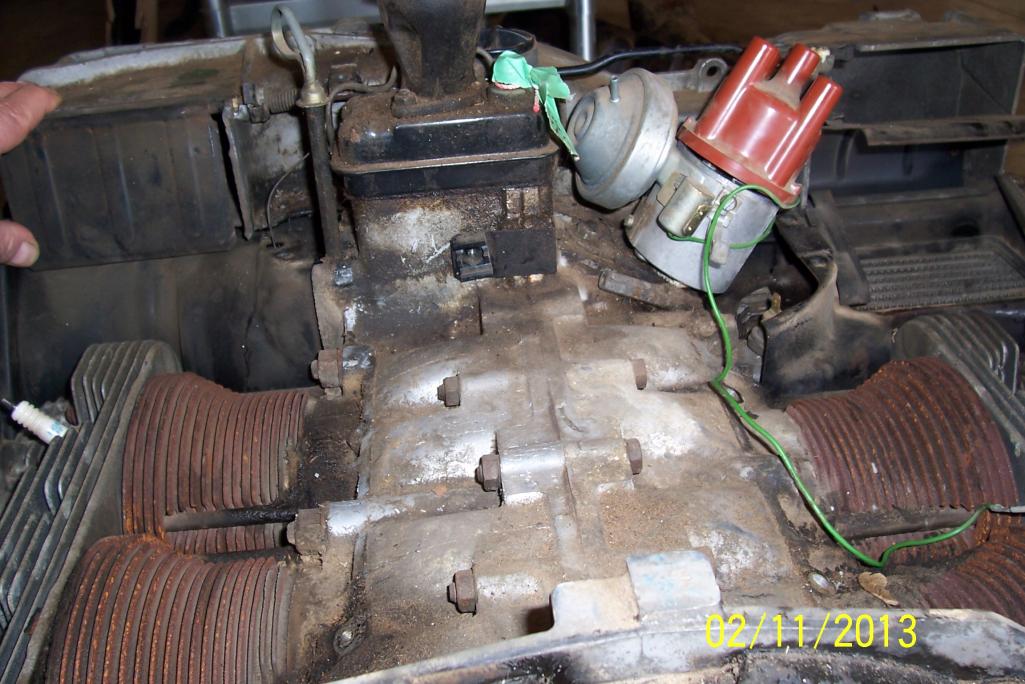
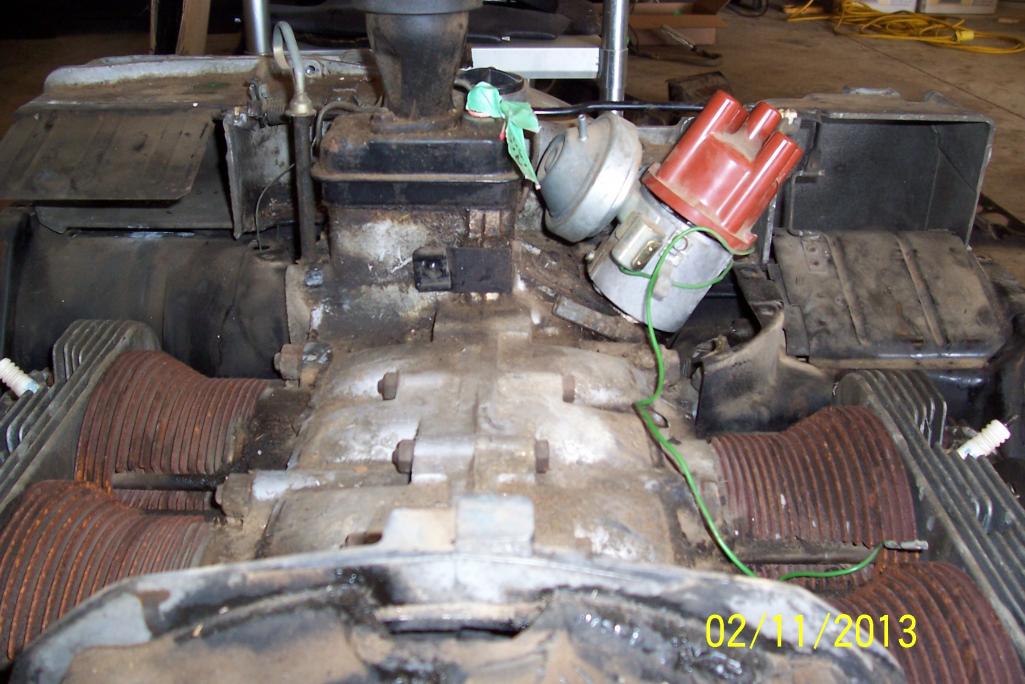
Posted by: dlee6204 Feb 11 2013, 02:23 PM
This is the only place I know about...
http://www.awesomepowdercoat.com/thermostat_new_used_rebuilt.html
Posted by: rnellums Feb 11 2013, 04:37 PM
Someone on here was repairing them at some point, but i don't recall how, maybe something about compressing them, heating them and then soldering? Other option is to find a good used one, or wire it in the full open position(it will take long to heat up though). I found a working used bellows for mine.
*edit* just checked that link above, looks like a good deal to me.
Posted by: nathansnathan Feb 11 2013, 05:22 PM
A lot of people use a type 1 thermostat instead of the type 4; they're easier to find. It opens at 150F instead of 180F but it works alright. Without a working thermostat, you end up with frothy oil from not ever getting warmed up.
Posted by: reharvey Feb 11 2013, 05:27 PM
Someone on here was repairing them at some point, but i don't recall how, maybe something about compressing them, heating them and then soldering? Other option is to find a good used one, or wire it in the full open position(it will take long to heat up though). I found a working used bellows for mine.
*edit* just checked that link above, looks like a good deal to me.
There is a guy on Samba selling new ones.
Posted by: IanS Feb 11 2013, 05:33 PM
I thin kit's the same guy (same pics, same price)
http://www.thesamba.com/vw/classifieds/detail.php?id=1036746
Posted by: turk22 Feb 11 2013, 05:51 PM
That wasn't my understanding as to how it worked either. I thought they were both opened or both closed. Not sure I understand why it would matter which side opened, but there may be a reason related to how the tin directs the airflow.
I was under the impression that if the thermostat failed both flaps failed to open...but there are much more experienced folks here to answer that...
thats why I like this thread, everything is directly related to the questions I have as well...thanks for blazing the path for us other newbies Eric!
So my thermostat is shot...wide open in 40 degree weather. I believe I've read that OEM thermostats are NLA, so what is everyone using now?
Also...I was a little surprised at how the flaps seem to work. In my mind, I expected that when the thermostat expanded, both the flaps would open. My flap linkage seems to be working smooth and properly, and what I'm seeing is that when cold, the driver's side is closed and right side is open. When hot, the driver's side opens, and the passenger side closes. Is this correct?
Posted by: nathansnathan Feb 11 2013, 06:43 PM
That wasn't my understanding as to how it worked either. I thought they were both opened or both closed. Not sure I understand why it would matter which side opened, but there may be a reason related to how the tin directs the airflow.
I was under the impression that if the thermostat failed both flaps failed to open...but there are much more experienced folks here to answer that...
thats why I like this thread, everything is directly related to the questions I have as well...thanks for blazing the path for us other newbies Eric!
So my thermostat is shot...wide open in 40 degree weather. I believe I've read that OEM thermostats are NLA, so what is everyone using now?
Also...I was a little surprised at how the flaps seem to work. In my mind, I expected that when the thermostat expanded, both the flaps would open. My flap linkage seems to be working smooth and properly, and what I'm seeing is that when cold, the driver's side is closed and right side is open. When hot, the driver's side opens, and the passenger side closes. Is this correct?
Bowlsby has it documented on his site
Here is the cold position
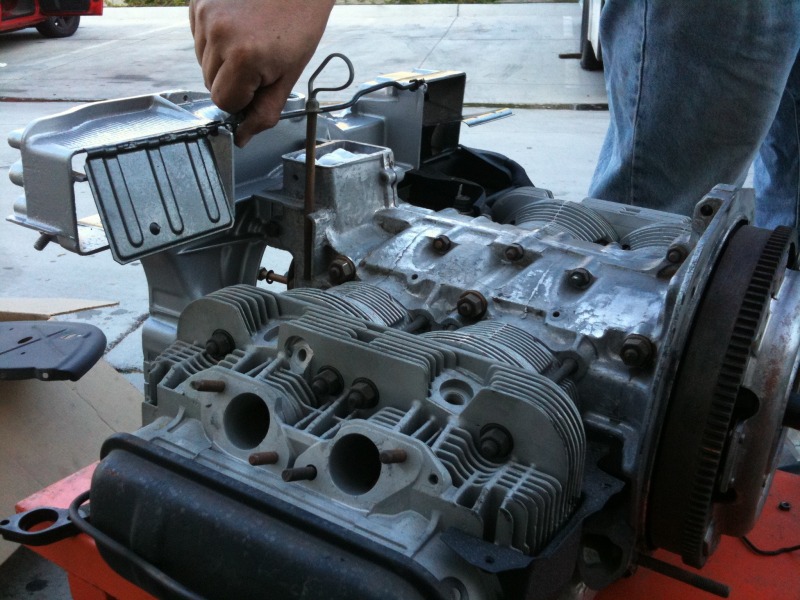
and the warm
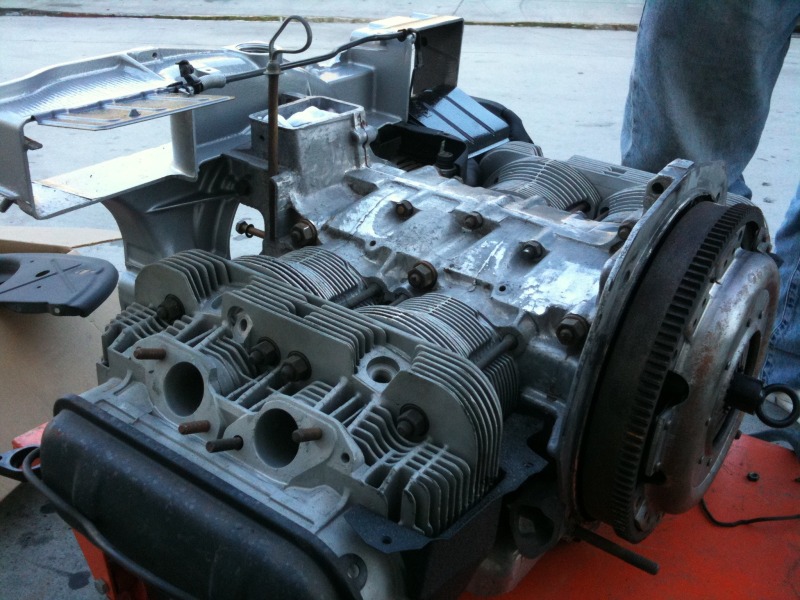
The trick is that the pivot for the one on the oil cooler side is not right at the end of the flap. So when it looks like the flap is covering the cooler, it is actually the Bernoulli principal in action; there is a gap beneath the flap, so the flap is directing air over/ through the cooler. So when it is up on that side it is closed, the bottom of the flap kind of hyperextending to block flow to the cooler, the top blocks flow to the cylinder fins, but in an 'opposite' way (with the back of the flap) to the other side. I hope that makes sense.
Posted by: McMark Feb 11 2013, 07:56 PM
Yes, that's how they work. The tricky piece is the flap by the oil cooler. When the flap is down on top the oil cooler, the front edge down inside the housing is open and scoops some air into the oil cooler. When the flap is in the 'cold' position, it seals against the top of the tin and at the same time, closes off the air going into the oil cooler. It's actually quite creative.
Posted by: 914Eric Feb 11 2013, 08:58 PM
thats why I like this thread, everything is directly related to the questions I have as well...thanks for blazing the path for us other newbies Eric!
Your welcome Steve...Seems everytime I peel back another layer...More questions.
It nice to have so many willing to take time and share their knowledge. It's what I had hoped for.
Posted by: MrKona Feb 11 2013, 11:18 PM
Someone on here was repairing them at some point, but i don't recall how, maybe something about compressing them, heating them and then soldering? Other option is to find a good used one, or wire it in the full open position(it will take long to heat up though). I found a working used bellows for mine.
*edit* just checked that link above, looks like a good deal to me.
Hey, I remember that http://www.914world.com/bbs2/index.php?showtopic=83221&hl=thermostat++alcohol.
Posted by: larss Feb 12 2013, 12:10 AM
That metal looks pretty dull as though it hasn't been used for awhile.
I don't recall ever seeing a spade connector there.
Mike
Yea...it is dull and nothing was connected. I just want to make sure that it was never connected...and not something a sloppy mechanic just forgot to connect. although there isn't any wires just hanging anywhere or even cut off. Not sure why the factory would add this ground to the cheesehead screw if it wasn't going to be hooked up to anything?
Hopefully, one of our resident engine gurus can answer this.
The factory manual (page 93)shows that tis connector was used to ground the oil pressure test gauge. I use it for the same purpose myself (grounding the test instrument).
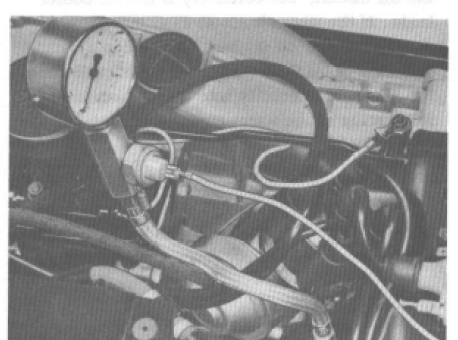
At page 188 one can also see the connector, this time empty, guess it was fitted to all cars but will often "disappear" at the 1st teardown.
/Lars S
Posted by: 914Eric Feb 13 2013, 03:24 PM
That metal looks pretty dull as though it hasn't been used for awhile.
I don't recall ever seeing a spade connector there.
Mike
Yea...it is dull and nothing was connected. I just want to make sure that it was never connected...and not something a sloppy mechanic just forgot to connect. although there isn't any wires just hanging anywhere or even cut off. Not sure why the factory would add this ground to the cheesehead screw if it wasn't going to be hooked up to anything?
Hopefully, one of our resident engine gurus can answer this.
The factory manual (page 93)shows that tis connector was used to ground the oil pressure test gauge. I use it for the same purpose myself (grounding the test instrument).
At page 188 one can also see the connector, this time empty, guess it was fitted to all cars but will often "disappear" at the 1st teardown.
/Lars S
Another mystery solved! Lars...You ARE the man.
Posted by: 914Eric Feb 13 2013, 03:27 PM
I was trying to figure out how to clean the trans of 40 years of baked on oil coating. It was like cement and I envisioned a week of scraping.
I had my torch out to loosen some cheesehead screws and thougt I'd see if would help clean off the tranny mess. 2 seconds with the torch and it scraped off like butter.
Posted by: turk22 Feb 22 2013, 05:08 PM
Been awhile, and I need a new fix...
how bout pic's of the clean tranny??
Posted by: 914Eric Mar 22 2013, 01:52 PM
Hello All,
Been down a while taking care of life. Should be back at it full time, hoping to be ready for the Dalles Oregon event soon.
So...first, after scrubing the trailing arms in preparation to pulling and painting them, I found more great news. The paint looks fantastic and the original assembly line markings are still in tact. The picture actually doesn't do the trailing arm justice...Looks far better in person. So I won't be pulling the trailing arms.
Second, trying to pull and replace the fuel lines through the tunnel, and need some advice. Looks to me that to do it, I'm going to need to pull out my console? The console is the only thing other than the dash left in the cab and I didn't see a need to pull it. Can the fuel lines be replaced without pulling the console? 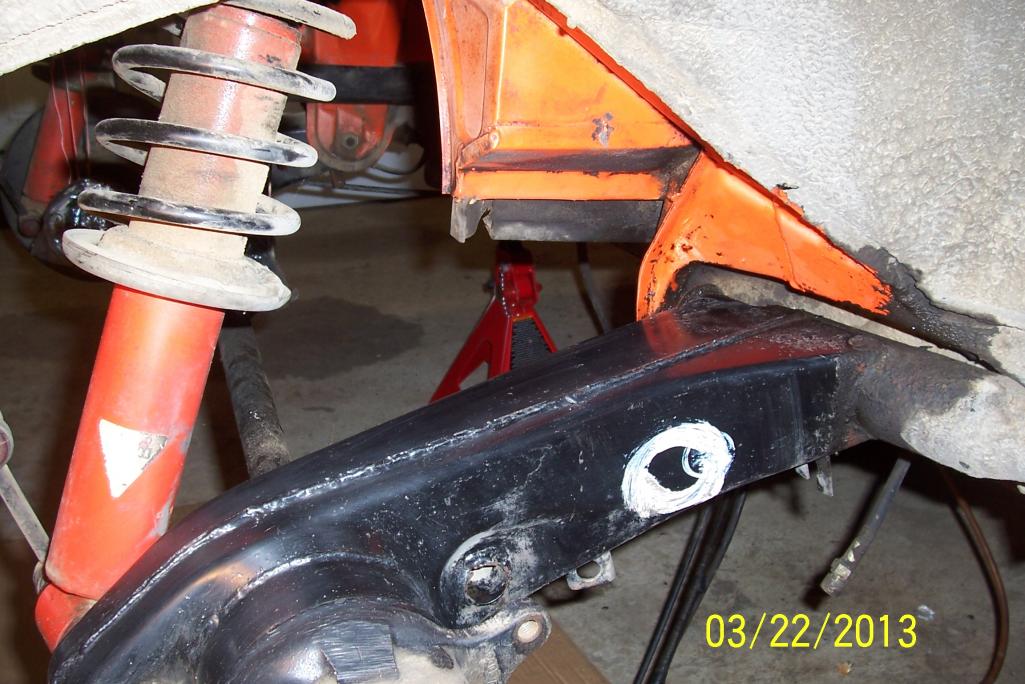
Fuel line nipples in front of console under the fuel tank.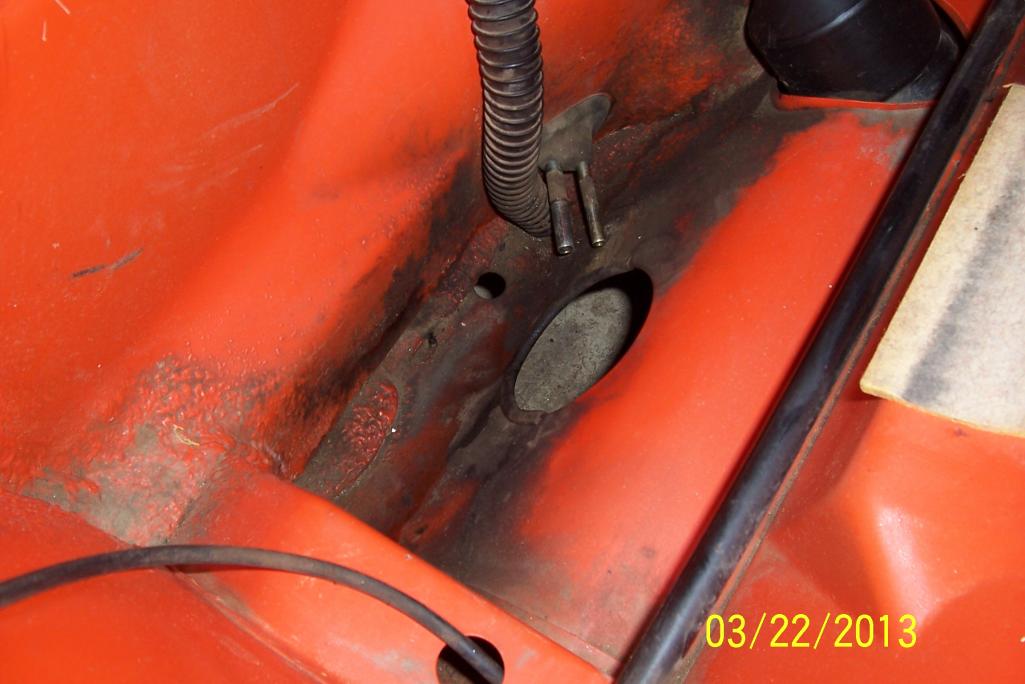
Posted by: Dave_Darling Mar 22 2013, 02:36 PM
Pull the console. It's about 10 minutes worth of work, maybe 15. It's a whole lot easier to do that than to try to work around it for all the crap in the tunnel.
--DD
Posted by: turk22 Mar 22 2013, 07:08 PM
Hey glad to see you back at it, I was getting worried....
Posted by: 914Eric Mar 22 2013, 08:21 PM
quote name='turk22' date='Mar 22 2013, 06:08 PM' post='1838789']
Hey glad to see you back at it, I was getting worried....
[/quote]
Hey Steve...Thanks for keeping an eye out.
Pulled out the console so I can get the fuel lines out and all I found was another tiny access panel. Not much help, but maybe a little. Got a friend coming over tomorrow to pull from the engine compartment side while I watch the tunnel and try to push it through the front firewall.
Got a little surprise when I pulled the console out and lifted up the carpet: a big wedge of foam glued to the floor pan to give shape to the passenger side floor. See second picture.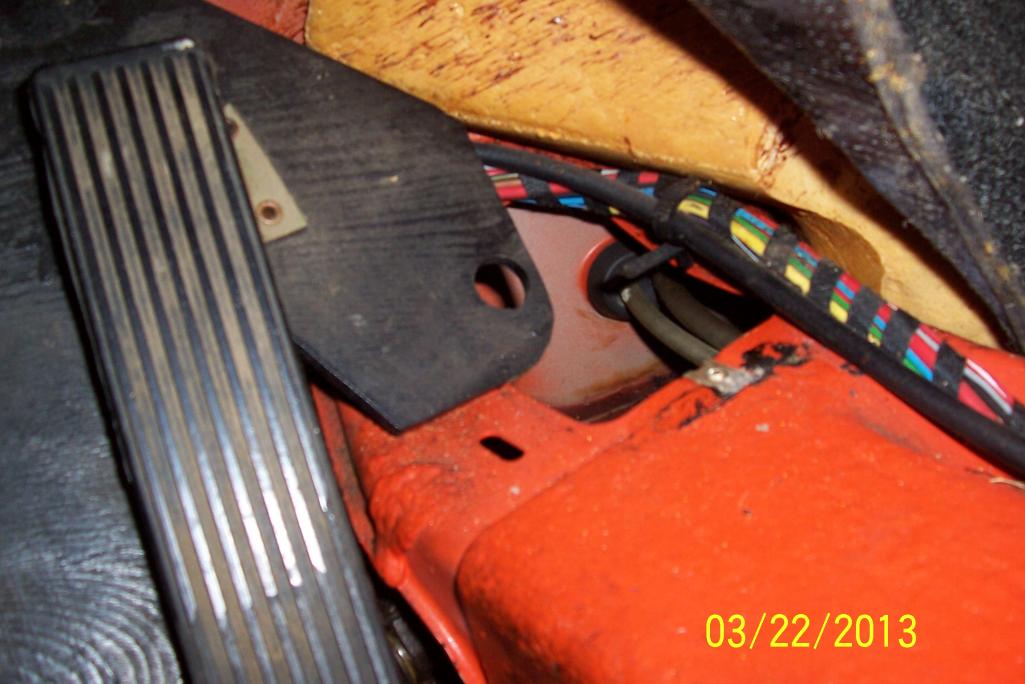
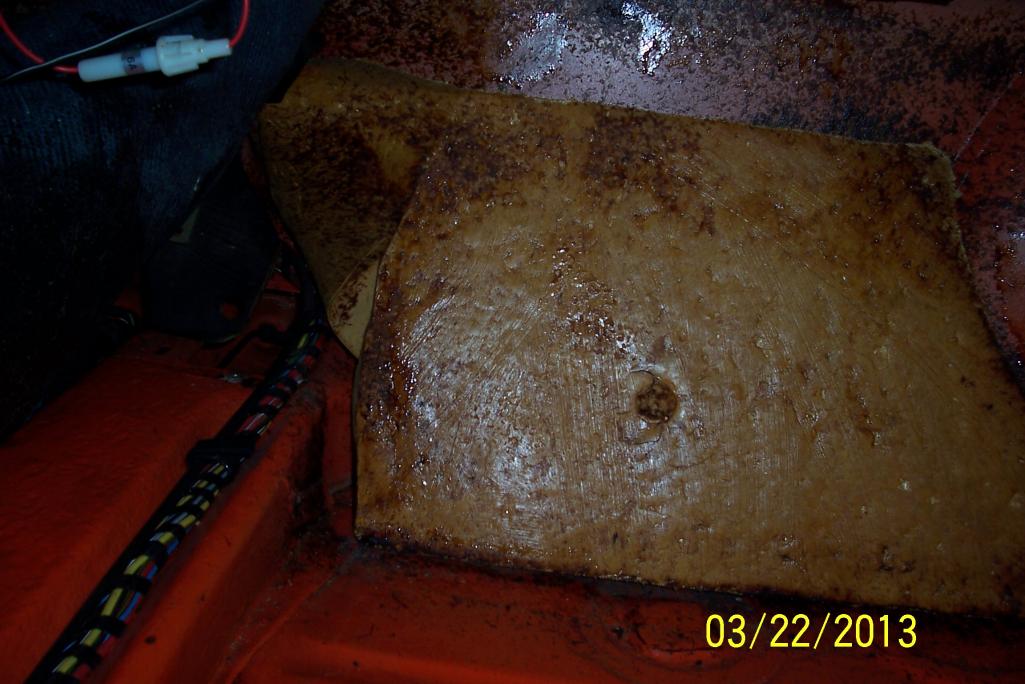 [
[
Posted by: mepstein Mar 22 2013, 08:35 PM
Eric - I just replaced my lines last week. A little lube on the rubber grommets and the ss line will slip right in. I gave my son a flashlight so he could guide the line through the tunnel and into the front bulkhead while I pushed from the engine compartment. It took 5 minutes from start to finish and on a scale from 1-10, was no more than a 2. It does help to have a helper and the engine out of the car.
Posted by: 914Eric Mar 27 2013, 12:14 PM
Thanks Bum...Got the old lines out and will be replacing.
Once I pulled out the console, of course things were dirty, so I needed to remove the carpet for cleaning which forced me to remove the steering linkage, and then the pedal board. Deeper and deeper we go.
While it was a little dirty under there from mice droppings and 40 years of crud, the pedal board was amazingly pristine. Could use a light coat of touchup paint, but really doesn't even need that.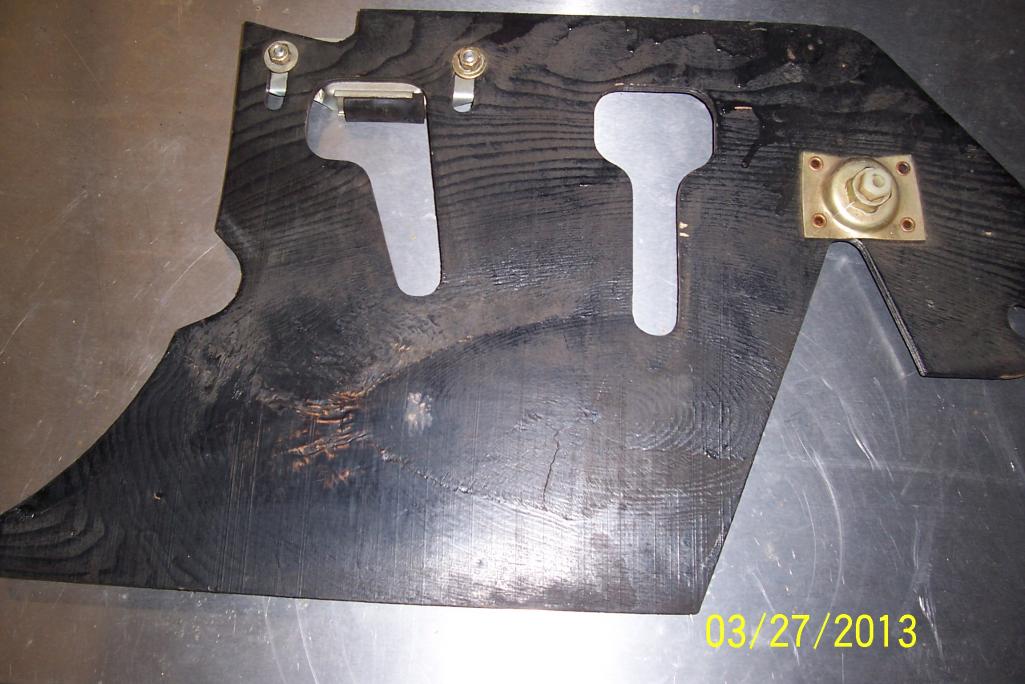

Posted by: rpmmaxxed Mar 27 2013, 03:11 PM
Really is amazing what condition some of these cars are in under all that crud. Keep up the good work, momentum is your ally!
Posted by: 914Eric Mar 27 2013, 03:48 PM
RPM,
Yea I have been really lucky in that other than the battery tray...This car has no rust. Helps that it spent its life in Cali, and half of that in storage in the high desert.
So here is a pic of the driver's floorboard and the pedal assembly. All 3 parts of the pedal assembly work smothly, and even the original paint looks nice...thus no need to rebuild. The paint under the driver's feet has some ground in crud that cleaned up nicely but still left the paint stained. It's under the carpet, so not really a big deal I guess.
Anybody think I need to do anything here before putting the pedal board, carpet, and console back in?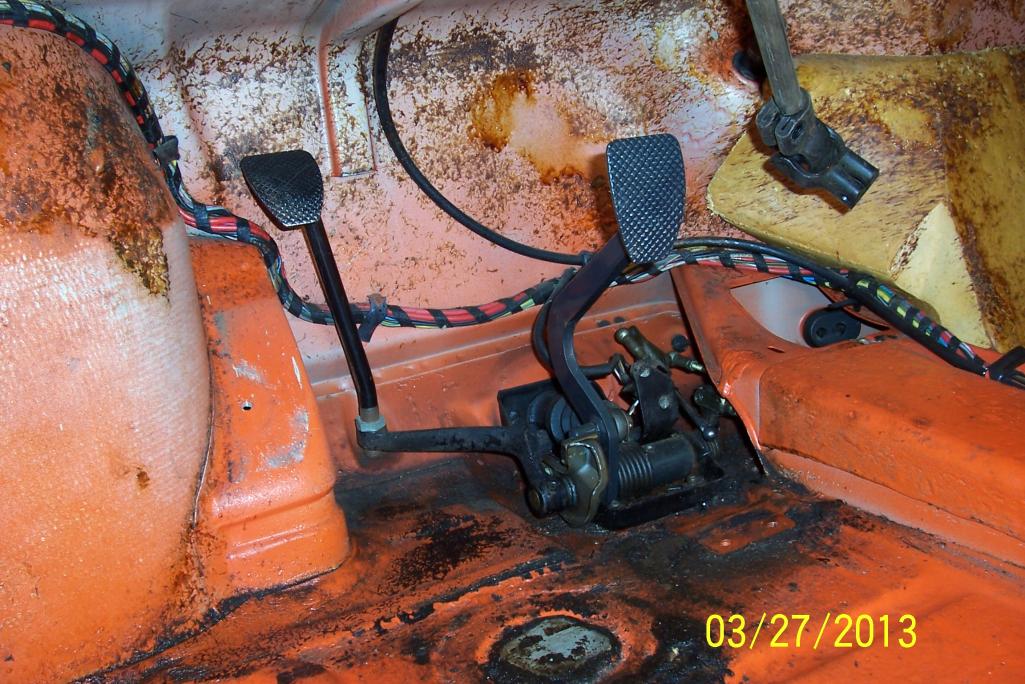
Posted by: Jeffs9146 Mar 27 2013, 04:29 PM
Personaly I would take the pedal cluster out, clean it, put in a brass bushing set, clean the floor and then button it up!
If the bushings haven't been done yet they will need to be at some point so why not now!
Posted by: Chris H. Mar 27 2013, 05:12 PM
Doing the bronze bushings is one of those "little things" that makes a huge difference. Much smoother operation.
Posted by: 914Eric Mar 27 2013, 05:27 PM
Doing the bronze bushings is one of those "little things" that makes a huge difference. Much smoother operation.Dammit you guys...Deeper and deeper and deeper I go. lol
I'm going crazy to start putting it back together and drive the thing. Spring is almost here.
I know Chris Shea does a complete rebuild, but everything seems to work really nice? But if they wear out and I'm already there...why not right?
Is it a fairly easy job of just popping in a couple of bushings or ???
Are the bushings available from the usual suspects; AA, Pelican?
Posted by: turk22 Mar 27 2013, 06:15 PM
Its the "while your in there" syndrome.
I'm able to drive mine, and that's why I'm reluctant to tear it all apart, cause while I'm in there, it may take a year before it get put back together.
Posted by: 914Eric Mar 27 2013, 08:46 PM
Been wanting to find my engine number for a while. Looked a few times and could never find it. Finally scrubbed away some gunk, and found it.
Engine number GA 000934
That along with my 001147 chassis number
and the vinyl on the window posts definitely shows an early 1973.
Posted by: Chris H. Mar 27 2013, 09:17 PM
There is a great DIY article on Pelican on rebuilding the pedal cluster. It's not very hard technically but the roll pin can be a PITA to remove and/or reinstall (never reuse the roll pin, always replace it with a new one).
Check it here:
http://www.pelicanparts.com/techarticles/Mult_pedal_cluster/Mult_pedal_cluster.htm
Eric Shea re-does them very nicely if you don't want to mess with it. Better than new.
Posted by: 914Eric Mar 28 2013, 05:40 PM
Chris H...Thank you for the pedal cluster article. Haven't read it yet, but I will.
So I ordered the "Super Pak" from RacerChris at Tangerine and have 5 SS fuel lines, fuel hose, injector elbows, fuel rail hose, etc... all coming in the next few days.
In preparation I'm checking out my injectors and noticed some odd things. While they are all green:
2 have press fit conectors.
2 had hose clamp connectors.
3 have black tips
1 has a green tip.
The ends on 3 open, and one appears stuck shut although I didn't force it.
I'm sending them all to WitchHunter to get them checked out, but I just wondered if anybody had any thoughts or insights as to why I have such a hodge-podge?
Posted by: rnellums Mar 29 2013, 07:30 AM
The hoses were originally on all of them, but if you cut them off carefully you end up with what is on the right. It should work equally well either way. I ordered and installed 4 new from Otto's in CA when I did my engine refresh last year so I would have some spares (but mine were leaking a bit already). ~90$ ea. I think.
Posted by: 914Eric Mar 29 2013, 11:03 AM
The hoses were originally on all of them, but if you cut them off carefully you end up with what is on the right. It should work equally well either way. I ordered and installed 4 new from Otto's in CA when I did my engine refresh last year so I would have some spares (but mine were leaking a bit already). ~90$ ea. I think.
Auto Atlanta's website lists new OEM porsche injectors for $321. Ouch. They also list new Bosch for $255. I wonder if those are the same without the "Porsche" box?
They also have rebuilt listed for $75. Pelican doesn't have anything at all.
You say you got new from Otto's for $90...New What? OEM, Bosch, or ??
Posted by: rnellums Mar 29 2013, 12:02 PM
New OEM Bosch, although I'm not sure how many are left.
http://www.914world.com/bbs2/index.php?showtopic=140025&st=90
post 97 are photos
Posted by: 914Eric Mar 29 2013, 08:15 PM
New OEM Bosch, although I'm not sure how many are left.
http://www.914world.com/bbs2/index.php?showtopic=140025&st=90
post 97 are photos
Ross,
Thanks for the link to the injector pics. While I was in there I got to really look over your car. Hadn't seen your thread before. VERY nice. I really like the unusual color.
Seems like if you got those Bosch injectors for $90...I'll need to give Otto's a call. Far cheaper than AA.
Posted by: rnellums Mar 31 2013, 07:11 PM
I think this is their website : http://www.ottosvenice.com/
Posted by: Dave_Darling Mar 31 2013, 07:33 PM
Are they still going? Otto passed away not long ago...
--DD
Posted by: 914Eric Apr 1 2013, 12:51 PM
Was looking back to try and find a particular post and realized that since the thread has gotten so big that I needed an index.
It is now in the page header to help find particular topics.
Posted by: 914Eric Apr 7 2013, 03:46 PM
Trying to pull the front blower housing off the engine and got all the cheeshead and hex bolts out but it still won't come off. It's loose all the way around the perimeter, but seems to be held by the large pulley or an "odd" fastener underneath the small pulley. The fastener is like a round carriage bolt with two flat sides.
Factory manual says to remove the 3 bolts on the large pulley, but when I try...It just spins the engine. How do you keep the engine from spinning to remove the pulley bolts?
How to remove the round headed bolt with the two flat sides? See arrow. It's always easy once you learn the technique. 
Thanks Guys.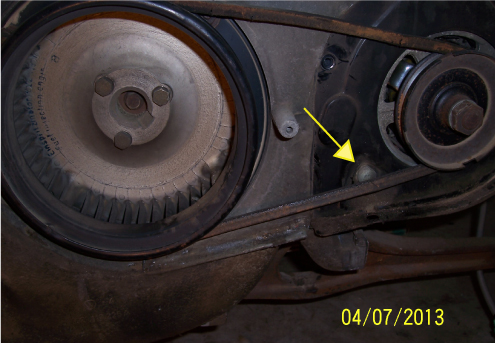
Posted by: rnellums Apr 7 2013, 06:58 PM
The round headed bolt has a square shoulder like a carriage bolt that fits into the alternator bracket, so all you need to do it loosen the nut on the other side. For the fan hub I usually use a flywheel lock that bolts to the case and has teeth that lock the flywheel, I picked mine up at a VW shop a while ago. Between the two case halves there are also two alignment pins. those usually are what holds it together after removing all the screws for me. a bit of rocking usually does a trick. A screwdriver might work too, but it will easily mar the metal.
Posted by: bigkensteele Apr 7 2013, 07:17 PM
Hey Eric, glad to see you working on it again.
The bolt by the arrow is the pivot point for your alternator. On the back side of the alternator, there is a nut that must be removed to pull that bolt out.
You do not need to separate the two halves of the fan housing, unless you feel the need to clean where no one will ever see. You will need to pull the fan off to get to the four bolts holding the fan housing to the engine case.
If you use any type of water-based cleaner on the fan housing, dry it immediately. It will pit it permanently if left to soak (ask me how I know).
You can't safely remove the fan without a flywheel lock, or some other means of holding the rotating assembly in a fixed position. Whatever you do, don't try wedging something between the fan blades. They will snap off. I strongly recommend the flywheel lock. Pelican has them.
Are you replacing the front main seal? If so, you will also need to pull the fan hub from the end of the crank. This requires a special tool that you can easily make if you have a welder. Basically a flat steel "C" shape. I can mail you the one I made if you don't weld.
Posted by: McMark Apr 8 2013, 10:10 AM
Grab yourself an impact gun (air or electric) for fasteners just like the fan bolts. Makes life so much easier.
Posted by: 914Eric Apr 8 2013, 11:20 AM
Mark...or anyone,
Will an impact gun get the fan bolts out without a flywheel lock?
Hi Ken...
Posted by: Dave_Darling Apr 8 2013, 03:23 PM
Yes, that's one of the things impact guns are for. Loosening things that you can't hold still.
BTW, I have been lucky enough not to break any fan blades by putting a long screwdriver through the timing hole and the fan. I try to keep the screwdriver at the back of the blade where it attaches to the rest of the fan; the blades are a little bit stronger that way. (Still some risk of breaking them, though.)
--DD
Posted by: 914Eric Apr 9 2013, 01:41 PM
So I got out my trusty hammer impact driver that I use on my motorcycles to get old philips heads out of the case once their frozen in and stripping. Worked great and I now have the fan housing and fan off.
Everything looks good EXCEPT, one of the fan blades is broken off and gone. So what do I do?
Ignore it...One missing blade isn't a big deal?
Find a replacement that has all the blades?
Find somebody who knows what they are doing and weld in a new blade?
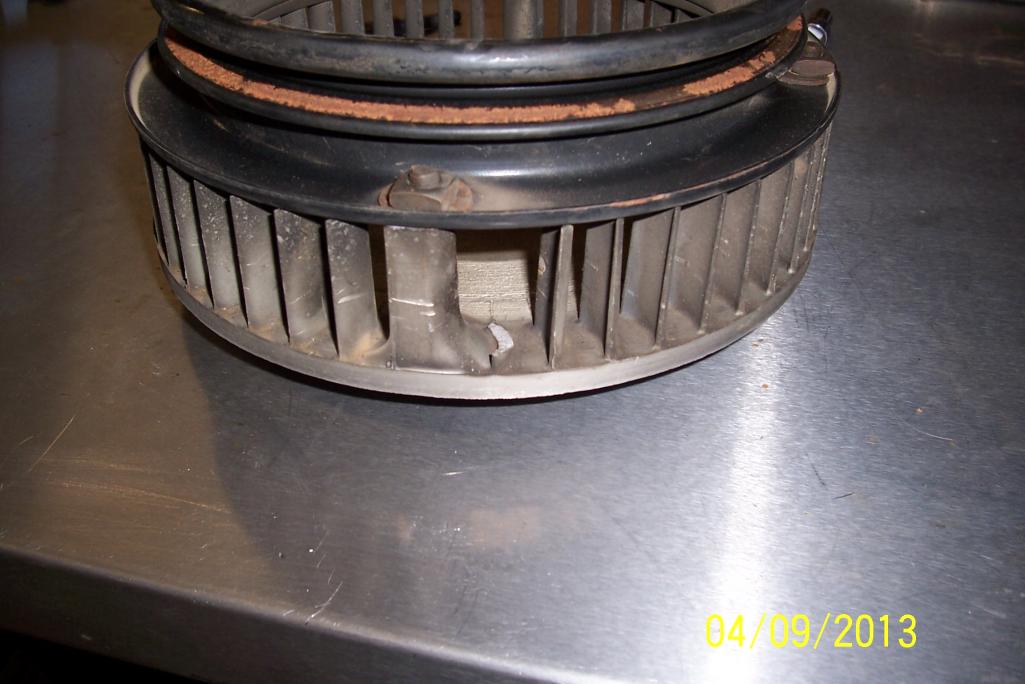
Posted by: Dave_Darling Apr 9 2013, 06:20 PM
You have a few choices.
1- Break off a blade 180 degrees from that one and run it.
2- Get an unbroken fan.
3- Break off a dozen more blades, then sell it on e-bay as a "special racing fan".
I suggest option #2. Should be some in the classifieds here or on Pelican. I bet the Cap'n has a few, and I know Rich at HPH has dozens.
--DD
Posted by: 914Eric Apr 9 2013, 06:42 PM
You have a few choices.
1- Break off a blade 180 degrees from that one and run it.
2- Get an unbroken fan.
3- Break off a dozen more blades, then sell it on e-bay as a "special racing fan".
I suggest option #2. Should be some in the classifieds here or on Pelican. I bet the Cap'n has a few, and I know Rich at HPH has dozens.
--DD
Thanks Dave.
I like option 3.
Pretty sure I wouldn't be the first to attempt such a thing.
Posted by: 914Eric Apr 10 2013, 09:48 AM
I bet the Cap'n has a few, and I know Rich at HPH has dozens.
--DD
For the uninformed...What is HPH?
Posted by: dlkawashima Apr 10 2013, 10:18 AM
High Performance House in Redwood City. Rich Bontempi is the owner.
Posted by: 914Eric Apr 10 2013, 01:17 PM
High Performance House in Redwood City. Rich Bontempi is the owner.
Thanks Dave. Here is something I thought you might enjoy. More original factory engine markings/stamps.
Little hard to read, but they are 022 010C
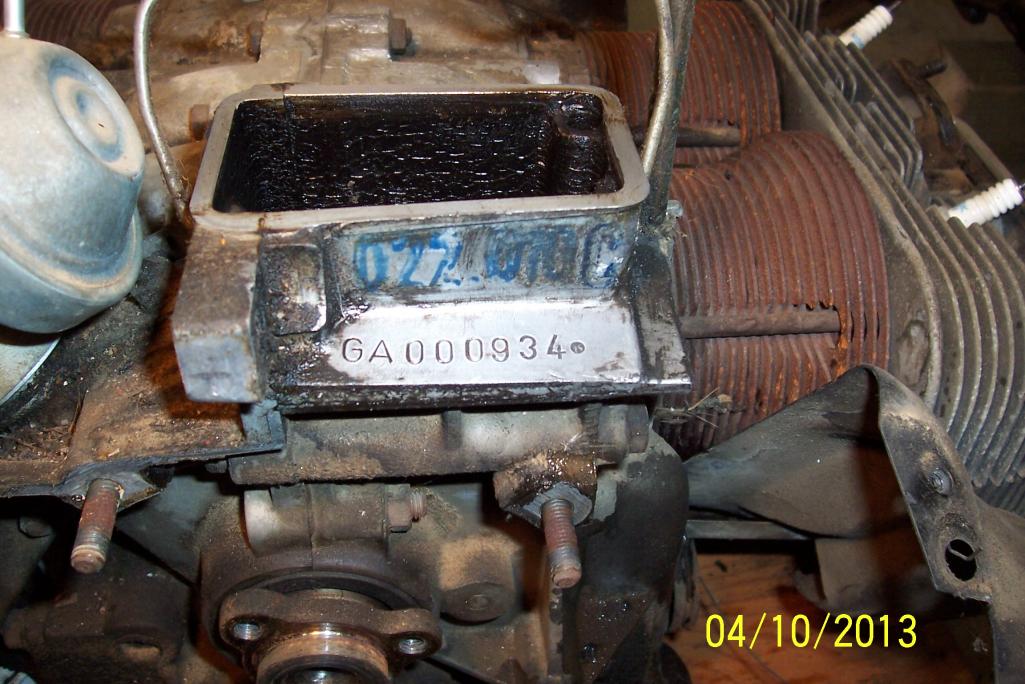
Posted by: bigkensteele Apr 10 2013, 07:43 PM
Hey Eric, this is the super-top-secret highly precise special fan removal tool that I mentioned earlier.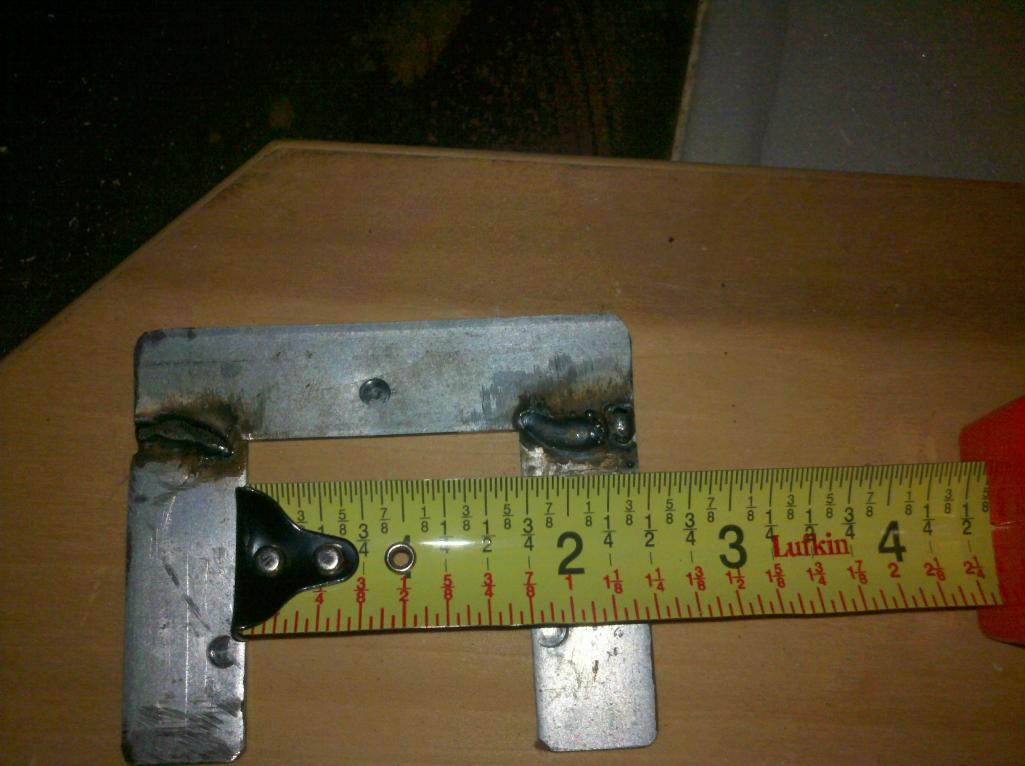
In your picture just above, you can see where it goes - between the fan hub and the case. You LOOSEN the big bolt in the middle and put the 3 smaller bolts back in. You then tighten the 3 bolts evenly until the hub pops loose. The reason you only loosen the center bolt is that there is a woodruff key that indexes the hub to the crank, and you don't want to loose it in the event that the hub pops off completely.
You can see in the picture that there are three circular marks where I used it.
I will try to get it in the mail tomorrow. No need to send it back. It took me longer to dig my welder out of the corner of the garage than it did to make the piece. 
Posted by: bigkensteele Apr 10 2013, 08:12 PM
By the way, it is said that the fan and pulley assembly are balanced from the factory and should not be separated unless you absolutely must. I don't know if this is true or not, and given that you have a blade missing, the balance is off anyway.
However, if you do separate the pulley from the fan for paint, cleaning or whatever, make sure you mark the position because, if I recall correctly, one of the timing marks is on the pulley and one is on the fan casting. So, the pulley should be put back on in the same position that it came off. I might be wrong on that, but I think that is what I recall.
Posted by: 914Eric Apr 12 2013, 01:17 PM
So I'm making progress, Cooling fan and housing is off; Oil cooler is off; and I've got the housing cleaned up and ready to put back on except one thing.
One of the little flaps just falls off. One stay on and it looks like there is some tiny piece of something that is holding it on. It's so tiny it's hard to tell if it is just a dab of glue, or a tiny grommet or what it is? I checked the parts fiche and only the flap and post are listed with nothing holding the post on.
So...What keeps the little flap from falling out of the fan housing?
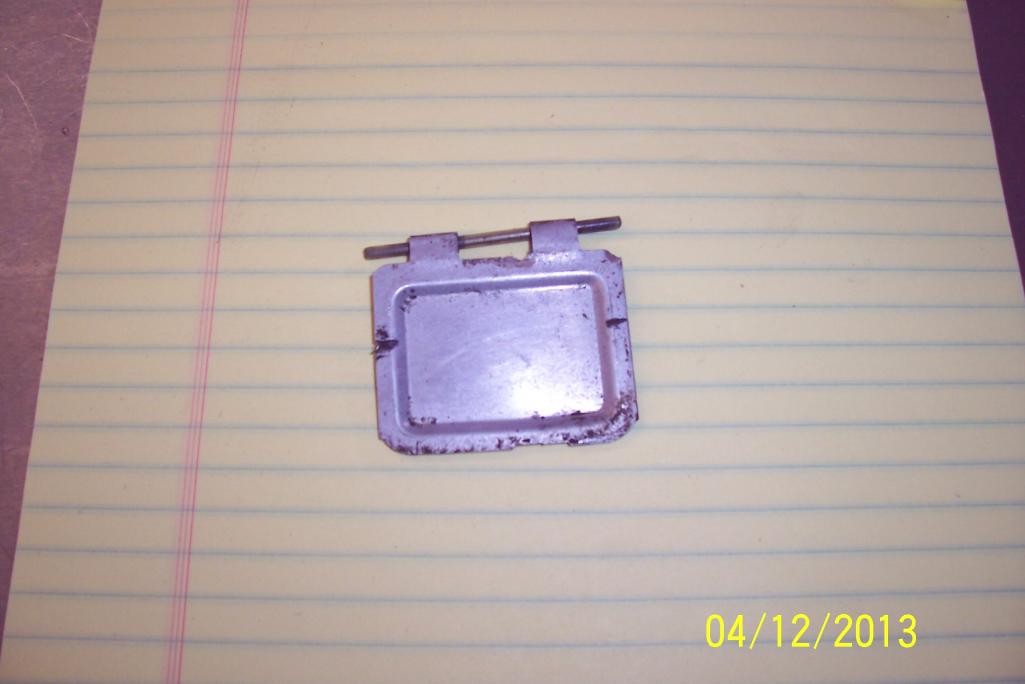
Posted by: rnellums Apr 12 2013, 01:30 PM
The rod is supposed to run through small holes in the fan shroud. I think its primary function is to keep junk from accumulating in the shroud when the engine is off, since any airflow when the engine is on will open the flap.
Posted by: 914Eric Apr 12 2013, 01:58 PM
The rod is supposed to run through small holes in the fan shroud. I think its primary function is to keep junk from accumulating in the shroud when the engine is off, since any airflow when the engine is on will open the flap.
Yes...I understand that part. What holds the rod IN the holes in the fan shroud? It is not a press fit that is snug...It just falls right out.
Posted by: rnellums Apr 12 2013, 02:28 PM
You mean side to side? I believe the hot air guides that clamp to the shroud prevent it from sliding out side to side.
Posted by: 914Eric Apr 12 2013, 04:10 PM
You mean side to side? I believe the hot air guides that clamp to the shroud prevent it from sliding out side to side.
Yea...I guess if you squeeze the hinge part of the flaps real tight onto the pin, it should keep the pin from vibrating out.
This must be VW engineering...as opposed to the Porsche side. Kinda cheesy IMO.
Posted by: rnellums Apr 12 2013, 09:11 PM
This clamps to the shroud on both sides of where the pin rests and should hold it in. I think the flap itself should be loose on the pin.
Attached thumbnail(s)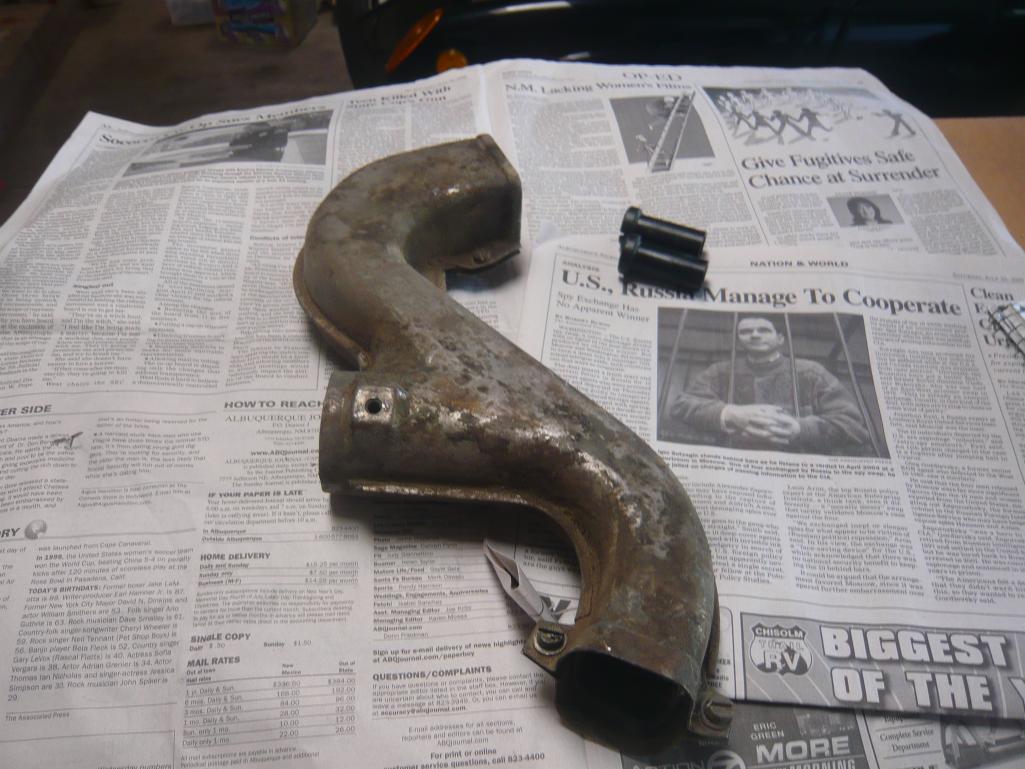
Posted by: 914Eric Apr 13 2013, 09:34 AM
Great point Rob...I forgot the heat exchanger goes on there and will keep the pins from moving. 
Posted by: 914Eric Apr 13 2013, 02:52 PM
Got my injectors back from WitchHunter. They were quick and easy, and I would recommend them. Problem is, they say my injectors don't match and recommend replacement.
While all the injectors tested OK on resistance, leak, and spray pattern, seems I have some variance issues. Injectors 1 and 4 are consistant; #2 is high, and #3 is low.
I have a 15% variance at static, and 11% variance at 2500 rpm.
Anybody know what an OEM original should test at for static and 2500 rpm?
What % variance is acceptable?
Would appreciate any insights some of you with experience in this area could offer.
Posted by: 914Eric Apr 14 2013, 06:29 PM
Still looking for help on what I need to do with my injectors now that I have test results back. See previous post.
Posted by: turk22 Apr 14 2013, 08:27 PM
Got my injectors back from WitchHunter. They were quick and easy, and I would recommend them. Problem is, they say my injectors don't match and recommend replacement.
While all the injectors tested OK on resistance, leak, and spray pattern, seems I have some variance issues. Injectors 1 and 4 are consistant; #2 is high, and #3 is low.
I have a 15% variance at static, and 11% variance at 2500 rpm.
Anybody know what an OEM original should test at for static and 2500 rpm?
What % variance is acceptable?
Would appreciate any insights some of you with experience in this area could offer.
Eric, when you say your injectors don't match, are they physically different injectors, (like two from a 73, and two from at 75 or something)? Or by don't match you mean do you mean just the fact they have a flow variance?
Thought I recalled that you thought the injectors looked different when you pulled them.
Posted by: 914Eric Apr 14 2013, 10:21 PM
Got my injectors back from WitchHunter. They were quick and easy, and I would recommend them. Problem is, they say my injectors don't match and recommend replacement.
While all the injectors tested OK on resistance, leak, and spray pattern, seems I have some variance issues. Injectors 1 and 4 are consistant; #2 is high, and #3 is low.
I have a 15% variance at static, and 11% variance at 2500 rpm.
Anybody know what an OEM original should test at for static and 2500 rpm?
What % variance is acceptable?
Would appreciate any insights some of you with experience in this area could offer.
Eric, when you say your injectors don't match, are they physically different injectors, (like two from a 73, and two from at 75 or something)? Or by don't match you mean do you mean just the fact they have a flow variance?
Thought I recalled that you thought the injectors looked different when you pulled them.
When I say "Match" I mean the flow rates. Not sure what amount of variance is acceptable.
And now that you mention it, Witchunter pointed out the 3 of my injectors are labeled "Ram". 1 has a Porsche/Bosch part number. So they seem to be 2 different manufacturers...but I'm not sure that is really my problem. The variance is what I'm most concerned about. I think.
Posted by: 914Eric Apr 25 2013, 06:27 PM
Front main seal and o-ring came in today, so I went out to install the new main seal.
I pulled the impeller hub with that hi-tech tool sent to me by Ken Steele.
Impeller hub came off nicely and everything appears in good order.
I'm thinking the old main seal just pops out...but no...Seems like it is welded in there.
What's the proper way to get the old front main seal out?
As always...thanks in advance.
Eric
Posted by: bigkensteele Apr 25 2013, 06:39 PM
Glad you liked the tool!
I used a large screw driver to pry it out with a piece of plastic between the case and the shaft of the screw driver. Be careful not to scratch the crank or the walls of the case where the seal seats.
My thread from two years ago asking the exact same question...
http://www.914world.com/bbs2/index.php?s=&showtopic=144645&view=findpost&p=1540919
Posted by: 76-914 Apr 25 2013, 06:49 PM
So I'm making progress, Cooling fan and housing is off; Oil cooler is off; and I've got the housing cleaned up and ready to put back on except one thing.
One of the little flaps just falls off. One stay on and it looks like there is some tiny piece of something that is holding it on. It's so tiny it's hard to tell if it is just a dab of glue, or a tiny grommet or what it is? I checked the parts fiche and only the flap and post are listed with nothing holding the post on.
So...What keeps the little flap from falling out of the fan housing?
Just started reading this last page tonite so this may be late in coming but.... be sure the flap swings freely and lands "flush". It's easy to bend those dead soft aluminum hinges to adjust. I remember the hinges being off set a tad bit.
Posted by: 914Eric Apr 25 2013, 09:05 PM
Got the front main seal out and the new one on. Also the O-ring that goes under the impeller hub. Cleaned up the impeller hub and reinstalled.
Took the 4 bolts off of the oil pump housing and tried to get it off to change the seals as well. Seems stuck on solid. Tapped it from many angles; tried to pry gently; still stuck solid.
What the secret on getting this off? I don't want to go all gorilla on the oil pump housing and screw something up.
Posted by: nathansnathan Apr 25 2013, 09:31 PM
You have to loosen the case parting bolts around the oil pump. The case halves are squeezing it. Be really careful with the ears that you don't break one off, but you should be able to pry it out gently with those and a bolt protruding or some awkward thing once the bolts around are loose.
Posted by: bigkensteele Apr 25 2013, 11:28 PM
I chose not to mess with my oil pump. It was clear that it was not leaking, and I did not want to go down the road of loosening case bolts that could cause potential leaks in the future. Not to take away from what Nathan has told you above, but if your pump is not leaking, I would not mess with it.
Posted by: 914Eric Apr 26 2013, 11:36 AM
I chose not to mess with my oil pump. It was clear that it was not leaking, and I did not want to go down the road of loosening case bolts that could cause potential leaks in the future. Not to take away from what Nathan has told you above, but if your pump is not leaking, I would not mess with it.
Yea...if you need to loosen the case bolts to get it off...I'm not really liking that. Leaks, cracks, could have unintended impacts.
I think I'll clean and move on. I may rebuild the engine at some point, but I want to get it running right now and see where we are.
Posted by: 914Eric Apr 26 2013, 11:38 AM
I also got a new oil filter flange gasket to install. Should it be installed dry...or with some kind of gasket sealer?
Posted by: A&PGirl Apr 26 2013, 12:49 PM
I would make sure it's clean and flat & level. Don't over torque when reinstalling and you should be fine. If you do get your oil pump off, there is a super special trick that needs to be greatly reduce leaking. Also, you'll want to "upgrade" to a type 1 pump as well.
Super Special Trick~
Get a piece of wood 1"-3" thick for your hand size and sized to what you are working on.
Get a granite surface plate (woodcraft) flat to .0001"
Sandpaper (multiple grits)
Instructions:
Lay sandpaper on granite grit side up
Take your wood piece and lay it on the sandpaper
Using even consistent pressure sand the wood till completely flat & level
Remove
Lightly glue the new sandpaper to the leveled portion of the wood block
Use even consistent pressure and sand in one direction only to level out your case surface.
Remember you will also need to level your attaching piece (such as the oil pump face) to match or it will leak.
Done
We did this for the oil pump & the oil filler neck because they were leaking. (Read: I did most of the manual labor ) No more leaks afterword with no sealant or sealer used.
Just a tip from an old mechanic (my dad who was the go to guy back in the day).
Posted by: 914Eric May 1 2013, 09:19 PM
Well it seems like I've finally got it stripped down as far as I need to go for now with the exception of the trans, and I can start reassembly. Got all the bits needed...I think. Gaskets, O-rings, fuel lines, vacuum lines, plugs, coil, etc, etc...
Waiting on my Dr. Evil trans CD to see what I need to do there.
Refurbished my injectors...new seals, elbows and clamps.
Posted by: 914Eric May 2 2013, 07:02 PM
Got the injectors mounted in the injector manifolds and ready to go. Sandblast, prime, paint.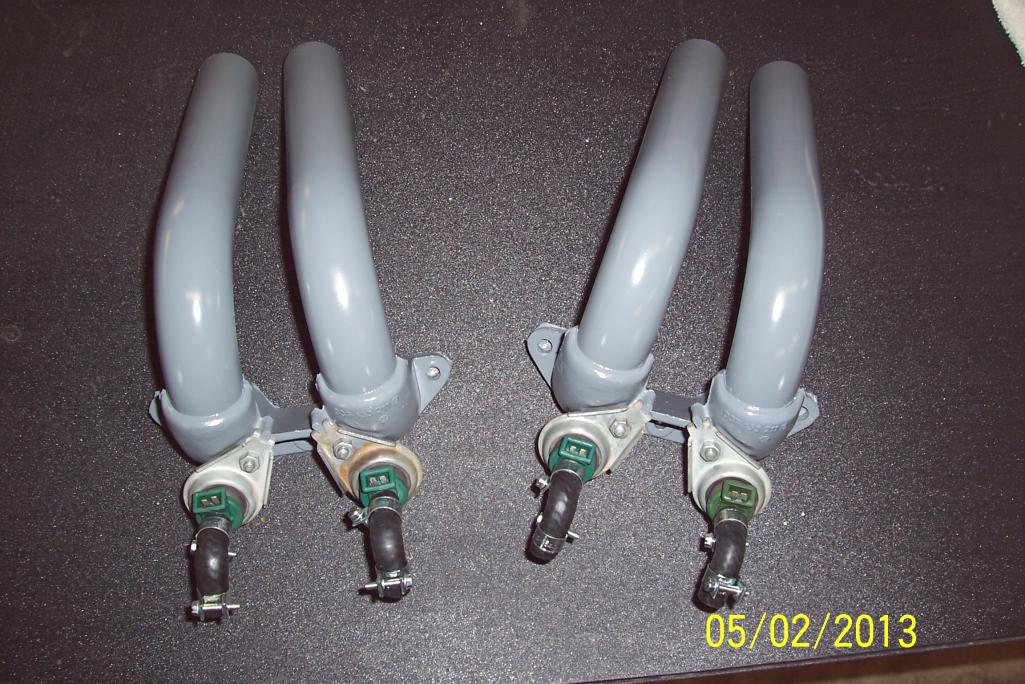
Posted by: rnellums May 2 2013, 08:14 PM
Got the injectors mounted in the injector manifolds and ready to go. Sandblast, prime, paint.
Looking good! But i think the elbows go the other way
Posted by: 914Eric May 8 2013, 07:29 PM
Haha...I knew that Rob.
So I'm changing the points and condenser today and of course another hiccup.
The condenser that I got as part of my "Tune Up" pack from AA doesn't fit.
The wire from the condenser to the hole in the dizzy where you poke the connector thru for the points to attach to is about 3/4" shorter than the 20 year old one that I'm replacing. And if you look at the picture of the one I removed...There isn't 3/4" to spare.
Anyone else experienced this?
I'm spending more time sourcing all the right parts than actually working on the car. 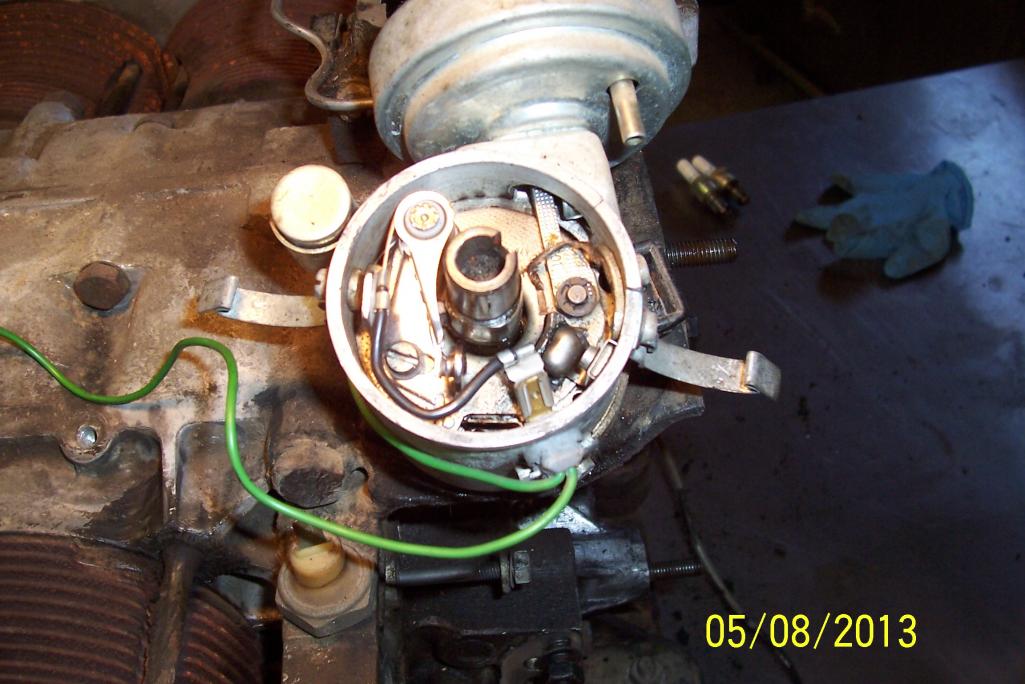
Posted by: rnellums May 9 2013, 12:44 PM
Its not concours correct, but what about mounting here! Is it a possibility?
Attached image(s)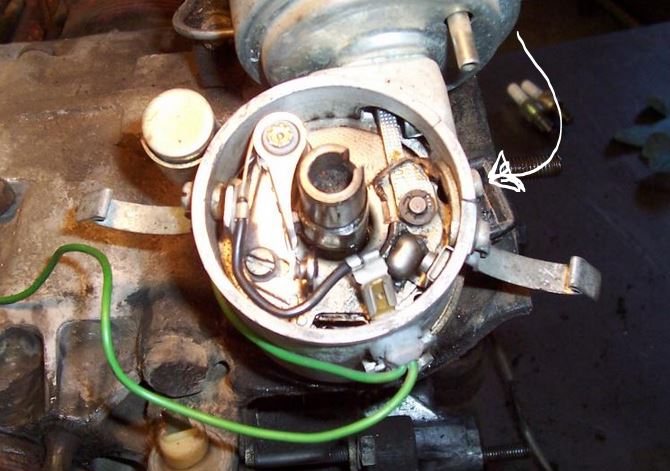
Posted by: brenz May 9 2013, 01:53 PM
I experienced this on a friend’s car. The condenser and cap clip are now sharing a screw, with no washer. It works, but should replace with a longer screw later.
Posted by: The Cabinetmaker May 9 2013, 02:52 PM
Put it on the other side, and you won't be able to plug in the trigger points or set the timing.The one in the pic is the proper one. If the new one is shorter, its the wrong one
Posted by: 914_teener May 9 2013, 08:36 PM
Put it on the other side, and you won't be able to plug in the trigger points or set the timing.The one in the pic is the proper one. If the new one is shorter, its the wrong one
Yes I have experienced this same thing. You have the wrong condenser.
Also....make sure you check your advance and retard cans for vacum...you will save yourself some headaches chasing idle problems later.
Also.......make sure the advance plate is clean and lubed.
Posted by: r_towle May 9 2013, 08:46 PM
flip in over on the same screw so its on the other side of the cap clip.
I have not found the "right" condensor anywhere....maybe the Capn has a source.
rich
Posted by: Nozzle May 10 2013, 03:49 AM
I am also having this exact problem. If anyone has a source for the correct part I would love to know!
Posted by: 914Eric May 10 2013, 01:13 PM
Talked to Auto Atlanta this morning and they are sending me another condenser...after they suggested that I try to "Stretch" the wire to see if that might make the one I have fit.
Posted by: 914Eric May 10 2013, 02:51 PM
The rotor on the left is the one I took off last week; a rev-limiter rotor.
The one on the right is the one I was sent by AA which I guess is NOT a rev-limiter.
At first glance, I like the smaller, simpler, non-limiter model on the right.
What was original? What do most people use?
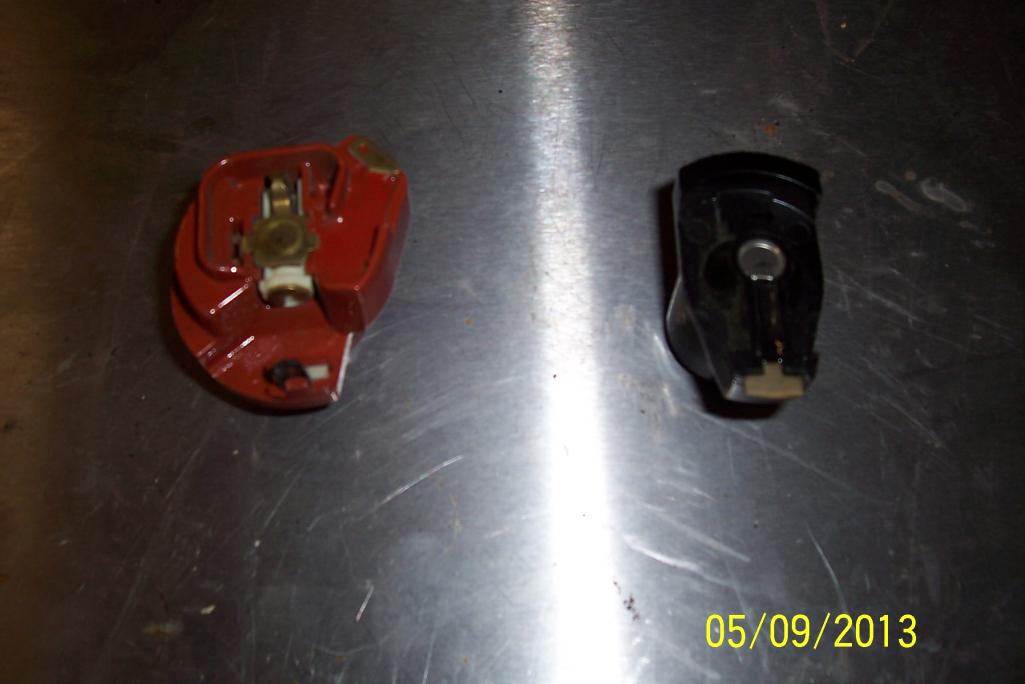
Posted by: mdelwiche May 10 2013, 03:45 PM
flip in over on the same screw so its on the other side of the cap clip.
I have not found the "right" condensor anywhere....maybe the Capn has a source.
rich
I bought mine from Autozone, (duralast) never used, installed a Petronix system instead, but as you can see the wire is the same length as the original.
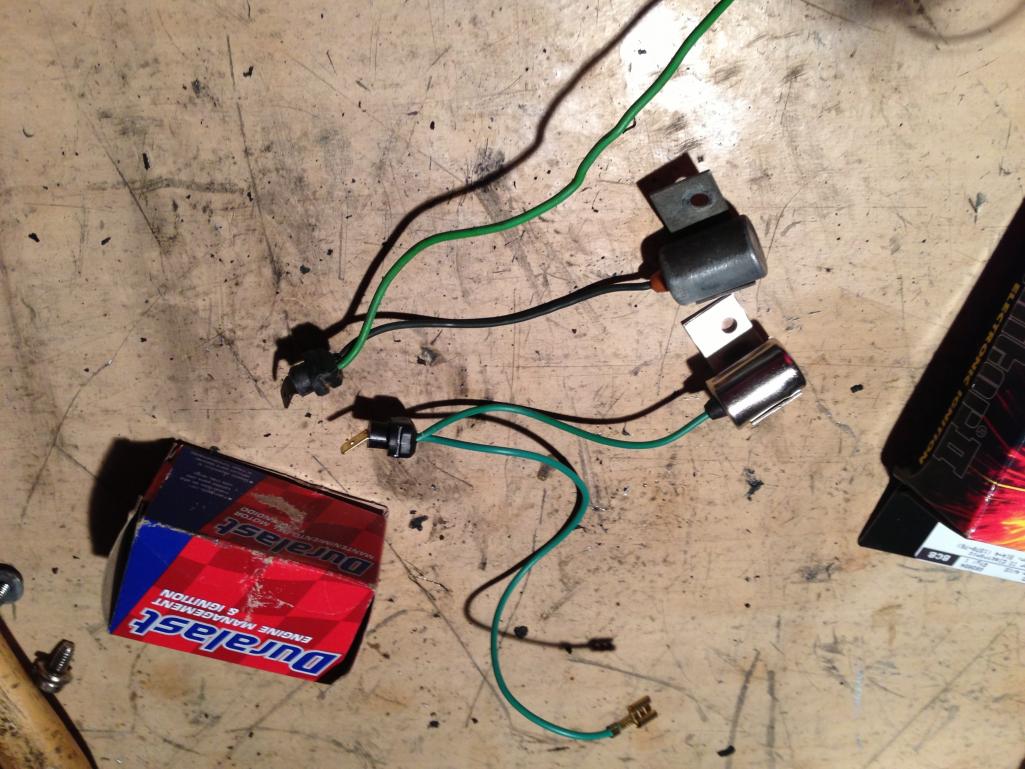
Posted by: McMark May 11 2013, 10:29 AM
I figure the rev-limiting rotor is just another part to fail. I don't have a problem hearing the red-line RPM, so a rev-limiter is useless.
Posted by: Krieger May 11 2013, 10:47 AM
I use a bosch rev limiting rotor. I always have. Cheap insurance. Its a real simple device that when spun to fast grounds out the rotor. I think it is just a single spring on it. I doubt they ever really fail. You could carry a spare one if your that worried. I use it all the time when autocrossing. There is never time to look at the tack when you are driving hard. It just does its job and I concentrate on tearing up the course. Autocrossing this past weekend there was a segment of the course I was dragging the rev limiter for maybe two seconds. Not worth upshifting. I was able to figure out the quickest way through and get a little better each time without ever looking at the tack!
Posted by: nathansnathan May 11 2013, 11:16 AM
Nigel Skeet, from the bay window bus forums, sent me this in a pm, and I am thinking of not using the rev-limiting rotor on account of his advice. it is a pretty long explanation, which he is kind of famous for.
To prevent over-revving, Volkswagen in their 'wisdom', fitted a centrifugal cut-out (i.e. governor) type, ignition rotor arm, which shorts the HT ignition pulses to earth, when the engine attains 4,500 RPM. The absolute maximum rev limit, is 5,000 RPM, for the VW 12/13/15/1600 Type 1, 2 & 3 engines, with magnesium-alloy crankcase; unless a specially counter-balanced crankshaft has been substituted, together with fine-tolerance balancing of other rotating or reciprocating components. The 1972~83 VW 17/18/2000 Type 2 & Vanagon engine, is also fitted with a cut-out type rotor arm, which operates at 5,400 RPM, but this engine, in common with other VW 17/18/2000 Type 4 style engines (VW 411 & 412 and VW-Porsche 914/4), can safely be revved briefly, even in unmodified form, to a maximum of 6,000 RPM.
Ignition cut-out, is characterised by violent juddering of the whole vehicle, arising from induced vibration of the engine and transmission., which is likely to cause more damage than merely over-revving the engine by 500 RPM or so. This situation can be avoided, by replacing the cut-out type rotor arm with the conventional type, plus fitting a rev counter and/or adjustable, electronic, smooth-cut rev limiter, which are also incorporated into some after-market electronic ignition systems, such as the Microdynamics Formula 1, FCD system, fitted to my family's 1973 VW '1600' Type 2.
Posted by: Krieger May 11 2013, 01:28 PM
"violent juddering" is horse crap! The engine sounds like it is misfiring and will not accelerate further. That is all.
Posted by: nathansnathan May 12 2013, 07:58 AM
"violent juddering" is horse crap! The engine sounds like it is misfiring and will not accelerate further. That is all.
Shad Laws talks about it some in this old shoptalkforums thread. One of the Bergs chimes in at the end as well about the backfiring causing engine fires.
http://www.shoptalkforums.com/viewtopic.php?f=1&t=4186
Posted by: 914Eric May 21 2013, 01:39 PM
Got my new thermostat in today from awesome powdercoat. Looks like a quality piece. Took a while to get it (About a Month) because they were between production runs, but he contacted me right away to let me know when they would be available and then contacted me again when they were shipping.
All in all...a good transaction. Once I get the car running, I'll test it and let you know.
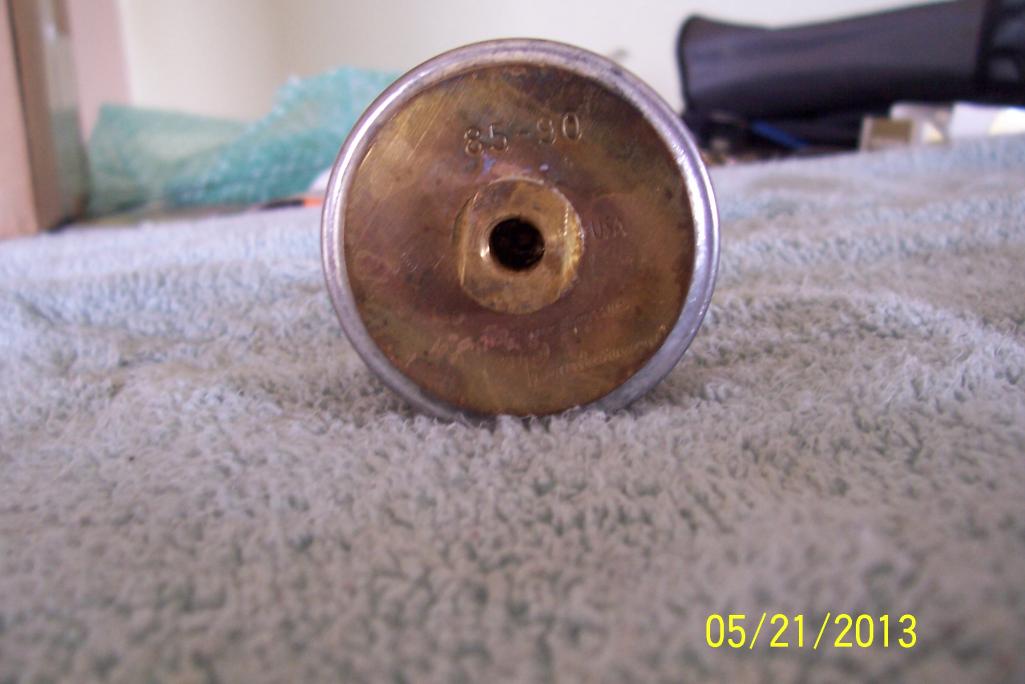
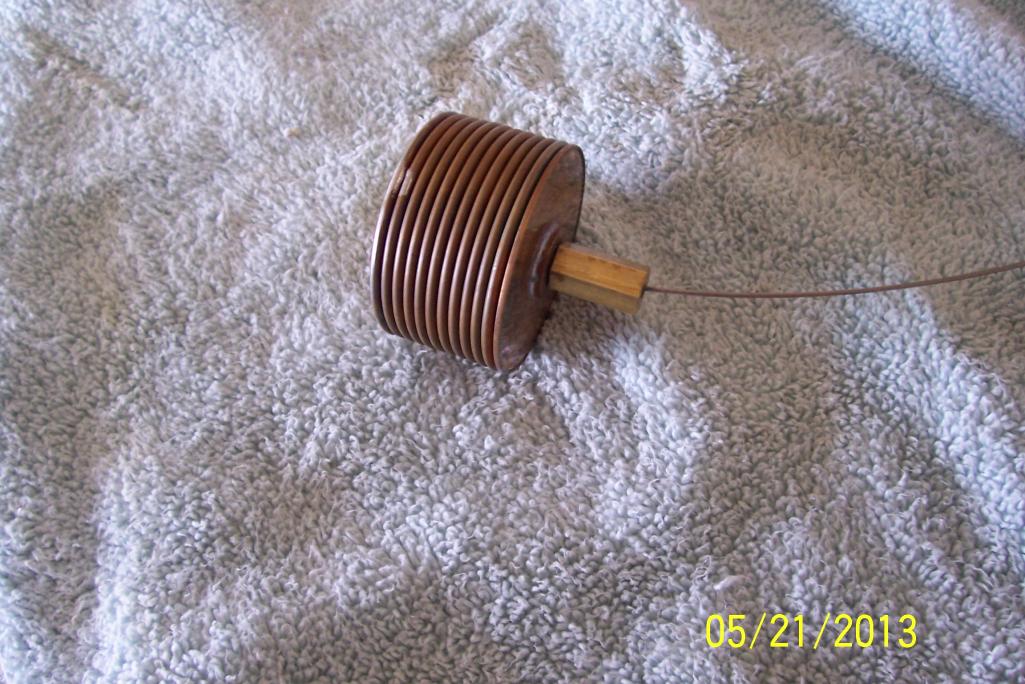
Posted by: reharvey May 21 2013, 06:11 PM
Got mine from the same guy. Great service and it really works!
Posted by: bigkensteele Aug 1 2013, 09:13 PM
Eric?
Updates?
Progress?
Posted by: 914Eric Aug 2 2013, 12:00 PM
Hi Ken,
Summer is busy here on the ranch. Once it became clear that I wasn't going to make it to the west coast get together in June...I got a little side tracked.
I do have everything cleaned up, inspected, and ready to start putting things back together. The last part I was waiting for was a replacement fan which I got from Rich at HPH.
Thanks for the kick...I'm on it...
Posted by: bigkensteele Dec 31 2013, 03:25 PM
Hi Ken,
Summer is busy here on the ranch. Once it became clear that I wasn't going to make it to the west coast get together in June...I got a little side tracked.
I do have everything cleaned up, inspected, and ready to start putting things back together. The last part I was waiting for was a replacement fan which I got from Rich at HPH.
Thanks for the kick...I'm on it...
OK, Eric. Summer is over!
Any updates?
Posted by: 914Eric Feb 16 2014, 01:39 PM
Hey Ken,
Yea...I've been on the shelf for a while. I'm sure I don't need to explain to many of you guys how family craziness can get in the way of OUR favorite Porsche projects.
I've got a few things done, and am beginning re-assembly. I changed the front and back crank seals, clean the oil cooler and replaced the seals, changed the seal on the oil filter connector piece, and am ready to put the engine back in. I also have the clutch off and need to check to see if it needs replacing. I'll need to research what the clutch should look like if it is OK. Any guidance?
What has me slightly held up is that I'm fixing the broken clutch cable bracket on the firewall that my dad's mechanic had attached with a U-bolt. When the cable tube broke, it also put a small crack into the firewall. I removed the u-bolt and have it all in place and just need to get the small weld done to hold it in place and fix the crack. Since I'm not a welder this has had me kind of in limbo because I really don't want to turn just anyone loose on it and I don't want to learn to weld on my 914.
I know it's kind of a small problem, but I just haven't searched out someone to do it. Once that weld is done, I can put in my new stainless fuel lines, run all the new throttle, and clutch cables, and seal her back up. Really shouldn't take more than a couple days/weeks once I get the weld done.
Posted by: 914Eric Feb 16 2014, 03:18 PM
One additional thing I've done that I forgot to mention is that I've drained all the brake fluid and the brake lines and blown them out with air. I also replaced the front rubber brake lines with new ones from 914Rubber. I also have the rear brake lines but need to send them back. I was sent rear brake lines that didn't have the slot for the clip. Going to call 914Rubber this week to swap for the correct ones.
Posted by: 914Eric Feb 18 2014, 01:26 PM
My brake lines actually came from Eric at PMB, not 914Rubber. Talked to him this morning and it seems I got lines from a 911 by mistake. Arranged to get the proper rear lines sent out today.
Excellent service...Thanks Eric
Posted by: hattrick Oct 22 2014, 03:48 PM
Hi Eric,
Just saw your cool story. I live in Boise and If you're down my way stop by my shop. I PM'd you. I service and restore older air cooled Porsche's. I use to work for Aase motors in California. If you need some advice or parts I might be able to help. I own a black 73 1.7 all original - never touched, a 73 2.0 and a 914-6 that I'm in the process of restoring...plus other Porsche's. What a great color too...
Wade
Posted by: 914Eric Aug 27 2021, 03:17 PM
I'm Back! Had some health issues, and am putting the car up for sale.

Powered by Invision Power Board (http://www.invisionboard.com)
© Invision Power Services (http://www.invisionpower.com)