Printable Version of Topic
Click here to view this topic in its original format
914World.com _ 914World Garage _ Home Wheel Alignment
Posted by: mrbubblehead Jan 24 2013, 11:25 AM
I have been talking to Ray Scruggs and he sent me his pdf file on how to home wheel align a 914. He said he didnt mind if I posted it up here for us. Which was pretty cool of him I thought. But I don't know how to post it. If you know how, pm me and I will email it to you.
Posted by: r_towle Jan 24 2013, 11:41 AM
Open the file and take a screen shot of each page.
Save each screen shot as a JPG file.
Post away.
rich
Posted by: rmital Jan 24 2013, 11:53 AM
PM sent...I have Adobe Acobat on my PC here at work. I could save each page as a image then easily posted.
Posted by: McMark Jan 24 2013, 12:04 PM
Post the PDF just like you would a picture.
Posted by: mrbubblehead Jan 24 2013, 12:32 PM
For now, right click, and save link as.... the attachment. then save it to your favorite place  HOME_ALIGNMENT_OF_PORSCHE_914.pdf ( 275.99k )
Number of downloads: 12138
HOME_ALIGNMENT_OF_PORSCHE_914.pdf ( 275.99k )
Number of downloads: 12138
Posted by: 914Eric Jan 24 2013, 04:42 PM
Tried it 4 times...never worked.
Just sat loading, and loading, and loading....Then timedout.
Posted by: Tilly74 Jan 24 2013, 04:46 PM
Yeah, didn't work for me either. When we do alignments on ATV's at our shop we use string or twine to measure and keep track of movement. It's pretty archaic compared to modern alignment machines, but it works well enough to keep our customers happy. I'm really curious to see how this works and if it's similar to the methods we use.
Posted by: ThePaintedMan Jan 24 2013, 04:50 PM
Man I've been trying to get a copy of this for a long time. If this doesn't work, you can always upload it to GoogleDocs and password it. Then just share the password here so we can access it. Thanks for reaching out to him for us!
Posted by: mrbubblehead Jan 24 2013, 05:17 PM
sorry guys, were working on it.
hopefully we will get it fixed shortly.
Posted by: mrbubblehead Jan 24 2013, 05:19 PM

Yeah, didn't work for me either. When we do alignments on ATV's at our shop we use string or twine to measure and keep track of movement. It's pretty archaic compared to modern alignment machines, but it works well enough to keep our customers happy. I'm really curious to see how this works and if it's similar to the methods we use.
Its probly the same method. It worked great for me. thats why I wanted to share it.
Posted by: rmital Jan 24 2013, 06:00 PM
I'll post the images first thing tomorrow morning when I get to work...
Posted by: mrbubblehead Jan 24 2013, 06:30 PM
I'll post the images first thing tomorrow morning when I get to work...
Right on bro. Thank you.
doug
Posted by: sixnotfour Jan 24 2013, 06:41 PM
If you cant wait;
http://www.2l7registry.com/doc/georacing.pdf
Its Great you talked to Ray ..
Posted by: mrbubblehead Jan 24 2013, 06:48 PM
If you cant wait;
http://www.2l7registry.com/doc/georacing.pdf
Its Great you talked to Ray ..
Ya I've seen that one but thats not the same one. He has a 914 specific version....
Posted by: sixnotfour Jan 24 2013, 06:55 PM
the method is the same
Posted by: Drums66 Jan 24 2013, 07:10 PM
....Bro, I think it's the old school front end alignment? involving
Twine & a board(2 by 4)...It's been discussed here 

![popcorn[1].gif](style_emoticons/default/popcorn[1].gif)
Posted by: mrbubblehead Jan 24 2013, 07:12 PM
Your right, but the rear suspension is totally different, and possibly the setup numbers too.
Posted by: David J Jan 24 2013, 07:56 PM
Great info - Thanks!
Posted by: strawman Jan 24 2013, 09:33 PM
I've used string alignment setups for years for a variety of street, autocross and track cars. To do it "right," you'll need a very flat surface. I've used stacks of 1/8" thick 12"x12" vinyl flooring tiles to "shim" the garage floor, based on where the car will sit during the alignment process. Essentially, I just parked the car where I've got a lot of room around it to work and marked the tire footprints with chalk. Then you back the car up, place one vinyl tire over each mark, pull the car back on top to make sure the tire footprints are squarely in the middle, mark around each square with a felt-tip pen, pull the car back out, and paint over the edge of each square with spraypaint. It'll last for years; use different colors for each car.
You can then use a long piece of clear vinyl tubing taped to a vertical surface, fill it mostly with water and water to figure out the relative heights of each of the four squares. Rather than try to explain it, http://www.factsfacts.com/MyHomeRepair/WaterLevel.htm provides a good explanation. Then shim with additional or fewer tiles until each square is at the same height as the other three. Use a Sharpie to write inside each "square" on the floor to record how many tiles are necessary to provide a flat surface. The tiles are less than a buck each at Home Despot (don't get the ones with the waxpaper covered stickiness).
I've used the jackstands method to hold the strings along both sides of the car, but I've found building a poor-man's https://www.pegasusautoracing.com/productdetails.asp?RecID=3004&utm_expid=10520551-6&utm_referrer=https%3A%2F%2Fwww.google.com%2Furl%3Fsa%3Dt%26rct%3Dj%26q%3D%26esrc%3Ds%26source%3Dweb%26cd%3D1%26ved%3D0CDUQFjAA%26url%3Dhttps%253A%252F%252Fwww.pegasusautoracing.com%252Fproductdetails.asp%253FRecID%253D3004%26ei%3DMPMBUfz2K8azigKov4DgBw%26usg%3DAFQjCNEvON27pX4EH1XoqLPjSoJigkv3sw%26sig2%3DnEJbOvmyQU9entp9Z79kRQ%26bvm%3Dbv.41524429%2Cd.cGE is pretty easy. And this setup lets you move the car around to settle the suspension after each change to the alignment setting.
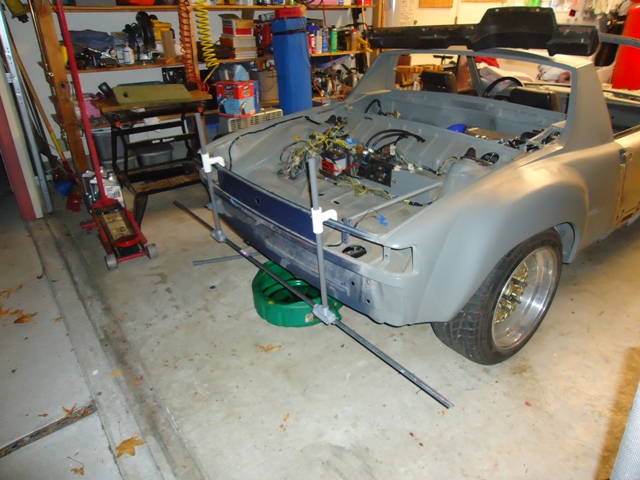
Below are some pics of the one I built last weekend (I seem to toss the previous version every time I move!). I've got about $30 bucks and an hour of my time into it. It is adjustable and works for my 914, as well as my two E36 BMWs.
First up is the front setup on the front of my car: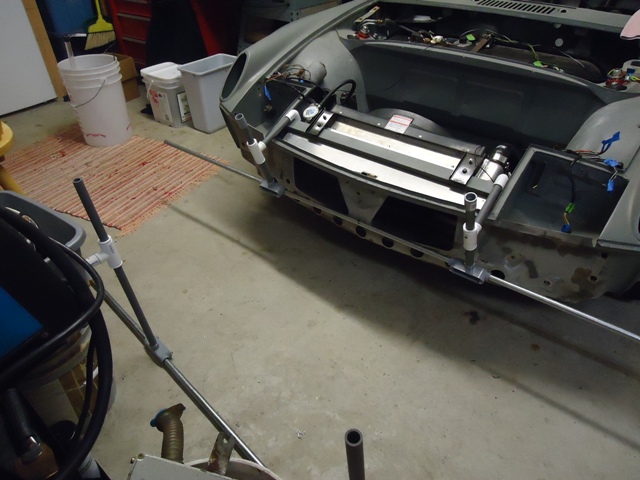
Next up is a close-up of some of the parts. You'll need four of the grey 1/2" PVC junction boxes ($2.50 each), four 3/4" white PVC tees ($0.80 each), eight 3/4" to 1/2" white PVC bushings ($0.40 each), four 1/2" white PVC elbows ($0.35 each), one 10' stick of 1/2" schedule 40 grey PVC pipe ($1.75) and two 10' sticks of 1/2" EMT galvanized metal conduits ($4.75 each). You'll also want to use 1" screws in place of the ones that come with the four grey junction boxes (those screws are too short); you use 'em to secure the metal conduit once you size things up. All the grey PVC parts are found in the Electrical section of your hated hardware store, and the white PVC parts are found in the Plumbing section. Be sure to curse the lack of helpful assistance in the aisles of the big box hardware stores while you're there...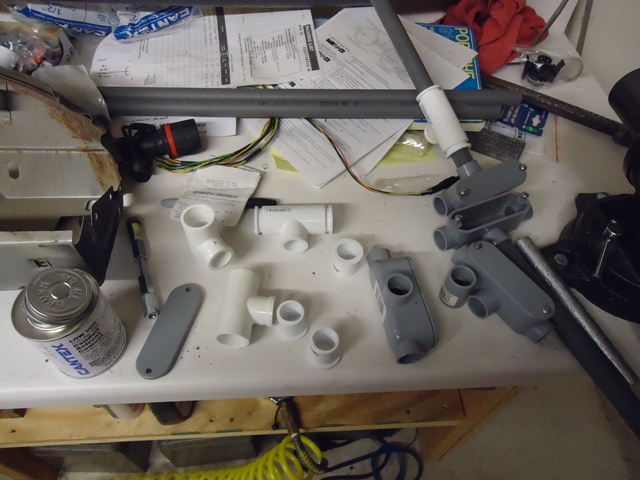
Next is a close up of the front-side of the junctions. Note that you'll want the grey sched 40 PVC pipe to slide up/down through the white PVC bushings you glued into the tee (it won't as purchased!), and a head porting sandpaper cone makes short work of it. I suppose you could use a round bastard file, but that would take a lot of sweating and swearing -- and you probably won't file it very straight. You'll also need to slightly open up the grey junction box holes for the EMT to slide left/right; again the porting sanding cone works great for this. Note the screw in the white PVC tee; that locks the grey PVC pipe in the vertical adjustment once you get the measurements right. Essentially, you want the strings on each side of the car to pass horizontally at the hub centers.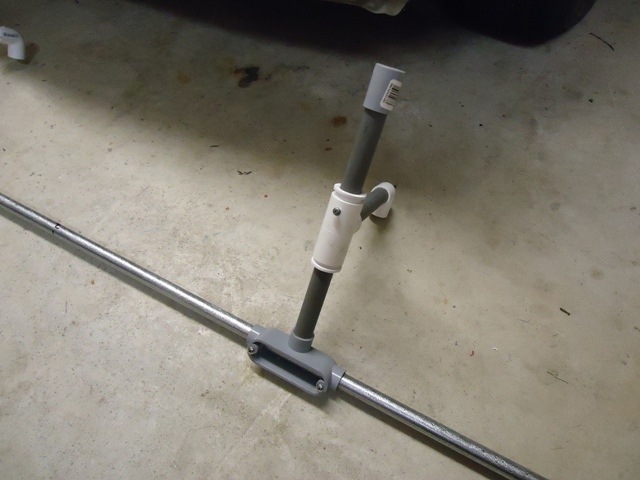
Finally is a pic of the backside. Nuthin' too exciting. You don't need to, but I like to push-on (don't glue!) a cap or union on the top of the vertical PVC pipe so it doesn't slide off when making the initial adjustments.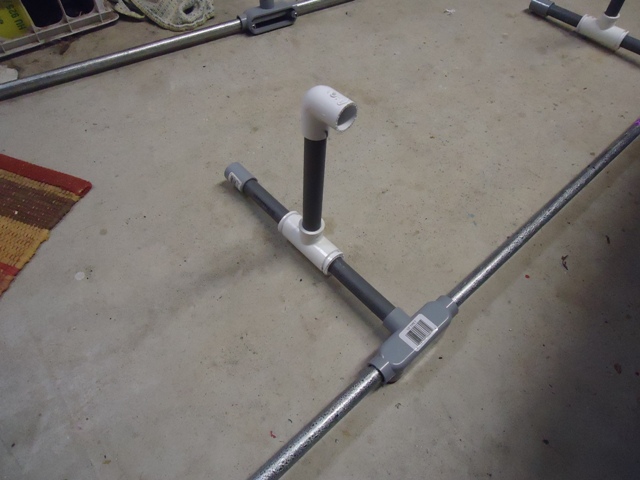
You'll want to find the exact center of the front and rear of the car, mark it on the car (a small Sharpie mark is virtually invisible) and line it up with the center of the front and rear of the string bars -- if you want the car to drive straight down the road. Once you get the strings equi-distant from the center at the front and rear, and tighten the strings and it will stay put while you make your measurements and changes.
The four level squares on your garage floor can also be used to counter-balance your car -- but that's a whole 'nother story.
File this under Cheap Bastard Racing solutions...
Posted by: mrbubblehead Jan 24 2013, 09:50 PM
That is a fantastic right up strawman! Thanks for the info. This will compliment Rays pdf when it gets posted tomorrow. I think Im gonna make these and realign my car. what keeps them attached to the car when you move the car to settle the suspension? I suppose as long as your fixture goes into the exact same place with each installment you could just mark the emt where the string should go. that would make re-setting up way faster. any pictures of the rear set up. and one more note, the strings should run in the same plane as the axles. And your fixtures are adjustable for that exact reason. I love it.
Posted by: Spoke Jan 24 2013, 09:50 PM
I was able to download the PDF.
Right click on the icon and select "save link as ..."
Save it and open it.
Posted by: mrbubblehead Jan 24 2013, 09:52 PM
I was able to download the PDF.
Right click on the icon and select "save link as ..."
Save it and open it.
wonderful spoke. thanks. i will edit my post...
Posted by: Black22 Jan 24 2013, 09:58 PM
Worked for me too...it just took a minute. Thanks!
Posted by: mrbubblehead Jan 24 2013, 09:59 PM
Worked for me too...it just took a minute. Thanks!
Oh good. I edited the post with the attachment also.
Posted by: strawman Jan 24 2013, 10:00 PM
what keeps them attached to the car when you move the car to settle the suspension?
The design of this essentially wedges it in place, once the strings are tightened. The right-angle elbows pull against the inside of the trunk, while the EMT crossbar pulls against the bumper with tension on the strings. Hope it works for you!
Posted by: draganc Jan 24 2013, 10:03 PM
That's awesome strawman - thanks!
Posted by: rmital Jan 25 2013, 07:33 AM
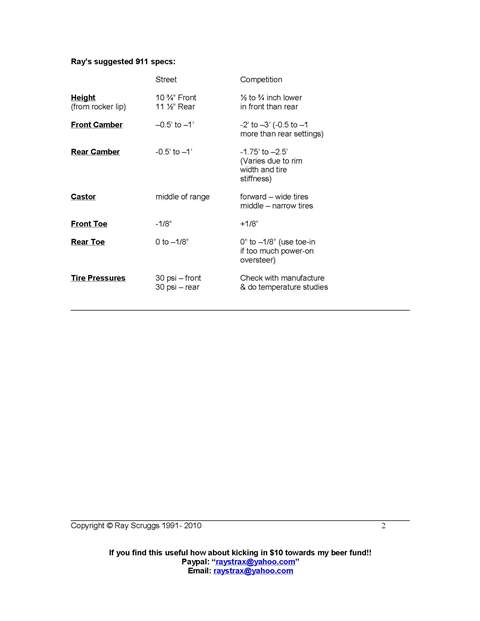
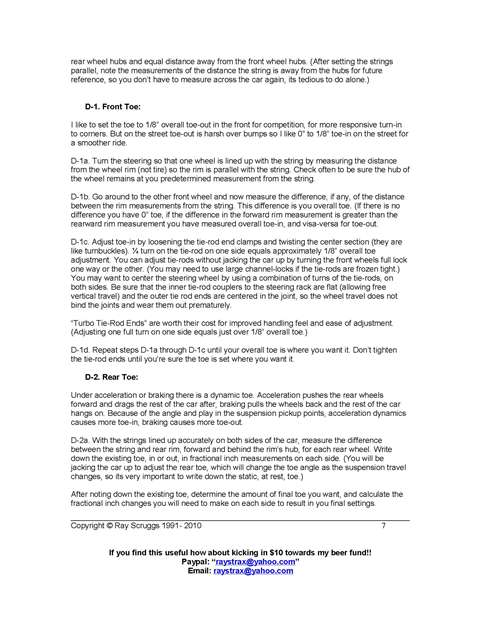
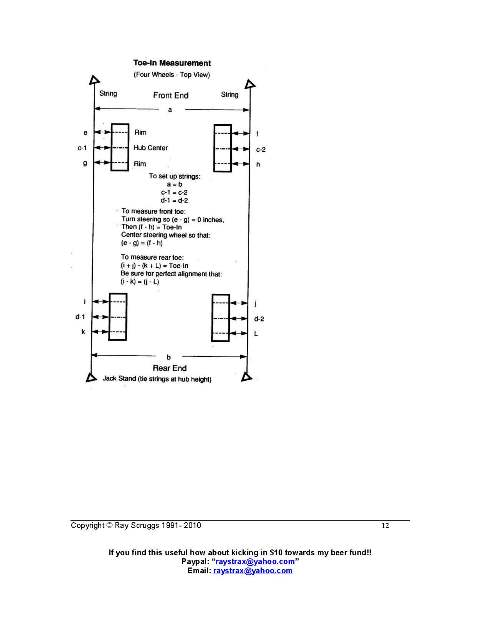
original PDF images: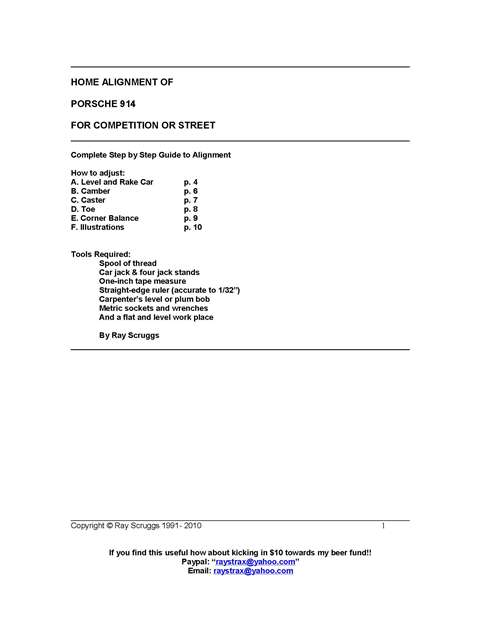


Posted by: rmital Jan 25 2013, 07:35 AM
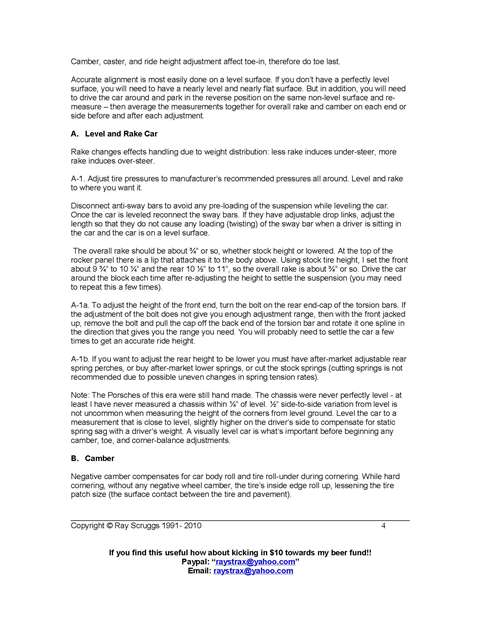
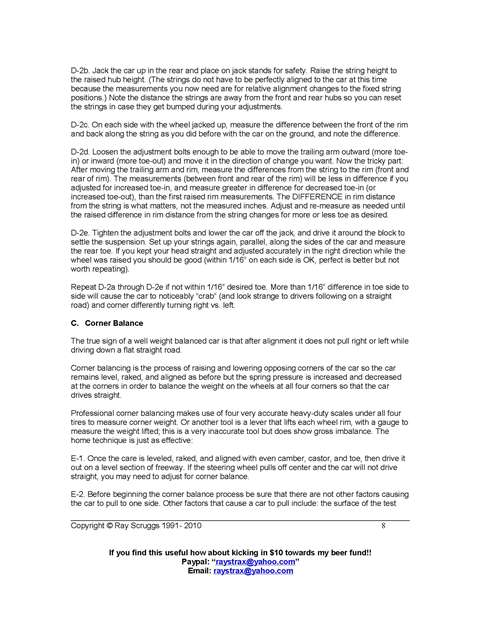
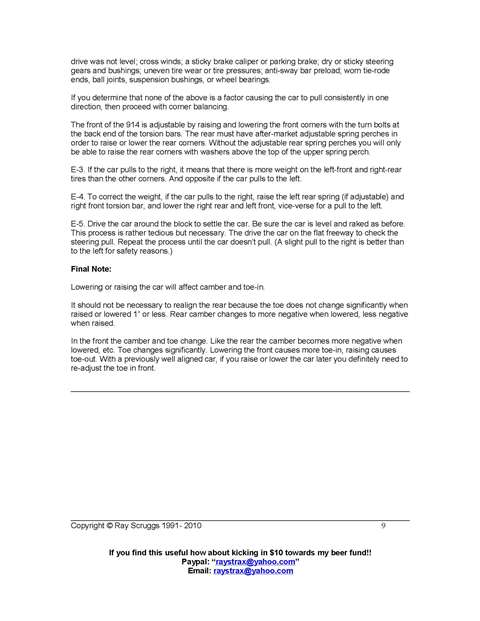
more: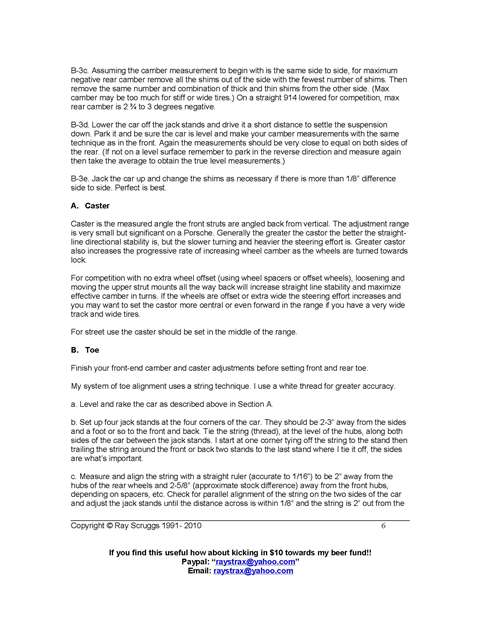
Posted by: rmital Jan 25 2013, 07:37 AM
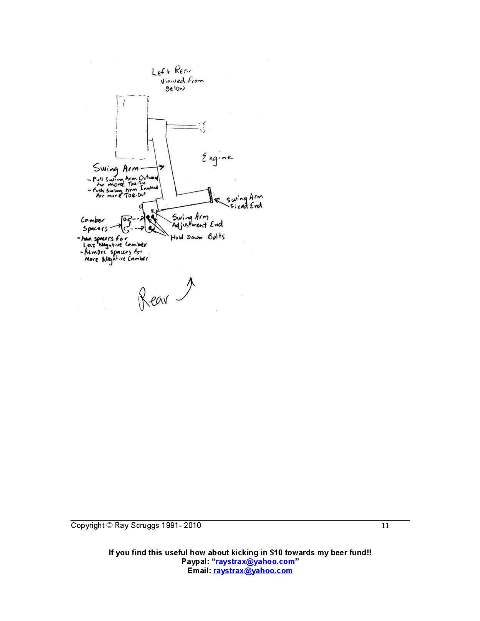
figures:
Posted by: Eric_Shea Jan 25 2013, 11:06 PM
Just amazing. Thanks! Is the rear any different?
Posted by: strawman Jan 25 2013, 11:34 PM
Is the rear any different?
The rear verticals are longer, and the fore/aft is shorter. See the pic below. Hope this helps!
Powered by Invision Power Board (http://www.invisionboard.com)
© Invision Power Services (http://www.invisionpower.com)