Printable Version of Topic
Click here to view this topic in its original format
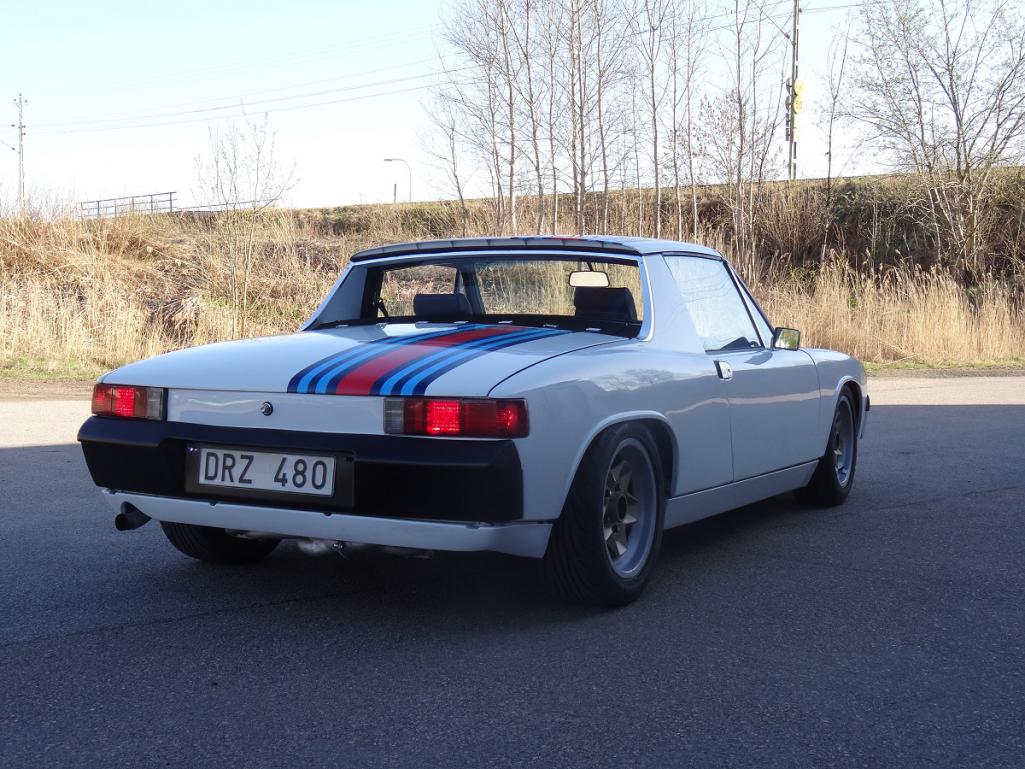
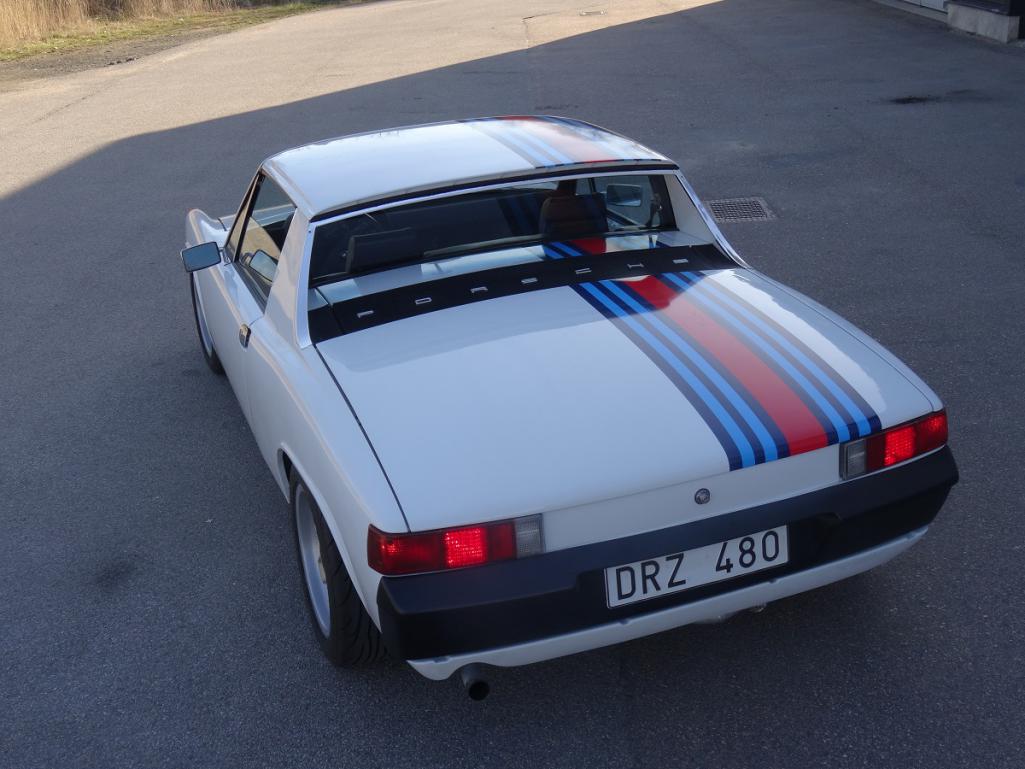
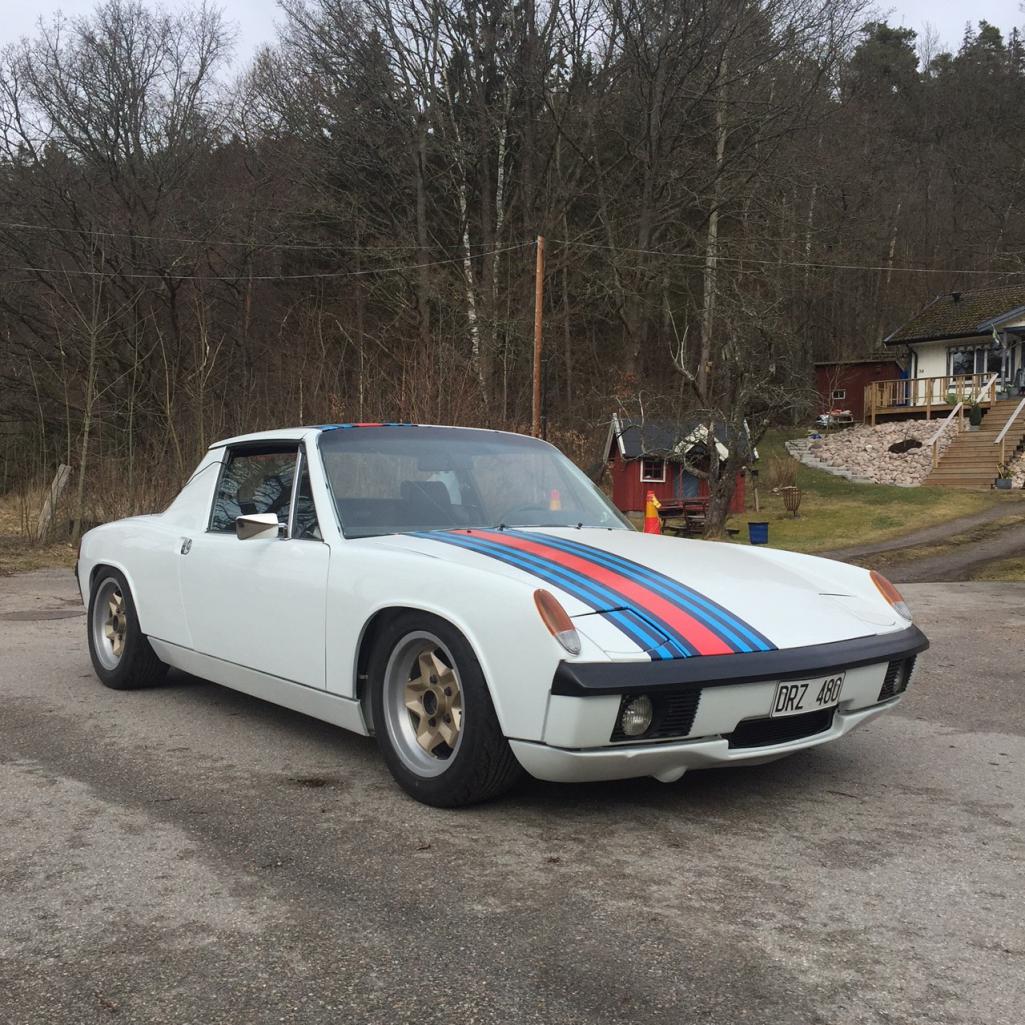
914World.com _ 914World Garage _ Martini 914 1974
Posted by: falcor75 Feb 2 2013, 09:09 AM
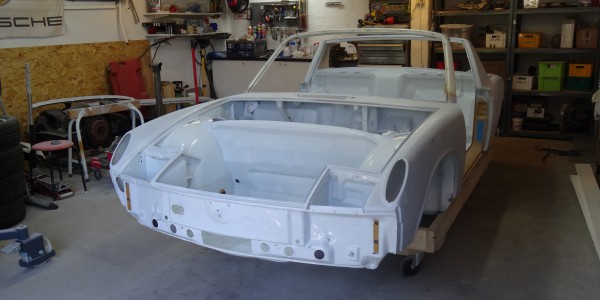
Got my first 914 home last monday...barely had time to look at it becuase of work.... was in rougher shape than the pictures I was sent of it before buying it.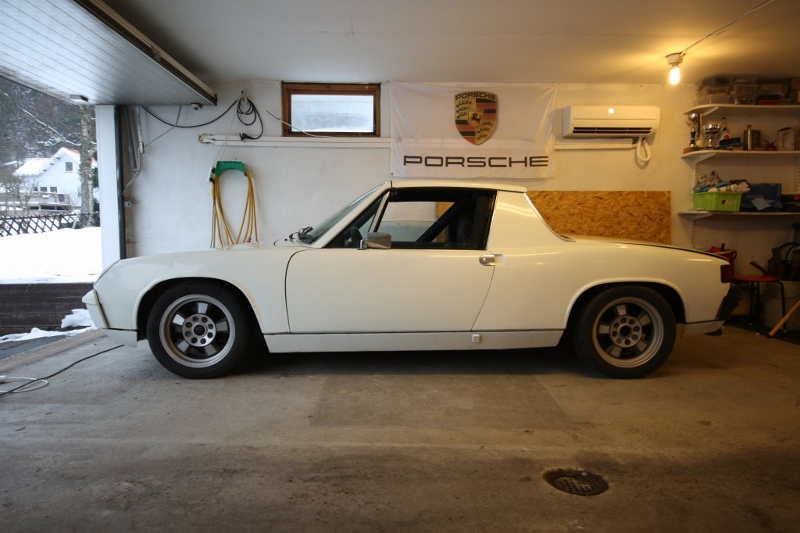
Spec's:
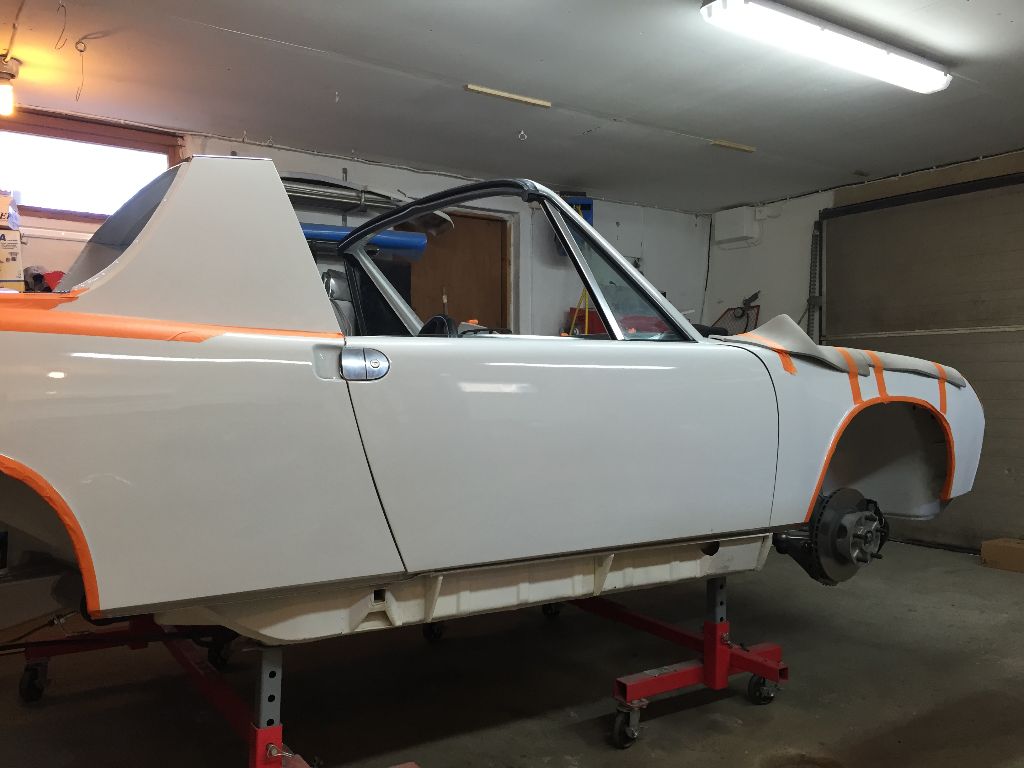
Front glasfibre hood
Rear glasfibre hood
Front GF bumper (cracked)
Rear GF bumper
Rollcage
Old five point harnesses, will be discarded.
Three point belts will be installed (needed to pass Swedish registration)
Rebound adjustable red Koni's front and rear
Springs "140 lb Weltmeister"
Engine overhauled 2001:
"Euro" pistons
Camshaft, unknown spec.
Overhauled heads with new valves and guides
Weltmeister oiltrap
Flywheel lightened 2 kg's
Frontmount oilcoover
External oilfilter
etc....
It's a pretty rough looking car but the plan is to get it registered (ex California car, I got it from 914er-teile in Germany)
and then tear it to pieces and do it right, find all rust, fix it and have it resprayed.
Yes, my projects tend to go overboard.... 
The long term plan is to build my own version of a "914 RS" in the same kind of way as the 964 RS was made. Original looks, a little bit lighter, a little more power, a little better brakes and handling.
Posted by: billh1963 Feb 2 2013, 09:16 AM

Got my first 914 home last monday...barely had time to look at it becuase of work.... was in rougher shape than the pictures I was sent of it before buying it.
They always are!
Congratulations on the new purchase

Posted by: doug_b_928 Feb 2 2013, 09:18 AM
Subscribed. Looking forward to watching the resto.
Posted by: rick 918-S Feb 2 2013, 09:22 AM
Looks like a nice start. Love white.
Posted by: Tom_T Feb 2 2013, 11:49 AM
 .... and to the Quest!


Posted by: falcor75 Feb 2 2013, 12:16 PM
Thanks 
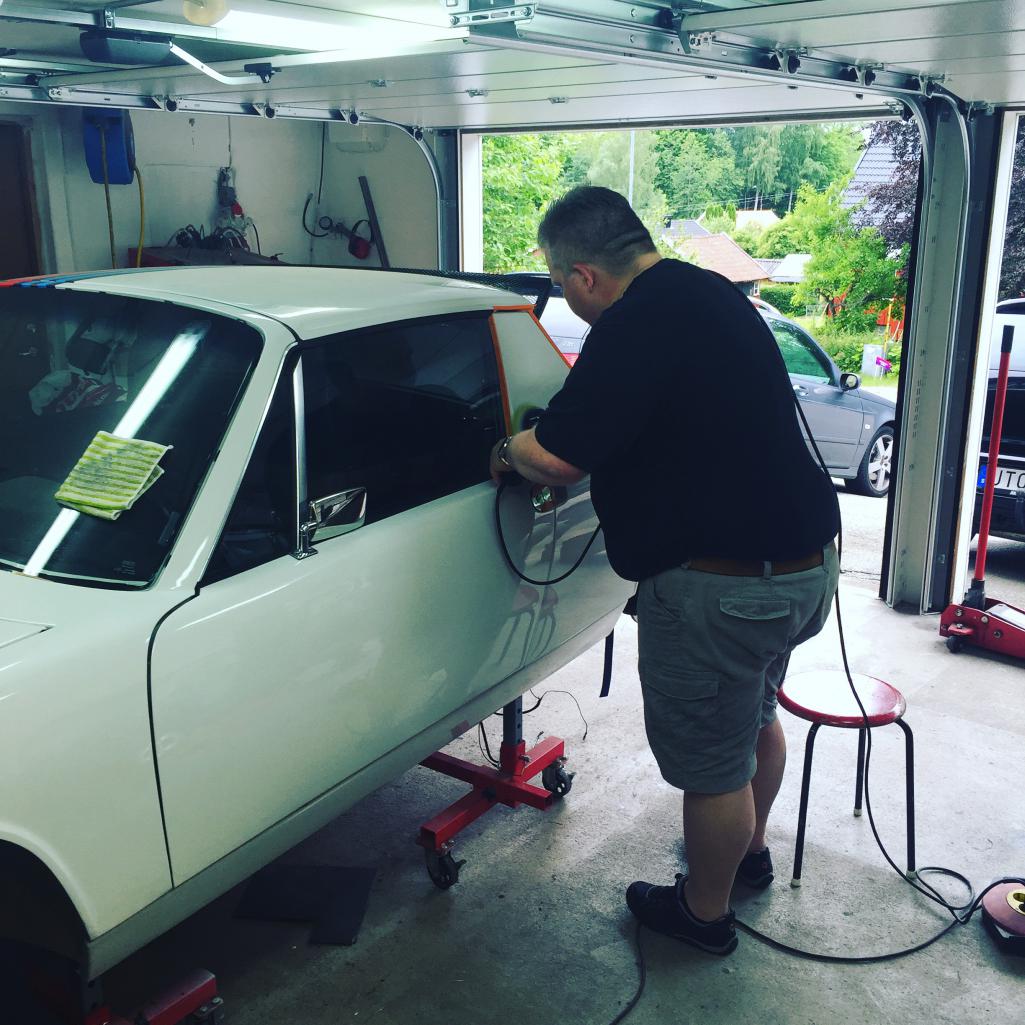
Today's mission was to pull the rollbar and 5 point harnesses from the car.
Was a bit of a chore getting the rollbar out on my own, had to move around the car and wriggle it up between the sills a few mm's at a time on each side.
Tomorrow I'll tackle installing the 3 point belts and do a list of stuff that needs to be fixed to pass the registration check...
Posted by: mittelmotor Feb 2 2013, 06:29 PM
Nice! the Rivieras look great on a white car.
Posted by: falcor75 Feb 3 2013, 06:33 AM
Finished the seatbeltinstallation today and cleaned up the rear vinyl pad aswell since it was quite nasty. Did some looking around and this is what I've found to fix so far.
* Brake lights doesn't work....
*High beams doesn't work, no click from the relay when I pull on the stalk
*Washer bottle non existant, will convert to electric pump system.
*Interior light broken
*Instrument lights very weak, probably a few dead bulbs
*Need both rear rubber grommets that hold the top in the trunk
*Left rear wheel hard to turn, probably stuck hand brake...
more to come as I find it... 
Posted by: falcor75 Feb 3 2013, 06:33 AM
doublepost....
Posted by: FourBlades Feb 3 2013, 06:52 AM
These cars are worth the work if you like to drive!
John
Posted by: JawjaPorsche Feb 3 2013, 07:59 AM
Nice Score! Welcome to our Madness! 
Posted by: Cairo94507 Feb 3 2013, 08:09 AM
You seem to be approaching it in a nice systematic order. I love white on 914's. Good luck and keep posting.
Posted by: falcor75 Mar 3 2013, 02:32 PM
Ok, I need to be educated on the warmup and idle behaviour of a Djet 2.0
Mine starts up easily with a little throttle help the first few seconds when cold. Idles around 1000-1200 and after half a minute or so the idle raises to about 2500-3000 and stays there, after 5-10 minutes it slowly decreses down to around 1500.
From what I've read the rising idle untill warm is normal but a but too high.
I couldn't find any vacuum leaks with starterfluid but need to try it again since
I only had a few squirts left in the can.
Posted by: falcor75 Nov 25 2013, 12:23 AM
Ok, it's been awhile since I wrote here. 
The car passed the Swedish registration after alot of hassles this spring, the "ex-California, export to Germany and then imported to Sweden" caused some greif and worries but it sorted itself out in the end thanks to help from the Swedish VW/Porsche group that helped with some brake certification documents. 
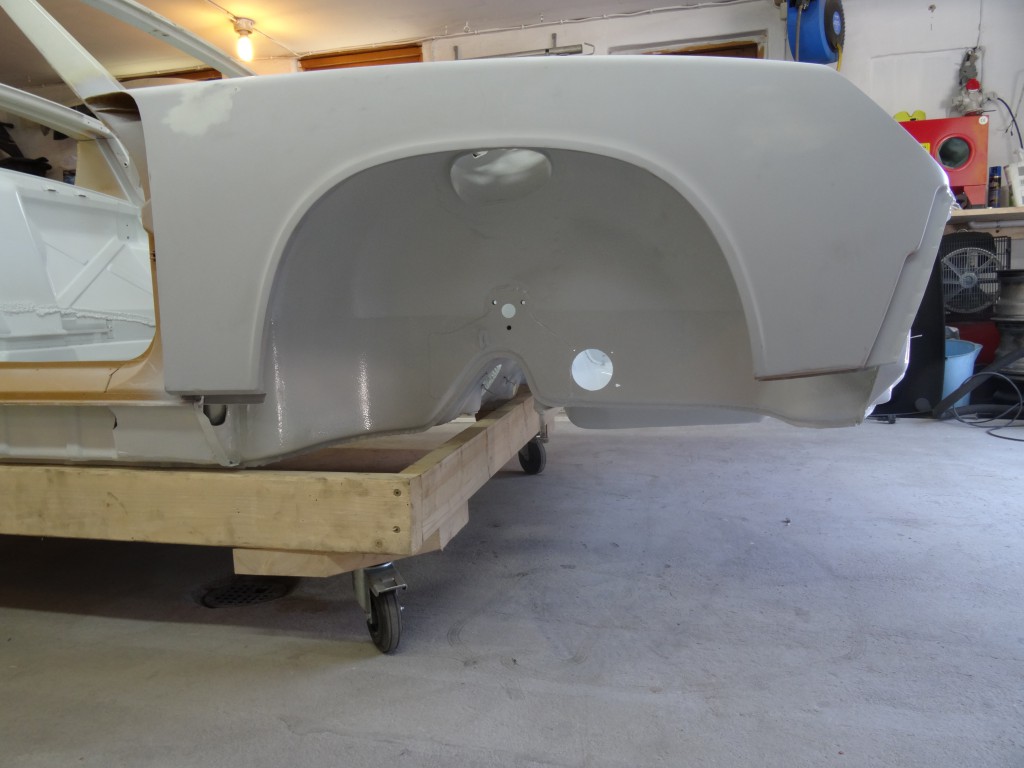
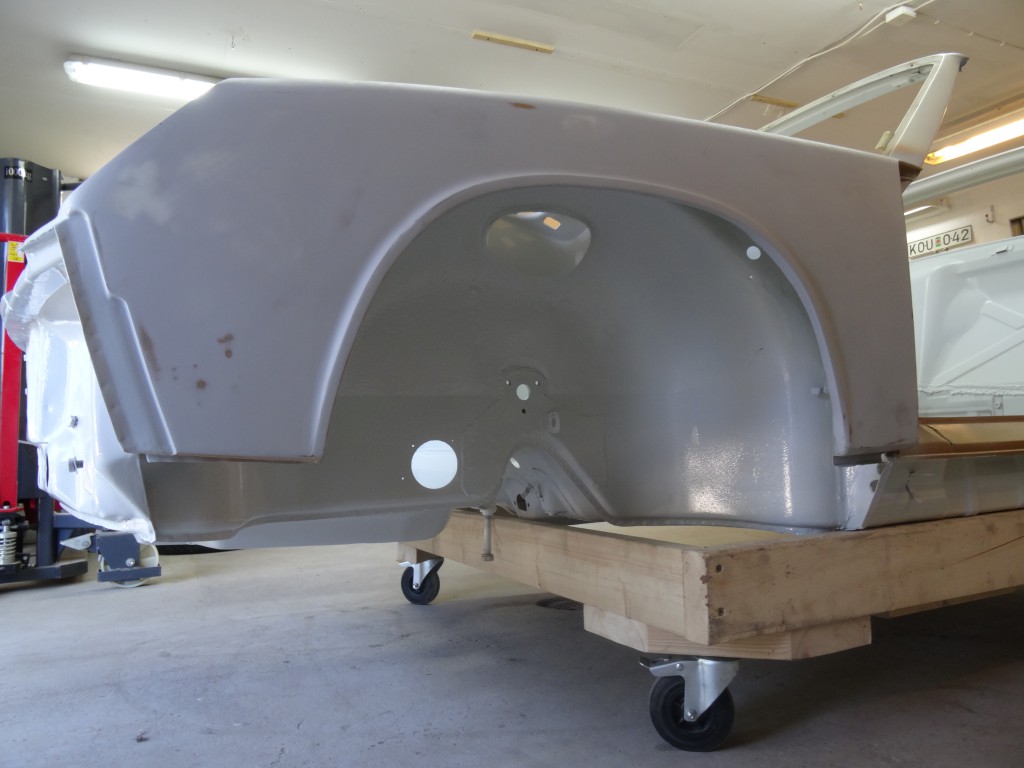
Wasting no time me and a friend tore into the car, cataloging nuts and bolts and small parts in labeled zipbags and soon we had a bare shell.
The shell has been one trip to the bodyshop for some straightening och rust repair, I also had them weld in a rear suspension reinforcement kit from Tangerine.
Currently I'm working on the surface rust in the center tunnel and working my way outwards from there.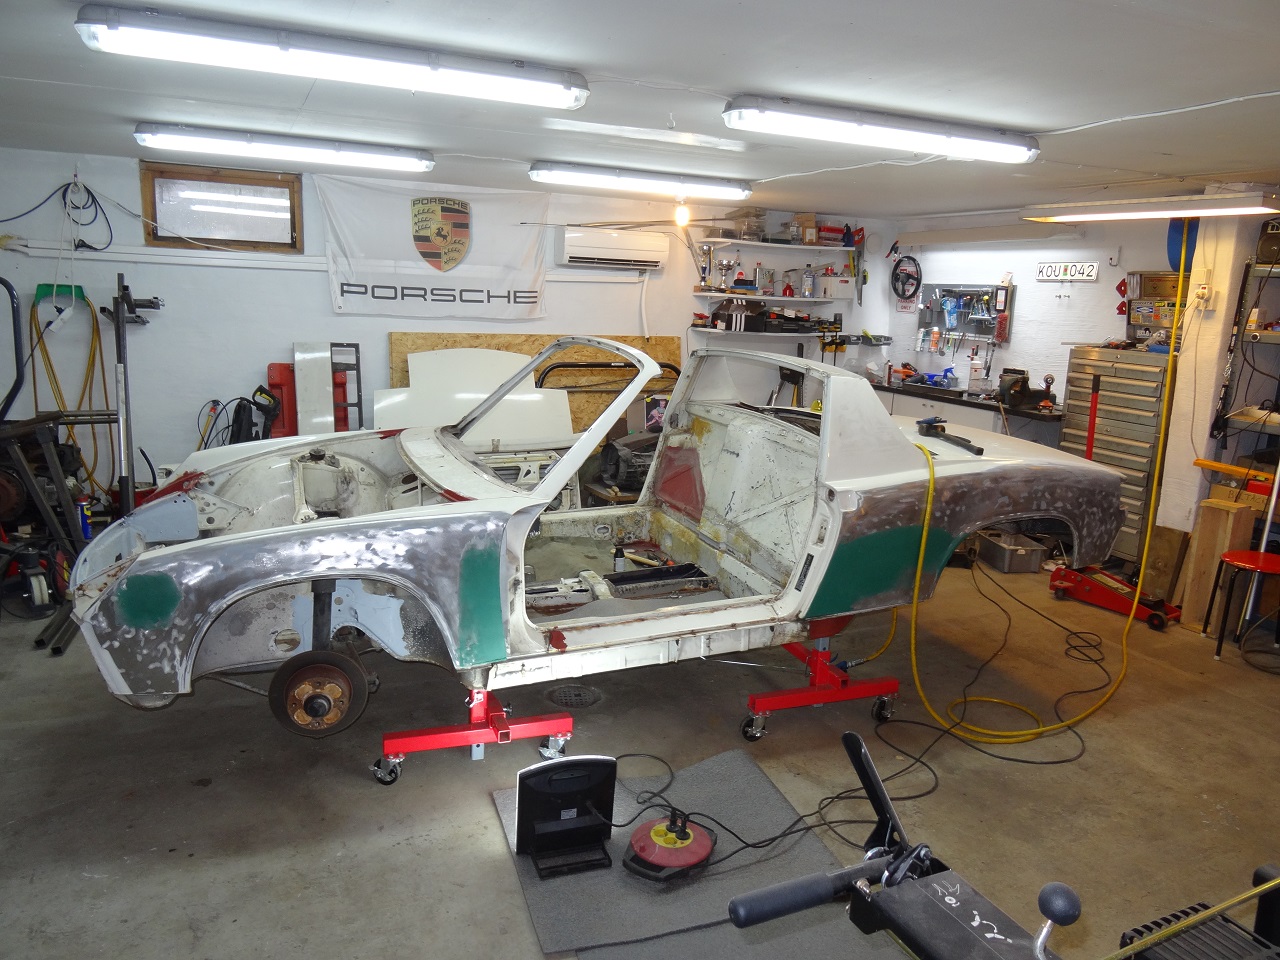
Posted by: arkitect Nov 25 2013, 06:10 AM
Looks like a cool project. More pictures, please.
Dave
Posted by: MMW Nov 25 2013, 06:59 AM
Looks like you are doing a nice job. Can you post some pics of your car dolly? It looks interesting as I haven't seen one like it before.
Posted by: cary Nov 25 2013, 07:28 AM
Looks like you are doing a nice job. Can you post some pics of your car dolly? It looks interesting as I haven't seen one like it before.
I was thinking the same thing .....................
Posted by: naro914 Nov 25 2013, 07:37 AM
I was actually marveling how his garage in Sweden doing a restoration project looks just like all the garages here in the States doing a restoration project...some things don't change anywhere in the world you are!
Looks great!
Posted by: saigon71 Nov 25 2013, 07:50 AM
Looks like you are making some fine progress!
Take your time and do it right the first time, then just
Posted by: rick 918-S Nov 25 2013, 08:31 AM
I like that car dolly!
Posted by: falcor75 Nov 25 2013, 09:08 AM
Thanks guys
Here's a link (text is in Swedish) for more information about the car dolly but the videos show the princible of it. Its basically jackstands on wheels.
http://verktygsboden.se/pallbockar/pallbock-rullbar
Posted by: 76-914 Nov 27 2013, 10:15 AM
Your garage door caught my eye. Looks like a sub-zero insulated bi-fold door? Something tells me your garage is toasty warm in the winter. Also, is that an LED light that looks like a comp monitor from the rear in one of those pic's? An L-80E 914 might be considered camouflaged in Sweden, no? 
Posted by: falcor75 Nov 27 2013, 11:25 PM
I dont know about toasty warm, keeping it around 18 degrees (65F) so I can work without getting to hot, when doing paintwork I usually put it up a bit higher.
You mean my worklight standing on the floor? it's one of these things with a strange megabulb in it, http://biltema.se/ProductImages/35/large/35-9570_l.jpg
Well since she wont be a winter driver anymore the L80E will come off when its time for paint to be replaced with something else.
(the agony of choosing a colour!)
Posted by: falcor75 Dec 2 2013, 12:37 AM
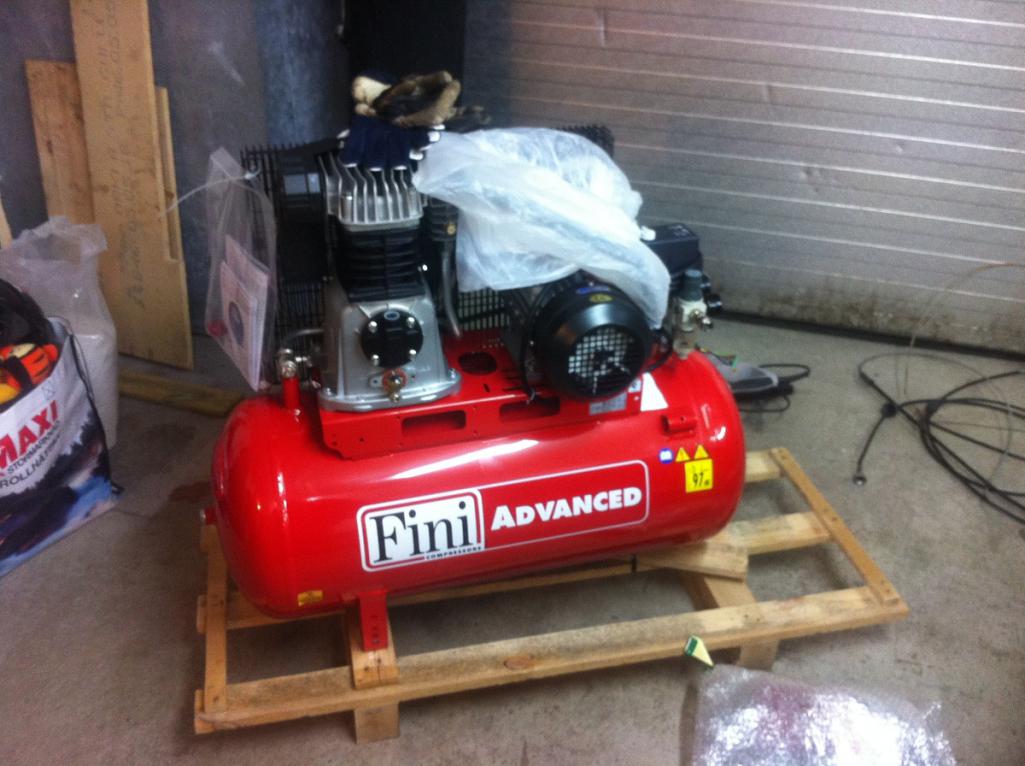
Didnt get much done this weekend, but I got my new compressor ! Finally I will have enough ooomph to mediablast smaller areas that are hard to get to with other tools.

Posted by: falcor75 Dec 23 2013, 01:31 AM
I've updated my homepage with the lastest progress (http://matsgarage.com/)
Here's some questions thats popped up during the hours spend in the garage getting brainwashed by christmas songs on the radio.
I'm thinking of removing the jack concoles on the sills for a cleaner look. Since I dont have the original jack and probably never will get one. Yay or nay from a structural point of view?
The plastic clips the keep the windshield trim in place, are they available to buy somewhere? And the plastic small square things in the top of the windshield frame what are they? drainage canals?
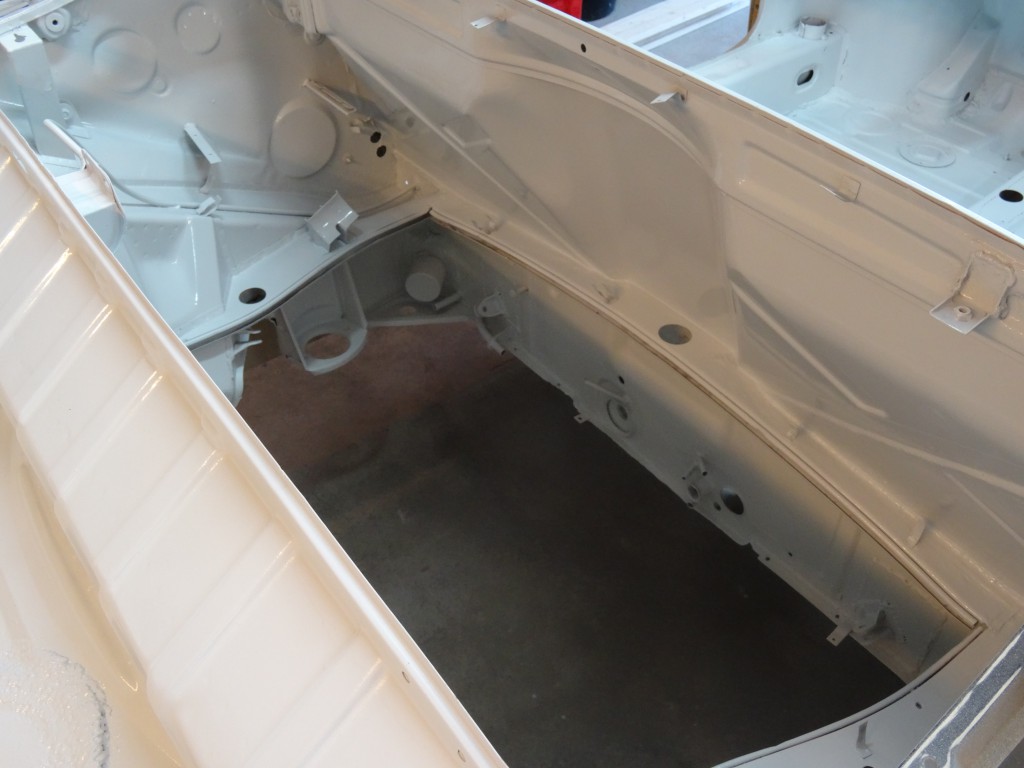
And this is what it looks like under your rear lifting points... 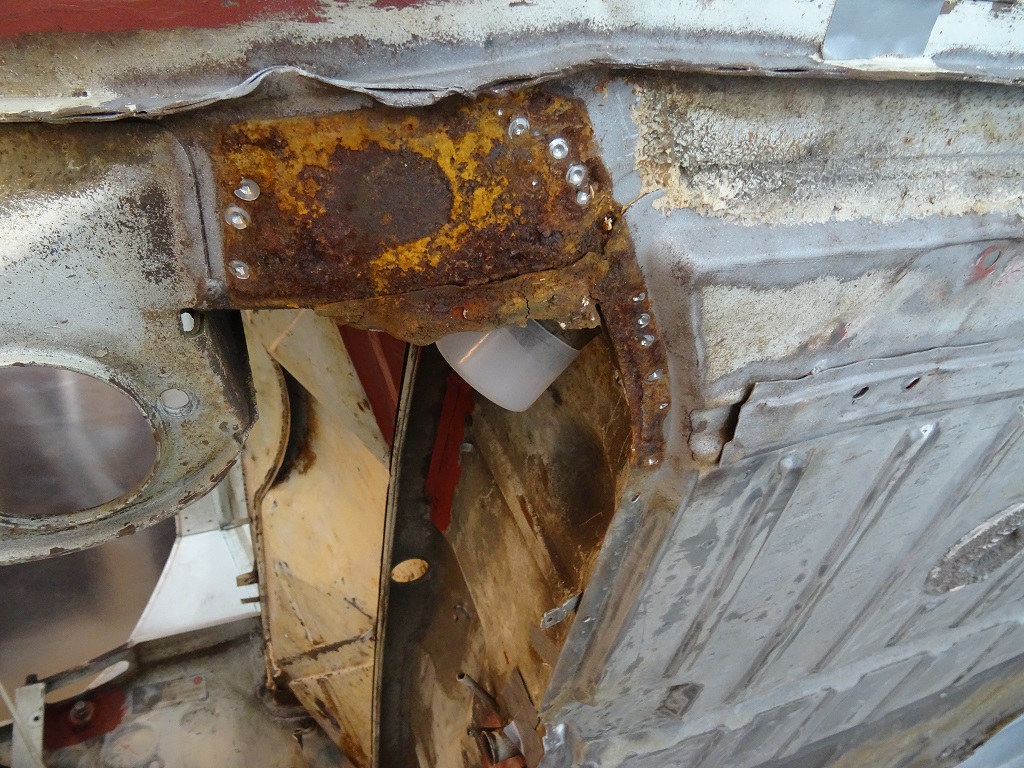
Posted by: peteyd Dec 28 2013, 07:02 PM
I've updated my homepage with the lastest progress (http://matsgarage.com/)
Here's some questions thats popped up during the hours spend in the garage getting brainwashed by christmas songs on the radio.
I'm thinking of removing the jack concoles on the sills for a cleaner look. Since I dont have the original jack and probably never will get one. Yay or nay from a structural point of view?
The plastic clips the keep the windshield trim in place, are they available to buy somewhere? And the plastic small square things in the top of the windshield frame what are they? drainage canals?
And this is what it looks like under your rear lifting points...
You can get the clips for the front windshield from 914rubber.com I believe. The square plastic pieces in the frame, if I am not mistaken are for an after market ski rack that was available back in the day.
As for the jack point, I think you can do without them if you don't want to put them back on. I personally don't have them on there, but my rockers also don't have holes stamped in them.(the perks of working at a metal stamping facility
)Pete
Posted by: OllieG Dec 29 2013, 06:17 AM
Following with interest..I'm at a similar stage to you with the bodywork. Looks like the body's in pretty good shape. Noticed you got the car from Patrik at 914er-teile.
Best of luck with it.
Posted by: falcor75 Dec 30 2013, 07:42 AM
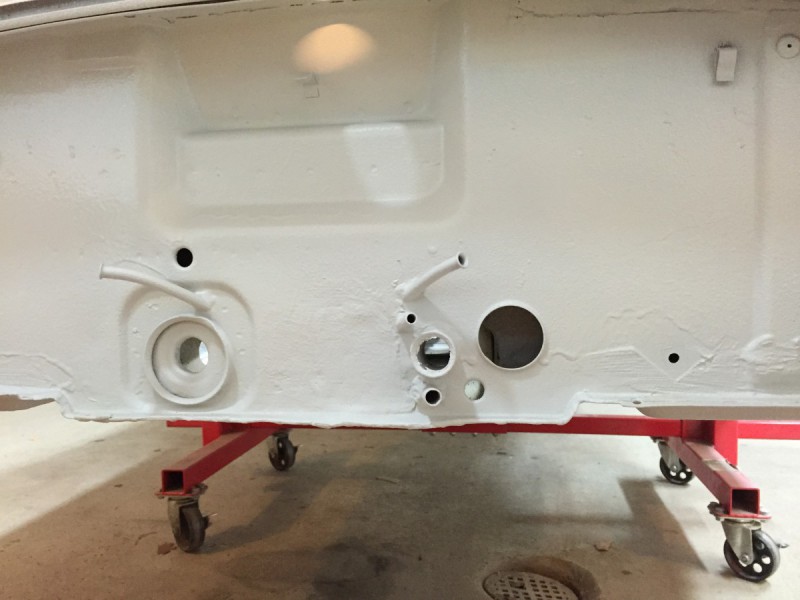
Thanks for the info about the square plastic pieces Pete, I've been wondering about those for some time now. Today I've spend the morning mediablasting the "floor" under the headlightbuckets, had to build a longer blasting nozzle to get in there effectivly. Found some more rust but it's nothing to big.
And I've sent an order to Restoration Design for two new rear jack points and an E-brake guide panel.
Posted by: falcor75 Jan 4 2014, 10:19 AM
Yes! First paint (primer) is on!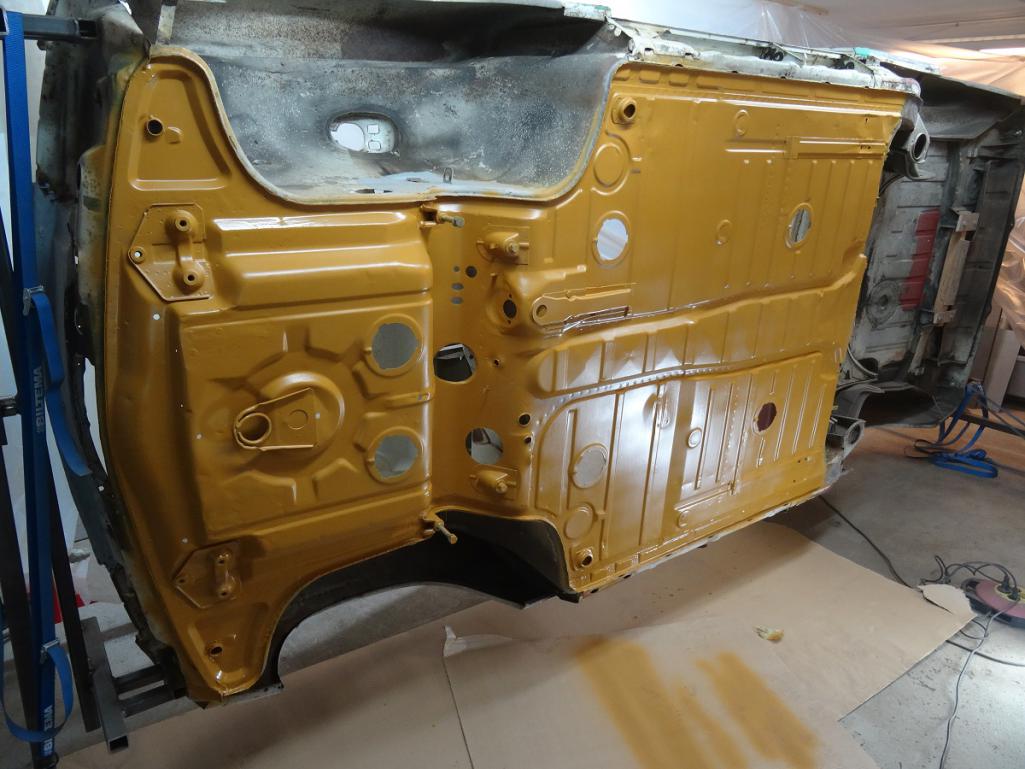
Posted by: FourBlades Jan 4 2014, 02:01 PM
Nice work! 
Making good progress.
John
Posted by: oldie914 Jan 5 2014, 01:50 AM
Regarding the discussion of the holes in the windshield frame; this is a picture of my 914/6 with a ski rack. The front bar fit the holes in the windshield frame. The rear bar was attached with screws into threaded holes under the rollbar.
The pictures aws taken in Bertschesgarten, Germany during the winter of 1972/73.
Posted by: falcor75 Jan 5 2014, 11:46 PM
ooooh nice picture, I'd love to try my 914 in snow some time, (snow...not salt)
Posted by: falcor75 Jan 17 2014, 12:45 PM
New panels from Restoration Design welded on today....
![]()
http://matsgarage.com/?p=213
Posted by: falcor75 Apr 5 2014, 12:12 AM
Lots of updates done in the last month. 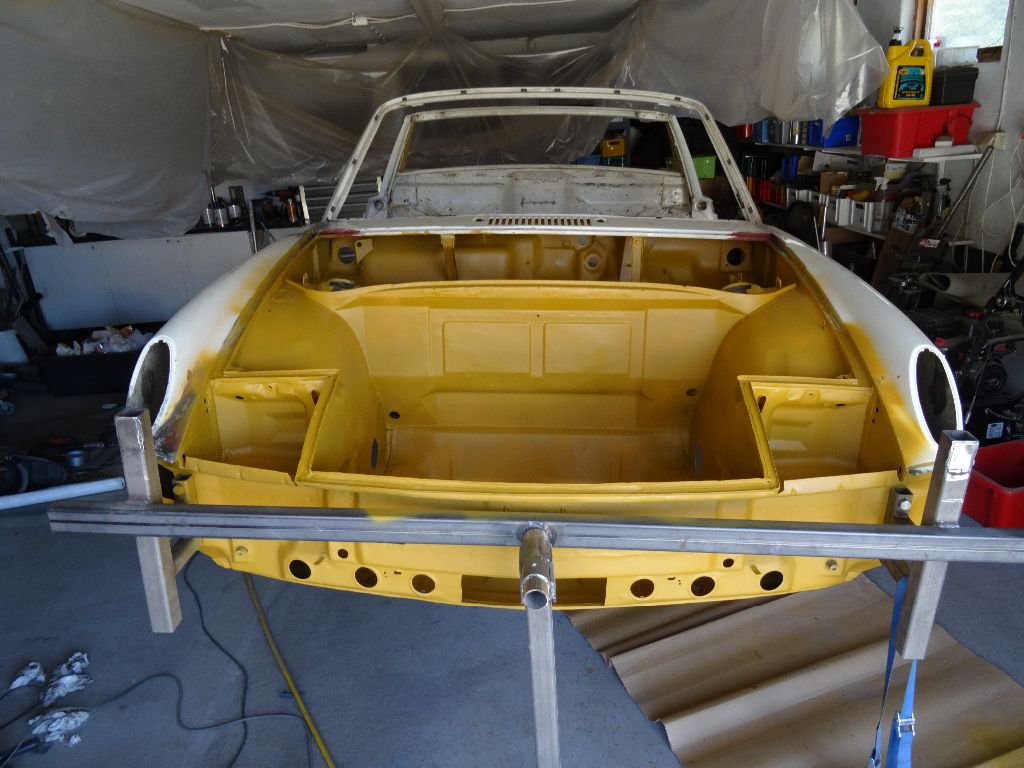
http://matsgarage.com/
Posted by: falcor75 May 26 2014, 10:23 PM

Stuffs happening still but as I work out of town during the weeks I only get a fewhours of work done each the weekend. I've finally decided on the colour for
the car to be resprayed in but I'll keep that to myself for now.
Also scored some nice new stuff like a set of 15x7 Cookie cutters and a set of heat exchangers in very good condition.
Still need to order every rubber part known to mankind from 914rubber and a set of carpets etc... 
Edit: and yes I ran out of primer... 
Posted by: falcor75 May 30 2014, 12:15 AM
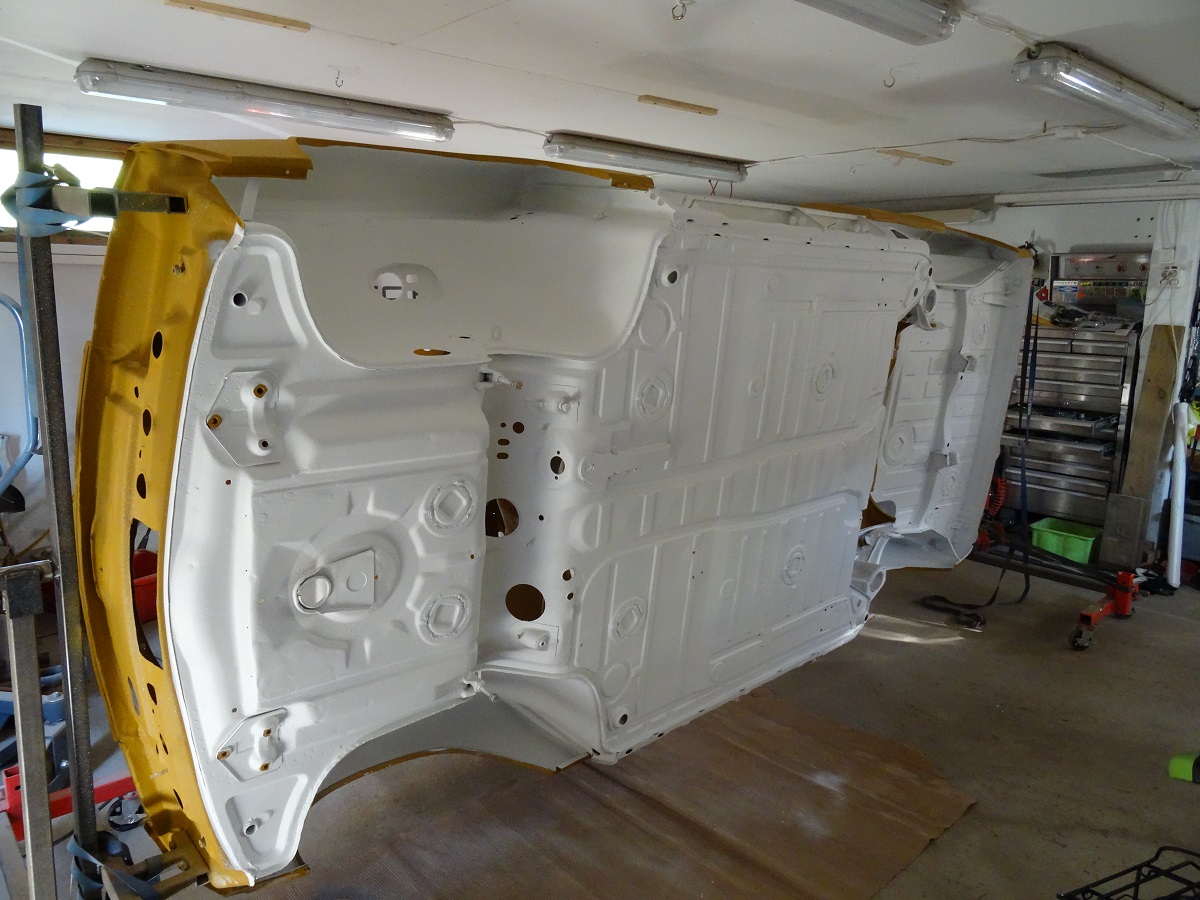
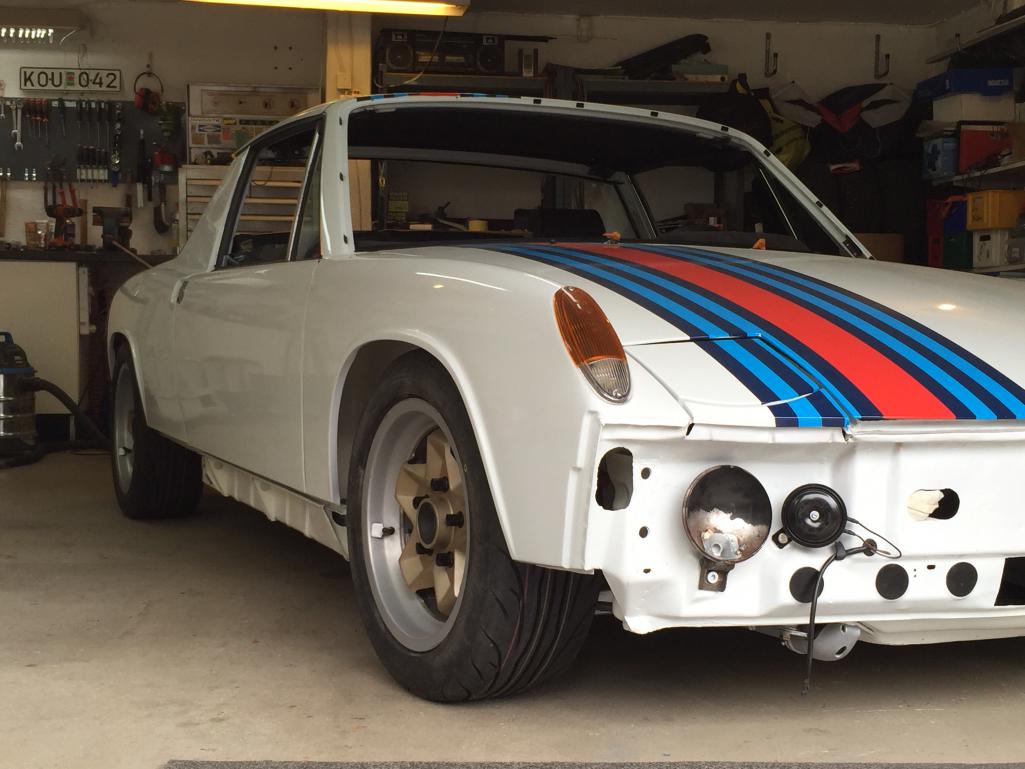
Undercoat went on yesterday, car will be white again but with a more modern white than the Light Ivory original colour.
Edit: pic was way to big, no sure why it didnt resize....
Posted by: 914Sixer May 30 2014, 08:40 PM
Looking good !!!!!
Posted by: falcor75 May 31 2014, 06:29 AM
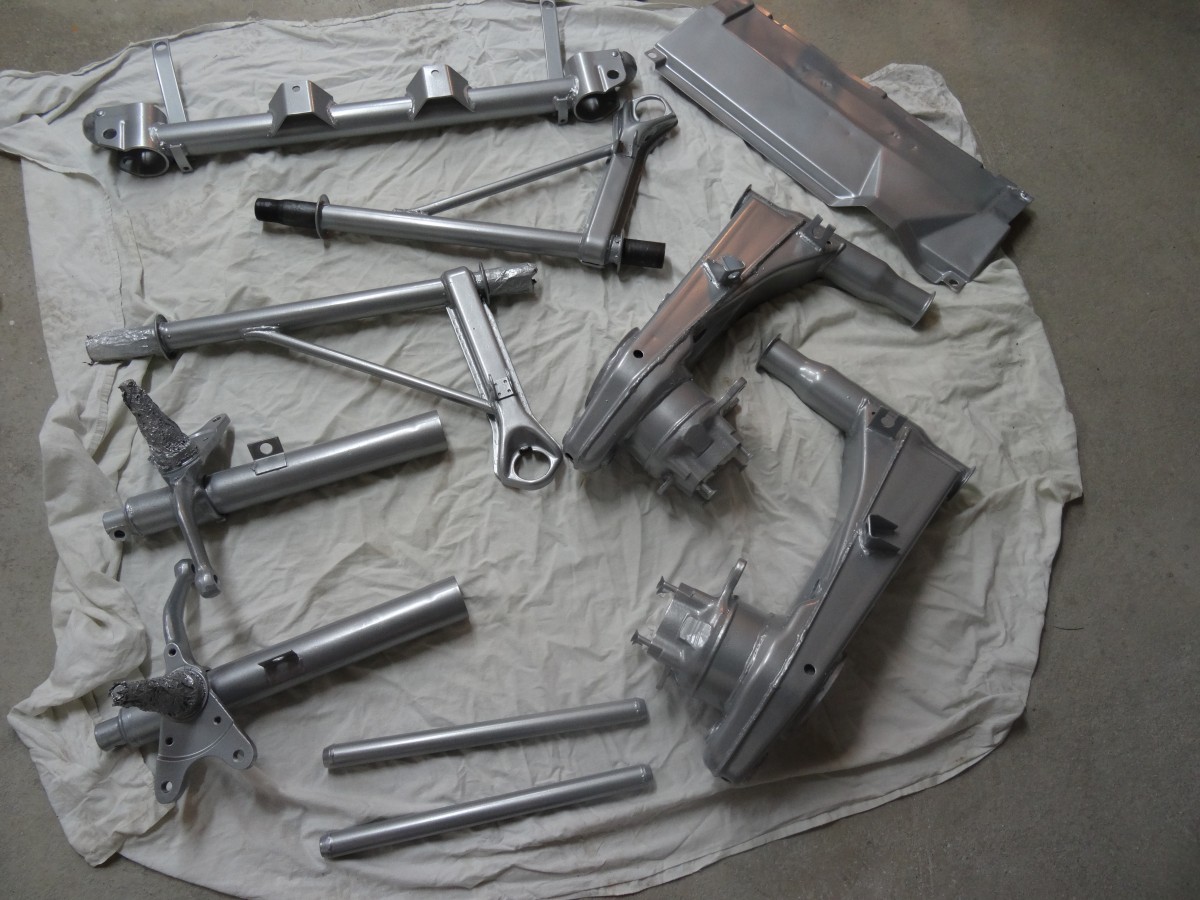
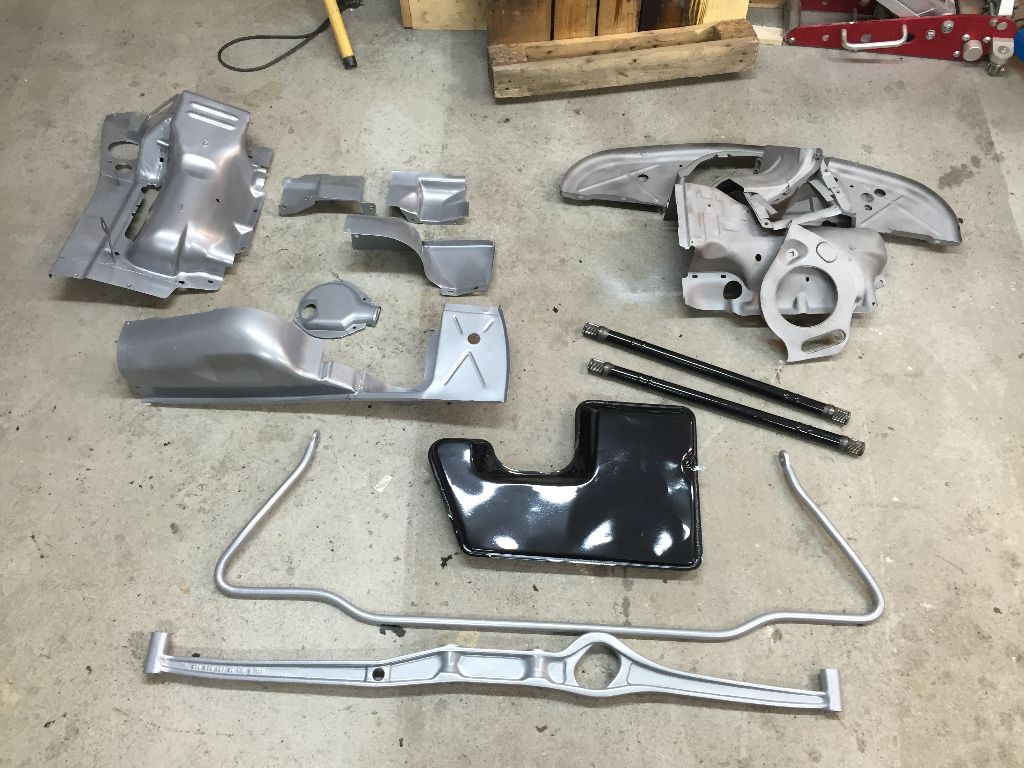
Got a tip from my cousin on a guy that could mediablast and powdercoat so today I've dropped off the following to him for refurbishment.
2x front A-arms
Front crossmember
Front guardplate
Front struts
Rear reinforcement rods (Tangerine kit)
Rear suspension arms
Should be done within a couple of weeks.
Posted by: arkitect May 31 2014, 07:10 AM
I like your rotisserie, making great progress.
Dave
Posted by: falcor75 Jun 28 2014, 11:15 AM
Freshly painted parts.
Posted by: Socalandy Jun 28 2014, 11:30 AM
Great progress!!! ![popcorn[1].gif](style_emoticons/default/popcorn[1].gif)
Posted by: falcor75 Jul 25 2014, 01:19 AM
First paint has happened! Ok its only "B-surfaces" like trunks, engine compartment etc. but still...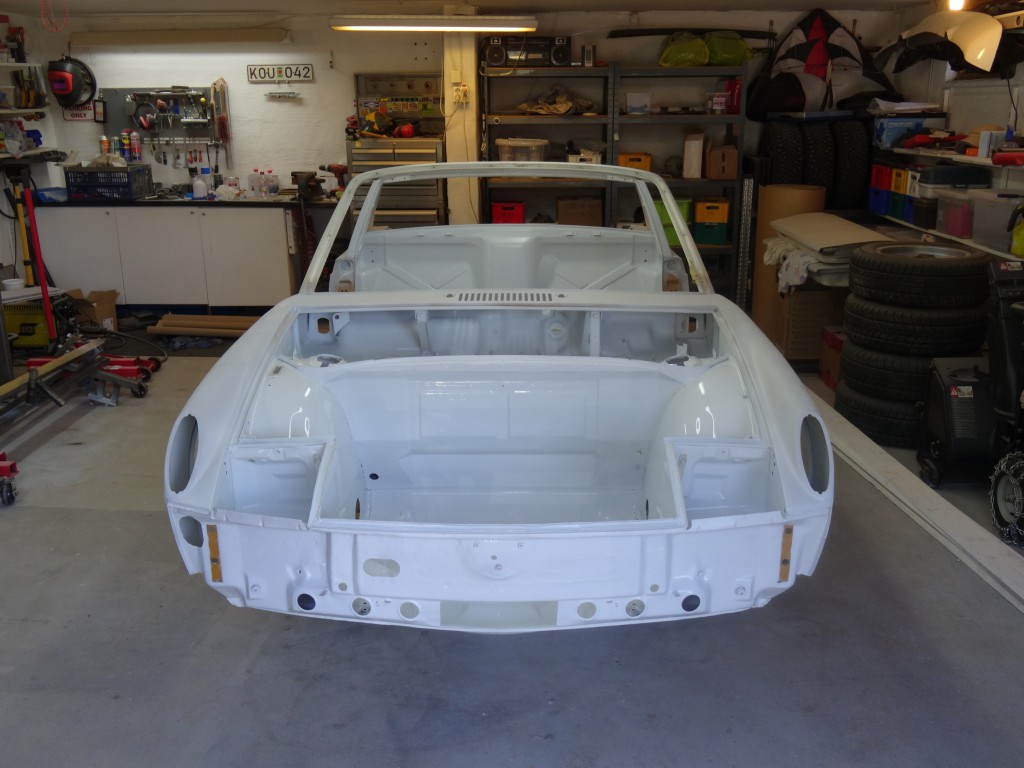
Posted by: falcor75 Aug 2 2014, 01:50 PM
Hinges painted.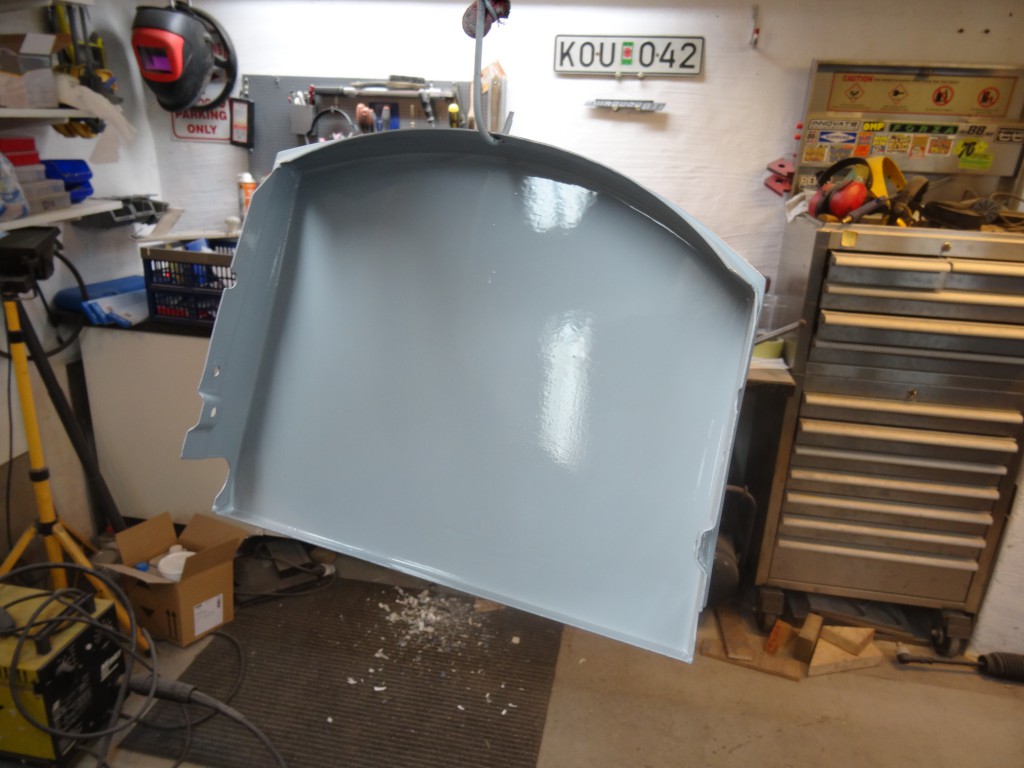
Headlight lids had 2-3 layers of paint, had to scrape it off before mediablast and primer.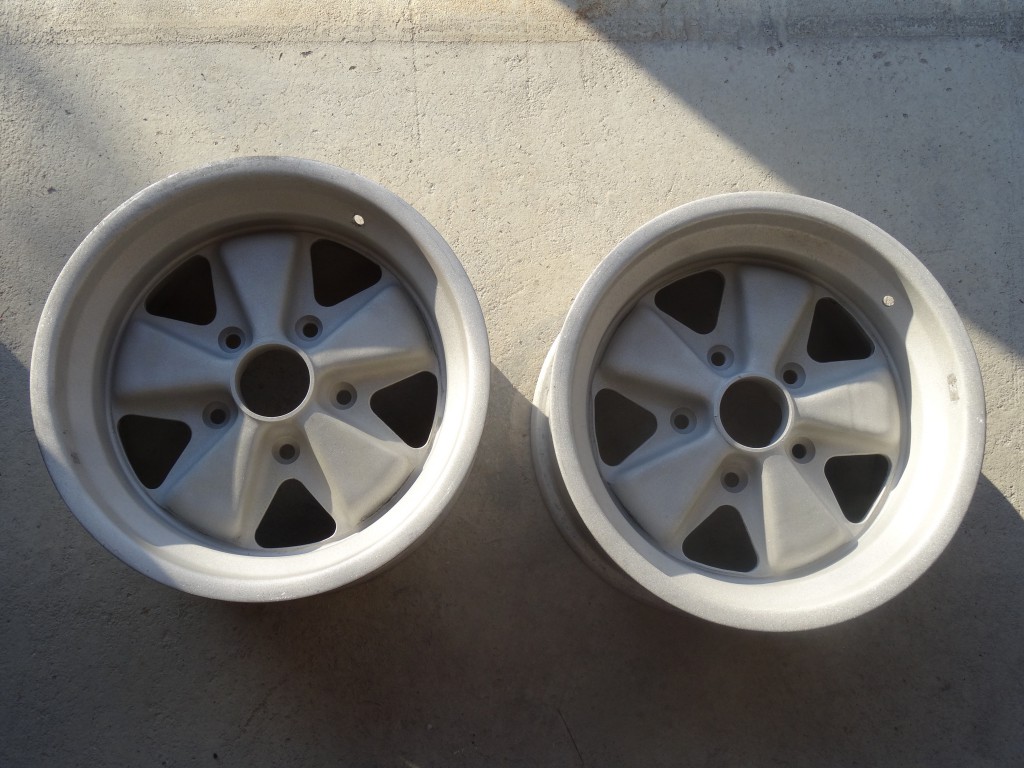
Scored two 15" Fuchs, sadly they're 8" wide so I'll try to swap them for two 7"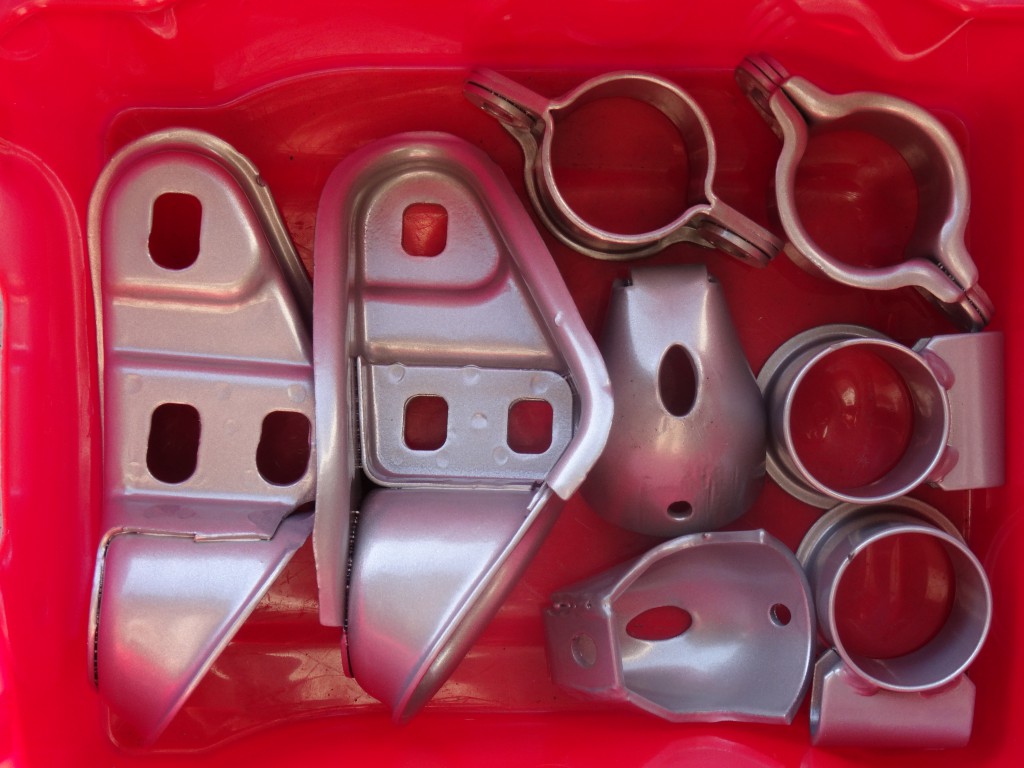
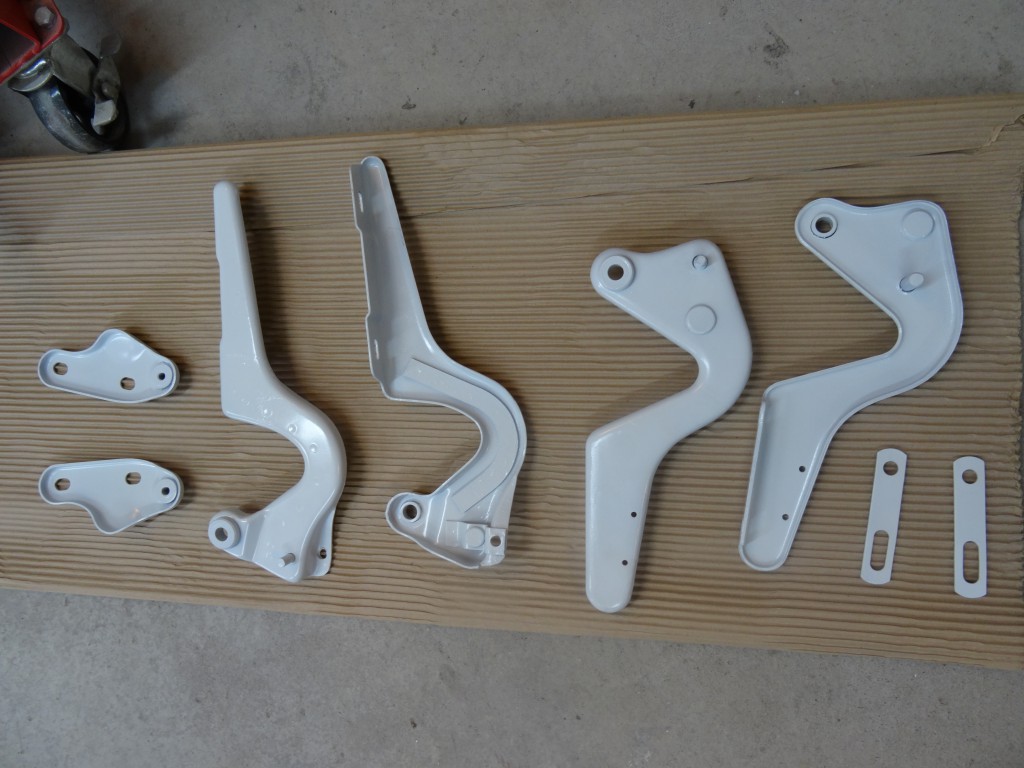
Picked up some small parts from powdercoat aswell.
Posted by: falcor75 Oct 31 2014, 03:36 PM
http://matsgarage.com/wp-content/uploads/2014/10/Foto-2014-10-30-20-49-14-e1414791748113.jpg
Got it home from the paintshop last night...winter is saved.
Posted by: falcor75 Nov 3 2014, 05:33 AM
A few more pictures of the fresh paint 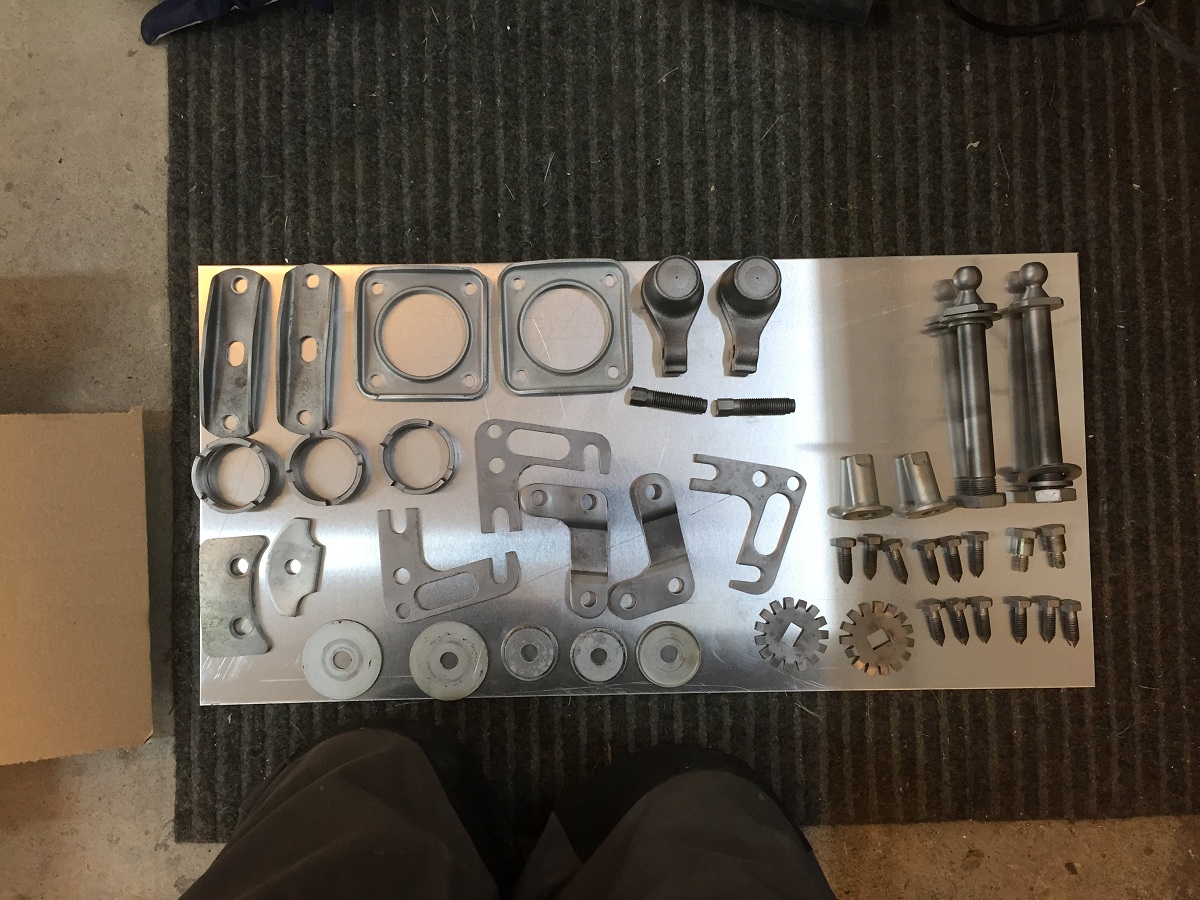
And some parts went out for surface treatment on friday.
Posted by: Cairo94507 Nov 3 2014, 07:16 AM
Very nice- Keep up the good work.
Posted by: falcor75 Nov 10 2014, 01:22 PM
This weekend was 2 steps forwards and then 1½ backwards... 
Glued the races for the front A-arm bushings on the A-arms on friday in preparation for
mounting the front suspension on saturday. Got the parts back from surface treatment
early saturday and proceded to mount the ball joints on the Aarms. Left went fine....right went....wtf is this!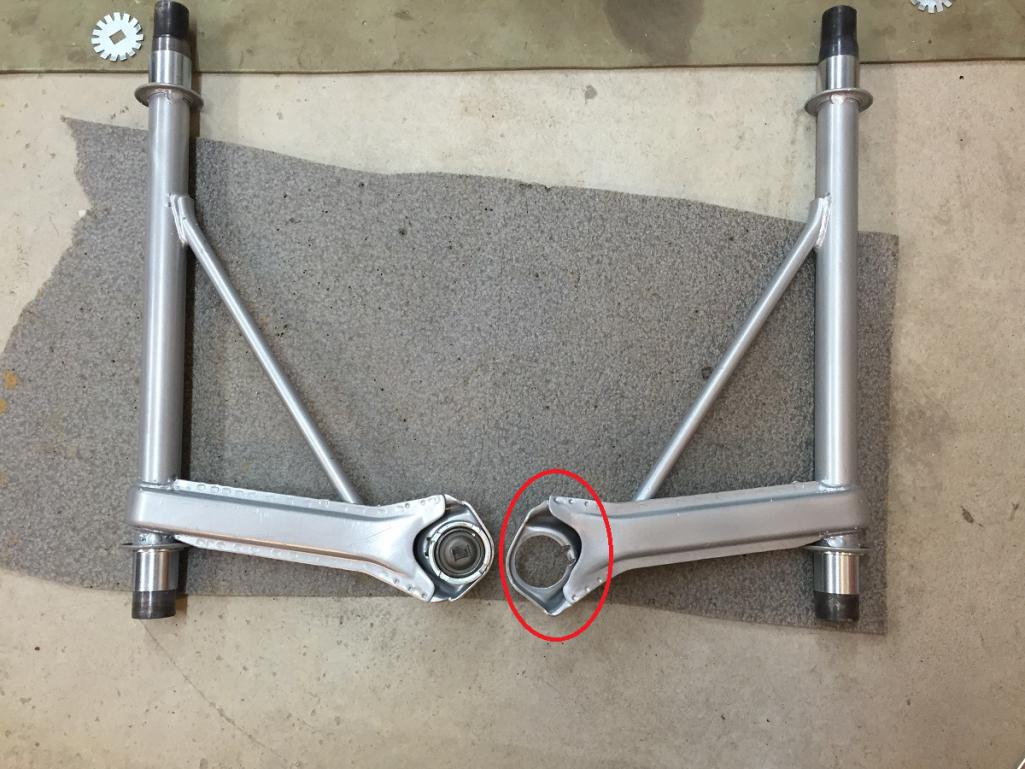
Aaaah of course, another trace of the hit to the front right corner that some PO never fixed correctly. Getting another A-arm is managable, will cost me about $150 to get one and get it mediablasted and powdercoated. Sadly tho the bearing races are stuck to the old one and not coming off. I've emailed Elephant racing hoping to purchase a pair of loose races.
Annoyed with this I started on the rear suspension arms instead, drilled
and tapped the holes for the grease nipples, and my M6 thread tap broke off in the last hole.... I left Mr Murphy in the garage and called it a day at that point... 
Posted by: veekry9 Nov 10 2014, 03:06 PM
Perfection when seen by mere mortals is a humbling revelation.
So,that's how.
Posted by: falcor75 Nov 12 2014, 07:54 AM
Thank you.....but its really far from perfect.
New front right A-arm on the way from Germany and Elephant Racing are sending two new bearing races. Now I just need to squeese into the powdercoaters schedule
and get some paint on the new part.
Posted by: chandler1969 Nov 12 2014, 01:18 PM
Looks great! Maybe one day my 74 will be as clean. Keep up the good work.
Posted by: falcor75 Nov 21 2014, 04:17 PM
Some trial assembly today.
Posted by: Steve Pratel Nov 21 2014, 05:09 PM
If you used JB weld or other such metal epoxy, heating evenly with a torch should melt the epoxy & allow to be pulled off. Check with Elephant though. I used the Rebel Racing Bushings, and this is what they recommend. I didn't have to remove mine, but the instructions that came with the bushings gave this advice.
This weekend was 2 steps forwards and then 1½ backwards...
Glued the races for the front A-arm bushings on the A-arms on friday in preparation for
mounting the front suspension on saturday. Got the parts back from surface treatment
early saturday and proceded to mount the ball joints on the Aarms. Left went fine....right went....wtf is this!
Aaaah of course, another trace of the hit to the front right corner that some PO never fixed correctly. Getting another A-arm is managable, will cost me about $150 to get one and get it mediablasted and powdercoated. Sadly tho the bearing races are stuck to the old one and not coming off. I've emailed Elephant racing hoping to purchase a pair of loose races.
Annoyed with this I started on the rear suspension arms instead, drilled
and tapped the holes for the grease nipples, and my M6 thread tap broke off in the last hole.... I left Mr Murphy in the garage and called it a day at that point...
Posted by: falcor75 Nov 26 2014, 02:59 PM
Got the last painted parts home today.
Posted by: trojanhorsepower Nov 26 2014, 03:03 PM
Looks great!
Posted by: falcor75 Dec 6 2014, 11:36 AM
Anyone that can spot something missing in this picture...
Posted by: zambezi Dec 6 2014, 01:28 PM
-6 engine mount
Posted by: falcor75 Dec 8 2014, 05:36 AM
I was more thinking of the missing fuel line hole... oh well I'll just drill a new one.
Posted by: cary Dec 8 2014, 08:16 AM
I was thinking it was the clutch tube hole.
Posted by: falcor75 Dec 24 2014, 04:58 AM

Been some work done the last weeks and I made a Christmas special catchup post on my website so I'll just post a link to that since I'm to lazy to rewrite it all again.
http://matsgarage.com/?p=511
Merry Christmas and a happy new 2015 to you all. 
Posted by: SixerJ Dec 24 2014, 05:30 AM
How did I miss this thread? Subscribed & nice work
Posted by: maf914 Dec 24 2014, 07:11 AM
Yes, great thread, and I missed it as well. Great work, Mats, and best of luck with your car. Merry Christmas!
Posted by: falcor75 Dec 31 2014, 02:05 PM
Happy new year!
Though I'm six months behind my original schedule it still feels pretty awsome having gotten this far.
Posted by: thieuster Feb 14 2015, 01:32 PM
Just found this thread (coming from the carpet thread). What a great job!
Menno
Posted by: falcor75 Feb 14 2015, 02:42 PM
Thanks!
Posted by: falcor75 Feb 22 2015, 03:36 AM
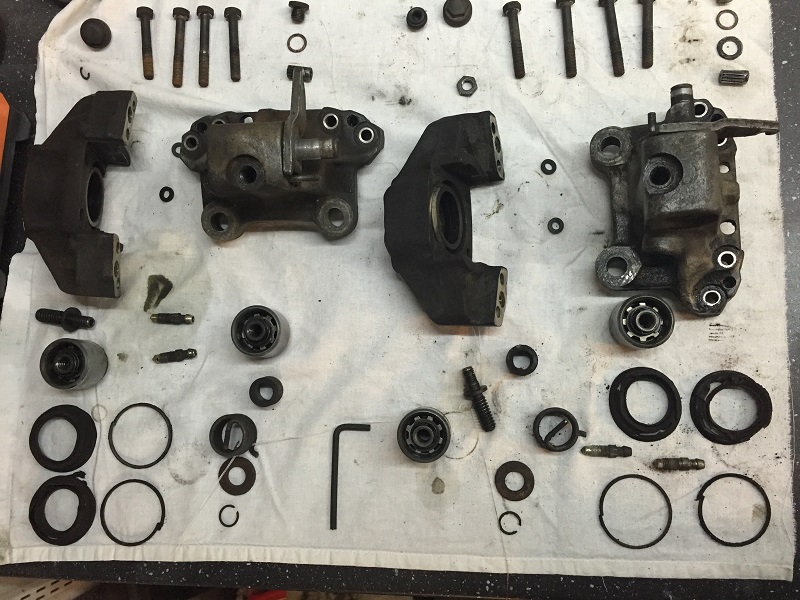
Watched PMB's video on rear caliper overhaul and proceded to take mine apart, turns out they must have been overhauled at some time during the cars lifespan.
Pistons were like new underneath the torn dust caps. Seal surfaces between the halfs were still nicely gold coloured. I'll replace the piston seals and dustcaps and reassemble and paint them black with some high temp paint.
Posted by: FourBlades Feb 22 2015, 09:33 AM
Nice work!
John
Posted by: falcor75 Feb 28 2015, 01:55 PM
Got the last pieces for the pressure side of the fuel pump.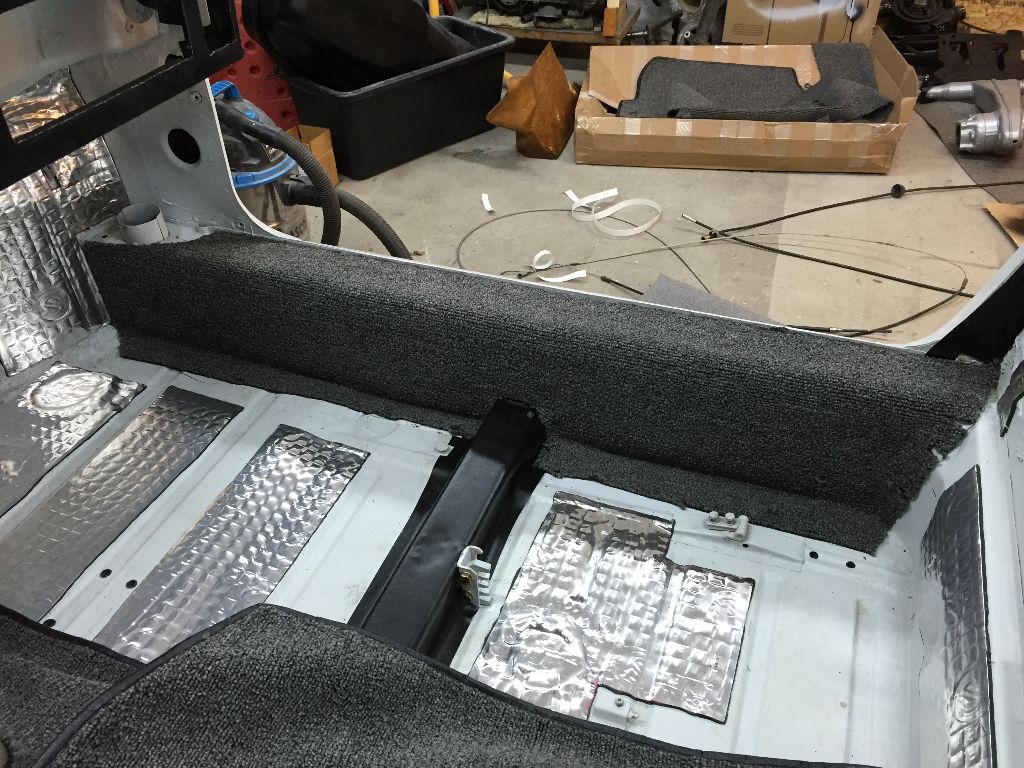
First piece of carpet installet. I chose to mount them with doublesided foam tape instead of glueing them in place.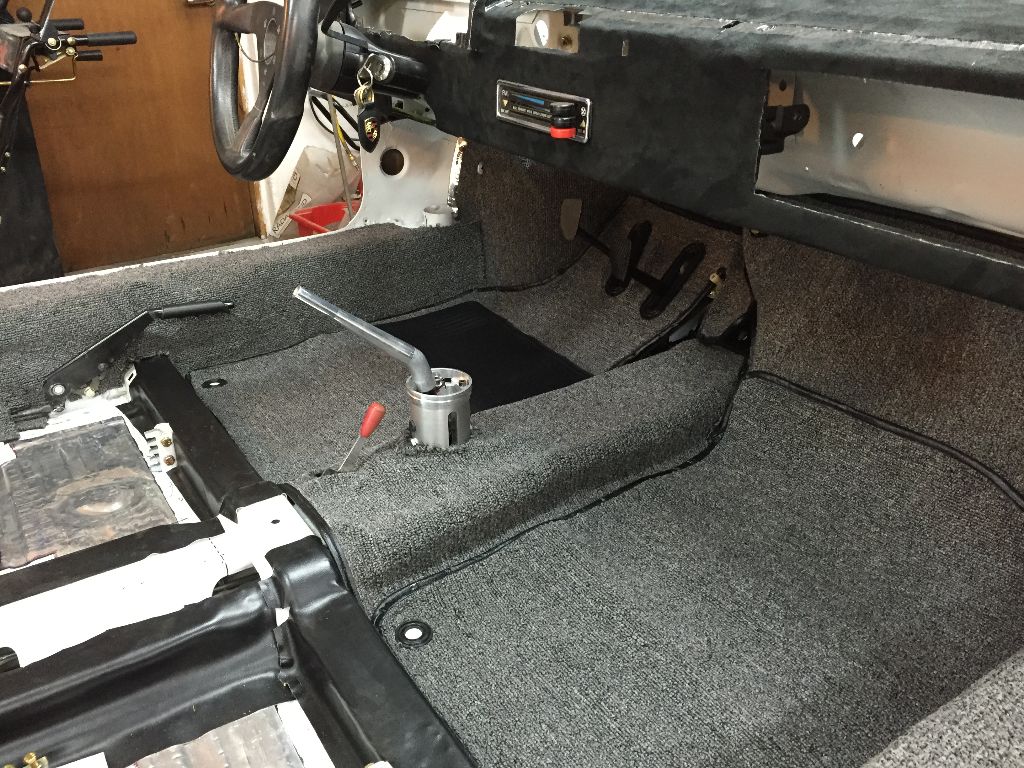
Starting to look ok. But the red handle for the rear heater fan will probably need to be replaced for a new one.
OCD means changing bolts that look alittle sad for new ones despite that noone will ever see them.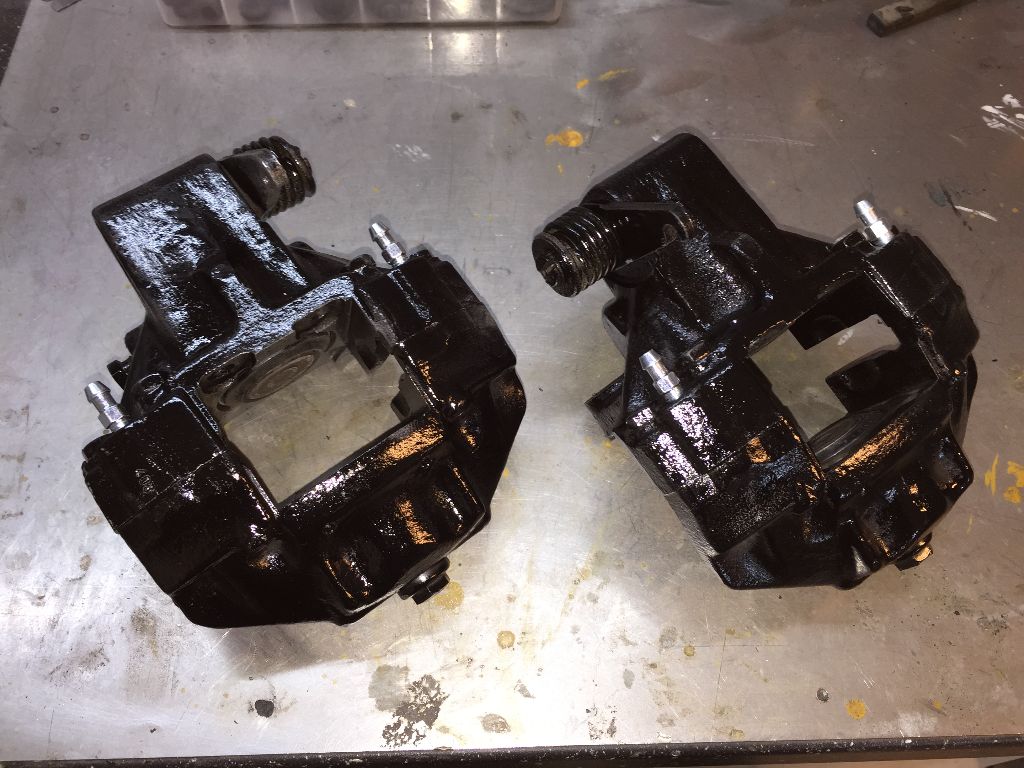
Spent a few hours today with putting the rear calipers back together. Again, PMB's video made it alot easier.
Posted by: mepstein Feb 28 2015, 04:00 PM
You can sand and buff that red knob and make it look like new.
Posted by: raynekat Feb 28 2015, 06:46 PM
Falcor:
Hey....can you hurry and finish this project?
I've got an ivory white 914 that I'm working on as well.
Trying to get some ideas from your work.
Ha....just kidding.
Looks great and keep up the good work.
And keep warm up there in Sweden during your winter.
Posted by: falcor75 Mar 1 2015, 05:59 AM
Is it just me or shouldnt the cone on the clutch cable face towards the firewall pipe?
Posted by: BIGKAT_83 Mar 1 2015, 07:49 AM
Nice job on the fuel pump mount. 
Posted by: falcor75 Mar 14 2015, 02:47 PM
Rear brakes and hardlines mounted
Engine decklid painted (the black pieces) and mesh grille installed with new rubber lining.
Lower and upper front targa seal installed.
Glued the top vinyl in aswell.
Posted by: falcor75 Mar 23 2015, 02:01 AM
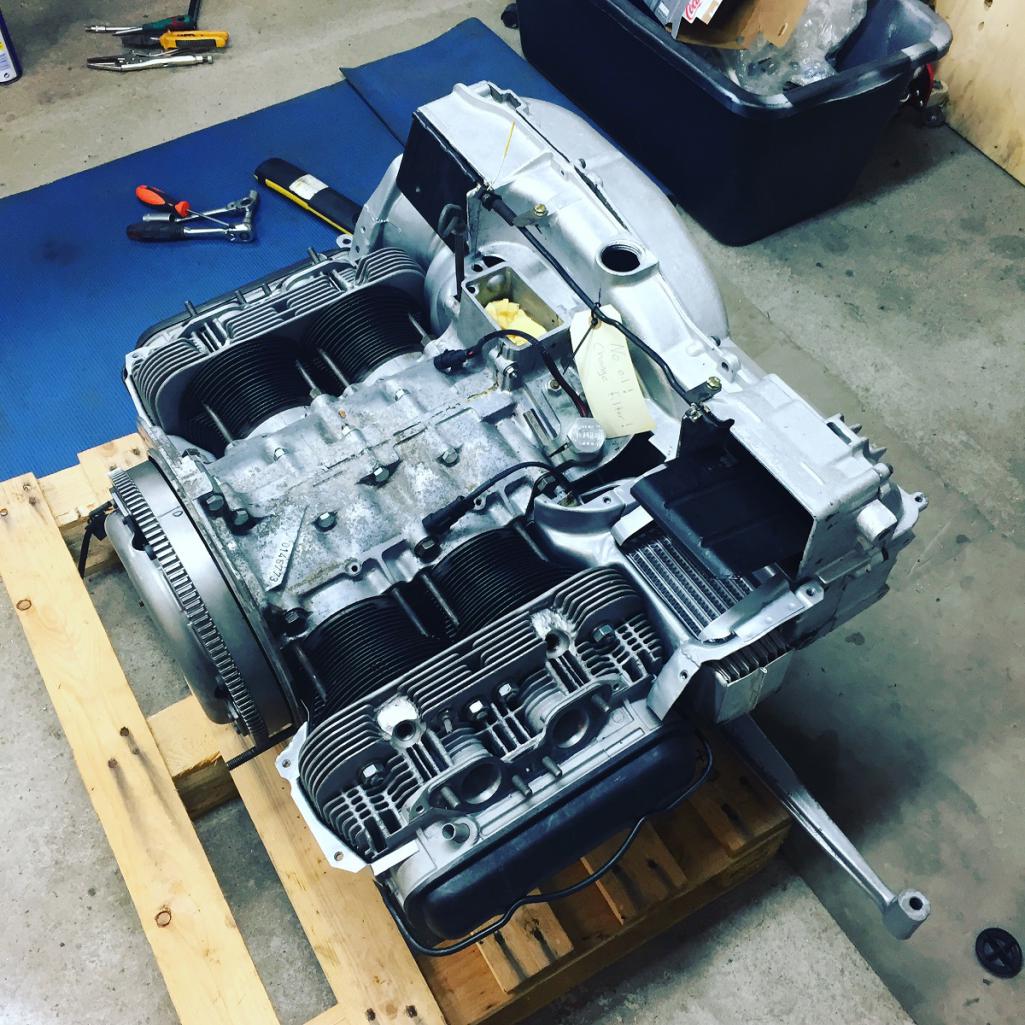
I'm starting to get close to the point to start dismantling the tins from the engine and fix it up cosmetically. (I will not be splitting the case or removing the heads etc)
I want to hang the engine from my engine stand but I dont have the yoke, I've seen some hang it up anyway while others say not to do it without the yoke.... Paying €300 for a yoke I'll use once isnt in my budget at the moment...
What's the wisdom of the forum?
Posted by: mgp4591 Mar 23 2015, 05:58 AM
You can sand and buff that red knob and make it look like new.
That's what SHE said...

Sorry... it's late in my work day and I'm more than ready to go home

Posted by: falcor75 Mar 23 2015, 06:12 AM
You can sand and buff that red knob and make it look like new.
That's what SHE said...
Sorry... it's late in my work day and I'm more than ready to go home
LOL!
Thanks for the laugh...

Posted by: falcor75 Mar 24 2015, 11:29 PM
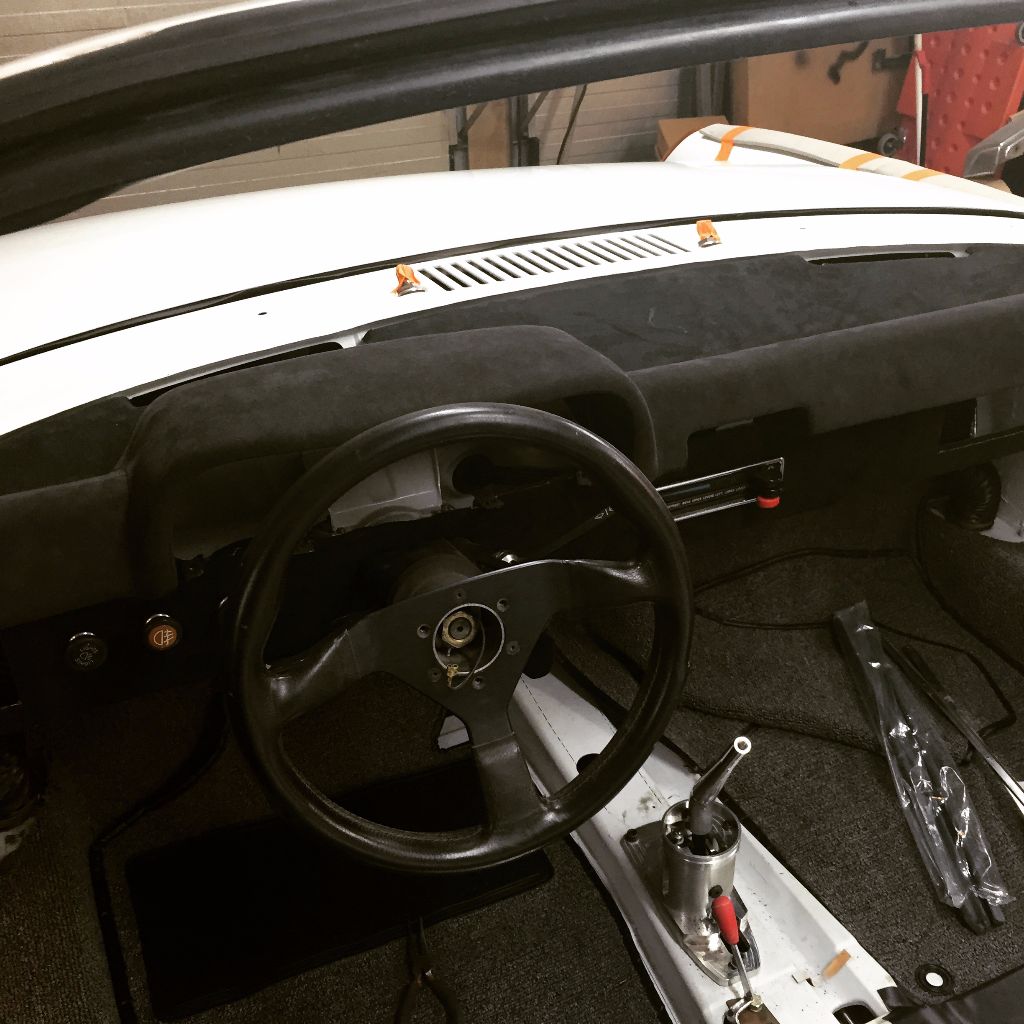
Got my dash back from the upholsterer....sooo smooth!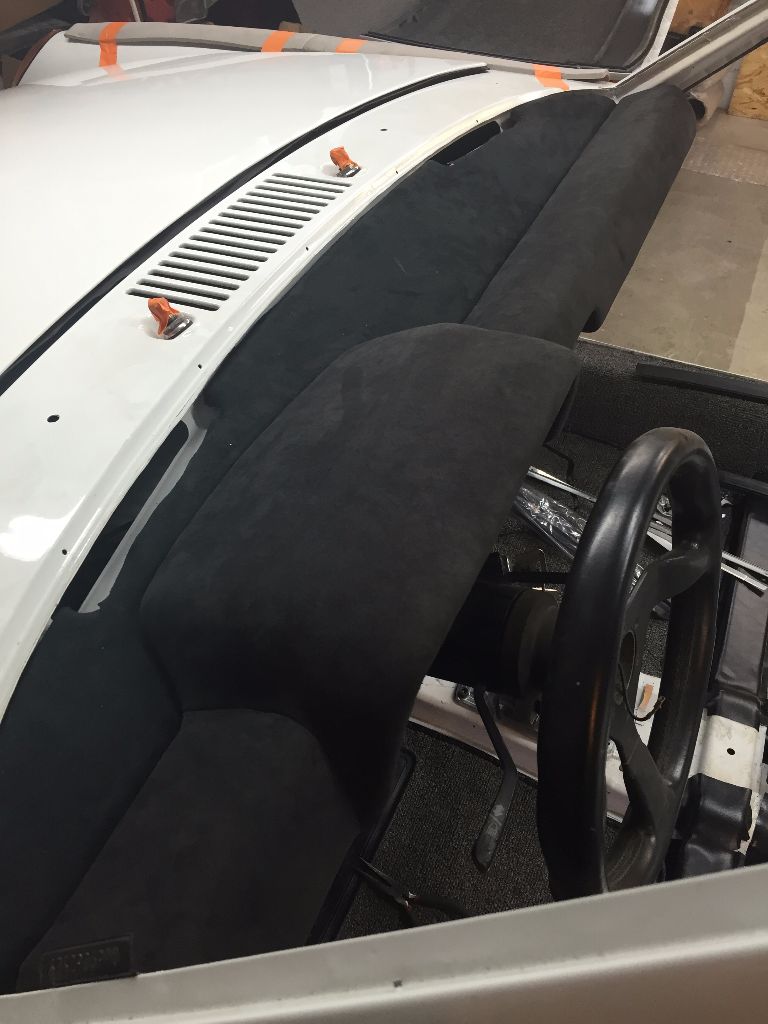
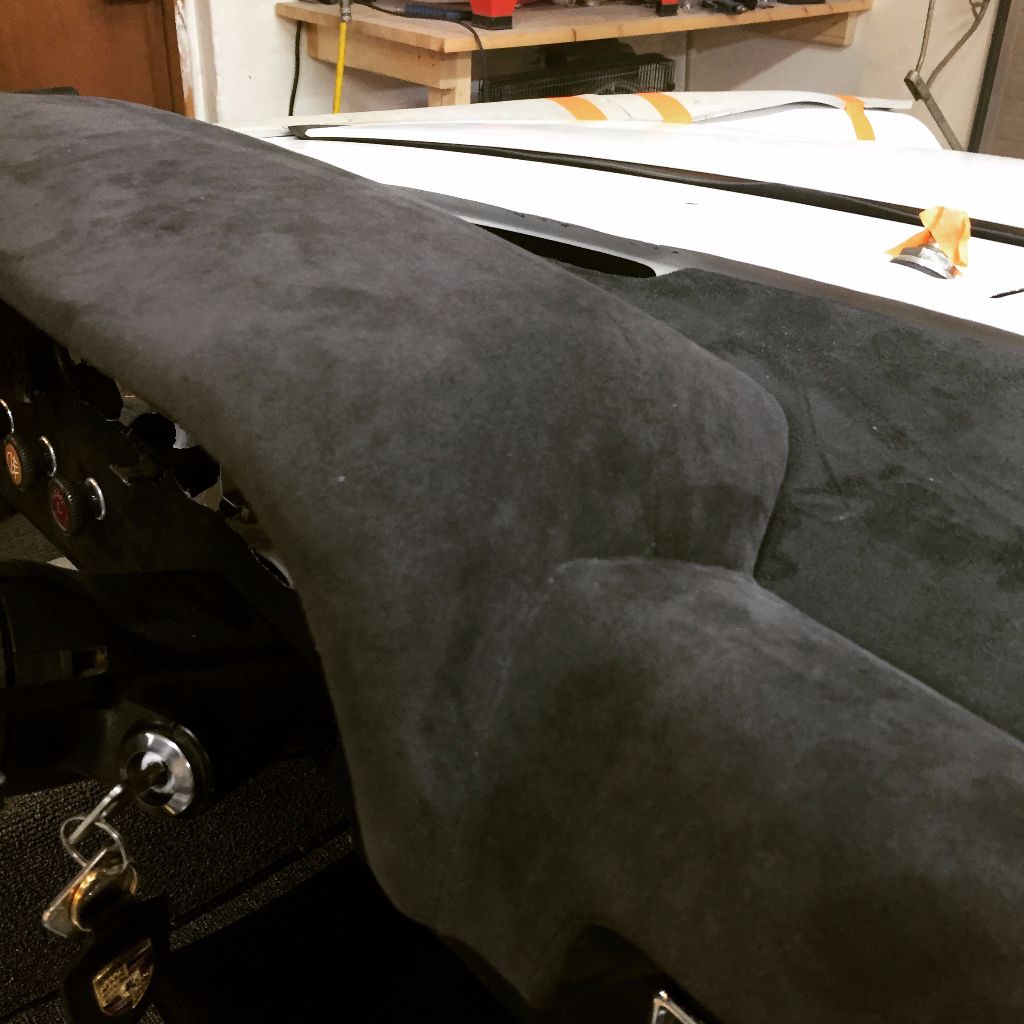
Closeup, he had to lay one seam to either side of the bulge and one across the top but it turned out great. He also did the lower piece but I didnt get any pics of that.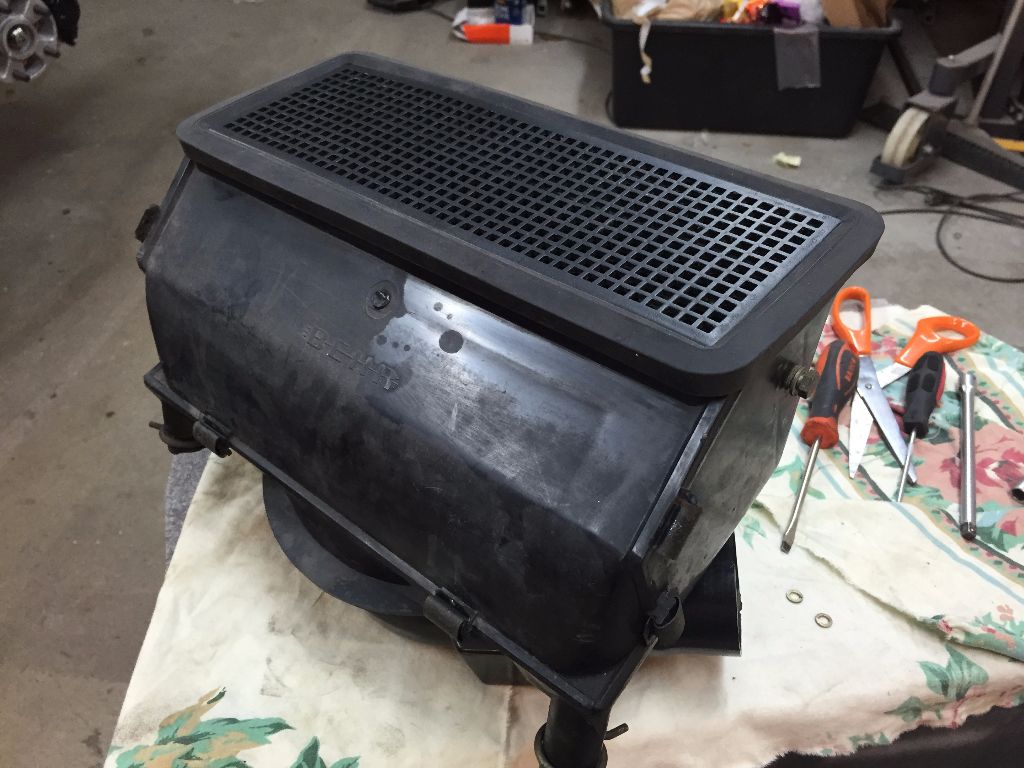
Also got my fresh air box back together. Used some 15x5 mm straight foam cell adhesive strips to seal the motor against the housing and the rest of the seals are from 914Rubber's airbox rebuild kit. Not sure why I cant get the box to clean up, annoying with one half looking ok and the other half looking dirty.
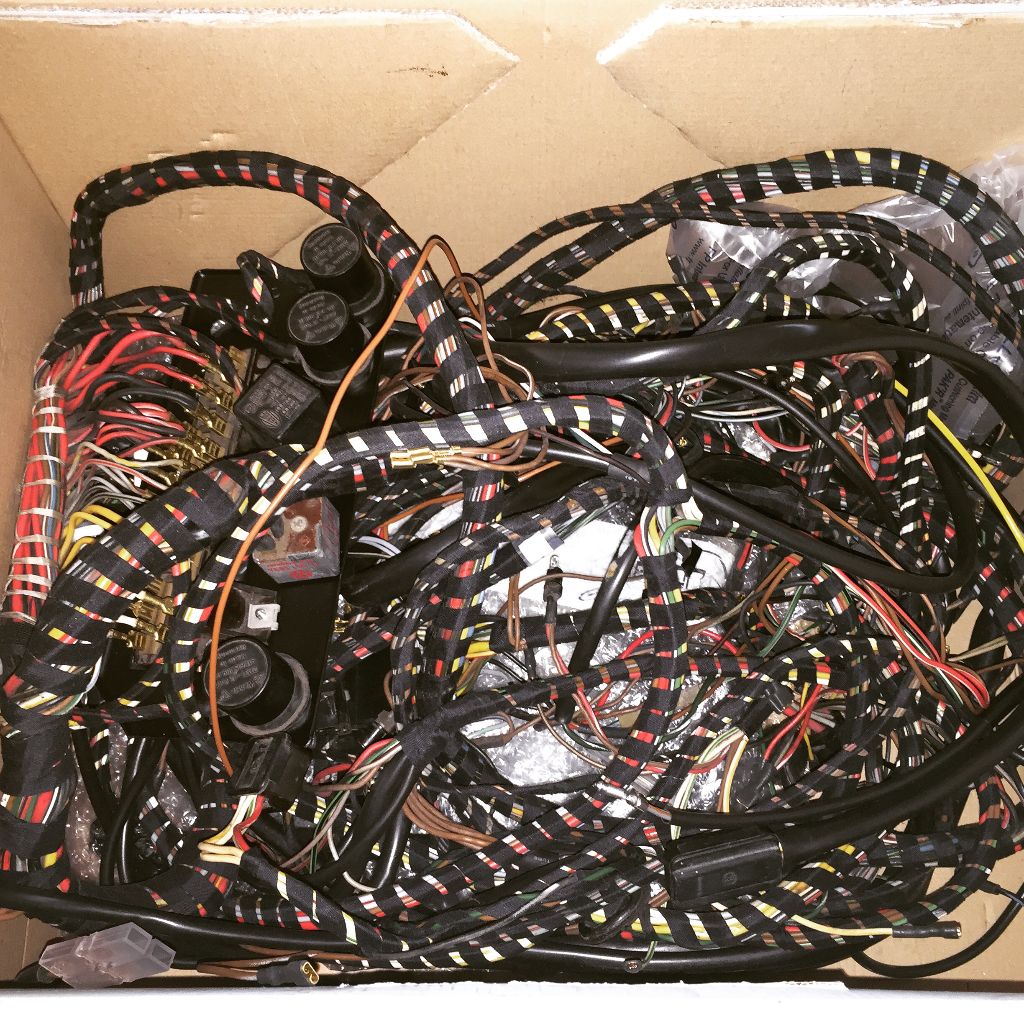
Now I'm just waiting for my electrical harness to be finished being refurbished by Kroon Wire Harnesses. They have replaced all the crimped on connectors and exchanged some damaged wires. If you need help with your wiring harness I recommend them warmly. http://www.kroonwireharnesses.com/site/About_us.html
Posted by: 914350 Mar 25 2015, 08:39 AM
I love that dash! Nice.
Posted by: falcor75 Apr 20 2015, 10:42 PM
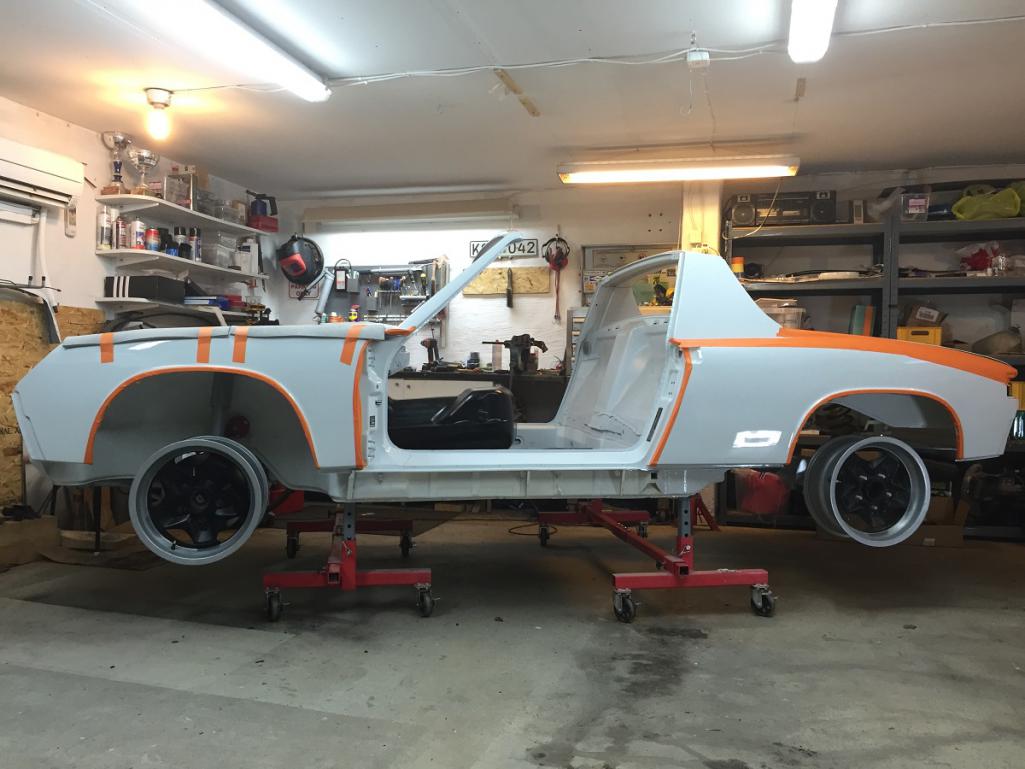
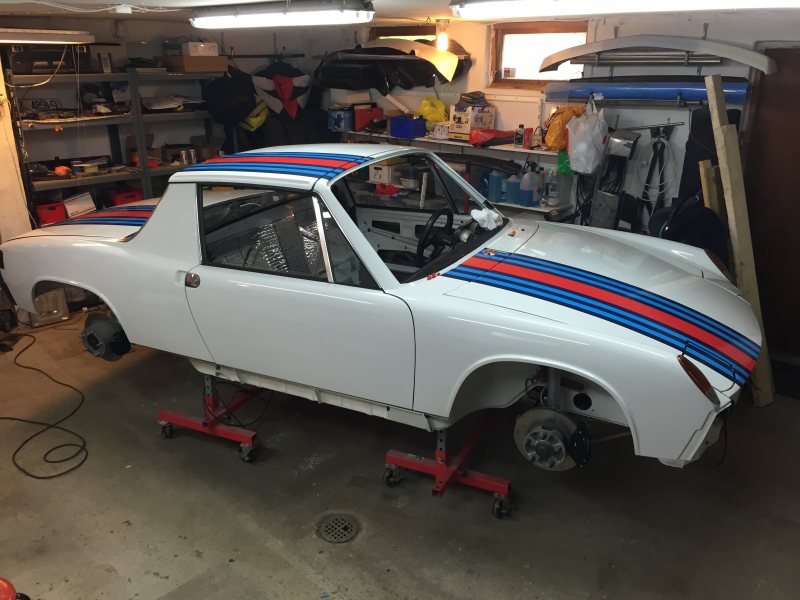
Doors have been added, panel gaps are ok on the passenger side and slightly off on the drivers side, will just have to live with that or get a less molested driver side door.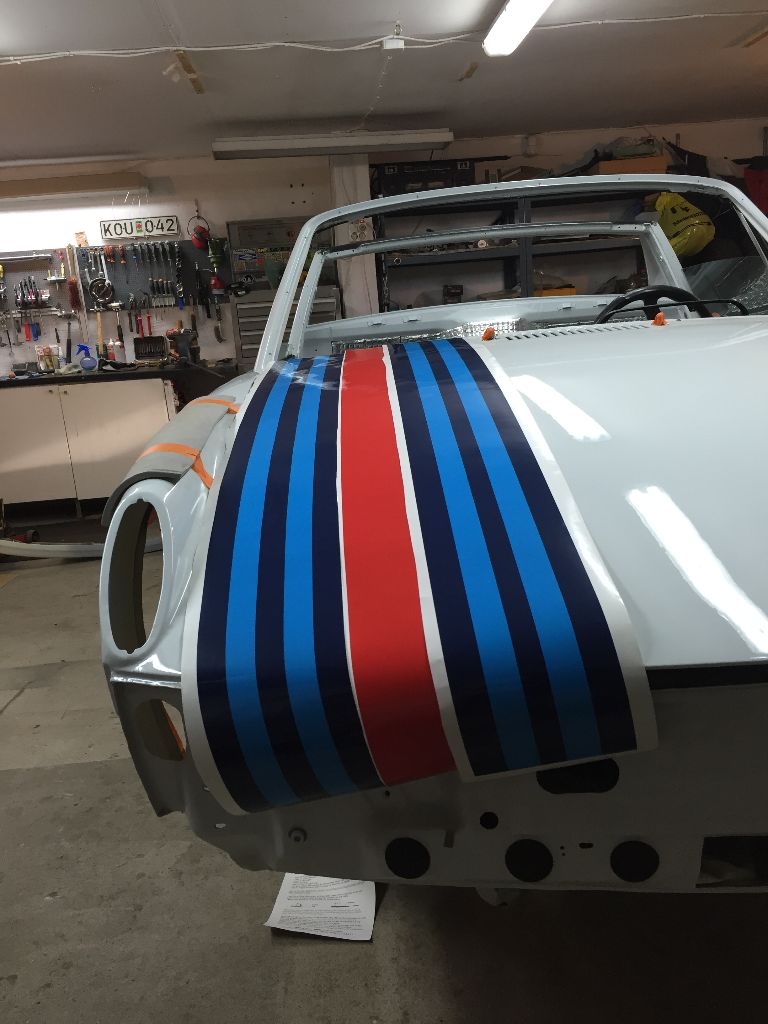
And I can reveal a bit about how the car will be decorated later on... 
More parts back from powdercoat, the pile on the right failed pre paint inspection and needs some attention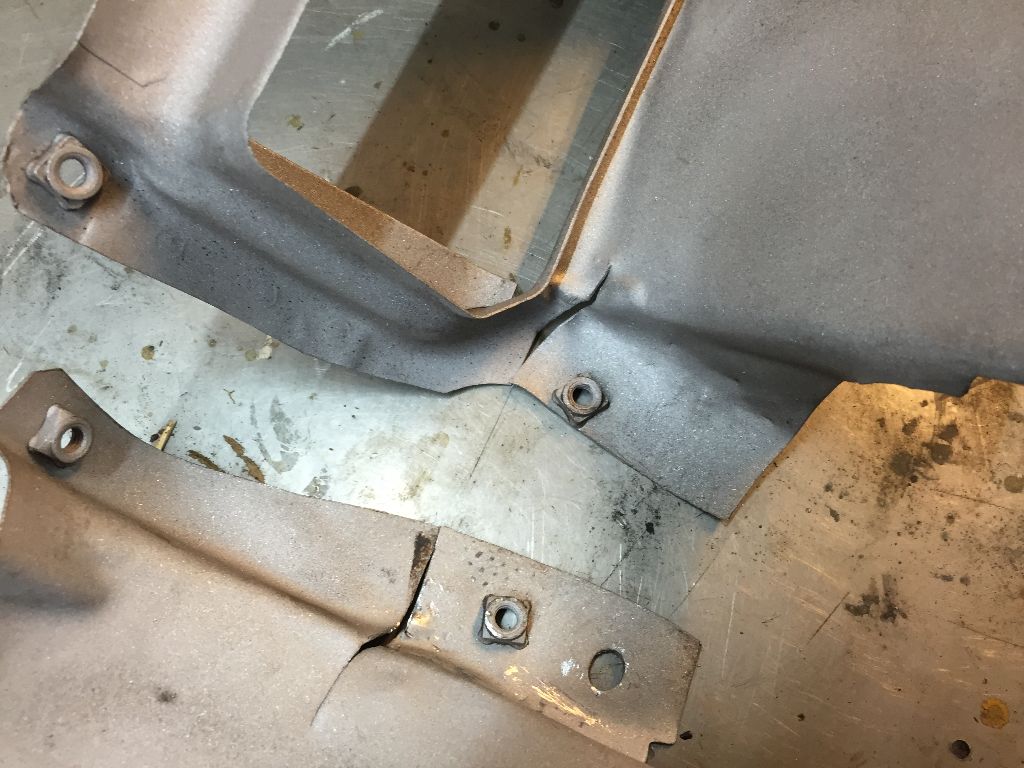
...there were cracks....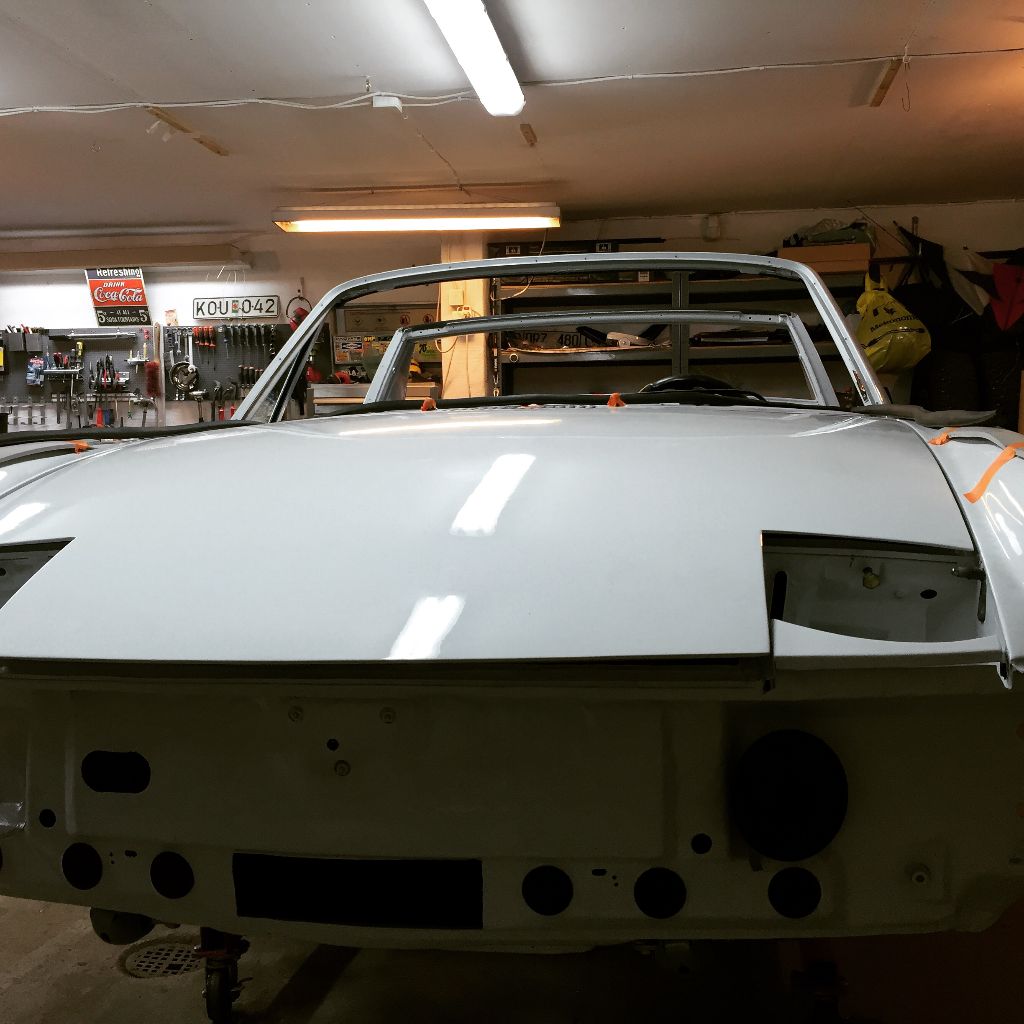
Trying to align the hood, the new front bulkhead seal seems to be too tall for the
GRP hood as it make the middle of it bulge up out of alignment.... 
The blackstriped electrical snake...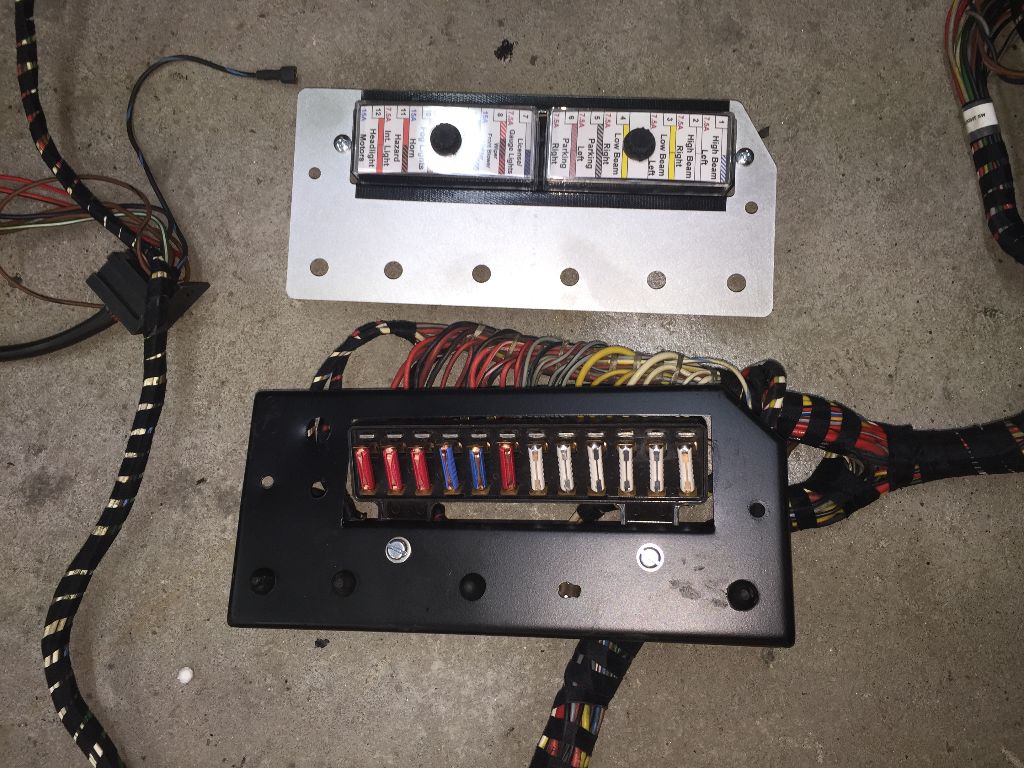
New fuse panel (yes it was painted black before it was installed)
Airbox went back in after the harness slithered into place.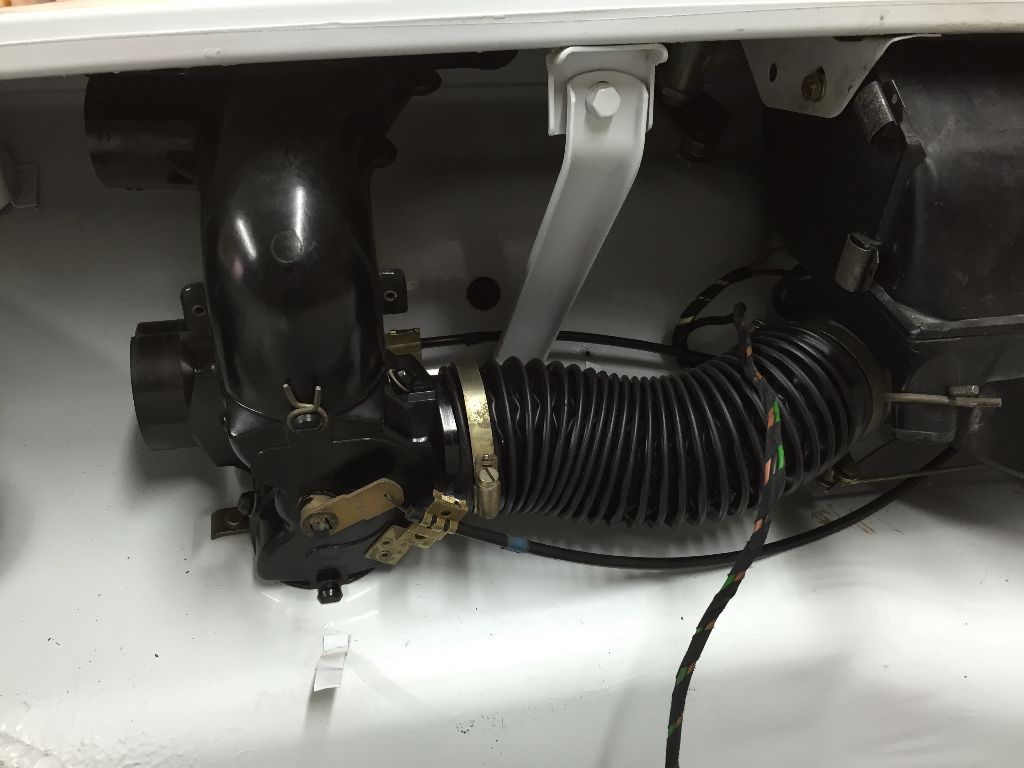
Along with the flapper valves and hoses.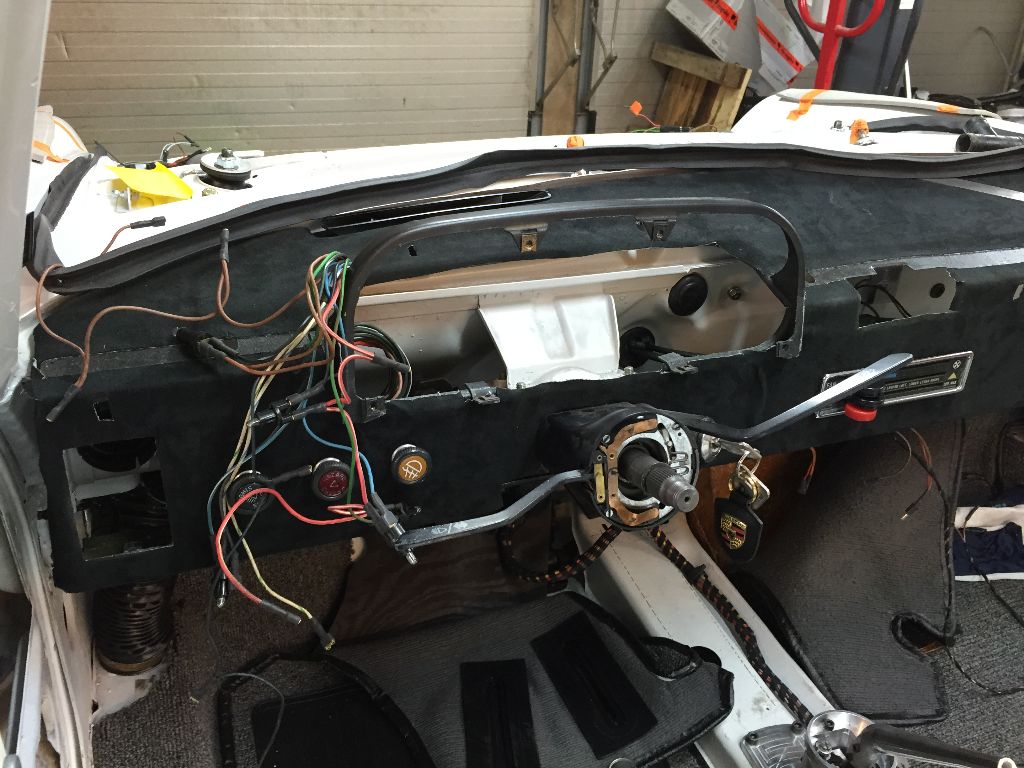
Cables everywhere...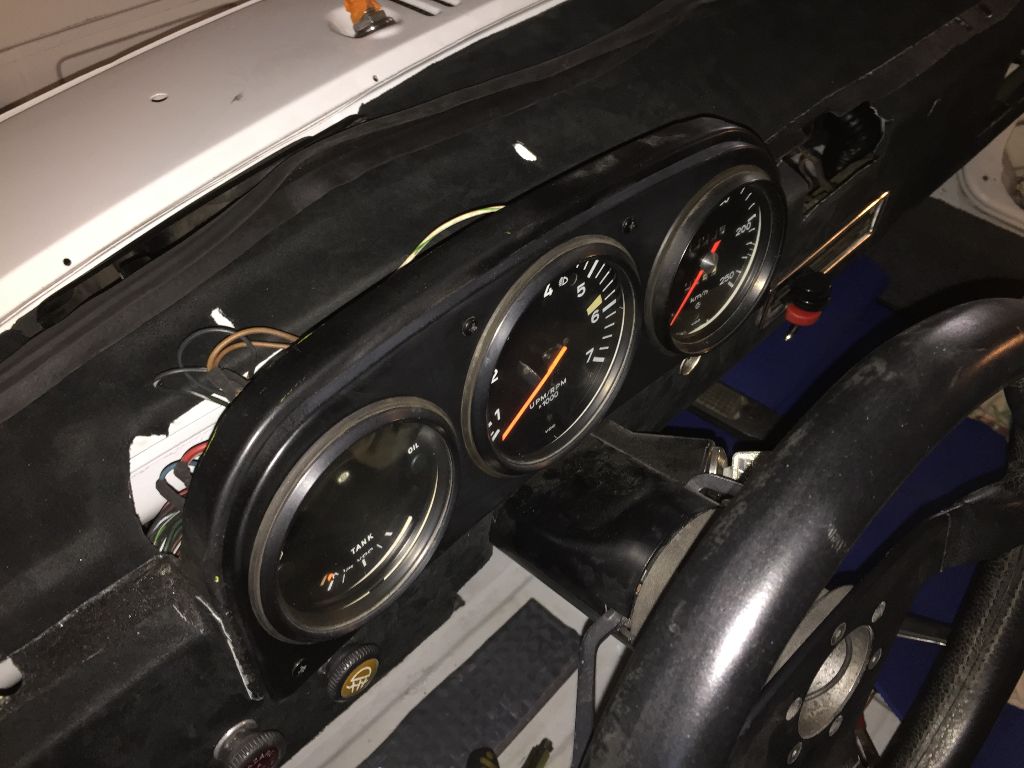
Slowly coming together, the plastic face on my left gauge has a defect in it, needs to be sorted at a later date.
And on sunday I tried to release the magical smoke, I failed.
Still working on installing all the electrical stuff back into the car but it felt like a major
step to have the lights light up again.
Posted by: Cairo94507 Apr 21 2015, 07:34 AM
Your car is coming along very nicely. Keep posting pictures please.
Posted by: CptTripps Apr 21 2015, 08:34 AM
Dash and face look amazing. You're going to love that....and hate it when any dust gets on it. Alcantara is a bitch to keep clean.
....but I'm doing the same thing in mine, so who am I to judge!
Posted by: francar Apr 21 2015, 02:31 PM
great thread. Very nice work 
Posted by: falcor75 May 25 2015, 11:15 PM
Since last update lots of small stuff has been completed.
New fuel pump wiring installed.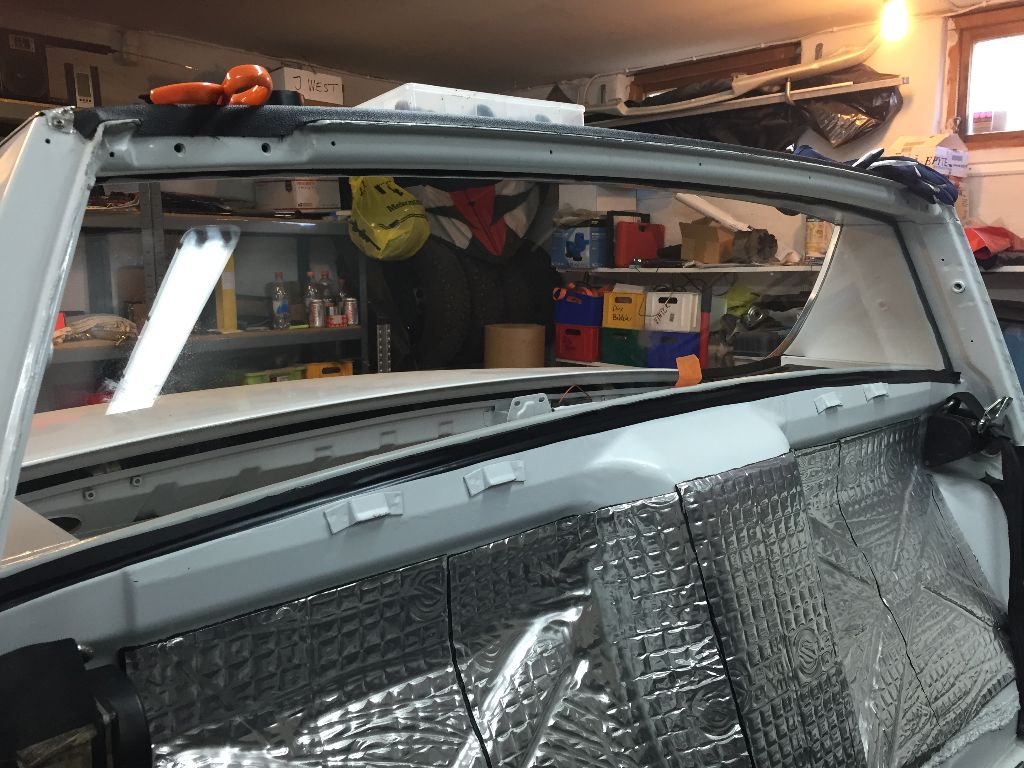
Rear glass and seat belts rollers installed.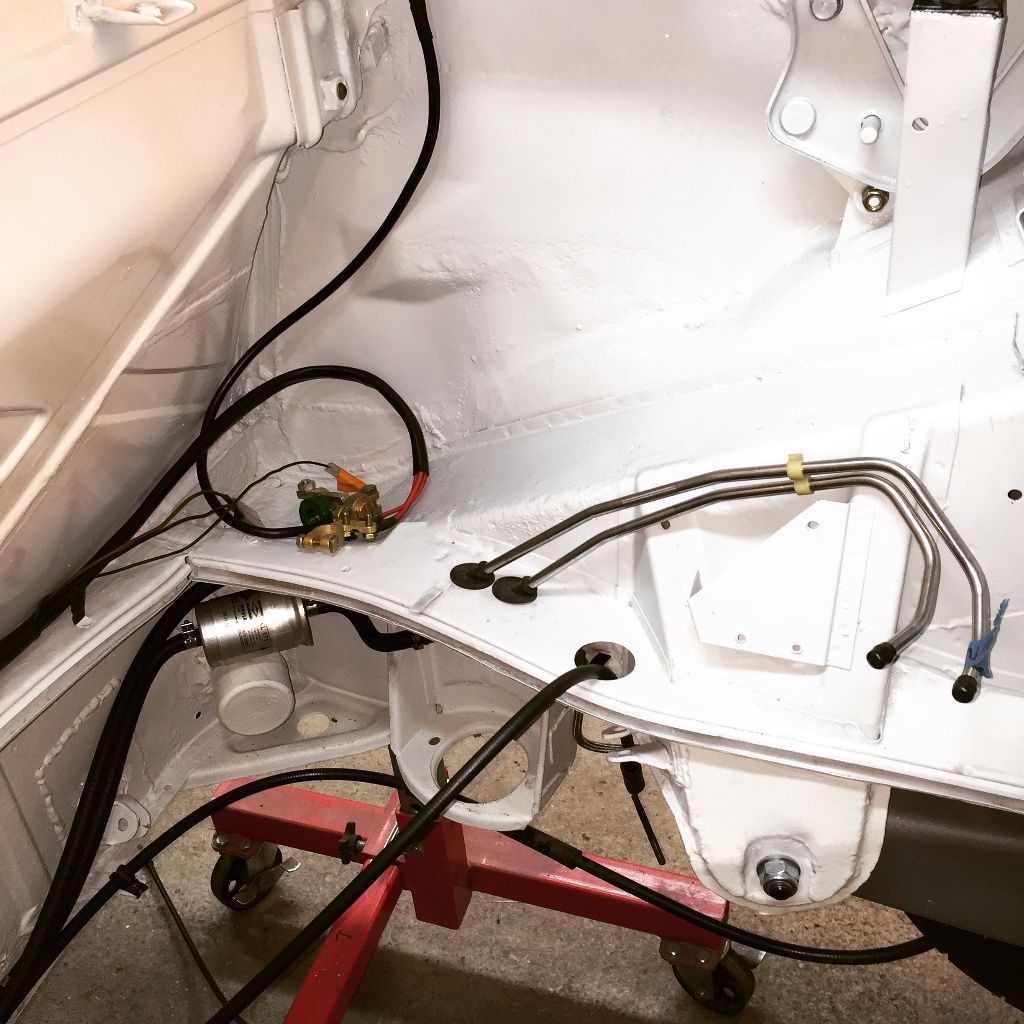
Fuel system completed up to the Engine bay.
Engine bay rubbers installed, teedious!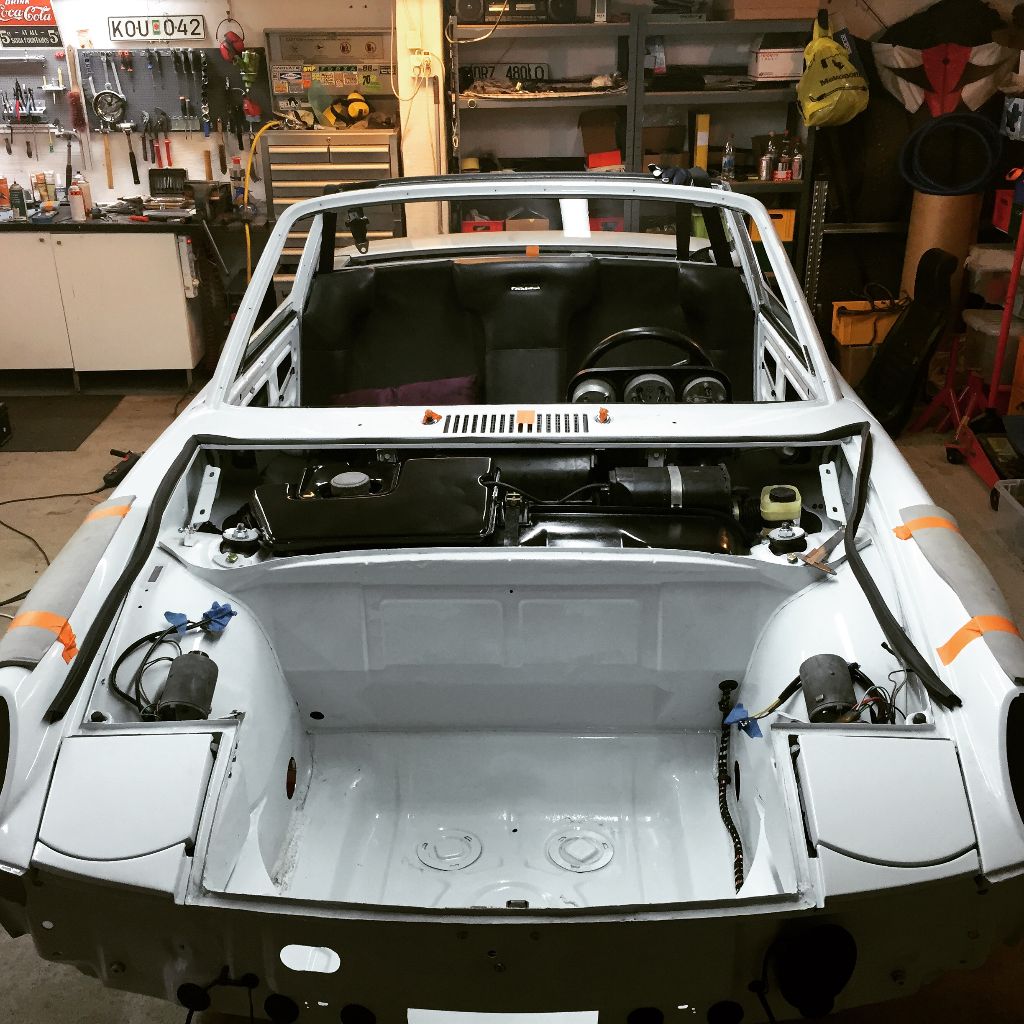
Front end starting to look complete. The new seal for the bulkhead is a Little to tall for my lightweight hood, not sure what to do about that just now...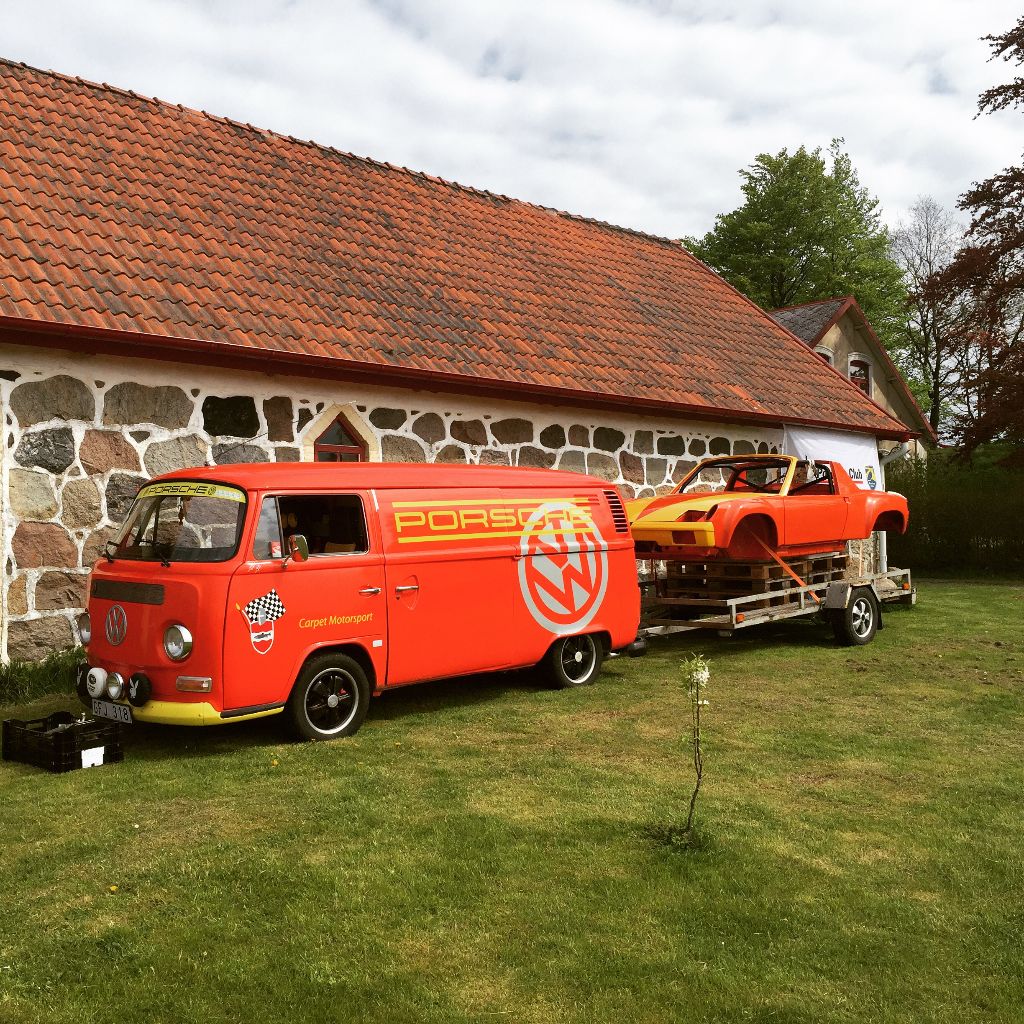
I've also been on a Swedish 914 meet, in total 6 914's where 4 was drivable and two under restoration. This one is a factory GT!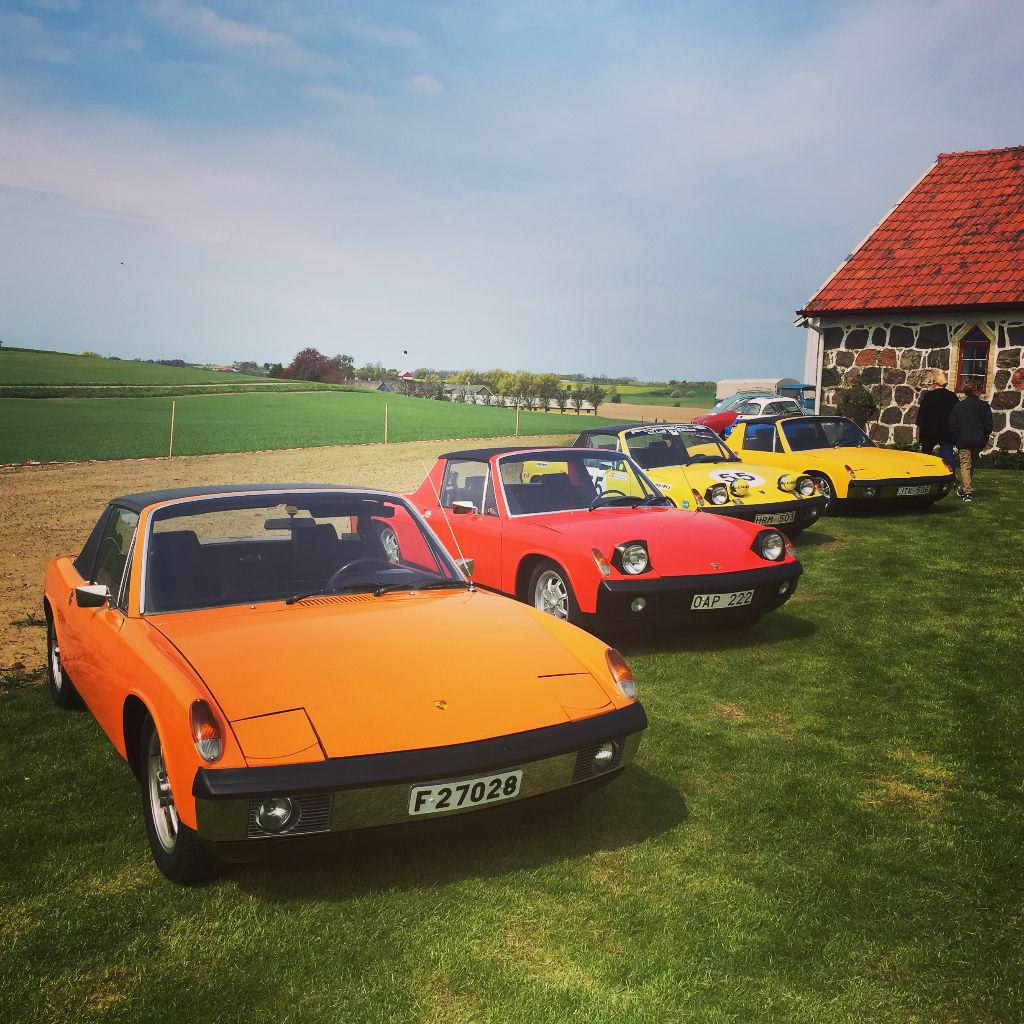
The drivers...totally worth driving 4 hours one way to see these cars in the flesh. 
Posted by: falcor75 May 26 2015, 12:52 PM
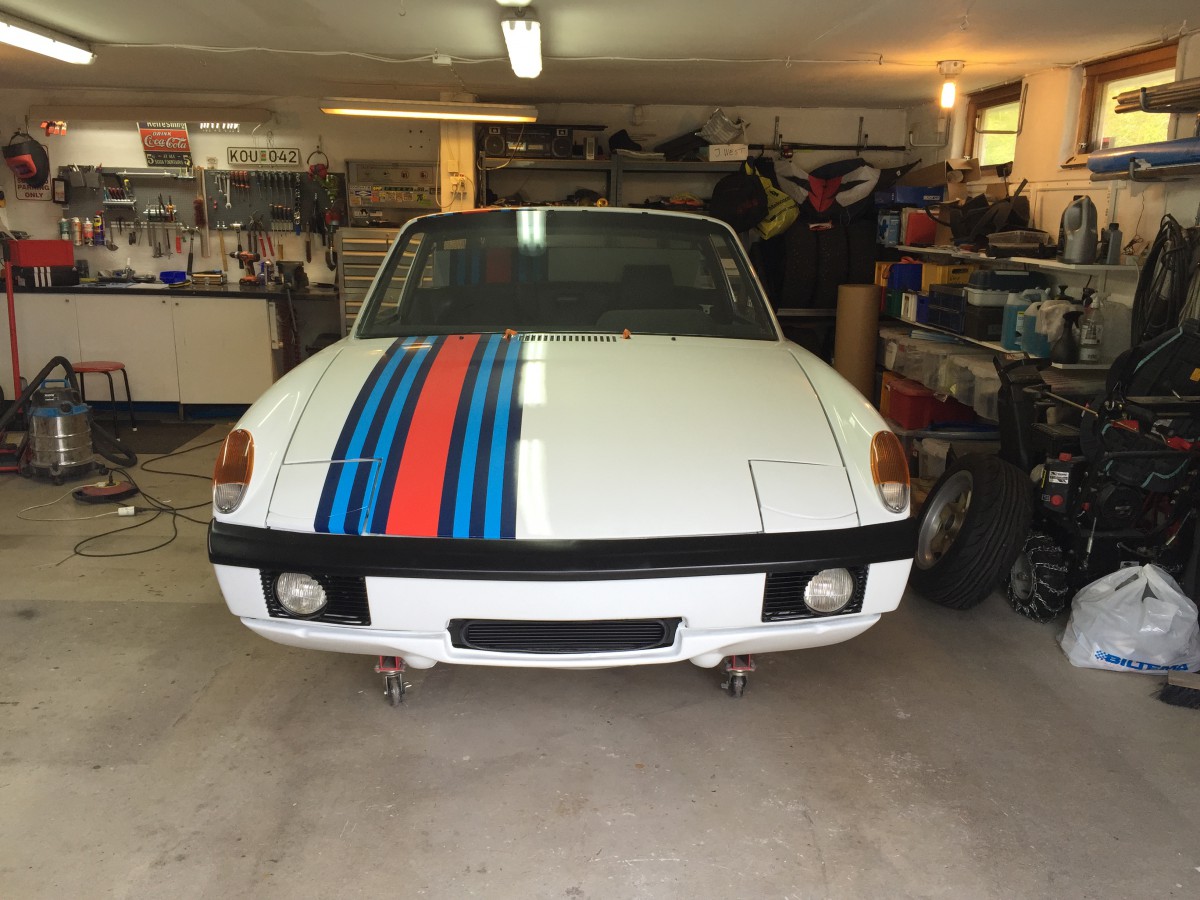
Trying some different layouts of my decals. 
Posted by: turk22 May 26 2015, 02:43 PM
I like the bottom one!
Posted by: SixerJ May 27 2015, 12:51 AM
I like the bottom one!
I second it
Posted by: jkb944t May 27 2015, 06:07 AM
Bottom one looks best to me too!
You are making some great progress, really enjoying this thread. I really like white on a 914!
Jeff B
Posted by: r_towle May 27 2015, 09:14 AM
Mats,
How far are you local 914 experts from the 914/6 located in southern Sweden, near the border....seems southwest of Stockholm?
Any local guys who might want to go take a look at it for the community and post your findings?
There is a thread on the main page here regarding a 914/6 sportomatic for sale....its that car.
rich
Posted by: falcor75 May 27 2015, 09:56 AM
Thats about 4 hours one way from me but very close for the host of the 914 meet I posted from above. Ill make contact with them and ask them to look at the sportomatic thread.
Posted by: thieuster May 27 2015, 11:43 AM
I like the bottom one!
Yeah, but with the MARTINI text facing (= readable) towards the RH side of the car!
Menno
Posted by: r_towle May 27 2015, 01:29 PM
Thats about 4 hours one way from me but very close for the host of the 914 meet I posted from above. Ill make contact with them and ask them to look at the sportomatic thread.
thank you
rich
Posted by: pete000 May 27 2015, 04:36 PM
Love the dash, how did they do that?
Posted by: falcor75 May 28 2015, 05:32 AM
I'm not quite sure how he did it but I've dashed the lines where there are seams done and the continus line there we filled the cavity with a high density foam and stretched the fabric over the foam to produce a smooth surface.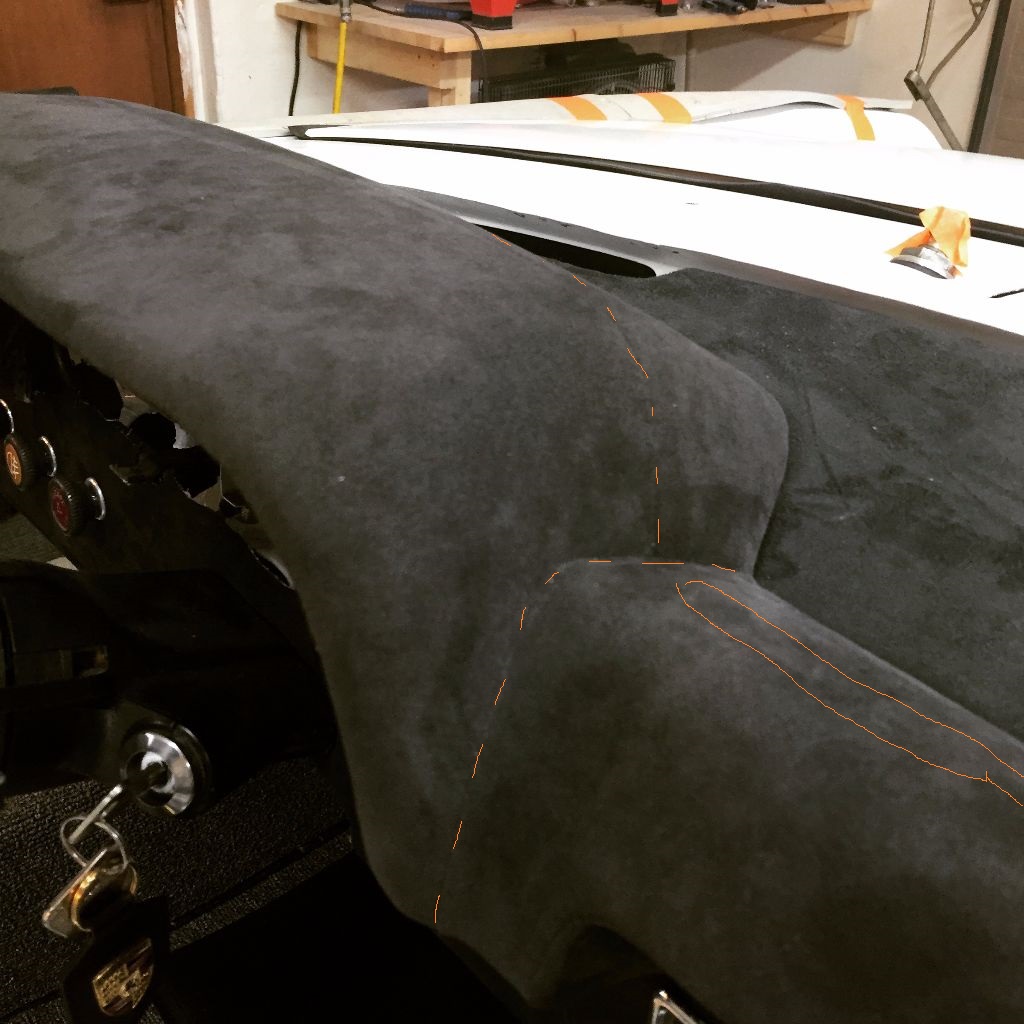
Posted by: falcor75 May 31 2015, 02:32 PM
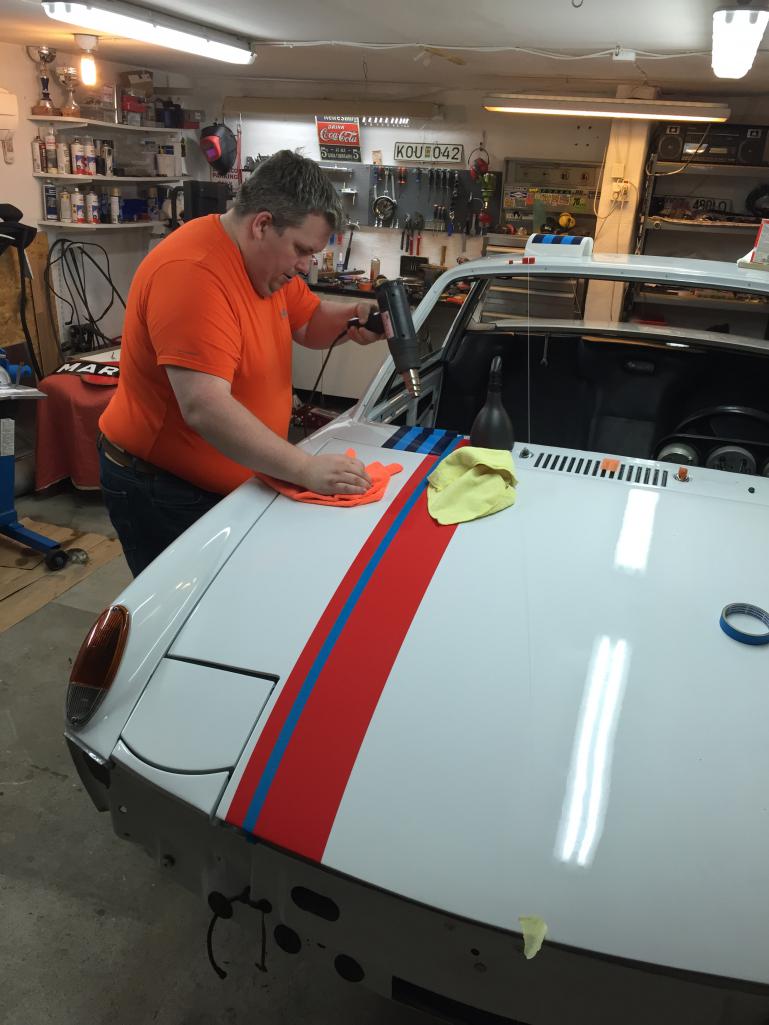
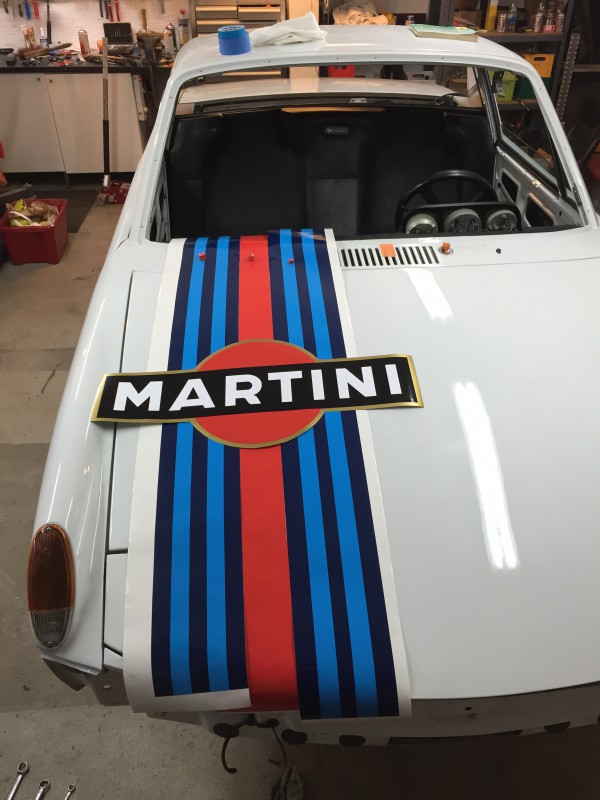
Yesterday I had some help to start laying down the stripes....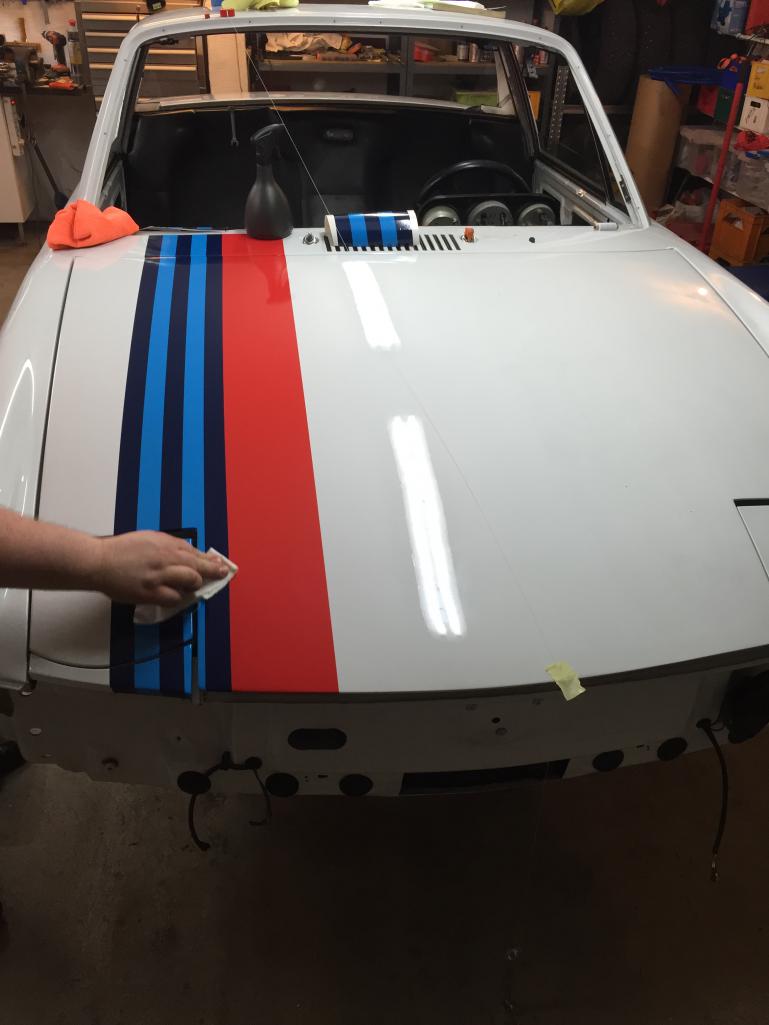
This was as far as we got yesterday...
Posted by: falcor75 May 31 2015, 02:34 PM
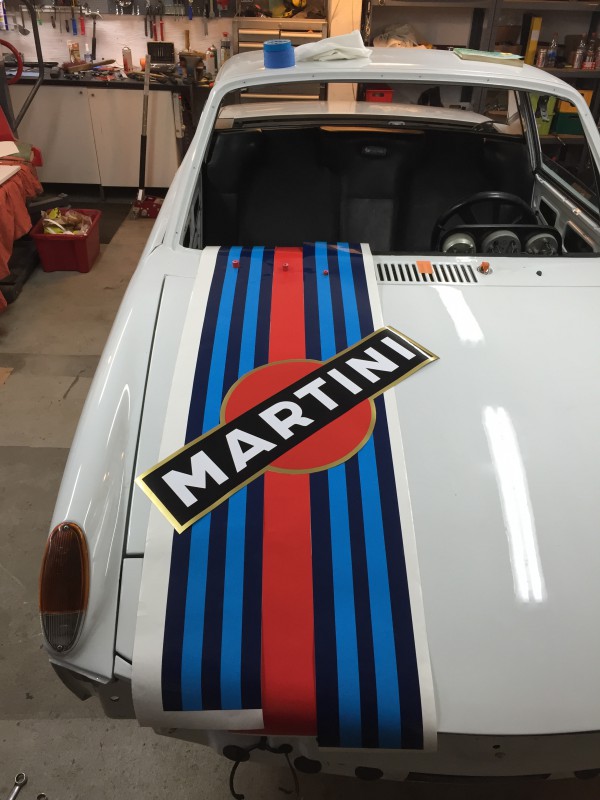
And todays work.
Posted by: Mikey914 May 31 2015, 04:02 PM
Looking real good. I love the look of fresh rubber amd interior parts on fresh paint!
Posted by: falcor75 May 31 2015, 11:05 PM
Looking real good. I love the look of fresh rubber amd interior parts on fresh paint!
Thanks Mikey, and thank you for what you're doing for all of the 914 Community!
Posted by: mgp4591 Jun 1 2015, 12:43 AM
I like the bottom one!
Yeah, but with the MARTINI text facing (= readable) towards the RH side of the car!
Menno

Posted by: falcor75 Jun 2 2015, 11:10 PM
Got a package in the mail with some long awaited parts.... 
Posted by: thieuster Jun 2 2015, 11:15 PM
Nice! But what's with the other edges of the cams? It looks as if they are not smooth! Or am I wrong?
Menno
Posted by: falcor75 Jun 2 2015, 11:42 PM
There's some minor burrs from the lasercutting, I'll smooth that down before I do the final assembly...
Posted by: raynekat Jun 3 2015, 02:09 AM
Lookin' good Mats.
I like the stripes with the Martini on the angle (middle one).
It will look great whatever you choose.
Keep up the great work.
Posted by: falcor75 Jun 9 2015, 06:35 AM
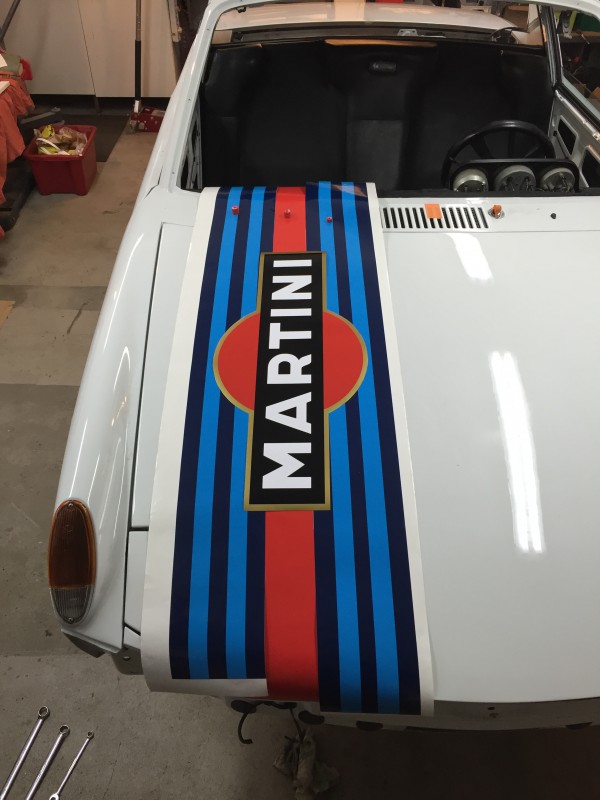
sorry for spamming almost the same pics but I'm just soo really pleased with how the stripes are turning out on the car...
Posted by: mepstein Jun 9 2015, 06:54 AM
I like the stripes a lot.
Posted by: RobW Jun 9 2015, 07:15 AM
Dig the stripes. Very Martini!
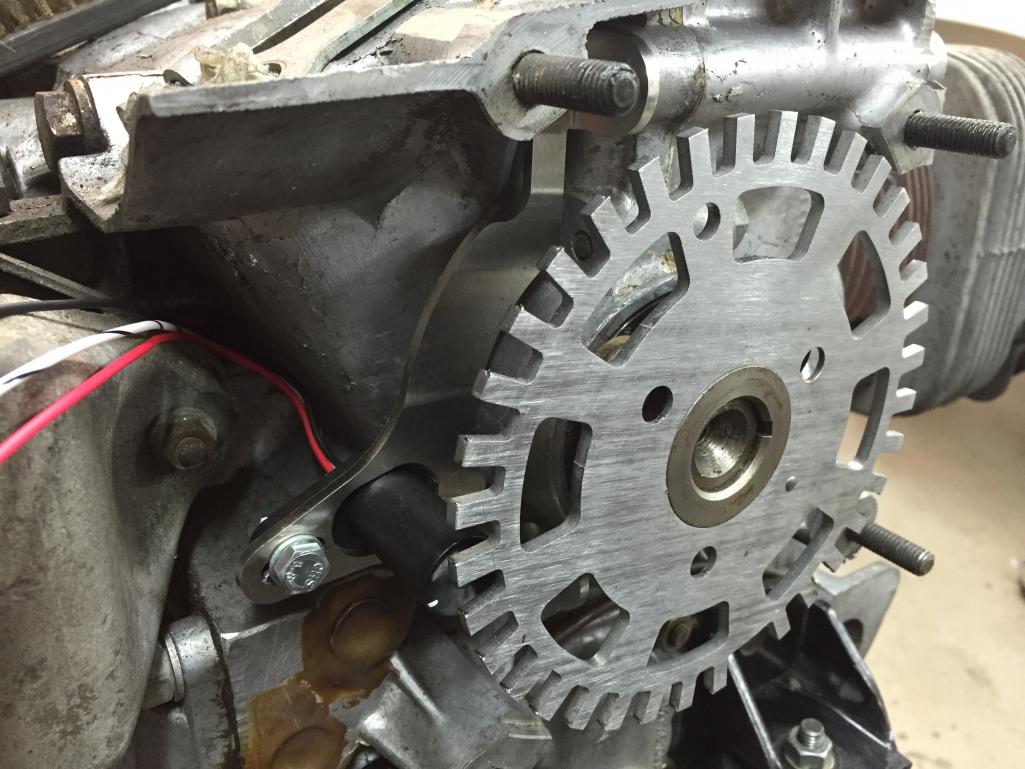
Posted by: falcor75 Jun 10 2015, 10:25 PM
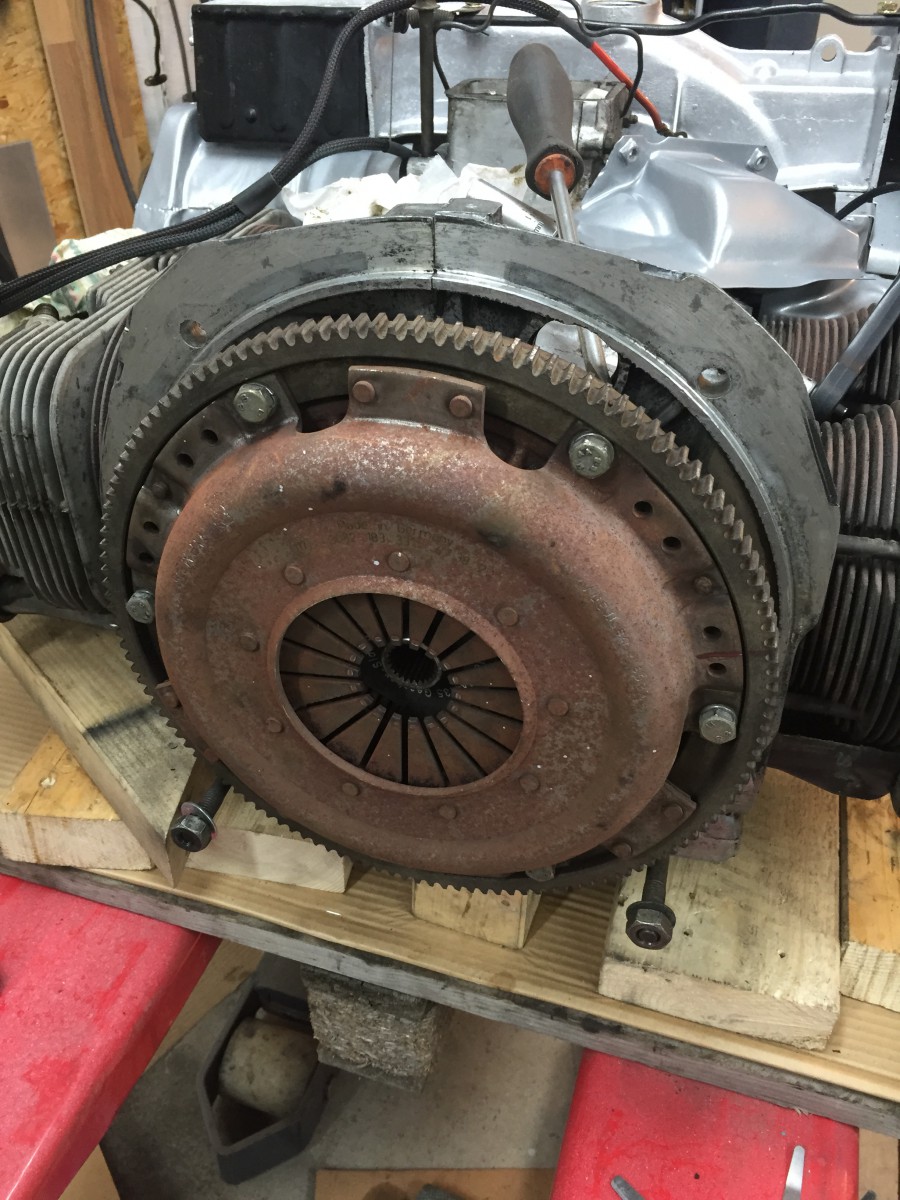
Got an hour in the garage last night and got the old crank seal pulled out, measured the crank axial play with 3x0,34 mm schims in place and got 0,1-0,11 mm of play so that should be ok. Put in a new seal and torqued everything up.
I know the pressure plate looks crap but its just surface rust, both clutch and pressure plate only have a few thousand miles on them according to the receipts I got with the car.
Posted by: thieuster Jun 10 2015, 11:40 PM
Familiar sight! That's what I was looking at only a few weeks back. Have a good look at the flywheel.
BTW, I like the look of the braided hoses/sleeves over the thick wire on the background! Looks classy.
About the Martini striping: are you going to add the word Martini as well, or will you keep it like this? I would have considered adding the word, but when I look at the car 'as is', I am not so sure. The stripe logo is so iconic!
Menno
Posted by: falcor75 Jun 11 2015, 12:44 AM
Familiar sight! That's what I was looking at only a few weeks back. Have a good look at the flywheel.
BTW, I like the look of the braided hoses/sleeves over the thick wire on the background! Looks classy.
About the Martini striping: are you going to add the word Martini as well, or will you keep it like this? I would have considered adding the word, but when I look at the car 'as is', I am not so sure. The stripe logo is so iconic!
Menno
Yes I understand what you mean about the stripes, without the "Martini" logo its a very nice clean look. I wont add the logo right away as I kinda like it like this...dont want to rush and do something I regret.
This weekend I will hopefully finish putting the last stripes onto the engine lid aswell and then I can call that finished...for now. The goal is to have the engine back in the car by the end of the month and then start laying out the new ecu-harness.
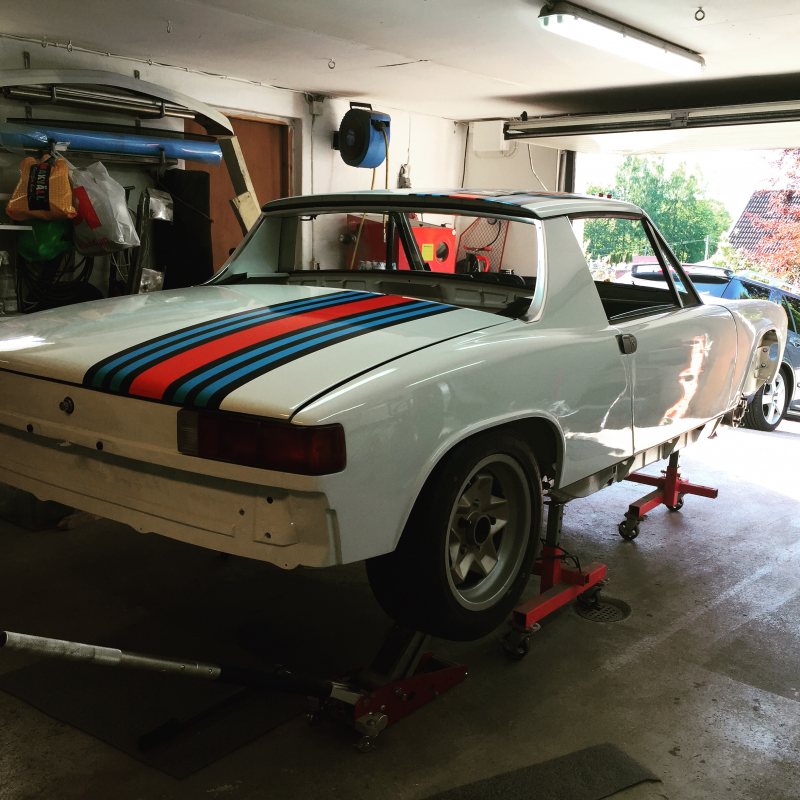
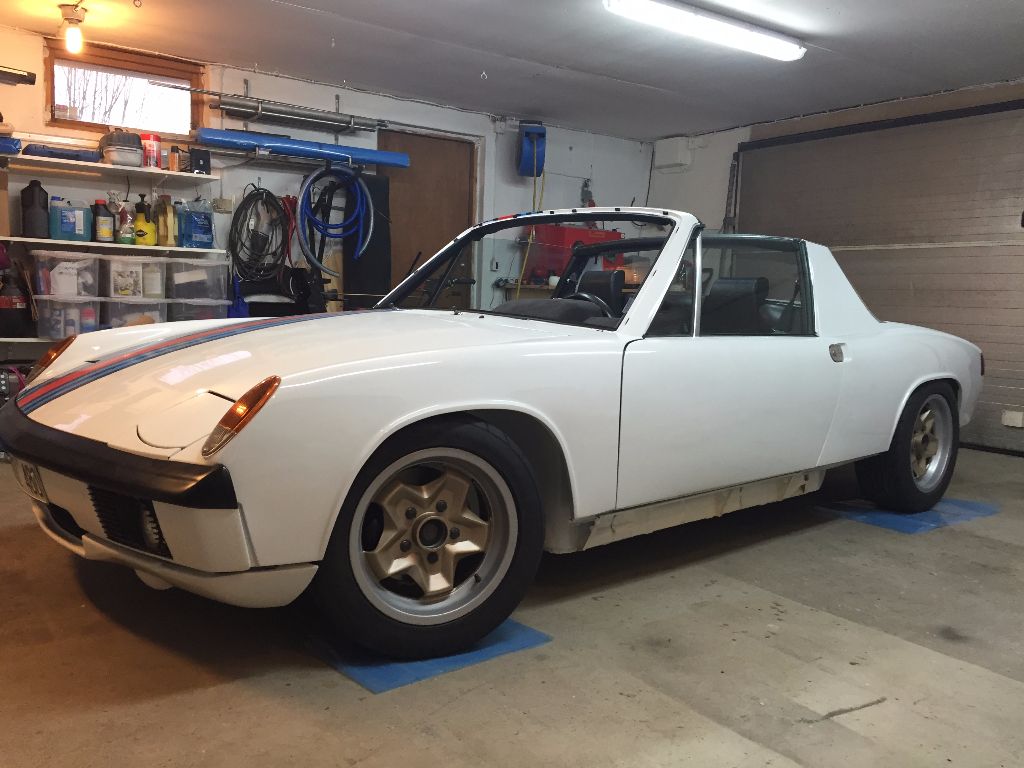
Posted by: falcor75 Jun 17 2015, 04:13 AM
While torquing the inner nut with the rear sway arm in the horizontal position I just had to see if I had clearance with the 7x15 Cookiecutter and my 195-55-15 Nankang NS-2R tires and it seems to fit perfectly. 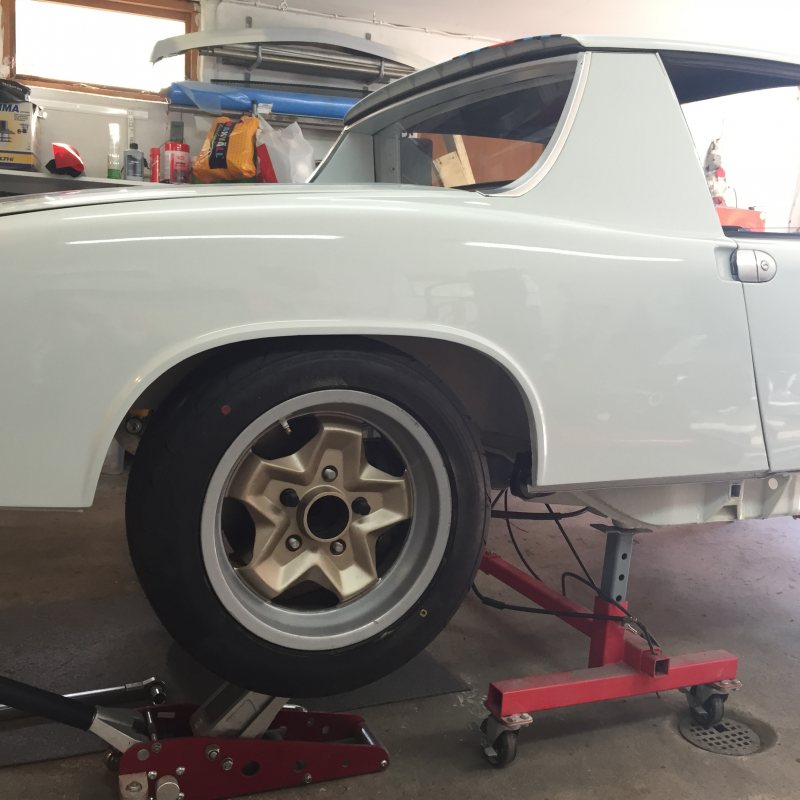
Mmmmm.....gooold...
Posted by: falcor75 Jun 26 2015, 12:50 PM
Engine is in!
Posted by: thieuster Jun 26 2015, 12:53 PM
Looks fantastic! Keep posting these pics
Menno
Posted by: gereed75 Jun 26 2015, 02:46 PM
really really nice build, Has that techno clean look going on. 
Posted by: falcor75 Jul 4 2015, 03:59 AM
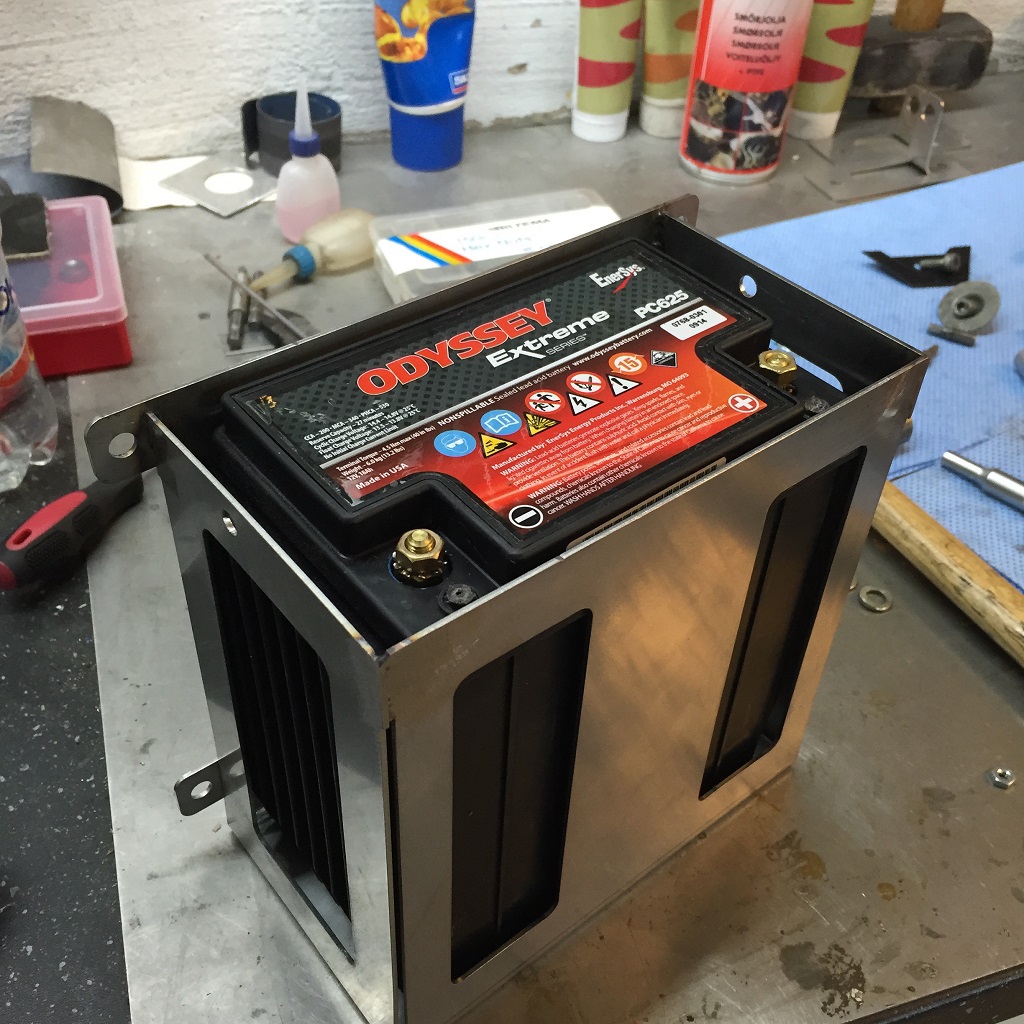
New battery holder lasercut, bent and welded up. Still unsure where to position the battery tho. Either the stock location or lower down on the passenger firewall.
Any suggestions?
Posted by: barefoot Jul 4 2015, 06:55 AM
With that height for your battery box, you may have to mount it much lower to be able to remove the battery, stock boxes much lower side walls.
Posted by: Cairo94507 Jul 4 2015, 07:05 AM
If not in the stock location, may not be possible given the height of your battery, then the lower in the car the better. Car is looking very nice BTW.
Posted by: arkitect Jul 4 2015, 09:33 AM
Engine is in!
Mats,
What type of carbs are you using? Looks similar to the Weber IDF's but velocity stack top is different.
Dave
Posted by: falcor75 Jul 4 2015, 11:47 AM
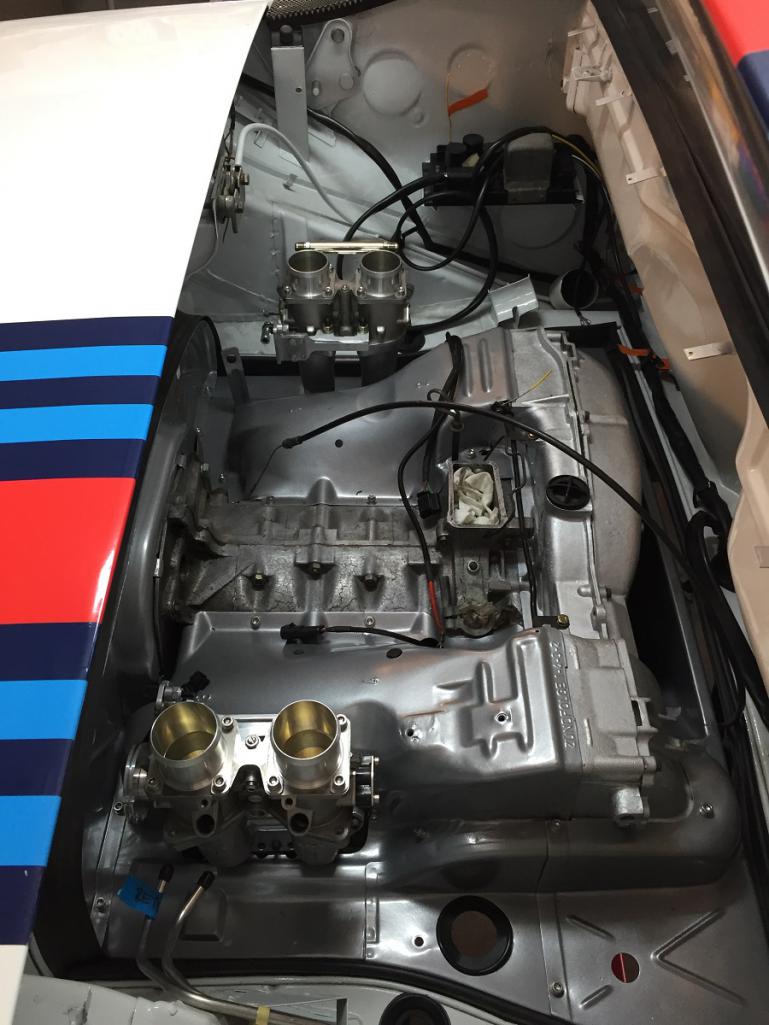
Dave: they're not carbs they're IDF pattern throttle bodies with injector ports (the round holes visible below the stacks) The stacks themselves will eventually be switched to taller full radii stacks.
Posted by: 914_teener Jul 4 2015, 12:07 PM
Great thread and great work.
I was wondering that myself.
Looks like crankfire and ITB's What are you going to use? Microsquirt or was it already set up when you got the car.
Can you tell us about the induction system and ignition you plan on using?
Posted by: falcor75 Jul 4 2015, 01:51 PM
I'm using a crank trigger and minicam sync from Mario @ thedubshop.net
He also sells the ITB's I have but I bought mine from the UK.
For fuel and spark I will be using 4 LS2 coils and a set of 350 cc Bosch injectors from a Saab 9-5 Aero.
All this will be driven by a swedish developed EFI system called Maxxecu, its kinda like Megasquirt but a but more "coherent" if that makes any sense....not alot of addons needed instead its all included in one package. Onboard wideband, E85 ready, bluetooth built-in etc. ( http://www.maxxtuning.eu/maxxecu/ )
Future wise the goal is to build a new 2276 longblock with around 10:1 compression running E85. The whole fuel system has been replaced using Chris's stainless lines and E85 compatible Gates hoses.
Posted by: falcor75 Jul 5 2015, 01:06 PM
Well today I installed the Tangerine shift adjuster and the shift rods. Since I've never really driven my car much I dont remember how it should feel, Shifts are a bit notchy and stiff but at least I can find all the gears.
Posted by: falcor75 Jul 9 2015, 02:48 PM
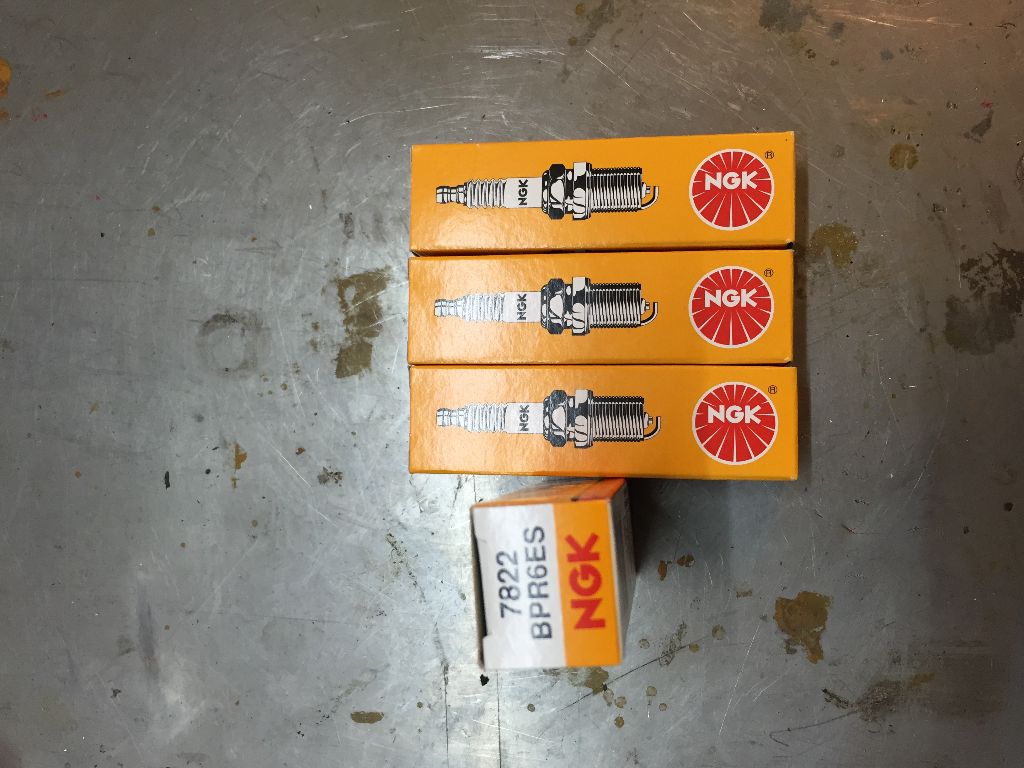
New sparkplugs going in.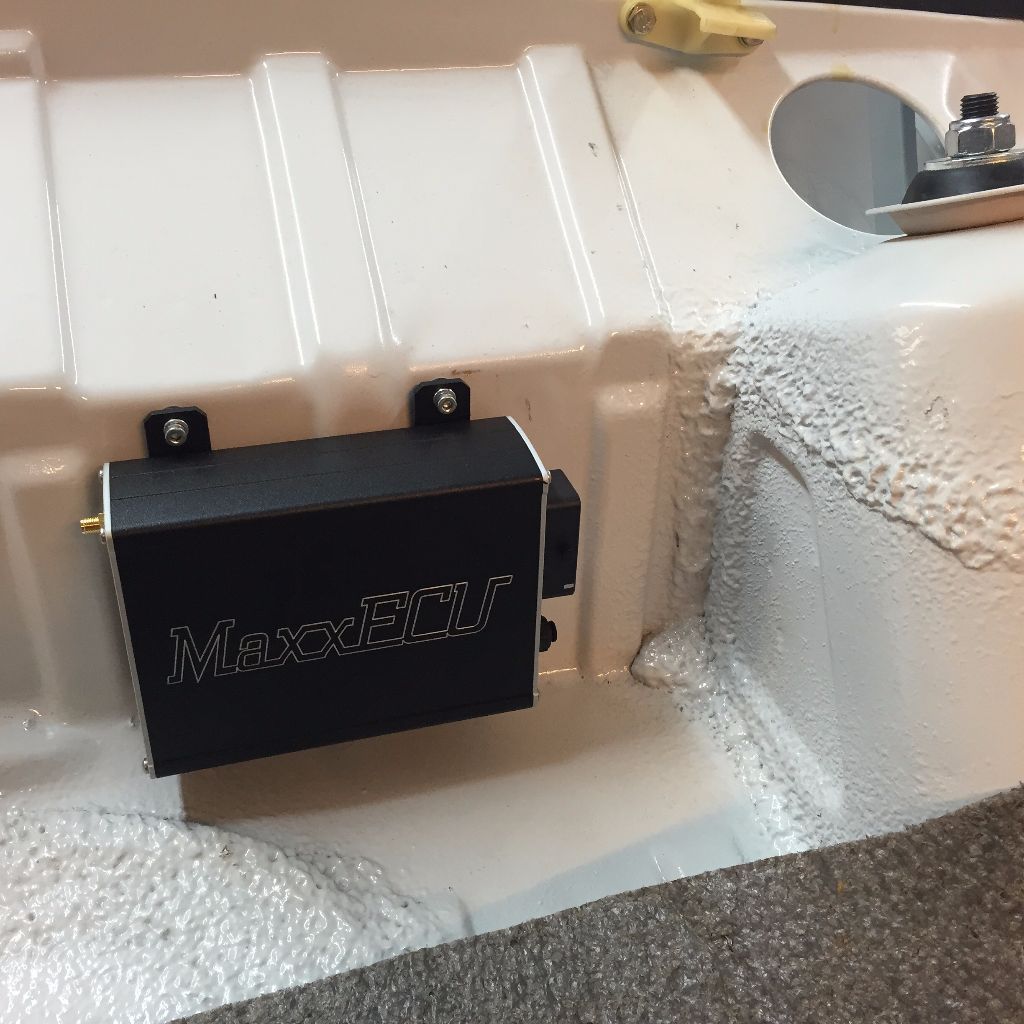
ECU in place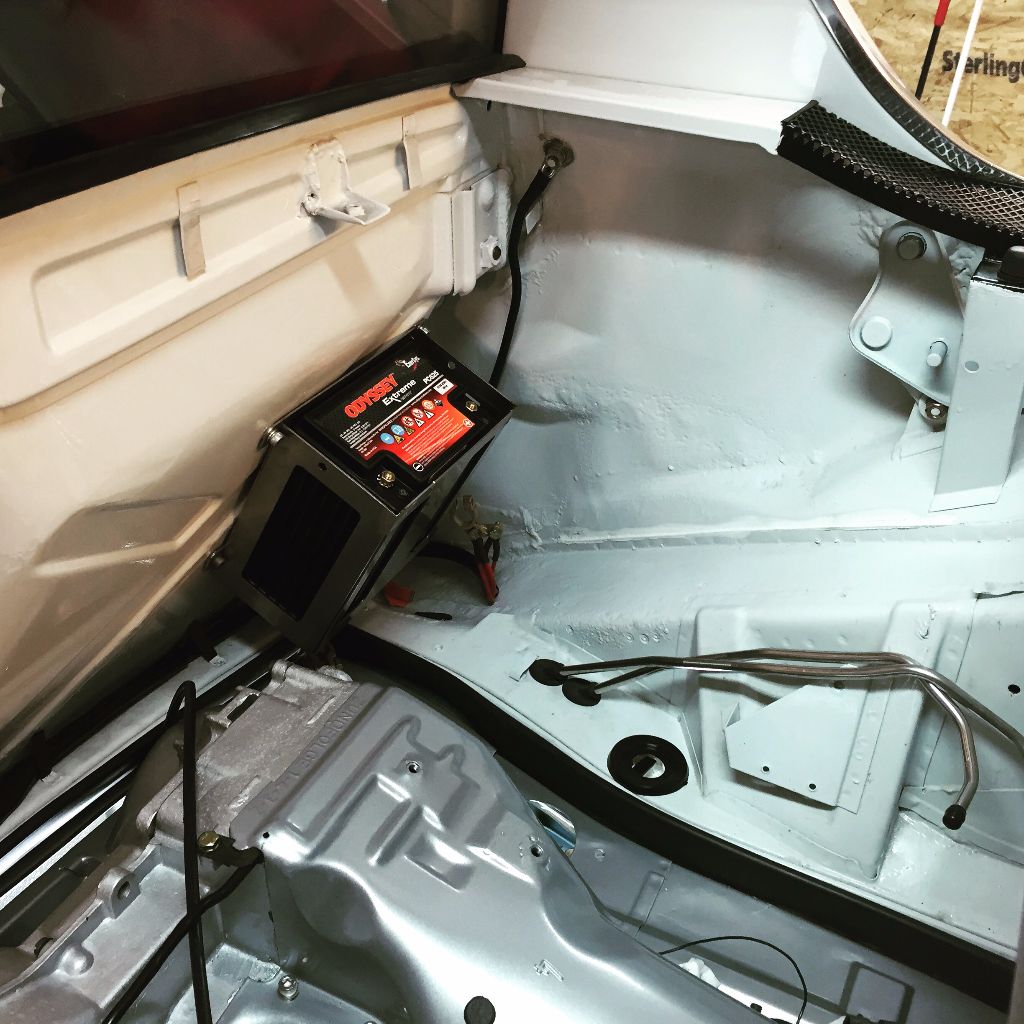
Battery in place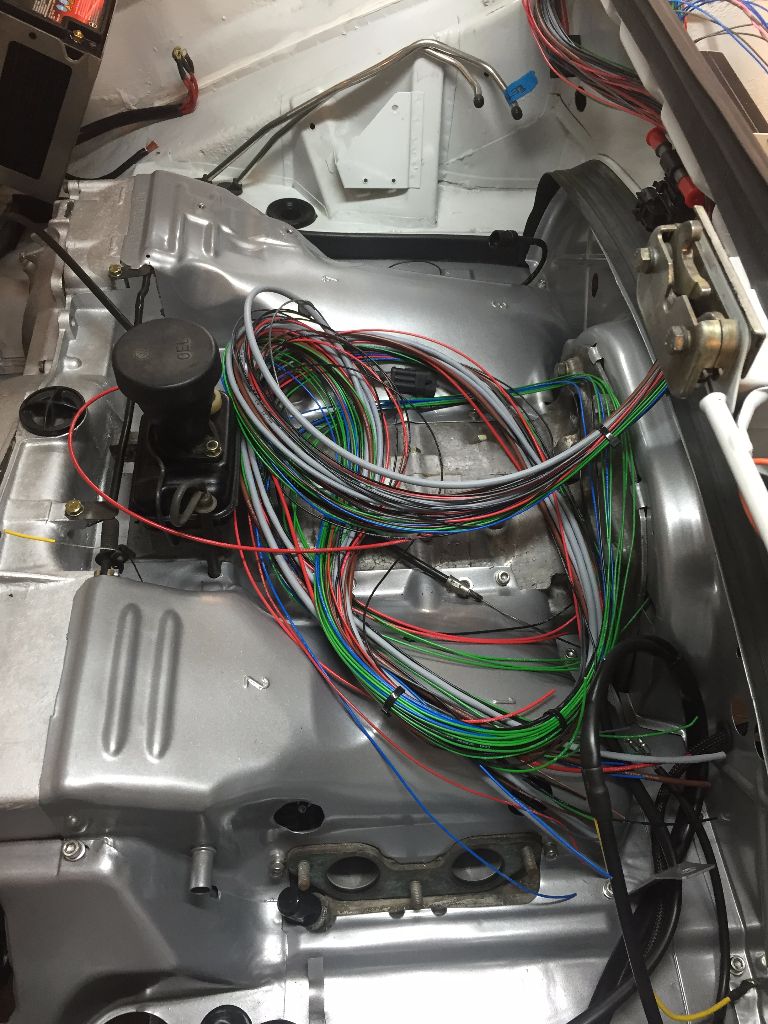
and then....there's the wiring......Yay! 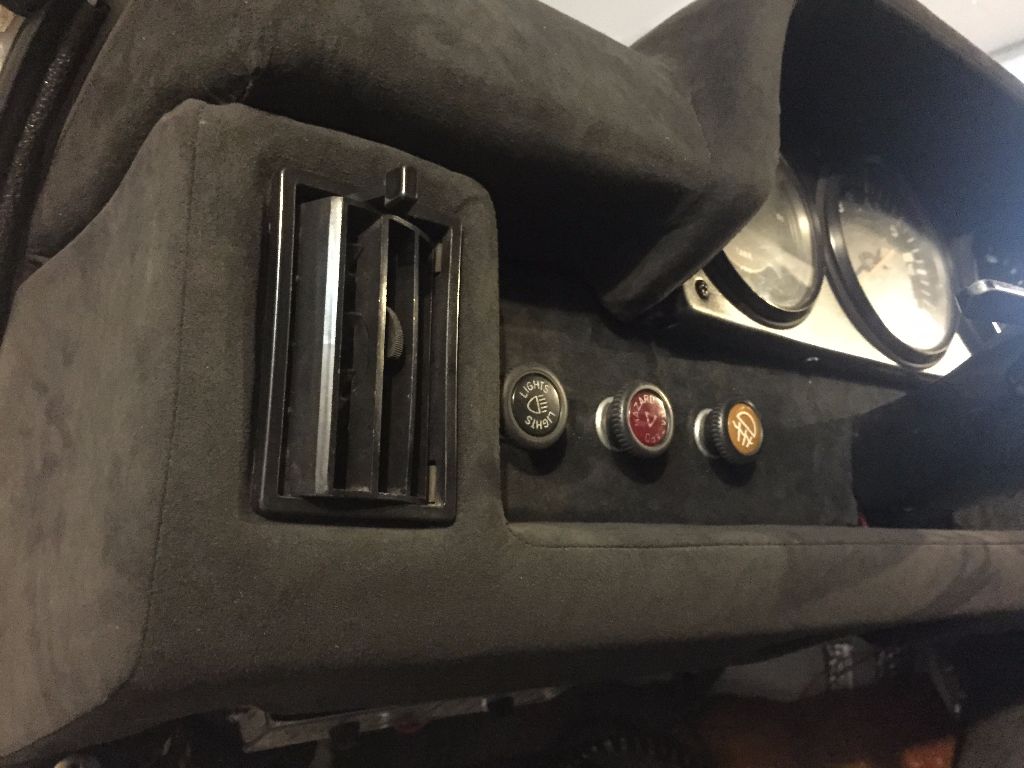
Getting the dash top in place and putting the plastic nuts in place is a dream job...not.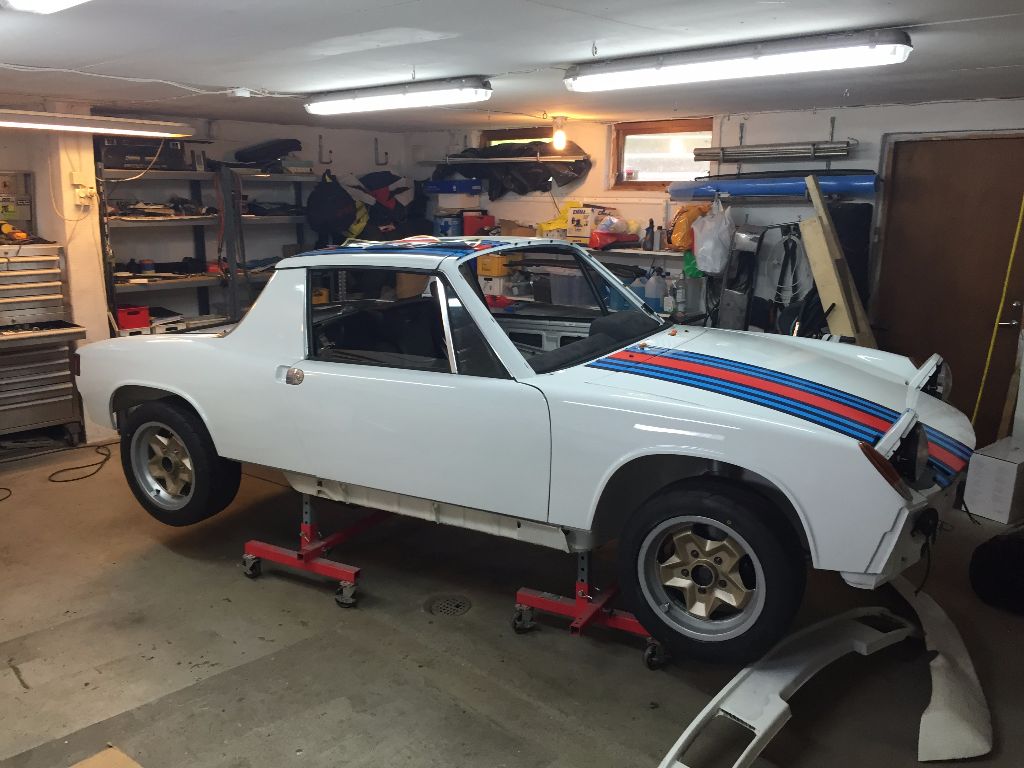
Got some Vintage Gold plastidip on the remaining Cookies aswell. Thinking of trading my set of 3 Fuchs for a set of BBS RS or Mahles.
Posted by: falcor75 Jul 10 2015, 11:40 AM
Touchdown!
Posted by: Scott S Jul 10 2015, 12:13 PM
Very cool!! You are making me miss my old car!
Attached image(s)
Posted by: thieuster Jul 10 2015, 01:56 PM
Touchdown!
Wow, great! Tell me more about the plastidip thing. Difficult? AFAIK, it's reversable without negative consequenses. Am I correct?
Menno
Posted by: falcor75 Jul 10 2015, 02:14 PM
No the plastidip is quite easy.
Degrease your wheels and mask off any area you dont want to paint.
First layer goes on very very thin, allow it to dry for 5-10 minutes.
Second layer goes on normally thick, it wont cover everything yet.
Again let dry for about 5 minutes.
Third layer should cover the base surface completely, fourth layer goes on pretty much just after the third has dried alittle. Remove the masking while the paint is wet (just be carefull) There's plenty of youtube videos showing the process. The paint will peel off easily if you're not happy with it, just find an edge and pull.
Posted by: falcor75 Jul 29 2015, 11:02 AM
CRAP!
ok....so how bad is a wobbly exhaust stud on the #3 cylinder?
Engine out, apart and repair bad or buy a new head bad?
Kinda lost my momentum when I noticed this earlier.....
Posted by: DavidSweden Jul 29 2015, 11:21 AM
CRAP!
ok....so how bad is a wobbly exhaust stud on the #3 cylinder?
Engine out, apart and repair bad or buy a new head bad?
Kinda lost my momentum when I noticed this earlier.....
Mats,
Your car looks great. I am in Gothenburg so I will look forward to having a good look at it some time in the future.
I am not sure what your last post means have you a bad thread on the exhaust stud?
I had this problem with one of the exhaust studs on my 912, I the hole welded, bored out and a helicoil installed it was like new and it didn't cost an arm and a leg
Posted by: falcor75 Jul 29 2015, 11:47 AM
CRAP!
ok....so how bad is a wobbly exhaust stud on the #3 cylinder?
Engine out, apart and repair bad or buy a new head bad?
Kinda lost my momentum when I noticed this earlier.....
Mats,
Your car looks great. I am in Gothenburg so I will look forward to having a good look at it some time in the future.
I am not sure what your last post means have you a bad thread on the exhaust stud?
I had this problem with one of the exhaust studs on my 912, I the hole welded, bored out and a helicoil installed it was like new and it didn't cost an arm and a leg
You are welcome up here anytime if you want to have a look before I get it drivable, wont be till next year I can drive it tho... I'm 90 km's north of Gbg.
Posted by: DavidSweden Jul 29 2015, 11:52 AM
CRAP!
ok....so how bad is a wobbly exhaust stud on the #3 cylinder?
Engine out, apart and repair bad or buy a new head bad?
Kinda lost my momentum when I noticed this earlier.....
Mats,
Your car looks great. I am in Gothenburg so I will look forward to having a good look at it some time in the future.
I am not sure what your last post means have you a bad thread on the exhaust stud?
I had this problem with one of the exhaust studs on my 912, I the hole welded, bored out and a helicoil installed it was like new and it didn't cost an arm and a leg
You are welcome up here anytime if you want to have a look before I get it drivable, wont be till next year I can drive it tho... I'm 90 km's north of Gbg.
Thanks for the invitation, I would like to come by. I have time this week up until sunday, does that work for you?
Posted by: falcor75 Jul 30 2015, 12:31 AM
After sleeping on the issie I've decided to finish all the ECU wiring before I pull the engine to get the exhaust stud fixed. That way pulling the engine will feel like a bit of a reward for finishing the wiring.... (yeah I'm wierd like that....)
Posted by: Dave_Darling Jul 30 2015, 08:49 AM
Probably the easiest solution would be to drill and tap for an oversize exhaust stud. There are 8/9 mm ones, and I think 8/10 mm ones as well. I'd bet that Mittlemotor carries them.
--DD
Posted by: falcor75 Jul 30 2015, 11:44 AM
Probably the easiest solution would be to drill and tap for an oversize exhaust stud. There are 8/9 mm ones, and I think 8/10 mm ones as well. I'd bet that Mittlemotor carries them.
--DD
Yes that will work, I'll just have to get the engine out and take the head off and get it done somewhere. Might get the heads flowmeasured while its out and have them both checked out.
Posted by: falcor75 Jul 31 2015, 12:48 PM
CRAP!
ok....so how bad is a wobbly exhaust stud on the #3 cylinder?
Engine out, apart and repair bad or buy a new head bad?
Kinda lost my momentum when I noticed this earlier.....
Mats,
Your car looks great. I am in Gothenburg so I will look forward to having a good look at it some time in the future.
I am not sure what your last post means have you a bad thread on the exhaust stud?
I had this problem with one of the exhaust studs on my 912, I the hole welded, bored out and a helicoil installed it was like new and it didn't cost an arm and a leg
You are welcome up here anytime if you want to have a look before I get it drivable, wont be till next year I can drive it tho... I'm 90 km's north of Gbg.
Thanks for the invitation, I would like to come by. I have time this week up until sunday, does that work for you?
I had a visit from David today and there was I think almost two hours of 914 talk. I think he liked what I've done so far.
Posted by: falcor75 Aug 8 2015, 03:05 PM
Today I pretty much finished up running the lines for the oilcooler and got to see the front end assembled for the first time. The bottom valance is kinda screwed up from being patched a few times but it'll do for now. Eventually I'll get a replacement one.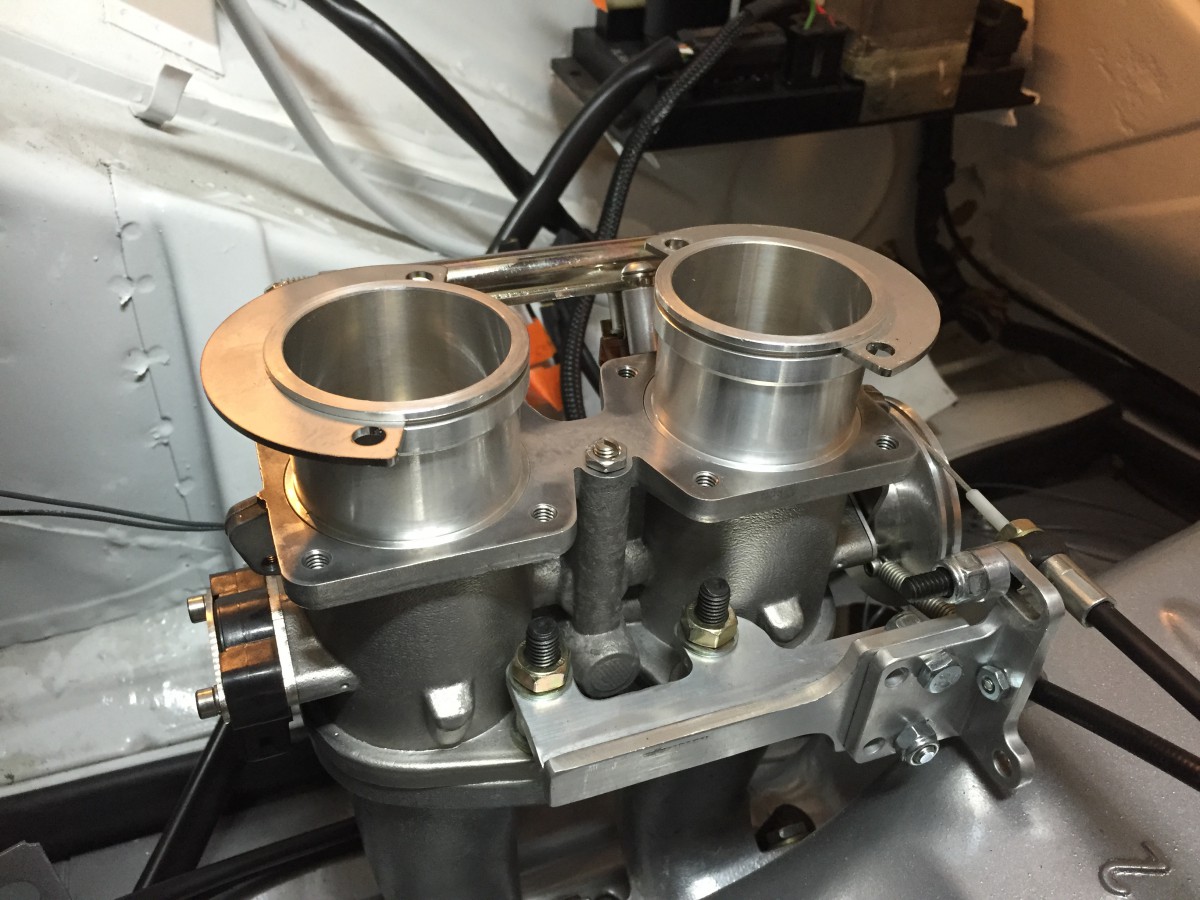
I also got some adapters for the ITB's, they'll let me use any IDF style air filter.
Also got the LS2 coils and made a bracket for them.
Posted by: raynekat Aug 8 2015, 06:26 PM
Looking really good there....
Posted by: falcor75 Aug 9 2015, 07:32 AM
Looking really good there....
tHANKS
Posted by: falcor75 Oct 7 2015, 03:54 AM
ECU mounted
Injector connectors
Engine harness routing
TPS connector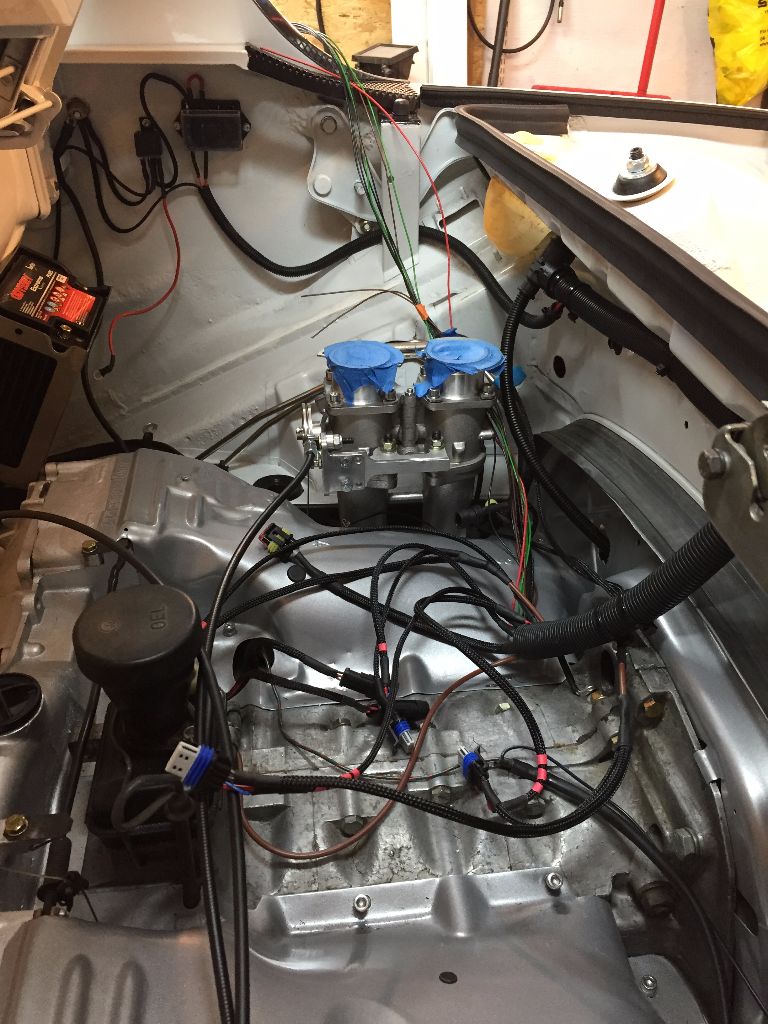
Wires wires and more wires.... 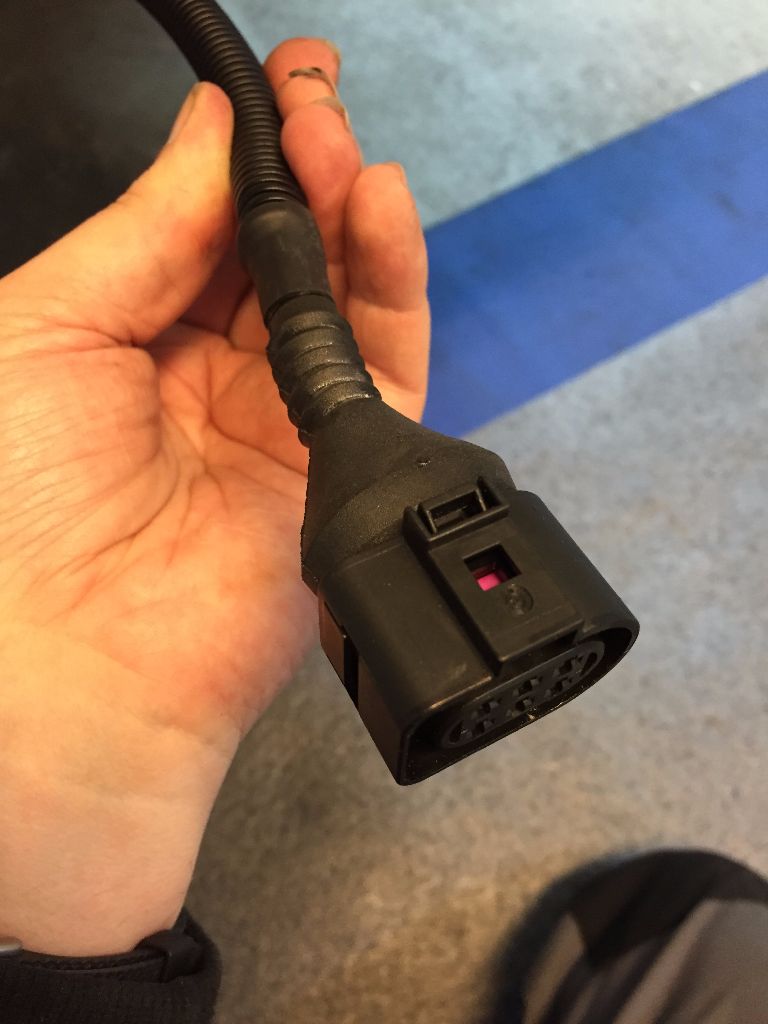
WB O2 connector.
Posted by: 914forme Oct 7 2015, 08:31 AM
Wow excellent work on that wiring harness!!!
Posted by: falcor75 Oct 7 2015, 10:17 PM
Thanks
Posted by: phillstek Oct 7 2015, 11:21 PM
Nice build, man! I really like your vision for the car and the way you’re putting it all together. You should be well pleased with yourself.
Posted by: thieuster Oct 7 2015, 11:37 PM
Looks stunning! Keep posting this sort of pics! I really like 'em.
Menno
Posted by: mrfourteen Oct 8 2015, 08:26 PM
Was the 914 meet at Niklas Ekström home near Malmo?
He has some nice rolling stock.
Posted by: falcor75 Oct 8 2015, 10:15 PM
That's correct, he's got a nice little aircooled and watercooled fleet.
Posted by: mrfourteen Oct 9 2015, 10:42 AM
I have a similar build to yours in process.
http://www.914world.com/bbs2/index.php?act=ST&f=2&t=260696&st=0#entry2215168
That's correct, he's got a nice little aircooled and watercooled fleet.
Posted by: falcor75 Oct 9 2015, 10:59 AM
I have a similar build to yours in process.
http://www.914world.com/bbs2/index.php?act=ST&f=2&t=260696&st=0#entry2215168
That's correct, he's got a nice little aircooled and watercooled fleet.
I know, I'm subscribed to your thread. Yours looks awsome!
Posted by: falcor75 Dec 24 2015, 09:59 AM
Merry Christmas! 
Posted by: thieuster Dec 24 2015, 10:14 AM
Classy, very classy.
I have nothing to match that - only perhaps that I wish you all a Merry Christmas from a blowtorch hot (!) part of Europe. No need for winter tires!
Menno
Posted by: DavidSweden Dec 24 2015, 11:14 AM
Looks good Mats, when will you fire it up?
Maybe I could come over and take a closer look if you are around over christmas and the New year.
David
Posted by: falcor75 Dec 26 2015, 10:56 AM
Houston, we have cranking rpm...
Got some work done today. Pulled the intakes off, removed the plugs and checked the plug gaps. All good. Proceeded to mount the oil filter, fill the engine with oil.
Then I built a remote start switch and hooked it up. *drumroll* It cranks! 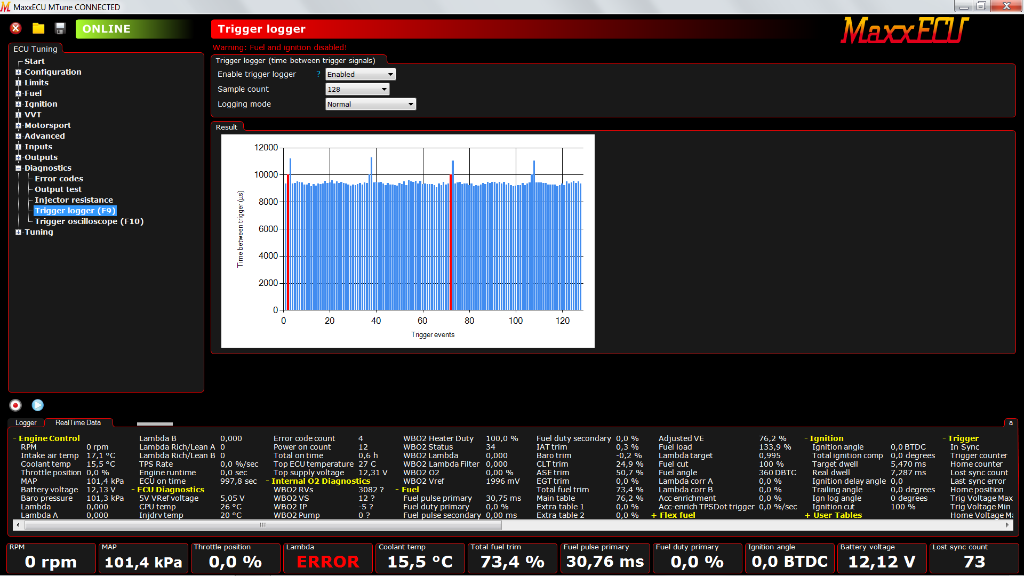
Nice with a built-in oscilloscope in the tuning software.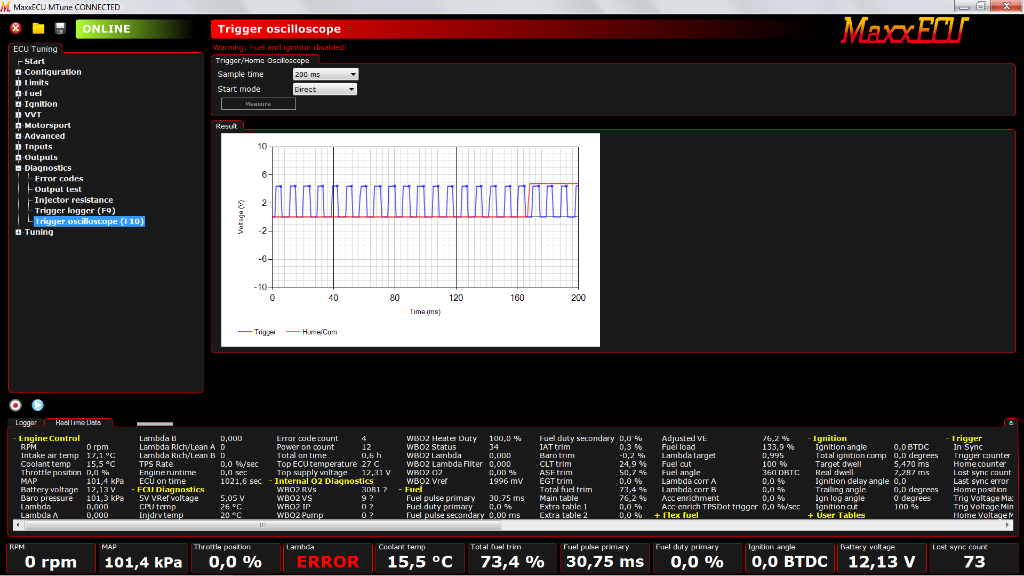
Posted by: falcor75 Dec 30 2015, 10:54 AM
Oil pressure is up.
And today I also verified that I have spark on all four cylinders and that my timing light was dead on arrival. Waiting for new intake gaskets before I can button everything up again.
Oh and the engine harness was finished today. Wired up the E85 flexfuel sensor and
cut and tucked the last remaining spare input/output wires.
Posted by: falcor75 Jan 17 2016, 11:10 AM
https://youtu.be/8FGpixyAc0w
Its alive!
Granted firing it up revealed a few issues to be solved.
1. The new hi torque starter doesnt disengage quick enough, you can hear the slight whine in the beginning of the video till it disengages.
2. Turning the key off doesnt kill the engine, it keeps running and I have to kill it via the laptop interface to the ecu. I'm not sure why this happens.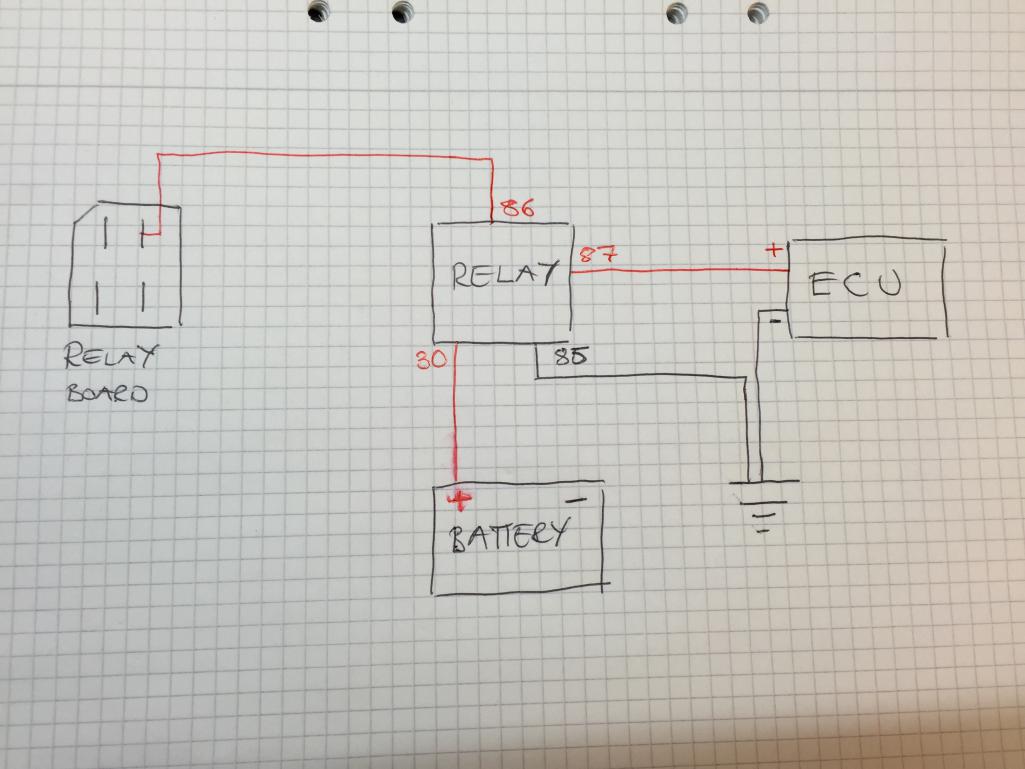
This is how I've hooked up the ecu, switched power from the post on the relay board to a separate relay that controls the power to the ECU.
3. Third issue is an oil leak from the left side valve cover. Suck having to pull the heat exchanger down to get access and fix it. Do I need to drain the oil before removing the valve cover?
Posted by: Dave_Darling Jan 17 2016, 11:56 AM
Your first two issues could be caused by a single thing. There might be something feeding back into the switched power circuit. I've done that by putting the wrong type of bulb into the taillights, for instance.
You don't have to drain the oil, or remove the exhaust, to replace the valve cover. There might be a little oil in the rocker box, but the "resting" level of the oil in the crankcase is below the bottom of the rocker box.
--DD
Posted by: siverson Jan 17 2016, 01:08 PM
And there will be even less oil if you jack up just one side of the car.
-Steve
Posted by: DavidSweden Jan 17 2016, 01:46 PM
Glad to hear it fired up and it looks very nice too
Posted by: CatDaddy60 Jan 17 2016, 09:33 PM
Way cool on your first start up. The independent injection is something I'm looking into as well. Does the crank sensor and wheel work well? I was under the impression that the sensor had to be mounted on the outside edge of the wheel.
Posted by: falcor75 Jan 18 2016, 09:49 AM
Way cool on your first start up. The independent injection is something I'm looking into as well. Does the crank sensor and wheel work well? I was under the impression that the sensor had to be mounted on the outside edge of the wheel.
I had no issues at all with the triggerwheel setup.
All my sensors are from Mario @ thedubshop.net Cant recommend him highly enough. Super guy to do business with if you want to go EFI. He's developing his own Megasquirt circuit board to be able to update aircooled fours to modern injection.
Posted by: falcor75 Jan 18 2016, 09:52 AM
Your first two issues could be caused by a single thing. There might be something feeding back into the switched power circuit. I've done that by putting the wrong type of bulb into the taillights, for instance.
You don't have to drain the oil, or remove the exhaust, to replace the valve cover. There might be a little oil in the rocker box, but the "resting" level of the oil in the crankcase is below the bottom of the rocker box.
--DD
I found a thread earlier today (cant find it now tho) about the alternator backfeeding current when you turn the key off, just enough to keep the power relay energized.
The engine should die if you for instance push the brake pedal and this is exactly what happens to me. Turning the key off doesnt kill the engine but then pushing the brake pedal to light up the brake lights kills the engine. Apparently putting a diode in somewhere would fix this issue.
Edit: http://forums.pelicanparts.com/porsche-914-914-6-technical-forum/873073-914-6-strange-electrical-problem-will-not-stop.html
Posted by: veekry9 Jan 19 2016, 01:41 AM
Av Tors hammare, är din 914 ett konstverk.
Posted by: falcor75 Jan 19 2016, 07:38 AM
Av Tors hammare, är din 914 ett konstverk.
Tack!
Posted by: falcor75 Jan 20 2016, 02:31 PM
Started tackling the oil leak today. On inspection I saw that the left valve cover was pushed upwards, probably happened when I pushed the spring in place.
I also took down the starter motor hoping to find a reason for it squealing a bit when the engine starts but I couldnt find anything. I put the starter in my vice and hooked it up to a spare battery and it runs flawlessly.
https://youtu.be/fiwULhbUrrg
Here's a clip of benchtesting the starter.
https://youtu.be/h6CsDYiB2YI
Here's a clip of the engine start efter putting the starter back on the car.
Any ideas on how to fix the annoying squealing noise?
Posted by: falcor75 Feb 11 2016, 03:19 PM
The last few weeks has been spend fixing issues found after getting the engine to start reliably. The biggest hurdle was the throwout bearing.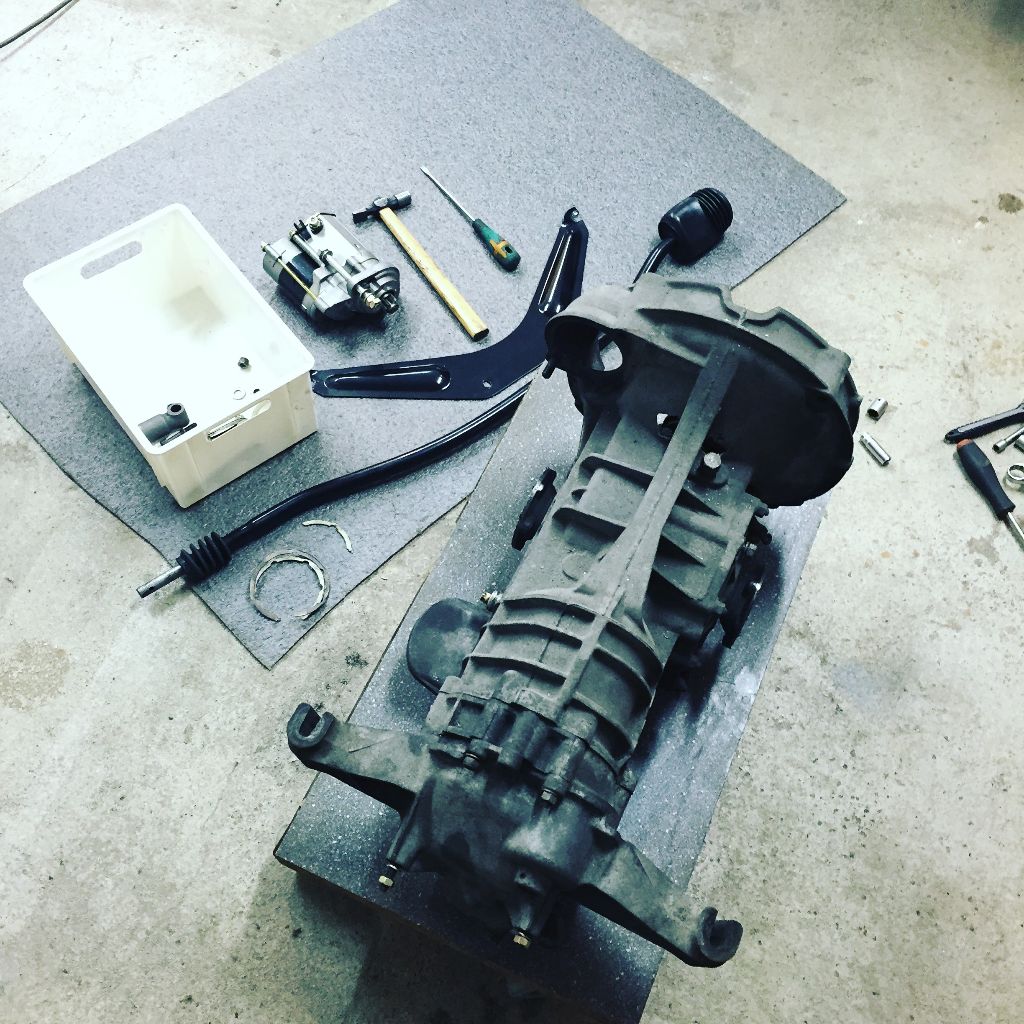
Last weekend the gearbox came out and I ordered a new throwout bearing and all the associated small parts.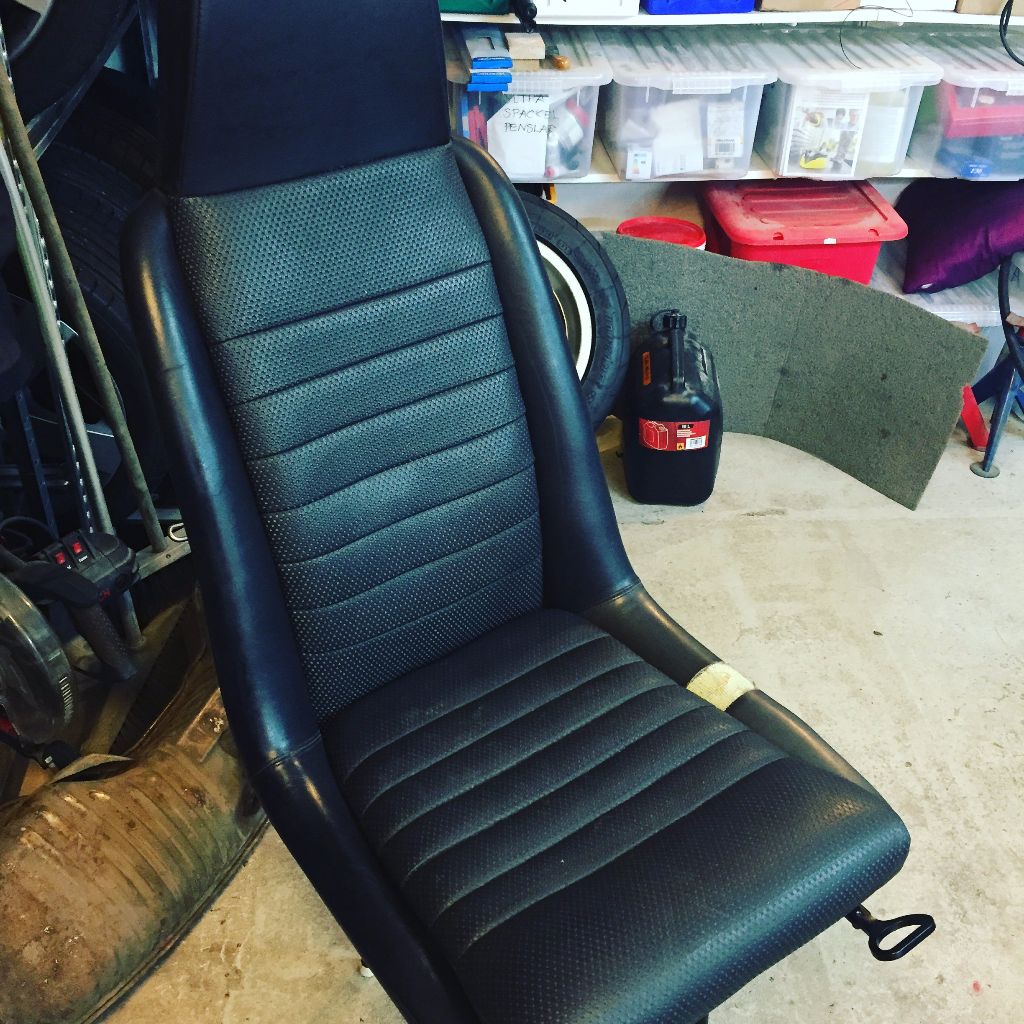
While waiting for the parts to arrive i cleaned up the seats. They need to be recovered eventually but for now the California patinated cracked and torn vinyl will have to do. This passenger seat is the better of the two.
I also cadded up some baseplates for the new velocity stacks and had them lasercut at work. A good friend of mine got them welded up tonight.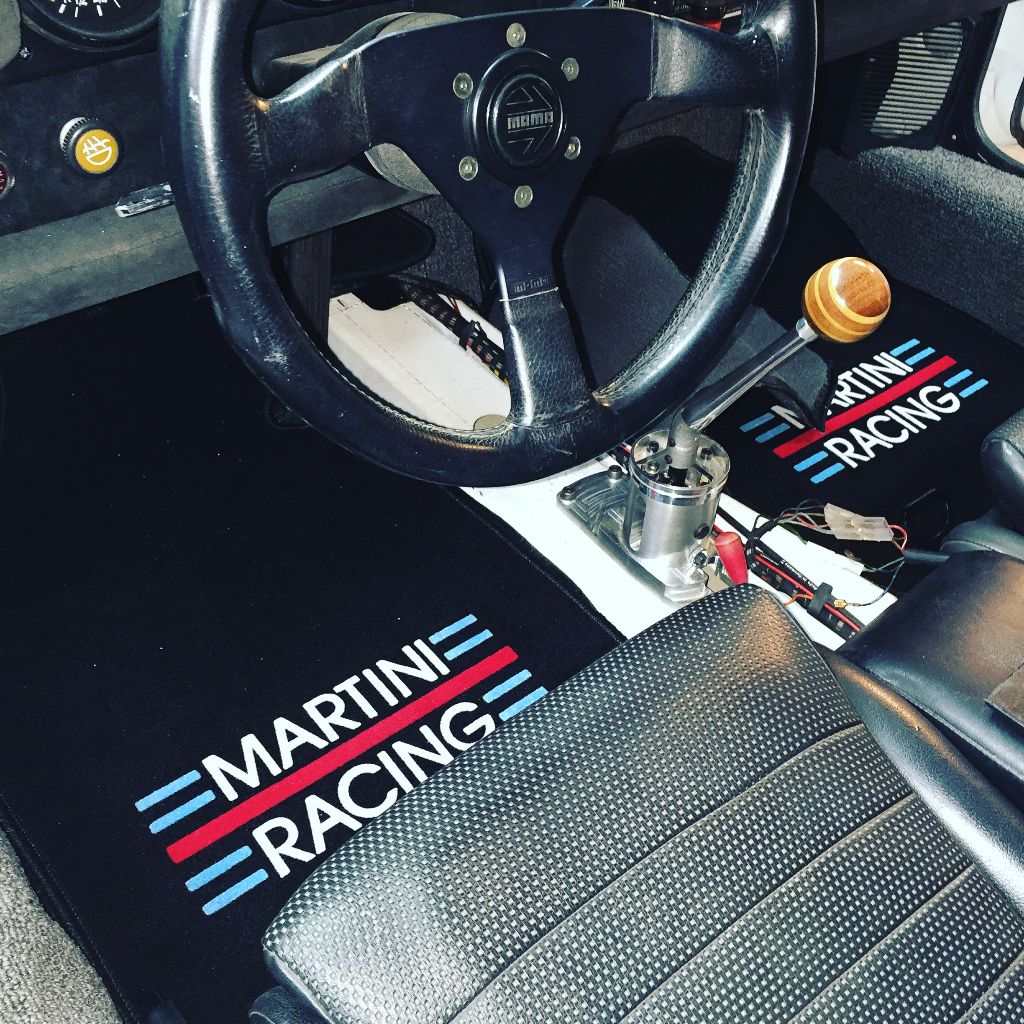
For my birthday earlier this week I also had a package arrive that I ordered about a month ago. Two custom front mats with the Martini Racing colours.
Posted by: thieuster Feb 11 2016, 05:36 PM
Well, what can I say... Going through all those pages with pic, I can only conclude that we share one thing: same sort of plastic storage boxes on the shelf...
Kidding aside: I think that you Martini Racing 914 is by far the nicest of the bunch. Keep those pics coming!
Menno
Posted by: g60pops Feb 11 2016, 07:24 PM
Are the Martini logo floor mats off ebay? If yes, how is the quality?
Posted by: falcor75 Feb 12 2016, 12:23 AM
Are the Martini logo floor mats off ebay? If yes, how is the quality?
Yes they're off ebay. Quality seems ok but I'm a Little dissapointed there was no edge binding around the cutouts for the pedals. Time will tell how well they last.
Posted by: falcor75 Feb 13 2016, 10:29 AM
Gearbox back up and the annoying whining noise is gone. Sweet!
Posted by: raynekat Feb 13 2016, 11:21 AM
Gearbox back up and the annoying whining noise is gone. Sweet!
Well done Mats.
Posted by: aircooledtechguy Feb 15 2016, 10:02 AM
It's really coming together nice Mats. I look forard to seeing video of you driving around!!
Posted by: falcor75 Feb 15 2016, 12:25 PM
Thanks Nate, its not far off now but we've gotten snow again so i'll have to wait a little bit more.
Posted by: falcor75 Feb 27 2016, 01:45 PM
After being knocked out with the flu for the past week I finally got some garagetime today. Changed the oil and filter and did some other small jobs. Then I just couldnt wait any longer.... and down it came. I love how small and nible it becomes when its back on the ground. Now spring needs to hurry up and arrive up here!!
Posted by: falcor75 Mar 1 2016, 11:48 AM
https://www.youtube.com/watch?v=t2cFQvHEeQA
Posted by: mark04usa Mar 1 2016, 12:25 PM
A milestone day for the Martini Racing car!
Posted by: falcor75 Mar 1 2016, 02:57 PM
A milestone day for the Martini Racing car!Thanks Mark! its sure was a huge motivational boost.
Posted by: DavidSweden Mar 1 2016, 03:35 PM
Congratulations Mats
The car looks and sounds great
Posted by: falcor75 Mar 2 2016, 02:46 AM
Congratulations Mats
The car looks and sounds great
Thanks David! We'll have to do a photoshoot once the weather is a little nicer.
I had a cm of snow outside this morning as punishment for the nerve to take the car out of the garage...
Posted by: CatDaddy60 Mar 2 2016, 04:18 AM
Way to go I really like the front valence on your car. It has to feel good to take it even for a short drive after so long.
Posted by: Mueller Mar 2 2016, 10:10 AM
Nice video...congrats!
Posted by: LowBridge Mar 3 2016, 09:43 AM
very nice... super job and congrats on a fantastic milestone
Posted by: falcor75 Mar 4 2016, 09:21 AM
Thanks guys.
Posted by: falcor75 May 9 2016, 10:27 PM
Yesterday was the big dyno day.....and it ended in failure.
https://youtu.be/3PrzYgzsMro
Upp towards 5000 rpm the engine makes a bad noise and then starts puking oil from the righ hand side valve cover.
I've never driven the car that hard before I started the restoration so its all news too me. Any ideas as to what the noise could be?
I had hopes I would be starting to be able to drive my car in a week or so, feeling very deflated at the moment. 
Posted by: 2mAn May 10 2016, 12:14 AM
dammit! I was so excited and was just hoping the disappointment was because you didnt make as much power. Hope its nothing too troubling
Posted by: veekry9 May 10 2016, 12:17 AM
Overfill?
Crankcase vent?
Posted by: falcor75 May 10 2016, 01:38 PM
It wasnt overfilled, had the oil level at the top mark.
Pulled the plugs and they look ok to me.
https://www.dropbox.com/s/bu05qkitwwhod ... 0.jpg?dl=0
Cylinder 1 to the left and 4 to the right.
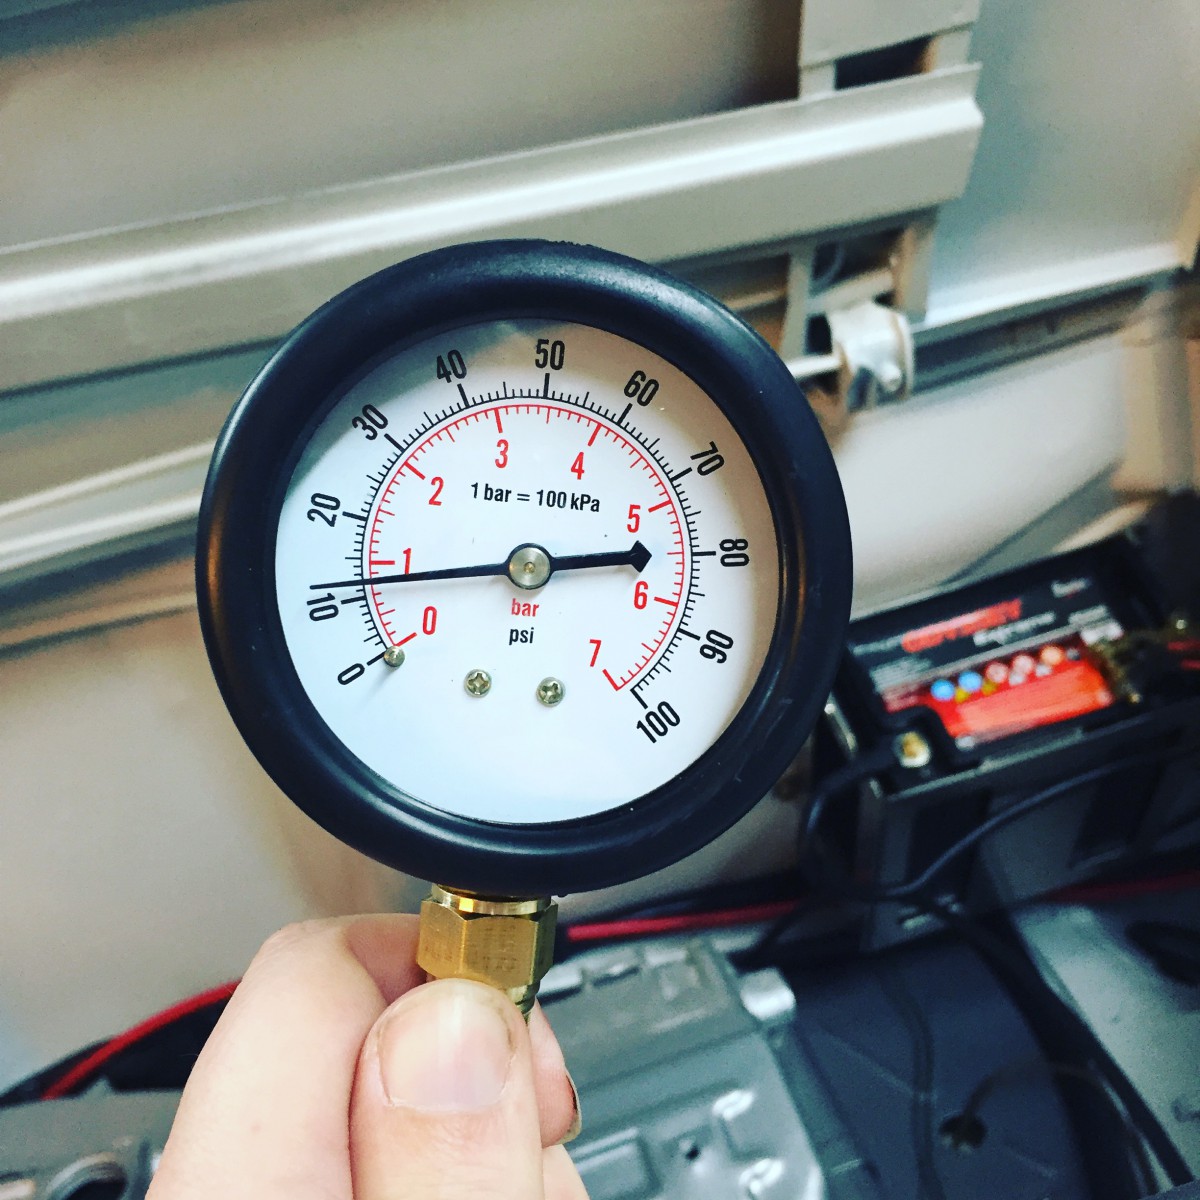
Did a compression test and got some varying results: 8,5/10/8/10,5.
Average value of 9,25 +/- 10% on that would give the range 8,3-10,2 so slightly outside of a 10% variation.
Posted by: porschetub May 10 2016, 02:07 PM
It wasnt overfilled, had the oil level at the top mark.
Pulled the plugs and they look ok to me.
https://www.dropbox.com/s/bu05qkitwwhod ... 0.jpg?dl=0
Cylinder 1 to the left and 4 to the right.
Did a compression test and got some varying results: 8,5/10/8/10,5.
Average value of 9,25 +/- 10% on that would give the range 8,3-10,2 so slightly outside of a 10% variation.
Had you "run" the engine in before the dyno attempt?
Posted by: falcor75 May 10 2016, 02:29 PM
It wasnt overfilled, had the oil level at the top mark.
Pulled the plugs and they look ok to me.
https://www.dropbox.com/s/bu05qkitwwhod ... 0.jpg?dl=0
Cylinder 1 to the left and 4 to the right.
Did a compression test and got some varying results: 8,5/10/8/10,5.
Average value of 9,25 +/- 10% on that would give the range 8,3-10,2 so slightly outside of a 10% variation.
Had you "run" the engine in before the dyno attempt?
No because I havnt done anything to the engine.
Posted by: Puebloswatcop May 10 2016, 02:45 PM
It's hard to tell from the video as my speakers suck, but it almost sounds like a valve issue. I was watching your first drive video and since it was in March it looks like the emissions from the exhaust pipe was just steam and I didn't here the horrible sound. Do you still have sound after the dyno run? Not sure on these little engines (but in a V8) I would certainly consider that you may have floated a valve.
Good luck and keep us posted. Hope it isn't all that serious. I have been following your build and the car is beautiful....It would be a real shame to have to do a complete engine.
Posted by: DavidSweden May 10 2016, 03:14 PM
Sorry to hear you have engine problem, lets hope it can be easily fixed
Posted by: porschetub May 10 2016, 05:43 PM
It wasnt overfilled, had the oil level at the top mark.
Pulled the plugs and they look ok to me.
https://www.dropbox.com/s/bu05qkitwwhod ... 0.jpg?dl=0
Cylinder 1 to the left and 4 to the right.
Did a compression test and got some varying results: 8,5/10/8/10,5.
Average value of 9,25 +/- 10% on that would give the range 8,3-10,2 so slightly outside of a 10% variation.
Had you "run" the engine in before the dyno attempt?
No because I havnt done anything to the engine.
Sorry assumed you had overhauled it,backtracking I found this wasn't so.
Puebloswatcop made a good point on valve float,hell it could be a broken or weak valve spring,did the noise sound like a clatter and did it subside after the RPM dropped?.
Hope you find a relatively easy solution.
Posted by: falcor75 May 10 2016, 10:25 PM
It wasnt overfilled, had the oil level at the top mark.
Pulled the plugs and they look ok to me.
https://www.dropbox.com/s/bu05qkitwwhod ... 0.jpg?dl=0
Cylinder 1 to the left and 4 to the right.
Did a compression test and got some varying results: 8,5/10/8/10,5.
Average value of 9,25 +/- 10% on that would give the range 8,3-10,2 so slightly outside of a 10% variation.
Had you "run" the engine in before the dyno attempt?
No because I havnt done anything to the engine.
Sorry assumed you had overhauled it,backtracking I found this wasn't so.
Puebloswatcop made a good point on valve float,hell it could be a broken or weak valve spring,did the noise sound like a clatter and did it subside after the RPM dropped?.
Hope you find a relatively easy solution.
Yes the noise did go away again when the rpms went down. My driveway is uphill so I had to start the car up to get it back inside when I got home from the dyno and it started up as normal with no unusual sounds.
Posted by: Puebloswatcop May 11 2016, 07:06 AM
You may have a weak valve spring which at high RPM is floating a valve. I would do another compression check though and see what that comes out to. Definately don't want to drive it hard until you can track down the problem, if you drive it at all.
Have the valves been adjusted to be sure they are correct? Sorry, without being there to actually hear the sound it is making it is hard to nail down what it might be, so I am just throwing out ideas.
Good Luck
Posted by: Puebloswatcop May 16 2016, 08:25 PM
Any update on your unfortunate engine issue? 
Posted by: falcor75 May 16 2016, 11:22 PM
Havnt had much garagetime but I've pulled the engine tins and measured the compression again with slightly better results now that I can see what I'm doing. Going to borrow a leakdown gauge and check that too. I've checked the valve clearances and they are ok. Oil was fine, no particles of any kind in it. Changed the valve cover gaskets. Found that the shrink wrap on my spark plug temp senders had melted so I've ordered new ones with a better spec.
Posted by: falcor75 May 18 2016, 10:32 AM
Well that was fun.....
Just did a leakdown test, it should be done with the engine warm but that wasnt an option at the moment.
Cylinder 1: 15% - most of the air going into the crank case
Cylinder 2: 11% - most of the air going into the crank case
Cylinder 3: 40% - most of the air passing the inlet valve
Cylinder 4: 13% - most of the air going into the crank case
Now spot the offender..... 
Posted by: Puebloswatcop May 22 2016, 03:16 PM
Well that was fun.....
Just did a leakdown test, it should be done with the engine warm but that wasnt an option at the moment.
Cylinder 1: 15% - most of the air going into the crank case
Cylinder 2: 11% - most of the air going into the crank case
Cylinder 3: 40% - most of the air passing the inlet valve
Cylinder 4: 13% - most of the air going into the crank case
Now spot the offender.....
Ouch
Posted by: falcor75 May 25 2016, 12:13 AM
When one door slams shut in your face you break out the wallet and smash down a wall.....
Engine is out of the car, heads are off, cant see anything wrong with them.
So screw this....I'm going big!
Posted by: r_towle May 25 2016, 12:24 AM
Six?
Big four?
Subaru?
Chevy?
Other?
Posted by: falcor75 May 25 2016, 10:57 PM
Big four.
Posted by: raynekat May 26 2016, 02:17 AM
Big four.
It will be great Mats.
Hang in there....
Posted by: falcor75 May 26 2016, 02:41 AM
Thanks Rayne...I figured that if I did a top end overhaul I'd still have a bottom end that I had no idea of the condition of. So...breaking out my spare 1.7 and sending it off to get a bit bigger. 2-3 months waiting time tho so this summer is sadly quite screwed.
Oh well there's Always beer...
Posted by: falcor75 Jun 10 2016, 04:19 AM
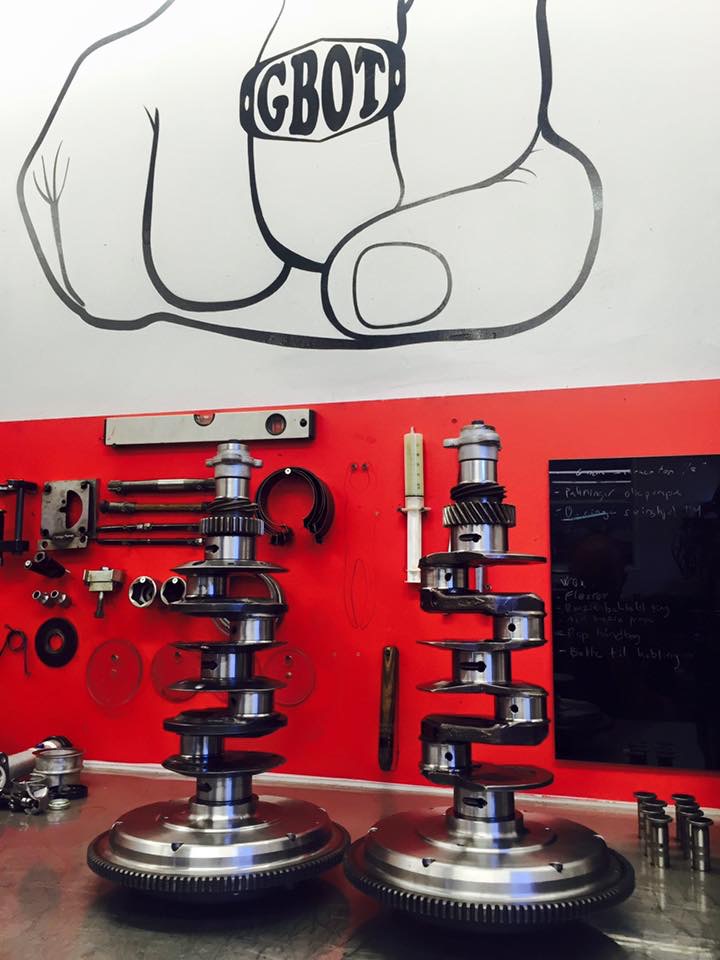
Oh yeah, one of these will go into my Engine...probably the right hand one
(Photo Jacob Spring @ GBOT)
Posted by: 76-914 Jun 10 2016, 06:14 PM
Sorry about the leak down results, Matt. 40% is huge. I'm surprised it didn't reveal itself once the heads were off. Was the head making good contact with that jug? Even if you dropped a ring or spaced them wrong I wouldn't expect 40% leak down! Regardless, good luck with your new build and do let us know what you find wrong with the old one. Kent
Posted by: falcor75 Jul 10 2016, 11:57 AM
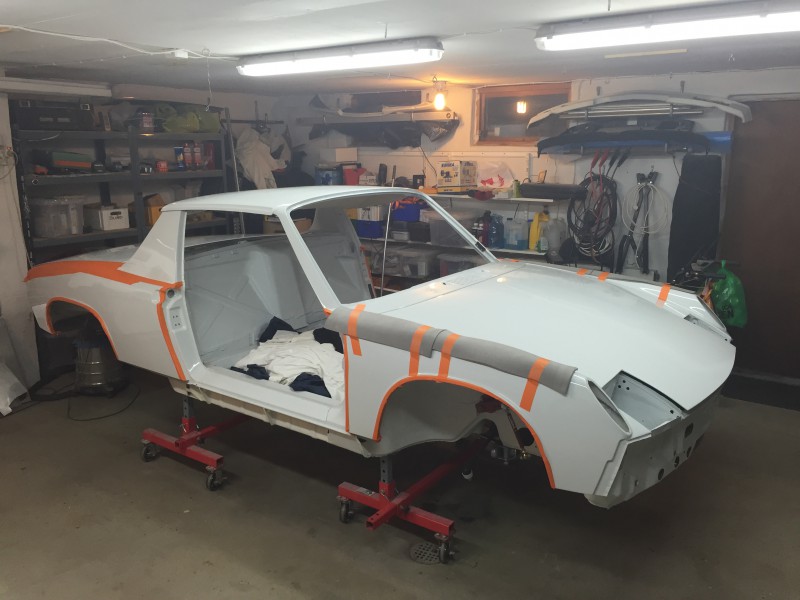
Well while the engine is still being built my mate Pontus and I decided to tackle the paint.
First polish and wax since it was painted about 18 months ago. What a difference it made! The downside of the polishing is that all the imperfections in the paint are much easier to spot and there are a few....
First pass was made using a fine medium-fine pad and a coarse compound, seconds pass using a fine pad and fine compund. All of the Rupes brand including the machine. Good stuff!
Posted by: falcor75 Jul 20 2016, 11:31 PM
While I'm waiting for the motor to be done I'm fixing small issues...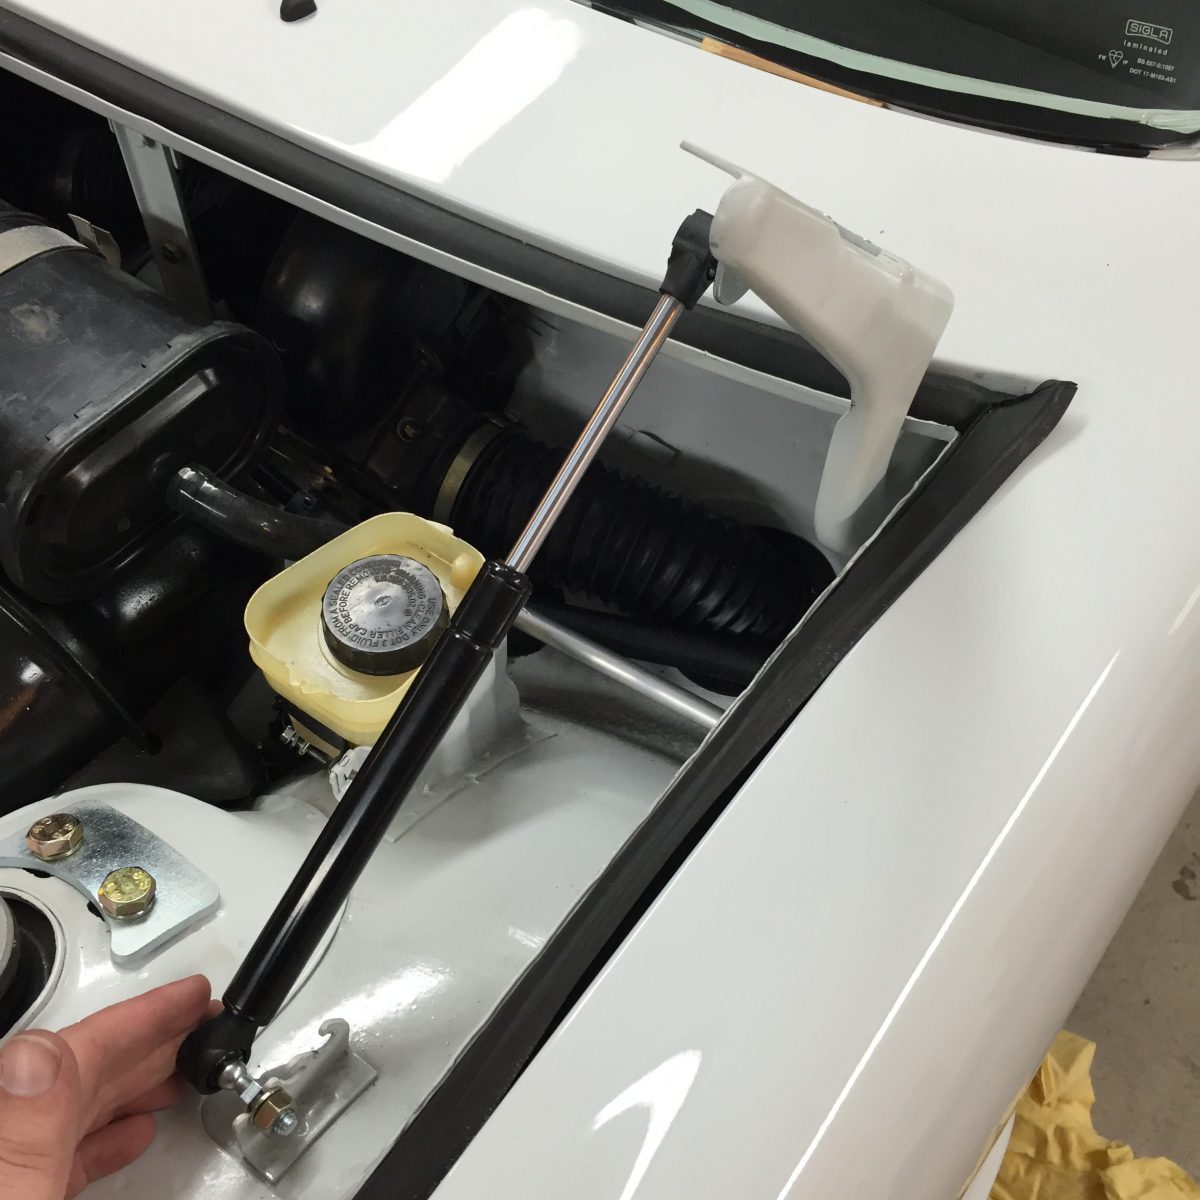
The light weight front hood kit I bought from Camp914 has never been working properly, the struts were too weak to hold the hood up so I finally got tired of it and set to fixing it.
Moving the hinge bracket to this location gives it a much better angle to hold the hood up. Drilled new holes and mounted the bracket with M5 countersunk screws and nyloc nuts.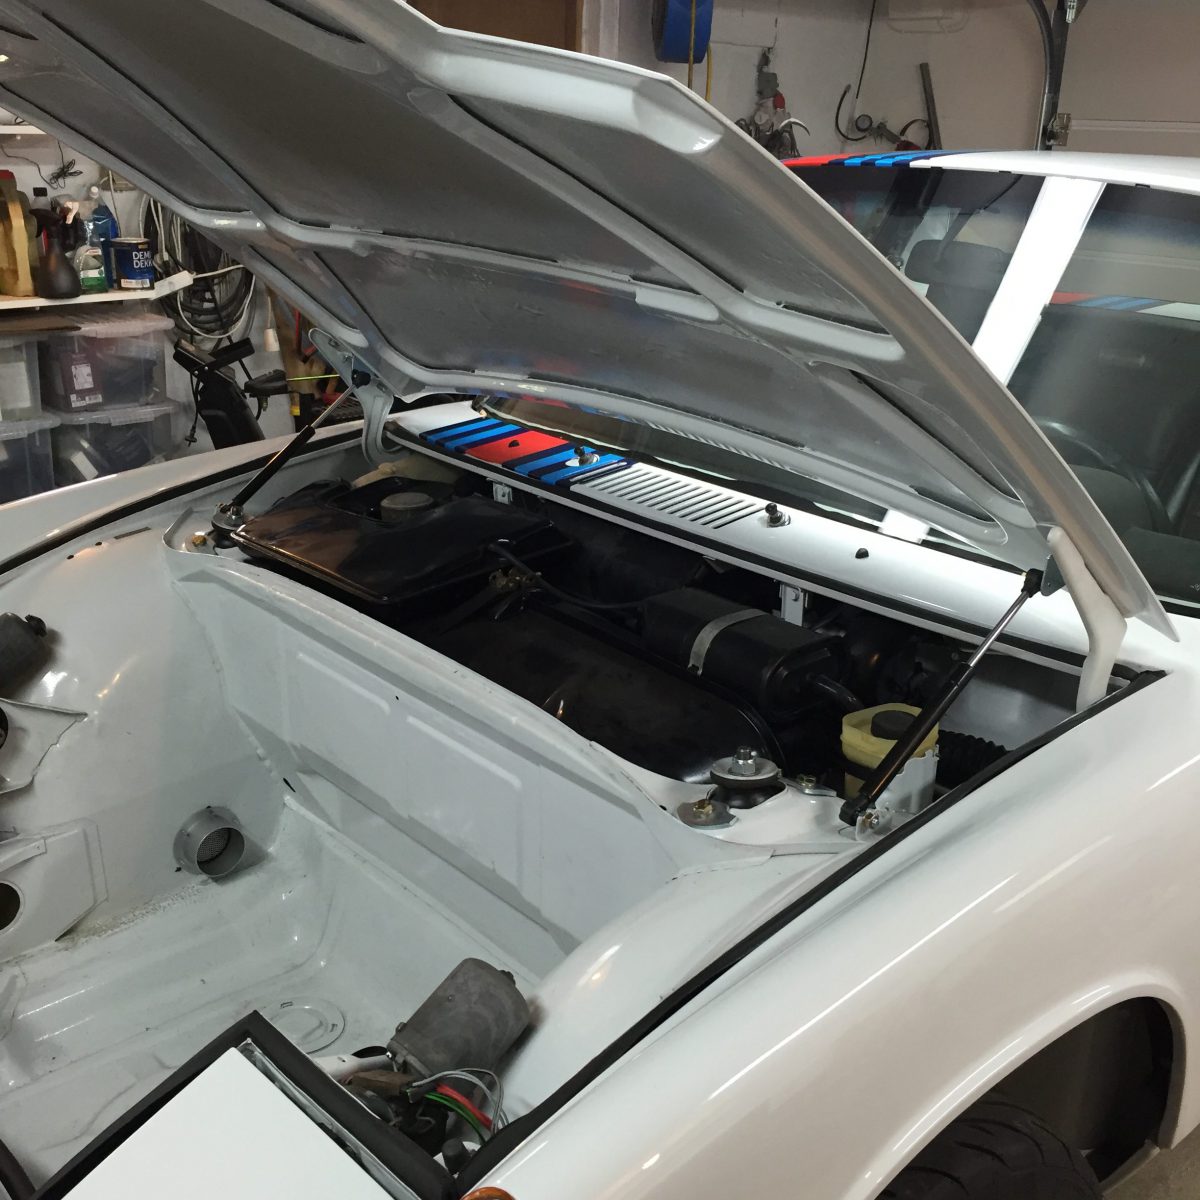
Tadaa! No more shamefull broomshaft to hold the hood up. 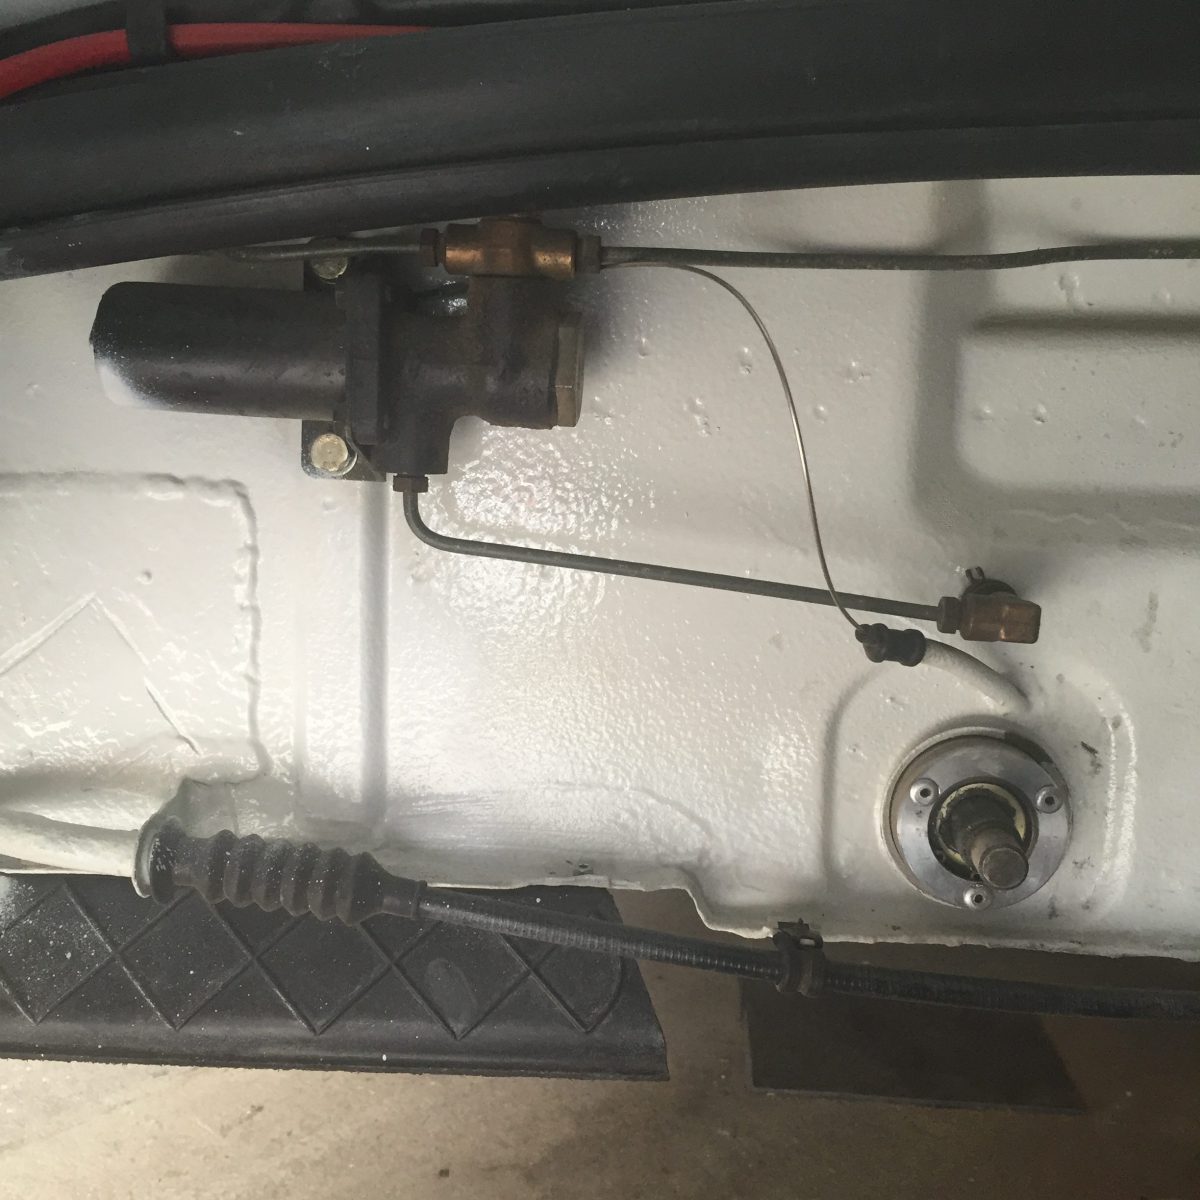
Another thing thats been bugging me is the brake pedal feel. I suspected I hadnt gotten all the air out of the brake pressure valve.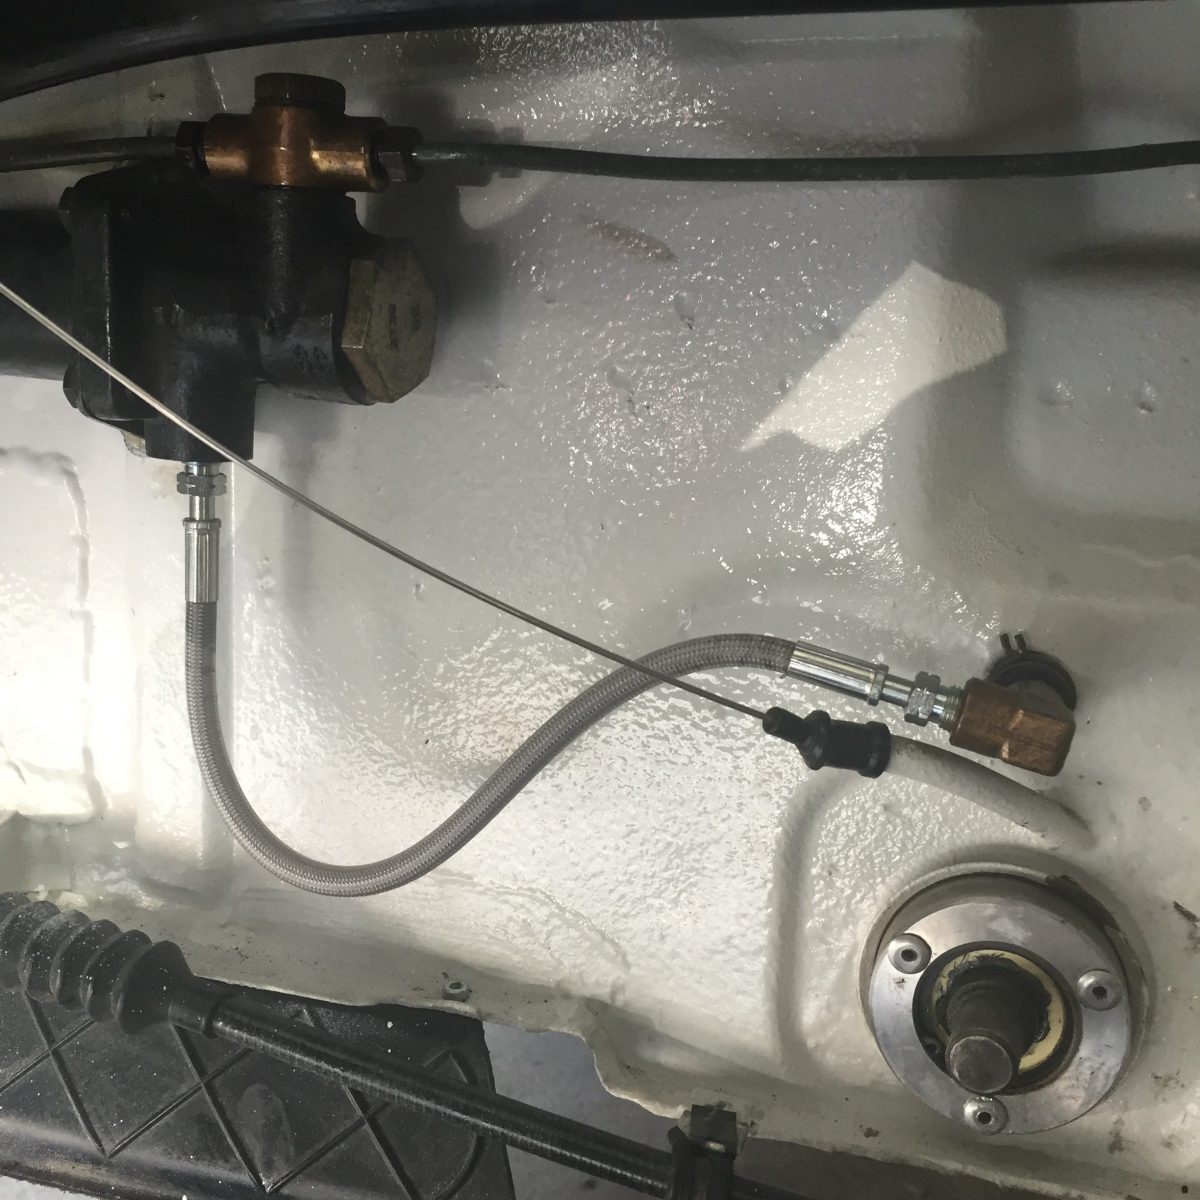
One 12 inch steel braided brake hose with male M10x1 in each end later and I can bleed the valve easily with two M10 bleed nipples on it, remount it on the firewall, reattach the hardlines and then bleed the rear calipers as normal. For apparent reasons I havnt driven the car yet but the pedal feels firmer.
195/55-15 on a 7x15 rim is a bit wide for the front trunk board to fit in place. 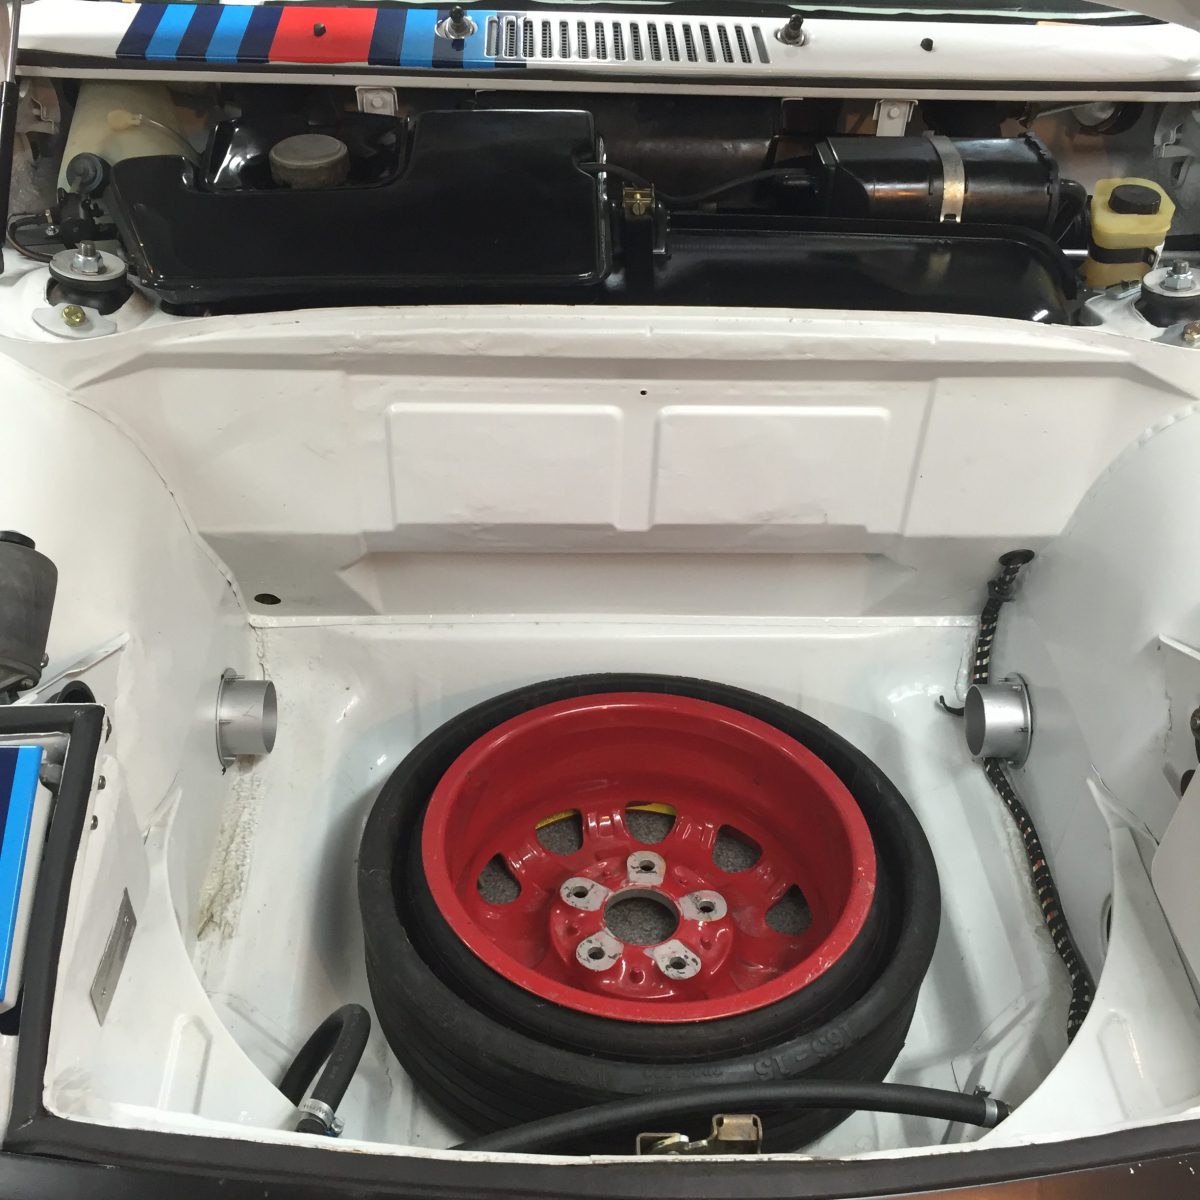
Spare wheel from a 944 will have to do.
And a small side project for my garage as SWD didnt want it in the livingroom.
Posted by: falcor75 Jul 22 2016, 11:54 AM
New parts from 914rubber arrived today, the new front trunk seal, heater valve hoses, raintray hoses, trunk targa cups and the door jamb vents.
Fit and finish was perfect. Good job Mark!
Posted by: barrym Jul 23 2016, 02:47 AM
could you measure the gas struts and see what the writing on the side says for how many kilos its supposed to hold please ?
Posted by: Cairo94507 Jul 23 2016, 06:47 AM
Way to go. Nice to knock off items like that. Car is looking very nice.
Posted by: falcor75 Jul 23 2016, 10:01 AM
could you measure the gas struts and see what the writing on the side says for how many kilos its supposed to hold please ?
The strut is 30 cm extended and 20,5 compressed. Theres no text on it at all but when compressed and held against a bathroom scale is shows 8,5 kg's.
Posted by: falcor75 Aug 11 2016, 11:26 AM
https://www.facebook.com/170137546413331/videos/1102990469794696/
New engine was started and run in today by the engine builder.
Posted by: raynekat Aug 11 2016, 11:28 AM
Nice "recovery" Mats from your previous bad luck with the engine. Sounds great!
Posted by: 2mAn Aug 11 2016, 04:44 PM
those little touches go VERY far on older cars! How big is this big four going to be?
Posted by: falcor75 Aug 12 2016, 12:19 AM
It's a 78 stroke and 96 bore so 2276. Should give at least 150 hp.
Posted by: SixerJ Aug 12 2016, 12:56 AM
Looking forward to more pics and details 
Posted by: falcor75 Aug 12 2016, 10:06 AM
Looking forward to more pics and details
The specs from what I remember:
DPR 78 mm crank,
Web 86b/c cam with new lifters
H-beam rods with ARP bolts.
Keith Black pistons
Bored stock 2.0 cylinders.
New flywheel with Kennedy pressureplate and clutch
Cr-Mo Pushrods
1700 heads welded and machined to 2.0 914 spec + porting + all new hardware.
Posted by: falcor75 Aug 19 2016, 12:37 PM
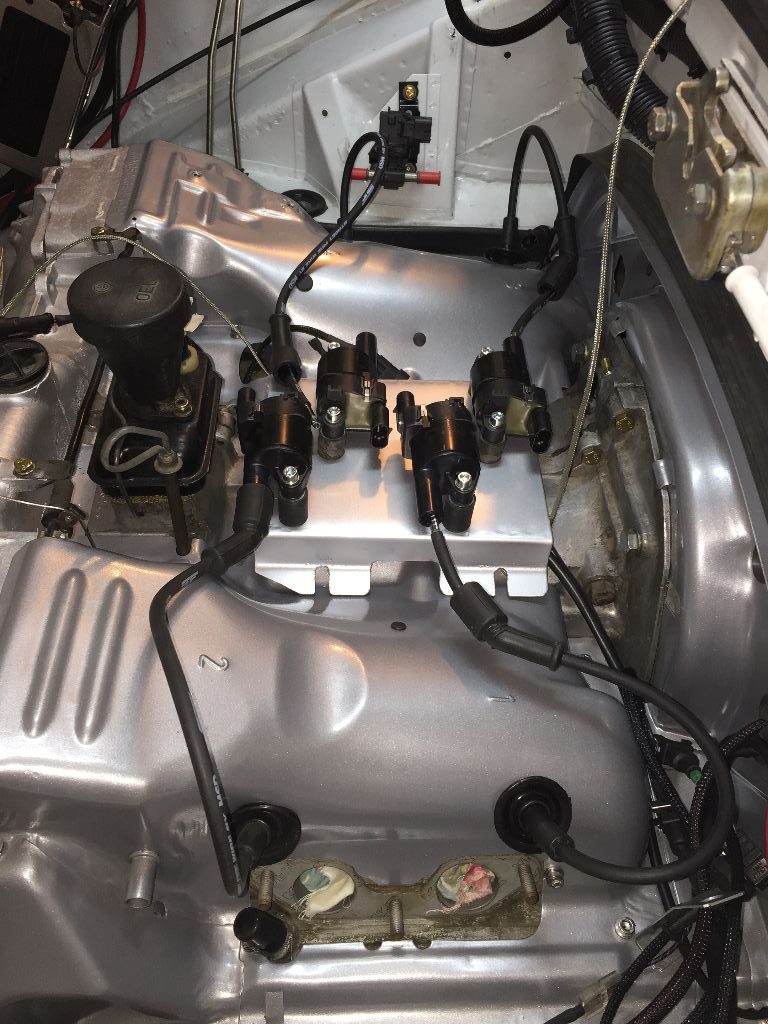
Previously I had the ignition coils mounted on an aluminium bracket sitting ontop of the engine. But I didnt like the cluttered look of it with all the connectors attached.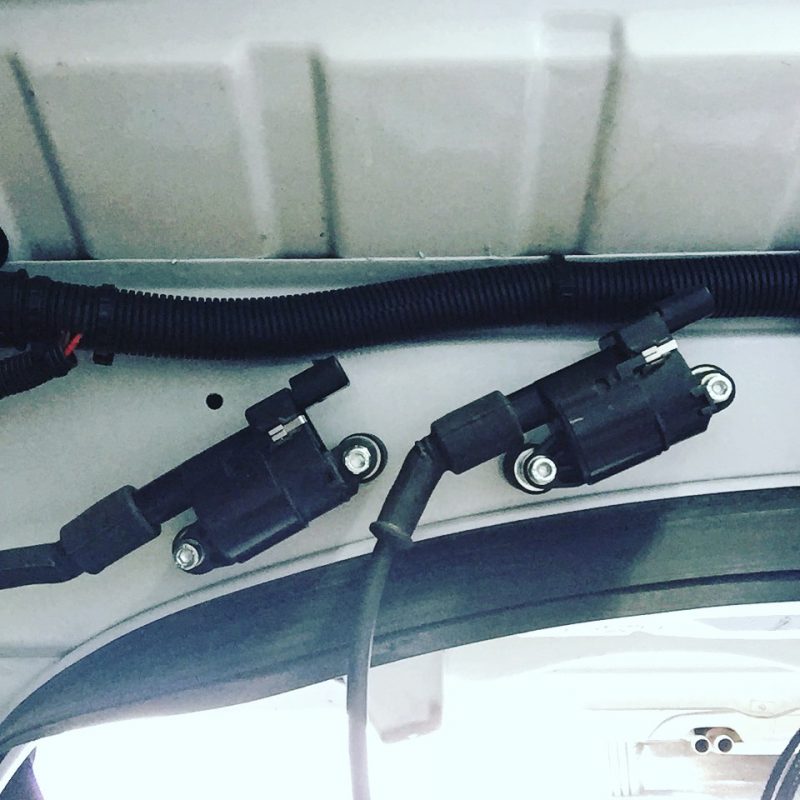
So now I'm mounting the coils on the rear wall of the engine bay. Using aluminium M6 rivnuts to attach the coils to the sheet metal.
Posted by: jd74914 Aug 19 2016, 01:03 PM
That look is better!
Are you mapping for ethanol content changes? It looks like you have a Continental flex fuel sensor mounted on the suspension console.
Posted by: falcor75 Aug 19 2016, 02:49 PM
That look is better!
Are you mapping for ethanol content changes? It looks like you have a Continental flex fuel sensor mounted on the suspension console.
Yes its an ethanol sensor but to start with I will be running straight 98/99 octane premium fuel in the newly built engine so while the sensor is fully wired up to my ECU its readings will not be used in the fuel map.
Posted by: barrym Aug 20 2016, 01:16 AM
could you measure the gas struts and see what the writing on the side says for how many kilos its supposed to hold please ?
The strut is 30 cm extended and 20,5 compressed. Theres no text on it at all but when compressed and held against a bathroom scale is shows 8,5 kg's.
thankyou !!!!
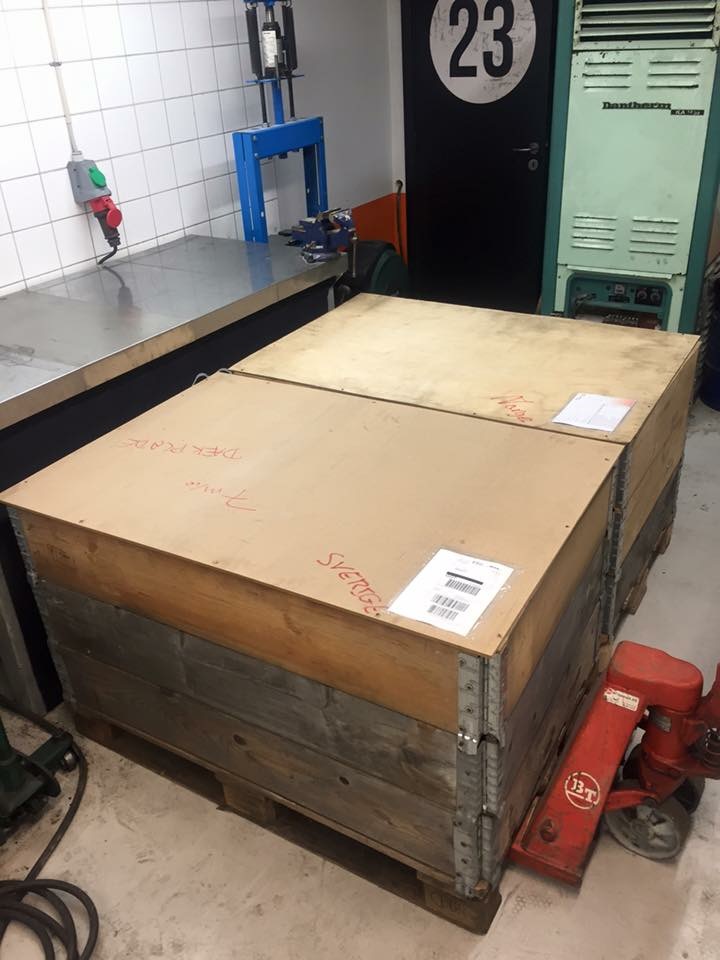
Posted by: falcor75 Aug 31 2016, 02:55 AM
Almost crate opening time!
Posted by: 76-914 Aug 31 2016, 08:07 AM
Almost crate opening time!
Now that's the proper way to ship an engine! Someone can see the light at the end of the tunnel.
Posted by: Claus Graf Aug 31 2016, 08:38 PM
Good work!
Posted by: falcor75 Sep 20 2016, 10:43 AM
Well as some of you know I've had issues with how my 2270 engine was built so today it was sent back to the builder to be fixed. But here's some nice pics from this spring when I drove around the block with the stock 2.0 for the first time with all the panels on, the only thing missing is the doorcards. 
Also got Spokes front LED in white/amber waiting to go on but I'll wait with mounting those untill the car has been inspected and passed the "mot" test.
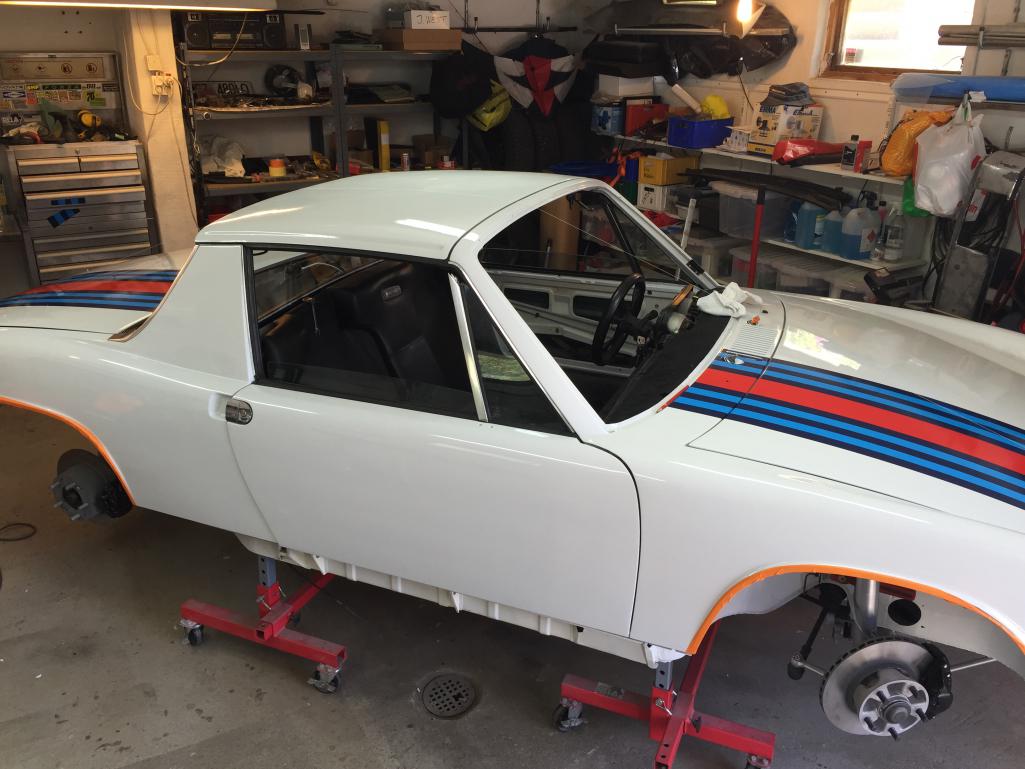
Posted by: 76-914 Sep 20 2016, 10:57 AM
Looks great! Ant wait to find out what the builder discovers.
Posted by: raynekat Sep 20 2016, 11:17 AM
Car absolutely looks great.
The stripes really work with the white background and lack of badging on the car.
Once you get that engine finished up and installed, you'll be "back in business" again.
Keep up the great work Mats!
Posted by: falcor75 Sep 20 2016, 11:27 PM
Looks great! Ant wait to find out what the builder discovers.
Hopefully he wont discover much of anything. He finished building the engine only 3 weeks ago. But he built it with 5.6" rods without telling me that would make the engine 15 mm's wider than stock, he also didnt use my donor 1.7 case and instead used a buss case which I wasnt too thrilled about. He's been understanding to my disapointment and will take the engine back to install 5.4" rods and use the case I sent him.
So I'll have to wait a bit longer but in the end it will be worth it.
Posted by: falcor75 Nov 27 2016, 02:18 PM
Engine is back!
Gearbox was happy to see engine back in the garage...
I'm happy to see them both back in the car.
Posted by: Frankvw Nov 28 2016, 12:26 AM
Good to see you have the engine, Mats. All worked out fine ?
Posted by: falcor75 Nov 28 2016, 01:47 AM
Good to see you have the engine, Mats. All worked out fine ?
...ummm....yeah.... At least I have the engine how I wanted it now.
Posted by: falcor75 Jan 7 2017, 01:43 PM
https://youtu.be/fPetao_syGY
Today we made some noise and got the idle and low revs tuning set up good enough to ba able to put it onto a trailer and eventually take it to the tuners.
Need to check the #3 cylinder temp sensor because it wasnt following the #1 cylinder sensor at all temperature wise....
Posted by: Frankvw Jan 7 2017, 02:34 PM
Hey Mats, happy new year to you. Good to see this small video. That exhaust sounds good !
Posted by: falcor75 Jan 7 2017, 03:45 PM
Hey Mats, happy new year to you. Good to see this small video. That exhaust sounds good !
Thank you Frank, it sure does....cant wait to hear it do more than 2000 rpm, at 2000 it will have almost another 5k to go before the revlimiter cuts in.
Posted by: Maltese Falcon Jan 7 2017, 05:13 PM
Amazing T4 build and perfect Livery...now in the mood for a martini/ Grey goose please
Posted by: falcor75 Jan 8 2017, 08:26 AM
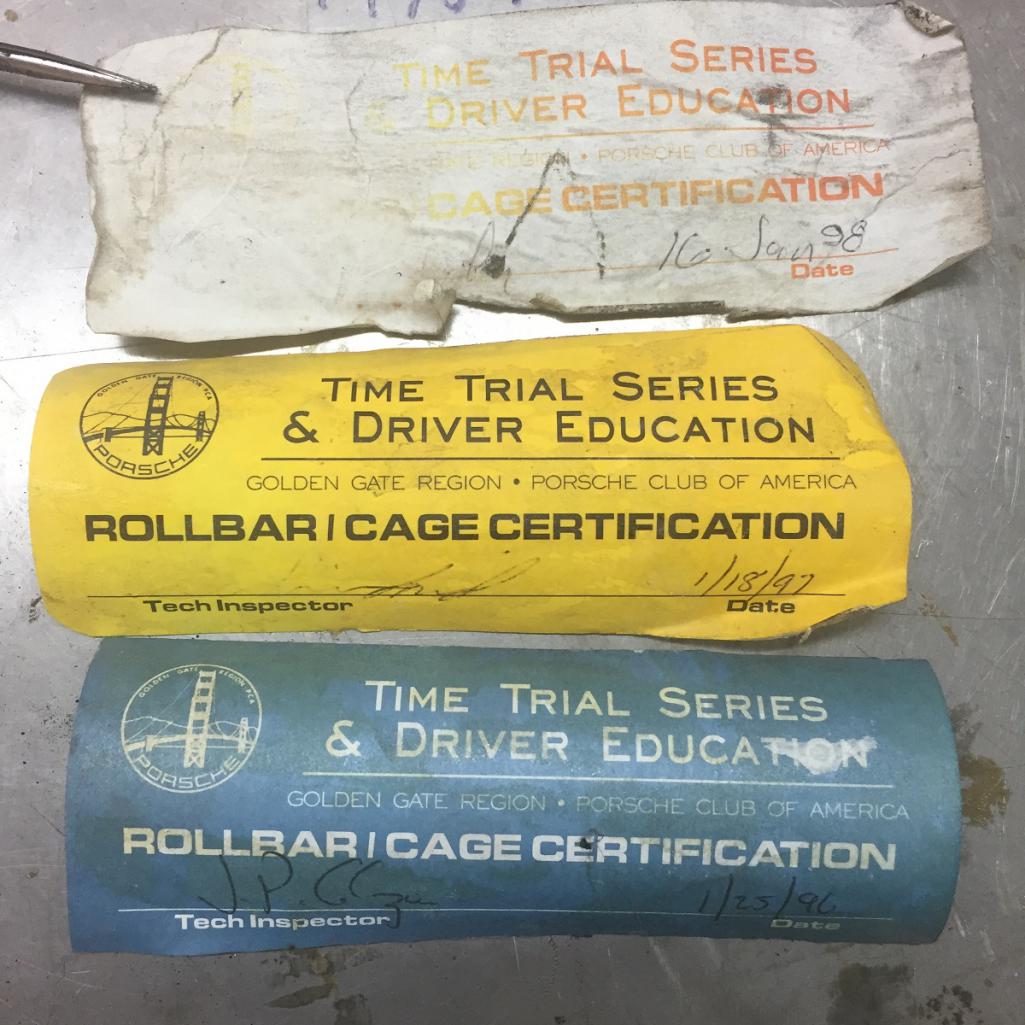
Would that be shaken or stirred Sir?
I've pulled the old roll bar out to try to get it ready for blasting and powdercoat but first
I rescued these old tech inspection labels from it. 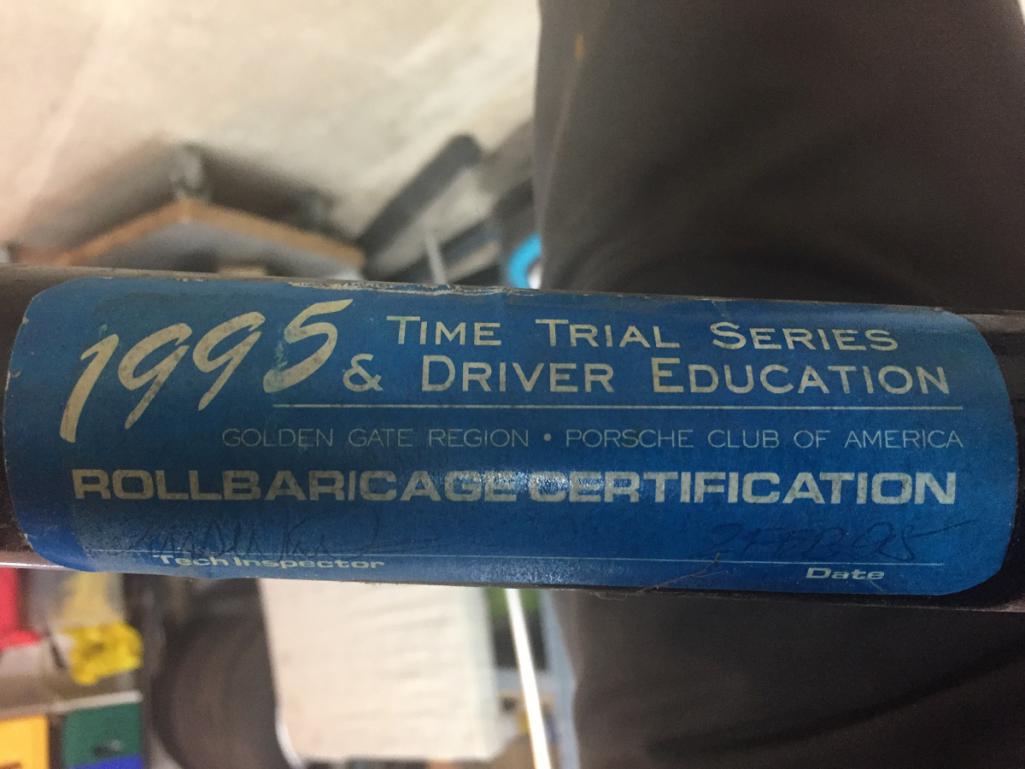
Posted by: Puebloswatcop Jan 8 2017, 10:15 AM
https://youtu.be/fPetao_syGY
Today we made some noise and got the idle and low revs tuning set up good enough to ba able to put it onto a trailer and eventually take it to the tuners.
Need to check the #3 cylinder temp sensor because it wasnt following the #1 cylinder sensor at all temperature wise....
Now that is music to the ears
Posted by: 914_teener Jan 8 2017, 11:29 AM
Love the period inspection stickers.
Sorry if this is a repetitive request:
Can you post the details of the induction that you are running?
Thanks!
Posted by: falcor75 Jan 8 2017, 01:00 PM
Love the period inspection stickers.
Sorry if this is a repetitive request:
Can you post the details of the induction that you are running?
Thanks!
Empi Type 4 manifolds
http://www.scatvw.com/intake-manifolds/
40 mm Throttle bodies from http://www.thedubshop.net / http://vwspeedshop.com/
Throttle linkage from Tangerineracing (needs to be modified a bit to fit)
+ whatever airfilters and IDF pattern intake trumpets you feel like using.
Posted by: falcor75 Jan 11 2017, 01:35 AM
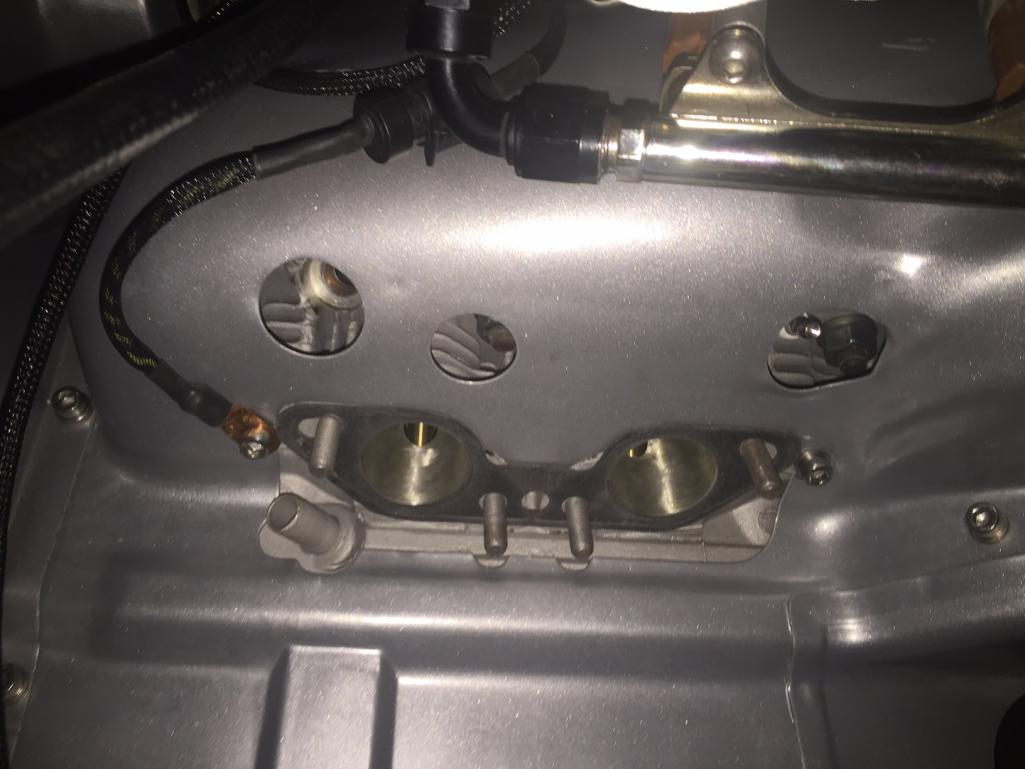
Pulled of the passenger side intake manifold to get the the #3 spark plug.
Removed the culprit temo sensor and I've sent it back to the vendor to hopefully be exchanged. 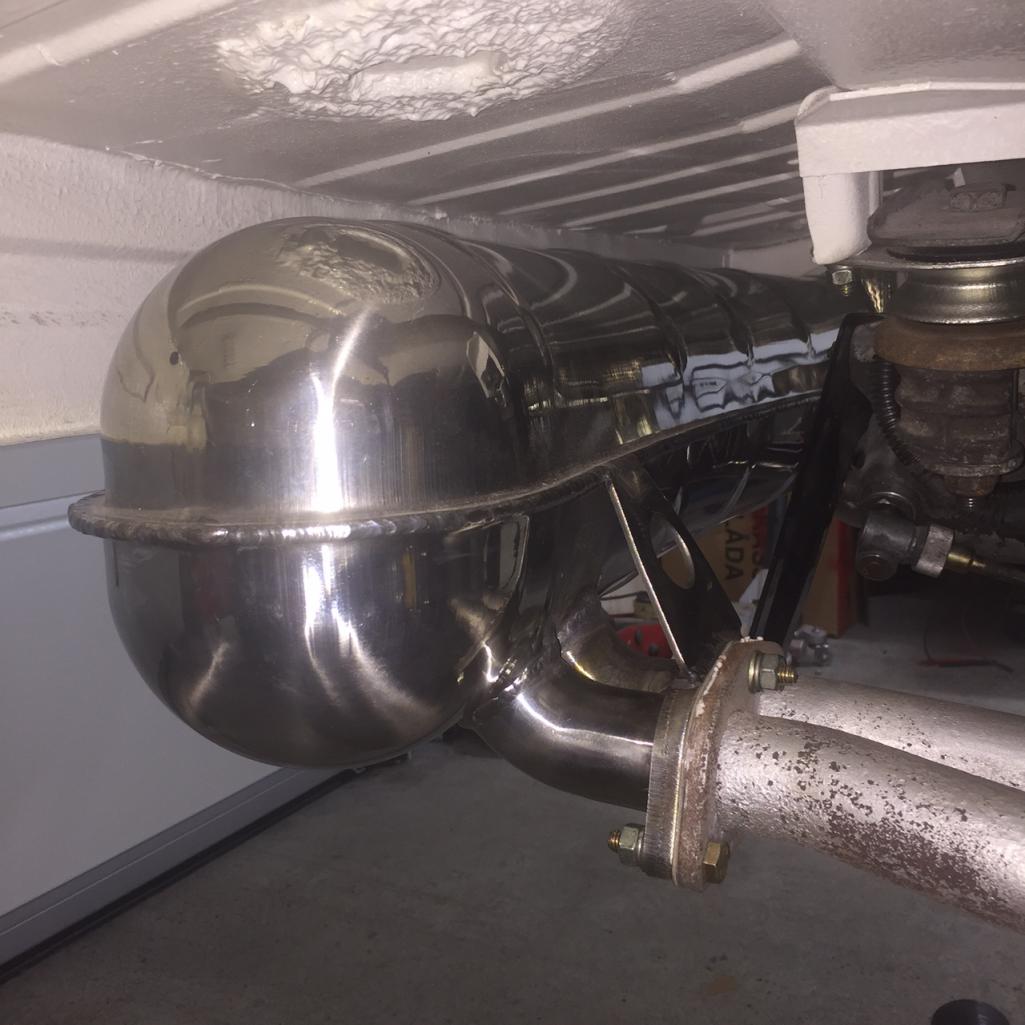
Very happy with the Scart muffler, the fit against the heater boxes was spot on, unlike the old Bursch snake pit that needed alot more effort to put in place.
Posted by: bretth Jan 11 2017, 09:55 AM
Very happy with the Scart muffler, the fit against the heater boxes was spot on, unlike the old Bursch snake pit that needed alot more effort to put in place.
Did you get the Scart Super Sound? Eventually I am getting one for my car. Can't wait to hear a video of it singing.
Brett
Posted by: falcor75 Jan 11 2017, 11:08 AM
Very happy with the Scart muffler, the fit against the heater boxes was spot on, unlike the old Bursch snake pit that needed alot more effort to put in place.
Did you get the Scart Super Sound? Eventually I am getting one for my car. Can't wait to hear a video of it singing.
Brett
Yes I did....
Will be awhile yet for any highrev singing as we still will have 3-4 months of winter to endure.....
Posted by: falcor75 Jan 30 2017, 01:24 PM
Well I got my faulty CHT sensor replaced and this weekend I've been running the engine on low revs and letting it heat up properly to check that both the air flap thermostat and oil cooler thermostat opens as they should. I've also verified that when the ecu sends 0 degrees ignition thats what the engine gets, also checked that the 27 degree mark lines up with the ignition locked to 27 degrees. Also been working on syncing the itb's as best I can with a synchrometer. The resulting airflow ended up at (6) (5) (5.5) (5.5) at 1000 rpm idle.
Over the next few days I'm going to drain the fuel tank to replace it with fresh fuel since the fuel thats in it has been sitting since may last year.
Posted by: Larmo63 Jan 30 2017, 10:33 PM
No heat baffle above the muffler?
Maybe I missed that part of the thread.
Beautiful car!!!
Posted by: falcor75 Jan 30 2017, 11:10 PM
No heat baffle above the muffler?
Maybe I missed that part of the thread.
Beautiful car!!!
Ummm...yeah about that.....

I kinda forgot to put that back.....which I've noticed now as I've been running the engine that the trunk floor gets warm-ish. Got a solution for it tho, will hopefully show it in a day or two.
Posted by: falcor75 Feb 1 2017, 01:39 PM
Slowly working thru my pre dyno checklist, draining the old gas from last years dyno attempt and will replace it with fresh fuel. The old fuel I put into the wifeys Saab and then I still had about 25 liters left so I had to call a friend over to put those in his car since I had no place else to put it.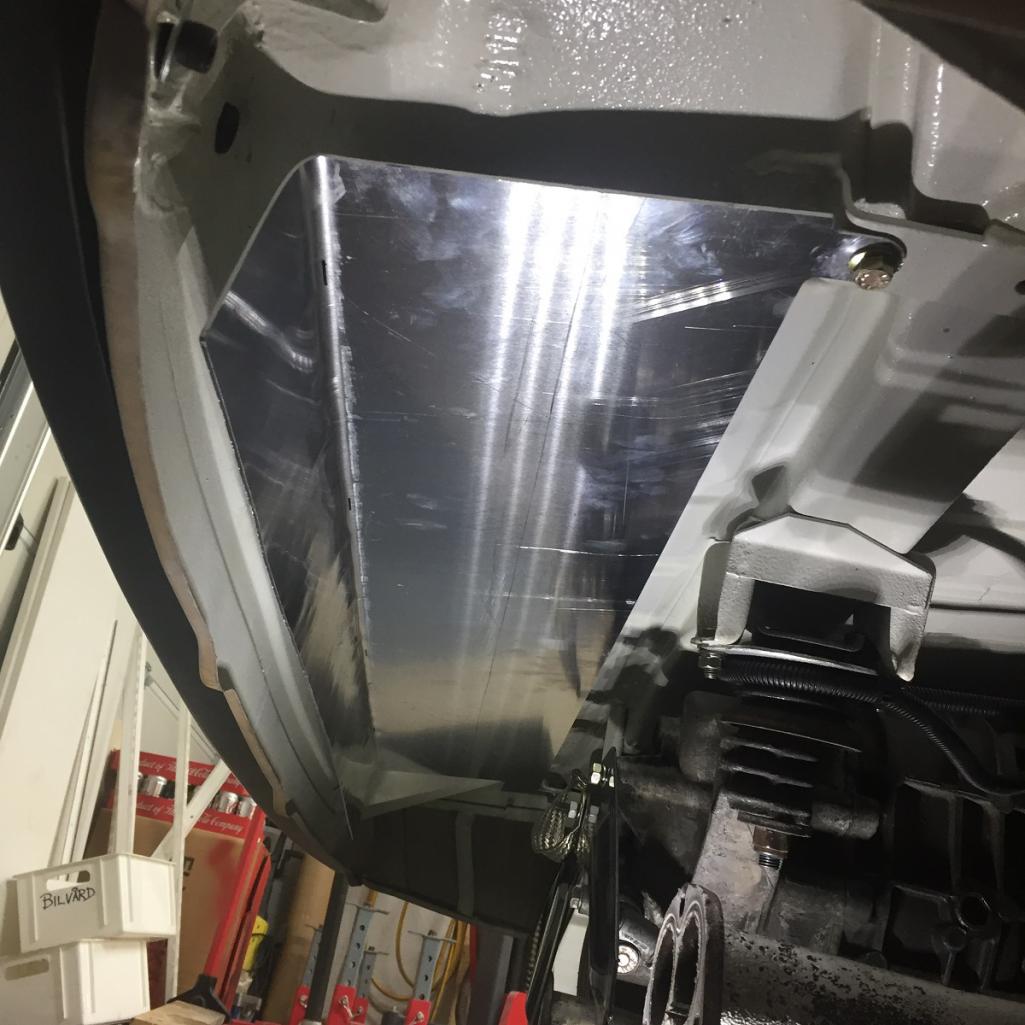
Then onto the issue with the missing heat shield. I took a few measurements and drew one up in Solidworks, bought some 2 mm sheet of aluminium and then bribed the laser boys at work that cut the shape for me. Did the bend myself at home between two screwed together 2x4's. Using the rear sway bar holes as mounting points Then I will also add a couple of connections to the lower bumper mounting bolts aswell to keep it from rattling around.
Posted by: jim_hoyland Feb 1 2017, 07:20 PM
I see the Scart mufflers are made in France: are they available as one in the USA ?
And, beautiful build, thanks for sharing.
Posted by: mepstein Feb 1 2017, 08:45 PM
Slowly working thru my pre dyno checklist, draining the old gas from last years dyno attempt and will replace it with fresh fuel. The old fuel I put into the wifeys Saab and then I still had about 25 liters left so I had to call a friend over to put those in his car since I had no place else to put it.
Then onto the issue with the missing heat shield. I took a few measurements and drew one up in Solidworks, bought some 2 mm sheet of aluminium and then bribed the laser boys at work that cut the shape for me. Did the bend myself at home between two screwed together 2x4's. Using the rear sway bar holes as mounting points Then I will also add a couple of connections to the lower bumper mounting bolts aswell to keep it from rattling around.
Looks good!
Posted by: RobW Feb 1 2017, 08:52 PM
Looks really good. I was a part of LPR and GGR back in the day. Don't remember this car, but there were many back then.... Great to see it your hands.
Posted by: falcor75 Feb 3 2017, 12:03 AM
Question: Should I paint the heat shield silver (high temp paint) or keep it bare aluminium?
Posted by: Dave_Darling Feb 3 2017, 01:21 AM
Bare is easiest. It shouldn't corrode, and even high-temp paint isn't perfect.
--DD
Posted by: falcor75 Feb 6 2017, 11:45 PM
Whooohoo ! I won a €500 Euro gift certifiqate to one of the local Tools/garage equipement shops for being voted "Project of the month". Will use it towards a new Tig welder. Perfect in time for my birthday.
Posted by: jd74914 Feb 7 2017, 12:35 PM
Whooohoo ! I won a €500 Euro gift certifiqate to one of the local Tools/garage equipement shops for being voted "Project of the month". Will use it towards a new Tig welder. Perfect in time for my birthday.
That's awesome!! Congratulations!!
If you don't mind me asking, what brand/model TIG are you thinking of? Just out of curiosity, do you have the Miller/Lincoln/Thermal Arc stuff we typically see in the USA or more European brands like HTP/Kemppi?
Posted by: falcor75 Feb 8 2017, 05:03 AM
Whooohoo ! I won a €500 Euro gift certifiqate to one of the local Tools/garage equipement shops for being voted "Project of the month". Will use it towards a new Tig welder. Perfect in time for my birthday.
That's awesome!! Congratulations!!
If you don't mind me asking, what brand/model TIG are you thinking of? Just out of curiosity, do you have the Miller/Lincoln/Thermal Arc stuff we typically see in the USA or more European brands like HTP/Kemppi?
Thanks Jim.
The most common brands at least here in Sweden are Esab and Kemppi.
At my work the welders use mainly Fronius and Kemppi Machines, we have a few Esabs too I Think.
Since I was limited to using the certifiqate in their own store I had no choice but to go for their own brand. Its a rebranded chinese build machine but I've cheecked it out and for hobby use even some experienced welders Think its more than ok.
http://verktygsboden.se/tigsvetsar/tiginverter-200-acdc
200A, AC/DC Inverter. I picked it up yesterday and also bought a better weld "Gun" package since the stock one felt really cheap.
Posted by: jd74914 Feb 8 2017, 06:21 AM
Interesting. I'd never heard of Kemppi, and saw a ton of their machines in a Polish shop which was what made me curious since they seemed to really like them.
The one you got looks pretty nice! It looks like it has all of the pulse, balance, and taper features you want to weld aluminum. Congratulations again!
Posted by: falcor75 Feb 11 2017, 01:11 AM
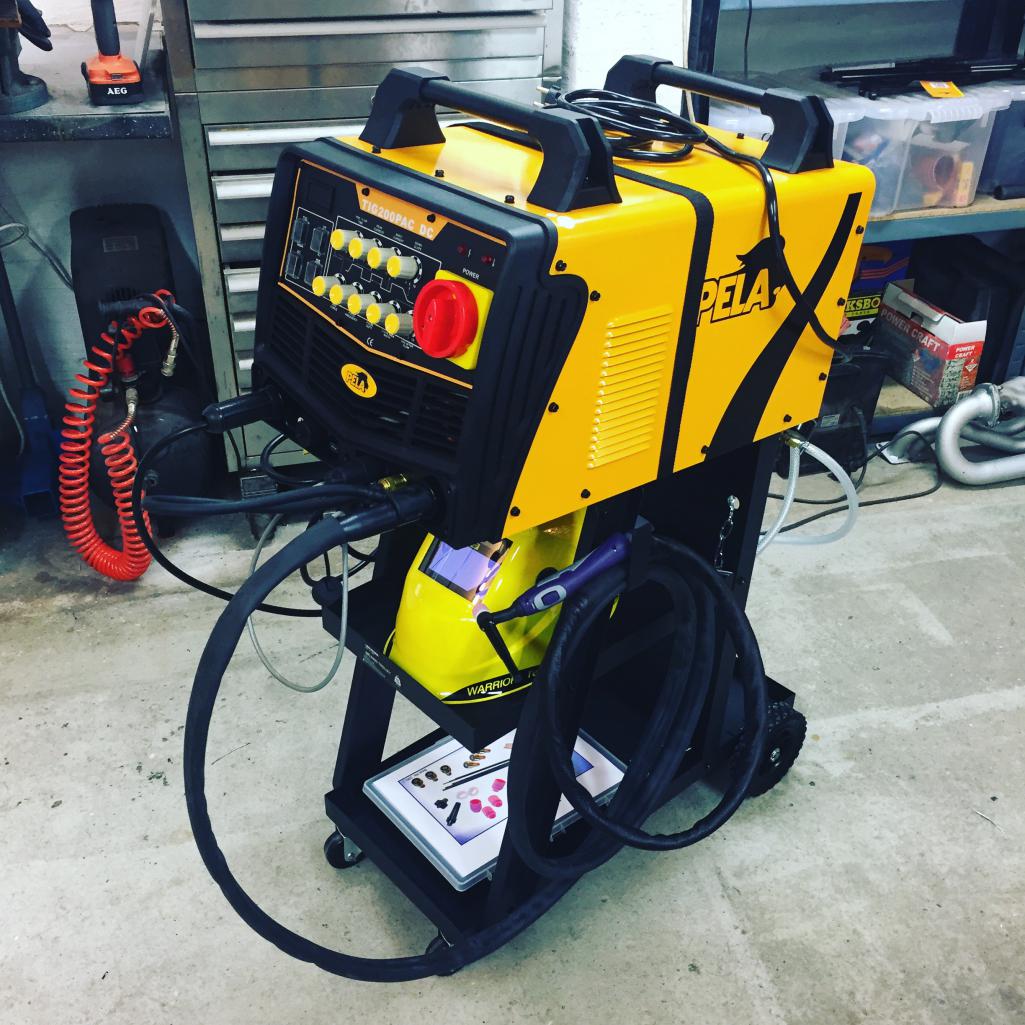
Spent yesterday afternoon assembling the cart, sharpening tungstens and then laid my first beads.....Now I just need lots and lots of practice...
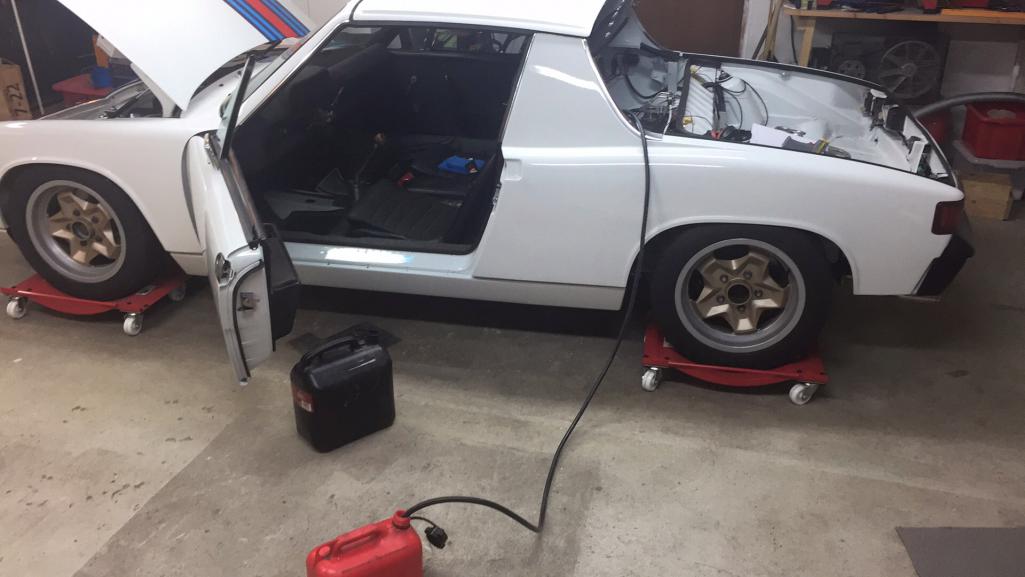
Posted by: falcor75 Mar 6 2017, 12:40 AM
Saturday noon I had the car out and drove it around the block.
Now 48 hours later we have had 24 hours of snow and somewhere between 10 and 20 inches depending on the drifts....
Posted by: 914forme Mar 6 2017, 05:10 AM
Congrats on a very nice build and the new welder.
Posted by: Frankvw Mar 6 2017, 06:15 AM
Hi Mats ! Looking sharp. at least you already drove your 914, even though it was a short trip. Engine running fine ?
Posted by: falcor75 Mar 6 2017, 06:44 AM
Hi Mats ! Looking sharp. at least you already drove your 914, even though it was a short trip. Engine running fine ?
Engine is running ok, still havnt had it on the dyno to get tuned so I'm puttering below 3k rpm still.
Posted by: mlindner Mar 6 2017, 07:50 AM
Congrats Mats, very nice build. thanks for sharing. Best, Mark
Posted by: falcor75 Mar 8 2017, 01:16 PM
Thank you Stephen and Mark. 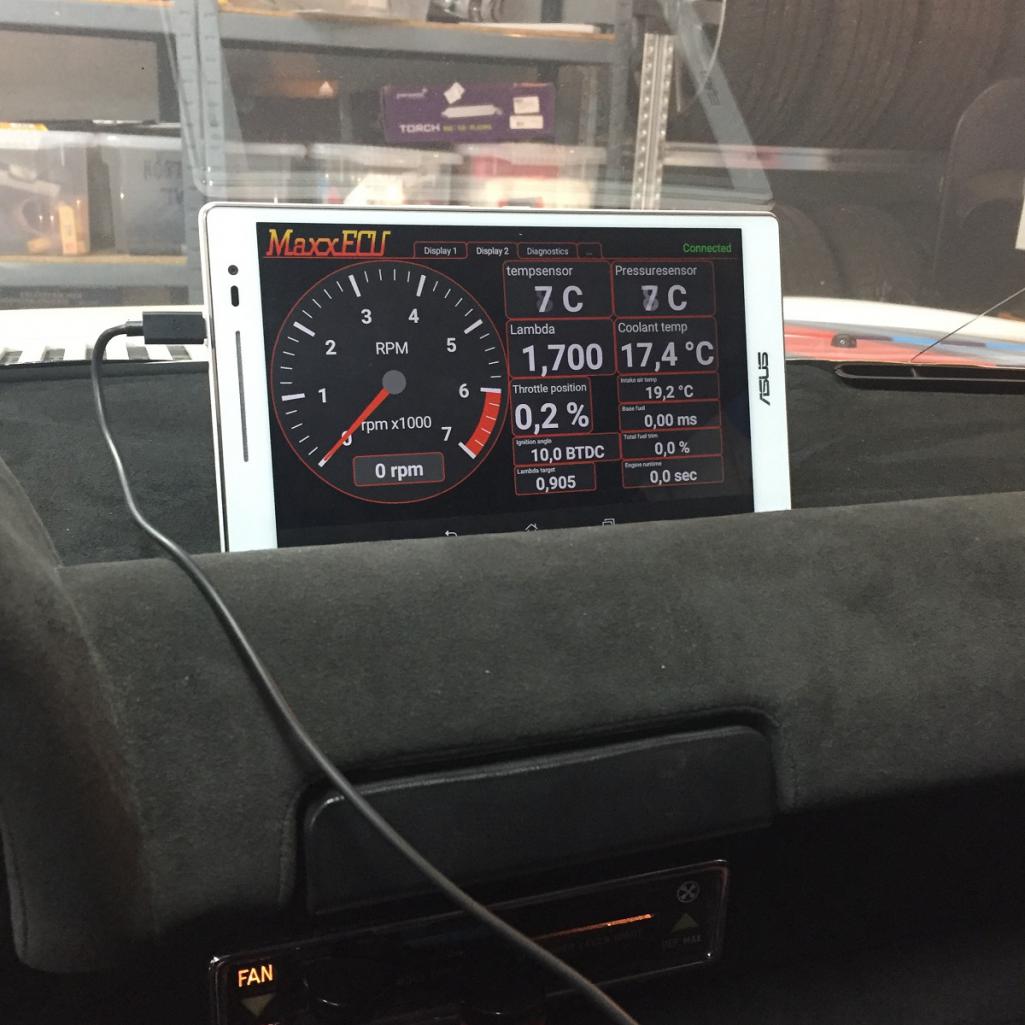
Today I started setting up a digital dash on the small tablet I bought last summer to use in the car. I will also use it for navigation and to hold my favorite Spotify playlists.
(please ignore the top right temp sensor saying pressure sensor, havnt found where to edit that text yet)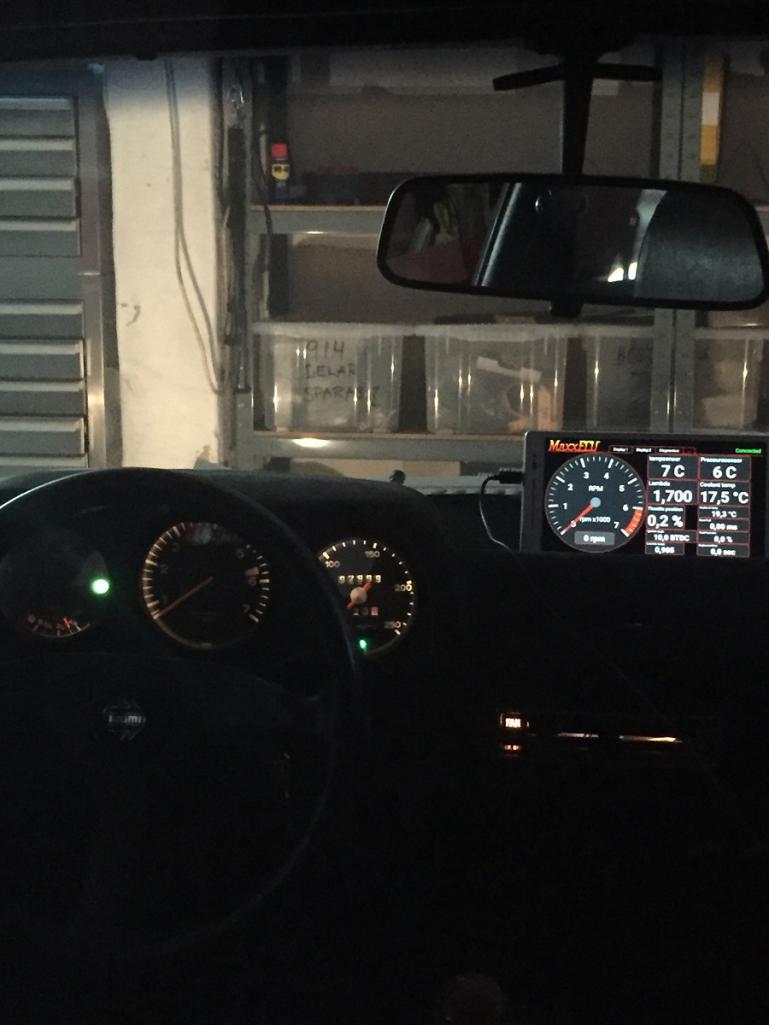
Had to try a shot from the rear with the interior garage lights off. Not sure I will have it up there. Working on a solution to have it sit below the dash instead.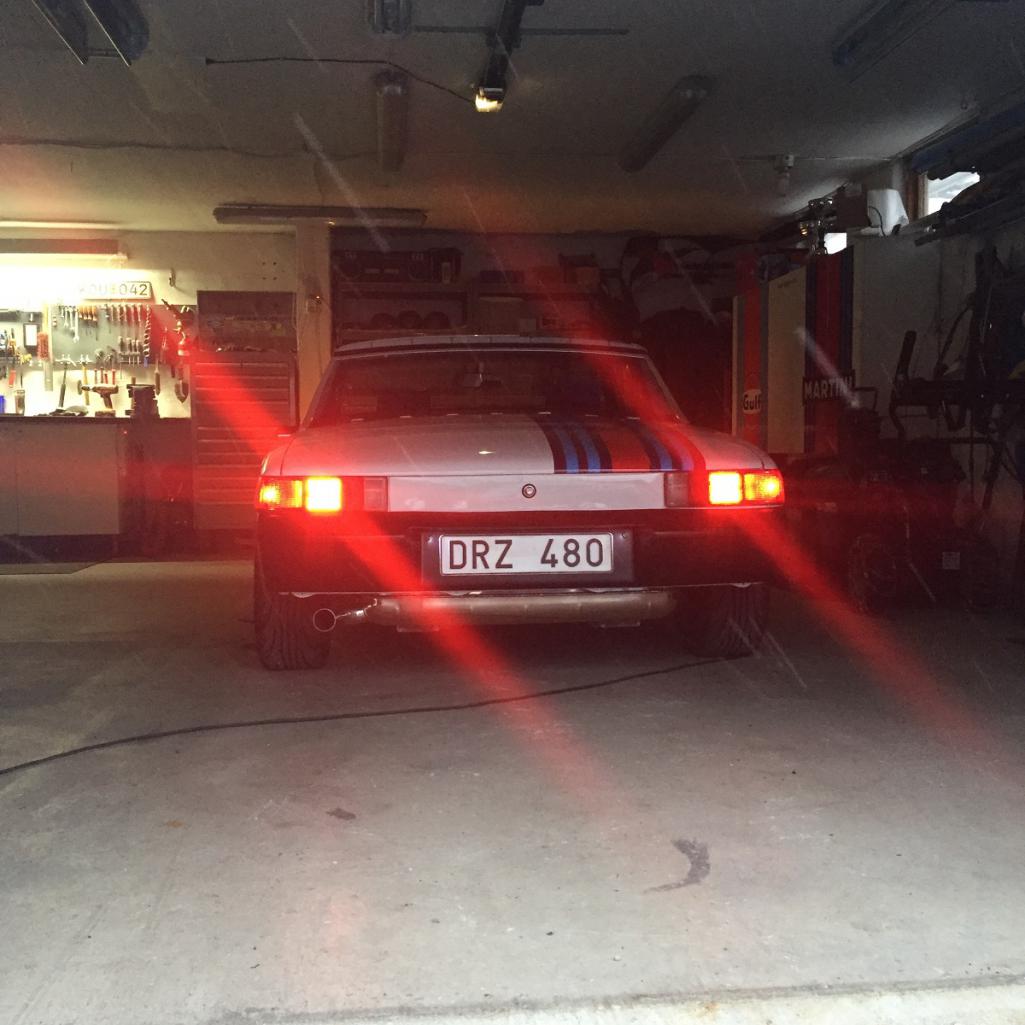
And this is the current weather, just below freezing and snowing. I'm kinda digging the look without the rear valance (correct word?) I might leave it off for awhile to flaunt my pretty silencer.
Posted by: porschetub Mar 9 2017, 01:13 PM
Thank you Stephen and Mark
And this is the current weather, just below freezing and snowing. I'm kinda digging the look without the rear valance (correct word?) I might leave it off for awhile to flaunt my pretty silencer.
Shame my 911 muffler is a bit ugly,might still remove mine after I blast and heatpaint my muffler,heard there is improved cooling without them,not sure if that's proven,I see pics of the GT's without them.
Mats what sort of rear body clearance do you have with the 7'' cookie cutters ?.
Posted by: mepstein Mar 9 2017, 01:38 PM
Thank you Stephen and Mark.
Today I started setting up a digital dash on the small tablet I bought last summer to use in the car. I will also use it for navigation and to hold my favorite Spotify playlists.
(please ignore the top right temp sensor saying pressure sensor, havnt found where to edit that text.
Had to try a shot from the rear with the interior garage lights off. Not sure I will have it up there. Working on a solution to have it sit below the dash instead.
And this is the current weather, just below freezing and snowing. I'm kinda digging the look without the rear valance (correct word?) I might leave it off for awhile to flaunt my pretty silencer.
Valance is correct. They were left off the factory 914-6 GT's.
Posted by: falcor75 Mar 9 2017, 01:51 PM
Thank you Stephen and Mark
And this is the current weather, just below freezing and snowing. I'm kinda digging the look without the rear valance (correct word?) I might leave it off for awhile to flaunt my pretty silencer.
Shame my 911 muffler is a bit ugly,might still remove mine after I blast and heatpaint my muffler,heard there is improved cooling without them,not sure if that's proven,I see pics of the GT's without them.
Mats what sort of rear body clearance do you have with the 7'' cookie cutters ?.
On the drivers side rear its barely that I get one of my fingers (tiny fingers) between the tire and fender lip, on the passenger side I have a little more space so I can easily but my finger between the tire and lip.
Posted by: Michel Mar 10 2017, 06:09 AM
I see the Scart mufflers are made in France: are they available as one in
met Martin who owns SCART at last Phoenix club swap. He indicated he'd just set up a shop in LA somewhere .
This is s great build
Posted by: 914dave Mar 10 2017, 01:40 PM
Mats
The car looks great! I really like the narrow cars with the oil cooler opening. Can't really go wrong with the Martini livery. Nice job!
Posted by: falcor75 Mar 16 2017, 01:13 PM
3
Posted by: PanelBilly Mar 16 2017, 03:07 PM
On the drivers side rear its barely that I get one of my fingers (tiny fingers) between the tire and fender lip, on the passenger side I have a little more space so I can easily but my finger between the tire and lip.
[/quote]
I RECOMMEND THAT YOU NOT PUT YOUR FINGERS BETWEEN THE TIRE AND BODY WHILE THE CAR IS IN MOTION!
Looks so nice. Wish I could see it in person
Posted by: Cal Mar 16 2017, 03:24 PM
Very happy with the Scart muffler, the fit against the heater boxes was spot on, unlike the old Bursch snake pit that needed alot more effort to put in place.
Did you get the Scart Super Sound? Eventually I am getting one for my car. Can't wait to hear a video of it singing.
Brett
Yes I did....
Will be awhile yet for any highrev singing as we still will have 3-4 months of winter to endure.....I recently purchased a NOS banana muffler for my '74 2.0L but I'm seriously thinking of also getting the SCART SS muffler. Can you please post a video of the exhaust sound?
Posted by: falcor75 Mar 16 2017, 10:48 PM
Very happy with the Scart muffler, the fit against the heater boxes was spot on, unlike the old Bursch snake pit that needed alot more effort to put in place.
Did you get the Scart Super Sound? Eventually I am getting one for my car. Can't wait to hear a video of it singing.
Brett
Yes I did....
Will be awhile yet for any highrev singing as we still will have 3-4 months of winter to endure.....I recently purchased a NOS banana muffler for my '74 2.0L but I'm seriously thinking of also getting the SCART SS muffler. Can you please post a video of the exhaust sound?
There are a few on the link below but its just idle and low revs. Dont have any driving videos yet....
https://www.youtube.com/channel/UC5VYeigxJ2vFRlNJjAjvnVw
Oh and: 2
Posted by: falcor75 Mar 19 2017, 11:15 AM
Does anyone want to know what it sounds like when its run in anger?
https://www.youtube.com/watch?v=QGGdYYHBmTo
Anyone want to guess the engine hp?
2276, 10:1 compression, Web 86 b/c cam, 40 mmm ITB's and stock 2.0 heaterboxes.
Posted by: Stiffmeister Mar 19 2017, 12:27 PM
Does anyone want to know what it sounds like when its run in anger?
https://www.youtube.com/watch?v=QGGdYYHBmTo
Anyone want to guess the engine hp?
2276, 10:1 compression, Web 86 b/c cam, 40 mmm ITB's and stock 2.0 heaterboxes.
Sounds mean and crisp. Grattis
Posted by: falcor75 Mar 19 2017, 02:45 PM
Does anyone want to know what it sounds like when its run in anger?
https://www.youtube.com/watch?v=QGGdYYHBmTo
Anyone want to guess the engine hp?
2276, 10:1 compression, Web 86 b/c cam, 40 mmm ITB's and stock 2.0 heaterboxes.
Sounds mean and crisp. Grattis
Tack
Posted by: maf914 Mar 19 2017, 04:00 PM
Anyone want to guess the engine hp?
2276, 10:1 compression, Web 86 b/c cam, 40 mmm ITB's and stock 2.0 heaterboxes.
Mats, Just a guess, but with your fuel injection and stock heat exchangers, I'll say 140 hp, 145 ft-lb torque.
Posted by: falcor75 Mar 19 2017, 11:10 PM
Anyone want to guess the engine hp?
2276, 10:1 compression, Web 86 b/c cam, 40 mmm ITB's and stock 2.0 heaterboxes.
Mats, Just a guess, but with your fuel injection and stock heat exchangers, I'll say 140 hp, 145 ft-lb torque.
Thats a pretty good guess but it was a little bit more.
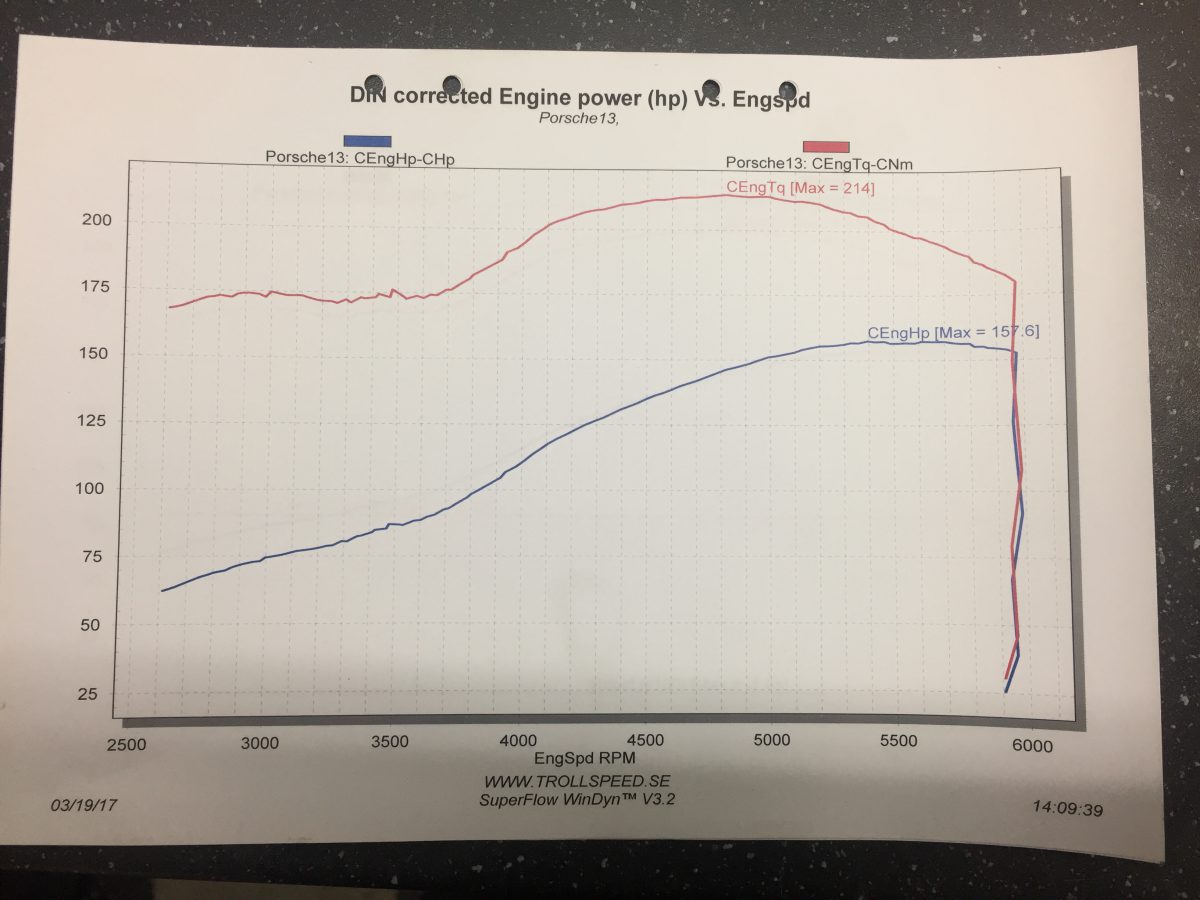
158 hp and 158 ft lbs.
Head temps ran between 140-170 C the whole time so that should be ok too.
Posted by: Dave_Darling Mar 20 2017, 09:22 AM
What is going on with that graph? I will happily buy your numbers (158 HP/158 lb-ft torque) but that graph is showing over 200 lb-ft and the torque doesn't cross the HP at 5250 RPM!
--DD
Posted by: falcor75 Mar 20 2017, 09:32 AM
What is going on with that graph? I will happily buy your numbers (158 HP/158 lb-ft torque) but that graph is showing over 200 lb-ft and the torque doesn't cross the HP at 5250 RPM!
--DD
The Torque is in Nm.....we damned metric europeans you know....
214 Nm = 158 ft lbs if my online converter is correct.
Posted by: Dave_Darling Mar 20 2017, 12:57 PM
Ah, crap! I missed the units on the graph!
*hangs head in shame*
--DD
Posted by: 3d914 Mar 20 2017, 01:53 PM
Does anyone want to know what it sounds like when its run in anger?
https://www.youtube.com/watch?v=QGGdYYHBmTo
Anyone want to guess the engine hp?
2276, 10:1 compression, Web 86 b/c cam, 40 mmm ITB's and stock 2.0 heaterboxes.
Sounds reeaally good. Nice job on a cool project.
Posted by: maf914 Mar 20 2017, 04:28 PM
Anyone want to guess the engine hp?
2276, 10:1 compression, Web 86 b/c cam, 40 mmm ITB's and stock 2.0 heaterboxes.
Mats, Just a guess, but with your fuel injection and stock heat exchangers, I'll say 140 hp, 145 ft-lb torque.
Thats a pretty good guess but it was a little bit more.
158 hp and 158 ft lbs.
Head temps ran between 140-170 C the whole time so that should be ok too.
That is impressive. Very good.
Posted by: raynekat Mar 20 2017, 05:04 PM
Mats....158x158. Perfect square numbers for a "boxer" engine. Should be a hoot to drive. Nice job!
Posted by: pete-stevers Mar 20 2017, 07:27 PM
Great build thread!!!
I hope mine are half as good when I get to them!
Posted by: falcor75 Mar 21 2017, 01:04 PM
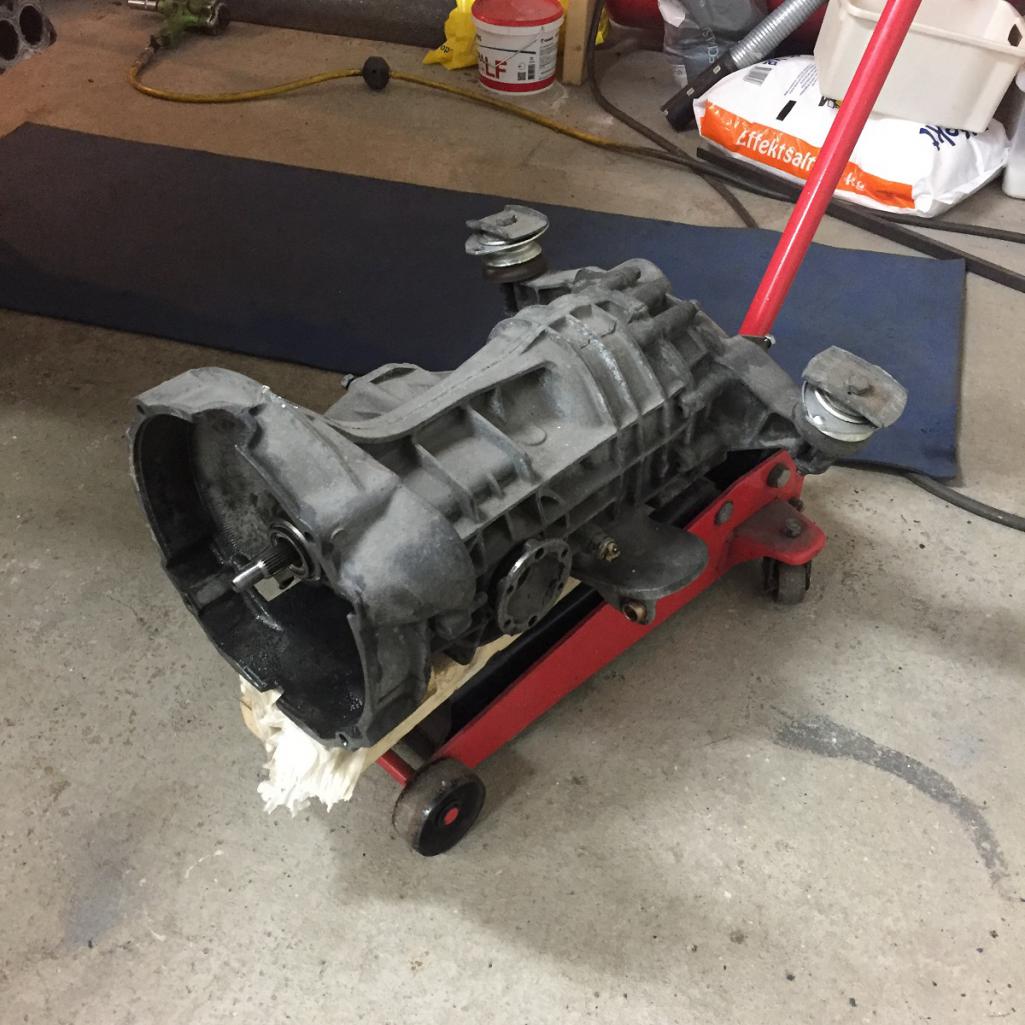
48 hours of happiness was all I got. Noticed a leak under the car and figured it was the tuna can that had seeped a bit more oil after the dyno day. Smelled the oil....transmission oil.... 
Input shaft seal is leaking. AT least it seems to be replaceable without opening the transmission. Figures it would start leaking as I've already changed the gear selector shaft seal and have the double o-ringed speedo drive unit.
Oh well down in the garage after dinner. 1 hour and 32 minutes and the gearbox was out of the car..
Posted by: Frankvw Mar 21 2017, 02:31 PM
Hi Mats, too bad a 2$ part (seal) caused this to your nice work, at least you got some wrench-time out of it ! :-)
Good luck with the fix !
Posted by: falcor75 Mar 22 2017, 09:56 AM
Ordered two new input shaft seals today. Is there a good DIY guide to pulling the old one and installing the new one somewhere? Prefered tools?
Posted by: Frankvw Mar 22 2017, 01:47 PM
There are special picks to do the job, a bit like a hook that is jammed in the seal, and then is pulled out, of course this destroys the seal, but you will never re-use it anyway. I know some people scew in a screw and use that to pull on.
Posted by: falcor75 Apr 9 2017, 11:36 PM
Had a productive last week and weekend.
Gearbox is re-sealed, refilled with Swepco 201 and juggled back into the car. All the surrounding parts mounted and done. Tore down both front struts and changed them for 911 struts with the later ball joint version, got rid of the annoying passenger side balljoint wiggle that would have been a MoT failure. Re-bled the brakes all around.
Then I had one of those Surreal "omg am I really doing this" moments....I put the windshield wipers and sunvisors back in the car. I've had those parts laying around for so long..and now they're on the car.
I'm just an alignment away from being able to get my car road legal!
Posted by: falcor75 Apr 20 2017, 08:23 AM
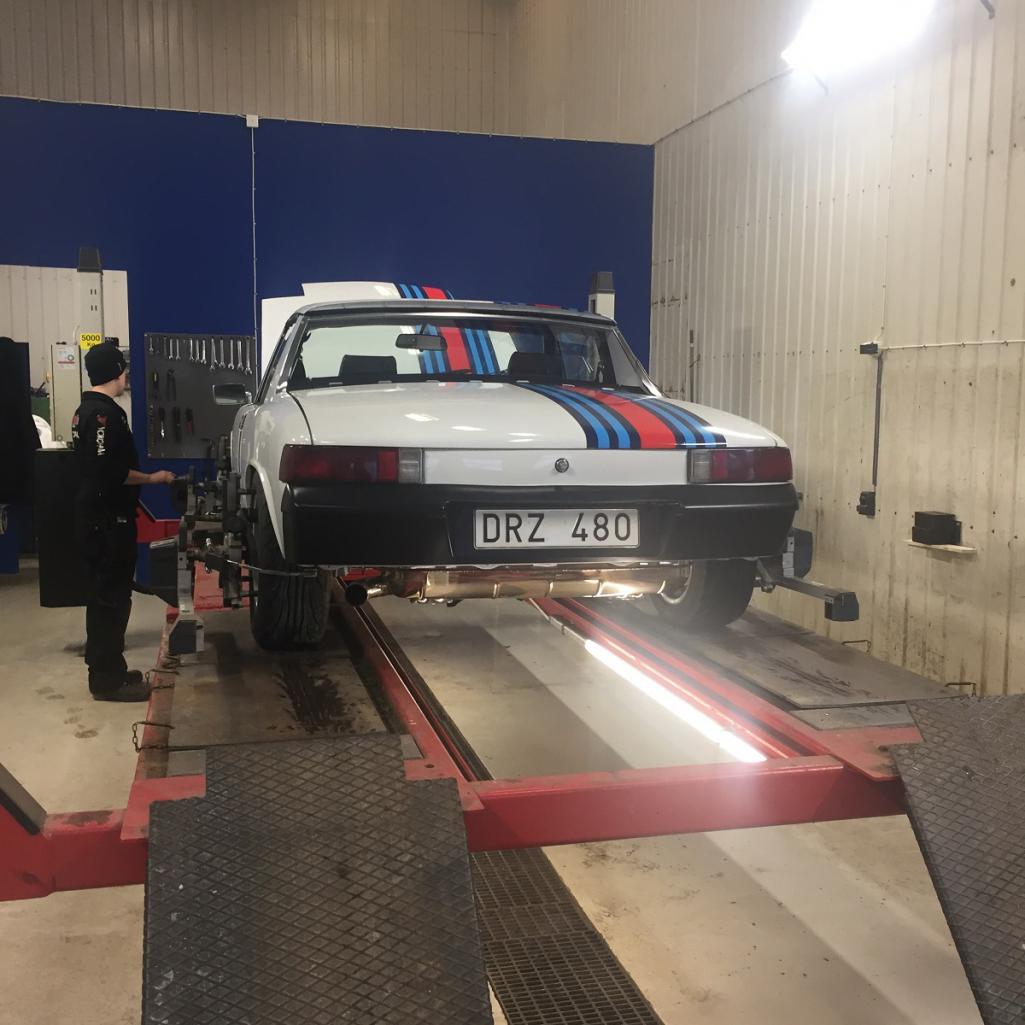
Drove the car legally on the road today for the first time since 2013.
(trips to and from repair shops are legal even if the inspection due date has expired)
Took it to an alignmentshop about 10 km's from where I live and I could tell on the way there that the front was very toe out.
Once there we started adjusting. Everything went ok except for one thing.
Drivers side rear cannot be adjusted to Toe in, currently it sits at 6 mm toe out, started at 9 mm toe out.
At the moment I'm not sure what is going on.... If its the control arm thats bent or
the outer mount itself thats somehow misaligned. 
Posted by: jd74914 Apr 20 2017, 08:56 AM
Wow, 6mm toe out is a lot. Do you have turbo tie rods with the thick washer? It may be as easy as removing the washer.
Posted by: falcor75 Apr 20 2017, 09:03 AM
Wow, 6mm toe out is a lot. Do you have turbo tie rods with the thick washer? It may be as easy as removing the washer.
Toe out is on the rear wheel, fronts are fine.
Posted by: jd74914 Apr 20 2017, 10:45 PM
Wow, 6mm toe out is a lot. Do you have turbo tie rods with the thick washer? It may be as easy as removing the washer.
Toe out is on the rear wheel, fronts are fine.
Missed that. The rear not coming in really sucks.
Posted by: falcor75 Apr 21 2017, 06:45 AM
ITS ROADLEGAL !!!!
After four years of restoration I can now legally drive my car on the road!!
Such a freaking fantastic feeling !
Ok I still need to sort the rear alignment but nevertheless its now ok for two years forwards. The inspection guy told he was a bit dissapointed that the paint was flaking off on the heat exchangers since the rest of the car was so nice. Exhaust CO-value was borderline (4,5% legal limit and it measured 4,4-4,5) but he said he was confident I'd have that fixed untill next time.
Posted by: Shadowfax Apr 21 2017, 07:42 AM
Awesome news! Car looks terrific.
Posted by: falcor75 Apr 21 2017, 12:25 PM
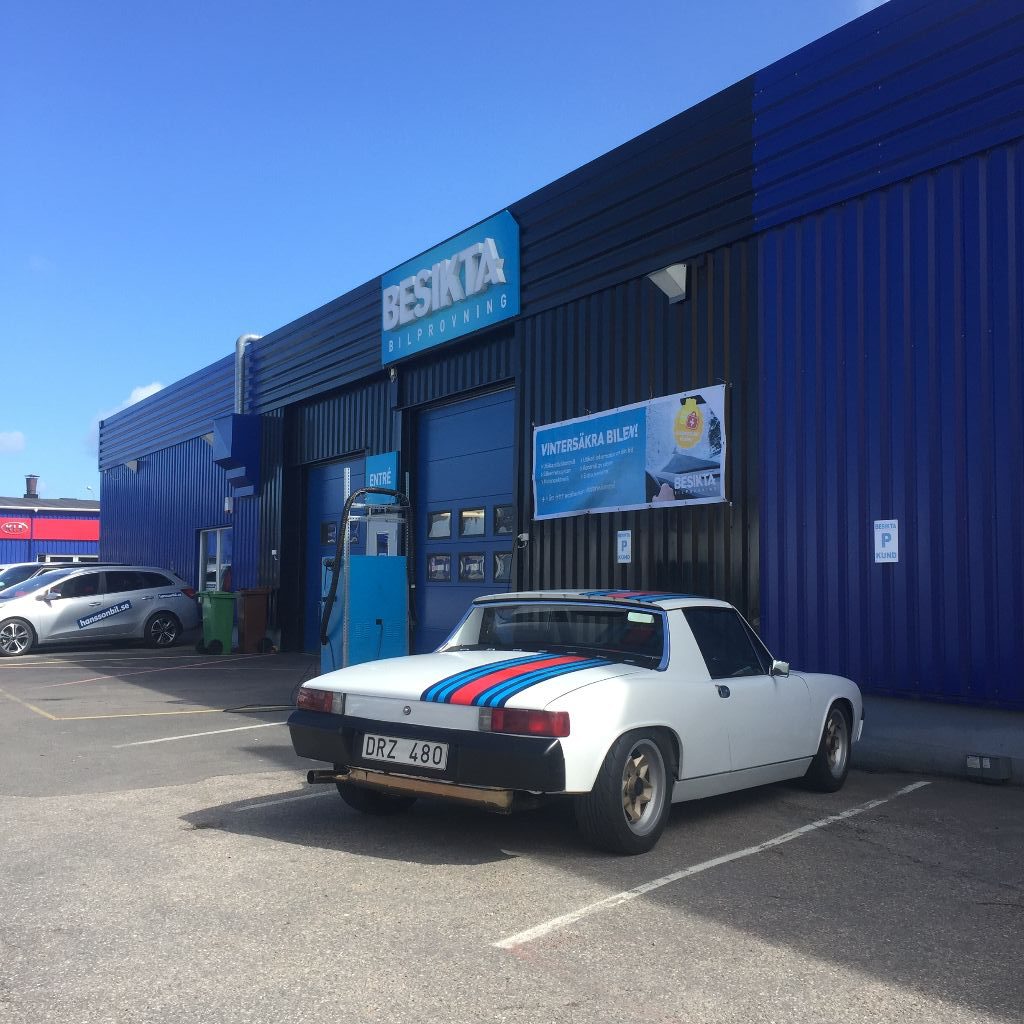
Waiting for our turn....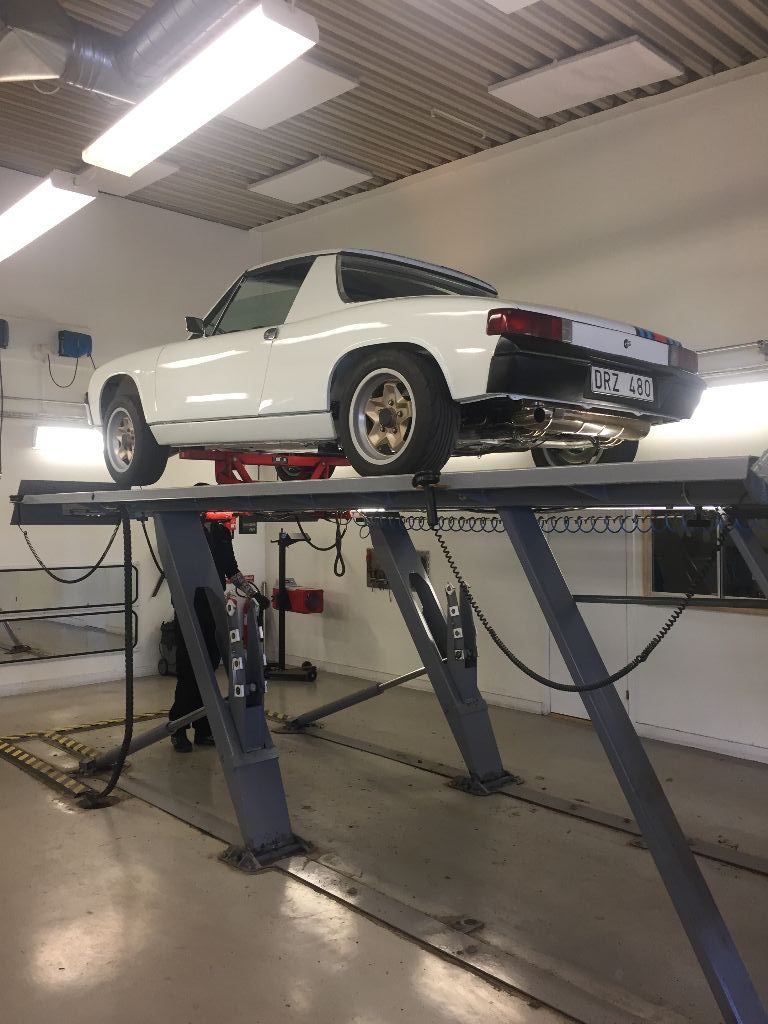
Going for an elevator ride, checking suspension movement, wheel bearings, brakes, rust and everything else. All lights, had to adjust the passenger headlight a bit to get it correct. 
Driving home again, the tablet displays my rpm, lambda value, CHT values, fuel trims and anything else I want to see from the ECU.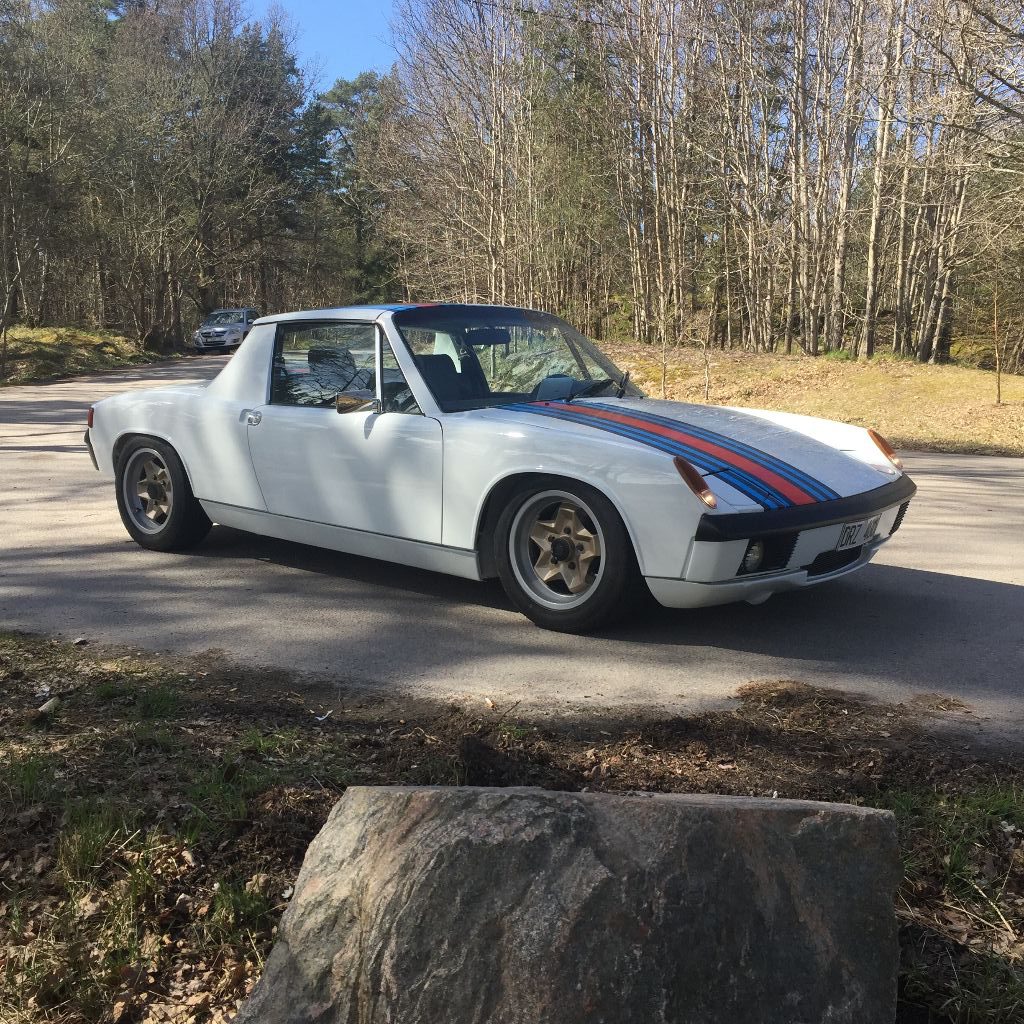
Took a litle break for some photos before we went home. Still got a silly grin on my face.
Posted by: LowBridge Apr 21 2017, 01:56 PM
wow... Loved keeping up with this build and it is a fantastic looking 914. Congrats on getting it "legal" for the road
Now you just need to drive it like you stole it 
Posted by: falcor75 Apr 21 2017, 02:17 PM
Well the nice thing about the inspection is that I got a chance to take a few seconds movie of the car in motion.
https://www.youtube.com/watch?v=yHfxqOpWzvM&feature=youtu.be
I really like how the Cookies turned out.....
Posted by: Coondog Apr 21 2017, 02:18 PM
Congrats and thank you for the thread.
Posted by: Camaro Mike Apr 21 2017, 05:50 PM
Congratulations! The cookies look great as does everything.
Yes, thanks for taking us along for the journey.
Posted by: AZBanks Apr 21 2017, 06:48 PM
Congratulations. The whole car looks great. I hope you enjoy driving it as much as we enjoyed reading about it.
Posted by: Spoke Apr 21 2017, 06:59 PM
Congrats. The car looks beautiful.
Posted by: infraredcalvin Apr 21 2017, 08:14 PM
Nice work! Inspiring!
Posted by: falcor75 May 11 2017, 11:45 AM
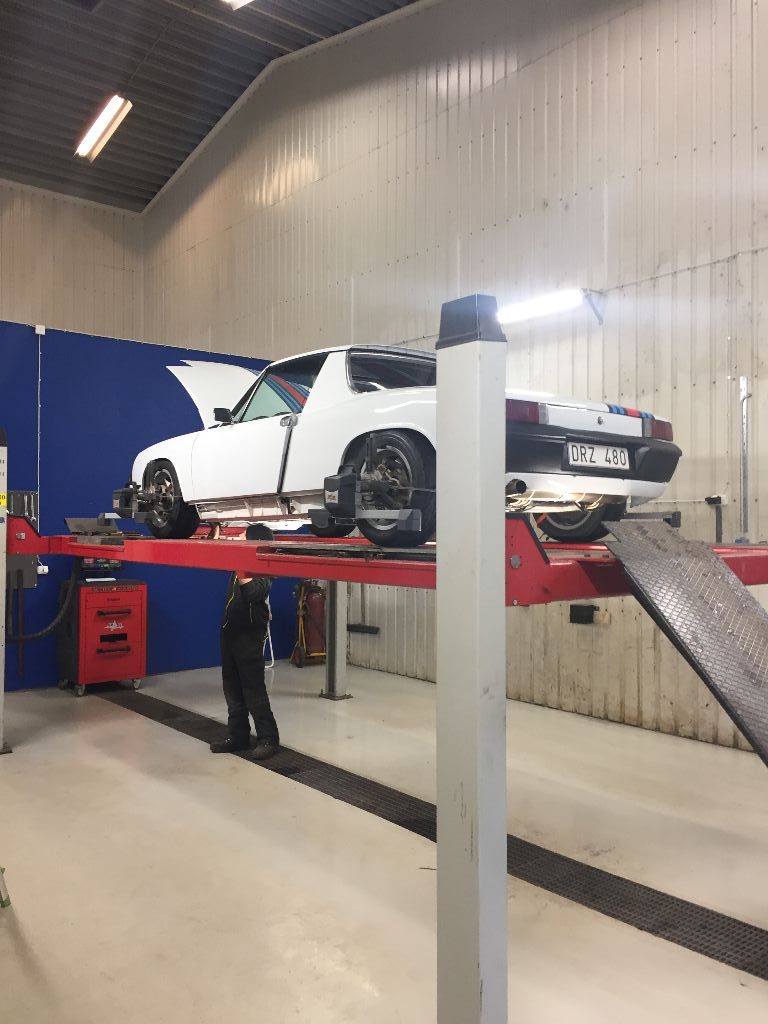
Been dealing with the alignment issues for the last three weeks.
No matter how I elongated the mounting holes for the outer bracket I couldnt get toe in.
Weekend two weeks ago I snapped and demounted both rear trailing arms, putting them side to side revealed the left one being 5 mm longer from the pivot axis to driveshaft center. Found the culprit!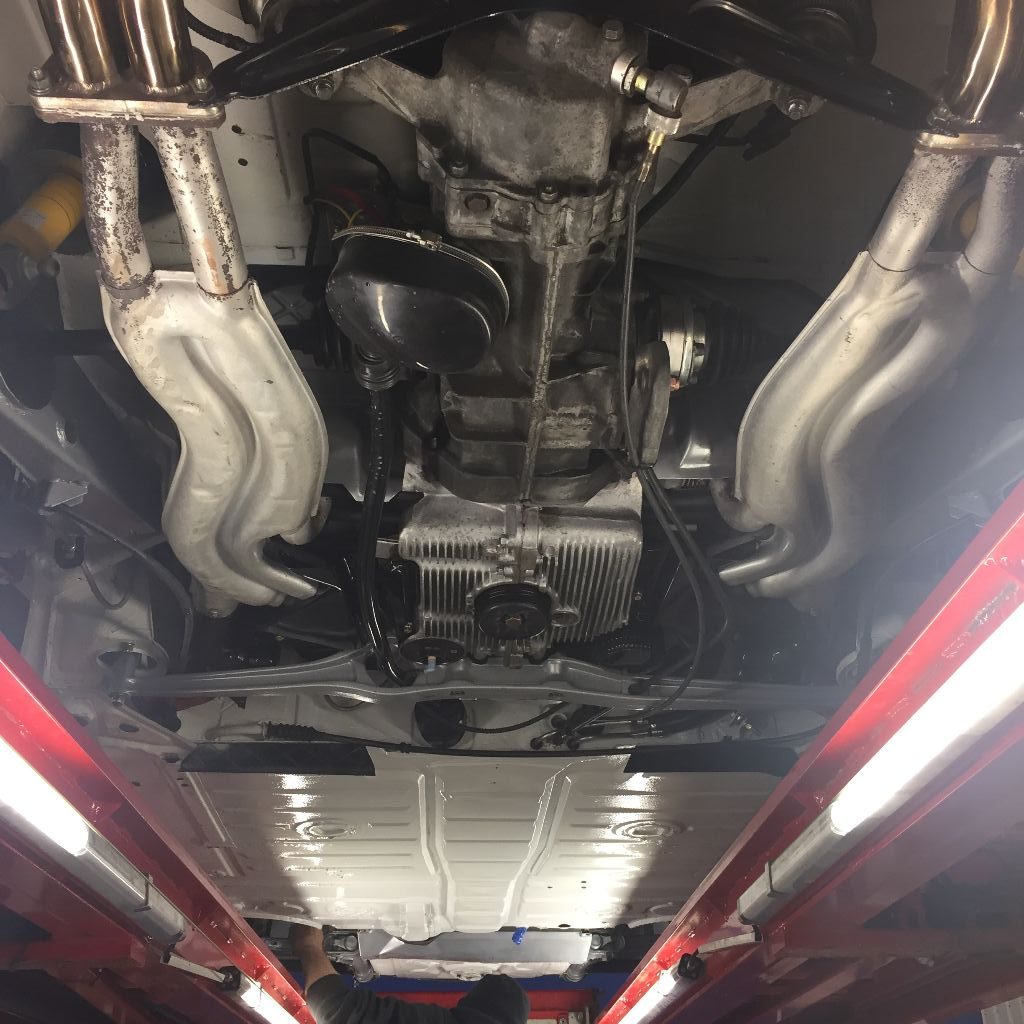
Ordered a used trailing arm from Germany, got it friday last week. Tore it apart after work and then drove to my blaster/powdercoat guy an hour away the same evening and got it painted and pretty. Managed to get my spare hub machined for 5 bolts for to use longer studs Got that fixed early this week and tuesday and wednesday I got the suspension back on again.
Today thursday I had booked an alignment, This time I had 4 degrees of toe IN on the rear left wheel. Sucess!! We adjusted it out to 1 mm toe in and that was that.
After lunch today I went for the first extended drive around 80 miles or so. 
Once home i celebrated by putting on some new parts I had laying waiting.
*Tarret front drop links to the swaybar went on.
*New targa latch cups in the rear trunk
*Gas dampers for the rear trunk lid
*Spokes front led position/indicator boards
*BBS Mesh copies with new Nokia tires. (long distance driving wheels)
Feeling all set for this saturdays upcoming 500 mile roadtrip.
Posted by: raynekat May 11 2017, 03:41 PM
Well done Mats.
I'll bet you're happy to have this alignment issue behind you finally.
Just the wide open roads to enjoy your car now.
Looking good.
Posted by: plays with cars May 11 2017, 09:03 PM
Congratulations. Sounds like you have a fun weekend trip planned.
I can't help but scratch my head though. How does a trailing arm become 5mm too long or too short? Was it bent from some prior incident?
Posted by: falcor75 May 11 2017, 10:10 PM
Congratulations. Sounds like you have a fun weekend trip planned.
I can't help but scratch my head though. How does a trailing arm become 5mm too long or too short? Was it bent from some prior incident?
I'm guessing a previous owner lost a round of "lets jump that curb"
Posted by: maf914 May 12 2017, 06:24 AM
Excellent work, Mats. Thank you for posting your build thread.
Could you tell us the specs for your BBS wheels and tires? Thanks.
Posted by: Garold Shaffer May 12 2017, 06:31 AM
Posted by: Cairo94507 May 12 2017, 06:39 AM
Sweet!
Posted by: falcor75 May 12 2017, 01:45 PM
Excellent work, Mats. Thank you for posting your build thread.
Could you tell us the specs for your BBS wheels and tires? Thanks.
Shhhhhh...they're not real BBS's but dont tell anyone....
I bought these from a guy that means to use them for an 2.7 RS Clone build but that never happened so I picked them up quite cheaply. All four are 7x15 and had never been used on the the street. The tires on them were from like 89 or something. Anyway the brand apparently is RW which I dont know much about. I'm thinking of eventually having them refinished in gold with a polished lip instead of the black they are now.
The tires and 195/50-15 Nokian. A bit of a budget tire but still a good brand so they should be ok for long drives and shows which is what I will use them for.
Posted by: 76-914 May 12 2017, 05:59 PM
 Stellar build. IIRC, you drove that in the Winter w/o the windscreen. Damn that was cold!
Posted by: falcor75 May 14 2017, 01:35 PM
So yesterday was the highpoint of the Swedish 914 year. The annual meeting down in south of Sweden, for the first time I would be bringing my own car that I only finished working on the evening before (fixing the odometer)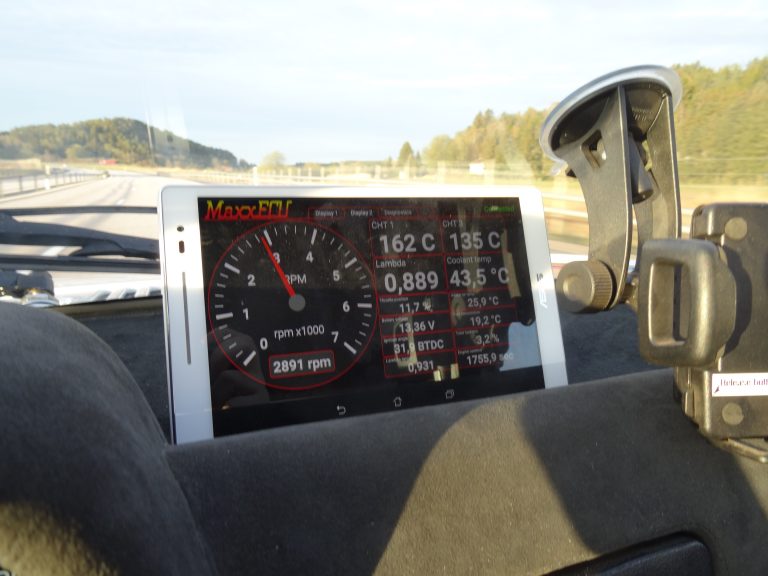
I left home at 5:20 am to drive the 255 miles south. Joining me I had my friend Pontus driving his Cayman as a backup/following vehicle. 
Since I had barely driven the car the first hour was a bit nervous. It was also quite cold for the season, only 40F when I left so I got to put the heat on to keep warm. Further south there are a couple of long inclines that I was a bit nervous about but the car handled them well just touching 375F at the top of the hills.
About 20 minutes out from arrival we stopped for fuel just to be sure, I know my engine is running quite rich (lambda 0.9) and it got around 25 mpg on that part of the trip keeping an everage speed around 100 km/h.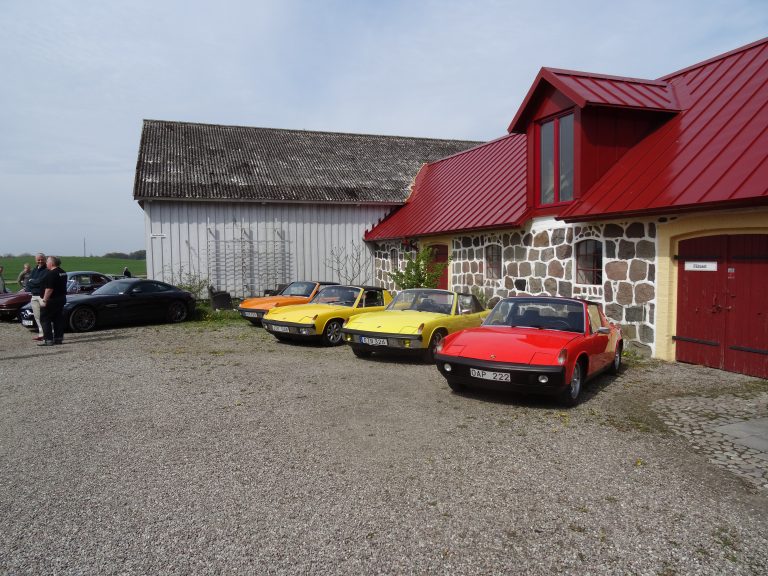
It was a very nice feeling driving into the small farmhouse courtyard to joing the other 914's attending. All of Sweden has an estimated number of 150 914's where probably 50 are being used every year.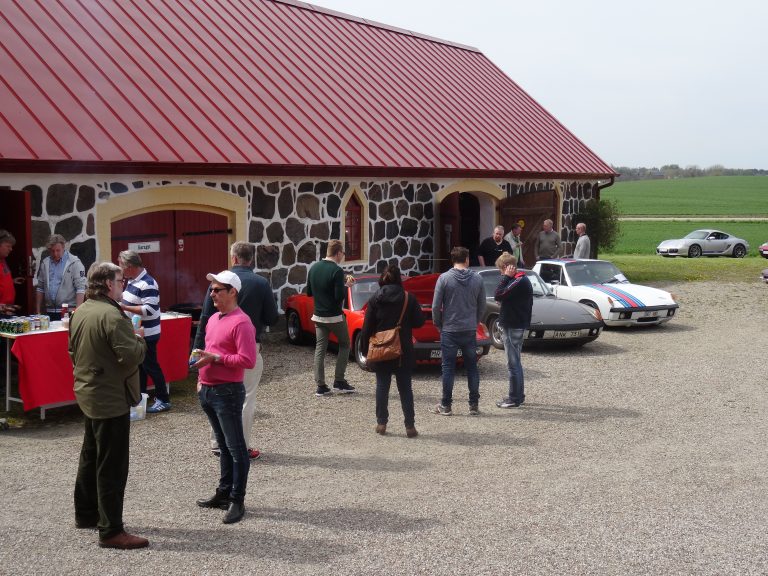
So the meet managed to have 7 driving cars and one project attending. Among the visitors there was at least three whose cars were not finished or not running, hopefully we'll break into double figures next year.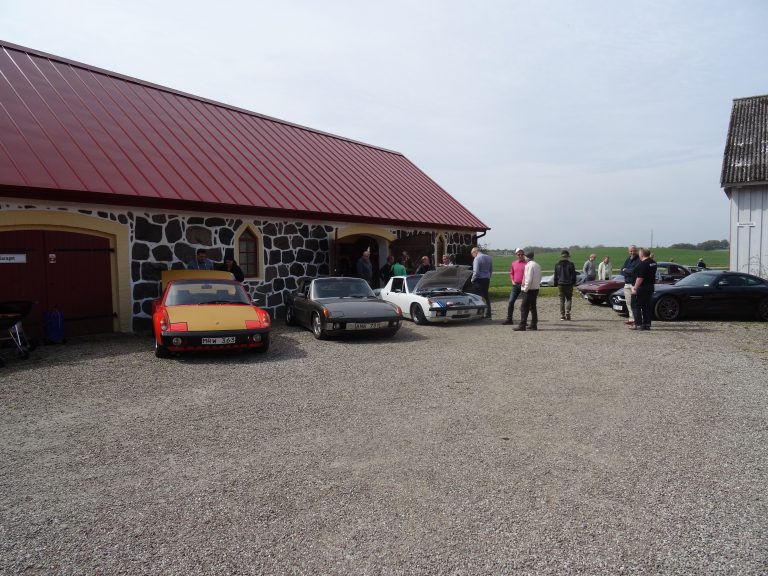
It was a great day, meeting old familliar face and learning a few new ones and seeing a few cars I'd only seen images of before.
All in all it was a great day, my first major trip in the car and it handled the 510 miles great. I was pretty tired getting home tho so next year i'll probably split the driving over two days.
Posted by: falcor75 May 18 2017, 01:40 PM
https://www.youtube.com/watch?v=yrh878om6pI&feature=youtu.be
Yesterday was the first ever slalom even for me with this car. I felt very rusty and had
some trouble with the 180 degree turn trying both a tight and a wide line. Only four cars in my class and when I headed home I was still the fastest in my class.
Posted by: raynekat May 18 2017, 06:51 PM
Looking good Mats.
Your car looks well up.
Certainly corners nice and flat.
Posted by: ben*james May 18 2017, 07:11 PM
So yesterday was the highpoint of the Swedish 914 year. The annual meeting down in south of Sweden, for the first time I would be bringing my own car that I only finished working on the evening before (fixing the odometer)
I left home at 5:20 am to drive the 255 miles south. Joining me I had my friend Pontus driving his Cayman as a backup/following vehicle.
Since I had barely driven the car the first hour was a bit nervous. It was also quite cold for the season, only 40F when I left so I got to put the heat on to keep warm. Further south there are a couple of long inclines that I was a bit nervous about but the car handled them well just touching 375F at the top of the hills.
About 20 minutes out from arrival we stopped for fuel just to be sure, I know my engine is running quite rich (lambda 0.9) and it got around 25 mpg on that part of the trip keeping an everage speed around 100 km/h.
It was a very nice feeling driving into the small farmhouse courtyard to joing the other 914's attending. All of Sweden has an estimated number of 150 914's where probably 50 are being used every year.
So the meet managed to have 7 driving cars and one project attending. Among the visitors there was at least three whose cars were not finished or not running, hopefully we'll break into double figures next year.
It was a great day, meeting old familliar face and learning a few new ones and seeing a few cars I'd only seen images of before.
All in all it was a great day, my first major trip in the car and it handled the 510 miles great. I was pretty tired getting home tho so next year i'll probably split the driving over two days.
Love this photo! Great perspective
Posted by: falcor75 Jun 22 2017, 08:43 AM
https://youtu.be/vXNzR7L_FRY
Had a little bit of fun last night...
Posted by: 914dave Jun 22 2017, 10:21 AM
Mats
Your car looks great. Enjoyed both of your videos. It's an excellent build!
Dave
Posted by: falcor75 Jul 20 2017, 01:58 PM
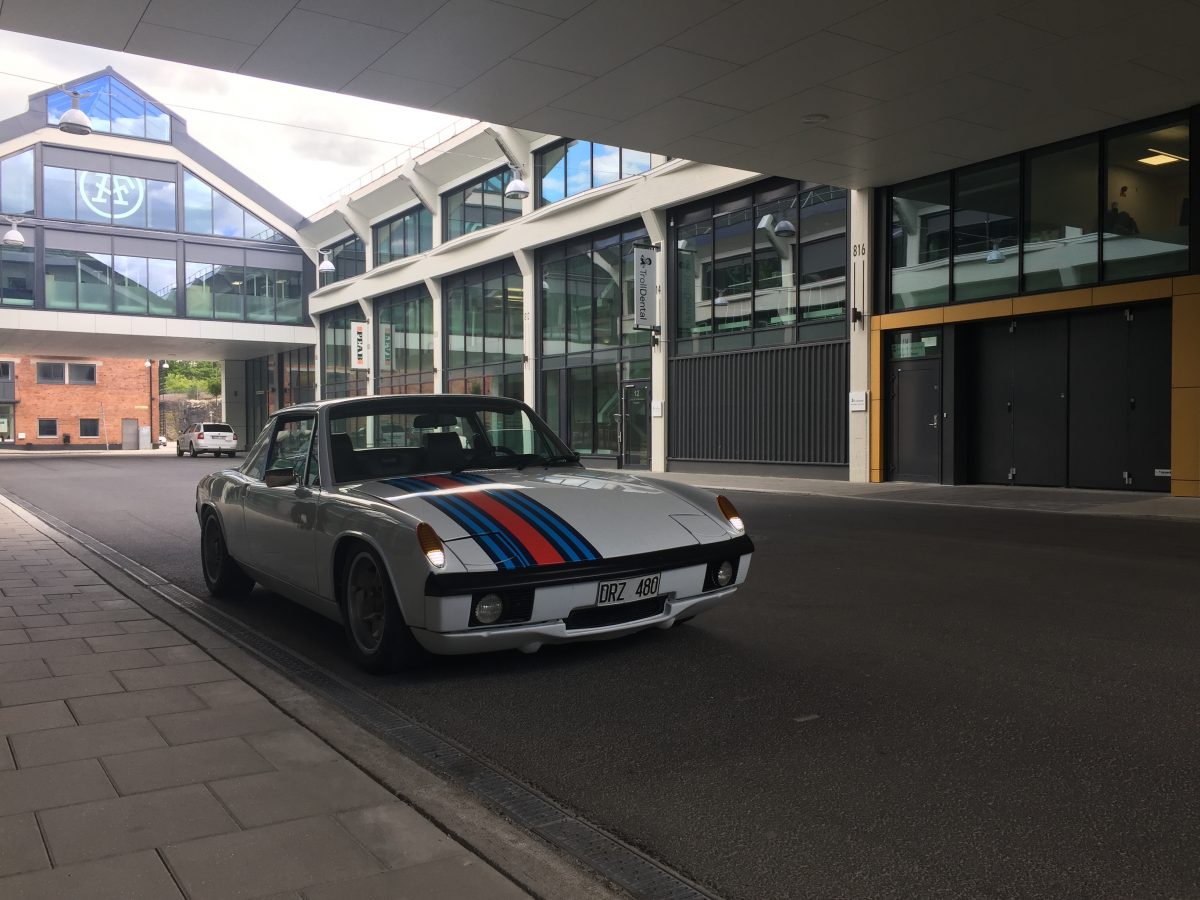
Well since last time things have been pretty smooth...mostly...but more on that later.
Spokes front LED's are great, cant recommend them enough.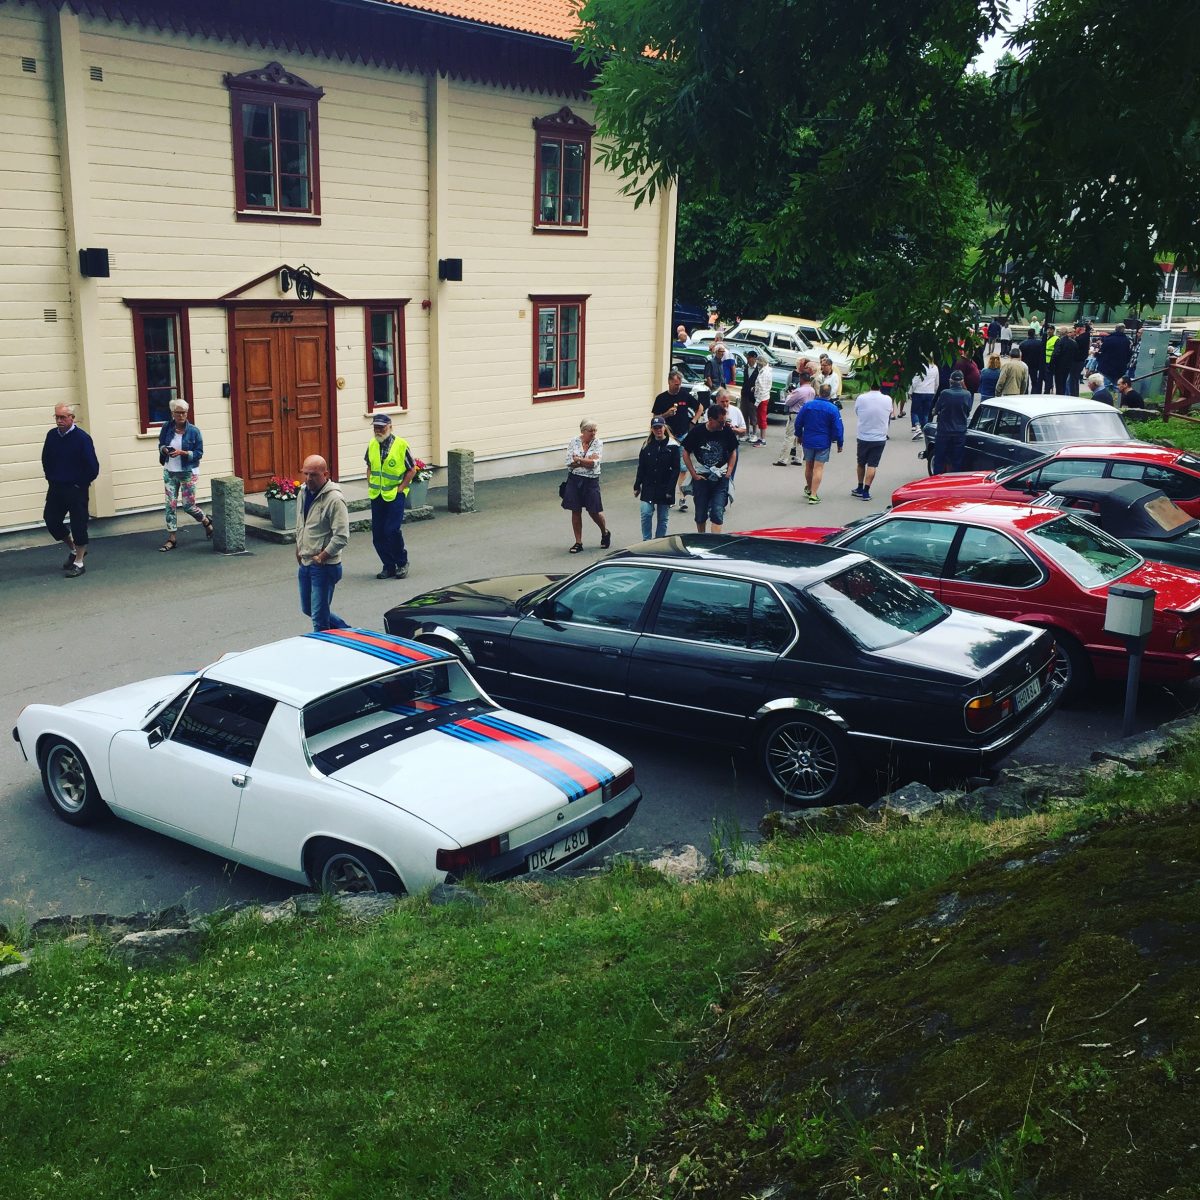
Been to a few local car shows and have gotten great response to the car. Always nice to get some appreciation when you've worked hard to make it a good car.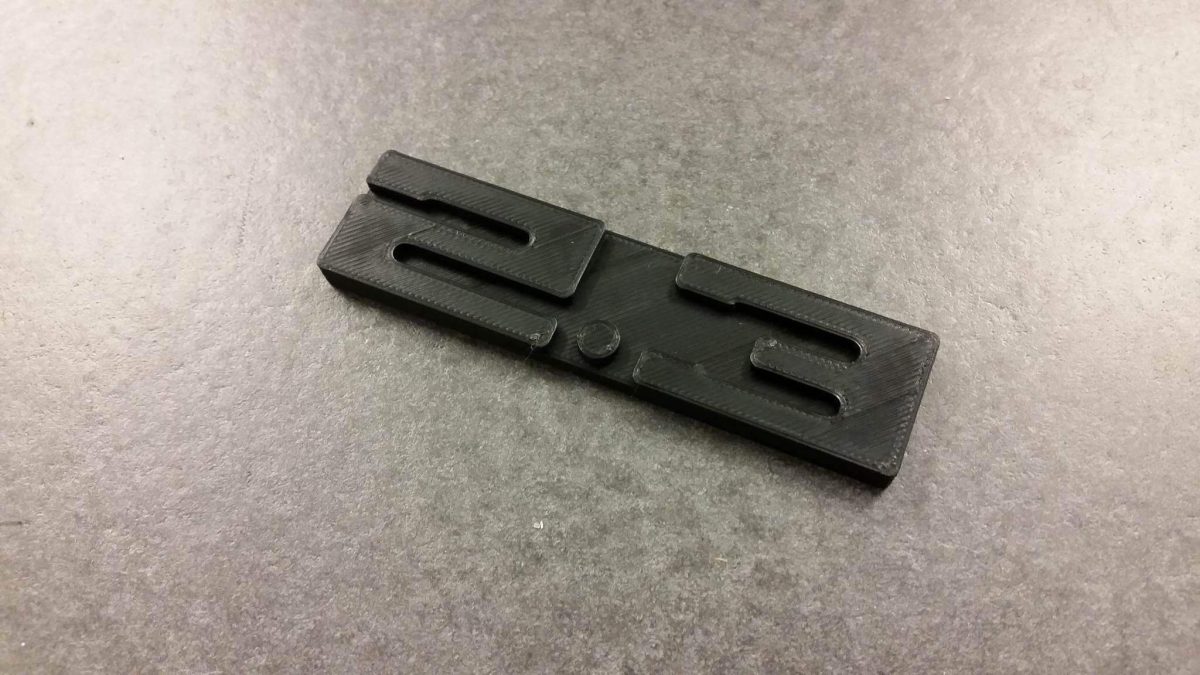
I designed this badge in Solidworks. It's basically a 1988 911 3.2 badge that I switched around. A friend 3D printed it for me and its got two strong magnets countersunk into the backside. 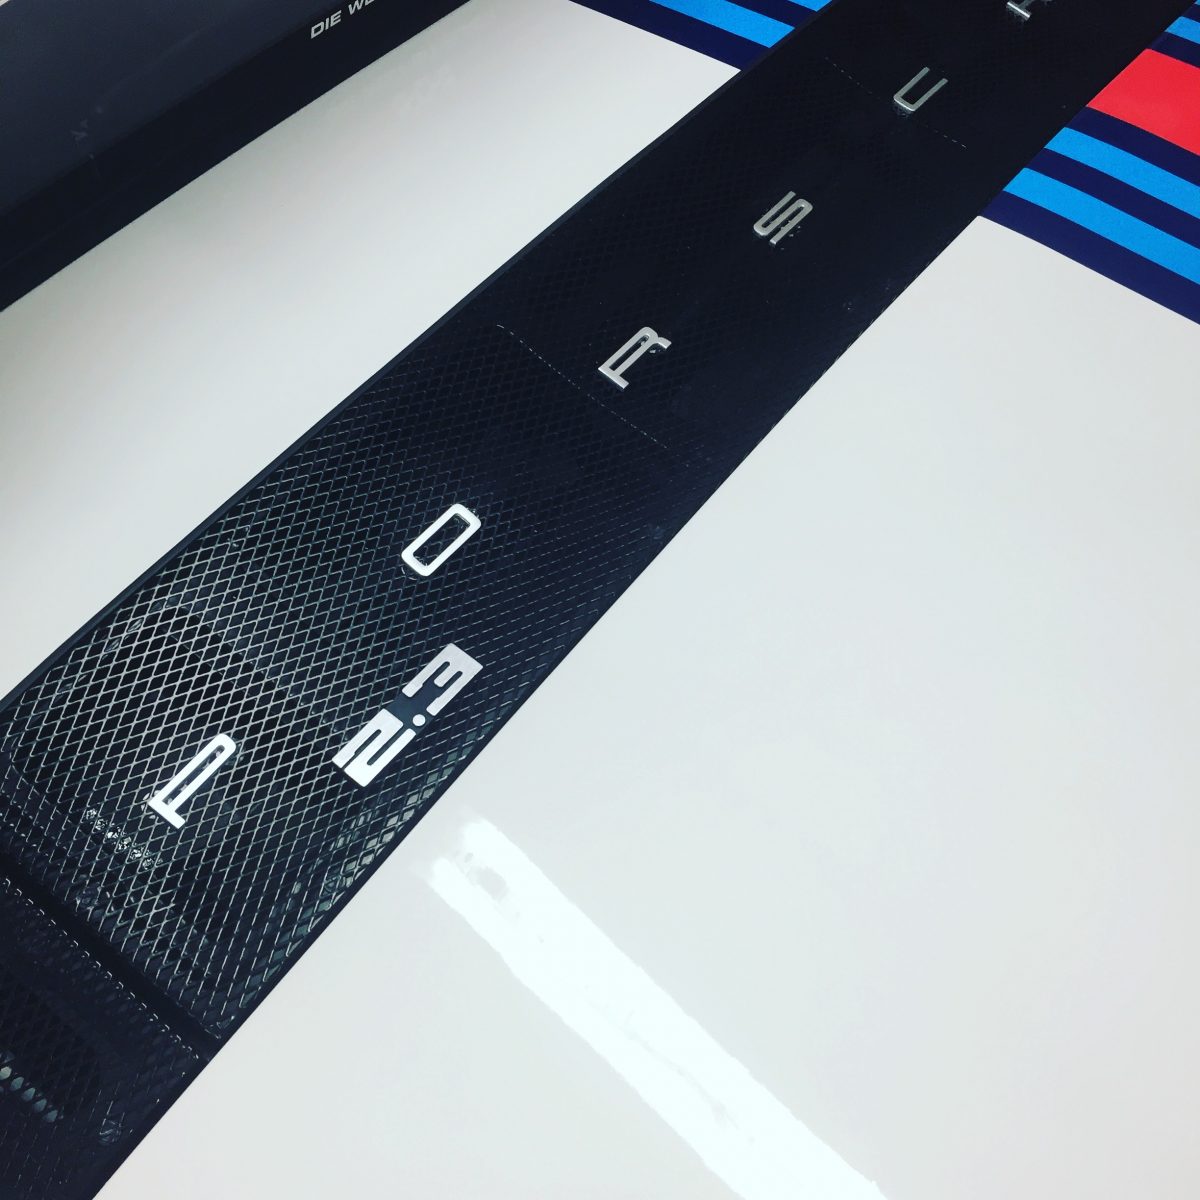
I finished the surface with a 1200 grit wet and dry paper and then painted it silver. Turned out pretty nice. 
I've had this faint whining noise from the gearbox since the start of the season. Sadly its getting louder and driving home from the autocross last night its really noticeable.
So the season might get quite short as I dont want to risk a total failure.
I've started investigating someone who can rebuild my gearbox. The good thing is that all the gears go in easy without crunching so the synchros should be ok.
Posted by: banananose914 Jul 20 2017, 06:26 PM
Looks like a great area for a 914. Thanks for sharing the car and the pictures. Jim.
Posted by: Frankvw Jul 20 2017, 11:25 PM
Hi Mats. Great job on the badge ! Nice custom touch.
Have fun and good luck on the gearbox rebuild.
Greetings from Holland
Posted by: falcor75 Aug 19 2017, 02:01 AM
I got a set of 914 Rubbers H4 headlights lenses and H4 LED bulbs in the mail last week and I've been waiting for a few non rainy evenings to try them out and compare with the stock sealed beam units that came on my ex California car.
This is the sealed beam on low/dipped beam. Quite short range.
This is the sealed beam on high beam. Better range of course but still not what I'd call good.
These are the LED H4's on low/dipped beam. The experience is that they are much brighter and light up the road further ahead than the sealed beam low beam did.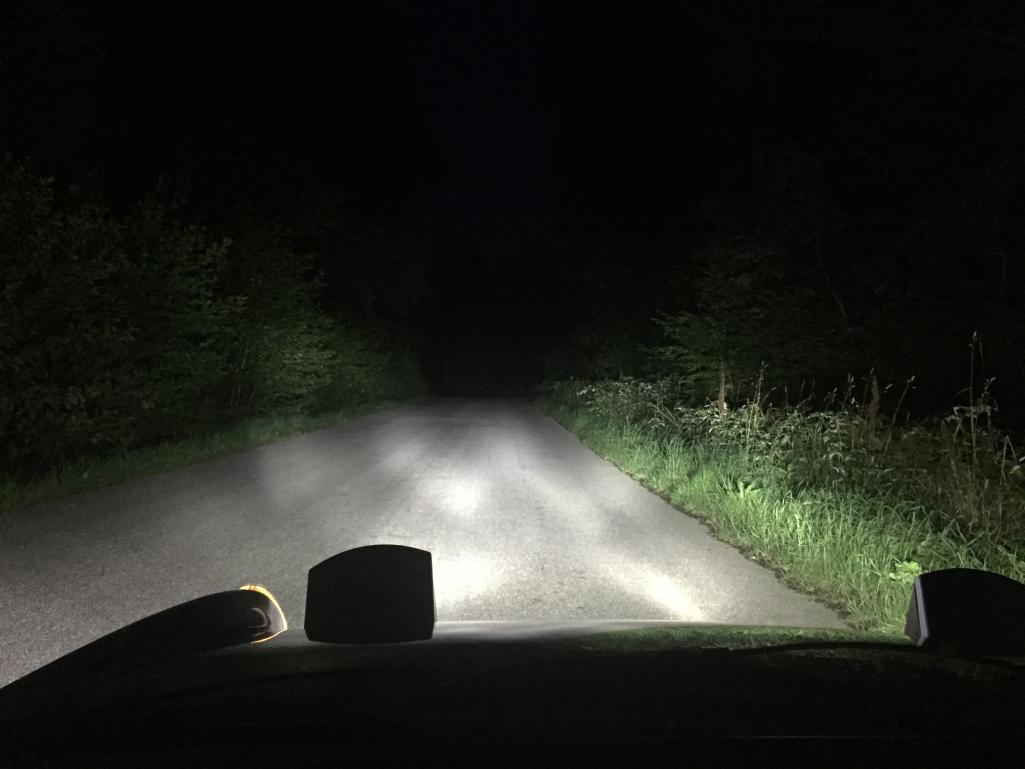
These are the H4 LEDs on high beam. I was quite dissapointed as there wasnt much difference from the low beam. As far as I can tell there is no extra range on the high beam and as the light pattern on the ground shows most of the extra light seems to end up close to the car. There was a little more vertical spread in the light but it didnt do much in actual long range light that you want on high beams.
My verdict: The improvement of the low beams makes it worth the upgrade. I wont be driving my car much in the dark so its ok for me. If you do alot of night driving I would try a set of Osram or Philips H4 bulbs too for comparison. (and get separate +12v feeds and relays for the headlights to ensure reliability)
Posted by: falcor75 Aug 19 2017, 02:04 AM
LED low beam from outside the car.
LED high beam from outside the car.
I also shot a two quite shakey movies from my phone while driving the same stretch of road both with the sealed beams and LED's.
I can post the links to them if someone is interested.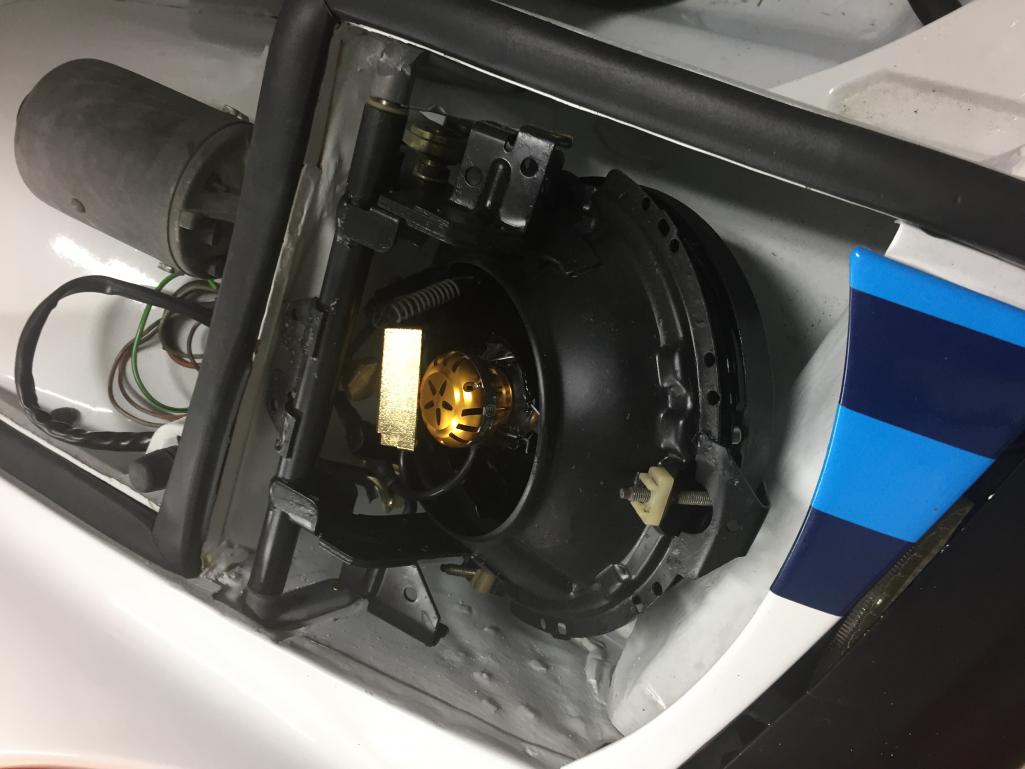
LED bulb installed.
Posted by: theer Aug 19 2017, 06:20 AM
Thanks for posting the comparison pics. Is it possible the the low & high beams are wired backward - and they are aimed too low? That might explain your high beam (really the low) hitting the ground so close to the car. Just a thought.
Posted by: jim_hoyland Aug 19 2017, 06:33 AM
Great story, pics, and build; thanks for sharing.
Posted by: falcor75 Aug 19 2017, 06:44 AM
Thanks for posting the comparison pics. Is it possible the the low & high beams are wired backward - and they are aimed too low? That might explain your high beam (really the low) hitting the ground so close to the car. Just a thought.
They are aimed the same height as the old sealed beams so I think that should be comparable. I've got the yellow wire connected to the top connector of the bulb, white and brown to the side ones.
Posted by: Philip W. Aug 19 2017, 01:50 PM
ive been playing around with this too, and i have rifht now the Osram H4 in the headlights and they are a good bit brighter and more white as you see with the Led, there is the typical difference in the hi va low beam - thanks for putting more "light" on the subject
Posted by: lonewolfe Aug 19 2017, 01:58 PM
Beautiful car Mats! Great video's too. What exhaust are you running? Your car sounds great!
Posted by: falcor75 Aug 20 2017, 07:53 AM
Beautiful car Mats! Great video's too. What exhaust are you running? Your car sounds great!
Thanks.
Its a Scart silencer on stock 2.0 HE's. Not quite the song of a -6 but damn nice for being a -4.
Posted by: falcor75 Aug 31 2017, 10:51 PM
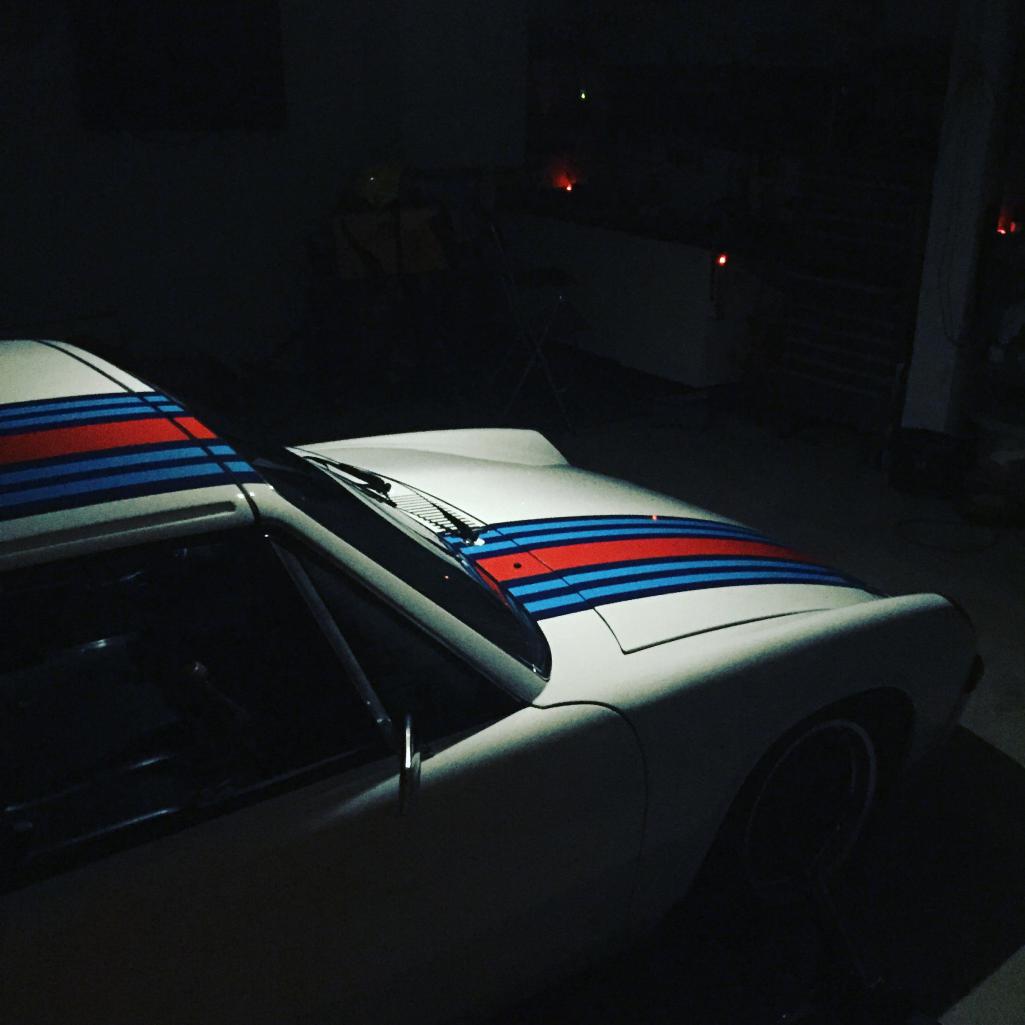
The other night when I came back into the garage after a short drive I caught this picture and got a little inspired. That moment after a drive and you turn of the bright garage lights. The silence is only interupted by the ticking noises of the engine beginning to cool down. Automotive nirvana right there.
Posted by: lonewolfe Sep 1 2017, 01:07 AM
The other night when I came back into the garage after a short drive I caught this picture and got a little inspired. That moment after a drive and you turn of the bright garage lights. The silence is only interupted by the ticking noises of the engine beginning to cool down. Automotive nirvana right there.
Great picture Mats! I always enjoy seeing pictures of your car!!
Posted by: falcor75 Oct 9 2017, 06:33 AM
The 2017 season is offically over. I havnt driven the car very much since late July due to an increasing whining noise from the gearbox. Its most notable when everything is warmed up and you accelerate from a slow speed in high gear.
Passing thru a village and slowing down to 50 kph (30 mph) and then accelerating
back up in forth gear and you can hear an whining noise that is rpm dependant.
So engine and gearbox out. The gearbox was dropped off last week to a semilocal (3 hour drive one way) Porsche engine/gearbox rebuilder thats very highly recommended here in Sweden. Now to play the waiting game and praying that I dont get have to eat porridge for all of 2018 due to the repair bill.
Attached thumbnail(s)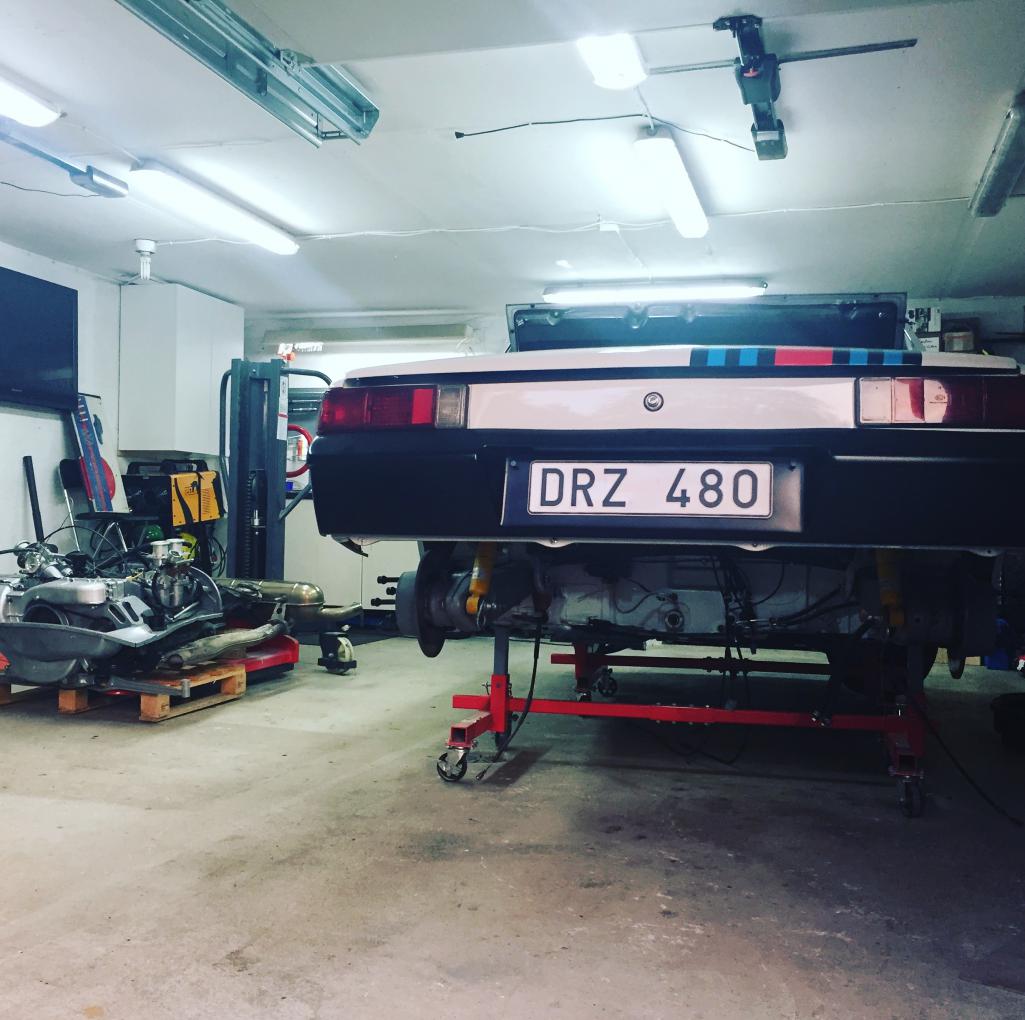
Posted by: Mikey914 Oct 9 2017, 08:35 AM
Nice pics on the LED head lights, yes you jump from 3900 to 6000 luemens, but the pattern is overlapped more than I'd like too, but if you look at your picture you can see the sign in the distance better, so it is throwing more light. is it 1/3rd more? Hard to tell with overlap, but I like mine.
Sorry to hear about the trans, but I'd think the repair bill would be limited to the replacement parts and the base cost to crack the trans. Hopefully, since it hasen't truly failed yet. Will be interesting to see why you have the noise.
Posted by: falcor75 Oct 10 2017, 11:15 PM
Nice pics on the LED head lights, yes you jump from 3900 to 6000 luemens, but the pattern is overlapped more than I'd like too, but if you look at your picture you can see the sign in the distance better, so it is throwing more light. is it 1/3rd more? Hard to tell with overlap, but I like mine.
Sorry to hear about the trans, but I'd think the repair bill would be limited to the replacement parts and the base cost to crack the trans. Hopefully, since it hasen't truly failed yet. Will be interesting to see why you have the noise.
Yes the LEDS are a definite improvment on my old sealed beam units but I'm curious how they stack up against a set of Hella lenses and quality relayed H4 bulbs.
Plus the fan noise is a dead giveaway that somethings not stock on the bi-yearly mandatory tech inspection.
I might have to make a comparison of that come spring.
Posted by: falcor75 Oct 31 2017, 11:54 PM
While I'm waiting for the verdict on my gearbox issues theres nothing that lights up the dark season like some new old parts...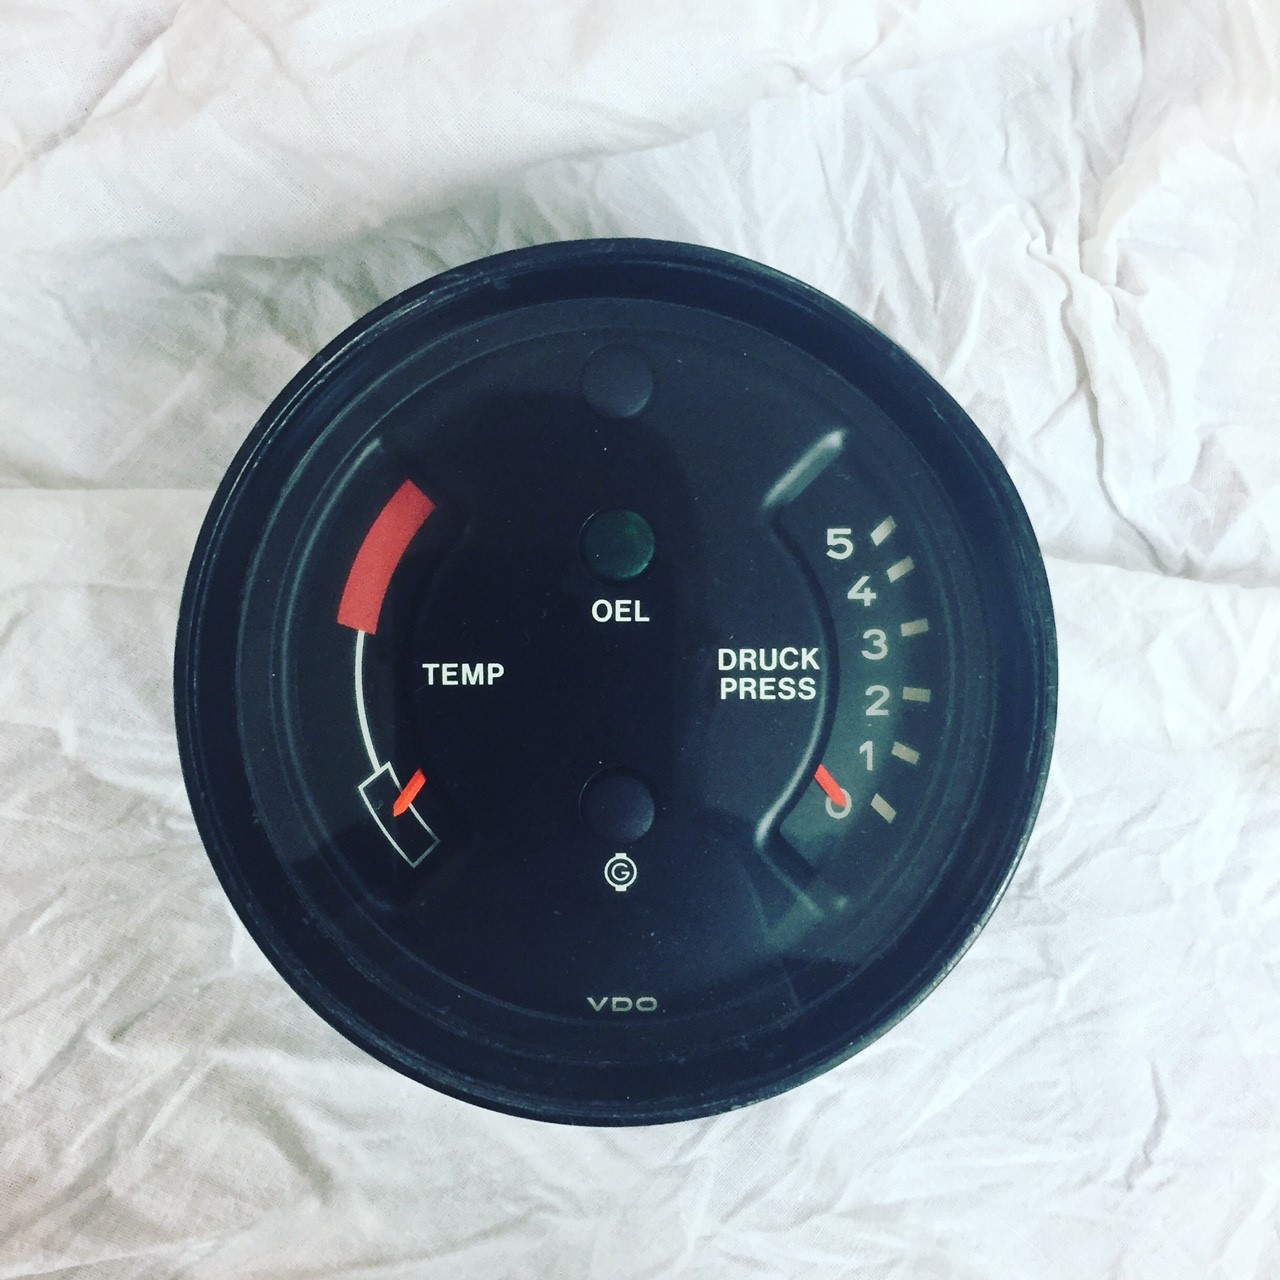
Might have to make myself a triple combi gauge this Winter.
Posted by: falcor75 Nov 10 2017, 03:51 AM
Just got an update from the guy thats got my gearbox and the 4-point bearing was apparently a total loss. Somehow the bearing had started separating, Another bearing was also on its way out along with first and second gear syncros.
Around €1000 in parts and then labor cost ontop of that so probably around 2k € for the whole rebuild.
Posted by: falcor75 Jan 14 2018, 11:03 AM
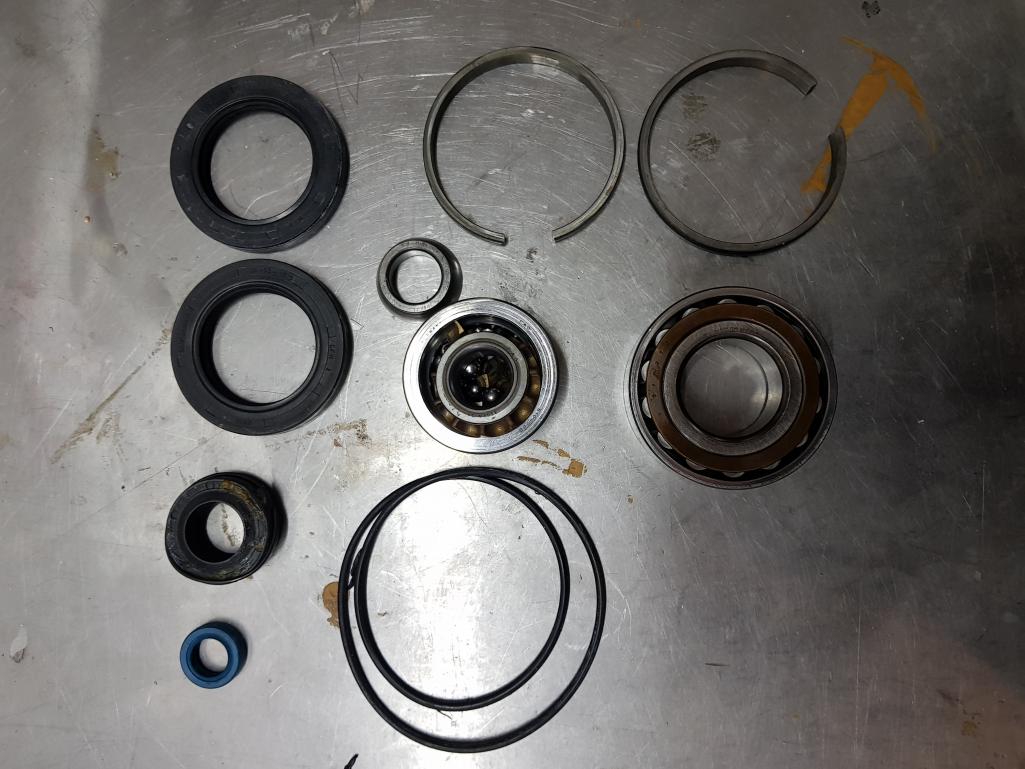
Spent about 7 hours in the car today to go pickup my rebuilt gearbox and drive home again. These are the leftover parts. Changed two bearings, two synchros and all the seals and nuts and washers.
Now I'm just waiting for a few remaining parts I've ordered before I can put the engine and gearbox back into the car. The goal is to have it drivable by the end of March.
Posted by: falcor75 Apr 8 2018, 01:11 PM
Just wrote a update post on my 914-6 GT fuel gauge replica on my webpage.
http://matsgarage.com/?p=1329
Any questions I'll try to answer here.
Posted by: falcor75 May 3 2018, 04:07 AM
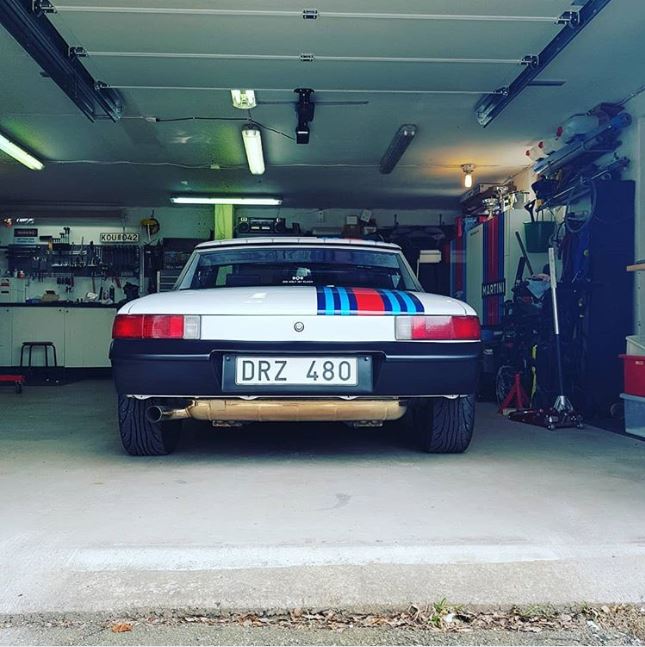
Still pretty cold for the season over here but last night I got some help with finetuning while cruising at different speeds and wow what a difference those small adjustments made to the feel of the car. Before it felt slightly reluctant or hesitant on cruising due to running to rich. Full throttle was never a problem tho. Now it runs sooo much sweeter at cruise and the CHT's were just fine. Now I'll drive it for awhile like this and then we'll do some more fine tuning when I feel its needed.
Happy Days !
Now I just need those Euro tail lenses from 914 Rubber.... 
Posted by: falcor75 Jun 5 2019, 11:05 AM
https://www.youtube.com/watch?v=jGhv9PJUGRU&feature=youtu.be
I wasnt aware my son was filming as we left a car meet tonight. He caught me spreading some lovely noise over the town...
Posted by: gereed75 Jun 5 2019, 03:02 PM
That is one sweet sounding car. Really nice build. Thanks Mat, enjoy it!
Posted by: falcor75 Jun 21 2019, 03:47 AM
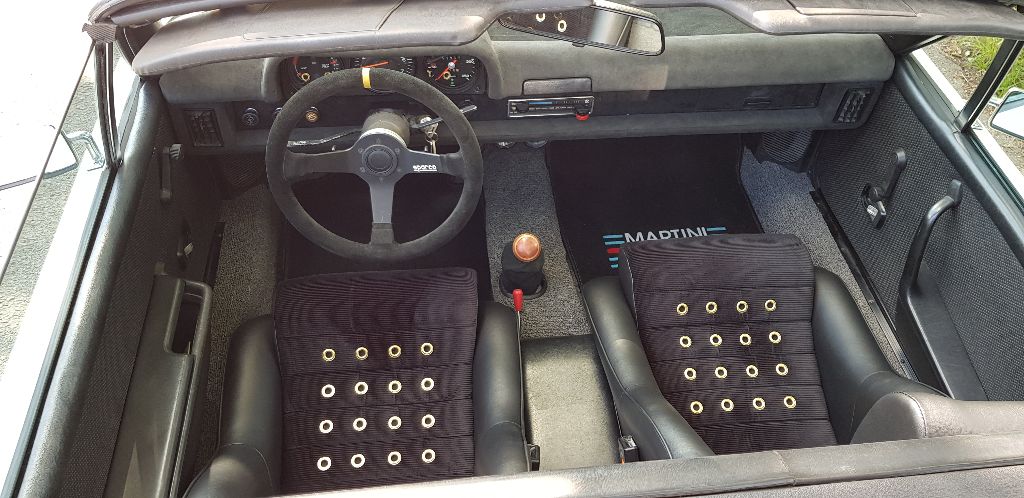
Finally got my new seats this week and got around to mounting them. They are Scheel replicas from Italian company D'Eser. Fitting them wasnt entirely troublefree. The stock rails wont fit directly because the mounting bolt c-c distance between the two rails are 360 mm on the stock seats and 385 mm on these seats. Also the seats use 4 M8 screws where the stock seats use 8 M6 screws. I designed a simple 5 mm thick adapterplate to be able to fit the seats for now. 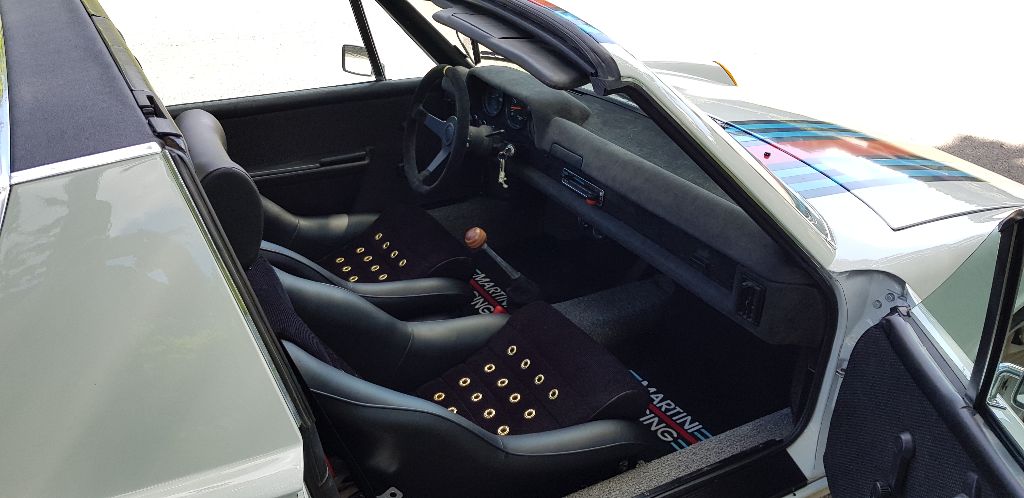
I end up sitting probably two inches higher than with the stock seats and the seat angle is a bit too reclined so some sort of modification will have to be done later on.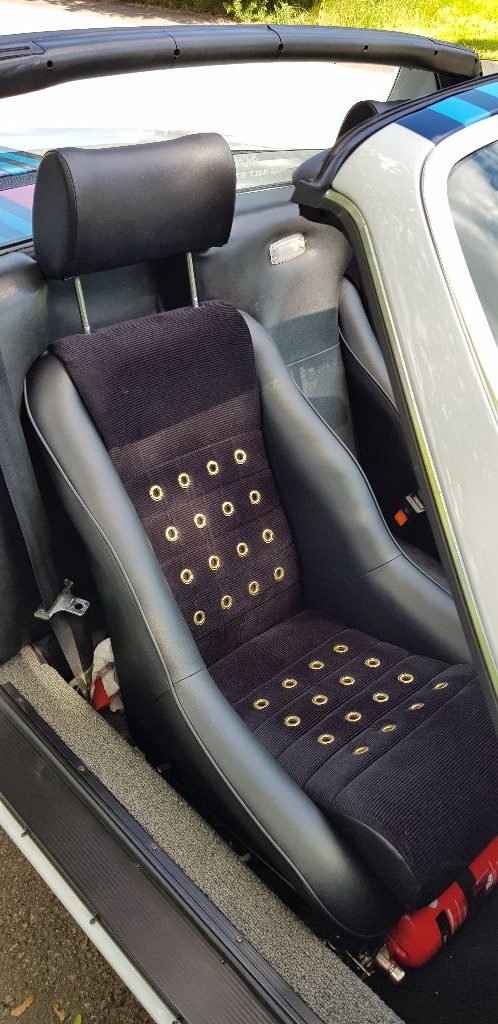
Because the seats end up sitting higher the shoulders rub against the backpad. I've put some thin microfiber cloth inbetween to prevent rubbing damage for now.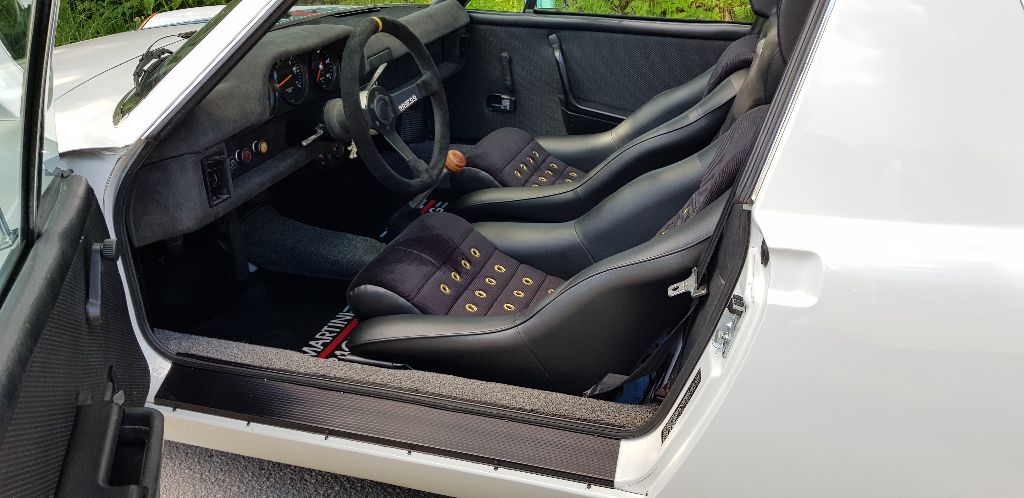
Access to the handbrake is also a bit more tight but it still works at least. And the seats look bloody amazing compared to my old stock sun damaged ones.
Posted by: sb914 Jun 21 2019, 04:19 AM
Wow ! Beautiful seats .
Posted by: rgalla9146 Jun 21 2019, 05:52 AM
That 2" height difference could be very important to some here.
A big plus for some and a deal killer for others.
Posted by: Spoke Jun 21 2019, 06:07 AM
Very nice seats. They complement your beautiful car.
Posted by: ValcoOscar Jun 21 2019, 02:13 PM
Mats-
You should be very proud of yourself...beautiful 914
PM me...I have a little something for you!!!!
Oscar
Posted by: gereed75 Jun 21 2019, 04:02 PM
Nice, the shape of the side bolsters pretty much the Scheels in the GT cars. Nice choice!
Posted by: falcor75 Jun 21 2019, 10:32 PM
Thank you everyone. These seats were the last big piece that was lacking on my car. I ordered them for my birthday back in february but between the maker having lots to do and a misunderstanding about the payment it took 4 months for them to get here. I could have gotten plain seats faster and cheaper but those rivets just elevate the look and I love it.
Now apparently my son wants to turn one of the stock seats into a gameseat for his playstation. I guess thats what we're doing over the summer vacation.
Posted by: falcor75 Aug 30 2019, 01:41 AM
Well I started writing this in the "why didnt you work on your 914 today" but figured it would place better here. I love the way my 914 drives and looks but even with a built 2,3 four and a rebuilt gearbox I just dont get the confidence in it that makes me want to drive it all the time or go too far from home.
This summer I've only done 250 miles and that is all just local driving. I could live with the engine leaving 2-3 drops on the floor in between drives, thats not a big issue. But the gearbox weeping from the input seal annoys me greatly. Also the whining from a worn 4th gear just makes my mechanical sensibility alarm go off. I've talked with the guy that rebuilt the gearbox and he'd swap the seal at no cost to me. But I'm thinking I should maybe get the whining dealt with too. Does anyone have a known good fourth and fifth gearset to sell me? @Dr Evil ?
I want to drive my car alot more but as it is now it feels too hand grenady.
Posted by: gereed75 Aug 30 2019, 05:15 AM
I had that feeling after rebuilding my engine. Took it to a weekend HPDE and thoroughly thrashed it. Never missed a beat and now I just drive it. Love your car, new seats are really nice too. Get out there and drive,
Posted by: Spoke Aug 30 2019, 05:39 AM
... @Dr Evil...
Bummer with the uneasy feeling about the car. The one thing I demand from my cars is reliability. Without it, I don't want to drive it.
BTW, I don't think the notification to Dr Evil works if the name has a space in it. You may want to PM Mike directly.
Posted by: r_towle Sep 2 2019, 04:11 PM
Falcor,
Where do you live?
I get to Stockholm a few times per year.
I could bring over some parts.
Posted by: falcor75 Sep 2 2019, 09:37 PM
Falcor,
Where do you live?
I get to Stockholm a few times per year.
I could bring over some parts.
I live on the oopposite side of Sweden. About an hour north from Gothenburg.
It would take me about 5 hours to drive to Stockholm. But if you have the parts I need then shipping from the US isnt that bad usually.
If the weather cooperates this weekend I've been invited to a car show in my hometown thats about an hour and twenty minutes from where I live so I'll drive it there and back just to put some more time on it before winter.
Posted by: 914forme Sep 3 2019, 06:34 PM
@http://www.914world.com/bbs2/index.php?showuser=15176 Sell you, I will give you a set, and if they need to be sent over or dropped in a piece of luggage let me know. You cover shipping I am happy to have them go to a good home.
PM me what you need. If Dr. Evil wants to look them over that is fine. I am some what local to him, get to his city about once a month, some times more depending on the political hands I need to shake. Part of the job I never enjoy, seeing 914 people while I am in the city makes it bearable. It is my reward for putting up with all the stuff, just part of the game.
Posted by: falcor75 Sep 5 2019, 06:26 AM
Thanks Stephen. I'd need a fourth and fifth gearset, the ratio isnt that important, the most common ones would do fine. The more important part is that they have some milege left on them. If we could get the good Dr to check them out before shipping that would be beyond awsome.
Posted by: mepstein Sep 5 2019, 06:28 AM
Thanks Stephen. I'd need a fourth and fifth gearset, the ratio isnt that important, the most common ones would do fine. The more important part is that they have some milege left on them. If we could get the good Dr to check them out before shipping that would be beyond awsome.
I would trust Stephen to know what he has.
Posted by: 914forme Sep 6 2019, 05:18 PM
I have several sets so I will take them out and drop some fine pictures in here. They will be good and a matched sets. Figuring out the Gear pieces is as easy as counting teeth, and referring to the chart.
Get them up this weekend so you can look at them before I leave for Okteenerfest. Travel 100s of miles to see a guy that lives just 45 minutes from me.
Posted by: falcor75 Sep 7 2019, 12:48 AM
I'm prepping the car today for the last show of the season. Its a thing called Speed Art Design in the town where I grew up. It's about an hour and 20 minutes from where I live so it should be fine. Wife and daughter will be riding backup in the daily driver.
Posted by: falcor75 Sep 9 2019, 11:08 PM
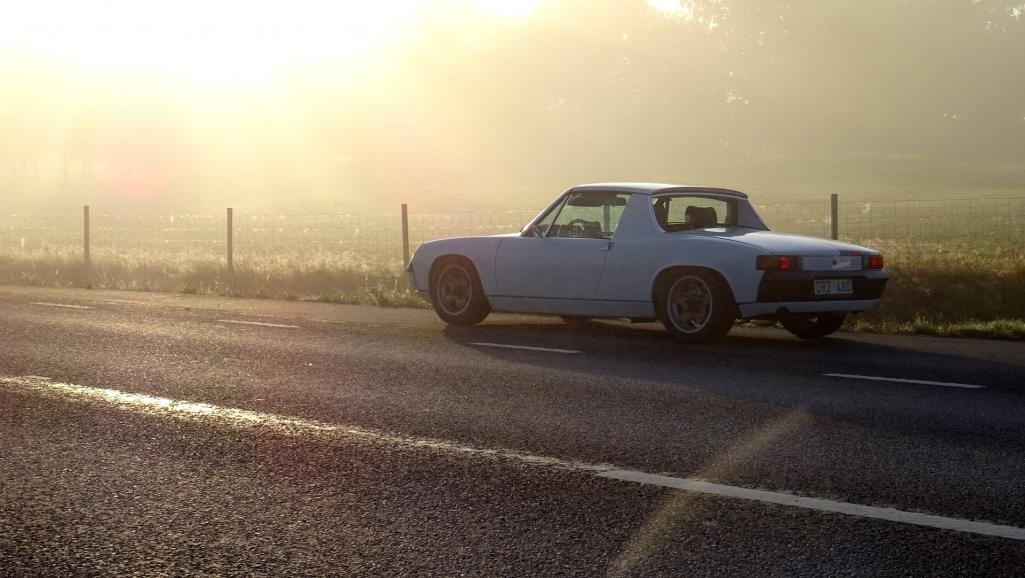
Well that sunday morning drive was worth it if nothing else then for just this photo. Magical light just as the sun broke thru the heavy fog.
Posted by: Mayne Sep 10 2019, 05:45 AM
Great shot! I really love your car; there is just something about it that looks so right. Keep enjoying it!
Posted by: ValcoOscar Oct 15 2019, 10:04 AM
Great shot! I really love your car; there is just something about it that looks so right. Keep enjoying it!
I've enjoyed following this thread myself.
Maybe it's a Martini thing

Oscar
Posted by: falcor75 Oct 15 2019, 11:36 PM
Great shot! I really love your car; there is just something about it that looks so right. Keep enjoying it!
I've enjoyed following this thread myself.
Maybe it's a Martini thing
Oscar
I'm hoping for a sunny autumn weekend day so I can take it out for a last ride and test some key fobs.
Posted by: mepstein Oct 17 2019, 03:05 PM
Great shot! I really love your car; there is just something about it that looks so right. Keep enjoying it!
I've enjoyed following this thread myself.
Maybe it's a Martini thing
Oscar
We have the right vehicle for you if you need a lift.
Attached image(s)
Posted by: falcor75 Oct 17 2019, 09:34 PM
Excellent now I just need a Martini badged Jetliner to hop across the pond in too.
Gotta travel in style....
Posted by: falcor75 Jan 14 2020, 02:00 PM
Well its winter here and its time for some service and leakfixing.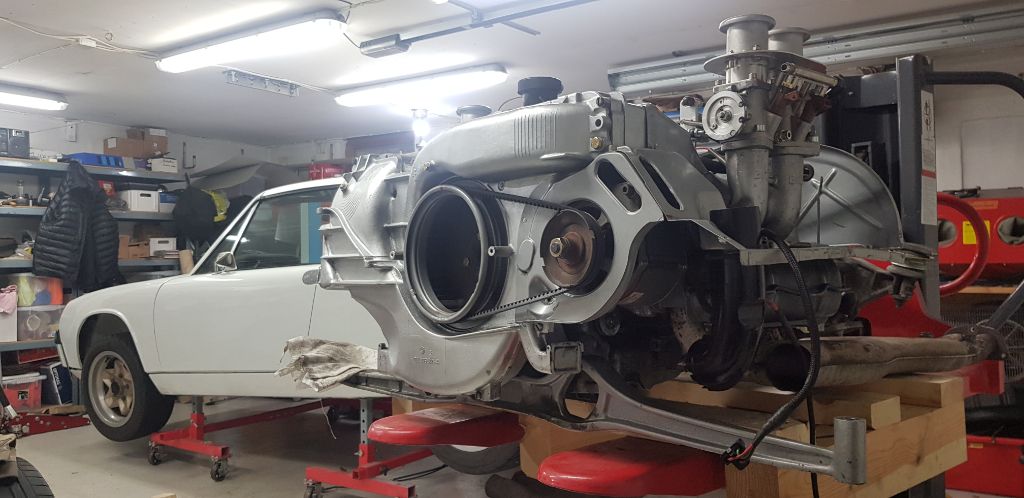
Engine out. First fixes was to remove the flywheel and pull the old Elring crank seal and swap it for a Sabo brand one. While in there's I've also adjusted the postion of my pilot bearing to make it support the input shaft a little bit more.
I thought I had a leak from the input shaft on the gearbox but it turns out it was more likely the reverse light switch. Took the old mangled brass? washer off and put in a new annealed copper one.
I still have to remove the washer I've spotted under the clutch pivot ball and see if that gives me a more centered clutch arm. Need to get a cheap 12 long 12 mm socket and modify it to get the pivot off.
While the engine is out I've also set the valves (zero lash on this engine)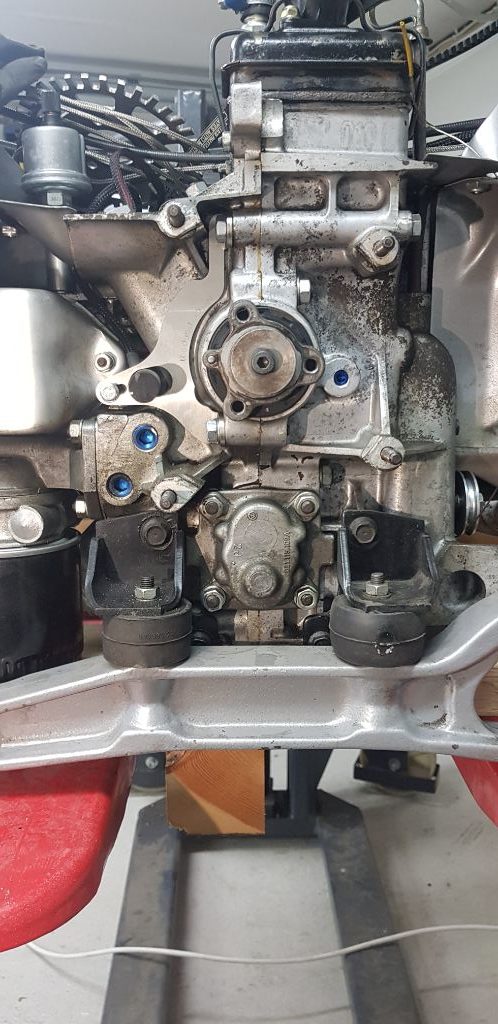
I've also noticed an annoying drip from the front of the engine. Typically its shown as a drop of oil hanging from the bottom of the drivers side engine bracket. (behind the engine bar in this picture)
I've taken the engine bar off and cleaned the entire front of the engine and wiped it dry. Now i'll let it sit for a day or two and see if the leak can be spotted. My main suspect is the oil pump.
Posted by: rgalla9146 Jan 14 2020, 09:28 PM
Mats you've done a beautiful job.
What perseverance !
You should be very proud.
Tremendous.
Enjoy.
Rory
Posted by: rgalla9146 Jan 14 2020, 09:29 PM
DBL
Posted by: raynekat Jan 14 2020, 11:27 PM
Yea, definitely looking good there Mats.
You'll get all those oil leaks sorted, I'm sure of it.
Great looking car and concept for the car.
Posted by: falcor75 Jan 16 2020, 07:55 AM
Thank you both.
Posted by: falcor75 Jan 27 2020, 01:09 AM
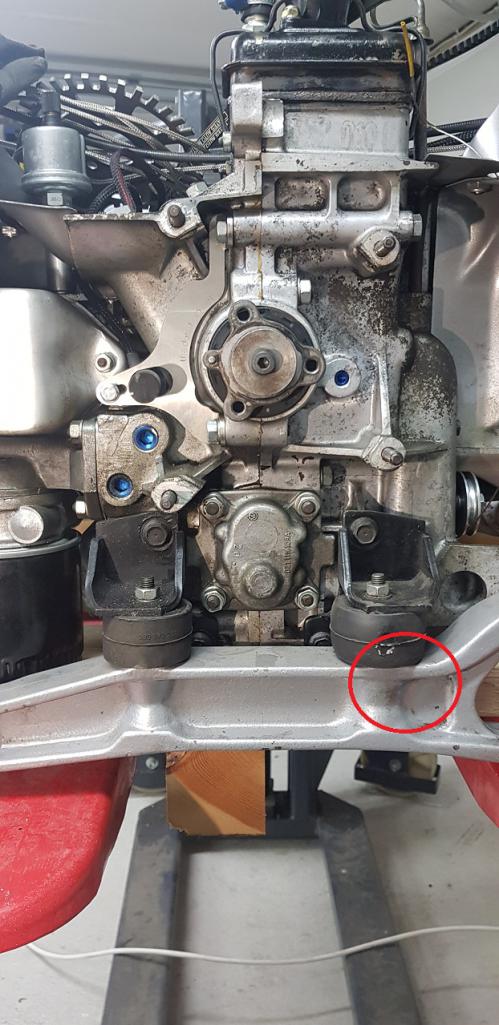
So I've been chasing oil leaks for a bit and itseems to be coming from this plug.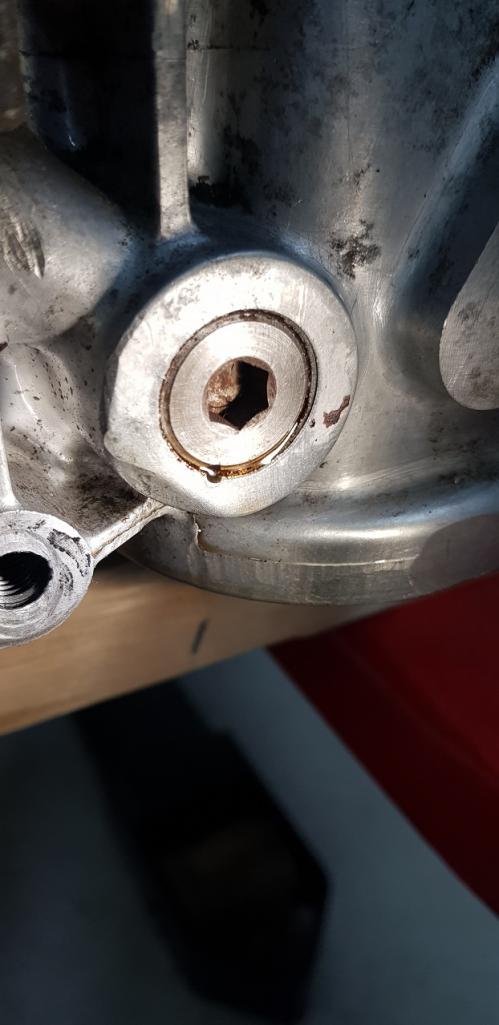
The offending member weeps a bit of oil after sitting for a few days, I'm suspecting that it leaks more when being heatcycled.
I'd prefer to not pull it and reseal it, has anyone had any luck with some sort of exterior sealant?
Posted by: PatrickB Jan 27 2020, 04:51 AM
So I've been chasing oil leaks for a bit and itseems to be coming from this plug.
The offending member weeps a bit of oil after sitting for a few days, I'm suspecting that it leaks more when being heatcycled.
I'd prefer to not pull it and reseal it, has anyone had any luck with some sort of exterior sealant?
Seal all. You'll be suprised how well it works.
Posted by: Superhawk996 Jan 27 2020, 05:52 AM
So I've been chasing oil leaks for a bit and itseems to be coming from this plug.
The offending member weeps a bit of oil after sitting for a few days, I'm suspecting that it leaks more when being heatcycled.
I'd prefer to not pull it and reseal it, has anyone had any luck with some sort of exterior sealant?
That leaking plug appears to be steel. I think I see rust in the hex and lathe marks on the face. I can see the other two up at the oil filter area and by the one by the crank nose are aluminum.
Verify the leaking offender is steel with a magnet. These are NPT tapered pipe plugs. If steel, your are correct, it has probably loosened from heat cycling.
If steel you have 3 options:
1) Just tigten it. NPT pluts are an interference fit and tightening will stop the leak. Temporarily but probably for many years.
2) Pull the plug completely and use PTFE thread sealeant (liquid not tape) and reinstall.
3) Replace it with a properly installed aluminum plug.
If it's an aluminum NPT plug:
1) You'll have a very hard time getting it out without stripping the aluminum hex. Make sure you have a new tight fitting hex wrench before you even attempt this. Best bet is to gently heat the case (200F is plenty) and then cool the plug quickly by squirting water with a syringe right into the hex. Immediately try to loosen. This doens't work everytime. Sometimes the aluminum plugs have to be machined out but on the other hand if it is aluminum I'd be surprised that it is leaking in the 1st place.
2) If #1 fails, then you might go for the cover with JB Weld route but I absolutely hate this solution but in the past I've sucessfully used JBWeld to seal worse leaks in emergency situations.
3) If the hex strips, you're done. It will need to to be machined out. In your case #2 is likely the best solution unitl you need a rebuild or other case machine work.
Most importantly, don't mess with the blue aluminum plugs if they are not leaking. I prefer aluminum plugs. When they are installed properly, they don't leak and are basically a permanent fix when replacing galley plugs. DO NOT try to move or "re-seal" the blue aluminum plugs.
We just had a relevant thread discussion on aluminum vs. steel oil galley plugs.
http://www.914world.com/bbs2/index.php?showtopic=342995
Posted by: Mark Henry Jan 27 2020, 08:04 AM
So I've been chasing oil leaks for a bit and itseems to be coming from this plug.
The offending member weeps a bit of oil after sitting for a few days, I'm suspecting that it leaks more when being heatcycled.
I'd prefer to not pull it and reseal it, has anyone had any luck with some sort of exterior sealant?
That leaking plug appears to be steel. I think I see rust in the hex and lathe marks on the face. I can see the other two up at the oil filter area and by the one by the crank nose are aluminum.
Verify the leaking offender is steel with a magnet. These are NPT tapered pipe plugs. If steel, your are correct, it has probably loosened from heat cycling.
If steel you have 3 options:
1) Just tigten it. NPT pluts are an interference fit and tightening will stop the leak. Temporarily but probably for many years.
2) Pull the plug completely and use PTFE thread sealeant (liquid not tape) and reinstall.
3) Replace it with a properly installed aluminum plug.
If it's an aluminum NPT plug:
1) You'll have a very hard time getting it out without stripping the aluminum hex. Make sure you have a new tight fitting hex wrench before you even attempt this. Best bet is to gently heat the case (200F is plenty) and then cool the plug quickly by squirting water with a syringe right into the hex. Immediately try to loosen. This doens't work everytime. Sometimes the aluminum plugs have to be machined out but on the other hand if it is aluminum I'd be surprised that it is leaking in the 1st place.
2) If #1 fails, then you might go for the cover with JB Weld route but I absolutely hate this solution but in the past I've sucessfully used JBWeld to seal worse leaks in emergency situations.
3) If the hex strips, you're done. It will need to to be machined out. In your case #2 is likely the best solution unitl you need a rebuild or other case machine work.
Most importantly, don't mess with the blue aluminum plugs if they are not leaking. I prefer aluminum plugs. When they are installed properly, they don't leak and are basically a permanent fix when replacing galley plugs. DO NOT try to move or "re-seal" the blue aluminum plugs.
We just had a relevant thread discussion on aluminum vs. steel oil galley plugs.
http://www.914world.com/bbs2/index.php?showtopic=342995
Sorry wrong.
This plug is steel, but it's a factory plug there's no way it's NPT, it's a metric thread.
It's the machining hole for the oil pick-up. It won't leak running as it's suction from the oil pump, but it's likely leaking air into the pick-up circuit.
I've had it out before, worth a try at removing and reseal. If no joy clean and cover with JB, etc.
Posted by: FourBlades Jan 27 2020, 10:34 AM
Wow, great car and great build!
Make sure to enjoy it to the max.
John
Posted by: 914forme Jan 27 2020, 11:52 AM
On that note though, the case will expand more than the steel when heated. The Aluminum based on alloy is over a 2:1 expansion rate of the steel plug counterpart. Depending on the amount of magnesium, we are approaching a 3:1.
Heat it nice with a heat gun 100 Celsius is fine, and go at it nice and slow. Aluminum threads can gall.
I would use a good pipe thread sealant PFTE like Superhawk mentions. Or if you have the means, find or cut a plug to match that galley threads.
If you bugger the threads, then you will need to chase them, or rethread the bung. Grease, and lots of cleaning are your friends here. I would even go as far as to back pack the passage to keep things from migrating back in to the engine. And count all the stuff I put in and out. Like a surgeon or AP mechanic would.
Or like everyone else has mentioned seal it with your favorite epoxy-ish sealant, that is the easy way out and understandable, unless you where doing a rebuild.
Posted by: Superhawk996 Jan 27 2020, 06:29 PM
Sorry wrong.
This plug is steel, but it's a factory plug there's no way it's NPT, it's a metric thread.
It's the machining hole for the oil pick-up. It won't leak running as it's suction from the oil pump, but it's likely leaking air into the pick-up circuit.
I've had it out before, worth a try at removing and reseal. If no joy clean and cover with JB, etc.
You are correct. Not NPT. My fault for not looking closely and being to fast to comment early in the morning .
It is straight cut thread and a very short thread at that. OEM design counts on this plug being threaded in deeply enough, and with enough torque to basically roll form a 1st thread from the steel plug into the aluminum case and on thread sealant after the fact.
The principle of a steel plug loosening over time and heat cycles is still relevant though. Honestly I had forgotten about that plug being straight cut and will have to look into addressing machining on my cases. Truly not a great design. In the case of the other lifter galley plug and the oil pressure relief valve they use a crush washer to ensure a good seal. Not sure why they didn't do the same here?
Maybe ultra tight clearances to the engine mount bracket? Thank you for keeping me honest.

Posted by: falcor75 Jan 27 2020, 11:37 PM
I will go for a thorough clean and some sort of exterior sealant first. The engine barely has 3500 miles on it since it was built.
Posted by: Tbrown4x4 Jan 28 2020, 03:37 AM
Mine was staked. Not sure if it was staked at the factory.
Posted by: wndsrfr Jan 28 2020, 06:58 AM
Devcon Titanium Putty for exterior repair...Peter Dawe recommended it to me for mag case cracks... expensive but top of the food chain...
Posted by: barefoot Jan 28 2020, 04:27 PM
So I've been chasing oil leaks for a bit and itseems to be coming from this plug.
The offending member weeps a bit of oil after sitting for a few days, I'm suspecting that it leaks more when being heatcycled.
I'd prefer to not pull it and reseal it, has anyone had any luck with some sort of exterior sealant?
[/quote]
Sorry wrong.
This plug is steel, but it's a factory plug there's no way it's NPT, it's a metric thread.
It's the machining hole for the oil pick-up. It won't leak running as it's suction from the oil pump, but it's likely leaking air into the pick-up circuit.
I've had it out before, worth a try at removing and reseal. If no joy clean and cover with JB, etc.
[/quote]
Interesting, both my 2L GC & GA cases have a pressed in plugs for the suction port.
Both cases have been tapped and plugged for all the other gallery plugs.
Barefoot
Posted by: falcor75 Mar 27 2020, 03:17 AM
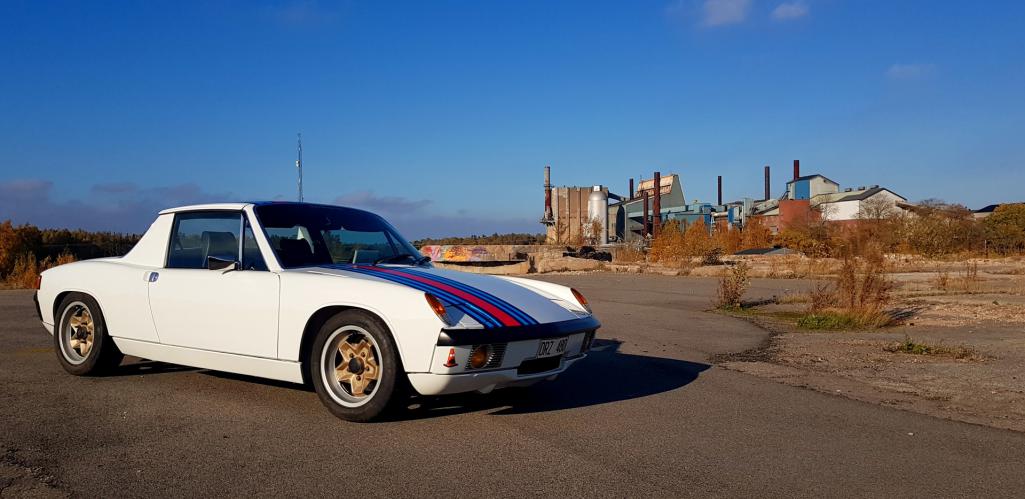
Pondering of wrapping the lower panels to get a more original and less fatbellied look...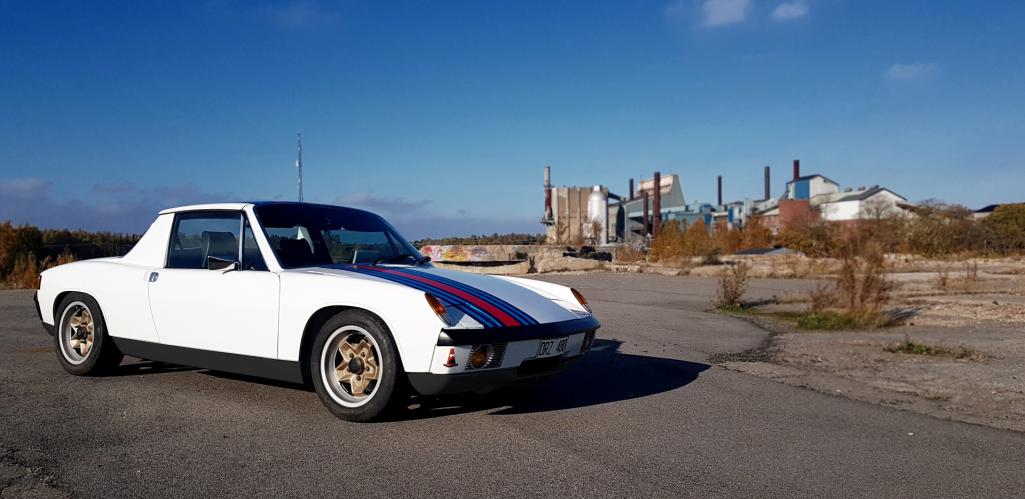
Posted by: Frankvw Mar 27 2020, 04:29 AM
Pondering of wrapping the lower panels to get a more original and less fatbellied look...
Matts, I like both, but the rockercover black is looking good. No Martini of Porsche Script on there ?
Posted by: gereed75 Mar 27 2020, 04:45 AM
Really love the refinement that your car represents. Very sano.
How about Martini dark blue
Posted by: Tbrown4x4 Mar 27 2020, 04:47 AM
The car's beautiful! What did you reseal the plug with?
Posted by: raynekat Mar 27 2020, 02:06 PM
The black down low looks great Mats.
Posted by: sixnotfour Mar 28 2020, 11:50 AM
Porsche script ??
Attached image(s)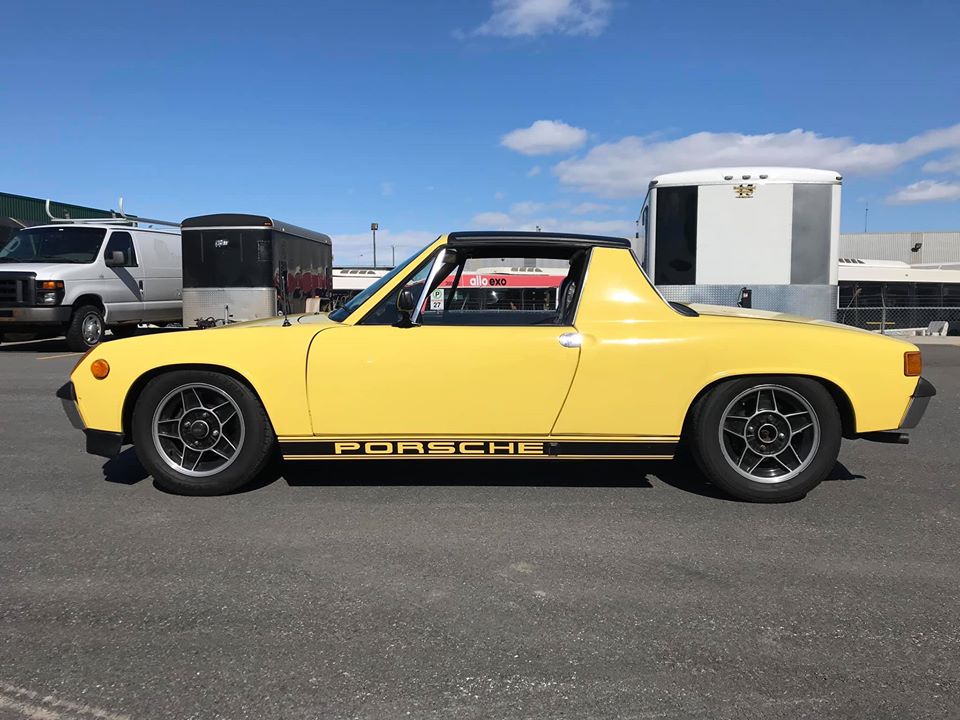
Posted by: Spoke Mar 28 2020, 04:03 PM
The car looks spectacular in white trim on the bottom. Very clean look.
Posted by: falcor75 Mar 29 2020, 02:34 AM
Thank you for all your comments and suggestions. About the script I prefer my car without....the only place it says Porsche on the whole car is on the engine grille and I kinda like that understated look.
Posted by: falcor75 Apr 20 2020, 09:01 AM
Well I managed to burn the tach output on my ECU so that will take 4-6 weeks to fix so now I have time for some needed upgrades. 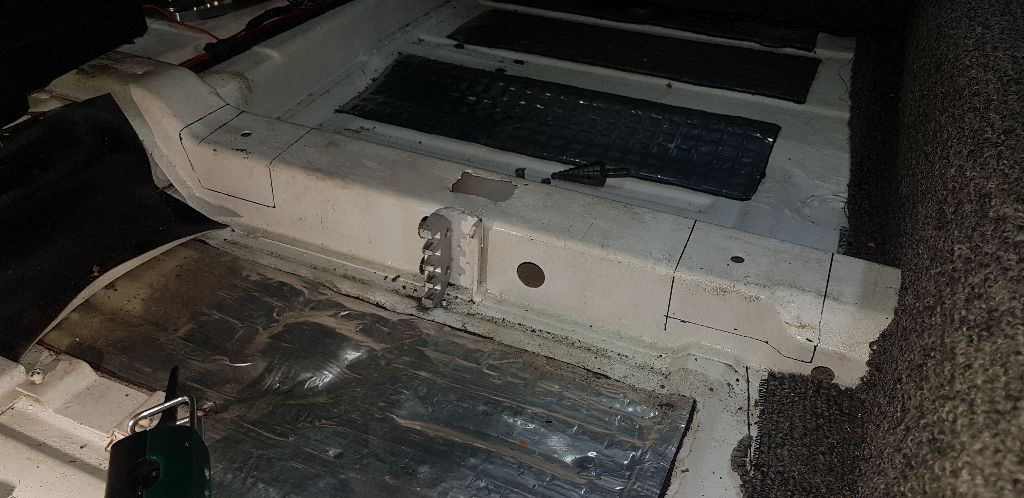
The nice seats I bought last year doesnt quite work with the stock seat rails/bases.
The seats ended up much too high and too reclined for my taste. I've been thinking about this alot but in the end there is no other solution than tho notch the beam that goes under the seats. The stock 914 seats will never go back into this car anyway since I will use them for my other project. Before getting this far I've measured the whole area and done some testing in Solidworks to make sure it will work. 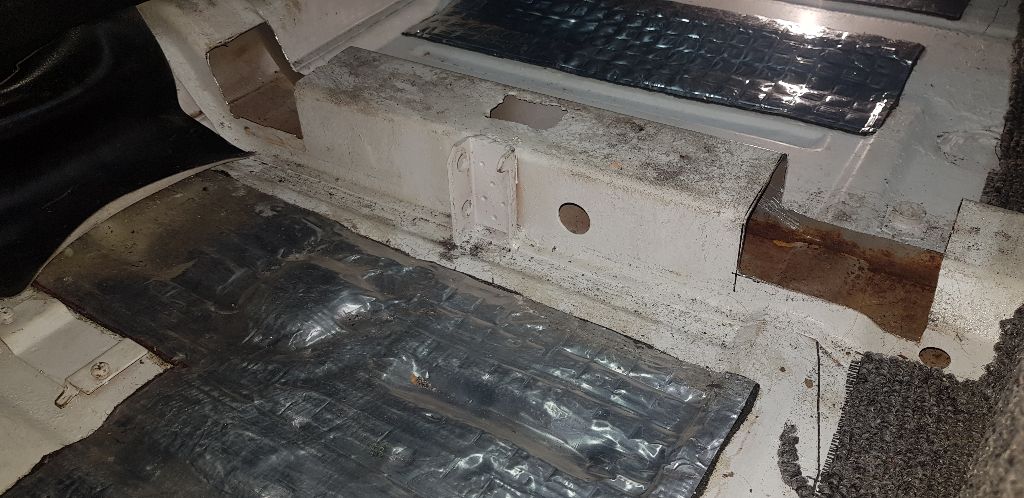
Then its just to bring out the step drill and the airsaw and get stuck in there. The rail was much nicer inside than I expected. Surface rust on the bottom but still very solid.
I wirebrushed it was best I could and then treated it with a rust converter. 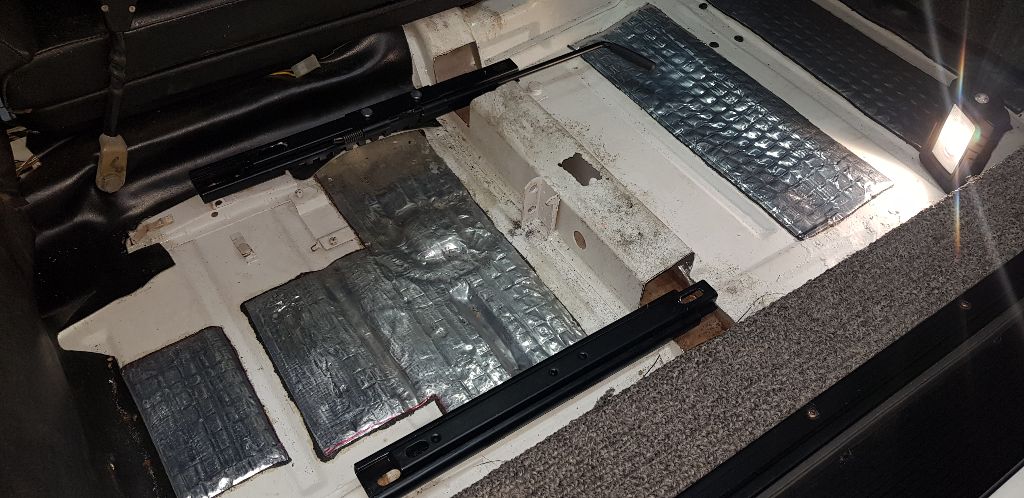
The aftermarket seat rails I bought for the Seven project gets used for mocking up and I have ordered a second pair so both cars will use the same kind of rails.
Posted by: Frankvw Apr 20 2020, 10:51 AM
Wow Mats, I guess you really measured a couple of times before actually cutting that ! Good luck with this project !
Posted by: Spoke Apr 20 2020, 03:58 PM
Nice cut job. What's the plan to close up the brace?
Posted by: falcor75 Apr 21 2020, 06:55 AM
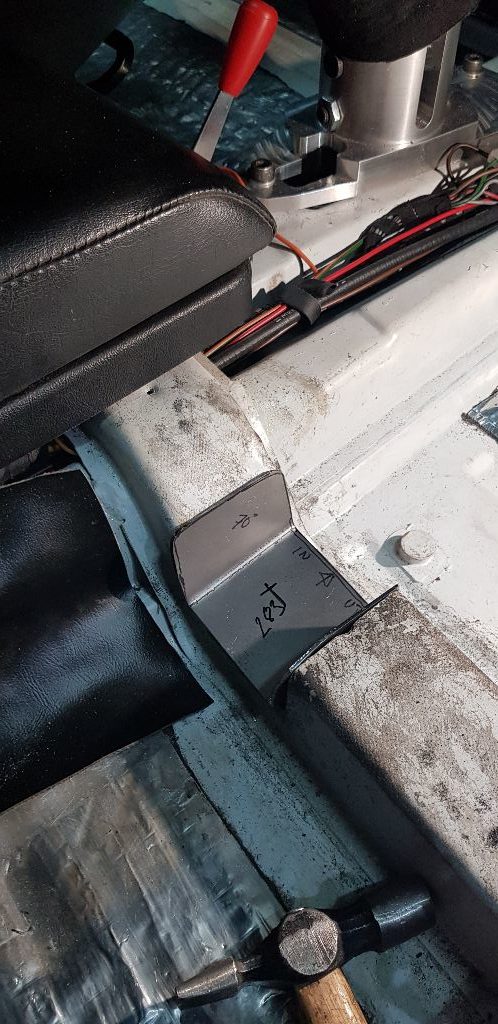
Good question Spoke. The original material wasnt very thick, 0,8-0,9 mm (20-22 gauge) and I'm making the filler pieces from 1,5 mm (thats about 15 gauge?)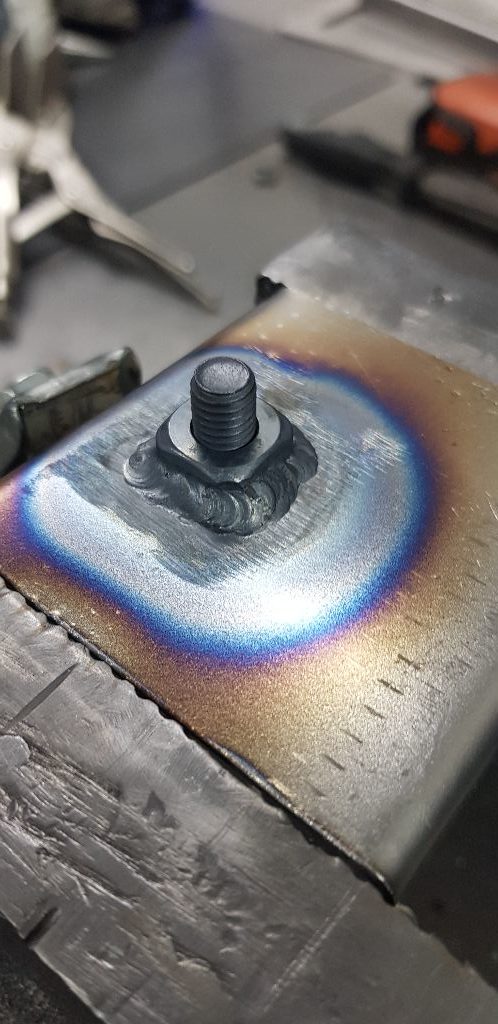
Welded in a capture nut on the underside as an offering to the Binky gods. 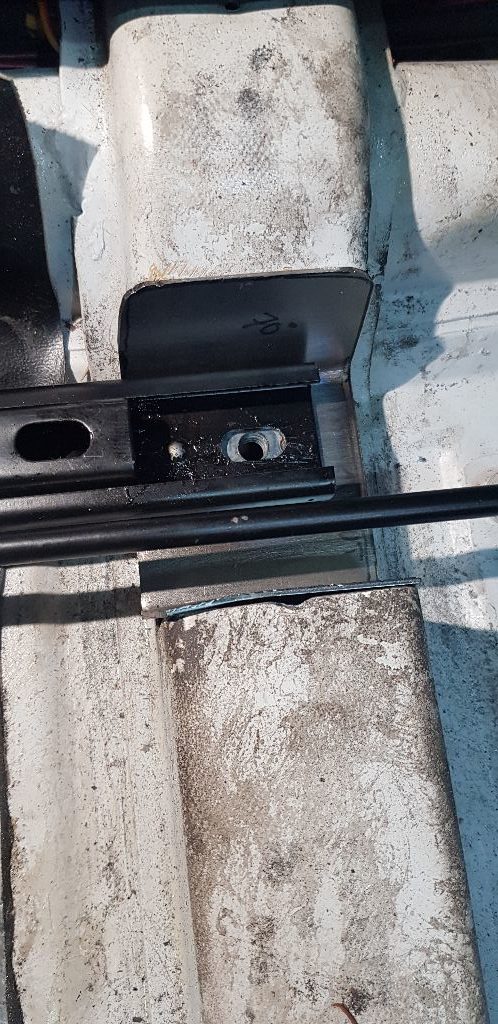
Looks like it will fit ok. Thank god for slotted holes tho.. 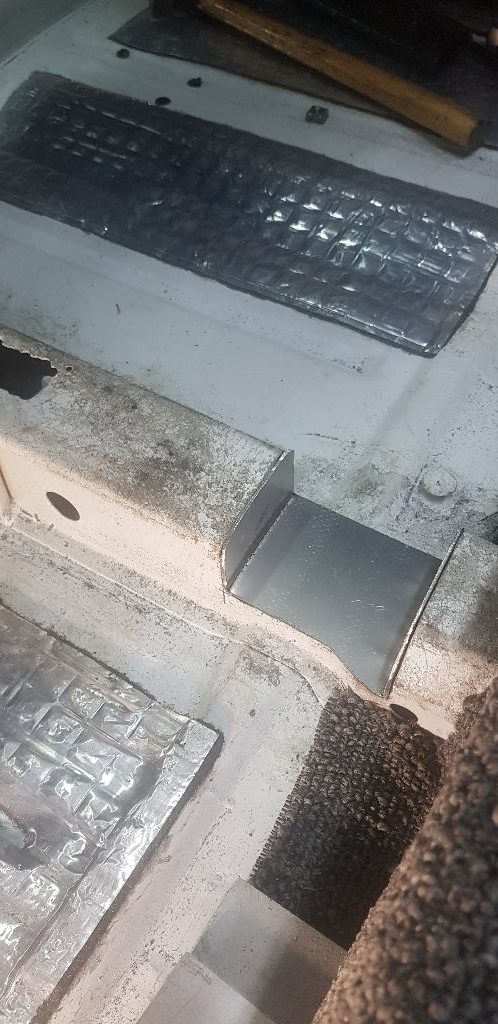
Outside patch panel made. I'm using the masking tape trick in which you cover the hole with masking tape and run a dirty glove finger around the edge. This leaves an imprint of the edge on the tape. You pull the tape off the part and cut away the excess and as you fold out the tape onto your sheet stock you get a perfect pattern of the piece you need to make. 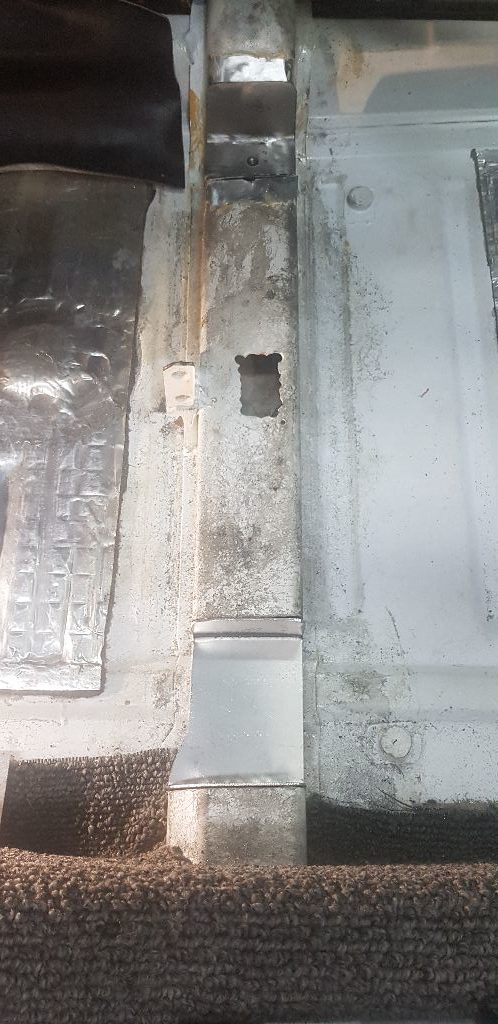
The outside panel got a capture nut too but I forgot to take a photo of that in the excitement of things moving forward and going quite well. 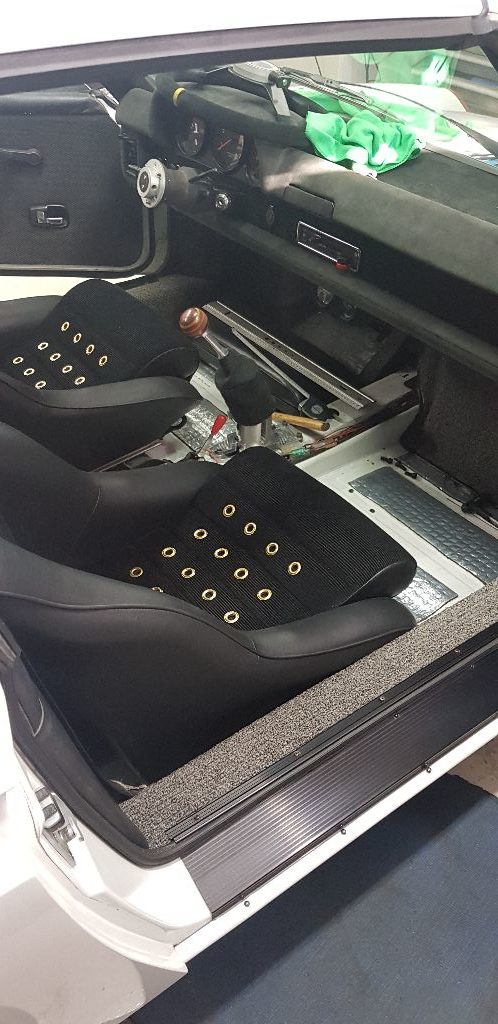
First test fit ! The front upper edge of the seat has come down 70 mm or almost 3 inches and makes the seat sit more upright. This makes me able to push the seat back another 50 mm or two inches because the top of the seatback doesnt hit the firewall as early as before. Success !!
Posted by: eric9144 Apr 21 2020, 09:17 AM
Success !!
Lets see more of those seats!
Posted by: DRPHIL914 Apr 21 2020, 09:24 AM
I had been following your work and progress on instagram, and recognized those pictures.
looks like those seat will now sit just like you wanted. The guy who sold you those seats go real defensive about you saying they didn’t fit, which i didn’t really understand.
it didn’t seem to me like you were saying that, but my feeling is he should be marking these as fitting in a 914, because they don’t without some significant modification.
it’s not like everyone has the ability or skill to do what you are doing here.
Anyway, i do like those seats, do they interfere with the E-brake function?
Phil
Good question Spoke. The original material wasnt very thick, 0,8-0,9 mm (20-22 gauge) and I'm making the filler pieces from 1,5 mm (thats about 15 gauge?)
Welded in a capture nut on the underside as an offering to the Binky gods.
Looks like it will fit ok. Thank god for slotted holes tho..
Outside patch panel made. I'm using the masking tape trick in which you cover the hole with masking tape and run a dirty glove finger around the edge. This leaves an imprint of the edge on the tape. You pull the tape off the part and cut away the excess and as you fold out the tape onto your sheet stock you get a perfect pattern of the piece you need to make.
The outside panel got a capture nut too but I forgot to take a photo of that in the excitement of things moving forward and going quite well.
First test fit ! The front upper edge of the seat has come down 70 mm or almost 3 inches and makes the seat sit more upright. This makes me able to push the seat back another 50 mm or two inches because the top of the seatback doesnt hit the firewall as early as before. Success !!
Posted by: Cairo94507 Apr 21 2020, 09:37 AM
I love your seats! Great work.
Posted by: BeatNavy Apr 21 2020, 09:48 AM
Looks great, Mats. Nice welds, too!
Posted by: Maltese Falcon Apr 21 2020, 09:57 AM
Perfect job Matt's !¡ may replicate your hard work into our build Need to see what our mounting kit looks like first...when the seat order goes down.
Marty
Posted by: falcor75 Apr 21 2020, 12:03 PM
Success !!
Lets see more of those seats!
@http://www.914world.com/bbs2/index.php?showuser=12876
There are some more pictures on page 17 in this thread.
Posted by: falcor75 Apr 21 2020, 01:22 PM
Yes saying they fit in a 914 is technically correct but they are not bolt in and to get them to fit well you either need to remove the backpad or do some mods of your own.
The seats do interfer slightly with the handbrake, but it still works. It still remains to be seen how well now that I adjust the drivers seat position aswell.
Posted by: falcor75 Apr 22 2020, 12:41 PM
Polished up my old crusty gas cap yesterday and though it would be cool to upgrade it a bit. So I edited an old file i had of the Porsche crest and scaled it to fit on the top surface and asked the lady manning the laser etching machine at work to have a go.
Turned out great ! 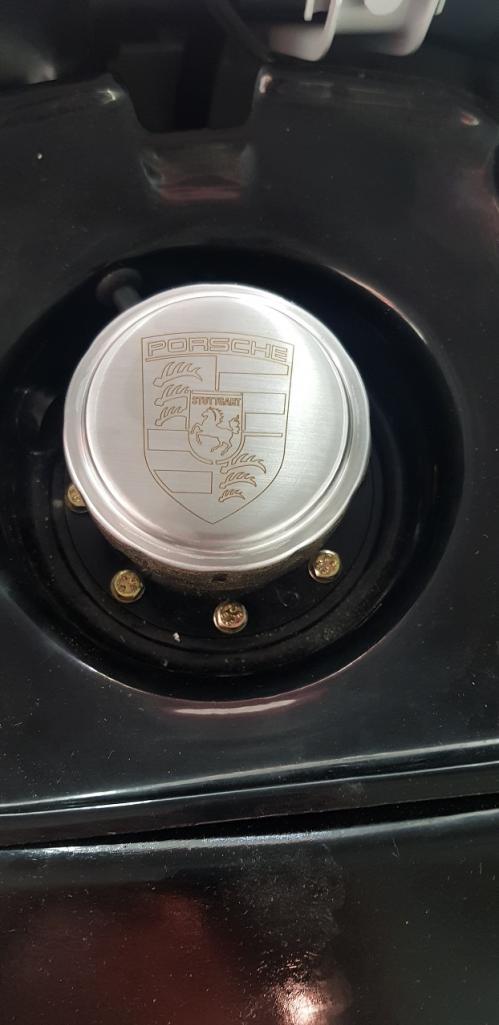
In place on the car, aligned so the point of the crest points forwards with the cap in the closed position.
Posted by: Spoke Apr 22 2020, 01:18 PM
Nice gas cap. That would be one heck of a product for someone to make.
Posted by: falcor75 Apr 22 2020, 09:35 PM
Nice gas cap. That would be one heck of a product for someone to make.
I dont think making stuff with the Porsche crest on it would be very poular seen from Porsches viewpoint. One would get a cease and decist pretty quickly.
Posted by: falcor75 Apr 23 2020, 11:09 AM
Well I just found that the drivers seat fits with the e-brake handle in place but there isnt any space to lift the handle. So I will need to make my own bracket and move it forwards along the side rail. Does anyone have a spare e-brake wire to donate or sell me? That way I could just use two of the short wires to lengthen system.
Posted by: mepstein Apr 23 2020, 11:12 AM
Well I just found that the drivers seat fits with the e-brake handle in place but there isnt any space to lift the handle. So I will need to make my own bracket and move it forwards along the side rail. Does anyone have a spare e-brake wire to donate or sell me? That way I could just use two of the short wires to lengthen system.
Maybe modify the seat upholstery to be similar to the 914 driver seat cutout. On a 914 seat, it's just a slice of foam off the outside of the seat base.
Posted by: 914forme Apr 23 2020, 11:16 AM
Or center tunnel mount the hand brake, but that is a bit more involved than a seat cushion slice of some padding.
Posted by: mepstein Apr 23 2020, 11:19 AM
Or center tunnel mount the hand brake, but that is a bit more involved than a seat cushion slice of some padding.
But a cool option that I'm planning for mine.
Jeff Hail's thread has a good photo tutorial on making a center handbrake.
Posted by: 914forme Apr 23 2020, 11:23 AM
I copied it, and later sold the copy. It uses the stock passenger side hand brake cable on both sides. Jeff's pictures make it easy to duplicate, and I added pictures also, in my EG thread.
Posted by: falcor75 Apr 23 2020, 12:57 PM
Thanks. I will have a look at the center mount option but I would prefer to keep the center cushion for my new little four legged JRT to ride with me and my son.
Posted by: falcor75 Apr 30 2020, 01:38 PM

Well the seat reposition is done and the seats fit........the handbrake...not so much!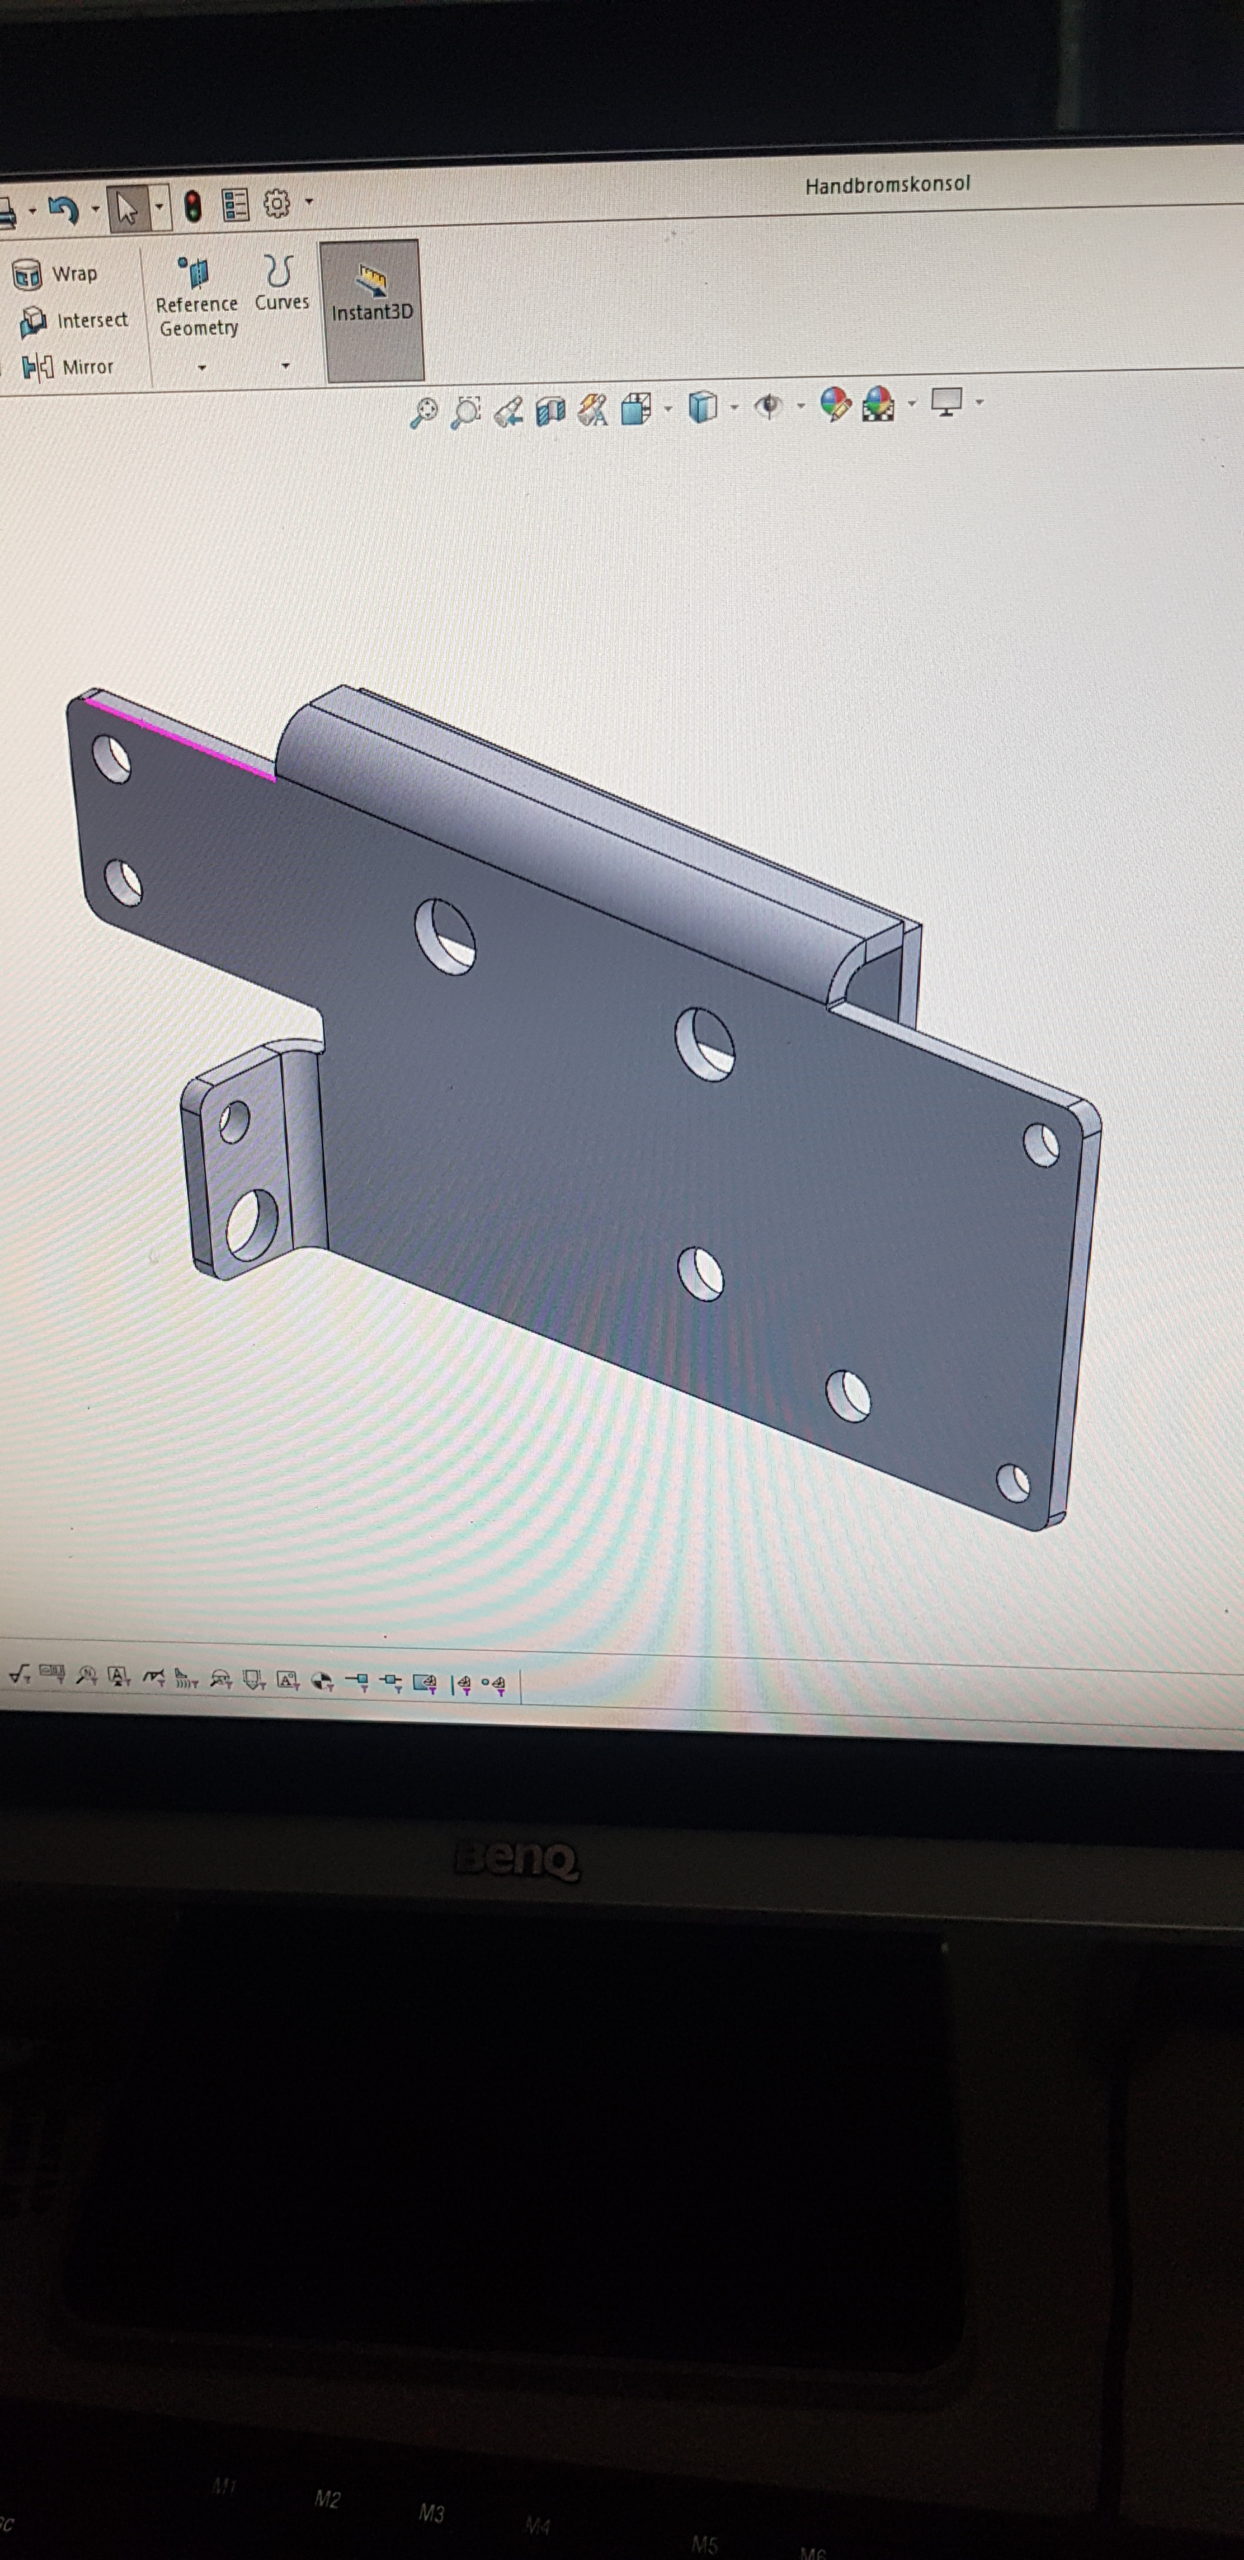
Time to design som bracketry.....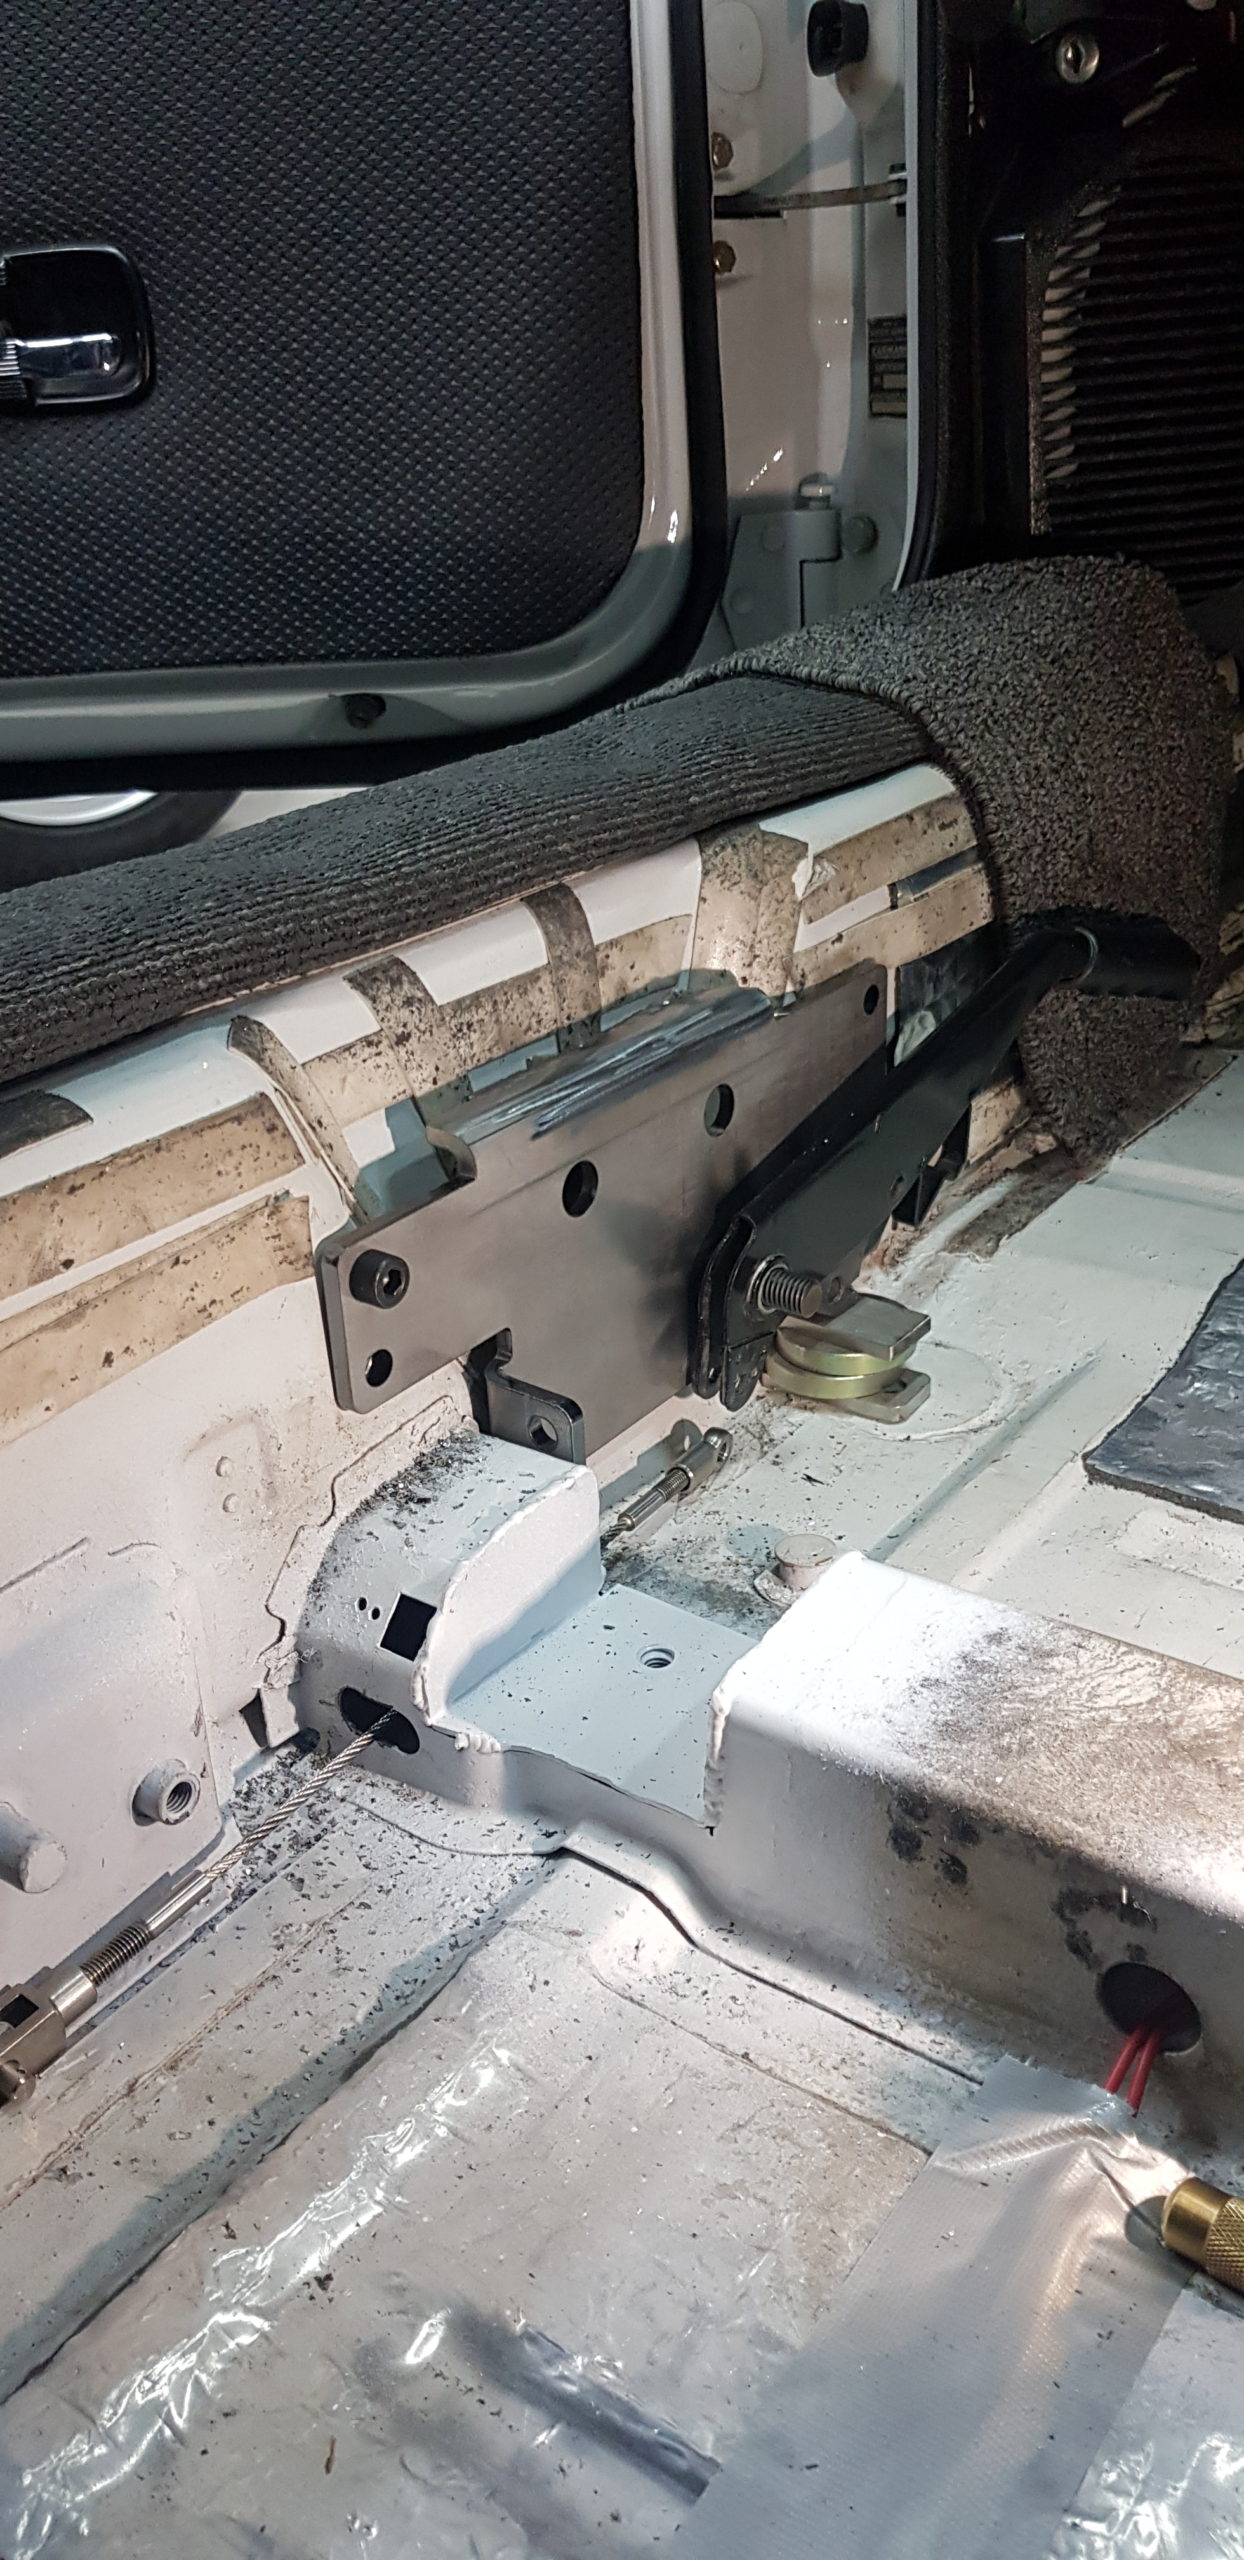
and make a handbrake relocation kit !
Posted by: Frankvw Apr 30 2020, 02:17 PM
Mats...wow...look at that handbrakeplate, really nice work.
One question...why did you make that small rectangular hole in the part under the seatframe that looks like a mouse ate his way through ? (between the spraycan and the lid of the spraycan)
Posted by: falcor75 Apr 30 2020, 09:43 PM
Thats a previous owners classy 5 point belt installation....
Posted by: falcor75 May 3 2020, 05:27 AM

So I have revised the design a bit. The sticky outy bit simply isnt needed.
With four M8 riv nuts into the side of the sill its plenty sturdy. So I cut that off.
Sorry for the mismatched screws but it was what I had at hand in the right lengths.
The result is simply great. My handbrake has never felt very solid but this is such an improvement. The M12 nut holding the handle has since been replaced with a nyloc nut.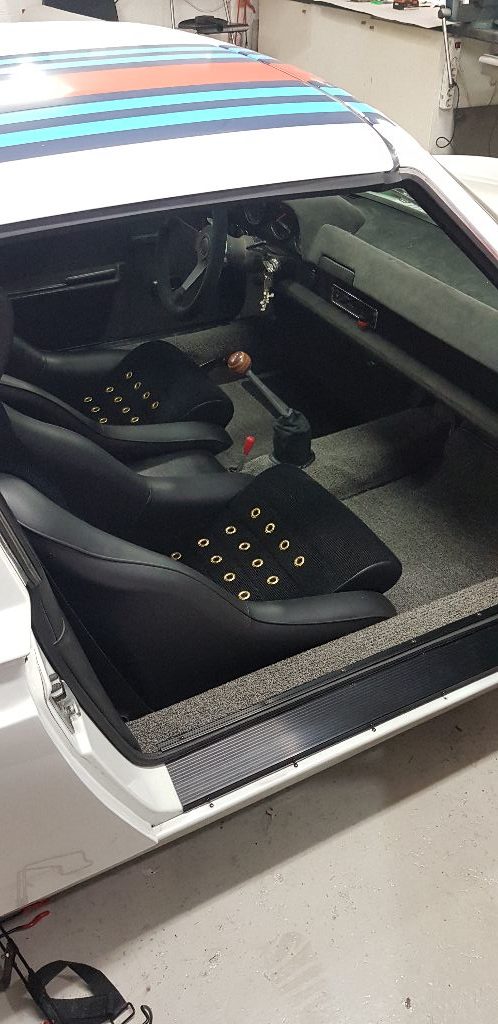
Seats and carpets back in.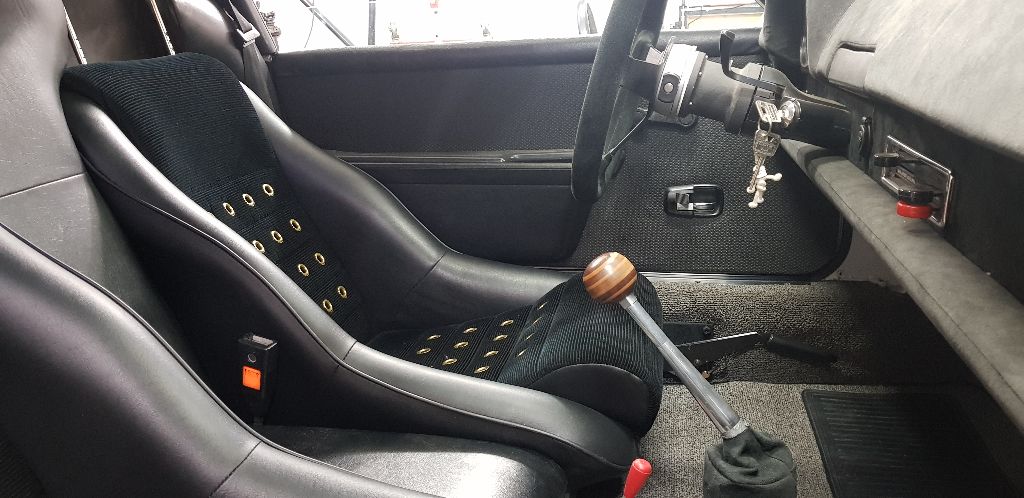
Now I just have to choose which one of Oscars awsome keyrings to add to the keys for this season. I'm adding a PDF drawing of the bracket below for those that might need it. Hand_brake_bracket.PDF ( 62.66k )
Number of downloads: 117
Hand_brake_bracket.PDF ( 62.66k )
Number of downloads: 117
Posted by: falcor75 May 30 2020, 08:34 AM
Got my new rear calipers from PMB this week after they have been out travelling for two months. Yes it took that long for them to get here, first one month to get out of the US and then another month to get from Belgium to Sweden. I thought for sure the package was lost when I last sunday got an update it had reached Sweden.
Today me an my son started mounting them. They went on without any trouble and I bled them and had just hooked up the hand brake cables and was about to tighten them back up when I noticed a drip from the drivers side caliper. 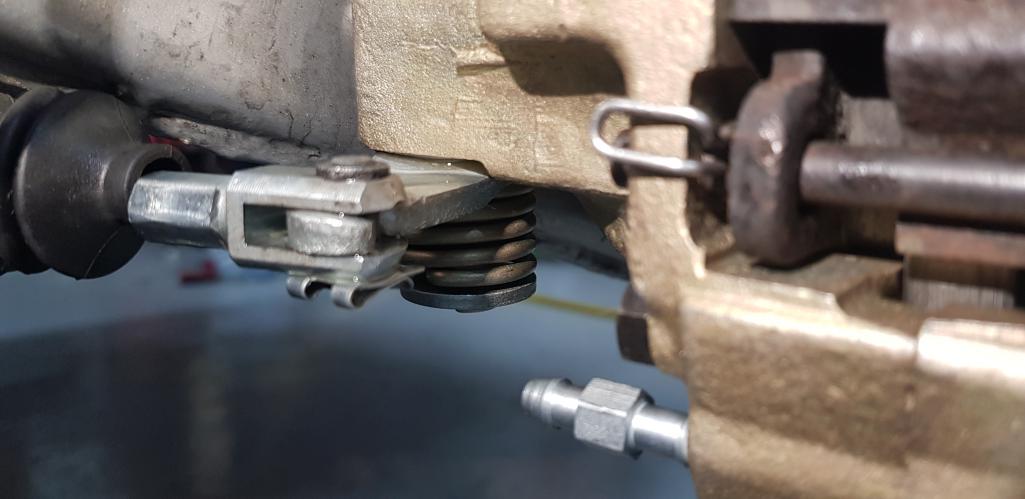
You can just see the wet gleam ontop of the hand brake lever, it runs out the arm and then drips off the bottom clip. I've contacted PMB already to get their view on how to sort this out. Getting about one drop every 20-25 seconds.
Posted by: Spoke May 30 2020, 10:01 PM
Mats, that sucks. That's a lot of fluid leaking. I'm assuming you're not trying to drive the car. PMB does fantastic work. Because of the shipping delay and cost I hope there's a way you can repair this yourself. Sending it back then waiting for it to return would really bite. Eric is great to work with and even helped me out on an issue with a rear caliper that was restored by a different shop.
Posted by: falcor75 May 31 2020, 12:12 AM
Yes I'm not worried they wont help me get this right and no I wont be driving the car as it is. I may swap back my old drivers side caliper as only the passenger side was bad but I figured I would change both while I was at it.
Posted by: Frankvw May 31 2020, 08:51 AM
Hi Mats, too bad that happened. But the good part was that you had a chance on some father/son wrenching time ! I hope it will get solved soon !
Posted by: falcor75 May 31 2020, 10:41 PM
Hi Mats, too bad that happened. But the good part was that you had a chance on some father/son wrenching time ! I hope it will get solved soon !
Thanks
Posted by: falcor75 Jun 2 2020, 10:51 PM
Looks like I will be rebuilding the caliper myself tonight.
Posted by: falcor75 Jun 3 2020, 01:49 PM
My friend that ordered parts from PMB with the same package as my calipers kindly lent me one of her rebuilt kits untill I get the one PMB is sending out for me.
Took the caliper apart tonight and replaced the inner adjuster O-ring. Put everything back together and bled the brakes. Now I'll wait till morning and see if its dry or not.
Cross your fingers !
Posted by: mepstein Jun 3 2020, 02:03 PM
One of my favorite build threads.
Posted by: falcor75 Jun 4 2020, 11:32 PM
Seems to be leak free so far, I did have to tighten down the 8mm bleed nipples quite hard to stop them weeping under brake pressure. Everything was dry when I left it last night and it still looked ok at a quick glance this morning before I headed to work.
Posted by: falcor75 Jun 16 2020, 11:42 AM
Had a wierd issue occur today. I havnt had the car started since march since the ECU has been away being repaired. Got it back today and loaded it up with my tune and everything worked fine. Except that my hand brake flasher is on all the time as soon as I turn on the ignition.
When moved my handbrake earlier I completely removed the hand brake switch but I cant see how that is the issue since it is "on" when grounded. Removing the switch should have it permanently off.
Turn signals and emergency flasher works fine. Brake pedal switch is connected. The only way I have found to get the flashing to stop is to disconnect the two brown/yellow cables from the warning light.
Any ideas please? I'm desperate to drive my car but I would prefer to do it without the warning light disconnected. 
Posted by: BeatNavy Jun 16 2020, 11:48 AM
Is this as simple as resetting the master cylinder switch?
Mats, when you changed brakes you lost pressure in your brake system. Most (many?) master cylinders have a warning switch that gets set when that happens. If it does there should be a little reset button on the master cylinder where the two wires are located. Easier to see when driver's side front wheel is off, I believe.
Posted by: falcor75 Jun 16 2020, 12:35 PM
Aaah thank you Navy, I just pulled out the wiring diagrams prior to reading your post and saw that one of the two brown/yellows do indeed lead to the brake warning switch.
I cant remember if there is a button on it but I will pull the belly pan off tomorrow after work and check.
Posted by: falcor75 Jun 17 2020, 12:02 PM
Thank you @http://www.914world.com/bbs2/index.php?showuser=17042 , it was indeed the master cylinder switch. Reset it and all was normal.
Took the car out for a short drive around the block, this revealed the brakes to be a tad on the spongy side. Back into the garage and up on jackstands and my son and I did a complete brake bleed. Back down again and then out for a half hour drive just to make sure it was running ok. 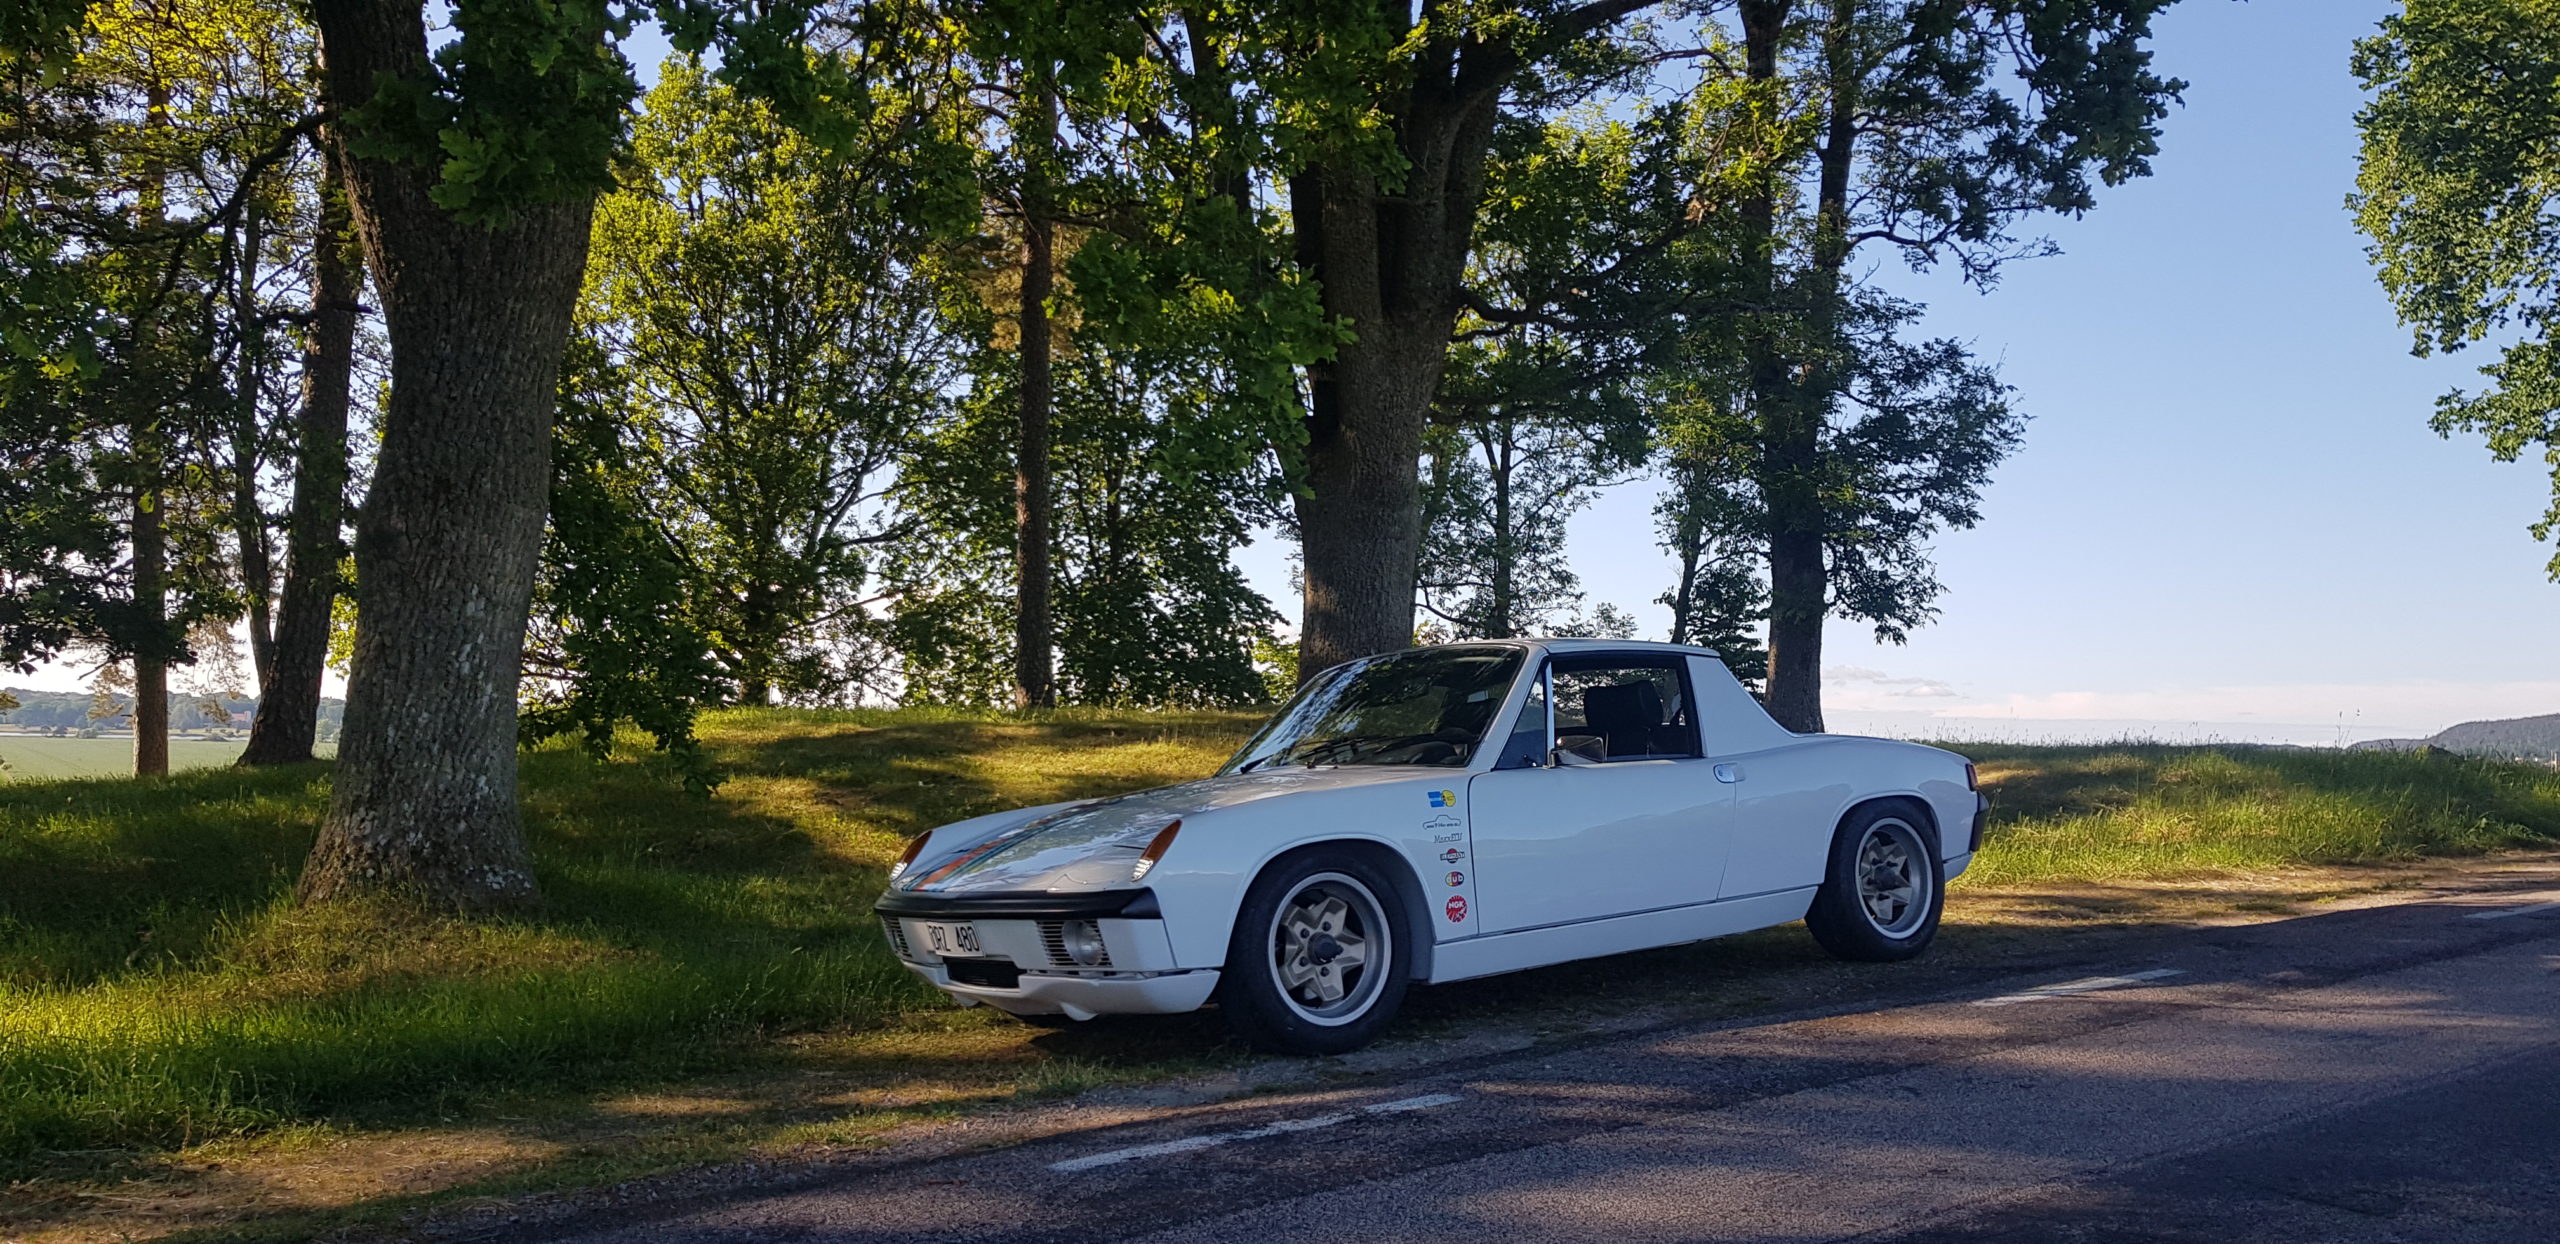

Cylinder 1 is running 15-20 C warmer than the others but it did the same last year.
Did a few accelerations and brake sessions just to get some temp into the brakes. Then cruised around for another 10 minutes before driving back into the garage.
I did raise the rear from the second notch on the Bilstens to the topmost one. Does anyone know how this affects the toe values, does it move towards toe in or toe out?
Posted by: falcor75 Aug 13 2020, 11:23 AM
https://www.youtube.com/watch?v=nYXZSTPqvGg
Dropped my son off with his phone in the long bend between the mountains here and I love the sound echoing before the car even comes into view.
Posted by: Frankvw Aug 13 2020, 11:31 AM
Hi Mats, great sound in the car ! nice video.
Posted by: 73-914 Aug 13 2020, 11:37 AM
Very nice . I like your rims
Posted by: Cairo94507 Aug 13 2020, 01:31 PM
Your car looks and sounds great.
Posted by: falcor75 Aug 14 2020, 06:09 AM
Thank you, was just a quick shot that my son did when we were out driving the other morning.
Posted by: gereed75 Aug 14 2020, 07:47 AM
I know the skart was expensive, but it sounds great, best four sound ever. And it seems to pull really well. Car seems very “together”. Really nice job.
Posted by: falcor75 Aug 15 2020, 02:27 PM
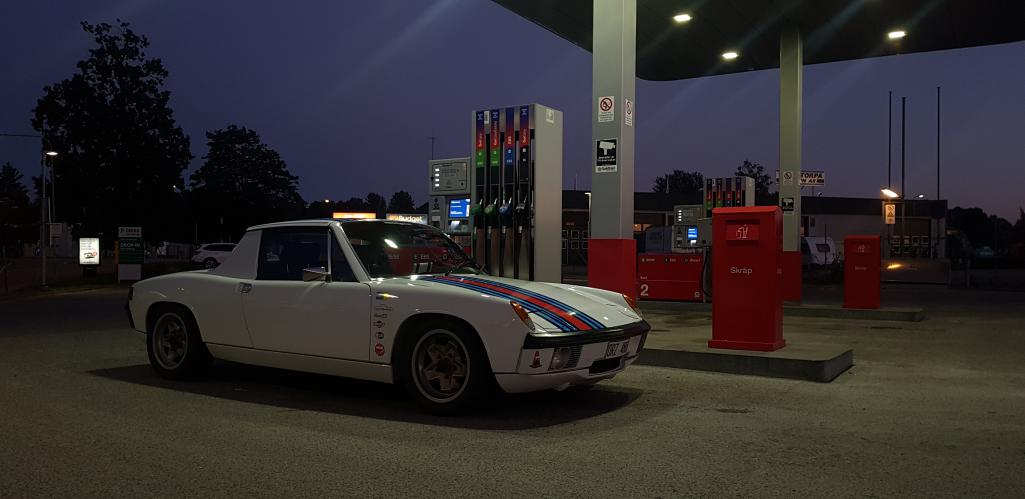
Summer evenings when the sun goes down....a cocky BMW driver was all over my ass but he couldnt take a tight roundabout in the same speed and launch out of it like my 914 does. 
Went to a local car meet with a nice mix but the car stereo guys kinda ruin it for everyone when you cant talk when standing 5-6 feet apart. Coolest car of the evening was a really nice Volvo Amazon
Posted by: falcor75 Aug 18 2020, 03:09 AM

Gorgeous sunset, straight out of the phone with no filters.
Posted by: Rleog Aug 18 2020, 03:54 AM
Gorgeous sunset, straight out of the phone with no filters.
[/quote]
Beautiful pic, Mats. You have a fine eye for photography.
Posted by: falcor75 Jun 20 2021, 02:55 AM
Well as I have put it up in the 914 group on facebook I might aswell mention it here too.
The car is up for sale. I have summarized all the details in this post on my webpage: https://matsgarage.com/?p=1730
I know most readers here are US based but since there is a few europeans maybe it will interest someone.
Posted by: BeatNavy Jun 20 2021, 05:48 AM
Good luck with the sale, Mats. It's a beautiful car and someone will really enjoy it.
Good luck with whatever you decide to do with your time and money as well, and hope to still see you around here from time to time.
Posted by: falcor75 Jun 20 2021, 01:14 PM
Thanks Navy, I'll be around here because I doubt it will sell quickly. And I have learned alot in the last 8 years and like helping others when I can.
Posted by: Spoke Jun 20 2021, 05:44 PM
Good luck with the sale, Mats. It has been enjoyable reading your thread and admiring your beautiful 914. Someone will be a lucky owner of a nice 914.
So you're finally pulling the trigger on a 911?
Posted by: falcor75 Jun 20 2021, 10:10 PM
Good luck with the sale, Mats. It has been enjoyable reading your thread and admiring your beautiful 914. Someone will be a lucky owner of a nice 914.
So you're finally pulling the trigger on a 911?
Probably not, I dont really need the pretend backseats. And I have already had a 911, I sold my 964 before I got the 914. Going to add to whatever the car sells for and aim for a 981 Cayman S or Jaguar F-type. Since I'm building a super seven type of car I feel having two cars that only gets driven in fair weather is one too much.
Posted by: falcor75 Jul 8 2021, 10:00 PM
https://youtu.be/BGdBuoACUDM
Made a short overview video of my digital dash setup and my oil pressure warning alarm.
Let me know what you think or what you would do differently.
Posted by: raynekat Jan 22 2022, 02:31 AM
Mats. Was going through your old build admiring all the work.
One question for you.
Do you remember where you got your custom Martini floor mats?
Looking to do a set of those in another car.
I know it's been a long, long time. Ha
Thx, Doug
Posted by: falcor75 Apr 25 2022, 02:01 AM
Maybe there are someone in Europe on here that would be interested?
https://suchen.mobile.de/fahrzeuge/details.html?id=343783831
This thread has all the restoration history.
Posted by: falcor75 May 25 2022, 06:51 AM
Last ride with my son in the 914 a few days ago. Now she is fully fueled and newly polished waiting for her new German owner to pick her up on friday.
Good luck Martin and take good care of her.
Powered by Invision Power Board (http://www.invisionboard.com)
© Invision Power Services (http://www.invisionpower.com)