Printable Version of Topic
Click here to view this topic in its original format
914World.com _ 914World Garage _ Front control arm Bushings
Posted by: malcolm2 Mar 3 2013, 03:58 PM
I am sure I have mentioned before that searching on this forum just does not work very well for me. So if I can get some help, I will be grateful.
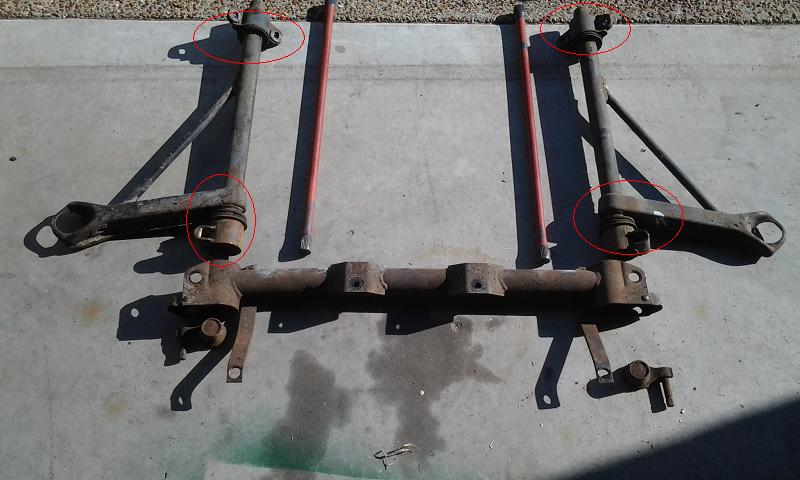
I have dropped my suspension today. 20 months and I have finally made it to tearing down the front of this car. Anyway, how in the world do you get the bushings and holders off? I did some research a while back, but only remember bits and pieces. Did I read that I can HEAT the hell out of them and basically melt the out? Do they have to be pressed out?
Again, any instructions or re-direction to a previous post will the awesome.
Clark
Posted by: Harpo Mar 3 2013, 04:00 PM
I used a whole lot of heat to get mine out.
David
Posted by: 914Sixer Mar 3 2013, 04:04 PM
Chain one end to a vise or nearest tree. Grab a come along and drop a bolt and nut with a little piece of chain. Start pulling with the come along and they will pop off. Keep your pull even so piece does not get sideways. Takes no time at all. I do not recommend heating.
Posted by: kg6dxn Mar 3 2013, 04:26 PM
BTW, you do not have to start a new thread for every suspension piece...
Posted by: t collins Mar 3 2013, 04:46 PM
This link should help you
http://www.elephantracing.com/suspension/rubberbushings/controlarmrubberbushingkitinstallation-video.htm
Posted by: Jeffs9146 Mar 3 2013, 04:50 PM
Just clamp the arm in a vice, heat the bracket with a torch, insert a large screw driver into one of the holes and turn it! It will twist off very easy!
Posted by: mrbubblehead Mar 3 2013, 05:10 PM
i tried the torch screw driver method and mine wouldnt budge. i ended up buying a HB hydrolic press. i needed a press anyways.
Posted by: Tedman5 Mar 3 2013, 05:21 PM
I did the screw and twist method with no heat. Only difference is prying back edges and squirting PB in and let soak. Came right out!
Posted by: mr914 Mar 3 2013, 05:57 PM
Drilled out what I could w 1/8" bit. Broke out torch and let the smoke out
Just make sure the windows are closed and not blowing towards the house ![]()
Posted by: malcolm2 Mar 3 2013, 05:59 PM
BTW, you do not have to start a new thread for every suspension piece...
I have found that the 1 question, 1 thread method gets me closer to complete answers for each question.
Posted by: malcolm2 Mar 3 2013, 06:15 PM
This link should help you
http://www.elephantracing.com/suspension/rubberbushings/controlarmrubberbushingkitinstallation-video.htm
Perfect, just what I needed. Wow, that was a great video. Bushing off, bushing on, then adjusted. I was curious about the angles that the bushing holders attached. wondered if they had to be set, or ended up that way when re-installed.
I am saving that one for sure. Probably should buy my bushings from Elephant since I watched the BRAND X comparison. He made it look easy.
Thanks,
Clark
Posted by: t collins Mar 3 2013, 06:50 PM
This link should help you
http://www.elephantracing.com/suspension/rubberbushings/controlarmrubberbushingkitinstallation-video.htm
Perfect, just what I needed. Wow, that was a great video. Bushing off, bushing on, then adjusted. I was curious about the angles that the bushing holders attached. wondered if they had to be set, or ended up that way when re-installed.
I am saving that one for sure. Probably should buy my bushings from Elephant. He made it look easy.
Thanks,
Clark
You must set them to the correct angle per the instructions ......... Elephant bushing kit available from PMB.
Posted by: malcolm2 Mar 3 2013, 08:58 PM
This link should help you
http://www.elephantracing.com/suspension/rubberbushings/controlarmrubberbushingkitinstallation-video.htm
It works...Stinks up the garage, but they are all off. Just hope the install goes smoothly as well.
Thanks to all for your input.
Powered by Invision Power Board (http://www.invisionboard.com)
© Invision Power Services (http://www.invisionpower.com)
