Printable Version of Topic
Click here to view this topic in its original format
914World.com _ 914World Garage _ Progress thread 74 2.0 to 3.0 6
Posted by: Luke M Jun 21 2013, 05:56 AM
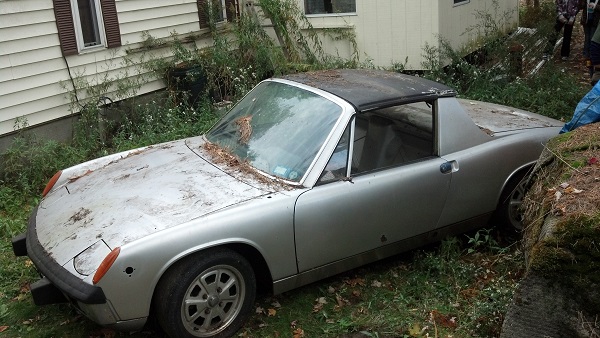
I figured why not start this thread. The car is a 74 914 2.0 that's been sitting since the early 90's. It was parked outside/in the woods up until my brother purchased it last fall. It didn't look too bad from 20 feet away but when you look closer it gets pretty bad. So, here's the plan... strip the car, fix the rust problems, paint it, add a 5 lug suspension, and convert it to a 3.0 6. Stay tuned for pics of the progress..


Posted by: Cupomeat Jun 21 2013, 06:55 AM
Looking forward to it!

Posted by: PanelBilly Jun 21 2013, 08:11 AM
Hey, that's my plan!
Posted by: Dasnowman Jun 21 2013, 04:28 PM

I figured why not start this thread. The car is a 74 914 2.0 that's been sitting since the early 90's. It was parked outside/in the woods up until my brother purchased it last fall. It didn't look too bad from 20 feet away but when you look closer it gets pretty bad. So, here's the plan... strip the car, fix the rust problems, paint it, add a 5 lug suspension, and convert it to a 3.0 6. Stay tuned for pics of the progress..
 I'll check back in 5-7 years when it's done!
Posted by: Luke M Jun 21 2013, 07:41 PM
I figured why not start this thread. The car is a 74 914 2.0 that's been sitting since the early 90's. It was parked outside/in the woods up until my brother purchased it last fall. It didn't look too bad from 20 feet away but when you look closer it gets pretty bad. So, here's the plan... strip the car, fix the rust problems, paint it, add a 5 lug suspension, and convert it to a 3.0 6. Stay tuned for pics of the progress..
I'll check back in 5-7 years when it's done! A funny guy..
Heck it better not take that long. I figure at the most 2 years..

I'll post a few pics for you guys tmrw...
Posted by: Luke M Jun 22 2013, 11:44 AM
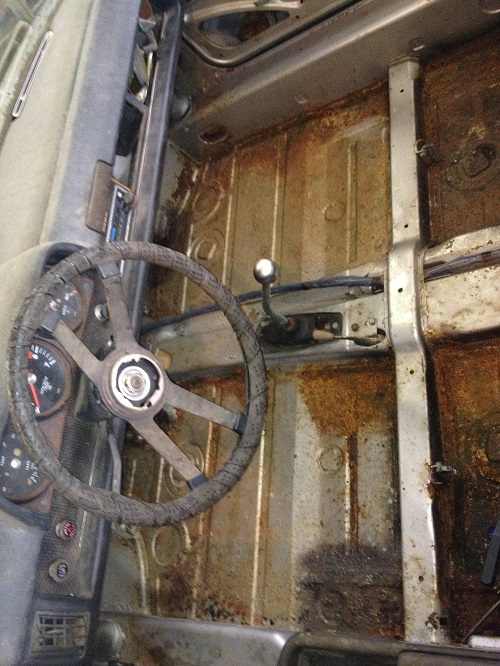
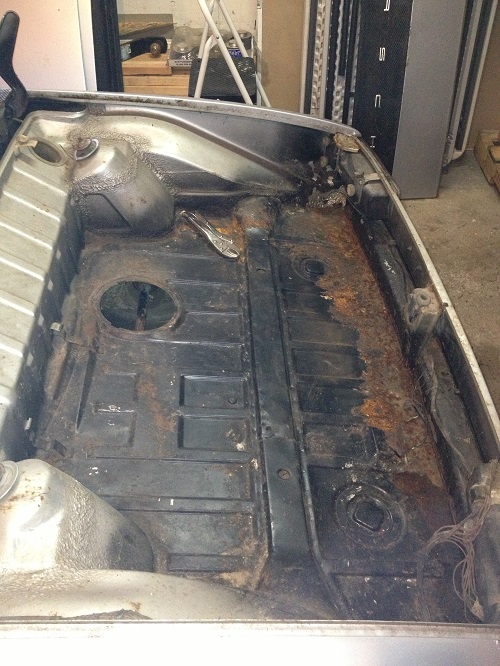
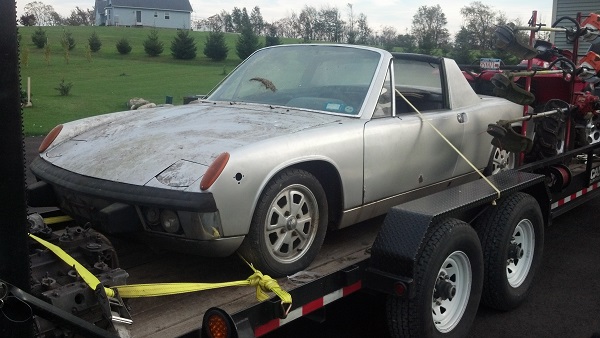
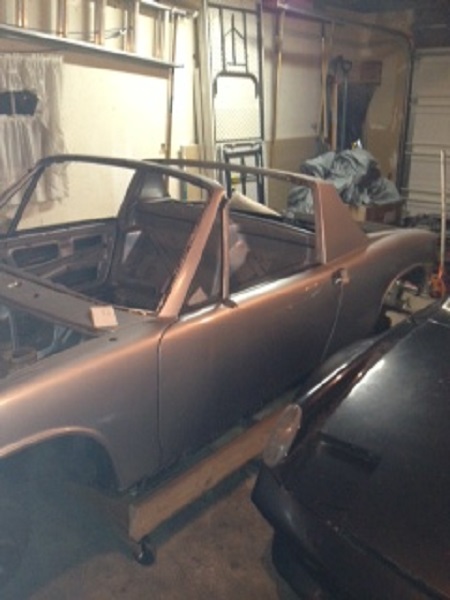
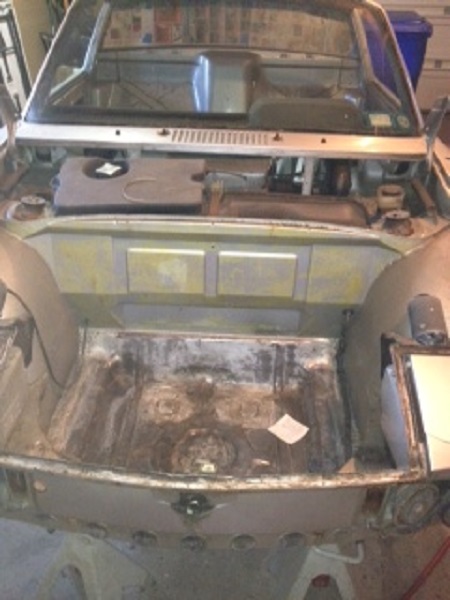
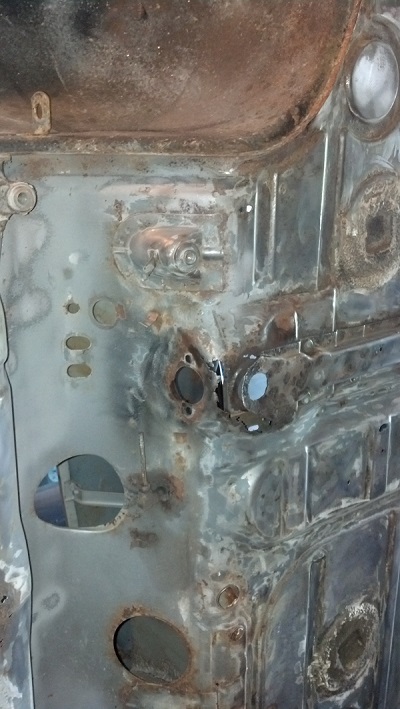
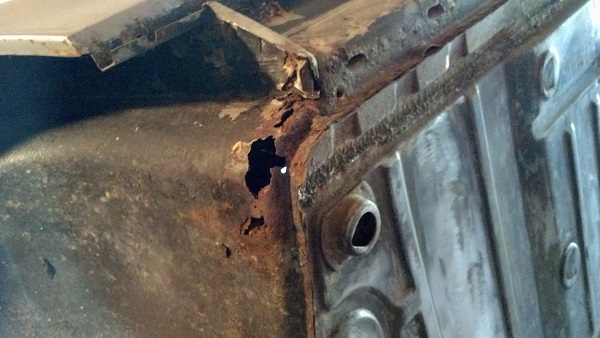
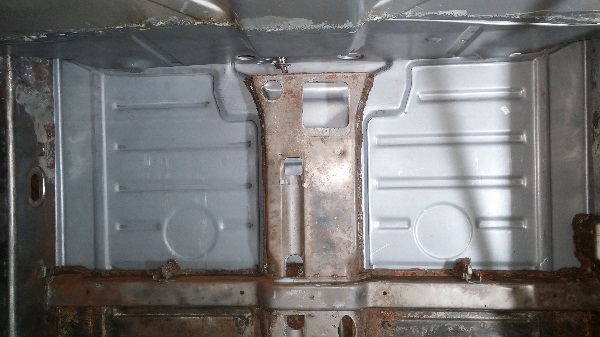
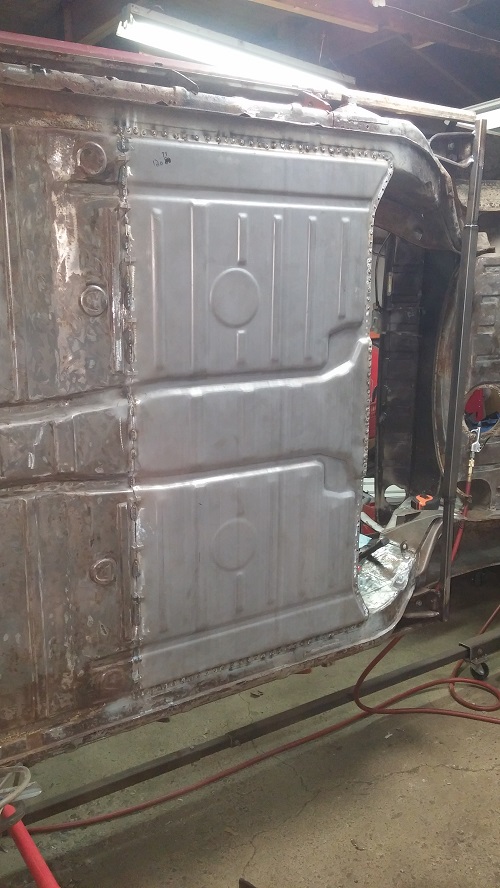
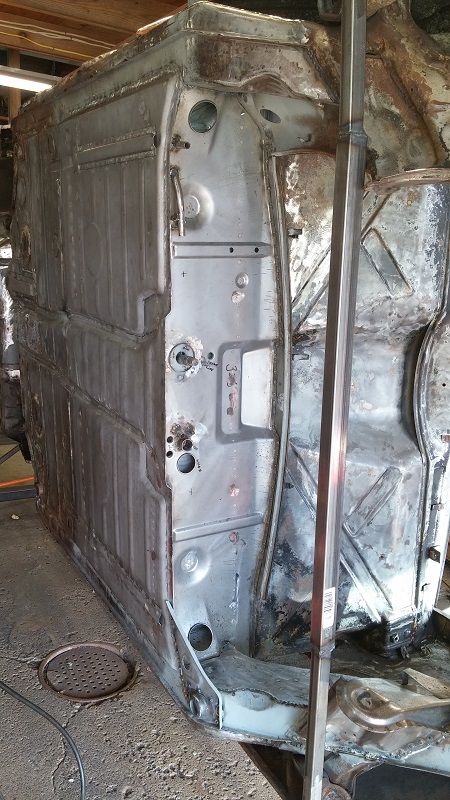
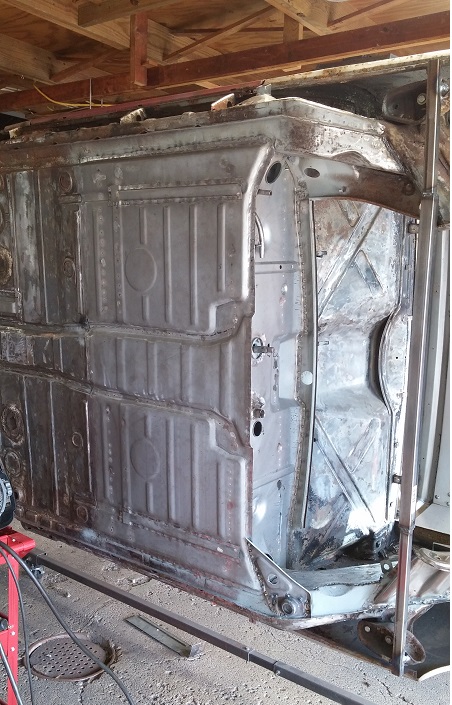
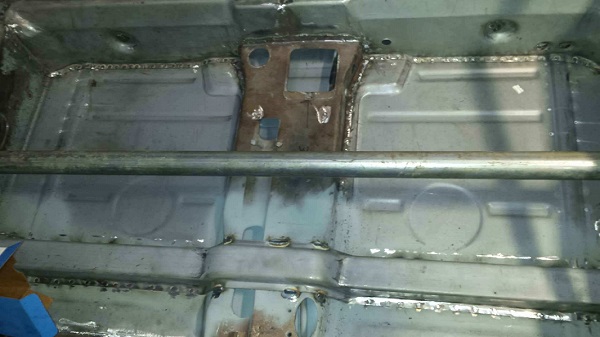
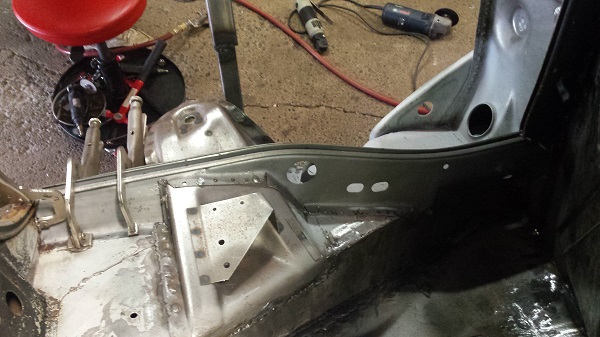
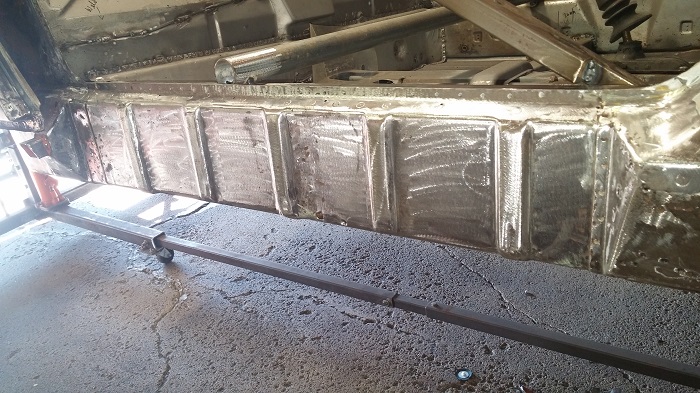
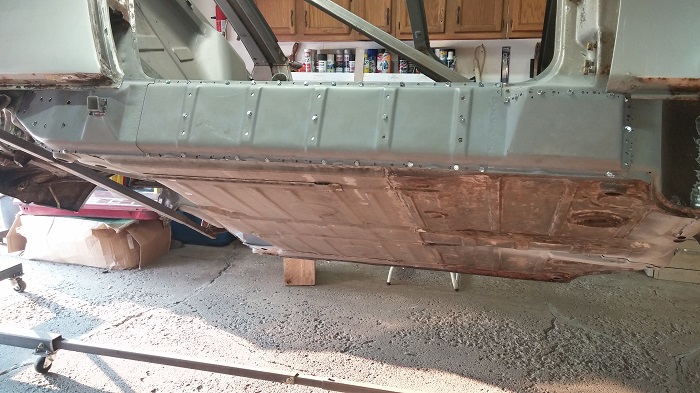
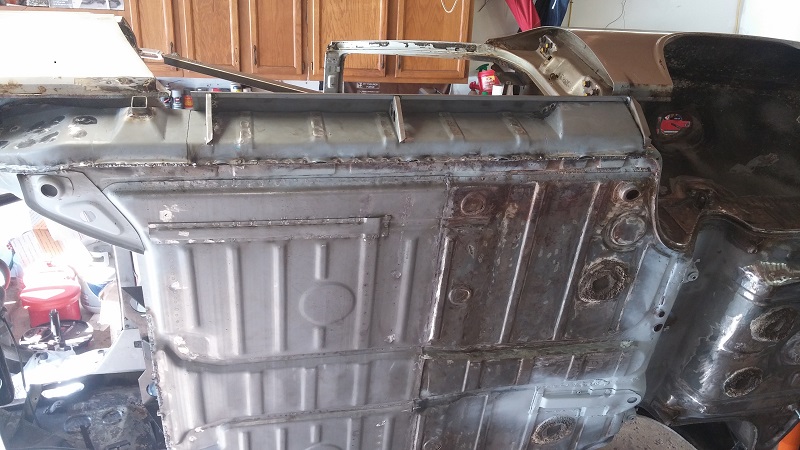
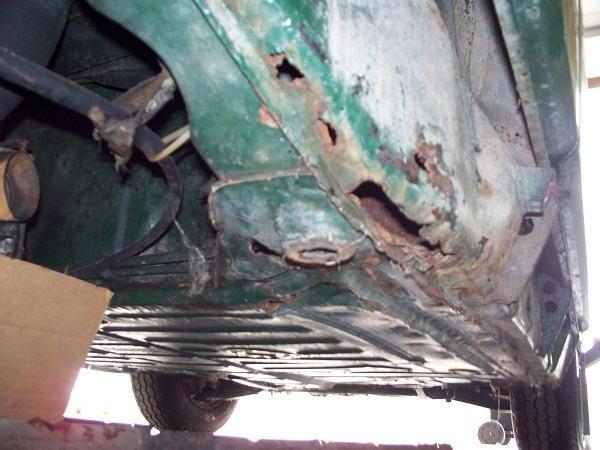
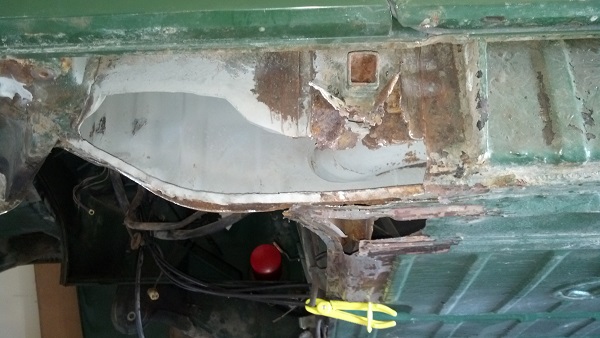
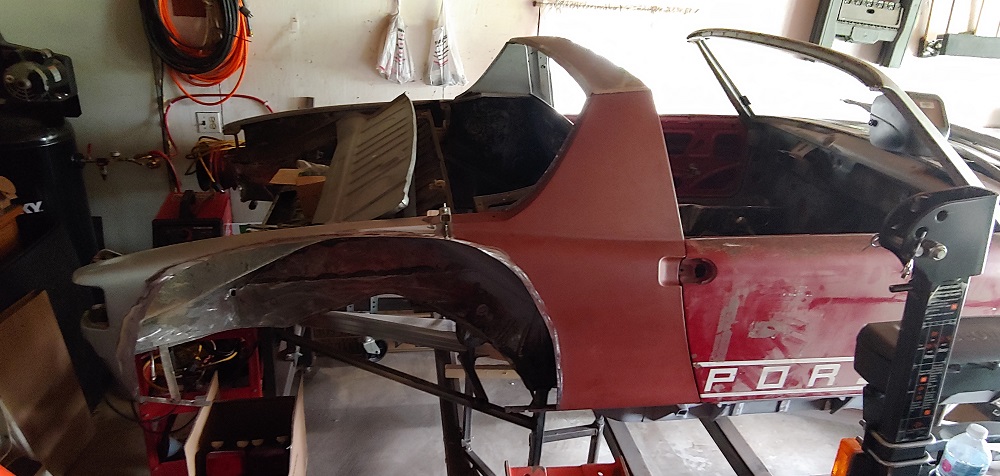
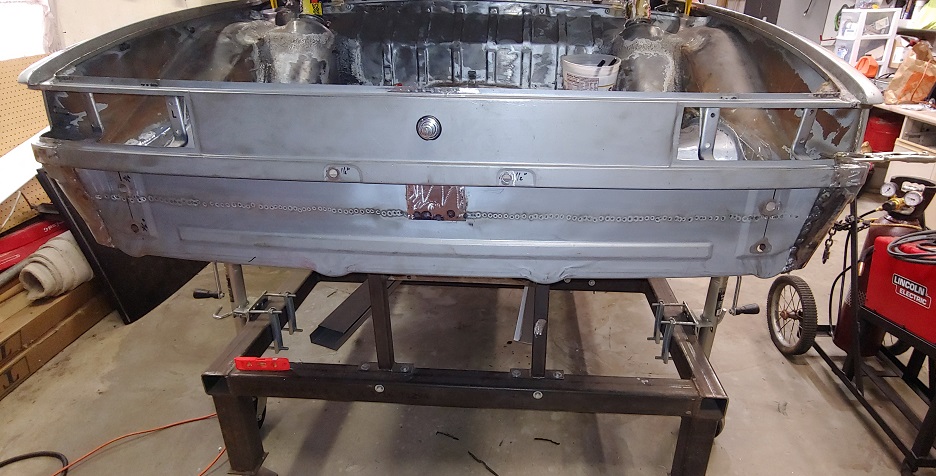
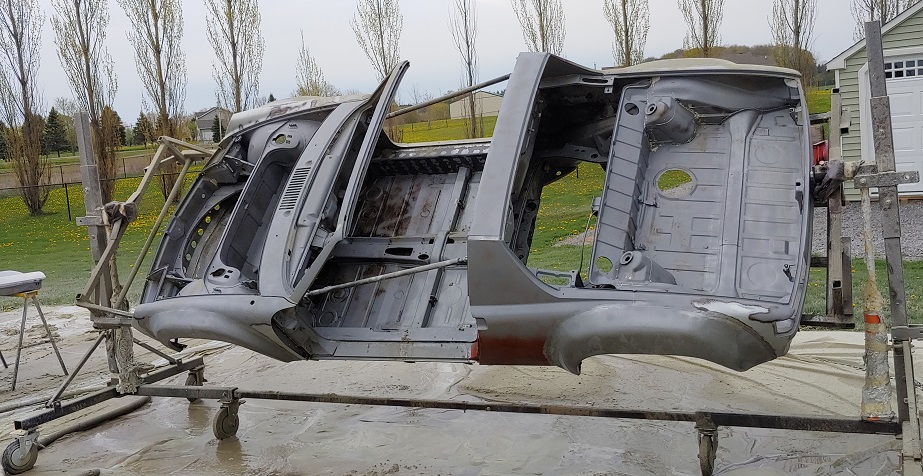
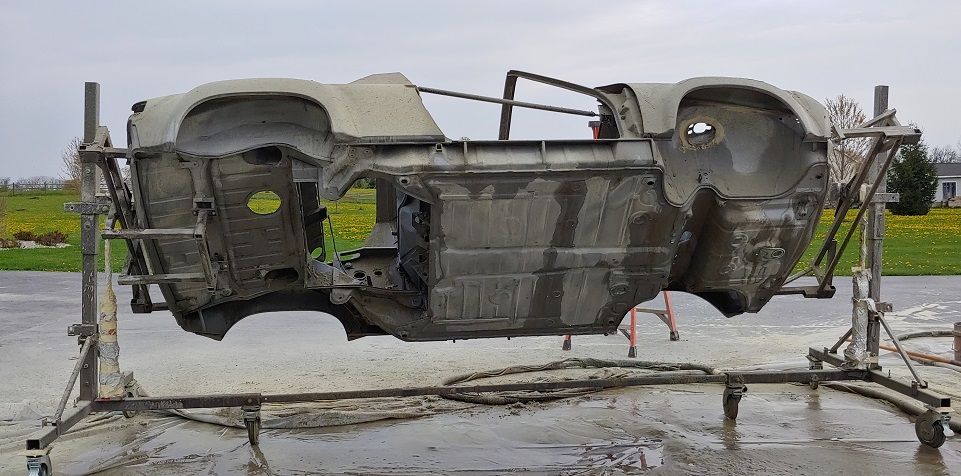
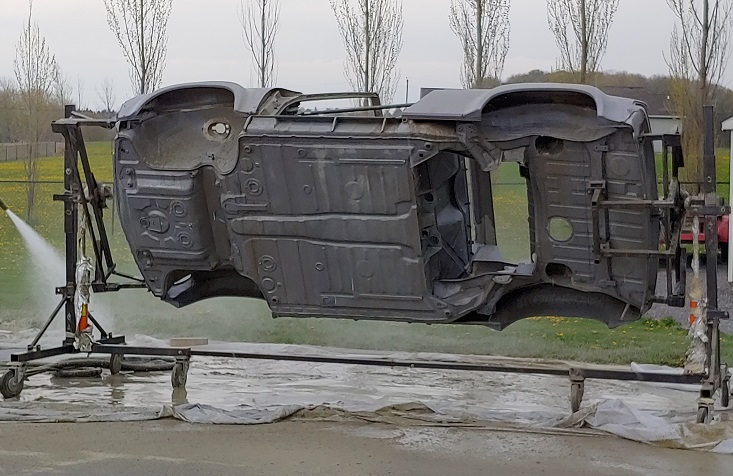
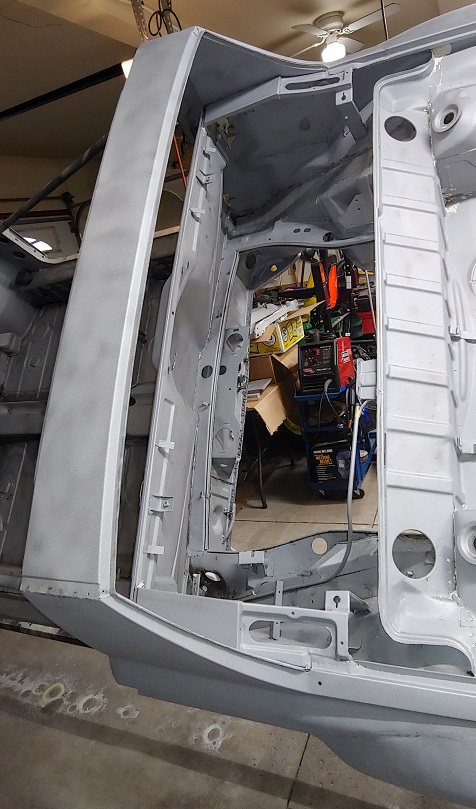
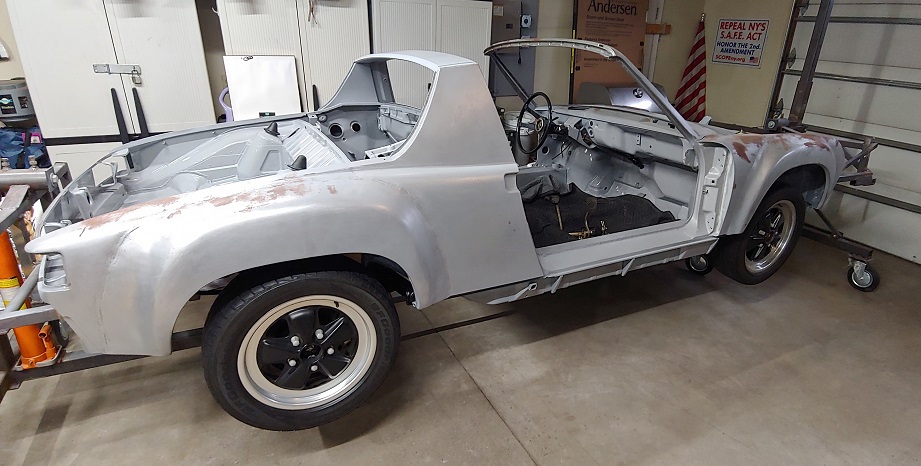
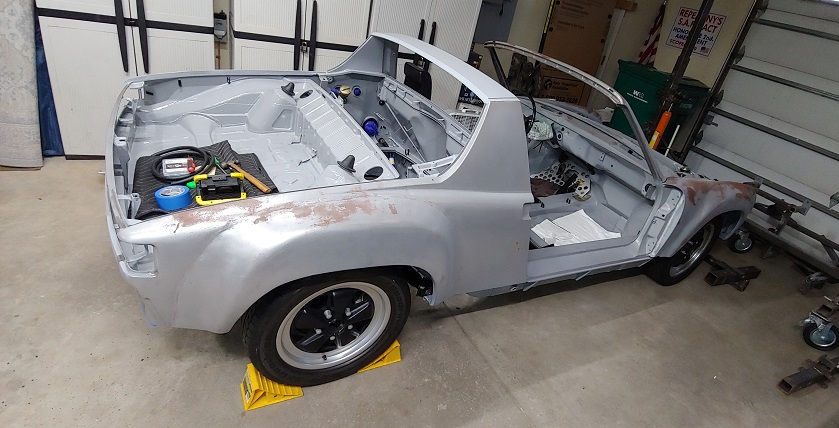
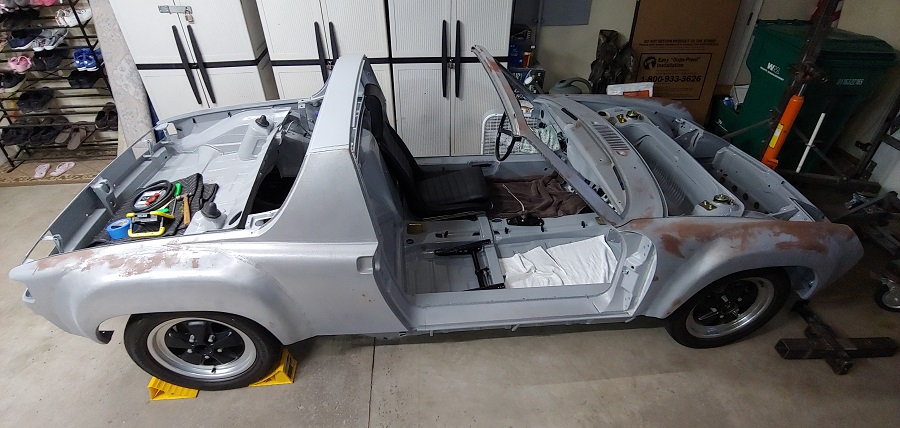
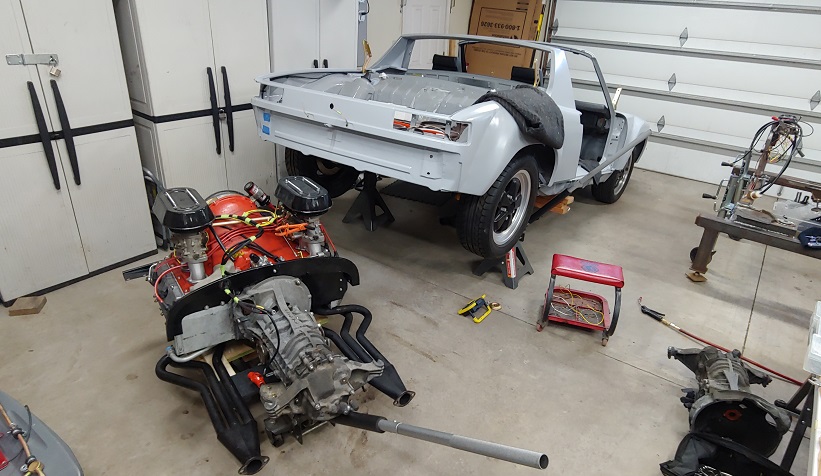
Here's a few pics of the car when it was purchased last fall..
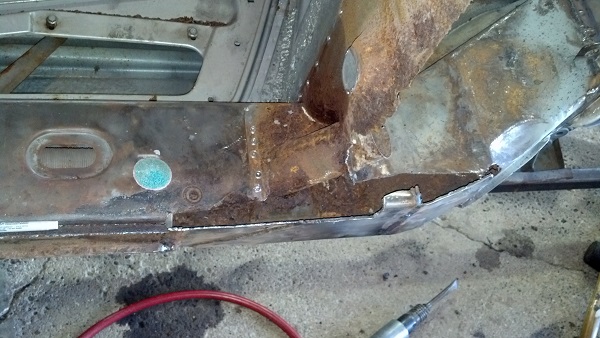
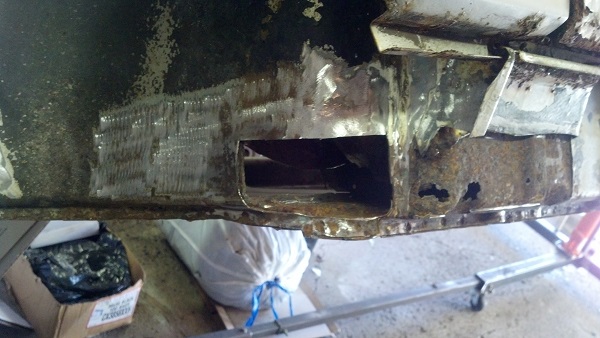
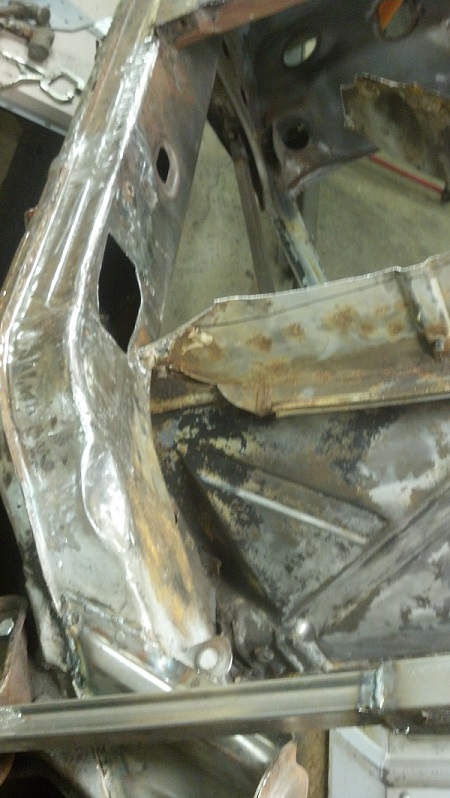
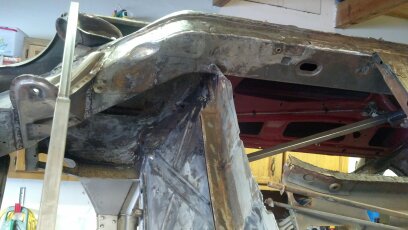
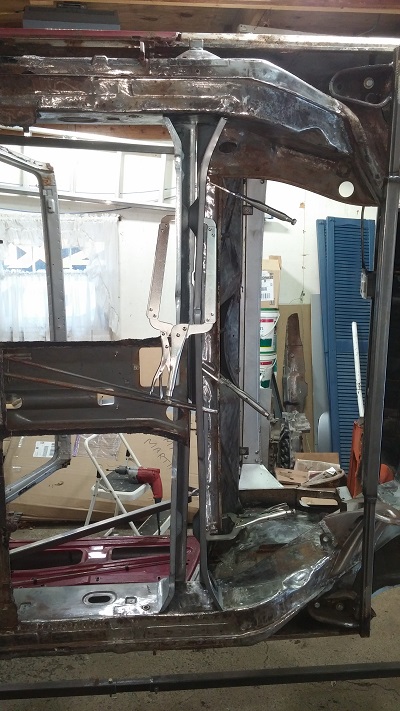
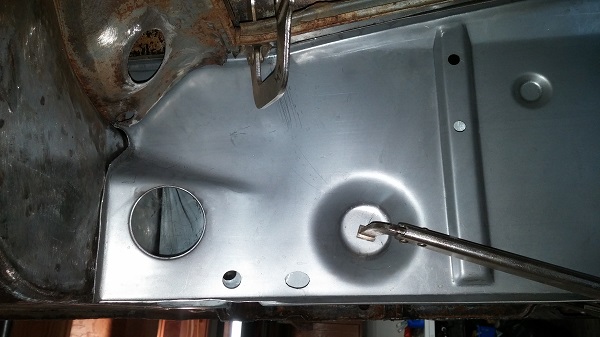
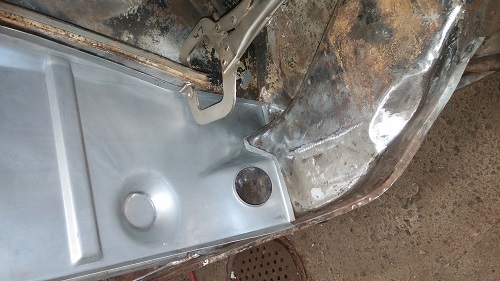
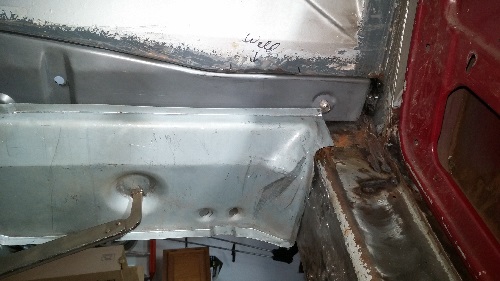
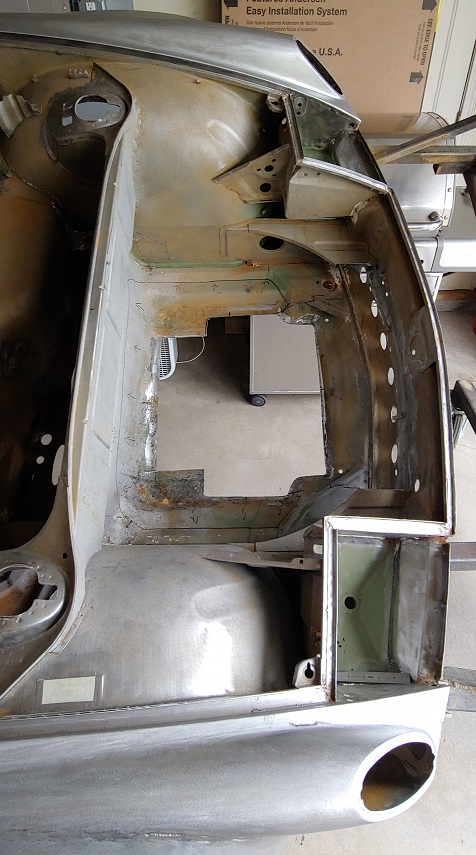
Then the current state of work.. Rear pan section, lower engine/interior firewall, right engine shelf & inner control arm mount, rear trunk floor, & pedal area are rusted out.
There's more panels that need replacement but this is to be taken care of first.
Attached image(s)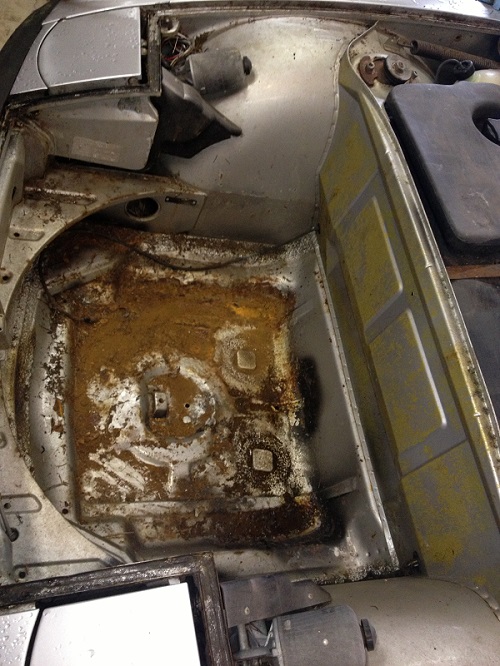
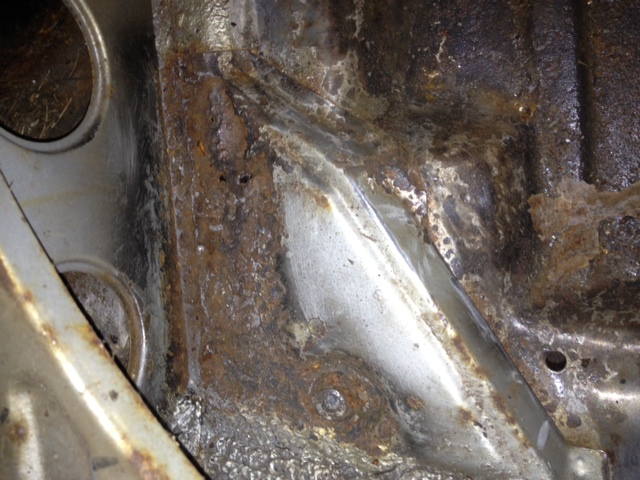
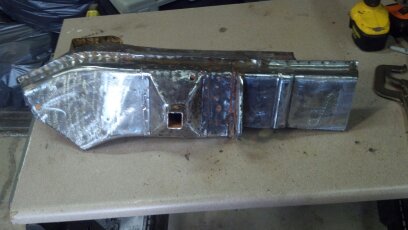
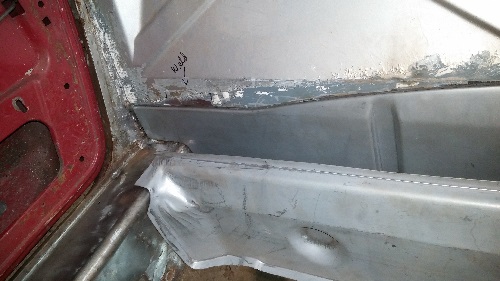
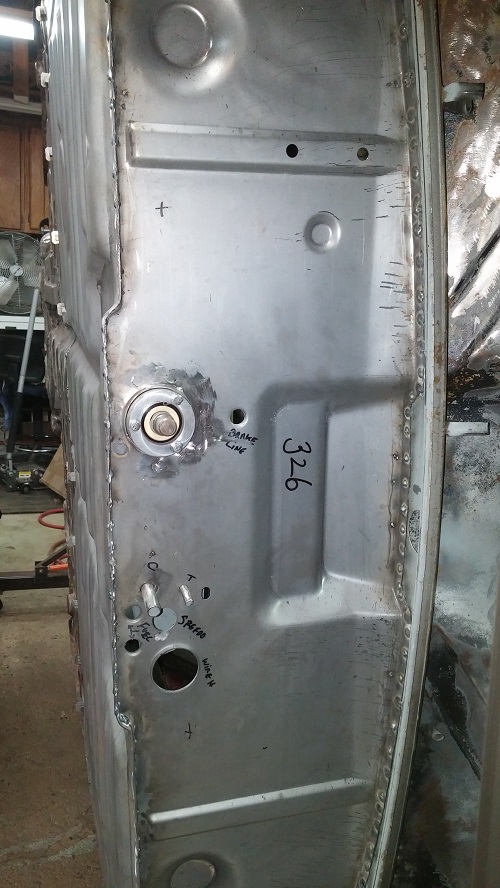
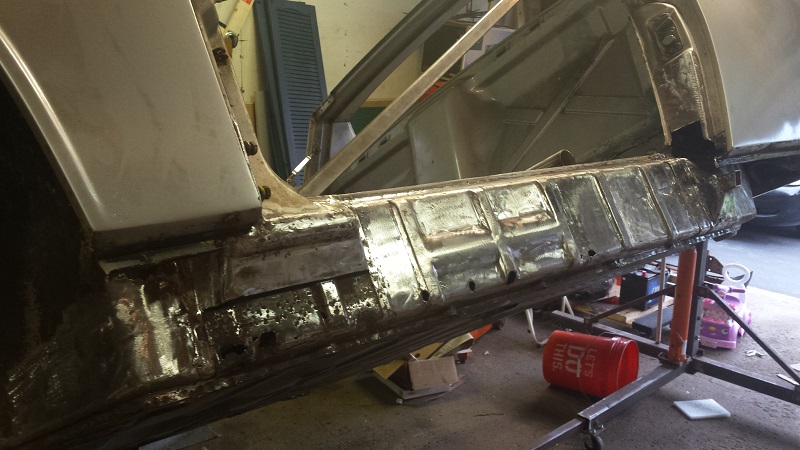
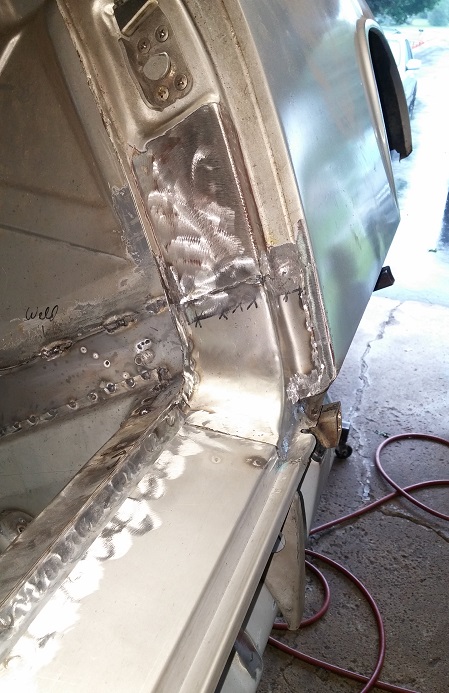
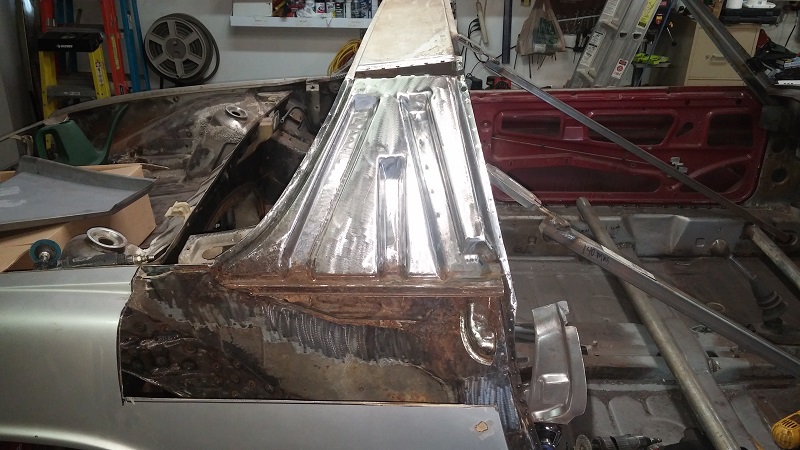
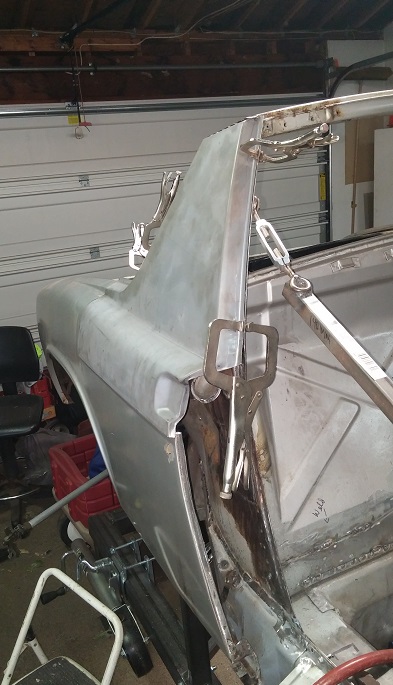
Posted by: Luke M Jun 22 2013, 12:26 PM
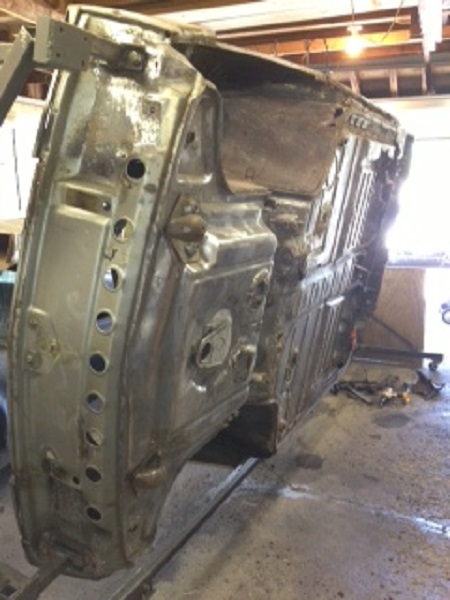
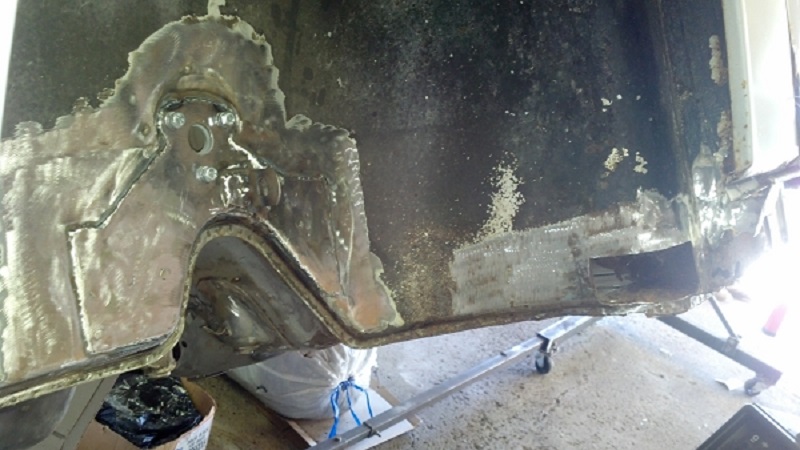
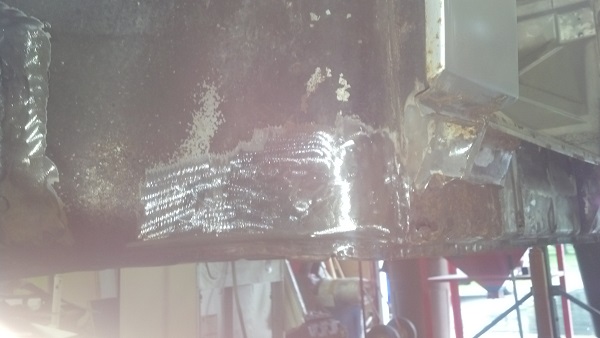
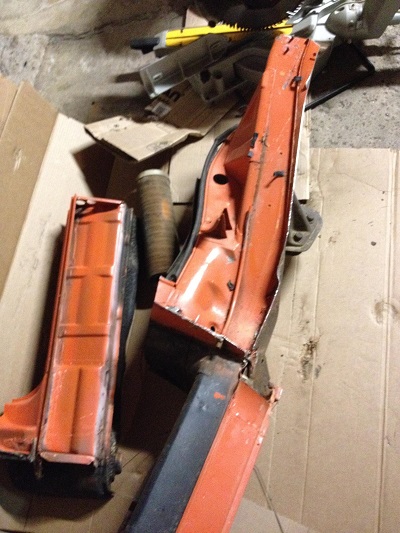
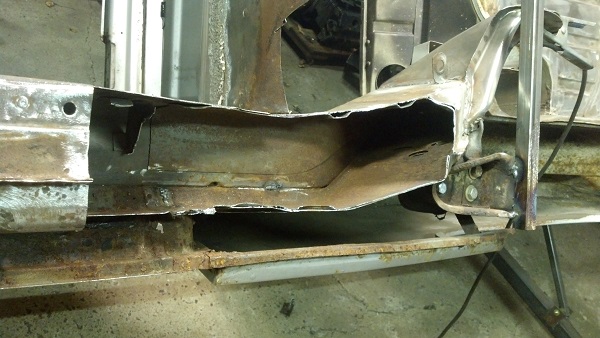
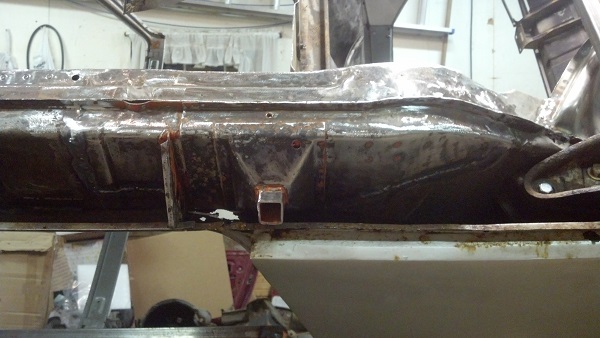
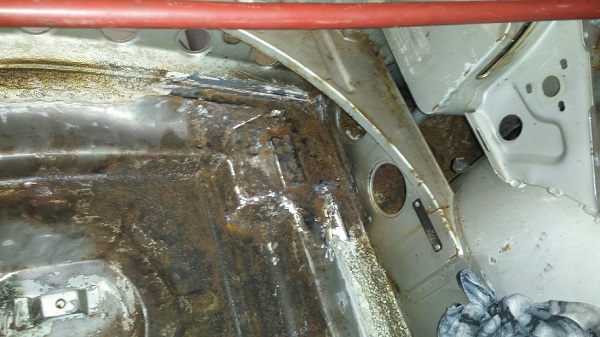
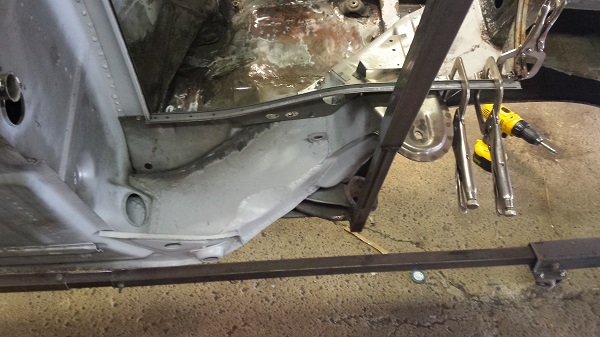
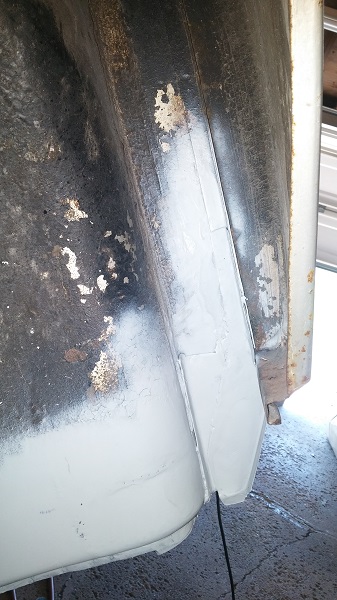
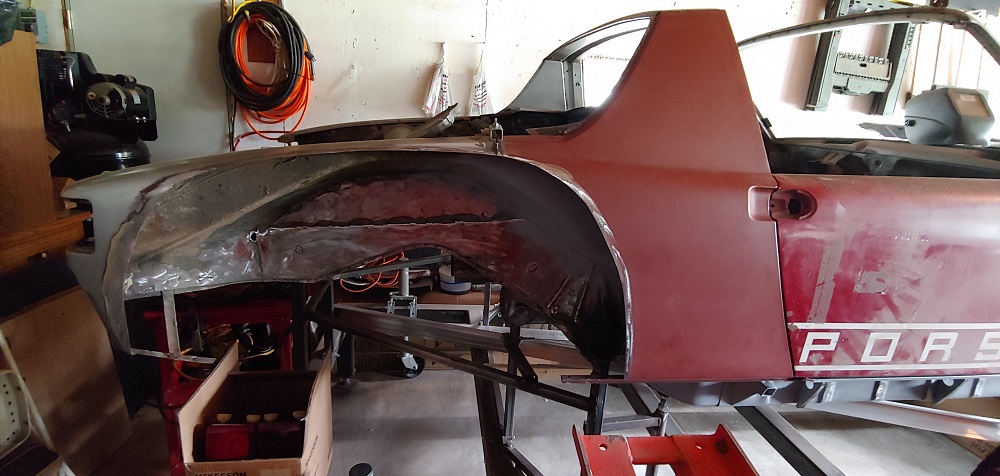
Rust repair in the works..
Attached image(s)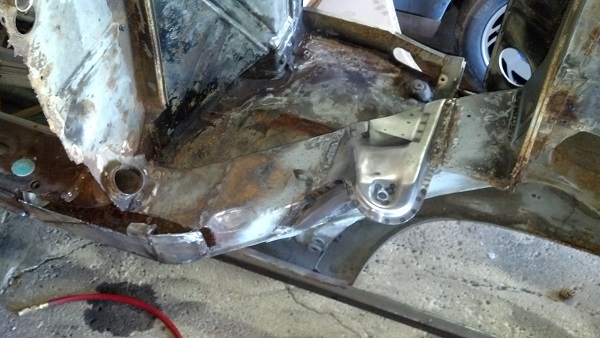
Posted by: Spoke Jun 22 2013, 05:40 PM
Good luck and happy welding.
Looks like a typical east coast 914.
Is that /6 cylinder engine going in this 914?
Posted by: Luke M Jun 22 2013, 06:57 PM
Good luck and happy welding.
Looks like a typical east coast 914.
Is that /6 cylinder engine going in this 914?
Yeah typical rust issues for a NE car for sure. I've seen worse then this but this will take sometime to repair.
No that engine on the trailer was sold but my brother has an 83 3.0 sc engine that's going in it. I'll post pics of parts when I get some time.
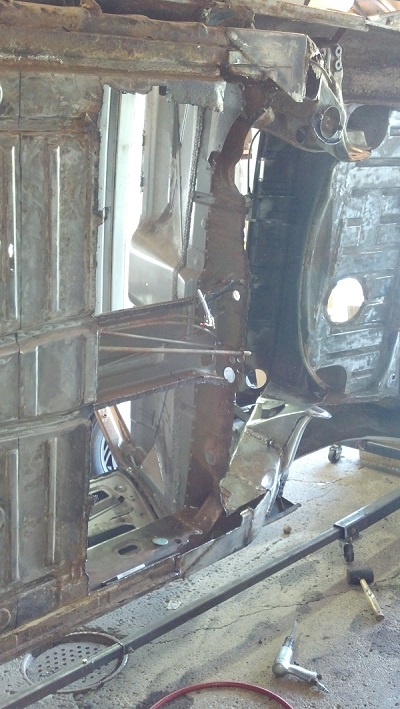
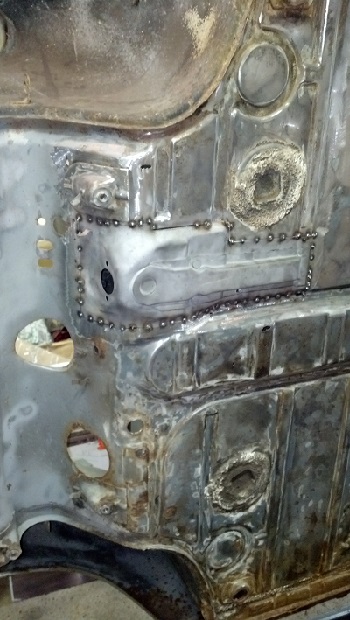
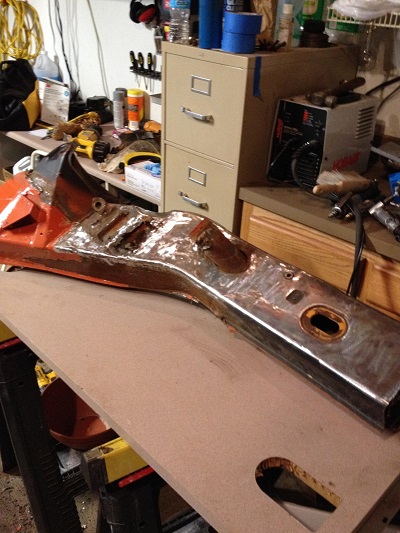
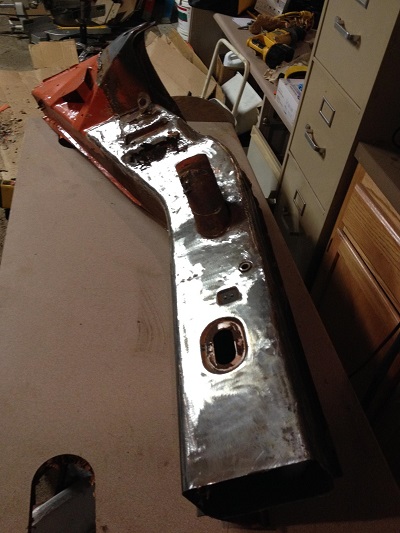
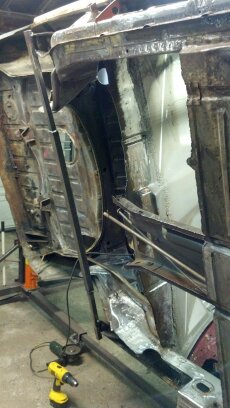
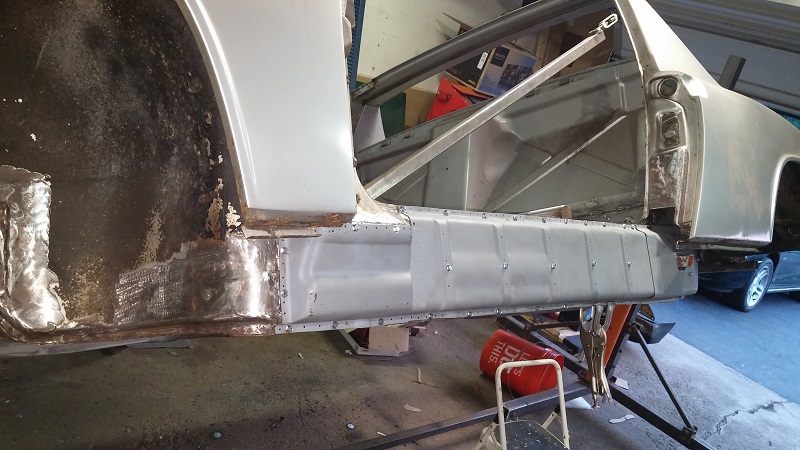
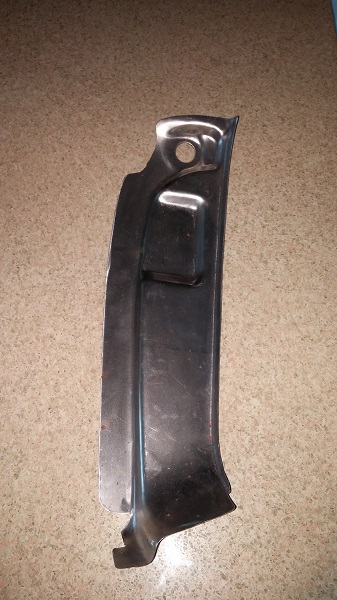
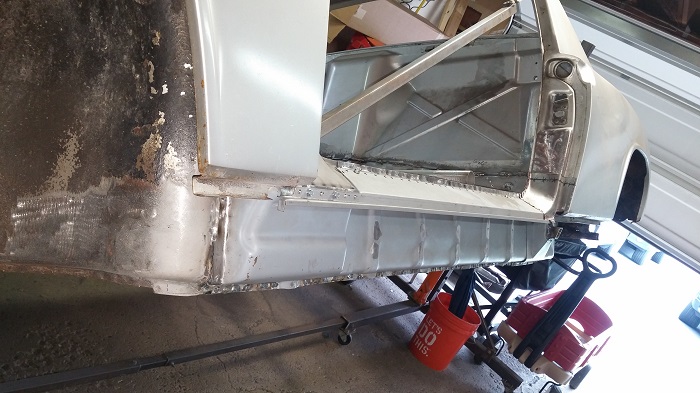
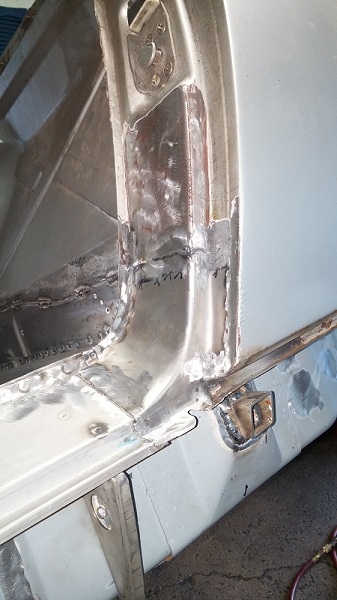
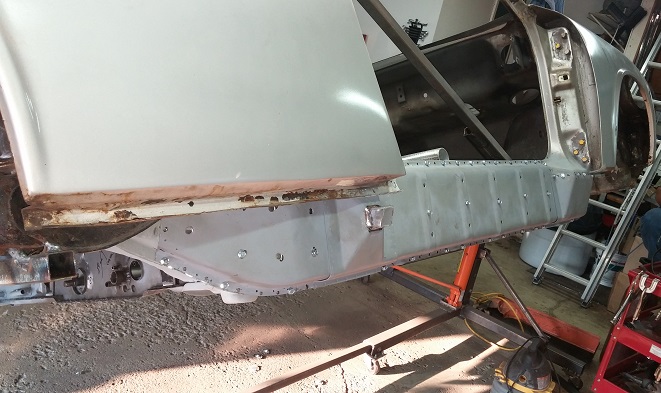
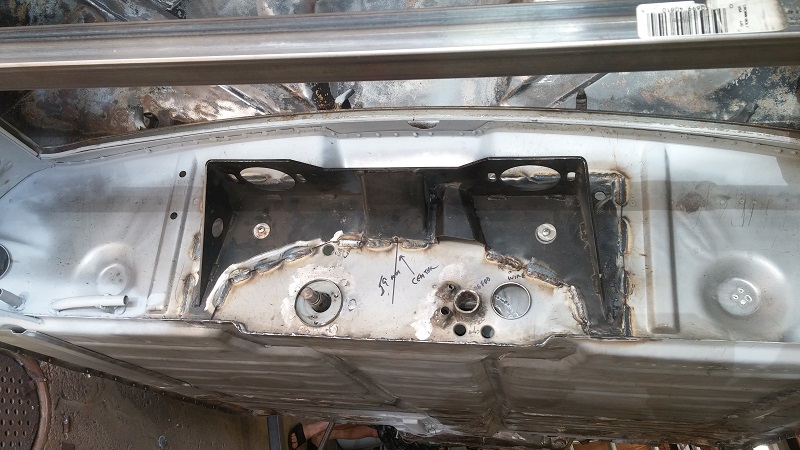
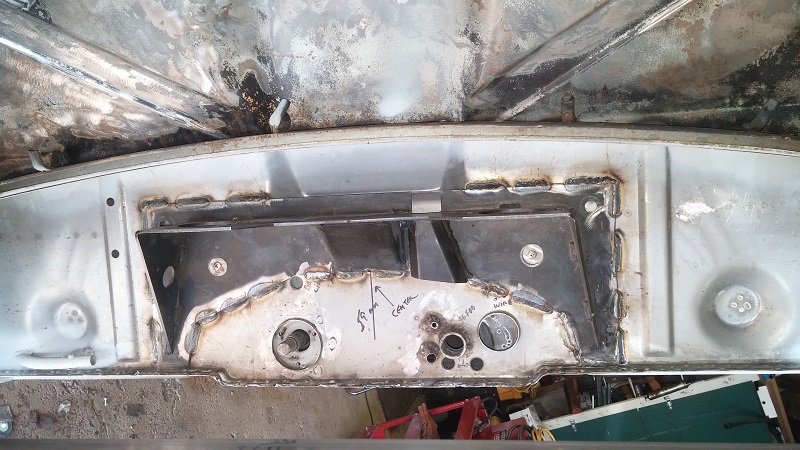
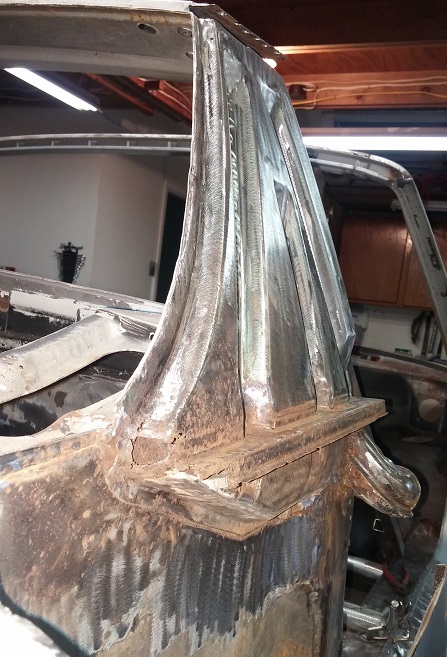
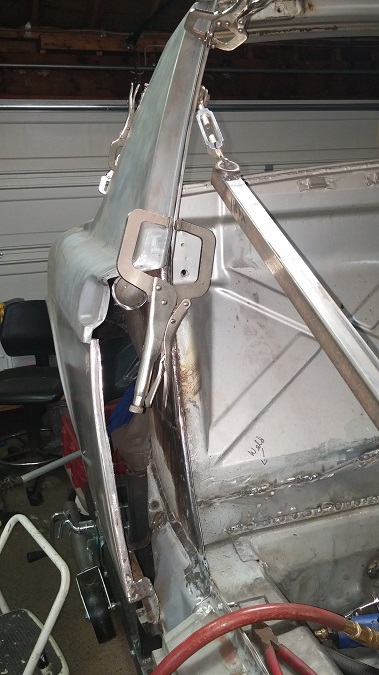
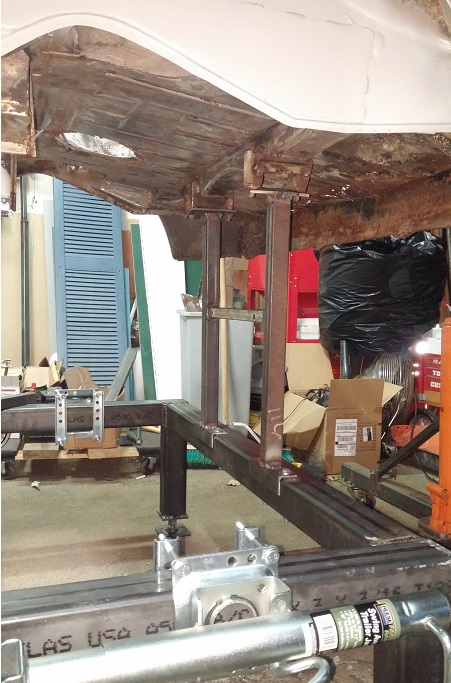
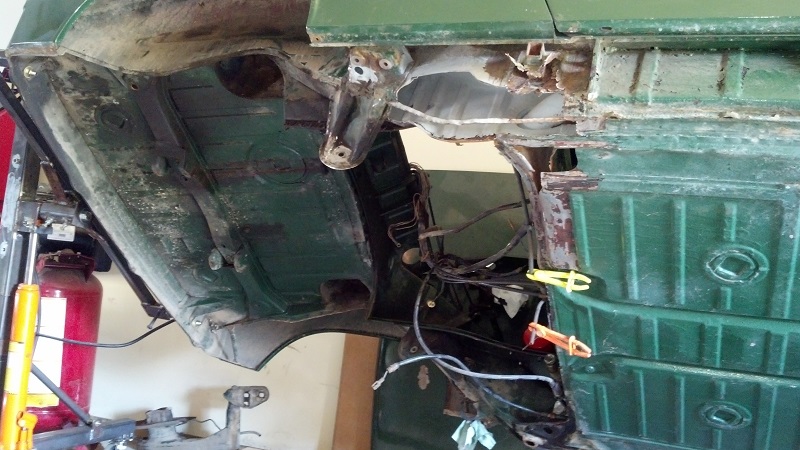
Posted by: Luke M Jun 24 2013, 07:08 AM
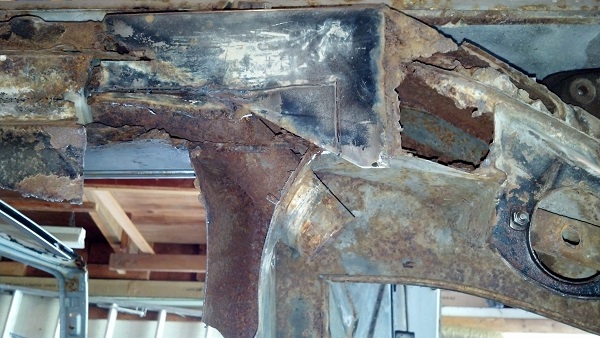
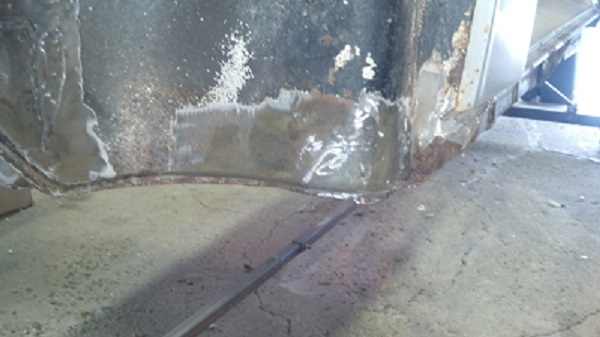
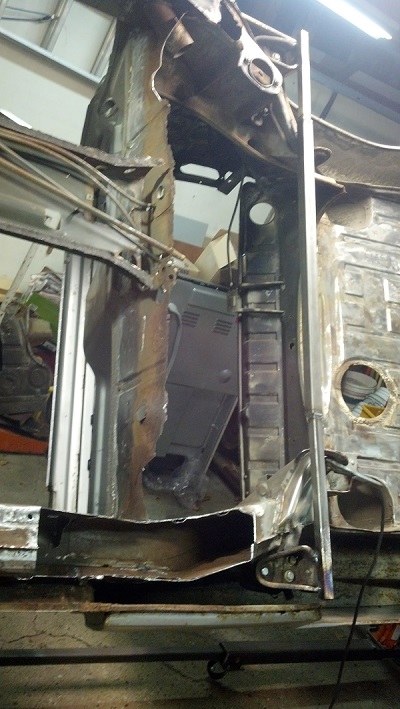
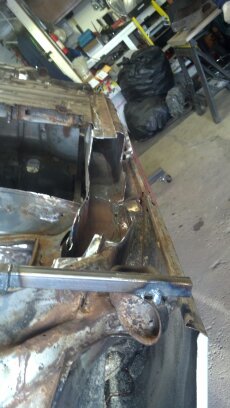
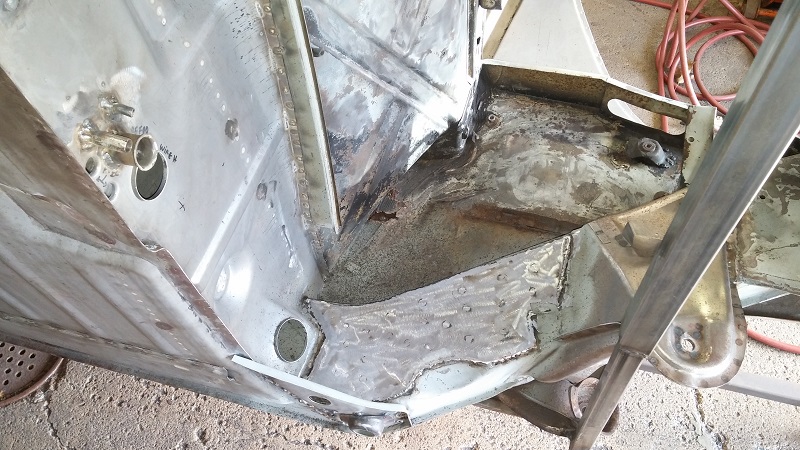
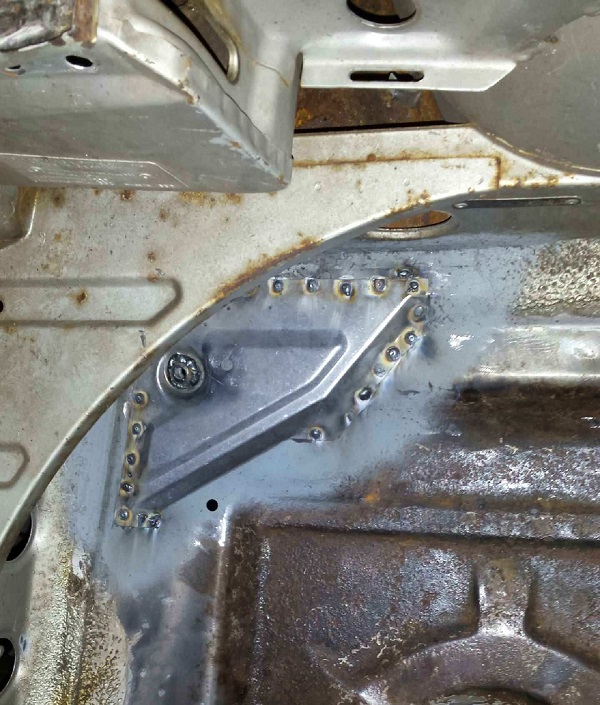
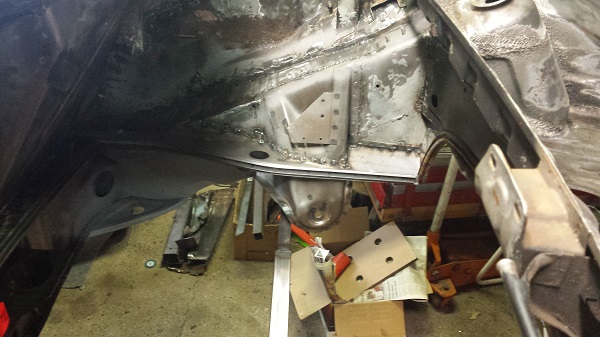
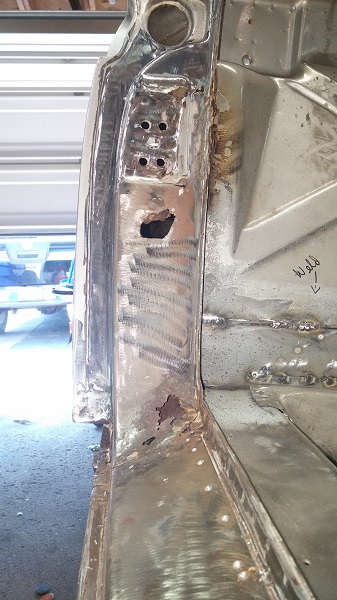
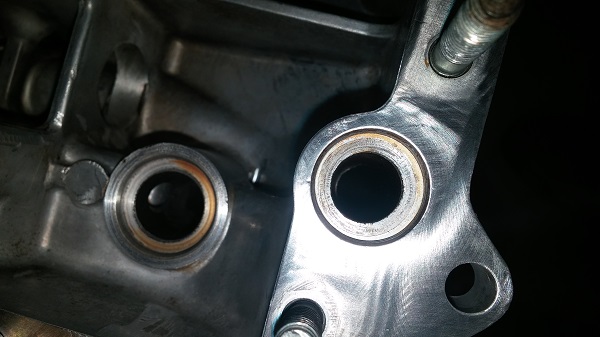
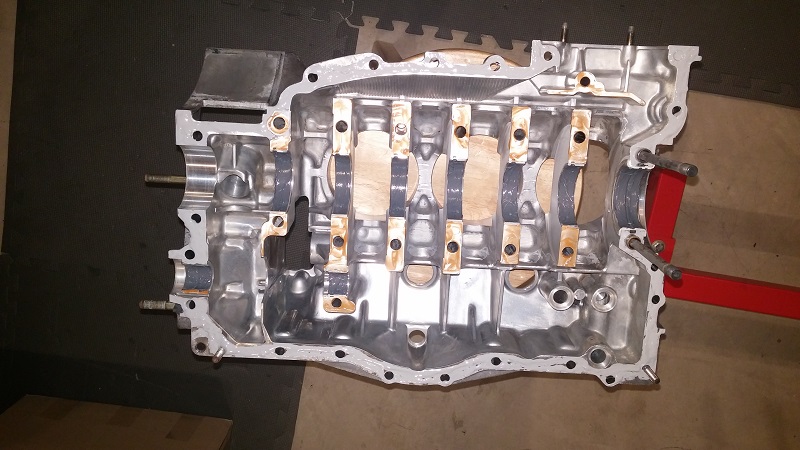
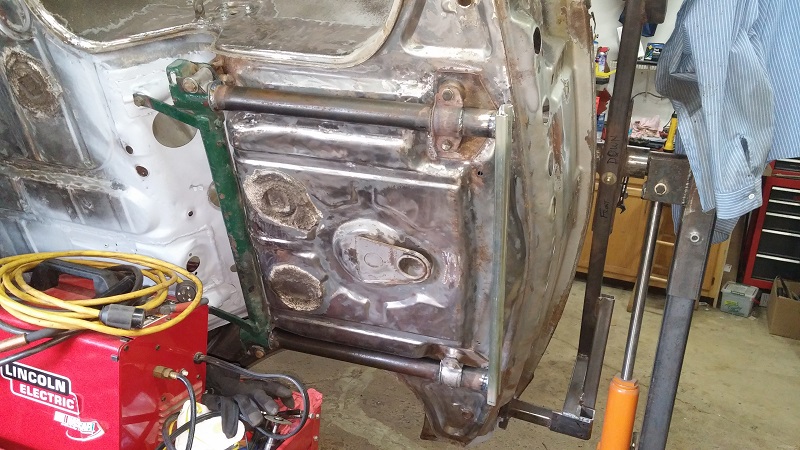
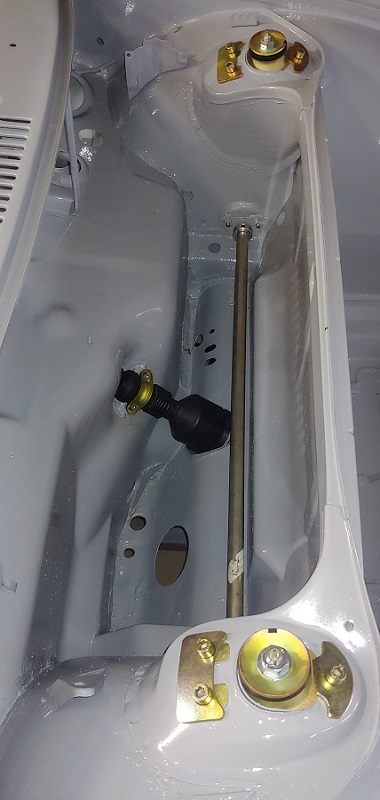
Replacing the r/r inner control arm mount was a real pain in the ass. As you can see by the pics someone attempted to repair it. Talk about a hack job. The inner control arm mount hole was so big that the the arm moved every which way. It now has a nice new mount installed. I have to give RD a plug for the replacement tins that we got. They seam to all fit real nice without any into place.
Attached image(s)
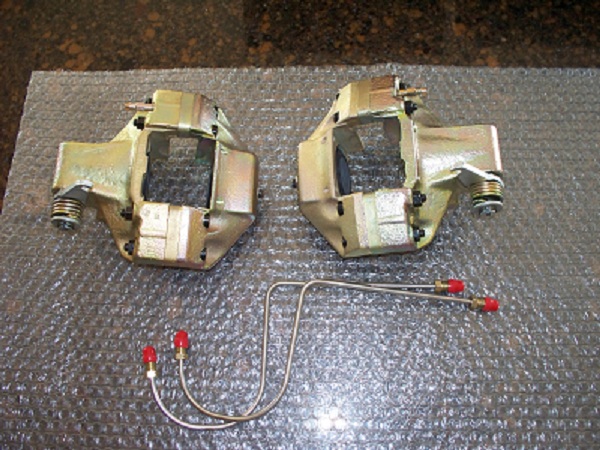
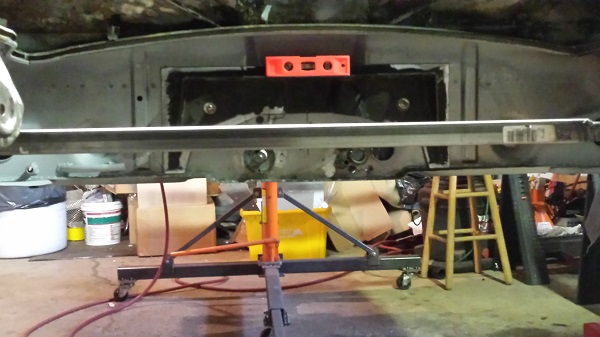
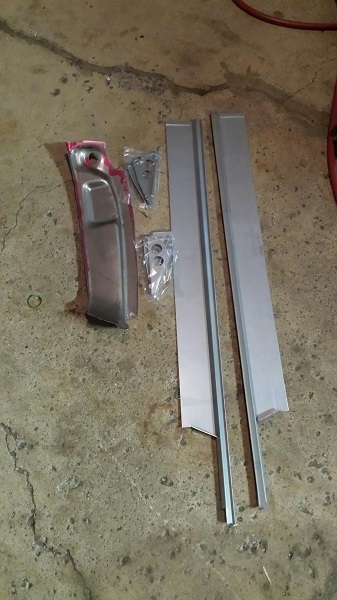
Posted by: Luke M Jun 25 2013, 07:48 AM
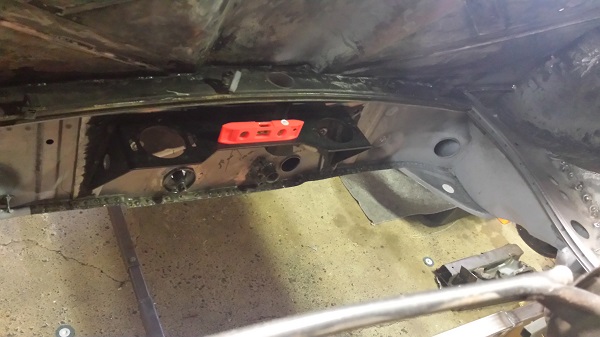
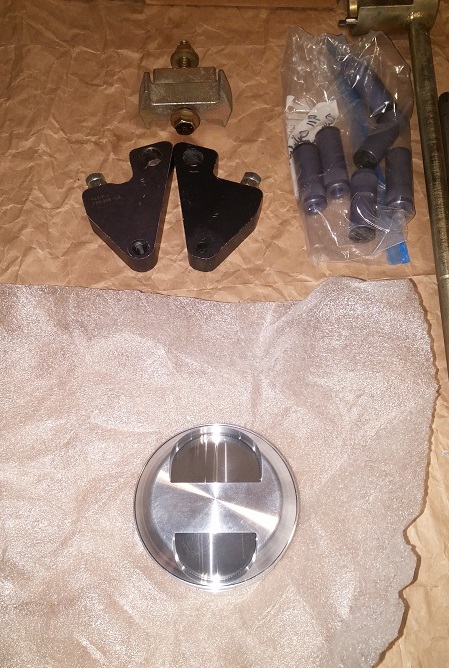
Some of the parts that will be used :
Original 914-6 rear calipers w/ GT spacer kit redone by Eric.
S front calipers & Boge struts off a late 911 Carrera.
83 3.0 SC engine will get some 40 IDA Weber carbs.
Front suspension.
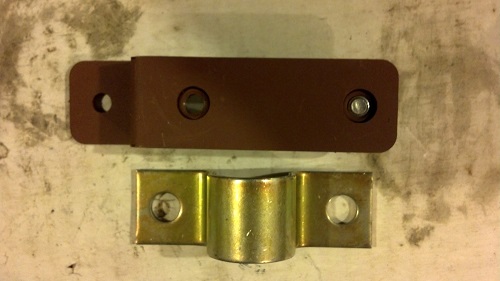
Rear sway bar mount.
Attached image(s)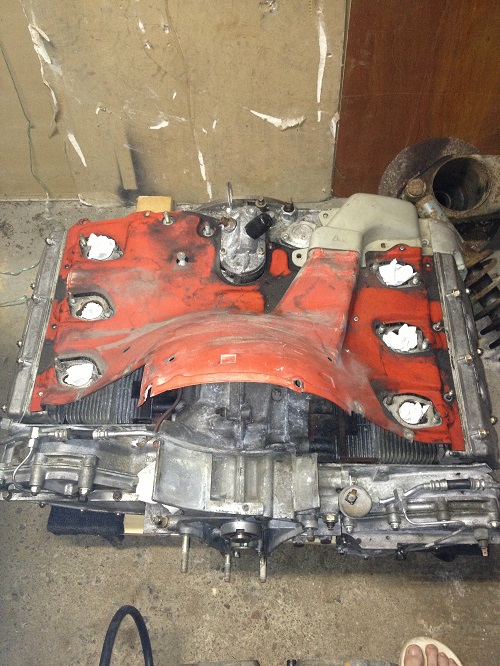

Posted by: rick 918-S Jun 25 2013, 08:06 AM
Nice start!
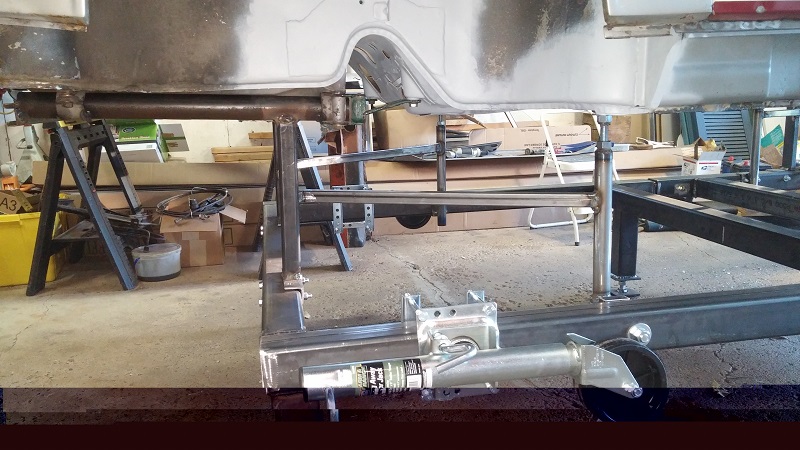
Posted by: Luke M Sep 21 2013, 08:58 AM
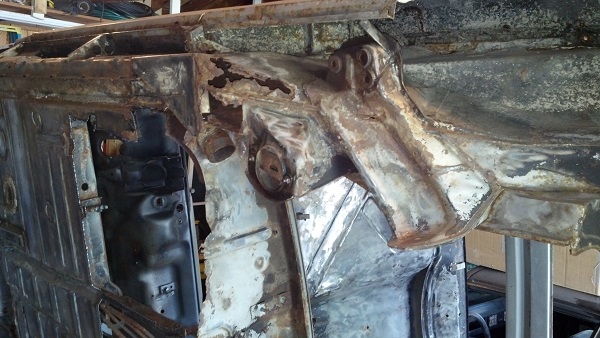
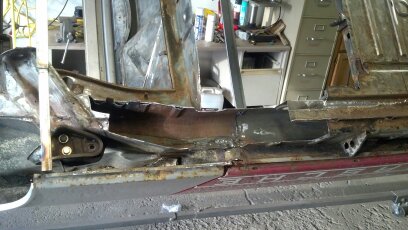
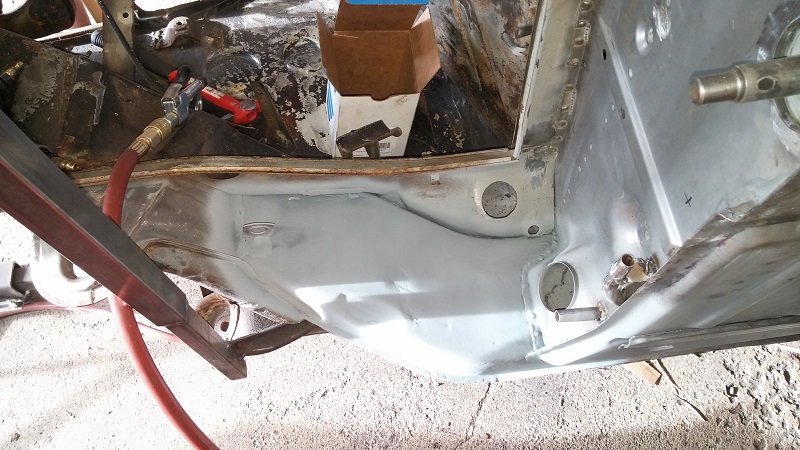
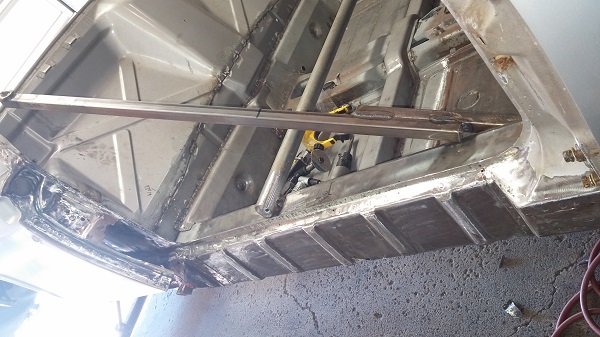
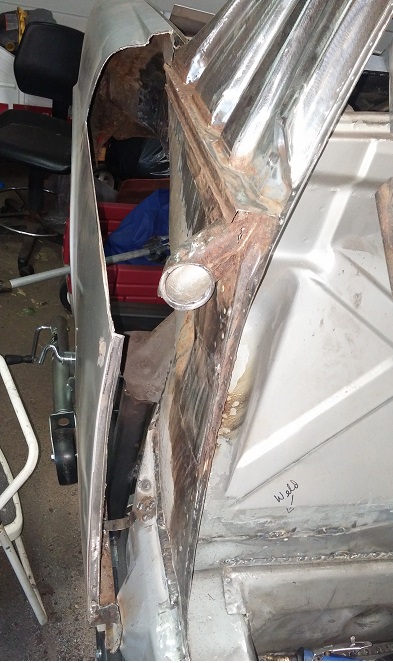
I'm back to it here. Finally had some time to fix a few more things on my brothers car. We got the pedal cluster sheet metal replaced and repaired the inner fender corner. Also installed the Maddog sway bar plates. Thanks to Bruce Stone for the replacement sheet metal. It made the repair a lot easier to cut out the bad sections and weld in some good metal. At first we where going to use just plain old sheet metal to patch things up but as I thought about it I changed my mind. I ended up sourcing the replacement metal from guys that where parting out some good old somewhat rust free CA cars. We are still waiting on a pair of longs from a CA guy. We will cut and splice in the new/used metal to fix the rust problems in the longs.
Then once the floors and the lower firewall are installed it will get the Maddog inner chassis kit installed. A GT chassis kit will also find it's way onto the car at some point.
Enjoy the pics.
Attached image(s)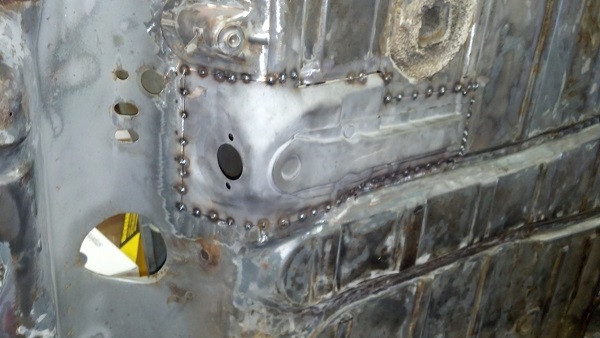
Posted by: Jamesmichael73 Sep 21 2013, 09:32 AM
Thats some nice work. I will be following this build for sure.
Posted by: r_towle Sep 21 2013, 10:17 AM
Parked outside in Rochester Ny, the northeast capital of snowfall....
Wow, you are taking on a challenge.
Posted by: Luke M Sep 30 2013, 06:36 PM
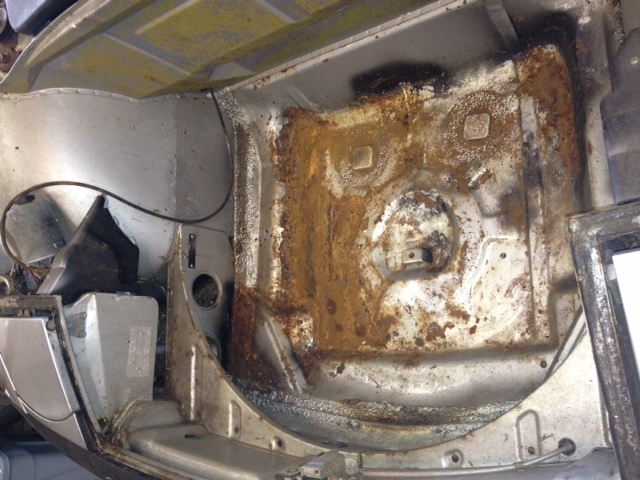
Finally got some sheet metal in from a CA parts car.. Not so rust free like I was told but it's better then what we have to work with now. Started to clean up the right side and found that someone laid down a 1/4 '' of bondo on top of the hell hole..
I got it scrapped off and found some rust. It must be that salt in the CA air taking it's toll.. 
Here's a few pics..enjoy
Attached image(s)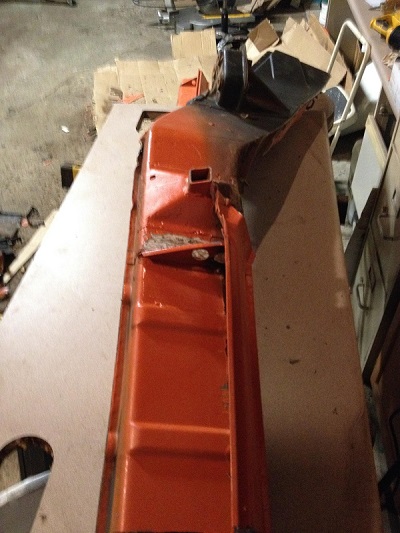
Posted by: 914forme Sep 30 2013, 06:48 PM
Thats some nice work your doing. And don't feel bad, CA cars do rust. Compared to our stuff and its might as well not be rust, will call it oxidation.
Posted by: Luke M Nov 24 2013, 08:20 AM
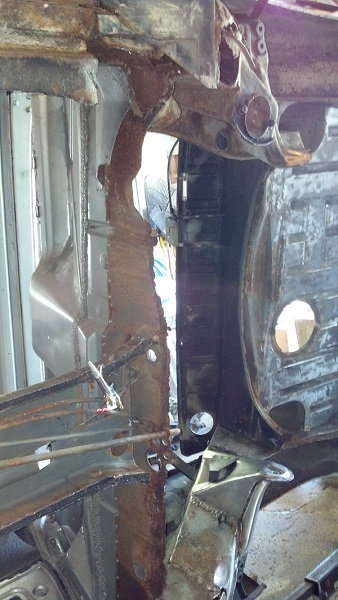
My brother and I finally got a few things done on the car.
We cut out the rusty long portions on the pass side and replaced it with some good metal. The heater tubes inside the longs will not be needed so we took it out.
Once all the longs are fixed up a maddog inner long kit will be installed.
We are also thinking about installing a set of clam shells from RD.
Some may say it's over kill to install both but we want a solid chassis for auto-x/track duty. The next step is to get the drivers side done then move to the lower firewall.
Attached image(s)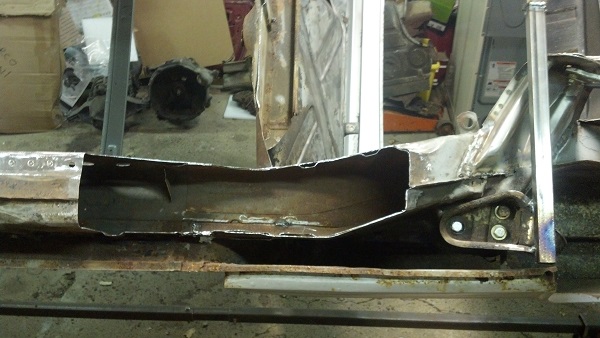
Posted by: trojanhorsepower Nov 24 2013, 09:16 AM
Man that looks familiar. Looks like it is going well though. What was your primary tool for cleaning the paint and junk off the metal?
Posted by: jimkelly Nov 24 2013, 09:40 AM
that's a pretty big - and nicely done - repair. check your door gaps throughout the process.
Posted by: Luke M Nov 24 2013, 10:04 AM
The door gaps should be ok as I placed the cross bars in prior to cutting anything.
I know things will move about as I'm cutting and welding but plan to address this prior to welding in the Maddog/RD pieces.
I used a 90 degree handheld air grinder and the b-blater to clean things up.
The plan is to have the car media blasted once all metal work is done.
Posted by: trojanhorsepower Nov 24 2013, 10:32 AM
Luke M,
Are you using a stone head or wire or pad?
Posted by: Luke M Nov 27 2013, 10:56 AM
[quote name='trojanhorsepower' date='Nov 24 2013, 09:32 AM' post='1961623']
Luke M,
Are you using a stone head or wire or pad.
It depends on the area that I'm working on but I use all of the above.
I'm also using a sand blasting cabinet for parts that fit in it.
I also have a hand held blast unit from hb for those tight areas .
Posted by: maddog Nov 27 2013, 11:20 AM
Nice work Luke, I am enjoying the pics and watching your progress!
Posted by: wndsnd Nov 27 2013, 11:32 AM
Well I know what you are dealing with. You are lucky you have your brother for help.
My car came out of Bangor Maine. I am sure most would have scrapped it. I said to my wife "Looks like a nice little project."
Rockers panels fell off the car while it was being hauled to my house. That was the beginning. I wish more crap fell off because the rest was rust welded together.
Keep the faith. Nice job.
John
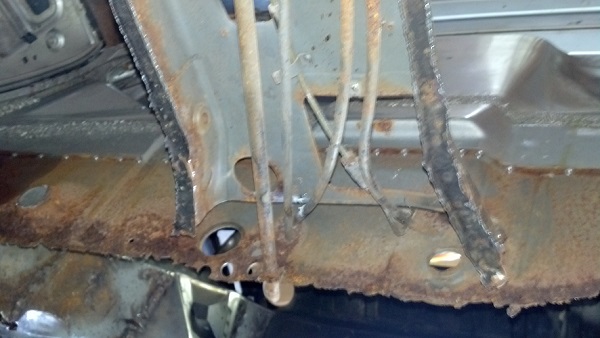
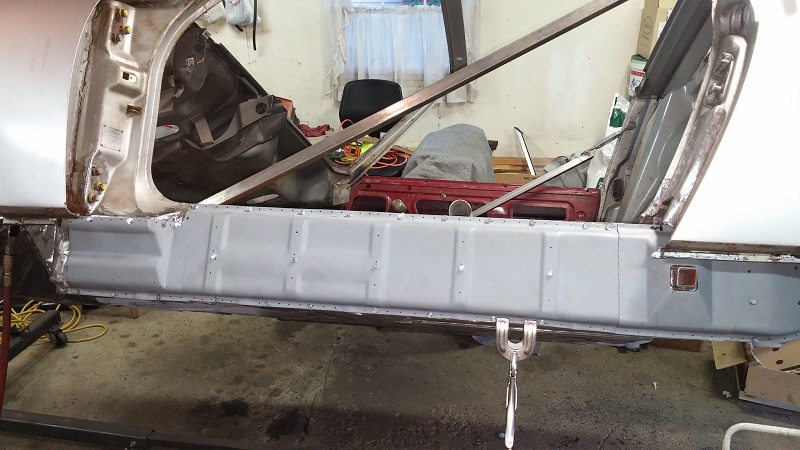
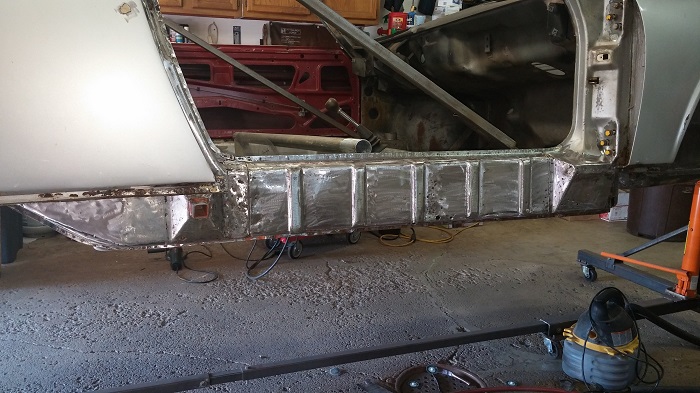
Posted by: Luke M Mar 2 2014, 07:49 PM
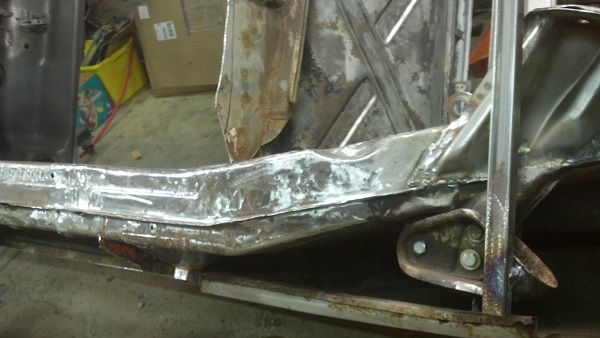
The work continues. The right long is done and started on the left side.
The heater tubes where deleted as this car will not see winter driving.
We are going to install another heat/defrost source later in the front trunk.
Installed the doors to check the door gaps and they fit nice.
Here a few pics.
Attached image(s)
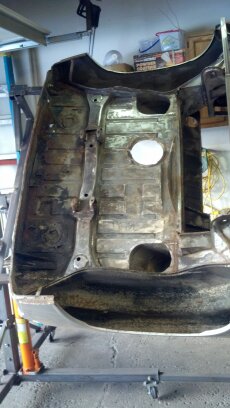
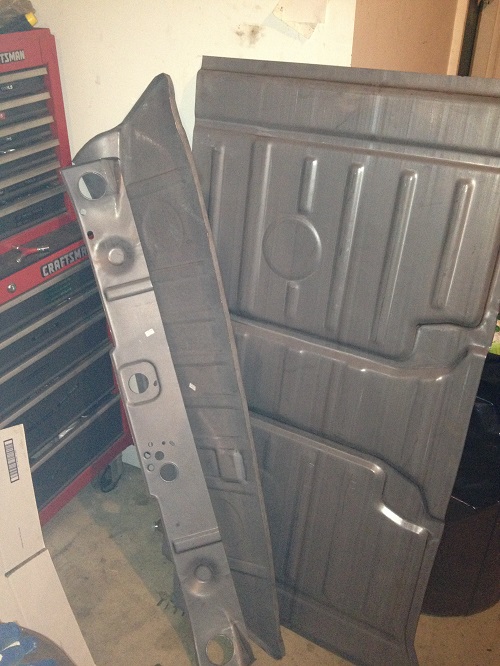
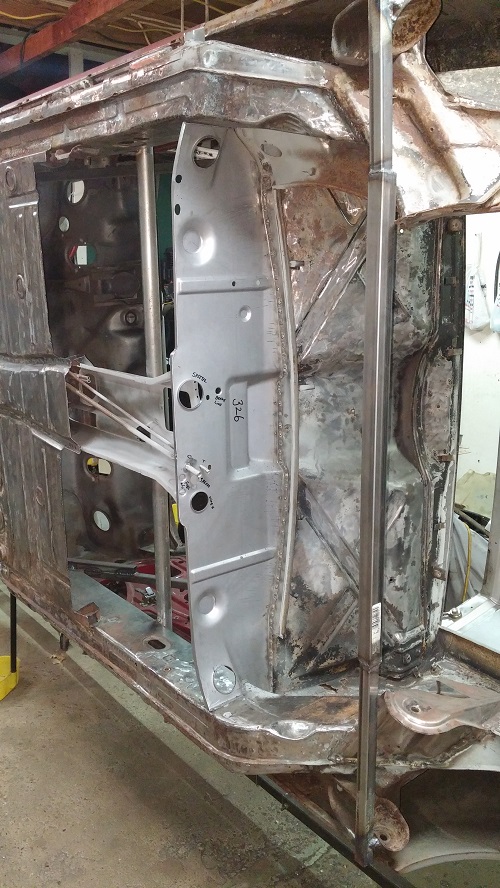
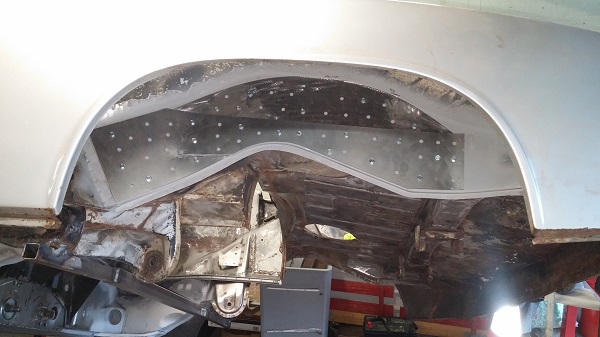
Posted by: Luke M Aug 18 2014, 07:31 AM
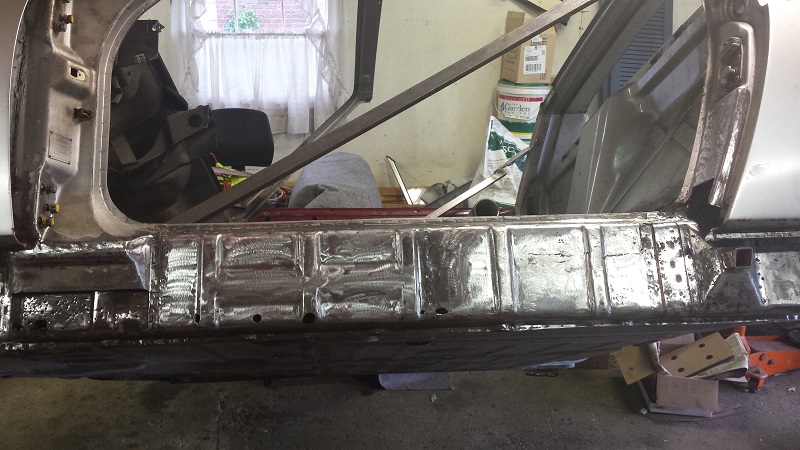
It's been a while since I updated this so here we go.
After looking over the chassis and making a list of panels that needed to be replaced. My brother and I decided that the lower firewall needed to be done. After all this 914 is getting a 3.0 6 so the firewall is going to be a huge structural piece. I started looking for a replacement panel but locating one seamed impossible. I knew that RD made a lower 5 '' replacement panel but that wasn't going to work for our need. I gave Pete at RD a call and was advised that they where working on making a full lower firewall panel. I was advised that it would take sometime to make it.
I told Pete that we could wait for the part to be made. After a long wait, I was notified that the lower firewall was finally in the production/sale phase.
I have to say that working with/communicating with Pete at RD has been great.
The order will be placed today for it.
Attached image(s)
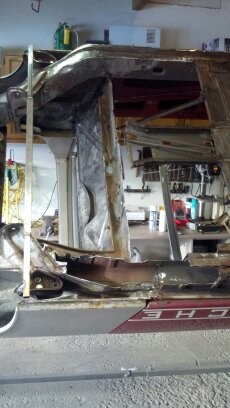
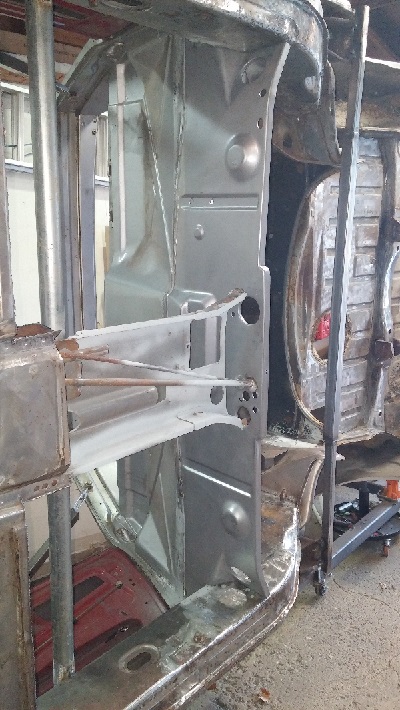
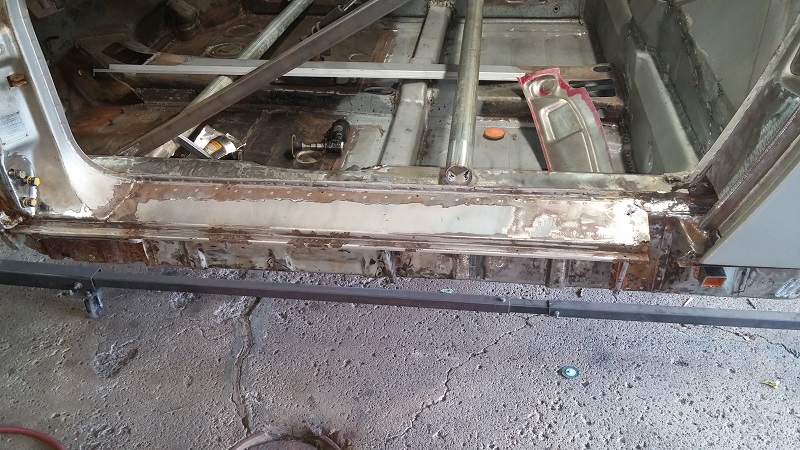
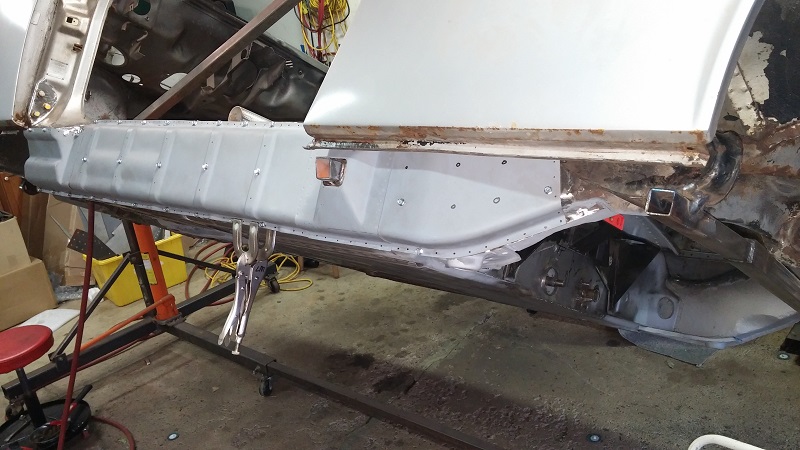
Posted by: Luke M Apr 6 2015, 11:31 AM
Well now that the cold weather has kinda gone away it's time to start on the 914 again. We got the car prepped for the lower firewall and rear floor pan.
The new RD firewall required some work to fit well but it wasn't too bad to do.
Tested fitted the floor pan and inner lower firewall. Checked over the throttle and clutch tubes. I'm thinking of adding some extra support brackets to the tubes before closing it up. The inner floor cross support was in bad shape so out it came. We got a new one on the way from RD. Also fixed some spots in the right long area.
Looks like a lot more of 
Attached thumbnail(s)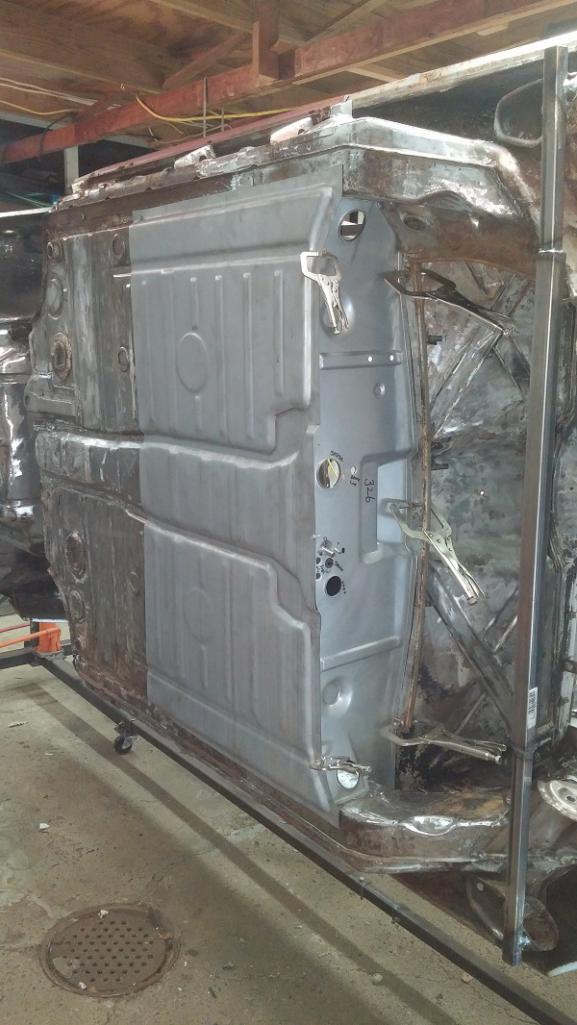
Attached image(s)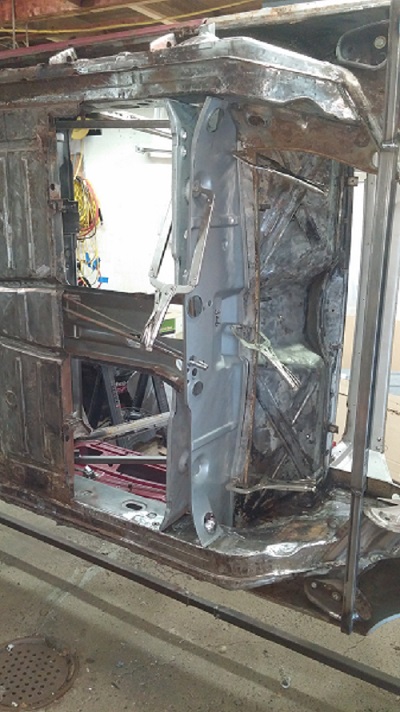

Posted by: Cairo94507 Apr 6 2015, 12:24 PM
Wow- Nice work. Doing it right is the only way to do it.
On the Internet, we see a lot of cars claiming to be bare metal restorations, etc., and they are not really as claimed. If you are doing this level of work to your car, failing to take before, in progress and finished photos, (to me) means it was not done properly.
This is the way to do this- 
Posted by: nathansnathan Apr 6 2015, 12:26 PM
Well now that the cold weather has kinda gone away it's time to start on the 914 again. We got the car prepped for the lower firewall and rear floor pan.
The new RD firewall required some work to fit well but it wasn't too bad to do.
Tested fitted the floor pan and inner lower firewall. Checked over the throttle and clutch tubes. I'm thinking of adding some extra support brackets to the tubes before closing it up. The inner floor cross support was in bad shape so out it came. We got a new one on the way from RD. Also fixed some spots in the right long area.
Looks like a lot more of
Awesome work there.
I notice the lower fw, though, seems to go down further on the passenger side relative to the bottom of the long... or else the long is higher on the passenger side.
I have a situation like that in my project, going to take some major rework to get even - the welding I did to the inner fenderwell, the inner suspension console and all in that area actually shrunk that side by just under a quarter inch. I found it when I went to fit up the engine mount bar, though I guess you're doing a 6 to have no mounts. Just thought I'd mention it, might be an issue.
Posted by: Luke M Apr 6 2015, 02:58 PM
Well now that the cold weather has kinda gone away it's time to start on the 914 again. We got the car prepped for the lower firewall and rear floor pan.
The new RD firewall required some work to fit well but it wasn't too bad to do.
Tested fitted the floor pan and inner lower firewall. Checked over the throttle and clutch tubes. I'm thinking of adding some extra support brackets to the tubes before closing it up. The inner floor cross support was in bad shape so out it came. We got a new one on the way from RD. Also fixed some spots in the right long area.
Looks like a lot more of
Awesome work there.
I notice the lower fw, though, seems to go down further on the passenger side relative to the bottom of the long... or else the long is higher on the passenger side.
I have a situation like that in my project, going to take some major rework to get even - the welding I did to the inner fenderwell, the inner suspension console and all in that area actually shrunk that side by just under a quarter inch. I found it when I went to fit up the engine mount bar, though I guess you're doing a 6 to have no mounts. Just thought I'd mention it, might be an issue.
It's off because it's not fully welded in yet. It's only welded at the top portion and I need to take some measurements off the parts car that my brother has. Once I have all the measurements we'll tack the lower portion in place. Then we will fit the other panels to make sure it all lines up. If all is good at that point we will finishing up the welding. Measure a hundred times , cut and weld once. Yes, it's going to get a RJ 6 mount welded to the lower firewall. Once all the work is done the car will find it's way to the media blaster. I'm sure this will reveal more areas that will need attention.
Posted by: Luke M Apr 6 2015, 03:19 PM
Wow- Nice work. Doing it right is the only way to do it.
On the Internet, we see a lot of cars claiming to be bare metal restorations, etc., and they are not really as claimed. If you are doing this level of work to your car, failing to take before, in progress and finished photos, (to me) means it was not done properly.
This is the way to do this-
Just like your 6 build. It's best to document everything that you do to it.. If it's not documented, it never happened in some peoples eyes. We have a lot of pics of the car in many different stages throughout the build. We also have pics to document the parts being used and the drive line work that's being performed.
Over the winter we rebuilt the org side shift trans to this car. It's all new inside from bearings to gear ratios.
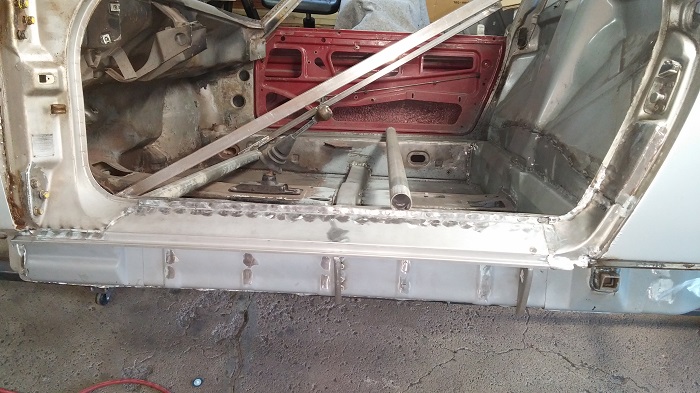
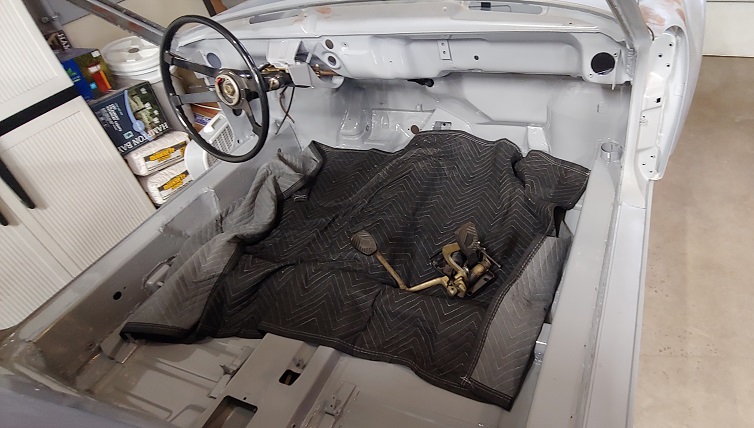
Posted by: Luke M Apr 13 2015, 11:10 AM
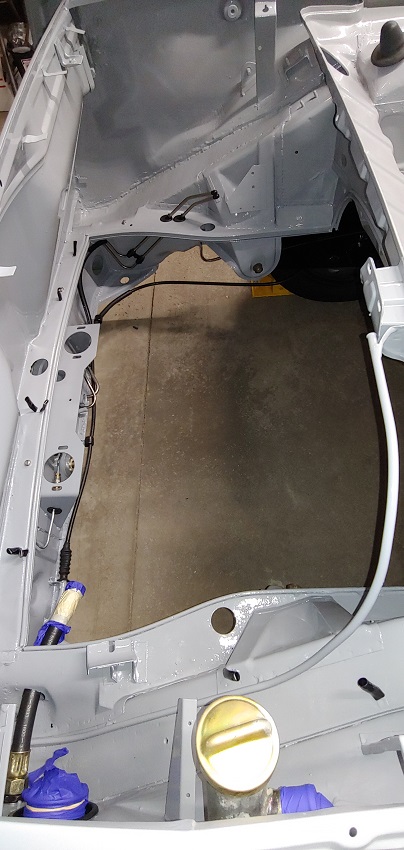
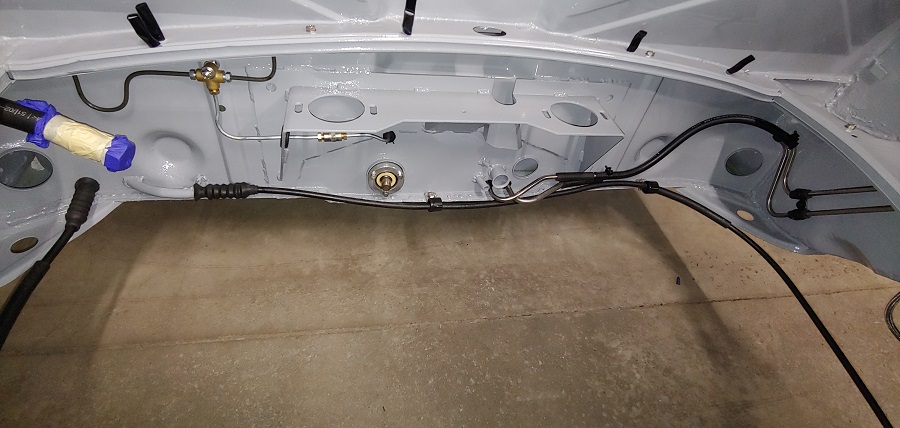
It's been a busy weekend. We got the lower outer firewall and 75 % of the floor pan welded in place. It took some time making sure the measurements where right. Installed the Tangerine firewall shifter bushing prior to installing the floor pan. Just an FYI if anyone is going to use the RD lower fire wall. You will need parts off your old firewall welded onto the new one. There's an inner shifter bushing plate, e-brake tubes, speedo cable tube, and the brake proportioning valve bracket.
Attached image(s)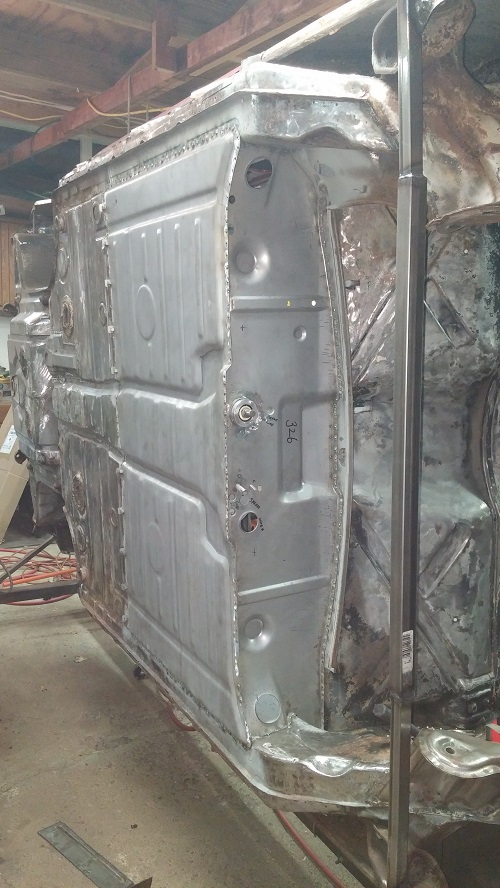
Posted by: nathansnathan Apr 13 2015, 03:35 PM
That looks awesome.
Don't forget the interties connecting the inner and out suspension consoles.
I forgot to say shout outs to WNY - I grew up in Buffalo, NY, like between Lockport and North Tonawanda area. 
Posted by: Luke M Apr 13 2015, 06:39 PM
That looks awesome.
Don't forget the interties connecting the inner and out suspension consoles.
I forgot to say shout outs to WNY - I grew up in Buffalo, NY, like between Lockport and North Tonawanda area.
Yeah I need to see if I can remove one from the parts car. I'm not sure if RD makes them but I only need the pass side. Be glad you don't live in the Buffalo area now.
They got killed with snow this year. I have family and friends that live in Lockport.
Posted by: trojanhorsepower Apr 13 2015, 06:42 PM
Lookin good!
Posted by: 914Sixer Apr 13 2015, 07:18 PM
Top Notch job !!!
Posted by: Luke M Apr 19 2015, 08:09 PM
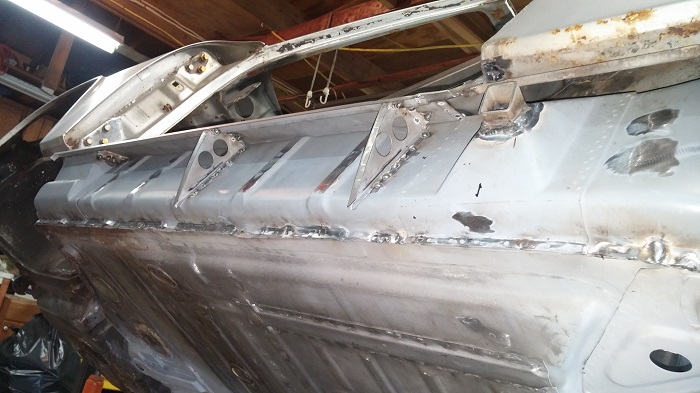
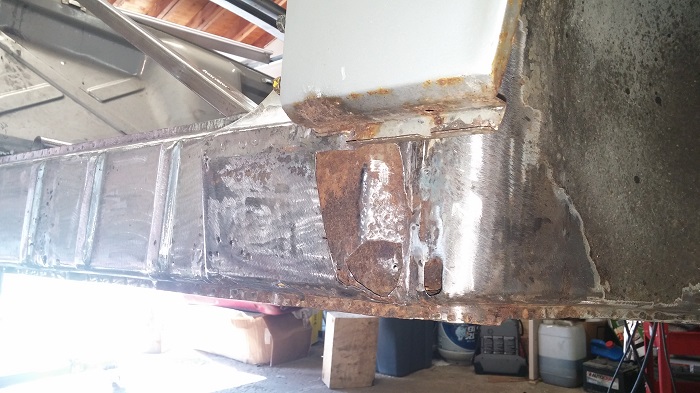
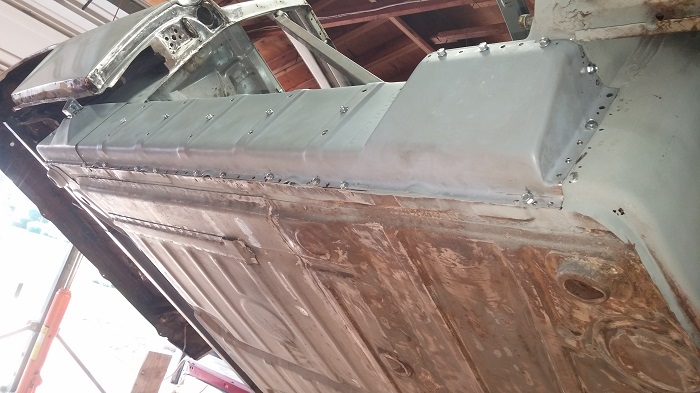
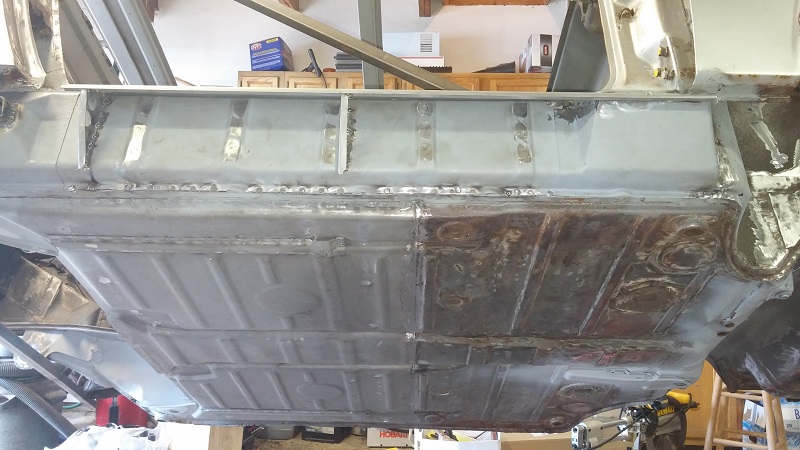
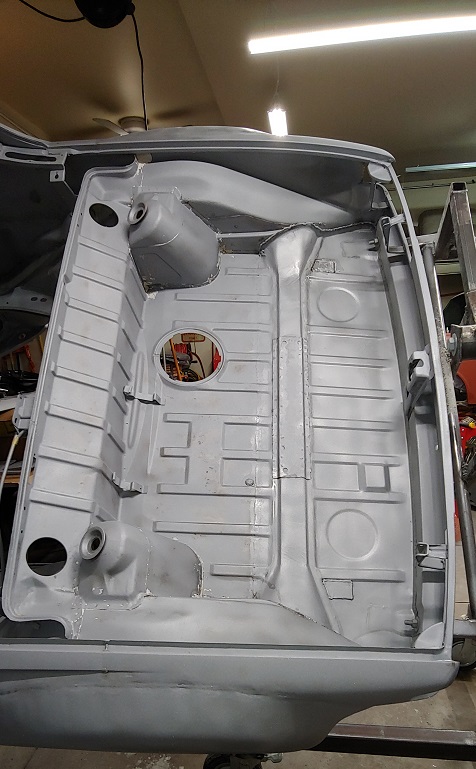
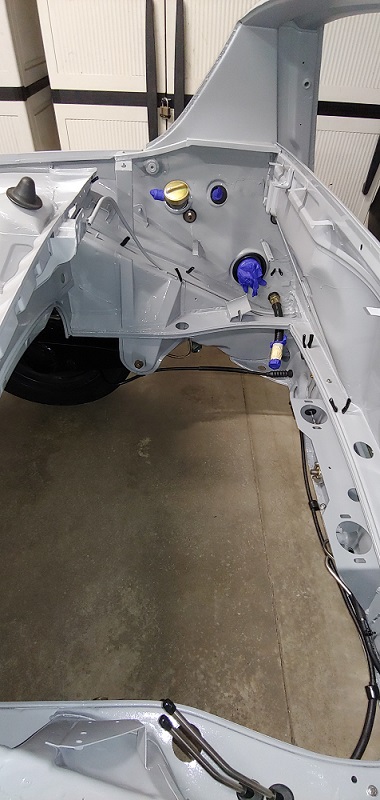
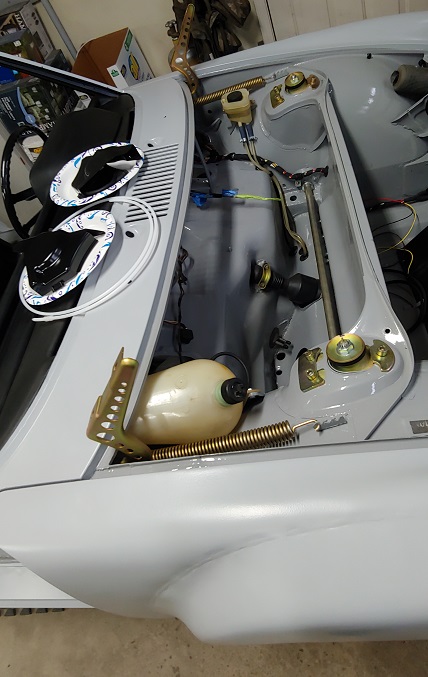
We got the floor pan/seat mount reinforcement all welded in, new RD cross member installed, RD lower inner firewall is in, installed a new RD right front trunk reinforcement corner, made some reinforcement plates for the inner engine long, and the right rear floor jack point is in. Yeah, we had a busy day.. 
Attached image(s)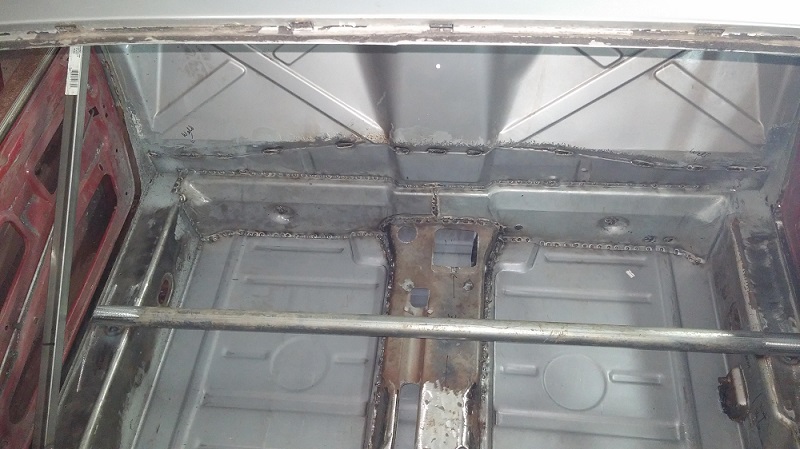
Posted by: 914350 Apr 19 2015, 11:40 PM
Looking great!!!
Posted by: peteyd May 15 2015, 02:38 PM
Looks great Luke! How did the cross member fit in? Its good to see the new parts installed. I rarely get much feedback about the new parts Im making.
I will eventually make the other bits that attach to the outer firewall also.
Posted by: Luke M May 15 2015, 03:09 PM
Looks great Luke! How did the cross member fit in? Its good to see the new parts installed. I rarely get much feedback about the new parts Im making.
I will eventually make the other bits that attach to the outer firewall also.
Hi Pete,
Other then the small problem we talked about on the phone it went in fairly easy.
We got all of the replacement metal from RD and so far what we've installed fits well. Most panels needed some minor fitting adjustments other then that the fit was great.
Keep up the great work on making us these and more replacement panels.
Thanks again for some great products.
Posted by: 3d914 May 15 2015, 05:20 PM
Looks great Luke! How did the cross member fit in? Its good to see the new parts installed. I rarely get much feedback about the new parts Im making.
I will eventually make the other bits that attach to the outer firewall also.
Hi Pete,
Other then the small problem we talked about on the phone it went in fairly easy.
We got all of the replacement metal from RD and so far what we've installed fits well. Most panels needed some minor fitting adjustments other then that the fit was great.
Keep up the great work on making us these and more replacement panels.
Thanks again for some great products.
While Pete's watching - do you make a weldin piece for the master cylinder at the pedal cluster? Luke, didn't you repair this area also? My whole front floor is great except for that portion behind the pedal cluster.
Posted by: Luke M May 15 2015, 06:59 PM
Looks great Luke! How did the cross member fit in? Its good to see the new parts installed. I rarely get much feedback about the new parts Im making.
I will eventually make the other bits that attach to the outer firewall also.
Hi Pete,
Other then the small problem we talked about on the phone it went in fairly easy.
We got all of the replacement metal from RD and so far what we've installed fits well. Most panels needed some minor fitting adjustments other then that the fit was great.
Keep up the great work on making us these and more replacement panels.
Thanks again for some great products.
While Pete's watching - do you make a weldin piece for the master cylinder at the pedal cluster? Luke, didn't you repair this area also? My whole front floor is great except for that portion behind the pedal cluster.
Yes, I had to fix the pedal area. I got a piece from a parts car that Bruce was cutting up.
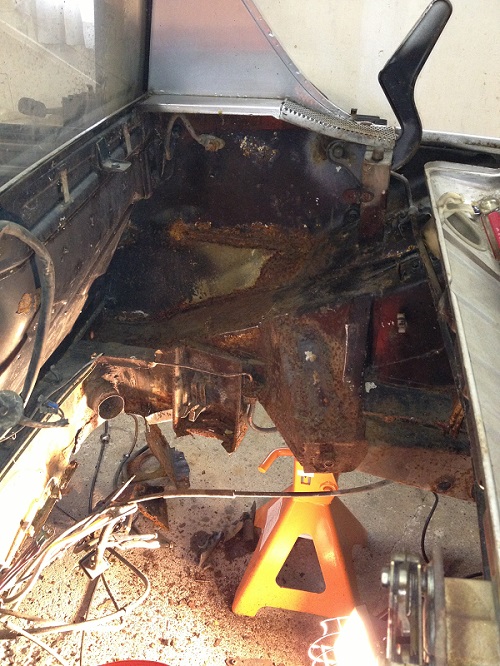
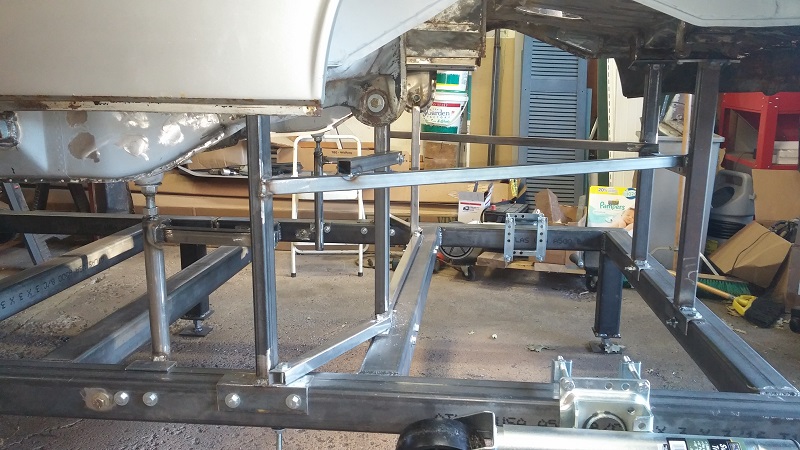
Posted by: Luke M Jun 4 2015, 09:28 AM
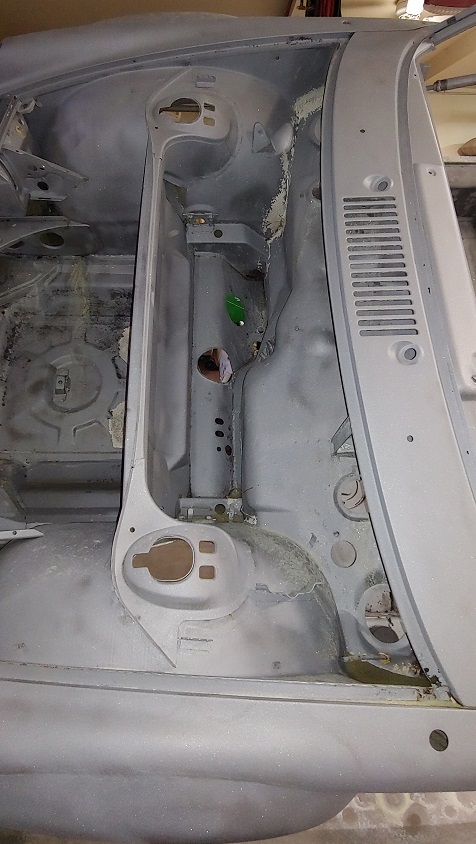
Back to it here..
We got the engine shelf in on the right side, added a stainless plate over the hell hole area, started to install the RJ engine mount, and welded up a few areas under the fuel tank. After the engine mount install it's time to tackle the rear trunk pan, install the mad dog kit, and outer frame stiffeners from RD. We are hoping to have all of the welding done by the end of July..
Attached image(s)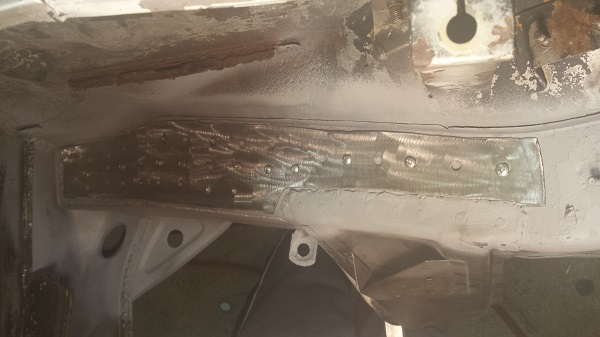
Posted by: Luke M Jun 10 2015, 08:49 AM
My brother and I got a few more things done on his 914.
Took the door sill off and lower rusty door jam.
We fixed a few spots in the long and test fitted the RD longitudinal frame stiffener overlays. Just an fyi, if you have a GT kit installed and plan to use these they will require some fitting at the rear by the outer suspension mounts.
Next we will remove the stiffener, coat the longs, and test fit the door prior to welding them in.

Attached image(s)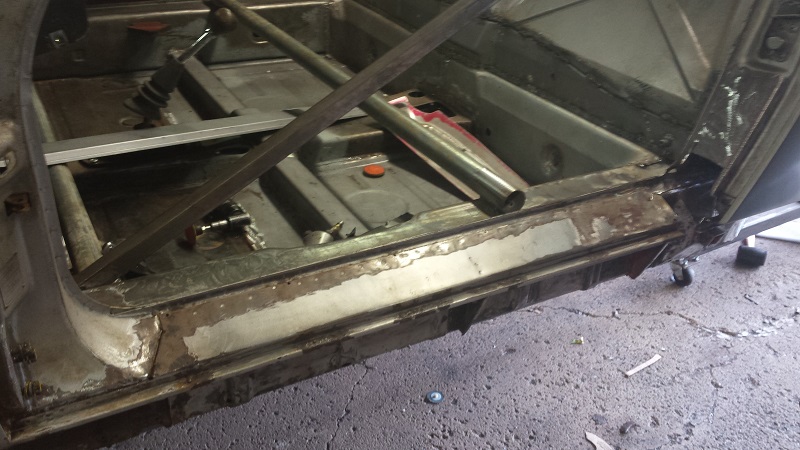

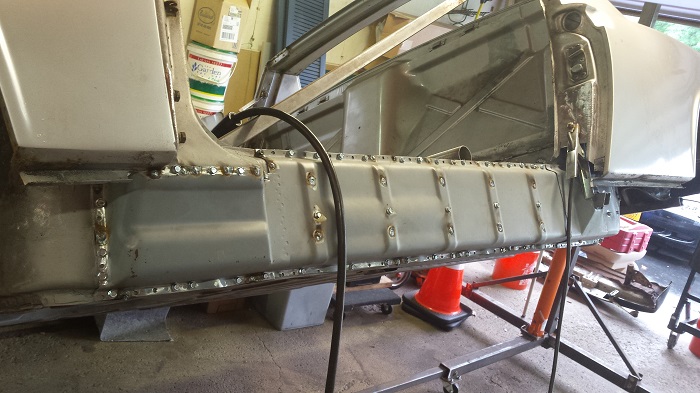
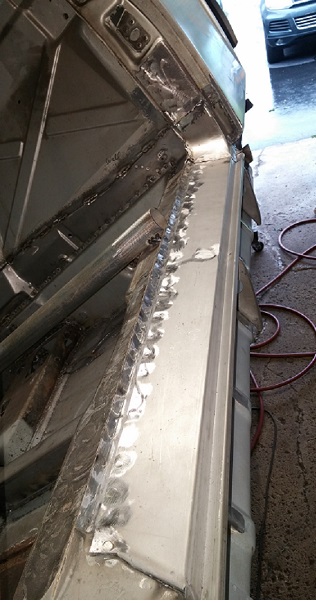
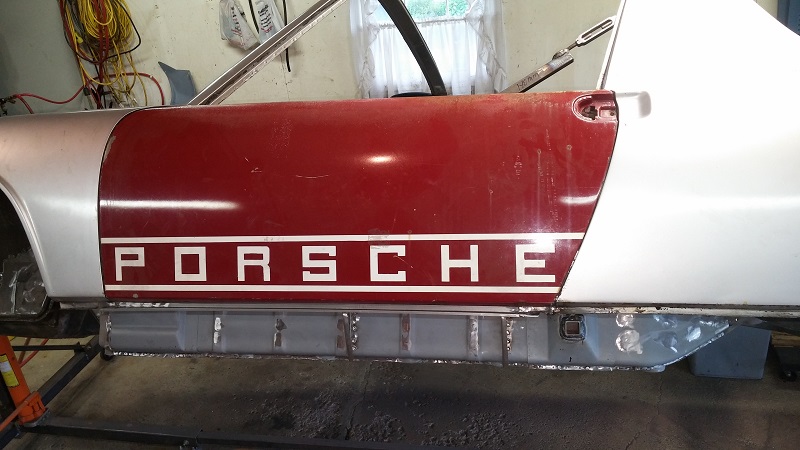
Posted by: Luke M Jul 1 2015, 07:09 AM
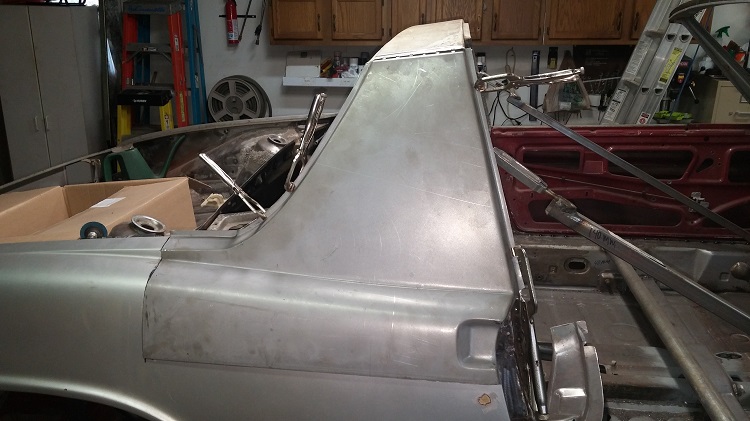
We got the drivers side chassis stiffener, door sill, and door jam installed.
Test fitted the door and all fits well. Looks like it's time to hit up RD for a few more pieces of sheet metal.
Attached image(s)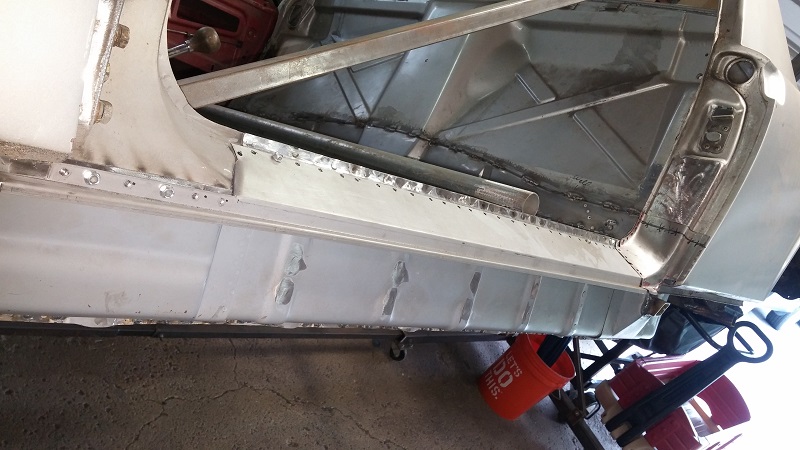


Posted by: Luke M Jul 2 2015, 08:12 PM
Wrapped up the drivers side and moved on to the pass side.
Attached image(s)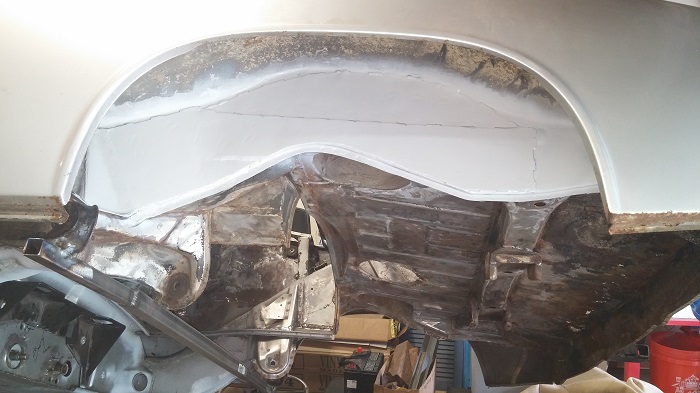
Posted by: Luke M Jul 12 2015, 08:26 PM
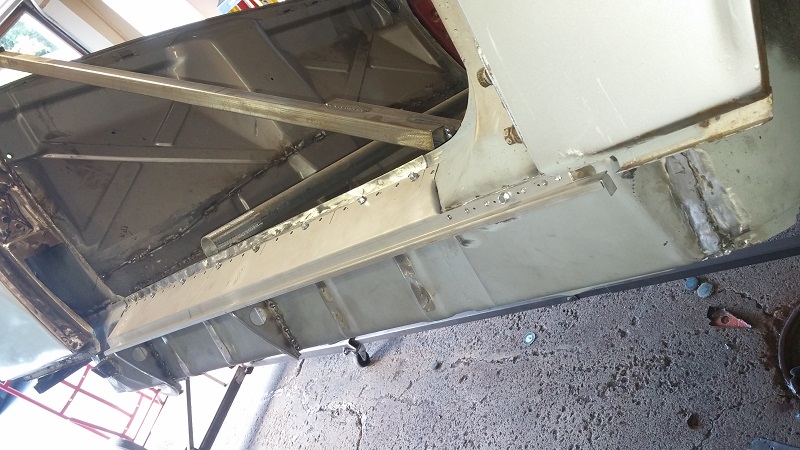
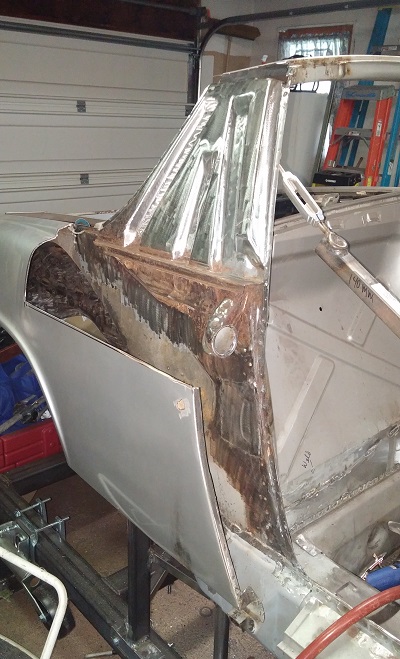
Moving forward on the pass side. Cut out and replaced the rusty metal with some from a parts car. Installed/prepped the right frame stiffener over the longitudinal.
Next step is to weld it in along with the door sill then the door jam and the
roof pillar panel. That should complete the pass side.
Attached image(s)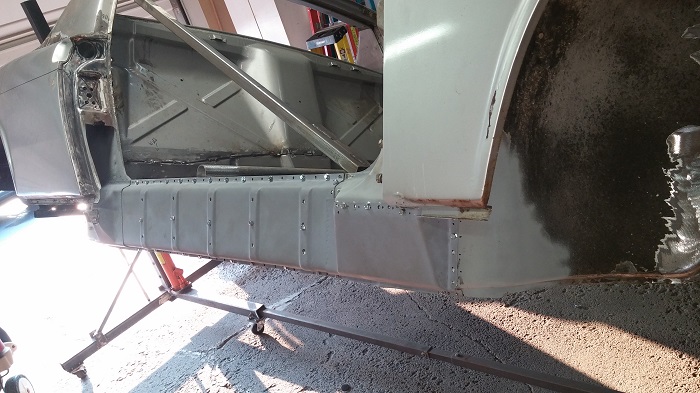
Posted by: Luke M Aug 6 2015, 09:04 AM
It's been way too hot and muggy here to do any welding on the car.
Figured why not take a break from that and get the motor prepped.
My brother picked up an 83 3.0 a while back from a guy doing a 3.6 upgrade.
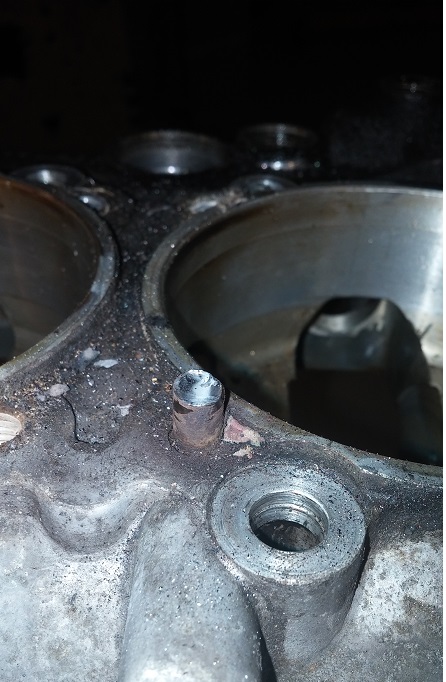
The shop that was doing the work said it was resealed not long ago and was a good running engine with good leak down numbers. I was looking it over and figured before I get too crazy installing the fan, wiring, flywheel, tins, and cooler to check the cylinder head torque. The 3.0 are known for broken head studs but was advised these are good. I wanted a piece of mind so I checked them anyway. Well guess what, The first lower head stud that I went to check snapped right off. I was like just great , now it's time to tear into this. I got the heads off and could clearly see that the stud had been broken for some time but didn't snap off. I checked all of the lower studs and sure enough three more where ready to let go. I could tell that someone had recently been in the engine at least on the top end by the new seals/sealant. Could the stud issue been know at that time? Guess I'll never know. Based on a sketchy " known " history we decided it was best to take it all down. Good thing we did tear it all apart as the #5 rod bearing looked like it was ready to let go soon too. Guess the " good " motor deal just turned into a major overhaul. Well not really cause my brother did get sweet deal on this motor and good luck finding a core for that price. One of the studs snapped right off too low to get out so I tried to welded a nut on it but it just wouldn't let go. It kept breaking the stud. That was it I said. I just dropped off several parts to the machine shop so now it's time to order up the stuff needed to put this baby back together. Oh and it's getting some upgrades now that it's apart.. Stay tuned.
Attached image(s)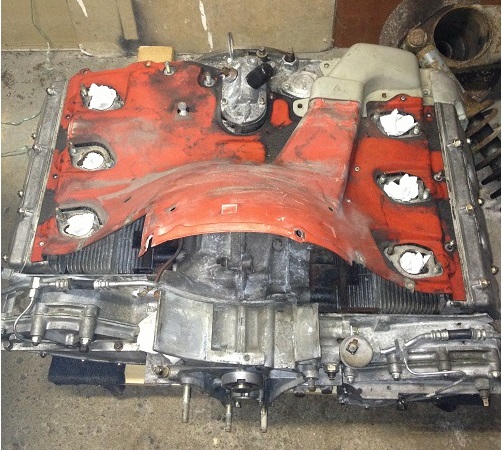
Posted by: Luke M Aug 25 2015, 05:54 AM
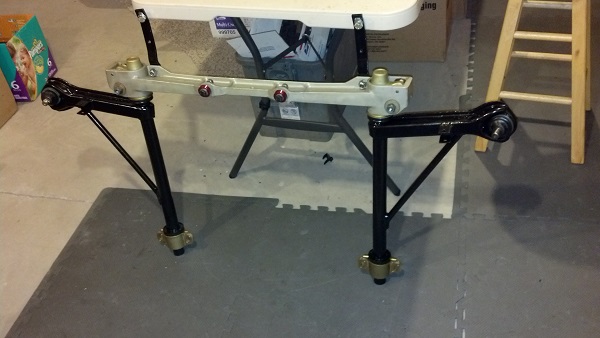
The case and a few other parts came back from the machine shop at end of last week. I'm waiting on two vendors to send me the rest of my parts order so in the mean time we knocked out some more chassis work. We got the RJ engine mount, right frame stiffener, and sill welded in.
Attached image(s)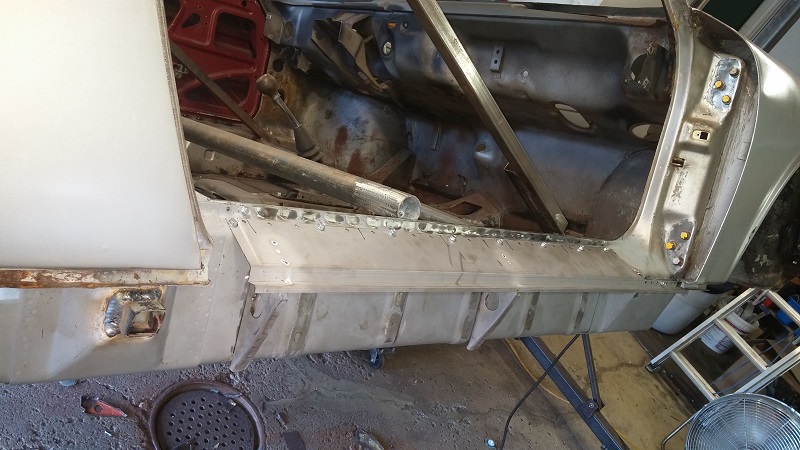
Posted by: Luke M Sep 5 2015, 06:41 AM
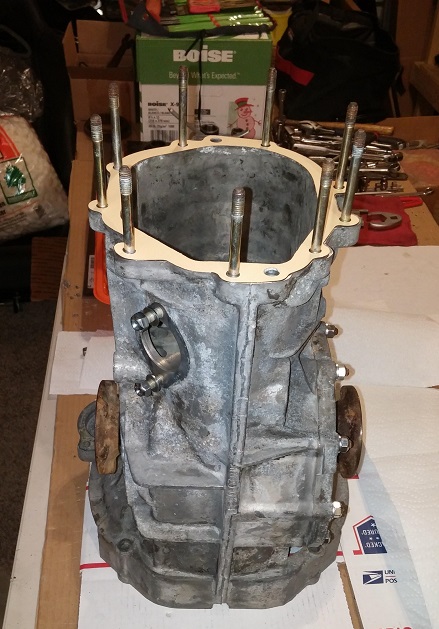
It's too darn hot 90+ in the garage to do any welding so more engine work was done.
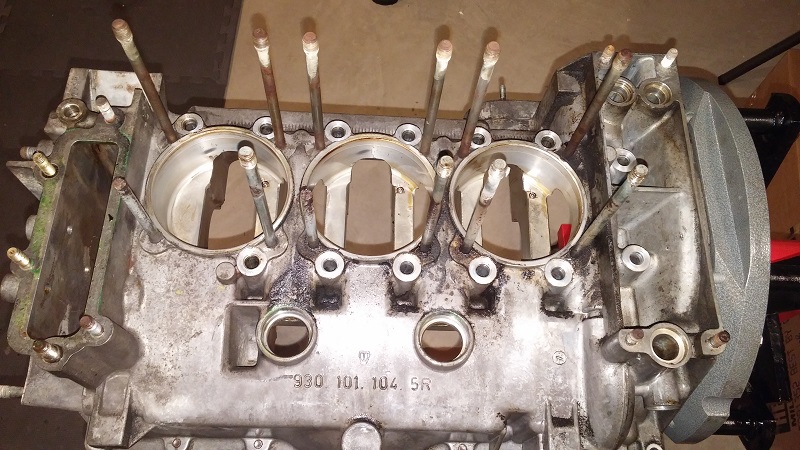
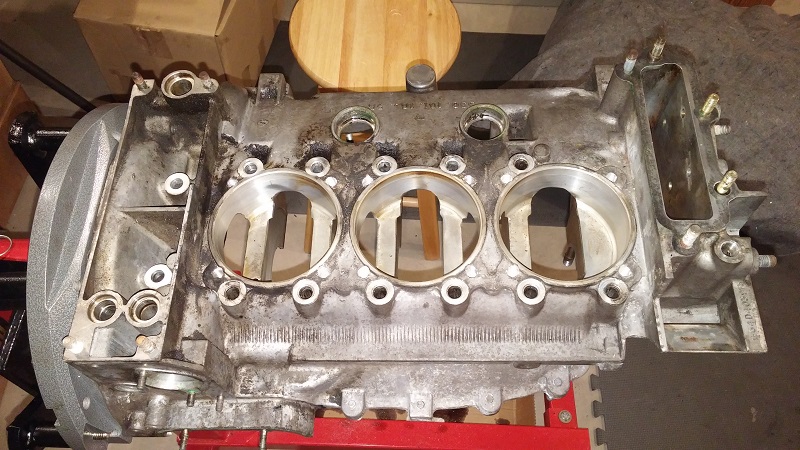
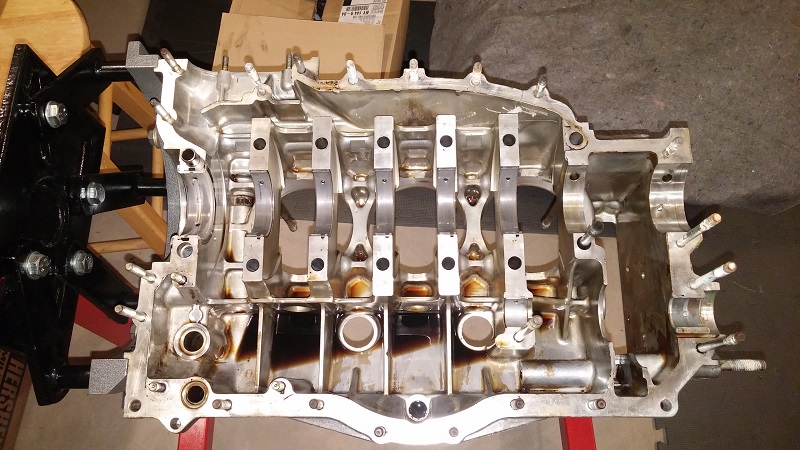
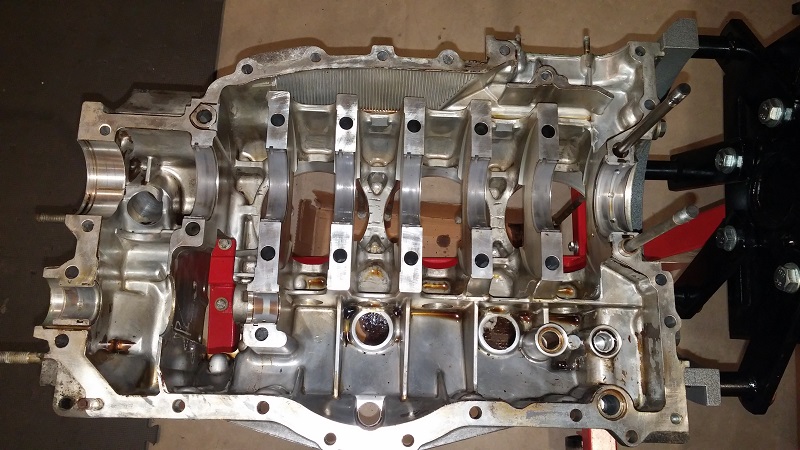
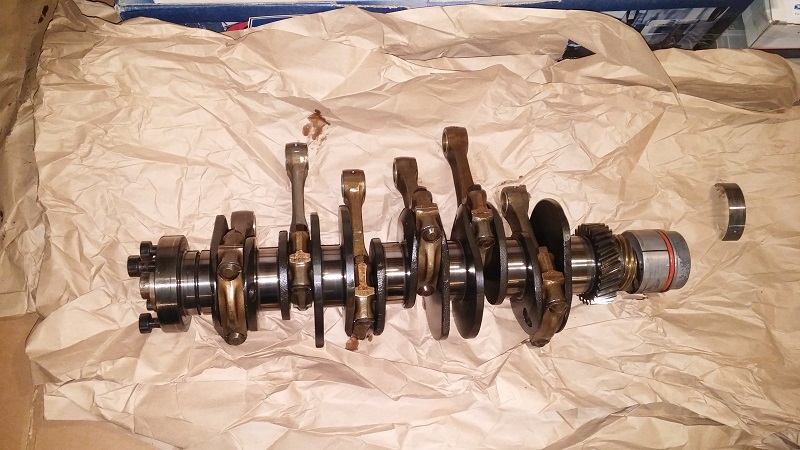
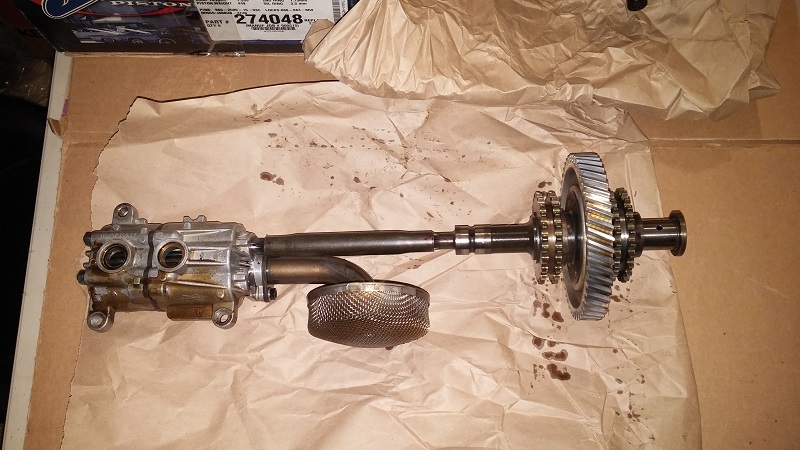
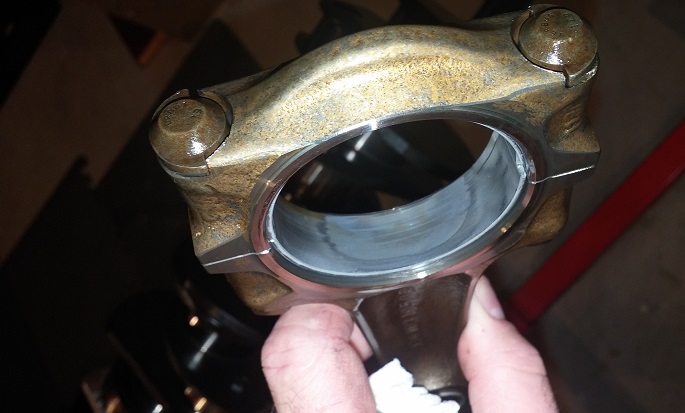
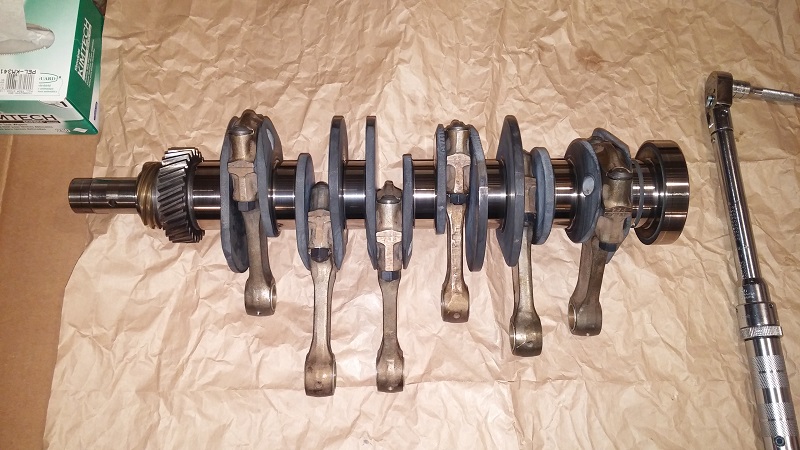
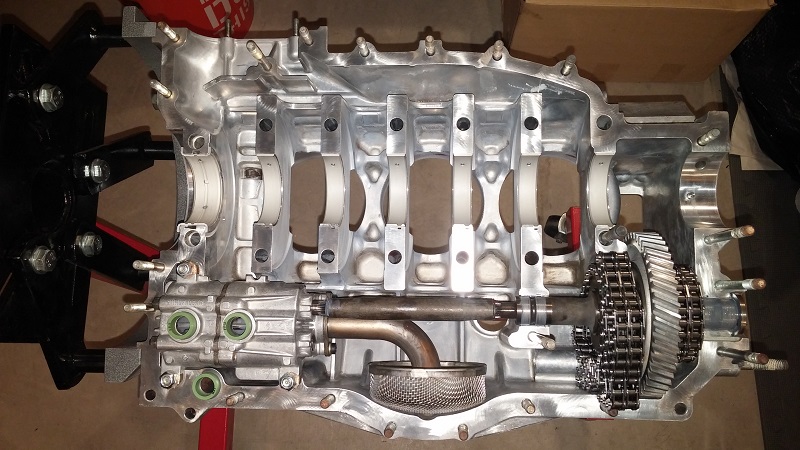
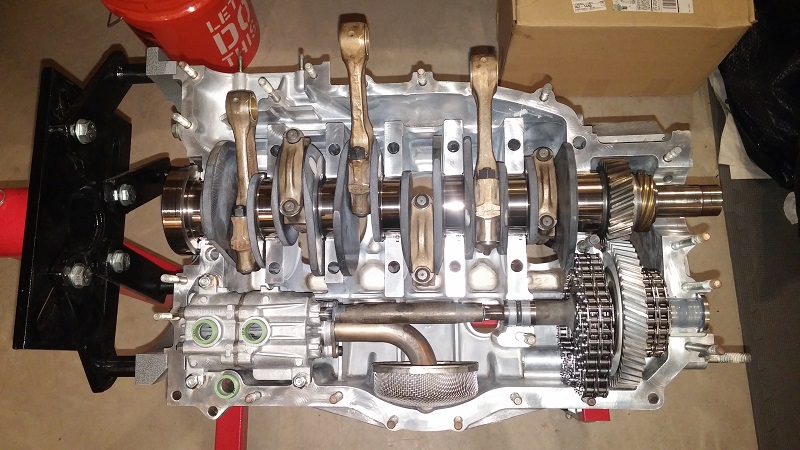
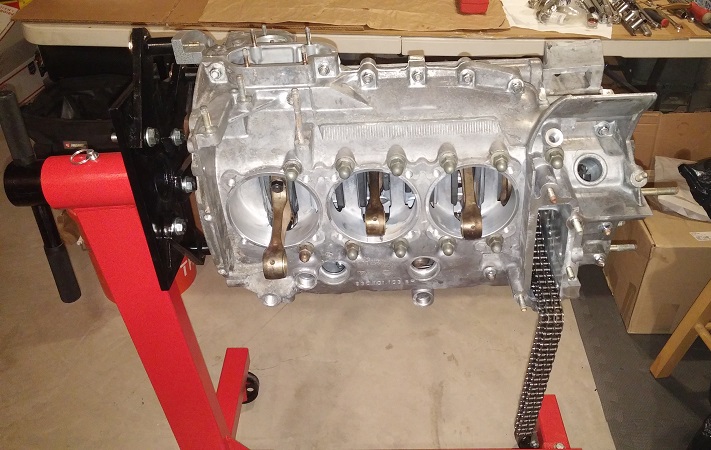
I got the case all cleaned up and JB weld applied to the areas that needed it. I had the machine shop clean the case and it came out looking pretty good. I still gave it a once over before the assembly started. I'm glad that I did as I found a large piece of aluminum stuck in one of the oil pump feed holes. It was stuck in there pretty good but it finally came out. It goes to show to always inspect and clean even after it was done by someone else. Then I got the rods mounted to the crank, oil pump/shaft installed into the case. Time to seal it up.
Attached image(s)
Posted by: Phoenix914 Sep 5 2015, 07:06 AM
![popcorn[1].gif](style_emoticons/default/popcorn[1].gif)
Looks like you're making good progress. Keep the pics coming!
Posted by: Luke M Sep 5 2015, 06:51 PM
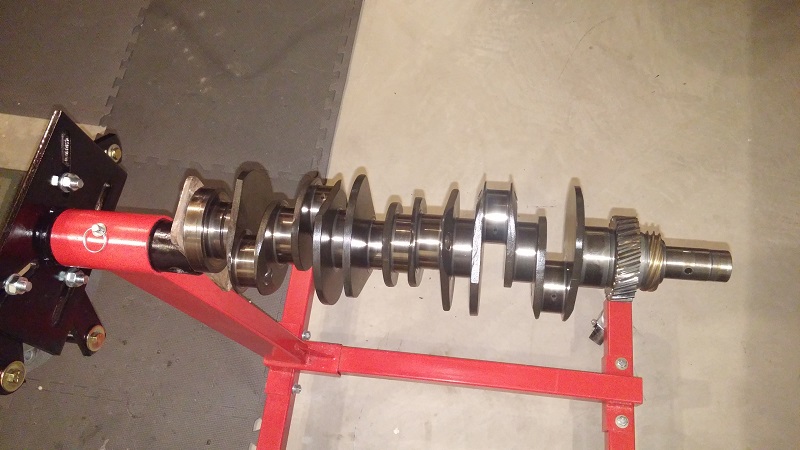
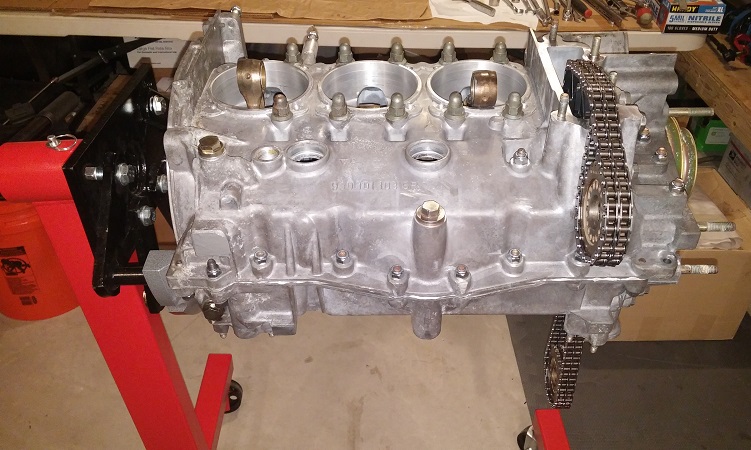
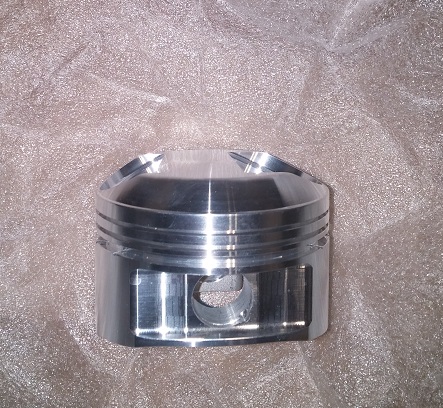
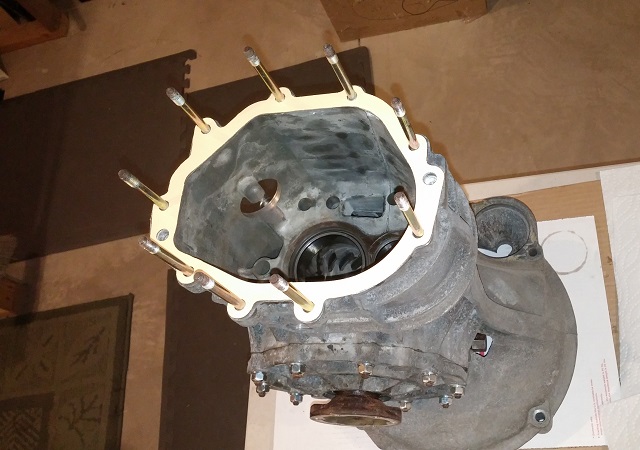
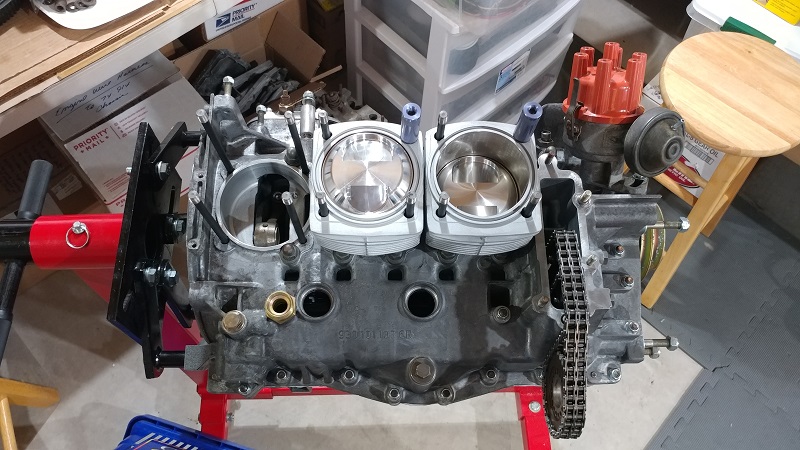
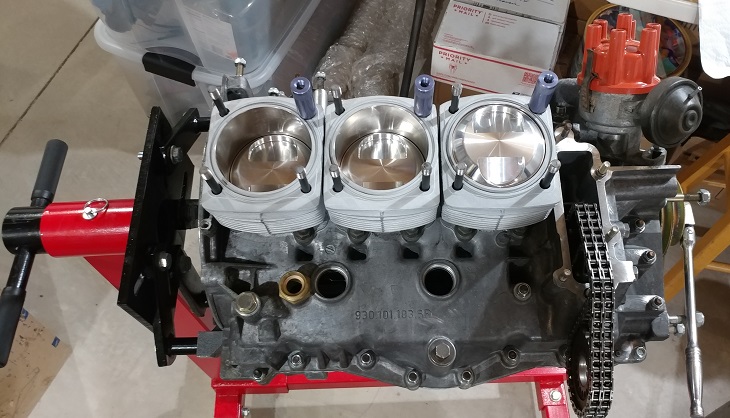
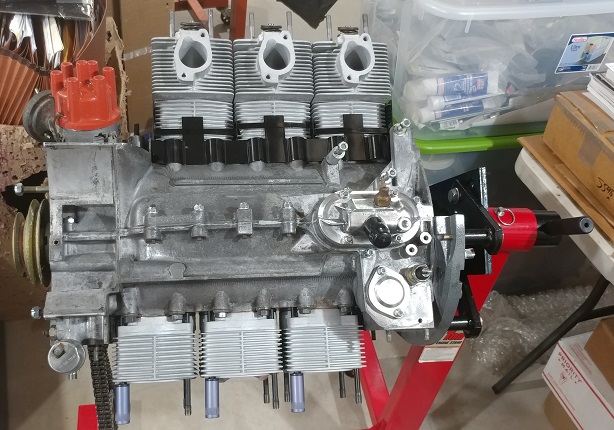
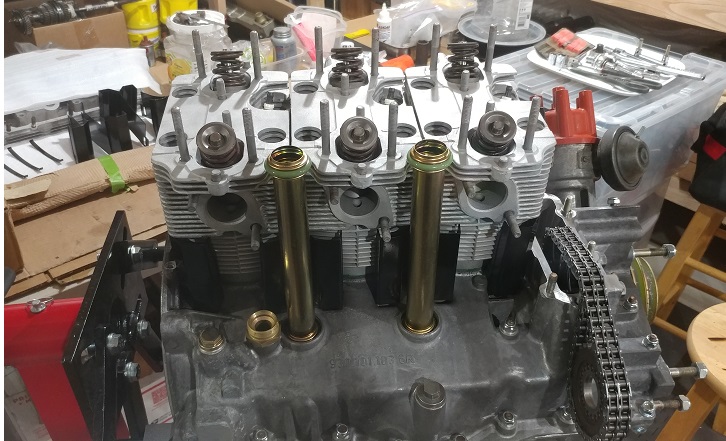
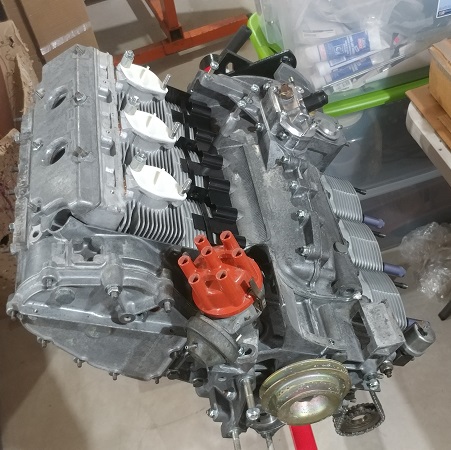
I got the head studs installed and set to 135 mm . They are all steel studs with some type of coating on them. Temporarily dropped the dizzy in as well.
This engine is getting some JE pistons with some reconditioned Nikasil cylinders.
Attached image(s)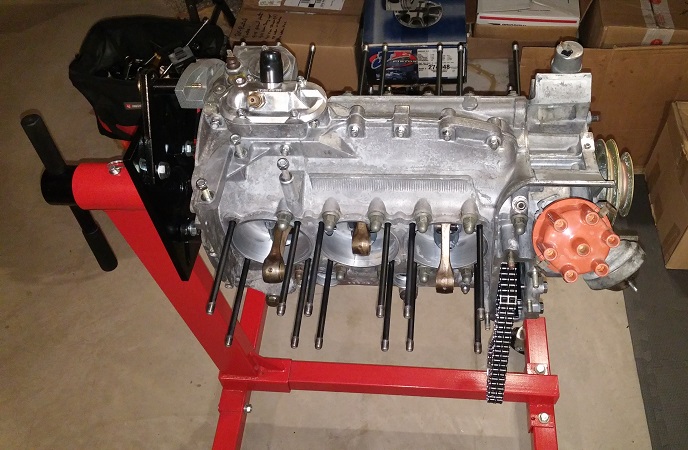

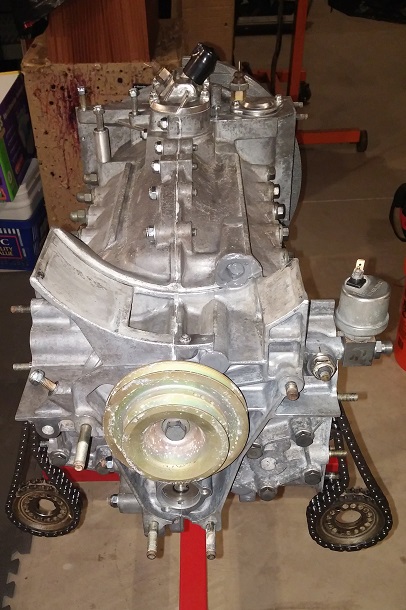
Posted by: Luke M Oct 5 2015, 08:50 AM
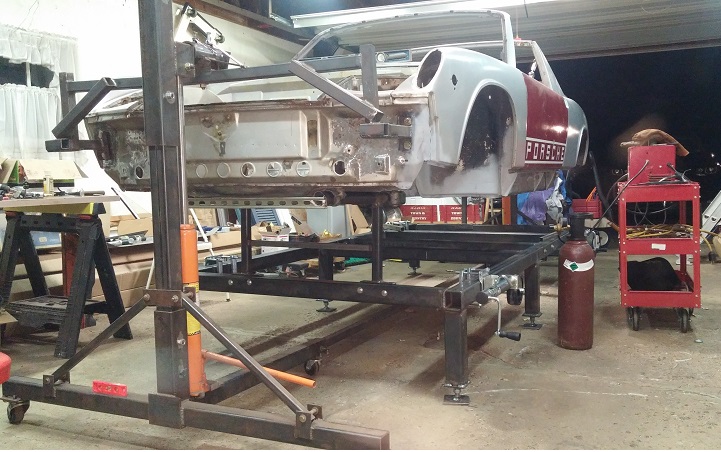
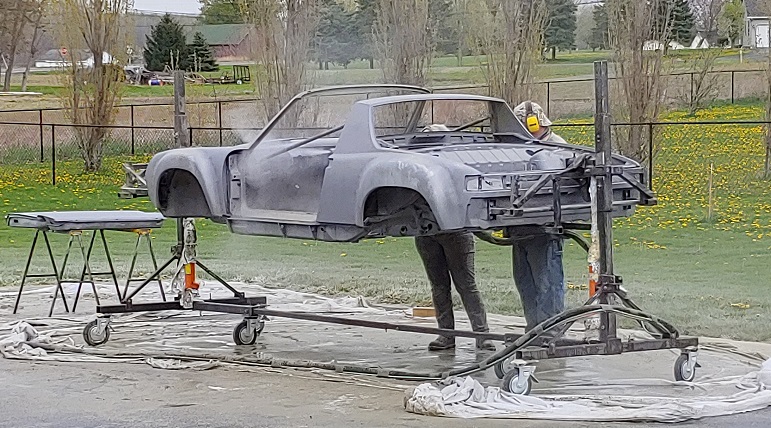
Got the right rear GT kit installed. Started on the right sail panel. We are going to build a chassis jig to mount to then off the rotisserie it comes. Started on the front portion for now.
Attached image(s)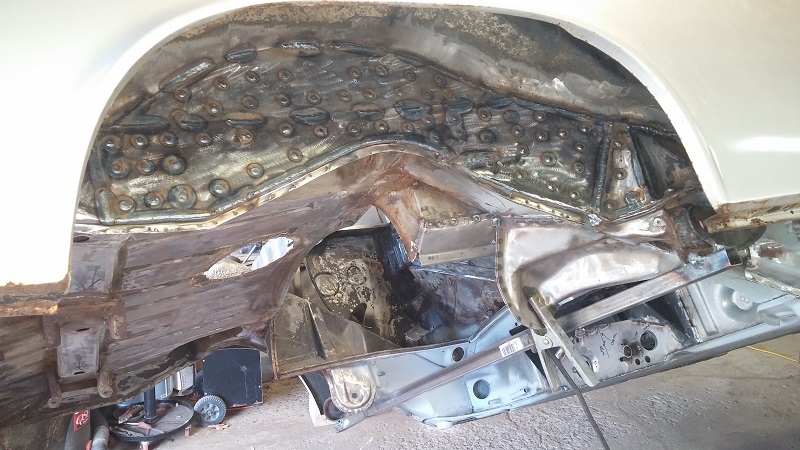


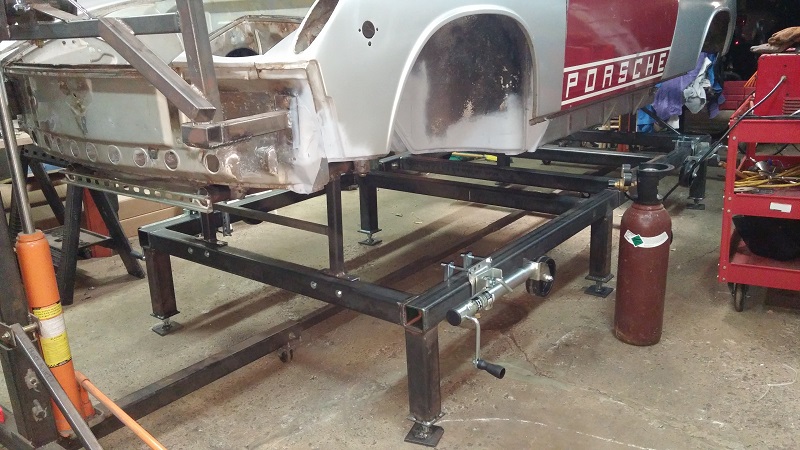
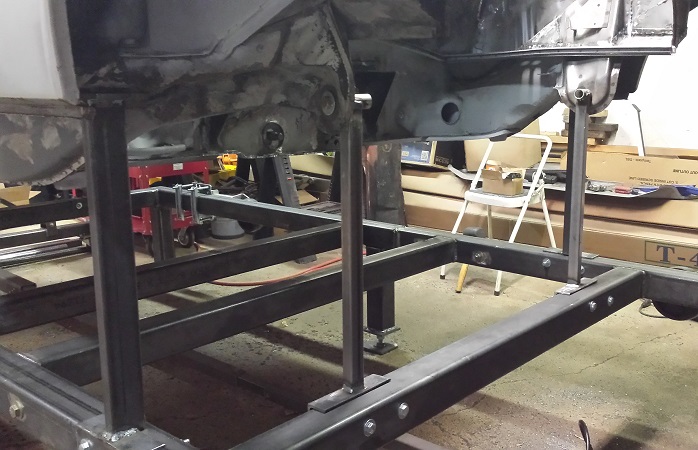
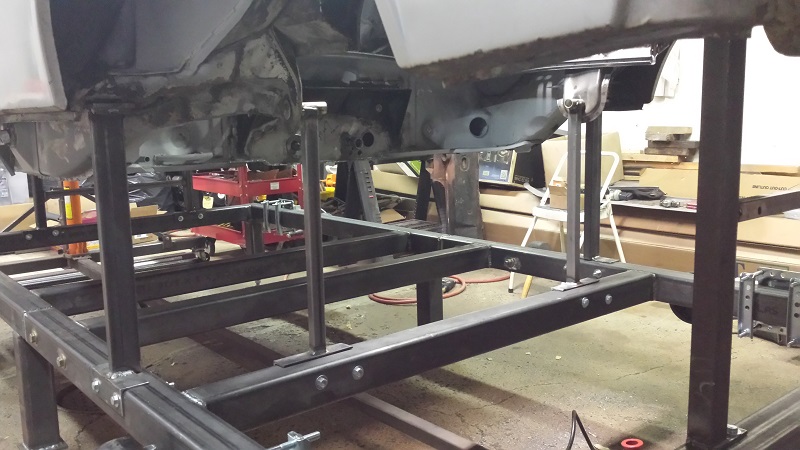
Posted by: Luke M Oct 10 2015, 08:42 AM
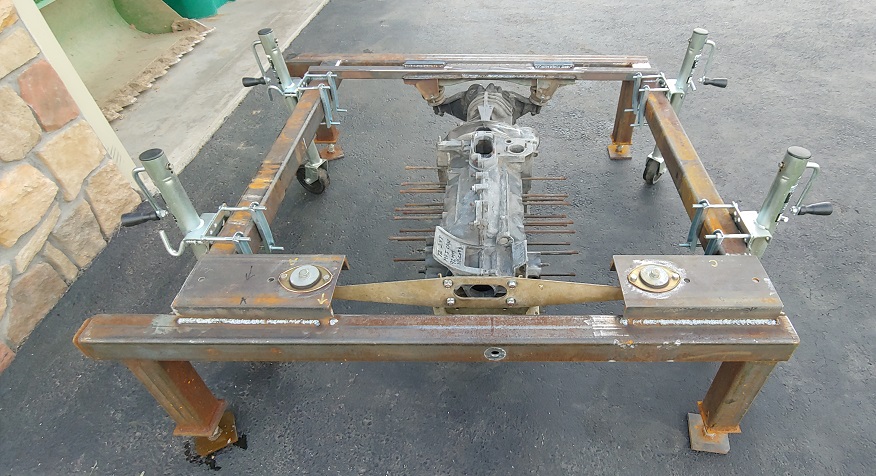
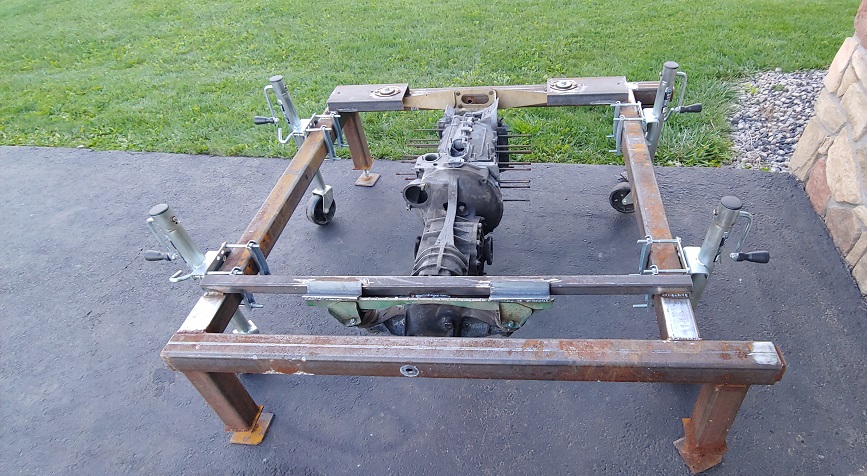
Started building the chassis jig and the brackets to attach the 914 to it.
Got the jig and 914 leveled out. Started to build the mounting brackets. I should be able to finish making them up today.
Attached image(s)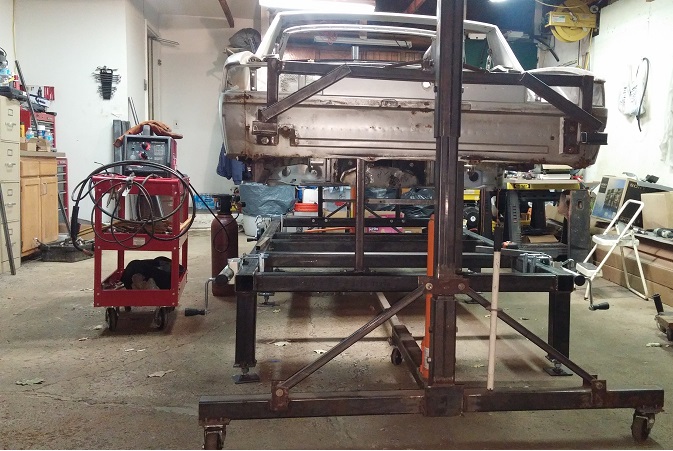
Posted by: jmitro Oct 10 2015, 09:10 AM
fantastic work; very thorough.
Just curious why you're building a chassis jig? With the structural welding done, i wouldn't imagine any significant chassis flex when it comes off the rotisserie. 
Posted by: Luke M Oct 10 2015, 09:30 AM
fantastic work; very thorough.
Just curious why you're building a chassis jig? With the structural welding done, i wouldn't imagine any significant chassis flex when it comes off the rotisserie.
I have another 914 that will need the chassis jig later on. I'll have to cut a good portion of the r/r & hell hole off the car. My brothers 914 chassis is solid now and measurements are within factory specs. I built the jig off his car as it was already on the rotisserie which made a few things easier to fabricate. I'll still use the jig to do more work on his 914 as the rotisserie work is just about done.
The next patient:
Attached image(s)
Posted by: trojanhorsepower Oct 10 2015, 11:01 AM
Great work guys!
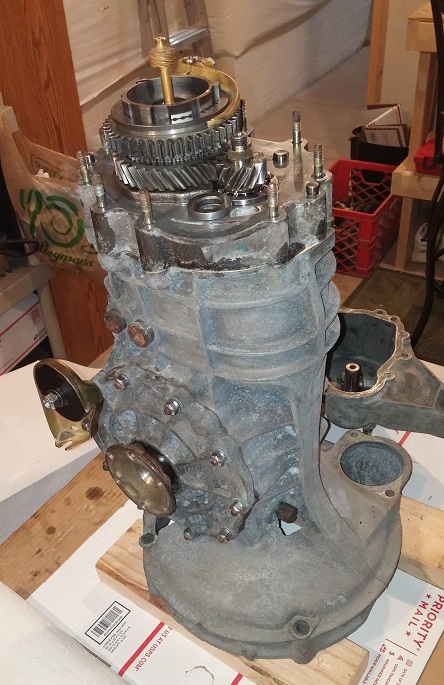
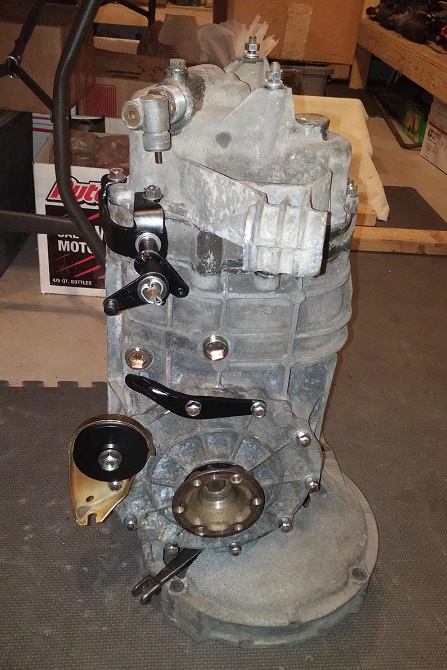
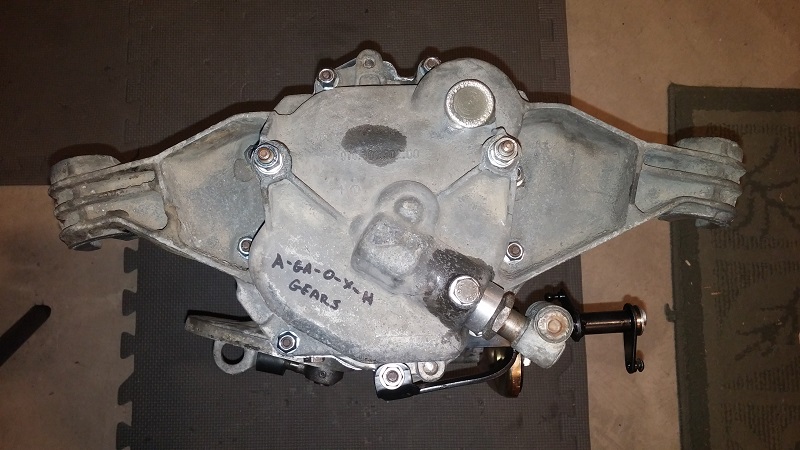
Posted by: Luke M Mar 15 2016, 11:26 AM
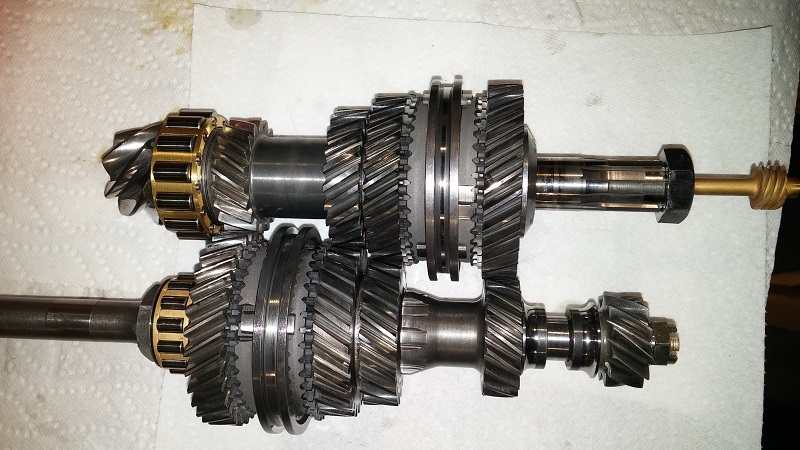
Slow winter here but we got two transmissions rebuilt.
All new bearings, synchros, gear teeth, gaskets, and swapped gears.
It's pretty easy once you have all the tools to do it right.
Made up a custom 6 throttle linkage bracket too.
Gear Ratio is now : A, GA, O, X, flipped H.
It's going to be run with the 3.0 6 .
Attached image(s)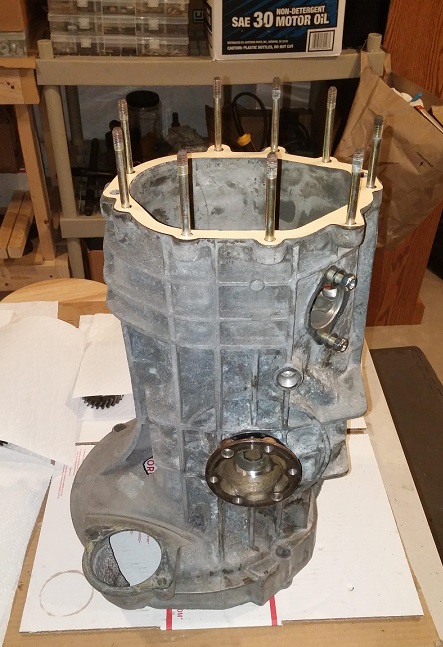
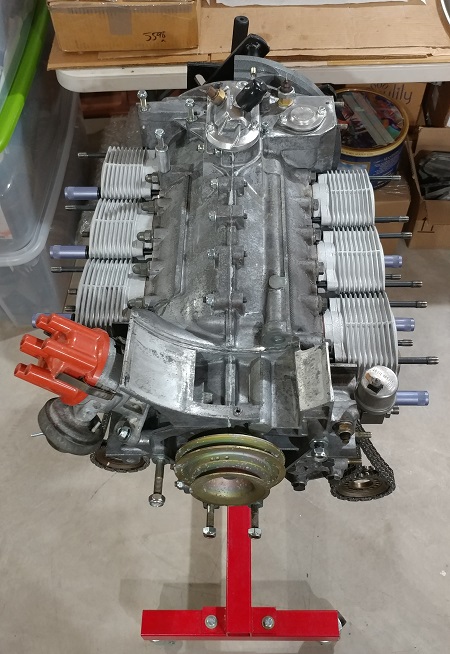
Posted by: Luke M May 19 2018, 10:25 AM
3.0 is almost done. Waiting on cams, rockers then set the timing.
Attached image(s)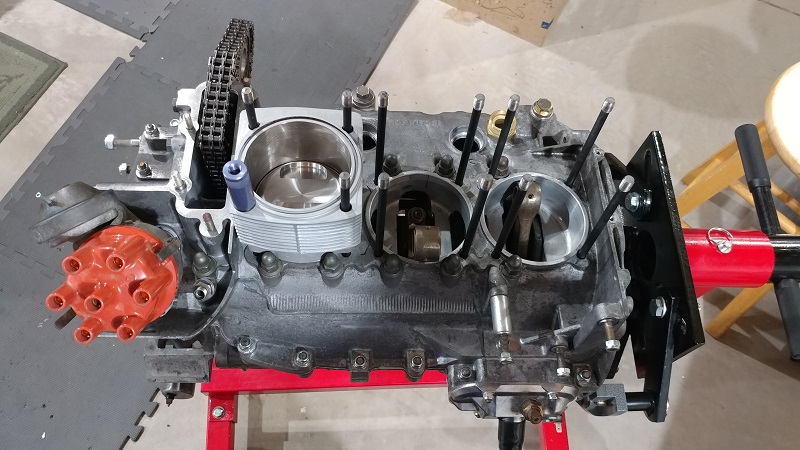
Posted by: Lucky9146 May 19 2018, 11:35 AM
Man that is a labor of love. You are doing it right! Just went through the entire thread from the beginning. I had some breaks in time with my car too, but finally made it. Hang in and keep the updates coming! Everyone loves to see progress.


Posted by: mepstein May 19 2018, 02:17 PM
What kind of induction on the 3.0
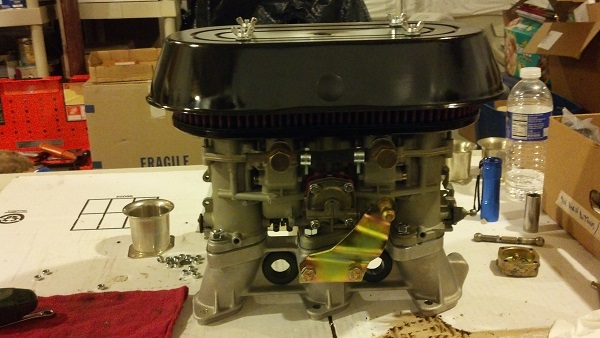
Posted by: Luke M May 19 2018, 05:20 PM
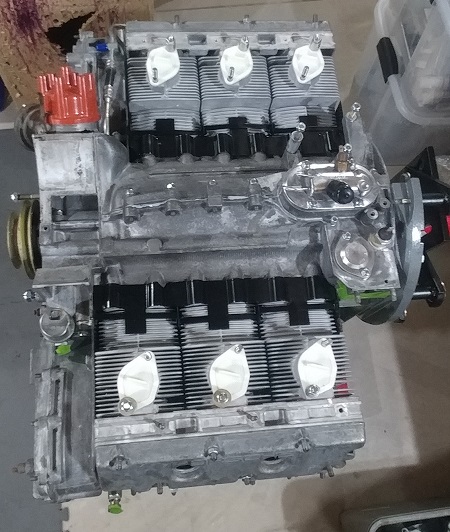
What kind of induction on the 3.0
Weber 40 IDA's with PMO manifolds.
Attached image(s)

Posted by: Luke M Jun 25 2019, 06:31 AM
We've been working away slowly on my brothers 914. When we went to replace the rear trunk pan we found that the rear panel was damaged at some point in the past. Looks like it was backed into something vs being hit in the rear. So off it came and a new section was ordered from our friends at RD. Also in the works is the steel flare install.
Attached image(s)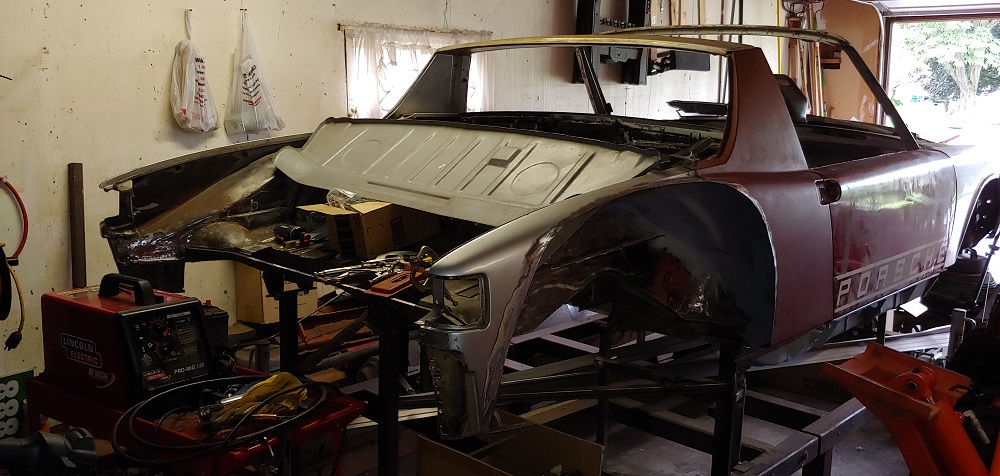
Posted by: Jamie Jun 25 2019, 09:27 AM
We've been working away slowly on my brothers 914. When we went to replace the rear trunk pan we found that the rear panel was damaged at some point in the past. Looks like it was backed into something vs being hit in the rear. So off it came and a new section was ordered from our friends at RD. Also in the works is the steel flare install.
It makes me sick to see the condition of many similar project cars in the beginning, and then amazed at the skill and determination exhibited to bring them back to life. Great work y'all!

Posted by: Luke M May 19 2020, 01:58 PM
Got a few more things knocked off my brothers 914 project list.
Rear RD panel is in, R/R flare welded on, Maddog inner frame kit installed, and tested fitted the new rear trunk pan. Need to order some longer spot welding tongs then we can finish up the rear trunk.
Attached image(s)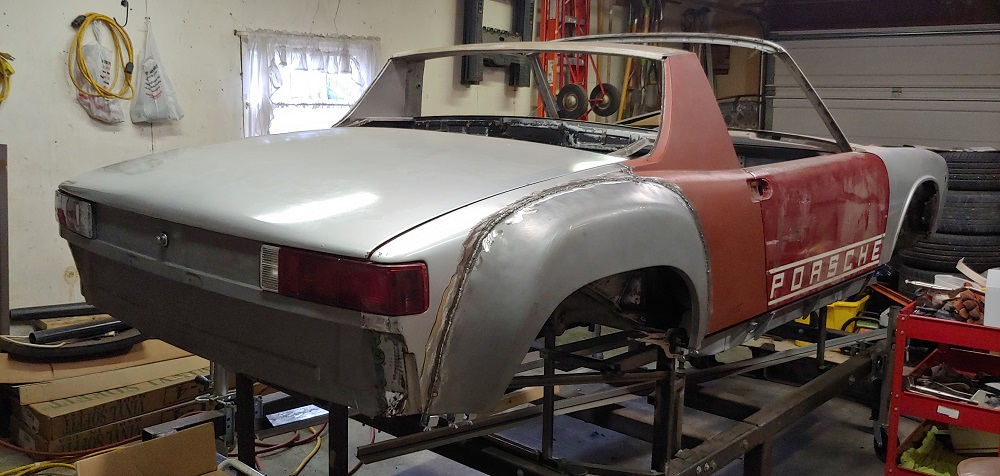
Posted by: Luke M Mar 13 2021, 05:45 PM
Worked on the rear trunk pan today. The spot welder worked great and best of all no grinding to do.
Attached image(s)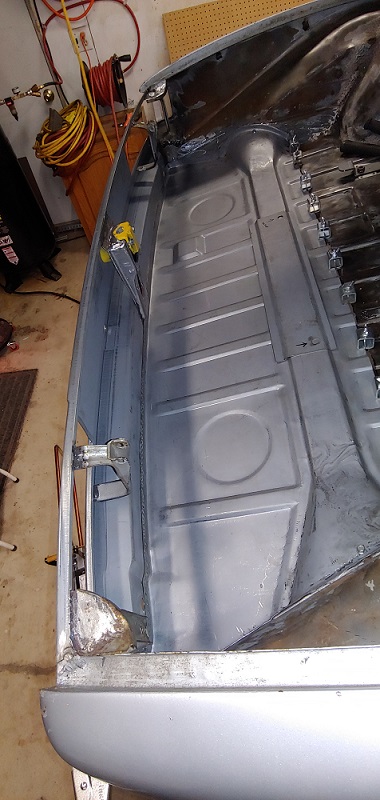
Posted by: Root_Werks Mar 16 2021, 05:13 PM
I really like the spot welder you are using. Yes, no grinding!
Posted by: Luke M Mar 16 2021, 06:18 PM
I really like the spot welder you are using. Yes, no grinding!
The only downside is it's heavy so it takes two of us to work it. One holds the spot welder while other lines up and welds. I'll have to get some pics next time I'm at my brothers place. We finished the rear trunk pan install, rear sway bar brackets are in, and knocked out a few other small items. We did forget to install the lower trunk pan to rear panel/bumper support brackets. Oh well, it's on the to do list now.
Posted by: Luke M Apr 29 2021, 07:33 AM
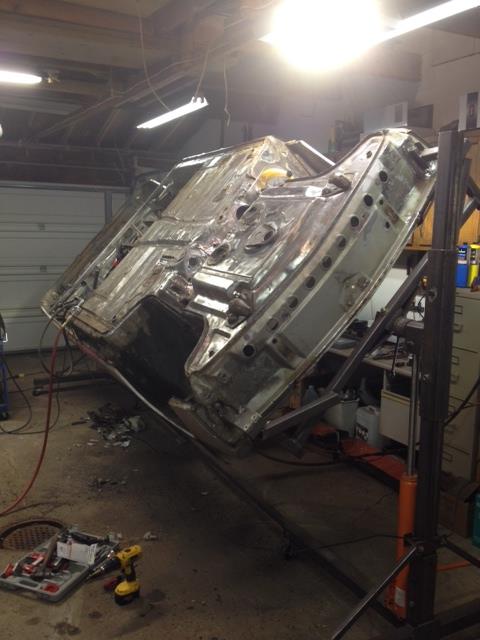
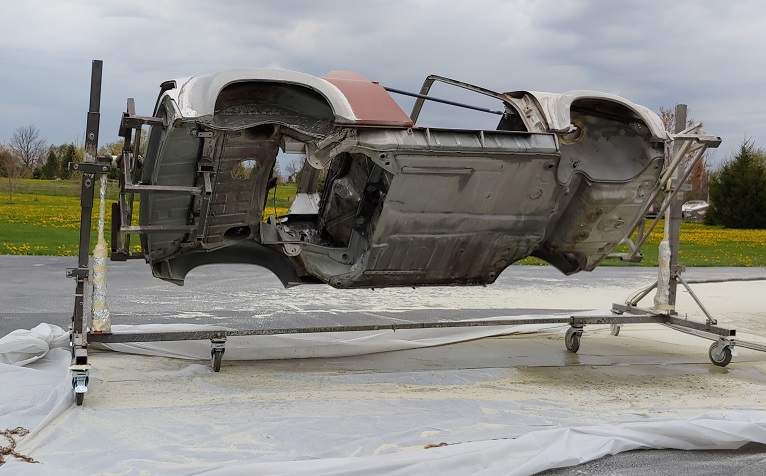
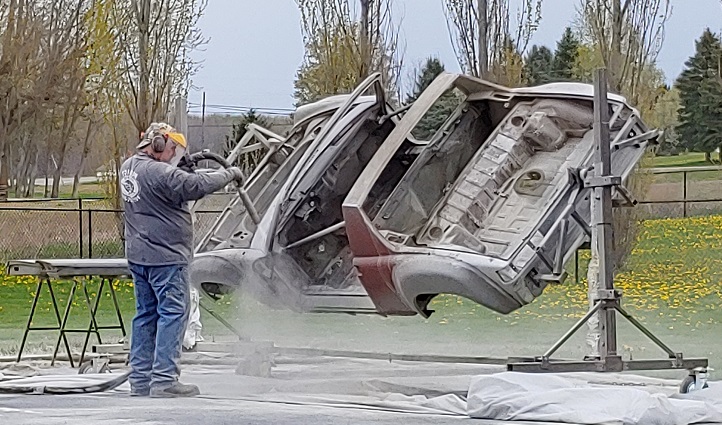
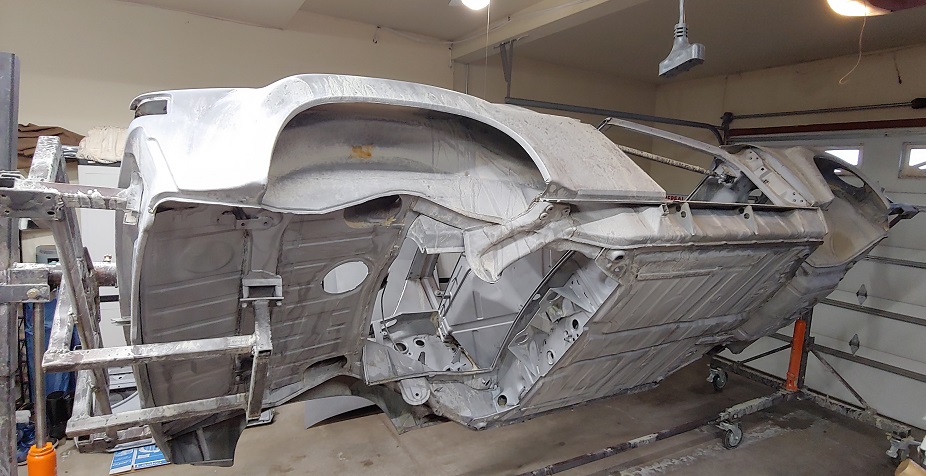
My brothers car has reached a huge milestone on Wed. The 914 is now blasted so epoxy will go on sometime early next week. Going out shortly to vacuum up some sand that was left over from blasting. The blast also revealed several more spots that need attention prior to primer.
Attached image(s)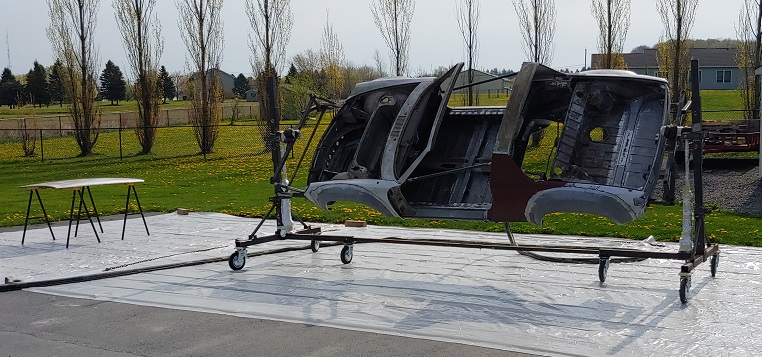
Posted by: Justinp71 Apr 29 2021, 02:53 PM
What kind of induction on the 3.0
Weber 40 IDA's with PMO manifolds.
Looking good! What cam's are you running?
I had my 3.0 with DC19 cams, weber 40's, 1 1/2" headers, re-curved dizzy for carbs and a good flowing muffler. Man it was a lot of fun. I was on a race track with a 81' 911 on slicks and I lapped him after about 10 minutes...
Since you have new pistons you can probably do even better cams...
Posted by: Shivers Apr 29 2021, 03:16 PM
Nice work
Posted by: rgalla9146 Apr 29 2021, 07:24 PM
Luke.....you are a friggin' glutton.
A very skilled, very thorough glutton.
Was it conventional blasting ?....or something new ?
Posted by: Luke M Apr 30 2021, 06:31 AM
[quote name='rgalla9146' date='Apr 29 2021, 06:24 PM' post='2912045']
Luke.....you are a friggin' glutton.
A very skilled, very thorough glutton.
Was it conventional blasting ?....or something new ?
[/quot
Hi Rory,
Yeah we've been working like crazy here. Think I'll push my 6 blast out a few weeks so I can knock out my brothers 914. Plan is to prep the chassis for epoxy and spray color in the trunks, interior, and whole underside. We are gonna try and get that all done within 1 to 2 weeks. Then get the car back on it's wheels. The body work can then be done as time goes.
The blasting was a mix of sand and soda. I can still get a taste of the soda here n there.
All wet blast which is what they call dustless blasting. Keeps the panels from being damaged. It makes a mess still. We spent a few hours sucking out sand from the chassis. I plugged as many holes as possible prior to blast but stuff still gets everywhere.
I have the 914 in my heated garage with fans blowing 70 degree air all around it. So far a few spots flashed but over all not too bad. See if we can get epoxy on by Tues or Wed.
Posted by: Luke M Apr 30 2021, 06:40 AM
What kind of induction on the 3.0
Weber 40 IDA's with PMO manifolds.
Looking good! What cam's are you running?
I had my 3.0 with DC19 cams, weber 40's, 1 1/2" headers, re-curved dizzy for carbs and a good flowing muffler. Man it was a lot of fun. I was on a race track with a 81' 911 on slicks and I lapped him after about 10 minutes...
Since you have new pistons you can probably do even better cams...
Yes, we installed different cams. They should be fine for a street car. I believe Mark Henry is running the same cams in his 3.0 as well. Web Cam, grind # 120/104 , Part # 05-261. It should go down the road just fine..
Posted by: Luke M May 5 2021, 08:36 AM
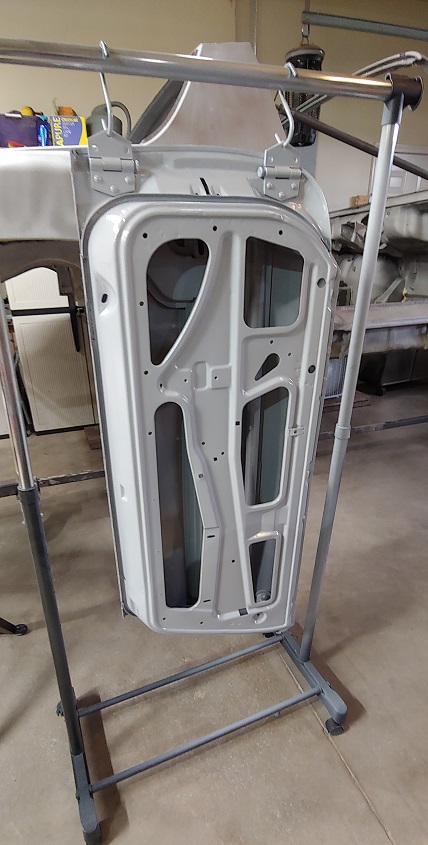
Oh what a PIA it has been getting all of this sand out of the chassis. We did get to spray a door in epoxy on Tues. Then the rain moved in and that was it for the day. We will do some welding on the chassis either today or tmrw. The blast exposed several areas that need some minor attention. We are gonna get all of the smaller parts in epoxy and leave the chassis for last.
Attached image(s)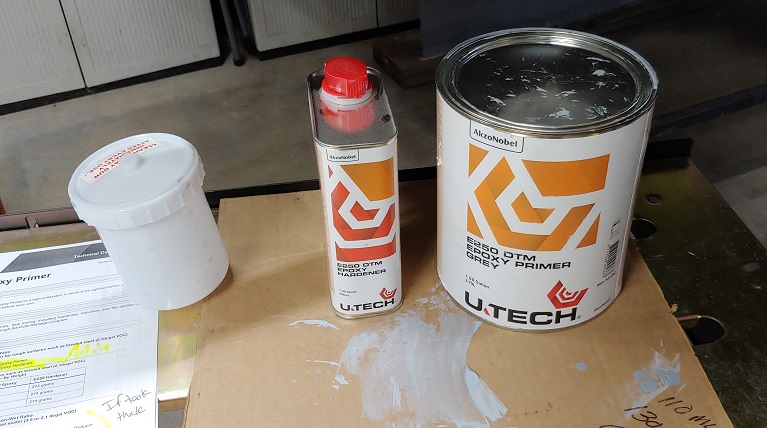
Posted by: Luke M Aug 19 2021, 01:53 PM
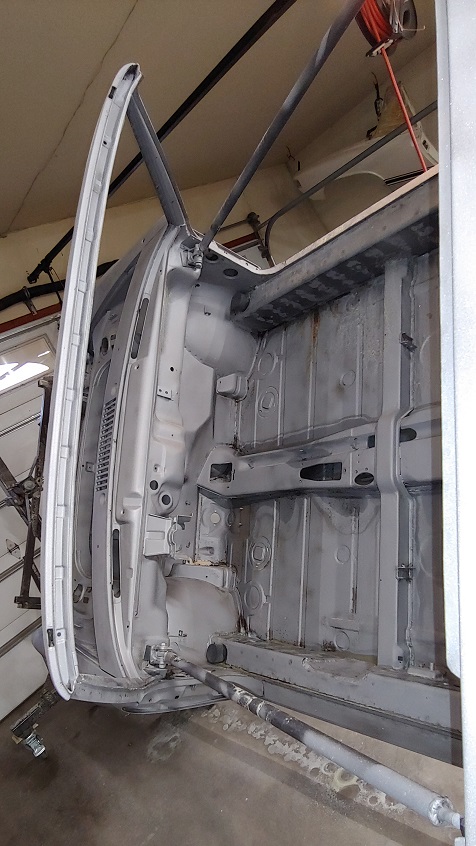
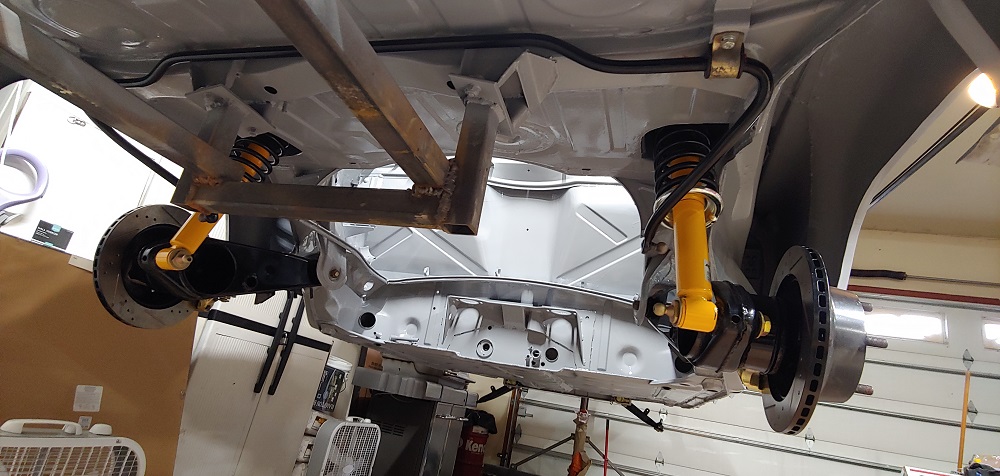
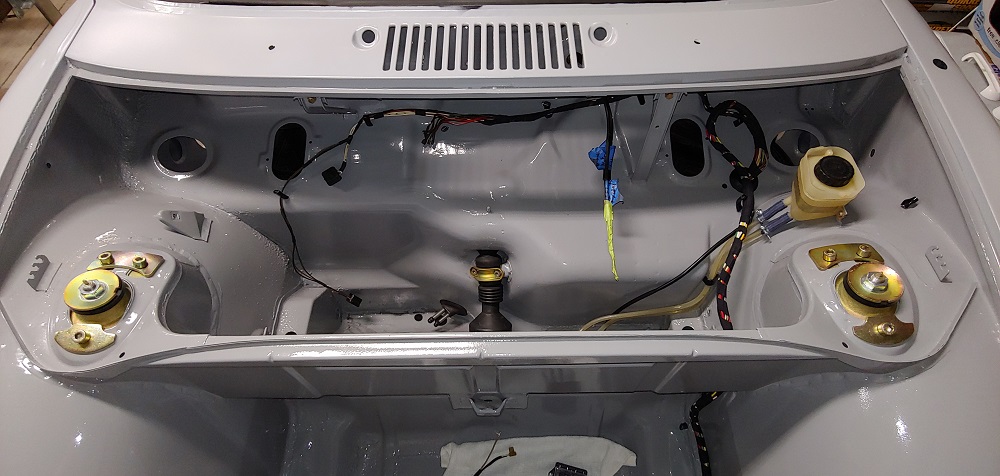
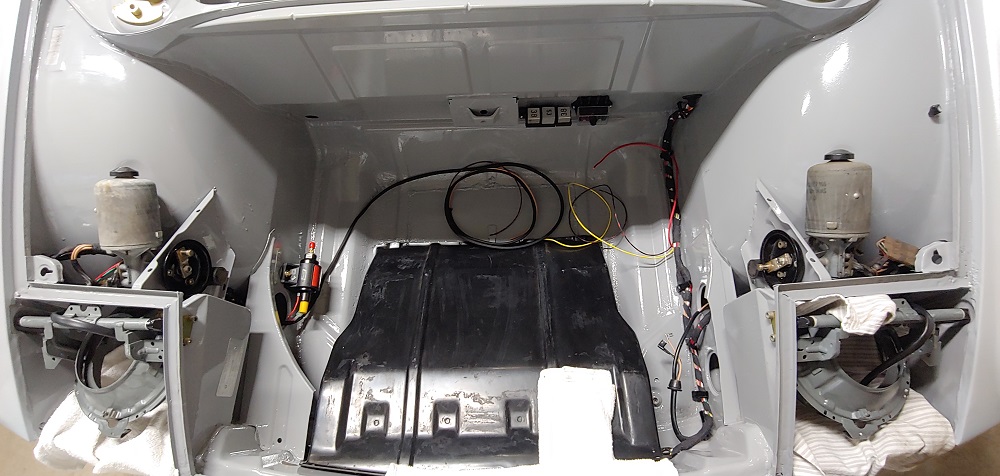
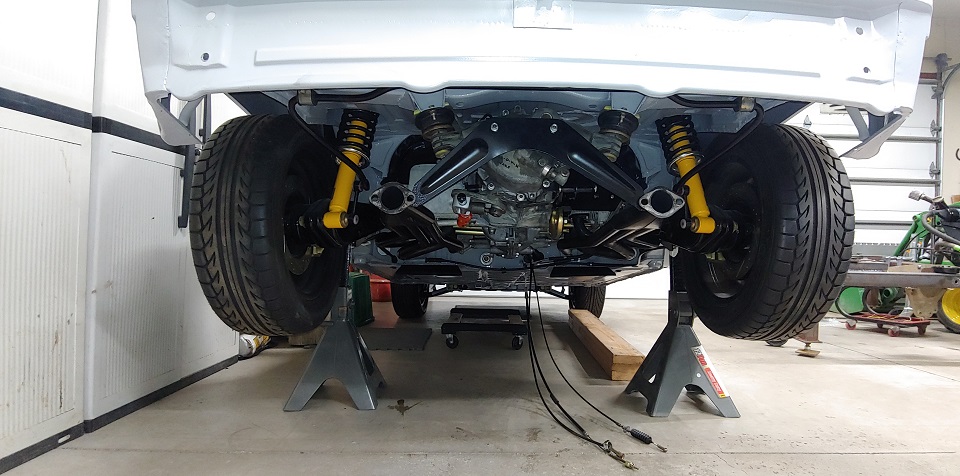
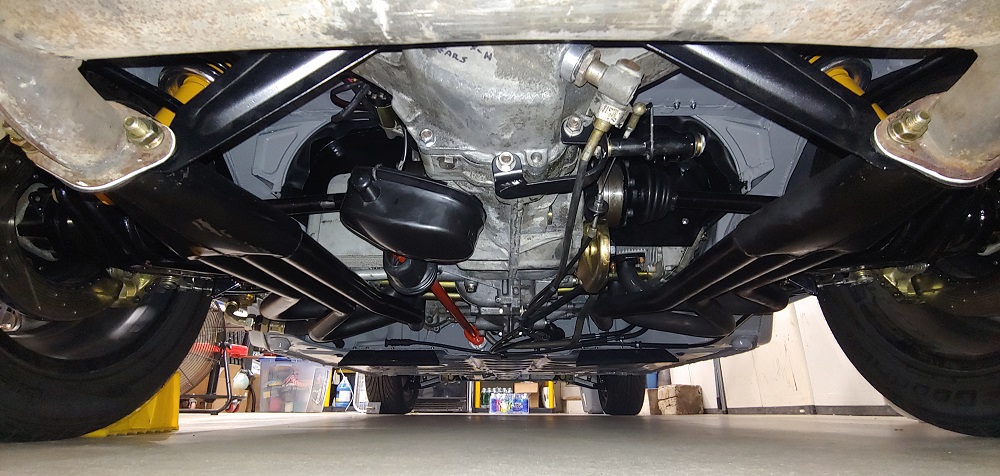
Well after weeks of cleaning and prepping we finally got my brothers 914 in epoxy, seam sealed and into paint. The whole underside, inner fenders, engine bay, interior, and both trunks are body color. The exterior needs to be finished yet. We still need to do a final sand and clean to the body. Once that's done my brother will have a buddy of his that does paint work finish the exterior. We got the suspension installed along with the steering column. Still waiting on several brake parts to arrive then will get the brakes all plumbed and bled before she heads out of my garage. Meantime we will install a few other items. Stay tuned.
Attached image(s)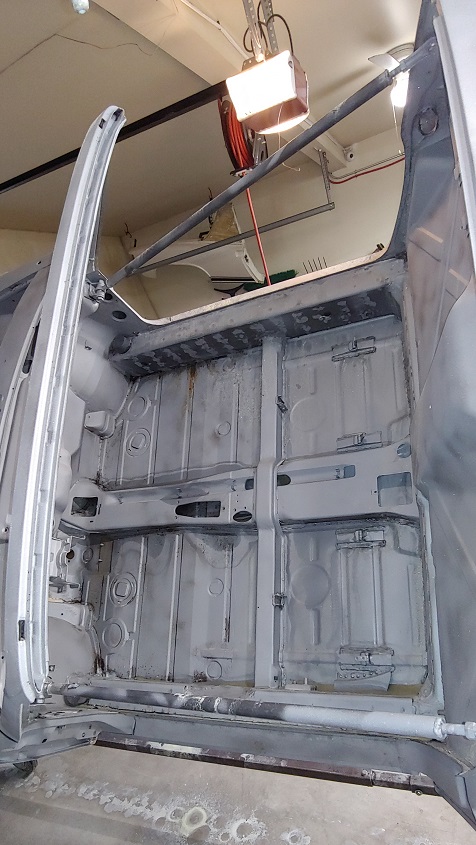
Posted by: Cairo94507 Aug 19 2021, 03:01 PM
Great progress and it is a roller again.
Posted by: rgalla9146 Aug 19 2021, 03:06 PM
Luke your brothers car looks great !
When in the middle of that process it seems the jobs just keep piling up....
the more you do the more you STILL have to do.....there's no way out...but
with every complete part there is a good feeling of accomplishment.
You've done plenty.
Fantastic !
What color will it be ?..... looks Gray ?
You've taken a good order of jobs....paint insides and bottom including wheelhouses
then make it a roller, do the dash and wiring, etc.etc. then onto paint.
Looks beautiful !
Posted by: Luke M Aug 19 2021, 07:27 PM
Luke your brothers car looks great !
When in the middle of that process it seems the jobs just keep piling up....
the more you do the more you STILL have to do.....there's no way out...but
with every complete part there is a good feeling of accomplishment.
You've done plenty.
Fantastic !
What color will it be ?..... looks Gray ?
You've taken a good order of jobs....paint insides and bottom including wheelhouses
then make it a roller, do the dash and wiring, etc.etc. then onto paint.
Looks beautiful !
Hi Rory,
Seams like the to do list never ends..lol
Like you said do more now vs later. I'm thinking that will also help with not scratching the new paint job too. Color is almost a Gray primer looking color. Think it's a Dodge color code. I'd have to confirm with my brother as he got the paint. See how the weekend goes here as we may knockout a few more things.
Posted by: Luke M Sep 11 2021, 06:30 PM
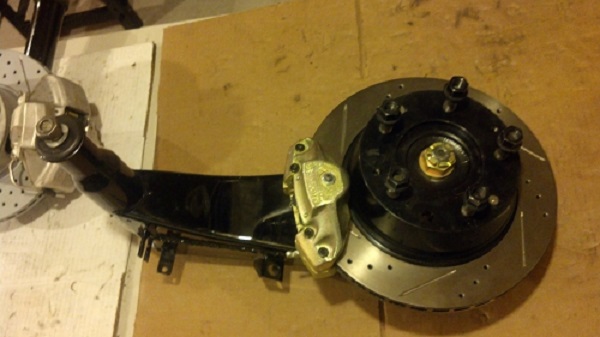
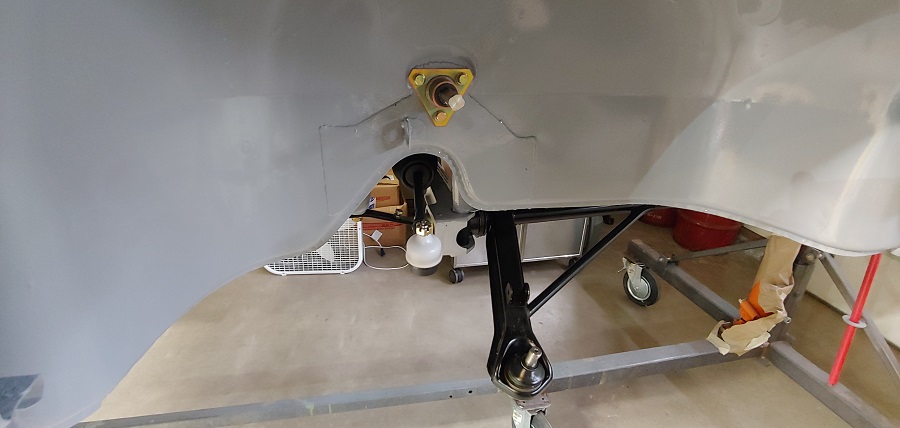
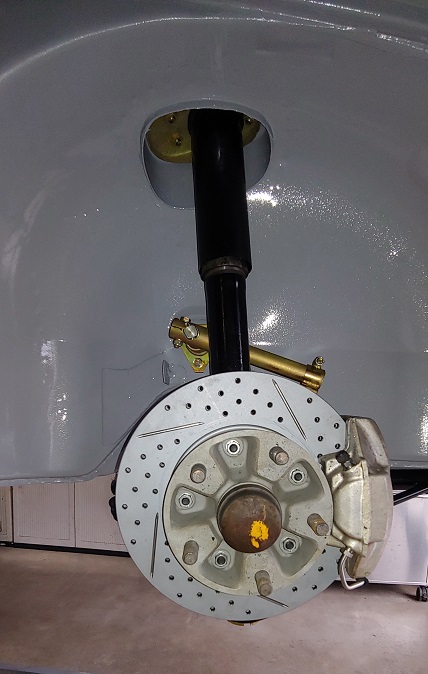
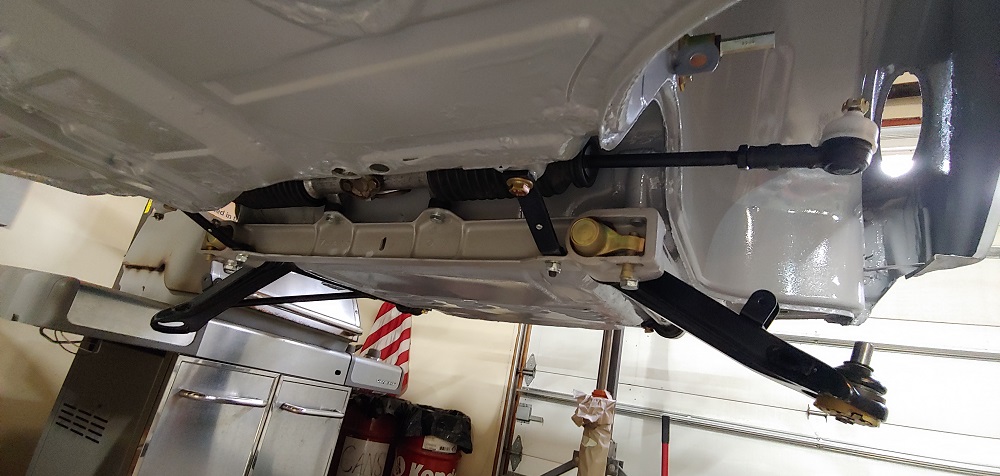
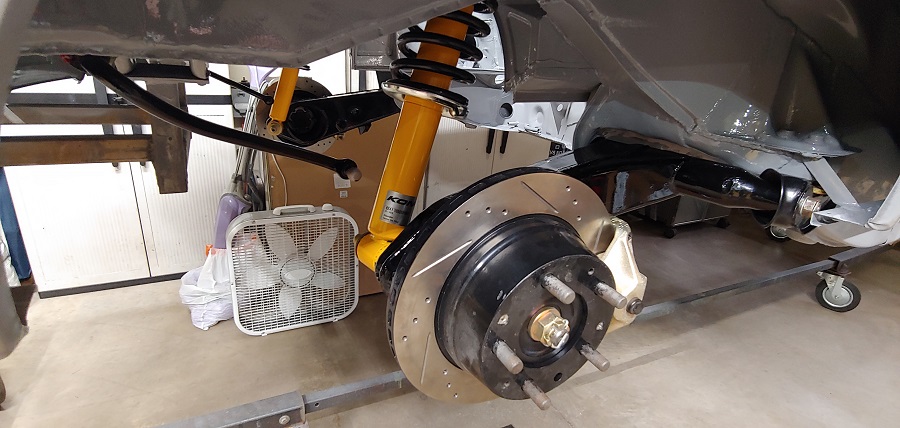
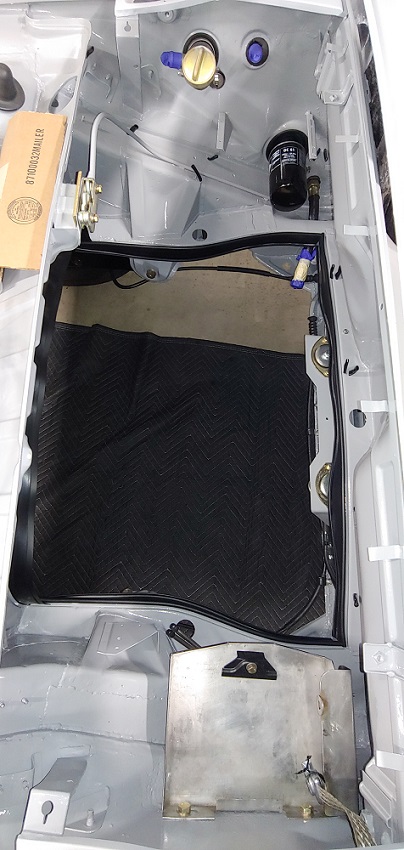
We've been working away here.. Got the brakes installed, adjusted, and bled. My brother went with a 19 mm ATE master, New brake lines from PMB, SS flex lines, Aluminum front 911 S calipers w/SS pistons, and PMB rebuilt 6 calipers to GT spec.
Wrapped up a few suspension items as well. Got the SS fuel lines installed. Local auto parts store was out of 3/8'' fuel hose so got some of that coming in.
Got the factory 6 oil tank installed. Actually went in pretty easy.. oh wait did I say easy... I forgot to remove the engine heater fan holder in the left engine shelf.. Yup it's in the way and can't mount the oil filter now.. Great, hopefully I do not wreck the fresh paint getting it out of there. Otherwise my brothers 914 is off the rotisserie and back on it's wheels. Only took 8 years... 
Attached image(s)
Posted by: Root_Werks Sep 13 2021, 05:02 PM
That's some fast progress! Looking good!
Posted by: mepstein Sep 13 2021, 05:50 PM
I figured why not start this thread. The car is a 74 914 2.0 that's been sitting since the early 90's. It was parked outside/in the woods up until my brother purchased it last fall. It didn't look too bad from 20 feet away but when you look closer it gets pretty bad. So, here's the plan... strip the car, fix the rust problems, paint it, add a 5 lug suspension, and convert it to a 3.0 6. Stay tuned for pics of the progress..
I'll check back in 5-7 years when it's done! A funny guy..
Heck it better not take that long. I figure at the most 2 years..
I'll post a few pics for you guys tmrw...

Posted by: Justinp71 Sep 13 2021, 05:53 PM
Looking good 
Posted by: Luke M Sep 13 2021, 06:41 PM
I figured why not start this thread. The car is a 74 914 2.0 that's been sitting since the early 90's. It was parked outside/in the woods up until my brother purchased it last fall. It didn't look too bad from 20 feet away but when you look closer it gets pretty bad. So, here's the plan... strip the car, fix the rust problems, paint it, add a 5 lug suspension, and convert it to a 3.0 6. Stay tuned for pics of the progress..
I'll check back in 5-7 years when it's done! A funny guy..
Heck it better not take that long. I figure at the most 2 years..
I'll post a few pics for you guys tmrw...

Time flies when you're having fun..

Looks like my brothers car will be hanging around my place a few more weeks.
We are gonna get the engine and trans installed before it heads to his place.
He just got the rebuilt engine rockers in so looks like engine work is in order now.
Posted by: Luke M Oct 2 2021, 06:46 PM
We've been chipping away at the list here. Got the exterior of the 914 in epoxy. Oh the fun... I think we sanded the whole car at least four or five times prior to epoxy.
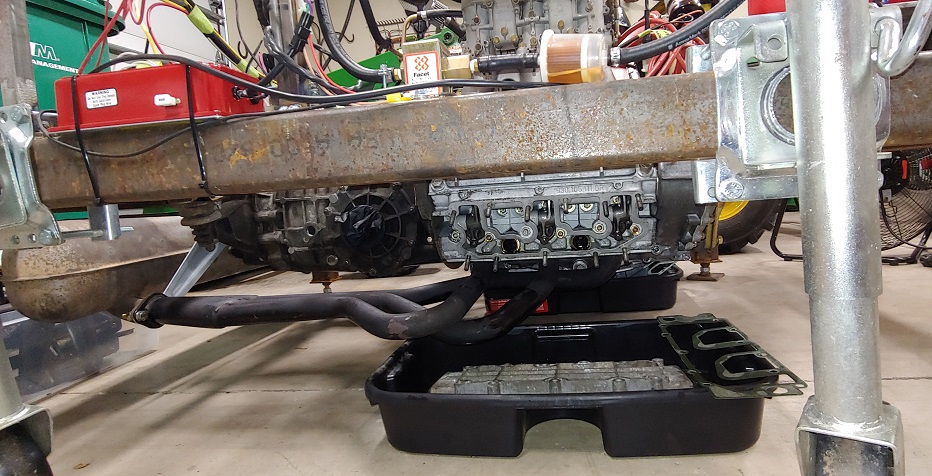
Got the 3.0 pretty much done. I can't seam to locate the dizzy green wire so now waiting for that to come in. We also decided to build a engine test stand. Figured this was way easier then having to pull the engine to re-torque everything after run in.
It wasn't a bad build. We repurposed the chassis stand we built several years ago.
Had the stand pretty much done in three days.
Attached image(s)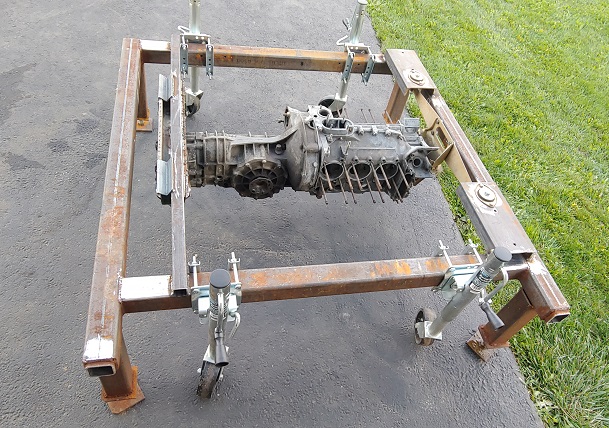

Posted by: Luke M Oct 10 2021, 05:44 PM
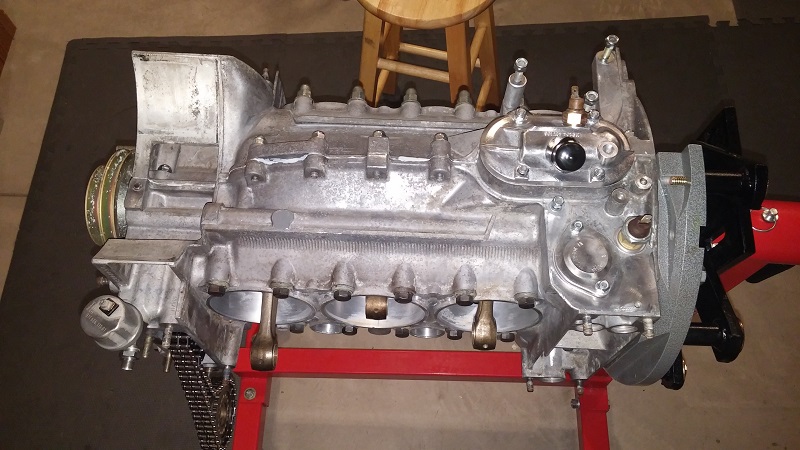
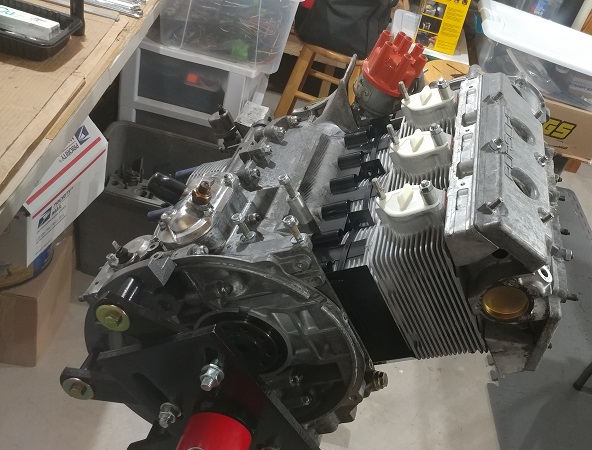
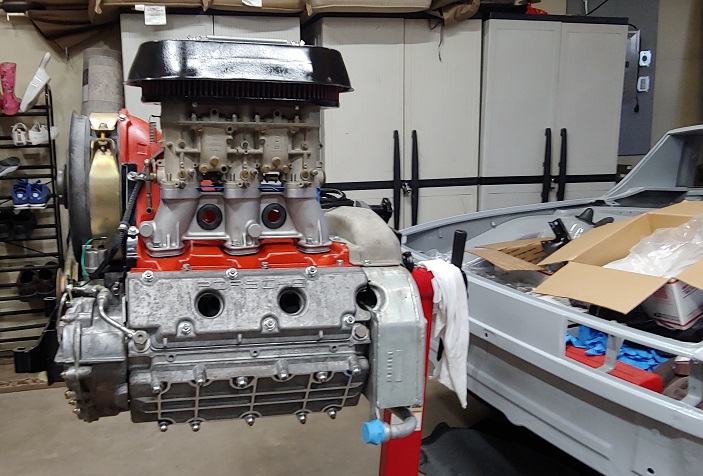
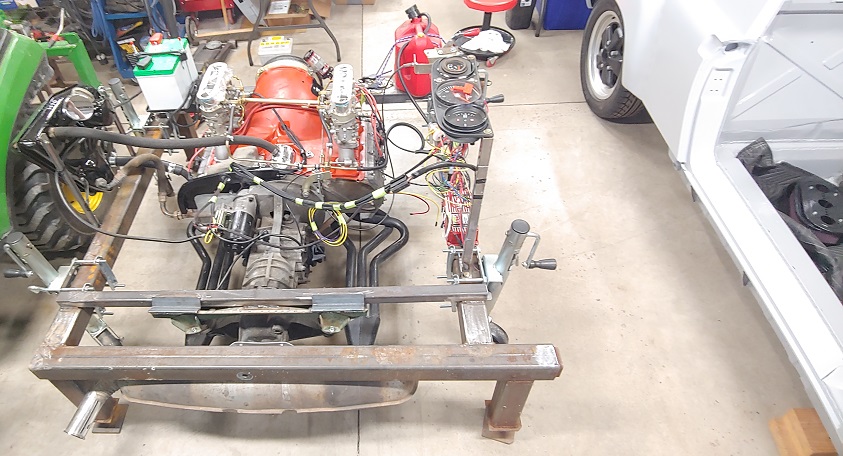
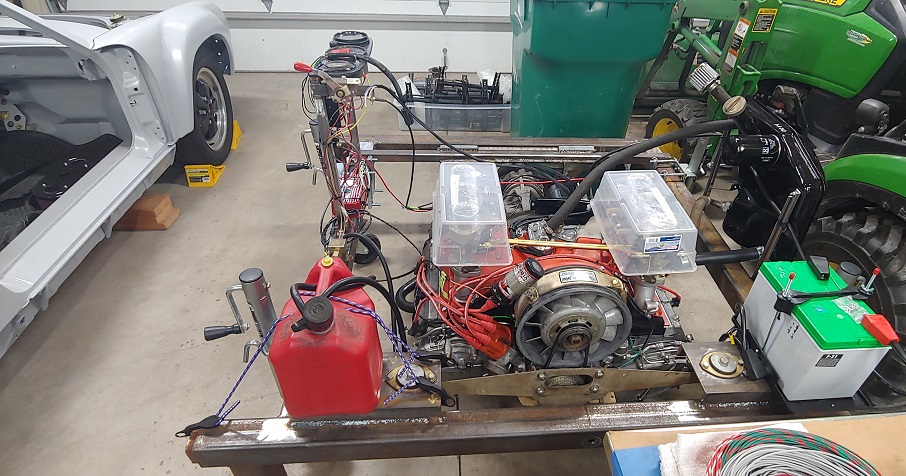
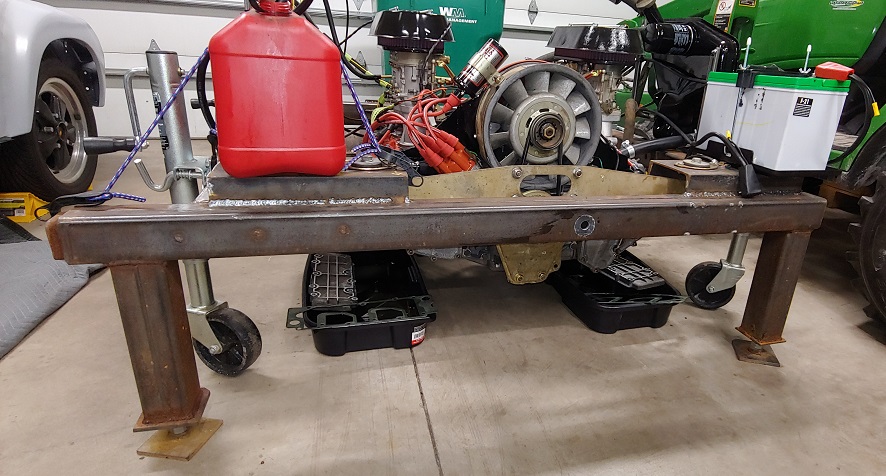
We got the 3.0 on the test stand today. I'm gonna try and see if we can get this baby fired up by the end of the week.
Attached image(s)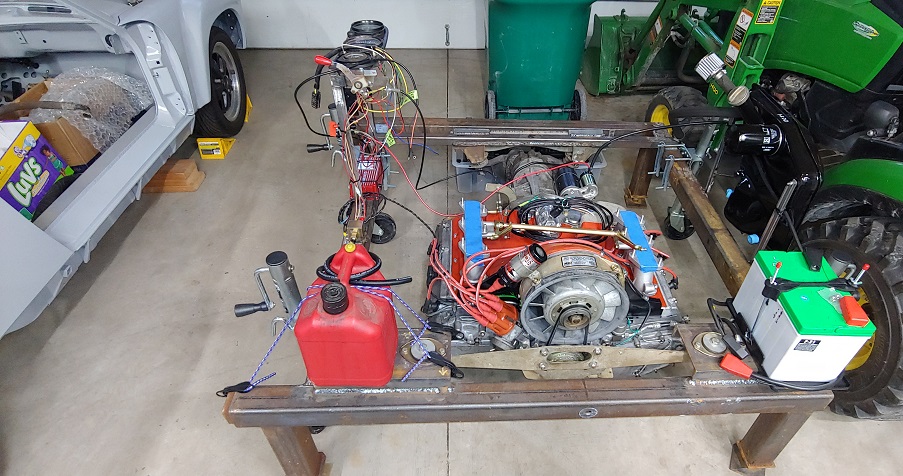
Posted by: Luke M Oct 14 2021, 07:29 PM
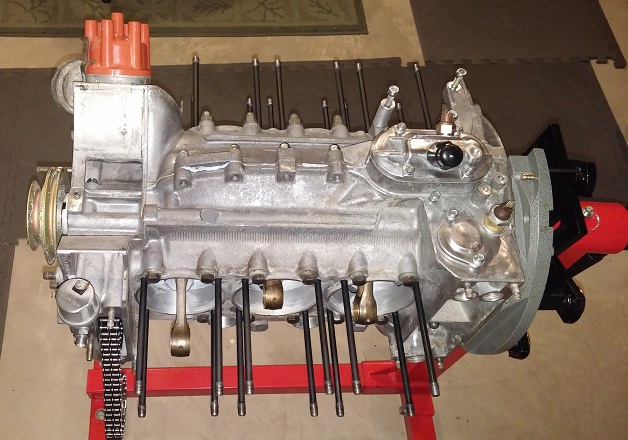
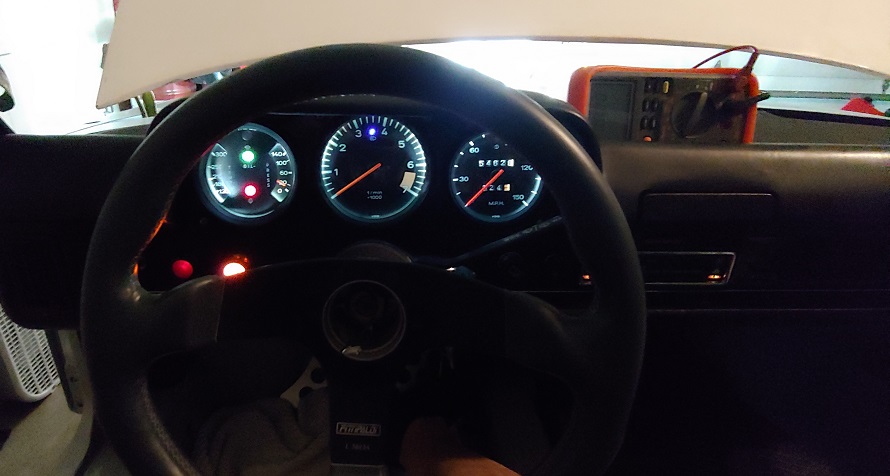
Fired up the 3.0 tonight... She's a runner and sounds sweet.
If I only knew how to post a video clip here. I guess a pic will have to do for now.
Attached image(s)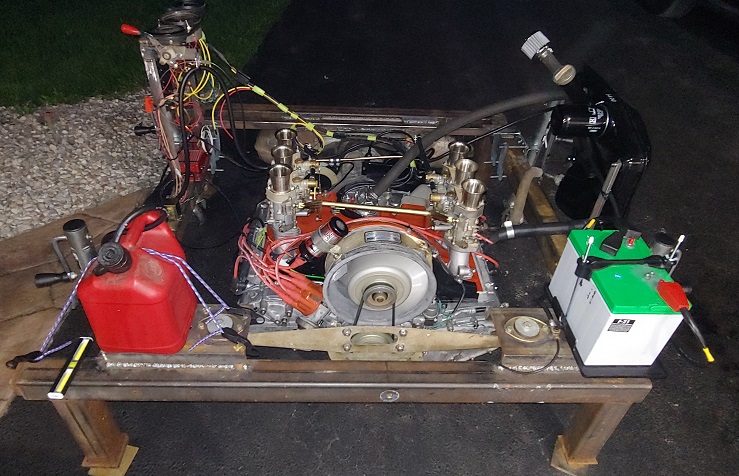
Posted by: Krieger Oct 14 2021, 10:52 PM
Congratulations! Great feeling isn't it
Posted by: rgalla9146 Oct 15 2021, 06:26 AM
Go Go Go Luke !
Engine start up before install is so good, best way to go with new or unknown
engine.
You and your brother are quite a team.
Great work !
More pics please !
Posted by: Root_Werks Oct 15 2021, 08:57 AM
Holy running engines Batman! I applaud your abilities and speed of progress! There are times I forget I have a 914.
Posted by: Luke M Oct 15 2021, 11:02 AM
Go Go Go Luke !
Engine start up before install is so good, best way to go with new or unknown
engine.
You and your brother are quite a team.
Great work !
More pics please !
Hi Rory,
My brother and I have been working away here. I rebuilt the 3.0 a few years ago now but was sitting on the engine stand until recently. I wanted to run the engine outside the car cause it's just way easier to see problems. I didn't want to have to pull it out of the car after I ran it to torque everything again. The test stand wasn't bad to build and cost was under $500 for what I needed to buy for it. The cost was worth not having to crawl under the car well not just yet anyways. Getting the engine on the stand was easy and straight forward. It's mounted on factory trans/motor mounts so nothing special there. I had a bad trans case hanging around so I'm using that on the back half. Wiring is easy once I had the proper schematic in hand. Using MSD 6al for the ignition and just a facet fuel pump for fuel supply. I had an issue with the new starter cranking slow but that was fixed with an extra ground wire to the front of the engine mount. Once the carbs had fuel in them the engine fired right up. I was shocked at how close I had dialed the carbs in on the bench. I still need to fine tune them but 1st I want to get a few heat cycles done and re-torque everything. Once that's done I'll go back and tune the Webers. I'll try to figure out how to post a video here.
Attached image(s)
Posted by: Dion Oct 15 2021, 11:23 AM
Nice work going on there. Congrats on the engine start!
Posted by: Luke M Oct 16 2021, 09:53 AM
Lets see if the video works..
https://youtu.be/Y8Q5FdB5xvI
Posted by: lesorubcheek Oct 16 2021, 02:00 PM
Lets see if the video works..
https://youtu.be/Y8Q5FdB5xvI
Sounds and looks great!
Dan
Posted by: Luke M Oct 24 2021, 07:37 PM
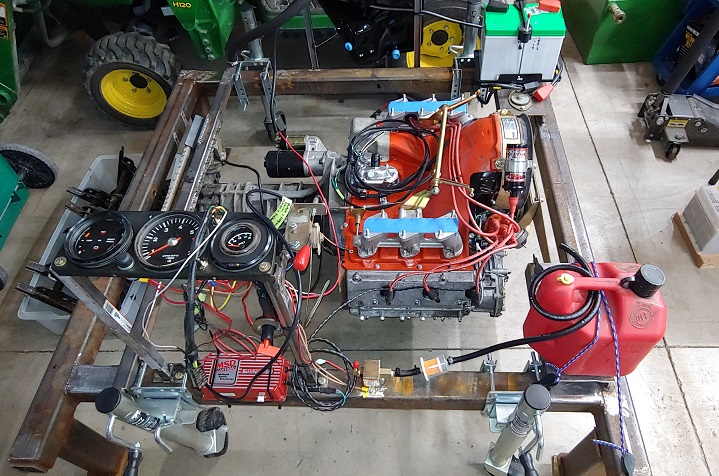
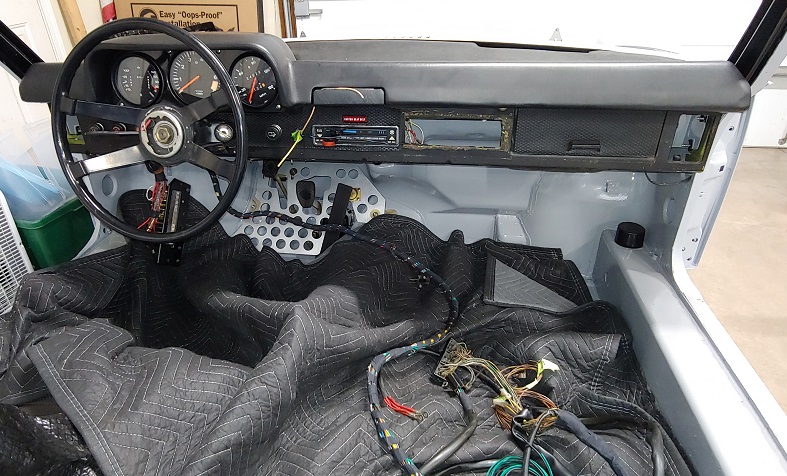
We had a busy weekend here. Got the wire harness all squared away and started to install that along with the dash. Got the 914rubber engine bay seal in, oil filter installed, and ran the 3.0 again. I'll get the wire harness mostly installed on Monday. Anyone remember what the fix was for the 914rubber harness snorkel when used in a later 914? It has a larger diameter hole on the fire wall then the early cars.
Attached image(s)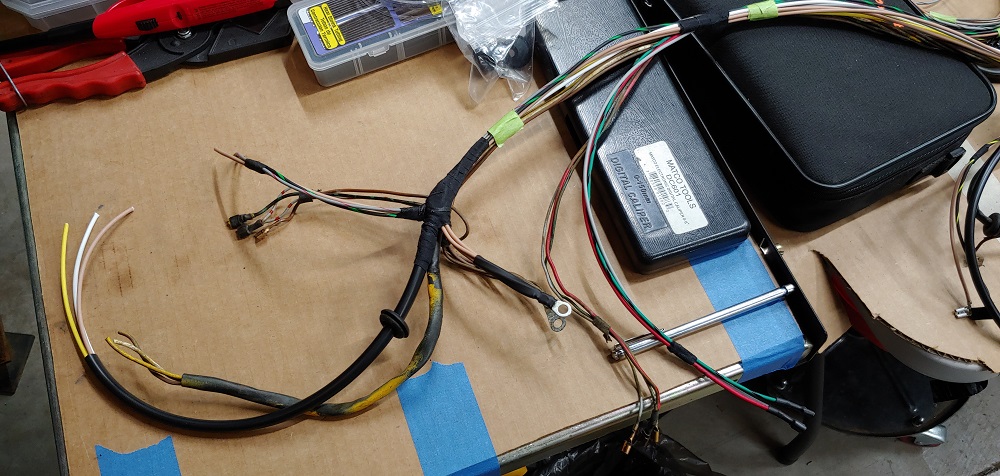
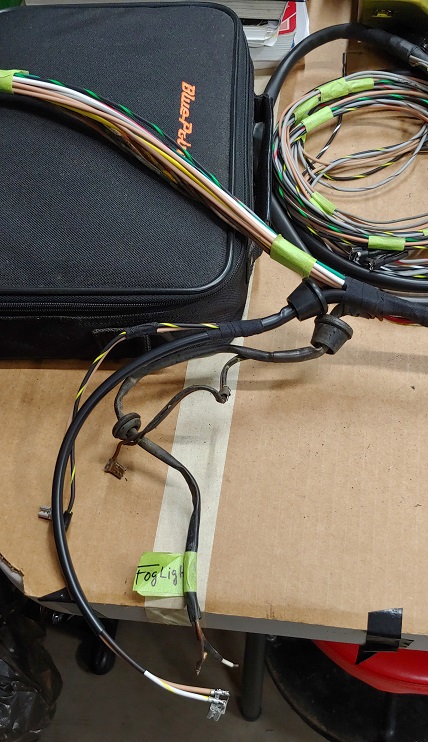
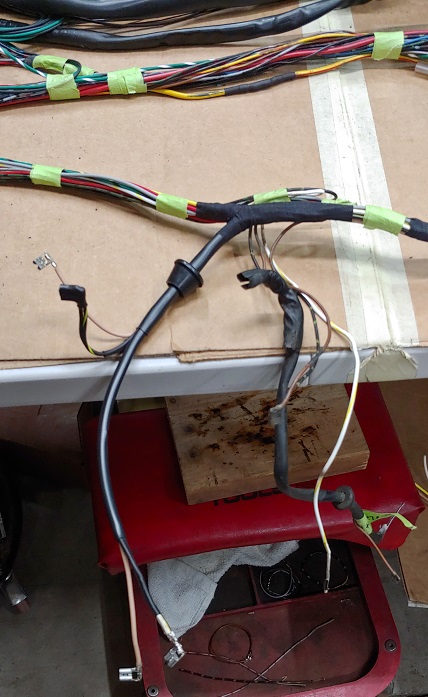
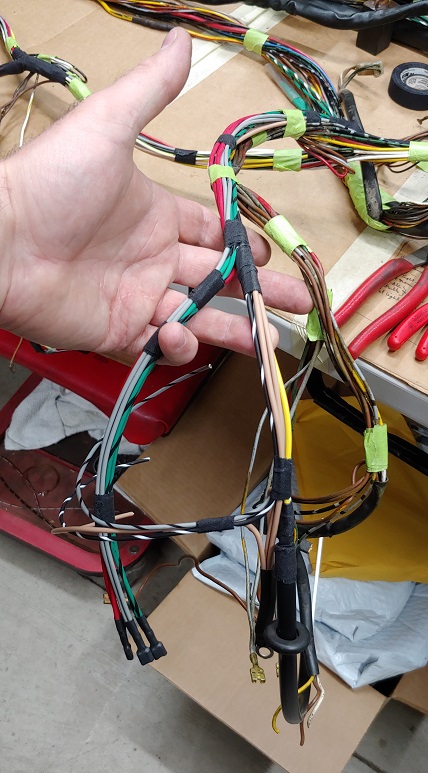
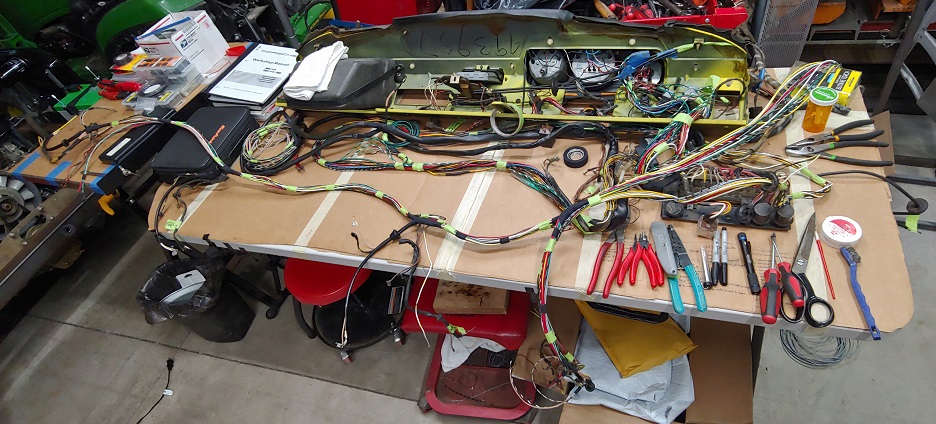
Posted by: Luke M Oct 25 2021, 07:02 PM
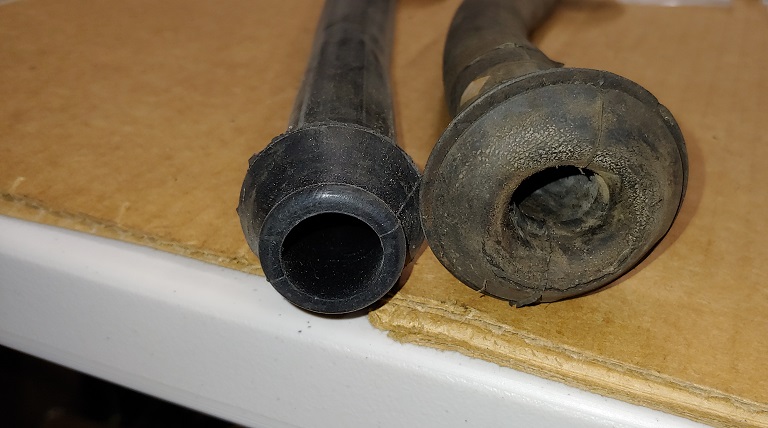
So I'm stuck with the harness install in the engine bay. Anyone know how to fix this issue with the snorkel. I recall seeing something on this several years ago but I can't locate that thread.
@http://www.914world.com/bbs2/index.php?showuser=3348
Attached image(s)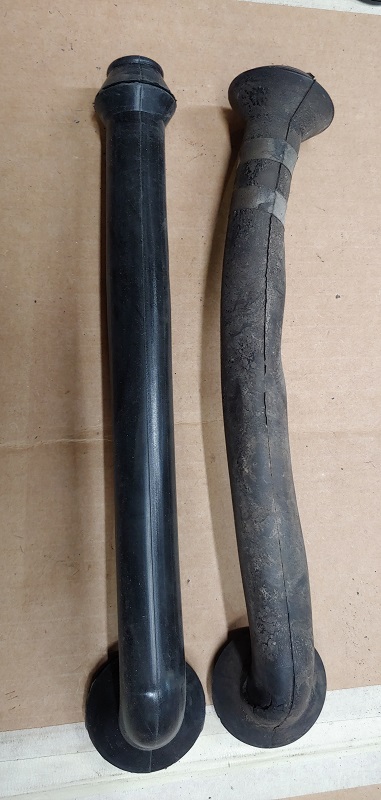
Posted by: rgalla9146 Oct 25 2021, 08:10 PM
Luke how about this ?
Work up the dimensions from the snorkel and whittle it up from alum sheet.
Can be done with or without the slot. With the slot make two and face them opposite each other. Easy peasy.
The tube can be shortened and glued with contact cement, shrink tube or electric tape.
I employed a ten year old artist.
Attached thumbnail(s)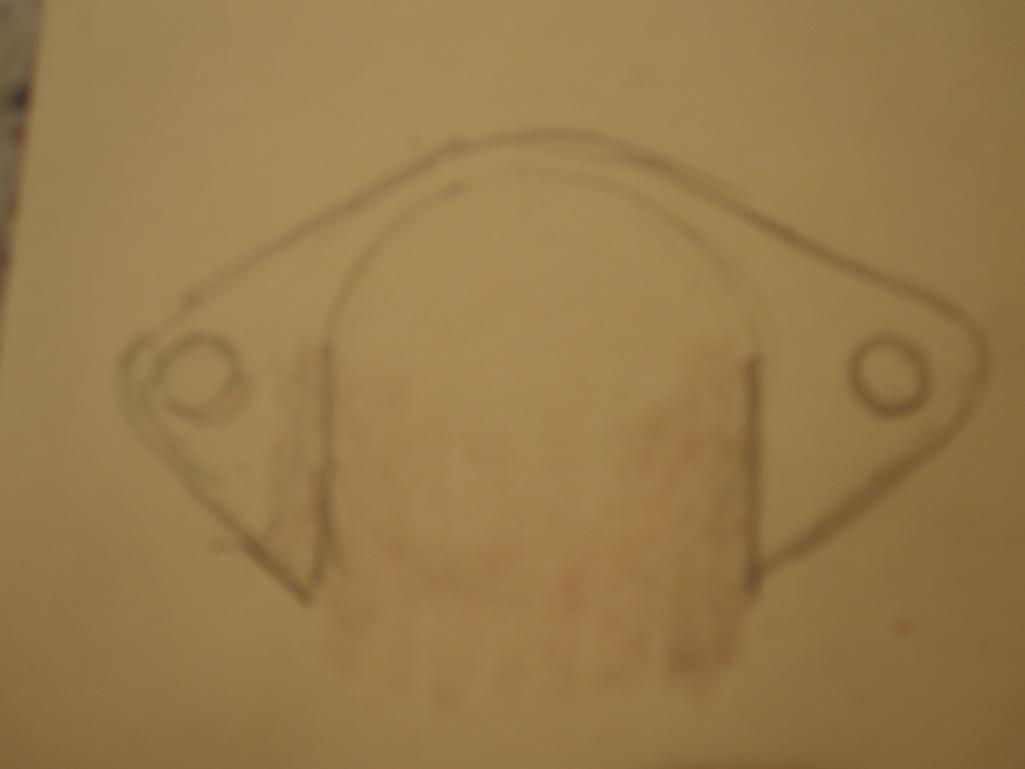
Posted by: Mikey914 Oct 26 2021, 02:19 AM
The fix had been to use a small section of sheet metal. I would like to make the larger ones also, I've almost broken even on the tooling for the small ones we made. I will put it on the list, but we are about 6 months out.
Posted by: Justinp71 Oct 26 2021, 12:22 PM
Nice build! That will be a blast to drive.
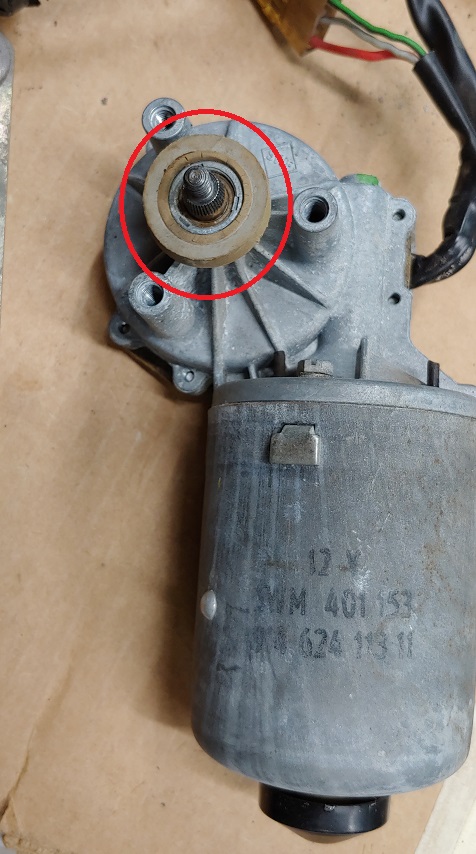
Posted by: Luke M Oct 27 2021, 09:40 AM
The fix had been to use a small section of sheet metal. I would like to make the larger ones also, I've almost broken even on the tooling for the small ones we made. I will put it on the list, but we are about 6 months out.
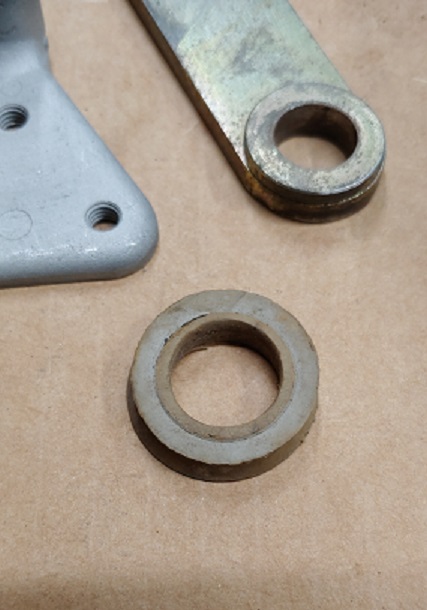
Thanks for the reply. Looks like I'll fab up a spacer for the snorkel.
While I have you here Mark do you make the spacer that goes on the headlight motor?
See pics.
@http://www.914world.com/bbs2/index.php?showuser=3348
Attached image(s)
Posted by: Mikey914 Oct 27 2021, 09:52 AM
Not yet. But I'll put that on the list. I forgot about those.
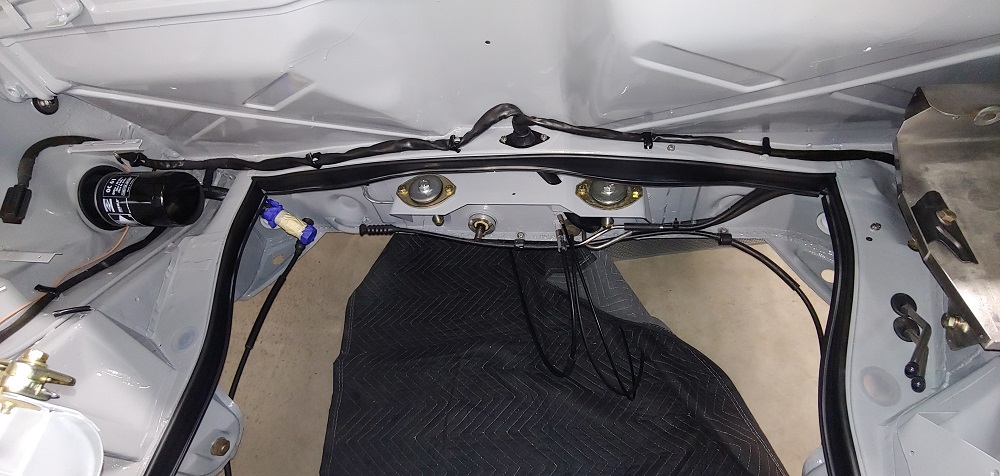
Posted by: Luke M Nov 5 2021, 09:41 AM
Made a snorkel mount bracket so that's now fixed and installed the rest of the wire harness. Cleaned up the wire mess under the pass seat as well. Started the headlight install but waiting on a few items from 914rubber to come in to finish up.
Torqued the heads, adjusted the rockers, and sealed up the 3.0. She's ready to get installed. Going to head out soon to install the tangerine shift kit on the 901 trans.
Attached image(s)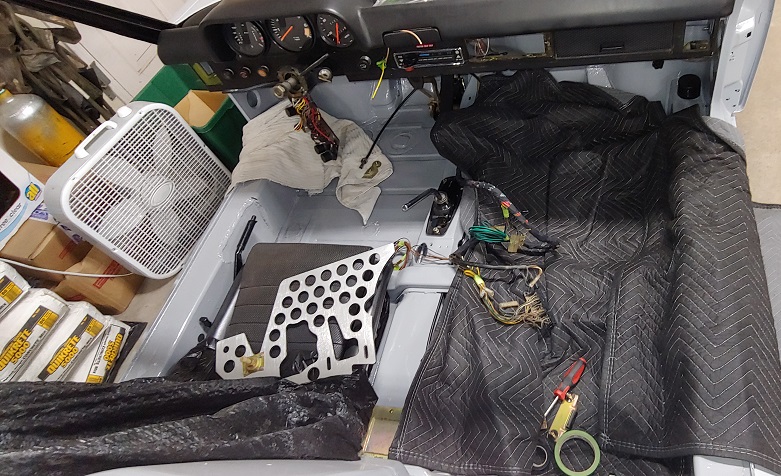

Posted by: TRS63 Nov 5 2021, 02:25 PM
It's beautiful when it's all with fresh paint 
Antoine
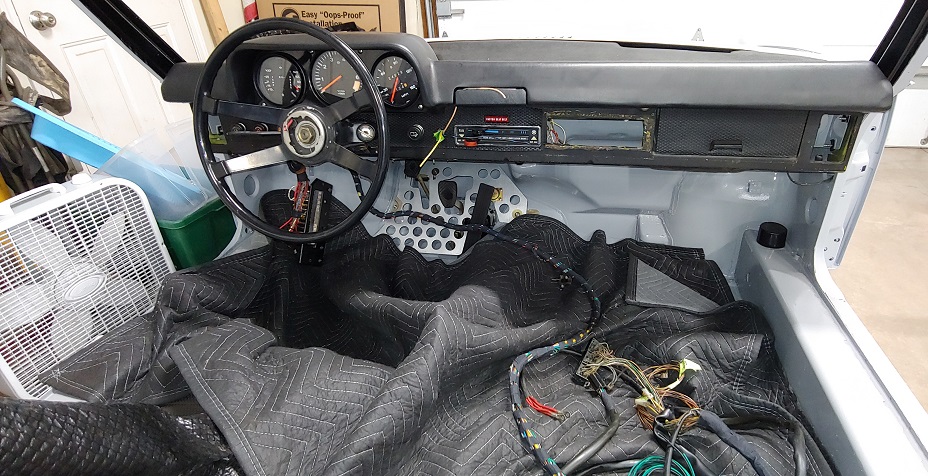
Posted by: Luke M Nov 6 2021, 06:28 AM
The exterior body work and paint will get done hopefully by spring 2022.
Meantime still putting this baby together. Got the trans shifter housing modified for the Tangerine shift kit. Filled with gear lube and ready to go in. Today I'll get the 3.0 ready to come off the test stand and hopefully installed on Sunday.
Attached image(s)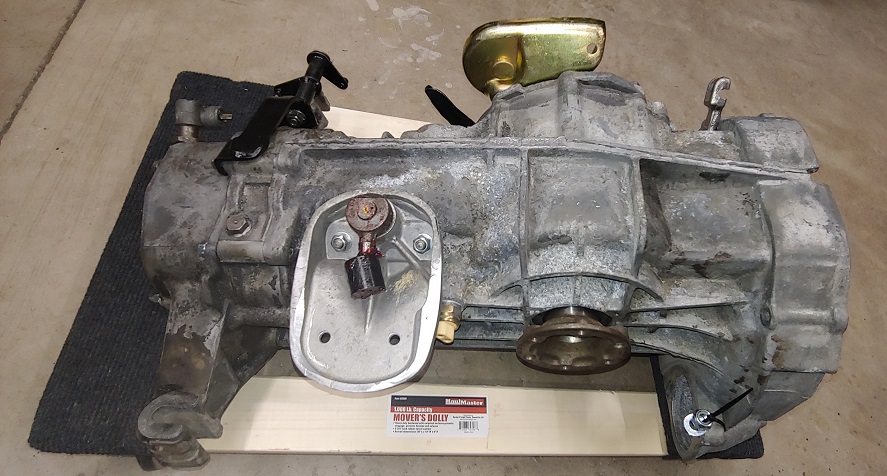

Posted by: Luke M Nov 6 2021, 07:52 PM
Got a few more things knocked off the list. Spent a good 6 hours re-keying and polishing all the locks on my brothers 914. That was not a fun job but at least it's done now. Wasn't there someone that was selling the tumblers to re key locks here? I ran out of #1 and #3 tumblers. I still have my 6 stuff to re-key yet.
Attached image(s)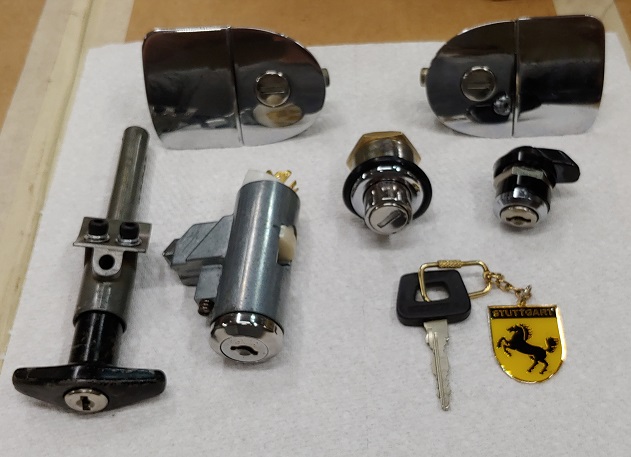
Posted by: mepstein Nov 6 2021, 08:02 PM
Got a few more things knocked off the list. Spent a good 6 hours re-keying and polishing all the locks on my brothers 914. That was not a fun job but at least it's done now. Wasn't there someone that was selling the tumblers to re key locks here? I ran out of #1 and #3 tumblers. I still have my 6 stuff to re-key yet.
I have some used wafers. If that helps, give me your address and I’ll mail them out.
Posted by: Luke M Nov 7 2021, 06:42 PM
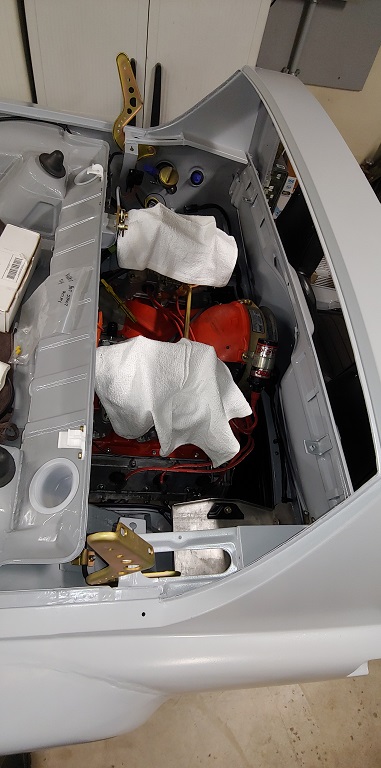
3.0 is installed now time to get everything hooked up. May have to swap out the tall PMO intakes for shorty style. Gonna set the engine lid on and see how close it is.
Attached image(s)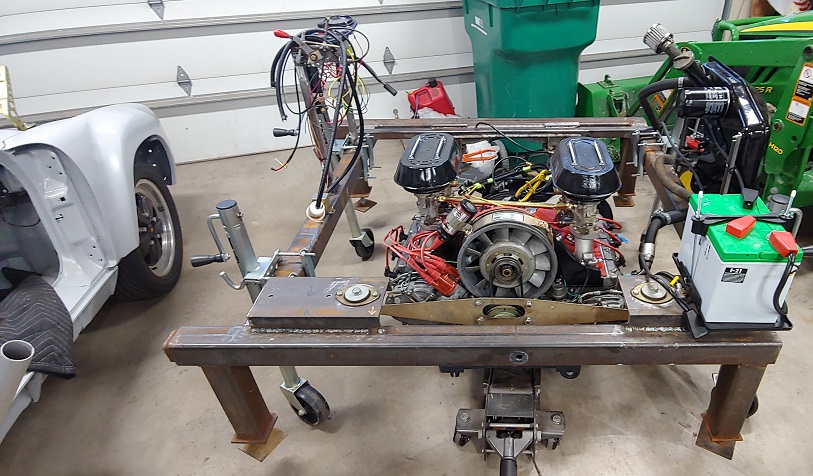
Posted by: Cairo94507 Nov 8 2021, 07:33 AM
Huge milestone.
Posted by: Luke M Nov 22 2021, 08:09 PM
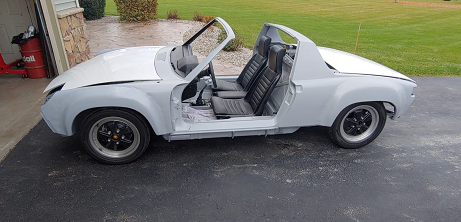
I finally got my brothers 914 out of my garage and back to his. Got a lot done in the last few weeks. The 3.0 is in and running. Still need to attach the front oil cooler setup yet. We will gather parts over the winter months. I drove it up n down my driveway and I gotta say that 3.0 moves that 914 really well. I was doing 2nd gear burn outs.. SHHHH my brother doesn't know.. 
I have all but 5th gear so I need to figure that part out. It wants to go but I wasn't about to force it. The shifter adjustment is rough so may work once it gets fine tuned.
Until the spring she's under covers.
Now time to clean out the garage and get working on my 6.
Attached image(s)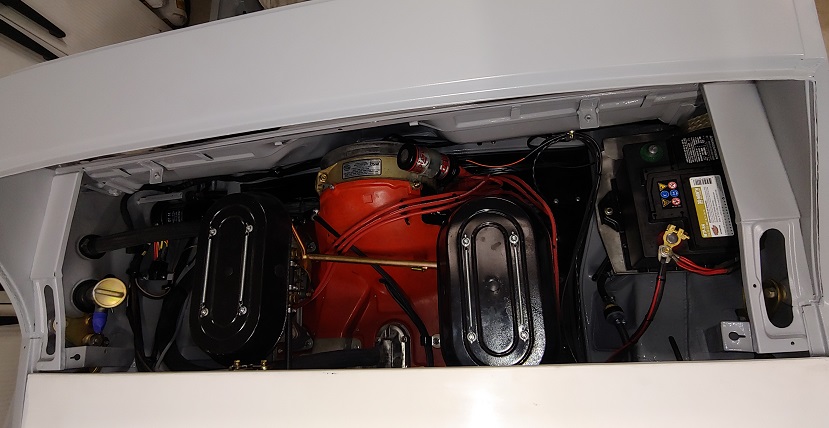
Posted by: Shivers Nov 22 2021, 08:15 PM
Giggity
Posted by: autopro Nov 23 2021, 10:53 AM
Awesome, beautiful car!
Posted by: rgalla9146 Nov 23 2021, 05:00 PM
Fantastic !
Man you've done so much.
You should be very proud.....you are doing two cars at a faster rate most
can do one.
Beautiful work.....X 2 !
Powered by Invision Power Board (http://www.invisionboard.com)
© Invision Power Services (http://www.invisionpower.com)