Printable Version of Topic
Click here to view this topic in its original format
914World.com _ 914World Garage _ Steve's 73 1.7 Restoration Thread
Posted by: Steve_R Jun 23 2013, 11:32 PM
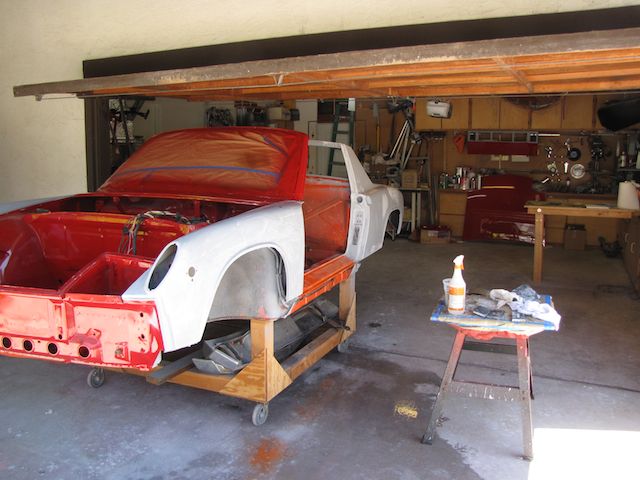
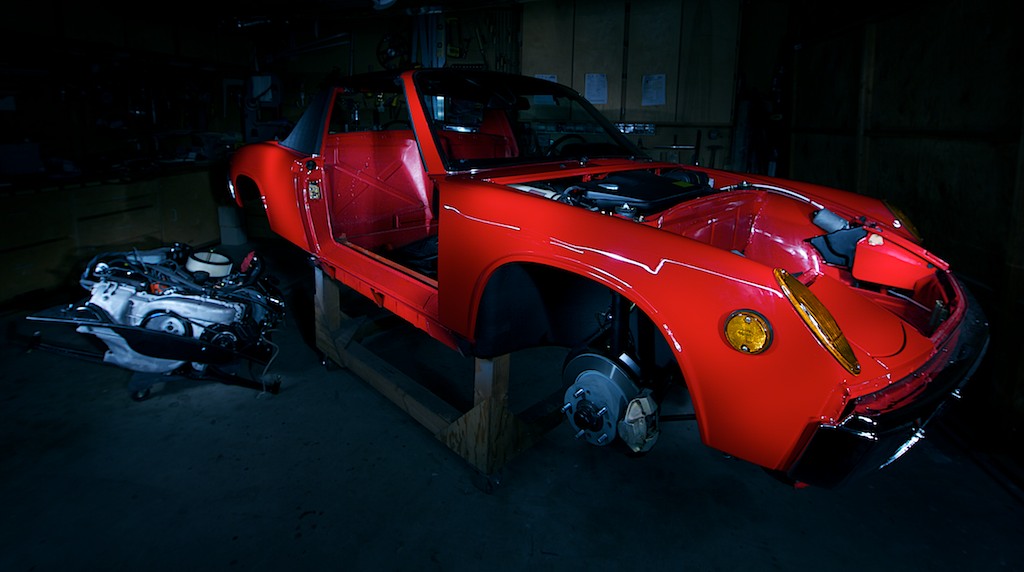
Hi, I would like to introduce myself and share my project. I’m Steve, I live in San Diego and I picked up this 1973 1.7 914 about a year ago. It was in great shape with no rust and had been sitting in a garage for the past 13 years. My plan is to restore it to its original condition. At this point I think the car is about 50% done.
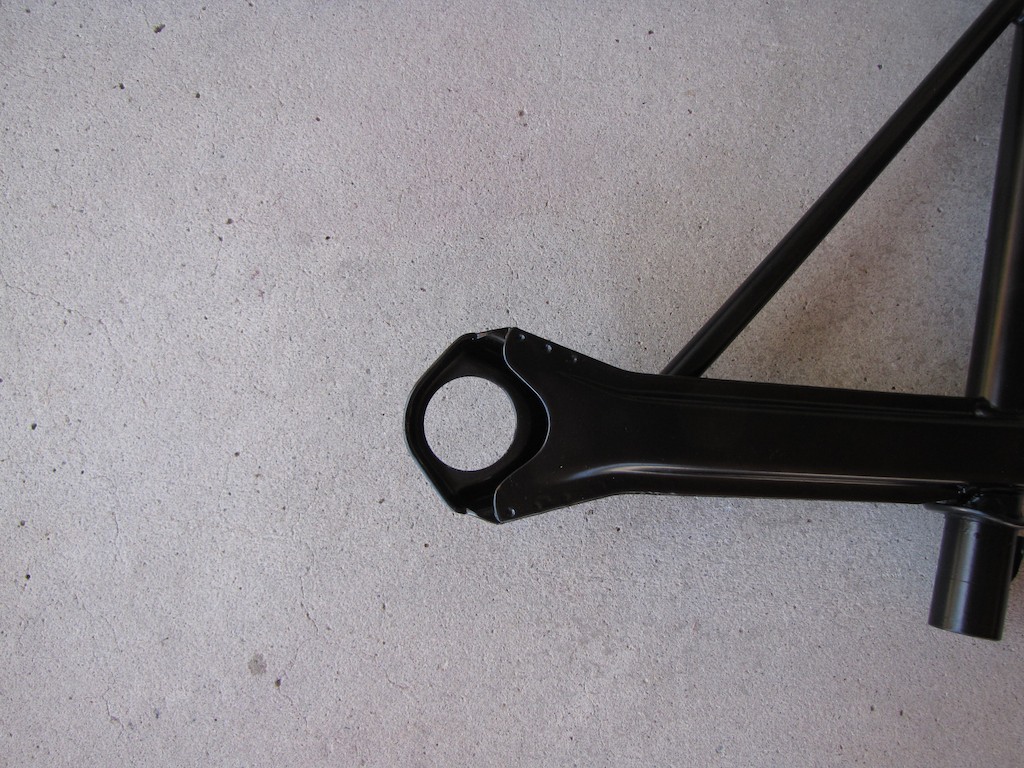
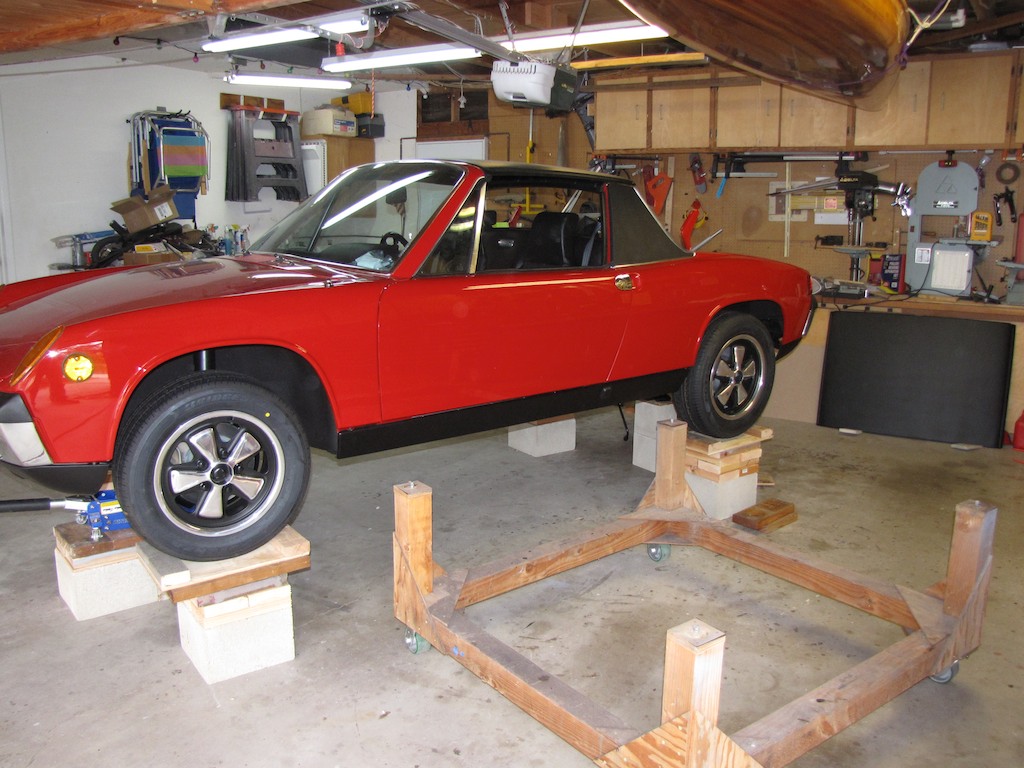
The car had door guards riveted to the sides and I had them welded up. One of the first things I did when I got the car was to build a dolly to be able to work on the suspension and make it easy to move it around the garage. It’s made from 4 X 4s and plywood and it took about 4 hours to build. If you don’t have a wood saw Home Depot will cut the 4 X 4s and plywood to the correct length. There are lag screws on top of the vertical posts that stick up ½” that fit into the 4 jack points cups under the car. This keeps the car from falling off. Also, I removed the engine before I put the car on it. To get it up there I used some cement blocks, 4 jack stands and 2 scissor jacks.
Over the past year I’ve learned a lot from reading your posts and now I would like to give back some of the knowledge I’ve learned.
Attached image(s)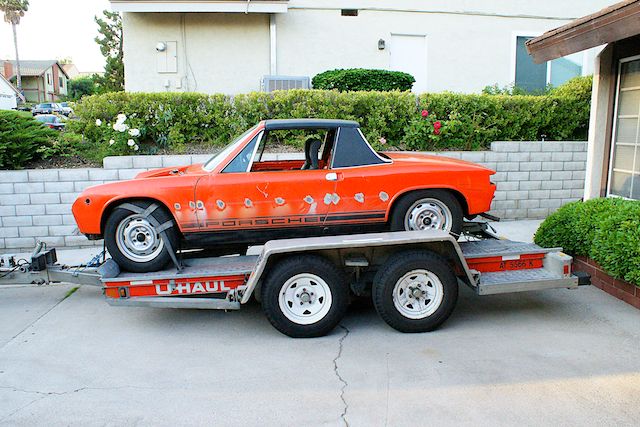

Attached File(s) Dolly.pdf ( 97.5k )
Number of downloads: 276
Dolly.pdf ( 97.5k )
Number of downloads: 276
Posted by: JawjaPorsche Jun 24 2013, 05:32 AM
Good luck with your project. Looks like you have a good teener to work on. 
I like your dolly height. Would save my back from bending over.
Same year, engine, and color as mine!
Posted by: Steve_R Aug 15 2013, 10:01 PM
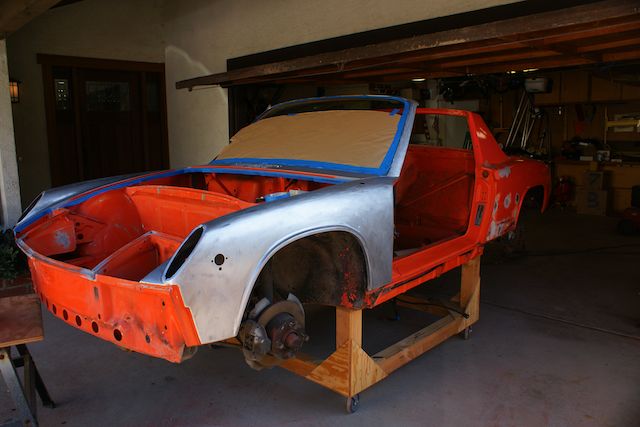
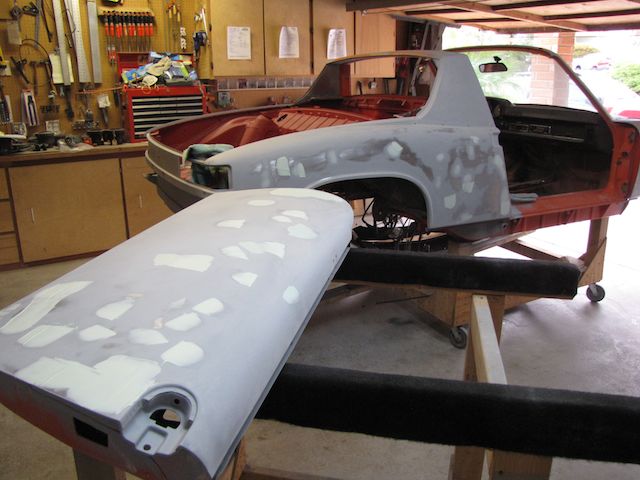
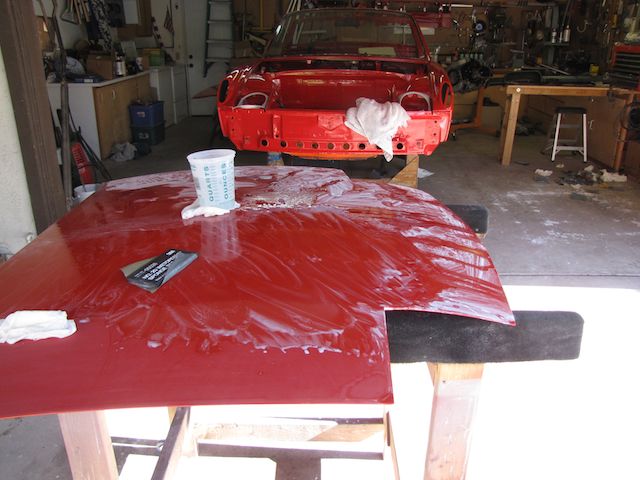
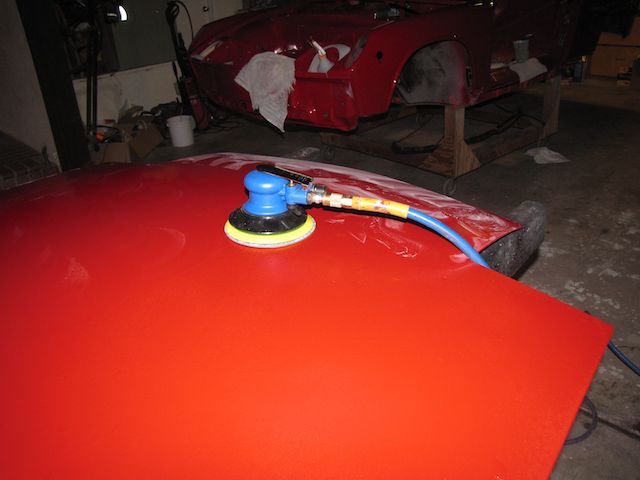
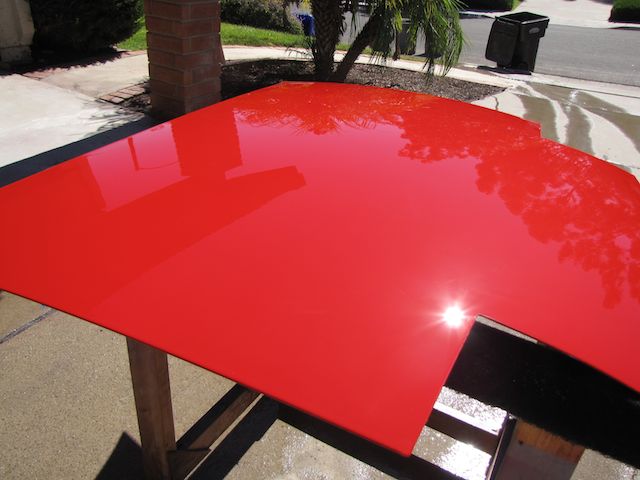
I finally finished the paint job. Here in California we have some of the strictest VOC laws in the country. I was originally planning on using PPG paint, but when I went to my local paint jobber (Tri City Paint) I found out that they would only sell me zero or low VOC paint. So, I decided on Valspar low VOC base and clear. Valspar also makes a direct to metal primer (DTM2004) that eliminates the need for an epoxy base primer and 2K sealer.
My goal was to do a show car type finish so I did a lot of extra steps. I used the 3M Trizact 3000 and 5000 sanding pads, on a DA sander, and the 3M Perfect It buffing compounds with the 3 different pads. I did this in my driveway using a Harbor Freight ($11.00) spray gun for the primer and a DeVilbiss Finish Line ($150.00) HVLP gun for the base and clear.
BTW the color is Bahia Red L-30E
1. Remove old paint to bare metal with 80 grit using Porter Cable DA sander.
2. Apply Evercoat Rage Gold filler to fill dents.
3. Sand filler with 80 grit on a long board sanding block.
4. Prime using Valspar DTM2004. Mix 4:1:1 with LVBM100 reducer and DTMA activator. 3 heavy coats.
5. Block sand using 220 dry Durra Gold sand paper roll on a long sanding board.
6. Fill small dents using Evercoat Metal Glaze and Blending Putty.
7. Block sand using 220 dry on a long sanding block.
8. Repeat to step 4 as needed.
9. Prime using Valspar DTM2004. Mix 4:1:2 (more reducer)
10. Sand with 800 wet using a firm rubber pad.
11. Spray 3 coats of base coat color (Bahia Red L-30E) using Valspar LVB100. Mix 1:1 with TCP Kustom Shop medium zero VOC XR-70 reducer. Use 1.3mm gun tip. No activator. Let flash between coats, about 15 min.
12. Spray 3 coats of clear Valspar LVCC300. Mix 4:1 with LVAA activator. Use 1.5mm gun tip. Let dry in between coats so there is no “stringing”. About 30-40 min.
13. Let dry for 48 hours.
14. Wet sand by hand with 1500.
15. Wet sand by hand with 2000.
16. Wet sand with 3000 using 3M Trizact pads on a DA sander. Hand sand all edges and corners with Trizact pad.
17. Wet sand with 5000 using 3M Trizact pads on a DA sander. Hand sand all edges and corners with Trizact pad.
18. Buff with 3M Perfect It system using white, black and blue foam pads and corresponding compounds. Hand polish edges and corners with each compound.
19. Let dry for 2 months and wax.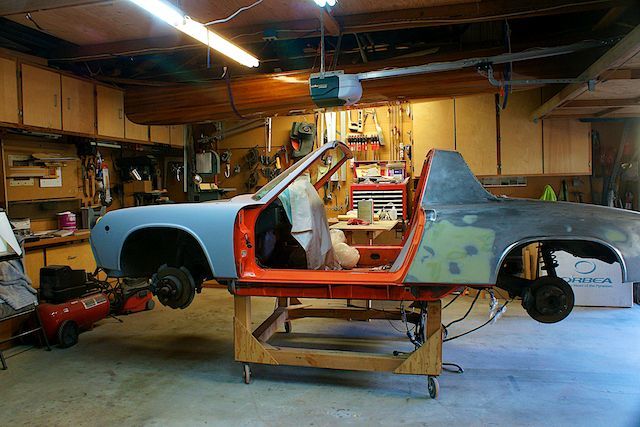
 [attachmentid=404
565]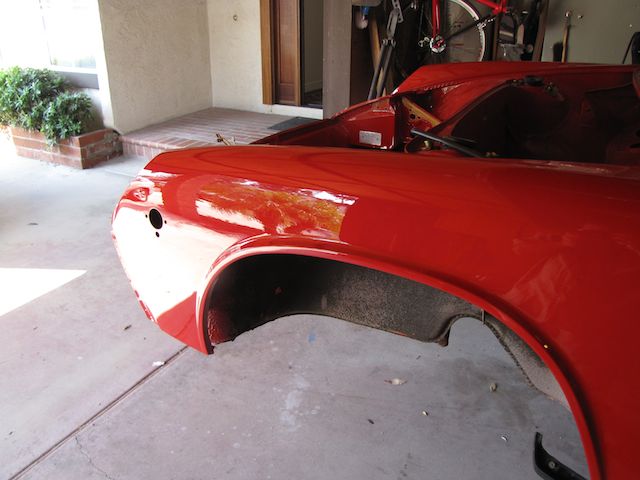
 [attachmentid
=404569]
Attached image(s)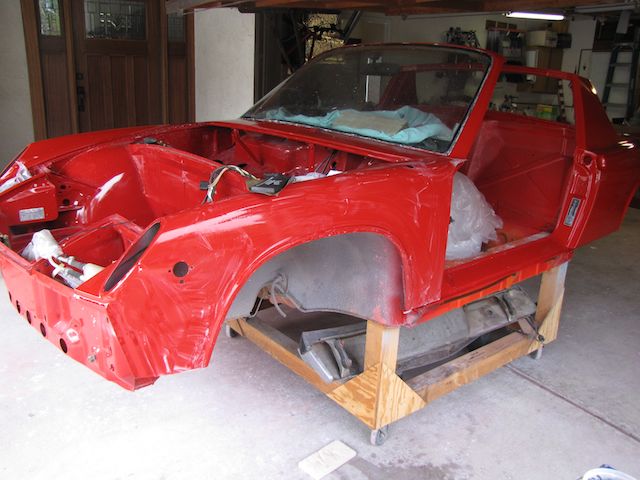
Posted by: zambezi Aug 16 2013, 09:54 PM
Great job. I hope my home paint job comes out that nice.
Posted by: Cairo94507 Aug 17 2013, 07:55 AM
That looks terrific! I hope you post more pictures soon. 
Posted by: rick 918-S Aug 18 2013, 05:19 AM
Nice work 
Posted by: jimkelly Aug 18 2013, 05:41 AM
thanks for the details and product list.
looks nice and shiney 
Posted by: bulitt Aug 18 2013, 06:34 AM
Wow! Love the canoe!
Posted by: FourBlades Aug 18 2013, 07:18 AM
What happened to welding in 30 rust repair panels? 
This can't be a teener restoration without that. 
Lets see more pictures, looks great so far. 
John
Posted by: watsonrx13 Aug 18 2013, 07:51 AM
Excellent work. Can you show some pics of the paint booth set up?
--- Rob
Posted by: Steve_R Aug 18 2013, 09:11 AM
Rob,
I didn't use a paint booth. I painted it in the drive way in the morning when there wasn't any wind. Also I hosed down the driveway to keep the dust down. On the whole car I got two small flies in the paint that I was able to pick out with tweezers.
I think the two stage base coat/clear coat paint makes it easier to paint without a paint booth. You can easily fix problems (bugs, runs) in the base coat. Since you sand and buff the clear coat, it's easy to fix problems.
Posted by: CptTripps Mar 3 2014, 07:25 PM
I was planning on getting one of these to do the paintwork that I'll be doing at home. I have the car on a rotisserie, so I can set this up outside and just wheel the car to/from the garage for the primer and paint stages.
http://www.harborfreight.com/10-ft-x-17-ft-portable-garage-69039.html#.UxUq6vRdWR8
Thinking about adding 2 box fans to one side for exhaust and 3-4 filters on the other side to let fresh air in.
Posted by: ndfrigi Mar 3 2014, 07:45 PM
Hi Steve,
Can you share a picture(s) of your car now. Thank you!
Posted by: cconcepcion Mar 3 2014, 07:49 PM
+1 on the canoe! on a side note….you must have a uber floor jack huh?
Nice paintwork!
Posted by: Steve_R Mar 4 2014, 12:09 AM
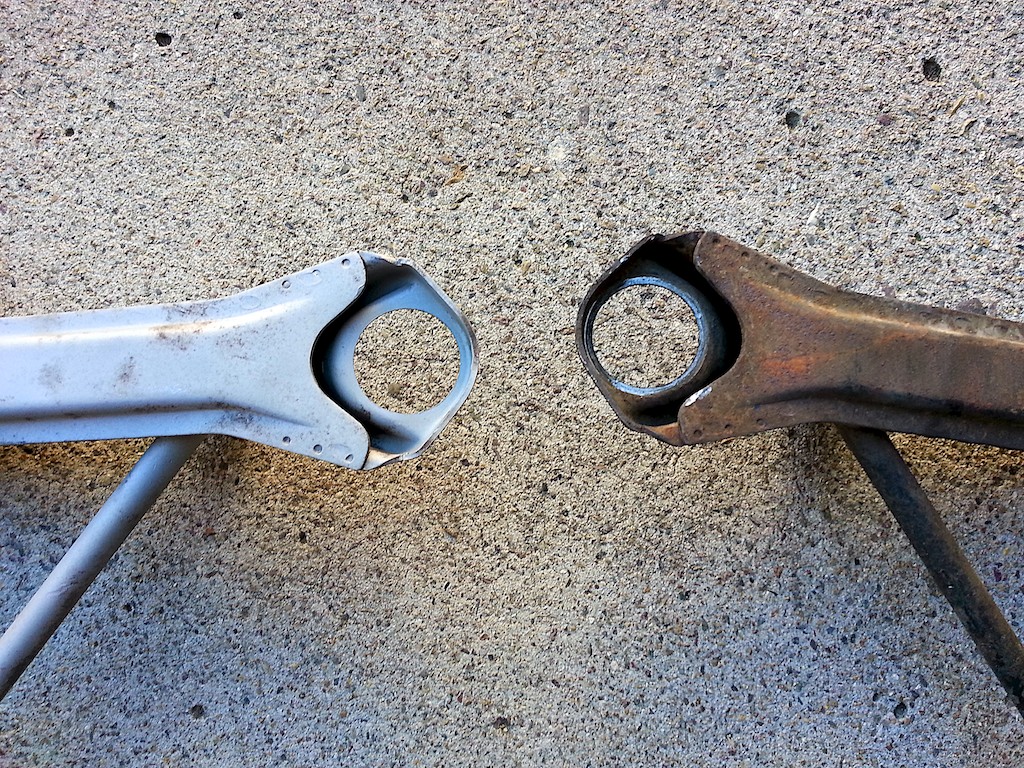
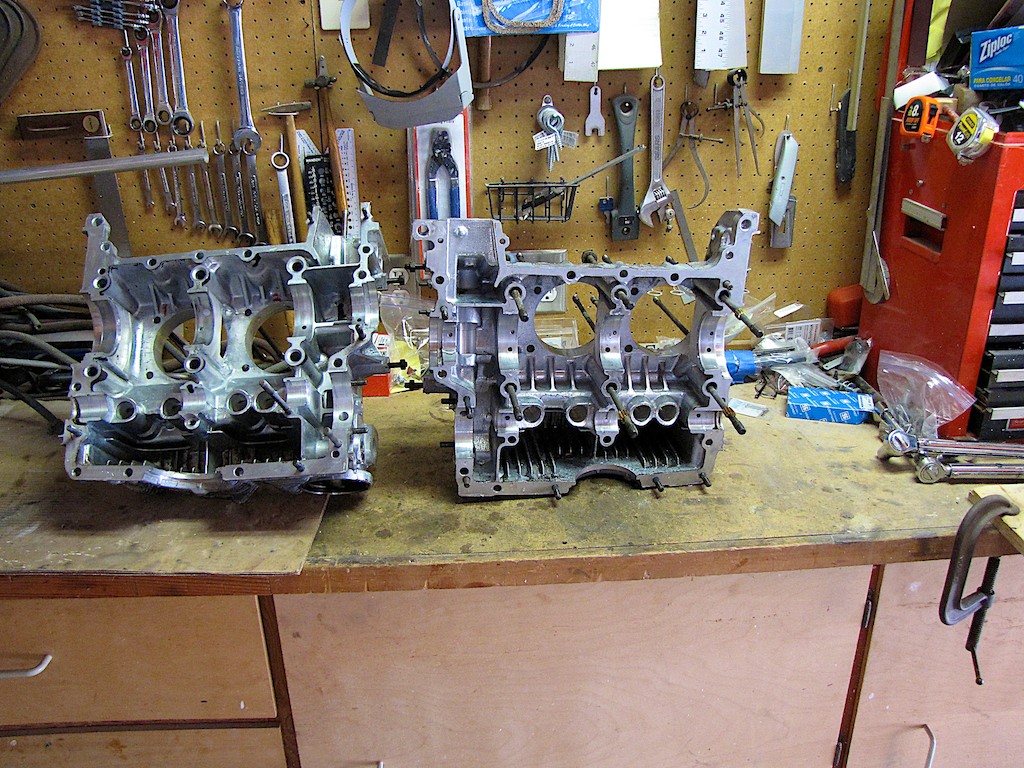
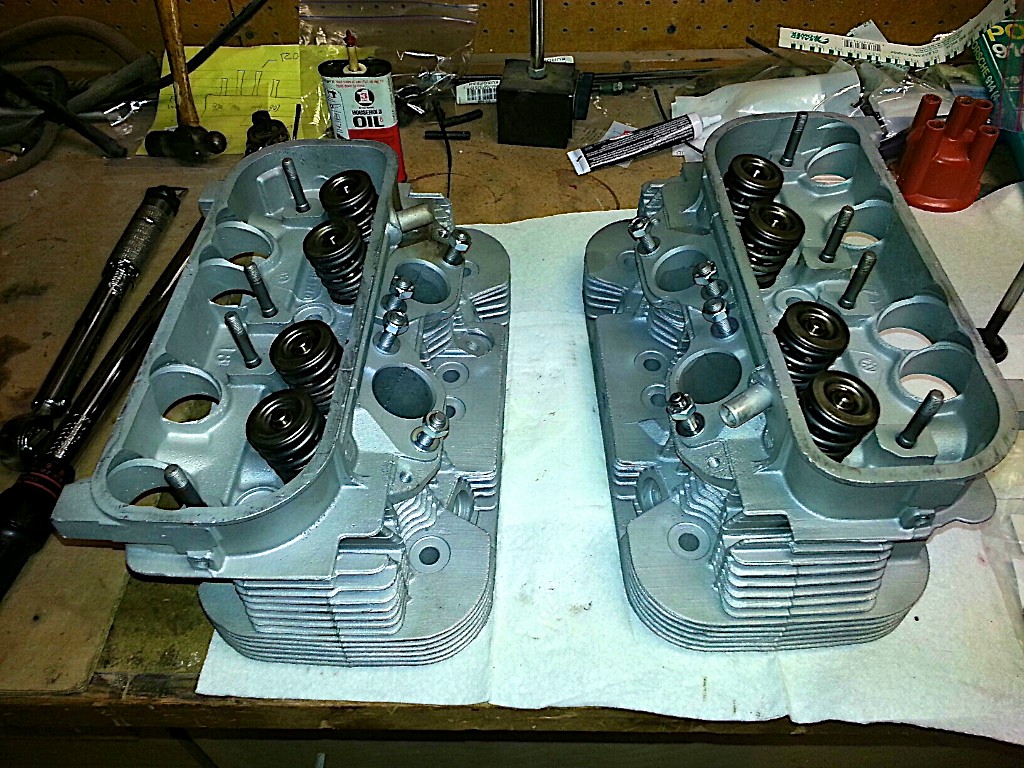
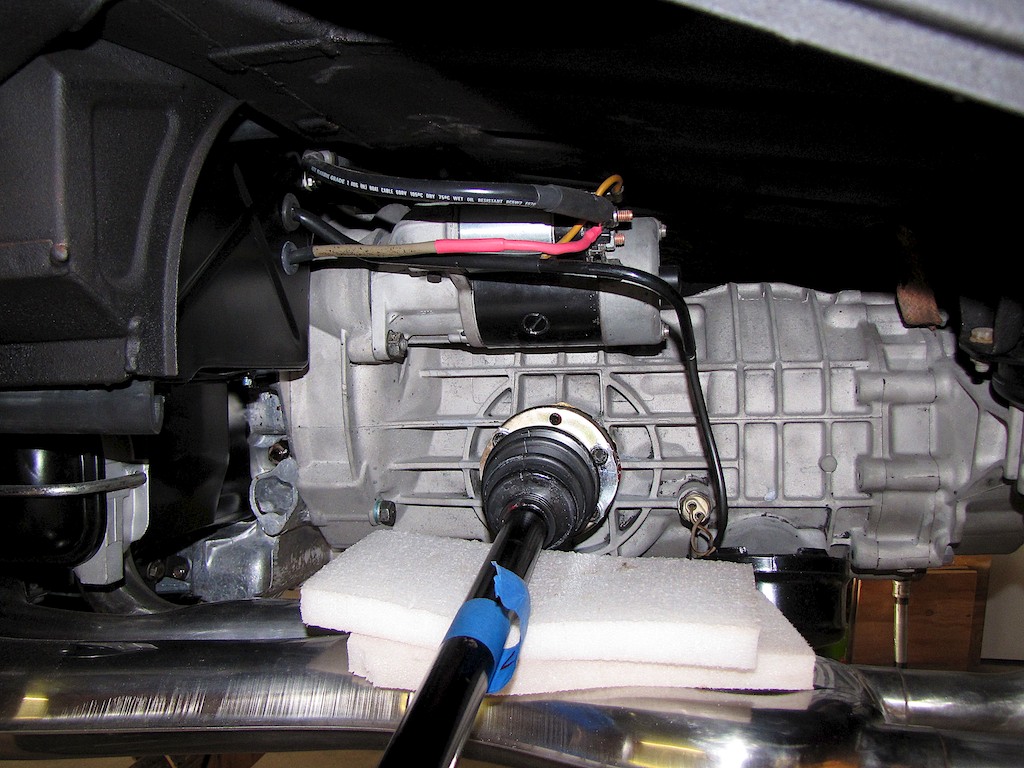
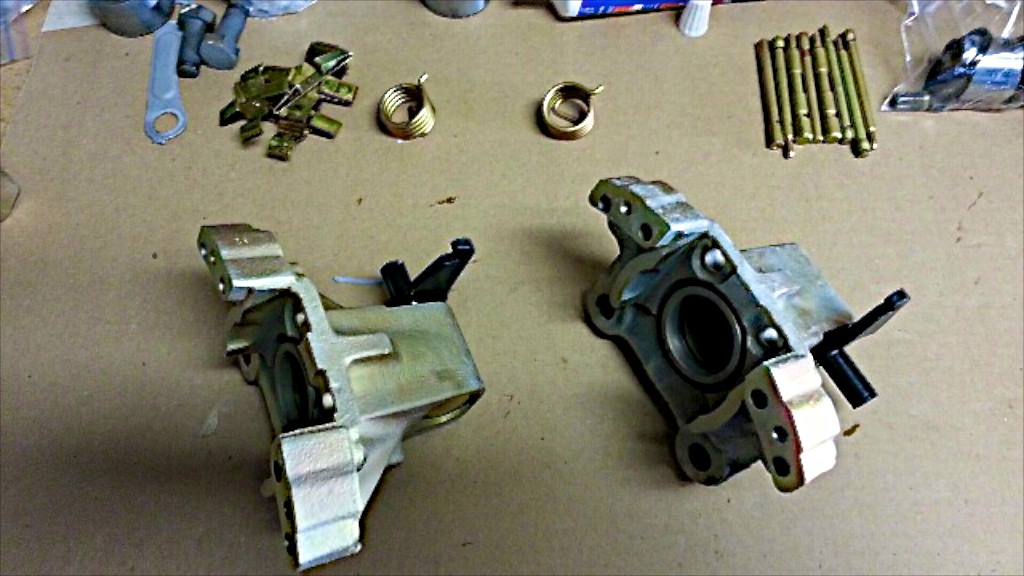
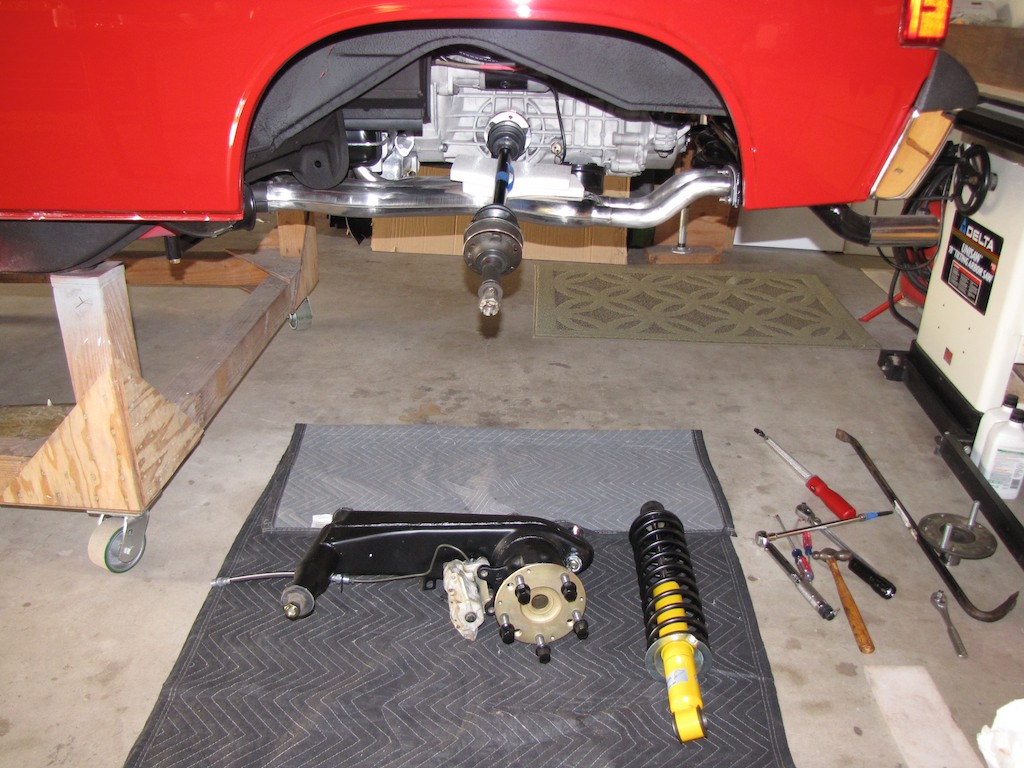
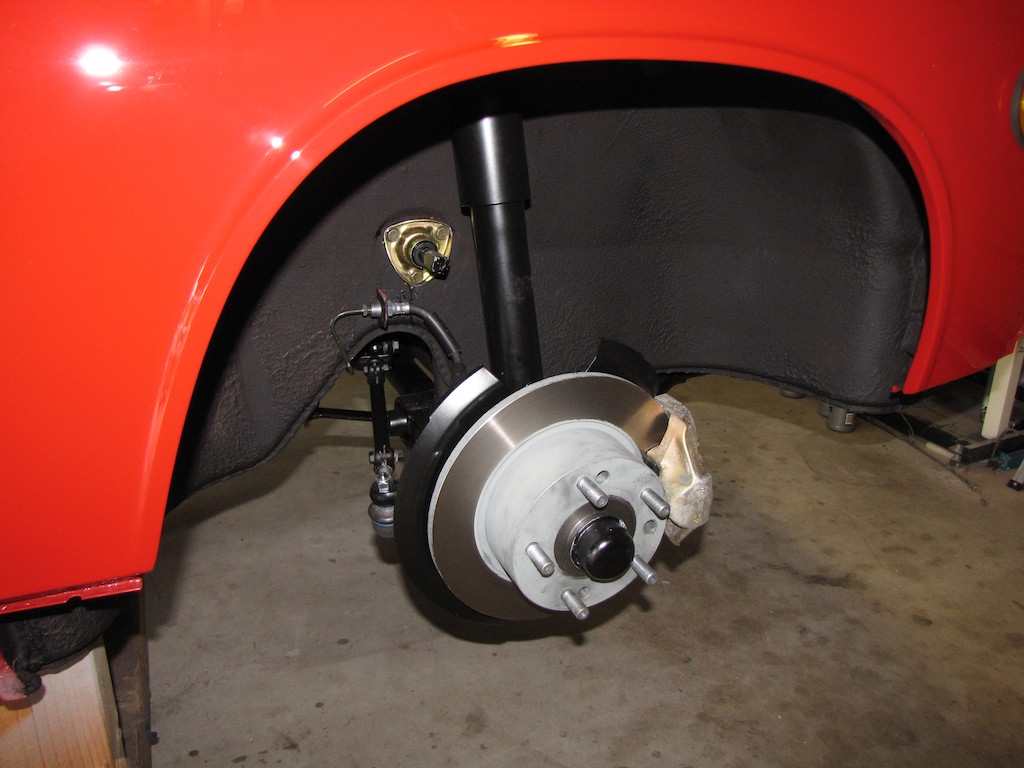
So, here's an update. Since my last post i've finished the engine rebuild, sand blasted the suspension parts and had them powder coated, rebuilt the brake calipers and installed the suspension. I found that most of the cost in powder coating is in sand blasting the parts. Since I did the sand blasting myself I was able to get the entire suspension power coated for $350.00.
Attached image(s)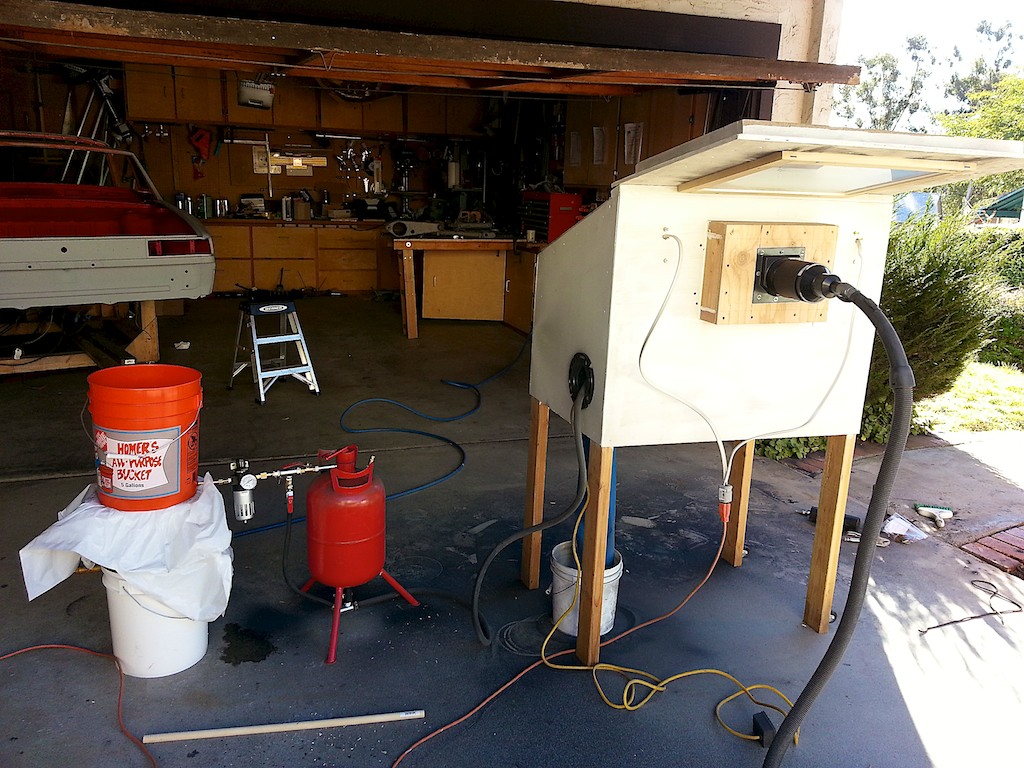


Posted by: ndfrigi Mar 4 2014, 12:19 AM
Wow beautiful! Thanks for sharing the update!
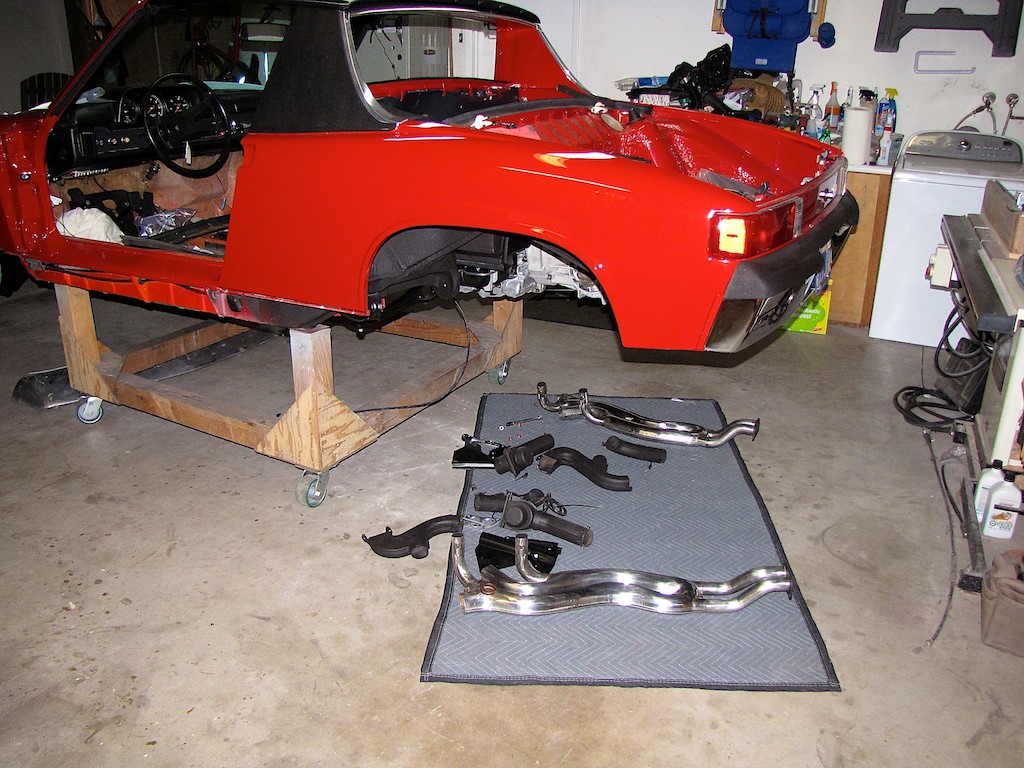
Posted by: Steve_R Mar 4 2014, 08:13 AM
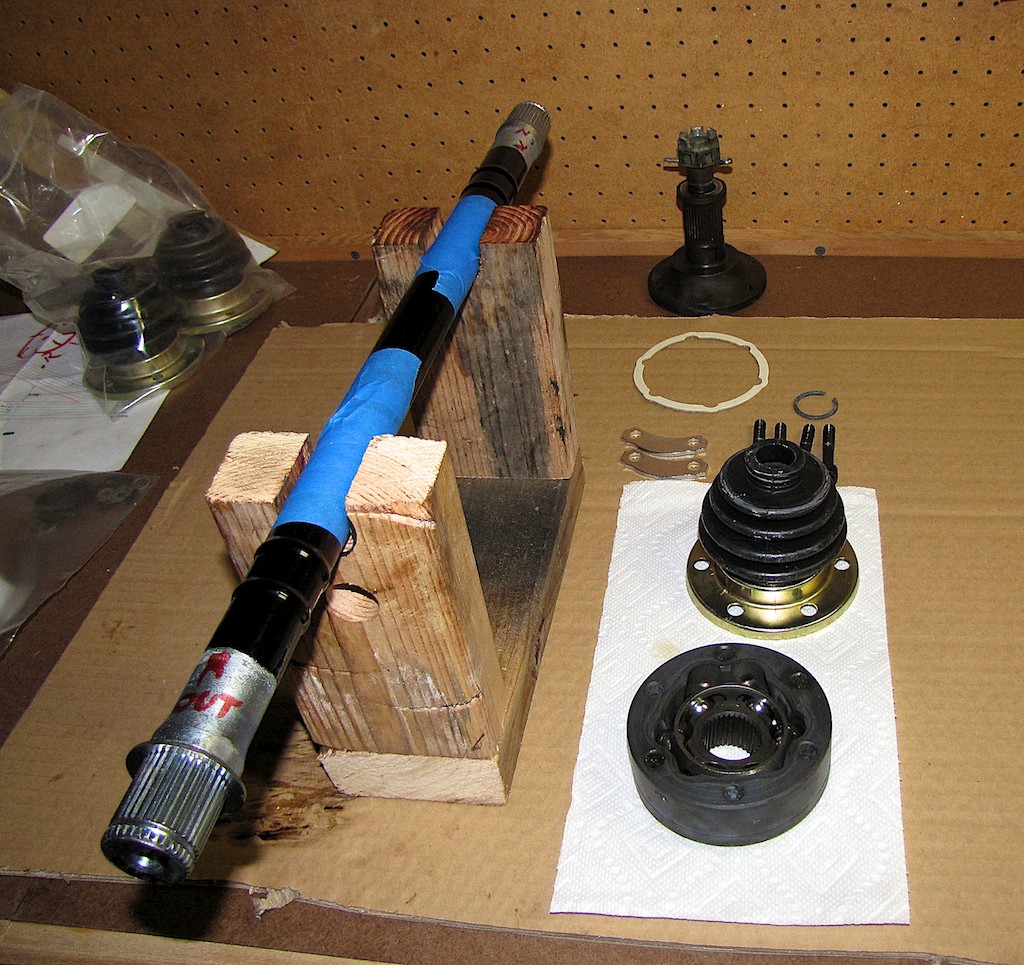
More pics
Attached image(s)
Posted by: ThePaintedMan Mar 4 2014, 08:29 AM
WOW. Really impressive work Steve. Nice to see someone spending time and energy renewing even a lowly 1.7. You'll enjoy the heck out of it when it's done.
Posted by: Steve_R Mar 4 2014, 08:17 PM
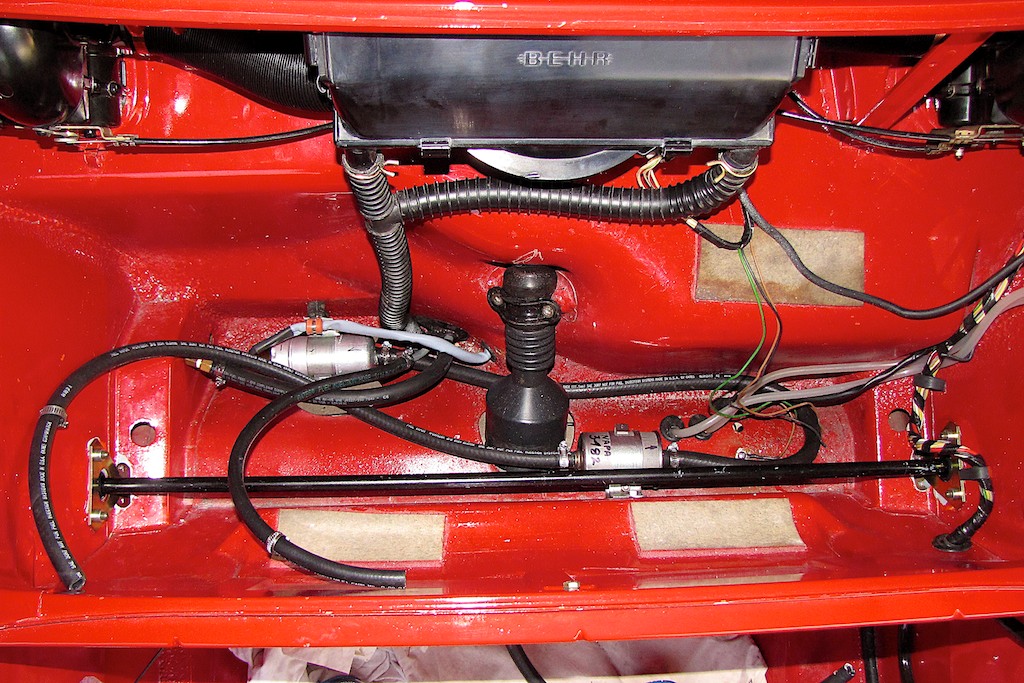
Applied undercoating and relocated the fuel pump and filter to under the gas tank.
The pump I used is a NAPA Bosch N69133 and the filter is a NAPA 3482. For the fuel lines I used 3/8 & 5/16 steel lines from NAPA. I cut them to length and flared the ends for the fittings. I did buy stainless lines to connect to the engine.
Attached image(s)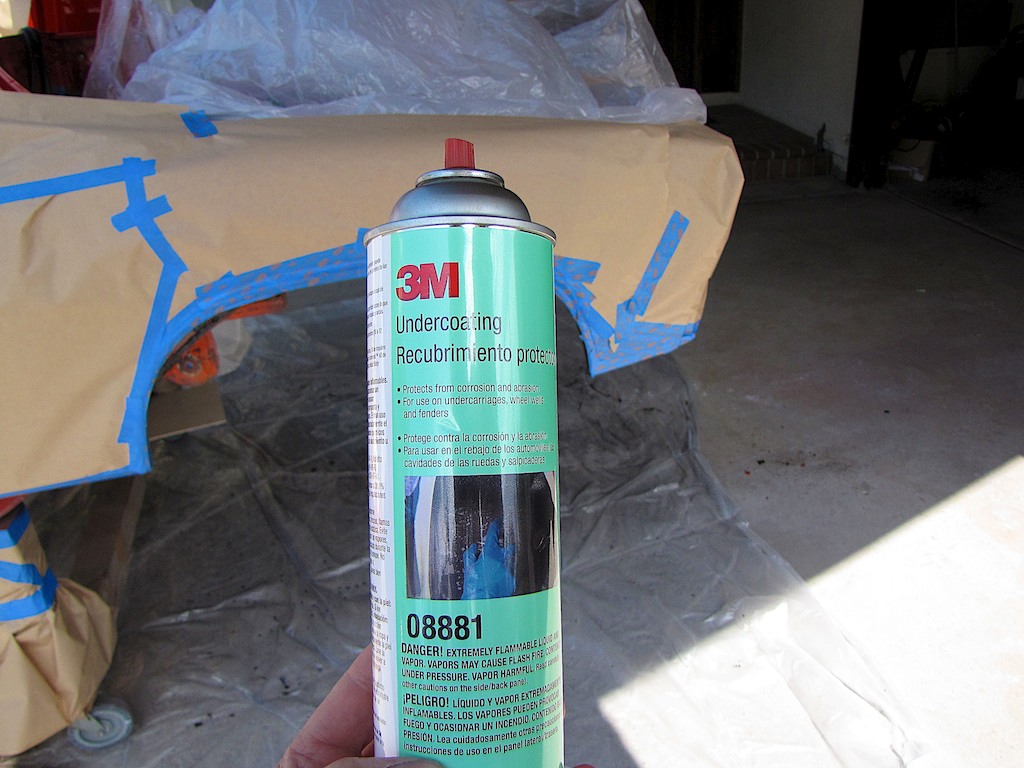
Posted by: wndsnd Mar 4 2014, 08:41 PM

WOW. Really impressive work Steve. Nice to see someone spending time and energy renewing even a lowly 1.7. You'll enjoy the heck out of it when it's done.
Lowly 1.7?


And I thought I liked you George.


Posted by: r3dplanet Mar 4 2014, 09:36 PM
The hell you say! The 1.7 should never be considered lowly. My '73 1.7 liter engine runs better than any other -4 except for the '73 2.0, and mine is ultimately destined to be a 1911.
Stop a moment, collect your thoughts, and look deep within your consciousness. Stay there a moment and allow the goodness of the 1.7 to soak through your bones. As though you're playing frisbee with on the beach with Tracy Reed. Like that one time you made it with your college intern student teacher in high school after displaying your Hamlet-reading prowess. Like hearing that glorious 1.7 roar behind the firewall as you take your 914 out for a warm summer's night drive with the top down. Reflect on this, and allow the perspective to change you.
Steve has already done this. His brainspace is right where it needs to be, clear and strong. Steve has taken the right steps. Steve knows his shit. So learn from Steve and love the 1.7 liter.
-m.
WOW. Really impressive work Steve. Nice to see someone spending time and energy renewing even a lowly 1.7. You'll enjoy the heck out of it when it's done.
Posted by: ben*james Mar 4 2014, 09:40 PM
Cracking me up! 
1.7 is worthy 
The hell you say! The 1.7 should never be considered lowly. My '73 1.7 liter engine runs better than any other -4 except for the '73 2.0, and mine is ultimately destined to be a 1911.
Stop a moment, collect your thoughts, and look deep within your consciousness. Stay there a moment and allow the goodness of the 1.7 to soak through your bones. As though you're playing frisbee with on the beach with Tracy Reed. Like that one time you made it with your college intern student teacher in high school after displaying your Hamlet-reading prowess. Like hearing that glorious 1.7 roar behind the firewall as you take your 914 out for a warm summer's night drive with the top down. Reflect on this, and allow the perspective to change you.
Steve has already done this. His brainspace is right where it needs to be, clear and strong. Steve has taken the right steps. Steve knows his shit. So learn from Steve and love the 1.7 liter.
-m.
WOW. Really impressive work Steve. Nice to see someone spending time and energy renewing even a lowly 1.7. You'll enjoy the heck out of it when it's done.
Posted by: type47 Mar 5 2014, 06:18 AM
... and relocated the fuel pump and filter to under the gas tank.
totally awesome work! Won't the filter location make it really hard to change?
Posted by: Steve_R Mar 5 2014, 08:07 AM
... and relocated the fuel pump and filter to under the gas tank.
totally awesome work! Won't the filter location make it really hard to change?
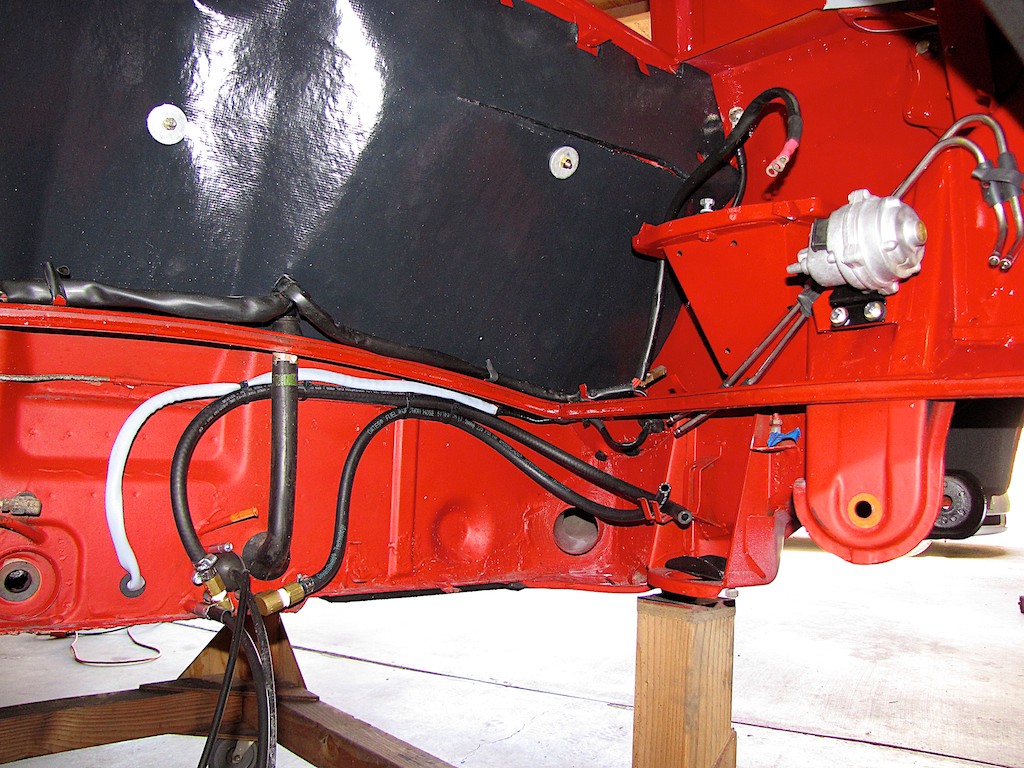
Thanks and good point. I think I'll re-relocate it back to it's original location and maybe add some insulation to help with vapor lock.
Posted by: Steve_R Mar 5 2014, 08:18 AM
... and relocated the fuel pump and filter to under the gas tank.
totally awesome work! Won't the filter location make it really hard to change?
Thanks and good point. I think I'll re-relocate it back to it's original location and maybe add some insulation to help with vapor lock.
Actually, now that I think about it, it should be between the tank and the pump.
So, I think I'll just leave it there. I want it to look stock as much as possible so I don't want to put it in the front trunk.
Posted by: saigon71 Mar 5 2014, 08:36 AM
Impressive work...very clean and meticulous!
Posted by: Steve_R Mar 5 2014, 10:14 PM
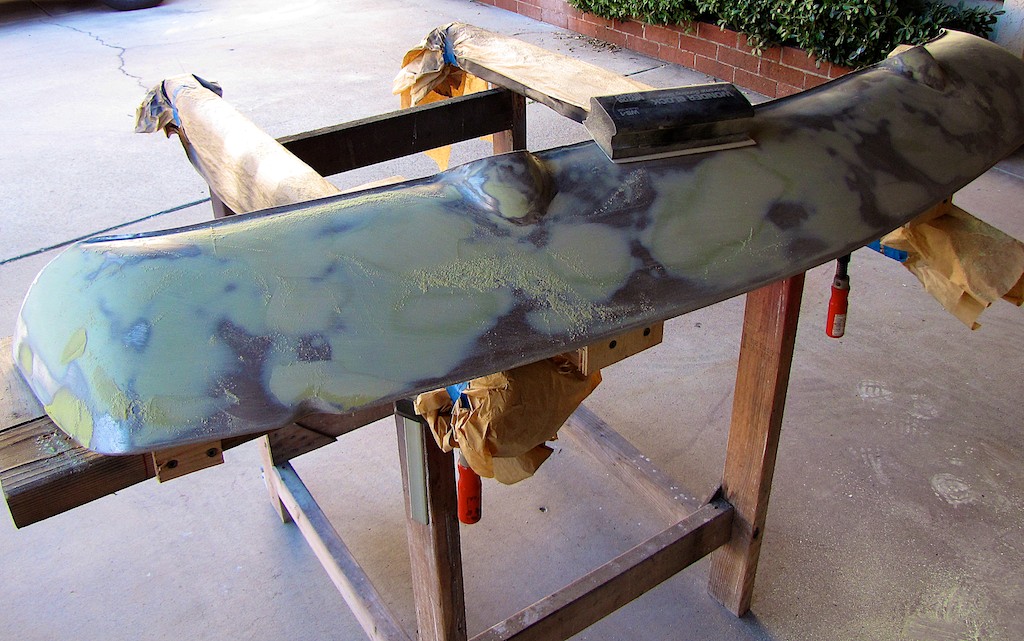
The front bumper had a rust hole that needed some patching. I cut out the section and welded in a piece. I made a crude form out of wood to form a slight curve in the piece before I welded it in place. I also welded up the bumper guard holes. After a lot of grinding and filing it turned out really good.
Also, the front valance needed a lot of work. I built a frame out of 2x4s to support it while i did the body work. I used wood screws to hold it to the support.
After a long search, I found the perfect semi gloss paint. It's called 2K urethane underhood black from Eastwood. I think it matches the original semi gloss black perfectly.
Attached image(s)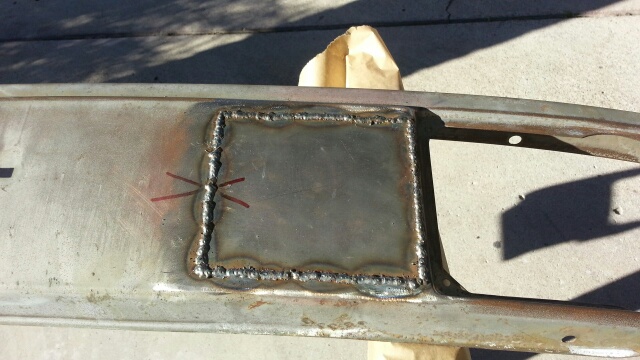

Posted by: mepstein Mar 5 2014, 10:27 PM
Just WOW!
Posted by: ndfrigi Mar 5 2014, 10:35 PM
The front bumper had a rust hole that needed some patching. I cut out the section and welded in a piece. I made a crude form out of wood to form a slight curve in the piece before I welded it in place. I also welded up the bumper guard holes. After a lot of grinding and filing it turned out really good.
Also, the front valance needed a lot of work. I built a frame out of 2x4s to support it while i did the body work. I used wood screws to hold it to the support.
After a long search, I found the perfect semi gloss paint. It's called 2K urethane underhood black from Eastwood. I think it matches the original semi gloss black perfectly.
wait!!!! Is that front bumper that was repaired is the same bumper that was installed in the car? Metal bumper to chrome bumper?
Posted by: Steve_R Mar 5 2014, 10:53 PM
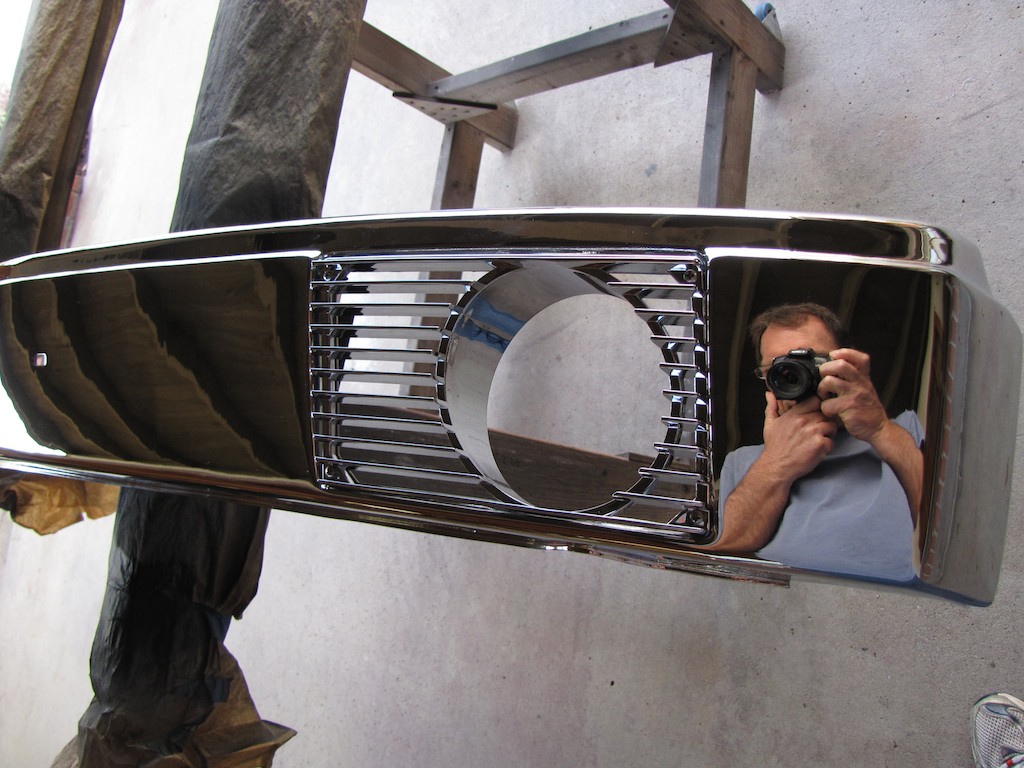
Yes, it is the same bumper. I forgot to mention that I took it to the chrome plater and had him strip off the chrome so I could weld on it.
Posted by: ndfrigi Mar 5 2014, 11:48 PM
Yes, it is the same bumper. I forgot to mention that I took it to the chrome plater and had him strip off the chrome so I could weld on it.
Sir Steve, that is an amazing job! It seems you prepare to do that than buying a clean chromed bumper. Is it cheaper that way sir? Can you share how much for the chrome plating and what shop in San Diego?
Thanks in advance and God bless!
Noel
Posted by: Shindog1961 Mar 6 2014, 12:03 AM
Nice! Really like the dolly, how did you get the body on to the dolly? Did you hoist it or jack it?
Posted by: Steve_R Mar 6 2014, 12:15 AM
Yes, it is the same bumper. I forgot to mention that I took it to the chrome plater and had him strip off the chrome so I could weld on it.
Sir Steve, that is an amazing job! It seems you prepare to do that than buying a clean chromed bumper. Is it cheaper that way sir? Can you share how much for the chrome plating and what shop in San Diego?
Thanks in advance and God bless!
Noel
Noel, I think it was a lot cheaper. It was a lot of work on my part but, I really enjoy the process.
Since I already had the bumper the only cost was chroming it and the $20 I paid the muffler shop to weld it. Don at Escondido Plating did the chrome and he charged me $400 for the front bumper He also plated both bumpers, shifter, inside and outside door handles and the seat belt loops.
In the end I think it was cheeper than buying another one and having it rechromed.
Posted by: mepstein Mar 6 2014, 07:17 AM
Yes, it is the same bumper. I forgot to mention that I took it to the chrome plater and had him strip off the chrome so I could weld on it.
Sir Steve, that is an amazing job! It seems you prepare to do that than buying a clean chromed bumper. Is it cheaper that way sir? Can you share how much for the chrome plating and what shop in San Diego?
Thanks in advance and God bless!
Noel
Noel, I think it was a lot cheaper. It was a lot of work on my part but, I really enjoy the process.
Since I already had the bumper the only cost was chroming it and the $20 I paid the muffler shop to weld it. Don at Escondido Plating did the chrome and he charged me $400 for the front bumper He also plated both bumpers, shifter, inside and outside door handles and the seat belt loops.
In the end I think it was cheeper than buying another one and having it rechromed.
Thanks for that info. Looks like you found a great vendor for chrome.
Posted by: ndfrigi Mar 6 2014, 11:40 AM
Yes, it is the same bumper. I forgot to mention that I took it to the chrome plater and had him strip off the chrome so I could weld on it.
Sir Steve, that is an amazing job! It seems you prepare to do that than buying a clean chromed bumper. Is it cheaper that way sir? Can you share how much for the chrome plating and what shop in San Diego?
Thanks in advance and God bless!
Noel
Noel, I think it was a lot cheaper. It was a lot of work on my part but, I really enjoy the process.
Since I already had the bumper the only cost was chroming it and the $20 I paid the muffler shop to weld it. Don at Escondido Plating did the chrome and he charged me $400 for the front bumper He also plated both bumpers, shifter, inside and outside door handles and the seat belt loops.
In the end I think it was cheeper than buying another one and having it rechromed.
Meaning Sir Steve, $400 for all those? (2 bumpers, shifter, handles and belt loops). Can I chrome plate a bumper which is originally a painted bumper? Thus it has same metal thickness for those original chromed bumper and painted bumper?
Any plans of doing a 914 guys BBQ fellowship at your place soon?
Posted by: Steve_R Mar 6 2014, 11:43 PM
Yes, it is the same bumper. I forgot to mention that I took it to the chrome plater and had him strip off the chrome so I could weld on it.
Sir Steve, that is an amazing job! It seems you prepare to do that than buying a clean chromed bumper. Is it cheaper that way sir? Can you share how much for the chrome plating and what shop in San Diego?
Thanks in advance and God bless!
Noel
Noel, I think it was a lot cheaper. It was a lot of work on my part but, I really enjoy the process.
Since I already had the bumper the only cost was chroming it and the $20 I paid the muffler shop to weld it. Don at Escondido Plating did the chrome and he charged me $400 for the front bumper He also plated both bumpers, shifter, inside and outside door handles and the seat belt loops.
In the end I think it was cheeper than buying another one and having it rechromed.
Meaning Sir Steve, $400 for all those? (2 bumpers, shifter, handles and belt loops). Can I chrome plate a bumper which is originally a painted bumper? Thus it has same metal thickness for those original chromed bumper and painted bumper?
Any plans of doing a 914 guys BBQ fellowship at your place soon?
Noel, It was $400 for just the front bumper. I can't remember how much the other parts were but the rear bumper was around $350. He charged me a little more for the front because he needed to add a little more copper to fill in some of the small pits from welding.
Posted by: Steve_R Mar 7 2014, 12:04 AM
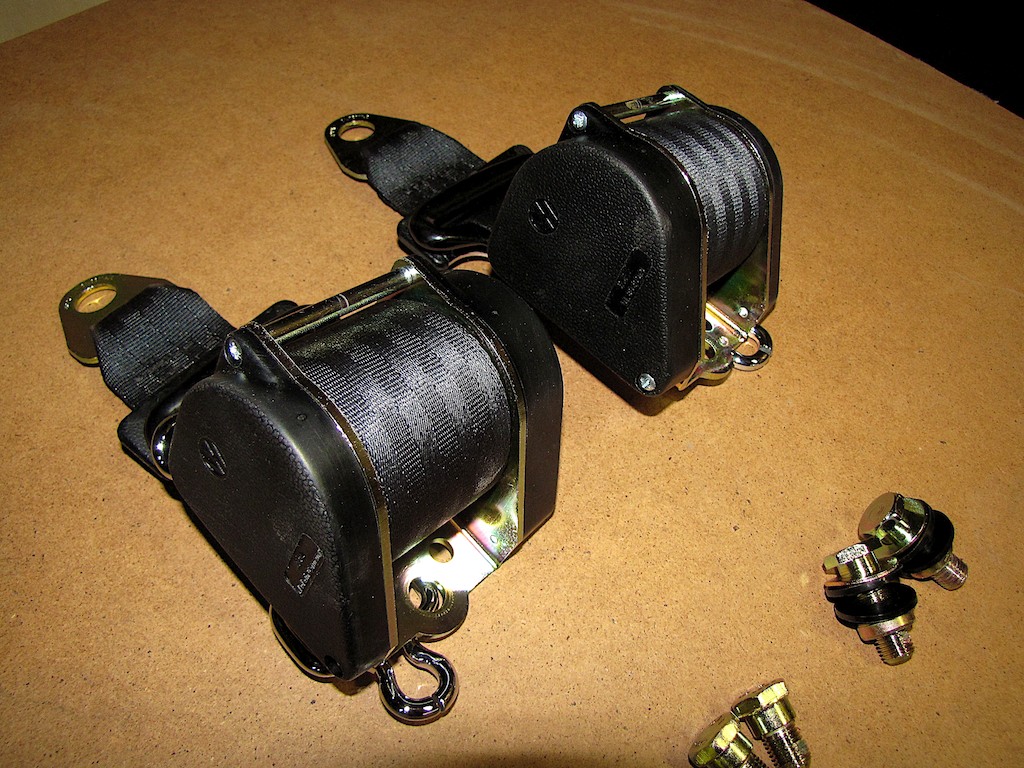
One of the more challenging projects was to rebuild the seat belts. I had all of the hardware zinc plated and I bought some 2" webbing on ebay for $15.00. I took the webbing to a upholstery shop and they sewed on the end pieces and charged me $10.00
The hardest part was getting the springs back in place. For the plastic covers I used some Meguiar's Professional Vinyl & Rubber Cleaner/Conditioner. This stuff is amazing. It makes plastic look new. I'm not sure how long it will last but, I've applied it to some other plastic parts over two months ago and they still look new.
Attached image(s)
Posted by: Cairo94507 Mar 7 2014, 07:22 AM
Steve that is some outstanding work. Bumper looks brand new- better than brand new actually.
Posted by: Philip W. Mar 7 2014, 07:53 AM
Very nice!, enjoyed seeing it all come together! How close are you to having it on wheels?
- also, when you did the front suspension parts(i am doing this now) looks like you put 5 -lug on, re-drilled rotors-
*what wheels are you going with?
* also did you pull just clean and powder coat your original stuff, or did you source new, like the a-arms, dust shields etc?
Looks like you have left no stone unturned!! great job-
Posted by: KELTY360 Mar 7 2014, 08:06 AM
... and relocated the fuel pump and filter to under the gas tank.
totally awesome work! Won't the filter location make it really hard to change?
Thanks and good point. I think I'll re-relocate it back to it's original location and maybe add some insulation to help with vapor lock.
Actually, now that I think about it, it should be between the tank and the pump.
So, I think I'll just leave it there. I want it to look stock as much as possible so I don't want to put it in the front trunk.
Spectacular work! Your attention to detail will pay off many times over.
You can make a more convenient location for the pump and filter by mounting in the cavity that holds the steering rack and master cylinder. It's protected from road debris by the panel yet easily accessed for service.
What are your plans for wheels?
Posted by: Steve_R Mar 9 2014, 11:18 AM
... and relocated the fuel pump and filter to under the gas tank.
totally awesome work! Won't the filter location make it really hard to change?
Thanks and good point. I think I'll re-relocate it back to it's original location and maybe add some insulation to help with vapor lock.
Actually, now that I think about it, it should be between the tank and the pump.
So, I think I'll just leave it there. I want it to look stock as much as possible so I don't want to put it in the front trunk.
Spectacular work! Your attention to detail will pay off many times over.
You can make a more convenient location for the pump and filter by mounting in the cavity that holds the steering rack and master cylinder. It's protected from road debris by the panel yet easily accessed for service.
What are your plans for wheels?
Marc,
That's a great idea. My car didn't have a debris shield so I didn't think of putting it there. Does anyone have any pictures of this?
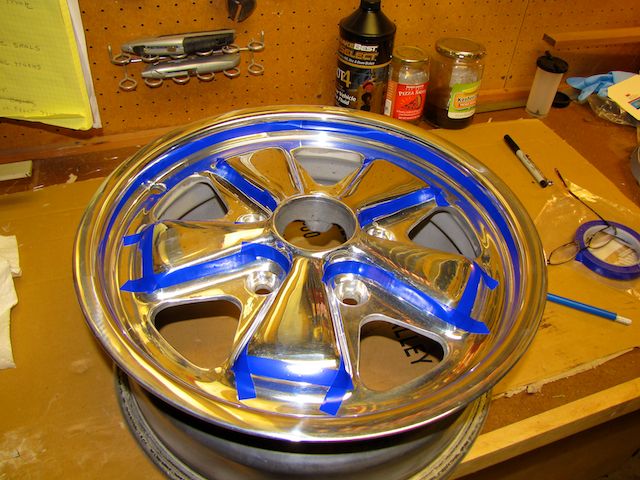
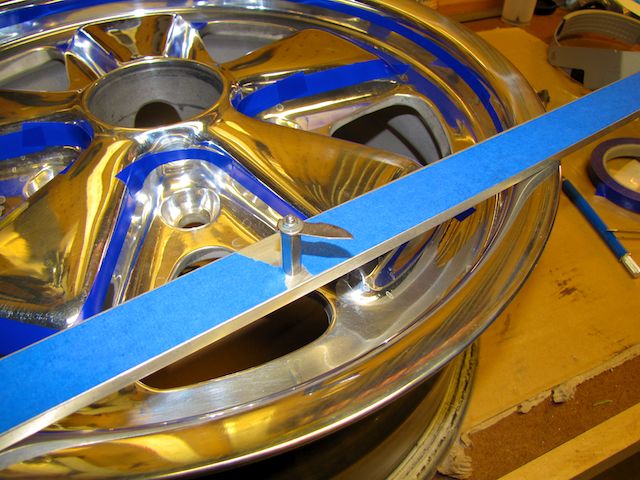
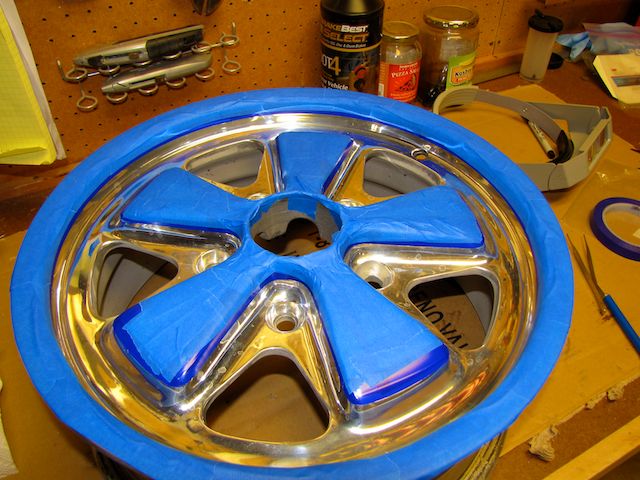
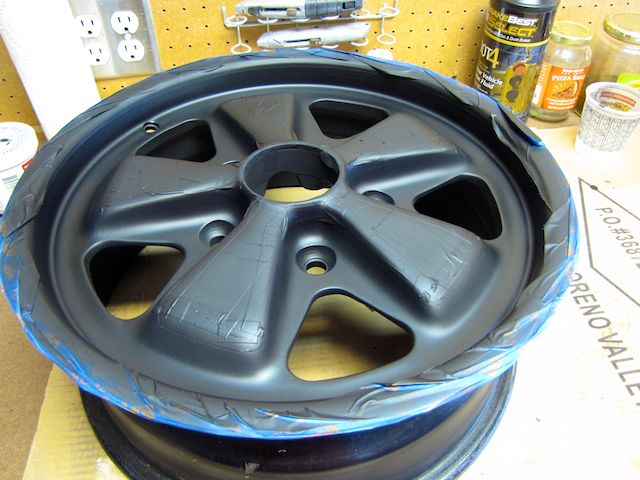
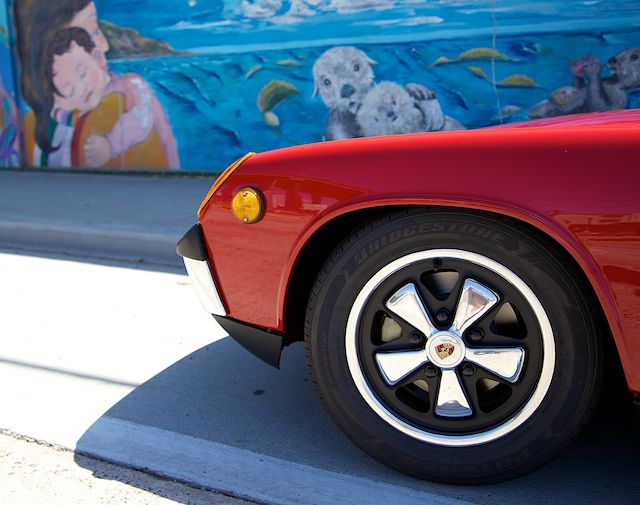
I just picked up some Fuchs wheels that I'll be using with some Bridgestone Potenza 195/60R15 tires. I'll be painting the centers black.
To paint the centers black I built a tool to cut the tape at a constant distance from the rim outer surface. It's basically a flat piece of aluminum with a standoff and a razor blade attached to the end. After taping up the wheel I just sliced thru the tape with the razor blade tool and had a perfect tape line. I'll add some pictures of the finished wheel next.
Attached image(s)
Posted by: Steve_R Mar 27 2014, 11:31 PM
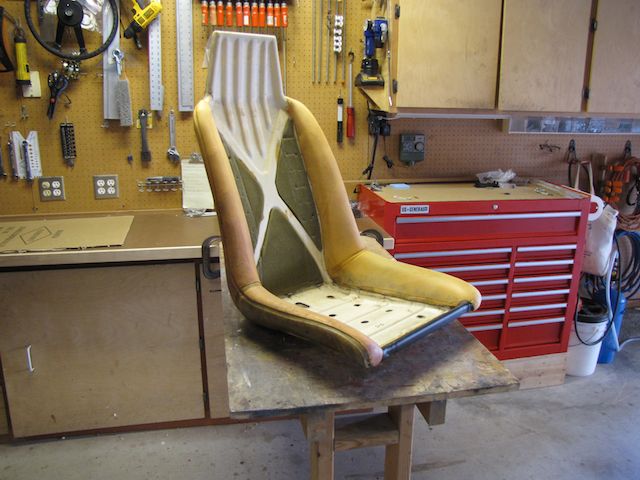
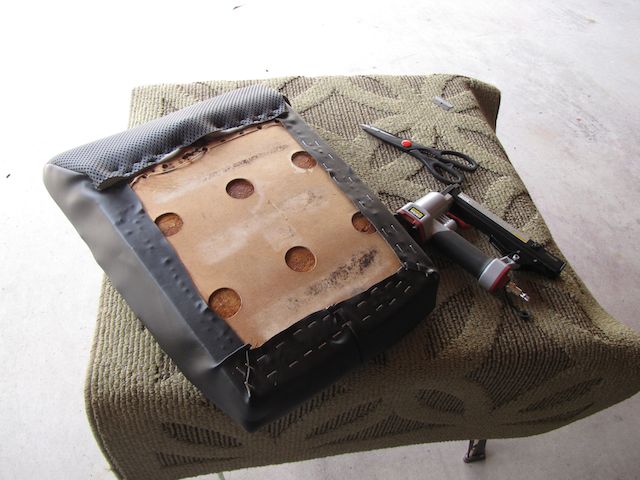
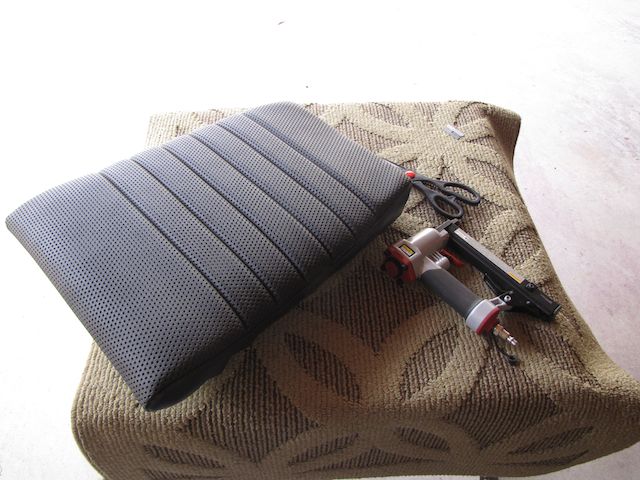
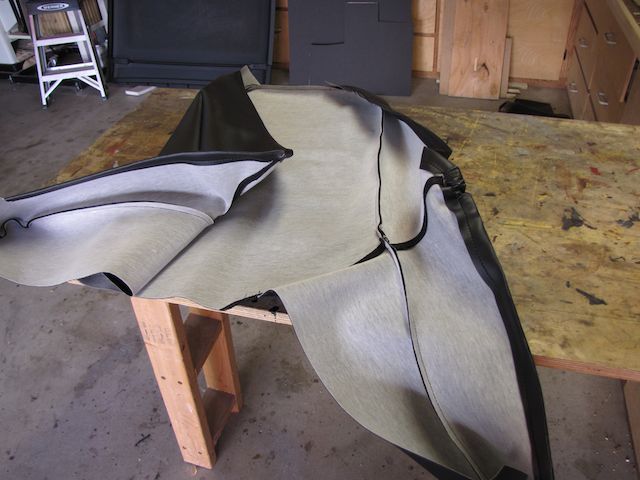
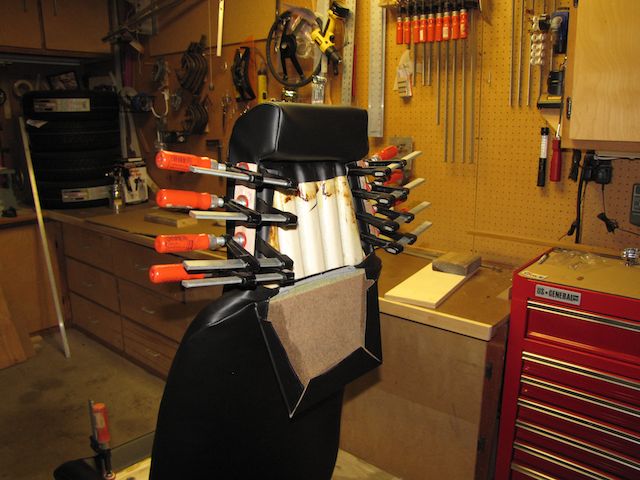
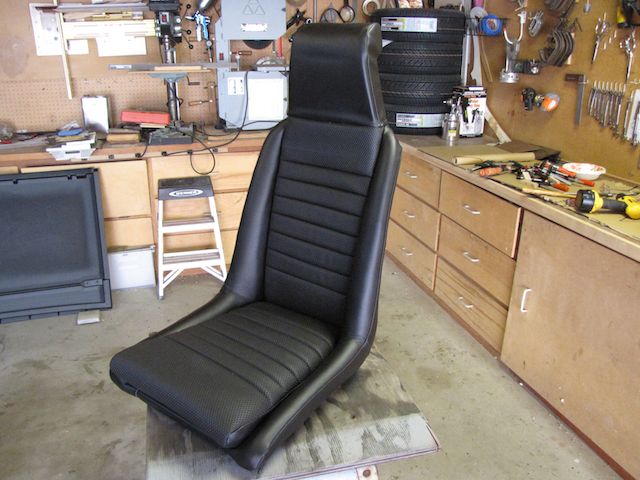
Started working on the interior this week. I bought a complete interior kit from Autos International and the quality is really nice. The kit was $1400. which included the seats, door panels, back pad, carpet and headliner.
Attached image(s)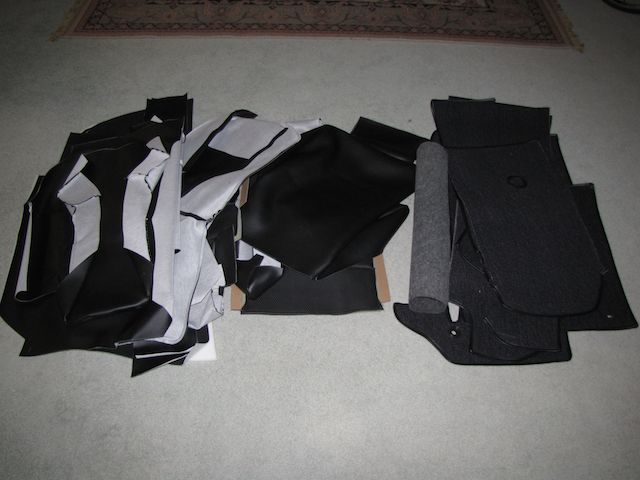
Posted by: Steve_R Jun 3 2014, 10:09 PM
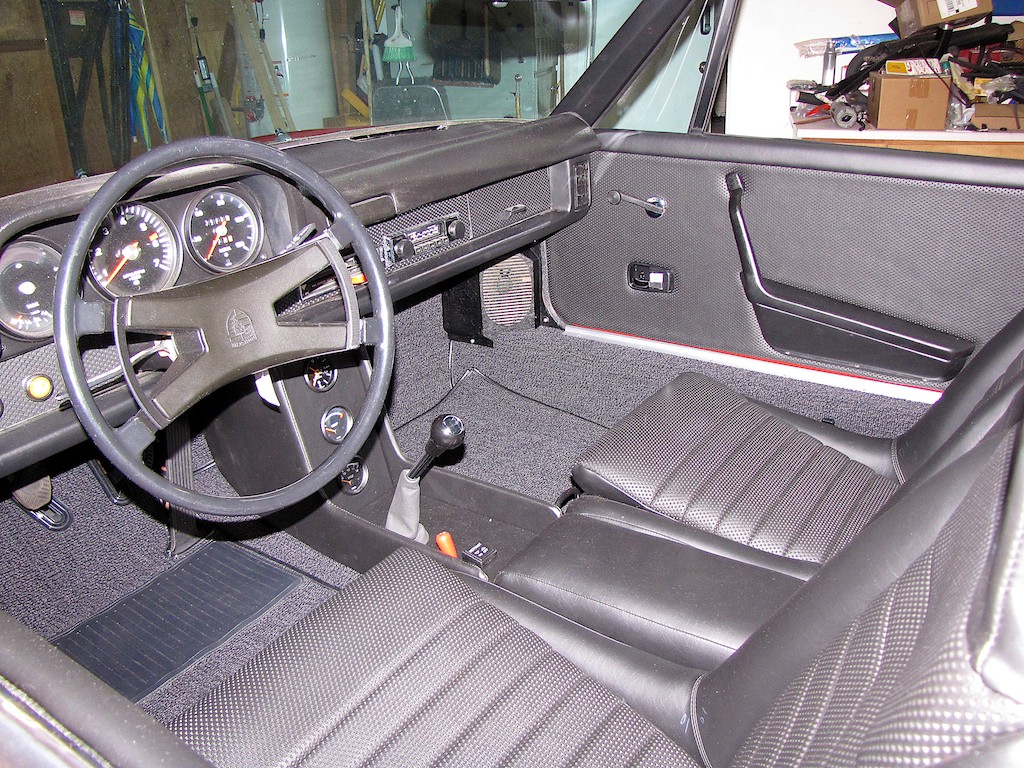
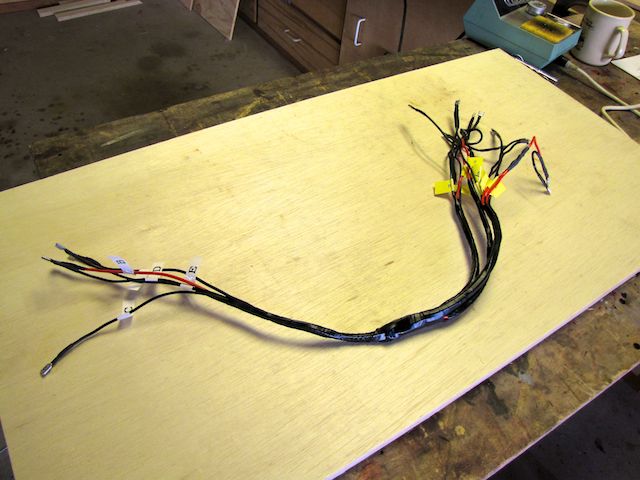
The next project was to make a wire harness for the gauges in the center console.
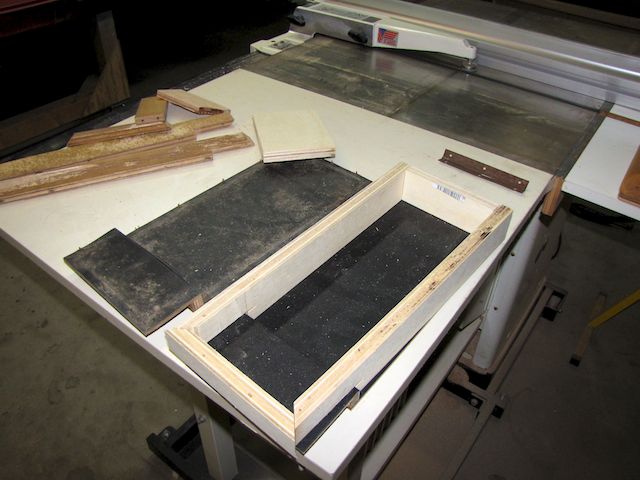
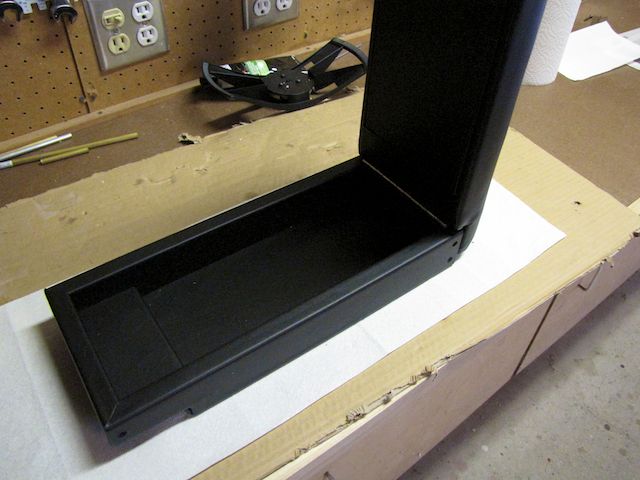
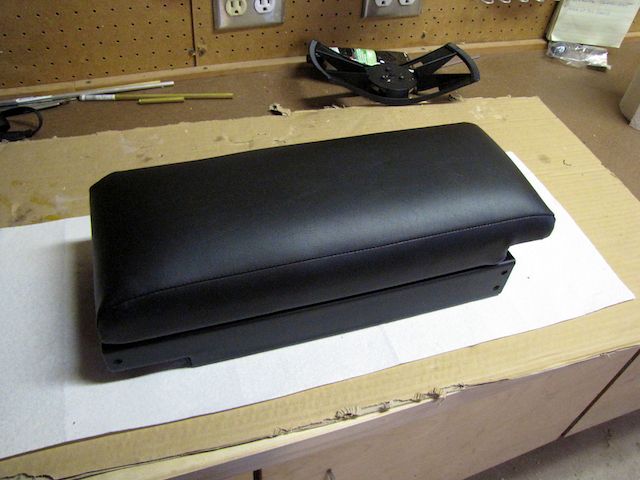
My other hobby is woodworking so I couldn't resist making a new center arm rest box.
The car didn't originally have one so i got one on ebay to use as a template.
Attached image(s)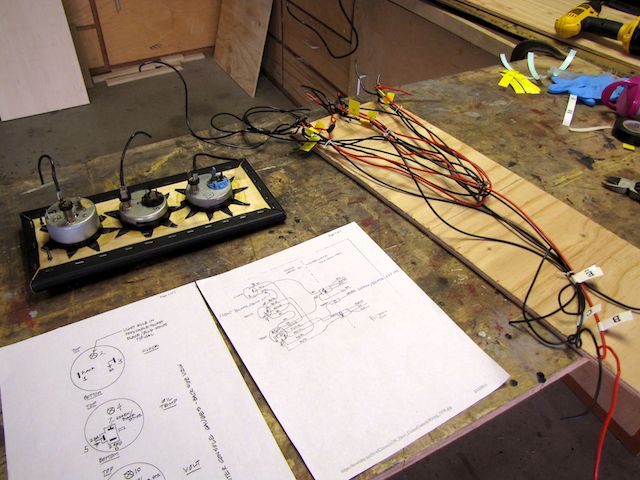
Posted by: Steve_R Jun 3 2014, 10:15 PM
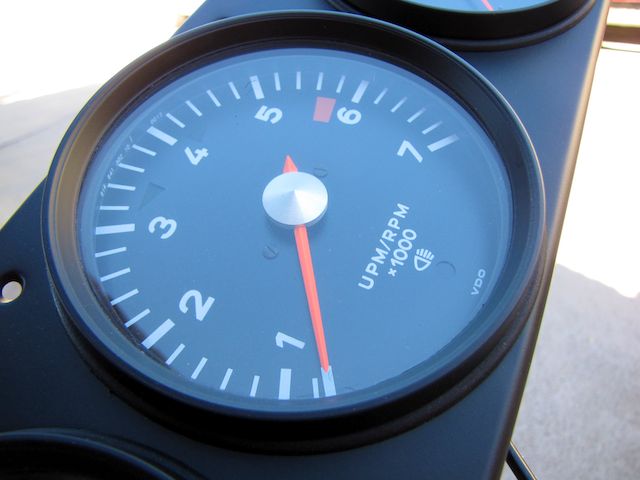
The gauges were in bad shape so I sanded them down and painted them with the same semi gloss paint I used for the valances.
Attached image(s)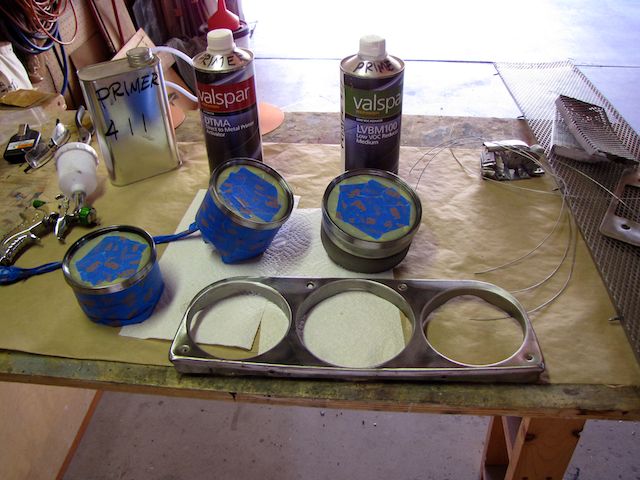
Posted by: ndfrigi Jun 4 2014, 01:43 AM
Hi Again Steve,
A real amazing job and beautiful teen that is running in the road soon!!!!
God Bless!
Noel
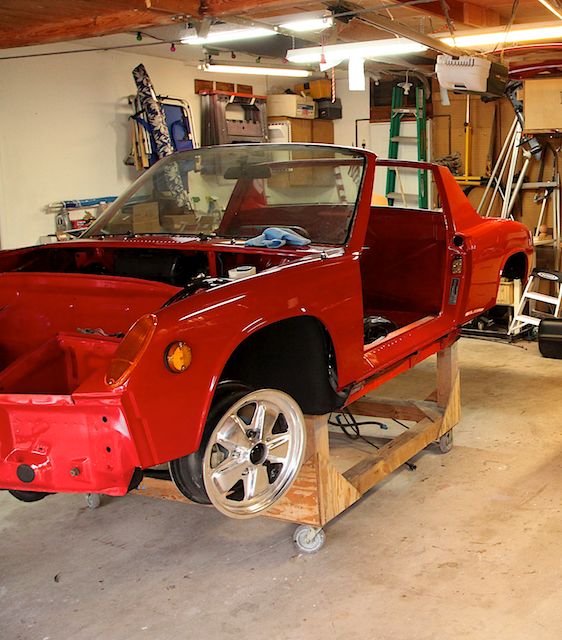
Posted by: Steve_R Oct 14 2014, 08:51 PM
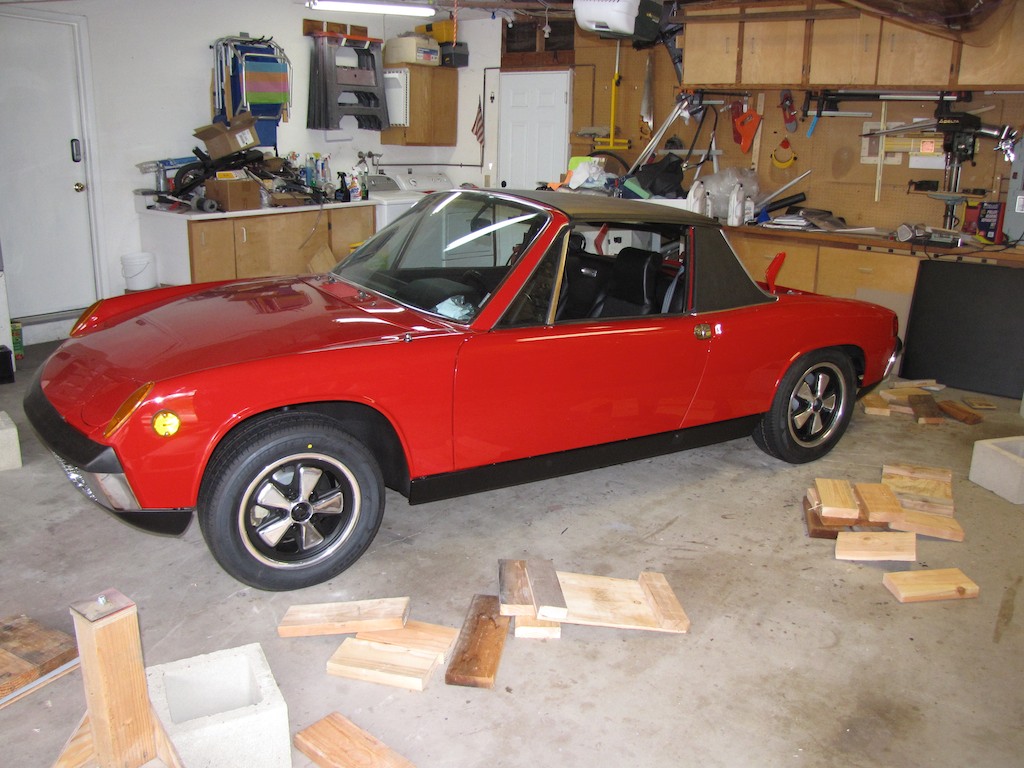
It's been a while since I've posted any pictures. So, here are some removing the dolly.
Attached image(s)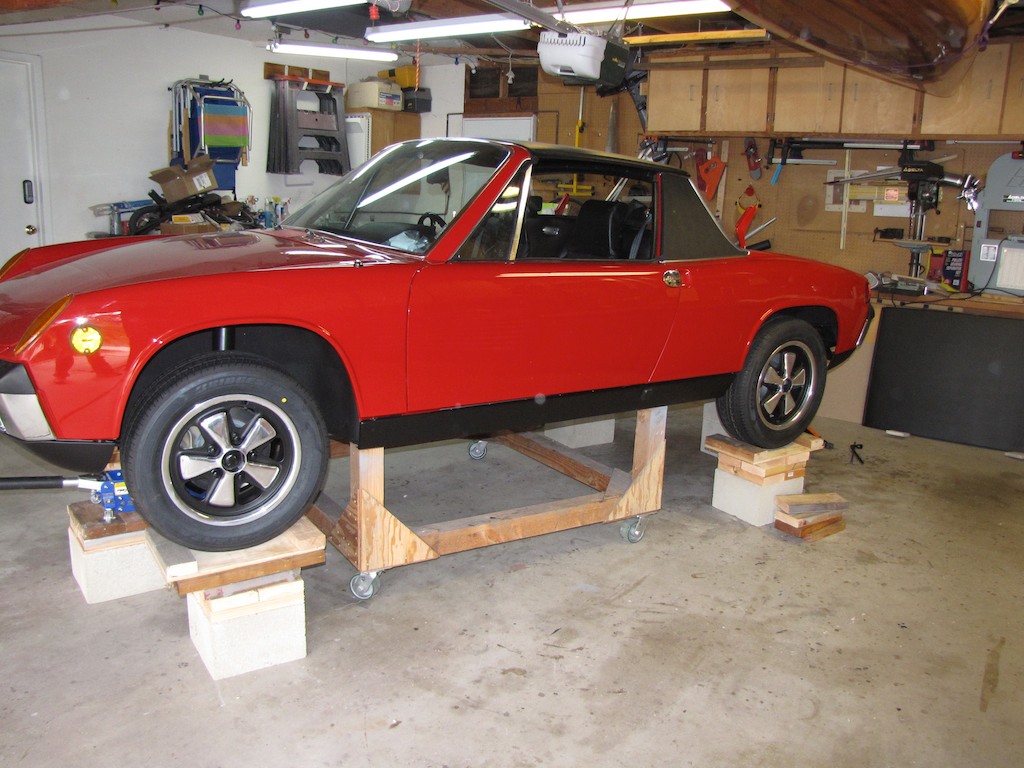
Posted by: mepstein Oct 14 2014, 09:00 PM
WOW!
Posted by: altitude411 Oct 14 2014, 09:09 PM
Sa-Weet! Really nice work. Congrads on being back on the earth.
Posted by: stevegm Oct 14 2014, 09:25 PM
Wasn't there a picture on 914world of this car (or maybe another car) being rolled onto a car trailer on a wood dolly like Steve used in this thread? I am just wondering if the wood dolly here:
http://www.914world.com/bbs2/index.php?act=Attach&type=post&id=394445
would be strong enough to haul the car, on a car trailer, to the paint shop. What do you think?
Posted by: Steve_R Oct 14 2014, 10:02 PM
Wasn't there a picture on 914world of this car (or maybe another car) being rolled onto a car trailer on a wood dolly like Steve used in this thread? I am just wondering if the wood dolly here:
http://www.914world.com/bbs2/index.php?act=Attach&type=post&id=394445
would be strong enough to haul the car, on a car trailer, to the paint shop. What do you think?
Steve,
It wasn't this car. I have not put it on a trailer.
I think it would work if the engine was out of the car.
You could also beef it up a little from these plans.
Maybe use 3/4" plywood with 2" deck screws for the gussets.
Posted by: stevegm Oct 14 2014, 10:11 PM
Wasn't there a picture on 914world of this car (or maybe another car) being rolled onto a car trailer on a wood dolly like Steve used in this thread? I am just wondering if the wood dolly here:
http://www.914world.com/bbs2/index.php?act=Attach&type=post&id=394445
would be strong enough to haul the car, on a car trailer, to the paint shop. What do you think?
Steve,
It wasn't this car. I have not put it on a trailer.
I think it would work if the engine was out of the car.
You could also beef it up a little from these plans.
Maybe use 3/4" plywood with 2" deck screws for the gussets.
Thanks. I can also beef it up with a metal strap all the way around. Just curious on your thoughts, since you used the dolly so much.
Posted by: trojanhorsepower Oct 14 2014, 10:15 PM
Wow!
Posted by: Cairo94507 Oct 15 2014, 07:29 AM
Car looks beautiful! 
Posted by: CptTripps Oct 15 2014, 11:04 AM
Great job on that interior. Very well done.
Posted by: Steve_R Oct 22 2014, 08:08 PM
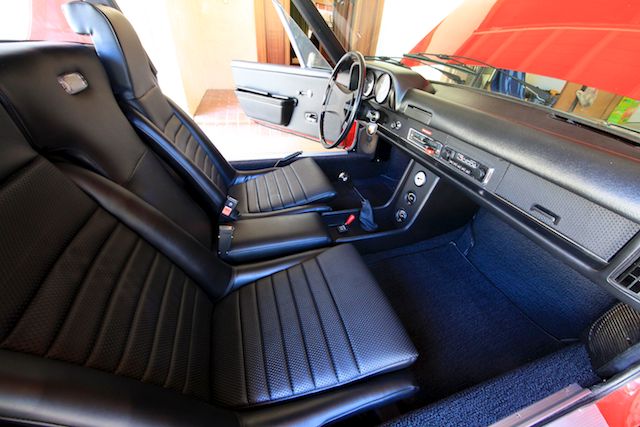
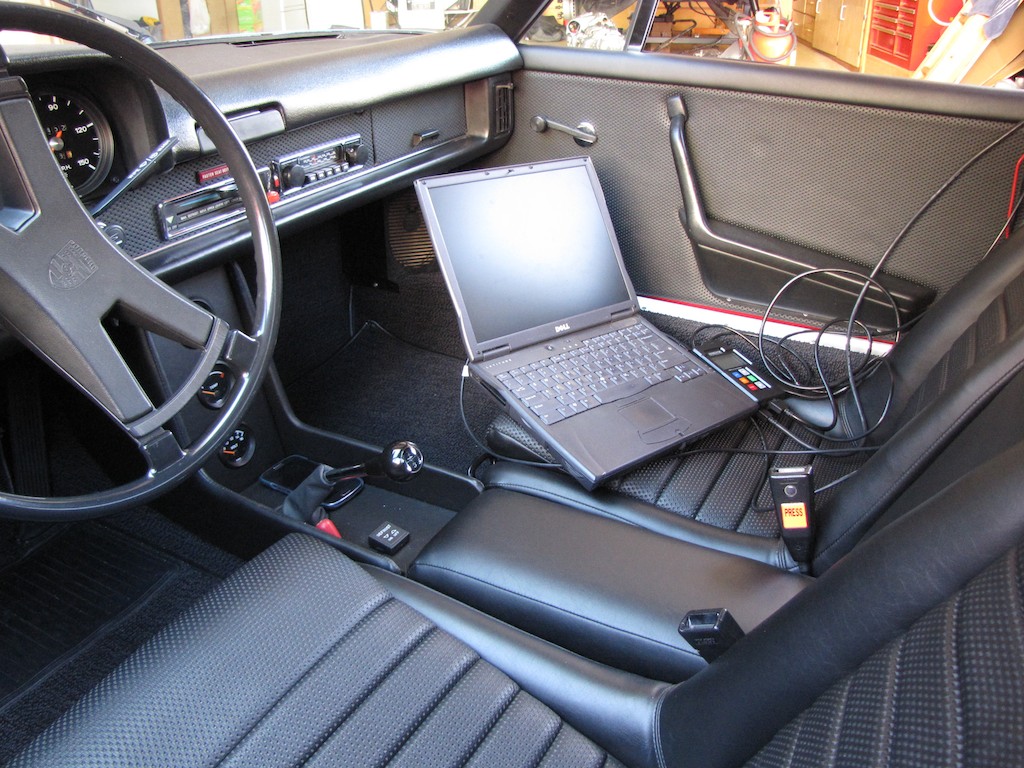
So now that I have about 1,000 miles on my car it’s time to adjust the air fuel ratio (mixture).
It generally runs good. However, it is a little rough before the engine is fully warmed up. Also, when I took it in for the initial wheel alignment the mechanic told me he thought it was running a little lean.
My plan is to use a wideband oxygen sensor to measure the AFR (air/fuel ratio) and adjust the MPS (manifold pressure sensor) to achieve an AFR of 12.5 at full load or WOT (Wide Open Throttle).
I purchased a new Innovate Motorsports LM-2 Air/Fuel meter on ebay for $300.00. I originally wanted to log the results on the LM-2 SD card , however I could not get the LM-2 to log data on the supplied SD memory card. After a few calls to their tech support I was able to connect a laptop to the LM-2 via the supplied USB cable. The laptop then displayed the data (AFR) and record it to a file. I also wanted to record RPM but I could not get it to read an accurate value. The LM-2 would be a great unit if it only worked. Also, the customer support and manual are not good. In the end, I was able to get it to log the AFR which was what I really needed.
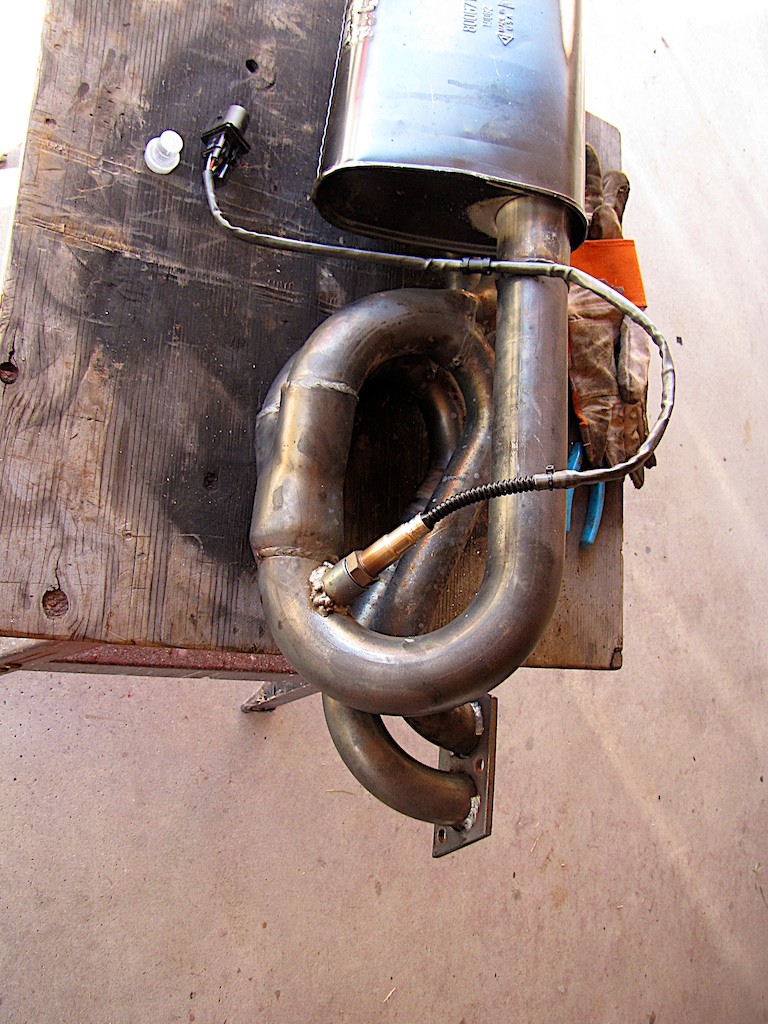
I drilled a hole in the exhaust muffler collector and welded in the O2 sensor fitting. It was cheaper to weld in the fitting (since it came with the kit) than buy the exhaust clamp for 80 bucks. Since this is not a permanent install I just ran the wires into the engine compartment and thru the engine lid, thru the passenger window to the passenger seat. The oxygen sensor is connected to the LM-2 and the LM-2 is connected to the laptop via a USB cable.
The laptop is running the supplied Logworks software and can display (and record) the AFR in real time on a graph as well as a digital gauge.
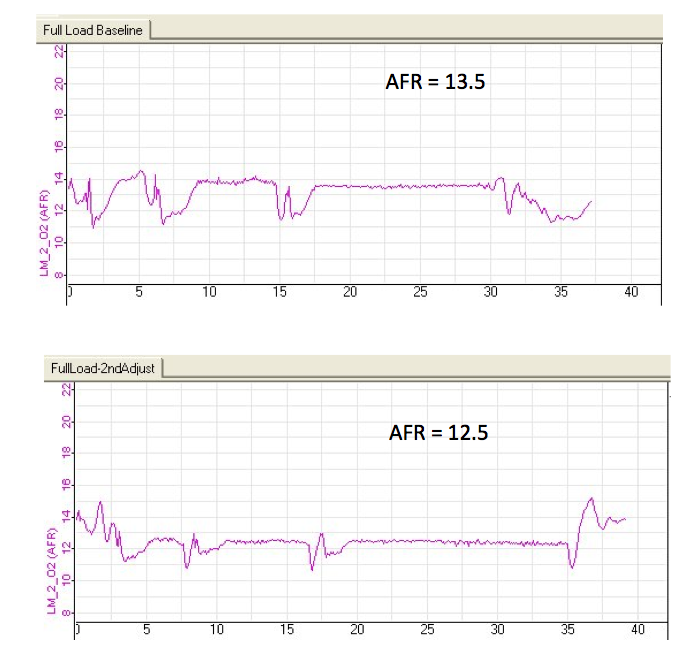
Once I got the Logworks software to log the AFR results real time, I made some initial baseline runs up a long hill to get a steady AFR plot at full throttle or WOT.
The baseline WOT AFR was about 13.5 which means it was running lean.
Next, I removed the MPS from the car and removed the epoxy plug covering the Full Load Stop screw. There are two adjustment screws, one inside of the other. I needed to adjust the inner screw without moving the outer screw. Luckily, I was able to turn the inner screw without turning the outer screw. If the outer screw turns there is a tool available from Tangerine Racing that allows you to turn either screw. I initially loosened the inner screw CCW 90 degrees and made another run. It helped but the AFR was still high. I then turned it another 90 degrees tor a total of 180 degrees. The WOT AFR was right on 12.5 and the car ran so much better. It was a lot smoother and the roughness when the engine was cold was gone.
Attached image(s)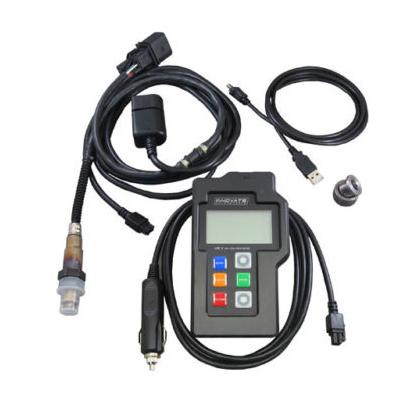

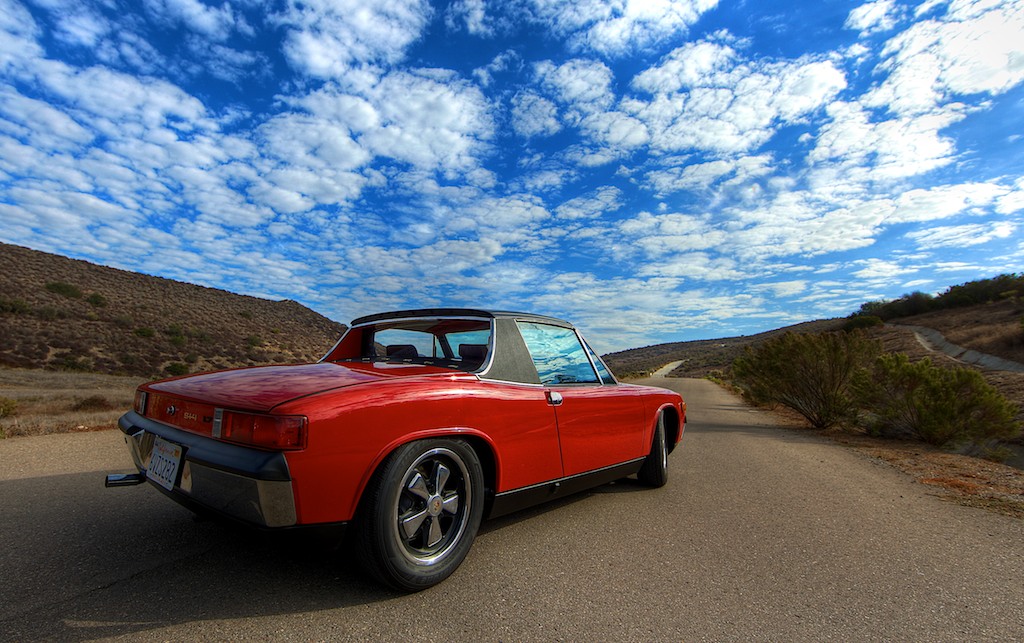
Posted by: Steve_R Dec 16 2014, 06:38 PM
Some pics
Attached image(s)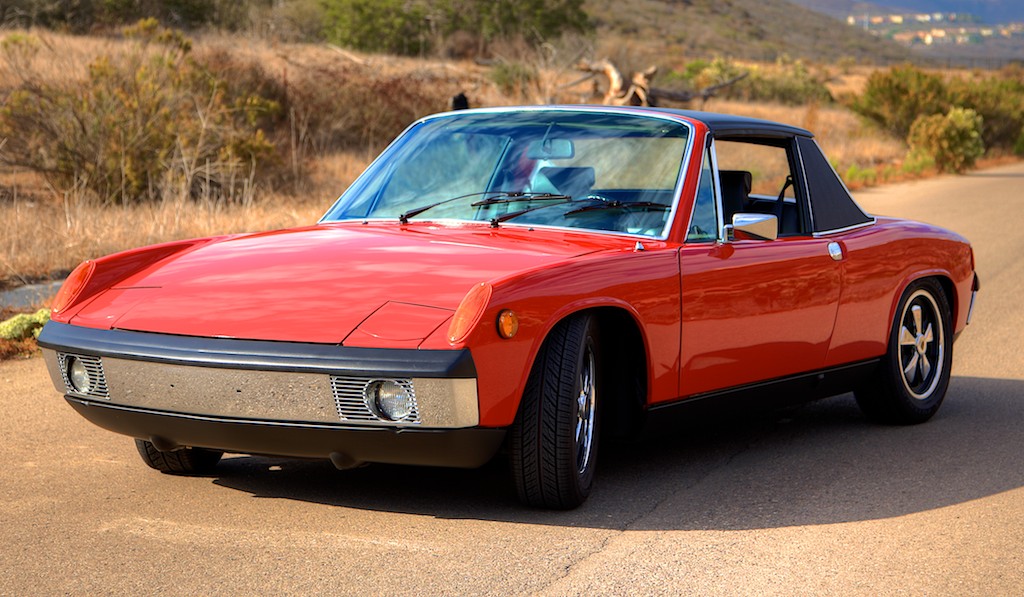
Posted by: Cairo94507 Dec 16 2014, 07:20 PM
I love your car
What's up with that long tailpipe sticking out so far past the bumper? That is all I would change on your car. Absolutely perfect car otherwise.
Posted by: turk22 Dec 16 2014, 07:21 PM
Absolutely beautiful job, just love the way it came out...
Posted by: Larmo63 Dec 16 2014, 08:21 PM
Gawd, is there anything you CAN'T do?? You did a great job on your car and I for one am jealous.
Really nice build!!!!!
Posted by: bigkensteele Dec 16 2014, 08:32 PM
Stunning! I admire your ingenuity and will be copying your tool for taping off the Fuchs.
Posted by: G e o r g e Dec 16 2014, 10:27 PM
That 914 is a thing of beauty. Great job
Posted by: Cuda911 Dec 17 2014, 12:26 AM
Holey Macaroni! Wow!! That is such an incredibly fantastic job. Amazing, is all I can say. Wow!!!
OK, so, how did you acquire all of these varied skills, from the painting to engine work to upholstery?
Posted by: Amphicar770 Jun 30 2016, 09:34 AM
Wow! Beautiful work all around. I wish I had half your skills.
Powered by Invision Power Board (http://www.invisionboard.com)
© Invision Power Services (http://www.invisionpower.com)