Printable Version of Topic
Click here to view this topic in its original format
914World.com _ 914World Garage _ 75 LJet will not fire
Posted by: malcolm2 Jul 9 2013, 08:09 PM
http://www.914world.com/bbs2/index.php?showtopic=213416&st=0
Summary: rescued 75 with L-jet: HAM repaired heads, 9550 cam from Type 4 store, All engine harnesses from Bowlsby, 96mm pistons from type 4 store (1911cc), Injectors cleaned by Cruzin Performance...(twice), engine sat for 12 mths while I worked on rust from sitting for 10 years, etc...
A couple weekends ago I went thru EXTENSIVE troubleshooting with Timothy_ND29 (huge thank you  ), but the engine would not fire. That is the above link....
We ended up determining that my fresh injectors were clogged cause they sat for 12+ months. CruzinPerformance "woke them up" last week and they arrived back here today. I don't know what else to test: EVERYTHING operates, EVERYTHING:
1. 35+ psi fuel pressure
2. Starter turns engine with the key.
3. Noid lights at all injectors LIGHT
4. Spark plugs at all plugs SPARK
5. Injectors squirt (tested 1 and 2)
6. Valves actually move (I had to know it the damn thing was moving on the inside)
Here is the big one: After installing the fresh injectors, I did hear a slight fire, or poot of a backfire. Then nothing. I took the air box off and sprayed starting fluid in the intake while trying to start and STILL NOTHING. 
Question 1: How much spark do I need?
Question 2: How much squirt do I need?
Both happened, but they seemed weak, or small.
Need more help, I feel like the doctor that left a sponge in his patient.... 
Posted by: jim_hoyland Jul 9 2013, 08:14 PM
Is the brown wire from the dual relay grounded ?
Posted by: timothy_nd28 Jul 9 2013, 08:15 PM
Sounds like the FI is doing its job. However the timing might be the issue now
Posted by: malcolm2 Jul 9 2013, 08:20 PM

Sounds like the FI is doing its job. However the timing might be the issue now
I forgot to mention timing. I had it set at 0 TDC for assembly. Tonight, I loosened the clamp and rotated the distributor slightly forwards and backwards, but no change. I have heard it should at least start at 0TDC, correct?
How can I be sure what it is set on if it won't start?
Posted by: malcolm2 Jul 9 2013, 08:23 PM
Is the brown wire from the dual relay grounded ?
I put one lead into the back of the dual relay block (brown wire) and one on the - of the battery.... continuity! any other way to check that?
Posted by: malcolm2 Jul 9 2013, 08:24 PM
Sounds like the FI is doing its job. However the timing might be the issue now
So you think I should verify 0 TDC? How do I do that in an air cooled car. I have a FWD Cabriolet that I can turn the engine by hand, but this car?????
Do I do it at the fan, that I cannot see or remember if there is even a nut on the fan?
I guess I could remove #1 plug, bump the engine. Insert a screwdriver. At a high point check the rotor button??
Posted by: timothy_nd28 Jul 9 2013, 08:28 PM
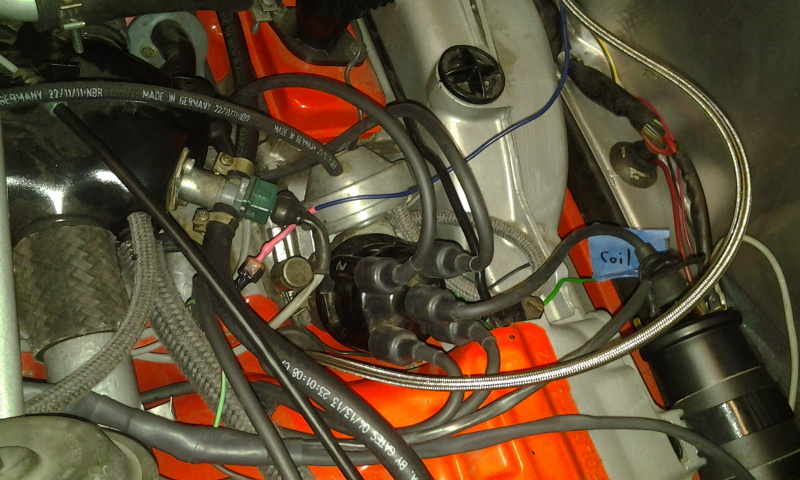
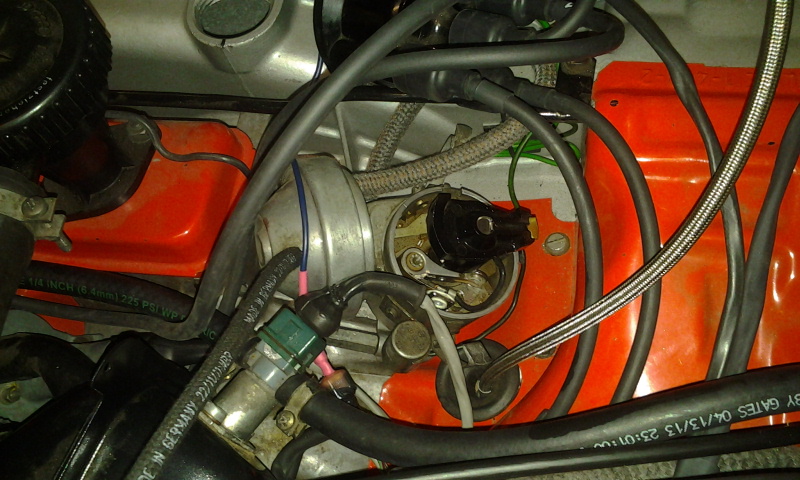
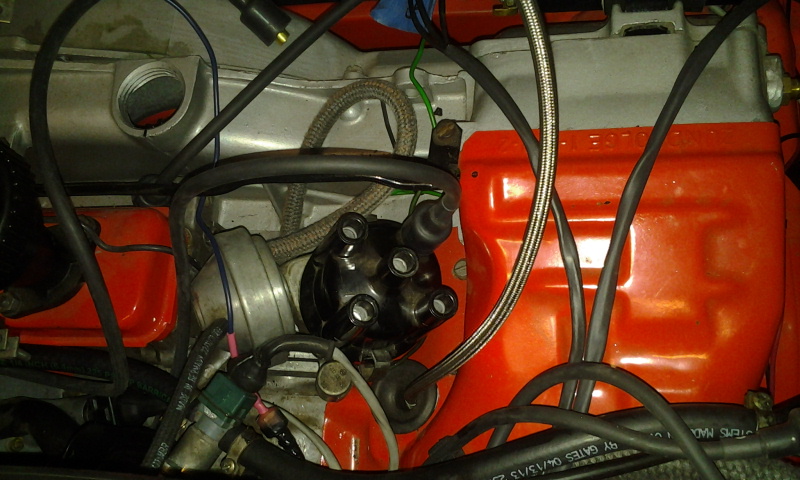
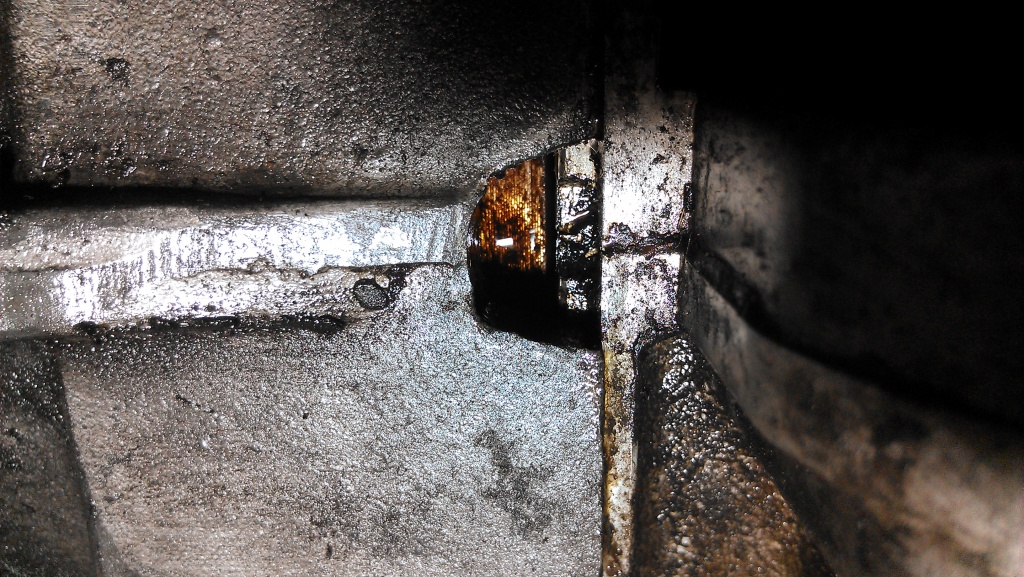
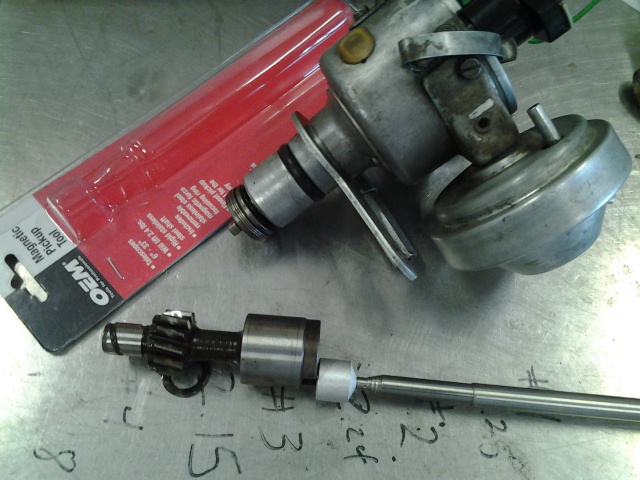
No need, your FI is working. We went thru the whole system earlier with no problems other than a disconnected ground wire (fixed now). You verified the working nature of the FI by using your noid light and physically seen fuel spraying. It's in the timing now or wrong firing order. Can you post a pic of your dizzy and a pic of the rotor when pointing to number one at TDC?
Posted by: malcolm2 Jul 9 2013, 08:42 PM
No need, your FI is working. We went thru the whole system earlier with no problems other than a disconnected ground wire (fixed now). You verified the working nature of the FI by using your noid light and physically seen fuel spraying. It's in the timing now or wrong firing order. Can you post a pic of your dizzy and a pic of the rotor when pointing to number one at TDC?
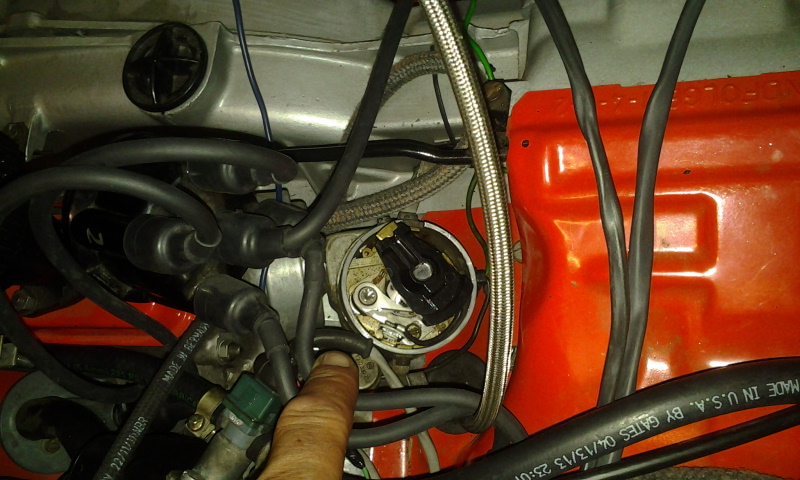
HERE YOU GO>>> Sorry the pictures are oriented differently, but the timing hole is closest to #1. So turn your head a bit, while looking at the 2nd picture....

Posted by: Mblizzard Jul 9 2013, 08:43 PM
I had a similar problem many years ago. It turned I had installed the dizzy drive gear 180 degrees out. All of my checks said it should run but I got nothing but flames out the exhaust pipes and backfires.
Not saying that you did the same, but it took me along time before i checked the drive gear.
Posted by: malcolm2 Jul 9 2013, 08:45 PM
I had a similar problem many years ago. It turned I had installed the dizzy drive gear 180 degrees out. All of my checks said it should run but I got nothing but flames out the exhaust pipes and backfires.
Not saying that you did the same, but it took me along time before i checked the drive gear.
That may be where I am heading... but I got no flames. Is #1 on the dizzy closest to the driver?
Posted by: timothy_nd28 Jul 9 2013, 08:47 PM
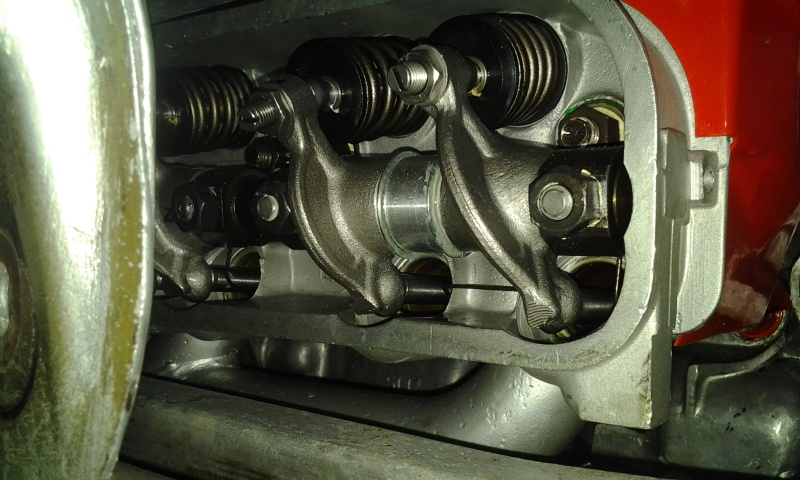
K, can you remove the valve cover and wiggle the rocker arms for the number one cylinder. Do they wiggle ?
Posted by: malcolm2 Jul 9 2013, 08:57 PM
K, can you remove the valve cover and wiggle the rocker arms for the number one cylinder. Do they wiggle ?
I did that on the other side, to see if I was getting movement. Give me a minute and I'll check #1 for wiggle.
the left one wiggles. the right does not... just thought of something.... should I have the rotor button pointing at #1? It is not in this picture.
Posted by: davesprinkle Jul 9 2013, 08:57 PM
Sounds like the FI is doing its job. However the timing might be the issue now
So you think I should verify 0 TDC? How do I do that in an air cooled car. I have a FWD Cabriolet that I can turn the engine by hand, but this car?????
Do I do it at the fan, that I cannot see or remember if there is even a nut on the fan?
I guess I could remove #1 plug, bump the engine. Insert a screwdriver. At a high point check the rotor button??
Rotating the engine on a 914 can be a little more challenging than other cars. I use an adjustable wrench on the alternator nut. You have to use your left hand and do it by feel, but it's possible.
Set your timing statically before you attempt to run:
1) Put in a fresh set of points and establish the gap at 0.016".
2) The Ljet cars have only 1 timing mark, located at 7.5 degrees ATDC. You'll need to use an inspection mirror to find the mark. Position the crank so that the mark is lined up in the v-notch of the fan housing.
3) Get a continuity checker (a continuity light or the beep function on a multi-meter). Measure continuity between the short green lead of the points and the housing of the distributor.
4) While watching (or listening) to your continuity meter, rotate the distributor until EXACTLY that point where the continuity goes away, no further. Do this very carefully, moving the distributor slowly. Tighten the distributor clamp.
5) Install the rotor and cap. Install the plug wires with the order 1-4-3-2, clockwise around the cap. Ensure that the #1 plug wire is connected to the cap in the position immediately above the rotor. (I'm assuming that the crank is still located so that the timing mark is aligned with the v-groove.)
6) Verify that the points are connected to the condensor and that the condensor wire is connected to the minus contact on the coil. Verify that the injector loom lead is also connected to the minus side of the coil. Verify that when the ignition switch is on you've got 12V at the plus side of the coil.
7) Now try to start the car.
Good luck.
Posted by: malcolm2 Jul 9 2013, 09:13 PM
K, can you remove the valve cover and wiggle the rocker arms for the number one cylinder. Do they wiggle ?
I did that on the other side, to see if I was getting movement. Give me a minute and I'll check #1 for wiggle.
the left one wiggles. the right does not... just thought of something.... should I have the rotor button pointing at #1? It is not in this picture.
I rechecked at very close to #1 TDC and I got NO WIGGLE. One valve is UP, and one is DOWN. I can snap another picture?
Posted by: timothy_nd28 Jul 9 2013, 09:17 PM
K, can you remove the valve cover and wiggle the rocker arms for the number one cylinder. Do they wiggle ?
I did that on the other side, to see if I was getting movement. Give me a minute and I'll check #1 for wiggle.
the left one wiggles. the right does not... just thought of something.... should I have the rotor button pointing at #1? It is not in this picture.
You should have valve lash wiggle on both rockers when piston number one is at TDC. Since you don't, tells me that number one isn't at tdc or valve lash isn't set right. Worse case scenario the cam wasn't meshed up with the crank correctly (I hope not). Your dizzy drive gear could be off as well. First thing is first, you must find TDC on piston one, making sure both rocker are relaxed and move by hand.
Posted by: Mblizzard Jul 9 2013, 09:18 PM
I had a similar problem many years ago. It turned I had installed the dizzy drive gear 180 degrees out. All of my checks said it should run but I got nothing but flames out the exhaust pipes and backfires.
Not saying that you did the same, but it took me along time before i checked the drive gear.
That may be where I am heading... but I got no flames. Is #1 on the dizzy closest to the driver?
Long story but a summary is that I had dumped a lot of fuel in the exhaust and on the times it did cough a bit out came flames.
Posted by: timothy_nd28 Jul 9 2013, 09:22 PM
Don't put anything into the spark plug hole
Posted by: malcolm2 Jul 9 2013, 09:25 PM
You should have valve lash wiggle on both rockers when piston number one is at TDC. Since you don't, tells me that number one isn't at tdc or valve lash isn't set right. Worse case scenario the cam wasn't meshed up with the crank correctly (I hope not). Your dizzy drive gear could be off as well. First thing is first, you must find TDC on piston one, making sure both rocker are relaxed and move by hand.
Keyword: FIND? So when the piston is at TDC, both valves are closed?
Should I bump the engine and check for wiggle? How do I find? I have taken the #1 plug out and don't seem to be able to feel high or low. Is it too much of an angle to feel with a punch or screw driver?
As I mentioned, I now have the rotor button pointing close to #1 (the mark on the dizzy) and my valves are not CLOSED.
Posted by: Mblizzard Jul 9 2013, 09:28 PM
Verify that you #1 viewed from sitting in the car, is the left rear cylinder. 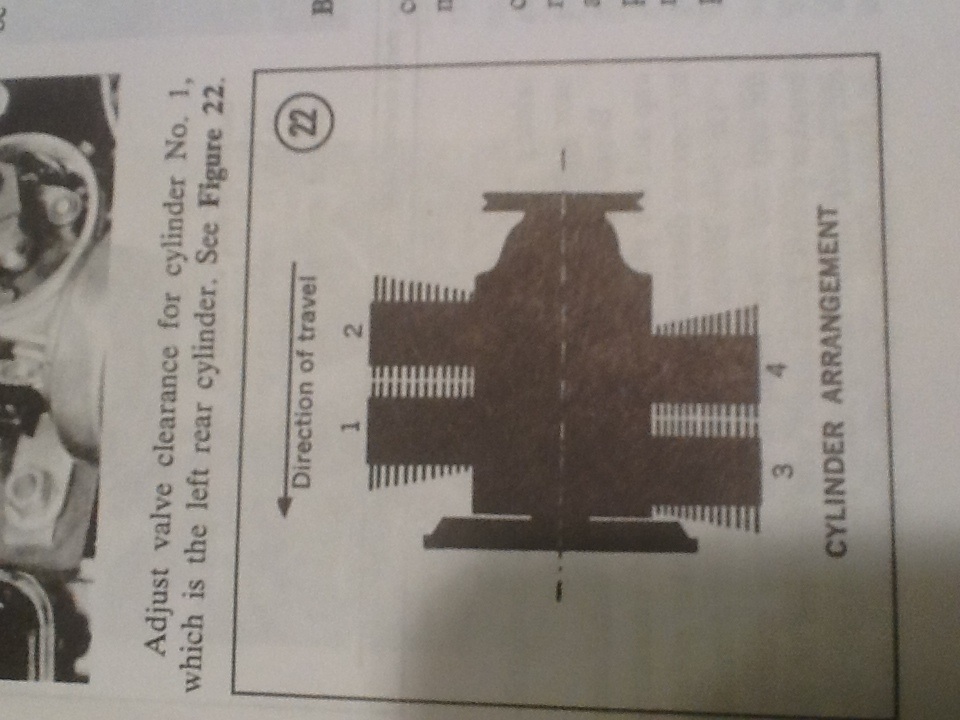
Disregard the arrow that says direction of travel.
Posted by: timothy_nd28 Jul 9 2013, 09:28 PM
I find it easy to put the passenger rear wheel on the ground. Jack up the rear driver side wheel and put the car in 5th gear. Spin the wheel by hand
Posted by: malcolm2 Jul 9 2013, 09:42 PM
I find it easy to put the passenger rear wheel on the ground. Jack up the rear driver side wheel and put the car in 5th gear. Spin the wheel by hand
No axles yet. Not sure about finding 5th gear either. Even at that don't I need to feel for the top of the piston?
Posted by: timothy_nd28 Jul 9 2013, 09:52 PM
It's dangerous, anything you put in that spark plug hole will be sheared off by the piston. You really need to find the mark on the fan.
Posted by: malcolm2 Jul 9 2013, 09:57 PM
It's dangerous, anything you put in that spark plug hole will be sheared off by the piston. You really need to find the mark on the fan.
Yes, I have read stuff about chop sticks.... I was not going to turn the engine with anything in the spark plug hole, just probing it AFTER I bump the engine. Anyway, the button is pointing at the mark on the top edge of the dizzy, I will see about the fan. I am looking for the timing mark, correct?
Clark
Posted by: malcolm2 Jul 9 2013, 10:07 PM
It's dangerous, anything you put in that spark plug hole will be sheared off by the piston. You really need to find the mark on the fan.
Yes, I have read stuff about chop sticks.... I was not going to turn the engine with anything in the spark plug hole, just probing it AFTER I bump the engine. Anyway, the button is pointing at the mark on the top edge of the dizzy, I will see about the fan. I am looking for the timing mark, correct?
Clark
OK, with the button pointed at the mark, I look into the timing hole and see nothing. I marked the edge of the fan during assembly with a couple marks to help me time the engine, in the future. If I am standing at the rear of the car, facing forward, those marks would be at 10 o'clock on the fan, maybe 10:30.
I assume they should be 12 o'clock, correct?
Do you follow?
Clark
Posted by: timothy_nd28 Jul 9 2013, 10:07 PM
Never mind the position of the dizzy's rotor for now. Mount up on your car and stare down the inspection hole. Look at the v knotch and spin the fan. You should see a red line, when you do, inspect the rockers at cylinder one. You have a 50-50 chance that when the mark is in between the v knotch that the piston is very close to tdc. If the rocker is pushing, spin the fan 360 degrees and recheck the rockers.
Posted by: malcolm2 Jul 9 2013, 10:14 PM
Never mind the position of the dizzy's rotor for now. Mount up on your car and stare down the inspection hole. Look at the v knotch and spin the fan. You should see a red line, when you do, inspect the rockers at cylinder one. You have a 50-50 chance that when the mark is in between the v knotch that the piston is very close to tdc. If the rocker is pushing, spin the fan 360 degrees and recheck the rockers.
I know it's getting late, I appreciate your help, shut me down whenever your ready....
I am not 100% sure, but using my mirror and my marks on the edge of the fan, I think I put the red mark exactly on the V notch. I do have a slight wiggle on both rockers for #1.
Posted by: timothy_nd28 Jul 9 2013, 10:23 PM
Excellent, with the red mark between the v knotch and you have rocker slack at number one cylinder, says we are good. Where ever you rotor is pointing, put the number one plug wire on it. Then 4,3,2 wires in a clockwise fashion, then start your beast.
Posted by: malcolm2 Jul 9 2013, 10:26 PM
Excellent, with the red mark between the v knotch and you have rocker slack at number one cylinder, says we are good. Where ever you rotor is pointing, put the number one plug wire on it. Then 4,3,2 wires in a clockwise fashion, then start your beast.
It is not quite pointing at a plug wire, but what the hay, I am doing it.
be right back.
Posted by: timothy_nd28 Jul 9 2013, 10:28 PM
Spin the dizzy so it's pointing at the number one lead
Posted by: malcolm2 Jul 9 2013, 10:50 PM
Excellent, with the red mark between the v knotch and you have rocker slack at number one cylinder, says we are good. Where ever you rotor is pointing, put the number one plug wire on it. Then 4,3,2 wires in a clockwise fashion, then start your beast.
It is not quite pointing at a plug wire, but what the hay, I am doing it.
be right back.
Still nothing! Man I thought you had it there.
Posted by: timothy_nd28 Jul 9 2013, 10:52 PM
Which way did you turn the distributor to align the rotor with the number one lead?
Posted by: malcolm2 Jul 9 2013, 10:56 PM
Which way did you turn the distributor to align the rotor with the number one lead?
I moved the plug wires. The button turns clockwise, so I moved #1 and then moved the others clockwise in the firing order.
Posted by: timothy_nd28 Jul 9 2013, 11:01 PM
Try moving the dizzy counter clockwise a smidge and try again
Posted by: malcolm2 Jul 9 2013, 11:09 PM
Try moving the dizzy counter clockwise a smidge and try again
No go on the smidge.
Posted by: timothy_nd28 Jul 9 2013, 11:12 PM
Lets start over. Line up the red mark with the v knotch and verify both rocker arms wiggle on the number 1 cylinder.
Posted by: malcolm2 Jul 9 2013, 11:12 PM
Lets start over. Line up the red mark with the v knotch and verify both rocker arms wiggle on the number 1 cylinder.
will do.
Posted by: Bob L. Jul 9 2013, 11:21 PM
![popcorn[1].gif](style_emoticons/default/popcorn[1].gif)
Posted by: malcolm2 Jul 9 2013, 11:26 PM
Lets start over. Line up the red mark with the v knotch and verify both rocker arms wiggle on the number 1 cylinder.
will do.
OK, I have the red mark at the notch. And I do have a wiggle on both rockers. 1 is wiggling a bit more than the other, but both are noticeable vs before being very very tight.
Posted by: timothy_nd28 Jul 9 2013, 11:28 PM
Can you post a pic of the rotor, so we can see which way it's pointing?
Posted by: malcolm2 Jul 9 2013, 11:35 PM
Can you post a pic of the rotor, so we can see which way it's pointing?
Straight right (passenger side)
Posted by: timothy_nd28 Jul 9 2013, 11:38 PM
Ok, put the cap on and put only the number one plug wire on. Leave the rest of the plug wires off the cap. Repost a pic with the cap and number one plug wire on.
Posted by: malcolm2 Jul 9 2013, 11:44 PM
Ok, put the cap on and put only the number one plug wire on. Leave the rest of the plug wires off the cap. Repost a pic with the cap and number one plug wire on.
Posted by: timothy_nd28 Jul 9 2013, 11:49 PM
With your volt meter, set it to resistance. Measure the resistance between the middle socket on the cap to the end of the number one plug wire. Spin the dizzy clockwise till you have infinite resistance then spin the dizzy back counter clockwise right to the point where you first get a low resistance.
Posted by: malcolm2 Jul 10 2013, 12:00 AM
With your volt meter, set it to resistance. Measure the resistance between the middle socket on the cap to the end of the number one plug wire. Spin the dizzy clockwise till you have infinite resistance then spin the dizzy back counter clockwise right to the point where you first get a low resistance.
Either I am doing this wrong, or I found something.... my meter never moved. I am basically checking continuity thru the points and the button, correct? I then checked the #1 wire itself and got continuity, but never got the meter to read thru the center connection.
Right or Wrong?
Posted by: timothy_nd28 Jul 10 2013, 12:03 AM
The vacuum can may be limiting the rotation. Try moving the number one plug wire one spot clockwise. Then spin the dizzy counter clockwise till you read resistance
Posted by: malcolm2 Jul 10 2013, 12:12 AM
The vacuum can may be limiting the rotation. Try moving the number one plug wire one spot clockwise. Then spin the dizzy counter clockwise till you read resistance
Yes the vacuum hits the fan housing as I turn clockwise and the cold start connector as I turn counter clockwise.
However, I put the #1 plug in each of the 4 holes in the dizzy and never got the meter to move. I took the cap off and checked thru the center spring loaded section. And got continuity. The spring and button were loose and came out, but I was able to re-assemble, and try again. No movement on the meter between the center of the dizzy and the spark plug end of #1 wire...spinning the dizzy.
is it me?
Posted by: timothy_nd28 Jul 10 2013, 12:16 AM
I'm sorry, I'm not thinking here. The rotor doesn't quite touch the contacts on the cap. There is a slight gap, again sorry falling asleep here. You could put a piece of aluminum foil over the rotor tip to close the distance. I think we are close here. Leave the number one plug wire where it is, and put the other wires back on. Spin the dizzy so it hits the cold start valve and try starting again
Posted by: malcolm2 Jul 10 2013, 12:29 AM
I'm sorry, I'm not thinking here. The rotor doesn't quite touch the contacts on the cap. There is a slight gap, again sorry falling asleep here. You could put a piece of aluminum foil over the rotor tip to close the distance. I think we are close here. Leave the number one plug wire where it is, and put the other wires back on. Spin the dizzy so it hits the cold start valve and try starting again
No change. Still will not fire up.
Posted by: timothy_nd28 Jul 10 2013, 12:31 AM
I'm turning in for the night, lets pick this up later this evening.
Posted by: malcolm2 Jul 10 2013, 12:33 AM
I'm turning in for the night, lets pick this up later this evening.
I was going to suggest the same.... Thanks so much.

Posted by: timothy_nd28 Jul 10 2013, 08:30 AM
After re-reading part of this thread I made a assumption that the timing red mark on the fan was a factory mark vs a mark that you made. 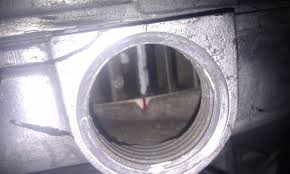
Is this what you saw last night? You should also have a 0 mark for TDC. It would be nicer if you can find the 0 mark on the fan. Depending what fan you have, the red mark could mean 7.5 degree or 27 degree BTDC. This is why the 0 TDC mark is better to set your static timing. 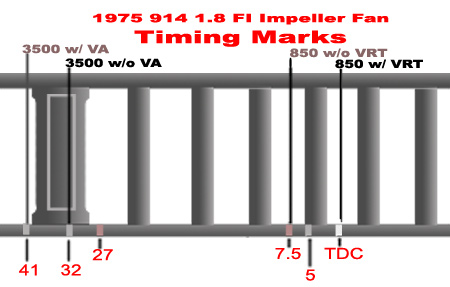
I know your 1911 is tight to turn right now, mine was a PIA to turn. You may be able to wedge a screw driver between the bell housing inspection port and a fly wheel tooth, which would spin the engine one tooth at a time.
Find that 0 timing mark on the fan, and verify that both rockers (intake and exhaust) wiggle freely.
Posted by: The Cabinetmaker Jul 10 2013, 09:06 AM
K, can you remove the valve cover and wiggle the rocker arms for the number one cylinder. Do they wiggle ?
I did that on the other side, to see if I was getting movement. Give me a minute and I'll check #1 for wiggle.
the left one wiggles. the right does not... just thought of something.... should I have the rotor button pointing at #1? It is not in this picture.
Looking at your pic, that is #1. The exhaust valve is open. You are not timed correctly. My guess is the diz drive gear is not in correctly.
Do as Timothy suggested. raise the drivers wheel, trans in 5th gear, get under the car and look at the rockers while moving the drivers wheel as if it were going forward. When both rockers are relaxed with some play, you are at tdc for # 1. If there is no play, your valves are incorrectly set. When you get both closed, go look at the rotor. Use the plug tower where the rotor is pointing. That will be "alternate"# 1. If that is not the tower closest to the driver, your drive gear is off. It may be that it will run if you reposition your wires with the "alternate" #1 tower as # 1 position, However, you might not be able to get full timing cause of the limited movement of the distributor. In that case, you will have to pull the diz and drive gear to reposition it.
Posted by: Java2570 Jul 10 2013, 09:31 AM

I just went through a similar issue with my 2.0L rebuild; had the dizzy drive gear skip one tick off and
I couldn't get it started. I finally realized I needed to verify TDC #1 and make sure my drive gear was in
correct place. After doing that, it started right up.....
Posted by: stugray Jul 10 2013, 11:14 AM
No, you should not need to pull the drive gear.
You can move the #1 position in the cap by 90 degrees either way to get your adjustment back.
This is when you get good at using the meter to set the static timing.
Oh, and not all fans have a 0 degree TDC mark.
On my recent build I had to Add one.
However there should be the #1 TDC mark on the flywheel that you can see through the bottom.
Stu
Posted by: malcolm2 Jul 10 2013, 11:50 AM
I just went through a similar issue with my 2.0L rebuild; had the dizzy drive gear skip one tick off and
I couldn't get it started. I finally realized I needed to verify TDC #1 and make sure my drive gear was in
correct place. After doing that, it started right up.....
You sir have given me hope! But I plan to start from scratch this evening. 1st off I need a way to turn the engine by hand. My wheels and axles have not been installed yet.
I plan on using a long bar and bolting it to the axle flange on the P-side, then finding something that will give me leverage and a full rotation on the D-side flange so I can turn the engine by hand and watch the rockers.
Posted by: malcolm2 Jul 10 2013, 12:04 PM
After re-reading part of this thread I made a assumption that the timing red mark on the fan was a factory mark vs a mark that you made.
Is this what you saw last night? You should also have a 0 mark for TDC. It would be nicer if you can find the 0 mark on the fan. Depending what fan you have, the red mark could mean 7.5 degree or 27 degree BTDC. This is why the 0 TDC mark is better to set your static timing.
I know your 1911 is tight to turn right now, mine was a PIA to turn. You may be able to wedge a screw driver between the bell housing inspection port and a fly wheel tooth, which would spin the engine one tooth at a time.
Find that 0 timing mark on the fan, and verify that both rockers (intake and exhaust) wiggle freely.
No, the marks are marks I made. Now I don't remember exactly what they were, I may have made notes. Also I wondered if there was a way to "re-mark" using the keyway in the fan as HOME. In your picture, it looks like the area of the fan in the V window is FLAT. IIRC I see a rounded area in mine. currently at work and can't check.
Is the V notch on the fan belt side or the engine side of the housing? Probably impossible and a bad idea to take the fan off with the engine in the car, right?
I forgot about the flywheel access from the bottom. There is a mark there too, right?
I guess one tooth at a time is better than tweeking the starter and hoping it stops on what I think is the mark. Can't watch the rocker that way either.
I am not productive here at work today, so I will probably get home early and start from stratch.
I can't thank you enough, at least I am hoping all this is leading to a smoke filled garage....sooner than later. If nothing else I am learning more and more.
Posted by: Java2570 Jul 10 2013, 12:23 PM
I just went through a similar issue with my 2.0L rebuild; had the dizzy drive gear skip one tick off and
I couldn't get it started. I finally realized I needed to verify TDC #1 and make sure my drive gear was in
correct place. After doing that, it started right up.....
You sir have given me hope! But I plan to start from scratch this evening. 1st off I need a way to turn the engine by hand. My wheels and axles have not been installed yet.
I plan on using a long bar and bolting it to the axle flange on the P-side, then finding something that will give me leverage and a full rotation on the D-side flange so I can turn the engine by hand and watch the rockers.
Yep, not having the axles and wheels on really makes it harder to turn over the engine! Good luck!!
Posted by: malcolm2 Jul 10 2013, 06:08 PM
I have come up with a way to manually rotate the engine. While doing that i can look straight accross the #1 rockers. I can perfectly see when the springs extend and close the valves. I then try to insert my feeler gauge. There is NOT a time when I can insert the .006 gauge under both swivel feet.
I can get .006 under the exhaust or outer foot, .005 seems to fit a bit better.
But the best I can do at the intake is .003.
At this location of the # 1 rockers the rotor button is pointing just past the location we made #1 last night.
My fan housing has the v notch on the fan belt side, I see NO marks because the marks are on the engine side.
Posted by: The Cabinetmaker Jul 10 2013, 06:19 PM
Forget the mark you made. Where does the rotor point? At a plug tower? Which one?
Valves are too tight, bit should still run.
Posted by: malcolm2 Jul 10 2013, 06:31 PM
Forget the mark you made. Where does the rotor point? At a plug tower? Which one?
Valves are too tight, bit should still run.
Pointing between the 2 "towers" on the passenger side. That is very close to where we THOUGHT TDC would be. As I shine a bright light in the hole I can see that I wrote on the blades and I see a big "O". So I am close. another 1/4 inch of fan turn and that will be it and the button will be pointing at the right rear tower.
I made the right front my temporary #1 last night.
Posted by: timothy_nd28 Jul 10 2013, 07:08 PM
Number one plug wire still on the right rear tower? Remove the cold start valve connector and spin the dizzy CCW max.
Posted by: stugray Jul 10 2013, 07:10 PM
When you think you are at TDC based on valves, check the flywheel hole in the tranny and position the white mark at the case split line.
Stu
Posted by: malcolm2 Jul 10 2013, 07:17 PM
Number one plug wire still on the right rear tower? Remove the cold start valve connector and spin the dizzy CCW max.
It was on right front last night, still there. But after moving manually and finding the spot where the valves are loosest, I think I should move it to right rear.
But the dizzy is maxed CCW and touching the cold start valve.
Posted by: malcolm2 Jul 10 2013, 07:39 PM
When you think you are at TDC based on valves, check the flywheel hole in the tranny and position the white mark at the case split line.
Stu
I can't see anything in that hole. I guess I could get a helper and have them look as I turn the engine.
Posted by: timothy_nd28 Jul 10 2013, 07:50 PM
Move the number one at the right rear tower and start the car. Use a bit of ether for easy starting
Posted by: malcolm2 Jul 10 2013, 07:56 PM
should I go ahead and adjust the valves on the drivers side, since I know they are a bit tight?
Posted by: timothy_nd28 Jul 10 2013, 07:59 PM
Are you using aluminum or chrome moly pushrods?
Posted by: The Cabinetmaker Jul 10 2013, 08:04 PM
Number one plug wire still on the right rear tower? Remove the cold start valve connector and spin the dizzy CCW max.
It was on right front last night, still there. But after moving manually and finding the spot where the valves are loosest, I think I should move it to right rear.
But the dizzy is maxed CCW and touching the cold start valve.
That is exactly what I said on my first post . Stop stalling
Pull the diz, , reposition the drive gear. 180 degrees. Start that puppy up.
Posted by: malcolm2 Jul 10 2013, 08:09 PM
Move the number one at the right rear tower and start the car. Use a bit of ether for easy starting
No change. Starter turns over, but never sounds like anything fires, even with the starting fluid.
Posted by: Bob L. Jul 10 2013, 08:09 PM
Number one plug wire still on the right rear tower? Remove the cold start valve connector and spin the dizzy CCW max.
It was on right front last night, still there. But after moving manually and finding the spot where the valves are loosest, I think I should move it to right rear.
But the dizzy is maxed CCW and touching the cold start valve.
That is exactly what I said on my first post . Stop stalling
Pull the diz, , reposition the drive gear. 180 degrees. Start that puppy up.
Posted by: malcolm2 Jul 10 2013, 08:13 PM
Number one plug wire still on the right rear tower? Remove the cold start valve connector and spin the dizzy CCW max.
It was on right front last night, still there. But after moving manually and finding the spot where the valves are loosest, I think I should move it to right rear.
But the dizzy is maxed CCW and touching the cold start valve.
That is exactly what I said on my first post . Stop stalling
Pull the diz, , reposition the drive gear. 180 degrees. Start that puppy up.
I was wondering if we would ever get to put the dizzy where is belongs. Is moving the plug wires correcting a wrong that has not been found yet?
Posted by: malcolm2 Jul 10 2013, 08:29 PM
Are you using aluminum or chrome moly pushrods?
Purchased awhile back from the type 4 store and cut to fit. I will have to double check, but I am thinking chrome moly.....
Yes chmly w/tips uncut
Posted by: Mblizzard Jul 10 2013, 08:30 PM
I will be traveling to Nashville next Tuesday to give a presentation. I hope you are not still struggling with it by then but I could lend a hand before I head back to Knoxville.
I went through all of the steps you have done with the same results almost. But I think I was able to move the dizzy a little more and get it to fire a bit.
Posted by: malcolm2 Jul 10 2013, 08:35 PM
I will be traveling to Nashville next Tuesday to give a presentation. I hope you are not still struggling with it by then but I could lend a hand before I head back to Knoxville.
I went through all of the steps you have done with the same results almost. But I think I was able to move the dizzy a little more and get it to fire a bit.
thanks for the offer. I will be gone Friday to Friday, so next week the car will sit, whether I get it running or not.
Posted by: malcolm2 Jul 10 2013, 08:48 PM
Timothy, what's on you mind to do next?
Posted by: timothy_nd28 Jul 10 2013, 08:59 PM
If you truly found TDC, I do like the idea of pulling the drive gear and putting it back in the correct spot.
Posted by: malcolm2 Jul 10 2013, 09:09 PM
If you truly found TDC, I do like the idea of pulling the drive gear and putting it back in the correct spot.
But do that with the valves at TDC?
I can get there again, but just to be sure. Which valve will close last just before TDC, engine turning forwards.....Exhaust, (the outer)?
And 2ndly, what are my pit falls in pulling the dizzy? It has been too long since I put it in, and hear rumblings of the spring or the washer falling in... Is there a perfect method to this?
Posted by: timothy_nd28 Jul 10 2013, 09:19 PM
I'll be honest, every time I split the case, I make sure everything is aligned before bolting back together. I have never attempted to pull the drive gear with the engine all together. Maybe others will give advise to what to do.
Posted by: timothy_nd28 Jul 10 2013, 09:27 PM
The intake valve should be last to move before tdc. At tdc you have a power stroke then the exhaust stroke.
Posted by: malcolm2 Jul 10 2013, 09:31 PM
The intake valve should be last to move before tdc. At tdc you have a power stroke then the exhaust stroke.
That was my thought too and the haynes manual confirmed, "TDC position with #1 piston on it's firing stroke"
Posted by: stugray Jul 10 2013, 09:39 PM
I just went through this entire process.
Can you turn the dizzy at least 90 degrees (back & forth total rotation)?
If so, then you should not need to pull it.
You can position the #1 wire at any one of the four rotor cap positions.
So you should be able to get it to adjust wherever the drive gear is positioned.
First you must find TDC - Beyond the shadow of a doubt.
Here is my procedure I posted on another timing thread:
Pull off the 1/2 side valve cover.
Rotate the engine while watching the #1 valves.
As soon as the #1 intake valve closes, watch through the triangular hole between the engine & tranny.
As TDC comes around you will see a white mark on the flywheel.
When that mark is lined up with the case split line and both #1 valves are slack, that is TDC #1.
At that point you might find a mark on the fan through the timing hole (maybe not)
You will probably need to rotate the engine through a few full rotations to "get" the valves on #1 so use the starter at first.
Once the engine is guaranteed to be at TDC #1, then:
Rotate the dist. back and forth through the full rotation and then put it back near half of that travel.
Put the rotor cap on and plug the #1 wire into the cap closest to the rotor position.
Then follow the procedure for setting the static timing using a DMM.
http://www.pelicanparts.com/techarticles/914_timing/914_timing.htm
Search that link for "Now, we need to check the wire orientation in the cap. " and follow the instructions for setting static timing from there.
Stu
Posted by: malcolm2 Jul 10 2013, 09:54 PM
I'll be honest, every time I split the case, I make sure everything is aligned before bolting back together. I have never attempted to pull the drive gear with the engine all together. Maybe others will give advise to what to do.
I guess I am going to need some input. I have #1 on TDC. I removed the nut on the hold down clamp and even loosened the adjustment bolt on the hold down clamp, but the dizzy will not come out. It rotates, but something is holding it in the engine.
Anyone have any ideas?
Posted by: timothy_nd28 Jul 10 2013, 09:59 PM
You may need to pry the hold down bracket while pulling on the dizzy.
Posted by: stugray Jul 10 2013, 10:00 PM
Read my post above first, and the link then IF that fails (it should not), then.......
Search under the dizzy. There is a nut holding down the adjustment bracket.
You have to remove that nut before you can pull the dizzy.
If you go and pull the dist drive gear and the "special washer" is not on the end, then what are you going to do?
If you do not know what the "special washer" is, then you need to do a little more research.
Some have pulled and replaced the drive gear for years with no problems.
Others have either lost the washer in the case, or there wasnt one there to start with and then ????
Stu
Posted by: malcolm2 Jul 11 2013, 05:50 AM
Read my post above first, and the link then IF that fails (it should not), then.......
Search under the dizzy. There is a nut holding down the adjustment bracket.
You have to remove that nut before you can pull the dizzy.
If you go and pull the dist drive gear and the "special washer" is not on the end, then what are you going to do?
If you do not know what the "special washer" is, then you need to do a little more research.
Some have pulled and replaced the drive gear for years with no problems.
Others have either lost the washer in the case, or there wasnt one there to start with and then ????
Stu
I have heard the stories, and did not really want to pull the dizzy because of the possible problems.
We went thru just about all your suggestions above. The last and probably most important did not get done, static timing.
Since I could not get the dizzy out easily, I will go back and verify all the other steps and follow the pelican instructions on that. I have read thru them.
1 issue I did notice from your steps, I do not see the white mark on the fly wheel. I will also get me a helper and see if I can't watch for the mark as he turns the engine manually.
I get the intake closing and some lash on both rockers, I get my homemade marks on the fan close to the right place and the rotor is pointing toward the passenger side. All that is left is the flywheel mark and the Pelican check. Sound correct?
That is a job for this (Thursday) evening. Thanks for all your help
Posted by: The Cabinetmaker Jul 11 2013, 06:51 AM
There is no white mark unless someone else made one there. If you are truly at tdc # 1, The factory notch will be visible in the hole at the top of the trans where it mounts to the case. You will have to pull the rear tin back to see it. You can also feel it with your finger if you reach up from the bottom of the trans. Yes, your arm and hand will fit up there.
On another note, You installed chromolly pushrods, but did not cut them? That tells me you did not do the geometry. You may have more problems than you realize.
BTW, chromolly rods run 0 lash.
Posted by: timothy_nd28 Jul 11 2013, 07:03 AM
Posted by: The Cabinetmaker Jul 11 2013, 07:26 AM
Purchased awhile back from the type 4 store and cut to fit. I will have to double check, but I am thinking chrome moly.....
Yes chmly w/tips uncut
Ok, First sentence says 'cut to fit". Second sentence says "uncut". So which is it?
Posted by: malcolm2 Jul 11 2013, 09:02 AM
There is no white mark unless someone else made one there. If you are truly at tdc # 1, The factory notch will be visible in the hole at the top of the trans where it mounts to the case. You will have to pull the rear tin back to see it. You can also feel it with your finger if you reach up from the bottom of the trans. Yes, your arm and hand will fit up there.
On another note, You installed chromolly pushrods, but did not cut them? That tells me you did not do the geometry. You may have more problems than you realize.
BTW, chromolly rods run 0 lash.
So what is it that tells you I did not do the geometry? I have an adjustable pushrod and spent alot of time on the geometry. Even at that, IIRC, I was not 100% confident in my results.
I did cut the push rods. I went thru the proceedure provided. Measured several, several times and cut once. I am 99% sure I did that as prescribed. I will have to look in my notes, but the NEW pushrods did not end up being that much different in length than the ones I took out, which I still have.
Clark
Posted by: malcolm2 Jul 11 2013, 09:06 AM
Purchased awhile back from the type 4 store and cut to fit. I will have to double check, but I am thinking chrome moly.....
Yes chmly w/tips uncut
Ok, First sentence says 'cut to fit". Second sentence says "uncut". So which is it?
I was meaning that I did the cut-to-fit. Jake's invoice said "uncut". So once I got the invoice out I knew what I had and I edited my post.
You probably know but, but they come alittle longer with one tip installed and the other end is to be cut to fit and the tip installed.
Posted by: The Cabinetmaker Jul 11 2013, 09:12 AM
Ok, I understand. you will be ok. just remember the 0 lash. I was kinda intimidated too on my first one. I breathed much easier when it started for the first time and made no weird noises.
Posted by: stugray Jul 11 2013, 09:14 AM
Ok, so there might not be white paint on the mark, but it is a notch that is cut (machined) into the flywheel.
And at TDC, the notch is visible in the BOTTOM of the tranny, not the top.
The timing mark is not visible in this pic, but it is there.
Stu
Posted by: stugray Jul 11 2013, 09:38 AM
I just did a search and found some say that the mark will be at the top of the trans at #1 TDC.
So....Either
The info I found in the search is wrong,
I am loosing my mind,
Or someone put another mark on my flywheel.
Stu
Posted by: The Cabinetmaker Jul 11 2013, 09:44 AM
If it were my old ass, I'd just go with option 2 and forget it. Oh wait, I forgot. what were we talking about?
Posted by: Java2570 Jul 11 2013, 09:47 AM
Factory notch will be at the top of the trans @ TDC #1.....I added a paint mark 180 degrees from that notch for reference on my flywheel.
Posted by: malcolm2 Jul 11 2013, 10:17 AM
So to verify TDC, I need to look for or feel for the flywheel mark. I remember something about a flywheel mark during assembly, so I have one. And since I see nothing from the bottom I am betting I will feel it on top.
With that, the rocker position on #1 just after intake closes and the homemade marks and writing on my fan, I feel pretty good about TDC. So I will proceed with Stu's "alternate #1" Dizzy cap wiring and the Pelican static timing, all that after I put the champange on ice, cause this is going to do it, right?
I was almost positive that I had EVERYTHING lined up for #1 at TDC during assembly. Anyone have an idea of how this happened? Is the only answer that I got the distributor drive gear 180 degrees out?
I re-read thru the manuals and the directions are clear. The drive gear slot is off-set to one side, they show the proper angle with the case seam, they have pictures and everything. Maybe since the engine was not on the car, I somehow was looking at it upside down? Damn this really sucks!
Posted by: stugray Jul 11 2013, 10:27 AM
Confusion resolved: I have the notch (visible at the top with #1 @ TDC) AND a white mark 180 degrees from that like Java mentioned.
So I can see the white mark from below when the engine is at TDC #1.
So I am not losing my mind, just my memory.
However I struggled to get the timing right repeatedly until I found TDC #1 and then set the static timing with the volt meter.
The engine would backfire and act like it wanted to start after 5 times trying to set it the wrong way.
Once I found REAL TDC #1 and set timing using the static method, the engine fired up on the first crank.
I also realized that in my setup (carbs & temporary 009 dizzy) I have a lot of rotation of the dizzy available.
I can essentially turn it all the way around if I want.
So since you do not have as much adjustment available with the SVDA, it might be possible to get the dist drive gear installed with a clocking such that you might never get it to work without pulling the gear.
Stu
Posted by: stugray Jul 11 2013, 10:31 AM
I re-read thru the manuals and the directions are clear. The drive gear slot is off-set to one side, they show the proper angle with the case seam, they have pictures and everything. Maybe since the engine was not on the car, I somehow was looking at it upside down?
I followed Jake's video and installed the drive gear and dist while the engine halves were still split.
Even verifying it looked exactly like in Jake's video and a helper verifying it, I still did not get the clocking right.
However in my application, it does not matter.
Stu
Posted by: Bob L. Jul 11 2013, 10:54 AM
Malcolm,
Have you tried the #1 wire on the right rear tower? you were asked if if it was on the right rear and answered that it was "still on the front".
Maybe I missed it but I don't see in the conversation where you did that. It sounds like the dizzy is off by 180Deg but with #1wire on the right front you're still off by 90.
Posted by: Bartlett 914 Jul 11 2013, 11:02 AM
Did you ever check your compression?
Posted by: malcolm2 Jul 11 2013, 11:03 AM
Malcolm,
Have you tried the #1 wire on the right rear tower. you were asked if if it was on the right rear and answered that it was "still on the front".
Maybe I missed it but I don't see in the conversation where you did that. It sounds like the dizzy is off by 180Deg but with #1wire on the right front you're still off by 90.
Yes, I did try to start the car with #1 plug wire on the front right and then the back right and then of course, followed by the firing order in a clockwise direction; the other plug wires.
Funny thing is that the rotor button appears to be pointing somewhere between the back rt and the front rt. Tonight I will go thru the static timing adjustment. It was not done after finding either "alternate #1" and it sounds like it might be a big part that I missed.
Posted by: malcolm2 Jul 11 2013, 11:16 AM
Did you ever check your compression?
No, I have not checked compression. I have a gauge, and someone at work mentioned it, but I never got to that. Would I still be looking for total value per cylinder and variation between cylinders?
I do know that this engine is tuff to turn by hand, and I can hear the air release as I turn it.
Posted by: malcolm2 Jul 11 2013, 11:21 AM
The engine would backfire and act like it wanted to start after 5 times trying to set it the wrong way.
Once I found REAL TDC #1 and set timing using the static method, the engine fired up on the first crank.
My difference here is that I have never really heard any firing, no backfire, I just hear the starter cranking when I hit the key.
BTW: the vacuum does get in the way, by I probably have 80 to 100 degrees of rotation on the distributor.
Posted by: Bartlett 914 Jul 11 2013, 11:42 AM
Did you ever check your compression?
No, I have not checked compression. I have a gauge, and someone at work mentioned it, but I never got to that. Would I still be looking for total value per cylinder and variation between cylinders?
I do know that this engine is tuff to turn by hand, and I can hear the air release as I turn it.
No Compression, no fire. It will tell you a lot.
Posted by: Mblizzard Jul 11 2013, 01:15 PM
Wow this is a bitch. Besides the time I had the dizzy 180 out I had a something similar (weak spark) due to grounding issues. This is a long shot but take a ground wire directly from the battery to the case.
Also pull the plugs and let any built up gas evaporate. I will have to tell you the flame story some time.
Did you ever pull the dizzy at TDC and verify the orientation of the drive gear? I think there is a good picture in the Haynes manual. If yours is different you know where to dig next.
Posted by: timothy_nd28 Jul 11 2013, 01:30 PM
Even in the alternate number one location, the car should of fired or did something. How sure are you that the marks on the cam gear lined up with the crank gear? I don't mean to insult your intelligence, I just want to be extra thorough.
Compression test would be good to know, and its a quick test. Do you still have spark? Sometimes if the ignition switch is left on without the engine running can burn and degrade the points.
The car should of sputtered, stumbled or something especially running off ether.
Posted by: bigkensteele Jul 11 2013, 02:53 PM
No need to completely pull the dizzy. You can remove the retainer nut and pull the dizzy up about 1/2", which is enough to pull the drive tabs out of the grooves on the gear. Then just rotate it 180 degrees and push the dizzy back in. You will feel it seat when you have the drive tabs back in. If you put a new O-ring on the shaft, it is pretty tight and hard to pull it up.
I had a similar experience last year when I did mine. My tin had gotten bent up a little, which was preventing the distributor from seating fully when I tightened it down. Every time I tried to start it, it would jump time. Took me days to figure out what was happening. When I finally realized what was going on, I hammered the tin back down (don't remember if I pulled the dizzy to do this). After that, it seated fine, I did a static timing, and it fired right up.
Another tip for finding TDC - line up your timing marks to TDC and pull the #1 spark plug. Use a straw from Mickey Ds to feel for the top of the piston. Do NOT use a chopstick!!!
Posted by: malcolm2 Jul 11 2013, 05:14 PM
Even in the alternate number one location, the car should of fired or did something. How sure are you that the marks on the cam gear lined up with the crank gear? I don't mean to insult your intelligence, I just want to be extra thorough.
Compression test would be good to know, and its a quick test. Do you still have spark? Sometimes if the ignition switch is left on without the engine running can burn and degrade the points.
The car should of sputtered, stumbled or something especially running off ether.
It has been about 15 months since the engine was done. At this point I can't be sure of anything. But I remember the 1 dot, 2 dot alignment on the crank and the cam gears. So there is a good chance that I did it right.
Note to self, take pictures of the key points of engine ASSMEBLY too.
Posted by: timothy_nd28 Jul 11 2013, 05:46 PM
Excellent. That's good enough for me
Posted by: Porschef Jul 11 2013, 05:48 PM
Wait a minute...I just pulled my dizzy last evening to see if the unknown seal I found was for said distributor...(it was  ) ......
The slots for the dizzy drive are off center. It can only go back in completely one way...
Or did I have one beer too many??
I swear I didn't use a BFH to reinstall it
Posted by: malcolm2 Jul 11 2013, 06:13 PM
Excellent. That's good enough for me
OK I have found TDC once again. THis time I felt the flywheel notch as well as all the other stuff. I have found my alternate #1 as the right rear tower. I am nowgoing to read the Pelican timing thing once more and pull out the voltmeter.
 one to read with!
Posted by: malcolm2 Jul 11 2013, 06:37 PM
Excellent. That's good enough for me
OK I have found TDC once again. THis time I felt the flywheel notch as well as all the other stuff. I have found my alternate #1 as the right rear tower. I am nowgoing to read the Pelican timing thing once more and pull out the voltmeter.
one to read with!Pelican static timing has you put your volt meter on - coil and ground. then you turn the dizzy and watch for 0 volts then back to 12 volts and stop.
Here is the deal. They want me to approach 12v from CCW direction. I can't. I get 12 volts when the vacuum is on the fan housing. Moving CCW takes me to 0 but never back to 12.
COmments?
Posted by: The Cabinetmaker Jul 11 2013, 06:57 PM
I have a comment, but I'm not gonna repeat myself again.
Posted by: malcolm2 Jul 11 2013, 07:01 PM
I have a comment, but I'm not gonna repeat myself again.
1.you folks have scared the hell out of me about pulling that thing
2. I tried last night and it is really really stuck. If I pry or pull too hard the scared factor goes up!
3. I am just going to DO IT! There is no other option.
Posted by: Mblizzard Jul 11 2013, 07:13 PM
We are there with you. I went through a lot of suggestions and trial and error recently myself. If you am confirm the gear is in the right position it takes a big part of the equation away. Heck I bet there are a number of people that would be willing to talk you through it.
If you an FaceTime or Skype on you phone the other person could be there. But you seem to have a pretty good grasp of what to do.
Posted by: stugray Jul 11 2013, 07:27 PM
If you rotate the dist until the vacuum can hits the fan housing, then turn it CCW, how far can you turn it?
If you can turn it more than 90 degrees, then turn it all the way CCW and move the #1 wire CW in the cap by one hole.
Now you should be on the other side of the adjustment range.
And as for the
Pulling the dizzy should not be scary.
Once the dizzy is out, pulling the dist drive gear out of the case is the only (slightly) scary part.
You put the drive gear in right? Are you positive that you put the special washer on?
With heavy grease? Then the drive gear should come out with the washer still attached.
However, we have not determined that the gear is in the wrong place yet.
Setting the engine at TDC #1 and looking down the hole is easy.
Stu
Posted by: malcolm2 Jul 11 2013, 07:40 PM
If you rotate the dist until the vacuum can hits the fan housing, then turn it CCW, how far can you turn it? I TURN IT ABOUT 90 DEGREES 'TIL IT HITS THE COLD START VALVE CONNECTOR
If you can turn it more than 90 degrees, then turn it all the way CCW and move the #1 wire CW in the cap by one hole. I CAN DO THAT.
Now you should be on the other side of the adjustment range.
And as for the
Pulling the dizzy should not be scary.
Once the dizzy is out, pulling the dist drive gear out of the case is the only (slightly) scary part. I GUESS THAT IS WHAT I MEANT.
You put the drive gear in right? BEST I CAN REMEMBER EVERYTHING IS IN AND IN CORRECTLY....ALMOST EVERYTHING. IF IT WASN'T IN, THE ROTOR WOULD NOT TURN, RIGHT?
Are you positive that you put the special washer on? I DO REMEMBER THE DISCUSSIONS ABOUT IT BEFORE AND IN JAKE'S VIDEO, SO I AM SAYING YES.
With heavy grease? Then the drive gear should come out with the washer still attached.
However, we have not determined that the gear is in the wrong place yet. SO YOU ARE SAYING THAT THE DIZZY IS OFF, BUT MAYBE NOT THE GEAR?
Setting the engine at TDC #1 and looking down the hole is easy. AT LEAST SOMETHING IS EASY!
Stu
Posted by: stugray Jul 11 2013, 07:48 PM
" IF IT WASN'T IN, THE ROTOR WOULD NOT TURN, RIGHT?"
I was just asking if you personally put the gear in to see if you remember the washer.
And you cannot get the dizzy misaligned with the gear.
The tabs on the bottom of the dizzy are offset so it only engages with the gear in one orientation.
Stu
Posted by: malcolm2 Jul 11 2013, 08:05 PM
" IF IT WASN'T IN, THE ROTOR WOULD NOT TURN, RIGHT?"
I was just asking if you personally put the gear in to see if you remember the washer.
And you cannot get the dizzy misaligned with the gear.
The tabs on the bottom of the dizzy are offset so it only engages with the gear in one orientation.
Stu
Oh, I can't be positive about anything now. But I know I that I knew about it...So I can only hope that I included it. That being said, I did install the gear, and I am pretty sure that I included the washer. And I knew about the offset slot. I found it again last night in one of the manuals I have.
Posted by: malcolm2 Jul 11 2013, 08:13 PM
Ok I have moved the alternate #1 from BACK RIGHT to FRONT RIGHT. And I tried the static timing again....at #1 TDC of course. Same problem. I get 12 volts at the fan housing. so there is no way to approach 12v in CCW rotation. Fan to cold start is CCW and the meter is reading 12 'til about 1/2 way, then it drops.....but not to zero. it drops to about 0.36 then to about 0.28 and then I hit the Cold start valve.
from the Cold start valve I am low and move CW to 12 at about 1/2 way.
is the fact that I don't hit zero volts relevant?
Posted by: malcolm2 Jul 11 2013, 08:50 PM
I have removed the distributor. I look down the hole and I see the drive gear slot pointing toward my alternate #1. Is the goal now to get the slot angled correctly? I assume I could lift it SLIGHTLY and rotate?
Posted by: stugray Jul 11 2013, 09:05 PM
If you have the haynes manual, a picture of the distributor drive positioned at TDC is on page 65, figure 3.6.
And do you have Jake's engine assembly video?
The procedure for doing the static timing can be done visually by looking down into the distributor with the cap & rotor out.
You should be seeing the points opening & closing as you rotate the distributor body.
Stu
Posted by: malcolm2 Jul 11 2013, 09:12 PM
If you have the haynes manual, a picture of the distributor drive positioned at TDC is on page 65, figure 3.6.
And do you have Jake's engine assembly video?
The procedure for doing the static timing can be done visually by looking down into the distributor with the cap & rotor out.
You should be seeing the points opening & closing as you rotate the distributor body.
Stu
Yes I have both and the manual was opened to that page. I do have the video. I will give it a look again.
I feel like the complete removal of the drive gear is not required. I just need to lift if slightly and drop it back when I hit the 12 degrees pictured, agreed?
Posted by: Bartlett 914 Jul 11 2013, 09:16 PM
I find it hard to believe after 5 pages of screwing around with the distributor and where is my TDC? etc and still no spark or firing? Maybe go back to basics.. Do you have a spark? Place a plug with #1 wire laying on the top of the engine and crank. Does it spark. You need spark, fuel and compression. Check compression (now I am repeating myself). This will tell you a lot! do you have 5 PSI? 50 PSI 100 or more? This will clear valve and cam / crank timing.
Posted by: stugray Jul 11 2013, 09:22 PM
I just compared the picture in the haynes manual to Jakes video, and the slots do not appear to be lined up the same.
The haynes manual shows the slot 12 deg. from perpendicular to the fan housing.
In Jakes video he is inserting the slot almost vertical which would line it up with the dist hold-down bolt in the case.
I tried to use Jake's method when I assembled it and must have been off some.
My rotor points almost directly at the CYL#1 spark plug when at TDC.
Stu
Posted by: malcolm2 Jul 11 2013, 09:49 PM
I just compared the picture in the haynes manual to Jakes video, and the slots do not appear to be lined up the same.
The haynes manual shows the slot 12 deg. from perpendicular to the fan housing.
In Jakes video he is inserting the slot almost vertical which would line it up with the dist hold-down bolt in the case.
I tried to use Jake's method when I assembled it and must have been off some.
My rotor points almost directly at the CYL#1 spark plug when at TDC.
Stu
Yes looking at the video again, that is how I installed it. And that is the orientation as I pulled the dizzy. You are correct, it does not match the manuals. Next challange is to get the "pinion" rotated to 12 degrees and the small segment towards the outside of the vehicle, like the haynes and clymer manual.
Posted by: timothy_nd28 Jul 11 2013, 09:56 PM
At least you FI system is working, that's half the battle!
Posted by: malcolm2 Jul 11 2013, 10:04 PM
At least you FI system is working, that's half the battle!
I guess I should take that back.... I am positive about the FI system. Thank you for that! But I think I am in for a battle to get this drive gear (pinion) out, or moved. It lifts up about 1/2 way then hits a snag and my grabber tool slips.
I think I am quitting for now. I have to be away for about 10 days. This is going to drive me crazy the whole time.
Thanks again. I'll restart.... (pun not intended) this mess after.
Posted by: malcolm2 Jul 11 2013, 10:09 PM
I find it hard to believe after 5 pages of screwing around with the distributor and where is my TDC? etc and still no spark or firing? Maybe go back to basics.. Do you have a spark? Place a plug with #1 wire laying on the top of the engine and crank. Does it spark. You need spark, fuel and compression. Check compression (now I am repeating myself). This will tell you a lot! do you have 5 PSI? 50 PSI 100 or more? This will clear valve and cam / crank timing.
Sorry dude, but EVERYTHING, I mean everything else is good. Or was 2 days ago. I tried to check compression, but my tool is a screw in type and I could not get it tight enough to guarantee the readings.
Do folks use the PUSH IN type for these VW engines with all the cooling tin? Maybe I can rent-a-tool one and give it a shot.
Thanks,
Clark
Posted by: timothy_nd28 Jul 11 2013, 10:10 PM
It won't just pop out. You'll need to spin and pull at the same time. You may lose tdc when rotating the engine, but I'm sure your getting good at finding tdc by now.
Posted by: malcolm2 Jul 11 2013, 10:18 PM
THANKS TO EVERYONE.... I will not be bothering you about this for about a week, so please take care of everyone else, and save up for more of my problems at the end of July.
Thanks again,
Clark
Posted by: ClayPerrine Jul 12 2013, 11:11 PM
I have a suggestion for you to try....
Get a compression gauge with a two piece hose. Take the schraeder (tire) valve out of the hose that screws into the spark plug hole, and then install it in the number 1 cylinder spark plug hole. Bump the engine over with a remote starter button while holding your thumb over the hole in the end of the compression tester hose. You will feel compression on your thumb when you are on the way to top dead center. Then move the engine in the normal direction of rotation until the timing mark on the fan (or flywheel) is centered.
Remove the distributor. Remove the distributor drive gear. Use a magnet to retrieve the special washer from the bottom of the hole. Use some wheel bearing grease to hold the washer on the bottom of the gear. Reinstall the drive gear so that the narrow side is on the passenger side of the car, and the slot points 12 degrees off center line, going from left front to right rear of the car.
Reinstall the distributor. Move the vacuum can until it is centered on the wire bail that holds the oil filler on the engine. Put the distributor cap on. Then install the plug wires. Connect the right rear distributor tower to the right rear plug. Connect the right front tower to the right front plug. Connect the left front tower to the left REAR plug, and connect the left rear tower to the left FRONT plug.
If you did that exactly as I have outlined, you should be able to start the car and be somewhere between 6 and 9 degrees timing. Adjust with a light once it is running.
And fyi.... you really need to install the distributor correctly. When VW designed the distributor, they retarded the timing on the #3 cylinder by about 2 degrees by deliberately mis-locating the point cam. This was to make the #3 cylinder run cooler. Installing the wires on the wrong towers will result in retarded timing on the wrong cylinder, and possible detonation on #3 due to it running hot.
Posted by: malcolm2 Jul 21 2013, 01:13 PM
Thanks Clay. I just returned home from 10 days in costa rica. and i did use magnet. I will try your suggestion this evening... I hope. Everything is out safely!
Posted by: stugray Jul 21 2013, 01:55 PM
I did figure out part of this puzzle.
If you use Jake's method from the video, the drive gear angle could be different based on what distributor you use the set the angle.
Here is a pic of two distributors with the rotor point up.
Those dist drive cams are different by a lot.
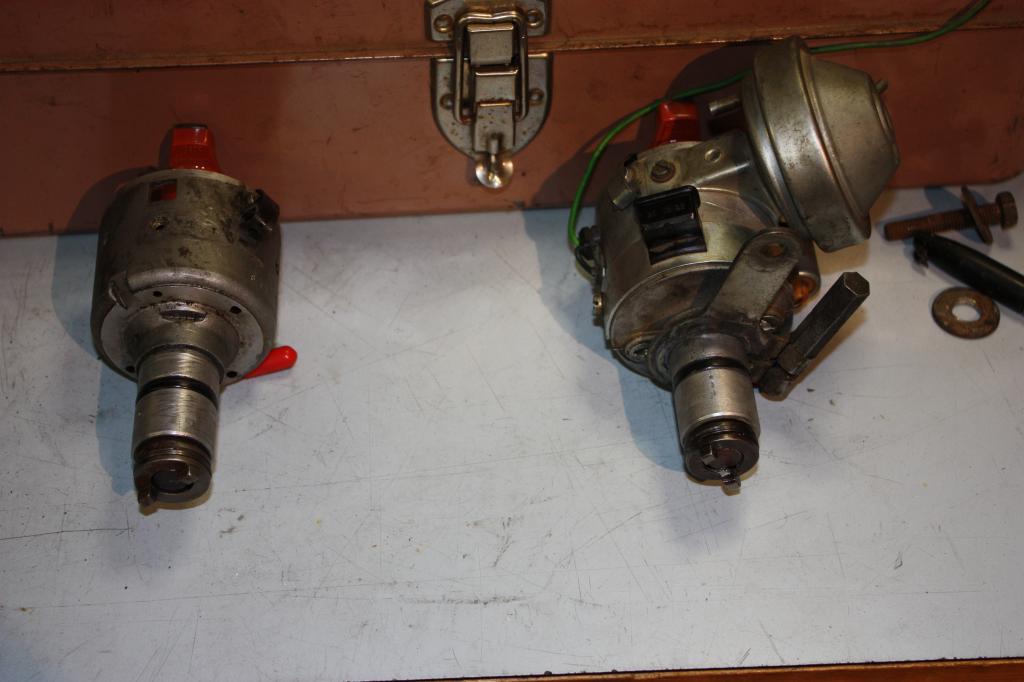
Stu
Posted by: malcolm2 Jul 27 2013, 02:18 PM
Well bad news for me on this one. I was able to get what I thought was a good seal on all 4 plug holes with my compression tester and I got
40 PSI on each cylinder. WTF?
I had several people recommend Racer Chris @ Tangerine racing as a guy that might be able to shine some light on this. He has been helping try to verify that I somehow screwed up the cam gear indexing before I pull it and crack it open. I am not sure it can be verified other than the fact that every other system is working.
The pinion was out of whack, it has been removed and replaced at 12 degrees per all the manuals. then the static timing was re-set. Since then I have replace the condenser, points and tried a Bosch coil too. New NGK plugs as well. But that did not help.
Anyone else care to chime in? I'll try anything!
Guess I'll break out the engine stand again. 
Posted by: Racer Chris Jul 27 2013, 02:36 PM
Anyone else care to chime in? I'll try anything!
Guess I'll break out the engine stand again.
One thing at a time.
Patience grashopper.
Check your inbox.
Posted by: timothy_nd28 Jul 27 2013, 03:35 PM
You have fuel, spark but no compression. I'm thinking its either miss adjusted valves, incorrect indexed cam or just wrong cam altogether.
Posted by: Racer Chris Jul 27 2013, 04:53 PM
You have fuel, spark but no compression. I'm think either miss adjusted valves, incorrect indexed cam or just wrong cam altogether.
I think I've ruled out the cam index and am currently having Clark focus on the valve adjustment.
Posted by: malcolm2 Jul 27 2013, 06:17 PM
You have fuel, spark but no compression. I'm think either miss adjusted valves, incorrect indexed cam or just wrong cam altogether.
I think I've ruled out the cam index and am currently having Clark focus on the valve adjustment.
sounds good, I am heading to Yahoo and see what good news there!
Posted by: malcolm2 Jul 28 2013, 07:23 PM
I think I've ruled out the cam index and am currently having Clark focus on the valve adjustment.
For those of you following along.
I had lots of kid stuff to do today, but I did find time to set all eight valves at 0 lash. Even checked (best I could) to see if the pushrods might not be seated properly.Double checked my work and turned the key. I am sorry to say that the engine did not start.
Clark
Posted by: timothy_nd28 Jul 28 2013, 07:27 PM
I wish you lived closer 
Posted by: Racer Chris Jul 29 2013, 07:03 AM
Sorry Clark.
After watching your short video I was nearly convinced it was a valve adjustment problem and not cam index.
I don't kow what else could cause your symptoms so I guess its time to pull the engine.
I know one knowledgeable member in Nashville who you might ask to pay you a visit before embarking on a major teardown.
William Grier is in Hermitage. He's been working on 914s for a long time.
His screenname is WFG.
Posted by: malcolm2 Jul 29 2013, 08:54 AM
Sorry Clark.
After watching your short video I was nearly convinced it was a valve adjustment problem and not cam index.
I don't kow what else could cause your symptoms so I guess its time to pull the engine.
I know one knowledgeable member in Nashville who you might ask to pay you a visit before embarking on a major teardown.
William Grier is in Hermitage. He's been working on 914s for a long time.
His screenname is WFG.
Yes, William and I have talked numerous times and he has mentioned coming to visit. His workplace is actually very close. He was busy last week, I will call him today, maybe he can give it a look.
I did recheck one cylinder's compression last night, it actually dropped a little. It was under 40, maybe 35-ish. Would it be worth trying to loosen the valves to OEM pushrod specs and give it a shot....0.006 -ish?
What is the theory behind the 0 lash on Chromoly pushrods?
Posted by: Racer Chris Jul 29 2013, 09:07 AM
Unless you got them too tight, I wouldn't think loosening the valve adjustment will be helpful at this stage.
Stock aluminum pushrods grow at a rate similar to the engine expansion.
CrMo pushrods grow much more slowly so starting with them at zero will put them at the right lash when the engine is hot.
I watched a racer experiment with carbon fiber pushrods in the past.
He had to set them up with an interference fit cold so they would be right at temperature.
The engine was very difficult to start and run cold.
Posted by: stugray Jul 29 2013, 09:07 AM
I cannot visually remember well enough.... is it possible to see the cam index marks through the oil pump hole?
The chromoly pushrods expand at a different rate than the stock pushrods.
Supposedly once everything is at operational temp, there will be just the right amount of lash if they are at zero when cold.
Stu
Posted by: timothy_nd28 Jul 29 2013, 09:23 AM
You should hurry and tear down this engine before those fuel injectors seize again! 
Posted by: malcolm2 Jul 29 2013, 09:37 AM
You should hurry and tear down this engine before those fuel injectors seize again!
Last time, 15 months went by before I used the injectors. I will shoot for less than 15 days this time. Maybe I will soak them while they wait....
Clark
Posted by: Mblizzard Jul 29 2013, 10:37 AM
Sorry it is going this way. I am real interested to find out the solution. Again let me know if you want to do a tag team tear down. I can make the drive up. It would not be a completely generous gester as I would plan on picking your brain on the A-arm rebuild process that you completed.
Let me know.
Posted by: Cap'n Krusty Jul 29 2013, 01:25 PM
Sorry I'm late to the party! With #1 and #3 pistons at TDC, one of those 2 cylinders will be on TDC compression stroke. A plastic soda straw makes a great tool for determining TDC, a chop stick doesn't. The other will not. The one on compression stroke will have clearance on both valves, the other will not. Once you've found the correct cylinder (the one with valve clearance), look at the rotor position. That would be the cylinder that should be sparking. If neither cylinder has valve clearance, you have a fundamental problem, assuming the valves have been adjusted correctly. (Might want to use the method outlined in my post in the classic threads to be sure you have proper clearance.) This method is cam lobe based and doesn't care which cylinder you're "on". The "fundamental" problem of which I speak would be camshaft timing, and that's one requiring disassembly for correction.
The Cap'n
Posted by: malcolm2 Jul 29 2013, 01:56 PM
Sorry I'm late to the party! With #1 and #3 pistons at TDC, one of those 2 cylinders will be on TDC compression stroke. A plastic soda straw makes a great tool for determining TDC, a chop stick doesn't. The other will not. The one on compression stroke will have clearance on both valves, the other will not. Once you've found the correct cylinder (the one with valve clearance), look at the rotor position. That would be the cylinder that should be sparking. If neither cylinder has valve clearance, you have a fundamental problem, assuming the valves have been adjusted correctly. (Might want to use the method outlined in my post in the classic threads to be sure you have proper clearance.) This method is cam lobe based and doesn't care which cylinder you're "on". The "fundamental" problem of which I speak would be camshaft timing, and that's one requiring disassembly for correction.
The Cap'n
Thanks Cap'n, can you clarify for me?:
1. When you say "valves will have clearance" in this setting, what does that mean?
2. I am fishing around the plug hole with the straw, looking for what? Top of the piston, slightly opened valves???
I'll look for your classic post, but I bet Racer Chris directed me... He had me basically open a valve on 1-2 side, set the corresponding valve on 3-4 side and visa versa?
Posted by: Cap'n Krusty Jul 29 2013, 03:11 PM
Sorry I'm late to the party! With #1 and #3 pistons at TDC, one of those 2 cylinders will be on TDC compression stroke. A plastic soda straw makes a great tool for determining TDC, a chop stick doesn't. The other will not. The one on compression stroke will have clearance on both valves, the other will not. Once you've found the correct cylinder (the one with valve clearance), look at the rotor position. That would be the cylinder that should be sparking. If neither cylinder has valve clearance, you have a fundamental problem, assuming the valves have been adjusted correctly. (Might want to use the method outlined in my post in the classic threads to be sure you have proper clearance.) This method is cam lobe based and doesn't care which cylinder you're "on". The "fundamental" problem of which I speak would be camshaft timing, and that's one requiring disassembly for correction.
The Cap'n
Thanks Cap'n, can you clarify for me?:
1. When you say "valves will have clearance" in this setting, what does that mean?
2. I am fishing around the plug hole with the straw, looking for what? Top of the piston, slightly opened valves???
I'll look for your classic post, but I bet Racer Chris directed me... He had me basically open a valve on 1-2 side, set the corresponding valve on 3-4 side and visa versa?
"Clearance" meaning you can feel the rocker move with respects to the valves when you wiggle them along the axis of the valve stem. The straw is used to dectect TDC by holding it against the piston top as you rotate the engine by hand. When it stops, or pauses, axial movement you've reached the top of the piston travel. It's a little difficult with the plug hole location in a 1.7/1.8 cylinder head, but you need to determining TDC. Actually, thinking about it, you can use the TDC mark on the fan, as it's pinned to the crank. Too many water cooled 5 cylinder Audi engines floating through my mind! I suggest you adjust the valves, then check for TDC, then look at the clearance of the 2 valves on the cylinder to which the rotor points. Again, this assumes the distributor is installed correctly. Remember, one cylinder will have clearance on both rocker arms, the opposite one won't.
The Cap'n
Posted by: Racer Chris Jul 29 2013, 05:35 PM
You're way too late to this party Cap'n
The fat lady has already sung, lol.
Posted by: Cap'n Krusty Jul 29 2013, 06:10 PM
She may have already sung, but I was invited this afternoon, so the problem obviously remains unsolved .......................... I do admit to not reading much of the previous 7 pages, however.
The Cap'n
Posted by: Mblizzard Jul 29 2013, 06:16 PM
Well I guess it is a party now that The Cap'n is here! I will keep reading and learn all I can.
Posted by: malcolm2 Jul 29 2013, 06:59 PM
She may have already sung, but I was invited this afternoon, so the problem obviously remains unsolved .......................... I do admit to not reading much of the previous 7 pages, however.
The Cap'n
Yes, I did it... I saw the Cap'n lurking some days back, but he never chimed in. and yes there are 7 pages of try, try again. He is the 1st to mention the pistons although I did try the straw trick some time back and he is correct, it is not easy.
I am just procrastinating about draining the oil and getting started.
 I mowed the grass and vacuumed the den, washed the dog, asked the Cap'n's opinion, you know, the regular stuff.
 I did not make it down to see WFG and he has not called back.
 I am dropping this baby right now! WFG can help me put it back together!
Posted by: malcolm2 Jul 29 2013, 09:48 PM
2.5 hours and everything up top is loose. Exhaust is out, everthing below is loose.
1 problem. The cone set screw on the rear of the shift rod was tight. The allen wrench insert striped, then I broke an extractor off in the allen head. Wow. Done for now!
Posted by: malcolm2 Aug 1 2013, 09:48 AM
![]() update
update
Holy Mackerel: I highly recommend that folks be aware that the conical set screws used on the shift shaft should NOT be over-tightened. And, best I could tell, the brand new ones that I just attempted to remove required a standard Allen wrench, not metric.
Long story short, I had to cut off the part Porsche calls a HEAD SHIFT ROD. It's on the rear of the shift rod and swivels to operate the shaft that enters the tranny. Very delicate operation.
The result is this engine is out, on the table and most of the accessories have been removed. I will have it open by Saturday and I hope to have an answer for the 40 PSI compression on all 4 cylinders. 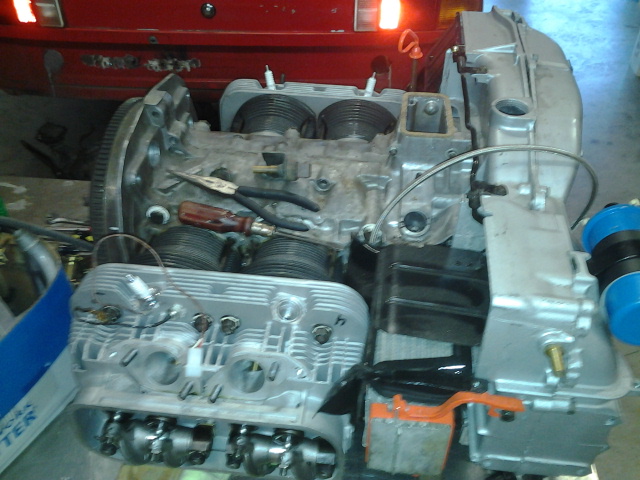
Posted by: The Cabinetmaker Aug 1 2013, 09:53 AM
It required an sae hex wrench bcause it WAS overtightened.
Posted by: malcolm2 Aug 1 2013, 10:08 AM
It required an sae hex wrench bcause it WAS overtightened.
The one on the other end came out and the SAE Allen was nice and snug. the metric wrench was loose. Maybe my inexpensive hex wrench set is not to specs.

Posted by: Bartlett 914 Aug 1 2013, 01:25 PM
I'll bet someone used Loctite. If it is too tight, add heat. It doesn't take a lot of heat to cause the Loctite to break down. It is best to use a new cone screw.
Posted by: Mblizzard Aug 1 2013, 03:54 PM
Running or not, that is a good looking engine.
Posted by: timothy_nd28 Aug 1 2013, 07:03 PM
Holy Mackerel: I highly recommend that folks be aware that the conical set screws used on the shift shaft should NOT be over-tightened. And, best I could tell, the brand new ones that I just attempted to remove required a standard Allen wrench, not metric.
Long story short, I had to cut off the part Porsche calls a HEAD SHIFT ROD. It's on the rear of the shift rod and swivels to operate the shaft that enters the tranny. Very delicate operation.
The result is this engine is out, on the table and most of the accessories have been removed. I will have it open by Saturday and I hope to have an answer for the 40 PSI compression on all 4 cylinders.
How come the rear lights are on?
Posted by: malcolm2 Aug 2 2013, 06:32 AM
How come the rear lights are on?
The front ones are on too.
Just kidding.....
 Must be the flash from the camera. Next time I'll use the RED EYE setting.
Posted by: malcolm2 Aug 3 2013, 09:17 AM
I am progressing along just fine. I have the case ready to split, but I need to get the pistons off. The clips I used for the pins are the spring type. How in the world do you get these things out?
I took the picture below when I was installing them. 2nd question, are these a 1 time use part...? I may find out that answer when I start digging them out.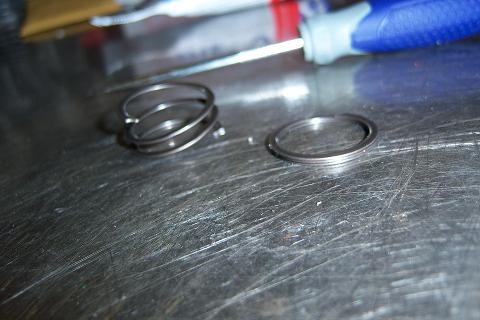
Posted by: timothy_nd28 Aug 3 2013, 10:12 AM
The wrist pins are held in with that? wild 
Posted by: Racer Chris Aug 3 2013, 10:26 AM
I think spiral lock wrist pin retainers are more common than circlips, especially in american made engines.
I think they are also more common on race engines.
They are a PITA to install or remove on a Type 4 but are better at staying in place compared to wire retainers or circlips.
Posted by: Racer Chris Aug 3 2013, 10:27 AM
To answer Clark's question - they can be reused if not damaged during removal.
Posted by: timothy_nd28 Aug 3 2013, 10:33 AM
You learn something new everyday
Posted by: malcolm2 Aug 3 2013, 10:49 AM
Once I took a closer look at the pin keepers with a bright light, I figured it out...they screw in, they have to screw out.
On another note....Please don't EVERYONE agree, but, YES, I am an idiot. My cam was not 1 tooth off, it was 5. 
At least I know. 


The bad thing is I marked the dots with a sharpie, SO I WOULD NOT SCREW UP! Can I sue Sharpie?
Making me a Bloody Mary and fixing this damn!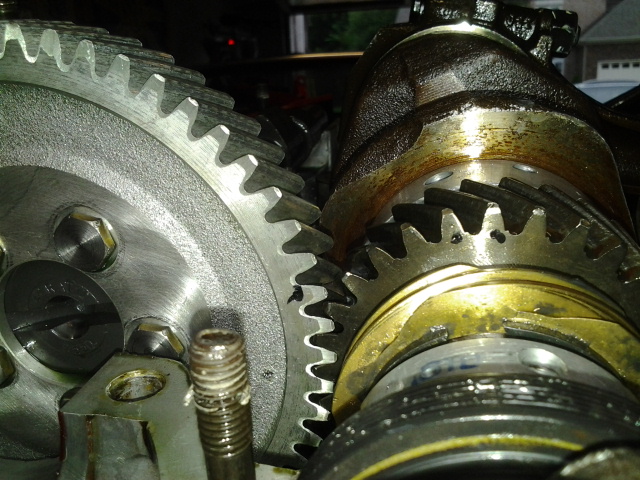
Posted by: timothy_nd28 Aug 3 2013, 10:54 AM
Great! So you'll have it all back together in the next 2 hours, so we can try starting it again?
Posted by: malcolm2 Aug 3 2013, 10:55 AM
Great! So you'll have it all back together in the next 2 hours, so we can try starting it again?
Only if autozone sells oil pump gaskets. And a short list of other things I broke taking it apart.
Posted by: Cap'n Krusty Aug 3 2013, 11:18 AM
Great! So you'll have it all back together in the next 2 hours, so we can try starting it again?
Only if autozone sells oil pump gaskets. And a short list of other things I broke taking it apart.
"Autozone"? Surely you jest ......................
The Cap'n
Posted by: Java2570 Aug 3 2013, 11:45 AM
Once I took a closer look at the pin keepers with a bright light, I figured it out...they screw in, they have to screw out.
On another note....Please don't EVERYONE agree, but, YES, I am an idiot. My cam was not 1 tooth off, it was 5.
At least I know.
The bad thing is I marked the dots with a sharpie, SO I WOULD NOT SCREW UP! Can I sue Sharpie?
Making me a Bloody Mary and fixing this damn!
Wow....5!! You did it up right on that one! At least you know now what's wrong!!
Posted by: Mblizzard Aug 3 2013, 02:42 PM
Wow that is impressive! Well at least you are moving forward.
Posted by: Jeff Bowlsby Aug 3 2013, 03:07 PM
I count 4 off not 5. Glad you found it Clark...you will never make that mistake again.
Posted by: malcolm2 Aug 3 2013, 04:35 PM
Great! So you'll have it all back together in the next 2 hours, so we can try starting it again?
Only if autozone sells oil pump gaskets. And a short list of other things I broke taking it apart.
"Autozone"? Surely you jest ......................
The Cap'n
Darn it... they don't have it!
Posted by: timothy_nd28 Aug 19 2013, 07:09 PM
Posted by: malcolm2 Aug 19 2013, 07:53 PM
Yes it has been a while. Everyone knows it is much easier to take something apart than it is to put it back together. Anyway, I had to clean all the sealant off of everything, then re-apply. I would misplace parts and tools, then find them. I would watch parts of Jake's video, read thru the books, etc...
Big stuff going on at my paying job too. I'll post a picture in a minute.
Tonight I am re-routing the vacuum lines, etc.... So I am very close. I ran across something strange. I did not take the hoses off of the DECEL valve the 1st time around. But I did tonight to help route them. The PO had plugged the RED hose from the decel to the air intake. WHY would he have done that? Yes it probably fixed something, but what? What does the decel do?
As a pre-caution, I thought I would get just about everything back on the engine, then I would mount the tranny and the starter and check the compression before she goes in. Just use a spare battery to crank the starter motor. No plugs, injectors, or brain, just pistons making pressure. Anyone have thoughts on that? Good idea, bad idea, another way to do it? Chime in please.
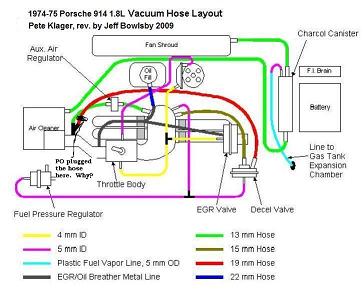
Posted by: timothy_nd28 Aug 19 2013, 08:56 PM
I think you got it this time, go ahead and re-install. I have faith this time 
Posted by: Mblizzard Aug 19 2013, 09:01 PM
That is how I checked the compression on mine. I think that seeing some good compression numbers would make you feel pretty good about putting it back in.
Posted by: Mblizzard Aug 19 2013, 09:02 PM
Delete
Posted by: malcolm2 Aug 19 2013, 09:17 PM

As promised, pictures from my paying job that has kept me busy and engine work secondary. But we are on the home stretch now.
6 40-ton HVAC units done last Saturday, one pictured. New Roof in process, 6 8-ton units to install next week and 6 70-ton units in a couple weeks after that. That is a 400 ton crane. Not cheap, but pretty cool to watch.
Posted by: malcolm2 Aug 20 2013, 04:12 PM
Follow up question to checking compression with the engine on a table....
Tranny connected so the starter can be. Spare battery to turn the starter, but what about the tranny. I don't remember if it was in neutral.
Is that an issue? No axles, no resistance to the starting rotation of the engine. Will this or could this hurt the tranny?
Just going to run the starter long enough to check the compression in each cylinder.
Posted by: Mblizzard Aug 20 2013, 05:18 PM
Should not be an issue if it is in gear. Mine was but it was easy enough to take it out by hand. I could not tell it made a difference either way.
Posted by: Racer Chris Aug 20 2013, 05:31 PM
Would you put the car in gear to do a compression test if the engine was in the car?
Posted by: malcolm2 Aug 20 2013, 05:36 PM
Would you put the car in gear to do a compression test if the engine was in the car?
NO, But without the shifter, how do I know? Can I attach the starter without the transmission?
Posted by: malcolm2 Aug 20 2013, 05:39 PM
Hey anyone know why the PO would have plugged up a vacuum line? The large line from the DECEL valve that goes to the intake boot. picture on post 178.
Posted by: stugray Aug 20 2013, 05:56 PM
You can find neutral very easy with the tranny out of the car.
Is it a side or tail? It feels about the same either way.
Pull forward or back on the lever till you find the half way point (there are three positions).
That should be neutral now the lever should go in & out easy from the R/1 side to 4/5.
You cannot attach the starter without the tranny.
Stu
Posted by: malcolm2 Aug 21 2013, 07:14 PM
OK 2 successes. 1. I was able to properly connect and use my remote starter switch. 1st time I got to try it.
2. I have more than 30 psi compression!
RESULTS: #1 and #3 were 90 #2 and #4 were 100.
I know that is much better but is it still low? I read some posts about 120 to 140. I installed Jake's web cam 9550 for FI and he mandated 8 CR or less. I came in under that IIRC 7.8-ish.
Does that sound reasonable? Brand new everything, KB pistons, AA cylinders, new rings, re-done heads with 2.0 porting???
Posted by: Racer Chris Aug 21 2013, 07:33 PM
OK 2 successes. 1. I was able to properly connect and use my remote starter switch. 1st time I got to try it.
2. I have more than 30 psi compression!
RESULTS: #1 and #3 were 90 #2 and #4 were 100.
I know that is much better but is it still low? I read some posts about 120 to 140. I installed Jake's web cam 9550 for FI and he mandated 8 CR or less. I came in under that IIRC 7.8-ish.
Does that sound reasonable? Brand new everything, KB pistons, AA cylinders, new rings, re-done heads with 2.0 porting???
You won't get very good compression on a dry engine that hasn't been run to seat the rings yet.
You're giving up some power at 7.8 but that's not important now.
The fact that they're equal and way more than 30 is good.
Install it and prep it for running!
Posted by: malcolm2 Aug 21 2013, 07:51 PM
You won't get very good compression on a dry engine that hasn't been run to seat the rings yet.
You're giving up some power at 7.8 but that's not important now.
The fact that they're equal and way more than 30 is good.
Install it and prep it for running!
I can probably live with less power. I wanted a daily driver to get good mileage.....

Posted by: malcolm2 Aug 23 2013, 06:29 PM
Happy Friday.
I started the engine
It will not stay running on it's own. And seems to smoke alot. I got a beer and thought I would sit in the car and hold the revs at 2000, but only lasted 2 minutes. I need to get a pipe for the exhaust and run it outside.
But what is going on with the idle?
After it starts it spits and sputters as I pump the gas pedal. Then it will "catch" and I can control the revs with the pedal. But as soon as I take my foot off it dies.
Clark
Posted by: timothy_nd28 Aug 23 2013, 06:31 PM
AFM connector plugged in?
Posted by: stugray Aug 23 2013, 07:50 PM
Great news!
Do you have an oil pressure gauge on it?
Stu
Posted by: malcolm2 Aug 23 2013, 10:12 PM
Great news!
Do you have an oil pressure gauge on it?
Stu
Yes, But I don't remember checking it while the engine was running. It is the VDO set-up with a connection for the light and one for the gauge. I use the OEM light and it goes off.
I am going to use some piping to send the exhaust out of the garage in the morning. Then I can check a few things.
Posted by: malcolm2 Aug 23 2013, 10:18 PM
AFM connector plugged in?
AFM, is that the air flow meter? The wide connector at end of the FI harness that attaches into the top of the box? Yes, it is connected, seems secure.

I used starting fluid initially and got some ignition, then assembled the box with the filter on it, connected the plug.
The engine fires right up, but stutters and lightly back-fires for a bit, but I can kinda force it to rev and it will rev up and I can hold it at 2k, but no idling on its own. I opened the idle by-pass screw a bit but that did not help or hurt.
Posted by: timothy_nd28 Aug 23 2013, 10:24 PM
Do you still have that inline fuel pressure gauge installed? If so, what is it reading at the lower rpm's? Double check for vacuum leaks/disconnected hoses.
Posted by: malcolm2 Aug 23 2013, 10:29 PM
Do you still have that inline fuel pressure gauge installed? If so, what is it reading at the lower rpm's? Double check for vacuum leaks/disconnected hoses.
I did not see the gauge during starting, but I can check that. After I shut it off, I still have 30+ psi on that gauge.
The only hoses I know are not connected are the ones for the charcoal filter. You think I should mock that up an hook up everything?
I do not have the tank mounted on top of the gas tank. I wanted to see the flow of fuel so I removed it and never put it back.
And I hear what I think is the fuel pump. It makes a strange sound during all this.
Posted by: Mblizzard Aug 24 2013, 03:50 AM
Great to hear it ran! With the in and out of the engine I bet it is a connection issue. Is the smoke seem to be oil or does it smell like gas from running rich. I had something similar and the cold start valve was putting excess fuel in.
Posted by: malcolm2 Aug 24 2013, 07:35 AM
Great to hear it ran! With the in and out of the engine I bet it is a connection issue. Is the smoke seem to be oil or does it smell like gas from running rich. I had something similar and the cold start valve was putting excess fuel in.
I am guessing, oil. Every other time I start it, it smokes up. not every time.
I really need to find me a helper. Since I have to force the idle with the pedal, I can do much investigating.
Any suggestions on what to use for an exhaust pipe? I was thinking about using that black landscaping pipe. But I am worried about it melting and fully closing up the connection point, since that pipe is 5 to 6" in dia and the car's tail pipe is more like 2".
Posted by: timothy_nd28 Aug 24 2013, 08:31 AM
Timing being off isn't helping matters. Of course you can't set the timing till you can get the engine running at low rpm. We need to rule out vacuum leaks, did you reconnect or cap off the decel valve? You do have the exhaust installed, right? If so, spray some starting fluid around the intake, plenum, oil cap, rubber boot, while the car is running and listen for any changes in engine speed.
Posted by: malcolm2 Aug 24 2013, 09:03 AM
I think I am dealing with just exhaust now. Not really smoke. So I will just monitor that.
I have gone over the vacuum hose diagrams and I have everything in the right place, all new hoses that seem to be snug.
Funny thing is, when I do get it running and I am holding the pedal at about 2K revs, it seems to be running smoothly.
Posted by: malcolm2 Aug 24 2013, 09:10 AM
Timing being off isn't helping matters. Of course you can't set the timing till you can get the engine running at low rpm. We need to rule out vacuum leaks, did you reconnect or cap off the decel valve? You do have the exhaust installed right? If so, spray some starting fluid around the intake, plenum, oil cap, rubber boot, while the car is running and listen for any changes in engine speed.
I did set the static timing at the 7.5 mark yesterday.
I did reconnect the decel WITHOUT the PO's plug.
Is there a way to install the exhaust wrong? I am using the OEM stuff from 75. My PO did not supply, but Scarlet75 gave me his old set up.
Small header pipes attach to the heads with copper washers then, bolt up to the heat exchangers. The rear attaches to the tranny hanger and the muffler etc... bolts to that.
I will get me a helper and check the vacuum with it running. Wife and kids are gone. I'll see who I can round up.
Posted by: timothy_nd28 Aug 24 2013, 09:13 AM
Timing being off isn't helping matters. Of course you can't set the timing till you can get the engine running at low rpm. We need to rule out vacuum leaks, did you reconnect or cap off the decel valve? You do have the exhaust installed right? If so, spray some starting fluid around the intake, plenum, oil cap, rubber boot, while the car is running and listen for any changes in engine speed.
I did set the static timing at the 7.5 mark yesterday.
I did reconnect the decel WITHOUT the PO's plug.
Is there a way to install the exhaust wrong? I am using the OEM stuff from 75. My PO did not supply, but Scarlet75 gave me his old set up.
Small header pipes attach to the heads with copper washers then, bolt up to the heat exchangers. The rear attaches to the tranny hanger and the muffler etc... bolts to that.
I will get me a helper and check the vacuum with it running. Wife and kids are gone. I'll see who I can round up.
Sorry, I was making sure that you had the exhaust connected. I didn't want you spraying starting fluid in the engine bay with the exhaust off.
Posted by: SLITS Aug 24 2013, 10:10 AM
I think I will join the party.
The De-accel valve is only to add air to the system on deacceleration (closed throttle) to supposedly prevent backfiring. Car will run nicely without it.
Timing ... a 1.8 is timed at 7.5 with the engine at idle as I remember (800 - 900 rpm, vacuum lines disconnected and plugged). I have no idea of what the static timing should be. Personally, I would start at 0 degrees (TDC) to get the engine started.
No idle, possibly the vane in the AFM is sticking or the idle adjustment screw is closed. If the engine ever backfired through the intake, the AFM could be toast as it disrupts the vane in the AFM.
I never understood the "0" lash bit on the valves. If no lash is present cold, the metal grows as the engine heats up and the valves would never close, but I guess a case could be made that there is a small amount of lash present 'cause the chrome-molly push rods grow at a different rate than the remainder of the engine.
Oh well .... party on.
Posted by: malcolm2 Aug 24 2013, 10:14 AM
Sorry, I was making sure that you had the exhaust connected. I didn't want you spraying starting fluid in the engine bay with the exhaust off.
No apologies needed here only THANK YOUS.
I was able to get my 13 year old to start the car and hold the pedal. I sprayed the fluid in most places and the only time I got an increase in revs was when I was close to the air intake nozzle.
I am 95% sure I don't have a leak.
Let me ask a question about the throttle cable. It should be tight, but not pulling the intake open when at rest, correct?
BTW: I found a dryer vent hose that I did not use and connected it to the landscaping culvert pipe and my garage is just about exhaust free.
Posted by: timothy_nd28 Aug 24 2013, 10:20 AM
So no vacuum leaks, and you have a 2000 rpm sweet spot. This leads me to believe that the air flow meter is having issues. Like Slits said, verify that you can push the flap inside the AFM, and it doesn't hang up. The flap should move on a frictionless path, with only spring tension fighting you. If the car backfires, the AFM flap will warp, and jam up.
Posted by: malcolm2 Aug 24 2013, 10:20 AM
No idle, possibly the vane in the AFM is sticking or the idle adjustment screw is closed. If the engine ever backfired through the intake, the AFM could be toast as it disrupts the vane in the AFM.
Oh well .... party on.
It never backfired hard on me, no telling about the PO. IIRC I tried to open the AFM months ago, but I did not. I believe it was factory sealed. Cover was screwed and glued. Of all the things to get to, that is EZ. I could open her up and give it a look.
Posted by: timothy_nd28 Aug 24 2013, 10:23 AM
you can access the airflow meter flap by removing the rubber boot or thru the air filter side
Posted by: malcolm2 Aug 24 2013, 10:27 AM
you can access the airflow meter flap by removing the rubber boot or thru the air filter side
Am I just checking for movement? Car running or not running? Just reach in with a finger?
OOPS, i did not see your previous post.... I got it.
Seems to move freely. is this the correct setting at rest?
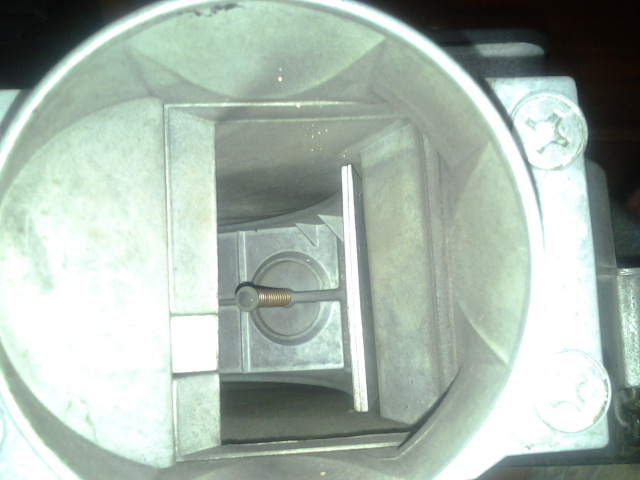
Posted by: timothy_nd28 Aug 24 2013, 10:28 AM
Car off, just checking if the flap moves freely with your finger or a long screwdriver
Posted by: SLITS Aug 24 2013, 10:34 AM
All you will see if you remove the cover on the AFM is the circuitry. If it is sealed with RTV, it has been taken off before ... Bosch wasn't that sloppy.
As I remember there is a screw in the top of the AFM used to set idle, but I've never owned a 1.8.
Would have to look at a unit at the shop to see the position of the vane and that wouldn't be till Monday.
Posted by: malcolm2 Aug 24 2013, 10:38 AM
All you will see if you remove the cover on the AFM is the circuitry. If it is sealed with RTV, it has been taken off before ... Bosch wasn't that sloppy.
It looks factory sealed, no screws just a small bit of glue around the edges.
Posted by: SLITS Aug 24 2013, 10:41 AM
AFM looks clean.
Did the vane move freely with no "sticking" points?
Oh well, carry on ... off to a Baby Shower for 2nd Granddaughter ... wheeeeee!
Tims' avatar shows the AFM with the top off.
Posted by: timothy_nd28 Aug 24 2013, 10:42 AM
On the airflow meter, remove the connector and locate pin 7 and pin 8. What is the resistance between these two? Now check pin 6 and pin 9 resistance.
The throttle cable shouldn't be tight. Also, have you adjusted that big screw on the throttle body? There is another screw on the air flow meter, that should be backed off 4.5 turns.
Posted by: malcolm2 Aug 24 2013, 10:43 AM
All you will see if you remove the cover on the AFM is the circuitry. If it is sealed with RTV, it has been taken off before ... Bosch wasn't that sloppy.
As I remember there is a screw in the top of the AFM used to set idle, but I've never owned a 1.8.
Would have to look at a unit at the shop to see the position of the vane and that wouldn't be till Monday.
This screw?
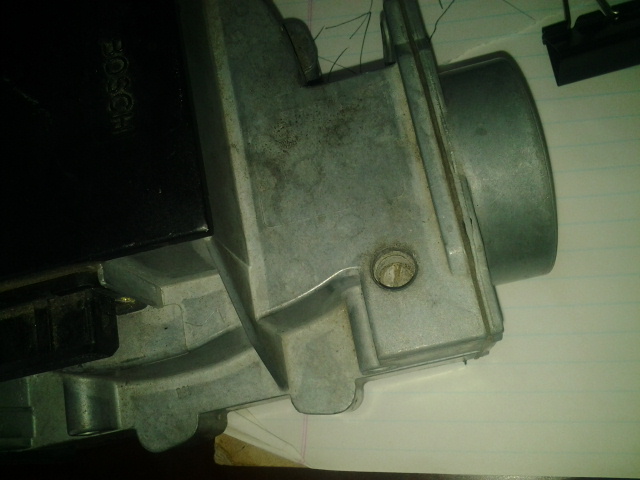
Posted by: malcolm2 Aug 24 2013, 10:45 AM
On the airflow meter, remove the connector and locate pin 7 and pin 8. What is the resistance between these two? Now check pin 6 and pin 9 resistance.
The throttle cable shouldn't be tight. Also, have you adjusted that big screw on the throttle body? There is another screw on the air flow meter, that should be backed off 4.5 turns.
I will have to wait to check the resistance this evening. Sorry, but fun time is over for today. I have Saturday duty at work this afternoon, DAMN IT.
Throw me a few more things to test tonight. and I will reply
Thanks again it all.... We are getting there.
Posted by: malcolm2 Aug 24 2013, 10:47 AM
AFM looks clean.
Did the vane move freely with no "sticking" points?
Oh well, carry on ... off to a Baby Shower for 2nd Granddaughter ... wheeeeee!
Tims' avatar shows the AFM with the top off.
Very smooth movement. Have fun.
Posted by: SLITS Aug 24 2013, 10:52 AM
All you will see if you remove the cover on the AFM is the circuitry. If it is sealed with RTV, it has been taken off before ... Bosch wasn't that sloppy.
As I remember there is a screw in the top of the AFM used to set idle, but I've never owned a 1.8.
Would have to look at a unit at the shop to see the position of the vane and that wouldn't be till Monday.
This screw?
Yes!
Posted by: Racer Chris Aug 24 2013, 11:01 AM
Opening that screw allows intake air to bypass the flapper, thereby decreasing it's movement and leaning out the mixture.
Basically its a controlled intake leak.
Backing out the big screw on the throttle body allows air to bypass the throttle plate, thereby increasing the idle rpm without affecting the mixture.
Posted by: timothy_nd28 Aug 24 2013, 02:48 PM
A honey to do list...
Pull the ECU connector off and check these pins with your multimeter:
Resistance between pin 6 and 9 on the ECU connector
Resistance between pin 7 and 8 on the ECU connector
Resistance between pin 6 and 27 on the ECU connector
Resistance between pin 13 ECU connector to engine case ground
Resistance between pin 18 and 3 on the ECU connector. Remeasure same pins but have your son depress the gas pedal fully when measuring again.
You should have 6 measurements to report back when complete.
Now the 2 adjustment screws. One screw (you posted a picture) is located on the airflow meter. Did you ever adjust this screw? It would be good to know just how many turns the screw is turned in. Is it screwed in all the way? This screw looks somewhat seized from your picture. You may want to spray a dab of PB blaster down that hole. Go ahead and tighten (clockwise) it in all the way. Record how many turns it took to seat this screw. Now back it off 4.5 turns. The PO may of had this screw max clockwise.
The 2nd screw, is located on the throttle body. It will be a wider screw, this adjusts your idle speed. Did you ever adjust this screw?
Lastly, the PO had plugged off the decel valve for reasons right now unknown. The decel valve may be faulty or undesired. Reinstalling this back into your car just added another variable to the equation. I would remove this valve and hoses, then cap with rubber plugs. I would do the same for the Aux air valve. I'm not saying this will be permanent, but for now it would be 2 less variables to deal with.
2 rubber plugs on the white plastic T on the rubber boot. You will need some plugs for the plenum. Also, the small vacuum lines will need to be plugged (except the dizzy line). These items aren't needed right now, and we can always add it back in later.
Posted by: timothy_nd28 Aug 24 2013, 02:59 PM
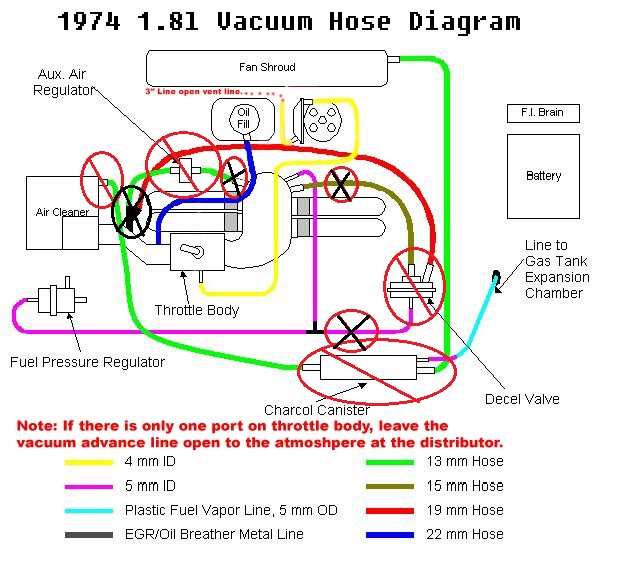
Posted by: timothy_nd28 Aug 24 2013, 03:00 PM
The places where I put black x's,,install a rubber cap
Posted by: timothy_nd28 Aug 24 2013, 03:20 PM
here you go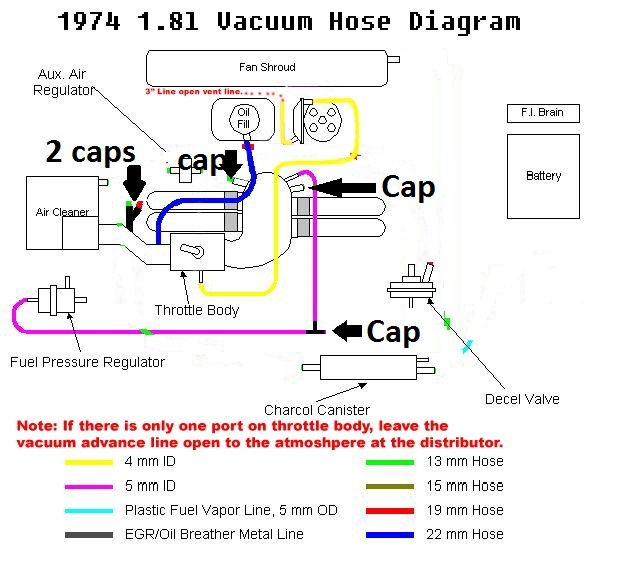
Posted by: malcolm2 Aug 24 2013, 07:56 PM
Opening that screw allows intake air to bypass the flapper, thereby decreasing it's movement and leaning out the mixture.
Basically its a controlled intake leak.
Backing out the big screw on the throttle body allows air to bypass the throttle plate, thereby increasing the idle rpm without affecting the mixture.
I have adjusted the screw on the throttle body. Opened it up a turn or two. I understood that if the car was idling, I could basically adjust 'til I hit 2K rpm and do the 20 minute break-in by adjusting the screw.
So I have not gotten far enough to turn that screw with the car running.
Clark
Posted by: malcolm2 Aug 25 2013, 08:20 AM
here you go
My car is a 75. It has the EGR valve.
Shall I take that out of the equation too. Truthfully, the backside of that valve(not depicted here) is a metal pipe that goes thru the back tin and should continue on to the exhaust. But it stops at the tin. I plugged that pipe already. Mine will then look just like your 74 layout above.
There are two more smaller hoses one Tees into the yellow line, the other Tees into the oil fill line.
I have no other emissions stuff that I know of on this car, don't want it either, not sure if the state will require it. I think 75 is the 1st year that is still tested. Why they go back that far, I don't know.
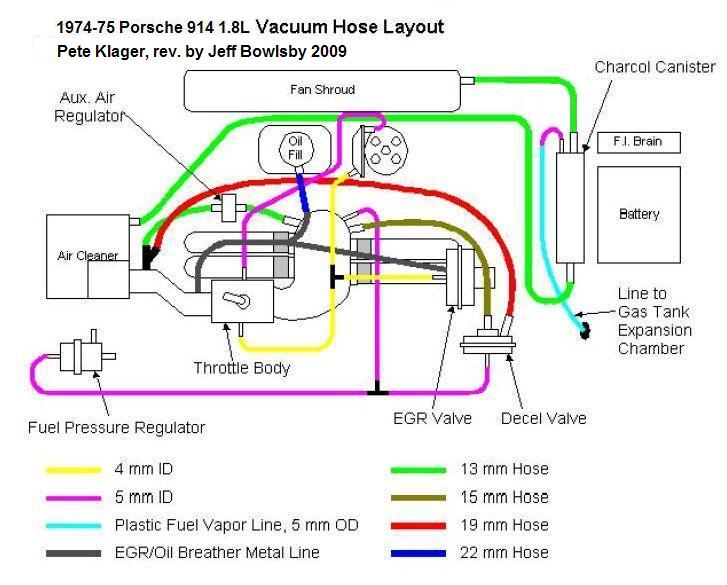
Posted by: SLITS Aug 25 2013, 08:59 AM
The EGR valve is not necessary for the car to run. All it does is take a portion of the exhaust gasses and runs them back into the intake system at the air cleaner. The valve does not open unless you have constant vacuum.
The line that is missing was from the muffler to the connector at the engine tin.
Posted by: malcolm2 Aug 25 2013, 10:00 AM
Pull the ECU connector off and check these pins with your multimeter:
Resistance between pin 6 and 9 on the ECU connector
Resistance between pin 7 and 8 on the ECU connector
Resistance between pin 6 and 27 on the ECU connector
Resistance between pin 13 ECU connector to engine case ground
Resistance between pin 18 and 3 on the ECU connector. Remeasure same pins but have your son depress the gas pedal fully when measuring again.
You should have 6 measurements to report back when complete.
Now the 2 adjustment screws. One screw (you posted a picture) is located on the airflow meter. Did you ever adjust this screw? It would be good to know just how many turns the screw is turned in. Is it screwed in all the way? This screw looks somewhat seized from your picture. You may want to spray a dab of PB blaster down that hole. Go ahead and tighten (clockwise) it in all the way. Record how many turns it took to seat this screw. Now back it off 4.5 turns. The PO may of had this screw max clockwise.
The 2nd screw, is located on the throttle body. It will be a wider screw, this adjusts your idle speed. Did you ever adjust this screw?
My six measurements:
6 and 9 = 0.382
7 and 8 = 0.265
6 and 27 = 1.331
13 and ground = 1.315
18 and 3 = nothing, meter did not move
18 and 3 with accelerator depressed = infinity. same reading as if I touched the meter leads together. That is infinity, correct?
I have turned the throttle body screw about one turn out. I have turned the AFM screw in 2.25 turns, then out 4.5 turns.
The plugging is done. I suppose it is time to fire her up once more?
Posted by: malcolm2 Aug 25 2013, 11:02 AM
seems to run much rougher, but still will not idle on it's own.
clark
Posted by: malcolm2 Aug 25 2013, 11:43 AM
seems to run much ruougher, but still will not idle on it's own.
clark
I take that back, it fires right up. not super smooth at 2K revs, but zero smoke, and alot less trouble to get it to 2k.
I adjusted the throttle body screw pretty much all the way out, it seemed to want to keep idling, took a second or two longer to die, but still dies.
Posted by: timothy_nd28 Aug 25 2013, 12:37 PM
I'm at a birthday party right now, I'll go thru the numbers in a few hours when I get back home.
Post #914 I should savor the moment and not post for awhile!
Posted by: timothy_nd28 Aug 25 2013, 05:53 PM
Looks like a few numbers is slightly out of tolerance with this AFM. About what temperature was the car when taking these measurements?
The engine will have a rough time idling, till it warms up. I would not adjust any screws till the engine reaches temperature. Perform your fast idle again (2k) and pull a injector lead and listen for engine stumble. If it does, plug it back in and remove the injector lead from the next one. Do this test for the remaining injectors, one at a time. If one doesn't stumble from after removing the injector lead, then let me know.
If the injector test passes, go back to the adjustment screw on the AFM. Right now, I had you back it off to around 4.5 turns. Put it back to the previous owner setting of 2.5 turns out. Does your idle improve or get worse? If the engine does improve at 2.5 turns, go ahead and screw it all the way in. Is the engine idle better at this setting? If so, you may have some vacuum leaks.
Posted by: malcolm2 Aug 25 2013, 06:37 PM
Looks like a few numbers is slightly out of tolerance with this AFM. About what temperature was the car when taking these measurements?
The engine will have a rough time idling, till it warms up. I would not adjust any screws till the engine reaches temperature. Perform your fast idle again (2k) and pull a injector lead and listen for engine stumble. If it does, plug it back in and remove the injector lead from the next one. Do this test for the remaining injectors, one at a time. If one doesn't stumble from after removing the injector lead, then let me know.
the earlier test was done with the engine cold.
I did the FI test and only #4 showed any reduction in revs from 2k. I saw no change with any other injector.
Posted by: timothy_nd28 Aug 25 2013, 07:07 PM
This may be the problem. Pulling the lead off a working injector should cause the engine to stumble. If you only got this to happen for 1 of the 4 injectors, tells me the the 3 other injectors aren't working, or you lack ignition to those 3 cylinders.
I never witnessed our engine running on one cylinder, but it would explain poor idle conditions. Just to be thorough, re-perform this injector test. If you get the same results, install a noid light on one of the offending 3 cylinders. If the noid light illuminates, pull that injector and see if it will spray into a jar. If the above 3 tests pass, inspect for spark on those 3 cylinders.
Posted by: timothy_nd28 Aug 25 2013, 07:56 PM
One more thought, having the sparkplug firing order wrong will cause this exact same problem. 
Posted by: malcolm2 Aug 25 2013, 08:00 PM
This may be the problem. Pulling the lead off a working injector should cause the engine to stumble. If you only got this to happen for 1 of the 4 injectors, tells me the the 3 other injectors aren't working, or you lack ignition to those 3 cylinders.
I never witnessed our engine running on one cylinder, but it would explain poor idle conditions. Just to be thorough, re-perform this injector test. If you get the same results, install a noid light on one of the offending 3 cylinders. If the noid light illuminates, pull that injector and see if it will spray into a jar. If the above 3 tests pass, inspect for spark on those 3 cylinders.
There is evidence of all cylinders running. I painted the headers and the paint has started to burn on all 4 exhaust valve pipes. I have a CHT gauge set up on #3 and it has gotten up to 300 on a 10 minute run.
If it was only 1 cylinder, wouldn't it have died when I pulled the good one?
same results on a re-do of the suggested test. not really a stumble, but the revs dropped from 2K to maybe 1.5K on the 1 cylinder'
Noid test: all four light up.
Posted by: malcolm2 Aug 25 2013, 08:25 PM
One more thought, having the sparkplug firing order wrong will cause this exact same problem.
Zundfolge = 1 4 3 2 double checked all wires
Posted by: timothy_nd28 Aug 26 2013, 10:20 AM
Guy's I'm at a loss here. Engine should stumble when you remove fuel to a cylinder
Posted by: Racer Chris Aug 26 2013, 10:51 AM
Guy's I'm at a loss here. Engine should stumble when you remove fuel to a cylinder
unless the injectors are stuck open - so he isn't removing the fuel by pulling the connector...
Posted by: malcolm2 Aug 26 2013, 11:12 AM
Guy's I'm at a loss here. Engine should stumble when you remove fuel to a cylinder
unless the injectors are stuck open - so he isn't removing the fuel by pulling the connector...
I'll be verifying spray and spark this evening. I should be able to easily check for a stuck open condition too.
I would assume I would just do the "unplug" test while the injector is in the jar, correct?
BTW: Tim, I have not moved the distributor since the static timing setting at 7.5 deg.
Posted by: Racer Chris Aug 26 2013, 11:23 AM
...
I would assume I would just do the "unplug" test while the injector is in the jar, correct?
...
Actually, if even one injector is stuck open the fuel circuit won't hold pressure with the key off.
Plus, if 3 were stuck open, that would make the engine so rich I don't think it would run.
Posted by: malcolm2 Aug 26 2013, 01:40 PM
...
I would assume I would just do the "unplug" test while the injector is in the jar, correct?
...
Actually, if even one injector is stuck open the fuel circuit won't hold pressure with the key off.
Plus, if 3 were stuck open, that would make the engine so rich I don't think it would run.
I still have the temporary fuel pressure gauge installed and the fuel ring has about 30 psi of pressure while the car is forced to run at 2K rpm. It takes 20 to 30 minutes after I shut it down to release the pressure.
If there was a stuck open situation, the pressure would drop much faster as it filled up the cylinder, correct?
Posted by: Racer Chris Aug 26 2013, 01:45 PM
If there was a stuck open situation, the pressure would drop much faster as it filled up the cylinder, correct?
Yes, but it wouldn't fill up the cylinder. The pressure would be relieved after a few ccs came out.
Posted by: timothy_nd28 Aug 26 2013, 02:29 PM
Yup I agree, but still confused on what's going on when the FI leads are pulled. I'll turn a blind eye for now. Just for the hell of it, turn the dizzy (while car running) a smidge CCW. See if this improves the idling condition at all.
Posted by: SLITS Aug 26 2013, 02:40 PM
I am going to assume that all injectors are firing ... if not, check the resistor pack for a broken wire(s). Resistor pack provides ground on a 1.8 L-Jet.
Running up in the RPM range will seemingly smooth out a misfiring engine.
Posted by: malcolm2 Aug 26 2013, 03:01 PM
I am going to assume that all injectors are firing ... if not, check the resistor pack for a broken wire(s). Resistor pack provides ground on a 1.8 L-Jet.
Running up in the RPM range will seemingly smooth out a misfiring engine.
I connected a NOID light to each FI connector one at a time and started the car. all four connectors lit the light. Would a broken resistor pack wire be pretty obvious? I checked it over pretty well before I installed.
Posted by: SLITS Aug 26 2013, 04:33 PM
I throw in the towel!
Posted by: pilothyer Aug 26 2013, 05:33 PM
The suspense is killin' me...planning a little trip to go see Clark...I can't slleep at night untill I do
Posted by: The Cabinetmaker Aug 26 2013, 05:49 PM
[qurote name='SLITS' date='Aug 26 2013, 05:33 PM' post='1915465']
I throw in the towel!
[/quote] :
lol4: that's what I thought on page 4.
Malcolm, you ever get the diz oriented properly?
Posted by: timothy_nd28 Aug 26 2013, 05:51 PM
Totally! 13 pages and still a nonfunctional engine, I feel embarrassed and blame myself for this failure.
10 dollars says it will be a faulty AFM with a side of tweaking the timing.
Posted by: Mblizzard Aug 26 2013, 06:27 PM
The suspense is killin' me...planning a little trip to go see Clark...I can't slleep at night untill I do
Let me know when you go I have a complete 2.0 FI system sitting on the shelf. But that's D-jet?
Posted by: malcolm2 Aug 26 2013, 06:31 PM
isn't the motto of teeners: "there are always CARBS!" But then I would get to take the engine out again and change the cam! Someone make a T-shirt.
I got the distributor right last week, when it was on the table. I am not saying 100%, but I am damn sure.
Posted by: malcolm2 Aug 26 2013, 06:34 PM
Totally! 13 pages and still a nonfunctional engine, I feel embarrassed and blame myself for this failure.
10 dollars says it will be a faulty AFM with a side of tweaking the timing.
No failures yet. Especially not your failure. There is a solution! I can always buy a new known working engine with a known working injection system or CARBS, right?
Posted by: timothy_nd28 Aug 26 2013, 06:35 PM
you may find that the cam gear is a tooth off,,
Posted by: malcolm2 Aug 26 2013, 06:38 PM
you may find that the cam gear is a tooth off,,
no one will know but me. I'll have to change my identity. Maybe Malcolm3, would anyone notice?
Posted by: timothy_nd28 Aug 26 2013, 06:44 PM
Your very close, and I wouldn't throw in the towel just yet. You just need a second pair of eyes to see this. I have the upmost faith that Pilothyer will have you all set by the end of his visit. I'll PM you my cell number for any help I can throw your way during his visit, just as long it isn't during my Notre Dame game! lol
Posted by: malcolm2 Aug 26 2013, 06:56 PM
Yup I agree, but still confused on what's going on when the FI leads are pulled. I'll turn a blind eye for now. Just for the hell of it, turn the dizzy (while car running) a smidge CCW. See if this improves the idling condition at all.
OK I started the car, held the revs at 2000 and turned the dizzy CCW. probably more than a smidge. anyway the revs went up. Released the acel pedal and the car did die, but it took it alot longer than any other time. The revs dropped and it spitted and sputtered for maybe 5 seconds, then died.
Jerry is coming by tomorrow evening....any thing else I should try now, did that lead us somewhere else? For kicks I'll go ahead and check the spark, that is not too difficult.
Clark
Posted by: timothy_nd28 Aug 26 2013, 06:58 PM
about how many turns on the bypass screw on the AFM?
Posted by: malcolm2 Aug 26 2013, 06:59 PM
about how many turns on the bypass screw on the AFM?
still at 4.5
Posted by: timothy_nd28 Aug 26 2013, 07:01 PM
screw it back to its original setting of 2.5 turns, see if that helps
Posted by: malcolm2 Aug 26 2013, 07:08 PM
screw it back to its original setting of 2.5 turns, see if that helps
WOW>>>> even better. It fired right up with no coaxing. I even got out of the car and messed with the idle screw on the throttle body, which was way OUT, I turned it in and it did not do anything. BUT THIS IS THE BEST EVER. I would not call it a smooth idle, but it idled.
Posted by: timothy_nd28 Aug 26 2013, 07:10 PM
k, now try 1.5 turns on the AFM bypass screw. (this is showing that you having a vacuum leak somewhere FYI)
Posted by: malcolm2 Aug 26 2013, 07:20 PM
k, now try 1.5 turns on the AFM bypass screw. (this is showing that you having a vacuum leak somewhere FYI)
OK first try was not any better. But I turned the throttle body screw back out where is was yesterday... too far out...and did the 1.5 on the AFM screw and it is idling. again, not smooth, but it would probably run all day like that.
I hate vacuum leaks, my 85 cabby seems to get them and I can never find them. all the hoses are new. most have been plugged....
Posted by: timothy_nd28 Aug 26 2013, 07:22 PM
can you get this to idle around 900, long enough to get this thing timed?
Posted by: malcolm2 Aug 26 2013, 07:26 PM
can you get this to idle around 900, long enough to get this thing timed?
Not sure what it is idling on, but let's go with it. What hoses come off to set the timing?
Posted by: timothy_nd28 Aug 26 2013, 07:28 PM
do you have one or two vacuum lines on the dizzy advance can?
Posted by: timothy_nd28 Aug 26 2013, 07:31 PM
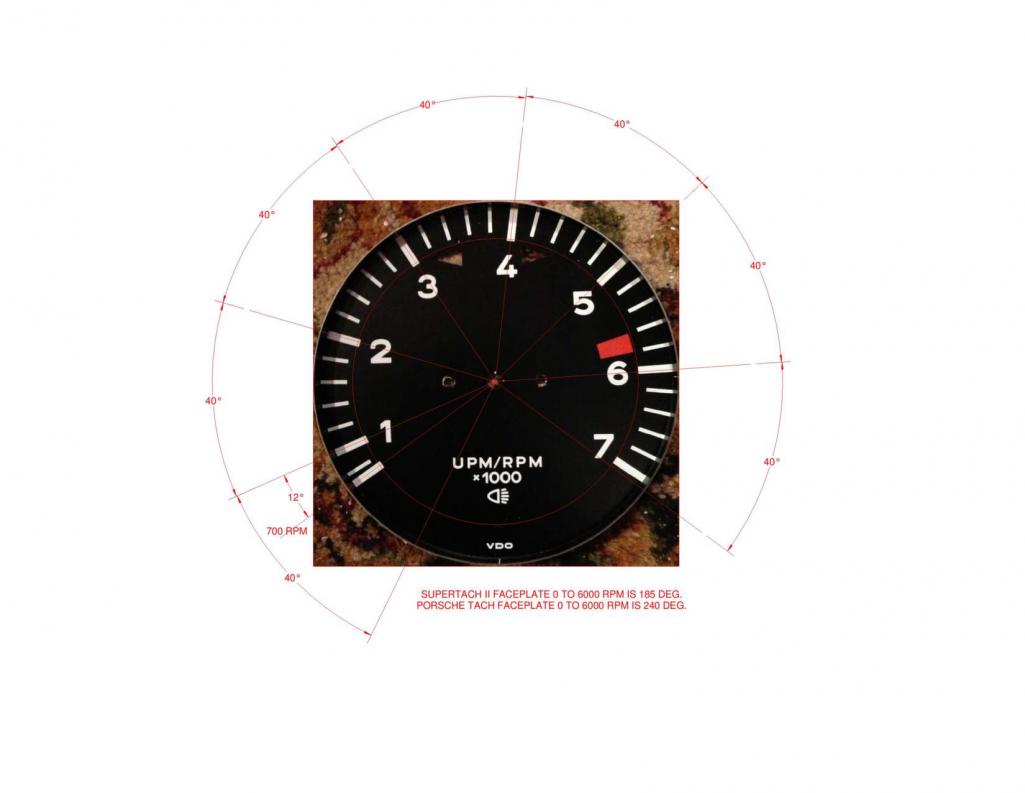
the bottom tic is 750 700 rpm
Posted by: malcolm2 Aug 26 2013, 07:35 PM
do you have one or two vacuum lines on the dizzy advance can?
2 small lines
Posted by: timothy_nd28 Aug 26 2013, 07:38 PM
confused, thought you just moved it a smidge CCW and things came alive for you?
Pull both hoses off, feel for the one that is sucking, then plug that one
Posted by: malcolm2 Aug 26 2013, 08:00 PM
confused, thought you just moved it a smidge CCW and things came alive for you?
Pull both hoses off, feel for the one that is sucking, then plug that one
The initial turning this evening I saw some improvement with MORE than a smidge of CCW turn.
I plugged the smallest line, it was on the side closest to the oil filler. Removed the larger one, had a helper keep the car at 900, just below the "1" and I set the timing.
to be clear, I made me a mark on the side of the fan that I can see. I used an old fan as a gauge and the template from Pelican for 7.5 degrees. Induction type light clamped to #1 plug wire and turn the dizzy til my mark was in the "V".
Idling, but very rough. Wanting to die.
Posted by: timothy_nd28 Aug 26 2013, 08:04 PM
did the dizzy need to turn more CCW to get it on the flywheel mark, or was it CW? I understand your new mark on the fan, but is it anywhere near the factory red mark?
Posted by: zambezi Aug 26 2013, 08:06 PM
Back to the injectors... could an injector be partly plugged. Most injectors have an inlet screen and I have seen them get plugged (a BMW I had once) and not allow enough fuel through to let the car idle smoothly or sometimes not at all. The injector can still fire electrically and have good fuel pressure, but the restriction at the screen prevents fuel into that particular cylinder. Pulling an electrical plug on the affected injector would have no change in RPM despite a good noid light signal or good fuel pressure.
Posted by: timothy_nd28 Aug 26 2013, 08:09 PM
a good point
Posted by: malcolm2 Aug 26 2013, 08:15 PM
did the dizzy need to turn more CCW to get it on the flywheel mark, or was it CW? I understand your new mark on the fan, but is it anywhere near the factory red mark?
I went back and forth several times, keeping it at 900 was a chore. I am going to say it was back CW where it was set statically a few days ago.
The factory marks on my fan are on the side of the fan closest to the engine. NO WAY TO EVER SEE THEM, unless I hang from the ceiling.
There was a red one and then what looked like a factory cut, no paint 0.57" away. I transferred the red one to the side of the fan closest the cockpit, used the pelican template to make a sliver mark about 0.57" away which pelican says is 7.5 degrees and used for timing the 1.8.
http://www.pelicanparts.com/techarticles/914_timing/914_timing.pdf
Posted by: timothy_nd28 Aug 26 2013, 08:22 PM
Okay, put the dizzy back where it idles the best for now. You need to tweak those screws till homeostasis is achieved. Let the car reach temperature, and make minor adjustments till it idles the best. Then check for spark on every plug wire, and go ahead and do the spray test again, just to rule out a plugged/partially plugged injector. It is possible some debris got stirred up and gunked them up..
Posted by: malcolm2 Aug 26 2013, 08:51 PM
I guess all I really need is axles and brakes and I could drive this thing.
I took a 1 minute video but I guess it is too big. It ran since Tim's last post, just a bit high on the RPMs but this is AWESOME!!! The oil lite is on, I know, but the VDO gauge is good. In my set up , I used a paint ball gun metal hose and attached the VDO sender to it. The sender has a light connection and a gauge connection. one is reading high, one is reading low. A problem for another day.
 this is for the TOWEL THROWERS.
Tim you are the man, 
 I almost let you give up. I turned the dizzy CCW a bit more to get it to stay at about 1000. Any less and it seems to struggle to much. T-stat has extended, CHT is 250-ish. looking good.
Just alittle tuning and air leak finding and I am good. What should I do about all those plugged hoses?
Posted by: timothy_nd28 Aug 26 2013, 08:52 PM
Also, since you have the AFM cover removed. Get the engine up to temp, and a good rolling idle. Carefully and gently rotate the armature on the air flow meter very slow towards the passenger side. Does the engine run better or worse? Try it the other way and ask yourself the same question. You shouldn't move it all that much, just a tiny tiny bit in either direction. IF you go too far, it will cause the engine to stumble and die. I think you said earlier that you have the 1911 set up? So if you move the AFM arm towards the passenger side, it will give the injectors more fuel, which may please your engine.
Again, you are moving the arm very slow and a small amount at a time till it stumbles. How far does it go before it stumbles?
Posted by: timothy_nd28 Aug 26 2013, 08:57 PM
Leave them plugged for now, lets get your engine well tuned before we add the AUX air valve back in. I'd consider leaving out the decel valve for good.
Posted by: malcolm2 Aug 26 2013, 08:58 PM
Also, since you have the AFM cover removed. Get the engine up to temp, and a good rolling idle. Carefully and gently rotate the armature on the air flow meter very slow towards the passenger side. Does the engine run better or worse? Try it the other way and ask yourself the same question. You shouldn't move it all that much, just a tiny tiny bit in either direction. IF you go too far, it will cause the engine to stumble and die. I think you said earlier that you have the 1911 set up? So if you move the AFM arm towards the passenger side, it will give the injectors more fuel, which may please your engine.
Again, you are moving the arm very slow and a small amount at a time till it stumbles. How far does it go before it stumbles?
You mean the small bolt on the pass side that is attached to the curved knife looking thing? Jerry said 7mm
Posted by: timothy_nd28 Aug 26 2013, 09:01 PM
Black22, could you chime in with the process you showed me?
Posted by: timothy_nd28 Aug 26 2013, 09:13 PM
Also, since you have the AFM cover removed. Get the engine up to temp, and a good rolling idle. Carefully and gently rotate the armature on the air flow meter very slow towards the passenger side. Does the engine run better or worse? Try it the other way and ask yourself the same question. You shouldn't move it all that much, just a tiny tiny bit in either direction. IF you go too far, it will cause the engine to stumble and die. I think you said earlier that you have the 1911 set up? So if you move the AFM arm towards the passenger side, it will give the injectors more fuel, which may please your engine.
Again, you are moving the arm very slow and a small amount at a time till it stumbles. How far does it go before it stumbles?
You mean the small bolt on the pass side that is attached to the curved knife looking thing? Jerry said 7mm
No, no adjustments. With the car running, you will witness the big black arm with a brass oblong shape wiper arm move. You will see it move when you goose the throttle for sure. I just want you to move it (temporary) with your fingers in a CCW direction to see if the engine behaves different. Don't unscrew anything or pull out any tools for this test. We just need steady surgical fingers for this test.
Posted by: timothy_nd28 Aug 26 2013, 09:15 PM
Don't touch the black carbon track on the resistor plate. The oils in your finger can change the resistance, and mess things up.
Posted by: Black22 Aug 26 2013, 09:18 PM
Read this...three times...you will then reveal the mysteries of L-jet tuning.
http://www.itinerant-air-cooled.com/viewtopic.php?t=7761
Posted by: timothy_nd28 Aug 26 2013, 09:19 PM
Thanks
Posted by: malcolm2 Aug 26 2013, 10:04 PM
Thanks
Consider it done. No tools and no touchy the black thingy, got it.
Posted by: malcolm2 Aug 27 2013, 07:46 PM
let's see if this works. I am trying to link the short 1 minute video I took last night. I have a you tube account with (now) 1 video on it...
http://youtu.be/Y0Ov5vBkbnw
Pilothyer (Jerry) drove up from Alabama today and we tinkered with the idle etc... Maybe the next video will be of those results. Thank you so much for doing that Jerry, from the sound of it, alot of 914 owners owe you big time.
We really did not do too much, checked alot of things. Adjusted a few others. No AFM changes today. He was pretty impressed with what we had accomplished so far. He agreed with me, the engine sounds wonderful. Hope the video works.
We did find that one of my vacuum ports on my throttle body was not sucking. The other was, so we just moved it to the advance side and that seemed to help. I guess I will take the throttle body off and see what is in there. Does anyone know which port will provide the largest vacuum, front or back?
Posted by: gunny Aug 27 2013, 07:58 PM
The TB vacuum line on the firewall side of the TB is for decel and will have more vacuum when TB is closed, it feeds from the idol screw.
The TB vacuum line in the back side is for advance it should also have vacuum most at WOT at lower RPMs
both should have vacuum at idol.
Posted by: timothy_nd28 Aug 27 2013, 08:08 PM
Nice! Look forward to the 2nd improved video.
Posted by: Mblizzard Aug 27 2013, 08:09 PM
Wow that was a great video after all you have been through! Get some axels in that thing and drive it!
It is amazing that you went through all of this and got where you are. The support you have received is astounding. There have been some issues that I know I would not have solved without this forum.
Posted by: malcolm2 Aug 27 2013, 08:21 PM
The TB vacuum line on the firewall side of the TB is for decel and will have more vacuum when TB is closed, it feeds from the idol screw.
The TB vacuum line in the back side is for advance it should also have vacuum most at WOT at lower RPMs
both should have vacuum at idol.
My rear port is plugged, and the front one is connected to the vacuum advance on the dizzy. Doing it's job.
Posted by: malcolm2 Sep 3 2013, 10:24 PM
I figured I'd use this to update those that helped, watched, laughed, gave up...
Car is idling to perfection now so I move on.
Putting the car back together takes much longer than taking it apart.
*Brake parts ordered, springs, pins, clips, etc...
*Fuel pump has returned to it's location.
*Clutch cable connected, not adjusted
*Shift shaft connected in all 3 places.
*Axles cleaned, CV joints re-packed
This one below is HELL by yourself or with help. It only goes in 1 way and it has to be mostly assembled. But the 1st side takes 3 tries for some reason!
*Axles, trailing arms, rear struts all installed and torqued what can be torqued.
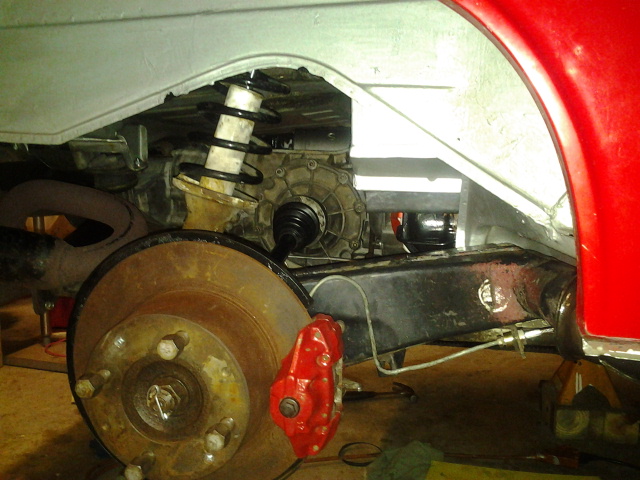
*Dust shield, Rotors with new hold down screws, Calipers, Brake lines, axle nut torqued and new cotter pin
*I'll mess with the parking brake later!
Tomorrow I bleed the brakes, install the wheels and I might even DRIVE THE BITCH down the driveway! 
(wait, I am still waiting on a few brake parts, Do I really need those? OK Thursday I drive)
Posted by: Mblizzard Sep 4 2013, 12:20 AM
Looking pretty good! Drive it you earned it that's for sure.
Posted by: shoguneagle Sep 4 2013, 06:14 AM
Everyone involved deserves a great round of applause since it is a great thread on problem solving, stick-to-it, and learning involving the 914; great reading and enjoyed it.
Great job!
Steve
Posted by: Mblizzard Sep 4 2013, 09:54 AM
I will have to give it up for Clark, Tim, and all the others that kept working on this. I know there would have been points where if this had been my car, a lot of things would have been broken!
Powered by Invision Power Board (http://www.invisionboard.com)
© Invision Power Services (http://www.invisionpower.com)