Printable Version of Topic
Click here to view this topic in its original format
914World.com _ 914World Garage _ mig questions
Posted by: jimkelly Aug 21 2013, 10:29 AM
my original argon valve was bent up and leaked, so I ordered a new one. it had again, different sized threads, jeez.
so I went to ace ( r towel advice) and went with barbed fitting at both ends since the new argon valve came with a 1/4 barb already.
question - when you are done welding and want to purge the lines of argon, after shutting the valve on the tank, do you have to waste wire or is there a way to purge without wasting wire?
also, I expected the bead to stay at 15 psi when i turned the brass valve open, but it only rises to 15 psi or what ever I set it at, when I pull the red trigger on the mig - is this normal?
also - I prepped some of my old real estate signs for practice : )
jim
Attached image(s)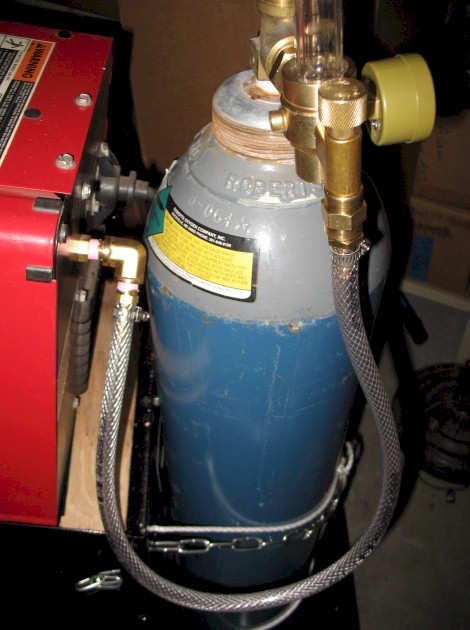
Posted by: Elliot Cannon Aug 21 2013, 10:46 AM
I purge my tank the same way. I turn off the tank valve and press the trigger till the tank gauge says zero and then watch as the regulator gauge also says zero. If you don't want to waste too much wire when doing this you can turn the wire speed way down and not so much will come through. I then (try to) remember to turn the regulator valve handle to the left till it is loose and relaxes pressure on the valve. I'm just a welding hobbyist but I will be staying at the Holliday inn in Flagstaff on the way to the RCC. Maybe we'll hear from the experts here. Scotty?
Posted by: McMark Aug 21 2013, 10:49 AM
Never heard of purging the line. 
Posted by: Elliot Cannon Aug 21 2013, 10:53 AM
I only do it to bring both gauges to zero. Relaxes the pressure in the gauges and I'm told they last longer. And I have cheap gauges. 
Posted by: jimkelly Aug 21 2013, 10:56 AM
maybe I just like Asian chicks - but see the last few minutes of this video
http://www.youtube.com/watch?v=lzBGZaS1apw
[i][/i]

Never heard of purging the line.
Posted by: Elliot Cannon Aug 21 2013, 11:00 AM
You mention Asian chicks, then provide a link that doesn't work. That's just mean! 
Posted by: jimkelly Aug 21 2013, 11:04 AM
Asian chick link is fixed 
Posted by: Racer Chris Aug 21 2013, 11:07 AM
The only reason to "purge" the lines is to relieve pressure on the regulator diaphragm.
Posted by: stugray Aug 21 2013, 11:20 AM
Lift up on the wheel hold-down lever in the wire feeder
The wheels will turn but not feed wire.
(wheels will be HOT while doing this)
Stu
Posted by: Elliot Cannon Aug 21 2013, 11:21 AM
Asian chick link is fixed
Asian chick and UC Irvine.

Posted by: jimkelly Aug 21 2013, 11:27 AM
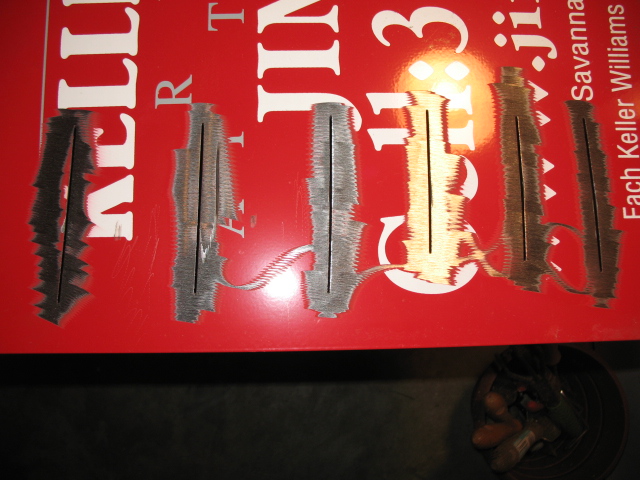
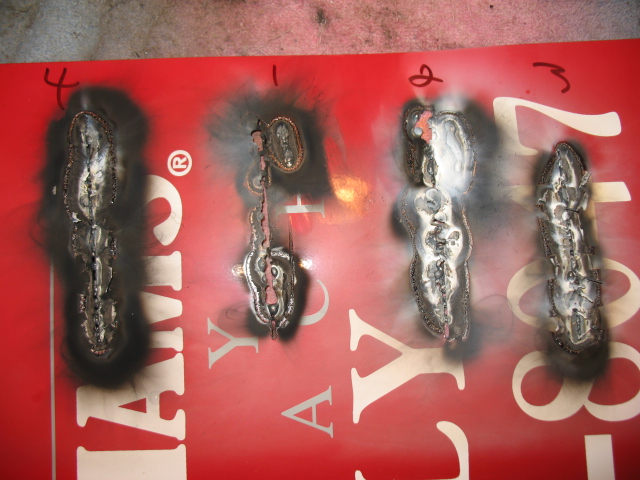
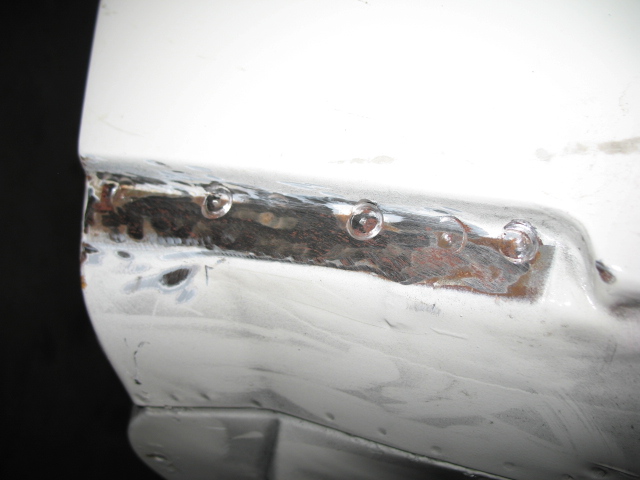
my first 4 welds : )
I was turning wrong dials a few times but 4th row is better than first : )
shown is panel front, panel rear where I did not remove paint, and rear of 4th weld upclose, and first again back lighted.
seems that having a copper back plate has got to help in most cases?
this is gonna take some serious practice and dialing in.
Attached image(s)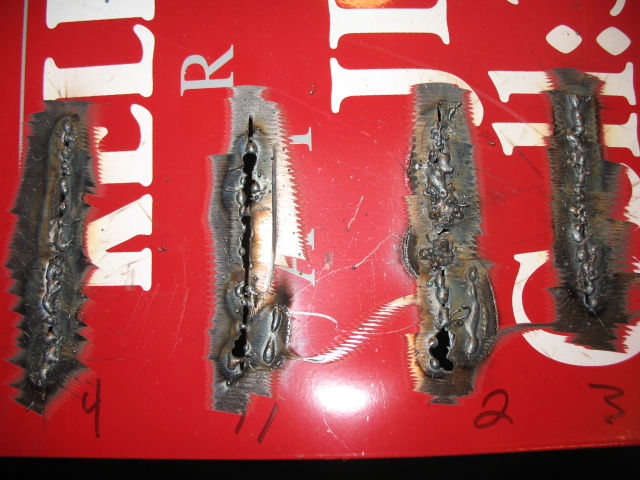

Posted by: Elliot Cannon Aug 21 2013, 11:28 AM
The only reason to "purge" the lines is to relieve pressure on the regulator diaphragm.
I knew we would get a definitive answer eventually.
 Thanks Chris.
Posted by: jimkelly Aug 21 2013, 11:31 AM
actually, I only waste about 5-6 inches of wire when I watch the psi gage drop to 0. I thought it was way more.
Posted by: rjames Aug 21 2013, 11:38 AM
Copper back plate helps! Work towards moving the puddle of molten metal in the direction your welding. Experiment with both pushing and pulling the puddle, you'll probably find you're better at doing one over the other, although the orientation of what you are welding will often dictate which method you'll use.
Posted by: jimkelly Aug 21 2013, 11:40 AM
i'm not sure I was ever moving a puddle, at all.
I will work on creating a puddle. to move 
my mig has .030 wire in it - i figured I would leave it in for practice - and i think the panel are maybe 20gage +-.
is it night and day between using .023 and .030 ????
thanks
Posted by: Elliot Cannon Aug 21 2013, 12:23 PM
I've never used anything other than .023 but I only weld 1/8 inch or less. I was taught that pulling the puddle makes for a deeper weld that pushing.
Posted by: Racer Chris Aug 21 2013, 01:59 PM
pushing is usually better
Posted by: jimkelly Aug 21 2013, 02:47 PM
I used a cut off wheel to cut the slices - so working with this gap - even though it was not much - was certainly more than welding a butted joint - and certainly, I assume, makes it much harder to create a puddle.
for my next trick - I will try some tight butts next.
Posted by: CptTripps Aug 21 2013, 07:24 PM
That's a great way to practice. I never thought to do it like that. Great idea.
Maybe do 15-20 though...instead of 4. ;-)
You'll get there. I still have all my 'practice pieces' from 2004 when I bought my welder.
Posted by: rick 918-S Aug 21 2013, 07:29 PM
I never turn off the valve on my tank. My gauge is 30 years old and never had an issue. I have barbed fitting and clamps. Never had a leak. My tank lasts years.
Posted by: infraredcalvin Aug 21 2013, 07:54 PM
Start on thicker metal, and start understanding what you're trying to get the feel for. You'll start to understand "the feel" then move towards thinner metal.
I'm a beginner as well, have some sheet metal practice welds that look similar, but don't worry about wasting the wire, get the big spools and practice away. Someone else may want to chime in but gass at 15 seems a little light, I think my welder likes 20.
Posted by: jimkelly Aug 21 2013, 08:01 PM
all good and helpful comments - thanks guys!
Posted by: Elliot Cannon Aug 21 2013, 08:07 PM
I never turn off the valve on my tank. My gauge is 30 years old and never had an issue. I have barbed fitting and clamps. Never had a leak. My tank lasts years.
The difference might be, that my gauges and valves were made in Shanghai.

Posted by: speed metal army Aug 21 2013, 09:27 PM
Pushing is usually better..
An old fart used to tell us young fellas his philosophy on mig..
"What would you rather do?? Push your wire or pull it??"
 Corny,but true.
Practicing on uncut material is good. Laying beads, over and over. Then work on lap joints.. Tees. Outside corners etc.
Posted by: tomeric914 Aug 21 2013, 09:44 PM
.023 for 24 gauge
.030 for 12 gauge (1/8")
YMMV, depending on your experience level
Trying to bridge a gap with the wrong size wire right out of the gate will only frustrate the hell out of you. To do sheet metal right with minimal warpage, you need to weld a series of SHORT 1/4" length beads every 6 inches, then go back and do the same every 3 inches, then every 1-1/2 inches, etc. until the butt weld is complete.
Keep the .030 in and get some 1/8" raw steel plate and practice running beads as speed metal army stated above.
YEARS AGO, as a young welder just starting out, I didn't have access to a MIG. SO I got real good at welding sheet metal with a stick welder. How'd I do it? LOTS of practice.
Posted by: jimkelly Aug 22 2013, 05:48 AM
guys - thank you all
think I better get me some- easy grind - .023 wire
scottyb wrote "Thermodynamics = firepower // ESAB = spoolarc"
no sense practicing on thicknesses I have no immediate intention to be working with
http://www.914world.com/bbs2/index.php?showtopic=156717&hl=easy+Grind
jim
Posted by: 76-914 Aug 22 2013, 08:30 AM
Jim, easygrind is about 4x's what regular wire is and you won't need that until you start your exposed body work. FWIW, I do most all my welding in the garage where the wind doesn't blow and 10psi of mix is usually enough. If there is a breeze coming thru I'll boost it up to about 15psi. The copper spoon is the trick and you will burn thru a few (thinking you've managed to weld copper to steel ) in the beginning. I don't know how our resident body experts keep a spoon in place but I use cheap magnets when my one and only pair of large C clamp pliers won't fit. One more beginner tip; clear the area of flammable materials. In the past 9 mo's I have ignited 3 shop towels right next to my head when welding.  PS, get some .023". You'll need some and a small spool is only about $7.
Posted by: McMark Aug 22 2013, 08:54 AM
On this sheet metal I usually don't run a bead at all. Just a series of well placed 'spots'. A real welder would probably lecture me on proper technique, but it's worked well for me.
Posted by: Brian_Boss Aug 22 2013, 11:04 AM
You are starting off by trying to do one of the hardest tasks (bridging a 1/16" gap). I think your learning curve will end up faster if you start with just a bead.
I suggest:
1) Run a straight bead 4-6" across your practice piece. Try push and pull, flat, uphill and downhill. When you can make a nice bead, move on.
2) Lap joint - cut a piece off your practice piece and scab it over part of the remainder. You can also drill some holes in the cut off piece and practice plug welds.
3) Butt joint - get two piece with nice, tight fit-up.
4) When you get comfortable with the above, work on filling a gap.
Hope this helps.
P.S. I would grind more (probably all) paint off your workpiece.
Posted by: jimkelly Aug 22 2013, 11:21 AM
great advice
I think I was expecting to hear much of what you guys are saying, from reading older threads on mig welding.
I will keep showing my practice welds here for comment.
off to harbor freight, I need a welding shirt, some nozzle grease, some welding vice grips, and I guess some regular .023 wire for now.
just got back from a visit to Milton de dogfish head beer factory. lots of stainless piping, welded up really nice. i'll post some pics later (pics posted). forgot to mention the sausages and sample beer, yumm-O
thanks again!
jim
Attached image(s)


Posted by: jimkelly Aug 22 2013, 11:22 AM
got it - beads are for butts 
On this sheet metal I usually don't run a bead at all. Just a series of well placed 'spots'. A real welder
would probably lecture me on proper technique, but it's worked well for me.Posted by: relentless Aug 22 2013, 12:28 PM
Jim, do a Youtube search for "Restolad" as he has a tutorial on how to weld thin sheet metal. Actually all his videos are very educational and he shows how to use the copper backing plate to keep from blowing holes in thin metal.
Posted by: Racer Chris Aug 22 2013, 06:41 PM
You are starting off by trying to do one of the hardest tasks (bridging a 1/16" gap). I think your learning curve will end up faster if you start with just a bead.
I suggest:
1) Run a straight bead 4-6" across your practice piece. Try push and pull, flat, uphill and downhill. When you can make a nice bead, move on.
2) Lap joint - cut a piece off your practice piece and scab it over part of the remainder. You can also drill some holes in the cut off piece and practice plug welds.
3) Butt joint - get two piece with nice, tight fit-up.
4) When you get comfortable with the above, work on filling a gap.
Hope this helps.
P.S. I would grind more (probably all) paint off your workpiece.
 100%
100%
Posted by: aharder Aug 22 2013, 07:42 PM
This thread makes me want to go buy a welder so I can try all the stuff I just read
Posted by: bigkensteele Aug 22 2013, 09:13 PM
I am in the process of backdating my bumpers. On the back I drilled out the spotwelds with a relatively flat-headed bit, thinking that I wouldn't go all the way through. Wrong x 8.
With probably about 30 minutes more experience than you, Jim, I started to fill the holes. The first 4 on the passenger side took me an hour and a half. The other side took me 20 minutes.
Practice does pay, and I am going to get some sheet metal this weekend and take advantage of all the advice above.
Posted by: Andyrew Aug 22 2013, 11:59 PM
Jim,
I prefer .30 wire personally for most bodywork.
You should be using as little gas as required to keep the weld from bubbling/sputtering. I use about 15, take it down to 10 in a super controlled environment and up to 30 in windy weather.
You need to practice running lines before you start bridging gaps like the 3/32nds gap you were working on. I bridge a gap like that with either a lot of wire speed and VERY quickly(This takes a lot of talent... and practice) or with tacks.
Run lines till they are solid beads that have great heat penetration. Do 10 lines 4" long, number them and post up a pic. We will help you analyze and modify your technique.
Posted by: Andyrew Aug 23 2013, 12:03 AM
Also I've never purged. I have a semi leaky system after my good welder setup got stolen and I had to build one off of a budget Lincoln 100, but I never purge. I do however shut off the valve after every short use.
Posted by: jimkelly Aug 23 2013, 04:27 AM
I ordered an eastwood metal gauge so I can know for sure what thickness my practice metal is. $12 shipped on ebay. should be a big help.
andyrew, I will do that bead running thing and post pics asap.
Attached image(s)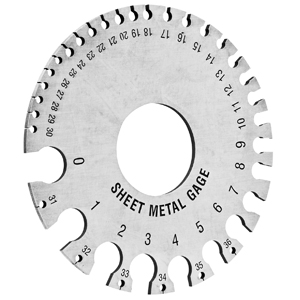
Posted by: jimkelly Aug 23 2013, 04:36 AM
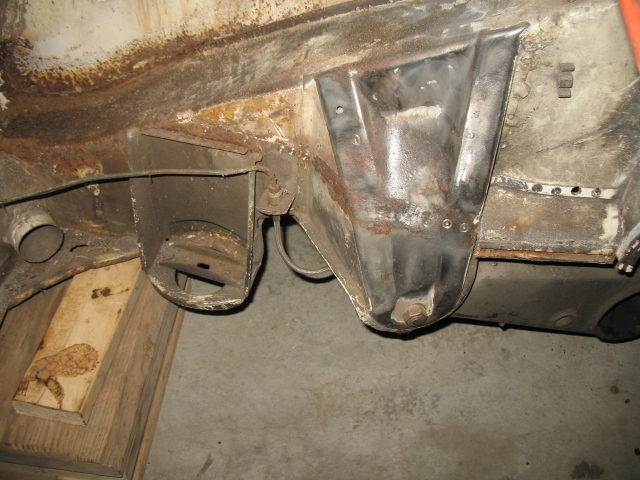
bigken
I too am backdating bumpers and removing all engine bay tin, and have been using this spot weld tool - only a very few drill thrus with it.
Attached image(s)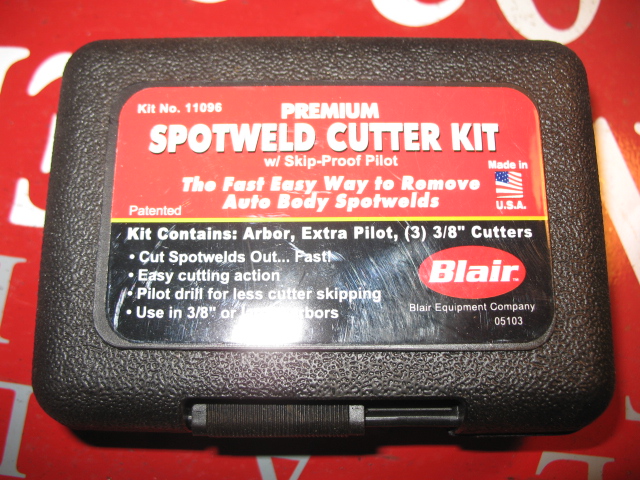

Posted by: rick 918-S Aug 23 2013, 06:18 AM
Here's some welding stuff. Copper strip use on page 3.
http://www.914world.com/bbs2/index.php?showtopic=107923&st=0
And here is some info on splitting spot welds. Lots of ways to get the end result. This is just one I use.
http://www.914world.com/bbs2/index.php?showtopic=212470&hl=
Posted by: 76-914 Aug 23 2013, 08:26 AM
Here's some welding stuff. Copper strip use on page 3.
http://www.914world.com/bbs2/index.php?showtopic=107923&st=0
And here is some info on splitting spot welds. Lots of ways to get the end result. This is just one I use.
http://www.914world.com/bbs2/index.php?showtopic=212470&hl=
I read this post originally and thought that your grinding method does indeed make sense. I shall try that approach next time. Good tip!
Posted by: jimkelly Aug 23 2013, 11:55 AM
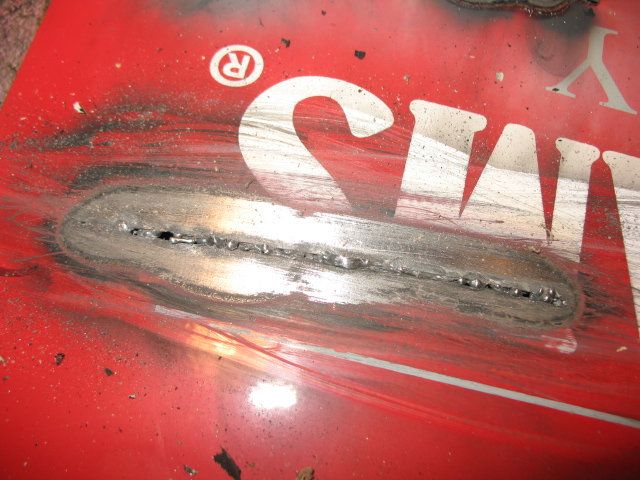
per andyrew's request - here are some samples at different settings.
front and back of panel - thickness I am not certain of, could be 20 gage??
wire is 030
all done push style from bottom to top - but I barely see the molten puddle, I see the bright molten area as the sparks are flying but I don't linger there enough that I can say I am pushing a puddle at all.
oh, and in between the top and bottom bead, I layed 2-3 tacks
and for some reason, I keep reaching for the bottom knob - less today - for amps vs wire speed, I need to take my time and really look when I make setting changes.
Attached thumbnail(s)
Posted by: Andyrew Aug 23 2013, 04:36 PM
That's a great way to learn what the settings do.
To be honest 2.5b looks like the best setting for that metal. Its definitely about 20 ga if it reacts like that.
Your optimum weld is one where you jave your bead up top but just a tiny bit of metal coming on the back side. You see that with 2.5b
3c looks more like its putting a lot of metal down. There is almost as much weld above the metal ad below it. This will cause metal warpage as you see a lot of heat being thrown around.
Now do 10 lines of 2.5b and 10 of 3c. And post the pic. We need to work on your form.
Be aware you can weld with any of these settings and lots of times you will as your metal is never the perfect thickness while working on cars.. sometimes its geound down or really thin, ext.
After you did the 20 lines cut the signs in half and lay them over each other with about 1" of overlap. You'll be doing a lap weld. Use the 3c setting for this on 1/2 the pannel and 2.5b setting on thr other half. Weld a 2" line, skip an inch and wait 10 seconds contemplating and adjusting your techique (not settings).
After that do a butt weld with no gap same thing
Then when your done with all that drill some 1/4" holes and weld them up. Use the a 2.5b setting or even 3b (c will make to much heat). Work in tacks around the hole till you have tacks all the way around it, then lay a quick bead over those tacks and a small bit in the middle to join it. This will teach you how to prevent form just burning through the metal when you hit thin or rusty spots. Go up to 3/4" holes when your confident.
When you can do all that you'll be able to really handle welding on the body.
Good luck and keep us posted!
Posted by: jimkelly Aug 24 2013, 04:00 PM
rcvd my eastwood sheet metal guage today, I mentioned it above, and my signs are 20 gage.
edit: 22 gage with paint fully removed.
nice little handy tool, about 3" diameter
Posted by: rfuerst911sc Aug 25 2013, 03:27 AM
I had my oxy/acetylene gauges rebuilt by a shop and the old codger behind the counter said you always want to purge the lines to take the pressure off the diaphrams so I always do. Do it on my mig also. My Hobart has a purge setting so no wasted wire. To the OP just keep practicing you will get the hang of it. You also might try making tiny circles as you push/pull the wire to spread the heat/bead around a little. Have fun.
Posted by: two-strokejohn Aug 25 2013, 07:18 AM
If you go with the .023 wire............ don't forget to change the contact tip.......doesn't weld right if you forget. Ask me how I know ! I use the sp-135 welder with .023 and it works great for my projects.
Posted by: jimkelly Aug 25 2013, 08:39 AM
I think i'm gonna hit home depot today for 023 and tips.
here is a great wire change video with warnings
http://www.youtube.com/watch?v=gPL1x16ZCmk
Posted by: jimkelly Aug 25 2013, 10:25 AM
I thought my mig was different than most. as my nozzle and tip can off together. but I realized today that the diffuser was coming off with my nozzle. I used my easy out to disassemble into the 3 parts. whew : )
Posted by: Jeff Hail Aug 25 2013, 11:22 AM
Hey Jim,
Couldn't help but notice.. looks are you using 100% argon shielding gas?
Jeff
Posted by: jimkelly Aug 25 2013, 11:39 AM
for a minute there - i thought - SHIT
but here is the label
Hey Jim,
Couldn't help but notice.. looks are you using 100% argon shielding gas?
Jeff
Attached image(s)

Posted by: Jeff Hail Aug 25 2013, 11:50 AM
for a minute there - i thought - SHIT
but here is the label
Hey Jim,
Couldn't help but notice.. looks are you using 100% argon shielding gas?
Jeff
Perfect on the gas mix. I was not sure by the original post photo and you mentioned argon valve. Carry on.
Posted by: 76-914 Aug 25 2013, 06:57 PM
One big confidence builder for me Jim was when I discovered there was nothing I could F up that I couldn't fix. The only penalty is time lost. Get a $12 HF dig caliper so you know the gage/inch/mm. It's important info for novices like us. It looks like your letting your tip get too far away in some of those pic's. I heard you say that you were having a problem seeing a puddle. Do this; instead of welding 2 pieces, scribe a line and run a bead on a flat piece of steel. It will be much more visible . Run that bead until you get a good fix on it. No pressure to get it right, just keep steady movement and maintain tip distance while watching the puddle. It only takes a few passes this way to "see it". 
Posted by: speed metal army Aug 25 2013, 10:51 PM
Practicing on slightly heaver stuff is good too.. It gets you used to the fundamentals.Try a variety of joints too. Tees, Laps, etc. As posted before a bit of a weave can also be good.
Posted by: jimkelly Aug 26 2013, 04:33 AM
yesterday I did weld on some flat metal. it turns out that not only are mig settings important, but hand travel speed is important too, and distance of TIP to metal as well. as stated above. not changing mig settings, I sometimes get a nice looking smooth melted bead, then the second pass was crap. I think this was do to hand speeds and distances not being kept consistent by me.
a mig may be considered the HOT GLUE GUN of welding, but there is more to it than just hoping for the best
practice is crucial, thus having lots of clean metal to practice on is crucial as well.
thanks guys!!!
Posted by: jimkelly Aug 26 2013, 04:34 AM
question - what can I expect when I switch to 023 wire/tip, from 030, when welding on my 20 gage scrap metal???
I assume I will need to turn my mig settings up as 023 will carry less heat???
Posted by: McMark Aug 26 2013, 10:22 AM
Yup.
Another tip, brace your welding hand on the work piece. Most people walk up and try to weld with no contact between them and the work piece. Their hands and arms are floating. It's like trying to shoot a sniper rifle standing up. If you can't solidly brace against the work piece, at least use your other hand to touch both the torch and the work piece so you get some tactile feedback about when and how far you're moving.
Posted by: jimkelly Aug 26 2013, 11:28 AM
nice tip.
I just returned from home depot to get 025 wire and some 025 and 030 tips.
now I know why my machine had a plastic thumb bolt in it - for the smaller narrower 2lb spool. at first I started to rig it with a bunch o washers, but then used the plastic bolt.
got me 2 wire brushes too.
with the naked eye and even with my cheaters on, I can barely see the difference between 025 and 030 - see pic.
I will say - when a bead is going down nice - that steady SIZZLE sounds so sweet
QUESTION >> do you guys all use grease on your nozzle and tip ????
Yup.
Another tip, brace your welding hand on the work piece. Most people walk up and try to weld with no contact between them and the work piece. Their hands and arms are floating. It's like trying to shoot a sniper rifle standing up. If you can't solidly brace against the work piece, at least use your other hand to touch both the torch and the work piece so you get some tactile feedback about when and how far you're moving.
Attached image(s)


Posted by: scotty b Aug 26 2013, 11:49 AM
I've never used the grease, but supposedly it works. Buy a pair of welders pliers. They are shaped to fit inside the nozzle. A good scraping with those does the trick. it also gives you a wire cutter, and a good inside grip for removing hot or stuck nozzles / tips
you're going to need to cut your settings back a tad bit for the .025, but not much. Once you get comfortable with it, you can turn the heat back up and get a better " melt in " when tacking one spot to another.
Attached image(s)
Posted by: jimkelly Aug 26 2013, 12:11 PM
I can see the grease not being critical - thanks.
I did get a pair of harbor freight plyers but the wire cutting section ain't the best.
Attached image(s)

Posted by: pete Aug 26 2013, 03:18 PM
maybe I just like Asian chicks - but see the last few minutes of this video
http://www.youtube.com/watch?v=lzBGZaS1apw
[i][/i]
Never heard of purging the line.
Can't believe I just watched that WHOLE video.....Buut, definitely learned a few things.
Posted by: jimkelly Aug 26 2013, 03:23 PM
the second video is good too - especially the warnings
safety first - machine should almost always be unplugged when side cover is open.
there are some 110v exposed cables in there.
Posted by: Andyrew Aug 26 2013, 07:48 PM
Yup.
Another tip, brace your welding hand on the work piece. Most people walk up and try to weld with no contact between them and the work piece. Their hands and arms are floating. It's like trying to shoot a sniper rifle standing up. If you can't solidly brace against the work piece, at least use your other hand to touch both the torch and the work piece so you get some tactile feedback about when and how far you're moving.
Good tip, Something most experts dont even think about until they see someone attempting it.
I typically weld with one large glove on my left hand and only put a glove on my right hand if Im doing more than a couple minutes worth of welding.
I've had the grease, it helps a little bit. I typically hit the nozzle against the floor to remove any pieces of metal stuck to the tip, and especially if its made contact between the two (It happens, Its OK, just fix it and shut off the welder.) Then I take the cover nozzle off and debur it against the threads of the tip (that you just unscrewed), its not really the best way, but it works for the pinch works.
Posted by: Jeff Hail Aug 26 2013, 10:06 PM
Yup.
Another tip, brace your welding hand on the work piece. Most people walk up and try to weld with no contact between them and the work piece. Their hands and arms are floating. It's like trying to shoot a sniper rifle standing up. If you can't solidly brace against the work piece, at least use your other hand to touch both the torch and the work piece so you get some tactile feedback about when and how far you're moving.
Good tip, Something most experts dont even think about until they see someone attempting it.
I typically weld with one large glove on my left hand and only put a glove on my right hand if Im doing more than a couple minutes worth of welding.
I've had the grease, it helps a little bit. I typically hit the nozzle against the floor to remove any pieces of metal stuck to the tip, and especially if its made contact between the two (It happens, Its OK, just fix it and shut off the welder.) Then I take the cover nozzle off and debur it against the threads of the tip (that you just unscrewed), its not really the best way, but it works for the pinch works.
Just a couple minutes exposure to triple range radiation can cause damage to your skin. Infrared, visible and ultraviolet radiation do not cause ionisation of body tissue, but they can still cause damage to body systems and membranes.The ultraviolet waves wont get you an island tan but can cause damage below the skin surface by heating blood vessels and water membranes below the skin layers. Gloves provide thermal insulation as well as blocking out UV and visible light frequencies.
Helmet, welding coat with collar, gloves and at least a N95 particulate respirator are the minimum that should be worn. R and P series respirators are also fine. Shielding gases and flux surface coatings which are burned or exposed to ultraviolet arc rays, they can generate harmful gases such as carbon monoxide, ozone, nitrogen oxides, gaseous fluoride and phosgene.
I have seen to many people with short and long term damage from welding and I'm not talking about pesky ear mosquito or slag burns. Its really easy to take safety precautions and only takes a few extra seconds. If you wear a helmet with a filter to keep from getting keratitis why wouldn't you protect the rest of the body?
Be Safe!
Posted by: Andyrew Aug 26 2013, 10:51 PM
Thank you for your concern and voicing these medical threats.
Posted by: speed metal army Aug 26 2013, 11:36 PM
Yup.
Another tip, brace your welding hand on the work piece. Most people walk up and try to weld with no contact between them and the work piece. Their hands and arms are floating. It's like trying to shoot a sniper rifle standing up. If you can't solidly brace against the work piece, at least use your other hand to touch both the torch and the work piece so you get some tactile feedback about when and how far you're moving.
Good tip, Something most experts dont even think about until they see someone attempting it.
I typically weld with one large glove on my left hand and only put a glove on my right hand if Im doing more than a couple minutes worth of welding.
I've had the grease, it helps a little bit. I typically hit the nozzle against the floor to remove any pieces of metal stuck to the tip, and especially if its made contact between the two (It happens, Its OK, just fix it and shut off the welder.) Then I take the cover nozzle off and debur it against the threads of the tip (that you just unscrewed), its not really the best way, but it works for the pinch works.
Sigh.. NO!!!!! A mig gun "Dip" is available at any welding supply. Grease isn't good for obvious reasons(contamination). Beating the gun on the floor is also negative.(beating on parts isn't good) Get some gun dip!!

Posted by: jimkelly Aug 27 2013, 05:26 AM
by grease - I meant DIP
so we have one DIP fan
I think I will get some - gotta go to dover de - as my local home depot did not have it.
Posted by: 76-914 Aug 27 2013, 08:55 AM
The dip gel stuff works. I don't know if this is Snake Oil but last trip to the welding supply I bought these felt disc's that slide over the wire before the feeder that are supposed to lub and clean the wire. We shall see.
Posted by: jimkelly Aug 27 2013, 09:10 AM
we shall - keep us posted.
right now I am citrus stripping some panels for my welding practice.
Attached image(s)
Posted by: jimkelly Aug 28 2013, 11:22 AM
pretty sound advice from Stacey
https://www.youtube.com/watch?v=AOAjQWKVHos
Posted by: jimkelly Sep 2 2013, 06:01 AM
ok - versus trying to weld big gaps, I sliced up some sheet - to try some tacks.
firstly, HF clamps are not square a cause seem to widen as clamp is tightened. no quality control on the manufacture of these.
so far it seems that HF mig cart and magnets and helmut are good buys.
also, I see that I did not keep my 2 pieces of sheet perpendicular to each other and the few beads I made cause big warping.
I have another 2 pieces set up, will try again.
my hope is that 18 and 16 gage are a lot more forgiving than 20.
Attached image(s)


Posted by: jimkelly Sep 2 2013, 08:15 AM
so I started to tack up 2 new test strips.
seems fine but wow - it must take a lot of tacks to seal up 15 inches of butt.
no bead - no warping.
I NOW fully understand why cars are assembled with spot welds.
seems to me - that in order to check ones work - the work must be back lighted - as it is hard to see the pin holes, from looking at the row of tacks without lighting from behind.
Attached image(s)


Posted by: jimkelly Sep 2 2013, 08:54 AM
and I can see why and EASY(er) GRIND wire would be nice
i'd like to see your work - a tack row of 2-3 inches - front and back on 18 gage or so.
seems once the tacks on front are ground down, no seam would be visable, BUT on back it seems that quite a bit of seam would still be seen.
Attached image(s)

Posted by: J P Stein Sep 2 2013, 09:41 AM
guys - thank you all
think I better get me some- easy grind - .023 wire
scottyb wrote "Thermodynamics = firepower // ESAB = spoolarc"
no sense practicing on thicknesses I have no immediate intention to be working with
http://www.914world.com/bbs2/index.php?showtopic=156717&hl=easy+Grind
jim
Easy Grind is the cats ass( but a tad pricy).You can even use it for structural welds.....it is still tougher than the base metal.....but for thicker material I do use .035 "normal" wire.
Most body/chassis material is made from cold form steel.....35,000 psi + yield strength easy grind is close to that and grinds closer to the same rate....it's harder because it cools quicker than the base steel when it's rolled.
"Normal" wire is around 70,000 yield as is hot rolled body/chassis material and with the .035 you get better penetration on thicker material....strenght is good on your roll cage,
......but sux for grinding on body work.All these yield strengths are approximates off the top of my haid, BTW. You have to read the "certs" of the melt (heat lot) to get actuals.....the ASTM ranges are fairly wide. A Ryerson Data Book is a good thing to have around.
I'm near sighted but even then I have to take off my glasses and get my haid up reeel close the the "puddle" to see it clearly.....I'm talkin' 3-4 inches. Auto darken hoods are the greatest thing since sliced bread......and are now pretty cheap.
I have no problem running downhand (pull) on body work, but always up hand (push) on structural stuff.
I found that the "feeds, speeds, & amperage on chart of Gary's 120V Miller
was spot on for .025 easy grind.....don't remember for .035....didn't use it as much but it's a good place to start, IIRC.
Like everything else, practice, practice, pra.....you have the idea.....and cleanliness is next to godliness.
Posted by: jimkelly Sep 2 2013, 09:58 AM
jp thank you and nice mustang BTW 
looks like easy grind comes in 023 and not 025 $66.00 11lb
my machine wants 025 or 030
https://weldingsupply.com/cgi-bin/einstein.pl?PNUM::1:UNDEF:OR:130TF43
Posted by: J P Stein Sep 2 2013, 10:39 AM
jp thank you and nice mustang BTW
No problem & I hope it is of some help.
I haven't done any serious rootin' around on that Mustang....yet.
I know the abysmal front suspension if gonna need some work but (Internet rootin') I think the replacement will be a bolt on deal......done by the folks that dominate SCCA CP nationally.....so, tho I want a welder I may not need one. Being a CSOB, that gives me some time to root around on CL for a good sed 120V.....I know, lotta rootin' going on.
Won't know till I get up close & personal with the nose of the thing.....it's even older than any 914.It'll go up on blocks in Oct., methinks. I'll play with the thing till then & finger out what to do......a man has got to have a plan.....even if it sux.
Posted by: jimkelly Sep 3 2013, 06:17 AM
good tack and grind video - no audio : (
http://www.youtube.com/watch?v=2Nk4JFKj9hM
and another
http://www.youtube.com/watch?v=Oj8p5upXHfU
seems that 023 is far more available than 025 wire
Posted by: J P Stein Sep 3 2013, 06:56 AM
.023 NOT .025 is the size I meant....sorry. My fingers can't seem to figure out what I meant to type. 
Without going out to the shop to check....IIRC, .025 is the tip used for .023 wire.
A little self contained set of tip reamers ( various sizes) is a good tool.
66 bucks is about what I paid about 10-12 years ago for easy grind.
I sold off/gave away most all of my "stuff" a couple years back....about 2k of Porsche tools, auto darken hood, left over weld wire....I won't miss the special tools, but will need to replace the a lot of the "normal " tools.....duh.
Posted by: jimkelly Sep 3 2013, 07:32 AM
jp
my reference to 023 was due to my mig seems to require 025 or 030
I need to find out if I can use 023 in my machine
i'm assuming I can but want to be sure before I buy an 11lb spool
update - just found my mig's manual online - aseems 023 is fine.
http://www.lincolnelectric.com/assets/ServiceNavigator-public/LINCOLN3/IM536.pdf
thanks
jim
Posted by: jimkelly Sep 3 2013, 09:38 AM
my first tool made with mig : )
my 220v compressor, that I never used yetm but a friend did at his shop some years ago, has been siting in my garage for years with some water in the tank but I could not remove drain plug, until today.
I welded a short socket extension into a pipe and WA LA, it loosened.
compressor all cleaned up
now I need to get 220 into my garage
Attached image(s)


Powered by Invision Power Board (http://www.invisionboard.com)
© Invision Power Services (http://www.invisionpower.com)