Printable Version of Topic
Click here to view this topic in its original format
914World.com _ 914World Garage _ Oil leak
Posted by: Elliot Cannon Sep 24 2013, 03:12 PM
Could this leak be coming from a crack in the head at the valve guide?
Attached image(s)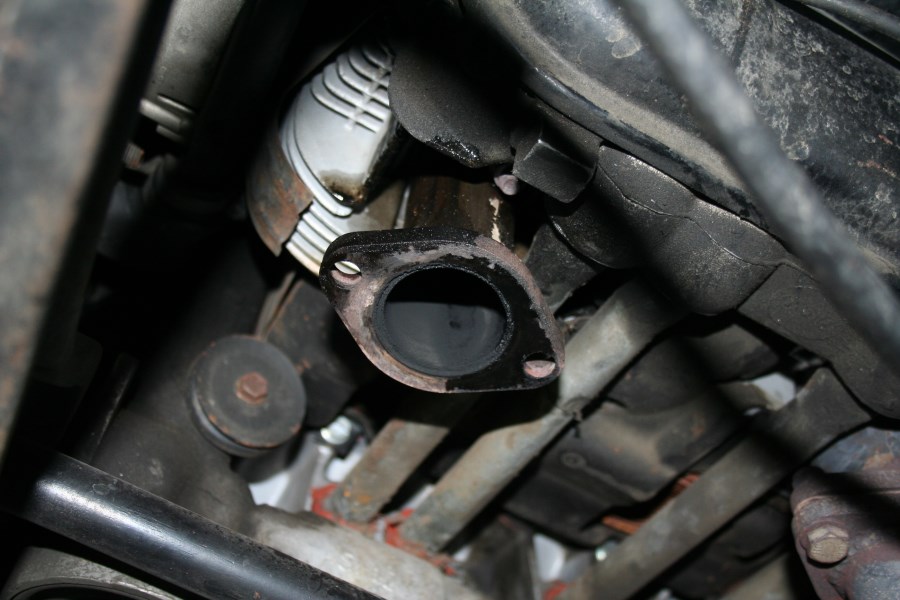
Posted by: stugray Sep 24 2013, 03:48 PM
My first thought was that there is nothing up there that can leak oil.
then I took some pics of a head laying right next to me: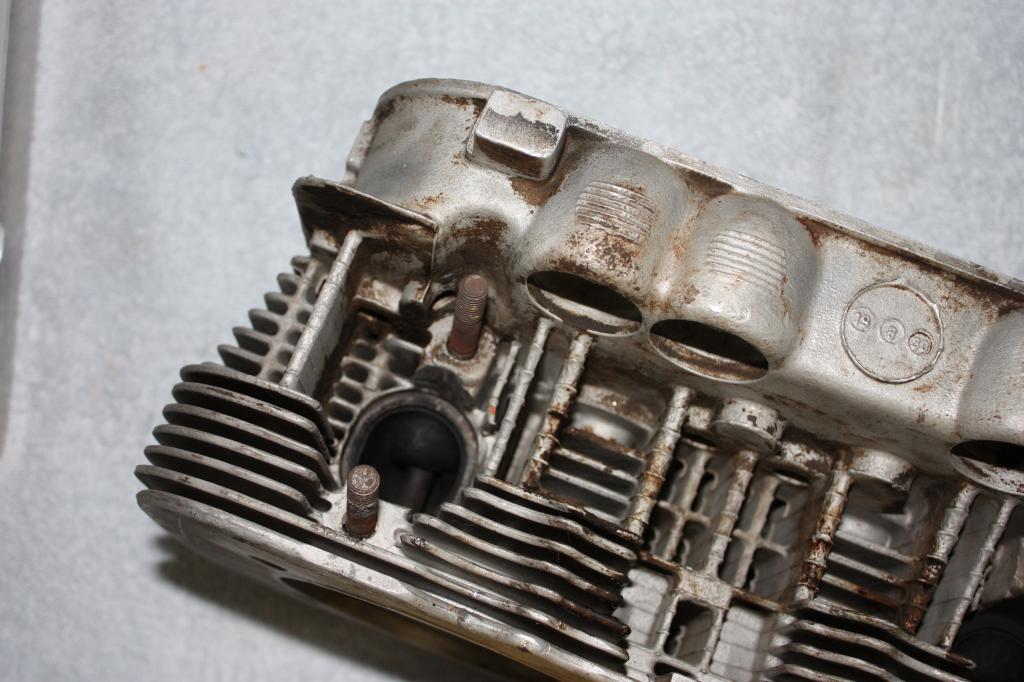
So after looking at those pics... If the head nut/stud to the left of the above pic gets really loose, then the oil could leak out where you are showing.
AND - B|tch slap whoever put all that sillycone on your pushrod tubes.
Posted by: SirAndy Sep 24 2013, 04:05 PM


Posted by: 396 Sep 24 2013, 04:12 PM

Posted by: Elliot Cannon Sep 24 2013, 09:24 PM
I ask for help and I get criticized. Sheesh. I feel like Rodney Dangerfield.  No respect.
Posted by: SLITS Sep 24 2013, 09:25 PM
I ask for help and I get criticized. Sheesh. I feel like Rodney Dangerfield.
No respect. I tole ya ya shuddin put that krap on dem tubes. Shoddy engine builder.
Posted by: Elliot Cannon Sep 25 2013, 02:19 PM
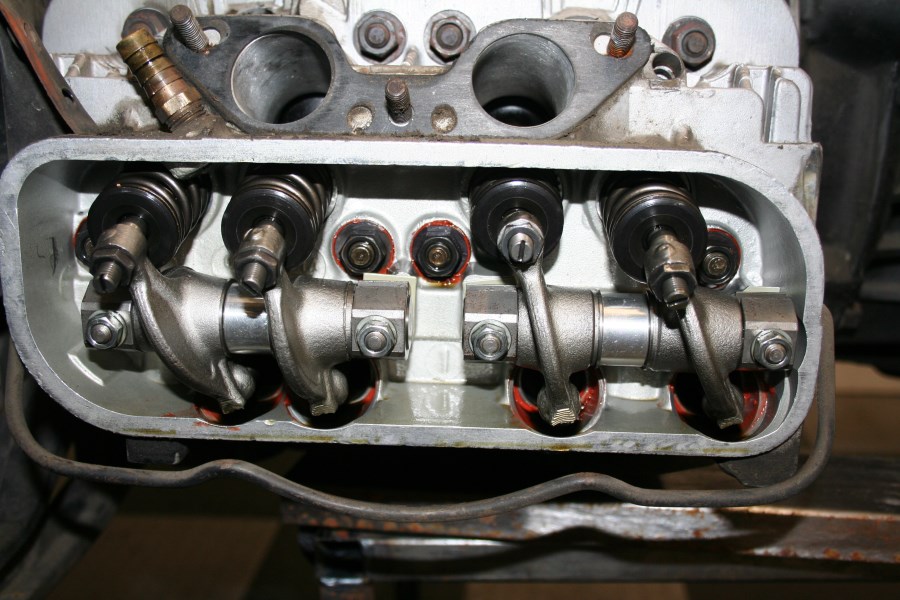
OK, I'm pretty sure the inside of the exhaust port including the valve and valve stem, shouldn't be covered with wet glistening oil. (It's actually worse than the picture shows). All the other exhaust ports are dark grey with carbon but they are totally dry. I need some experienced opinions here unless you just can't help making remarks about silicone and bitch slapping.  This is the number 2 exhaust port. I found the smoke the car was making was worse doing down hill with a right turn. Since number 2 is the forward left cylinder I guess this makes sense. Does anyone besides SLITS agree with this? Looks like the engine comes out and the head comes off.
Attached image(s)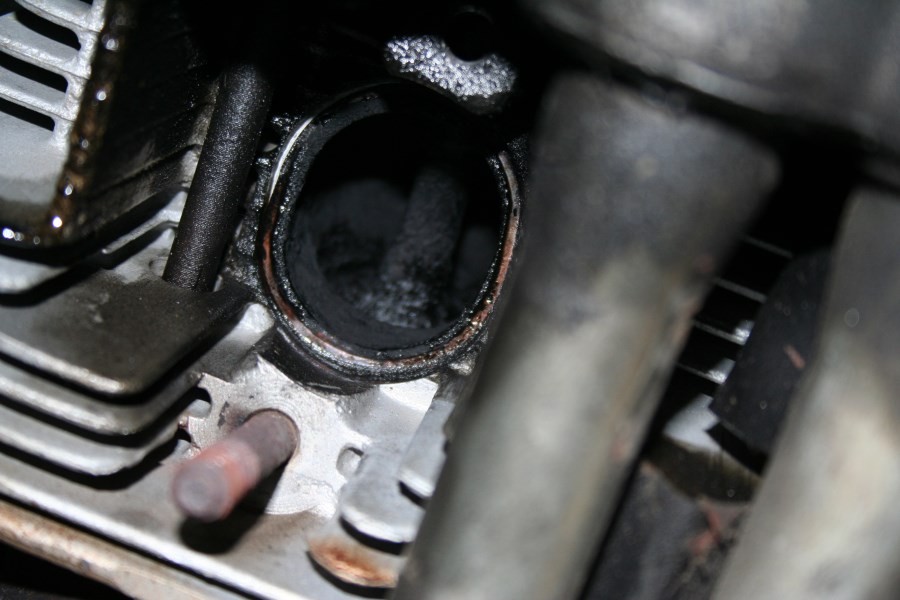
Posted by: Dave_Darling Sep 25 2013, 02:43 PM
 I'd agree; time to pull that head and have it checked thoroughly.
--DD
Posted by: r_towle Sep 25 2013, 03:03 PM
could be headwork, could be junk rings.
Pull it, stop taking pictures already..
rich
Posted by: stugray Sep 25 2013, 03:15 PM
The part that I was commenting on was the drip of oil coming from ABOVE the stub pipe, which cannot be coming from inside the exhaust port.
Or do you not see the drip coming off of the cooling fin?
I was being serious both about the leak and the fact that you should not use silicone on the tube seals....
Looks like you have a leak both inside & outside that cylinder.
Maybe from that bolt AND from inside. Maybe related?
Posted by: Elliot Cannon Sep 25 2013, 04:31 PM
could be headwork, could be junk rings.
Pull it, stop taking pictures already..
rich
A picture is worth a thousand words.
Posted by: Elliot Cannon Sep 25 2013, 04:34 PM
The part that I was commenting on was the drip of oil coming from ABOVE the stub pipe, which cannot be coming from inside the exhaust port.
Or do you not see the drip coming off of the cooling fin?
I was being serious both about the leak and the fact that you should not use silicone on the tube seals....
Looks like you have a leak both inside & outside that cylinder.
Maybe from that bolt AND from inside. Maybe related?
Thanks. It looks like the engine comes out.
The push rod tubes aren't leaking and never have on this engine because of the high temp sealant that was used. So, which is better, carbs or fuel injection?
Posted by: SLITS Sep 25 2013, 04:37 PM
I would have told you that your guess at a crack valve guide seat would have oiled the port, but you don't listen anyway.
Go sit in your lawn chair, take more pictures, drink wine, eat more moldy cheese, PUT DOWN THE RTV AND TOOLS and wait for the Leprechauns to fix your car.
PULL THE DAMN HEAD!!!!!
Posted by: SLITS Sep 25 2013, 04:44 PM
So, which is better, carbs or fuel injection?
Neither .........
Posted by: r_towle Sep 25 2013, 07:41 PM
I would have told you that your guess at a crack valve guide seat would have oiled the port, but you don't listen anyway.
Go sit in your lawn chair, take more pictures, drink wine, eat more moldy cheese, PUT DOWN THE RTV AND TOOLS and wait for the Leprechauns to fix your car.
PULL THE DAMN HEAD!!!!!
And if I lived nearby, I would swing by and pick up SLITS, along with two more chairs, a few extra bottles of wine, some scotch and we would come supervise you while you waited for the leprechauns.
Posted by: StratPlayer Sep 25 2013, 08:14 PM
Time for a six elliot 
Posted by: Elliot Cannon Sep 25 2013, 10:32 PM
I would have told you that your guess at a crack valve guide seat would have oiled the port, but you don't listen anyway.
Go sit in your lawn chair, take more pictures, drink wine, eat more moldy cheese, PUT DOWN THE RTV AND TOOLS and wait for the Leprechauns to fix your car.
PULL THE DAMN HEAD!!!!!
But you didn't. All you could think of was giving me shit about RTV on the push rod tube seals. Speaking of Leprechauns, does that mean you'll be coming up here to help?
Posted by: Elliot Cannon Sep 25 2013, 10:36 PM
I would have told you that your guess at a crack valve guide seat would have oiled the port, but you don't listen anyway.
Go sit in your lawn chair, take more pictures, drink wine, eat more moldy cheese, PUT DOWN THE RTV AND TOOLS and wait for the Leprechauns to fix your car.
PULL THE DAMN HEAD!!!!!
And if I lived nearby, I would swing by and pick up SLITS, along with two more chairs, a few extra bottles of wine, some scotch and we would come supervise you while you waited for the leprechauns.
Hey! Hey! New England boy. SLITS is the only one who can talk about me like that. Besides if you lived close by, I don't think either one of you would be much help.
Posted by: Elliot Cannon Sep 25 2013, 10:37 PM
Time for a six elliot
I'm working on it. I'm looking for one for the 914 as well.
Posted by: Elliot Cannon Sep 25 2013, 10:40 PM
So, which is better, carbs or fuel injection?
Neither .........
What chicken $hit answer!
 FI is more efficient. Carbs are more fun.
Posted by: Dave_Darling Sep 25 2013, 11:13 PM
... supervise you while you waited for the leprechauns.
Someone has invited Clay?
--DD
Posted by: Elliot Cannon Sep 26 2013, 10:34 AM
... supervise you while you waited for the leprechauns.
Someone has invited Clay?
--DD
No, the other one.
Posted by: SLITS Sep 26 2013, 11:17 AM
... supervise you while you waited for the leprechauns.
Someone has invited Clay?
--DD
No, the other one.
OoooooooooooooH, I've been burned by a Vegan.

Posted by: Dave_Darling Sep 26 2013, 04:17 PM
I thought he was from the Coast, not from Vegas!
--DD
Posted by: r_towle Sep 26 2013, 04:20 PM
Guinness and scotch are not made from meat, right?
While waiting for the magic to happen, you too can remain a vegan for that part of the day.
Posted by: Elliot Cannon Sep 26 2013, 05:31 PM
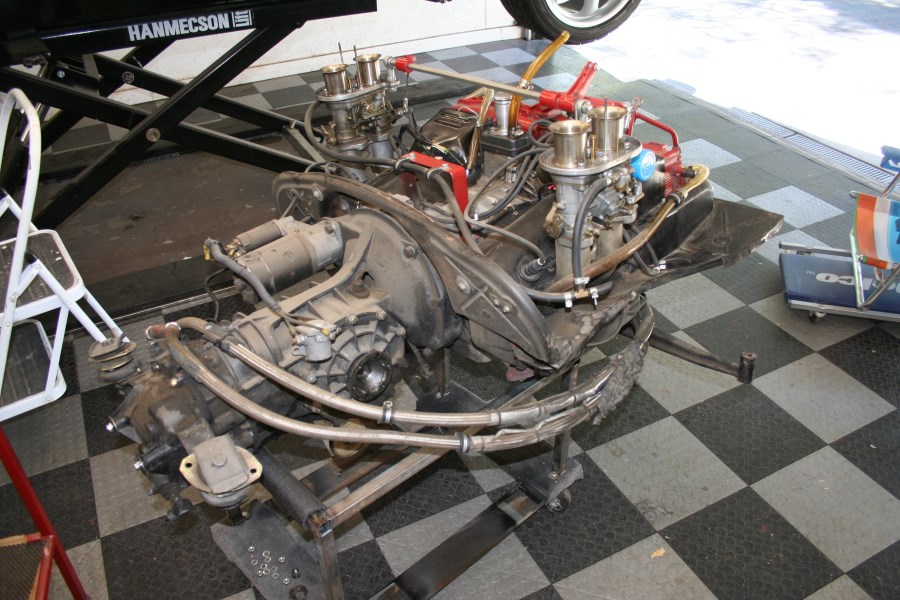
OMG, I went to bed last night and the Leprechauns must have showed up while I was sleeping and look what they did! So now what else should I do "while I'm in there"? Everything in there is at least 10 years old. I'm thinking of replacing all the cables and I'll have to replace the engine tin rubber seals as they were somewhat damaged when the car was raised off the engine. All the rubber fuel lines will be changed out to the new plastic lined ones. New fuel filter. What else besides general cleaning and re-painting? The engine has about 30,000miles on it. If I have the bad head done, does anyone recommend doing the other one as well or "if it aint broke, don't fix it"?
Attached image(s)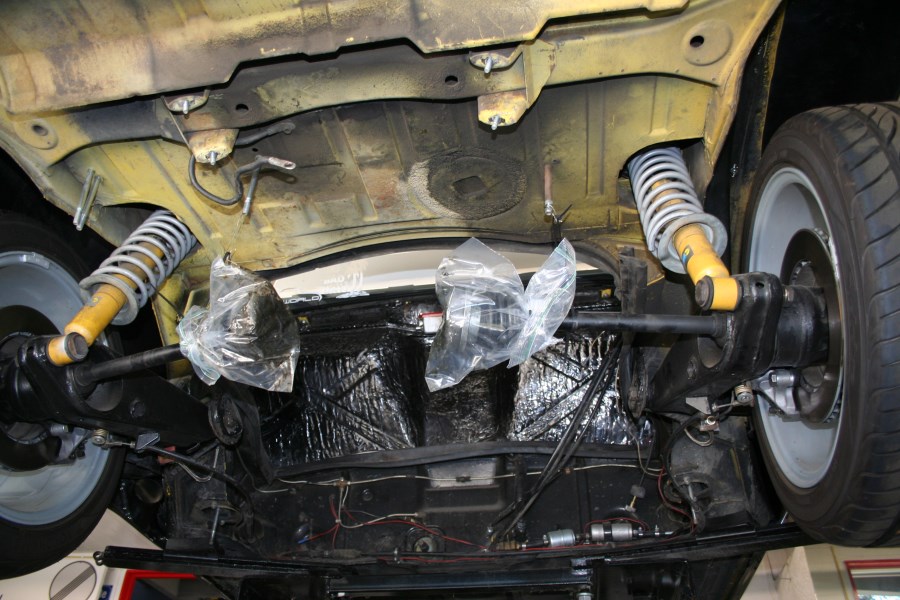
Posted by: r_towle Sep 26 2013, 05:48 PM
Undercoating.
Posted by: stugray Sep 26 2013, 08:19 PM
nice job! I have said many times that you can remove a carb typeIV in less than an hour if you have the right tools sitting around.
FIRST: AND - B|tch slap whoever put that throttle linkage on there.
Just buy the right one when you put it back in ;-)
Posted by: Elliot Cannon Sep 26 2013, 10:20 PM
Undercoating.
It will be painted with VHT. Works as a great insulator and will keep the rear trunk cooler.
Posted by: Elliot Cannon Sep 26 2013, 10:25 PM
nice job! I have said many times that you can remove a carb typeIV in less than an hour if you have the right tools sitting around.
FIRST: AND - B|tch slap whoever put that throttle linkage on there.
Just buy the right one when you put it back in ;-)
That throttle linkage works perfectly. It's a CB performance linkage that has been modified. There is absolutely NO slack in the linkage. All four throttles open and close fully and at the exact same rate. Someone needs to be Bitch slapped for criticizing something they don't know about. I'll take better pictures of the linkage and you can see how it's been re-worked, when I get the engine back together. Whenever the hell that might be.
Posted by: Dave_Darling Sep 26 2013, 10:40 PM
Inspect the head first. Look over it carefully to see if you can find where the leak was.
--DD
Posted by: Elliot Cannon Sep 26 2013, 10:42 PM
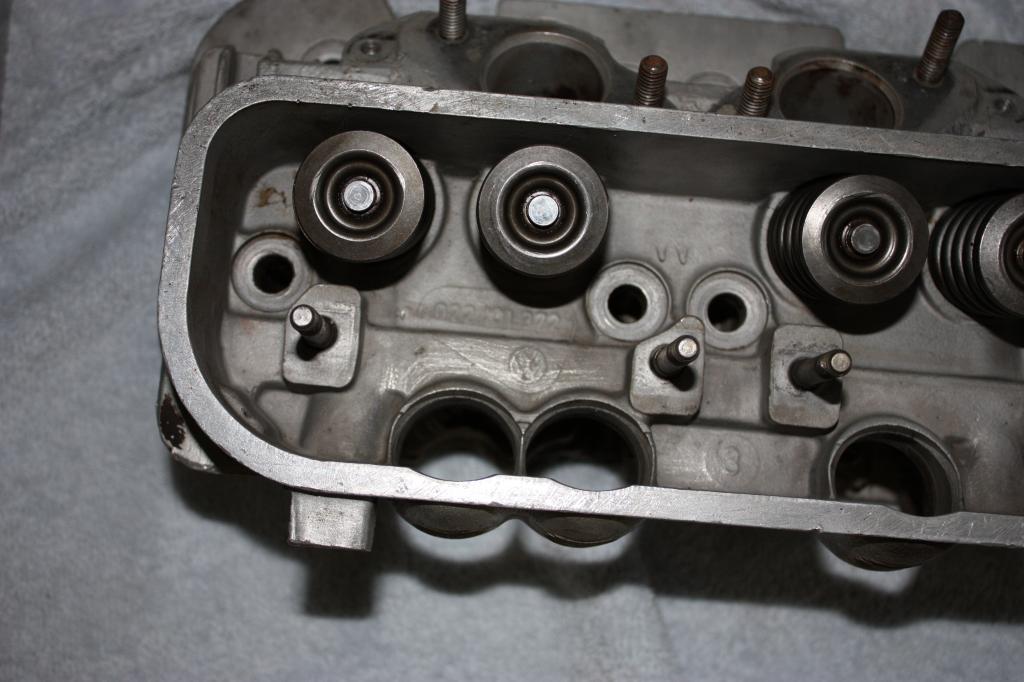
These valve guides just don't look right and maybe someone can help explain what I'm looking at. Three of the intake valves have what I think is a brass valve guide showing? It shows weather the valves are open or closed. One of the valves doesn't show anything as you can see from the pics. Does this mean the valve guides have come loose? The last picture shows the rockers looking pretty clean. Anyway, it looks like both heads will come off.
Attached image(s)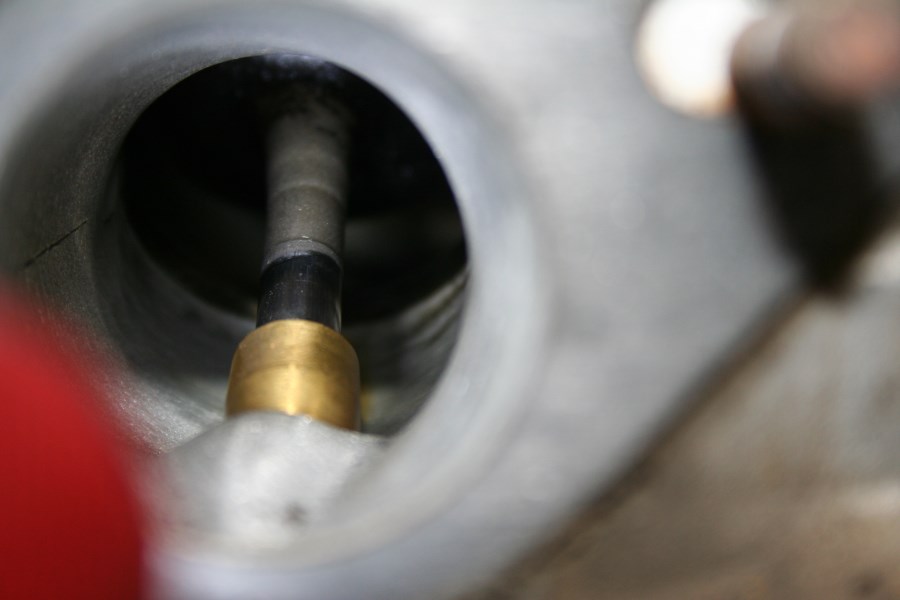
Posted by: stugray Sep 26 2013, 10:49 PM
If you cant tell a

 when you see one, I just dont know anymore....
I could criticize your starter "helper relay" or your head vents next if that really gets you going
Posted by: Elliot Cannon Sep 26 2013, 10:56 PM
If you cant tell a
when you see one, I just dont know anymore....Can you tell what has been done to the linkage? Have you seen mine work? If you want to help me with this problem I have with the engine fine but I don't need to be criticized by someone who hasn't even seen, heard, or driven my car. Help me out with some of your expertise or stay the fuck off this thread.
Posted by: stugray Sep 26 2013, 10:58 PM
The inside of those heads look too clean for some reason.
How many miles did this engine have on it before you noticed the leak?
Posted by: stugray Sep 26 2013, 11:00 PM
Got it! I actually thought we had a pretty good conversational relationship from some of the other threads.
SO... I guess I will just fuck off then.
Posted by: Elliot Cannon Sep 26 2013, 11:03 PM
The inside of those heads look too clean for some reason.
How many miles did this engine have on it before you noticed the leak?
About 30,000. The engine was built by FAT Performance about 9 years ago. 147 HP @5300RPM on the dyno. This is the first time I have had any trouble.
Posted by: Elliot Cannon Sep 26 2013, 11:11 PM
Got it! I actually thought we had a pretty good conversational relationship from some of the other threads.
SO... I guess I will just fuck off then.
I always appreciate informed help. When someone blindly criticizes something they know nothing about... Kinda bothers me. I can show you what I did with the throttle linkage when I get things back together. Apologies till then.
Posted by: stugray Sep 26 2013, 11:40 PM
When I first said:
I didnt realize that you had head vents.
Maybe you should ask if there is anything that could have caused higher crankcase pressure than before. (clogged vent or blown ring?)
And I dont just go and take the time to take pictures of a spare head and bother to post them to photobucket just for the opportunity to dick with someone....
Posted by: Elliot Cannon Sep 27 2013, 12:00 AM
Both head vents are connected to a breather and I don't believe either one is clogged. I'm hoping this is a head issue and not a blown ring. The helper relay was there when I bought the car. It works fine and I saw no reason to remove it.
Posted by: euro911 Sep 27 2013, 01:37 AM
I would go through both heads. It will help to assure uniform compression.
If you do have a ring issue, the hard part is already done - the engine is out and the heads off.
Inspect the cylinders. Might want to re-ring it too?
Posted by: SLITS Sep 27 2013, 06:28 AM
Most engines that use guides, the guide for the valve hangs into the port. The only time I have ever seen a guide cut flush with the roof of the port was on a racing engine that was torn down after each race anyway. Others I have seen may cut the guide a bit shorter and then taper it in the direction of flow. The two above methods were to achieve maximum flow through the port.
It appears that one has moved. Yes the markings on the valve stem are from the valve moving in and out which is normal to me. The only way to tell is to remove the springs and retainers. Once that is done you will be able to see how much of the guide is sticking above the valve guide boss or if you have means of depressing the valve you might see the guide magically appear in the port.
I had an engine that the guide seized on the valve stem and pulled it. Smoked like hell and still ran though. It happened just driving around in a parking lot at low RPMs.
All in all, it appears to be a head issue. If you had a broken ring on a piston you would see grooving in the cylinder wall. On the way to Wickenburg for Route 66, this happened to me.
And whatever brand of fuel you are using is leaving deposits. Years ago I used Smell gas until I tore and engine down. Deposits are from the additive package.
Posted by: bulitt Sep 27 2013, 06:45 AM
Slits has it. The guide has moved in the head. Either loose or a crack in the head.
As he said the guides normally protrude into the port. Old mass produced engine guides are simple tubes, usually cast iron. Your heads have been reworked to improve flow and have had tapered guides installed. If not cracked they can just install an oversize guide and new seal, and figure out why this one came loose. 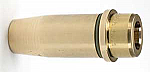
Looks like the intake ports have had some mild porting done on them.
If you end up with a replacement head you will need the same work done
on the new one or it could have different flow rates then the other.
Posted by: rhodyguy Sep 27 2013, 07:14 AM
remove, straighten, and 'pretty up' the engine tin.
Posted by: lsintampa Sep 27 2013, 10:26 AM
IDK,
If the valve guide were leaking, it would smoke sure, but if the headers are on with a good seal, there shouldn't be oil on the outside.
See if you can move the valve guide, one on mine came loose and I could actually move the thing with my finger.
Good luck!
Posted by: stugray Sep 27 2013, 11:04 AM
If the valve guide is loose and leaking, that will cause higher than normal crankcase pressure as the exhaust gases blow by the guide into the head.
Since he has a head vent directly over where we see the oil leaking down the header stub, I think that is the source of the oil on the outside of the stub.
Posted by: 914_teener Sep 27 2013, 12:04 PM
I am with Mark......, Elliot....
I'd do both heads. Sounds and looks like the guides from your posts.
And for those that don't know him....He's a nice guy and is pretty meticulous with his car. He drives it more that anyone I know who owns a 914
Posted by: Elliot Cannon Sep 27 2013, 12:18 PM
I am with Mark......, Elliot....
I'd do both heads. Sounds and looks like the guides from your posts.
And for those that don't know him....He's a nice guy and is pretty meticulous with his car. He drives it more that anyone I know who owns a 914
I agree with Mark as well. Both heads coming off. I know Mark is a nice guy and is pretty meticulous with his car but I didn't think he drives it much because I'm not sure if he ever had a 914 that ran much.
Posted by: SLITS Sep 27 2013, 01:31 PM
You two should get a room.
Can I pick on you now about the RTV under the head washers?
and
The "T" in the brake line?
Posted by: r_towle Sep 27 2013, 02:01 PM
It looks like it moved.
I would re-ring it, but that is just me...you are in there, and its simple to do at this point...
Otherwise, do both heads.
Suck that it happened.
They are press fit in there then honed out.
I believe the metallurgy has changed quite a bit and the new guide have a stronger blend of the alloy so they wont wear out as fast.
If you put them in correctly, which seems to be your issue.
BTW, they were never cast iron...
If those are stock heads, its time to do it.
If those were previously done by a machine shop 30k miles ago, you might want to consider bringing your business elsewhere for this time around.
Rich
Posted by: 76-914 Sep 27 2013, 04:57 PM
Damn Ron, you gonna let that "relay comment" slide. I remember when you were good for a couple of paragraphs on that one. Elyut, if you're a CSOB pm me. I've got a set of engine rubber seals 1 yr old, I won't be needing.
Posted by: Elliot Cannon Sep 27 2013, 07:02 PM
You two should get a room.
Can I pick on you now about the RTV under the head washers?
and
The "T" in the brake line?
You can pick on me about the RTV under the head washers because they were done by FAT Performance. I put the "T" in the brake line. What the hell is wrong with that.
 You can pick on me any time because I know how much you love me. Besides, I think you might know a little more about this car than I do.
Posted by: Elliot Cannon Sep 27 2013, 07:03 PM
Mid-rise lift makes a good work bench.
Attached image(s)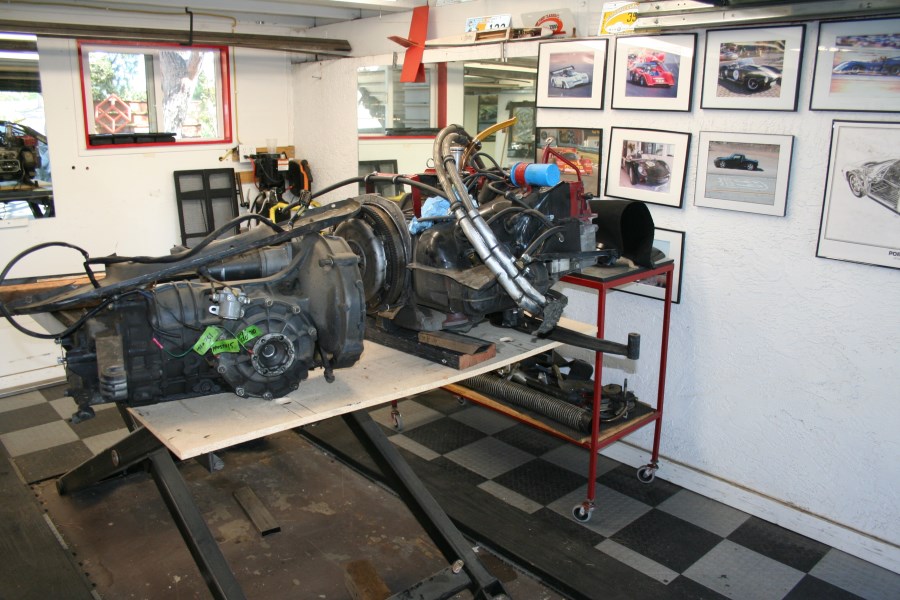
Posted by: Elliot Cannon Sep 27 2013, 07:05 PM
I hope I remember how all this shit goes back together? 
Attached image(s)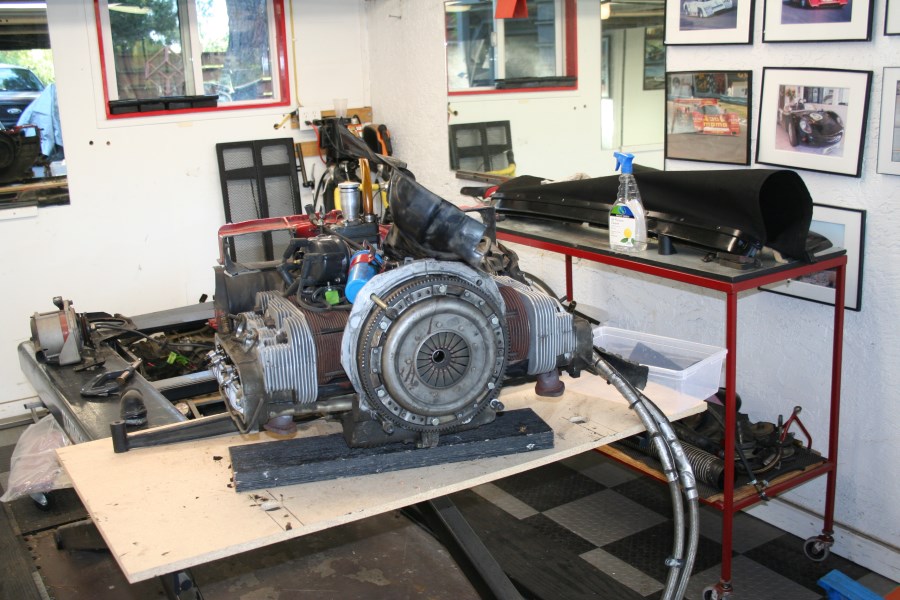
Posted by: Elliot Cannon Sep 27 2013, 07:07 PM
Both the rocker arm assemblies are totally clean. I thought there would be more gunk in there.  You know, besides all that orange shit.
Attached image(s)
Posted by: SLITS Sep 27 2013, 08:54 PM
When you pull the rocker assemblies get 8 each 5/16 bolts about 3" long. As you start to pull the rocker assemblies off the studs, push the bolts thru the stud holes. This will keep the rocker assemblies assembled and you merely slide the assemblies over the studs which will push the bolts out. Saves a bunch of time reassembling the rocker assemblies if you let them fall apart.
Before you pull the heads make sure you get the cheese head screws out of the block that holds the warm air guide under the cylinders. Heads won't come off otherwise.
but I know you know all of this.
Posted by: Elliot Cannon Sep 27 2013, 11:50 PM
When you pull the rocker assemblies get 8 each 5/16 bolts about 3" long. As you start to pull the rocker assemblies off the studs, push the bolts thru the stud holes. This will keep the rocker assemblies assembled and you merely slide the assemblies over the studs which will push the bolts out. Saves a bunch of time reassembling the rocker assemblies if you let them fall apart.
Before you pull the heads make sure you get the cheese head screws out of the block that holds the warm air guide under the cylinders. Heads won't come off otherwise.
but I know you know all of this.
Thanks Ron. I haven't done this in about 8 years. Considering the fact that I can't remember what I had for lunch today, your advice comes at the right time.
Posted by: Eric_Shea Sep 28 2013, 12:02 AM
Paint the rest of it yellow...
Posted by: euro911 Sep 28 2013, 02:50 AM
I hope you tagged your push rods, and if you pull(ed) the lifters, you tag(ged) them as well ... so they go back in where they originally came from
I'm pretty sure that Rob was referring to YOU about driving your 914 more than anyone else he knows. There's a lot of folks that have never seen me drive one, and probably think I only own a couple of Toyota trucks
Posted by: SLITS Sep 28 2013, 08:52 AM
I hope you tagged your push rods, and if you pull(ed) the lifters, you tag(ged) them as well
... so they go back in where they originally came from I'm pretty sure that Rob was referring to YOU about driving your 914 more than anyone else he knows. There's a lot of folks that have never seen me drive one, and probably think I only own a couple of Toyota trucks
I saw you drive one once ... poorly, but you drove it.
And Elleyot,
 even though you're a Vegan
 "My candle burns at both ends;
It will not last the night;
But ah, my foes, and oh, my friends—
It gives a lovely light.
Posted by: Eric_Shea Sep 28 2013, 09:46 AM
So we've heard...

Posted by: euro911 Sep 28 2013, 09:59 AM
... and it's a blue flame, or so I've heard 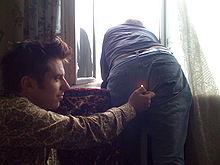
They call me mellow yellow ...
Posted by: NORD Sep 28 2013, 11:30 AM
Elliot; Make sure when you disasemble that you use a vac to get all that silicone out of that engine. Mine was sealed like that when I broke it down and as careful as I was to get it all, The first oil change after 20 minutes of running there was some silicone at the strainer. I'm sure it was from the pushrod tubes that were sealed like yours at the block.
Thinking about it, my motor only had 39,000 when it failed. Maybe the silicone shortens the motor life. It did not drip any oil though. Get it running. 
Posted by: SLITS Sep 28 2013, 09:25 PM
That is the problem with using RTV in areas where shards can break off and get into the oil. Being semi soft, they can pass thru the strainer and potentially plug an oil feed to a bearing.
If you're going to use it, apply tighten what ever and wipe clean what squeezes out when installing whatever and use a very small amount to begin with.
I used to use toilet paper to clean bearings prior to install because it doesn't leave lint. Lost an engine due to a small piece of asswipe plugging a rod bearing feed.
Posted by: Elliot Cannon Sep 30 2013, 05:00 PM
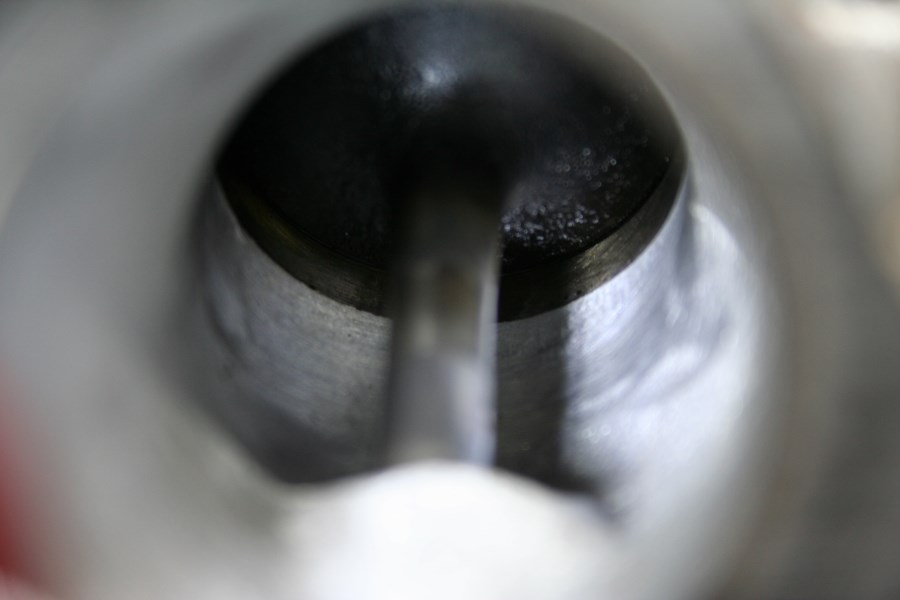
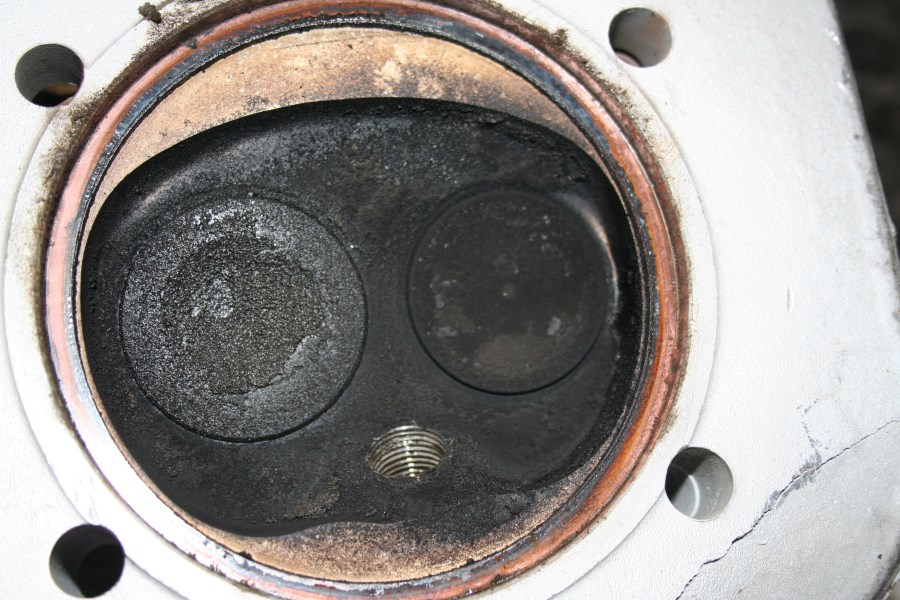
I finally got the head off. These are cylinders two and one respectively. Does it look like cyl. two has been burning some Mobil 1? Number one is much better although it shows it's been running a little rich maybe? I really don't have the experience to tell. I'm pretty sure about number two though.
Attached image(s)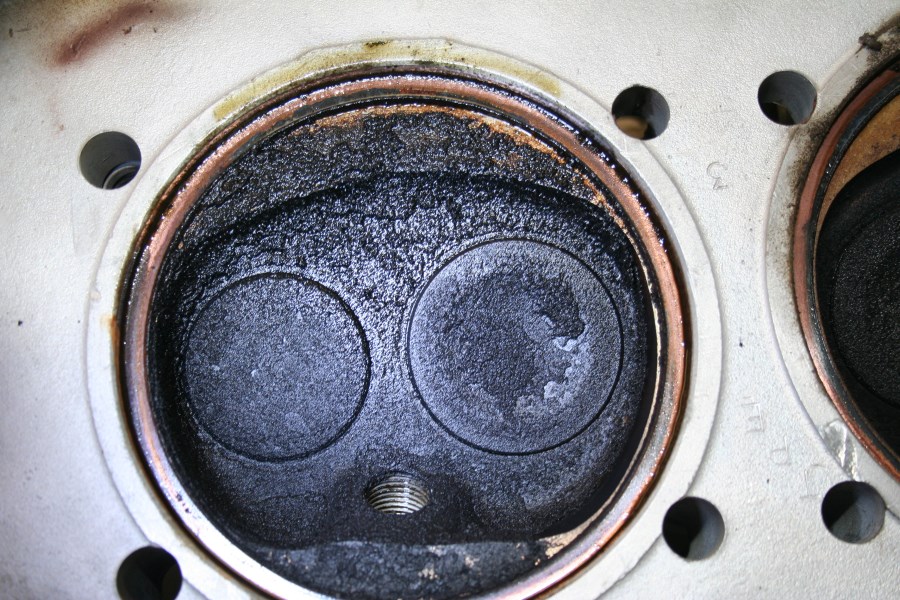
Posted by: Elliot Cannon Sep 30 2013, 05:02 PM
The cylinder walls look pretty good to me. I can't see any scoring. Both one and two look great. 
Attached image(s)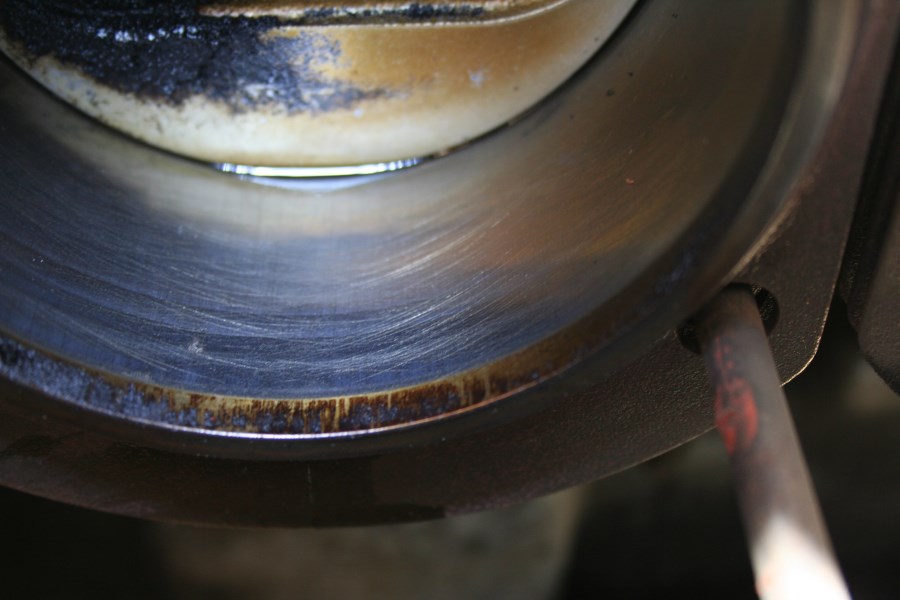
Posted by: Elliot Cannon Sep 30 2013, 05:05 PM
I pulled out one of the ceramic valve lifters. After 25,000 miles they look just like they did when I installed them about 8 years ago. Thanks Clayton, (where ever you are).
Attached image(s)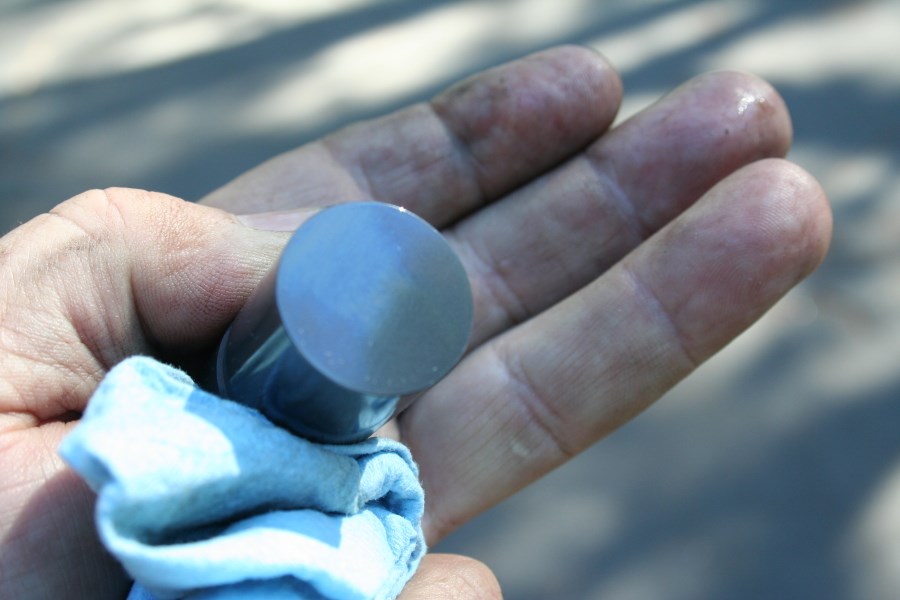
Posted by: Elliot Cannon Sep 30 2013, 05:10 PM
I'll be pulling the other head off soon and figure out where to take them to be worked on. I still can't see how oil got into the combustion chamber although I think the valve guides are a good bet to this amateur. I don't have a spring compressor to remove the valves. I'll let someone else do that. While the heads are being done, I guess about a case of carb. cleaner might get a lot of the gunk off. Maybe get some stuff powder coated so it looks clean at least for awhile.
Attached image(s)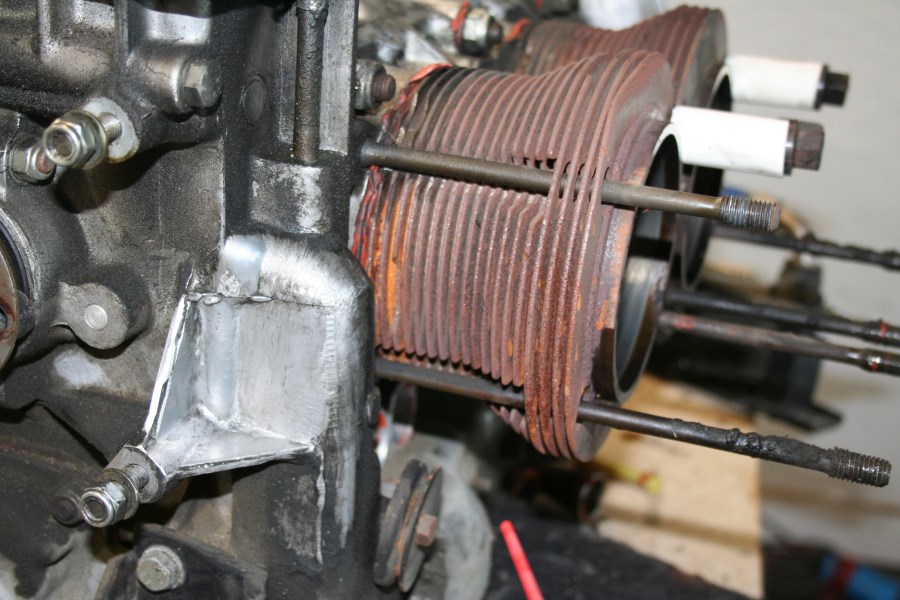
Posted by: StratPlayer Sep 30 2013, 06:59 PM
Elliot are those 94 or 96mm pistons?
Posted by: SLITS Sep 30 2013, 08:01 PM
Not much wear .... you can still see the cross hatching on the cylinder walls. Looks good to go to me.
Posted by: Elliot Cannon Sep 30 2013, 09:20 PM
Elliot are those 94 or 96mm pistons?
96 pistons and 76 crank.
Posted by: r_towle Sep 30 2013, 09:23 PM
Can you see the valve guide on the vale in question from the top?
Inside the spring?
Posted by: Elliot Cannon Sep 30 2013, 09:25 PM
It has dual springs and I can't see anything.
Posted by: 72hardtop Nov 11 2013, 02:33 PM
Whoever used RTV needs to be tarred and feathered in public. If you use anything on the push-rod tubes only use 'Thread sealant'. It does not cure like RTV and won't plug anything up.
As for the case/cylinder mating surfaces Curil K2
Posted by: stugray Nov 12 2013, 12:28 AM
![popcorn[1].gif](style_emoticons/default/popcorn[1].gif)
Posted by: 72hardtop Nov 12 2013, 01:41 AM
What P/C set was used? Any idea?
The following should suite you well:
http://aapistons.com/shop/vw-piston-and-cylinder-kits-37/vw-porsche-2-0-96mm-piston-cylinder-kit-914-type-4.html
Powered by Invision Power Board (http://www.invisionboard.com)
© Invision Power Services (http://www.invisionpower.com)