Printable Version of Topic
Click here to view this topic in its original format
914World.com _ 914World Garage _ Area51Werks starts another Autotopsy Resurrection of a Factory 6
Posted by: rick 918-S Oct 24 2013, 12:48 AM
I wanted to start another build thread for the 914-6 I purchased from Ethan. When we were able to put together a deal I could hardly wait to come out and collect it.
Last year our Titan was totaled. So Sandy and I took our little truck with trailer and headed out. We drove straight through to Vegas. We met up with John Peterson and stayed in the 914 room. Sandy was calling it our room. 
Half way to Vegas the brakes started grinding. There was no way we were going to make So Cal and all the hills with dead brakes. So while Sandy was at her meeting in Vegas JP and I rebuilt the front brakes on the mighty Ranger. Thanks again for all your help and hospitality John!
Our first stop on the way to pick up the 6 was at Ron's shop. Ron set me up with a 2.7S and goodies. Thanks to his generosity I have most everything to put the car back in running condition when the chassis work in done. And congratulations to Grandpa Ron and the new baby girl they just welcomed into the world.
When we arrived at Ethan's we were pleasantly surprised by the weather. Beautiful Sunny California makes it hard to leave and come back to the cold and snow.  Yes, we were greeted by a nice light dusting of snow when we arrived home.
Anyway, it was great to spend the day with friends, eat brisket and tell stories.
Kent, Rod and Wayne came to help with the fun.
I received a project from Rod while I was there. More on that in another thread.
Rod was a wealth of knowledge about the history of this car. I really need to spend some time on the phone with him now that I am back and talk more about the cars origin and past.
Kent lead the way and got us back on the road heading out of So Cal to points east. It was a great day in the 914World. Thanks all!
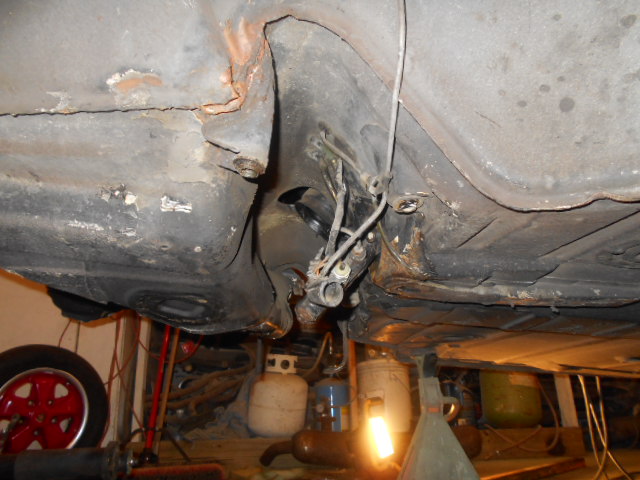
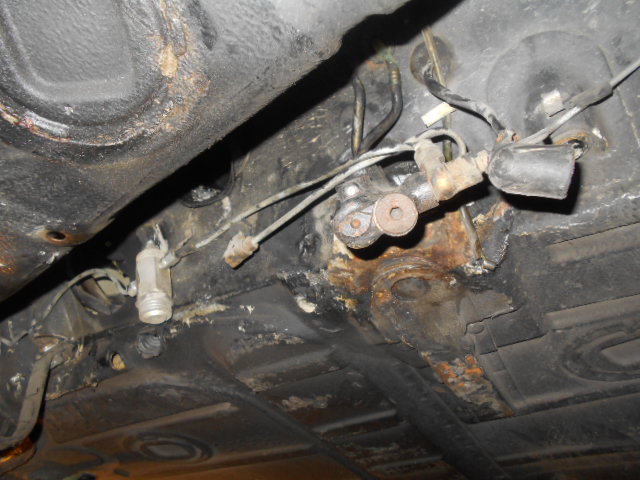
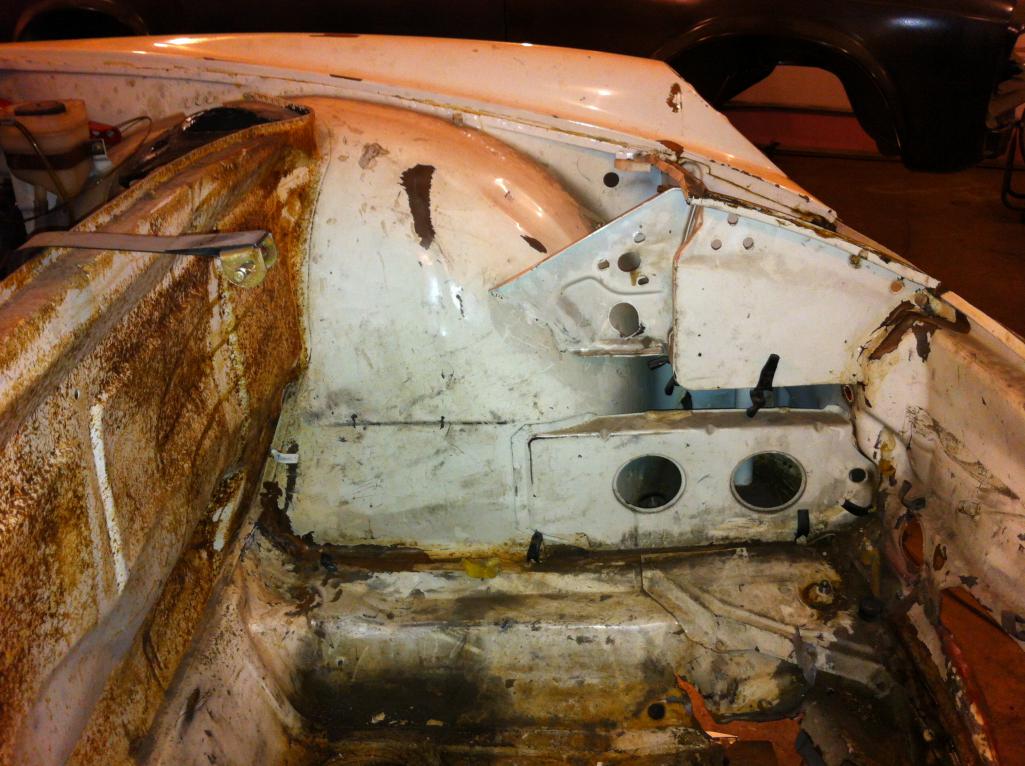
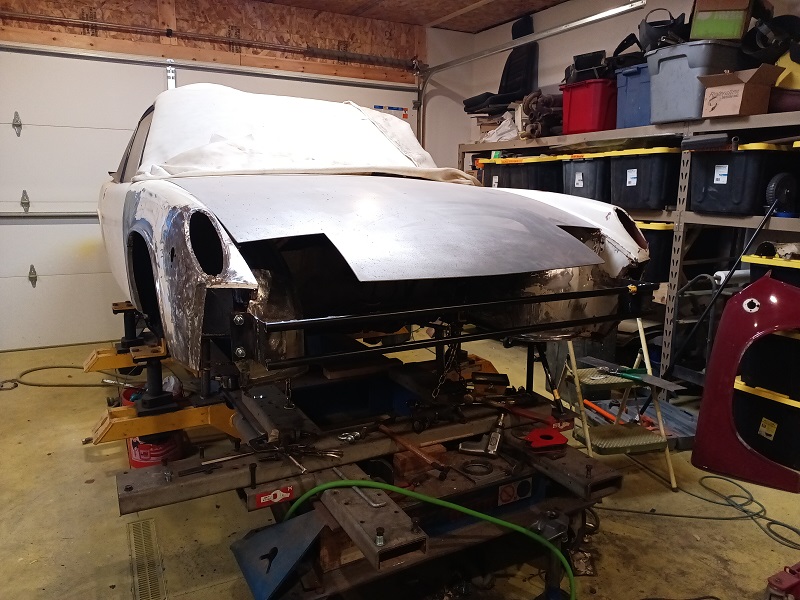
Now on to the car. I have it home now. My son Aric and I spent some time doing forensics on the chassis. We dropped the suspension and started removing some of the bolt on stuff that will have to be cleared in order to repair the chassis.
I plan a full on documented chassis rebuild showing the process involved in determining how and where to pull, what to remove and the importance of proper technic when splitting panels welding things back together. To some this may be basic but I get a lot of questions about chassis repairs and felt it would be a good place to start a discussion.
For now, here's the car: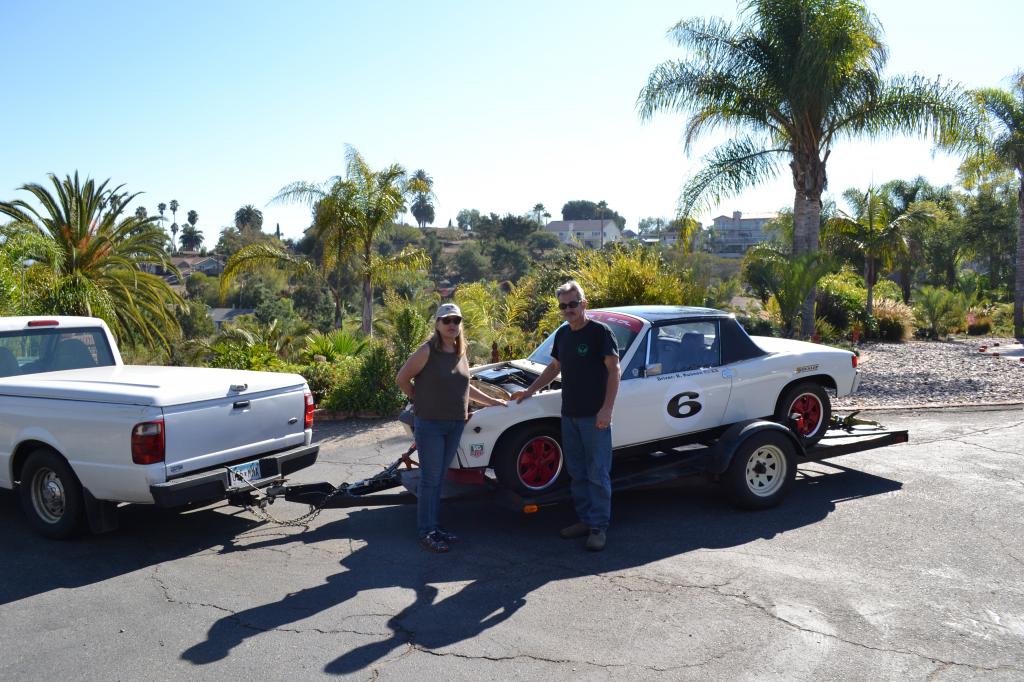
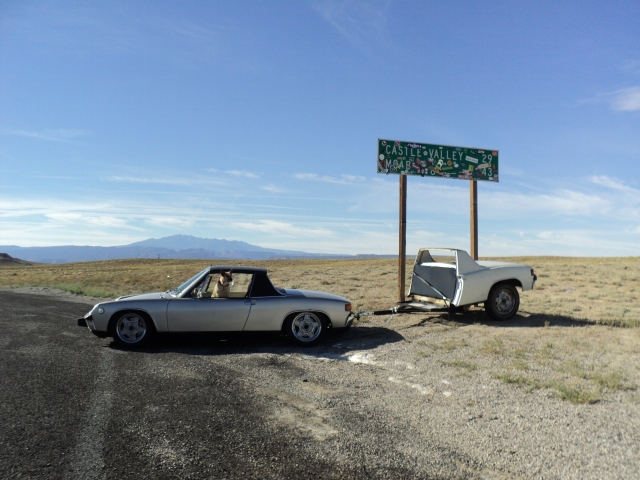
My favorite place to stop for a photo of my 914's. I have taken a photo here with every 914 I have.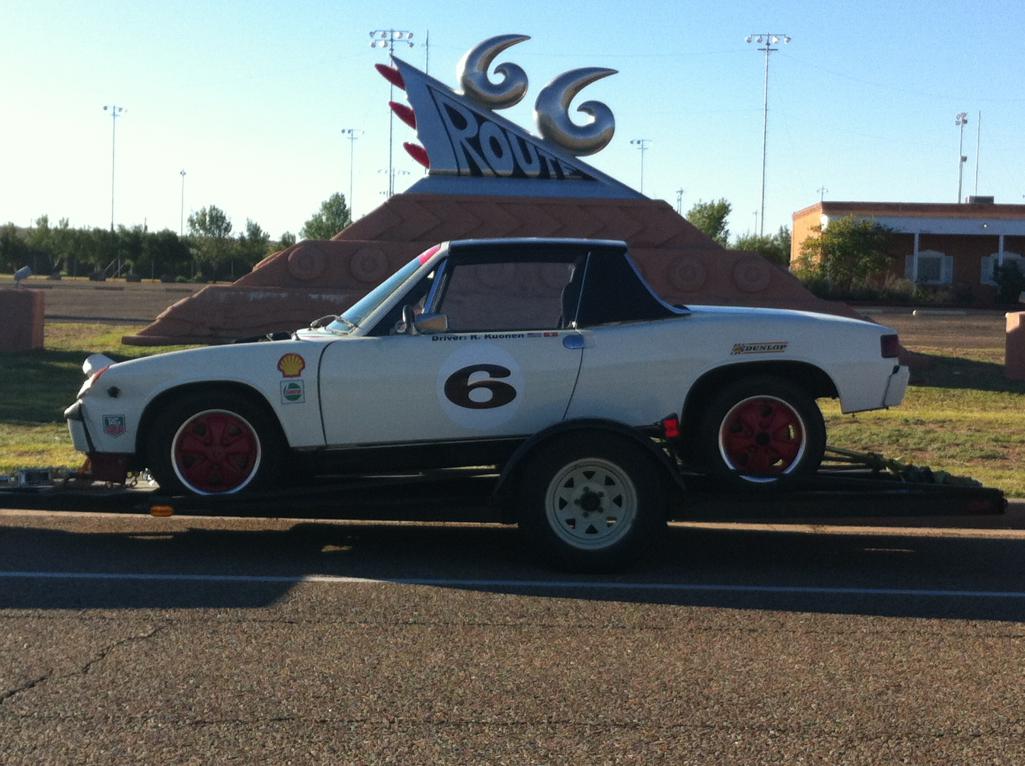
Posted by: ThinAir Oct 24 2013, 01:09 AM
Really looking forward to following this one!
Posted by: euro911 Oct 24 2013, 02:28 AM
Glad to see it went to a good home, where it can get the required surgery and a good recovery prognosis 
Subscribed 
Posted by: rhodyguy Oct 24 2013, 06:03 AM
you're still the master of fast long distance retrievals rick. this will make for an excellent 'how to fix it' thread.
k
Posted by: SLITS Oct 24 2013, 06:22 AM
Glad all went well. You're the Master of the Long Distance Drives.
Posted by: iamchappy Oct 24 2013, 07:34 AM
I may have to come up for a visit to see a real alien autotopsy at area 51.
Posted by: Chris H. Oct 24 2013, 07:56 AM

![popcorn[1].gif](style_emoticons/default/popcorn[1].gif)
Posted by: Luke M Oct 24 2013, 07:56 AM
I'll be watching ...

Posted by: DBCooper Oct 24 2013, 07:59 AM
Whoa, 666! SoCal, for sure! 

Posted by: rick 918-S Oct 24 2013, 09:17 AM
Here's a few photos from our initial probing.
Posted by: scotty b Oct 24 2013, 09:20 AM
I wish i could take the time off to come up and help with the chassis pulling. I'd like to learn more about that end of this work
Posted by: McMark Oct 24 2013, 09:25 AM
Gonna rent fixtures for this one? Looks like fun. I'd come out and help, but I'm allergic to snow. 
Posted by: rick 918-S Oct 24 2013, 09:47 AM
Mark & Scotty,
Yes. I will rent fixtures for this one. I am going to do a full on instructional video. My goal is to start with the basics of chassis construction and logic in repairs with an emphasis on safety of repairs. This car is an excellent test case for this as it is damaged back past the suspension. An improper repair would render this chassis non usable.
There was a 6 for sale awhile back in the classified that suffered from collision damage and improper repairs and as a result would not corner balance. You say, no big deal I'm not racing but it effects the track in suspension loading and steering Ackermann. Wrong weather conditions and spirited driving and your in the guard rail.
Also, there is an issue with metal fatigue and pre-stressed metal or metal left damaged causing a weakened condition.
Anyway I will address these all during this repair.
I have a few things still on my plate. I really doubt I will start the chassis work until late January or February. I need to clear the Mercedes off the Celette, I'm helping another member here on World with chassis repairs on his 6. and I may get a 911 Targa for a repaint... 
Posted by: sixnotfour Oct 24 2013, 09:52 AM
Bigger hit than I thought...still easy fix for you...looks like had a pretty good rate of speed going at impact.. I have seen a safety brake
dampener in a long time..
Posted by: oldschool Oct 24 2013, 10:19 AM
Man! I missed you (  ) I was out..I'll send you a G&R shirt
  your the man.
Posted by: rick 918-S Oct 24 2013, 12:23 PM
Bigger hit than I thought...still easy fix for you...looks like had a pretty good rate of speed going at impact.. I have seen a safety brake
dampener in a long time..
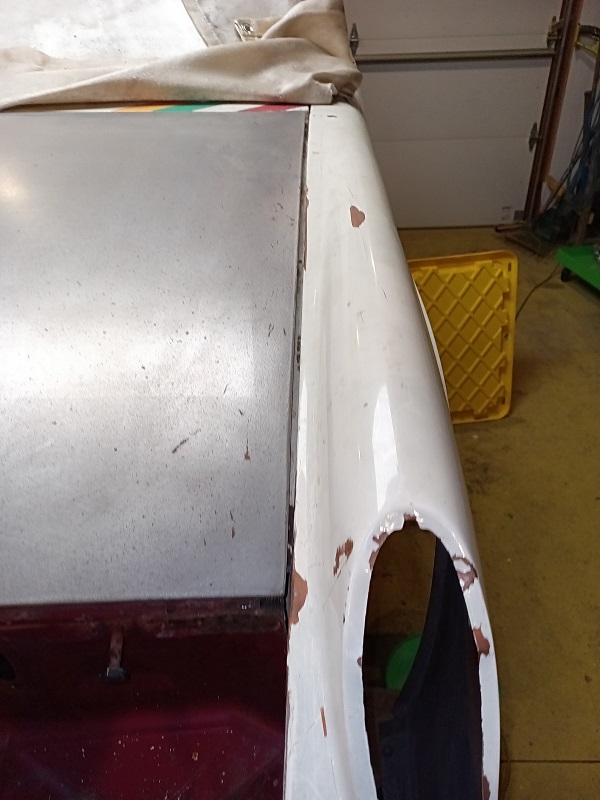
Ya, broke the master cylinder mounting ears off. The damage stops at the vertical foot well. I already have a nice new trunk pan and nose panel. I'll replace the entire nose, trunk pan all the way under the gas tank. The part was a gift from my good friend with the wicked turbo twin plug six from the metro.
Thanks buddy!
Posted by: rick 918-S Oct 24 2013, 12:24 PM
Man! I missed you (
) I was out..I'll send you a G&R shirt your the man.Sorry to hear you were down for the count. See ya next time.
Posted by: sixnotfour Oct 24 2013, 12:28 PM
Who is Rod, that knows all about the -6 ???
R Gruppe guys didn't know it got crashed ?? well the ones on FB.
Posted by: rick 918-S Oct 24 2013, 12:32 PM
Who is Rod, that knows all about the -6 ???
R Gruppe guys didn't know it got crashed ?? well the ones on FB.
Rod took care of the car and did a lot of the work for the P.O.
Posted by: sixnotfour Oct 24 2013, 12:42 PM
Who is Rod, that knows all about the -6 ???
R Gruppe guys didn't know it got crashed ?? well the ones on FB.
Rod took care of the car and did a lot of the work for the P.O.
How did it happen ? Is Rocky OK ??
Posted by: ConeDodger Oct 24 2013, 12:47 PM
Gonna rent fixtures for this one? Looks like fun. I'd come out and help, but I'm allergic to snow.
It's ok Mark. Duluth is the 'Banana Belt' of the Midwest. They don't actually get any snow to speak of... A lot of people from the Twin Cities go North for a budget vacation in January.


Posted by: '73-914kid Oct 24 2013, 01:11 PM
Who is Rod, that knows all about the -6 ???
R Gruppe guys didn't know it got crashed ?? well the ones on FB.
Rod took care of the car and did a lot of the work for the P.O.
How did it happen ? Is Rocky OK ??
Took a turn too fast and I think the car just understeered into the light pole.
Rocky was just fine, albeit a tad shaken up.
Posted by: Kansas 914 Oct 24 2013, 01:26 PM
I have subscribed to this thread - it will be one to watch for sure.
Besides I have a dotted line link to this car........................
Good luck Rick - this is going to be very informative.
Posted by: Marty Yeoman Oct 24 2013, 02:38 PM
Saw this in another thread.
Thought it fit here. 
Attached image(s)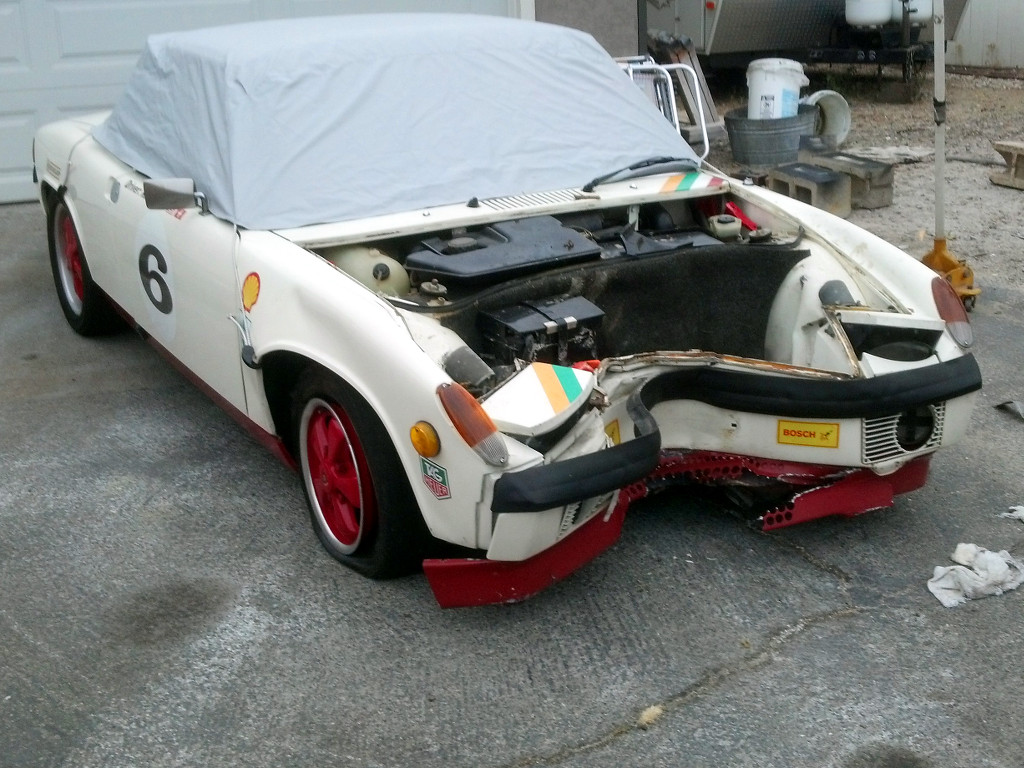
Posted by: CptTripps Oct 24 2013, 02:43 PM
:woot:
Posted by: 914coop Oct 24 2013, 08:47 PM
I may have to come up for a visit to see a real alien autotopsy at area 51.

Be cool to see this in person.
Posted by: Cairo94507 Oct 25 2013, 09:00 AM
It is going to be very cool to see this car as it is returned to pre-crash condition or better. 
Posted by: Maltese Falcon Oct 25 2013, 10:52 AM
Rick you are the guy for this rebuild, and the rare lineage on this 914 to the Rgruppe is awesome.
Freeman Thomas , pres. of the Rgruppe does not hand these invitations out too often, and at that only to the early 911 crowd.
More info on this cars history when you get a chance.
Marty
Posted by: 7TPorsh Oct 25 2013, 11:05 AM
Saw this in another thread.
Thought it fit here.
Merely a flesh wound.
Posted by: r_towle Oct 25 2013, 01:13 PM
done yet?
Posted by: rick 918-S Nov 8 2013, 11:52 PM
I'm collecting parts and trimming the donor panels in preparation of the big day. I have every intension of having scotty b here during the big pull on the Celette. We have been chatting about this for some time. He seems to think I can teach him something.
Mark your welcome to come out too. I have a big house with extra beds. Spend a long weekend. It will be a great time.
The truth is I need Scotty's metal finishing skills. I absolutely have to save both inner wheelhouses without the use of body filler. Between the two of us I'm confident it will be done. This is key to the success of this repair.
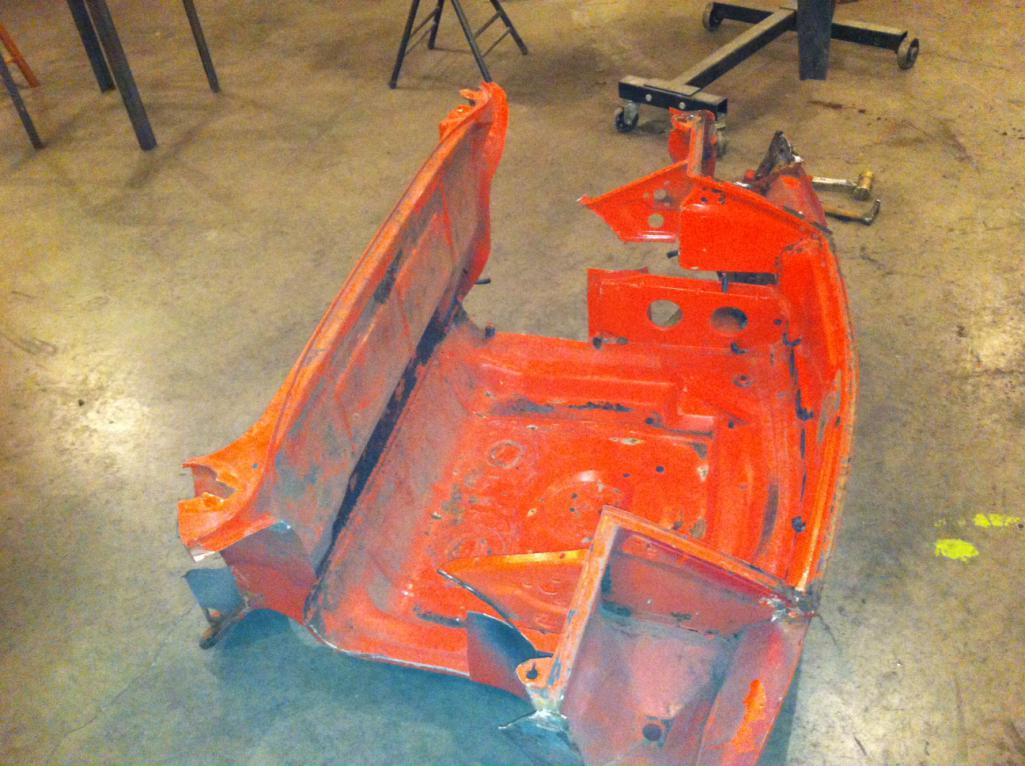
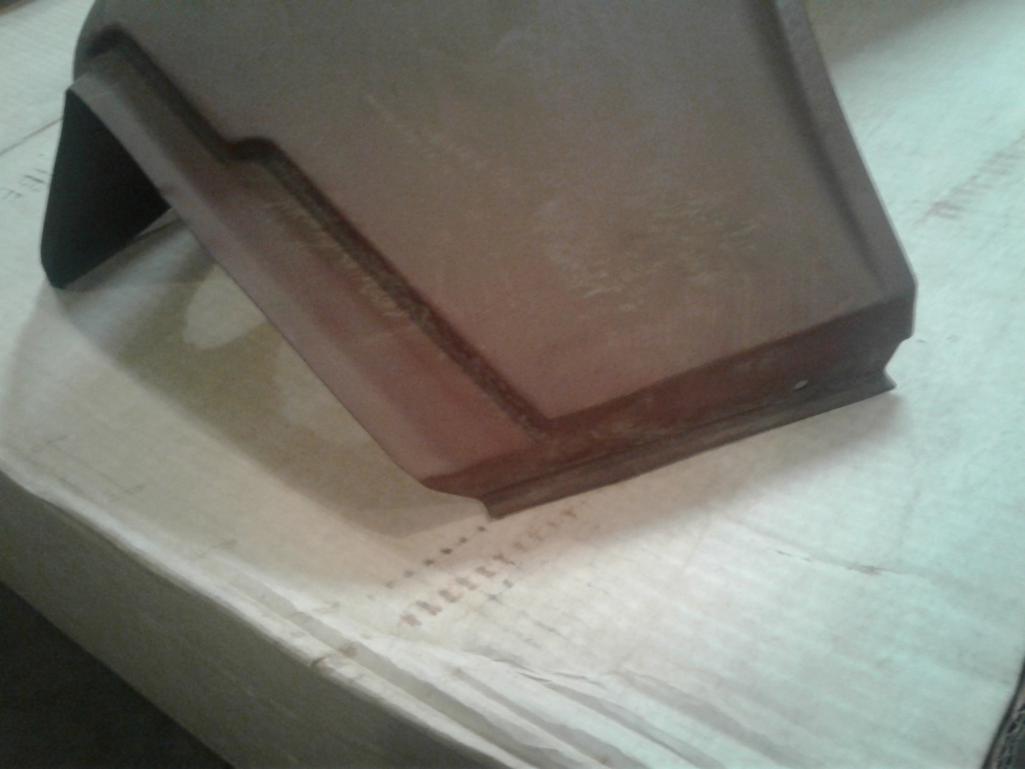
It will be a waste of time to have him come if I'm not ready to fit parts. Lots of trimming to do to clean up all the attachment flanges on the parts shown here but I have a nose panel trunk floor and bulkhead. After I'm done trimming the panel I will bring it to the blaster and have it stripped clean of all the orange paint.
This clip will look a lot different after it's trimmed.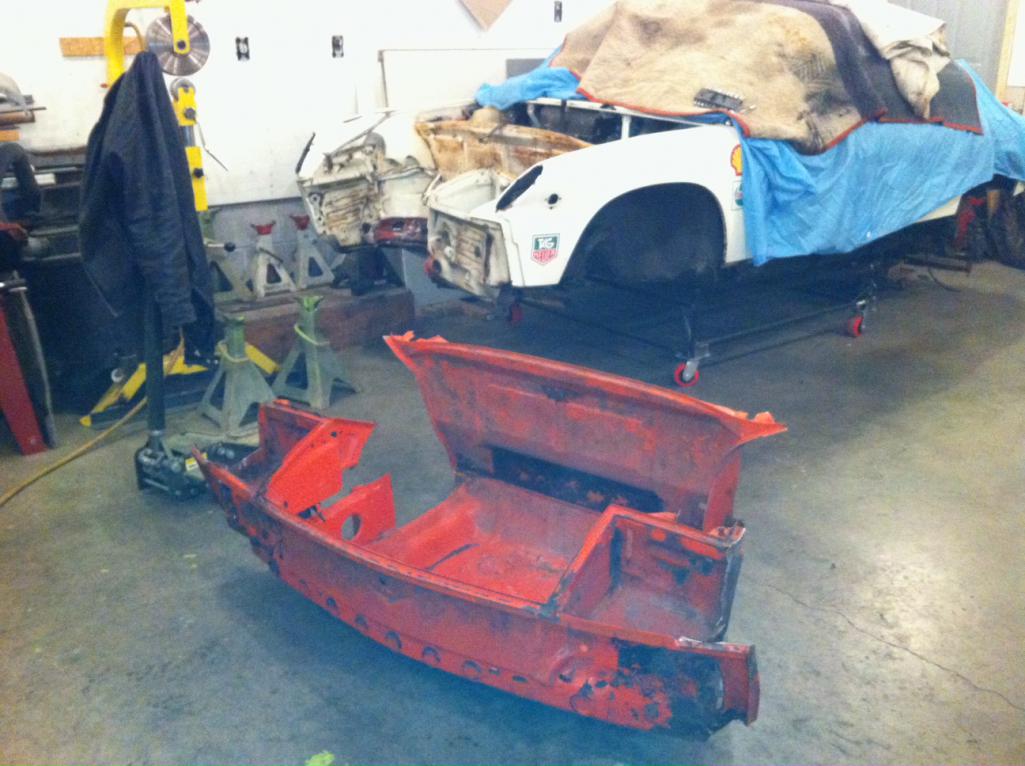
Posted by: scotty b Nov 8 2013, 11:56 PM
You give me too much credit sensei
Posted by: KELTY360 Nov 9 2013, 12:11 AM
The A Team.
Posted by: CptTripps Nov 9 2013, 01:12 AM
Damn. That's some "next level" stuff right there.
Posted by: jimkelly Nov 9 2013, 08:13 AM
due to my level of expertise, here is the only guidance I can offer.
Attached image(s)
Posted by: ThePaintedMan Nov 9 2013, 08:50 AM
As one of the few people here who actually likes to do bodywork/metalwork, I'm definitely tuning in to this! I doubt I'll ever have the facilities to be able to do proper frame pulling, but I do want to learn the fundamentals of unibody repair. Furthermore, having Rick, Scotty and potentially Mark all in the same place is enough reason for everyone to be following this thread.
Can't wait to see the progress! 
Posted by: Cairo94507 Nov 9 2013, 09:16 AM
This is going to be an incredible re-build to return this car to the street. This car could not be in better hands.
Posted by: mepstein Nov 9 2013, 09:20 AM
due to my level of expertise, here is the only guidance I can offer.

Is that how it works? I better check some things before my next drive.
Posted by: watsonrx13 Nov 9 2013, 09:40 AM
As one of the few people here who actually likes to do bodywork/metalwork, I'm definitely tuning in to this! I doubt I'll ever have the facilities to be able to do proper frame pulling, but I do want to learn the fundamentals of unibody repair. Furthermore, having Rick, Scotty and potentially Mark all in the same place is enough reason for everyone to be following this thread.
Can't wait to see the progress!
Well said and I agree totally. Rick, Scotty and Mark have been inspirations for my continual learning of body work/metal work... and the 914 specifically...
--- Rob
Posted by: McMark Nov 9 2013, 09:46 AM
Keep me posted.
 Thought about driving out, but then remembered that severe snow allergy I have.
Posted by: KELTY360 Nov 9 2013, 10:21 AM
I'm collecting parts and trimming the donor panels in preparation of the big day. I have every intension of having scotty b here during the big pull on the Celette. We have been chatting about this for some time. He seems to think I can teach him something.
Mark your welcome to come out too. I have a big house with extra beds. Spend a long weekend. It will be a great time.
 I wonder if there's room for the film crew?
Posted by: scotty b Nov 9 2013, 10:30 AM
Keep me posted.
Thought about driving out, but then remembered that severe snow allergy I have. We need to make this happen

Posted by: NORD Nov 9 2013, 10:37 AM
Mark I'm sure they have a pill for that.
Posted by: jimkelly Nov 9 2013, 10:40 AM
so how many real six-es do we think are out there?
and I am sure everyone has seen the SILVER one in the classifieds priced at $87k 
Posted by: JRust Nov 9 2013, 11:22 AM
This thread might just set a record for follows! I can't wait to see this come back to life
Posted by: 914-300Hemi Nov 9 2013, 05:48 PM
Posted by: RobW Nov 10 2013, 07:11 AM
You rock Rick! Can't wait to see it done. Let me know if you need a hand. 
Posted by: rick 918-S Dec 15 2013, 01:11 PM
Ok, I finally have the Mercedes off the Celette. I have limited space and with all the snow I can't move the Celette to the other garage. So I spent all day yesterday removing the Mercedes and mounting the 6 on the pinch weld clamps.
I have other cars ahead of mine so I won't rent the fixtures to start the repairs until around the end of March but at least the car is sitting on the bench.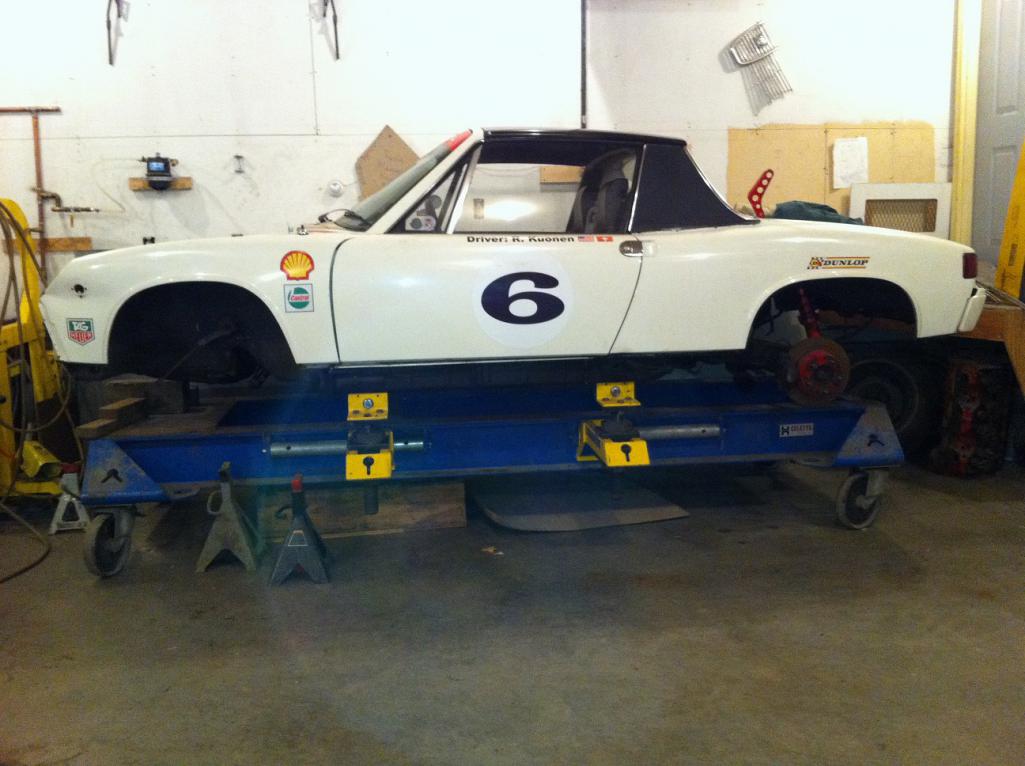
Posted by: oldschool Dec 15 2013, 02:44 PM
I'm collecting parts and trimming the donor panels in preparation of the big day. I have every intension of having scotty b here during the big pull on the Celette. We have been chatting about this for some time. He seems to think I can teach him something.
Mark your welcome to come out too. I have a big house with extra beds. Spend a long weekend. It will be a great time.
I wonder if there's room for the film crew?Did some one Call
Posted by: rick 918-S Dec 15 2013, 03:08 PM
Posted by: r_towle Dec 15 2013, 04:11 PM
How do you get the car up there?
Posted by: sixnotfour Dec 15 2013, 09:46 PM
Aliens
Posted by: rick 918-S May 8 2014, 06:40 PM
Thought I would give this a bump. I'm just finishing Ben's 6 and a 72 911 targa. If I don't get called to work I may be able to rent the fixtures and get started with the first pulls.
A couple issues. I have a parts roller I have to retrieve from Mosier OR. first. I may need the front fenders off the roller. I'm also working another deal on a front clip in Cali. I may be out west sooner than I can get up to OR. What to do...
Posted by: rick 918-S Jun 29 2014, 06:49 AM
A lot has happened since my last post. I delivered the 911 to Cleveland. My intension was to hit the road with my trailer from there and head west. I have a rear trunk lid in Vegas to collect from JP and a roller in OR. to try to get home.
While in Cleveland I got a call to work. So instead of heading to JP's I ended up in Nebraska. I spent a couple weeks there then had a blast back home for another obligation I can't mention yet...
Then from home I ended up going back to Cleveland to get the Mercedes back here to finish. 14+ hrs. both ways is a killer!
I talked to SoCal Andy yesterday about the 6. It inspired me to bump this thread. I am thinking about renting the fixtures and starting on the 6 even without the roller I need to collect from OR. So maybe some progress soon.
Posted by: rick 918-S Jun 29 2014, 07:10 AM
BTW: my friend that owned the Mercedes I'm working on gave me 5 cans of this for the 6.
Attached thumbnail(s)
Posted by: mepstein Jun 29 2014, 08:02 AM
BTW: my friend that owned the Mercedes I'm working on gave me 5 cans of this for the 6.
I heard beige is nla. Probably worth it's weight in gold.
Posted by: Chris H. Jun 29 2014, 09:45 AM
Awesome. You can paint over it and even if you get a few chips over time it won't be too noticeable with beige.
I haven't used the word "beige" in a while . Beige....it looks funny.
Posted by: rick 918-S Jul 4 2014, 05:40 AM
I got my COA but started a new thread instead of adding to this one. Anywho, here's the link to get everything in the same place.
http://www.914world.com/bbs2/index.php?showtopic=238745&hl=
So I would like to search out the original engine if possible. 6404371. I know it's a needle in a hay stack but the thrill is in the hunt.
Also what is option C13?
Does "light metal wheels" always mean 14" Fuch wheels or 15" Mahle gas burners?
Were 15" Fuch wheels also in that mix?
Posted by: 914Sixer Jul 4 2014, 05:55 AM
Light metal wheels is usually Mahle wheels. 14" Fuchs were the factory wheel but many dealers and individuals swapped them for the 911 15" Fuchs.
C13 is unknown to me.
Posted by: rick 918-S Sep 20 2014, 10:53 AM
A special WOW! and thank you to PMB performance for fixing me up with these awesome 6 parts!
Attached thumbnail(s)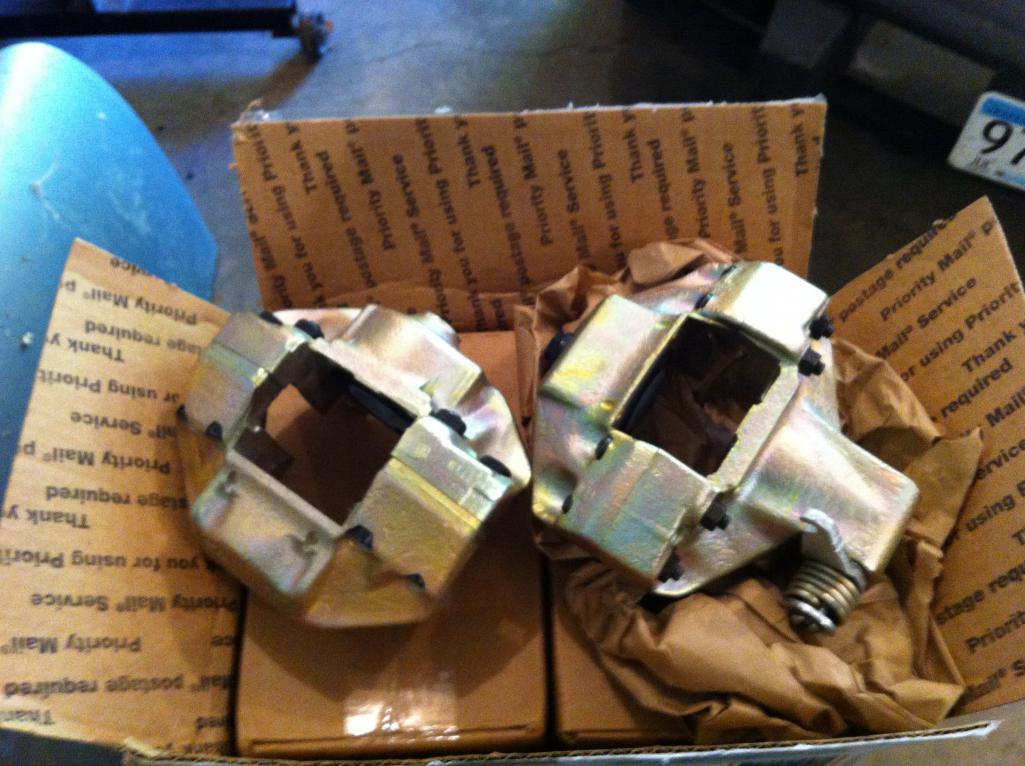
Posted by: Maltese Falcon Sep 21 2014, 03:21 PM
Light metal wheels is usually Mahle wheels. 14" Fuchs were the factory wheel but many dealers and individuals swapped them for the 911 15" Fuchs.
C13 is unknown to me.
same here, but I'll research c 13 !
I happened on this set of 15" mahles in L.A., and a local guy paid me almost $2,800 for the set of 4. He stockpiles these, sometimes sells on Samba.
At approx 7.5 lbs each, these have to be the lightest Porsche wheels ever.
There are some good (but heavier) aluminum replicas out there if you are in a pinch.
Marty
Posted by: mepstein Sep 21 2014, 03:25 PM
My set of mahles weighed 10.2.
Posted by: rick 918-S Oct 4 2014, 09:13 AM
Trying to keep my posts in the same place.
http://www.914world.com/bbs2/index.php?showtopic=243457
Searching for one of the former owners of my 6 turned up this info. Trying to back track the factory engine. # 4371
Oregon Rennsport
12929 NW Laidlaw Rd., Portland, OR 97229-2413
503) 645-1199
Contact name: Gordon Ledbetter
Posted by: Sleepin Oct 4 2014, 09:47 AM
Aliens

Posted by: rick 918-S Nov 9 2014, 01:00 AM
I was able to connect with Gordon Ledbetter today. He sent me an email response. I shortened it up some but this is the thrust of his reply.
Gordon,
I was attempting to contact you to talk about a 914-6 I have. I was told you used to own and possibly AX'd the car. The car is # 624. I was hoping you may know something about the history of the car before you owned it. I would like to try to track back the history and when the car lost it's original engine. Anything you can share would be greatly appreciated.
I am a former resto/collision shop owner. I have a Celette and have plans for a full on restoration.
(reply)
We bought the car in the spring of 76 from an ad in the Sunday Oregonian. Don't remember from whom. We auto x and tracked the car in Portland. In 77 I put an injected 2.2S engine in the car and the original engine went into another car. Don't know what car.
We moved to Boise and I built the side shifter trans as the original had cracked the case above the main shaft roller bearing, very common. I geared it AFMSX and installed a LSD. Also the front oil cooler was installed, I'm no fabricator, just an engine and trans guy.
In 80 I built a injected 2.8 and installed it. We auto x and hill climbed the car. The rear suspension pick up under the battery came apart so the work you see was to repair it, I'm no body guy or welder. We did run slicks so lots of extra load. At an auto x we hit a curb and tore one of the front suspension consoles out, had it repaired.
Sold the car in 84 to a guy in salt lake thru pano. I stole the engine, LSD, R wheels and installed a 2.4 CIS T with carbs and 6's. I put all the stuff in a 73S I bought to replace the 914. Till that point the car had all original paint. The salt lake guy painted the car and when I saw it later it looked great. He sold it to a guy in San Jose.
Back in the early days I did the engine grill. Chuck Stoddard had bitchen 6, and we all tried copy his stuff. I hope it can be restored to more original looking configuration. Back in those days we weren't concerned about originality.
Thank god I came to my senses with the 73S. For a while when I was trying to sell it, it had my 2.4S in it for $13G. When all people would only go $10G, I put the T engine in. How stupid would that of been to separate the engine from the 73. I sold the 2.8 and restored the 73, which I still have.
Good luck Gordon
So it looks like the last known location for the original engine # 4371 is Oregon.
Keep an eye out. You never know when it may show up.
Posted by: euro911 Nov 9 2014, 01:31 PM
Cool. Hope you can get you hands on the original motor, Rick
Posted by: rick 918-S Nov 9 2014, 06:26 PM
Cool. Hope you can get you hands on the original motor, Rick
It's a long shot but some have turned up over time. If I happen to locate it, fine. If I don't that's fine too.
Oh, and I wanted to try to keep all the info in one place. Link to my strange chassis number: 130666
http://www.914world.com/bbs2/index.php?showtopic=240960&hl=
Posted by: rick 918-S Aug 18 2015, 05:38 PM
Special thank you to Peter 0396 for generously offering his factory NOS left fender. Although I never met Peter I have had the good fortune of having a couple telephone conversations with him. He is one of the strongest and most determined men I have ever had the pleasure to know.
And another guy that helped put this together and deserves a tip of the hat is Mark euro911. Mark went out of his way to collect this fender, package it up safely and get it shipped out.
Thanks to both of you! 
Posted by: worn Aug 18 2015, 07:17 PM
No more generous than Rick. I wanted to see the alien and he ran home from a busy day and fed my entire family. I hope this build and pull goes as I am sure it will, with all of the chips sliding your way. I wanted to publicly thank you Rick but I was worried that you would be seeing hordes of teeners. Then I calculated the distance between California and Minnesota. so with that worry gone, thank you so much for the nice time. My younger son put it well. "so Dad, we are going to have dinner with someone you have never met?" Yep, and I had a great time.
Posted by: rick 918-S Aug 18 2015, 07:40 PM
No more generous than Rick. I wanted to see the alien and he ran home from a busy day and fed my entire family. I hope this build and pull goes as I am sure it will, with all of the chips sliding your way. I wanted to publicly thank you Rick but I was worried that you would be seeing hordes of teeners. Then I calculated the distance between California and Minnesota. so with that worry gone, thank you so much for the nice time. My younger son put it well. "so Dad, we are going to have dinner with someone you have never met?" Yep, and I had a great time.
We enjoyed the company! You two raised a couple of great boys there! You are all welcome anytime. Tell your boy if he get bored on his off hours he can come over and hang out here in Area51Werks.

Posted by: euro911 Aug 18 2015, 10:19 PM
And another guy that helped put this together and deserves a tip of the hat is Mark euro911. Mark went out of his way to collect this fender, package it up safely and get it shipped out.
Thanks to both of you!

Keep your chin up, Peter ... and get your butt home soon

Posted by: rick 918-S Sep 13 2015, 08:41 PM
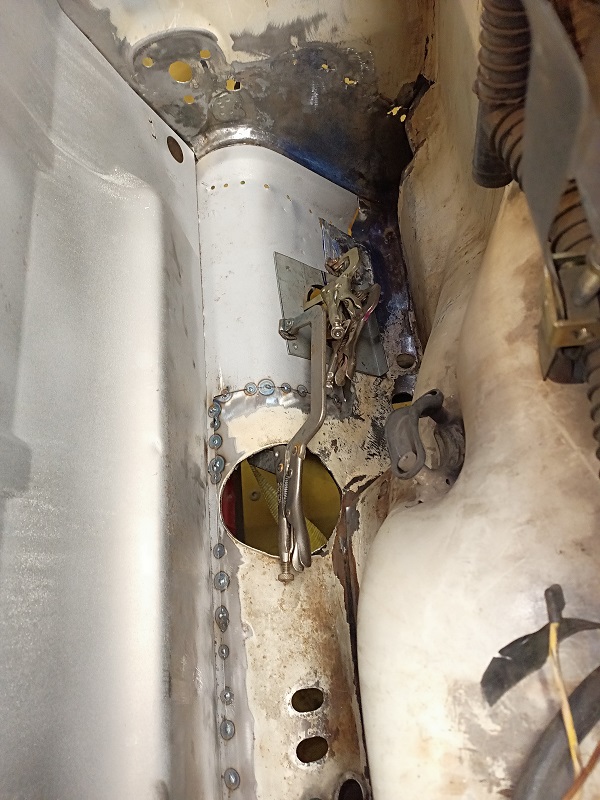
Time for an update. I really shouldn't have spent the time out in the garage this weekend but I did. I'll pay for it tomorrow at work. But hey I couldn't stand to see the six sit there idle another month.
I pulled out the tower, hooked it up to the Celette and did the rough in pulled. Some know I have a little experience with this. I owned a collision/resto shop for 18 years. I had a 4000 sf shop with a 1300 sf computerized office, 6 full time employees and all the drama that goes with it.
For those that are interested in the approach to proper collision repair on a unitized car I'll give you a little taste of the process and the how and how not to proceed.
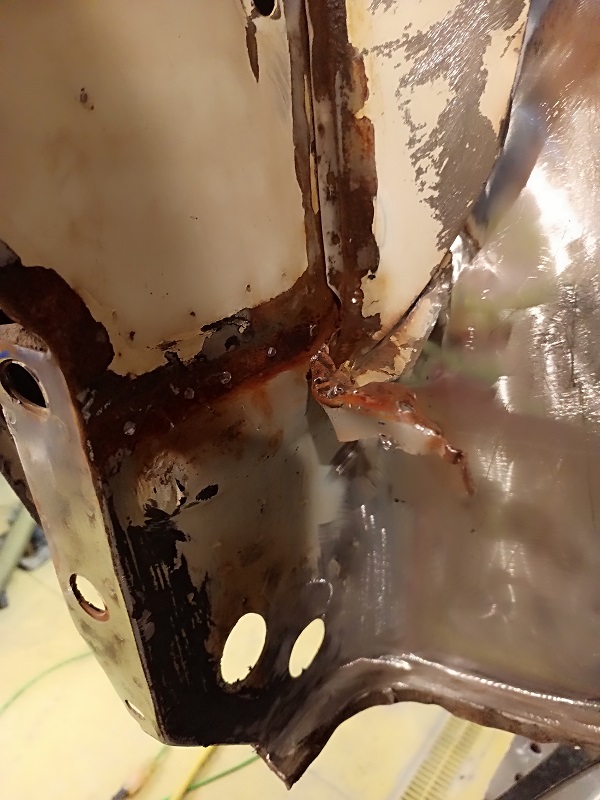
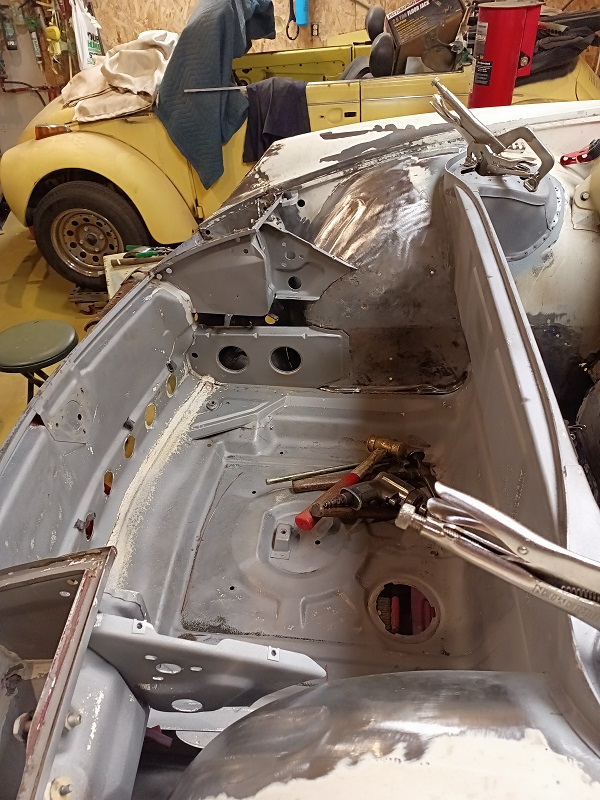
First you need to picture a car built like a wire framework. Push on one corner and the wire frame moved is several different directions throughout the structure. Now image the wire frame is bent like the photos I will post. The object is to use the damaged structure, specially the parts you know you will not re-use to move the wire frame back into position.
Imagine you just say, heck, I'm not using the front handle I'm just going to cut it off. Proceed that way and you will trap damage back into the wire frame with no way to pull it evenly and move all the members back into position. When you go to re-assemble you will have issues with door fit, top fit and chassis balance, braking predictability and cornering. It is also possible the chassis will end up with kinked or pre-damaged members that will make it unsafe.
So, here's the plan. Do the rough-in pulls. This does not require fixtures those will come later. My goal is to relieve the stress introduced into the unit-body,(drag all the wires effected back in place) start to reshape both right and left inner wheelhouses. and prepare the car for the removal of the parts I will not need when I get the fixtures from Celette and start rebuilding the chassis.
Here's where I started.
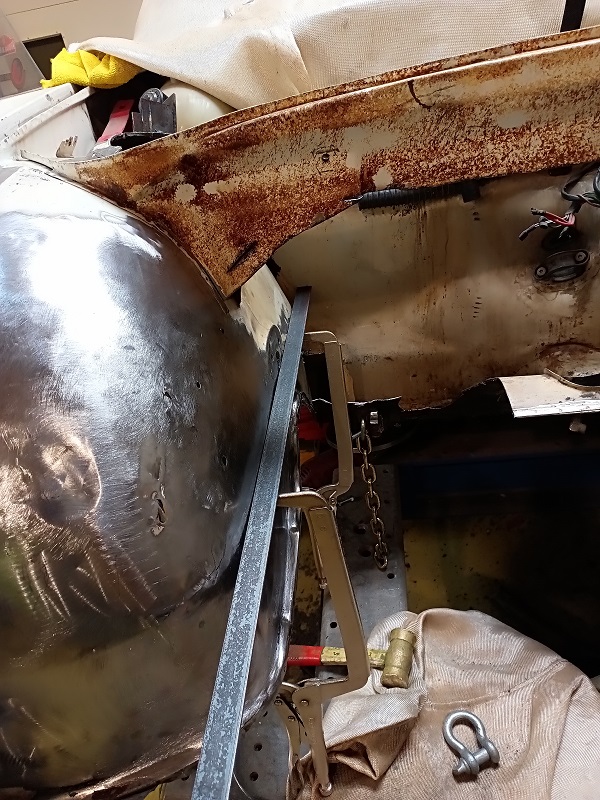
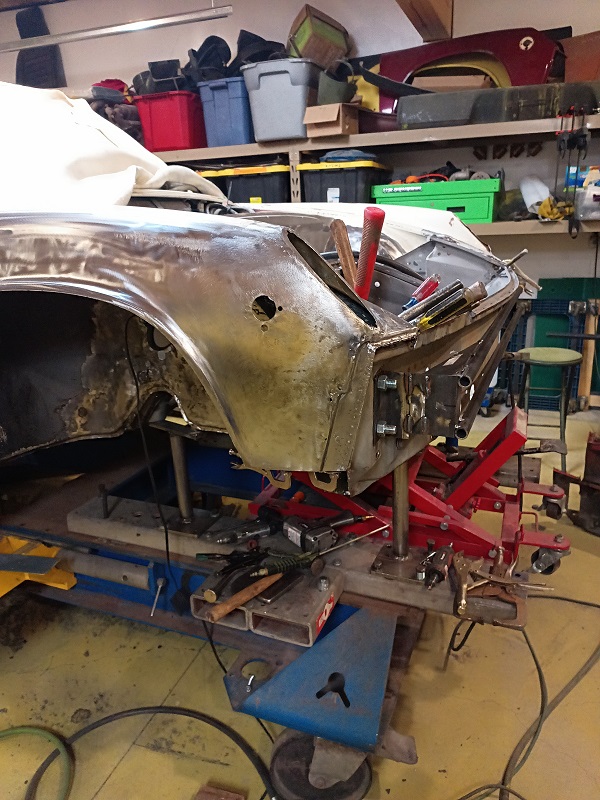
Posted by: rick 918-S Sep 13 2015, 09:53 PM
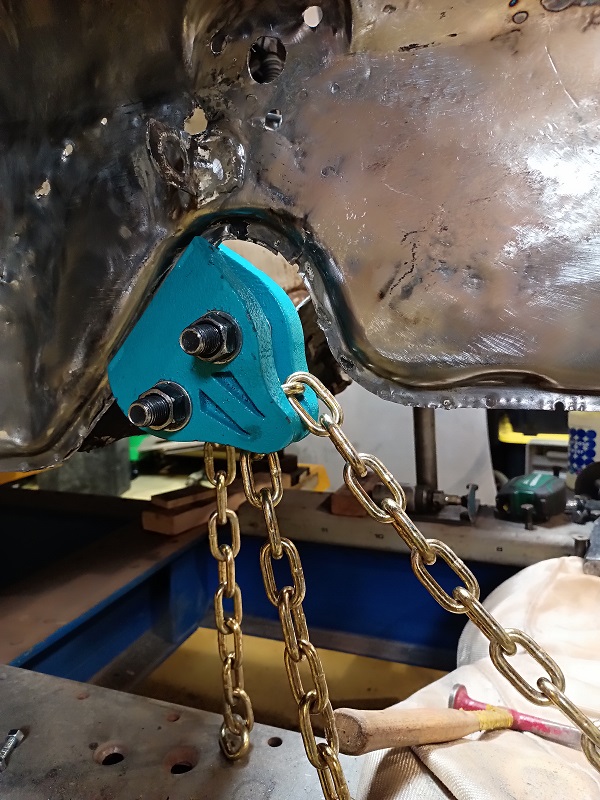
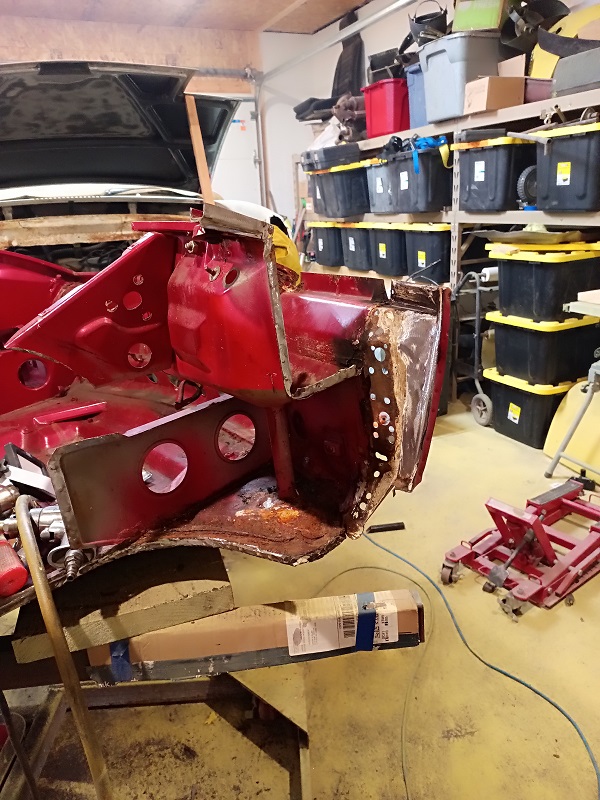
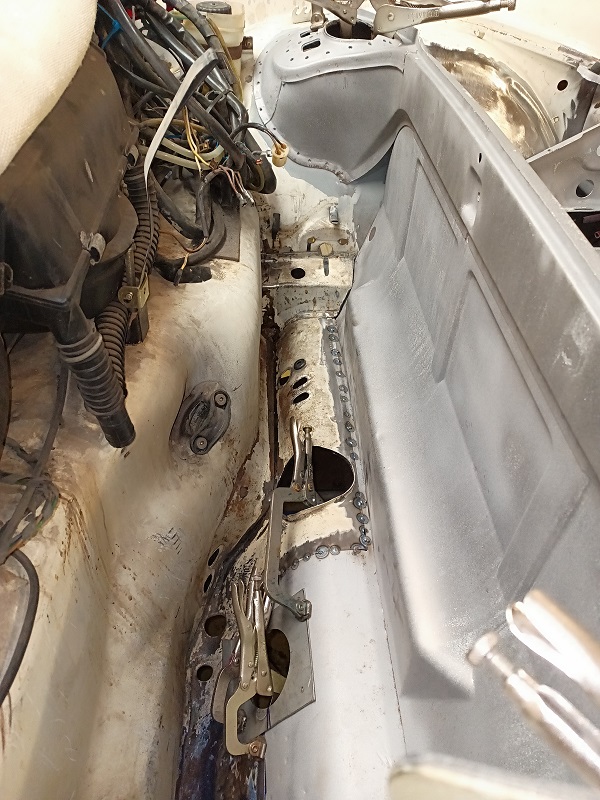
The car is set up on the Celette. There is a set of 4 clamps that are attached to the pinch flange on the bottom of the longitudinal members. They are tightened with an impact gun. During the pulling process I actually pulled the car out of the forward clamps several times. The pinch flange on the 914 is pretty small. Sometimes You have to weld an angle iron the chassis to get a good hold. I used a second set of chains running through the strut towers to help hold the car down during an upward pull.
Both inner wheel houses were kinked very deep. More on the right than the left Both the right and left wheelhouses where they arch over the rack had closed up and the pinch welds were split in several places. I have to say I am impressed the way the chassis took the impact and specially the way I was able to move the damaged metal back into place. 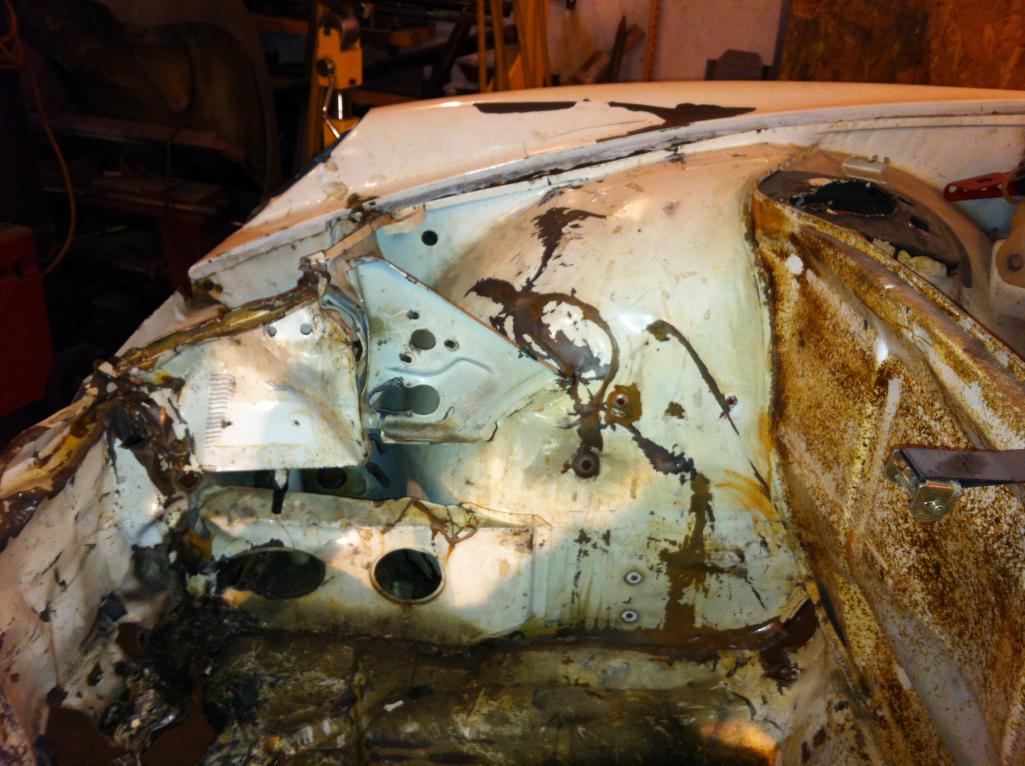
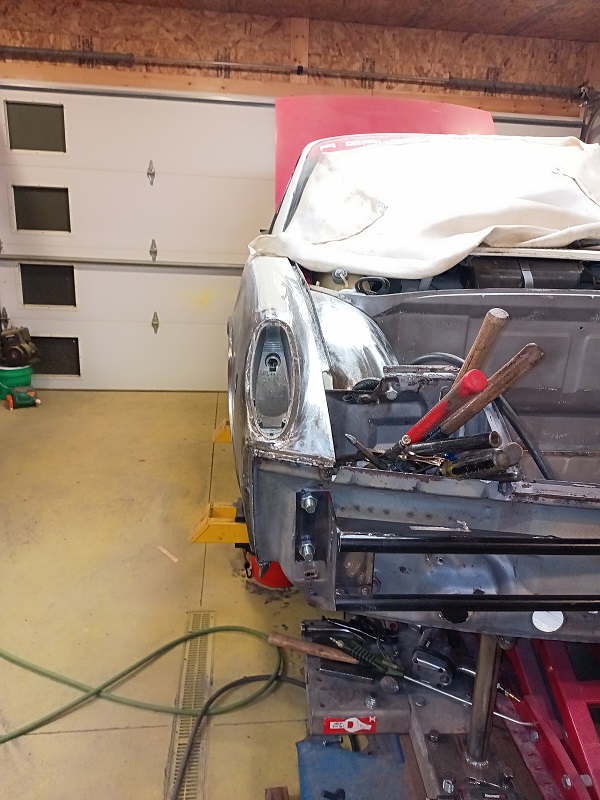
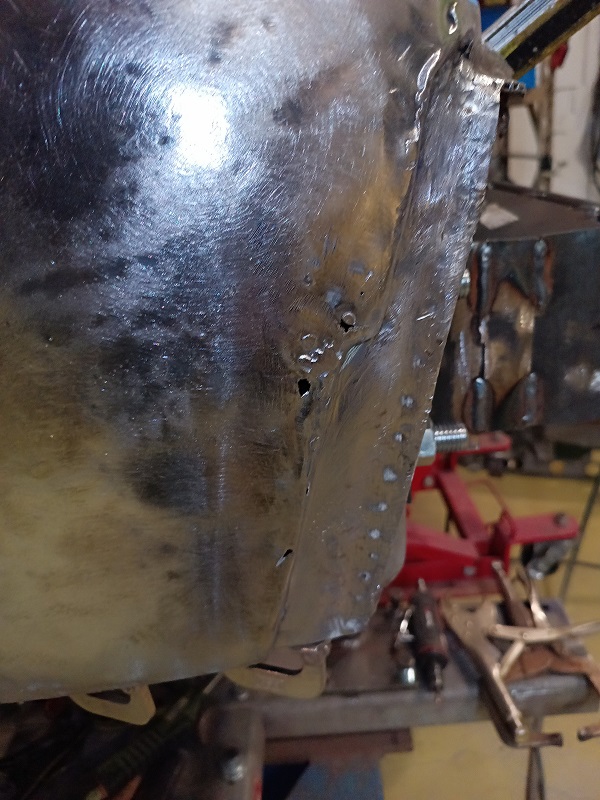
Some may say...Eeek! That looks like crap! Have no fear. Once I remove the front panel. the right and left fenders, the headlight buckets, the floor pan and the gas tank bulkhead I will be able to us an air powered planishing hammer on the damage and smooth it all out. Here's a link to some hand work I did before I got my hammer.
http://www.914world.com/bbs2/index.php?showtopic=132215
Posted by: Johny Blackstain Sep 13 2015, 09:57 PM

Posted by: rick 918-S Sep 13 2015, 09:59 PM
So here is where I'm at today. The rough-in is done. I went to check up on fixtures a couple weeks ago. I was told the original fixture set was scrapped. In order to rent fixtures you now need to own your own towers. The new fixture set is downsized and lighter to ship. The real problem comes in when you have to purchase a 6k set of towers to rent a 1k-1500.00 worth of fixtures. So, I think I'm stalled for a short while until I locate a deal on towers...
Attached thumbnail(s)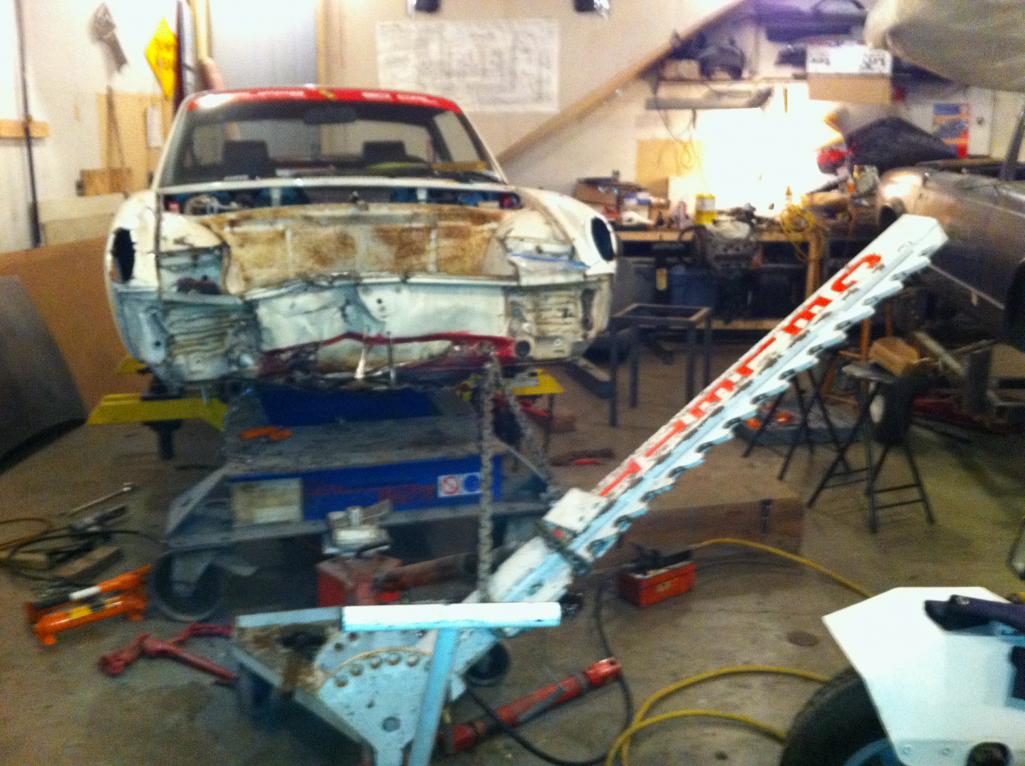

Posted by: bandjoey Sep 13 2015, 10:22 PM
Wow. The initial pull is impressive. Good work!
Posted by: Cairo94507 Sep 14 2015, 07:24 AM
That is amazing. I look forward to seeing this come along. 
Posted by: Chris H. Sep 14 2015, 08:49 AM
Looks like you're done !
Sorry that's not even funny to Rick. He'll spend hundreds more hours on that thing.
Hey doesn't McMark have a Celette bench? Should be on it's way to the Midwest. Not sure about the fixtures and stuff but maybe he has some of what you need.
Posted by: Dave_Darling Sep 14 2015, 08:52 AM
Some may say...Eeek! That looks like crap!
Compared to where it started, it looks almost like new! I'm in awe at what some force, applied with skill and knowledge, can do!
--DD
Posted by: Jeff Bowlsby Sep 14 2015, 01:24 PM
What do the towers look like Rick? Do you have their dimensions? I would think they could be custom fabbed easier/cheaper than $6K.
Posted by: scotty b Sep 14 2015, 01:38 PM
These are the towers for the newer models. They are generic for many models, you own them, then rent the top and bottom portions from Celette for your specific application. The red parts in the next pic are what you rent. Last pic is the actual 914 parts for the older benched like Ricks and one I'm looking at. I'm also pricing out to build one from scratch and so far, when I calculate my time, the materials, and the possibility of surface grinding the whole table, + the plates welded onto it, it makes the cost of a used or even new Celette look pretty reasonable  You want to know anything about Celette's just ask....I've got more pics then you can shake a stick at. Rick and I have been going over this issue for quite a while now
Attached thumbnail(s)
Attached image(s)
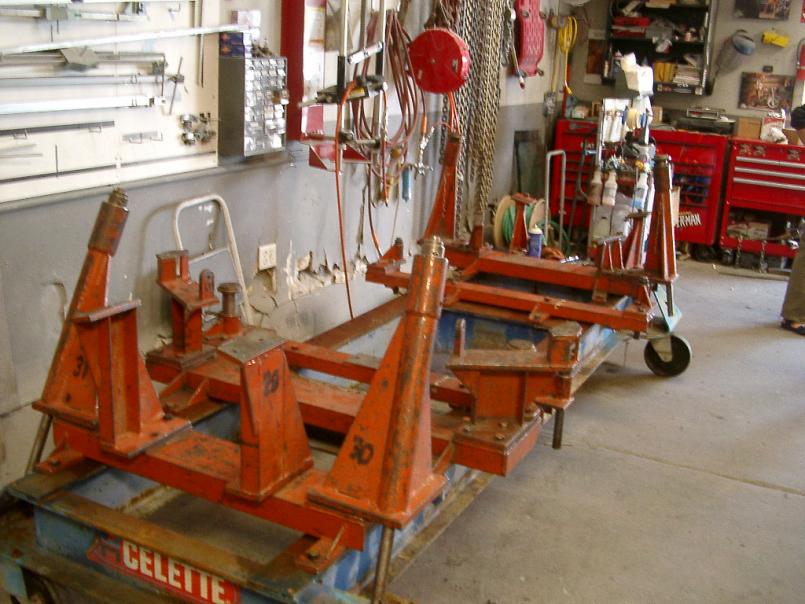
Posted by: rick 918-S Sep 14 2015, 02:26 PM
Thanks for posting that Scotty. Yes, I just contacted Celette again today. Jenny verified the original fixtures you see there in red were shipped back to France. She double checked. So they were not sold off to a shop here in the US. She is going to price out the bare bones tower set and send me an email with pricing. The set you see in blue covers a range of many vehicles.
Posted by: sixnotfour Sep 15 2015, 10:12 AM
I have a swiss made car o liner that is very similar to the celette..
I have 3 towers and hydraulics 2 benches and a ton of fixtures and a Unik lifter..all for under 3k.. If your going to make fixtures the celette is not necessary...I found both of mine 2 separate deals on craigs list...
The old celette fixture where hella stout..the new ones more for checking
There is also a blackhawk bench that is similar and a few 911 fixture for it..
Unless you want to buy new..then cellette
Posted by: worn Sep 15 2015, 10:46 AM
Gonna rent fixtures for this one? Looks like fun. I'd come out and help, but I'm allergic to snow.
I just noticed this
Posted by: rick 918-S Oct 30 2017, 02:32 AM
I've had a few setbacks In the last couple years. Hope to get an RFN soon so I can spend more time in the shop. I'm not going to comment on that further for now.
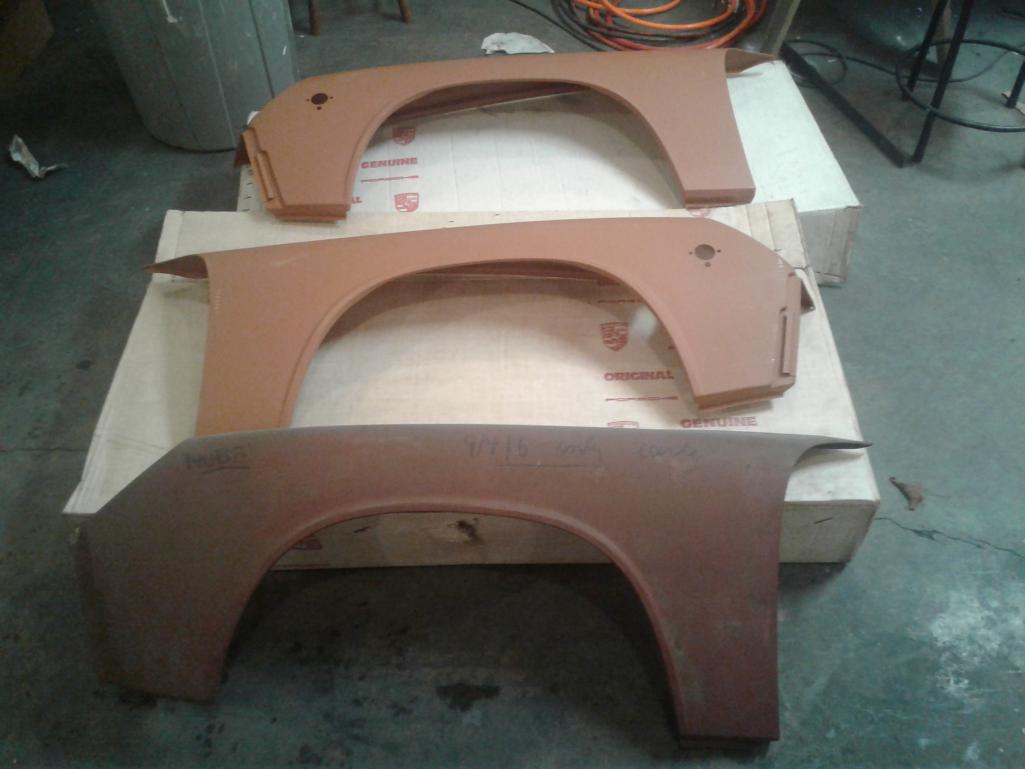
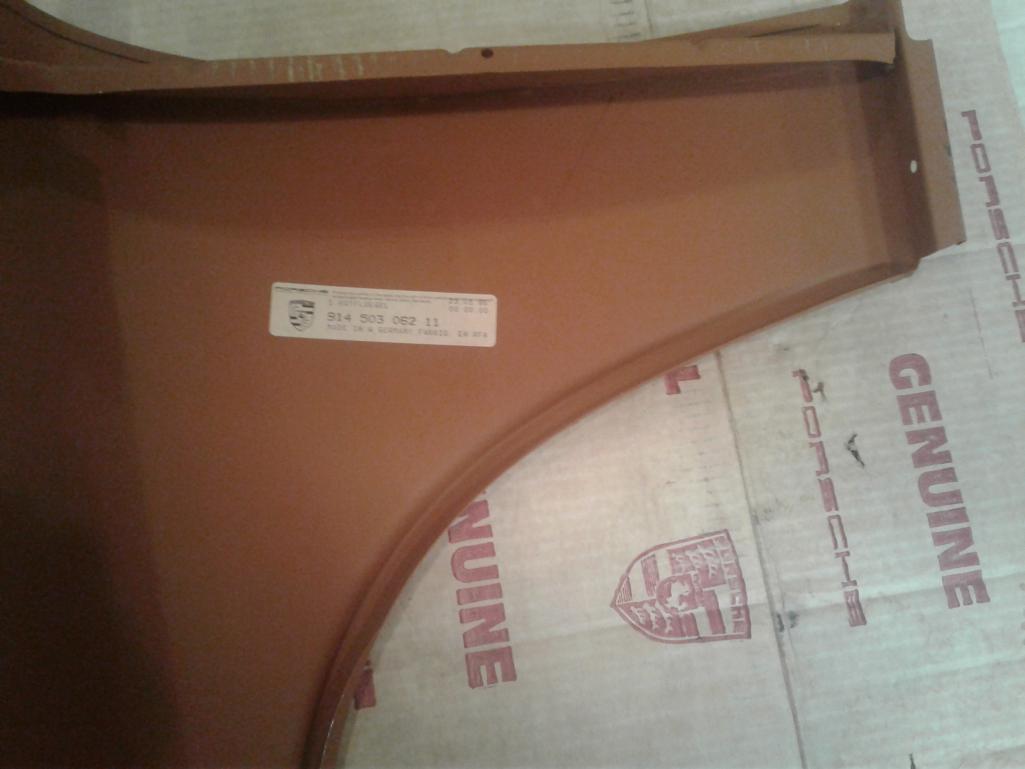
I wanted to include a special thank you to Glenn Stazak. He helped me score a set on NOS front fenders! Wooo hoo!
I now have a left side NOS Euro fender which I will be using on Juergen's car and a set of NOS fenders for my 6. There are still in the factory boxes!
.
Posted by: rick 918-S Oct 30 2017, 02:41 AM
These are late fenders. Couple small differences that are easily erased to make these early style.
There are brackets for the late bumpers and hole for the valence I think.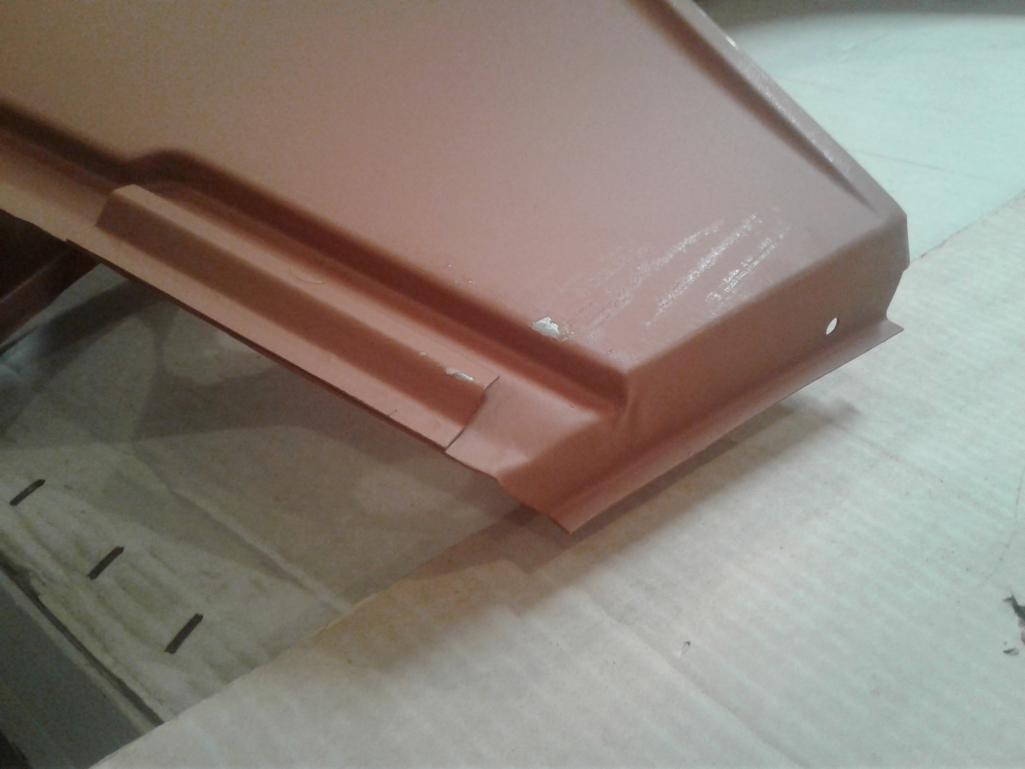
Posted by: Cairo94507 Oct 30 2017, 06:43 AM
Hi Rick -
Welcome back and I was wondering what had happened. Those are some terrific NOS parts you scored there. Nice to see you posting and hopefully back at it.
Cheers
Michael
Posted by: mb911 Oct 30 2017, 06:59 AM
Excited to see the project come together.
Posted by: gms Oct 30 2017, 08:37 AM
Rick,
I am glad they met with your approval
Hopefully we can meet in person next time.
Posted by: gms Oct 30 2017, 08:42 AM
Keep me posted.
Thought about driving out, but then remembered that severe snow allergy I have. Mark I Hope you have overcome your allergy !

Posted by: McMark Oct 30 2017, 09:00 AM
Keep me posted.
Thought about driving out, but then remembered that severe snow allergy I have. Mark I Hope you have overcome your allergy !
Turns out it was gluten intolerance. 
Posted by: gms Oct 30 2017, 09:04 AM
Keep me posted.
Thought about driving out, but then remembered that severe snow allergy I have. Mark I Hope you have overcome your allergy !
Turns out it was gluten intolerance.
Posted by: 76-914 Oct 30 2017, 10:42 AM
Hell Rick, I don't care if your rebuilding Mail Box's. Just glad your back.
Posted by: infraredcalvin Jun 10 2018, 08:46 PM
Any updates?
Posted by: rick 918-S Jun 11 2018, 08:27 PM
Anyone of you that really know me know I am extremely driven. I haven't talked about this before but I had some set backs. Going to Mayo for a surgical consult. May or may not be a candidate. Either way I'm doing what I do everyday. Just some days it's a lot. Had my legs collapse a few times. Makes inspecting roofs scary. Anywho that's enough of that Waaa waaa BS. Not going to let it defeat me. Not going to happen. Don't even comment on it cuss I'm not going to respond.
My friend Chappy gave me an early front clip several years ago before I even had this 6. When I got the car I spent a butt load of time trimming it in preparation for the repair. I had it ready to transfer.
Along came Juergen's 6 in need of a serious front end repair to an otherwise near rust free car. Only reason it needs the work is because some rookie completely spanked the repair. I purchased a 74 shell and planned on using it for Juergen's car. The cost to ship it is way out of control. I bid it up to $ 1100.00 with no takers.
I ended up donating the early front I had trimmed for my 6 in order to get this moving. I am still collecting parts for his repair. But I'm close now. As soon as I can get the parts I need from Glenn. Mark and I can work out the details with regard to his fixtures.
Brings me to my 6. I now plan to use the 74 parts car. I am working out a deal with Garold to pick up a car for Mark from 914 rubber in Michigan and bring it to Glenn's place West of Chicago. I have to collect some parts from Glenn for Juergen's car. So I will have my son pick up Mark's car from Glenn and eventually haul it west to Billings Montana where Mark or who ever he has come my way can swap cars. Crazy car relay but both of us have been unable to get shippers to move the cars at a price that makes sense.
So this will be awhile before my 6 gets reassembled.
Posted by: mepstein Jun 11 2018, 09:11 PM
I had a lot of trouble getting my bare shell shipped from CA. Cost almost 50% more than a running car.
Posted by: rick 918-S Jun 11 2018, 10:04 PM
I had a lot of trouble getting my bare shell shipped from CA. Cost almost 50% more than a running car.
Ya, $ 450.00 shell purchased for the front clip. Add $ 1,600.00 to ship it, then add in the cost to deconstruct it down to a usable section... A nose panel with headlight buckets and reinforcements end up costing 3500.00 before installation...

Posted by: mepstein Jun 12 2018, 06:08 AM
I had a lot of trouble getting my bare shell shipped from CA. Cost almost 50% more than a running car.
Ya, $ 450.00 shell purchased for the front clip. Add $ 1,600.00 to ship it, then add in the cost to deconstruct it down to a usable section... A nose panel with headlight buckets and reinforcements end up costing 3500.00 before installation...
I guess I got lucky. $500 shell, $1,150 to ship CA to DE. Lat year a running 914 cost $800 for the same xcountry trip.
Still cheaper than rust repair.
Posted by: rick 918-S Nov 3 2019, 11:51 AM
I have come to the realization that I have too many commitments in my life. I have decided to put the 6 up for sale. I am posing the info in the classifieds later today. When looking remember this is not a rust bucket. I have collected some parts and pieces that go with the car.
Posted by: johnhora Nov 3 2019, 03:48 PM
Rick...are the NOS front fenders L/R going with the car or will they be for sale separately...Thanks John
Posted by: rick 918-S Nov 3 2019, 08:26 PM
Package deal only.
Posted by: rick 918-S Nov 2 2022, 07:34 PM
Back in the Q. Looking for a 70 to early 72 front clip Any leads would be appreciated. 

Posted by: AZBanks Nov 2 2022, 10:43 PM
Glad to see you back in it.
Posted by: rick 918-S Oct 15 2023, 09:06 AM
Finally back on this car. It is hard to believe it has been 10 years since Sandy and I picked it up. So much has gone on betweeen that time.
I actually had a front clip from a donor I got from Chappy in Minneapolis at one time and ended up using most of it on Jueren's 6 repair.
Since the car made it here We built a house and moved to another state. Well just across the Big lake. Infact I can see my old neighborhood from my deck.
I purchased a 74 from Craig and ended up giving it Mark at 914 Rubber. The cost to ship it was more than I could justify.
I located a California 1970-4 up on the Canadian Border that was brought up there on a trailer in the late 90's from Arizona, parked on the trailer in a pole building and never moved. This was the find of the century up here. But the more I looked at the car the less motivaed I was to cut it up. It is as rust free as 914 come these days. So I added it to the cars to build and not the cars to part out.
Now that we are in our new house and Juergen's car is headed for spain it's time. The car is in the shop on some of the fixtures McMark built for me. I picked up a front clip from Garold but as I was trimming it down I realized it was not enough to complete the repairs.
So my friend Pat, the guy I did the I did the Mercedes 280SL for located a clip down by him in Ohio. A mutual friend of ours coming back from the East Coast with an open trailer and will be dropping off here for me the end of the month. So stay tuned.
From the begining...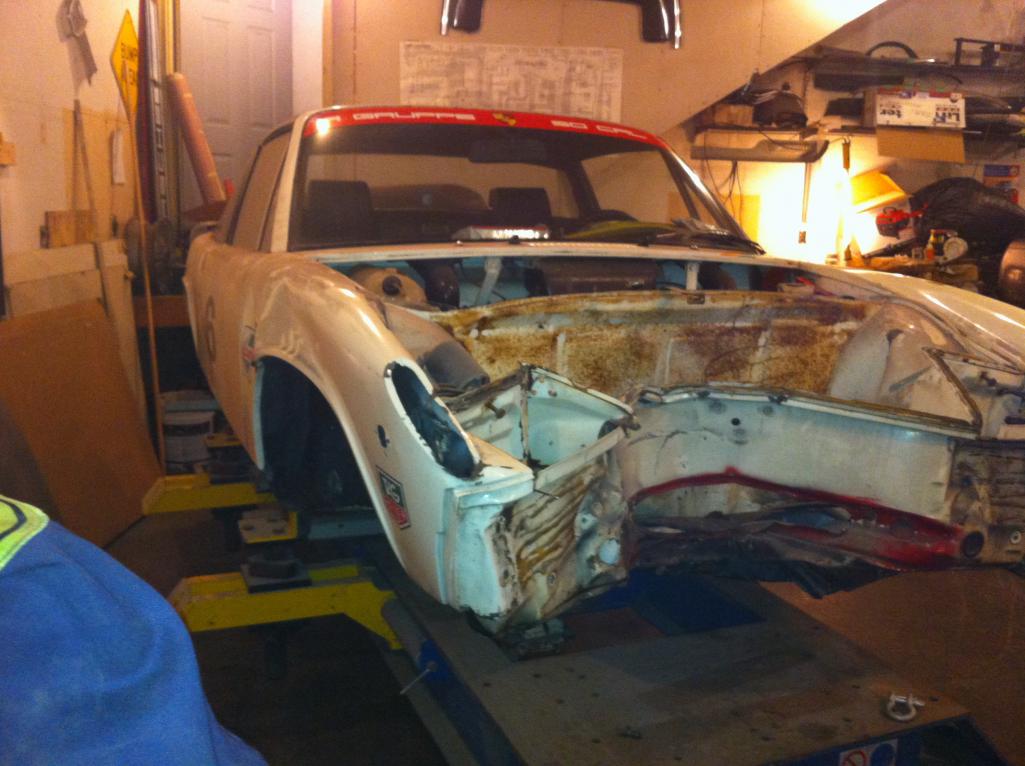
Posted by: 76-914 Oct 15 2023, 10:58 AM
10 years ago and I remember that day.
Posted by: Cairo94507 Oct 15 2023, 01:35 PM
Posted by: rick 918-S Oct 15 2023, 03:59 PM
Made the tool last night.
This is a planishing hammer. This is for the inner wheelhouse. I plan to metal finish it. There is alot of time to be invested before I get far enough to really use it but I tried it out on a couple of creases they I hammered out. With the shrinking disc and this tool I am fairly confident I can pull it off. Most guys would have just chopped out the wheelhouse and sectioned one in.
This was the current state.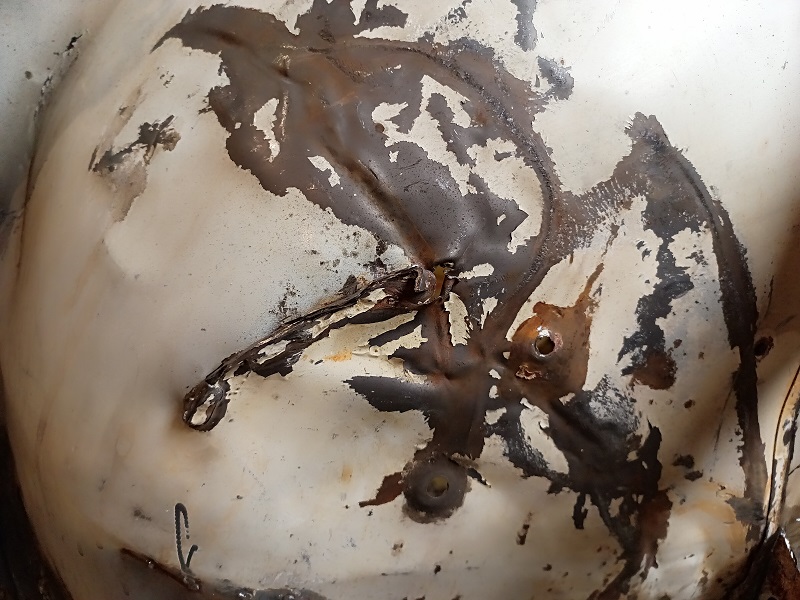
Alot of time will need to go into bumping and shrinking yet before thplanishing hammer becomes an effective tool but this was about 3-5 minutes time.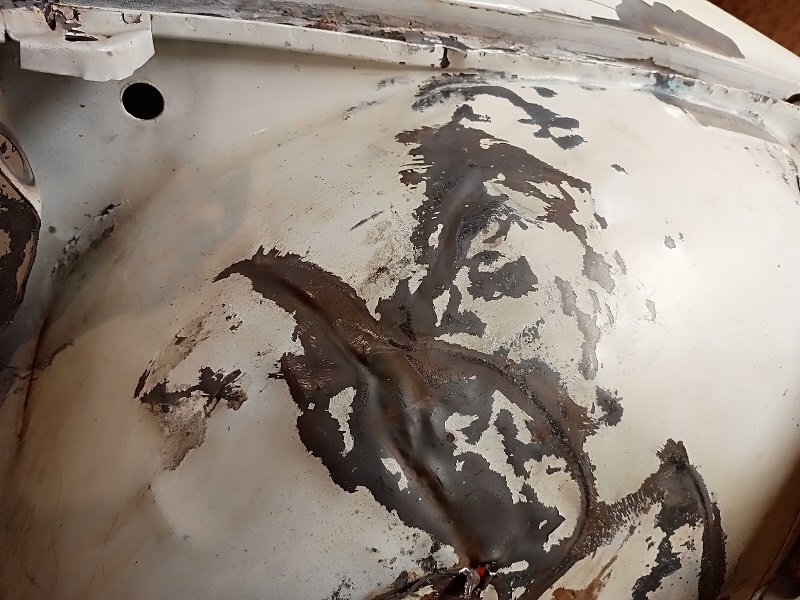
Posted by: KELTY360 Oct 15 2023, 04:42 PM
Been waiting for this. I’m prepared to be amazed.
Posted by: East coaster Oct 15 2023, 07:07 PM
Nice! Sandy did a number on me too
Posted by: rick 918-S Oct 15 2023, 09:42 PM
Messed around a little tonight just as a demonstration. There is alot f repairs down low that need to be straightened before I get to finishing the panel. There is a thick layer of rubberized in the wheelwell i need to strip completely in order to work the panel level and straight.
But this was for fun:
Started here. I worked a deep wrinkle above the sharpie area then moved to here.
Started the metal moving.
Ended here for now.
Posted by: infraredcalvin Oct 15 2023, 09:54 PM
Love this car, looking forward to following its resurrection!
Posted by: Krieger Oct 15 2023, 10:45 PM
Nice work!
Posted by: gms Oct 16 2023, 10:01 AM
nice work Rick, get after it so you can do my '86 Targa!
Posted by: rick 918-S Oct 16 2023, 10:12 AM
nice work Rick, get after it so you can do my '86 Targa!
Working on it..
Posted by: rick 918-S Oct 16 2023, 10:14 AM
10 years ago and I remember that day.
Great day Great Food!!
Posted by: rick 918-S Oct 16 2023, 09:56 PM
Spent a couple hours on the 6 tonight. Started roughing out the panel and working in a broader sweep.
Around the sway bar hole there is alot of stress. And by the way, I did not drill the holes in the wheelhouse or slice the right fender with a zip cut tool. 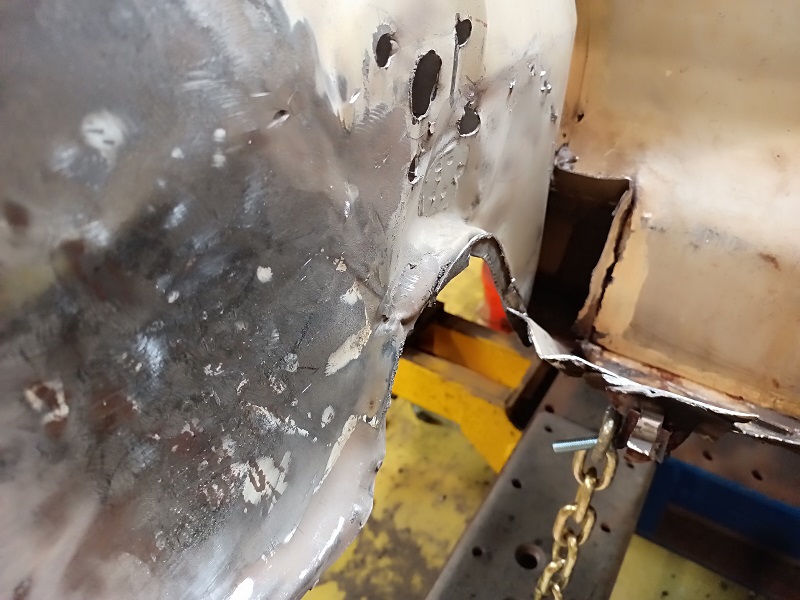
By the end of the night I started getting the horizontal crease back in the panel. I think another couple nights and I will be ready to start trimming the parts clip. It will be here by the end of the month. 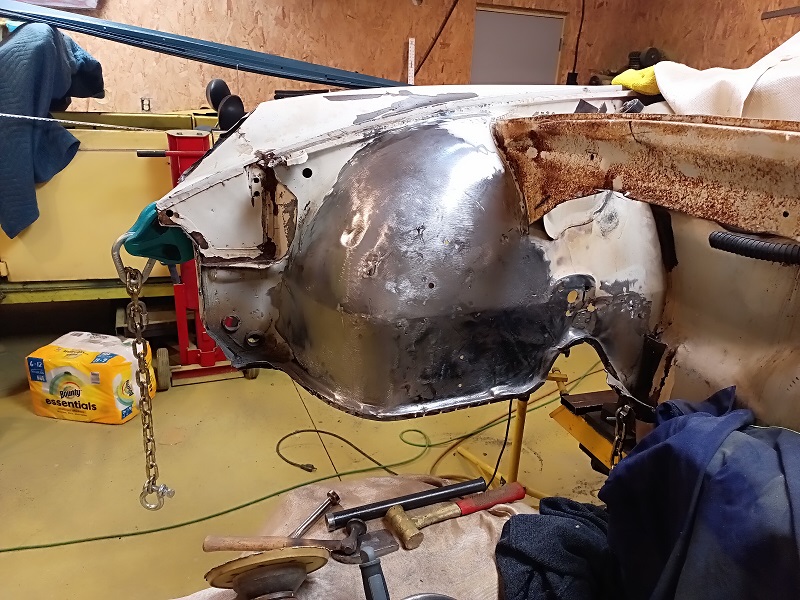
As I am working the wheelhouse the right fender is coming back in line. 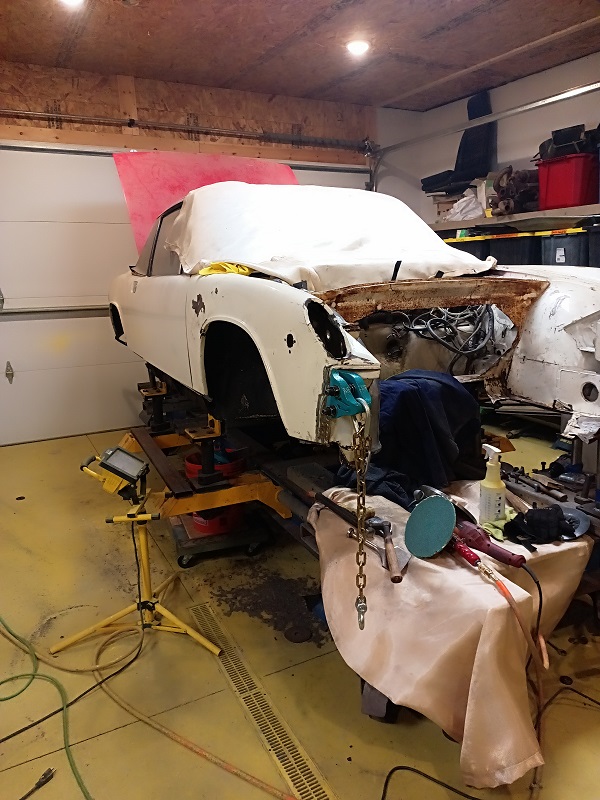
Posted by: 76-914 Oct 17 2023, 07:10 AM
Metal Magician. I love watching the transformation.
Posted by: rhodyguy Oct 17 2023, 07:17 AM
WOW! I would have no idea where to start. Real progress Rick!
Posted by: rick 918-S Oct 17 2023, 10:22 PM
Another night out hammering away on the wheelhouse. i set up this vector pull to start moving the panel forward. the arch over the Rack was closed up. I actually did two different pulls to get the shape back.
Ther is not much tension here. Just enough t help move the metal as I hammered the kinks. 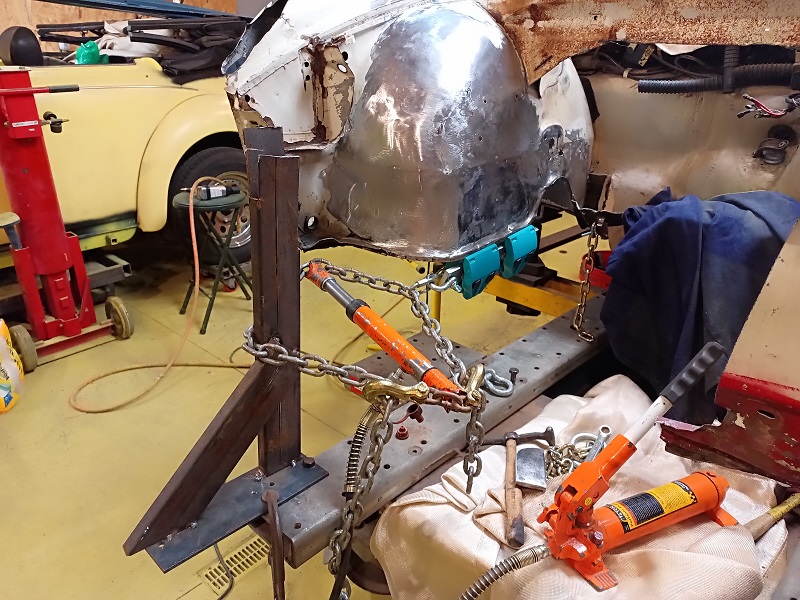
Hard to tell but this depression took hours to flatten. This was caused by the kink over the rack. 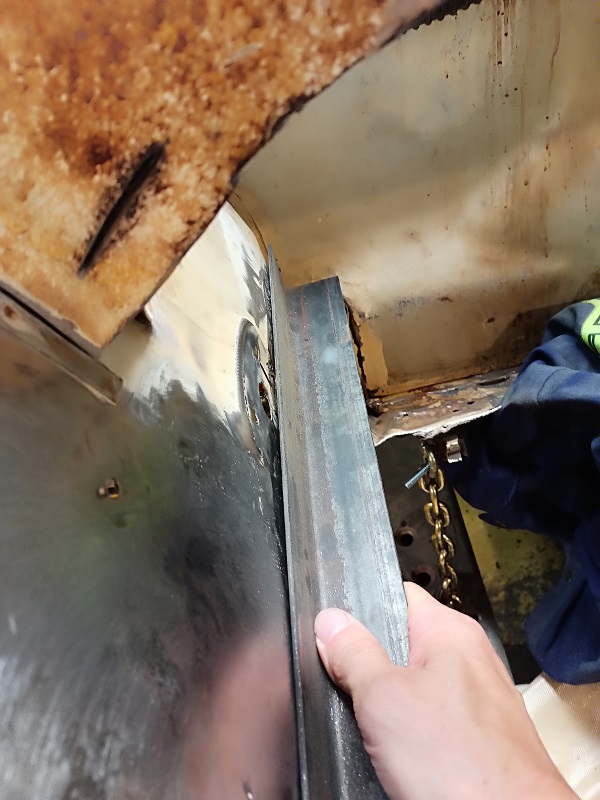
You can see this spotweld flange is pushed backand the panel is rolled out.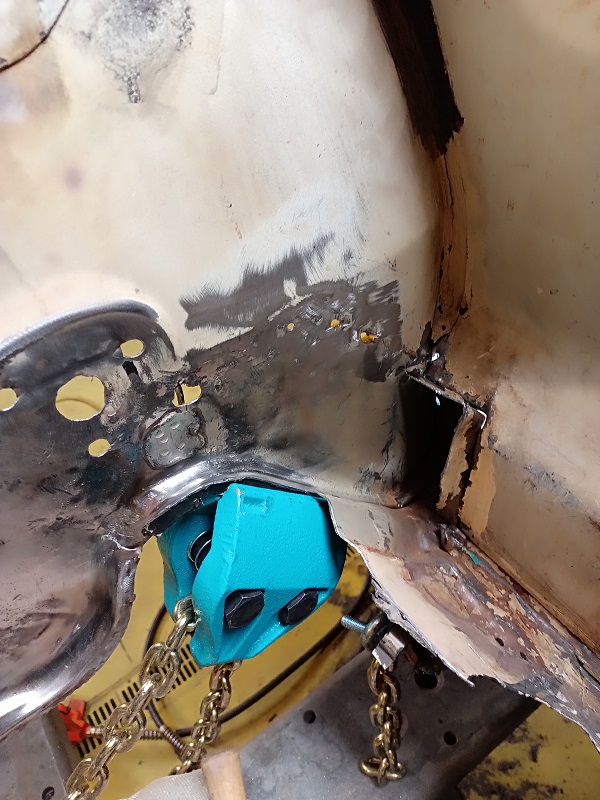
There is still a very slight depression at the swaybar mounting hole but once the gas tank bulkhead is welded back in ot will be right on.
Posted by: flyer86d Oct 18 2023, 05:13 AM
Wow, just wow!
Don’t feel bad. It took me 41 years before I started working on my -6.
Charlie
Posted by: doug_b_928 Oct 18 2023, 07:36 AM
Amazing artistry, Rick!
Posted by: rick 918-S Oct 19 2023, 09:16 PM
Slow night tonight. I am kind of stalled until the cowl cut arrives later this month. I want to see how much of the front is usable before trim too much more.
I started thinking about the car and how best to move it forward to it's next life. When Rocky had it he was invited into the very exclusive R Gruppe So Cal. The car still wears the banner on the windsheild. I'm not Rocky. I do not know any of the R Gruppe that I am aware of. I am not the one that was invited to join. So I am torn.
Should I complete the car as it was when Rocky ran with the So Cal gang or take it to another place. I don't have the 3.2 or the short gear transaxle. I have a 2.7S I got from Slits.
Here's my thought. Plan one is to complete the car with all the graphics like it was when it was crashed complete with the orginal R Gruppe So Cal banner on the windsheild. (Which I really do not have permission to do)
Or reinvent the car with an Alien Spin. Alien Graphics Flares and 16x6 and 16x7's
What say you... 
Posted by: mepstein Oct 19 2023, 09:55 PM
Your car, your choice.
Posted by: rick 918-S Oct 20 2023, 07:35 AM
I think i should contact someone from the So Cal R Gruppe to see how they feel about putting the car back and leaving their banner. One of those situations where assking first may be the right thing.
Anyone know any of those guys?
Posted by: tygaboy Oct 20 2023, 07:57 AM
I know a number of the members. And while at Rennsport, I had the pleasure of dining with Jessica, the daughter of R Gruppe founder Chris Huregas. I'll PM you some details.
Posted by: Root_Werks Oct 20 2023, 11:42 AM
Really fun to watch you work metal, it's such a lost art! Even the couple of 356's I restored, the shop was all about cut out and replace. Really didn't spend much time metal working to save panels.
Using heat to get metal back where it's supposed to be is also an art. Sort of got okay at it years back. I'm certain I'd just punch holes in things these days.
Posted by: rick 918-S Oct 20 2023, 04:38 PM
I had a section close to the arch over the rack that was really stretched. I ended up using the torch - hammer - quench - method. Old school.
Posted by: rick 918-S Oct 20 2023, 04:45 PM
I had a nice conversation with one of the board of the R Gruppe. Short story from a long conversation is the windshield Banner will be coming off. If I could get it off without wrecking it I would send it to Rocky.
Posted by: tygaboy Oct 20 2023, 05:49 PM
Glad to hear the R Gruppe stuff was worked out quickly. Now, back to the METAL!!!
Posted by: rick 918-S Oct 25 2023, 04:18 PM
Parts Clip arrived. Originally a white car.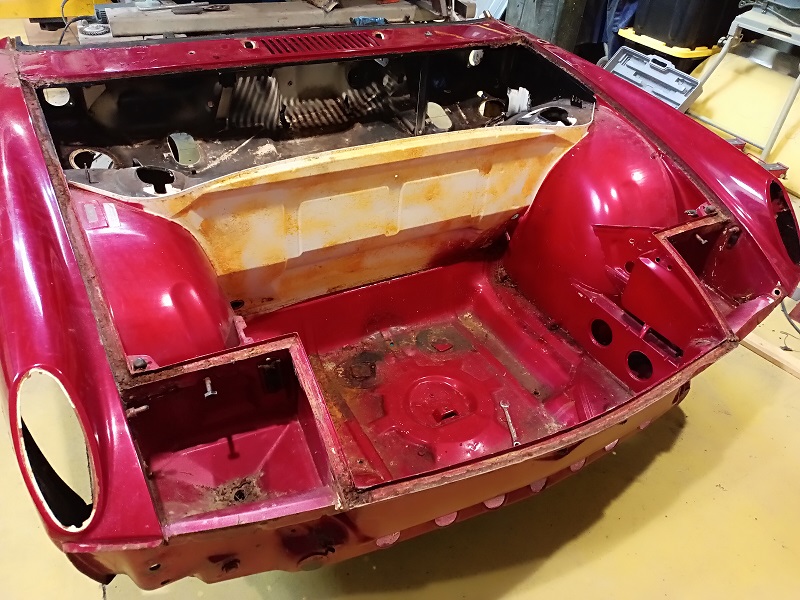
Posted by: rhodyguy Oct 25 2023, 04:24 PM
WOW, that was a fast acquisition. The hood channel looks pretty good. Big cuts a coming. Following.
Posted by: porschetub Oct 25 2023, 07:32 PM
Parts Clip arrived. Originally a white car.
Impressive work ,working on a compound curve and some rack pull outwards @ the same time wow, where do you plan cut for the clip ? ,I would assume forward of the wheel wells ?.
Great to see this car back Rick ,keep up the great work
 .
.
Posted by: Geezer914 Oct 26 2023, 06:46 AM
That is some metal work! Very nice!
Posted by: rick 918-S Oct 27 2023, 11:41 PM
Continuing to work the right inner panel. I am not sure you noticed but the depression on the wheelhouse was completely obliterated and wrinkled. In order to repair the shape I had to hammer it smooth first then put the depression back in. Here is a reminder of where this started.
Then the reshape
Then adding the depression back in. I started with the torch and a homemade hammer made of 3/4" roundstock with a bullet or rounded face. I just wanted to bump the metal down when it was mallable. 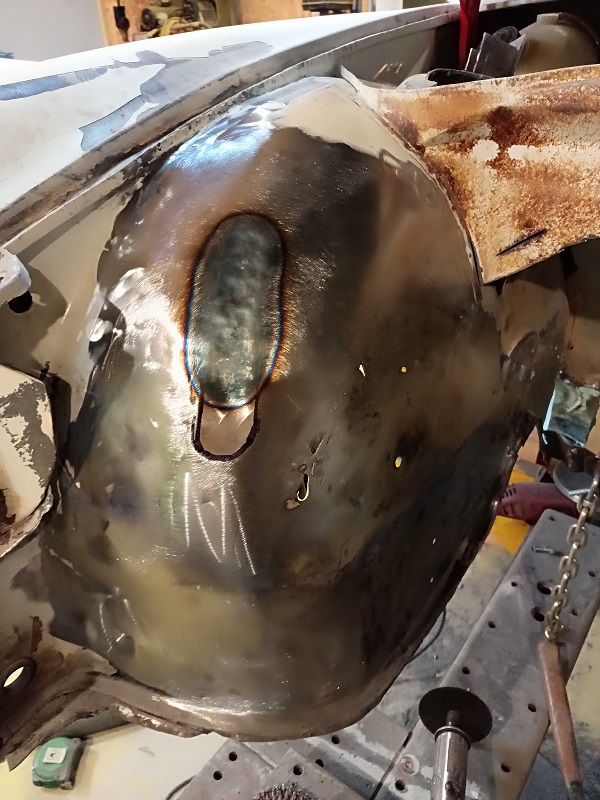
I spent about an hour and a half working the shape with hammers and dollies. When it was shaped and the lines we sharp I ran the planishing hammer thru the depression to smooth it out. Then used the shrinking disc to tune up the edges. 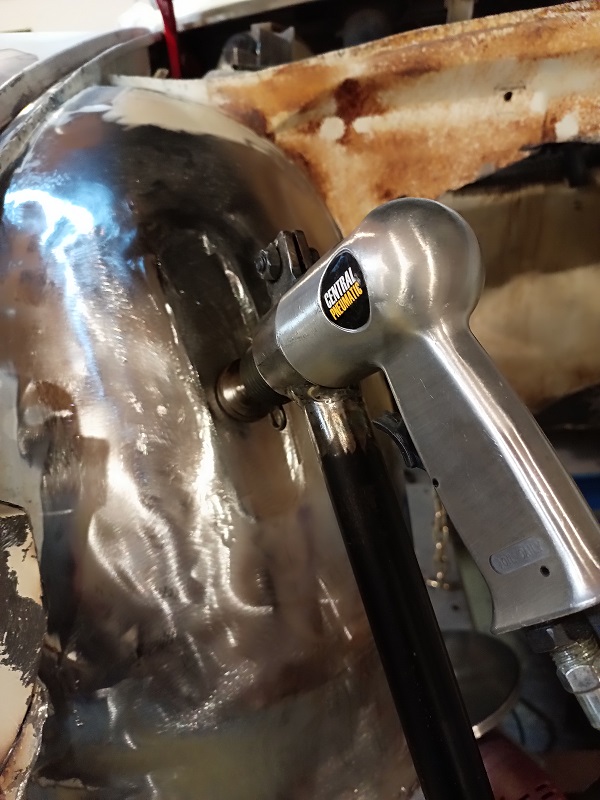
Compared to the donor clip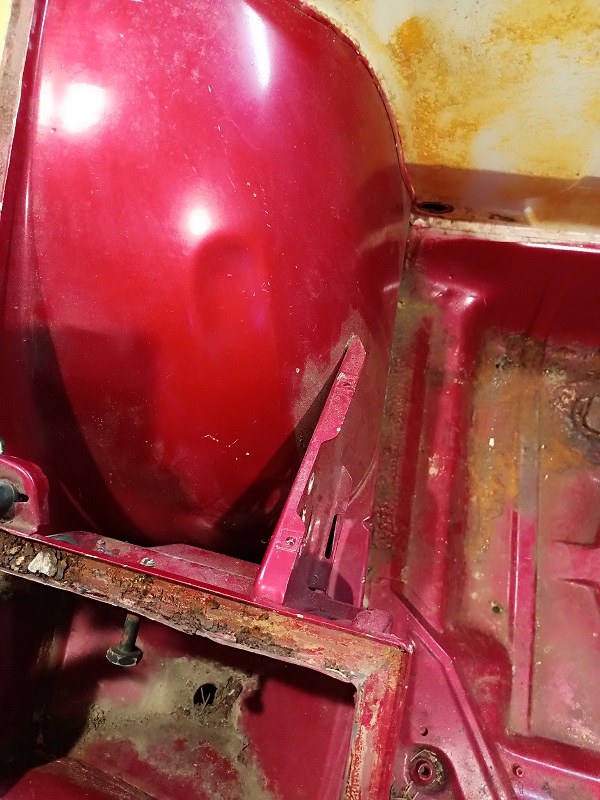
Posted by: tygaboy Oct 28 2023, 08:37 AM
Your skill level is ridiculous, Rick. I'd love to be close enough to come hang out and watch. Thanks for all your effort saving these cars.
Posted by: burton73 Oct 28 2023, 08:55 AM
Rick,
Your skillsets are amazing, you are an artist in metal shaping and much more. Thank you for taking us on this journey with you. It takes time to document the work the way you are, so thanks a lot
Best Bob B
Posted by: rick 918-S Oct 28 2023, 12:26 PM
So much more to do before I can say it's a usable panel. I have been eyeing up the parts clip thinking how easy it would be to just section in the whole thing. But the more I work on this wheelhouse the better it gets. I think I am past the hard stuff. The little dents and dings left will really not show as progress. But there are lots more big moves to make as it starts to come back to life.
Posted by: worn Oct 29 2023, 05:41 PM
Your skill level is ridiculous, Rick. I'd love to be close enough to come hang out and watch. Thanks for all your effort saving these cars.
My son says that a hammer is the most complex tool available: it never does exactly the same thing twice. My father used to say that all of the tools we now have were made with a stone hammer. Me, I say that if all you have is a hammer, everything looks really different and interesting. Only once in a while like a nail. Nice work!
Posted by: KELTY360 Oct 29 2023, 10:19 PM
Your skill level is ridiculous, Rick. I'd love to be close enough to come hang out and watch. Thanks for all your effort saving these cars.
My son says that a hammer is the most complex tool available: it never does exactly the same thing twice. My father used to say that all of the tools we now have were made with a stone hammer. Me, I say that if all you have is a hammer, everything looks really different and interesting. Only once in a while like a nail. Nice work!
"Sooner or later, every tool becomes a hammer." - Garage Squad
Posted by: rick 918-S Oct 31 2023, 10:13 PM
Started trimming the parts clip. I and separating the outer cross brace fro where it caps over the wheelhouse. I have done this before when I changed a factory wheelhouse on Juergen's 6. The spot welds are tiny and fairly easy to drill out. I will tig the holes when I put the outer cross brace back over the wheelhouse strut caps . 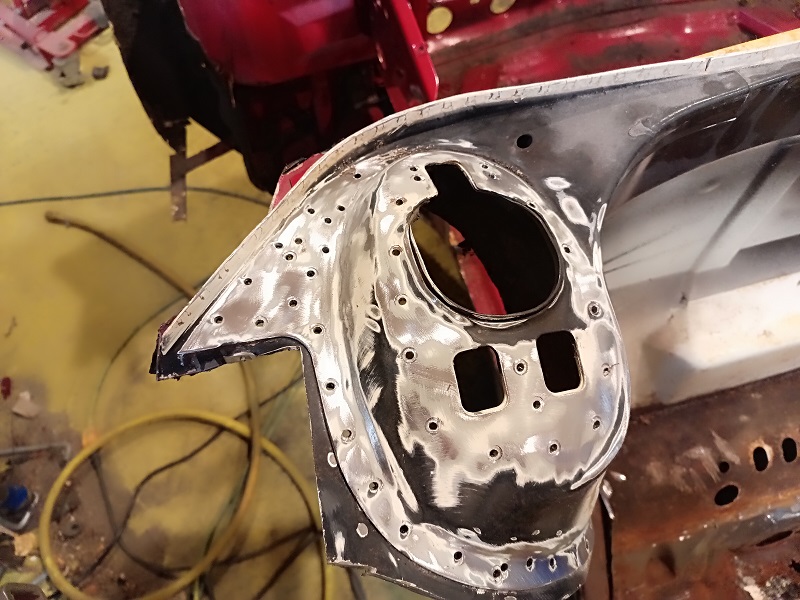
Working my way around the floor pan. I have most of the left side off. I have the bumper brace and the headlight brace trimmed. 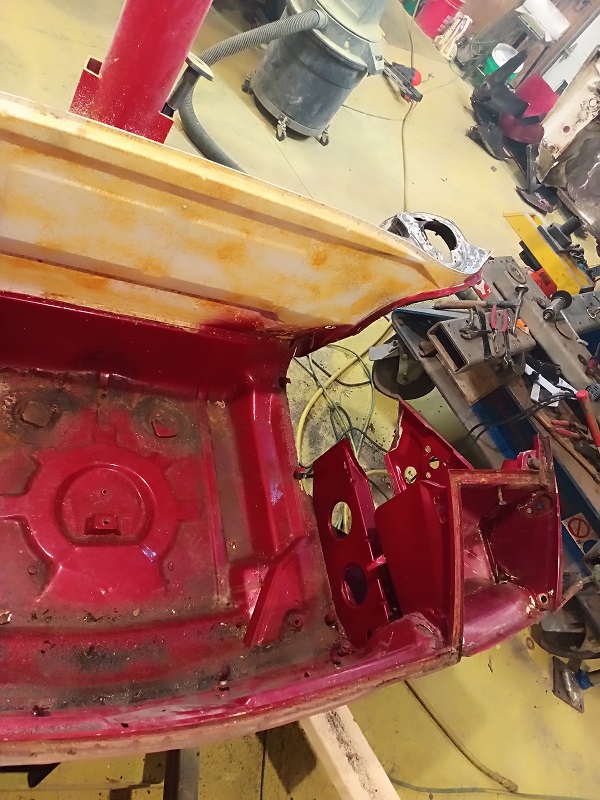
The scrap pile is getting bigger.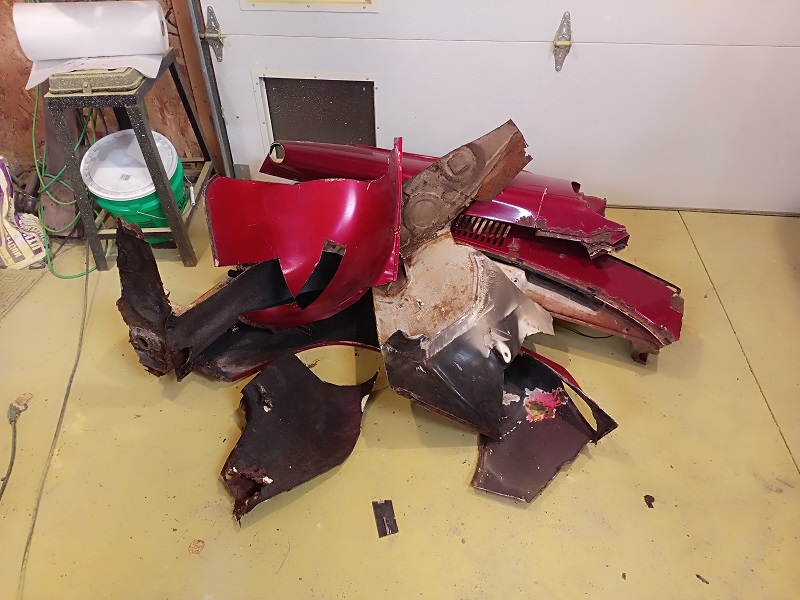
Posted by: Root_Werks Nov 1 2023, 08:43 AM
That's a pile of 914 sheet metal now! 
Very cool watching you save as much original metal as possible.
Posted by: Maltese Falcon Nov 1 2023, 09:13 AM
Awesome work Rick...there shall be NO bondo on your watch !
You should keep a log on the R gruppe history of this 914; there were 1 or 2 allowed into that "Club", and I've seen one car there in person at the Rennsport 6 corral.
Years ago Chris Huergas invited me to meet up at the Rose Bowl parking lot to hang out with his followers; he took a liking to my black flat-fan biturbo six. He did mention that the 914 would not be extended an invite into their club. I never met up there (already had other calendar plans). A few years on from there...I brought the 914 to Chino CA. "Freinds of Steve McQueen" car show. One of the judges that I met on that day was Freeman Thomas, co-founder of the R-Gruppe. He and his team did inspect and judge my car; I left that Sunday with the "McQueen Cool Style" trophy...guess they had a soft spot for the 914 !

Posted by: tygaboy Nov 1 2023, 09:44 AM
Awesome work Rick...there shall be NO bondo on your watch !
You should keep a log on the R gruppe history of this 914; there were 1 or 2 allowed into that "Club", and I've seen one car there in person at the Rennsport 6 corral.
Years ago Chris Huergas invited me to meet up at the Rose Bowl parking lot to hang out with his followers; he took a liking to my black flat-fan biturbo six. He did mention that the 914 would not be extended an invite into their club. I never met up there (already had other calendar plans). A few years on from there...I brought the 914 to Chino CA. "Freinds of Steve McQueen" car show. One of the judges that I met on that day was Freeman Thomas, co-founder of the R-Gruppe. He and his team did inspect and judge my car; I left that Sunday with the "McQueen Cool Style" trophy...guess they had a soft spot for the 914 !
One of our 914 World members, Bob @http://www.914world.com/bbs2/index.php?showuser=7784 , was invited to join the R Gruppe with his 914 v8 conversion (327 SBC). Not sure if that's one of the 914s you're mentioning but for sure there are some in the club.
Sorry for the hijack...back to saving the 6!
Posted by: Maltese Falcon Nov 1 2023, 09:49 AM
@http://www.914world.com/bbs2/index.php?showuser=19241 Hi Chris...came by 000 at Renn7 but missed you + Pete
Marty
Posted by: Shivers Nov 1 2023, 10:02 AM
Really great work. Makes my hands hurt just looking at it. But what I am really enjoying the most is all the wonderful toys. My workshop (backyard) to move metal it would be an anchored floor jack and a sledgehammer. I will endeavor to be more like you.
Posted by: rick 918-S Nov 2 2023, 09:57 PM
Just more boring trim work. 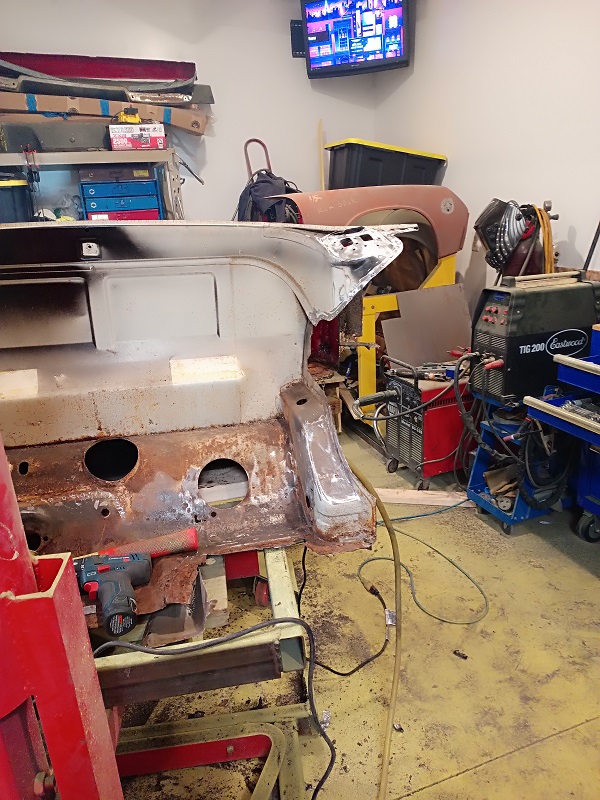
Front panel and headlight bucket braces on both sides are trimmed.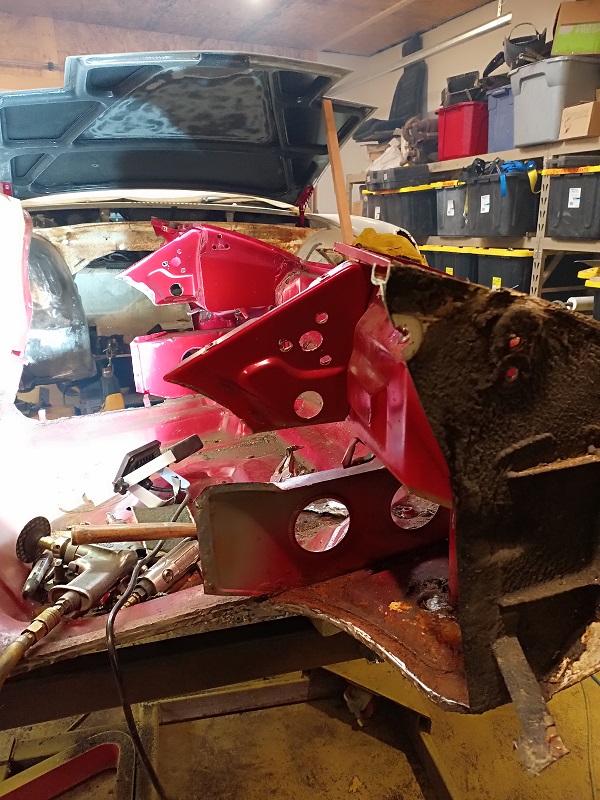
Right side Strut tower brace is trimmed. Wheel house strut tower top is removed,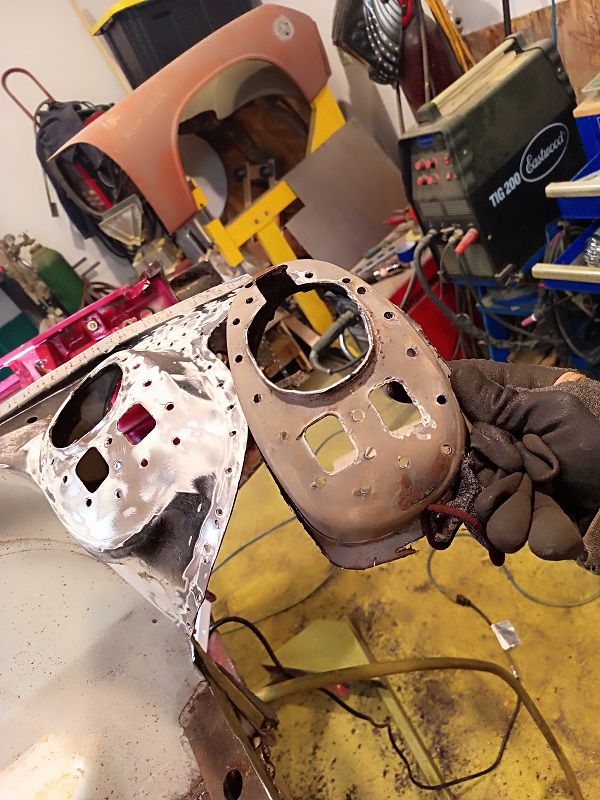
The donor is getting leaner and the scrap pile is getting bigger. 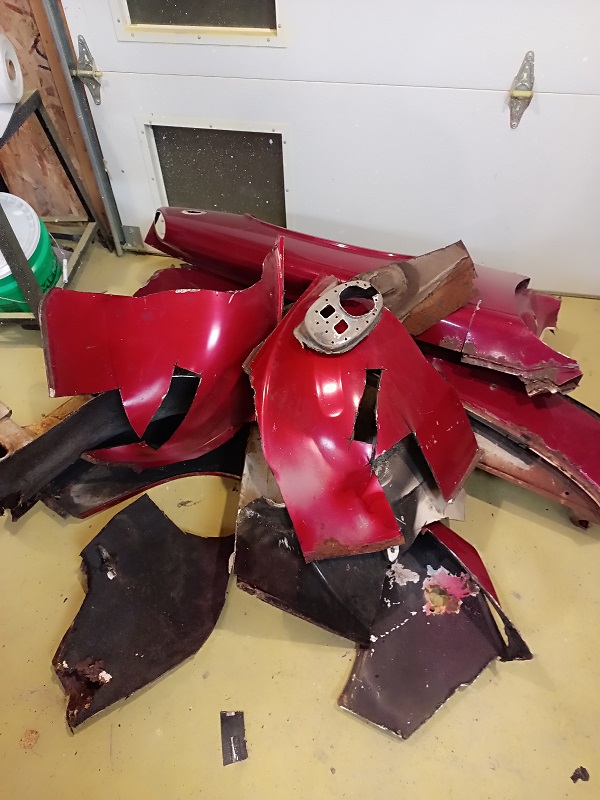
Posted by: majkos1 Nov 3 2023, 11:06 AM
Great work Rick,
love how you make your own tools ,
helps to know we can make em not spend $$$
(if any were to be found.)
Guys and Gals, I was bless with Rick coming through town, on his way to Red Rock,
he helped finalize Car-B-Q with design and help Beauty's receiver hitch .
Rick's Red Rock adventure that year is another story.
(wish I have that photo of Henna watching Rick leave his mark on a sign.)
Posted by: rick 918-S Nov 3 2023, 12:38 PM
Great work Rick,
love how you make your own tools ,
helps to know we can make em not spend $$$
(if any were to be found.)
Guys and Gals, I was bless with Rick coming through town, on his way to Red Rock,
he helped finalize Car-B-Q with design and help Beauty's receiver hitch .
Rick's Red Rock adventure that year is another story.
(wish I have that photo of Henna watching Rick leave his mark on a sign.)
Hey Kevin! I may have to dig up a photo or two. I think I may have that old girl saved someplace. Rest her soul. She was a great companion.
Posted by: majkos1 Nov 3 2023, 09:12 PM
Great work Rick,
love how you make your own tools ,
helps to know we can make em not spend $$$
(if any were to be found.)
Guys and Gals, I was bless with Rick coming through town, on his way to Red Rock,
he helped finalize Car-B-Q with design and help Beauty's receiver hitch .
Rick's Red Rock adventure that year is another story.
(wish I have that photo of Henna watching Rick leave his mark on a sign.)
Hey Kevin! I may have to dig up a photo or two. I think I may have that old girl saved someplace. Rest her soul. She was a great companion.
That would be so cool to see,
Classic Alien is here, animals can see em.
Posted by: rick 918-S Nov 4 2023, 07:39 AM
Great work Rick,
love how you make your own tools ,
helps to know we can make em not spend $$$
(if any were to be found.)
Guys and Gals, I was bless with Rick coming through town, on his way to Red Rock,
he helped finalize Car-B-Q with design and help Beauty's receiver hitch .
Rick's Red Rock adventure that year is another story.
(wish I have that photo of Henna watching Rick leave his mark on a sign.)
Hey Kevin! I may have to dig up a photo or two. I think I may have that old girl saved someplace. Rest her soul. She was a great companion.
That would be so cool to see,
Classic Alien is here, animals can see em.
Just a little Off Topic for Kevin.. Henna Looking at us like 'What are you hoodlums up to"
Had to stand on the Car-b-q to Reach the Sign
BTW This was 2010 Wow!
Posted by: majkos1 Nov 4 2023, 08:20 AM
Thank you Sir
Classic
True 914'ners moment
And, Yes, Alien exist!
Posted by: rick 918-S Nov 4 2023, 10:12 PM
Back to our regularly shceduled deconstruction. This section is extremely diffecult to split. Still have the other side to go and then some trimming at the spot welds along the gas tank bulkhead. Anyone have any idea how much time it takes to slpit all these panels apart? 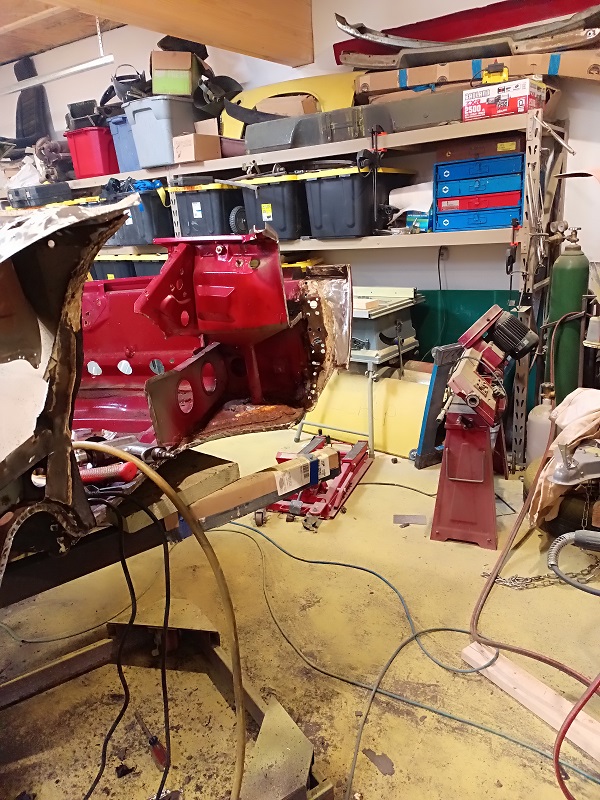
Posted by: East coaster Nov 5 2023, 05:20 AM
What are you using to remove spot welds? I’ve yet to find anything that doesn’t challenge my patience.
Posted by: rick 918-S Nov 5 2023, 06:24 AM
What are you using to remove spot welds? I’ve yet to find anything that doesn’t challenge my patience.
I use a multitude of methods. The strut tower tops I used an 1/8 drill bit and they drilled the spot welds. Then used a ball shaped grinder on the underside ( the part that is going to be trashed) this thins the part so the weld will snaps when I work it
Posted by: rick 918-S Nov 5 2023, 06:30 AM
What are you using to remove spot welds? I’ve yet to find anything that doesn’t challenge my patience.
I use a multitude of methods. The strut tower tops I used an 1/8 drill bit and drilled the spot welds. Then used a ball shaped grinder on the underside ( the part that is going to be trashed) this thins the part so the weld snaps when I work it. I will post more later with better photos.
Posted by: rick 918-S Nov 6 2023, 07:38 AM
I wanted to expand a little on the process of extrating parts in the most usable state. Deconstructing a spotwelded car is a challange. Let's face it. The car you are working to collect parts from you are really destroying. You really have to to get the part you need in the most unmolested state.
I dont often drill out welds but this section and example where I thought it was the best choice. I moved away from Blair spot Weld Drills as they are hard to center and gauge the depth you are drilling. If you over do it you are thinning the part you are attmpting to repair.
I need the bulkhead panel as the one in Rocky's car was bowed at the top when the strut towers pulled inward. The vertcal panel was kinked and dented from maybe a spare tire?
Anyway there are alot of spotwelds securing the bracing to the wheelhouse. The outer spotwelds are small. I was able to clear most of them with an 1/8 drill bit. When the section is reinstalled I will tig the donor part in place and most likely the welds will appear to be spotwelds again. The inner welds holding the parts together are a bit larger. And the strut tower top on the wheel house side it heavier gauge. I used a step drill to increase the 1/8" holes to clear the spotweld.
The second step I used was to go to the back side and use my ball grinder the thin the metal making the part I am not saving thin and weak. I have a couple screwdrivers I ground into a chisels to split the two parts.
The outer section of spot welds on the brace were still held but easy to split. I also cut around the "Cap" on the wheelhouse side to separate the outer wheelhouse side from the Cap.
The Cap part or strut mount I also used my ball grinder on. Once I felt I have the mount weaked enough. I used my screwdriver chisel from the top opening and struck the cap lip around the opening. There were a few spots hold but after a couple hits the part popped out.
Again I will Tig these holes when reinstalling. 

The brace removal from Rocky's car will be just the ball grinder on the part I am removing. No Holes.
Posted by: rick 918-S Nov 12 2023, 09:47 PM
More on the way i remove spot welds. This is just what I do. You may have a different method.
I use my ball grinder on the spot welds.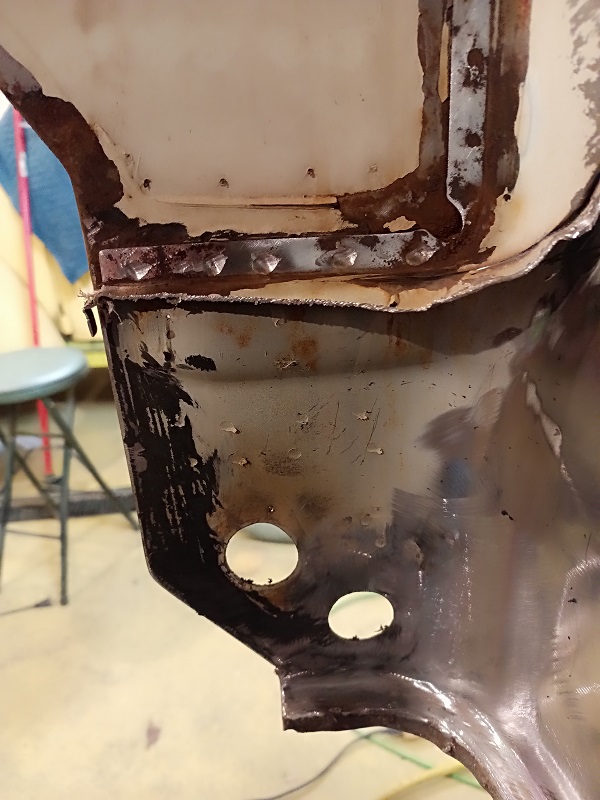
[quote]Then I use my screwdriver to pop them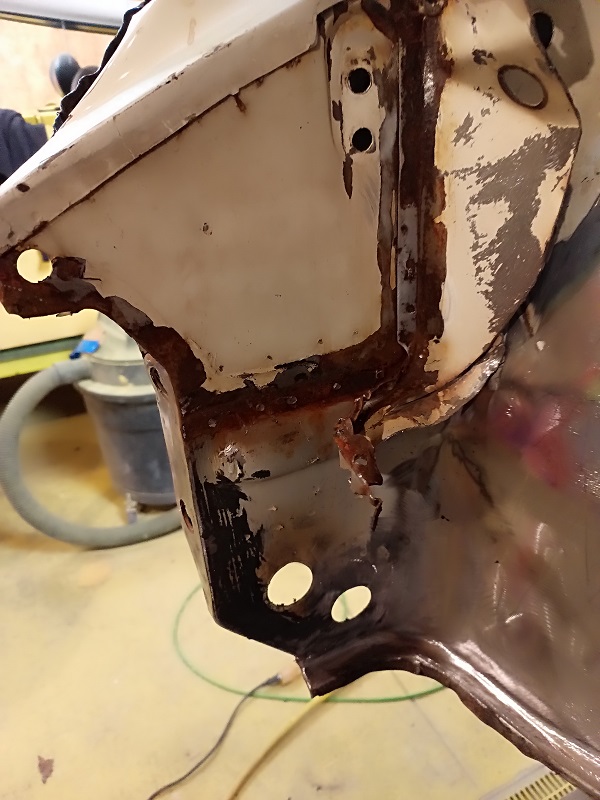
All Cleaned up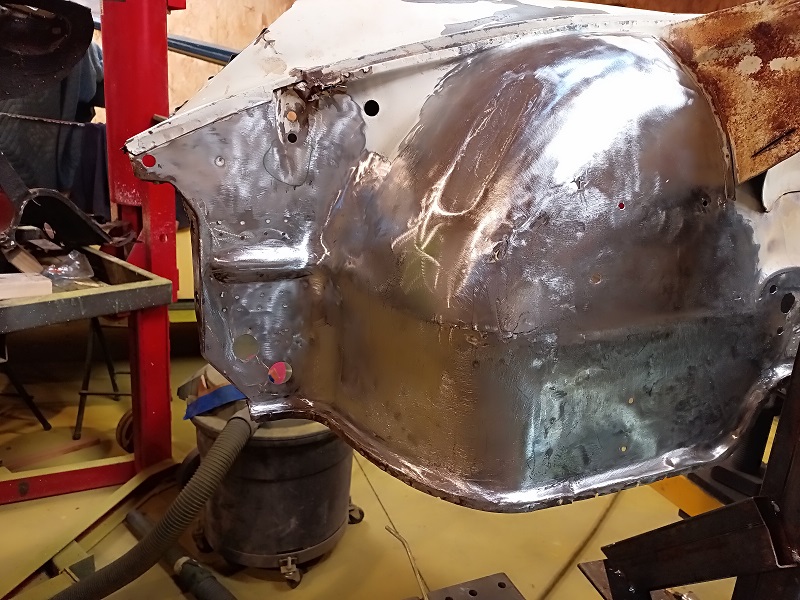
Posted by: rick 918-S Nov 12 2023, 09:58 PM
Worked on the left side for while tonight. Let's revisit to extent of the damage. 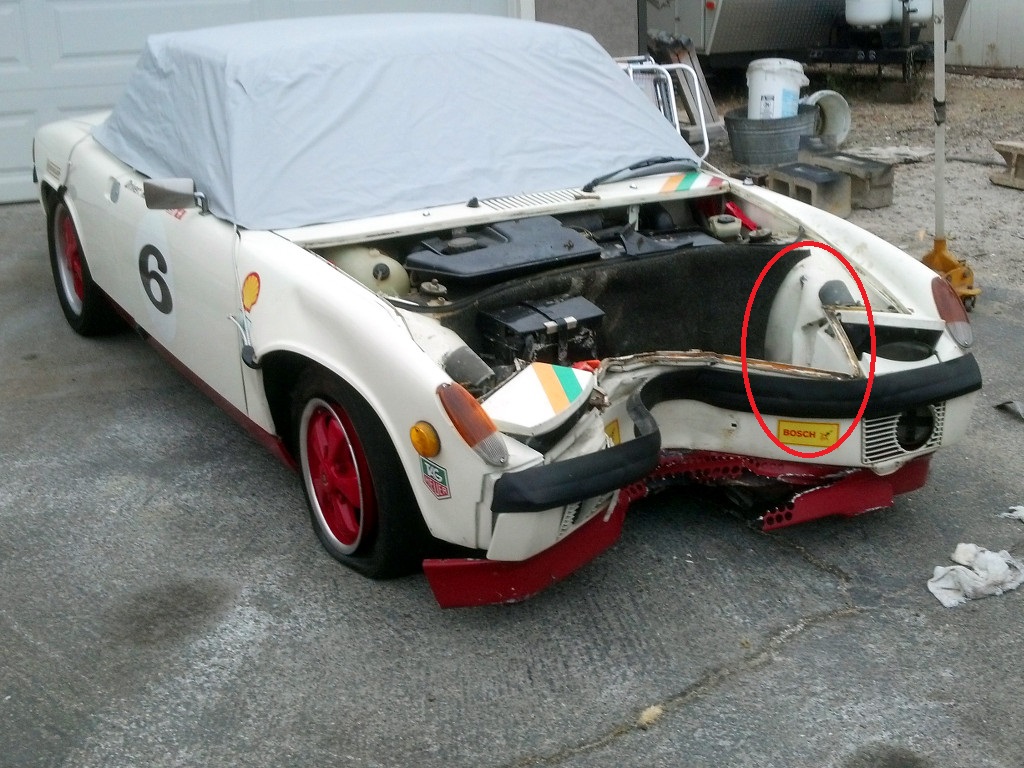
After the rough pulls I started the bumping.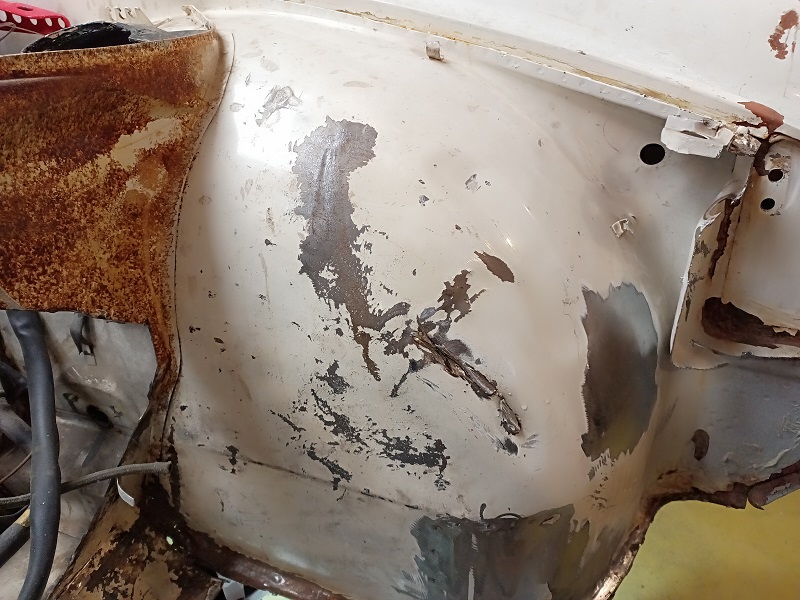

Starting to take shape but lots of work to go yet.
Attached image(s)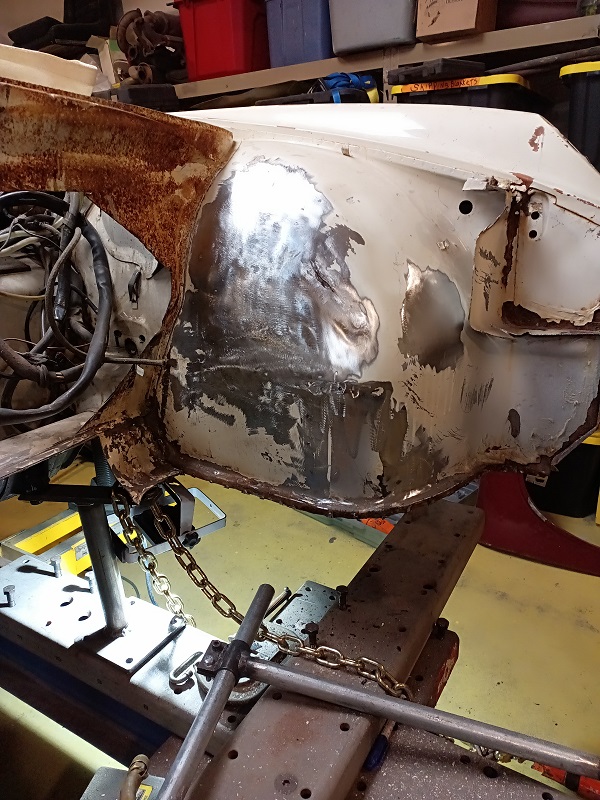
Posted by: Freezin 914 Nov 12 2023, 10:00 PM
Always love seeing your work, makes me feel like they all can be saved…. Just.not by me….
Your metal working skills are very impressive….
I personally find lot of the workyou guys and gals do on the world very inspiring!
Posted by: TRS63 Nov 14 2023, 10:33 AM
Thanks for sharing your methods and those really interesting pictures !
Antoine
Posted by: 76-914 Nov 14 2023, 10:59 AM
Posted by: ThinAir Nov 15 2023, 02:37 PM
It's amazing to see the magic that you work!
Posted by: rick 918-S Dec 24 2023, 09:34 AM
It has been a few minutes since I updated this repair. I have an NOS right fender but decided to see if I could save the factory part. As I dug into it I discovered it had been hit, drilled full of holes and bondo'd. Besides be crushed for the last accident there was alot of prior damage. I spent a few hours on it and it is strting to come around. I think I will just keep at it as I work out the inner panels and see where it leads. 
I also discovered this front suspension mount. This was the left side forward of the rack.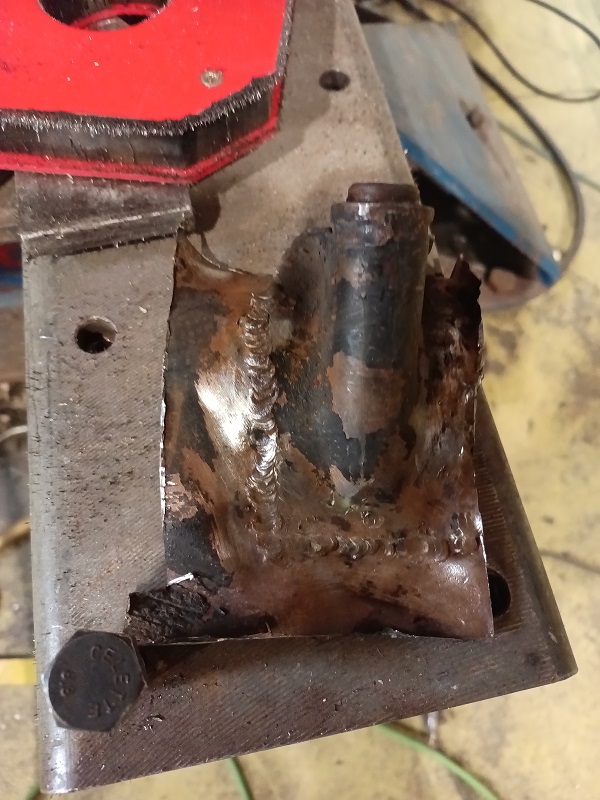
Posted by: Root_Werks Dec 29 2023, 11:42 AM
Seems like keeping as much of the original metal as possible lends to the value of the finished product.
Looking good, it's come a long way!
Posted by: rick 918-S Dec 30 2023, 11:20 PM
started trimming the clip to line up with the fixtures. 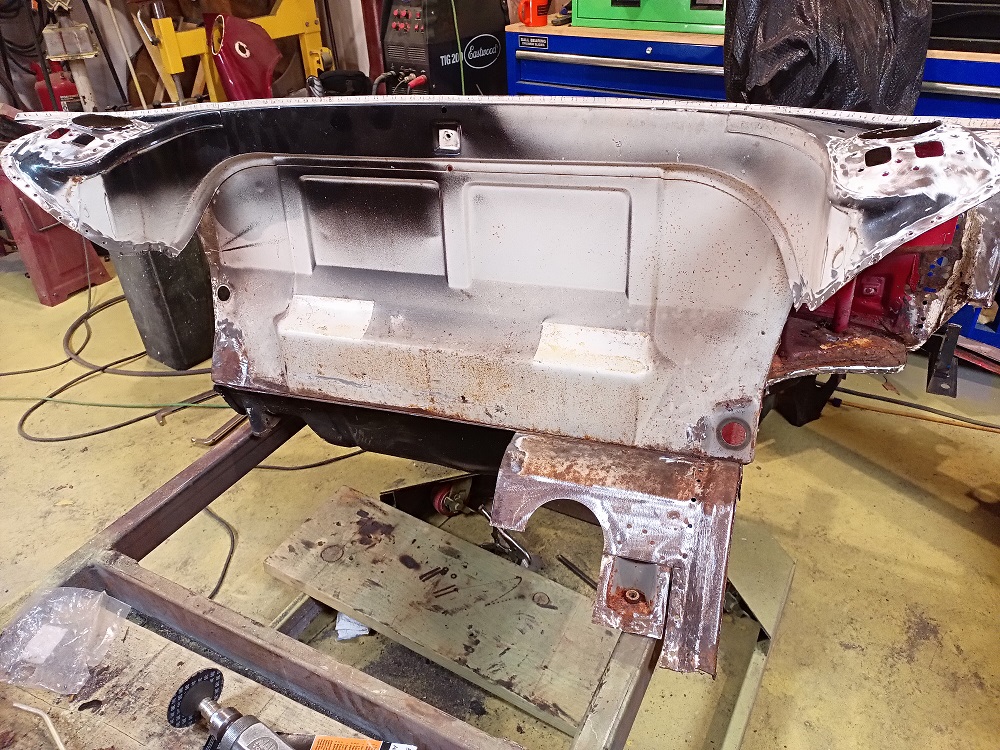
I made this circle fixture for Juergen's car when I sectioned on the right side floor pan.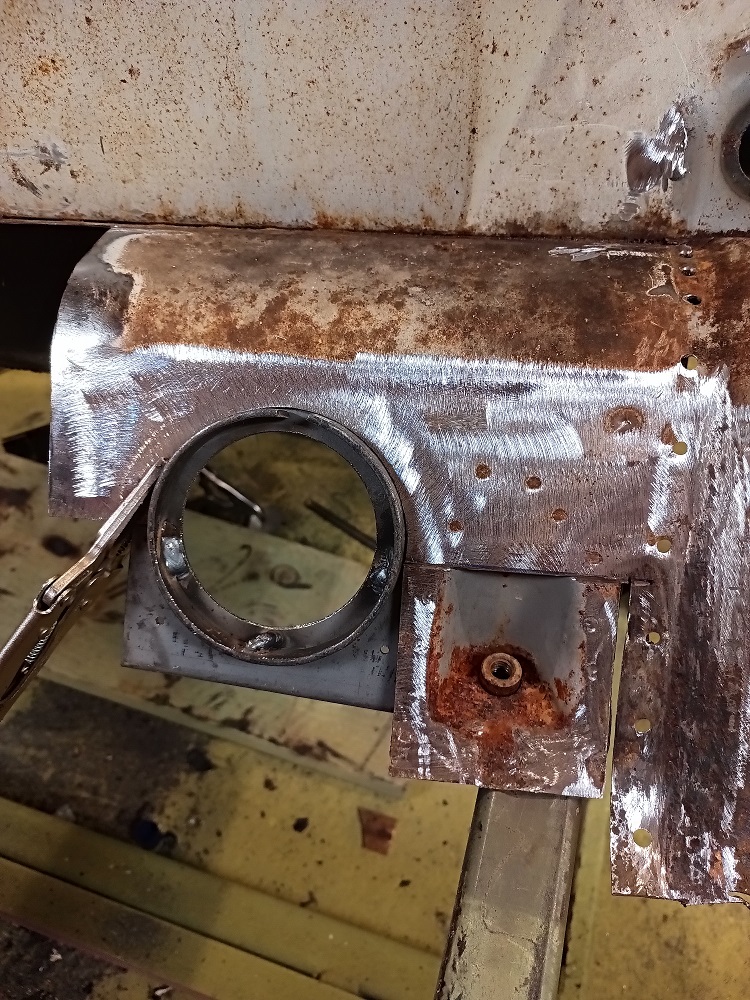
I stripped the floor pan section I am saving and trimmed a mount as an alignment point so i know when I set the floor pan back the mount will line up with the fixture. 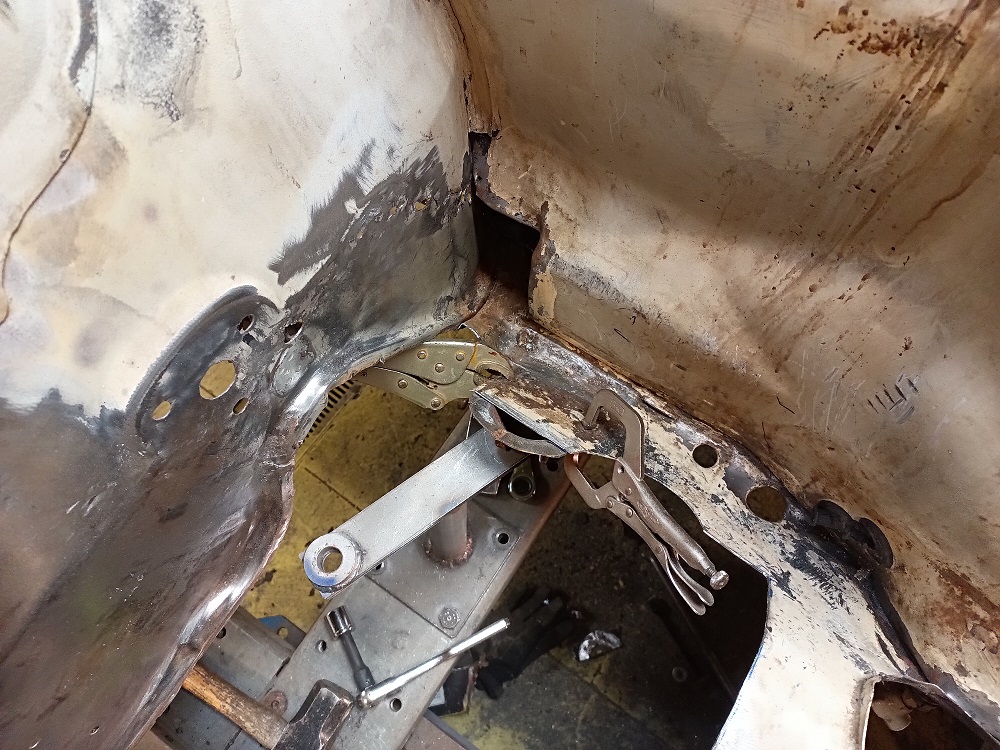
I finished up the left wheelhouse with the planisher and knocked the horizontal crease back in the panel. 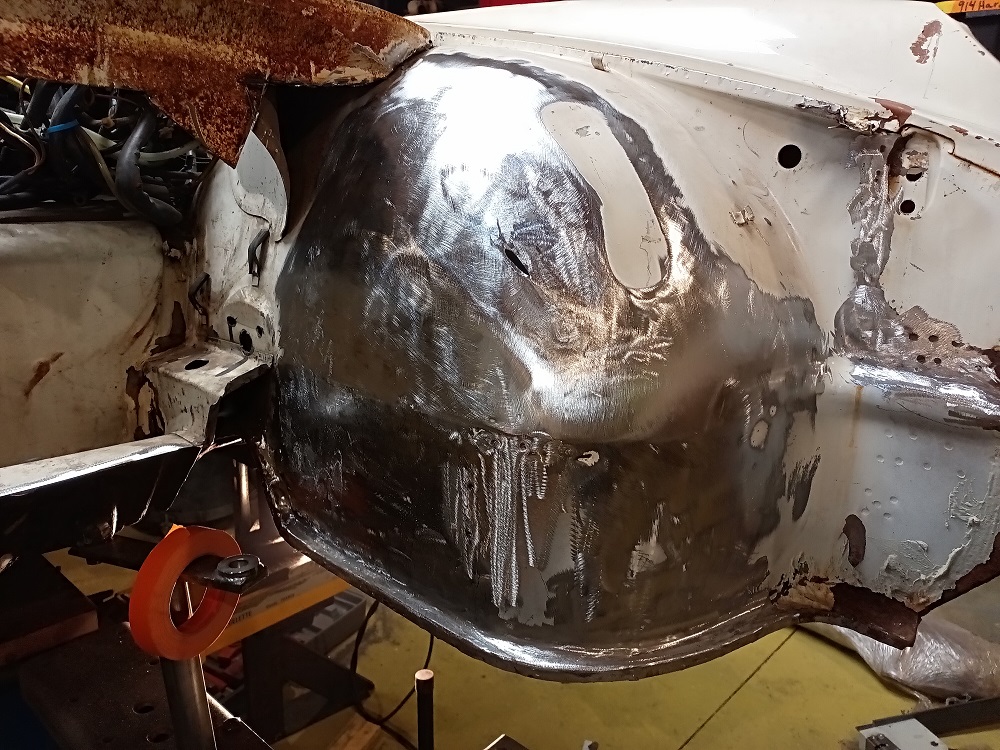
Posted by: 76-914 Dec 31 2023, 07:14 AM
Amazing work as always Rick. The first time that I noticed that crease I thought it was from a collision.
Posted by: rhodyguy Dec 31 2023, 02:34 PM
Super stuff Rick. The dr side hole/mount for the anti-sway bar picture pretty much settles that debate.
Posted by: flyer86d Dec 31 2023, 03:05 PM
Nicely done and you are very brave!
Charlie
Happy New Year!
Posted by: rick 918-S Jan 1 2024, 06:56 AM
I purchased a floor pan from Restoration Design. I am not going to end up using it but thought as long as I have it in the shop I would see how the inner panels are linning up. 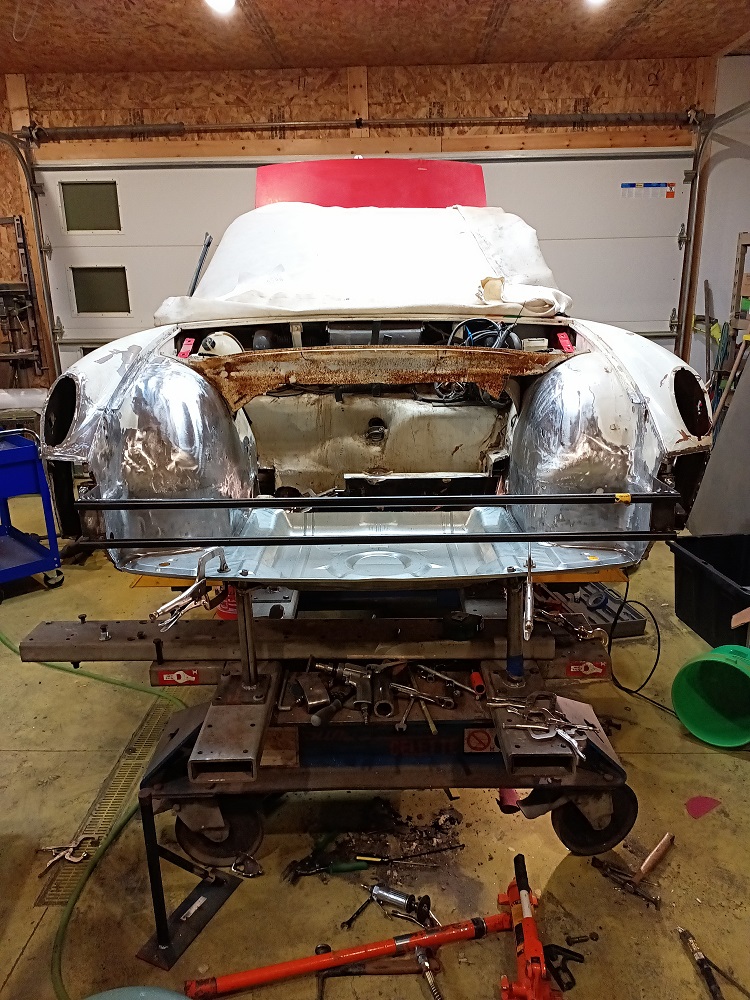
Posted by: rick 918-S Jan 3 2024, 08:11 AM
Slow Progress but the inner wheelhouses are lining up with the floor pan. That is an important step. The fenders are starting to come back in line. This may not look like much but from where these were to where they are is a considerable correction.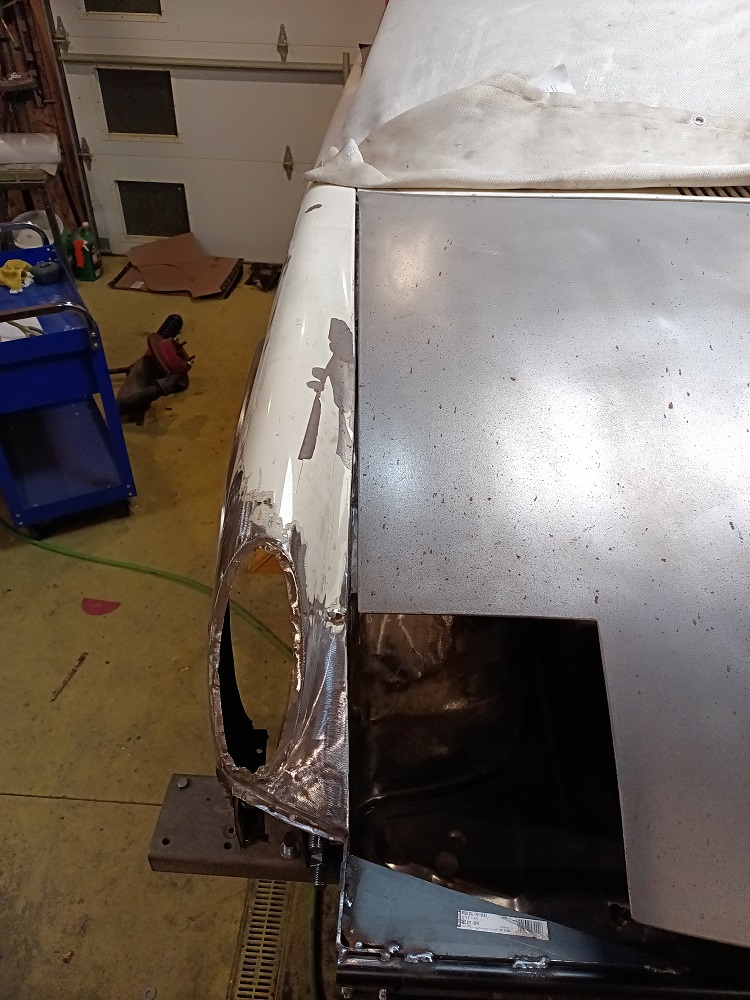
Posted by: Mikey914 Jan 3 2024, 01:57 PM
I remember seeing that. I formidable project, but sure you can handle it.
Posted by: rick 918-S Jan 3 2024, 11:55 PM
Progress The donor part is trimmed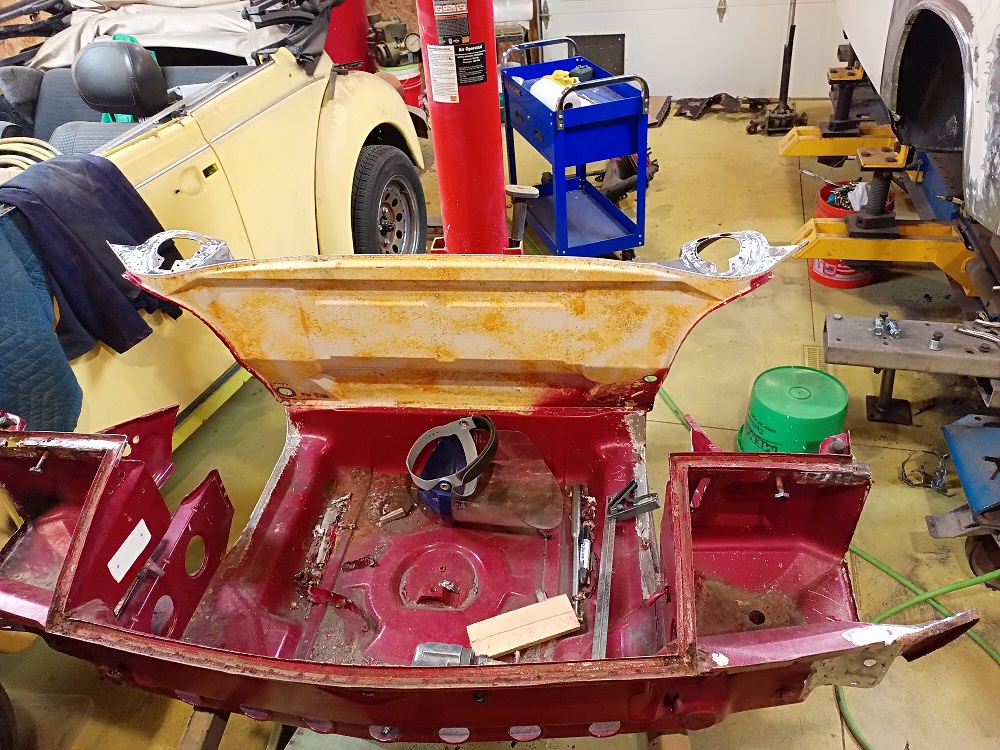
The car is trimmed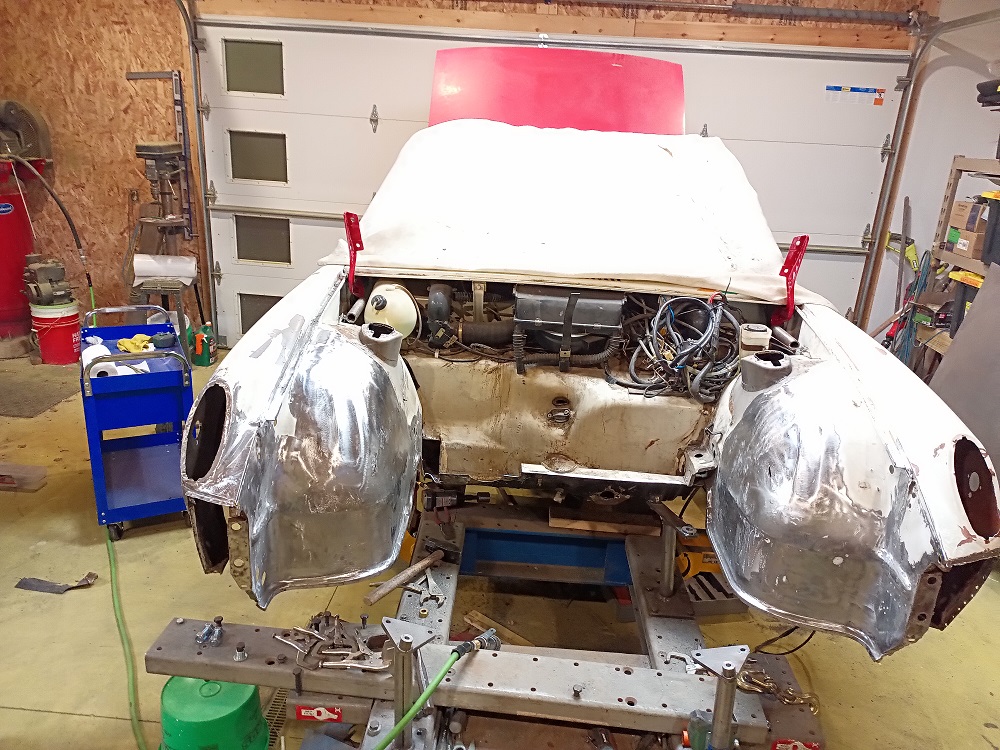
And this is the first test fit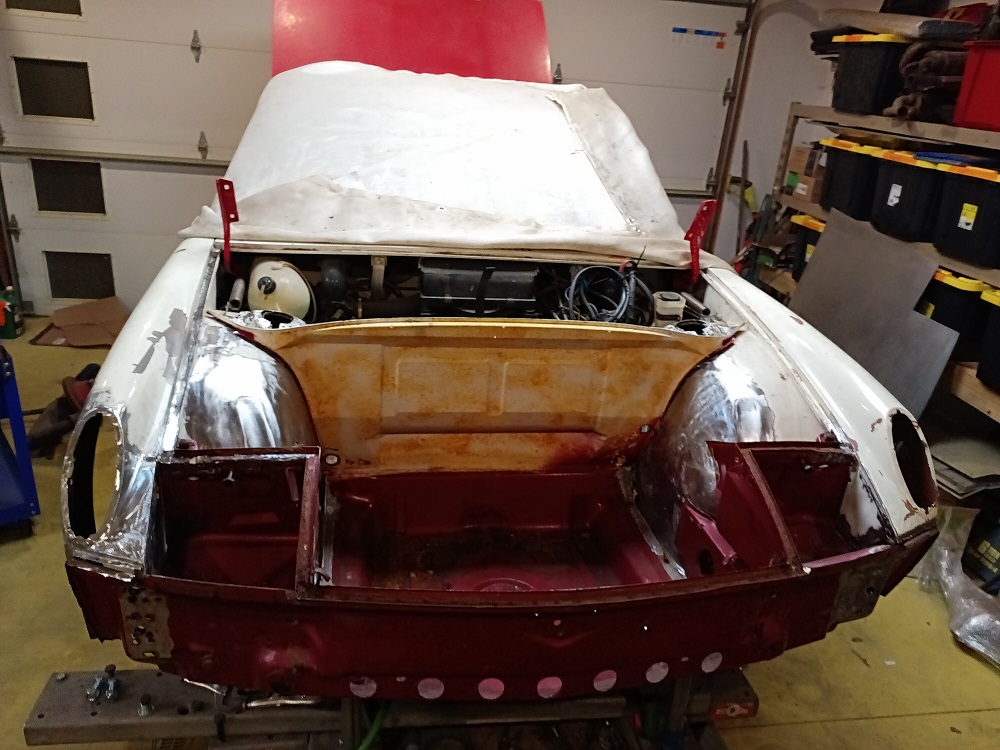
Still some final fitting to do. Then sandblast and epoxy before welding it up. once the platform is stable I can complete the metal finishing on the upper body.
Posted by: infraredcalvin Jan 4 2024, 12:21 AM
Wow, that is staring to look like you’re in the home stretch… doesn't look like any damage telegraphed to the mid/rear of the chassis. Fascinated with your progress!!!
Posted by: rick 918-S Feb 1 2024, 10:05 PM
Starting to fit. I plan to tig weld the butts. Here is are some photos of the seams starting to line up tight. It is hard to see but there is a seam just behind the bulkhead. 
I split the hole and made a fixture to align it when the section comes back together. 
Left side hood gap is starting to line up.
Posted by: East coaster Feb 2 2024, 06:35 AM
Amazing work…….and a lesson in patience!
Posted by: DRPHIL914 Feb 2 2024, 09:58 AM
Starting to fit. I plan to tig weld the butts. Here is are some photos of the seams starting to line up tight. It is hard to see but there is a seam just behind the bulkhead.
I split the hole and made a fixture to align it when the section comes back together.
Left side hood gap is starting to line up.
exciting transformation!
was it easier to just use that whole front clip rather than the Restoration Design part for the front frunk floor etc?
Phil
Posted by: rick 918-S Feb 2 2024, 10:26 AM
Starting to fit. I plan to tig weld the butts. Here is are some photos of the seams starting to line up tight. It is hard to see but there is a seam just behind the bulkhead.
I split the hole and made a fixture to align it when the section comes back together.
Left side hood gap is starting to line up.
exciting transformation!
was it easier to just use that whole front clip rather than the Restoration Design part for the front frunk floor etc?
Phil
The damage was too far into the car. The floor section wasn't long enough. I have been using it just to check the wheelhouse fit along the frunk floor though.
Posted by: rick 918-S Feb 2 2024, 10:27 AM
Starting to fit. I plan to tig weld the butts. Here is are some photos of the seams starting to line up tight. It is hard to see but there is a seam just behind the bulkhead.
I split the hole and made a fixture to align it when the section comes back together.
Left side hood gap is starting to line up.
exciting transformation!
was it easier to just use that whole front clip rather than the Restoration Design part for the front frunk floor etc?
Phil
The damage was too far into the car. The floor section wasn't long enough. I have been using it just to check the wheelhouse fit along the frunk floor though.
Posted by: Montreal914 Feb 2 2024, 10:32 AM
Pure art!
Posted by: rick 918-S Feb 16 2024, 06:00 AM
I sand blasted the replacement section and started the welding process.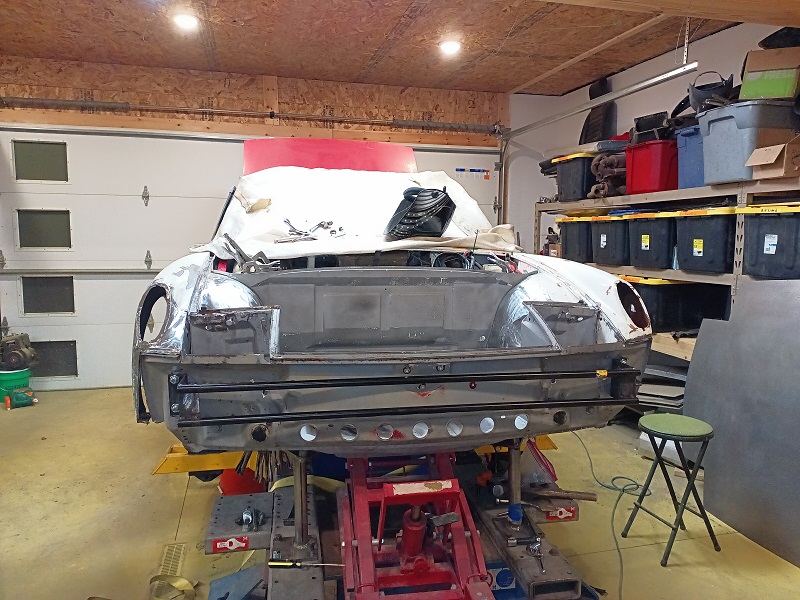

Posted by: Freezin 914 Feb 16 2024, 06:12 AM
Very impressive! Looking good!
Posted by: DRPHIL914 Feb 16 2024, 07:00 AM
 wow , huge project, cars like that were crushed not many years ago,
nice that they have become worth enough to put the time and effort into saving.
Posted by: Cairo94507 Feb 16 2024, 07:21 AM
Just so pleasing to see a badly damaged car come back from that and look like it did when it was assembled at the factory.
Posted by: EdwardBlume Feb 16 2024, 07:26 AM
Well done Rick!
Posted by: infraredcalvin Feb 16 2024, 07:34 AM
Wow, just wow!
That is such a milestone, love to see those seams so tight and the welds started. You have got to be excited to see this coming back together.
Posted by: majkos1 Feb 16 2024, 08:27 AM
Wow, just wow!
That is such a milestone, love to see those seams so tight and the welds started. You have got to be excited to see this coming back together.
it's ART, as you majestically craft the pieces together.

You have secret help?

Posted by: TRS63 Feb 16 2024, 09:30 AM
Looking fantastic!
Antoine
Posted by: rick 918-S Feb 16 2024, 11:33 AM
Wow, just wow!
That is such a milestone, love to see those seams so tight and the welds started. You have got to be excited to see this coming back together.
it's ART, as you majestically craft the pieces together.
You have secret help?
Hey Kevin! Wish i had an Alien helping me. When you tack the seam it pulls tight. You need to be able to hold a dolly on the back of the weld and strike the tack. This spreads the seam out again. Otherwise by the time you get 6" the metal is overlapping. I really needed a second set of hands but I figured it out..
Posted by: rick 918-S Feb 16 2024, 11:25 PM
Second day welding.
Not the prettiest welding I ever did but tig welding at the bottom of the gas tank well to me is like trying to build a ship in a bottle. I think my auto darkening hood was not working tonight.  I had a low battery light on. Once I am finished I will flush off the weld.
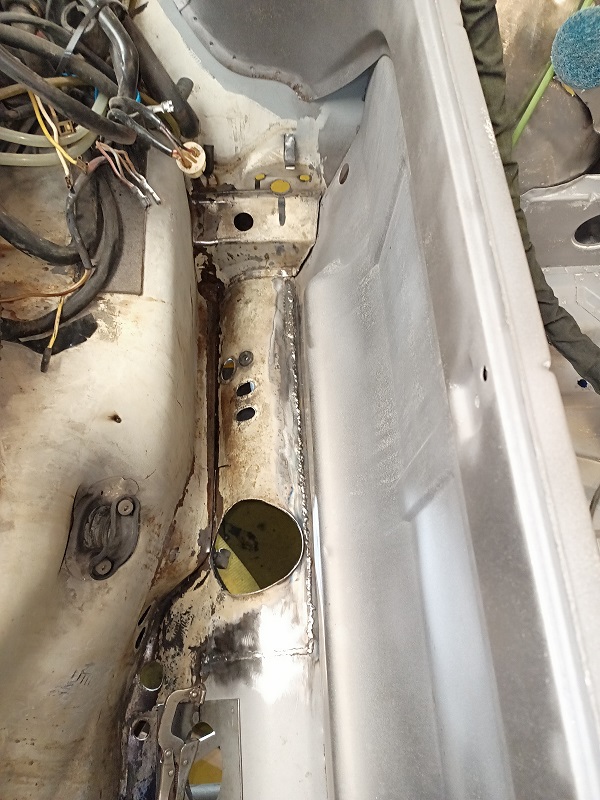
Note the fixture I made to align hole in the panel. 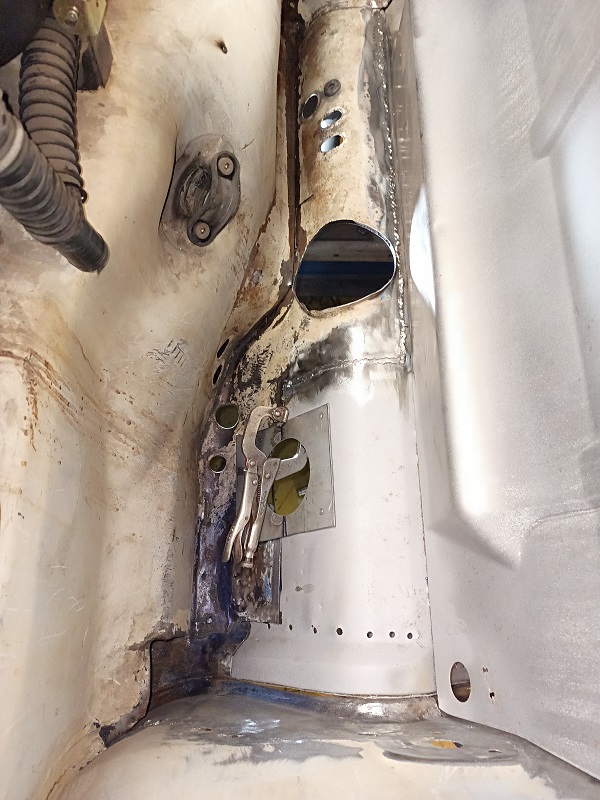
Posted by: rick 918-S Feb 25 2024, 11:02 PM
I haven't posted any progress in a while. This type of repair is victory by millimeters.At this point I have the Frunk Floor welded to the inner wheelhouses. I have the bulkhead and cross support for the strut towers welded. I have the front panel lower supports for the front panel to floor to wheelhouse welded. I used my Lenco Panel spotter so it looks factory.
Here is the bulkhead fit prior to spot welding. Consiering this panel was buckled in half and rwisted this is a remarkable fit. 
Here it is after spot welding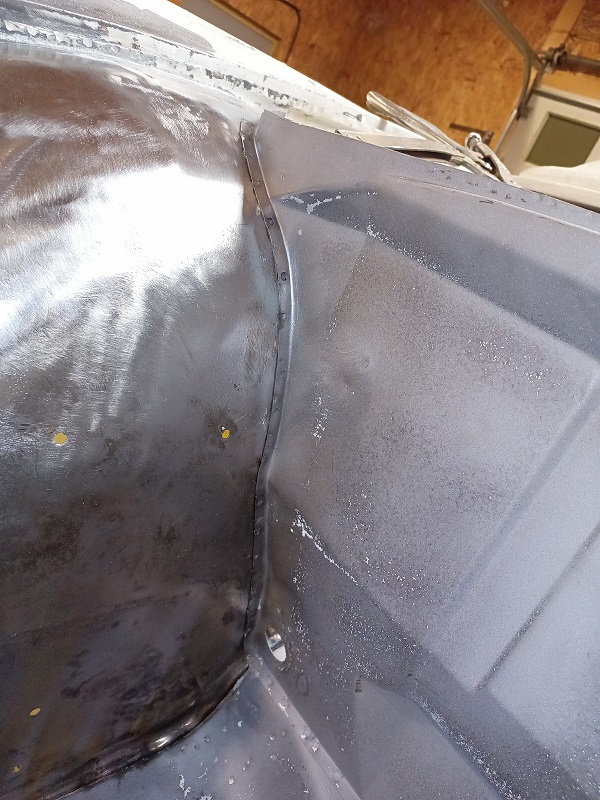
Right Brace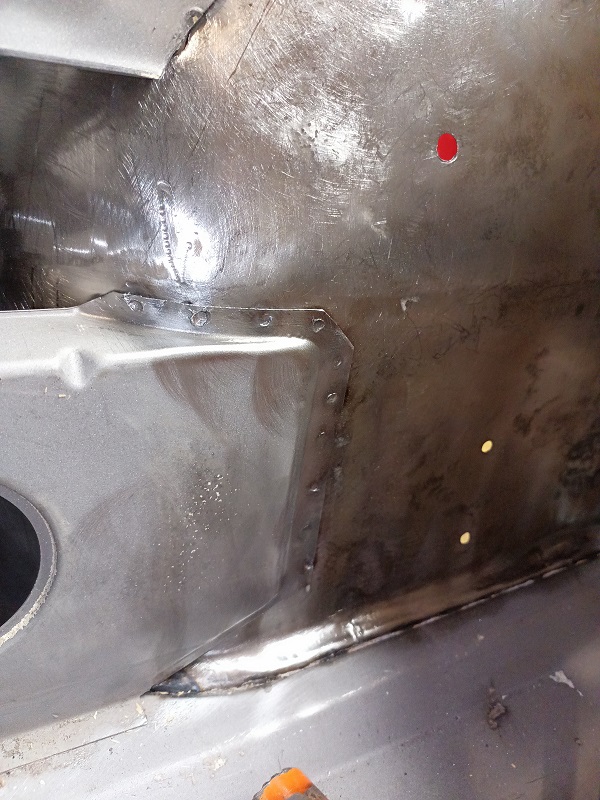
Left Brace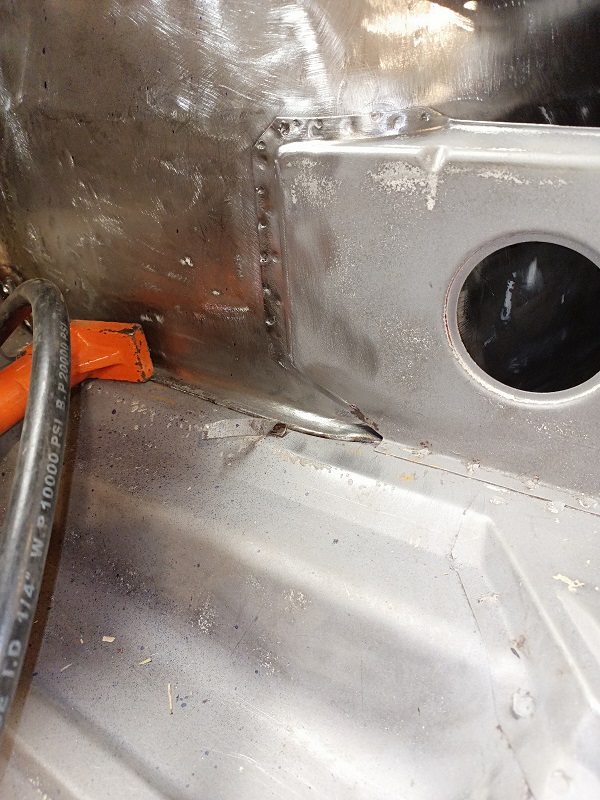
The best part of the progress is this right and left fender fit. There is literally dozens of hours in moving the upper body back into alignment. The right fender being the most challenging. As a reminder here is where I started.
The first photo was over a month ago. The second photo was today.
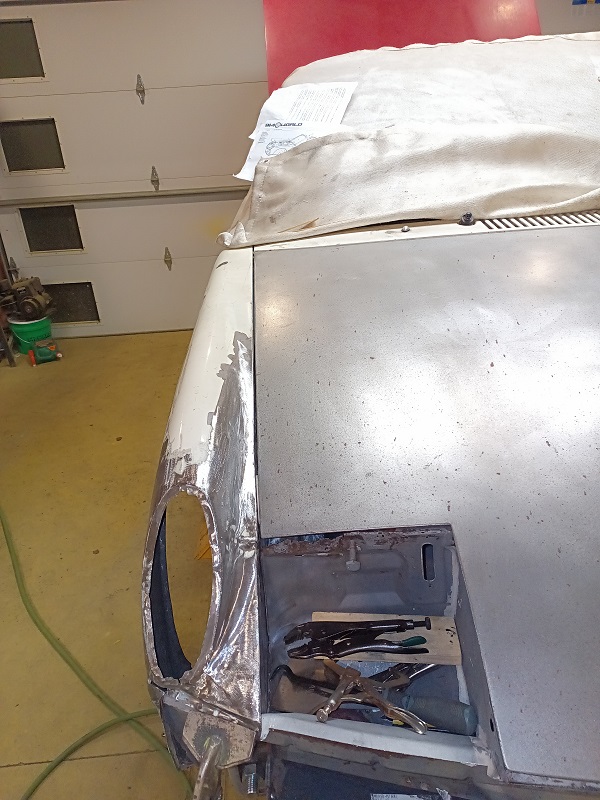
There are about 8 hours of welding left. Granted I only get to work on the car a couple hours an evening if I am lucky. But I am getting close. Even when the welding is finished I will have several hours on correcting work on the right fender that was done prior to this crash.
Victory by Millimeters
Posted by: vintage914racer Feb 26 2024, 07:46 AM
Great work, Rick!
I'm always amazed by the work that you do.
Posted by: Cairo94507 Feb 26 2024, 07:58 AM
Man, that fender/hood gap....
Posted by: doug_b_928 Feb 26 2024, 09:01 AM
That quarter gap is amazing!!! I’d be interested to see how you did that.
Posted by: rick 918-S Feb 26 2024, 09:45 AM
So much more to do before I can say I am happy keeping the right fender. There was a prior repair involving drilling holes and lots of body filler I don't like using. I will expand on the process later tonight.
Posted by: rick 918-S Mar 1 2024, 06:10 AM
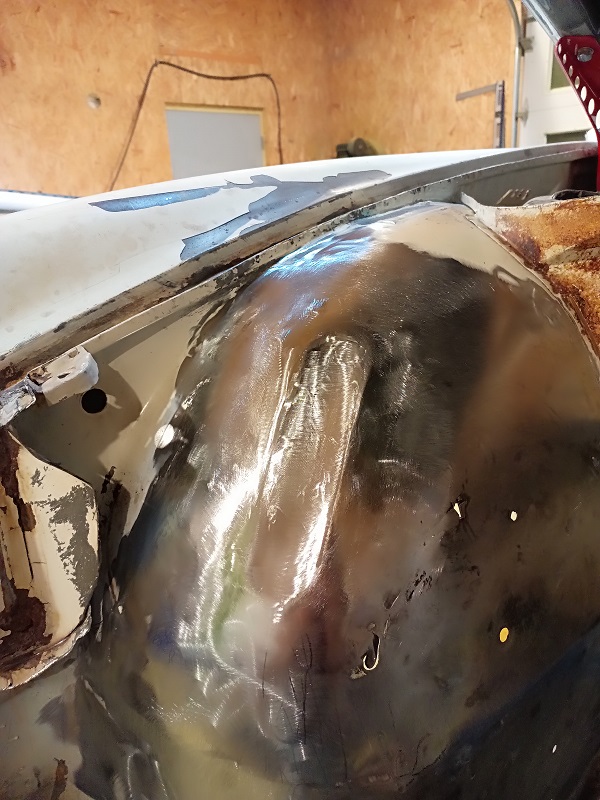
Continued working on the right fender. There was a crack in the fender by the Headlight bucket and a kink in the vertical wheelhouse extension where the headlight pivot bolts. The metal eas overlapping at the crack.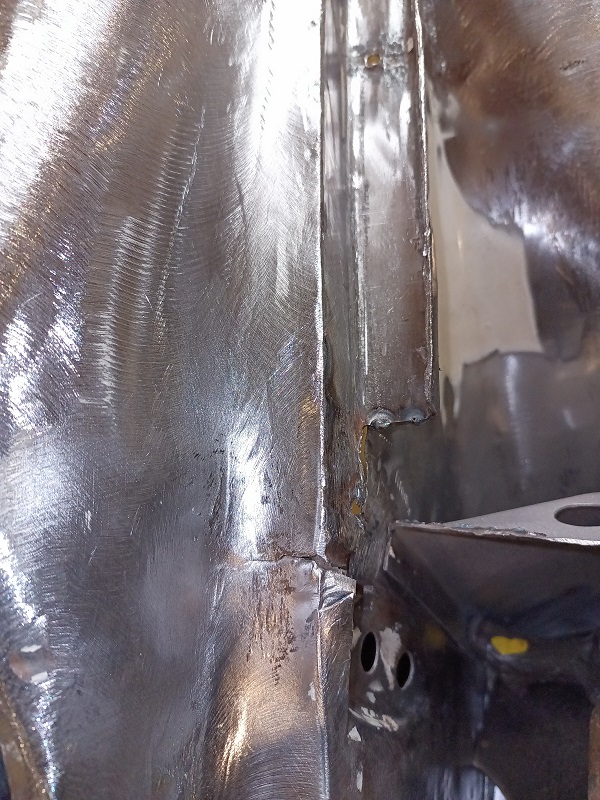
After about 3 hours the crack is repaired.
The hood is not bolted. I just wet it on and pushed it up against the cowl panel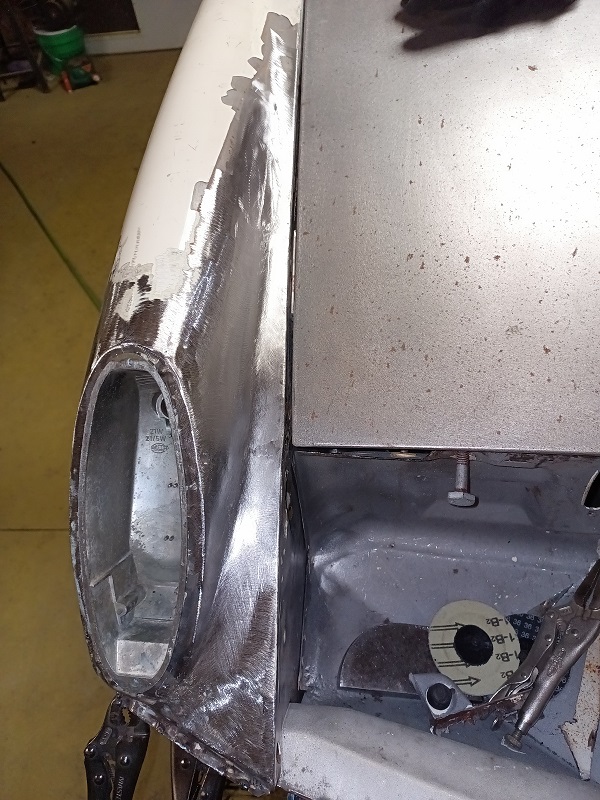
Still working on the end of the fender around the running light. There are a few other rips that need attension. I could replace this frnder but I would rather repair the original if it works out. 
Posted by: rick 918-S Mar 4 2024, 10:00 PM
Finally brought the engine home. Kind of a special engine. I got this from Slits. It's a 73 2.7S 
Posted by: KELTY360 Mar 5 2024, 07:17 AM
Finally brought the engine home. Kind of a special engine. I got this from Slits. It's a 73 2.7S
Posted by: rick 918-S Mar 7 2024, 07:41 AM
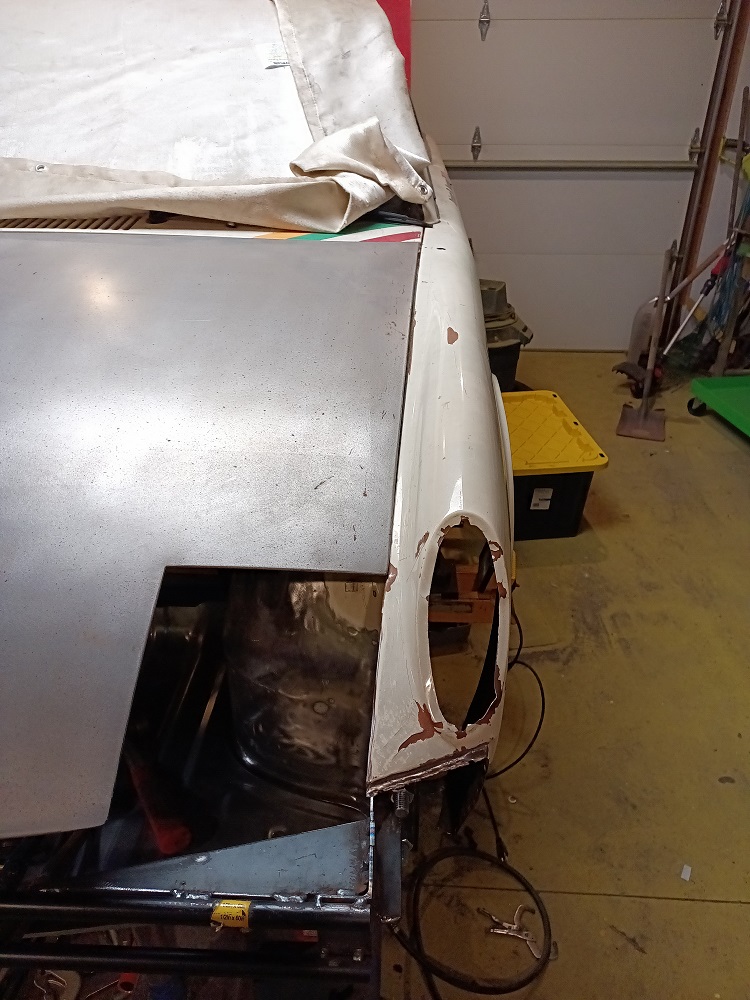
Little more progress on the right fender. This is one of the tools I made to planish out damage. As I started to strip this fender I discovered old damage that was pummeled with pick hammer marks and ground thin and stretched.
I held a slightly curved dolly on the back of the panel and planished out the pick marks we well as I was able. Then I spent about 2 hours with a shrinking disc and various body hammers and dollies working out the stretch. 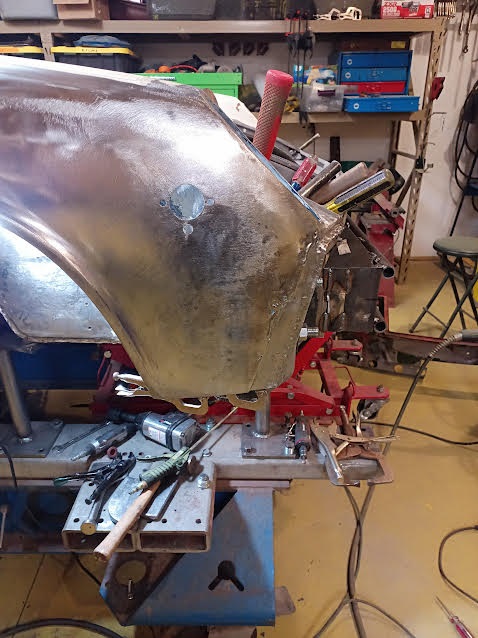
I have the running/signal light fitting nicely now. 
Lots of work to do yet but I am getting closer to saying the original fender will remain with the car.
Posted by: 76-914 Mar 7 2024, 08:28 AM
You have the patience of Jobe, Rick.
Posted by: SteveL Mar 7 2024, 08:32 AM
When the metal has been ground thin, how thin can it be and still be usable?
Posted by: rick 918-S Mar 7 2024, 08:38 AM
When the metal has been ground thin, how thin can it be and still be usable?
It was on the bumper recess. I will need to cut out the edge and repair it. There were holes that were welded up that opened up we I was moving the metal back where it belonged. I did no welding here. that is what I uncovered. You can still see the pick hammer marks. The repair is at the level of high build primer over the surface with the exception of the recess.
Posted by: rick 918-S Mar 16 2024, 08:45 PM
Time for an update. I spent several hours working over this right fender. Besides someone slicing it open, there was an extensive amount of damage both from the accident I am repairing and a prior collision. There was about 3/8" of body filler across the section above the wheel lip from a prior repair.
I was unable to swing a hammer to knock the damage out. The planishing hammer I made for the inner wheelhouse repair was to big to fit inside the tight space as well. So I made another one.
I used a needle scaler and the dies from the bench top Harbor Freight planisher I have.
This photo show the extent of damage just past the hammer.
You can see how flat and concaved the fender was over the wheel opening.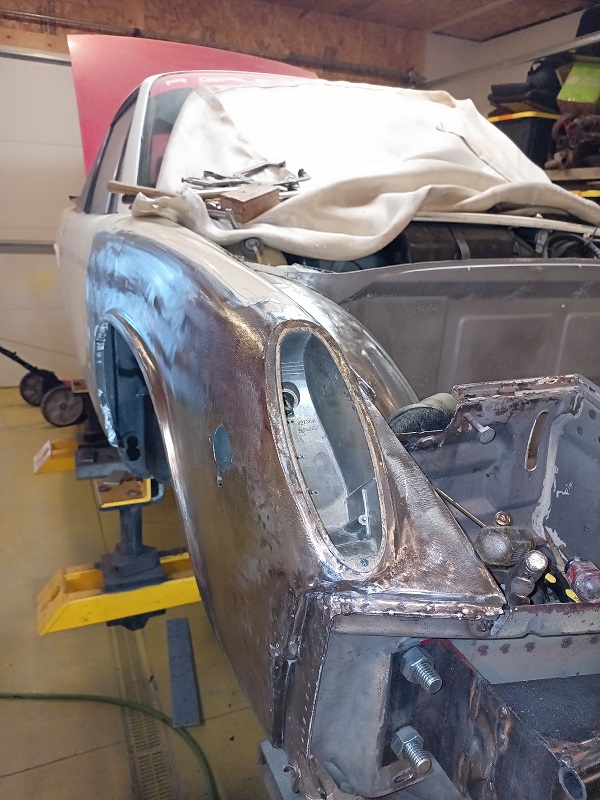
Welding up the Cut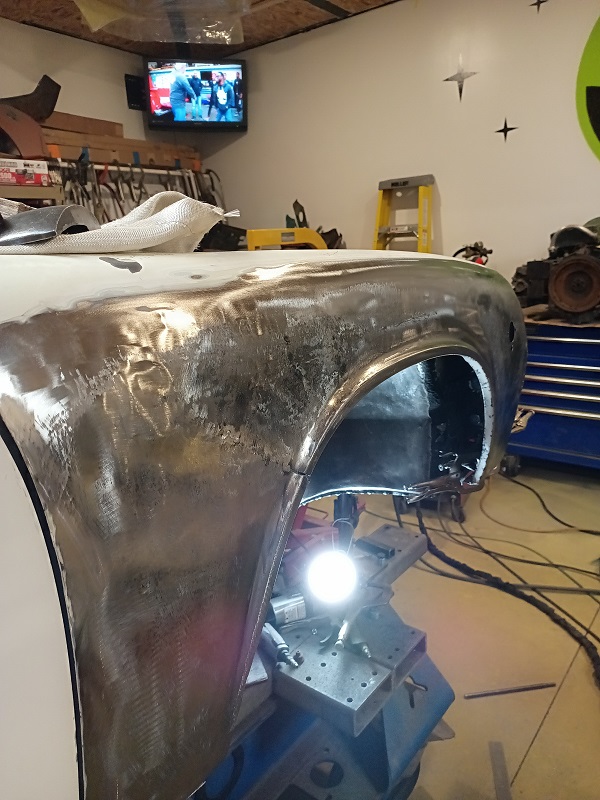
Roughing in the damage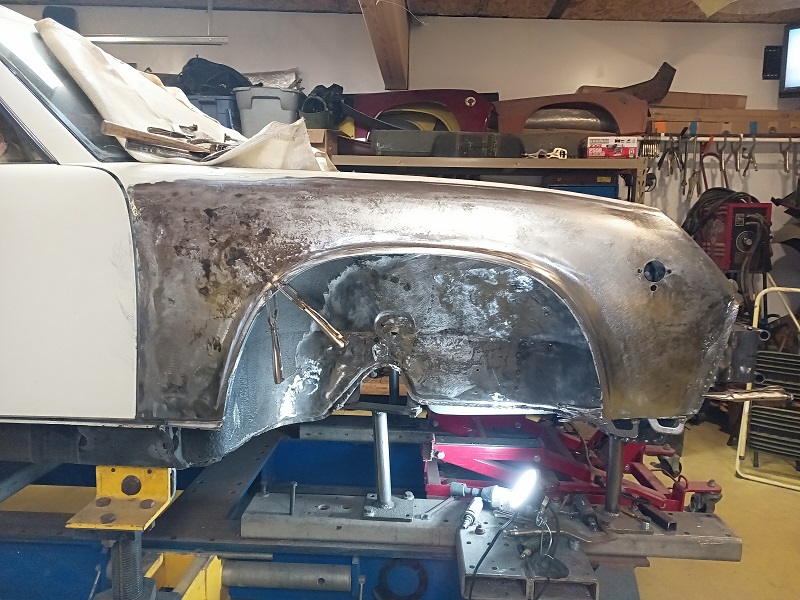
Nearly Repaired. 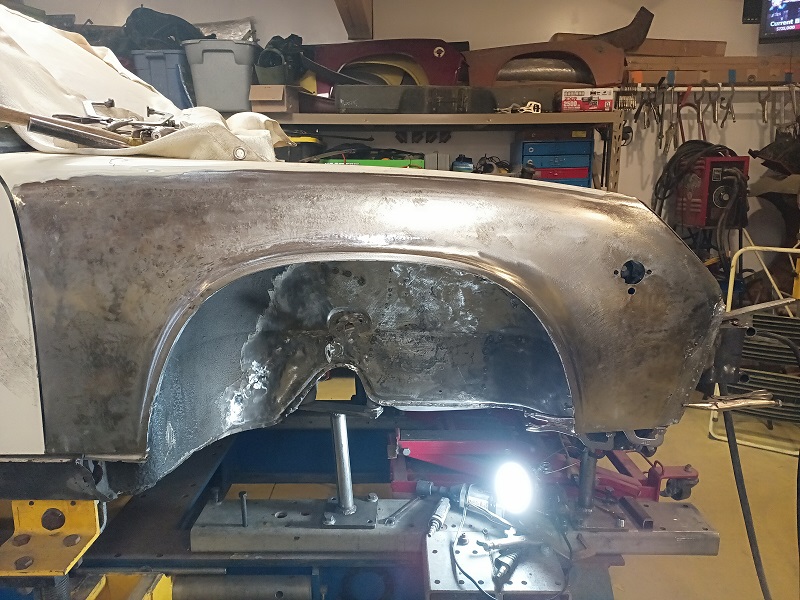
Along with the planisher I used a shrinking disc and lots of time working the surface with hammers and blocks. I can say now that I will be keeping the original fender with the car. I really doubted I would be able to bring it back into a usable condition.
Posted by: Cairo94507 Mar 17 2024, 06:37 AM
Simply amazing skills.
Posted by: gms Mar 17 2024, 08:20 AM
Well done Rick!
Posted by: DaveB Mar 17 2024, 10:57 PM
I really doubted I would be able to bring it back into a usable condition.
Great job on this. I assume you were hammering left handed with the dolly to work that area.
DaveB
Posted by: DRPHIL914 Mar 18 2024, 06:37 AM
@Rick_918-S
Rick, i think you are a glutton for punishment!! I mean, something about minnesotans maybe? I mean anyone that subjects themsselves to such climate by choice is just different (former reformed minnesotan talking here) just kidding, but the reason i say that is it would be less time and effort almost to just take a donor fender like you did in the front and replace the whole thing and you dont have that damaged hammerd out metal, BUT i know your goal is to keep and repair as much original metal as possible. If not for it being an original six, i am wondering , would you on a different car take that approach instead?
Phil
Posted by: rick 918-S Mar 18 2024, 07:45 PM
@Rick_918-S
Rick, i think you are a glutton for punishment!! I mean, something about minnesotans maybe? I mean anyone that subjects themsselves to such climate by choice is just different
(former reformed minnesotan talking here) just kidding, but the reason i say that is it would be less time and effort almost to just take a donor fender like you did in the front and replace the whole thing and you dont have that damaged hammerd out metal, BUT i know your goal is to keep and repair as much original metal as possible. If not for it being an original six, i am wondering , would you on a different car take that approach instead?Phil
Hey Doc!
We both left Minnesooota. Me, not s far. I still look across to Downtown Duluth from my deck in Superior WI. Still have snow in the winter. Except this year.
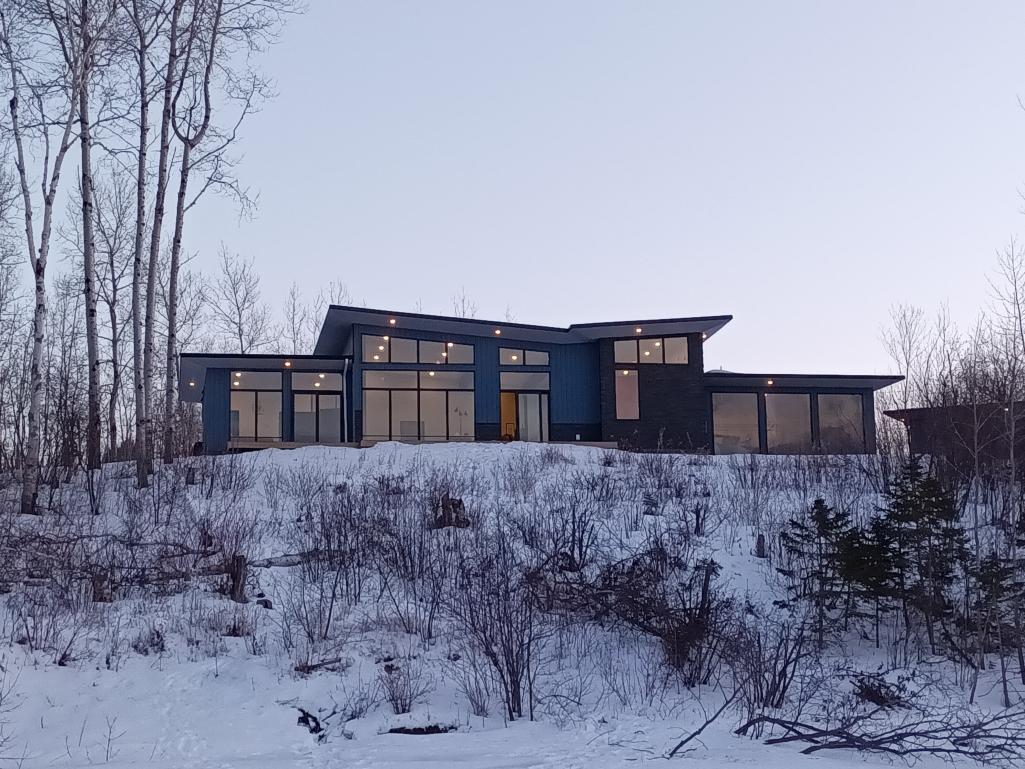
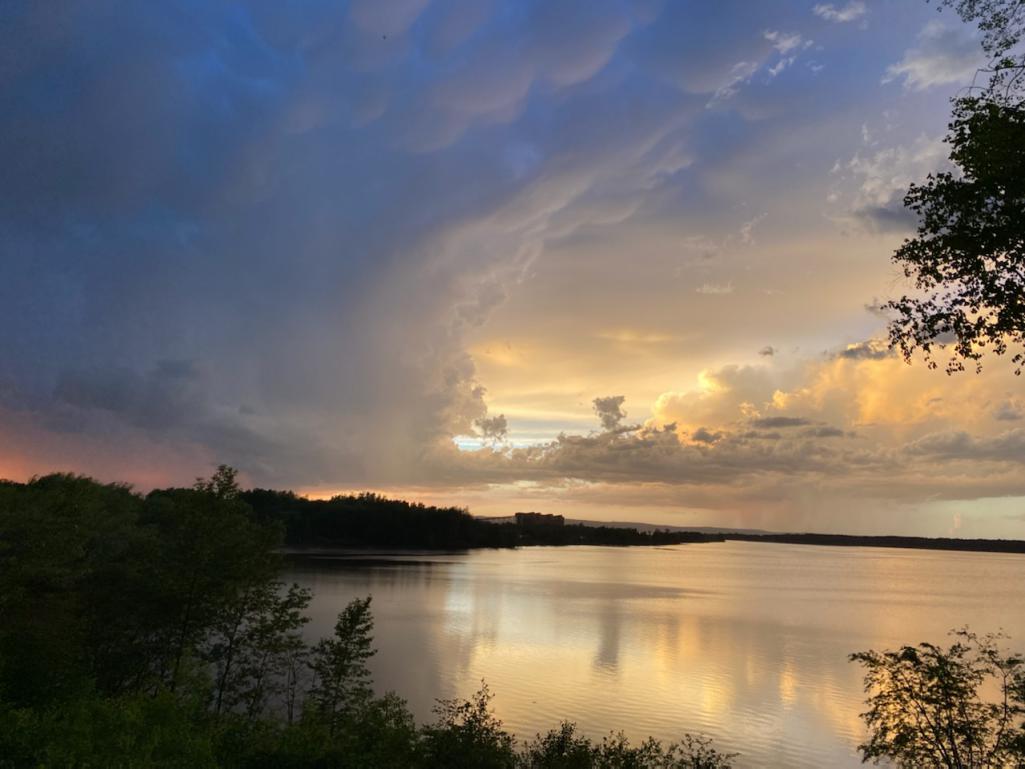
Here is our house from the street. i designed it with the help of my friend at ARI. in Duluth. It's a SIP house. I was the general for the build and did much of the work myself.
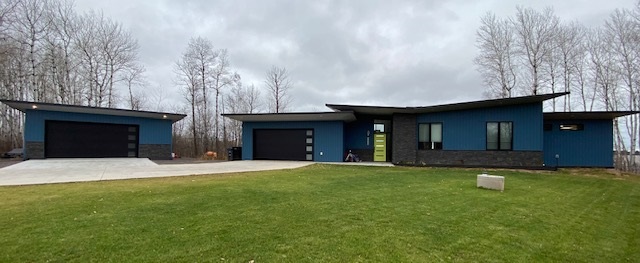
Here is our view across the bay.
I am a crazy guy with a lot of ideas. Some good, some not so good.
Which brings me to the 6. It would be much easier to change the fender. I have an NOS one on the shelf. But if I don't need to remove the factory fender I would rather not. And if this was a 4 cylinder car that was crashed this hard I would have to have a real personal attachment to it to even entertain a repair.
Posted by: DaveB Mar 18 2024, 10:29 PM
That's a really beautify MCM and great choice to use structural insulation. I have a happy place for glassy mid century style; had one for many years in Northern CA.
DaveB
Posted by: TRS63 Mar 19 2024, 12:41 AM
Amazing house..not to forget the incredible metal work here!
Bests
Antoine
Posted by: DRPHIL914 Mar 19 2024, 06:26 AM
@Rick_918-S
Rick, i think you are a glutton for punishment!! I mean, something about minnesotans maybe? I mean anyone that subjects themsselves to such climate by choice is just different
(former reformed minnesotan talking here) just kidding, but the reason i say that is it would be less time and effort almost to just take a donor fender like you did in the front and replace the whole thing and you dont have that damaged hammerd out metal, BUT i know your goal is to keep and repair as much original metal as possible. If not for it being an original six, i am wondering , would you on a different car take that approach instead?Phil
Hey Doc!
We both left Minnesooota. Me, not s far. I still look across to Downtown Duluth from my deck in Superior WI. Still have snow in the winter. Except this year.
Here is our house from the street. i designed it with the help of my friend at ARI. in Duluth. It's a SIP house. I was the general for the build and did much of the work myself.
Here is our view across the bay.
I am a crazy guy with a lot of ideas. Some good, some not so good.
Which brings me to the 6. It would be much easier to change the fender. I have an NOS one on the shelf. But if I don't need to remove the factory fender I would rather not. And if this was a 4 cylinder car that was crashed this hard I would have to have a real personal attachment to it to even entertain a repair. thanks for the reply, sorry for a hijack of your build thread,truth be told growing up i did dream of someday having a home on a lake up in N. Minnesota, we used to spend a lot of time on Pelican Lake, Breazy point , but friends owned a resort across the lake from it. i LOVE that house and saw the build thread you posted, the view is awesome, i really dont blame you for staying, in some weird ways i miss the winter a bit, i forgot you moved across the border!. I have a friend that retired from active practice a few years ago, he was from that area originally but spent 40+ years in St. Louis, they built a beautiful cabin on a bluff overlooking a lake up in N. Wisconsin near the Canada boarder and they LOVE the winter experience, and stay most of the winter. anyway carry on..... that fender will look new and i look forward to seeing the end result.
The dream now for me upon retirement is a cabin in NC or TN area.....with a shop....
Posted by: Root_Werks Mar 19 2024, 10:16 AM
Very cool! Only knew one person who could shape metal like that. It's an art to say the least.
Posted by: rick 918-S Mar 25 2024, 10:15 PM
Just some boring repair work over the last several days. Some previous owner did some seal channel repair that kind of wrecked the back side of the right headlight bucket. Luckily I had a second front panel I got from Garold that had a good bucket for the section I needed. Still have some finish grinding but it's close now. Typical rust in the seal channel. I still have lots of clean up grinding to do but I thought I would save it for last. 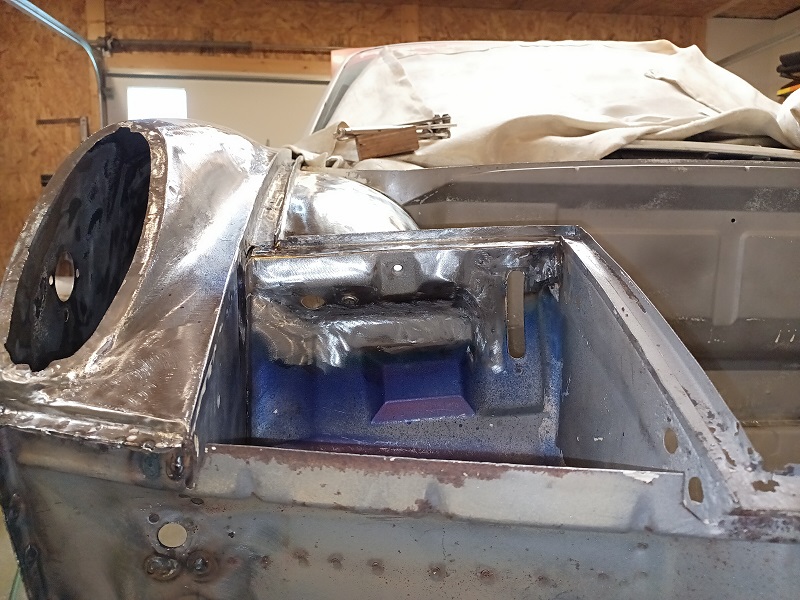
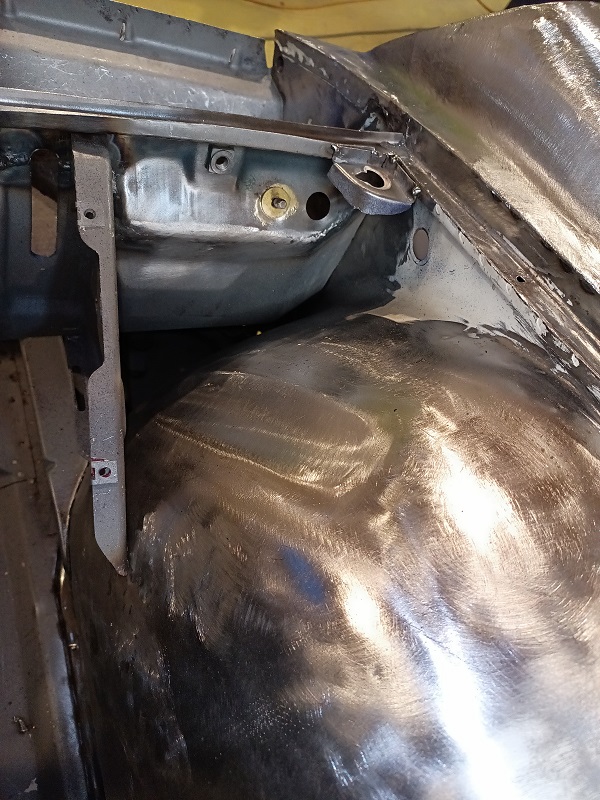
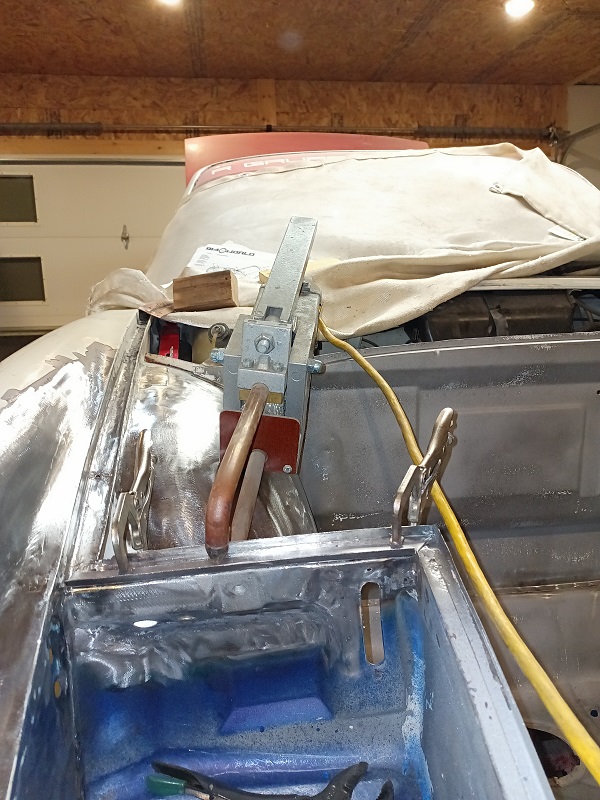
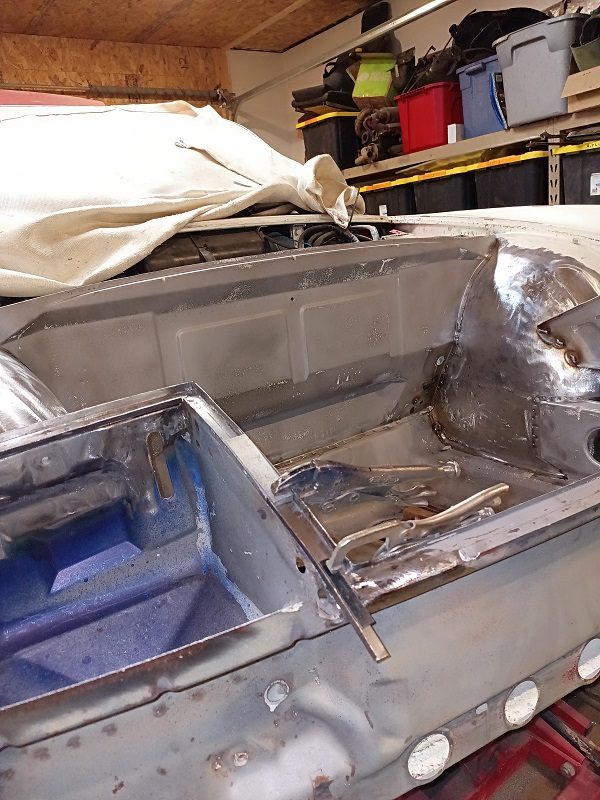
Posted by: Root_Werks Mar 28 2024, 04:31 PM
To see what the damage started as to what it is now is amazing! Thanks for posting all the pics!
Posted by: rick 918-S Mar 29 2024, 06:47 AM
Left Headlight Bucket had an issue where the headlight cover extension mounts as well as some seal channel replacement needed. 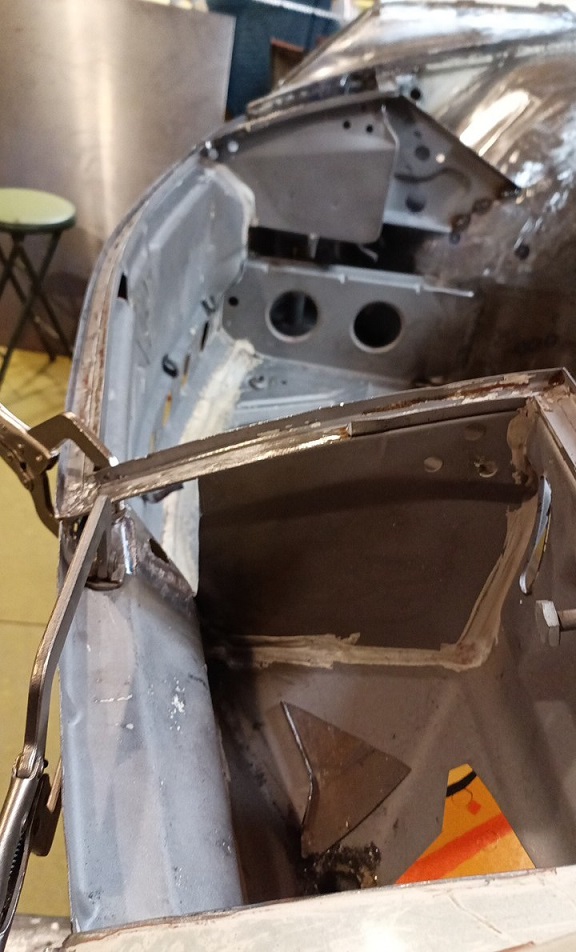
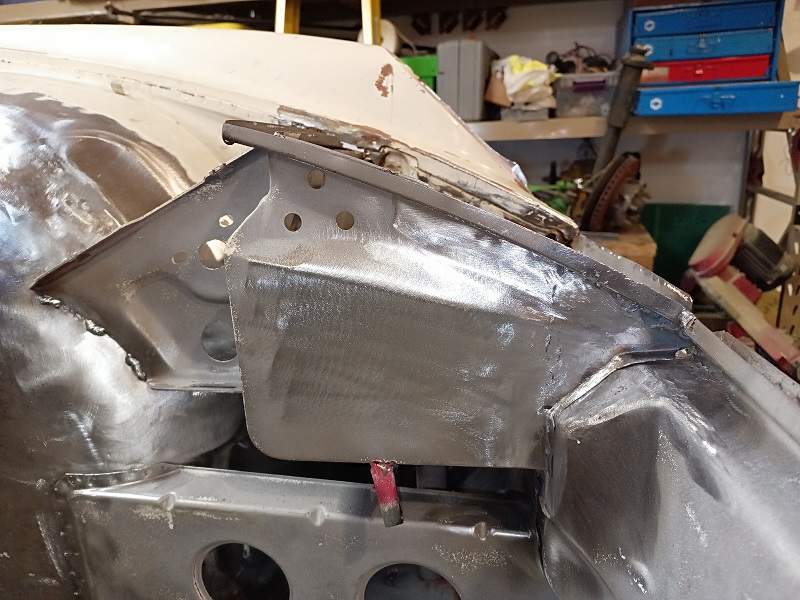
Almost ready for epoxy Primer. I should have all the welding done on the front repair this weekend. I have 3 days off!! Wooo Hoo!
Posted by: KELTY360 Mar 29 2024, 06:59 AM
That's a big step forward Rick. Very nicely done.
Posted by: East coaster Mar 29 2024, 08:19 AM
Phenomenal work man!
Posted by: rick 918-S Mar 29 2024, 09:02 PM
All the seal channels have been repaired. I had to re-drill the the holes for the eyebrow rubber bumpers.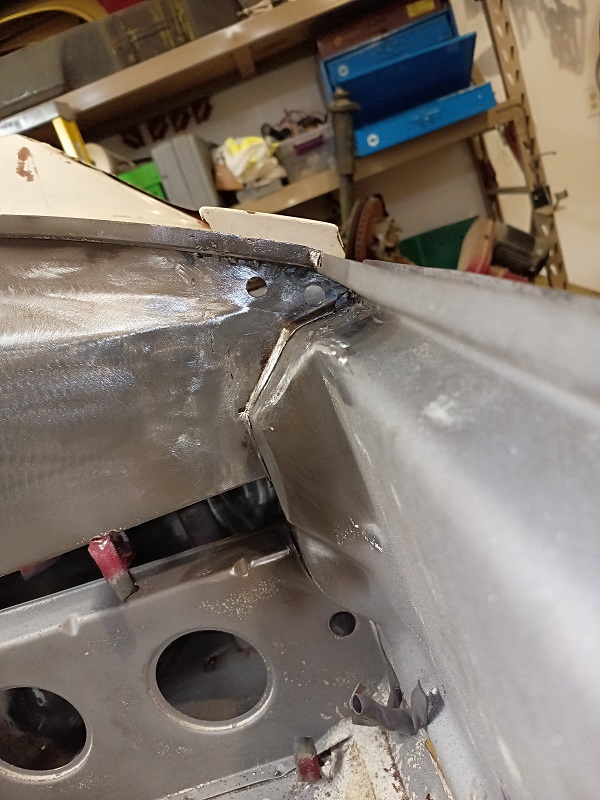
Test fit the eyebrows. 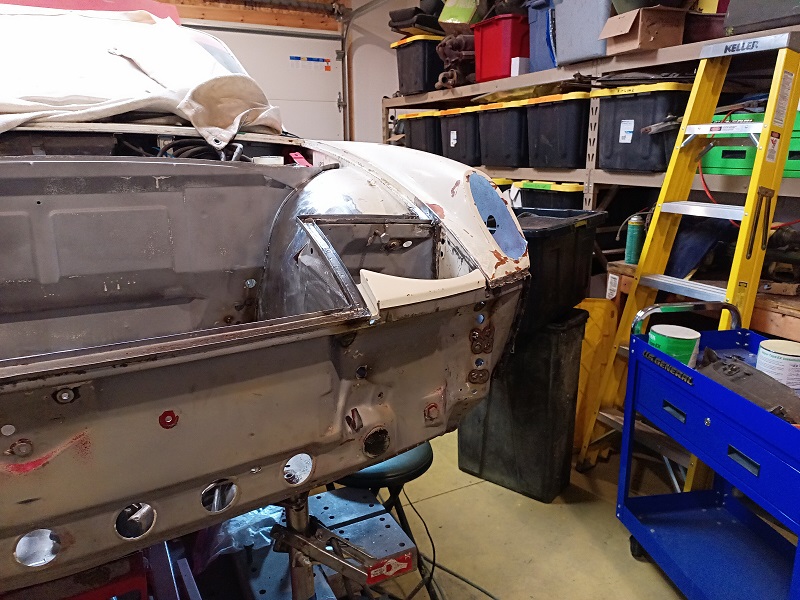
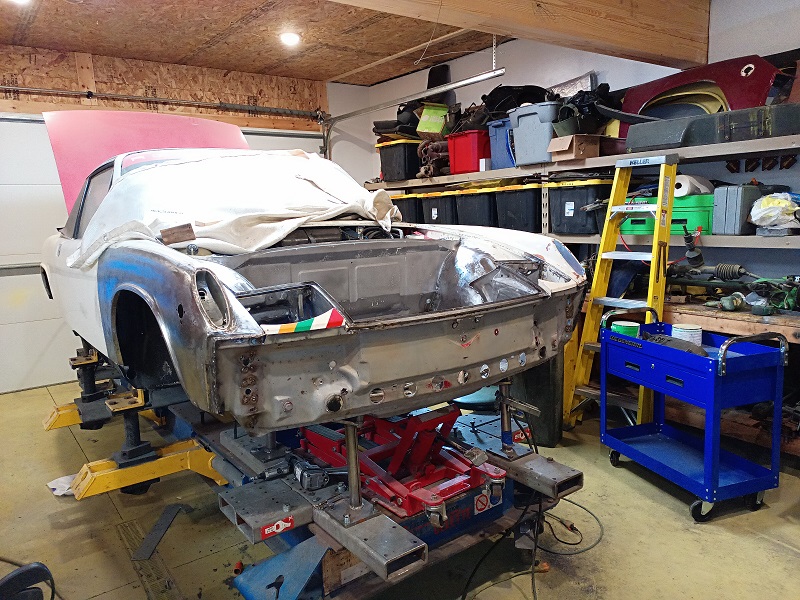
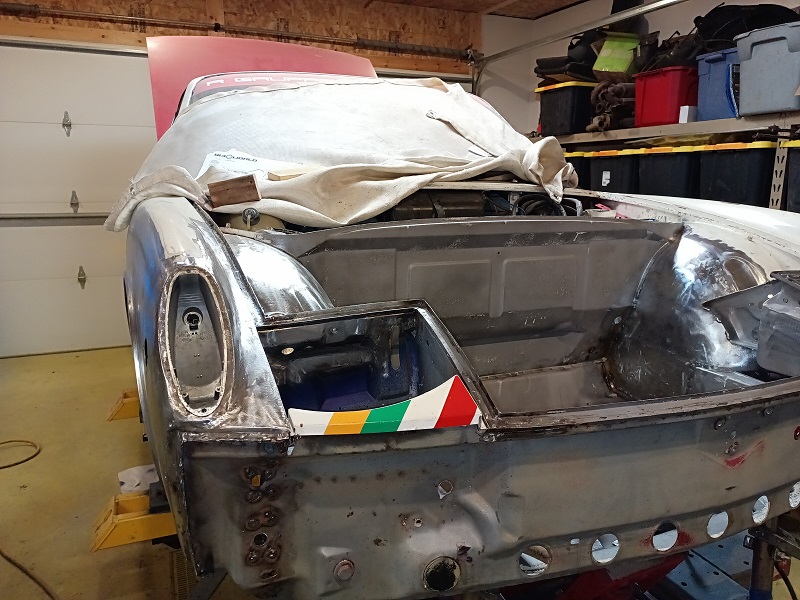
Probably another week before it goes into epoxy primer. Lots of little details to complete.
Posted by: tygaboy Mar 30 2024, 08:30 AM
I am in awe at the level of skill. @http://www.914world.com/bbs2/index.php?showuser=43 , count me as one of your biggest fan-boys!
Posted by: Shivers Mar 30 2024, 08:46 AM
Great work and a great work enviroment. And you just keep pulling out the right tool for the Job. Cool
Posted by: rick 918-S Mar 30 2024, 09:23 AM
I am in awe at the level of skill. @http://www.914world.com/bbs2/index.php?showuser=43 , count me as one of your biggest fan-boys!
Thanks but your no slouch yourself. I like that cooler your doing for Michael.
Posted by: rick 918-S Mar 30 2024, 06:29 PM
Some may remember I posted about the guy that crashed the car. We became friends since I ended up with it. I pulled the triangle window with the SoCal stickers I was planning on sending them to Rocky.
I started making a trophy type display and thought I should verify his address. I have it from a packet he mailed my a few years back of some of the SoCal tours he organized. He was very fond of the car. I called his number and the person that answered hung up without saying anything.
I thought I would just pull the mailing I received and google the address to see if it comes back current. I did not realize it has been since July of 2019 when I received it. My google search came up with his obituary. I have to tell you I am pretty sad about it. I never met him in person. We spoke on the phone a few times at length.
He was a friend I never met. The post mark on the mailing I received is July 23, 2019. Turns out he lost his battle with stage 4 Lymphoma on July 22. 2020. I should have been a better friend.
https://www.californiafuneralalternatives.com/obituary/Rocky-Kuonen
Posted by: sixnotfour Mar 30 2024, 06:44 PM
Some may remember I posted about the guy that crashed the car. We became friends since I ended up with it. I pulled the triangle window with the SoCal stickers I was planning on sending them to Rocky.I started making a trophy type display and thought I should verify his address. I have it from a packet he mailed my a few years back of some of the SoCal tours he organized. He was very fond of the car. I called his number and the person that answered hung up without saying anything.
I thought I would just pull the mailing I received and google the address to see if it comes back current. I did not realize it has been since July of 2019 when I received it. My google search came up with his obituary. I have to tell you I am pretty sad about it. I never met him in person. We spoke on the phone a few times at length.
He was a friend I never met. The post mark on the mailing I received is July 23, 2019. Turns out he lost his battle with stage 4 Lymphoma on July 22. 2020. I should have been a better friend.
https://www.californiafuneralalternatives.com/obituary/Rocky-Kuonen
I remember when he crashed it ...Time marches On..RIP Rocky

Posted by: rick 918-S Mar 30 2024, 09:35 PM
I see his wife passed a year later. I wonder if any of the SoCal R Gruppe guys were close friends with him. I am looking for ideas for a fitting tribute. Maybe one of the SoCal guys would organize a Rally or something in his honor and present the winner with the triangle window I was going to send to Rocky. From the conversations I had with him I could tell it meant a lot to him to be welcomed by the Gruppe. 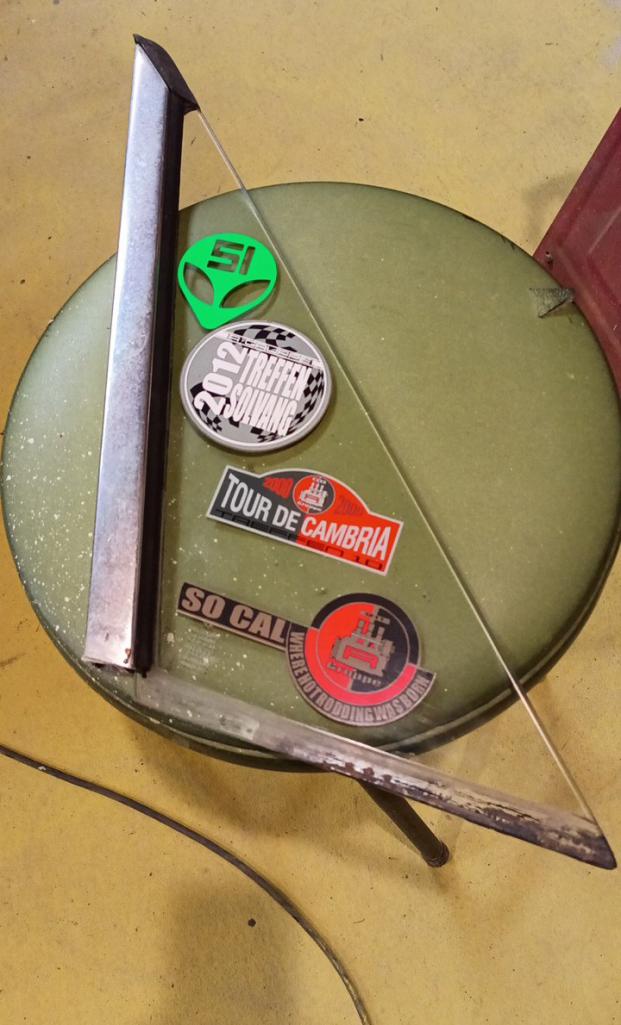
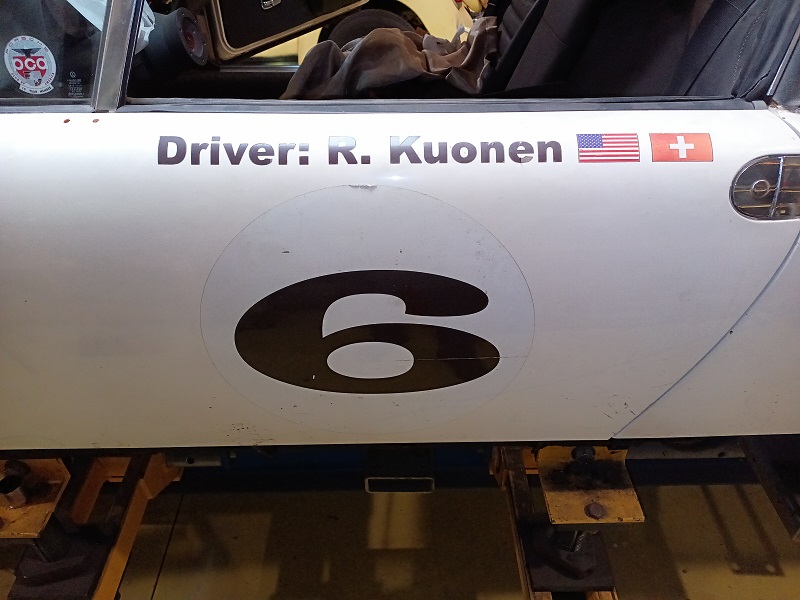
Posted by: rick 918-S Mar 31 2024, 11:04 PM
Front bumper Test Fit went well.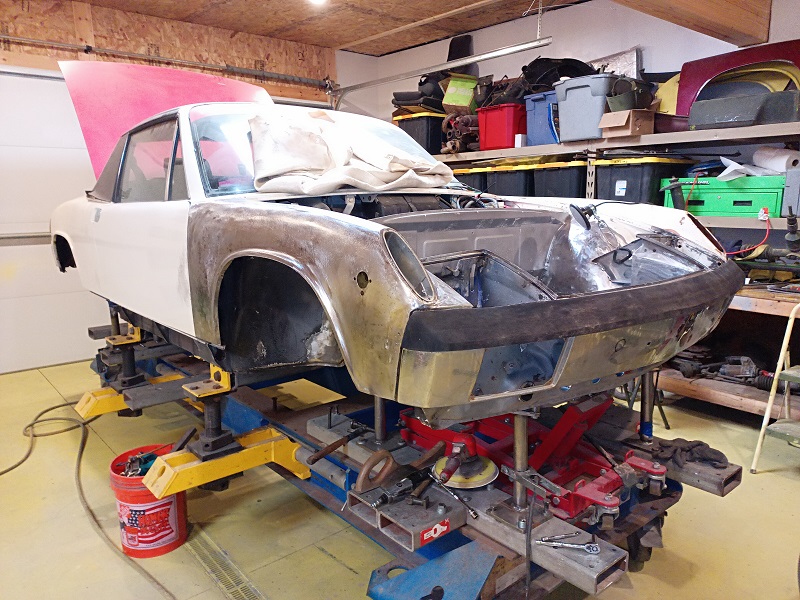
Posted by: FourBlades Apr 1 2024, 05:34 PM
The car is looking good!
It is a bummer about poor Rocky.
John
Posted by: Freezin 914 Apr 1 2024, 05:43 PM
The car is looking good!
It is a bummer about poor Rocky.
John
Total bummer…..I am saddened by the loss of any of our 914 family members. PS the car does look great.
Posted by: rick 918-S Apr 21 2024, 06:51 PM
Fixtures are officially off. 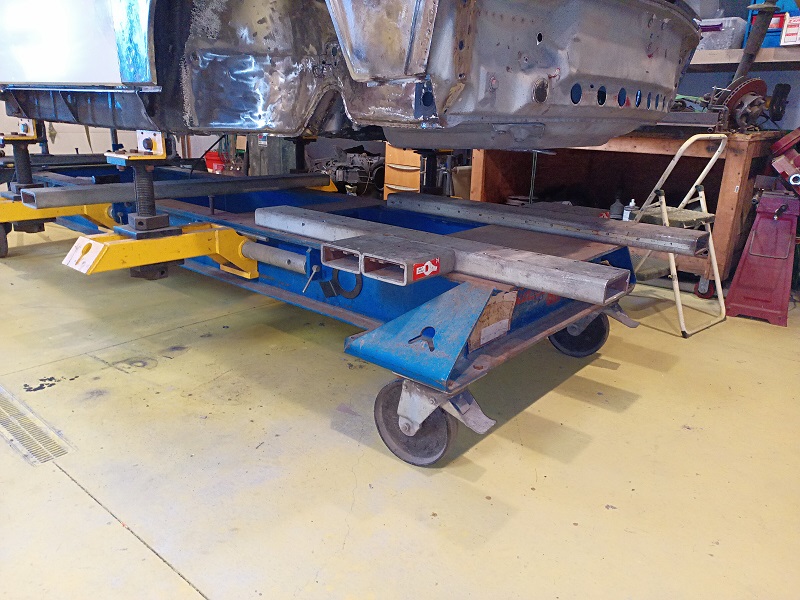
Posted by: 76-914 Apr 22 2024, 06:32 AM
What an accomplishment! Fantastic workmanship throughout Rick.
Posted by: eric9144 Apr 22 2024, 03:17 PM
Sad the owner passed, bet he would have been stoked to see it back together, he was a San Diego guy -- from the obit memory wall :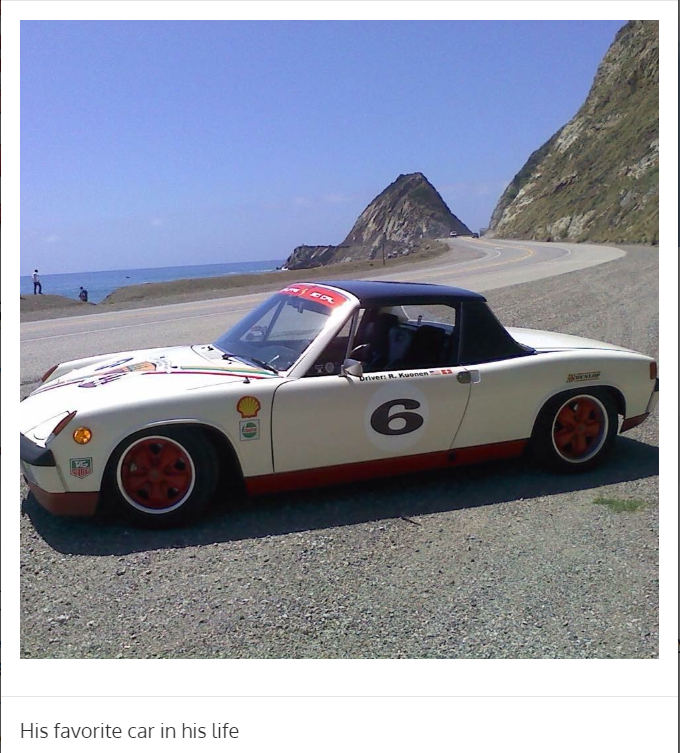
Posted by: flyer86d Apr 22 2024, 04:24 PM
It turned out really nice!
Charlie
Posted by: rick 918-S May 1 2024, 08:13 PM
I haven't posted lately about the car. I am working on some slow, boring, tedious progress. I sprayed Encapsuator inside the rails and any of the weld seams. It flows nicely. I applied Epoxy to the underside, wheelhouses, inside the fenders and inside the lower section of the gas tank well. The seam Sealer work is completed and I started spraying on some Wurth under body rubberized coating. My friend I did the 280SL for ended up with 5 cans of Beige Wurth and gifted them to me. I was actually surprised they were still good but the factory foil seal preserved them. 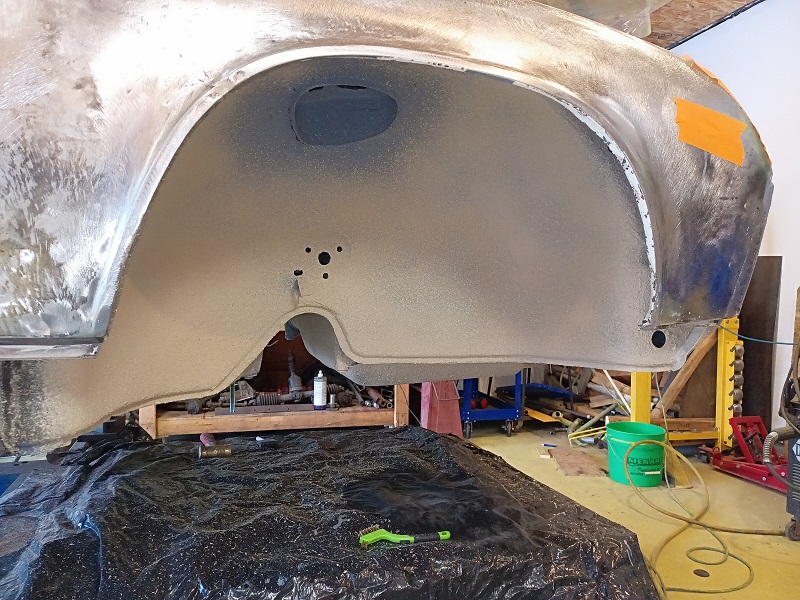
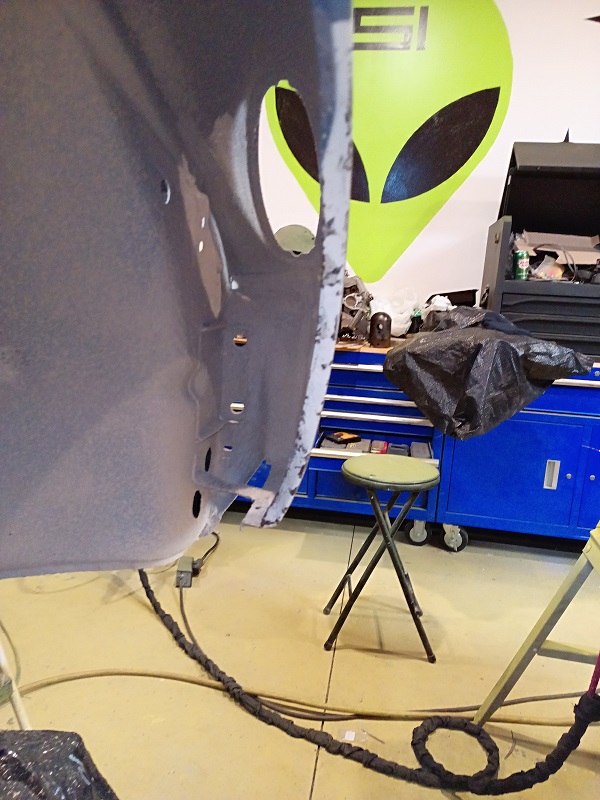
Seam Sealer Before the Wurth 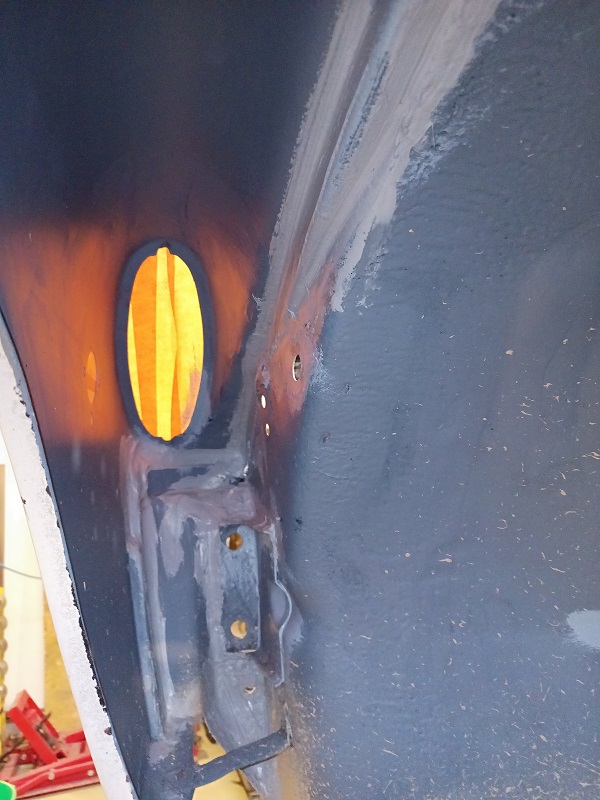
Gas Tank Well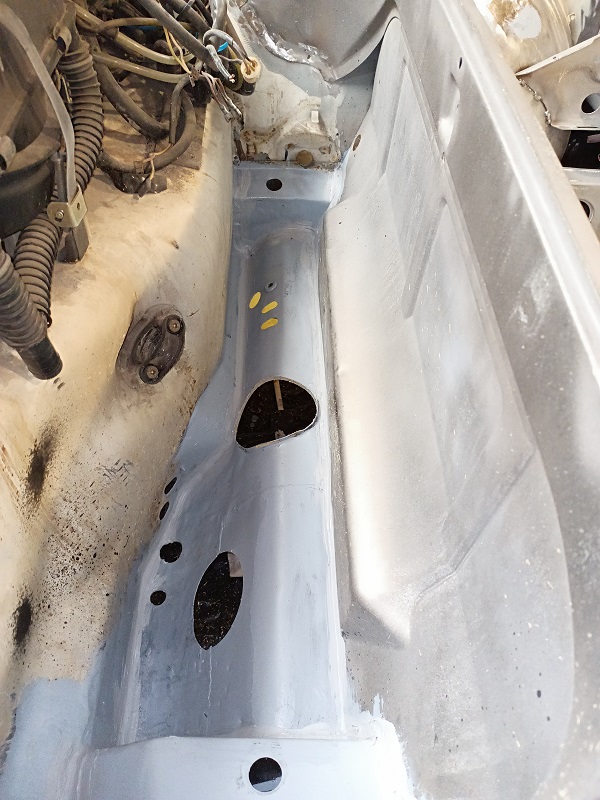
Front Panel 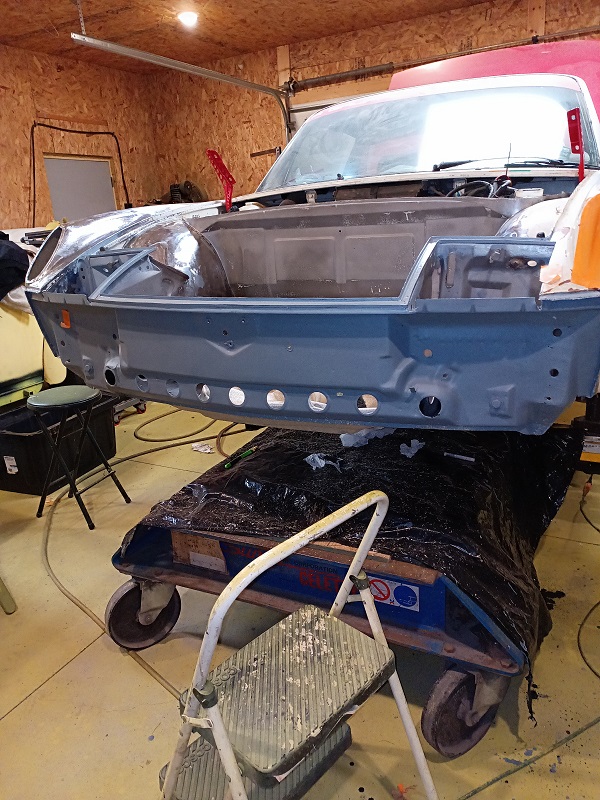
As a foot note to the work.
I am not restoring this car. I am repairing it.
Really the car does not "need" a full on restoration. However I will be pulling the front air box and Harness to "clean up" the bulkhead while I am that close into the area under the cowl panel.
Posted by: Root_Werks May 2 2024, 03:51 PM
Even though a six, I can totally see this 914-6 being totaled and scrapped if not in the right hands.
So cool to see it back together!
The owner should be nothing short of elated.
Posted by: rick 918-S May 2 2024, 04:04 PM
Even though a six, I can totally see this 914-6 being totaled and scrapped if not in the right hands.
So cool to see it back together!
The owner should be nothing short of elated.
I kind of am... This one's mine!
Posted by: Root_Werks May 2 2024, 04:48 PM
Even though a six, I can totally see this 914-6 being totaled and scrapped if not in the right hands.
So cool to see it back together!
The owner should be nothing short of elated.
I kind of am... This one's mine!
Even cooler! What a cool resurrection thread.
Posted by: ThinAir May 2 2024, 08:52 PM
Impressive changes since I saw it last year. Congrats on the progress. You are a true craftsman!
Posted by: rick 918-S May 2 2024, 09:05 PM
Impressive changes since I saw it last year. Congrats on the progress. You are a true craftsman!
Thanks Ernie! Maybe see you at RRC this year if things work out.
Posted by: ThinAir May 2 2024, 09:19 PM
Impressive changes since I saw it last year. Congrats on the progress. You are a true craftsman!
Thanks Ernie! Maybe see you at RRC this year if things work out.
That would be wonderful!
Posted by: ClayPerrine May 3 2024, 10:47 AM
Impressive changes since I saw it last year. Congrats on the progress. You are a true craftsman!
Thanks Ernie! Maybe see you at RRC this year if things work out.
That would be wonderful!
When are you going to bring the Alien to Okteenerfest???????
Posted by: DRPHIL914 May 3 2024, 12:16 PM
Impressive changes since I saw it last year. Congrats on the progress. You are a true craftsman!
Thanks Ernie! Maybe see you at RRC this year if things work out.
That would be wonderful!
When are you going to bring the Alien to Okteenerfest???????
come on down Rick! i know thats a long haul but, if Clay and Betty and others can come al lthe way from Texas....... i know there used to be a midwest gathering called MUSR somwere like central Tennessee , but that faded and Okteenerfest sprung up in its place.
We do have some fun roads !
Posted by: ClayPerrine May 3 2024, 02:18 PM
Impressive changes since I saw it last year. Congrats on the progress. You are a true craftsman!
Thanks Ernie! Maybe see you at RRC this year if things work out.
That would be wonderful!
When are you going to bring the Alien to Okteenerfest???????
come on down Rick! i know thats a long haul but, if Clay and Betty and others can come al lthe way from Texas....... i know there used to be a midwest gathering called MUSR somwere like central Tennessee , but that faded and Okteenerfest sprung up in its place.
We do have some fun roads !
I want to see the Alien try to abduct the Dragon!
Posted by: rick 918-S May 9 2024, 09:38 PM
Impressive changes since I saw it last year. Congrats on the progress. You are a true craftsman!
Thanks Ernie! Maybe see you at RRC this year if things work out.
That would be wonderful!
When are you going to bring the Alien to Okteenerfest???????
come on down Rick! i know thats a long haul but, if Clay and Betty and others can come al lthe way from Texas....... i know there used to be a midwest gathering called MUSR somwere like central Tennessee , but that faded and Okteenerfest sprung up in its place.
We do have some fun roads !
I want to see the Alien try to abduct the Dragon!
I would love to make that event some day. I retire in a little over a year. Maybe I can work it in then.
Posted by: rick 918-S May 9 2024, 09:42 PM
I guess this car was really meant to end up at Area51Werks. I was pulling the stuff out from under the cowl to clean up the dirt and mess and the 4 lbs of grinder metal I could not get even with a blow gun and a shop vac. I removed the left side defroster vent and a bunch of stuff fell out. This was one of the items that was stuck in there. 
Posted by: sb914 May 10 2024, 05:30 AM
There in Oceanside ca .
I’ve actually ate there. It was out of this world good ..
Posted by: rick 918-S May 10 2024, 09:07 PM
There in Oceanside ca .
I’ve actually ate there. It was out of this world good ..
How's the pizza?
Posted by: rick 918-S May 11 2024, 08:08 PM
Little clean up under way. 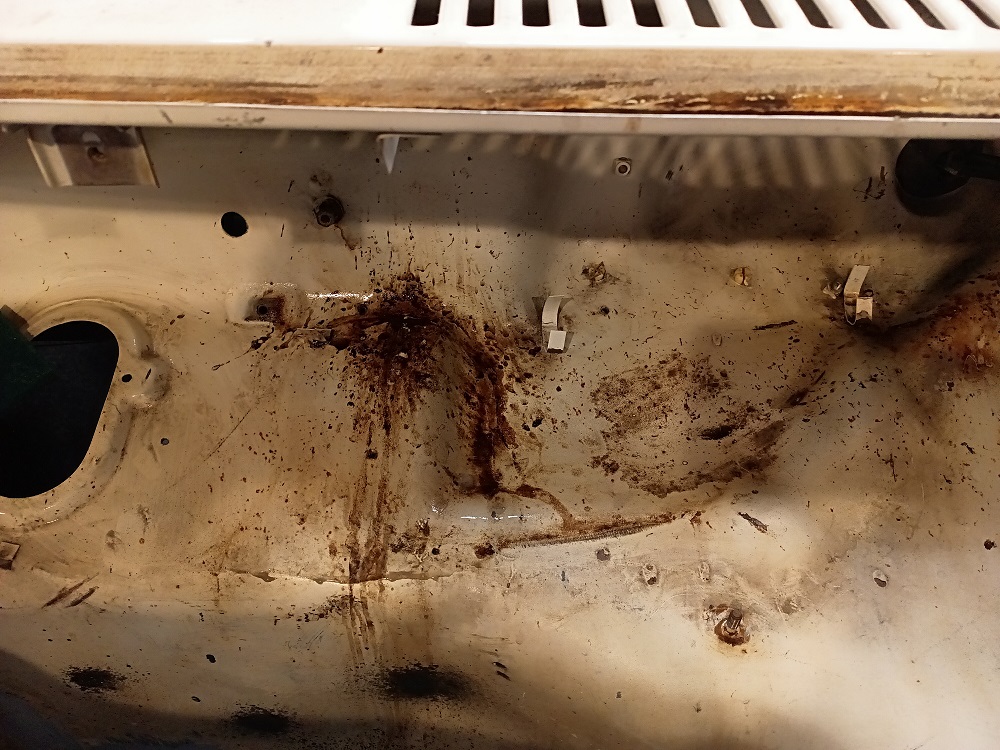
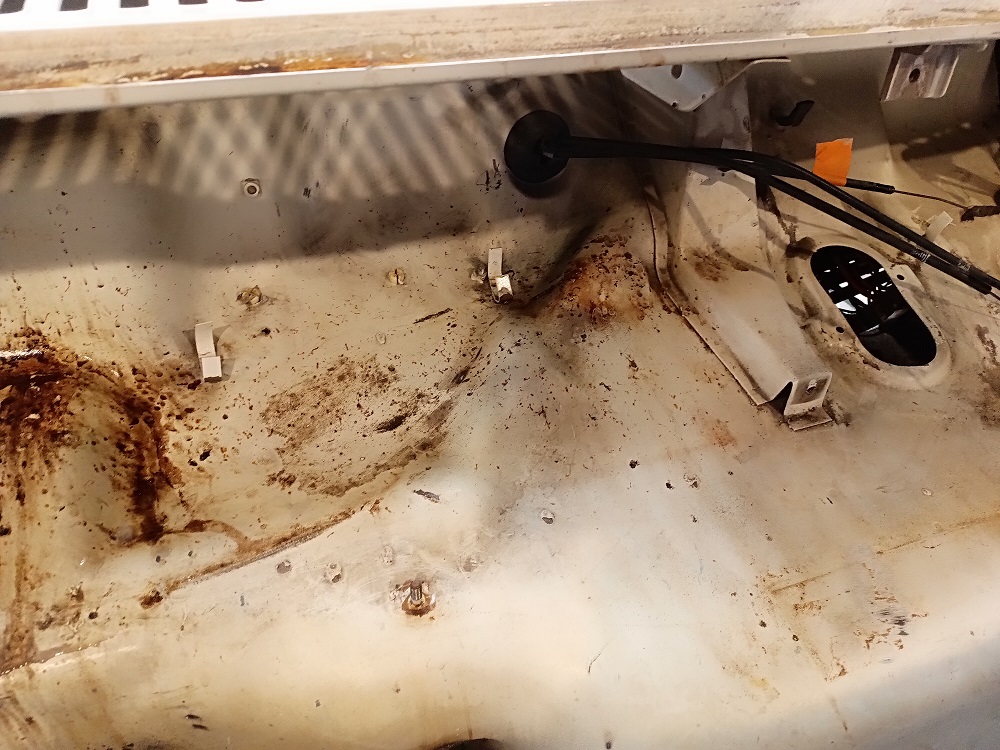
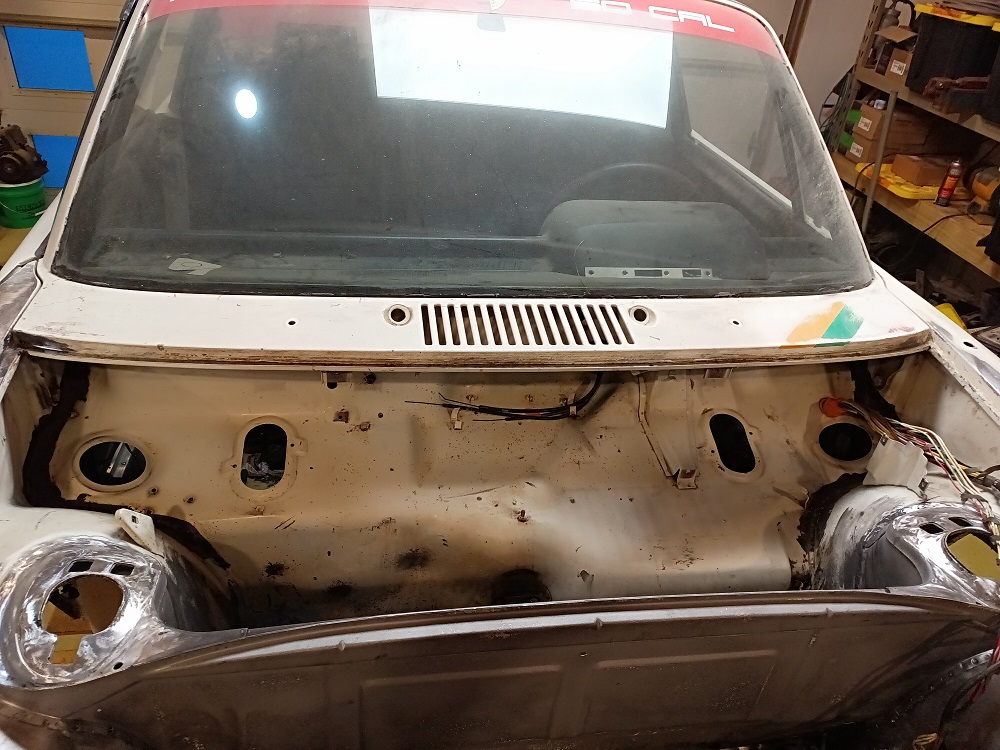
Posted by: napasteve May 11 2024, 08:13 PM
Did you find OJ’s knife in there?
Posted by: rick 918-S Jun 2 2024, 09:47 PM
Been a couple weeks since I posted an update. The clip is in primer. 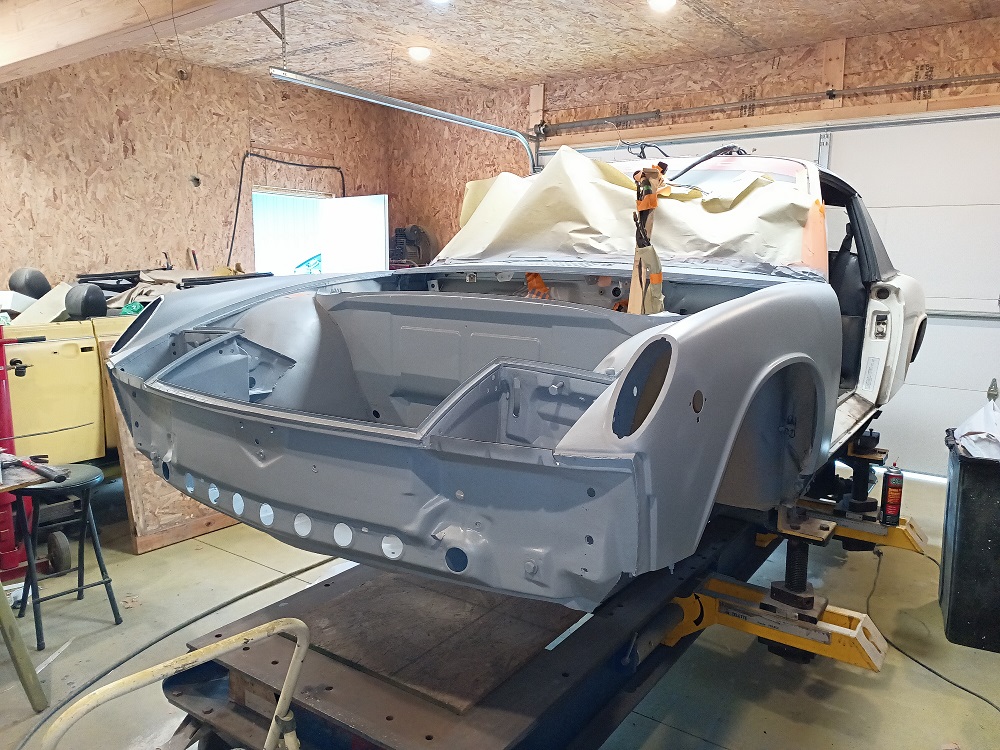
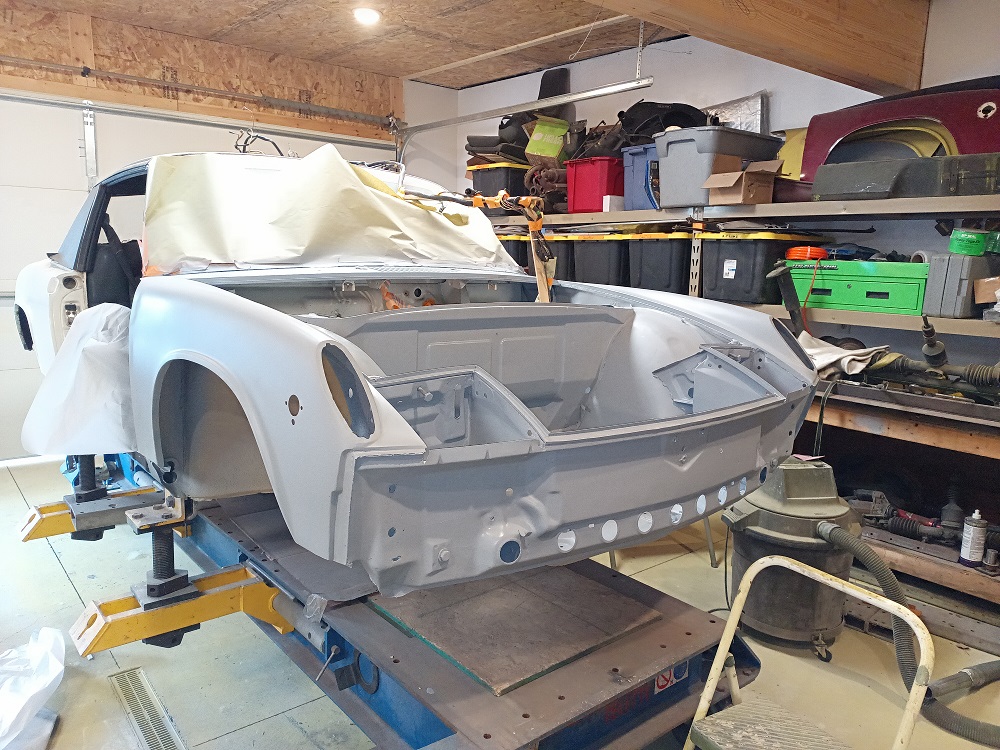
Posted by: Maltese Falcon Jun 2 2024, 09:52 PM
Mad skills/ coming around to the finish line !
Posted by: KELTY360 Jun 2 2024, 10:12 PM
Unimaginable!
My mind takes me back to a mangled wreck that could easily have become a premium parts car. Instead it will take to the road again as a prime example of the 914 mystique!
Thanks for taking us on the journey.
Posted by: porschetub Jun 2 2024, 11:08 PM
Unimaginable!
My mind takes me back to a mangled wreck that could easily have become a premium parts car. Instead it will take to the road again as a prime example of the 914 mystique!
Thanks for taking us on the journey.
share the same thoughts ,the metal work would have been unrepairable to many and look @ it now ....wow ,another level ,lost for more words .
Posted by: flyer86d Jun 3 2024, 03:54 AM
Unimaginable!
My mind takes me back to a mangled wreck that could easily have become a premium parts car. Instead it will take to the road again as a prime example of the 914 mystique!
Thanks for taking us on the journey.
share the same thoughts ,the metal work would have been unrepairable to many and look @ it now ....wow ,another level ,lost for more words .Yup!
Charlie
Posted by: Cairo94507 Jun 3 2024, 06:02 AM
Beautiful work.
Posted by: Luke M Jun 3 2024, 06:41 AM
I gotta say it.. You're the man
Lots of work involved in bring it back to life.
Did you spray it with epoxy or ?
Posted by: Front yard mechanic Jun 3 2024, 06:53 AM
Nice a 99000.00 dollar repair on a 100,000.00 car
Posted by: rick 918-S Jun 3 2024, 07:00 AM
I gotta say it.. You're the man
Lots of work involved in bring it back to life.
Did you spray it with epoxy or ?
Hi Luke and all,
Yes 2 part an then high build. Ready to start blocking. I have some nasty work ahead. The bottom of the car is covered in oil and dirt. Likely why it is so preserved. I needed to get it to the point where it was in primer in the event I had some splatter while pressure washing the bottom of the car. Not looking forward to this.
Things that are left after the oil mess is cleaned up:
Replace the battery tray and stand. It was removed and the battery was relocated to the frunk.
Repair the right side jack post cover. Looks like the rocker cover trapped dirt up against it causeing the bottom to rust. Pretty minor really.
Posted by: rick 918-S Jun 3 2024, 07:02 AM
Nice a 99000.00 dollar repair on a 100,000.00 car
If it were a rusty car it would have ended up in the scrap bid. And good thing I didn't have to charge someone to do this work.
Posted by: rick 918-S Jun 28 2024, 10:41 PM
Little Frunk Paint. Maybe Red Rocks?
Attached image(s)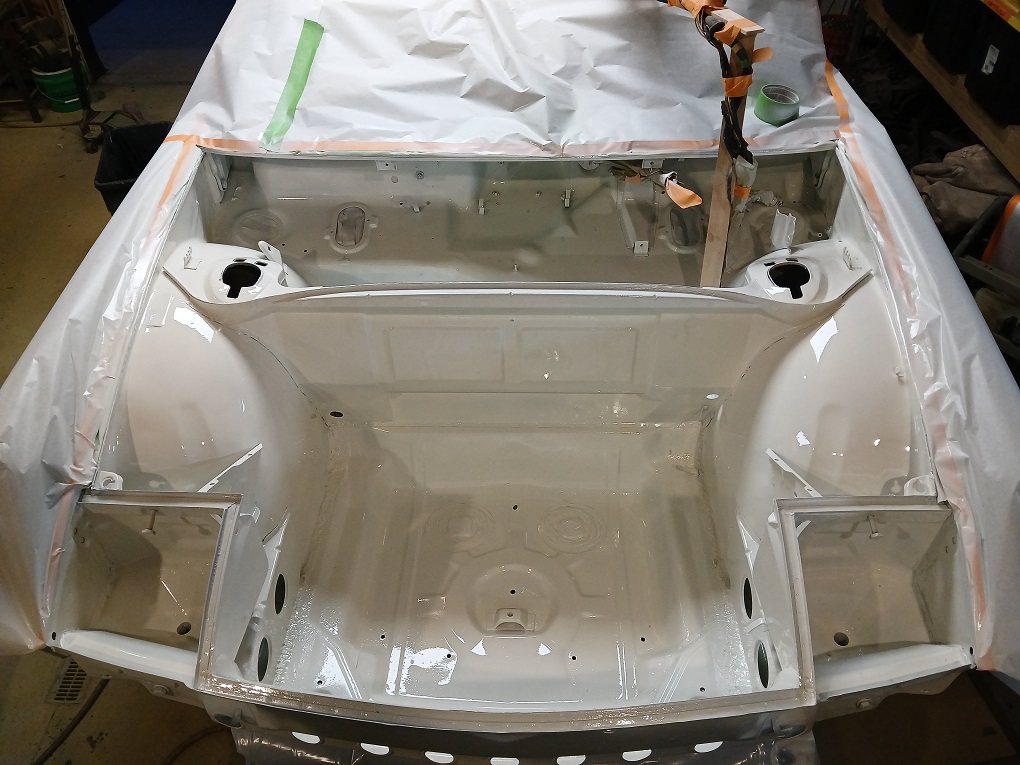
Posted by: rick 918-S Jun 28 2024, 11:08 PM
The doors are blocked and ready. I have a pressure washer and it looks like it is going to stop raining tomorrow. I hope to get the bottom and engine bay pressure washed clean tomorrow while it is still on the Celette. I hope to get the suspension back under the car within the next couple weeks.
Posted by: rick 918-S Jun 29 2024, 02:05 PM
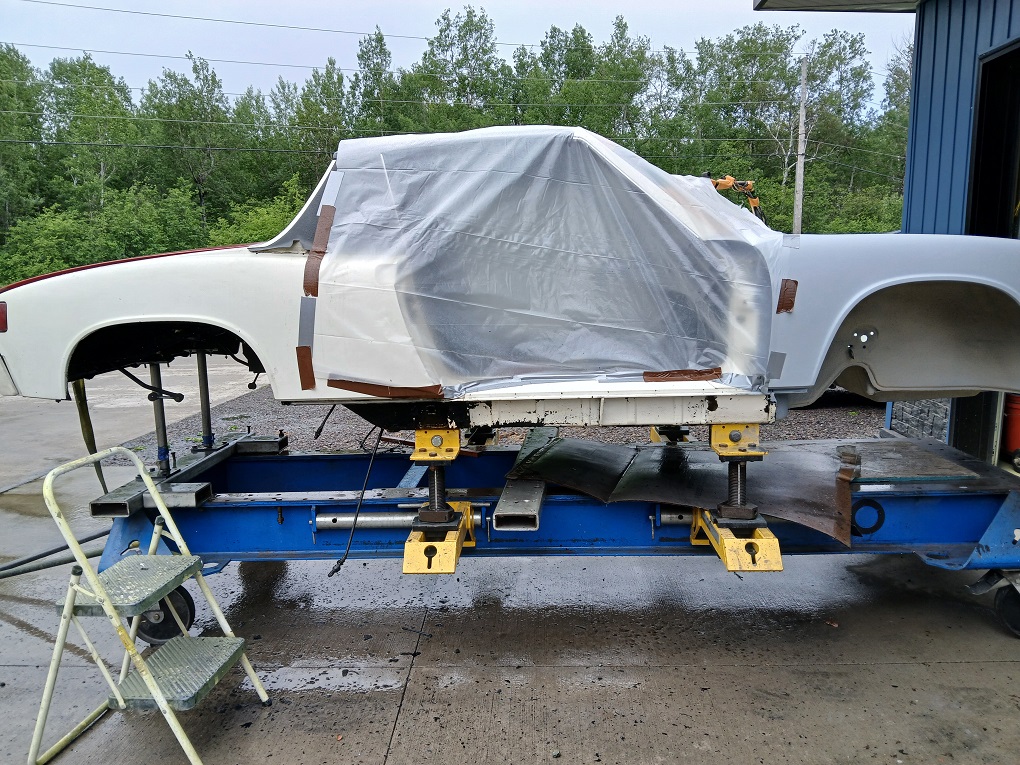
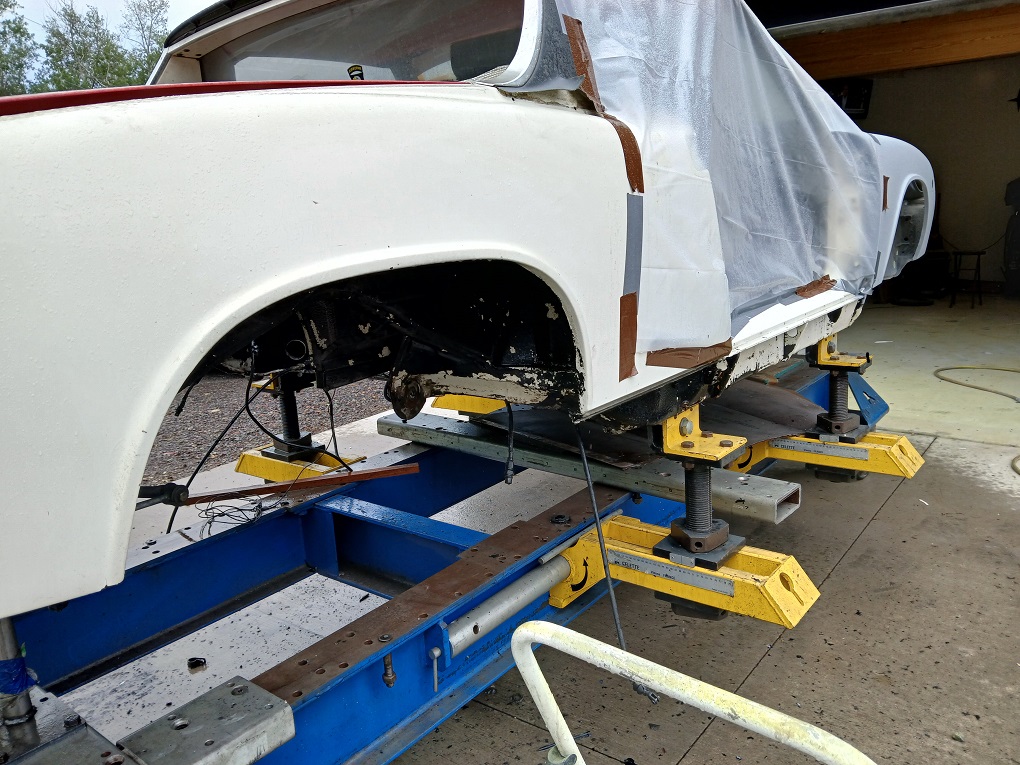
Dont spray that black crap on the bottom of the car
Attached image(s)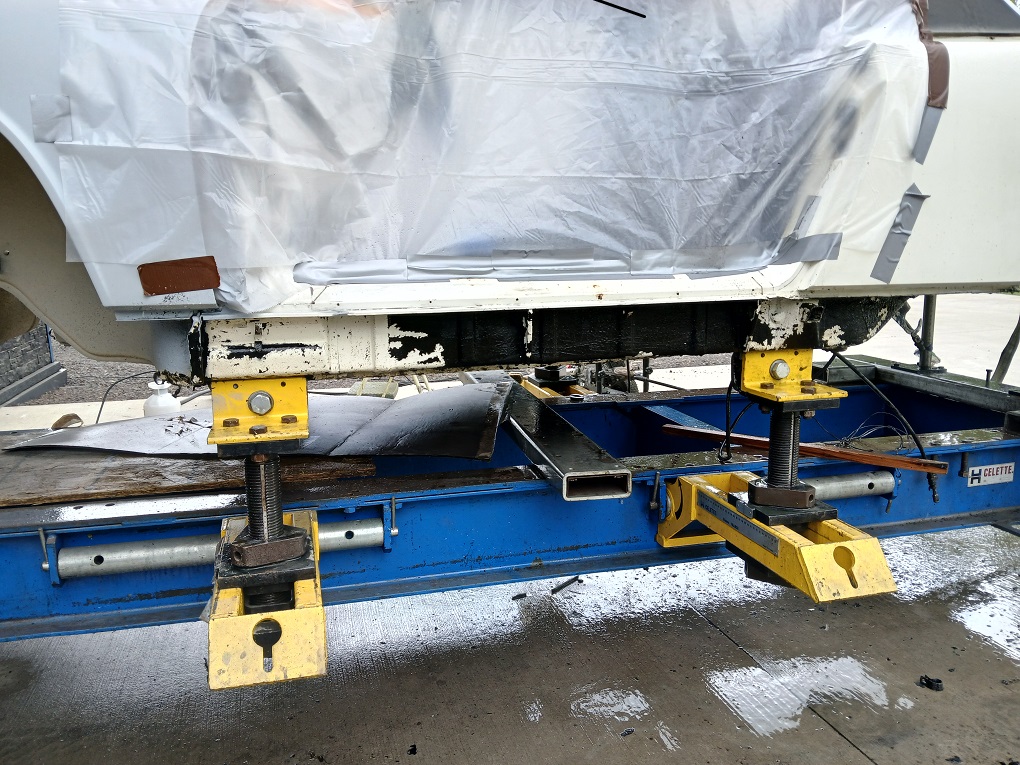
Posted by: rick 918-S Jul 1 2024, 06:59 AM
Good progress on the removal of the black bomb can coating. I ended up using spray can paint stripper to soften the coating then used the pressure washer to get it off. 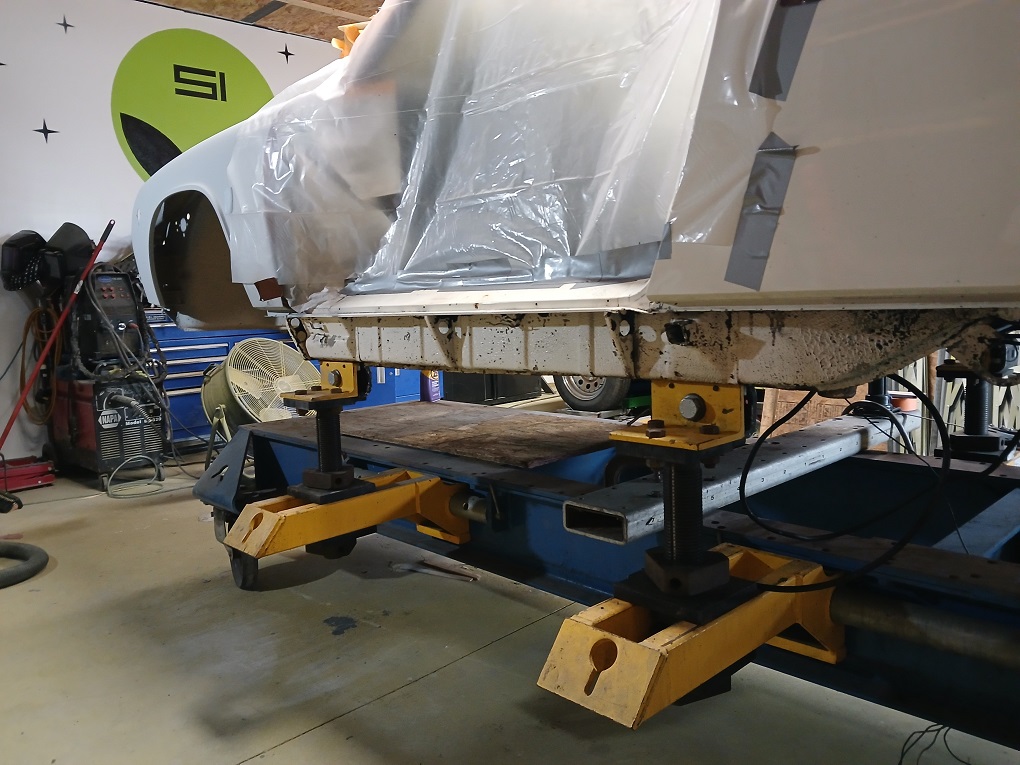
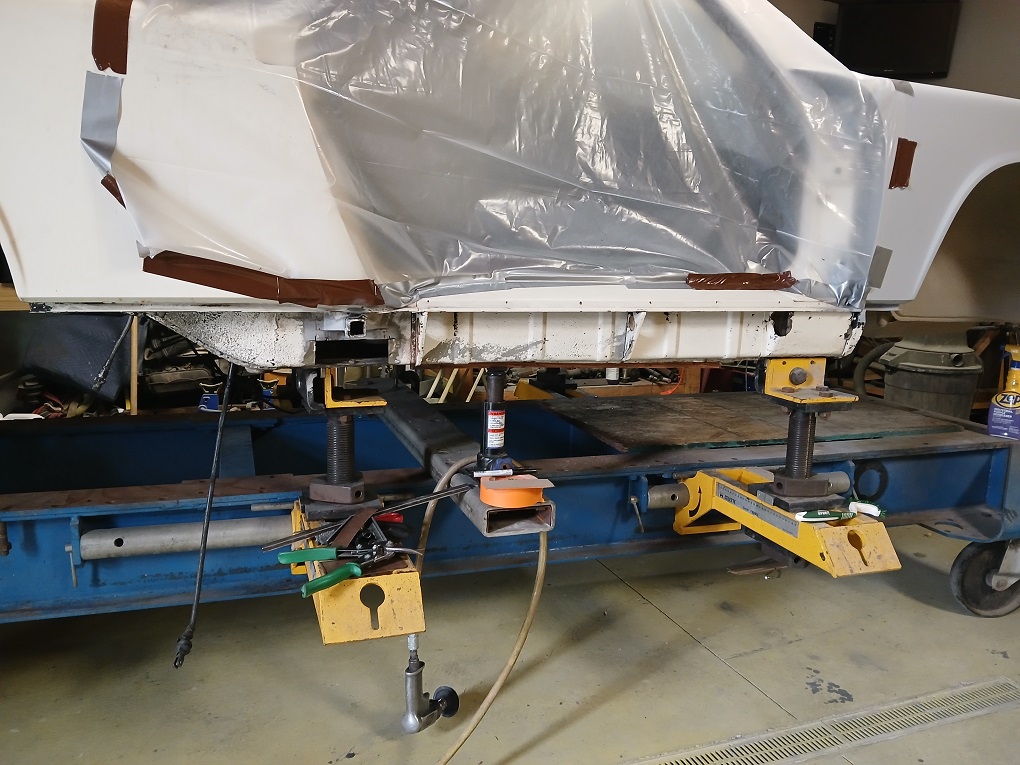
The only rust was on the jack post cover from dirt being packed against it. When I cut it open I discovered a small hole in the long behind the cover. I cut out the rust. The inside of the long is still in light gray primer. This car is very solid!
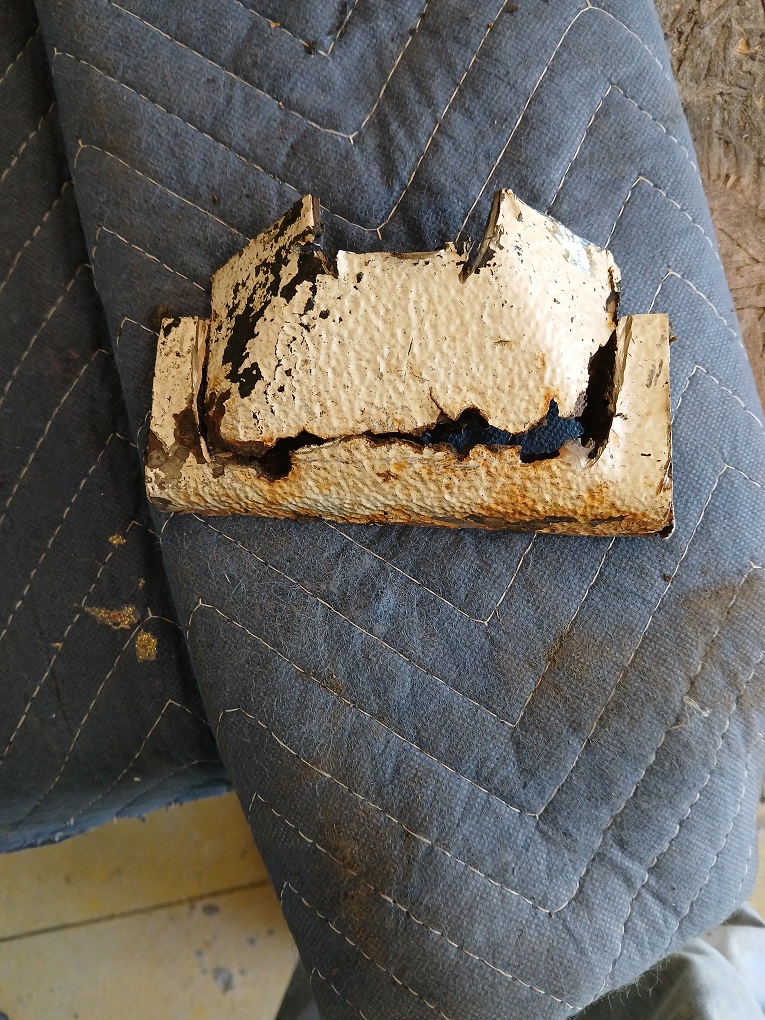
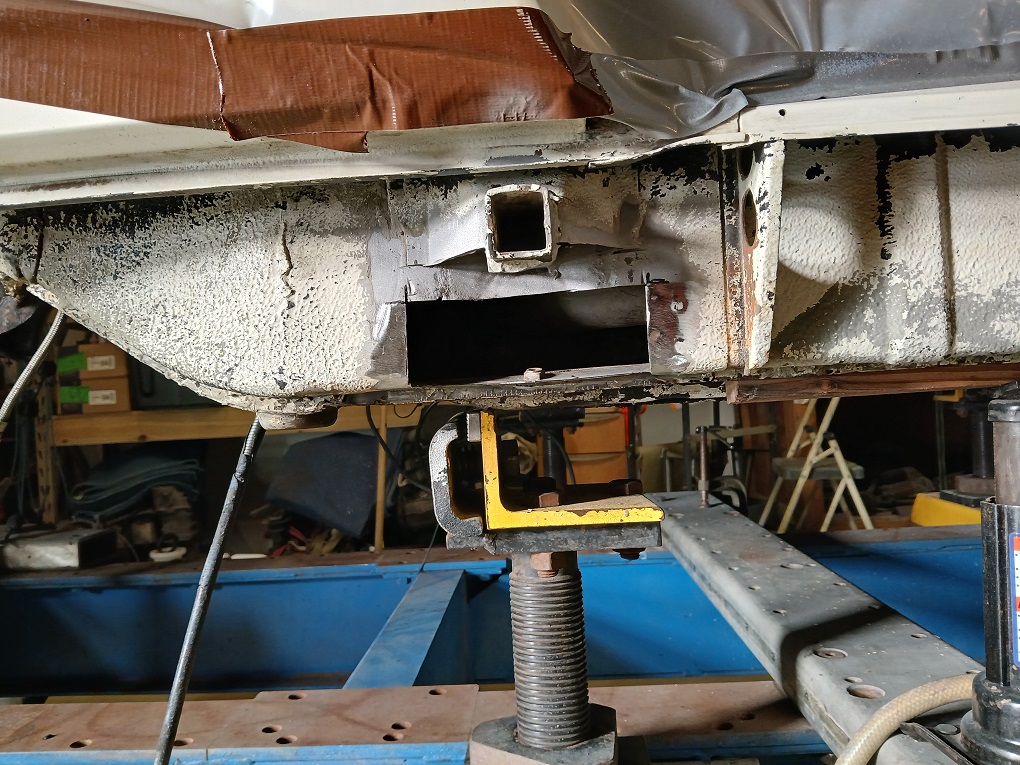
Posted by: Cairo94507 Jul 1 2024, 07:18 AM
I am glad to see that; that car has been through enough and deserved a break.
Posted by: rick 918-S Jul 7 2024, 10:00 PM
Slow progress but I have enough done in the front to start assembling the Frunk stuff. Sprayed the under side of the front section I replaced. It is very rewarding to get this far. 
I had some thick shrink tube so I put it to good use today covering all the wire harness retaining straps. I went thru several bins of stuff getting out the part that need to go back in the frunk and gas tank well. So slow cleaning of parts, waiting on a couple vent tube rubber grommets and a fuel sock to really starting to put stuff back. 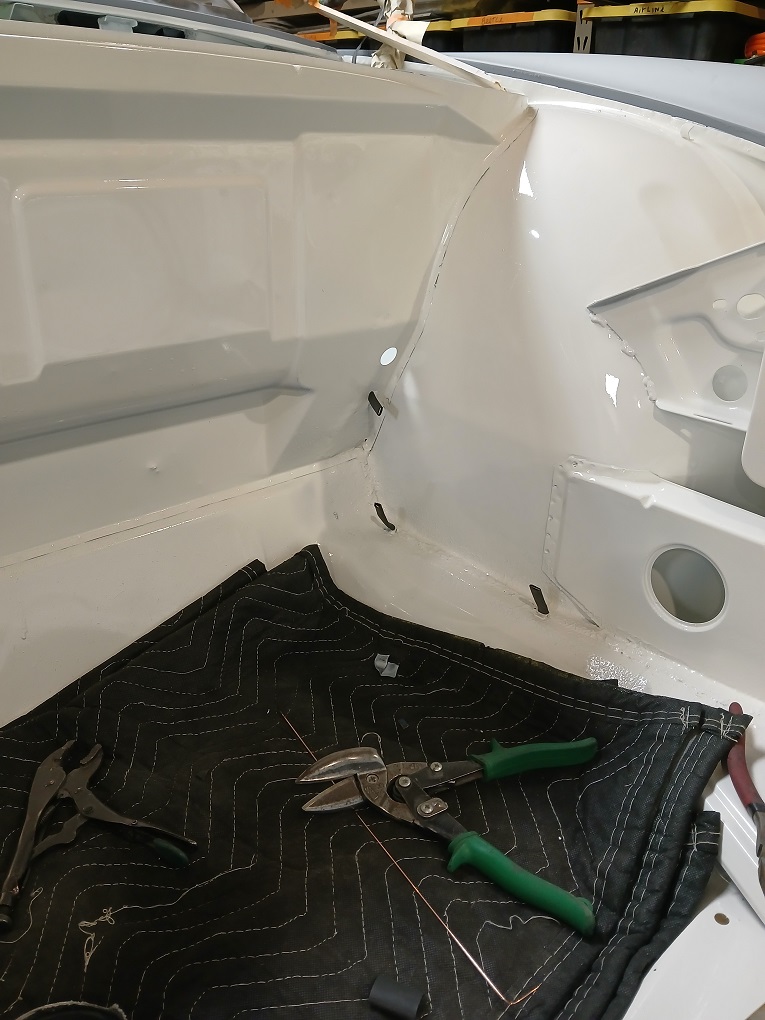
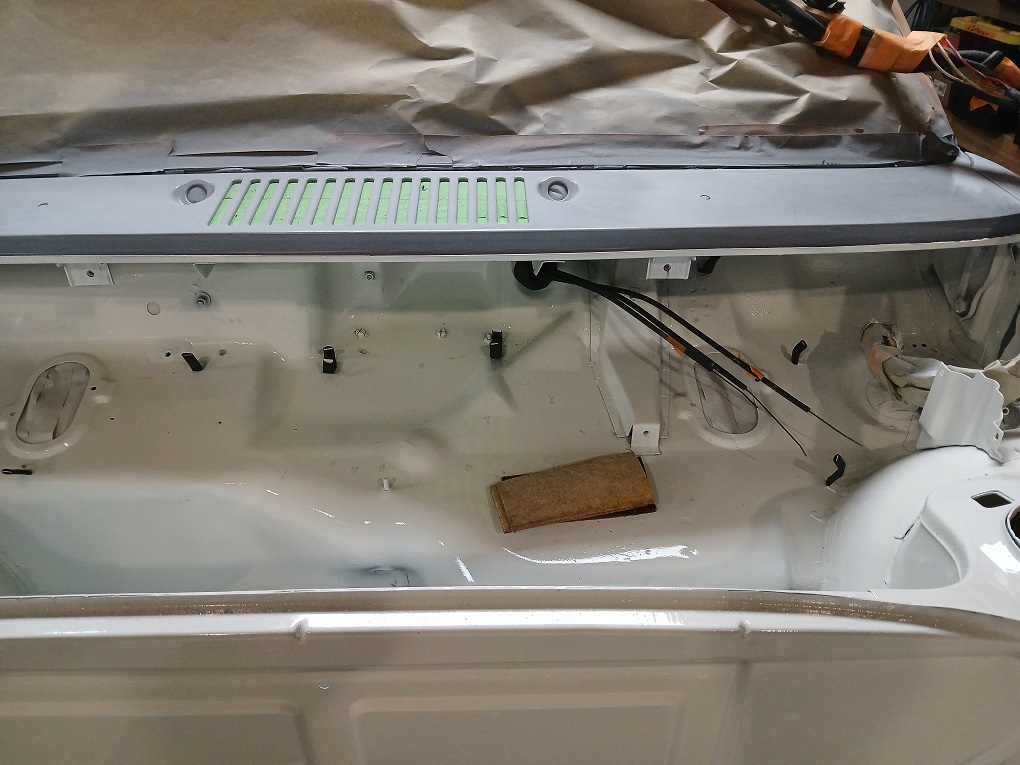
Posted by: Cairo94507 Jul 8 2024, 05:51 AM
Posted by: gereed75 Jul 8 2024, 09:57 AM
Fabulous work. Is the car light Ivory?? What paint are you using?? Single stage or base clear?
Posted by: rick 918-S Jul 8 2024, 12:04 PM
Fabulous work. Is the car light Ivory?? What paint are you using?? Single stage or base clear?
Yes, light Ivory. Axalta (DuPont) single stage
Posted by: 930cabman Jul 8 2024, 03:31 PM
11 years, you must be one of the really crazy ones
Looking great
Posted by: friethmiller Jul 8 2024, 04:50 PM
Looking awesome, @http://www.914world.com/bbs2/index.php?showuser=8358 918-S How's that single stage paint? Did you go this route for authenticity? Or, other reasons? I'm thinking about this for my LE.
Posted by: rick 918-S Jul 8 2024, 07:52 PM
I always use single stage on old cars unless they are metallic. The best way to replicate a factory look. Todays paint has (more gloss more clear less solids) than I care for but there is no option anymore.
Posted by: infraredcalvin Jul 9 2024, 12:16 AM
Car looks amazing, i look forward to reading updates every time i see this bumped to the top!
Posted by: TRS63 Jul 9 2024, 06:15 AM
Looking amazing, now to enjoy putting nice stuff back !
Bests
Antoine
Posted by: rick 918-S Jul 10 2024, 05:27 AM
This has to be another sign.... I was sorting parts to start putting some of the stuff back on the car. I pulled out the ashtray from storage and found a bunch of these wrappers stuffed in there.
Posted by: rick 918-S Jul 10 2024, 09:53 PM
I found a bunch of early photos of the car at the old house. I took some videos while I was doing the rough pulls but I don't know how to post them. Is it possible to post them here? I tried one but It was too large of a file I guess. 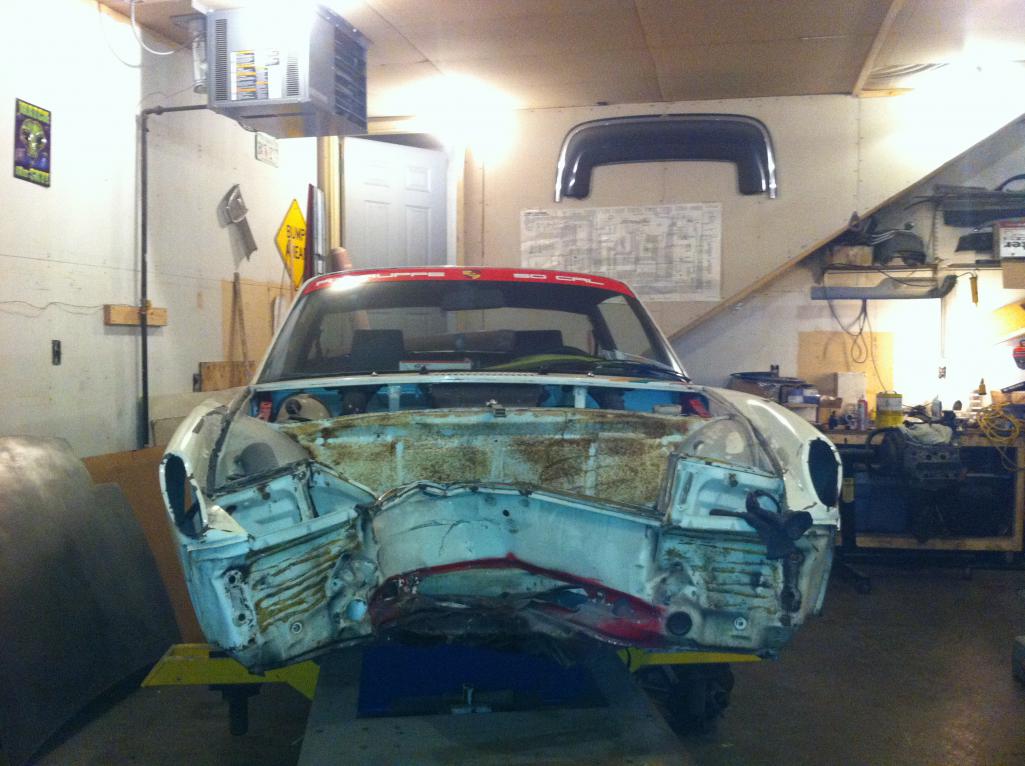
Can you believe I repaired those fenders? That slice was in that fender when i picked up the car. I TIG welded it back together.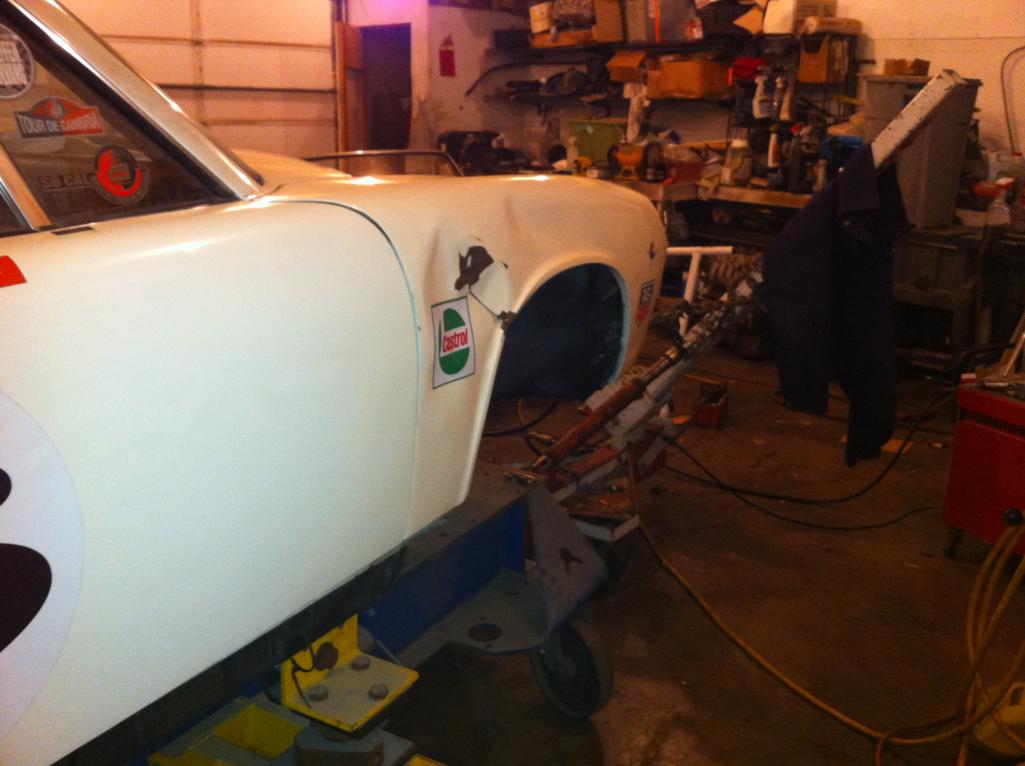
Posted by: rick 918-S Jul 10 2024, 10:09 PM

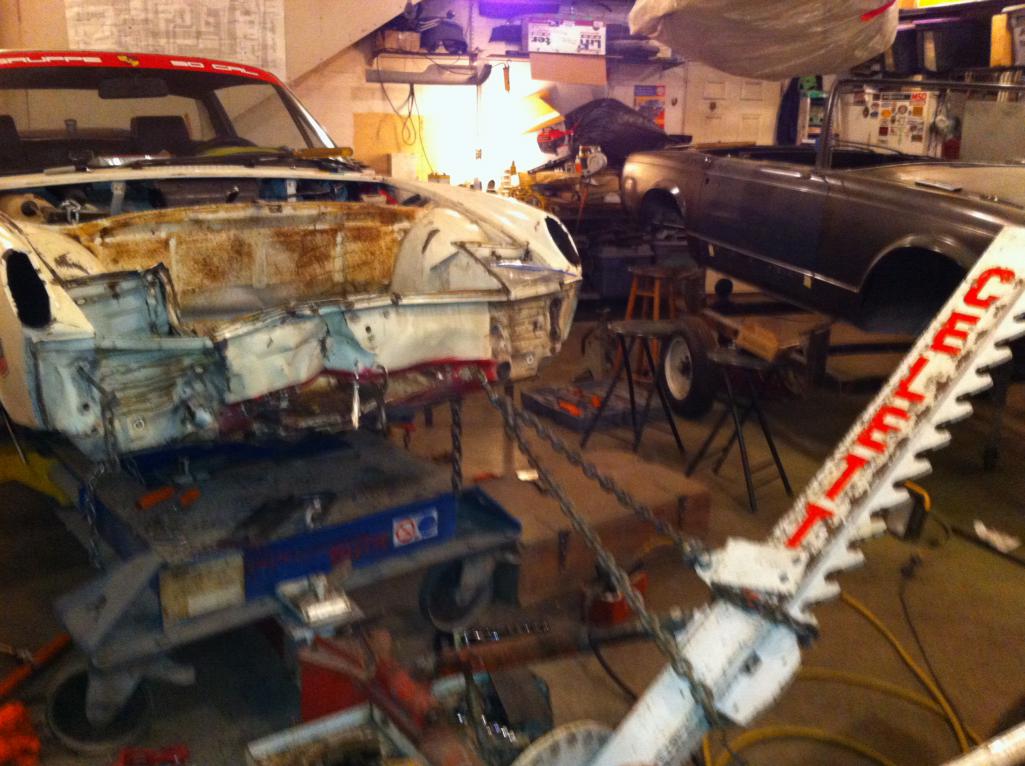
Posted by: rick 918-S Jul 10 2024, 10:11 PM
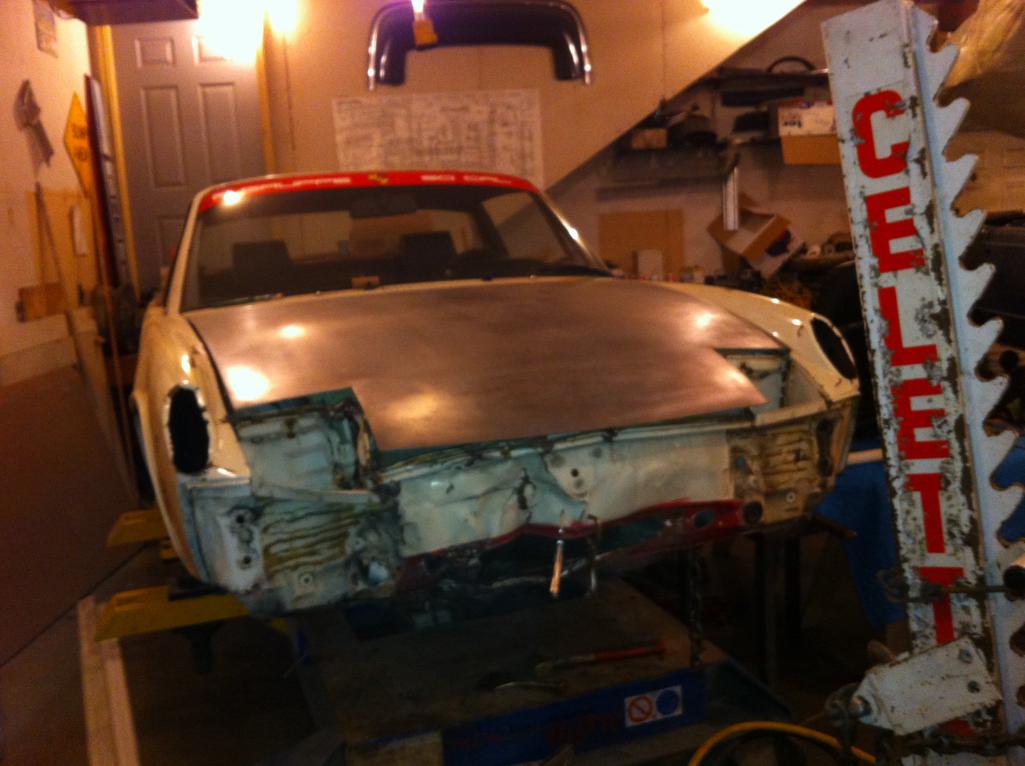
Posted by: Cairo94507 Jul 11 2024, 06:38 AM
Your skills are beyond great. Thankfully experts like you are out there repairing these cars to keep them alive for the next generation so people can remember 50 years ago what a really nice car was.
Posted by: Root_Werks Jul 11 2024, 09:25 AM
It sure has come a long way.
Nice to see paint going on! Installing nice, clean parts is sort of fun to me.
Posted by: rick 918-S Jul 13 2024, 08:38 PM
Started cleaning out the gas tank. I did this on 7 of 9 and it worked good.
I just added a second anode in the other hole. I have it outside running over night.
The tank behind the one I am cleaning is the one from the car. There is a large dent in it. 
Posted by: rick 918-S Jul 14 2024, 04:47 PM
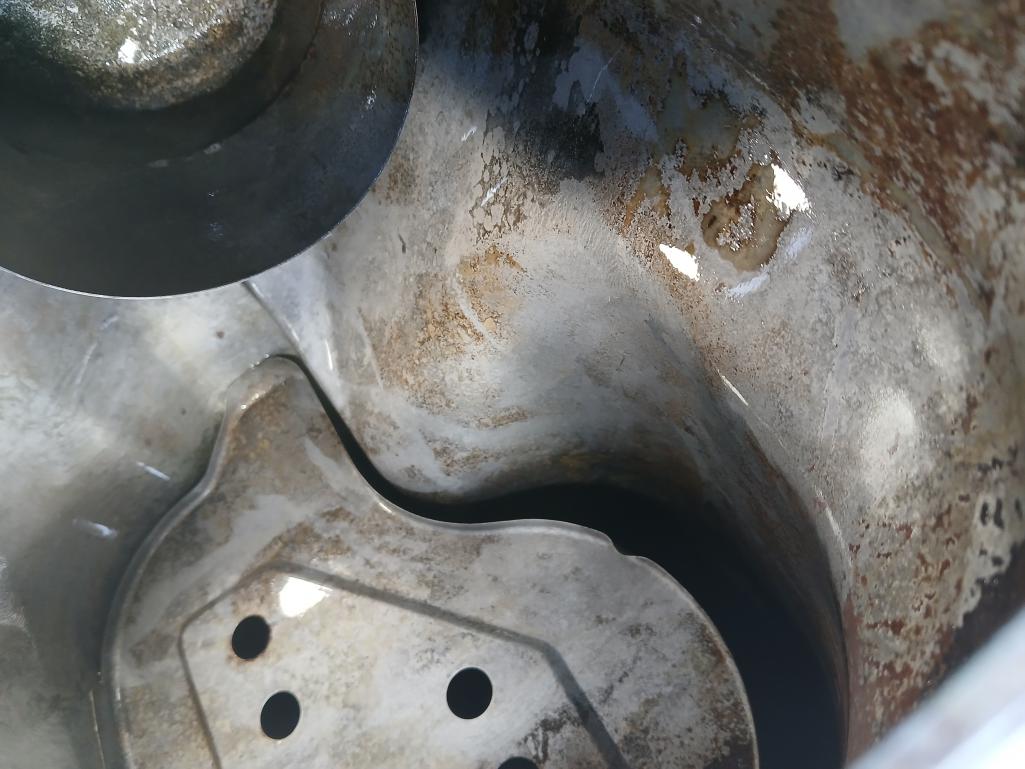
One more round should do it.
Posted by: worn Jul 14 2024, 07:15 PM
One more round should do it.
We ought to get together on these tanks. I use an old bar b q rotisserie and bolts and chains to clean out the tanks but I feel a need for electrodes connected to Grand Coulee dam.
Posted by: rick 918-S Jul 14 2024, 07:29 PM
One more round should do it.
We ought to get together on these tanks. I use an old bar b q rotisserie and bolts and chains to clean out the tanks but I feel a need for electrodes connected to Grand Coulee dam.
That's kinda ingenious
Posted by: ClayPerrine Jul 15 2024, 06:14 AM
What are you using for an electrode?
Posted by: rick 918-S Jul 15 2024, 08:09 AM
I used two pieces of thin wall steel tubing. The washing soda grass the rust as it pulled off the inside of the tank and attaches to the steel
The photo shows how thick the washing soda crust gets
Posted by: ClayPerrine Jul 15 2024, 10:16 AM
I used two pieces of thin wall steel tubing. The washing soda grass the rust as it pulled off the inside of the tank and attaches to the steel
The photo shows how thick the washing soda crust gets
Washing soda????
Posted by: rick 918-S Jul 15 2024, 11:48 AM
I used two pieces of thin wall steel tubing. The washing soda grass the rust as it pulled off the inside of the tank and attaches to the steel
The photo shows how thick the washing soda crust gets
Washing soda????
Yes, Arm & Hammer Washing soda. Makes the water a better conductor of electricity. Not baking soda
Posted by: Shivers Jul 15 2024, 12:05 PM
Started cleaning out the gas tank. I did this on 7 of 9 and it worked good.
I just added a second anode in the other hole. I have it outside running over night.
The tank behind the one I am cleaning is the one from the car. There is a large dent in it.
What a good idea. I've never seen another charger like that, except mine. I bought it new in 1986. I was really surprised, then again mine has lasted all these years there had to be more somewhere

Posted by: rick 918-S Jul 15 2024, 03:00 PM
Started cleaning out the gas tank. I did this on 7 of 9 and it worked good.
I just added a second anode in the other hole. I have it outside running over night.
The tank behind the one I am cleaning is the one from the car. There is a large dent in it.
What a good idea. I've never seen another charger like that, except mine. I bought it new in 1986. I was really surprised, then again mine has lasted all these years there had to be more somewhere
Yes! I have had mine since then also!
Posted by: ClayPerrine Jul 16 2024, 06:55 AM
I used two pieces of thin wall steel tubing. The washing soda grass the rust as it pulled off the inside of the tank and attaches to the steel
The photo shows how thick the washing soda crust gets
Washing soda????
Yes, Arm & Hammer Washing soda. Makes the water a better conductor of electricity. Not baking soda
I learned something today. Thanks!
Posted by: jd74914 Jul 17 2024, 11:56 AM
Started cleaning out the gas tank. I did this on 7 of 9 and it worked good.
I just added a second anode in the other hole. I have it outside running over night.
The tank behind the one I am cleaning is the one from the car. There is a large dent in it.
What a good idea. I've never seen another charger like that, except mine. I bought it new in 1986. I was really surprised, then again mine has lasted all these years there had to be more somewhere
Yes! I have had mine since then also!
We have that same one too from about the same time (before I was born haha). The thing is a tank-way better than all the newer one's I've used for start boosting.
Cool trick, I'm going to have to try that with my tractor gas tank which is super rusty inside.
Posted by: rhodyguy Jul 17 2024, 12:12 PM
Rick, is the Arm and Hammer product A&H detergent?
Posted by: rick 918-S Jul 18 2024, 05:24 AM
Rick, is the Arm and Hammer product A&H detergent?
Hi Kevin. It is a multi use detergent.
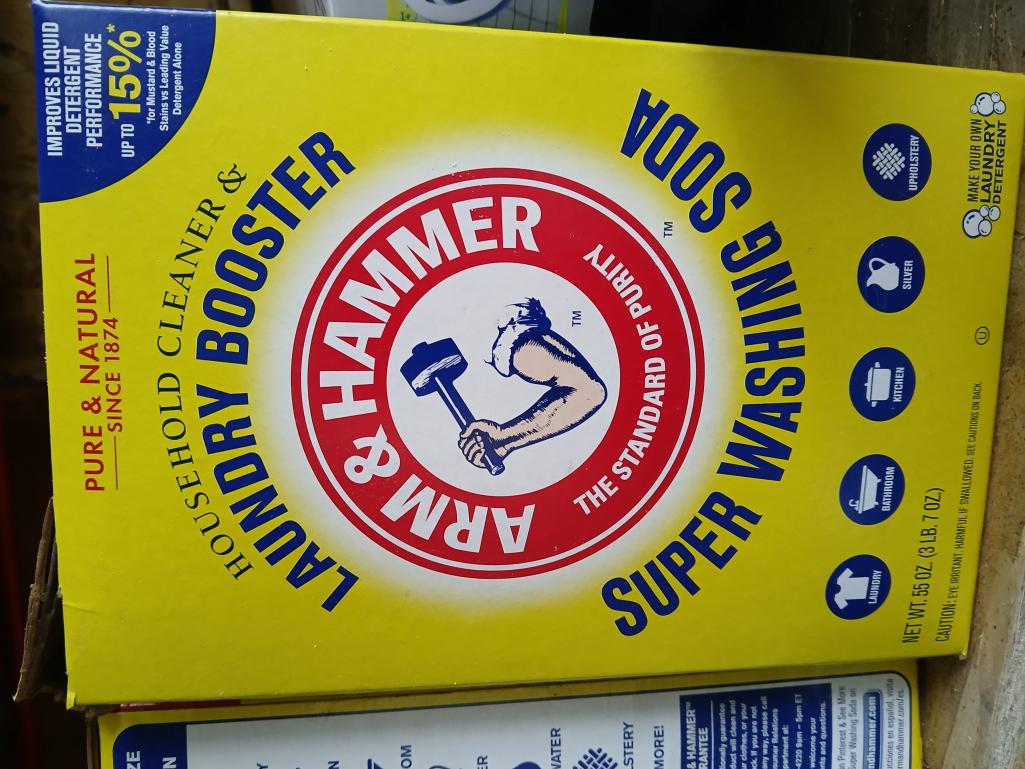
Posted by: rick 918-S Dec 11 2024, 07:14 PM
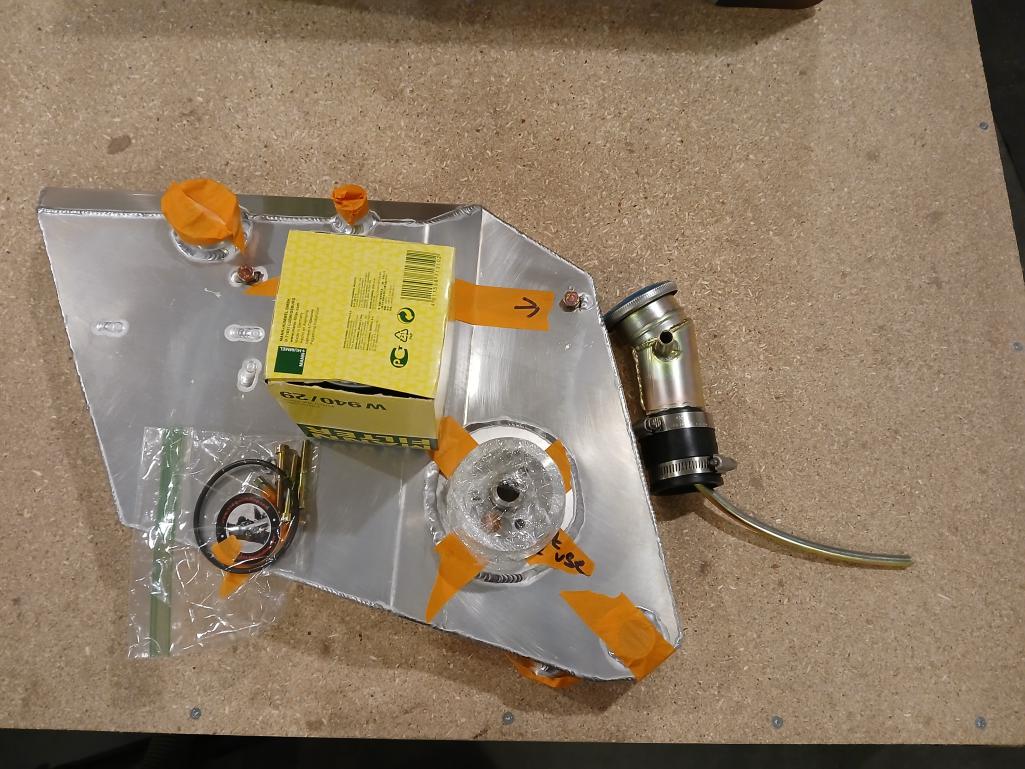
Got a early Christmas present for the 6. Ben does nice work
Posted by: mb911 Dec 11 2024, 07:18 PM
Got a early Christmas present for the 6. Ben does nice work
Hang that sticker with pride. You actually got the last filter console I have. Contemplating making another run. BTW did you find those cis to carb adapters?
Posted by: Maltese Falcon Dec 11 2024, 08:06 PM
Rick > you should get the history/ member# of this 'R Grüppe 9146; if you were to join them on their annual Treffen', you could be the official representative of our F Trüppe NARPs
I'm sure that the designated R Grüppe club acceptance runs with that car...regardless of owners trading hands.
Of the very small 1960's production quantity of the acid dipped body 911R's built>> there are hundreds of these remaining today
Attached thumbnail(s)
Posted by: Root_Werks Dec 19 2024, 03:57 PM
Rick, any updates on the project? Will be neat to see the setup hung back in the 914.
Posted by: sixnotfour Dec 19 2024, 07:35 PM
Sorry Ben,,,,That SIX deserves an OEM tank..I have several..
Posted by: rick 918-S Dec 20 2024, 04:56 AM
Sorry Ben,,,,That SIX deserves an OEM tank..I have several..
I purchased one off ebay a few years ago. I never looked at. Just left it in the box. Turned out to have a giant mouse nest inside and the top was rusted out. I just made a deal on a factory tank yesterday. so the 6 is getting the tank I wanted it to have.
But Ben's tanks are a great option and we are lucky he invests the time to do this.
Posted by: sixnotfour Dec 20 2024, 09:29 AM
Sorry Ben,,,,That SIX deserves an OEM tank..I have several..
I purchased one off ebay a few years ago. I never looked at. Just left it in the box. Turned out to have a giant mouse nest inside and the top was rusted out. I just made a deal on a factory tank yesterday. so the 6 is getting the tank I wanted it to have.
But Ben's tanks are a great option and we are lucky he invests the time to do this.
Posted by: rick 918-S Dec 20 2024, 05:23 PM
Sorry Ben,,,,That SIX deserves an OEM tank..I have several..
I purchased one off ebay a few years ago. I never looked at. Just left it in the box. Turned out to have a giant mouse nest inside and the top was rusted out. I just made a deal on a factory tank yesterday. so the 6 is getting the tank I wanted it to have.
But Ben's tanks are a great option and we are lucky he invests the time to do this.
Me and Clay made a swap deal. I wanted a factory tank and he has been wanting a Ben tank for his red car. Worked slick.
Posted by: ClayPerrine Dec 21 2024, 09:03 AM
Sorry Ben,,,,That SIX deserves an OEM tank..I have several..
I purchased one off ebay a few years ago. I never looked at. Just left it in the box. Turned out to have a giant mouse nest inside and the top was rusted out. I just made a deal on a factory tank yesterday. so the 6 is getting the tank I wanted it to have.
But Ben's tanks are a great option and we are lucky he invests the time to do this.
Me and Clay made a swap deal. I wanted a factory tank and he has been wanting a Ben tank for his red car. Worked slick.
I was running the factory tank with the 4.0, and I had to run an adapter to hook up the return line to the tank. With Ben's tank, I can run the correct sized fitting so no adapter. And the six that Rick is restoring really needs a factory tank and accessories. So the trade was a no-brainer.
Posted by: rick 918-S Dec 21 2024, 10:05 AM
Sorry Ben,,,,That SIX deserves an OEM tank..I have several..
I purchased one off ebay a few years ago. I never looked at. Just left it in the box. Turned out to have a giant mouse nest inside and the top was rusted out. I just made a deal on a factory tank yesterday. so the 6 is getting the tank I wanted it to have.
But Ben's tanks are a great option and we are lucky he invests the time to do this.
Me and Clay made a swap deal. I wanted a factory tank and he has been wanting a Ben tank for his red car. Worked slick.
I was running the factory tank with the 4.0, and I had to run an adapter to hook up the return line to the tank. With Ben's tank, I can run the correct sized fitting so no adapter. And the six that Rick is restoring really needs a factory tank and accessories. So the trade was a no-brainer.
Ya that beast you built needed a modern tank with larger filter console. This worked out great. I was kind of excited when you contacted me.
Now if I can just get the Alien back up and running so I can get the 6 on it's wheels again... I have two huge builds going at the same time.

Posted by: mb911 Dec 21 2024, 01:15 PM
Sorry Ben,,,,That SIX deserves an OEM tank..I have several..
I purchased one off ebay a few years ago. I never looked at. Just left it in the box. Turned out to have a giant mouse nest inside and the top was rusted out. I just made a deal on a factory tank yesterday. so the 6 is getting the tank I wanted it to have.
But Ben's tanks are a great option and we are lucky he invests the time to do this.
Me and Clay made a swap deal. I wanted a factory tank and he has been wanting a Ben tank for his red car. Worked slick.
I was running the factory tank with the 4.0, and I had to run an adapter to hook up the return line to the tank. With Ben's tank, I can run the correct sized fitting so no adapter. And the six that Rick is restoring really needs a factory tank and accessories. So the trade was a no-brainer.
@http://www.914world.com/bbs2/index.php?showuser=1143 if you need anything else let me know I owe you
Posted by: rick 918-S Dec 22 2024, 12:09 AM
Got my flywheel back and did complete assembly today. Everything work as it should. Next step is to get it back in the car.
Posted by: Root_Werks Dec 26 2024, 11:26 AM
Can't wait to see a picture of the drivetrain back in the 914!
Posted by: rick 918-S Dec 26 2024, 08:54 PM
Can't wait to see a picture of the drivetrain back in the 914!
I forgot I had to build the other header. I started on last night but I am out of Argon for the TIG. I hope to get some tomorrow. Then it is time to try to slide it under the car and build a tranny mount.
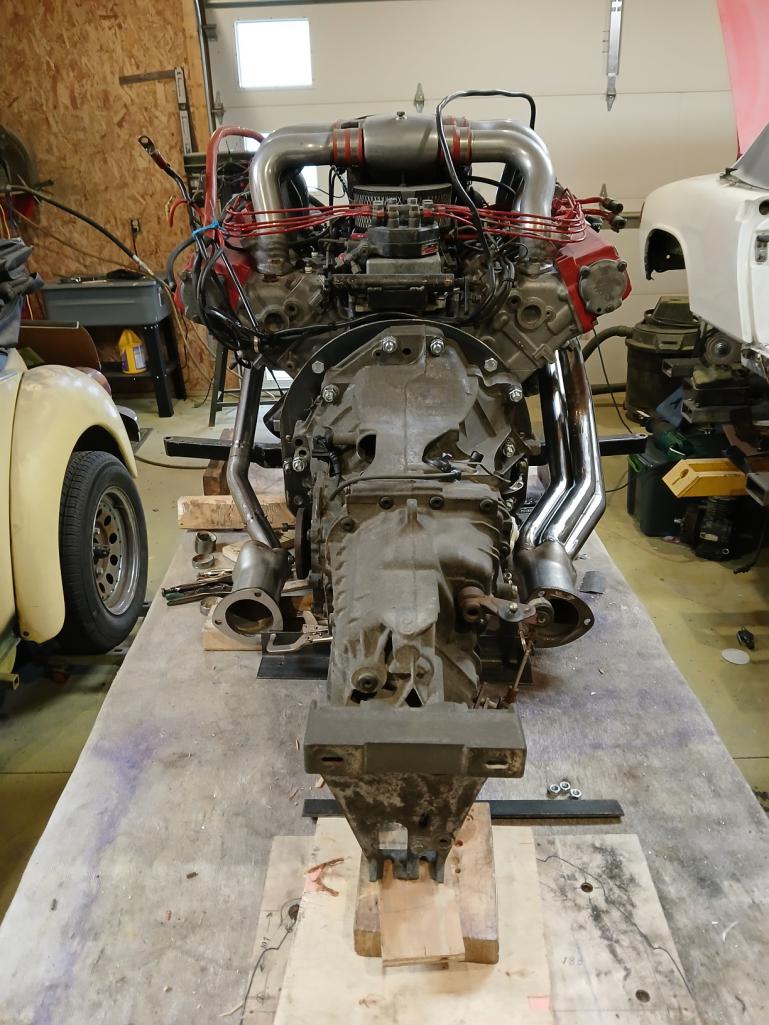
Posted by: rick 918-S Jun 12 2025, 10:22 AM
I haven't posted about this car for awhile. I have been working on the Alien. But the work goes on. I have been working to Un-pull the quarters. Lots of time shrinking the panel and reforming the lip.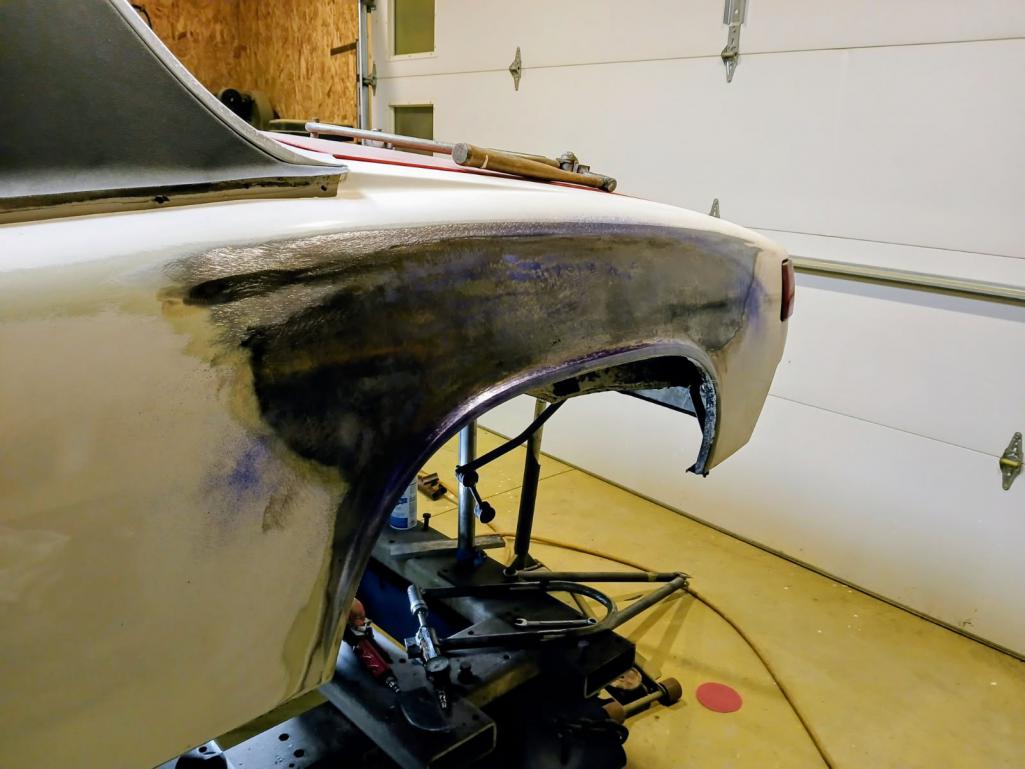
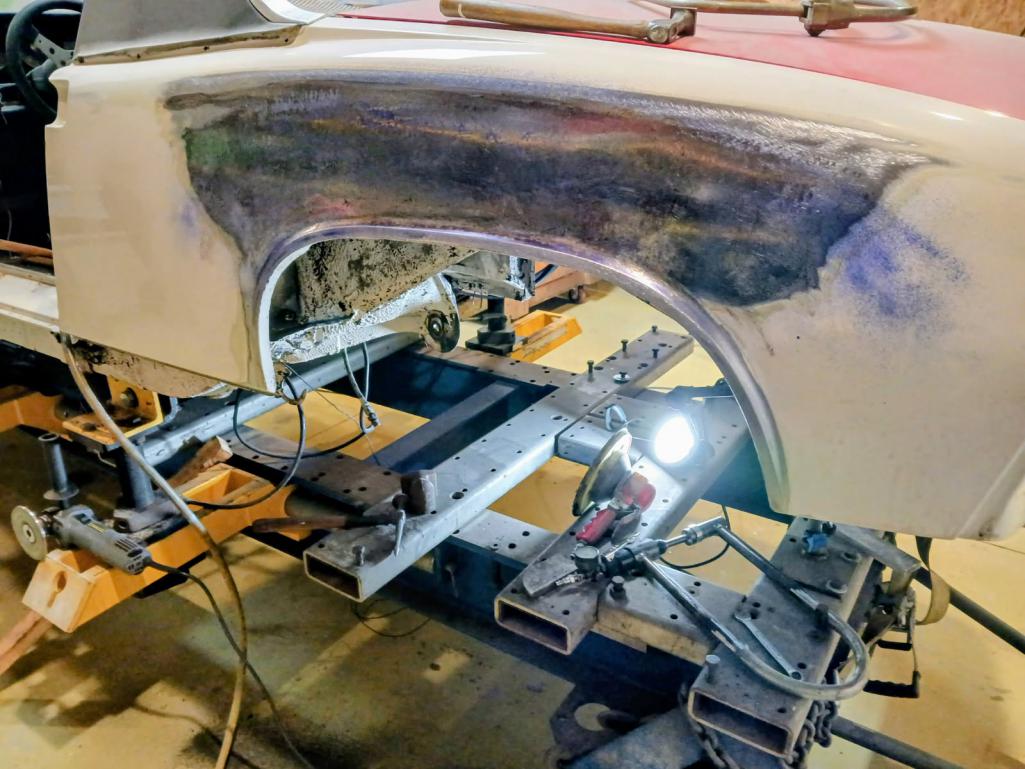
Not sure if you can see the difference from one side to the other.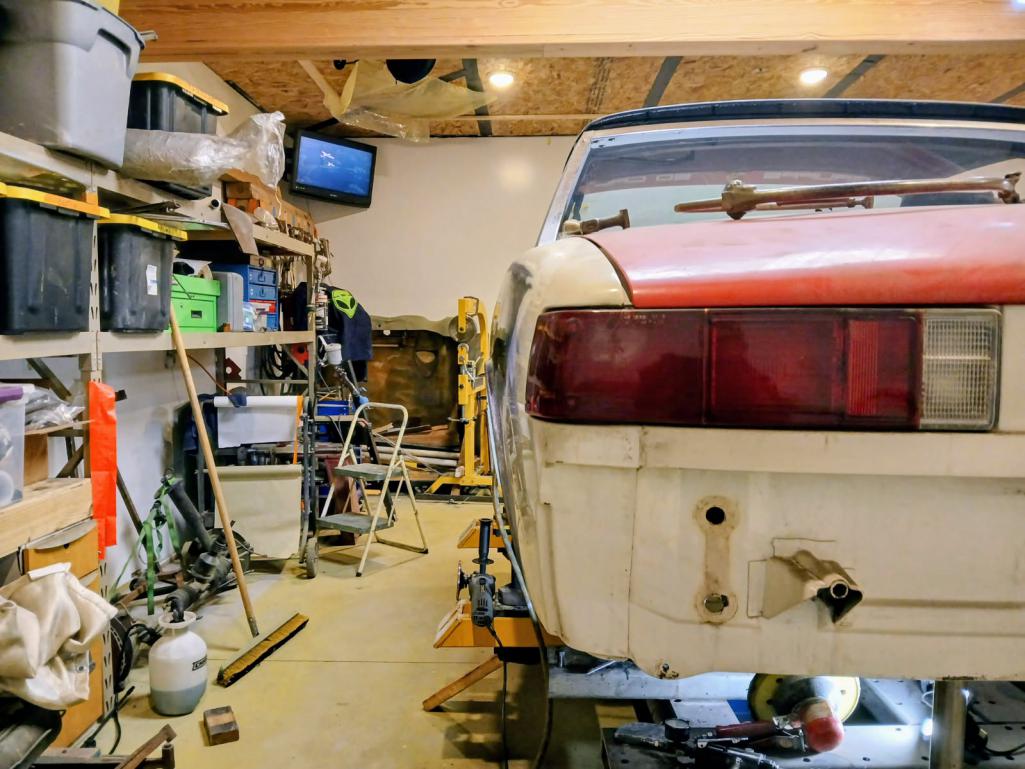
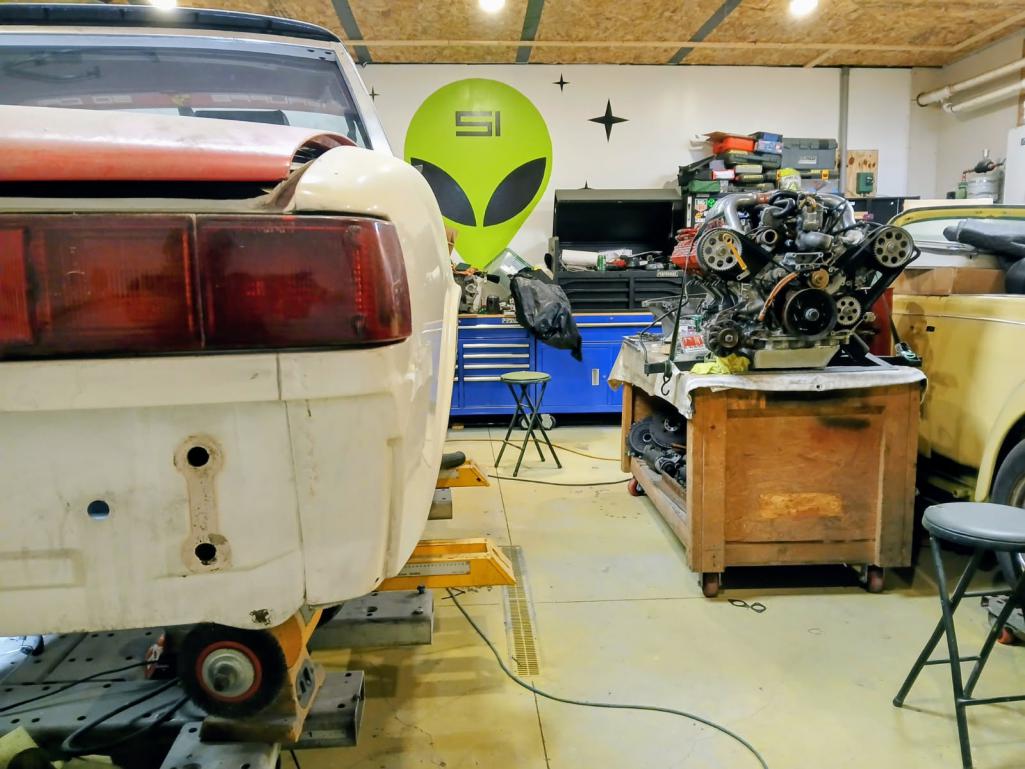
Posted by: Root_Werks Jun 12 2025, 02:39 PM
You can see the difference in fenders for sure. That must be an exercise in repetitive patience!
Powered by Invision Power Board (http://www.invisionboard.com)
© Invision Power Services (http://www.invisionpower.com)