Printable Version of Topic
Click here to view this topic in its original format
914World.com _ 914World Garage _ What I did on semester break
Posted by: Dave-O Jan 2 2005, 11:20 PM
Finally a chance to get in the garage and get my 914 ready for the next autocross season. This car is being built on a very tight budget. Many of the parts are being fabricated by myself. When i finish my homemade front anti-sway bar i will post a complete set of pictures of the build. In the meantime i made a lot of progress on other things. The first order of business was to groove and regrease all my badly creaking suspension bushings.
Attached image(s)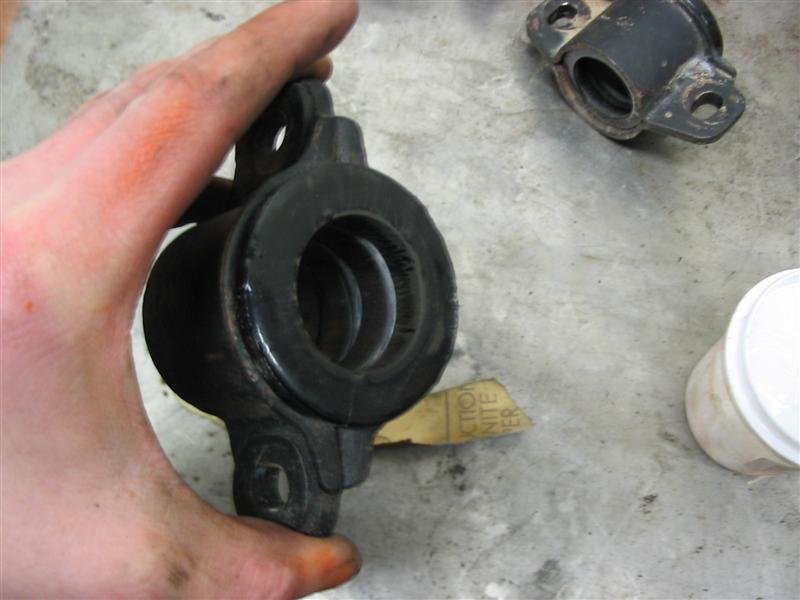
Posted by: Dave-O Jan 2 2005, 11:21 PM
Next up, I installed the rear bar (kindly donated by a club member). I made up these brackets to instal It.
Attached image(s)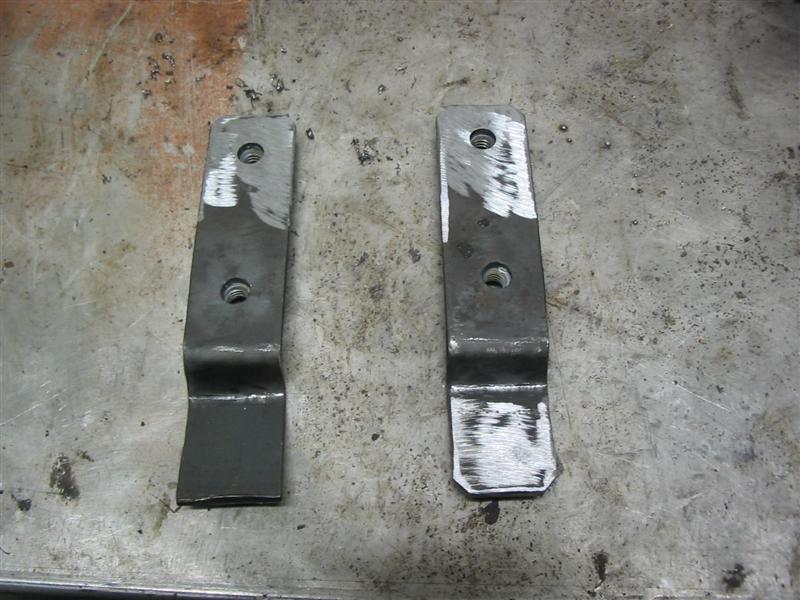
Posted by: Dave-O Jan 2 2005, 11:23 PM
And in goes the bar. In this picture you can also see the repainted used koni reds i installed and the trailing arm i used to replace my old bent one.
Attached image(s)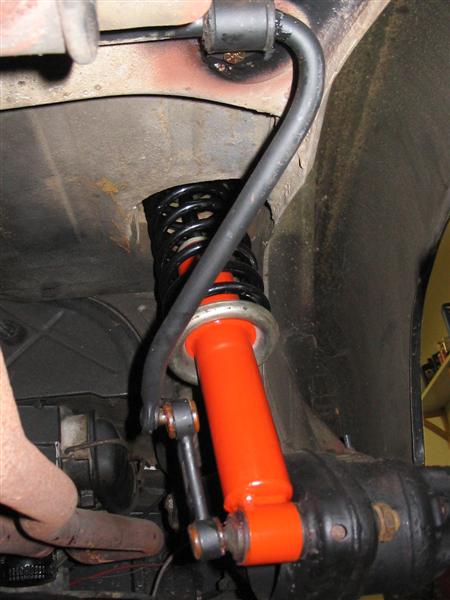
Posted by: Dave-O Jan 2 2005, 11:26 PM
Finally i got started on some interior projects. I first made a set of door panels out of 3/16" plywood. These pieces are actually lighter than the original paper-board and a much much more durable. I re-used the metal piece on the top of the old panel.
Attached image(s)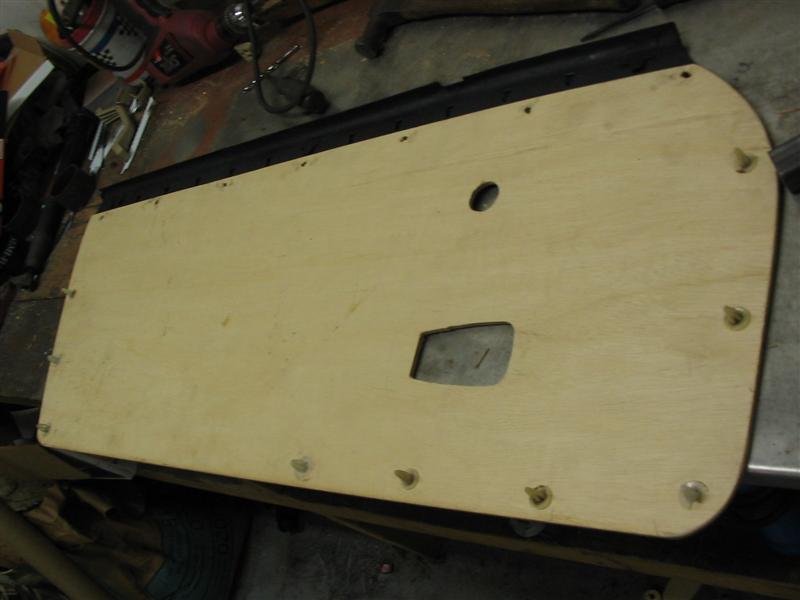
Posted by: Dave-O Jan 2 2005, 11:29 PM
After upholstering, I hope the "waves" in the top folded part even out with time. My mistake was gluing the vinyl of this portion to the padding underneath. For future reference leave the padding "sit" inside the vinyl flap so it is not distorted by the pinched vinyl underneath. The handle is simply an overhead handle on a saturn parts car I have around. I covered the handle portion with vinyl and painted the end caps. These panels turned out much better than I expected, this was the first time I’ve done door panels.
Attached image(s)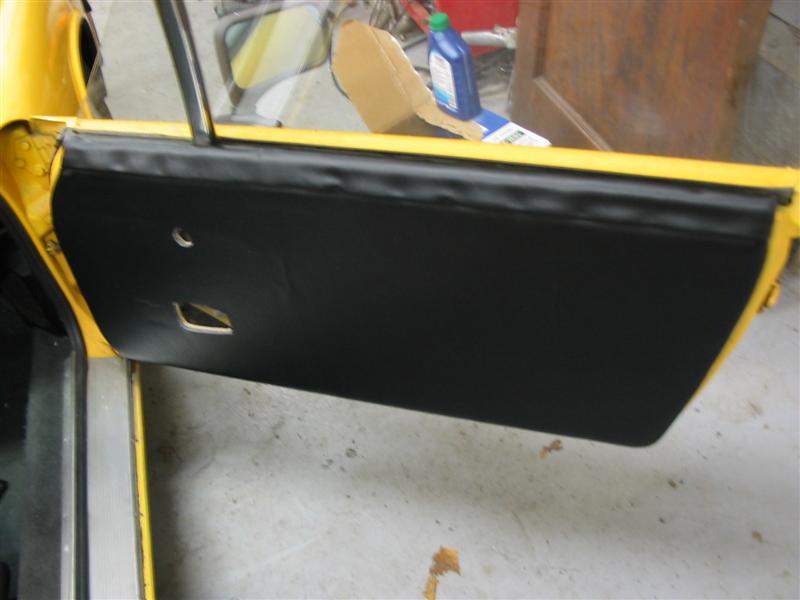
Posted by: Dave-O Jan 2 2005, 11:31 PM
crap, wrong picture. Here is the picture of the finished door panel.
Attached image(s)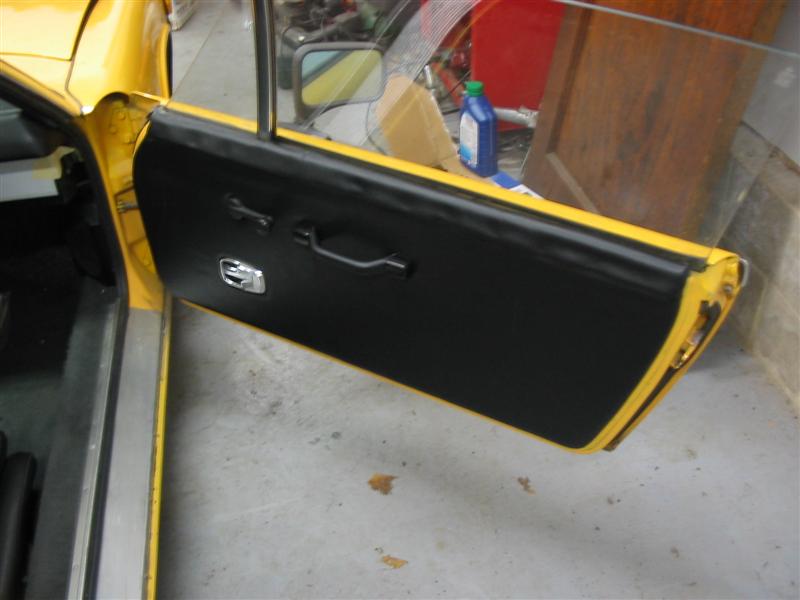
Posted by: airsix Jan 2 2005, 11:32 PM
Dave,
I'm interested to see your front sway-bar project. I love DIY stuff. Are you modifying a bar off of something else, or making up a new bar from scratch? If from scratch do you have plans for getting it heat treated and tempered to spring-temper?
-Ben M.
Posted by: Dave-O Jan 2 2005, 11:33 PM
I also re-covered the dash face with a felt material. Since i eliminated the radio and glove box i had to make new backing panels out of aluminum sheet.
Attached image(s)
Posted by: Dave-O Jan 2 2005, 11:35 PM
Here is the dash face installed. I still need to find a good knee pad. In this picture you can also see the 917-style shift knob...a christmas present from my dad 
Attached image(s)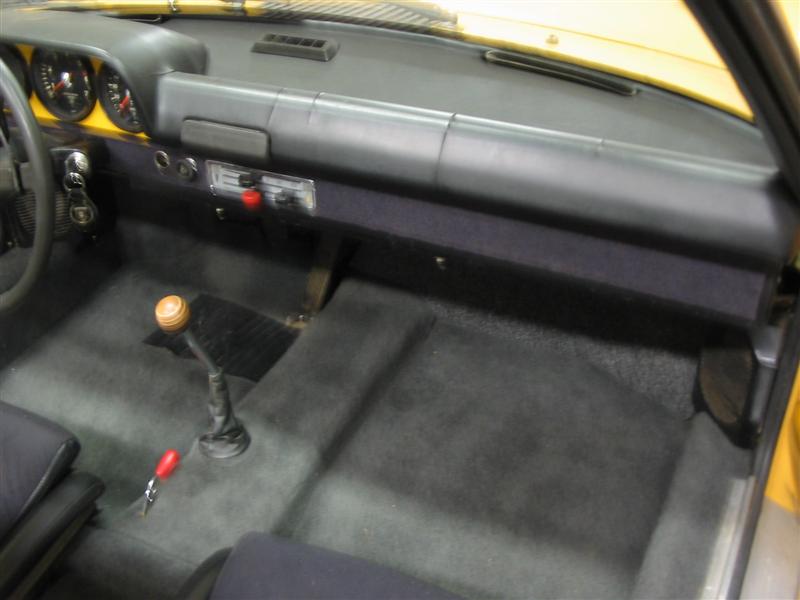
Posted by: Dave-O Jan 2 2005, 11:36 PM
I also picked up a set of these 
Attached image(s)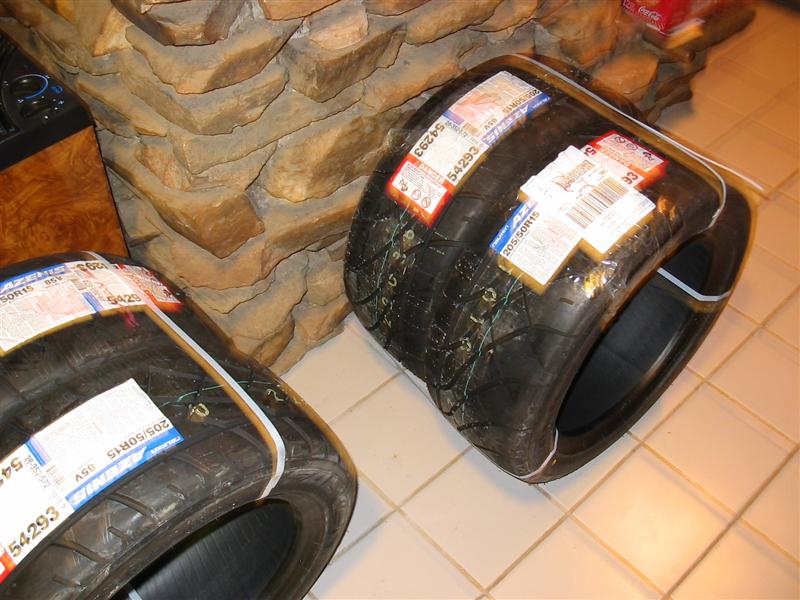
Posted by: Dave-O Jan 2 2005, 11:42 PM
| QUOTE (airsix @ Jan 2 2005, 11:32 PM) |
| Dave, I'm interested to see your front sway-bar project. I love DIY stuff. Are you modifying a bar off of something else, or making up a new bar from scratch? If from scratch do you have plans for getting it heat treated and tempered to spring-temper? -Ben M. |
well i guess i can let the cat out of the bag
 . I will be using a welt 22mm bar. I am making the rest of the hardware myself. This first picture is of the homemade bushing holder. I also made the backing plate and welded it into the car.
Attached image(s)

Posted by: Dave-O Jan 2 2005, 11:43 PM
in the car
Attached image(s)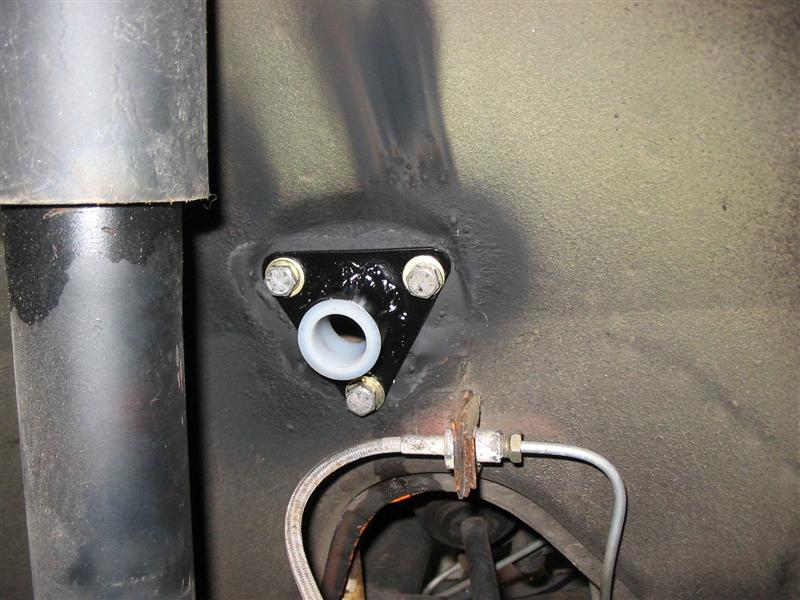
Posted by: Dave-O Jan 2 2005, 11:46 PM
Here is the start of the adjustable "rod ends"
Attached image(s)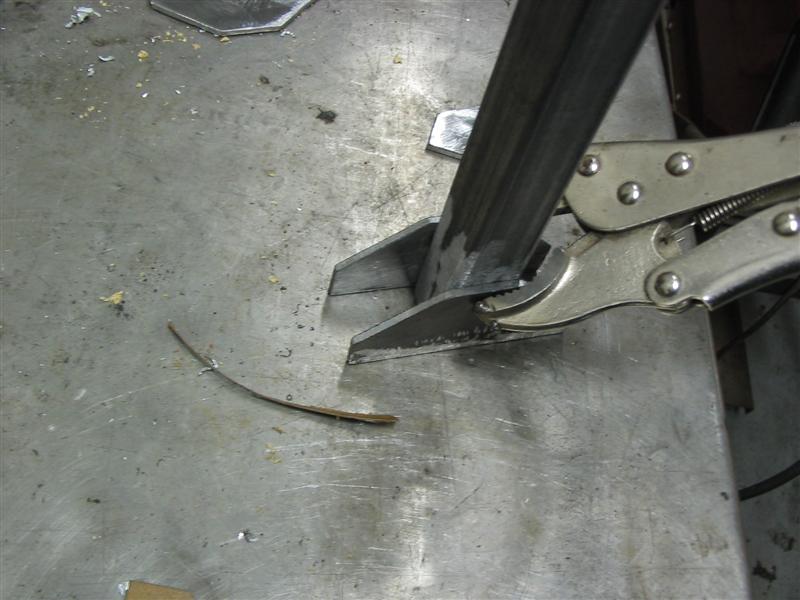
Posted by: Dave-O Jan 2 2005, 11:47 PM
welded
Attached image(s)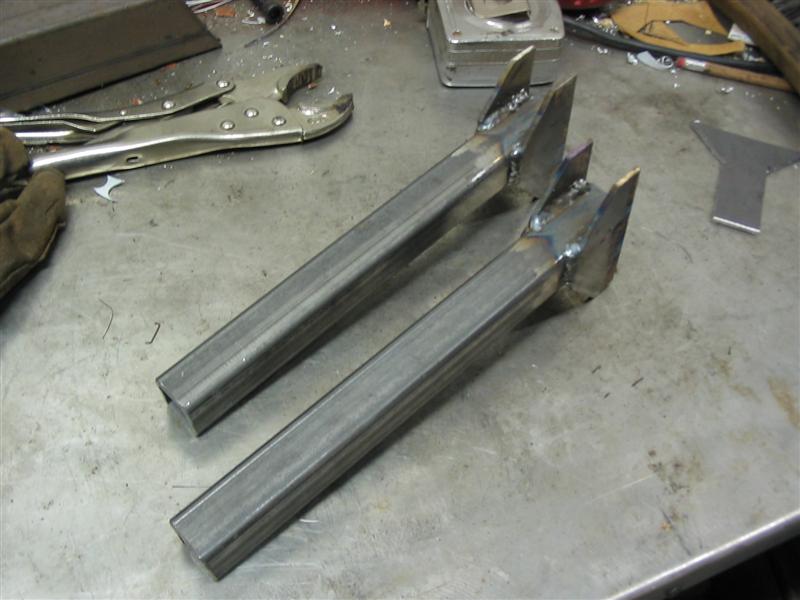
Posted by: Dave-O Jan 2 2005, 11:48 PM
I also finished making the adjustable rod connectors. This seemed like the easiest design to fabricate
Attached image(s)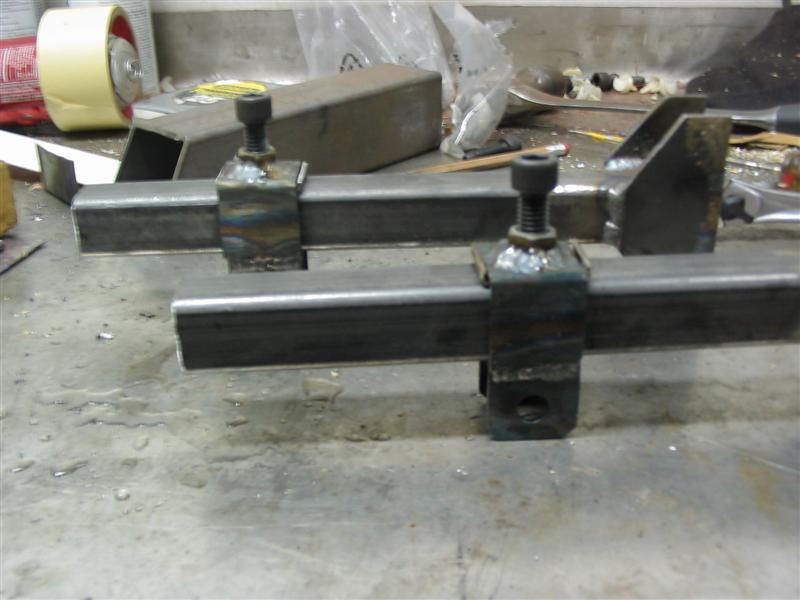
Posted by: Dave-O Jan 2 2005, 11:50 PM
i just got started making the attachment point when i had to go back to work. I'll do the rest over spring break,
Attached image(s)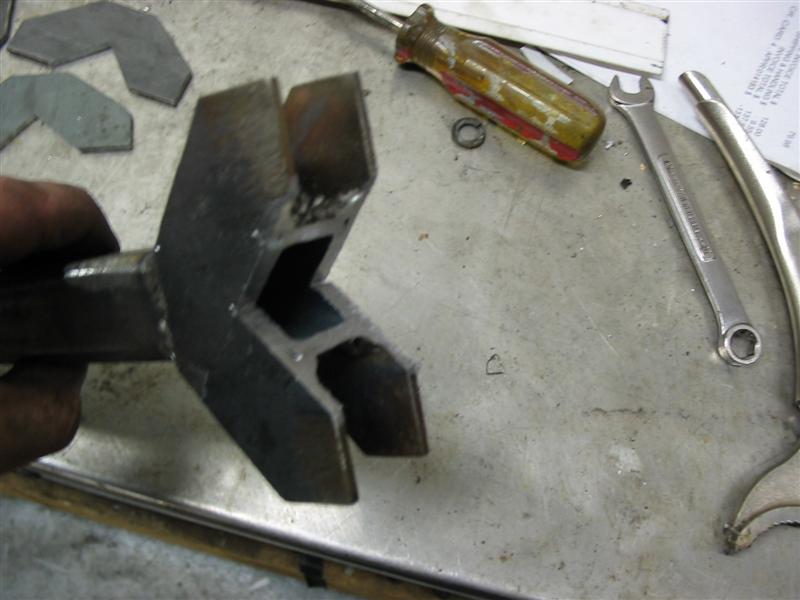
Posted by: 736conver Jan 3 2005, 12:35 AM
Looks good Dave.
Hey are those my Konis in action there. I hope they were good.
As for your door panels you should glue the back side of the top. Just like the factory did. Or you can also staple them. I've done both and the both work well.
Did you put in a little foam cushion too?
If you do them over I have a staple gun and the small 4mm staples I could loan you.
Here's an example I did for a customer.
Attached image(s)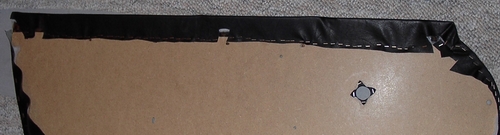
Posted by: 736conver Jan 3 2005, 12:36 AM
..
Attached image(s)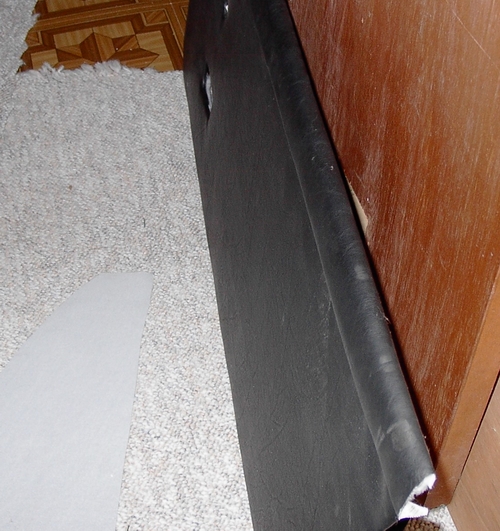
Posted by: Dave-O Jan 3 2005, 08:38 AM
Brian, I glued the backside like the factory did. My problem was that i glued the pad that sits inside the top part down to the vinyl below (which is really uneven because it is pinched by those tabs). Then i glued the top piece of vinyl to the distorted pad. I'm going to try and work the vinyl loose from the pad below and as a last resort take the top apart again.
Yes, those are your old koni's. They seem to be working fine. I put a pair of your fronts in too. Thanks!
David
Posted by: 736conver Jan 3 2005, 08:53 AM
Glad the Koni's worked out. Give a call or email if you need anything else. I need to empty that trailer out.
Brian
Posted by: Stutgart46 Jan 3 2005, 09:03 AM
Great pics. The felt dash looks really good. I also like what you did with your panels. I'm thinking of using sheet metal.
Show us some pics of the whole car after you get your new shoes on.
Posted by: STL914 Jan 3 2005, 11:50 AM
Dave,
I just pulled a lower dash pad from my 74 that I'd be willing to sell to you. Let me know exactly what condition
of pad you're looking for. Mine is not concourse but is in very good shape with a small tear in the inside corner near the right side vent.
If interested, send me your e-mail address and I'll send you a couple of pictures.
Former Cheesehead now in STL. Go Pack!
Posted by: aircooledboy Jan 3 2005, 03:19 PM
| QUOTE (Dave-O @ Jan 2 2005, 11:35 PM) |
| I still need to find a good knee pad. |
Dood,
Looking good. I told ya I've got ya covered on the knee pad. Just gotta wait til it warms up a bit. (We need a guy wearing a skirt smilie
 )
)
Posted by: Dave-O Mar 13 2005, 09:28 PM
Hey All!
Well, I’m on my spring break so it's time to get back to work in the garage. First order of business is to finish up the fabricating work on the front sway bar. I finally got the bar stock from Paragon (those guys rock!) and tested out my aluminum collars.
Attached image(s)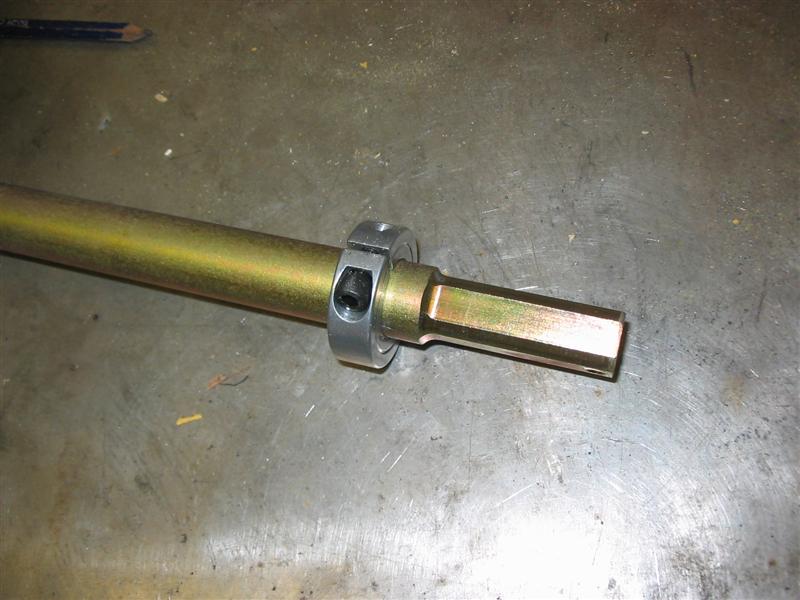
Posted by: Dave-O Mar 13 2005, 09:30 PM
Here's a shot of my adjustable arms, a litte further along.
Attached image(s)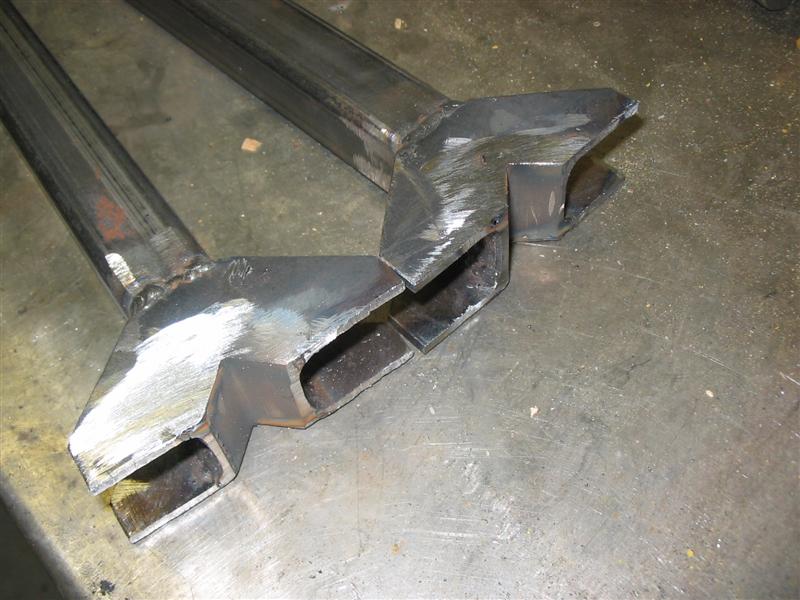
Posted by: Dave-O Mar 13 2005, 09:32 PM
I made the "caps" for the arm-bar junction
Attached image(s)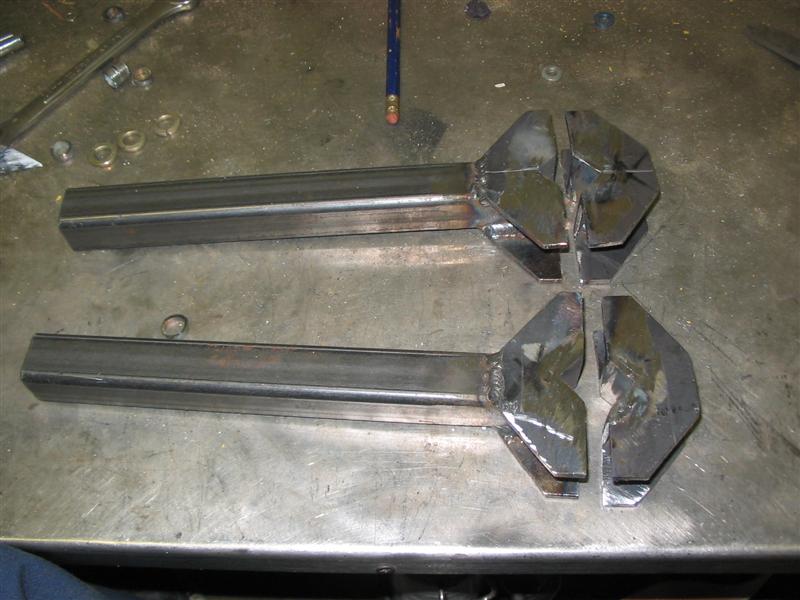
Posted by: Dave-O Mar 13 2005, 09:33 PM
Some drilling/grinding/welding/grinding later they're finally complete!
Attached image(s)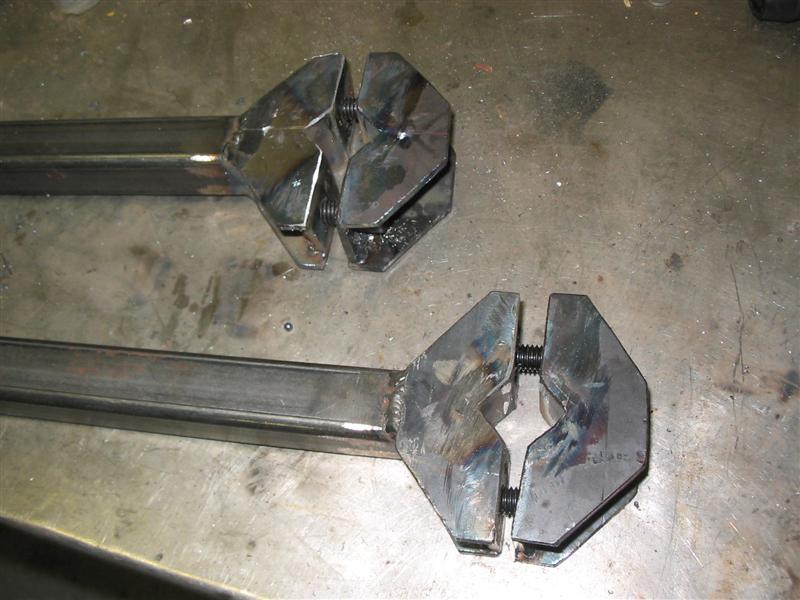
Posted by: Aaron Cox Mar 13 2005, 09:35 PM
those arms are LONG! wow!
cool stuff man!
what size/who made the bar?
Posted by: Dave-O Mar 13 2005, 09:36 PM
mocked up on the bench
Attached image(s)
Posted by: Dave-O Mar 13 2005, 09:37 PM
one more
Attached image(s)
Posted by: Dave-O Mar 13 2005, 09:38 PM
test fit on the car
Attached image(s)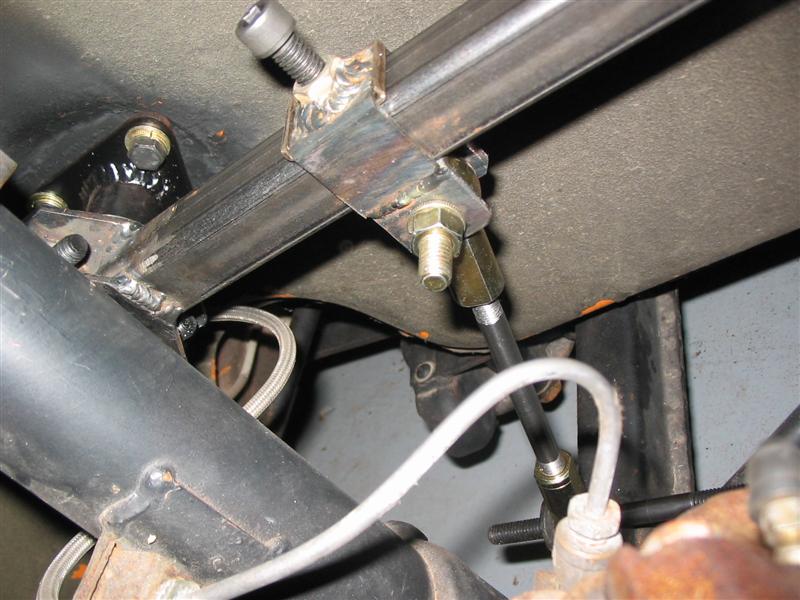
Posted by: Dave-O Mar 13 2005, 09:40 PM
ready for paint
Attached image(s)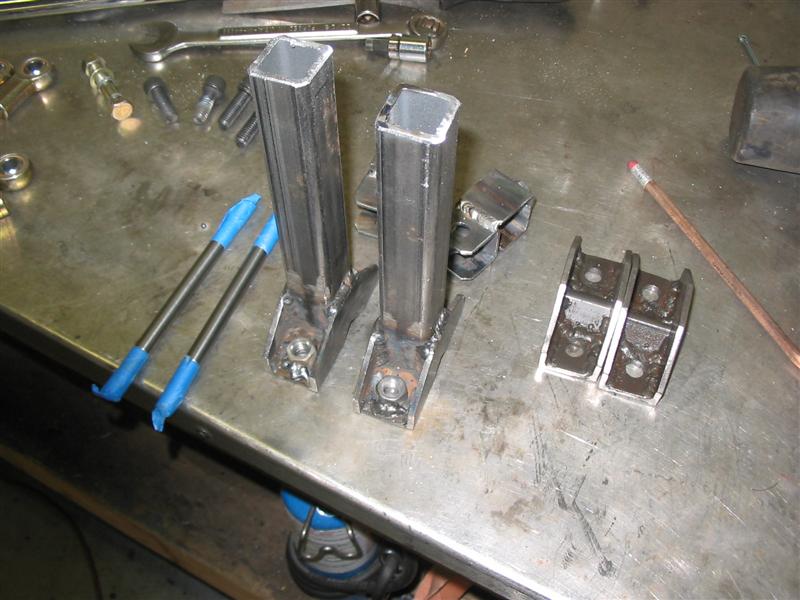
Posted by: Dave-O Mar 13 2005, 09:42 PM
While the paint was drying I re-mounted my rockers with stainless steel screws and threaded inserts. More progress tomorrow...
David
Attached image(s)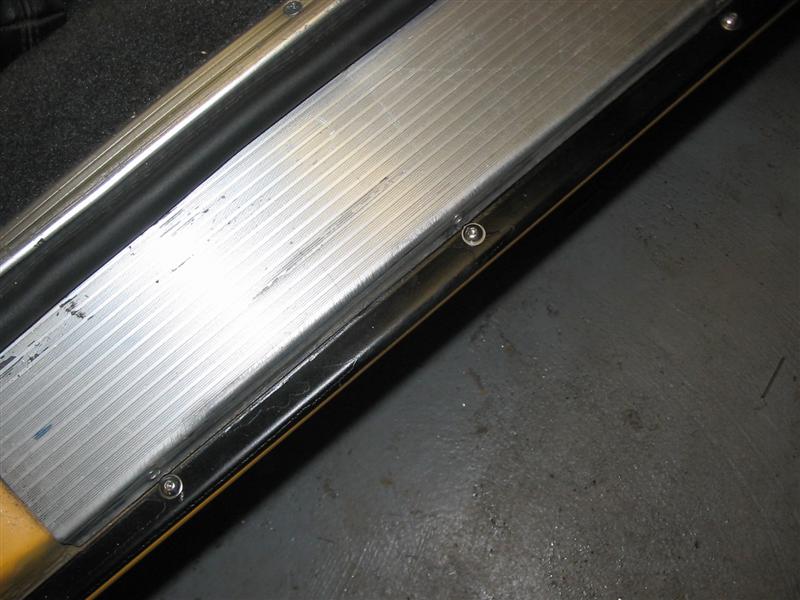
Posted by: Dave-O Mar 13 2005, 09:45 PM
| QUOTE (Aaron Cox @ Mar 13 2005, 09:35 PM) |
| those arms are LONG! wow! cool stuff man! what size/who made the bar? |
I left the arms run "wild". After i test-fit on the car I marked where the maximum distance before the drop-links would bind was and cut them off.
The bar is a Welt 22mm
Can't wait for my car to NOT sway like the one in my avitar!
Posted by: Qarl Mar 13 2005, 09:59 PM
Awesome work dude!
Can I get a Woop Woop!

Posted by: rick 918-S Mar 13 2005, 10:08 PM
| QUOTE (Qarl @ Mar 13 2005, 07:59 PM) |
| Awesome work dude! Can I get a Woop Woop! |
 Sweet!
 Rock no roll!
Posted by: Dave-O Mar 14 2005, 08:13 PM
More progress from project: "MIATA KILLER". I fit all my freshly painted sway-bar parts. I must say, it turned out pretty nice. Besides installation, the only real work i had to do on the front bar was cutting spacers to place the ball joints in the middle of the junctions. Here's one shot following installation.
Attached image(s)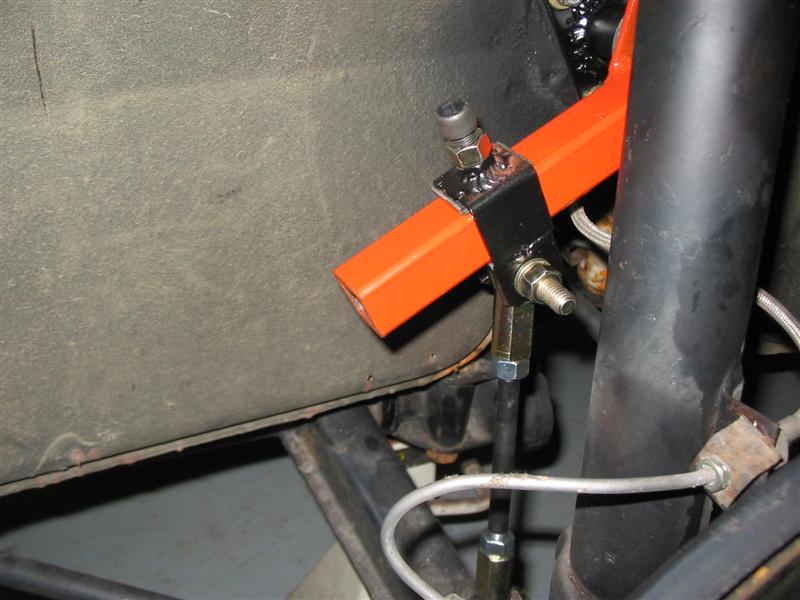
Posted by: Dave-O Mar 14 2005, 08:14 PM
and the backside...
Attached image(s)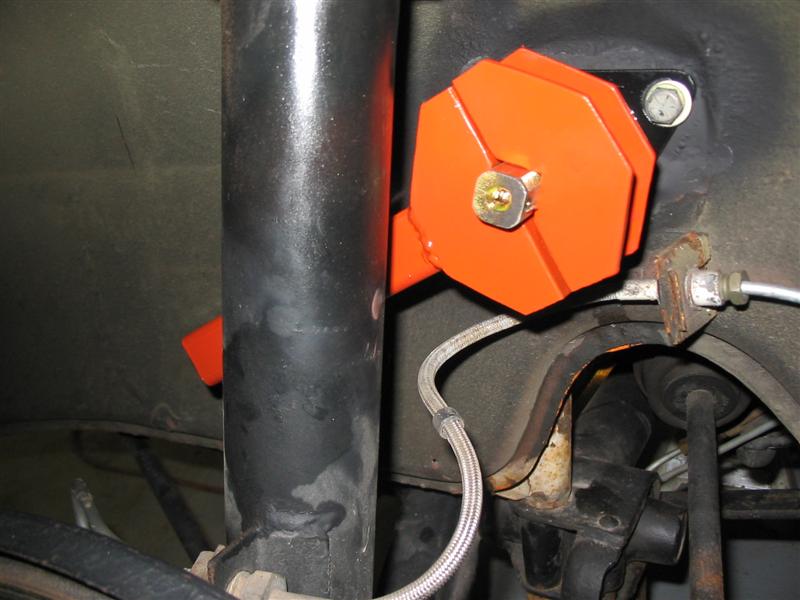
Posted by: Dave-O Mar 14 2005, 08:15 PM
one more, from underneath...
Attached image(s)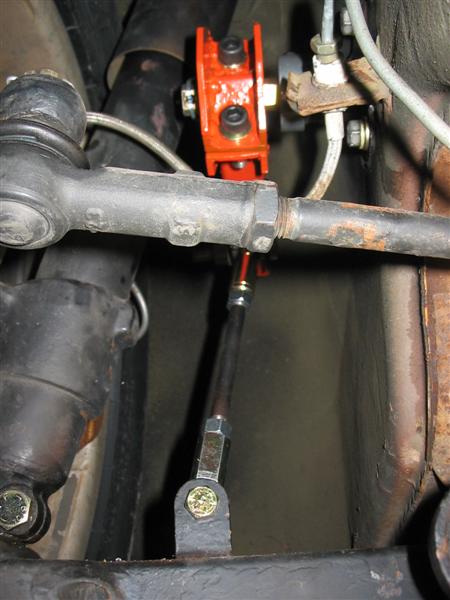
Posted by: Dave-O Mar 14 2005, 08:17 PM
I also got these bad boys mounted.
Attached image(s)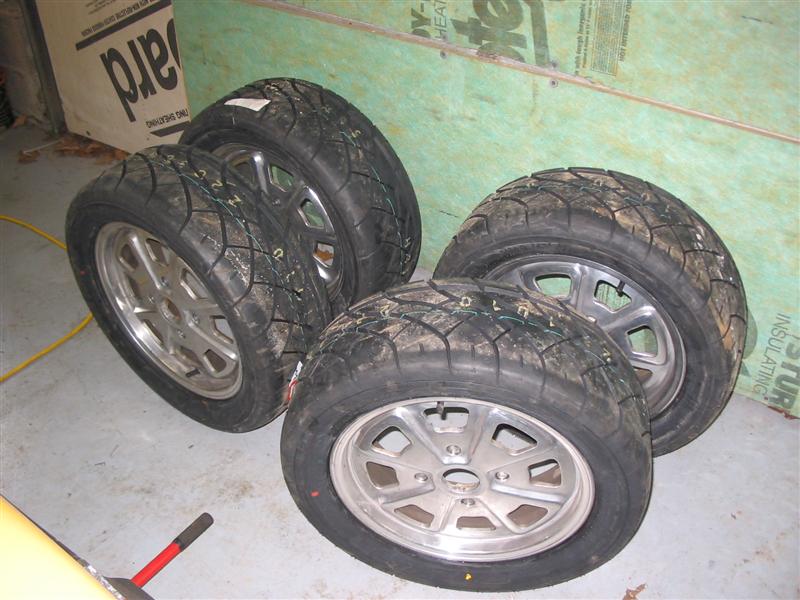
Posted by: Dave-O Mar 14 2005, 08:19 PM
Gots me some TIAR!!!!!! this one goes out to JP
Attached image(s)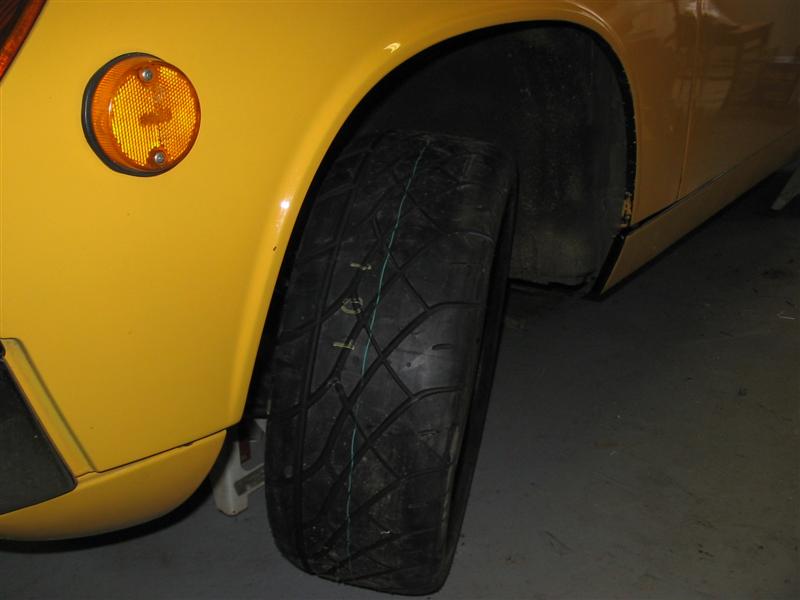
Posted by: Aaron Cox Mar 14 2005, 08:20 PM
| QUOTE (Dave-O @ Mar 14 2005, 07:17 PM) |
| I also got these bad boys mounted. |
i love my bad boy falkens....
Posted by: Dave-O Mar 14 2005, 08:23 PM
She wants to go out and play...but Wisconsin weather will not allow it. Besides, i still have to do an alignment and try to get it on some scales for a corner balance. The rest of the day was spent changing oil, adjusting valves, installing a rear view mirror and checking over everything else. I love days when things just "come together"!!! 
David
Attached image(s)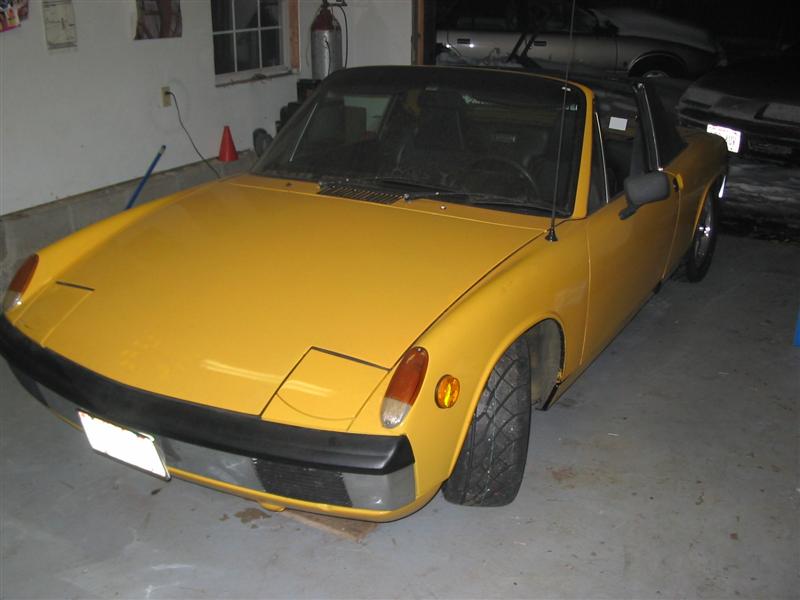
Posted by: Brett W Mar 14 2005, 11:39 PM
What is that white stuff all over your drive way? That is really gonna put a damper on your test drive.
Posted by: Dave-O Mar 15 2005, 09:38 AM
| QUOTE (Brett W @ Mar 14 2005, 11:39 PM) |
| What is that white stuff all over your drive way? That is really gonna put a damper on your test drive. |
The white stuff on the ground is snow...The white stuff on my saturn is salt!

No test drives for a couple weeks.
David
Posted by: Dave-O Jan 18 2006, 10:56 AM
It's been almost a year since I last posted on this thread. I had an awesome time running in SCCA C-stock class with street tires...but I would be nice to be remotely competitive . I've decided to build the car to the new SCCA STS2 class. I began work on preparing the car for this class over this semester break. Plans include 6.5" rims with new Falken RT-615's, rear coilovers with stiffer springs, racing seat, Momo steering wheel, header, pointless ignition, and a few other odds and ends.
First step was strip the wheels so I could get them sent out to the machinist to have ball seats cut into them.
Before...
Attached image(s)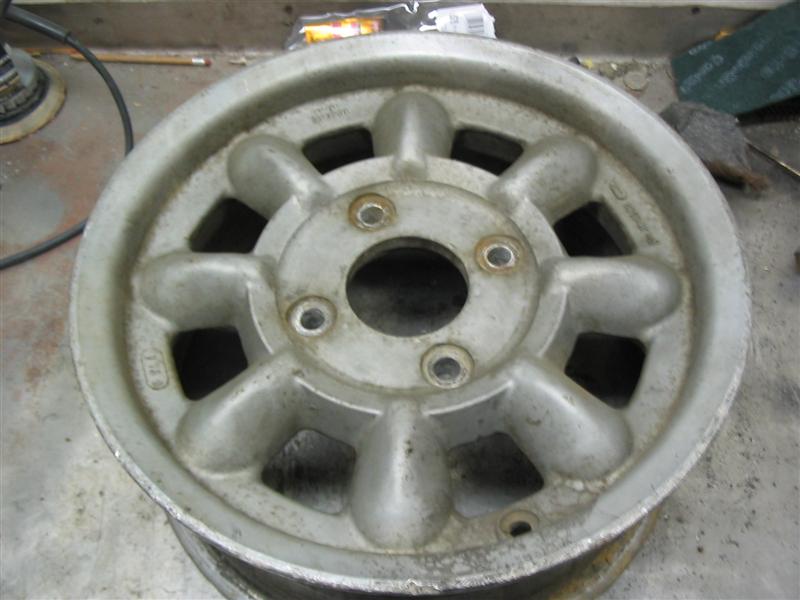
Posted by: Dave-O Jan 18 2006, 10:58 AM
after
Attached image(s)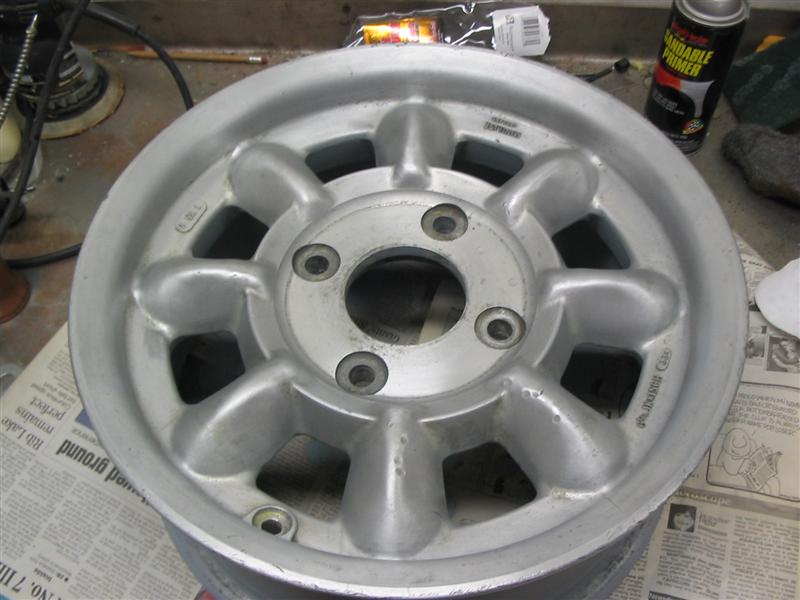
Posted by: Dave-O Jan 18 2006, 10:59 AM
mmmm...minilites
Attached image(s)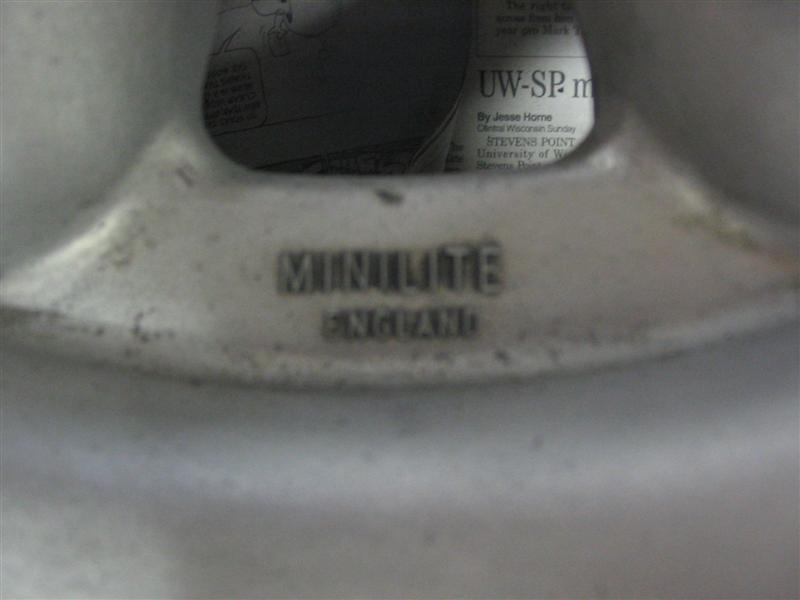
Posted by: Dave-O Jan 18 2006, 11:00 AM
I mocked them up on the car to see the fit. These wheels fit just perfectly. Eventually I may add spacers in the front to increase the front track width a bit, but the rears need nothing.
In front
Attached image(s)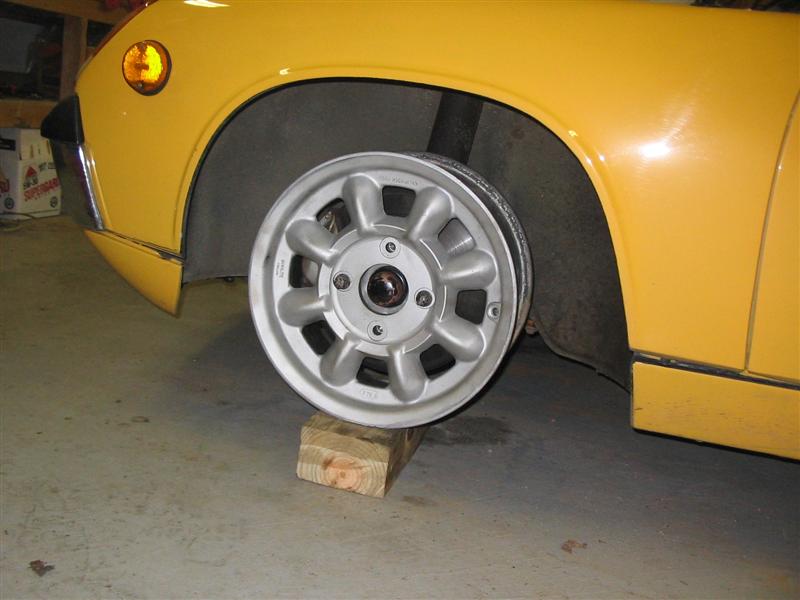
Posted by: Dave-O Jan 18 2006, 11:02 AM
And the rear fit
Attached image(s)
Posted by: Dave-O Jan 18 2006, 11:05 AM
I got a used KH header from Chris Foley (thanks Chris ) and ran it with the beat up finish that was on it last year. Over break I had the header sandblasted and put on a coat of "header paint"...we'll see if it holds up but at least it will look better than it did!
Attached image(s)
Posted by: Dave-O Jan 18 2006, 11:07 AM
And on the car....
Attached image(s)
Posted by: Root_Werks Jan 18 2006, 11:08 AM
Nice 914!
Posted by: Dave-O Jan 18 2006, 11:11 AM
For rear coilovers I used koni yellows with coleman racing adjustable perches. For now I will be running a set of 150 lb springs that a friend of mine had left over and adjust from there. I had to make a washer for the top of the strut to allow the coleman perch to be centered on the shaft of the shock.
Attached image(s)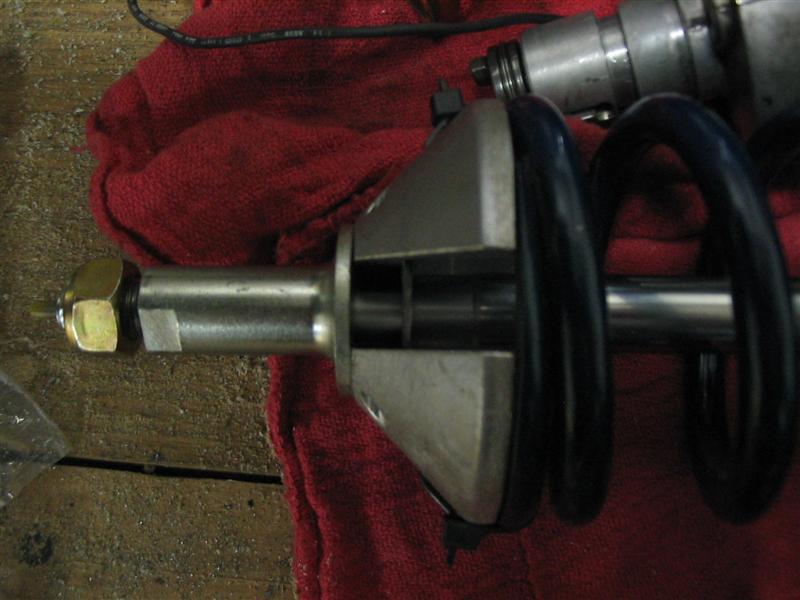
Posted by: Dave-O Jan 18 2006, 11:12 AM
And the go here (in case you didn't know that )
Attached image(s)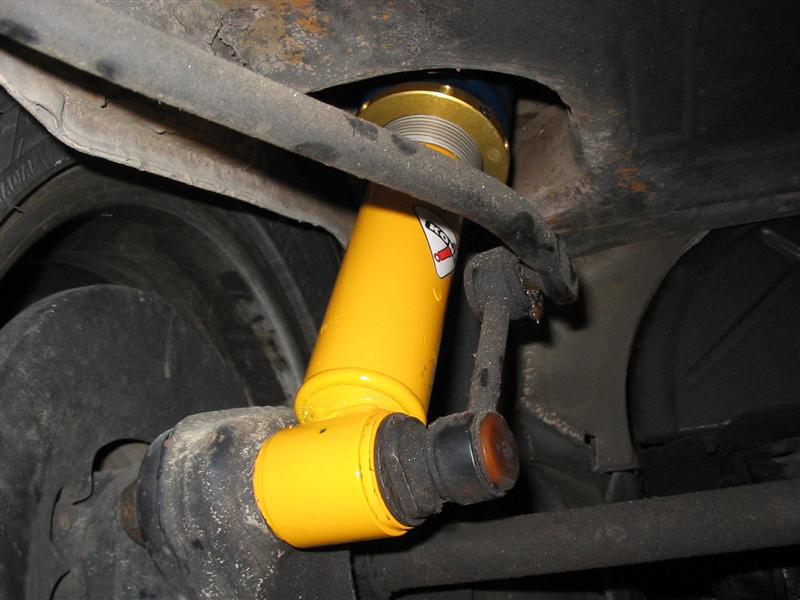
Posted by: Dave-O Jan 18 2006, 11:14 AM
The last of the interesting stuff...I made a camera mount that attaches to my aluminum seat to mount my digital camera to. You can bet there will be some AX videos this next season!
Attached image(s)
Posted by: ottox914 Jan 19 2006, 11:23 AM
Nice work, Dave. Hope to see you put a hurt'n on the rest of STS2 this season. And paint those wheels black.
Posted by: tat2dphreak Jan 19 2006, 11:31 AM
sorry I missed this thread the first time... what is the weight diff. between a stock sway bar setup and your DIY setup, the diy setup looks awesome, adjustability for much less than an aftermarket bar!!
car looks great! 
Posted by: Dave-O Jan 19 2006, 02:27 PM
| QUOTE (tat2dphreak @ Jan 19 2006, 11:31 AM) |
| sorry I missed this thread the first time... what is the weight diff. between a stock sway bar setup and your DIY setup, the diy setup looks awesome, adjustability for much less than an aftermarket bar!! car looks great! |
I've never actually held a welt or any other aftermarket stuff in my hands, but I'd guess my set-up is a few pounds heavier. If you factor in my own time on it i'm sure I'm way behind a welt set up...but it sure was fun doing! (isn't that what this is all about?)
Posted by: Dave-O Mar 15 2006, 06:58 PM
And it's spring break!... I turned down trips to Vegas and Florida to work on my 914 (this really is a sickness) but a lot has to be done before it's ready to pound the AX parking lots on April 29th and 30th. What I wanted to get done over break was:
-get my tires mounted on my new wheels and get those ready to roll
-fix a few odds and ends on the car including a couple of fasteners that fell out on my valences
-fix the steering wheel wobble I really started to notice when I put my new wheel on
-do another alignment and corner balance on the car
-put my new vinyl numbers on the car
First order of business was to get the minilites back from the machinest... they did a really good job, perfect match to the stock ball seat.
Attached image(s)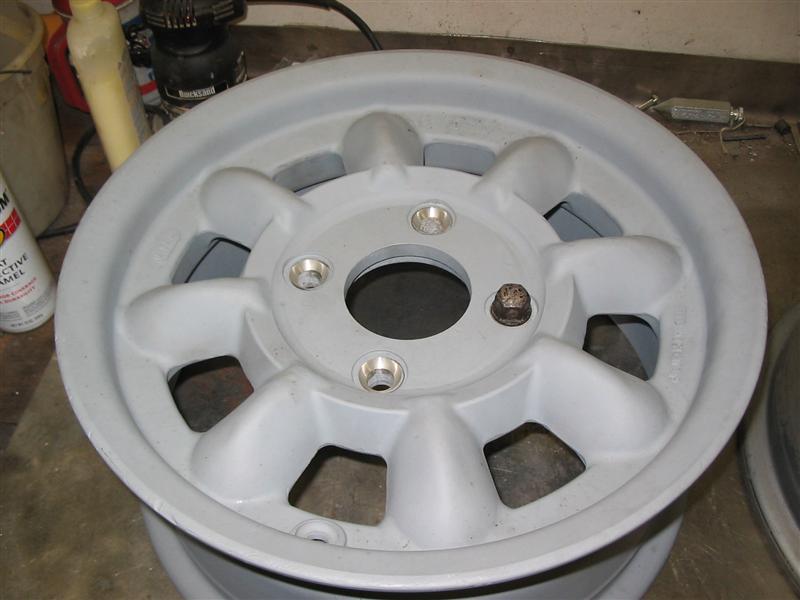
Posted by: Dave-O Mar 15 2006, 07:01 PM
I started by doing the finishing on these. I decided to go with gloss black. I didn't spend too much time on them, just sanded them a bit and put on one coat of black and one coat of clear. Here is the result...
Attached image(s)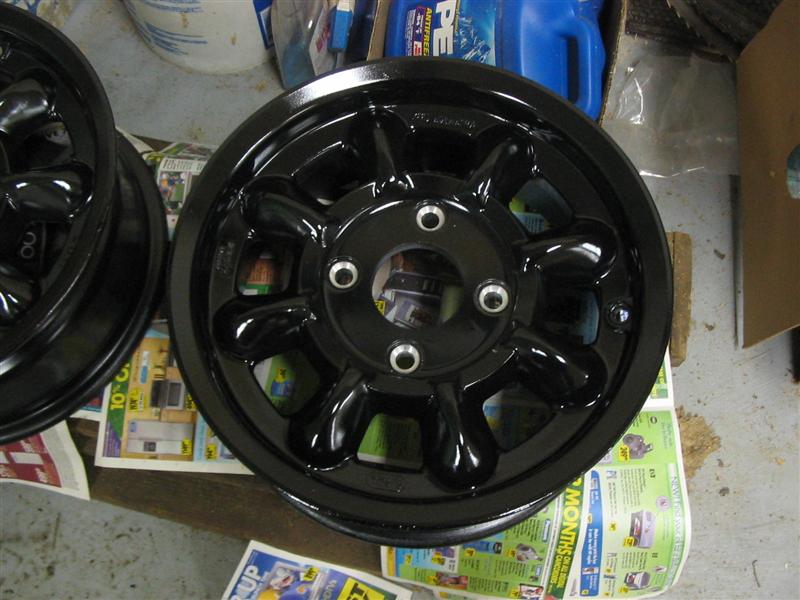
Posted by: Dave-O Mar 15 2006, 07:03 PM
While those were drying I took on a few other projects. When I put my Kerry Hunter on at first I just took off the rear valence. I decided to notch it and put it back on. The whole valence needs to be refinished but just to get it on I did a cheap and easy paint job around the notch.
Attached image(s)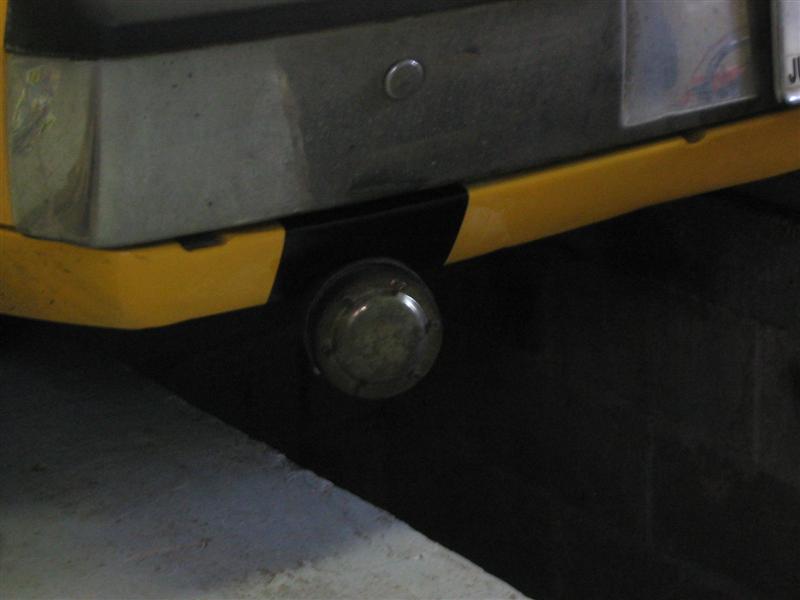
Posted by: Dave-O Mar 15 2006, 07:06 PM
When I put my rear coilovers on, the top of the rear shock didn't fit quite like it did on the stock set-up. It seems the bottom rubber part seated further down the coleman perch than on the stock set up, becasue of this I had to come up with a solution to put some tension on those rubber pads.
Here is the problem at first
Attached image(s)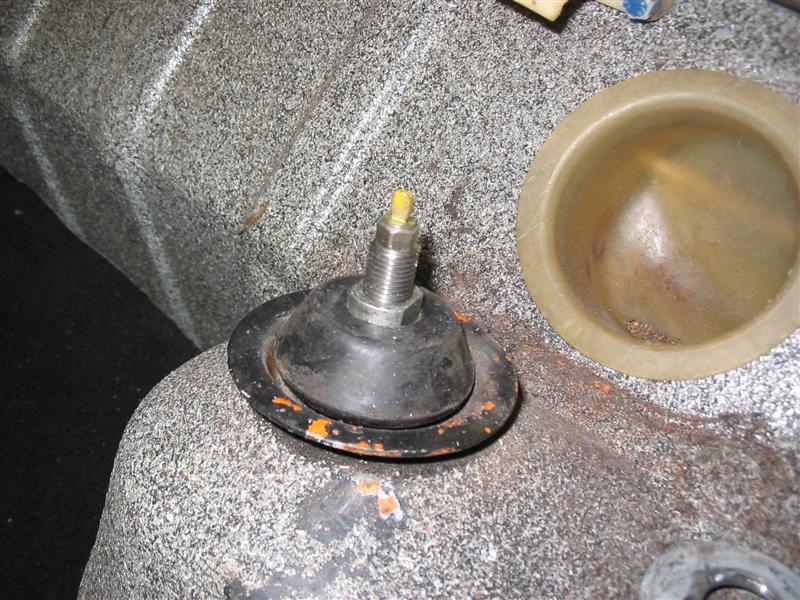
Posted by: Dave-O Mar 15 2006, 07:09 PM
I reamed out the inside of the stock top washer so it will press against the top rubber pad.
Attached image(s)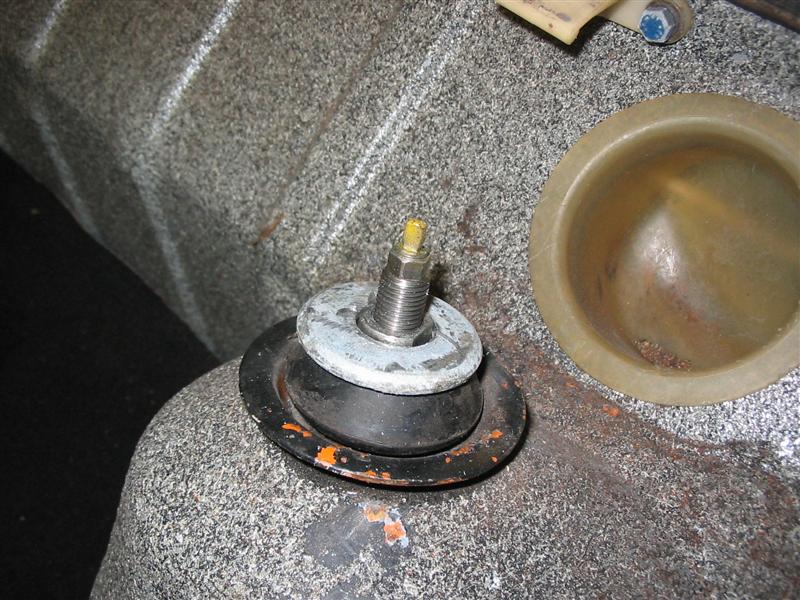
Posted by: Dave-O Mar 15 2006, 07:11 PM
I made a spacer to finish it up
Attached image(s)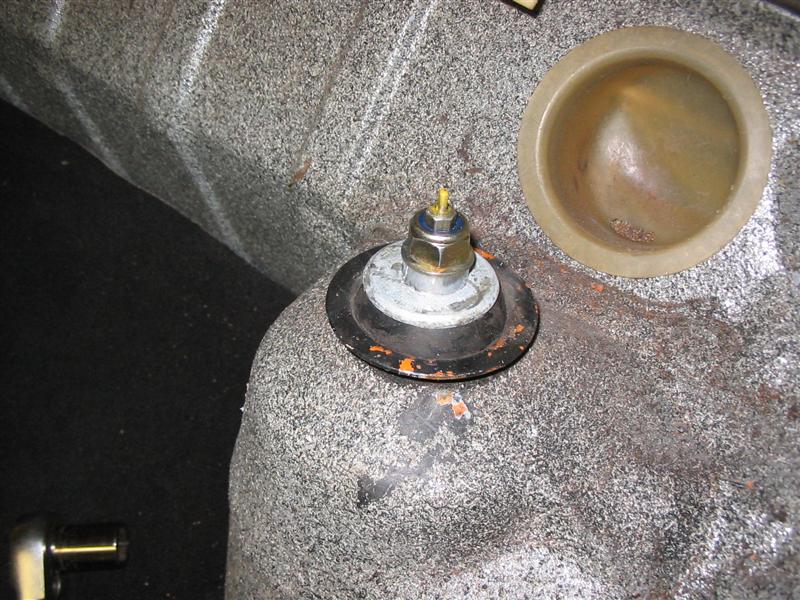
Posted by: Dave-O Mar 15 2006, 07:14 PM
Next I fixed my steering wheel wobble by making a thin aluminum spacer to take up the play between the upper bearing and the column.
Attached image(s)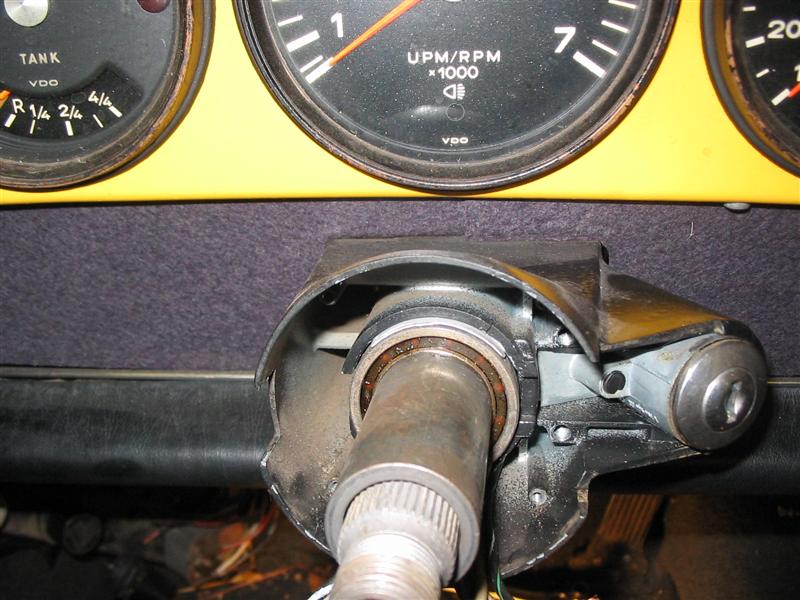
Posted by: Dave-O Mar 15 2006, 07:18 PM
Finally after getting really frustrated putting the column back together (the understatment of the day) I decided to bolt the wheels on and see how it looked. I must say...the black rims make the car look tough! also the contact patch between the tire and the road is much flatter. I can't wait to get the car out there and tear it up. More progress later...
Attached image(s)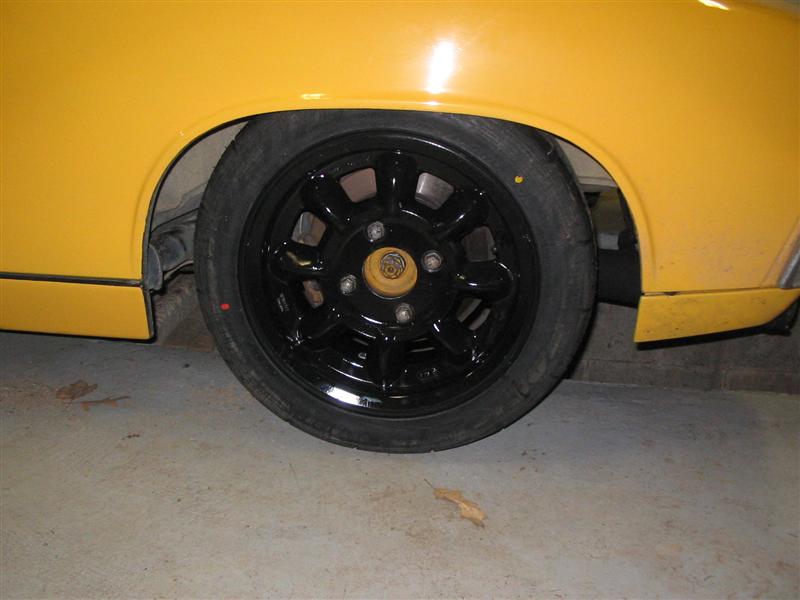
Posted by: Dave-O Mar 15 2006, 07:19 PM
I'll post better shots if/when I get the car outside.
Attached image(s)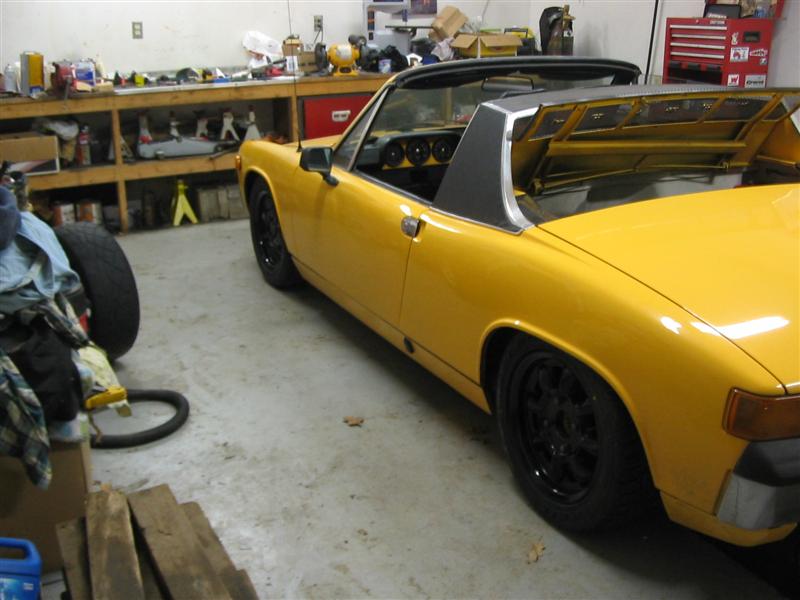
Posted by: ottox914 Mar 17 2006, 08:06 AM
wow dave, those black rims look COOL! I'm actually a little disapointed that I'll be running shiney keizers rather than my black rims from last season. great progress. STS2 beware!!!
Posted by: Dave-O Mar 17 2006, 02:15 PM
Ok, yesterday I set the ride height, did a corner balance, and set the camber on the car. I went with -2.0 degrees on all four corners. This is partially because I can't get any more on the front with the stock camber plates, and also I don't know how much I will need with the falkens. I don't want to put too much on the rear because I'm a little concerned about inside wheel traction (no LSD). I'll see how the car handles with this set up and change it if need be.
Anyway, on to the fun stuff. I got my numbers from my graphics guy (my dad and I remodeled his house ) and put those on today.
Here I am positioning them on the car.
Attached image(s)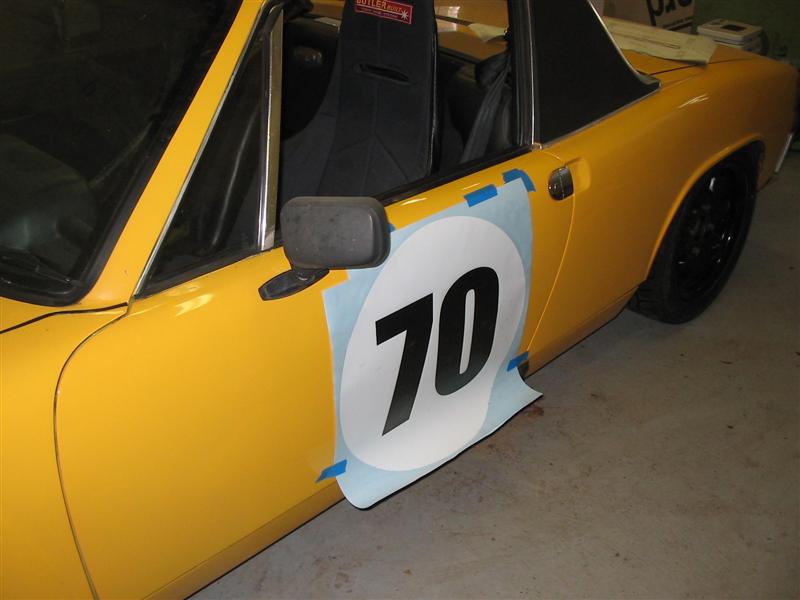
Posted by: Dave-O Mar 17 2006, 02:16 PM
After removing the backing.
Attached image(s)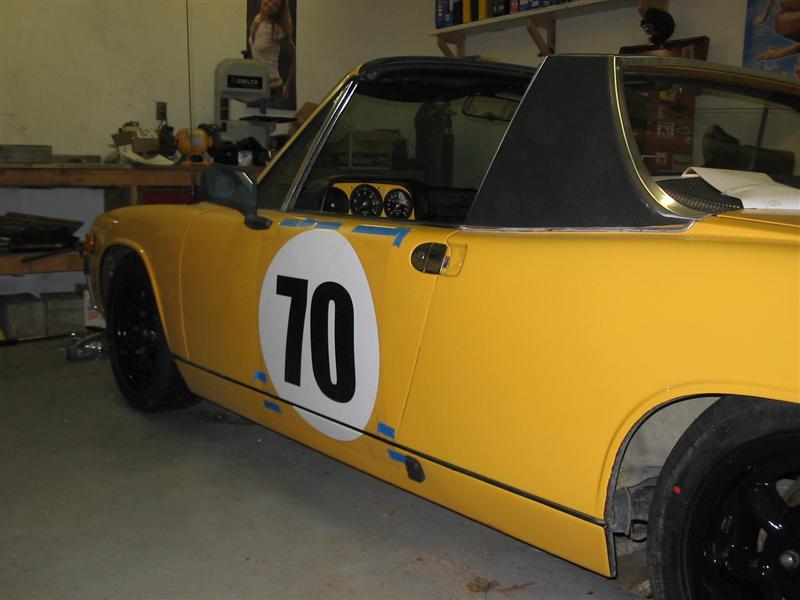
Posted by: Dave-O Mar 17 2006, 02:18 PM
And the finished product. I've never done any vinyl this big, but it turned out really nice. I only had a few small bubbles to take care of.
Attached image(s)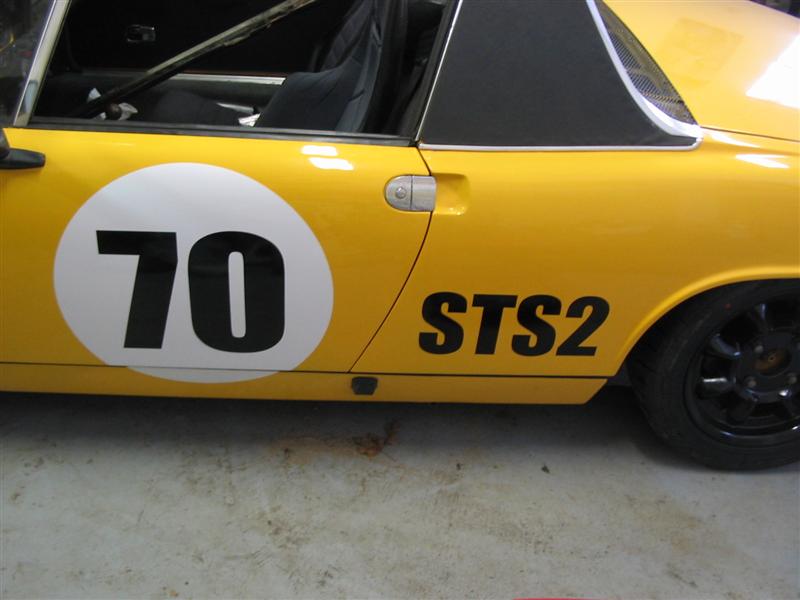
Posted by: Dave-O Mar 17 2006, 02:21 PM
and a glamor shot of the whole car. I had an extra "dot" made in case I really messed something up. The side ones went pretty well so it found it's place on the hood.
Attached image(s)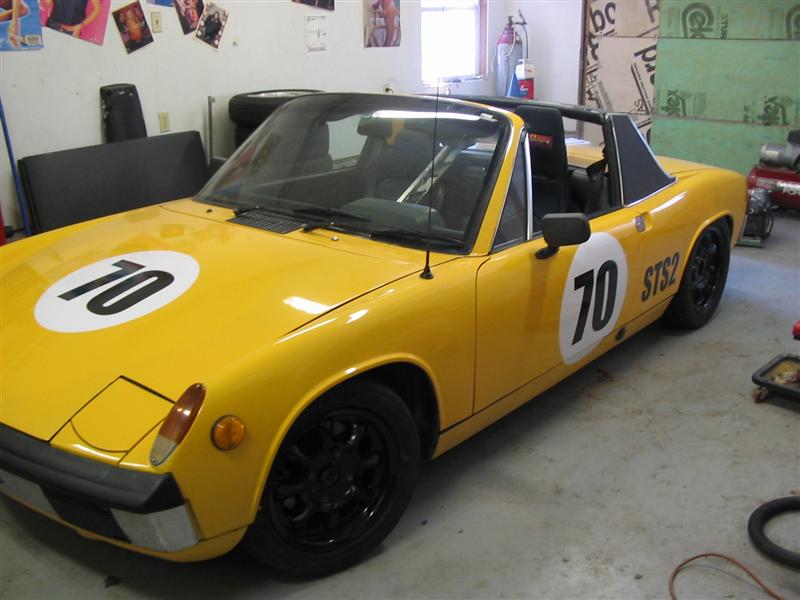
Posted by: Racing916 Mar 17 2006, 02:23 PM
Looks sweet, good work!
Posted by: Eric Taylor Mar 17 2006, 02:35 PM
Sweet! That really looks great. I'm looking forward to break just to drive the dam thing! What's the motor in it?
Eric
Posted by: Dave-O Mar 17 2006, 08:25 PM
| QUOTE (Eric Taylor @ Mar 17 2006, 02:35 PM) |
| Sweet! That really looks great. I'm looking forward to break just to drive the dam thing! What's the motor in it? Eric |
Just has a 1.7 in it. STS2 has a 1.8L maximum displacement. Only engine mods I can do are the KH header and I might put a foam air filter on for the autocrosses. Also I might play around with the timing a bit and if I can get a Wideband O2 sensor on it I may play with the mixture a little bit too.
Posted by: iamchappy Mar 17 2006, 09:06 PM
Dave, Im considering getting rid of my Autopower roll cage do you have any interest in it.
Posted by: ottox914 Mar 17 2006, 11:13 PM
Car looks double hot with the meatballs on the side...
gottcha covered on the wideband- just get a bung welded into the KH exhaust, bring it to my place, and we can play a little.
Posted by: Dave-O Mar 18 2006, 12:44 AM
| QUOTE (iamchappy @ Mar 17 2006, 09:06 PM) |
| Dave, Im considering getting rid of my Autopower roll cage do you have any interest in it. |
Hey Dave, I have no immediate desire to put a cage or a roll bar in...but who knows what my plans will be in 5-10 years. If nobody else buys it let me know and maybe we can work something out.
Posted by: iamchappy Mar 18 2006, 10:44 AM
Dave, I've had in in and out of the car many times over the past few weeks, cracked my windshield one day while installing. I cut it out of the car by removing the side bar which I was going to pin for easy removal if I reinstalled, and I cut the top bars which would have to be rewelded. I was using the bar to get my door gaps right as the roll cage was under a lot of tension when it was removed and was keeping the car square.
I hope that someone in the area would have interest in it. I wouldn't want to ship it, otherwise I will find someplace to store it out of the way and maybe use it someday for track events. If you run across someone in town that has interest let me know.
Posted by: lotus_65 Mar 22 2006, 09:41 PM
schweet.
that car is m o n e y and i think you know it.
Powered by Invision Power Board (http://www.invisionboard.com)
© Invision Power Services (http://www.invisionpower.com)