Printable Version of Topic
Click here to view this topic in its original format
914World.com _ 914World Garage _ 73 SoCal Rebuild
Posted by: Nate Aug 28 2014, 04:24 PM
Hey guys,
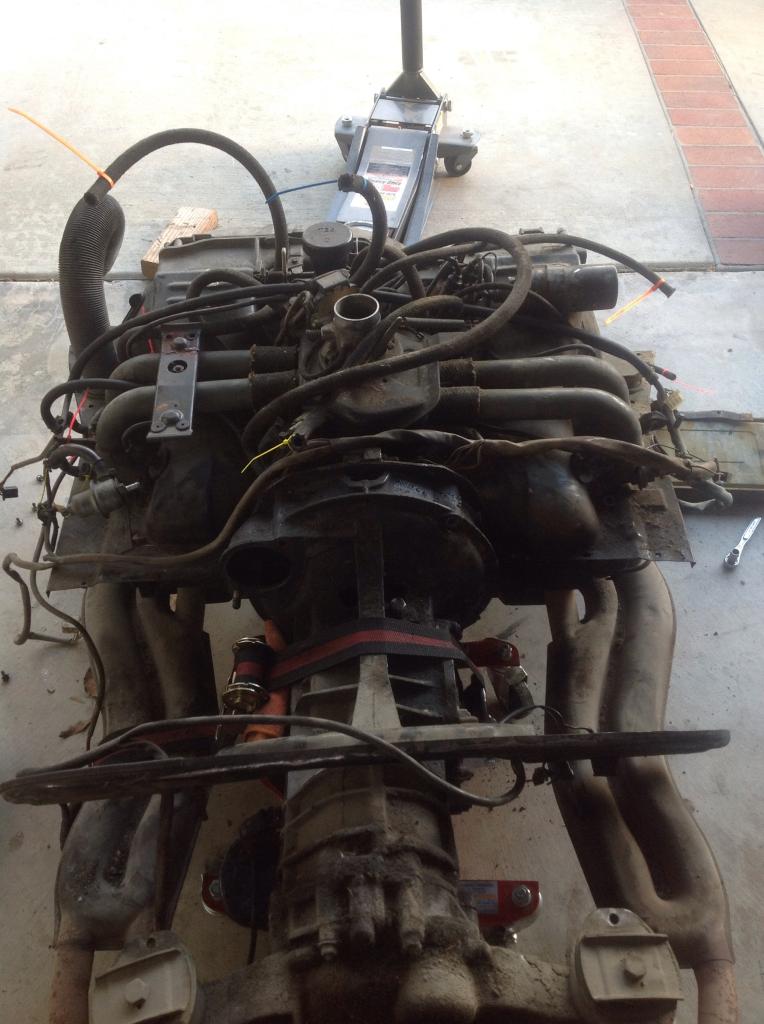
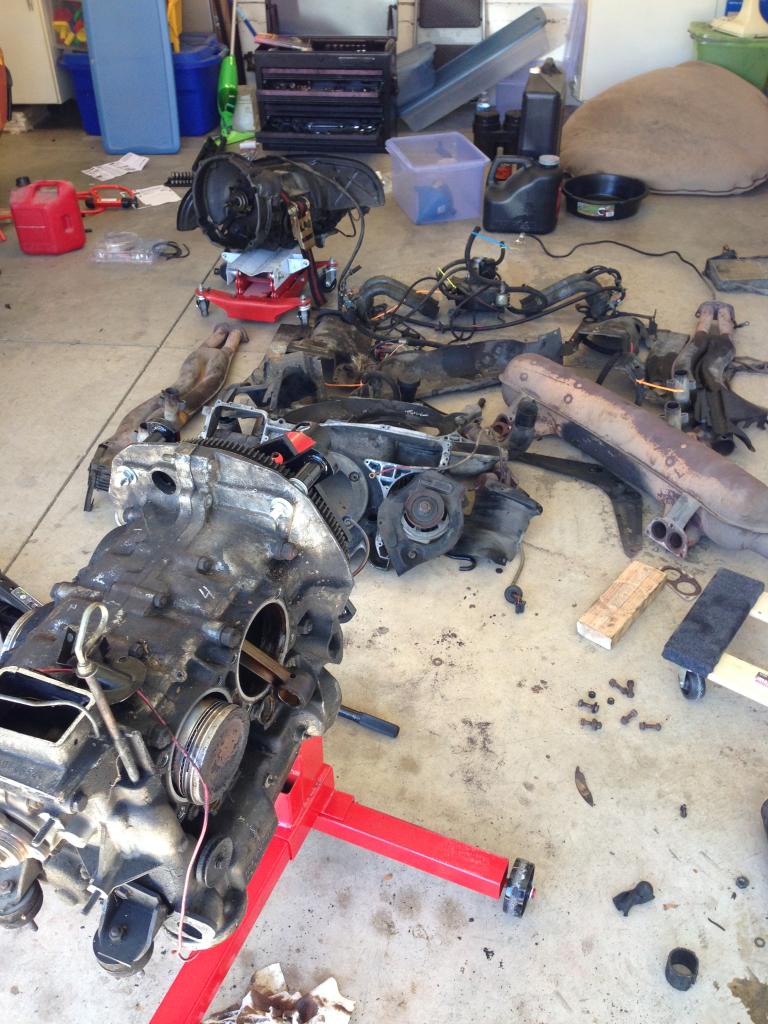
Recently joined this forum as I started working on a 73 914 2.0. The last time the car ran it was making a bad noise. It hasn't run in about 15 years. I pulled the motor and started taking everything apart. I have to say that the flat head screws that hold most of the engine cooling sheet metal on are a damn pain in the ass. The flywheel turned freely and nothing seemed seized. The motor is pretty high mileage. Somewhere around 200k. The odometer stopped working around 140k miles. So enough talking, here are some pictures of where I am with the project right now. 
And here is the car it came out of. It's always been a California car so the rust is minimal. Only a couple places of cosmetic rust.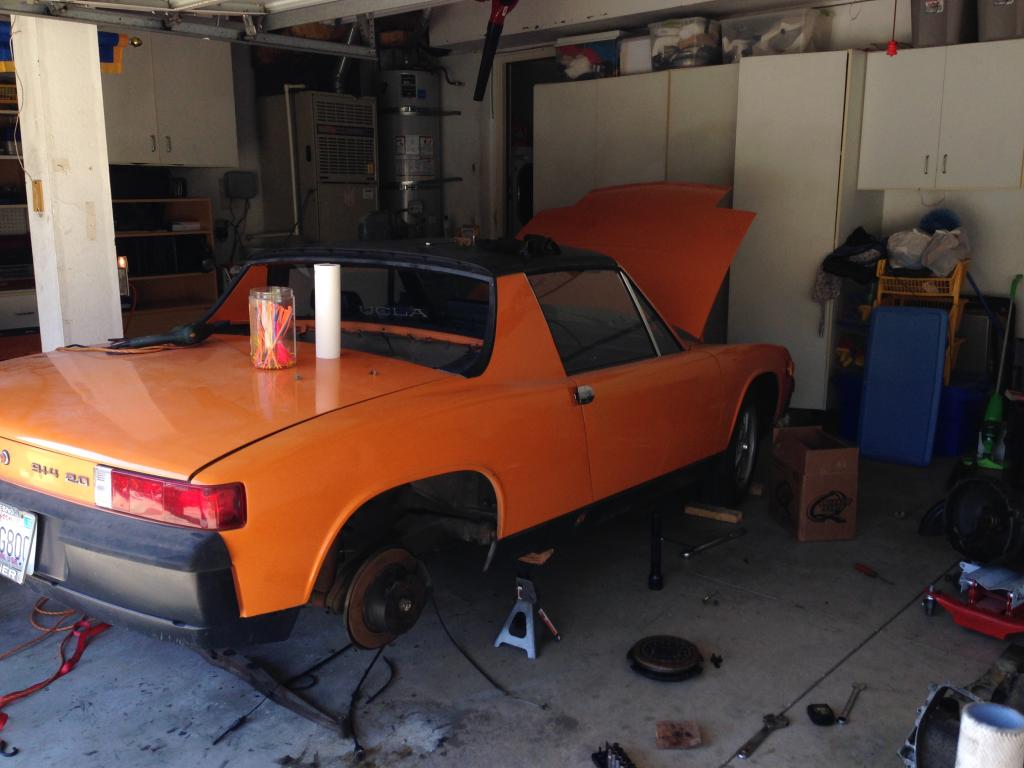
I'm in the process of pulling the cylinders and pistons and then I'm gonna decide whether I want to split the case or not.
I don't really want to make this car into a race car or anything. Just get it running and driving well. That being said, I don't want to dump $1000 into new pistons and cylinders. Anyone have any good options? Cylinder honing?
Posted by: oldschool Aug 28 2014, 04:33 PM
 very cool what's your 20....
  what part of SoCal do you make home. we have a bunch of very cool people that some time can come by and advice.
Posted by: Dave_Darling Aug 28 2014, 04:56 PM
Or at least drink your beer and flap their gums at you...
--DD
Posted by: Nate Aug 28 2014, 05:38 PM
Haha. I'm in San Dimas. Not too far from you in P-Town.
Posted by: 76-914 Aug 28 2014, 06:05 PM
San Dimas. That was the first place that I got lost in CA. Ended up in LA and a traffic jam at 9:00 pm. 
Posted by: ndfrigi Aug 28 2014, 10:39 PM
Nice car you have there and 15 years is too long to keep in hanging. You should finish the engine sir and drive the car soon.
Posted by: Nate Aug 29 2014, 02:26 PM

Nice car you have there and 15 years is too long to keep in hanging. You should finish the engine sir and drive the car soon.
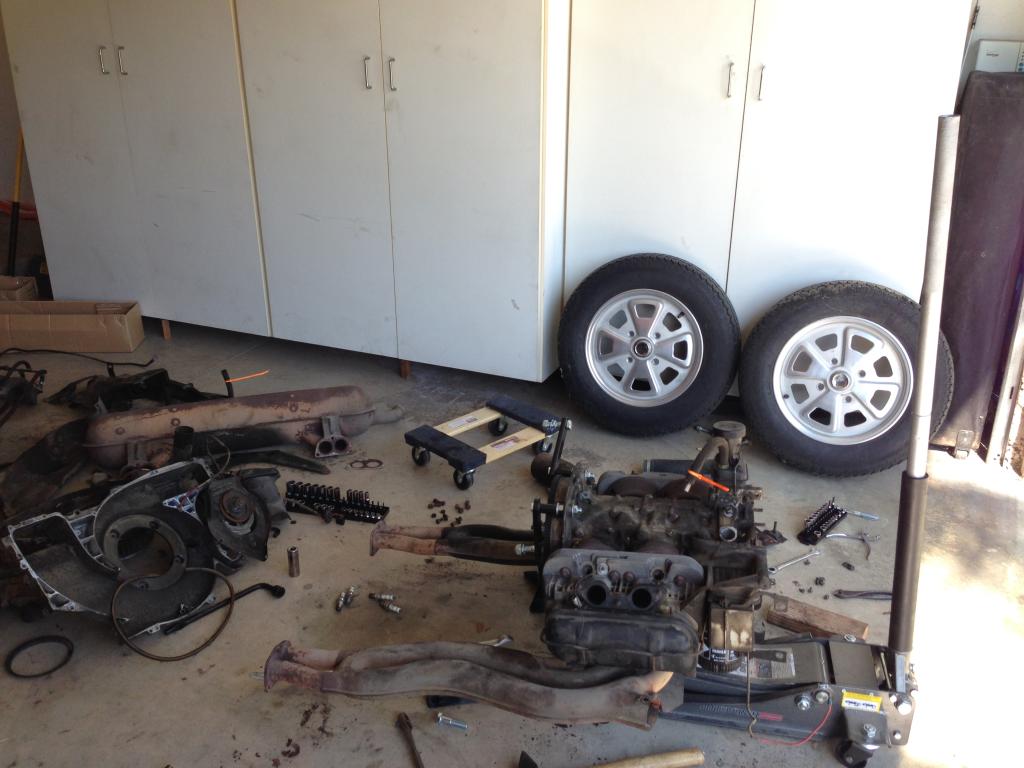
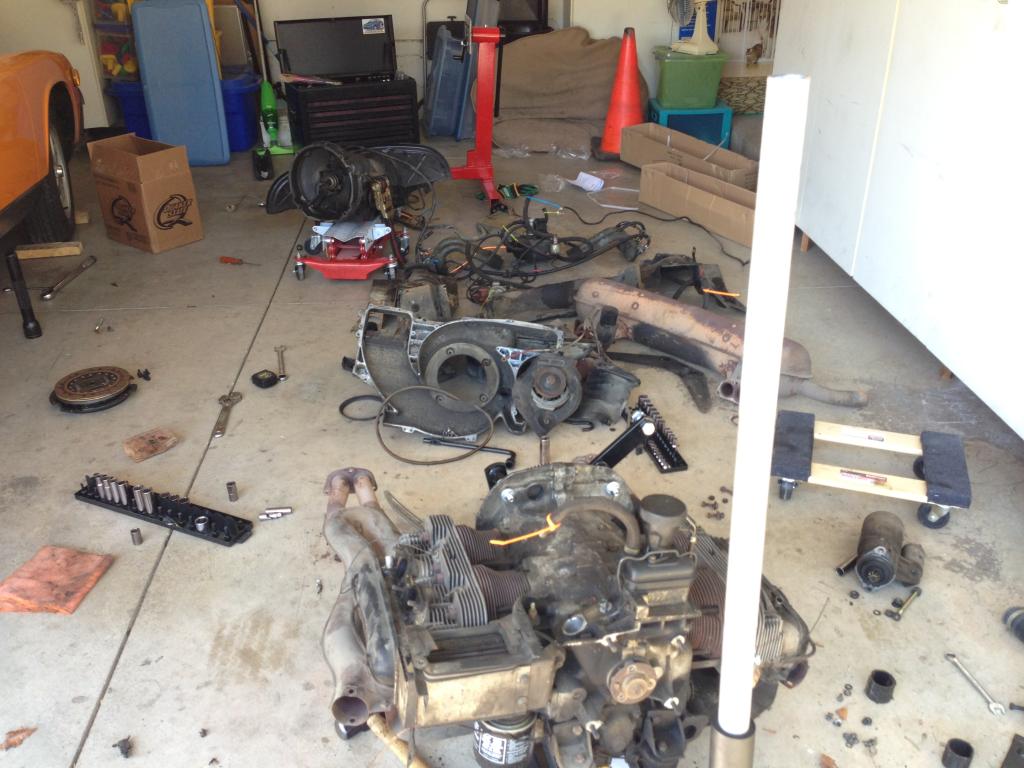
That's my intention. Got all the cylinders off and two of the pistons but I need to get it off the engine stand before I can get the other two pistons out. I also need to get my hands on an impact wrench to remove the flywheel...

Here's where I stand now.
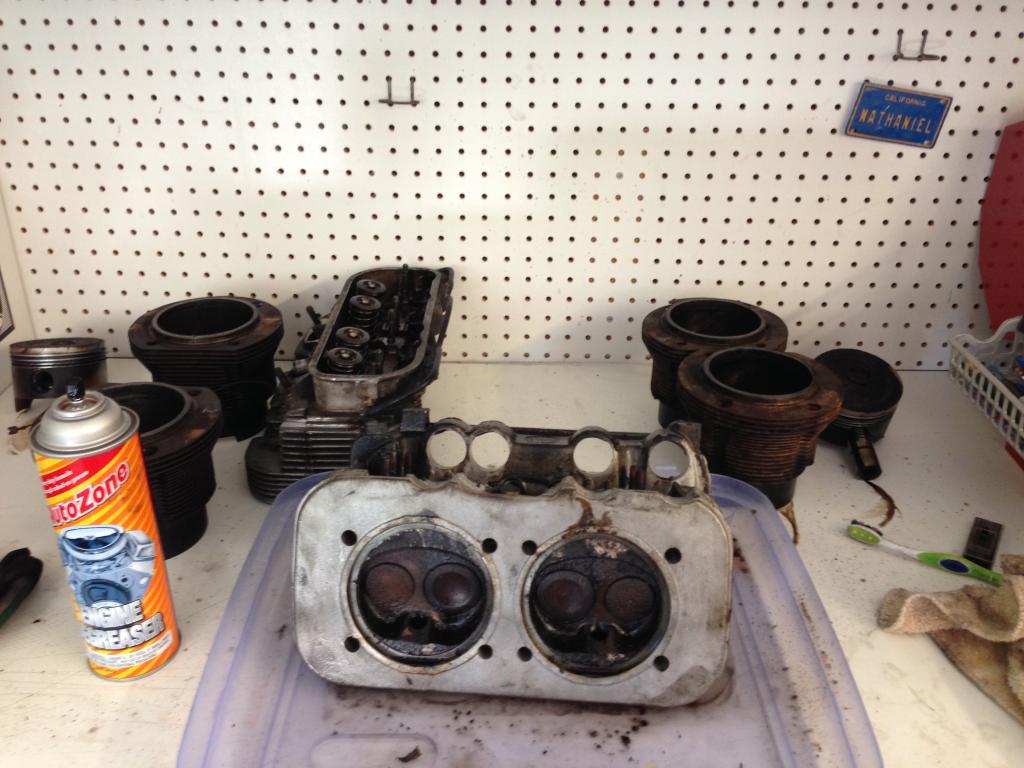
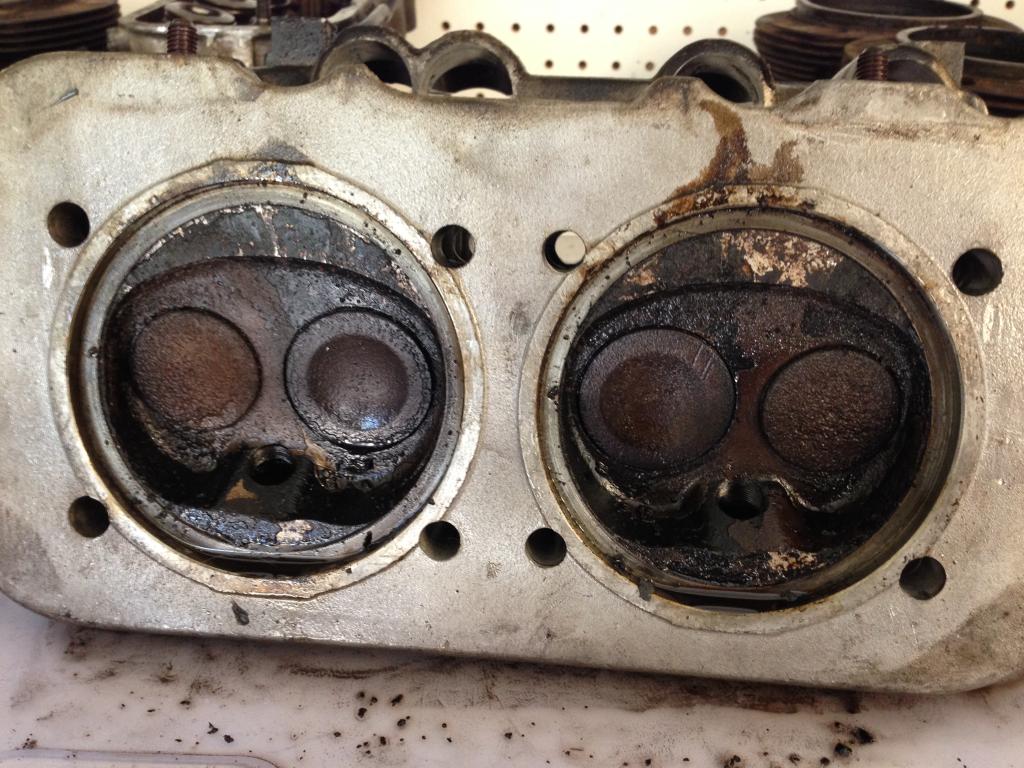
Anyone have any tips on removing the massive carbon build up on and around the valves? I tried degreaser and a toothbrush but it's obviously going to take something a bit more aggressive to get the job done.
Posted by: 914_teener Aug 29 2014, 05:48 PM
I am right next door in Glendora.
PM me if you need help.
Welcome to the fold and..............
Posted by: Nate Oct 11 2014, 06:25 PM
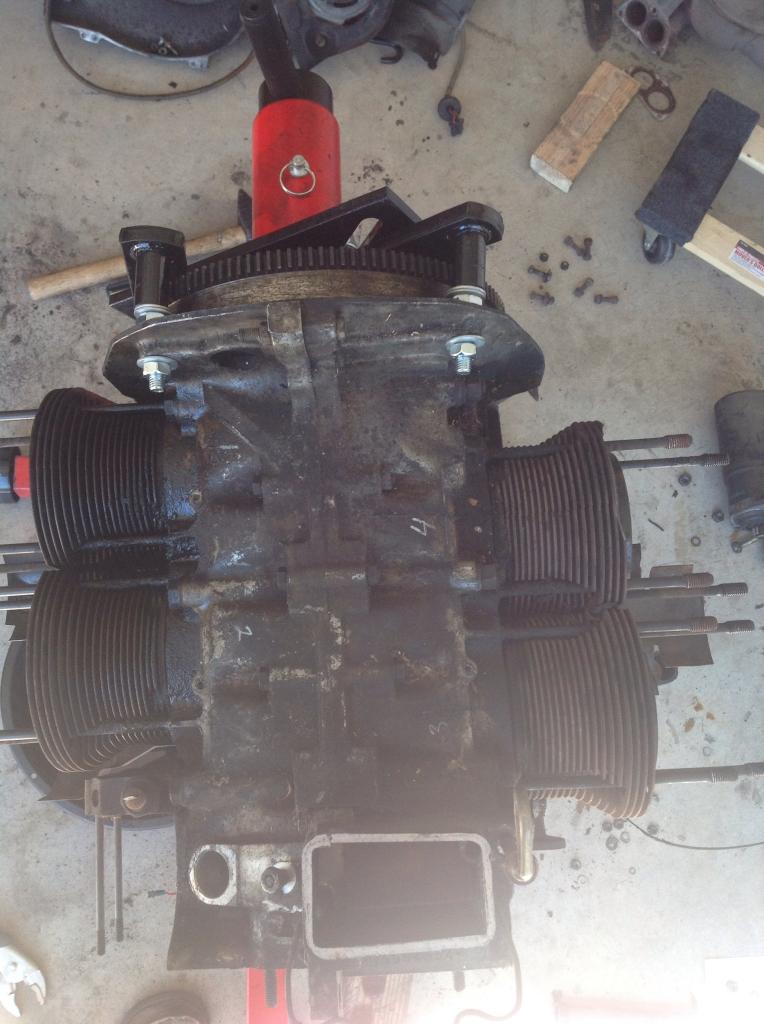
Thought I would give an update to this thread to update my progress. Got everything apart a while ago. Had the crank polished, cam reground and heads rebuild with new guides and valves. New bearings all throughout. Reassembled and now have a complete long block. Ready to get off the bench and mount the trans back up.
a photo and a little time lapse of installing push rod tubes and valve adjustment.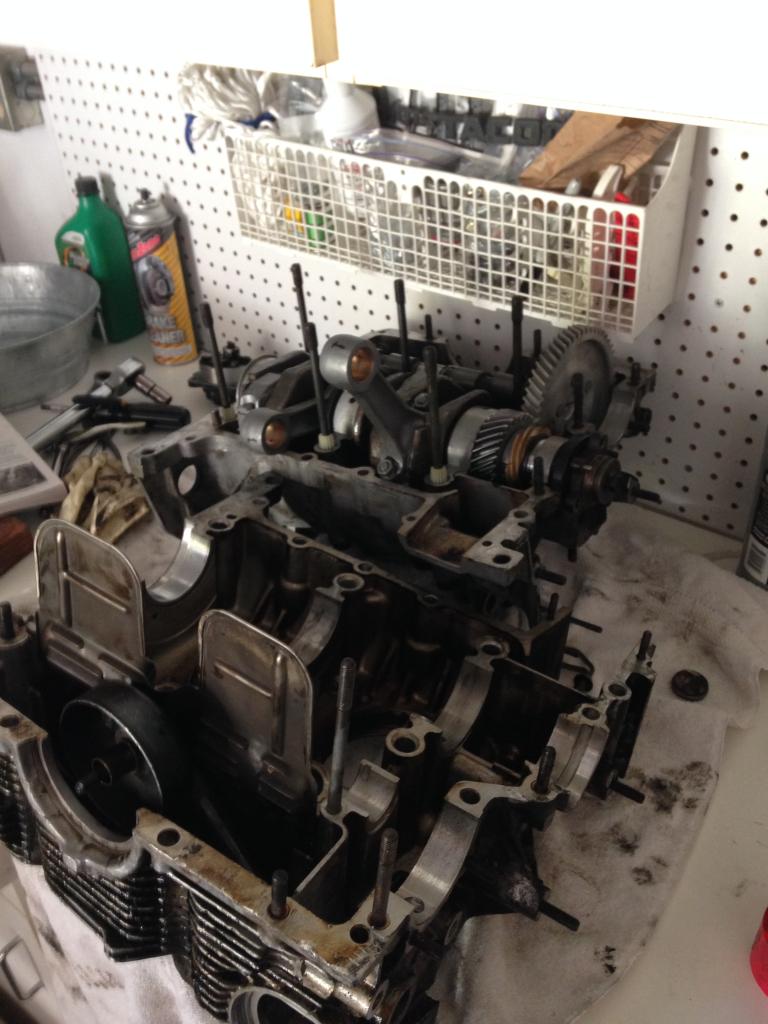
https://www.youtube.com/watch?v=GYDB-a5xCqs
Posted by: 76-914 Oct 12 2014, 04:39 PM
What caused those 2 hash marks on that intake valve?
Posted by: 396 Oct 12 2014, 10:09 PM
Who did all the work on the motor?
Posted by: Nate Oct 17 2014, 01:33 PM
I'm not sure what caused the two marks on the intake valve. But all the valves were replaced when the heads were rebuilt anyway and I checked clearances upon reassembly to make sure there will be no piston to valve contact.
Brother's VW in Ontario, CA did all the machine work. Nice guys. Very knowledgeable on all things Volkswagen and reasonable prices. I would recommend them.
Couple more questions as I come nearing the end of the rebuild (hopefully haha). I tried hard to mark all the connections so I would know where everything would need to go back come time for reassembly. But, now that I have the motor back in, I have noticed that I missed a couple. I'm hoping you guys can help me out a bit.
Took some pics to show you what I'm looking at.
First one is a white wire coming out of the ECU harness just past the injector plugs for cylinders 3 and 4. I think it connects with the white wire with inline fuse in the next photo but not 100% sure.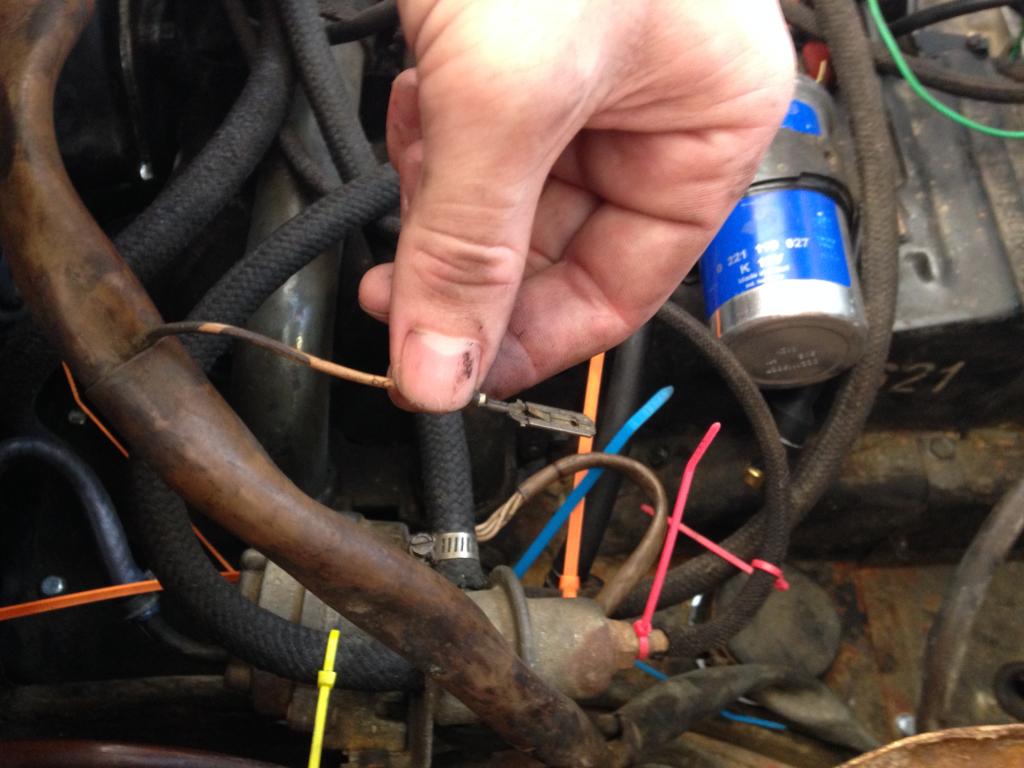
This photo is of the harness that connects to the board on the driver side of the car and connects to the starter motor (sorry, not sure of the proper name). It has the white wire with inline fuse mentioned above. But there is also a green wire with a red or pink strip that I'm not too sure on.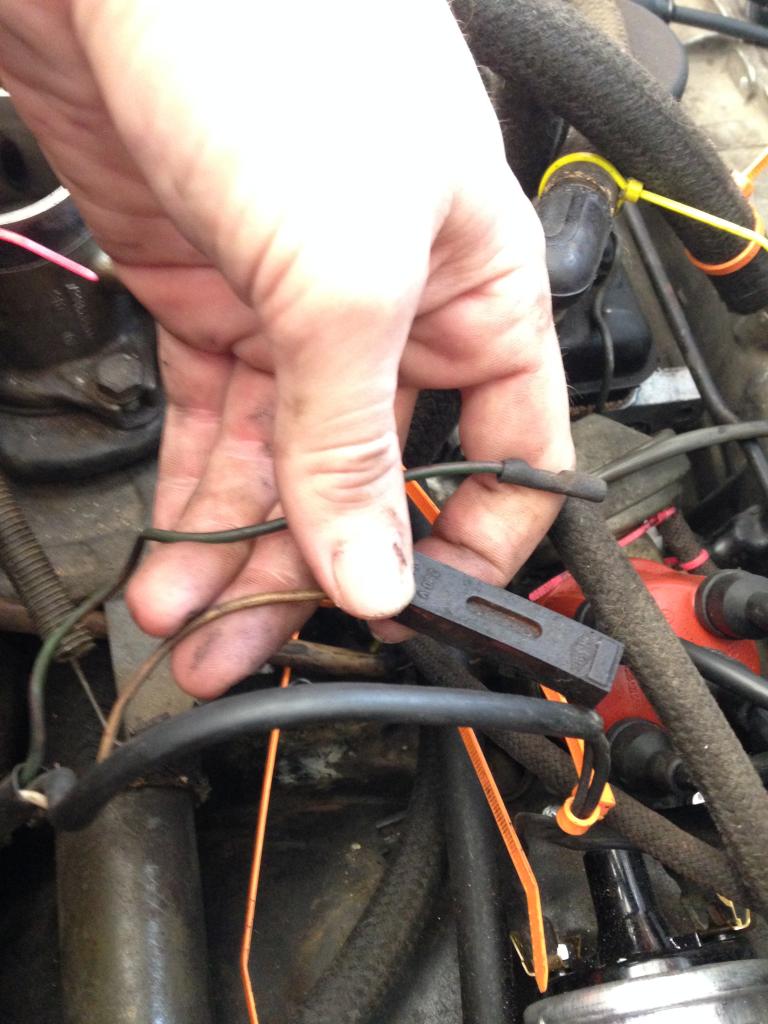
Here is the green wire that comes off of the distributor.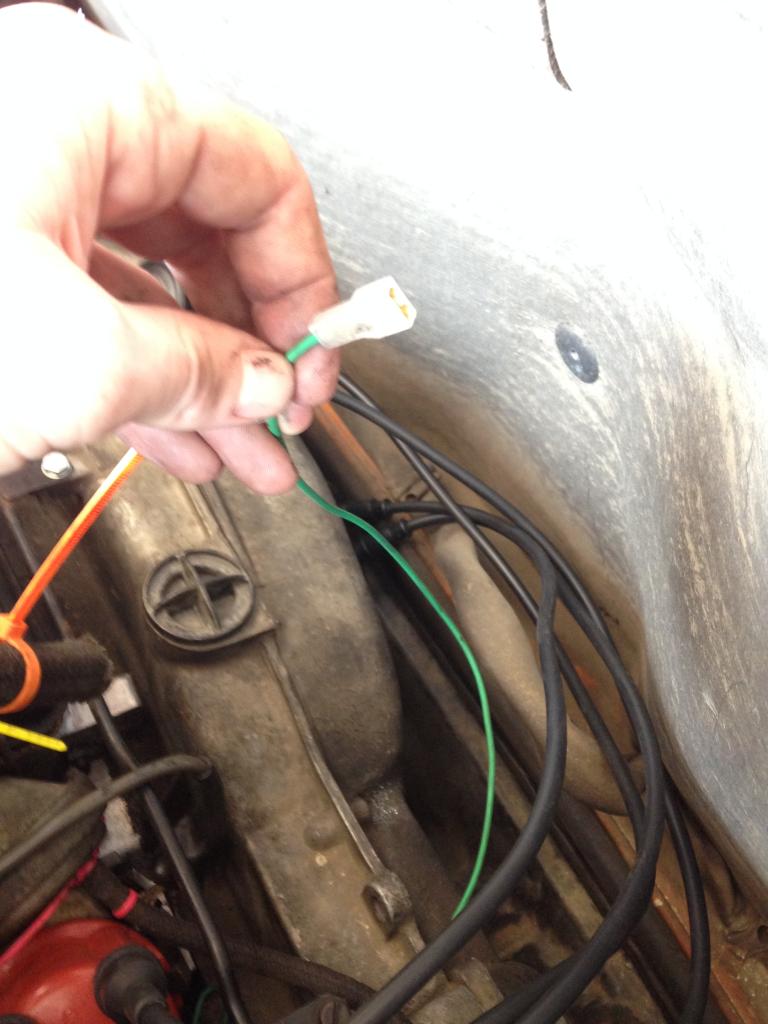
And here are, what I'm pretty sure are ground wires. Not too sure where they are supposed to hook up. They are pretty close to the case nut/bolt at the top of the flywheel so I'm thinking the ring might go on that bolt.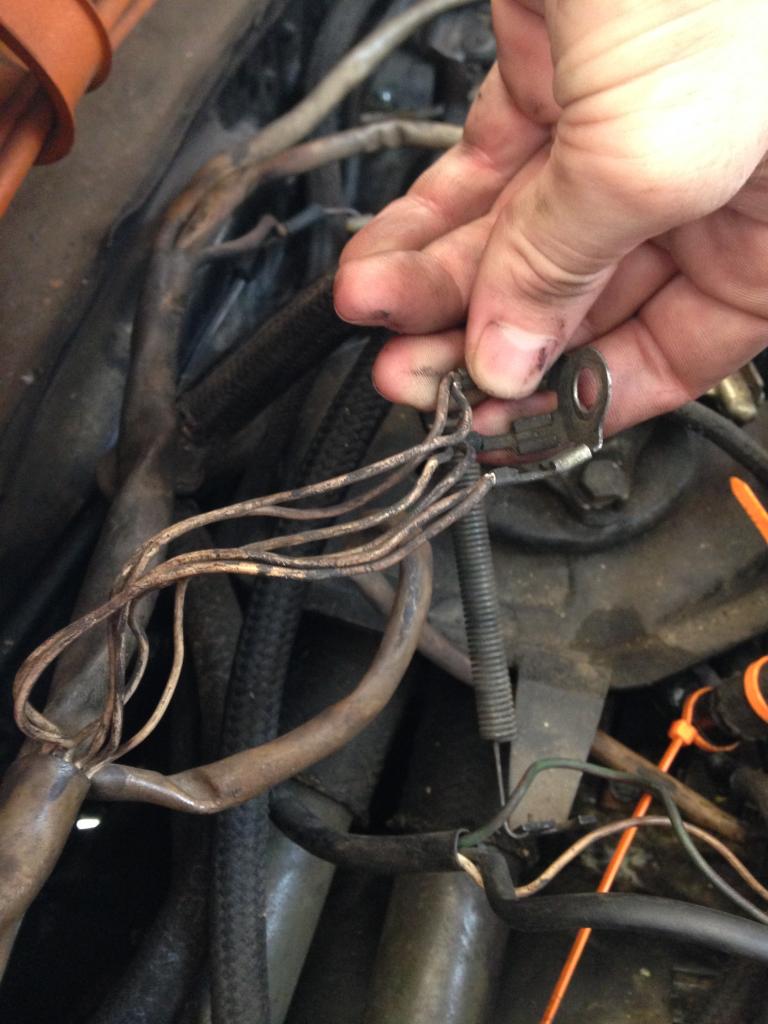
Lastly, There is the cylinder temp sensor. I'm not sure where that needs to plug in and also, what I think is the oil temp sensor, that is a red wire that comes out of the bottom of the motor near the oil drain plug.
Any help you guys can give is much appreciated!
Posted by: Dave_Darling Oct 17 2014, 09:20 PM
The "fuse holder" is just a connector. The male part is usually held inside the plastic box, and the female part of the connector gets pushed in the other end.
The wire in the first pic is quite likely for the head temp sensor, the one that lives near the #3 spark plug.
The green/red wire goes to the oil pressure switch near the distributor.
That green wire off the distributor.... Could be the wire from the points/condenser to the (-) side of the coil?
The ring terminal with lots of wires is indeed the common ground point for most of the fuel injection. The ring goes over the case bolt on top of the motor closest to the transmission end.
--DD
Posted by: Nate Oct 17 2014, 10:18 PM
Thanks Dave,
Been looking at wiring diagrams for the last hour and was thinking the same for all of those. Thanks for confirming for me!
Posted by: oldschool Oct 17 2014, 10:51 PM
Nat I can come by with my 1973 2.0 if you need to look at stuff or come by my place.
PM me for address
Posted by: RobW Oct 18 2014, 05:59 AM
The "fuse holder" is just a connector. The male part is usually held inside the plastic box, and the female part of the connector gets pushed in the other end.
The wire in the first pic is quite likely for the head temp sensor, the one that lives near the #3 spark plug.
The green/red wire goes to the oil pressure switch near the distributor.
That green wire off the distributor.... Could be the wire from the points/condenser to the (-) side of the coil?
The ring terminal with lots of wires is indeed the common ground point for most of the fuel injection. The ring goes over the case bolt on top of the motor closest to the transmission end.
--DD
Dave is a mental Haynes manual but better!
Posted by: RobW Oct 18 2014, 05:59 AM
Oh and
Posted by: FourBlades Oct 18 2014, 07:11 AM
Nice progress! 
John
Posted by: 914-300Hemi Oct 18 2014, 08:43 AM
Nate,
I am located in San Dimas also. PM me if you need any assistance and java script:emoticon(':wttc:','smid_64')
Posted by: Nate Oct 19 2014, 09:21 PM
Thanks for the help offers guys. Gonna work on it some more this week and see what happens!
Posted by: 914_teener Oct 19 2014, 09:48 PM
Just my two bits......
You may want to "ring" out that harness just to make sure the wiring is sound while it's out. Visually inspect the ground point ends and the areas around that looks hardened...so to make sure the wires aren't making intermittent contact. Sounds like you know what you are doing and realize how important electrical contacts are to D-jet running well.
Make sure the vaccum hoses are refreshed and especially the fuel lines as they will be under more that 30psi. I'm using the new CARB rated hoses now for the fuel line....for the last 4 years with no cracking.
Good luck....

Posted by: Nate Oct 20 2014, 04:11 PM
I have this red wire coming off of the auxiliary air regulator. I'm not sure where it goes as I have no connections near hear. The only other red wire I have is coming off the bottom of the motor from what I believe is the oil temp gauge...? I'm not sure where that one goes either but logic would tell me they connect together...?
Here are some pics of what I'm talking about.
Wire off of air pressure reg.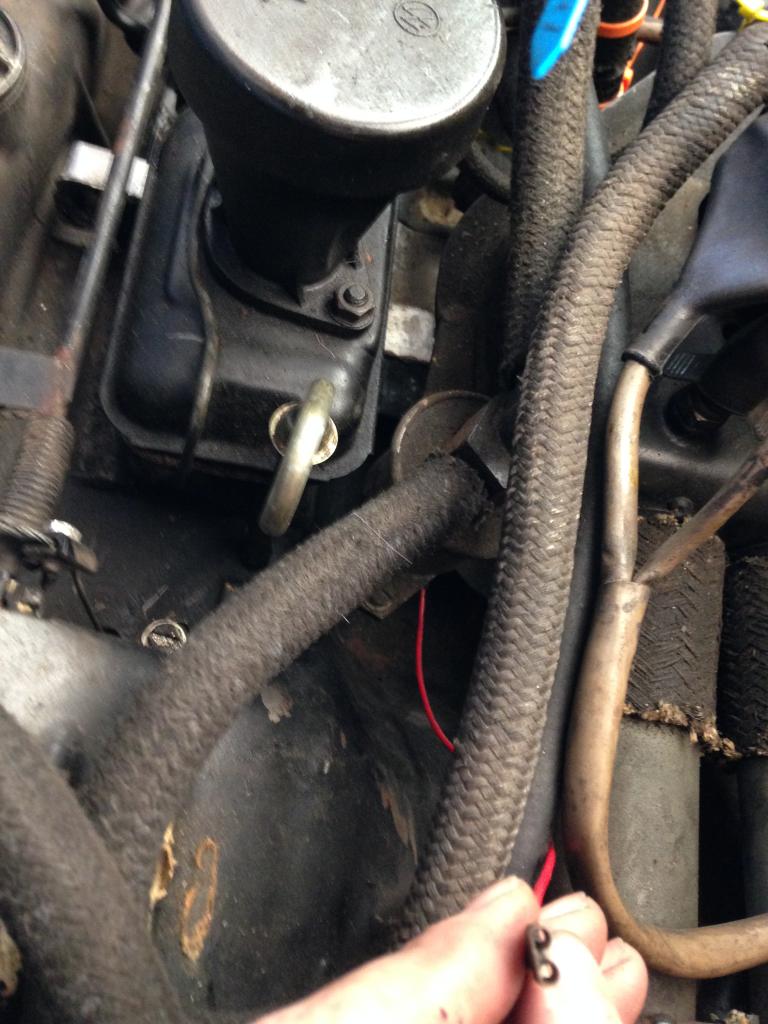
Wire from oil temp sensor?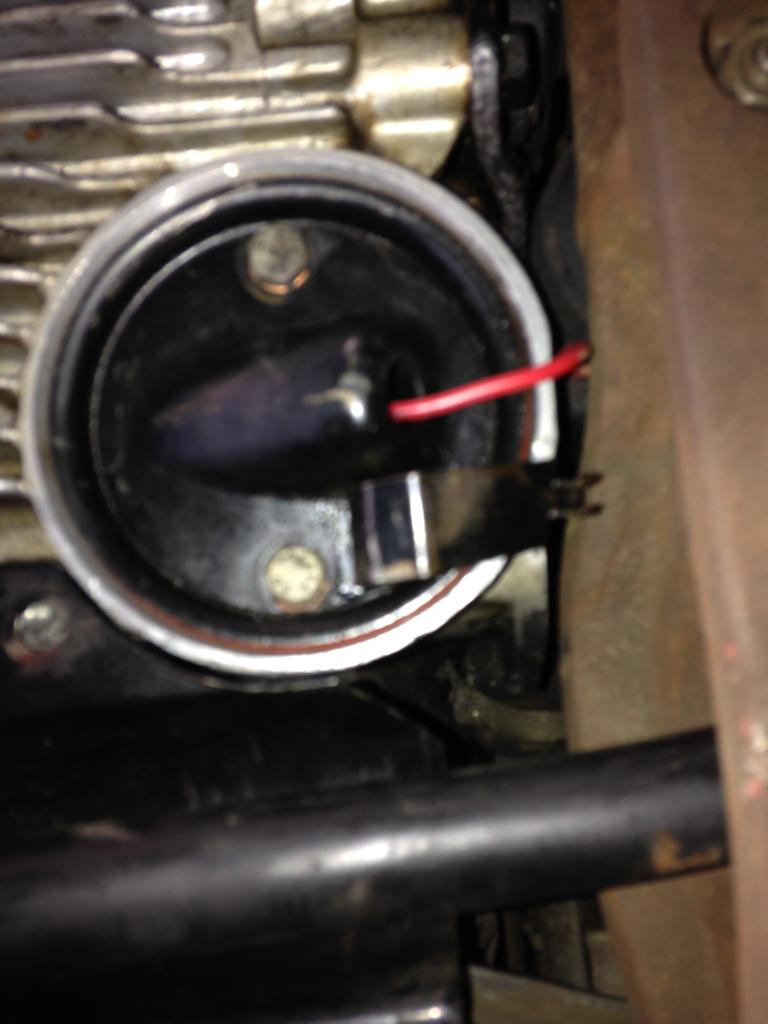
Any helpful info?
Posted by: Dave_Darling Oct 20 2014, 05:29 PM
AAR wire plugs into a white wire from the ignition wiring harness. It taps into the fuel pump circuit, and provides the heat that closes the AAR.
The red wire from the oil temp sender (under the engine) is not stock; stock would be green with a black stripe. It goes across the front of the engine, up through the engine tin, and plugs into the main wiring harness under the battery.
--DD
Posted by: Nate Oct 20 2014, 07:11 PM
Thanks for the heads up teener. I did go through the harness with a multimeter and it all seemed alright. Unfortunately I don't think I'm as knowledgable as I need to be for this project but you guys have helped me out quite a bit. Unfortunately electronics are my downfall.
Turned the motor over tonight. It turned well and didn't make any noises that were out of the ordinary, in my opinion. Unfortunately the motor did not start so I am going to begin a long checklist of possible problems. First on the list is distributed calibration. All of the distributor set up instructions I've read are too vague to really be of good help to me. This is my first motor rebuild ever and I have almost no experience setting up distributors.
One positive thing is that after a bit of cranking the oil pressure dummy light turned off. Indicating to me that the oil pressure built up and was good. Gonna tinker and read some more and then see where I end up.
Anyone have any good 'how to' articles on setting dwell angle and setting up the distributor in general?
Posted by: Nate Oct 20 2014, 07:13 PM
Dave,
In regards to your comment about the aftermarket oil temp sender, I'm beginning to wonder what work my dad had done to this thing. It seems that the harness doesn't have enough inputs for all the temp/sending units.
Posted by: Phoenix914 Oct 20 2014, 07:15 PM
Here is a tech article on Pelican about setting dwell and timing:
http://www.pelicanparts.com/techarticles/914_timing/914_timing.htm
This is something I also need to do. There are a lot of articles there, so maybe you can find what you need.
Posted by: Nate Oct 20 2014, 07:25 PM
Thanks Phoenix. I was just reading that article. Good find!
Posted by: Nate Oct 22 2014, 12:42 PM
Finally got the beast started up today. Ran into a couple issues. I am having a problem with the motor surging and then wanting to shut off. I think vacuum leaks are to blame. I'll try to get a little video later. But basically, motor will start and sound good for a moment and then it will want to die so I'll open the throttle a bit and it will surge and the the rpm's will drop even though the throttle is still open. When it revs it sounds good (like its firing on all cylinders). Timing seems good. Just having this surging problem.
Posted by: Nate Oct 23 2014, 05:54 PM
Making progress but have run into another set back. Got the motor running. Sounds pretty strong and broke in the cam this morning. I have a high idle that I believe is due to the timing being set static and no timing light or dwell meter setting yet.
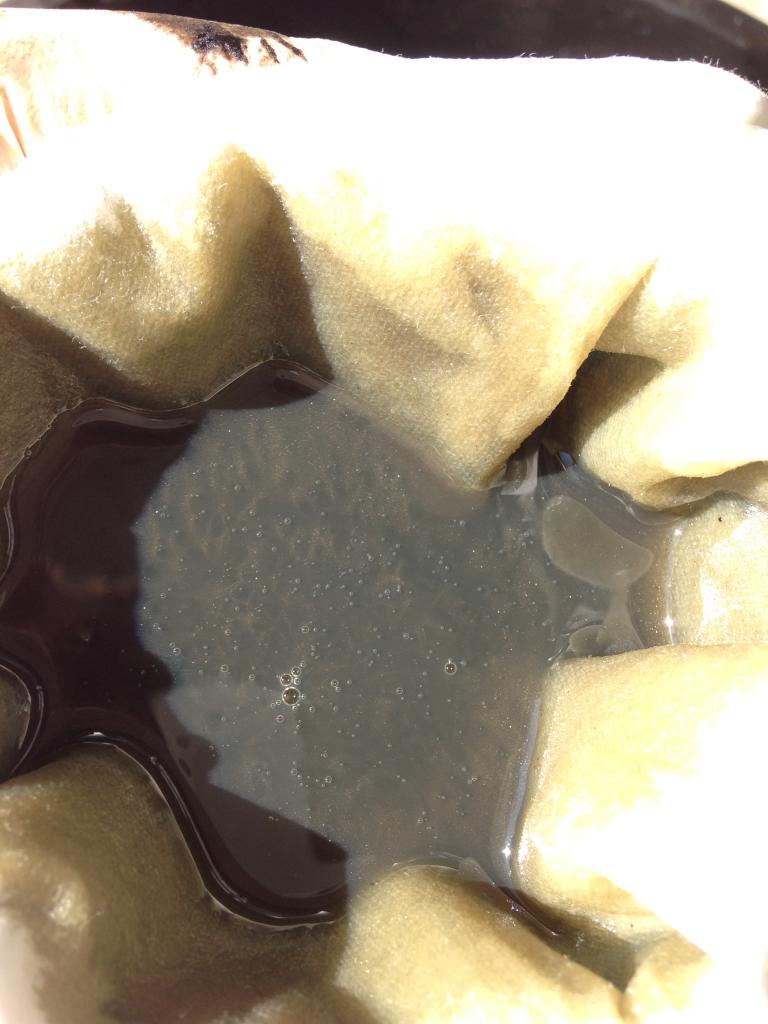
The problem I ran into first started when I shut the motor off after cam break in. It made a sound like a squealing belt for a few seconds and quieted as the motor came to a stop. I waited a bit and drained the oil and changed the filter. I looked at the oil for signs of metal fragments and filtered it through a paper towel to catch any metal shards. No shards. I'll attach a pic so you guys can tell me what you think of the oil.
Put new oil in and started the motor back up and now the squeal is constant. The only way I can describe it is that it sounds like a squealing belt. However it doesn't seem to be coming from the belt area. Obviously the engine bay isn't that large an area and it's pretty loud all over the place but the squeal seems to be coming from the front/passenger side of the motor. For the life of me I can't figure out what it is.
I'm thinking the belt has loosened since it was a brand new belt and is now slipping a bit on the fan. Gonna try tightening the belt and fingered crossed it'll solve the squeal.
Oil
Powered by Invision Power Board (http://www.invisionboard.com)
© Invision Power Services (http://www.invisionpower.com)