Printable Version of Topic
Click here to view this topic in its original format
914World.com _ 914World Garage _ Aussie 914 Restoration
Posted by: barrym Oct 26 2014, 04:05 PM
First time post of lurking here for a while.
I bought a '75 914 a couple of weeks ago that had already been partly pulled apart to restore- its mostly complete but needs to be further pulled down to repair the rust & make mods to it for my intended purpose.
it already came as right hand drive and has an amazingly good condition dash board. I have no history with the car so cant tell who or when the conversion was done. I don't even know if it was a US or European import, or if it was an aussie delivered car ... how can I tell ???
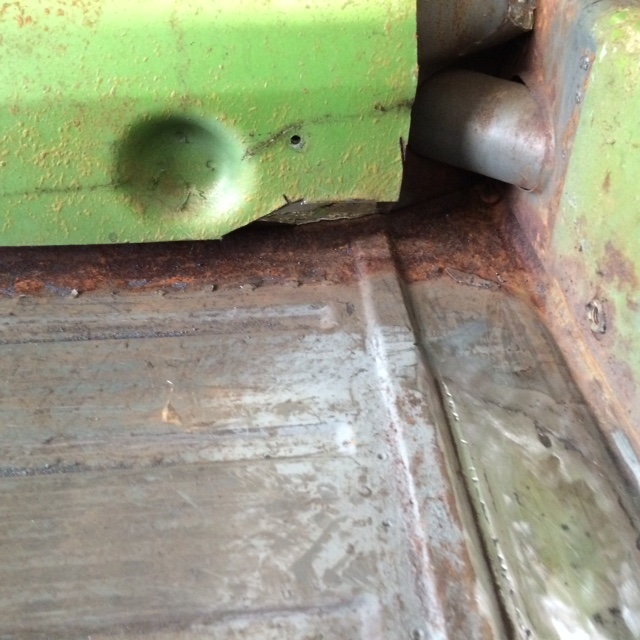
it has a scallop out of the right hand side chassis rail for the handbrake, but not the left hand side ...
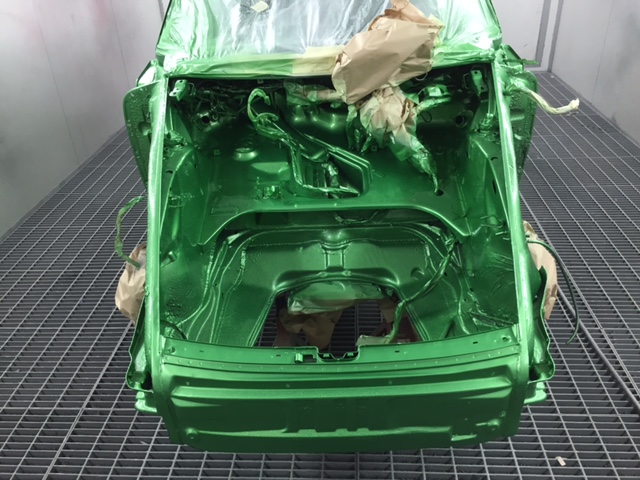
it used to be viper green and has had a poor respray in red - it's going back to viper green 
I have some garage space with a couple of chaps who has worked on 14's before which is a HUGE help to me, very lucky as i'm new to Porsche having owned lotus's for years (and still do). the plan is to restore it for partial road use but mostly track & tarmac rally. in the short term I plan to drop a 3.0 Subaru engine in while I build up funds & parts for a 2.7 Porsche engine.
Its been in dry storage for at least 11 years than I know of, and possibly more before that.
anyway, am documenting my rebuild thread here.
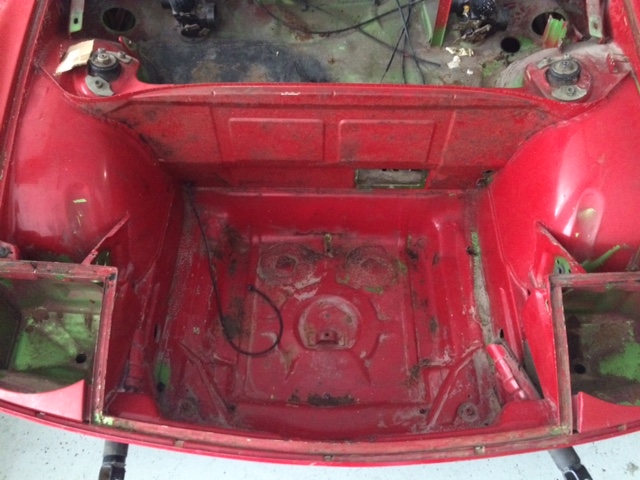
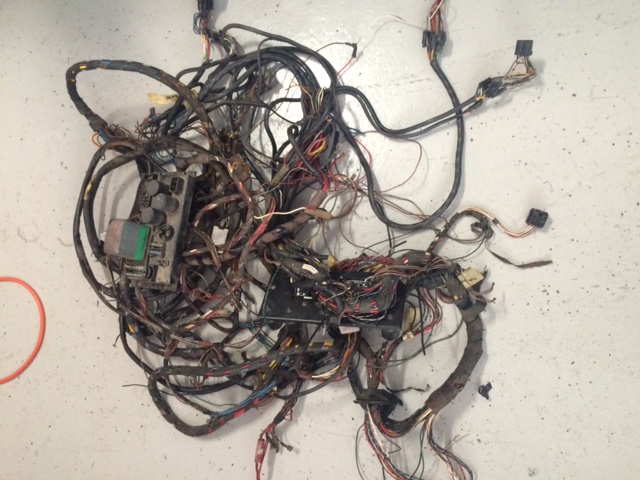
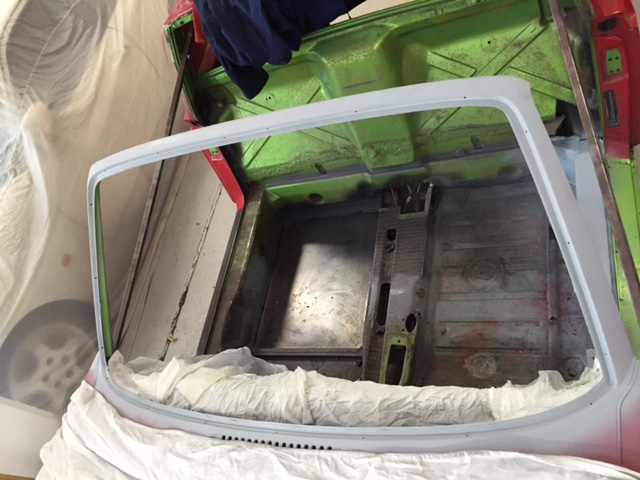
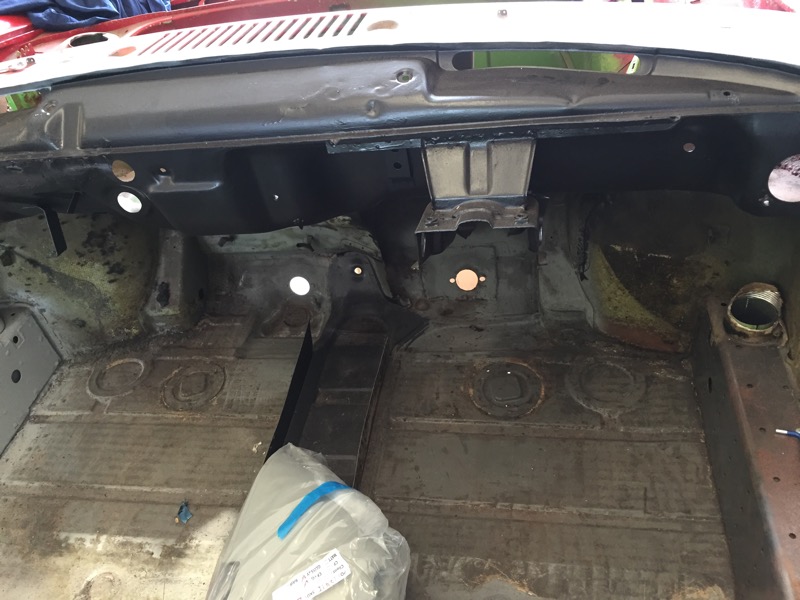
I've made a start on removing the hacked up loom & vacuuming all the loose rust out. Its better than expected (as I bought the car only from pictures)
it needs;
new hell holes
back of floorpan & bottom of firewall
boot
and that's about it - the rest of it looks (at this stage) like only surface rust - the suspension consoles are solid as is the majority of the front boot - again, only surface rust there ...
the windscreen will come out next to get access to pull out the dash so I can continue to remove the loom.
i'll be making up a new loom for it.
question though - how do I remove the left hand seat ? the lever at the side does nothing - possibly broken ? and there is no handle at the front to slide the seat forwards to get at the rear bolts ... stumped on this one ...
Attached image(s)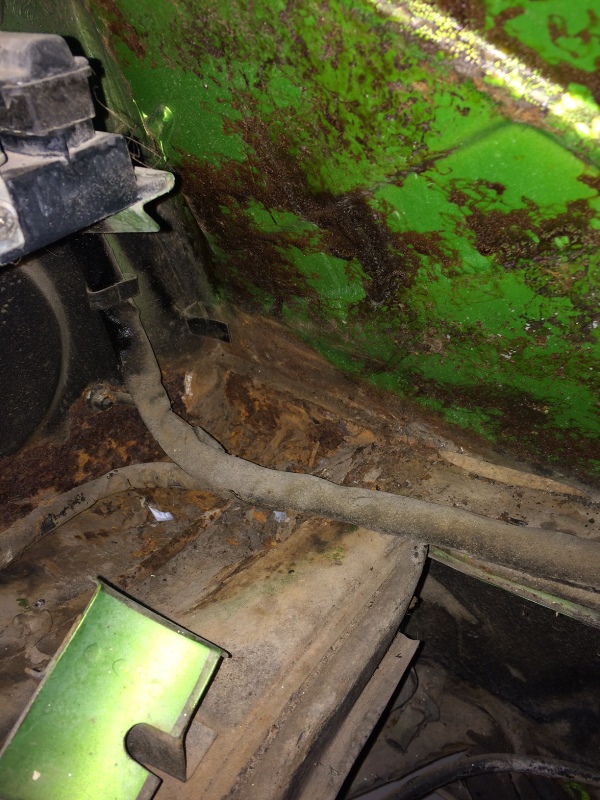

Posted by: 76-914 Oct 26 2014, 05:20 PM
 You'd better not drive that thing with the Suby 6. You might not want to go to a P 2.7 if you do.
Posted by: Betty Oct 26 2014, 06:40 PM

Howdy from Texas!
Posted by: Mike Bellis Oct 26 2014, 06:58 PM
Posted by: porschefile2010 Oct 26 2014, 07:27 PM
That doesn't look too bad at all. I've seen a lot worse for sure. Would you really want to waste a 2.7 engine on a teener though? Not sure if your investment would stack up when you come to sell. If you want a buzz I would stick with your Subaru plan.
To get the front seat out you need to drag the seat as far forward as you can and then (from memory ) slide a long screwdriver down the right hand rail and lift the tab out of it's locking hole and it should just slip right out. If the lever is broken, follow this anyway to move the seat forward. Good luck.
Be interested to see how it all comes together. There's a yellow 914 in race set up over here. I think it's still for sale but haven't seen it at a track yet.
Posted by: edwin Oct 26 2014, 07:59 PM
I was watching that one on eBay good to see it's found a good home
Where abouts are you based? I'm in Geelong. Would be great to catch up if you're close.
Seems a fair bit of work to convert to water cooled if you want to go back to a Porsche six in the future
I'd be pretty sure that's a US car as euros didn't have the side marker lights like yours. The handbrake cutout on the left has likely been covered over. Be worth checking for cracks around the one that's been cut in too
Cheers
Edwin
Posted by: abnrdo Oct 26 2014, 08:29 PM
Nice car color! You have a rare one my friend! Maybe we can give each other motivation! Cheers!
Posted by: rick 918-S Oct 26 2014, 09:11 PM
Viper! 

Posted by: barrym Oct 26 2014, 09:19 PM
Thanks all ..
the 2.7 idea is essentially required if I want to race it in historic racing as a 916 (has been done here before)
I can race it in timed sprints & tarmac rally with the subi engine which gives me something fun to do for a while
Edwin - i'm in Sydney :/ will check out the inner rockers for evidence - although i'll be putting the strengthening kit in there as well & moving the handbrake to the centre.
Posted by: Dave_Darling Oct 27 2014, 10:41 AM
Let's see. US-spec models would have the "warts" on the side between the turn signals and the front wheels. They would also have a VIN tag on the windshield frame near the lower-left corner.
To slide the seat forward, reach under the seat along the seat rails, where the adjusting loop would be. One rail will have a metal bar inside of it, push this upward and slide the seat forward. When it stops, reach under the other rail and push up the metal tab in there, and slide the seat forward off the rails. Note that the rails may be greasy; I use rubber gloves when I do this.
--DD
Posted by: Downunderman Oct 27 2014, 11:17 AM
It's good to have another teener in the historic garage, so soon after mine left. It is a remarkably sound shell, and wont take much to fix.
Cheers,
Posted by: johnnymagoo Oct 27 2014, 02:25 PM
A company called Crayford in the UK offered a RHD conversion for the LHD only 914 in the early 70's.
I saw a crayford conversion on the UK ebay site a few years back in pieces for sale.
So one of them is still out there somewhere.
www.crayfordconvertibleclub.com site has some pictures of a 914 being worked on
and some details of work carried out on conversion.
Look under the Porsche section of their site.
Posted by: barrym Oct 27 2014, 02:55 PM
little more progress last night - got the windscreen out and started to take the sill (rocker?) covers off, at which resulted in MANY years of mud & stones falling out
I'll have a go at the seat tonight - thanks for the info all.
and yes, it looks like it was a US car - has the tag on the windshield frame & the side repeaters.
also found that during the RHD conversion some muppet has welded the dashboard frame TO the car ... so I cant get it out :/
Attached image(s)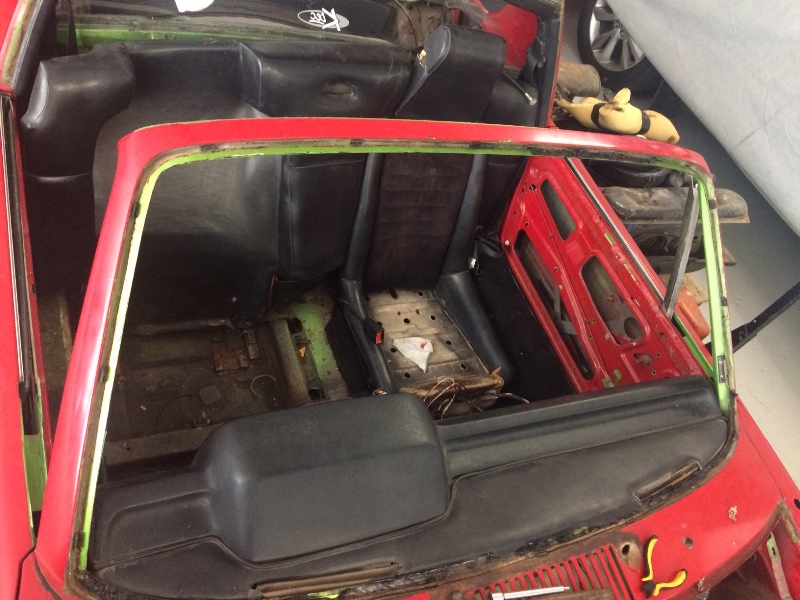
Posted by: mein_tag Oct 27 2014, 05:26 PM
Really like the color!
Posted by: barrym Oct 28 2014, 03:23 PM
A little more work last night was very successful - wont be able to work on it for a few more days so was good to make progress.
Door came off - easy, but geez its heavy - I can see a fibreglass skin in its very near future !
Pulled off sill cover expecting a fair amount of rust given how mud mud & stone fell out when I pulled the cover off - but 10 minutes cleaning revealed an extremely clean sill/rocker ! couple of small spots of surface rust but otherwise extremely good.
Finished removing the loom - there is about 3kg of surplus in that I think 
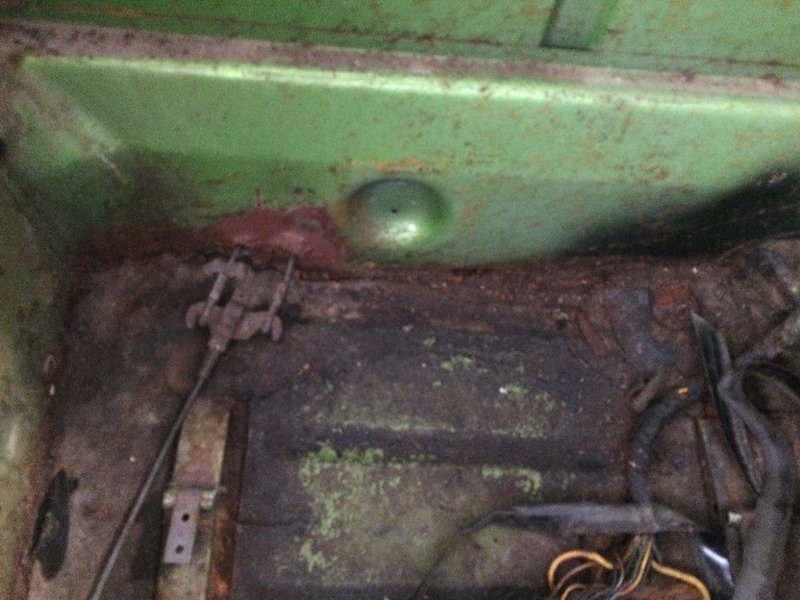
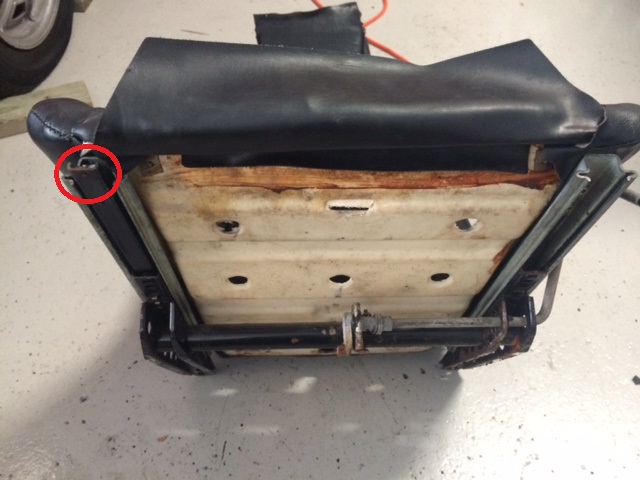
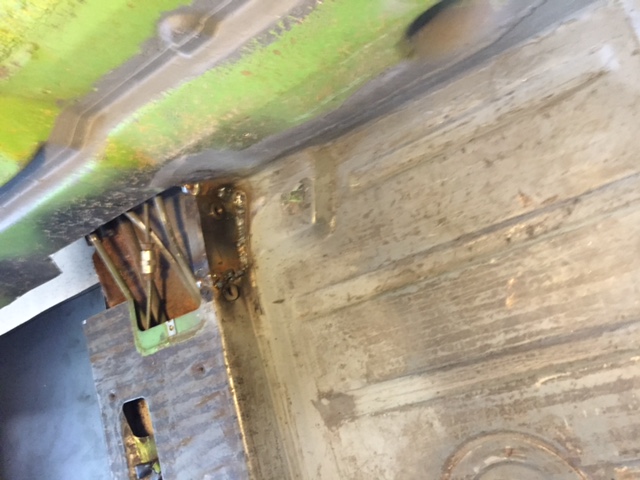
removed the seat, the pic shows the seat with the broken off tab - I was stuffing around for ages with this poking bits of metal under the seat - all I needed to do was lift the tab up - I think it should have a longer tab on it that's broken off ...
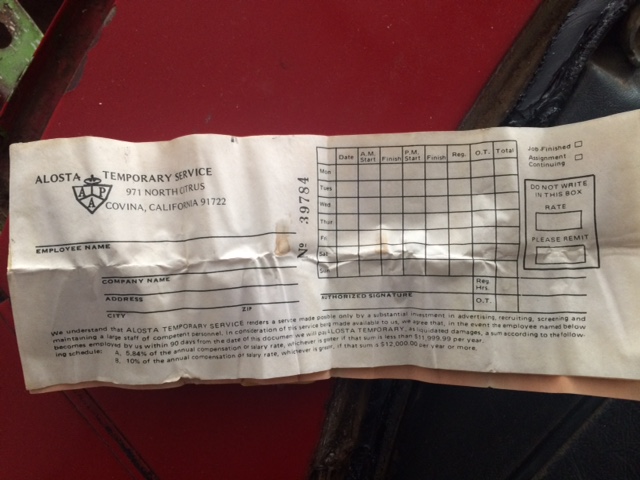
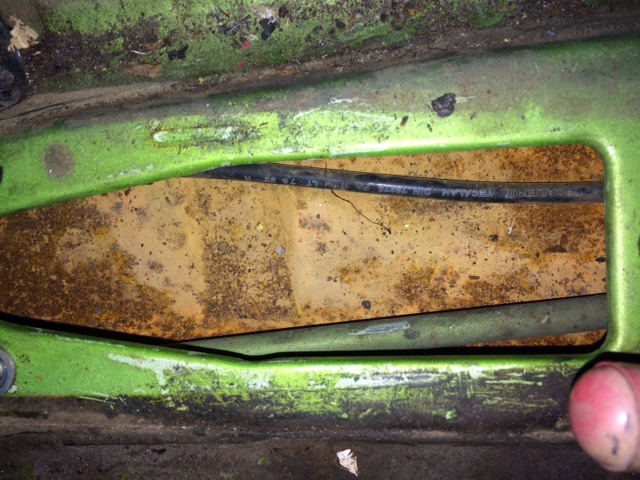
removed rear windscreen - as I pulled it out a folded up bit of paper fell out that was wedging it in place ... see pic - I guess I know where it came from now !
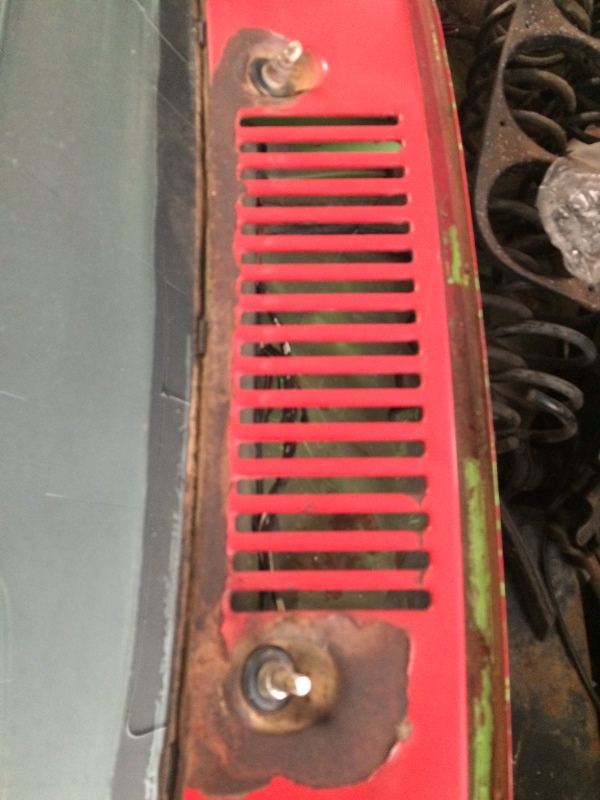
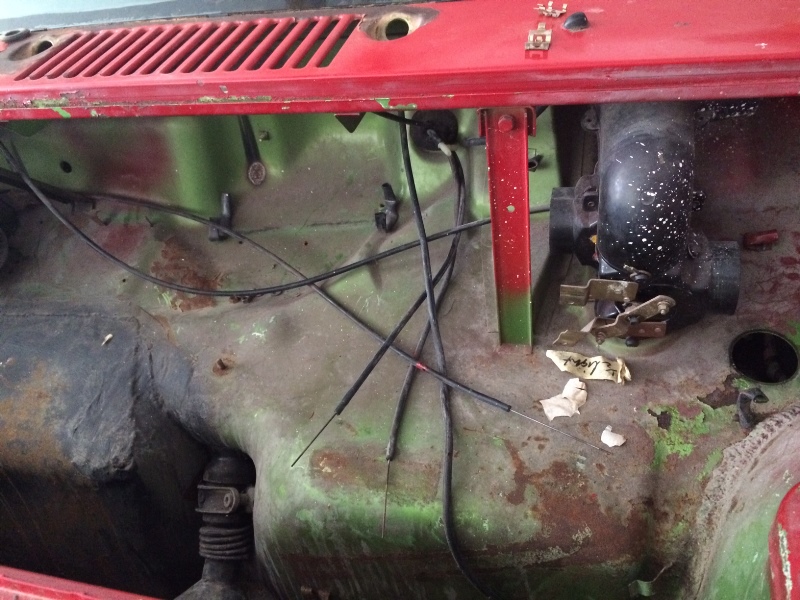
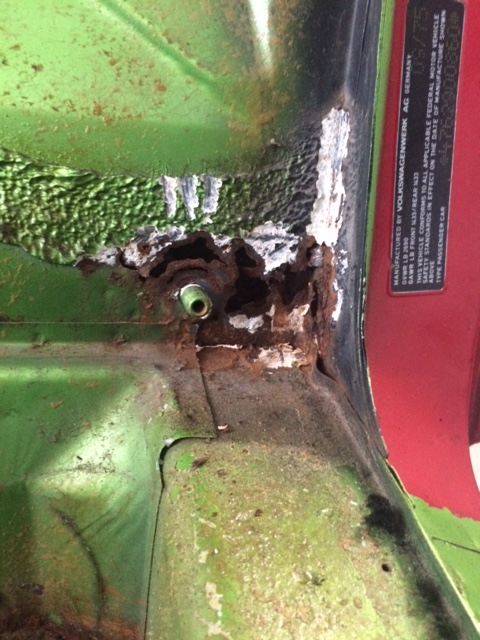
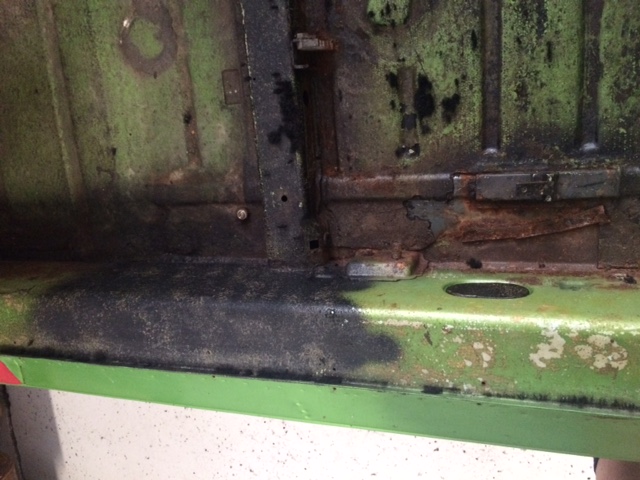
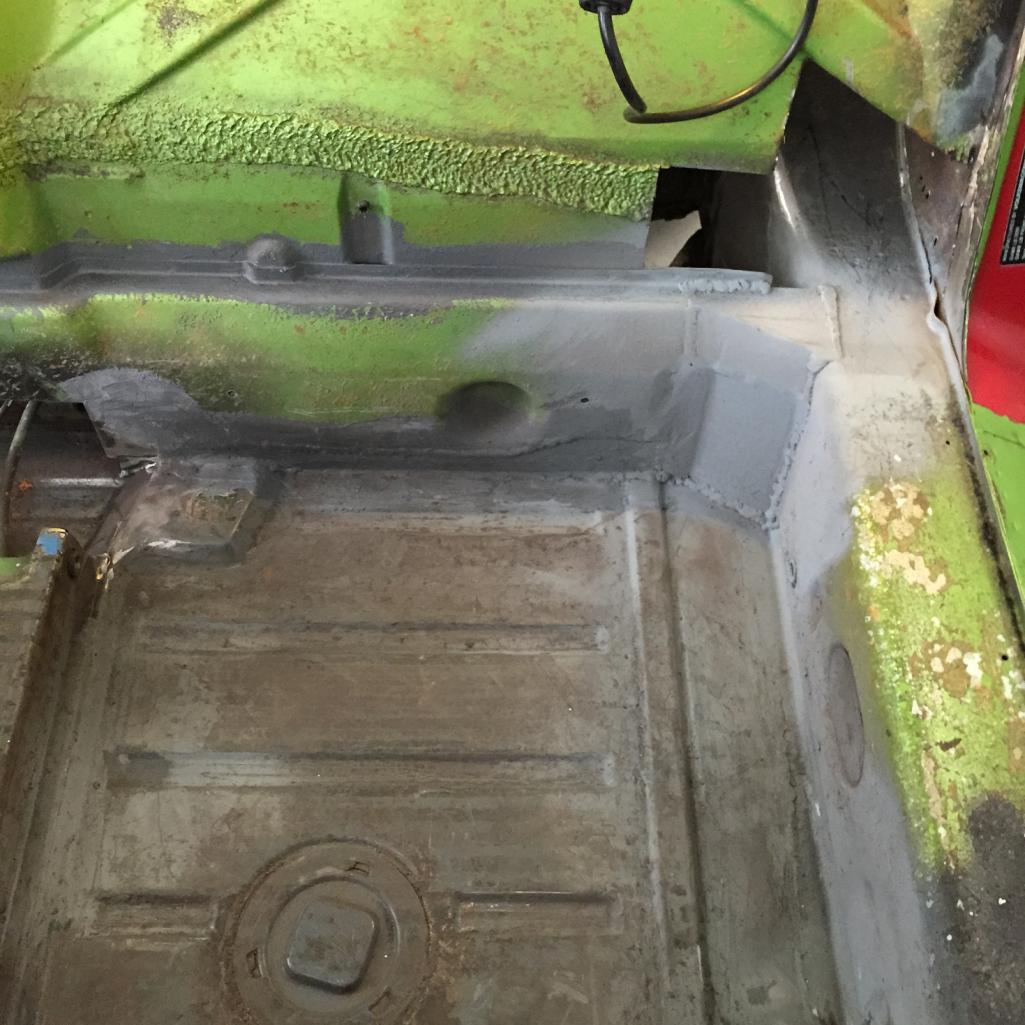
started cleaning up the firewall around the engine lid release - bit of rust here, but its quite concentrated to this area - easily cut out & replaced.
the left land side scallop in the rocker has been well covered - couldn't see any cracks but will clean it back to bare metal & get a better look.
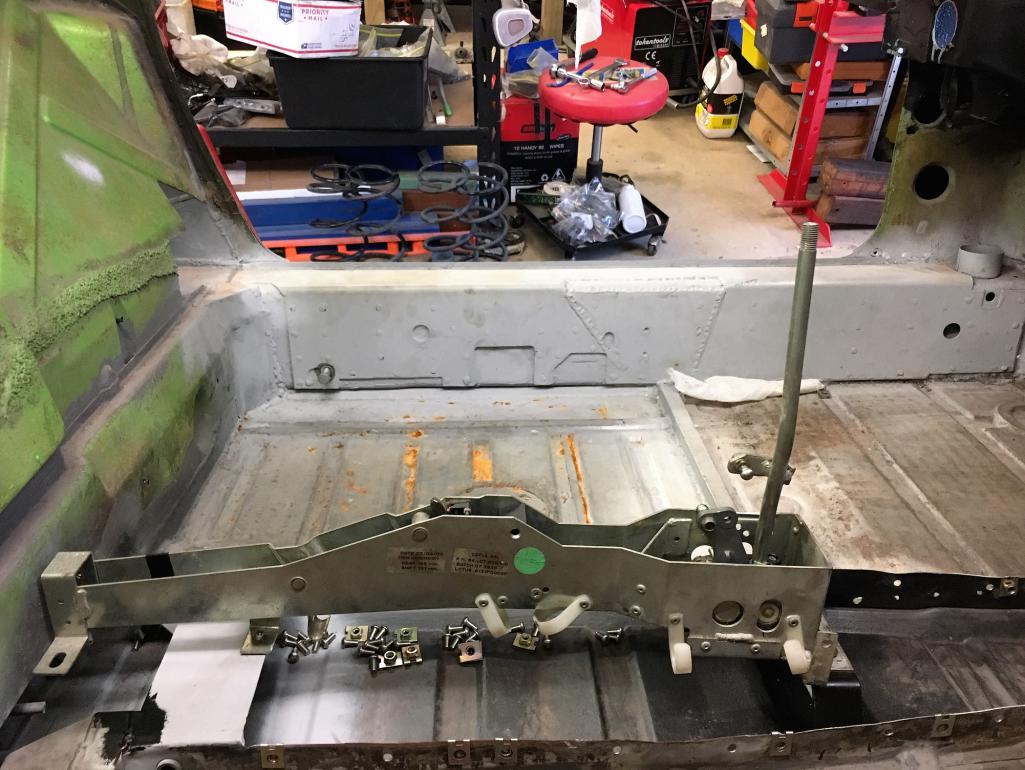
removed the gear shift lever - seems a fair amount of surface rust on the floor pan under there, should I remove the centre tunnel & clean it up ???
and thanks to maddogmortorsport who are shipping me the full chassis strengthening kit
I have a query with Coldwater914 for the sub conversion now
Attached image(s)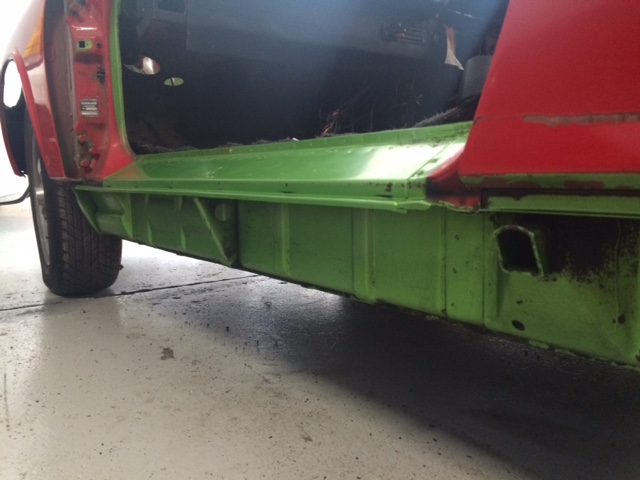
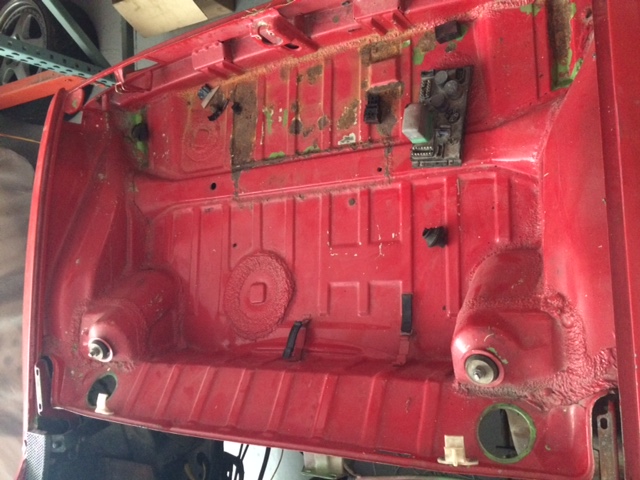
Posted by: barrym Oct 31 2014, 11:47 PM
little more progress today;
did a little workshop organising to make some more space - always takes longer than expected :/
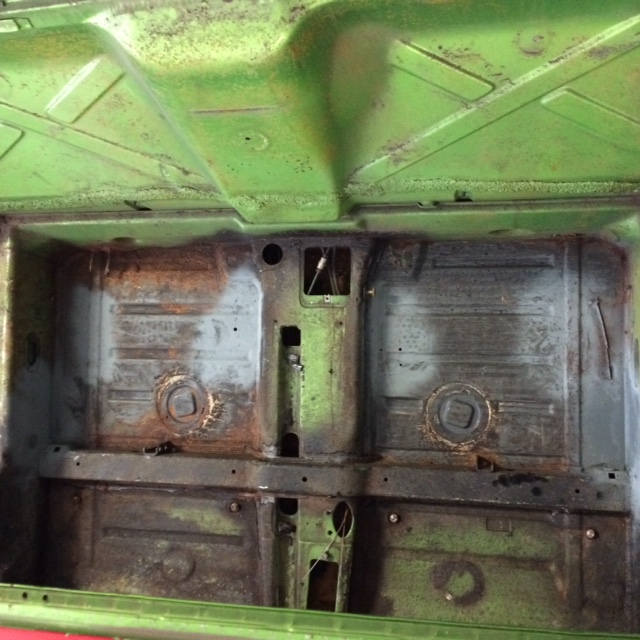
removed the floor covering - the tar like stuff - gave it a little heat and it peels off easily enough ..
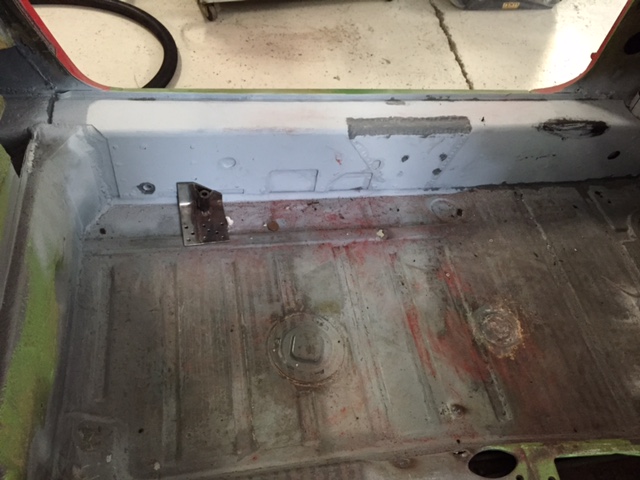
Cut off the handbrake mount points - there were two of them - one on each side as it was converted to right hand drive the left hand one was just left in place.
Removed both rear seat mounts as I have secured a pair of sparco rev plus seats.
When I pulled out the rear seat mounts I found a bunch of coins under them - quarters & dimes by the look of them ?? - fair well corroded tho ...
Removed a bunch of small brackets on the floor & cleaned it all up & gave a spray of weld thru primer.
next job is to remove the cross floor brace and cut the top off the tunnel to clean out the surface rust & give it a coat of epoxy.
Attached image(s)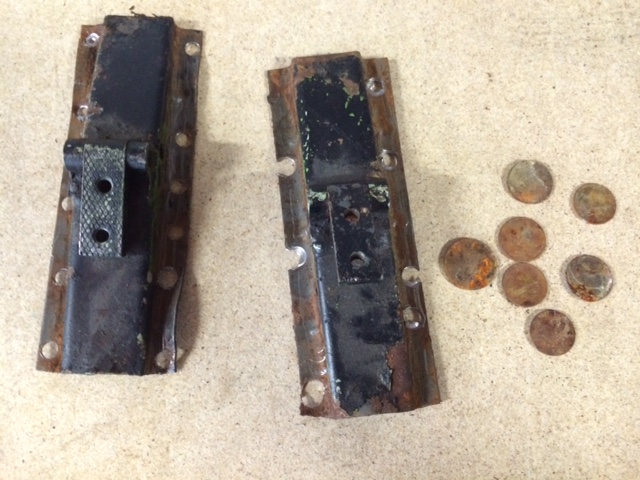
Posted by: al weidman Nov 1 2014, 10:00 AM
A fiberglass door skin will not help much on a US '75 car door. The US car doors have safety crash bars in them. The earlier doors are much lighter. You can, however, remove the guts of your doors and they will be very reasonable in weight. I also hope you backdate the bumpers for additional weight savings.
Posted by: barrym Nov 1 2014, 01:18 PM
Can the crash bars be removed without splitting the door skins ?
Posted by: barrym Nov 3 2014, 10:11 PM
small update - i have a spare shifter tunnel & cables from my lotus - will build this into the 914 tunnel will also have handbrake attached & lotus shifter cover ...
Attached image(s)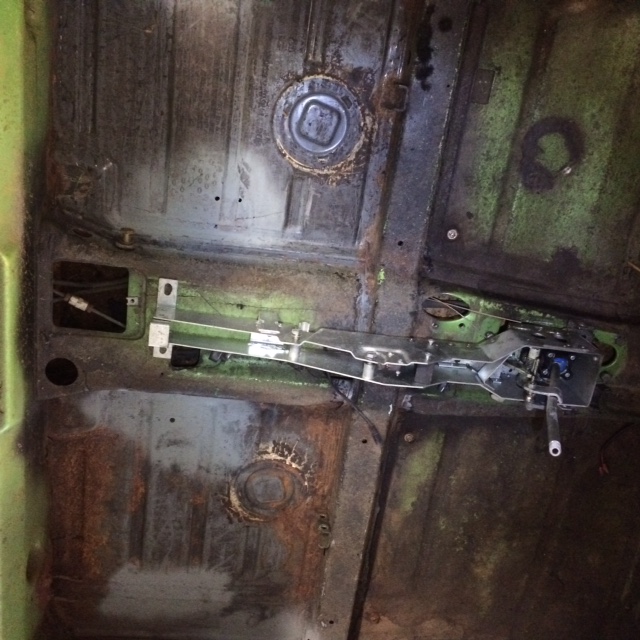
Posted by: Dave_Darling Nov 4 2014, 10:20 AM

Can the crash bars be removed without splitting the door skins ?
I believe you can go in through the door webbing and get much of the bar out. I've seen that done in a track-only car before.
--DD
Posted by: dale73914 Nov 5 2014, 06:12 AM
Hey Barry,
Looks good, especially those sills. They are impressively clean !!!
Look forward to seeing how this one progresses.
As to where your car came from, mine was imported and converted in about 1999 - 2000 by the owner of a workshop / wrecker called aPorscheapart in Melbourne.
From what I found from my cars previous owner, this person imported quite a few, converted and restoéd them as much as needed and then sold them.
Yours may be one of those too possibly.
I'm in Melbourne
Cheers
Dale
Posted by: venturadeb Nov 5 2014, 06:27 AM
little more progress today;
Removed both rear seat mounts as I have secured a pair of sparco rev plus seats.
When I pulled out the rear seat mounts I found a bunch of coins under them - quarters & dimes by the look of them ?? - fair well corroded tho ...
Removed a bunch of small brackets on the floor & cleaned it all up & gave a spray of weld thru primer.
If your car has rear seats, are you sure you have a 914?????
you have a problem!

Posted by: barrym Nov 6 2014, 04:47 PM
Thanks Dale - i shall investigate them, although have not been particularly impressed with the conversion so far - the pedal box extension & other parts is somewhat primitive ..
anyway, have some good progress over the last couple of days although 'things' always seem to take longer than you expect them to take.
I've now cleaned all the tar like insulation off the floor pan - floor is in generally good condition all over, little surface rust here & there but nothing that cant just be cleaned up.
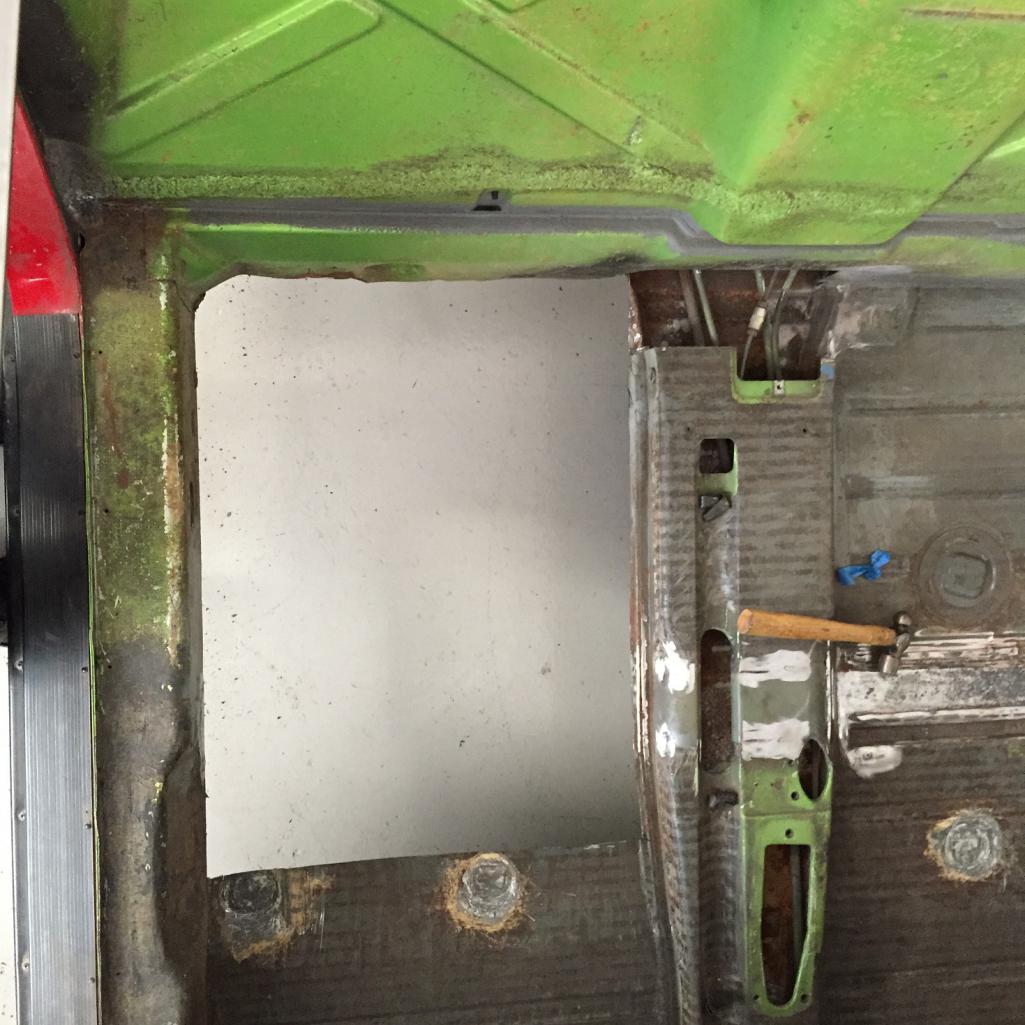
I had to cut out a couple of inches of the bottom of the firewall & couple of inches from the back of the floor pan, have been busily making templates & cutting / welding.
right hand side floor pan will be dropped a few inches to accommodate my height with a cage - i'm 6'2" with arms like some kind of simian ... need all the space i can get ! the cross brace will also be moved forwards about 6-8" to give some adjustability to the seat so the wife can drive it if she feels like it.
the seat in my lotus (Exige V6) is fixed position, she can only drive it with a number of pillows stuffed behind her so she sits on the edge of the seat ... not ideal !
There was a small hole in the left hand side floor where the RHD conversion people had cut the handbrake guide out. removed section & welded in a new piece.
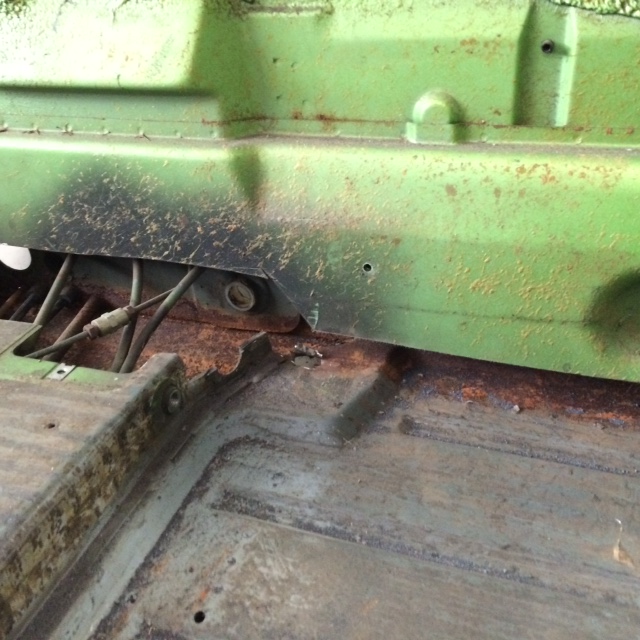
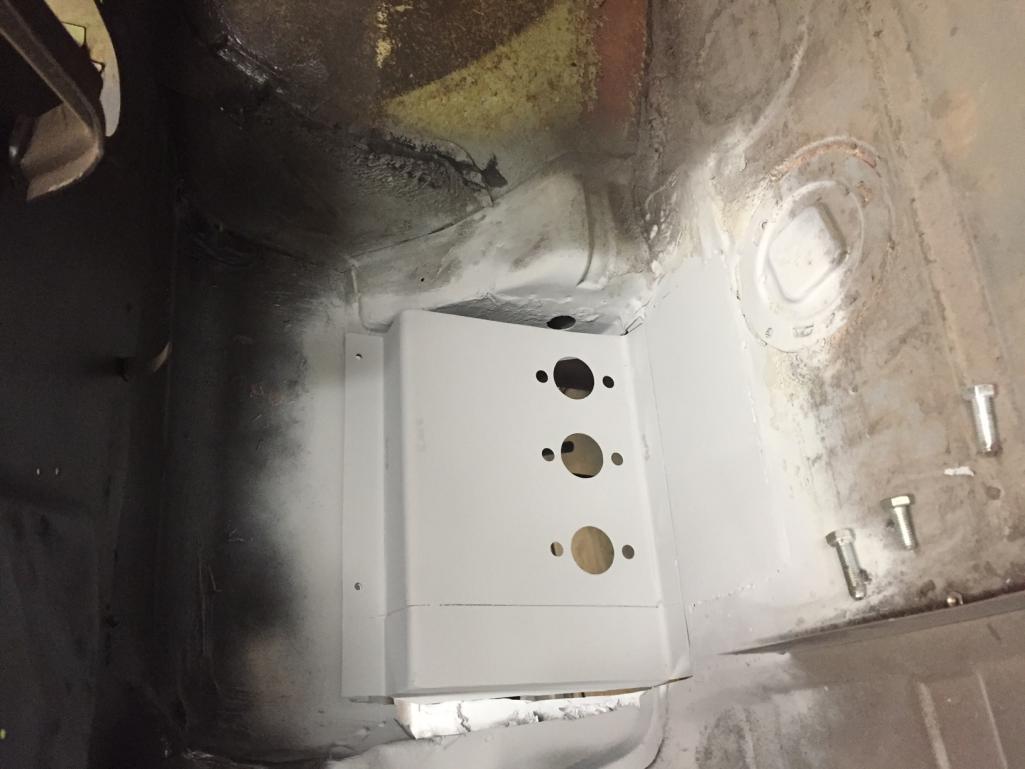
Right hand side hell hole looks like its already been fixed before - need to investigate that area more when i get the battery box out - the battery box has been replaced at some point in the past - it needs to go - its WAY too big anyway, i'll be installing a much smaller battery when the time comes.
'hell hole' on the left hand side needs some work - chassis section looks good with only surface rust but inner wheel guard & some of the shelf in the engine bay needed to go. a question; what tool to use to cut out the inner guard - its a very restricted area to get an angle grinder in there ... ??
finished removing all the gunk from the windscreen & removed the rest of the air vents from the gas tank area. removed the shock absorbers from the fenders.
pedal box is removed & a fair number of small holes have been welded & cleaned up from the floor & pedal box area. seam sealed where i needed to.
recently arrived stuff;
a box of steel arrived from maddogmotorsports - thanks, v quick shipping.
it contains the full strengthening kit for chassis.
new fuse box & harness - went with a 'universal' 22 circuit harness - i can work electrical stuff no probs - not phased with this at all.
Picked up a couple of Sparco rev plus seats for a song - but i struggle to fit into them. i'm about a 33" waist and they are TIGHT ... considering splitting the base to make them an inch or two wider ... hmmm more work ...
arriving soon should be;
tail lights, indicators, Headlights, engine bay cover, window cranks, boot floor, targa roof, floor mount pedal box (dual brake circuit 0.75" M/C)
need to order;
new brake lines - what flares do i need & what fittments to 'soft' lines
steering wheel adapter & wheel
gas tank (when i have finished the front mount radiator)
roll cage ...
the list expands ...
Attached image(s)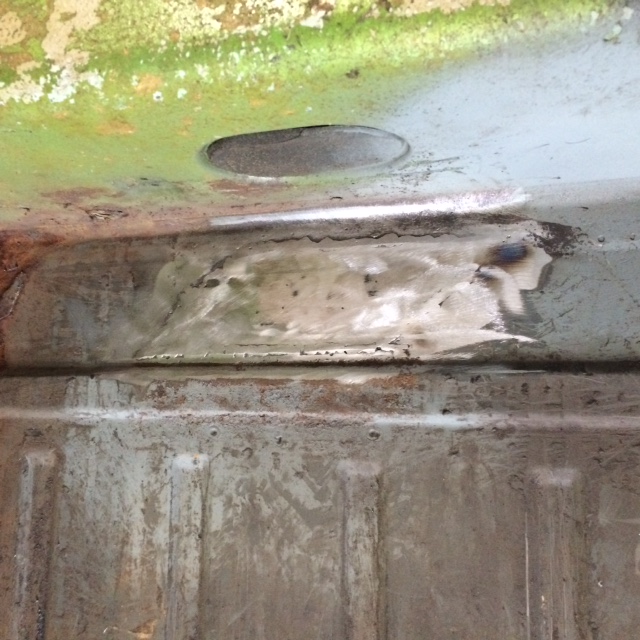
Posted by: barrym Nov 6 2014, 09:22 PM
some of the firewall replaced ...
and picked up a bag of bicarb of soda in the daily driver to test out surface rust removal in hard to reach areas ...
i say daily driver - but it sees some track work too
Attached thumbnail(s)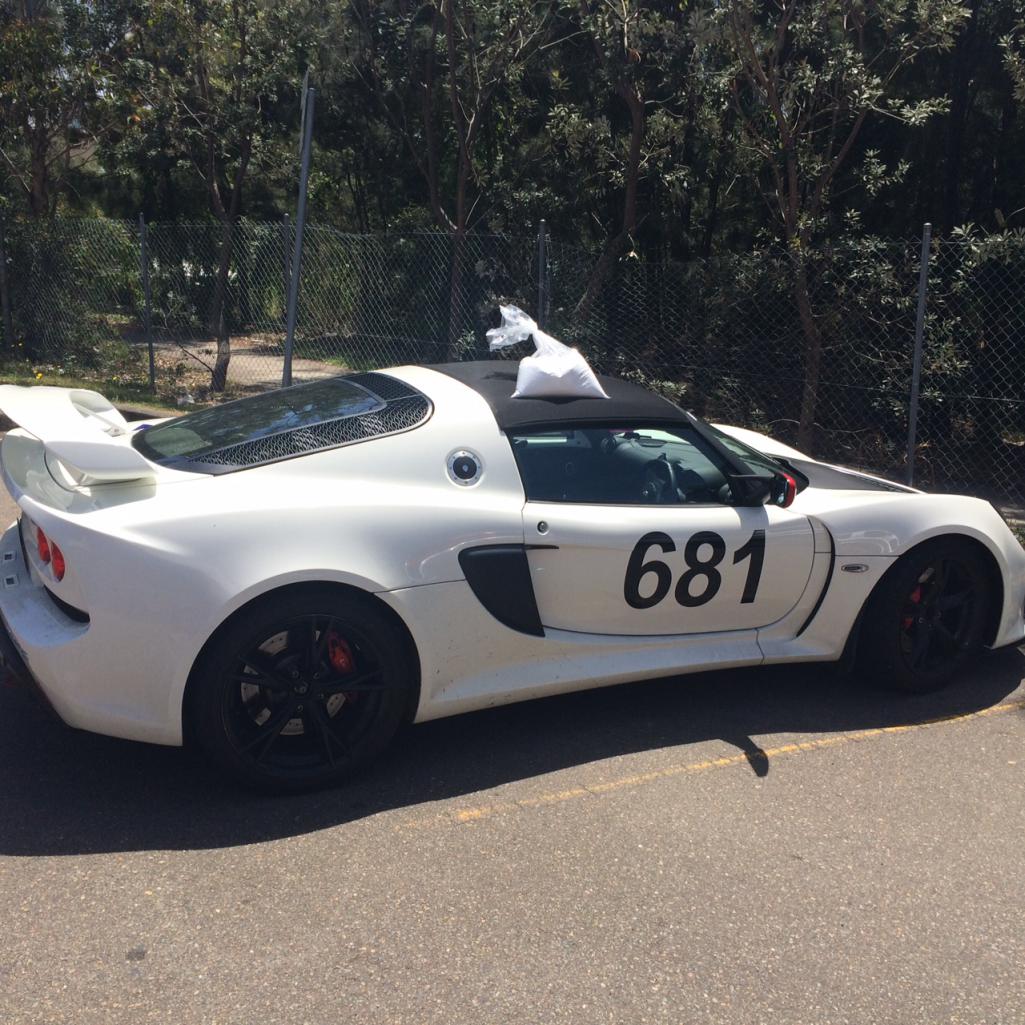
Attached image(s)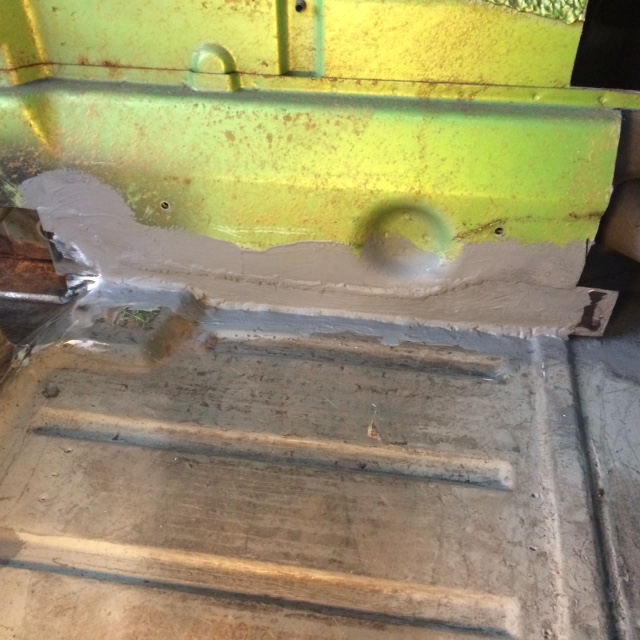
Posted by: barrym Nov 9 2014, 06:25 PM
a few big days of work this week ...
where do I begin !?
I finished fixing the inner / lower firewall with some welded in steel plate.
braced the front upper door mount to the seatbelt mount
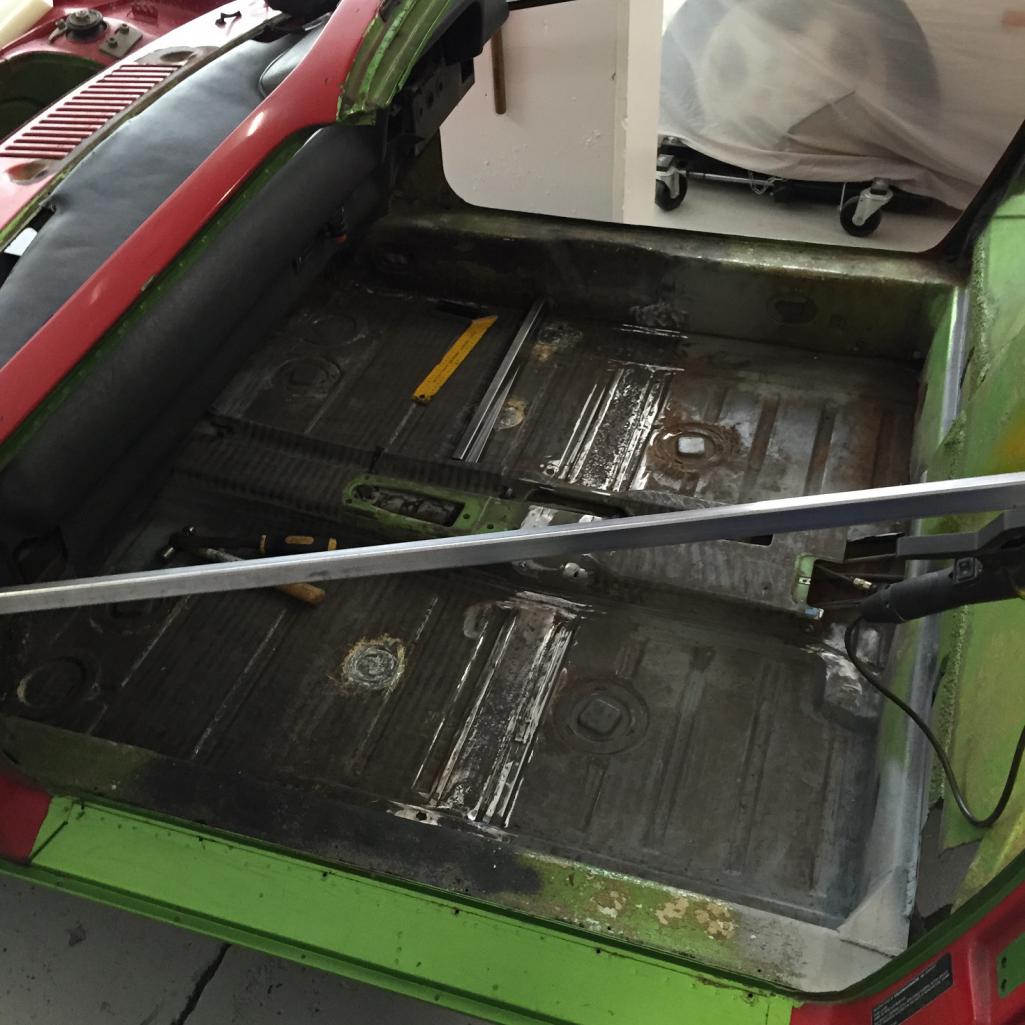
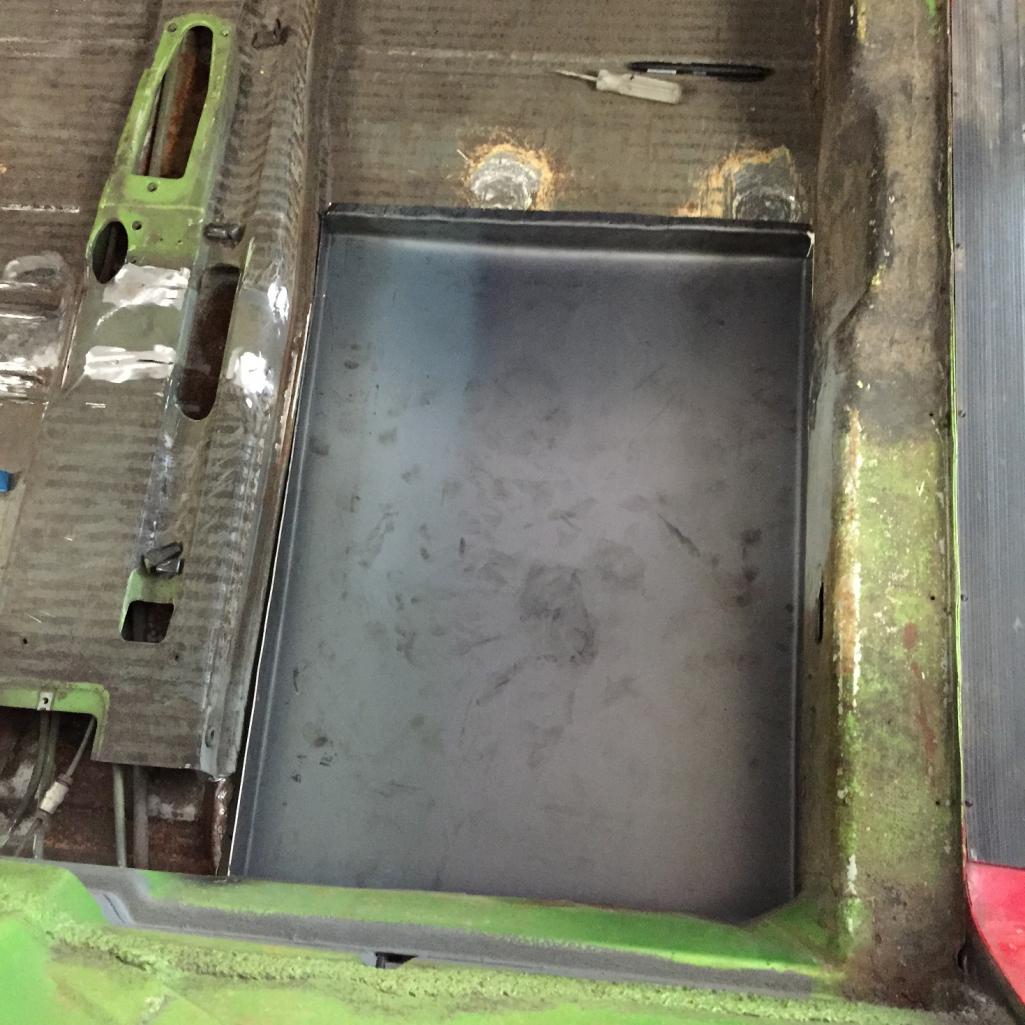
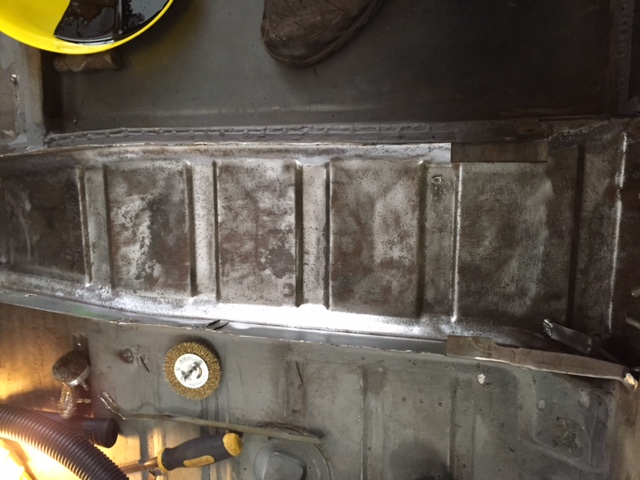
cut out the lateral floor support - while it looked in generally good condition on the outside there was a cornflake box of rust flakes inside it. cut it out as i'm moving it forwards to give some adjustability to the drivers seat. made up a couple of bars to replace the cross mount from 1.2mm SHS - will stitch weld them together. i also am going to drop the floor a couple of inches as i wont fit into the car with a helmet & roll cage ... upon looking at the floor a little closer, at the back, i decided to cut the floor out completely and make up a new floor. the rear of the right hand side floor was pretty poor condition due to the RHD conversion handbrake cable. bent up a new floor from 1.5mm steel - its about in place in the pic, but not yet welded in. there will be two flat bars welded the length of the floor to provide additional support to the seat mounts. the front of the floor drops down 20mm and ramps down to 50mm at the back, with the seats reclined i should get about the right amount of height.
bought a pair of cobra seats that fit perfectly
Attached thumbnail(s)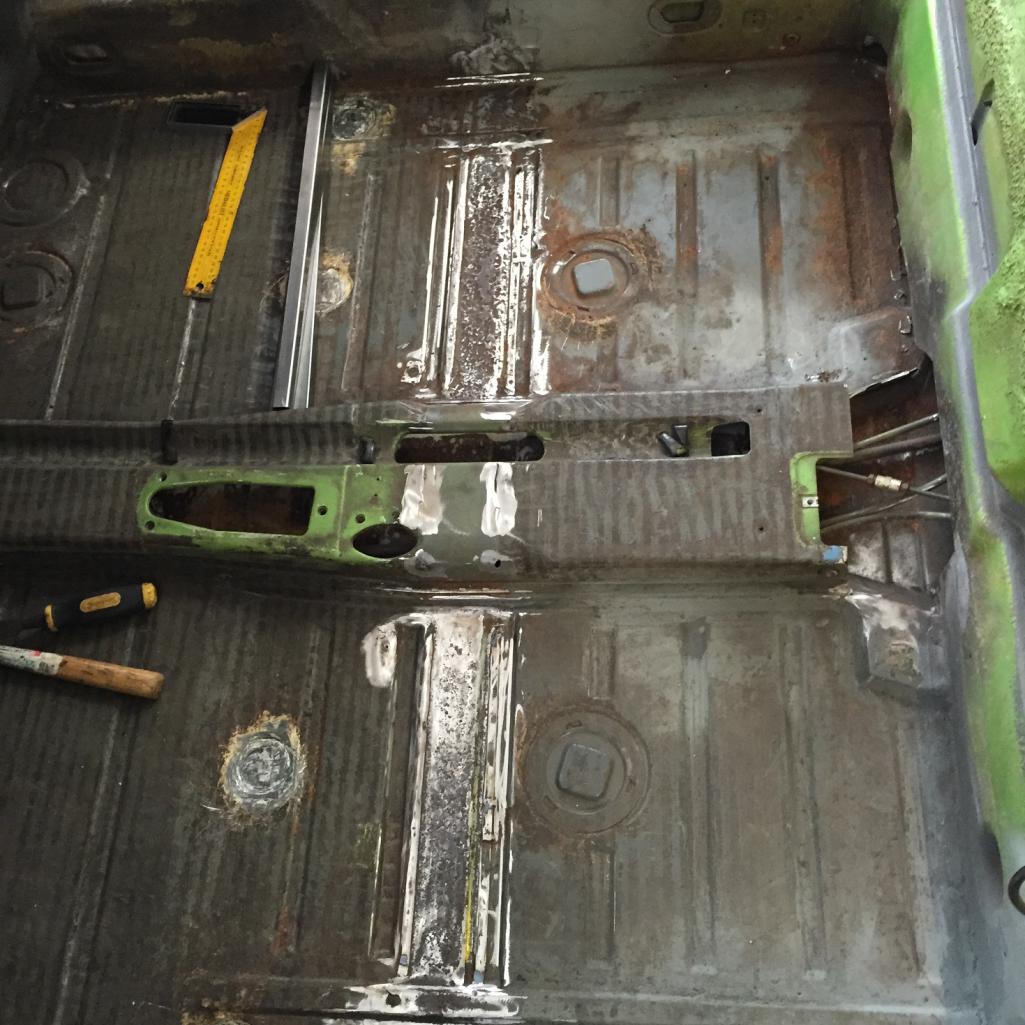
Posted by: barrym Nov 12 2014, 04:36 PM
couple of nice large boxes arrived for me over the last couple of days ..
Roof, engine lid, boot floor, window cranks, rear light buckets & lens, floor mount pedal box, headlights, front indicator buckets & lens
still need to order some brake lines & fuel lines tho ...
but I have sourced what I think is a complete kit for the Subaru gearbox conversion ...
Subarugears (Australia based as well) make a mid mount conversion kit - http://www.subarugears.com/index_files/Products.html
they do a bunch of other stuff too that may interest Porsche owners ..
Anyway, the 914 CV joint is about 90mm diameter, this conversion kit requires 100mm joints, but the VW kombi van is apparently a direct slip onto the 914 driveshaft and is a 100mm CV.
this makes a complete mid mount conversion to 2wd & 914 kit around $1100 aussie $ - well, plus the gear shift mechanism ...
pretty good value I think ...
can anyone comment on using kombi CV joints ?
Posted by: barrym Nov 25 2014, 05:56 PM
been a few weeks since updates - have been away with work, but have also made some progress.
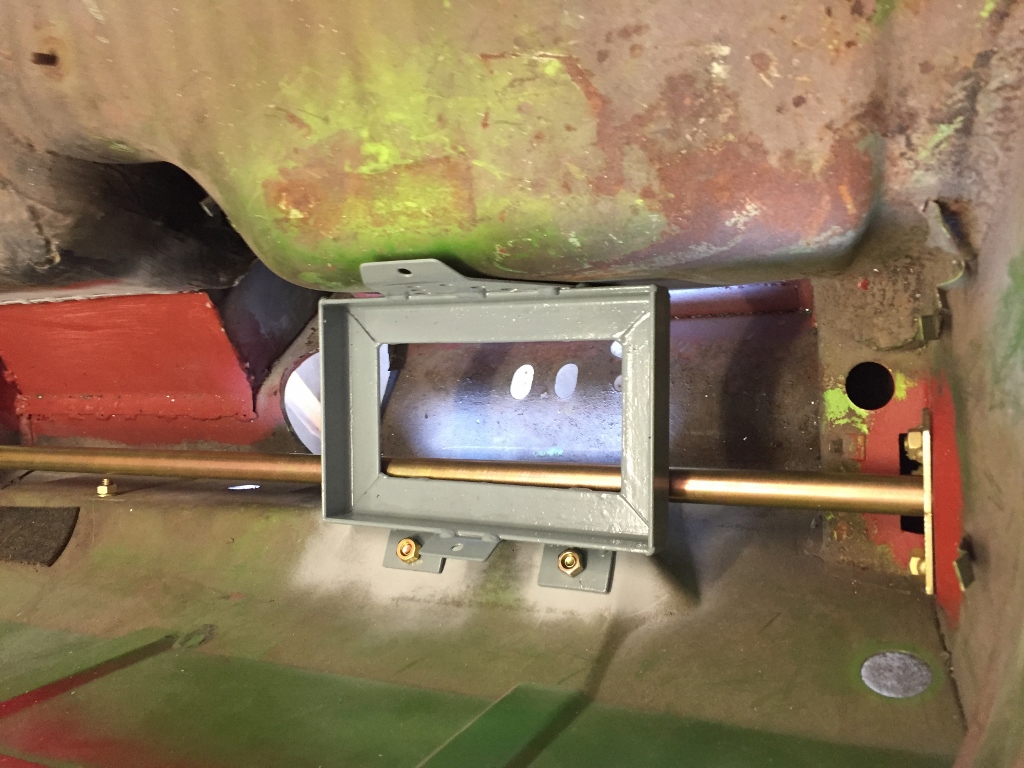
fabricated new harness mounting points for install in the centre section - upon advice from another 914 member the standard points are a little too far forwards with the harness buckle ending up on the seat rather than between seat & mount point. anyway, this allows me to use the standard mount point for the standard seatbelt as well, if I choose to use it.
mostly finished making the new floor & welded it in place. with the seat in place I now fit comfortably in the car, with enough room for roll cage & helmet/hans and can still see over the steering wheel. the new floor is approx. 40mm lower at the back and 15mm lower at the front. I've yet to complete the welding in of replacement cross floor beams.
a bunch of stuff has arrived from the US and will keep me busy for some time.
next on the list to do is remove shelf in engine bay & fix up the rear inner guards - then replace the boot floor.
Attached image(s)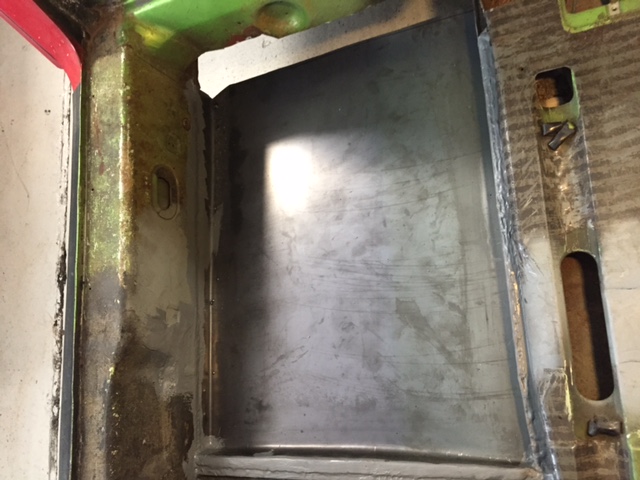
Posted by: barrym Dec 22 2014, 04:39 PM
been a few weeks since the last update - but have been busily beavering away on small stuff - but non the less, stuff that needs to be done ...
in no particular order ...
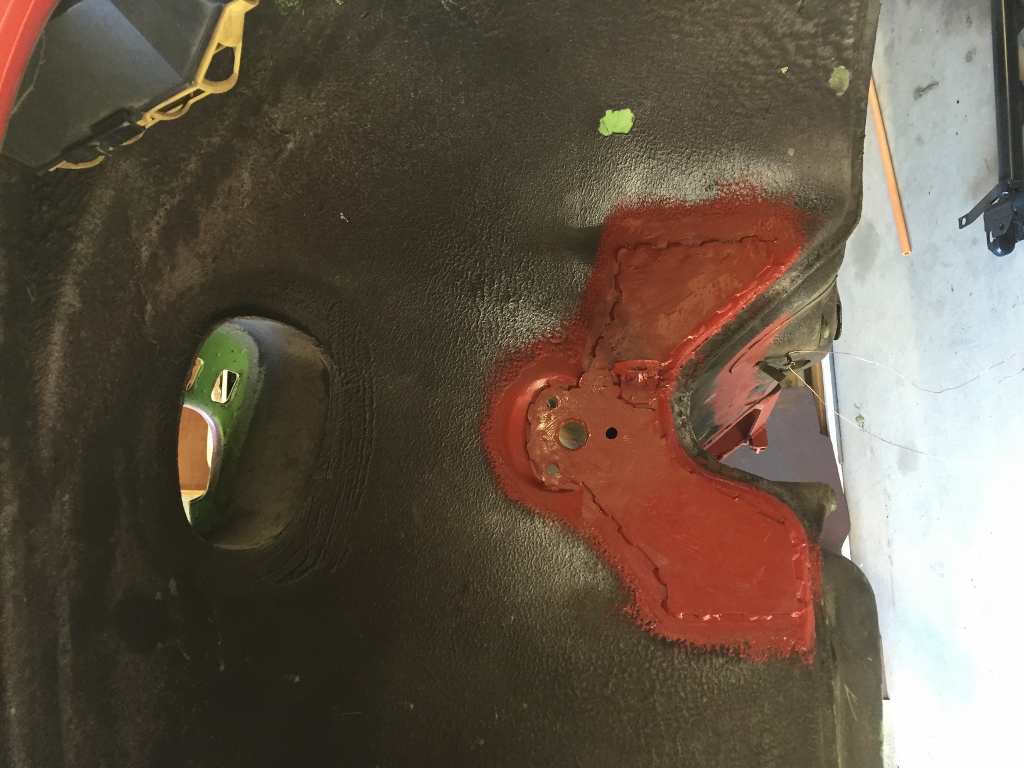
the PO welded the dashboard to the scuttle - you can see in the pics the weld marks - I have no idea why they would have done this, the 4 bolts across the top were in place & holding it down ... v odd ... must have been done when it was converted to RHD.
painful place to be able to get to as well, ended up getting a chisel & making a bit of a mess of the scuttle ... its out though now & have repaired the scuttle & pained it with epoxy rustkill in matt black. looks much better now :
had a weekend away with the lotus guys at a track about 650 kms from home ! great weekend with 65 other lotus' - a huge achievement for Australia given the lotus is not an overly popular car here ...
cleaned up the windscreen surround - removed all the black goop holding the screen in place, cleaned, sanded & gave it a couple of coats of primer to keep it in good condition. the bottom of the screen was good condition with only very minor pitting.
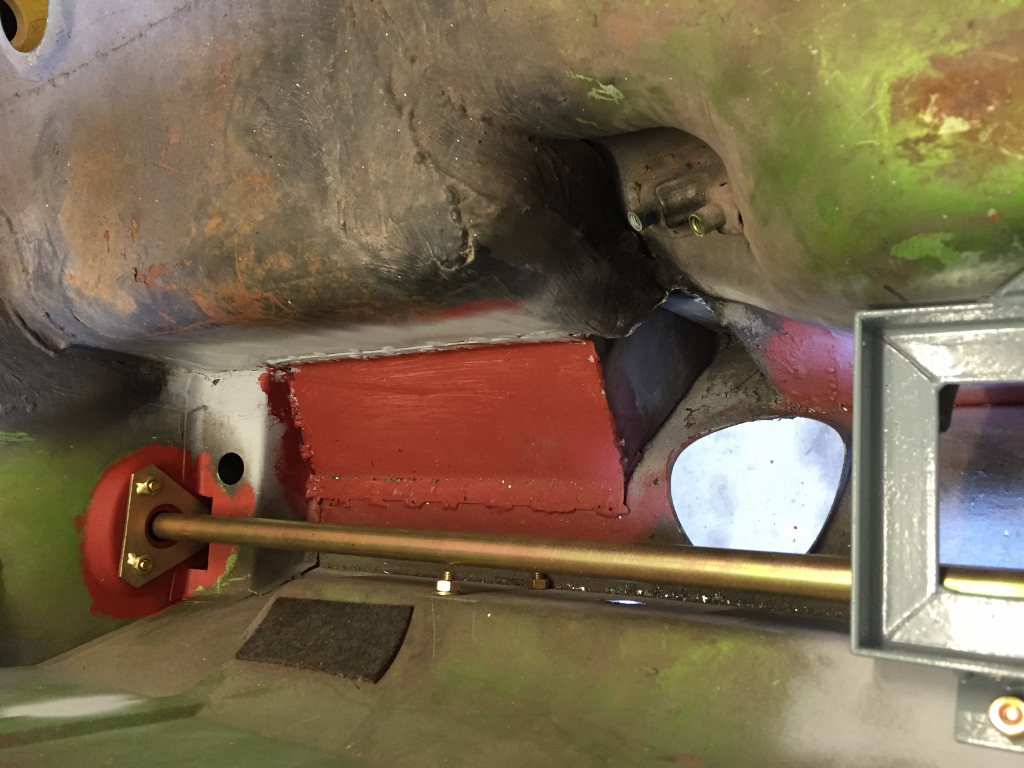
started installing the bracing kits & have the left hand side installed - went in easily enough - have the rest of it to do now
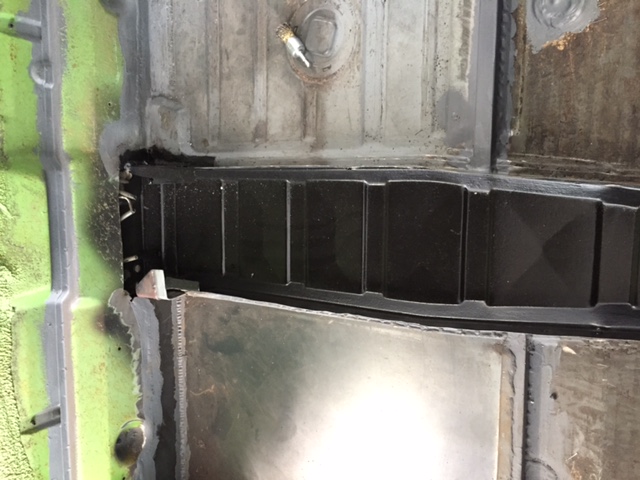
there was a lot of surface rust under the middle section, where the various pipes run, that was impossible to get at to clean up - so I cut the top off it, spent about 2 hours with a a few wire wheels & painted in matt black epoxy rustkill - looks good now will make up a few straps to weld in place to box the tunnel in place & will cover with a new sheet of steel & will bolt it in place with rivnuts to allow later access
also got the bottom of the firewall welded in on the right hand side- whats the best way to re-coat the inner part of the firewall - the void ?
cleaned & painted the various parts of the steering column - installed a new VW ignition switch & sourced a new ignition barrel - my car didn't come with a key - so managed to get a working barrel & key from a '73 and will send door locks & boot lock off to get serviced & re-key'd.
as a note of interest, and possibly common knowledge, but the '75 onwards ignition barrel cannot be re-keyed - however, the early barrel fits in the late steering column with no modifications.
picked up a wrx gearbox for cheap from ebay ($430 AUD) - have ordered a locking spline and made up a cover for the rear of the box from 5mm aluminium plate.
still not decided on the best option for driveshafts - not in a big rush to make the decision as am prob 8 months of needing to install a drivetrain ...
should be able to get a day or two of work in over the xmas period - would be great to get it to the point of being able to install a roll cage !
Attached image(s)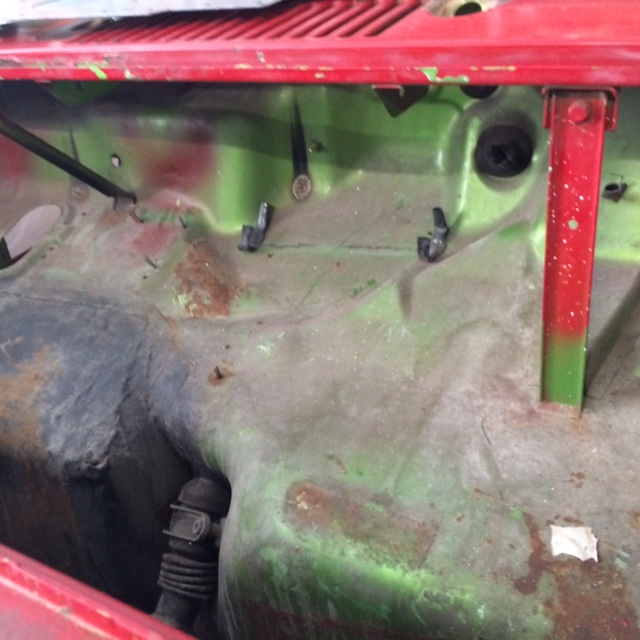
Posted by: crsedge Jan 3 2015, 02:22 PM
Hi Barry,
Great work! And Viper Green- great colour!!
I enquired some time back re undertaking a WRX conversion with gearbox into a 914 with Subarugears, but I ended up going a different direction (with a different car).
I am now back on the hunt for a 914 in Australia (Melbourne) but will probably stay naturally aspirated.
Cheers
Craig
Posted by: barrym Jan 4 2015, 07:16 PM
thx
although I recently found out it is not viper green but I think is a custom colour known as 'lime metallic green'
either way, it'll get painted as close a match as I can get.
in other news, I did get some time on it over the xmas break, but only to start re-assembling it. I've accepted a job that is in a different State so have to pack everything up & have it moved to Queensland - this will mean a slight delay on the project while it goes into storage & I look for a new house with lots of garage space
in the mean time i'm building a list of things I still need to procure and can keep that process underway
Posted by: barrym Nov 6 2015, 06:32 PM
Finally I can get started on this again- had to move house twice and states once and finally have a garage & all my stuff back to start work again.
Things have not stalled tho as I have been collecting parts - including a wrx as a donor car
Posted by: veekry9 Nov 7 2015, 04:30 AM
Loti
The plural of Lotus. 
Confronted the conundrum in the '70s,"How many models of Loti did Emerson Fittipaldi drive in F1?".
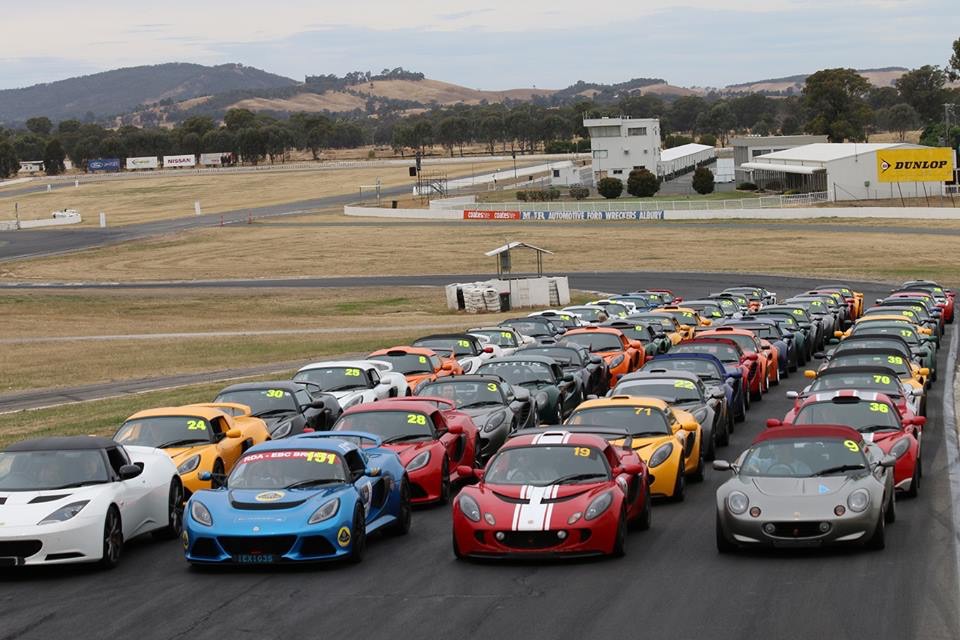
https://www.google.ca/maps/place/Wakefield+Park+Raceway/@-35.3272705,149.0114597,9z/data=!4m5!1m2!2m1!1sracetrack+australia!3m1!1s0x0000000000000000:0x1efee9381939ac8c!6m1!1e1
The track looks real fast,I gotta ask how your time was,assuming the photo was the grid.
Anyone wreck?(The fun part of racing).
Posted by: Cairo94507 Nov 7 2015, 08:26 AM
Nice progress and work. 


Posted by: barrym Nov 8 2015, 11:28 PM
Veekry9 : that pic was at Winton (around 8-10 hours drive from wakefield) did ok, I think, was a while ago now I think I was 3rd in class ...
that pic was a mock up grid for the photo op. the actual grid was a LOT smaller & very friendly 'gentlemans rules' racing.
I had the A arms & cross member sandblasted & powder coated & picked them up last week - really pleased with the outcome, they look factory new now - super happy with them ... however, the 914 torsion bars I ordered from autoatlanta had 30 splines on them ... I need 29 splines :/ - hopefully I can work out how to return them without incurring int'l shipping rates ...
Posted by: veekry9 Nov 8 2015, 11:39 PM
This restore is a major task.
A cornucopia of ideas are here.
Canadians talk about drives like that the same way.
Atikokan to Toronto is about 18hrs in summer,if the hwy isn't washed out.
I was sure I had the right track,still very nice,and fast.
Posted by: maf914 Nov 9 2015, 11:59 AM
Loti
The plural of Lotus.
Confronted the conundrum in the '70s,"How many models of Loti did Emerson Fittipaldi drive in F1?".
Emmo drove the 49C, 56B, 72C, 72D, and 72E.

Posted by: Andyrew Nov 9 2015, 12:23 PM
Great looking work!
I must note I have never seen repair in this area before.. (Left of the steering column)
Very interesting!
Posted by: veekry9 Nov 9 2015, 01:33 PM
https://www.youtube.com/watch?v=pNrnDlda5p8
Thanks for the touraround,a chance to see Wangaratta.
https://www.google.ca/maps/place/Winton+Raceway/@-36.411009,145.7866401,9z/data=!4m2!3m1!1s0x6b271b3f9fa25f8f:0x32cec97918341ff2
Both of these tracks are fast,high velocity on the grandstand straights.
https://www.google.ca/maps/@-36.3797799,146.3673933,3a,75y,340.92h,98.94t/data=!3m6!1e1!3m4!1sR1JOwqzmN6saaWmS5lOj7Q!2e0!7i13312!8i6656
http://www.elephantracing.com/suspension/torsionbars/914torsionbars.htm
A nice product,which I am happy to endorse.
Pratt and Whitney power,4 wheel drive for off road tracks.
Further,as a sidestep
[urlhttp://www.f1-grandprix.com/?p=35728[/url]
https://www.formula1.com/content/fom-website/en/championship/drivers/hall-of-fame/Emerson_Fittipaldi.html
https://en.wikipedia.org/wiki/Australian_Grand_Prix
Posted by: barrym Nov 9 2015, 02:43 PM
Great looking work!
I must note I have never seen repair in this area before.. (Left of the steering column)
Very interesting!
It's for the right hand drive conversion (done before I bought it) so the pedals fit
Posted by: Andyrew Nov 9 2015, 03:56 PM
I see the rusted marks from the hammer for the steering column shaft!
Cool!
Posted by: rgalla9146 Nov 9 2015, 07:15 PM
thx
although I recently found out it is not viper green but I think is a custom colour known as 'lime metallic green'
either way, it'll get painted as close a match as I can get.
in other news, I did get some time on it over the xmas break, but only to start re-assembling it. I've accepted a job that is in a different State so have to pack everything up & have it moved to Queensland - this will mean a slight delay on the project while it goes into storage & I look for a new house with lots of garage space
in the mean time i'm building a list of things I still need to procure and can keep that process underway
In '75 that color was known as "Palma Green Metallic" L95K
I've got the same color car..... but with blue metallic on top.
Nice work.
Posted by: barrym Nov 11 2015, 05:21 AM
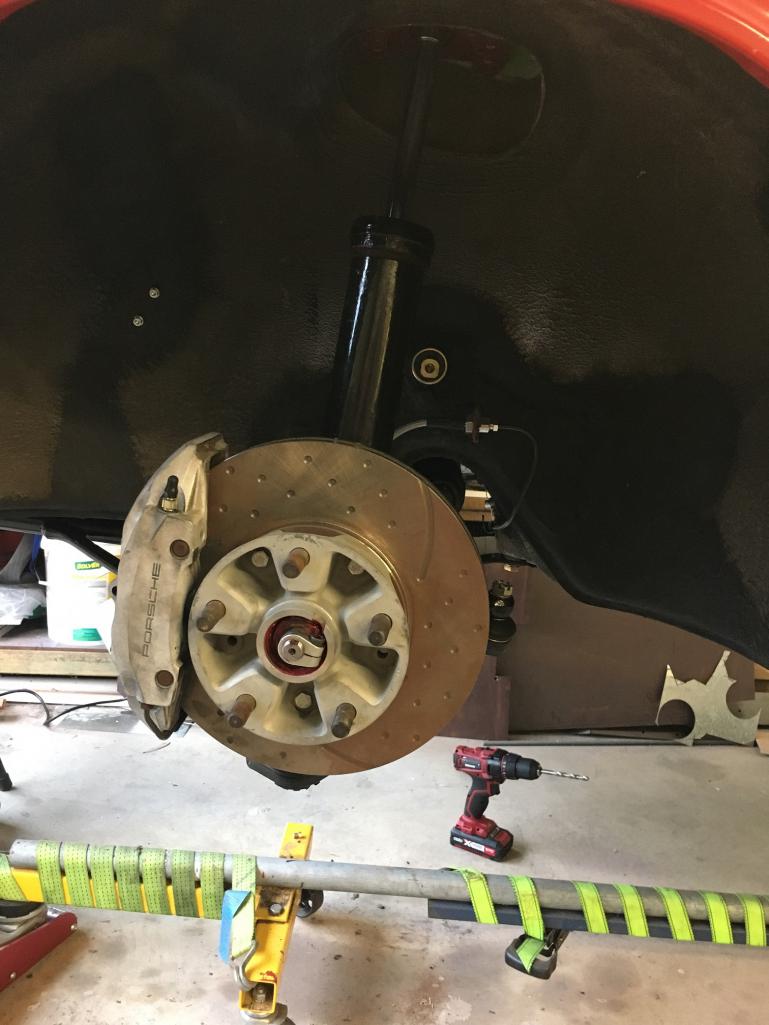
Boxster caliper stuff arrived today from rebel - all fits perfectly on my boge struts & 5 stud hubs
Picked up the calipers a couple of months back for $600 shipped from Poland ! Of all places ....
I do have a question about bolts through hub / brake disc - the book appears to say m8 x19mm with a spring washer & regular nut - all assuming in iso8.8. Is this right? And which side does the nut go ??
Attached thumbnail(s)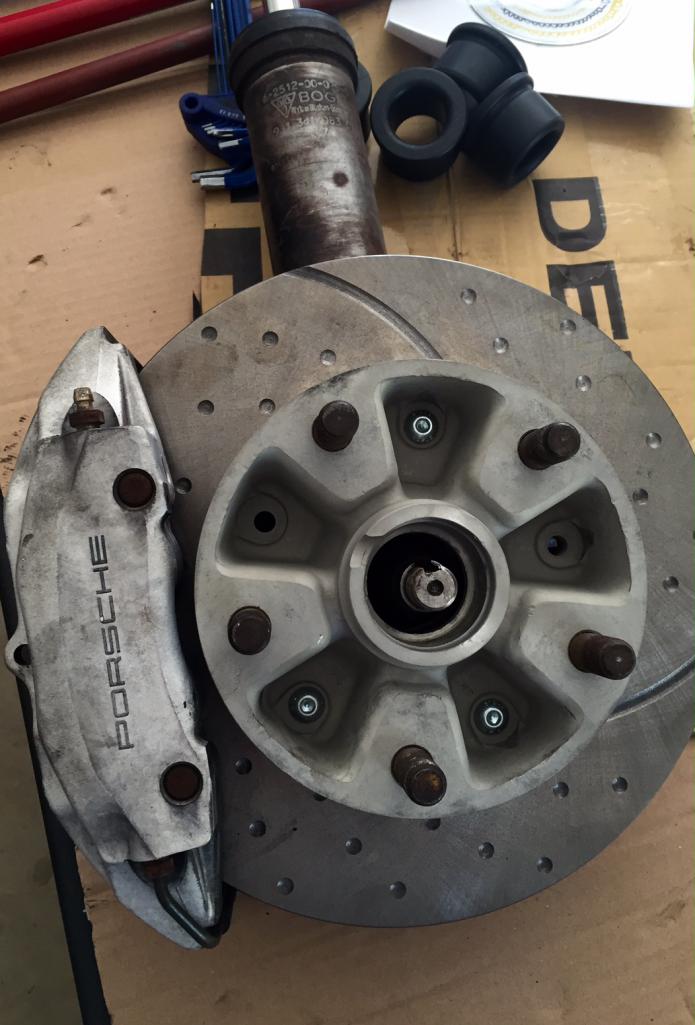
Posted by: barrym Nov 11 2015, 05:27 AM
thx
although I recently found out it is not viper green but I think is a custom colour known as 'lime metallic green'
either way, it'll get painted as close a match as I can get.
in other news, I did get some time on it over the xmas break, but only to start re-assembling it. I've accepted a job that is in a different State so have to pack everything up & have it moved to Queensland - this will mean a slight delay on the project while it goes into storage & I look for a new house with lots of garage space
in the mean time i'm building a list of things I still need to procure and can keep that process underway
In '75 that color was known as "Palma Green Metallic" L95K
I've got the same color car..... but with blue metallic on top.
Nice work.
Thanks - could you post a pic of the full car ? Am interested to see what it looks like !
Thx
Posted by: Chris H. Nov 11 2015, 07:08 AM
Is your car titled as a 1975? Because it looks like it's a '76. 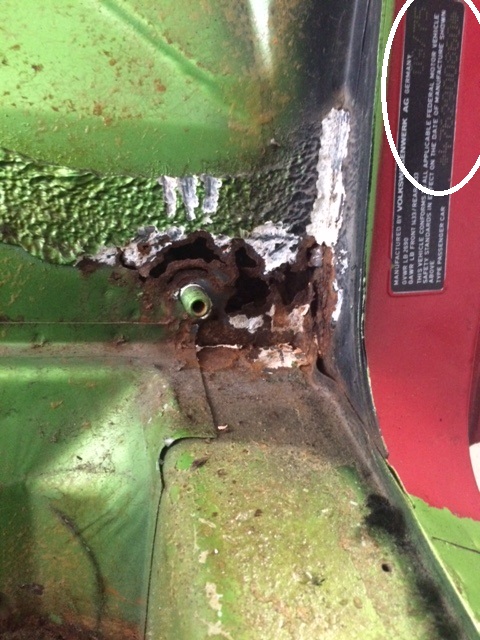
Which explains the color thing. It didn't look like a '75 color but lime green was '76 only. Now that we know it's a '76, it's most likely lime green after all (similar to viper green).
Here's speed metal army's lime green metallic car: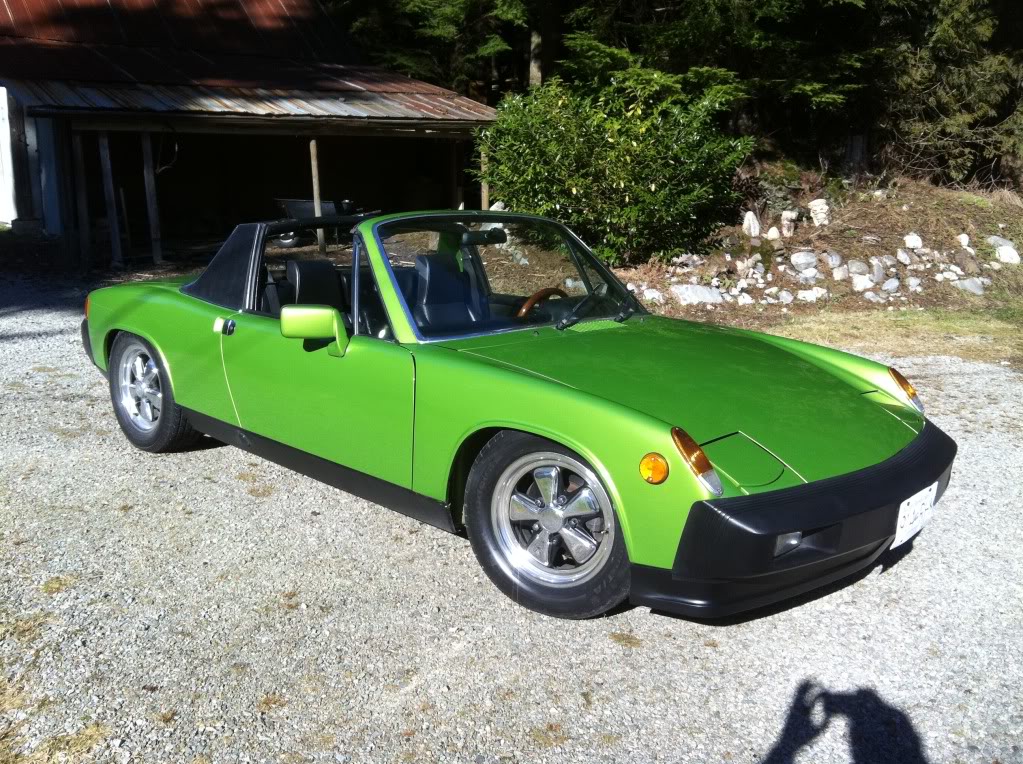
Posted by: Nutter965 Nov 11 2015, 07:53 AM
Looking good, i noticed yours had been converted to RHD i'm in the process of doing mine ! Do you have a picture of the back of the dashboard per chance ?
Posted by: 76-914 Nov 11 2015, 09:04 AM
Is your car titled as a 1975? Because it looks like it's a '76.
It happens. My '76 is registered as a 75 also. And that's a good thing in CA.
Posted by: barrym Nov 11 2015, 02:49 PM
Is your car titled as a 1975? Because it looks like it's a '76.
It happens. My '76 is registered as a 75 also. And that's a good thing in CA.
Not sure I understand - I thought that label says it was made in sept '75 ??
Posted by: Chris H. Nov 11 2015, 03:34 PM
It's the VIN number that tells you what model year it is.
It starts with:
47 is the model number for the car
6 is the model year
Your car, although built in 1975, is a 1976 model. If you take a look at the members VIN numbers you'll see that to be the case with a few exceptions (like Kent's).
Posted by: barrym Nov 11 2015, 04:30 PM
Ahh- that makes sense thanks
Posted by: barrym Nov 14 2015, 03:03 PM
Dash pics - it was basically chopped & welded back together...
Dash top the same, sliced & glued back in place then recovered in vinyl...
Attached image(s)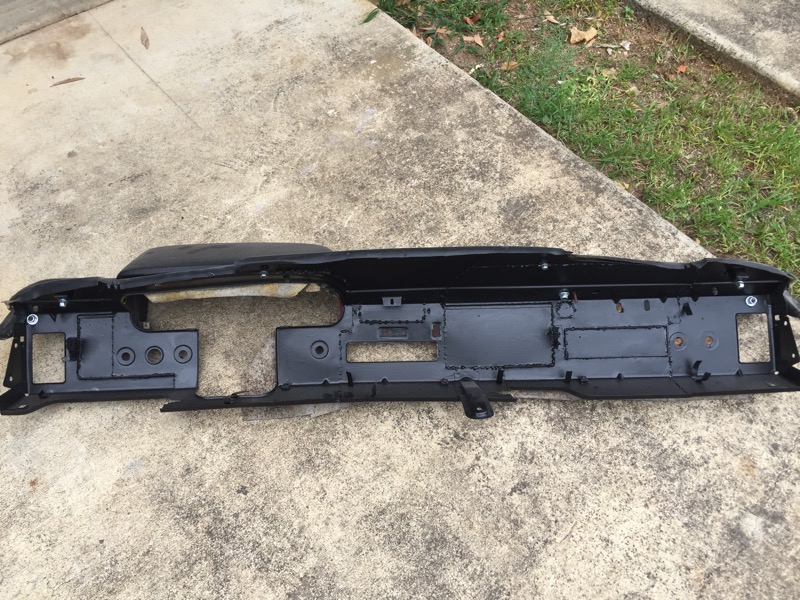
Posted by: barrym Nov 14 2015, 03:04 PM
Cross bar & control arm back from powder coating - like new !
Attached thumbnail(s)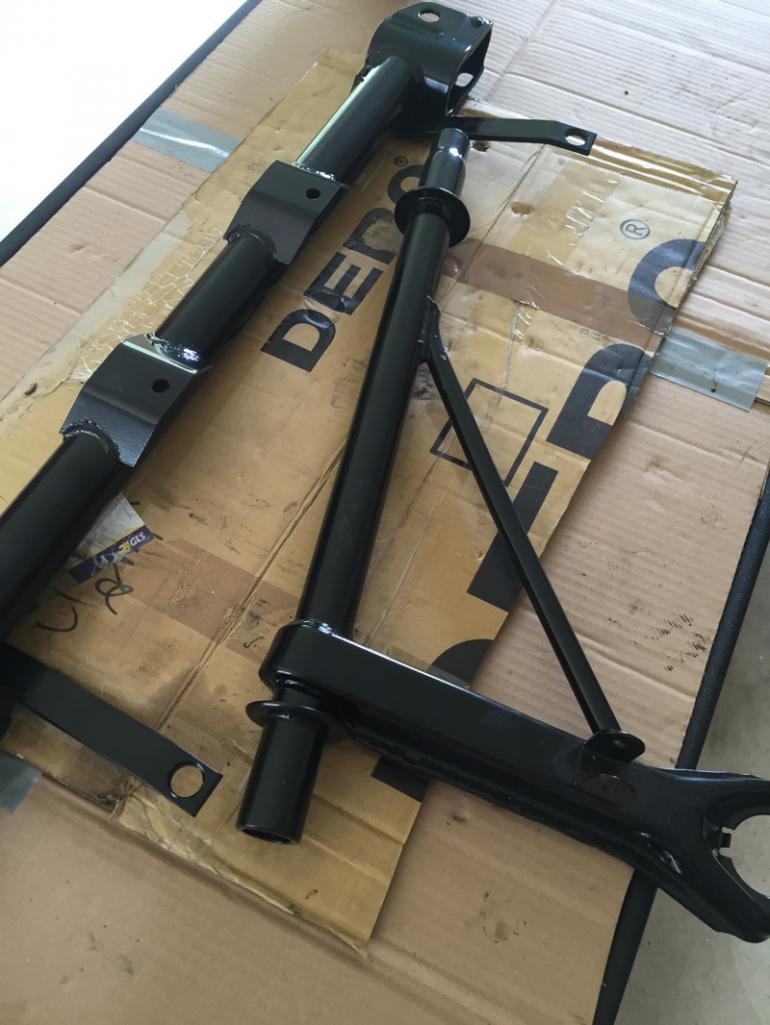
Posted by: barrym Nov 14 2015, 03:06 PM
I bought a my2000 wrx for the engine/ gearbox etc- I knew it had a little rust in the roof, but wasn't prepared for this when I took the battery out !
Attached thumbnail(s)
Posted by: Nutter965 Nov 14 2015, 03:36 PM
Dash pics - it was basically chopped & welded back together...
Dash top the same, sliced & glued back in place then recovered in vinyl...
Cool, thanks for that ! Inspiration for my conversion, although I might try to keep the glovebox even for a pair of shades to live in

Posted by: dale73914 Nov 15 2015, 09:18 PM
I bought a my2000 wrx for the engine/ gearbox etc- I knew it had a little rust in the roof, but wasn't prepared for this when I took the battery out !
The engine is going to feel right at home then going into a teener ....
Posted by: barrym Nov 15 2015, 10:25 PM
Dash pics - it was basically chopped & welded back together...
Dash top the same, sliced & glued back in place then recovered in vinyl...
Cool, thanks for that ! Inspiration for my conversion, although I might try to keep the glovebox even for a pair of shades to live in
Yeah - I still have to modify it slightly to install the terratrip stuff...
Posted by: barrym Nov 29 2015, 01:10 AM
Picked up a zinc plating & passivating kit - have been busy sandblasting & plating
Attached thumbnail(s)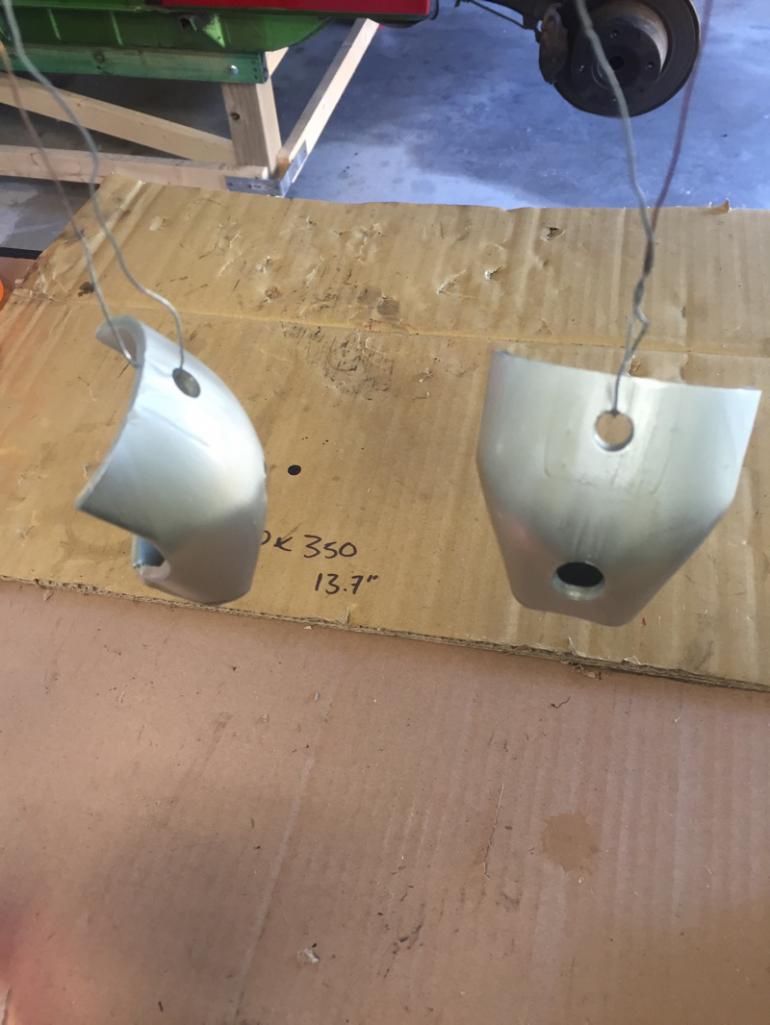
Posted by: barrym Dec 18 2015, 12:10 AM
Managed to get a days work in last weekend and decided to fabricate a GT headlight mechanism - took about 8 hours to figure it out, cut, file, weld & zinc plate/passivate.
Works well... I used a motorbike throttle adapter for the 2 into one cable splitter& 10 kg gas struts...
Also, removed engine from the wrx- what an odd way to split the gearbox- have to pull out the clutch fork.... Anyway, it's on a stand now. Also removed the engine bay wiring loom, also painful as you have to remove the aircon units...
I have a few days over the xmas period to get some work done, I should get the boot floor replaced & a few holes patched.
RCI fuel tank arrived too- just have to get some foam for it now... Fits perfectly
Attached thumbnail(s)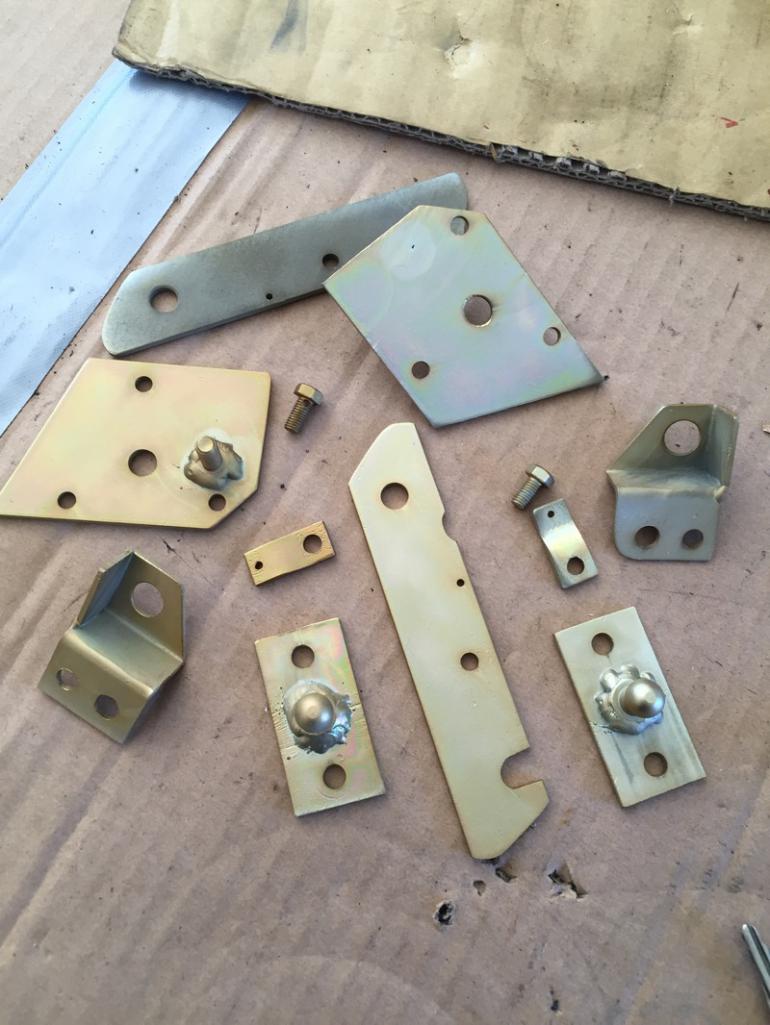
Posted by: barrym Dec 18 2015, 12:29 AM
Oh- and I repainted the cluster surround & installed the gauges, early 924 multi gauge & speedhut speedo...
Attached image(s)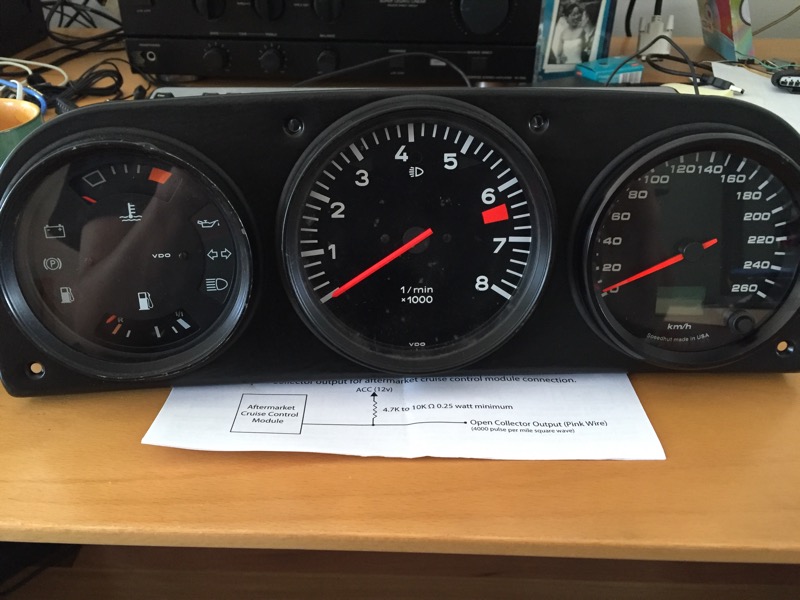
Posted by: barrym Jan 20 2016, 03:59 PM
managed to get a few things done over the xmas break ...
the RCI fuel tank was delivered and I mocked up the mounting position for it so I could make up the brackets for the radiator (celica gts rad) - this was an interesting process, the tabs at the bottom have about a 10 degree twist in them as well as being angled, will take some pics when they are welded in place.
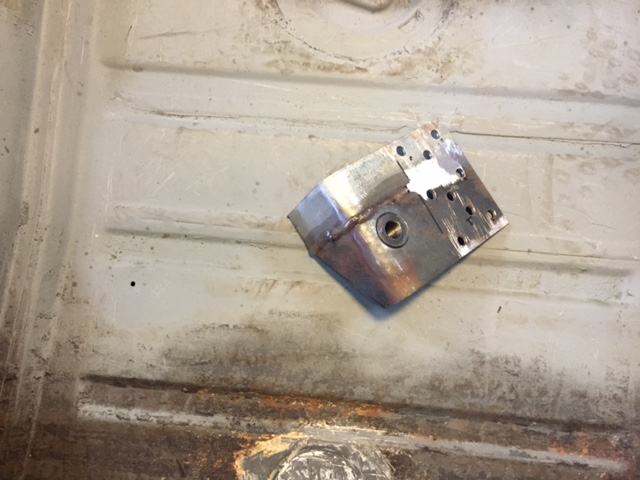
also, what took AGES was the shifter linkage - using a lotus elise shifter tunnel & cables I measured, then measured more, then mocked up, then tore apart, then mocked up again and finally completed it ... it works perfectly ! as you can see from the pic, I also modified the gearbox for 2wd & made a rear plate. I do already have a gearbox that I did the 2wd mod on, its a slightly older box tho and theres no harm in keeping a spare
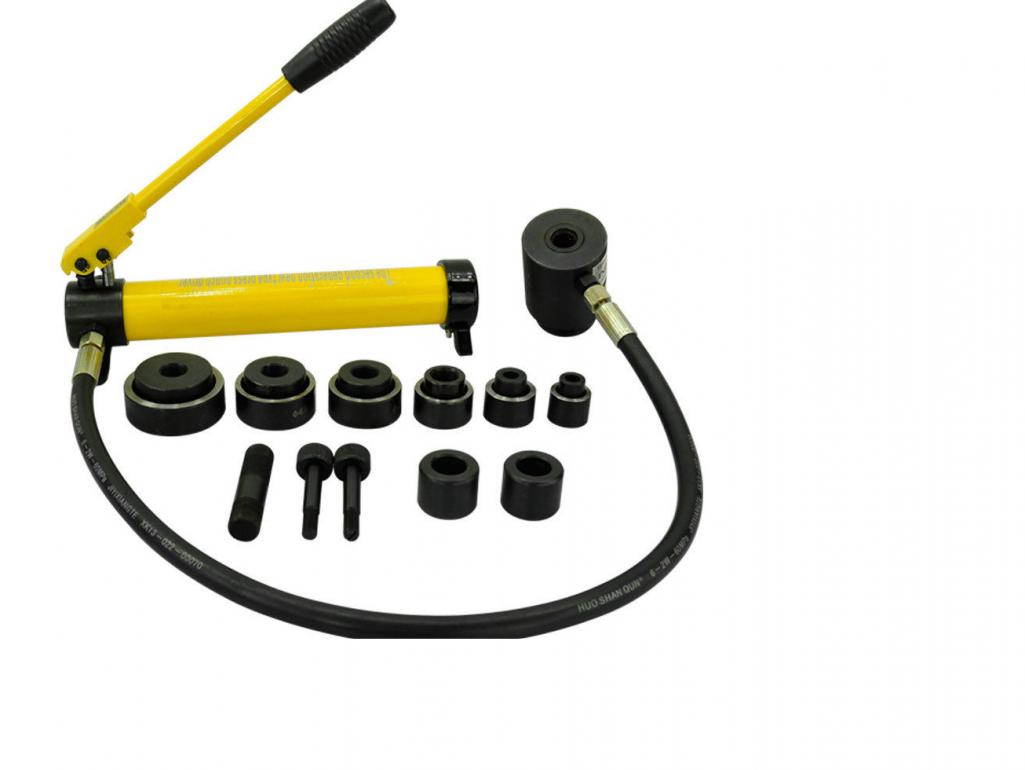
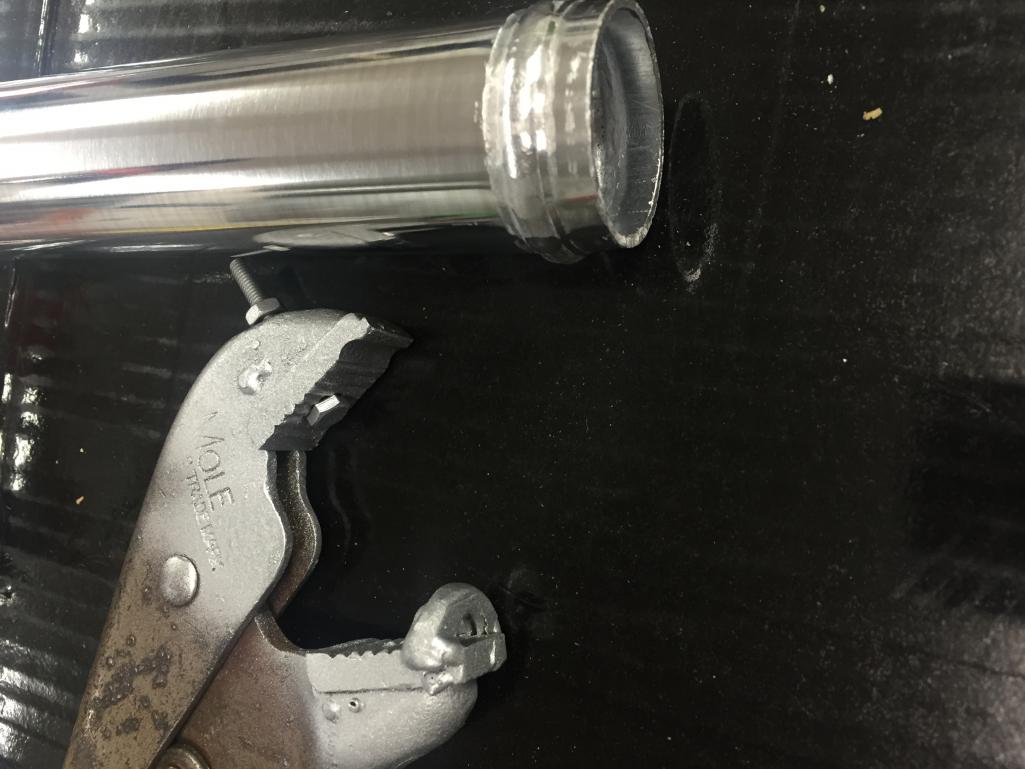
you can see the bottom of the L shaped part is the pivot point, this has a sealed ball bearing in there for nice free movement - I made the cap for it by using a hydraulic hole cutter, but inverting the cutter part, using it as a press to shape a piece of metal to cover the flange in the bearing and keeping it in place. (pic of the press attached) it works extremely well - the other idea was to use a bearing flange, as per the 3rd pic, which I still have as an option if this doesn't work out ...
I obviously also have had good use of out the zinc plating kit
Attached thumbnail(s)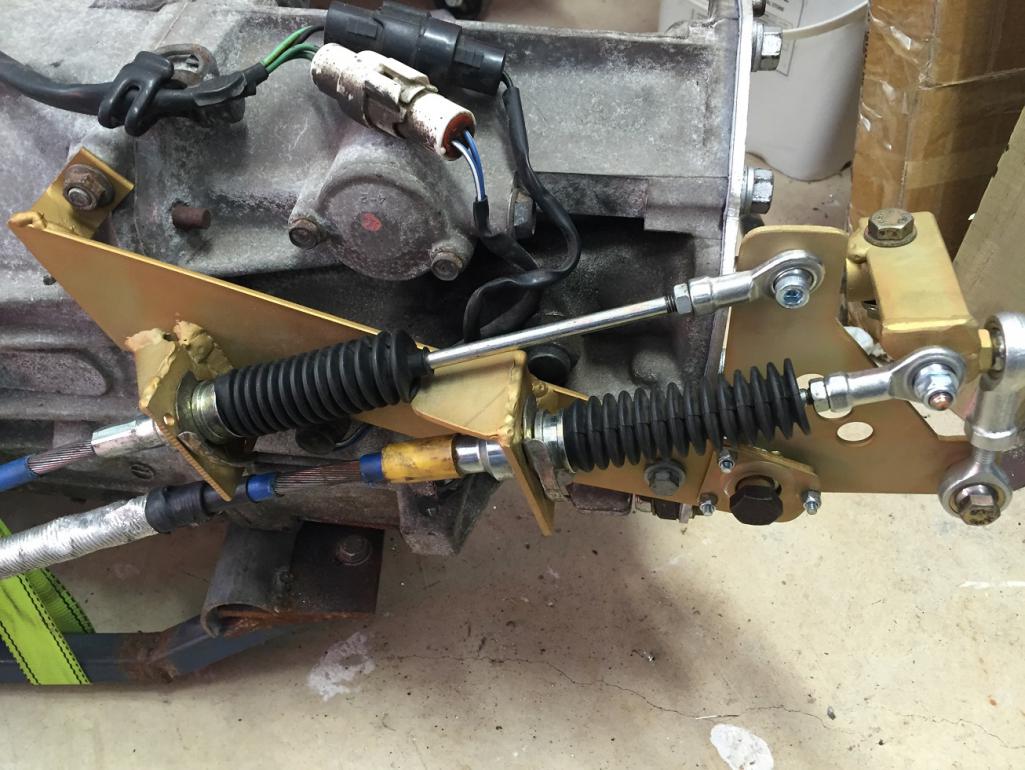
Attached image(s)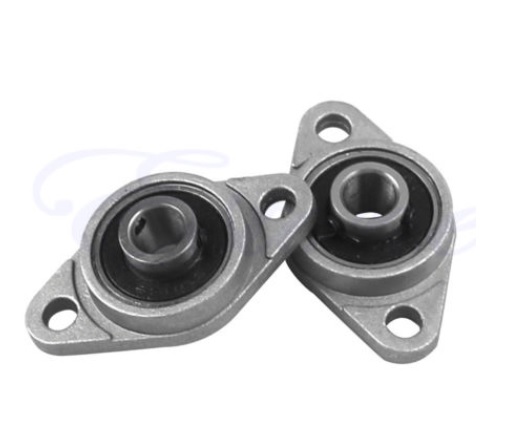
Posted by: barrym Jan 20 2016, 04:08 PM
I've also been busy designing a circuit to flash the centre brake light on the lotus ... I looked at units for sale and I could find any reasonably priced units that did what I wanted - which is to flash a few times on application of brake and then turn to solid 'on' light until the pedal is released.
I came up with this circuit and it works perfectly well
made up a few more for sales too ...
Attached thumbnail(s)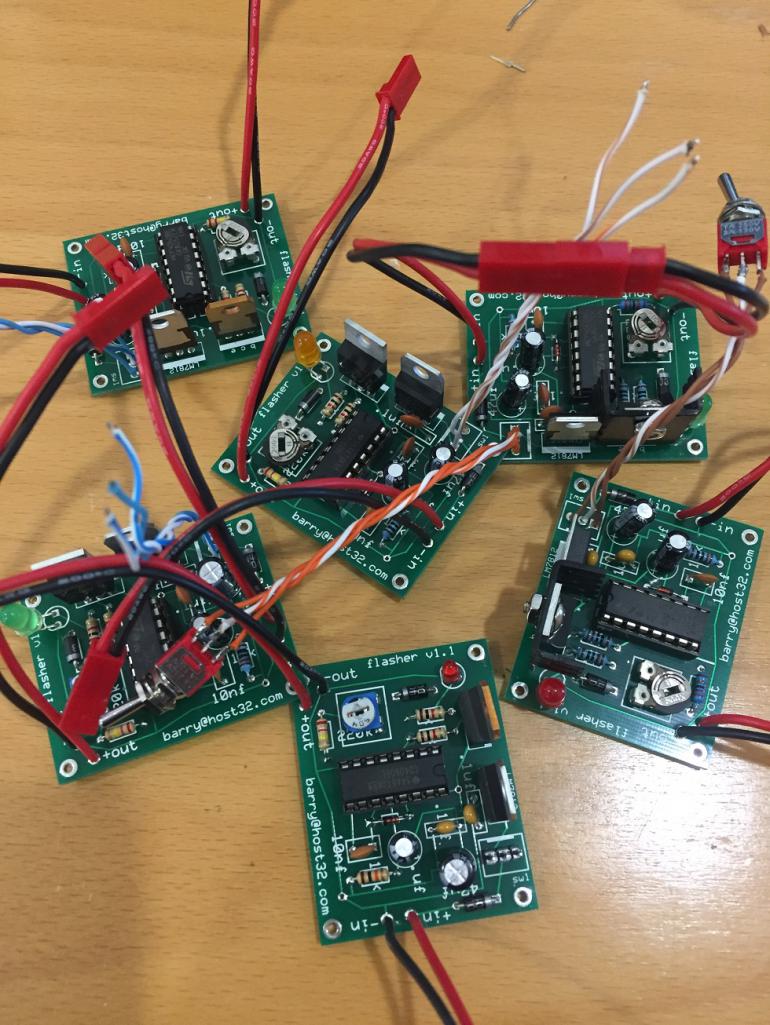
Posted by: Saggas Jan 20 2016, 04:14 PM
hey barry!
awesome to see an aussie restoration.
where abouts are you located? I just scored a 914 and am in melb.
Posted by: barrym Jan 20 2016, 04:18 PM
nice .. a few thousand clicks north ... sunshine coast
Posted by: dale73914 Jan 20 2016, 05:12 PM
hey barry!
awesome to see an aussie restoration.
where abouts are you located? I just scored a 914 and am in melb.
Hey Saggas,
I'm in Melbourne too ( North East ).
Ive got a 73 model 1.7 .
Which 914 did you buy ??
Would like to see a few pics , you should put a post up
Cheers
Dale
Posted by: Larmo63 Jan 20 2016, 06:28 PM
THIS is Viper Green: 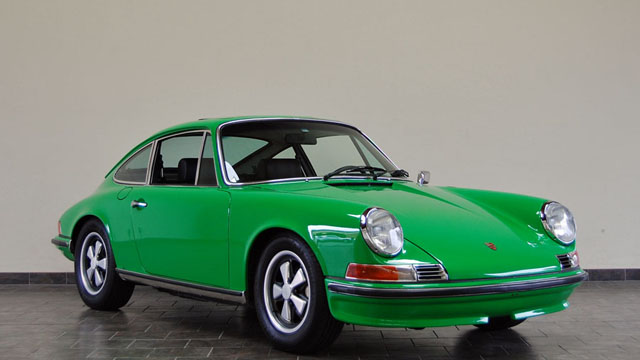
Your 914 would look good in this color!!!!
Posted by: barrym Feb 24 2016, 02:43 AM
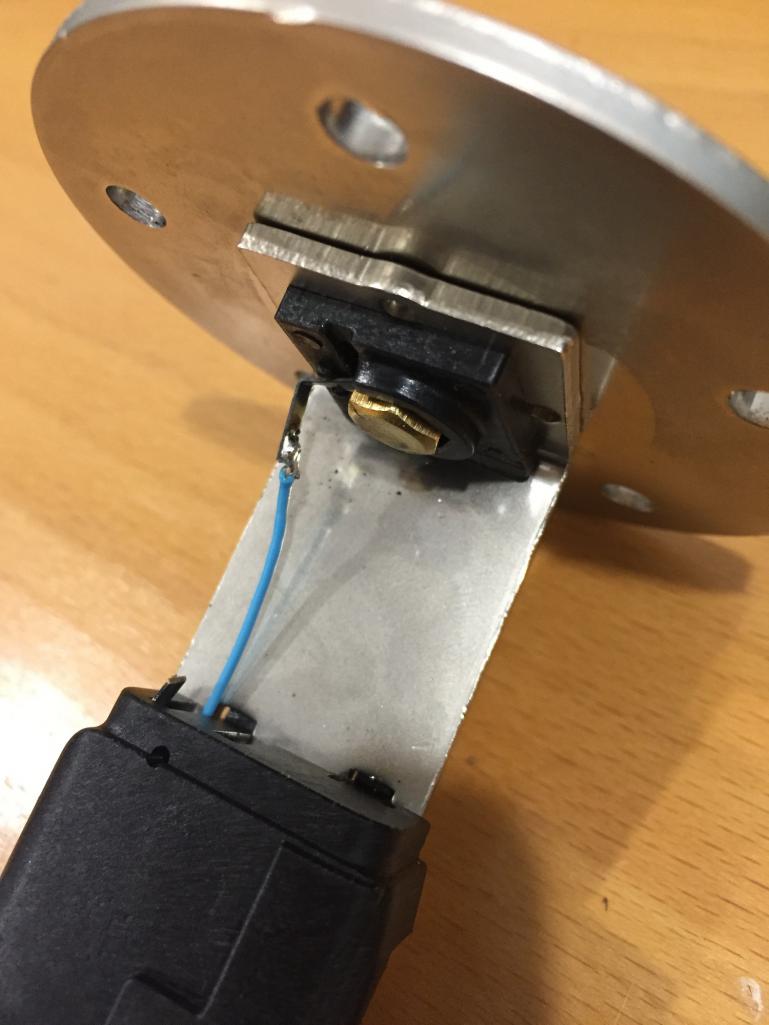
have been working on the front end a bit - got lower radiator (celica gt) brackets fabricated & placed fuel tank ... its the RCI one from summit racing - however, the sender is the incorrect ohm reading - the Porsche unit looks for 0 ohms full, 90 ohms empty - the RCI unit measures 90 ohms full, 0 ohms empty ...
so I pulled apart the sender unit and soldered on a wire on the other end of the resister circuit to measure 'correctly'
also have the A arms completely rebuilt now with new bushings etc ...
Attached thumbnail(s)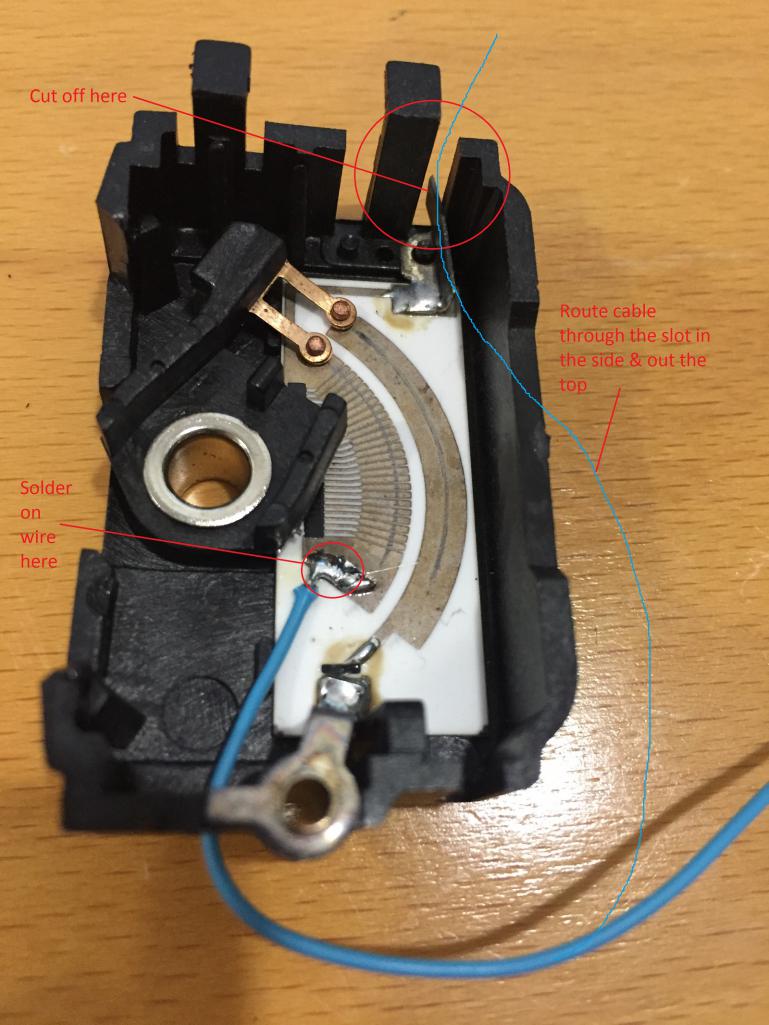
Posted by: 914forme Feb 24 2016, 07:22 AM
Loving this thread ![popcorn[1].gif](style_emoticons/default/popcorn[1].gif)
Posted by: forrestkhaag Mar 4 2016, 01:33 PM
Hey Barry: Nice work / An immense undertaking. At your convenience, can you post a few pictures of your headlight release system noted in a prior post?

Attached thumbnail(s)
Posted by: Michel Mar 8 2016, 11:45 AM
Barry enjoying the thread. And having just bought a 14 project car following with interest.
Lime green metallic - great colour. There's a 911 been painted same in Bris right now.
Cheers Michel
Attached image(s)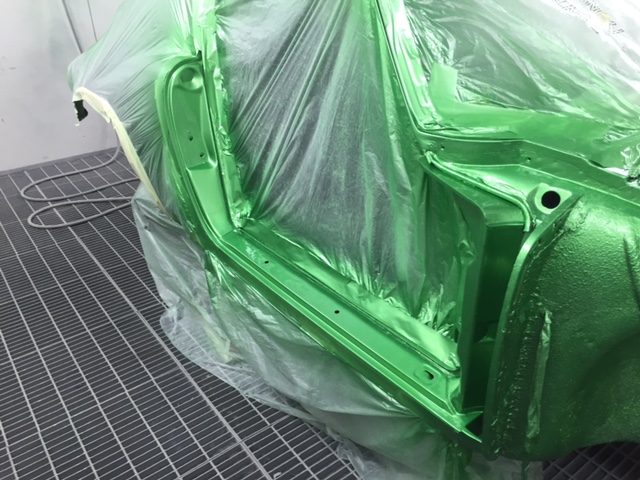
Posted by: barrym Mar 29 2016, 05:15 AM
Hey Barry: Nice work / An immense undertaking. At your convenience, can you post a few pictures of your headlight release system noted in a prior post?
Hi,
that's prob the best pic I have of the mechanism currently - I built it to fit then stripped it down as I continue to work through the front of the chassis to fit the fuel tank & radiator - progress is slow due to house renovations :/
but I did refurb the steering rack, installing turbo tie rods & have the indicator / key wiring all figured out. have ordered bolts for to mount the indicator ring to the column ...
Posted by: 76-914 Mar 29 2016, 01:04 PM
What a beautiful green. My favorite color.  Can't wait to see it in all of it's splendor.
Posted by: barrym Apr 26 2016, 04:52 AM
Well, have managed to get a few things done over the last few weeks...
Got radiator mounted, fuel tank frame & removable mounting feet, as well as the start of the coolant pipes ... Also have been stripping down the wrx engine & replacing seals etc....
I also made up a tool for beading the aluminium coolant pipes ... Works well
Attached thumbnail(s)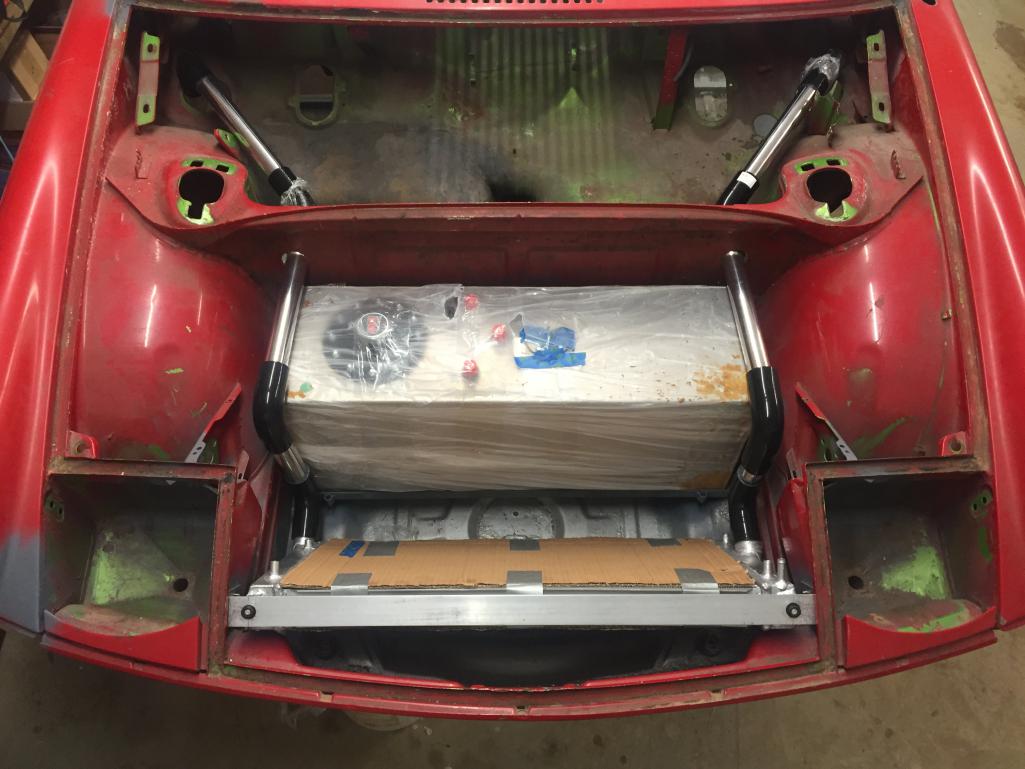
Posted by: barrym May 9 2016, 08:28 PM
have been making some solid progress over the last few weeks ...
took a cut off wheel to the pedal box area & made up a new box for the 3 pedal assembly - its not completely done, but I have an off road adventure through western Australia to go on soon so just covered it up in primer while i'm away.
the new pedal assembly had to be cut up a bit and I had to make up a new accelerator pedal & associated brackets / levers for the cable - took a day, well, 8am to 3pm to sort out the pedal ratio's & brackets etc ...
the new pedal doesn't have the capability for a brake bias adjuster cable to run through it - the old one had a big U shape in the pedal to accommodate it. instead i'll use a 90 degree gearbox on the end of the bias bar.
i'm using wildwood master cylinders, of the 'compact' variety - they give me about an inch of clearance from the steering arm flexi joint.
I still have to work on the cross bar strap, but have a cunning plan that will leave it in place and provide some additional rigidity to the pedal box area.
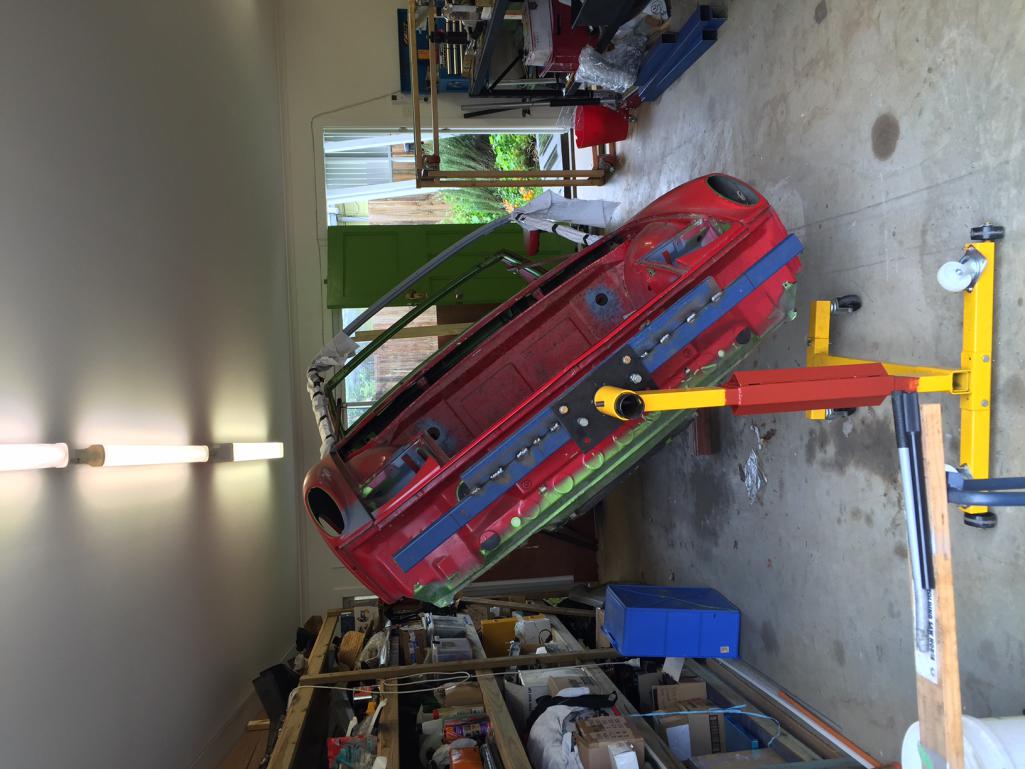
had to get the shell on the rotisserie in order to do all this too ...
Attached thumbnail(s)
Posted by: barrym May 9 2016, 08:34 PM
I had to bend some sheet metal for the pedal box - so made a metal brake ... works perfectly !
Attached thumbnail(s)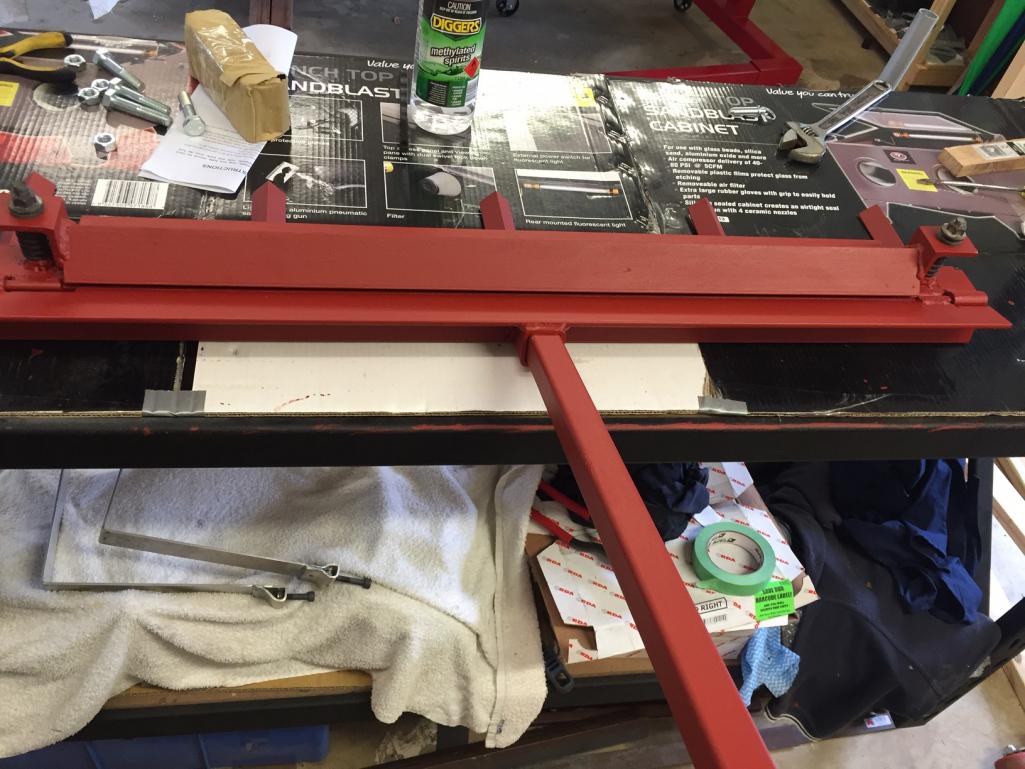
Posted by: barrym Aug 24 2016, 01:39 AM
wow - time really does fly - looking at some of the pics above and where i'm at now it doesn't feel like I've achieved as much as I should - but I've been working a lot on the detail bits.
I was scratching my head over the way to bolt in the rearward facing stay from the front suspension cross bar given I cut out the pedal box area - I saw a few options but settled on welding in some re-enforcement and welding in a cross bar with out of 5mm bar & welded in a new mounting tab - fits perfectly and clears the 3 master cylinders that poke through the pedal box. the MC's also clear the steering rack when its installed.
the top of the pedal box (the angled part) also now has holes cut in it for the brake fluid bottle.
I did the relevant cuts and installed a front sway bar, also using the maddog reinforcement plates in the wheel arches.
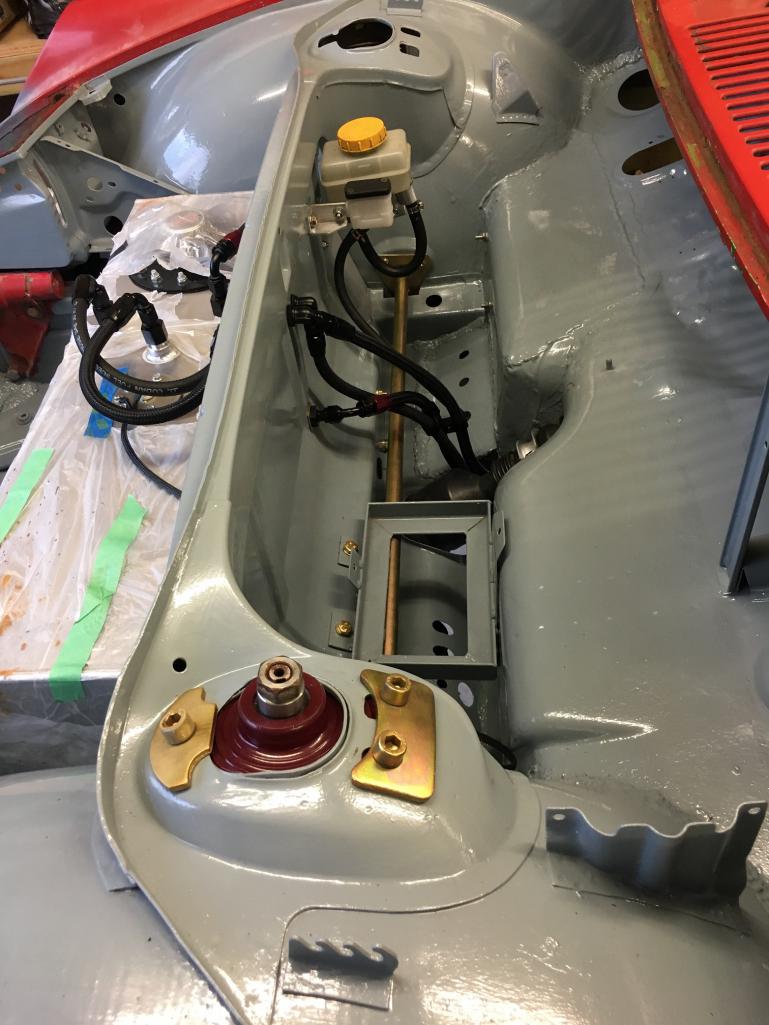
I made up a battery tray, & bolted it in place - its painted with an epoxy paint in pewter - i'll be painting the interior of the car in this colour.
All the fuel lines are now cut to length & bulkhead mounts installed. didn't realise the RCI fuel tank came with a built in roll over valve - handy that ! i'm still waiting on a few AN6 hose ends to arrive, but all that's left to do is to a final fit of the lines when i'm ready. I've also finished all the fuel line routing on the engine - I've scrapped most of the factory fueling system and ensured parallel fueling is feeding both rails properly with a rising rate fuel pressure reg.
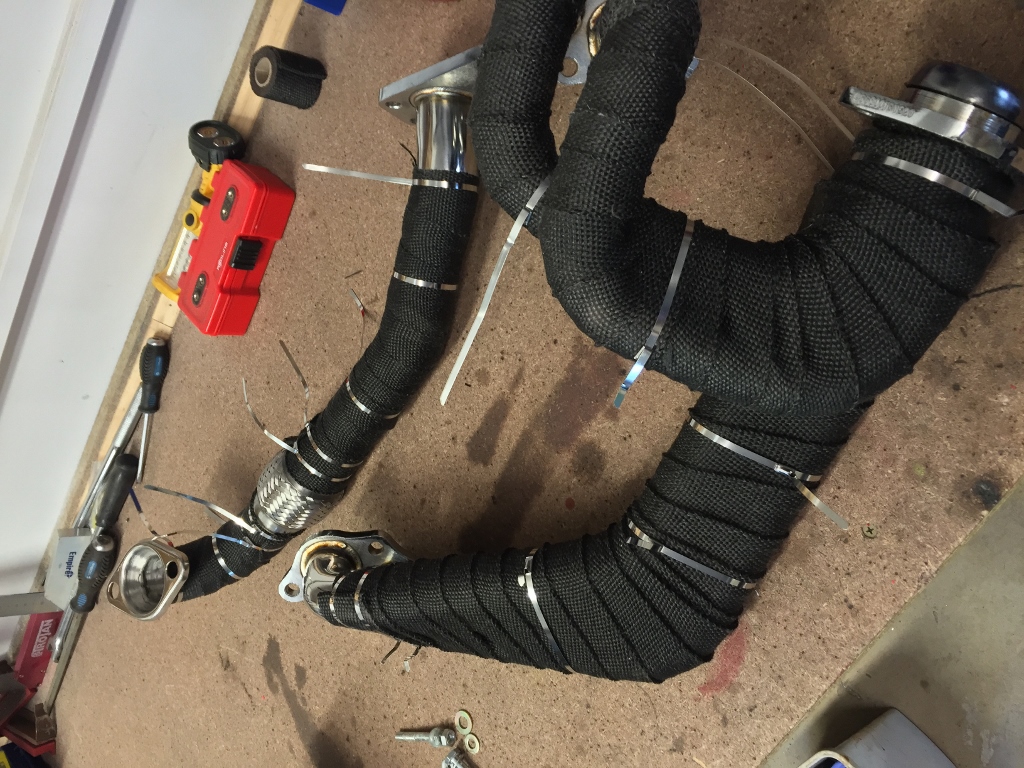
I picked up a stainless manifold that was on sale - $180AUD ! wrapped it in tape - doent need to last a long time as i'll get it ceramic coated in the future at some point ...
Attached image(s)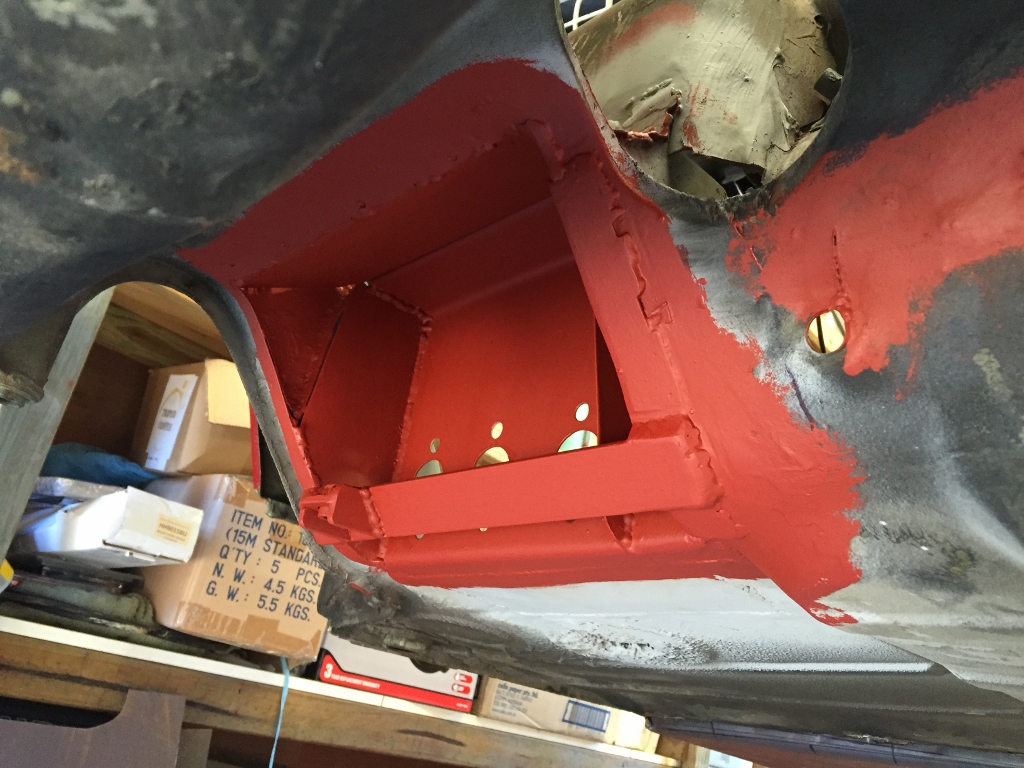
Posted by: barrym Aug 24 2016, 01:46 AM
I needed to straighten the brake lines as it came to me in a big roll, and didn't want to pay $$ for a straightener - bought some wardrobe door rollers for a few $ and bolted them to some scrap pine - then 2 bolts through to adjust tension - it works perfectly !
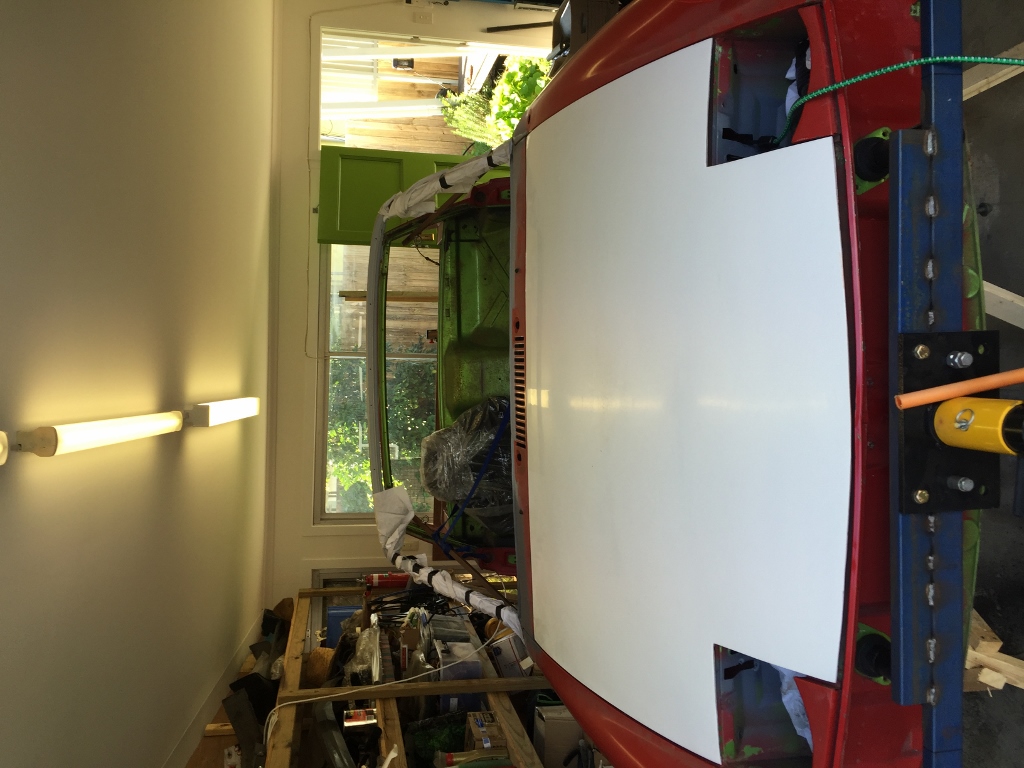
dropped on the fiberglass hood as I needed to check clearance for the radiator - no problems here - first time a hood has been on it for a year or so - makes the car seem wider somehow ...
Attached image(s)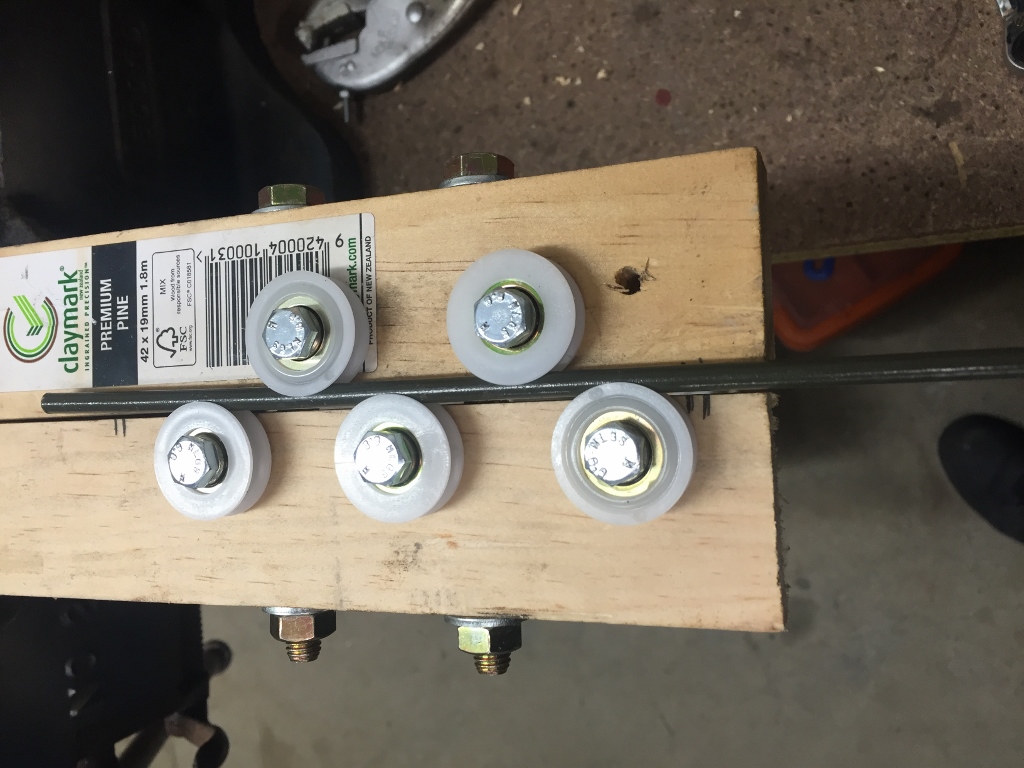
Posted by: barrym Aug 24 2016, 01:50 AM
have started to get busy with wiring - this was a MAJOR time consumer on my last car build (lotus 7 clone) so want to do this car wiring in parts ...
I started on the wiper motor - my 914 didn't come with a wiper stalk, I also wanted to declutter around the wheel as much as possible so I bought a cole hersey wiper switch - then had to figure out how to hook it all up ... this is done now and the below is how it works ...
Attached image(s)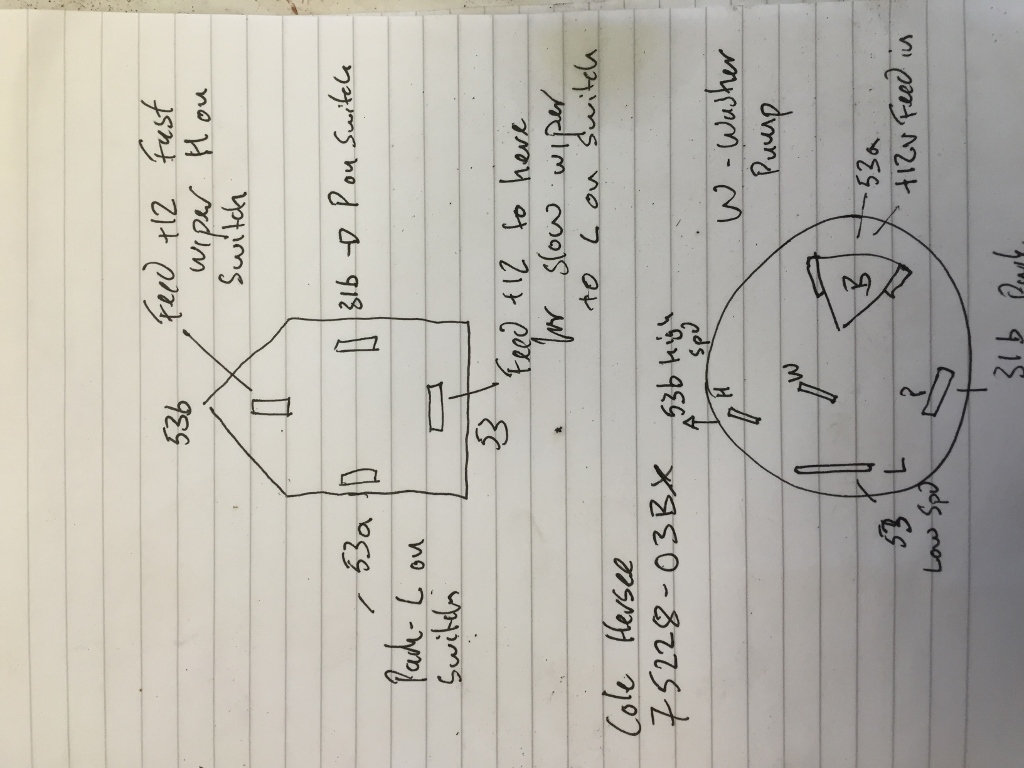
Posted by: barrym Aug 24 2016, 02:05 AM
also pulled apart the WRX wiring loom - I have it strung up in the garage and all wires marked where they hook up to and what ISNT needed. I also pulled the engine part of the loom off and cleaned / re-wrapped it with cloth tape. one of the nice things with the Subaru loom is the plugs at the engine - makes it very easy to remove the engine as the harness has 3 or 4 plugs that sit at the side of the engine that snake off into the various engine sensors & injectors etc.
I broke some of my ethos too ... started work on the rear hubs by installing the 930 turbo CV's to the inner side of the suspension arm - fits well !
I also procured an early 911 handbrake (e-brake) setup that needs a little cleaning up before installing ... this'll sit on the shelf for a little while tho.
I fabricated a mount for the brake fluid bottle - searched around for a suitable container, but ended up using the Subaru one from the wreck I have and made up a mount for it - easy & cheap solution ! just some time on the lathe & some scrap aluminium.
I've prob spent at least 2 days working on the throttle cable mechanism - I still don't like it, too much slop, despite using bearing races, and couldn't get the 'feel' right. it was just too tight. so I bought an '07 corolla ecu, an '07 camry throttle pedal and an IS350 throttle body - all drive by wire and will use this lot for my throttle solution. in the medium term i'll replace the factory wrx ecu (cant be tuned) and corolla ecu with a single standalone ecu - but that's a 2.5k investment I don't NEED to make right now ... it'll also lead me down the 'more power & e85' route ...
i'm close now to be able to paint the inside of the front trunk, strip the underside and re-tar it. - that'll be a great milestone to hit and will allow me to move to the middle of the car which is a fairly minor amount of work then to the rear of the car ... LOTS of work here ...
onwards on upwards !
Attached image(s)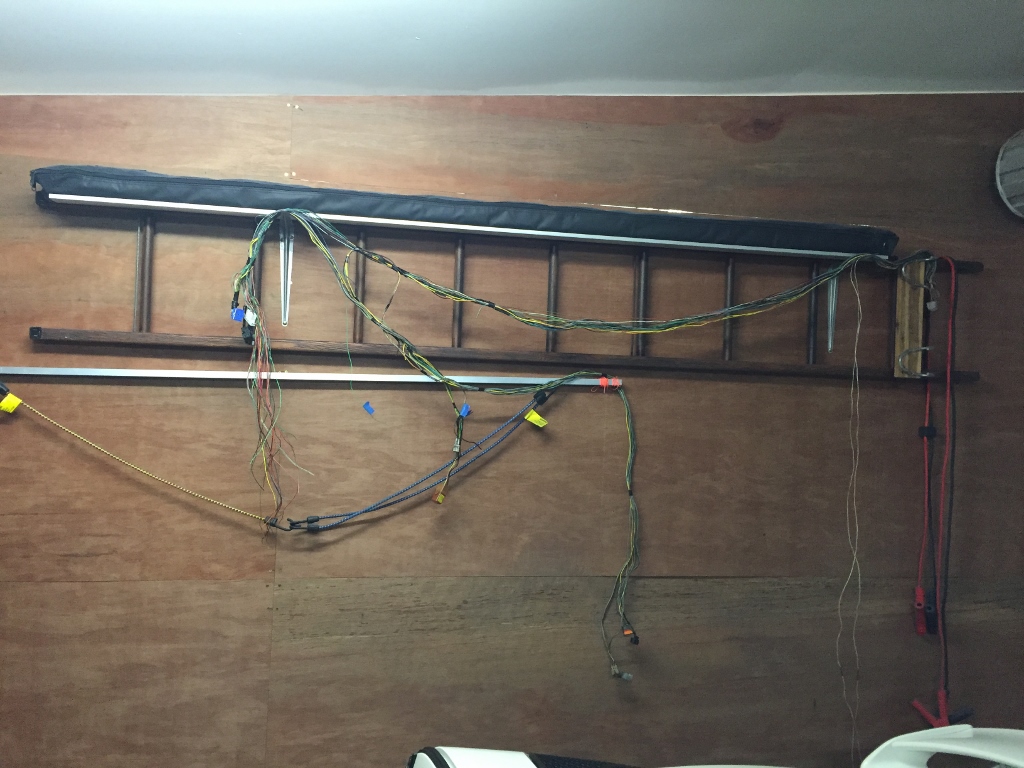
Posted by: Old Yella Aug 24 2016, 02:42 AM
What did you do with your 914 running gear if I may ask?
Posted by: barrym Aug 24 2016, 04:18 AM
The motor went to far north Australia - I still have the gearbox... The car was very incomplete when I got it ...
Posted by: barrym Sep 5 2016, 02:35 AM
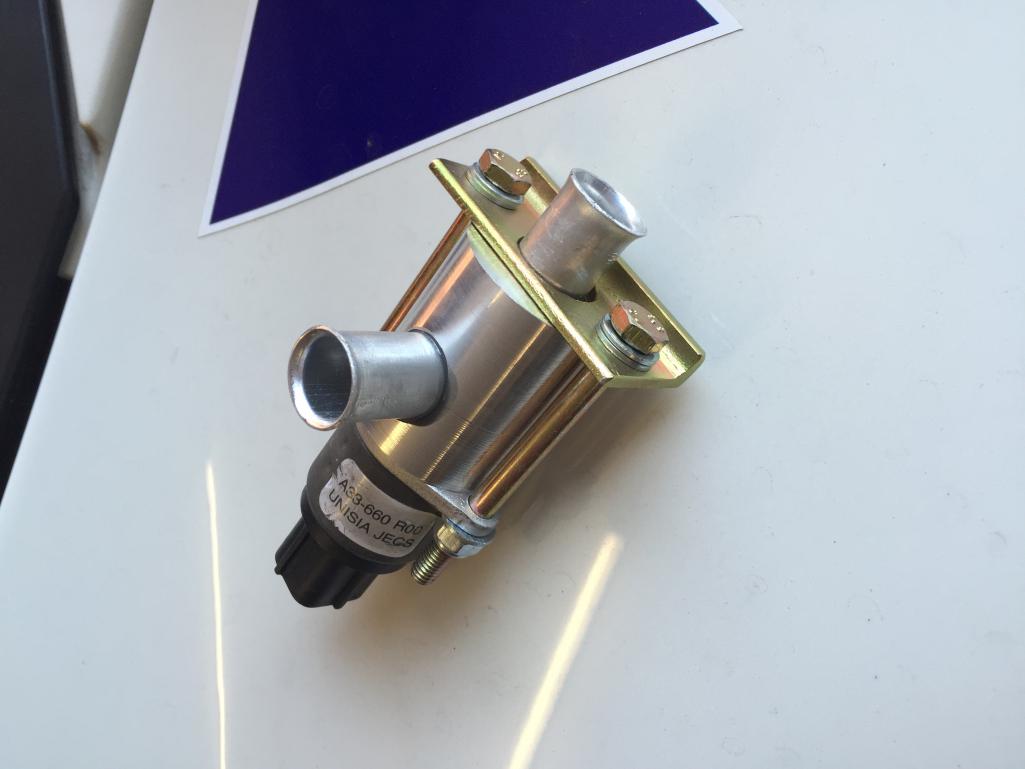
Because I'm switching to electronic throttle on a stand alone system I need to be able for the stock ecu to control idle speed - so took the Subaru iac valve from the cable throttle body & made a new housing for it ....
Attached thumbnail(s)
Posted by: barrym Sep 9 2016, 05:20 PM
been doing a little work on the throttle body - wanted to move to electronic throttle control - but the Subaru ecu i'm using is cable throttle ...
so, I bought an '07 corolla ECU, a Camry '07 accelerator pedal and a lexus is350 throttle body - all up cost less than $200 shipped to me.
then figured out all the wiring and I have a fully working Drive by wire solution
i'll use a TPS out from the throttle body to feed to the Subaru ecu.
this combo will work with any modern Toyota throttle body / pedal combo.
Attached image(s)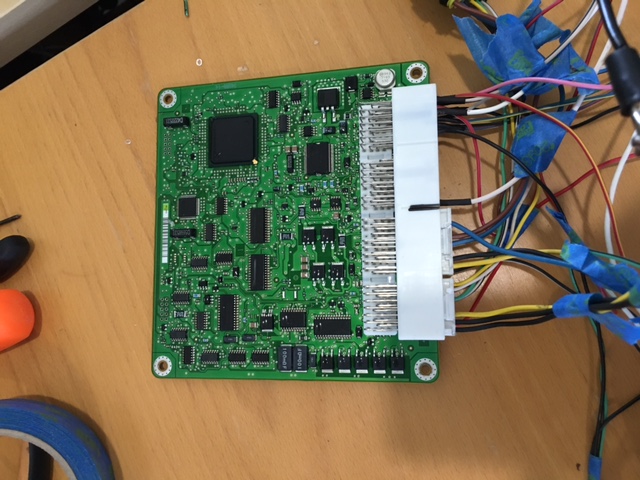


Posted by: barrym Sep 9 2016, 06:32 PM
i'll also add that you have to fool the corolla ecu into thinking its running at operating temp, otherwise it limits amount of throttle opening ... do this by running a 330ohm resistor to the temp sens input & ground, ecu now thinks its running at about 88 deg c.
no other sensors are required for throttle control to work.
I did have to wire up the obd port tho to erase all codes. it still throws a bunch of codes about various sensors not being detected, but doesn't affect the running of the throttle control
Posted by: barrym Sep 11 2016, 01:34 AM
hmm - slight change in plans for the TPS to the Subaru ecu ...
the range outputted from the Toyota throttle body is not matching for the Subaru requirements ...
Subaru needs a range of 0.46v-4.20v
Toyota electronic throttle body outputs 0.79v - 4.00v
so, on the end of the toyo throttle body is a welsh plug - popped this off and have mounted the Subaru tps to the end of the throttle body, its not overly pretty at the moment, just need to fabricate a 'proper' spacer block, but allows me to use the Toyota throttle body, with Subaru tps ...
works perfectly now !
Attached image(s)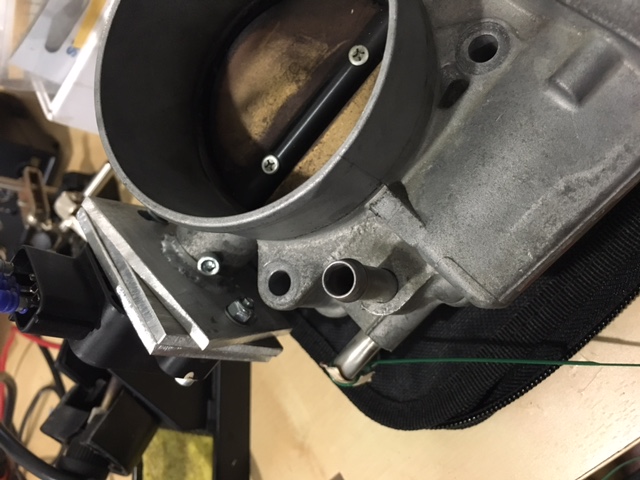
Posted by: barrym Oct 11 2016, 04:54 AM
they say that pictures are worth a thousand words ... so, here you go ...
lots of progress made - the DBW accelerator is working perfectly now with the Subaru TPS bolted to the side of the throttle body ... very happy with that result ...
got the inside of the front end close to being complete - still a few more things to tidy up in there, but all the heavy lifting is done there.
suspension & steering rack installed - fuel systems all done, just need to lay the remaining hoses down the spine to the engine bay - that'll keep for the 'middle' work tho.
anti roll bar & wheel well strengthening plates welded in & sealed up.
additional camber plates for front shock towers installed, well at least one side is.
front struts reconditioned, boge shocks, 22mm torsion bars, boxster calipers & brake lines installed. I used the rebel racing boxster caliper 'kit' and sourced my own calipers. the start of brake lines are fabricated.
battery tray bracket fabricated & installed - just need to weld in an earthing strap bolt.
brake & clutch fluid mounts fabricated & installed.
fuel pump sits as low as I could get it behind the fuel tank. bosch 044.
the lotus shifter & handbrake mechanism is mounted and covers are completed for the centre tunnel.
dbw pedal & linkages installed - still need to play with the rod length.
Attached thumbnail(s)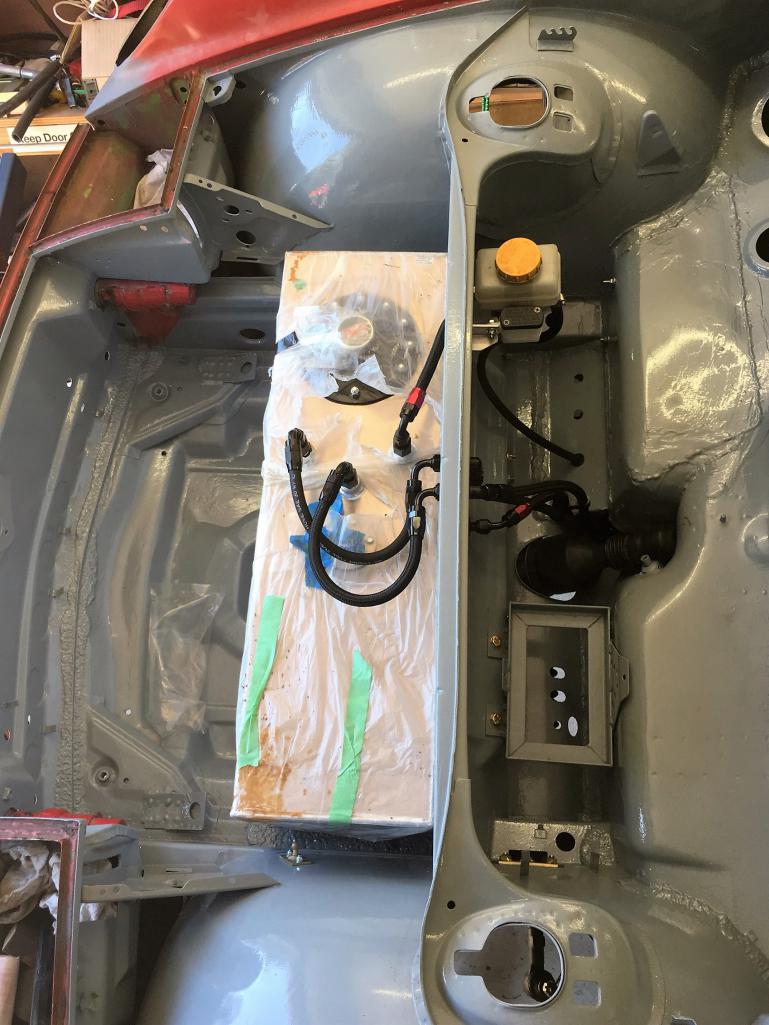
Posted by: barrym Oct 11 2016, 04:56 AM
and if all this didn't keep me busy i'm in the midst of commissioning the IT stuff in a new 730 bed tertiary teaching hospital ...
Attached thumbnail(s)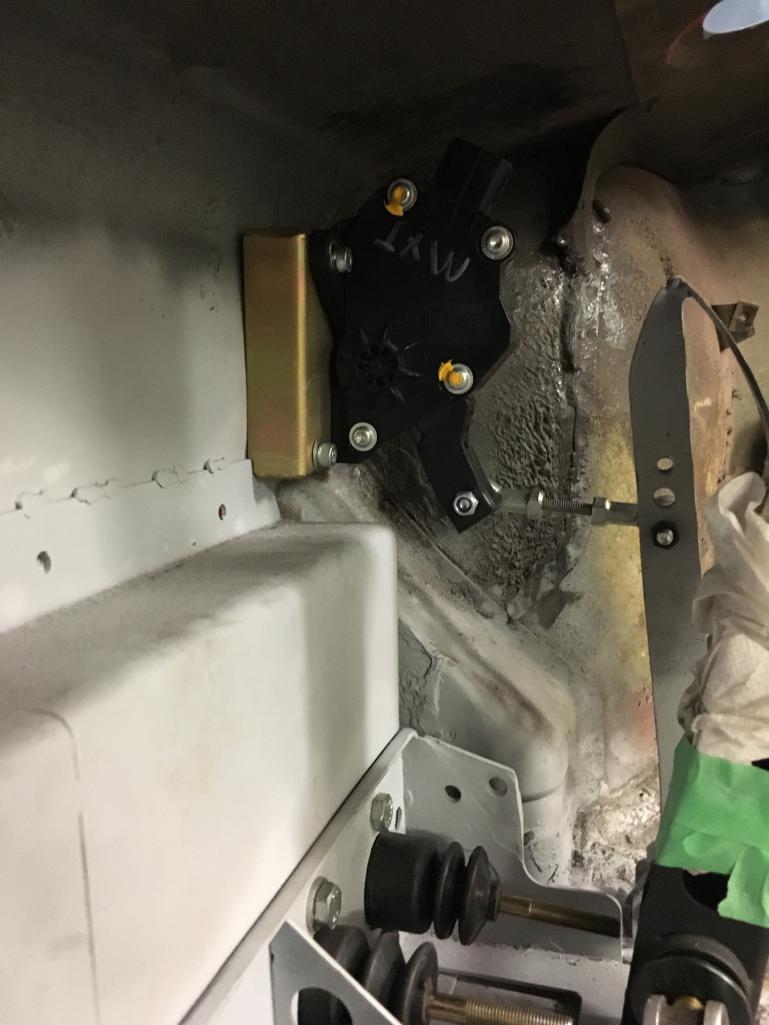
Posted by: Cairo94507 Oct 11 2016, 07:27 AM
Nice progress and work. Congratulations and keep it going.
Posted by: jd74914 Oct 11 2016, 09:17 AM
It looks great Barry!
That Corolla pedal is exactly what I've been looking for, thanks!
Posted by: barrym Oct 11 2016, 04:23 PM
Thanks !
The pedal actually from an '07 Camry - the ecu is '07 corolla & throttle body is is350 - the throttle body doesn't make a different what it is from - neither does the pedal really as long as it's from a Toyota !
Posted by: jd74914 Oct 14 2016, 07:37 AM
Cool! Thanks for the info! I really like the fact that it has bolting provisions to easily attach to the firewall. Much easier to implement that the Subaru sensor.
Do you happen to have its connector pinouts?
Posted by: barrym Oct 14 2016, 08:05 PM
sure - i'm pretty sure this is the final xls I ended up mapping out ... its not hard to lookup the corolla manuals and work out what needs to go where ...
take a look at the pic - the gold coloured box is made up to space out the pedal from the firewall ... just a bit of sheet metal folded, welded & zinc coated ..
Attached image(s)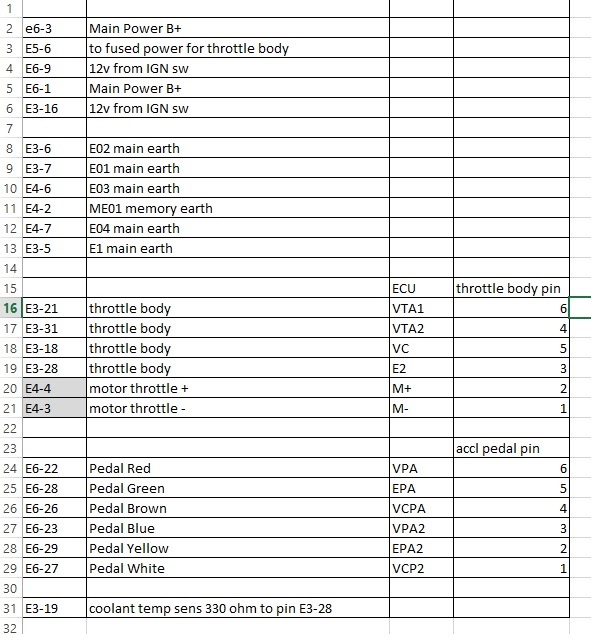
Powered by Invision Power Board (http://www.invisionboard.com)
© Invision Power Services (http://www.invisionpower.com)