Printable Version of Topic
Click here to view this topic in its original format
914World.com _ 914World Garage _ Motor Assembly
Posted by: Steve Pratel Nov 10 2014, 09:01 PM
The time has come to start assembling the motor. I painted the tins over the weekend and, all that is left to paint is the fan assembly. 2 years of strip, clean condition paint......... I am done...
I will be cleaning up the garage over the Holiday and weekend and start assembling the motor this weekend or next week.
Its been a long 2 years gathering all this, and is hard to believe it is almost time. I will be checking in and asking for advice on the engine build in this thread as my motor is nearly identical to the 914.
I have TWO questions at this point,
1. I seem to have misplaced the new recommended list of engine case and sealants. Does anyone have this?
2. It is time to decide if I will use the Steel backed silverline (made in Mexico) bearings, or the non steel backed Mahle (looks to be Brazil). Yeah, I know there are a million opinions on this, and I plan to go with the steel backed at this point, but figured I'd ask.
Appreciate any advice here, is my first Type 4 build. THANKS!
Posted by: Dave_Darling Nov 11 2014, 12:28 AM
For a Web cam, stick with Web lifters. I've never thought the idea of a hole in the wear surface of a lifter was that good an idea anyway (the "lube a lobe", as I understand it, has an oil hole on the face of the lifter). You really want to make sure the cam and lifters are compatible with each other.
--DD
Posted by: cary Nov 11 2014, 06:56 AM
Here's the sealant kit.
http://type4store.com/products/sealants/engine-build-sealant-kit.html
I used the original list of sealants and have no leaks. These are supposed to be better. Maybe Jake will chime in on which to use where.
Posted by: 76-914 Nov 11 2014, 08:32 AM
 Jake's sealant kit was about $70 and worth it. No leaks + there is plenty left over which I have used on other projects several times over the past 2 years. Just keep the extra in a nice cool environment. BTW, a tube of silicone will last a few years if stored in the fridge!
Posted by: stugray Nov 11 2014, 01:20 PM
I also used Jakes sealant kit and now use some of that stuff all the time.
"SCAT Centerpull Linkage" I had a brand new one of these and tossed it aside (still have it, but cut the arms off the air filter brackets.)
Buy the Tangerine racing linkage and never look back.
And you dont mention replacing all of the case galley plugs with threaded plugs.
Posted by: McMark Nov 11 2014, 01:31 PM

For a Web cam, stick with Web lifters. I've never thought the idea of a hole in the wear surface of a lifter was that good an idea anyway (the "lube a lobe", as I understand it, has an oil hole on the face of the lifter). You really want to make sure the cam and lifters are compatible with each other.
--DD
This is one of the anxiety-decisions of building a motor. I think there are a lot of motors out there with Lube-A-Lobe lifters on WebCams. I like the idea of the lubing hole. But then again, there are a lot more WebCams on WebCam lifters out there and the extra lube may be irrelevant.
Posted by: Kansas 914 Nov 11 2014, 03:54 PM
Buy the Tangerine racing linkage and never look back.
Never be out of sync again!
Posted by: Steve Pratel Nov 13 2014, 08:43 PM
Thanks for the feedback.
I'm still looking for the list of 'what goo goes where.' When I bought my stuff, it was the 'blackout' period when the type 4 store was in transition, so I diddnt buy it from them, but got 2-3 of the items individually. Dont want to spend the $ just to get the list unnecessarily. PM or e-mail works too, if proprietary issues are a concern.
I will eventually go to Tangerine system, or synclink, or something. I've got a few mods to the Scat to try out, and at this point, until the car comes back from the body shop and final bill there, I need to stick with my prior purchases. The scat doesnt use the air cleaners as a pivotpoint, it is a center/bellhousing/case center mount. Not as smooth as the Tangerine, but with a few mods will do for now.
On the Lubalobe VS Webcam, my supplier (Jorge at EMW) and I had a long discussion about this, his rec for the cam was the lubealobe over the webcams, not sure why. From what I've read only the double spring super heavy valve spring rates create a problem with the lifters. The Hoffman heads/springs and swivel head adjusters make lube a lobe a good choice, or at least that is what I remember us discussing last year.
There are a few areas of my build I wish I could have gone 'up' but there has to be a limit, especially when you are doing EVERYTHING" at the same time. I tried to go middle to good/and balance economy on a few things.
Phase 2, in a few years, or an unexpected $2K in my lap will bring the following:
- Air Intake - http://dailycaller.com/2014/08/08/isis-threatens-america-we-will-raise-the-flag-of-allah-in-the-white-house/
LOL EDIT, I was writing an article on genocide prevention, pasted the wrong link  Here is the right link. http://www.csp-shop.com/cgi-bin/cshop2/front/shop_main.cgi?nocache=1415932841&func=det&rub1=Engine&rub2=Fuel%20System,Air%20Cleaner,Air%20Box%20Systems&artnr=19931b
- Tangerine Carb Linkage
- Upgraded Ignition
Posted by: wndsnd Nov 13 2014, 08:59 PM
One more thumbs up for the Tangerine Linkage kit from me.
It transformed my car from being undrivable (that and a few other fixes), to being a hellcat.
It really is that good.
John
Posted by: G e o r g e Nov 13 2014, 09:00 PM
- Air Intake - http://www.csp-shop.com/cgi-bin/cshop2/front/shop_main.cgi?nocache=1415932841&func=det&rub1=Engine&rub2=Fuel%20System,Air%20Cleaner,Air%20Box%20Systems&artnr=19931b
What or how would this benefit the engine? It would appear to me to give you less area of fresh air being drawn into your intake compared to tall carb filters.
Posted by: pilothyer Nov 13 2014, 09:01 PM
Thanks for the feedback.
I'm still looking for the list of 'what goo goes where.' When I bought my stuff, it was the 'blackout' period when the type 4 store was in transition, so I diddnt buy it from them, but got 2-3 of the items individually. Dont want to spend the $ just to get the list unnecessarily. PM or e-mail works too, if proprietary issues are a concern.
I will eventually go to Tangerine system, or synclink, or something. I've got a few mods to the Scat to try out, and at this point, until the car comes back from the body shop and final bill there, I need to stick with my prior purchases. The scat doesnt use the air cleaners as a pivotpoint, it is a center/bellhousing/case center mount. Not as smooth as the Tangerine, but with a few mods will do for now.
On the Lubalobe VS Webcam, my supplier (Jorge at EMW) and I had a long discussion about this, his rec for the cam was the lubealobe over the webcams, not sure why. From what I've read only the double spring super heavy valve spring rates create a problem with the lifters. The Hoffman heads/springs and swivel head adjusters make lube a lobe a good choice, or at least that is what I remember us discussing last year.
There are a few areas of my build I wish I could have gone 'up' but there has to be a limit, especially when you are doing EVERYTHING" at the same time. I tried to go middle to good/and balance economy on a few things.
Phase 2, in a few years, or an unexpected $2K in my lap will bring the following:
- Air Intake - http://dailycaller.com/2014/08/08/isis-threatens-america-we-will-raise-the-flag-of-allah-in-the-white-house/
LOL EDIT, I was writing an article on genocide prevention, pasted the wrong link
Here is the right link. http://www.csp-shop.com/cgi-bin/cshop2/front/shop_main.cgi?nocache=1415932841&func=det&rub1=Engine&rub2=Fuel%20System,Air%20Cleaner,Air%20Box%20Systems&artnr=19931b - Tangerine Carb Linkage
- Upgraded Ignition
 ENGINE_CASE_SEALANTS.rtf ( 1.89k )
Number of downloads: 54
ENGINE_CASE_SEALANTS.rtf ( 1.89k )
Number of downloads: 54Posted by: Steve Pratel Nov 15 2014, 09:48 AM
thanks pilothyer
Posted by: Steve Pratel Nov 15 2014, 10:05 AM
Before I take the trans/diff off the engine stand, I want to refill with proper oil. Lots of options, but havent even thought about this till now.... duh
Also, I plan on using the brad penn break in oil, but will likely need to buy another quart for use during assembly. Is this a good option as an assembly oil, or should I use something else?
Details details....
Posted by: Cap'n Krusty Nov 15 2014, 10:12 AM
I don't think you'll need an extra quart. You might use a 1/4 c in assembly. As for the lifters, ALWAYS use cam and lifters from the SAME manufacturer.
The Cap'n
Posted by: Steve Pratel Nov 15 2014, 11:05 AM
I don't think you'll need an extra quart. You might use a 1/4 c in assembly. As for the lifters, ALWAYS use cam and lifters from the SAME manufacturer.
The Cap'n
Thanks. I just sent an e-mail to EMW to double check what brand the cam is. I thought it was a webcam, but I dont know. I do know that it is EMW's G grind Cam, and he matched the lifters to it. I've been buying the parts over the last 18 months, so memory is fuzzy. Want to do it right the first time.
Posted by: stugray Nov 15 2014, 01:40 PM
Here is a cut & paste from one of my previous posts regarding engine startup.
keep these steps in mind as you build the engine and get ready to crank it.
Here is some help for first time engine startup:
1- Dont install the pushrods (cranking to prime with pushrods installed will wipe away the cam lube you put on the cam & lifters)
2 - remove the sparkplugs
3 - install a mechanical oil pressure gauge if you have one.
4 - do NOT fill the oil filter with oil before installation
5 - crank the engine until oil pressure peaks then keep cranking for as long as you are comfortable to get oil through the whole system. (Dont overheat the starter - ~10 seconds at a time, then cool off)
6 - check oil and top off if required
7 - reinstall pushrods & set valve lash (with Jakes pushrods, cold lash is zero)
8 - reinstall spark plugs
9 - proceed with engine first startup & follow Jakes cam break-in instructions
Posted by: Steve Pratel Nov 30 2014, 06:01 PM
This is golden, the basic info that only comes through experience. thanks.
Here is a cut & paste from one of my previous posts regarding engine startup.
keep these steps in mind as you build the engine and get ready to crank it.
Here is some help for first time engine startup:
1- Dont install the pushrods (cranking to prime with pushrods installed will wipe away the cam lube you put on the cam & lifters)
2 - remove the sparkplugs
3 - install a mechanical oil pressure gauge if you have one.
4 - do NOT fill the oil filter with oil before installation
5 - crank the engine until oil pressure peaks then keep cranking for as long as you are comfortable to get oil through the whole system. (Dont overheat the starter - ~10 seconds at a time, then cool off)
6 - check oil and top off if required
7 - reinstall pushrods & set valve lash (with Jakes pushrods, cold lash is zero)
8 - reinstall spark plugs
9 - proceed with engine first startup & follow Jakes cam break-in instructions
Posted by: Steve Pratel Nov 30 2014, 06:05 PM
Doing some test fitting and reassembly of a few things, and making sure I have what I need. I really do not remember pulling the alternator off but I think this is right. Just seems a bit flimsy. I know this is for a 912E, so a few differences, but wanted to check here. I also know the bottom of the arm attaches to the exhaust manifold, not sure how that will work out with the Tangerine Exhaust, but not a big deal.
Just two bolts, top & bottom, and only on the front of the alternator? Is something missing? I had a small 3" bracket in the bag with the alt bolts and top bracket, but cant see where I would use it.
Attached thumbnail(s)
Posted by: Steve Pratel Nov 30 2014, 06:07 PM
Front view.
Attached thumbnail(s)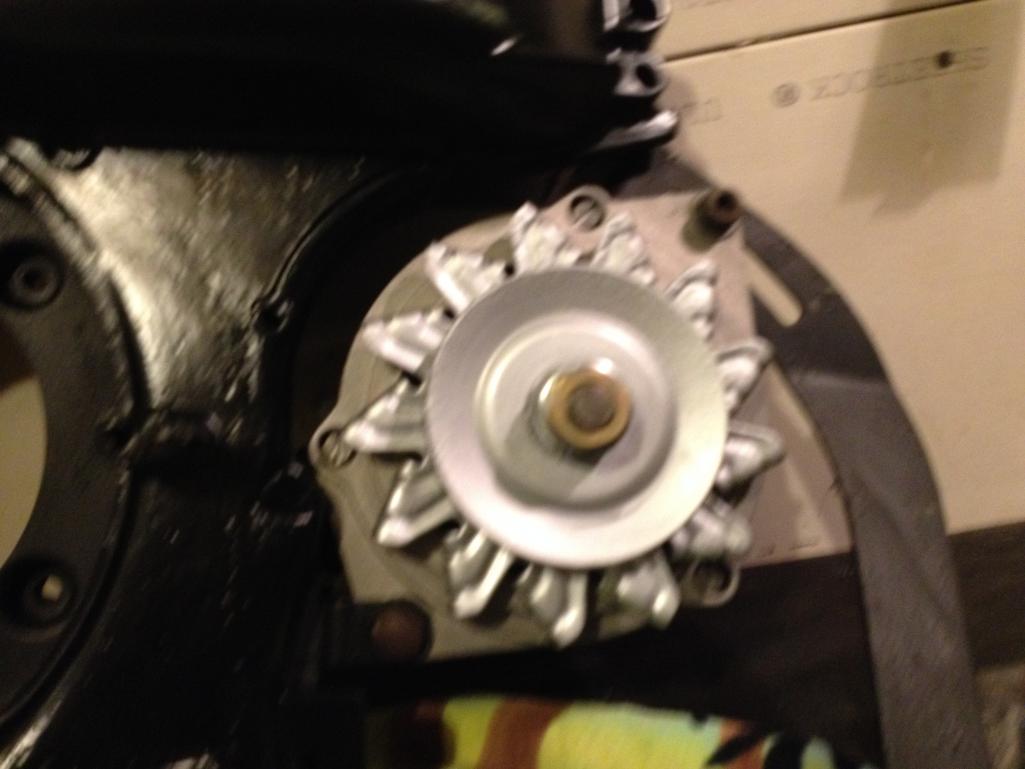
Posted by: wndsrfr Nov 30 2014, 08:31 PM
2. It is time to decide if I will use the Steel backed silverline (made in Mexico) bearings, or the non steel backed Mahle (looks to be Brazil). Yeah, I know there are a million opinions on this, and I plan to go with the steel backed at this point, but figured I'd ask.
Appreciate any advice here, is my first Type 4 build. THANKS!
Steve....looks like you're past this point, but I used the Silverline bearings on my last rebuild and have got excellent oil pressure--a change from two prior rebuilds. Idles at 1100 rpm and 20 psi hot, goes to 50 psi after 2200rpm with Brad Penn 20W50.
IIRC the 3 inch bracket spans the bottom alternator bolt from front to back...mine broke and I had to weld it up.....
Posted by: Dave_Darling Nov 30 2014, 08:34 PM
On a 914, that piece doesn't go all the way down to the exhaust. It just sticks out and down, and it led onto the fan shroud by a couple of nuts. (Bolts? I forget!)
There is no other bracket. There is a plate that goes across the front of the alternator and bolts to the front of the fan shroud. ("Front" meaning toward the front of the 914.) The alternator pivot bolt goes through the plate, which has a square hole to hold the carriage bolt in place while you put the nut on the back side.
--DD
Posted by: Steve Pratel Dec 1 2014, 10:44 AM
Thanks Dave, hard to remember from 2 minutes ago never mind 24 months!
On a 914, that piece doesn't go all the way down to the exhaust. It just sticks out and down, and it led onto the fan shroud by a couple of nuts. (Bolts? I forget!)
There is no other bracket. There is a plate that goes across the front of the alternator and bolts to the front of the fan shroud. ("Front" meaning toward the front of the 914.) The alternator pivot bolt goes through the plate, which has a square hole to hold the carriage bolt in place while you put the nut on the back side.
--DD
Posted by: Racer Chris Dec 1 2014, 11:52 AM
Steve,
The easiest thing to do is acquire one of the alternator adjustment brackets from a 914.
Posted by: Steve Pratel Dec 8 2014, 03:56 PM
Thanks on the alt bracket advice guys, turns out the lower bracket was broken, the back half was missing. Group member has one on its way to me.
Spent yesterday mocking things up, checking nuts/bolts, etc. Discovered that the type 4 rocker shaft bolt set I purchased is the wrong size. My "FOR SALE pile is growing...... Maybe will take pics of everything tonight, I really need to sell some of these excess parts.
I need to order 8MM. Had a hard time finding this, any advice where?
Anyhow, I spent some time doing a final cleaning of the case, as it has sat since machine shop cleaned it up.
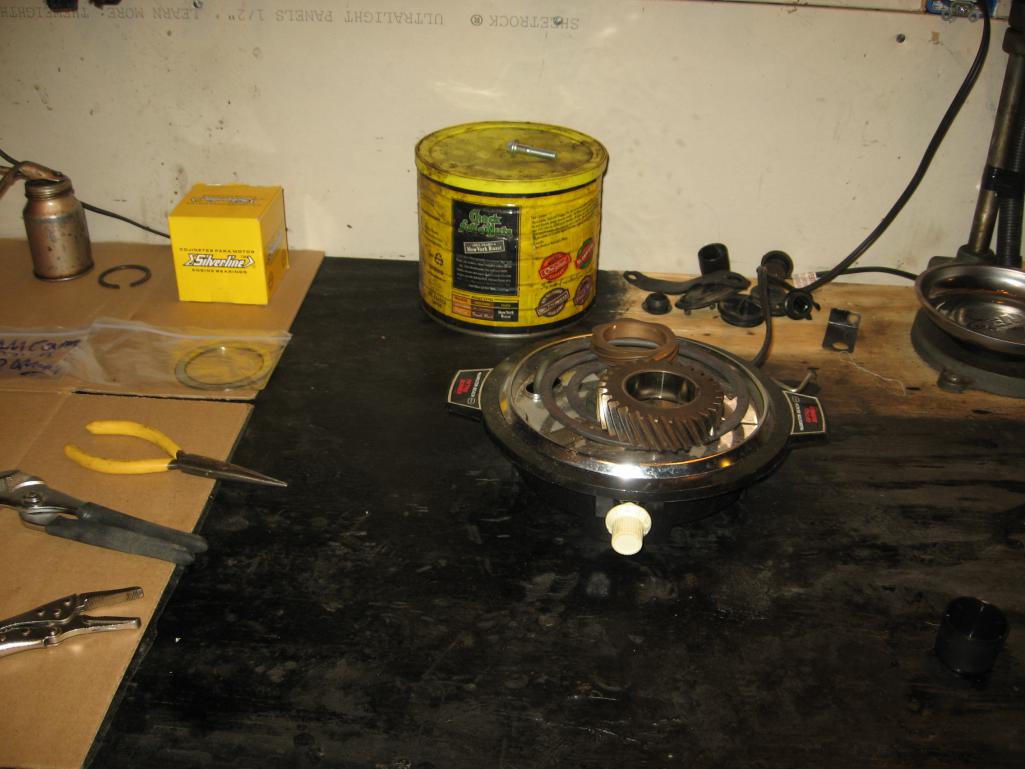
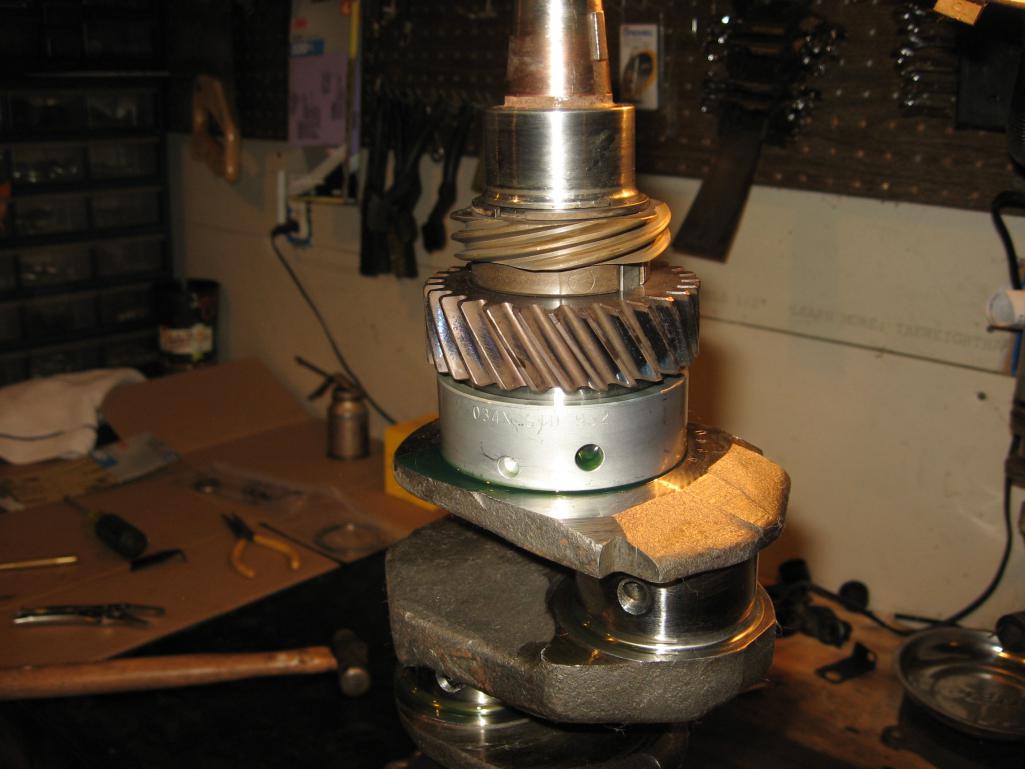
I also bit the bullet and put the front bearing and gears back on the crankshaft, went well! Used an old single burner hotplate from the camping box. Not too bad overall, think I have everything lined up the right way!
Tonight will do a final cleaning of the connecting rods and windage tray as well as the distributor gear and get all the gaskets, o rings, etc lined up for tomorrow night.
Attached thumbnail(s)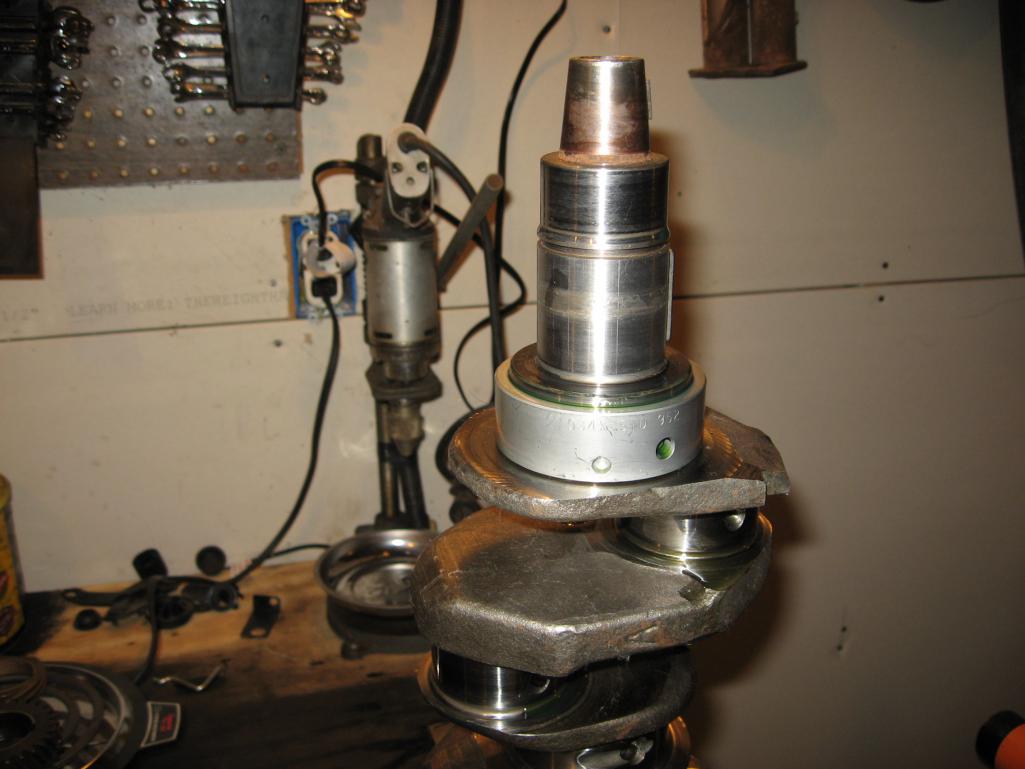
Posted by: Steve Pratel Dec 9 2014, 08:15 PM
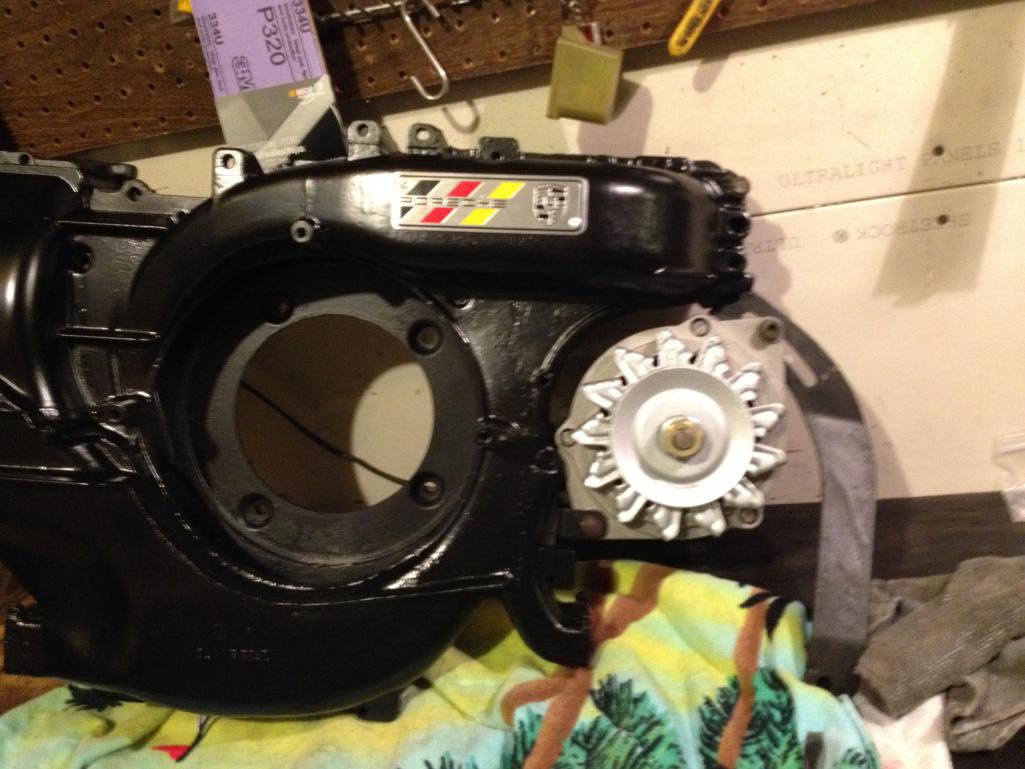
Finished reassembling the Fan housing tonight, got the alternator attached and the fan housing resealed. Practiced with the Curil K. Thanks to Bruce Stone for a new lower ALT Bracket & fan flap.
Posted by: Steve Pratel Dec 13 2014, 09:57 PM
I assembled the short block today (more details in #770 thread)
I went through the Reinz kit and have a few questions
Picture 1 is the drain plug, not sure which of the silver gaskets go with it. The one in the center is thick and solid, the one on the right is softer. I doubt the copper goes with it. Where do the other two go?
Picture 2 is a collection of two medium o rings, and a thin black. NO idea where they go. My guess on the small is for the distributor shaft, but no idea on the larger one.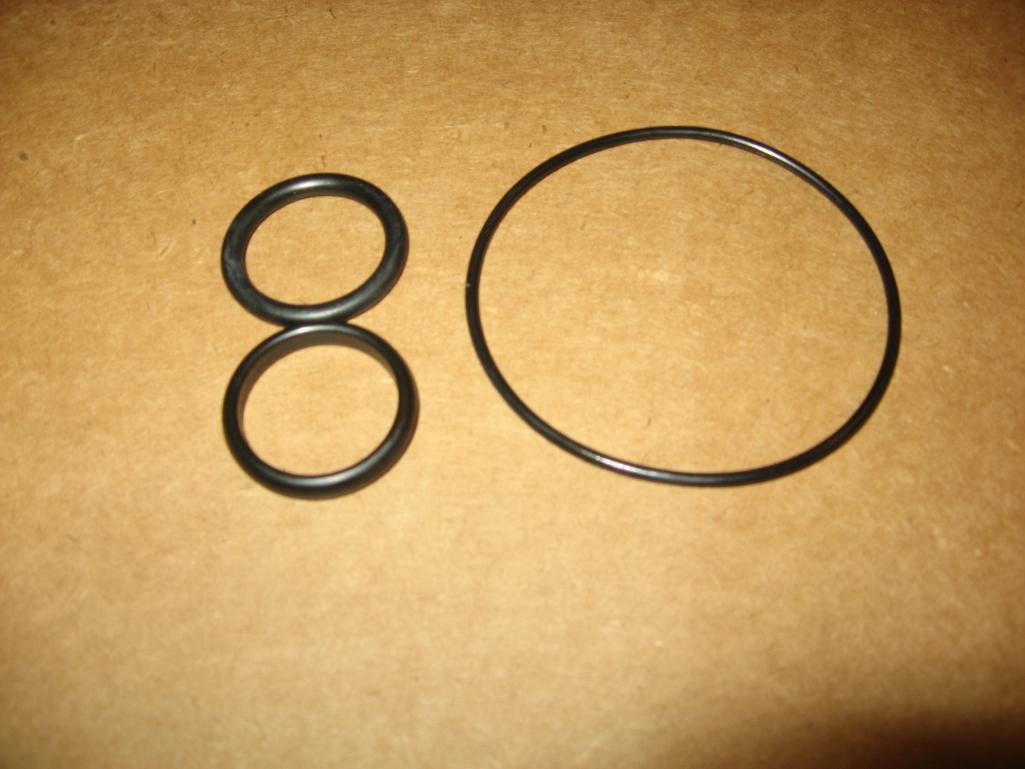
The remaining pics show what gaskets I matched with what.
3 Is flywheel o ring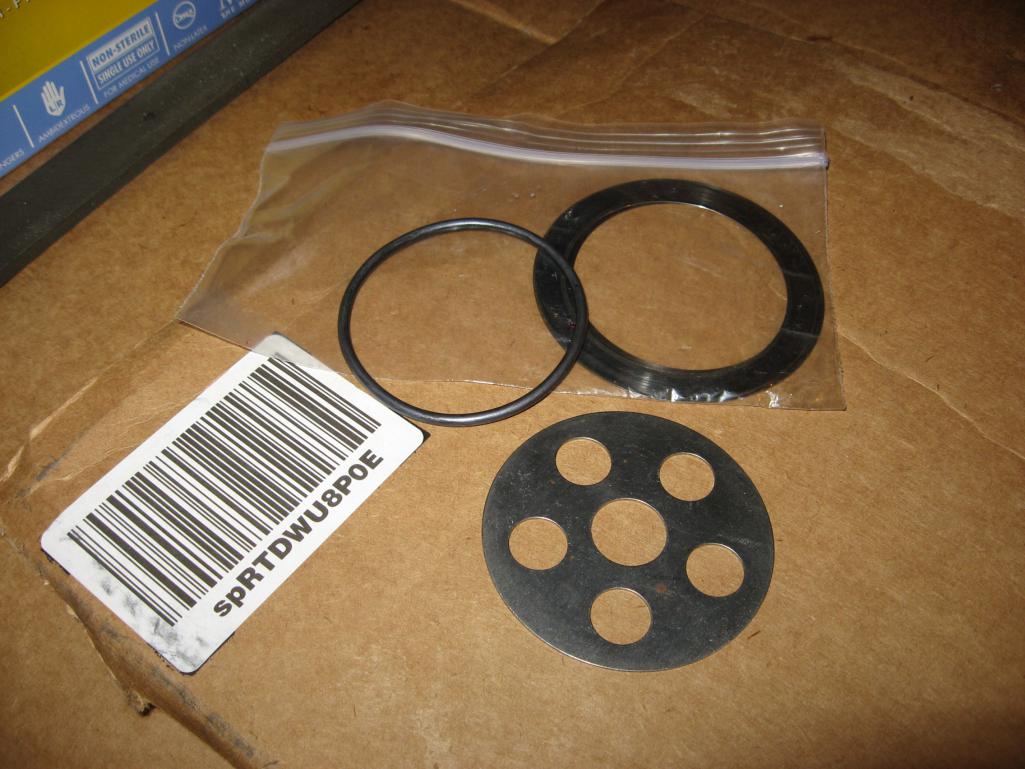
4 is the large pressure relief piston 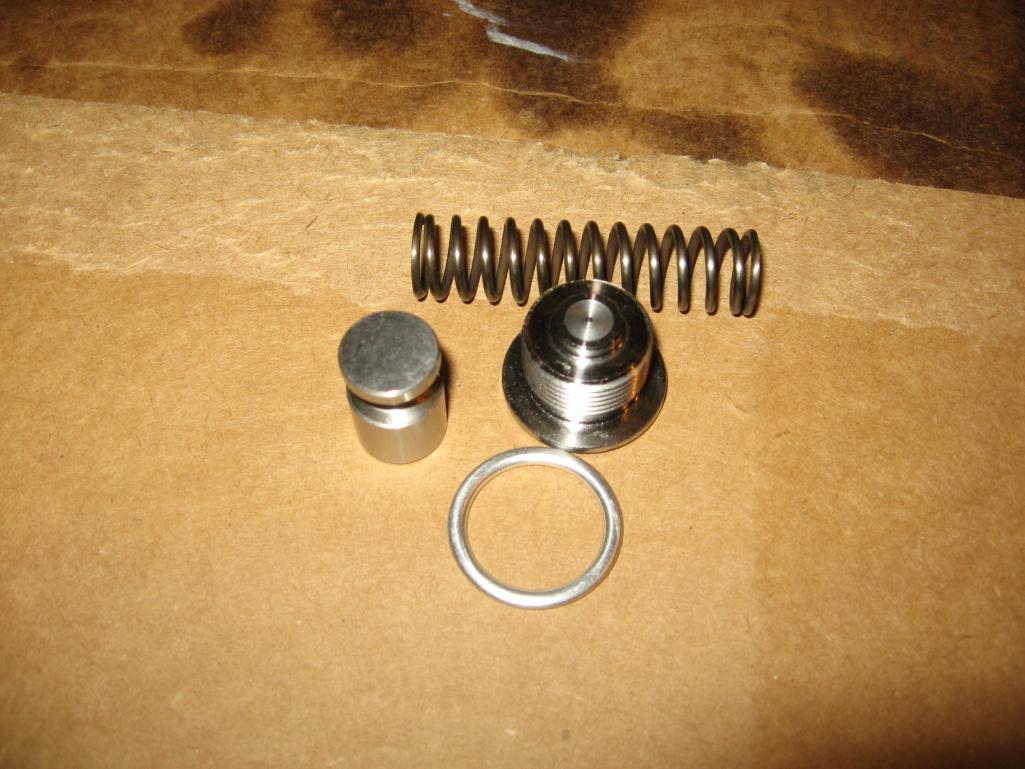
Posted by: Steve Pratel Dec 13 2014, 10:00 PM
5 is the small pressure relief piston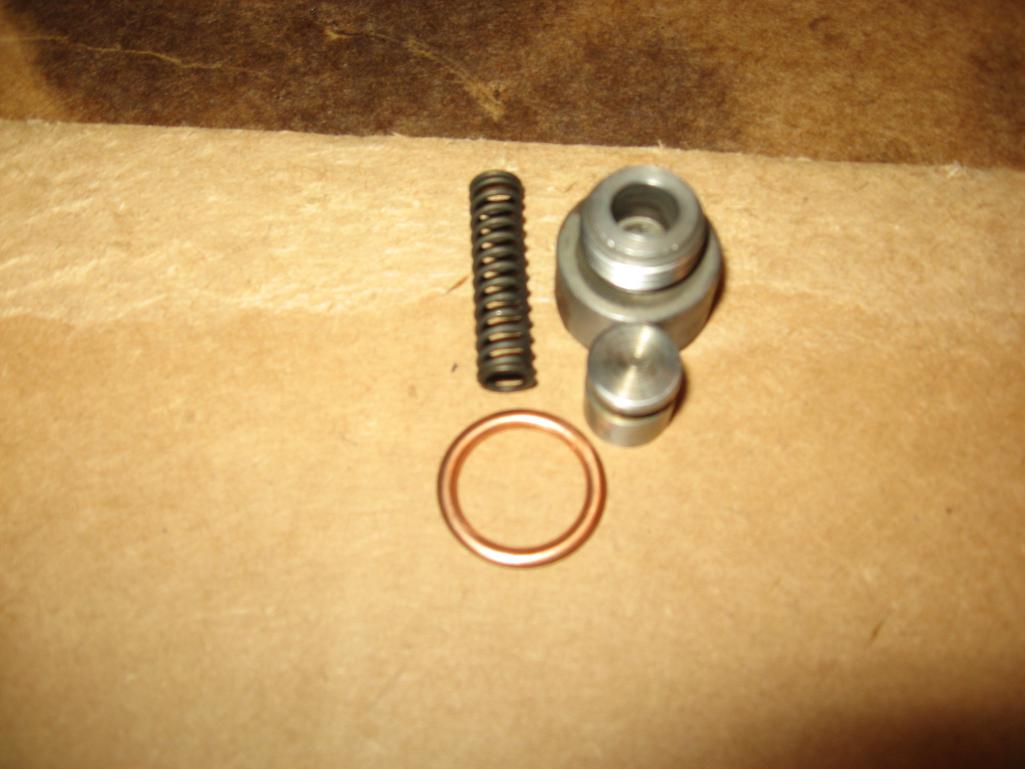
6 is the fan mount (front) or ring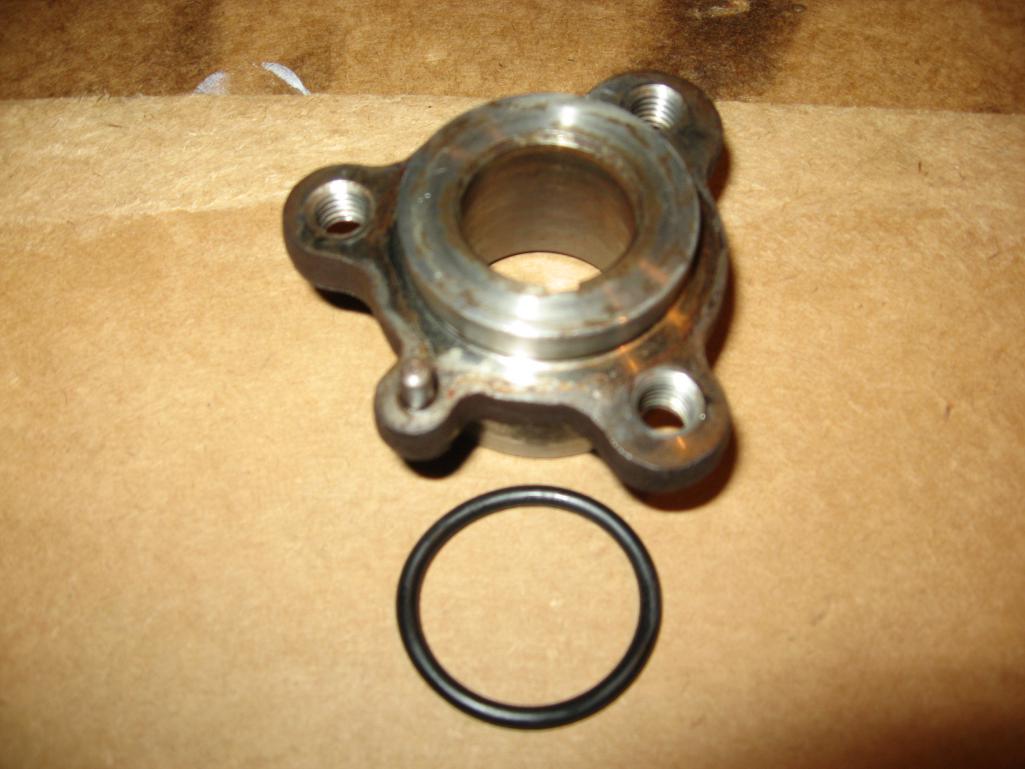
7 is oil filter/cooler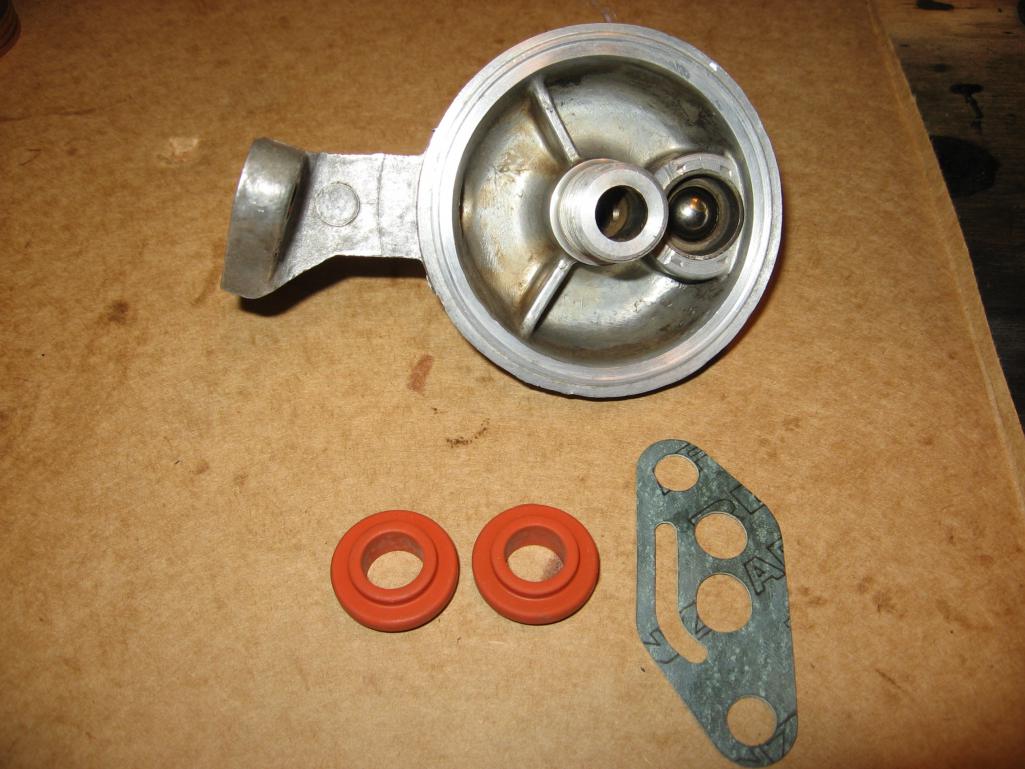
8 is the taco plate/oil temp sender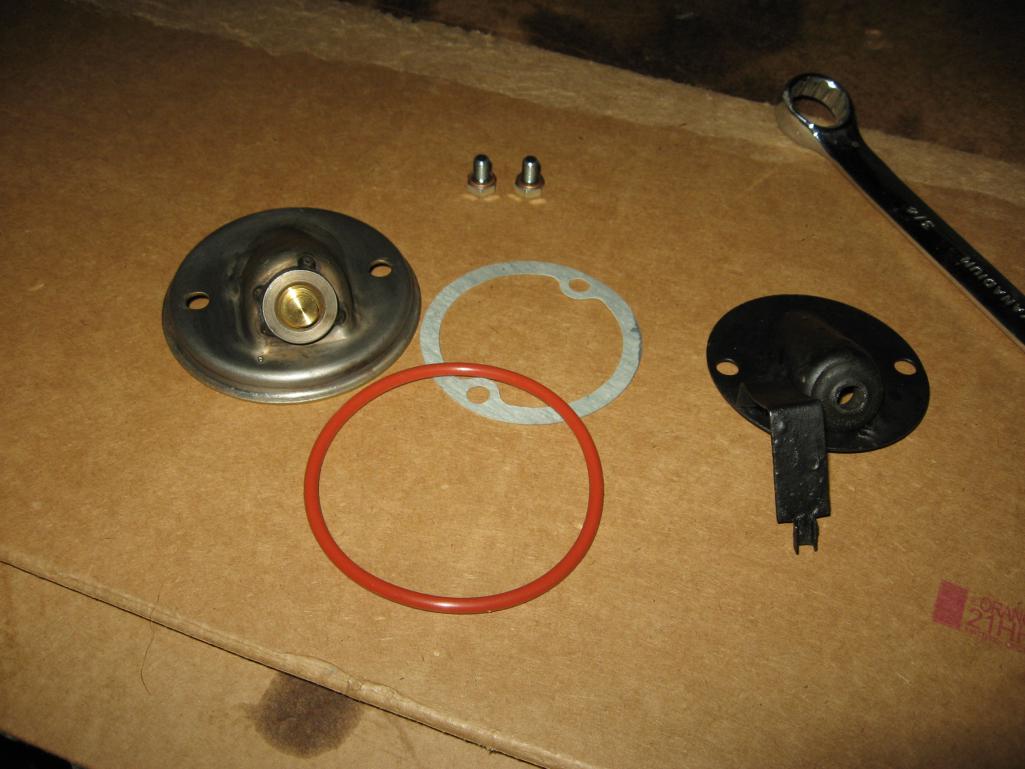
I already installed the sump with its two gaskets and aluminum crush ring, and the exhaust and pushrod o rings & a few other pieces are self explanatory.
Posted by: Racer Chris Dec 14 2014, 09:30 AM
...
Picture 2 is a collection of two medium o rings, and a thin black. NO idea where they go. My guess on the small is for the distributor shaft, but no idea on the larger one.
...
Top left is for the oil pickup tube inside the crankcase.
Lower left is for the distributor.
Posted by: Racer Chris Dec 14 2014, 09:37 AM
...
Picture 1 is the drain plug, not sure which of the silver gaskets go with it. The one in the center is thick and solid, the one on the right is softer. I doubt the copper goes with it. Where do the other two go?
...
The hollow aluminum one, center bottom, is for the drain plug.
The flat aluminum one might go on the oil temp sender.
Posted by: pilothyer Dec 14 2014, 10:37 AM
Steve......These may be helpful to you. First the picture next the legend.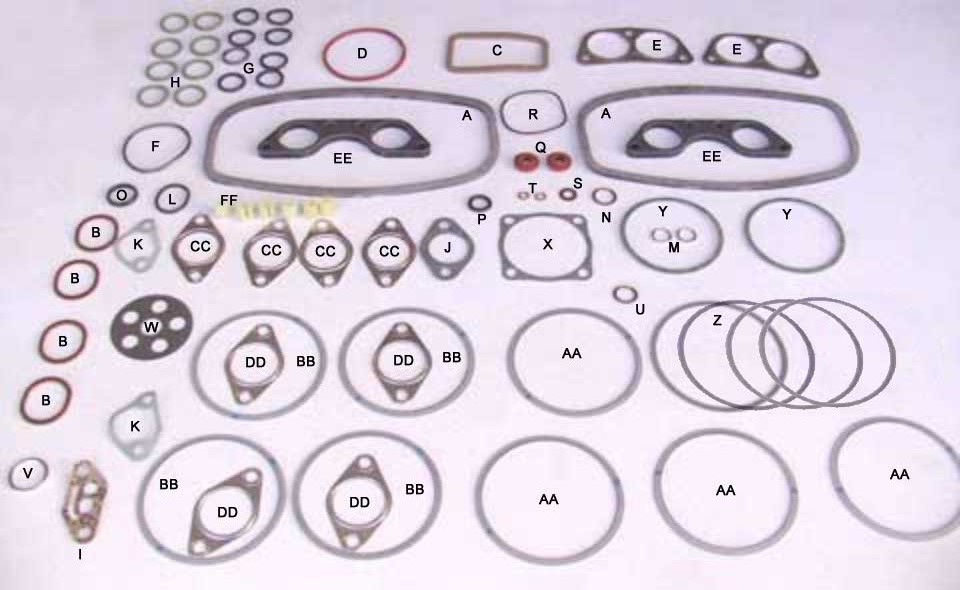
A Valve Cover Gasket (2) CORK
B Exhaust Gasket Ring (4) COPPER
C Oil Breather Gasket (1) CORK
D Sump cover O-ring (1) RED RUBBER 77 X 4 mm
E Muffler Flange Gasket (2) Metalic / Fiber
F Flywheel O-ring (1) Graphite Impregnated
G Push rod tube inner (8) Black Rubber
H Push rod tube outer (8) Green Rubber
I Oil Filter Mount (1) Paper
J Oil Filler Tube Gasket (1) Paper
K Fuel Pump Gasket (1) Paper
L Fan Hub O-Ring (1) Rubber
M Oil Strainer Crush Washer (2) Aluminum
N Oil Plug Crush Washer (1) Copper 14 mm
O Distributor O-Ring (1) Black Rubber
P Oil Pickup Tube O-ring (1) Black Rubber 13.5 X 2.5 mm
Q Oil Cooler Seals (2) Orange/Red Silicone
R Oil Pump O-Ring (1) Black Rubber 60.8 X 2 mm
S Oil Pickup Case thru Bolt Washer (1) Copper 8.2 X 16 mm
T Oil Sump Crush Washer (2) Copper A6 X10 mm
U Oil Pressur Control Crush Washer (1) Copper 16 mm
V Oil Press Relief Valve Crush Washer (1) Aluminum 22 mm
W FLYWHEEL CRUSH WASHER (1) 5 HOLE Metal
X Oil Pump Gasket (1) Paper
Y OIL Strainer Gaskets (2) Paper -Pair w Alum Crush
Z Cylinder Base Gaskets (4) Metal 100 X 109 mm
AA Cylinder Head Gaskets (4) Metal 94 X 105 X 0.7 mm 2.0 L
BB Cylinder Head Gaskets(4)Metal 93 X 104 X 0.7 mm 1.7,1.8L
CC, DD Not Applicable to F.I.
EE INTAKE MANIFOLD GASKETS (2) BAKELITE
FF CASE VIBRATION DAMPERS (6) NYLON
Posted by: Steve Pratel Dec 14 2014, 10:55 AM
Thanks Chris, I figured one of them was for the distributor. I already replaced the o ring on the oil pickup tube.
Still not sure what the large black/thin o ring is for.
I assumed the hollow gasket was for the drain plug as the one I pulled off the plug on dissasembly was soft alum.
Top left is for the oil pickup tube inside the crankcase.
Lower left is for the distributor.
Posted by: Steve Pratel Dec 14 2014, 10:56 AM
This is great, thanks! Should be a sticky on the forum.
Posted by: stugray Dec 14 2014, 11:16 AM
Still not sure what the large black/thin o ring is for.
18 in pic:
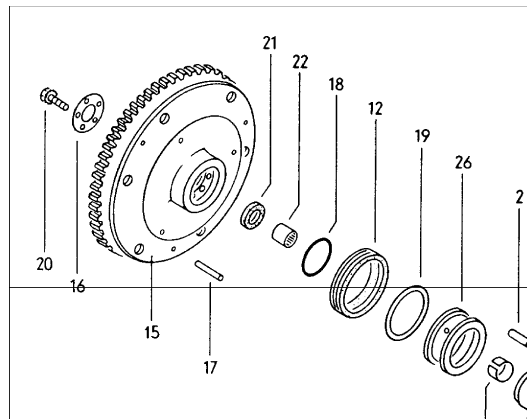
Posted by: gifted914 Dec 14 2014, 01:20 PM
There is a groove inside the end of the flywheel that mates with the crankshaft. This 'O' ring is fitted in there.
Good Luck
Posted by: Steve Pratel Dec 14 2014, 01:42 PM
I think I already located the fly wheel O ring,is thicker and dark gray. This is thinner, a bit larger. I set the flywheel O ring with the locking plate in pic 3. The O ring I am still looking to identify is black in the pic with the two smaller black o rings (distributor and chimney o rings).
I was able to identify the other small black o ring, it is for the breather chimney. I also looked at my sensors, and all came with the gaskets so the only one left to identify is the large thin black.
Thanks for the help guys. Couldn't do this without your help.
Attached image(s)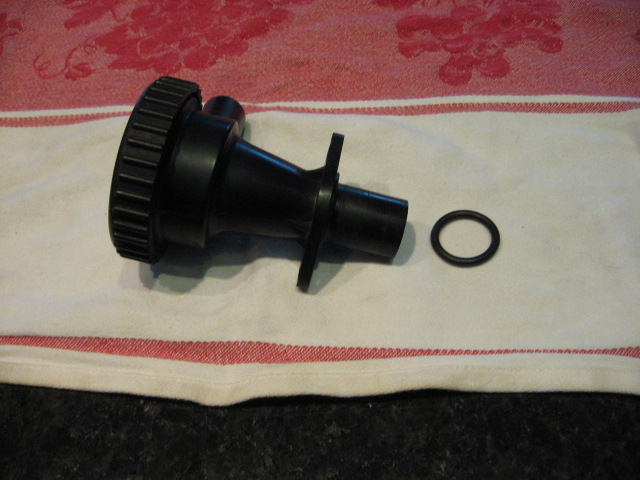
Posted by: Valy Dec 14 2014, 04:33 PM
Still not sure what the large black/thin o ring is for.
Top left is for the oil pickup tube inside the crankcase.
Lower left is for the distributor.
It's the oil pump seal. When you take the oil pump apart, you'll see it selling the 2 halfs.
Posted by: Steve Pratel Dec 14 2014, 06:24 PM
Ah, thanks that makes sense. I am not using the stock pump. Great, thanks I can sleep well tonight!
Still not sure what the large black/thin o ring is for.
Top left is for the oil pickup tube inside the crankcase.
Lower left is for the distributor.
It's the oil pump seal. When you take the oil pump apart, you'll see it selling the 2 halfs.
Posted by: Steve Pratel Dec 19 2014, 04:18 PM
'cue sinister music'
I'm almost ready to take on the 'valvetrain' geometry nightmare. I'm hoping to borrow a dial gauge and mount from a local 914 guy this weekend, and I'm a bit nervous. 
I've tried to work through Jakes 8 page instructions but it is overwhelming. Anybody have a laymans guide? AKA as accurate but simpler? Not a ding on the article, but my ability to concentrate ;-)
Because this is my first time doing this and I know there will be a LOT of turning turning turning, I'm wondering if I just put a piston in cyls 1 & 2 without rings, then mock up the jugs with spacer and snug up the heads if this will make the job easier and be BETTER for the rings and cyls. They are the Keith black floating wrist pins so this is an easy task.
I'm wondering if I just put a piston in cyls 1 & 2 without rings, then mock up the jugs with spacer and snug up the heads if this will make the job easier and be BETTER for the rings and cyls. They are the Keith black floating wrist pins so this is an easy task.
Also realized that the timing mark is way before TDC..... The true TDC is about 26.5 degrees after. So I'm scratching my head and then open some books to discover that the 'TIMING MARK' IS 27 degrees before TDC....
Everything is mating up nicely and I confirmed that BOTH valves are completely closed when at TDC.
Posted by: stugray Dec 19 2014, 05:39 PM
There should be a mark on the FW that you use as true TDC #1.
The one on the fan is the 27 deg BTDC used for timing at 3500 RPM (for FI).
With my carbs I use closer to 34 degrees.
And did you measure the cam lobes before installing the cam?
Posted by: OU8AVW Dec 19 2014, 06:19 PM
Did you get your dial gauge set up? Annapolis is a haul but you can use mine over the holidays.
I might have other stuff too.....
443-994-6 four six zero
Mike-
Powered by Invision Power Board (http://www.invisionboard.com)
© Invision Power Services (http://www.invisionpower.com)