Printable Version of Topic
Click here to view this topic in its original format
914World.com _ 914World Garage _ In Over My Head Restoration
Posted by: BeatNavy Nov 11 2014, 07:27 PM
Ok, here goes. I picked up this '75 last April in lower Maryland. It was advertised as a 2.0, it has a 2.0 badge on the back, and it looked pretty good from a distance (or with beer goggles).
Attached thumbnail(s)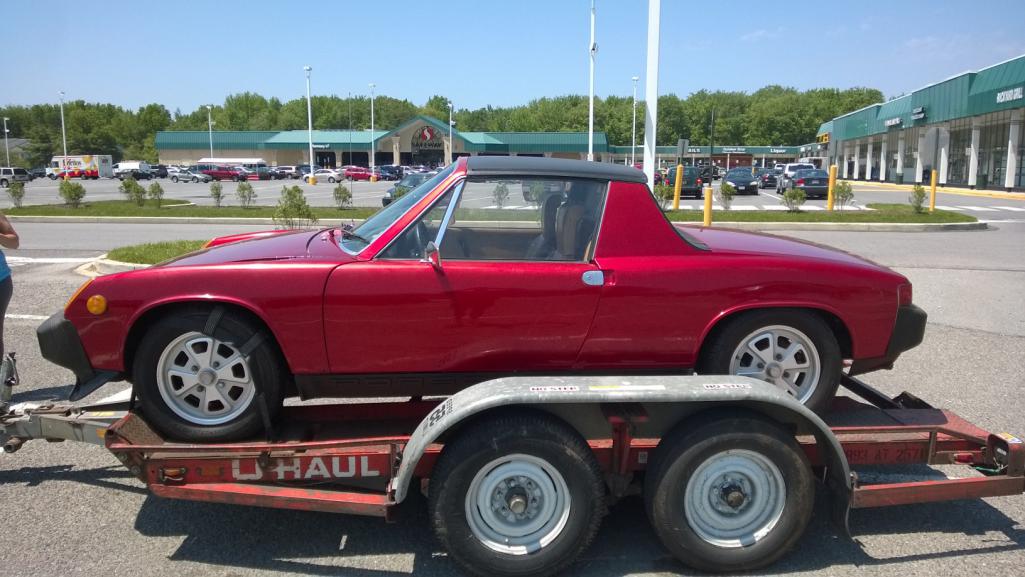
Posted by: BeatNavy Nov 11 2014, 07:31 PM
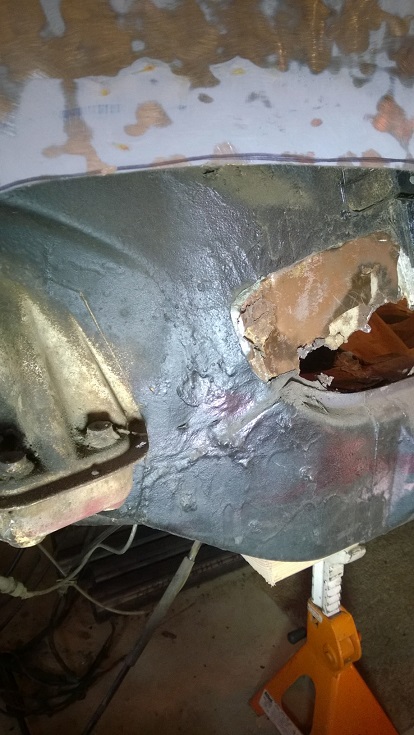
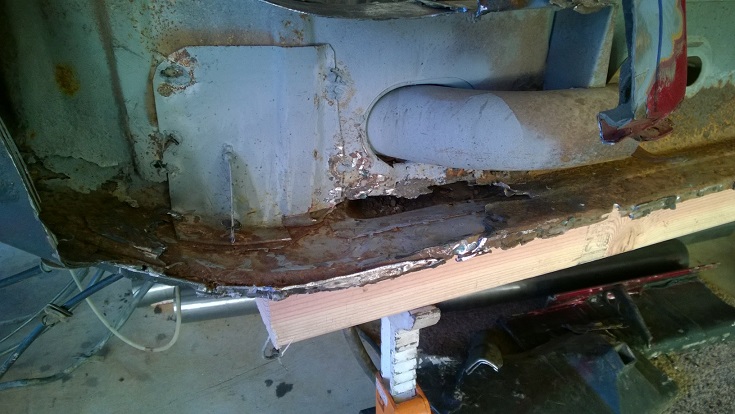
But when I got it home I found that it was actually a 1.8L and it had some ugliness as seen in the hell hole below: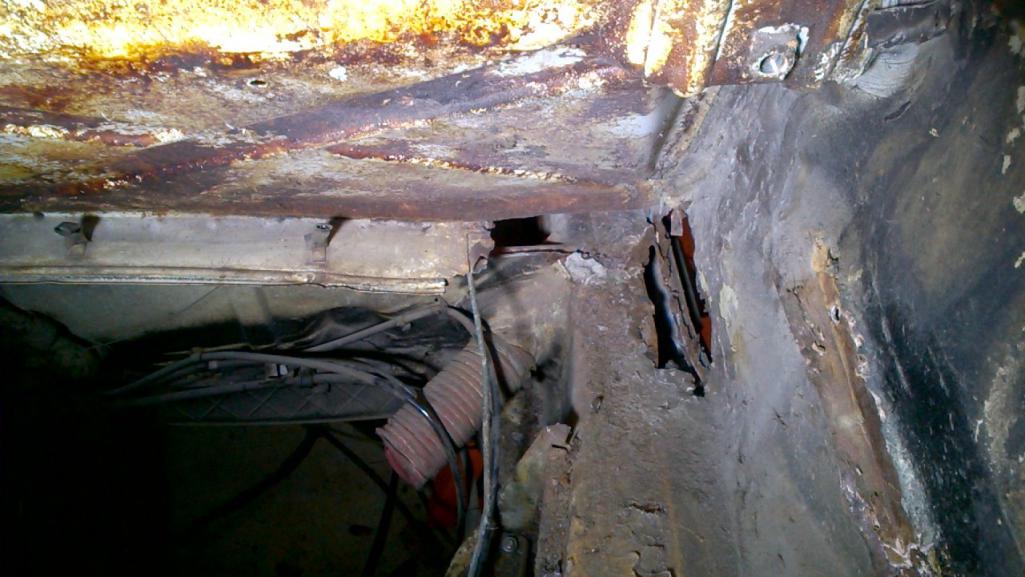
And the floor pans aren't in great shape: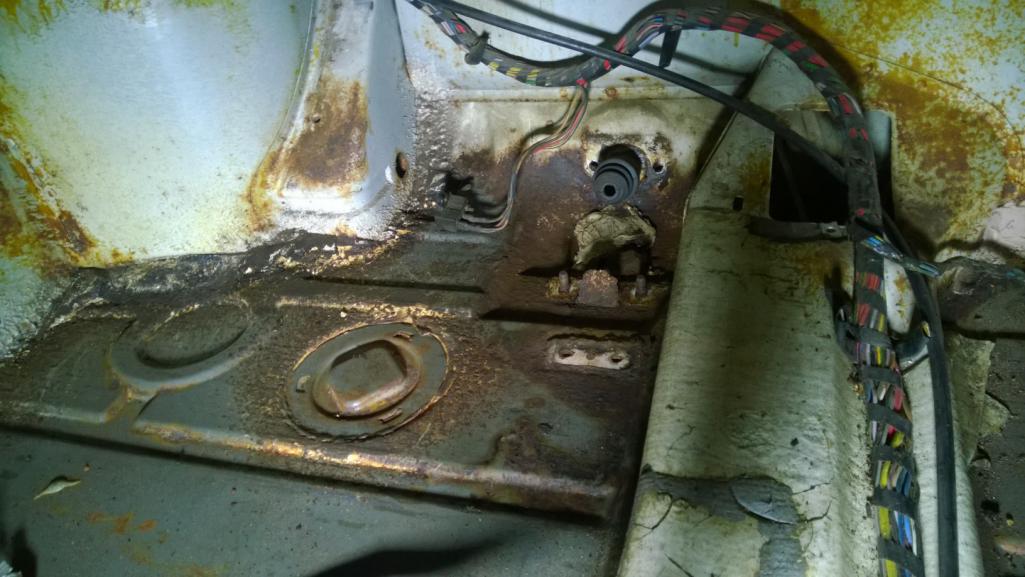
I'm pretty sure the longs need work, so I plan to tear into those in the next couple of weeks.
This is going to be a bigger project than I anticipated....
Posted by: BeatNavy Nov 11 2014, 07:38 PM
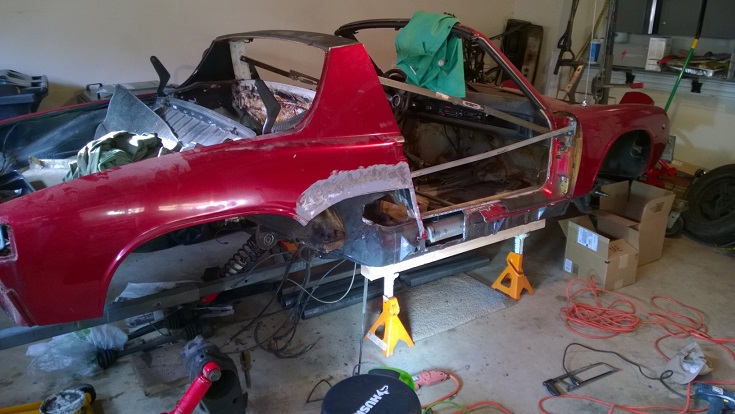
Anyway, I picked up a 2.0 engine that's been built out to a 2056. Now I just need to get serious about fixing up the tub. Today was a big step toward that. David (Half Moon) is letting me "borrow" his rotisserie, so I have no excuses now. I don't know the full genealogy of this rotisserie, but I think it belonged to CptTripps before David inherited it. Anyway, here's David dropping it off and helping me set it up today.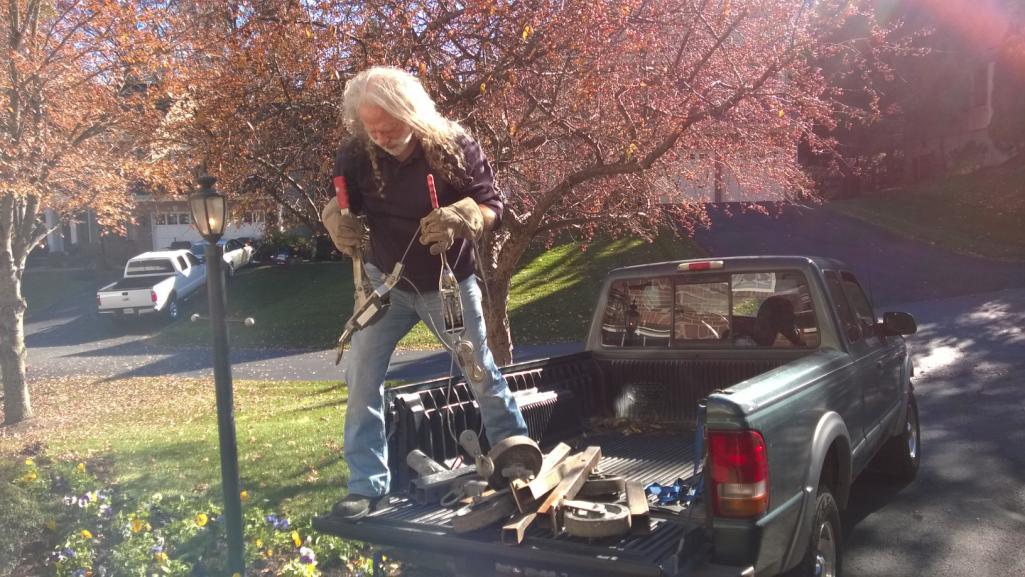
And setting it up in the garage. Honestly, I did help. Some.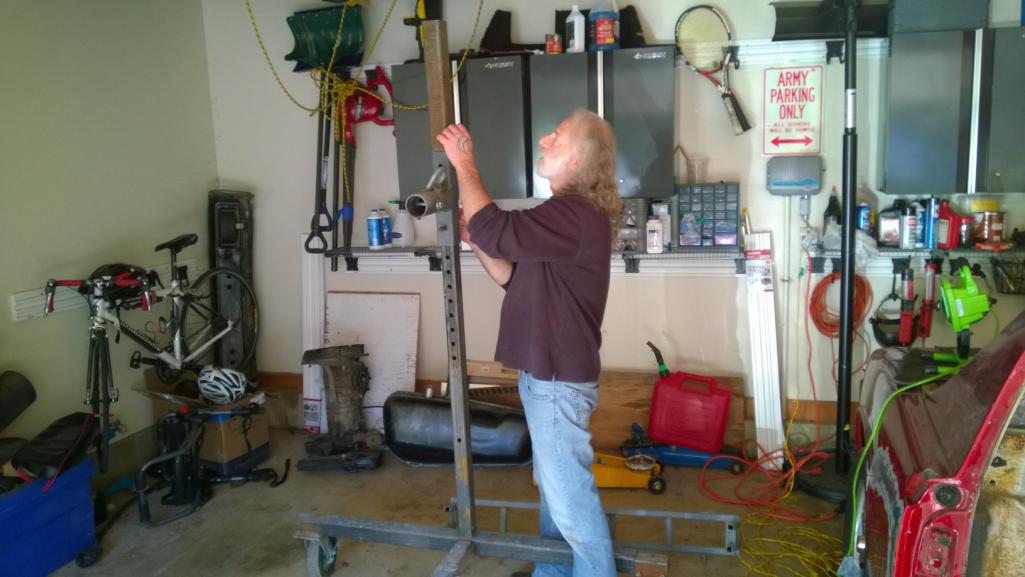
Ready. Sort of.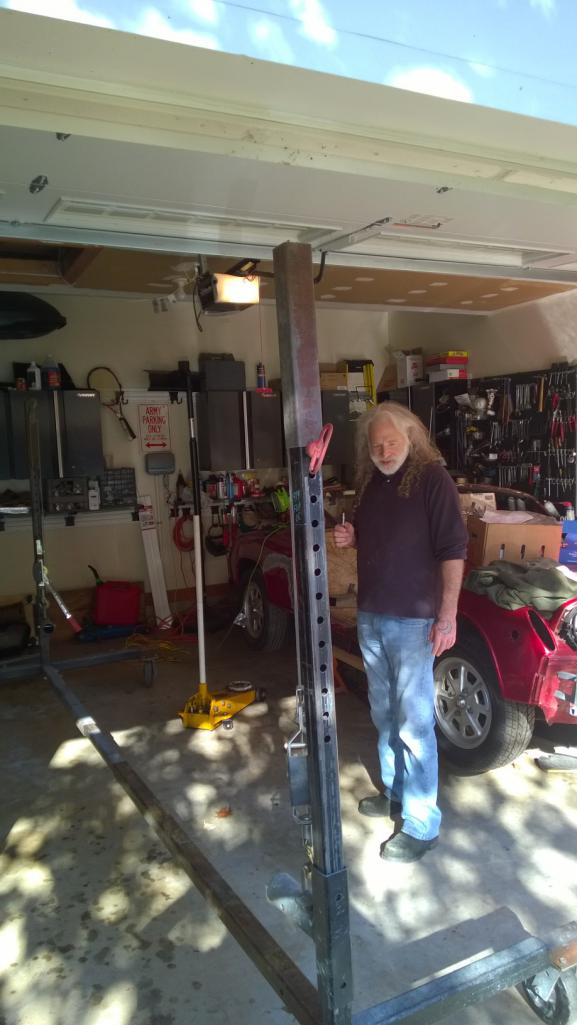
Honestly, I've only been part of this "community" for about a year, but I'm amazed by the cooperation and camaraderie herein. I've already met some great people.
Posted by: Elliot Cannon Nov 11 2014, 07:39 PM
Who did your pre-buy inspection? 

Posted by: BeatNavy Nov 11 2014, 07:45 PM
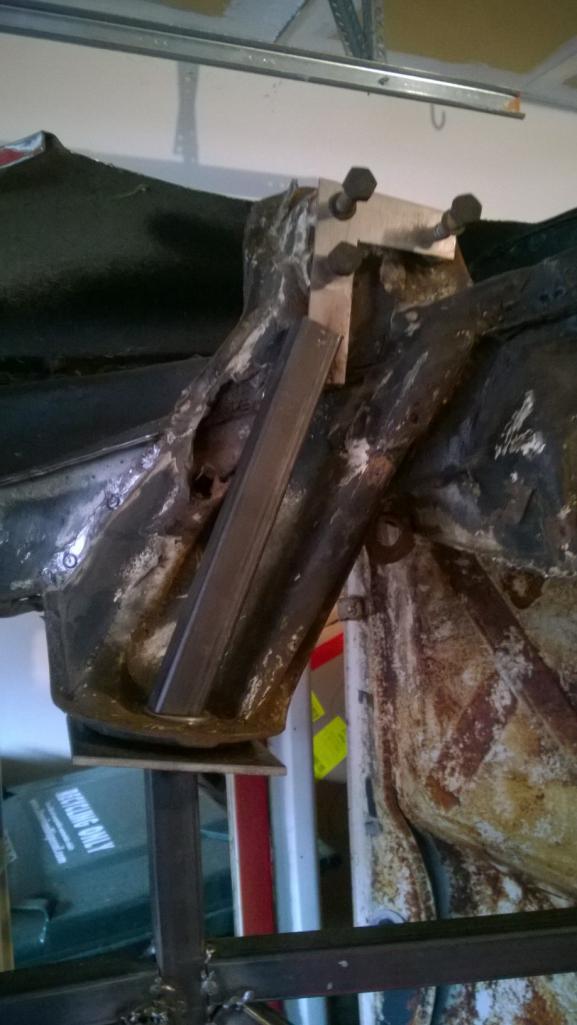
Now I just need to get this thing up on the rotisserie. Give that this is a '75, I know the mounting solution needs to be modified. It's also a little complicated that it appears the PO, or some PO, appears to have done a pretty piss poor repair to fix the front end following some moderate front end collision: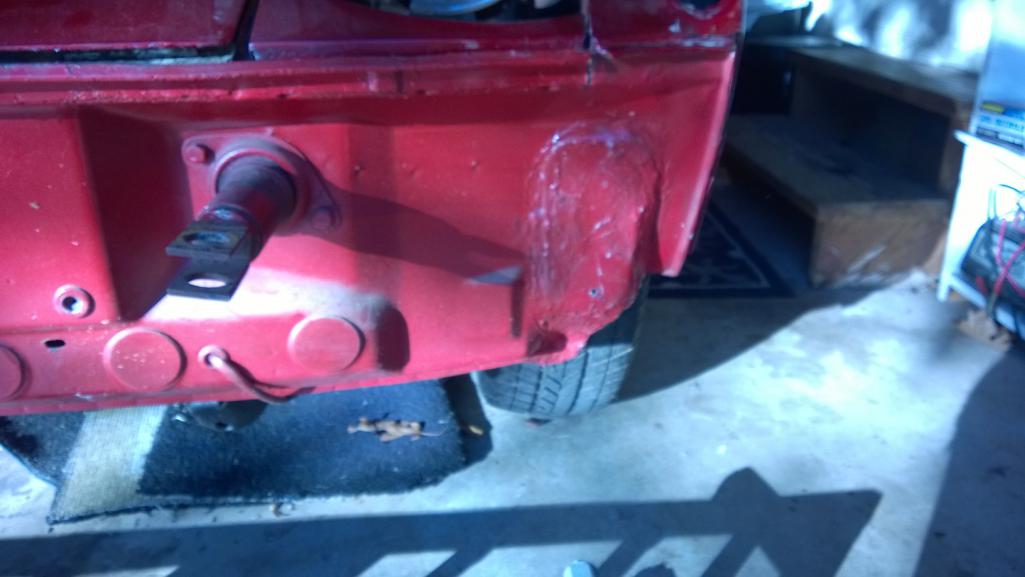
Don't think it's good idea to trust suspending the car on whatever that is. After a little grinding, and a LOT of bondo dust, it looks like this: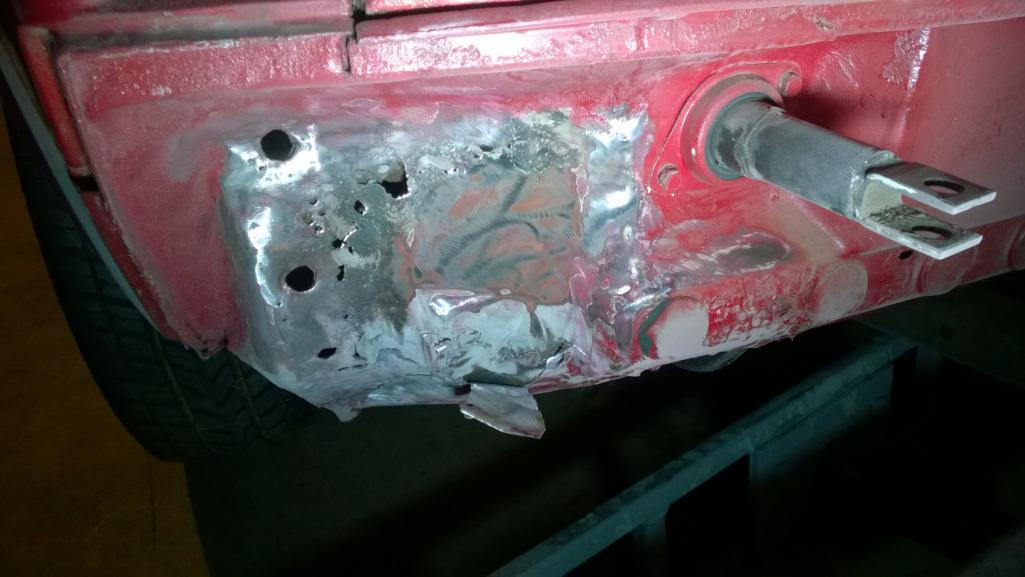
Yeah, that's not going to hold anything. I'm going to see if David's ok if I modify the front mount bracket for the rotisserie so it fits the '75 bumper shocks. I think Zach documented this somewhere, once upon a time.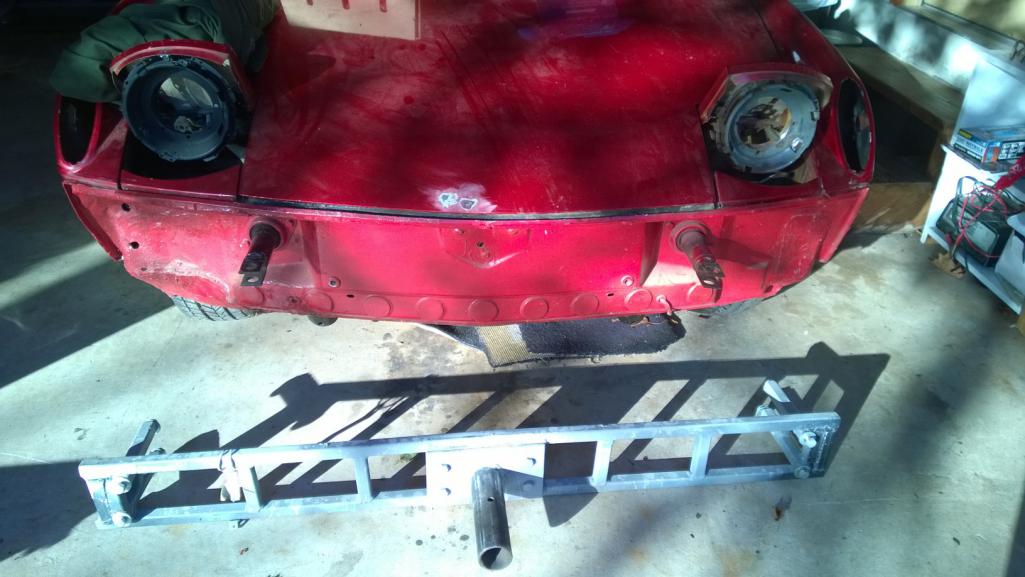
Posted by: BeatNavy Nov 11 2014, 07:45 PM

Who did your pre-buy inspection?
Some newbie that didn't know what the hell he was doing. I'd fire the guy, if I didn't have to live with him
Posted by: BeatNavy Nov 11 2014, 07:54 PM
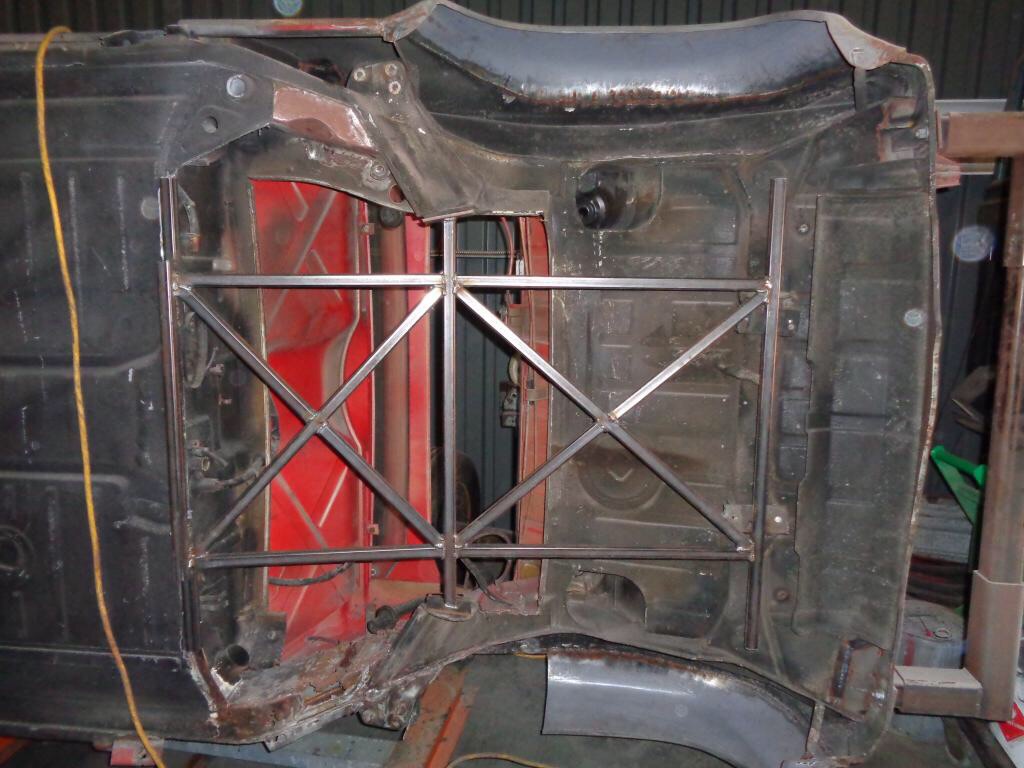
The rotisserie very conveniently comes with some door braces, which I've rigged with braces I built a month or two ago (picture below shows only my original bracing solution):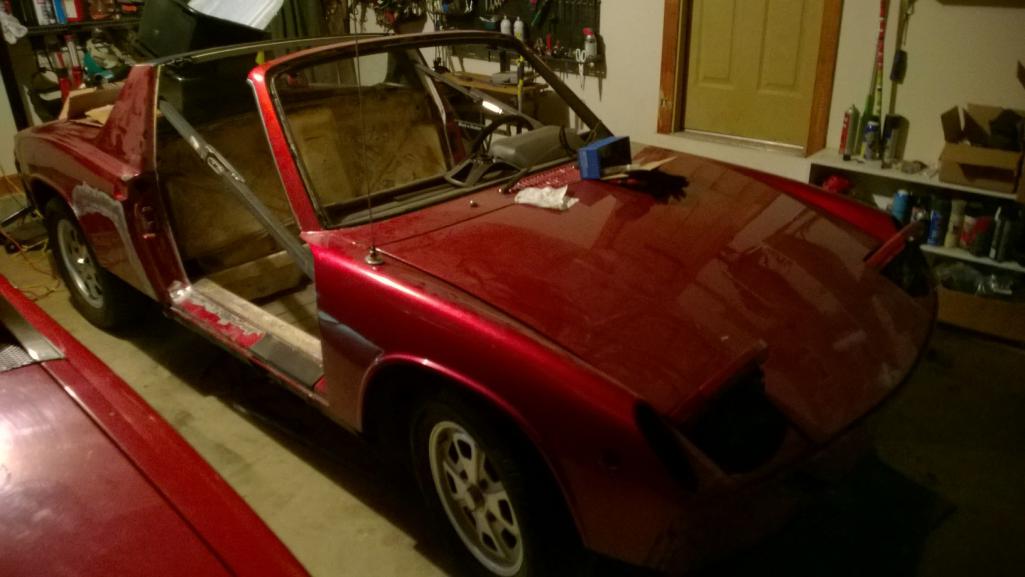
So now I just need to start cutting. I know I'm in over my head. My goal is to take my time and try to follow the examples of guys like Michelko, George (PaintedMan), and many others, and turn this into a solid, if certainly not spectacular, restoration effort. The only other thing I know is that this will not end up red. Wife says we already have too many red cars. I've got my '72 daily driver (red) that seems to demand daily attention  to enjoy while I work on this. Hopefully I can make a lot of progress on this through the winter. I know I'm going to need lots of advice and help, so I'll try to keep this updated.
As always, thanks in advance for your help!
Posted by: ThePaintedMan Nov 11 2014, 08:18 PM
Rob,
Awesome man! You've got good folks nearby to help you along. I wasn't so lucky when I started so I did a lot of learning on my own until I met my local buddies.
First problem I see though - you said my name as an example of who to follow. BAD IDEA. I was in grad school and did all of mine on jackstands...outside...in my driveway. The way you're going about it is MUCH better.  Good luck man - will be checking in on your progress.
Posted by: BeatNavy Nov 11 2014, 08:24 PM
Rob,
Awesome man! You've got good folks nearby to help you along. I wasn't so lucky when I started so I did a lot of learning on my own until I met my local buddies.
First problem I see though - you said my name as an example of who to follow. BAD IDEA. I was in grad school and did all of mine on jackstands...outside...in my driveway. The way you're going about it is MUCH better.
Good luck man - will be checking in on your progress.Yeah, I was pretty amazed how you did restoration...without a garage...in the driveway...while going to school! But I guess it's not that big a deal, as it never really rains in Florida or anything
Thanks, George. I'll be relying on your experience and the collective wisdom of the community.
But I WILL be in a garage.
Posted by: altitude411 Nov 11 2014, 08:33 PM
Subbed to watch Rob build an awesome teener.  Lots of pictures please. It's winter & we need build photo's.
Posted by: PanelBilly Nov 11 2014, 10:33 PM
I'd strip the suspension off the car before trying to hang it. Lighten the load first
Posted by: saigon71 Nov 12 2014, 06:56 AM
A rotisserie will be a big help in bringing this one back to life.
Keep us posted on your progress & good luck!
Posted by: BeatNavy Nov 12 2014, 07:13 AM
Subbed to watch Rob build an awesome teener.
Lots of pictures please. It's winter & we need build photo's. Yeah, man. I'll try to keep the pics a'comin as I try to make progress. I'm not always good at that, so I need to make a note to do that. First step is to get this thing on a rotisserie...
I'd strip the suspension off the car before trying to hang it. Lighten the load first
Good point, and absolutely.
A rotisserie will be a big help in bringing this one back to life.
Keep us posted on your progress & good luck!
Hey Bob! Yeah, I'm SURE this will be ready by Hershey

Posted by: BeatNavy Jan 1 2015, 05:29 PM
Happy New Year everyone. It’s been a while since I started this. This project started off like a herd of turtles. Life got in the way (preparing for the holidays, trips out of town, etc.). I also struggled for a while to figure out how to adapt the rotisserie for the ’75 bumper setup, but I managed to weld a bracket on that fits to the bumper shocks just before Christmas. Now I can REALLY get myself in trouble. BTW, even without need to flip the car just yet that rotisserie rocks as I’m able to move the car around the tub. Now that the holidays are actually here and gone I have chunks of time on the weekend to work on the car (in between son’s wrestling tournaments).
Consistent with recommendations, I felt it best to unload the suspension and other unneeded “stuff” both to lighten the car on the rotisserie and also just get it out of the way. I took off the front hubs, and I still need to remove the rest of the front suspension. But I focused on the rear for now.
My first challenge was getting that axel nut off without engine/tranny or brakes in car. The wheel kept turning under the torque, but with enough PB Blaster, heat from a propane torch, some blocking leverage, and my son sitting on the car to give it extra weight, I managed to break those free.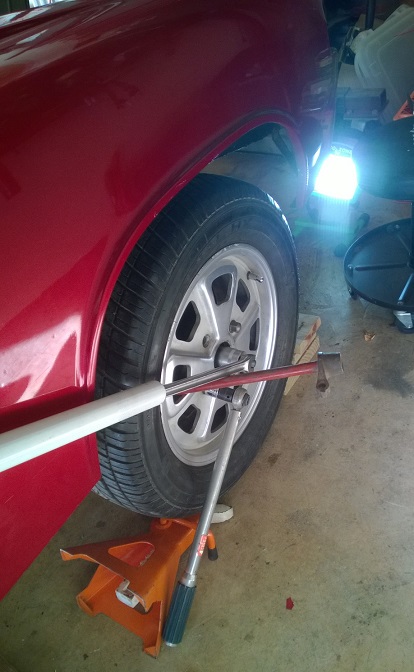
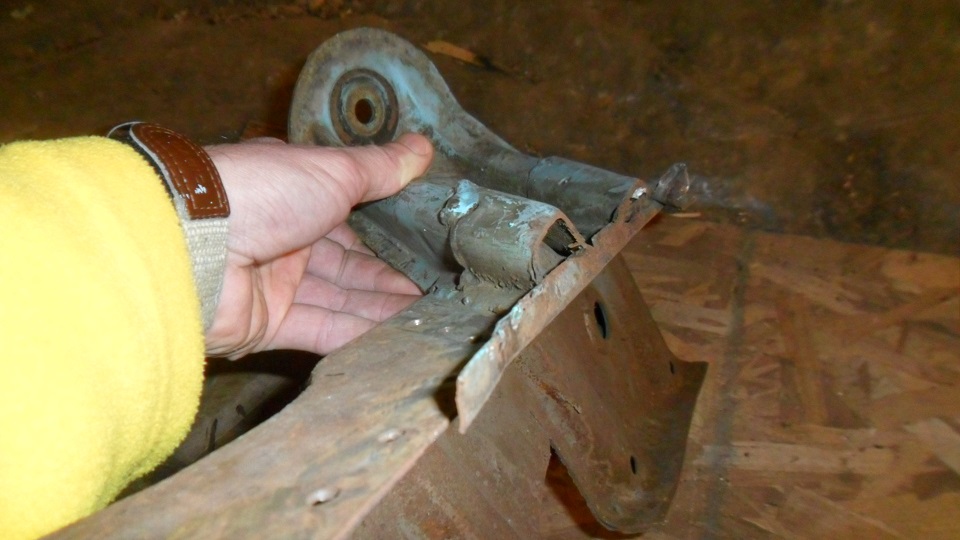
Anyway, after removing the drive axels with a gear puller and banging out the hubs, it was time to take out the rest of the trialing arm. Here’s a picture of the bolts connecting the arm to the body. There were two shims there (don’t know what size), and I know from reading here that these are important to rear wheel alignment. I imagine I did not do correctly whatever I’m supposed to do to make alignment easier upon install.
Stupid question #1: is it the number (or total size) of shims present and/or the positioning of the shims that determines the alignment? 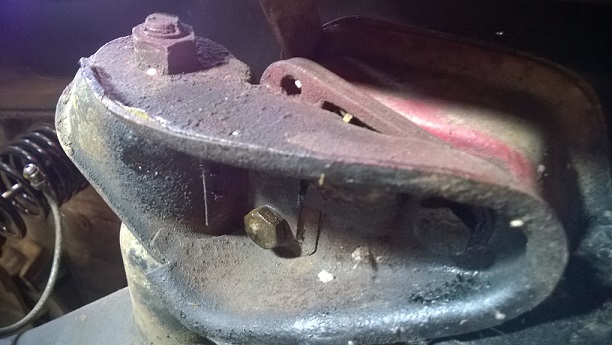
Here is the trailing arm removed. Stupid Question #2: what brand of shock is that? It’s been painted over. 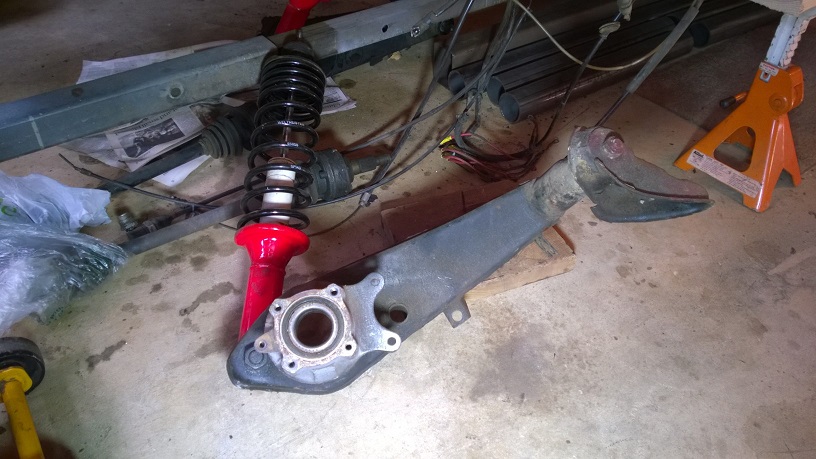

Anyway, now the car has no rear suspension. Much lighter!
Posted by: BeatNavy Jan 1 2015, 05:30 PM
Then it was time to start cutting. I’ve spent way too much time thinking about it. It’s good to just dive in and commit. My goals are pretty simple: learn and hopefully be pleased with the end result. So after removing the rear suspension, I started cutting. Here’s what I’ve found so far after some exploratory “surgery.” 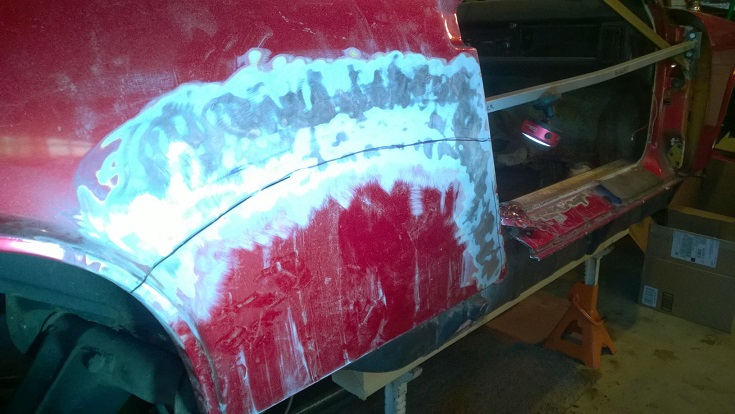
The PO used some pretty funky stuff to do his hell hole and long “repair.” It involved lots of sticky stuff, globs of paint, something resembling tin foil, another substance resembling something ceramic, 18 gauge sheet metal, and unicorn farts. Ok, I’m kidding. There was no sheet metal involved.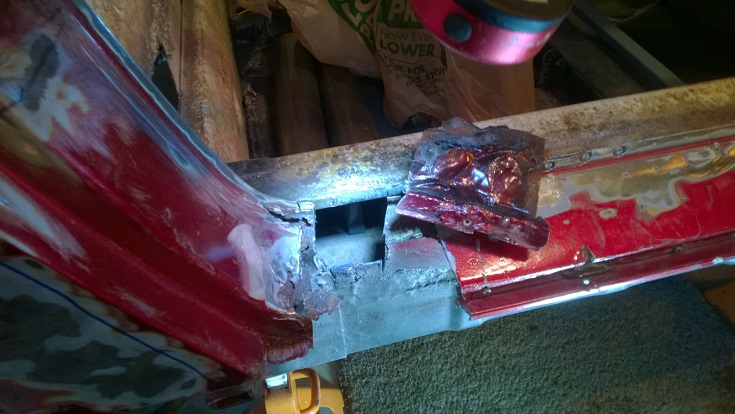
And here’s where I “retired” for today. I’m glad to at least be committed at this point. I’m hoping to do some more cutting into the long this weekend and get the rest (or most) of the outer long removed.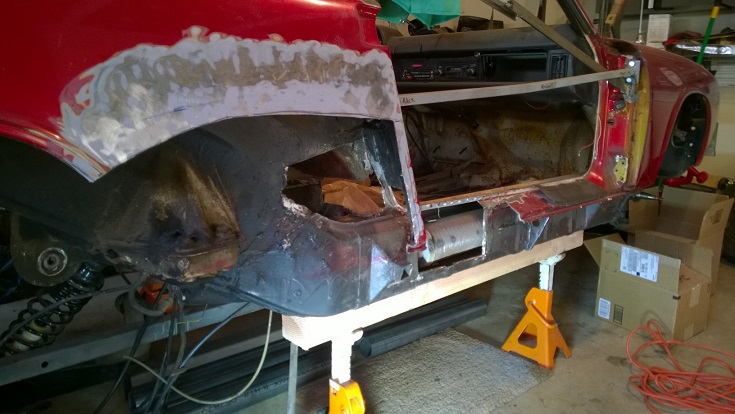
Stupid question #3 (yes, I’m keeping a running total): I guess I’m going to need, as a minimum: outer long and door sill, right? I previously purchased the hell hole restoration kit from Mad Dog, which I need to start shaping.
Getting this far required lots of research on previous threads. Thanks for everyone's help. This site is such a great resource, particularly for a noob like me. More soon.
Posted by: rhodyguy Jan 1 2015, 06:10 PM
Wow.
Posted by: billh1963 Jan 1 2015, 06:19 PM
looks like you are well into it! 
Posted by: 993inNC Jan 1 2015, 06:49 PM
Here comes the real fun Took mine five years to get completed. A lot of time and a LOT of $$ invested. Best of luck!
Posted by: BeatNavy Jan 1 2015, 06:54 PM
Here comes the real fun
Took mine five years to get completed. A lot of time and a LOT of $$ invested. Best of luck!Shhh!!! Don't want my wife to hear things like "five years."
 I think she'll want "her" side of the garage back sooner than that. I'll just keep telling her "I'm making progress...."
Posted by: scotty b Jan 1 2015, 07:15 PM
white shocks indicate KYB....toss them in the trash. Alignment is based on the thickness ( number ) of shims. They only go on one way
Don't buy anything quite yet, but plan on:
http://www.restoration-design.com/mm5/merchant.mvc?Screen=CTGY&Category_Code=914
P331
P319R
P302
P303
P351
P342R
P315
P316
P317
P318 (maybe. Can't tell from the pics)
Fabricate a hell hole patch
Fabricate lower firewall patch
Fabricate outer skin if you have to replace the inner long ( P351) in the engine compartment.
Posted by: BeatNavy Jan 1 2015, 07:28 PM
Excellent, thanks for the input, Scotty. I'll keep cutting, but based on your experience I'm sure you're probably right on (although I'm hoping I don't have to replace that suspension ear). I'll post more pictures hopefully this weekend and start saving up for my purchase at RD.
Posted by: type47 Jan 3 2015, 08:01 AM
Incredible thread for a guy who joined 914world in Feb 2014! I am not worthy 
Posted by: ThePaintedMan Jan 3 2015, 08:20 AM
Wow, nice progress Rob! Unfortunate that you ended up with such a turd of a car. Have you learned how to remove the spot welds yet? You'll need a decent spot weld bit, or do the grind away trick that Rick does. Much better than just hacking out portions of the unibody.
Might also be worth it to go further into the body before you order pieces from RD. That car looks like it had a lot of bondo and patches on it, so there might be more rust that lurks...especially front and rear trunks.
Posted by: BeatNavy Jan 3 2015, 11:26 AM
Incredible thread for a guy who joined 914world in Feb 2014! I am not worthy
Hey Jim! You are more than worthy ... and wise ...and not foolish like I probably am. We'll see what I've got myself into.
Wow, nice progress Rob! Unfortunate that you ended up with such a turd of a car. Have you learned how to remove the spot welds yet? You'll need a decent spot weld bit, or do the grind away trick that Rick does. Much better than just hacking out portions of the unibody.
Might also be worth it to go further into the body before you order pieces from RD. That car looks like it had a lot of bondo and patches on it, so there might be more rust that lurks...especially front and rear trunks.
Hey George! No worries about the car. It's gives me challenges and plenty of opportunity to learn, which is a large part of what this effort is all about. I should have done a better pre-buy inspection, but what the hell? I'm using a spot weld removal bit, but I'm still learning my technique. It takes time. And I agree, I'm not ordering stuff until I get a better assessment of what I have to work with. Trunks do not LOOK bad, although they're heavily painted over. I'm sure PO wasn't trying to hide anything.

Right now I'm working on my other teener, trying to change output shaft seals (done) and rear bearings, based on the way you documented in http://www.914world.com/bbs2/index.php?s=&showtopic=161596&view=findpost&p=1986007. Back from a wrestling tournament now, and I'm trying to get the driver's side axle out, but I'm pretty sure I have to remove the starter. Ugh...
Posted by: ThePaintedMan Jan 3 2015, 11:55 AM
Yep, not a bad idea to strip the trunks as well. My PO did a better job hiding the rust in them than he did with the rockers.
Yes, you do need to remove the starter to get the axle out (or it at least makes life a lot easier.)
Posted by: mepstein Jan 3 2015, 01:30 PM
Excellent, thanks for the input, Scotty. I'll keep cutting, but based on your experience I'm sure you're probably right on (although I'm hoping I don't have to replace that suspension ear). I'll post more pictures hopefully this weekend and start saving up for my purchase at RD.
The suspension ear is one of the first things to go on these cars. battery acid and rain dripping down helped insure its early demise. the little drain hole was always plugged up and held the mixture inside against the untreated metal. 99% chance you will need a new one. Strip yours down and check.
Posted by: BeatNavy Jan 3 2015, 02:32 PM
Yes, you do need to remove the starter to get the axle out (or it at least makes life a lot easier.)
Wow, I got the starter out and the bearings in. But I barely got that half-shaft out even with removing the starter, and now I can't get it back in despite negotiating it all over the underside. Do you have to disassemble the half shaft at the CV or something? This is one of the most challenging things I've had to do...until the next thing.
EDIT: I'm going to start a new thread.
Posted by: r_towle Jan 3 2015, 03:47 PM
Not sure I am following this along, but don't put a car on a rottisierre with the enging installed.
Posted by: type47 Jan 3 2015, 04:06 PM
I believe he's referring to his other daily driver 914. Seals, axles, starter stuff on the DD. Car undergoing surgery already sans drivetrain.
Posted by: barefoot Jan 3 2015, 04:17 PM
Anyway, after removing the drive axels with a gear puller and banging out the hubs, it was time to take out the rest of the trialing arm. Here’s a picture of the bolts connecting the arm to the body. There were two shims there (don’t know what size), and I know from reading here that these are important to rear wheel alignment. I imagine I did not do correctly whatever I’m supposed to do to make alignment easier upon install.
Stupid question #1: is it the number (or total size) of shims present and/or the positioning of the shims that determines the alignment?
when I was taking the rear trailing arms off I drilled up thru the bracket into the body structure so i could pin the exact location when re-assembling. Also noted what shims were on either side
Posted by: BeatNavy Jan 3 2015, 05:45 PM
I believe he's referring to his other daily driver 914. Seals, axles, starter stuff on the DD. Car undergoing surgery already sans drivetrain.
Yes, thanks for the assist Jim. Yeah, sorry Rich. My daily driver. I should have been more specific.
Posted by: r_towle Jan 3 2015, 06:40 PM
Makes sense considering you are a long way from worrying about bearings.
Posted by: BeatNavy Jan 11 2015, 01:08 PM
Ok, last weekend was replacing bearings and tranny seals on my other teener – very greasy and dirty – this weekend it’s back to IOMH (in over my head) restoration and getting dusty. What better way to spend a weekend than in a cold garage cutting steel and bondo? So I put aside some time and did some more exploratory surgery. I’ll have at least three more stupid questions for anyone that can answer them as I assess and figure out how to repair:
1. The long up to the door frame
2. The suspension console and long inside engine bay
3. The hell hole itself
Based on what I saw this weekend, I think the “RD shopping list” Scotty helpfully put together for me in post #20 is looking pretty accurate about now.
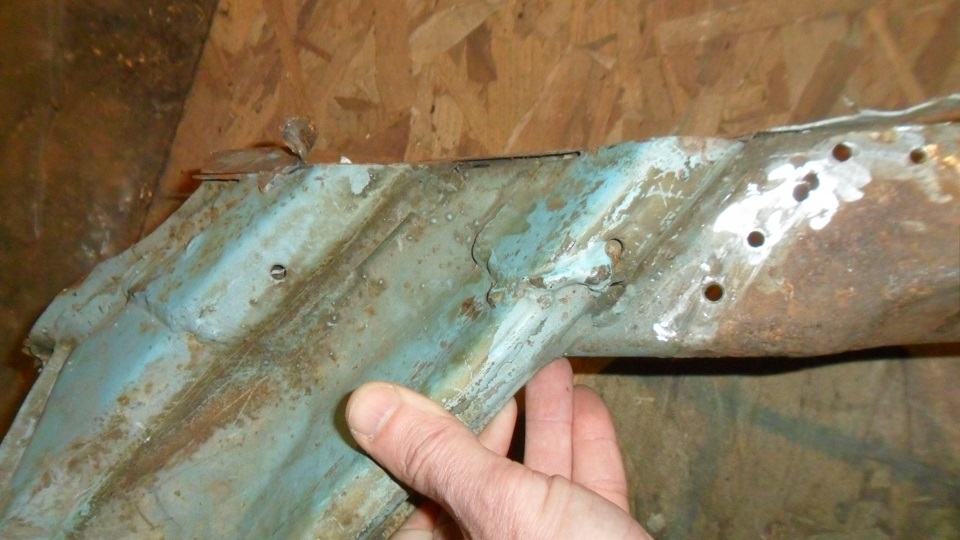
First the long under the door. Cut away some more steel and here’s what I have (apologies for picture quality and lighting):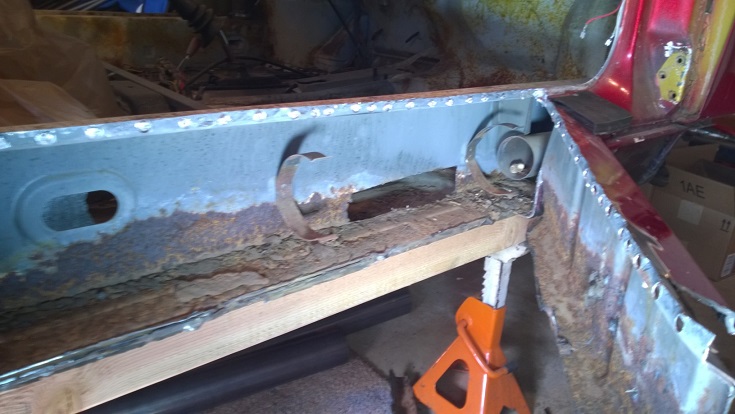
What??? Leftover mouse stuff in the heater channels??  My first reactions to this are a) where did God’s little rodents live prior to the first 914? and b) is my spot-weld removing technique actually worse than my welding? Anyway, there was a fair amount of loose rust and other gunk in the longs. The lower third of the inner shell is possibly salvageable, but it gets to the question I have on this. Here are a couple of other views first:
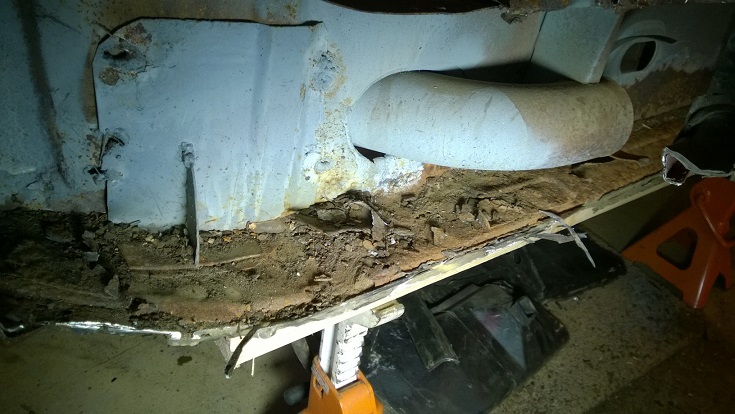
and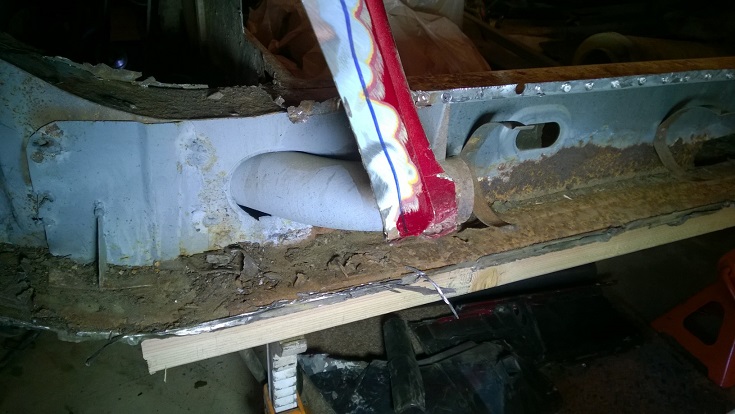
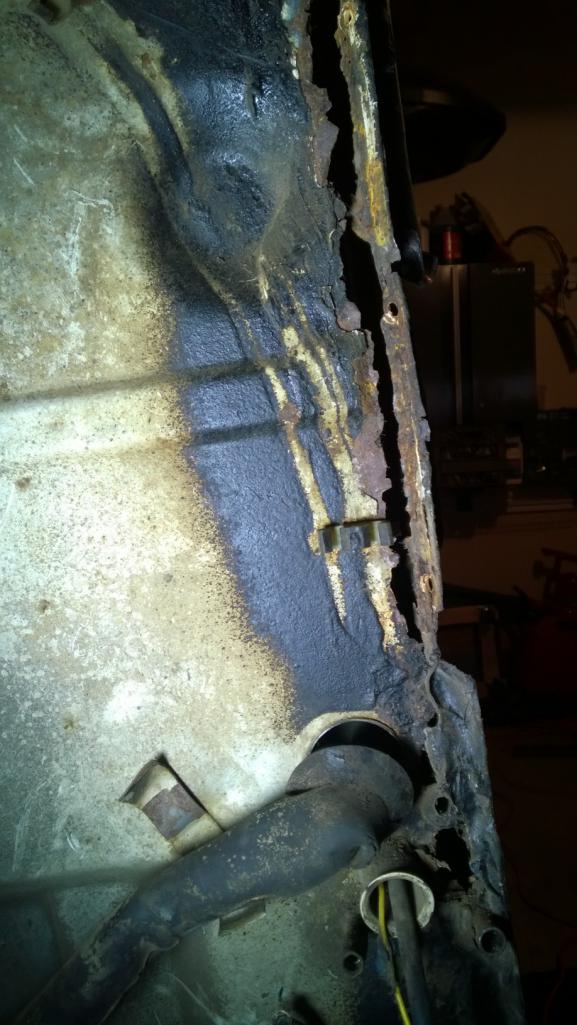
And, after some cleanup and chipping away the loose and rusted metal:
and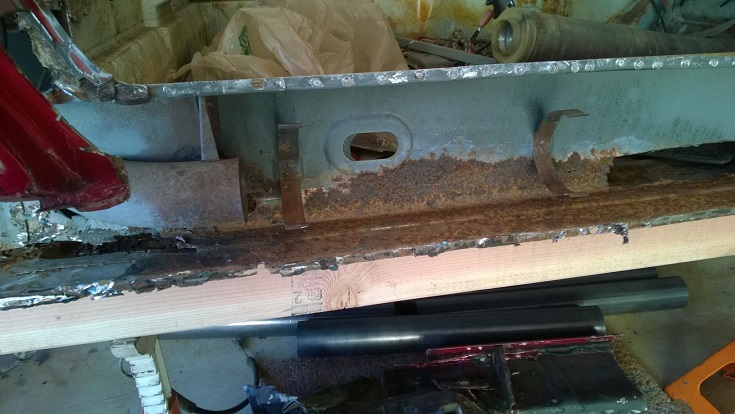
So here is first stupid question, or set of stupid questions, for today (#4 overall): What I didn’t realize is that there are two layers of steel on the horizontal section of the long. Is that correct? I’m trying to decide if that’s the way it’s built or not. But I also see what might be a seam right underneath the first bracket for the heater hose. It’s rusted so much it’s hard to tell, but maybe that’s a layer of steel from a previous PO fix. In the picture above you can see the jagged edges where I’ve torn out one layer of rusty metal up to just under the heat pipe. The lower layer doesn’t look bad. The top layer has a lot of surface rust that could probably be treated and sealed.
Should I simply cut out that top layer to some point and fabricate a replacement to weld in attached to the inner shell and then marry up the outer long piece? I see how George cut the whole bottom section out and welded a horizontal section along a good portion of the long as shown here: http://www.914world.com/bbs2/index.php?s=&showtopic=161596&view=findpost&p=1597434
I guess the answer may sort of depend on whether there are really two layers of metal there and whether or not one or both should be replaced. If there aren’t two layers along that long, I think I can minimize the actual fabrication and replacement required on that inner long.
Oh, and the seat belt mount came out in the process. I’m not sure whether or not that can be cleaned up or not. I may have to fabricate a solution there. Right now that's not the biggest issue I have, as I'll post something on the suspension console soon...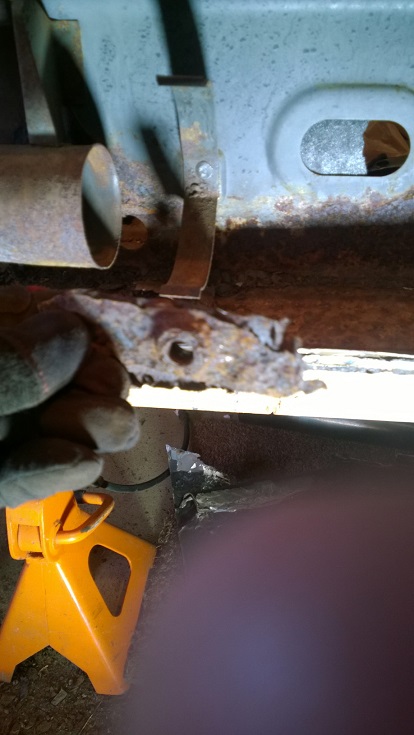
Posted by: boxsterfan Jan 11 2015, 01:33 PM
I really think you should change those jack stands out for ones that have pins in them. I don't think those "teeth" based ones are all that safe.
Posted by: BeatNavy Jan 11 2015, 01:46 PM
I really think you should change those jack stands out for ones that have pins in them. I don't think those "teeth" based ones are all that safe.
Thanks for the comment. The car is also partially supported by the rotisserie right now, so even if those gave way it shouldn't go "anywhere." Hopefully.
Posted by: Tilly74 Jan 11 2015, 02:08 PM
 Great work! You inspire the rest of us to get stuff done, and your "stupid questions" make me feel less stupid so keep on asking.
And definitely use extreme caution when under any vehicle, my father-in-law, a farmer his entire life and no stranger to working on heavy machinery, is dealing with two broken ribs after being run over by a semi over the weekend. Not a typo. He was using the appropriate jack stands, blocks, and wheel chocks. One of the wheel chocks started to slide and he couldn't get out in time. Almost cost his life. I only share this to serve as a reminder to all. 914's ROCK!
Posted by: SirAndy Jan 11 2015, 02:13 PM
Just get a new one ...

Posted by: BeatNavy Jan 11 2015, 02:14 PM
Yikes. That's scary, and yes, you are right. I hope he's feeling better soon. Never broken a rib (I don't think), but I'm sure it's no fun. Don't worry, I have plenty of stupid questions stored up...
Posted by: BeatNavy Jan 11 2015, 02:17 PM
Just get a new one ...
Haven't seen them listed before, but if they are available it's probably the cheapest fabricated part I'll end up buying. Cool, thanks Andy.
Posted by: SirAndy Jan 11 2015, 02:44 PM
Hmmm, i remember someone making those, but now i can't find them.

The bolt/thread is M11 X 1.25 just in case you end up making your own ...

Posted by: BeatNavy Jan 11 2015, 02:52 PM
As much money as I'm fixin' to spend at RD I probably ought to get that for free. But with that info you gave me I'm sure I could fab something.
Posted by: BeatNavy Jan 11 2015, 02:59 PM
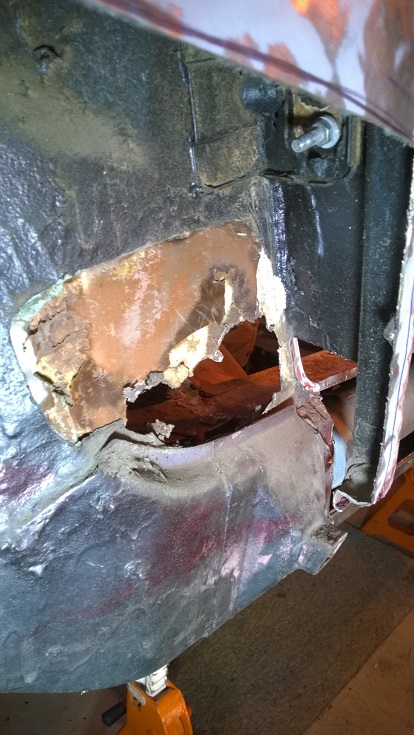
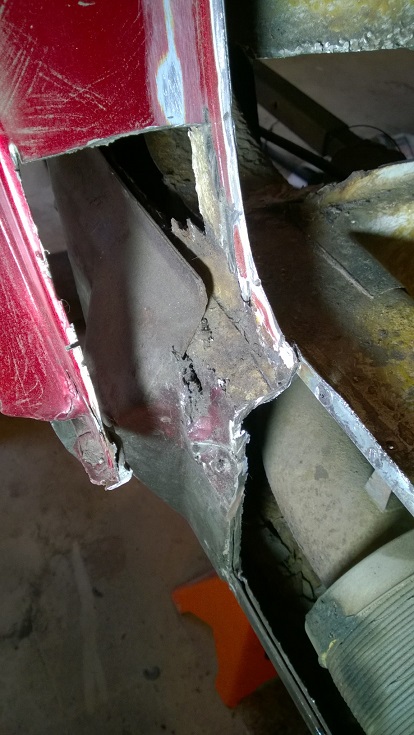
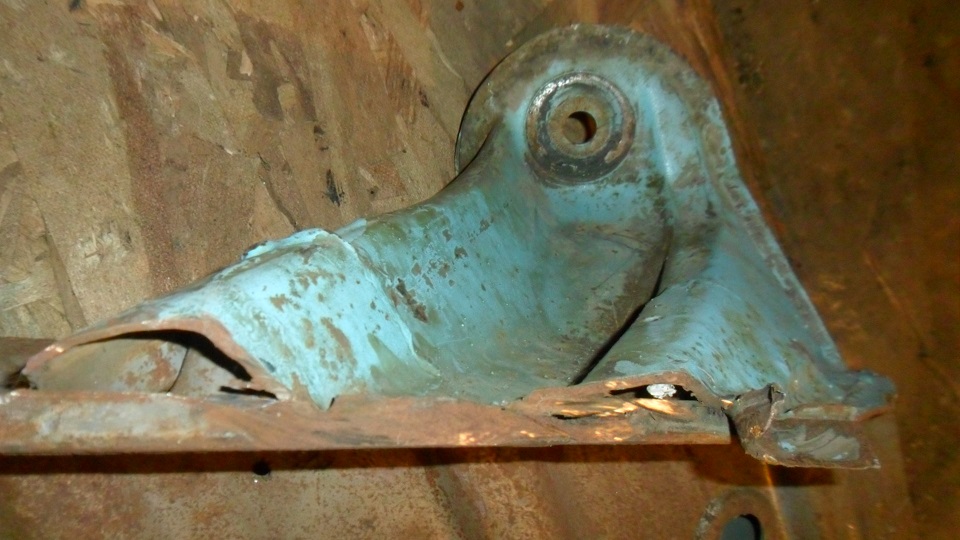
Ok, I’m also taking assessment of the suspension console and the long inside that runs up to it. Here’s what I see (that I don’t like):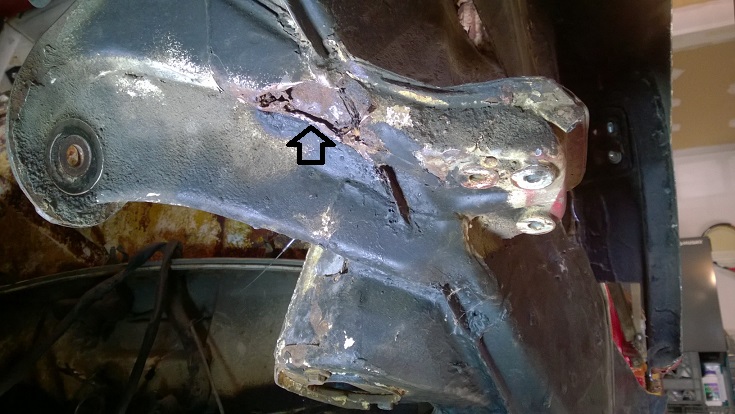
And, slightly closer view: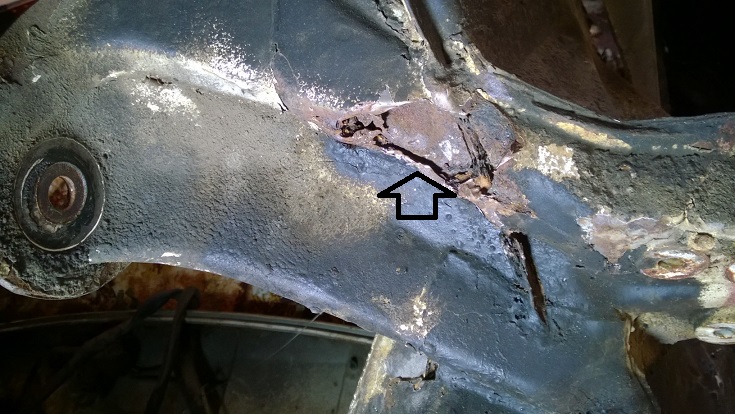
Between that, and this below, I think there’s little doubt that I’m going to need to remove the suspension console and the rest of that outer section (and don't worry, that orange milk crate is not actually supporting the car):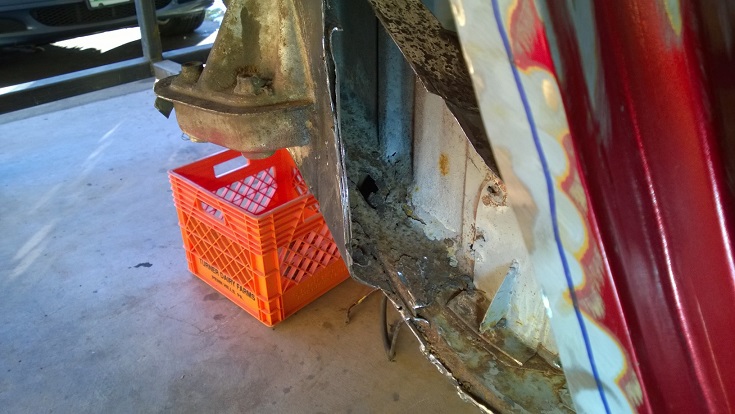
Second stupid question(s) for today (#5 overall): what’s the best way to remove that suspension console? From other people’s example I see the spot welds can be removed, but what other recommendations can you provide (e.g. measuring location, easiest way to separate, etc.)? Also, can/should this one be repaired? I saw someone had one FS the other day…
TIA
Posted by: SirAndy Jan 11 2015, 03:16 PM
I would build a jig that covers both consoles and the motor mounts.
That way, you can position your replacements exactly where they need to be.

Posted by: scotty b Jan 11 2015, 04:51 PM
I would build a jig that covers both consoles and the motor mounts.
That way, you can position your replacements exactly where they need to be.
 100% Also This " patch and brace " behind the heater tube is NOT factory. Someone has already been in there with a feeble attempt to keep the car in one piece.
Yes there are several areas in there that are 2 and 3 layers of metal overlapping. A VERY poor design IMHO. I posted a picture here several years ago of the area just behind the jack post that was 3 layers of metal and had rusted in between each layer to the point the " metal " had stretched out to where it was close to 3/8" thick
Attached image(s)
Posted by: BeatNavy Jan 11 2015, 05:26 PM
Thank you, fellas. A jig, eh? With the help of the search function I think I've found what you're referring to: http://www.914world.com/bbs2/index.php?s=&showtopic=227430&view=findpost&p=1974952.
Cool! Something else to build...
Posted by: Grump Jan 11 2015, 05:53 PM
Roy,
Too bad you are not closer than 2 hours. I could pack my sawsall and have that 75 in pieces in short order. Welding, well that's something else. You are on your own there.
Honestly, if you need assistance I don't mind the drive. Sometimes you just need 4 hands. I'm retired so available most of the time. I do need copious amounts of coffee though.
As I see it you have 2 projects: keeping the DD on the road and the 75 rustoration. Both are likely to keep your mind working and awake at night.
I'm slowing down on my to do list. Not many items left and when they are all done, then what? I know, there will always be projects that surface.
Good luck/
Bill
Posted by: Grump Jan 11 2015, 05:54 PM
oops, Roy... where did Rob come from?
Posted by: mepstein Jan 11 2015, 06:23 PM
Thank you, fellas. A jig, eh? With the help of the search function I think I've found what you're referring to: http://www.914world.com/bbs2/index.php?s=&showtopic=227430&view=findpost&p=1974952.
Cool! Something else to build...
One solution
Attached image(s)
Posted by: scotty b Jan 11 2015, 06:34 PM
With all the metal you'll be replacing you really need to do a lot more bracing than the simple console jig. Something like what I made for Marks car would be a good start. I was looking at his just yesterday in preparation for making the cuts ( for reals  ) and think I'm also going to tack a couple braces to the rotted inner long/wheelhouse while I am repairing the outside, just as added insurance since the inside of his is so bad. You can NEVER have too much bracing, but you can definitely have to little
Posted by: BeatNavy Jan 11 2015, 06:42 PM
Roy,
Too bad you are not closer than 2 hours. I could pack my sawsall and have that 75 in pieces in short order. Welding, well that's something else. You are on your own there.
Honestly, if you need assistance I don't mind the drive. Sometimes you just need 4 hands. I'm retired so available most of the time. I do need copious amounts of coffee though.
As I see it you have 2 projects: keeping the DD on the road and the 75 rustoration. Both are likely to keep your mind working and awake at night.
I'm slowing down on my to do list. Not many items left and when they are all done, then what? I know, there will always be projects that surface.
Good luck/
Bill
Hey Bill! May have to take you up on that if you're up for a drive to NoVa. I have plenty of coffee. Yeah, I have my hands full here but I would love an extra set of more mechanically-inclined eyes and hands. Thanks for all the help you've given me already.
With all the metal you'll be replacing you really need to do a lot more bracing than the simple console jig. Something like what I made for Marks car would be a good start. I was looking at his just yesterday in preparation for making the cuts ( for reals
) and think I'm also going to tack a couple braces to the rotted inner long/wheelhouse while I am repairing the outside, just as added insurance since the inside of his is so bad. You can NEVER have too much bracing, but you can definitely have to littleHmmm...ok. This is going to require some more thought then. I'm may have some follow up questions, but the first thing is: I assume I need to both brace the frame AND locate the suspension consoles later, correct? Does this setup do this? I see where it appears to connected to the ear, but not the outer console.
Thanks, Mark and Scotty.
Posted by: scotty b Jan 11 2015, 06:45 PM
Roy,
Too bad you are not closer than 2 hours. I could pack my sawsall and have that 75 in pieces in short order. Welding, well that's something else. You are on your own there.
Honestly, if you need assistance I don't mind the drive. Sometimes you just need 4 hands. I'm retired so available most of the time. I do need copious amounts of coffee though.
As I see it you have 2 projects: keeping the DD on the road and the 75 rustoration. Both are likely to keep your mind working and awake at night.
I'm slowing down on my to do list. Not many items left and when they are all done, then what? I know, there will always be projects that surface.
Good luck/
Bill
Hey Bill! May have to take you up on that if you're up for a drive to NoVa. I have plenty of coffee. Yeah, I have my hands full here but I would love an extra set of more mechanically-inclined eyes and hands. Thanks for all the help you've given me already.
With all the metal you'll be replacing you really need to do a lot more bracing than the simple console jig. Something like what I made for Marks car would be a good start. I was looking at his just yesterday in preparation for making the cuts ( for reals
) and think I'm also going to tack a couple braces to the rotted inner long/wheelhouse while I am repairing the outside, just as added insurance since the inside of his is so bad. You can NEVER have too much bracing, but you can definitely have to littleHmmm...ok. This is going to require some more thought then. I'm may have some follow up questions, but the first thing is: I assume I need to both brace the frame AND locate the suspension consoles later, correct? Does this setup do this? I see where it appears to connected to the ear, but not the outer console.
Thanks, Mark and Scotty.
I made that jig to connect to the trans mounts, both suspension ears, and then a couple tack welds on the floor pan. That way the locations for the suspension mount are repeatable. The plates rest firmly on the inside of the consoles, and there is a nut welded to the back side of the plate. Bolt goes through the console bolt holes and tightens down
Posted by: BeatNavy Jan 11 2015, 06:51 PM
Roger that. It makes sense. I guess I'm breaking out the welder earlier than I had planned.
Posted by: BeatNavy Jan 24 2015, 07:23 PM
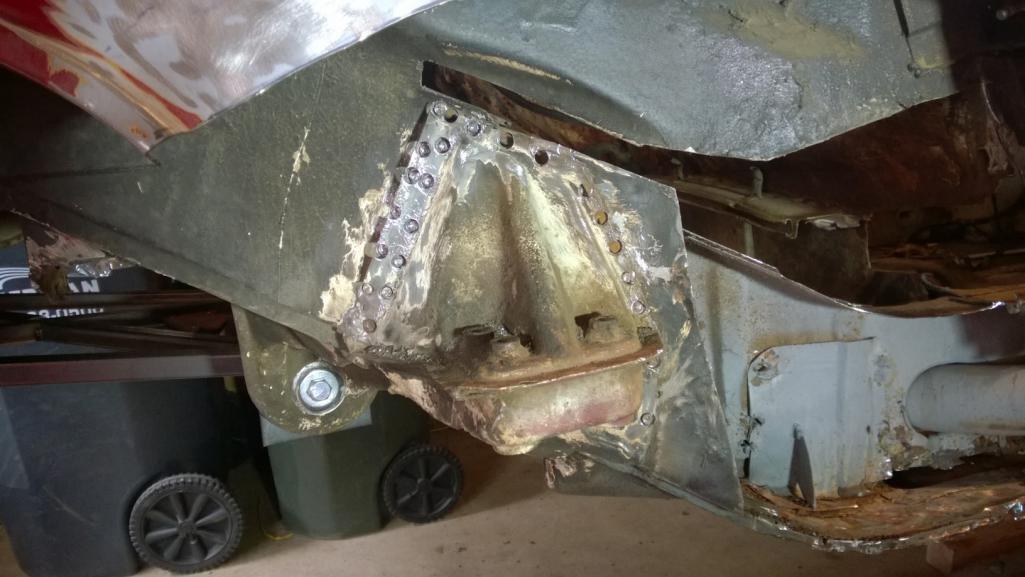
Small update. My homework assignment was to build a brace and jig for the suspension console. I'm turning this in for at least partial credit (still have one diagonal to do):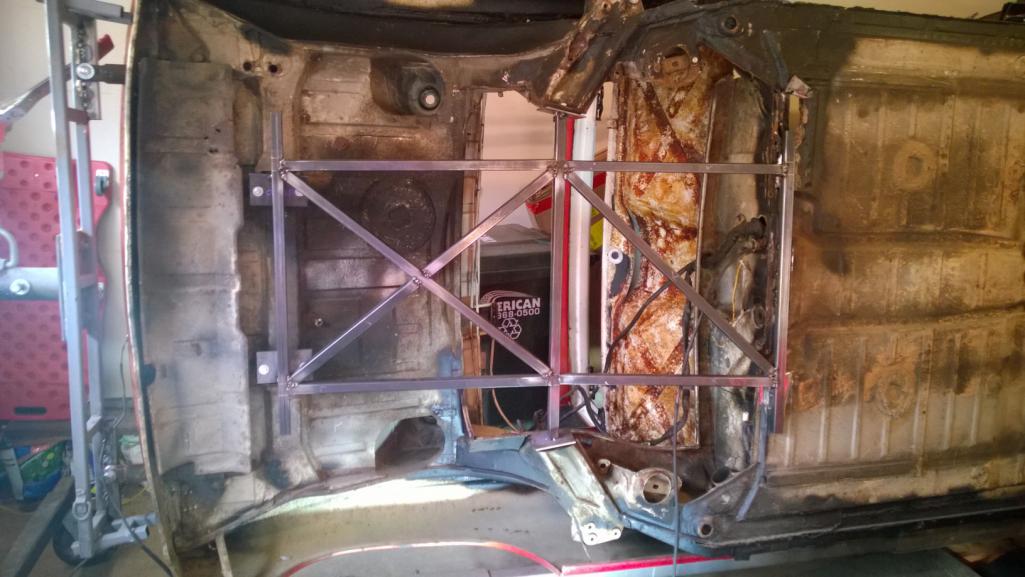
I also got my first shipment from RD. I wanted to get a good look at the new suspension console to help me remove the old one. I've a lot more to order from RD, so if they were publicly-traded, I'd say "buy RD stock now."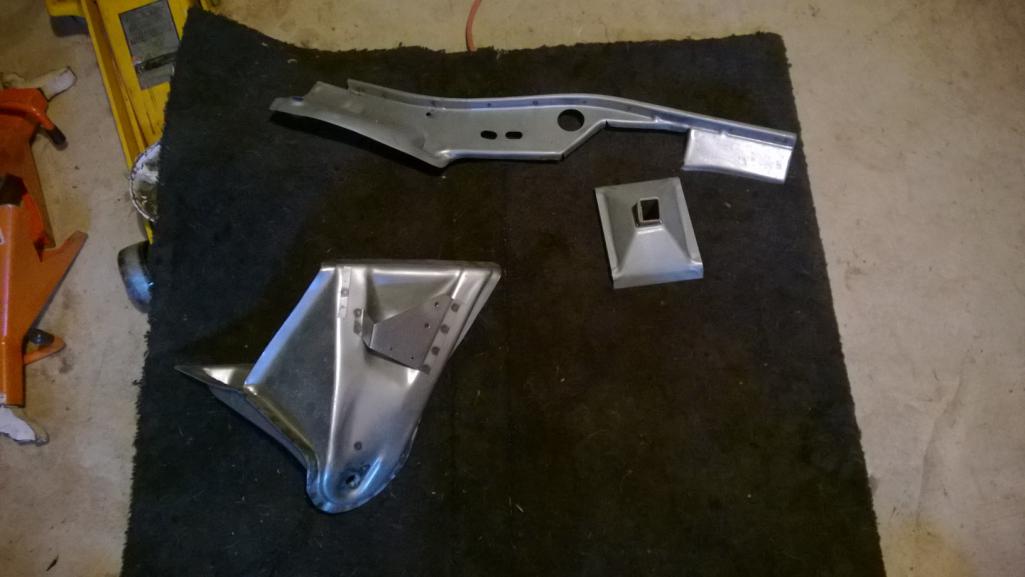
And, I found more rust. The floor pan and base of firewall is pretty well trashed. This is going to be a challenge as whatever fix I do is going to have to accommodate the cable outlets.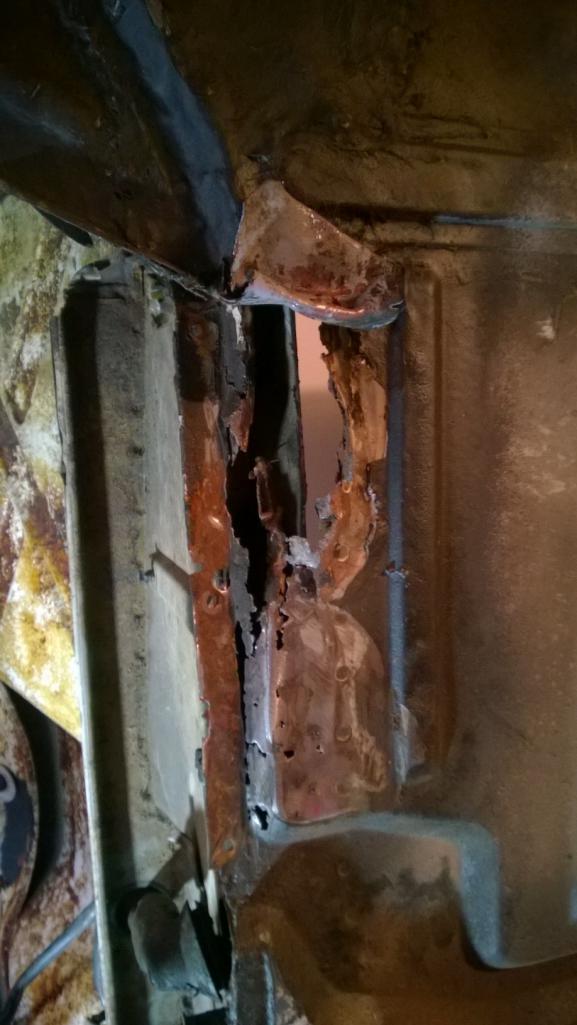
So now I'm removing the suspension console ear. I'm trying to drill out the spot welds, but it's slow going. Maybe I'll start grinding the welds off. Any suggestions to make this task any more pleasant? My intention is then to remove the outer suspension console piece and repair and clean that up. Hopefully make more progress tomorrow.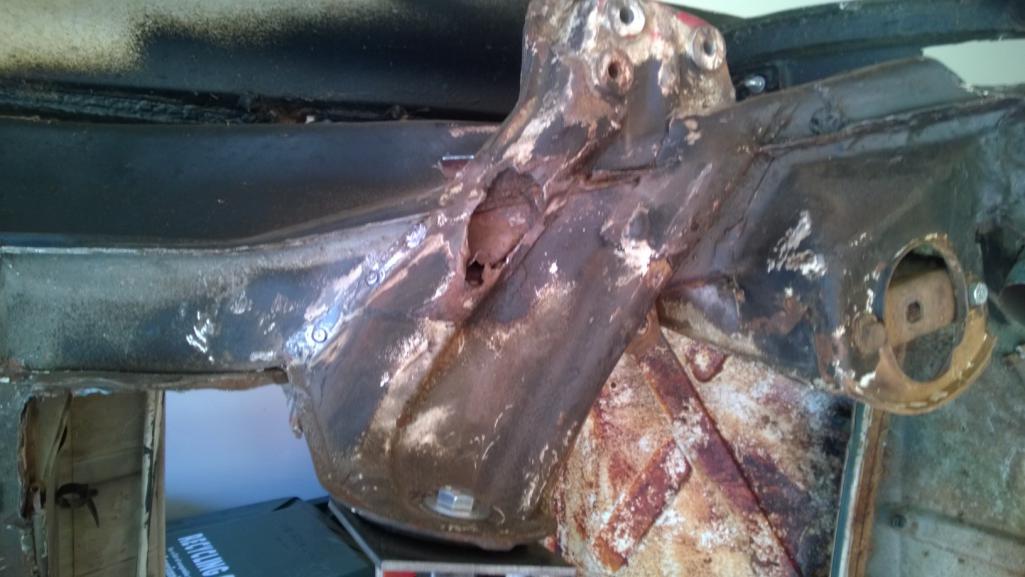
Posted by: scotty b Jan 24 2015, 07:43 PM
There's no easy, pleasant, fast, or fun way to do it. I go around the edges with the plasma cutter and grind the flanges down. It's about the fastest way to go, but it does require the plasma cutter. Sometime next week I will be getting back to Marks car, and the suspension console on his will be getting replaced. I'll show some pics in his thread
Posted by: BeatNavy Jan 24 2015, 07:52 PM
Thanks Scotty. My buddy has a plasma cutter - up in New Hampshire! I guess it's just going to be slog getting that thing out (my next homework assignment). I look forward to seeing any pictures you can provide for reference!
Posted by: cary Jan 24 2015, 11:41 PM
Rob here's a pattern I found for the console tie.
http://www.performanceforum.com/wesvann/914a/rust-diary/rd-9-1-08.html
Posted by: BeatNavy Jan 25 2015, 07:35 AM
Rob here's a pattern I found for the console tie.
http://www.performanceforum.com/wesvann/914a/rust-diary/rd-9-1-08.html
Awesome Cary, thanks. That helps me understand how that's held on to the frame. With all the crappy undercoating, dirt, rust, etc. it' hard to see how things tie together. I didn't even know those ties were there.
Posted by: saigon71 Jan 25 2015, 07:51 AM
You are tackling some serious rust!
The suspension console is just a PITA to remove. For non-spot welds I ground down the welds a little at a time until I could get a big screwdriver in between to pry the metal apart.
Spot weld cutting bits work great for the spot welds, but I never invested in a set that would hold up for a long time without getting dull. I used a set of Dewalt Cobalt bits for most of them.
Keep up the good work!
Posted by: FourBlades Jan 25 2015, 08:36 AM
Its clear you have the skills to do this right!
I have found the blair rotobroach to be the best spot weld bit.
You can find them on Amazon along with a lot of other good, hard to find tools and parts.
Use some cutting oil with each new spot weld and drill slow with firm pressure.
Keep it going!
John
Posted by: BeatNavy Jan 25 2015, 04:36 PM
You are tackling some serious rust!
The suspension console is just a PITA to remove. For non-spot welds I ground down the welds a little at a time until I could get a big screwdriver in between to pry the metal apart.
Spot weld cutting bits work great for the spot welds, but I never invested in a set that would hold up for a long time without getting dull. I used a set of Dewalt Cobalt bits for most of them.
Keep up the good work!
Thanks, Bob! I'll try your technique. Didn't have too much time in the garage today, but I made some progress on the outer welds that are easily accessible:
This thing IS going to be a PITA. Getting at those seams and the underside of the console will be a LOT of fun, especially with all that paint or undercoating. And those "brackets" (or whatever you call them) that hold the inner ear and outer console together -- not sure how exactly to remove them yet. Ground them down? Just cut them off?
I also made a little "gauge" for helping me locate the outer console when I put it back on. I was just a little worried that the brace won't help me exactly locate the outer piece:
Posted by: BeatNavy Jan 25 2015, 04:38 PM
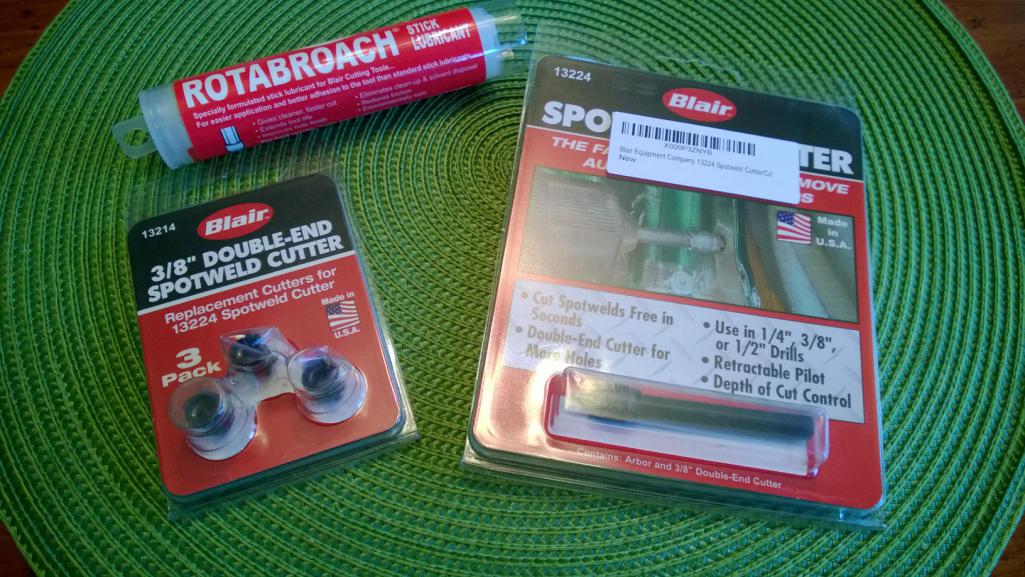
Its clear you have the skills to do this right!
I have found the blair rotobroach to be the best spot weld bit.
You can find them on Amazon along with a lot of other good, hard to find tools and parts.
Use some cutting oil with each new spot weld and drill slow with firm pressure.
Keep it going!
John
Hey John, thanks for the vote of confidence. I have blair spot weld cutter and cutting oil on order from Amazon. Thanks for the tip!
Posted by: mepstein Jan 25 2015, 04:55 PM
here's a thread of scotty doing a suspension console repair back when he worked on 914's
http://www.914world.com/bbs2/index.php?showtopic=52994&hl=suspension+console
Posted by: BeatNavy Jan 25 2015, 05:10 PM
here's a thread of scotty doing a suspension console repair back when he worked on 914's
http://www.914world.com/bbs2/index.php?showtopic=52994&hl=suspension+console
Thanks Mark. Holy crap that's ugly. I hope I don't have to deal with what he did in that thread. But I guess I won't know until I get that thing off of the frame.
Posted by: scotty b Jan 25 2015, 06:36 PM
here's a thread of scotty doing a suspension console repair back when he worked on 914's
http://www.914world.com/bbs2/index.php?showtopic=52994&hl=suspension+console

 daffuq was wrong with me ?
Posted by: saigon71 Jan 26 2015, 06:59 PM
Rob:
Here are some cross section pictures of a cut up long. I cut this one right down the seam of the long, which left both the inner & outer suspension consoles intact. Hopefully it will shed some light on how to proceed:
It's a PITA getting these things off. 
Posted by: BeatNavy Jan 26 2015, 07:17 PM
Awesome, thanks Bob! I've been wrestling with this console for a couple of days now. I've been hesitant to cut it, but it looks like from your photos that's probably the way to go. I also have a better spot weld cutter on order that should help as well.
I'm looking forward to the point where I can stop tearing down and I can start building back up....
Posted by: BeatNavy Feb 9 2015, 07:58 AM
Small update. I didn't work last weekend (was sick and felt like crap -- my wife knew I legitimately was sick when I didn't venture into the garage at all  )
)
I did manage to get a few things done this weekend. After doing some housekeeping on my daily driver teener (oil change, added third brake light) I went to tackle that outer suspension console again. Getting that thing off of there was a royal PITA just as advertised. Thanks Scotty/Bob for the reference points. 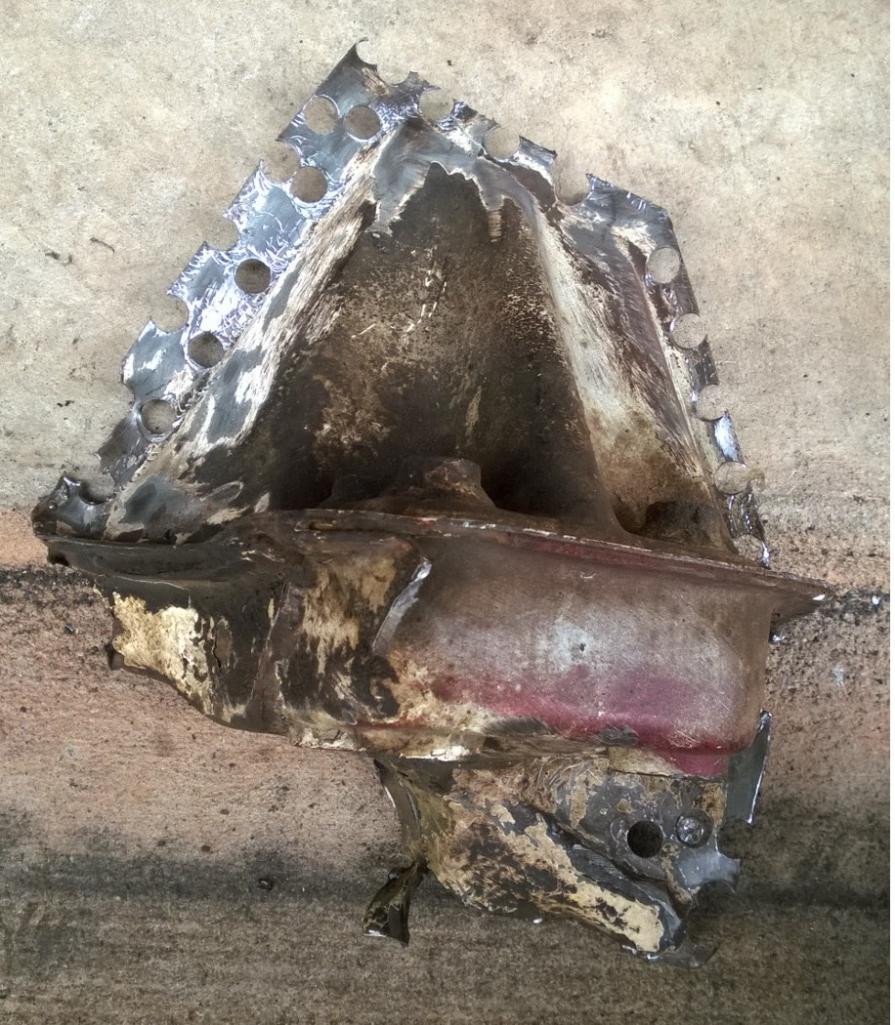
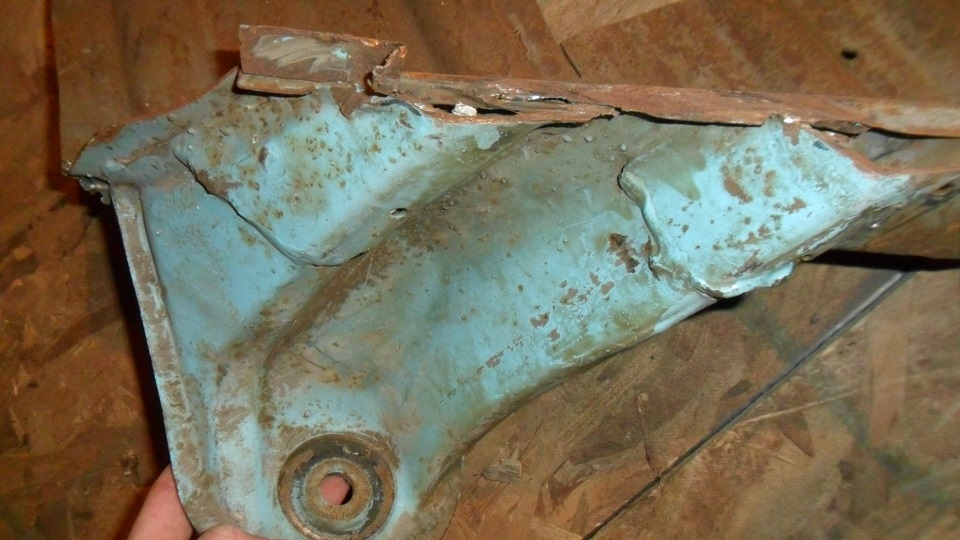
And here's what I was waiting to see. How badly rusted is the inside? It looks fairly bad to me, although not as bad as the at example Scotty B repaired several years ago. What do you think? Salvageable? I'm taking it to be sand-blasted sometime this week.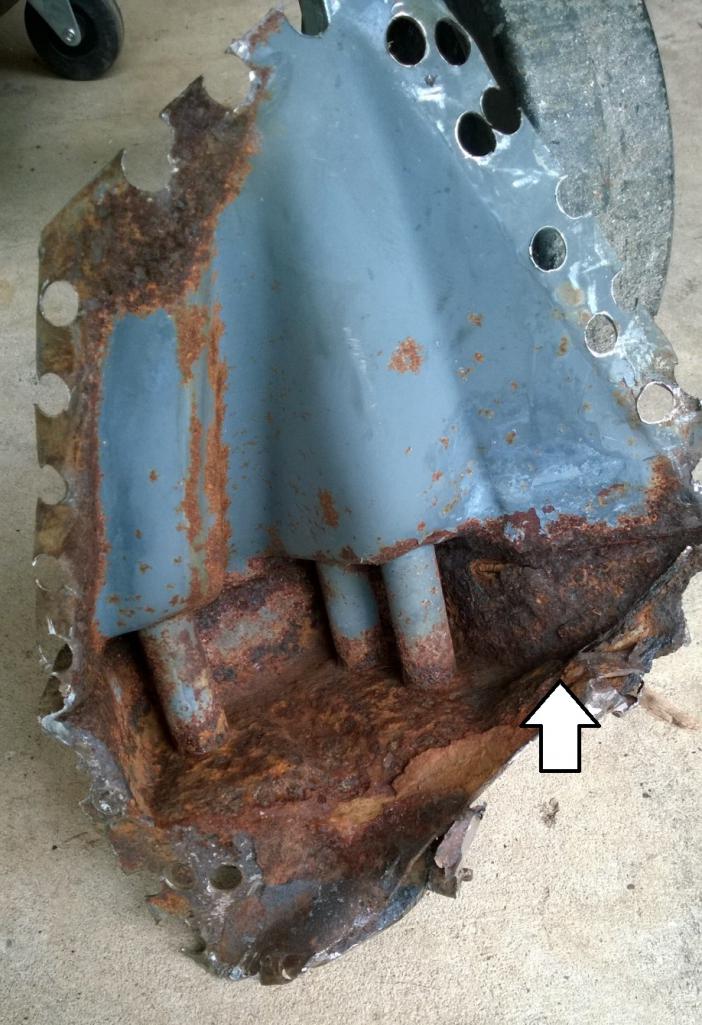
Here's a shot of the upper long. I've got the two replacement parts on order from RD. I'm struggling to figure out my next sequence of actions in terms of replacing this section. I'm hoping it will come to me once I have the replacement parts in my hand and can visualize it a bit better. I'm also doing my part to keep the Canadian economy humming along. This won't be my last RD purchase....
I guess I also need to remove the engine mount as well. Any advice there? Is there zero room for error when reinstalling that (meaning I need precise measurements)?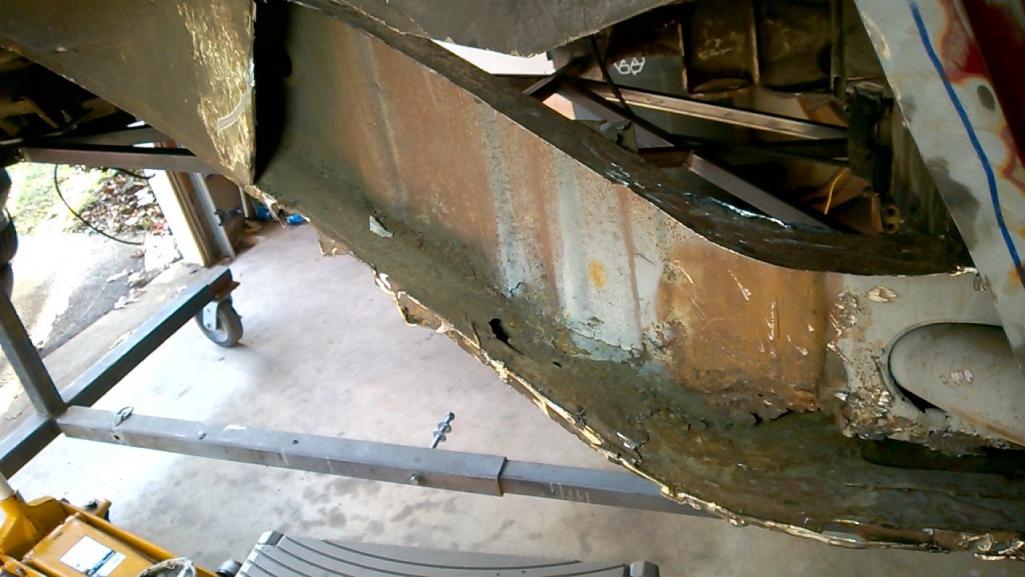
From a distance, the damage doesn't look too bad! I'm hoping there's some light at the end of the tunnel in terms of rust removal. I'm anxious for the "moral victory" of starting to build up rather than just tear down.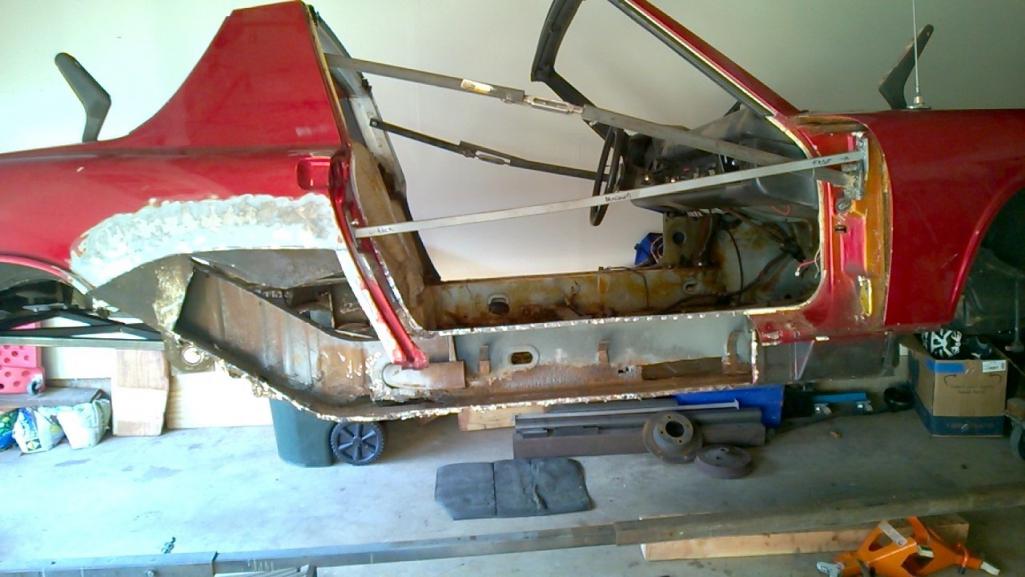
Posted by: altitude411 Feb 9 2015, 08:18 AM
Nice work. What are your thoughts on the (blair) spot weld cutter?
Posted by: cary Feb 9 2015, 08:19 AM
Does the bottom of the upper already have a patch welded on top of the original metal?
Posted by: BeatNavy Feb 9 2015, 08:25 AM
Nice work. What are your thoughts on the (blair) spot weld cutter?
My thoughts are that it's probably more effective than the HF cheapo but that I'm still probably not using it right. I think I went through four bits just to get this console out. The teeth kept breaking on it, probably when I would go in at a different angle than the cut I started with. I did realize you need to use it at very low speed. I also used that stick lubricant, and it catches all the metal shavings which need to be wiped away frequently. I'm not sure any cutter would work magic on this console piece, due to the metal thickness and the weird angles. Hopefully it'll work better for me on the floor plan welds...
EDIT: picture added:
Posted by: BeatNavy Feb 9 2015, 08:27 AM
Does the bottom of the upper already have a patch welded on top of the original metal?
Hey Cary - not sure. Someone definitely did some work in there at some point - like trying to spray a rust encapsulator up in there. I don't think they put a real steel layer down, though.
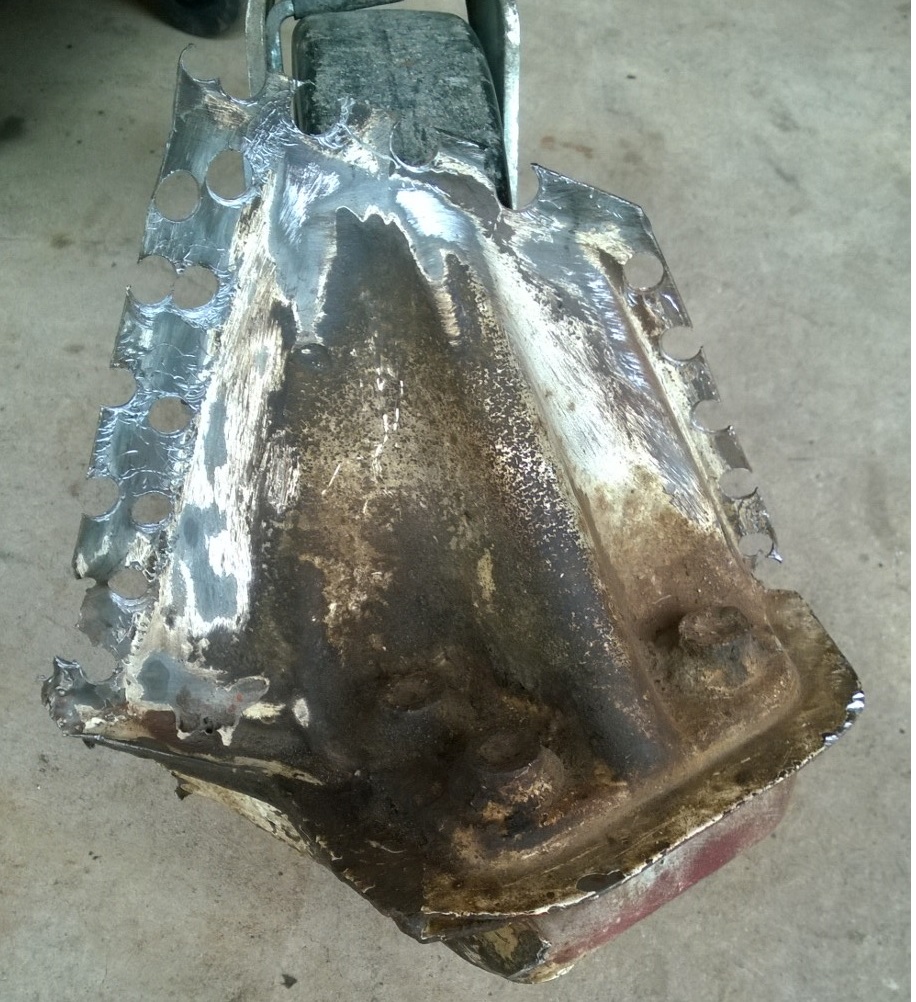
Posted by: BeatNavy Feb 13 2015, 06:55 PM
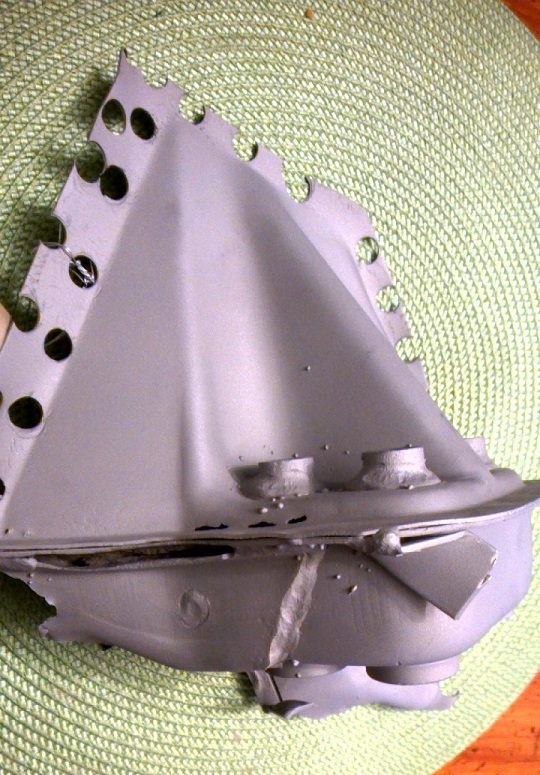
Ok, I got the suspension console back from the stripping provider today (along with the engine tin, valve covers, and intake runners I had powdercoated -- look SWEET, but that's for another time). Here's how the console looks after blasting. Looks salvageable, IMHO. It's not nearly as bad as that one Scotty resurrected. Which is good because I'm not nearly that talented or experienced. 
I guess I can weld some reinforcement steel in those sections that are gone. Am I wrong here?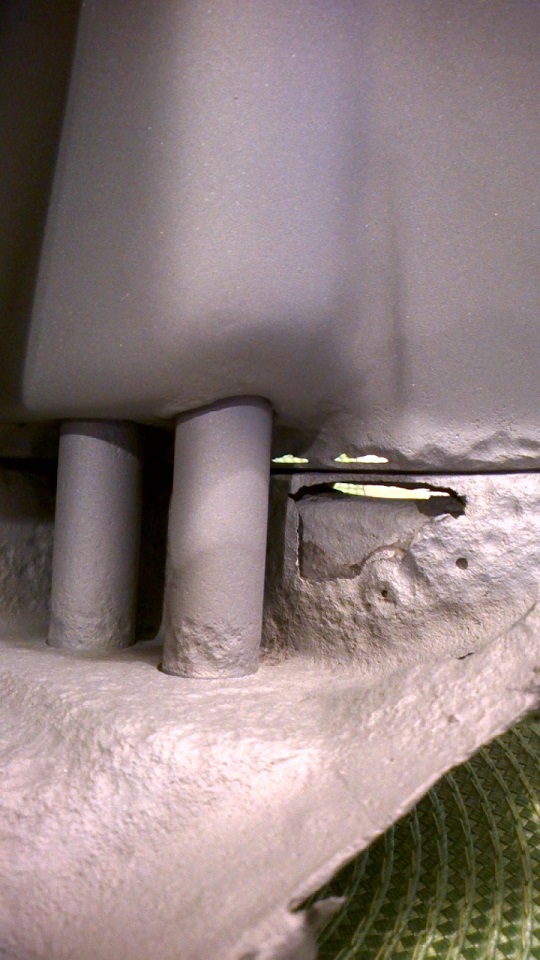
Posted by: BeatNavy Feb 13 2015, 06:56 PM
I also got the wheelhouse and inner long pieces from RD. Looks like the wheelhouse comes with the inner piece already in. Following Bob's thread it looks like he had to weld that piece in separately: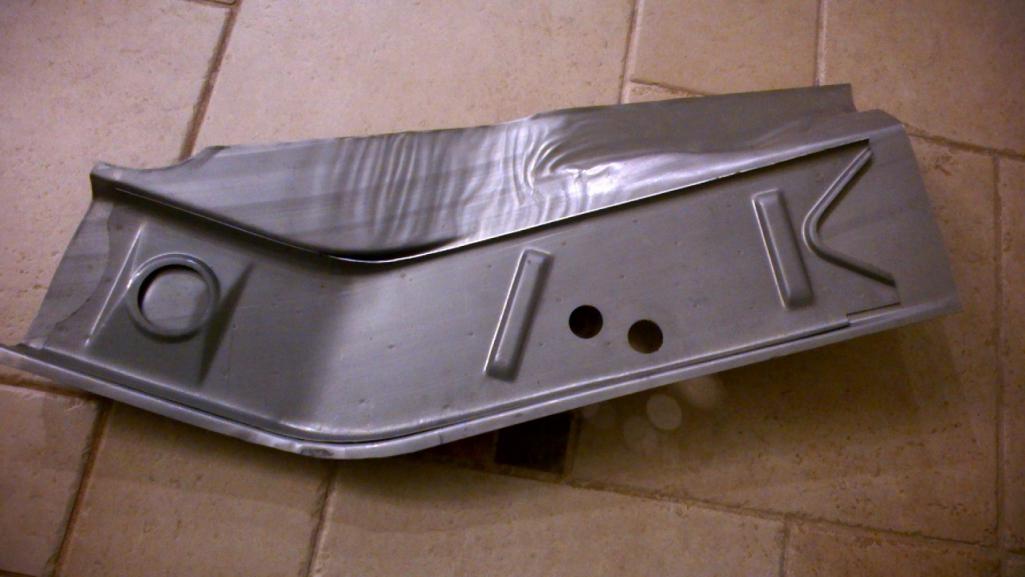
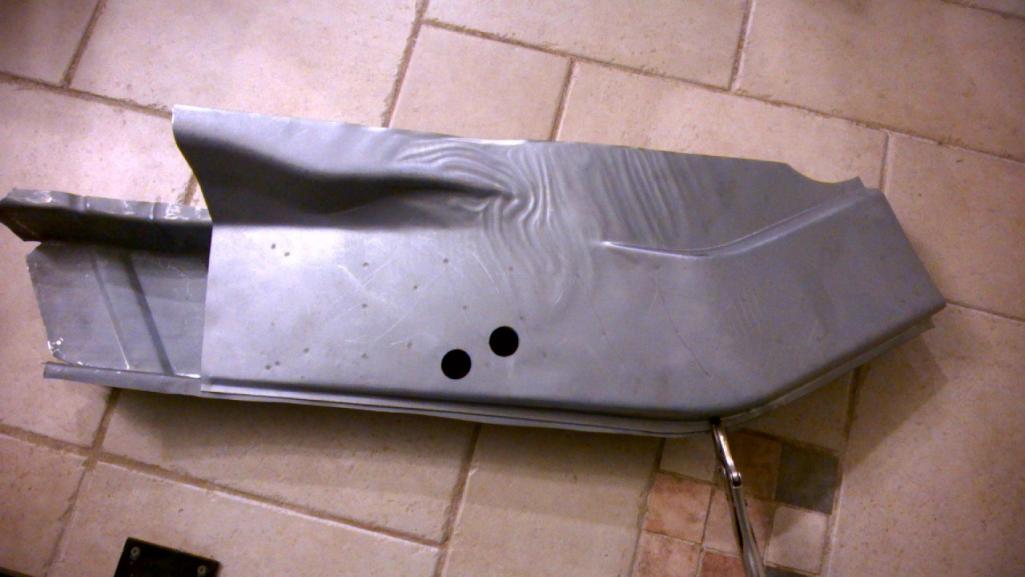
I need to figure out the plan of attack for replacing these pieces. Any advice for fitting these in/cutting out the old? Do I start with the inner and do I need to make exact measurements on engine mount for replacement? Any advice, input, or help appreciated. (I can make up some story about how I'm building this car for orphaned kids with horrible diseases or their widowed mother if that will help. But I think we've all had enough of that today, and anyway it's never been necessary here on the World).
Thanks for the help. I'm excited to start welding stuff back in.
Posted by: scotty b Feb 13 2015, 07:49 PM
IMO you really should cut out that rotted area. You still have rust in there the blaster couldn't get to. I know it's a PITA ( welcome to my world  ) but do it once and do it right. I would also make new pieces for there rather then trying to patch those holes. It's just a couple of bends, nothing major. That metal is pretty damned thin from the rusting
Posted by: Cairo94507 Feb 13 2015, 09:49 PM
Please take the advise of the man who knows of what he speaks.
Posted by: BeatNavy Feb 14 2015, 08:05 AM
Please take the advise of the man who knows of what he speaks.
Oh absolutely. If Scotty says it needs surgery, it's going in to surgery. The doctor (me) may not be that competent, but it's still going under the knife.IMO you really should cut out that rotted area. You still have rust in there the blaster couldn't get to. I know it's a PITA ( welcome to my world
) but do it once and do it right. I would also make new pieces for there rather then trying to patch those holes. It's just a couple of bends, nothing major. That metal is pretty damned thin from the rustingI need to figure out the best way to cut out that section with the tools I have and how extensive the repair needs to be. I'm taking a welding class at the county adult ed facilities now. The first three weeks have been all gas welding (got to use a cutting torch on thick steel the other night, which was cool). They do have some nice tools out there I may be able to take advantage of during one of the sessions for fabricating or shaping. So far I've found that gas welding easier than MIG for the simple reason that I can better see what I'm doing.
Posted by: Han Solo Feb 15 2015, 07:58 AM
Awesome. Go man, go!
Powered by Invision Power Board (http://www.invisionboard.com)
© Invision Power Services (http://www.invisionpower.com)