Printable Version of Topic
Click here to view this topic in its original format
914World.com _ 914World Garage _ My Frame Repair Project
Posted by: cdmcse Feb 13 2005, 12:15 AM
It seemed like it was going to take forever to make some progress on my rust repair. After spending the entire winter locating parts, grinding, cuting, painting, and learning to weld, I was finally ready to take the plunge....
Also thanks to everyone on the board, I would have never had enough confidence to tackle this without this site!!!
BTW: I must be getting addicted to the "914 lifestyle" as I had withdrawal when the site was down. 
Fist Pic : The Rust
Attached image(s)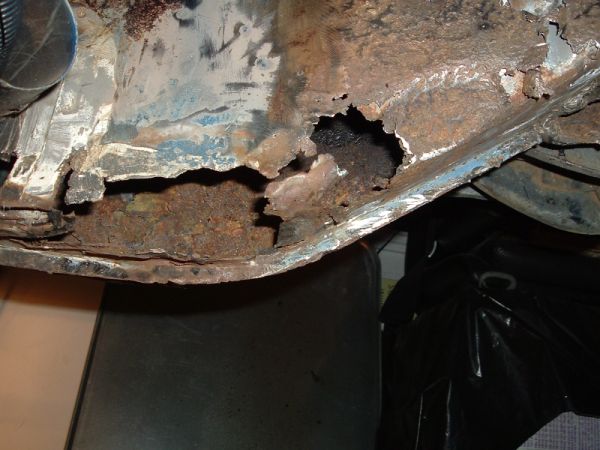
Posted by: cdmcse Feb 13 2005, 12:15 AM
Where the motor mount was.
Attached image(s)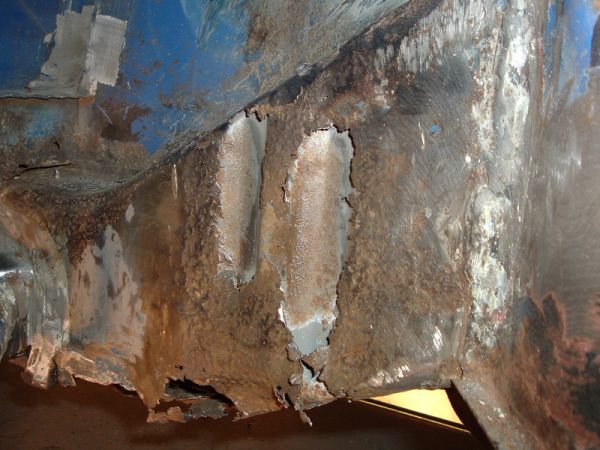
Posted by: cdmcse Feb 13 2005, 12:17 AM
Here we go.
Attached image(s)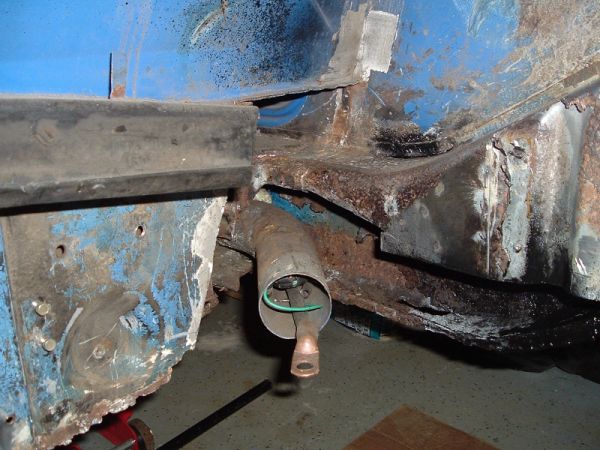
Posted by: cdmcse Feb 13 2005, 12:18 AM
The repair piece from a parts car.
Attached image(s)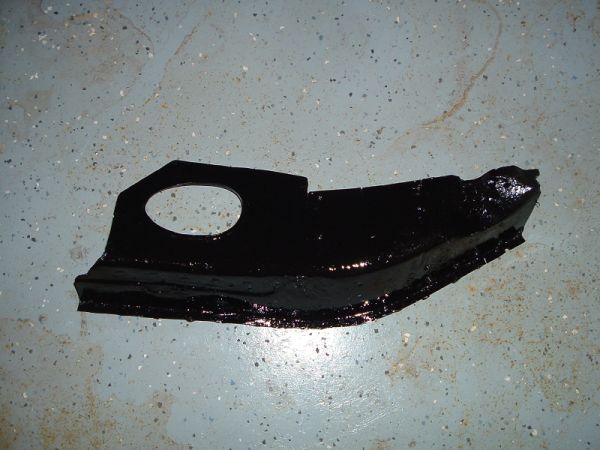
Posted by: cdmcse Feb 13 2005, 12:19 AM
Clamped.
Attached image(s)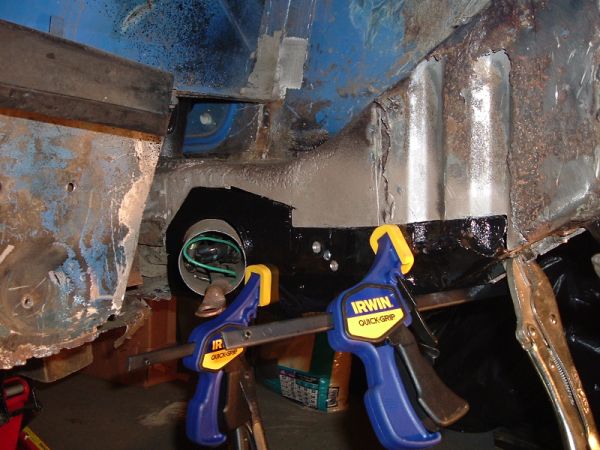
Posted by: cdmcse Feb 13 2005, 12:20 AM
Welded (no making fun) 
Attached image(s)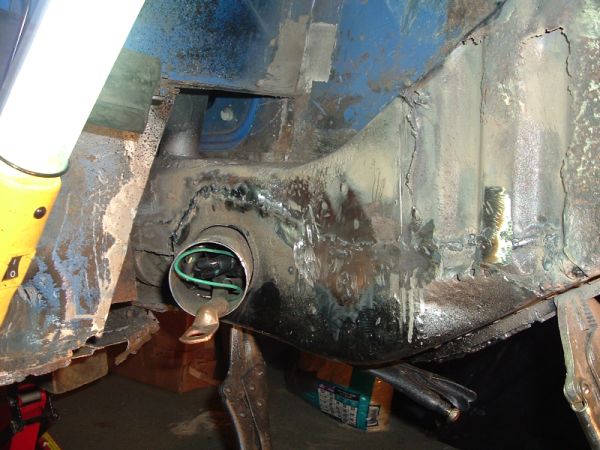
Posted by: cdmcse Feb 13 2005, 12:21 AM
The patch for the frame under the engine mount.
Attached image(s)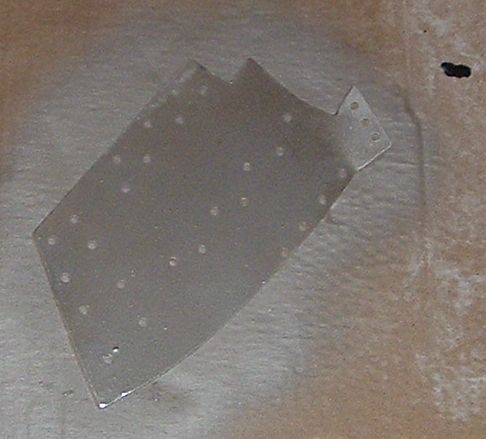
Posted by: cdmcse Feb 13 2005, 12:22 AM
Patch welded in.
Attached image(s)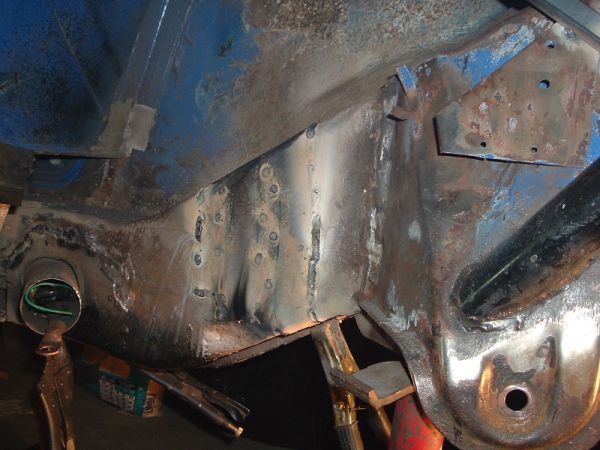
Posted by: cdmcse Feb 13 2005, 12:23 AM
This part is next, after a little clean up in the welds.
Attached image(s)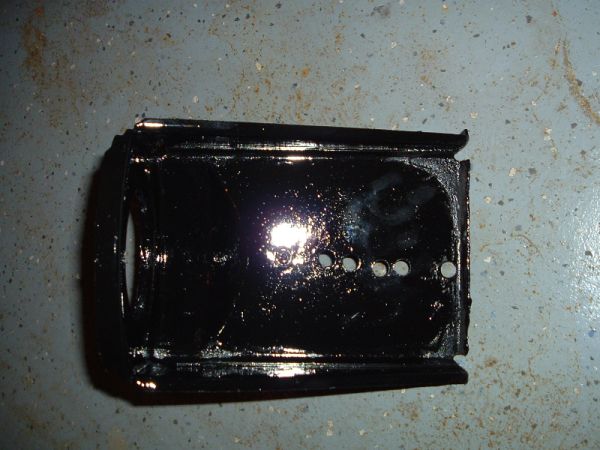
Posted by: Lou W Feb 13 2005, 01:30 AM
Looks great, keep the pictures coming. I'm getting ready to start cutting some rust out of mine and these pictures help me to see what I may be getting into. 
Posted by: Bleyseng Feb 13 2005, 09:41 AM
Whats with the electrical cable coming out of the heater tube??
Geoff
Posted by: jd74914 Feb 13 2005, 10:10 AM
looks good 
Posted by: cdmcse Feb 13 2005, 11:25 AM
These cables in the heater tubes are for a front trunk mounted battery and some aux gauges. I am moving them to the center tunnel when I replace the rear floorpan.
Posted by: cdmcse Feb 13 2005, 07:24 PM
Motor Mount is in, I can practially hear the engine running (as soon as I put in a new floor pan  )
)
Attached image(s)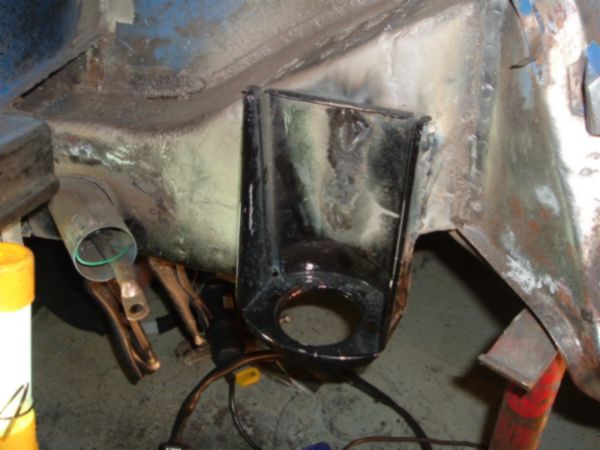
Posted by: mharrison Feb 13 2005, 08:13 PM
You don't need a floor pan to run the engine!!! 
Seriously, the work looks great. It's good to see another one NOT get crushed or shredded due to rust!
Posted by: MecGen Feb 13 2005, 09:08 PM
Thumbs up Dude 
You don't need to be an expert to see that you put some serious good work into you car. gotta love the before and after pics 
Gotta send us more pics dude
WBR
Joe
Posted by: cdmcse Feb 23 2005, 11:40 PM
Made some more progress
Before:
Attached image(s)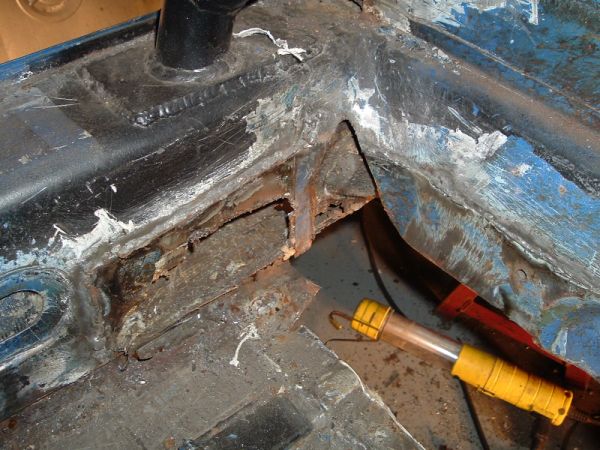
Posted by: cdmcse Feb 23 2005, 11:42 PM
After:
Attached image(s)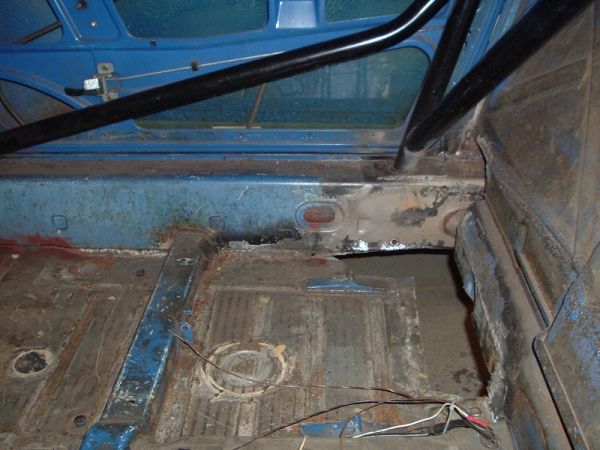
Posted by: cdmcse Feb 23 2005, 11:43 PM
Outer Firewall back in:
Attached image(s)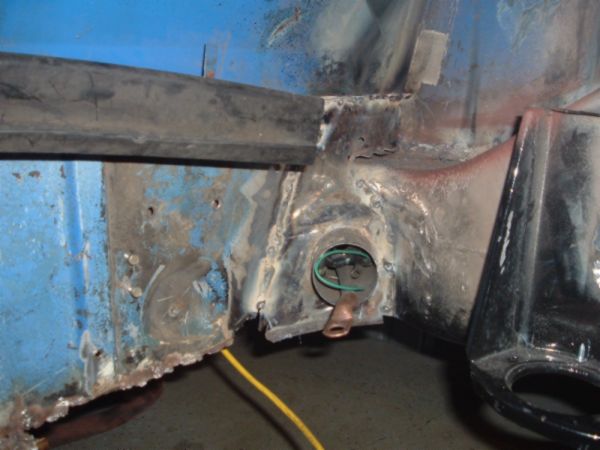
Posted by: SirAndy Feb 23 2005, 11:57 PM
did you spray plenty of "metal-ready" inside that long before you closed it up?
looked like there was quite some surface rust in there.
i'd hate to see it rust from the inside out again ...
nice work!
 Andy
Andy
Posted by: cdmcse Feb 24 2005, 12:09 AM
Yep, I metal readied the hell out of it it. Then I used a spray gun to "Blow" some industrial rusty metal paint (I got it at the local tractor / farm supply store and it is nasty stuff used to paint old rusty tractors with, and yes there are lots of those in KY) down the long till it came out the front.
I opted not to use POR-15 in this scenario because I had no way properly prepare the surface and with the experience I've had with POR-15 it really doesn't work great unless the surface gets the proper prep.
Posted by: Jamie Feb 25 2005, 08:58 PM
Looks like you're making great progress. We need to get together for some shop talk soon. BTW, I saw a silver teener at Stuttgart on Leestown Rd. last week- must be a new car in the area!
Posted by: MecGen Feb 26 2005, 07:31 AM
Hello
I just spoke with the dist of Por15, for almost 2 hours.
For once a distributor that doesn't live in CA
I toured his warehouse and blabbed.
What kind of issues did you have, my tub gets a coat tomorow. One thing he was really explaning to me was that the top coat needs to be applyed between 4-5 hours after shooting Por15, if not you need an etcher, for after 24 hours of drying.
I have the degreaser, prep, Por15, and an etcher.
Again nice job
Cheers Joe

Posted by: cdmcse Feb 26 2005, 10:42 AM
Well, with POR-15 I've noticed that the prep is everything. If you don't have the part really, really clean from grease or water, it won't stick and will kinda will scrape off pretty easily. Also it seems to stick better on a rough surface. The way I did it with the best results are...
1) Scrape / Sand/ Grind / Wire brush the part off till any loose material and ALL old paint is removed. (Leaving some surface rust is fine)
2) Clean the part with a degreaser ( I use simple green)
3) Rinse clean with water
4) Apply the POR-15 Metal Ready, let it stand on there about 30 minutes.
5) Rinse clean with water (It should leave a white zinc coating on the metal)
6) Allow to COMPLETELY dry (I mean NO water)
7) Paint on the POR-15
The finish on the parts I have done this way seem really durable. Any other way and the finish seems less than securely attached. 
I have not topcoated anything yet, but that is interesting about the etcher. I have noticed it leaves a pretty smooth glossy finish. I wonder if etching primer will work.
Posted by: red914 Feb 26 2005, 10:47 AM
WOW! you have done imipressive work. i see myself referring to this thread at some future date...
"him, my name is shane, and i have rust nightmares..."
Posted by: cdmcse Feb 26 2005, 11:25 AM
Jamie, Another teener, cool. Including yours and mine there are only 4 I know about in this area (One of them yellow I've only seen). I had not seen a silver one. My wife is getting ready to have baby #2 so I am little busy getting the house ready, otherwise I would have already hooked up with you.
red914, I know how you feel I was intimidated by the rust at first too. Now I think it is just annoying. You cant ignore it, but you can it.
Posted by: cdmcse Feb 27 2005, 11:36 PM
Ok I made some more progress this weekend. I got the old floorpan out, here are the removed bits...
Attached image(s)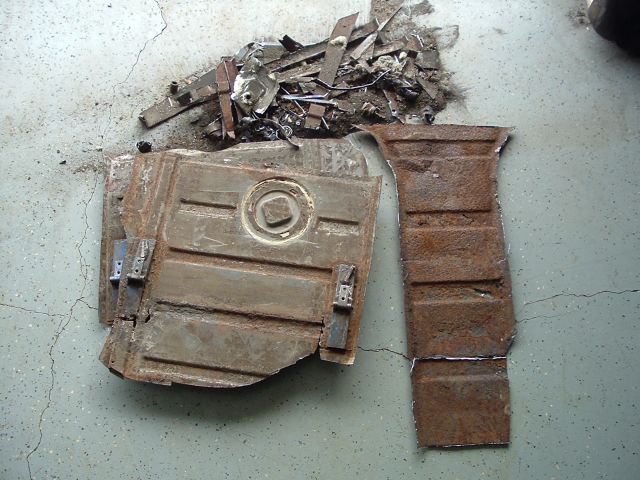
Posted by: cdmcse Feb 27 2005, 11:37 PM
The new pan...
Attached image(s)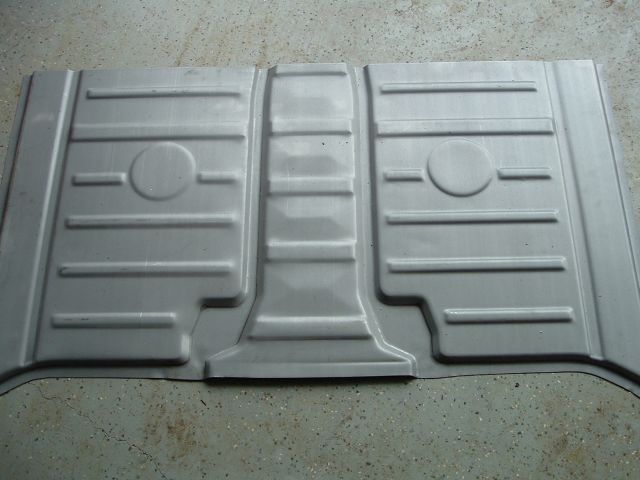
Posted by: cdmcse Feb 27 2005, 11:39 PM
Zee Hole...
Attached image(s)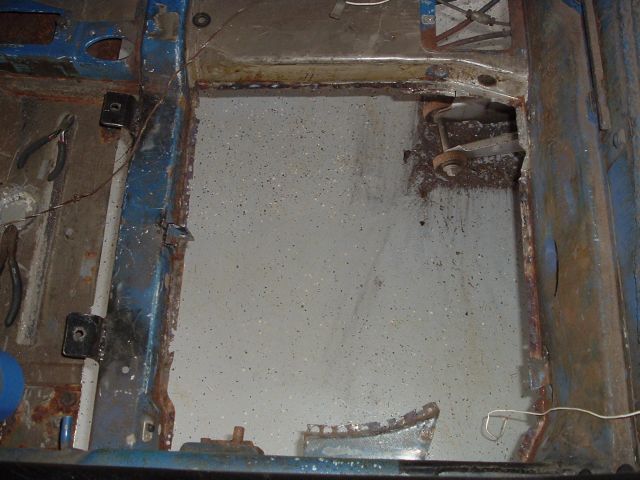
Posted by: cdmcse Feb 27 2005, 11:39 PM
Zee other hole...
Attached image(s)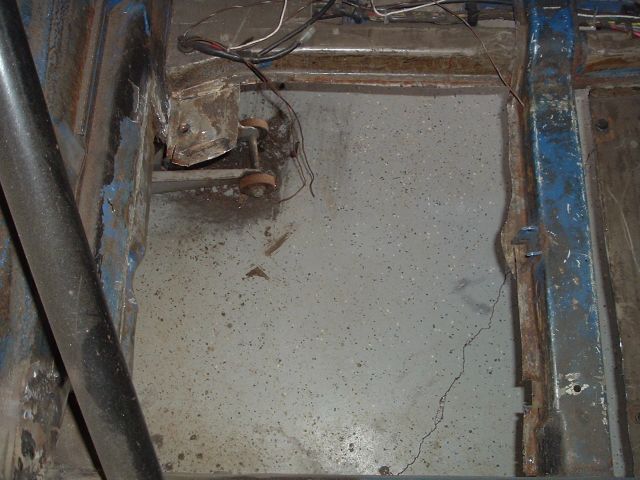
Posted by: cdmcse Feb 27 2005, 11:40 PM
Who wants to see down my tunnel?
Attached image(s)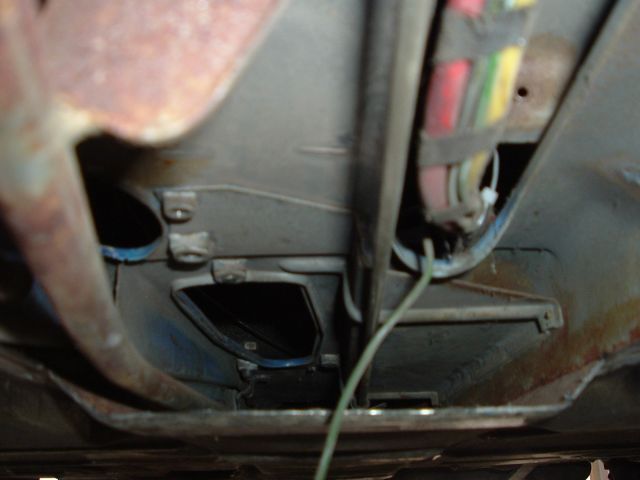
Posted by: cdmcse Feb 27 2005, 11:42 PM
The firewall side of the tunnel...
Attached image(s)
Posted by: cdmcse Feb 27 2005, 11:42 PM
Up the firewall on the driver's side...
Attached image(s)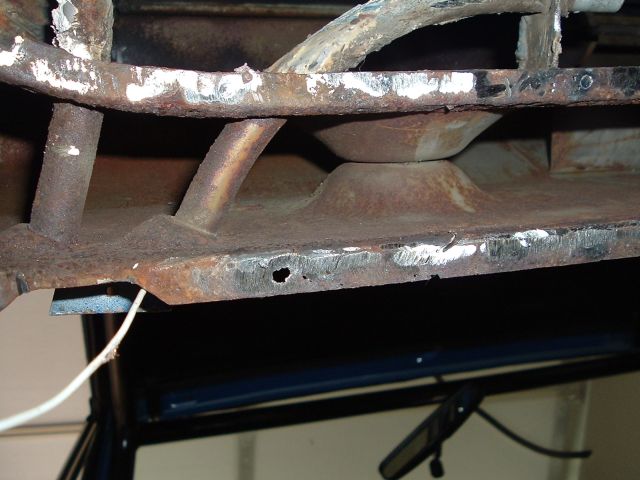
Posted by: cdmcse Feb 27 2005, 11:48 PM
Broken clutch tube support about half way down the tunnel...
Attached image(s)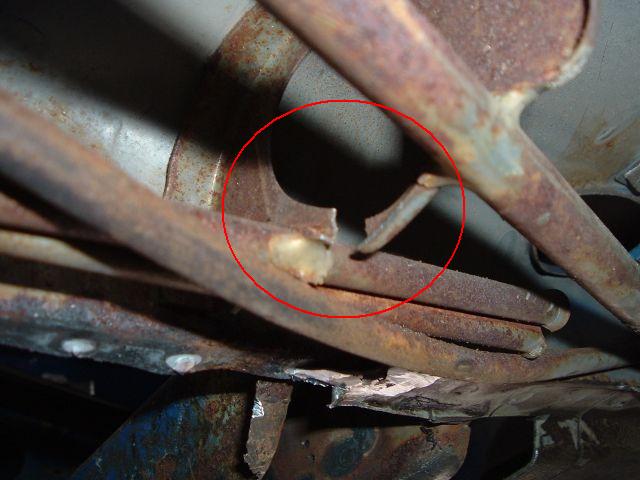
Posted by: cdmcse Feb 27 2005, 11:49 PM
Broken tube at the firewall...
Attached image(s)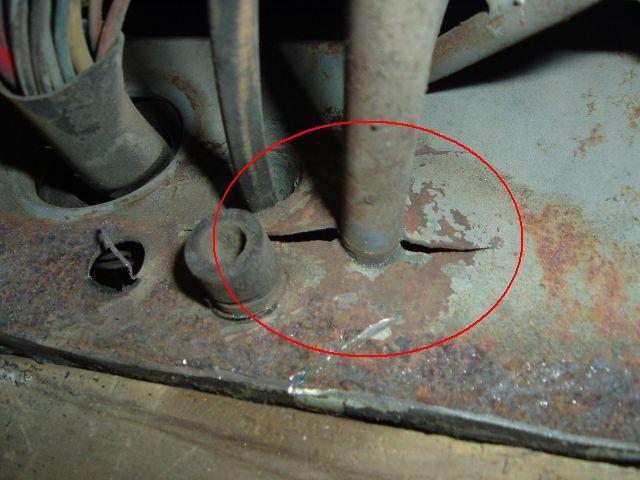
Posted by: cdmcse Feb 27 2005, 11:51 PM
Look, I made some cash while tearing out the floor...10 cents
A 1975 and 1980 Nickel, and some strange amulet.
Posted by: cdmcse Feb 27 2005, 11:52 PM
Forgot the pic.
Attached image(s)
Posted by: cdmcse Feb 27 2005, 11:55 PM
Why you should always wear your safety gear. This is the safety face shield I wear, and that is a small sliver of metal stuck in it. Am I posting too many pics?
Attached image(s)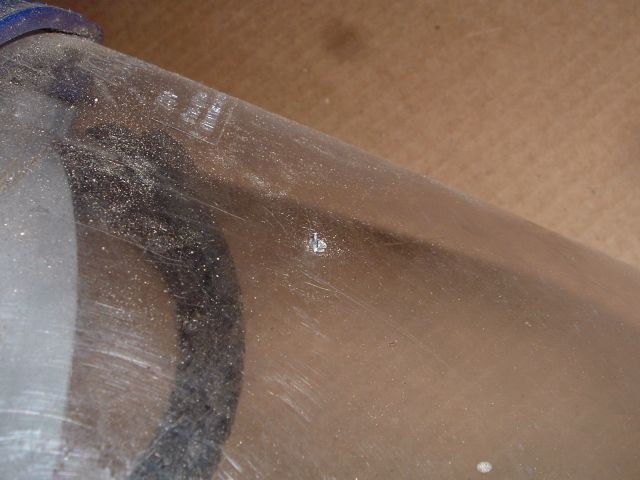
Posted by: Lou W Mar 1 2005, 12:09 AM
| QUOTE |
| cdmcse Posted on Feb 27 2005, 09:55 PM Why you should always wear your safety gear. This is the safety face shield I wear, and that is a small sliver of metal stuck in it. Am I posting too many pics? |
 Wow, that would have really messed up your eye.
Posted by: Travis Neff Mar 1 2005, 10:45 AM
Never too many pics, NEVER!
Posted by: cdmcse Mar 2 2005, 01:54 AM
I welded all the clutch tube breakage, then I added this extra re-enforcement to the center clutch tube bracket. That should hold it.
Attached image(s)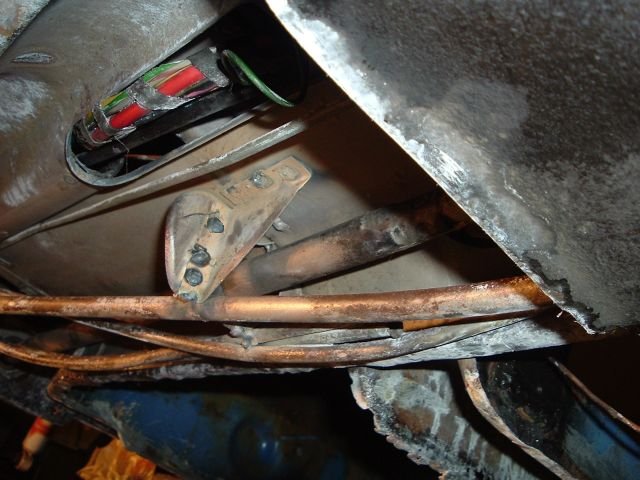
Posted by: cdmcse Mar 2 2005, 01:55 AM
New metal fuel lines secured to the center of the tunnel.
Attached image(s)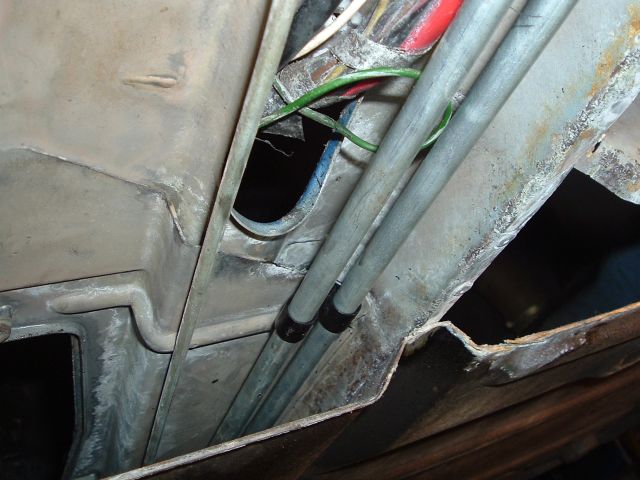
Posted by: cdmcse Mar 2 2005, 01:56 AM
Fuel Tank end
Attached image(s)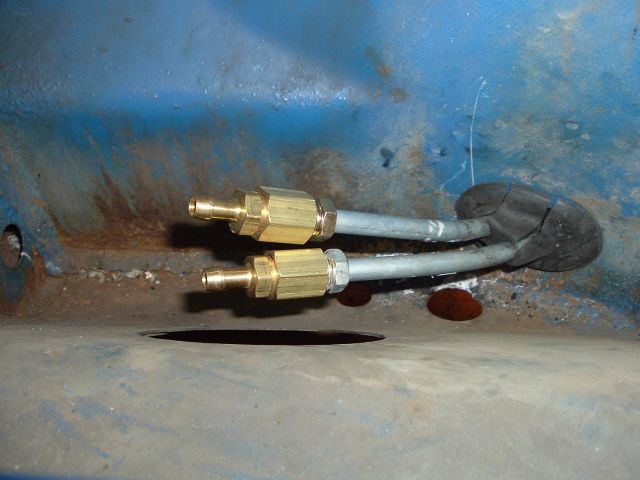
Posted by: cdmcse Mar 2 2005, 01:56 AM
Firewall End.
Attached image(s)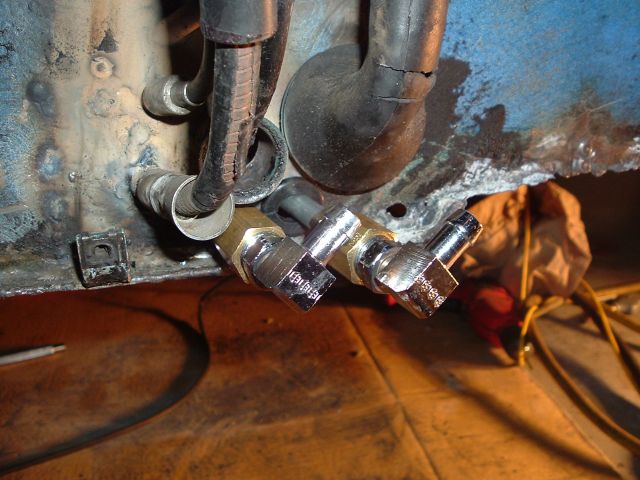
Posted by: cdmcse Mar 2 2005, 01:58 AM
POR-15 Applied. Is there anything else I should do in the tunnel before I close it up?
Attached image(s)
Posted by: Jeroen Mar 2 2005, 04:24 AM
I see light at the end of your tunnel 
great job!
Posted by: xsboost90 Mar 2 2005, 07:14 AM
i keep thinking i should use some metal lines for the tank...hm. I dont really want to get into that though. 3m makes some spray in rust preventative stuff for enclosed areas, i sprayed the crap out of mine before i welded it up, then sprayed back the other direction from the hole in the interior under the consule.....Next one i build im dipping the whole car in rubber or something.
Posted by: cdmcse Mar 2 2005, 08:03 AM
Metal lines were easy. I got two 60" 3/8 "easy-bend" brake lines and the fittings to convert the ends to hose barbs at NAPA for about $30. I had to drill larger holes in the rear firewall for the connectors to slide through. It took me less than 1 hour to install them (Of course half of my tunnel was already open) 
Posted by: mr914 Mar 2 2005, 06:52 PM
Looks like the rust on my -6 #269.... Not Pretty.
My rust or ation thread
http://www.914world.com/bbs2/index.php?act=ST&f=2&t=5574&hl=269
I would change one thing though... Go from hose barbs to -4 or -6 AN hydrauilic fittings. More expensive than barbs and clamps, but will last a lifetime.....
Only want to fix my baby once....
best of luck 
Posted by: cdmcse Mar 2 2005, 08:50 PM
mr914, If you are ready to get started on the repair I would recommend you you start a thread on here with some pics. Even if noone else here cares I find it really motivating to make progress so I can post some pics. Maybe I am just strange 
I hope to be able to afford AN hardware someday
Posted by: cdmcse Mar 4 2005, 01:22 AM
OK, more progress...Top coated the POR-15 with some rattle can blue.
Attached image(s)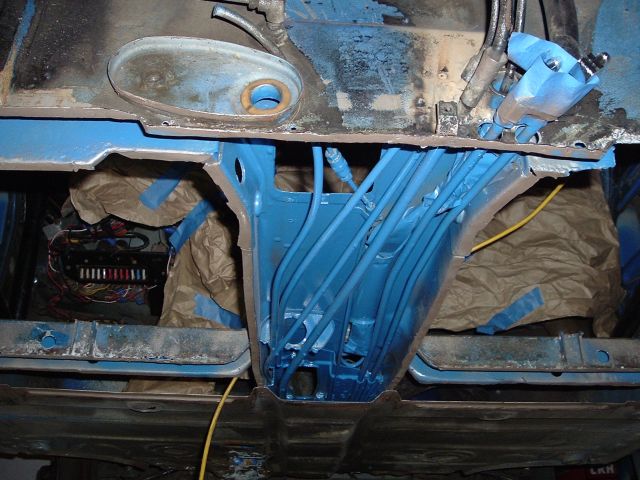
Posted by: cdmcse Mar 4 2005, 01:23 AM
Yay, the floorpan is in!
Attached image(s)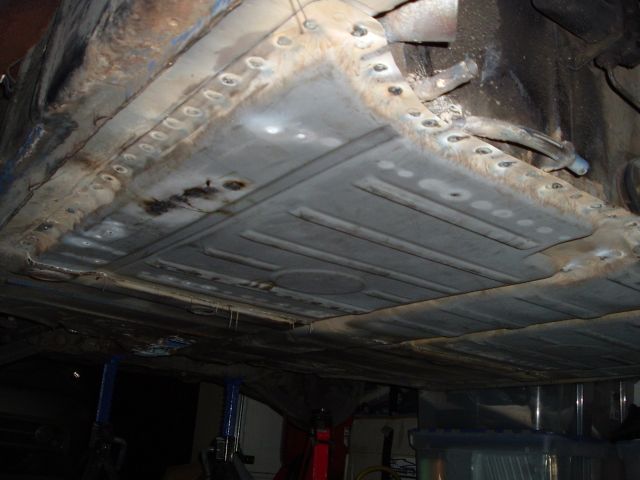
Posted by: cdmcse Mar 4 2005, 01:24 AM
Driver's Side.
Attached image(s)
Posted by: cdmcse Mar 4 2005, 01:26 AM
Passenger Side. Next I have to finish the passenger side Firewall and I'll be ready to paint all the repairs up. (If I ever get the engine shelf from R-D)
Attached image(s)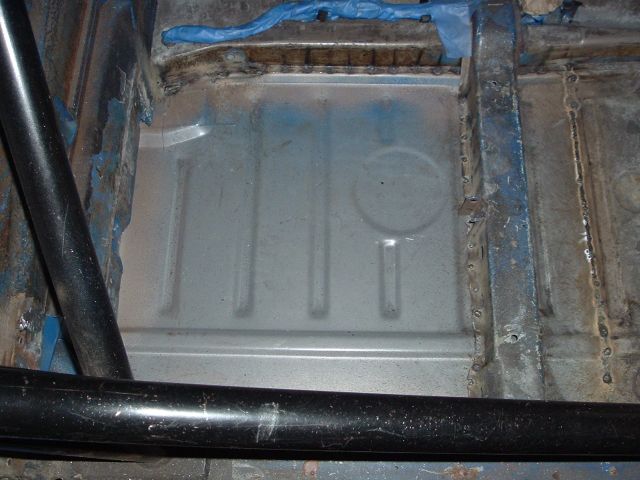
Posted by: Jeroen Mar 4 2005, 06:04 AM
Impressive job!
Go have a  or make that
Posted by: cdmcse Mar 15 2005, 12:47 AM
More work done...Inner firewall done.
Attached image(s)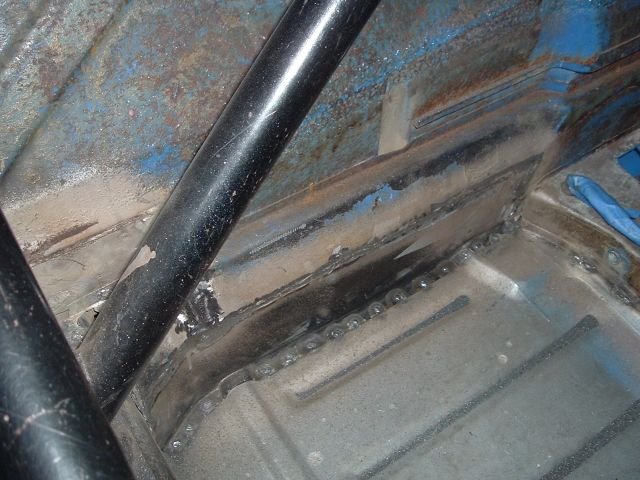
Posted by: cdmcse Mar 15 2005, 12:50 AM
Cancer removed from the outer firewall...
Attached image(s)
Posted by: cdmcse Mar 15 2005, 12:51 AM
Outer firewall patched...
Attached image(s)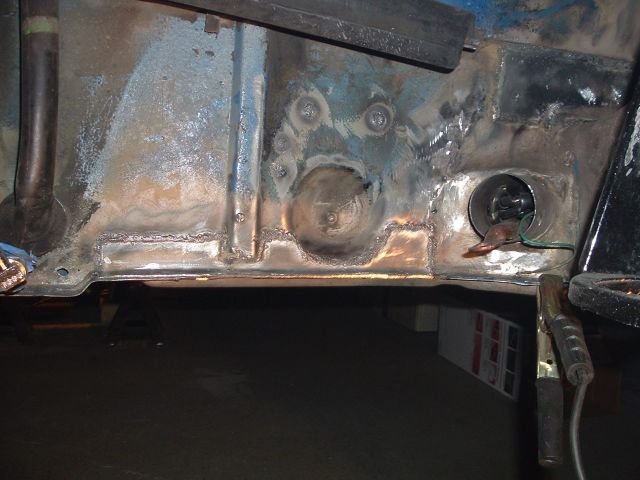
Posted by: SirAndy Mar 15 2005, 01:19 AM
| QUOTE (cdmcse @ Mar 1 2005, 11:54 PM) |
| I welded all the clutch tube breakage, then I added this extra re-enforcement to the center clutch tube bracket. That should hold it. |
schweet!
most people don't even know it's there. if the tube breaks off, it'll slide out from under the bracket and hit the shift rod (or worse). good idea to reinforce it ....
nice work!
Andy
Posted by: SpecialK Mar 15 2005, 03:07 AM
Now that's a view of the center tunnel you don't see too often! 
Looks like you're doing one hell of a job! 
Makes me think that there's hope for the '75 rusting away in my backyard.
Posted by: Lou W Mar 15 2005, 11:41 AM
Looks great
Posted by: Travis Neff Mar 15 2005, 11:49 AM
That's love buddy, painting to match on the inside of the tunnel where no-one can see, but you did it because YOU know it's there. Looks great!
Posted by: Gint Mar 15 2005, 01:02 PM
Good lookin work!
Posted by: cdmcse Apr 4 2005, 10:52 PM
Well, after the arrival of our new son (March 6th). I was finally able to get back out to the garage this past weekend.
Gratuitous pic of the handsome kid (He looks like me of course!)...
Attached image(s)
Posted by: cdmcse Apr 4 2005, 10:54 PM
Now back on topic...Passenger side floor re-enforcement (grafted together from 2 partially rusted ones).
Attached image(s)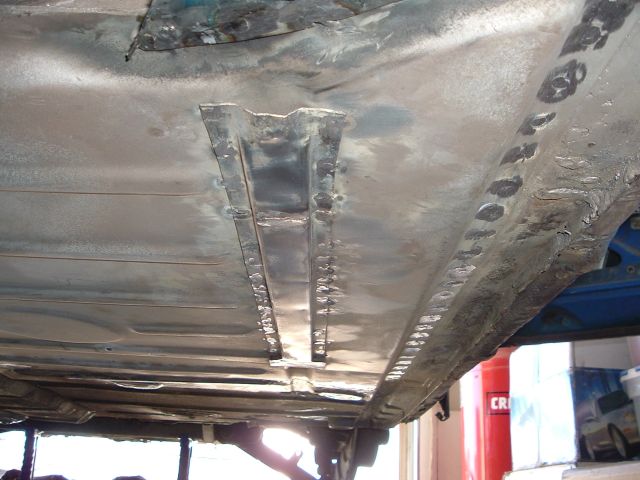
Posted by: cdmcse Apr 4 2005, 10:56 PM
Driver's side floor re-enforcement, this one is new.
Attached image(s)
Posted by: cdmcse Apr 4 2005, 10:56 PM
Right Rear Floor Jackpoint.
Attached image(s)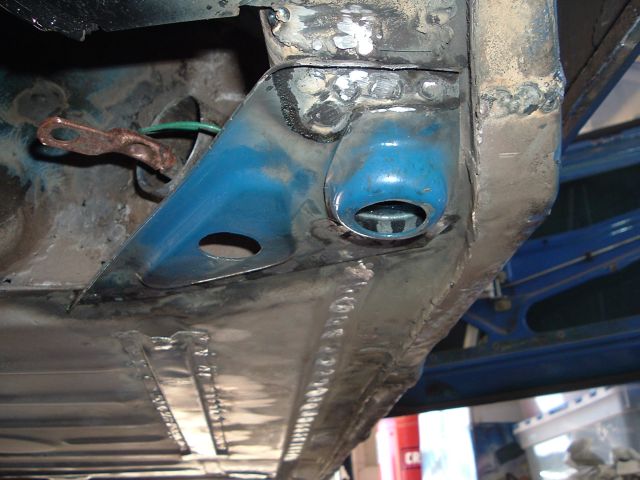
Posted by: cdmcse Apr 4 2005, 10:57 PM
Left Rear Jackpoint.
Attached image(s)
Posted by: cdmcse Apr 4 2005, 10:58 PM
Engine Shelf installed. I finally got all the parts I need from Restoration Design.
Attached image(s)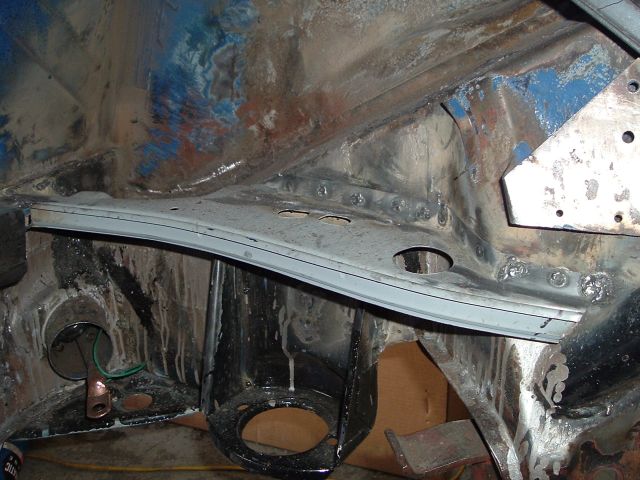
Posted by: cdmcse Apr 4 2005, 10:59 PM
The interior all grinded and stripped ready to POR-15 and Paint.
Attached image(s)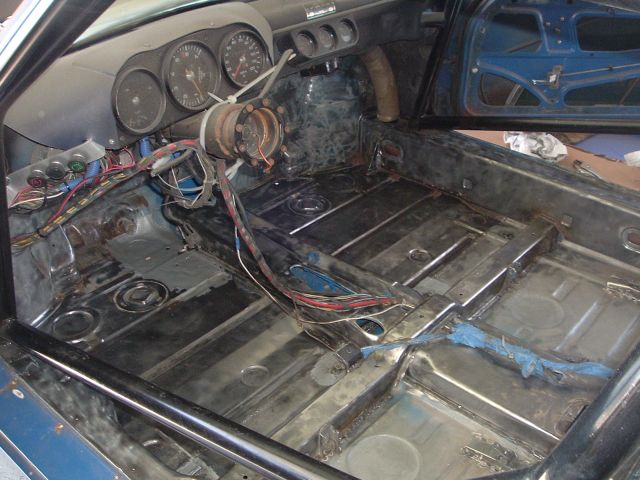
Posted by: cdmcse Apr 4 2005, 11:01 PM
The Firewall had Zero Rust!!!! Yay
Attached image(s)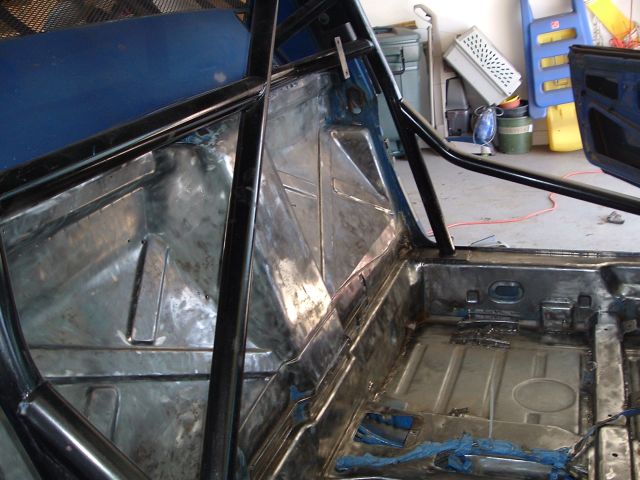
Posted by: michelko Apr 5 2005, 12:20 AM
Fantastic . This look very familiar to me!
Keep on posting pic´s
Posted by: Jeroen Apr 5 2005, 06:00 AM
Excellent work Chris!
And congrats on the kid
Posted by: CptTripps Apr 5 2005, 07:07 AM
Well done sir....very nice work.
I think we need to get shirts made for those of us that did (or are doing) a 914 over the winter.
'914 Mid-West Class of 2005' or something like that. I may have to go to summer-school to graduate though. 
Posted by: kafermeister Apr 5 2005, 07:28 AM
Wow! congrats on the new arrival. You know in a few years, you're going to have to build him his own 914...
R
Posted by: Gint Apr 5 2005, 07:38 AM
Congratulations on the pit crew!
Posted by: cdmcse Apr 7 2005, 11:08 PM
A little farther along... POR-15 Silver Applied
Attached image(s)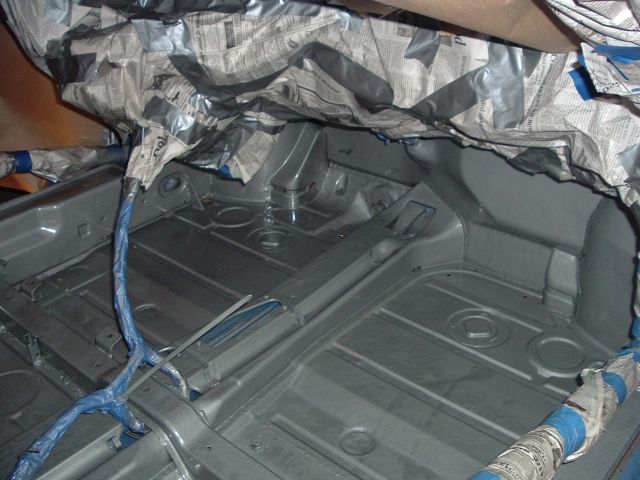
Posted by: cdmcse Apr 7 2005, 11:10 PM
Another...
Attached image(s)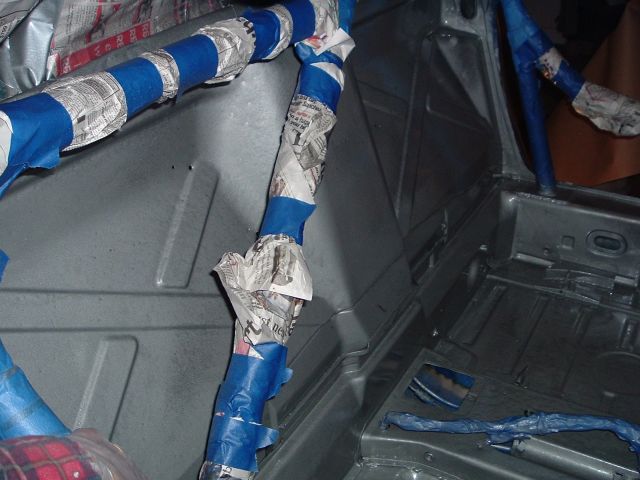
Posted by: Root_Werks Apr 8 2005, 08:44 AM
Sweet! Another 914 saved from the rust monster! 
Posted by: maf914 Apr 8 2005, 11:17 AM
Way to go, Chris! Great looking work.
Also, congradulations to you and your wife on the birth of your son. He is a nice looking boy.
Posted by: cdmcse Apr 12 2005, 09:44 PM
Well I reached what I feel like is a major milestone...got the interior done except for re-assembly. After watching CptTripps bedliner his interior with good results, deceided I would like some texture inside as well.
Here is what I did to my interior...
1) took it down to bare metal (mostly)
2) Clean, Metal-ready, POR-15 Silver
3) Etching Primer
4) Paintable textured undercoating
5) Sealing Primer
6) Adriatic Blue Topcoat
I think it turned out real well. Since I'm not putting carpet in there I think it will be pretty durable too.
Attached image(s)
Posted by: cdmcse Apr 12 2005, 09:45 PM
Another...
Attached image(s)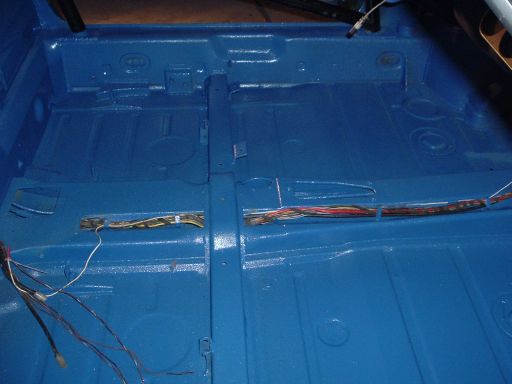
Posted by: cdmcse Apr 12 2005, 09:46 PM
Another
Attached image(s)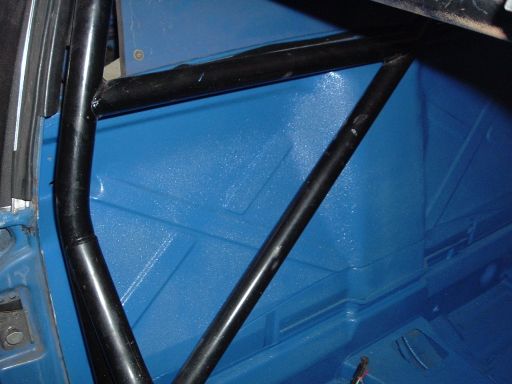
Posted by: cdmcse Apr 12 2005, 09:47 PM
Last one. Now just a few more bits on the outside and some paint, then re-assembly will begin for summer drivin! 
Attached image(s)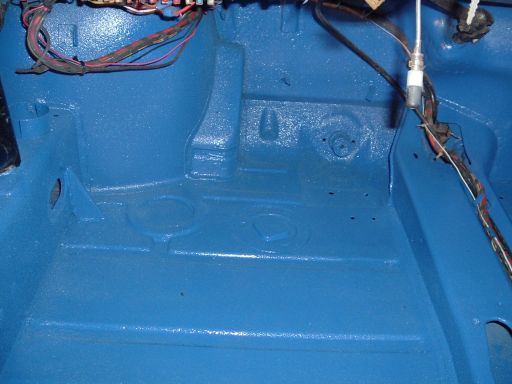
Posted by: dakotaewing Apr 12 2005, 09:52 PM
How did you apply the Por-15 and primer? Gun or brush...?
I need to do the same thing....
Thom
Posted by: cdmcse Apr 12 2005, 11:23 PM
| QUOTE (dakotaewing @ Apr 12 2005, 10:52 PM) |
| How did you apply the Por-15 and primer? Gun or brush...? I need to do the same thing.... Thom |
I sprayed it with a gun. I have a little $20 gun from Harbor Freight. Mixed it up with 5% POR-15 thinner and 95% POR-15. And the primer was sprayed too.
Works good, but it has the nastiest fumes of anything I have used. Pay for a good mask or respirator.
Posted by: tat2dphreak Apr 13 2005, 07:57 AM
looks awesome man!!
Posted by: Eric_Shea Apr 13 2005, 08:08 AM
Chris,
You do really good work.
Posted by: brant Apr 13 2005, 09:13 AM
Really really really amazing work
good job
brant
Posted by: Root_Werks Apr 13 2005, 09:16 AM
Wow! Looks great! This 914 sure has come a long way! Good job!
Posted by: Gint Apr 13 2005, 10:08 AM
That does look fantastic. Nice work.
Posted by: dakotaewing Apr 13 2005, 12:46 PM
| QUOTE (cdmcse @ Apr 13 2005, 12:23 AM) | ||
I sprayed it with a gun. I have a little $20 gun from Harbor Freight. Mixed it up with 5% POR-15 thinner and 95% POR-15. And the primer was sprayed too. Works good, but it has the nastiest fumes of anything I have used. Pay for a good mask or respirator. |
How much of each did you have to buy in order to do this? (Not just the POR-15, but the other stuff too -)
I have got a cheap gun too....!!!!!

Thanks - Thom
Posted by: cdmcse Apr 13 2005, 01:18 PM
| QUOTE (dakotaewing @ Apr 13 2005, 01:46 PM) |
| How much of each did you have to buy in order to do this? (Not just the POR-15, but the other stuff too -) I have got a cheap gun too....!!!!! Thanks - Thom |
Let's See,
3 6oz cans of POR-15 (I buy in it in those six packs) ~ $37
1 Quart of Etching primer (It is real thin and I used the whole quart) ~ $18
3 Rattle cans of 3M Paintable Rubberized undercoating. ~$30
1 Quart of Sealing Primer (used about 1/3 to 1/2 of that) ~$15
1 Quart of Adriatic blue (Used about 1/2 of that) ~$22
I also used a 1/2 tube of that POR-15 patch to cover some welding and rust pinholes. (BTW: that is tough stuff, make sure you wipe it as smooth as possible unless you want to sand on it 4 ever)
It cost me about $150 bucks to do the whole thing, not too bad.
Posted by: Lawrence Apr 13 2005, 04:00 PM
You've done some great work... my hat is off to you.
-Rusty 
Posted by: michelko Apr 14 2005, 12:24 AM
| QUOTE (cdmcse @ Apr 13 2005, 11:18 AM) | ||
Let's See, 3 6oz cans of POR-15 (I buy in it in those six packs) ~ $37 1 Quart of Etching primer (It is real thin and I used the whole quart) ~ $18 3 Rattle cans of 3M Paintable Rubberized undercoating. ~$30 1 Quart of Sealing Primer (used about 1/3 to 1/2 of that) ~$15 1 Quart of Adriatic blue (Used about 1/2 of that) ~$22 I also used a 1/2 tube of that POR-15 patch to cover some welding and rust pinholes. (BTW: that is tough stuff, make sure you wipe it as smooth as possible unless you want to sand on it 4 ever) It cost me about $150 bucks to do the whole thing, not too bad. |
very nice work
.Is there an reference number for the adriatic blue paint? Or must the colour been mixed to match the existing colour?
I have to paint some parts of my car in the near future. Which kind of paint did you use?
Regards Michael
Posted by: cdmcse Apr 14 2005, 12:58 AM
| QUOTE (michelko @ Apr 14 2005, 01:24 AM) |
| very nice work .Is there an reference number for the adriatic blue paint? Or must the colour been mixed to match the existing colour? I have to paint some parts of my car in the near future. Which kind of paint did you use? Regards Michael |
All I did was go to my local auto paint store and tell them the code (L50E) and the year (1972). They looked it up on a computer to get the formula and mixed it.
It is way too bright to match the old paint on the outside of my car, so unless you paint the whole thing I wouldn't go that route.
Most shops offer computer matching also. You can take your headlight lid with you and they can scan it with their computer. This "should" match your car exactly taking into account the years of wear and fading on the paint.
I used a low end acrylic enamel since it was just on the interior. If you are going to paint the outside, the guy I bought the paint from recommended a paint that is a base-coat and clear-coat combined into one. He said it is the easiest to make look good.
Good Luck and keep up the good work on yours also!
Posted by: premierauto5150 Apr 21 2005, 11:19 AM
Chris...I just have to throw in my two cents here....EXCELLENT WORK!!! Like I've said before....its great that you ended up with that car from us and have put your heart and soul in it. I'm jealous now....as if I wasn't the day I drove it you.
We can't wait to see it in person and if you need anything just let us know.
BTW...after you get this stage of the project done you should consider doing some resto work for others...hint, hint..I have a 73 2.0 that could use your touch!!
See ya,
Mark
www.premier-autosales.com
Posted by: Bleyseng Apr 21 2005, 12:45 PM
Oh, you mean the one in your avatar pic??? looks like it needs some rust repairs......
Posted by: cdmcse Apr 21 2005, 02:02 PM
| QUOTE (premierauto5150 @ Apr 21 2005, 12:19 PM) |
| Chris...I just have to throw in my two cents here....EXCELLENT WORK!!! Like I've said before....its great that you ended up with that car from us and have put your heart and soul in it. I'm jealous now....as if I wasn't the day I drove it you. We can't wait to see it in person and if you need anything just let us know. BTW...after you get this stage of the project done you should consider doing some resto work for others...hint, hint..I have a 73 2.0 that could use your touch!! See ya, Mark www.premier-autosales.com |
Well, I am coming to see you guys soon to get that pipe so we can talk about that
As far as the one in you avatar, it probably just needs a few welds here and there, some duct tape, and a bungee cord or two and and everything will be fine
Or maybe we could get one of those fine chasis that AA has for sale on Ebay right now.
Posted by: cdmcse Apr 21 2005, 11:50 PM
More Progress, it is too nice outside for my teener to be on jackstands. Fitting the Right outer suspension mount (Thanks Cloudbuster for the rust-free CA part).
Attached image(s)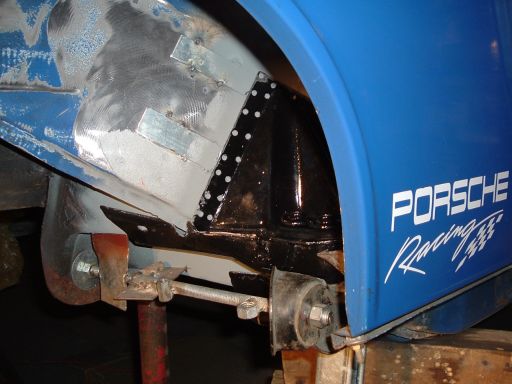
Posted by: cdmcse Apr 21 2005, 11:50 PM
Mount welded on...
Attached image(s)
Posted by: cdmcse Apr 21 2005, 11:51 PM
Engine Bay completely done and POR-15'ed.
Attached image(s)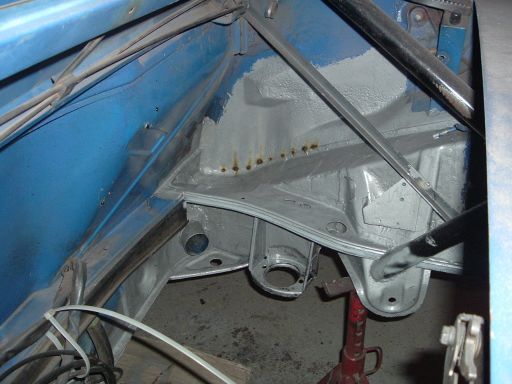
Posted by: cdmcse Apr 21 2005, 11:52 PM
My hell hole is no longer a hell hole...
Attached image(s)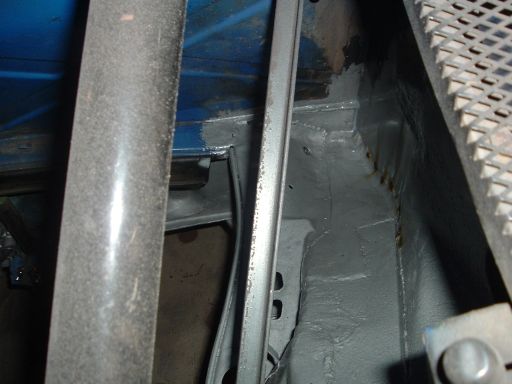
Posted by: cdmcse Apr 21 2005, 11:53 PM
Right side RD rocker re-enforcement installed...
Attached image(s)
Posted by: cdmcse Apr 21 2005, 11:55 PM
Last one for now. Left Side Rocker re-enforcement. Note the Jackpost Delete. Now for a
Attached image(s)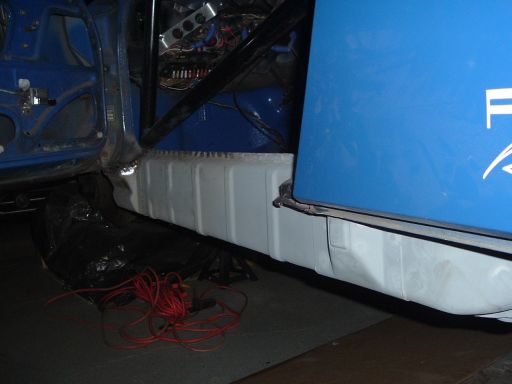
Posted by: cdmcse Apr 29 2005, 07:14 PM
A little more work done, First panel of the chassis stiffening kit installed...
Attached image(s)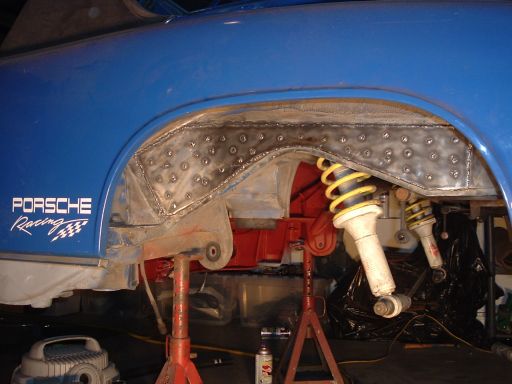
Posted by: cdmcse Apr 29 2005, 07:15 PM
Got my rear arms cleaned up and new bearings installed...
Attached image(s)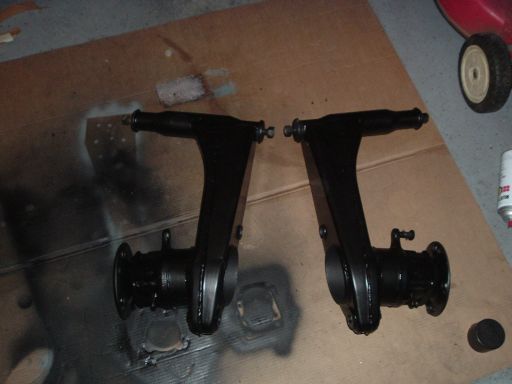
Posted by: Brad Roberts Apr 29 2005, 07:34 PM
I havent been following along.. but where is the down tube going that comes from the top of the main hoop ??
Surprised you are installing the GT kit with a caged car.
B
Posted by: cdmcse Apr 29 2005, 09:07 PM
| QUOTE (Brad Roberts @ Apr 29 2005, 08:34 PM) |
| I havent been following along.. but where is the down tube going that comes from the top of the main hoop ?? Surprised you are installing the GT kit with a caged car. B |
The down tube goes to the shock towers, then another fork from that goes to the inside suspension ear.
What I was getting during hard corning is a twisting effect on the down tube to the suspension ear (The right rear was actually barely rubbing in the fender occasionally). I think this was mainly due to where the chassis was weakend due to rust. I replaced the severely rusted areas, but I think the whole structure is probably slightly weaker due to the rust.
I decided to lock it all in together with the stiffening kit. I think I will only use the piece pictured above and the small piece that ties that to the outer mount. I am still considering if I should use the one that goes on the bottom side of the mount.
Posted by: Brad Roberts Apr 29 2005, 09:13 PM
It looks good. I really like that color of blue.
I would use the other piece you are referencing.
The side piece you installed isnt really needed when you run a tube to the front of the shock tower. What we used to see in GT caged cars (with no down tubes) they would crack right in front of the shock tower as we increased spring rate over 300lbs. The stiff kit didnt help this. Only the tubing to the front side of the shock tower helped (or to the top of the frame rail just in front of the shock tower)
This car looks familiar. Was this the one that the "dealer" in KY had for sale ? Had multiple pics on a website they run for a small used car dealership ?
B
Posted by: cdmcse Apr 29 2005, 09:46 PM
| QUOTE (Brad Roberts @ Apr 29 2005, 10:13 PM) |
| This car looks familiar. Was this the one that the "dealer" in KY had for sale ? Had multiple pics on a website they run for a small used car dealership ? B |
Yep same car. It ended up having more rust in it than I thought when I bought it, but That is all behind me now.
Posted by: Brad Roberts Apr 29 2005, 09:55 PM
I was asked last April to have someone take a look at the car for us (Resident German Female) She wanted to know if I could go buy it for her and bring it back here. She wanted a track/AutoX car. I told her we would locate something closer to us... we did... The rest is history. It appears you have sorted out all the issues. Get it back together so you can enjoy it.
B
Posted by: cdmcse May 9 2005, 11:25 PM
OK, now since we are having a KY 914 meet on the 22nd, I am going to finish this thing. Left side stiffening kit installed...
Attached image(s)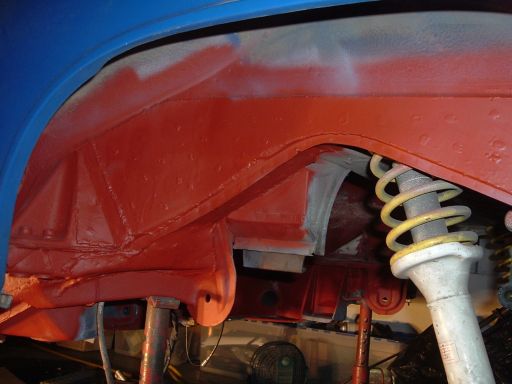
Posted by: cdmcse May 9 2005, 11:25 PM
Right Side...
Attached image(s)
Posted by: cdmcse May 9 2005, 11:27 PM
Left door sill, I had to take the doors off to finish it right.
Attached image(s)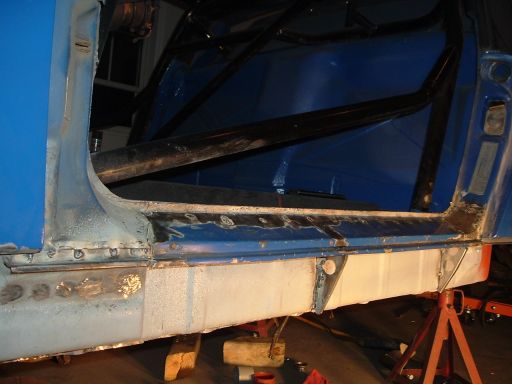
Posted by: cdmcse May 9 2005, 11:29 PM
This is my patch I made for the door sill. There was a rust repair done there in the past that was bascally hammer a big dent in all the rust, then fill with 1" of bondo.
Attached image(s)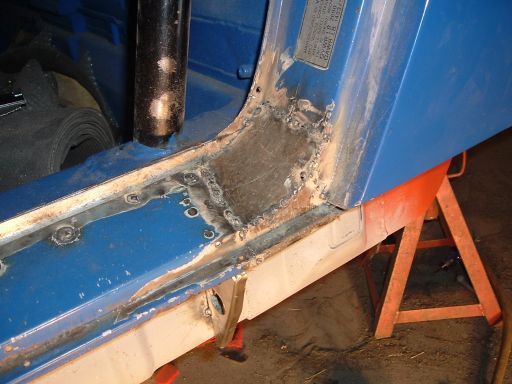
Posted by: cdmcse May 9 2005, 11:31 PM
Last one for now. The Right door sill. Now I just have to patch a couple of small holes in the driver wheel well, then I am 100% done with the welding!!!!!!
Attached image(s)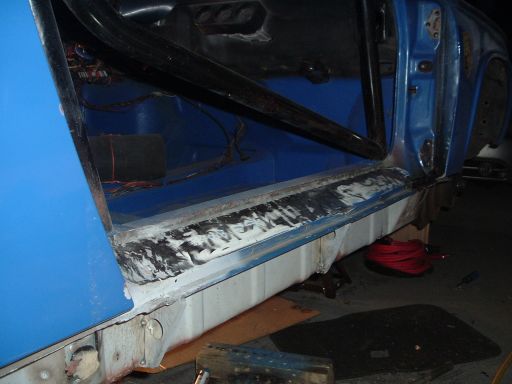
Posted by: 914fire May 10 2005, 12:16 AM
thats looking good keep it up..
Posted by: cdmcse May 11 2005, 11:29 PM
Woo Hoo, all the welding is done.  Prime and Paint tomorrow and friday, re-assemble this weekend.
Posted by: Michael J May 14 2005, 10:30 AM
Wow, I just ran across your repair thread. That series of pictures is a good story for those who think that a bunch of rust means the junk yard. Good work and good luck. I was worried about just replacing my battery tray and claening up surface rust. I am inspired.
Posted by: xsboost90 May 14 2005, 11:02 AM
i saw that car for sale, very nice looking car, ill have to check it out sometime after mine is done.
Posted by: cdmcse May 14 2005, 11:06 PM
| QUOTE (xsboost90 @ May 14 2005, 12:02 PM) |
| i saw that car for sale, very nice looking car, ill have to check it out sometime after mine is done. |
You are pretty close to me, so we will have to hook up sometime. I'm trying my best to get the car done by next weekend.
Posted by: cdmcse May 15 2005, 10:10 PM
Paint work is finished. It is not the greatest finish but it will protect from rust until I get the whole car a profressional paint job. Now all that is left is re-assembly...
Attached image(s)
Posted by: cdmcse May 15 2005, 10:10 PM
Passenger Jamb...
Attached image(s)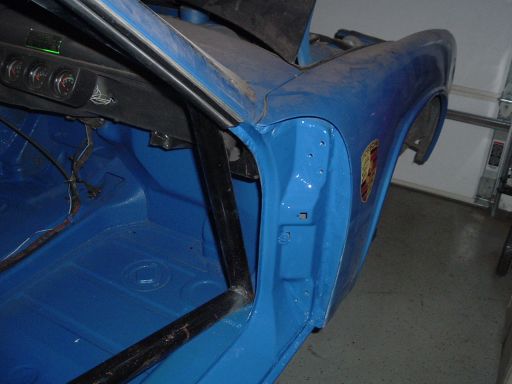
Posted by: cdmcse May 15 2005, 10:11 PM
Again...
Attached image(s)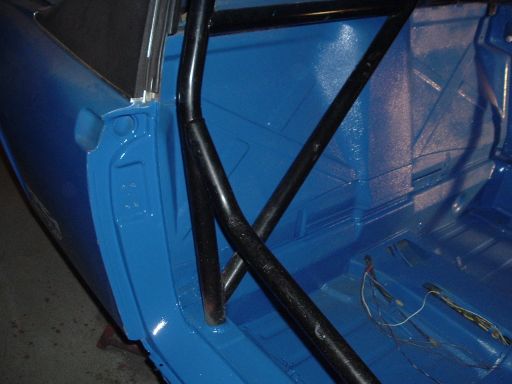
Posted by: cdmcse May 15 2005, 10:12 PM
Right Rear...
Attached image(s)
Posted by: cdmcse May 15 2005, 10:14 PM
Hell Hole
Attached image(s)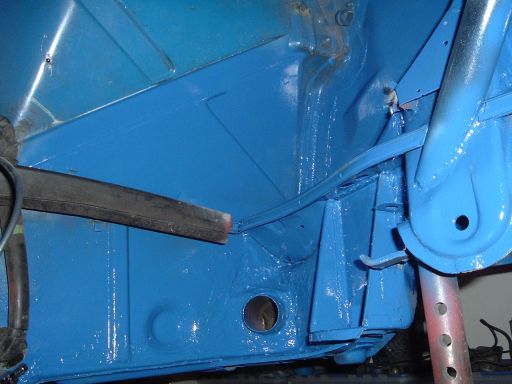
Posted by: cdmcse May 15 2005, 10:15 PM
Drivers Side
Attached image(s)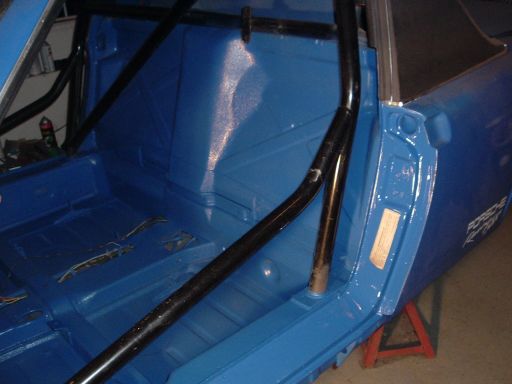
Posted by: cdmcse May 15 2005, 10:15 PM
Hell Hole again...
Attached image(s)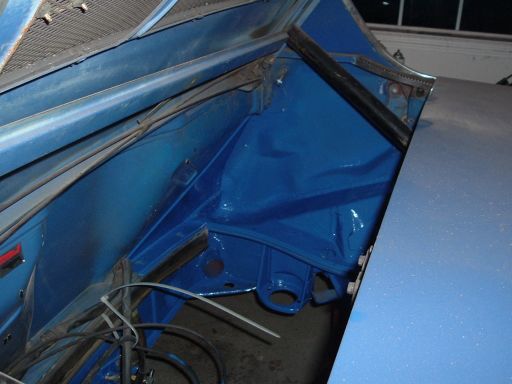
Posted by: cdmcse May 15 2005, 10:16 PM
Right Suspension...
Attached image(s)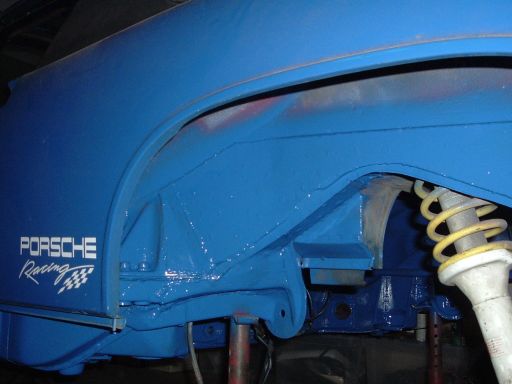
Posted by: cdmcse May 15 2005, 10:16 PM
Last one for now - Underbelly...
Attached image(s)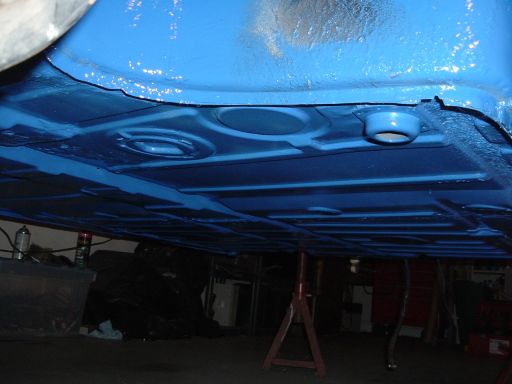
Posted by: cdmcse May 18 2005, 09:38 PM
Rear suspension is in...
Attached image(s)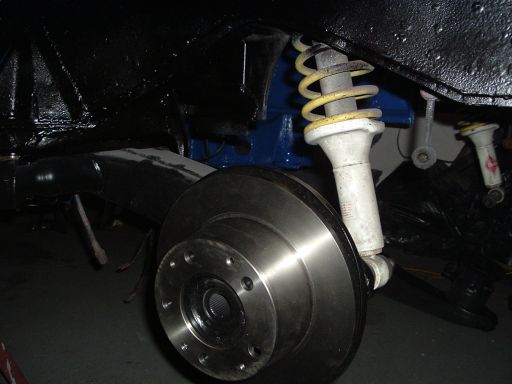
Posted by: cdmcse May 18 2005, 09:40 PM
Front Suspension (88 Carrera). I have some questions about the swaybar though I'll ask in another thread...
Attached image(s)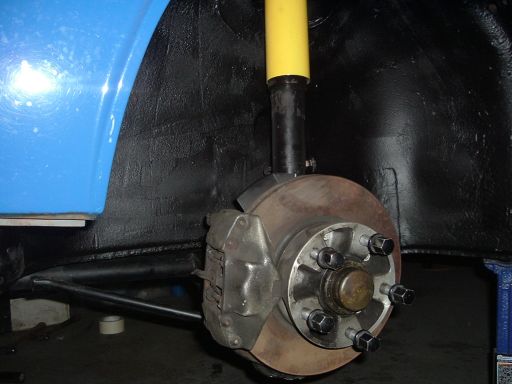
Posted by: cdmcse May 18 2005, 09:40 PM
Engine is all cleaned up, reassembled and ready to go back in...
Attached image(s)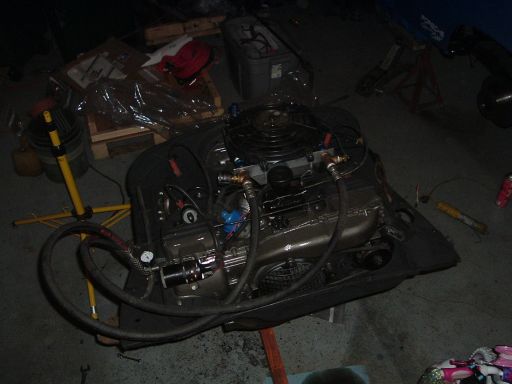
Posted by: Gint May 18 2005, 10:32 PM
| QUOTE (cdmcse @ May 15 2005, 10:10 PM) |
| Paint work is finished. It is not the greatest finish but it will protect from rust until I get the whole car a profressional paint job. Now all that is left is re-assembly... |
Looks pretty good to me...
Posted by: Michael J May 18 2005, 11:31 PM
I have to jump in again and say how great it is to see the after pictures. The before was scary. My before is not as bad but i figure I have a piece of cake now. Thanks for all the process pictures.
Attached image(s)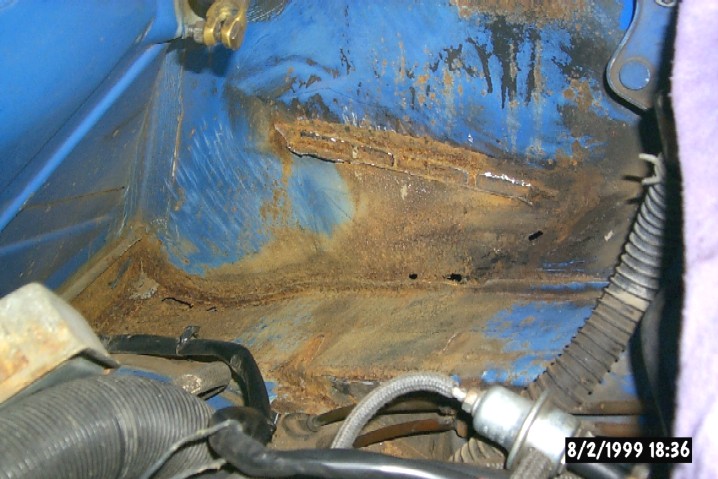
Posted by: cdmcse May 18 2005, 11:42 PM
Thanks for the comments!
| QUOTE |
I have to jump in again and say how great it is to see the after pictures. The before was scary. My before is not as bad but i figure I have a piece of cake now. Thanks for all the process pictures. |
You should be able to tackle that. I have learned so much during this process and I enjoyed doing most of it. Now that I am on the tail end, I can hardly wait to drive it again.
Posted by: cdmcse May 24 2005, 12:02 AM
Wiring is done...
Attached image(s)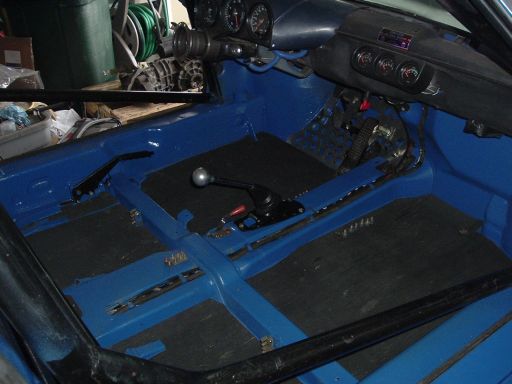
Posted by: cdmcse May 24 2005, 12:02 AM
Pedals and Shifter are in, Engman's Pedal Board ROCKS!
Attached image(s)
Posted by: cdmcse May 24 2005, 12:03 AM
Seats and Harnesses are in...
Attached image(s)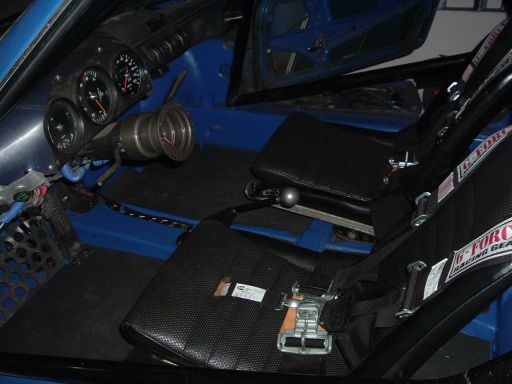
Posted by: cdmcse May 24 2005, 12:04 AM
The interior is complete except for my Burnt Steering wheel 
Attached image(s)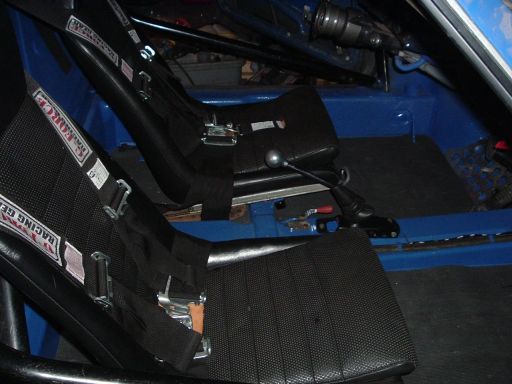
Posted by: Gint May 24 2005, 05:41 AM
Nice! What''s the black stuff on the floor pans? What'd you use?
Posted by: rallyman May 24 2005, 06:08 AM
I like these threads, but it seems there is one thing I never see (or hear?). What are you guys using to cut out the metal before you go to patching? Airbody saw or nibblers or ???? What are the recommendations on this?
Thanks for the info.....
Posted by: cdmcse May 24 2005, 06:17 AM
| QUOTE (Gint @ May 24 2005, 06:41 AM) |
| Nice! What''s the black stuff on the floor pans? What'd you use? |
It is just some of that black floor runner you can find in hardware stores. Cut it to fit.
Posted by: cdmcse May 24 2005, 06:25 AM
| QUOTE (rallyman @ May 24 2005, 07:08 AM) |
| I like these threads, but it seems there is one thing I never see (or hear?). What are you guys using to cut out the metal before you go to patching? Airbody saw or nibblers or ???? What are the recommendations on this? Thanks for the info..... |
That is because the method varies greatly depending on what you are fixing. I would primarily try to remove the original spot welds where possible using a spot weld cutting drill bit. When that didn't work I would use a thin cutting wheel on my angle grinder or a swazall. Some are areas really sucked and I had to resort to a dremel tool, or even a hacksaw blade to make some of the more delicate cuts. I typically did not use any kind of shears as it deforms the edge of the metal when cutting.
I think the air bodysaw is probably a good way to go also, but I don't have one yet.
I think it is important just to have a selection of metal cutting tools as you will need various types for various locations. My personal favorite is the 4.5" cutting wheel on my angle grinder, cuts fast with lots of sparks

Posted by: Jeroen May 24 2005, 06:57 AM
for a job well done!
Posted by: cdmcse May 30 2005, 10:45 PM
Woo Hoo I fired up the engine today.
Over the weekend I got a lot done...
Rebuilt the carbs, installed motor / tranny, rewired the engine bay, installed the drive shafts, fabricated an exhaust, plumbed it all.
Engine in the car...
Attached image(s)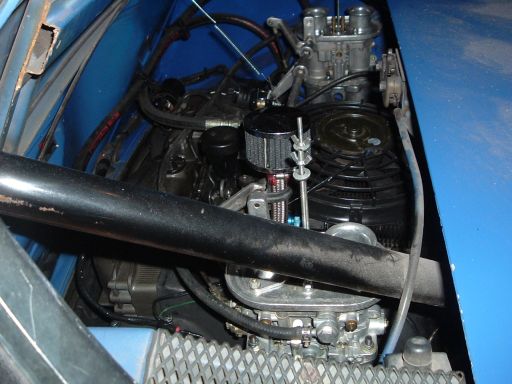
Posted by: cdmcse May 30 2005, 10:48 PM
My fabricated exhaust. 76 manifolds flipped attached to 31" glasspacks. Simple and it sounds really throaty. It is loud, but not too loud for me . Sounds kinda like an 60's F1 car now.
Attached image(s)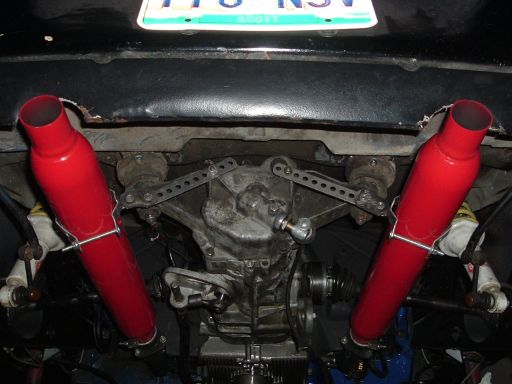
Posted by: cdmcse May 30 2005, 10:52 PM
Last one from this weekend. Under the engine.
All I have left to do now is...
Buy Tires
Rebuild the rear calipers
Bleed the brakes
Install shift linkage
install the sway bar and support brackets on the front.
Fabricate a bracket for the throttle cable
Alignment
And she will be ready to hit the street. Of course I have to buy all that stuff so until my cashflow improves she will sit quietly on the jackstands eagerly awaiting the time to roll.
Attached image(s)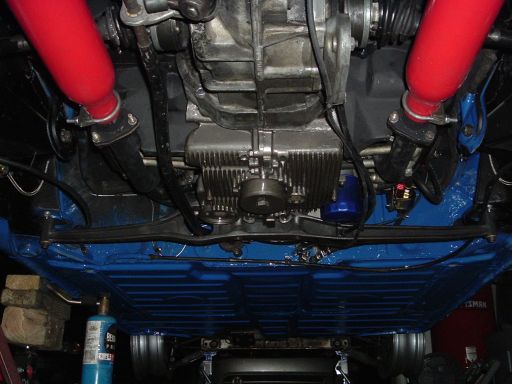
Posted by: Greg Bell May 30 2005, 11:48 PM
Awesome! F@#@ing inspiring! Great work. My father and I screwed around for years. It is nice to see somebody just get it done! Hats off!
Posted by: cdmcse Jun 12 2005, 09:46 PM
My Jackstands are lonely...
Attached image(s)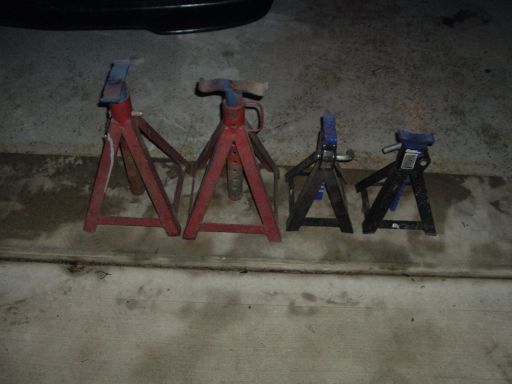
Posted by: cdmcse Jun 12 2005, 09:48 PM
The Car is back on its wheels...
Attached image(s)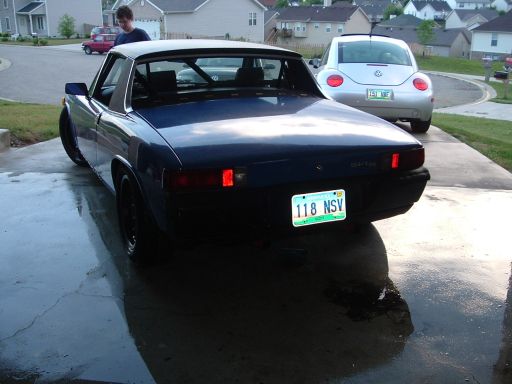
Posted by: cdmcse Jun 12 2005, 09:50 PM
Had to wash the crap off of it. Cookies w/ 205-60-15s. It still has no rear brakes and the front swaybar isnt installed so I can't drive it...but soon.
Attached image(s)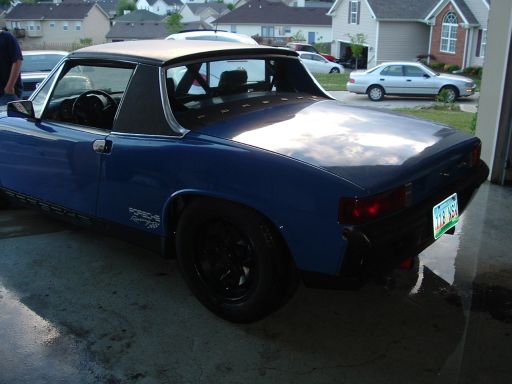
Posted by: cdmcse Jun 12 2005, 09:51 PM
Fat rubber...
Attached image(s)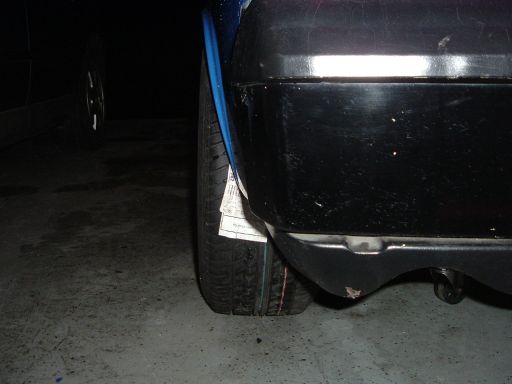
Posted by: cdmcse Jun 12 2005, 09:52 PM
Stuck in a cheap fire extinguisher just in case...
Attached image(s)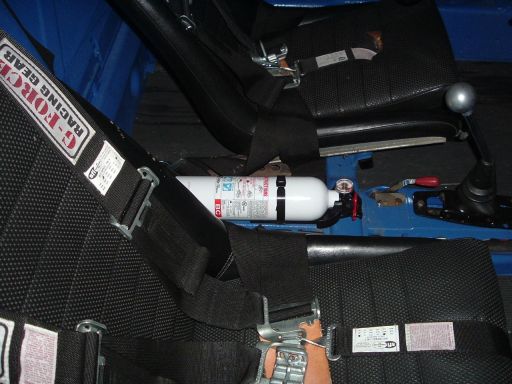
Posted by: brp914 Jun 12 2005, 10:54 PM
hooray!!!
I'm jealous - my teeners wont rust. But then my "progress" thread would look like yours in reverse.
Posted by: cdmcse Jul 23 2005, 07:28 PM
A few parting shots. I have got most of the bugs sorted out and she is moving and stopping gud.
Attached image(s)
Posted by: cdmcse Jul 23 2005, 07:29 PM
Nuther...
Attached image(s)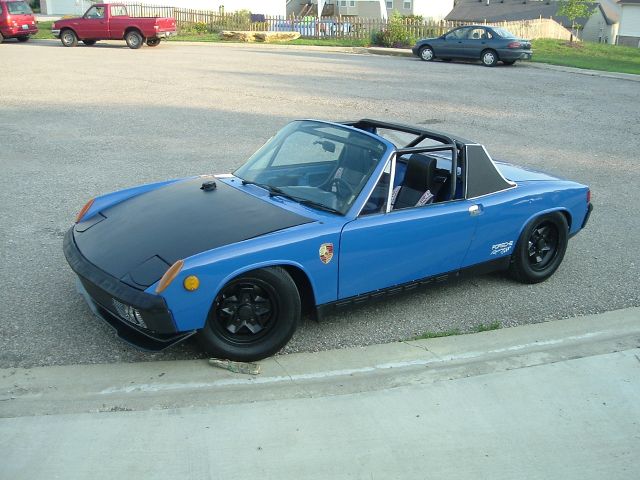
Posted by: cdmcse Jul 23 2005, 07:29 PM
Rear
Attached image(s)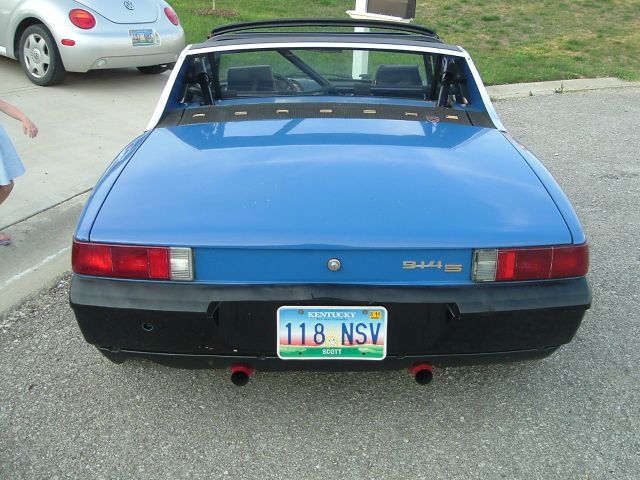
Posted by: cdmcse Jul 23 2005, 07:31 PM
Last one. Engine. I guess this offically completes my rust repair, another one saved from the rust disease .
I'm sure I'll have more projects to show you this winter.
Attached image(s)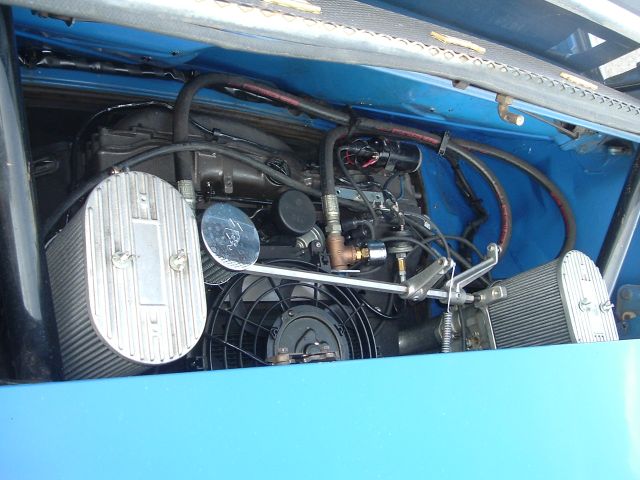
Posted by: Cire Nov 1 2009, 10:14 PM

More Progress, it is too nice outside for my teener to be on jackstands. Fitting the Right outer suspension mount (Thanks Cloudbuster for the rust-free CA part).
I noticed in this picture you put in a bolt in your rear trailing arm bracket before you did your welding on the rear end. Do you think it can warp? Not worth taking a chance? Interesting. Dont have that part still laying around do you? = )
Thanks for your thoughts. I love all the pictures. = )
Eric
Posted by: SirAndy Nov 1 2009, 10:51 PM
More Progress, it is too nice outside for my teener to be on jackstands. Fitting the Right outer suspension mount (Thanks Cloudbuster for the rust-free CA part).
I noticed in this picture you put in a bolt in your rear trailing arm bracket before you did your welding on the rear end. Do you think it can warp? Not worth taking a chance? Interesting. Dont have that part still laying around do you? = )
Thanks for your thoughts. I love all the pictures. = )
Eric
This thread is 4 years old ...

Powered by Invision Power Board (http://www.invisionboard.com)
© Invision Power Services (http://www.invisionpower.com)